Repository: HpWens/MCropImageView
Branch: master
Commit: c7d8b335e986
Files: 31
Total size: 77.8 KB
Directory structure:
gitextract_bypklb1j/
├── .gitignore
├── .idea/
│ ├── caches/
│ │ └── build_file_checksums.ser
│ ├── codeStyles/
│ │ └── Project.xml
│ ├── gradle.xml
│ ├── misc.xml
│ ├── runConfigurations.xml
│ └── vcs.xml
├── README.md
├── app/
│ ├── .gitignore
│ ├── build.gradle
│ ├── proguard-rules.pro
│ └── src/
│ ├── androidTest/
│ │ └── java/
│ │ └── com/
│ │ └── demo/
│ │ └── mcropimageview/
│ │ └── ExampleInstrumentedTest.java
│ ├── main/
│ │ ├── AndroidManifest.xml
│ │ ├── java/
│ │ │ └── com/
│ │ │ └── demo/
│ │ │ └── mcropimageview/
│ │ │ ├── MCropImageView.java
│ │ │ └── MainActivity.java
│ │ └── res/
│ │ ├── drawable/
│ │ │ └── ic_launcher_background.xml
│ │ ├── drawable-v24/
│ │ │ └── ic_launcher_foreground.xml
│ │ ├── layout/
│ │ │ └── activity_main.xml
│ │ ├── mipmap-anydpi-v26/
│ │ │ ├── ic_launcher.xml
│ │ │ └── ic_launcher_round.xml
│ │ └── values/
│ │ ├── colors.xml
│ │ ├── strings.xml
│ │ └── styles.xml
│ └── test/
│ └── java/
│ └── com/
│ └── demo/
│ └── mcropimageview/
│ └── ExampleUnitTest.java
├── build.gradle
├── gradle/
│ └── wrapper/
│ ├── gradle-wrapper.jar
│ └── gradle-wrapper.properties
├── gradle.properties
├── gradlew
├── gradlew.bat
└── settings.gradle
================================================
FILE CONTENTS
================================================
================================================
FILE: .gitignore
================================================
*.iml
.gradle
/local.properties
/.idea/libraries
/.idea/modules.xml
/.idea/workspace.xml
.DS_Store
/build
/captures
.externalNativeBuild
================================================
FILE: .idea/codeStyles/Project.xml
================================================
================================================
FILE: .idea/gradle.xml
================================================
================================================
FILE: .idea/misc.xml
================================================
================================================
FILE: .idea/runConfigurations.xml
================================================
================================================
FILE: .idea/vcs.xml
================================================
================================================
FILE: README.md
================================================
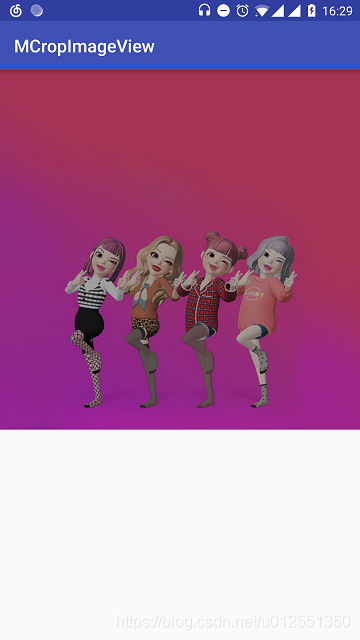
### 第一站小红书图片裁剪控件,深度解析大厂炫酷控件
先来看两张效果图:

哈哈,就是这样了。效果差了一些,感兴趣的小伙伴们可以运行代码感受丝滑与弹性。前段时间在竞品小红书上看到了这样的效果:图片可以跟随手指移动,双指可以(无限)放大,缩小,还可以挤压,手指抬起后还有一个有趣的效果,图片回弹。。。一直想撸一个手势的控件,正好可以模仿小红书图片裁剪控件,话不多说,撸起袖子就是干。
本系列共有两篇,在第二篇会重点讲解与RecyclerView的联动效果,先放一张效果图,感兴趣的小伙伴们继续关注哦:
### []()初步分析
先来看看小红书的样子:
emmmm,从效果上来看呢,其实也只是基本的Translation和Scale组合而已,难点在于缩小态下的阻尼计算,左下角那个按钮用来控制留白,填充等状态的切换(好像小红书还有bug,状态切换会导致图片位置不正确,哈哈哈),接下来我们就一步步分析,从而打造出属于我们的自己的效果。
仔细观察,有没有发现:
* 单指滑动,图片跟随手指移动,当手指滑动到图片边缘继续沿同一方向滑动,会出现阻尼效果,滑动的距离越大,阻尼越大,手指抬起后,图片回弹到控件边缘;
* 双指触摸分两种情况,一种是双指向内挤压,图片缩小;另一种是双指向外扩散,图片放大;
* 当双指向外扩散达到一定的临界值,手指抬起后,图片缩小到临界值状态;
* 手指触摸且有一定的滑动值,会显示线条九宫格,且线条跟随图片的大小动态改变,始终分割图片为9等分,如果手指触摸停止,线条消失,再次滑动,线条则再次出现;
那么图片缩放时,需要一个缩放中心点,也就是PivotX和PivotY,这个点默认情况下在View的中心。但很明显,它这个就不是在中心了,至于在哪里,先看下这张图:

可以看到,图片始终是以双指的中点在缩放,那么缩放中心点就是双指连线的中点位置上了。又怎么获取到双指的中点坐标呢?这里涉及到了Android提供的两个帮助类:GestureDetector、ScaleGestureDetector。接下来让我们先来了解下这两个类,揭开它的神秘面纱。神秘?你个糟老头,坏得很,信你个鬼。。。
### []()手势帮助类
什么是手势帮助类?Android手机屏幕上,当我们触摸屏幕的时候,会产生许多手势事件,如down,up,scroll,filing等等。我们可以在onTouchEvent()方法里面完成各种手势识别。但是,我们自己去识别各种手势就比较麻烦了,而且有些情况可能考虑的不是那么的全面。所以,为了方便我们的使用Android就提供了GestureDetector帮助类,先来看看他的构造方法:
```java
public GestureDetector(Context context, OnGestureListener listener, Handler handler,
boolean unused) {
}
```
context表示上下文,listener表示手势的监听回调,handler可以指定线程(UI线程、非UI线程),unused未被使用的参数。如果我们的手势不需要在子线程中处理,我们一般只关心前两个参数,context是上下文这个简单,重点看下listener参数:
GestureDetector给我们提供了三个接口类与一个外部类:
* OnGestureListener:接口,用来监听手势事件(6种);
* OnDoubleTapListener:接口,用来监听双击事件;
* OnContextClickListener:接口,外接设备,比如外接鼠标产生的事件(本文中我们不考虑);
* SimpleOnGestureListener:外部类,SimpleOnGestureListener其实是上面三个接口中所有函数的集成,它包含了这三个接口里所有必须要实现的函数而且都已经重写,但所有方法体都是空的。需要自己根据情况去重写;
OnGestureListener接口方法:
```java
public interface OnGestureListener {
/**
* 按下。返回值表示事件是否处理
*/
boolean onDown(MotionEvent e);
/**
* 短按(手指尚未松开也没有达到scroll条件)
*/
void onShowPress(MotionEvent e);
/**
* 轻触(手指松开)
*/
boolean onSingleTapUp(MotionEvent e);
/**
* 滑动(一次完整的事件可能会多次触发该函数)。返回值表示事件是否处理
*/
boolean onScroll(MotionEvent e1, MotionEvent e2, float distanceX, float distanceY);
/**
* 长按(手指尚未松开也没有达到scroll条件)
*/
void onLongPress(MotionEvent e);
/**
* 滑屏(用户按下触摸屏、快速滑动后松开,返回值表示事件是否处理)
*/
boolean onFling(MotionEvent e1, MotionEvent e2, float velocityX, float velocityY);
}
```
OnDoubleTapListener接口方法:
```java
public interface OnDoubleTapListener {
/**
* 单击事件(onSingleTapConfirmed,onDoubleTap是两个互斥的函数)
*/
boolean onSingleTapConfirmed(MotionEvent e);
/**
* 双击事件
*/
boolean onDoubleTap(MotionEvent e);
/**
* 双击事件产生之后手指还没有抬起的时候的后续事件
*/
boolean onDoubleTapEvent(MotionEvent e);
}
```
GestureDetector的使用:
* 定义GestureDetector类;
* 将touch事件交给GestureDetector(onTouchEvent函数里面调用GestureDetector的onTouchEvent函数);
* 处理SimpleOnGestureListener或者OnGestureListener、OnDoubleTapListener、OnContextClickListener三者之一的回调;
GestureDetector使用流程如下(有关例子会在后文中讲到):
```java
public GestureView(Context context, @Nullable AttributeSet attrs) {
this(context, attrs, 0);
}
public GestureView(Context context, @Nullable AttributeSet attrs, int defStyleAttr) {
super(context, attrs, defStyleAttr);
// 第一步
mGestureDetector = new GestureDetector(context, mOnGestureListener);
}
@Override
public boolean onTouchEvent(MotionEvent event) {
// 第三步
return mGestureDetector.onTouchEvent(event);
}
// 第二步
GestureDetector.OnGestureListener mOnGestureListener = new GestureDetector.OnGestureListener() {
@Override
public boolean onDown(MotionEvent e) {
return false;
}
```
这里就不再深入GestureDetector源码讲解,有感兴趣的小伙伴可以自行查阅资料,接着了解ScaleGestureDetector缩放手势类,用法与GestureDetector类似,都是通过onTouchEvent()关联相应的MotionEvent事件。
ScaleGestureDetector类给提供了OnScaleGestureListener接口,来告诉我们缩放的过程中的一些回调:
```java
public interface OnScaleGestureListener {
/**
* 缩放进行中,返回值表示是否下次缩放需要重置,如果返回ture,那么detector就会重置缩放事件,如果返回false,detector会在之前的缩放上继续进行计算
*/
public boolean onScale(ScaleGestureDetector detector);
/**
* 缩放开始,返回值表示是否受理后续的缩放事件
*/
public boolean onScaleBegin(ScaleGestureDetector detector);
/**
* 缩放结束
*/
public void onScaleEnd(ScaleGestureDetector detector);
}
```
ScaleGestureDetector类常用函数介绍,因为在缩放的过程中,要通过ScaleGestureDetector来获取一些缩放信息:
```java
/**
* 缩放是否正处在进行中
*/
public boolean isInProgress();
/**
* 返回组成缩放手势(两个手指)中点x的位置
*/
public float getFocusX();
/**
* 返回组成缩放手势(两个手指)中点y的位置
*/
public float getFocusY();
/**
* 组成缩放手势的两个触点的跨度(两个触点间的距离)
*/
public float getCurrentSpan();
/**
* 同上,x的距离
*/
public float getCurrentSpanX();
/**
* 同上,y的距离
*/
public float getCurrentSpanY();
/**
* 组成缩放手势的两个触点的前一次缩放的跨度(两个触点间的距离)
*/
public float getPreviousSpan();
/**
* 同上,x的距离
*/
public float getPreviousSpanX();
/**
* 同上,y的距离
*/
public float getPreviousSpanY();
/**
* 获取本次缩放事件的缩放因子,缩放事件以onScale()返回值为基准,一旦该方法返回true,代表本次事件结束,重新开启下次缩放事件。
*/
public float getScaleFactor();
/**
* 返回上次缩放事件结束时到当前的时间间隔
*/
public long getTimeDelta();
/**
* 获取当前motion事件的时间
*/
public long getEventTime();
```
ScaleGestureDetector使用方式与GestureDetector类似,这里就不再重复讲解,了解了相关手势类,接下来开始代码构思。
### []()构思代码
想一想,图片有任意尺寸,怎样才能让图片铺满控件,那么就需要对图片进行缩放,平移。还有一点是必须考虑的,在加载高分辨率的图片非常消耗内存,在低内存的手机上很容易造成OOM,那么针对高分辨率的图片就必须压缩。还有一种情况是来回切换相同的两张图片,如果每次都加载本地图片,既消耗内存速度还很慢,这时候缓存就很有必要了,第一次加载本地图片,再次切回到该图片加载缓存图片。
显示图片,一般有两种方式,一种是Android提供了ImageView控件来显示图片;另一种直接在onDraw()方法里调用canvas.drawBitmap()方法,通过调研小红书显示方案,发现他采用了第二种:

(*^__^*) 嘻嘻……那我们就用第一种显示图片的方式,继承ImageView来显示图片。
通过观察小红书,我们会发现:
1. 图片显示区域为宽高相等的矩形,那么在测量onMeasure的时候需要保证宽高一致,左下角小按钮的状态切换先不考虑,后面会重点讲解。
2. 图片默认会**充满整个控件并居中对齐**,那么怎么保证图片充满控件,最常规的做法就是:取控件的宽高与图片的宽高比的最大值缩放`Math.max(控件宽度/图片宽度,控件高度/图片高度)`;同理,取控件宽高与图片宽高的偏移量的一半来平移图片保证居中对齐。
3. 在2的基础上,非宽高相等的图片有一部分会显示在控件区域之外,可以通过手指滑动来显示,相信大家都用过[PhotoView](https://github.com/chrisbanes/PhotoView),效果一致。 移动图片与移动控件的原理一样,都是改变setTranslation的值,不过这里用到了图片矩阵,通过改变Matrix.postTranslate(dx, dy)的值来移动图片。
4. 移动图片,那就不得不考虑越界问题,请观察下图,这里以上边界为例(左,右,下边界同理)。**注意:这里的越界指的不是数组越界,而是图片滑动到边缘继续沿相同方向滑动,图片未铺满控件区域。** 在下图中你会发现:图片跟随手指继续滑动,手指滑动的距离越大阻尼越大,手指抬起后图片会回弹到控件顶部。
5. 双指挤压图片缩小,扩散图片放大,缩放中心点是双指中点坐标,那么缩放比例怎么计算呢?最开始取的`缩放因子ScaleGestureDetector.getScaleFactor()` ,出来的效果真的天马行空(~~轻微挤压扩散图片无限放大缩小~~ ),接着给缩放因子加一个比例,效果依旧不行,哦豁。没办法,打印缩放数据,观察数据,寻找规律。几经尝试最后取了缩放因子的偏移量。~~为了写好控件,没什么捷径,只能多观察,多尝试。~~ 在缩小至越界的状态下,手指抬起,图片放大到充满控件;在放大到一定的阈值后放手后,图片回弹到一定的缩放比例。前文提到了在缩小至越界状态下单指滑动图片,根据四周滑动的距离,会出现阻尼效果,在后文会讲解阻尼算法。
6. 图片在滑动或缩放态下,会出现九宫格白色线条,线条始终平分控件内的图片为九等分,滑动或缩放停止线条消失,再次滑动或缩放线条出现,手指抬起后线条消失。
嗯,整个过程的大致行为就是这样了。
开工写代码咯~
### []()起名字
在开始写代码之前,要先给这个自定义控件起一个名字,又哦豁。。。不会起名字,
就叫:**裁剪图片控件(MCropImageView)** 吧。不要问我M字母是啥含义,我不会告诉你的。
### []()编写代码
#### []()宽高相等矩阵测量
测量比较简单,具体请看相关代码:
```java
@Override
protected void onMeasure(int widthMeasureSpec, int heightMeasureSpec) {
int widthSize = MeasureSpec.getSize(widthMeasureSpec);
int heightSize = MeasureSpec.getSize(heightMeasureSpec);
if (widthSize > heightSize) {
// 取高
super.onMeasure(heightMeasureSpec, heightMeasureSpec);
} else {
// 取宽
super.onMeasure(widthMeasureSpec, widthMeasureSpec);
}
}
```
#### []()铺满居中
铺满的原理上文已经讲到了,对应的公式如下:
```java
控件宽度/图片宽度 = a
控件高度/高度高度 = b
mBaseScale = Math.max(a,b)
Matrix.postScale(mBaseScale, mBaseScale, 控件宽度/ 2, 控件高度/ 2)
```
居中的原理上面也提到过了,来看看代码怎么写:
```java
@Override
public void onGlobalLayout() {
mMatrix.reset();
// 获取控件的宽度和高度
int viewWidth = getWidth();
int viewHeight = getHeight();
// 图片的固定宽度 高度
// 获取图片的宽度和高度
Drawable drawable = getDrawable();
if (null == drawable) {
return;
}
int drawableWidth = drawable.getIntrinsicWidth();
int drawableHeight = drawable.getIntrinsicHeight();
// 将图片移动到屏幕的中点位置
float dx = (viewWidth - drawableWidth) / 2;
float dy = (viewHeight - drawableHeight) / 2;
// 取最大值
mBaseScale = Math.max((float) viewWidth / drawableWidth, (float) viewHeight / drawableHeight);
// 平移居中
mMatrix.postTranslate(dx, dy);
// 缩放
mMatrix.postScale(mBaseScale, mBaseScale, viewWidth / 2, viewHeight / 2);
setImageMatrix(mMatrix);
}
```
有关Matrix的set 、 pre、post方法调用顺序,这里简单说一下(~~个人理解,有错还望指出~~ ),可以把Matrix的操作看成队列,**post方法添加到队列的尾部,pre添加到队列的头部,而set方法则重置队列**。
看看铺满居中的效果:
#### []()单指滑动
单指滑动,在上文已经讲到GestureDetector.SimpleOnGestureListener内部接口用来处理手势滑动,重写以下接口方法:
```java
// 处理手指滑动
private GestureDetector.SimpleOnGestureListener mSimpleOnGestureListener = new GestureDetector.SimpleOnGestureListener() {
@Override
public boolean onDown(MotionEvent e) {
// 消费事件
return true;
}
@Override
public boolean onScroll(MotionEvent e1, MotionEvent e2, float distanceX, float distanceY) {
// 限定单指
if (e1.getPointerCount() == e2.getPointerCount() && e1.getPointerCount() == 1) {
// distanceX 左正右负 所以这里取相反数
mMatrix.postTranslate(-distanceX, -distanceY);
setImageMatrix(mMatrix);
return true;
}
return super.onScroll(e1, e2, distanceX, distanceY);
}
};
```
获取到手指滑动的距离,对图片矩阵进行平移Matrix.postTranslate(),但在x轴方向获取到的滑动距离右负左正,y轴方向获取到的滑动距离上正下负,跟实际平移的值相反,那么平移值Matrix.postTranslate(-distanceX, -distanceY)取滑动距离的负数。
单指滑动还有一个效果,越界下的阻尼效果,看看效果图:
很明显图片跟随手指滑动,距离控件边缘越近,阻尼越大。那么很明显需要获取图片边缘距离控件的距离,然后根据滑动偏移量进行计算。为了获取图片边缘距离控件的距离,就需要获取图片的位置信息。那么怎样才能获取图片位置信息呢?
在ViewGroup的transformPointToViewLocal方法中有这样一段代码:
```java
if (!child.hasIdentityMatrix()) {
child.getInverseMatrix().mapPoints(point);
}
```
如果child所对应的矩阵发生过旋转、缩放等变化的话(补间动画不算,因为是临时的),会通过矩阵的mapPoints方法来将触摸点转换到矩阵变换后的坐标。
没错,我们也可以用矩阵的mapRect方法来将图片的坐标及尺寸转换一下,就像这样:
这样就可以获取到图片的矩形区域,相关方法如下:
```java
// 获取图片矩阵区域
private RectF getMatrixRectF() {
RectF rectF = new RectF();
Drawable drawable = getDrawable();
if (drawable != null) {
// 注意set
rectF.set(0, 0, drawable.getIntrinsicWidth(), drawable.getIntrinsicHeight());
mMatrix.mapRect(rectF);
}
return rectF;
}
```
获取到了图片矩阵,那么图片越界就很容易判定了,先看下面两张越界图:
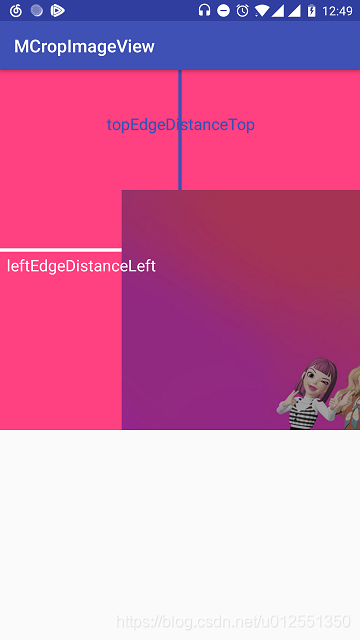
图片上边缘距离控件顶部变量为topEdgeDistanceTop,左边缘距离控件左边变量为leftEdgeDistanceLeft,右边缘距离控件右边变量为rightEdgeDistanceRight,下边缘距离控件底部变量为bottomEdgeDistanceBottom,分别对应的代码如下:
```java
// 获取图片矩阵
RectF rectF = getMatrixRectF();
float leftEdgeDistanceLeft = rectF.left;
float topEdgeDistanceTop = rectF.top;
//位移 rectF.right - rectF.left 图片宽度
float rightEdgeDistanceRight = leftEdgeDistanceLeft + rectF.right - rectF.left - getWidth();
// rectF.bottom - rectF.top 图片高度
float bottomEdgeDistanceBottom = topEdgeDistanceTop + rectF.bottom - rectF.top - getHeight();
```
好了,这样就可以准确判定图片是否越界。接下来我们看看越界状态下的阻尼算法是怎么计算的,有什么规律:
先来观察图片左右越界的情况(上下越界同理),左右越界又分为三种情况,**左越界&右不越界(简称左越界),右越界&左不越界(简称右越界),左越界&右越界(简称左右越界)** 左越界的情况与右越界类似,那么就只有两种情况:
1. 左越界
可以看到在向左滑动的情况下,图片左侧距离控件左侧距离越大,阻力越大。通俗一点,手指滑动的距离越大,图片跟随手指滑动的距离就越小,那么可以根据以下公式获取阻尼系数:
```java
最大阻尼数 / 最大偏移量 * leftEdgeDistanceLeft
```
最大阻尼数默认取值为9,最大偏移量为控件宽度的三分之一,对应的代码如下:
```java
// 获取图片矩阵
RectF rectF = getMatrixRectF();
float leftEdgeDistanceLeft = rectF.left;
float rightEdgeDistanceRight = leftEdgeDistanceLeft + rectF.right - rectF.left - getWidth();
// MAX_SCROLL_FACTOR = 3
int maxOffsetWidth = getWidth() / MAX_SCROLL_FACTOR;
int maxOffsetHeight = getHeight() / MAX_SCROLL_FACTOR;
// 图片左侧越界并且图片右侧未越界
if (leftEdgeDistanceLeft > 0 && rightEdgeDistanceRight > 0) {
// distanceX < 0 表示继续向右滑动
if (distanceX < 0) {
if (leftEdgeDistanceLeft < maxOffsetWidth) {
// DAMP_FACTOR = 9 系数越大阻尼越大 +1防止ratio为0
int ratio = (int) (DAMP_FACTOR / maxOffsetWidth * leftEdgeDistanceLeft) + 1;
distanceX /= ratio;
} else {
// 图片向右滑动超过了最大偏移量 图片则不平移
distanceX = 0;
}
}
// 向左滑动不做处理 默认取值distanceX
}
```
2. 左右越界
左右越界的情况与左越界的情况正好相反,距离控件边缘越近,图片阻力越大。那么怎么判定图片距离控件边缘越近,这里分两种情况,图片中点在控件中点左侧以及图片中点在控件中点右侧。第一种情况图片中点在控件中点左侧,向左滑动阻力越大,向右滑动阻力为0;第二种情况图片中点在控件中点的右侧,向右滑动阻力越大,向左滑动阻力为0。
来看看代码怎么写:
```java
// 图片左侧越界并且图片右侧越界
if (leftEdgeDistanceLeft > 0 && rightEdgeDistanceRight < 0) {
// 控件宽度的一半
int halfWidth = getWidth() / 2;
// 获取图片中点x坐标
float centerX = (rectF.right - rectF.left) / 2 + rectF.left;
// 图片中点x坐标是否右侧偏移
boolean rightOffsetCenterX = centerX >= halfWidth;
// 右侧偏移并且向右滑动
if (distanceX < 0 && rightOffsetCenterX) {
// centerX - halfWidth 图片右侧偏移量
int ratio = (int) (DAMP_FACTOR / maxOffsetWidth * (centerX - halfWidth)) + 1;
distanceX /= ratio;
}
// 左侧偏移并且向左滑动
else if (distanceX > 0 && !rightOffsetCenterX) {
// halfWidth - centerX 左侧的偏移量
int ratio = (int) (DAMP_FACTOR / maxOffsetWidth * (halfWidth - centerX)) + 1;
distanceX /= ratio;
}
}
```
好了,左右越界就讲到这里,上下越界同理,越界的整体代码如下:
```java
@Override
public boolean onScroll(MotionEvent e1, MotionEvent e2, float distanceX, float distanceY) {
if (e1.getPointerCount() == e2.getPointerCount() && e1.getPointerCount() == 1) {
// 获取图片矩阵
RectF rectF = getMatrixRectF();
float leftEdgeDistanceLeft = rectF.left;
float topEdgeDistanceTop = rectF.top;
float rightEdgeDistanceRight = leftEdgeDistanceLeft + rectF.right - rectF.left - getWidth();
float bottomEdgeDistanceBottom = topEdgeDistanceTop + rectF.bottom - rectF.top - getHeight();
// MAX_SCROLL_FACTOR = 3
int maxOffsetWidth = getWidth() / MAX_SCROLL_FACTOR;
int maxOffsetHeight = getHeight() / MAX_SCROLL_FACTOR;
// 图片左侧越界并且图片右侧未越界
if (leftEdgeDistanceLeft > 0 && rightEdgeDistanceRight > 0) {
// distanceX < 0 表示继续向右滑动
if (distanceX < 0) {
if (leftEdgeDistanceLeft < maxOffsetWidth) {
// DAMP_FACTOR = 9 系数越大阻尼越大 +1防止ratio为0
int ratio = (int) (DAMP_FACTOR / maxOffsetWidth * leftEdgeDistanceLeft) + 1;
distanceX /= ratio;
} else {
// 图片向右滑动超过了最大偏移量 图片则不平移
distanceX = 0;
}
}
// 向左滑动不做处理 默认取值distanceX
}
// 图片右侧越界并且图片左侧未越界 (同上处理)
else if (rightEdgeDistanceRight < 0 && leftEdgeDistanceLeft < 0) {
// distanceX > 0 表示继续向左滑动
if (distanceX > 0) {
if (rightEdgeDistanceRight > -maxOffsetWidth) {
int ratio = (int) (DAMP_FACTOR / maxOffsetWidth * -rightEdgeDistanceRight) + 1;
distanceX /= ratio;
} else {
// 图片右侧距离控件右侧超过最大偏移量 图片则不平移
distanceX = 0;
}
}
}
// 图片左侧越界并且图片右侧越界
else if (leftEdgeDistanceLeft > 0 && rightEdgeDistanceRight < 0) {
// 控件宽度的一半
int halfWidth = getWidth() / 2;
// 获取图片中点x坐标
float centerX = (rectF.right - rectF.left) / 2 + rectF.left;
// 图片中点x坐标是否右侧偏移
boolean rightOffsetCenterX = centerX >= halfWidth;
// 右侧偏移并且向右滑动
if (distanceX < 0 && rightOffsetCenterX) {
// centerX - halfWidth 图片右侧偏移量
int ratio = (int) (DAMP_FACTOR / maxOffsetWidth * (centerX - halfWidth)) + 1;
distanceX /= ratio;
}
// 左侧偏移并且向左滑动
else if (distanceX > 0 && !rightOffsetCenterX) {
// halfWidth - centerX 左侧的偏移量
int ratio = (int) (DAMP_FACTOR / maxOffsetWidth * (halfWidth - centerX)) + 1;
distanceX /= ratio;
}
}
// 上下越界 处理方式同左右处理方式一样 本可以提成一个方法但为了方便理解先这样了
// 图片上侧越界并且图片下侧未越界
if (topEdgeDistanceTop > 0 && bottomEdgeDistanceBottom > 0) {
// distanceY < 0 表示图片继续向下滑动
if (distanceY < 0) {
if (topEdgeDistanceTop < maxOffsetHeight) {
// 获取阻尼比例
int ratio = (int) (DAMP_FACTOR / maxOffsetHeight * topEdgeDistanceTop) + 1;
distanceY /= ratio;
} else {
// 向下滑动超过了最大偏移量 则图片不滑动
distanceY = 0;
}
}
}
// 图片下侧越界并且图片上侧未越界
else if (bottomEdgeDistanceBottom < 0 && topEdgeDistanceTop < 0) {
if (distanceY > 0) {
if (bottomEdgeDistanceBottom > -maxOffsetHeight) {
int ratio = (int) (DAMP_FACTOR / maxOffsetHeight * -bottomEdgeDistanceBottom) + 1;
distanceY /= ratio;
} else {
// 向上滑动超过了最大偏移量 则图片不滑动
distanceY = 0;
}
}
} else if (topEdgeDistanceTop > 0 && bottomEdgeDistanceBottom < 0) {
int halfHeight = getHeight() / 2;
// 获取图片中点y坐标
float centerY = (rectF.bottom - rectF.top) / 2 + rectF.top;
// 图片中点y坐标是否向下偏移
boolean bottomOffsetCenterY = centerY >= halfHeight;
// 向下偏移并且向下移动
if (distanceY < 0 && bottomOffsetCenterY) {
// centerY - halfHeight 图片偏移量
int ratio = (int) (DAMP_FACTOR / maxOffsetHeight * (centerY - halfHeight)) + 1;
distanceY /= ratio;
} else if (distanceY > 0 && !bottomOffsetCenterY) { // 向上偏移并且向上移动
int ratio = (int) (DAMP_FACTOR / maxOffsetHeight * (halfHeight - centerY)) + 1;
distanceY /= ratio;
}
}
mMatrix.postTranslate(-distanceX, -distanceY);
setImageMatrix(mMatrix);
return true;
}
return super.onScroll(e1, e2, distanceX, distanceY);
}
```
#### []()双指缩放
双指缩放的原理在上文已经提及过了,重写ScaleGestureDetector.OnScaleGestureListener缩放手势类接口方法:
```java
// 处理双指的缩放
private ScaleGestureDetector.OnScaleGestureListener mOnScaleGestureListener = new ScaleGestureDetector.OnScaleGestureListener() {
@Override
public boolean onScale(ScaleGestureDetector detector) {
if (null == getDrawable() || mMatrix == null) {
// 如果返回true那么detector就会重置缩放事件
return true;
}
// 缩放因子,缩小小于1,放大大于1
float scaleFactor = mScaleGestureDetector.getScaleFactor();
// 缩放因子偏移量
float deltaFactor = scaleFactor - mPreScaleFactor;
if (scaleFactor != 1.0F && deltaFactor != 0F) {
mMatrix.postScale(deltaFactor + 1F, deltaFactor + 1F, mScaleGestureDetector.getFocusX(),
mScaleGestureDetector.getFocusY());
setImageMatrix(mMatrix);
}
mPreScaleFactor = scaleFactor;
return false;
}
@Override
public boolean onScaleBegin(ScaleGestureDetector detector) {
// 注意返回true
return true;
}
@Override
public void onScaleEnd(ScaleGestureDetector detector) {
}
};
```
#### []()回弹
在手指抬起时,图片在某种状态下会出现回弹动效,这里某种状态指的是**越界&图片的缩放比例大于一定的阈值&图片的缩放比例小于一定的阈值**三种状态,回弹无非改变图片矩阵的setTranslation,setScale值。当我们需要监听手指抬起的状态时,都是直接重写onTouchEvent去实现:
```java
@Override
public boolean onTouchEvent(MotionEvent event) {
switch (event.getAction()) {
case MotionEvent.ACTION_DOWN:
// 防止父类拦截事件
getParent().requestDisallowInterceptTouchEvent(true);
break;
case MotionEvent.ACTION_MOVE:
break;
case MotionEvent.ACTION_CANCEL:
case MotionEvent.ACTION_UP:
float scale = getScale();
if (scale > mMaxScale) {
// 缩小
} else if (scale < mBaseScale) {
// 放大
} else {
// 平移
}
getParent().requestDisallowInterceptTouchEvent(false);
break;
}
return true;
}
```
~~为了防止父类拦截事件,一般会在手指按下,抬起调用requestDisallowInterceptTouchEvent方法来避免事件冲突。~~ getScale方法如下,获取图片矩阵的缩放比例:
```java
private float getScale() {
float[] values = new float[9];
mMatrix.getValues(values);
return values[Matrix.MSCALE_X];
}
```
缩小放大的动画怎么实现呢?知道了开始与结束的缩放比例,在动画回调接口中动态设置 mMatrix.setValues(values)来实现缩小放大的效果,可现实很骨感,效果相去甚远,缩放中心点PivotX和PivotY始终在图片原点,同时Matrix并没有提供设置缩放中心点的方法。看来只能老老实实的使用Matrix.postScale(float sx, float sy, float px, float py)方法,同时设置缩放中心点为双指的中点坐标ScaleGestureDetector.getFocusX()。注意:**sx,sx是相对值,相对上一个终点的缩放值。**
相对值,多缩放一次与少缩放一次图片的状态完全不一样,那么必须控制缩放次数,由于ValueAnimator回调次数在不同的机型上并不一样,那么就不能用ValueAnimator的回调来实现动画,那么怎么做呢?
emmmm,你一定会想到Handler,既可以控制次数还可以控制消息延时。知道了开始与结束缩放点,也知道了缩放次数,那么怎么获取缩放相对值呢,利用Math.pow数学公式:
```java
/**
* 计算d的1/count次幂
*
* @param d
* @param count 开根的次数
* @return 相对值
*/
private static float getRelativeValue(double d, double count) {
if (count == 0) {
return 1F;
}
count = 1 / count;
return (float) Math.pow(d, count);
}
```
接下来就是发送消息与接收消息:
```java
/**
* 发送消息
*
* @param relativeScale
* @param what
* @param delayMillis
*/
private void sendMessage(float relativeScale, int what, long delayMillis) {
Message mes = new Message();
mes.obj = relativeScale;
mes.what = what;
mHandler.sendMessageDelayed(mes, delayMillis);
}
// 调用 省略前面 ...
case MotionEvent.ACTION_UP:
float scale = getScale();
if (scale > mMaxScale) {
// 缩小 SCALE_ANIM_COUNT = 10 ZOOM_OUT_ANIM_WHIT = 0
sendMessage(getRelativeValue(mMaxScale / scale, SCALE_ANIM_COUNT), ZOOM_OUT_ANIM_WHIT, 0);
} else if (scale < mBaseScale) {
// 放大 ZOOM_ANIM_WHIT = 1
sendMessage(getRelativeValue(mMaxScale / scale, SCALE_ANIM_COUNT), ZOOM_ANIM_WHIT, 0);
} else {
// 平移
boundCheck();
}
```
接收并处理消息:
```java
private Handler mHandler = new Handler() {
@Override
public void handleMessage(Message msg) {
super.handleMessage(msg);
if (msg != null) {
if (mCurrentScaleAnimCount < SCALE_ANIM_COUNT) {
float obj = (float) msg.obj;
mMatrix.postScale(obj, obj, mLastFocusX, mLastFocusY);
setImageMatrix(mMatrix);
mCurrentScaleAnimCount++;
// what scale > mMaxScale 取0 不然取 1
sendScaleMessage(obj, msg.what, SCALE_ANIM_COUNT);
} else if (mCurrentScaleAnimCount >= SCALE_ANIM_COUNT) {
float[] values = new float[9];
mMatrix.getValues(values);
if (msg.what == ZOOM_OUT_ANIM_WHIT) {
values[Matrix.MSCALE_X] = mMaxScale;
values[Matrix.MSCALE_Y] = mMaxScale;
} else if (msg.what == ZOOM_ANIM_WHIT) {
values[Matrix.MSCALE_X] = mBaseScale;
values[Matrix.MSCALE_Y] = mBaseScale;
}
mMatrix.setValues(values);
setImageMatrix(mMatrix);
// 边界检测
boundCheck();
}
}
}
};
```
缩小放大的效果如下:
为了防止Handler泄露,清空队列:
```java
@Override
protected void onDetachedFromWindow() {
if (mHandler != null) {
// 防止内存泄露
mHandler.removeCallbacksAndMessages(null);
}
super.onDetachedFromWindow();
}
```
回弹还剩最后一种情况越界,在上文中已经提到了越界的四种(上下左右)情况,手指抬起后图片平移到控件边缘。所谓的平移,就是从一点平移到另一点,那么怎么获取起点与结束点呢?
首先需要判定越界,根据getMatrixRectF图片矩阵,代码已经很清晰:
```java
// 边界检测
private void boundCheck() {
// 获取图片矩阵
RectF rectF = getMatrixRectF();
if (rectF.left >= 0) {
// 左越界
}
if (rectF.top >= 0) {
// 上越界
}
if (rectF.right <= getWidth()) {
// 右越界
}
if (rectF.bottom <= getHeight()) {
// 下越界
}
}
```
在左越界的情况下,起点为rectF.left,结束点为0;同理上越界的起点rectF.top,结束点0;那么右越界起点与结束点呢?有小伙伴会说那还不简单,不就是rectF.right,getWidth()吗?
很遗憾,你又哦豁了,不得不提一下,图片的矩阵的平移是以左上角为基点,那么右越界的起点同样为rectF.left,结束点为:
```java
起点 + 图片右侧距离控件右侧的距离
```
图片右侧距离控件右侧的距离为getWidth() - rectF.right,那么结束点的坐标为rectF.left + getWidth() - rectF.right;同理下越界的起点为rectF.top,结束点getHeight() - rectF.bottom + rectF.top。有了起点与结束点,那么平移就很容易了:
```java
/**
* 开始越界动画
*
* @param start 开始点坐标
* @param end 结束点坐标
* @param horizontal 是否水平动画 true 水平动画 false 垂直动画
*/
private void startBoundAnimator(float start, float end, final boolean horizontal) {
boundAnimator = ValueAnimator.ofFloat(start, end);
boundAnimator.setDuration(200);
boundAnimator.setInterpolator(new LinearInterpolator());
boundAnimator.addUpdateListener(new ValueAnimator.AnimatorUpdateListener() {
@Override
public void onAnimationUpdate(ValueAnimator animation) {
float v = (float) animation.getAnimatedValue();
float[] values = new float[9];
mMatrix.getValues(values);
values[horizontal ? Matrix.MTRANS_X : Matrix.MTRANS_Y] = v;
mMatrix.setValues(values);
setImageMatrix(mMatrix);
}
});
boundAnimator.start();
}
```
好了,看看效果:
#### []()九宫线条
在上文已经提到九宫线条的规律: **图片在滑动或缩放态下,会出现九宫格白色线条,线条始终平分控件内的图片为九等分,滑动或缩放停止线条消失,再次滑动或缩放线条出现,手指抬起后线条消失**。那么从这句话中我们可以得出以下结论:
1. 有关绘制涉及到onDraw()方法的重写
2. 线条的显示区域为图片与控件的交集
3. 控制线条的显示与消失(是否绘制)
怎么取交集记住一个原则:**上左取大,右下取小** 八字真言,就像这样:
```java
// 开始点
float startX = 0;
float startY = 0;
// 结束点
float endX = 0;
float endY = 0;
RectF rectF = getMatrixRectF();
// 上左取大 右下取小
startX = rectF.left <= 0 ? 0 : rectF.left;
startY = rectF.top <= 0 ? 0 : rectF.top;
endX = rectF.right >= getWidth() ? getWidth() : rectF.right;
endY = rectF.bottom >= getHeight() ? getHeight() : rectF.bottom;
```
获取到线条绘制的区域,那么怎么绘制线条?绘制多少线条?就比较容易了:
```java
float lineWidth = 0;
float lineHeight = 0;
lineWidth = endX - startX;
lineHeight = endY - startY;
// LINE_ROW_NUMBER = 3 表示多少行
for (int i = 1; i < LINE_ROW_NUMBER; i++) {
canvas.drawLine(startX + 0, startY + lineHeight / LINE_ROW_NUMBER * i, endX, startY + lineHeight / LINE_ROW_NUMBER * i, mLinePaint);
}
// LINE_COLUMN_NUMBER = 3 表示多少列
for (int i = 1; i < LINE_COLUMN_NUMBER; i++) {
canvas.drawLine(startX + lineWidth / LINE_COLUMN_NUMBER * i, startY, startX + lineWidth / LINE_COLUMN_NUMBER * i, endY, mLinePaint);
}
```
怎么控制线条的显示消失,注意显示消失的规则,缩放或滑动停止线条消失,再次滑动或缩放线条显示,以此类推,绝大部分人会想到怎么判定滑动或缩放停止?
写控件很多时候就是这样,不知不觉就入坑了,一头扎进里面,茶不思饭不想。。。然而这一切并没有什么用,最后还得换方案。
说下为什么不行,你会在手势MotionEvent.ACTION_MOVE事件判定滑动或缩放停止,但同时GestureDetector与ScaleGestureDetector也在消费滑动事件,导致判定不准确。那么怎么解决呢?
还记得Android源码长按事件的处理方式吗?相关代码如下:
```java
case MotionEvent.ACTION_DOWN:
......省略代码
if (mIsLongpressEnabled) {
mHandler.removeMessages(LONG_PRESS);
// 延迟时长为500毫秒
mHandler.sendEmptyMessageAtTime(LONG_PRESS,
mCurrentDownEvent.getDownTime() + LONGPRESS_TIMEOUT);
}
case MotionEvent.ACTION_MOVE:
int distance = (deltaX * deltaX) + (deltaY * deltaY);
int slopSquare = isGeneratedGesture ? 0 : mTouchSlopSquare;
if (distance > slopSquare) {
......省略代码
mHandler.removeMessages(LONG_PRESS);
}
```
在事件ACTION_DOWN延时发送长按事件,在延迟周期内,如果发生滑动,则移除长按事件,反之未发生滑动则触发长按事件。
借鉴长按事件的处理方式:
```java
// 绘制九宫线条
private void drawLine(Canvas canvas) {
// 省略中间代码
mHandler.removeCallbacks(lineRunnable);
mHandler.postDelayed(lineRunnable, 400);
}
private Runnable lineRunnable = new Runnable() {
@Override
public void run() {
mIsDragging = false;
invalidate();
}
};
@Override
protected void onDraw(Canvas canvas) {
super.onDraw(canvas);
if (mIsDragging) {
canvas.save();
drawLine(canvas);
canvas.restore();
}
}
```
效果就像这样:
哈哈哈~,小红书的图片裁剪控件喜欢吗?想看更多炫酷控件,请搜索关注公众号:**控件人生**
你可以留言,告诉小编想实现什么样的炫酷控件?小编会每周选取炫酷的控件进行讲解。
由于篇幅原因,文章到这里就差不多了,有关左下角留白,填充效果,以及联动效果,将在下一篇讲解,打造属于你自己的CoordinatorLayout效果,喜欢的小伙伴被忘记关注控件人生(新公众号),同大家一起成长。
### []()Github地址:https://github.com/HpWens/MCropImageView 欢迎Star
### []()炫酷控件集:https://github.com/HpWens/MeiWidgetView 欢迎Star
================================================
FILE: app/.gitignore
================================================
*.iml
.gradle
/local.properties
/.idea/libraries
/.idea/modules.xml
/.idea/workspace.xml
.DS_Store
/build
/captures
.externalNativeBuild
================================================
FILE: app/build.gradle
================================================
apply plugin: 'com.android.application'
android {
compileSdkVersion 28
defaultConfig {
applicationId "com.demo.mcropimageview"
minSdkVersion 15
targetSdkVersion 28
versionCode 1
versionName "1.0"
testInstrumentationRunner "android.support.test.runner.AndroidJUnitRunner"
}
buildTypes {
release {
minifyEnabled false
proguardFiles getDefaultProguardFile('proguard-android.txt'), 'proguard-rules.pro'
}
}
}
dependencies {
implementation fileTree(dir: 'libs', include: ['*.jar'])
implementation 'com.android.support:appcompat-v7:28.0.0'
implementation 'com.android.support.constraint:constraint-layout:1.1.3'
testImplementation 'junit:junit:4.12'
androidTestImplementation 'com.android.support.test:runner:1.0.2'
androidTestImplementation 'com.android.support.test.espresso:espresso-core:3.0.2'
}
================================================
FILE: app/proguard-rules.pro
================================================
# Add project specific ProGuard rules here.
# You can control the set of applied configuration files using the
# proguardFiles setting in build.gradle.
#
# For more details, see
# http://developer.android.com/guide/developing/tools/proguard.html
# If your project uses WebView with JS, uncomment the following
# and specify the fully qualified class name to the JavaScript interface
# class:
#-keepclassmembers class fqcn.of.javascript.interface.for.webview {
# public *;
#}
# Uncomment this to preserve the line number information for
# debugging stack traces.
#-keepattributes SourceFile,LineNumberTable
# If you keep the line number information, uncomment this to
# hide the original source file name.
#-renamesourcefileattribute SourceFile
================================================
FILE: app/src/androidTest/java/com/demo/mcropimageview/ExampleInstrumentedTest.java
================================================
package com.demo.mcropimageview;
import android.content.Context;
import android.support.test.InstrumentationRegistry;
import android.support.test.runner.AndroidJUnit4;
import org.junit.Test;
import org.junit.runner.RunWith;
import static org.junit.Assert.*;
/**
* Instrumented test, which will execute on an Android device.
*
* @see Testing documentation
*/
@RunWith(AndroidJUnit4.class)
public class ExampleInstrumentedTest {
@Test
public void useAppContext() {
// Context of the app under test.
Context appContext = InstrumentationRegistry.getTargetContext();
assertEquals("com.demo.mcropimageview", appContext.getPackageName());
}
}
================================================
FILE: app/src/main/AndroidManifest.xml
================================================
================================================
FILE: app/src/main/java/com/demo/mcropimageview/MCropImageView.java
================================================
package com.demo.mcropimageview;
import android.animation.ValueAnimator;
import android.content.Context;
import android.graphics.Canvas;
import android.graphics.Color;
import android.graphics.Matrix;
import android.graphics.Paint;
import android.graphics.RectF;
import android.graphics.drawable.Drawable;
import android.os.Build;
import android.os.Handler;
import android.os.Message;
import android.support.annotation.Nullable;
import android.support.v7.widget.AppCompatImageView;
import android.util.AttributeSet;
import android.view.GestureDetector;
import android.view.MotionEvent;
import android.view.ScaleGestureDetector;
import android.view.ViewConfiguration;
import android.view.ViewTreeObserver;
import android.view.animation.LinearInterpolator;
/**
* Created by wenshi on 2019/2/26.
* Description
*/
public class MCropImageView extends AppCompatImageView implements ViewTreeObserver.OnGlobalLayoutListener {
// 手势帮助类
private GestureDetector mGestureDetector;
private ScaleGestureDetector mScaleGestureDetector;
private boolean mFirstLayout;
private float mBaseScale = 1.0F;
private float mMaxScale = 3.0F;
private float mPreScaleFactor = 1.0f;
private Matrix mMatrix;
// 缩放手势(两个手指)中点位置
private float mLastFocusX;
private float mLastFocusY;
private int mTouchSlop = -1;
private int mCurrentScaleAnimCount;
private ValueAnimator boundAnimator;
private Paint mLinePaint;
// 是否绘制线条
private boolean mIsDragging;
private static int MAX_SCROLL_FACTOR = 3;
// 阻尼系数
private static float DAMP_FACTOR = 9.0F;
private static int SCALE_ANIM_COUNT = 10;
private static int ZOOM_OUT_ANIM_WHIT = 0;
private static int ZOOM_ANIM_WHIT = 1;
private static int LINE_ROW_NUMBER = 3;
private static int LINE_COLUMN_NUMBER = 3;
public MCropImageView(Context context) {
this(context, null);
}
public MCropImageView(Context context, @Nullable AttributeSet attrs) {
this(context, attrs, 0);
}
public MCropImageView(Context context, @Nullable AttributeSet attrs, int defStyleAttr) {
super(context, attrs, defStyleAttr);
mScaleGestureDetector = new ScaleGestureDetector(context, mOnScaleGestureListener);
mGestureDetector = new GestureDetector(context, mSimpleOnGestureListener);
mFirstLayout = true;
mMatrix = new Matrix();
setScaleType(ScaleType.MATRIX);
mLinePaint = new Paint();
mLinePaint.setAntiAlias(true);
mLinePaint.setColor(Color.WHITE);
mLinePaint.setStrokeWidth(dip2px(context, 0.5f));
}
@Override
public boolean onTouchEvent(MotionEvent event) {
if (mTouchSlop < 0) {
mTouchSlop = ViewConfiguration.get(getContext()).getScaledTouchSlop();
}
switch (event.getAction()) {
case MotionEvent.ACTION_DOWN:
// 防止父类拦截事件
getParent().requestDisallowInterceptTouchEvent(true);
mIsDragging = false;
break;
case MotionEvent.ACTION_MOVE:
break;
case MotionEvent.ACTION_CANCEL:
case MotionEvent.ACTION_UP:
mCurrentScaleAnimCount = 0;
mIsDragging = false;
invalidate();
float scale = getScale();
if (scale > mMaxScale) {
// 缩小 SCALE_ANIM_COUNT = 10
sendScaleMessage(getRelativeValue(mMaxScale / scale, SCALE_ANIM_COUNT), ZOOM_OUT_ANIM_WHIT, 0);
} else if (scale < mBaseScale) {
// 放大
sendScaleMessage(getRelativeValue(mBaseScale / scale, SCALE_ANIM_COUNT), ZOOM_ANIM_WHIT, 0);
} else {
// 平移
boundCheck();
}
getParent().requestDisallowInterceptTouchEvent(true);
break;
}
if (mGestureDetector.onTouchEvent(event)) {
return true;
}
mScaleGestureDetector.onTouchEvent(event);
return true;
}
// 边界检测
private void boundCheck() {
// 获取图片矩阵
RectF rectF = getMatrixRectF();
if (rectF.left >= 0) {
// 左越界
startBoundAnimator(rectF.left, 0, true);
}
if (rectF.top >= 0) {
// 上越界
startBoundAnimator(rectF.top, 0, false);
}
if (rectF.right <= getWidth()) {
// 右越界
startBoundAnimator(rectF.left, rectF.left + getWidth() - rectF.right, true);
}
if (rectF.bottom <= getHeight()) {
// 下越界
startBoundAnimator(rectF.top, getHeight() - rectF.bottom + rectF.top, false);
}
}
/**
* 开始越界动画
*
* @param start 开始点坐标
* @param end 结束点坐标
* @param horizontal 是否水平动画 true 水平动画 false 垂直动画
*/
private void startBoundAnimator(float start, float end, final boolean horizontal) {
boundAnimator = ValueAnimator.ofFloat(start, end);
boundAnimator.setDuration(200);
boundAnimator.setInterpolator(new LinearInterpolator());
boundAnimator.addUpdateListener(new ValueAnimator.AnimatorUpdateListener() {
@Override
public void onAnimationUpdate(ValueAnimator animation) {
float v = (float) animation.getAnimatedValue();
float[] values = new float[9];
mMatrix.getValues(values);
values[horizontal ? Matrix.MTRANS_X : Matrix.MTRANS_Y] = v;
mMatrix.setValues(values);
setImageMatrix(mMatrix);
}
});
boundAnimator.start();
}
@Override
protected void onMeasure(int widthMeasureSpec, int heightMeasureSpec) {
int widthSize = MeasureSpec.getSize(widthMeasureSpec);
int heightSize = MeasureSpec.getSize(heightMeasureSpec);
if (widthSize > heightSize) {
super.onMeasure(heightMeasureSpec, heightMeasureSpec);
} else {
super.onMeasure(widthMeasureSpec, widthMeasureSpec);
}
}
@Override
public void onGlobalLayout() {
if (mFirstLayout) {
mFirstLayout = false;
mMatrix.reset();
// 获取控件的宽度和高度
int viewWidth = getWidth();
int viewHeight = getHeight();
// 图片的固定宽度 高度
// 获取图片的宽度和高度
Drawable drawable = getDrawable();
if (null == drawable) {
return;
}
int drawableWidth = drawable.getIntrinsicWidth();
int drawableHeight = drawable.getIntrinsicHeight();
// 将图片移动到屏幕的中点位置
float dx = (viewWidth - drawableWidth) / 2;
float dy = (viewHeight - drawableHeight) / 2;
mBaseScale = Math.max((float) viewWidth / drawableWidth, (float) viewHeight / drawableHeight);
// 平移居中
mMatrix.postTranslate(dx, dy);
// 缩放
mMatrix.postScale(mBaseScale, mBaseScale, viewWidth / 2, viewHeight / 2);
setImageMatrix(mMatrix);
if (mBaseScale >= mMaxScale) {
mMaxScale = (int) Math.floor(mBaseScale) + 2;
} else if (mBaseScale < 1.0f) {
mMaxScale = 1.0f;
}
}
}
@Override
protected void onAttachedToWindow() {
super.onAttachedToWindow();
getViewTreeObserver().addOnGlobalLayoutListener(this);
}
@Override
protected void onDetachedFromWindow() {
if (mHandler != null) {
// 防止内存泄露
mHandler.removeCallbacksAndMessages(null);
}
super.onDetachedFromWindow();
if (Build.VERSION.SDK_INT >= Build.VERSION_CODES.JELLY_BEAN) {
getViewTreeObserver().removeOnGlobalLayoutListener(this);
} else {
getViewTreeObserver().removeGlobalOnLayoutListener(this);
}
}
// 获取图片矩阵区域
private RectF getMatrixRectF() {
RectF rectF = new RectF();
Drawable drawable = getDrawable();
if (drawable != null) {
rectF.set(0, 0, drawable.getIntrinsicWidth(), drawable.getIntrinsicHeight());
mMatrix.mapRect(rectF);
}
return rectF;
}
// 处理双指的缩放
private ScaleGestureDetector.OnScaleGestureListener mOnScaleGestureListener = new ScaleGestureDetector.OnScaleGestureListener() {
@Override
public boolean onScale(ScaleGestureDetector detector) {
if (null == getDrawable() || mMatrix == null) {
// 如果返回true那么detector就会重置缩放事件
return true;
}
mIsDragging = true;
// 缩放因子,缩小小于1,放大大于1
float scaleFactor = mScaleGestureDetector.getScaleFactor();
// 缩放因子偏移量
float deltaFactor = scaleFactor - mPreScaleFactor;
if (scaleFactor != 1.0F && deltaFactor != 0F) {
mMatrix.postScale(deltaFactor + 1F, deltaFactor + 1F, mLastFocusX = mScaleGestureDetector.getFocusX(),
mLastFocusY = mScaleGestureDetector.getFocusY());
setImageMatrix(mMatrix);
}
mPreScaleFactor = scaleFactor;
return false;
}
@Override
public boolean onScaleBegin(ScaleGestureDetector detector) {
// 注意返回true
return true;
}
@Override
public void onScaleEnd(ScaleGestureDetector detector) {
}
};
private float getScale() {
float[] values = new float[9];
mMatrix.getValues(values);
return values[Matrix.MSCALE_X];
}
private float[] getTransition() {
float[] values = new float[9];
mMatrix.getValues(values);
return new float[]{values[Matrix.MTRANS_X], values[Matrix.MTRANS_Y]};
}
/**
* 计算d的1/count次幂
*
* @param d
* @param count 开根的次数
* @return 相对值
*/
private static float getRelativeValue(double d, double count) {
if (count == 0) {
return 1F;
}
count = 1 / count;
return (float) Math.pow(d, count);
}
@Override
protected void onDraw(Canvas canvas) {
super.onDraw(canvas);
if (mIsDragging) {
canvas.save();
drawLine(canvas);
canvas.restore();
}
}
// 绘制九宫线条
private void drawLine(Canvas canvas) {
// 开始点
float startX = 0;
float startY = 0;
// 结束点
float endX = 0;
float endY = 0;
RectF rectF = getMatrixRectF();
startX = rectF.left <= 0 ? 0 : rectF.left;
startY = rectF.top <= 0 ? 0 : rectF.top;
endX = rectF.right >= getWidth() ? getWidth() : rectF.right;
endY = rectF.bottom >= getHeight() ? getHeight() : rectF.bottom;
float lineWidth = 0;
float lineHeight = 0;
lineWidth = endX - startX;
lineHeight = endY - startY;
// LINE_ROW_NUMBER = 3 表示多少行
for (int i = 1; i < LINE_ROW_NUMBER; i++) {
canvas.drawLine(startX + 0, startY + lineHeight / LINE_ROW_NUMBER * i, endX, startY + lineHeight / LINE_ROW_NUMBER * i, mLinePaint);
}
// LINE_COLUMN_NUMBER = 3 表示多少列
for (int i = 1; i < LINE_COLUMN_NUMBER; i++) {
canvas.drawLine(startX + lineWidth / LINE_COLUMN_NUMBER * i, startY, startX + lineWidth / LINE_COLUMN_NUMBER * i, endY, mLinePaint);
}
mHandler.removeCallbacks(lineRunnable);
mHandler.postDelayed(lineRunnable, 400);
}
// 处理手指滑动
private GestureDetector.SimpleOnGestureListener mSimpleOnGestureListener = new GestureDetector.SimpleOnGestureListener() {
@Override
public boolean onDown(MotionEvent e) {
return true;
}
@Override
public boolean onScroll(MotionEvent e1, MotionEvent e2, float distanceX, float distanceY) {
if (e1.getPointerCount() == e2.getPointerCount() && e1.getPointerCount() == 1) {
mIsDragging = true;
// 获取图片矩阵
RectF rectF = getMatrixRectF();
float leftEdgeDistanceLeft = rectF.left;
float topEdgeDistanceTop = rectF.top;
float rightEdgeDistanceRight = leftEdgeDistanceLeft + rectF.right - rectF.left - getWidth();
float bottomEdgeDistanceBottom = topEdgeDistanceTop + rectF.bottom - rectF.top - getHeight();
// MAX_SCROLL_FACTOR = 3
int maxOffsetWidth = getWidth() / MAX_SCROLL_FACTOR;
int maxOffsetHeight = getHeight() / MAX_SCROLL_FACTOR;
// 图片左侧越界并且图片右侧未越界
if (leftEdgeDistanceLeft > 0 && rightEdgeDistanceRight > 0) {
// distanceX < 0 表示继续向右滑动
if (distanceX < 0) {
if (leftEdgeDistanceLeft < maxOffsetWidth) {
// DAMP_FACTOR = 9 系数越大阻尼越大 +1防止ratio为0
int ratio = (int) (DAMP_FACTOR / maxOffsetWidth * leftEdgeDistanceLeft) + 1;
distanceX /= ratio;
} else {
// 图片向右滑动超过了最大偏移量 图片则不平移
distanceX = 0;
}
}
// 向左滑动不做处理 默认取值distanceX
}
// 图片右侧越界并且图片左侧未越界 (同上处理)
else if (rightEdgeDistanceRight < 0 && leftEdgeDistanceLeft < 0) {
// distanceX > 0 表示继续向左滑动
if (distanceX > 0) {
if (rightEdgeDistanceRight > -maxOffsetWidth) {
int ratio = (int) (DAMP_FACTOR / maxOffsetWidth * -rightEdgeDistanceRight) + 1;
distanceX /= ratio;
} else {
// 图片右侧距离控件右侧超过最大偏移量 图片则不平移
distanceX = 0;
}
}
}
// 图片左侧越界并且图片右侧越界
else if (leftEdgeDistanceLeft > 0 && rightEdgeDistanceRight < 0) {
// 控件宽度的一半
int halfWidth = getWidth() / 2;
// 获取图片中点x坐标
float centerX = (rectF.right - rectF.left) / 2 + rectF.left;
// 图片中点x坐标是否右侧偏移
boolean rightOffsetCenterX = centerX >= halfWidth;
// 右侧偏移并且向右滑动
if (distanceX < 0 && rightOffsetCenterX) {
// centerX - halfWidth 图片右侧偏移量
int ratio = (int) (DAMP_FACTOR / maxOffsetWidth * (centerX - halfWidth)) + 1;
distanceX /= ratio;
}
// 左侧偏移并且向左滑动
else if (distanceX > 0 && !rightOffsetCenterX) {
// halfWidth - centerX 左侧的偏移量
int ratio = (int) (DAMP_FACTOR / maxOffsetWidth * (halfWidth - centerX)) + 1;
distanceX /= ratio;
}
}
// 上下越界 处理方式同左右处理方式一样 本可以提成一个方法但为了方便理解先这样了
// 图片上侧越界并且图片下侧未越界
if (topEdgeDistanceTop > 0 && bottomEdgeDistanceBottom > 0) {
// distanceY < 0 表示图片继续向下滑动
if (distanceY < 0) {
if (topEdgeDistanceTop < maxOffsetHeight) {
// 获取阻尼比例
int ratio = (int) (DAMP_FACTOR / maxOffsetHeight * topEdgeDistanceTop) + 1;
distanceY /= ratio;
} else {
// 向下滑动超过了最大偏移量 则图片不滑动
distanceY = 0;
}
}
}
// 图片下侧越界并且图片上侧未越界
else if (bottomEdgeDistanceBottom < 0 && topEdgeDistanceTop < 0) {
if (distanceY > 0) {
if (bottomEdgeDistanceBottom > -maxOffsetHeight) {
int ratio = (int) (DAMP_FACTOR / maxOffsetHeight * -bottomEdgeDistanceBottom) + 1;
distanceY /= ratio;
} else {
// 向上滑动超过了最大偏移量 则图片不滑动
distanceY = 0;
}
}
} else if (topEdgeDistanceTop > 0 && bottomEdgeDistanceBottom < 0) {
int halfHeight = getHeight() / 2;
// 获取图片中点y坐标
float centerY = (rectF.bottom - rectF.top) / 2 + rectF.top;
// 图片中点y坐标是否向下偏移
boolean bottomOffsetCenterY = centerY >= halfHeight;
// 向下偏移并且向下移动
if (distanceY < 0 && bottomOffsetCenterY) {
// centerY - halfHeight 图片偏移量
int ratio = (int) (DAMP_FACTOR / maxOffsetHeight * (centerY - halfHeight)) + 1;
distanceY /= ratio;
} else if (distanceY > 0 && !bottomOffsetCenterY) { // 向上偏移并且向上移动
int ratio = (int) (DAMP_FACTOR / maxOffsetHeight * (halfHeight - centerY)) + 1;
distanceY /= ratio;
}
}
mMatrix.postTranslate(-distanceX, -distanceY);
setImageMatrix(mMatrix);
return true;
}
return super.onScroll(e1, e2, distanceX, distanceY);
}
};
private Handler mHandler = new Handler() {
@Override
public void handleMessage(Message msg) {
super.handleMessage(msg);
if (msg != null) {
if (mCurrentScaleAnimCount < SCALE_ANIM_COUNT) {
float obj = (float) msg.obj;
mMatrix.postScale(obj, obj, mLastFocusX, mLastFocusY);
setImageMatrix(mMatrix);
mCurrentScaleAnimCount++;
// what scale > mMaxScale 取0 不然取 1
sendScaleMessage(obj, msg.what, SCALE_ANIM_COUNT);
} else if (mCurrentScaleAnimCount >= SCALE_ANIM_COUNT) {
float[] values = new float[9];
mMatrix.getValues(values);
if (msg.what == ZOOM_OUT_ANIM_WHIT) {
values[Matrix.MSCALE_X] = mMaxScale;
values[Matrix.MSCALE_Y] = mMaxScale;
} else if (msg.what == ZOOM_ANIM_WHIT) {
values[Matrix.MSCALE_X] = mBaseScale;
values[Matrix.MSCALE_Y] = mBaseScale;
}
mMatrix.setValues(values);
setImageMatrix(mMatrix);
// 边界检测
boundCheck();
}
}
}
};
/**
* 发送消息
*
* @param relativeScale
* @param what
* @param delayMillis
*/
private void sendScaleMessage(float relativeScale, int what, long delayMillis) {
Message mes = new Message();
mes.obj = relativeScale;
mes.what = what;
mHandler.sendMessageDelayed(mes, delayMillis);
}
public static int dip2px(Context context, float dpValue) {
float scale = context.getResources().getDisplayMetrics().density;
return (int) (dpValue * scale + 0.5f);
}
private Runnable lineRunnable = new Runnable() {
@Override
public void run() {
mIsDragging = false;
invalidate();
}
};
}
================================================
FILE: app/src/main/java/com/demo/mcropimageview/MainActivity.java
================================================
package com.demo.mcropimageview;
import android.support.v7.app.AppCompatActivity;
import android.os.Bundle;
import android.view.View;
import android.widget.TextView;
public class MainActivity extends AppCompatActivity {
MCropImageView mMCropImageView;
@Override
protected void onCreate(Bundle savedInstanceState) {
super.onCreate(savedInstanceState);
setContentView(R.layout.activity_main);
mMCropImageView = findViewById(R.id.crop_view);
findViewById(R.id.tv).setOnClickListener(new View.OnClickListener() {
@Override
public void onClick(View v) {
// mMCropImageView.drawAidLine();
}
});
}
}
================================================
FILE: app/src/main/res/drawable/ic_launcher_background.xml
================================================
================================================
FILE: app/src/main/res/drawable-v24/ic_launcher_foreground.xml
================================================