\n\n以下是实现该算法的代码\n\n```js\nfunction sort(array) {\n checkArray(array);\n quickSort(array, 0, array.length - 1);\n return array;\n}\n\nfunction quickSort(array, left, right) {\n if (left < right) {\n swap(array, , right)\n // 随机取值,然后和末尾交换,这样做比固定取一个位置的复杂度略低\n let indexs = part(array, parseInt(Math.random() * (right - left + 1)) + left, right);\n quickSort(array, left, indexs[0]);\n quickSort(array, indexs[1] + 1, right);\n }\n}\nfunction part(array, left, right) {\n let less = left - 1;\n let more = right;\n while (left < more) {\n if (array[left] < array[right]) {\n // 当前值比基准值小,`less` 和 `left` 都加一\n\t ++less;\n ++left;\n } else if (array[left] > array[right]) {\n // 当前值比基准值大,将当前值和右边的值交换\n // 并且不改变 `left`,因为当前换过来的值还没有判断过大小\n swap(array, --more, left);\n } else {\n // 和基准值相同,只移动下标\n left++;\n }\n }\n // 将基准值和比基准值大的第一个值交换位置\n // 这样数组就变成 `[比基准值小, 基准值, 比基准值大]`\n swap(array, right, more);\n return [less, more];\n}\n```\n\n该算法的复杂度和归并排序是相同的,但是额外空间复杂度比归并排序少,只需 O(logN),并且相比归并排序来说,所需的常数时间也更少。\n\n### 面试题\n\n**Sort Colors**:该题目来自 [LeetCode](https://leetcode.com/problems/sort-colors/description/),题目需要我们将 `[2,0,2,1,1,0]` 排序成 `[0,0,1,1,2,2]` ,这个问题就可以使用三路快排的思想。\n\n以下是代码实现\n\n```js\nvar sortColors = function(nums) {\n let left = -1;\n let right = nums.length;\n let i = 0;\n // 下标如果遇到 right,说明已经排序完成\n while (i < right) {\n if (nums[i] == 0) {\n swap(nums, i++, ++left);\n } else if (nums[i] == 1) {\n i++;\n } else {\n swap(nums, i, --right);\n }\n }\n};\n```\n\n**Kth Largest Element in an Array**:该题目来自 [LeetCode](https://leetcode.com/problems/kth-largest-element-in-an-array/description/),题目需要找出数组中第 K 大的元素,这问题也可以使用快排的思路。并且因为是找出第 K 大元素,所以在分离数组的过程中,可以找出需要的元素在哪边,然后只需要排序相应的一边数组就好。\n\n以下是代码实现\n\n```js\nvar findKthLargest = function(nums, k) {\n let l = 0\n let r = nums.length - 1\n // 得出第 K 大元素的索引位置\n k = nums.length - k\n while (l < r) {\n // 分离数组后获得比基准树大的第一个元素索引\n let index = part(nums, l, r)\n // 判断该索引和 k 的大小\n if (index < k) {\n l = index + 1\n } else if (index > k) {\n r = index - 1\n } else {\n break\n }\n }\n return nums[k]\n};\nfunction part(array, left, right) {\n let less = left - 1;\n let more = right;\n while (left < more) {\n if (array[left] < array[right]) {\n\t ++less;\n ++left;\n } else if (array[left] > array[right]) {\n swap(array, --more, left);\n } else {\n left++;\n }\n }\n swap(array, right, more);\n return more;\n}\n```\n\n\n\n## 堆排序\n\n堆排序利用了二叉堆的特性来做,二叉堆通常用数组表示,并且二叉堆是一颗完全二叉树(所有叶节点(最底层的节点)都是从左往右顺序排序,并且其他层的节点都是满的)。二叉堆又分为大根堆与小根堆。\n\n- 大根堆是某个节点的所有子节点的值都比他小\n- 小根堆是某个节点的所有子节点的值都比他大\n\n堆排序的原理就是组成一个大根堆或者小根堆。以小根堆为例,某个节点的左边子节点索引是 `i * 2 + 1`,右边是 `i * 2 + 2`,父节点是 `(i - 1) /2`。\n\n1. 首先遍历数组,判断该节点的父节点是否比他小,如果小就交换位置并继续判断,直到他的父节点比他大\n2. 重新以上操作 1,直到数组首位是最大值\n3. 然后将首位和末尾交换位置并将数组长度减一,表示数组末尾已是最大值,不需要再比较大小\n4. 对比左右节点哪个大,然后记住大的节点的索引并且和父节点对比大小,如果子节点大就交换位置\n5. 重复以上操作 3 - 4 直到整个数组都是大根堆。\n\n
\n\n以下是实现该算法的代码\n\n```js\nfunction heap(array) {\n checkArray(array);\n // 将最大值交换到首位\n for (let i = 0; i < array.length; i++) {\n heapInsert(array, i);\n }\n let size = array.length;\n // 交换首位和末尾\n swap(array, 0, --size);\n while (size > 0) {\n heapify(array, 0, size);\n swap(array, 0, --size);\n }\n return array;\n}\n\nfunction heapInsert(array, index) {\n // 如果当前节点比父节点大,就交换\n while (array[index] > array[parseInt((index - 1) / 2)]) {\n swap(array, index, parseInt((index - 1) / 2));\n // 将索引变成父节点\n index = parseInt((index - 1) / 2);\n }\n}\nfunction heapify(array, index, size) {\n let left = index * 2 + 1;\n while (left < size) {\n // 判断左右节点大小\n let largest =\n left + 1 < size && array[left] < array[left + 1] ? left + 1 : left;\n // 判断子节点和父节点大小\n largest = array[index] < array[largest] ? largest : index;\n if (largest === index) break;\n swap(array, index, largest);\n index = largest;\n left = index * 2 + 1;\n }\n}\n```\n\n以上代码实现了小根堆,如果需要实现大根堆,只需要把节点对比反一下就好。\n\n该算法的复杂度是 O(logN)\n\n## 系统自带排序实现\n\n每个语言的排序内部实现都是不同的。\n\n对于 JS 来说,数组长度大于 10 会采用快排,否则使用插入排序 [源码实现](https://github.com/v8/v8/blob/ad82a40509c5b5b4680d4299c8f08d6c6d31af3c/src/js/array.js#L760:7) 。选择插入排序是因为虽然时间复杂度很差,但是在数据量很小的情况下和 `O(N * logN) `相差无几,然而插入排序需要的常数时间很小,所以相对别的排序来说更快。\n\n对于 Java 来说,还会考虑内部的元素的类型。对于存储对象的数组来说,会采用稳定性好的算法。稳定性的意思就是对于相同值来说,相对顺序不能改变。\n\n
\n\n# 链表\n\n## 反转单向链表\n\n该题目来自 [LeetCode](https://leetcode.com/problems/reverse-linked-list/description/),题目需要将一个单向链表反转。思路很简单,使用三个变量分别表示当前节点和当前节点的前后节点,虽然这题很简单,但是却是一道面试常考题\n\n以下是实现该算法的代码\n\n```js\nvar reverseList = function(head) {\n // 判断下变量边界问题\n if (!head || !head.next) return head\n // 初始设置为空,因为第一个节点反转后就是尾部,尾部节点指向 null\n let pre = null\n let current = head\n let next\n // 判断当前节点是否为空\n // 不为空就先获取当前节点的下一节点\n // 然后把当前节点的 next 设为上一个节点\n // 然后把 current 设为下一个节点,pre 设为当前节点\n while(current) {\n next = current.next\n current.next = pre\n pre = current\n current = next\n }\n return pre\n};\n```\n\n\n\n# 树\n\n## 二叉树的先序,中序,后序遍历\n\n先序遍历表示先访问根节点,然后访问左节点,最后访问右节点。\n\n中序遍历表示先访问左节点,然后访问根节点,最后访问右节点。\n\n后序遍历表示先访问左节点,然后访问右节点,最后访问根节点。\n\n### 递归实现\n\n递归实现相当简单,代码如下\n\n```js\nfunction TreeNode(val) {\n this.val = val;\n this.left = this.right = null;\n}\nvar traversal = function(root) {\n if (root) {\n // 先序\n console.log(root); \n traversal(root.left);\n // 中序\n // console.log(root); \n traversal(root.right);\n // 后序\n // console.log(root);\n }\n};\n```\n\n对于递归的实现来说,只需要理解每个节点都会被访问三次就明白为什么这样实现了。\n\n### 非递归实现\n\n非递归实现使用了栈的结构,通过栈的先进后出模拟递归实现。\n\n以下是先序遍历代码实现\n\n```js\nfunction pre(root) {\n if (root) {\n let stack = [];\n // 先将根节点 push\n stack.push(root);\n // 判断栈中是否为空\n while (stack.length > 0) {\n // 弹出栈顶元素\n root = stack.pop();\n console.log(root);\n // 因为先序遍历是先左后右,栈是先进后出结构\n // 所以先 push 右边再 push 左边\n if (root.right) {\n stack.push(root.right);\n }\n if (root.left) {\n stack.push(root.left);\n }\n }\n }\n}\n```\n\n以下是中序遍历代码实现\n\n```js\nfunction mid(root) {\n if (root) {\n let stack = [];\n // 中序遍历是先左再根最后右\n // 所以首先应该先把最左边节点遍历到底依次 push 进栈\n // 当左边没有节点时,就打印栈顶元素,然后寻找右节点\n // 对于最左边的叶节点来说,可以把它看成是两个 null 节点的父节点\n // 左边打印不出东西就把父节点拿出来打印,然后再看右节点\n while (stack.length > 0 || root) {\n if (root) {\n stack.push(root);\n root = root.left;\n } else {\n root = stack.pop();\n console.log(root);\n root = root.right;\n }\n }\n }\n}\n```\n\n以下是后序遍历代码实现,该代码使用了两个栈来实现遍历,相比一个栈的遍历来说要容易理解很多\n\n```js\nfunction pos(root) {\n if (root) {\n let stack1 = [];\n let stack2 = [];\n // 后序遍历是先左再右最后根\n\t// 所以对于一个栈来说,应该先 push 根节点\n // 然后 push 右节点,最后 push 左节点\n stack1.push(root);\n while (stack1.length > 0) {\n root = stack1.pop();\n stack2.push(root);\n if (root.left) {\n stack1.push(root.left);\n }\n if (root.right) {\n stack1.push(root.right);\n }\n }\n while (stack2.length > 0) {\n console.log(s2.pop());\n }\n }\n}\n```\n\n## 中序遍历的前驱后继节点\n\n实现这个算法的前提是节点有一个 `parent` 的指针指向父节点,根节点指向 `null` 。\n\n
\n\n如图所示,该树的中序遍历结果是 `4, 2, 5, 1, 6, 3, 7`\n\n### 前驱节点\n\n对于节点 `2` 来说,他的前驱节点就是 `4` ,按照中序遍历原则,可以得出以下结论\n\n1. 如果选取的节点的左节点不为空,就找该左节点最右的节点。对于节点 `1` 来说,他有左节点 `2` ,那么节点 `2` 的最右节点就是 `5`\n2. 如果左节点为空,且目标节点是父节点的右节点,那么前驱节点为父节点。对于节点 `5` 来说,没有左节点,且是节点 `2` 的右节点,所以节点 `2` 是前驱节点\n3. 如果左节点为空,且目标节点是父节点的左节点,向上寻找到第一个是父节点的右节点的节点。对于节点 `6` 来说,没有左节点,且是节点 `3` 的左节点,所以向上寻找到节点 `1` ,发现节点 `3` 是节点 `1` 的右节点,所以节点 `1` 是节点 `6` 的前驱节点\n\n以下是算法实现\n\n```js\nfunction predecessor(node) {\n if (!node) return \n // 结论 1\n if (node.left) {\n return getRight(node.left)\n } else {\n let parent = node.parent\n // 结论 2 3 的判断\n while(parent && parent.right === node) {\n node = parent\n parent = node.parent\n }\n return parent\n }\n}\nfunction getRight(node) {\n if (!node) return \n node = node.right\n while(node) node = node.right\n return node\n}\n```\n\n### 后继节点\n\n对于节点 `2` 来说,他的后继节点就是 `5` ,按照中序遍历原则,可以得出以下结论\n\n1. 如果有右节点,就找到该右节点的最左节点。对于节点 `1` 来说,他有右节点 `3` ,那么节点 `3` 的最左节点就是 `6`\n2. 如果没有右节点,就向上遍历直到找到一个节点是父节点的左节点。对于节点 `5` 来说,没有右节点,就向上寻找到节点 `2` ,该节点是父节点 `1` 的左节点,所以节点 `1` 是后继节点\n\n以下是算法实现\n\n```js\nfunction successor(node) {\n if (!node) return \n // 结论 1\n if (node.right) {\n return getLeft(node.right)\n } else {\n // 结论 2\n let parent = node.parent\n // 判断 parent 为空\n while(parent && parent.left === node) {\n node = parent\n parent = node.parent\n }\n return parent\n }\n}\nfunction getLeft(node) {\n if (!node) return \n node = node.left\n while(node) node = node.left\n return node\n}\n```\n\n## 树的深度\n\n**树的最大深度**:该题目来自 [Leetcode](https://leetcode.com/problems/maximum-depth-of-binary-tree/description/),题目需要求出一颗二叉树的最大深度\n\n以下是算法实现\n\n```js\nvar maxDepth = function(root) {\n if (!root) return 0 \n return Math.max(maxDepth(root.left), maxDepth(root.right)) + 1\n};\n```\n\n对于该递归函数可以这样理解:一旦没有找到节点就会返回 0,每弹出一次递归函数就会加一,树有三层就会得到3。\n\n# 动态规划\n\n动态规划背后的基本思想非常简单。就是将一个问题拆分为子问题,一般来说这些子问题都是非常相似的,那么我们可以通过只解决一次每个子问题来达到减少计算量的目的。\n\n一旦得出每个子问题的解,就存储该结果以便下次使用。\n\n## 斐波那契数列\n\n斐波那契数列就是从 0 和 1 开始,后面的数都是前两个数之和\n\n0,1,1,2,3,5,8,13,21,34,55,89....\n\n那么显然易见,我们可以通过递归的方式来完成求解斐波那契数列\n\n```js\nfunction fib(n) {\n if (n < 2 && n >= 0) return n\n return fib(n - 1) + fib(n - 2)\n}\nfib(10)\n```\n\n以上代码已经可以完美的解决问题。但是以上解法却存在很严重的性能问题,当 n 越大的时候,需要的时间是指数增长的,这时候就可以通过动态规划来解决这个问题。\n\n动态规划的本质其实就是两点\n\n1. 自底向上分解子问题\n2. 通过变量存储已经计算过的解\n\n根据上面两点,我们的斐波那契数列的动态规划思路也就出来了\n\n1. 斐波那契数列从 0 和 1 开始,那么这就是这个子问题的最底层\n2. 通过数组来存储每一位所对应的斐波那契数列的值\n\n```js\nfunction fib(n) {\n let array = new Array(n + 1).fill(null)\n array[0] = 0\n array[1] = 1\n for (let i = 2; i <= n; i++) {\n array[i] = array[i - 1] + array[i - 2]\n }\n return array[n]\n}\nfib(10)\n```\n\n## 0 - 1背包问题\n\n该问题可以描述为:给定一组物品,每种物品都有自己的重量和价格,在限定的总重量内,我们如何选择,才能使得物品的总价格最高。每个问题只能放入至多一次。\n\n假设我们有以下物品\n\n| 物品 ID / 重量 | 价值 |\n| :------------: | :--: |\n| 1 | 3 |\n| 2 | 7 |\n| 3 | 12 |\n\n对于一个总容量为 5 的背包来说,我们可以放入重量 2 和 3 的物品来达到背包内的物品总价值最高。\n\n对于这个问题来说,子问题就两个,分别是放物品和不放物品,可以通过以下表格来理解子问题\n\n| 物品 ID / 剩余容量 | 0 | 1 | 2 | 3 | 4 | 5 |\n| :----------------: | :--: | :--: | :--: | :--: | :--: | :--: |\n| 1 | 0 | 3 | 3 | 3 | 3 | 3 |\n| 2 | 0 | 3 | 7 | 10 | 10 | 10 |\n| 3 | 0 | 3 | 7 | 12 | 15 | 19 |\n\n直接来分析能放三种物品的情况,也就是最后一行\n\n- 当容量少于 3 时,只取上一行对应的数据,因为当前容量不能容纳物品 3\n- 当容量 为 3 时,考虑两种情况,分别为放入物品 3 和不放物品 3\n - 不放物品 3 的情况下,总价值为 10\n - 放入物品 3 的情况下,总价值为 12,所以应该放入物品 3\n- 当容量 为 4 时,考虑两种情况,分别为放入物品 3 和不放物品 3\n - 不放物品 3 的情况下,总价值为 10\n - 放入物品 3 的情况下,和放入物品 1 的价值相加,得出总价值为 15,所以应该放入物品 3\n- 当容量 为 5 时,考虑两种情况,分别为放入物品 3 和不放物品 3\n - 不放物品 3 的情况下,总价值为 10\n - 放入物品 3 的情况下,和放入物品 2 的价值相加,得出总价值为 19,所以应该放入物品 3\n\n以下代码对照上表更容易理解\n\n```js\n/**\n * @param {*} w 物品重量\n * @param {*} v 物品价值\n * @param {*} C 总容量\n * @returns\n */\nfunction knapsack(w, v, C) {\n let length = w.length\n if (length === 0) return 0\n\n // 对照表格,生成的二维数组,第一维代表物品,第二维代表背包剩余容量\n // 第二维中的元素代表背包物品总价值\n let array = new Array(length).fill(new Array(C + 1).fill(null))\n\n // 完成底部子问题的解\n for (let i = 0; i <= C; i++) {\n // 对照表格第一行, array[0] 代表物品 1\n // i 代表剩余总容量\n // 当剩余总容量大于物品 1 的重量时,记录下背包物品总价值,否则价值为 0\n array[0][i] = i >= w[0] ? v[0] : 0\n }\n\n // 自底向上开始解决子问题,从物品 2 开始\n for (let i = 1; i < length; i++) {\n for (let j = 0; j <= C; j++) {\n // 这里求解子问题,分别为不放当前物品和放当前物品\n // 先求不放当前物品的背包总价值,这里的值也就是对应表格中上一行对应的值\n array[i][j] = array[i - 1][j]\n // 判断当前剩余容量是否可以放入当前物品\n if (j >= w[i]) {\n // 可以放入的话,就比大小\n // 放入当前物品和不放入当前物品,哪个背包总价值大\n array[i][j] = Math.max(array[i][j], v[i] + array[i - 1][j - w[i]])\n }\n }\n }\n return array[length - 1][C]\n}\n```\n\n## 最长递增子序列\n\n最长递增子序列意思是在一组数字中,找出最长一串递增的数字,比如\n\n0, 3, 4, 17, 2, 8, 6, 10\n\n对于以上这串数字来说,最长递增子序列就是 0, 3, 4, 8, 10,可以通过以下表格更清晰的理解\n\n| 数字 | 0 | 3 | 4 | 17 | 2 | 8 | 6 | 10 |\n| :--: | :--: | :--: | :--: | :--: | :--: | :--: | :--: | :--: |\n| 长度 | 1 | 2 | 3 | 4 | 2 | 4 | 4 | 5 |\n\n通过以上表格可以很清晰的发现一个规律,找出刚好比当前数字小的数,并且在小的数组成的长度基础上加一。\n\n这个问题的动态思路解法很简单,直接上代码\n\n```js\nfunction lis(n) {\n if (n.length === 0) return 0\n // 创建一个和参数相同大小的数组,并填充值为 1\n let array = new Array(n.length).fill(1)\n // 从索引 1 开始遍历,因为数组已经所有都填充为 1 了\n for (let i = 1; i < n.length; i++) {\n // 从索引 0 遍历到 i\n // 判断索引 i 上的值是否大于之前的值\n for (let j = 0; j < i; j++) {\n if (n[i] > n[j]) {\n array[i] = Math.max(array[i], 1 + array[j])\n }\n }\n }\n let res = 1\n for (let i = 0; i < array.length; i++) {\n res = Math.max(res, array[i])\n }\n return res\n}\n```\n\n# 字符串相关\n\n在字符串相关算法中,Trie 树可以解决解决很多问题,同时具备良好的空间和时间复杂度,比如以下问题\n\n- 词频统计\n- 前缀匹配\n\n如果你对于 Trie 树还不怎么了解,可以前往 [这里](../DataStruct/dataStruct-zh.md#trie) 阅读\n\n"
},
{
"path": "Algorithm/algorithm-en.md",
"content": "# Time Complexity\n\nThe worst time complexity is often used to measure the quality of an algorithm.\n\nThe constant time O(1) means that this operation has nothing to do with the amount of data. It is a fixed-time operation, such as arithmetic operation.\n\nFor an algorithm, it is possible to calculate the operation numbers of `aN + 1`, N represents the amount of data. Then the time complexity of the algorithm is O(N). Because when we calculate the time complexity, the amount of data is usually very large, when low-order terms and constant terms are negligible.\n\nOf course, it may happen that both algorithms are O(N) time complexity, then comparing the low-order terms and the constant terms of the two algorithms.\n\n# Bit Operation\n\nBit operation is useful in algorithms and can be much faster than arithmetic operations.\n\nBefore learning bit operation, you should know how decimal converts to binary and how binary turns to decimal. Here is a simple calculation method.\n\n- Decimal `33` can be seen as `32 + 1` and `33` should be six-bit binary (Because 33 is approximately 32, and 32 is the fifth power of 2, so it is six bit), so the decimal `33` is `100001`, as long as it is the power of 2, then it is 1 otherwise it is 0.\n- Then binary `100001` is the same, the first is `2^5`, the last is `2^0`, and the sum is 33\n\n## Shift Arithmetic Left <<\n\n```js\n10 << 1 // -> 20\n```\n\nShift arithmetic left is to move all the binary to the left, `10` is represented as `1010` in binary, after shifting one bit to the left becomes `10100`, and converted to decimal is 20, so the left shift can be basically regarded as the following formula `a << b => a * (2 ^ b)`.\n\n## Shift Arithmetic Right >>\n\n```js\n10 >> 1 // -> 5\n```\n\nThe bitwise right shift moves all the binary digits to the right and remove the extra left digit. `10` is represented as `1010` in binary, and becomes `101` after shifting one bit to the right, and becomes 5 in decimal value, so the right shift is basically the following formula: `a >> b => a / (2 ^ b)`.\n\nRight shift is very useful, for example, you can calculate the intermediate value in the binary algorithm.\n\n```js\n13 >> 1 // -> 6\n```\n\n## Bitwise Operation\n\n**Bitwise And**\n\nEach bit is 1, and the result is 1\n\n```js\n8 & 7 // -> 0\n// 1000 & 0111 -> 0000 -> 0\n```\n\n**Bitwise Or**\n\nOne of bit is 1, and the result is 1\n\n```js\n8 | 7 // -> 15\n// 1000 | 0111 -> 1111 -> 15\n```\n\n**Bitwise XOR**\n\nEach bit is different, and the result is 1\n\n```js\n8 ^ 7 // -> 15\n8 ^ 8 // -> 0\n// 1000 ^ 0111 -> 1111 -> 15\n// 1000 ^ 1000 -> 0000 -> 0\n```\n\nFrom the above code, we can find that the bitwise XOR is the not carry addition.\n\n**Interview Question**:Not using arithmetic operation to get the sum of two numbers\n\nThis question can use bitwise XOR, because bitwise XOR is not carry addition, `8 ^ 8 = 0`, but if carry it will be 16 , so we only need to XOR the two numbers and then carry. So, if both bit is 1, and there should be a carry 1 on the left, so the following formula can be obtained `a + b = a ^ b + (a & b) << 1` , then simulate addition by recursive.\n\n```js\nfunction sum(a, b) {\n if (a == 0) return b\n if (b == 0) return a\n let newA = a ^ b\n let newB = (a & b) << 1\n return sum(newA, newB)\n}\n```\n\n# Sort\n\nThe following two functions will be used in sorting commonly, so I don't write them one by one.\n\n```js\nfunction checkArray(array) {\n if (!array || array.length <= 2) return\n}\nfunction swap(array, left, right) {\n let rightValue = array[right]\n array[right] = array[left]\n array[left] = rightValue\n}\n```\n\n## Bubble Sort\n\nThe principle of bubble sort is as follows, starting with the first element, and comparing the current element with the next index element. If the current element is larger, then swap them and repeat until the last element is compared, then the last element at this time is the largest number in the array. The above operation is repeated in the next round, but the last element is already the maximum number, so there is no need to compare the last element, only the position of `length - 1` is needed.\n\n
\n\n
\n\nThe following code is implement of the algorithm.\n\n```js\nfunction bubble(array) {\n checkArray(array);\n for (let i = array.length - 1; i > 0; i--) {\n // Traversing from 0 to `length - 1`\n for (let j = 0; j < i; j++) {\n if (array[j] > array[j + 1]) swap(array, j, j + 1)\n }\n }\n return array;\n}\n```\n\nThe operation numbers of the algorithm is an arithmetic progression `n + (n - 1) + (n - 2) + 1` . After removing the constant part, the time complexity is `O(n * n)`.\n\n## Insert Sort\n\nThe principle of insert sort is as follows. The first element is default as the sorted element, taking the next element and comparing it to the current element, swapping them if the current element is larger. Then the first element is the minimum number at this time, so the next operation starts from the third element, and repeats the previous operation.\n\n
\n\nThe following code is implement of the algorithm.\n\n```js\nfunction insertion(array) {\n checkArray(array);\n for (let i = 1; i < array.length; i++) {\n for (let j = i - 1; j >= 0 && array[j] > array[j + 1]; j--)\n swap(array, j, j + 1);\n }\n return array;\n}\n```\n\nThe operation numbers of the algorithm is an arithmetic progression `n + (n - 1) + (n - 2) + 1` . After removing the constant part, the time complexity is `O(n * n)`.\n\n## Select Sort\n\nThe principle of select sort is as follows. Traverse the array, set the index of minimum to 0. If the extracted value is smaller than the current minimum, replace the minimum index. After the traversal is completed, the value on the first element and the minimum index are exchanged. After the above operation, the first element is the minimum value in the array, and the next operation starts from index 1 and repeats the previous opration.\n\n
\n\nThe following code is implement of the algorithm.\n\n```js\nfunction selection(array) {\n checkArray(array);\n for (let i = 0; i < array.length - 1; i++) {\n let minIndex = i;\n for (let j = i + 1; j < array.length; j++) {\n minIndex = array[j] < array[minIndex] ? j : minIndex;\n }\n swap(array, i, minIndex);\n }\n return array;\n}\n```\n\nThe operation numbers of the algorithm is an arithmetic progression `n + (n - 1) + (n - 2) + 1` . After removing the constant part, the time complexity is `O(n * n)`.\n\n## Merge Sort\n\nThe principle of merge sort is as follows. Divide the array into two parts by recursion until one array contains at most two elements, then sort the array and merge them into a sorted array. Suppose I have a set of array `[3, 1, 2, 8, 9, 7, 6]`, the intermediate index is 3, and the array `[3, 1, 2, 8]` is sorted first. On this left array, continue splitting until the array becomes two elements (if the array length is odd, there will be a array containing only one element). Then sort the array `[3, 1]` and `[2, 8]`, and then sort the array `[1, 3, 2, 8]`, this time the left array is sorted, then sort the right array according to the above method, and finally sort the array `[1, 2, 3, 8]` and `[6, 7, 9]`.\n\n
\n\nThe following code is implement of the algorithm.\n\n```js\nfunction sort(array) {\n checkArray(array);\n mergeSort(array, 0, array.length - 1);\n return array;\n}\n\nfunction mergeSort(array, left, right) {\n // The left and right indexes are the same. \n // means there is only one element.\n if (left === right) return;\n // Equivalent to `left + (right - left) / 2`\n // More secure than `(left + right) / 2`, \n // and the index will not out of bounds\n // Bit operations are used because bit operations \n // are faster than arithmetic operation\n let mid = parseInt(left + ((right - left) >> 1));\n mergeSort(array, left, mid);\n mergeSort(array, mid + 1, right);\n\n let help = [];\n let i = 0;\n let p1 = left;\n let p2 = mid + 1;\n while (p1 <= mid && p2 <= right) {\n help[i++] = array[p1] < array[p2] ? array[p1++] : array[p2++];\n }\n while (p1 <= mid) {\n help[i++] = array[p1++];\n }\n while (p2 <= right) {\n help[i++] = array[p2++];\n }\n for (let i = 0; i < help.length; i++) {\n array[left + i] = help[i];\n }\n return array;\n}\n```\n\nThe above algorithm uses the idea of recursion. The essence of recursion is pushed into stack. Whenever a function is executed recursively, the information of the function (such as parameters, internal variables, the number of rows has executed) is pushed into stack until a termination condition is encountered, then pop stack and continue execute the function. The call trajectory for the above recursive function is as follows.\n\n```js\nmergeSort(data, 0, 6) // mid = 3\n mergeSort(data, 0, 3) // mid = 1\n mergeSort(data, 0, 1) // mid = 0\n mergeSort(data, 0, 0) // return to the previous step\n mergeSort(data, 1, 1) // return to the previous step\n // Sort p1 = 0, p2 = mid + 1 = 1\n // Fall back to `mergeSort(data, 0, 3)` \n // and perform the next recursion\n mergeSort(2, 3) // mid = 2\n mergeSort(3, 3) // return to the previous step\n // Sort p1 = 2, p2 = mid + 1 = 3\n // Fall back to `mergeSort(data, 0, 3)` and execution merge logic\n // Sort p1 = 0, p2 = mid + 1 = 2\n // Execution completed\n // The array on the left is sorted,\n // and the right side is also sorted like this\n```\n\nThe operation numbers of the algorithm can be calculated as follows: recursively twice and each time the amount of data is half of the array, and finally the entire array is iterated once, so the expression `2T(N / 2) + T(N) `( T represent time and N represent data amount). According to the expression, the [formula](https://www.wikiwand.com/en/Master_theorem_(analysis_of_algorithms)) can be applied to get a time complexity of `O(N * logN)`.\n\n## Quick Sort\n\nThe principle of quick sort is as follows. Randomly select a value in the array as the reference value, and compare the value with the reference value from left to right.Move the value to the left of the array if it is smaller than the reference value, and the larger one move to the right. The reference value is exchanged with the value which first larger than the reference value after the comparison completed. Then divide the array into two parts through the position of the reference value and continue the recursive operation.\n\n
\n\nThe following code is implement of the algorithm.\n\n```js\nfunction sort(array) {\n checkArray(array);\n quickSort(array, 0, array.length - 1);\n return array;\n}\n\nfunction quickSort(array, left, right) {\n if (left < right) {\n swap(array, , right)\n // Randomly take values and then swap it with the end,\n // which is slightly less complex than take a fixed position\n let indexs = part(array, parseInt(Math.random() * (right - left + 1)) + left, right);\n quickSort(array, left, indexs[0]);\n quickSort(array, indexs[1] + 1, right);\n }\n}\nfunction part(array, left, right) {\n let less = left - 1;\n let more = right;\n while (left < more) {\n if (array[left] < array[right]) {\n // The current value is smaller than the reference value,\n // and both `less` and `left` are added one.\n\t ++less;\n ++left;\n } else if (array[left] > array[right]) {\n // The current value is larger than the reference value, \n // and the current value is exchanged with \n // the value on the right.\n // And don't change `left`, because the current value\n // has not been judged yet.\n swap(array, --more, left);\n } else {\n // Same as the reference value, only move the index\n left++;\n }\n }\n // Exchange the reference value with the value \n // which is first larger than the reference value.\n // Thus the array becomes `[less than the reference value, \n // the reference value, larger than the reference value]`.\n swap(array, right, more);\n return [less, more];\n}\n```\n\nThe time complexity is same as merge sort, but the extra space complexity is less than the merge sort, only `O(logN)` is needed, and the constant time also smaller than the merge sort.\n\n### Interview Question\n\n**Sort Colors**:The topic is from [LeetCode](https://leetcode.com/problems/sort-colors/description/),The problem requires us to sort `[2,0,2,1,1,0]` into `[0,0,1,1,2,2]`, and this problem can use the idea of three-way quicksort.\n\nThe following code is implement of the algorithm.\n\n```js\nvar sortColors = function(nums) {\n let left = -1;\n let right = nums.length;\n let i = 0;\n // If the index encounters right, \n // it indicates that the sort has been completed.\n while (i < right) {\n if (nums[i] == 0) {\n swap(nums, i++, ++left);\n } else if (nums[i] == 1) {\n i++;\n } else {\n swap(nums, i, --right);\n }\n }\n};\n```\n\n**Kth Largest Element in an Array**:The topic is from [LeetCode](https://leetcode.com/problems/kth-largest-element-in-an-array/description/),The problem needs to find the Kth largest element in the array. This problem can also use the idea of quicksort. And because it is to find out the Kth element, in the process of separating the array, you can find out which side of the element you need, and then just sort the corresponding side array.\n\nThe following code is implement of the algorithm.\n\n```js\nvar findKthLargest = function(nums, k) {\n let l = 0\n let r = nums.length - 1\n // Get the index of the Kth largest element\n k = nums.length - k\n while (l < r) {\n // After separating the array, get the element\n // which first larger than the reference element\n let index = part(nums, l, r)\n // Compare the index with the k\n if (index < k) {\n l = index + 1\n } else if (index > k) {\n r = index - 1\n } else {\n break\n }\n }\n return nums[k]\n};\nfunction part(array, left, right) {\n let less = left - 1;\n let more = right;\n while (left < more) {\n if (array[left] < array[right]) {\n\t ++less;\n ++left;\n } else if (array[left] > array[right]) {\n swap(array, --more, left);\n } else {\n left++;\n }\n }\n swap(array, right, more);\n return more;\n}\n```\n\n## Heap Sort\n\nHeap sort takes advantage of the characteristics with the binary heap, which is usually represented by an array, and the binary heap is a complete binary tree (all leaf nodes (the lowest node) are sorted from left to right, and others nodes are all full). The binary heap is divided into max-head and min-heap.\n\n- A max-heap is all child nodes value smaller than the node value.\n- A min-heap is all child nodes value larger than the node value.\n\nThe principle of heap sort is to compose a max-heap or a min-heap. Taking a min-heap as an example, the index of the left child node is `i * 2 + 1`, and the right node is `i * 2 + 2`, and the parent node is `(i - 1) / 2`.\n\n1. First at all traverse the array to determine if the parent node is smaller than current node. If true, swap the position and continue to judge until his parent node is larger than him.\n2. Repeat the above operation 1, until the first position of the array is the maximum.\n3. Then swap the first and last position and minus 1with the length of the array, indicating that the end of the array is the maximum, it is no need to compare with it.\n4. Compare with the left and right nodes, then remember the index of the larger node and compare it with the parent node. If the child node is larger, then swap them.\n5. Repeat the above steps 3 - 4 until the whole array is a max-heap.\n\n
\n\nThe following code is implement of the algorithm.\n\n```js\nfunction heap(array) {\n checkArray(array);\n // Exchange the maximum value to the first position\n for (let i = 0; i < array.length; i++) {\n heapInsert(array, i);\n }\n let size = array.length;\n // Exchange first and last position\n swap(array, 0, --size);\n while (size > 0) {\n heapify(array, 0, size);\n swap(array, 0, --size);\n }\n return array;\n}\n\nfunction heapInsert(array, index) {\n // Exchange them if current node larger than parent node\n while (array[index] > array[parseInt((index - 1) / 2)]) {\n swap(array, index, parseInt((index - 1) / 2));\n // Change the index to the parent node\n index = parseInt((index - 1) / 2);\n }\n}\nfunction heapify(array, index, size) {\n let left = index * 2 + 1;\n while (left < size) {\n // Judge the size of the left and right node\n let largest =\n left + 1 < size && array[left] < array[left + 1] ? left + 1 : left;\n // Judge the size of the child and parent node\n largest = array[index] < array[largest] ? largest : index;\n if (largest === index) break;\n swap(array, index, largest);\n index = largest;\n left = index * 2 + 1;\n }\n}\n```\n\nThe above code implements a min-heap. If you need to implement a max-heap, you only need to reverse the comparison.\n\nThe time complexity of the algorithm is `O(logN)`.\n\n## System Comes With Sorting Implementation\n\nThe internal implementation of sorting for each language is different.\n\nFor JS, it will use quick sort if array length greater than 10, otherwise will use insert sort [Source implementation](https://github.com/v8/v8/blob/ad82a40509c5b5b4680d4299c8f08d6c6d31af3c/src/js/array.js#L760:7) . The insert sort is chosen because although the time complexity is very poor, it is almost the same as `O(N * logN)` when the amount of data is small, but the constant time required for insert sort is small, so it is faster than other sorts. \n\nFor Java, the type of elements inside is also considered. For arrays that store objects, a stable algorithm is used. Stability means that the relative order cannot be changed for the same value.\n\n
\n\n# Linked List\n\n## Reverse Singly Linked List\n\nThe topic is from [LeetCode](https://leetcode.com/problems/reverse-linked-list/description/),The problem needs to reverse a singly linked list. The idea is very simple. Use three variables to represent the current node and the previous and next nodes of current node. Although this question is very simple, it is an regular interview question.\n\nThe following code is implement of the algorithm.\n\n```js\nvar reverseList = function(head) {\n // Judge the problem of variable boundary\n if (!head || !head.next) return head\n // The initial setting is empty because the first node is the tail when it is inverted, and the tail node points to null\n let pre = null\n let current = head\n let next\n // Judge if the current node is empty\n // Get the next node of the current node if it is not empty\n // Then set the next node of current to the previous node.\n // Then set current to the next node and pre to the current node\n while(current) {\n next = current.next\n current.next = pre\n pre = current\n current = next\n }\n return pre\n};\n```\n\n\n\n# Tree\n\n## Preorder, Inorder, Postorder Traversal of Binary Tree\n\nPreorder traversal means that the root node is accessed first, then the left node is accessed, and the right node is accessed last.\n\nInorder traversal means that the left node is accessed first, then the root node is accessed, and the right node is accessed last.\n\nPostorder traversal means that the left node is accessed first, then the right node is accessed, and the root node is accessed last.\n\n### Recursive Implementation\n\nRecursive implementation is quite simple, the code is as follows.\n\n```js\nfunction TreeNode(val) {\n this.val = val;\n this.left = this.right = null;\n}\nvar traversal = function(root) {\n if (root) {\n // Preorder\n console.log(root); \n traversal(root.left);\n // Inorder\n // console.log(root); \n traversal(root.right);\n // Postorder\n // console.log(root);\n }\n};\n```\n\nFor recursive implementation, you only need to understand that each node will be accessed three times so you will understand why this is done.\n\n### Non-Recursive Implementation\n\nThe non-recursive implementation uses the structure of the stack, realize the recursive implementation by implementing the FILO of the stack.\n\nThe following code is implementation of the preorder traversal.\n\n```js\nfunction pre(root) {\n if (root) {\n let stack = [];\n // Push the root node first\n stack.push(root);\n // Determine if the stack is empty\n while (stack.length > 0) {\n // Pop the top element\n root = stack.pop();\n console.log(root);\n // Because the preorder traversal is first left and then right, \n // the stack is a structure of FILO.\n // So push the right node and then push the left node.\n if (root.right) {\n stack.push(root.right);\n }\n if (root.left) {\n stack.push(root.left);\n }\n }\n }\n}\n```\n\nThe following code is implementation of the inorder traversal. \n\n```js\nfunction mid(root) {\n if (root) {\n let stack = [];\n // The inorder traversal is first left, then root and last right node\n // So first should traverse the left node and push it to the stack.\n // When there is no node on the left,\n // the top node is printed and then find the right node.\n // For the leftmost leaf node, \n // you can think of it as the parent of two null nodes.\n // If you can't print anything on the left, \n // take the parent node out and print it, then look at the right node.\n while (stack.length > 0 || root) {\n if (root) {\n stack.push(root);\n root = root.left;\n } else {\n root = stack.pop();\n console.log(root);\n root = root.right;\n }\n }\n }\n}\n```\n\nThe following code is the postorder traversal implementation that uses two stacks to implement traversal, which is easier to understand than a stack traversal.\n\n```js\nfunction pos(root) {\n if (root) {\n let stack1 = [];\n let stack2 = [];\n // Postorder traversal is first left, then right and last root node\n\t// So for a stack, you should first push the root node\n // Then push the right node, and finally push the left node\n stack1.push(root);\n while (stack1.length > 0) {\n root = stack1.pop();\n stack2.push(root);\n if (root.left) {\n stack1.push(root.left);\n }\n if (root.right) {\n stack1.push(root.right);\n }\n }\n while (stack2.length > 0) {\n console.log(s2.pop());\n }\n }\n}\n```\n\n## Predecessor and Successor Nodes of the Inorder Traversal\n\nThe premise of implementing this algorithm is that the node has a `parent` pointer to the parent node and a root node to `null` .\n\n
\n\nAs shown, the tree's inorder traversal result is `4, 2, 5, 1, 6, 3, 7`\n\n### Predecessor Node\n\nFor node `2`, his predecessor node is`4 `. According to the principle of inorder traversal, the following conclusions can be drawn.\n\n1. If the left node of the selected node is not empty, look for the rightmost node of the left node. For node `1`, he has left node `2`, then the rightmost node of node `2` is `5`\n2. If the left node is empty and the target node is the right node of the parent node, then the predecessor node is the parent node. For node `5`, there is no left node and it is the right node of node `2`, so node `2` is the precursor node.\n3. If the left node is empty and the target node is the left node of the parent node, look up the first node that is the right node of the parent node. For node `6`, there is no left node, and it is the left node of node `3`. So look up to node `1` and find that node `3` is the right node of node `1`, so node `1` is the predecessor of node `6`.\n\nThe following code is implement of the algorithm.\n\n```js\nfunction predecessor(node) {\n if (!node) return \n // Conclusion 1\n if (node.left) {\n return getRight(node.left)\n } else {\n let parent = node.parent\n // Conclusion 2 3 judgment\n while(parent && parent.right === node) {\n node = parent\n parent = node.parent\n }\n return parent\n }\n}\nfunction getRight(node) {\n if (!node) return \n node = node.right\n while(node) node = node.right\n return node\n}\n```\n\n### Successor Node\n\nFor node `2`, his successor is `5`, according to the principle of inorder traversal, you can draw the following conclusions.\n\n1. If there is a right node, the leftmost node of the right node will be found. For node `1`, he has a right node `3`, then the leftmost node of node `3` is `6`.\n2. If there is no right node, it traverses up until it finds a node that is the left node of the parent node. For node `5`, if there is no right node, it will look up to node `2`, which is the left node of parent node `1`, so node `1` is the successor node.\n\nThe following code is implement of the algorithm.\n\n```js\nfunction successor(node) {\n if (!node) return \n // Conclusion 1\n if (node.right) {\n return getLeft(node.right)\n } else {\n // Conclusion 2\n let parent = node.parent\n // Judge parent if it is empty\n while(parent && parent.left === node) {\n node = parent\n parent = node.parent\n }\n return parent\n }\n}\nfunction getLeft(node) {\n if (!node) return \n node = node.left\n while(node) node = node.left\n return node\n}\n```\n\n## Depth of the Tree\n\n**Maximum Depth of the Tree**:The topic comes from [Leetcode](https://leetcode.com/problems/maximum-depth-of-binary-tree/description/),The problem needs to find the maximum depth of a binary tree.\n\nThe following code is implement of the algorithm.\n\n```js\nvar maxDepth = function(root) {\n if (!root) return 0 \n return Math.max(maxDepth(root.left), maxDepth(root.right)) + 1\n};\n```\n\nFor this recursive function, you can understand that if you don't find the node, it will return 0. Each time you pop up, the recursive function will add one. If you have three layers, you will get 3.\n\n# Dynamic Programming\n\nThe basic principle behind dynamic programming is very simple. It split a problem into sub-problems. Generally speaking, these sub-problems are very similar. Then we can reduce the amount of calculation by solving only one sub-problem once.\n\nOnce the solution for each sub-problem is derived, the result is stored for next use.\n\n## Fibonacci Sequence\n\nThe Fibonacci sequence starts with 0 and 1, and the following numbers are the sum of the first two numbers.\n\n0,1,1,2,3,5,8,13,21,34,55,89....\n\nSo obviously easy to see, we can complete the Fibonacci sequence by recursively.\n\n```js\nfunction fib(n) {\n if (n < 2 && n >= 0) return n\n return fib(n - 1) + fib(n - 2)\n}\nfib(10)\n```\n\nThe above code has been able to solve the problem perfectly. However, the above solution has serious performance problems. When n is larger, the time required is exponentially increasing. At this time, dynamic programming can solve this problem.\n\nThe essence of dynamic programming is actually two points.\n\n1. Bottom-up decomposition problem\n2. Store the already calculated solution by variable\n\nAccording to the above two points, the dynamic programming of our Fibonacci sequence is coming out.\n\n1. The Fibonacci sequence starts with 0 and 1, then this is the bottom of the sub-problem\n2. Store the value of the corresponding Fibonacci sequence for each bit through an array\n\n```js\nfunction fib(n) {\n let array = new Array(n + 1).fill(null)\n array[0] = 0\n array[1] = 1\n for (let i = 2; i <= n; i++) {\n array[i] = array[i - 1] + array[i - 2]\n }\n return array[n]\n}\nfib(10)\n```\n\n## 0 - 1 Backpack Problem\n\nThe problem can be described as: given a group of goods, each good has its own weight and price, How can we choose to make the highest total price of the good within a limited total weight. Each question can only be placed at most once.\n\nSuppose we have the following goods.\n\n| Goods ID / Weight | Value |\n| :---------------: | :---: |\n| 1 | 3 |\n| 2 | 7 |\n| 3 | 12 |\n\nFor a backpack with a total capacity of 5, we can put goods with weight 2 and 3 to achieve the highest total value of the goods in the backpack.\n\nFor this problem, there are two sub-problems, one is placing goods and another is not. You can use the following table to understand sub-questions.\n\n| Goods ID / The remaining capacity | 0 | 1 | 2 | 3 | 4 | 5 |\n| :-------------------------------: | :--: | :--: | :--: | :--: | :--: | :--: |\n| 1 | 0 | 3 | 3 | 3 | 3 | 3 |\n| 2 | 0 | 3 | 7 | 10 | 10 | 10 |\n| 3 | 0 | 3 | 7 | 12 | 15 | 19 |\n\nDirectly analyze the situation where three goods can be placed, that is the last line.\n\n- When the capacity is less than 3, only the data corresponding to the previous row is taken because the current capacity cannot accommodate the good 3\n- When the capacity is 3, consider two cases, placing the good 3 and another is not placing the good 3\n - In the case of not placing good 3, the total value is 10\n - In the case of placing good 3, the total value is 12, so goods should be placed 3\n- When the capacity is 4, consider two cases, placing goods 3 and another is not placing goods 3\n - In the case of not placing good 3, the total value is 10\n - In the case of placing good 3, add the value of good 1 to get the total value of 15, so it should be placed in good 3\n- When the capacity is 5, consider two cases, placing the good 3 and not placing the good 3\n - In the case of not placing good 3, the total value is 10\n - In the case of placing good 3, add the value of good 2 to get the total value of 19, so it should be placed in good 3\n\nIt is easier to understand the following code with the above table.\n\n```js\n/**\n * @param {*} w Good weight\n * @param {*} v Good value\n * @param {*} C Total capacity\n * @returns\n */\nfunction knapsack(w, v, C) {\n let length = w.length\n if (length === 0) return 0\n\n // Compare to the table, the generated two-dimensional array, \n // the first dimension represents the good, \n // and the second dimension represents the remaining capacity of the backpack.\n // The elements in the second dimension represent the total value of the backpack good\n let array = new Array(length).fill(new Array(C + 1).fill(null))\n\n // Complete the solution of the bottom sub-problem\n for (let i = 0; i <= C; i++) {\n // Compare to the first line of the table, array[0] represents the good 1\n // i represents the total remaining capacity\n // When the remaining total capacity is greater than the weight of the good 1, \n // record the total value of the backpack good, otherwise the value is 0.\n array[0][i] = i >= w[0] ? v[0] : 0\n }\n\n // Solve sub-problems from bottom to up, starting with good 2\n for (let i = 1; i < length; i++) {\n for (let j = 0; j <= C; j++) {\n // Solve the sub-problems here, \n // divided into not to put the current good and put the current good\n // First solve the total value of the backpack with not putting the current good. \n // The value here is the value corresponding to the previous line in the corresponding table.\n array[i][j] = array[i - 1][j]\n // Determine whether the current remaining capacity can be placed in the current good.\n if (j >= w[i]) {\n // If you can put it, and then compare it.\n // Put the current item and not put the current item, \n // which backpack has a max total value\n array[i][j] = Math.max(array[i][j], v[i] + array[i - 1][j - w[i]])\n }\n }\n }\n return array[length - 1][C]\n}\n```\n\n## Longest Increasing Subsequence\n\nThe longest incrementing subsequence means finding out the longest incremental numbers in a set of numbers, such as\n\n0, 3, 4, 17, 2, 8, 6, 10\n\nFor the above numbers, the longest increment subsequence is 0, 3, 4, 8, 10, which can be understood more clearly by the following table.\n\n| Number | 0 | 3 | 4 | 17 | 2 | 8 | 6 | 10 |\n| :----: | :--: | :--: | :--: | :--: | :--: | :--: | :--: | :--: |\n| Length | 1 | 2 | 3 | 4 | 2 | 4 | 4 | 5 |\n\nThrough the above table, you can clearly find a rule, find out the number just smaller than the current number, and add one based on the length of the small number. \n\nThe dynamic solution to this problem is very simple, directly on the code.\n\n```js\nfunction lis(n) {\n if (n.length === 0) return 0\n // Create an array of the same size as the parameter and fill it with a value of 1\n let array = new Array(n.length).fill(1)\n // Traversing from index 1, because the array has all been filled with 1\n for (let i = 1; i < n.length; i++) {\n // Traversing from index 0 to i\n // Determine if the value on index i is greater than the previous value\n for (let j = 0; j < i; j++) {\n if (n[i] > n[j]) {\n array[i] = Math.max(array[i], 1 + array[j])\n }\n }\n }\n let res = 1\n for (let i = 0; i < array.length; i++) {\n res = Math.max(res, array[i])\n }\n return res\n}\n```\n\n# String Related\n\nIn the string correlation algorithm, Trie tree can solve many problems, and has good space and time complexity, such as the following problems.\n\n- Word frequency statistics\n- Prefix matching\n\nIf you don't know much about the Trie tree, you can go [here](../DataStruct/dataStruct-zh.md#trie) to read\n"
},
{
"path": "Browser/browser-ch.md",
"content": "\n\n**Table of Contents** *generated with [DocToc](https://github.com/thlorenz/doctoc)*\n\n- [事件机制](#%E4%BA%8B%E4%BB%B6%E6%9C%BA%E5%88%B6)\n - [事件触发三阶段](#%E4%BA%8B%E4%BB%B6%E8%A7%A6%E5%8F%91%E4%B8%89%E9%98%B6%E6%AE%B5)\n - [注册事件](#%E6%B3%A8%E5%86%8C%E4%BA%8B%E4%BB%B6)\n - [事件代理](#%E4%BA%8B%E4%BB%B6%E4%BB%A3%E7%90%86)\n- [跨域](#%E8%B7%A8%E5%9F%9F)\n - [JSONP](#jsonp)\n - [CORS](#cors)\n - [document.domain](#documentdomain)\n - [postMessage](#postmessage)\n- [Event loop](#event-loop)\n - [Node 中的 Event loop](#node-%E4%B8%AD%E7%9A%84-event-loop)\n - [timer](#timer)\n - [I/O](#io)\n - [idle, prepare](#idle-prepare)\n - [poll](#poll)\n - [check](#check)\n - [close callbacks](#close-callbacks)\n- [存储](#%E5%AD%98%E5%82%A8)\n - [cookie,localStorage,sessionStorage,indexDB](#cookielocalstoragesessionstorageindexdb)\n - [Service Worker](#service-worker)\n- [渲染机制](#%E6%B8%B2%E6%9F%93%E6%9C%BA%E5%88%B6)\n - [Load 和 DOMContentLoaded 区别](#load-%E5%92%8C-domcontentloaded-%E5%8C%BA%E5%88%AB)\n - [图层](#%E5%9B%BE%E5%B1%82)\n - [重绘(Repaint)和回流(Reflow)](#%E9%87%8D%E7%BB%98repaint%E5%92%8C%E5%9B%9E%E6%B5%81reflow)\n - [减少重绘和回流](#%E5%87%8F%E5%B0%91%E9%87%8D%E7%BB%98%E5%92%8C%E5%9B%9E%E6%B5%81)\n\n\n\n# 事件机制\n\n## 事件触发三阶段\n\n事件触发有三个阶段\n\n- `window` 往事件触发处传播,遇到注册的捕获事件会触发\n- 传播到事件触发处时触发注册的事件\n- 从事件触发处往 `window` 传播,遇到注册的冒泡事件会触发\n\n事件触发一般来说会按照上面的顺序进行,但是也有特例,如果给一个目标节点同时注册冒泡和捕获事件,事件触发会按照注册的顺序执行。\n\n```js\n// 以下会先打印冒泡然后是捕获\nnode.addEventListener('click',(event) =>{\n\tconsole.log('冒泡')\n},false);\nnode.addEventListener('click',(event) =>{\n\tconsole.log('捕获 ')\n},true)\n```\n\n## 注册事件\n\n通常我们使用 `addEventListener` 注册事件,该函数的第三个参数可以是布尔值,也可以是对象。对于布尔值 `useCapture` 参数来说,该参数默认值为 `false` 。`useCapture` 决定了注册的事件是捕获事件还是冒泡事件。对于对象参数来说,可以使用以下几个属性\n\n- `capture`,布尔值,和 `useCapture` 作用一样\n- `once`,布尔值,值为 `true` 表示该回调只会调用一次,调用后会移除监听\n- `passive`,布尔值,表示永远不会调用 `preventDefault` \n\n一般来说,我们只希望事件只触发在目标上,这时候可以使用 `stopPropagation` 来阻止事件的进一步传播。通常我们认为 `stopPropagation` 是用来阻止事件冒泡的,其实该函数也可以阻止捕获事件。`stopImmediatePropagation` 同样也能实现阻止事件,但是还能阻止该事件目标执行别的注册事件。\n\n```js\nnode.addEventListener('click',(event) =>{\n\tevent.stopImmediatePropagation()\n\tconsole.log('冒泡')\n},false);\n// 点击 node 只会执行上面的函数,该函数不会执行\nnode.addEventListener('click',(event) => {\n\tconsole.log('捕获 ')\n},true)\n```\n\n## 事件代理\n\n如果一个节点中的子节点是动态生成的,那么子节点需要注册事件的话应该注册在父节点上\n\n```html\n
\n\t
1
\n
2
\n\t
3
\n\t
4
\n\t
5
\n
\n\n```\n\n事件代理的方式相对于直接给目标注册事件来说,有以下优点\n\n- 节省内存\n- 不需要给子节点注销事件\n\n# 跨域\n\n因为浏览器出于安全考虑,有同源策略。也就是说,如果协议、域名或者端口有一个不同就是跨域,Ajax 请求会失败。\n\n我们可以通过以下几种常用方法解决跨域的问题\n\n## JSONP\n\nJSONP 的原理很简单,就是利用 `\n \n```\n\nJSONP 使用简单且兼容性不错,但是只限于 `get` 请求。\n\n在开发中可能会遇到多个 JSONP 请求的回调函数名是相同的,这时候就需要自己封装一个 JSONP,以下是简单实现\n\n```js\nfunction jsonp(url, jsonpCallback, success) {\n let script = document.createElement(\"script\");\n script.src = url;\n script.async = true;\n script.type = \"text/javascript\";\n window[jsonpCallback] = function(data) {\n success && success(data);\n };\n document.body.appendChild(script);\n}\njsonp(\n \"http://xxx\",\n \"callback\",\n function(value) {\n console.log(value);\n }\n);\n```\n\n## CORS\n\nCORS需要浏览器和后端同时支持。IE 8 和 9 需要通过 `XDomainRequest` 来实现。\n\n浏览器会自动进行 CORS 通信,实现CORS通信的关键是后端。只要后端实现了 CORS,就实现了跨域。\n\n服务端设置 `Access-Control-Allow-Origin` 就可以开启 CORS。 该属性表示哪些域名可以访问资源,如果设置通配符则表示所有网站都可以访问资源。\n\n## document.domain \n\n该方式只能用于二级域名相同的情况下,比如 `a.test.com` 和 `b.test.com` 适用于该方式。\n\n只需要给页面添加 `document.domain = 'test.com'` 表示二级域名都相同就可以实现跨域\n\n## postMessage\n\n这种方式通常用于获取嵌入页面中的第三方页面数据。一个页面发送消息,另一个页面判断来源并接收消息\n\n```js\n// 发送消息端\nwindow.parent.postMessage('message', 'http://test.com');\n// 接收消息端\nvar mc = new MessageChannel();\nmc.addEventListener('message', (event) => {\n var origin = event.origin || event.originalEvent.origin; \n if (origin === 'http://test.com') {\n console.log('验证通过')\n }\n});\n```\n\n# Event loop\n\n众所周知 JS 是门非阻塞单线程语言,因为在最初 JS 就是为了和浏览器交互而诞生的。如果 JS 是门多线程的语言话,我们在多个线程中处理 DOM 就可能会发生问题(一个线程中新加节点,另一个线程中删除节点),当然可以引入读写锁解决这个问题。\n\nJS 在执行的过程中会产生执行环境,这些执行环境会被顺序的加入到执行栈中。如果遇到异步的代码,会被挂起并加入到 Task(有多种 task) 队列中。一旦执行栈为空,Event Loop 就会从 Task 队列中拿出需要执行的代码并放入执行栈中执行,所以本质上来说 JS 中的异步还是同步行为。\n\n```js\nconsole.log('script start');\n\nsetTimeout(function() {\n console.log('setTimeout');\n}, 0);\n\nconsole.log('script end');\n```\n\n以上代码虽然 `setTimeout` 延时为 0,其实还是异步。这是因为 HTML5 标准规定这个函数第二个参数不得小于 4 毫秒,不足会自动增加。所以 `setTimeout` 还是会在 `script end` 之后打印。\n\n不同的任务源会被分配到不同的 Task 队列中,任务源可以分为 微任务(microtask) 和 宏任务(macrotask)。在 ES6 规范中,microtask 称为 `jobs`,macrotask 称为 `task`。\n\n```js\nconsole.log('script start');\n\nsetTimeout(function() {\n console.log('setTimeout');\n}, 0);\n\nnew Promise((resolve) => {\n console.log('Promise')\n resolve()\n}).then(function() {\n console.log('promise1');\n}).then(function() {\n console.log('promise2');\n});\n\nconsole.log('script end');\n// script start => Promise => script end => promise1 => promise2 => setTimeout\n```\n\n以上代码虽然 `setTimeout` 写在 `Promise` 之前,但是因为 `Promise` 属于微任务而 `setTimeout` 属于宏任务,所以会有以上的打印。\n\n微任务包括 `process.nextTick` ,`promise` ,`Object.observe` ,`MutationObserver`\n\n宏任务包括 `script` , `setTimeout` ,`setInterval` ,`setImmediate` ,`I/O` ,`UI rendering`\n\n很多人有个误区,认为微任务快于宏任务,其实是错误的。因为宏任务中包括了 `script` ,浏览器会先执行一个宏任务,接下来有异步代码的话就先执行微任务。\n\n所以正确的一次 Event loop 顺序是这样的\n\n1. 执行同步代码,这属于宏任务\n2. 执行栈为空,查询是否有微任务需要执行\n3. 执行所有微任务\n4. 必要的话渲染 UI\n5. 然后开始下一轮 Event loop,执行宏任务中的异步代码\n\n通过上述的 Event loop 顺序可知,如果宏任务中的异步代码有大量的计算并且需要操作 DOM 的话,为了更快的 界面响应,我们可以把操作 DOM 放入微任务中。\n\n## Node 中的 Event loop\n\nNode 中的 Event loop 和浏览器中的不相同。\n\nNode 的 Event loop 分为6个阶段,它们会按照顺序反复运行\n\n```\n┌───────────────────────┐\n┌─>│ timers │\n│ └──────────┬────────────┘\n│ ┌──────────┴────────────┐\n│ │ I/O callbacks │\n│ └──────────┬────────────┘\n│ ┌──────────┴────────────┐\n│ │ idle, prepare │\n│ └──────────┬────────────┘ ┌───────────────┐\n│ ┌──────────┴────────────┐ │ incoming: │\n│ │ poll │<──connections─── │\n│ └──────────┬────────────┘ │ data, etc. │\n│ ┌──────────┴────────────┐ └───────────────┘\n│ │ check │\n│ └──────────┬────────────┘\n│ ┌──────────┴────────────┐\n└──┤ close callbacks │\n └───────────────────────┘\n```\n\n### timer\n\ntimers 阶段会执行 `setTimeout` 和 `setInterval`\n\n一个 `timer` 指定的时间并不是准确时间,而是在达到这个时间后尽快执行回调,可能会因为系统正在执行别的事务而延迟。\n\n下限的时间有一个范围:`[1, 2147483647]` ,如果设定的时间不在这个范围,将被设置为1。\n\n### I/O \n\nI/O 阶段会执行除了 close 事件,定时器和 `setImmediate` 的回调\n\n### idle, prepare \n\nidle, prepare 阶段内部实现\n\n### poll \n\npoll 阶段很重要,这一阶段中,系统会做两件事情\n\n1. 执行到点的定时器\n2. 执行 poll 队列中的事件\n\n并且当 poll 中没有定时器的情况下,会发现以下两件事情\n\n- 如果 poll 队列不为空,会遍历回调队列并同步执行,直到队列为空或者系统限制\n- 如果 poll 队列为空,会有两件事发生\n - 如果有 `setImmediate` 需要执行,poll 阶段会停止并且进入到 check 阶段执行 `setImmediate`\n - 如果没有 `setImmediate` 需要执行,会等待回调被加入到队列中并立即执行回调\n\n如果有别的定时器需要被执行,会回到 timer 阶段执行回调。\n\n### check\n\ncheck 阶段执行 `setImmediate` \n\n### close callbacks\n\nclose callbacks 阶段执行 close 事件\n\n并且在 Node 中,有些情况下的定时器执行顺序是随机的\n\n```js\nsetTimeout(() => {\n console.log('setTimeout');\n}, 0);\nsetImmediate(() => {\n console.log('setImmediate');\n})\n// 这里可能会输出 setTimeout,setImmediate\n// 可能也会相反的输出,这取决于性能\n// 因为可能进入 event loop 用了不到 1 毫秒,这时候会执行 setImmediate\n// 否则会执行 setTimeout\n```\n\n当然在这种情况下,执行顺序是相同的\n\n```js\nvar fs = require('fs')\n\nfs.readFile(__filename, () => {\n setTimeout(() => {\n console.log('timeout');\n }, 0);\n setImmediate(() => {\n console.log('immediate');\n });\n});\n// 因为 readFile 的回调在 poll 中执行\n// 发现有 setImmediate ,所以会立即跳到 check 阶段执行回调\n// 再去 timer 阶段执行 setTimeout\n// 所以以上输出一定是 setImmediate,setTimeout\n```\n\n上面介绍的都是 macrotask 的执行情况,microtask 会在以上每个阶段完成后立即执行。\n\n```js\nsetTimeout(()=>{\n console.log('timer1')\n\n Promise.resolve().then(function() {\n console.log('promise1')\n })\n}, 0)\n\nsetTimeout(()=>{\n console.log('timer2')\n\n Promise.resolve().then(function() {\n console.log('promise2')\n })\n}, 0)\n\n// 以上代码在浏览器和 node 中打印情况是不同的\n// 浏览器中一定打印 timer1, promise1, timer2, promise2\n// node 中可能打印 timer1, timer2, promise1, promise2\n// 也可能打印 timer1, promise1, timer2, promise2\n```\n\nNode 中的 `process.nextTick` 会先于其他 microtask 执行。\n\n ```js\nsetTimeout(() => {\n console.log(\"timer1\");\n\n Promise.resolve().then(function() {\n console.log(\"promise1\");\n });\n}, 0);\n\nprocess.nextTick(() => {\n console.log(\"nextTick\");\n});\n// nextTick, timer1, promise1\n ```\n\n# 存储\n\n## cookie,localStorage,sessionStorage,indexDB\n\n| 特性 | cookie | localStorage | sessionStorage | indexDB |\n| :----------: | :----------------------------------------: | :----------------------: | :------------: | :----------------------: |\n| 数据生命周期 | 一般由服务器生成,可以设置过期时间 | 除非被清理,否则一直存在 | 页面关闭就清理 | 除非被清理,否则一直存在 |\n| 数据存储大小 | 4K | 5M | 5M | 无限 |\n| 与服务端通信 | 每次都会携带在 header 中,对于请求性能影响 | 不参与 | 不参与 | 不参与 |\n\n从上表可以看到,`cookie` 已经不建议用于存储。如果没有大量数据存储需求的话,可以使用 `localStorage` 和 `sessionStorage` 。对于不怎么改变的数据尽量使用 `localStorage` 存储,否则可以用 `sessionStorage` 存储。\n\n对于 `cookie`,我们还需要注意安全性。\n\n| 属性 | 作用 |\n| :-------: | :----------------------------------------------------------: |\n| value | 如果用于保存用户登录态,应该将该值加密,不能使用明文的用户标识 |\n| http-only | 不能通过 JS 访问 Cookie,减少 XSS 攻击 |\n| secure | 只能在协议为 HTTPS 的请求中携带 |\n| same-site | 规定浏览器不能在跨域请求中携带 Cookie,减少 CSRF 攻击 |\n\n## Service Worker\n\n> Service workers 本质上充当Web应用程序与浏览器之间的代理服务器,也可以在网络可用时作为浏览器和网络间的代理。它们旨在(除其他之外)使得能够创建有效的离线体验,拦截网络请求并基于网络是否可用以及更新的资源是否驻留在服务器上来采取适当的动作。他们还允许访问推送通知和后台同步API。\n\n目前该技术通常用来做缓存文件,提高首屏速度,可以试着来实现这个功能。\n\n```js\n// index.js\nif (navigator.serviceWorker) {\n navigator.serviceWorker\n .register(\"sw.js\")\n .then(function(registration) {\n console.log(\"service worker 注册成功\");\n })\n .catch(function(err) {\n console.log(\"servcie worker 注册失败\");\n });\n}\n// sw.js\n// 监听 `install` 事件,回调中缓存所需文件\nself.addEventListener(\"install\", e => {\n e.waitUntil(\n caches.open(\"my-cache\").then(function(cache) {\n return cache.addAll([\"./index.html\", \"./index.js\"]);\n })\n );\n});\n\n// 拦截所有请求事件\n// 如果缓存中已经有请求的数据就直接用缓存,否则去请求数据\nself.addEventListener(\"fetch\", e => {\n e.respondWith(\n caches.match(e.request).then(function(response) {\n if (response) {\n return response;\n }\n console.log(\"fetch source\");\n })\n );\n});\n```\n\n打开页面,可以在开发者工具中的 `Application` 看到 Service Worker 已经启动了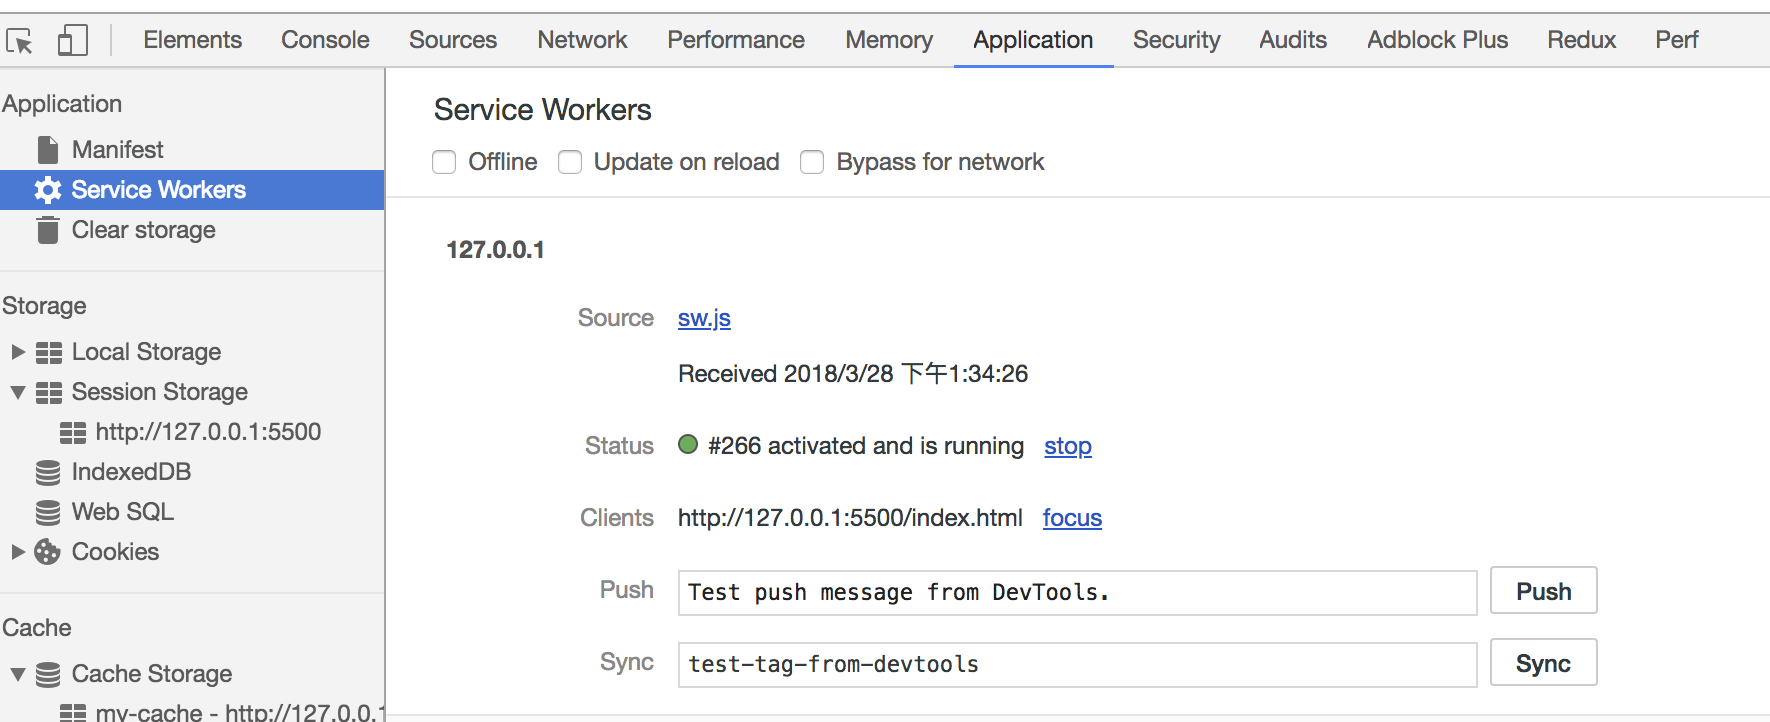\n\n在 Cache 中也可以发现我们所需的文件已被缓存\n\n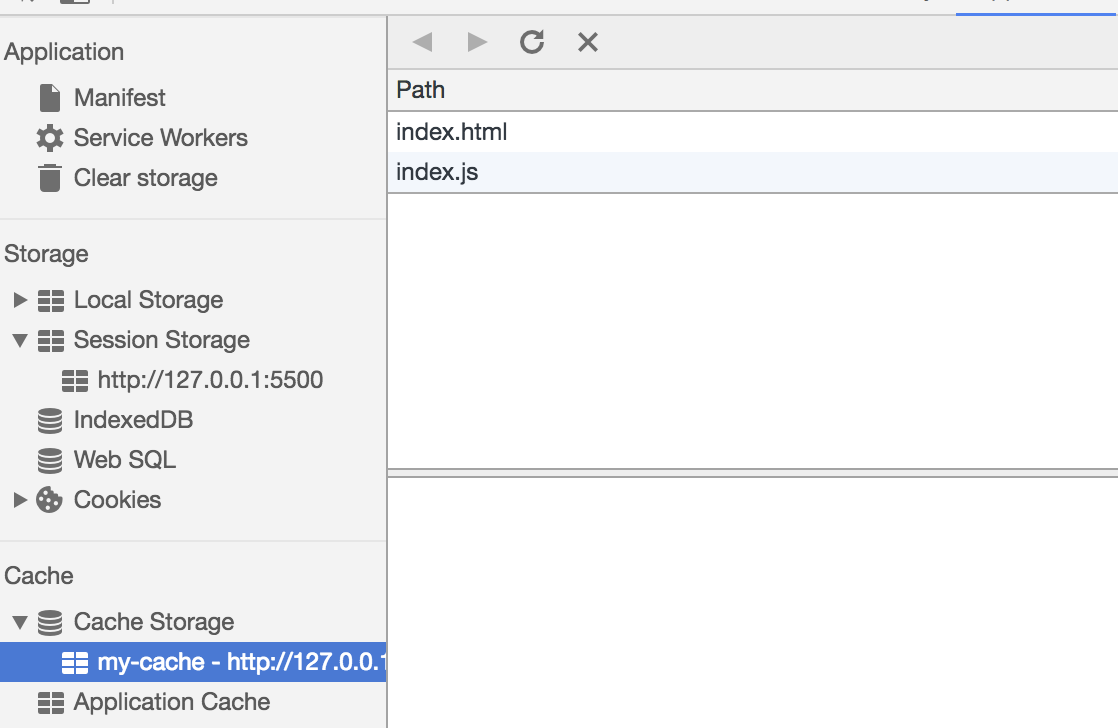\n\n当我们重新刷新页面可以发现我们缓存的数据是从 Service Worker 中读取的\n\n\n\n\n\n# 渲染机制\n\n浏览器的渲染机制一般分为以下几个步骤\n\n1. 处理 HTML 并构建 DOM 树。\n2. 处理 CSS 构建 CSSOM 树。\n3. 将 DOM 与 CSSOM 合并成一个渲染树。\n4. 根据渲染树来布局,计算每个节点的位置。\n5. 调用 GPU 绘制,合成图层,显示在屏幕上。\n\n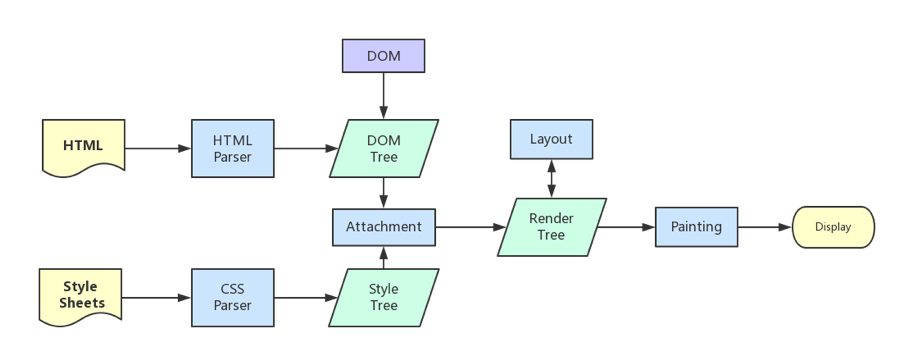\n\n在构建 CSSOM 树时,会阻塞渲染,直至 CSSOM 树构建完成。并且构建 CSSOM 树是一个十分消耗性能的过程,所以应该尽量保证层级扁平,减少过度层叠,越是具体的 CSS 选择器,执行速度越慢。\n\n当 HTML 解析到 script 标签时,会暂停构建 DOM,完成后才会从暂停的地方重新开始。也就是说,如果你想首屏渲染的越快,就越不应该在首屏就加载 JS 文件。并且 CSS 也会影响 JS 的执行,只有当解析完样式表才会执行 JS,所以也可以认为这种情况下,CSS 也会暂停构建 DOM。\n\n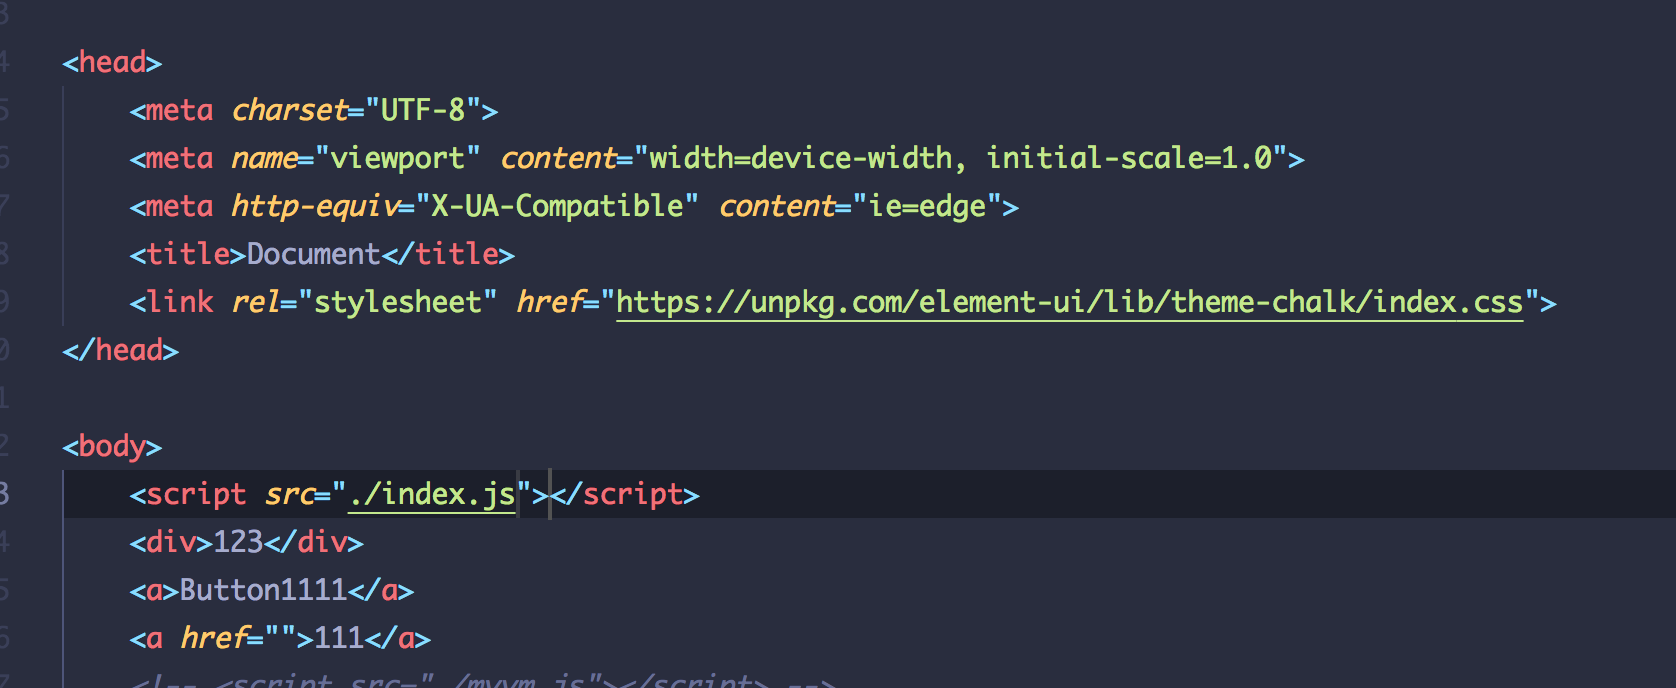\n\n\n\n## Load 和 DOMContentLoaded 区别\n\nLoad 事件触发代表页面中的 DOM,CSS,JS,图片已经全部加载完毕。\n\nDOMContentLoaded 事件触发代表初始的 HTML 被完全加载和解析,不需要等待 CSS,JS,图片加载。\n\n## 图层\n\n一般来说,可以把普通文档流看成一个图层。特定的属性可以生成一个新的图层。**不同的图层渲染互不影响**,所以对于某些频繁需要渲染的建议单独生成一个新图层,提高性能。**但也不能生成过多的图层,会引起反作用。**\n\n通过以下几个常用属性可以生成新图层\n\n- 3D 变换:`translate3d`、`translateZ`\n- `will-change`\n- `video`、`iframe` 标签\n- 通过动画实现的 `opacity` 动画转换\n- `position: fixed`\n\n## 重绘(Repaint)和回流(Reflow)\n\n重绘和回流是渲染步骤中的一小节,但是这两个步骤对于性能影响很大。\n\n- 重绘是当节点需要更改外观而不会影响布局的,比如改变 `color` 就叫称为重绘\n- 回流是布局或者几何属性需要改变就称为回流。\n\n回流必定会发生重绘,重绘不一定会引发回流。回流所需的成本比重绘高的多,改变深层次的节点很可能导致父节点的一系列回流。\n\n所以以下几个动作可能会导致性能问题:\n\n- 改变 window 大小\n- 改变字体\n- 添加或删除样式\n- 文字改变\n- 定位或者浮动\n- 盒模型\n\n很多人不知道的是,重绘和回流其实和 Event loop 有关。\n\n1. 当 Event loop 执行完 Microtasks 后,会判断 document 是否需要更新。因为浏览器是 60Hz 的刷新率,每 16ms 才会更新一次。\n2. 然后判断是否有 `resize` 或者 `scroll` ,有的话会去触发事件,所以 `resize` 和 `scroll` 事件也是至少 16ms 才会触发一次,并且自带节流功能。\n3. 判断是否触发了 media query\n4. 更新动画并且发送事件\n5. 判断是否有全屏操作事件\n6. 执行 `requestAnimationFrame` 回调\n7. 执行 `IntersectionObserver` 回调,该方法用于判断元素是否可见,可以用于懒加载上,但是兼容性不好\n8. 更新界面\n9. 以上就是一帧中可能会做的事情。如果在一帧中有空闲时间,就会去执行 `requestIdleCallback` 回调。\n\n以上内容来自于 [HTML 文档](https://html.spec.whatwg.org/multipage/webappapis.html#event-loop-processing-model)\n\n## 减少重绘和回流\n\n- 使用 `translate` 替代 `top`\n\n ```html\n \n \n \n ```\n\n- 使用 `visibility` 替换 `display: none` ,因为前者只会引起重绘,后者会引发回流(改变了布局)\n\n- 把 DOM 离线后修改,比如:先把 DOM 给 `display:none` (有一次 Reflow),然后你修改100次,然后再把它显示出来\n\n- 不要把 DOM 结点的属性值放在一个循环里当成循环里的变量\n\n ```js\n for(let i = 0; i < 1000; i++) {\n // 获取 offsetTop 会导致回流,因为需要去获取正确的值\n console.log(document.querySelector('.test').style.offsetTop)\n }\n ```\n\n- 不要使用 table 布局,可能很小的一个小改动会造成整个 table 的重新布局\n\n- 动画实现的速度的选择,动画速度越快,回流次数越多,也可以选择使用 `requestAnimationFrame`\n\n- CSS 选择符从右往左匹配查找,避免 DOM 深度过深\n\n- 将频繁运行的动画变为图层,图层能够阻止该节点回流影响别的元素。比如对于 `video` 标签,浏览器会自动将该节点变为图层。\n\n "
},
{
"path": "Browser/browser-en.md",
"content": "\n\n**Table of Contents** *generated with [DocToc](https://github.com/thlorenz/doctoc)*\n\n- [Event mechanism](#event-mechanism)\n - [The three phases of event propagation](#the-three-phases-of-event-propagation)\n - [Event Registration](#event-registration)\n - [Event Delegation](#event-delegation)\n- [Cross Domain](#cross-domain)\n - [JSONP](#jsonp)\n - [CORS](#cors)\n - [document.domain](#documentdomain)\n - [postMessage](#postmessage)\n- [Event Loop](#event-loop)\n - [Event Loop in Node](#event-loop-in-node)\n - [timer](#timer)\n - [pending callbacks](#pending-callbacks)\n - [idle, prepare](#idle-prepare)\n - [poll](#poll)\n - [check](#check)\n - [close callbacks](#close-callbacks)\n- [Storage](#storage)\n - [cookie,localStorage,sessionStorage,indexDB](#cookielocalstoragesessionstorageindexdb)\n - [Service Worker](#service-worker)\n- [Rendering mechanism](#rendering-mechanism)\n - [Difference between Load & DOMContentLoaded](#difference-between-load--domcontentloaded)\n - [Layers](#layers)\n - [Repaint & Reflow](#repaint--reflow)\n - [Minimize Repaint & Reflow](#minimize-repaint--reflow)\n\n\n\n# Event mechanism\n\n## The three phases of event propagation\n\nEvent propagation has three phases:\n\n- The event object propagates from the Window to the target’s parent. Capturing events will trigger.\n- The event object arrives at the event object’s event target. Events registered to target will trigger.\n- The event object propagates from the target's parent up to the Window. Bubbling events will trigger.\n\nEvent propagation generally follows the above sequence, but there are exceptions. If a target node is registered for both bubbling and capturing events, events are invoked in the order they were registered.\n\n```js\n// The following code will print bubbling first and then trigger capture events\nnode.addEventListener('click',(event) =>{\n\tconsole.log('bubble')\n},false);\nnode.addEventListener('click',(event) =>{\n\tconsole.log('capture')\n},true)\n```\n\n## Event Registration\n\nUsually, we use `addEventListener` to register an event, and the `useCapture` is a function parameter, which receives a Boolean value, the default value is `false`. `useCapture` determines whether the registered event is a capturing event or a bubbling event. For the object parameter, you can use the following properties:\n\n- `capture`, Boolean value, same as `useCapture`\n- `once`, Boolean value, `true` indicating that the callback should be called at most once, after invoked the listener will be removed\n- `passive`, Boolean, means it will never call `preventDefault`\n\nGenerally speaking, we only want the event to trigger on the target. To achieve this we can use `stopPropagation` to prevent the propagation of the event. Usually, we would think that `stopPropagation` is used to stop the event bubbling, but this function can also prevent the event capturing. `stopImmediatePropagation` can achieve the same effects, and it can also prevent other listeners of the same event from being called.\n\n```js\nnode.addEventListener('click',(event) =>{\n\tevent.stopImmediatePropagation()\n\tconsole.log('bubbling')\n},false);\n// Clicking node will only execute the above function, this function will not execute\nnode.addEventListener('click',(event) => {\n\tconsole.log('capture ')\n},true)\n```\n\n## Event Delegation\n\nIf a child node inside a parent node is dynamically generated, events on the child node should be added to parent node:\n\n```html\n
\n\t
1
\n
2
\n\t
3
\n\t
4
\n\t
5
\n
\n\n```\n\nEvent delegation has the following advantages over adding events straight to child nodes:\n\n- Save memory\n- No need remove event listeners on child nodes\n\n# Cross Domain\n\nBrowsers have the same-origin policy for security reasons. In other words, if the protocol, domain name or port has one difference, that would be cross-domain, and the Ajax request will fail.\n\nWe can solve the cross-domain issues through following methods: \n\n## JSONP\n\nThe principle of JSONP is very simple, that is to make use of the `\n \n```\n\nJSONP is simple to use and has good compatibility, but is limited to `get` requests.\n\nYou may encounter the situation where you have the same callback names in multiple JSONP requests. In this situation you need to encapsulate JSONP. The following is a simple implementation:\n\n```js\nfunction jsonp(url, jsonpCallback, success) {\n let script = document.createElement(\"script\");\n script.src = url;\n script.async = true;\n script.type = \"text/javascript\";\n window[jsonpCallback] = function(data) {\n success && success(data);\n };\n document.body.appendChild(script);\n}\njsonp(\n \"http://xxx\",\n \"callback\",\n function(value) {\n console.log(value);\n }\n);\n```\n\n## CORS\n\nCORS requires browser and backend support at the same time. Internet Explorer 8 and 9 expose CORS via the XDomainRequest object.\n\nThe browser will automatically perform CORS. The key to implementing CORS is the backend. As long as the backend implements CORS, it enables cross-domain.\n\nThe server sets `Access-Control-Allow-Origin` to enable CORS. This property specifies which domains can access the resource. If set to wildcard, all websites can access the resource.\n\n## document.domain\n\nThis can only be used for the same second-level domain, for example, `a.test.com` and `b.test.com` are suitable for this case.\n\nSet `document.domain = 'test.com'` would enable CORS within the same second-level domain.\n\n## postMessage\n\nThis method is usually used to get data from embedded third-party page. One page sends a message, the other page checks the source and receives the message:\n\n```js\n// send of page\nwindow.parent.postMessage('message', 'http://test.com');\n// receive of page\nvar mc = new MessageChannel();\nmc.addEventListener('message', (event) => {\n var origin = event.origin || event.originalEvent.origin;\n if (origin === 'http://test.com') {\n console.log('success')\n }\n});\n```\n\n# Event Loop\n\nAs we all know, JS is a non-blocking and single-threaded language, because JS was born to interact with the browser in the beginning. If JS was a multi-threaded language, we might have problems handling DOM in multiple threads (imagine adding nodes in a thread and deleting nodes in another thread at the same time), however we could introduce a read-write lock to solve this problem.\n\nExecution context, generated during JS execution, will be pushed into call stack sequentially. Asynchronous codes will hang up and get pushed into the task queues (there are multiple kinds of tasks). Once the call stack is empty, the Event Loop will process the next message in the task queues and push it into the call stack for execution, thus essentially the asynchronous operation in JS is actually synchronous.\n\n```js\nconsole.log('script start');\n\nsetTimeout(function() {\n console.log('setTimeout');\n}, 0);\n\nconsole.log('script end');\n```\n\nThe above code is asynchronous, even though the `setTimeout` delay is 0. That’s because the HTML5 standard stipulates that the second parameter of the function `setTimeout` must not be less than 4 milliseconds, otherwise it will automatically . So `setTimeout` is still logged after `script end`.\n\nDifferent tasks are assigned to different Task queues. Tasks can be divided into `microtasks` and `macrotasks`. In the ES6 specification, a `microtask` is called a `job` and a `macrotask` is called a `task`.\n\n```js\nconsole.log('script start');\n\nsetTimeout(function() {\n console.log('setTimeout');\n}, 0);\n\nnew Promise((resolve) => {\n console.log('Promise')\n resolve()\n}).then(function() {\n console.log('promise1');\n}).then(function() {\n console.log('promise2');\n});\n\nconsole.log('script end');\n// script start => Promise => script end => promise1 => promise2 => setTimeout\n```\n\nAlthough `setTimeout` is set before `Promise`, the above printing still occurs because `Promise` belongs to microtask and `setTimeout` belongs to macrotask.\n\nMicrotasks include `process.nextTick`, `promise`, `Object.observe` and `MutationObserver`.\n\nMacrotasks include `script`, `setTimeout`, `setInterval`, `setImmediate`, `I/O` and `UI rendering`.\n\nMany people have the misunderstanding that microtasks always get executed before macrotasks and this is incorrect. Because the macrotask includes `script`, the browser will perform this macrotask first, followed by any microtasks in asynchronous codes.\n\nSo the correct sequence of an event loop looks like this:\n\n1. Execute synchronous codes, which belongs to macrotask\n2. Once call stack is empty, query if any microtasks need to be executed\n3. Execute all the microtasks\n4. If necessary, render the UI\n5. Then start the next round of the Event loop, and execute the asynchronous operations in the macrotask\n\nAccording to the above sequence of the event loop, if the asynchronous codes in the macrotask have a large number of calculations and need to operate on DOM, we can put DOM operation into microtask for faster interface response.\n\n## Event Loop in Node\n\nThe event loop in Node is not the same as in the browser.\n\nThe event loop in Node is divided into 6 phases, and they will be executed in order repeatedly:\n\n```\n ┌───────────────────────┐\n┌─>│ timers │\n│ └──────────┬────────────┘\n│ ┌──────────┴────────────┐\n│ │ pending callbacks │\n│ └──────────┬────────────┘\n│ ┌──────────┴────────────┐\n│ │ idle, prepare │\n│ └──────────┬────────────┘ ┌───────────────┐\n│ ┌──────────┴────────────┐ │ incoming: │\n│ │ poll │<──---| connections │\n│ └──────────┬────────────┘ │ data, etc. │\n│ ┌──────────┴────────────┐ └───────────────┘\n│ │ check │\n│ └──────────┬────────────┘\n│ ┌──────────┴────────────┐\n└──┤ close callbacks │\n └───────────────────────┘\n```\n\n### timer\n\nThe `timer` phase executes the callbacks of `setTimeout` and `setInterval`.\n\n`Timer` specifies the time that callbacks will run as early as they can be scheduled, after the specified amount of time has passed rather than the exact time a person wants it to be executed.\n\nThe lower bound time has a range: `[1, 2147483647]`. If the set time is not in this range, it will be set to 1.\n\n### pending callbacks\n\nThis phase executes I/O callbacks deferred to the next loop iteration.\n\n### idle, prepare\n\nThe `idle, prepare` phase is for internal implementation.\n\n### poll\n\nThis phase retrieves new I/O events; execute I/O related callbacks (almost all with the exception of close callbacks, the ones scheduled by timers, and setImmediate()); node will block here when appropriate.\n\nThe `poll` phase has two main functions:\n\n1. Calculating how long it should block and poll for I/O, then\n2. Processing events in the poll queue.\n\nWhen the event loop enters the `poll` phase and there are no timers scheduled, one of two things will happen:\n\n- If the `poll` queue is not empty, the event loop will iterate through its queue of callbacks executing them synchronously until either the queue has been exhausted, or the system-dependent hard limit is reached.\n- If the `poll` queue is empty, one of two more things will happen:\n 1. If scripts have been scheduled by `setImmediate`. the event loop will end the `poll` phase and continue to the check phase to execute those scheduled scripts.\n 2. If scripts have not been scheduled by `setImmediate`, the event loop will wait for callbacks to be added to the queue, then execute them immediately.\n\nOnce the `poll` queue is empty the event loop will check for timers whose time thresholds have been reached. If one or more timers are ready, the event loop will wrap back to the timers phase to execute those timers' callbacks.\n\n### check\n\nThe `check` phase executes the callbacks of `setImmediate`.\n\n### close callbacks\n\nThe `close` event will be emitted in this phase.\n\nAnd in Node, the order of execution of timers is random in some cases:\n\n```js\nsetTimeout(() => {\n console.log('setTimeout');\n}, 0);\nsetImmediate(() => {\n console.log('setImmediate');\n})\n// Here, it may log setTimeout => setImmediate\n// It is also possible to log the opposite result, which depends on performance\n// Because it may take less than 1 millisecond to enter the event loop, `setImmediate` would be executed at this time.\n// Otherwise it will execute `setTimeout`\n```\n\nCertainly, in this case, the execution order is the same:\n\n```js\nvar fs = require('fs')\n\nfs.readFile(__filename, () => {\n setTimeout(() => {\n console.log('timeout');\n }, 0);\n setImmediate(() => {\n console.log('immediate');\n });\n});\n// Because the callback of `readFile` was executed in `poll` phase\n// Founding `setImmediate`,it immediately jumps to the `check` phase to execute the callback\n// and then goes to the `timer` phase to execute `setTimeout`\n// so the above output must be `setImmediate` => `setTimeout`\n```\n\nThe above is the implementation of the macrotask. The microtask will be executed immediately after each phase is completed.\n\n```js\nsetTimeout(()=>{\n console.log('timer1')\n\n Promise.resolve().then(function() {\n console.log('promise1')\n })\n}, 0)\n\nsetTimeout(()=>{\n console.log('timer2')\n\n Promise.resolve().then(function() {\n console.log('promise2')\n })\n}, 0)\n// The log result is different, when the above code is executed in browser and node\n// In browser, it will log: timer1 => promise1 => timer2 => promise2\n// In node, it may log: timer1 => timer2 => promise1 => promise2\n// or timer1, promise1, timer2, promise2\n```\n\n`process.nextTick` in Node will be executed before other microtasks.\n\n```js\nsetTimeout(() => {\n console.log(\"timer1\");\n\n Promise.resolve().then(function() {\n console.log(\"promise1\");\n });\n}, 0);\n\nprocess.nextTick(() => {\n console.log(\"nextTick\");\n});\n// nextTick => timer1 => promise1\n```\n\n# Storage\n\n## cookie,localStorage,sessionStorage,indexDB\n\n| features | cookie | localStorage | sessionStorage | indexDB |\n| :---------------------: | :----------------------------------------------------------: | :---------------------------------------: | :----------------------------------------------------------: | :---------------------------------------: |\n| Life cycle of data | generally generated by the server, but you can set the expiration time | unless cleared manually, it always exists | once the browser tab is closed, it will be cleaned up immediately | unless cleared manually, it always exists |\n| Storage size of data | 4K | 5M | 5M | unlimited |\n| Communication with server | it is carried in the header everytime, and has a performance impact on the request | doesn't participate | doesn't participate | doesn't participate |\n\nAs we can see from the above table, `cookies` are no longer recommended for storage. We can use `localStorage` and `sessionStorage` if we don't have much data to store. Use `localStorage` to store data that doesn't change much, otherwise `sessionStorage` can be used.\n\nFor `cookies`, we also need pay attention to security issue.\n\n| attribute | effect |\n| :-------: | :----------------------------------------------------------: |\n| value | the value should be encrypted if used to save the login state, and the cleartext user ID shouldn't be used |\n| http-only | cookies cannot be accessed through JS, for reducing XSS attack |\n| secure | cookies can only be carried in requests with HTTPS protocol |\n| same-site | browsers cannot pass cookies in cross-origin requests, for reducing CSRF attacks |\n\n## Service Worker\n\n> Service workers essentially act as proxy servers that sit between web applications, the browser and the network (when available). They are intended, among other things, to enable the creation of effective offline experiences, intercept network requests and take appropriate action based on whether the network is available, and update assets residing on the server. They will also allow access to push notifications and background sync APIs.\n\nAt present, this technology is usually used to cache files and increase the render speed of the first screen. We can try to implement this function:\n\n```js\n// index.js\nif (navigator.serviceWorker) {\n navigator.serviceWorker\n .register(\"sw.js\")\n .then(function(registration) {\n console.log(\"service worker register success\");\n })\n .catch(function(err) {\n console.log(\"servcie worker register error\");\n });\n}\n// sw.js\n// Listen for the `install` event, and cache the required files in the callback\nself.addEventListener(\"install\", e => {\n e.waitUntil(\n caches.open(\"my-cache\").then(function(cache) {\n return cache.addAll([\"./index.html\", \"./index.js\"]);\n })\n );\n});\n\n// intercept all the request events\n// use the cache directly if the requested data already existed in the cache; otherwise, send requests for data\nself.addEventListener(\"fetch\", e => {\n e.respondWith(\n caches.match(e.request).then(function(response) {\n if (response) {\n return response;\n }\n console.log(\"fetch source\");\n })\n );\n});\n```\n\nOpen the page, we can see that the Service Worker has started in the `Application` pane of devTools:\n\n\n\nIn the Cache pane, we can also find that the files we need have been cached:\n\n\n\nRefreshing the page, we can see that our cached data is read from the Service Worker:\n\n\n\n# Rendering mechanism\n\nThe mechanism of the browser engine usually has the following steps:\n\n1. Parse HTML to construct the DOM tree.\n\n2. Parse CSS to construct the CSSOM tree.\n\n3. Create the render tree by combining the DOM & CSSOM.\n\n4. Run layout based on the render tree, then calculate each node's exact coordinates on the screen.\n\n5. Paint elements by GPU, composite layers and display on the screen.\n\n\n\nWhen building the CSSOM tree, the rendering is blocked until the CSSOM tree is built. And building the CSSOM tree is a very cost-intensive process, so you should try to ensure that the level is flat and reduce excessive cascading. The more specific the CSS selector is, the slower the execution.\n\nWhen the HTML is parsing the script tag, the DOM is paused and will restart from the paused position. In other words, the faster you want to render the first screen, the less you should load the JS file on the first screen. And CSS will also affect the execution of JS. JS will only be executed when the stylesheet is parsed. Therefore, it can be considered that CSS will also suspend the DOM in this case.\n\n\n\n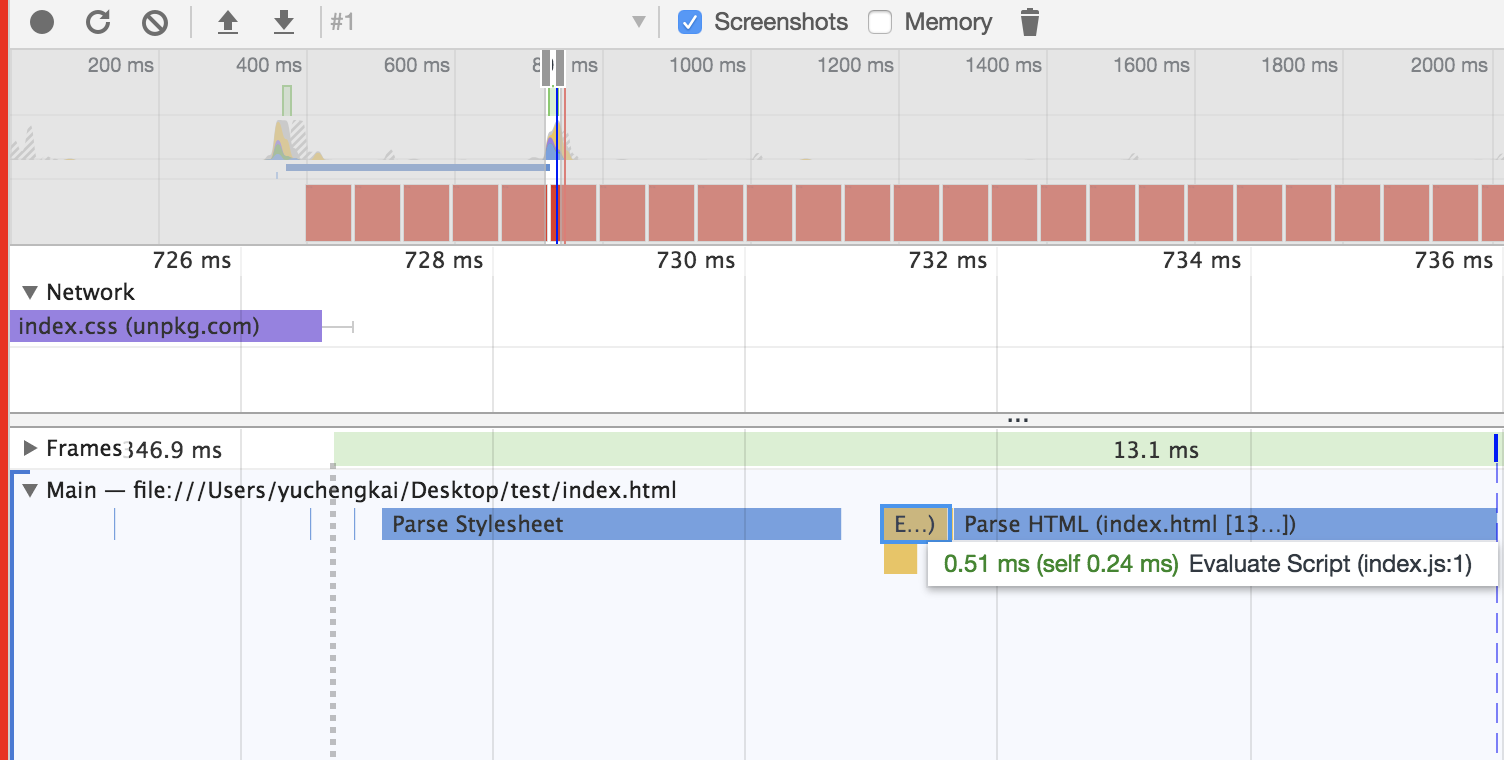\n\n\n## Difference between Load & DOMContentLoaded\n\n**Load** event occurs when all the resources (e.g. DOM、CSS、JS、pictures) have been loaded.\n\n**DOMContentLoaded** event occurs as soon as the HTML of the pages has been loaded, no matter whether the other resources have been loaded.\n\n## Layers\n\nGenerally,we can treat the document flow as a single layer. Some special attributes also could create a new layer. **Different Layers are independent**. So, it is recommended to create a new layer to render some elements which changes frequently. **But it is also a bad idea to create too many layers.**\n\nThe following attributes usually can create a new layer:\n\n- 3Dtranslate: `translate3d`, `translateZ`\n\n- `will-change`\n\n- tags like: `video`, `iframe`\n\n- animation achieved by `opacity`\n\n- `position: fixed`\n\n## Repaint & Reflow\n\nRepaint and Reflow is a small step in the main rendering flow, but they have a great impact on the performance.\n\n- Repaint occurs when the node changes but doesn't affect the layout, e.g. `color`.\n\n- Reflow occurs when the node changes caused by layout or the geometry attributes.\n\nReflow will trigger a Repaint, but the opposite is not necessarily true. Reflow is much more expensive than Repaint. The changes in deep level node's attributes may cause a series of changes of its ancestral nodes.\n\nActions like the following may cause performance problems:\n\n- change the window's size\n\n- change font-family\n\n- add or delete styles\n\n- change texts\n\n- change position & float\n\n- change box model\n\nYou may not know that Repaint and Reflow has something to do with the **Event Loop**.\n\n- In a event loop, when a microtask finishes, the engine will check whether the document needs update. As the refresh rate of the browse is 60Hz, this means it will update every 16ms.\n\n- Then browser would check whether there are events like `resize` or `scroll` and if true, trigger the handlers. So the handlers of resize and scroll will be invoked every 16ms, which means automatic throttling.\n\n- Evaluate media queries and report changes.\n\n- Update animations and send events.\n\n- Check whether this is a full-screen event.\n\n- Execute `requestAnimationFrame` callback.\n\n- Execute `IntersectionObserver` callback, which is used to determine whether an element should be displaying, usually in lazy-load, but has poor compatibility.\n\n- Update the screen.\n\n- The above events may occur in every frame. If there is idle time, the `requestIdleCallback` callback will be called.\n\nAll of the above are from [HTML Documents](https://html.spec.whatwg.org/multipage/webappapis.html#event-loop-processing-model).\n\n## Minimize Repaint & Reflow\n\n- Use `translate` instead of `top`:\n\n```html\n\n\n\n```\n\n- Use `visibility` instead of `display: none`, because the former will only cause Repaint while the latter will cause Reflow, which changes the layout.\n\n- Change the DOM when it is offline, e.g. change the DOM 100 times after set it `display: none` and then show it on screen. During this process there is only one Reflow.\n\n- Do not put an attribute of a node inside a loop:\n\n```js\nfor(let i = 0; i < 1000; i++) {\n // it will cause the reflow to get offsetTop, because it need to calculate the right value\n console.log(document.querySelector('.test').style.offsetTop)\n}\n```\n\n- Do not use table to construct the layout, because even a little change will cause the re-construct.\n\n- Animation speed matters: the faster it goes, the more Reflow. You can also utilize `requestAnimationFrame`.\n\n- The css selector will search to match from right to left, so you'd better avoid deep level DOM node.\n\n- As we know that the layer will prevent the changed node from affecting others, so it is good practice to create a new layer for animations with high frequency.\n\n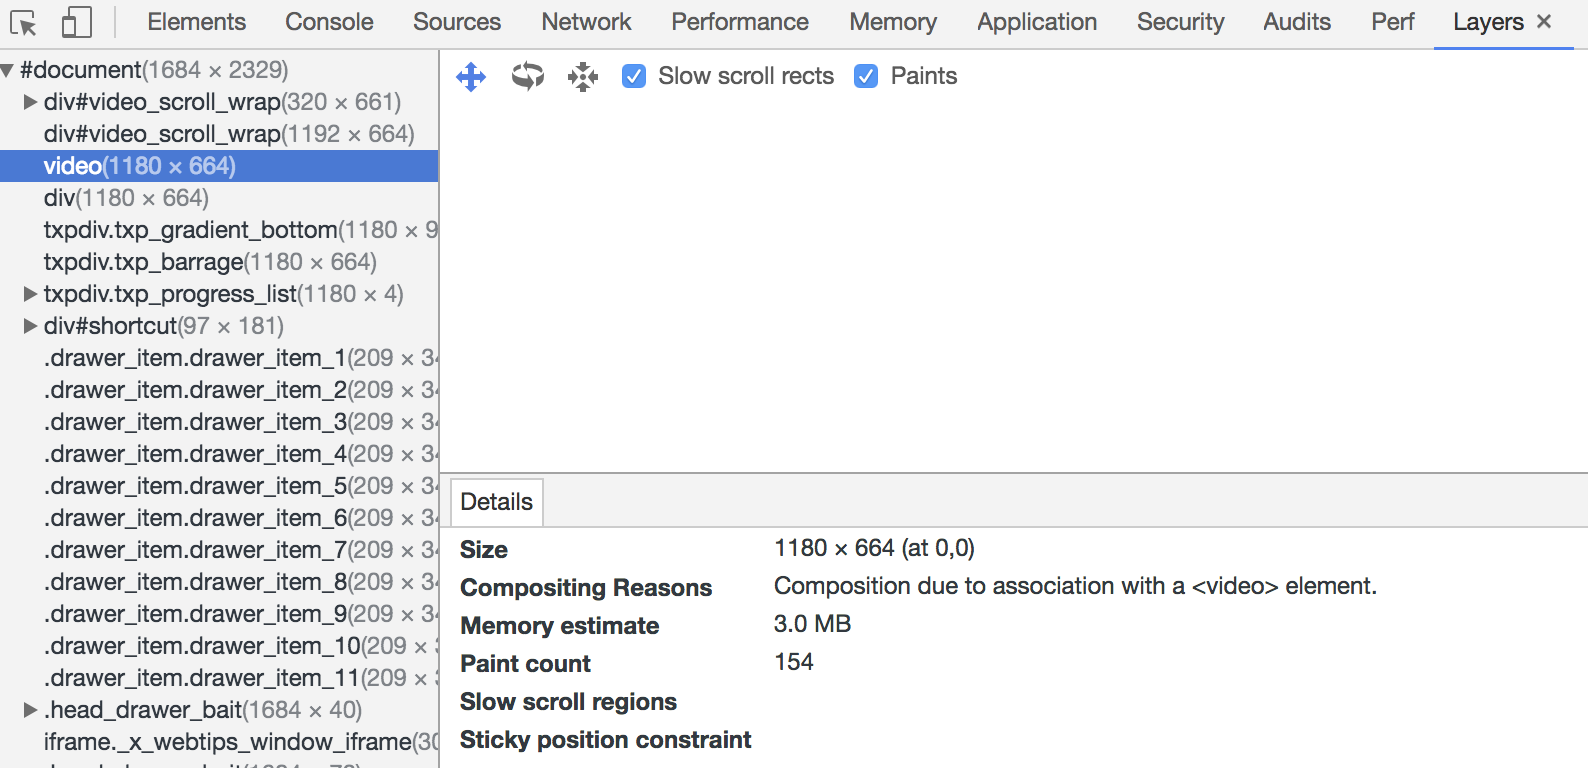\n"
},
{
"path": "Career/How-to-use-your-time-correctly.md",
"content": "\n\n**Table of Contents** *generated with [DocToc](https://github.com/thlorenz/doctoc)*\n\n- [花时间补基础,读文档](#%E8%8A%B1%E6%97%B6%E9%97%B4%E8%A1%A5%E5%9F%BA%E7%A1%80%E8%AF%BB%E6%96%87%E6%A1%A3)\n- [学会搜索](#%E5%AD%A6%E4%BC%9A%E6%90%9C%E7%B4%A2)\n- [学点英语](#%E5%AD%A6%E7%82%B9%E8%8B%B1%E8%AF%AD)\n- [画个图,想一想再做](#%E7%94%BB%E4%B8%AA%E5%9B%BE%E6%83%B3%E4%B8%80%E6%83%B3%E5%86%8D%E5%81%9A)\n- [利用好下班时间学习](#%E5%88%A9%E7%94%A8%E5%A5%BD%E4%B8%8B%E7%8F%AD%E6%97%B6%E9%97%B4%E5%AD%A6%E4%B9%A0)\n- [列好 ToDo](#%E5%88%97%E5%A5%BD-todo)\n- [反思和整理](#%E5%8F%8D%E6%80%9D%E5%92%8C%E6%95%B4%E7%90%86)\n\n\n\n你是否时常会焦虑时间过的很快,没时间学习,本文将会分享一些个人的见解。\n\n### 花时间补基础,读文档\n在工作中我们时常会花很多时间去 debug,但是你是否发现很多问题最终只是你基础不扎实或者文档没有仔细看。\n\n基础是你技术的基石,一定要花时间打好基础,而不是追各种新的技术。一旦你的基础扎实,学习各种新的技术也肯定不在话下,因为新的技术,究其根本都是相通的。\n\n文档同样也是一门技术的基础。一个优秀的库,开发人员肯定已经把如何使用这个库都写在文档中了,仔细阅读文档一定会是少写 bug 的最省事路子。\n\n### 学会搜索\n如果你还在使用百度搜索编程问题,请尽快抛弃这个垃圾搜索引擎。同样一个关键字,使用百度和谷歌,谷歌基本完胜的。即使你使用中文在谷歌中搜索,得到的结果也往往是谷歌占优,所以如果你想迅速的通过搜索引擎来解决问题,那一定是谷歌。\n\n### 学点英语\n说到英语,一定是大家所最不想听的。其实我一直认为程序员学习英语是简单的,因为我们工作中是一直接触着英语,并且看懂技术文章,文档所需要的单词量是极少的。我时常在群里看到大家发出一个问题的截图问什么原因,其实在截图中英语已经很明白的说明了问题的所在,如果你的英语过关,完全不需要浪费时间来提问和搜索。所以我认为学点英语也是节省时间中很重要的一点。\n\n那么如何去学习呢,chrome 装个翻译插件,直接拿英文文档或文章读,不会的就直接划词翻译,然后记录下这个单词并背诵。每天花半小时看点英文文档和文章,坚持两个月,你的英语水平不说别的,看文档和文章绝对不会有难题了。这一定是一个很划算的个人时间投资,花点时间学习英语,能为你将来的技术之路铺平很多坎。\n\n### 画个图,想一想再做\n你是否遇到过这种问题,需求一下来,看一眼,然后马上就按照设计稿开始做了,可能中间出个问题导致你需要返工。\n\n如果你存在这样的问题,我很推荐在看到设计稿和需求的时候花点时间想一想,画一画。考虑一下设计稿中是否可以找到可以拆分出来的复用组件,是否存在之前写过的组件。该如何组织这个界面,数据的流转是怎么样的。然后画一下这个页面的需求,最后再动手做。\n\n### 利用好下班时间学习\n说到下班时间,那可能就有人说了公司很迟下班,这其实是国内很普遍的情况。但是我认为正常的加班是可以的,但是强制的加班就是在损耗你的身体和前途。\n\n可以这么说,大部分的 996 公司,加班的这些时间并不会增加你的技术,无非就是在写一些重复的业务逻辑。也许你可以拿到更多的钱,但是代价是身体还有前途。程序员是靠技术吃饭的,如果你长久呆在一个长时间加班的公司,不能增长你的技术还要吞噬你的下班学习时间,那么你一定会废掉的。如果你遇到了这种情况,只能推荐尽快跳槽到非 996 的公司。\n\n那么如果你有足够的下班时间,一定要花上 1, 2 小时去学习,上班大家基本都一样,技术的精进就是看下班以后的那几个小时了。如果你能利用好下班时间来学习,坚持下去,时间一定会给你很好的答复。\n\n### 列好 ToDo\n我喜欢规划好一段时间内要做的事情,并且要把事情拆分为小点。给 ToDo 列好优先级,紧急的优先级最高。相同优先级的我喜欢先做简单的,因为这样一旦完成就能划掉一个,提高成就感。\n\n### 反思和整理\n每周末都会花上点时间整理下本周记录的笔记和看到的不错文章。然后考虑下本周完成的工作和下周准备要完成的工作。\n"
},
{
"path": "DataStruct/dataStruct-en.md",
"content": "\n\n**Table of Contents** *generated with [DocToc](https://github.com/thlorenz/doctoc)*\n\n- [Stack](#stack)\n - [Conception](#conception)\n - [Implementation](#implementation)\n - [Application](#application)\n- [Queues](#queues)\n - [concept](#concept)\n - [implementation](#implementation)\n - [Singly-linked Queue](#singly-linked-queue)\n - [Circular Queue](#circular-queue)\n- [Linked List](#linked-list)\n - [Concept](#concept)\n - [Implementation](#implementation-1)\n- [Tree](#tree)\n - [Binary Tree](#binary-tree)\n - [Binary Search Tree](#binary-search-tree)\n - [Implementation](#implementation-2)\n - [AVL Tree](#avl-tree)\n - [Concept](#concept-1)\n - [Implementation](#implementation-3)\n- [Trie](#trie)\n - [Concept](#concept-2)\n - [Implementation](#implementation-4)\n- [Disjoint Set](#disjoint-set)\n - [Concept](#concept-3)\n - [Implementation](#implementation-5)\n- [Heap](#heap)\n - [Concept](#concept-4)\n - [Implementation of Max Binary Heap](#implementation-of-max-binary-heap)\n\n\n\n# Stack\n\n## Conception\n\nA stack is the basic data structure that can be logically thought of as a linear structure.\n\nInsertion and deletion of items at the top of the stack and the operation should obey the rules LIFO(Last In First Out).\n\n\n\n## Implementation\n\nEach data structure can be implemented by the different method. We can treat stack as a subclass of Array. So we take the array for example here.\n\n```js\nclass Stack {\n constructor() {\n this.stack = []\n }\n push(item) {\n this.stack.push(item)\n }\n pop() {\n this.stack.pop()\n }\n peek() {\n return this.stack[this.getCount() - 1]\n }\n getCount() {\n return this.stack.length\n }\n isEmpty() {\n return this.getCount() === 0\n }\n}\n```\n\n## Application\n\nWe choose [the NO.20 topic in LeetCode](https://leetcode.com/problems/valid-parentheses/submissions/1)\n\nOur goal is to match the brackets. We can use the features of the stack to implement it.\n\n```js\nvar isValid = function (s) {\n let map = {\n '(': -1,\n ')': 1,\n '[': -2,\n ']': 2,\n '{': -3,\n '}': 3\n }\n let stack = []\n for (let i = 0; i < s.length; i++) {\n if (map[s[i]] < 0) {\n stack.push(s[i])\n } else {\n let last = stack.pop()\n if (map[last] + map[s[i]] != 0) return false\n }\n }\n if (stack.length > 0) return false\n return true\n};\n```\n\n# Queues\n\n## concept\n\nA queue is a linear data structure. The insertion takes place at one end while the deletion occurs the other one. And the operation should obey the rules FIFO(First In First Out).\n\n\n\n## implementation\n\nHere, we'll talk two implementations of the queue: Singly-linked Queue and Circular Queue.\n\n### Singly-linked Queue\n\n```js\nclass Queue {\n constructor() {\n this.queue = []\n }\n enQueue(item) {\n this.queue.push(item)\n }\n deQueue() {\n return this.queue.shift()\n }\n getHeader() {\n return this.queue[0]\n }\n getLength() {\n return this.queue.length\n }\n isEmpty() {\n return this.getLength() === 0\n }\n}\n```\n\nIt is an O(n) operation to enqueue in a Singly-linked Queue, while it is an average O(1) in a Circular Queue. So here comes the Circular Queue.\n\n### Circular Queue\n\n```js\nclass SqQueue {\n constructor(length) {\n this.queue = new Array(length + 1)\n // head of the queue\n this.first = 0\n // tail of the queue\n this.last = 0\n // size of the queue\n this.size = 0\n }\n enQueue(item) {\n // the array need to expand if last + 1 is the head\n // `% this.queue.length` is to avoid index out of bounds\n if (this.first === (this.last + 1) % this.queue.length) {\n this.resize(this.getLength() * 2 + 1)\n }\n this.queue[this.last] = item\n this.size++\n this.last = (this.last + 1) % this.queue.length\n }\n deQueue() {\n if (this.isEmpty()) {\n throw Error('Queue is empty')\n }\n let r = this.queue[this.first]\n this.queue[this.first] = null\n this.first = (this.first + 1) % this.queue.length\n this.size--\n // if the size of queue is too small \n // reduce the size half when the real size is quarter of the length and the length is not 2\n if (this.size === this.getLength() / 4 && this.getLength() / 2 !== 0) {\n this.resize(this.getLength() / 2)\n }\n return r\n }\n getHeader() {\n if (this.isEmpty()) {\n throw Error('Queue is empty')\n }\n return this.queue[this.first]\n }\n getLength() {\n return this.queue.length - 1\n }\n isEmpty() {\n return this.first === this.last\n }\n resize(length) {\n let q = new Array(length)\n for (let i = 0; i < length; i++) {\n q[i] = this.queue[(i + this.first) % this.queue.length]\n }\n this.queue = q\n this.first = 0\n this.last = this.size\n }\n}\n```\n\n# Linked List\n\n## Concept\n\nThe linked list is a linear data structure and born to be recursive structure. It can fully use the memory of the computer and manage the memory dynamically and flexibly. But Nodes in the linked list must be read in order from the beginning which can be random in the array, and it uses more memory than the array because of the storage used by their pointers.\n\n\n\n## Implementation\n\nSingly-linked list\n\n```javascript\nclass Node {\n constructor(v, next) {\n this.value = v\n this.next = next\n }\n}\nclass LinkList {\n constructor() {\n // size\n this.size = 0\n // virtual head\n this.dummyNode = new Node(null, null)\n }\n find(header, index, currentIndex) {\n if (index === currentIndex) return header\n return this.find(header.next, index, currentIndex + 1)\n }\n addNode(v, index) {\n this.checkIndex(index)\n // the next of the node inserted should be previous node'next\n // and the previous node's next should point to the node insert,\n // except inserted to tail which next is null\n let prev = this.find(this.dummyNode, index, 0)\n prev.next = new Node(v, prev.next)\n this.size++\n return prev.next\n }\n insertNode(v, index) {\n return this.addNode(v, index)\n }\n addToFirst(v) {\n return this.addNode(v, 0)\n }\n addToLast(v) {\n return this.addNode(v, this.size)\n }\n removeNode(index, isLast) {\n this.checkIndex(index)\n index = isLast ? index - 1 : index\n let prev = this.find(this.dummyNode, index, 0)\n let node = prev.next\n prev.next = node.next\n node.next = null\n this.size--\n return node\n }\n removeFirstNode() {\n return this.removeNode(0)\n }\n removeLastNode() {\n return this.removeNode(this.size, true)\n }\n checkIndex(index) {\n if (index < 0 || index > this.size) throw Error('Index error')\n }\n getNode(index) {\n this.checkIndex(index)\n if (this.isEmpty()) return\n return this.find(this.dummyNode, index, 0).next\n }\n isEmpty() {\n return this.size === 0\n }\n getSize() {\n return this.size\n }\n}\n```\n\n# Tree\n\n## Binary Tree\n\nBinary Tree is a common one of the many structures of the tree. And it is born to be recursive.\n\nBinary tree start at a root node and each node consists of two child-nodes at most: left node and right node. The nodes in the bottom are usually called leaf nodes, and when the leaf nodes is full, we call the Full Binary Tree. \n\n\n\n## Binary Search Tree\n\nBinary Search Tree (BST) is one of the binary trees, so it has all the features of the binary tree. But different with the binary tree, the value in any node is larger than the values in all nodes in that node's left subtree and smaller than the values in all nodes in that node's right subtree.\n\nThis storage method is very suitable for data search. As shown below, when you need to find 6, because the value you need to find is larger than the value of the root node, you only need to find it in the right subtree of the root node, which greatly improves the search efficiency.\n\n\n\n### Implementation\n\n```js\nclass Node {\n constructor(value) {\n this.value = value\n this.left = null\n this.right = null\n }\n}\nclass BST {\n constructor() {\n this.root = null\n this.size = 0\n }\n getSize() {\n return this.size\n }\n isEmpty() {\n return this.size === 0\n }\n addNode(v) {\n this.root = this._addChild(this.root, v)\n }\n // make comparison to the value of the node when insertion\n _addChild(node, v) {\n if (!node) {\n this.size++\n return new Node(v)\n }\n if (node.value > v) {\n node.left = this._addChild(node.left, v)\n } else if (node.value < v) {\n node.right = this._addChild(node.right, v)\n }\n return node\n }\n}\n```\n\nAbove is the basic implementation of BST, the implementation of traversing tree are as follows.\n\nThere are three ways for traversing trees: Preorder Traversal, In order Traversal, PostOrder Traversal. The difference of these ways is the time when to visit the root node. In the process of traversing the tree, each node traverses three times, traversing itself, traversing the left subtree and traversing the right subtree. If you need to implement pre-order traversal, you only need to operate the first time when traversing to the node.\n\n Following are the implementation by recursive, if you want to find the non-recursive, [click here](../Algorithm/algorithm-ch.md#%E9%9D%9E%E9%80%92%E5%BD%92%E5%AE%9E%E7%8E%B0)\n\n```js\n// Preorder traversal can be used to print the structure of the tree\n// first root then left, and the right is last\ntraversal() {\n this._pre(this.root)\n}\n_pre(node) {\n if (node) {\n console.log(node.value)\n this._pre(node.left)\n this._pre(node.right)\n }\n}\n// Inorder traversal can be used to order\n// you can sort the value of BST only by one time of Inorder traversal\n// first left , then root and right is last\nmidTraversal() {\n this._mid(this.root)\n}\n_mid(node) {\n if (node) {\n this._mid(node.left)\n console.log(node.value)\n this._mid(node.right)\n }\n}\n// Postorder traversal can be used in the case that you want to\n// operate the child node first and then the parent node\n// first left, then right and the root is last\nbackTraversal() {\n this._back(this.root)\n}\n_back(node) {\n if (node) {\n this._back(node.left)\n this._back(node.right)\n console.log(node.value)\n }\n}\n```\n\nThese three ways belong to Deep First Search. Meanwhile, there is Breadth First Search, which traverse the node layer by layer. We can implement it in the queue.\n\n```js\nbreadthTraversal() {\n if (!this.root) return null\n let q = new Queue()\n // enqueue the root node\n q.enQueue(this.root)\n // whether the queue is empty, if true, the traverse is finished.\n while (!q.isEmpty()) {\n // dequeue the head, and whether it has child-node, \n // if true, enqueue th left and the right\n let n = q.deQueue()\n if (n.left) q.enQueue(n.left)\n if (n.right) q.enQueue(n.right)\n }\n}\n```\n\nWe will introduce how to find the smallest and the biggest in the tree. Because of the feature of the BST, the smallest must be on the left while the biggest is on the right.\n\n```js\ngetMin() {\n return this._getMin(this.root).value\n}\n_getMin(node) {\n if (!node.left) return node\n return this._getMin(node.left)\n}\ngetMax() {\n return this._getMax(this.root).value\n}\n_getMax(node) {\n if (!node.right) return node\n return this._getMin(node.right)\n}\n```\n\n**Round up and Round down** Since these two operations are opposite, the code is similar, here we'll talk about round down. According to the feature of the BST, the target must be on the left. We only need to traverse the left nodes until the current node is no bigger than the target. And then adjudge if there have right nodes, if do, continue the judgment recursively.\n\n```js\nfloor(v) {\n let node = this._floor(this.root, v)\n return node ? node.value : null\n}\n_floor(node, v) {\n if (!node) return null\n if (node.value === v) return v\n // if the current node is bigger than the target, continue\n if (node.value > v) {\n return this._floor(node.left, v)\n }\n // whether the current node has the right subtree\n let right = this._floor(node.right, v)\n if (right) return right\n return node\n}\n```\n\n**Rank** get the rank of the given value or get the value of the given rank, and these two operations are also similar. We as usual only introduce the operation of the latter. We should retrofit the code to add a property `size` to each node which indicates how many subnodes a node has, include itself. \n\n```js\nclass Node {\n constructor(value) {\n this.value = value\n this.left = null\n this.right = null\n // add code \n this.size = 1\n }\n}\n// add code\n_getSize(node) {\n return node ? node.size : 0\n}\n_addChild(node, v) {\n if (!node) {\n return new Node(v)\n }\n if (node.value > v) {\n // edit code\n node.size++\n node.left = this._addChild(node.left, v)\n } else if (node.value < v) {\n // edit code\n node.size++\n node.right = this._addChild(node.right, v)\n }\n return node\n}\nselect(k) {\n let node = this._select(this.root, k)\n return node ? node.value : null\n}\n_select(node, k) {\n if (!node) return null\n // get the size of the node in the left subtree\n let size = node.left ? node.left.size : 0\n // if size is bigger than k, the target is in the left side\n if (size > k) return this._select(node.left, k)\n // if the size is smaller than k, the target is in the right side\n // there is need to recalculate the k\n if (size < k) return this._select(node.right, k - size - 1)\n return node\n}\n```\n\nHere come the most difficult parts in BST: delete nodes, include the following cases:\n\n- the target node has no subtree\n- the target node has only one subtree\n- the target node has two subtrees\n\nThe first and the second is easy to resolve, while the last is a little difficult. \nSo let us implement the simple operation at first: delete the minimum node. It could not appear in the third case, and the operation delete the largest node is opposite, so there is no need to talk.\n\n```js\ndelectMin() {\n this.root = this._delectMin(this.root)\n console.log(this.root)\n}\n_delectMin(node) {\n // rescursive the left subtree\n // if the left subtree is null, check if the right is exist\n // if true, take the right subtree in place of the delect node\n if ((node != null) & !node.left) return node.right\n node.left = this._delectMin(node.left)\n // update the size at last\n node.size = this._getSize(node.left) + this._getSize(node.right) + 1\n return node\n}\n```\n\nThe last, how to delete a random node. T.Hibbard put forward the solution in 1962 which can be used to solve the third case.\n\nIn this situation, we should get the descendant node of the current node which is the smallest node in the current node's right subtree and replace the target node by it. And then assign the descendant node with the subtree of the target, and give the right subtree without decent node to the left subtree.\n\nSince the root node is bigger than all the nodes in left subtree, while less than all the nodes in the right subtree. When you want to delete a root node, you need to pick a suitable node to take place, which should bigger than the root node that means it must come from the right subtree. Then the smallest node would be picked with the limit that all the nodes in the right subtree should bigger than the root node.\n\n```js\ndelect(v) {\n this.root = this._delect(this.root, v)\n}\n_delect(node, v) {\n if (!node) return null\n // if the target is less than the current node, serach in the left subtree\n if (node.value < v) {\n node.right = this._delect(node.right, v)\n } else if (node.value > v) {\n // if the target is bigger than the current node, serach in the right subtree\n node.left = this._delect(node.left, v)\n } else {\n // in this case, the target has been found\n // check if the node has subtree\n // if true, return the subtree, same operation with `_delectMin`\n if (!node.left) return node.right\n if (!node.right) return node.left\n // in this case, the node has both subtree\n // get the decendent node of the current node, \n // which is the smallest node in the right subtree\n let min = this._getMin(node.right)\n // delete the smallest after got it\n // Then assign the subtree after deleting the node to the smallest node\n min.right = this._delectMin(node.right)\n // subtree is the same\n min.left = node.left\n node = min\n }\n // update size\n node.size = this._getSize(node.left) + this._getSize(node.right) + 1\n return node\n}\n```\n\n## AVL Tree\n\n### Concept\n\nBST is limited in the production because it is not the strict O(log N) and sometimes it will degenerate to a linked list, e.g., insertion of an ascending order number list.\n\nAVL tree improved the BST, the difference between the left subtree height and the right subtree height in each node is less than 1, which can ensure that the time complexity is strict O(log N). Based on this, the insertion and deletion may need to rotate the tree to balance the height.\n\n### Implementation\n\nSince improved from the BST, some codes in AVL are repeated, which we will not analysis again.\n\nFour cases are in the node insertion of AVL tree. \n\n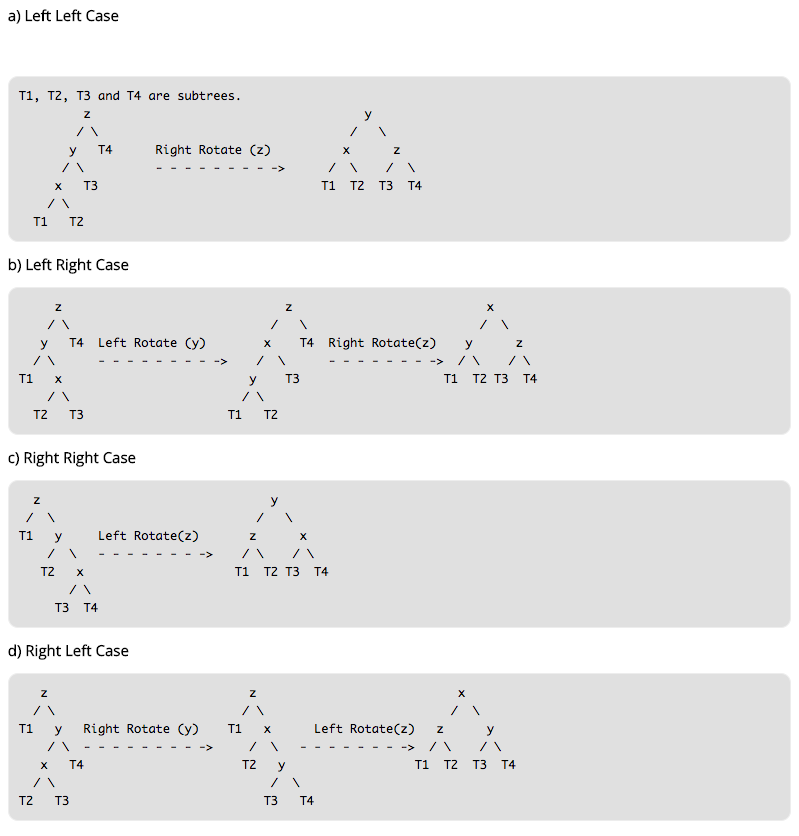\n\nAs for l-l(left-left), the new node T1 is in the left side of the node X. The tree cannot keep balance by now, so there need to rotate. After rotating, the tree should still obey the rules the mid is bigger than the left and less than the right according to the features of the BST.\n\nbefore rotating: T1 < X < T2 < Y < T3 < Z < T4, after rotating, the node Y is the root, so we need to add the right subtree of Y to the left of the Z and update the height of the nodes.\n\nThe same situation to the r-r, opposite to the l-l, we do not talk more.\n\nAs for the l-r, the new node is on the right side of the node X, and we need to rotate twice.\n\nFirst, rotate the left node to the left, after that the case change to l-l, we can handle it like l-l.\n\n```js\nclass Node {\n constructor(value) {\n this.value = value\n this.left = null\n this.right = null\n this.height = 1\n }\n}\n\nclass AVL {\n constructor() {\n this.root = null\n }\n addNode(v) {\n this.root = this._addChild(this.root, v)\n }\n _addChild(node, v) {\n if (!node) {\n return new Node(v)\n }\n if (node.value > v) {\n node.left = this._addChild(node.left, v)\n } else if (node.value < v) {\n node.right = this._addChild(node.right, v)\n } else {\n node.value = v\n }\n node.height =\n 1 + Math.max(this._getHeight(node.left), this._getHeight(node.right))\n let factor = this._getBalanceFactor(node)\n // when need right-rotate, the height of the left subtree must higher than right \n if (factor > 1 && this._getBalanceFactor(node.left) >= 0) {\n return this._rightRotate(node)\n }\n // when need left-rotate, the height of the left subtree must lower than right\n if (factor < -1 && this._getBalanceFactor(node.right) <= 0) {\n return this._leftRotate(node)\n }\n // l-r\n // left subtree is higher than right, \n // and the right subtree of the left subtree of the node \n // is higher than the left subtree of the left subtree of the node\n if (factor > 1 && this._getBalanceFactor(node.left) < 0) {\n node.left = this._leftRotate(node.left)\n return this._rightRotate(node)\n }\n // r-l\n // left subtree is lower than right, \n // and the right subtree of the right subtree of the node \n // is lower than the left subtree of the right subtree of the node\n if (factor < -1 && this._getBalanceFactor(node.right) > 0) {\n node.right = this._rightRotate(node.right)\n return this._leftRotate(node)\n }\n\n return node\n }\n _getHeight(node) {\n if (!node) return 0\n return node.height\n }\n _getBalanceFactor(node) {\n return this._getHeight(node.left) - this._getHeight(node.right)\n }\n // right-rotate\n // 5 2\n // / \\ / \\\n // 2 6 ==> 1 5\n // / \\ / / \\\n // 1 3 new 3 6\n // /\n // new\n _rightRotate(node) {\n // new root after rotate\n let newRoot = node.left\n // node need to be moved\n let moveNode = newRoot.right\n // right node of the node 2 change to node 5\n newRoot.right = node\n // left node of node 5 change to node 3\n node.left = moveNode\n // update the height\n node.height =\n 1 + Math.max(this._getHeight(node.left), this._getHeight(node.right))\n newRoot.height =\n 1 +\n Math.max(this._getHeight(newRoot.left), this._getHeight(newRoot.right))\n\n return newRoot\n }\n // left-rotate\n // 4 6\n // / \\ / \\\n // 2 6 ==> 4 7\n // / \\ / \\ \\\n // 5 7 2 5 new\n // \\\n // new\n _leftRotate(node) {\n // new root after rotate\n let newRoot = node.right\n // node need to be moved\n let moveNode = newRoot.left\n // left node of the node 6 change to node 4\n newRoot.left = node\n // right node of the node 4 change to node 5\n node.right = moveNode\n // update the height\n node.height =\n 1 + Math.max(this._getHeight(node.left), this._getHeight(node.right))\n newRoot.height =\n 1 +\n Math.max(this._getHeight(newRoot.left), this._getHeight(newRoot.right))\n\n return newRoot\n }\n}\n```\n\n# Trie\n\n## Concept\n\nIn computer science, a trie, also called digital tree and sometimes radix tree or prefix tree (as prefixes can search them), is a kind of search tree—an ordered tree data structure that is used to store a dynamic set or associative array where the keys are usually strings.\n\nSimply, this data structure is used to search string easily, with the following features:\n\n- the root is on behalf of the empty string, and each node has N links (N is 26 in searching English character), each link represents a character.\n- all nodes do not store a character, and only the path store, this is different from other tree structures.\n- the character in the path from the root to the random node can combine to the strings corresponding to the node\n\n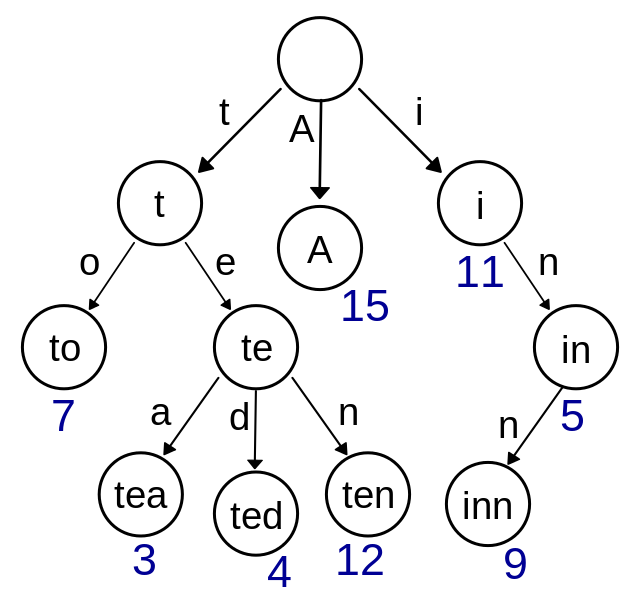\n\n## Implementation\n\nGenerally, the implementation of the trie is much more simple than others, let's take the English character searching for example.\n\n```js\nclass TrieNode {\n constructor() {\n // the times of each character travels through the node\n this.path = 0\n // the amount of the string to the node\n this.end = 0\n // links\n this.next = new Array(26).fill(null)\n }\n}\nclass Trie {\n constructor() {\n // root node, empty string\n this.root = new TrieNode()\n }\n // insert string\n insert(str) {\n if (!str) return\n let node = this.root\n for (let i = 0; i < str.length; i++) {\n // get the index of the character\n let index = str[i].charCodeAt() - 'a'.charCodeAt()\n // create if without the index\n if (!node.next[index]) {\n node.next[index] = new TrieNode()\n }\n node.path += 1\n node = node.next[index]\n }\n node.end += 1\n }\n // The number of times the search string appears\n search(str) {\n if (!str) return\n let node = this.root\n for (let i = 0; i < str.length; i++) {\n let index = str[i].charCodeAt() - 'a'.charCodeAt()\n // if the index does node exists, there is no string to be search\n if (!node.next[index]) {\n return 0\n }\n node = node.next[index]\n }\n return node.end\n }\n // delete the string\n delete(str) {\n if (!this.search(str)) return\n let node = this.root\n for (let i = 0; i < str.length; i++) {\n let index = str[i].charCodeAt() - 'a'.charCodeAt()\n // if the path is 0, this means no string pass \n // delete it\n if (--node.next[index].path == 0) {\n node.next[index] = null\n return\n }\n node = node.next[index]\n }\n node.end -= 1\n }\n}\n```\n\n# Disjoint Set\n\n## Concept\n\nDisjoint Set is a special data structure of the tree. Each node in this structure has a parent node, if there is only the current node, then the pointer of the parent node points to itself.\n\nTwo important operations are in this structure,\n\n- Find: find the member of the set to which the element belongs, and it can be used to determine whether the two elements belong to the same set\n- Union: combine two sets to a new set\n\n\n\n## Implementation\n\n```js\nclass DisjointSet {\n // init sample\n constructor(count) {\n // each node's parenet node is iteself when initialization\n this.parent = new Array(count)\n // record the deepth of the tree to optimize the complexity of query\n this.rank = new Array(count)\n for (let i = 0; i < count; i++) {\n this.parent[i] = i\n this.rank[i] = 1\n }\n }\n find(p) {\n // check whether the parent node of the current node is itself, if false, means has not found yet\n // uglify the path for optimization\n // assume the parent node of the current node is A\n // mount the current node to the parent node of A to deeply optimize\n while (p != this.parent[p]) {\n this.parent[p] = this.parent[this.parent[p]]\n p = this.parent[p]\n }\n return p\n }\n isConnected(p, q) {\n return this.find(p) === this.find(q)\n }\n // combine\n union(p, q) {\n // find the parent node of the two number\n let i = this.find(p)\n let j = this.find(q)\n if (i === j) return\n // compare the deepth of the two trees \n // if the deepth is equal, add as you wish\n if (this.rank[i] < this.rank[j]) {\n this.parent[i] = j\n } else if (this.rank[i] > this.rank[j]) {\n this.parent[j] = i\n } else {\n this.parent[i] = j\n this.rank[j] += 1\n }\n }\n}\n```\n\n# Heap\n\n## Concept\n\nHeap is usually treated as a tree-based array list.\n\nIt is implemented by constructure binary heap, one of the BST. Features are as follows:\n\n- each node either larger or less than all its child-nodes\n- heap is always a full-tree\n\nWe call the heap **Max Binary Heap** that its root value is the largest, while the heap with the smallest root value is called **Min Binary Heap**.\n\nPriority Queue also can be implemented by the heap, with the same operation.\n\n## Implementation of Max Binary Heap\n\nThe index of the left-child of each node is `i * 2 + 1`, while the right's is `i * 2 + 2`, and the parent's is `(i - 1) / 2`\n\nThere are two central operations in the heap, `shiftUp` and `shiftDown`. The former is used for insertion, and the latter is to delete the root node.\n\nThe key of `shiftUp` is to compare with the parent node bubbly and exchange the position if it is larger than the parent.\n\nAs for `shiftDown`, first exchange root and the tail node, and then delete the tail. After that, Compare with the parent node and both child-nodes circularly, if the child-node is larger, assign the parent node with the larger node.\n\n\n\n```js\nclass MaxHeap {\n constructor() {\n this.heap = []\n }\n size() {\n return this.heap.length\n }\n empty() {\n return this.size() == 0\n }\n add(item) {\n this.heap.push(item)\n this._shiftUp(this.size() - 1)\n }\n removeMax() {\n this._shiftDown(0)\n }\n getParentIndex(k) {\n return parseInt((k - 1) / 2)\n }\n getLeftIndex(k) {\n return k * 2 + 1\n }\n _shiftUp(k) {\n // exchange if the current node is bigger than the parent node\n while (this.heap[k] > this.heap[this.getParentIndex(k)]) {\n this._swap(k, this.getParentIndex(k))\n // update the index to the parent node's\n k = this.getParentIndex(k)\n }\n }\n _shiftDown(k) {\n // exchange the head and tail, then delete the tail\n this._swap(k, this.size() - 1)\n this.heap.splice(this.size() - 1, 1)\n // check whether the node has left child-node, \n // the right must exist because of full-tree\n while (this.getLeftIndex(k) < this.size()) {\n let j = this.getLeftIndex(k)\n // check whether the right child exits, and whether it is largger than the left\n if (j + 1 < this.size() && this.heap[j + 1] > this.heap[j]) j++\n // check whether the parenet node is largger than both child-nodes\n if (this.heap[k] >= this.heap[j]) break\n this._swap(k, j)\n k = j\n }\n }\n _swap(left, right) {\n let rightValue = this.heap[right]\n this.heap[right] = this.heap[left]\n this.heap[left] = rightValue\n }\n}\n```\n```js\nclass MaxHeap {\n constructor() {\n this.heap = []\n }\n size() {\n return this.heap.length\n }\n empty() {\n return this.size() == 0\n }\n add(item) {\n this.heap.push(item)\n this._shiftUp(this.size() - 1)\n }\n removeMax() {\n this._shiftDown(0)\n }\n getParentIndex(k) {\n return parseInt((k - 1) / 2)\n }\n getLeftIndex(k) {\n return k * 2 + 1\n }\n _shiftUp(k) {\n // exchange if the current node is bigger than the parent node\n while (this.heap[k] > this.heap[this.getParentIndex(k)]) {\n this._swap(k, this.getParentIndex(k))\n // update the index to the parent node's\n k = this.getParentIndex(k)\n }\n }\n _shiftDown(k) {\n // exchange the head and delete the tail\n this._swap(k, this.size() - 1)\n this.heap.splice(this.size() - 1, 1)\n // check if the node has left child-node, the right must exist if true according to the binary heap\n while (this.getLeftIndex(k) < this.size()) {\n let j = this.getLeftIndex(k)\n // check if the right child exits, and whether it is largger than the left\n if (j + 1 < this.size() && this.heap[j + 1] > this.heap[j]) j++\n // check if the parenet node is largger than both child-nodes\n if (this.heap[k] >= this.heap[j]) break\n this._swap(k, j)\n k = j\n }\n }\n _swap(left, right) {\n let rightValue = this.heap[right]\n this.heap[right] = this.heap[left]\n this.heap[left] = rightValue\n }\n}\n```\n"
},
{
"path": "DataStruct/dataStruct-zh.md",
"content": "\n\n**Table of Contents** *generated with [DocToc](https://github.com/thlorenz/doctoc)*\n\n- [栈](#%E6%A0%88)\n - [概念](#%E6%A6%82%E5%BF%B5)\n - [实现](#%E5%AE%9E%E7%8E%B0)\n - [应用](#%E5%BA%94%E7%94%A8)\n- [队列](#%E9%98%9F%E5%88%97)\n - [概念](#%E6%A6%82%E5%BF%B5-1)\n - [实现](#%E5%AE%9E%E7%8E%B0-1)\n - [单链队列](#%E5%8D%95%E9%93%BE%E9%98%9F%E5%88%97)\n - [循环队列](#%E5%BE%AA%E7%8E%AF%E9%98%9F%E5%88%97)\n- [链表](#%E9%93%BE%E8%A1%A8)\n - [概念](#%E6%A6%82%E5%BF%B5-2)\n - [实现](#%E5%AE%9E%E7%8E%B0-2)\n- [树](#%E6%A0%91)\n - [二叉树](#%E4%BA%8C%E5%8F%89%E6%A0%91)\n - [二分搜索树](#%E4%BA%8C%E5%88%86%E6%90%9C%E7%B4%A2%E6%A0%91)\n - [实现](#%E5%AE%9E%E7%8E%B0-3)\n - [AVL 树](#avl-%E6%A0%91)\n - [概念](#%E6%A6%82%E5%BF%B5-3)\n - [实现](#%E5%AE%9E%E7%8E%B0-4)\n- [Trie](#trie)\n - [概念](#%E6%A6%82%E5%BF%B5-4)\n - [实现](#%E5%AE%9E%E7%8E%B0-5)\n- [并查集](#%E5%B9%B6%E6%9F%A5%E9%9B%86)\n - [概念](#%E6%A6%82%E5%BF%B5-5)\n - [实现](#%E5%AE%9E%E7%8E%B0-6)\n- [堆](#%E5%A0%86)\n - [概念](#%E6%A6%82%E5%BF%B5-6)\n - [实现大根堆](#%E5%AE%9E%E7%8E%B0%E5%A4%A7%E6%A0%B9%E5%A0%86)\n\n\n\n# 栈\n\n## 概念\n\n栈是一个线性结构,在计算机中是一个相当常见的数据结构。\n\n栈的特点是只能在某一端添加或删除数据,遵循先进后出的原则\n\n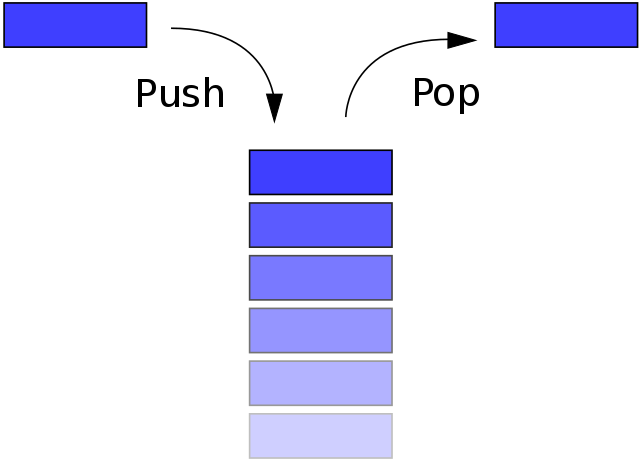\n\n## 实现\n\n每种数据结构都可以用很多种方式来实现,其实可以把栈看成是数组的一个子集,所以这里使用数组来实现\n\n```js\nclass Stack {\n constructor() {\n this.stack = []\n }\n push(item) {\n this.stack.push(item)\n }\n pop() {\n this.stack.pop()\n }\n peek() {\n return this.stack[this.getCount() - 1]\n }\n getCount() {\n return this.stack.length\n }\n isEmpty() {\n return this.getCount() === 0\n }\n}\n```\n\n## 应用\n\n选取了 [LeetCode 上序号为 20 的题目](https://leetcode.com/problems/valid-parentheses/submissions/1)\n\n题意是匹配括号,可以通过栈的特性来完成这道题目\n\n```js\nvar isValid = function (s) {\n let map = {\n '(': -1,\n ')': 1,\n '[': -2,\n ']': 2,\n '{': -3,\n '}': 3\n }\n let stack = []\n for (let i = 0; i < s.length; i++) {\n if (map[s[i]] < 0) {\n stack.push(s[i])\n } else {\n let last = stack.pop()\n if (map[last] + map[s[i]] != 0) return false\n }\n }\n if (stack.length > 0) return false\n return true\n};\n```\n\n# 队列\n\n## 概念\n\n队列一个线性结构,特点是在某一端添加数据,在另一端删除数据,遵循先进先出的原则。\n\n\n\n## 实现\n\n这里会讲解两种实现队列的方式,分别是单链队列和循环队列。\n\n### 单链队列\n\n```js\nclass Queue {\n constructor() {\n this.queue = []\n }\n enQueue(item) {\n this.queue.push(item)\n }\n deQueue() {\n return this.queue.shift()\n }\n getHeader() {\n return this.queue[0]\n }\n getLength() {\n return this.queue.length\n }\n isEmpty() {\n return this.getLength() === 0\n }\n}\n```\n\n因为单链队列在出队操作的时候需要 O(n) 的时间复杂度,所以引入了循环队列。循环队列的出队操作平均是 O(1) 的时间复杂度。\n\n## 循环队列\n\n```js\nclass SqQueue {\n constructor(length) {\n this.queue = new Array(length + 1)\n // 队头\n this.first = 0\n // 队尾\n this.last = 0\n // 当前队列大小\n this.size = 0\n }\n enQueue(item) {\n // 判断队尾 + 1 是否为队头\n // 如果是就代表需要扩容数组\n // % this.queue.length 是为了防止数组越界\n if (this.first === (this.last + 1) % this.queue.length) {\n this.resize(this.getLength() * 2 + 1)\n }\n this.queue[this.last] = item\n this.size++\n this.last = (this.last + 1) % this.queue.length\n }\n deQueue() {\n if (this.isEmpty()) {\n throw Error('Queue is empty')\n }\n let r = this.queue[this.first]\n this.queue[this.first] = null\n this.first = (this.first + 1) % this.queue.length\n this.size--\n // 判断当前队列大小是否过小\n // 为了保证不浪费空间,在队列空间等于总长度四分之一时\n // 且不为 2 时缩小总长度为当前的一半\n if (this.size === this.getLength() / 4 && this.getLength() / 2 !== 0) {\n this.resize(this.getLength() / 2)\n }\n return r\n }\n getHeader() {\n if (this.isEmpty()) {\n throw Error('Queue is empty')\n }\n return this.queue[this.first]\n }\n getLength() {\n return this.queue.length - 1\n }\n isEmpty() {\n return this.first === this.last\n }\n resize(length) {\n let q = new Array(length)\n for (let i = 0; i < length; i++) {\n q[i] = this.queue[(i + this.first) % this.queue.length]\n }\n this.queue = q\n this.first = 0\n this.last = this.size\n }\n}\n```\n\n# 链表\n\n## 概念\n\n链表是一个线性结构,同时也是一个天然的递归结构。链表结构可以充分利用计算机内存空间,实现灵活的内存动态管理。但是链表失去了数组随机读取的优点,同时链表由于增加了结点的指针域,空间开销比较大。\n\n\n\n## 实现\n\n单向链表\n\n```javascript\nclass Node {\n constructor(v, next) {\n this.value = v\n this.next = next\n }\n}\nclass LinkList {\n constructor() {\n // 链表长度\n this.size = 0\n // 虚拟头部\n this.dummyNode = new Node(null, null)\n }\n find(header, index, currentIndex) {\n if (index === currentIndex) return header\n return this.find(header.next, index, currentIndex + 1)\n }\n addNode(v, index) {\n this.checkIndex(index)\n // 当往链表末尾插入时,prev.next 为空\n // 其他情况时,因为要插入节点,所以插入的节点\n // 的 next 应该是 prev.next\n // 然后设置 prev.next 为插入的节点\n let prev = this.find(this.dummyNode, index, 0)\n prev.next = new Node(v, prev.next)\n this.size++\n return prev.next\n }\n insertNode(v, index) {\n return this.addNode(v, index)\n }\n addToFirst(v) {\n return this.addNode(v, 0)\n }\n addToLast(v) {\n return this.addNode(v, this.size)\n }\n removeNode(index, isLast) {\n this.checkIndex(index)\n index = isLast ? index - 1 : index\n let prev = this.find(this.dummyNode, index, 0)\n let node = prev.next\n prev.next = node.next\n node.next = null\n this.size--\n return node\n }\n removeFirstNode() {\n return this.removeNode(0)\n }\n removeLastNode() {\n return this.removeNode(this.size, true)\n }\n checkIndex(index) {\n if (index < 0 || index > this.size) throw Error('Index error')\n }\n getNode(index) {\n this.checkIndex(index)\n if (this.isEmpty()) return\n return this.find(this.dummyNode, index, 0).next\n }\n isEmpty() {\n return this.size === 0\n }\n getSize() {\n return this.size\n }\n}\n```\n# 树\n\n## 二叉树\n\n树拥有很多种结构,二叉树是树中最常用的结构,同时也是一个天然的递归结构。\n\n二叉树拥有一个根节点,每个节点至多拥有两个子节点,分别为:左节点和右节点。树的最底部节点称之为叶节点,当一颗树的叶数量数量为满时,该树可以称之为满二叉树。\n\n\n\n## 二分搜索树\n\n二分搜索树也是二叉树,拥有二叉树的特性。但是区别在于二分搜索树每个节点的值都比他的左子树的值大,比右子树的值小。\n\n这种存储方式很适合于数据搜索。如下图所示,当需要查找 6 的时候,因为需要查找的值比根节点的值大,所以只需要在根节点的右子树上寻找,大大提高了搜索效率。\n\n\n\n### 实现\n\n```js\nclass Node {\n constructor(value) {\n this.value = value\n this.left = null\n this.right = null\n }\n}\nclass BST {\n constructor() {\n this.root = null\n this.size = 0\n }\n getSize() {\n return this.size\n }\n isEmpty() {\n return this.size === 0\n }\n addNode(v) {\n this.root = this._addChild(this.root, v)\n }\n // 添加节点时,需要比较添加的节点值和当前\n // 节点值的大小\n _addChild(node, v) {\n if (!node) {\n this.size++\n return new Node(v)\n }\n if (node.value > v) {\n node.left = this._addChild(node.left, v)\n } else if (node.value < v) {\n node.right = this._addChild(node.right, v)\n }\n return node\n }\n}\n```\n\n以上是最基本的二分搜索树实现,接下来实现树的遍历。\n\n对于树的遍历来说,有三种遍历方法,分别是先序遍历、中序遍历、后序遍历。三种遍历的区别在于何时访问节点。在遍历树的过程中,每个节点都会遍历三次,分别是遍历到自己,遍历左子树和遍历右子树。如果需要实现先序遍历,那么只需要第一次遍历到节点时进行操作即可。\n\n以下都是递归实现,如果你想学习非递归实现,可以 [点击这里阅读](../Algorithm/algorithm-ch.md#%E9%9D%9E%E9%80%92%E5%BD%92%E5%AE%9E%E7%8E%B0)\n\n```js\n// 先序遍历可用于打印树的结构\n// 先序遍历先访问根节点,然后访问左节点,最后访问右节点。\npreTraversal() {\n this._pre(this.root)\n}\n_pre(node) {\n if (node) {\n console.log(node.value)\n this._pre(node.left)\n this._pre(node.right)\n }\n}\n// 中序遍历可用于排序\n// 对于 BST 来说,中序遍历可以实现一次遍历就\n// 得到有序的值\n// 中序遍历表示先访问左节点,然后访问根节点,最后访问右节点。\nmidTraversal() {\n this._mid(this.root)\n}\n_mid(node) {\n if (node) {\n this._mid(node.left)\n console.log(node.value)\n this._mid(node.right)\n }\n}\n// 后序遍历可用于先操作子节点\n// 再操作父节点的场景\n// 后序遍历表示先访问左节点,然后访问右节点,最后访问根节点。\nbackTraversal() {\n this._back(this.root)\n}\n_back(node) {\n if (node) {\n this._back(node.left)\n this._back(node.right)\n console.log(node.value)\n }\n}\n```\n\n以上的这几种遍历都可以称之为深度遍历,对应的还有种遍历叫做广度遍历,也就是一层层地遍历树。对于广度遍历来说,我们需要利用之前讲过的队列结构来完成。\n\n```js\nbreadthTraversal() {\n if (!this.root) return null\n let q = new Queue()\n // 将根节点入队\n q.enQueue(this.root)\n // 循环判断队列是否为空,为空\n // 代表树遍历完毕\n while (!q.isEmpty()) {\n // 将队首出队,判断是否有左右子树\n // 有的话,就先左后右入队\n let n = q.deQueue()\n console.log(n.value)\n if (n.left) q.enQueue(n.left)\n if (n.right) q.enQueue(n.right)\n }\n}\n```\n\n接下来先介绍如何在树中寻找最小值或最大数。因为二分搜索树的特性,所以最小值一定在根节点的最左边,最大值相反\n\n```js\ngetMin() {\n return this._getMin(this.root).value\n}\n_getMin(node) {\n if (!node.left) return node\n return this._getMin(node.left)\n}\ngetMax() {\n return this._getMax(this.root).value\n}\n_getMax(node) {\n if (!node.right) return node\n return this._getMin(node.right)\n}\n```\n\n**向上取整和向下取整**,这两个操作是相反的,所以代码也是类似的,这里只介绍如何向下取整。既然是向下取整,那么根据二分搜索树的特性,值一定在根节点的左侧。只需要一直遍历左子树直到当前节点的值不再大于等于需要的值,然后判断节点是否还拥有右子树。如果有的话,继续上面的递归判断。\n\n```js\nfloor(v) {\n let node = this._floor(this.root, v)\n return node ? node.value : null\n}\n_floor(node, v) {\n if (!node) return null\n if (node.value === v) return v\n // 如果当前节点值还比需要的值大,就继续递归\n if (node.value > v) {\n return this._floor(node.left, v)\n }\n // 判断当前节点是否拥有右子树\n let right = this._floor(node.right, v)\n if (right) return right\n return node\n}\n```\n\n**排名**,这是用于获取给定值的排名或者排名第几的节点的值,这两个操作也是相反的,所以这个只介绍如何获取排名第几的节点的值。对于这个操作而言,我们需要略微的改造点代码,让每个节点拥有一个 `size` 属性。该属性表示该节点下有多少子节点(包含自身)。\n\n```js\nclass Node {\n constructor(value) {\n this.value = value\n this.left = null\n this.right = null\n // 修改代码\n this.size = 1\n }\n}\n// 新增代码\n_getSize(node) {\n return node ? node.size : 0\n}\n_addChild(node, v) {\n if (!node) {\n return new Node(v)\n }\n if (node.value > v) {\n // 修改代码\n node.size++\n node.left = this._addChild(node.left, v)\n } else if (node.value < v) {\n // 修改代码\n node.size++\n node.right = this._addChild(node.right, v)\n }\n return node\n}\nselect(k) {\n let node = this._select(this.root, k)\n return node ? node.value : null\n}\n_select(node, k) {\n if (!node) return null\n // 先获取左子树下有几个节点\n let size = node.left ? node.left.size : 0\n // 判断 size 是否大于 k\n // 如果大于 k,代表所需要的节点在左节点\n if (size > k) return this._select(node.left, k)\n // 如果小于 k,代表所需要的节点在右节点\n // 注意这里需要重新计算 k,减去根节点除了右子树的节点数量\n if (size < k) return this._select(node.right, k - size - 1)\n return node\n}\n```\n\n接下来讲解的是二分搜索树中最难实现的部分:删除节点。因为对于删除节点来说,会存在以下几种情况\n\n- 需要删除的节点没有子树\n- 需要删除的节点只有一条子树\n- 需要删除的节点有左右两条树\n\n对于前两种情况很好解决,但是第三种情况就有难度了,所以先来实现相对简单的操作:删除最小节点,对于删除最小节点来说,是不存在第三种情况的,删除最大节点操作是和删除最小节点相反的,所以这里也就不再赘述。\n\n```js\ndelectMin() {\n this.root = this._delectMin(this.root)\n console.log(this.root)\n}\n_delectMin(node) {\n // 一直递归左子树\n // 如果左子树为空,就判断节点是否拥有右子树\n // 有右子树的话就把需要删除的节点替换为右子树\n if ((node != null) & !node.left) return node.right\n node.left = this._delectMin(node.left)\n // 最后需要重新维护下节点的 `size`\n node.size = this._getSize(node.left) + this._getSize(node.right) + 1\n return node\n}\n```\n\n最后讲解的就是如何删除任意节点了。对于这个操作,T.Hibbard 在 1962 年提出了解决这个难题的办法,也就是如何解决第三种情况。\n\n当遇到这种情况时,需要取出当前节点的后继节点(也就是当前节点右子树的最小节点)来替换需要删除的节点。然后将需要删除节点的左子树赋值给后继结点,右子树删除后继结点后赋值给他。\n\n你如果对于这个解决办法有疑问的话,可以这样考虑。因为二分搜索树的特性,父节点一定比所有左子节点大,比所有右子节点小。那么当需要删除父节点时,势必需要拿出一个比父节点大的节点来替换父节点。这个节点肯定不存在于左子树,必然存在于右子树。然后又需要保持父节点都是比右子节点小的,那么就可以取出右子树中最小的那个节点来替换父节点。\n\n```js\ndelect(v) {\n this.root = this._delect(this.root, v)\n}\n_delect(node, v) {\n if (!node) return null\n // 寻找的节点比当前节点小,去左子树找\n if (node.value < v) {\n node.right = this._delect(node.right, v)\n } else if (node.value > v) {\n // 寻找的节点比当前节点大,去右子树找\n node.left = this._delect(node.left, v)\n } else {\n // 进入这个条件说明已经找到节点\n // 先判断节点是否拥有拥有左右子树中的一个\n // 是的话,将子树返回出去,这里和 `_delectMin` 的操作一样\n if (!node.left) return node.right\n if (!node.right) return node.left\n // 进入这里,代表节点拥有左右子树\n // 先取出当前节点的后继结点,也就是取当前节点右子树的最小值\n let min = this._getMin(node.right)\n // 取出最小值后,删除最小值\n // 然后把删除节点后的子树赋值给最小值节点\n min.right = this._delectMin(node.right)\n // 左子树不动\n min.left = node.left\n node = min\n }\n // 维护 size\n node.size = this._getSize(node.left) + this._getSize(node.right) + 1\n return node\n}\n```\n\n## AVL 树 \n\n### 概念\n\n二分搜索树实际在业务中是受到限制的,因为并不是严格的 O(logN),在极端情况下会退化成链表,比如加入一组升序的数字就会造成这种情况。\n\nAVL 树改进了二分搜索树,在 AVL 树中任意节点的左右子树的高度差都不大于 1,这样保证了时间复杂度是严格的 O(logN)。基于此,对 AVL 树增加或删除节点时可能需要旋转树来达到高度的平衡。\n\n### 实现\n\n因为 AVL 树是改进了二分搜索树,所以部分代码是于二分搜索树重复的,对于重复内容不作再次解析。\n\n对于 AVL 树来说,添加节点会有四种情况\n\n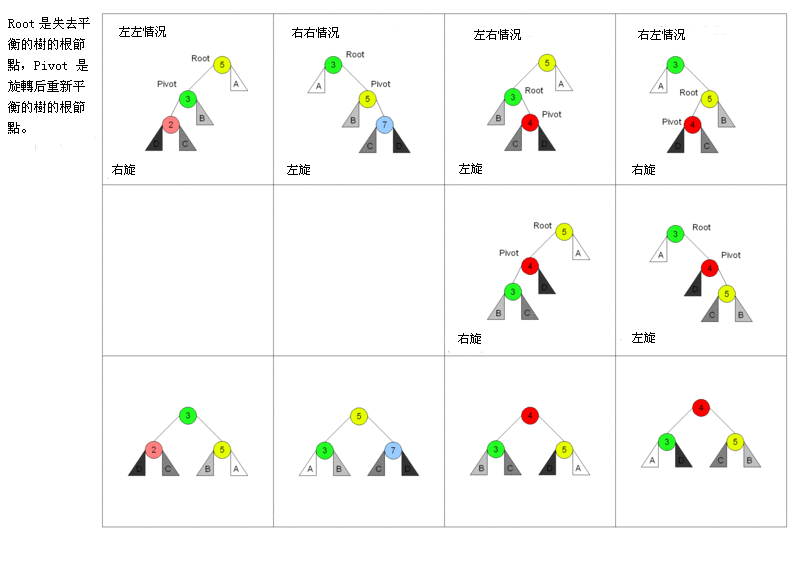\n\n对于左左情况来说,新增加的节点位于节点 2 的左侧,这时树已经不平衡,需要旋转。因为搜索树的特性,节点比左节点大,比右节点小,所以旋转以后也要实现这个特性。 \n\n旋转之前:new < 2 < C < 3 < B < 5 < A,右旋之后节点 3 为根节点,这时候需要将节点 3 的右节点加到节点 5 的左边,最后还需要更新节点的高度。\n\n对于右右情况来说,相反于左左情况,所以不再赘述。\n\n对于左右情况来说,新增加的节点位于节点 4 的右侧。对于这种情况,需要通过两次旋转来达到目的。\n\n首先对节点的左节点左旋,这时树满足左左的情况,再对节点进行一次右旋就可以达到目的。\n\n```js\nclass Node {\n constructor(value) {\n this.value = value\n this.left = null\n this.right = null\n this.height = 1\n }\n}\n\nclass AVL {\n constructor() {\n this.root = null\n }\n addNode(v) {\n this.root = this._addChild(this.root, v)\n }\n _addChild(node, v) {\n if (!node) {\n return new Node(v)\n }\n if (node.value > v) {\n node.left = this._addChild(node.left, v)\n } else if (node.value < v) {\n node.right = this._addChild(node.right, v)\n } else {\n node.value = v\n }\n node.height =\n 1 + Math.max(this._getHeight(node.left), this._getHeight(node.right))\n let factor = this._getBalanceFactor(node)\n // 当需要右旋时,根节点的左树一定比右树高度高\n if (factor > 1 && this._getBalanceFactor(node.left) >= 0) {\n return this._rightRotate(node)\n }\n // 当需要左旋时,根节点的左树一定比右树高度矮\n if (factor < -1 && this._getBalanceFactor(node.right) <= 0) {\n return this._leftRotate(node)\n }\n // 左右情况\n // 节点的左树比右树高,且节点的左树的右树比节点的左树的左树高\n if (factor > 1 && this._getBalanceFactor(node.left) < 0) {\n node.left = this._leftRotate(node.left)\n return this._rightRotate(node)\n }\n // 右左情况\n // 节点的左树比右树矮,且节点的右树的右树比节点的右树的左树矮\n if (factor < -1 && this._getBalanceFactor(node.right) > 0) {\n node.right = this._rightRotate(node.right)\n return this._leftRotate(node)\n }\n\n return node\n }\n _getHeight(node) {\n if (!node) return 0\n return node.height\n }\n _getBalanceFactor(node) {\n return this._getHeight(node.left) - this._getHeight(node.right)\n }\n // 节点右旋\n // 5 2\n // / \\ / \\\n // 2 6 ==> 1 5\n // / \\ / / \\\n // 1 3 new 3 6\n // /\n // new\n _rightRotate(node) {\n // 旋转后新根节点\n let newRoot = node.left\n // 需要移动的节点\n let moveNode = newRoot.right\n // 节点 2 的右节点改为节点 5\n newRoot.right = node\n // 节点 5 左节点改为节点 3\n node.left = moveNode\n // 更新树的高度\n node.height =\n 1 + Math.max(this._getHeight(node.left), this._getHeight(node.right))\n newRoot.height =\n 1 +\n Math.max(this._getHeight(newRoot.left), this._getHeight(newRoot.right))\n\n return newRoot\n }\n // 节点左旋\n // 4 6\n // / \\ / \\\n // 2 6 ==> 4 7\n // / \\ / \\ \\\n // 5 7 2 5 new\n // \\\n // new\n _leftRotate(node) {\n // 旋转后新根节点\n let newRoot = node.right\n // 需要移动的节点\n let moveNode = newRoot.left\n // 节点 6 的左节点改为节点 4\n newRoot.left = node\n // 节点 4 右节点改为节点 5\n node.right = moveNode\n // 更新树的高度\n node.height =\n 1 + Math.max(this._getHeight(node.left), this._getHeight(node.right))\n newRoot.height =\n 1 +\n Math.max(this._getHeight(newRoot.left), this._getHeight(newRoot.right))\n\n return newRoot\n }\n}\n```\n\n\n\n# Trie\n\n## 概念\n\n在计算机科学,**trie**,又称**前缀树**或**字典树**,是一种有序树,用于保存关联数组,其中的键通常是字符串。\n\n简单点来说,这个结构的作用大多是为了方便搜索字符串,该树有以下几个特点\n\n- 根节点代表空字符串,每个节点都有 N(假如搜索英文字符,就有 26 条) 条链接,每条链接代表一个字符\n- 节点不存储字符,只有路径才存储,这点和其他的树结构不同\n- 从根节点开始到任意一个节点,将沿途经过的字符连接起来就是该节点对应的字符串\n\n、\n\n## 实现\n\n总得来说 Trie 的实现相比别的树结构来说简单的很多,实现就以搜索英文字符为例。\n\n```js\nclass TrieNode {\n constructor() {\n // 代表每个字符经过节点的次数\n this.path = 0\n // 代表到该节点的字符串有几个\n this.end = 0\n // 链接\n this.next = new Array(26).fill(null)\n }\n}\nclass Trie {\n constructor() {\n // 根节点,代表空字符\n this.root = new TrieNode()\n }\n // 插入字符串\n insert(str) {\n if (!str) return\n let node = this.root\n for (let i = 0; i < str.length; i++) {\n // 获得字符先对应的索引\n let index = str[i].charCodeAt() - 'a'.charCodeAt()\n // 如果索引对应没有值,就创建\n if (!node.next[index]) {\n node.next[index] = new TrieNode()\n }\n node.path += 1\n node = node.next[index]\n }\n node.end += 1\n }\n // 搜索字符串出现的次数\n search(str) {\n if (!str) return\n let node = this.root\n for (let i = 0; i < str.length; i++) {\n let index = str[i].charCodeAt() - 'a'.charCodeAt()\n // 如果索引对应没有值,代表没有需要搜素的字符串\n if (!node.next[index]) {\n return 0\n }\n node = node.next[index]\n }\n return node.end\n }\n // 删除字符串\n delete(str) {\n if (!this.search(str)) return\n let node = this.root\n for (let i = 0; i < str.length; i++) {\n let index = str[i].charCodeAt() - 'a'.charCodeAt()\n // 如果索引对应的节点的 Path 为 0,代表经过该节点的字符串\n // 已经一个,直接删除即可\n if (--node.next[index].path == 0) {\n node.next[index] = null\n return\n }\n node = node.next[index]\n }\n node.end -= 1\n }\n}\n```\n\n# 并查集\n\n## 概念\n\n并查集是一种特殊的树结构,用于处理一些不交集的合并及查询问题。该结构中每个节点都有一个父节点,如果只有当前一个节点,那么该节点的父节点指向自己。\n\n这个结构中有两个重要的操作,分别是:\n\n- Find:确定元素属于哪一个子集。它可以被用来确定两个元素是否属于同一子集。\n- Union:将两个子集合并成同一个集合。\n\n\n\n## 实现\n\n```js\nclass DisjointSet {\n // 初始化样本\n constructor(count) {\n // 初始化时,每个节点的父节点都是自己\n this.parent = new Array(count)\n // 用于记录树的深度,优化搜索复杂度\n this.rank = new Array(count)\n for (let i = 0; i < count; i++) {\n this.parent[i] = i\n this.rank[i] = 1\n }\n }\n find(p) {\n // 寻找当前节点的父节点是否为自己,不是的话表示还没找到\n // 开始进行路径压缩优化\n // 假设当前节点父节点为 A\n // 将当前节点挂载到 A 节点的父节点上,达到压缩深度的目的\n while (p != this.parent[p]) {\n this.parent[p] = this.parent[this.parent[p]]\n p = this.parent[p]\n }\n return p\n }\n isConnected(p, q) {\n return this.find(p) === this.find(q)\n }\n // 合并\n union(p, q) {\n // 找到两个数字的父节点\n let i = this.find(p)\n let j = this.find(q)\n if (i === j) return\n // 判断两棵树的深度,深度小的加到深度大的树下面\n // 如果两棵树深度相等,那就无所谓怎么加\n if (this.rank[i] < this.rank[j]) {\n this.parent[i] = j\n } else if (this.rank[i] > this.rank[j]) {\n this.parent[j] = i\n } else {\n this.parent[i] = j\n this.rank[j] += 1\n }\n }\n}\n```\n\n# 堆\n\n## 概念\n\n堆通常是一个可以被看做一棵树的数组对象。\n\n堆的实现通过构造**二叉堆**,实为二叉树的一种。这种数据结构具有以下性质。\n\n- 任意节点小于(或大于)它的所有子节点\n- 堆总是一棵完全树。即除了最底层,其他层的节点都被元素填满,且最底层从左到右填入。\n\n将根节点最大的堆叫做**最大堆**或**大根堆**,根节点最小的堆叫做**最小堆**或**小根堆**。\n\n优先队列也完全可以用堆来实现,操作是一模一样的。\n\n## 实现大根堆\n\n堆的每个节点的左边子节点索引是 `i * 2 + 1`,右边是 `i * 2 + 2`,父节点是 `(i - 1) /2`。\n\n堆有两个核心的操作,分别是 `shiftUp` 和 `shiftDown` 。前者用于添加元素,后者用于删除根节点。\n\n`shiftUp` 的核心思路是一路将节点与父节点对比大小,如果比父节点大,就和父节点交换位置。\n\n`shiftDown` 的核心思路是先将根节点和末尾交换位置,然后移除末尾元素。接下来循环判断父节点和两个子节点的大小,如果子节点大,就把最大的子节点和父节点交换。\n\n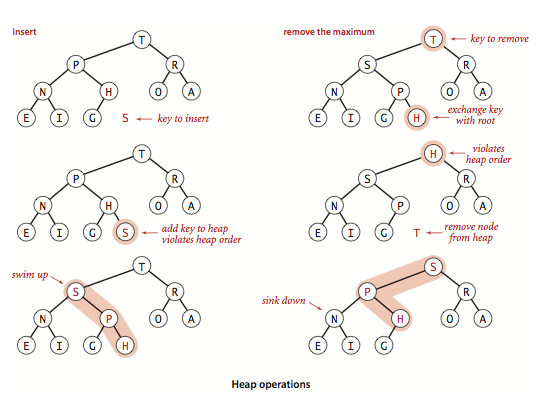\n\n```js\nclass MaxHeap {\n constructor() {\n this.heap = []\n }\n size() {\n return this.heap.length\n }\n empty() {\n return this.size() == 0\n }\n add(item) {\n this.heap.push(item)\n this._shiftUp(this.size() - 1)\n }\n removeMax() {\n this._shiftDown(0)\n }\n getParentIndex(k) {\n return parseInt((k - 1) / 2)\n }\n getLeftIndex(k) {\n return k * 2 + 1\n }\n _shiftUp(k) {\n // 如果当前节点比父节点大,就交换\n while (this.heap[k] > this.heap[this.getParentIndex(k)]) {\n this._swap(k, this.getParentIndex(k))\n // 将索引变成父节点\n k = this.getParentIndex(k)\n }\n }\n _shiftDown(k) {\n // 交换首位并删除末尾\n this._swap(k, this.size() - 1)\n this.heap.splice(this.size() - 1, 1)\n // 判断节点是否有左孩子,因为二叉堆的特性,有右必有左\n while (this.getLeftIndex(k) < this.size()) {\n let j = this.getLeftIndex(k)\n // 判断是否有右孩子,并且右孩子是否大于左孩子\n if (j + 1 < this.size() && this.heap[j + 1] > this.heap[j]) j++\n // 判断父节点是否已经比子节点都大\n if (this.heap[k] >= this.heap[j]) break\n this._swap(k, j)\n k = j\n }\n }\n _swap(left, right) {\n let rightValue = this.heap[right]\n this.heap[right] = this.heap[left]\n this.heap[left] = rightValue\n }\n}\n```\n\n"
},
{
"path": "Framework/framework-br.md",
"content": "\n\n**Table of Contents** *generated with [DocToc](https://github.com/thlorenz/doctoc)*\n\n- [MVVM](#mvvm)\n - [Verificação suja](#dirty-checking)\n - [Sequestro de dados](#data-hijacking)\n - [Proxy vs. Obeject.defineProperty](#proxy-vs-obejectdefineproperty)\n- [Princípios de rota](#routing-principle)\n- [Virtual Dom](#virtual-dom)\n - [Por que Virtual Dom é preciso](#why-virtual-dom-is-needed)\n - [Intrudução ao algoritmo do Virtual Dom](#virtual-dom-algorithm-introduction)\n - [Implementação do algoritimo do Virtual Dom](#virtual-dom-algorithm-implementation)\n - [recursão da árvore](#recursion-of-the-tree)\n - [varificando mudança de propriedades](#checking-property-changes)\n - [Implementação do algoritimo para detectar mudanças de lista](#algorithm-implementation-for-detecting-list-changes)\n - [Iterando e marcando elementos filhos](#iterating-and-marking-child-elements)\n - [Diferença de renderização](#rendering-difference)\n - [Fim](#the-end)\n\n\n\n# MVVM\n\nMVVM consiste dos três seguintes conceitos\n\n* View: Interface\n* Model:Modelo de dados\n* ViewModel:Como uma ponte responsável pela comunicação entre a View e o Model\n\nNa época do JQuery, se você precisar atualizar a UI, você precisar obter o DOM correspondente e então atualizar a UI, então os dados e as regras de negócio estão fortemente acoplados com a página.\n\nNo MVVM, o UI é condizudo pelos dados. Uma vez que o dado mudou, a UI correspondente será atualizada. Se a UI mudar, o dado correspondente também ira mudar. Dessas forma, nos preocupamos apenas com o fluxo de dados no processamento do negócio sem lidar com a página diretamente. ViewModel apenas se preocupa com o processamento de dados e regras de negócio e não se preocupa como a View manipula os dados. Nesse caso, nós podemos separar a View da Model. Se qualquer uma das partes mudarem, isso não necessariamente precisa mudar na outra parte, e qualquer lógica reusável pode ser colocado na ViewModel, permitindo multiplas View reusarem esse ViewModel.\n\nNo MVVM, o núcleo é two-way binding de dados, tal como a verificação suja do Angular e sequestro de dados no Vue.\n\n## Verificação Suja\n\nQuando o evento especificado é disparado, ele irá entrar na verificação suja e chamar o laço `$digest` caminhando através de todos os dados observados para determinar se o valor atual é diferente do valor anterior. Se a mudança é detectada, irá chamar a função `$watch`, e então chamar o laço `$digest` novamente até que nenhuma mudança seja encontrada. O ciclo vai de pelo menos de duas vezes até dez vezes.\n\nEmbora a verificação suja ser ineficiente, ele consegue completar a tarefa sem se preocupar sobre como o dado mudou, mas o two-way binding no `Vue` é problemático. E a verificação suja consegue alcançar detecção de lotes de valores atualizados, e então unificar atualizações na UI, com grandeza reduzindo o número de operações no DOM. Assim sendo, ineficiência é relativa, e é assim que o benevolente vê o sábio e a sabedoria.\n\n## Sequesto de dados\n\nVue internamente usa `Obeject.defineProperty()` para implementar o two-way binding, do qual permite você escutar por eventos de `set` e `get`.\n\n```js\nvar data = { name: 'yck' }\nobserve(data)\nlet name = data.name // -> ontém o valor\ndata.name = 'yyy' // -> muda o valor\n\nfunction observe(obj) {\n // juiz do tipo\n if (!obj || typeof obj !== 'object') {\n return\n }\n Object.keys(obj).forEach(key => {\n defineReactive(obj, key, obj[key])\n })\n}\n\nfunction defineReactive(obj, key, val) {\n // recurse as propriedades dos filhos\n observe(val)\n Object.defineProperty(obj, key, {\n enumerable: true,\n configurable: true,\n get: function reactiveGetter() {\n console.log('get value')\n return val\n },\n set: function reactiveSetter(newVal) {\n console.log('change value')\n val = newVal\n }\n })\n}\n```\n\nO código acima é uma simples implementação de como escutar os eventos `set` e `get` dos dados, mas isso não é o suficiente. Você também precisa adicionar um Publish/Subscribe para as propriedades quando apropriado.\n\n```html\n
\n {{name}}\n
\n```\n\n::: v-pre\nNesse processo, análisando o código do modelo, como acima, quando encontrando `{{name}}`, adicione um publish/subscribe para a propriedade `name` \n:::\n\n```js\n// dissociar por Dep\nclass Dep {\n constructor() {\n this.subs = []\n }\n addSub(sub) {\n // Sub é uma instância do observador\n this.subs.push(sub)\n }\n notify() {\n this.subs.forEach(sub => {\n sub.update()\n })\n }\n}\n// Propriedade global, configura o observador com essa propriedade\nDep.target = null\n\nfunction update(value) {\n document.querySelector('div').innerText = value\n}\n\nclass Watcher {\n constructor(obj, key, cb) {\n // Aponte Dep.target para se mesmo\n // Então dispare o getter para a propriedade adicionar o ouvinte\n // Finalmente, set Dep.target como null\n Dep.target = this\n this.cb = cb\n this.obj = obj\n this.key = key\n this.value = obj[key]\n Dep.target = null\n }\n update() {\n // obtenha o novo valor\n this.value = this.obj[this.key]\n // update Dom with the update method\n // atualize o DOM com o método de atualizar\n this.cb(this.value)\n }\n}\nvar data = { name: 'yck' }\nobserve(data)\n// Simulando a ação disparada analisando o `{{name}}`\nnew Watcher(data, 'name', update)\n// atualiza o DOM innerText\ndata.name = 'yyy' \n```\n\nNext, improve on the `defineReactive` function.\n\n```js\nfunction defineReactive(obj, key, val) {\n // recurse as propriedades do filho\n observe(val)\n let dp = new Dep()\n Object.defineProperty(obj, key, {\n enumerable: true,\n configurable: true,\n get: function reactiveGetter() {\n console.log('get value')\n // Adiciona o Watcher para inscrição\n if (Dep.target) {\n dp.addSub(Dep.target)\n }\n return val\n },\n set: function reactiveSetter(newVal) {\n console.log('change value')\n val = newVal\n // Execute o método de atualização do Watcher\n dp.notify()\n }\n })\n}\n```\n\nA implementação acima é um simples two-way binding. A idéia central é manualmente disparar o getter das propriedades para adicionar o Publish/Subscribe.\n\n\n## Proxy vs. Obeject.defineProperty\n\nApesar do `Obeject.defineProperty` ser capaz de implementar o two-way binding, ele ainda é falho.\n\n* Ele consegue implementar apenas o sequestro de dados nas propriedades,\n* ele não consegue escutar a mudança de dados para arrays\n\nApesar de Vue conseguir detectar mudanças em um array de dados, é na verdade um hack e é falho.\n\n```js\nconst arrayProto = Array.prototype\nexport const arrayMethods = Object.create(arrayProto)\n// hack as seguintes funções\nconst methodsToPatch = [\n 'push',\n 'pop',\n 'shift',\n 'unshift',\n 'splice',\n 'sort',\n 'reverse'\n]\nmethodsToPatch.forEach(function (method) {\n // obter a função nativa\n const original = arrayProto[method]\n def(arrayMethods, method, function mutator (...args) {\n // chama a função nativa\n const result = original.apply(this, args)\n const ob = this.__ob__\n let inserted\n switch (method) {\n case 'push':\n case 'unshift':\n inserted = args\n break\n case 'splice':\n inserted = args.slice(2)\n break\n }\n if (inserted) ob.observeArray(inserted)\n // dispara uma atualização\n ob.dep.notify()\n return result\n })\n})\n```\n\nPor outro lado, `Proxy` não tem o problema acima. Ele suporta nativamente a escuta para mudança no array e consegue interceptar o objeto completo diretamente, então Vue irá também substituir `Obeject.defineProperty` por `Proxy` na próxima grande versão.\n\n\n```js\nlet onWatch = (obj, setBind, getLogger) => {\n let handler = {\n get(target, property, receiver) {\n getLogger(target, property)\n return Reflect.get(target, property, receiver);\n },\n set(target, property, value, receiver) {\n setBind(value);\n return Reflect.set(target, property, value);\n }\n };\n return new Proxy(obj, handler);\n};\n\nlet obj = { a: 1 }\nlet value\nlet p = onWatch(obj, (v) => {\n value = v\n}, (target, property) => {\n console.log(`Get '${property}' = ${target[property]}`);\n})\np.a = 2 // vincula `value` para `2`\np.a // -> obtém 'a' = 2\n```\n\n# Princípio de rotas\n\nAs rotas no front-end é atualmente simples de implementar. A essência é escutar as mudanças na URL, então coincidir com as regras de roteamento, exibindo a página correspondente, e não precisa atualizar. Atualmente, existe apenas duas implementações de rotas usados pela página única.\n\n- modo hash\n- modo history\n\n\n`www.test.com/#/` é a hash URL. Quando o valor depois do hash `#` muda, nenhuma request será enviada ao servidor. Você pode escutar as mudanças na URL através do evento `hashchange`, e então pular para a página correspondente.\n\n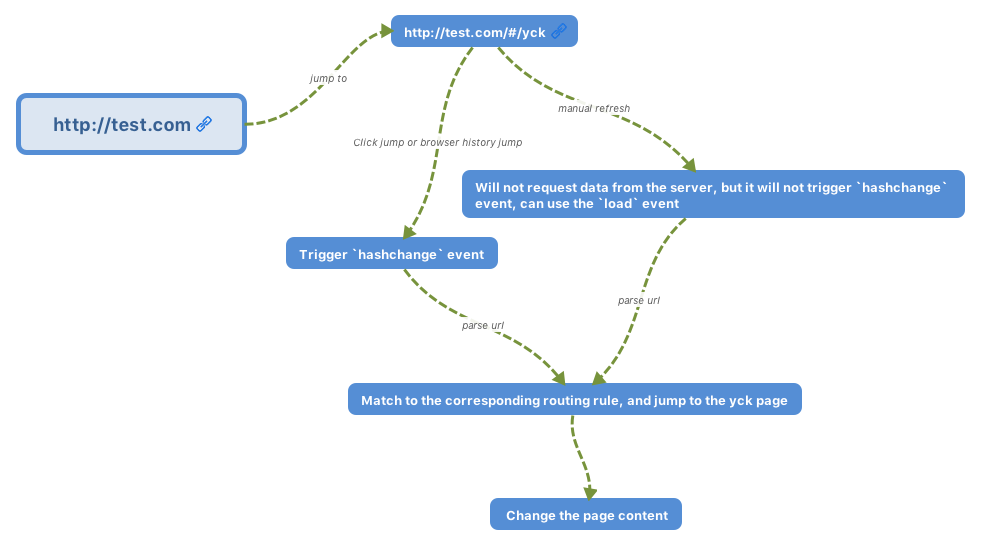\n\nO modo history é uma nova funcionalidade do HTML5, do qual é muito mais lindo que o Hash URL. \n\n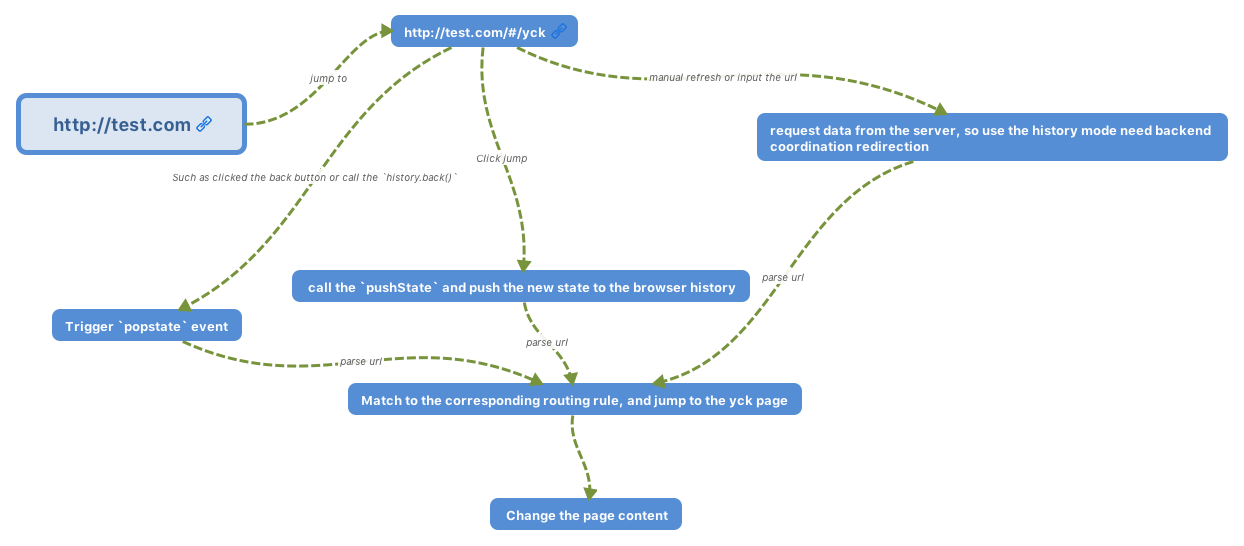\n\n# Virtual Dom\n\n[source code](https://github.com/KieSun/My-wheels/tree/master/Virtual%20Dom)\n\n## Por que Virtual Dom é preciso\n\nComo nós sabemos, modificar o DOM é uma tarefa custosa. Poderiamos considerar usar objetos JS para simular objetos DOM, desde de que operando em objetos JS é economizado muito mais tempo que operar no DOM.\n\nPor exemplo\n\n```js\n// Vamos assumir que esse array simula um ul do qual cotém 5 li's.\n[1, 2, 3, 4, 5]\n// usando esse para substituir a ul acima.\n[1, 2, 5, 4]\n```\n\nA partir do exemplo acima, é aparente que a terceira li foi removida, e a quarta e quinta mudaram suas posições\n\nSe a operação anterior for aplicada no DOM, nós temos o seguinte código:\n\n```js\n// removendo a terceira li\nul.childNodes[2].remove()\n// trocando internamente as posições do quarto e quinto elemento\nlet fromNode = ul.childNodes[4]\nlet toNode = node.childNodes[3]\nlet cloneFromNode = fromNode.cloneNode(true)\nlet cloenToNode = toNode.cloneNode(true)\nul.replaceChild(cloneFromNode, toNode)\nul.replaceChild(cloenToNode, fromNode)\n```\n\nDe fato, nas operações atuais, nós precisamos de um identificador para cada nó, como um index para verificar se os dois nós são idênticos. Esse é o motivo de ambos Vue e React sugerirem na documentação oficial usar identificadores `key` para os nós em uma lista para garantir eficiência.\n\nElementos do DOM não só podem ser simulados, mas eles também podem ser renderizados por objetos JS.\n\nAbaixo está uma simples implementação de um objeto JS simulando um elemento DOM.\n\n```js\nexport default class Element {\n /**\n * @param {String} tag 'div'\n * @param {Object} props { class: 'item' }\n * @param {Array} children [ Element1, 'text']\n * @param {String} key option\n */\n constructor(tag, props, children, key) {\n this.tag = tag\n this.props = props\n if (Array.isArray(children)) {\n this.children = children\n } else if (isString(children)) {\n this.key = children\n this.children = null\n }\n if (key) this.key = key\n }\n // renderização\n render() {\n let root = this._createElement(\n this.tag,\n this.props,\n this.children,\n this.key\n )\n document.body.appendChild(root)\n return root\n }\n create() {\n return this._createElement(this.tag, this.props, this.children, this.key)\n }\n // criando um elemento\n _createElement(tag, props, child, key) {\n // criando um elemento com tag\n let el = document.createElement(tag)\n // definindo propriedades em um elemento\n for (const key in props) {\n if (props.hasOwnProperty(key)) {\n const value = props[key]\n el.setAttribute(key, value)\n }\n }\n if (key) {\n el.setAttribute('key', key)\n }\n // adicionando nós filhos recursivamente\n if (child) {\n child.forEach(element => {\n let child\n if (element instanceof Element) {\n child = this._createElement(\n element.tag,\n element.props,\n element.children,\n element.key\n )\n } else {\n child = document.createTextNode(element)\n }\n el.appendChild(child)\n })\n }\n return el\n }\n}\n```\n\n## Introdução ao algoritmo de Virtual Dom\n\nO próximo passo depois de usar JS para implementar elementos DOM é detectar mudanças no objeto.\n\nDOM é uma árvore de multi-ramifacações. Se nós compararmos a antiga e a nova árvore completamente, o tempo de complexidade seria O(n ^ 3), o que é simplesmente inaceitável. Assim sendo, o time do React otimizou esse algoritimo para alcançar uma complexidade O(n) para detectar as mudanças.\n\nA chave para alcançar O(n) é apenas comparar os\nnós no mesmo nível em vez de através dos níveis. Isso funciona porque no uso atual nós raramente movemos elementos DOM através dos níveis.\n\nNós então temos dois passos do algoritmo.\n\n- Do topo para fundo, da esquerda para direita itera o objeto, primeira pesquisa de profundidade. Nesse passo adicionamos um índice para cada nó, renderizando as diferenças depois. \n- sempre que um nó tiver um elemento filho, nós verificamos se o elemento filho mudou.\n\n## Implementação do algoritmo do Virtual Dom\n\n### recursão da árvore\n\nPrimeiro vamos implementar o algoritmo de recursão da árvore. Antes de fazer isso, vamos considerar os diferentes casos de comparar dois nós.\n\n1. novos nós `tagName` ou `key` são diferentes do antigo. Isso significa que o nó antigo é substituido, e nós não temos que recorrer no nó mais porque a subárvore foi completamente removida.\n2. novos nós `tagName` e `key` (talvez inexistente) são a mesma do antigo. Nós começamos a recursar na subárvore.\n3. não aparece novo nó. Não é preciso uma operação.\n\n```js\nimport { StateEnums, isString, move } from './util'\nimport Element from './element'\n\nexport default function diff(oldDomTree, newDomTree) {\n // para gravar mudanças\n let pathchs = {}\n // o índice começa no 0\n dfs(oldDomTree, newDomTree, 0, pathchs)\n return pathchs\n}\n\nfunction dfs(oldNode, newNode, index, patches) {\n // para salvar as mudanças na subárvore\n let curPatches = []\n // três casos\n // 1. não é novo nó, não faça nada\n // 2. novos nós tagName e `key` são diferentes dos antigos, substitua\n // 3. novos nós tagName e key são o mesmo do antigo, comece a recursão\n if (!newNode) {\n } else if (newNode.tag === oldNode.tag && newNode.key === oldNode.key) {\n // verifique se as propriedades mudaram\n let props = diffProps(oldNode.props, newNode.props)\n if (props.length) curPatches.push({ type: StateEnums.ChangeProps, props })\n // recurse a subárvore\n diffChildren(oldNode.children, newNode.children, index, patches)\n } else {\n // diferentes nós, substitua\n curPatches.push({ type: StateEnums.Replace, node: newNode })\n }\n\n if (curPatches.length) {\n if (patches[index]) {\n patches[index] = patches[index].concat(curPatches)\n } else {\n patches[index] = curPatches\n }\n }\n}\n```\n\n### verificando mudança das propriedades\n\nNós temos também três passos para verificar por mudanças nas propriedades\n\n1. itere a lista de propriedades antiga, verifique se a propriedade ainda existe na nova lista de propriedade.\n2. itere a nova lista de propriedades, verifique se existe mudanças para propriedades existente nas duas listas.\n3. no segundo passo, também verifique se a propriedade não existe na lista de propriedades antiga.\n\n```js\nfunction diffProps(oldProps, newProps) {\n // três passos para checar as props\n // itere oldProps para remover propriedades\n // itere newProps para mudar os valores das propriedades\n // por último verifique se novas propriedades foram adicionadas\n let change = []\n for (const key in oldProps) {\n if (oldProps.hasOwnProperty(key) && !newProps[key]) {\n change.push({\n prop: key\n })\n }\n }\n for (const key in newProps) {\n if (newProps.hasOwnProperty(key)) {\n const prop = newProps[key]\n if (oldProps[key] && oldProps[key] !== newProps[key]) {\n change.push({\n prop: key,\n value: newProps[key]\n })\n } else if (!oldProps[key]) {\n change.push({\n prop: key,\n value: newProps[key]\n })\n }\n }\n }\n return change\n}\n```\n\n### Implementação do Algoritmo de detecção de mudanças na lista\n\nEsse algoritmo é o núcle do Virtual Dom. Vamos descer a lista.\nO passo principal é similar a verificação de mudanças nas propriedades. Também existe três passos.\n\n1. itere a antiga lista de nós, verifique se ao nó ainda existe na nova lista.\n2. itere a nova lista de nós, verifiquen se existe algum novo nó.\n3. para o seguindo passo, também verifique se o nó moveu.\n\nPS: esse algoritmo apenas manipula nós com `key`s.\n\n```js\nfunction listDiff(oldList, newList, index, patches) {\n // para fazer a iteração mais conveniente, primeiro pegue todas as chaves de ambas as listas\n let oldKeys = getKeys(oldList)\n let newKeys = getKeys(newList)\n let changes = []\n\n // para salvar o dado do nó depois das mudanças\n // existe varia vantagem de usar esse array para salvar\n // 1. nós conseguimos obter corretamente o index de nós deletados\n // 2. precisamos apenas opera no DOM uma vez para interexchanged os nós \n // 3. precisamos apenas iterar para verificar na função `diffChildren`\n // nós não precisamos verificar de novo para nós existente nas duas listas\n let list = []\n oldList &&\n oldList.forEach(item => {\n let key = item.key\n if (isString(item)) {\n key = item\n }\n // verificando se o novo filho tem o nó atual\n // se não, então delete\n let index = newKeys.indexOf(key)\n if (index === -1) {\n list.push(null)\n } else list.push(key)\n })\n // array depois de alterações iterativas\n let length = list.length\n // uma vez deletando um array de elementos, o índice muda\n // removemos de trás para ter certeza que os índices permanecem o mesmo \n for (let i = length - 1; i >= 0; i--) {\n // verifica se o elemento atual é null, se sim então significa que precisamos remover ele\n if (!list[i]) {\n list.splice(i, 1)\n changes.push({\n type: StateEnums.Remove,\n index: i\n })\n }\n }\n // itere a nova lista, verificando se um nó é adicionado ou movido\n // também adicione ou mova nós para `list`\n newList &&\n newList.forEach((item, i) => {\n let key = item.key\n if (isString(item)) {\n key = item\n }\n // verifique se o filho antigo tem o nó atual\n let index = list.indexOf(key)\n // se não então precisamos inserir\n if (index === -1 || key == null) {\n changes.push({\n type: StateEnums.Insert,\n node: item,\n index: i\n })\n list.splice(i, 0, key)\n } else {\n // encontrado o nó, precisamos verificar se ele precisar ser movido.\n if (index !== i) {\n changes.push({\n type: StateEnums.Move,\n from: index,\n to: i\n })\n move(list, index, i)\n }\n }\n })\n return { changes, list }\n}\n\nfunction getKeys(list) {\n let keys = []\n let text\n list &&\n list.forEach(item => {\n let key\n if (isString(item)) {\n key = [item]\n } else if (item instanceof Element) {\n key = item.key\n }\n keys.push(key)\n })\n return keys\n}\n```\n\n### Iterando e marcando elementos filho\n\nPara essa função, existe duas principais funcionalidades.\n\n1. verificando diferenças entre duas listas\n2. marcando nós\n\nNo geral, a implementação das funcionalidades são simples.\n\n```js\nfunction diffChildren(oldChild, newChild, index, patches) {\n let { changes, list } = listDiff(oldChild, newChild, index, patches)\n if (changes.length) {\n if (patches[index]) {\n patches[index] = patches[index].concat(changes)\n } else {\n patches[index] = changes\n }\n }\n // marcando o ultimo nó iterado\n let last = null\n oldChild &&\n oldChild.forEach((item, i) => {\n let child = item && item.children\n if (child) {\n index =\n last && last.children ? index + last.children.length + 1 : index + 1\n let keyIndex = list.indexOf(item.key)\n let node = newChild[keyIndex]\n // só itera nós existentes em ambas as listas\n // não precisamos visitar os adicionados ou removidos \n if (node) {\n dfs(item, node, index, patches)\n }\n } else index += 1\n last = item\n })\n}\n```\n\n### Renderizando diferenças\n\nA partir dos algoritmos anteriores, nós já obtemos as diferenças entre duas árvores. Depois de saber as diferenças, precisamos atualizar o DOM localmente. Vamos dar uma olhada no último passo do algoritmo do Virtual Dom.\n\nHá duas funcionalidades principais para isso\n\n1. Busca profunda na árvore e extrair os nós que precisam ser modificados.\n2. Atualize o DOM local\n\nEsse pedaço de código é bastante fácil de entender como um todo.\n\n```js\nlet index = 0\nexport default function patch(node, patchs) {\n let changes = patchs[index]\n let childNodes = node && node.childNodes\n // essa busca profunda é a mesma do algoritmo de diff\n if (!childNodes) index += 1\n if (changes && changes.length && patchs[index]) {\n changeDom(node, changes)\n }\n let last = null\n if (childNodes && childNodes.length) {\n childNodes.forEach((item, i) => {\n index =\n last && last.children ? index + last.children.length + 1 : index + 1\n patch(item, patchs)\n last = item\n })\n }\n}\n\nfunction changeDom(node, changes, noChild) {\n changes &&\n changes.forEach(change => {\n let { type } = change\n switch (type) {\n case StateEnums.ChangeProps:\n let { props } = change\n props.forEach(item => {\n if (item.value) {\n node.setAttribute(item.prop, item.value)\n } else {\n node.removeAttribute(item.prop)\n }\n })\n break\n case StateEnums.Remove:\n node.childNodes[change.index].remove()\n break\n case StateEnums.Insert:\n let dom\n if (isString(change.node)) {\n dom = document.createTextNode(change.node)\n } else if (change.node instanceof Element) {\n dom = change.node.create()\n }\n node.insertBefore(dom, node.childNodes[change.index])\n break\n case StateEnums.Replace:\n node.parentNode.replaceChild(change.node.create(), node)\n break\n case StateEnums.Move:\n let fromNode = node.childNodes[change.from]\n let toNode = node.childNodes[change.to]\n let cloneFromNode = fromNode.cloneNode(true)\n let cloenToNode = toNode.cloneNode(true)\n node.replaceChild(cloneFromNode, toNode)\n node.replaceChild(cloenToNode, fromNode)\n break\n default:\n break\n }\n })\n}\n```\n\n## Fim\n\nA implementação dos algoritimos do Virtual Dom contém os três seguintes passos:\n\n1. Simular a criação de objetos DOM através do JS\n2. Verifica a diferança entre dois objetos\n2. Renderiza a diferença\n\n```js\nlet test4 = new Element('div', { class: 'my-div' }, ['test4'])\nlet test5 = new Element('ul', { class: 'my-div' }, ['test5'])\n\nlet test1 = new Element('div', { class: 'my-div' }, [test4])\n\nlet test2 = new Element('div', { id: '11' }, [test5, test4])\n\nlet root = test1.render()\n\nlet pathchs = diff(test1, test2)\nconsole.log(pathchs)\n\nsetTimeout(() => {\n console.log('start updating')\n patch(root, pathchs)\n console.log('end updating')\n}, 1000)\n```\n\nEmbora a implementação atual seja simples, isso não é definitivamente o suficiente para ententer os algoritmos do Virtual Dom."
},
{
"path": "Framework/framework-en.md",
"content": "\n\n**Table of Contents** *generated with [DocToc](https://github.com/thlorenz/doctoc)*\n\n- [MVVM](#mvvm)\n - [Dirty Checking](#dirty-checking)\n - [Data hijacking](#data-hijacking)\n - [Proxy vs. Object.defineProperty](#proxy-vs-objectdefineproperty)\n- [Routing principle](#routing-principle)\n- [Virtual Dom](#virtual-dom)\n - [Why Virtual Dom is needed](#why-virtual-dom-is-needed)\n - [Virtual Dom algorithm introduction](#virtual-dom-algorithm-introduction)\n - [Virtual Dom algorithm implementation](#virtual-dom-algorithm-implementation)\n - [recursion of the tree](#recursion-of-the-tree)\n - [checking property changes](#checking-property-changes)\n - [Algorithm Implementation for Detecting List Changes](#algorithm-implementation-for-detecting-list-changes)\n - [Iterating and Marking Child Elements](#iterating-and-marking-child-elements)\n - [Rendering Difference](#rendering-difference)\n - [The End](#the-end)\n\n\n\n# MVVM\n\nMVVM consists of the following three contents\n\n* View: interface\n* Model:Data model\n* ViewModel:As a bridge responsible for communicating View and Model\n\n\nIn the JQuery period, if you need to refresh the UI, you need to get the corresponding DOM and then update the UI, so the data and business logic are strongly-coupled with the page.\n\nIn MVVM, the UI is driven by data. Once the data is changed, the corresponding UI will be refreshed. If the UI changes, the corresponding data will also be changed. In this way, we can only care about the data flow in business processing without dealing with the page directly. ViewModel only cares about the processing of data and business and does not care how View handles data. In this case, we can separate the View from the Model. If either party changes, it does not necessarily need to change the other party, and some reusable logic can be placed in a ViewModel, allowing multiple Views to reuse this ViewModel.\n\nIn MVVM, the core is the two-way binding of data, such as dirty checking by Angular and data hijacking in Vue.\n\n\n## Dirty Checking\n\nWhen the specified event is triggered, it will enter the dirty checking and call the `$digest` loop to walk through all the data observers to determine whether the current value is different from the previous value. If a change is detected, it will call the `$watch` function, and then call the `$digest` loop again until no changes are found. The cycle is at least two times, up to ten times.\n\nAlthough dirty checking has inefficiencies, it can complete the task without caring about how the data is changed, but the two-way binding in `Vue` is problematic. And dirty checking can achieve batch detection of updated values, and then unified update UI, greatly reducing the number of operating DOM. Therefore, inefficiency is also relative, and this is what the benevolent sees the wise and sees wisdom.\n\n\n## Data hijacking\n\nVue internally uses `Object.defineProperty()` to implement two-way binding, which allows you to listen for events of `set` and `get`.\n\n```js\nvar data = { name: 'yck' }\nobserve(data)\nlet name = data.name // -> get value\ndata.name = 'yyy' // -> change value\n\nfunction observe(obj) {\n // judge the type\n if (!obj || typeof obj !== 'object') {\n return\n }\n Object.keys(obj).forEach(key => {\n defineReactive(obj, key, obj[key])\n })\n}\n\nfunction defineReactive(obj, key, val) {\n // recurse the properties of child\n observe(val)\n Object.defineProperty(obj, key, {\n enumerable: true,\n configurable: true,\n get: function reactiveGetter() {\n console.log('get value')\n return val\n },\n set: function reactiveSetter(newVal) {\n console.log('change value')\n val = newVal\n }\n })\n}\n```\n\nThe above code simply implements how to listen for the `set` and `get` events of the data, but that's not enough. You also need to add a Publish/Subscribe to the property when appropriate.\n\n```html\n
\n {{name}}\n
\n```\n\n::: v-pre\nIn the process of parsing the template code like above, when encountering `{{name}}`, add a publish/subscribe to the property `name` \n:::\n\n```js\n// decouple by Dep\nclass Dep {\n constructor() {\n this.subs = []\n }\n addSub(sub) {\n // Sub is an instance of Watcher\n this.subs.push(sub)\n }\n notify() {\n this.subs.forEach(sub => {\n sub.update()\n })\n }\n}\n// Global property, configure Watcher with this property\nDep.target = null\n\nfunction update(value) {\n document.querySelector('div').innerText = value\n}\n\nclass Watcher {\n constructor(obj, key, cb) {\n // Point Dep.target to itself \n // Then trigger the getter of the property to add the listener\n // Finally, set Dep.target as null \n Dep.target = this\n this.cb = cb\n this.obj = obj\n this.key = key\n this.value = obj[key]\n Dep.target = null\n }\n update() {\n // get the new value\n this.value = this.obj[this.key]\n // update Dom with the update method\n this.cb(this.value)\n }\n}\nvar data = { name: 'yck' }\nobserve(data)\n// Simulate the action triggered by parsing the `{{name}}`\nnew Watcher(data, 'name', update)\n// update Dom innerText\ndata.name = 'yyy' \n```\n\nNext, improve on the `defineReactive` function.\n\n```js\nfunction defineReactive(obj, key, val) {\n // recurse the properties of child\n observe(val)\n let dp = new Dep()\n Object.defineProperty(obj, key, {\n enumerable: true,\n configurable: true,\n get: function reactiveGetter() {\n console.log('get value')\n // Add Watcher to the subscription\n if (Dep.target) {\n dp.addSub(Dep.target)\n }\n return val\n },\n set: function reactiveSetter(newVal) {\n console.log('change value')\n val = newVal\n // Execute the update method of Watcher\n dp.notify()\n }\n })\n}\n```\n\nThe above implements a simple two-way binding. The core idea is to manually trigger the getter of the property to add the Publish/Subscribe.\n\n\n\n## Proxy vs. Object.defineProperty\n\nAlthough `Object.defineProperty` has been able to implement two-way binding, it is still flawed.\n\n* It can only implement data hijacking on properties, so it needs deep traversal of the entire object\n* it can't listen to changes in data for arrays\n\nAlthough Vue can detect the changes in array data, it is actually a hack and is flawed.\n\n```js\nconst arrayProto = Array.prototype\nexport const arrayMethods = Object.create(arrayProto)\n// hack the following functions\nconst methodsToPatch = [\n 'push',\n 'pop',\n 'shift',\n 'unshift',\n 'splice',\n 'sort',\n 'reverse'\n]\nmethodsToPatch.forEach(function (method) {\n // get the native function\n const original = arrayProto[method]\n def(arrayMethods, method, function mutator (...args) {\n // call the native function\n const result = original.apply(this, args)\n const ob = this.__ob__\n let inserted\n switch (method) {\n case 'push':\n case 'unshift':\n inserted = args\n break\n case 'splice':\n inserted = args.slice(2)\n break\n }\n if (inserted) ob.observeArray(inserted)\n // trigger the update\n ob.dep.notify()\n return result\n })\n})\n```\n\nOn the other hand, `Proxy` doesn't have the above problem. It natively supports listening to array changes and can intercept the entire object directly, so Vue will also replace `Object.defineProperty` with `Proxy` in the next big version.\n\n```js\nlet onWatch = (obj, setBind, getLogger) => {\n let handler = {\n get(target, property, receiver) {\n getLogger(target, property)\n return Reflect.get(target, property, receiver);\n },\n set(target, property, value, receiver) {\n setBind(value);\n return Reflect.set(target, property, value);\n }\n };\n return new Proxy(obj, handler);\n};\n\nlet obj = { a: 1 }\nlet value\nlet p = onWatch(obj, (v) => {\n value = v\n}, (target, property) => {\n console.log(`Get '${property}' = ${target[property]}`);\n})\np.a = 2 // bind `value` to `2`\np.a // -> Get 'a' = 2\n```\n\n# Routing principle\n\nThe front-end routing is actually very simple to implement. The essence is to listen to changes in the URL, then match the routing rules, display the corresponding page, and no need to refresh. Currently, there are only two implementations of the route used by a single page.\n\n- hash mode\n- history mode\n\n\n`www.test.com/#/` is the hash URL. When the hash value after `#` changes, no request will be sent to server. You can listen to the URL change through the `hashchange` event, and then jump to the corresponding page.\n\n\n\nHistory mode is a new feature of HTML5, which is more beautiful than Hash URL.\n\n\n\n# Virtual Dom\n\n[source code](https://github.com/KieSun/My-wheels/tree/master/Virtual%20Dom)\n\n## Why Virtual Dom is needed\n\nAs we know, modifying DOM is a costly task. We could consider using JS objects to simulate DOM objects, since operating on JS objects is much more time saving than operating on DOM.\n\nFor example\n\n```js\n// Let's assume this array simulates a ul which contains five li's.\n[1, 2, 3, 4, 5]\n// using this to replace the ul above.\n[1, 2, 5, 4]\n```\n\nFrom the above example, it's apparent that the first ul's 3rd li is removed, and the 4th and the 5th are exchanged positions.\n\nIf the previous operation is applied to DOM, we have the following code:\n\n```js\n// removing the 3rd li\nul.childNodes[2].remove()\n// interexchanging positions between the 4th and the 5th\nlet fromNode = ul.childNodes[4]\nlet toNode = node.childNodes[3]\nlet cloneFromNode = fromNode.cloneNode(true)\nlet cloneToNode = toNode.cloneNode(true)\nul.replaceChild(cloneFromNode, toNode)\nul.replaceChild(cloneToNode, fromNode)\n```\n\nOf course, in actual operations, we need an identifier for each node, as an index for checking if two nodes are identical. This is why both Vue and React's official documentation suggests using a unique identifier `key` for nodes in a list to ensure efficiency.\n\nDOM element can not only be simulated, but they can also be rendered by JS objects.\n\nBelow is a simple implementation of a JS object simulating a DOM element.\n\n```js\nexport default class Element {\n /**\n * @param {String} tag 'div'\n * @param {Object} props { class: 'item' }\n * @param {Array} children [ Element1, 'text']\n * @param {String} key option\n */\n constructor(tag, props, children, key) {\n this.tag = tag\n this.props = props\n if (Array.isArray(children)) {\n this.children = children\n } else if (isString(children)) {\n this.key = children\n this.children = null\n }\n if (key) this.key = key\n }\n // render\n render() {\n let root = this._createElement(\n this.tag,\n this.props,\n this.children,\n this.key\n )\n document.body.appendChild(root)\n return root\n }\n create() {\n return this._createElement(this.tag, this.props, this.children, this.key)\n }\n // create an element\n _createElement(tag, props, child, key) {\n // create an element with tag\n let el = document.createElement(tag)\n // set properties on the element\n for (const key in props) {\n if (props.hasOwnProperty(key)) {\n const value = props[key]\n el.setAttribute(key, value)\n }\n }\n if (key) {\n el.setAttribute('key', key)\n }\n // add children nodes recursively\n if (child) {\n child.forEach(element => {\n let child\n if (element instanceof Element) {\n child = this._createElement(\n element.tag,\n element.props,\n element.children,\n element.key\n )\n } else {\n child = document.createTextNode(element)\n }\n el.appendChild(child)\n })\n }\n return el\n }\n}\n```\n\n## Virtual Dom algorithm introduction\n\nThe next step after using JS to implement DOM element is to detect object changes.\n\nDOM is a multi-branching tree. If we were to compare the old and the new trees thoroughly, the time complexity would be O(n ^ 3), which is simply unacceptable. Therefore, the React team optimized their algorithm to achieve an O(n) complexity for detecting changes.\n\nThe key to achieving O(n) is to only compare the nodes on the same level rather than across levels. This works because in actual usage we rarely move DOM elements across levels.\n\nWe then have two steps of the algorithm.\n\n- from top to bottom, from left to right to iterate the object, aka depth first search. This step adds an index to every node, for rendering the differences later.\n- whenever a node has a child element, we check whether the child element changed.\n\n## Virtual Dom algorithm implementation\n\n### recursion of the tree\n\nFirst let's implement the recursion algorithm of the tree. Before doing that, let's consider the different cases of comparing two nodes.\n\n1. new node's `tagName` or `key` is different from that of the old one. This means the old node is replaced, and we don't have to recurse on the node any more because the whole subtree is removed.\n2. new node's `tagName` and `key` (maybe nonexistent) are the same as the old's. We start recursing on the subtree.\n3. no new node appears. No operation needed.\n\n```js\nimport { StateEnums, isString, move } from './util'\nimport Element from './element'\n\nexport default function diff(oldDomTree, newDomTree) {\n // for recording changes\n let patches = {}\n // the index starts at 0\n dfs(oldDomTree, newDomTree, 0, patches)\n return patches\n}\n\nfunction dfs(oldNode, newNode, index, patches) {\n // for saving the subtree changes\n let curPatches = []\n // three cases\n // 1. no new node, do nothing\n // 2. new nodes' tagName and `key` are different from the old one's, replace\n // 3. new nodes' tagName and key are the same as the old one's, start recursing\n if (!newNode) {\n } else if (newNode.tag === oldNode.tag && newNode.key === oldNode.key) {\n // check whether properties changed\n let props = diffProps(oldNode.props, newNode.props)\n if (props.length) curPatches.push({ type: StateEnums.ChangeProps, props })\n // recurse the subtree\n diffChildren(oldNode.children, newNode.children, index, patches)\n } else {\n // different node, replace\n curPatches.push({ type: StateEnums.Replace, node: newNode })\n }\n\n if (curPatches.length) {\n if (patches[index]) {\n patches[index] = patches[index].concat(curPatches)\n } else {\n patches[index] = curPatches\n }\n }\n}\n```\n\n### checking property changes\n\nWe also have three steps for checking for property changes\n\n1. iterate the old property list, check if the property still exists in the new property list.\n2. iterate the new property list, check if there are changes for properties existing in both lists.\n3. for the second step, also check if a property doesn't exist in the old property list.\n\n```js\nfunction diffProps(oldProps, newProps) {\n // three steps for checking for props\n // iterate oldProps for removed properties\n // iterate newProps for changed property values\n // lastly check if new properties are added\n let change = []\n for (const key in oldProps) {\n if (oldProps.hasOwnProperty(key) && !newProps[key]) {\n change.push({\n prop: key\n })\n }\n }\n for (const key in newProps) {\n if (newProps.hasOwnProperty(key)) {\n const prop = newProps[key]\n if (oldProps[key] && oldProps[key] !== newProps[key]) {\n change.push({\n prop: key,\n value: newProps[key]\n })\n } else if (!oldProps[key]) {\n change.push({\n prop: key,\n value: newProps[key]\n })\n }\n }\n }\n return change\n}\n```\n\n### Algorithm Implementation for Detecting List Changes\n\nThis algorithm is the core of the Virtual Dom. Let's go down the list.\nThe main steps are similar to checking property changes. There are also three steps.\n\n1. iterate the old node list, check if the node still exists in the new list.\n2. iterate the new node list, check if there is any new node.\n3. for the second step, also check if a node moved.\n\nPS: this algorithm only handles nodes with `key`s.\n\n```js\nfunction listDiff(oldList, newList, index, patches) {\n // to make the iteration more convenient, first take all keys from both lists\n let oldKeys = getKeys(oldList)\n let newKeys = getKeys(newList)\n let changes = []\n\n // for saving the node data after changes\n // there are several advantages of using this array to save\n // 1. we can correctly obtain the index of the deleted node\n // 2. we only need to operate on the DOM once for interexchanged nodes\n // 3. we only need to iterate for the checking in the `diffChildren` function\n // we don't need to check again for nodes existing in both lists\n let list = []\n oldList &&\n oldList.forEach(item => {\n let key = item.key\n if (isString(item)) {\n key = item\n }\n // checking if the new children has the current node\n // if not then delete\n let index = newKeys.indexOf(key)\n if (index === -1) {\n list.push(null)\n } else list.push(key)\n })\n // array after iterative changes\n let length = list.length\n // since deleting array elements changes the indices\n // we remove from the back to make sure indices stay the same\n for (let i = length - 1; i >= 0; i--) {\n // check if the current element is null, if so then it means we need to remove it\n if (!list[i]) {\n list.splice(i, 1)\n changes.push({\n type: StateEnums.Remove,\n index: i\n })\n }\n }\n // iterate the new list, check if a node is added or moved\n // also add and move nodes for `list`\n newList &&\n newList.forEach((item, i) => {\n let key = item.key\n if (isString(item)) {\n key = item\n }\n // check if the old children has the current node\n let index = list.indexOf(key)\n // if not then we need to insert\n if (index === -1 || key == null) {\n changes.push({\n type: StateEnums.Insert,\n node: item,\n index: i\n })\n list.splice(i, 0, key)\n } else {\n // found the node, need to check if it needs to be moved.\n if (index !== i) {\n changes.push({\n type: StateEnums.Move,\n from: index,\n to: i\n })\n move(list, index, i)\n }\n }\n })\n return { changes, list }\n}\n\nfunction getKeys(list) {\n let keys = []\n let text\n list &&\n list.forEach(item => {\n let key\n if (isString(item)) {\n key = [item]\n } else if (item instanceof Element) {\n key = item.key\n }\n keys.push(key)\n })\n return keys\n}\n```\n\n### Iterating and Marking Child Elements\n\nFor this function, there are two main functionalities.\n\n1. checking differences between two lists\n2. marking nodes\n\nIn general, the functionalities implemented are simple.\n\n```js\nfunction diffChildren(oldChild, newChild, index, patches) {\n let { changes, list } = listDiff(oldChild, newChild, index, patches)\n if (changes.length) {\n if (patches[index]) {\n patches[index] = patches[index].concat(changes)\n } else {\n patches[index] = changes\n }\n }\n // marking last iterated node\n let last = null\n oldChild &&\n oldChild.forEach((item, i) => {\n let child = item && item.children\n if (child) {\n index =\n last && last.children ? index + last.children.length + 1 : index + 1\n let keyIndex = list.indexOf(item.key)\n let node = newChild[keyIndex]\n // only iterate nodes existing in both lists\n // no need to visit the added or removed ones\n if (node) {\n dfs(item, node, index, patches)\n }\n } else index += 1\n last = item\n })\n}\n```\n\n### Rendering Difference\n\nFrom the earlier algorithms, we can already get the differences between two trees. After knowing the differences, we need to locally update DOM. Let's take a look at the last step of Virtual Dom algorithms.\n\nTwo main functionalities for this function\n\n1. Deep search the tree and extract the nodes needing modifications\n2. Locally update DOM\n\nThis code snippet is pretty easy to understand as a whole.\n\n```js\nlet index = 0\nexport default function patch(node, patches) {\n let changes = patches[index]\n let childNodes = node && node.childNodes\n // this deep search is the same as the one in diff algorithm\n if (!childNodes) index += 1\n if (changes && changes.length && patches[index]) {\n changeDom(node, changes)\n }\n let last = null\n if (childNodes && childNodes.length) {\n childNodes.forEach((item, i) => {\n index =\n last && last.children ? index + last.children.length + 1 : index + 1\n patch(item, patches)\n last = item\n })\n }\n}\n\nfunction changeDom(node, changes, noChild) {\n changes &&\n changes.forEach(change => {\n let { type } = change\n switch (type) {\n case StateEnums.ChangeProps:\n let { props } = change\n props.forEach(item => {\n if (item.value) {\n node.setAttribute(item.prop, item.value)\n } else {\n node.removeAttribute(item.prop)\n }\n })\n break\n case StateEnums.Remove:\n node.childNodes[change.index].remove()\n break\n case StateEnums.Insert:\n let dom\n if (isString(change.node)) {\n dom = document.createTextNode(change.node)\n } else if (change.node instanceof Element) {\n dom = change.node.create()\n }\n node.insertBefore(dom, node.childNodes[change.index])\n break\n case StateEnums.Replace:\n node.parentNode.replaceChild(change.node.create(), node)\n break\n case StateEnums.Move:\n let fromNode = node.childNodes[change.from]\n let toNode = node.childNodes[change.to]\n let cloneFromNode = fromNode.cloneNode(true)\n let cloneToNode = toNode.cloneNode(true)\n node.replaceChild(cloneFromNode, toNode)\n node.replaceChild(cloneToNode, fromNode)\n break\n default:\n break\n }\n })\n}\n```\n\n## The End\n\nThe implementation of the Virtual Dom algorithms contains the following three steps:\n\n1. Simulate the creation of DOM objects through JS\n2. Check differences between two objects\n3. Render the differences\n\n```js\nlet test4 = new Element('div', { class: 'my-div' }, ['test4'])\nlet test5 = new Element('ul', { class: 'my-div' }, ['test5'])\n\nlet test1 = new Element('div', { class: 'my-div' }, [test4])\n\nlet test2 = new Element('div', { id: '11' }, [test5, test4])\n\nlet root = test1.render()\n\nlet patches = diff(test1, test2)\nconsole.log(patches)\n\nsetTimeout(() => {\n console.log('start updating')\n patch(root, patches)\n console.log('end updating')\n}, 1000)\n```\n\nAlthough the current implementation is simple, it's definitely enough for understanding Virtual Dom algorithms.\n"
},
{
"path": "Framework/framework-zh.md",
"content": "\n\n**Table of Contents** *generated with [DocToc](https://github.com/thlorenz/doctoc)*\n\n- [MVVM](#mvvm)\n - [脏数据检测](#%E8%84%8F%E6%95%B0%E6%8D%AE%E6%A3%80%E6%B5%8B)\n - [数据劫持](#%E6%95%B0%E6%8D%AE%E5%8A%AB%E6%8C%81)\n - [Proxy 与 Object.defineProperty 对比](#proxy-%E4%B8%8E-objectdefineproperty-%E5%AF%B9%E6%AF%94)\n- [路由原理](#%E8%B7%AF%E7%94%B1%E5%8E%9F%E7%90%86)\n- [Virtual Dom](#virtual-dom)\n - [为什么需要 Virtual Dom](#%E4%B8%BA%E4%BB%80%E4%B9%88%E9%9C%80%E8%A6%81-virtual-dom)\n - [Virtual Dom 算法简述](#virtual-dom-%E7%AE%97%E6%B3%95%E7%AE%80%E8%BF%B0)\n - [Virtual Dom 算法实现](#virtual-dom-%E7%AE%97%E6%B3%95%E5%AE%9E%E7%8E%B0)\n - [树的递归](#%E6%A0%91%E7%9A%84%E9%80%92%E5%BD%92)\n - [判断属性的更改](#%E5%88%A4%E6%96%AD%E5%B1%9E%E6%80%A7%E7%9A%84%E6%9B%B4%E6%94%B9)\n - [判断列表差异算法实现](#%E5%88%A4%E6%96%AD%E5%88%97%E8%A1%A8%E5%B7%AE%E5%BC%82%E7%AE%97%E6%B3%95%E5%AE%9E%E7%8E%B0)\n - [遍历子元素打标识](#%E9%81%8D%E5%8E%86%E5%AD%90%E5%85%83%E7%B4%A0%E6%89%93%E6%A0%87%E8%AF%86)\n - [渲染差异](#%E6%B8%B2%E6%9F%93%E5%B7%AE%E5%BC%82)\n - [最后](#%E6%9C%80%E5%90%8E)\n\n\n\n# MVVM\n\nMVVM 由以下三个内容组成\n\n- View:界面\n- Model:数据模型\n- ViewModel:作为桥梁负责沟通 View 和 Model\n\n在 JQuery 时期,如果需要刷新 UI 时,需要先取到对应的 DOM 再更新 UI,这样数据和业务的逻辑就和页面有强耦合。\n\n在 MVVM 中,UI 是通过数据驱动的,数据一旦改变就会相应的刷新对应的 UI,UI 如果改变,也会改变对应的数据。这种方式就可以在业务处理中只关心数据的流转,而无需直接和页面打交道。ViewModel 只关心数据和业务的处理,不关心 View 如何处理数据,在这种情况下,View 和 Model 都可以独立出来,任何一方改变了也不一定需要改变另一方,并且可以将一些可复用的逻辑放在一个 ViewModel 中,让多个 View 复用这个 ViewModel。\n\n在 MVVM 中,最核心的也就是数据双向绑定,例如 Angluar 的脏数据检测,Vue 中的数据劫持。\n\n## 脏数据检测\n\n当触发了指定事件后会进入脏数据检测,这时会调用 `$digest` 循环遍历所有的数据观察者,判断当前值是否和先前的值有区别,如果检测到变化的话,会调用 `$watch` 函数,然后再次调用 `$digest` 循环直到发现没有变化。循环至少为二次 ,至多为十次。\n\n脏数据检测虽然存在低效的问题,但是不关心数据是通过什么方式改变的,都可以完成任务,但是这在 Vue 中的双向绑定是存在问题的。并且脏数据检测可以实现批量检测出更新的值,再去统一更新 UI,大大减少了操作 DOM 的次数。所以低效也是相对的,这就仁者见仁智者见智了。\n\n## 数据劫持\n\nVue 内部使用了 `Object.defineProperty()` 来实现双向绑定,通过这个函数可以监听到 `set` 和 `get` 的事件。\n\n```js\nvar data = { name: 'yck' }\nobserve(data)\nlet name = data.name // -> get value\ndata.name = 'yyy' // -> change value\n\nfunction observe(obj) {\n // 判断类型\n if (!obj || typeof obj !== 'object') {\n return\n }\n Object.keys(obj).forEach(key => {\n defineReactive(obj, key, obj[key])\n })\n}\n\nfunction defineReactive(obj, key, val) {\n // 递归子属性\n observe(val)\n Object.defineProperty(obj, key, {\n enumerable: true,\n configurable: true,\n get: function reactiveGetter() {\n console.log('get value')\n return val\n },\n set: function reactiveSetter(newVal) {\n console.log('change value')\n val = newVal\n }\n })\n}\n```\n\n以上代码简单的实现了如何监听数据的 `set` 和 `get` 的事件,但是仅仅如此是不够的,还需要在适当的时候给属性添加发布订阅\n\n```html\n
\n {{name}}\n
\n```\n::: v-pre\n在解析如上模板代码时,遇到 `{{name}}` 就会给属性 `name` 添加发布订阅。\n:::\n\n```js\n// 通过 Dep 解耦\nclass Dep {\n constructor() {\n this.subs = []\n }\n addSub(sub) {\n // sub 是 Watcher 实例\n this.subs.push(sub)\n }\n notify() {\n this.subs.forEach(sub => {\n sub.update()\n })\n }\n}\n// 全局属性,通过该属性配置 Watcher\nDep.target = null\n\nfunction update(value) {\n document.querySelector('div').innerText = value\n}\n\nclass Watcher {\n constructor(obj, key, cb) {\n // 将 Dep.target 指向自己\n // 然后触发属性的 getter 添加监听\n // 最后将 Dep.target 置空\n Dep.target = this\n this.cb = cb\n this.obj = obj\n this.key = key\n this.value = obj[key]\n Dep.target = null\n }\n update() {\n // 获得新值\n this.value = this.obj[this.key]\n // 调用 update 方法更新 Dom\n this.cb(this.value)\n }\n}\nvar data = { name: 'yck' }\nobserve(data)\n// 模拟解析到 `{{name}}` 触发的操作\nnew Watcher(data, 'name', update)\n// update Dom innerText\ndata.name = 'yyy' \n```\n\n接下来,对 `defineReactive` 函数进行改造\n\n```js\nfunction defineReactive(obj, key, val) {\n // 递归子属性\n observe(val)\n let dp = new Dep()\n Object.defineProperty(obj, key, {\n enumerable: true,\n configurable: true,\n get: function reactiveGetter() {\n console.log('get value')\n // 将 Watcher 添加到订阅\n if (Dep.target) {\n dp.addSub(Dep.target)\n }\n return val\n },\n set: function reactiveSetter(newVal) {\n console.log('change value')\n val = newVal\n // 执行 watcher 的 update 方法\n dp.notify()\n }\n })\n}\n```\n\n以上实现了一个简易的双向绑定,核心思路就是手动触发一次属性的 getter 来实现发布订阅的添加。\n\n## Proxy 与 Object.defineProperty 对比\n\n`Object.defineProperty` 虽然已经能够实现双向绑定了,但是他还是有缺陷的。\n\n1. 只能对属性进行数据劫持,所以需要深度遍历整个对象\n2. 对于数组不能监听到数据的变化\n\n虽然 Vue 中确实能检测到数组数据的变化,但是其实是使用了 hack 的办法,并且也是有缺陷的。\n\n```js\nconst arrayProto = Array.prototype\nexport const arrayMethods = Object.create(arrayProto)\n// hack 以下几个函数\nconst methodsToPatch = [\n 'push',\n 'pop',\n 'shift',\n 'unshift',\n 'splice',\n 'sort',\n 'reverse'\n]\nmethodsToPatch.forEach(function (method) {\n // 获得原生函数\n const original = arrayProto[method]\n def(arrayMethods, method, function mutator (...args) {\n // 调用原生函数\n const result = original.apply(this, args)\n const ob = this.__ob__\n let inserted\n switch (method) {\n case 'push':\n case 'unshift':\n inserted = args\n break\n case 'splice':\n inserted = args.slice(2)\n break\n }\n if (inserted) ob.observeArray(inserted)\n // 触发更新\n ob.dep.notify()\n return result\n })\n})\n```\n\n反观 Proxy 就没以上的问题,原生支持监听数组变化,并且可以直接对整个对象进行拦截,所以 Vue 也将在下个大版本中使用 Proxy 替换 Object.defineProperty\n\n```js\nlet onWatch = (obj, setBind, getLogger) => {\n let handler = {\n get(target, property, receiver) {\n getLogger(target, property)\n return Reflect.get(target, property, receiver);\n },\n set(target, property, value, receiver) {\n setBind(value);\n return Reflect.set(target, property, value);\n }\n };\n return new Proxy(obj, handler);\n};\n\nlet obj = { a: 1 }\nlet value\nlet p = onWatch(obj, (v) => {\n value = v\n}, (target, property) => {\n console.log(`Get '${property}' = ${target[property]}`);\n})\np.a = 2 // bind `value` to `2`\np.a // -> Get 'a' = 2\n```\n\n# 路由原理\n\n前端路由实现起来其实很简单,本质就是监听 URL 的变化,然后匹配路由规则,显示相应的页面,并且无须刷新。目前单页面使用的路由就只有两种实现方式\n\n- hash 模式\n- history 模式\n\n`www.test.com/#/` 就是 Hash URL,当 `#` 后面的哈希值发生变化时,不会向服务器请求数据,可以通过 `hashchange` 事件来监听到 URL 的变化,从而进行跳转页面。\n\n\n\nHistory 模式是 HTML5 新推出的功能,比之 Hash URL 更加美观\n\n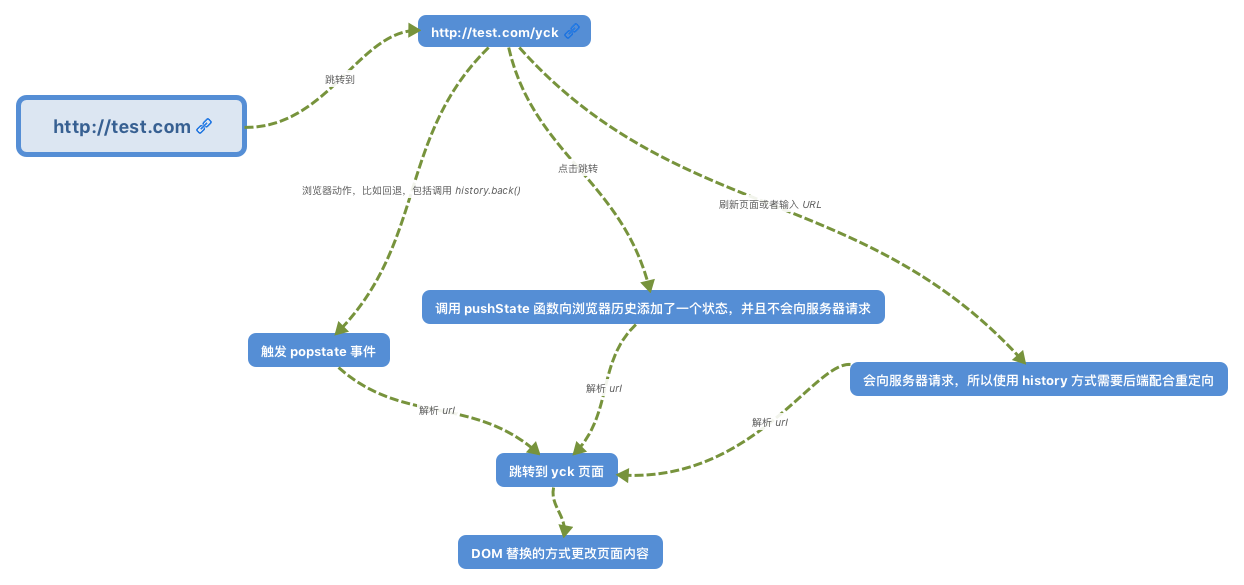\n\n# Virtual Dom\n\n[代码地址](https://github.com/KieSun/My-wheels/tree/master/Virtual%20Dom)\n\n## 为什么需要 Virtual Dom\n\n众所周知,操作 DOM 是很耗费性能的一件事情,既然如此,我们可以考虑通过 JS 对象来模拟 DOM 对象,毕竟操作 JS 对象比操作 DOM 省时的多。\n\n举个例子\n\n```js\n// 假设这里模拟一个 ul,其中包含了 5 个 li\n[1, 2, 3, 4, 5]\n// 这里替换上面的 li\n[1, 2, 5, 4]\n```\n\n从上述例子中,我们一眼就可以看出先前的 ul 中的第三个 li 被移除了,四五替换了位置。\n\n如果以上操作对应到 DOM 中,那么就是以下代码\n\n```js\n// 删除第三个 li\nul.childNodes[2].remove()\n// 将第四个 li 和第五个交换位置\nlet fromNode = ul.childNodes[4]\nlet toNode = node.childNodes[3]\nlet cloneFromNode = fromNode.cloneNode(true)\nlet cloenToNode = toNode.cloneNode(true)\nul.replaceChild(cloneFromNode, toNode)\nul.replaceChild(cloenToNode, fromNode)\n```\n\n当然在实际操作中,我们还需要给每个节点一个标识,作为判断是同一个节点的依据。所以这也是 Vue 和 React 中官方推荐列表里的节点使用唯一的 `key` 来保证性能。\n\n那么既然 DOM 对象可以通过 JS 对象来模拟,反之也可以通过 JS 对象来渲染出对应的 DOM\n\n以下是一个 JS 对象模拟 DOM 对象的简单实现\n\n```js\nexport default class Element {\n /**\n * @param {String} tag 'div'\n * @param {Object} props { class: 'item' }\n * @param {Array} children [ Element1, 'text']\n * @param {String} key option\n */\n constructor(tag, props, children, key) {\n this.tag = tag\n this.props = props\n if (Array.isArray(children)) {\n this.children = children\n } else if (isString(children)) {\n this.key = children\n this.children = null\n }\n if (key) this.key = key\n }\n // 渲染\n render() {\n let root = this._createElement(\n this.tag,\n this.props,\n this.children,\n this.key\n )\n document.body.appendChild(root)\n return root\n }\n create() {\n return this._createElement(this.tag, this.props, this.children, this.key)\n }\n // 创建节点\n _createElement(tag, props, child, key) {\n // 通过 tag 创建节点\n let el = document.createElement(tag)\n // 设置节点属性\n for (const key in props) {\n if (props.hasOwnProperty(key)) {\n const value = props[key]\n el.setAttribute(key, value)\n }\n }\n if (key) {\n el.setAttribute('key', key)\n }\n // 递归添加子节点\n if (child) {\n child.forEach(element => {\n let child\n if (element instanceof Element) {\n child = this._createElement(\n element.tag,\n element.props,\n element.children,\n element.key\n )\n } else {\n child = document.createTextNode(element)\n }\n el.appendChild(child)\n })\n }\n return el\n }\n}\n```\n\n## Virtual Dom 算法简述\n\n既然我们已经通过 JS 来模拟实现了 DOM,那么接下来的难点就在于如何判断旧的对象和新的对象之间的差异。\n\nDOM 是多叉树的结构,如果需要完整的对比两颗树的差异,那么需要的时间复杂度会是 O(n ^ 3),这个复杂度肯定是不能接受的。于是 React 团队优化了算法,实现了 O(n) 的复杂度来对比差异。\n\n实现 O(n) 复杂度的关键就是只对比同层的节点,而不是跨层对比,这也是考虑到在实际业务中很少会去跨层的移动 DOM 元素。\n\n所以判断差异的算法就分为了两步\n\n- 首先从上至下,从左往右遍历对象,也就是树的深度遍历,这一步中会给每个节点添加索引,便于最后渲染差异\n- 一旦节点有子元素,就去判断子元素是否有不同\n\n## Virtual Dom 算法实现\n\n### 树的递归\n\n首先我们来实现树的递归算法,在实现该算法前,先来考虑下两个节点对比会有几种情况\n\n1. 新的节点的 `tagName` 或者 `key` 和旧的不同,这种情况代表需要替换旧的节点,并且也不再需要遍历新旧节点的子元素了,因为整个旧节点都被删掉了\n2. 新的节点的 `tagName` 和 `key`(可能都没有)和旧的相同,开始遍历子树\n3. 没有新的节点,那么什么都不用做\n\n```js\nimport { StateEnums, isString, move } from './util'\nimport Element from './element'\n\nexport default function diff(oldDomTree, newDomTree) {\n // 用于记录差异\n let pathchs = {}\n // 一开始的索引为 0\n dfs(oldDomTree, newDomTree, 0, pathchs)\n return pathchs\n}\n\nfunction dfs(oldNode, newNode, index, patches) {\n // 用于保存子树的更改\n let curPatches = []\n // 需要判断三种情况\n // 1.没有新的节点,那么什么都不用做\n // 2.新的节点的 tagName 和 `key` 和旧的不同,就替换\n // 3.新的节点的 tagName 和 key(可能都没有) 和旧的相同,开始遍历子树\n if (!newNode) {\n } else if (newNode.tag === oldNode.tag && newNode.key === oldNode.key) {\n // 判断属性是否变更\n let props = diffProps(oldNode.props, newNode.props)\n if (props.length) curPatches.push({ type: StateEnums.ChangeProps, props })\n // 遍历子树\n diffChildren(oldNode.children, newNode.children, index, patches)\n } else {\n // 节点不同,需要替换\n curPatches.push({ type: StateEnums.Replace, node: newNode })\n }\n\n if (curPatches.length) {\n if (patches[index]) {\n patches[index] = patches[index].concat(curPatches)\n } else {\n patches[index] = curPatches\n }\n }\n}\n```\n\n### 判断属性的更改\n\n判断属性的更改也分三个步骤\n\n1. 遍历旧的属性列表,查看每个属性是否还存在于新的属性列表中\n2. 遍历新的属性列表,判断两个列表中都存在的属性的值是否有变化\n3. 在第二步中同时查看是否有属性不存在与旧的属性列列表中\n\n```js\nfunction diffProps(oldProps, newProps) {\n // 判断 Props 分以下三步骤\n // 先遍历 oldProps 查看是否存在删除的属性\n // 然后遍历 newProps 查看是否有属性值被修改\n // 最后查看是否有属性新增\n let change = []\n for (const key in oldProps) {\n if (oldProps.hasOwnProperty(key) && !newProps[key]) {\n change.push({\n prop: key\n })\n }\n }\n for (const key in newProps) {\n if (newProps.hasOwnProperty(key)) {\n const prop = newProps[key]\n if (oldProps[key] && oldProps[key] !== newProps[key]) {\n change.push({\n prop: key,\n value: newProps[key]\n })\n } else if (!oldProps[key]) {\n change.push({\n prop: key,\n value: newProps[key]\n })\n }\n }\n }\n return change\n}\n\n```\n\n### 判断列表差异算法实现\n\n这个算法是整个 Virtual Dom 中最核心的算法,且让我一一为你道来。\n这里的主要步骤其实和判断属性差异是类似的,也是分为三步\n\n1. 遍历旧的节点列表,查看每个节点是否还存在于新的节点列表中\n2. 遍历新的节点列表,判断是否有新的节点\n3. 在第二步中同时判断节点是否有移动\n\nPS:该算法只对有 `key` 的节点做处理\n\n```js\nfunction listDiff(oldList, newList, index, patches) {\n // 为了遍历方便,先取出两个 list 的所有 keys\n let oldKeys = getKeys(oldList)\n let newKeys = getKeys(newList)\n let changes = []\n\n // 用于保存变更后的节点数据\n // 使用该数组保存有以下好处\n // 1.可以正确获得被删除节点索引\n // 2.交换节点位置只需要操作一遍 DOM\n // 3.用于 `diffChildren` 函数中的判断,只需要遍历\n // 两个树中都存在的节点,而对于新增或者删除的节点来说,完全没必要\n // 再去判断一遍\n let list = []\n oldList &&\n oldList.forEach(item => {\n let key = item.key\n if (isString(item)) {\n key = item\n }\n // 寻找新的 children 中是否含有当前节点\n // 没有的话需要删除\n let index = newKeys.indexOf(key)\n if (index === -1) {\n list.push(null)\n } else list.push(key)\n })\n // 遍历变更后的数组\n let length = list.length\n // 因为删除数组元素是会更改索引的\n // 所有从后往前删可以保证索引不变\n for (let i = length - 1; i >= 0; i--) {\n // 判断当前元素是否为空,为空表示需要删除\n if (!list[i]) {\n list.splice(i, 1)\n changes.push({\n type: StateEnums.Remove,\n index: i\n })\n }\n }\n // 遍历新的 list,判断是否有节点新增或移动\n // 同时也对 `list` 做节点新增和移动节点的操作\n newList &&\n newList.forEach((item, i) => {\n let key = item.key\n if (isString(item)) {\n key = item\n }\n // 寻找旧的 children 中是否含有当前节点\n let index = list.indexOf(key)\n // 没找到代表新节点,需要插入\n if (index === -1 || key == null) {\n changes.push({\n type: StateEnums.Insert,\n node: item,\n index: i\n })\n list.splice(i, 0, key)\n } else {\n // 找到了,需要判断是否需要移动\n if (index !== i) {\n changes.push({\n type: StateEnums.Move,\n from: index,\n to: i\n })\n move(list, index, i)\n }\n }\n })\n return { changes, list }\n}\n\nfunction getKeys(list) {\n let keys = []\n let text\n list &&\n list.forEach(item => {\n let key\n if (isString(item)) {\n key = [item]\n } else if (item instanceof Element) {\n key = item.key\n }\n keys.push(key)\n })\n return keys\n}\n```\n\n### 遍历子元素打标识\n\n对于这个函数来说,主要功能就两个\n\n1. 判断两个列表差异\n2. 给节点打上标记\n\n总体来说,该函数实现的功能很简单\n\n```js\nfunction diffChildren(oldChild, newChild, index, patches) {\n let { changes, list } = listDiff(oldChild, newChild, index, patches)\n if (changes.length) {\n if (patches[index]) {\n patches[index] = patches[index].concat(changes)\n } else {\n patches[index] = changes\n }\n }\n // 记录上一个遍历过的节点\n let last = null\n oldChild &&\n oldChild.forEach((item, i) => {\n let child = item && item.children\n if (child) {\n index =\n last && last.children ? index + last.children.length + 1 : index + 1\n let keyIndex = list.indexOf(item.key)\n let node = newChild[keyIndex]\n // 只遍历新旧中都存在的节点,其他新增或者删除的没必要遍历\n if (node) {\n dfs(item, node, index, patches)\n }\n } else index += 1\n last = item\n })\n}\n```\n\n### 渲染差异\n\n通过之前的算法,我们已经可以得出两个树的差异了。既然知道了差异,就需要局部去更新 DOM 了,下面就让我们来看看 Virtual Dom 算法的最后一步骤\n\n这个函数主要两个功能\n\n1. 深度遍历树,将需要做变更操作的取出来\n2. 局部更新 DOM\n\n整体来说这部分代码还是很好理解的\n\n```js\nlet index = 0\nexport default function patch(node, patchs) {\n let changes = patchs[index]\n let childNodes = node && node.childNodes\n // 这里的深度遍历和 diff 中是一样的\n if (!childNodes) index += 1\n if (changes && changes.length && patchs[index]) {\n changeDom(node, changes)\n }\n let last = null\n if (childNodes && childNodes.length) {\n childNodes.forEach((item, i) => {\n index =\n last && last.children ? index + last.children.length + 1 : index + 1\n patch(item, patchs)\n last = item\n })\n }\n}\n\nfunction changeDom(node, changes, noChild) {\n changes &&\n changes.forEach(change => {\n let { type } = change\n switch (type) {\n case StateEnums.ChangeProps:\n let { props } = change\n props.forEach(item => {\n if (item.value) {\n node.setAttribute(item.prop, item.value)\n } else {\n node.removeAttribute(item.prop)\n }\n })\n break\n case StateEnums.Remove:\n node.childNodes[change.index].remove()\n break\n case StateEnums.Insert:\n let dom\n if (isString(change.node)) {\n dom = document.createTextNode(change.node)\n } else if (change.node instanceof Element) {\n dom = change.node.create()\n }\n node.insertBefore(dom, node.childNodes[change.index])\n break\n case StateEnums.Replace:\n node.parentNode.replaceChild(change.node.create(), node)\n break\n case StateEnums.Move:\n let fromNode = node.childNodes[change.from]\n let toNode = node.childNodes[change.to]\n let cloneFromNode = fromNode.cloneNode(true)\n let cloenToNode = toNode.cloneNode(true)\n node.replaceChild(cloneFromNode, toNode)\n node.replaceChild(cloenToNode, fromNode)\n break\n default:\n break\n }\n })\n}\n```\n\n## 最后\n\nVirtual Dom 算法的实现也就是以下三步\n\n1. 通过 JS 来模拟创建 DOM 对象\n2. 判断两个对象的差异\n3. 渲染差异\n\n```js\nlet test4 = new Element('div', { class: 'my-div' }, ['test4'])\nlet test5 = new Element('ul', { class: 'my-div' }, ['test5'])\n\nlet test1 = new Element('div', { class: 'my-div' }, [test4])\n\nlet test2 = new Element('div', { id: '11' }, [test5, test4])\n\nlet root = test1.render()\n\nlet pathchs = diff(test1, test2)\nconsole.log(pathchs)\n\nsetTimeout(() => {\n console.log('开始更新')\n patch(root, pathchs)\n console.log('结束更新')\n}, 1000)\n```\n\n当然目前的实现还略显粗糙,但是对于理解 Virtual Dom 算法来说已经是完全足够的了。"
},
{
"path": "Framework/react-br.md",
"content": "\n\n**Table of Contents** *generated with [DocToc](https://github.com/thlorenz/doctoc)*\n\n- [React Lifecycle analysis](#react-lifecycle-analysis)\n - [The usage advice of Lifecycle methods in React V16](#the-usage-advice-of--lifecycle-methods-in-react-v16)\n- [setState](#setstate)\n- [Redux Source Code Analysis](#redux-source-code-analysis)\n\n\n\n# Análise do Ciclo de vida React\n\nO Fiber foi introduzido no lançamento da V16. O mecanismo afeta alguma das chamadas do ciclo de vida até certo ponto e foi introduzida duas novas APIs para resolver problemas.\n\nNas versões anteriores, se eu tiver um componente composto complexo e então mudar o `state` na camada mais alta do componente, a pilha de chamada poderia ser grande.\n\n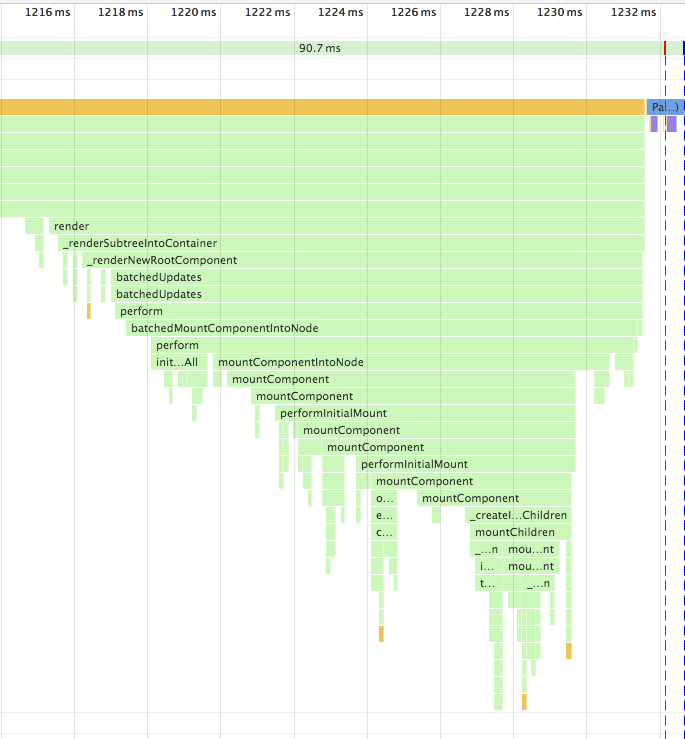\n\nSe a pilha de chamada for muito longa, e complicadas operações estiverem no meio, isso pode causar um bloqueio a thread principal por um longe tempo, resultando em uma experiência ruim para o usuário. Fiber nasceu para resolver esse problema. \n\nFiber é na essência uma pilha virtual de quadros, e o novo agendador espontaneamente agenda esses quadros de acordo\ncom sua prioridade, desse modo, mudando a renderização síncrona anterior para renderização assíncrona, e segmentando a atualização sem afetar a experiência.\n\n\n\nReact tem seu proprio conjunto de lógica sobre como priorizar. Para coisas que requerem alta performance em tempo-real, tal como animação, que significa isso deve ser renderizado uma vez dentro de 16 ms para garantir que não está emperrando, React pausa o update a cada 16 ms (dentro de 16 ms) e retorna para continuar renderizando a animação.\n\nPara renderização assíncrona, existe agora dois estagios de renderização: `reconciliation` e `commit`. O primeiro processo pode ser interrompido, enquanto o último não poder ser suspenso, e a interface será atualizada até isso ser completo.\n\n**Reconciliation** etapa\n\n- `componentWillMount`\n- `componentWillReceiveProps`\n- `shouldComponentUpdate`\n- `componentWillUpdate`\n\n**Commit** etapa\n\n- `componentDidMount`\n- `componentDidUpdate`\n- `componentWillUnmount`\n\nPelo fato que a fase de `reconciliation` pode ser interrompida, as funções do ciclo de vida que executaram na fase de `reconciliation` podem ser chamadas multiplas vezes, o que pode causar vários bugs. Então para essas funções, exceto para `shouldComponentUpdate`, devemos evitar assim que possivel, e uma nova API está introduzida na V16 para resolver esse problema.\n\n`getDerivedStateFromProps` é usado para substituir `componentWillReceiveProps`, do qual é chamado durando a inicialização e atualização\n\n```js\nclass ExampleComponent extends React.Component {\n // Inicializa o state no construtor,\n // Ou com a propriedade initializer.\n state = {};\n\n static getDerivedStateFromProps(nextProps, prevState) {\n if (prevState.someMirroredValue !== nextProps.someValue) {\n return {\n derivedData: computeDerivedState(nextProps),\n someMirroredValue: nextProps.someValue\n };\n }\n\n // Retorna nulo para indicar que não há mudança no state.\n return null;\n }\n}\n```\n\n`getSnapshotBeforeUpdate` é usado para substituir o `componentWillUpdate`, do qual é chamado depois do `update` mas antes do DOM atualizar para leitura o último dado do DOM.\n\n## O conselho usado nos métodos do ciclo de vida no React V16\n\n```js\nclass ExampleComponent extends React.Component {\n // Usado para iniciar o state\n constructor() {}\n // Usado para substituir o `componentWillReceiveProps`, do qual ira ser chamado quando inicializado e `update`\n // Porque a função é estática, você não pode acessar o `this`\n // Se você precisar comparar `prevProps`, você precisa manter ele separado no `state`\n static getDerivedStateFromProps(nextProps, prevState) {}\n // Determina se você precisa atualizar os componentes, usado na maioria das vezes para otimização de performance do componente\n shouldComponentUpdate(nextProps, nextState) {}\n // Chamado depois do componente ser montado\n // Pode requisitar ou subscrever nessa função\n componentDidMount() {}\n // Obter o último dado do DOM\n getSnapshotBeforeUpdate() {}\n // É sobre o componente ser destruido\n // Pode remover subscrições, timers, etc.\n componentWillUnmount() {}\n // Chamado depois do componente ser destruido\n componentDidUnMount() {}\n // Chamado depois da atualização do componente\n componentDidUpdate() {}\n // renderiza o componente\n render() {}\n // As seguintes funções não são recomendadas\n UNSAFE_componentWillMount() {}\n UNSAFE_componentWillUpdate(nextProps, nextState) {}\n UNSAFE_componentWillReceiveProps(nextProps) {}\n}\n```\n\n# setState\n\n`setState` é uma API que é frequentemente usada no React, mas ele tem alguns problemas que podem levar a erros. O centro das razões é que a API é assíncrona.\n\nPrimeiro, chamando `setState` não casa mudança imediata no `state`, e se você chamar multiplos `setState` de uma vez, o resultado pode não ser como o esperado.\n\n```js\nhandle() {\n // Iniciado o `count` em 0\n console.log(this.state.count) // -> 0\n this.setState({ count: this.state.count + 1 })\n this.setState({ count: this.state.count + 1 })\n this.setState({ count: this.state.count + 1 })\n console.log(this.state.count) // -> 0\n}\n```\n\nPrimeiro, ambos os prints são 0, porque o `setState` é uma API assíncrona e irá apenas executar depois do código síncrono terminar sua execução. O motivo para o `setState` ser assíncrono é que `setState` pode causar repintar no DOM. Se a chamada repintar imediatamente depois da chamada, a chamada vai causar uma perca de performance desnecessária. Desenhando para ser assíncrono, você pode colocar multiplas chamadas dentro da fila e unificar os processos de atualização quando apropriado.\n\nSegundo, apesar do `setState` ser chamado três vezes, o valor do `count` ainda é 1. Porque multiplas chamadas são fundidas em uma, o `state` só vai mudar quando a atualização terminar, e três chamadas são equivalente para o seguinte código.\n\n\n```js\nObject.assign( \n {},\n { count: this.state.count + 1 },\n { count: this.state.count + 1 },\n { count: this.state.count + 1 },\n)\n```\n\nDe fato, você pode também chamar `setState` três vezes da seguinte maneira para fazer `count` 3\n\n```js\nhandle() {\n this.setState((prevState) => ({ count: prevState.count + 1 }))\n this.setState((prevState) => ({ count: prevState.count + 1 }))\n this.setState((prevState) => ({ count: prevState.count + 1 }))\n}\n```\n\nSe você quer acessar o `state` correto depois de cada chamada ao `setState`, você pode fazer isso com o seguinte código:\n\n\n```js\nhandle() {\n this.setState((prevState) => ({ count: prevState.count + 1 }), () => {\n console.log(this.state)\n })\n}\n```\n# Análise de código do Redux\n\nVamos dar uma olhada na função `combineReducers` primeiro.\n\n```js\n// passe um objeto\nexport default function combineReducers(reducers) {\n // capture as chaves desse objeto\n const reducerKeys = Object.keys(reducers)\n // reducers depois filtrados\n const finalReducers = {}\n // obtenha os valores correspondentes para cada chave\n // no ambiente de desenvolvimento, verifique se o valor é undefined\n // então coloque os valores do tipo de função dentro do finalReducers\n for (let i = 0; i < reducerKeys.length; i++) {\n const key = reducerKeys[i]\n\n if (process.env.NODE_ENV !== 'production') {\n if (typeof reducers[key] === 'undefined') {\n warning(`No reducer provided for key \"${key}\"`)\n }\n }\n\n if (typeof reducers[key] === 'function') {\n finalReducers[key] = reducers[key]\n }\n }\n // obtenha as chaves dos reducers depois de filtrado\n const finalReducerKeys = Object.keys(finalReducers)\n \n // no ambiente de desenvolvimento verifique e salvo as chaves inesperadas em cache para alertas futuros\n let unexpectedKeyCache\n if (process.env.NODE_ENV !== 'production') {\n unexpectedKeyCache = {}\n }\n \n let shapeAssertionError\n try {\n // explicações de funções estão abaixo\n assertReducerShape(finalReducers)\n } catch (e) {\n shapeAssertionError = e\n }\n// combineReducers retorna outra função, que é reduzido depois de fundido\n// essa função retorna o state raiz\n// também percena que um encerramento é usado aqui. A função usa algumas propriedades externas\n return function combination(state = {}, action) {\n if (shapeAssertionError) {\n throw shapeAssertionError\n }\n // explicações das funções estão abaixo\n if (process.env.NODE_ENV !== 'production') {\n const warningMessage = getUnexpectedStateShapeWarningMessage(\n state,\n finalReducers,\n action,\n unexpectedKeyCache\n )\n if (warningMessage) {\n warning(warningMessage)\n }\n }\n // if state changed\n let hasChanged = false\n // state depois das mudanças\n const nextState = {}\n for (let i = 0; i < finalReducerKeys.length; i++) {\n // obter a chave com index\n const key = finalReducerKeys[i]\n // obter a função de reducer correspondente com a chave\n const reducer = finalReducers[key]\n // a chave na arvore do state é a mesma chave no finalReducers\n // então a chave passada nos parametros para o combineReducers representa cada reducer assim como cada state\n const previousStateForKey = state[key]\n // execute as funções reducer para pegar o state correspondente a chave\n const nextStateForKey = reducer(previousStateForKey, action)\n // verifique o valor do state, reporte erros se ele não estiver undefined\n if (typeof nextStateForKey === 'undefined') {\n const errorMessage = getUndefinedStateErrorMessage(key, action)\n throw new Error(errorMessage)\n }\n // coloque o valor dentro do nextState\n nextState[key] = nextStateForKey\n // se o state mudaou\n hasChanged = hasChanged || nextStateForKey !== previousStateForKey\n }\n // enquanto o state mudar, retorne um novo state\n return hasChanged ? nextState : state\n }\n}\n```\n`combineReducers` é simples e generico. Resumindo, ele aceita um objeto e retorna uma função depois processado os parâmetros. Essa função tem um objeto finalReducers que armazena os parametros processados. O objeto é então iterado, cada função reducer nela é executada, e o novo state é executado.\n\nVamos então olhar as duas funções usadas no combineReducers.\n\n```js\n// a primeira função usada para lançar os erros\nfunction assertReducerShape(reducers) {\n// iterar nós paramêtros no combineReducers\n Object.keys(reducers).forEach(key => {\n const reducer = reducers[key]\n // passar uma ação\n const initialState = reducer(undefined, { type: ActionTypes.INIT })\n // lança um erro se o state estiver undefined\n if (typeof initialState === 'undefined') {\n throw new Error(\n `Reducer \"${key}\" retorna undefined durante a inicialização. ` +\n `Se o state passado para o reducer for undefined, você deve ` +\n `explicitamente retornar o state inicial. O state inicial não deve ` +\n `ser undefined. Se você não quer definir um valor para esse reducer, ` +\n `você pode user null ao invés de undefined.`\n )\n }\n // processe novamente, considerando o caso que o usuário retornou um valor para ActionTypes.INIT no reducer\n // passa uma ação aleatória e verificar se o valor é undefined\n const type =\n '@@redux/PROBE_UNKNOWN_ACTION_' +\n Math.random()\n .toString(36)\n .substring(7)\n .split('')\n .join('.')\n if (typeof reducer(undefined, { type }) === 'undefined') {\n throw new Error(\n `Reducer \"${key}\" retorna undefined quando sondado com um tipo aleatório. ` +\n `Não tente manipular ${\n ActionTypes.INIT\n } ou outras ações no \"redux/*\" ` +\n `namespace.Eles são considerados privado. Ao invés, você deve retornar o ` +\n `state atual para qualquer action desconhecida, a menos que esteja undefined, ` +\n `nesse caso você deve retorna o state inicial, independemente do ` +\n `tipo da ação. O state inicial não deve ser undefined, mas pode ser null.`\n )\n }\n })\n}\n\nfunction getUnexpectedStateShapeWarningMessage(\n inputState,\n reducers,\n action,\n unexpectedKeyCache\n) {\n // aqui os reducers já estão no finalReducers\n const reducerKeys = Object.keys(reducers)\n const argumentName =\n action && action.type === ActionTypes.INIT\n ? 'preloadedState argumento passado para o createStore'\n : 'state anterior recebido pelo reducer'\n \n // se finalReducers estiver vázio\n if (reducerKeys.length === 0) {\n return (\n 'Store não tem um reducer válido. Certifique-se de que um argumento foi passado ' +\n 'para o combineReducers é um objeto do qual os valores são reducers.'\n )\n }\n // se o state passado não é um objeto\n if (!isPlainObject(inputState)) {\n return (\n `O ${argumentName} tem um tipo inesperado de \"` +\n {}.toString.call(inputState).match(/\\s([a-z|A-Z]+)/)[1] +\n `\". O argumento esperado deve ser um objeto com as seguintes ` +\n `chaves: \"${reducerKeys.join('\", \"')}\"`\n )\n }\n // compara as chaves do state a do finalReducers e filtra as chaves extras\n const unexpectedKeys = Object.keys(inputState).filter(\n key => !reducers.hasOwnProperty(key) && !unexpectedKeyCache[key]\n )\n\n unexpectedKeys.forEach(key => {\n unexpectedKeyCache[key] = true\n })\n\n if (action && action.type === ActionTypes.REPLACE) return\n\n// se unexpectedKeys não estiver vázia\n if (unexpectedKeys.length > 0) {\n return (\n `Inesperada ${unexpectedKeys.length > 1 ? 'chaves' : 'chave'} ` +\n `\"${unexpectedKeys.join('\", \"')}\" encontrada em ${argumentName}. ` +\n `Esperado encontrar uma das chaves do reducer conhecida ao invés: ` +\n `\"${reducerKeys.join('\", \"')}\". Chaves inesperadas serão ignoradas.`\n )\n }\n}\n```\n\nVamos então dar uma olhada na função `compose`\n\n```js\n// Essa função é bem elegante. Ela nos permite empilhar diversas funções passando a\n// referências da função. O termo é chamado de Higher-order function.\n// chama funções a partir da direita para esquerda com funções reduce\n// por exemplo, no objeto acima\ncompose(\n applyMiddleware(thunkMiddleware),\n window.devToolsExtension ? window.devToolsExtension() : f => f\n)\n// Com compose ele retorna dentro do applyMiddleware(thunkMiddleware)(window.devToolsExtension()())\n// então você deveria retorna uma função quando window.devToolsExtension não for encontrada\nexport default function compose(...funcs) {\n if (funcs.length === 0) {\n return arg => arg\n }\n\n if (funcs.length === 1) {\n return funcs[0]\n }\n\n return funcs.reduce((a, b) => (...args) => a(b(...args)))\n}\n```\n\nVamos então analisar pare do código da função `createStore`\n\n```js\nexport default function createStore(reducer, preloadedState, enhancer) {\n // normalmente preloadedState é raramente usado\n // verificar o tipo, é o segundo parâmetro da função e não existe terceiro parâmetro, então troque as posições\n if (typeof preloadedState === 'function' && typeof enhancer === 'undefined') {\n enhancer = preloadedState\n preloadedState = undefined\n }\n // verifique se enhancer é uma função\n if (typeof enhancer !== 'undefined') {\n if (typeof enhancer !== 'function') {\n throw new Error('É esperado que enhancer seja uma função.')\n }\n // se não existe um tipo error, primeiro execute o enhancer, então execute o createStore\n return enhancer(createStore)(reducer, preloadedState)\n }\n // verifique se o reducer é uma função\n if (typeof reducer !== 'function') {\n throw new Error('É esperado que o reducer seja uma função.')\n }\n // reducer atual\n let currentReducer = reducer\n // state atual\n let currentState = preloadedState\n // atual listener array\n let currentListeners = []\n // esse é um design muito importante. O proposito é que o currentListeners array seja invariante quando os listeners estiverem sendo interado\n // Nós podemos considerar se apenas um currentListeners existe. Se nós executarmos o subscribe novamente em alguma execução do subscribe, ou unsubscribe isso mudaria o tamanho do currentListeners array, então devemos ter um index erro\n let nextListeners = currentListeners\n // se o reducer está executando\n let isDispatching = false\n // se o currentListeners é o mesmo que o nextListeners, atribua o valor de volta\n function ensureCanMutateNextListeners() {\n if (nextListeners === currentListeners) {\n nextListeners = currentListeners.slice()\n }\n }\n // ......\n}\n```\n\nVamos dar uma olhada na função `applyMiddleware`\n\nAntes eu preciso introduzir um conceito chamado Currying. Currying é uma tecnologia para mudar uma função com multiplos parâmetros em uma série de funções com um único parâmetro.\n\n```js\nfunction add(a,b) { return a + b } \nadd(1, 2) => 3\n// para a função abaixo, nós usamos Currying igual a\nfunction add(a) {\n return b => {\n return a + b\n }\n}\nadd(1)(2) => 3\n// você pode entender Currying como:\n// nós armazenamos uma variável do lado de fora com um closure, e retornamos uma função que leva um parâmetro. Nessa função, nós usamos a variável armazenada e retornamos um valor.\n```\n\n```js\n// essa função deve ser a parte mais obstrusa de todo código\n// essa função retorna um função Curried\n// assim sendo a função deve se chamada como: applyMiddleware(...middlewares)(createStore)(...args)\nexport default function applyMiddleware(...middlewares) {\n return createStore => (...args) => {\n // aqui nós executamos createStore, e passamos o parâmetro passado por último a função applyMiddleware\n const store = createStore(...args)\n let dispatch = () => {\n throw new Error(\n `Dispatching while constructing your middleware is not allowed. ` +\n `Other middleware would not be applied to this dispatch.`\n )\n }\n let chain = []\n // todo middleware deve ter essas duas funções\n const middlewareAPI = {\n getState: store.getState,\n dispatch: (...args) => dispatch(...args)\n }\n // passar cada middleware nos middlewares para o middlewareAPI\n chain = middlewares.map(middleware => middleware(middlewareAPI))\n // assim como antes, chame cada middleware da esquerda para direita, e passo para o store.dispatch\n dispatch = compose(...chain)(store.dispatch)\n // essa parte é um pouco abstrata, nós iremos analisar juntos com o código do redux-thunk\n // createThunkMiddleware retorna uma função de 3-nível, o primeiro nível aceita um parâmetro middlewareAPI\n // o segundo nível aceita store.dispatch\n // o terceiro nível aceita parâmentros no dispatch\n{function createThunkMiddleware(extraArgument) {\n return ({ dispatch, getState }) => next => action => {\n // verifique se o parâmetro no dispatch é uma função\n if (typeof action === 'function') {\n // se assim for, passe esses parâmetros, até as acões não sejam mais uma função, então execute dispatch({type: 'XXX'})\n return action(dispatch, getState, extraArgument);\n }\n\n return next(action);\n };\n}\nconst thunk = createThunkMiddleware();\n\nexport default thunk;}\n// retorn o middleware-empowered dispatch e o resto das propriedades no store.\n return {\n ...store,\n dispatch\n }\n }\n}\n```\n\nAgora nós passamos a parte difícil. Vamos olhar uma parte mais fácil.\n\n```js \n// Não há muito para dizer aqui, retorne o state atual, mas nós não podemos chamar essa função quando o reducer estiver executando\nfunction getState() {\n if (isDispatching) {\n throw new Error(\n 'You may not call store.getState() while the reducer is executing. ' +\n 'The reducer has already received the state as an argument. ' +\n 'Pass it down from the top reducer instead of reading it from the store.'\n )\n }\n\n return currentState\n}\n// aceita uma função parâmetro\nfunction subscribe(listener) {\n if (typeof listener !== 'function') {\n throw new Error('Expected listener to be a function.')\n }\n // a maior parte desse design já foi coberto na descrição sobre nextListeners. Não há muito para falar sobre.\n if (isDispatching) {\n throw new Error(\n 'You may not call store.subscribe() while the reducer is executing. ' +\n 'If you would like to be notified after the store has been updated, subscribe from a ' +\n 'component and invoke store.getState() in the callback to access the latest state. ' +\n 'See http://redux.js.org/docs/api/Store.html#subscribe for more details.'\n )\n }\n\n let isSubscribed = true\n\n ensureCanMutateNextListeners()\n nextListeners.push(listener)\n\n// retorne a função de cancelar a subscription\n return function unsubscribe() {\n if (!isSubscribed) {\n return\n }\n\n if (isDispatching) {\n throw new Error(\n 'You may not unsubscribe from a store listener while the reducer is executing. ' +\n 'See http://redux.js.org/docs/api/Store.html#subscribe for more details.'\n )\n }\n\n isSubscribed = false\n\n ensureCanMutateNextListeners()\n const index = nextListeners.indexOf(listener)\n nextListeners.splice(index, 1)\n }\n }\n \nfunction dispatch(action) {\n // o prototype dispatch vai verificar se a ação é um objeto\n if (!isPlainObject(action)) {\n throw new Error(\n 'Actions must be plain objects. ' +\n 'Use custom middleware for async actions.'\n )\n }\n\n if (typeof action.type === 'undefined') {\n throw new Error(\n 'Actions may not have an undefined \"type\" property. ' +\n 'Have you misspelled a constant?'\n )\n }\n // perceba que você não pode chamar uma função dispatch nos reducers\n // isso causaria um estouro de pilha\n if (isDispatching) {\n throw new Error('Reducers may not dispatch actions.')\n }\n // execute a função composta depois do combineReducers\n try {\n isDispatching = true\n currentState = currentReducer(currentState, action)\n } finally {\n isDispatching = false\n }\n // itere nos currentListeners e execute as funções salvas no array de funções\n const listeners = (currentListeners = nextListeners)\n for (let i = 0; i < listeners.length; i++) {\n const listener = listeners[i]\n listener()\n }\n\n return action\n }\n // no fim do createStore, invoce uma ação dispatch({ type: ActionTypes.INIT });\n // para inicializar o state\n```"
},
{
"path": "Framework/react-en.md",
"content": "\n\n**Table of Contents** *generated with [DocToc](https://github.com/thlorenz/doctoc)*\n\n- [React Lifecycle analysis](#react-lifecycle-analysis)\n - [The usage advice of Lifecycle methods in React V16](#the-usage-advice-of--lifecycle-methods-in-react-v16)\n- [setState](#setstate)\n- [Redux Source Code Analysis](#redux-source-code-analysis)\n\n\n\n# React Lifecycle analysis\n\nThe Fiber mechanism was introduced in the V16 release. The mechanism affects some of the lifecycle calls to a certain extent and introduces two new APIs to solve the problems.\n\nIn previous versions, if you had a very complex composite component and then changed the `state` of the topmost component, the call stack might be long.\n\n\n\nIf the call stack is too long, and complicated operations are performed in the middle, it may cause the main thread to be blocked for a long time, resulting in a bad user experience. Fiber is born to solve this problem.\n\nFiber is essentially a virtual stack frame, and the new scheduler freely schedules these frames according to their priority, thereby changing the previous synchronous rendering to asynchronous rendering, and segmenting the update without affecting the experience.\n\n\n\nReact has its own set of logic on how to prioritize. For things that require high real-time performance, such as animation, which means it must be rendered once within 16 ms to ensure that it is not stuck, React pauses the update every 16 ms (within 16ms) and returns to continue rendering the animation.\n\nFor asynchronous rendering, there are now two stages of rendering: `reconciliation` and `commit`. The former process can be interrupted, while the latter cannot be suspended, and the interface will be updated until it is completed.\n\n**Reconciliation** stage\n\n- `componentWillMount`\n- `componentWillReceiveProps`\n- `shouldComponentUpdate`\n- `componentWillUpdate`\n\n**Commit** stage\n\n- `componentDidMount`\n- `componentDidUpdate`\n- `componentWillUnmount`\n\nBecause the `reconciliation` phase can be interrupted, the lifecycle functions that will be executed in the `reconciliation` phase may be called multiple times, which may cause bugs. So for these functions, except for `shouldComponentUpdate`, should be avoided as much as possible, and a new API is introduced in V16 to solve this problem.\n\n`getDerivedStateFromProps` is used to replace `componentWillReceiveProps` , which is called during initialization and update\n\n```js\nclass ExampleComponent extends React.Component {\n // Initialize state in constructor,\n // Or with a property initializer.\n state = {};\n\n static getDerivedStateFromProps(nextProps, prevState) {\n if (prevState.someMirroredValue !== nextProps.someValue) {\n return {\n derivedData: computeDerivedState(nextProps),\n someMirroredValue: nextProps.someValue\n };\n }\n\n // Return null to indicate no change to state.\n return null;\n }\n}\n```\n\n`getSnapshotBeforeUpdate` is used to replace `componentWillUpdate`, which is called after the `update` but before the DOM update to read the latest DOM data.\n\n## The usage advice of Lifecycle methods in React V16\n\n```js\nclass ExampleComponent extends React.Component {\n // Used to initialize the state\n constructor() {}\n // Used to replace `componentWillReceiveProps` , which will be called when initializing and `update`\n // Because the function is static, you can't get `this`\n // If need to compare `prevProps`, you need to maintain it separately in `state`\n static getDerivedStateFromProps(nextProps, prevState) {}\n // Determine whether you need to update components, mostly for component performance optimization\n shouldComponentUpdate(nextProps, nextState) {}\n // Called after the component is mounted\n // Can request or subscribe in this function\n componentDidMount() {}\n // Used to get the latest DOM data\n getSnapshotBeforeUpdate() {}\n // Component is about to be destroyed\n // Can remove subscriptions, timers, etc. here\n componentWillUnmount() {}\n // Called after the component is destroyed\n componentDidUnMount() {}\n // Called after component update\n componentDidUpdate() {}\n // render component\n render() {}\n // The following functions are not recommended\n UNSAFE_componentWillMount() {}\n UNSAFE_componentWillUpdate(nextProps, nextState) {}\n UNSAFE_componentWillReceiveProps(nextProps) {}\n}\n```\n\n# setState\n\n`setState` is an API that is often used in React, but it has some problems that can lead to mistakes. The core reason is that the API is asynchronous.\n\nFirst, calling `setState` does not immediately cause a change to `state`, and if you call multiple `setState` at a time, the result may not be as you expect.\n\n```js\nhandle() {\n // Initialize `count` to 0\n console.log(this.state.count) // -> 0\n this.setState({ count: this.state.count + 1 })\n this.setState({ count: this.state.count + 1 })\n this.setState({ count: this.state.count + 1 })\n console.log(this.state.count) // -> 0\n}\n```\n\nFirst, both prints are 0, because `setState` is an asynchronous API and will only execute after the sync code has finished running. The reason for `setState` is asynchronous is that `setState` may cause repainting of the DOM. If the call is repainted immediately after the call, the call will cause unnecessary performance loss. Designed to be asynchronous, you can put multiple calls into a queue and unify the update process when appropriate.\n\nSecond, although `setState` is called three times, the value of `count` is still 1. Because multiple calls are merged into one, only `state` will change when the update ends, and three calls are equivalent to the following code.\n\n```js\nObject.assign( \n {},\n { count: this.state.count + 1 },\n { count: this.state.count + 1 },\n { count: this.state.count + 1 },\n)\n```\n\nOf course, you can also call `setState` three times by the following way to make `count` 3\n\n```js\nhandle() {\n this.setState((prevState) => ({ count: prevState.count + 1 }))\n this.setState((prevState) => ({ count: prevState.count + 1 }))\n this.setState((prevState) => ({ count: prevState.count + 1 }))\n}\n```\n\nIf you want to get the correct `state` after each call to `setState`, you can do it with the following code:\n\n```js\nhandle() {\n this.setState((prevState) => ({ count: prevState.count + 1 }), () => {\n console.log(this.state)\n })\n}\n```\n# Redux Source Code Analysis\n\nLet's take a look at the `combineReducers` function first.\n\n```js\n// pass an object\nexport default function combineReducers(reducers) {\n // get this object's keys\n const reducerKeys = Object.keys(reducers)\n // reducers after filtering\n const finalReducers = {}\n // get the values corresponding to every key\n // in dev environment, check if the value is undefined\n // then put function type values into finalReducers\n for (let i = 0; i < reducerKeys.length; i++) {\n const key = reducerKeys[i]\n\n if (process.env.NODE_ENV !== 'production') {\n if (typeof reducers[key] === 'undefined') {\n warning(`No reducer provided for key \"${key}\"`)\n }\n }\n\n if (typeof reducers[key] === 'function') {\n finalReducers[key] = reducers[key]\n }\n }\n // get the keys of the reducers after filtering\n const finalReducerKeys = Object.keys(finalReducers)\n \n // in dev environment check and save unexpected key to cache for warnings later\n let unexpectedKeyCache\n if (process.env.NODE_ENV !== 'production') {\n unexpectedKeyCache = {}\n }\n \n let shapeAssertionError\n try {\n // explanations of the function is below\n assertReducerShape(finalReducers)\n } catch (e) {\n shapeAssertionError = e\n }\n// combineReducers returns another function, which is reducer after merging\n// this function returns the root state\n// also notice a closure is used here. The function uses some outside properties\n return function combination(state = {}, action) {\n if (shapeAssertionError) {\n throw shapeAssertionError\n }\n // explanations of the function is below\n if (process.env.NODE_ENV !== 'production') {\n const warningMessage = getUnexpectedStateShapeWarningMessage(\n state,\n finalReducers,\n action,\n unexpectedKeyCache\n )\n if (warningMessage) {\n warning(warningMessage)\n }\n }\n // if state changed\n let hasChanged = false\n // state after changes\n const nextState = {}\n for (let i = 0; i < finalReducerKeys.length; i++) {\n // get the key with index\n const key = finalReducerKeys[i]\n // get the corresponding reducer function with key\n const reducer = finalReducers[key]\n // the key in state tree is the same as the key in finalReducers\n // so the key of the parameter passed to combineReducers represents each reducer as well as each state\n const previousStateForKey = state[key]\n // execute reducer function to get the state corresponding to the key\n const nextStateForKey = reducer(previousStateForKey, action)\n // check the value of state, report error if it's undefined\n if (typeof nextStateForKey === 'undefined') {\n const errorMessage = getUndefinedStateErrorMessage(key, action)\n throw new Error(errorMessage)\n }\n // put the value into nextState\n nextState[key] = nextStateForKey\n // if state changed\n hasChanged = hasChanged || nextStateForKey !== previousStateForKey\n }\n // as long as state changed, return the new state\n return hasChanged ? nextState : state\n }\n}\n```\n\n`combineReducers` is simple in general. In short, it accepts an object and return a function after processing the parameters. This function has an object finalReducers that stores the processed parameters. The object is then itereated on, each reducer function in it is executed, and the new state is returned.\n\nLet's then take a look at the two functions used in combineReducers.\n\n```js\n// the first function used to throw errors\nfunction assertReducerShape(reducers) {\n// iterate on the parameters in combineReducers\n Object.keys(reducers).forEach(key => {\n const reducer = reducers[key]\n // pass an action\n const initialState = reducer(undefined, { type: ActionTypes.INIT })\n // throw an error if the state is undefined\n if (typeof initialState === 'undefined') {\n throw new Error(\n `Reducer \"${key}\" returned undefined during initialization. ` +\n `If the state passed to the reducer is undefined, you must ` +\n `explicitly return the initial state. The initial state may ` +\n `not be undefined. If you don't want to set a value for this reducer, ` +\n `you can use null instead of undefined.`\n )\n }\n // process again, considering the case that the user returned a value for ActionTypes.INIT in the reducer\n // pass a random action and check if the value is undefined\n const type =\n '@@redux/PROBE_UNKNOWN_ACTION_' +\n Math.random()\n .toString(36)\n .substring(7)\n .split('')\n .join('.')\n if (typeof reducer(undefined, { type }) === 'undefined') {\n throw new Error(\n `Reducer \"${key}\" returned undefined when probed with a random type. ` +\n `Don't try to handle ${\n ActionTypes.INIT\n } or other actions in \"redux/*\" ` +\n `namespace. They are considered private. Instead, you must return the ` +\n `current state for any unknown actions, unless it is undefined, ` +\n `in which case you must return the initial state, regardless of the ` +\n `action type. The initial state may not be undefined, but can be null.`\n )\n }\n })\n}\n\nfunction getUnexpectedStateShapeWarningMessage(\n inputState,\n reducers,\n action,\n unexpectedKeyCache\n) {\n // here the reducers is already finalReducers\n const reducerKeys = Object.keys(reducers)\n const argumentName =\n action && action.type === ActionTypes.INIT\n ? 'preloadedState argument passed to createStore'\n : 'previous state received by the reducer'\n \n // if finalReducers is empty\n if (reducerKeys.length === 0) {\n return (\n 'Store does not have a valid reducer. Make sure the argument passed ' +\n 'to combineReducers is an object whose values are reducers.'\n )\n }\n // if the state passed is not an object\n if (!isPlainObject(inputState)) {\n return (\n `The ${argumentName} has unexpected type of \"` +\n {}.toString.call(inputState).match(/\\s([a-z|A-Z]+)/)[1] +\n `\". Expected argument to be an object with the following ` +\n `keys: \"${reducerKeys.join('\", \"')}\"`\n )\n }\n // compare the keys of the state and of finalReducers and filter out the extra keys\n const unexpectedKeys = Object.keys(inputState).filter(\n key => !reducers.hasOwnProperty(key) && !unexpectedKeyCache[key]\n )\n\n unexpectedKeys.forEach(key => {\n unexpectedKeyCache[key] = true\n })\n\n if (action && action.type === ActionTypes.REPLACE) return\n\n// if unexpectedKeys is not empty\n if (unexpectedKeys.length > 0) {\n return (\n `Unexpected ${unexpectedKeys.length > 1 ? 'keys' : 'key'} ` +\n `\"${unexpectedKeys.join('\", \"')}\" found in ${argumentName}. ` +\n `Expected to find one of the known reducer keys instead: ` +\n `\"${reducerKeys.join('\", \"')}\". Unexpected keys will be ignored.`\n )\n }\n}\n```\n\nLet's then take a look at `compose` function\n\n```js\n// This function is quite elegant. It let us stack several functions via passing the references of functions. The term is called Higher-order function.\n// call functions from the right to the left with reduce function\n// for the example in the project above\ncompose(\n applyMiddleware(thunkMiddleware),\n window.devToolsExtension ? window.devToolsExtension() : f => f\n) \n// with compose it turns into applyMiddleware(thunkMiddleware)(window.devToolsExtension()())\n// so you should return a function when window.devToolsExtension is not found\nexport default function compose(...funcs) {\n if (funcs.length === 0) {\n return arg => arg\n }\n\n if (funcs.length === 1) {\n return funcs[0]\n }\n\n return funcs.reduce((a, b) => (...args) => a(b(...args)))\n}\n```\n\nLet's then analyze part of the source code of `createStore` function\n\n```js\nexport default function createStore(reducer, preloadedState, enhancer) {\n // normally preloadedState is rarely used\n // check type, is the second parameter is a function and there is no third parameter, then exchange positions\n if (typeof preloadedState === 'function' && typeof enhancer === 'undefined') {\n enhancer = preloadedState\n preloadedState = undefined\n }\n // check if enhancer is a function\n if (typeof enhancer !== 'undefined') {\n if (typeof enhancer !== 'function') {\n throw new Error('Expected the enhancer to be a function.')\n }\n // if there is no type error, first execute enhancer, then execute createStore\n return enhancer(createStore)(reducer, preloadedState)\n }\n // check if reducer is a function\n if (typeof reducer !== 'function') {\n throw new Error('Expected the reducer to be a function.')\n }\n // current reducer\n let currentReducer = reducer\n // current state\n let currentState = preloadedState\n // current listener array\n let currentListeners = []\n // this is a very important design. The purpose is that currentListeners array is an invariant when the listeners are iterated every time\n // we can consider if only currentListeners exists. If we execute subscribe again in some subscribe execution, or unsubscribe, it would change the length of the currentListeners array, so there might be an index error\n let nextListeners = currentListeners\n // if reducer is executing\n let isDispatching = false\n // if currentListeners is the same as nextListeners, assign the value back\n function ensureCanMutateNextListeners() {\n if (nextListeners === currentListeners) {\n nextListeners = currentListeners.slice()\n }\n }\n // ......\n}\n```\n\nWe look at `applyMiddleware` function next\n\nBefore that I need to introduce a concept called function Currying. Currying is a technology for changing a function with multiple parameters to a series of functions with a single parameter.\n\n```js\nfunction add(a,b) { return a + b } \nadd(1, 2) => 3\n// for the above function, we can use Currying like so\nfunction add(a) {\n return b => {\n return a + b\n }\n}\nadd(1)(2) => 3\n// you can understand Currying like this:\n// we store an outside variable with a closure, and return a function that takes a parameter. In this function, we use the stored variable and return the value.\n```\n\n```js\n// this function should be the most abstruse part of the whole source code\n// this function returns a function Curried\n// therefore the funciton should be called like so: applyMiddleware(...middlewares)(createStore)(...args)\nexport default function applyMiddleware(...middlewares) {\n return createStore => (...args) => {\n // here we execute createStore, and pass the parameters passed lastly to the applyMiddleware function\n const store = createStore(...args)\n let dispatch = () => {\n throw new Error(\n `Dispatching while constructing your middleware is not allowed. ` +\n `Other middleware would not be applied to this dispatch.`\n )\n }\n let chain = []\n // every middleware should have these two functions\n const middlewareAPI = {\n getState: store.getState,\n dispatch: (...args) => dispatch(...args)\n }\n // pass every middleware in middlewares to middlewareAPI\n chain = middlewares.map(middleware => middleware(middlewareAPI))\n // same as before, calle very middleWare from right to left, and pass to store.dispatch\n dispatch = compose(...chain)(store.dispatch)\n // this piece is a little abstract, we'll analyze together with the code of redux-thunk\n // createThunkMiddleware returns a 3-level function, the first level accepts a middlewareAPI parameter\n // the second level accepts store.dispatch\n // the third level accepts parameters in dispatch\n{function createThunkMiddleware(extraArgument) {\n return ({ dispatch, getState }) => next => action => {\n // check if the parameters in dispatch is a function\n if (typeof action === 'function') {\n // if so, pass those parameters, until action is no longer a function, then execute dispatch({type: 'XXX'})\n return action(dispatch, getState, extraArgument);\n }\n\n return next(action);\n };\n}\nconst thunk = createThunkMiddleware();\n\nexport default thunk;}\n// return the middleware-empowered dispatch and the rest of the properties in store.\n return {\n ...store,\n dispatch\n }\n }\n}\n```\n\nNow we've passed the hardest part. Let's take a look at some easier pieces.\n\n```js \n// Not much to say here, return the current state, but we can't call this function when reducer is running\nfunction getState() {\n if (isDispatching) {\n throw new Error(\n 'You may not call store.getState() while the reducer is executing. ' +\n 'The reducer has already received the state as an argument. ' +\n 'Pass it down from the top reducer instead of reading it from the store.'\n )\n }\n\n return currentState\n}\n// accept a function parameter\nfunction subscribe(listener) {\n if (typeof listener !== 'function') {\n throw new Error('Expected listener to be a function.')\n }\n // the major design of this part is already covered in the description of nextListeners. Not much to talk about otherwise\n if (isDispatching) {\n throw new Error(\n 'You may not call store.subscribe() while the reducer is executing. ' +\n 'If you would like to be notified after the store has been updated, subscribe from a ' +\n 'component and invoke store.getState() in the callback to access the latest state. ' +\n 'See http://redux.js.org/docs/api/Store.html#subscribe for more details.'\n )\n }\n\n let isSubscribed = true\n\n ensureCanMutateNextListeners()\n nextListeners.push(listener)\n\n// return a cancel subscription function\n return function unsubscribe() {\n if (!isSubscribed) {\n return\n }\n\n if (isDispatching) {\n throw new Error(\n 'You may not unsubscribe from a store listener while the reducer is executing. ' +\n 'See http://redux.js.org/docs/api/Store.html#subscribe for more details.'\n )\n }\n\n isSubscribed = false\n\n ensureCanMutateNextListeners()\n const index = nextListeners.indexOf(listener)\n nextListeners.splice(index, 1)\n }\n }\n \nfunction dispatch(action) {\n // the prototype dispatch will check if action is an object\n if (!isPlainObject(action)) {\n throw new Error(\n 'Actions must be plain objects. ' +\n 'Use custom middleware for async actions.'\n )\n }\n\n if (typeof action.type === 'undefined') {\n throw new Error(\n 'Actions may not have an undefined \"type\" property. ' +\n 'Have you misspelled a constant?'\n )\n }\n // note that you can't call dispatch function in reducers\n // it would cause a stack overflow\n if (isDispatching) {\n throw new Error('Reducers may not dispatch actions.')\n }\n // execute the composed function after combineReducers\n try {\n isDispatching = true\n currentState = currentReducer(currentState, action)\n } finally {\n isDispatching = false\n }\n // iterate on currentListeners and execute saved functions in the array\n const listeners = (currentListeners = nextListeners)\n for (let i = 0; i < listeners.length; i++) {\n const listener = listeners[i]\n listener()\n }\n\n return action\n }\n // at the end of createStore, invoke an action dispatch({ type: ActionTypes.INIT });\n // to initialize state\n```"
},
{
"path": "Framework/react-zh.md",
"content": "\n\n**Table of Contents** *generated with [DocToc](https://github.com/thlorenz/doctoc)*\n\n- [React 生命周期分析](#react-%E7%94%9F%E5%91%BD%E5%91%A8%E6%9C%9F%E5%88%86%E6%9E%90)\n - [V16 生命周期函数用法建议](#v16-%E7%94%9F%E5%91%BD%E5%91%A8%E6%9C%9F%E5%87%BD%E6%95%B0%E7%94%A8%E6%B3%95%E5%BB%BA%E8%AE%AE)\n- [setState](#setstate)\n- [Redux 源码分析](#redux-%E6%BA%90%E7%A0%81%E5%88%86%E6%9E%90)\n\n\n\n# React 生命周期分析\n\n在 V16 版本中引入了 Fiber 机制。这个机制一定程度上的影响了部分生命周期的调用,并且也引入了新的 2 个 API 来解决问题。\n\n在之前的版本中,如果你拥有一个很复杂的复合组件,然后改动了最上层组件的 `state`,那么调用栈可能会很长\n\n\n\n调用栈过长,再加上中间进行了复杂的操作,就可能导致长时间阻塞主线程,带来不好的用户体验。Fiber 就是为了解决该问题而生。\n\nFiber 本质上是一个虚拟的堆栈帧,新的调度器会按照优先级自由调度这些帧,从而将之前的同步渲染改成了异步渲染,在不影响体验的情况下去分段计算更新。\n\n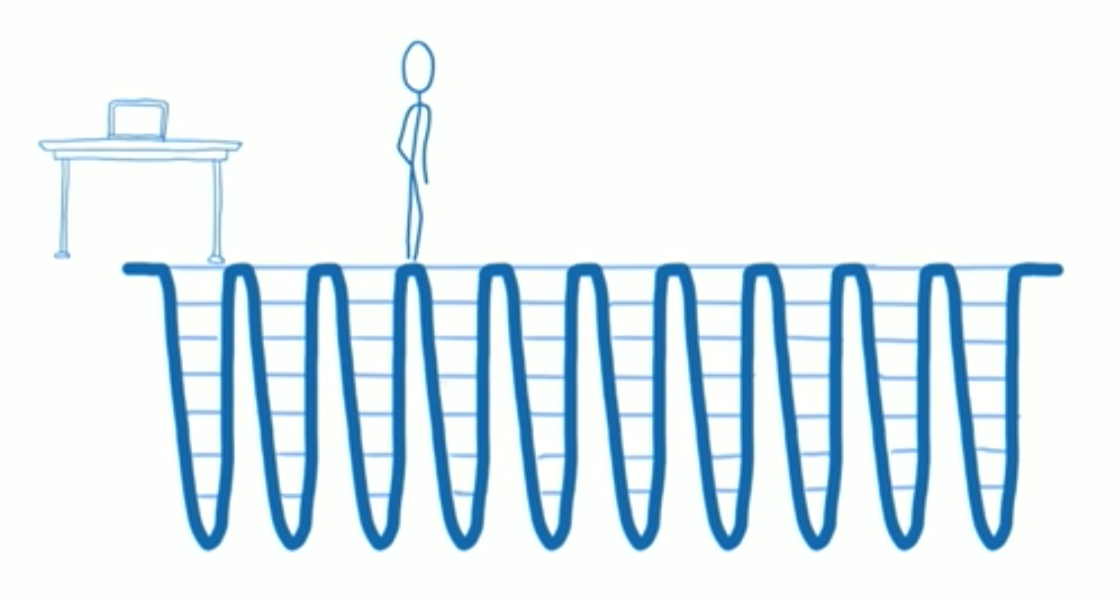\n\n对于如何区别优先级,React 有自己的一套逻辑。对于动画这种实时性很高的东西,也就是 16 ms 必须渲染一次保证不卡顿的情况下,React 会每 16 ms(以内) 暂停一下更新,返回来继续渲染动画。\n\n对于异步渲染,现在渲染有两个阶段:`reconciliation` 和 `commit` 。前者过程是可以打断的,后者不能暂停,会一直更新界面直到完成。\n\n**Reconciliation** 阶段\n\n- `componentWillMount`\n- `componentWillReceiveProps`\n- `shouldComponentUpdate`\n- `componentWillUpdate`\n\n**Commit** 阶段\n\n- `componentDidMount`\n- `componentDidUpdate`\n- `componentWillUnmount`\n\n因为 `reconciliation` 阶段是可以被打断的,所以 `reconciliation` 阶段会执行的生命周期函数就可能会出现调用多次的情况,从而引起 Bug。所以对于 `reconciliation` 阶段调用的几个函数,除了 `shouldComponentUpdate` 以外,其他都应该避免去使用,并且 V16 中也引入了新的 API 来解决这个问题。\n\n`getDerivedStateFromProps` 用于替换 `componentWillReceiveProps` ,该函数会在初始化和 `update` 时被调用\n\n```js\nclass ExampleComponent extends React.Component {\n // Initialize state in constructor,\n // Or with a property initializer.\n state = {};\n\n static getDerivedStateFromProps(nextProps, prevState) {\n if (prevState.someMirroredValue !== nextProps.someValue) {\n return {\n derivedData: computeDerivedState(nextProps),\n someMirroredValue: nextProps.someValue\n };\n }\n\n // Return null to indicate no change to state.\n return null;\n }\n}\n```\n\n`getSnapshotBeforeUpdate` 用于替换 `componentWillUpdate` ,该函数会在 `update` 后 DOM 更新前被调用,用于读取最新的 DOM 数据。\n\n## V16 生命周期函数用法建议\n\n```js\nclass ExampleComponent extends React.Component {\n // 用于初始化 state\n constructor() {}\n // 用于替换 `componentWillReceiveProps` ,该函数会在初始化和 `update` 时被调用\n // 因为该函数是静态函数,所以取不到 `this`\n // 如果需要对比 `prevProps` 需要单独在 `state` 中维护\n static getDerivedStateFromProps(nextProps, prevState) {}\n // 判断是否需要更新组件,多用于组件性能优化\n shouldComponentUpdate(nextProps, nextState) {}\n // 组件挂载后调用\n // 可以在该函数中进行请求或者订阅\n componentDidMount() {}\n // 用于获得最新的 DOM 数据\n getSnapshotBeforeUpdate() {}\n // 组件即将销毁\n // 可以在此处移除订阅,定时器等等\n componentWillUnmount() {}\n // 组件销毁后调用\n componentDidUnMount() {}\n // 组件更新后调用\n componentDidUpdate() {}\n // 渲染组件函数\n render() {}\n // 以下函数不建议使用\n UNSAFE_componentWillMount() {}\n UNSAFE_componentWillUpdate(nextProps, nextState) {}\n UNSAFE_componentWillReceiveProps(nextProps) {}\n}\n```\n\n# setState\n\n`setState` 在 React 中是经常使用的一个 API,但是它存在一些问题,可能会导致犯错,核心原因就是因为这个 API 是异步的。\n\n首先 `setState` 的调用并不会马上引起 `state` 的改变,并且如果你一次调用了多个 `setState` ,那么结果可能并不如你期待的一样。\n\n```js\nhandle() {\n // 初始化 `count` 为 0\n console.log(this.state.count) // -> 0\n this.setState({ count: this.state.count + 1 })\n this.setState({ count: this.state.count + 1 })\n this.setState({ count: this.state.count + 1 })\n console.log(this.state.count) // -> 0\n}\n```\n\n第一,两次的打印都为 0,因为 `setState` 是个异步 API,只有同步代码运行完毕才会执行。`setState` 异步的原因我认为在于,`setState` 可能会导致 DOM 的重绘,如果调用一次就马上去进行重绘,那么调用多次就会造成不必要的性能损失。设计成异步的话,就可以将多次调用放入一个队列中,在恰当的时候统一进行更新过程。\n\n第二,虽然调用了三次 `setState` ,但是 `count` 的值还是为 1。因为多次调用会合并为一次,只有当更新结束后 `state` 才会改变,三次调用等同于如下代码\n\n```js\nObject.assign( \n {},\n { count: this.state.count + 1 },\n { count: this.state.count + 1 },\n { count: this.state.count + 1 },\n)\n```\n\n当然你也可以通过以下方式来实现调用三次 `setState` 使得 `count` 为 3\n\n```js\nhandle() {\n this.setState((prevState) => ({ count: prevState.count + 1 }))\n this.setState((prevState) => ({ count: prevState.count + 1 }))\n this.setState((prevState) => ({ count: prevState.count + 1 }))\n}\n```\n\n如果你想在每次调用 `setState` 后获得正确的 `state` ,可以通过如下代码实现\n\n```js\nhandle() {\n this.setState((prevState) => ({ count: prevState.count + 1 }), () => {\n console.log(this.state)\n })\n}\n```\n\n# Redux 源码分析\n\n首先让我们来看下 `combineReducers` 函数\n\n```js\n// 传入一个 object\nexport default function combineReducers(reducers) {\n // 获取该 Object 的 key 值\n const reducerKeys = Object.keys(reducers)\n // 过滤后的 reducers\n const finalReducers = {}\n // 获取每一个 key 对应的 value\n // 在开发环境下判断值是否为 undefined\n // 然后将值类型是函数的值放入 finalReducers\n for (let i = 0; i < reducerKeys.length; i++) {\n const key = reducerKeys[i]\n\n if (process.env.NODE_ENV !== 'production') {\n if (typeof reducers[key] === 'undefined') {\n warning(`No reducer provided for key \"${key}\"`)\n }\n }\n\n if (typeof reducers[key] === 'function') {\n finalReducers[key] = reducers[key]\n }\n }\n // 拿到过滤后的 reducers 的 key 值\n const finalReducerKeys = Object.keys(finalReducers)\n \n // 在开发环境下判断,保存不期望 key 的缓存用以下面做警告 \n let unexpectedKeyCache\n if (process.env.NODE_ENV !== 'production') {\n unexpectedKeyCache = {}\n }\n \n let shapeAssertionError\n try {\n // 该函数解析在下面\n assertReducerShape(finalReducers)\n } catch (e) {\n shapeAssertionError = e\n }\n// combineReducers 函数返回一个函数,也就是合并后的 reducer 函数\n// 该函数返回总的 state\n// 并且你也可以发现这里使用了闭包,函数里面使用到了外面的一些属性\n return function combination(state = {}, action) {\n if (shapeAssertionError) {\n throw shapeAssertionError\n }\n // 该函数解析在下面\n if (process.env.NODE_ENV !== 'production') {\n const warningMessage = getUnexpectedStateShapeWarningMessage(\n state,\n finalReducers,\n action,\n unexpectedKeyCache\n )\n if (warningMessage) {\n warning(warningMessage)\n }\n }\n // state 是否改变\n let hasChanged = false\n // 改变后的 state\n const nextState = {}\n for (let i = 0; i < finalReducerKeys.length; i++) {\n // 拿到相应的 key\n const key = finalReducerKeys[i]\n // 获得 key 对应的 reducer 函数\n const reducer = finalReducers[key]\n // state 树下的 key 是与 finalReducers 下的 key 相同的\n // 所以你在 combineReducers 中传入的参数的 key 即代表了 各个 reducer 也代表了各个 state\n const previousStateForKey = state[key]\n // 然后执行 reducer 函数获得该 key 值对应的 state\n const nextStateForKey = reducer(previousStateForKey, action)\n // 判断 state 的值,undefined 的话就报错\n if (typeof nextStateForKey === 'undefined') {\n const errorMessage = getUndefinedStateErrorMessage(key, action)\n throw new Error(errorMessage)\n }\n // 然后将 value 塞进去\n nextState[key] = nextStateForKey\n // 如果 state 改变\n hasChanged = hasChanged || nextStateForKey !== previousStateForKey\n }\n // state 只要改变过,就返回新的 state\n return hasChanged ? nextState : state\n }\n}\n```\n\n`combineReducers` 函数总的来说很简单,总结来说就是接收一个对象,将参数过滤后返回一个函数。该函数里有一个过滤参数后的对象 finalReducers,遍历该对象,然后执行对象中的每一个 reducer 函数,最后将新的 state 返回。\n\n接下来让我们来看看 combinrReducers 中用到的两个函数\n\n```js\n// 这是执行的第一个用于抛错的函数\nfunction assertReducerShape(reducers) {\n// 将 combineReducers 中的参数遍历\n Object.keys(reducers).forEach(key => {\n const reducer = reducers[key]\n // 给他传入一个 action\n const initialState = reducer(undefined, { type: ActionTypes.INIT })\n // 如果得到的 state 为 undefined 就抛错\n if (typeof initialState === 'undefined') {\n throw new Error(\n `Reducer \"${key}\" returned undefined during initialization. ` +\n `If the state passed to the reducer is undefined, you must ` +\n `explicitly return the initial state. The initial state may ` +\n `not be undefined. If you don't want to set a value for this reducer, ` +\n `you can use null instead of undefined.`\n )\n }\n // 再过滤一次,考虑到万一你在 reducer 中给 ActionTypes.INIT 返回了值\n // 传入一个随机的 action 判断值是否为 undefined\n const type =\n '@@redux/PROBE_UNKNOWN_ACTION_' +\n Math.random()\n .toString(36)\n .substring(7)\n .split('')\n .join('.')\n if (typeof reducer(undefined, { type }) === 'undefined') {\n throw new Error(\n `Reducer \"${key}\" returned undefined when probed with a random type. ` +\n `Don't try to handle ${\n ActionTypes.INIT\n } or other actions in \"redux/*\" ` +\n `namespace. They are considered private. Instead, you must return the ` +\n `current state for any unknown actions, unless it is undefined, ` +\n `in which case you must return the initial state, regardless of the ` +\n `action type. The initial state may not be undefined, but can be null.`\n )\n }\n })\n}\n\nfunction getUnexpectedStateShapeWarningMessage(\n inputState,\n reducers,\n action,\n unexpectedKeyCache\n) {\n // 这里的 reducers 已经是 finalReducers\n const reducerKeys = Object.keys(reducers)\n const argumentName =\n action && action.type === ActionTypes.INIT\n ? 'preloadedState argument passed to createStore'\n : 'previous state received by the reducer'\n \n // 如果 finalReducers 为空\n if (reducerKeys.length === 0) {\n return (\n 'Store does not have a valid reducer. Make sure the argument passed ' +\n 'to combineReducers is an object whose values are reducers.'\n )\n }\n // 如果你传入的 state 不是对象\n if (!isPlainObject(inputState)) {\n return (\n `The ${argumentName} has unexpected type of \"` +\n {}.toString.call(inputState).match(/\\s([a-z|A-Z]+)/)[1] +\n `\". Expected argument to be an object with the following ` +\n `keys: \"${reducerKeys.join('\", \"')}\"`\n )\n }\n // 将参入的 state 于 finalReducers 下的 key 做比较,过滤出多余的 key\n const unexpectedKeys = Object.keys(inputState).filter(\n key => !reducers.hasOwnProperty(key) && !unexpectedKeyCache[key]\n )\n\n unexpectedKeys.forEach(key => {\n unexpectedKeyCache[key] = true\n })\n\n if (action && action.type === ActionTypes.REPLACE) return\n\n// 如果 unexpectedKeys 有值的话\n if (unexpectedKeys.length > 0) {\n return (\n `Unexpected ${unexpectedKeys.length > 1 ? 'keys' : 'key'} ` +\n `\"${unexpectedKeys.join('\", \"')}\" found in ${argumentName}. ` +\n `Expected to find one of the known reducer keys instead: ` +\n `\"${reducerKeys.join('\", \"')}\". Unexpected keys will be ignored.`\n )\n }\n}\n```\n\n接下来让我们先来看看 `compose` 函数\n\n```js\n// 这个函数设计的很巧妙,通过传入函数引用的方式让我们完成多个函数的嵌套使用,术语叫做高阶函数\n// 通过使用 reduce 函数做到从右至左调用函数\n// 对于上面项目中的例子\ncompose(\n applyMiddleware(thunkMiddleware),\n window.devToolsExtension ? window.devToolsExtension() : f => f\n) \n// 经过 compose 函数变成了 applyMiddleware(thunkMiddleware)(window.devToolsExtension()())\n// 所以在找不到 window.devToolsExtension 时你应该返回一个函数\nexport default function compose(...funcs) {\n if (funcs.length === 0) {\n return arg => arg\n }\n\n if (funcs.length === 1) {\n return funcs[0]\n }\n\n return funcs.reduce((a, b) => (...args) => a(b(...args)))\n}\n```\n\n然后我们来解析 `createStore` 函数的部分代码\n\n```js\nexport default function createStore(reducer, preloadedState, enhancer) {\n // 一般 preloadedState 用的少,判断类型,如果第二个参数是函数且没有第三个参数,就调换位置\n if (typeof preloadedState === 'function' && typeof enhancer === 'undefined') {\n enhancer = preloadedState\n preloadedState = undefined\n }\n // 判断 enhancer 是否是函数\n if (typeof enhancer !== 'undefined') {\n if (typeof enhancer !== 'function') {\n throw new Error('Expected the enhancer to be a function.')\n }\n // 类型没错的话,先执行 enhancer,然后再执行 createStore 函数\n return enhancer(createStore)(reducer, preloadedState)\n }\n // 判断 reducer 是否是函数\n if (typeof reducer !== 'function') {\n throw new Error('Expected the reducer to be a function.')\n }\n // 当前 reducer\n let currentReducer = reducer\n // 当前状态\n let currentState = preloadedState\n // 当前监听函数数组\n let currentListeners = []\n // 这是一个很重要的设计,为的就是每次在遍历监听器的时候保证 currentListeners 数组不变\n // 可以考虑下只存在 currentListeners 的情况,如果我在某个 subscribe 中再次执行 subscribe\n // 或者 unsubscribe,这样会导致当前的 currentListeners 数组大小发生改变,从而可能导致\n // 索引出错\n let nextListeners = currentListeners\n // reducer 是否正在执行\n let isDispatching = false\n // 如果 currentListeners 和 nextListeners 相同,就赋值回去\n function ensureCanMutateNextListeners() {\n if (nextListeners === currentListeners) {\n nextListeners = currentListeners.slice()\n }\n }\n // ......\n}\n```\n\n接下来先来介绍 `applyMiddleware` 函数\n\n在这之前我需要先来介绍一下函数柯里化,柯里化是一种将使用多个参数的一个函数转换成一系列使用一个参数的函数的技术。\n\n```js\nfunction add(a,b) { return a + b } \nadd(1, 2) => 3\n// 对于以上函数如果使用柯里化可以这样改造\nfunction add(a) {\n return b => {\n return a + b\n }\n}\nadd(1)(2) => 3\n// 你可以这样理解函数柯里化,通过闭包保存了外部的一个变量,然后返回一个接收参数的函数,在该函数中使用了保存的变量,然后再返回值。\n```\n\n```js\n// 这个函数应该是整个源码中最难理解的一块了\n// 该函数返回一个柯里化的函数\n// 所以调用这个函数应该这样写 applyMiddleware(...middlewares)(createStore)(...args)\nexport default function applyMiddleware(...middlewares) {\n return createStore => (...args) => {\n // 这里执行 createStore 函数,把 applyMiddleware 函数最后次调用的参数传进来\n const store = createStore(...args)\n let dispatch = () => {\n throw new Error(\n `Dispatching while constructing your middleware is not allowed. ` +\n `Other middleware would not be applied to this dispatch.`\n )\n }\n let chain = []\n // 每个中间件都应该有这两个函数\n const middlewareAPI = {\n getState: store.getState,\n dispatch: (...args) => dispatch(...args)\n }\n // 把 middlewares 中的每个中间件都传入 middlewareAPI\n chain = middlewares.map(middleware => middleware(middlewareAPI))\n // 和之前一样,从右至左调用每个中间件,然后传入 store.dispatch\n dispatch = compose(...chain)(store.dispatch)\n // 这里只看这部分代码有点抽象,我这里放入 redux-thunk 的代码来结合分析\n // createThunkMiddleware返回了3层函数,第一层函数接收 middlewareAPI 参数\n // 第二次函数接收 store.dispatch\n // 第三层函数接收 dispatch 中的参数\n{function createThunkMiddleware(extraArgument) {\n return ({ dispatch, getState }) => next => action => {\n // 判断 dispatch 中的参数是否为函数\n if (typeof action === 'function') {\n // 是函数的话再把这些参数传进去,直到 action 不为函数,执行 dispatch({tyep: 'XXX'})\n return action(dispatch, getState, extraArgument);\n }\n\n return next(action);\n };\n}\nconst thunk = createThunkMiddleware();\n\nexport default thunk;}\n// 最后把经过中间件加强后的 dispatch 于剩余 store 中的属性返回,这样你的 dispatch\n return {\n ...store,\n dispatch\n }\n }\n}\n```\n\n好了,我们现在将困难的部分都攻克了,来看一些简单的代码\n\n```js \n// 这个没啥好说的,就是把当前的 state 返回,但是当正在执行 reducer 时不能执行该方法\nfunction getState() {\n if (isDispatching) {\n throw new Error(\n 'You may not call store.getState() while the reducer is executing. ' +\n 'The reducer has already received the state as an argument. ' +\n 'Pass it down from the top reducer instead of reading it from the store.'\n )\n }\n\n return currentState\n}\n// 接收一个函数参数\nfunction subscribe(listener) {\n if (typeof listener !== 'function') {\n throw new Error('Expected listener to be a function.')\n }\n// 这部分最主要的设计 nextListeners 已经讲过,其他基本没什么好说的\n if (isDispatching) {\n throw new Error(\n 'You may not call store.subscribe() while the reducer is executing. ' +\n 'If you would like to be notified after the store has been updated, subscribe from a ' +\n 'component and invoke store.getState() in the callback to access the latest state. ' +\n 'See http://redux.js.org/docs/api/Store.html#subscribe for more details.'\n )\n }\n\n let isSubscribed = true\n\n ensureCanMutateNextListeners()\n nextListeners.push(listener)\n\n// 返回一个取消订阅函数\n return function unsubscribe() {\n if (!isSubscribed) {\n return\n }\n\n if (isDispatching) {\n throw new Error(\n 'You may not unsubscribe from a store listener while the reducer is executing. ' +\n 'See http://redux.js.org/docs/api/Store.html#subscribe for more details.'\n )\n }\n\n isSubscribed = false\n\n ensureCanMutateNextListeners()\n const index = nextListeners.indexOf(listener)\n nextListeners.splice(index, 1)\n }\n }\n \nfunction dispatch(action) {\n// 原生的 dispatch 会判断 action 是否为对象\n if (!isPlainObject(action)) {\n throw new Error(\n 'Actions must be plain objects. ' +\n 'Use custom middleware for async actions.'\n )\n }\n\n if (typeof action.type === 'undefined') {\n throw new Error(\n 'Actions may not have an undefined \"type\" property. ' +\n 'Have you misspelled a constant?'\n )\n }\n// 注意在 Reducers 中是不能执行 dispatch 函数的\n// 因为你一旦在 reducer 函数中执行 dispatch,会引发死循环\n if (isDispatching) {\n throw new Error('Reducers may not dispatch actions.')\n }\n// 执行 combineReducers 组合后的函数\n try {\n isDispatching = true\n currentState = currentReducer(currentState, action)\n } finally {\n isDispatching = false\n }\n// 然后遍历 currentListeners,执行数组中保存的函数\n const listeners = (currentListeners = nextListeners)\n for (let i = 0; i < listeners.length; i++) {\n const listener = listeners[i]\n listener()\n }\n\n return action\n }\n // 然后在 createStore 末尾会发起一个 action dispatch({ type: ActionTypes.INIT });\n // 用以初始化 state\n```\n\n\n"
},
{
"path": "Framework/vue-br.md",
"content": "\n\n**Table of Contents** *generated with [DocToc](https://github.com/thlorenz/doctoc)*\n\n- [Análises do princípio NextTick](#nexttick-principle-analysis)\n- [Análises do ciclo de vid](#lifecycle-analysis)\n\n\n\n# Análises do princípio NextTick\n\n`nextTick` permiti-nos adiar a callback ser executada depois da próxima atualizada do ciclo do DOM, para obter a atualização.\n\nAntes da versão 2.4, Vue usou micro tarefas, mas prioridade das micro tarefas é bem alta, e em alguns casos, isso deve ser mais rápido que o evento de bubbling, mas se você usar macro tarefas, pode haver alguns problemas de performance na renderização. Então na nova versão, micro tarefas são usadas por padrão, mas macro tarefas serão usadas em casos especiais, como v-on.\n\nPara implementar macro tarefas, você primeiro deve determinar se o `setImmediate` pode ser usado, se não, abaixe para `MessageChannel`. Se não novamente, use `setTimeout`.\n\n```js\nif (typeof setImmediate !== 'undefined' && isNative(setImmediate)) {\n macroTimerFunc = () => {\n setImmediate(flushCallbacks)\n }\n} else if (\n typeof MessageChannel !== 'undefined' &&\n (isNative(MessageChannel) ||\n // PhantomJS\n MessageChannel.toString() === '[object MessageChannelConstructor]')\n) {\n const channel = new MessageChannel()\n const port = channel.port2\n channel.port1.onmessage = flushCallbacks\n macroTimerFunc = () => {\n port.postMessage(1)\n }\n} else {\n /* istanbul ignore next */\n macroTimerFunc = () => {\n setTimeout(flushCallbacks, 0)\n }\n}\n```\n\n`nextTick` também suporta o uso de `Promise`, do qual ira determinar se a `Promise` está implementada.\n\n```js\nexport function nextTick(cb?: Function, ctx?: Object) {\n let _resolve\n // Consolide funções de callback dentro do de um array\n callbacks.push(() => {\n if (cb) {\n try {\n cb.call(ctx)\n } catch (e) {\n handleError(e, ctx, 'nextTick')\n }\n } else if (_resolve) {\n _resolve(ctx)\n }\n })\n if (!pending) {\n pending = true\n if (useMacroTask) {\n macroTimerFunc()\n } else {\n microTimerFunc()\n }\n }\n // Determina se a Promisse pode ser usada\n // Atribuir _resolve se possivel\n // Desta maneira a função callback pode ser chamada em forma de promise\n if (!cb && typeof Promise !== 'undefined') {\n return new Promise(resolve => {\n _resolve = resolve\n })\n }\n}\n```\n\n# Análise do Ciclo de Vida\n\nA função do ciclo de vida é a função gancho que o componente vai disparar quando inicializar ou atualizar os dados.\n\n\n\nO seguinte código irá ser chamado na inicialização, e o ciclo de vida vai ser chamado pelo `callHook`\n\n```js\nVue.prototype._init = function(options) {\n initLifecycle(vm)\n initEvents(vm)\n initRender(vm)\n callHook(vm, 'beforeCreate') // não consegue receber dados das props\n initInjections(vm) \n initState(vm)\n initProvide(vm)\n callHook(vm, 'created')\n}\n```\n\nEle pode ser encontrado no código acima quando `beforeCreate` é chamado, o dado no `props` ou `data` não pode ser obtido porque a inicialização desse dado está no `initState`.\n\nNo próximo, a função montadora vai ser chamada\n\n```js\nexport function mountComponent {\n callHook(vm, 'beforeMount')\n // ...\n if (vm.$vnode == null) {\n vm._isMounted = true\n callHook(vm, 'mounted')\n }\n}\n```\n\n`beforeMount` vai ser executado antes de montar uma instância, então comece a criar o VDOM e substituir ele com o DOM real, e finalmente chame o gancho `mounted`. E há um julgamente lógico aqui, que se ele for um `new Vue({}) ` externo, `$vnode` não existe, então o gancho `mounted` será executado diretamente. Se existe um componente filho, ele vai ser montado recursivamente, apenas quando todos os componentes filhos forem montados, o gancho de montar o componente raíz vai ser executado.\n\nPróximo, isso vem para a função gancho que vai ser chamada quando os dados forem atualizados.\n\n```js\nfunction flushSchedulerQueue() {\n // ...\n for (index = 0; index < queue.length; index++) {\n watcher = queue[index]\n if (watcher.before) {\n watcher.before() // chama `beforeUpdate`\n }\n id = watcher.id\n has[id] = null\n watcher.run()\n // no dev build, verifca e para check and stop circular updates.\n if (process.env.NODE_ENV !== 'production' && has[id] != null) {\n circular[id] = (circular[id] || 0) + 1\n if (circular[id] > MAX_UPDATE_COUNT) {\n warn(\n 'You may have an infinite update loop ' +\n (watcher.user\n ? `in watcher with expression \"${watcher.expression}\"`\n : `in a component render function.`),\n watcher.vm\n )\n break\n }\n }\n }\n callUpdatedHooks(updatedQueue)\n}\n\nfunction callUpdatedHooks(queue) {\n let i = queue.length\n while (i--) {\n const watcher = queue[i]\n const vm = watcher.vm\n if (vm._watcher === watcher && vm._isMounted) {\n callHook(vm, 'updated')\n }\n }\n}\n```\n\nExistem duas funções do ciclo de vida que não são mencionada no diagrama acima, `activated` e `deactivated`, e apenas o componente `kee-alive` possui esses dois ciclos. Componente encapsulado com `keep-alive` não serão destruídos durante o switch, mas sera cacheado em memória e executado a função gancho `deactivated`, e executar a função `actived` depois de coincidir o cache e a renderização.\n\nFinalmente, vamos olhar a função gancho usada para destruir o componente.\n\n```js\nVue.prototype.$destroy = function() {\n // ...\n callHook(vm, 'beforeDestroy')\n vm._isBeingDestroyed = true\n // remove-se mesmo a partir do pai\n const parent = vm.$parent\n if (parent && !parent._isBeingDestroyed && !vm.$options.abstract) {\n remove(parent.$children, vm)\n }\n // destroi watchers\n if (vm._watcher) {\n vm._watcher.teardown()\n }\n let i = vm._watchers.length\n while (i--) {\n vm._watchers[i].teardown()\n }\n // remove a referência a partir do dado ob\n // objeto congelados não devem ter um observador.\n if (vm._data.__ob__) {\n vm._data.__ob__.vmCount--\n }\n // chame o último gancho...\n vm._isDestroyed = true\n // invoque ganchos destruídos na árvore atualmente renderizada\n // dispare o gancho destruído\n callHook(vm, 'destroyed')\n // desligo todos os ouvintes da instância.\n vm.$off()\n // remove __vue__ reference\n // remove __vue__ reference\n if (vm.$el) {\n vm.$el.__vue__ = null\n }\n // lance uma referência circular (#6759)\n if (vm.$vnode) {\n vm.$vnode.parent = null\n }\n}\n```\n\nA função `beforeDestroy` será chamada antes da operação de destruir ser desempenhada, e então uma série de operações de destruição são desempenhadas. Se existe um componente filho, eles serão destruidos recursivamente, e apenas quando todos os componente filhos são destruídos, o gancho `destroyed` do componente raíz será executado.\n"
},
{
"path": "Framework/vue-en.md",
"content": "\n\n**Table of Contents** *generated with [DocToc](https://github.com/thlorenz/doctoc)*\n\n- [NextTick principle analysis](#nexttick-principle-analysis)\n- [Lifecycle analysis](#lifecycle-analysis)\n\n\n\n# NextTick principle analysis\n\n`nextTick` allows us to defer the callback to be executed after the next DOM update cycle, to get the updated DOM.\n\nBefore version 2.4, Vue used microtasks, but the priority of microtasks is too high, and in some cases, it may faster than event bubbling, but if you use macrotasks, there may be some issues of rendering performance. So in the new version, microtasks will be used by default, but macrotasks will be used in special cases, such as v-on.\n\nFor implementing macrotasks, you will first determine if `setImmediate` can be used, if not, downgrade to `MessageChannel`. If not again, use `setTimeout`.\n\n```js\nif (typeof setImmediate !== 'undefined' && isNative(setImmediate)) {\n macroTimerFunc = () => {\n setImmediate(flushCallbacks)\n }\n} else if (\n typeof MessageChannel !== 'undefined' &&\n (isNative(MessageChannel) ||\n // PhantomJS\n MessageChannel.toString() === '[object MessageChannelConstructor]')\n) {\n const channel = new MessageChannel()\n const port = channel.port2\n channel.port1.onmessage = flushCallbacks\n macroTimerFunc = () => {\n port.postMessage(1)\n }\n} else {\n /* istanbul ignore next */\n macroTimerFunc = () => {\n setTimeout(flushCallbacks, 0)\n }\n}\n```\n\n`nextTick` also supports the use of `Promise`, which will determine whether `Promise` is implemented.\n\n```js\nexport function nextTick(cb?: Function, ctx?: Object) {\n let _resolve\n // Consolidate callback functions into an array\n callbacks.push(() => {\n if (cb) {\n try {\n cb.call(ctx)\n } catch (e) {\n handleError(e, ctx, 'nextTick')\n }\n } else if (_resolve) {\n _resolve(ctx)\n }\n })\n if (!pending) {\n pending = true\n if (useMacroTask) {\n macroTimerFunc()\n } else {\n microTimerFunc()\n }\n }\n // Determine if Promise can be used\n // Assign _resolve if possible\n // This way the callback function can be called in the way of promise\n if (!cb && typeof Promise !== 'undefined') {\n return new Promise(resolve => {\n _resolve = resolve\n })\n }\n}\n```\n\n# Lifecycle analysis\n\nThe lifecycle function is the hook function that the component will trigger when it initializes or updates the data.\n\n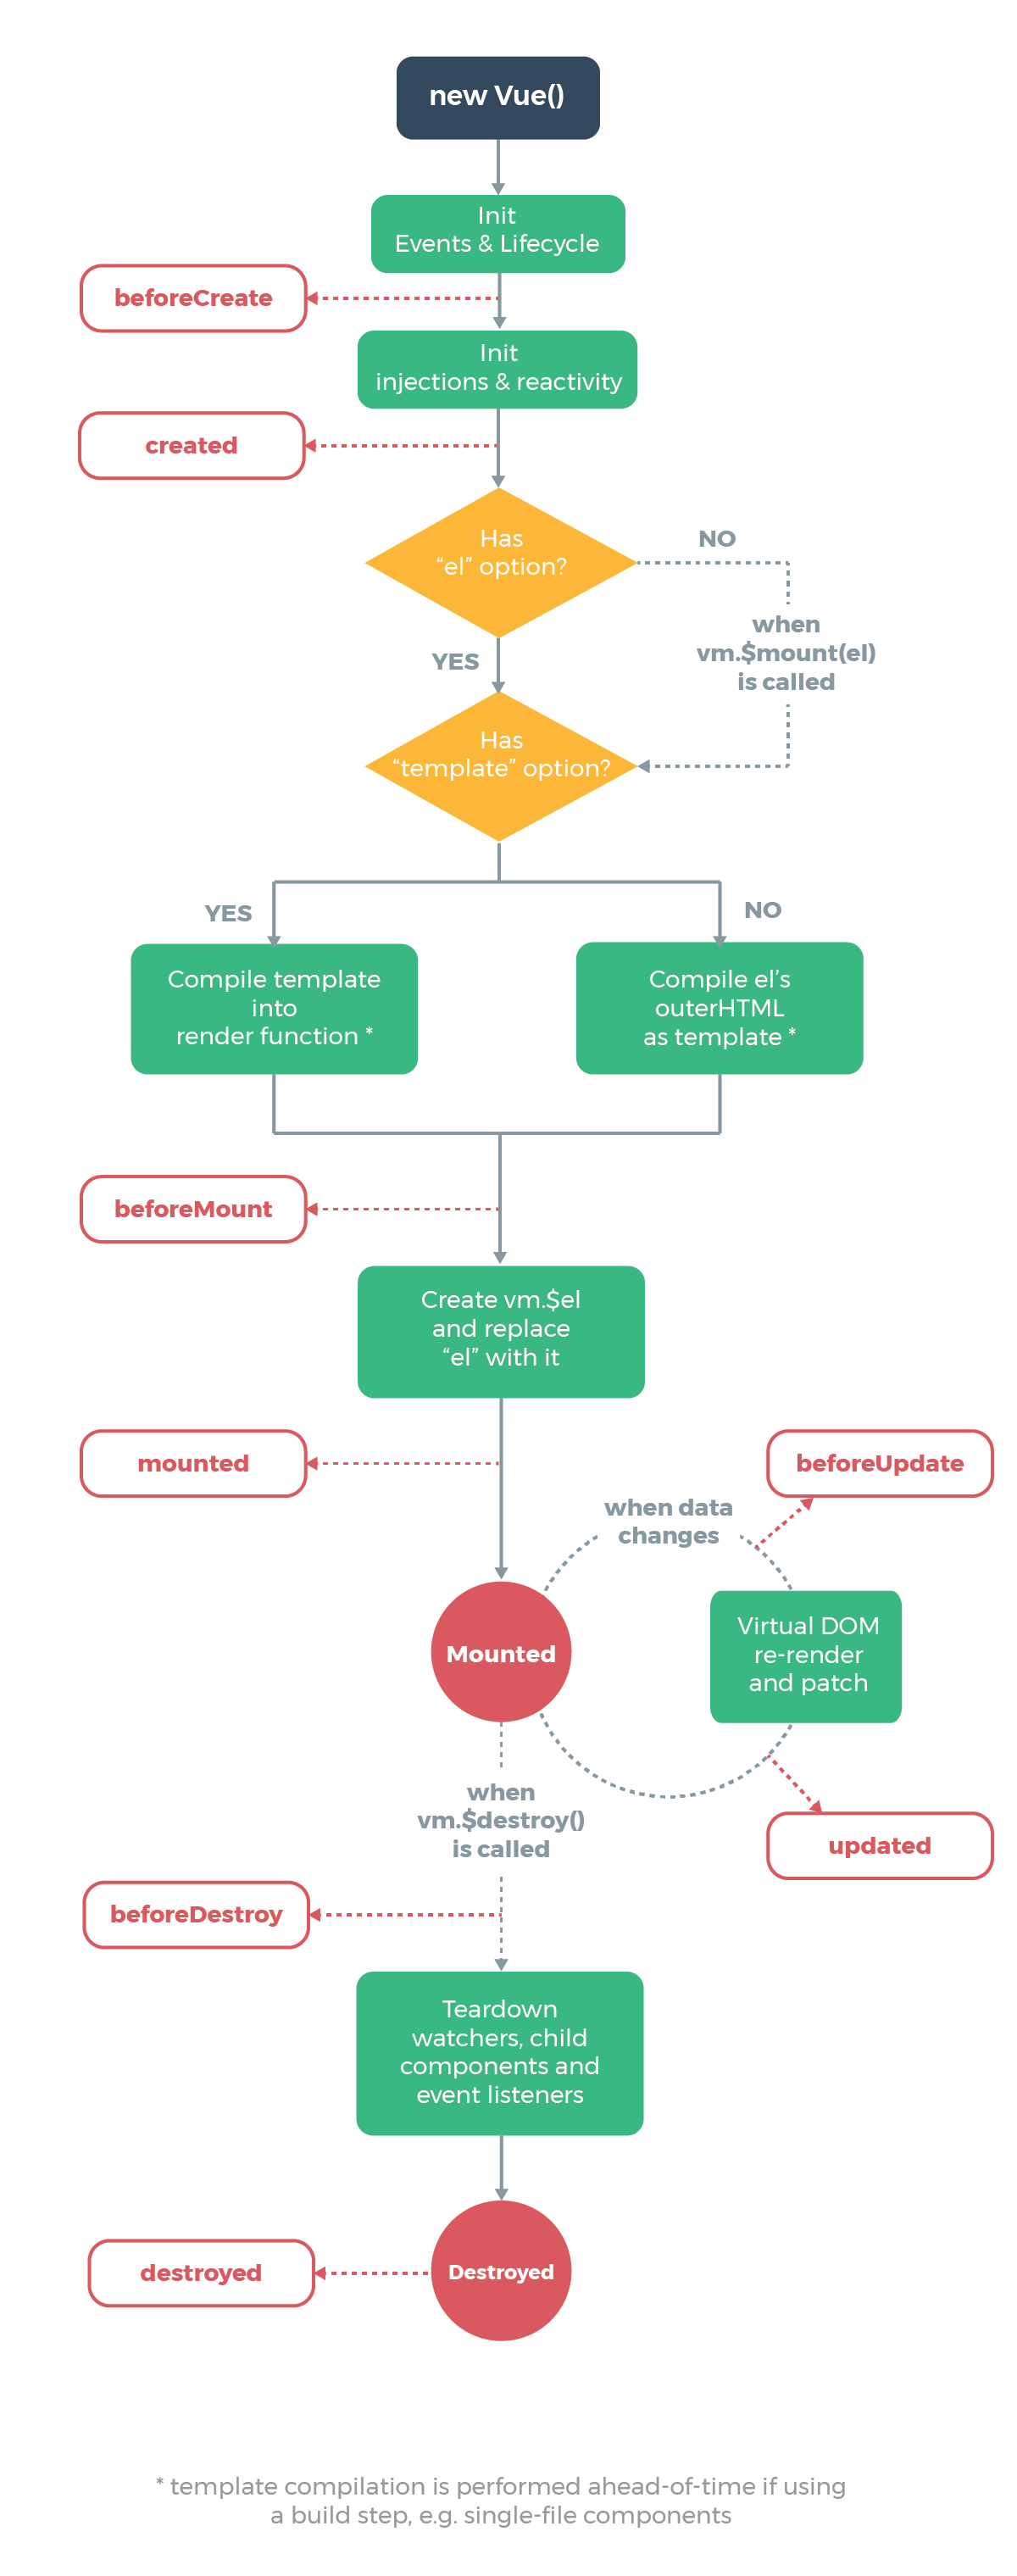\n\nThe following code will be called at initialization, and lifecycle is called by `callHook`\n\n```js\nVue.prototype._init = function(options) {\n initLifecycle(vm)\n initEvents(vm)\n initRender(vm)\n callHook(vm, 'beforeCreate') // can not get props data\n initInjections(vm) \n initState(vm)\n initProvide(vm)\n callHook(vm, 'created')\n}\n```\n\nIt can be found that in the above code when `beforeCreate` is called, the data in `props` or `data` cannot be obtained because the initialization of these data is in `initState`.\n\nNext, the mount function will be called\n\n```js\nexport function mountComponent {\n callHook(vm, 'beforeMount')\n // ...\n if (vm.$vnode == null) {\n vm._isMounted = true\n callHook(vm, 'mounted')\n }\n}\n```\n\n`beforeMount` will be executed before mounting the instance, then starts to create the VDOM and replace it with the real DOM, and finally call the `mounted` hook. And there’s a judgment logic here that if it is an external `new Vue({}) `, `$vnode` doesn’t exist, so the `mounted` hook will be executed directly. If there are child components, they will be mounted recursively, only when all the child components are mounted, the mount hooks of the root components will be executed. \n\nNext, it comes to the hook function that will be called when the data is updated.\n\n```js\nfunction flushSchedulerQueue() {\n // ...\n for (index = 0; index < queue.length; index++) {\n watcher = queue[index]\n if (watcher.before) {\n watcher.before() // call `beforeUpdate`\n }\n id = watcher.id\n has[id] = null\n watcher.run()\n // in dev build, check and stop circular updates.\n if (process.env.NODE_ENV !== 'production' && has[id] != null) {\n circular[id] = (circular[id] || 0) + 1\n if (circular[id] > MAX_UPDATE_COUNT) {\n warn(\n 'You may have an infinite update loop ' +\n (watcher.user\n ? `in watcher with expression \"${watcher.expression}\"`\n : `in a component render function.`),\n watcher.vm\n )\n break\n }\n }\n }\n callUpdatedHooks(updatedQueue)\n}\n\nfunction callUpdatedHooks(queue) {\n let i = queue.length\n while (i--) {\n const watcher = queue[i]\n const vm = watcher.vm\n if (vm._watcher === watcher && vm._isMounted) {\n callHook(vm, 'updated')\n }\n }\n}\n```\n\nThere are two lifecycle functions that aren’t mentioned in the above diagram, `activated` and `deactivated`, and only the `kee-alive` component has these two life cycles. Components wrapped with `keep-alive` will not be destroyed during the switch, but be cached in memory and execute the `deactivated` hook function, and execute the `actived` hook function after matching the cache and rendering.\n\nFinally, let’s see the hook function that used to destroy the component.\n\n```js\nVue.prototype.$destroy = function() {\n // ...\n callHook(vm, 'beforeDestroy')\n vm._isBeingDestroyed = true\n // remove self from parent\n const parent = vm.$parent\n if (parent && !parent._isBeingDestroyed && !vm.$options.abstract) {\n remove(parent.$children, vm)\n }\n // teardown watchers\n if (vm._watcher) {\n vm._watcher.teardown()\n }\n let i = vm._watchers.length\n while (i--) {\n vm._watchers[i].teardown()\n }\n // remove reference from data ob\n // frozen object may not have observer.\n if (vm._data.__ob__) {\n vm._data.__ob__.vmCount--\n }\n // call the last hook...\n vm._isDestroyed = true\n // invoke destroy hooks on current rendered tree\n vm.__patch__(vm._vnode, null)\n // fire destroyed hook\n callHook(vm, 'destroyed')\n // turn off all instance listeners.\n vm.$off()\n // remove __vue__ reference\n if (vm.$el) {\n vm.$el.__vue__ = null\n }\n // release circular reference (#6759)\n if (vm.$vnode) {\n vm.$vnode.parent = null\n }\n}\n```\n\nThe `beforeDestroy` hook function will be called before the destroy operation is performed, and then a series of destruction operations are performed. If there are child components, they will be destroyed recursively, and only when all the child components are destroyed, the hook `destroyed` of the root component will be executed.\n"
},
{
"path": "Framework/vue-zh.md",
"content": "\n\n**Table of Contents** *generated with [DocToc](https://github.com/thlorenz/doctoc)*\n\n- [NextTick 原理分析](#nexttick-%E5%8E%9F%E7%90%86%E5%88%86%E6%9E%90)\n- [生命周期分析](#%E7%94%9F%E5%91%BD%E5%91%A8%E6%9C%9F%E5%88%86%E6%9E%90)\n- [VueRouter 源码解析](#vuerouter-%E6%BA%90%E7%A0%81%E8%A7%A3%E6%9E%90)\n - [重要函数思维导图](#%E9%87%8D%E8%A6%81%E5%87%BD%E6%95%B0%E6%80%9D%E7%BB%B4%E5%AF%BC%E5%9B%BE)\n - [路由注册](#%E8%B7%AF%E7%94%B1%E6%B3%A8%E5%86%8C)\n - [VueRouter 实例化](#vuerouter-%E5%AE%9E%E4%BE%8B%E5%8C%96)\n - [创建路由匹配对象](#%E5%88%9B%E5%BB%BA%E8%B7%AF%E7%94%B1%E5%8C%B9%E9%85%8D%E5%AF%B9%E8%B1%A1)\n - [路由初始化](#%E8%B7%AF%E7%94%B1%E5%88%9D%E5%A7%8B%E5%8C%96)\n - [路由跳转](#%E8%B7%AF%E7%94%B1%E8%B7%B3%E8%BD%AC)\n\n\n\n# NextTick 原理分析\n\n`nextTick` 可以让我们在下次 DOM 更新循环结束之后执行延迟回调,用于获得更新后的 DOM。\n\n在 Vue 2.4 之前都是使用的 microtasks,但是 microtasks 的优先级过高,在某些情况下可能会出现比事件冒泡更快的情况,但如果都使用 macrotasks 又可能会出现渲染的性能问题。所以在新版本中,会默认使用 microtasks,但在特殊情况下会使用 macrotasks,比如 v-on。\n\n对于实现 macrotasks ,会先判断是否能使用 `setImmediate` ,不能的话降级为 `MessageChannel` ,以上都不行的话就使用 `setTimeout` \n\n```js\nif (typeof setImmediate !== 'undefined' && isNative(setImmediate)) {\n macroTimerFunc = () => {\n setImmediate(flushCallbacks)\n }\n} else if (\n typeof MessageChannel !== 'undefined' &&\n (isNative(MessageChannel) ||\n // PhantomJS\n MessageChannel.toString() === '[object MessageChannelConstructor]')\n) {\n const channel = new MessageChannel()\n const port = channel.port2\n channel.port1.onmessage = flushCallbacks\n macroTimerFunc = () => {\n port.postMessage(1)\n }\n} else {\n /* istanbul ignore next */\n macroTimerFunc = () => {\n setTimeout(flushCallbacks, 0)\n }\n}\n```\n\n`nextTick` 同时也支持 Promise 的使用,会判断是否实现了 Promise \n\n```js\nexport function nextTick(cb?: Function, ctx?: Object) {\n let _resolve\n // 将回调函数整合进一个数组中\n callbacks.push(() => {\n if (cb) {\n try {\n cb.call(ctx)\n } catch (e) {\n handleError(e, ctx, 'nextTick')\n }\n } else if (_resolve) {\n _resolve(ctx)\n }\n })\n if (!pending) {\n pending = true\n if (useMacroTask) {\n macroTimerFunc()\n } else {\n microTimerFunc()\n }\n }\n // 判断是否可以使用 Promise \n // 可以的话给 _resolve 赋值\n // 这样回调函数就能以 promise 的方式调用\n if (!cb && typeof Promise !== 'undefined') {\n return new Promise(resolve => {\n _resolve = resolve\n })\n }\n}\n```\n\n# 生命周期分析\n\n生命周期函数就是组件在初始化或者数据更新时会触发的钩子函数。\n\n\n\n在初始化时,会调用以下代码,生命周期就是通过 `callHook` 调用的\n\n```js\nVue.prototype._init = function(options) {\n initLifecycle(vm)\n initEvents(vm)\n initRender(vm)\n callHook(vm, 'beforeCreate') // 拿不到 props data\n initInjections(vm) \n initState(vm)\n initProvide(vm)\n callHook(vm, 'created')\n}\n```\n\n可以发现在以上代码中,`beforeCreate` 调用的时候,是获取不到 props 或者 data 中的数据的,因为这些数据的初始化都在 `initState` 中。\n\n接下来会执行挂载函数\n\n```js\nexport function mountComponent {\n callHook(vm, 'beforeMount')\n // ...\n if (vm.$vnode == null) {\n vm._isMounted = true\n callHook(vm, 'mounted')\n }\n}\n```\n\n`beforeMount` 就是在挂载前执行的,然后开始创建 VDOM 并替换成真实 DOM,最后执行 `mounted` 钩子。这里会有个判断逻辑,如果是外部 `new Vue({}) ` 的话,不会存在 `$vnode` ,所以直接执行 ``mounted`` 钩子了。如果有子组件的话,会递归挂载子组件,只有当所有子组件全部挂载完毕,才会执行根组件的挂载钩子。\n\n接下来是数据更新时会调用的钩子函数\n\n```js\nfunction flushSchedulerQueue() {\n // ...\n for (index = 0; index < queue.length; index++) {\n watcher = queue[index]\n if (watcher.before) {\n watcher.before() // 调用 beforeUpdate\n }\n id = watcher.id\n has[id] = null\n watcher.run()\n // in dev build, check and stop circular updates.\n if (process.env.NODE_ENV !== 'production' && has[id] != null) {\n circular[id] = (circular[id] || 0) + 1\n if (circular[id] > MAX_UPDATE_COUNT) {\n warn(\n 'You may have an infinite update loop ' +\n (watcher.user\n ? `in watcher with expression \"${watcher.expression}\"`\n : `in a component render function.`),\n watcher.vm\n )\n break\n }\n }\n }\n callUpdatedHooks(updatedQueue)\n}\n\nfunction callUpdatedHooks(queue) {\n let i = queue.length\n while (i--) {\n const watcher = queue[i]\n const vm = watcher.vm\n if (vm._watcher === watcher && vm._isMounted) {\n callHook(vm, 'updated')\n }\n }\n}\n```\n\n上图还有两个生命周期没有说,分别为 `activated` 和 `deactivated` ,这两个钩子函数是 `keep-alive` 组件独有的。用 `keep-alive` 包裹的组件在切换时不会进行销毁,而是缓存到内存中并执行 `deactivated` 钩子函数,命中缓存渲染后会执行 `actived` 钩子函数。\n\n最后就是销毁组件的钩子函数了\n\n```js\nVue.prototype.$destroy = function() {\n // ...\n callHook(vm, 'beforeDestroy')\n vm._isBeingDestroyed = true\n // remove self from parent\n const parent = vm.$parent\n if (parent && !parent._isBeingDestroyed && !vm.$options.abstract) {\n remove(parent.$children, vm)\n }\n // teardown watchers\n if (vm._watcher) {\n vm._watcher.teardown()\n }\n let i = vm._watchers.length\n while (i--) {\n vm._watchers[i].teardown()\n }\n // remove reference from data ob\n // frozen object may not have observer.\n if (vm._data.__ob__) {\n vm._data.__ob__.vmCount--\n }\n // call the last hook...\n vm._isDestroyed = true\n // invoke destroy hooks on current rendered tree\n vm.__patch__(vm._vnode, null)\n // fire destroyed hook\n callHook(vm, 'destroyed')\n // turn off all instance listeners.\n vm.$off()\n // remove __vue__ reference\n if (vm.$el) {\n vm.$el.__vue__ = null\n }\n // release circular reference (#6759)\n if (vm.$vnode) {\n vm.$vnode.parent = null\n }\n}\n```\n\n在执行销毁操作前会调用 `beforeDestroy` 钩子函数,然后进行一系列的销毁操作,如果有子组件的话,也会递归销毁子组件,所有子组件都销毁完毕后才会执行根组件的 `destroyed` 钩子函数。\n\n# VueRouter 源码解析\n\n## 重要函数思维导图\n\n以下思维导图罗列了源码中重要的一些函数\n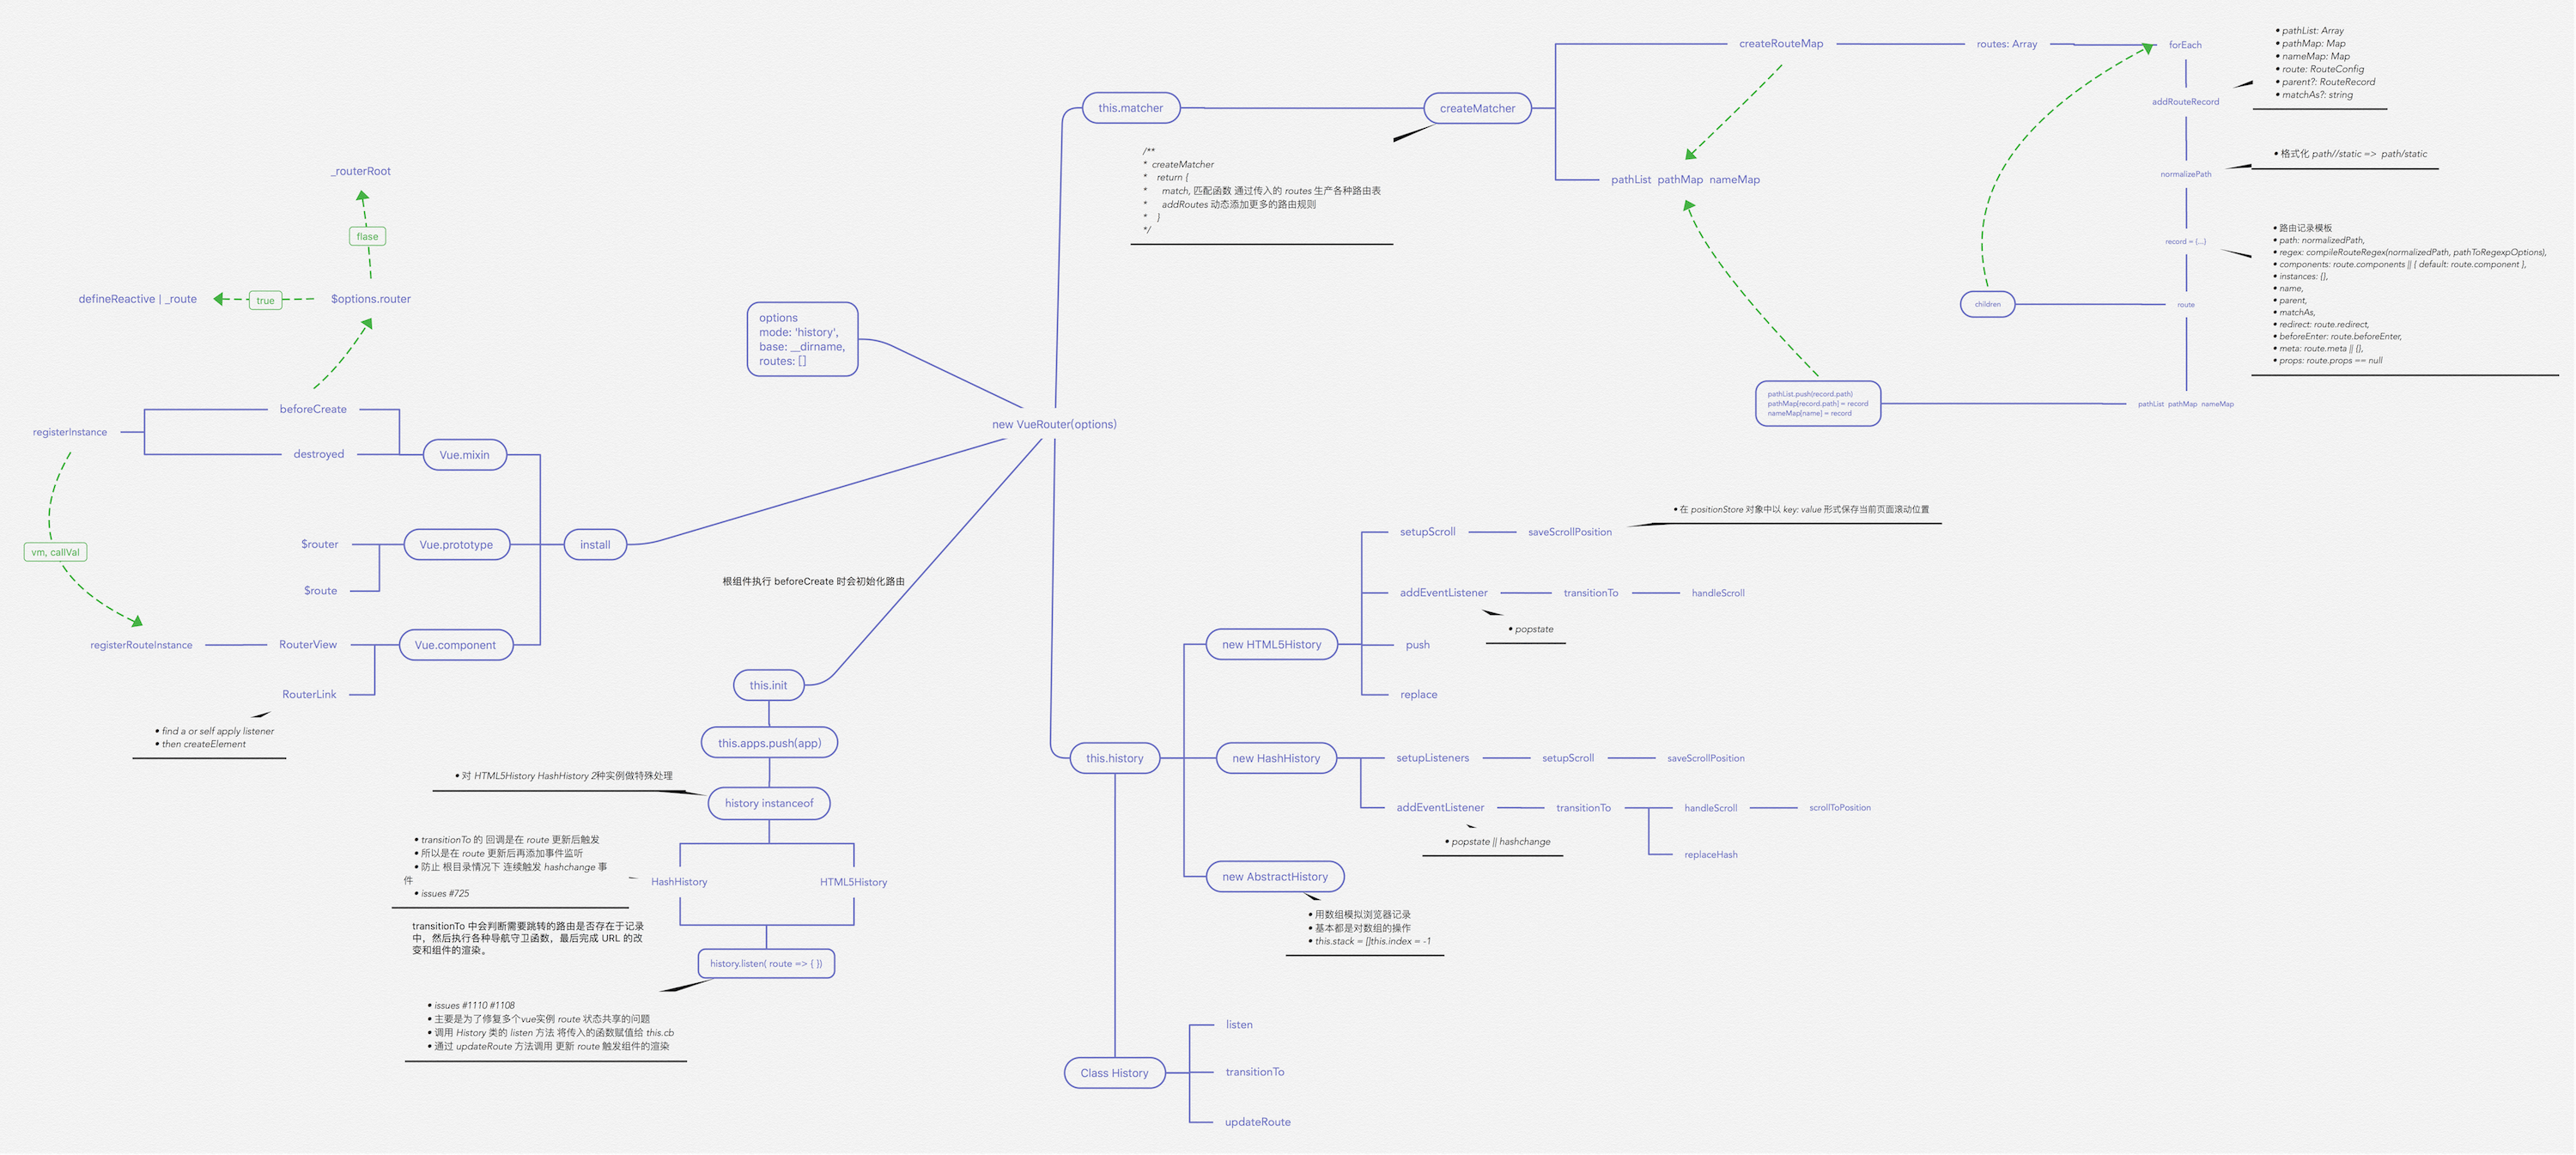\n\n## 路由注册\n\n在开始之前,推荐大家 clone 一份源码对照着看。因为篇幅较长,函数间的跳转也很多。\n\n使用路由之前,需要调用 `Vue.use(VueRouter)`,这是因为让插件可以使用 Vue \n```js\nexport function initUse (Vue: GlobalAPI) {\n Vue.use = function (plugin: Function | Object) {\n // 判断重复安装插件\n const installedPlugins = (this._installedPlugins || (this._installedPlugins = []))\n if (installedPlugins.indexOf(plugin) > -1) {\n return this\n }\n const args = toArray(arguments, 1)\n // 插入 Vue\n args.unshift(this)\n // 一般插件都会有一个 install 函数\n // 通过该函数让插件可以使用 Vue\n if (typeof plugin.install === 'function') {\n plugin.install.apply(plugin, args)\n } else if (typeof plugin === 'function') {\n plugin.apply(null, args)\n }\n installedPlugins.push(plugin)\n return this\n }\n}\n```\n接下来看下 `install` 函数的部分实现\n```js\nexport function install (Vue) {\n // 确保 install 调用一次\n if (install.installed && _Vue === Vue) return\n install.installed = true\n // 把 Vue 赋值给全局变量\n _Vue = Vue\n const registerInstance = (vm, callVal) => {\n let i = vm.$options._parentVnode\n if (isDef(i) && isDef(i = i.data) && isDef(i = i.registerRouteInstance)) {\n i(vm, callVal)\n }\n }\n // 给每个组件的钩子函数混入实现\n // 可以发现在 `beforeCreate` 钩子执行时\n // 会初始化路由\n Vue.mixin({\n beforeCreate () {\n // 判断组件是否存在 router 对象,该对象只在根组件上有\n if (isDef(this.$options.router)) {\n // 根路由设置为自己\n this._routerRoot = this\n this._router = this.$options.router\n // 初始化路由\n this._router.init(this)\n // 很重要,为 _route 属性实现双向绑定\n // 触发组件渲染\n Vue.util.defineReactive(this, '_route', this._router.history.current)\n } else {\n // 用于 router-view 层级判断\n this._routerRoot = (this.$parent && this.$parent._routerRoot) || this\n }\n registerInstance(this, this)\n },\n destroyed () {\n registerInstance(this)\n }\n })\n // 全局注册组件 router-link 和 router-view\n Vue.component('RouterView', View)\n Vue.component('RouterLink', Link)\n}\n```\n对于路由注册来说,核心就是调用 `Vue.use(VueRouter)`,使得 VueRouter 可以使用 Vue。然后通过 Vue 来调用 VueRouter 的 `install` 函数。在该函数中,核心就是给组件混入钩子函数和全局注册两个路由组件。\n\n## VueRouter 实例化\n在安装插件后,对 VueRouter 进行实例化。\n```js\nconst Home = { template: '
home
' }\nconst Foo = { template: '
foo
' }\nconst Bar = { template: '
bar
' }\n\n// 3. Create the router\nconst router = new VueRouter({\n mode: 'hash',\n base: __dirname,\n routes: [\n { path: '/', component: Home }, // all paths are defined without the hash.\n { path: '/foo', component: Foo },\n { path: '/bar', component: Bar }\n ]\n})\n```\n来看一下 VueRouter 的构造函数\n```js\nconstructor(options: RouterOptions = {}) {\n // ...\n // 路由匹配对象\n this.matcher = createMatcher(options.routes || [], this)\n\n // 根据 mode 采取不同的路由方式\n let mode = options.mode || 'hash'\n this.fallback =\n mode === 'history' && !supportsPushState && options.fallback !== false\n if (this.fallback) {\n mode = 'hash'\n }\n if (!inBrowser) {\n mode = 'abstract'\n }\n this.mode = mode\n\n switch (mode) {\n case 'history':\n this.history = new HTML5History(this, options.base)\n break\n case 'hash':\n this.history = new HashHistory(this, options.base, this.fallback)\n break\n case 'abstract':\n this.history = new AbstractHistory(this, options.base)\n break\n default:\n if (process.env.NODE_ENV !== 'production') {\n assert(false, `invalid mode: ${mode}`)\n }\n }\n }\n```\n在实例化 VueRouter 的过程中,核心是创建一个路由匹配对象,并且根据 mode 来采取不同的路由方式。\n\n## 创建路由匹配对象\n\n```js\nexport function createMatcher (\n routes: Array,\n router: VueRouter\n): Matcher {\n // 创建路由映射表\n const { pathList, pathMap, nameMap } = createRouteMap(routes)\n \n function addRoutes (routes) {\n createRouteMap(routes, pathList, pathMap, nameMap)\n }\n // 路由匹配\n function match (\n raw: RawLocation,\n currentRoute?: Route,\n redirectedFrom?: Location\n ): Route {\n //...\n }\n\n return {\n match,\n addRoutes\n }\n}\n```\n`createMatcher` 函数的作用就是创建路由映射表,然后通过闭包的方式让 `addRoutes` 和 `match` 函数能够使用路由映射表的几个对象,最后返回一个 `Matcher` 对象。\n\n接下来看 `createMatcher` 函数时如何创建映射表的\n```js\nexport function createRouteMap (\n routes: Array,\n oldPathList?: Array,\n oldPathMap?: Dictionary,\n oldNameMap?: Dictionary\n): {\n pathList: Array;\n pathMap: Dictionary;\n nameMap: Dictionary;\n} {\n // 创建映射表\n const pathList: Array = oldPathList || []\n const pathMap: Dictionary = oldPathMap || Object.create(null)\n const nameMap: Dictionary = oldNameMap || Object.create(null)\n // 遍历路由配置,为每个配置添加路由记录\n routes.forEach(route => {\n addRouteRecord(pathList, pathMap, nameMap, route)\n })\n // 确保通配符在最后\n for (let i = 0, l = pathList.length; i < l; i++) {\n if (pathList[i] === '*') {\n pathList.push(pathList.splice(i, 1)[0])\n l--\n i--\n }\n }\n return {\n pathList,\n pathMap,\n nameMap\n }\n}\n// 添加路由记录\nfunction addRouteRecord (\n pathList: Array,\n pathMap: Dictionary,\n nameMap: Dictionary,\n route: RouteConfig,\n parent?: RouteRecord,\n matchAs?: string\n) {\n // 获得路由配置下的属性\n const { path, name } = route\n const pathToRegexpOptions: PathToRegexpOptions = route.pathToRegexpOptions || {}\n // 格式化 url,替换 / \n const normalizedPath = normalizePath(\n path,\n parent,\n pathToRegexpOptions.strict\n )\n // 生成记录对象\n const record: RouteRecord = {\n path: normalizedPath,\n regex: compileRouteRegex(normalizedPath, pathToRegexpOptions),\n components: route.components || { default: route.component },\n instances: {},\n name,\n parent,\n matchAs,\n redirect: route.redirect,\n beforeEnter: route.beforeEnter,\n meta: route.meta || {},\n props: route.props == null\n ? {}\n : route.components\n ? route.props\n : { default: route.props }\n }\n\n if (route.children) {\n // 递归路由配置的 children 属性,添加路由记录\n route.children.forEach(child => {\n const childMatchAs = matchAs\n ? cleanPath(`${matchAs}/${child.path}`)\n : undefined\n addRouteRecord(pathList, pathMap, nameMap, child, record, childMatchAs)\n })\n }\n // 如果路由有别名的话\n // 给别名也添加路由记录\n if (route.alias !== undefined) {\n const aliases = Array.isArray(route.alias)\n ? route.alias\n : [route.alias]\n\n aliases.forEach(alias => {\n const aliasRoute = {\n path: alias,\n children: route.children\n }\n addRouteRecord(\n pathList,\n pathMap,\n nameMap,\n aliasRoute,\n parent,\n record.path || '/' // matchAs\n )\n })\n }\n // 更新映射表\n if (!pathMap[record.path]) {\n pathList.push(record.path)\n pathMap[record.path] = record\n }\n // 命名路由添加记录\n if (name) {\n if (!nameMap[name]) {\n nameMap[name] = record\n } else if (process.env.NODE_ENV !== 'production' && !matchAs) {\n warn(\n false,\n `Duplicate named routes definition: ` +\n `{ name: \"${name}\", path: \"${record.path}\" }`\n )\n }\n }\n}\n```\n以上就是创建路由匹配对象的全过程,通过用户配置的路由规则来创建对应的路由映射表。\n## 路由初始化\n\n当根组件调用 `beforeCreate` 钩子函数时,会执行以下代码\n```js\nbeforeCreate () {\n// 只有根组件有 router 属性,所以根组件初始化时会初始化路由\n if (isDef(this.$options.router)) {\n this._routerRoot = this\n this._router = this.$options.router\n this._router.init(this)\n Vue.util.defineReactive(this, '_route', this._router.history.current)\n } else {\n this._routerRoot = (this.$parent && this.$parent._routerRoot) || this\n }\n registerInstance(this, this)\n}\n```\n接下来看下路由初始化会做些什么\n```js\ninit(app: any /* Vue component instance */) {\n // 保存组件实例\n this.apps.push(app)\n // 如果根组件已经有了就返回\n if (this.app) {\n return\n }\n this.app = app\n // 赋值路由模式\n const history = this.history\n // 判断路由模式,以哈希模式为例\n if (history instanceof HTML5History) {\n history.transitionTo(history.getCurrentLocation())\n } else if (history instanceof HashHistory) {\n // 添加 hashchange 监听\n const setupHashListener = () => {\n history.setupListeners()\n }\n // 路由跳转\n history.transitionTo(\n history.getCurrentLocation(),\n setupHashListener,\n setupHashListener\n )\n }\n // 该回调会在 transitionTo 中调用\n // 对组件的 _route 属性进行赋值,触发组件渲染\n history.listen(route => {\n this.apps.forEach(app => {\n app._route = route\n })\n })\n }\n```\n在路由初始化时,核心就是进行路由的跳转,改变 URL 然后渲染对应的组件。接下来来看一下路由是如何进行跳转的。\n## 路由跳转\n```js\ntransitionTo (location: RawLocation, onComplete?: Function, onAbort?: Function) {\n // 获取匹配的路由信息\n const route = this.router.match(location, this.current)\n // 确认切换路由\n this.confirmTransition(route, () => {\n // 以下为切换路由成功或失败的回调\n // 更新路由信息,对组件的 _route 属性进行赋值,触发组件渲染\n // 调用 afterHooks 中的钩子函数\n this.updateRoute(route)\n // 添加 hashchange 监听\n onComplete && onComplete(route)\n // 更新 URL\n this.ensureURL()\n // 只执行一次 ready 回调\n if (!this.ready) {\n this.ready = true\n this.readyCbs.forEach(cb => { cb(route) })\n }\n }, err => {\n // 错误处理\n if (onAbort) {\n onAbort(err)\n }\n if (err && !this.ready) {\n this.ready = true\n this.readyErrorCbs.forEach(cb => { cb(err) })\n }\n })\n}\n```\n在路由跳转中,需要先获取匹配的路由信息,所以先来看下如何获取匹配的路由信息\n```js\nfunction match (\n raw: RawLocation,\n currentRoute?: Route,\n redirectedFrom?: Location\n): Route {\n // 序列化 url\n // 比如对于该 url 来说 /abc?foo=bar&baz=qux#hello\n // 会序列化路径为 /abc\n // 哈希为 #hello\n // 参数为 foo: 'bar', baz: 'qux'\n const location = normalizeLocation(raw, currentRoute, false, router)\n const { name } = location\n // 如果是命名路由,就判断记录中是否有该命名路由配置\n if (name) {\n const record = nameMap[name]\n // 没找到表示没有匹配的路由\n if (!record) return _createRoute(null, location)\n const paramNames = record.regex.keys\n .filter(key => !key.optional)\n .map(key => key.name)\n // 参数处理\n if (typeof location.params !== 'object') {\n location.params = {}\n }\n if (currentRoute && typeof currentRoute.params === 'object') {\n for (const key in currentRoute.params) {\n if (!(key in location.params) && paramNames.indexOf(key) > -1) {\n location.params[key] = currentRoute.params[key]\n }\n }\n }\n if (record) {\n location.path = fillParams(record.path, location.params, `named route \"${name}\"`)\n return _createRoute(record, location, redirectedFrom)\n }\n } else if (location.path) {\n // 非命名路由处理\n location.params = {}\n for (let i = 0; i < pathList.length; i++) {\n // 查找记录\n const path = pathList[i]\n const record = pathMap[path]\n // 如果匹配路由,则创建路由\n if (matchRoute(record.regex, location.path, location.params)) {\n return _createRoute(record, location, redirectedFrom)\n }\n }\n }\n // 没有匹配的路由\n return _createRoute(null, location)\n}\n```\n接下来看看如何创建路由\n```js\n// 根据条件创建不同的路由\nfunction _createRoute(\n record: ?RouteRecord,\n location: Location,\n redirectedFrom?: Location\n): Route {\n if (record && record.redirect) {\n return redirect(record, redirectedFrom || location)\n }\n if (record && record.matchAs) {\n return alias(record, location, record.matchAs)\n }\n return createRoute(record, location, redirectedFrom, router)\n}\n\nexport function createRoute (\n record: ?RouteRecord,\n location: Location,\n redirectedFrom?: ?Location,\n router?: VueRouter\n): Route {\n const stringifyQuery = router && router.options.stringifyQuery\n // 克隆参数\n let query: any = location.query || {}\n try {\n query = clone(query)\n } catch (e) {}\n // 创建路由对象\n const route: Route = {\n name: location.name || (record && record.name),\n meta: (record && record.meta) || {},\n path: location.path || '/',\n hash: location.hash || '',\n query,\n params: location.params || {},\n fullPath: getFullPath(location, stringifyQuery),\n matched: record ? formatMatch(record) : []\n }\n if (redirectedFrom) {\n route.redirectedFrom = getFullPath(redirectedFrom, stringifyQuery)\n }\n // 让路由对象不可修改\n return Object.freeze(route)\n}\n// 获得包含当前路由的所有嵌套路径片段的路由记录\n// 包含从根路由到当前路由的匹配记录,从上至下\nfunction formatMatch(record: ?RouteRecord): Array {\n const res = []\n while (record) {\n res.unshift(record)\n record = record.parent\n }\n return res\n}\n```\n至此匹配路由已经完成,我们回到 `transitionTo` 函数中,接下来执行 `confirmTransition` \n```js\ntransitionTo (location: RawLocation, onComplete?: Function, onAbort?: Function) {\n // 确认切换路由\n this.confirmTransition(route, () => {}\n}\nconfirmTransition(route: Route, onComplete: Function, onAbort?: Function) {\n const current = this.current\n // 中断跳转路由函数\n const abort = err => {\n if (isError(err)) {\n if (this.errorCbs.length) {\n this.errorCbs.forEach(cb => {\n cb(err)\n })\n } else {\n warn(false, 'uncaught error during route navigation:')\n console.error(err)\n }\n }\n onAbort && onAbort(err)\n }\n // 如果是相同的路由就不跳转\n if (\n isSameRoute(route, current) &&\n route.matched.length === current.matched.length\n ) {\n this.ensureURL()\n return abort()\n }\n // 通过对比路由解析出可复用的组件,需要渲染的组件,失活的组件\n const { updated, deactivated, activated } = resolveQueue(\n this.current.matched,\n route.matched\n )\n \n function resolveQueue(\n current: Array,\n next: Array\n ): {\n updated: Array,\n activated: Array,\n deactivated: Array\n } {\n let i\n const max = Math.max(current.length, next.length)\n for (i = 0; i < max; i++) {\n // 当前路由路径和跳转路由路径不同时跳出遍历\n if (current[i] !== next[i]) {\n break\n }\n }\n return {\n // 可复用的组件对应路由\n updated: next.slice(0, i),\n // 需要渲染的组件对应路由\n activated: next.slice(i),\n // 失活的组件对应路由\n deactivated: current.slice(i)\n }\n }\n // 导航守卫数组\n const queue: Array = [].concat(\n // 失活的组件钩子\n extractLeaveGuards(deactivated),\n // 全局 beforeEach 钩子\n this.router.beforeHooks,\n // 在当前路由改变,但是该组件被复用时调用\n extractUpdateHooks(updated),\n // 需要渲染组件 enter 守卫钩子\n activated.map(m => m.beforeEnter),\n // 解析异步路由组件\n resolveAsyncComponents(activated)\n )\n // 保存路由\n this.pending = route\n // 迭代器,用于执行 queue 中的导航守卫钩子\n const iterator = (hook: NavigationGuard, next) => {\n // 路由不相等就不跳转路由\n if (this.pending !== route) {\n return abort()\n }\n try {\n // 执行钩子\n hook(route, current, (to: any) => {\n // 只有执行了钩子函数中的 next,才会继续执行下一个钩子函数\n // 否则会暂停跳转\n // 以下逻辑是在判断 next() 中的传参\n if (to === false || isError(to)) {\n // next(false) \n this.ensureURL(true)\n abort(to)\n } else if (\n typeof to === 'string' ||\n (typeof to === 'object' &&\n (typeof to.path === 'string' || typeof to.name === 'string'))\n ) {\n // next('/') 或者 next({ path: '/' }) -> 重定向\n abort()\n if (typeof to === 'object' && to.replace) {\n this.replace(to)\n } else {\n this.push(to)\n }\n } else {\n // 这里执行 next\n // 也就是执行下面函数 runQueue 中的 step(index + 1)\n next(to)\n }\n })\n } catch (e) {\n abort(e)\n }\n }\n // 经典的同步执行异步函数\n runQueue(queue, iterator, () => {\n const postEnterCbs = []\n const isValid = () => this.current === route\n // 当所有异步组件加载完成后,会执行这里的回调,也就是 runQueue 中的 cb()\n // 接下来执行 需要渲染组件的导航守卫钩子\n const enterGuards = extractEnterGuards(activated, postEnterCbs, isValid)\n const queue = enterGuards.concat(this.router.resolveHooks)\n runQueue(queue, iterator, () => {\n // 跳转完成\n if (this.pending !== route) {\n return abort()\n }\n this.pending = null\n onComplete(route)\n if (this.router.app) {\n this.router.app.$nextTick(() => {\n postEnterCbs.forEach(cb => {\n cb()\n })\n })\n }\n })\n })\n}\nexport function runQueue (queue: Array, fn: Function, cb: Function) {\n const step = index => {\n // 队列中的函数都执行完毕,就执行回调函数\n if (index >= queue.length) {\n cb()\n } else {\n if (queue[index]) {\n // 执行迭代器,用户在钩子函数中执行 next() 回调\n // 回调中判断传参,没有问题就执行 next(),也就是 fn 函数中的第二个参数\n fn(queue[index], () => {\n step(index + 1)\n })\n } else {\n step(index + 1)\n }\n }\n }\n // 取出队列中第一个钩子函数\n step(0)\n}\n```\n接下来介绍导航守卫\n```js\nconst queue: Array = [].concat(\n // 失活的组件钩子\n extractLeaveGuards(deactivated),\n // 全局 beforeEach 钩子\n this.router.beforeHooks,\n // 在当前路由改变,但是该组件被复用时调用\n extractUpdateHooks(updated),\n // 需要渲染组件 enter 守卫钩子\n activated.map(m => m.beforeEnter),\n // 解析异步路由组件\n resolveAsyncComponents(activated)\n)\n```\n第一步是先执行失活组件的钩子函数\n```js\nfunction extractLeaveGuards(deactivated: Array): Array {\n// 传入需要执行的钩子函数名\n return extractGuards(deactivated, 'beforeRouteLeave', bindGuard, true)\n}\nfunction extractGuards(\n records: Array,\n name: string,\n bind: Function,\n reverse?: boolean\n): Array {\n const guards = flatMapComponents(records, (def, instance, match, key) => {\n // 找出组件中对应的钩子函数\n const guard = extractGuard(def, name)\n if (guard) {\n // 给每个钩子函数添加上下文对象为组件自身\n return Array.isArray(guard)\n ? guard.map(guard => bind(guard, instance, match, key))\n : bind(guard, instance, match, key)\n }\n })\n // 数组降维,并且判断是否需要翻转数组\n // 因为某些钩子函数需要从子执行到父\n return flatten(reverse ? guards.reverse() : guards)\n}\nexport function flatMapComponents (\n matched: Array,\n fn: Function\n): Array {\n// 数组降维\n return flatten(matched.map(m => {\n // 将组件中的对象传入回调函数中,获得钩子函数数组\n return Object.keys(m.components).map(key => fn(\n m.components[key],\n m.instances[key],\n m, key\n ))\n }))\n}\n```\n第二步执行全局 beforeEach 钩子函数\n```js\nbeforeEach(fn: Function): Function {\n return registerHook(this.beforeHooks, fn)\n}\nfunction registerHook(list: Array, fn: Function): Function {\n list.push(fn)\n return () => {\n const i = list.indexOf(fn)\n if (i > -1) list.splice(i, 1)\n }\n}\n```\n在 VueRouter 类中有以上代码,每当给 VueRouter 实例添加 beforeEach 函数时就会将函数 push 进 beforeHooks 中。\n\n第三步执行 `beforeRouteUpdate` 钩子函数,调用方式和第一步相同,只是传入的函数名不同,在该函数中可以访问到 `this` 对象。\n\n第四步执行 `beforeEnter` 钩子函数,该函数是路由独享的钩子函数。\n\n第五步是解析异步组件。\n```js\nexport function resolveAsyncComponents (matched: Array): Function {\n return (to, from, next) => {\n let hasAsync = false\n let pending = 0\n let error = null\n // 该函数作用之前已经介绍过了\n flatMapComponents(matched, (def, _, match, key) => {\n // 判断是否是异步组件\n if (typeof def === 'function' && def.cid === undefined) {\n hasAsync = true\n pending++\n // 成功回调\n // once 函数确保异步组件只加载一次\n const resolve = once(resolvedDef => {\n if (isESModule(resolvedDef)) {\n resolvedDef = resolvedDef.default\n }\n // 判断是否是构造函数\n // 不是的话通过 Vue 来生成组件构造函数\n def.resolved = typeof resolvedDef === 'function'\n ? resolvedDef\n : _Vue.extend(resolvedDef)\n // 赋值组件\n // 如果组件全部解析完毕,继续下一步\n match.components[key] = resolvedDef\n pending--\n if (pending <= 0) {\n next()\n }\n })\n // 失败回调\n const reject = once(reason => {\n const msg = `Failed to resolve async component ${key}: ${reason}`\n process.env.NODE_ENV !== 'production' && warn(false, msg)\n if (!error) {\n error = isError(reason)\n ? reason\n : new Error(msg)\n next(error)\n }\n })\n let res\n try {\n // 执行异步组件函数\n res = def(resolve, reject)\n } catch (e) {\n reject(e)\n }\n if (res) {\n // 下载完成执行回调\n if (typeof res.then === 'function') {\n res.then(resolve, reject)\n } else {\n const comp = res.component\n if (comp && typeof comp.then === 'function') {\n comp.then(resolve, reject)\n }\n }\n }\n }\n })\n // 不是异步组件直接下一步\n if (!hasAsync) next()\n }\n}\n```\n以上就是第一个 `runQueue` 中的逻辑,第五步完成后会执行第一个 `runQueue` 中回调函数\n```js\n// 该回调用于保存 `beforeRouteEnter` 钩子中的回调函数\nconst postEnterCbs = []\nconst isValid = () => this.current === route\n// beforeRouteEnter 导航守卫钩子\nconst enterGuards = extractEnterGuards(activated, postEnterCbs, isValid)\n// beforeResolve 导航守卫钩子\nconst queue = enterGuards.concat(this.router.resolveHooks)\nrunQueue(queue, iterator, () => {\n if (this.pending !== route) {\n return abort()\n }\n this.pending = null\n // 这里会执行 afterEach 导航守卫钩子\n onComplete(route)\n if (this.router.app) {\n this.router.app.$nextTick(() => {\n postEnterCbs.forEach(cb => {\n cb()\n })\n })\n }\n})\n```\n第六步是执行 `beforeRouteEnter` 导航守卫钩子,`beforeRouteEnter` 钩子不能访问 `this` 对象,因为钩子在导航确认前被调用,需要渲染的组件还没被创建。但是该钩子函数是唯一一个支持在回调中获取 `this` 对象的函数,回调会在路由确认执行。\n```js\nbeforeRouteEnter (to, from, next) {\n next(vm => {\n // 通过 `vm` 访问组件实例\n })\n}\n```\n下面来看看是如何支持在回调中拿到 `this` 对象的\n```js\nfunction extractEnterGuards(\n activated: Array,\n cbs: Array,\n isValid: () => boolean\n): Array {\n// 这里和之前调用导航守卫基本一致\n return extractGuards(\n activated,\n 'beforeRouteEnter',\n (guard, _, match, key) => {\n return bindEnterGuard(guard, match, key, cbs, isValid)\n }\n )\n}\nfunction bindEnterGuard(\n guard: NavigationGuard,\n match: RouteRecord,\n key: string,\n cbs: Array,\n isValid: () => boolean\n): NavigationGuard {\n return function routeEnterGuard(to, from, next) {\n return guard(to, from, cb => {\n // 判断 cb 是否是函数\n // 是的话就 push 进 postEnterCbs\n next(cb)\n if (typeof cb === 'function') {\n cbs.push(() => {\n // 循环直到拿到组件实例\n poll(cb, match.instances, key, isValid)\n })\n }\n })\n }\n}\n// 该函数是为了解决 issus #750\n// 当 router-view 外面包裹了 mode 为 out-in 的 transition 组件 \n// 会在组件初次导航到时获得不到组件实例对象\nfunction poll(\n cb: any, // somehow flow cannot infer this is a function\n instances: Object,\n key: string,\n isValid: () => boolean\n) {\n if (\n instances[key] &&\n !instances[key]._isBeingDestroyed // do not reuse being destroyed instance\n ) {\n cb(instances[key])\n } else if (isValid()) {\n // setTimeout 16ms 作用和 nextTick 基本相同\n setTimeout(() => {\n poll(cb, instances, key, isValid)\n }, 16)\n }\n}\n```\n第七步是执行 `beforeResolve` 导航守卫钩子,如果注册了全局 `beforeResolve` 钩子就会在这里执行。\n\n第八步就是导航确认,调用 `afterEach` 导航守卫钩子了。\n\n以上都执行完成后,会触发组件的渲染\n```js\nhistory.listen(route => {\n this.apps.forEach(app => {\n app._route = route\n })\n})\n```\n以上回调会在 `updateRoute` 中调用\n```js\nupdateRoute(route: Route) {\n const prev = this.current\n this.current = route\n this.cb && this.cb(route)\n this.router.afterHooks.forEach(hook => {\n hook && hook(route, prev)\n })\n}\n```\n\n至此,路由跳转已经全部分析完毕。核心就是判断需要跳转的路由是否存在于记录中,然后执行各种导航守卫函数,最后完成 URL 的改变和组件的渲染。"
},
{
"path": "Git/git-en.md",
"content": "\n\n**Table of Contents** *generated with [DocToc](https://github.com/thlorenz/doctoc)*\n\n- [Merge with Rebase](#merge-with-rebase)\n- [stash](#stash)\n- [reflog](#reflog)\n- [Reset](#reset)\n\n\n\nThis is not for rookie, we'll introduce something about more advanced.\n## Merge with Rebase\nThis command shows no difference with the command `merge`. \n\nWe usually use `merge` to merge the code from one branch to `master` , like this:\n\n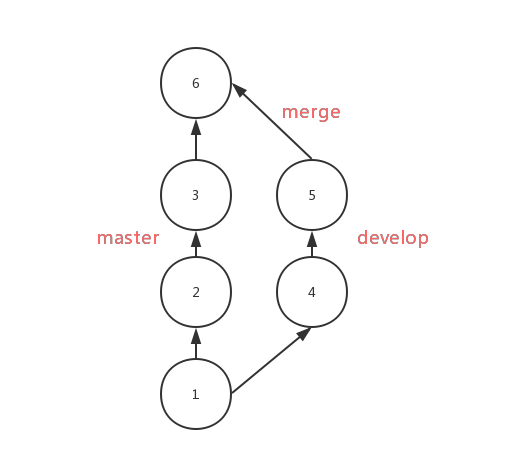\n\nAfter using `rebase ` , the commits from `develop` will be moved to the third `commit` of the `master` in order, as follows:\n\n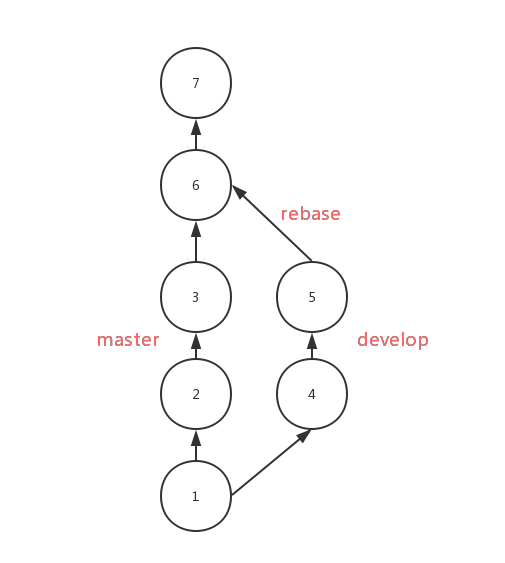\n\nCompare with `merge`, the result of `rebase` is very clear with a single flow. But if there is any conflict, you'll be in trouble to solving them. You have to solve them one by one , while you only need to solve them one-time if using `merge`.\n\nYou should use `rebase` on the local branchs which need be rebased. If you need to `rebase` the `develop` to the `master`, you should do as follows:\n\n```shell\n## branch develop\ngit rebase master\ngit checkout master\n## move HEAD on `master` to the latest commit\ngit merge develop\n```\n\n## stash\n\nUse `git stash` to save the current state of the working directory while you want to check out branch, if you don't want to use `commit`.\n\n```shell\ngit stash\n```\nThis command can record the current state of the working directory, if you want to recover it, you can do like this:\n\n```shell\ngit stash pop\n```\nthen you'll back to the exactly state before.\n\n## reflog\n\nThis command will show you the records of HEAD's trace. If you delete a branch by mistake, you can examine the hashs of HEAD by using `reflog`.\n\n\n\nAccording to the picture, the last movement of HEAD is just after `merge`, and then the `new` branch was deleted, so we can get the branch back by the following command:\n\n```shell\ngit checkout 37d9aca\ngit checkout -b new\n```\n\nPS:`reflog` is time-bound, it can only record the state over a period of time.\n\n\n## Reset\n\nIf you want to delete the last commit, you can do like this:\n\n```shell\ngit reset --hard HEAD^\n```\nBut this command doesn't delete the commit, it just reset the HEAD and branch.\n"
},
{
"path": "Git/git-zh.md",
"content": "\n\n**Table of Contents** *generated with [DocToc](https://github.com/thlorenz/doctoc)*\n\n- [Rebase 合并](#rebase-%E5%90%88%E5%B9%B6)\n- [stash](#stash)\n- [reflog](#reflog)\n- [Reset](#reset)\n\n\n\n本文不会介绍 Git 的基本操作,会对一些高级操作进行说明。\n\n## Rebase 合并\n\n该命令可以让和 `merge` 命令得到的结果基本是一致的。\n\n通常使用 `merge` 操作将分支上的代码合并到 `master` 中,分支样子如下所示\n\n\n\n使用 `rebase` 后,会将 `develop` 上的 `commit` 按顺序移到 `master` 的第三个 `commit` 后面,分支样子如下所示\n\n\n\nRebase 对比 merge,优势在于合并后的结果很清晰,只有一条线,劣势在于如果一旦出现冲突,解决冲突很麻烦,可能要解决多个冲突,但是 merge 出现冲突只需要解决一次。\n\n使用 rebase 应该在需要被 rebase 的分支上操作,并且该分支是本地分支。如果 `develop` 分支需要 rebase 到 `master` 上去,那么应该如下操作\n\n```shell\n## branch develop\ngit rebase master\ngit checkout master\n## 用于将 `master` 上的 HEAD 移动到最新的 commit\ngit merge develop\n```\n\n## stash\n\n`stash` 用于临时保存工作目录的改动。开发中可能会遇到代码写一半需要切分支打包的问题,如果这时候你不想 `commit` 的话,就可以使用该命令。\n\n```shell\ngit stash\n```\n\n使用该命令可以暂存你的工作目录,后面想恢复工作目录,只需要使用\n\n```shell\ngit stash pop\n```\n\n这样你之前临时保存的代码又回来了\n\n## reflog\n\n`reflog` 可以看到 HEAD 的移动记录,假如之前误删了一个分支,可以通过 `git reflog` 看到移动 HEAD 的哈希值\n\n\n\n从图中可以看出,HEAD 的最后一次移动行为是 `merge` 后,接下来分支 `new` 就被删除了,那么我们可以通过以下命令找回 `new` 分支\n\n```shell\ngit checkout 37d9aca\ngit checkout -b new\n```\n\nPS:`reflog` 记录是时效的,只会保存一段时间内的记录。\n\n## Reset\n\n如果你想删除刚写的 commit,就可以通过以下命令实现\n\n```shell\ngit reset --hard HEAD^\n```\n\n但是 `reset` 的本质并不是删除了 commit,而是重新设置了 HEAD 和它指向的 branch。\n"
},
{
"path": "JS/JS-br.md",
"content": "\n\n**Table of Contents** *generated with [DocToc](https://github.com/thlorenz/doctoc)*\n\n- [Tipos incorporados](#tipos-incorporados)\n- [Conversão de Tipos](#conversão-de-tipos)\n - [Convertendo para boleano](#convertendo-para-boleano)\n - [De objetos para tipos primitivos](#de-objetos-para-tipos-primitivos)\n - [Operadores aritméticos](#operadores-aritméticos)\n - [`==` operador](#-operador)\n - [Operador de comparação](#operador-de-comparação)\n- [Typeof](#typeof)\n- [New](#new)\n- [This](#this)\n- [Instanceof](#instanceof)\n- [Scope](#scope)\n- [Closure](#closure)\n- [Prototypes](#prototypes)\n- [Herança](#herança)\n- [Cópia rasa e profunda](#cópia-rasa-e-profunda)\n - [Cópia rasa](#cópia-rasa)\n - [Cópia profunda](#cópia-profunda)\n- [Modularização](#modularização)\n - [CommonJS](#commonjs)\n - [AMD](#amd)\n- [A diferença entre call apply bind](#a-diferença-entre-call-apply-bind)\n - [simulação para implementar `call` e `apply`](#simulação-para-implementar--call-e--apply)\n- [Implementação de Promise](#implementação-de-promise)\n- [Implementação do Generator](#implementação-do-generator)\n- [Debouncing](#debouncing)\n- [Throttle](#throttle)\n- [Map、FlatMap e Reduce](#mapflatmap-e-reduce)\n- [Async e await](#async-e-await)\n- [Proxy](#proxy)\n- [Por que 0.1 + 0.2 != 0.3](#por-que-01--02--03)\n- [Expressões regulares](#expressões-regulares)\n - [Metacaracteres](#metacaracteres)\n - [Flags](#flags)\n - [Character Shorthands](#character-shorthands)\n\n\n\n# Tipos incorporados\nO JavaScript define sete tipos incorporados, dos quais podem ser divididos em duas categorias `Primitive Type` e `Object`.\n\nExistem seis tipos primitivos: `null`, `undefined`, `boolean`, `number`, `string` e `symbol `.\n\nEm JavaScript, não existe inteiros de verdade, todos os números são implementados em dupla-precisão 64-bit em formato binário IEEE 754. Quando nós usamos números de pontos flutuantes, iremos ter alguns efeitos colaterais. Aqui está um exemplo desses efeitos colaterais.\n\n```js\n0.1 + 0.2 == 0.3 // false\n```\n\nPara tipos primitivos, quando usamos literais para inicializar uma variável, ela tem apenas um valor literal, ela não tem um tipo. Isso será convertido para o tipo correspondente apenas quando necessário.\n\n```js\nlet a = 111 // apenas literais, não um número\na.toString() // convertido para o objeto quando necessário\n```\n\nObjeto é um tipo de referência. Nós iremos encontrar problemas sobre cópia rasa e cópia profunda quando usando ele.\n\n```js\nlet a = { name: 'FE' }\nlet b = a\nb.name = 'EF'\nconsole.log(a.name) // EF\n```\n\n# Conversão de Tipos\n\n## Convertendo para Boleano\n\nQuando a condição é julgada, que não seja `undefined`, `null`, `false`, `NaN`, `''`, `0`, `-0`, os esses valores, incluindo objetos, são convertidos para `true`.\n\n## De objetos para tipos primitivos\n\nQuando objetos são convertidos, `valueOf` e `toString` serão chamados, respectivamente em ordem. Esses dois métodos também são sobrescritos.\n\n```js\nlet a = {\n valueOf() {\n return 0\n }\n}\n```\n\n## Operadores Aritméticos\n\nApenas para adicão, se um dos parâmentros for uma string, o outro será convertido para uma string também. Para todas as outras operações, enquanto se um dos parâmetros for um número, o outro será convertido para um número.\n\nAdicões invocaram três tipos de conversões de tipos: para tipos primitivos, para números e string:\n\n```js\n1 + '1' // '11'\n2 * '2' // 4\n[1, 2] + [2, 1] // '1,22,1'\n// [1, 2].toString() -> '1,2'\n// [2, 1].toString() -> '2,1'\n// '1,2' + '2,1' = '1,22,1'\n```\n\nObserve a expressão `'a' + + 'b'` para adição:\n\n```js\n'a' + + 'b' // -> \"aNaN\"\n// uma vez que + 'b' -> NaN\n// Você deve ter visto + '1' -> 1\n```\n\n## `==` operador\n\n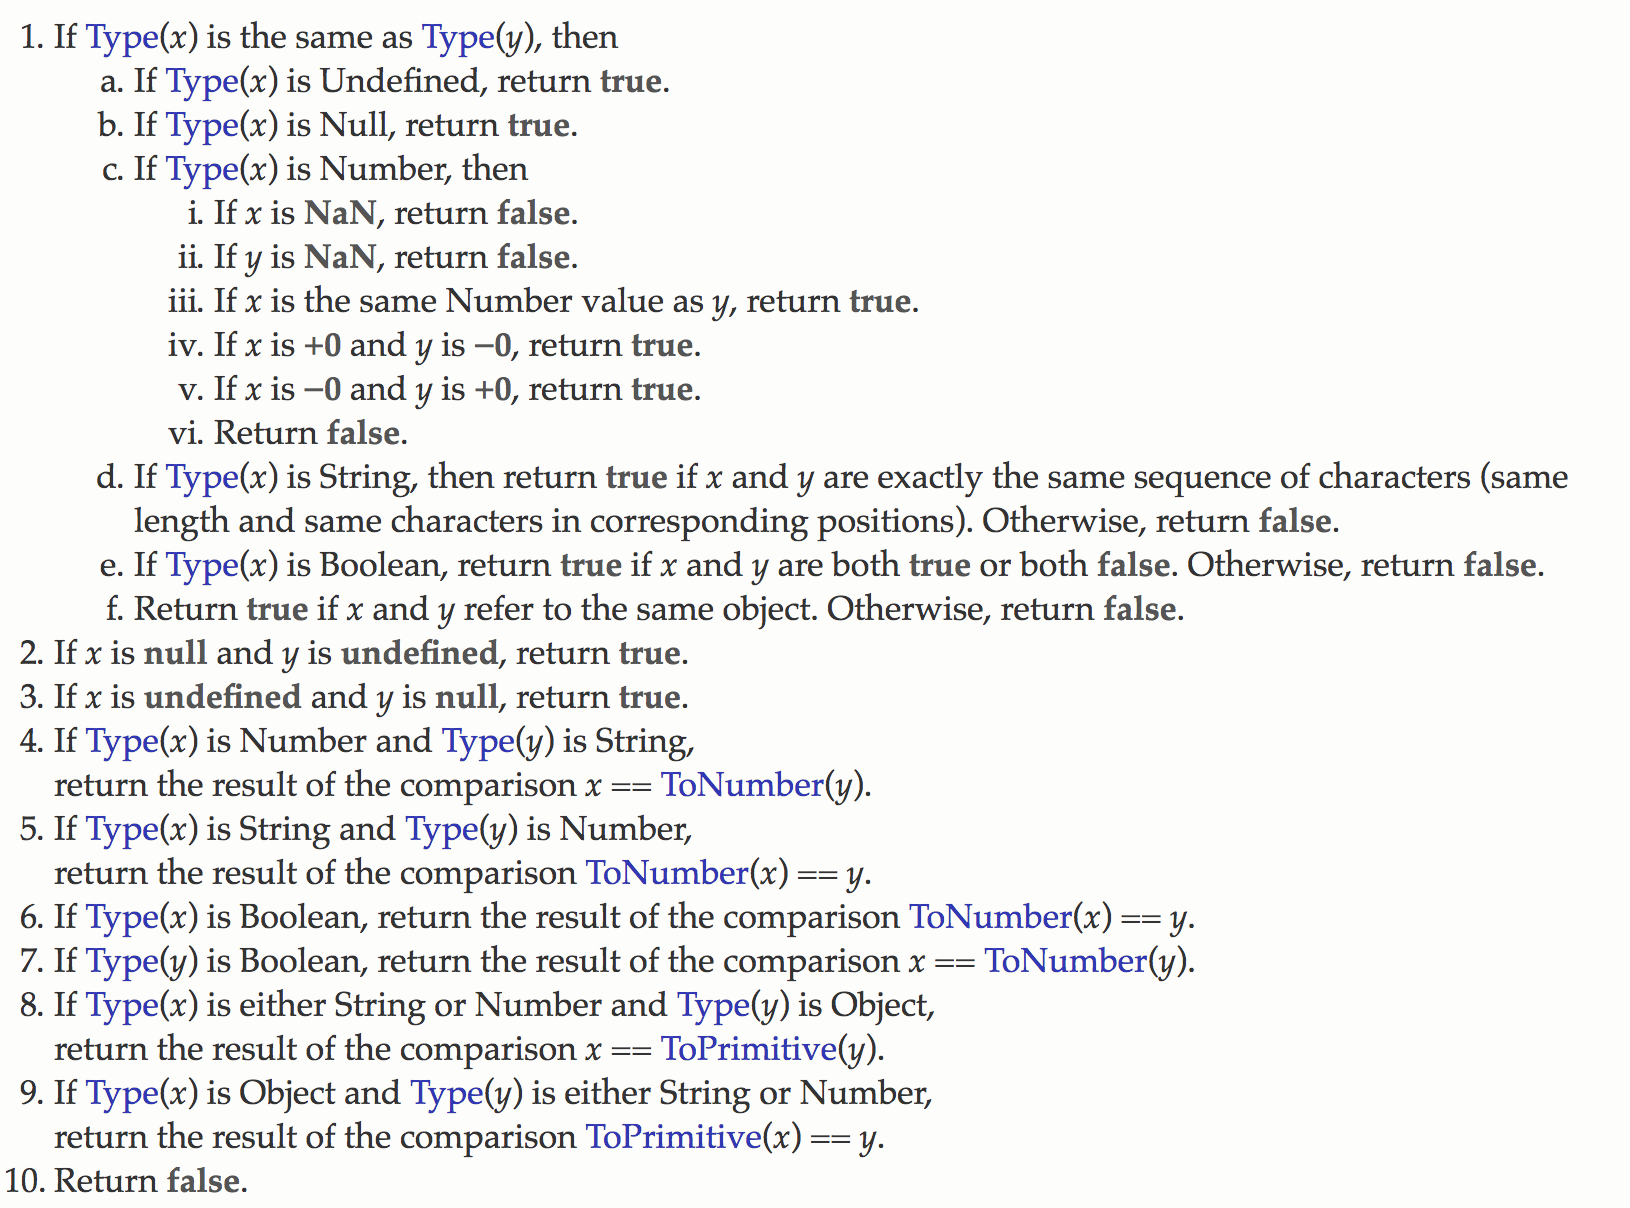\n\n`toPrimitive` na figura acima é convertido objetos para tipos primitivos.\n\n`===` é geralmente recomendado para comparar valores. Contudo, se você gostaria de checar o valor `null`, você pode usar `xx == null`.\n\nVamos dar uma olhada no exemplo `[] == ![] // -> true`. O processo seguinte explica por que a expressão é `true`:\n\n```js\n// [] convertendo para true, então pegue o oposto para false\n[] == false\n// com #8\n[] == ToNumber(false)\n[] == 0\n// com #10\nToPrimitive([]) == 0\n// [].toString() -> ''\n'' == 0\n// com #6\n0 == 0 // -> true\n```\n\n## Operador de comparação\n\n1. Se for um objeto, `toPrimitive` é usado.\n2. Se for uma string, o caractere índice `unicode` é usado.\n\n# Typeof\n\n`typeof` também permite exibir o tipo correto de tipos primitivos, exceto `null`:\n```js\ntypeof 1 // 'number'\ntypeof '1' // 'string'\ntypeof undefined // 'undefined'\ntypeof true // 'boolean'\ntypeof Symbol() // 'symbol'\ntypeof b // b não foi declarado, mas ainda pode ser exibido como undefined\n```\n\nPara objeto, `typeof` irá sempre exibir `object`, exceto **function**:\n```js\ntypeof [] // 'object'\ntypeof {} // 'object'\ntypeof console.log // 'function'\n```\n\nQuanto a `null`, ele é sempre tratado como um `object` pelo `typeof`, apesar de ser um tipo primitivo, e esse é um bug que que existe a um bom tempo.\n```js\ntypeof null // 'object'\n```\n\nPor que isso acontece? Porque a versão inicial do JS era baseada em sistemas de 32-bits, do qual armazenava a informação do tipo de variável em bits mais baixos por considerações de performance. Essas começam com objetos `000`, e todos os bits de `null` são zero, então isso é erroneamente tratado como um objeto. Apesar do código atual verificar se os tipos internos mudaram, esse bug foi passado para baixo.\n\nNós podemos usar `Object.prototype.toString.call(xx)` se quisermos pegar o tipo de dado correto da variável, e então obtemos uma string como `[object Type]`:\n\n```js\nlet a\n// Podemos declarar `undefined` da seguinte maneira\na === undefined\n// mas a palavra não reservada `undefined` pode ser re assinada em versões antigas dos browsers\nlet undefined = 1\n// vai dar errado declarar assim\n// então nós podemos usar o seguinte método, com menos código\n// ele sempre vai retornar `undefined`, tanto faz vir seguido de `void`\na === void 0\n```\n\n# New\n\n1. Crie um novo objeto\n2. Encadei o prototype\n3. Ligue o this\n4. Retorne um novo objeto\n\nOs quatro passos acima vão acontecer no processo chamado `new`. Podemos também tentar implementar o `new ` nós mesmos:\n\n```js\nfunction create() {\n // Crie um objeto vázio\n let obj = new Object()\n // Obtenha o construtor\n let Ctor = [].shift.call(arguments)\n // Encadeie para o prototype\n obj.__proto__ = Ctor.prototype\n // Ligue o this, execute o construtor\n let result = Con.apply(obj, arguments)\n // Tenha certeza que o novo é um objeto\n return typeof result === 'object'? result : obj\n}\n```\n\nInstância de um novo objeto são todas criadas com `new`, seja ele `function Foo()`, ou `let a = { b: 1 }` .\n\nÉ recomendado criar os objetos usando notação literal (seja por questões de performance ou legibilidade), uma vez que é necessário um look-up para `Object` atravessar o escopo encadeado quando criando um objeto usando `new Object()`, mas você não precisa ter esse tipo de probelma quando usando literais.\n\n```js\nfunction Foo() {}\n// Função são sintáticamente amigáveis\n// Internamente é equivalente a new Function() \nlet a = { b: 1 }\n// Dentro desse lireal, `new Object()` também é usado\n```\n\nPara `new`, também precisamos prestar atenção ao operador precedente:\n\n```js\nfunction Foo() {\n return this;\n}\nFoo.getName = function () {\n console.log('1');\n};\nFoo.prototype.getName = function () {\n console.log('2');\n};\n\nnew Foo.getName(); // -> 1\nnew Foo().getName(); // -> 2\n```\n\n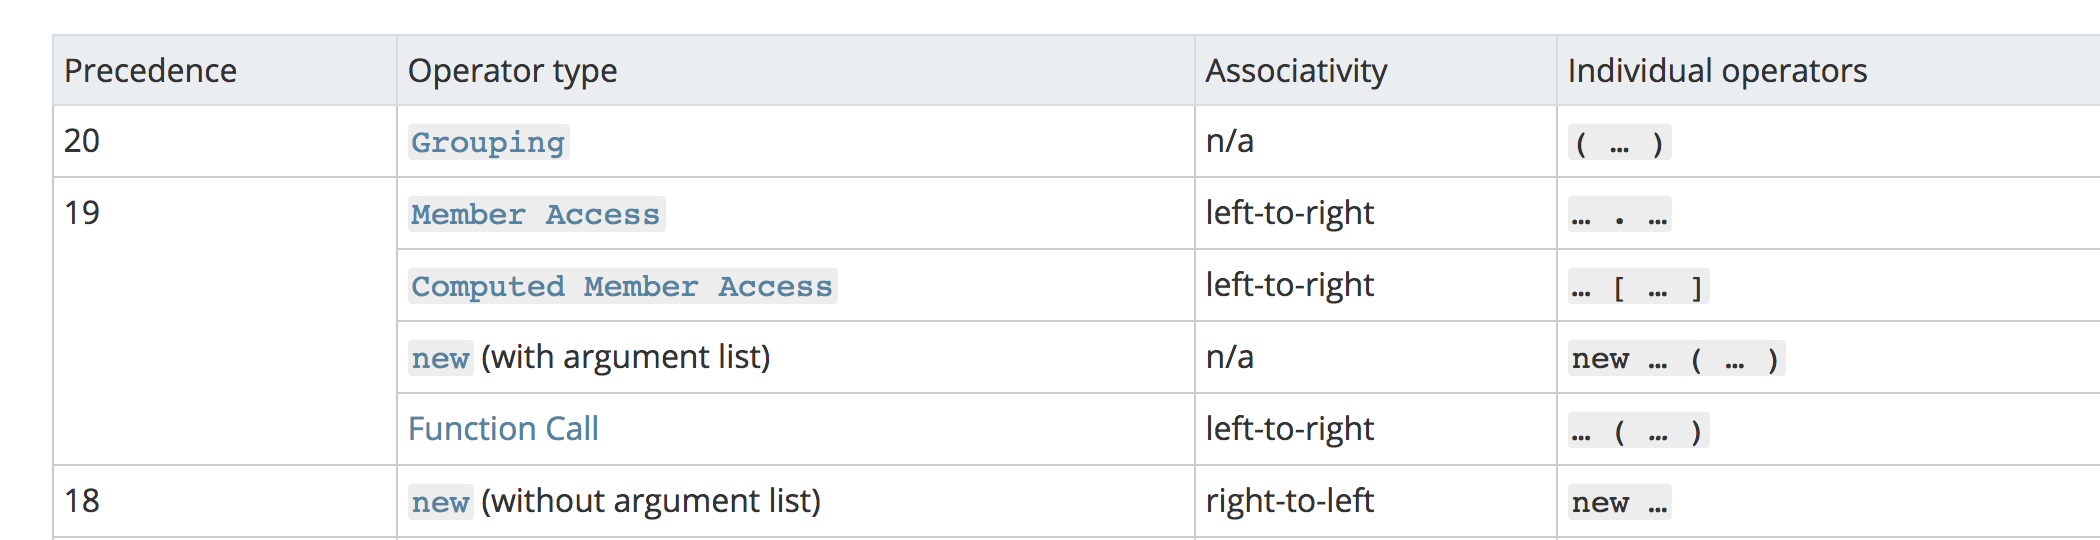\n\nComo você pode ver na imagem acima, `new Foo()` possui uma alta prioridade sobre `new Foo`, então podemos dividir a ordem de execução do código acima assim:\n\n```js\nnew (Foo.getName());\n(new Foo()).getName();\n```\n\nPara a primeira função, `Foo.getName()` é executado primeiro, então o resultado é 1;\nPara mais tarte, ele primeiro executa `new Foo()` para criar uma instância, então encontrar a função `getName` no `Foo` via cadeia de prototype, então o resultado é 2.\n\n# This\n\n`This`, um conceito que é confuso para maioria das pessoas, atualmente não é difícil de entender enquanto você lembrar as seguintes regras:\n\n```js\nfunction foo() {\n console.log(this.a);\n}\nvar a = 1;\nfoo();\n\nvar obj = {\n a: 2,\n foo: foo\n};\nobj.foo();\n\n// Nas duas situações acima, `this` depende apenas do objeto ser chamado antes da função,\n// e o segundo caso tem uma alta prioriade sobre o primeiro caso.\n\n// o seguinte cenário tem uma alta prioridade, `this` só ficará ligado para c,\n// e não existe uma maneira de mudar o que `this` está limitado\n\nvar c = new foo();\nc.a = 3;\nconsole.log(c.a);\n\n// finalmente, usando `call`, `apply`, `bind` para mudar o que o `this` é obrigado,\n// em outro cenário onde essa prioridade é apenas o segundo `new`\n```\n\nEntendendo sobre as várias situações acima, nós não vamos ser confundidos pelo `this` na maioria dos casos. Depois, vamos dar uma olhada no `this` nas arrow functions:\n\n```js\nfunction a() {\n return () => {\n return () => {\n console.log(this);\n };\n };\n}\nconsole.log(a()()());\n```\nAtualmente, as arrow function não tem o `this`, `this` na função acima apenas depende da primeira função externa que não é uma arrow function. Nesse caso, `this` é o padrão para `window` porque chamando `a` iguala a primeira condição nos códigos acima. Também, o que o `this` está ligado não ira ser mudado por qualquer código uma vez que o `this` estiver ligado em um contexto.\n\n\n# Instanceof\n\nO operador `instanceof` consegue checar corretamente o tipo dos objetos, porque o seu mecanismo interno encontra se o tipo do `prototype` pode ser encontrado na cadeia de prototype do objeto.\n\nvamos tentar implementar ele:\n```js\nfunction instanceof(left, right) {\n // obtenha o type do `prototype`\n let prototype = right.prototype\n // obtenha o `prototype` do objeto\n left = left.__proto__\n // verifique se o tipo do objeto é igual ao prototype do tipo\n while (true) {\n \tif (left === null)\n \t\treturn false\n \tif (prototype === left)\n \t\treturn true\n \tleft = left.__proto__\n }\n}\n```\n\n# Scope\n\nExecutar código JS deveria gerar execução do contexto, enquanto o código não é escrito na função, ele faz parte da execução do contexto global. O código na função vai gerar executação do contexto da função. Existe também uma execução do contexto do `eval`, do qual basicamente não é mais usado, então você pode pensar apenas em duas execuções de contexto.\n\nO atributo `[[Scope]]` é gerado no primeiro estágio de geração de contexto, que é um ponteiro, corresponde a linked list do escopo, e o JS vai procurar variáveis através dessas linked list no contexto global.\n\nVamos olhar um exemplo common, `var`:\n\n```js\nb() // chama b\nconsole.log(a) // undefined\n\nvar a = 'Hello world'\n\nfunction b() {\n\tconsole.log('call b')\n}\n```\n\nEle sabe que funcões e variáveis são içadas acima em relação aos outputs. A explicação usual para o hoisting diz que as declarações são ‘movidas’ para o topo do código, e não existe nada de errado com isso e é fácil de todo mundo entender. Mas para um explicação mais precisa deveria ser algo como:\n\nHaveria dois estágios quando a execução do contexto é gerada. O primeiro estágio é o estágio de criação(para ser mais epecífico, o passo de geração variáveis objeto), no qual o interpretador de JS deveria encontrar variáveis e funções que precisam ser içadas, e aloca memória para eles atecipadamente, então as funções deveriam ser guardadas na memória internamente, mas variáveis seriam apenas declaradas e assinadas para `undefined`, assim sendo, nós podemos usar elas adiante no segundo estágio (a execução do código no estágio)\n\nNo processo de içar, a mesma função deveria sobrescrever a última função, e funções tem alta prioridade sobre variáveis içadas.\n\n```js\nb() // chama segundo b\n\nfunction b() {\n\tconsole.log('chama b primeiro')\n}\nfunction b() {\n\tconsole.log('chama b segundo')\n}\nvar b = 'Hello world'\n```\n\nUsando `var` é mais provável error-prone, portanto ES6 introduziu uma nova palava-chave `let`. `let` tem uma característica importante que ela não pode ser usada antes de declarada, que conflita com o ditado comum que `let` não tem a habilidade de içar. De fato, `let` iça a declaracão, mas não é assinada, por causa da **temporal dead zone**.\n\n\n# Closure\n\nA definição de closure é simples: a função A retorna a função B, e a função b consegue acessar as variáveis da função A, portanto a função B é chamada de closure.\n\n```js\nfunction A() {\n let a = 1\n function B() {\n console.log(a)\n }\n return B\n}\n```\n\nSe você estiver se perguntando por que a função B também consegue se referenciar as variáveis da função A enquanto a função A aparece a partir da stack de chamadas? Porque as variáveis na função A são guardadas na pilha nesse momento. O motor atual do JS consegue indentificar quais variáveis precisam ser salvas na heap e quais precisam ser salvas na stack por análise de fuga.\n\nUma pergunta classica de entrevista é usando closure em loops para resolver o problema de usar `var` para definir funções:\n\n```js\nfor ( var i=1; i<=5; i++) {\n setTimeout( function timer() {\n console.log( i );\n }, i*1000 );\n)\n```\n\nEm primeirio lugar, todos os loops vão ser executados completamente porque `setTimeout` é uma função assíncrona, e nesse momento `i` é 6, então isso vai exibir um bando de 6.\n\nExiste três soluções, closure é a primeira:\n\n```js\nfor (var i = 1; i <= 5; i++) {\n (function(j) {\n setTimeout(function timer() {\n console.log(j);\n }, j * 1000);\n })(i);\n}\n```\n\nA segunda é fazer o uso do terceiro parâmetro do `setTimeout`:\n\n```js\nfor ( var i=1; i<=5; i++) {\n setTimeout( function timer(j) {\n console.log( j );\n }, i*1000, i);\n}\n```\n\nA terceira é definir o `i` usando `let`:\n\n```js\nfor ( let i=1; i<=5; i++) {\n setTimeout( function timer() {\n console.log( i );\n }, i*1000 );\n}\n```\n\nPara `let`, ele vai criar um escopo de block-level, do qual é equivalente a:\n\n```js\n{\n // Forma o escopo block-level\n let i = 0\n {\n let ii = i\n setTimeout( function timer() {\n console.log( i );\n }, i*1000 );\n }\n i++\n {\n let ii = i\n }\n i++\n {\n let ii = i\n }\n ...\n}\n```\n\n# Prototypes\n\n\n\nCada função, além de `Function.prototype.bind()`, tem uma propriedade interna, denotado como `prototype`, do qual é uma referência para o prototype.\n\nCada objeto tem uma propriedade interna, denotada como `__proto__`, que é uma referência para o prototype do construtor que criou o objeto. Essa propriedade é atualmente referenciada ao `[[prototype]]`, mas o `[[prototype]]` é uma propriedade interna que nós não podemos acessar, então usamos o `__proto__` para acessar ele.\n\nObjetos podem usar `__proto__` para procurar propriedade que não fazem parte do objeto, e `__proto__` conecta os objetos juntos para formar uma cadeida de prototype.\n\n# Herança\n\nNo ES5, podemos resolve os problema de herança usando os seguintes passos:\n\n```js\nfunction Super() {}\nSuper.prototype.getNumber = function() {\n return 1\n}\n\nfunction Sub() {}\nlet s = new Sub()\nSub.prototype = Object.create(Super.prototype, {\n constructor: {\n value: Sub,\n enumerable: false,\n writable: true,\n configurable: true\n }\n})\n```\n\nA idéia de herança implementada acima é para definir o `prototype` da classe filho como o `prototype` da classe pai.\n\nNo ES6, podemos facilmente resolver esse problema com a sintaxe `class`:\n\n```js\nclass MyDate extends Date {\n test() {\n return this.getTime()\n }\n}\nlet myDate = new MyDate()\nmyDate.test()\n```\n\nContudo, ES6 não é compátivel com todos os navegadores, então usamos o Babel para compilar esser código.\n\nSe chamar `myDate.test()` com o código compilado, você vai ficar surpreso de ver que existe um erro:\n\n\n\nPorque existem restrições no baixo nível do JS, se a instância não for construida pelo `Date`, ele não pode chamar funções no `Date`, que também explica a partir de outro aspecto que herança de `Class` no ES6 é diferente das heranças gerais na sintaxe do ES5.\n\nUma vez o baixo nível dos limites do JS que a instância deve ser construido pelo `Date`, nós podemos tentar outra maneira de implementar herança:\n\n```js\nfunction MyData() {\n\n}\nMyData.prototype.test = function () {\n return this.getTime()\n}\nlet d = new Date()\nObject.setPrototypeOf(d, MyData.prototype)\nObject.setPrototypeOf(MyData.prototype, Date.prototype)\n```\n\nA implementação da idéia acima sobre herança: primeiro cria uma instância da classe do pai => muda o original `__proto__` de instância, conectado ao `prototype` da classe do filho => muda o `__proto__` da classe do filho `prototype` para o `prototype` da classe do pai.\n\nA herança de implementação com o método acima pode perfeitamente resolver a restrição no baixo nível do JS.\n\n\n# Cópia rasa e profunda\n\n```js\nlet a = {\n age: 1\n}\nlet b = a\na.age = 2\nconsole.log(b.age) // 2\n```\n\nA partir do exemplo acima, nós podemos ver que se você assinar um objeto para uma variável, então os valores dos dois vão ter a mesma referência, um muda o outro muda adequadamente.\n\nGeralmente, nós não queremos que tal problema apareça durante o desensolvimento, portanto podemos usar a cópia rasa para resolver esse problema.\n\n## Cópia rasa\n\nPrimeiramente podemos resolver o problema através do `Object.assign`:\n```js\nlet a = {\n age: 1\n}\nlet b = Object.assign({}, a)\na.age = 2\nconsole.log(b.age) // 1\n```\n\nCertamente, podemos usar o spread operator (...) para resolver o problema:\n```js\nlet a = {\n age: 1\n}\nlet b = {...a}\na.age = 2\nconsole.log(b.age) // 1\n```\n\nGeralmente, a cópia rasa pode resolver a maioria dos problemas, mas precisamos da cópia profunda quando encontrado a seguinte situação:\n```js\nlet a = {\n age: 1,\n jobs: {\n first: 'FE'\n }\n}\nlet b = {...a}\na.jobs.first = 'native'\nconsole.log(b.jobs.first) // native\n```\nA cópia rasa resolve apenas o problema na primeira camada. Se o objeto contém objetos, então ele retorna para o topico inicial que os dois valores compartilham a mesma referência. Para resolver esse problema, precisamos introduzir a cópia profunda. \n\n## Cópia profunda\n\nO problema pode geralmente ser resolvido por `JSON.parse(JSON.stringify(object))`\n\n```js\nlet a = {\n age: 1,\n jobs: {\n first: 'FE'\n }\n}\nlet b = JSON.parse(JSON.stringify(a))\na.jobs.first = 'native'\nconsole.log(b.jobs.first) // FE\n```\n\nMas esse método também tem seus limites:\n* ignora `undefined`\n* incapaz de serializar função\n* incapaz de resolver referência circular de um objeto\n```js\nlet obj = {\n a: 1,\n b: {\n c: 2,\n d: 3,\n },\n}\nobj.c = obj.b\nobj.e = obj.a\nobj.b.c = obj.c\nobj.b.d = obj.b\nobj.b.e = obj.b.c\nlet newObj = JSON.parse(JSON.stringify(obj))\nconsole.log(newObj)\n```\n\nSe um objto é uma referência circular como o exemplo acima, você vai encontrar o método `JSON.parse(JSON.stringify(object))` ele não pode fazer a cópia profunda desse objeto:\n\n\n\nQuando lidando com uma função ou `undefined`, o objeto pode não ser serializado adequedamente.\n```js\nlet a = {\n age: undefined,\n sex: Symbol('male'),\n jobs: function() {},\n name: 'yck'\n}\nlet b = JSON.parse(JSON.stringify(a))\nconsole.log(b) // {name: \"yck\"}\n```\n\nNo caso acima, você pode perceber que o método ignora a função e `undefined`.\n\nA maioria dos dados conseguem ser serializados, então esse método resolve a maioria dos problemas, e como uma função embutida, ele tem uma performance melhor quando lidando com a cópia profunda. Certamente, você pode usar [the deep copy function of `lodash` ](https://lodash.com/docs#cloneDeep) quando sues dados contém os três casos acima.\n\nSe o objeto que você quer copiar contém um tipo embutido mas não contém uma função, você pode usar `MessageChannel`\n```js\nfunction structuralClone(obj) {\n return new Promise(resolve => {\n const {port1, port2} = new MessageChannel();\n port2.onmessage = ev => resolve(ev.data);\n port1.postMessage(obj);\n });\n}\n\nvar obj = {a: 1, b: {\n c: b\n}}\n\n// preste atenção que esse método é assíncrono\n// ele consegue manipular `undefined` e referência circular do objeto\n(async () => {\n const clone = await structuralClone(obj)\n})()\n```\n\n# Modularização\n\nCom o Babel, nós conseguimos usar a ES6 modularização:\n\n```js\n// arquivo a.js\nexport function a() {}\nexport function b() {}\n// arquivo b.js\nexport default function() {}\n\nimport {a, b} from './a.js'\nimport XXX from './b.js'\n```\n\n## CommonJS\n\n`CommonJS` é uma aspecto único do Node. É preciso `Browserify` para o `CommonJS` ser usado nos navegadores.\n\n```js\n// a.js\nmodule.exports = {\n a: 1\n}\n// ou\nexports.a = 1\n\n// b.js\nvar module = require('./a.js')\nmodule.a // -> log 1\n```\n\nNo código acima, `module.exports` e `exports` podem causar confusão. Vamos dar uma olhada na implementação interna:\n\n```js\nvar module = require('./a.js')\nmodule.a\n// esse é o empacotador atual de uma função a ser executada imediatamente, de modo que não precisamos bagunçar as variáveis globais.\n// O que é importante aqui é que o módulo é apenas uma variável do Node.\nmodule.exports = {\n a: 1\n}\n// implementação básica\nvar module = {\n exports: {} // exporta em um objeto vázio\n}\n// Esse é o por que o exports e module.exports tem usos similares.\nvar exports = module.exports\nvar load = function (module) {\n // to be exported\n var a = 1\n module.exports = a\n return module.exports\n};\n```\n\nVamos então falar sobre `module.exports` e `exports`, que tem uso similar, mas um não atribui um valor para `exports` diretamente. A tarefa seria um no-op.\n\nA diferença entre as modularizações no `CommonJS` a no ES6 são:\n\n- O antigo suporta importes dinamico, que é `require(${path}/xx.js)`; o último não suporta isso ainda, mas \nexistem propostas.\n- O antigo usa importes síncronos. Desde de que usado no servidor os arquivos são locais, não importa muito mesmo se o import síncrono bloqueia a main thread. O último usa importe assíncrono, porque ele é usado no navegador em que os arquivos baixados são precisos. O processo de renderização seria afetado muito se assíncrono importe for usado.\n- O anterior copia os valores quando exportando. Mesmo se o valor exportado mudou, os valores importados não irão mudar. Portanto, se os valores devem ser atualizados, outro importe precisa acontecer. Contudo, o último usa ligações em tempo real, os valores importados são importados no mesmo endereço de memória, então o valor importado muda junto com os importados.\n- Em execução o último é compilado para `require/exports`.\n\n## AMD\n\nAMD é apresentado por `RequireJS`.\n\n```js\n// AMD\ndefine(['./a', './b'], function(a, b) {\n a.do()\n b.do()\n})\ndefine(function(require, exports, module) {\n var a = require('./a') \n a.doSomething() \n var b = require('./b')\n b.doSomething()\n})\n```\n\n# A diferença entre call apply bind\n\nPrimeiro, vamos falar a diferença entre os dois antigos.\n\nAmbos `call` e `apply` são usados para mudar o que o `this` se refere. Seu papel é o mesmo, mas a maneira de passar os parâmetros é diferente.\n\nAlém do primeiro parâmetro, `call` também aceita uma lista de argumentos, enquanto `apply` aceita um único array de argumentos.\n\n```js\nlet a = {\n value: 1\n}\nfunction getValue(name, age) {\n console.log(name)\n console.log(age)\n console.log(this.value)\n}\ngetValue.call(a, 'yck', '24')\ngetValue.apply(a, ['yck', '24'])\n```\n\n## simulação para implementar `call` e `apply`\n\nConsideramos implementar eles a partir das seguintes regras:\n\n* Se o primeiro parâmetro não foi passado, então o primeiro será o padrão `window`;\n\n* Mude a referência do `this`, que faz um novo objeto capaz de executar a função. Então vamos pensar assim: adicione a função para um novo objeto e então delete ele depois da execução.\n\n```js\nFunction.prototype.myCall = function (context) {\n var context = context || window\n // Adiciona uma propriedade ao `context`\n // getValue.call(a, 'yck', '24') => a.fn = getValue\n context.fn = this\n // pega os parâmentros do `context`\n var args = [...arguments].slice(1)\n // getValue.call(a, 'yck', '24') => a.fn('yck', '24')\n var result = context.fn(...args)\n // deleta fn\n delete context.fn\n return result\n}\n```\n\nO exemplo acima é a idéia central da simulação do `call`, e a implementação do `apply` é similar.\n\n```js\nFunction.prototype.myApply = function (context) {\n var context = context || window\n context.fn = this\n\n var result\n // Existe a necessidade de determinar se guarda o segundo parâmentro\n // Se o segundo parâmetro existir, espalhe ele\n if (arguments[1]) {\n result = context.fn(...arguments[1])\n } else {\n result = context.fn()\n }\n\n delete context.fn\n return result\n}\n```\n\nA regra do `bind` é a mesma das outras duas, exceto que ela retorna uma função. E nós podemos implementar currying com o `bind`\n\nvamos simular o `bind`:\n\n```js\nFunction.prototype.myBind = function (context) {\n if (typeof this !== 'function') {\n throw new TypeError('Error')\n }\n var _this = this\n var args = [...arguments].slice(1)\n // retorna uma função\n return function F() {\n // Nós podemos usar `new F()` porque ele retorna uma função, então precisamos determinar\n if (this instanceof F) {\n return new _this(...args, ...arguments)\n }\n return _this.apply(context, args.concat(...arguments))\n }\n}\n```\n\n# Implementação de Promise\n\n`Promise` é a nova sintaxe introduzida pelo ES6, que resolve os problemas de callback hell.\n\nPromise pode ser visto como um estado de máquina e o seu estado inicial é `pending`. Nós podemos mudar o estado para `resolved` ou `rejected` usando as funções `resolve` e `reject`. Uma vez que o state mudou, ele não pode mudar novamente.\n\nA função `then` retorna uma instância da Promise, do qual é uma nova instância ao invés do anterior. E existe por que a especificação de estado da Promise que adiciona para o estado `pending`, outro estado não pode ser mudado, e multiplas chamadas a função `then` serão insignificantes se a mesma instância for retornada.\n\nPara `then`, ele pode essencialmente ser visto como flatMap`:\n\n```js\n// árvore de estados\nconst PENDING = 'pending';\nconst RESOLVED = 'resolved';\nconst REJECTED = 'rejected';\n// promise aceita um argumento na função que será executada imediatamente.\nfunction MyPromise(fn) {\n let _this = this;\n _this.currentState = PENDING;\n _this.value = undefined;\n // Save o callback do `then`, apenas em cache quando o estado da promise for pending,\n // no máximo será cacheado em cada instância\n _this.resolvedCallbacks = [];\n _this.rejectedCallbacks = [];\n\n _this.resolve = function(value) {\n // execute assícronamente para garantir a ordem de execução\n setTimeout(() => {\n if (value instanceof MyPromise) {\n // se o valor é uma Promise, execute recursivamente\n return value.then(_this.resolve, _this.reject)\n }\n if (_this.currentState === PENDING) {\n _this.currentState = RESOLVED;\n _this.value = value;\n _this.resolvedCallbacks.forEach(cb => cb());\n }\n })\n }\n\n _this.reject = function(reason) {\n // execute assícronamente para garantir a ordem de execução\n setTimeout(() => {\n if (_this.currentState === PENDING) {\n _this.currentState = REJECTED;\n _this.value = reason;\n _this.rejectedCallbacks.forEach(cb => cb());\n }\n })\n }\n\n // para resolver o seguinte problema\n // `new Promise(() => throw Error('error))`\n try {\n fn(_this.resolve, _this.reject);\n } catch (e) {\n _this.reject(e);\n }\n}\n\nMyPromise.prototype.then = function(onResolved, onRejected) {\n const self = this;\n // especificação 2.2.7, `then` deve retornar uma nova promise\n let promise2;\n // especificação 2.2, ambos `onResolved` e `onRejected` são argumentos opcionais\n // isso deveria ser ignorado se `onResolved` ou `onRjected` não for uma função,\n // do qual implementa a penetrar a passagem desse valor\n // `Promise.resolve(4).then().then((value) => console.log(value))`\n onResolved = typeof onResolved === 'function' ? onResolved : v => v;\n onRejected = typeof onRejected === 'function' ? onRejected : r => throw r;\n\n if (self.currentState === RESOLVED) {\n return (promise2 = new MyPromise((resolve, reject) => {\n // especificação 2.2.4, encapsula eles com `setTimeout`,\n // em ordem para garantir que `onFulfilled` e `onRjected` executam assícronamente\n setTimeout(() => {\n try {\n let x = onResolved(self.value);\n resolutionProcedure(promise2, x, resolve, reject);\n } catch (reason) {\n reject(reason);\n }\n });\n }));\n }\n\n if (self.currentState === REJECTED) {\n return (promise2 = new MyPromise((resolve, reject) => {\n // execute `onRejected` assícronamente\n setTimeout(() => {\n try {\n let x = onRejected(self.value);\n resolutionProcedure(promise2, x, resolve, reject);\n } catch (reason) {\n reject(reason);\n }\n });\n }))\n }\n\n if (self.currentState === PENDING) {\n return (promise2 = new MyPromise((resolve, reject) => {\n self.resolvedCallbacks.push(() => {\n // Considerando que isso deve lançar um erro, encapsule eles com `try/catch`\n try {\n let x = onResolved(self.value);\n resolutionProcedure(promise2, x, resolve, reject);\n } catch (r) {\n reject(r);\n }\n });\n\n self.rejectedCallbacks.push(() => {\n try {\n let x = onRejected(self.value);\n resolutionProcedure(promise2, x, resolve, reject);\n } catch (r) {\n reject(r);\n }\n })\n }))\n }\n}\n\n// especificação 2.3\nfunction resolutionProcedure(promise2, x, resolve, reject) {\n // especificação 2.3.1,`x` e `promise2` não podem ser referenciados para o mesmo objeto,\n // evitando referência circular\n if (promise2 === x) {\n return reject(new TypeError('Error'));\n }\n\n // especificação 2.3.2, se `x` é uma Promise e o estado é `pending`,\n // a promisse deve permanecer, se não, ele deve ser executado.\n if (x instanceof MyPromise) {\n if (x.currentState === PENDING) {\n // chame a função `resolutionProcedure` novamente para \n // confirmar o tipo de argumento que x resolve\n // Se for um tipo primitivo, irá ser resolvido novamente\n // passando o valor para o próximo `then`.\n x.then((value) => {\n resolutionProcedure(promise2, value, resolve, reject);\n }, reject)\n } else {\n x.then(resolve, reject);\n }\n return;\n }\n\n // especificação 2.3.3.3.3\n // se ambos `reject` e `resolve` forem executado, a primeira execução \n // de sucesso tem precedência, e qualquer execução é ignorada\n let called = false;\n // especificação 2.3.3, determina se `x` é um objeto ou uma função \n if (x !== null && (typeof x === 'object' || typeof x === 'function')) {\n // especificação 2.3.3.2, se não conseguir obter o `then`, execute o `reject`\n try {\n // especificação 2.3.3.1\n let then = x.then;\n // se `then` é uma função, chame o `x.then`\n if (typeof then === 'function') {\n // especificação 2.3.3.3\n then.call(x, y => {\n if (called) return;\n called = true;\n // especificação 2.3.3.3.1\n resolutionProcedure(promise2, y, resolve, reject);\n }, e => {\n if (called) return;\n called = true;\n reject(e);\n });\n } else {\n // especificação 2.3.3.4\n resolve(x);\n }\n } catch (e) {\n if (called) return;\n called = true;\n reject(e);\n }\n } else {\n // especificação 2.3.4, `x` pertence ao tipo primitivo de dados\n resolve(x);\n }\n}\n```\n\nO código acima, que é implementado baseado em Promise / A+ especificação, pode passar os testes completos de `promises-aplus-tests`\n\n\n\n# Implementação do Generator\n\nGenerator é uma funcionalidade sintática adicionada no ES6. Similar a `Promise`, pode ser usado para programação assíncrona.\n\n```js\n// * significa que isso é uma função Generator\n// yield dentro de um bloco pode ser usado para pausar a execução\n// next consegue resumir a execução\nfunction* test() {\n let a = 1 + 2;\n yield 2;\n yield 3;\n}\nlet b = test();\nconsole.log(b.next()); // > { value: 2, done: false }\nconsole.log(b.next()); // > { value: 3, done: false }\nconsole.log(b.next()); // > { value: undefined, done: true }\n```\n\nComo podemos dizer no código acima, a função com um `*` teria a execução da função `next`. Em outras palavras, a execução de função retorna um objeto. Toda chamada a função `next` pode continuar a execução do código pausado. Um simples implementação da função Generator é mostrada abaixo:\n```js\n// cb é a função 'test' compilada\nfunction generator(cb) {\n return (function() {\n var object = {\n next: 0,\n stop: function() {}\n };\n\n return {\n next: function() {\n var ret = cb(object);\n if (ret === undefined) return { value: undefined, done: true };\n return {\n value: ret,\n done: false\n };\n }\n };\n })();\n}\n// Depois da compilação do babel's, a função 'test' retorna dentro dessa:\nfunction test() {\n var a;\n return generator(function(_context) {\n while (1) {\n switch ((_context.prev = _context.next)) {\n // yield separa o código em diversos blocos\n // cada chamada 'next' executa um bloco de código\n // e indica o próximo bloco a ser executado\n case 0:\n a = 1 + 2;\n _context.next = 4;\n return 2;\n case 4:\n _context.next = 6;\n return 3;\n // execução completa\n case 6:\n case \"end\":\n return _context.stop();\n }\n }\n });\n}\n```\n\n# Debouncing\n\nTendo você encontrado esse problema e seu dia-a-dia no desenvolvimento: como fazer uma computação complexa em um evento de scroll ou prevenir o \"segundo clique acidental\" no butão?\n\nEsses requisitos podem ser alcançados com funcões debouncing. Especialmente para o primeiro, se uma computação complexa estiver sendo chamado em frequentes eventos de callbacks, existe uma grande chance que a página se torne lenta. É melhor combinar essas multiplas computações e uma, e apenas operar em determinado periodo de tempo. Desde que existe muitas bibliotecas que implementam debouncing, nós não construimos nosso próprio aqui e vamos pegar o código do underscore para explicar o debouncing:\n\n```js\n/**\n * função underscore debouncing. Quando a função callback é chamada em série, a funcão vai executar apenas quando o tempo ideal é maior ou igual ao `wait`.\n *\n * @param {function} func função callback\n * @param {number} wait tamanho do intervalo de espera\n * @param {boolean} immediate quando definido para true, func é executada imadiatamente\n * @return {function} retorna a função a ser chamada pelo cliente\n */\n_.debounce = function(func, wait, immediate) {\n var timeout, args, context, timestamp, result;\n\n var later = function() {\n // compara now para o último timestamp\n var last = _.now() - timestamp;\n // se o tempo de intervalo atual é menor então o set interval é maior que 0, então reinicie o timer.\n if (last < wait && last >= 0) {\n timeout = setTimeout(later, wait - last);\n } else {\n // senão é o momento de executar a função callback\n timeout = null;\n if (!immediate) {\n result = func.apply(context, args);\n if (!timeout) context = args = null;\n }\n }\n };\n\n return function() {\n context = this;\n args = arguments;\n // obtendo o timestamp\n timestamp = _.now();\n // se o timer não existir então execute a função imediatamente\n var callNow = immediate && !timeout;\n // se o time não existe então crie um\n if (!timeout) timeout = setTimeout(later, wait);\n if (callNow) {\n // se a função imediata é precisa, use aplly para começar a função\n result = func.apply(context, args);\n context = args = null;\n }\n\n return result;\n };\n };\n```\n\nA implementação completa da ƒunção não é tão difícil.\n\n- Para a implementação de proteger contra clicks acidentais: enquanto eu começar o time e o time existir, não importa quantas vezes eu clicar o butão, a função de callback não será executada. Contudo quando o time termina, é setado para `null`, outro click é permitido.\n- Para a implementação da executação da função de atraso: toda chamada para a função debouncing vai disparar um tempo de intervalo equivalente entre a chamada tual e a última chamada. Se o intervalo é menor que o requerido, outro time será cirado, e o atraso é atribuido ao set interval menos o tempo anterior. Quando o tempo passa, a função de callback é executada.\n\n# Throttle\n\n`Debounce` e `Throttle` possuem naturezas diferentes. `Debounce` é para tornar multiplas execuções na última execução, e `Throttle` é para tornar multiplas execuções em uma execução de intervalos regulares.\n\n```js\n// Os dois primeiro parâmetros com debounce são a mesma função\n// options: você pode passar duas propriedades\n// trailing: o último tempo não é executado\n// leading: o primeiro tempo não é executado\n// As duas propriedades não coexistem, contudo a função não será executada\n_.throttle = function(func, wait, options) {\n var context, args, result;\n var timeout = null;\n // timestamp anterior\n var previous = 0;\n // Defina vázio se as opções não forem passadas\n if (!options) options = {};\n // Função Timer callback\n var later = function() {\n // se você definiu `leading`, então defina `previous` para zero\n // O primeiro if da seguinte função é usada\n previous = options.leading === false ? 0 : _.now();\n // O primeiro é prevenindo memory leaks e o segundo é julgado os seguintes timers quando configurado `timeout` para null\n timeout = null;\n result = func.apply(context, args);\n if (!timeout) context = args = null;\n };\n return function() {\n // Obtenha o timestamp atual\n var now = _.now();\n // Deve ser verdado quando entrar pela primeira vez\n // Se você não precisa executar essa função na primeira vez\n // Defina o último timestamp para o atual\n // Então ele será maior que 0 quando o termo remanecente for calculado da próxima vez\n if (!previous && options.leading === false)\n previous = now;\n var remaining = wait - (now - previous);\n context = this;\n args = arguments;\n // Essa condição só será preenchida se definido para `trailing`\n // Essa condição só será preenchida no ínicio se não definido `leading`\n // Outro ponto, você deve pensar que essa condição não será preenchida se você ligar o timer\n // De fato, será assim até entrar porque o atraso do timer não é acurado\n // Isso é muito como se você setar a 2 segundos, mas ele precisa 2.2 segundos para disparar, então o tempo será preenchido nessa condição\n if (remaining <= 0 || remaining > wait) {\n // Limpe se existe um timer e ele chama a callback duas vezes\n if (timeout) {\n clearTimeout(timeout);\n timeout = null;\n }\n previous = now;\n result = func.apply(context, args);\n if (!timeout) context = args = null;\n } else if (!timeout && options.trailing !== false) {\n // Julge se o timer e trailing forem definidos\n // E você não pode defirnor leading e trailing no mesmo instante\n timeout = setTimeout(later, remaining);\n }\n return result;\n };\n};\n```\n\n# Map、FlatMap e Reduce\n\nO efeito do `Map` é para gerar um novo array, iterando sobre o array original, tomando cada elemento para fazer alguma transformação, e então `append` para um novo array.\n\n```js\n[1, 2, 3].map((v) => v + 1)\n// -> [2, 3, 4]\n```\n\n`Map` tem três parâmetros, nomeando o índice atual do elemento, o índice, o array original.\n\n```js\n['1','2','3'].map(parseInt)\n// parseInt('1', 0) -> 1\n// parseInt('2', 1) -> NaN\n// parseInt('3', 2) -> NaN\n```\n\nO efeito do `FlatMap` é quase o mesmo do `Map`, mas o array original será substituído para um array multidimensional. Você pode pensar no `FlatMap` com um `map` e um `flatten`, que atualmente não é suportado nos navegadores.\n\n```js\n[1, [2], 3].flatMap((v) => v + 1)\n// -> [2, 3, 4]\n```\n\nVocê pode alcançar isso quando você quer reduzir completamente dimensões de um array multidimensional:\n\n```js\nconst flattenDeep = (arr) => Array.isArray(arr)\n ? arr.reduce( (a, b) => [...a, ...flattenDeep(b)] , [])\n : [arr]\n\nflattenDeep([1, [[2], [3, [4]], 5]])\n```\n\nO efeito do `Reduce` é para combinar os valores em um array e pegar o valor final:\n\n```js\nfunction a() {\n console.log(1);\n}\n\nfunction b() {\n console.log(2);\n}\n\n[a, b].reduce((a, b) => a(b()))\n// -> 2 1\n```\n\n\n# Async e await\n\nA função `async` vai retornar uma `Promise`:\n\n```js\nasync function test() {\n return \"1\";\n}\nconsole.log(test()); // -> Promise {: \"1\"}\n```\n\nVocê pode pensar em `async` como uma função encapsuladora usando `Promise.resolve()`.\n\n`await` pode ser usado apenas em funcões `async`:\n\n```js\nfunction sleep() {\n return new Promise(resolve => {\n setTimeout(() => {\n console.log('finish')\n resolve(\"sleep\");\n }, 2000);\n });\n}\nasync function test() {\n let value = await sleep();\n console.log(\"object\");\n}\ntest()\n```\n\nO código acime vai exibir `finish` antes de exibir `object`. Porque `await` espera pela funcão `sleep` `resolve`, mesmo se a sincronização de código estiver seguida, ele não executa antes do código assíncrono ser executado.\n\nA vantagem do `async` e `await` comparado ao uso direto da `Promise` mente em manipular a cadeia de chamada do `then`, que pode produzir código claro e acurado. A desvantagem é que uso indevido do `await` pode causar problemas de performance porque `await` bloqueia o código. Possivelmente o código assíncrono não depende do anterior, mas ele ainda precisa esperar o anterir ser completo, ocasionando perda de concorrência.\n\nVamos dar uma olhada em um código que usa `await`:\n\n```js\nvar a = 0\nvar b = async () => {\n a = a + await 10\n console.log('2', a) // -> '2' 10\n a = (await 10) + a\n console.log('3', a) // -> '3' 20\n}\nb()\na++\nconsole.log('1', a) // -> '1' 1\n```\n\nVocê pode ter dúvidas sobre o código acima, aqui nós explicamos o príncipio:\n\n- Primeiro a função `b` é executada. A variável `a` ainda é zero antes da execução do `await 10`, porque os `Generators` são implementados dentro do `await` e `Generators` matém as coisas na pilha, então nesse momento `a = 0` é salvo\n- Porque `await` é uma operação assíncrona, `console.log('1', a)` será executada primeiro.\n- Nesse ponto, o código síncrono é completado e o código assíncrono é iniciado. O valor salvo é usado. Nesse instante, `a = 10`\n- Então chega a execução usual do código\n\n# Proxy\n\nProxy é uma nova funcionalidade desde o ES6. Ele costuma ser usado para definir operações em objetos:\n\n```js\nlet p = new Proxy(target, handler);\n// `target` representa o objeto que precisamos adicionar o proxy\n// `handler` operações customizadas no objeto\n```\n\nProxy podem ser conveniente para implementação de data bindind e listening:\n\n```js\nlet onWatch = (obj, setBind, getLogger) => {\n let handler = {\n get(target, property, receiver) {\n getLogger(target, property)\n return Reflect.get(target, property, receiver);\n },\n set(target, property, value, receiver) {\n setBind(value);\n return Reflect.set(target, property, value);\n }\n };\n return new Proxy(obj, handler);\n};\n\nlet obj = { a: 1 }\nlet value\nlet p = onWatch(obj, (v) => {\n value = v\n}, (target, property) => {\n console.log(`Get '${property}' = ${target[property]}`);\n})\np.a = 2 // liga `value` para `2`\np.a // -> obtém 'a' = 2\n```\n\n# Por que 0.1 + 0.2 != 0.3\n\nPorque JS usa a precisão-dupla do IEEE 754 versão (64-bit). Toda linguagem que usa esse padrão tem esse problema.\n\nComo nós sabemos, computadores usam binários para representar decimais, então `0.1` em binário é representado como\n\n```js\n// (0011) representa o ciclo\n0.1 = 2^-4 * 1.10011(0011)\n```\n\nComo nós chegamos a esse número binário? Podemos tentar computar ele como abaixo:\n\n\n\nComputações binária em números flutuantes são diferentes daqueles em inteiros. Por multiplicação, apenas bits flutuantes são computados, enquanto bits do tipo inteiro são usados pelos binários para cada bit. Então o primeiro bit é usado como o bit mais significante. Assim sendo nós obtemos 0.1 = 2^-4 * 1.10011(0011)`.\n\n`0.2` é similar. Nós apenas precisamos passear na primeira multiplicação e obter `0.2 = 2^-3 * 1.10011(0011)`\n\nVoltando a precisão dupla pelo padrão IEE 754. Entre o 64 bits, um bit é usado para assinatura, 11 é usado para bits inteiros, e o outros 52 bits são floats. Uma vez que `0.1` e `0.2` são ciclos infinitos de binários, o último bit do float precisa indicar se volta (mesmo como o arredendomaneto em decimal).\n\nDepois do arredondamento, `2^-4 * 1.10011...001` se torna `2^-4 * 1.10011(0011 * 12 vezes)010`. Depois de adicionado esses dois binários obtemos `2^-2 * 1.0011(0011 * 11 vezes)0100`, que é `0.30000000000000004` em decimal.\n\nA solução nativa pra esse problema é mostrado abaixo:\n\n```js\nparseFloat((0.1 + 0.2).toFixed(10))\n```\n\n# Expressões Regulares\n\n## Metacaracteres\n\n| Metacaractere | Efeito |\n| :-----------: | :----------------------------------------------------------: |\n| . | corresponde a qualquer caractere exceto de terminadores de linhas: \\n, \\r, \\u2028 or \\u2029. |\n| [] | corresponde a qualquer coisa dentro dos colchetes. Por exemplo, [0-9] corresponde a qualquer número |\n| ^ | ^9 significa corresponder qualquer coisa que começa com '9'; [`^`9] significa não corresponder aos caracteres exceto '9' nos colchetes |\n| {1, 2} | corresponde 1 ou 2 caracteres digitais |\n| (yck) | corresponde apenas strings com o mesmo 'yck' |\n| \\| | corresponde a qualquer caractere antes e depois \\| |\n| \\ | caracter de escape |\n| * | corresponde a expressão precedente 0 ou mais vezes |\n| + | corresponde a expressão precedente 1 ou mais vezes |\n| ? | o caractere antes do '?' é opcional |\n\n## Bandeiras\n\n| Bandeira | Efeito |\n| :------: | :--------------: |\n| i | pesquisa insensível a maiúsculas e minúsculas |\n| g | corresponde globalmente |\n| m | multilinha |\n\n## Caracteres Atalhos\n\n| Atalho | Efeito |\n| :--: | :------------------------: |\n| \\w | caracteres alfanuméricos, caracteres sublinhados |\n| \\W | o oposto do acima |\n| \\s | qualquer caractere em branco |\n| \\S | o oposto do acima |\n| \\d | números |\n| \\D | o oposto do acima |\n| \\b | inicio ou fim da palavra |\n| \\B | o oposto do acima |\n\n"
},
{
"path": "JS/JS-ch.md",
"content": "\n\n**Table of Contents** *generated with [DocToc](https://github.com/thlorenz/doctoc)*\n\n- [内置类型](#%E5%86%85%E7%BD%AE%E7%B1%BB%E5%9E%8B)\n- [Typeof](#typeof)\n- [类型转换](#%E7%B1%BB%E5%9E%8B%E8%BD%AC%E6%8D%A2)\n - [转Boolean](#%E8%BD%ACboolean)\n - [对象转基本类型](#%E5%AF%B9%E8%B1%A1%E8%BD%AC%E5%9F%BA%E6%9C%AC%E7%B1%BB%E5%9E%8B)\n - [四则运算符](#%E5%9B%9B%E5%88%99%E8%BF%90%E7%AE%97%E7%AC%A6)\n - [`==` 操作符](#-%E6%93%8D%E4%BD%9C%E7%AC%A6)\n - [比较运算符](#%E6%AF%94%E8%BE%83%E8%BF%90%E7%AE%97%E7%AC%A6)\n- [原型](#%E5%8E%9F%E5%9E%8B)\n- [new](#new)\n- [instanceof](#instanceof)\n- [this](#this)\n- [执行上下文](#%E6%89%A7%E8%A1%8C%E4%B8%8A%E4%B8%8B%E6%96%87)\n- [闭包](#%E9%97%AD%E5%8C%85)\n- [深浅拷贝](#%E6%B7%B1%E6%B5%85%E6%8B%B7%E8%B4%9D)\n - [浅拷贝](#%E6%B5%85%E6%8B%B7%E8%B4%9D)\n - [深拷贝](#%E6%B7%B1%E6%8B%B7%E8%B4%9D)\n- [模块化](#%E6%A8%A1%E5%9D%97%E5%8C%96)\n - [CommonJS](#commonjs)\n - [AMD](#amd)\n- [防抖](#%E9%98%B2%E6%8A%96)\n- [节流](#%E8%8A%82%E6%B5%81)\n- [继承](#%E7%BB%A7%E6%89%BF)\n- [call, apply, bind 区别](#call-apply-bind-%E5%8C%BA%E5%88%AB)\n - [模拟实现 call 和 apply](#%E6%A8%A1%E6%8B%9F%E5%AE%9E%E7%8E%B0-call-%E5%92%8C-apply)\n- [Promise 实现](#promise-%E5%AE%9E%E7%8E%B0)\n- [Generator 实现](#generator-%E5%AE%9E%E7%8E%B0)\n- [Map、FlatMap 和 Reduce](#mapflatmap-%E5%92%8C-reduce)\n- [async 和 await](#async-%E5%92%8C-await)\n- [Proxy](#proxy)\n- [为什么 0.1 + 0.2 != 0.3](#%E4%B8%BA%E4%BB%80%E4%B9%88-01--02--03)\n- [正则表达式](#%E6%AD%A3%E5%88%99%E8%A1%A8%E8%BE%BE%E5%BC%8F)\n - [元字符](#%E5%85%83%E5%AD%97%E7%AC%A6)\n - [修饰语](#%E4%BF%AE%E9%A5%B0%E8%AF%AD)\n - [字符简写](#%E5%AD%97%E7%AC%A6%E7%AE%80%E5%86%99)\n- [V8 下的垃圾回收机制](#v8-%E4%B8%8B%E7%9A%84%E5%9E%83%E5%9C%BE%E5%9B%9E%E6%94%B6%E6%9C%BA%E5%88%B6)\n - [新生代算法](#%E6%96%B0%E7%94%9F%E4%BB%A3%E7%AE%97%E6%B3%95)\n - [老生代算法](#%E8%80%81%E7%94%9F%E4%BB%A3%E7%AE%97%E6%B3%95)\n\n\n\n# 内置类型\n\nJS 中分为七种内置类型,七种内置类型又分为两大类型:基本类型和对象(Object)。\n\n基本类型有六种: `null`,`undefined`,`boolean`,`number`,`string`,`symbol`。\n\n其中 JS 的数字类型是浮点类型的,没有整型。并且浮点类型基于 IEEE 754标准实现,在使用中会遇到某些 [Bug](#%E4%B8%BA%E4%BB%80%E4%B9%88-01--02--03)。`NaN` 也属于 `number` 类型,并且 `NaN` 不等于自身。\n\n对于基本类型来说,如果使用字面量的方式,那么这个变量只是个字面量,只有在必要的时候才会转换为对应的类型\n\n```js\nlet a = 111 // 这只是字面量,不是 number 类型\na.toString() // 使用时候才会转换为对象类型\n```\n\n对象(Object)是引用类型,在使用过程中会遇到浅拷贝和深拷贝的问题。\n\n```js\nlet a = { name: 'FE' }\nlet b = a\nb.name = 'EF'\nconsole.log(a.name) // EF\n```\n\n# Typeof\n\n`typeof` 对于基本类型,除了 `null` 都可以显示正确的类型\n\n```js\ntypeof 1 // 'number'\ntypeof '1' // 'string'\ntypeof undefined // 'undefined'\ntypeof true // 'boolean'\ntypeof Symbol() // 'symbol'\ntypeof b // b 没有声明,但是还会显示 undefined\n```\n\n`typeof` 对于对象,除了函数都会显示 `object`\n\n```js\ntypeof [] // 'object'\ntypeof {} // 'object'\ntypeof console.log // 'function'\n```\n\n对于 `null` 来说,虽然它是基本类型,但是会显示 `object`,这是一个存在很久了的 Bug\n\n```js\ntypeof null // 'object'\n```\n\nPS:为什么会出现这种情况呢?因为在 JS 的最初版本中,使用的是 32 位系统,为了性能考虑使用低位存储了变量的类型信息,`000` 开头代表是对象,然而 `null` 表示为全零,所以将它错误的判断为 `object` 。虽然现在的内部类型判断代码已经改变了,但是对于这个 Bug 却是一直流传下来。\n\n如果我们想获得一个变量的正确类型,可以通过 `Object.prototype.toString.call(xx)`。这样我们就可以获得类似 `[object Type]` 的字符串。\n\n```js\nlet a\n// 我们也可以这样判断 undefined\na === undefined\n// 但是 undefined 不是保留字,能够在低版本浏览器被赋值\nlet undefined = 1\n// 这样判断就会出错\n// 所以可以用下面的方式来判断,并且代码量更少\n// 因为 void 后面随便跟上一个组成表达式\n// 返回就是 undefined\na === void 0\n```\n\n# 类型转换\n\n## 转Boolean\n\n在条件判断时,除了 `undefined`, `null`, `false`, `NaN`, `''`, `0`, `-0`,其他所有值都转为 `true`,包括所有对象。\n\n## 对象转基本类型\n\n对象在转换基本类型时,首先会调用 `valueOf` 然后调用 `toString`。并且这两个方法你是可以重写的。\n\n```js\nlet a = {\n valueOf() {\n \treturn 0\n }\n}\n```\n\n当然你也可以重写 `Symbol.toPrimitive` ,该方法在转基本类型时调用优先级最高。\n\n```js\nlet a = {\n valueOf() {\n return 0;\n },\n toString() {\n return '1';\n },\n [Symbol.toPrimitive]() {\n return 2;\n }\n}\n1 + a // => 3\n'1' + a // => '12'\n```\n\n## 四则运算符\n\n只有当加法运算时,其中一方是字符串类型,就会把另一个也转为字符串类型。其他运算只要其中一方是数字,那么另一方就转为数字。并且加法运算会触发三种类型转换:将值转换为原始值,转换为数字,转换为字符串。\n\n```js\n1 + '1' // '11'\n2 * '2' // 4\n[1, 2] + [2, 1] // '1,22,1'\n// [1, 2].toString() -> '1,2'\n// [2, 1].toString() -> '2,1'\n// '1,2' + '2,1' = '1,22,1'\n```\n\n对于加号需要注意这个表达式 `'a' + + 'b'`\n\n```js\n'a' + + 'b' // -> \"aNaN\"\n// 因为 + 'b' -> NaN\n// 你也许在一些代码中看到过 + '1' -> 1\n```\n\n## `==` 操作符\n\n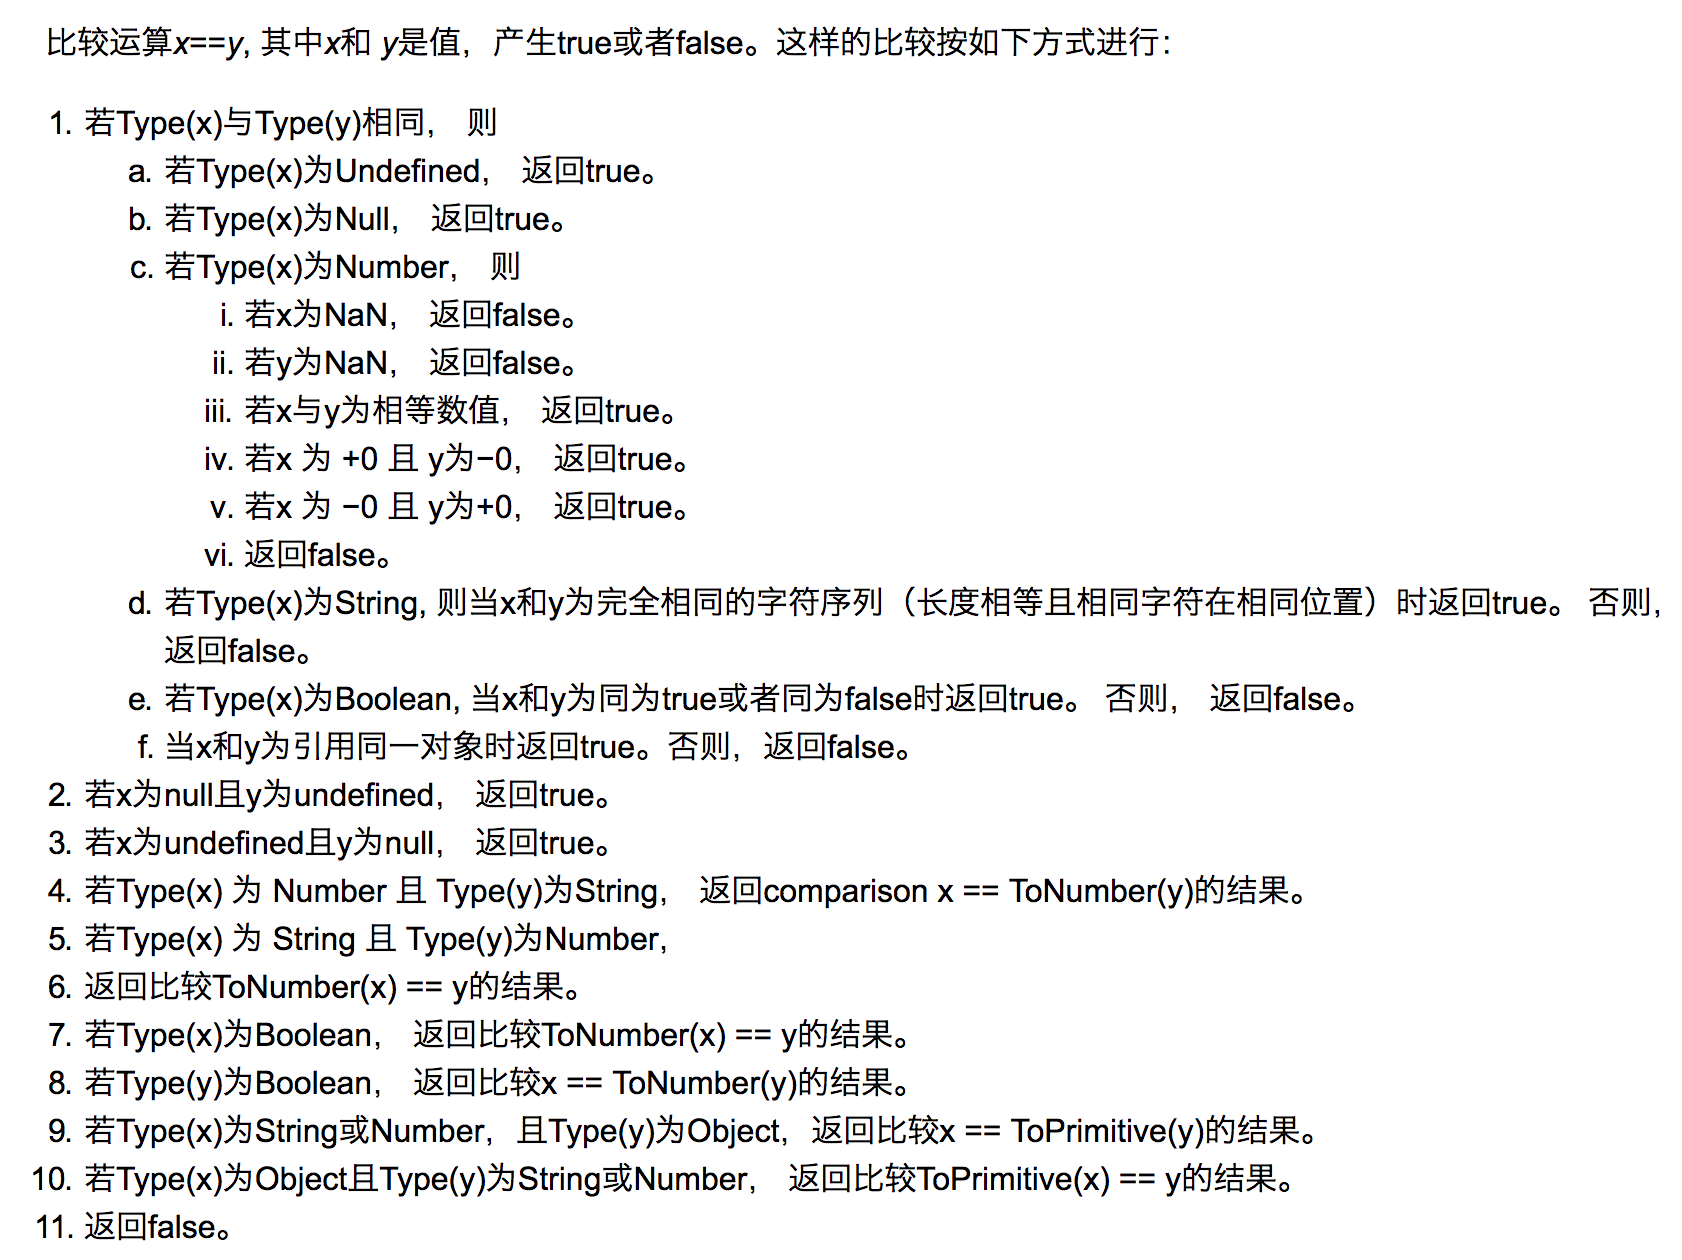\n\n上图中的 `toPrimitive` 就是对象转基本类型。\n\n这里来解析一道题目 `[] == ![] // -> true` ,下面是这个表达式为何为 `true` 的步骤\n\n```js\n// [] 转成 true,然后取反变成 false\n[] == false\n// 根据第 8 条得出\n[] == ToNumber(false)\n[] == 0\n// 根据第 10 条得出\nToPrimitive([]) == 0\n// [].toString() -> ''\n'' == 0\n// 根据第 6 条得出\n0 == 0 // -> true\n```\n\n## 比较运算符\n\n1. 如果是对象,就通过 `toPrimitive` 转换对象\n2. 如果是字符串,就通过 `unicode` 字符索引来比较\n\n# 原型\n\n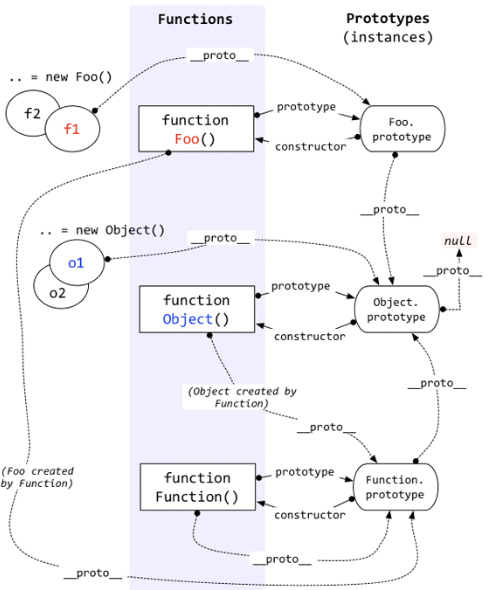\n\n每个函数都有 `prototype` 属性,除了 `Function.prototype.bind()`,该属性指向原型。\n\n每个对象都有 `__proto__` 属性,指向了创建该对象的构造函数的原型。其实这个属性指向了 `[[prototype]]`,但是 `[[prototype]]` 是内部属性,我们并不能访问到,所以使用 `_proto_` 来访问。\n\n对象可以通过 `__proto__` 来寻找不属于该对象的属性,`__proto__` 将对象连接起来组成了原型链。\n\n如果你想更进一步的了解原型,可以仔细阅读 [深度解析原型中的各个难点](https://github.com/KieSun/Blog/issues/2)。\n\n# new\n\n1. 新生成了一个对象\n2. 链接到原型\n3. 绑定 this\n4. 返回新对象\n\n在调用 `new` 的过程中会发生以上四件事情,我们也可以试着来自己实现一个 `new`\n\n```js\nfunction create() {\n // 创建一个空的对象\n let obj = new Object()\n // 获得构造函数\n let Con = [].shift.call(arguments)\n // 链接到原型\n obj.__proto__ = Con.prototype\n // 绑定 this,执行构造函数\n let result = Con.apply(obj, arguments)\n // 确保 new 出来的是个对象\n return typeof result === 'object' ? result : obj\n}\n```\n\n对于实例对象来说,都是通过 `new` 产生的,无论是 `function Foo()` 还是 `let a = { b : 1 }` 。\n\n对于创建一个对象来说,更推荐使用字面量的方式创建对象(无论性能上还是可读性)。因为你使用 `new Object()` 的方式创建对象需要通过作用域链一层层找到 `Object`,但是你使用字面量的方式就没这个问题。\n\n```js\nfunction Foo() {}\n// function 就是个语法糖\n// 内部等同于 new Function()\nlet a = { b: 1 }\n// 这个字面量内部也是使用了 new Object()\n```\n对于 `new` 来说,还需要注意下运算符优先级。\n\n```js\nfunction Foo() {\n return this;\n}\nFoo.getName = function () {\n console.log('1');\n};\nFoo.prototype.getName = function () {\n console.log('2');\n};\n\nnew Foo.getName(); // -> 1\nnew Foo().getName(); // -> 2 \n```\n\n\n\n从上图可以看出,`new Foo() ` 的优先级大于 `new Foo` ,所以对于上述代码来说可以这样划分执行顺序\n\n```js\nnew (Foo.getName()); \n(new Foo()).getName();\n```\n\n对于第一个函数来说,先执行了 `Foo.getName()` ,所以结果为 1;对于后者来说,先执行 `new Foo()` 产生了一个实例,然后通过原型链找到了 `Foo` 上的 `getName` 函数,所以结果为 2。\n\n# instanceof\n\n`instanceof` 可以正确的判断对象的类型,因为内部机制是通过判断对象的原型链中是不是能找到类型的 `prototype`。\n\n我们也可以试着实现一下 `instanceof`\n\n```js\nfunction instanceof(left, right) {\n // 获得类型的原型\n let prototype = right.prototype\n // 获得对象的原型\n left = left.__proto__\n // 判断对象的类型是否等于类型的原型\n while (true) {\n \tif (left === null)\n \t\treturn false\n \tif (prototype === left)\n \t\treturn true\n \tleft = left.__proto__\n }\n}\n```\n\n# this\n\n`this` 是很多人会混淆的概念,但是其实他一点都不难,你只需要记住几个规则就可以了。\n\n```js\nfunction foo() {\n\tconsole.log(this.a)\n}\nvar a = 1\nfoo()\n\nvar obj = {\n\ta: 2,\n\tfoo: foo\n}\nobj.foo()\n\n// 以上两者情况 `this` 只依赖于调用函数前的对象,优先级是第二个情况大于第一个情况\n\n// 以下情况是优先级最高的,`this` 只会绑定在 `c` 上,不会被任何方式修改 `this` 指向\nvar c = new foo()\nc.a = 3\nconsole.log(c.a)\n\n// 还有种就是利用 call,apply,bind 改变 this,这个优先级仅次于 new\n```\n\n以上几种情况明白了,很多代码中的 `this` 应该就没什么问题了,下面让我们看看箭头函数中的 `this`\n\n```js\nfunction a() {\n return () => {\n return () => {\n \tconsole.log(this)\n }\n }\n}\nconsole.log(a()()())\n```\n\n箭头函数其实是没有 `this` 的,这个函数中的 `this` 只取决于他外面的第一个不是箭头函数的函数的 `this`。在这个例子中,因为调用 `a` 符合前面代码中的第一个情况,所以 `this` 是 `window`。并且 `this` 一旦绑定了上下文,就不会被任何代码改变。\n\n# 执行上下文\n当执行 JS 代码时,会产生三种执行上下文\n\n- 全局执行上下文\n- 函数执行上下文\n- eval 执行上下文\n\n每个执行上下文中都有三个重要的属性\n\n- 变量对象(VO),包含变量、函数声明和函数的形参,该属性只能在全局上下文中访问\n- 作用域链(JS 采用词法作用域,也就是说变量的作用域是在定义时就决定了)\n- this\n\n```js\nvar a = 10\nfunction foo(i) {\n var b = 20\n}\nfoo()\n```\n\n对于上述代码,执行栈中有两个上下文:全局上下文和函数 `foo` 上下文。\n\n```js\nstack = [\n globalContext,\n fooContext\n]\n```\n\n对于全局上下文来说,VO 大概是这样的\n\n```js\nglobalContext.VO === globe\nglobalContext.VO = {\n a: undefined,\n\tfoo: ,\n}\n```\n\n对于函数 `foo` 来说,VO 不能访问,只能访问到活动对象(AO)\n\n```js\nfooContext.VO === foo.AO\nfooContext.AO {\n i: undefined,\n\tb: undefined,\n arguments: <>\n}\n// arguments 是函数独有的对象(箭头函数没有)\n// 该对象是一个伪数组,有 `length` 属性且可以通过下标访问元素\n// 该对象中的 `callee` 属性代表函数本身\n// `caller` 属性代表函数的调用者\n```\n\n对于作用域链,可以把它理解成包含自身变量对象和上级变量对象的列表,通过 `[[Scope]]` 属性查找上级变量\n\n```js\nfooContext.[[Scope]] = [\n globalContext.VO\n]\nfooContext.Scope = fooContext.[[Scope]] + fooContext.VO\nfooContext.Scope = [\n fooContext.VO,\n globalContext.VO\n]\n```\n\n接下来让我们看一个老生常谈的例子,`var`\n\n```js\nb() // call b\nconsole.log(a) // undefined\n\nvar a = 'Hello world'\n\nfunction b() {\n\tconsole.log('call b')\n}\n```\n\n想必以上的输出大家肯定都已经明白了,这是因为函数和变量提升的原因。通常提升的解释是说将声明的代码移动到了顶部,这其实没有什么错误,便于大家理解。但是更准确的解释应该是:在生成执行上下文时,会有两个阶段。第一个阶段是创建的阶段(具体步骤是创建 VO),JS 解释器会找出需要提升的变量和函数,并且给他们提前在内存中开辟好空间,函数的话会将整个函数存入内存中,变量只声明并且赋值为 undefined,所以在第二个阶段,也就是代码执行阶段,我们可以直接提前使用。\n\n在提升的过程中,相同的函数会覆盖上一个函数,并且函数优先于变量提升\n\n```js\nb() // call b second\n\nfunction b() {\n\tconsole.log('call b fist')\n}\nfunction b() {\n\tconsole.log('call b second')\n}\nvar b = 'Hello world'\n```\n\n`var` 会产生很多错误,所以在 ES6中引入了 `let`。`let` 不能在声明前使用,但是这并不是常说的 `let` 不会提升,`let` 提升了声明但没有赋值,因为临时死区导致了并不能在声明前使用。\n\n对于非匿名的立即执行函数需要注意以下一点\n\n```js\nvar foo = 1\n(function foo() {\n foo = 10\n console.log(foo)\n}()) // -> ƒ foo() { foo = 10 ; console.log(foo) }\n```\n\n因为当 JS 解释器在遇到非匿名的立即执行函数时,会创建一个辅助的特定对象,然后将函数名称作为这个对象的属性,因此函数内部才可以访问到 `foo`,但是这个值又是只读的,所以对它的赋值并不生效,所以打印的结果还是这个函数,并且外部的值也没有发生更改。\n\n ```js\nspecialObject = {};\n \nScope = specialObject + Scope;\n \nfoo = new FunctionExpression;\nfoo.[[Scope]] = Scope;\nspecialObject.foo = foo; // {DontDelete}, {ReadOnly}\n \ndelete Scope[0]; // remove specialObject from the front of scope chain\n ```\n\n# 闭包\n\n闭包的定义很简单:函数 A 返回了一个函数 B,并且函数 B 中使用了函数 A 的变量,函数 B 就被称为闭包。\n\n```js\nfunction A() {\n let a = 1\n function B() {\n console.log(a)\n }\n return B\n}\n```\n\n你是否会疑惑,为什么函数 A 已经弹出调用栈了,为什么函数 B 还能引用到函数 A 中的变量。因为函数 A 中的变量这时候是存储在堆上的。现在的 JS 引擎可以通过逃逸分析辨别出哪些变量需要存储在堆上,哪些需要存储在栈上。\n\n经典面试题,循环中使用闭包解决 `var` 定义函数的问题\n\n```Js\nfor ( var i=1; i<=5; i++) {\n\tsetTimeout( function timer() {\n\t\tconsole.log( i );\n\t}, i*1000 );\n}\n```\n\n首先因为 `setTimeout` 是个异步函数,所有会先把循环全部执行完毕,这时候 `i` 就是 6 了,所以会输出一堆 6。\n\n解决办法两种,第一种使用闭包\n\n```js\nfor (var i = 1; i <= 5; i++) {\n (function(j) {\n setTimeout(function timer() {\n console.log(j);\n }, j * 1000);\n })(i);\n}\n```\n\n第二种就是使用 `setTimeout ` 的第三个参数\n\n```js\nfor ( var i=1; i<=5; i++) {\n\tsetTimeout( function timer(j) {\n\t\tconsole.log( j );\n\t}, i*1000, i);\n}\n```\n\n第三种就是使用 `let` 定义 `i` 了\n\n```js\nfor ( let i=1; i<=5; i++) {\n\tsetTimeout( function timer() {\n\t\tconsole.log( i );\n\t}, i*1000 );\n}\n```\n\n因为对于 `let` 来说,他会创建一个块级作用域,相当于\n\n```js\n{ // 形成块级作用域\n let i = 0\n {\n let ii = i\n setTimeout( function timer() {\n console.log( ii );\n }, i*1000 );\n }\n i++\n {\n let ii = i\n }\n i++\n {\n let ii = i\n }\n ...\n}\n```\n\n# 深浅拷贝\n\n```js\nlet a = {\n age: 1\n}\nlet b = a\na.age = 2\nconsole.log(b.age) // 2\n```\n\n从上述例子中我们可以发现,如果给一个变量赋值一个对象,那么两者的值会是同一个引用,其中一方改变,另一方也会相应改变。\n\n通常在开发中我们不希望出现这样的问题,我们可以使用浅拷贝来解决这个问题。\n\n## 浅拷贝\n\n首先可以通过 `Object.assign` 来解决这个问题。\n\n```js\nlet a = {\n age: 1\n}\nlet b = Object.assign({}, a)\na.age = 2\nconsole.log(b.age) // 1\n```\n\n当然我们也可以通过展开运算符(…)来解决\n\n```js\nlet a = {\n age: 1\n}\nlet b = {...a}\na.age = 2\nconsole.log(b.age) // 1\n```\n\n通常浅拷贝就能解决大部分问题了,但是当我们遇到如下情况就需要使用到深拷贝了\n\n```js\nlet a = {\n age: 1,\n jobs: {\n first: 'FE'\n }\n}\nlet b = {...a}\na.jobs.first = 'native'\nconsole.log(b.jobs.first) // native\n```\n\n浅拷贝只解决了第一层的问题,如果接下去的值中还有对象的话,那么就又回到刚开始的话题了,两者享有相同的引用。要解决这个问题,我们需要引入深拷贝。\n\n## 深拷贝\n\n这个问题通常可以通过 `JSON.parse(JSON.stringify(object))` 来解决。\n\n```js\nlet a = {\n age: 1,\n jobs: {\n first: 'FE'\n }\n}\nlet b = JSON.parse(JSON.stringify(a))\na.jobs.first = 'native'\nconsole.log(b.jobs.first) // FE\n```\n\n但是该方法也是有局限性的:\n\n- 会忽略 `undefined`\n- 会忽略 `symbol`\n- 不能序列化函数\n- 不能解决循环引用的对象\n\n```js\nlet obj = {\n a: 1,\n b: {\n c: 2,\n d: 3,\n },\n}\nobj.c = obj.b\nobj.e = obj.a\nobj.b.c = obj.c\nobj.b.d = obj.b\nobj.b.e = obj.b.c\nlet newObj = JSON.parse(JSON.stringify(obj))\nconsole.log(newObj)\n```\n\n如果你有这么一个循环引用对象,你会发现你不能通过该方法深拷贝\n\n\n\n在遇到函数、 `undefined` 或者 `symbol` 的时候,该对象也不能正常的序列化\n\n```js\nlet a = {\n age: undefined,\n sex: Symbol('male'),\n jobs: function() {},\n name: 'yck'\n}\nlet b = JSON.parse(JSON.stringify(a))\nconsole.log(b) // {name: \"yck\"}\n```\n\n你会发现在上述情况中,该方法会忽略掉函数和 `undefined` 。\n\n但是在通常情况下,复杂数据都是可以序列化的,所以这个函数可以解决大部分问题,并且该函数是内置函数中处理深拷贝性能最快的。当然如果你的数据中含有以上三种情况下,可以使用 [lodash 的深拷贝函数](https://lodash.com/docs#cloneDeep)。\n\n如果你所需拷贝的对象含有内置类型并且不包含函数,可以使用 `MessageChannel`\n\n```js\nfunction structuralClone(obj) {\n return new Promise(resolve => {\n const {port1, port2} = new MessageChannel();\n port2.onmessage = ev => resolve(ev.data);\n port1.postMessage(obj);\n });\n}\n\nvar obj = {a: 1, b: {\n c: b\n}}\n// 注意该方法是异步的\n// 可以处理 undefined 和循环引用对象\n(async () => {\n const clone = await structuralClone(obj)\n})()\n```\n\n# 模块化\n\n在有 Babel 的情况下,我们可以直接使用 ES6 的模块化\n\n```js\n// file a.js\nexport function a() {}\nexport function b() {}\n// file b.js\nexport default function() {}\n\nimport {a, b} from './a.js'\nimport XXX from './b.js'\n```\n\n## CommonJS\n\n`CommonJs` 是 Node 独有的规范,浏览器中使用就需要用到 `Browserify` 解析了。\n\n```js\n// a.js\nmodule.exports = {\n a: 1\n}\n// or\nexports.a = 1\n\n// b.js\nvar module = require('./a.js')\nmodule.a // -> log 1\n```\n\n在上述代码中,`module.exports` 和 `exports` 很容易混淆,让我们来看看大致内部实现\n\n```js\nvar module = require('./a.js')\nmodule.a\n// 这里其实就是包装了一层立即执行函数,这样就不会污染全局变量了,\n// 重要的是 module 这里,module 是 Node 独有的一个变量\nmodule.exports = {\n a: 1\n}\n// 基本实现\nvar module = {\n exports: {} // exports 就是个空对象\n}\n// 这个是为什么 exports 和 module.exports 用法相似的原因\nvar exports = module.exports\nvar load = function (module) {\n // 导出的东西\n var a = 1\n module.exports = a\n return module.exports\n};\n```\n\n再来说说 `module.exports` 和 `exports`,用法其实是相似的,但是不能对 `exports` 直接赋值,不会有任何效果。\n\n对于 `CommonJS` 和 ES6 中的模块化的两者区别是:\n\n- 前者支持动态导入,也就是 `require(${path}/xx.js)`,后者目前不支持,但是已有提案\n- 前者是同步导入,因为用于服务端,文件都在本地,同步导入即使卡住主线程影响也不大。而后者是异步导入,因为用于浏览器,需要下载文件,如果也采用同步导入会对渲染有很大影响\n\n- 前者在导出时都是值拷贝,就算导出的值变了,导入的值也不会改变,所以如果想更新值,必须重新导入一次。但是后者采用实时绑定的方式,导入导出的值都指向同一个内存地址,所以导入值会跟随导出值变化\n- 后者会编译成 `require/exports` 来执行的\n\n## AMD\n\nAMD 是由 `RequireJS` 提出的\n\n```js\n// AMD\ndefine(['./a', './b'], function(a, b) {\n a.do()\n b.do()\n})\ndefine(function(require, exports, module) { \n var a = require('./a') \n a.doSomething() \n var b = require('./b')\n b.doSomething()\n})\n\n```\n# 防抖\n\n你是否在日常开发中遇到一个问题,在滚动事件中需要做个复杂计算或者实现一个按钮的防二次点击操作。\n\n这些需求都可以通过函数防抖动来实现。尤其是第一个需求,如果在频繁的事件回调中做复杂计算,很有可能导致页面卡顿,不如将多次计算合并为一次计算,只在一个精确点做操作。\n\nPS:防抖和节流的作用都是防止函数多次调用。区别在于,假设一个用户一直触发这个函数,且每次触发函数的间隔小于wait,防抖的情况下只会调用一次,而节流的 情况会每隔一定时间(参数wait)调用函数。\n\n我们先来看一个袖珍版的防抖理解一下防抖的实现:\n\n```js\n// func是用户传入需要防抖的函数\n// wait是等待时间\nconst debounce = (func, wait = 50) => {\n // 缓存一个定时器id\n let timer = 0\n // 这里返回的函数是每次用户实际调用的防抖函数\n // 如果已经设定过定时器了就清空上一次的定时器\n // 开始一个新的定时器,延迟执行用户传入的方法\n return function(...args) {\n if (timer) clearTimeout(timer)\n timer = setTimeout(() => {\n func.apply(this, args)\n }, wait)\n }\n}\n// 不难看出如果用户调用该函数的间隔小于wait的情况下,上一次的时间还未到就被清除了,并不会执行函数\n```\n这是一个简单版的防抖,但是有缺陷,这个防抖只能在最后调用。一般的防抖会有immediate选项,表示是否立即调用。这两者的区别,举个栗子来说:\n- 例如在搜索引擎搜索问题的时候,我们当然是希望用户输入完最后一个字才调用查询接口,这个时候适用`延迟执行`的防抖函数,它总是在一连串(间隔小于wait的)函数触发之后调用。\n- 例如用户给interviewMap点star的时候,我们希望用户点第一下的时候就去调用接口,并且成功之后改变star按钮的样子,用户就可以立马得到反馈是否star成功了,这个情况适用`立即执行`的防抖函数,它总是在第一次调用,并且下一次调用必须与前一次调用的时间间隔大于wait才会触发。\n\n下面我们来实现一个带有立即执行选项的防抖函数\n\n\n```js\n// 这个是用来获取当前时间戳的\nfunction now() {\n return +new Date()\n}\n/**\n * 防抖函数,返回函数连续调用时,空闲时间必须大于或等于 wait,func 才会执行\n *\n * @param {function} func 回调函数\n * @param {number} wait 表示时间窗口的间隔\n * @param {boolean} immediate 设置为ture时,是否立即调用函数\n * @return {function} 返回客户调用函数\n */\nfunction debounce (func, wait = 50, immediate = true) {\n let timer, context, args\n \n // 延迟执行函数\n const later = () => setTimeout(() => {\n // 延迟函数执行完毕,清空缓存的定时器序号\n timer = null\n // 延迟执行的情况下,函数会在延迟函数中执行\n // 使用到之前缓存的参数和上下文\n if (!immediate) {\n func.apply(context, args)\n context = args = null\n }\n }, wait)\n\n // 这里返回的函数是每次实际调用的函数\n return function(...params) {\n // 如果没有创建延迟执行函数(later),就创建一个\n if (!timer) {\n timer = later()\n // 如果是立即执行,调用函数\n // 否则缓存参数和调用上下文\n if (immediate) {\n func.apply(this, params)\n } else {\n context = this\n args = params\n }\n // 如果已有延迟执行函数(later),调用的时候清除原来的并重新设定一个\n // 这样做延迟函数会重新计时\n } else {\n clearTimeout(timer)\n timer = later()\n }\n }\n}\n```\n\n整体函数实现的不难,总结一下。\n\n- 对于按钮防点击来说的实现:如果函数是立即执行的,就立即调用,如果函数是延迟执行的,就缓存上下文和参数,放到延迟函数中去执行。一旦我开始一个定时器,只要我定时器还在,你每次点击我都重新计时。一旦你点累了,定时器时间到,定时器重置为 `null`,就可以再次点击了。\n- 对于延时执行函数来说的实现:清除定时器ID,如果是延迟调用就调用函数\n\n# 节流\n\n防抖动和节流本质是不一样的。防抖动是将多次执行变为最后一次执行,节流是将多次执行变成每隔一段时间执行。\n\n```js\n/**\n * underscore 节流函数,返回函数连续调用时,func 执行频率限定为 次 / wait\n *\n * @param {function} func 回调函数\n * @param {number} wait 表示时间窗口的间隔\n * @param {object} options 如果想忽略开始函数的的调用,传入{leading: false}。\n * 如果想忽略结尾函数的调用,传入{trailing: false}\n * 两者不能共存,否则函数不能执行\n * @return {function} 返回客户调用函数 \n */\n_.throttle = function(func, wait, options) {\n var context, args, result;\n var timeout = null;\n // 之前的时间戳\n var previous = 0;\n // 如果 options 没传则设为空对象\n if (!options) options = {};\n // 定时器回调函数\n var later = function() {\n // 如果设置了 leading,就将 previous 设为 0\n // 用于下面函数的第一个 if 判断\n previous = options.leading === false ? 0 : _.now();\n // 置空一是为了防止内存泄漏,二是为了下面的定时器判断\n timeout = null;\n result = func.apply(context, args);\n if (!timeout) context = args = null;\n };\n return function() {\n // 获得当前时间戳\n var now = _.now();\n // 首次进入前者肯定为 true\n\t // 如果需要第一次不执行函数\n\t // 就将上次时间戳设为当前的\n // 这样在接下来计算 remaining 的值时会大于0\n if (!previous && options.leading === false) previous = now;\n // 计算剩余时间\n var remaining = wait - (now - previous);\n context = this;\n args = arguments;\n // 如果当前调用已经大于上次调用时间 + wait\n // 或者用户手动调了时间\n \t // 如果设置了 trailing,只会进入这个条件\n\t // 如果没有设置 leading,那么第一次会进入这个条件\n\t // 还有一点,你可能会觉得开启了定时器那么应该不会进入这个 if 条件了\n\t // 其实还是会进入的,因为定时器的延时\n\t // 并不是准确的时间,很可能你设置了2秒\n\t // 但是他需要2.2秒才触发,这时候就会进入这个条件\n if (remaining <= 0 || remaining > wait) {\n // 如果存在定时器就清理掉否则会调用二次回调\n if (timeout) {\n clearTimeout(timeout);\n timeout = null;\n }\n previous = now;\n result = func.apply(context, args);\n if (!timeout) context = args = null;\n } else if (!timeout && options.trailing !== false) {\n // 判断是否设置了定时器和 trailing\n\t // 没有的话就开启一个定时器\n // 并且不能不能同时设置 leading 和 trailing\n timeout = setTimeout(later, remaining);\n }\n return result;\n };\n };\n```\n\n# 继承\n\n在 ES5 中,我们可以使用如下方式解决继承的问题\n\n```js\nfunction Super() {}\nSuper.prototype.getNumber = function() {\n return 1\n}\n\nfunction Sub() {}\nlet s = new Sub()\nSub.prototype = Object.create(Super.prototype, {\n constructor: {\n value: Sub,\n enumerable: false,\n writable: true,\n configurable: true\n }\n})\n```\n\n以上继承实现思路就是将子类的原型设置为父类的原型\n\n在 ES6 中,我们可以通过 `class` 语法轻松解决这个问题\n\n```js\nclass MyDate extends Date {\n test() {\n return this.getTime()\n }\n}\nlet myDate = new MyDate()\nmyDate.test()\n```\n\n但是 ES6 不是所有浏览器都兼容,所以我们需要使用 Babel 来编译这段代码。\n\n如果你使用编译过得代码调用 `myDate.test()` 你会惊奇地发现出现了报错\n\n\n\n因为在 JS 底层有限制,如果不是由 `Date` 构造出来的实例的话,是不能调用 `Date` 里的函数的。所以这也侧面的说明了:**ES6 中的 `class` 继承与 ES5 中的一般继承写法是不同的**。\n\n既然底层限制了实例必须由 `Date` 构造出来,那么我们可以改变下思路实现继承\n\n```js\nfunction MyData() {\n\n}\nMyData.prototype.test = function () {\n return this.getTime()\n}\nlet d = new Date()\nObject.setPrototypeOf(d, MyData.prototype)\nObject.setPrototypeOf(MyData.prototype, Date.prototype)\n```\n\n以上继承实现思路:**先创建父类实例** => 改变实例原先的 `_proto__` 转而连接到子类的 `prototype` => 子类的 `prototype` 的 `__proto__` 改为父类的 `prototype`。\n\n通过以上方法实现的继承就可以完美解决 JS 底层的这个限制。\n\n# call, apply, bind 区别\n\n首先说下前两者的区别。\n\n`call` 和 `apply` 都是为了解决改变 `this` 的指向。作用都是相同的,只是传参的方式不同。\n\n除了第一个参数外,`call` 可以接收一个参数列表,`apply` 只接受一个参数数组。\n\n```js\nlet a = {\n value: 1\n}\nfunction getValue(name, age) {\n console.log(name)\n console.log(age)\n console.log(this.value)\n}\ngetValue.call(a, 'yck', '24')\ngetValue.apply(a, ['yck', '24'])\n```\n\n## 模拟实现 call 和 apply\n\n可以从以下几点来考虑如何实现\n\n- 不传入第一个参数,那么默认为 `window`\n- 改变了 this 指向,让新的对象可以执行该函数。那么思路是否可以变成给新的对象添加一个函数,然后在执行完以后删除?\n\n```js\nFunction.prototype.myCall = function (context) {\n var context = context || window\n // 给 context 添加一个属性\n // getValue.call(a, 'yck', '24') => a.fn = getValue\n context.fn = this\n // 将 context 后面的参数取出来\n var args = [...arguments].slice(1)\n // getValue.call(a, 'yck', '24') => a.fn('yck', '24')\n var result = context.fn(...args)\n // 删除 fn\n delete context.fn\n return result\n}\n```\n\n 以上就是 `call` 的思路,`apply` 的实现也类似\n\n```js\nFunction.prototype.myApply = function (context) {\n var context = context || window\n context.fn = this\n\n var result\n // 需要判断是否存储第二个参数\n // 如果存在,就将第二个参数展开\n if (arguments[1]) {\n result = context.fn(...arguments[1])\n } else {\n result = context.fn()\n }\n\n delete context.fn\n return result\n}\n```\n\n`bind` 和其他两个方法作用也是一致的,只是该方法会返回一个函数。并且我们可以通过 `bind` 实现柯里化。\n\n同样的,也来模拟实现下 `bind`\n\n```js\nFunction.prototype.myBind = function (context) {\n if (typeof this !== 'function') {\n throw new TypeError('Error')\n }\n var _this = this\n var args = [...arguments].slice(1)\n // 返回一个函数\n return function F() {\n // 因为返回了一个函数,我们可以 new F(),所以需要判断\n if (this instanceof F) {\n return new _this(...args, ...arguments)\n }\n return _this.apply(context, args.concat(...arguments))\n }\n}\n```\n\n# Promise 实现\n\nPromise 是 ES6 新增的语法,解决了回调地狱的问题。\n\n可以把 Promise 看成一个状态机。初始是 `pending` 状态,可以通过函数 `resolve` 和 `reject` ,将状态转变为 `resolved` 或者 `rejected` 状态,状态一旦改变就不能再次变化。\n\n`then` 函数会返回一个 Promise 实例,并且该返回值是一个新的实例而不是之前的实例。因为 Promise 规范规定除了 `pending` 状态,其他状态是不可以改变的,如果返回的是一个相同实例的话,多个 `then` 调用就失去意义了。\n\n对于 `then` 来说,本质上可以把它看成是 `flatMap`\n\n```js\n// 三种状态\nconst PENDING = \"pending\";\nconst RESOLVED = \"resolved\";\nconst REJECTED = \"rejected\";\n// promise 接收一个函数参数,该函数会立即执行\nfunction MyPromise(fn) {\n let _this = this;\n _this.currentState = PENDING;\n _this.value = undefined;\n // 用于保存 then 中的回调,只有当 promise\n // 状态为 pending 时才会缓存,并且每个实例至多缓存一个\n _this.resolvedCallbacks = [];\n _this.rejectedCallbacks = [];\n\n _this.resolve = function (value) {\n if (value instanceof MyPromise) {\n // 如果 value 是个 Promise,递归执行\n return value.then(_this.resolve, _this.reject)\n }\n setTimeout(() => { // 异步执行,保证执行顺序\n if (_this.currentState === PENDING) {\n _this.currentState = RESOLVED;\n _this.value = value;\n _this.resolvedCallbacks.forEach(cb => cb());\n }\n })\n };\n\n _this.reject = function (reason) {\n setTimeout(() => { // 异步执行,保证执行顺序\n if (_this.currentState === PENDING) {\n _this.currentState = REJECTED;\n _this.value = reason;\n _this.rejectedCallbacks.forEach(cb => cb());\n }\n })\n }\n // 用于解决以下问题\n // new Promise(() => throw Error('error))\n try {\n fn(_this.resolve, _this.reject);\n } catch (e) {\n _this.reject(e);\n }\n}\n\nMyPromise.prototype.then = function (onResolved, onRejected) {\n var self = this;\n // 规范 2.2.7,then 必须返回一个新的 promise\n var promise2;\n // 规范 2.2.onResolved 和 onRejected 都为可选参数\n // 如果类型不是函数需要忽略,同时也实现了透传\n // Promise.resolve(4).then().then((value) => console.log(value))\n onResolved = typeof onResolved === 'function' ? onResolved : v => v;\n onRejected = typeof onRejected === 'function' ? onRejected : r => throw r;\n\n if (self.currentState === RESOLVED) {\n return (promise2 = new MyPromise(function (resolve, reject) {\n // 规范 2.2.4,保证 onFulfilled,onRjected 异步执行\n // 所以用了 setTimeout 包裹下\n setTimeout(function () {\n try {\n var x = onResolved(self.value);\n resolutionProcedure(promise2, x, resolve, reject);\n } catch (reason) {\n reject(reason);\n }\n });\n }));\n }\n\n if (self.currentState === REJECTED) {\n return (promise2 = new MyPromise(function (resolve, reject) {\n setTimeout(function () {\n // 异步执行onRejected\n try {\n var x = onRejected(self.value);\n resolutionProcedure(promise2, x, resolve, reject);\n } catch (reason) {\n reject(reason);\n }\n });\n }));\n }\n\n if (self.currentState === PENDING) {\n return (promise2 = new MyPromise(function (resolve, reject) {\n self.resolvedCallbacks.push(function () {\n // 考虑到可能会有报错,所以使用 try/catch 包裹\n try {\n var x = onResolved(self.value);\n resolutionProcedure(promise2, x, resolve, reject);\n } catch (r) {\n reject(r);\n }\n });\n\n self.rejectedCallbacks.push(function () {\n try {\n var x = onRejected(self.value);\n resolutionProcedure(promise2, x, resolve, reject);\n } catch (r) {\n reject(r);\n }\n });\n }));\n }\n};\n// 规范 2.3\nfunction resolutionProcedure(promise2, x, resolve, reject) {\n // 规范 2.3.1,x 不能和 promise2 相同,避免循环引用\n if (promise2 === x) {\n return reject(new TypeError(\"Error\"));\n }\n // 规范 2.3.2\n // 如果 x 为 Promise,状态为 pending 需要继续等待否则执行\n if (x instanceof MyPromise) {\n if (x.currentState === PENDING) {\n x.then(function (value) {\n // 再次调用该函数是为了确认 x resolve 的\n // 参数是什么类型,如果是基本类型就再次 resolve\n // 把值传给下个 then\n resolutionProcedure(promise2, value, resolve, reject);\n }, reject);\n } else {\n x.then(resolve, reject);\n }\n return;\n }\n // 规范 2.3.3.3.3\n // reject 或者 resolve 其中一个执行过得话,忽略其他的\n let called = false;\n // 规范 2.3.3,判断 x 是否为对象或者函数\n if (x !== null && (typeof x === \"object\" || typeof x === \"function\")) {\n // 规范 2.3.3.2,如果不能取出 then,就 reject\n try {\n // 规范 2.3.3.1\n let then = x.then;\n // 如果 then 是函数,调用 x.then\n if (typeof then === \"function\") {\n // 规范 2.3.3.3\n then.call(\n x,\n y => {\n if (called) return;\n called = true;\n // 规范 2.3.3.3.1\n resolutionProcedure(promise2, y, resolve, reject);\n },\n e => {\n if (called) return;\n called = true;\n reject(e);\n }\n );\n } else {\n // 规范 2.3.3.4\n resolve(x);\n }\n } catch (e) {\n if (called) return;\n called = true;\n reject(e);\n }\n } else {\n // 规范 2.3.4,x 为基本类型\n resolve(x);\n }\n}\n```\n以上就是根据 Promise / A+ 规范来实现的代码,可以通过 `promises-aplus-tests` 的完整测试\n\n\n\n# Generator 实现\n\nGenerator 是 ES6 中新增的语法,和 Promise 一样,都可以用来异步编程\n\n```js\n// 使用 * 表示这是一个 Generator 函数\n// 内部可以通过 yield 暂停代码\n// 通过调用 next 恢复执行\nfunction* test() {\n let a = 1 + 2;\n yield 2;\n yield 3;\n}\nlet b = test();\nconsole.log(b.next()); // > { value: 2, done: false }\nconsole.log(b.next()); // > { value: 3, done: false }\nconsole.log(b.next()); // > { value: undefined, done: true }\n```\n\n从以上代码可以发现,加上 `*` 的函数执行后拥有了 `next` 函数,也就是说函数执行后返回了一个对象。每次调用 `next` 函数可以继续执行被暂停的代码。以下是 Generator 函数的简单实现\n\n```js\n// cb 也就是编译过的 test 函数\nfunction generator(cb) {\n return (function() {\n var object = {\n next: 0,\n stop: function() {}\n };\n\n return {\n next: function() {\n var ret = cb(object);\n if (ret === undefined) return { value: undefined, done: true };\n return {\n value: ret,\n done: false\n };\n }\n };\n })();\n}\n// 如果你使用 babel 编译后可以发现 test 函数变成了这样\nfunction test() {\n var a;\n return generator(function(_context) {\n while (1) {\n switch ((_context.prev = _context.next)) {\n // 可以发现通过 yield 将代码分割成几块\n // 每次执行 next 函数就执行一块代码\n // 并且表明下次需要执行哪块代码\n case 0:\n a = 1 + 2;\n _context.next = 4;\n return 2;\n case 4:\n _context.next = 6;\n return 3;\n\t\t// 执行完毕\n case 6:\n case \"end\":\n return _context.stop();\n }\n }\n });\n}\n```\n\n# Map、FlatMap 和 Reduce\n\n`Map` 作用是生成一个新数组,遍历原数组,将每个元素拿出来做一些变换然后 `append` 到新的数组中。\n\n```js\n[1, 2, 3].map((v) => v + 1)\n// -> [2, 3, 4]\n```\n\n`Map` 有三个参数,分别是当前索引元素,索引,原数组\n\n```js\n['1','2','3'].map(parseInt)\n// parseInt('1', 0) -> 1\n// parseInt('2', 1) -> NaN\n// parseInt('3', 2) -> NaN\n```\n\n`FlatMap` 和 `map` 的作用几乎是相同的,但是对于多维数组来说,会将原数组降维。可以将 `FlatMap` 看成是 `map` + `flatten` ,目前该函数在浏览器中还不支持。\n\n```js\n[1, [2], 3].flatMap((v) => v + 1)\n// -> [2, 3, 4]\n```\n\n如果想将一个多维数组彻底的降维,可以这样实现\n\n```js\nconst flattenDeep = (arr) => Array.isArray(arr)\n ? arr.reduce( (a, b) => [...a, ...flattenDeep(b)] , [])\n : [arr]\n\nflattenDeep([1, [[2], [3, [4]], 5]])\n```\n\n`Reduce` 作用是数组中的值组合起来,最终得到一个值\n\n```js\nfunction a() {\n console.log(1);\n}\n\nfunction b() {\n console.log(2);\n}\n\n[a, b].reduce((a, b) => a(b()))\n// -> 2 1\n```\n\n# async 和 await\n\n一个函数如果加上 `async` ,那么该函数就会返回一个 `Promise`\n\n```js\nasync function test() {\n return \"1\";\n}\nconsole.log(test()); // -> Promise {: \"1\"}\n```\n\n可以把 `async` 看成将函数返回值使用 `Promise.resolve()` 包裹了下。\n\n`await` 只能在 `async` 函数中使用\n\n```js\nfunction sleep() {\n return new Promise(resolve => {\n setTimeout(() => {\n console.log('finish')\n resolve(\"sleep\");\n }, 2000);\n });\n}\nasync function test() {\n let value = await sleep();\n console.log(\"object\");\n}\ntest()\n```\n\n上面代码会先打印 `finish` 然后再打印 `object` 。因为 `await` 会等待 `sleep` 函数 `resolve` ,所以即使后面是同步代码,也不会先去执行同步代码再来执行异步代码。\n\n`async 和 await` 相比直接使用 `Promise` 来说,优势在于处理 `then` 的调用链,能够更清晰准确的写出代码。缺点在于滥用 `await` 可能会导致性能问题,因为 `await` 会阻塞代码,也许之后的异步代码并不依赖于前者,但仍然需要等待前者完成,导致代码失去了并发性。\n\n下面来看一个使用 `await` 的代码。\n\n```js\nvar a = 0\nvar b = async () => {\n a = a + await 10\n console.log('2', a) // -> '2' 10\n a = (await 10) + a\n console.log('3', a) // -> '3' 20\n}\nb()\na++\nconsole.log('1', a) // -> '1' 1\n```\n\n对于以上代码你可能会有疑惑,这里说明下原理\n\n- 首先函数 `b` 先执行,在执行到 `await 10` 之前变量 `a` 还是 0,因为在 `await` 内部实现了 `generators` ,`generators` 会保留堆栈中东西,所以这时候 `a = 0` 被保存了下来\n- 因为 `await` 是异步操作,遇到`await`就会立即返回一个`pending`状态的`Promise`对象,暂时返回执行代码的控制权,使得函数外的代码得以继续执行,所以会先执行 `console.log('1', a)`\n- 这时候同步代码执行完毕,开始执行异步代码,将保存下来的值拿出来使用,这时候 `a = 10`\n- 然后后面就是常规执行代码了\n\n# Proxy\n\nProxy 是 ES6 中新增的功能,可以用来自定义对象中的操作\n\n```js\nlet p = new Proxy(target, handler);\n// `target` 代表需要添加代理的对象\n// `handler` 用来自定义对象中的操作\n```\n\n可以很方便的使用 Proxy 来实现一个数据绑定和监听\n\n```js\nlet onWatch = (obj, setBind, getLogger) => {\n let handler = {\n get(target, property, receiver) {\n getLogger(target, property)\n return Reflect.get(target, property, receiver);\n },\n set(target, property, value, receiver) {\n setBind(value);\n return Reflect.set(target, property, value);\n }\n };\n return new Proxy(obj, handler);\n};\n\nlet obj = { a: 1 }\nlet value\nlet p = onWatch(obj, (v) => {\n value = v\n}, (target, property) => {\n console.log(`Get '${property}' = ${target[property]}`);\n})\np.a = 2 // bind `value` to `2`\np.a // -> Get 'a' = 2\n```\n\n# 为什么 0.1 + 0.2 != 0.3\n\n因为 JS 采用 IEEE 754 双精度版本(64位),并且只要采用 IEEE 754 的语言都有该问题。\n\n我们都知道计算机表示十进制是采用二进制表示的,所以 `0.1` 在二进制表示为\n\n```js\n// (0011) 表示循环\n0.1 = 2^-4 * 1.10011(0011)\n```\n那么如何得到这个二进制的呢,我们可以来演算下\n\n\n\n小数算二进制和整数不同。乘法计算时,只计算小数位,整数位用作每一位的二进制,并且得到的第一位为最高位。所以我们得出 `0.1 = 2^-4 * 1.10011(0011)`,那么 `0.2` 的演算也基本如上所示,只需要去掉第一步乘法,所以得出 `0.2 = 2^-3 * 1.10011(0011)`。\n\n回来继续说 IEEE 754 双精度。六十四位中符号位占一位,整数位占十一位,其余五十二位都为小数位。因为 `0.1` 和 `0.2` 都是无限循环的二进制了,所以在小数位末尾处需要判断是否进位(就和十进制的四舍五入一样)。\n\n所以 `2^-4 * 1.10011...001` 进位后就变成了 `2^-4 * 1.10011(0011 * 12次)010` 。那么把这两个二进制加起来会得出 `2^-2 * 1.0011(0011 * 11次)0100` , 这个值算成十进制就是 `0.30000000000000004`\n\n下面说一下原生解决办法,如下代码所示\n\n```js\nparseFloat((0.1 + 0.2).toFixed(10))\n```\n# 正则表达式\n\n## 元字符\n\n| 元字符 | 作用 |\n| :----: | :----------------------------------------------------------: |\n| . | 匹配任意字符除了换行符和回车符 |\n| [] | 匹配方括号内的任意字符。比如 [0-9] 就可以用来匹配任意数字 |\n| ^ | ^9,这样使用代表匹配以 9 开头。[`^`9],这样使用代表不匹配方括号内除了 9 的字符 |\n| {1, 2} | 匹配 1 到 2 位字符 |\n| (yck) | 只匹配和 yck 相同字符串 |\n| \\| | 匹配 \\| 前后任意字符 |\n| \\ | 转义 |\n| * | 只匹配出现 0 次及以上 * 前的字符 |\n| + | 只匹配出现 1 次及以上 + 前的字符 |\n| ? | ? 之前字符可选 |\n\n## 修饰语\n\n| 修饰语 | 作用 |\n| :----: | :--------: |\n| i | 忽略大小写 |\n| g | 全局搜索 |\n| m | 多行 |\n\n## 字符简写\n\n| 简写 | 作用 |\n| :--: | :------------------: |\n| \\w | 匹配字母数字或下划线 |\n| \\W | 和上面相反 |\n| \\s | 匹配任意的空白符 |\n| \\S | 和上面相反 |\n| \\d | 匹配数字 |\n| \\D | 和上面相反 |\n| \\b | 匹配单词的开始或结束 |\n| \\B | 和上面相反 |\n\n# V8 下的垃圾回收机制\n\nV8 实现了准确式 GC,GC 算法采用了分代式垃圾回收机制。因此,V8 将内存(堆)分为新生代和老生代两部分。\n\n## 新生代算法\n\n新生代中的对象一般存活时间较短,使用 Scavenge GC 算法。\n\n在新生代空间中,内存空间分为两部分,分别为 From 空间和 To 空间。在这两个空间中,必定有一个空间是使用的,另一个空间是空闲的。新分配的对象会被放入 From 空间中,当 From 空间被占满时,新生代 GC 就会启动了。算法会检查 From 空间中存活的对象并复制到 To 空间中,如果有失活的对象就会销毁。当复制完成后将 From 空间和 To 空间互换,这样 GC 就结束了。\n\n## 老生代算法\n\n老生代中的对象一般存活时间较长且数量也多,使用了两个算法,分别是标记清除算法和标记压缩算法。\n\n在讲算法前,先来说下什么情况下对象会出现在老生代空间中:\n\n- 新生代中的对象是否已经经历过一次 Scavenge 算法,如果经历过的话,会将对象从新生代空间移到老生代空间中。\n- To 空间的对象占比大小超过 25 %。在这种情况下,为了不影响到内存分配,会将对象从新生代空间移到老生代空间中。\n\n老生代中的空间很复杂,有如下几个空间\n\n```c++\nenum AllocationSpace {\n // TODO(v8:7464): Actually map this space's memory as read-only.\n RO_SPACE, // 不变的对象空间\n NEW_SPACE, // 新生代用于 GC 复制算法的空间\n OLD_SPACE, // 老生代常驻对象空间\n CODE_SPACE, // 老生代代码对象空间\n MAP_SPACE, // 老生代 map 对象\n LO_SPACE, // 老生代大空间对象\n NEW_LO_SPACE, // 新生代大空间对象\n\n FIRST_SPACE = RO_SPACE,\n LAST_SPACE = NEW_LO_SPACE,\n FIRST_GROWABLE_PAGED_SPACE = OLD_SPACE,\n LAST_GROWABLE_PAGED_SPACE = MAP_SPACE\n};\n```\n\n在老生代中,以下情况会先启动标记清除算法:\n\n- 某一个空间没有分块的时候\n- 空间中被对象超过一定限制\n- 空间不能保证新生代中的对象移动到老生代中\n\n在这个阶段中,会遍历堆中所有的对象,然后标记活的对象,在标记完成后,销毁所有没有被标记的对象。在标记大型对内存时,可能需要几百毫秒才能完成一次标记。这就会导致一些性能上的问题。为了解决这个问题,2011 年,V8 从 stop-the-world 标记切换到增量标志。在增量标记期间,GC 将标记工作分解为更小的模块,可以让 JS 应用逻辑在模块间隙执行一会,从而不至于让应用出现停顿情况。但在 2018 年,GC 技术又有了一个重大突破,这项技术名为并发标记。该技术可以让 GC 扫描和标记对象时,同时允许 JS 运行,你可以点击 [该博客](https://v8project.blogspot.com/2018/06/concurrent-marking.html) 详细阅读。\n\n清除对象后会造成堆内存出现碎片的情况,当碎片超过一定限制后会启动压缩算法。在压缩过程中,将活的对象像一端移动,直到所有对象都移动完成然后清理掉不需要的内存。\n"
},
{
"path": "JS/JS-en.md",
"content": "\n\n**Table of Contents** *generated with [DocToc](https://github.com/thlorenz/doctoc)*\n\n- [Built-in Types](#built-in-types)\n- [Type Conversion](#type-conversion)\n - [Converting to Boolean](#converting-to-boolean)\n - [Objects to Primitive Types](#objects-to-primitive-types)\n - [Arithmetic Operators](#arithmetic-operators)\n - [`==` operator](#-operator)\n - [Comparison Operator](#comparison-operator)\n- [Typeof](#typeof)\n- [New](#new)\n- [This](#this)\n- [Instanceof](#instanceof)\n- [Scope](#scope)\n- [Closure](#closure)\n- [Prototypes](#prototypes)\n- [Inheritance](#inheritance)\n- [Deep and Shallow Copy](#deep-and-shallow-copy)\n - [Shallow copy](#shallow-copy)\n - [Deep copy](#deep-copy)\n- [Modularization](#modularization)\n - [CommonJS](#commonjs)\n - [AMD](#amd)\n- [The differences between call, apply, bind](#the-differences-between-call-apply-bind)\n - [simulation to implement `call` and `apply`](#simulation-to-implement--call-and--apply)\n- [Promise implementation](#promise-implementation)\n- [Generator Implementation](#generator-implementation)\n- [Debouncing](#debouncing)\n- [Throttle](#throttle)\n- [Map、FlatMap and Reduce](#mapflatmap-and-reduce)\n- [Async and await](#async-and-await)\n- [Proxy](#proxy)\n- [Why 0.1 + 0.2 != 0.3](#why-01--02--03)\n- [Regular Expressions](#regular-expressions)\n - [Metacharacters](#metacharacters)\n - [Flags](#flags)\n - [Character Shorthands](#character-shorthands)\n\n\n\n# Built-in Types\nJavaScript defines seven built-in types, which can be broken down into two categories: `Primitive Type` and `Object`.\n\nThere are six primitive types: `null`, `undefined`, `boolean`, `number`, `string` and `symbol `.\n\nIn JavaScript, there are no true integers, all numbers are implemented in double-precision 64-bit binary format IEEE 754. When we use binary floating-point numbers, it will have some side effects. Here is an example of these side effects.\n\n```js\n0.1 + 0.2 == 0.3 // false\n```\n\nFor the primitive data types, when we use literals to initialize a variable, the variable only has the literals as its value, it doesn’t have a type. It will be converted to the corresponding type only when necessary.\n\n```js\nlet a = 111 // only literals, not a number\na.toString() // converted to object when necessary\n```\n\nObject is a reference type. We will encouter problems about shallow copy and deep copy when using it.\n\n```js\nlet a = { name: 'FE' }\nlet b = a\nb.name = 'EF'\nconsole.log(a.name) // EF\n```\n\n# Type Conversion\n\n## Converting to Boolean\n\nWhen the condition is judged, other than `undefined`, `null`, `false`, `NaN`, `''`, `0`, `-0`, all of the values, including objects, are converted to `true`.\n\n## Objects to Primitive Types\n\nWhen objects are converted, `valueOf` and `toString` will be called, respectively in order. These two methods can also be overridden.\n\n```js\nlet a = {\n valueOf() {\n return 0\n }\n}\n```\n\n## Arithmetic Operators\n\nOnly for additions, if one of the parameters is a string, the other one will be converted to string as well. For all other operations, as long as one of the parameters is a number, the other one will be converted to a number.\n\nAdditions will invoke three types of type conversions: to primitive types, to numbers and to string:\n\n```js\n1 + '1' // '11'\n2 * '2' // 4\n[1, 2] + [2, 1] // '1,22,1'\n// [1, 2].toString() -> '1,2'\n// [2, 1].toString() -> '2,1'\n// '1,2' + '2,1' = '1,22,1'\n```\n\nNote the expression `'a' + + 'b'` for addition:\n\n```js\n'a' + + 'b' // -> \"aNaN\"\n// since + 'b' -> NaN\n// You might have seen + '1' -> 1\n```\n\n## `==` operator\n\n\n\n`toPrimitive` in above figure is converting objects to primitive types.\n\n`===` is usually recommended to compare values. However, if you would like to check for `null` value, you can use `xx == null`.\n\nLet's take a look at an example `[] == ![] // -> true`. The following process explains why the expression evaluates to `true`:\n\n```js\n// [] converting to true, then take the opposite to false\n[] == false\n// with #8\n[] == ToNumber(false)\n[] == 0\n// with #10\nToPrimitive([]) == 0\n// [].toString() -> ''\n'' == 0\n// with #6\n0 == 0 // -> true\n```\n\n## Comparison Operator\n\n1. If it's an object, `toPrimitive` is used.\n2. If it's a string, `unicode` character index is used.\n\n# Typeof\n\n`typeof` can always display the correct type of primitive types, except `null`:\n```js\ntypeof 1 // 'number'\ntypeof '1' // 'string'\ntypeof undefined // 'undefined'\ntypeof true // 'boolean'\ntypeof Symbol() // 'symbol'\ntypeof b // b is not declared,but it still can be displayed as undefined\n```\n\nFor object, `typeof` will always display `object`, except **function**:\n```js\ntypeof [] // 'object'\ntypeof {} // 'object'\ntypeof console.log // 'function'\n```\n\nAs for `null`, it is always be treated as an `object` by `typeof`,although it is a primitive data type, and this is a bug that has been around for a long time.\n```js\ntypeof null // 'object'\n```\n\nWhy does this happen? Because the initial version of JS was based on 32-bit systems, which stored type information of variables in the lower bits for performance considerations. Those start with `000` are objects, and all the bits of `null` are zero, so it is erroneously treated as an object. Although the current code of checking internal types has changed, this bug has been passed down.\n\nWe can use `Object.prototype.toString.call(xx)` if we want to get the correct data type of a variable, and then we can get a string like `[object Type]`:\n\n```js\nlet a\n// We can also judge `undefined` like this\na === undefined\n// But the nonreserved word `undefined` can be re-assigned in a lower version browser\nlet undefined = 1\n// it will go wrong to judge like this\n// So we can use the following method, with less code\n// it will always return `undefined`, whatever follows `void `\na === void 0\n```\n\n# New\n\n1. Create a new object\n2. Chained to prototype\n3. Bind this\n4. Return a new object\n\nThe above four steps will happen in the process of calling `new`. We can also try to implement `new ` by ourselves:\n\n```js\nfunction create() {\n // Create an empty object\n let obj = new Object()\n // Get the constructor\n let Ctor = [].shift.call(arguments)\n // Chained to prototype\n obj.__proto__ = Ctor.prototype\n // Bind this, Execute the constructor\n let result = Con.apply(obj, arguments)\n // Make sure the new one is an object\n return typeof result === 'object'? result : obj\n}\n```\n\nInstances of object are all created with `new`, whether it's `function Foo()` , or `let a = { b: 1 }` .\n\nIt is recommended to create objects using the literal notation (whether it's for performance or readability), since a look-up is needed for `Object` through the scope chain when creating an object using `new Object()`, but you don't have this kind of problem when using literals.\n\n```js\nfunction Foo() {}\n// Function is a syntactic sugar\n// Internally equivalent to new Function()\nlet a = { b: 1 }\n// Inside this literal, `new Object()` is also used\n```\n\nFor `new`, we also need pay attention to the operator precedence:\n\n```js\nfunction Foo() {\n return this;\n}\nFoo.getName = function () {\n console.log('1');\n};\nFoo.prototype.getName = function () {\n console.log('2');\n};\n\nnew Foo.getName(); // -> 1\nnew Foo().getName(); // -> 2\n```\n\n\n\nAs you can see from the above image, `new Foo()` has a higher priority than `new Foo`, so we can divide the execution order of the above code like this:\n\n\n```js\nnew (Foo.getName());\n(new Foo()).getName();\n```\n\nFor the first function, `Foo.getName()` is executed first, so the result is 1;\nAs for the latter, it first executes `new Foo()` to create an instance, then finds the `getName` function on `Foo` via the prototype chain, so the result is 2.\n\n# This\n\n`This`, a concept that is confusing to many people, is actually not difficult to understand as long as you remember the following rules:\n\n```js\nfunction foo() {\n console.log(this.a);\n}\nvar a = 1;\nfoo();\n\nvar obj = {\n a: 2,\n foo: foo\n};\nobj.foo();\n\n// In the above two situations, `this` only depends on the object before calling the function,\n// and the second case has higher priority than the first case .\n\n// the following scenario has the highest priority,`this` will only be bound to c,\n// and there's no way to change what `this` is bound to .\n\nvar c = new foo();\nc.a = 3;\nconsole.log(c.a);\n\n// finally, using `call`, `apply`, `bind` to change what `this` is bound to,\n// is another scenario where its priority is only second to `new`\n```\n\nUnderstanding the above several situations, we won’t be confused by `this` under most circumstances. Next, let’s take a look at `this` in arrow functions:\n\n```js\nfunction a() {\n return () => {\n return () => {\n console.log(this);\n };\n };\n}\nconsole.log(a()()());\n```\nActually, the arrow function does not have `this`, `this` in the above function only depends on the first outer function that is not an arrow function. For this case, `this` is default to `window` because calling `a` matches the first condition in the above codes. Also, what `this` is bound to will not be changed by any codes once `this` is bound to the context.\n\n\n# Instanceof\n\nThe `instanceof` operator can correctly check the type of objects, because its internal mechanism is to find out if `prototype` of this type can be found in the prototype chain of the object.\n\nlet’s try to implement it:\n```js\nfunction instanceof(left, right) {\n // get the `prototype` of the type\n let prototype = right.prototype\n // get the `prototype` of the object\n left = left.__proto__\n // check if the type of the object is equal to the prototype of the type\n while (true) {\n \tif (left === null)\n \t\treturn false\n \tif (prototype === left)\n \t\treturn true\n \tleft = left.__proto__\n }\n}\n```\n\n# Scope\n\nExecuting JS code would generate execution context, as long as code is not written in a function, it belongs to the global execution context. Code in a function will generate function execution context. There’s also an `eval` execution context, which basically is not used anymore, so you can think of only two execution contexts.\n\nThe `[[Scope]]` attribute is generated in the first stage of generating execution context, which is a pointer, corresponds to the linked list of the scope, and JS will look up variables through this linked list up to the global context.\n\nLet's look at a common example , `var`:\n\n```js\nb() // call b\nconsole.log(a) // undefined\n\nvar a = 'Hello world'\n\nfunction b() {\n\tconsole.log('call b')\n}\n```\n\nIt’s known that function and variable hoisting is the real reason for the above outputs. The usual explanation for hoisting says that the declarations are ‘moved’ to the top of the code, and there is nothing wrong with that and it’s easy for everyone to understand. But a more accurate explanation should be something like this:\n\nThere would be two stages when the execution context is generated. The first stage is the stage of creation(to be specific, the step of generating variable objects), in which the JS interpreter would find out variables and functions that need to be hoisted, and allocate memory for them in advance, then functions would be stored into memory entirely, but variables would only be declared and assigned to `undefined`, therefore, we can use them in advance in the second stage (the code execution stage).\n\nIn the process of hoisting, the same function would overwrite the last function, and functions have higher priority than variables hoisting.\n\n```js\nb() // call b second\n\nfunction b() {\n\tconsole.log('call b fist')\n}\nfunction b() {\n\tconsole.log('call b second')\n}\nvar b = 'Hello world'\n```\n\nUsing `var` is more likely error-prone, thus ES6 introduces a new keyword `let`. `let` has an important feature that it can’t be used before declared, which conflicts the common saying that `let` doesn’t have the ability of hoisting. In fact, `let` hoists declaration, but is not assigned, because the **temporal dead zone**.\n\n# Closure\n\nThe definition of closure is simple: function A returns a function B, and function B can access variables of function A, thus function B is called a closure.\n\n```js\nfunction A() {\n let a = 1\n function B() {\n console.log(a)\n }\n return B\n}\n```\n\nAre you wondering why function B can also refer to variables in function A while function A has been popped up from the call stack? Because variables in function A are stored on the heap at this time. The current JS engine can identify which variables need to be stored on the heap and which need to be stored on the stack by escape analysis.\n\nA classic interview question is using closures in loops to solve the problem of using `var` to define functions:\n\n```js\nfor ( var i=1; i<=5; i++) {\n setTimeout( function timer() {\n console.log( i );\n }, i*1000 );\n)\n```\n\nFirst of all, all loops will be executed completely because `setTimeout` is an asynchronous function, and at that time `i` is 6, so it will print a bunch of 6.\n\nThere are three solutions,closure is the first one:\n\n```js\nfor (var i = 1; i <= 5; i++) {\n (function(j) {\n setTimeout(function timer() {\n console.log(j);\n }, j * 1000);\n })(i);\n}\n```\n\nThe second one is to make use of the third parameter of `setTimeout`:\n\n```js\nfor ( var i=1; i<=5; i++) {\n setTimeout( function timer(j) {\n console.log( j );\n }, i*1000, i);\n}\n```\n\nThe third is to define `i` using `let`:\n\n```js\nfor ( let i=1; i<=5; i++) {\n setTimeout( function timer() {\n console.log( i );\n }, i*1000 );\n}\n```\n\nFor `let`, it will create a block-level scope, which is equivalent to:\n\n```js\n{\n // Form block-level scope\n let i = 0\n {\n let ii = i\n setTimeout( function timer() {\n console.log( i );\n }, i*1000 );\n }\n i++\n {\n let ii = i\n }\n i++\n {\n let ii = i\n }\n ...\n}\n```\n\n# Prototypes\n\n\n\nEach function, besides `Function.prototype.bind()`, has an internal property, denoted as `prototype`, which is a reference to the prototype.\n\nEach object has an internal property, denoted as `__proto__`, which is a reference to the prototype of the constructor that creates the object. This property actually refers to `[[prototype]]`, but `[[prototype]]` is an internal property that we can’t access, so we use `__proto__` to access it.\n\nObjects can use `__proto__` to look up properties that do not belong to the object, and `__proto__` connects objects together to form a prototype chain.\n\n\n# Inheritance\n\nIn ES5, we can solve the problems of inheritance by using the following ways:\n\n```js\nfunction Super() {}\nSuper.prototype.getNumber = function() {\n return 1\n}\n\nfunction Sub() {}\nlet s = new Sub()\nSub.prototype = Object.create(Super.prototype, {\n constructor: {\n value: Sub,\n enumerable: false,\n writable: true,\n configurable: true\n }\n})\n```\n\nThe above idea of inheritance implementation is to set the `prototype` of the child class as the `prototype` of the parent class.\n\nIn ES6, we can easily solve this problem with the `class` syntax:\n\n```js\nclass MyDate extends Date {\n test() {\n return this.getTime()\n }\n}\nlet myDate = new MyDate()\nmyDate.test()\n```\n\nHowever, ES6 is not compatible with all browsers, so we need to use Babel to compile this code.\n\nIf call `myDate.test()` with compiled code, you’ll be surprised to see that there’s an error:\n\n\n\nBecause there are restrictions on the low-level of JS, if the instance isn’t constructed by `Date`, it can’t call functions in `Date`, which also explains from another aspect that `Class` inheritance in ES6 is different from the general inheritance in ES5 syntax.\n\nSince the low-level of JS limits that the instance must be constructed by `Date` , we can try another way to implement inheritance:\n\n```js\nfunction MyData() {\n\n}\nMyData.prototype.test = function () {\n return this.getTime()\n}\nlet d = new Date()\nObject.setPrototypeOf(d, MyData.prototype)\nObject.setPrototypeOf(MyData.prototype, Date.prototype)\n```\n\nThe implementation idea of the above inheritance: first create the instance of parent class => change the original `__proto__` of the instance, connect it to the `prototype` of child class => change the `__proto__` of child class’s `prototype` to the `prototype` of parent class.\n\nThe inheritance implement with the above method can perfectly solve the restriction on low-level of JS.\n\n\n# Deep and Shallow Copy\n\n```js\nlet a = {\n age: 1\n}\nlet b = a\na.age = 2\nconsole.log(b.age) // 2\n```\n\nFrom the above example, we can see that if you assign an object to a variable, then the values of both will be the same reference, one changes, the other changes accordingly.\n\nUsually, we don't want such problem to appear during development, thus we can use shallow copy to solve this problem.\n\n## Shallow copy\n\nFirstly we can solve the problem by `Object.assign`:\n```js\nlet a = {\n age: 1\n}\nlet b = Object.assign({}, a)\na.age = 2\nconsole.log(b.age) // 1\n```\n\nCertainly, we can use the spread operator (...) to solve the problem:\n```js\nlet a = {\n age: 1\n}\nlet b = {...a}\na.age = 2\nconsole.log(b.age) // 1\n```\n\nUsually, shallow copy can solve most problems, but we need deep copy when encountering the following situation:\n```js\nlet a = {\n age: 1,\n jobs: {\n first: 'FE'\n }\n}\nlet b = {...a}\na.jobs.first = 'native'\nconsole.log(b.jobs.first) // native\n```\nThe shallow copy only solves the problem of the first layer. If the object contains objects, then it returns to the beginning topic that both values share the same reference. To solve this problem, we need to introduce deep copy.\n\n## Deep copy\n\nThe problem can usually be solved by `JSON.parse(JSON.stringify(object))`\n\n```js\nlet a = {\n age: 1,\n jobs: {\n first: 'FE'\n }\n}\nlet b = JSON.parse(JSON.stringify(a))\na.jobs.first = 'native'\nconsole.log(b.jobs.first) // FE\n```\n\nBut this method also has its limits:\n* ignore `undefined`\n* ignore `symbol`\n* unable to serialize function\n* unable to resolve circular references in an object\n```js\nlet obj = {\n a: 1,\n b: {\n c: 2,\n d: 3,\n },\n}\nobj.c = obj.b\nobj.e = obj.a\nobj.b.c = obj.c\nobj.b.d = obj.b\nobj.b.e = obj.b.c\nlet newObj = JSON.parse(JSON.stringify(obj))\nconsole.log(newObj)\n```\n\nIf an object is circularly referenced like the above example, you’ll find the method `JSON.parse(JSON.stringify(object))` can’t make a deep copy of this object:\n\n\n\nWhen dealing with function, `undefined` or `symbol`, the object can also not be serialized properly.\n```js\nlet a = {\n age: undefined,\n sex: Symbol('male'),\n jobs: function() {},\n name: 'yck'\n}\nlet b = JSON.parse(JSON.stringify(a))\nconsole.log(b) // {name: \"yck\"}\n```\n\nIn above case, you can see that the method ignores function and `undefined`.\n\nMost often complex data can be serialized, so this method can solve most problems, and as a built-in function, it has the fastest performance when dealing with deep copy. Certainly, you can use [the deep copy function of `lodash` ](https://lodash.com/docs#cloneDeep) when your data contains the above three cases.\n\nIf the object you want to copy contains a built-in type but doesn’t contain a function, you can use `MessageChannel`\n```js\nfunction structuralClone(obj) {\n return new Promise(resolve => {\n const {port1, port2} = new MessageChannel();\n port2.onmessage = ev => resolve(ev.data);\n port1.postMessage(obj);\n });\n}\n\nvar obj = {a: 1, b: {\n c: b\n}}\n// pay attention that this method is asynchronous\n// it can handle `undefined` and circular reference object\n(async () => {\n const clone = await structuralClone(obj)\n})()\n```\n\n# Modularization\n\nWith Babel, we can directly use ES6's modularization:\n\n```js\n// file a.js\nexport function a() {}\nexport function b() {}\n// file b.js\nexport default function() {}\n\nimport {a, b} from './a.js'\nimport XXX from './b.js'\n```\n\n## CommonJS\n\n`CommonJS` is Node's unique feature. `Browserify` is needed for `CommonJS` to be used in browsers.\n\n```js\n// a.js\nmodule.exports = {\n a: 1\n}\n// or\nexports.a = 1\n\n// b.js\nvar module = require('./a.js')\nmodule.a // -> log 1\n```\n\nIn the code above, `module.exports` and `exports` can cause confusions. Let us take a peek at the internal implementations:\n\n```js\nvar module = require('./a.js')\nmodule.a\n// this is actually a wrapper of a function to be executed immediately so that we don't mess up the global variables.\n// what's important here is that module is a Node only variable.\nmodule.exports = {\n a: 1\n}\n// basic implementation\nvar module = {\n exports: {} // exports is an empty object\n}\n// This is why exports and module.exports have similar usage.\nvar exports = module.exports\nvar load = function (module) {\n // to be exported\n var a = 1\n module.exports = a\n return module.exports\n};\n```\n\nLet's then talk about `module.exports` and `exports`, which have similar usage, but one cannot assign a value to `exports` directly. The assignment would be a no-op.\n\nThe differences between the modularizations in `CommonJS` and in ES6 are:\n\n- The former supports dynamic imports, which is `require(${path}/xx.js)`; the latter doesn't support it yet, but there have been proposals.\n- The former uses synchronous imports. Since it is used on the server end and files are local, it doesn't matter much even if the synchronous imports block the main thread. The latter uses asynchronous imports, because it is used in browsers in which file downloads are needed. Rendering process would be affected much if synchronous import was used.\n- The former copies the values when exporting. Even if the values exported change, the values imported will not change. Therefore, if values shall be updated, another import needs to happen. However, the latter uses realtime bindings, the values imported and exported point to the same memory addresses, so the imported values change along with the exported ones.\n- In execution the latter is compiled to `require/exports`.\n\n## AMD\n\nAMD is brought forward by `RequireJS`.\n\n```js\n// AMD\ndefine(['./a', './b'], function(a, b) {\n a.do()\n b.do()\n})\ndefine(function(require, exports, module) {\n var a = require('./a') \n a.doSomething() \n var b = require('./b')\n b.doSomething()\n})\n```\n\n# The differences between call, apply, bind\n\nFirstly, let’s tell the difference between the former two.\n\nBoth `call` and `apply` are used to change what `this` refers to. Their role is the same, but the way to pass parameters is different.\n\nIn addition to the first parameter, `call` can accept an argument list, while `apply` accepts a single array of arguments.\n\n```js\nlet a = {\n value: 1\n}\nfunction getValue(name, age) {\n console.log(name)\n console.log(age)\n console.log(this.value)\n}\ngetValue.call(a, 'yck', '24')\ngetValue.apply(a, ['yck', '24'])\n```\n\n## simulation to implement `call` and `apply`\n\nWe can consider how to implement them from the following rules:\n\n* If the first parameter isn’t passed, then the first parameter will default to `window`;\n* Change what `this` refers to, which makes new object capable of executing the function. Then let’s think like this: add a function to a new object and then delete it after the execution.\n\n```js\nFunction.prototype.myCall = function (context) {\n var context = context || window\n // Add an property to the `context`\n // getValue.call(a, 'yck', '24') => a.fn = getValue\n context.fn = this\n // take out the rest parameters of `context`\n var args = [...arguments].slice(1)\n // getValue.call(a, 'yck', '24') => a.fn('yck', '24')\n var result = context.fn(...args)\n // delete fn\n delete context.fn\n return result\n}\n```\n\nThe above is the main idea of simulating `call`, and the implementation of `apply` is similar.\n\n```js\nFunction.prototype.myApply = function (context) {\n var context = context || window\n context.fn = this\n\n var result\n // There's a need to determine whether to store the second parameter\n // If the second parameter exists, spread it\n if (arguments[1]) {\n result = context.fn(...arguments[1])\n } else {\n result = context.fn()\n }\n\n delete context.fn\n return result\n}\n```\n\nThe role of `bind` is the same as the other two, except that it returns a function. And we can implement currying with `bind`\n\nlet’s simulate `bind`:\n\n```js\nFunction.prototype.myBind = function (context) {\n if (typeof this !== 'function') {\n throw new TypeError('Error')\n }\n var _this = this\n var args = [...arguments].slice(1)\n // return a function\n return function F() {\n // we can use `new F()` because it returns a function, so we need to determine\n if (this instanceof F) {\n return new _this(...args, ...arguments)\n }\n return _this.apply(context, args.concat(...arguments))\n }\n}\n```\n\n# Promise implementation\n\n`Promise` is a new syntax introduced by ES6, which resolves the problem of callback hell.\n\nPromise can be seen as a state machine and it's initial state is `pending`. We can change the state to `resolved` or `rejected` by using the `resolve` and `reject` functions. Once the state is changed, it cannot be changed again.\n\nThe function `then` returns a Promise instance, which is a new instance instead of the previous one. And that's because the Promise specification states that in addition to the `pending` state, other states cannot be changed, and multiple calls of function `then` will be meaningless if the same instance is returned.\n\nFor `then`, it can essentially be seen as `flatMap`:\n\n```js\n// three states\nconst PENDING = 'pending';\nconst RESOLVED = 'resolved';\nconst REJECTED = 'rejected';\n// promise accepts a function argument that will execute immediately.\nfunction MyPromise(fn) {\n let _this = this;\n _this.currentState = PENDING;\n _this.value = undefined;\n // To save the callback of `then`,only cached when the state of the promise is pending,\n // at most one will be cached in every instance\n _this.resolvedCallbacks = [];\n _this.rejectedCallbacks = [];\n\n _this.resolve = function(value) {\n // execute asynchronously to guarantee the execution order\n setTimeout(() => {\n if (value instanceof MyPromise) {\n // if value is a Promise, execute recursively\n return value.then(_this.resolve, _this.reject)\n }\n if (_this.currentState === PENDING) {\n _this.currentState = RESOLVED;\n _this.value = value;\n _this.resolvedCallbacks.forEach(cb => cb());\n }\n })\n }\n\n _this.reject = function(reason) {\n // execute asynchronously to guarantee the execution order\n setTimeout(() => {\n if (_this.currentState === PENDING) {\n _this.currentState = REJECTED;\n _this.value = reason;\n _this.rejectedCallbacks.forEach(cb => cb());\n }\n })\n }\n\n // to solve the following problem\n // `new Promise(() => throw Error('error))`\n try {\n fn(_this.resolve, _this.reject);\n } catch (e) {\n _this.reject(e);\n }\n}\n\nMyPromise.prototype.then = function(onResolved, onRejected) {\n const self = this;\n // specification 2.2.7, `then` must return a new promise\n let promise2;\n // specification 2.2, both `onResolved` and `onRejected` are optional arguments\n // it should be ignored if `onResolved` or `onRjected` is not a function,\n // which implements the penetrate pass of it's value\n // `Promise.resolve(4).then().then((value) => console.log(value))`\n onResolved = typeof onResolved === 'function' ? onResolved : v => v;\n onRejected = typeof onRejected === 'function' ? onRejected : r => throw r;\n\n if (self.currentState === RESOLVED) {\n return (promise2 = new MyPromise((resolve, reject) => {\n // specification 2.2.4, wrap them with `setTimeout`,\n // in order to insure that `onFulfilled` and `onRjected` execute asynchronously\n setTimeout(() => {\n try {\n let x = onResolved(self.value);\n resolutionProcedure(promise2, x, resolve, reject);\n } catch (reason) {\n reject(reason);\n }\n });\n }));\n }\n\n if (self.currentState === REJECTED) {\n return (promise2 = new MyPromise((resolve, reject) => {\n // execute `onRejected` asynchronously\n setTimeout(() => {\n try {\n let x = onRejected(self.value);\n resolutionProcedure(promise2, x, resolve, reject);\n } catch (reason) {\n reject(reason);\n }\n });\n }))\n }\n\n if (self.currentState === PENDING) {\n return (promise2 = new MyPromise((resolve, reject) => {\n self.resolvedCallbacks.push(() => {\n // Considering that it may throw error, wrap them with `try/catch`\n try {\n let x = onResolved(self.value);\n resolutionProcedure(promise2, x, resolve, reject);\n } catch (r) {\n reject(r);\n }\n });\n\n self.rejectedCallbacks.push(() => {\n try {\n let x = onRejected(self.value);\n resolutionProcedure(promise2, x, resolve, reject);\n } catch (r) {\n reject(r);\n }\n })\n }))\n }\n}\n\n// specification 2.3\nfunction resolutionProcedure(promise2, x, resolve, reject) {\n // specification 2.3.1,`x` and `promise2` can't refer to the same object,\n // avoiding the circular references\n if (promise2 === x) {\n return reject(new TypeError('Error'));\n }\n\n // specification 2.3.2, if `x` is a Promise and the state is `pending`,\n // the promise must remain, If not, it should execute.\n if (x instanceof MyPromise) {\n if (x.currentState === PENDING) {\n // call the function `resolutionProcedure` again to\n // confirm the type of the argument that x resolves\n // If it's a primitive type, it will be resolved again to\n // pass the value to next `then`.\n x.then((value) => {\n resolutionProcedure(promise2, value, resolve, reject);\n }, reject)\n } else {\n x.then(resolve, reject);\n }\n return;\n }\n\n // specification 2.3.3.3.3\n // if both `reject` and `resolve` are executed, the first successful\n // execution takes precedence, and any further executions are ignored\n let called = false;\n // specification 2.3.3, determine whether `x` is an object or a function\n if (x !== null && (typeof x === 'object' || typeof x === 'function')) {\n // specification 2.3.3.2, if can't get `then`, execute the `reject`\n try {\n // specification 2.3.3.1\n let then = x.then;\n // if `then` is a function, call the `x.then`\n if (typeof then === 'function') {\n // specification 2.3.3.3\n then.call(x, y => {\n if (called) return;\n called = true;\n // specification 2.3.3.3.1\n resolutionProcedure(promise2, y, resolve, reject);\n }, e => {\n if (called) return;\n called = true;\n reject(e);\n });\n } else {\n // specification 2.3.3.4\n resolve(x);\n }\n } catch (e) {\n if (called) return;\n called = true;\n reject(e);\n }\n } else {\n // specification 2.3.4, `x` belongs to primitive data type\n resolve(x);\n }\n}\n```\n\nThe above codes, which is implemented based on the Promise / A+ specification, can pass the full test of `promises-aplus-tests`\n\n\n\n# Generator Implementation\n\nGenerator is an added syntactic feature in ES6. Similar to `Promise`, it can be used for asynchronous programming.\n\n```js\n// * means this is a Generator function\n// yield within the block can be used to pause the execution\n// next can resume execution\nfunction* test() {\n let a = 1 + 2;\n yield 2;\n yield 3;\n}\nlet b = test();\nconsole.log(b.next()); // > { value: 2, done: false }\nconsole.log(b.next()); // > { value: 3, done: false }\nconsole.log(b.next()); // > { value: undefined, done: true }\n```\n\nAs we can tell from the above code, a function with a `*` would have the `next` function execution. In other words, the execution of the function returns an object. Every call to the `next` function can resume executing the paused code. A simple implementation of the Generator function is shown below:\n\n```js\n// cb is the compiled 'test' function\nfunction generator(cb) {\n return (function() {\n var object = {\n next: 0,\n stop: function() {}\n };\n\n return {\n next: function() {\n var ret = cb(object);\n if (ret === undefined) return { value: undefined, done: true };\n return {\n value: ret,\n done: false\n };\n }\n };\n })();\n}\n// After babel's compilation, 'test' function turns into this:\nfunction test() {\n var a;\n return generator(function(_context) {\n while (1) {\n switch ((_context.prev = _context.next)) {\n // yield splits the code into several blocks\n // every 'next' call executes one block of clode\n // and indicates the next block to execute\n case 0:\n a = 1 + 2;\n _context.next = 4;\n return 2;\n case 4:\n _context.next = 6;\n return 3;\n // execution complete\n case 6:\n case \"end\":\n return _context.stop();\n }\n }\n });\n}\n```\n\n# Debouncing\n\nHave you ever encountered this problem in your development: how to do a complex computation in a scrolling event or to prevent the \"second accidental click\" on a button?\n\nThese requirements can be achieved with function debouncing. Especially for the first one, if complex computations are carried out in frequent event callbacks, there's a large chance that the page becomes laggy. It's better to combine multiple computations into a single one, and only operate at particular time. Since there are many libraries that implement debouncing, we won't build our own here and will just take underscore's source code to explain debouncing:\n\n```js\n/**\n * underscore's debouncing function. When the callback function is called in series, func will only execute when the idel time is larger or equal to `wait`.\n *\n * @param {function} func callback function\n * @param {number} wait length of waiting intervals\n * @param {boolean} immediate when set to true, func is executed immediately\n * @return {function} returns the function to be called by the client\n */\n_.debounce = function(func, wait, immediate) {\n var timeout, args, context, timestamp, result;\n\n var later = function() {\n // compare now to the last timestamp\n var last = _.now() - timestamp;\n // if the current time interval is smaller than the set interval and larger than 0, then reset the timer.\n if (last < wait && last >= 0) {\n timeout = setTimeout(later, wait - last);\n } else {\n // otherwise it's time to execute the callback function\n timeout = null;\n if (!immediate) {\n result = func.apply(context, args);\n if (!timeout) context = args = null;\n }\n }\n };\n\n return function() {\n context = this;\n args = arguments;\n // obtain the timestamp\n timestamp = _.now();\n // if the timer doesn't exist then execute the function immediately\n var callNow = immediate && !timeout;\n // if the timer doesn't exist then create one\n // else clear the current timer and reset a new timer\n if (timeout) clearTimeout(timeout);\n timeout = setTimeout(later, wait);\n if (callNow) {\n // if the immediate execution is needed, use apply to start the function\n result = func.apply(context, args);\n context = args = null;\n }\n\n return result;\n };\n };\n```\n\nThe complete function implementation is not too difficult. Let's summarize here.\n\n- For the implementation of protecting against accidental clicks: as long as I start a timer and the timer is there, no matter how you click the button, the callback function won't be executed. Whenever the timer ends and is set to `null`, another click is allowed.\n- For the implementation of a delayed function execution: every call to the debouncing function will trigger an evaluation of time interval between the current call and the last one. If the interval is less than the required, another timer will be created, and the delay is set to the set interval minus the previous elapsed time. When the time's up, the corresponding callback function is executed.\n\n# Throttle\n\n`Debounce` and `Throttle` are different in nature. `Debounce` is to turn multiple executions into one last execution, and `Throttle` is to turn multiple executions into executions at regular intervals.\n\n```js\n// The first two parameters with debounce are the same function\n// options: You can pass two properties\n// trailing: Last time does not execute\n// leading: First time does not execute\n// The two properties cannot coexist, otherwise the function cannot be executed\n_.throttle = function(func, wait, options) {\n var context, args, result;\n var timeout = null;\n // Previous timestamp\n var previous = 0;\n // Set empty if options is not passed\n if (!options) options = {};\n // Timer callback function\n var later = function() {\n // If you set `leading`, then set `previous` to zero\n // The first `if` statement of the following function is used\n previous = options.leading === false ? 0 : _.now();\n // The first is prevented memory leaks and the second is judged the following timers when setting `timeout` to null\n timeout = null;\n result = func.apply(context, args);\n if (!timeout) context = args = null;\n };\n return function() {\n // Get current timestamp\n var now = _.now();\n // It must be true when it entering firstly\n // If you do not need to execute the function firstly\n // Set the last timestamp to current\n // Then it will be greater than 0 when the remaining time is calculated next\n if (!previous && options.leading === false)\n previous = now;\n var remaining = wait - (now - previous);\n context = this;\n args = arguments;\n // This condition will only be entered if it set `trailing`\n // This condition will be entered firstly if it not set `leading`\n // Another point, you may think that this condition will not be entered if you turn on the timer\n // In fact, it will still enter because the timer delay is not accurate\n // It is very likely that you set 2 seconds, but it needs 2.2 seconds to trigger, then this time will enter this condition\n if (remaining <= 0 || remaining > wait) {\n // Clean up if there exist a timer otherwise it call twice callback\n if (timeout) {\n clearTimeout(timeout);\n timeout = null;\n }\n previous = now;\n result = func.apply(context, args);\n if (!timeout) context = args = null;\n } else if (!timeout && options.trailing !== false) {\n // Judgment whether timer and trailing are set\n // And you can't set leading and trailing at the same time\n timeout = setTimeout(later, remaining);\n }\n return result;\n };\n};\n```\n\n# Map、FlatMap and Reduce\n\nThe effect of `Map` is to generate a new array, iterate over the original array, take each element out to do some transformation, and then `append` to the new array.\n\n```js\n[1, 2, 3].map((v) => v + 1)\n// -> [2, 3, 4]\n```\n\n`Map` has three parameters, namely the current index element, the index, the original array.\n\n```js\n['1','2','3'].map(parseInt)\n// parseInt('1', 0) -> 1\n// parseInt('2', 1) -> NaN\n// parseInt('3', 2) -> NaN\n```\n\nThe effect of `FlatMap` is almost the same with a `Map`, but the original array will be flatten for multidimensional arrays. You can think of `FlatMap` as a `map` and a `flatten`, which is currently not supported in browsers.\n\n```js\n[1, [2], 3].flatMap((v) => v + 1)\n// -> [2, 3, 4]\n```\n\nYou can achieve this when you want to completely reduce the dimensions of a multidimensional array:\n\n```js\nconst flattenDeep = (arr) => Array.isArray(arr)\n ? arr.reduce( (a, b) => [...a, ...flattenDeep(b)] , [])\n : [arr]\n\nflattenDeep([1, [[2], [3, [4]], 5]])\n```\n\nThe effect of `Reduce` is to combine the values in the array and get a final value:\n\n```js\nfunction a() {\n console.log(1);\n}\n\nfunction b() {\n console.log(2);\n}\n\n[a, b].reduce((a, b) => a(b()))\n// -> 2 1\n```\n\n\n# Async and await\n\n`async` function will return a `Promise`:\n\n```js\nasync function test() {\n return \"1\";\n}\nconsole.log(test()); // -> Promise {: \"1\"}\n```\n\nYou can think of `async` as wrapping a function using `Promise.resolve()`.\n\n`await` can only be used in `async` functions:\n\n```js\nfunction sleep() {\n return new Promise(resolve => {\n setTimeout(() => {\n console.log('finish')\n resolve(\"sleep\");\n }, 2000);\n });\n}\nasync function test() {\n let value = await sleep();\n console.log(\"object\");\n}\ntest()\n```\n\nThe above code will print `finish` before printing `object`. Because `await` waits for the `sleep` function `resolve`, even if the synchronization code is followed, it is not executed before the asynchronous code is executed.\n\nThe advantage of `async` and `await` compared to the direct use of `Promise` lies in handling the call chain of `then`, which can produce clear and accurate code. The downside is that misuse of `await` can cause performance problems because `await` blocks the code. Perhaps the asynchronous code does not depend on the former, but it still needs to wait for the former to complete, causing the code to lose concurrency.\n\nLet's look at a code that uses `await`:\n\n```js\nvar a = 0\nvar b = async () => {\n a = a + await 10\n console.log('2', a) // -> '2' 10\n a = (await 10) + a\n console.log('3', a) // -> '3' 20\n}\nb()\na++\nconsole.log('1', a) // -> '1' 1\n```\n\nYou may have doubts about the above code, here we explain the principle:\n\n- First the function `b` is executed. The variable `a` is still 0 before execution `await 10`, Because the `Generators` are implemented inside `await` and `Generators` will keep things in the stack, so at this time `a = 0` is saved\n- Because `await` is an asynchronous operation, it will immediately return a `pending` state `Promise` object when it encounter `await`, and temporarily returning control of the execution code, so that the code outside the function can continue to be executed. `console.log('1', a)` will be executed first.\n- At this point, the synchronous code is completed and asynchronous code is started. The saved value is used. At this time, `a = 10`\n- Then comes the usual code execution\n\n# Proxy\n\nProxy is a new feature since ES6. It can be used to define operations in objects:\n\n```js\nlet p = new Proxy(target, handler);\n// `target` represents the object of need to add the proxy\n// `handler` customizes operations in the object\n```\n\nProxy can be handy for implementation of data binding and listening:\n\n```js\nlet onWatch = (obj, setBind, getLogger) => {\n let handler = {\n get(target, property, receiver) {\n getLogger(target, property)\n return Reflect.get(target, property, receiver);\n },\n set(target, property, value, receiver) {\n setBind(value);\n return Reflect.set(target, property, value);\n }\n };\n return new Proxy(obj, handler);\n};\n\nlet obj = { a: 1 }\nlet value\nlet p = onWatch(obj, (v) => {\n value = v\n}, (target, property) => {\n console.log(`Get '${property}' = ${target[property]}`);\n})\np.a = 2 // bind `value` to `2`\np.a // -> Get 'a' = 2\n```\n\n# Why 0.1 + 0.2 != 0.3\n\nBecause JS uses the IEEE 754 double-precision version (64-bit). Every language that uses this standard has this problem.\n\nAs we know, computers use binaries to represent decimals, so `0.1` in binary is represented as\n\n```js\n// (0011) represents cycle\n0.1 = 2^-4 * 1.10011(0011)\n```\n\nHow do we come to this binary number? We can try computing it as below:\n\n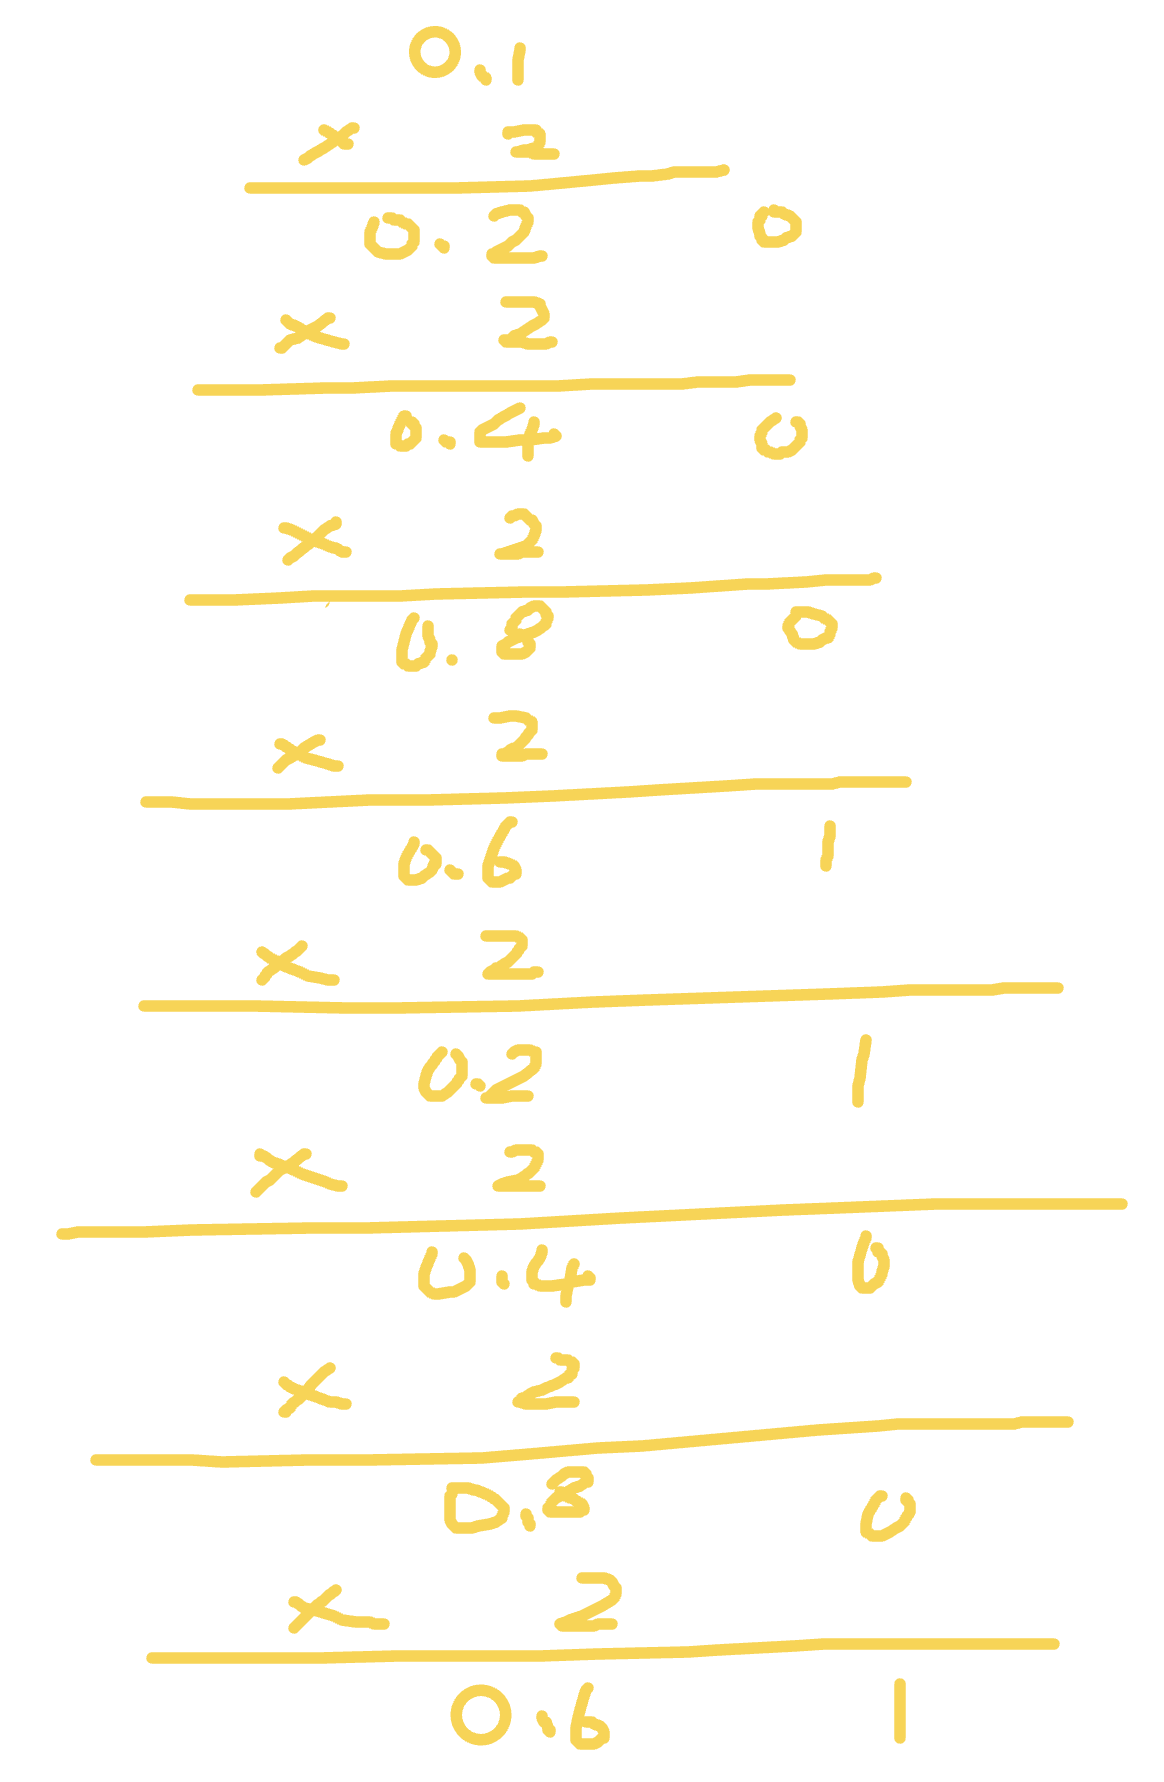\n\nBinary computations in float numbers are different from those in integers. For multiplications, only the float bits are computed, while the integer bits are used for the binaries for each bit. Then the first bit is used as the most significant bit. Therefore we get `0.1 = 2^-4 * 1.10011(0011)`.\n\n`0.2` is similar. We just need to get rid of the first multiplcation and get `0.2 = 2^-3 * 1.10011(0011)`.\n\nBack to the double float for IEEE 754 standard. Among the 64 bits, one bit is used for signing, 11 used for integer bits, and the rest 52 bits are floats. Since `0.1` and `0.2` are infinitely cycling binaries, the last bit of the floats needs to indicate whether to round (same as rounding in decimals).\n\nAfter rounding, `2^-4 * 1.10011...001` becomes `2^-4 * 1.10011(0011 * 12 times)010`. After adding these two binaries we get `2^-2 * 1.0011(0011 * 11 times)0100`, which is `0.30000000000000004` in decimals.\n\nThe native solution to this problem is shown below:\n\n```js\nparseFloat((0.1 + 0.2).toFixed(10))\n```\n\n# Regular Expressions\n\n## Metacharacters\n\n| Metacharacter | Effect |\n| :-----------: | :----------------------------------------------------------: |\n| . | matches any character except line terminators: \\n, \\r, \\u2028 or \\u2029. |\n| [] | matches anything within the brackets. For example, [0-9] can match any number |\n| ^ | ^9 means matching anything that starts with '9'; [`^`9] means not matching characters except '9' in between brackets |\n| {1, 2} | matches 1 or 2 digit characters |\n| (yck) | only matches strings the same as 'yck' |\n| \\| | matches any character before and after \\| |\n| \\ | escape character |\n| * | matches the preceding expression 0 or more times |\n| + | matches the preceding expression 1 or more times |\n| ? | the character before '?' is optional |\n\n## Flags\n\n| Flag | Effect |\n| :------: | :--------------: |\n| i | case-insensitive search |\n| g | matches globally |\n| m | multiline |\n\n## Character Shorthands\n\n| shorthand | Effect |\n| :--: | :------------------------: |\n| \\w | alphanumeric characters, underline character |\n| \\W | the opposite of the above |\n| \\s | any blank character |\n| \\S | the opposite of the above |\n| \\d | numbers |\n| \\D | the opposite of the above |\n| \\b | start or end of a word |\n| \\B | the opposite of the above |\n\n"
},
{
"path": "LICENSE",
"content": "MIT License\n\nCopyright (c) 2018 YuChengKai\n\nPermission is hereby granted, free of charge, to any person obtaining a copy\nof this software and associated documentation files (the \"Software\"), to deal\nin the Software without restriction, including without limitation the rights\nto use, copy, modify, merge, publish, distribute, sublicense, and/or sell\ncopies of the Software, and to permit persons to whom the Software is\nfurnished to do so, subject to the following conditions:\n\nThe above copyright notice and this permission notice shall be included in all\ncopies or substantial portions of the Software.\n\nTHE SOFTWARE IS PROVIDED \"AS IS\", WITHOUT WARRANTY OF ANY KIND, EXPRESS OR\nIMPLIED, INCLUDING BUT NOT LIMITED TO THE WARRANTIES OF MERCHANTABILITY,\nFITNESS FOR A PARTICULAR PURPOSE AND NONINFRINGEMENT. IN NO EVENT SHALL THE\nAUTHORS OR COPYRIGHT HOLDERS BE LIABLE FOR ANY CLAIM, DAMAGES OR OTHER\nLIABILITY, WHETHER IN AN ACTION OF CONTRACT, TORT OR OTHERWISE, ARISING FROM,\nOUT OF OR IN CONNECTION WITH THE SOFTWARE OR THE USE OR OTHER DEALINGS IN THE\nSOFTWARE.\n"
},
{
"path": "MP/mp-ch.md",
"content": "\n\n- [小程序-登录](#小程序-登录)\n - [unionid和openid](#unionid和openid)\n - [关键Api](#关键api)\n - [登录流程设计](#登录流程设计)\n - [利用现有登录体系](#利用现有登录体系)\n - [利用OpenId 创建用户体系](#利用openid-创建用户体系)\n - [利用 Unionid 创建用户体系](#利用-unionid-创建用户体系)\n - [注意事项](#注意事项)\n- [小程序-图片导出](#小程序-图片导出)\n - [基本原理](#基本原理)\n - [如何优雅实现](#如何优雅实现)\n - [注意事项](#注意事项-1)\n- [小程序-数据统计](#小程序-数据统计)\n - [设计一个埋点sdk](#设计一个埋点sdk)\n - [分析接口](#分析接口)\n - [微信自定义数据分析](#分析接口)\n- [小程序-工程化](#小程序-工程化)\n - [工程化做什么](#工程化做什么)\n - [方案选型](#方案选型)\n - [具体开发思路](#具体开发思路)\n- [小程序-持续集成](#小程序-持续集成)\n - [规范化的开发流程](#规范化的开发流程)\n - [如何做小程序的持续集成](#如何做小程序的持续集成)\n - [准备工作](#准备工作)\n - [开发小程序的集成脚本](#开发小程序的集成脚本可以使用各种语言shell-js-python)\n - [集成](#集成)\n - [总结](#总结)\n- [小程序架构](#小程序架构)\n - [下载小程序完整包](#下载小程序完整包)\n - [App Service - Life Cylce](#app-service---life-cylce)\n - [面试题](#面试题)\n- [View - WXML](#view---wxml)\n- [View - WXSS](#view---wxss)\n - [支持大部分CSS特性](#支持大部分css特性)\n - [尺寸单位 rpx](#尺寸单位-rpx)\n - [样式导入](#样式导入)\n - [内联样式](#内联样式)\n - [全局样式与局部样式](#全局样式与局部样式)\n - [iconfont](#iconfont)\n- [View - Component](#view---component)\n- [View - Native Component](#view---native-component)\n- [目前小程序的问题或限制](#目前小程序的问题或限制)\n - [小程序HTTP2支持情况](#小程序http2支持情况)\n - [HTTP2支持情况:模拟器与真机均不支持](#http2支持情况模拟器与真机均不支持)\n - [HTTP2服务器需要对小程序做兼容性适配](#http2服务器需要对小程序做兼容性适配)\n- [授权获取用户信息流程](#授权获取用户信息流程)\n- [性能优化](#性能优化)\n - [加载优化](#加载优化)\n - [使用分包加载优化](#使用分包加载优化)\n - [渲染性能优化](#渲染性能优化)\n- [官方小程序技术能力规划](#官方小程序技术能力规划)\n - [自定义组件2.0](#自定义组件20)\n - [npm支持](#npm支持)\n - [官方自定义组件](#官方自定义组件)\n - [添加体验评分](#添加体验评分)\n - [原生组件同层渲染](#原生组件同层渲染)\n- [wepy vs mpvue](#wepy-vs-mpvue)\n - [数据流管理](#数据流管理)\n - [组件化](#组件化)\n - [工程化](#工程化)\n - [综合比较](#综合比较)\n - [选型的个人看法](#选型的个人看法)\n- [mpvue](#mpvue)\n - [框架原理](#框架原理)\n - [mpvue-loader](#mpvue-loader)\n - [compiler](#compiler)\n - [runtime](#runtime)\n - [Class和Style为什么暂不支持组件](#class和style为什么暂不支持组件)\n - [分包加载](#分包加载)\n - [问题与展望](#问题与展望)\n- [小程序-学习](#小程序-学习)\n - [学习建议](#学习建议)\n - [如何解决遇到的问题](#如何解决遇到的问题)\n - [总结](#总结-1)\n- [参考链接](#参考链接)\n\n\n\n# 小程序-登录\n\n## unionid和openid\n\n了解小程序登录之前,我们写了解下小程序/公众号登录涉及到两个最关键的用户标识:\n\n- `OpenId` 是一个用户对于一个小程序/公众号的标识,开发者可以通过这个标识识别出用户。\n- `UnionId` 是一个用户对于同主体微信小程序/公众号/APP的标识,开发者需要在微信开放平台下绑定相同账号的主体。开发者可通过UnionId,实现多个小程序、公众号、甚至APP 之间的数据互通了。\n\n## 关键Api\n\n- [`wx.login`](https://developers.weixin.qq.com/miniprogram/dev/api/api-login.html) 官方提供的登录能力\n\n- [`wx.checkSession`](https://developers.weixin.qq.com/miniprogram/dev/api/signature.html#wxchecksessionobject) 校验用户当前的session_key是否有效\n\n- [`wx.authorize`](https://developers.weixin.qq.com/miniprogram/dev/api/authorize.html) 提前向用户发起授权请求\n\n- [`wx.getUserInfo`](https://developers.weixin.qq.com/miniprogram/dev/api/api-login.html) 获取用户基本信息\n\n\n## 登录流程设计\n\n 以下从笔者接触过的几种登录流程来做阐述:\n\n### 利用现有登录体系\n\n 直接复用现有系统的登录体系,只需要在小程序端设计用户名,密码/验证码输入页面,便可以简便的实现登录,只需要保持良好的用户体验即可。\n\n### 利用OpenId 创建用户体系\n\n👆提过,`OpenId` 是一个小程序对于一个用户的标识,利用这一点我们可以轻松的实现一套基于小程序的用户体系,值得一提的是这种用户体系对用户的打扰最低,可以实现静默登录。具体步骤如下:\n\n 1. 小程序客户端通过 `wx.login` 获取 code\n\n 2. 传递 code 向服务端,服务端拿到 code 调用微信登录凭证校验接口,微信服务器返回 `openid` 和会话密钥 `session_key` ,此时开发者服务端便可以利用 `openid` 生成用户入库,再向小程序客户端返回自定义登录态\n\n 3. 小程序客户端缓存 (通过`storage`)自定义登录态(token),后续调用接口时携带该登录态作为用户身份标识即可\n\n### 利用 Unionid 创建用户体系\n\n如果想实现多个小程序,公众号,已有登录系统的数据互通,可以通过获取到用户 unionid 的方式建立用户体系。因为 unionid 在同一开放平台下的所所有应用都是相同的,通过 `unionid` 建立的用户体系即可实现全平台数据的互通,更方便的接入原有的功能,那如何获取 `unionid` 呢,有以下两种方式:\n\n 1. 如果户关注了某个相同主体公众号,或曾经在某个相同主体App、公众号上进行过微信登录授权,通过 `wx.login` 可以直接获取 到 `unionid`\n\n 2. 结合 `wx.getUserInfo` 和 `