Repository: PricelessToolkit/Droplet
Branch: main
Commit: 33a0d511c567
Files: 17
Total size: 96.4 MB
Directory structure:
gitextract_212i8y20/

├── .gitattributes
├── 3D/
│   ├── Assem.SLDASM
│   ├── Assem_Cover_full.SLDASM
│   ├── Battom.STL
│   ├── Cover.STL
│   ├── Cover_full_Part.SLDPRT
│   ├── Housing_battom.SLDPRT
│   ├── Pump_Holder_Down.SLDPRT
│   ├── Pump_Holder_UP.SLDPRT
│   └── Pumps_Holder.STL
├── Config/
│   ├── ESPHome/
│   │   └── droplet.yaml
│   └── Home Assistant/
│       ├── VerticalStackCardConfiguration.txt
│       └── desiredmoisturelevel.yaml
├── Gerber/
│   ├── Droplet_Expansion_BOM.xlsx
│   └── Droplet_Main_Board_BOM.csv
├── LICENSE
└── README.md
================================================
FILE CONTENTS
================================================
================================================
FILE: .gitattributes
================================================
# Auto detect text files and perform LF normalization
* text=auto
================================================
FILE: 3D/Battom.STL
================================================
[File too large to display: 35.8 MB]
================================================
FILE: 3D/Cover.STL
================================================
[File too large to display: 60.6 MB]
================================================
FILE: Config/ESPHome/droplet.yaml
================================================
substitutions:
name: droplet
esphome:
name: ${name}
name_add_mac_suffix: true
project:
name: pricelesstoolkit.droplet
version: "1.0"
on_boot:
priority: -100
then:
- lambda: id(oled).turn_off();
esp32:
board: esp32dev
dashboard_import:
package_import_url: github://PricelessToolkit/Droplet/Config/ESPHome/droplet.yaml@main
import_full_config: true
# Enable logging
logger:
ota:
- platform: esphome
password: bfec11234xsfea57e1b5d3b985cfe06c
wifi:
ssid: !secret wifi_ssid
password: !secret wifi_password
fast_connect: true
# domain: .lab.lan # if you have custom domain not .local
# Enable fallback hotspot (captive portal) in case wifi connection fails
ap:
ssid: ${name} Fallback Hotspot
password: password
captive_portal:
one_wire: #https://esphome.io/components/one_wire
- platform: gpio
pin: GPIO25
i2c: # i2c Pins
sda: 21
scl: 22
scan: true
mcp23017: # Expansion Board https://esphome.io/components/mcp230xx.html
- id: mcp23017_hub
address: 0x20
font: # Fonts for Display
- file: arial.ttf
id: font1
size: 8
- file: arial.ttf
id: font2
size: 10
- file: arial.ttf
id: font3
size: 14
display: # More info https://esphome.io/components/display/ssd1306.html?highlight=1306
- platform: ssd1306_i2c
id: oled
model: SSD1306 128x64
address: 0x3C # Oled Display Address
lambda: |-
it.printf(2, 0, id(font2), TextAlign::TOP_LEFT, "DROPLET");
it.printf(61, 0, id(font2) ,"%.1f", id(dbm).state);
it.line(0, 12, 98, 12);
it.line(98, 0, 98, 64);
it.printf(102, 0, id(font2) ,"%.1f", id(Soil1).state);
it.printf(102, 12, id(font2) ,"%.1f", id(Soil2).state);
it.printf(102, 24, id(font2) ,"%.1f", id(Soil3).state);
it.printf(102, 36, id(font2) ,"%.1f", id(Soil4).state);
it.printf(102, 48, id(font2) ,"%.1f", id(Soil5).state);
# it.printf(5, 15, id(font3) ,"%.1f°C", id(intergratedtmp).state);
# it.printf(5, 30, id(font3) ,"%.1fH", id(dhthumidity).state);
# it.printf(5, 45, id(font3) ,"%.1fP", id(pressure).state);
# Integrated BUZZER # If you using pin23 for something else, delete this and remove jumper 1
rtttl:
output: rtttl_out
on_finished_playback:
- logger.log: Song ended!
api:
services:
- service: play_rtttl
variables:
song_str: string
then:
- rtttl.play:
rtttl: !lambda 'return song_str;'
# https://esphome.io/components/rtttl.html
# In the developer tools. E.g. for calling rtttl.play select the service droplet_play_rtttl and in service data enter siren:d=8,o=5,b=100:d,e,d,e,d,e,d,e or scale_up:d=32,o=5,b=100:c,c#,d#,e,f#,g#,a#,b
sensor:
# MOISTUR LEVEL SENSORS # https://esphome.io/components/sensor/adc.html?highlight=adc
- platform: adc
pin: 34
id: Soil1
name: ${name} SoilM Sens 1
icon: mdi:water-percent
update_interval: 2s
unit_of_measurement: '%'
attenuation: 12db
filters:
- calibrate_linear:
- 2.520 -> 0.00 # Calibrate Min in dry soil
- 0.99 -> 100.00 # Calibrate MAX in 100% wet soil
- lambda: |
if (x < 0) return 0;
else if (x > 100) return 100;
else return (x);
accuracy_decimals: 0
- platform: adc
pin: 35
id: Soil2
name: ${name} SoilM Sens 2
icon: mdi:water-percent
update_interval: 2s
unit_of_measurement: '%'
attenuation: 12db
filters:
- calibrate_linear:
- 2.520 -> 0.00 # Calibrate Min in dry soil
- 0.99 -> 100.00 # Calibrate MAX in 100% wet soil
- lambda: |
if (x < 0) return 0;
else if (x > 100) return 100;
else return (x);
accuracy_decimals: 0
- platform: adc
pin: 32
id: Soil3
name: ${name} SoilM Sens 3
icon: mdi:water-percent
update_interval: 2s
unit_of_measurement: '%'
attenuation: 12db
filters:
- calibrate_linear:
- 2.520 -> 0.00 # Calibrate Min in dry soil
- 0.99 -> 100.00 # Calibrate MAX in 100% wet soil
- lambda: |
if (x < 0) return 0;
else if (x > 100) return 100;
else return (x);
accuracy_decimals: 0
- platform: adc
pin: 33
id: Soil4
name: ${name} SoilM Sens 4
icon: mdi:water-percent
update_interval: 2s
unit_of_measurement: '%'
attenuation: 12db
filters:
- calibrate_linear:
- 2.520 -> 0.00 # Calibrate Min in dry soil
- 0.99 -> 100.00 # Calibrate MAX in 100% wet soil
- lambda: |
if (x < 0) return 0;
else if (x > 100) return 100;
else return (x);
accuracy_decimals: 0
- platform: adc
pin: 39
id: Soil5
name: ${name} SoilM Sens 5
icon: mdi:water-percent
update_interval: 2s
unit_of_measurement: '%'
attenuation: 12db
filters:
- calibrate_linear:
- 2.520 -> 0.00 # Calibrate Min in dry soil
- 0.99 -> 100.00 # Calibrate MAX in 100% wet soil
- lambda: |
if (x < 0) return 0;
else if (x > 100) return 100;
else return (x);
accuracy_decimals: 0
# HOME ASSISTANT DESIRED MOISTURE LEVELS # https://esphome.io/components/sensor/homeassistant.html
- platform: homeassistant
name: Desired Moisture level 1
id: desired_mois_value_1
internal: true
entity_id: input_number.moisture_level_for_pump1
- platform: homeassistant
name: Desired Moisture level 2
id: desired_mois_value_2
internal: true
entity_id: input_number.moisture_level_for_pump2
- platform: homeassistant
name: Desired Moisture level 3
id: desired_mois_value_3
internal: true
entity_id: input_number.moisture_level_for_pump3
- platform: homeassistant
name: Desired Moisture level 4
id: desired_mois_value_4
internal: true
entity_id: input_number.moisture_level_for_pump4
- platform: homeassistant
name: Desired Moisture level 5
id: desired_mois_value_5
internal: true
entity_id: input_number.moisture_level_for_pump5
# KEEPS MOISTURE LEVEL # Comment out or delete these 5 sensors "Comparison Sens 1,2,3,4,5" if you want to automate the Soil Moisture level with Home Assistant "Automation".
- platform: template
name: Comparison Sens1
internal: true
update_interval: 2s # Seconds to pump water then stops pumping and starts comparing sensors data, if needed it will pump again
lambda: |-
if (id(Soil1).state < id(desired_mois_value_1).state) {
id(pump1).toggle();
} else {
id(pump1).turn_off();
}
return {};
- platform: template
name: Comparison Sens2
internal: true
update_interval: 2s # Seconds to pump water then stops pumping and starts comparing sensors data, if needed it will pump again
lambda: |-
if (id(Soil2).state < id(desired_mois_value_2).state) {
id(pump2).toggle();
} else {
id(pump2).turn_off();
}
return {};
- platform: template
name: Comparison Sens3
internal: true
update_interval: 2s # Seconds to pump water then stops pumping and starts comparing sensors data, if needed it will pump again
lambda: |-
if (id(Soil3).state < id(desired_mois_value_3).state) {
id(pump3).toggle();
} else {
id(pump3).turn_off();
}
return {};
- platform: template
name: Comparison Sens4
internal: true
update_interval: 2s # Seconds to pump water then stops pumping and starts comparing sensors data, if needed it will pump again
lambda: |-
if (id(Soil4).state < id(desired_mois_value_4).state) {
id(pump4).toggle();
} else {
id(pump4).turn_off();
}
return {};
- platform: template
name: Comparison Sens5
internal: true
update_interval: 2s # Seconds to pump water then stops pumping and starts comparing sensors data, if needed it will pump again
lambda: |-
if (id(Soil5).state < id(desired_mois_value_5).state) {
id(pump5).toggle();
} else {
id(pump5).turn_off();
}
return {};
# DHT TMP and HUMIDITY SENSOR # https://esphome.io/components/sensor/dht.html Delet if not used
#- platform: dht
# pin: 5
# temperature:
# name: "${name} DHT Temperature"
# id: "dhttemperature"
# humidity:
# name: "${name} DHT Humidity"
# id: "dhthumidity"
# update_interval: 5s
# DISTANCE SENSOR # # You can measure the height of the plant and plot the growth reight # https://esphome.io/components/sensor/vl53l0x.html?highlight=vl53l0 Delet if not used
#- platform: vl53l0x
# name: "${name} VL53L0x Distance"
# id: "distance"
# address: 0x29
# update_interval: 2s
# long_range: true
# BMP280 TMP and HUMIDITY SENSOR # https://esphome.io/components/sensor/bmp280.html?highlight=bmp280 Delet if not used
#- platform: bmp280_i2c
# temperature:
# name: "${name} bmp280 Temperature"
# oversampling: 16x
# pressure:
# name: "${name} bmp280 Pressure"
# id: "pressure"
# address: 0x76
# update_interval: 5s
# https://esphome.io/components/sensor/dallas_temp.html
#- platform: dallas_temp
# address: 0x6e3c......
# name: "${name} Integrated TMP"
# id: "intergratedtmp"
# WIFI #
- platform: wifi_signal
name: ${name} WiFi Signal Sensor
id: dbm
update_interval: 5s
# Uptime sensor #
- platform: uptime
name: ${name} Uptime
update_interval: 3600s
switch:
# PUMPS GPIOs # https://esphome.io/components/switch/gpio.html?highlight=switch
- platform: gpio
pin: 13
id: pump1
name: ${name} Pump 1
icon: mdi:water-pump
restore_mode: ALWAYS_OFF
- platform: gpio
pin: 4
id: pump2
name: ${name} Pump 2
icon: mdi:water-pump
restore_mode: ALWAYS_OFF
- platform: gpio
pin: 16
id: pump3
name: ${name} Pump 3
icon: mdi:water-pump
restore_mode: ALWAYS_OFF
- platform: gpio
pin: 17
id: pump4
name: ${name} Pump 4
icon: mdi:water-pump
restore_mode: ALWAYS_OFF
- platform: gpio
pin: 18
id: pump5
name: ${name} Pump 5
icon: mdi:water-pump
restore_mode: ALWAYS_OFF
# MCP230017 FOR EXPANSION BOARD # Uncomment when using expansion board https://esphome.io/components/mcp230xx.html
- platform: gpio
name: '${name} MCP23017 Pin #0'
restore_mode: ALWAYS_OFF
pin:
mcp23xxx: mcp23017_hub
# Use pin number 0
number: 0
mode:
output: true
inverted: true
- platform: gpio
name: '${name} MCP23017 Pin #1'
restore_mode: ALWAYS_OFF
pin:
mcp23xxx: mcp23017_hub
# Use pin number 0
number: 1
mode:
output: true
inverted: true
- platform: gpio
name: '${name} MCP23017 Pin #2'
restore_mode: ALWAYS_OFF
pin:
mcp23xxx: mcp23017_hub
# Use pin number 0
number: 2
mode:
output: true
inverted: true
- platform: gpio
name: '${name} MCP23017 Pin #3'
restore_mode: ALWAYS_OFF
pin:
mcp23xxx: mcp23017_hub
# Use pin number 0
number: 3
mode:
output: true
inverted: true
- platform: gpio
name: '${name} MCP23017 Pin #4'
restore_mode: ALWAYS_OFF
pin:
mcp23xxx: mcp23017_hub
# Use pin number 0
number: 4
mode:
output: true
inverted: true
- platform: gpio
name: '${name} MCP23017 Pin #5'
restore_mode: ALWAYS_OFF
pin:
mcp23xxx: mcp23017_hub
# Use pin number 0
number: 5
mode:
output: true
inverted: true
- platform: gpio
name: '${name} MCP23017 Pin #6'
restore_mode: ALWAYS_OFF
pin:
mcp23xxx: mcp23017_hub
# Use pin number 0
number: 6
mode:
output: true
inverted: true
- platform: gpio
name: '${name} MCP23017 Pin #7'
restore_mode: ALWAYS_OFF
pin:
mcp23xxx: mcp23017_hub
# Use pin number 0
number: 7
mode:
output: true
inverted: true
- platform: gpio
name: '${name} MCP23017 Pin #8'
restore_mode: ALWAYS_OFF
pin:
mcp23xxx: mcp23017_hub
# Use pin number 0
number: 8
mode:
output: true
inverted: true
- platform: gpio
name: '${name} MCP23017 Pin #9'
restore_mode: ALWAYS_OFF
pin:
mcp23xxx: mcp23017_hub
# Use pin number 0
number: 9
mode:
output: true
inverted: true
- platform: gpio
name: '${name} MCP23017 Pin #10'
restore_mode: ALWAYS_OFF
pin:
mcp23xxx: mcp23017_hub
# Use pin number 0
number: 10
mode:
output: true
inverted: true
- platform: gpio
name: '${name} MCP23017 Pin #11'
restore_mode: ALWAYS_OFF
pin:
mcp23xxx: mcp23017_hub
# Use pin number 0
number: 11
mode:
output: true
inverted: true
- platform: gpio
name: '${name} MCP23017 Pin #12'
restore_mode: ALWAYS_OFF
pin:
mcp23xxx: mcp23017_hub
# Use pin number 0
number: 12
mode:
output: true
inverted: true
- platform: gpio
name: '${name} MCP23017 Pin #13'
restore_mode: ALWAYS_OFF
pin:
mcp23xxx: mcp23017_hub
# Use pin number 0
number: 13
mode:
output: true
inverted: true
- platform: gpio
name: '${name} MCP23017 Pin #14'
restore_mode: ALWAYS_OFF
pin:
mcp23xxx: mcp23017_hub
# Use pin number 0
number: 14
mode:
output: true
inverted: true
- platform: gpio
name: '${name} MCP23017 Pin #15'
restore_mode: ALWAYS_OFF
pin:
mcp23xxx: mcp23017_hub
# Use pin number 0
number: 15
mode:
output: true
inverted: true
- platform: restart
name: ${name} Restart
output:
# Integrated BUZZER # If you using pin23 for something else, delete this and remove jumper 1 https://esphome.io/components/output/ledc.html?highlight=buzzer
- platform: ledc
pin: GPIO23
id: rtttl_out
binary_sensor:
# BUTTON SHORT and LONG PRES AVALIABLE IN HOME ASSISTANT # https://esphome.io/components/binary_sensor/index.html?highlight=binary_sensor
- platform: gpio
name: ${name} Button
pin:
number: 36
# Short press activates OLED for 20s
on_click:
- min_length: 10ms
max_length: 350ms
then:
- lambda: id(oled).turn_on();
- delay: 20s
- lambda: id(oled).turn_off();
# Long press Do whatever you want
- min_length: 500ms
max_length: 1500ms
then:
# - switch.turn_on: relay_1
# Status (connection) sensor#
- platform: status
name: ${name} Status
================================================
FILE: Config/Home Assistant/VerticalStackCardConfiguration.txt
================================================
type: vertical-stack
cards:
- type: horizontal-stack
cards:
- type: vertical-stack
cards:
- type: entities
entities:
- input_number.moisture_level_for_pump1
- type: sensor
entity: sensor.droplet_soilm_sens_1
graph: line
- type: vertical-stack
cards:
- type: entities
entities:
- input_number.moisture_level_for_pump2
- type: sensor
entity: sensor.droplet_soilm_sens_2
graph: line
- type: horizontal-stack
cards:
- type: vertical-stack
cards:
- type: entities
entities:
- input_number.moisture_level_for_pump3
- type: sensor
entity: sensor.droplet_soilm_sens_3
graph: line
- type: vertical-stack
cards:
- type: entities
entities:
- entity: input_number.moisture_level_for_pump4
- type: sensor
entity: sensor.droplet_soilm_sens_4
graph: line
- type: entities
entities:
- input_number.moisture_level_for_pump5
- type: sensor
entity: sensor.droplet_soilm_sens_5
graph: line
================================================
FILE: Config/Home Assistant/desiredmoisturelevel.yaml
================================================
input_number:
moisture_level_for_pump1:
name: Desired Moisture level 1
unit_of_measurement: "%"
min: 0
max: 90
step: 1
mode: box
moisture_level_for_pump2:
name: Desired Moisture level 2
unit_of_measurement: "%"
min: 0
max: 90
step: 1
mode: box
moisture_level_for_pump3:
name: Desired Moisture level 3
unit_of_measurement: "%"
min: 0
max: 90
step: 1
mode: box
moisture_level_for_pump4:
name: Desired Moisture level 4
unit_of_measurement: "%"
min: 0
max: 90
step: 1
mode: box
moisture_level_for_pump5:
name: Desired Moisture level 5
unit_of_measurement: "%"
min: 0
max: 90
step: 1
mode: box
================================================
FILE: LICENSE
================================================
BSD 3-Clause License
Copyright (c) 2022, PricelessToolkit
Redistribution and use in source and binary forms, with or without
modification, are permitted provided that the following conditions are met:
1. Redistributions of source code must retain the above copyright notice, this
list of conditions and the following disclaimer.
2. Redistributions in binary form must reproduce the above copyright notice,
this list of conditions and the following disclaimer in the documentation
and/or other materials provided with the distribution.
3. Neither the name of the copyright holder nor the names of its
contributors may be used to endorse or promote products derived from
this software without specific prior written permission.
THIS SOFTWARE IS PROVIDED BY THE COPYRIGHT HOLDERS AND CONTRIBUTORS "AS IS"
AND ANY EXPRESS OR IMPLIED WARRANTIES, INCLUDING, BUT NOT LIMITED TO, THE
IMPLIED WARRANTIES OF MERCHANTABILITY AND FITNESS FOR A PARTICULAR PURPOSE ARE
DISCLAIMED. IN NO EVENT SHALL THE COPYRIGHT HOLDER OR CONTRIBUTORS BE LIABLE
FOR ANY DIRECT, INDIRECT, INCIDENTAL, SPECIAL, EXEMPLARY, OR CONSEQUENTIAL
DAMAGES (INCLUDING, BUT NOT LIMITED TO, PROCUREMENT OF SUBSTITUTE GOODS OR
SERVICES; LOSS OF USE, DATA, OR PROFITS; OR BUSINESS INTERRUPTION) HOWEVER
CAUSED AND ON ANY THEORY OF LIABILITY, WHETHER IN CONTRACT, STRICT LIABILITY,
OR TORT (INCLUDING NEGLIGENCE OR OTHERWISE) ARISING IN ANY WAY OUT OF THE USE
OF THIS SOFTWARE, EVEN IF ADVISED OF THE POSSIBILITY OF SUCH DAMAGE.
================================================
FILE: README.md
================================================
🤗 Please consider subscribing to my [YouTube channel](https://www.youtube.com/@PricelessToolkit/videos)
Your subscription goes a long way in backing my work.
[](https://ko-fi.com/U6U2QLAF8)
# Droplet
ALL-IN-ONE Irrigation and monitoring system for ESPHome and Home Assistant.
* Youtube How-To https://youtu.be/mCXTqONmpZk
* Shop https://www.pricelesstoolkit.com
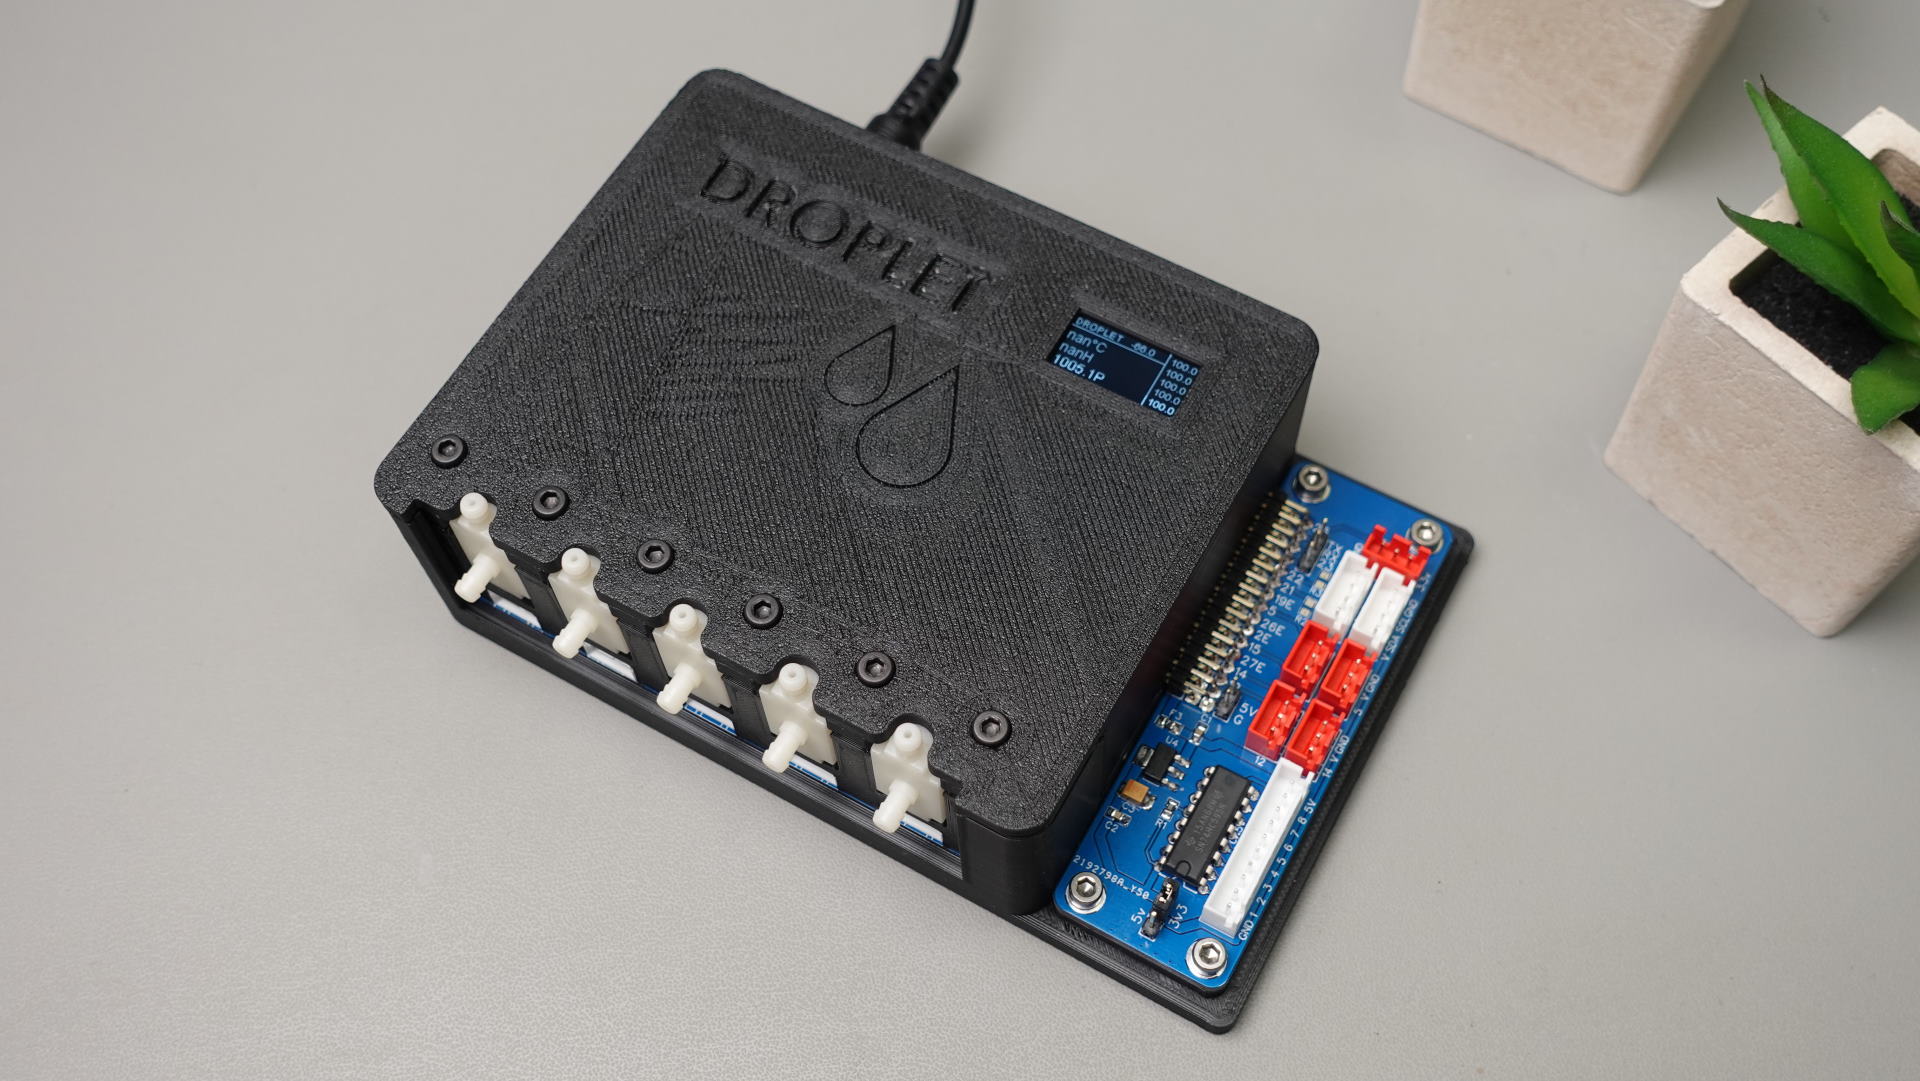
### Main Board
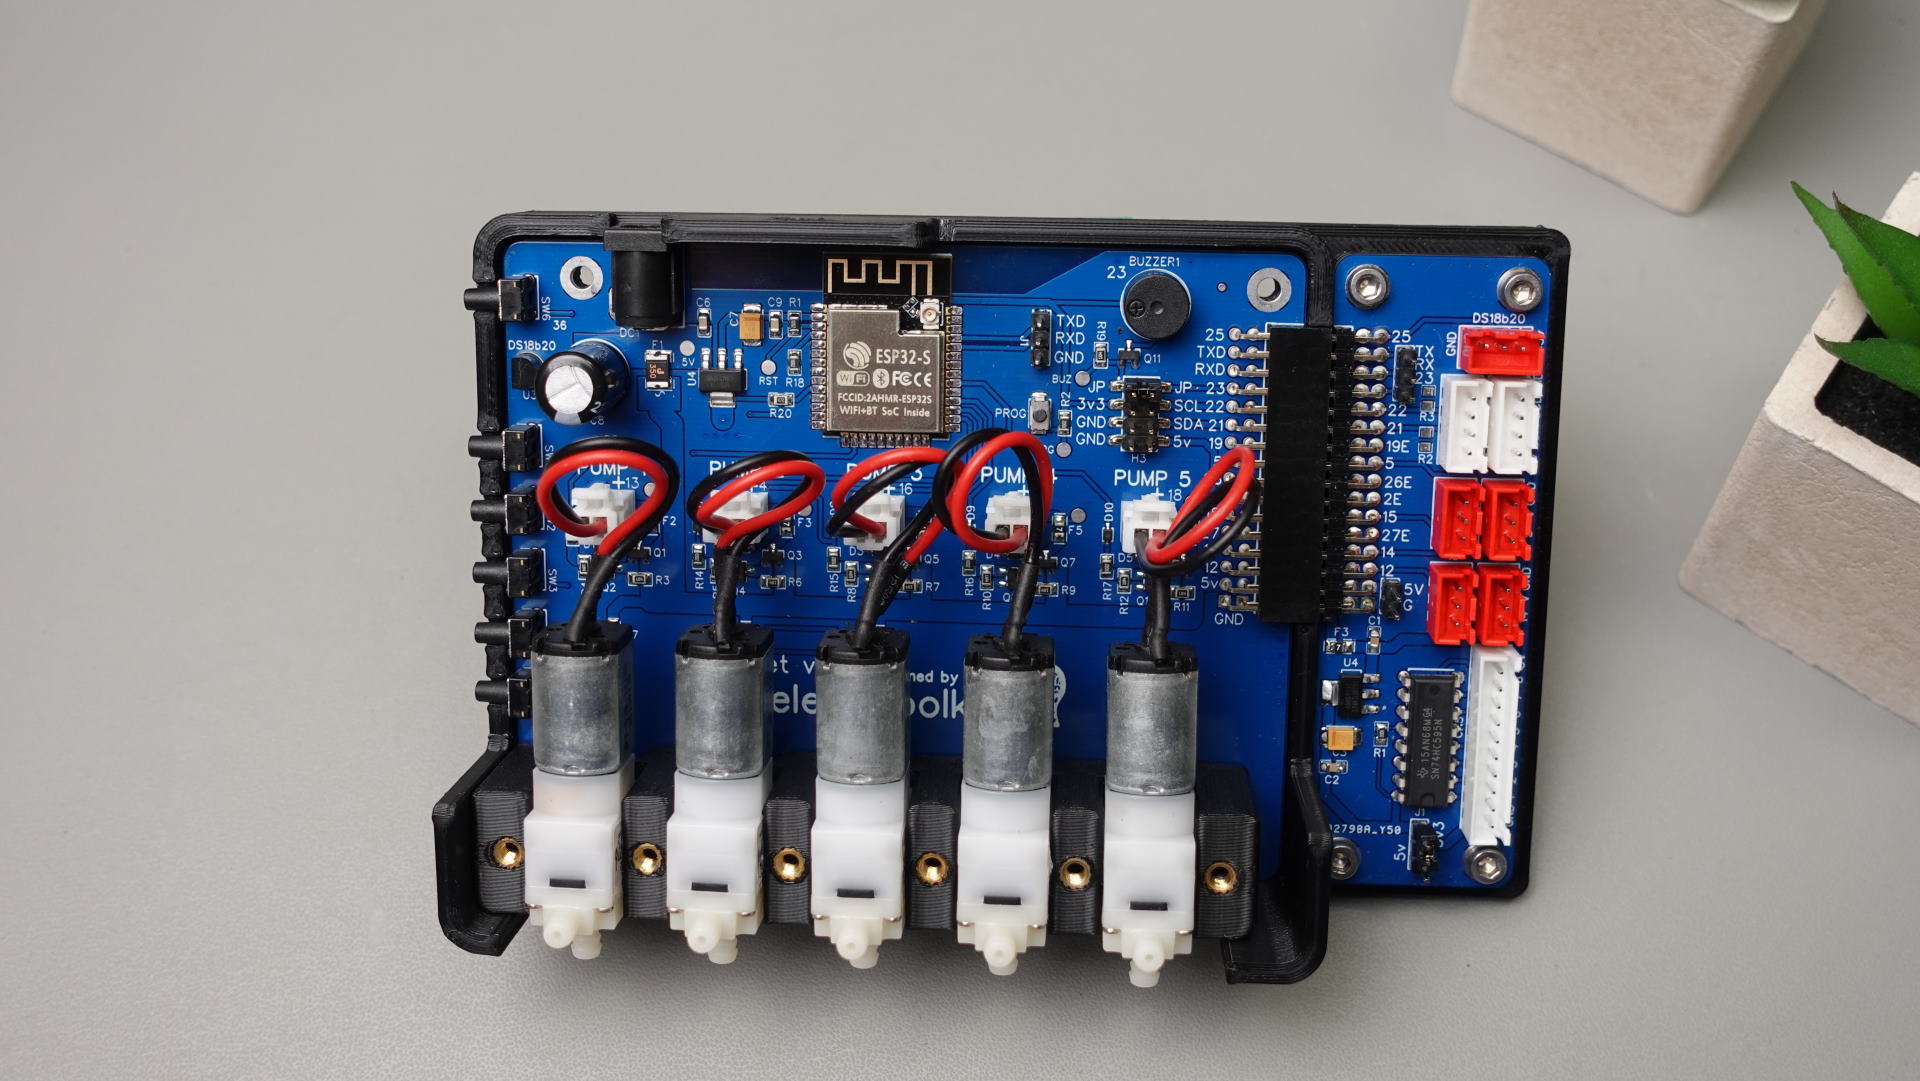
1. 5x Micro Pump outputs "5v"
2. 5x Soil Moisture sensor inputs "Data-5v-GND" 'Data line pulled down with 1M ohm resistor' ( Data line MAX 3.3v !!!!! )
3. Onboard Temperature sensor "DS18B20" https://esphome.io/components/sensor/dallas.html
4. Onboard Buzzer "Buzzer port can be free up with jumper" https://esphome.io/components/rtttl.html?highlight=buzzer
5. Breakout pins for connecting "i2c OLED Display" https://esphome.io/components/display/ssd1306.html?highlight=display
6. 5x Buttons for manual Pumps controll
7. 1x Button "Short press" for wake-up Oled "Long press" for general purpose. "2x Binary sensors available for HA"
8. All pumps outputs and moisture sensor inputs have fuses
9. Pins Which can be used "GPIO 19,5,26,2,15,27,14,12" and "1xi2c GPIO 21,22" "1xUART" "GPIO25 External port for DS18B20 TMP Sensor!!"
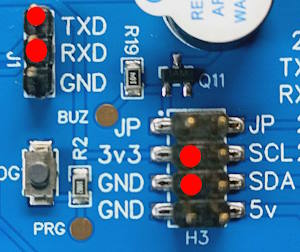
### Expansion Board v3
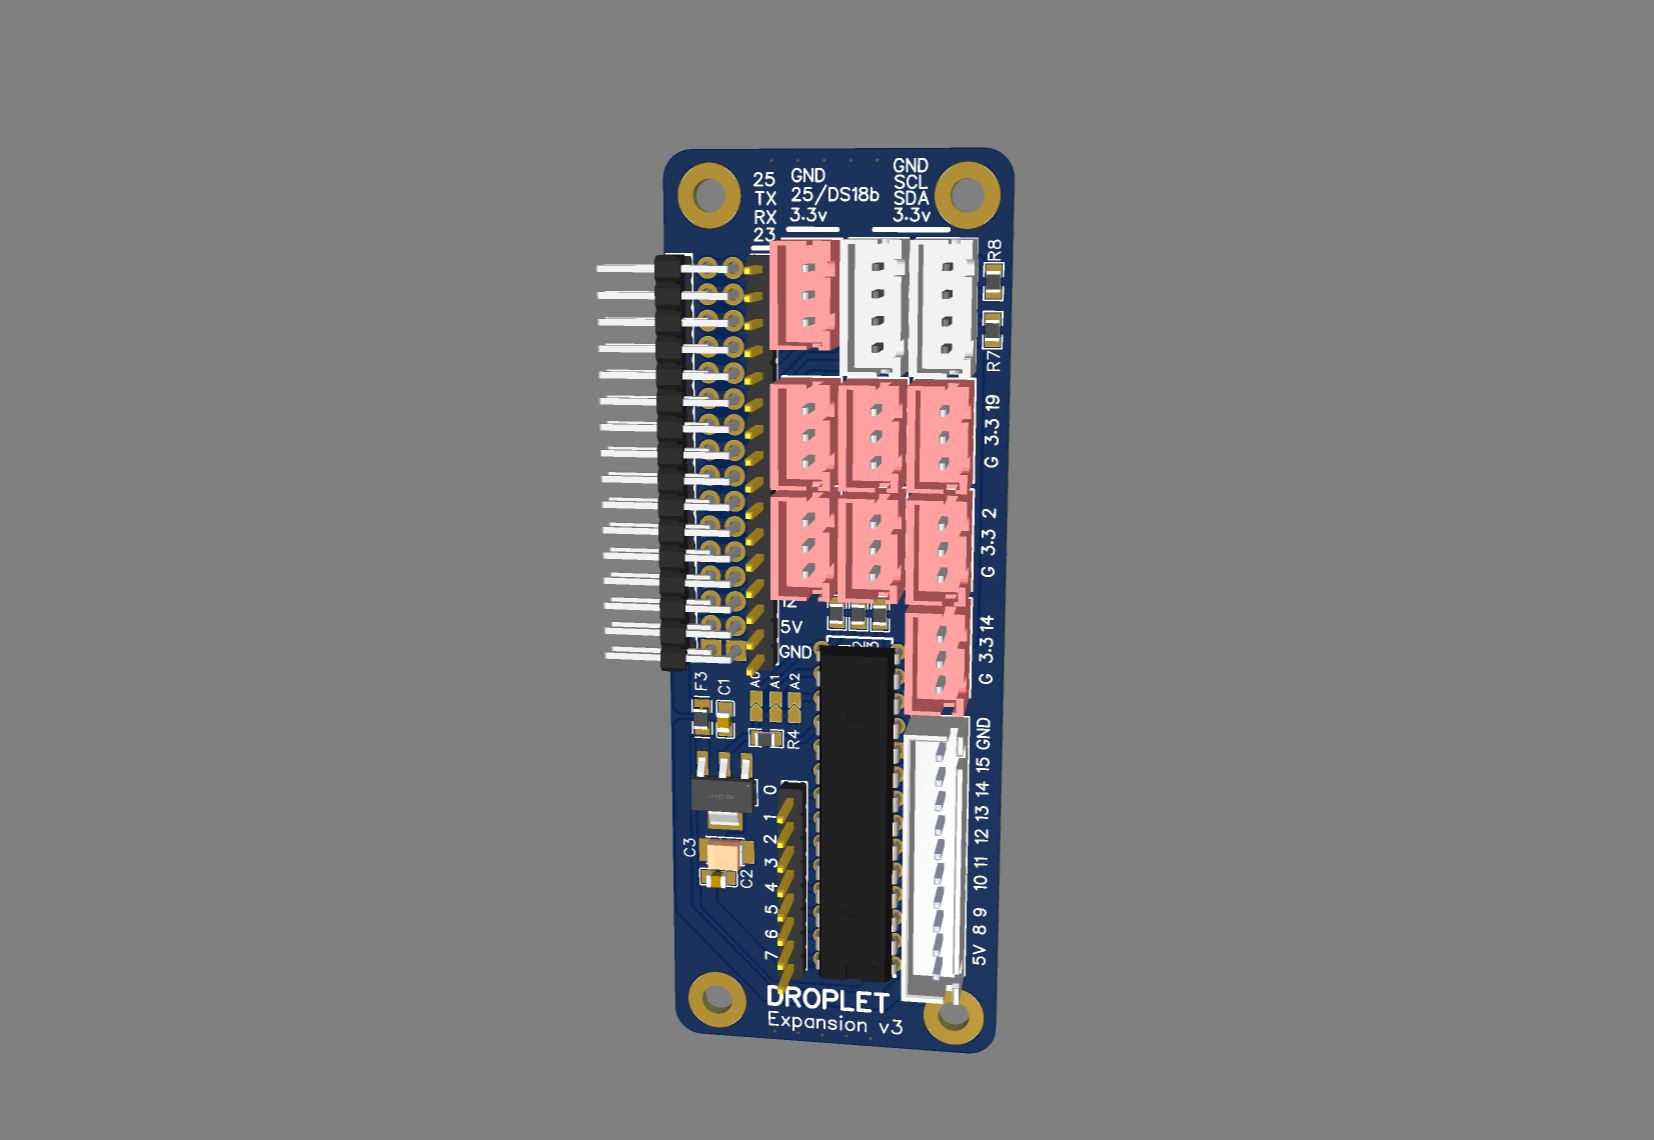
1. 1x JST 10pin connector Outputs for 8 Relays "MCP23017" Expander https://esphome.io/components/mcp230xx.html
2. 1x 8 Pin Header "MCP23017" Expander https://esphome.io/components/mcp230xx.html
3. 2x XH 4pin i2c (V, GPIO 21, GPIO 22 GND)
4. 7x XH 3pin GPIO 19,5,26,2,15,27,14
5. 1x XH 3pin for "DS18B20 TMP Sensors" (3.3v, GPIO 25, GND)
6. 1x 1pin Header GPIO23 connected to buzzer. Buzzer port can be free up, "remove jumper JP"
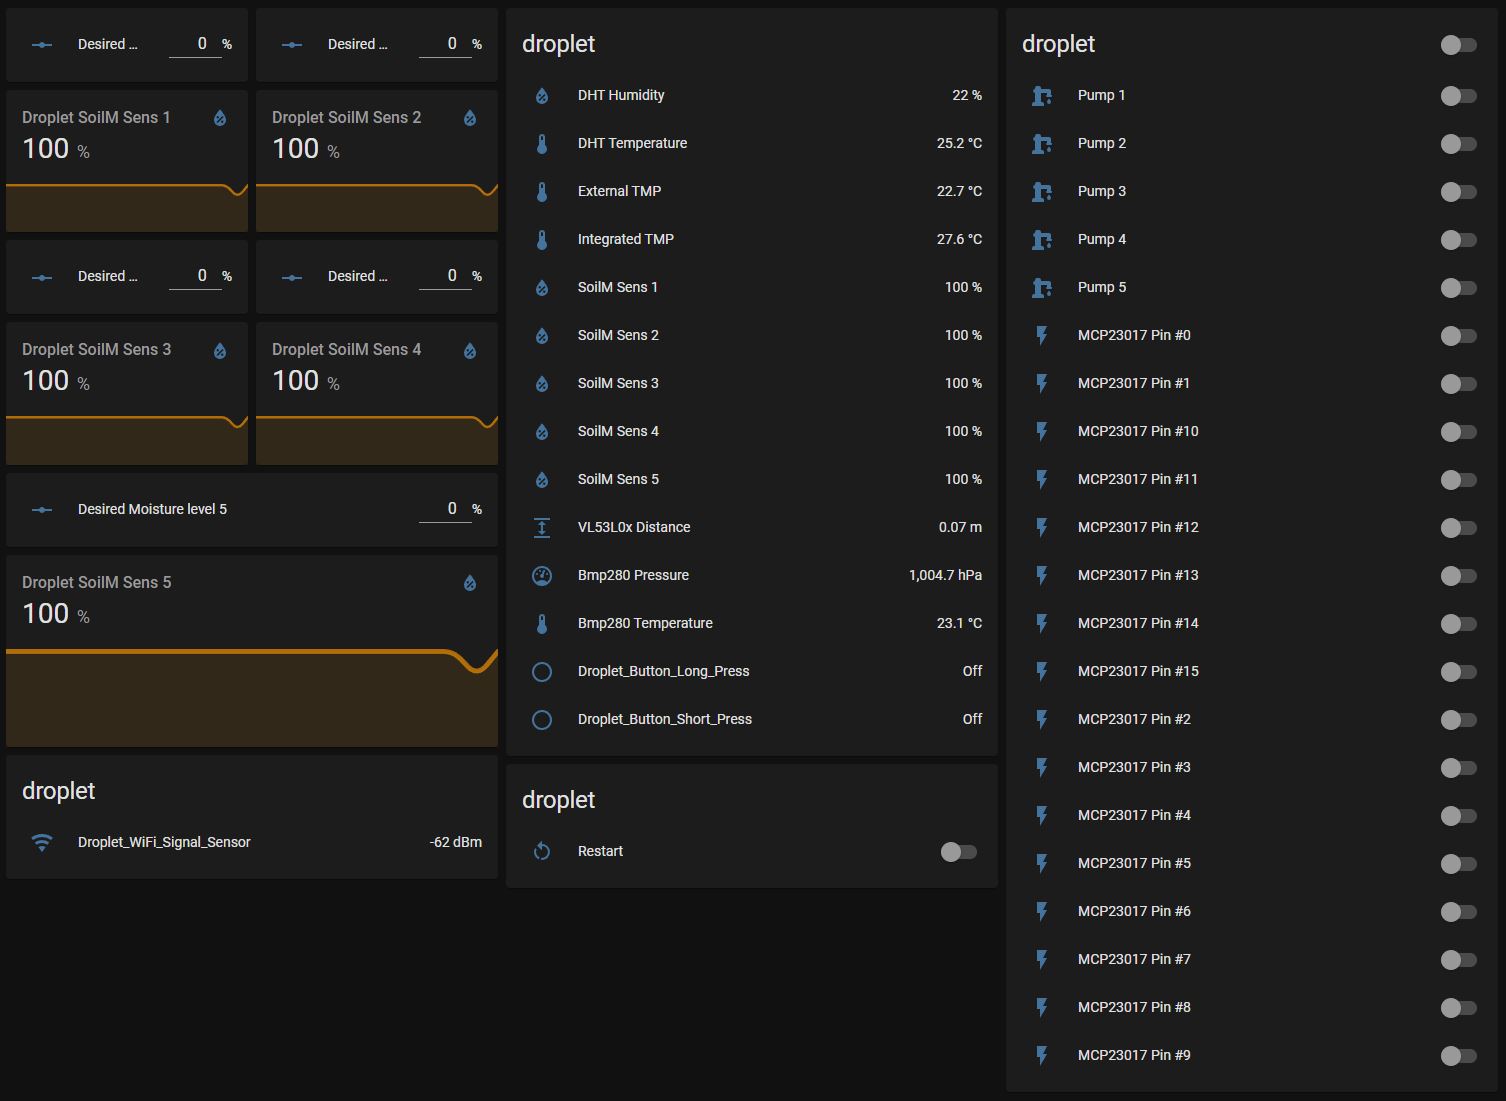
## What sensors Droplet support ?
### Droplet support "Almost all sensors supported by ESPHome" https://esphome.io/index.html
I connected and tested at the same time.
* 5x Pump
* 5x Moisture Sensor V2,
* 2x "DS18B20" Temperature,
* 1x BMP280 Temperature and Pressure,
* 1x VL53L0x Distance Sensor,
* 1x DHT Temperature and Humidity,
* 8x Relays.
## First time setup
### WIFI Captive Portal
The captive portal component in ESPHome is a fallback mechanism for when connecting to the configured WiFi fails.
After 1 minute of unsuccessful WiFi connection attempts, the ESP will start a WiFi hotspot with the credentials
```
SSID: "Droplet Fallback Hotspot"
password: "password"
```
When you connect to the fallback network, the web interface should open automatically (see also login to network notifications).
If that does not work, you can also navigate to http://192.168.4.1/ manually in your browser.
In this web interface, you can manually override the WiFi settings of the device.
Additionally, you can upload a new firmware file to your node without having to use a USB cable for uploads.
<img src="https://esphome.io/_images/captive_portal-ui.png" width="390" height="400" />
### Reflashing via USB-UART adapter
First, you need to create in the ESPhome new device using the Droplet Config file "don't forget to change it to your needs" then compile it and download the ".bin" file. To upload it to the Droplet, we also need "ESPHome Flasher" software
* Connect your USB-UART adapter to the Droplet Mainboard "GND, 3.3V, TX, RX"
*
* Push the "PROG" button on the Droplet Mainboard "Don't release it"
* Plug the USB-UART adapter to the PC.
* Upload firmware via ESPHome Flasher.
* Release the "PROG" button.
## Setting the onboard DS18b20 temperature sensor
First of all we need to find out the address of the Onboard temperature sensor.
For example with this configuration: "which is already in the default config"
```yaml
one_wire: #https://esphome.io/components/one_wire
- platform: gpio
pin: GPIO25
```
In the log output (ensure the log level is set to at least debug), you’ll see something like this.
<img src="https://esphome.io/_images/dallas-log.png" width="634" height="321" />
With the temperature sensor address identified in the log, we can now enable the Display component by uncomenting this line.
```yaml
it.printf(5, 15, id(font3) ,"%.1f°C", id(intergratedtmp).state);
```
It should look like this in the full configuration.
```yaml
display: # More info https://esphome.io/components/display/ssd1306.html?highlight=1306
- platform: ssd1306_i2c
id: oled
model: SSD1306 128x64
address: 0x3C # Oled Display Address
lambda: |-
it.printf(2, 0, id(font2), TextAlign::TOP_LEFT, "DROPLET");
it.printf(61, 0, id(font2) ,"%.1f", id(dbm).state);
it.line(0, 12, 98, 12);
it.line(98, 0, 98, 64);
it.printf(102, 0, id(font2) ,"%.1f", id(Soil1).state);
it.printf(102, 12, id(font2) ,"%.1f", id(Soil2).state);
it.printf(102, 24, id(font2) ,"%.1f", id(Soil3).state);
it.printf(102, 36, id(font2) ,"%.1f", id(Soil4).state);
it.printf(102, 48, id(font2) ,"%.1f", id(Soil5).state);
it.printf(5, 15, id(font3) ,"%.1f°C", id(intergratedtmp).state);
# it.printf(5, 30, id(font3) ,"%.1fH", id(dhthumidity).state);
# it.printf(5, 45, id(font3) ,"%.1fP", id(pressure).state);
```
Now, uncomment the integrated temperature sensor configuration and add the address.
```yaml
- platform: dallas_temp
address: 0x6e3c......
name: "${name} Integrated TMP"
id: "intergratedtmp"
```
After adding it to the configuration, reinstall the firmware once more.
## Part List
> [!NOTE]
> !!! Sellers often change the type of pump, so the link may not be relevant. !!!
> The correct pump connector pitch is 2.54 mm.
* Power adapter 5v 2-3.5Ah Connector DC-005 2.0 - https://s.click.aliexpress.com/e/_DEsuOdV
* OLED Display - https://s.click.aliexpress.com/e/_DlkmoXv
* Water Pump "Model B JSB1523" 5V "Connector pitch 2.54mm"
- - https://s.click.aliexpress.com/e/_ok8vbDj
- - https://s.click.aliexpress.com/e/_op1xxnx
- - Any 5v 0.3A pump with Connector pitch 2.54mm - https://fr.aliexpress.com/w/wholesale-water-pump-5v--jsb1523.html
* Water Pump Datasheet - https://github.com/PricelessToolkit/Droplet/blob/main/Water_Pump_JSB1523008.pdf
* Silicone tube "inner diameters 3 and 4mm" - https://s.click.aliexpress.com/e/_DBnM9qL
* Heat Set Insert M3 X D4.6 X L4.5 - https://s.click.aliexpress.com/e/_9xbSZC
* Capacitive Soil Moisture Sensor "lottery may be working or defective" - https://s.click.aliexpress.com/e/_oDhHhEv
* Cables with connectors for sensors and relays "pin pitch XH 2.54MM" - https://s.click.aliexpress.com/e/_DDpn7iB
* 3D Case "For those who live in France" you can order here - https://www.facebook.com/Upin3d
* Cable for soil moisture sensor https://s.click.aliexpress.com/e/_DDGNx5h
gitextract_212i8y20/ ├── .gitattributes ├── 3D/ │ ├── Assem.SLDASM │ ├── Assem_Cover_full.SLDASM │ ├── Battom.STL │ ├── Cover.STL │ ├── Cover_full_Part.SLDPRT │ ├── Housing_battom.SLDPRT │ ├── Pump_Holder_Down.SLDPRT │ ├── Pump_Holder_UP.SLDPRT │ └── Pumps_Holder.STL ├── Config/ │ ├── ESPHome/ │ │ └── droplet.yaml │ └── Home Assistant/ │ ├── VerticalStackCardConfiguration.txt │ └── desiredmoisturelevel.yaml ├── Gerber/ │ ├── Droplet_Expansion_BOM.xlsx │ └── Droplet_Main_Board_BOM.csv ├── LICENSE └── README.md
Condensed preview — 17 files, each showing path, character count, and a content snippet. Download the .json file or copy for the full structured content (26K chars).
[
  {
    "path": ".gitattributes",
    "chars": 66,
    "preview": "# Auto detect text files and perform LF normalization\n* text=auto\n"
  },
  {
    "path": "Config/ESPHome/droplet.yaml",
    "chars": 13951,
    "preview": "substitutions:\n  name: droplet\n\nesphome:\n  name: ${name}\n  name_add_mac_suffix: true\n  project:\n    name: pricelesstoolk"
  },
  {
    "path": "Config/Home Assistant/VerticalStackCardConfiguration.txt",
    "chars": 1240,
    "preview": "type: vertical-stack\ncards:\n  - type: horizontal-stack\n    cards:\n      - type: vertical-stack\n        cards:\n          "
  },
  {
    "path": "Config/Home Assistant/desiredmoisturelevel.yaml",
    "chars": 726,
    "preview": "input_number:\n  moisture_level_for_pump1:\n    name: Desired Moisture level 1\n    unit_of_measurement: \"%\"\n    min: 0\n   "
  },
  {
    "path": "LICENSE",
    "chars": 1503,
    "preview": "BSD 3-Clause License\n\nCopyright (c) 2022, PricelessToolkit\n\nRedistribution and use in source and binary forms, with or w"
  },
  {
    "path": "README.md",
    "chars": 7173,
    "preview": "🤗 Please consider subscribing to my [YouTube channel](https://www.youtube.com/@PricelessToolkit/videos)\nYour subscriptio"
  }
]

// ... and 11 more files (download for full content)
About this extraction
This page contains the full source code of the PricelessToolkit/Droplet GitHub repository, extracted and formatted as plain text for AI agents and large language models (LLMs). The extraction includes 17 files (96.4 MB), approximately 8.1k tokens. Use this with OpenClaw, Claude, ChatGPT, Cursor, Windsurf, or any other AI tool that accepts text input. You can copy the full output to your clipboard or download it as a .txt file.
Extracted by GitExtract — free GitHub repo to text converter for AI. Built by Nikandr Surkov.