A comprehensive Vue UI components library based on the [Arco Design](https://arco.design/) system.
[](https://github.com/arco-design/arco-design-vue/blob/main/LICENSE)
English | [简体中文](./README.zh-CN.md)
# Features
## Comprehensive
With more than 60 crafted components that you can use out of the box.
## Customizable theme
Extensive theme tokens can be customized to build your own theme. Two ways of customization are supported:
* [With less-loader](https://arco.design/vue/docs/theme)
* [Design Lab](https://arco.design/themes) - Recommended!
## TypeScript friendly
All components are written in TypeScript so it's type friendly.
# Installation
Available as an [npm package](https://www.npmjs.com/package/@arco-design/web-vue)
```bash
// with npm
npm install @arco-design/web-vue
// with yarn
yarn add @arco-design/web-vue
// with pnpm
pnpm add @arco-design/web-vue
```
# Examples
```typescript
import { createApp } from 'vue'
import ArcoVue from '@arco-design/web-vue';
import App from './App.vue';
import '@arco-design/web-vue/dist/arco.css';
const app = createApp(App);
app.use(ArcoVue);
app.mount('#app');
```
# Useful Links
* [Documentation website](https://arco.design/)
* [Dark mode](https://arco.design/vue/docs/dark)
* [Theme customization](https://arco.design/vue/docs/theme)
* [Figma component library](https://www.figma.com/file/FVu1DydEeXvJqXrkOb90Oi/ArcoDesign%E7%BB%84%E4%BB%B6%E8%AE%BE%E8%AE%A1_2.0?node-id=5472%3A308)
* [Awesome Arco](https://github.com/arco-design/awesome-arco)
# Ecosystems
| Project | Description |
| --------------------- | ------------------------------------------------------- |
| [React Component Library] | A comprehensive React UI components library based on the Arco Design system |
| [Design Lab] | A platform to create and manage your themes with ease. |
| [Material Market] | A platform that provides massive high-quality customized materials to greatly boost development efficiency. |
| [Icon Box] | One-stop platform to manage your icons. |
| [Arco Pro] | A solution to quickly building applications from scratch. |
[React Component Library]: https://arco.design/react/docs/start
[Design Lab]: https://arco.design/themes
[Material Market]: https://arco.design/material
[Icon Box]: https://arco.design/iconbox
[Arco Pro]: https://arco.design/pro/
# Contributing
Developers interested in contributing should read the [Code of Conduct](./CODE_OF_CONDUCT.md) and
the [Contributing Guide](./CONTRIBUTING.md).
Thank you to all the people who already contributed to ArcoDesign!
# License
Ths project is [MIT licensed](./LICENSE).
================================================
FILE: README.zh-CN.md
================================================
{{ type === 'color' && dark ? `dark-${record.name}` : record.name }}
{{ dark ? record.darkValue ?? record.value : record.value }}
{{ record.cssvar ? `--${record.name}` : '-' }}
================================================
FILE: packages/arco-vue-docs/context.ts
================================================
import { InjectionKey } from 'vue';
export interface CollapseContext {
showNav: boolean;
showAnchor: boolean;
toggleNav: () => void;
toggleAnchor: () => void;
}
export const collapseInjectionKey: InjectionKey =
Symbol('CollapseContext');
================================================
FILE: packages/arco-vue-docs/docs/dark.en-US.md
================================================
```yaml
meta:
type: Developer Guide
title: Dark mode
description: The dark theme is built in the component library, and you can easily switch to dark.
```
*Auto translate by google.*
## Switch to dark mode
The component library uses the arco-theme attribute on the body tag to indicate the current theme, so you only need to modify this attribute to complete the theme switch.
```ts
// Set as dark theme
document.body.setAttribute('arco-theme', 'dark')
// Restore light theme
document.body.removeAttribute('arco-theme');
```
## Principle and built-in colors
Refer to [Dark Mode](https://arco.design/react/docs/palette) and [Color](https://arco.design/react/docs/palette)
================================================
FILE: packages/arco-vue-docs/docs/dark.zh-CN.md
================================================
```yaml
meta:
type: 开发指南
title: 暗黑模式
description: 组件库内置暗色的主题,你可以轻易的切换到暗色。
```
## 切换到暗黑模式
组件库通过 body 标签上的 arco-theme 属性来标明当前的主题,所以你只要修改这个属性,即可完成主题的切换。
```ts
// 设置为暗黑主题
document.body.setAttribute('arco-theme', 'dark')
// 恢复亮色主题
document.body.removeAttribute('arco-theme');
```
## 原理和内置颜色
可参考 [暗黑模式](https://arco.design/react/docs/palette) 和 [颜色](https://arco.design/react/docs/palette)
================================================
FILE: packages/arco-vue-docs/docs/faq.en-US.md
================================================
```yaml
meta:
type: Developer Guide
title: FAQ
description: Frequently Asked Questions in the Use of the Component Library
```
## Controlled and Uncontrolled
The concept of `controlled` is used in the Arco Design Vue component library, as the name suggests, the display state of the component will always be the same as the incoming value. We recommend using input components in controlled mode.
At this time, you can modify the value of `model-value` through `two-way binding (v-model)` or `change` event to ensure the same value inside and outside the component.
In controlled mode, if you want to control the displayed value, you can use the `change` event to handle it.
If we don't want to control the value of the component, we can use the uncontrolled mode, in which case the value of the component will be maintained inside the component, and the initial value can be set by `default-value`. In uncontrolled mode, you can get the value of the component through the `change` event.
pay attention:
The `default-*` class attributes are used to set initial values in uncontrolled mode and do not affect subsequent states. When this value and the controlled value are used at the same time, the controlled value takes precedence.
## Update At Scroll
By default, the drop-down menu will follow the change of the window scroll bar to update the position. If the component containing the drop-down menu is placed in a scrollable container, there will be a problem that the drop-down menu does not update the position when the container is scrolled. At this time, you can use the trigger inside the component. configuration, will `updateAtScroll`
Set to `true` to enable rolling update support.
If there are many such scenes in the project, you can enable this property globally through the [ConfigProvider](/vue/component/config-provider) component.
## The use of virtual lists
Components that support setting up virtual lists [List](/vue/component/list) 、[Select](/vue/component/Select)、[Table](/vue/component/table)、[Tree](/vue/component/tree) set `virtual-list-props` Enable the virtual list function.
The rendering of virtual list elements can be divided into two cases: **elements are highly fixed** and **elements are highly dynamic**.
|Name|Description|Type|Default|version|
|---|---|---|:---:|:---|
|height|Viewable area height|`number \| string`|`-`||
|fixedSize| Whether the elements in the list are of fixed size (height) |`boolean`|`false`|2.34.1|
|estimatedSize| Estimated size (height) [this value is not valid when `fixedSize` is `true`], and if it is closer to the average size, the scroll bar length will look more accurate. It is recommended to allocate the average calculated by yourself. The default dynamic height will use the average of the first Section |`number`|`-`|2.34.1|
|buffer| The number of elements mounted in advance outside the boundary of the viewport. (`Section = buffer * 3`) the default value is `10` (that is, Section defaults to 30). It is recommended to adjust the height of the list viewport. This value will affect performance. |`number`|`10`|2.34.1|
================================================
FILE: packages/arco-vue-docs/docs/faq.zh-CN.md
================================================
```yaml
meta:
type: 开发指南
title: 常见问题
description: 组件库使用中的常见问题解答
```
## 受控与非受控
Arco Design Vue 组件库中使用了 `受控` 的概念,正如其名,组件的显示状态将始终与传入值相同。我们推荐通过受控模式来使用输入组件。
这时可以通过 `双向绑定(v-model)` 或者 `change` 事件来修改 `model-value` 的值,来保证组件内部与外部的值相同。
在受控模式中,如果希望控制显示的值,可以使用 `change` 事件进行处理。
如果我们不希望控制组件的值,可以使用非受控模式,此时组件的值将维护在组件内部,可以通过 `default-value` 来设置初始值。非受控模式下可以通过 `change` 事件来获取组件的值。
特别注意:
`default-*` 类属性用来设置非受控模式下的初始值,不会影响后续的状态。此值与受控值同时使用时,受控值优先生效。
## 下拉菜单的滚动跟随
下拉菜单默认会跟随 window 滚动条的变化更新位置,如果将包含下拉菜单的组件放置在一个可滚动的容器中,会出现容器滚动时下拉菜单没有更新位置的问题,此时可以通过组件内部的 trigger 配置,将 `updateAtScroll`
设置为 `true` 开启滚动更新的支持。
如果项目内此场景较多,可以通过 [ConfigProvider](/vue/component/config-provider) 组件全局开启此属性。
## 虚拟列表的使用
支持设置虚拟列表的组件 [List](/vue/component/list) 、[Select](/vue/component/Select)、[Table](/vue/component/table)、[Tree](/vue/component/tree) 设置 `virtual-list-props` 开启虚拟列表功能。
虚拟列表元素的渲染分为 **元素高度固定**,**元素高度动态** 两种情况。
|参数名|描述|类型|默认值|版本|
|---|---|---|:---:|:---|
|height|可视区域高度|`number \| string`|`-`||
|fixedSize| 列表内元素是否为固定大小(高度)|`boolean`|`false`|2.34.1|
|estimatedSize| 预估大小(高度)[当 `fixedSize` 为 `true` 时,此值无效],如果它更接近平均大小,则滚动条长度看起来将更准确。建议分配自己计算的平均值。默认动态高度将使用首个 Section 的平均值|`number`|`-`|2.34.1|
|buffer|视口边界外提前挂载的元素数量。(`Section = buffer * 3`)默认值为 `10`(也就是 Section 默认为 30), 建议根据列表视口的高度做调整,此值太大会影响性能。|`number`|`10`|2.34.1|
================================================
FILE: packages/arco-vue-docs/docs/i18n.en-US.md
================================================
```yaml
meta:
type: Developer Guide
title: Globalization
description: All component texts use Chinese by default, and other languages can be used by setting.
```
_Auto translate by google._
Internationalization is achieved through the [ConfigProvider](/vue/component/config-provider) component.
## Basic usage
```vue
```
## Supported regional languages
| Language | Area code |
| ------------------- | --------- |
| Simple Chinese | zh-CN |
| English (US) | en-US |
| Japanese | ja-JP |
| Traditional Chinese | zh-TW |
| Portuguese | pt-PT |
| Spanish | es-ES |
| Indonesian | id-ID |
| French, France | fr-FR |
| German, Germany | de-DE |
| Korean | ko-KR |
| Italian, Italy | it-IT |
| Thai | th-TH |
| Melayu (Malaysia) | ms-MY |
| Vietnamese | vi-VN |
| Khmer (Cambodia) | km-KH |
| Arabic (Egypt) | ar-EG |
| Russian (Russia) | ru-RU |
| Dutch (Netherlands) | nl-NL |
================================================
FILE: packages/arco-vue-docs/docs/i18n.zh-CN.md
================================================
```yaml
meta:
type: 开发指南
title: 国际化
description: 所有组件文案默认使用的是中文,通过设置可以使用其它语言。
```
通过 [ConfigProvider](/vue/component/config-provider) 组件实现国际化。
## 基本用法
```vue
```
## 支持的地区语言
| 语言 | 地区编码 |
| -------------------- | -------- |
| 简体中文 | zh-CN |
| 英文 | en-US |
| 日文 | ja-JP |
| 繁体中文(中国台湾) | zh-TW |
| 葡萄牙语 | pt-PT |
| 西班牙语 | es-ES |
| 印度尼西亚语 | id-ID |
| 法语(法国) | fr-FR |
| 德语(德国) | de-DE |
| 韩语 | ko-KR |
| 意大利语(意大利) | it-IT |
| 马来语(马来西亚) | ms-MY |
| 泰语 | th-TH |
| 越南语 | vi-VN |
| 高棉语(柬埔寨) | km-KH |
| 阿拉伯语(埃及) | ar-EG |
| 俄语(俄罗斯) | ru-RU |
| 荷兰语(荷兰) | nl-NL |
================================================
FILE: packages/arco-vue-docs/docs/pro/build.en-US.md
================================================
```yaml
meta:
type: Arco Pro
title: Package build
description: Package code
```
*Auto translate by google.*
## Package and build
When the code is written, execute the following command to package the code
```bash
npm run build
```
This command calls the packaging command provided by vite. After the packaging is completed, a `dist` folder will be generated in the root directory, which is the code that can be used for deployment.
PS: Tips for reducing package size! ! !
Because in the Pro project, the displayed table component requires the vue compile function, so a version with a compiler is introduced.
If you don't need the Vue template compilation function, delete the corresponding business code, configure the specified Vue version, and build and package to reduce the package size.
If you need the ability to compile vue templates, you can configure it in the vite.config.prod.ts file (see below).
```ts
// config/vite.config.build.ts
import {defineConfig} from'vite';
export default defineConfig({
mode:'production',
...
resolve: {
alias: [
{
find:'vue',
replacement:'vue/dist/vue.esm-bundler.js', // need to compile tmp
},
],
},
});
```
For more specific configuration details, please refer to [vite](https://vitejs.dev/)[Official Website](https://vitejs.dev/).
================================================
FILE: packages/arco-vue-docs/docs/pro/build.zh-CN.md
================================================
```yaml
meta:
type: Arco Pro 最佳实践
title: 打包构建
description: 打包代码
```
## 打包构建
当代码书写完成后,执行以下命令即可打包代码
```bash
npm run build
```
该命令调用的是 vite 提供的打包命令,打包完成后,会在根目录生成 `dist` 文件夹,这里面就是可以用于部署的代码。
PS: 打包体积缩减提示!!!
因为在Pro项目中,展示的table组件需要 vue compile 功能,所以引入了带有编译器的版本。
如果不需要vue 模板编译功能,删除对应的业务代码后,配置指定的vue版本,构建打包以缩小打包体积。
如果需要 vue 模板编译 能力,可在 vite.config.prod.ts 文件 中进行配置(如下)。
```ts
// config/vite.config.build.ts
import { defineConfig } from 'vite';
export default defineConfig({
mode: 'production',
...
resolve: {
alias: [
{
find: 'vue',
replacement: 'vue/dist/vue.esm-bundler.js', // 需要编译tmp
},
],
},
});
```
更多具体配置详见[vite](https://vitejs.dev/)[官网](https://vitejs.dev/)。
================================================
FILE: packages/arco-vue-docs/docs/pro/directory.en-US.md
================================================
```yaml
meta:
type: Arco Pro
title: Directory Structure
description: The organizational structure of the project file.
```
*Auto translate by google.*
## Content
```
├── README.md
├── package.json
├── index.html
├── src
│ ├── api # Request interface
│ ├── assets # Static resources
│ └── style # Global style
│ ├── components # General business components
│ ├── config # Global configuration (including echarts theme)
│ └── settings.json # Configuration file
│ ├── directive # Instruction set (if necessary, you can add it yourself)
│ ├── filters # filter (if necessary, you can add it yourself)
│ ├── hooks # global hooks
│ ├── layout # Layout
│ ├── locale # Internationalized language pack
│ ├── mock # Mock data
│ ├── views # Page template
| |—— router # Routing configuration
│ ├── store # State management center
│ ├── types # Typescript types
│ └── utils # Tool library
│ └── App.vue # View entrance
│ └── main.ts # Entry file
└── tsconfig.json
```
ps: [Filter description](https://v3-migration.vuejs.org/breaking-changes/filters.html)
================================================
FILE: packages/arco-vue-docs/docs/pro/directory.zh-CN.md
================================================
```yaml
meta:
type: Arco Pro 最佳实践
title: 目录结构
description: 项目文件的组织结构
```
## 目录
```
├── README.md
├── package.json
├── index.html
├── src
│ ├── api # 请求接口
│ ├── assets # 静态资源
│ └── style 全局样式
│ ├── components # 通用业务组件
│ ├── config # 全局配置(包含echarts主题)
│ └── settings.json # 配置文件
│ ├── directives # 指令集(如需,可自行补充)
│ ├── filters # 过滤器(如需,可自行补充)
│ ├── hooks # 全局hooks
│ ├── layout # 布局
│ ├── locale # 国际化语言包
│ ├── mock # 模拟数据
│ ├── views # 页面模板
│ ├── router # 路由配置
│ ├── store # 状态管理中心
│ ├── types # Typescript 类型
│ └── utils # 工具库
│ └── App.vue # 视图入口
│ └── main.ts # 入口文件
└── tsconfig.json
```
ps:[过滤器说明](https://v3-migration.vuejs.org/breaking-changes/filters.html)
================================================
FILE: packages/arco-vue-docs/docs/pro/faq.en-US.md
================================================
```yaml
meta:
type: Arco Pro
title: FAQ
description: Arco Design Pro Vue FAQ Collection
```
*Auto translate by google.*
## Initialization
### 1. Initialization of arco-cli failed

If the dependency installation fails, go to the directory of the initialization project and execute the npm install or yarn install installation operation again.
## Development
### 1. How to set highlight for menu items?
See [Routes and menu](/vue/docs/pro/routes-and-menu) for details
### 2.Menu hides children
See [Routes and menu](/vue/docs/pro/routes-and-menu) for details
### 3.Configure first-level menu items
Due to the architecture, configuring a single first-level menu item requires the cooperation of multiple menu configuration items. See [#85]([/vue/docs/pro/routes-and-menu](https://github.com/arco-design/arco-design-pro-vue/issues/85#issuecomment-1142289501)) for details
### 4.Using jsx in Vue3
详见 [babel-plugin-jsx](https://github.com/vuejs/babel-plugin-jsx)
### 5.Cross-domain proxy
See [vite configuration](https://cn.vitejs.dev/config/#server-open) for details
### 6.Code cannot be pushed
Because of the use of [husky](https://github.com/typicode/husky), the hook [normalizes](https://docs.google.com/document/d/1QrDFcIiPjSLDn3EL15IJygNPiHORgU1_OOAqWjiDU5Y/edit#heading=h.greljkmo14y0) the uploaded commit information check.
Please follow the documentation for git commit information normalization.
If you do not need this function, you can delete husky related files and corresponding scripts. (**Not recommended**)
## Build
### 1. Rollup failed to resolve import "XXXXXX/node_modules/@arco-design/web-vue/es/xxx-xxx/style/css.js”
The error comes from loading the build plugin (config/plugin/styleImport.ts) on demand. There are several reasons for this problem.
- The new version of the component library has added components.
- The component itself is missing and not added.
- The unplugin-vue-components dependency library version is too low.
Solution please [move](https://github.com/arco-design/arco-design-pro-vue/issues/71).
### 2. Executing build TS type error
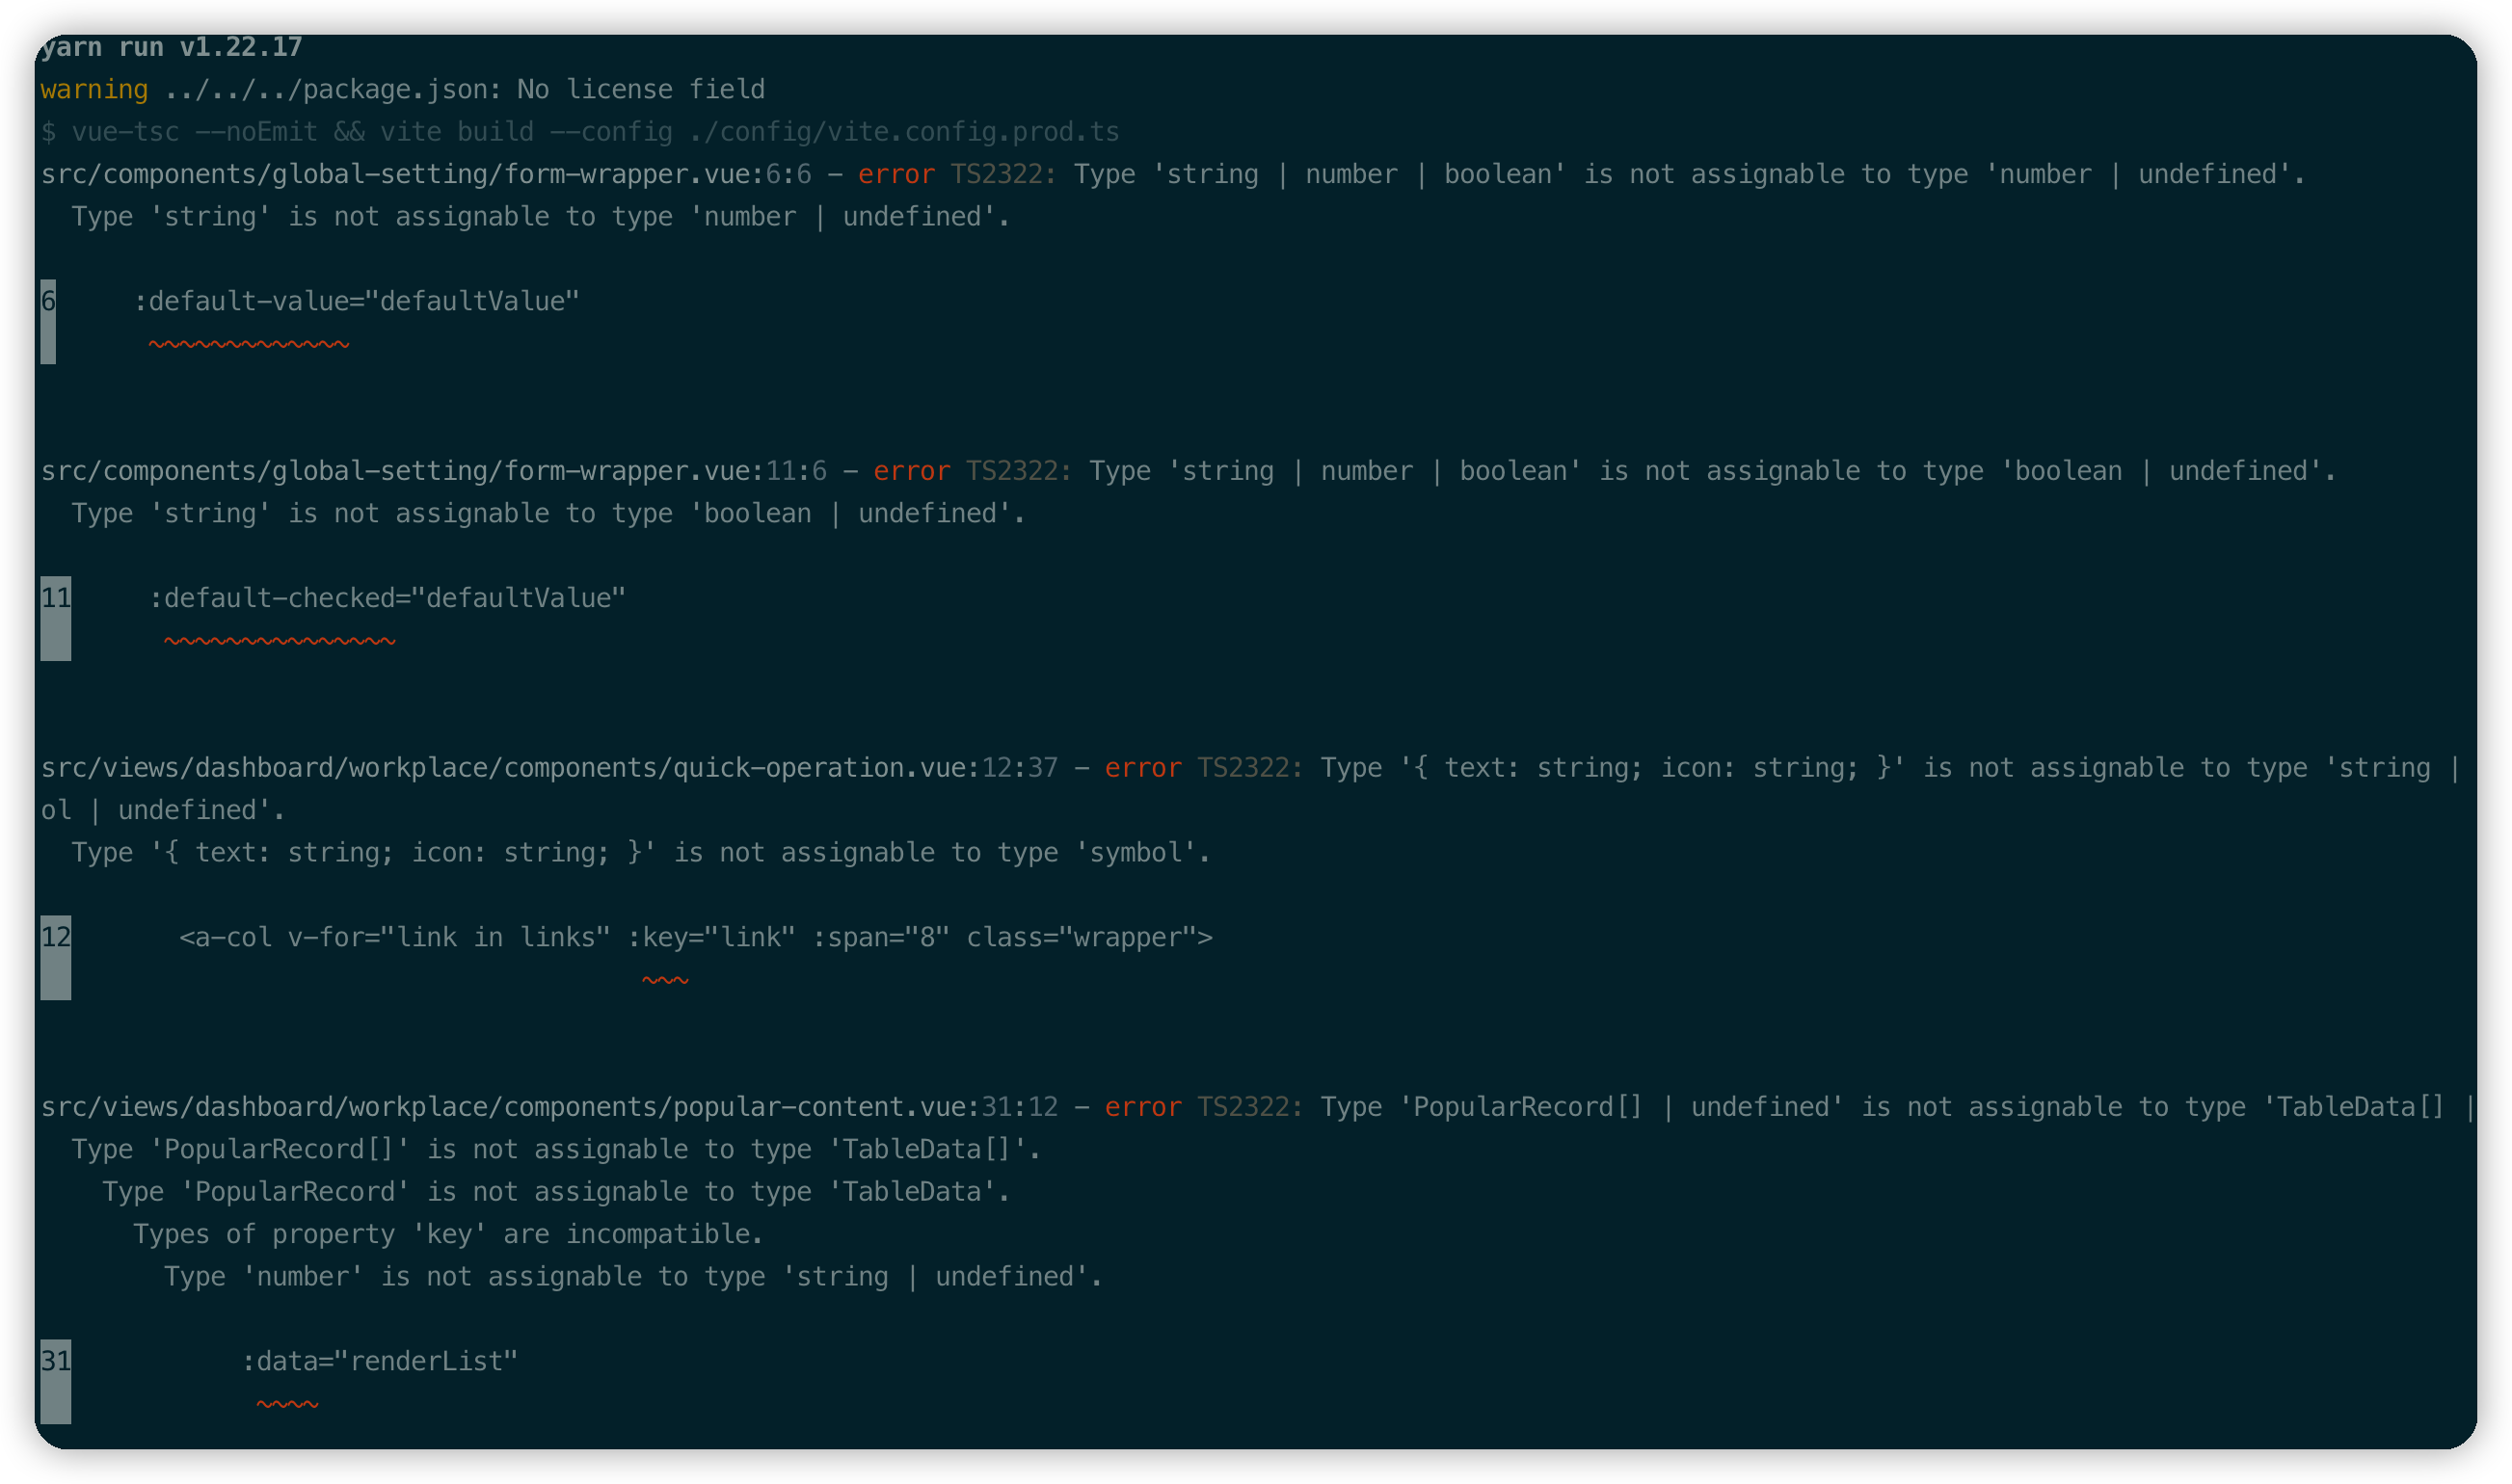
Reason for error:
- There is a problem with the spelling itself.
- The new version of the component library has made changes to the type declaration.
Solution:
- Follow the type hints to make changes.
- Turn off vue-tsc checks. (**Not recommended**)
```ts
// package.json
"build": "vue-tsc --noEmit && vite build --config ./config/vite.config.prod.ts" // before fixing
"build": "vite build --config ./config/vite.config.prod.ts" // 修改后
```
### 3. Vue-tsc builds slowly
- Reinstall vue-tsc to the latest version.
```shell
# npm
npm install vue-tsc@latest
# yarn
yarn add vue-tsc@latest
```
- Turn off vue-tsc checks. (**Not recommended**)
### 4. Preview the packaged project
```shell
# npm
npm run preview
# yarn
yarn preview
```
**PS: The preview command will execute the build operation first in Pro.**
## Deployment
### 1. After the page is deployed successfully, refresh the 404 page
[Moving to Vue Router](https://router.vuejs.org/guide/essentials/history-mode.html)
## Other
### 1. Can the developed projects be upgraded to the latest version?
Arco Pro, as a project template, does not have the ability to smoothly upgrade to the latest version.
If you need a new version capability, you can initialize a project and copy your business code into it, and then make the corresponding changes.
================================================
FILE: packages/arco-vue-docs/docs/pro/faq.zh-CN.md
================================================
```yaml
meta:
type: Arco Pro 最佳实践
title: 常见问题
description: Arco Design Pro Vue 常见问题合集
```
## 初始化
### 一、arco-cli初始化失败

依赖安装失败的问题,进入到初始化项目的目录,重新执行执行npm install 或 yarn install安装操作即可。
## 开发相关
### 一、菜单项如何设置高亮?
详见 [路由和菜单](/vue/docs/pro/routes-and-menu)
### 二、菜单隐藏子项
详见 [路由和菜单](/vue/docs/pro/routes-and-menu)
### 三、配置一级菜单项
因为架构缘故,配置单独的一级菜单项,需要多个菜单配置项进行配合。详见 [#85]([/vue/docs/pro/routes-and-menu](https://github.com/arco-design/arco-design-pro-vue/issues/85#issuecomment-1142289501))
### 四、Vue3 中使用 jsx 写法
详见 [babel-plugin-jsx](https://github.com/vuejs/babel-plugin-jsx)
### 五、跨域代理
详见 [vite配置](https://cn.vitejs.dev/config/#server-open)
### 六、代码无法提交
因为使用了 [husky](https://github.com/typicode/husky) 的缘故,钩子对上传的commit信息进行[规范化](https://docs.google.com/document/d/1QrDFcIiPjSLDn3EL15IJygNPiHORgU1_OOAqWjiDU5Y/edit#heading=h.greljkmo14y0)校验。
请按照文档进行git commit信息规范化。
如果不需要该功能,可以删除掉husky相关文件和对应脚本。(**不推荐**)
## 构建相关
### 一. Rollup failed to resolve import "XXXXXX/node_modules/@arco-design/web-vue/es/xxx-xxx/style/css.js”
报错源于按需加载构建插件(config/plugin/styleImport.ts),该问题产生分别有以下几个原因
- 新版组件库新增了组件。
- 组件本身遗漏未进行添加。
- unplugin-vue-components 依赖库版本过低。
解决方法请 [移步](https://github.com/arco-design/arco-design-pro-vue/issues/71)。
### 二、执行构建TS类型报错

报错原因:
- 写法本身存在问题。
- 新版组件库对类型声明进行了变更修改。
解决方法:
- 按照类型提示进行修改。
- 关闭vue-tsc检查。(**不推荐**)
```ts
// package.json
"build": "vue-tsc --noEmit && vite build --config ./config/vite.config.prod.ts" // 修改前
"build": "vite build --config ./config/vite.config.prod.ts" // 修改后
```
### 三、vue-tsc构建缓慢
- 重新安装vue-tsc至最新版本。
```shell
# npm
npm install vue-tsc@latest
# yarn
yarn add vue-tsc@latest
```
- 关闭vue-tsc检查。(**不推荐**)
### 四、预览打包项目
```shell
# npm
npm run preview
# yarn
yarn preview
```
**PS: 该预览命令在Pro中会先执行build操作。**
## 部署相关
### 一、页面部署成功后刷新出现404页面
[移步 Vue Router](https://router.vuejs.org/guide/essentials/history-mode.html)
## 其它
### 一、已经开发的项目是否能够升级到最新版?
Arco Pro作为一个项目模板,不具备平滑升级过渡到最新版本的能力。
如需新版本能力,可以初始化一个项目后将自己的业务代码拷贝进去,在进行相应的更改即可。
================================================
FILE: packages/arco-vue-docs/docs/pro/i18n.en-US.md
================================================
```yaml
meta:
type: Arco Pro
title: Internationalization
description: Multi-language implementation
```
*Auto translate by google.*
## Language Pack
Internationalization is firstly the provision of language packs. In Pro, the language packs are defined in `src/locale`, and then imported into `main` to take effect.
```
├── locale
│ ├── en-US.ts
│ └── zh-CN.ts
├── hooks
│ ├── locale.ts
└── main.ts
```
At the same time, hooks for obtaining the current language and switching the current language are provided in the hooks directory.
```ts
import {computed} from'vue';
import {useI18n} from'vue-i18n';
export default function useLocale() {
const i18 = useI18n();
const currentLocale = computed(() => {
return i18.locale.value;
});
const changeLocale = (value: string) => {
i18.locale.value = value;
localStorage.setItem('arco-locale', value);
};
return {
currentLocale,
changeLocale,
};
}
```
================================================
FILE: packages/arco-vue-docs/docs/pro/i18n.zh-CN.md
================================================
```yaml
meta:
type: Arco Pro 最佳实践
title: 国际化
description: 多语言实现
```
## 语言包
国际化首先是语言包的提供,Pro 里面将语言包定义在 `src/locale` 中,然后导入 `main` 中生效。
```
├── locale
│ ├── en-US.ts
│ └── zh-CN.ts
├── hooks
│ ├── locale.ts
└── main.ts
```
同时在hooks目录中提供获取当前语言以及切换当前语言的hook。
```ts
import { computed } from 'vue';
import { useI18n } from 'vue-i18n';
export default function useLocale() {
const i18 = useI18n();
const currentLocale = computed(() => {
return i18.locale.value;
});
const changeLocale = (value: string) => {
i18.locale.value = value;
localStorage.setItem('arco-locale', value);
};
return {
currentLocale,
changeLocale,
};
}
```
================================================
FILE: packages/arco-vue-docs/docs/pro/layout.en-US.md
================================================
```yaml
meta:
type: Arco Pro
title: Layout
description: General layout of the page
```
*Auto translate by google.*
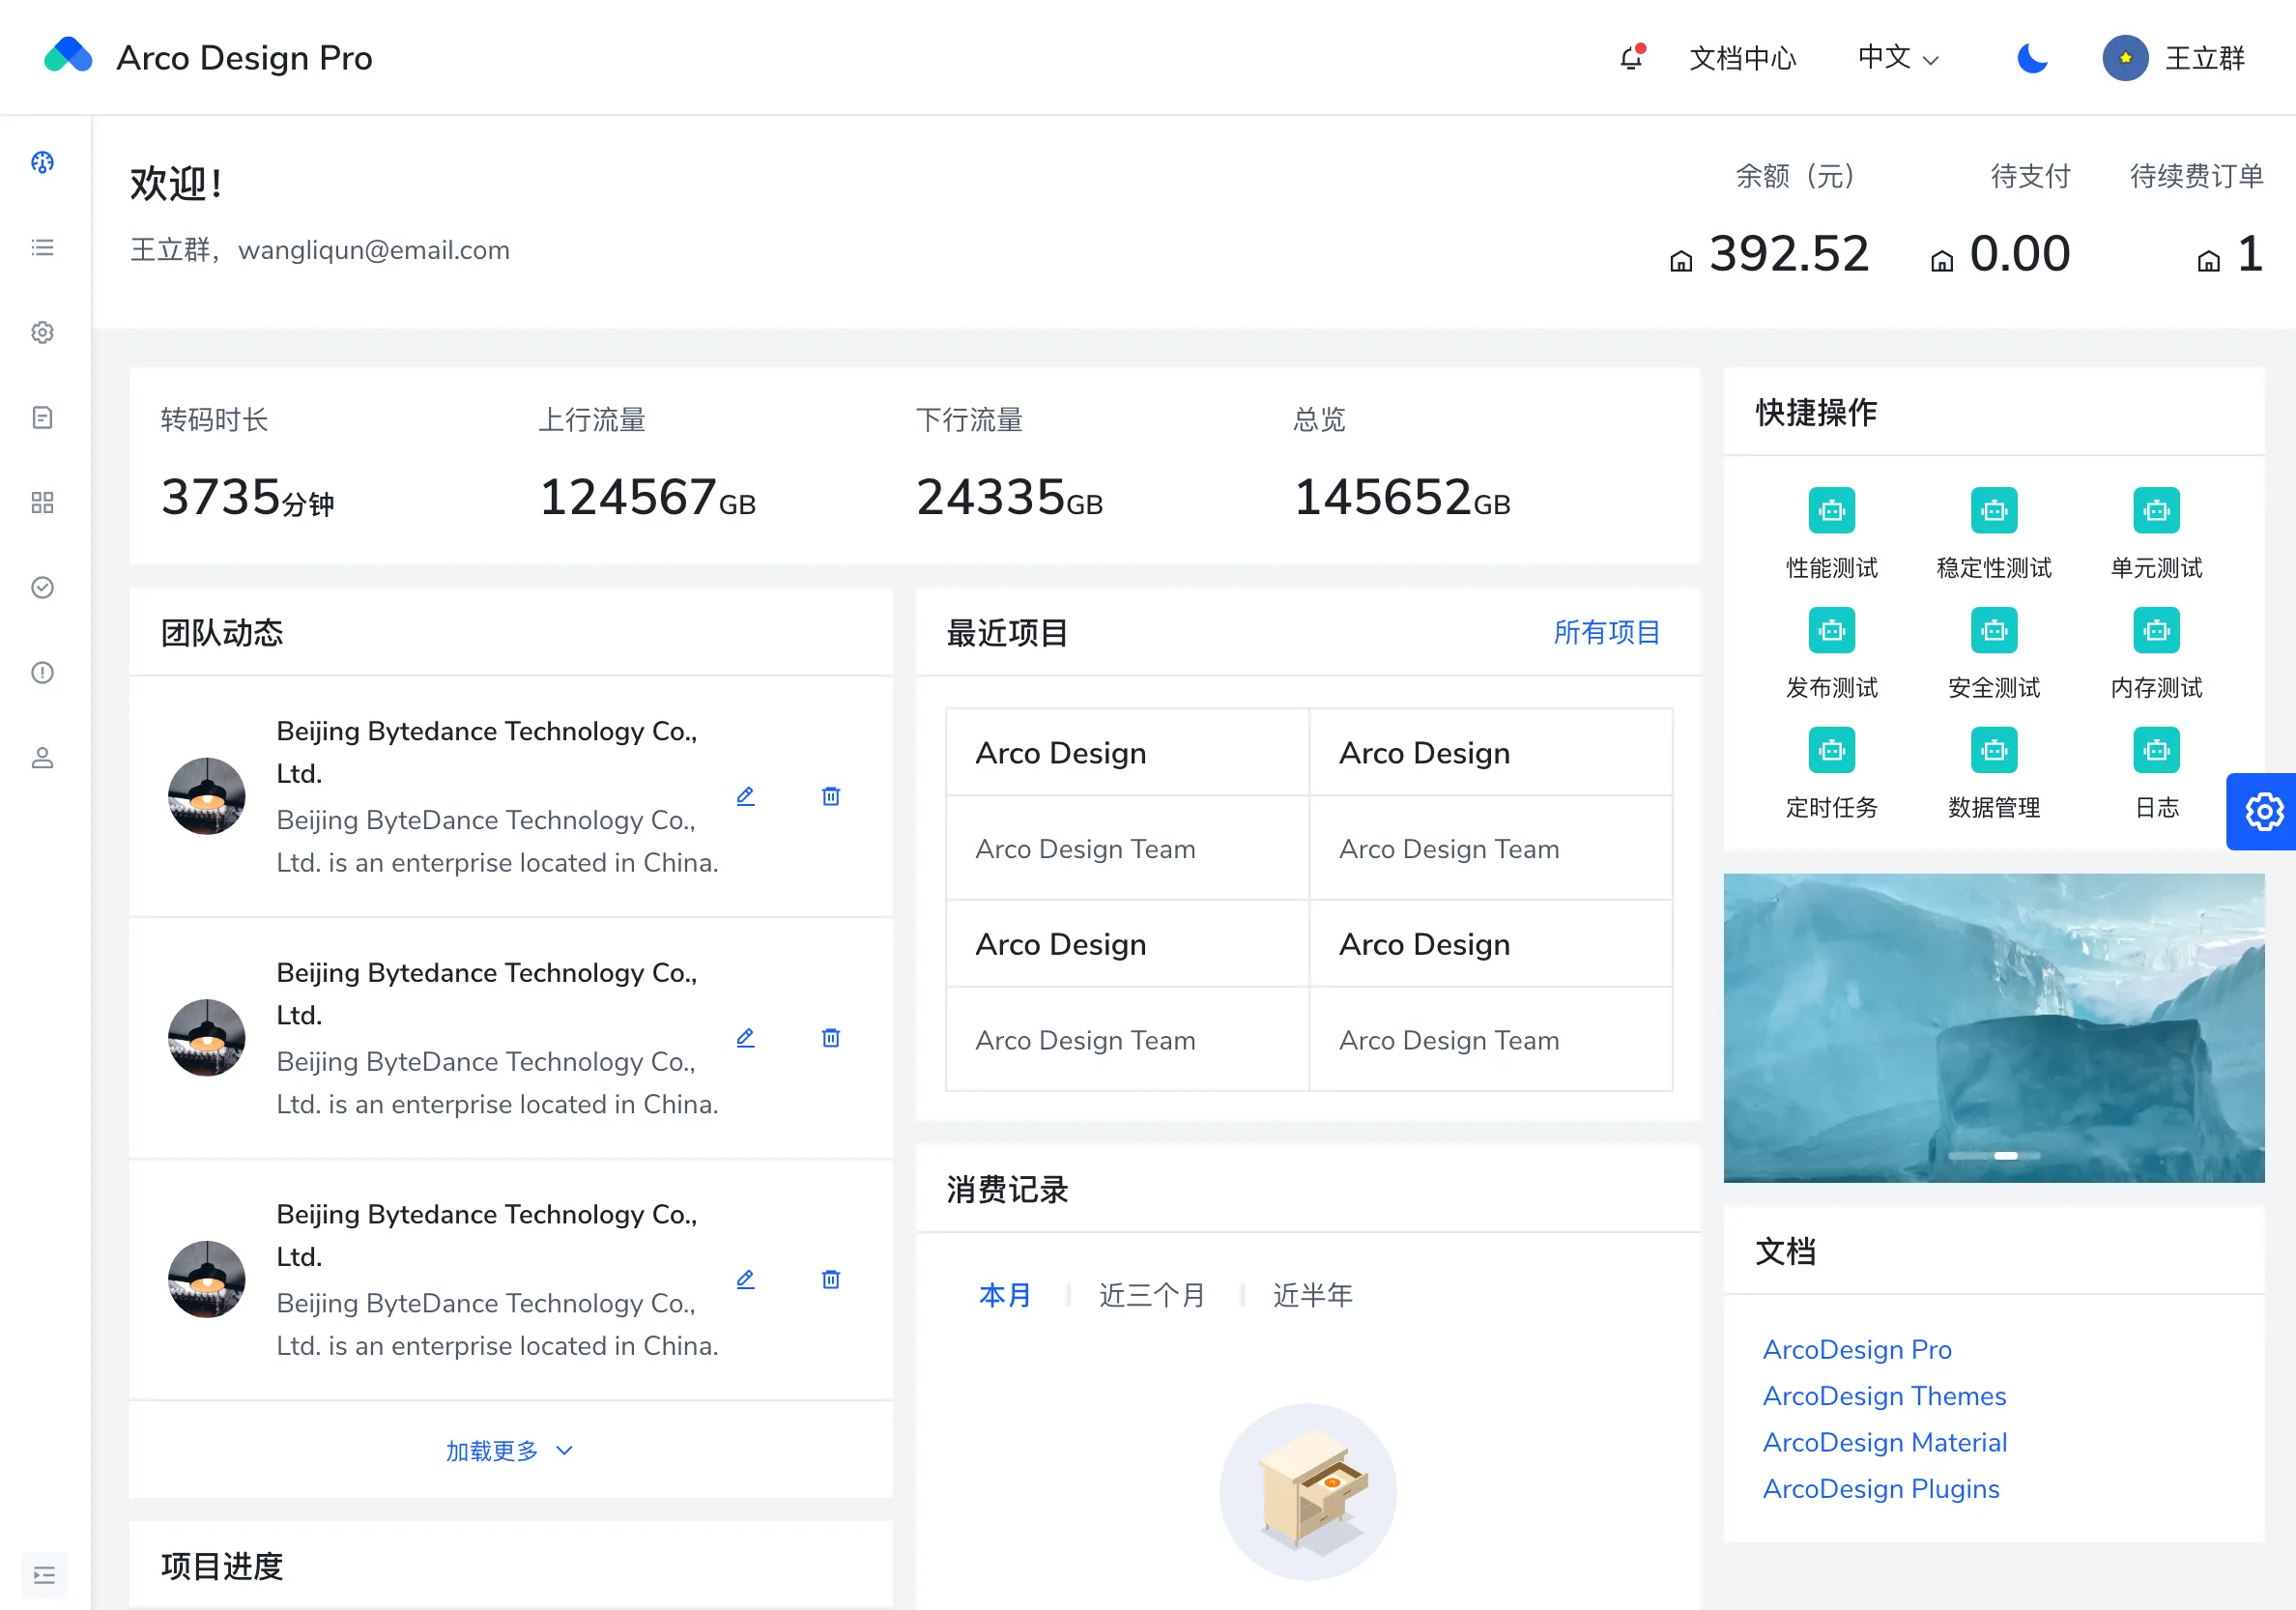
## Layout
There is only one set of layouts currently provided, which is applied to all routing pages, including side menu bar, top notification bar, footer and content area. The side bar and top notification bar are fixed to facilitate the scrolling process of users Focus on other views.
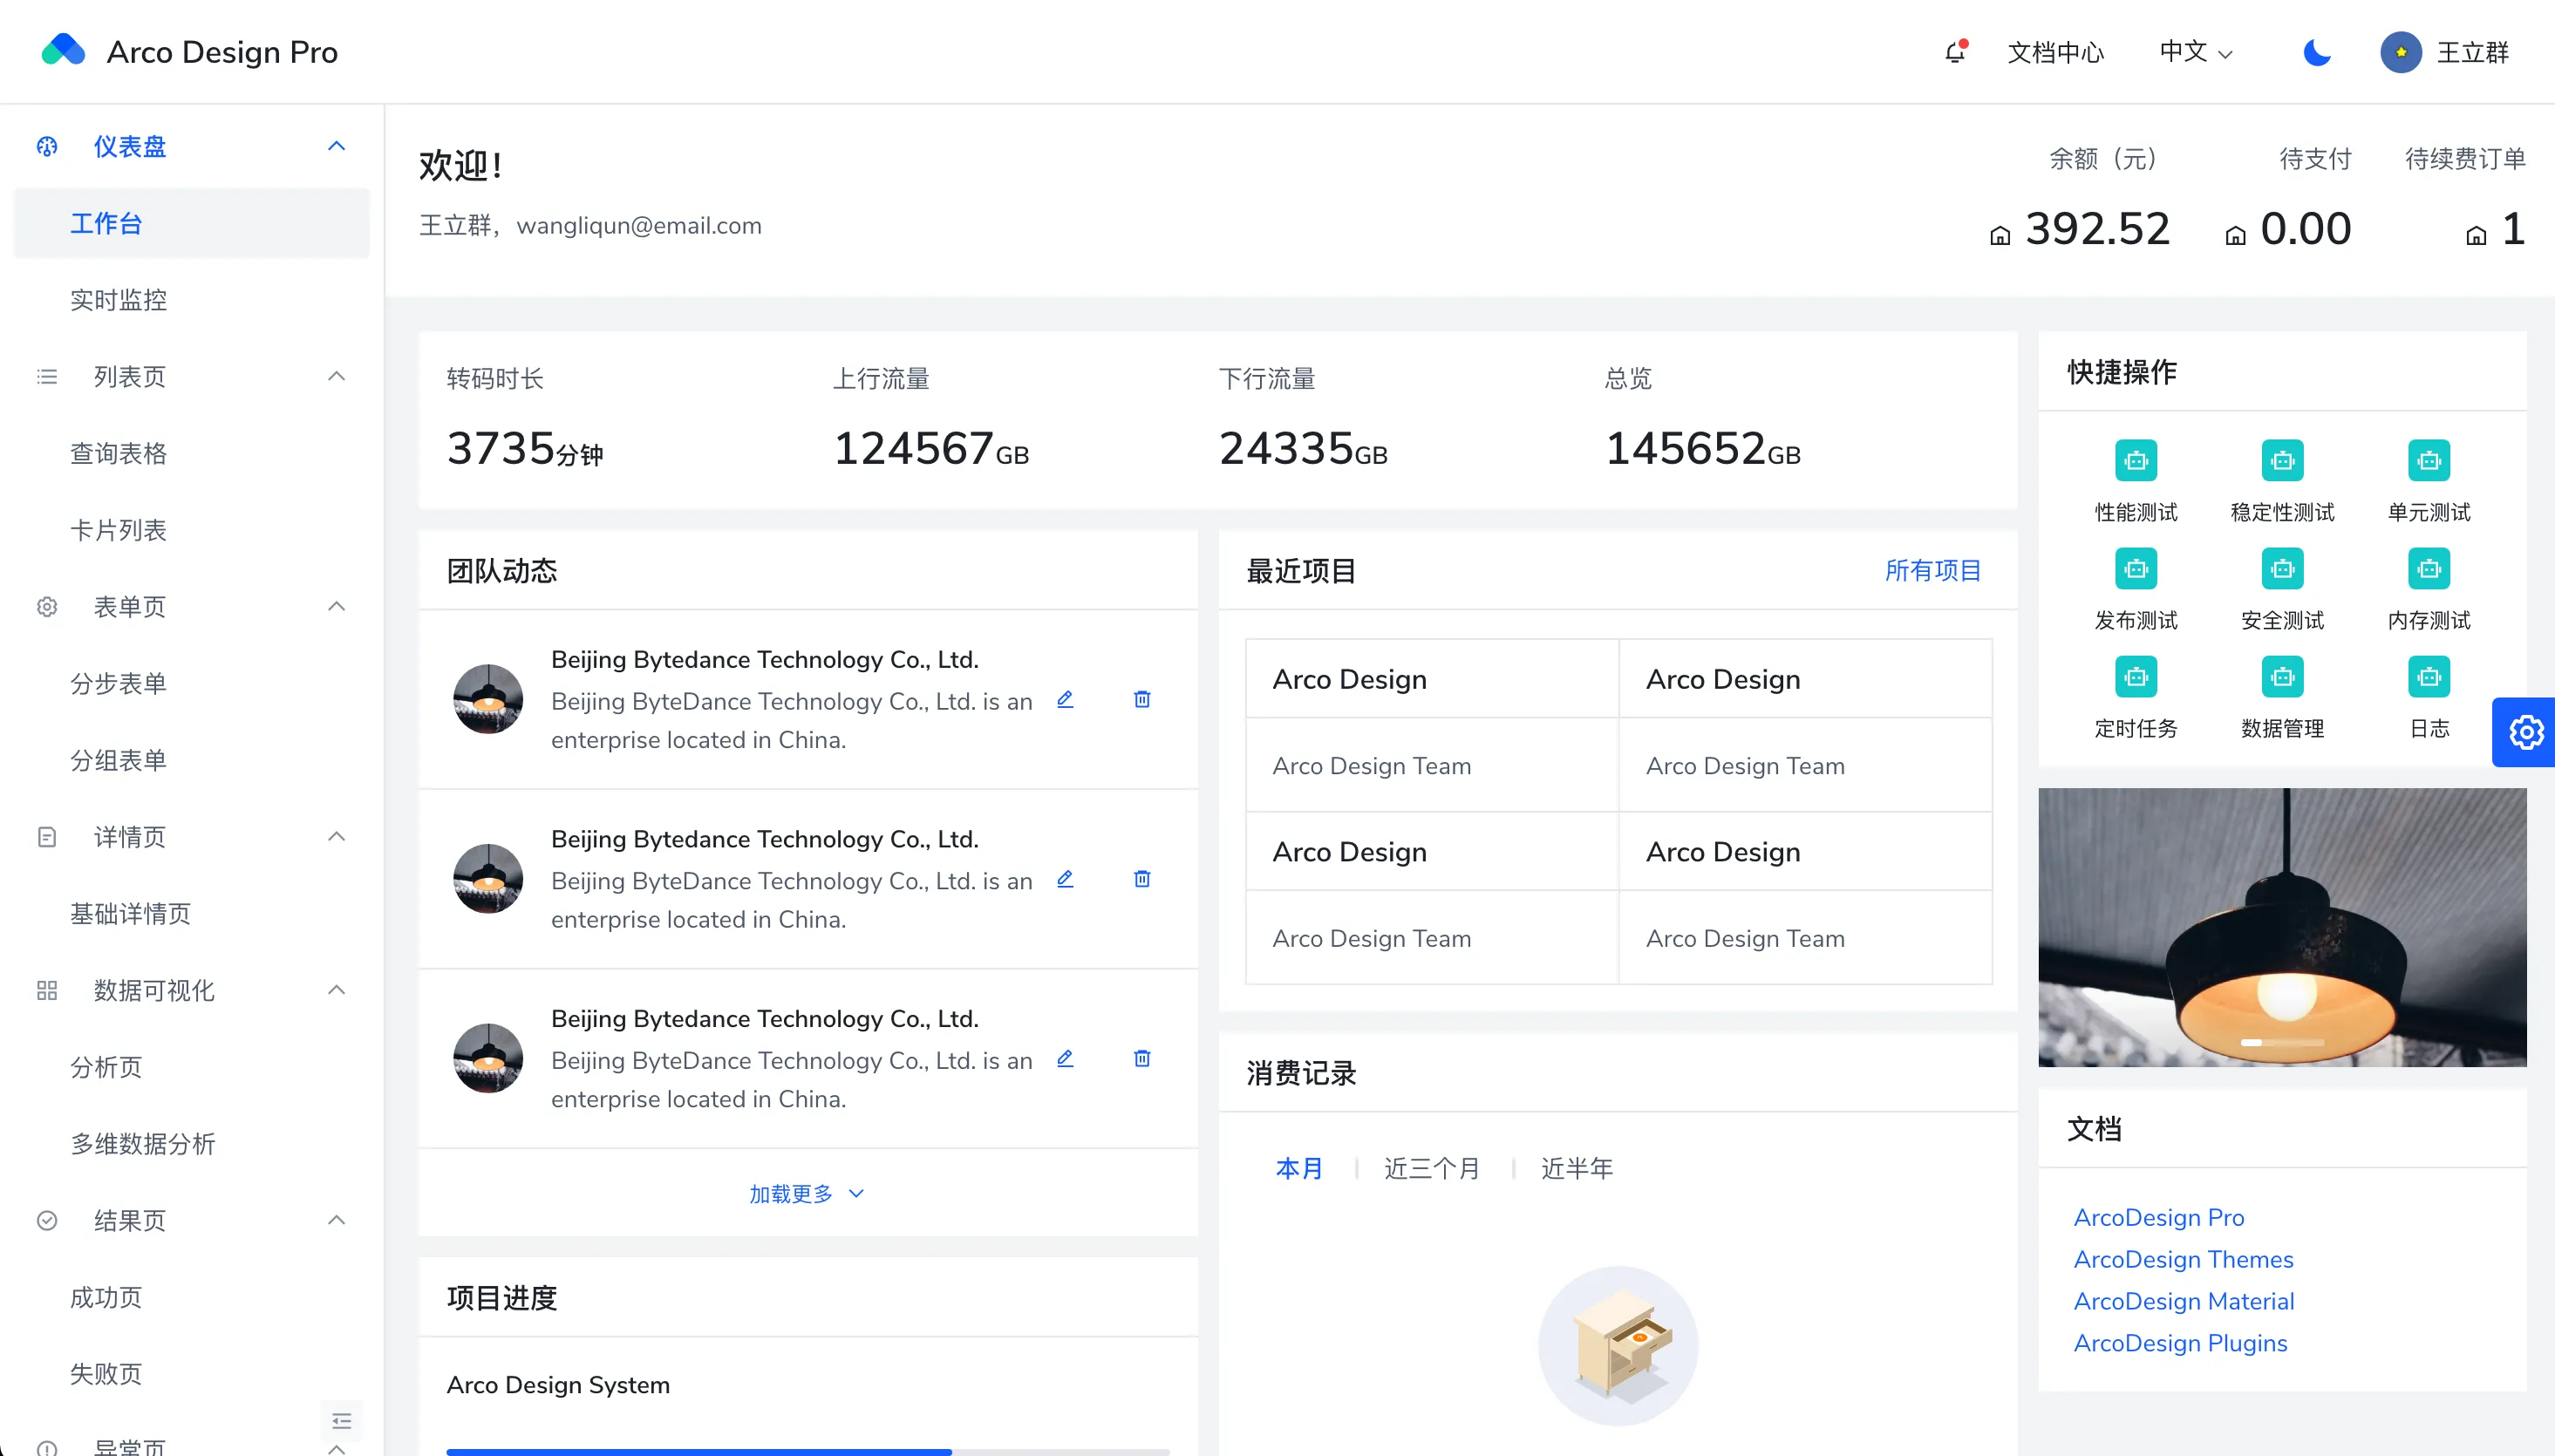
In addition, the responsive sidebar will automatically shrink as follows when the window width is less than `1200px`:
================================================
FILE: packages/arco-vue-docs/docs/pro/layout.zh-CN.md
================================================
```yaml
meta:
type: Arco Pro 最佳实践
title: 布局
description: 页面通用布局
```
## 布局
目前提供的布局只有一套,应用到了所有路由页面上,包含侧边菜单栏,顶部通知栏,页脚和内容区域,其中侧边栏和顶部通知栏都是 fixed 的,方便用户在滚动的过程中关注到其他视图。

此外,响应式的侧边栏会在窗口宽度小于 `1200px` 的时候,自动收缩如下:

================================================
FILE: packages/arco-vue-docs/docs/pro/mock.en-US.md
================================================
```yaml
meta:
type: Arco Pro
title: Interface and Mock
description: Network request, interceptor and simulation data
```
*Auto translate by google.*
## Network request
Use axios to make remote interface requests.
It is recommended to improve the type definition of the returned and requested data.
```ts
import axios from'axios';
export interface UserToken {
token: string;
}
export interface UserStateTypes {
name: string;
location: string;
}
export function getUserInfo(data: UserToken) {
// Get complete type hints by passing generics.
return axios.post('/api/user/info', data);
}
```
## Interceptor
Multi-layer interceptors can be added according to the needs of your own system.
```ts
import axios, {AxiosRequestConfig, AxiosResponse} from'axios';
// Users can modify according to their own background system
export interface HttpResponse {
status: number;
msg: string;
code: number;
data: T;
}
axios.interceptors.request.use(
(config: AxiosRequestConfig) => {
// Configure the request here
return config;
},
(error) => {
// What to do with request errors
return Promise.reject(error);
}
);
// Add response interceptor
axios.interceptors.response.use(
(response: AxiosResponse) => {
const res = response.data;
// if the custom code is not 20000, it is judged as an error.
if (res.code !== 20000) {
// remind users
// 50008: Illegal token; 50012: Other clients logged in; 50014: Token expired;
if (
[50008, 50012, 50014].includes(res.code)
) {
// do something
}
return Promise.reject(new Error(res.msg ||'Error'));
}
return res;
},
(error) => {
return Promise.reject(error);
}
);
```
Intercept ajax and return simulated data
## mock solution
Parallel development of the front and back ends means that the front end needs to be developed without interface data. In this case, if the function of simulating data requests can be provided, our data request code can be written normally. Pro uses Mock.js to achieve This feature.
Mock.js will intercept the ajax request. If there is a matching mock rule, the ajax will not be sent out, but the mock data will be returned. Mock.js has a wealth of simulation data generation methods, it is recommended to read the document first, the document is very clear and easy to understand [MockJs document](http://mockjs.com/)
```ts
import Mock from'mockjs';
import {
successResponseWrap,
} From'@/utils/setup-mock';
Mock.mock(new RegExp('/api/chatList'), () => {
const data = Mock.mock(successResponseWrap({
'data|4-6': [
{
'id|+1': 1,
username:'User 7352772',
content:'It will start soon, so excited! ',
time: '13:09:12',
'isCollect|2': true,
},
],
}));
return data.data;
});
```
When the request url sent by the client is matched by `new RegExp('/api/chatList')`, Mock.js will intercept the request, execute the corresponding callback function, and return the data returned in the callback function.
> Note: Requests that are matched and intercepted by Mock.js will not appear in the network panel of the developer tools.
## Close Mock
In order to facilitate the opening and closing of the data simulation function, each `Mock` will be wrapped by `setupMock.setup`, the setupMock is as follows:
```ts
import {debug} from'./env';
export default ({ mock, setup }: {mock?: boolean; setup: () => void; }) => {
if (mock !== false && debug) setup();
};
```
Data simulation is started by default in a non-production environment. When we need to debug the interface, we only need to set the mock parameter of setupMock to false, as follows:
```ts
import Mock from'mockjs';
import setupMock from'../utils/setupMock';
setupMock({
mock: false
setup() {
// User Info
Mock.mock(new RegExp('/api/userInfo'), () => {
return {
name:'name',
};
});
},
});
```
================================================
FILE: packages/arco-vue-docs/docs/pro/mock.zh-CN.md
================================================
```yaml
meta:
type: Arco Pro 最佳实践
title: 接口和数据模拟
description: 网络请求、拦截器及模拟数据
```
## 网络请求
使用axios进行远程接口请求。
建议完善返回及请求数据的类型定义。
```ts
import axios from 'axios';
export interface UserToken {
token: string;
}
export interface UserStateTypes {
name: string;
location: string;
}
export function getUserInfo(data: UserToken) {
// 通过传递泛型,以获得完整的类型提示。
return axios.post('/api/user/info', data);
}
```
## 拦截器
可以根据自身系统需要增加多层拦截器。
```ts
import axios, { AxiosRequestConfig, AxiosResponse } from 'axios';
// 用户可以根据自身后台系统进行修改
export interface HttpResponse {
status: number;
msg: string;
code: number;
data: T;
}
axios.interceptors.request.use(
(config: AxiosRequestConfig) => {
// 此处对请求进行配置
return config;
},
(error) => {
// 对请求错误做些什么
return Promise.reject(error);
}
);
// 添加响应拦截器
axios.interceptors.response.use(
(response: AxiosResponse) => {
const res = response.data;
// if the custom code is not 20000, it is judged as an error.
if (res.code !== 20000) {
// remind users
// 50008: Illegal token; 50012: Other clients logged in; 50014: Token expired;
if (
[50008, 50012, 50014].includes(res.code)
) {
// do something
}
return Promise.reject(new Error(res.msg || 'Error'));
}
return res;
},
(error) => {
return Promise.reject(error);
}
);
```
拦截 ajax 并返回模拟的数据
## mock解决方案
前后端并行开发意味着前端需要在没有接口数据的情况下进行开发,在这种情况下如果能提供模拟数据请求的功能,我们的数据请求代码就能正常书写,Pro 采用了 Mock.js 来实现这个功能。
Mock.js 会拦截 ajax 请求,如果有匹配的 mock 规则,就不会将 ajax 发出去,而是返回 mock 的数据。Mock.js 有着丰富的模拟数据生成方法,建议先读一下文档,文档写的很清晰易懂 [MockJs 文档](http://mockjs.com/)
```ts
import Mock from 'mockjs';
import {
successResponseWrap,
} from '@/utils/setup-mock';
Mock.mock(new RegExp('/api/chatList'), () => {
const data = Mock.mock(successResponseWrap({
'data|4-6': [
{
'id|+1': 1,
username: '用户7352772',
content: '马上就开始了,好激动!',
time: '13:09:12',
'isCollect|2': true,
},
],
}));
return data.data;
});
```
当客户端发送请求的 url 被 `new RegExp('/api/chatList')` 匹配到,Mock.js 就会拦截这条请求,并执行对应的回调函数,返回回调函数中 return 的数据。
> 注意:被 Mock.js 匹配并拦截的请求,不会出现在开发者工具的 network 面板中。
## 关闭 Mock
为了方便开启和关闭数据模拟功能,每个 `Mock` 都会被 `setupMock.setup` 包裹,setupMock 如下:
```
import { debug } from './env';
export default ({ mock, setup }: { mock?: boolean; setup: () => void; }) => {
if (mock !== false && debug) setup();
};
```
非生产环境下默认启动数据模拟,当我们需要调试接口的时候只需要将 setupMock 的 mock 参数置为 false 即可,如下:
```ts
import Mock from 'mockjs';
import setupMock from '../utils/setupMock';
setupMock({
mock: false
setup() {
// 用户信息
Mock.mock(new RegExp('/api/userInfo'), () => {
return {
name: 'name',
};
});
},
});
```
================================================
FILE: packages/arco-vue-docs/docs/pro/npm-scripts.en-US.md
================================================
```yaml
meta:
type: Arco Pro
title: Npm Scripts
description: package.json script presets convenient and practical commands
```
*Auto translate by google.*
## Configuration file
```
├── README.md
├── config
│ ├── plugin # vite plugin
│ ├── vite.config.base.ts # Basic Environment Configuration
│ ├── vite.config.dev.ts # Development environment configuration
│ ├── vite.config.prod.ts # Production environment configuration
└── package.json
```
## Local development
```bash
npm run dev
```
The command invoked is as follows
```json
{
"scripts": {
"dev": "vite --config ./config/vite.config.dev.ts",
}
}
```
## Build production
```bash
npm run build
```
The commands to be called are as follows. According to actual needs, please refer to [vite](https://vitejs.dev/)[Official Website](https://vitejs.dev/) for output configuration.
```json
{
"scripts": {
"build": "vue-tsc --noEmit && vite build --config ./config/vite.config.prod.ts",
}
}
```
================================================
FILE: packages/arco-vue-docs/docs/pro/npm-scripts.zh-CN.md
================================================
```yaml
meta:
type: Arco Pro 最佳实践
title: npm 命令
description: package.json script 预置方便实用的命令
```
## 配置文件
```
├── README.md
├── config
│ ├── plugin # vite插件
│ ├── vite.config.base.ts # 基础环境配置
│ ├── vite.config.dev.ts # 开发环境配置
│ ├── vite.config.prod.ts # 生产环境配置
└── package.json
```
## 本地开发
```bash
npm run dev
```
调用的命令如下
```json
{
"scripts": {
"dev": "vite --config ./config/vite.config.dev.ts",
}
}
```
## 构建生产
```bash
npm run build
```
调用的命令如下,可以根据实际需要,查阅[vite](https://vitejs.dev/)[官网](https://vitejs.dev/),进行输出配置。
```json
{
"scripts": {
"build": "vue-tsc --noEmit && vite build --config ./config/vite.config.prod.ts",
}
}
```
================================================
FILE: packages/arco-vue-docs/docs/pro/permission.en-US.md
================================================
```yaml
meta:
type: Arco Pro
title: Permission control
description: Permission control is a very common basic function in middle and background scenarios. In v2.2.0, the permission control function was integrated into Arco Design Pro
```
*Auto translate by google.*
## Applicable scene
The common front-end permission control in the middle and background can be roughly summarized as the following scenarios:
1. Menu permission control, manage permissions for a certain menu/page , you can see this page, otherwise it will show no permission.
[//]: # ()
2. Menu permission control, manage permissions for a certain menu/page , you can see this page, otherwise it will show no permission.
[//]: # ()
## Usage
### Menu permission management
For menu and routing permission control, you can add `roles` parameters . (If not added, the default is to have permission)
`roles` can be defined according to their own business.
```ts
export default {
path: 'dashboard',
name: 'dashboard',
component: () => import('@/views/dashboard/index.vue'),
meta: {
locale: 'menu.dashboard',
requiresAuth: true,
icon: 'icon-dashboard',
},
children: [
{
path: 'workplace',
name: 'workplace',
component: () => import('@/views/dashboard/workplace/index.vue'),
meta: {
locale: 'menu.dashboard.workplace',
requiresAuth: true,
roles: ['*'], // * Indicates wildcard permissions. Tip: In order to write less code, you can also not define this field.
},
},
{
path: 'monitor',
name: 'monitor',
component: () => import('@/views/dashboard/monitor/index.vue'),
meta: {
locale: 'menu.dashboard.monitor',
requiresAuth: true,
roles: ['admin'],
},
},
],
};
```
### A button permission management
Arco Design Pro encapsulates the `v-permission` directives . Can be used on components or native elements.
As follows, place the authorized role types in the array.
```vue
Delete
```
The above is the specific method of using the front-end page for permission control, but it needs to combine the back-end interface to return the specific permissions owned by the user to the front-end.
At the same time, in the middle and back-end systems, it is far from enough to have simple front-end permission control, and the back-end is also required to perform interface permission control. In particular, some interfaces involving write operations need to strictly control permissions.
## Accomplish
### Routing authority management
Pro provides corresponding permission management hooks. The permission requirements of the business can be customized.
```ts
#src/hooks/permission.ts
import { RouteLocationNormalized, RouteRecordRaw } from 'vue-router';
import { useUserStore } from '@/store';
export default function usePermission() {
const userStore = useUserStore();
return {
accessRouter(route: RouteLocationNormalized | RouteRecordRaw) { // Determine whether the current user has permission to the route
return (
!route.meta?.requiresAuth ||
!route.meta?.roles ||
route.meta?.roles?.includes('*') ||
route.meta?.roles?.includes(userStore.role)
);
},
// You can add any rules you want
};
}
```
Set up a route guard, and manage the user's page entry and exit in the route guard. For example, whether the current user has logged in and whether the current user has page permissions.
``` ts
router.beforeEach(async (to, from, next) => {
const userStore = useUserStore();
async function crossroads() {
const Permission = usePermission();
if (Permission.accessRouter(to)) await next();
else {
const destination = Permission.findFirstPermissionRoute(
appRoutes,
userStore.role
) || {
name: 'notFound',
}; // Go to the first authorized page or 404.
await next(destination);
}
}
if (isLogin()) { // Check if the user is logged in
if (userStore.role) { // If there is role information, it means that the current user has logged in and obtained user information.
crossroads();
} else {
try {
await userStore.info(); // Obtain user role information and then perform subsequent jump processing
crossroads();
} catch (error) {
next({
name: 'login',
query: {
redirect: to.name,
...to.query,
} as LocationQueryRaw,
});
}
}
} else {
// Redirect to login page if not logged in
if (to.name === 'login') {
next();
return;
}
next({
name: 'login',
query: {
redirect: to.name,
...to.query,
} as LocationQueryRaw,
});
}
});
```
Custom permission directive
```ts
import { DirectiveBinding } from 'vue';
import { useUserStore } from '@/store';
function checkPermission(el: HTMLElement, binding: DirectiveBinding) {
const { value } = binding;
const userStore = useUserStore();
const { role } = userStore;
if (Array.isArray(value)) {
if (value.length > 0) {
const permissionValues = value;
// Compare the role permission of the current user with the permission type of the incoming command. If the current user does not have permission, the node deletion operation will be performed.
const hasPermission = permissionValues.includes(role);
if (!hasPermission && el.parentNode) {
el.parentNode.removeChild(el);
}
}
} else {
throw new Error(`need roles! Like v-permission="['admin','user']"`);
}
}
export default {
mounted(el: HTMLElement, binding: DirectiveBinding) {
checkPermission(el, binding);
},
updated(el: HTMLElement, binding: DirectiveBinding) {
checkPermission(el, binding);
},
};
```
================================================
FILE: packages/arco-vue-docs/docs/pro/permission.zh-CN.md
================================================
```yaml
meta:
type: Arco Pro 最佳实践
title: 权限控制
description: 权限控制是中后台场景非常常见的基础功能,在 v2.2.0 将权限控制功能集成至 Arco Design Pro
```
## 适用场景
中后台常见的前端权限控制大概可概括为以下场景:
1. 菜单权限控制,针对**某个菜单/页面**进行权限管理,有则能看到此页面,否则将展示无权限。
[//]: # ()
2. **针对某页面中的某触发器**进行权限管理,例如对列表页的某一条数据进行删除操作。有权限情况下则展示删除按钮。
[//]: # ()
## 使用
### 菜单权限管理
针对菜单及路由权限控制,可以在 路由配置项 中,对某项增加 `roles` 参数即可。(如果不加,默认为拥有权限)
`roles` 可以根据自己的业务进行定义。
```ts
export default {
path: 'dashboard',
name: 'dashboard',
component: () => import('@/views/dashboard/index.vue'),
meta: {
locale: 'menu.dashboard',
requiresAuth: true,
icon: 'icon-dashboard',
},
children: [
{
path: 'workplace',
name: 'workplace',
component: () => import('@/views/dashboard/workplace/index.vue'),
meta: {
locale: 'menu.dashboard.workplace',
requiresAuth: true,
roles: ['*'], // * 表示通配权限。提示:为了少写点代码,也可以不定义这个字段。
},
},
{
path: 'monitor',
name: 'monitor',
component: () => import('@/views/dashboard/monitor/index.vue'),
meta: {
locale: 'menu.dashboard.monitor',
requiresAuth: true,
roles: ['admin'],
},
},
],
};
```
### 某按钮权限管理
Arco Design Pro 封装了 `v-permission` 指令。可在组件或者原生元素上使用。
如下,将有权限的角色类型放置在数组中即可。
```vue
删除
```
以上是前端页面进行权限控制的具体使用方法,但是需要结合后端接口将用户所拥有的具体权限返回至前端。
同时,在中后台系统中,仅仅有简单的前端权限控制是远远不够的,还需要后端进行接口权限控制。特别是涉及到写操作的一些接口,需要严格把控权限。
## 实现
### 路由权限管理
Pro提供对应的权限管理钩子。可以自定义业务的权限需求。
```ts
#src/hooks/permission.ts
import { RouteLocationNormalized, RouteRecordRaw } from 'vue-router';
import { useUserStore } from '@/store';
export default function usePermission() {
const userStore = useUserStore();
return {
accessRouter(route: RouteLocationNormalized | RouteRecordRaw) { // 判断当前用户是否有该路由的权限
return (
!route.meta?.requiresAuth ||
!route.meta?.roles ||
route.meta?.roles?.includes('*') ||
route.meta?.roles?.includes(userStore.role)
);
},
// You can add any rules you want
};
}
```
设置路由守卫,在路由守卫中对用户的页面进出进行管理。例如 当前用户是否已经登录、当前用户是否有页面权限。
``` ts
router.beforeEach(async (to, from, next) => {
const userStore = useUserStore();
async function crossroads() {
const Permission = usePermission();
if (Permission.accessRouter(to)) await next();
else {
const destination = Permission.findFirstPermissionRoute(
appRoutes,
userStore.role
) || {
name: 'notFound',
}; // 前往首个有权限的页面或者404。
await next(destination);
}
}
if (isLogin()) { // 判读用户是否登录
if (userStore.role) { // 有角色信息表示当前用户已经登录且获取过用户信息
crossroads();
} else {
try {
await userStore.info(); // 获取用户角色信息后再进行后续跳转处理
crossroads();
} catch (error) {
next({
name: 'login',
query: {
redirect: to.name,
...to.query,
} as LocationQueryRaw,
});
}
}
} else {
// 如果未登录则重定向到登录页面
if (to.name === 'login') {
next();
return;
}
next({
name: 'login',
query: {
redirect: to.name,
...to.query,
} as LocationQueryRaw,
});
}
});
```
自定义权限指令
```ts
import { DirectiveBinding } from 'vue';
import { useUserStore } from '@/store';
function checkPermission(el: HTMLElement, binding: DirectiveBinding) {
const { value } = binding;
const userStore = useUserStore();
const { role } = userStore;
if (Array.isArray(value)) {
if (value.length > 0) {
const permissionValues = value;
// 对当前用户的角色权限和传入指令的权限类型进行比对。如果当前用户无权限则会执行节点删除操作。
const hasPermission = permissionValues.includes(role);
if (!hasPermission && el.parentNode) {
el.parentNode.removeChild(el);
}
}
} else {
throw new Error(`need roles! Like v-permission="['admin','user']"`);
}
}
export default {
mounted(el: HTMLElement, binding: DirectiveBinding) {
checkPermission(el, binding);
},
updated(el: HTMLElement, binding: DirectiveBinding) {
checkPermission(el, binding);
},
};
```
================================================
FILE: packages/arco-vue-docs/docs/pro/routes-and-menu.en-US.md
================================================
```yaml
meta:
type: Arco Pro
title: Routes and menu
description: Route and menu generation
```
*Auto translate by google.*
The routing is usually tied to the menu. In order to reduce the amount of maintenance, we directly generate the menu through the routing table.
## Router
First, you need to understand the configuration of the routing table. For basic routing configuration, please refer to the official documentation of [Vue-Router](https://router.vuejs.org/)
```ts
// In this example, the final path to the page is /dashboard/workplace
export default {
path: 'dashboard',
name: 'dashboard',
component: () => import('@/views/dashboard/index.vue'),
meta: {
locale: 'menu.dashboard',
requiresAuth: true,
icon: 'icon-dashboard',
},
children: [
{
path: 'workplace',
name: 'workplace',
component: () => import('@/views/dashboard/workplace/index.vue'),
meta: {
locale: 'menu.dashboard.workplace',
requiresAuth: true,
roles: ['admin'],
hideInMenu: false,
},
},
],
};
```
Route `Meta` meta information
| Key | Description | Type | default|
| ------------- | ------------- | -------------- | -------------- |
roles | Configure the role that can access the page. If it does not match, it will be forbidden to access the routing page | string[]| - |
requiresAuth | Whether login authentication is required | boolean| false |
icon | Menu configuration icon | string| - |
locale | First-level menu name (language pack key name) | string| - |
hideInMenu | Whether to hide this item in the left menu | boolean| - |
hideChildrenInMenu | Force single item to be displayed in left menu | boolean| - |
activeMenu | If set name, the menu will be highlighted according to the name you set | string| - |
order | Sort routing menu items. If this value is set, the higher the value, the higher the front. | number| - |
noAffix | If set to true, the tabs will not be added to the tab-bar. | boolean| - |
ignoreCache | If set to true the page will not be cached | boolean| - |
## Menu
Front-end menu generation process:
- Through the computed property of [appRoute](https://github.com/arco-design/arco-design-pro-vue/blob/23a21ceb939e1e2334e8c3b0f1f8a8049503ad9d/arco-design-pro-vite/src/components/menu/useMenuTree.ts#L10), a routing tree with routing information is obtained.
- Use the routing information obtained in the previous step to filter permissions to generate a menu [tree for rendering](https://github.com/arco-design/arco-design-pro-vue/blob/23a21ceb939e1e2334e8c3b0f1f8a8049503ad9d/arco-design-pro-vite/src/components/menu/useMenuTree.ts#L23).
- Recursively generate menus by [rendering]((https://github.com/arco-design/arco-design-pro-vue/blob/23a21ceb939e1e2334e8c3b0f1f8a8049503ad9d/arco-design-pro-vite/src/components/menu/index.vue#L48)) the menu tree.
Server menu generation process:
- Add the [action](https://github.com/arco-design/arco-design-pro-vue/blob/23a21ceb939e1e2334e8c3b0f1f8a8049503ad9d/arco-design-pro-vite/src/store/modules/app/index.ts#L47) of the api request to the Store to obtain the routing configuration of the server.
- Add the action of the api request to the Store to obtain the routing configuration of the server.
- Through the computed property of [appRoute](https://github.com/arco-design/arco-design-pro-vue/blob/23a21ceb939e1e2334e8c3b0f1f8a8049503ad9d/arco-design-pro-vite/src/components/menu/useMenuTree.ts#L10), a routing tree with routing information is obtained.
- Use the routing information obtained in the previous step to filter permissions to generate a menu [tree for rendering](https://github.com/arco-design/arco-design-pro-vue/blob/23a21ceb939e1e2334e8c3b0f1f8a8049503ad9d/arco-design-pro-vite/src/components/menu/useMenuTree.ts#L23).
- Recursively generate menus by [rendering]((https://github.com/arco-design/arco-design-pro-vue/blob/23a21ceb939e1e2334e8c3b0f1f8a8049503ad9d/arco-design-pro-vite/src/components/menu/index.vue#L48)) the menu tree.
**Note: Compared with the local menu generation process, the server menu only has more interface requests and server routing configuration information storage steps.**
**Individual companies may have corresponding authority management systems to generate corresponding server-side routing configuration information and store them for front-end interface retrieval. However, the overall situation is similar, as long as the routing configuration information returned by the back-end interface conforms to the above routing configuration specifications and can be correctly parsed by the front-end**
## Steps to add a new menu item
After understanding the routing and menu generation, you can configure a new menu item. Take a new monitoring page as an example.
- Add a monitor folder in views/dashboard and add index.vue to it
```ts
