Repository: bitrise-io/bitrise-steplib
Branch: master
Commit: aa774409866e
Files: 4004
Total size: 17.9 MB
Directory structure:
gitextract_glh1oxsp/
├── LICENSE
├── PULL_REQUEST_TEMPLATE.md
├── README.md
├── steplib.yml
└── steps/
├── activate-build-cache-for-bazel/
│ ├── 1.0.0/
│ │ └── step.yml
│ ├── 1.0.1/
│ │ └── step.yml
│ ├── 1.0.2/
│ │ └── step.yml
│ ├── 1.0.3/
│ │ └── step.yml
│ ├── 1.1.0/
│ │ └── step.yml
│ ├── 1.1.1/
│ │ └── step.yml
│ ├── 1.1.2/
│ │ └── step.yml
│ ├── 1.1.3/
│ │ └── step.yml
│ ├── 1.1.4/
│ │ └── step.yml
│ ├── 1.1.5/
│ │ └── step.yml
│ ├── 1.1.6/
│ │ └── step.yml
│ ├── 1.2.1/
│ │ └── step.yml
│ ├── 1.2.2/
│ │ └── step.yml
│ ├── 1.2.3/
│ │ └── step.yml
│ └── step-info.yml
├── activate-build-cache-for-gradle/
│ ├── 1.0.0/
│ │ └── step.yml
│ ├── 1.0.1/
│ │ └── step.yml
│ ├── 1.0.2/
│ │ └── step.yml
│ ├── 1.1.0/
│ │ └── step.yml
│ ├── 1.1.1/
│ │ └── step.yml
│ ├── 2.0.0/
│ │ └── step.yml
│ ├── 2.0.1/
│ │ └── step.yml
│ ├── 2.0.2/
│ │ └── step.yml
│ ├── 2.0.3/
│ │ └── step.yml
│ ├── 2.1.0/
│ │ └── step.yml
│ ├── 2.10.0/
│ │ └── step.yml
│ ├── 2.11.0/
│ │ └── step.yml
│ ├── 2.12.0/
│ │ └── step.yml
│ ├── 2.13.0/
│ │ └── step.yml
│ ├── 2.13.1/
│ │ └── step.yml
│ ├── 2.13.2/
│ │ └── step.yml
│ ├── 2.13.3/
│ │ └── step.yml
│ ├── 2.13.4/
│ │ └── step.yml
│ ├── 2.13.5/
│ │ └── step.yml
│ ├── 2.13.6/
│ │ └── step.yml
│ ├── 2.13.7/
│ │ └── step.yml
│ ├── 2.13.8/
│ │ └── step.yml
│ ├── 2.13.9/
│ │ └── step.yml
│ ├── 2.14.0/
│ │ └── step.yml
│ ├── 2.14.1/
│ │ └── step.yml
│ ├── 2.15.0/
│ │ └── step.yml
│ ├── 2.16.0/
│ │ └── step.yml
│ ├── 2.16.1/
│ │ └── step.yml
│ ├── 2.16.2/
│ │ └── step.yml
│ ├── 2.17.0/
│ │ └── step.yml
│ ├── 2.17.1/
│ │ └── step.yml
│ ├── 2.17.2/
│ │ └── step.yml
│ ├── 2.18.0/
│ │ └── step.yml
│ ├── 2.18.1/
│ │ └── step.yml
│ ├── 2.18.2/
│ │ └── step.yml
│ ├── 2.18.3/
│ │ └── step.yml
│ ├── 2.18.4/
│ │ └── step.yml
│ ├── 2.18.5/
│ │ └── step.yml
│ ├── 2.18.6/
│ │ └── step.yml
│ ├── 2.18.7/
│ │ └── step.yml
│ ├── 2.18.8/
│ │ └── step.yml
│ ├── 2.18.9/
│ │ └── step.yml
│ ├── 2.19.0/
│ │ └── step.yml
│ ├── 2.2.0/
│ │ └── step.yml
│ ├── 2.20.0/
│ │ └── step.yml
│ ├── 2.20.1/
│ │ └── step.yml
│ ├── 2.3.0/
│ │ └── step.yml
│ ├── 2.4.0/
│ │ └── step.yml
│ ├── 2.5.0/
│ │ └── step.yml
│ ├── 2.6.0/
│ │ └── step.yml
│ ├── 2.7.0/
│ │ └── step.yml
│ ├── 2.7.1/
│ │ └── step.yml
│ ├── 2.7.10/
│ │ └── step.yml
│ ├── 2.7.11/
│ │ └── step.yml
│ ├── 2.7.12/
│ │ └── step.yml
│ ├── 2.7.13/
│ │ └── step.yml
│ ├── 2.7.14/
│ │ └── step.yml
│ ├── 2.7.15/
│ │ └── step.yml
│ ├── 2.7.16/
│ │ └── step.yml
│ ├── 2.7.17/
│ │ └── step.yml
│ ├── 2.7.18/
│ │ └── step.yml
│ ├── 2.7.19/
│ │ └── step.yml
│ ├── 2.7.2/
│ │ └── step.yml
│ ├── 2.7.20/
│ │ └── step.yml
│ ├── 2.7.21/
│ │ └── step.yml
│ ├── 2.7.22/
│ │ └── step.yml
│ ├── 2.7.23/
│ │ └── step.yml
│ ├── 2.7.24/
│ │ └── step.yml
│ ├── 2.7.25/
│ │ └── step.yml
│ ├── 2.7.26/
│ │ └── step.yml
│ ├── 2.7.27/
│ │ └── step.yml
│ ├── 2.7.28/
│ │ └── step.yml
│ ├── 2.7.29/
│ │ └── step.yml
│ ├── 2.7.3/
│ │ └── step.yml
│ ├── 2.7.30/
│ │ └── step.yml
│ ├── 2.7.31/
│ │ └── step.yml
│ ├── 2.7.32/
│ │ └── step.yml
│ ├── 2.7.33/
│ │ └── step.yml
│ ├── 2.7.34/
│ │ └── step.yml
│ ├── 2.7.35/
│ │ └── step.yml
│ ├── 2.7.36/
│ │ └── step.yml
│ ├── 2.7.37/
│ │ └── step.yml
│ ├── 2.7.38/
│ │ └── step.yml
│ ├── 2.7.39/
│ │ └── step.yml
│ ├── 2.7.4/
│ │ └── step.yml
│ ├── 2.7.40/
│ │ └── step.yml
│ ├── 2.7.41/
│ │ └── step.yml
│ ├── 2.7.42/
│ │ └── step.yml
│ ├── 2.7.43/
│ │ └── step.yml
│ ├── 2.7.44/
│ │ └── step.yml
│ ├── 2.7.46/
│ │ └── step.yml
│ ├── 2.7.47/
│ │ └── step.yml
│ ├── 2.7.48/
│ │ └── step.yml
│ ├── 2.7.49/
│ │ └── step.yml
│ ├── 2.7.5/
│ │ └── step.yml
│ ├── 2.7.50/
│ │ └── step.yml
│ ├── 2.7.52/
│ │ └── step.yml
│ ├── 2.7.53/
│ │ └── step.yml
│ ├── 2.7.54/
│ │ └── step.yml
│ ├── 2.7.55/
│ │ └── step.yml
│ ├── 2.7.56/
│ │ └── step.yml
│ ├── 2.7.57/
│ │ └── step.yml
│ ├── 2.7.58/
│ │ └── step.yml
│ ├── 2.7.59/
│ │ └── step.yml
│ ├── 2.7.6/
│ │ └── step.yml
│ ├── 2.7.60/
│ │ └── step.yml
│ ├── 2.7.7/
│ │ └── step.yml
│ ├── 2.7.8/
│ │ └── step.yml
│ ├── 2.7.9/
│ │ └── step.yml
│ ├── 2.8.0/
│ │ └── step.yml
│ ├── 2.8.1/
│ │ └── step.yml
│ ├── 2.8.2/
│ │ └── step.yml
│ ├── 2.8.3/
│ │ └── step.yml
│ ├── 2.8.4/
│ │ └── step.yml
│ ├── 2.8.7/
│ │ └── step.yml
│ ├── 2.8.8/
│ │ └── step.yml
│ ├── 2.9.0/
│ │ └── step.yml
│ └── step-info.yml
├── activate-build-cache-for-react-native/
│ ├── 0.1.0/
│ │ └── step.yml
│ ├── 0.2.0/
│ │ └── step.yml
│ ├── 0.3.0/
│ │ └── step.yml
│ ├── 0.4.0/
│ │ └── step.yml
│ ├── 0.4.1/
│ │ └── step.yml
│ ├── 0.5.0/
│ │ └── step.yml
│ ├── 0.5.1/
│ │ └── step.yml
│ ├── 0.5.2/
│ │ └── step.yml
│ ├── 0.5.3/
│ │ └── step.yml
│ ├── 0.5.4/
│ │ └── step.yml
│ ├── 0.5.5/
│ │ └── step.yml
│ ├── 0.5.6/
│ │ └── step.yml
│ ├── 0.5.7/
│ │ └── step.yml
│ ├── 0.6.0/
│ │ └── step.yml
│ ├── 0.7.0/
│ │ └── step.yml
│ ├── 0.7.1/
│ │ └── step.yml
│ └── step-info.yml
├── activate-build-cache-for-tuist/
│ ├── 1.0.0/
│ │ └── step.yml
│ ├── 1.0.1/
│ │ └── step.yml
│ ├── 1.0.2/
│ │ └── step.yml
│ ├── 1.0.3/
│ │ └── step.yml
│ ├── 1.0.4/
│ │ └── step.yml
│ ├── 1.0.5/
│ │ └── step.yml
│ ├── 1.0.6/
│ │ └── step.yml
│ ├── 1.0.7/
│ │ └── step.yml
│ └── step-info.yml
├── activate-build-cache-for-xcode/
│ ├── 0.0.1/
│ │ └── step.yml
│ ├── 0.0.2/
│ │ └── step.yml
│ ├── 0.0.3/
│ │ └── step.yml
│ ├── 0.0.4/
│ │ └── step.yml
│ ├── 0.10.0/
│ │ └── step.yml
│ ├── 0.10.1/
│ │ └── step.yml
│ ├── 0.10.2/
│ │ └── step.yml
│ ├── 0.10.3/
│ │ └── step.yml
│ ├── 0.11.0/
│ │ └── step.yml
│ ├── 0.12.0/
│ │ └── step.yml
│ ├── 0.2.0/
│ │ └── step.yml
│ ├── 0.2.1/
│ │ └── step.yml
│ ├── 0.3.0/
│ │ └── step.yml
│ ├── 0.3.1/
│ │ └── step.yml
│ ├── 0.3.2/
│ │ └── step.yml
│ ├── 0.3.3/
│ │ └── step.yml
│ ├── 0.4.0/
│ │ └── step.yml
│ ├── 0.4.1/
│ │ └── step.yml
│ ├── 0.4.2/
│ │ └── step.yml
│ ├── 0.4.3/
│ │ └── step.yml
│ ├── 0.4.4/
│ │ └── step.yml
│ ├── 0.4.5/
│ │ └── step.yml
│ ├── 0.4.6/
│ │ └── step.yml
│ ├── 0.4.7/
│ │ └── step.yml
│ ├── 0.4.8/
│ │ └── step.yml
│ ├── 0.5.0/
│ │ └── step.yml
│ ├── 0.5.1/
│ │ └── step.yml
│ ├── 0.5.2/
│ │ └── step.yml
│ ├── 0.5.3/
│ │ └── step.yml
│ ├── 0.6.0/
│ │ └── step.yml
│ ├── 0.6.1/
│ │ └── step.yml
│ ├── 0.7.0/
│ │ └── step.yml
│ ├── 0.8.0/
│ │ └── step.yml
│ ├── 0.8.1/
│ │ └── step.yml
│ ├── 0.8.2/
│ │ └── step.yml
│ ├── 0.9.0/
│ │ └── step.yml
│ └── step-info.yml
├── activate-gradle-mirrors/
│ ├── 0.1.0/
│ │ └── step.yml
│ ├── 0.1.1/
│ │ └── step.yml
│ ├── 0.1.2/
│ │ └── step.yml
│ ├── 0.1.3/
│ │ └── step.yml
│ ├── 0.1.4/
│ │ └── step.yml
│ ├── 0.2.0/
│ │ └── step.yml
│ └── step-info.yml
├── activate-ssh-key/
│ ├── 3.0.2/
│ │ └── step.yml
│ ├── 3.0.3/
│ │ └── step.yml
│ ├── 3.1.0/
│ │ └── step.yml
│ ├── 3.1.1/
│ │ └── step.yml
│ ├── 4.0.1/
│ │ └── step.yml
│ ├── 4.0.2/
│ │ └── step.yml
│ ├── 4.0.3/
│ │ └── step.yml
│ ├── 4.0.5/
│ │ └── step.yml
│ ├── 4.0.6/
│ │ └── step.yml
│ ├── 4.1.0/
│ │ └── step.yml
│ ├── 4.1.1/
│ │ └── step.yml
│ └── step-info.yml
├── add-trace-sdk/
│ ├── 1.0.1/
│ │ └── step.yml
│ ├── 1.0.3/
│ │ └── step.yml
│ ├── 1.0.4/
│ │ └── step.yml
│ ├── 1.1.0/
│ │ └── step.yml
│ ├── 1.1.1/
│ │ └── step.yml
│ ├── 1.2.1/
│ │ └── step.yml
│ ├── 1.2.2/
│ │ └── step.yml
│ ├── 1.2.3/
│ │ └── step.yml
│ ├── 1.2.4/
│ │ └── step.yml
│ └── step-info.yml
├── add-trace-sdk-android/
│ ├── 0.0.1/
│ │ └── step.yml
│ ├── 0.0.2/
│ │ └── step.yml
│ ├── 0.0.3/
│ │ └── step.yml
│ ├── 0.0.4/
│ │ └── step.yml
│ ├── 0.0.5/
│ │ └── step.yml
│ ├── 0.1.0/
│ │ └── step.yml
│ └── step-info.yml
├── amazon-s3-deploy/
│ ├── 3.0.0/
│ │ └── step.yml
│ ├── 3.1.0/
│ │ └── step.yml
│ ├── 3.1.1/
│ │ └── step.yml
│ ├── 3.2.0/
│ │ └── step.yml
│ ├── 3.3.0/
│ │ └── step.yml
│ ├── 3.4.0/
│ │ └── step.yml
│ ├── 3.5.0/
│ │ └── step.yml
│ ├── 3.5.1/
│ │ └── step.yml
│ ├── 3.5.3/
│ │ └── step.yml
│ ├── 3.5.4/
│ │ └── step.yml
│ ├── 3.5.6/
│ │ └── step.yml
│ ├── 3.5.7/
│ │ └── step.yml
│ ├── 3.5.8/
│ │ └── step.yml
│ ├── 3.5.9/
│ │ └── step.yml
│ └── step-info.yml
├── amazon-s3-upload/
│ ├── 3.0.0/
│ │ └── step.yml
│ ├── 3.1.0/
│ │ └── step.yml
│ ├── 3.1.1/
│ │ └── step.yml
│ ├── 3.1.2/
│ │ └── step.yml
│ ├── 3.1.3/
│ │ └── step.yml
│ ├── 3.1.4/
│ │ └── step.yml
│ ├── 3.1.5/
│ │ └── step.yml
│ └── step-info.yml
├── amazon-s3-uploader/
│ ├── 1.0.1/
│ │ └── step.yml
│ └── step-info.yml
├── android-build/
│ ├── 0.10.0/
│ │ └── step.yml
│ ├── 0.10.1/
│ │ └── step.yml
│ ├── 0.10.2/
│ │ └── step.yml
│ ├── 0.10.3/
│ │ └── step.yml
│ ├── 0.10.4/
│ │ └── step.yml
│ ├── 0.9.0/
│ │ └── step.yml
│ ├── 0.9.1/
│ │ └── step.yml
│ ├── 0.9.2/
│ │ └── step.yml
│ ├── 0.9.3/
│ │ └── step.yml
│ ├── 0.9.4/
│ │ └── step.yml
│ ├── 0.9.5/
│ │ └── step.yml
│ ├── 0.9.6/
│ │ └── step.yml
│ ├── 1.0.0/
│ │ └── step.yml
│ ├── 1.0.1/
│ │ └── step.yml
│ ├── 1.0.2/
│ │ └── step.yml
│ ├── 1.0.3/
│ │ └── step.yml
│ ├── 1.0.4/
│ │ └── step.yml
│ ├── 1.0.5/
│ │ └── step.yml
│ ├── 1.0.6/
│ │ └── step.yml
│ ├── 1.1.0/
│ │ └── step.yml
│ └── step-info.yml
├── android-build-for-ui-testing/
│ ├── 0.1.0/
│ │ └── step.yml
│ ├── 0.1.1/
│ │ └── step.yml
│ ├── 0.1.2/
│ │ └── step.yml
│ ├── 0.1.3/
│ │ └── step.yml
│ ├── 0.1.4/
│ │ └── step.yml
│ ├── 0.1.5/
│ │ └── step.yml
│ ├── 0.1.6/
│ │ └── step.yml
│ ├── 0.1.7/
│ │ └── step.yml
│ ├── 0.1.8/
│ │ └── step.yml
│ ├── 0.1.9/
│ │ └── step.yml
│ └── step-info.yml
├── android-detekt/
│ ├── 0.0.2/
│ │ └── step.yml
│ ├── 0.0.3/
│ │ └── step.yml
│ └── step-info.yml
├── android-instrumented-test/
│ ├── 0.1.0/
│ │ └── step.yml
│ ├── 0.1.1/
│ │ └── step.yml
│ ├── 0.1.2/
│ │ └── step.yml
│ └── step-info.yml
├── android-lint/
│ ├── 0.9.0/
│ │ └── step.yml
│ ├── 0.9.1/
│ │ └── step.yml
│ ├── 0.9.10/
│ │ └── step.yml
│ ├── 0.9.11/
│ │ └── step.yml
│ ├── 0.9.12/
│ │ └── step.yml
│ ├── 0.9.13/
│ │ └── step.yml
│ ├── 0.9.14/
│ │ └── step.yml
│ ├── 0.9.2/
│ │ └── step.yml
│ ├── 0.9.4/
│ │ └── step.yml
│ ├── 0.9.5/
│ │ └── step.yml
│ ├── 0.9.6/
│ │ └── step.yml
│ ├── 0.9.7/
│ │ └── step.yml
│ ├── 0.9.8/
│ │ └── step.yml
│ ├── 0.9.9/
│ │ └── step.yml
│ └── step-info.yml
├── android-manifest-info/
│ ├── 1.0.0/
│ │ └── step.yml
│ ├── 1.0.1/
│ │ └── step.yml
│ ├── 1.0.2/
│ │ └── step.yml
│ └── step-info.yml
├── android-screenrecord-start/
│ ├── 0.9.0/
│ │ └── step.yml
│ └── step-info.yml
├── android-screenrecord-stop/
│ ├── 0.9.0/
│ │ └── step.yml
│ └── step-info.yml
├── android-sdk-add-on-installer/
│ ├── 0.0.1/
│ │ └── step.yml
│ └── step-info.yml
├── android-sdk-update/
│ ├── 1.0.1/
│ │ └── step.yml
│ ├── 1.0.2/
│ │ └── step.yml
│ ├── 1.0.4/
│ │ └── step.yml
│ ├── 1.0.6/
│ │ └── step.yml
│ └── step-info.yml
├── android-unit-test/
│ ├── 0.10.0/
│ │ └── step.yml
│ ├── 0.11.0/
│ │ └── step.yml
│ ├── 0.11.1/
│ │ └── step.yml
│ ├── 0.9.0/
│ │ └── step.yml
│ ├── 0.9.2/
│ │ └── step.yml
│ ├── 0.9.3/
│ │ └── step.yml
│ ├── 0.9.4/
│ │ └── step.yml
│ ├── 0.9.5/
│ │ └── step.yml
│ ├── 0.9.6/
│ │ └── step.yml
│ ├── 1.0.0/
│ │ └── step.yml
│ ├── 1.0.1/
│ │ └── step.yml
│ ├── 1.0.2/
│ │ └── step.yml
│ ├── 1.0.3/
│ │ └── step.yml
│ ├── 1.0.4/
│ │ └── step.yml
│ ├── 1.0.5/
│ │ └── step.yml
│ ├── 1.0.6/
│ │ └── step.yml
│ ├── 1.1.0/
│ │ └── step.yml
│ ├── 1.2.0/
│ │ └── step.yml
│ ├── 1.2.1/
│ │ └── step.yml
│ ├── 1.2.2/
│ │ └── step.yml
│ ├── 1.2.3/
│ │ └── step.yml
│ ├── 1.2.4/
│ │ └── step.yml
│ ├── 1.2.5/
│ │ └── step.yml
│ └── step-info.yml
├── apispotter-test-runner/
│ ├── 0.0.1/
│ │ └── step.yml
│ └── step-info.yml
├── apk-info/
│ ├── 1.0.4/
│ │ └── step.yml
│ ├── 1.1.0/
│ │ └── step.yml
│ ├── 1.1.1/
│ │ └── step.yml
│ ├── 1.2.0/
│ │ └── step.yml
│ ├── 1.2.1/
│ │ └── step.yml
│ ├── 1.2.2/
│ │ └── step.yml
│ ├── 1.2.3/
│ │ └── step.yml
│ ├── 1.3.0/
│ │ └── step.yml
│ ├── 1.4.0/
│ │ └── step.yml
│ ├── 1.4.1/
│ │ └── step.yml
│ ├── 1.4.2/
│ │ └── step.yml
│ ├── 1.4.4/
│ │ └── step.yml
│ ├── 1.4.5/
│ │ └── step.yml
│ ├── 1.4.6/
│ │ └── step.yml
│ ├── 1.4.7/
│ │ └── step.yml
│ └── step-info.yml
├── app-center-launch-test-android/
│ ├── 1.0.0/
│ │ └── step.yml
│ └── step-info.yml
├── app-gallery-deploy/
│ ├── 1.0.0/
│ │ └── step.yml
│ ├── 1.0.1/
│ │ └── step.yml
│ ├── 1.1.0/
│ │ └── step.yml
│ └── step-info.yml
├── app-ray-mobile-security/
│ ├── 1.3.9/
│ │ └── step.yml
│ └── step-info.yml
├── appaloosa/
│ ├── 1.0.0/
│ │ └── step.yml
│ ├── 1.1.0/
│ │ └── step.yml
│ ├── 1.2.0/
│ │ └── step.yml
│ ├── 1.2.1/
│ │ └── step.yml
│ ├── 1.2.3/
│ │ └── step.yml
│ ├── 1.3.0/
│ │ └── step.yml
│ ├── 1.4.0/
│ │ └── step.yml
│ ├── 1.5.0/
│ │ └── step.yml
│ └── step-info.yml
├── appcenter-apk-upload/
│ ├── 0.0.1/
│ │ └── step.yml
│ └── step-info.yml
├── appcenter-app-release/
│ ├── 1.0.0/
│ │ └── step.yml
│ ├── 1.0.1/
│ │ └── step.yml
│ ├── 1.0.3/
│ │ └── step.yml
│ ├── 1.0.5/
│ │ └── step.yml
│ └── step-info.yml
├── appcenter-codepush-release-react-native/
│ ├── 0.0.1/
│ │ └── step.yml
│ ├── 0.0.2/
│ │ └── step.yml
│ ├── 0.0.3/
│ │ └── step.yml
│ └── step-info.yml
├── appcenter-deploy-android/
│ ├── 1.0.0/
│ │ └── step.yml
│ ├── 1.0.1/
│ │ └── step.yml
│ ├── 1.0.2/
│ │ └── step.yml
│ ├── 1.1.0/
│ │ └── step.yml
│ ├── 2.0.0/
│ │ └── step.yml
│ ├── 2.0.1/
│ │ └── step.yml
│ ├── 2.0.2/
│ │ └── step.yml
│ ├── 2.1.0/
│ │ └── step.yml
│ ├── 2.1.1/
│ │ └── step.yml
│ ├── 2.1.2/
│ │ └── step.yml
│ ├── 2.2.0/
│ │ └── step.yml
│ ├── 2.2.1/
│ │ └── step.yml
│ ├── 2.2.2/
│ │ └── step.yml
│ ├── 2.2.3/
│ │ └── step.yml
│ └── step-info.yml
├── appcenter-deploy-ios/
│ ├── 1.0.0/
│ │ └── step.yml
│ ├── 1.1.0/
│ │ └── step.yml
│ ├── 2.0.0/
│ │ └── step.yml
│ ├── 2.0.1/
│ │ └── step.yml
│ ├── 2.0.2/
│ │ └── step.yml
│ ├── 2.1.0/
│ │ └── step.yml
│ ├── 2.1.1/
│ │ └── step.yml
│ ├── 2.1.2/
│ │ └── step.yml
│ ├── 2.2.0/
│ │ └── step.yml
│ ├── 2.2.1/
│ │ └── step.yml
│ ├── 2.2.2/
│ │ └── step.yml
│ └── step-info.yml
├── appcenter-dsym-upload/
│ ├── 0.1.2/
│ │ └── step.yml
│ ├── 0.1.3/
│ │ └── step.yml
│ └── step-info.yml
├── appcenter-ipa-upload/
│ ├── 0.0.2/
│ │ └── step.yml
│ ├── 0.0.3/
│ │ └── step.yml
│ ├── 0.0.4/
│ │ └── step.yml
│ └── step-info.yml
├── appcenter-test/
│ ├── 0.9.0/
│ │ └── step.yml
│ ├── 0.9.1/
│ │ └── step.yml
│ ├── 0.9.2/
│ │ └── step.yml
│ └── step-info.yml
├── appdome-build-2secure-android/
│ ├── 1.0.12/
│ │ └── step.yml
│ ├── 1.0.5/
│ │ └── step.yml
│ ├── 1.0.7/
│ │ └── step.yml
│ ├── 2.0.0/
│ │ └── step.yml
│ ├── 3.0.0/
│ │ └── step.yml
│ ├── 3.2.0/
│ │ └── step.yml
│ ├── 3.3.1/
│ │ └── step.yml
│ ├── 3.4.1/
│ │ └── step.yml
│ ├── 3.5.0/
│ │ └── step.yml
│ ├── 3.6.0/
│ │ └── step.yml
│ └── step-info.yml
├── appdome-build-2secure-ios/
│ ├── 1.0.12/
│ │ └── step.yml
│ ├── 1.0.5/
│ │ └── step.yml
│ ├── 1.0.6/
│ │ └── step.yml
│ ├── 2.0.0/
│ │ └── step.yml
│ ├── 3.0.0/
│ │ └── step.yml
│ ├── 3.1.0/
│ │ └── step.yml
│ ├── 3.1.1/
│ │ └── step.yml
│ ├── 3.2.0/
│ │ └── step.yml
│ └── step-info.yml
├── appetize-deploy/
│ ├── 0.1.3/
│ │ └── step.yml
│ ├── 0.10.0/
│ │ └── step.yml
│ ├── 0.9.0/
│ │ └── step.yml
│ ├── 0.9.1/
│ │ └── step.yml
│ ├── 0.9.3/
│ │ └── step.yml
│ ├── 0.9.4/
│ │ └── step.yml
│ ├── 0.9.5/
│ │ └── step.yml
│ └── step-info.yml
├── appgallery-deploy/
│ ├── 0.9.0/
│ │ └── step.yml
│ ├── 1.0.0/
│ │ └── step.yml
│ ├── 1.5.0/
│ │ └── step.yml
│ ├── 1.5.1/
│ │ └── step.yml
│ ├── 1.5.2/
│ │ └── step.yml
│ ├── 1.5.3/
│ │ └── step.yml
│ ├── 1.5.4/
│ │ └── step.yml
│ ├── 1.5.5/
│ │ └── step.yml
│ ├── 1.5.6/
│ │ └── step.yml
│ ├── 1.5.7/
│ │ └── step.yml
│ ├── 1.5.8/
│ │ └── step.yml
│ ├── 1.5.9/
│ │ └── step.yml
│ └── step-info.yml
├── appium-server/
│ ├── 0.0.2/
│ │ └── step.yml
│ ├── 0.0.4/
│ │ └── step.yml
│ ├── 0.0.5/
│ │ └── step.yml
│ ├── 0.0.6/
│ │ └── step.yml
│ └── step-info.yml
├── applivery-android/
│ ├── 0.1.0/
│ │ └── step.yml
│ ├── 0.2.0/
│ │ └── step.yml
│ ├── 0.2.1/
│ │ └── step.yml
│ ├── 0.3.0/
│ │ └── step.yml
│ ├── 0.3.1/
│ │ └── step.yml
│ ├── 0.3.2/
│ │ └── step.yml
│ ├── 0.3.3/
│ │ └── step.yml
│ ├── 0.3.4/
│ │ └── step.yml
│ ├── 1.0.0/
│ │ └── step.yml
│ ├── 1.0.1/
│ │ └── step.yml
│ └── step-info.yml
├── applivery-ios/
│ ├── 0.1.1/
│ │ └── step.yml
│ ├── 0.2.0/
│ │ └── step.yml
│ ├── 0.2.1/
│ │ └── step.yml
│ ├── 0.3.0/
│ │ └── step.yml
│ ├── 0.3.1/
│ │ └── step.yml
│ ├── 0.3.2/
│ │ └── step.yml
│ ├── 1.0.0/
│ │ └── step.yml
│ ├── 1.0.1/
│ │ └── step.yml
│ └── step-info.yml
├── apps-decompiler/
│ ├── 1.0.1/
│ │ └── step.yml
│ ├── 1.0.2/
│ │ └── step.yml
│ ├── 1.0.3/
│ │ └── step.yml
│ └── step-info.yml
├── apptestai-test/
│ ├── 0.1.0/
│ │ └── step.yml
│ └── step-info.yml
├── apt-get-install/
│ ├── 0.10.0/
│ │ └── step.yml
│ ├── 0.10.1/
│ │ └── step.yml
│ ├── 0.9.0/
│ │ └── step.yml
│ ├── 0.9.1/
│ │ └── step.yml
│ └── step-info.yml
├── artifact-pull/
│ ├── 1.0.0/
│ │ └── step.yml
│ ├── 1.0.1/
│ │ └── step.yml
│ └── step-info.yml
├── ascii-generator/
│ ├── 1.0.3/
│ │ └── step.yml
│ ├── 1.0.4/
│ │ └── step.yml
│ └── step-info.yml
├── authenticate-host-with-netrc/
│ ├── 0.9.0/
│ │ └── step.yml
│ ├── 0.9.2/
│ │ └── step.yml
│ ├── 0.9.3/
│ │ └── step.yml
│ ├── 0.9.4/
│ │ └── step.yml
│ ├── 0.9.5/
│ │ └── step.yml
│ ├── 0.9.6/
│ │ └── step.yml
│ ├── 0.9.7/
│ │ └── step.yml
│ ├── 0.9.8/
│ │ └── step.yml
│ ├── 0.9.9/
│ │ └── step.yml
│ └── step-info.yml
├── authenticate-with-aws/
│ ├── 0.0.1/
│ │ └── step.yml
│ └── step-info.yml
├── authenticate-with-bitbucket-oauth/
│ ├── 0.10.0/
│ │ └── step.yml
│ ├── 0.10.1/
│ │ └── step.yml
│ ├── 0.10.2/
│ │ └── step.yml
│ ├── 0.10.3/
│ │ └── step.yml
│ ├── 0.9.0/
│ │ └── step.yml
│ └── step-info.yml
├── authenticate-with-gcp/
│ ├── 0.0.1/
│ │ └── step.yml
│ ├── 0.0.4/
│ │ └── step.yml
│ └── step-info.yml
├── authenticate-with-github-oauth/
│ ├── 0.9.0/
│ │ └── step.yml
│ ├── 0.9.1/
│ │ └── step.yml
│ ├── 0.9.2/
│ │ └── step.yml
│ ├── 0.9.3/
│ │ └── step.yml
│ ├── 0.9.4/
│ │ └── step.yml
│ └── step-info.yml
├── autify-test-run/
│ ├── 1.0.0/
│ │ └── step.yml
│ ├── 1.0.1/
│ │ └── step.yml
│ ├── 1.1.0/
│ │ └── step.yml
│ └── step-info.yml
├── autify-upload/
│ ├── 0.0.1/
│ │ └── step.yml
│ ├── 0.0.2/
│ │ └── step.yml
│ ├── 0.0.3/
│ │ └── step.yml
│ ├── 1.0.0/
│ │ └── step.yml
│ ├── 1.1.0/
│ │ └── step.yml
│ └── step-info.yml
├── avd-manager/
│ ├── 0.9.1/
│ │ └── step.yml
│ ├── 0.9.2/
│ │ └── step.yml
│ ├── 1.0.0/
│ │ └── step.yml
│ ├── 1.0.1/
│ │ └── step.yml
│ ├── 1.0.2/
│ │ └── step.yml
│ ├── 1.0.3/
│ │ └── step.yml
│ ├── 1.0.4/
│ │ └── step.yml
│ ├── 1.1.0/
│ │ └── step.yml
│ ├── 1.1.1/
│ │ └── step.yml
│ ├── 1.1.2/
│ │ └── step.yml
│ ├── 1.2.0/
│ │ └── step.yml
│ ├── 1.2.1/
│ │ └── step.yml
│ ├── 1.3.0/
│ │ └── step.yml
│ ├── 2.0.0/
│ │ └── step.yml
│ ├── 2.0.1/
│ │ └── step.yml
│ ├── 2.0.2/
│ │ └── step.yml
│ └── step-info.yml
├── aws-device-farm-file-deploy/
│ ├── 0.0.1/
│ │ └── step.yml
│ ├── 0.0.2/
│ │ └── step.yml
│ ├── 0.0.3/
│ │ └── step.yml
│ ├── 0.0.4/
│ │ └── step.yml
│ └── step-info.yml
├── aws-device-farm-runner/
│ ├── 0.0.2/
│ │ └── step.yml
│ ├── 0.0.3/
│ │ └── step.yml
│ ├── 0.0.4/
│ │ └── step.yml
│ ├── 0.0.5/
│ │ └── step.yml
│ ├── 0.0.6/
│ │ └── step.yml
│ ├── 0.0.7/
│ │ └── step.yml
│ ├── 0.0.8/
│ │ └── step.yml
│ └── step-info.yml
├── aws-s3-upload/
│ ├── 0.0.1/
│ │ └── step.yml
│ └── step-info.yml
├── aws-secrets-manager/
│ ├── 0.0.1/
│ │ └── step.yml
│ ├── 0.0.2/
│ │ └── step.yml
│ ├── 1.0.0/
│ │ └── step.yml
│ ├── 2.0.0/
│ │ └── step.yml
│ ├── 2.1.0/
│ │ └── step.yml
│ ├── 2.2.0/
│ │ └── step.yml
│ └── step-info.yml
├── azure-devops-status/
│ ├── 1.0.0/
│ │ └── step.yml
│ ├── 1.0.1/
│ │ └── step.yml
│ └── step-info.yml
├── badgetizr/
│ ├── 3.0.3/
│ │ └── step.yml
│ └── step-info.yml
├── beat-android-code-stats/
│ ├── 0.0.2/
│ │ └── step.yml
│ └── step-info.yml
├── bitbucket-server-post-build-status/
│ ├── 0.0.10/
│ │ └── step.yml
│ ├── 0.0.11/
│ │ └── step.yml
│ ├── 0.0.12/
│ │ └── step.yml
│ ├── 0.0.13/
│ │ └── step.yml
│ ├── 0.0.8/
│ │ └── step.yml
│ ├── 0.0.9/
│ │ └── step.yml
│ └── step-info.yml
├── bitbucket-snippet-runner/
│ ├── 0.1.0/
│ │ └── step.yml
│ ├── 1.0.0/
│ │ └── step.yml
│ ├── 1.1.0/
│ │ └── step.yml
│ ├── 1.1.1/
│ │ └── step.yml
│ ├── 1.2.0/
│ │ └── step.yml
│ └── step-info.yml
├── bitrise-aws-device-farm-runner/
│ └── step-info.yml
├── bitrise-run/
│ ├── 0.9.0/
│ │ └── step.yml
│ ├── 0.9.1/
│ │ └── step.yml
│ ├── 0.9.2/
│ │ └── step.yml
│ └── step-info.yml
├── bitrise-snyk-scan/
│ ├── 0.1.0/
│ │ └── step.yml
│ └── step-info.yml
├── bitrise-step-appdome-build-2secure-ios/
│ ├── 1.0.2/
│ │ └── step.yml
│ └── step-info.yml
├── bitrise-step-appledoc/
│ ├── 1.0.2/
│ │ └── step.yml
│ └── step-info.yml
├── bitrise-step-eschecker/
│ ├── 0.0.1/
│ │ └── step.yml
│ └── step-info.yml
├── bitrise-step-export-universal-apk/
│ ├── 0.1.1/
│ │ └── step.yml
│ ├── 0.1.2/
│ │ └── step.yml
│ ├── 0.1.3/
│ │ └── step.yml
│ ├── 0.1.4/
│ │ └── step.yml
│ └── step-info.yml
├── bitrise-step-icon-overlay/
│ ├── 1.0.1/
│ │ └── step.yml
│ ├── 2.0.0/
│ │ └── step.yml
│ └── step-info.yml
├── bitrise-step-ionic-build/
│ ├── 0.0.1/
│ │ └── step.yml
│ └── step-info.yml
├── bitrise-step-multikey-restore-cache/
│ ├── 0.1.0/
│ │ └── step.yml
│ ├── 0.1.1/
│ │ └── step.yml
│ └── step-info.yml
├── bitrise-step-multikey-save-cache/
│ ├── 0.1.0/
│ │ └── step.yml
│ └── step-info.yml
├── bitrise-step-nowsecure-auto-analysis/
│ ├── 0.1.1/
│ │ └── step.yml
│ ├── 0.1.3/
│ │ └── step.yml
│ ├── 0.1.4/
│ │ └── step.yml
│ └── step-info.yml
├── bitrise-step-qyrus-mobility-test-runner-android/
│ ├── 0.0.1/
│ │ └── step.yml
│ ├── 0.0.2/
│ │ └── step.yml
│ └── step-info.yml
├── bitrise-step-stamp-appicon-with-version-number/
│ ├── 1.0.0/
│ │ └── step.yml
│ ├── 1.2.0/
│ │ └── step.yml
│ └── step-info.yml
├── bitrise-step-version-pre-release-info/
│ ├── 1.0.3/
│ │ └── step.yml
│ ├── 1.1.0/
│ │ └── step.yml
│ └── step-info.yml
├── bitrise-step-xctest-cobertura-xml/
│ ├── 1.0.0/
│ │ └── step.yml
│ ├── 1.1.0/
│ │ └── step.yml
│ ├── 1.2.0/
│ │ └── step.yml
│ └── step-info.yml
├── bitrise-to-appscan/
│ ├── 0.2.4/
│ │ └── step.yml
│ └── step-info.yml
├── bluepill-build-test-for-ios/
│ ├── 0.2.6/
│ │ └── step.yml
│ ├── 0.2.7/
│ │ └── step.yml
│ ├── 0.3.0/
│ │ └── step.yml
│ ├── 0.4.0/
│ │ └── step.yml
│ └── step-info.yml
├── bower/
│ ├── 0.1.2/
│ │ └── step.yml
│ ├── 0.1.3/
│ │ └── step.yml
│ └── step-info.yml
├── brew-install/
│ ├── 0.10.0/
│ │ └── step.yml
│ ├── 0.10.2/
│ │ └── step.yml
│ ├── 0.11.0/
│ │ └── step.yml
│ ├── 0.11.1/
│ │ └── step.yml
│ ├── 0.12.0/
│ │ └── step.yml
│ ├── 0.12.1/
│ │ └── step.yml
│ ├── 0.12.2/
│ │ └── step.yml
│ ├── 0.12.3/
│ │ └── step.yml
│ ├── 0.12.4/
│ │ └── step.yml
│ ├── 0.9.0/
│ │ └── step.yml
│ ├── 1.0.0/
│ │ └── step.yml
│ ├── 1.0.1/
│ │ └── step.yml
│ └── step-info.yml
├── browserstack-app-live-upload/
│ ├── 1.0.0/
│ │ └── step.yml
│ └── step-info.yml
├── browserstack-bitrise-espresso-step/
│ ├── 1.0.0/
│ │ └── step.yml
│ └── step-info.yml
├── browserstack-bitrise-xcui-step/
│ ├── 1.0.0/
│ │ └── step.yml
│ ├── 1.0.1/
│ │ └── step.yml
│ └── step-info.yml
├── browserstack-espresso-app-automate/
│ ├── 0.3.0/
│ │ └── step.yml
│ └── step-info.yml
├── browserstack-upload/
│ ├── 0.1.3/
│ │ └── step.yml
│ ├── 0.1.4/
│ │ └── step.yml
│ └── step-info.yml
├── build-number-adjust/
│ ├── 1.0.0/
│ │ └── step.yml
│ └── step-info.yml
├── build-router-start/
│ ├── 0.10.0/
│ │ └── step.yml
│ ├── 0.11.1/
│ │ └── step.yml
│ ├── 0.11.2/
│ │ └── step.yml
│ ├── 0.11.3/
│ │ └── step.yml
│ ├── 0.12.0/
│ │ └── step.yml
│ ├── 0.12.1/
│ │ └── step.yml
│ ├── 0.13.0/
│ │ └── step.yml
│ ├── 0.14.0/
│ │ └── step.yml
│ ├── 0.14.1/
│ │ └── step.yml
│ ├── 0.14.2/
│ │ └── step.yml
│ ├── 0.14.3/
│ │ └── step.yml
│ ├── 0.14.4/
│ │ └── step.yml
│ ├── 0.14.5/
│ │ └── step.yml
│ ├── 0.14.6/
│ │ └── step.yml
│ ├── 0.14.7/
│ │ └── step.yml
│ ├── 0.9.0/
│ │ └── step.yml
│ └── step-info.yml
├── build-router-wait/
│ ├── 0.10.0/
│ │ └── step.yml
│ ├── 0.10.1/
│ │ └── step.yml
│ ├── 0.11.0/
│ │ └── step.yml
│ ├── 0.12.0/
│ │ └── step.yml
│ ├── 0.12.1/
│ │ └── step.yml
│ ├── 0.12.2/
│ │ └── step.yml
│ ├── 0.12.3/
│ │ └── step.yml
│ ├── 0.12.4/
│ │ └── step.yml
│ ├── 0.9.0/
│ │ └── step.yml
│ ├── 0.9.1/
│ │ └── step.yml
│ ├── 0.9.2/
│ │ └── step.yml
│ └── step-info.yml
├── build-status-change/
│ ├── 0.1.1/
│ │ └── step.yml
│ ├── 0.1.2/
│ │ └── step.yml
│ └── step-info.yml
├── bundle-universal-apk/
│ ├── 0.0.2/
│ │ └── step.yml
│ ├── 0.0.3/
│ │ └── step.yml
│ ├── 0.0.4/
│ │ └── step.yml
│ ├── 0.0.5/
│ │ └── step.yml
│ ├── 0.0.6/
│ │ └── step.yml
│ └── step-info.yml
├── bundler/
│ ├── 0.0.1/
│ │ └── step.yml
│ ├── 0.0.2/
│ │ └── step.yml
│ ├── 0.0.3/
│ │ └── step.yml
│ ├── 0.0.4/
│ │ └── step.yml
│ └── step-info.yml
├── cache-pull/
│ ├── 0.9.0/
│ │ └── step.yml
│ ├── 0.9.1/
│ │ └── step.yml
│ ├── 0.9.2/
│ │ └── step.yml
│ ├── 0.9.4/
│ │ └── step.yml
│ ├── 1.0.0/
│ │ └── step.yml
│ ├── 2.0.0/
│ │ └── step.yml
│ ├── 2.0.1/
│ │ └── step.yml
│ ├── 2.1.0/
│ │ └── step.yml
│ ├── 2.1.1/
│ │ └── step.yml
│ ├── 2.1.2/
│ │ └── step.yml
│ ├── 2.1.3/
│ │ └── step.yml
│ ├── 2.1.4/
│ │ └── step.yml
│ ├── 2.1.5/
│ │ └── step.yml
│ ├── 2.1.6/
│ │ └── step.yml
│ ├── 2.3.0/
│ │ └── step.yml
│ ├── 2.4.0/
│ │ └── step.yml
│ ├── 2.5.0/
│ │ └── step.yml
│ ├── 2.6.0/
│ │ └── step.yml
│ ├── 2.6.1/
│ │ └── step.yml
│ ├── 2.7.0/
│ │ └── step.yml
│ ├── 2.7.1/
│ │ └── step.yml
│ ├── 2.7.2/
│ │ └── step.yml
│ └── step-info.yml
├── cache-push/
│ ├── 0.9.0/
│ │ └── step.yml
│ ├── 0.9.1/
│ │ └── step.yml
│ ├── 0.9.2/
│ │ └── step.yml
│ ├── 0.9.3/
│ │ └── step.yml
│ ├── 0.9.4/
│ │ └── step.yml
│ ├── 0.9.6/
│ │ └── step.yml
│ ├── 1.0.0/
│ │ └── step.yml
│ ├── 1.1.0/
│ │ └── step.yml
│ ├── 1.1.1/
│ │ └── step.yml
│ ├── 1.1.3/
│ │ └── step.yml
│ ├── 1.1.4/
│ │ └── step.yml
│ ├── 2.0.0/
│ │ └── step.yml
│ ├── 2.0.1/
│ │ └── step.yml
│ ├── 2.0.2/
│ │ └── step.yml
│ ├── 2.0.3/
│ │ └── step.yml
│ ├── 2.0.4/
│ │ └── step.yml
│ ├── 2.0.5/
│ │ └── step.yml
│ ├── 2.1.0/
│ │ └── step.yml
│ ├── 2.1.1/
│ │ └── step.yml
│ ├── 2.2.0/
│ │ └── step.yml
│ ├── 2.2.1/
│ │ └── step.yml
│ ├── 2.2.2/
│ │ └── step.yml
│ ├── 2.2.3/
│ │ └── step.yml
│ ├── 2.2.4/
│ │ └── step.yml
│ ├── 2.3.0/
│ │ └── step.yml
│ ├── 2.3.1/
│ │ └── step.yml
│ ├── 2.3.2/
│ │ └── step.yml
│ ├── 2.4.0/
│ │ └── step.yml
│ ├── 2.4.1/
│ │ └── step.yml
│ ├── 2.5.0/
│ │ └── step.yml
│ ├── 2.5.1/
│ │ └── step.yml
│ ├── 2.6.0/
│ │ └── step.yml
│ ├── 2.7.0/
│ │ └── step.yml
│ ├── 2.7.1/
│ │ └── step.yml
│ └── step-info.yml
├── cakebuild/
│ ├── 1.0.0/
│ │ └── step.yml
│ ├── 1.0.1/
│ │ └── step.yml
│ ├── 1.0.2/
│ │ └── step.yml
│ ├── 1.0.3/
│ │ └── step.yml
│ ├── 1.0.4/
│ │ └── step.yml
│ ├── 1.0.5/
│ │ └── step.yml
│ ├── 1.0.6/
│ │ └── step.yml
│ ├── 1.0.7/
│ │ └── step.yml
│ ├── 1.0.8/
│ │ └── step.yml
│ ├── 1.0.9/
│ │ └── step.yml
│ └── step-info.yml
├── calabash-android-uitest/
│ ├── 0.9.0/
│ │ └── step.yml
│ ├── 0.9.1/
│ │ └── step.yml
│ ├── 1.0.0/
│ │ └── step.yml
│ ├── 1.1.0/
│ │ └── step.yml
│ ├── 1.2.0/
│ │ └── step.yml
│ ├── 1.2.1/
│ │ └── step.yml
│ └── step-info.yml
├── calabash-ios-uitest/
│ ├── 0.9.0/
│ │ └── step.yml
│ ├── 0.9.1/
│ │ └── step.yml
│ ├── 1.0.0/
│ │ └── step.yml
│ ├── 1.1.0/
│ │ └── step.yml
│ ├── 1.2.1/
│ │ └── step.yml
│ ├── 1.3.0/
│ │ └── step.yml
│ ├── 1.3.1/
│ │ └── step.yml
│ └── step-info.yml
├── carthage/
│ ├── 1.0.0/
│ │ └── step.yml
│ ├── 1.0.1/
│ │ └── step.yml
│ ├── 1.0.2/
│ │ └── step.yml
│ ├── 1.0.3/
│ │ └── step.yml
│ ├── 1.0.4/
│ │ └── step.yml
│ ├── 1.0.5/
│ │ └── step.yml
│ ├── 1.0.6/
│ │ └── step.yml
│ ├── 1.0.7/
│ │ └── step.yml
│ ├── 1.0.8/
│ │ └── step.yml
│ ├── 2.0.0/
│ │ └── step.yml
│ ├── 2.0.1/
│ │ └── step.yml
│ ├── 2.0.2/
│ │ └── step.yml
│ ├── 2.1.0/
│ │ └── step.yml
│ ├── 2.1.1/
│ │ └── step.yml
│ ├── 2.1.2/
│ │ └── step.yml
│ ├── 2.2.0/
│ │ └── step.yml
│ ├── 2.3.0/
│ │ └── step.yml
│ ├── 2.4.0/
│ │ └── step.yml
│ ├── 3.0.0/
│ │ └── step.yml
│ ├── 3.0.1/
│ │ └── step.yml
│ ├── 3.0.2/
│ │ └── step.yml
│ ├── 3.0.3/
│ │ └── step.yml
│ ├── 3.0.4/
│ │ └── step.yml
│ ├── 3.0.5/
│ │ └── step.yml
│ ├── 3.0.6/
│ │ └── step.yml
│ ├── 3.1.2/
│ │ └── step.yml
│ ├── 3.1.3/
│ │ └── step.yml
│ ├── 3.1.4/
│ │ └── step.yml
│ ├── 3.1.5/
│ │ └── step.yml
│ ├── 3.1.6/
│ │ └── step.yml
│ ├── 3.1.7/
│ │ └── step.yml
│ ├── 3.2.0/
│ │ └── step.yml
│ ├── 3.2.1/
│ │ └── step.yml
│ ├── 3.2.2/
│ │ └── step.yml
│ ├── 3.2.3/
│ │ └── step.yml
│ ├── 3.2.4/
│ │ └── step.yml
│ ├── 3.2.5/
│ │ └── step.yml
│ └── step-info.yml
├── certificate-and-profile-installer/
│ ├── 1.1.0/
│ │ └── step.yml
│ ├── 1.1.1/
│ │ └── step.yml
│ ├── 1.10.0/
│ │ └── step.yml
│ ├── 1.10.1/
│ │ └── step.yml
│ ├── 1.10.2/
│ │ └── step.yml
│ ├── 1.10.3/
│ │ └── step.yml
│ ├── 1.10.4/
│ │ └── step.yml
│ ├── 1.10.5/
│ │ └── step.yml
│ ├── 1.10.6/
│ │ └── step.yml
│ ├── 1.11.0/
│ │ └── step.yml
│ ├── 1.11.1/
│ │ └── step.yml
│ ├── 1.11.2/
│ │ └── step.yml
│ ├── 1.11.3/
│ │ └── step.yml
│ ├── 1.11.4/
│ │ └── step.yml
│ ├── 1.11.5/
│ │ └── step.yml
│ ├── 1.2.0/
│ │ └── step.yml
│ ├── 1.2.1/
│ │ └── step.yml
│ ├── 1.2.2/
│ │ └── step.yml
│ ├── 1.3.0/
│ │ └── step.yml
│ ├── 1.4.0/
│ │ └── step.yml
│ ├── 1.4.1/
│ │ └── step.yml
│ ├── 1.4.2/
│ │ └── step.yml
│ ├── 1.5.0/
│ │ └── step.yml
│ ├── 1.5.2/
│ │ └── step.yml
│ ├── 1.6.0/
│ │ └── step.yml
│ ├── 1.7.0/
│ │ └── step.yml
│ ├── 1.8.0/
│ │ └── step.yml
│ ├── 1.8.1/
│ │ └── step.yml
│ ├── 1.8.2/
│ │ └── step.yml
│ ├── 1.8.3/
│ │ └── step.yml
│ ├── 1.8.4/
│ │ └── step.yml
│ ├── 1.8.5/
│ │ └── step.yml
│ ├── 1.8.6/
│ │ └── step.yml
│ ├── 1.8.7/
│ │ └── step.yml
│ ├── 1.8.8/
│ │ └── step.yml
│ ├── 1.9.0/
│ │ └── step.yml
│ ├── 1.9.1/
│ │ └── step.yml
│ ├── 1.9.2/
│ │ └── step.yml
│ ├── 1.9.3/
│ │ └── step.yml
│ └── step-info.yml
├── change-android-applicationid/
│ ├── 1.0.0/
│ │ └── step.yml
│ └── step-info.yml
├── change-android-versioncode-and-versionname/
│ ├── 0.9.0/
│ │ └── step.yml
│ ├── 1.0.0/
│ │ └── step.yml
│ ├── 1.0.1/
│ │ └── step.yml
│ ├── 1.1.0/
│ │ └── step.yml
│ ├── 1.1.1/
│ │ └── step.yml
│ ├── 1.2.0/
│ │ └── step.yml
│ ├── 1.2.1/
│ │ └── step.yml
│ ├── 1.2.2/
│ │ └── step.yml
│ ├── 1.2.3/
│ │ └── step.yml
│ ├── 1.2.4/
│ │ └── step.yml
│ ├── 1.3.0/
│ │ └── step.yml
│ ├── 1.3.1/
│ │ └── step.yml
│ ├── 1.3.2/
│ │ └── step.yml
│ └── step-info.yml
├── change-value/
│ ├── 1.0.1/
│ │ └── step.yml
│ ├── 1.1.0/
│ │ └── step.yml
│ ├── 1.1.1/
│ │ └── step.yml
│ ├── 1.1.3/
│ │ └── step.yml
│ ├── 2.0.0/
│ │ └── step.yml
│ └── step-info.yml
├── change-workdir/
│ ├── 1.0.0/
│ │ └── step.yml
│ ├── 1.0.1/
│ │ └── step.yml
│ ├── 1.0.2/
│ │ └── step.yml
│ ├── 1.0.3/
│ │ └── step.yml
│ └── step-info.yml
├── check-certificate/
│ ├── 1.0.0/
│ │ └── step.yml
│ └── step-info.yml
├── chuck-norris/
│ ├── 1.0.1/
│ │ └── step.yml
│ └── step-info.yml
├── close-jira-tasks/
│ ├── 1.0.0/
│ │ └── step.yml
│ └── step-info.yml
├── cocoapod-key/
│ ├── 1.0.1/
│ │ └── step.yml
│ ├── 1.0.2/
│ │ └── step.yml
│ ├── 1.1.0/
│ │ └── step.yml
│ ├── 2.0.0/
│ │ └── step.yml
│ └── step-info.yml
├── cocoapods-dependency-check/
│ ├── 0.0.1/
│ │ └── step.yml
│ ├── 0.0.2/
│ │ └── step.yml
│ └── step-info.yml
├── cocoapods-install/
│ ├── 1.0.0/
│ │ └── step.yml
│ ├── 1.0.1/
│ │ └── step.yml
│ ├── 1.0.2/
│ │ └── step.yml
│ ├── 1.0.3/
│ │ └── step.yml
│ ├── 1.1.0/
│ │ └── step.yml
│ ├── 1.10.0/
│ │ └── step.yml
│ ├── 1.10.1/
│ │ └── step.yml
│ ├── 1.11.0/
│ │ └── step.yml
│ ├── 1.2.0/
│ │ └── step.yml
│ ├── 1.2.1/
│ │ └── step.yml
│ ├── 1.3.0/
│ │ └── step.yml
│ ├── 1.4.0/
│ │ └── step.yml
│ ├── 1.4.1/
│ │ └── step.yml
│ ├── 1.4.2/
│ │ └── step.yml
│ ├── 1.5.0/
│ │ └── step.yml
│ ├── 1.5.1/
│ │ └── step.yml
│ ├── 1.5.2/
│ │ └── step.yml
│ ├── 1.5.3/
│ │ └── step.yml
│ ├── 1.5.4/
│ │ └── step.yml
│ ├── 1.5.5/
│ │ └── step.yml
│ ├── 1.5.6/
│ │ └── step.yml
│ ├── 1.5.7/
│ │ └── step.yml
│ ├── 1.5.8/
│ │ └── step.yml
│ ├── 1.5.9/
│ │ └── step.yml
│ ├── 1.6.0/
│ │ └── step.yml
│ ├── 1.6.1/
│ │ └── step.yml
│ ├── 1.7.1/
│ │ └── step.yml
│ ├── 1.7.2/
│ │ └── step.yml
│ ├── 1.8.0/
│ │ └── step.yml
│ ├── 1.9.0/
│ │ └── step.yml
│ ├── 1.9.1/
│ │ └── step.yml
│ ├── 2.0.0/
│ │ └── step.yml
│ ├── 2.1.0/
│ │ └── step.yml
│ ├── 2.2.0/
│ │ └── step.yml
│ ├── 2.2.1/
│ │ └── step.yml
│ ├── 2.3.0/
│ │ └── step.yml
│ ├── 2.3.1/
│ │ └── step.yml
│ ├── 2.3.2/
│ │ └── step.yml
│ ├── 2.3.3/
│ │ └── step.yml
│ ├── 2.3.4/
│ │ └── step.yml
│ ├── 2.3.5/
│ │ └── step.yml
│ ├── 2.4.0/
│ │ └── step.yml
│ ├── 2.4.1/
│ │ └── step.yml
│ ├── 2.4.2/
│ │ └── step.yml
│ ├── 2.4.3/
│ │ └── step.yml
│ ├── 3.0.0/
│ │ └── step.yml
│ └── step-info.yml
├── cocoaseeds-install/
│ ├── 1.0.0/
│ │ └── step.yml
│ └── step-info.yml
├── code-signing-setting-patch/
│ ├── 1.0.4/
│ │ └── step.yml
│ ├── 1.0.5/
│ │ └── step.yml
│ └── step-info.yml
├── codecov/
│ ├── 1.0.0/
│ │ └── step.yml
│ ├── 1.0.1/
│ │ └── step.yml
│ ├── 1.1.0/
│ │ └── step.yml
│ ├── 1.1.1/
│ │ └── step.yml
│ ├── 1.1.2/
│ │ └── step.yml
│ ├── 1.1.3/
│ │ └── step.yml
│ ├── 1.1.4/
│ │ └── step.yml
│ ├── 1.1.5/
│ │ └── step.yml
│ ├── 1.1.6/
│ │ └── step.yml
│ ├── 2.0.0/
│ │ └── step.yml
│ ├── 2.0.1/
│ │ └── step.yml
│ ├── 2.0.2/
│ │ └── step.yml
│ ├── 3.0.0/
│ │ └── step.yml
│ ├── 3.0.1/
│ │ └── step.yml
│ ├── 3.1.0/
│ │ └── step.yml
│ ├── 3.1.1/
│ │ └── step.yml
│ ├── 3.1.2/
│ │ └── step.yml
│ ├── 3.1.3/
│ │ └── step.yml
│ ├── 3.2.0/
│ │ └── step.yml
│ ├── 3.3.0/
│ │ └── step.yml
│ ├── 3.3.1/
│ │ └── step.yml
│ ├── 3.3.2/
│ │ └── step.yml
│ ├── 3.3.3/
│ │ └── step.yml
│ ├── 4.0.0/
│ │ └── step.yml
│ ├── 4.1.0/
│ │ └── step.yml
│ └── step-info.yml
├── codified-security-bitrise/
│ ├── 1.0.0/
│ │ └── step.yml
│ ├── 1.0.1/
│ │ └── step.yml
│ ├── 2.0.0/
│ │ └── step.yml
│ └── step-info.yml
├── comment-on-github-pull-request/
│ ├── 0.10.0/
│ │ └── step.yml
│ ├── 0.10.1/
│ │ └── step.yml
│ ├── 0.11.0/
│ │ └── step.yml
│ ├── 0.9.0/
│ │ └── step.yml
│ ├── 0.9.1/
│ │ └── step.yml
│ ├── 0.9.2/
│ │ └── step.yml
│ ├── 0.9.3/
│ │ └── step.yml
│ ├── 0.9.4/
│ │ └── step.yml
│ └── step-info.yml
├── configcat-feature-flag-sync/
│ ├── 0.0.10/
│ │ └── step.yml
│ ├── 0.0.11/
│ │ └── step.yml
│ ├── 0.0.2/
│ │ └── step.yml
│ ├── 0.0.3/
│ │ └── step.yml
│ ├── 0.0.4/
│ │ └── step.yml
│ ├── 0.0.5/
│ │ └── step.yml
│ ├── 0.0.6/
│ │ └── step.yml
│ ├── 0.0.7/
│ │ └── step.yml
│ ├── 0.0.8/
│ │ └── step.yml
│ ├── 0.0.9/
│ │ └── step.yml
│ └── step-info.yml
├── connect-to-fortigate-sslvpn/
│ ├── 1.0.0/
│ │ └── step.yml
│ └── step-info.yml
├── cordova-android/
│ ├── 0.9.0/
│ │ └── step.yml
│ ├── 0.9.1/
│ │ └── step.yml
│ ├── 0.9.2/
│ │ └── step.yml
│ └── step-info.yml
├── cordova-archive/
│ ├── 0.9.0/
│ │ └── step.yml
│ ├── 0.9.1/
│ │ └── step.yml
│ ├── 0.9.2/
│ │ └── step.yml
│ ├── 0.9.3/
│ │ └── step.yml
│ ├── 1.0.0/
│ │ └── step.yml
│ ├── 1.0.1/
│ │ └── step.yml
│ ├── 1.1.0/
│ │ └── step.yml
│ ├── 1.1.1/
│ │ └── step.yml
│ ├── 1.2.0/
│ │ └── step.yml
│ ├── 1.2.1/
│ │ └── step.yml
│ ├── 2.0.0/
│ │ └── step.yml
│ ├── 2.1.0/
│ │ └── step.yml
│ ├── 2.1.1/
│ │ └── step.yml
│ ├── 2.2.0/
│ │ └── step.yml
│ ├── 2.2.1/
│ │ └── step.yml
│ ├── 2.3.0/
│ │ └── step.yml
│ ├── 2.4.0/
│ │ └── step.yml
│ ├── 3.0.0/
│ │ └── step.yml
│ ├── 3.0.1/
│ │ └── step.yml
│ ├── 3.0.2/
│ │ └── step.yml
│ ├── 3.0.3/
│ │ └── step.yml
│ └── step-info.yml
├── cordova-config/
│ ├── 0.0.3/
│ │ └── step.yml
│ └── step-info.yml
├── cordova-ios/
│ ├── 0.1.0/
│ │ └── step.yml
│ └── step-info.yml
├── cordova-prepare/
│ ├── 0.9.1/
│ │ └── step.yml
│ ├── 0.9.2/
│ │ └── step.yml
│ ├── 1.0.0/
│ │ └── step.yml
│ ├── 1.1.0/
│ │ └── step.yml
│ ├── 1.1.1/
│ │ └── step.yml
│ └── step-info.yml
├── create-a-new-release-in-jira/
│ ├── 1.0.1/
│ │ └── step.yml
│ ├── 1.0.2/
│ │ └── step.yml
│ └── step-info.yml
├── create-android-emulator/
│ ├── 0.9.0/
│ │ └── step.yml
│ ├── 0.9.1/
│ │ └── step.yml
│ ├── 1.0.0/
│ │ └── step.yml
│ ├── 1.1.0/
│ │ └── step.yml
│ ├── 1.1.1/
│ │ └── step.yml
│ ├── 1.1.2/
│ │ └── step.yml
│ ├── 1.1.3/
│ │ └── step.yml
│ ├── 1.1.4/
│ │ └── step.yml
│ ├── 1.1.5/
│ │ └── step.yml
│ ├── 1.1.6/
│ │ └── step.yml
│ └── step-info.yml
├── create-apple-documentation/
│ ├── 1.0.0/
│ │ └── step.yml
│ ├── 1.1.0/
│ │ └── step.yml
│ ├── 1.1.1/
│ │ └── step.yml
│ └── step-info.yml
├── create-github-app-token/
│ ├── 1.0.0/
│ │ └── step.yml
│ └── step-info.yml
├── create-github-pull-request/
│ ├── 0.0.1/
│ │ └── step.yml
│ └── step-info.yml
├── create-install-page-qr-code/
│ ├── 0.1.0/
│ │ └── step.yml
│ ├── 0.1.2/
│ │ └── step.yml
│ ├── 1.0.0/
│ │ └── step.yml
│ ├── 1.0.1/
│ │ └── step.yml
│ └── step-info.yml
├── create-new-app-store-release/
│ ├── 1.0.0/
│ │ └── step.yml
│ └── step-info.yml
├── create-zip/
│ ├── 0.9.0/
│ │ └── step.yml
│ ├── 0.9.1/
│ │ └── step.yml
│ ├── 0.9.2/
│ │ └── step.yml
│ ├── 1.0.0/
│ │ └── step.yml
│ └── step-info.yml
├── curl-ping/
│ ├── 2.0.0/
│ │ └── step.yml
│ ├── 2.0.1/
│ │ └── step.yml
│ └── step-info.yml
├── custom-test-results-export/
│ ├── 0.1.0/
│ │ └── step.yml
│ ├── 0.1.1/
│ │ └── step.yml
│ ├── 0.1.2/
│ │ └── step.yml
│ ├── 0.1.3/
│ │ └── step.yml
│ ├── 1.0.0/
│ │ └── step.yml
│ ├── 1.0.1/
│ │ └── step.yml
│ ├── 1.1.0/
│ │ └── step.yml
│ └── step-info.yml
├── danger/
│ ├── 0.1.1/
│ │ └── step.yml
│ ├── 1.0.0/
│ │ └── step.yml
│ ├── 1.1.0/
│ │ └── step.yml
│ ├── 2.0.0/
│ │ └── step.yml
│ ├── 2.0.1/
│ │ └── step.yml
│ ├── 2.0.2/
│ │ └── step.yml
│ ├── 2.0.3/
│ │ └── step.yml
│ └── step-info.yml
├── data-theorem-mobile-secure/
│ ├── 0.0.1/
│ │ └── step.yml
│ ├── 1.0.0/
│ │ └── step.yml
│ ├── 1.1.0/
│ │ └── step.yml
│ ├── 1.2.0/
│ │ └── step.yml
│ └── step-info.yml
├── decrypt-file/
│ ├── 0.9.0/
│ │ └── step.yml
│ ├── 0.9.1/
│ │ └── step.yml
│ └── step-info.yml
├── dependency-installer/
│ ├── 1.0.1/
│ │ └── step.yml
│ └── step-info.yml
├── deploy-react-native-update-to-appzung-codepush/
│ ├── 1.0.0/
│ │ └── step.yml
│ └── step-info.yml
├── deploy-to-bitrise-io/
│ ├── 2.0.7/
│ │ └── step.yml
│ ├── 2.0.8/
│ │ └── step.yml
│ ├── 2.0.9/
│ │ └── step.yml
│ ├── 2.1.0/
│ │ └── step.yml
│ ├── 2.1.1/
│ │ └── step.yml
│ ├── 2.1.2/
│ │ └── step.yml
│ ├── 2.1.3/
│ │ └── step.yml
│ ├── 2.1.4/
│ │ └── step.yml
│ ├── 2.1.5/
│ │ └── step.yml
│ ├── 2.1.6/
│ │ └── step.yml
│ ├── 2.1.7/
│ │ └── step.yml
│ ├── 2.1.8/
│ │ └── step.yml
│ ├── 2.10.0/
│ │ └── step.yml
│ ├── 2.11.0/
│ │ └── step.yml
│ ├── 2.12.0/
│ │ └── step.yml
│ ├── 2.13.0/
│ │ └── step.yml
│ ├── 2.14.0/
│ │ └── step.yml
│ ├── 2.15.0/
│ │ └── step.yml
│ ├── 2.16.0/
│ │ └── step.yml
│ ├── 2.16.1/
│ │ └── step.yml
│ ├── 2.17.0/
│ │ └── step.yml
│ ├── 2.18.0/
│ │ └── step.yml
│ ├── 2.18.1/
│ │ └── step.yml
│ ├── 2.18.2/
│ │ └── step.yml
│ ├── 2.19.0/
│ │ └── step.yml
│ ├── 2.19.1/
│ │ └── step.yml
│ ├── 2.19.2/
│ │ └── step.yml
│ ├── 2.19.3/
│ │ └── step.yml
│ ├── 2.19.4/
│ │ └── step.yml
│ ├── 2.2.0/
│ │ └── step.yml
│ ├── 2.2.1/
│ │ └── step.yml
│ ├── 2.2.2/
│ │ └── step.yml
│ ├── 2.2.3/
│ │ └── step.yml
│ ├── 2.20.0/
│ │ └── step.yml
│ ├── 2.20.1/
│ │ └── step.yml
│ ├── 2.20.2/
│ │ └── step.yml
│ ├── 2.20.4/
│ │ └── step.yml
│ ├── 2.21.0/
│ │ └── step.yml
│ ├── 2.21.1/
│ │ └── step.yml
│ ├── 2.22.0/
│ │ └── step.yml
│ ├── 2.23.0/
│ │ └── step.yml
│ ├── 2.23.1/
│ │ └── step.yml
│ ├── 2.23.2/
│ │ └── step.yml
│ ├── 2.3.0/
│ │ └── step.yml
│ ├── 2.4.0/
│ │ └── step.yml
│ ├── 2.5.0/
│ │ └── step.yml
│ ├── 2.5.1/
│ │ └── step.yml
│ ├── 2.6.0/
│ │ └── step.yml
│ ├── 2.6.1/
│ │ └── step.yml
│ ├── 2.7.0/
│ │ └── step.yml
│ ├── 2.7.1/
│ │ └── step.yml
│ ├── 2.7.2/
│ │ └── step.yml
│ ├── 2.7.3/
│ │ └── step.yml
│ ├── 2.7.4/
│ │ └── step.yml
│ ├── 2.7.5/
│ │ └── step.yml
│ ├── 2.7.6/
│ │ └── step.yml
│ ├── 2.7.7/
│ │ └── step.yml
│ ├── 2.7.8/
│ │ └── step.yml
│ ├── 2.8.0/
│ │ └── step.yml
│ ├── 2.8.1/
│ │ └── step.yml
│ ├── 2.8.2/
│ │ └── step.yml
│ ├── 2.8.3/
│ │ └── step.yml
│ ├── 2.9.0/
│ │ └── step.yml
│ ├── 2.9.1/
│ │ └── step.yml
│ ├── 2.9.2/
│ │ └── step.yml
│ └── step-info.yml
├── deploy-to-itunesconnect-application-loader/
│ ├── 0.10.1/
│ │ └── step.yml
│ ├── 0.11.0/
│ │ └── step.yml
│ ├── 0.11.1/
│ │ └── step.yml
│ ├── 0.9.1/
│ │ └── step.yml
│ ├── 0.9.2/
│ │ └── step.yml
│ ├── 0.9.3/
│ │ └── step.yml
│ ├── 0.9.4/
│ │ └── step.yml
│ ├── 0.9.5/
│ │ └── step.yml
│ ├── 0.9.6/
│ │ └── step.yml
│ ├── 1.0.0/
│ │ └── step.yml
│ ├── 1.1.0/
│ │ └── step.yml
│ ├── 1.1.1/
│ │ └── step.yml
│ ├── 1.2.0/
│ │ └── step.yml
│ ├── 1.3.0/
│ │ └── step.yml
│ ├── 1.3.1/
│ │ └── step.yml
│ ├── 1.3.2/
│ │ └── step.yml
│ ├── 1.3.3/
│ │ └── step.yml
│ ├── 1.3.4/
│ │ └── step.yml
│ ├── 1.4.0/
│ │ └── step.yml
│ ├── 1.5.0/
│ │ └── step.yml
│ ├── 2.0.0/
│ │ └── step.yml
│ ├── 2.1.0/
│ │ └── step.yml
│ └── step-info.yml
├── deploy-to-itunesconnect-deliver/
│ ├── 2.0.0/
│ │ └── step.yml
│ ├── 2.1.0/
│ │ └── step.yml
│ ├── 2.10.0/
│ │ └── step.yml
│ ├── 2.11.0/
│ │ └── step.yml
│ ├── 2.12.0/
│ │ └── step.yml
│ ├── 2.13.0/
│ │ └── step.yml
│ ├── 2.13.1/
│ │ └── step.yml
│ ├── 2.13.2/
│ │ └── step.yml
│ ├── 2.14.0/
│ │ └── step.yml
│ ├── 2.14.1/
│ │ └── step.yml
│ ├── 2.15.0/
│ │ └── step.yml
│ ├── 2.16.0/
│ │ └── step.yml
│ ├── 2.16.1/
│ │ └── step.yml
│ ├── 2.16.2/
│ │ └── step.yml
│ ├── 2.16.3/
│ │ └── step.yml
│ ├── 2.17.0/
│ │ └── step.yml
│ ├── 2.18.0/
│ │ └── step.yml
│ ├── 2.18.1/
│ │ └── step.yml
│ ├── 2.19.0/
│ │ └── step.yml
│ ├── 2.2.0/
│ │ └── step.yml
│ ├── 2.2.1/
│ │ └── step.yml
│ ├── 2.20.0/
│ │ └── step.yml
│ ├── 2.20.1/
│ │ └── step.yml
│ ├── 2.20.2/
│ │ └── step.yml
│ ├── 2.21.0/
│ │ └── step.yml
│ ├── 2.21.1/
│ │ └── step.yml
│ ├── 2.21.2/
│ │ └── step.yml
│ ├── 2.21.3/
│ │ └── step.yml
│ ├── 2.21.4/
│ │ └── step.yml
│ ├── 2.21.5/
│ │ └── step.yml
│ ├── 2.21.6/
│ │ └── step.yml
│ ├── 2.22.0/
│ │ └── step.yml
│ ├── 2.22.1/
│ │ └── step.yml
│ ├── 2.23.0/
│ │ └── step.yml
│ ├── 2.3.0/
│ │ └── step.yml
│ ├── 2.4.0/
│ │ └── step.yml
│ ├── 2.4.1/
│ │ └── step.yml
│ ├── 2.5.0/
│ │ └── step.yml
│ ├── 2.5.1/
│ │ └── step.yml
│ ├── 2.6.0/
│ │ └── step.yml
│ ├── 2.6.1/
│ │ └── step.yml
│ ├── 2.6.2/
│ │ └── step.yml
│ ├── 2.6.3/
│ │ └── step.yml
│ ├── 2.7.0/
│ │ └── step.yml
│ ├── 2.7.1/
│ │ └── step.yml
│ ├── 2.7.2/
│ │ └── step.yml
│ ├── 2.7.3/
│ │ └── step.yml
│ ├── 2.8.0/
│ │ └── step.yml
│ ├── 2.8.1/
│ │ └── step.yml
│ ├── 2.8.2/
│ │ └── step.yml
│ ├── 2.9.2/
│ │ └── step.yml
│ ├── 2.9.4/
│ │ └── step.yml
│ ├── 2.9.5/
│ │ └── step.yml
│ └── step-info.yml
├── deploy-to-itunesconnect-shenzhen/
│ ├── 2.0.0/
│ │ └── step.yml
│ ├── 2.1.0/
│ │ └── step.yml
│ ├── 2.1.1/
│ │ └── step.yml
│ ├── 2.1.2/
│ │ └── step.yml
│ └── step-info.yml
├── deploy-to-updraft/
│ ├── 0.0.1/
│ │ └── step.yml
│ ├── 0.0.2/
│ │ └── step.yml
│ └── step-info.yml
├── deploygate--upload-app-bitrise-step/
│ ├── 1.0.0/
│ │ └── step.yml
│ ├── 1.0.1/
│ │ └── step.yml
│ ├── 1.1.0/
│ │ └── step.yml
│ ├── 1.1.1/
│ │ └── step.yml
│ ├── 1.1.2/
│ │ └── step.yml
│ ├── 1.1.3/
│ │ └── step.yml
│ └── step-info.yml
├── detekt/
│ ├── 1.0.0/
│ │ └── step.yml
│ └── step-info.yml
├── device-cloud-for-maestro/
│ ├── 0.0.10/
│ │ └── step.yml
│ ├── 0.0.11/
│ │ └── step.yml
│ ├── 0.0.6/
│ │ └── step.yml
│ ├── 0.0.7/
│ │ └── step.yml
│ ├── 0.0.8/
│ │ └── step.yml
│ ├── 1.0.0/
│ │ └── step.yml
│ ├── 1.1.0/
│ │ └── step.yml
│ └── step-info.yml
├── dexprotector/
│ ├── 1.0.5/
│ │ └── step.yml
│ └── step-info.yml
├── diawi-upload/
│ ├── 0.0.2/
│ │ └── step.yml
│ ├── 0.0.3/
│ │ └── step.yml
│ ├── 0.0.4/
│ │ └── step.yml
│ ├── 0.0.7/
│ │ └── step.yml
│ └── step-info.yml
├── disable-iphonesimulator-connect-hardware-keyboard/
│ ├── 0.1.0/
│ │ └── step.yml
│ ├── 0.1.1/
│ │ └── step.yml
│ └── step-info.yml
├── discord-message/
│ ├── 0.0.1/
│ │ └── step.yml
│ ├── 0.0.2/
│ │ └── step.yml
│ ├── 0.0.3/
│ │ └── step.yml
│ └── step-info.yml
├── docker-build-push/
│ ├── 1.0.0/
│ │ └── step.yml
│ ├── 1.0.1/
│ │ └── step.yml
│ └── step-info.yml
├── dropbox/
│ ├── 1.0.3/
│ │ └── step.yml
│ └── step-info.yml
├── dsym-upload-to-crashlytics--no-cocoapods/
│ ├── 0.0.1/
│ │ └── step.yml
│ └── step-info.yml
├── email-with-mailgun/
│ ├── 2.0.0/
│ │ └── step.yml
│ ├── 2.1.0/
│ │ └── step.yml
│ ├── 2.1.1/
│ │ └── step.yml
│ ├── 2.1.2/
│ │ └── step.yml
│ ├── 2.1.4/
│ │ └── step.yml
│ ├── 2.2.0/
│ │ └── step.yml
│ └── step-info.yml
├── embrace-symbol-upload/
│ ├── 1.0.0/
│ │ └── step.yml
│ └── step-info.yml
├── ensure-clean-git/
│ ├── 0.9.0/
│ │ └── step.yml
│ ├── 0.9.1/
│ │ └── step.yml
│ └── step-info.yml
├── errcheck/
│ ├── 0.9.0/
│ │ └── step.yml
│ ├── 0.9.1/
│ │ └── step.yml
│ └── step-info.yml
├── expo-detach/
│ ├── 0.10.1/
│ │ └── step.yml
│ ├── 0.10.2/
│ │ └── step.yml
│ ├── 0.9.0/
│ │ └── step.yml
│ ├── 0.9.2/
│ │ └── step.yml
│ ├── 0.9.3/
│ │ └── step.yml
│ ├── 1.0.0/
│ │ └── step.yml
│ ├── 1.1.0/
│ │ └── step.yml
│ └── step-info.yml
├── export-ios-to-lingohub/
│ ├── 0.0.1/
│ │ └── step.yml
│ ├── 0.0.2/
│ │ └── step.yml
│ └── step-info.yml
├── export-lingohub-to-ios/
│ ├── 0.0.1/
│ │ └── step.yml
│ ├── 0.0.2/
│ │ └── step.yml
│ ├── 0.0.3/
│ │ └── step.yml
│ └── step-info.yml
├── export-xcarchive/
│ ├── 0.9.0/
│ │ └── step.yml
│ ├── 0.9.1/
│ │ └── step.yml
│ ├── 0.9.2/
│ │ └── step.yml
│ ├── 1.0.0/
│ │ └── step.yml
│ ├── 1.0.1/
│ │ └── step.yml
│ ├── 1.0.2/
│ │ └── step.yml
│ ├── 1.0.3/
│ │ └── step.yml
│ ├── 2.0.0/
│ │ └── step.yml
│ ├── 2.1.0/
│ │ └── step.yml
│ ├── 2.2.0/
│ │ └── step.yml
│ ├── 3.0.0/
│ │ └── step.yml
│ ├── 4.0.0/
│ │ └── step.yml
│ ├── 4.1.0/
│ │ └── step.yml
│ ├── 4.2.0/
│ │ └── step.yml
│ ├── 4.2.1/
│ │ └── step.yml
│ ├── 4.2.2/
│ │ └── step.yml
│ ├── 4.2.3/
│ │ └── step.yml
│ ├── 4.2.4/
│ │ └── step.yml
│ ├── 4.2.5/
│ │ └── step.yml
│ ├── 4.2.6/
│ │ └── step.yml
│ ├── 4.2.7/
│ │ └── step.yml
│ ├── 4.2.8/
│ │ └── step.yml
│ ├── 4.3.0/
│ │ └── step.yml
│ ├── 4.3.1/
│ │ └── step.yml
│ ├── 4.4.0/
│ │ └── step.yml
│ ├── 4.5.0/
│ │ └── step.yml
│ ├── 4.5.1/
│ │ └── step.yml
│ ├── 4.5.2/
│ │ └── step.yml
│ ├── 4.5.3/
│ │ └── step.yml
│ ├── 4.6.0/
│ │ └── step.yml
│ ├── 4.6.1/
│ │ └── step.yml
│ ├── 4.6.2/
│ │ └── step.yml
│ ├── 4.6.3/
│ │ └── step.yml
│ ├── 4.7.0/
│ │ └── step.yml
│ ├── 4.8.0/
│ │ └── step.yml
│ ├── 4.8.1/
│ │ └── step.yml
│ ├── 4.8.2/
│ │ └── step.yml
│ ├── 4.8.3/
│ │ └── step.yml
│ ├── 4.8.4/
│ │ └── step.yml
│ ├── 4.9.0/
│ │ └── step.yml
│ └── step-info.yml
├── export-xcarchive-mac/
│ ├── 0.9.0/
│ │ └── step.yml
│ ├── 0.9.1/
│ │ └── step.yml
│ ├── 0.9.2/
│ │ └── step.yml
│ ├── 1.0.2/
│ │ └── step.yml
│ ├── 1.0.3/
│ │ └── step.yml
│ ├── 1.0.4/
│ │ └── step.yml
│ ├── 1.1.0/
│ │ └── step.yml
│ ├── 1.1.1/
│ │ └── step.yml
│ ├── 1.1.2/
│ │ └── step.yml
│ ├── 1.2.0/
│ │ └── step.yml
│ └── step-info.yml
├── fabric-crashlytics-beta-deploy/
│ ├── 2.0.0/
│ │ └── step.yml
│ ├── 2.0.1/
│ │ └── step.yml
│ ├── 2.1.0/
│ │ └── step.yml
│ ├── 2.1.1/
│ │ └── step.yml
│ ├── 2.2.0/
│ │ └── step.yml
│ ├── 2.2.1/
│ │ └── step.yml
│ ├── 2.2.3/
│ │ └── step.yml
│ ├── 2.2.4/
│ │ └── step.yml
│ ├── 2.2.5/
│ │ └── step.yml
│ ├── 2.3.0/
│ │ └── step.yml
│ ├── 2.3.1/
│ │ └── step.yml
│ ├── 2.3.2/
│ │ └── step.yml
│ ├── 2.3.3/
│ │ └── step.yml
│ └── step-info.yml
├── fastlane/
│ ├── 2.0.0/
│ │ └── step.yml
│ ├── 2.1.0/
│ │ └── step.yml
│ ├── 2.1.1/
│ │ └── step.yml
│ ├── 2.1.2/
│ │ └── step.yml
│ ├── 2.1.3/
│ │ └── step.yml
│ ├── 2.2.0/
│ │ └── step.yml
│ ├── 2.3.0/
│ │ └── step.yml
│ ├── 2.3.1/
│ │ └── step.yml
│ ├── 2.3.11/
│ │ └── step.yml
│ ├── 2.3.12/
│ │ └── step.yml
│ ├── 2.3.13/
│ │ └── step.yml
│ ├── 2.3.3/
│ │ └── step.yml
│ ├── 2.3.4/
│ │ └── step.yml
│ ├── 2.3.5/
│ │ └── step.yml
│ ├── 2.3.6/
│ │ └── step.yml
│ ├── 2.3.7/
│ │ └── step.yml
│ ├── 2.3.9/
│ │ └── step.yml
│ ├── 2.4.0/
│ │ └── step.yml
│ ├── 2.5.0/
│ │ └── step.yml
│ ├── 2.5.1/
│ │ └── step.yml
│ ├── 2.5.2/
│ │ └── step.yml
│ ├── 2.6.0/
│ │ └── step.yml
│ ├── 2.7.0/
│ │ └── step.yml
│ ├── 2.7.1/
│ │ └── step.yml
│ ├── 2.7.2/
│ │ └── step.yml
│ ├── 2.7.3/
│ │ └── step.yml
│ ├── 2.7.4/
│ │ └── step.yml
│ ├── 3.0.0/
│ │ └── step.yml
│ ├── 3.0.1/
│ │ └── step.yml
│ ├── 3.1.0/
│ │ └── step.yml
│ ├── 3.2.0/
│ │ └── step.yml
│ ├── 3.2.1/
│ │ └── step.yml
│ ├── 3.2.2/
│ │ └── step.yml
│ ├── 3.2.3/
│ │ └── step.yml
│ ├── 3.3.0/
│ │ └── step.yml
│ ├── 3.4.0/
│ │ └── step.yml
│ ├── 3.4.1/
│ │ └── step.yml
│ ├── 3.4.2/
│ │ └── step.yml
│ ├── 3.4.3/
│ │ └── step.yml
│ ├── 3.5.0/
│ │ └── step.yml
│ ├── 3.5.1/
│ │ └── step.yml
│ ├── 3.5.2/
│ │ └── step.yml
│ └── step-info.yml
├── fastlane-match/
│ ├── 0.0.2/
│ │ └── step.yml
│ ├── 0.1.0/
│ │ └── step.yml
│ ├── 0.2.0/
│ │ └── step.yml
│ └── step-info.yml
├── fauxpasapp/
│ ├── 0.1.3/
│ │ └── step.yml
│ └── step-info.yml
├── feature-list-for-release-notes/
│ ├── 0.0.1/
│ │ └── step.yml
│ ├── 0.0.2/
│ │ └── step.yml
│ ├── 0.0.3/
│ │ └── step.yml
│ ├── 0.0.4/
│ │ └── step.yml
│ └── step-info.yml
├── fetch-infisical-secrets/
│ ├── 1.0.0/
│ │ └── step.yml
│ └── step-info.yml
├── file-downloader/
│ ├── 0.9.0/
│ │ └── step.yml
│ ├── 0.9.1/
│ │ └── step.yml
│ ├── 1.0.0/
│ │ └── step.yml
│ ├── 1.0.1/
│ │ └── step.yml
│ ├── 1.0.2/
│ │ └── step.yml
│ ├── 1.0.3/
│ │ └── step.yml
│ ├── 1.1.0/
│ │ └── step.yml
│ └── step-info.yml
├── find-jira-issue/
│ ├── 0.0.1/
│ │ └── step.yml
│ └── step-info.yml
├── firebase-app-distribution/
│ ├── 0.1.0/
│ │ └── step.yml
│ ├── 0.10.0/
│ │ └── step.yml
│ ├── 0.11.0/
│ │ └── step.yml
│ ├── 0.12.0/
│ │ └── step.yml
│ ├── 0.12.1/
│ │ └── step.yml
│ ├── 0.2.0/
│ │ └── step.yml
│ ├── 0.3.0/
│ │ └── step.yml
│ ├── 0.4.0/
│ │ └── step.yml
│ ├── 0.5.0/
│ │ └── step.yml
│ ├── 0.6.0/
│ │ └── step.yml
│ ├── 0.7.0/
│ │ └── step.yml
│ ├── 0.8.0/
│ │ └── step.yml
│ ├── 0.9.0/
│ │ └── step.yml
│ ├── 0.9.1/
│ │ └── step.yml
│ └── step-info.yml
├── firebase-change-file-by-env/
│ ├── 0.0.2/
│ │ └── step.yml
│ └── step-info.yml
├── firebase-dsym-upload/
│ ├── 1.0.0/
│ │ └── step.yml
│ ├── 1.0.1/
│ │ └── step.yml
│ ├── 1.0.2/
│ │ └── step.yml
│ ├── 1.1.0/
│ │ └── step.yml
│ ├── 1.1.1/
│ │ └── step.yml
│ ├── 2.0.0/
│ │ └── step.yml
│ ├── 2.0.1/
│ │ └── step.yml
│ └── step-info.yml
├── flank/
│ ├── 0.1.0/
│ │ └── step.yml
│ ├── 0.1.1/
│ │ └── step.yml
│ ├── 0.1.2/
│ │ └── step.yml
│ └── step-info.yml
├── flowdock/
│ ├── 0.1.1/
│ │ └── step.yml
│ ├── 0.1.2/
│ │ └── step.yml
│ └── step-info.yml
├── flutter/
│ ├── 0.0.1/
│ │ └── step.yml
│ ├── 0.0.10/
│ │ └── step.yml
│ ├── 0.0.11/
│ │ └── step.yml
│ ├── 0.0.2/
│ │ └── step.yml
│ ├── 0.0.3/
│ │ └── step.yml
│ ├── 0.0.4/
│ │ └── step.yml
│ ├── 0.0.5/
│ │ └── step.yml
│ ├── 0.0.6/
│ │ └── step.yml
│ ├── 0.0.7/
│ │ └── step.yml
│ ├── 0.0.8/
│ │ └── step.yml
│ ├── 0.0.9/
│ │ └── step.yml
│ ├── 0.1.0/
│ │ └── step.yml
│ ├── 0.1.2/
│ │ └── step.yml
│ ├── 0.1.3/
│ │ └── step.yml
│ ├── 0.1.4/
│ │ └── step.yml
│ ├── 0.1.5/
│ │ └── step.yml
│ ├── 0.1.6/
│ │ └── step.yml
│ ├── 0.1.7/
│ │ └── step.yml
│ └── step-info.yml
├── flutter-analyze/
│ ├── 0.1.0/
│ │ └── step.yml
│ ├── 0.1.1/
│ │ └── step.yml
│ ├── 0.1.2/
│ │ └── step.yml
│ ├── 0.2.0/
│ │ └── step.yml
│ ├── 0.3.0/
│ │ └── step.yml
│ ├── 0.3.1/
│ │ └── step.yml
│ ├── 0.3.2/
│ │ └── step.yml
│ └── step-info.yml
├── flutter-build/
│ ├── 0.10.0/
│ │ └── step.yml
│ ├── 0.11.0/
│ │ └── step.yml
│ ├── 0.12.0/
│ │ └── step.yml
│ ├── 0.13.0/
│ │ └── step.yml
│ ├── 0.13.1/
│ │ └── step.yml
│ ├── 0.13.2/
│ │ └── step.yml
│ ├── 0.13.3/
│ │ └── step.yml
│ ├── 0.14.0/
│ │ └── step.yml
│ ├── 0.15.0/
│ │ └── step.yml
│ ├── 0.15.1/
│ │ └── step.yml
│ ├── 0.16.0/
│ │ └── step.yml
│ ├── 0.17.0/
│ │ └── step.yml
│ ├── 0.9.0/
│ │ └── step.yml
│ ├── 0.9.1/
│ │ └── step.yml
│ ├── 0.9.2/
│ │ └── step.yml
│ └── step-info.yml
├── flutter-build-patrol/
│ ├── 0.0.8/
│ │ └── step.yml
│ └── step-info.yml
├── flutter-installer/
│ ├── 0.10.0/
│ │ └── step.yml
│ ├── 0.11.0/
│ │ └── step.yml
│ ├── 0.11.1/
│ │ └── step.yml
│ ├── 0.11.2/
│ │ └── step.yml
│ ├── 0.11.3/
│ │ └── step.yml
│ ├── 0.11.4/
│ │ └── step.yml
│ ├── 0.11.5/
│ │ └── step.yml
│ ├── 0.11.6/
│ │ └── step.yml
│ ├── 0.12.0/
│ │ └── step.yml
│ ├── 0.13.0/
│ │ └── step.yml
│ ├── 0.13.1/
│ │ └── step.yml
│ ├── 0.9.1/
│ │ └── step.yml
│ ├── 0.9.2/
│ │ └── step.yml
│ ├── 1.0.0/
│ │ └── step.yml
│ ├── 1.0.1/
│ │ └── step.yml
│ ├── 1.0.2/
│ │ └── step.yml
│ ├── 1.1.0/
│ │ └── step.yml
│ └── step-info.yml
├── flutter-test/
│ ├── 0.10.0/
│ │ └── step.yml
│ ├── 0.10.1/
│ │ └── step.yml
│ ├── 0.10.2/
│ │ └── step.yml
│ ├── 0.10.3/
│ │ └── step.yml
│ ├── 0.9.0/
│ │ └── step.yml
│ ├── 0.9.1/
│ │ └── step.yml
│ ├── 1.0.0/
│ │ └── step.yml
│ ├── 1.0.1/
│ │ └── step.yml
│ ├── 1.0.2/
│ │ └── step.yml
│ ├── 1.0.3/
│ │ └── step.yml
│ └── step-info.yml
├── fortify-on-demand-mobile-assessment/
│ ├── 0.0.1/
│ │ └── step.yml
│ ├── 0.0.2/
│ │ └── step.yml
│ ├── 0.1.1/
│ │ └── step.yml
│ └── step-info.yml
├── ftp-upload/
│ ├── 2.0.0/
│ │ └── step.yml
│ ├── 2.0.1/
│ │ └── step.yml
│ ├── 2.0.2/
│ │ └── step.yml
│ ├── 2.0.3/
│ │ └── step.yml
│ ├── 2.0.4/
│ │ └── step.yml
│ ├── 2.1.1/
│ │ └── step.yml
│ ├── 2.1.2/
│ │ └── step.yml
│ ├── 2.1.3/
│ │ └── step.yml
│ ├── 2.1.4/
│ │ └── step.yml
│ ├── 2.1.5/
│ │ └── step.yml
│ └── step-info.yml
├── gcp-storage-upload/
│ ├── 0.0.1/
│ │ └── step.yml
│ └── step-info.yml
├── geckoboard-dashboard-build-result/
│ ├── 0.1.0/
│ │ └── step.yml
│ └── step-info.yml
├── generate-changelog/
│ ├── 0.10.0/
│ │ └── step.yml
│ ├── 0.10.1/
│ │ └── step.yml
│ ├── 0.10.2/
│ │ └── step.yml
│ ├── 0.9.0/
│ │ └── step.yml
│ ├── 0.9.1/
│ │ └── step.yml
│ └── step-info.yml
├── generate-cordova-build-configuration/
│ ├── 0.9.0/
│ │ └── step.yml
│ ├── 0.9.2/
│ │ └── step.yml
│ ├── 0.9.3/
│ │ └── step.yml
│ ├── 0.9.5/
│ │ └── step.yml
│ ├── 0.9.6/
│ │ └── step.yml
│ ├── 0.9.7/
│ │ └── step.yml
│ ├── 0.9.8/
│ │ └── step.yml
│ └── step-info.yml
├── generate-gradle-wrapper/
│ ├── 0.10.0/
│ │ └── step.yml
│ ├── 0.10.1/
│ │ └── step.yml
│ ├── 0.9.2/
│ │ └── step.yml
│ └── step-info.yml
├── generate-image-difference/
│ ├── 0.0.2/
│ │ └── step.yml
│ └── step-info.yml
├── generate-text-file/
│ ├── 0.0.2/
│ │ └── step.yml
│ ├── 0.0.3/
│ │ └── step.yml
│ ├── 0.1.0/
│ │ └── step.yml
│ └── step-info.yml
├── generate-xcode-html-report/
│ ├── 1.0.0/
│ │ └── step.yml
│ ├── 1.0.1/
│ │ └── step.yml
│ ├── 1.0.2/
│ │ └── step.yml
│ ├── 1.1.0/
│ │ └── step.yml
│ ├── 1.1.1/
│ │ └── step.yml
│ └── step-info.yml
├── generic-file-storage/
│ ├── 0.9.0/
│ │ └── step.yml
│ ├── 0.9.1/
│ │ └── step.yml
│ ├── 0.9.2/
│ │ └── step.yml
│ ├── 0.9.3/
│ │ └── step.yml
│ ├── 0.9.4/
│ │ └── step.yml
│ └── step-info.yml
├── genymotion-cloud-saas-start/
│ ├── 0.0.1/
│ │ └── step.yml
│ ├── 0.1.1/
│ │ └── step.yml
│ ├── 0.1.2/
│ │ └── step.yml
│ ├── 0.1.3/
│ │ └── step.yml
│ ├── 0.1.4/
│ │ └── step.yml
│ ├── 0.1.5/
│ │ └── step.yml
│ ├── 0.1.6/
│ │ └── step.yml
│ ├── 0.1.7/
│ │ └── step.yml
│ └── step-info.yml
├── genymotion-cloud-saas-stop/
│ ├── 0.0.2/
│ │ └── step.yml
│ ├── 0.1.1/
│ │ └── step.yml
│ ├── 0.1.2/
│ │ └── step.yml
│ └── step-info.yml
├── genymotion-saas-install-gmsaas-cli/
│ ├── 0.0.1/
│ │ └── step.yml
│ ├── 0.0.3/
│ │ └── step.yml
│ └── step-info.yml
├── get-app/
│ ├── 0.1.0/
│ │ └── step.yml
│ ├── 0.2.0/
│ │ └── step.yml
│ └── step-info.yml
├── get-flutter-version/
│ ├── 0.0.1/
│ │ └── step.yml
│ ├── 0.0.2/
│ │ └── step.yml
│ └── step-info.yml
├── get-identity-token/
│ ├── 0.0.1/
│ │ └── step.yml
│ ├── 0.0.2/
│ │ └── step.yml
│ └── step-info.yml
├── get-info-on-android-app-bundle/
│ ├── 0.0.1/
│ │ └── step.yml
│ └── step-info.yml
├── get-npm-package-version/
│ ├── 1.0.1/
│ │ └── step.yml
│ └── step-info.yml
├── get-pubspec-version-and-build-number/
│ ├── 1.0.0/
│ │ └── step.yml
│ ├── 1.0.1/
│ │ └── step.yml
│ ├── 1.0.2/
│ │ └── step.yml
│ ├── 1.0.3/
│ │ └── step.yml
│ └── step-info.yml
├── giphy/
│ ├── 0.1.0/
│ │ └── step.yml
│ ├── 0.1.1/
│ │ └── step.yml
│ ├── 0.2.0/
│ │ └── step.yml
│ └── step-info.yml
├── git-clone/
│ ├── 2.0.0/
│ │ └── step.yml
│ ├── 2.1.0/
│ │ └── step.yml
│ ├── 2.2.0/
│ │ └── step.yml
│ ├── 3.0.0/
│ │ └── step.yml
│ ├── 3.1.0/
│ │ └── step.yml
│ ├── 3.1.1/
│ │ └── step.yml
│ ├── 3.2.0/
│ │ └── step.yml
│ ├── 3.3.0/
│ │ └── step.yml
│ ├── 3.3.1/
│ │ └── step.yml
│ ├── 3.3.2/
│ │ └── step.yml
│ ├── 3.3.3/
│ │ └── step.yml
│ ├── 3.3.4/
│ │ └── step.yml
│ ├── 3.4.0/
│ │ └── step.yml
│ ├── 3.4.1/
│ │ └── step.yml
│ ├── 3.4.2/
│ │ └── step.yml
│ ├── 3.4.3/
│ │ └── step.yml
│ ├── 3.4.4/
│ │ └── step.yml
│ ├── 3.5.0/
│ │ └── step.yml
│ ├── 3.5.1/
│ │ └── step.yml
│ ├── 3.5.2/
│ │ └── step.yml
│ ├── 3.5.3/
│ │ └── step.yml
│ ├── 3.6.0/
│ │ └── step.yml
│ ├── 3.6.1/
│ │ └── step.yml
│ ├── 3.6.2/
│ │ └── step.yml
│ ├── 4.0.1/
│ │ └── step.yml
│ ├── 4.0.10/
│ │ └── step.yml
│ ├── 4.0.11/
│ │ └── step.yml
│ ├── 4.0.12/
│ │ └── step.yml
│ ├── 4.0.13/
│ │ └── step.yml
│ ├── 4.0.14/
│ │ └── step.yml
│ ├── 4.0.15/
│ │ └── step.yml
│ ├── 4.0.16/
│ │ └── step.yml
│ ├── 4.0.17/
│ │ └── step.yml
│ ├── 4.0.18/
│ │ └── step.yml
│ ├── 4.0.19/
│ │ └── step.yml
│ ├── 4.0.2/
│ │ └── step.yml
│ ├── 4.0.20/
│ │ └── step.yml
│ ├── 4.0.21/
│ │ └── step.yml
│ ├── 4.0.22/
│ │ └── step.yml
│ ├── 4.0.23/
│ │ └── step.yml
│ ├── 4.0.24/
│ │ └── step.yml
│ ├── 4.0.25/
│ │ └── step.yml
│ ├── 4.0.26/
│ │ └── step.yml
│ ├── 4.0.27/
│ │ └── step.yml
│ ├── 4.0.28/
│ │ └── step.yml
│ ├── 4.0.3/
│ │ └── step.yml
│ ├── 4.0.4/
│ │ └── step.yml
│ ├── 4.0.5/
│ │ └── step.yml
│ ├── 4.0.6/
│ │ └── step.yml
│ ├── 4.0.7/
│ │ └── step.yml
│ ├── 4.0.8/
│ │ └── step.yml
│ ├── 4.0.9/
│ │ └── step.yml
│ ├── 4.1.0/
│ │ └── step.yml
│ ├── 4.2.0/
│ │ └── step.yml
│ ├── 4.2.1/
│ │ └── step.yml
│ ├── 4.3.0/
│ │ └── step.yml
│ ├── 5.0.0/
│ │ └── step.yml
│ ├── 5.0.1/
│ │ └── step.yml
│ ├── 5.1.0/
│ │ └── step.yml
│ ├── 5.1.1/
│ │ └── step.yml
│ ├── 5.1.2/
│ │ └── step.yml
│ ├── 6.0.0/
│ │ └── step.yml
│ ├── 6.1.0/
│ │ └── step.yml
│ ├── 6.1.1/
│ │ └── step.yml
│ ├── 6.1.2/
│ │ └── step.yml
│ ├── 6.2.0/
│ │ └── step.yml
│ ├── 6.2.1/
│ │ └── step.yml
│ ├── 6.2.2/
│ │ └── step.yml
│ ├── 6.2.3/
│ │ └── step.yml
│ ├── 7.0.0/
│ │ └── step.yml
│ ├── 7.0.1/
│ │ └── step.yml
│ ├── 7.0.2/
│ │ └── step.yml
│ ├── 7.0.3/
│ │ └── step.yml
│ ├── 8.0.0/
│ │ └── step.yml
│ ├── 8.0.1/
│ │ └── step.yml
│ ├── 8.1.0/
│ │ └── step.yml
│ ├── 8.1.1/
│ │ └── step.yml
│ ├── 8.1.2/
│ │ └── step.yml
│ ├── 8.2.0/
│ │ └── step.yml
│ ├── 8.2.1/
│ │ └── step.yml
│ ├── 8.2.2/
│ │ └── step.yml
│ ├── 8.2.3/
│ │ └── step.yml
│ ├── 8.2.4/
│ │ └── step.yml
│ ├── 8.2.5/
│ │ └── step.yml
│ ├── 8.3.0/
│ │ └── step.yml
│ ├── 8.4.0/
│ │ └── step.yml
│ ├── 8.4.1/
│ │ └── step.yml
│ ├── 8.4.2/
│ │ └── step.yml
│ ├── 8.5.0/
│ │ └── step.yml
│ └── step-info.yml
├── git-commit-changelog/
│ ├── 1.0.2/
│ │ └── step.yml
│ ├── 1.0.3/
│ │ └── step.yml
│ ├── 1.0.4/
│ │ └── step.yml
│ ├── 1.0.5/
│ │ └── step.yml
│ └── step-info.yml
├── git-last-commit-date/
│ ├── 1.0.0/
│ │ └── step.yml
│ └── step-info.yml
├── git-tag/
│ ├── 1.0.0/
│ │ └── step.yml
│ ├── 1.1.0/
│ │ └── step.yml
│ └── step-info.yml
├── git-tag-project-version-and-build-number/
│ ├── 1.0.0/
│ │ └── step.yml
│ ├── 1.0.1/
│ │ └── step.yml
│ ├── 1.0.10/
│ │ └── step.yml
│ ├── 1.0.13/
│ │ └── step.yml
│ ├── 1.0.14/
│ │ └── step.yml
│ ├── 1.0.3/
│ │ └── step.yml
│ ├── 1.0.4/
│ │ └── step.yml
│ ├── 1.0.5/
│ │ └── step.yml
│ ├── 1.0.6/
│ │ └── step.yml
│ ├── 1.0.7/
│ │ └── step.yml
│ ├── 1.0.9/
│ │ └── step.yml
│ └── step-info.yml
├── github-release/
│ ├── 0.10.0/
│ │ └── step.yml
│ ├── 0.10.1/
│ │ └── step.yml
│ ├── 0.11.0/
│ │ └── step.yml
│ ├── 0.12.0/
│ │ └── step.yml
│ ├── 0.9.1/
│ │ └── step.yml
│ ├── 0.9.2/
│ │ └── step.yml
│ ├── 0.9.3/
│ │ └── step.yml
│ ├── 0.9.4/
│ │ └── step.yml
│ └── step-info.yml
├── github-release-downloader/
│ ├── 0.0.1/
│ │ └── step.yml
│ ├── 0.0.2/
│ │ └── step.yml
│ ├── 0.0.3/
│ │ └── step.yml
│ └── step-info.yml
├── github-script-runner/
│ ├── 0.0.1/
│ │ └── step.yml
│ └── step-info.yml
├── github-status/
│ ├── 0.9.0/
│ │ └── step.yml
│ ├── 0.9.1/
│ │ └── step.yml
│ ├── 1.0.1/
│ │ └── step.yml
│ ├── 1.0.3/
│ │ └── step.yml
│ ├── 1.0.4/
│ │ └── step.yml
│ ├── 1.1.0/
│ │ └── step.yml
│ ├── 1.1.1/
│ │ └── step.yml
│ ├── 2.0.0/
│ │ └── step.yml
│ ├── 2.1.0/
│ │ └── step.yml
│ ├── 2.2.0/
│ │ └── step.yml
│ ├── 2.2.1/
│ │ └── step.yml
│ ├── 2.2.2/
│ │ └── step.yml
│ ├── 2.3.1/
│ │ └── step.yml
│ ├── 2.3.3/
│ │ └── step.yml
│ ├── 2.3.4/
│ │ └── step.yml
│ ├── 2.4.0/
│ │ └── step.yml
│ ├── 3.0.0/
│ │ └── step.yml
│ ├── 3.0.1/
│ │ └── step.yml
│ └── step-info.yml
├── gitlab-status/
│ ├── 0.10.0/
│ │ └── step.yml
│ ├── 0.11.0/
│ │ └── step.yml
│ ├── 0.12.0/
│ │ └── step.yml
│ ├── 0.12.1/
│ │ └── step.yml
│ ├── 0.12.2/
│ │ └── step.yml
│ ├── 0.12.3/
│ │ └── step.yml
│ ├── 0.12.4/
│ │ └── step.yml
│ ├── 0.12.5/
│ │ └── step.yml
│ ├── 0.12.6/
│ │ └── step.yml
│ ├── 0.12.7/
│ │ └── step.yml
│ ├── 0.9.0/
│ │ └── step.yml
│ ├── 0.9.1/
│ │ └── step.yml
│ ├── 0.9.2/
│ │ └── step.yml
│ ├── 0.9.3/
│ │ └── step.yml
│ ├── 0.9.5/
│ │ └── step.yml
│ ├── 0.9.6/
│ │ └── step.yml
│ └── step-info.yml
├── go-list/
│ ├── 0.10.0/
│ │ └── step.yml
│ ├── 0.10.1/
│ │ └── step.yml
│ ├── 0.9.0/
│ │ └── step.yml
│ ├── 1.0.0/
│ │ └── step.yml
│ └── step-info.yml
├── go-test/
│ ├── 0.9.0/
│ │ └── step.yml
│ ├── 1.0.1/
│ │ └── step.yml
│ ├── 1.0.2/
│ │ └── step.yml
│ └── step-info.yml
├── golint/
│ ├── 0.9.0/
│ │ └── step.yml
│ ├── 0.9.1/
│ │ └── step.yml
│ └── step-info.yml
├── google-play-deploy/
│ ├── 0.9.0/
│ │ └── step.yml
│ ├── 0.9.1/
│ │ └── step.yml
│ ├── 0.9.2/
│ │ └── step.yml
│ ├── 1.0.0/
│ │ └── step.yml
│ ├── 1.0.1/
│ │ └── step.yml
│ ├── 1.1.0/
│ │ └── step.yml
│ ├── 1.2.1/
│ │ └── step.yml
│ ├── 1.2.2/
│ │ └── step.yml
│ ├── 1.2.3/
│ │ └── step.yml
│ ├── 1.3.1/
│ │ └── step.yml
│ ├── 1.3.2/
│ │ └── step.yml
│ ├── 1.3.3/
│ │ └── step.yml
│ ├── 1.4.1/
│ │ └── step.yml
│ ├── 1.4.2/
│ │ └── step.yml
│ ├── 1.4.3/
│ │ └── step.yml
│ ├── 1.5.0/
│ │ └── step.yml
│ ├── 1.5.1/
│ │ └── step.yml
│ ├── 1.6.0/
│ │ └── step.yml
│ ├── 1.6.1/
│ │ └── step.yml
│ ├── 2.0.1/
│ │ └── step.yml
│ ├── 3.0.0/
│ │ └── step.yml
│ ├── 3.0.1/
│ │ └── step.yml
│ ├── 3.0.2/
│ │ └── step.yml
│ ├── 3.1.1/
│ │ └── step.yml
│ ├── 3.1.2/
│ │ └── step.yml
│ ├── 3.2.0/
│ │ └── step.yml
│ ├── 3.2.1/
│ │ └── step.yml
│ ├── 3.2.2/
│ │ └── step.yml
│ ├── 3.3.0/
│ │ └── step.yml
│ ├── 3.4.0/
│ │ └── step.yml
│ ├── 3.5.0/
│ │ └── step.yml
│ ├── 3.6.0/
│ │ └── step.yml
│ ├── 3.7.1/
│ │ └── step.yml
│ ├── 3.7.2/
│ │ └── step.yml
│ ├── 3.7.3/
│ │ └── step.yml
│ ├── 3.7.4/
│ │ └── step.yml
│ ├── 3.7.5/
│ │ └── step.yml
│ ├── 3.7.6/
│ │ └── step.yml
│ ├── 3.8.0/
│ │ └── step.yml
│ ├── 3.8.1/
│ │ └── step.yml
│ ├── 3.8.2/
│ │ └── step.yml
│ └── step-info.yml
├── google-play-rollout-update/
│ ├── 0.0.2/
│ │ └── step.yml
│ └── step-info.yml
├── gradle-coveralls/
│ ├── 1.0.0/
│ │ └── step.yml
│ ├── 1.0.1/
│ │ └── step.yml
│ └── step-info.yml
├── gradle-dependency-checker/
│ ├── 1.0.1/
│ │ └── step.yml
│ └── step-info.yml
├── gradle-runner/
│ ├── 0.9.0/
│ │ └── step.yml
│ ├── 0.9.1/
│ │ └── step.yml
│ ├── 0.9.2/
│ │ └── step.yml
│ ├── 0.9.3/
│ │ └── step.yml
│ ├── 1.0.0/
│ │ └── step.yml
│ ├── 1.1.0/
│ │ └── step.yml
│ ├── 1.1.1/
│ │ └── step.yml
│ ├── 1.2.0/
│ │ └── step.yml
│ ├── 1.3.0/
│ │ └── step.yml
│ ├── 1.3.1/
│ │ └── step.yml
│ ├── 1.4.0/
│ │ └── step.yml
│ ├── 1.4.1/
│ │ └── step.yml
│ ├── 1.5.0/
│ │ └── step.yml
│ ├── 1.5.1/
│ │ └── step.yml
│ ├── 1.5.2/
│ │ └── step.yml
│ ├── 1.5.3/
│ │ └── step.yml
│ ├── 1.5.4/
│ │ └── step.yml
│ ├── 1.5.6/
│ │ └── step.yml
│ ├── 1.6.0/
│ │ └── step.yml
│ ├── 1.6.1/
│ │ └── step.yml
│ ├── 1.6.3/
│ │ └── step.yml
│ ├── 1.7.0/
│ │ └── step.yml
│ ├── 1.7.1/
│ │ └── step.yml
│ ├── 1.7.2/
│ │ └── step.yml
│ ├── 1.7.3/
│ │ └── step.yml
│ ├── 1.7.5/
│ │ └── step.yml
│ ├── 1.7.6/
│ │ └── step.yml
│ ├── 1.7.7/
│ │ └── step.yml
│ ├── 1.7.8/
│ │ └── step.yml
│ ├── 1.8.0/
│ │ └── step.yml
│ ├── 1.8.1/
│ │ └── step.yml
│ ├── 1.8.2/
│ │ └── step.yml
│ ├── 1.8.3/
│ │ └── step.yml
│ ├── 1.8.4/
│ │ └── step.yml
│ ├── 1.8.5/
│ │ └── step.yml
│ ├── 1.9.0/
│ │ └── step.yml
│ ├── 1.9.1/
│ │ └── step.yml
│ ├── 1.9.2/
│ │ └── step.yml
│ ├── 1.9.3/
│ │ └── step.yml
│ ├── 1.9.4/
│ │ └── step.yml
│ ├── 1.9.5/
│ │ └── step.yml
│ ├── 1.9.6/
│ │ └── step.yml
│ ├── 1.9.7/
│ │ └── step.yml
│ ├── 1.9.8/
│ │ └── step.yml
│ ├── 1.9.9/
│ │ └── step.yml
│ ├── 2.0.0/
│ │ └── step.yml
│ ├── 2.0.1/
│ │ └── step.yml
│ ├── 3.0.0/
│ │ └── step.yml
│ ├── 4.0.0/
│ │ └── step.yml
│ ├── 4.0.1/
│ │ └── step.yml
│ ├── 4.0.2/
│ │ └── step.yml
│ ├── 5.0.0/
│ │ └── step.yml
│ ├── 5.1.0/
│ │ └── step.yml
│ ├── 5.1.1/
│ │ └── step.yml
│ ├── 5.1.2/
│ │ └── step.yml
│ ├── 5.1.3/
│ │ └── step.yml
│ ├── 5.1.4/
│ │ └── step.yml
│ ├── 5.2.0/
│ │ └── step.yml
│ ├── 5.2.1/
│ │ └── step.yml
│ └── step-info.yml
├── gradle-unit-test/
│ ├── 0.9.0/
│ │ └── step.yml
│ ├── 0.9.1/
│ │ └── step.yml
│ ├── 0.9.2/
│ │ └── step.yml
│ ├── 0.9.3/
│ │ └── step.yml
│ ├── 1.0.0/
│ │ └── step.yml
│ ├── 1.0.1/
│ │ └── step.yml
│ ├── 1.0.2/
│ │ └── step.yml
│ ├── 1.0.3/
│ │ └── step.yml
│ ├── 1.0.4/
│ │ └── step.yml
│ ├── 1.0.5/
│ │ └── step.yml
│ ├── 1.0.7/
│ │ └── step.yml
│ ├── 1.0.8/
│ │ └── step.yml
│ ├── 2.0.0/
│ │ └── step.yml
│ ├── 2.1.0/
│ │ └── step.yml
│ ├── 2.1.1/
│ │ └── step.yml
│ ├── 2.1.2/
│ │ └── step.yml
│ └── step-info.yml
├── gulp/
│ ├── 0.1.0/
│ │ └── step.yml
│ ├── 0.1.1/
│ │ └── step.yml
│ └── step-info.yml
├── heroku-deploy/
│ ├── 0.10.0/
│ │ └── step.yml
│ ├── 0.11.0/
│ │ └── step.yml
│ ├── 0.11.1/
│ │ └── step.yml
│ ├── 0.9.0/
│ │ └── step.yml
│ ├── 0.9.1/
│ │ └── step.yml
│ ├── 0.9.2/
│ │ └── step.yml
│ ├── 0.9.3/
│ │ └── step.yml
│ └── step-info.yml
├── hockeyapp-deploy/
│ ├── 2.0.0/
│ │ └── step.yml
│ ├── 2.1.0/
│ │ └── step.yml
│ ├── 2.1.1/
│ │ └── step.yml
│ ├── 2.2.0/
│ │ └── step.yml
│ ├── 2.2.1/
│ │ └── step.yml
│ ├── 2.2.2/
│ │ └── step.yml
│ ├── 2.3.0/
│ │ └── step.yml
│ ├── 2.4.0/
│ │ └── step.yml
│ ├── 2.4.2/
│ │ └── step.yml
│ ├── 2.4.3/
│ │ └── step.yml
│ ├── 2.4.4/
│ │ └── step.yml
│ └── step-info.yml
├── hockeyapp-deploy-android/
│ ├── 0.9.0/
│ │ └── step.yml
│ ├── 1.0.0/
│ │ └── step.yml
│ ├── 1.1.0/
│ │ └── step.yml
│ ├── 1.1.1/
│ │ └── step.yml
│ ├── 1.1.4/
│ │ └── step.yml
│ ├── 1.2.1/
│ │ └── step.yml
│ ├── 1.2.2/
│ │ └── step.yml
│ ├── 1.3.3/
│ │ └── step.yml
│ └── step-info.yml
├── image-overlayer/
│ ├── 1.0.2/
│ │ └── step.yml
│ ├── 1.0.5/
│ │ └── step.yml
│ ├── 1.0.6/
│ │ └── step.yml
│ ├── 1.0.7/
│ │ └── step.yml
│ └── step-info.yml
├── instabug-android-mapping-file-upload/
│ ├── 1.0.2/
│ │ └── step.yml
│ └── step-info.yml
├── instabug-ios-symbol-upload/
│ ├── 1.0.4/
│ │ └── step.yml
│ └── step-info.yml
├── install-bundler/
│ ├── 1.0.0/
│ │ └── step.yml
│ ├── 1.2.0/
│ │ └── step.yml
│ └── step-info.yml
├── install-dotnetcore/
│ ├── 1.0.0/
│ │ └── step.yml
│ └── step-info.yml
├── install-flutter-version-manager/
│ ├── 1.0.2/
│ │ └── step.yml
│ ├── 1.0.3/
│ │ └── step.yml
│ ├── 2.0.0/
│ │ └── step.yml
│ └── step-info.yml
├── install-missing-android-tools/
│ ├── 0.9.1/
│ │ └── step.yml
│ ├── 0.9.2/
│ │ └── step.yml
│ ├── 1.0.0/
│ │ └── step.yml
│ ├── 1.0.1/
│ │ └── step.yml
│ ├── 1.0.2/
│ │ └── step.yml
│ ├── 1.0.3/
│ │ └── step.yml
│ ├── 1.1.0/
│ │ └── step.yml
│ ├── 2.0.0/
│ │ └── step.yml
│ ├── 2.0.1/
│ │ └── step.yml
│ ├── 2.0.2/
│ │ └── step.yml
│ ├── 2.0.3/
│ │ └── step.yml
│ ├── 2.0.4/
│ │ └── step.yml
│ ├── 2.0.5/
│ │ └── step.yml
│ ├── 2.0.6/
│ │ └── step.yml
│ ├── 2.1.0/
│ │ └── step.yml
│ ├── 2.1.1/
│ │ └── step.yml
│ ├── 2.2.0/
│ │ └── step.yml
│ ├── 2.3.0/
│ │ └── step.yml
│ ├── 2.3.1/
│ │ └── step.yml
│ ├── 2.3.2/
│ │ └── step.yml
│ ├── 2.3.3/
│ │ └── step.yml
│ ├── 2.3.4/
│ │ └── step.yml
│ ├── 2.3.5/
│ │ └── step.yml
│ ├── 2.3.6/
│ │ └── step.yml
│ ├── 2.3.7/
│ │ └── step.yml
│ ├── 2.3.8/
│ │ └── step.yml
│ ├── 2.3.9/
│ │ └── step.yml
│ ├── 2.4.0/
│ │ └── step.yml
│ ├── 2.4.1/
│ │ └── step.yml
│ ├── 3.0.0/
│ │ └── step.yml
│ ├── 3.0.1/
│ │ └── step.yml
│ ├── 3.1.0/
│ │ └── step.yml
│ ├── 3.2.0/
│ │ └── step.yml
│ ├── 3.2.1/
│ │ └── step.yml
│ ├── 3.2.2/
│ │ └── step.yml
│ ├── 3.2.3/
│ │ └── step.yml
│ ├── 3.3.0/
│ │ └── step.yml
│ ├── 3.4.0/
│ │ └── step.yml
│ ├── 3.4.1/
│ │ └── step.yml
│ ├── 3.4.2/
│ │ └── step.yml
│ ├── 3.4.3/
│ │ └── step.yml
│ ├── 3.4.4/
│ │ └── step.yml
│ ├── 3.4.5/
│ │ └── step.yml
│ ├── 3.4.6/
│ │ └── step.yml
│ ├── 3.4.7/
│ │ └── step.yml
│ ├── 3.5.0/
│ │ └── step.yml
│ ├── 3.5.1/
│ │ └── step.yml
│ └── step-info.yml
├── install-react-native/
│ ├── 0.1.0/
│ │ └── step.yml
│ ├── 0.10.0/
│ │ └── step.yml
│ ├── 0.9.1/
│ │ └── step.yml
│ ├── 0.9.2/
│ │ └── step.yml
│ └── step-info.yml
├── installrapp-deploy/
│ ├── 1.0.1/
│ │ └── step.yml
│ └── step-info.yml
├── ionic-archive/
│ ├── 0.10.0/
│ │ └── step.yml
│ ├── 0.9.1/
│ │ └── step.yml
│ ├── 0.9.3/
│ │ └── step.yml
│ ├── 0.9.4/
│ │ └── step.yml
│ ├── 0.9.5/
│ │ └── step.yml
│ ├── 1.0.0/
│ │ └── step.yml
│ ├── 1.1.0/
│ │ └── step.yml
│ ├── 1.2.1/
│ │ └── step.yml
│ ├── 1.2.2/
│ │ └── step.yml
│ ├── 1.2.3/
│ │ └── step.yml
│ ├── 1.2.4/
│ │ └── step.yml
│ ├── 1.2.5/
│ │ └── step.yml
│ ├── 1.2.6/
│ │ └── step.yml
│ ├── 2.0.0/
│ │ └── step.yml
│ ├── 2.1.0/
│ │ └── step.yml
│ ├── 2.1.1/
│ │ └── step.yml
│ ├── 2.2.0/
│ │ └── step.yml
│ ├── 2.2.1/
│ │ └── step.yml
│ ├── 2.3.0/
│ │ └── step.yml
│ ├── 2.3.1/
│ │ └── step.yml
│ ├── 2.3.2/
│ │ └── step.yml
│ ├── 2.3.3/
│ │ └── step.yml
│ └── step-info.yml
├── ionic-prepare/
│ ├── 0.9.0/
│ │ └── step.yml
│ ├── 1.0.0/
│ │ └── step.yml
│ ├── 1.1.0/
│ │ └── step.yml
│ ├── 1.2.0/
│ │ └── step.yml
│ ├── 1.2.1/
│ │ └── step.yml
│ └── step-info.yml
├── ios-auto-provision/
│ ├── 0.9.0/
│ │ └── step.yml
│ ├── 0.9.1/
│ │ └── step.yml
│ ├── 0.9.2/
│ │ └── step.yml
│ ├── 0.9.3/
│ │ └── step.yml
│ ├── 0.9.4/
│ │ └── step.yml
│ ├── 0.9.5/
│ │ └── step.yml
│ ├── 0.9.6/
│ │ └── step.yml
│ ├── 0.9.7/
│ │ └── step.yml
│ ├── 1.0.0/
│ │ └── step.yml
│ ├── 1.0.1/
│ │ └── step.yml
│ ├── 1.0.2/
│ │ └── step.yml
│ ├── 1.0.3/
│ │ └── step.yml
│ ├── 1.1.0/
│ │ └── step.yml
│ ├── 1.1.2/
│ │ └── step.yml
│ ├── 1.1.3/
│ │ └── step.yml
│ ├── 1.1.4/
│ │ └── step.yml
│ ├── 1.1.5/
│ │ └── step.yml
│ ├── 1.2.0/
│ │ └── step.yml
│ ├── 1.2.1/
│ │ └── step.yml
│ ├── 1.2.2/
│ │ └── step.yml
│ ├── 1.2.3/
│ │ └── step.yml
│ ├── 1.3.0/
│ │ └── step.yml
│ ├── 1.3.1/
│ │ └── step.yml
│ ├── 1.3.2/
│ │ └── step.yml
│ ├── 1.4.0/
│ │ └── step.yml
│ ├── 1.4.1/
│ │ └── step.yml
│ ├── 1.4.2/
│ │ └── step.yml
│ ├── 1.4.3/
│ │ └── step.yml
│ ├── 1.5.0/
│ │ └── step.yml
│ ├── 1.5.1/
│ │ └── step.yml
│ ├── 1.5.10/
│ │ └── step.yml
│ ├── 1.5.2/
│ │ └── step.yml
│ ├── 1.5.3/
│ │ └── step.yml
│ ├── 1.5.4/
│ │ └── step.yml
│ ├── 1.5.5/
│ │ └── step.yml
│ ├── 1.5.6/
│ │ └── step.yml
│ ├── 1.5.7/
│ │ └── step.yml
│ ├── 1.5.8/
│ │ └── step.yml
│ ├── 1.5.9/
│ │ └── step.yml
│ ├── 2.0.0/
│ │ └── step.yml
│ ├── 2.0.1/
│ │ └── step.yml
│ ├── 2.0.2/
│ │ └── step.yml
│ ├── 2.0.3/
│ │ └── step.yml
│ └── step-info.yml
├── ios-auto-provision-appstoreconnect/
│ ├── 0.1.0/
│ │ └── step.yml
│ ├── 0.1.1/
│ │ └── step.yml
│ ├── 0.1.2/
│ │ └── step.yml
│ ├── 0.1.3/
│ │ └── step.yml
│ ├── 0.1.4/
│ │ └── step.yml
│ ├── 0.1.5/
│ │ └── step.yml
│ ├── 0.1.6/
│ │ └── step.yml
│ ├── 0.1.7/
│ │ └── step.yml
│ ├── 1.0.0/
│ │ └── step.yml
│ ├── 1.0.1/
│ │ └── step.yml
│ ├── 1.0.2/
│ │ └── step.yml
│ ├── 1.0.3/
│ │ └── step.yml
│ ├── 1.0.4/
│ │ └── step.yml
│ ├── 1.1.0/
│ │ └── step.yml
│ ├── 1.1.1/
│ │ └── step.yml
│ ├── 1.1.2/
│ │ └── step.yml
│ ├── 1.1.3/
│ │ └── step.yml
│ ├── 2.0.0/
│ │ └── step.yml
│ ├── 2.0.1/
│ │ └── step.yml
│ ├── 2.0.2/
│ │ └── step.yml
│ ├── 2.0.3/
│ │ └── step.yml
│ ├── 2.1.0/
│ │ └── step.yml
│ ├── 2.1.1/
│ │ └── step.yml
│ ├── 2.1.2/
│ │ └── step.yml
│ ├── 2.1.3/
│ │ └── step.yml
│ ├── 2.2.0/
│ │ └── step.yml
│ ├── 2.2.1/
│ │ └── step.yml
│ ├── 2.2.2/
│ │ └── step.yml
│ ├── 2.2.3/
│ │ └── step.yml
│ ├── 2.2.4/
│ │ └── step.yml
│ ├── 2.2.5/
│ │ └── step.yml
│ ├── 2.2.6/
│ │ └── step.yml
│ ├── 2.2.7/
│ │ └── step.yml
│ ├── 2.2.8/
│ │ └── step.yml
│ └── step-info.yml
├── ipa-info/
│ ├── 1.0.0/
│ │ └── step.yml
│ ├── 1.0.1/
│ │ └── step.yml
│ ├── 1.1.0/
│ │ └── step.yml
│ ├── 1.1.1/
│ │ └── step.yml
│ └── step-info.yml
├── jandi-message/
│ ├── 0.1.0/
│ │ └── step.yml
│ └── step-info.yml
├── jasmine-runner/
│ ├── 0.9.0/
│ │ └── step.yml
│ ├── 0.9.1/
│ │ └── step.yml
│ └── step-info.yml
├── jira-comments/
│ ├── 0.0.1/
│ │ └── step.yml
│ ├── 0.0.2/
│ │ └── step.yml
│ ├── 0.0.3/
│ │ └── step.yml
│ ├── 0.0.4/
│ │ └── step.yml
│ ├── 0.0.5/
│ │ └── step.yml
│ ├── 0.0.6/
│ │ └── step.yml
│ ├── 0.0.7/
│ │ └── step.yml
│ ├── 0.0.8/
│ │ └── step.yml
│ └── step-info.yml
├── jira-issue-field-add-or-update/
│ ├── 0.0.2/
│ │ └── step.yml
│ └── step-info.yml
├── jira-issue-status-update/
│ ├── 0.1.0/
│ │ └── step.yml
│ ├── 0.1.2/
│ │ └── step.yml
│ └── step-info.yml
├── jira-issue-update-build/
│ ├── 0.1.4/
│ │ └── step.yml
│ ├── 0.2.3/
│ │ └── step.yml
│ ├── 0.2.4/
│ │ └── step.yml
│ ├── 0.2.5/
│ │ └── step.yml
│ └── step-info.yml
├── karma-jasmine-runner/
│ ├── 0.9.0/
│ │ └── step.yml
│ ├── 0.9.1/
│ │ └── step.yml
│ ├── 0.9.2/
│ │ └── step.yml
│ └── step-info.yml
├── kobiton-app-upload/
│ ├── 1.0.0/
│ │ └── step.yml
│ ├── 1.0.1/
│ │ └── step.yml
│ ├── 1.0.2/
│ │ └── step.yml
│ ├── 1.0.3/
│ │ └── step.yml
│ └── step-info.yml
├── kobiton-execute-test/
│ ├── 1.0.0/
│ │ └── step.yml
│ ├── 1.0.1/
│ │ └── step.yml
│ ├── 2.0.0/
│ │ └── step.yml
│ └── step-info.yml
├── kotlin-script/
│ ├── 1.0.2/
│ │ └── step.yml
│ └── step-info.yml
├── lambdatest-espresso-app-automate/
│ ├── 1.0.0/
│ │ └── step.yml
│ └── step-info.yml
├── lambdatest-upload/
│ ├── 1.0.0/
│ │ └── step.yml
│ ├── 2.0.0/
│ │ └── step.yml
│ ├── 3.0.0/
│ │ └── step.yml
│ ├── 4.0.0/
│ │ └── step.yml
│ ├── 4.1.0/
│ │ └── step.yml
│ ├── 4.2.0/
│ │ └── step.yml
│ └── step-info.yml
├── lambdatest-xcuitest-app-automate/
│ ├── 1.0.0/
│ │ └── step.yml
│ └── step-info.yml
├── lifx-notifier/
│ ├── 1.0.0/
│ │ └── step.yml
│ ├── 1.0.1/
│ │ └── step.yml
│ ├── 1.0.3/
│ │ └── step.yml
│ ├── 1.1.1/
│ │ └── step.yml
│ ├── 1.2.1/
│ │ └── step.yml
│ └── step-info.yml
├── localazy/
│ ├── 1.0.0/
│ │ └── step.yml
│ ├── 1.0.2/
│ │ └── step.yml
│ ├── 1.0.5/
│ │ └── step.yml
│ └── step-info.yml
├── loco/
│ ├── 0.0.3/
│ │ └── step.yml
│ ├── 0.1.1/
│ │ └── step.yml
│ ├── 0.1.2/
│ │ └── step.yml
│ ├── 0.1.3/
│ │ └── step.yml
│ └── step-info.yml
├── maestro-cloud-upload/
│ ├── 1.0.0/
│ │ └── step.yml
│ ├── 1.0.1/
│ │ └── step.yml
│ ├── 1.1.0/
│ │ └── step.yml
│ ├── 1.2.0/
│ │ └── step.yml
│ ├── 1.3.0/
│ │ └── step.yml
│ ├── 1.3.2/
│ │ └── step.yml
│ ├── 1.4.0/
│ │ └── step.yml
│ ├── 1.5.0/
│ │ └── step.yml
│ ├── 1.6.0/
│ │ └── step.yml
│ ├── 1.7.0/
│ │ └── step.yml
│ ├── 1.8.0/
│ │ └── step.yml
│ ├── 1.9.0/
│ │ └── step.yml
│ └── step-info.yml
├── maestro-ios-test-run/
│ ├── 0.0.1/
│ │ └── step.yml
│ ├── 0.0.2/
│ │ └── step.yml
│ └── step-info.yml
├── magic-pod/
│ ├── 0.54.1/
│ │ └── step.yml
│ ├── 0.65.1/
│ │ └── step.yml
│ ├── 0.95.1/
│ │ └── step.yml
│ ├── 0.99.24/
│ │ └── step.yml
│ ├── 0.99.40/
│ │ └── step.yml
│ ├── 0.99.7/
│ │ └── step.yml
│ ├── 1.38.0/
│ │ └── step.yml
│ ├── 1.60.0/
│ │ └── step.yml
│ └── step-info.yml
├── magicpod-ui-test/
│ ├── 0.1.0/
│ │ └── step.yml
│ ├── 0.1.1/
│ │ └── step.yml
│ ├── 0.26.0/
│ │ └── step.yml
│ ├── 0.47.0/
│ │ └── step.yml
│ ├── 0.47.1/
│ │ └── step.yml
│ ├── 0.54.1/
│ │ └── step.yml
│ └── step-info.yml
├── manage-ios-code-signing/
│ ├── 1.0.0/
│ │ └── step.yml
│ ├── 1.0.1/
│ │ └── step.yml
│ ├── 1.0.2/
│ │ └── step.yml
│ ├── 1.0.3/
│ │ └── step.yml
│ ├── 1.0.4/
│ │ └── step.yml
│ ├── 1.0.5/
│ │ └── step.yml
│ ├── 1.1.0/
│ │ └── step.yml
│ ├── 1.1.1/
│ │ └── step.yml
│ ├── 1.1.2/
│ │ └── step.yml
│ ├── 1.2.0/
│ │ └── step.yml
│ ├── 1.2.1/
│ │ └── step.yml
│ ├── 2.0.0/
│ │ └── step.yml
│ ├── 2.0.1/
│ │ └── step.yml
│ ├── 2.1.0/
│ │ └── step.yml
│ ├── 2.1.1/
│ │ └── step.yml
│ ├── 2.1.2/
│ │ └── step.yml
│ ├── 2.1.3/
│ │ └── step.yml
│ ├── 2.1.4/
│ │ └── step.yml
│ ├── 2.1.5/
│ │ └── step.yml
│ ├── 2.1.6/
│ │ └── step.yml
│ ├── 2.2.0/
│ │ └── step.yml
│ ├── 2.2.1/
│ │ └── step.yml
│ ├── 2.2.2/
│ │ └── step.yml
│ ├── 2.2.3/
│ │ └── step.yml
│ └── step-info.yml
├── microsoft-teams-adaptive-card/
│ ├── 1.0.4/
│ │ └── step.yml
│ └── step-info.yml
├── microsoft-teams-integration/
│ ├── 1.0.1/
│ │ └── step.yml
│ ├── 1.0.2/
│ │ └── step.yml
│ ├── 1.1.0/
│ │ └── step.yml
│ ├── 1.2.0/
│ │ └── step.yml
│ ├── 1.2.2/
│ │ └── step.yml
│ ├── 2.0.0/
│ │ └── step.yml
│ ├── 2.1.1/
│ │ └── step.yml
│ └── step-info.yml
├── mobile-quality/
│ ├── 1.0.2/
│ │ └── step.yml
│ └── step-info.yml
├── mobitru-upload/
│ ├── 1.0.0/
│ │ └── step.yml
│ └── step-info.yml
├── mobsfscan/
│ ├── 1.0.0/
│ │ └── step.yml
│ └── step-info.yml
├── monitoring-apps-logs/
│ ├── 1.0.3/
│ │ └── step.yml
│ ├── 1.0.4/
│ │ └── step.yml
│ └── step-info.yml
├── monitoring-apps-permissions/
│ ├── 1.0.1/
│ │ └── step.yml
│ ├── 1.0.2/
│ │ └── step.yml
│ ├── 1.0.4/
│ │ └── step.yml
│ └── step-info.yml
├── monitoring-apps-sizes/
│ ├── 1.0.1/
│ │ └── step.yml
│ ├── 1.0.2/
│ │ └── step.yml
│ └── step-info.yml
├── monkop-android/
│ ├── 1.0.1/
│ │ └── step.yml
│ └── step-info.yml
├── msbuild-sonarscanner-begin/
│ ├── 0.9.1/
│ │ └── step.yml
│ ├── 0.9.2/
│ │ └── step.yml
│ └── step-info.yml
├── msbuild-sonarscanner-end/
│ ├── 0.9.0/
│ │ └── step.yml
│ └── step-info.yml
├── mussel/
│ ├── 1.0.0/
│ │ └── step.yml
│ └── step-info.yml
├── nitro-android/
│ ├── 4.2.1/
│ │ └── step.yml
│ ├── 4.4.0/
│ │ └── step.yml
│ ├── 4.5.0/
│ │ └── step.yml
│ ├── 4.6.0/
│ │ └── step.yml
│ └── step-info.yml
├── nitro-ios/
│ ├── 4.2.1/
│ │ └── step.yml
│ ├── 4.4.0/
│ │ └── step.yml
│ ├── 4.5.0/
│ │ └── step.yml
│ ├── 4.7.0/
│ │ └── step.yml
│ └── step-info.yml
├── npm/
│ ├── 0.1.0/
│ │ └── step.yml
│ ├── 0.1.1/
│ │ └── step.yml
│ ├── 0.9.0/
│ │ └── step.yml
│ ├── 0.9.1/
│ │ └── step.yml
│ ├── 1.0.0/
│ │ └── step.yml
│ ├── 1.0.1/
│ │ └── step.yml
│ ├── 1.0.2/
│ │ └── step.yml
│ ├── 1.1.0/
│ │ └── step.yml
│ ├── 1.1.1/
│ │ └── step.yml
│ ├── 1.1.2/
│ │ └── step.yml
│ ├── 1.1.3/
│ │ └── step.yml
│ ├── 1.1.4/
│ │ └── step.yml
│ ├── 1.1.5/
│ │ └── step.yml
│ ├── 1.1.6/
│ │ └── step.yml
│ ├── 2.0.0/
│ │ └── step.yml
│ ├── 3.0.0/
│ │ └── step.yml
│ └── step-info.yml
├── nuget-restore/
│ ├── 0.9.0/
│ │ └── step.yml
│ ├── 0.9.1/
│ │ └── step.yml
│ ├── 0.9.2/
│ │ └── step.yml
│ ├── 0.9.3/
│ │ └── step.yml
│ ├── 1.0.0/
│ │ └── step.yml
│ ├── 1.0.1/
│ │ └── step.yml
│ ├── 1.0.2/
│ │ └── step.yml
│ ├── 1.0.3/
│ │ └── step.yml
│ ├── 1.0.4/
│ │ └── step.yml
│ ├── 1.0.5/
│ │ └── step.yml
│ ├── 1.0.6/
│ │ └── step.yml
│ ├── 1.0.7/
│ │ └── step.yml
│ ├── 1.1.0/
│ │ └── step.yml
│ ├── 1.1.1/
│ │ └── step.yml
│ └── step-info.yml
├── nunit-runner/
│ ├── 0.9.0/
│ │ └── step.yml
│ ├── 0.9.1/
│ │ └── step.yml
│ ├── 0.9.2/
│ │ └── step.yml
│ ├── 0.9.3/
│ │ └── step.yml
│ ├── 1.0.0/
│ │ └── step.yml
│ ├── 1.1.0/
│ │ └── step.yml
│ ├── 1.1.1/
│ │ └── step.yml
│ ├── 1.1.2/
│ │ └── step.yml
│ ├── 1.2.0/
│ │ └── step.yml
│ ├── 1.3.0/
│ │ └── step.yml
│ ├── 1.4.0/
│ │ └── step.yml
│ ├── 1.4.1/
│ │ └── step.yml
│ └── step-info.yml
├── nvm/
│ ├── 0.1.0/
│ │ └── step.yml
│ ├── 1.0.0/
│ │ └── step.yml
│ ├── 1.0.1/
│ │ └── step.yml
│ ├── 1.1.1/
│ │ └── step.yml
│ ├── 1.1.2/
│ │ └── step.yml
│ ├── 1.2.1/
│ │ └── step.yml
│ ├── 1.2.2/
│ │ └── step.yml
│ ├── 1.3.0/
│ │ └── step.yml
│ ├── 1.3.1/
│ │ └── step.yml
│ ├── 1.3.2/
│ │ └── step.yml
│ ├── 1.3.3/
│ │ └── step.yml
│ └── step-info.yml
├── onesignal-create-push/
│ ├── 0.0.1/
│ │ └── step.yml
│ └── step-info.yml
├── open-vpn/
│ ├── 0.0.1/
│ │ └── step.yml
│ ├── 0.0.2/
│ │ └── step.yml
│ ├── 0.0.3/
│ │ └── step.yml
│ ├── 0.1.0/
│ │ └── step.yml
│ ├── 0.1.1/
│ │ └── step.yml
│ ├── 0.1.2/
│ │ └── step.yml
│ └── step-info.yml
├── openstf-connect/
│ ├── 0.0.1/
│ │ └── step.yml
│ ├── 0.0.2/
│ │ └── step.yml
│ ├── 0.0.3/
│ │ └── step.yml
│ ├── 0.0.4/
│ │ └── step.yml
│ ├── 0.0.5/
│ │ └── step.yml
│ ├── 0.0.6/
│ │ └── step.yml
│ ├── 0.0.7/
│ │ └── step.yml
│ ├── 0.0.8/
│ │ └── step.yml
│ └── step-info.yml
├── openstf-disconnect/
│ ├── 0.0.1/
│ │ └── step.yml
│ ├── 0.0.2/
│ │ └── step.yml
│ ├── 0.0.3/
│ │ └── step.yml
│ ├── 0.0.4/
│ │ └── step.yml
│ ├── 0.0.5/
│ │ └── step.yml
│ ├── 0.0.6/
│ │ └── step.yml
│ └── step-info.yml
├── oversecured/
│ ├── 1.0.0/
│ │ └── step.yml
│ ├── 1.0.1/
│ │ └── step.yml
│ ├── 1.0.2/
│ │ └── step.yml
│ └── step-info.yml
├── pagerduty/
│ ├── 0.1.2/
│ │ └── step.yml
│ └── step-info.yml
├── parse-composer-results/
│ ├── 0.0.1/
│ │ └── step.yml
│ ├── 0.0.2/
│ │ └── step.yml
│ └── step-info.yml
├── pcloudy-app-upload/
│ ├── 0.1.2/
│ │ └── step.yml
│ └── step-info.yml
├── pebble-build/
│ ├── 1.0.0/
│ │ └── step.yml
│ └── step-info.yml
├── perfecto-upload/
│ ├── 0.0.3/
│ │ └── step.yml
│ ├── 0.0.6/
│ │ └── step.yml
│ ├── 0.0.7/
│ │ └── step.yml
│ ├── 0.0.8/
│ │ └── step.yml
│ ├── 0.0.9/
│ │ └── step.yml
│ ├── 1.0.0/
│ │ └── step.yml
│ └── step-info.yml
├── post-jira-comment-with-build-details/
│ ├── 0.1.1/
│ │ └── step.yml
│ ├── 0.1.10/
│ │ └── step.yml
│ ├── 0.1.11/
│ │ └── step.yml
│ ├── 0.1.12/
│ │ └── step.yml
│ ├── 0.1.2/
│ │ └── step.yml
│ ├── 0.1.4/
│ │ └── step.yml
│ ├── 0.1.5/
│ │ └── step.yml
│ ├── 0.1.6/
│ │ └── step.yml
│ ├── 0.1.8/
│ │ └── step.yml
│ ├── 0.1.9/
│ │ └── step.yml
│ ├── 1.0.0/
│ │ └── step.yml
│ ├── 1.1.0/
│ │ └── step.yml
│ ├── 1.1.1/
│ │ └── step.yml
│ └── step-info.yml
├── project-scanner/
│ ├── 0.10.0/
│ │ └── step.yml
│ ├── 0.10.1/
│ │ └── step.yml
│ ├── 0.11.0/
│ │ └── step.yml
│ ├── 0.11.1/
│ │ └── step.yml
│ ├── 0.11.2/
│ │ └── step.yml
│ ├── 0.11.3/
│ │ └── step.yml
│ ├── 0.11.4/
│ │ └── step.yml
│ ├── 0.12.0/
│ │ └── step.yml
│ ├── 0.9.0/
│ │ └── step.yml
│ ├── 0.9.1/
│ │ └── step.yml
│ ├── 0.9.10/
│ │ └── step.yml
│ ├── 0.9.11/
│ │ └── step.yml
│ ├── 0.9.12/
│ │ └── step.yml
│ ├── 0.9.13/
│ │ └── step.yml
│ ├── 0.9.14/
│ │ └── step.yml
│ ├── 0.9.2/
│ │ └── step.yml
│ ├── 0.9.3/
│ │ └── step.yml
│ ├── 0.9.4/
│ │ └── step.yml
│ ├── 0.9.5/
│ │ └── step.yml
│ ├── 0.9.6/
│ │ └── step.yml
│ ├── 0.9.7/
│ │ └── step.yml
│ ├── 0.9.8/
│ │ └── step.yml
│ ├── 0.9.9/
│ │ └── step.yml
│ ├── 1.0.0/
│ │ └── step.yml
│ ├── 1.0.1/
│ │ └── step.yml
│ ├── 1.1.0/
│ │ └── step.yml
│ ├── 1.1.1/
│ │ └── step.yml
│ ├── 1.1.2/
│ │ └── step.yml
│ ├── 1.1.3/
│ │ └── step.yml
│ ├── 1.2.1/
│ │ └── step.yml
│ ├── 1.2.2/
│ │ └── step.yml
│ ├── 1.2.3/
│ │ └── step.yml
│ ├── 1.2.4/
│ │ └── step.yml
│ ├── 1.3.0/
│ │ └── step.yml
│ ├── 1.4.0/
│ │ └── step.yml
│ ├── 1.4.1/
│ │ └── step.yml
│ ├── 1.4.2/
│ │ └── step.yml
│ ├── 1.5.0/
│ │ └── step.yml
│ ├── 1.5.2/
│ │ └── step.yml
│ ├── 1.5.3/
│ │ └── step.yml
│ ├── 1.5.4/
│ │ └── step.yml
│ ├── 1.5.5/
│ │ └── step.yml
│ ├── 1.5.6/
│ │ └── step.yml
│ ├── 1.5.7/
│ │ └── step.yml
│ ├── 1.5.8/
│ │ └── step.yml
│ ├── 1.6.0/
│ │ └── step.yml
│ ├── 1.6.1/
│ │ └── step.yml
│ ├── 1.6.2/
│ │ └── step.yml
│ ├── 1.6.3/
│ │ └── step.yml
│ ├── 1.6.4/
│ │ └── step.yml
│ ├── 1.6.5/
│ │ └── step.yml
│ ├── 1.6.6/
│ │ └── step.yml
│ ├── 1.6.7/
│ │ └── step.yml
│ ├── 1.6.8/
│ │ └── step.yml
│ ├── 1.7.0/
│ │ └── step.yml
│ ├── 1.7.1/
│ │ └── step.yml
│ ├── 1.7.2/
│ │ └── step.yml
│ ├── 1.7.3/
│ │ └── step.yml
│ ├── 1.8.0/
│ │ └── step.yml
│ ├── 1.9.0/
│ │ └── step.yml
│ ├── 3.0.0/
│ │ └── step.yml
│ ├── 3.1.0/
│ │ └── step.yml
│ ├── 3.1.1/
│ │ └── step.yml
│ ├── 3.10.0/
│ │ └── step.yml
│ ├── 3.11.0/
│ │ └── step.yml
│ ├── 3.12.0/
│ │ └── step.yml
│ ├── 3.13.0/
│ │ └── step.yml
│ ├── 3.14.0/
│ │ └── step.yml
│ ├── 3.15.0/
│ │ └── step.yml
│ ├── 3.16.0/
│ │ └── step.yml
│ ├── 3.17.0/
│ │ └── step.yml
│ ├── 3.18.0/
│ │ └── step.yml
│ ├── 3.19.0/
│ │ └── step.yml
│ ├── 3.2.0/
│ │ └── step.yml
│ ├── 3.20.0/
│ │ └── step.yml
│ ├── 3.21.0/
│ │ └── step.yml
│ ├── 3.22.0/
│ │ └── step.yml
│ ├── 3.23.0/
│ │ └── step.yml
│ ├── 3.24.1/
│ │ └── step.yml
│ ├── 3.25.0/
│ │ └── step.yml
│ ├── 3.26.0/
│ │ └── step.yml
│ ├── 3.26.1/
│ │ └── step.yml
│ ├── 3.26.2/
│ │ └── step.yml
│ ├── 3.26.3/
│ │ └── step.yml
│ ├── 3.26.4/
│ │ └── step.yml
│ ├── 3.27.0/
│ │ └── step.yml
│ ├── 3.28.0/
│ │ └── step.yml
│ ├── 3.29.0/
│ │ └── step.yml
│ ├── 3.3.0/
│ │ └── step.yml
│ ├── 3.3.1/
│ │ └── step.yml
│ ├── 3.3.2/
│ │ └── step.yml
│ ├── 3.3.3/
│ │ └── step.yml
│ ├── 3.30.0/
│ │ └── step.yml
│ ├── 3.30.1/
│ │ └── step.yml
│ ├── 3.31.0/
│ │ └── step.yml
│ ├── 3.32.0/
│ │ └── step.yml
│ ├── 3.33.0/
│ │ └── step.yml
│ ├── 3.34.0/
│ │ └── step.yml
│ ├── 3.35.0/
│ │ └── step.yml
│ ├── 3.35.1/
│ │ └── step.yml
│ ├── 3.35.2/
│ │ └── step.yml
│ ├── 3.35.3/
│ │ └── step.yml
│ ├── 3.36.0/
│ │ └── step.yml
│ ├── 3.37.0/
│ │ └── step.yml
│ ├── 3.38.0/
│ │ └── step.yml
│ ├── 3.39.0/
│ │ └── step.yml
│ ├── 3.4.0/
│ │ └── step.yml
│ ├── 3.5.0/
│ │ └── step.yml
│ ├── 3.6.0/
│ │ └── step.yml
│ ├── 3.6.1/
│ │ └── step.yml
│ ├── 3.6.2/
│ │ └── step.yml
│ ├── 3.6.3/
│ │ └── step.yml
│ ├── 3.6.5/
│ │ └── step.yml
│ ├── 3.6.6/
│ │ └── step.yml
│ ├── 3.7.0/
│ │ └── step.yml
│ ├── 3.8.0/
│ │ └── step.yml
│ ├── 3.9.0/
│ │ └── step.yml
│ ├── 4.0.0/
│ │ └── step.yml
│ ├── 4.0.1/
│ │ └── step.yml
│ ├── 4.0.2/
│ │ └── step.yml
│ ├── 4.1.0/
│ │ └── step.yml
│ ├── 4.10.0/
│ │ └── step.yml
│ ├── 4.2.0/
│ │ └── step.yml
│ ├── 4.3.0/
│ │ └── step.yml
│ ├── 4.4.0/
│ │ └── step.yml
│ ├── 4.4.1/
│ │ └── step.yml
│ ├── 4.5.0/
│ │ └── step.yml
│ ├── 4.6.0/
│ │ └── step.yml
│ ├── 4.6.1/
│ │ └── step.yml
│ ├── 4.6.2/
│ │ └── step.yml
│ ├── 4.7.0/
│ │ └── step.yml
│ ├── 4.7.1/
│ │ └── step.yml
│ ├── 4.7.2/
│ │ └── step.yml
│ ├── 4.7.3/
│ │ └── step.yml
│ ├── 4.7.4/
│ │ └── step.yml
│ ├── 4.8.0/
│ │ └── step.yml
│ ├── 4.9.0/
│ │ └── step.yml
│ └── step-info.yml
├── pull-intermediate-files/
│ ├── 1.0.0/
│ │ └── step.yml
│ ├── 1.0.1/
│ │ └── step.yml
│ ├── 1.0.2/
│ │ └── step.yml
│ ├── 1.0.3/
│ │ └── step.yml
│ ├── 1.0.4/
│ │ └── step.yml
│ ├── 1.0.5/
│ │ └── step.yml
│ ├── 1.1.0/
│ │ └── step.yml
│ ├── 1.1.1/
│ │ └── step.yml
│ ├── 1.2.0/
│ │ └── step.yml
│ ├── 1.2.1/
│ │ └── step.yml
│ ├── 1.2.2/
│ │ └── step.yml
│ ├── 1.3.0/
│ │ └── step.yml
│ ├── 1.3.1/
│ │ └── step.yml
│ ├── 1.3.2/
│ │ └── step.yml
│ ├── 1.3.3/
│ │ └── step.yml
│ ├── 1.3.4/
│ │ └── step.yml
│ ├── 1.3.5/
│ │ └── step.yml
│ └── step-info.yml
├── push-notification-with-parse/
│ ├── 2.0.0/
│ │ └── step.yml
│ └── step-info.yml
├── random-quote/
│ ├── 3.0.0/
│ │ └── step.yml
│ ├── 3.0.2/
│ │ └── step.yml
│ ├── 3.0.3/
│ │ └── step.yml
│ └── step-info.yml
├── raygun/
│ ├── 1.0.0/
│ │ └── step.yml
│ ├── 1.0.1/
│ │ └── step.yml
│ └── step-info.yml
├── react-native-bundle/
│ ├── 0.1.0/
│ │ └── step.yml
│ ├── 0.1.2/
│ │ └── step.yml
│ ├── 0.2.0/
│ │ └── step.yml
│ ├── 1.0.0/
│ │ └── step.yml
│ ├── 1.0.1/
│ │ └── step.yml
│ ├── 1.0.2/
│ │ └── step.yml
│ ├── 1.0.3/
│ │ └── step.yml
│ ├── 1.0.4/
│ │ └── step.yml
│ ├── 1.1.0/
│ │ └── step.yml
│ ├── 1.1.1/
│ │ └── step.yml
│ ├── 1.2.0/
│ │ └── step.yml
│ └── step-info.yml
├── recreate-user-schemes/
│ ├── 0.9.0/
│ │ └── step.yml
│ ├── 0.9.1/
│ │ └── step.yml
│ ├── 0.9.2/
│ │ └── step.yml
│ ├── 0.9.4/
│ │ └── step.yml
│ ├── 0.9.5/
│ │ └── step.yml
│ ├── 1.0.0/
│ │ └── step.yml
│ ├── 1.0.1/
│ │ └── step.yml
│ ├── 1.0.2/
│ │ └── step.yml
│ ├── 1.0.3/
│ │ └── step.yml
│ ├── 1.0.4/
│ │ └── step.yml
│ ├── 1.0.5/
│ │ └── step.yml
│ ├── 1.1.0/
│ │ └── step.yml
│ ├── 1.1.1/
│ │ └── step.yml
│ └── step-info.yml
├── recursive-touch/
│ ├── 0.9.0/
│ │ └── step.yml
│ └── step-info.yml
├── release-notes-extractor/
│ ├── 0.0.1/
│ │ └── step.yml
│ ├── 0.1.0/
│ │ └── step.yml
│ ├── 0.1.1/
│ │ └── step.yml
│ └── step-info.yml
├── remote-script-runner/
│ ├── 2.0.0/
│ │ └── step.yml
│ ├── 2.0.1/
│ │ └── step.yml
│ └── step-info.yml
├── repeato-test-runner/
│ ├── 0.0.1/
│ │ └── step.yml
│ ├── 0.0.2/
│ │ └── step.yml
│ └── step-info.yml
├── repository-scanner/
│ ├── 1.0.0/
│ │ └── step.yml
│ ├── 1.1.0/
│ │ └── step.yml
│ ├── 1.1.1/
│ │ └── step.yml
│ ├── 1.1.2/
│ │ └── step.yml
│ ├── 1.2.0/
│ │ └── step.yml
│ ├── 1.3.0/
│ │ └── step.yml
│ ├── 1.3.1/
│ │ └── step.yml
│ ├── 1.3.2/
│ │ └── step.yml
│ ├── 1.4.0/
│ │ └── step.yml
│ ├── 1.4.1/
│ │ └── step.yml
│ ├── 1.4.2/
│ │ └── step.yml
│ ├── 1.4.3/
│ │ └── step.yml
│ └── step-info.yml
├── resource-archive/
│ ├── 2.0.0/
│ │ └── step.yml
│ ├── 2.0.1/
│ │ └── step.yml
│ ├── 2.0.3/
│ │ └── step.yml
│ └── step-info.yml
├── restore-cache/
│ ├── 1.0.0/
│ │ └── step.yml
│ ├── 1.0.1/
│ │ └── step.yml
│ ├── 1.0.2/
│ │ └── step.yml
│ ├── 1.1.0/
│ │ └── step.yml
│ ├── 1.1.1/
│ │ └── step.yml
│ ├── 1.1.2/
│ │ └── step.yml
│ ├── 2.0.0/
│ │ └── step.yml
│ ├── 2.1.0/
│ │ └── step.yml
│ ├── 2.2.0/
│ │ └── step.yml
│ ├── 2.3.0/
│ │ └── step.yml
│ ├── 2.4.0/
│ │ └── step.yml
│ ├── 2.4.1/
│ │ └── step.yml
│ ├── 2.5.0/
│ │ └── step.yml
│ ├── 2.6.0/
│ │ └── step.yml
│ ├── 3.0.0/
│ │ └── step.yml
│ └── step-info.yml
├── restore-carthage-cache/
│ ├── 1.0.0/
│ │ └── step.yml
│ ├── 2.0.0/
│ │ └── step.yml
│ ├── 2.1.0/
│ │ └── step.yml
│ ├── 2.1.1/
│ │ └── step.yml
│ ├── 2.1.2/
│ │ └── step.yml
│ ├── 2.1.3/
│ │ └── step.yml
│ ├── 3.0.0/
│ │ └── step.yml
│ └── step-info.yml
├── restore-cocoapods-cache/
│ ├── 1.0.0/
│ │ └── step.yml
│ ├── 1.1.0/
│ │ └── step.yml
│ ├── 1.1.1/
│ │ └── step.yml
│ ├── 2.0.0/
│ │ └── step.yml
│ ├── 2.1.0/
│ │ └── step.yml
│ ├── 2.1.1/
│ │ └── step.yml
│ ├── 2.1.2/
│ │ └── step.yml
│ ├── 2.1.3/
│ │ └── step.yml
│ ├── 3.0.0/
│ │ └── step.yml
│ └── step-info.yml
├── restore-dart-cache/
│ ├── 1.0.0/
│ │ └── step.yml
│ ├── 2.0.0/
│ │ └── step.yml
│ ├── 2.1.0/
│ │ └── step.yml
│ ├── 2.1.1/
│ │ └── step.yml
│ ├── 2.1.2/
│ │ └── step.yml
│ ├── 3.0.0/
│ │ └── step.yml
│ └── step-info.yml
├── restore-gradle-cache/
│ ├── 1.0.0/
│ │ └── step.yml
│ ├── 1.1.0/
│ │ └── step.yml
│ ├── 1.1.1/
│ │ └── step.yml
│ ├── 1.1.2/
│ │ └── step.yml
│ ├── 2.0.0/
│ │ └── step.yml
│ ├── 2.1.0/
│ │ └── step.yml
│ ├── 2.2.0/
│ │ └── step.yml
│ ├── 2.2.1/
│ │ └── step.yml
│ ├── 2.2.3/
│ │ └── step.yml
│ ├── 2.2.4/
│ │ └── step.yml
│ ├── 3.0.0/
│ │ └── step.yml
│ └── step-info.yml
├── restore-gradle-configuration-cache/
│ ├── 1.0.0/
│ │ └── step.yml
│ ├── 1.0.1/
│ │ └── step.yml
│ ├── 1.0.10/
│ │ └── step.yml
│ ├── 1.0.3/
│ │ └── step.yml
│ ├── 1.0.5/
│ │ └── step.yml
│ ├── 1.0.6/
│ │ └── step.yml
│ ├── 1.0.7/
│ │ └── step.yml
│ ├── 1.0.8/
│ │ └── step.yml
│ ├── 1.0.9/
│ │ └── step.yml
│ └── step-info.yml
├── restore-npm-cache/
│ ├── 1.0.0/
│ │ └── step.yml
│ ├── 1.1.0/
│ │ └── step.yml
│ ├── 1.1.1/
│ │ └── step.yml
│ ├── 2.0.0/
│ │ └── step.yml
│ ├── 2.1.0/
│ │ └── step.yml
│ ├── 2.2.0/
│ │ └── step.yml
│ ├── 2.3.0/
│ │ └── step.yml
│ ├── 2.3.1/
│ │ └── step.yml
│ ├── 2.3.2/
│ │ └── step.yml
│ ├── 3.0.0/
│ │ └── step.yml
│ └── step-info.yml
├── restore-s3-cache/
│ ├── 0.9.1/
│ │ └── step.yml
│ ├── 0.9.2/
│ │ └── step.yml
│ ├── 0.9.3/
│ │ └── step.yml
│ └── step-info.yml
├── restore-spm-cache/
│ ├── 1.0.0/
│ │ └── step.yml
│ ├── 1.1.0/
│ │ └── step.yml
│ ├── 1.1.1/
│ │ └── step.yml
│ ├── 2.0.0/
│ │ └── step.yml
│ ├── 2.1.0/
│ │ └── step.yml
│ ├── 2.1.1/
│ │ └── step.yml
│ ├── 2.1.2/
│ │ └── step.yml
│ ├── 2.1.3/
│ │ └── step.yml
│ ├── 3.0.0/
│ │ └── step.yml
│ └── step-info.yml
├── revopush-command-line-interface/
│ ├── 0.0.1/
│ │ └── step.yml
│ └── step-info.yml
├── ruby-script/
│ ├── 2.0.0/
│ │ └── step.yml
│ ├── 2.0.1/
│ │ └── step.yml
│ ├── 2.1.0/
│ │ └── step.yml
│ └── step-info.yml
├── run-eas-build/
│ ├── 0.1.0/
│ │ └── step.yml
│ ├── 0.1.1/
│ │ └── step.yml
│ └── step-info.yml
├── run-tests-using-marathon-cloud/
│ ├── 0.1.2/
│ │ └── step.yml
│ ├── 0.2.0/
│ │ └── step.yml
│ ├── 1.0.0/
│ │ └── step.yml
│ ├── 1.0.1/
│ │ └── step.yml
│ └── step-info.yml
├── rustup-install/
│ ├── 0.1.0/
│ │ └── step.yml
│ ├── 0.1.1/
│ │ └── step.yml
│ ├── 0.2.0/
│ │ └── step.yml
│ └── step-info.yml
├── s3-cache-pull/
│ ├── 0.1.0/
│ │ └── step.yml
│ └── step-info.yml
├── s3-cache-push/
│ ├── 0.1.0/
│ │ └── step.yml
│ └── step-info.yml
├── s3-download/
│ ├── 1.0.0/
│ │ └── step.yml
│ ├── 1.1.0/
│ │ └── step.yml
│ ├── 1.2.0/
│ │ └── step.yml
│ ├── 1.2.1/
│ │ └── step.yml
│ └── step-info.yml
├── saucelabs-espresso-app-automate/
│ ├── 0.1.1/
│ │ └── step.yml
│ ├── 0.1.2/
│ │ └── step.yml
│ ├── 0.1.3/
│ │ └── step.yml
│ ├── 0.1.4/
│ │ └── step.yml
│ ├── 0.1.6/
│ │ └── step.yml
│ └── step-info.yml
├── save-cache/
│ ├── 1.0.0/
│ │ └── step.yml
│ ├── 1.0.1/
│ │ └── step.yml
│ ├── 1.0.2/
│ │ └── step.yml
│ ├── 1.1.0/
│ │ └── step.yml
│ ├── 1.1.1/
│ │ └── step.yml
│ ├── 1.1.2/
│ │ └── step.yml
│ ├── 1.2.0/
│ │ └── step.yml
│ ├── 1.3.0/
│ │ └── step.yml
│ ├── 1.3.1/
│ │ └── step.yml
│ ├── 1.4.0/
│ │ └── step.yml
│ ├── 1.5.0/
│ │ └── step.yml
│ ├── 1.5.1/
│ │ └── step.yml
│ ├── 1.5.2/
│ │ └── step.yml
│ └── step-info.yml
├── save-carthage-cache/
│ ├── 1.0.0/
│ │ └── step.yml
│ ├── 1.0.1/
│ │ └── step.yml
│ ├── 1.0.2/
│ │ └── step.yml
│ ├── 1.1.0/
│ │ └── step.yml
│ ├── 1.1.1/
│ │ └── step.yml
│ └── step-info.yml
├── save-cocoapods-cache/
│ ├── 1.0.0/
│ │ └── step.yml
│ ├── 1.0.1/
│ │ └── step.yml
│ ├── 1.0.2/
│ │ └── step.yml
│ ├── 1.0.3/
│ │ └── step.yml
│ ├── 1.1.0/
│ │ └── step.yml
│ ├── 1.1.1/
│ │ └── step.yml
│ └── step-info.yml
├── save-dart-cache/
│ ├── 1.0.0/
│ │ └── step.yml
│ ├── 1.0.1/
│ │ └── step.yml
│ ├── 1.1.0/
│ │ └── step.yml
│ └── step-info.yml
├── save-gradle-cache/
│ ├── 1.0.0/
│ │ └── step.yml
│ ├── 1.0.1/
│ │ └── step.yml
│ ├── 1.1.0/
│ │ └── step.yml
│ ├── 1.1.1/
│ │ └── step.yml
│ ├── 1.1.2/
│ │ └── step.yml
│ ├── 1.1.3/
│ │ └── step.yml
│ ├── 1.1.4/
│ │ └── step.yml
│ ├── 1.1.5/
│ │ └── step.yml
│ ├── 1.2.0/
│ │ └── step.yml
│ ├── 1.3.0/
│ │ └── step.yml
│ ├── 1.4.0/
│ │ └── step.yml
│ ├── 1.4.1/
│ │ └── step.yml
│ ├── 1.4.2/
│ │ └── step.yml
│ ├── 1.4.3/
│ │ └── step.yml
│ └── step-info.yml
├── save-gradle-configuration-cache/
│ ├── 1.0.0/
│ │ └── step.yml
│ ├── 1.0.1/
│ │ └── step.yml
│ ├── 1.0.10/
│ │ └── step.yml
│ ├── 1.0.3/
│ │ └── step.yml
│ ├── 1.0.5/
│ │ └── step.yml
│ ├── 1.0.6/
│ │ └── step.yml
│ ├── 1.0.7/
│ │ └── step.yml
│ ├── 1.0.8/
│ │ └── step.yml
│ ├── 1.0.9/
│ │ └── step.yml
│ └── step-info.yml
├── save-npm-cache/
│ ├── 1.0.0/
│ │ └── step.yml
│ ├── 1.0.1/
│ │ └── step.yml
│ ├── 1.0.2/
│ │ └── step.yml
│ ├── 1.1.0/
│ │ └── step.yml
│ ├── 1.2.0/
│ │ └── step.yml
│ └── step-info.yml
├── save-s3-cache/
│ ├── 0.9.0/
│ │ └── step.yml
│ ├── 0.9.1/
│ │ └── step.yml
│ └── step-info.yml
├── save-spm-cache/
│ ├── 1.0.0/
│ │ └── step.yml
│ ├── 1.0.1/
│ │ └── step.yml
│ ├── 1.0.2/
│ │ └── step.yml
│ ├── 1.0.3/
│ │ └── step.yml
│ ├── 1.1.0/
│ │ └── step.yml
│ ├── 1.2.0/
│ │ └── step.yml
│ ├── 1.3.0/
│ │ └── step.yml
│ ├── 1.3.1/
│ │ └── step.yml
│ ├── 1.3.2/
│ │ └── step.yml
│ └── step-info.yml
├── scan-with-appsweep/
│ ├── 1.0.0/
│ │ └── step.yml
│ ├── 2.0.0/
│ │ └── step.yml
│ ├── 2.0.2/
│ │ └── step.yml
│ ├── 3.0.0/
│ │ └── step.yml
│ ├── 3.0.1/
│ │ └── step.yml
│ ├── 3.1.1/
│ │ └── step.yml
│ └── step-info.yml
├── script/
│ ├── 0.9.0/
│ │ └── step.yml
│ ├── 0.9.1/
│ │ └── step.yml
│ ├── 1.0.0/
│ │ └── step.yml
│ ├── 1.1.0/
│ │ └── step.yml
│ ├── 1.1.1/
│ │ └── step.yml
│ ├── 1.1.2/
│ │ └── step.yml
│ ├── 1.1.3/
│ │ └── step.yml
│ ├── 1.1.4/
│ │ └── step.yml
│ ├── 1.1.5/
│ │ └── step.yml
│ ├── 1.1.6/
│ │ └── step.yml
│ ├── 1.2.0/
│ │ └── step.yml
│ ├── 1.2.1/
│ │ └── step.yml
│ └── step-info.yml
├── script-runner/
│ ├── 0.9.2/
│ │ └── step.yml
│ ├── 0.9.3/
│ │ └── step.yml
│ ├── 0.9.4/
│ │ └── step.yml
│ └── step-info.yml
├── secure-delete-path/
│ ├── 2.0.0/
│ │ └── step.yml
│ ├── 2.0.1/
│ │ └── step.yml
│ └── step-info.yml
├── send-google-chat-message/
│ ├── 1.1.0/
│ │ └── step.yml
│ ├── 1.1.1/
│ │ └── step.yml
│ └── step-info.yml
├── send-microsoft-teams-message/
│ ├── 0.1.0/
│ │ └── step.yml
│ └── step-info.yml
├── sentry-dsym-upload/
│ └── step-info.yml
├── set-android-application-attributes/
│ ├── 0.9.0/
│ │ └── step.yml
│ └── step-info.yml
├── set-android-manifest-package-name/
│ ├── 0.9.0/
│ │ └── step.yml
│ └── step-info.yml
├── set-android-manifest-values/
│ ├── 1.0.1/
│ │ └── step.yml
│ └── step-info.yml
├── set-android-manifest-versions/
│ ├── 1.0.0/
│ │ └── step.yml
│ ├── 1.0.1/
│ │ └── step.yml
│ ├── 1.0.2/
│ │ └── step.yml
│ ├── 1.0.4/
│ │ └── step.yml
│ ├── 1.0.5/
│ │ └── step.yml
│ └── step-info.yml
├── set-env-var/
│ ├── 0.9.0/
│ │ └── step.yml
│ ├── 0.9.1/
│ │ └── step.yml
│ └── step-info.yml
├── set-gem-home/
│ ├── 0.0.1/
│ │ └── step.yml
│ └── step-info.yml
├── set-git-credentials/
│ ├── 1.0.0/
│ │ └── step.yml
│ └── step-info.yml
├── set-ios-bundle-identifier/
│ ├── 1.0.1/
│ │ └── step.yml
│ ├── 1.0.2/
│ │ └── step.yml
│ └── step-info.yml
├── set-ios-info-plist-unified/
│ ├── 1.1.4/
│ │ └── step.yml
│ ├── 1.1.6/
│ │ └── step.yml
│ └── step-info.yml
├── set-ios-product-bundle-identifier/
│ ├── 1.1.0/
│ │ └── step.yml
│ ├── 1.1.2/
│ │ └── step.yml
│ ├── 1.1.3/
│ │ └── step.yml
│ └── step-info.yml
├── set-ios-version/
│ ├── 1.0.2/
│ │ └── step.yml
│ ├── 1.1.0/
│ │ └── step.yml
│ ├── 1.1.1/
│ │ └── step.yml
│ ├── 2.0.0/
│ │ └── step.yml
│ └── step-info.yml
├── set-java-version/
│ ├── 1.0.1/
│ │ └── step.yml
│ ├── 1.0.2/
│ │ └── step.yml
│ ├── 1.0.3/
│ │ └── step.yml
│ ├── 1.1.0/
│ │ └── step.yml
│ ├── 1.1.1/
│ │ └── step.yml
│ ├── 1.1.2/
│ │ └── step.yml
│ ├── 1.2.0/
│ │ └── step.yml
│ ├── 1.2.1/
│ │ └── step.yml
│ └── step-info.yml
├── set-macos-timezone/
│ ├── 0.0.1/
│ │ └── step.yml
│ ├── 0.0.2/
│ │ └── step.yml
│ ├── 0.0.3/
│ │ └── step.yml
│ ├── 0.0.4/
│ │ └── step.yml
│ └── step-info.yml
├── set-nuget-private-source/
│ ├── 1.0.1/
│ │ └── step.yml
│ └── step-info.yml
├── set-pubspec-application-version/
│ ├── 0.0.1/
│ │ └── step.yml
│ ├── 0.0.2/
│ │ └── step.yml
│ ├── 0.0.3/
│ │ └── step.yml
│ ├── 0.1.0/
│ │ └── step.yml
│ ├── 1.0.0/
│ │ └── step.yml
│ └── step-info.yml
├── set-xcode-build-number/
│ ├── 1.0.0/
│ │ └── step.yml
│ ├── 1.0.1/
│ │ └── step.yml
│ ├── 1.0.10/
│ │ └── step.yml
│ ├── 1.0.11/
│ │ └── step.yml
│ ├── 1.0.12/
│ │ └── step.yml
│ ├── 1.0.2/
│ │ └── step.yml
│ ├── 1.0.3/
│ │ └── step.yml
│ ├── 1.0.4/
│ │ └── step.yml
│ ├── 1.0.5/
│ │ └── step.yml
│ ├── 1.0.7/
│ │ └── step.yml
│ ├── 1.0.8/
│ │ └── step.yml
│ ├── 1.0.9/
│ │ └── step.yml
│ ├── 2.0.0/
│ │ └── step.yml
│ ├── 2.0.1/
│ │ └── step.yml
│ ├── 2.0.2/
│ │ └── step.yml
│ ├── 2.0.3/
│ │ └── step.yml
│ ├── 2.0.4/
│ │ └── step.yml
│ ├── 2.0.5/
│ │ └── step.yml
│ ├── 2.0.6/
│ │ └── step.yml
│ ├── 2.1.0/
│ │ └── step.yml
│ ├── 2.1.1/
│ │ └── step.yml
│ ├── 2.2.0/
│ │ └── step.yml
│ └── step-info.yml
├── set-xcode-plist-value/
│ ├── 1.0.0/
│ │ └── step.yml
│ └── step-info.yml
├── share-pipeline-variable/
│ ├── 1.0.0/
│ │ └── step.yml
│ ├── 1.1.0/
│ │ └── step.yml
│ ├── 1.1.1/
│ │ └── step.yml
│ ├── 1.1.2/
│ │ └── step.yml
│ └── step-info.yml
├── sign-apk/
│ ├── 0.9.1/
│ │ └── step.yml
│ ├── 0.9.2/
│ │ └── step.yml
│ ├── 0.9.3/
│ │ └── step.yml
│ ├── 0.9.4/
│ │ └── step.yml
│ ├── 0.9.5/
│ │ └── step.yml
│ ├── 0.9.6/
│ │ └── step.yml
│ ├── 0.9.8/
│ │ └── step.yml
│ ├── 1.0.1/
│ │ └── step.yml
│ ├── 1.1.0/
│ │ └── step.yml
│ ├── 1.1.1/
│ │ └── step.yml
│ ├── 1.1.2/
│ │ └── step.yml
│ ├── 1.2.0/
│ │ └── step.yml
│ ├── 1.2.1/
│ │ └── step.yml
│ ├── 1.2.2/
│ │ └── step.yml
│ ├── 1.2.3/
│ │ └── step.yml
│ ├── 1.2.4/
│ │ └── step.yml
│ ├── 1.3.0/
│ │ └── step.yml
│ ├── 1.3.1/
│ │ └── step.yml
│ ├── 1.4.0/
│ │ └── step.yml
│ ├── 1.4.1/
│ │ └── step.yml
│ ├── 1.4.2/
│ │ └── step.yml
│ ├── 1.4.3/
│ │ └── step.yml
│ ├── 1.5.0/
│ │ └── step.yml
│ ├── 1.6.0/
│ │ └── step.yml
│ ├── 1.7.1/
│ │ └── step.yml
│ ├── 1.7.10/
│ │ └── step.yml
│ ├── 1.7.11/
│ │ └── step.yml
│ ├── 1.7.2/
│ │ └── step.yml
│ ├── 1.7.3/
│ │ └── step.yml
│ ├── 1.7.4/
│ │ └── step.yml
│ ├── 1.7.5/
│ │ └── step.yml
│ ├── 1.7.6/
│ │ └── step.yml
│ ├── 1.7.7/
│ │ └── step.yml
│ ├── 1.7.8/
│ │ └── step.yml
│ ├── 1.7.9/
│ │ └── step.yml
│ ├── 2.0.0/
│ │ └── step.yml
│ ├── 2.0.1/
│ │ └── step.yml
│ └── step-info.yml
├── slack/
│ ├── 2.1.0/
│ │ └── step.yml
│ ├── 2.2.0/
│ │ └── step.yml
│ ├── 2.3.0/
│ │ └── step.yml
│ ├── 2.4.0/
│ │ └── step.yml
│ ├── 2.4.1/
│ │ └── step.yml
│ ├── 2.5.0/
│ │ └── step.yml
│ ├── 2.6.1/
│ │ └── step.yml
│ ├── 2.6.2/
│ │ └── step.yml
│ ├── 2.6.3/
│ │ └── step.yml
│ ├── 2.6.4/
│ │ └── step.yml
│ ├── 2.6.5/
│ │ └── step.yml
│ ├── 2.7.1/
│ │ └── step.yml
│ ├── 2.7.2/
│ │ └── step.yml
│ ├── 2.7.3/
│ │ └── step.yml
│ ├── 2.7.4/
│ │ └── step.yml
│ ├── 3.0.0/
│ │ └── step.yml
│ ├── 3.1.0/
│ │ └── step.yml
│ ├── 3.1.1/
│ │ └── step.yml
│ ├── 3.1.2/
│ │ └── step.yml
│ ├── 3.1.3/
│ │ └── step.yml
│ ├── 3.1.4/
│ │ └── step.yml
│ ├── 3.1.5/
│ │ └── step.yml
│ ├── 3.2.0/
│ │ └── step.yml
│ ├── 3.2.1/
│ │ └── step.yml
│ ├── 3.3.0/
│ │ └── step.yml
│ ├── 3.4.0/
│ │ └── step.yml
│ ├── 3.5.0/
│ │ └── step.yml
│ ├── 4.0.0/
│ │ └── step.yml
│ ├── 4.1.0/
│ │ └── step.yml
│ ├── 4.2.0/
│ │ └── step.yml
│ ├── 4.2.1/
│ │ └── step.yml
│ ├── 4.2.2/
│ │ └── step.yml
│ ├── 4.3.0/
│ │ └── step.yml
│ └── step-info.yml
├── smart-qa/
│ ├── 0.0.1/
│ │ └── step.yml
│ ├── 0.0.2/
│ │ └── step.yml
│ └── step-info.yml
├── sms-text-message/
│ ├── 2.0.0/
│ │ └── step.yml
│ ├── 2.0.1/
│ │ └── step.yml
│ └── step-info.yml
├── snyk/
│ ├── 0.1.0/
│ │ └── step.yml
│ ├── 1.0.0/
│ │ └── step.yml
│ ├── 1.0.1/
│ │ └── step.yml
│ ├── 1.0.2/
│ │ └── step.yml
│ ├── 1.0.3/
│ │ └── step.yml
│ └── step-info.yml
├── sofy-upload/
│ ├── 0.0.3/
│ │ └── step.yml
│ └── step-info.yml
├── sofy-upload-bitrise-step/
│ ├── 0.0.2/
│ │ └── step.yml
│ ├── 0.0.4/
│ │ └── step.yml
│ └── step-info.yml
├── sonarqube-msbuild-scanner/
│ ├── 1.0.0/
│ │ └── step.yml
│ └── step-info.yml
├── sonarqube-quality-gate/
│ └── step-info.yml
├── sonarqube-scanner/
│ ├── 1.0.0/
│ │ └── step.yml
│ ├── 1.0.1/
│ │ └── step.yml
│ ├── 1.0.10/
│ │ └── step.yml
│ ├── 1.0.11/
│ │ └── step.yml
│ ├── 1.0.12/
│ │ └── step.yml
│ ├── 1.0.2/
│ │ └── step.yml
│ ├── 1.0.3/
│ │ └── step.yml
│ ├── 1.0.4/
│ │ └── step.yml
│ ├── 1.0.5/
│ │ └── step.yml
│ ├── 1.0.6/
│ │ └── step.yml
│ ├── 1.0.7/
│ │ └── step.yml
│ ├── 1.0.8/
│ │ └── step.yml
│ ├── 1.0.9/
│ │ └── step.yml
│ └── step-info.yml
├── stamp-appicon-with-version-number/
│ ├── 1.1.0/
│ │ └── step.yml
│ └── step-info.yml
├── start-android-emulator/
│ ├── 0.9.0/
│ │ └── step.yml
│ ├── 0.9.1/
│ │ └── step.yml
│ ├── 0.9.2/
│ │ └── step.yml
│ ├── 0.9.3/
│ │ └── step.yml
│ ├── 0.9.4/
│ │ └── step.yml
│ ├── 0.9.5/
│ │ └── step.yml
│ ├── 0.9.7/
│ │ └── step.yml
│ ├── 1.0.0/
│ │ └── step.yml
│ ├── 1.0.1/
│ │ └── step.yml
│ ├── 1.0.2/
│ │ └── step.yml
│ ├── 1.1.0/
│ │ └── step.yml
│ ├── 1.1.1/
│ │ └── step.yml
│ ├── 1.2.0/
│ │ └── step.yml
│ ├── 1.2.1/
│ │ └── step.yml
│ ├── 1.3.0/
│ │ └── step.yml
│ ├── 1.3.1/
│ │ └── step.yml
│ ├── 1.3.2/
│ │ └── step.yml
│ └── step-info.yml
├── steps-app-gallery-reports/
│ ├── 0.9.0/
│ │ └── step.yml
│ └── step-info.yml
├── steps-chatwork-message/
│ ├── 0.0.1/
│ │ └── step.yml
│ ├── 0.0.2/
│ │ └── step.yml
│ ├── 0.0.3/
│ │ └── step.yml
│ ├── 0.0.4/
│ │ └── step.yml
│ └── step-info.yml
├── swift-environment-variable-injector/
│ ├── 0.1.0/
│ │ └── step.yml
│ ├── 0.1.1/
│ │ └── step.yml
│ ├── 0.1.2/
│ │ └── step.yml
│ ├── 0.1.3/
│ │ └── step.yml
│ └── step-info.yml
├── swift-package-manager-build-for-mac/
│ ├── 0.0.1/
│ │ └── step.yml
│ └── step-info.yml
├── swift-package-manager-test-for-mac/
│ ├── 0.0.1/
│ │ └── step.yml
│ └── step-info.yml
├── swift-package-manager-xcodeproj-for-mac/
│ ├── 0.0.1/
│ │ └── step.yml
│ └── step-info.yml
├── swiftformat/
│ ├── 0.1.0/
│ │ └── step.yml
│ └── step-info.yml
├── swiftlint/
│ ├── 0.1.1/
│ │ └── step.yml
│ ├── 0.10.1/
│ │ └── step.yml
│ ├── 0.2.1/
│ │ └── step.yml
│ ├── 0.3.0/
│ │ └── step.yml
│ ├── 0.3.1/
│ │ └── step.yml
│ ├── 0.4.0/
│ │ └── step.yml
│ ├── 0.4.2/
│ │ └── step.yml
│ ├── 0.6.0/
│ │ └── step.yml
│ ├── 0.7.0/
│ │ └── step.yml
│ ├── 0.8.0/
│ │ └── step.yml
│ └── step-info.yml
├── swiftlint-extended/
│ ├── 1.0.0/
│ │ └── step.yml
│ └── step-info.yml
├── telegram-notifier/
│ ├── 1.0.0/
│ │ └── step.yml
│ └── step-info.yml
├── telegram-notify/
│ ├── 1.0.2/
│ │ └── step.yml
│ ├── 1.0.3/
│ │ └── step.yml
│ ├── 1.0.5/
│ │ └── step.yml
│ ├── 2.0.0/
│ │ └── step.yml
│ └── step-info.yml
├── testfairy-deploy/
│ ├── 2.0.0/
│ │ └── step.yml
│ ├── 2.0.1/
│ │ └── step.yml
│ ├── 2.1.1/
│ │ └── step.yml
│ ├── 2.2.0/
│ │ └── step.yml
│ ├── 2.3.0/
│ │ └── step.yml
│ ├── 2.3.1/
│ │ └── step.yml
│ ├── 2.3.2/
│ │ └── step.yml
│ └── step-info.yml
├── testfairy-deploy-android/
│ ├── 1.0.0/
│ │ └── step.yml
│ ├── 1.0.1/
│ │ └── step.yml
│ ├── 1.0.3/
│ │ └── step.yml
│ ├── 1.0.4/
│ │ └── step.yml
│ └── step-info.yml
├── testingbot-upload-app/
│ ├── 0.0.1/
│ │ └── step.yml
│ └── step-info.yml
├── testlio-upload/
│ ├── 0.1.0/
│ │ └── step.yml
│ └── step-info.yml
├── testproject-run/
│ ├── 0.2.0/
│ │ └── step.yml
│ └── step-info.yml
├── testproject-upload/
│ ├── 0.1.0/
│ │ └── step.yml
│ └── step-info.yml
├── theappspajamas-service-account-key-installer/
│ ├── 0.0.3/
│ │ └── step.yml
│ └── step-info.yml
├── timestamp/
│ ├── 0.9.1/
│ │ └── step.yml
│ └── step-info.yml
├── translized/
│ ├── 1.0.2/
│ │ └── step.yml
│ └── step-info.yml
├── trigger-bitrise-workflow/
│ ├── 0.0.1/
│ │ └── step.yml
│ ├── 0.0.2/
│ │ └── step.yml
│ ├── 0.0.3/
│ │ └── step.yml
│ ├── 0.0.4/
│ │ └── step.yml
│ ├── 0.0.5/
│ │ └── step.yml
│ ├── 0.0.6/
│ │ └── step.yml
│ ├── 0.0.7/
│ │ └── step.yml
│ ├── 0.0.8/
│ │ └── step.yml
│ └── step-info.yml
├── tryoutapps-shaman/
│ ├── 1.0.1/
│ │ └── step.yml
│ ├── 1.0.4/
│ │ └── step.yml
│ ├── 1.0.5/
│ │ └── step.yml
│ ├── 1.0.7/
│ │ └── step.yml
│ ├── 1.0.8/
│ │ └── step.yml
│ ├── 1.0.9/
│ │ └── step.yml
│ ├── 1.1.0/
│ │ └── step.yml
│ └── step-info.yml
├── tslint/
│ ├── 0.0.4/
│ │ └── step.yml
│ └── step-info.yml
├── tuist/
│ ├── 0.1.0/
│ │ └── step.yml
│ ├── 0.2.1/
│ │ └── step.yml
│ └── step-info.yml
├── twitter-message/
│ ├── 0.0.4/
│ │ └── step.yml
│ ├── 1.0.2/
│ │ └── step.yml
│ ├── 1.0.4/
│ │ └── step.yml
│ └── step-info.yml
├── unzip/
│ ├── 0.0.3/
│ │ └── step.yml
│ └── step-info.yml
├── update-gitops-repository/
│ ├── 0.1.2/
│ │ └── step.yml
│ ├── 0.1.3/
│ │ └── step.yml
│ ├── 1.0.0/
│ │ └── step.yml
│ ├── 1.0.1/
│ │ └── step.yml
│ ├── 1.1.0/
│ │ └── step.yml
│ ├── 1.1.10/
│ │ └── step.yml
│ ├── 1.1.11/
│ │ └── step.yml
│ ├── 1.1.2/
│ │ └── step.yml
│ ├── 1.1.3/
│ │ └── step.yml
│ ├── 1.1.4/
│ │ └── step.yml
│ ├── 1.1.5/
│ │ └── step.yml
│ ├── 1.1.6/
│ │ └── step.yml
│ ├── 1.1.7/
│ │ └── step.yml
│ ├── 1.1.8/
│ │ └── step.yml
│ ├── 1.1.9/
│ │ └── step.yml
│ ├── 2.0.0/
│ │ └── step.yml
│ ├── 2.0.1/
│ │ └── step.yml
│ ├── 2.0.3/
│ │ └── step.yml
│ ├── 2.0.4/
│ │ └── step.yml
│ ├── 2.0.5/
│ │ └── step.yml
│ ├── 3.0.0/
│ │ └── step.yml
│ └── step-info.yml
├── update-jira-issue-field/
│ ├── 1.0.0/
│ │ └── step.yml
│ ├── 1.0.1/
│ │ └── step.yml
│ ├── 1.0.2/
│ │ └── step.yml
│ └── step-info.yml
├── update-jira-release-status/
│ ├── 0.0.1/
│ │ └── step.yml
│ └── step-info.yml
├── update-xcode-project-provisioning/
│ ├── 1.0.0/
│ │ └── step.yml
│ ├── 1.1.0/
│ │ └── step.yml
│ └── step-info.yml
├── upload-gradle-github-dependencies/
│ ├── 0.1.0/
│ │ └── step.yml
│ └── step-info.yml
├── upload-to-sauce-labs/
│ ├── 0.0.1/
│ │ └── step.yml
│ └── step-info.yml
├── urls-scanner/
│ ├── 1.0.7/
│ │ └── step.yml
│ └── step-info.yml
├── veracode-security/
│ ├── 1.0.3/
│ │ └── step.yml
│ ├── 1.0.4/
│ │ └── step.yml
│ └── step-info.yml
├── version-extractor-android/
│ ├── 0.3.0/
│ │ └── step.yml
│ └── step-info.yml
├── version-pre-release-info/
│ ├── 1.0.0/
│ │ └── step.yml
│ ├── 1.0.1/
│ │ └── step.yml
│ ├── 1.0.2/
│ │ └── step.yml
│ └── step-info.yml
├── versionbox-deploy/
│ ├── 0.0.2/
│ │ └── step.yml
│ ├── 0.0.3/
│ │ └── step.yml
│ └── step-info.yml
├── virtual-device-testing-for-android/
│ ├── 0.9.4/
│ │ └── step.yml
│ ├── 0.9.5/
│ │ └── step.yml
│ ├── 0.9.6/
│ │ └── step.yml
│ ├── 0.9.7/
│ │ └── step.yml
│ ├── 0.9.8/
│ │ └── step.yml
│ ├── 0.9.9/
│ │ └── step.yml
│ ├── 1.0.0/
│ │ └── step.yml
│ ├── 1.0.1/
│ │ └── step.yml
│ ├── 1.0.2/
│ │ └── step.yml
│ ├── 1.0.3/
│ │ └── step.yml
│ ├── 1.0.5/
│ │ └── step.yml
│ ├── 1.0.6/
│ │ └── step.yml
│ ├── 1.1.1/
│ │ └── step.yml
│ ├── 1.1.10/
│ │ └── step.yml
│ ├── 1.1.11/
│ │ └── step.yml
│ ├── 1.1.12/
│ │ └── step.yml
│ ├── 1.1.13/
│ │ └── step.yml
│ ├── 1.1.2/
│ │ └── step.yml
│ ├── 1.1.3/
│ │ └── step.yml
│ ├── 1.1.4/
│ │ └── step.yml
│ ├── 1.1.5/
│ │ └── step.yml
│ ├── 1.1.6/
│ │ └── step.yml
│ ├── 1.1.7/
│ │ └── step.yml
│ ├── 1.1.8/
│ │ └── step.yml
│ ├── 1.1.9/
│ │ └── step.yml
│ ├── 1.2.0/
│ │ └── step.yml
│ ├── 1.2.1/
│ │ └── step.yml
│ ├── 1.3.0/
│ │ └── step.yml
│ ├── 1.3.1/
│ │ └── step.yml
│ ├── 1.3.2/
│ │ └── step.yml
│ ├── 1.3.3/
│ │ └── step.yml
│ ├── 1.3.4/
│ │ └── step.yml
│ └── step-info.yml
├── virtual-device-testing-for-ios/
│ ├── 0.9.0/
│ │ └── step.yml
│ ├── 0.9.1/
│ │ └── step.yml
│ ├── 0.9.10/
│ │ └── step.yml
│ ├── 0.9.11/
│ │ └── step.yml
│ ├── 0.9.12/
│ │ └── step.yml
│ ├── 0.9.13/
│ │ └── step.yml
│ ├── 0.9.2/
│ │ └── step.yml
│ ├── 0.9.3/
│ │ └── step.yml
│ ├── 0.9.5/
│ │ └── step.yml
│ ├── 0.9.6/
│ │ └── step.yml
│ ├── 0.9.7/
│ │ └── step.yml
│ ├── 0.9.9/
│ │ └── step.yml
│ ├── 1.0.0/
│ │ └── step.yml
│ ├── 1.0.2/
│ │ └── step.yml
│ ├── 1.1.0/
│ │ └── step.yml
│ ├── 1.1.1/
│ │ └── step.yml
│ ├── 1.1.2/
│ │ └── step.yml
│ ├── 1.1.3/
│ │ └── step.yml
│ ├── 1.2.0/
│ │ └── step.yml
│ ├── 1.3.0/
│ │ └── step.yml
│ ├── 1.3.1/
│ │ └── step.yml
│ ├── 1.4.0/
│ │ └── step.yml
│ ├── 1.4.1/
│ │ └── step.yml
│ └── step-info.yml
├── vpnc-connect/
│ ├── 1.0.0/
│ │ └── step.yml
│ └── step-info.yml
├── wait-for-android-emulator/
│ ├── 0.9.0/
│ │ └── step.yml
│ ├── 1.0.0/
│ │ └── step.yml
│ ├── 1.0.1/
│ │ └── step.yml
│ ├── 1.0.2/
│ │ └── step.yml
│ ├── 1.0.3/
│ │ └── step.yml
│ ├── 1.0.4/
│ │ └── step.yml
│ ├── 1.0.5/
│ │ └── step.yml
│ ├── 1.0.6/
│ │ └── step.yml
│ ├── 1.0.7/
│ │ └── step.yml
│ ├── 1.0.8/
│ │ └── step.yml
│ ├── 1.0.9/
│ │ └── step.yml
│ └── step-info.yml
├── waldo-upload/
│ ├── 0.3.0/
│ │ └── step.yml
│ ├── 1.0.0/
│ │ └── step.yml
│ ├── 1.0.1/
│ │ └── step.yml
│ ├── 1.1.0/
│ │ └── step.yml
│ ├── 1.1.1/
│ │ └── step.yml
│ ├── 2.0.0/
│ │ └── step.yml
│ ├── 2.1.0/
│ │ └── step.yml
│ ├── 2.1.1/
│ │ └── step.yml
│ ├── 2.2.0/
│ │ └── step.yml
│ ├── 2.3.0/
│ │ └── step.yml
│ ├── 2.3.1/
│ │ └── step.yml
│ ├── 2.4.0/
│ │ └── step.yml
│ ├── 2.4.1/
│ │ └── step.yml
│ └── step-info.yml
├── web-translate-it/
│ ├── 1.0.1/
│ │ └── step.yml
│ ├── 1.0.2/
│ │ └── step.yml
│ └── step-info.yml
├── wetransfer/
│ ├── 0.0.5/
│ │ └── step.yml
│ └── step-info.yml
├── xamarin-android-test/
│ ├── 0.9.0/
│ │ └── step.yml
│ ├── 0.9.1/
│ │ └── step.yml
│ ├── 1.0.0/
│ │ └── step.yml
│ ├── 1.1.0/
│ │ └── step.yml
│ ├── 1.2.0/
│ │ └── step.yml
│ ├── 1.2.2/
│ │ └── step.yml
│ └── step-info.yml
├── xamarin-archive/
│ ├── 0.9.0/
│ │ └── step.yml
│ ├── 1.0.0/
│ │ └── step.yml
│ ├── 1.1.0/
│ │ └── step.yml
│ ├── 1.1.1/
│ │ └── step.yml
│ ├── 1.1.2/
│ │ └── step.yml
│ ├── 1.2.0/
│ │ └── step.yml
│ ├── 1.3.1/
│ │ └── step.yml
│ ├── 1.3.2/
│ │ └── step.yml
│ ├── 1.3.3/
│ │ └── step.yml
│ ├── 1.4.1/
│ │ └── step.yml
│ ├── 1.4.2/
│ │ └── step.yml
│ ├── 1.5.0/
│ │ └── step.yml
│ ├── 1.5.1/
│ │ └── step.yml
│ ├── 1.5.2/
│ │ └── step.yml
│ ├── 1.5.3/
│ │ └── step.yml
│ ├── 1.6.0/
│ │ └── step.yml
│ └── step-info.yml
├── xamarin-components-restore/
│ ├── 0.9.0/
│ │ └── step.yml
│ └── step-info.yml
├── xamarin-insights/
│ ├── 0.9.0/
│ │ └── step.yml
│ ├── 1.0.0/
│ │ └── step.yml
│ └── step-info.yml
├── xamarin-ios-test/
│ ├── 0.9.0/
│ │ └── step.yml
│ ├── 0.9.1/
│ │ └── step.yml
│ ├── 0.9.2/
│ │ └── step.yml
│ ├── 0.9.3/
│ │ └── step.yml
│ ├── 1.0.1/
│ │ └── step.yml
│ ├── 1.0.2/
│ │ └── step.yml
│ ├── 1.0.3/
│ │ └── step.yml
│ ├── 1.0.4/
│ │ └── step.yml
│ ├── 2.0.0/
│ │ └── step.yml
│ ├── 2.1.0/
│ │ └── step.yml
│ ├── 2.1.1/
│ │ └── step.yml
│ ├── 2.2.0/
│ │ └── step.yml
│ ├── 2.3.1/
│ │ └── step.yml
│ ├── 2.4.0/
│ │ └── step.yml
│ └── step-info.yml
├── xamarin-test-cloud-for-android/
│ ├── 0.9.0/
│ │ └── step.yml
│ ├── 0.9.1/
│ │ └── step.yml
│ ├── 1.0.0/
│ │ └── step.yml
│ ├── 1.0.1/
│ │ └── step.yml
│ ├── 1.1.0/
│ │ └── step.yml
│ ├── 1.1.1/
│ │ └── step.yml
│ ├── 1.2.0/
│ │ └── step.yml
│ ├── 1.2.1/
│ │ └── step.yml
│ ├── 1.2.2/
│ │ └── step.yml
│ ├── 1.2.3/
│ │ └── step.yml
│ ├── 2.0.0/
│ │ └── step.yml
│ ├── 2.1.0/
│ │ └── step.yml
│ ├── 2.1.1/
│ │ └── step.yml
│ ├── 2.2.0/
│ │ └── step.yml
│ ├── 2.3.0/
│ │ └── step.yml
│ └── step-info.yml
├── xamarin-test-cloud-for-calabash-android/
│ ├── 0.9.0/
│ │ └── step.yml
│ ├── 0.9.1/
│ │ └── step.yml
│ ├── 0.9.2/
│ │ └── step.yml
│ ├── 1.0.0/
│ │ └── step.yml
│ └── step-info.yml
├── xamarin-test-cloud-for-calabash-ios/
│ ├── 0.9.0/
│ │ └── step.yml
│ ├── 0.9.1/
│ │ └── step.yml
│ ├── 0.9.2/
│ │ └── step.yml
│ ├── 0.9.3/
│ │ └── step.yml
│ ├── 0.9.4/
│ │ └── step.yml
│ ├── 1.0.0/
│ │ └── step.yml
│ └── step-info.yml
├── xamarin-test-cloud-for-ios/
│ ├── 0.9.0/
│ │ └── step.yml
│ ├── 0.9.1/
│ │ └── step.yml
│ ├── 0.9.2/
│ │ └── step.yml
│ ├── 0.9.3/
│ │ └── step.yml
│ ├── 1.0.0/
│ │ └── step.yml
│ ├── 1.0.1/
│ │ └── step.yml
│ ├── 1.1.0/
│ │ └── step.yml
│ ├── 1.1.1/
│ │ └── step.yml
│ ├── 1.2.0/
│ │ └── step.yml
│ ├── 1.2.1/
│ │ └── step.yml
│ ├── 1.2.2/
│ │ └── step.yml
│ ├── 2.0.0/
│ │ └── step.yml
│ ├── 2.1.0/
│ │ └── step.yml
│ ├── 2.1.1/
│ │ └── step.yml
│ ├── 2.2.0/
│ │ └── step.yml
│ ├── 2.3.0/
│ │ └── step.yml
│ ├── 2.4.0/
│ │ └── step.yml
│ └── step-info.yml
├── xamarin-user-management/
│ ├── 0.9.0/
│ │ └── step.yml
│ ├── 0.9.1/
│ │ └── step.yml
│ ├── 1.0.0/
│ │ └── step.yml
│ ├── 1.0.1/
│ │ └── step.yml
│ ├── 1.0.2/
│ │ └── step.yml
│ ├── 1.0.3/
│ │ └── step.yml
│ ├── 1.1.0/
│ │ └── step.yml
│ └── step-info.yml
├── xcode-analyze/
│ ├── 1.0.0/
│ │ └── step.yml
│ ├── 1.1.0/
│ │ └── step.yml
│ ├── 1.2.0/
│ │ └── step.yml
│ ├── 1.3.0/
│ │ └── step.yml
│ ├── 1.4.0/
│ │ └── step.yml
│ ├── 1.4.1/
│ │ └── step.yml
│ ├── 1.5.0/
│ │ └── step.yml
│ ├── 1.5.1/
│ │ └── step.yml
│ ├── 1.6.0/
│ │ └── step.yml
│ ├── 1.6.1/
│ │ └── step.yml
│ ├── 1.7.1/
│ │ └── step.yml
│ ├── 2.0.0/
│ │ └── step.yml
│ ├── 2.1.0/
│ │ └── step.yml
│ ├── 2.1.1/
│ │ └── step.yml
│ ├── 2.2.0/
│ │ └── step.yml
│ ├── 2.2.2/
│ │ └── step.yml
│ ├── 2.2.3/
│ │ └── step.yml
│ ├── 2.3.0/
│ │ └── step.yml
│ ├── 2.4.0/
│ │ └── step.yml
│ ├── 2.4.1/
│ │ └── step.yml
│ ├── 2.5.0/
│ │ └── step.yml
│ ├── 2.5.1/
│ │ └── step.yml
│ ├── 2.5.2/
│ │ └── step.yml
│ ├── 2.5.3/
│ │ └── step.yml
│ ├── 2.5.4/
│ │ └── step.yml
│ └── step-info.yml
├── xcode-archive/
│ ├── 0.9.2/
│ │ └── step.yml
│ ├── 0.9.3/
│ │ └── step.yml
│ ├── 1.0.1/
│ │ └── step.yml
│ ├── 1.1.0/
│ │ └── step.yml
│ ├── 1.1.1/
│ │ └── step.yml
│ ├── 1.10.0/
│ │ └── step.yml
│ ├── 1.10.1/
│ │ └── step.yml
│ ├── 1.2.0/
│ │ └── step.yml
│ ├── 1.3.0/
│ │ └── step.yml
│ ├── 1.3.1/
│ │ └── step.yml
│ ├── 1.3.2/
│ │ └── step.yml
│ ├── 1.3.3/
│ │ └── step.yml
│ ├── 1.3.4/
│ │ └── step.yml
│ ├── 1.3.5/
│ │ └── step.yml
│ ├── 1.3.6/
│ │ └── step.yml
│ ├── 1.4.0/
│ │ └── step.yml
│ ├── 1.4.1/
│ │ └── step.yml
│ ├── 1.5.0/
│ │ └── step.yml
│ ├── 1.5.1/
│ │ └── step.yml
│ ├── 1.5.2/
│ │ └── step.yml
│ ├── 1.6.0/
│ │ └── step.yml
│ ├── 1.6.1/
│ │ └── step.yml
│ ├── 1.7.0/
│ │ └── step.yml
│ ├── 1.7.1/
│ │ └── step.yml
│ ├── 1.7.2/
│ │ └── step.yml
│ ├── 1.7.3/
│ │ └── step.yml
│ ├── 1.8.0/
│ │ └── step.yml
│ ├── 1.8.1/
│ │ └── step.yml
│ ├── 1.8.2/
│ │ └── step.yml
│ ├── 1.8.3/
│ │ └── step.yml
│ ├── 1.8.4/
│ │ └── step.yml
│ ├── 1.8.5/
│ │ └── step.yml
│ ├── 1.9.0/
│ │ └── step.yml
│ ├── 1.9.1/
│ │ └── step.yml
│ ├── 1.9.2/
│ │ └── step.yml
│ ├── 2.0.0/
│ │ └── step.yml
│ ├── 2.0.1/
│ │ └── step.yml
│ ├── 2.0.2/
│ │ └── step.yml
│ ├── 2.0.3/
│ │ └── step.yml
│ ├── 2.0.4/
│ │ └── step.yml
│ ├── 2.0.5/
│ │ └── step.yml
│ ├── 2.0.6/
│ │ └── step.yml
│ ├── 2.1.0/
│ │ └── step.yml
│ ├── 2.1.1/
│ │ └── step.yml
│ ├── 2.2.0/
│ │ └── step.yml
│ ├── 2.2.1/
│ │ └── step.yml
│ ├── 2.3.0/
│ │ └── step.yml
│ ├── 2.3.1/
│ │ └── step.yml
│ ├── 2.3.2/
│ │ └── step.yml
│ ├── 2.3.3/
│ │ └── step.yml
│ ├── 2.3.5/
│ │ └── step.yml
│ ├── 2.3.6/
│ │ └── step.yml
│ ├── 2.3.7/
│ │ └── step.yml
│ ├── 2.4.0/
│ │ └── step.yml
│ ├── 2.4.1/
│ │ └── step.yml
│ ├── 2.4.10/
│ │ └── step.yml
│ ├── 2.4.11/
│ │ └── step.yml
│ ├── 2.4.12/
│ │ └── step.yml
│ ├── 2.4.13/
│ │ └── step.yml
│ ├── 2.4.14/
│ │ └── step.yml
│ ├── 2.4.15/
│ │ └── step.yml
│ ├── 2.4.16/
│ │ └── step.yml
│ ├── 2.4.17/
│ │ └── step.yml
│ ├── 2.4.18/
│ │ └── step.yml
│ ├── 2.4.19/
│ │ └── step.yml
│ ├── 2.4.2/
│ │ └── step.yml
│ ├── 2.4.20/
│ │ └── step.yml
│ ├── 2.4.21/
│ │ └── step.yml
│ ├── 2.4.3/
│ │ └── step.yml
│ ├── 2.4.4/
│ │ └── step.yml
│ ├── 2.4.5/
│ │ └── step.yml
│ ├── 2.4.6/
│ │ └── step.yml
│ ├── 2.4.7/
│ │ └── step.yml
│ ├── 2.4.8/
│ │ └── step.yml
│ ├── 2.4.9/
│ │ └── step.yml
│ ├── 2.5.0/
│ │ └── step.yml
│ ├── 2.6.0/
│ │ └── step.yml
│ ├── 2.6.1/
│ │ └── step.yml
│ ├── 2.6.2/
│ │ └── step.yml
│ ├── 2.7.0/
│ │ └── step.yml
│ ├── 2.7.1/
│ │ └── step.yml
│ ├── 2.7.2/
│ │ └── step.yml
│ ├── 2.8.0/
│ │ └── step.yml
│ ├── 2.8.1/
│ │ └── step.yml
│ ├── 2.8.2/
│ │ └── step.yml
│ ├── 2.8.3/
│ │ └── step.yml
│ ├── 2.8.4/
│ │ └── step.yml
│ ├── 2.8.5/
│ │ └── step.yml
│ ├── 2.8.6/
│ │ └── step.yml
│ ├── 2.8.7/
│ │ └── step.yml
│ ├── 3.0.0/
│ │ └── step.yml
│ ├── 3.1.0/
│ │ └── step.yml
│ ├── 3.1.1/
│ │ └── step.yml
│ ├── 3.2.0/
│ │ └── step.yml
│ ├── 3.2.1/
│ │ └── step.yml
│ ├── 3.2.2/
│ │ └── step.yml
│ ├── 3.2.3/
│ │ └── step.yml
│ ├── 3.2.4/
│ │ └── step.yml
│ ├── 3.2.5/
│ │ └── step.yml
│ ├── 3.3.0/
│ │ └── step.yml
│ ├── 3.3.1/
│ │ └── step.yml
│ ├── 3.3.2/
│ │ └── step.yml
│ ├── 4.0.0/
│ │ └── step.yml
│ ├── 4.0.1/
│ │ └── step.yml
│ ├── 4.0.2/
│ │ └── step.yml
│ ├── 4.0.3/
│ │ └── step.yml
│ ├── 4.0.4/
│ │ └── step.yml
│ ├── 4.1.0/
│ │ └── step.yml
│ ├── 4.2.0/
│ │ └── step.yml
│ ├── 4.2.1/
│ │ └── step.yml
│ ├── 4.2.2/
│ │ └── step.yml
│ ├── 4.2.3/
│ │ └── step.yml
│ ├── 4.2.4/
│ │ └── step.yml
│ ├── 4.2.5/
│ │ └── step.yml
│ ├── 4.2.6/
│ │ └── step.yml
│ ├── 4.2.7/
│ │ └── step.yml
│ ├── 4.2.8/
│ │ └── step.yml
│ ├── 4.3.0/
│ │ └── step.yml
│ ├── 4.3.1/
│ │ └── step.yml
│ ├── 4.3.2/
│ │ └── step.yml
│ ├── 4.3.3/
│ │ └── step.yml
│ ├── 4.4.0/
│ │ └── step.yml
│ ├── 4.5.0/
│ │ └── step.yml
│ ├── 4.5.1/
│ │ └── step.yml
│ ├── 4.5.2/
│ │ └── step.yml
│ ├── 4.6.0/
│ │ └── step.yml
│ ├── 4.7.0/
│ │ └── step.yml
│ ├── 4.7.1/
│ │ └── step.yml
│ ├── 4.7.2/
│ │ └── step.yml
│ ├── 4.8.0/
│ │ └── step.yml
│ ├── 4.8.1/
│ │ └── step.yml
│ ├── 5.0.0/
│ │ └── step.yml
│ ├── 5.0.1/
│ │ └── step.yml
│ ├── 5.0.2/
│ │ └── step.yml
│ ├── 5.0.3/
│ │ └── step.yml
│ ├── 5.0.4/
│ │ └── step.yml
│ ├── 5.0.5/
│ │ └── step.yml
│ ├── 5.0.6/
│ │ └── step.yml
│ ├── 5.1.0/
│ │ └── step.yml
│ ├── 5.1.1/
│ │ └── step.yml
│ ├── 5.1.2/
│ │ └── step.yml
│ ├── 5.1.3/
│ │ └── step.yml
│ ├── 5.2.0/
│ │ └── step.yml
│ ├── 5.2.1/
│ │ └── step.yml
│ ├── 5.2.2/
│ │ └── step.yml
│ ├── 5.3.0/
│ │ └── step.yml
│ ├── 5.3.1/
│ │ └── step.yml
│ ├── 5.4.0/
│ │ └── step.yml
│ ├── 5.4.1/
│ │ └── step.yml
│ ├── 5.5.0/
│ │ └── step.yml
│ ├── 5.5.1/
│ │ └── step.yml
│ ├── 5.6.0/
│ │ └── step.yml
│ ├── 5.7.0/
│ │ └── step.yml
│ ├── 5.8.0/
│ │ └── step.yml
│ ├── 5.8.1/
│ │ └── step.yml
│ ├── 5.8.2/
│ │ └── step.yml
│ ├── 5.8.3/
│ │ └── step.yml
│ ├── 5.8.4/
│ │ └── step.yml
│ ├── 5.8.5/
│ │ └── step.yml
│ ├── 5.9.0/
│ │ └── step.yml
│ ├── 5.9.1/
│ │ └── step.yml
│ ├── 5.9.2/
│ │ └── step.yml
│ ├── 5.9.3/
│ │ └── step.yml
│ ├── 5.9.4/
│ │ └── step.yml
│ ├── 5.9.5/
│ │ └── step.yml
│ ├── 6.0.0/
│ │ └── step.yml
│ ├── 6.0.1/
│ │ └── step.yml
│ └── step-info.yml
├── xcode-archive-mac/
│ ├── 0.1.0/
│ │ └── step.yml
│ ├── 1.0.0/
│ │ └── step.yml
│ ├── 1.1.0/
│ │ └── step.yml
│ ├── 1.1.1/
│ │ └── step.yml
│ ├── 1.1.2/
│ │ └── step.yml
│ ├── 1.1.3/
│ │ └── step.yml
│ ├── 1.1.4/
│ │ └── step.yml
│ ├── 1.1.6/
│ │ └── step.yml
│ ├── 1.10.0/
│ │ └── step.yml
│ ├── 1.10.1/
│ │ └── step.yml
│ ├── 1.10.2/
│ │ └── step.yml
│ ├── 1.10.3/
│ │ └── step.yml
│ ├── 1.11.0/
│ │ └── step.yml
│ ├── 1.2.0/
│ │ └── step.yml
│ ├── 1.3.0/
│ │ └── step.yml
│ ├── 1.3.1/
│ │ └── step.yml
│ ├── 1.3.2/
│ │ └── step.yml
│ ├── 1.3.3/
│ │ └── step.yml
│ ├── 1.4.0/
│ │ └── step.yml
│ ├── 1.4.1/
│ │ └── step.yml
│ ├── 1.5.1/
│ │ └── step.yml
│ ├── 1.5.2/
│ │ └── step.yml
│ ├── 1.6.0/
│ │ └── step.yml
│ ├── 1.6.1/
│ │ └── step.yml
│ ├── 1.6.2/
│ │ └── step.yml
│ ├── 1.7.0/
│ │ └── step.yml
│ ├── 1.8.0/
│ │ └── step.yml
│ ├── 1.9.0/
│ │ └── step.yml
│ ├── 1.9.1/
│ │ └── step.yml
│ └── step-info.yml
├── xcode-build-for-simulator/
│ ├── 0.10.0/
│ │ └── step.yml
│ ├── 0.11.0/
│ │ └── step.yml
│ ├── 0.11.1/
│ │ └── step.yml
│ ├── 0.11.2/
│ │ └── step.yml
│ ├── 0.11.3/
│ │ └── step.yml
│ ├── 0.11.4/
│ │ └── step.yml
│ ├── 0.11.5/
│ │ └── step.yml
│ ├── 0.11.6/
│ │ └── step.yml
│ ├── 0.12.0/
│ │ └── step.yml
│ ├── 0.12.1/
│ │ └── step.yml
│ ├── 0.12.2/
│ │ └── step.yml
│ ├── 0.9.0/
│ │ └── step.yml
│ ├── 0.9.1/
│ │ └── step.yml
│ ├── 0.9.2/
│ │ └── step.yml
│ ├── 0.9.3/
│ │ └── step.yml
│ ├── 0.9.4/
│ │ └── step.yml
│ ├── 1.0.0/
│ │ └── step.yml
│ ├── 2.0.0/
│ │ └── step.yml
│ ├── 3.0.0/
│ │ └── step.yml
│ ├── 3.0.1/
│ │ └── step.yml
│ ├── 3.0.2/
│ │ └── step.yml
│ ├── 3.0.3/
│ │ └── step.yml
│ └── step-info.yml
├── xcode-build-for-test/
│ ├── 0.1.0/
│ │ └── step.yml
│ ├── 0.1.1/
│ │ └── step.yml
│ ├── 0.2.0/
│ │ └── step.yml
│ ├── 0.2.1/
│ │ └── step.yml
│ ├── 0.2.2/
│ │ └── step.yml
│ ├── 0.2.3/
│ │ └── step.yml
│ ├── 0.3.0/
│ │ └── step.yml
│ ├── 0.4.0/
│ │ └── step.yml
│ ├── 0.4.1/
│ │ └── step.yml
│ ├── 1.0.0/
│ │ └── step.yml
│ ├── 1.0.1/
│ │ └── step.yml
│ ├── 1.1.0/
│ │ └── step.yml
│ ├── 1.1.1/
│ │ └── step.yml
│ ├── 1.2.0/
│ │ └── step.yml
│ ├── 1.2.1/
│ │ └── step.yml
│ ├── 1.2.2/
│ │ └── step.yml
│ ├── 1.2.3/
│ │ └── step.yml
│ ├── 1.2.4/
│ │ └── step.yml
│ ├── 1.2.5/
│ │ └── step.yml
│ ├── 1.3.0/
│ │ └── step.yml
│ ├── 1.3.1/
│ │ └── step.yml
│ ├── 1.3.2/
│ │ └── step.yml
│ ├── 1.4.0/
│ │ └── step.yml
│ ├── 2.0.0/
│ │ └── step.yml
│ ├── 2.1.0/
│ │ └── step.yml
│ ├── 2.1.1/
│ │ └── step.yml
│ ├── 2.1.2/
│ │ └── step.yml
│ ├── 2.1.3/
│ │ └── step.yml
│ ├── 2.2.0/
│ │ └── step.yml
│ ├── 3.0.0/
│ │ └── step.yml
│ ├── 3.0.1/
│ │ └── step.yml
│ ├── 3.1.0/
│ │ └── step.yml
│ ├── 3.1.1/
│ │ └── step.yml
│ ├── 3.2.0/
│ │ └── step.yml
│ ├── 3.3.0/
│ │ └── step.yml
│ ├── 3.3.1/
│ │ └── step.yml
│ ├── 3.3.10/
│ │ └── step.yml
│ ├── 3.3.2/
│ │ └── step.yml
│ ├── 3.3.3/
│ │ └── step.yml
│ ├── 3.3.4/
│ │ └── step.yml
│ ├── 3.3.5/
│ │ └── step.yml
│ ├── 3.3.6/
│ │ └── step.yml
│ ├── 3.3.7/
│ │ └── step.yml
│ ├── 3.3.8/
│ │ └── step.yml
│ ├── 3.3.9/
│ │ └── step.yml
│ └── step-info.yml
├── xcode-build-version/
│ ├── 0.0.4/
│ │ └── step.yml
│ └── step-info.yml
├── xcode-create-device-pair/
│ ├── 1.0.0/
│ │ └── step.yml
│ └── step-info.yml
├── xcode-project-info/
│ ├── 1.0.1/
│ │ └── step.yml
│ ├── 1.0.2/
│ │ └── step.yml
│ ├── 2.0.0/
│ │ └── step.yml
│ ├── 2.1.0/
│ │ └── step.yml
│ └── step-info.yml
├── xcode-result-bundle-to-checks/
│ ├── 1.0.0/
│ │ └── step.yml
│ ├── 1.1.0/
│ │ └── step.yml
│ └── step-info.yml
├── xcode-start-simulator/
│ ├── 0.1.0/
│ │ └── step.yml
│ ├── 0.2.0/
│ │ └── step.yml
│ ├── 0.2.1/
│ │ └── step.yml
│ ├── 0.3.0/
│ │ └── step.yml
│ ├── 0.3.1/
│ │ └── step.yml
│ └── step-info.yml
├── xcode-test/
│ ├── 0.9.2/
│ │ └── step.yml
│ ├── 0.9.3/
│ │ └── step.yml
│ ├── 1.0.0/
│ │ └── step.yml
│ ├── 1.1.0/
│ │ └── step.yml
│ ├── 1.1.1/
│ │ └── step.yml
│ ├── 1.1.2/
│ │ └── step.yml
│ ├── 1.10.0/
│ │ └── step.yml
│ ├── 1.11.0/
│ │ └── step.yml
│ ├── 1.12.0/
│ │ └── step.yml
│ ├── 1.12.1/
│ │ └── step.yml
│ ├── 1.13.0/
│ │ └── step.yml
│ ├── 1.13.1/
│ │ └── step.yml
│ ├── 1.13.2/
│ │ └── step.yml
│ ├── 1.13.3/
│ │ └── step.yml
│ ├── 1.13.4/
│ │ └── step.yml
│ ├── 1.13.5/
│ │ └── step.yml
│ ├── 1.13.6/
│ │ └── step.yml
│ ├── 1.13.7/
│ │ └── step.yml
│ ├── 1.13.8/
│ │ └── step.yml
│ ├── 1.14.0/
│ │ └── step.yml
│ ├── 1.14.1/
│ │ └── step.yml
│ ├── 1.15.0/
│ │ └── step.yml
│ ├── 1.16.0/
│ │ └── step.yml
│ ├── 1.16.1/
│ │ └── step.yml
│ ├── 1.17.0/
│ │ └── step.yml
│ ├── 1.17.1/
│ │ └── step.yml
│ ├── 1.17.2/
│ │ └── step.yml
│ ├── 1.18.0/
│ │ └── step.yml
│ ├── 1.18.1/
│ │ └── step.yml
│ ├── 1.18.10/
│ │ └── step.yml
│ ├── 1.18.11/
│ │ └── step.yml
│ ├── 1.18.12/
│ │ └── step.yml
│ ├── 1.18.13/
│ │ └── step.yml
│ ├── 1.18.14/
│ │ └── step.yml
│ ├── 1.18.15/
│ │ └── step.yml
│ ├── 1.18.16/
│ │ └── step.yml
│ ├── 1.18.17/
│ │ └── step.yml
│ ├── 1.18.2/
│ │ └── step.yml
│ ├── 1.18.3/
│ │ └── step.yml
│ ├── 1.18.4/
│ │ └── step.yml
│ ├── 1.18.5/
│ │ └── step.yml
│ ├── 1.18.6/
│ │ └── step.yml
│ ├── 1.18.7/
│ │ └── step.yml
│ ├── 1.18.8/
│ │ └── step.yml
│ ├── 1.18.9/
│ │ └── step.yml
│ ├── 1.2.0/
│ │ └── step.yml
│ ├── 1.3.0/
│ │ └── step.yml
│ ├── 1.4.0/
│ │ └── step.yml
│ ├── 1.4.1/
│ │ └── step.yml
│ ├── 1.4.2/
│ │ └── step.yml
│ ├── 1.5.0/
│ │ └── step.yml
│ ├── 1.6.0/
│ │ └── step.yml
│ ├── 1.7.0/
│ │ └── step.yml
│ ├── 1.8.0/
│ │ └── step.yml
│ ├── 1.9.0/
│ │ └── step.yml
│ ├── 2.0.0/
│ │ └── step.yml
│ ├── 2.1.0/
│ │ └── step.yml
│ ├── 2.1.1/
│ │ └── step.yml
│ ├── 2.1.2/
│ │ └── step.yml
│ ├── 2.2.0/
│ │ └── step.yml
│ ├── 2.3.0/
│ │ └── step.yml
│ ├── 2.3.1/
│ │ └── step.yml
│ ├── 2.3.2/
│ │ └── step.yml
│ ├── 2.4.0/
│ │ └── step.yml
│ ├── 2.4.1/
│ │ └── step.yml
│ ├── 2.4.2/
│ │ └── step.yml
│ ├── 2.4.3/
│ │ └── step.yml
│ ├── 2.4.4/
│ │ └── step.yml
│ ├── 2.4.5/
│ │ └── step.yml
│ ├── 2.4.6/
│ │ └── step.yml
│ ├── 2.5.0/
│ │ └── step.yml
│ ├── 2.6.0/
│ │ └── step.yml
│ ├── 2.6.1/
│ │ └── step.yml
│ ├── 2.6.2/
│ │ └── step.yml
│ ├── 2.7.0/
│ │ └── step.yml
│ ├── 2.7.1/
│ │ └── step.yml
│ ├── 3.0.0/
│ │ └── step.yml
│ ├── 3.0.1/
│ │ └── step.yml
│ ├── 3.0.2/
│ │ └── step.yml
│ ├── 3.1.0/
│ │ └── step.yml
│ ├── 4.0.0/
│ │ └── step.yml
│ ├── 4.0.1/
│ │ └── step.yml
│ ├── 4.0.2/
│ │ └── step.yml
│ ├── 4.0.3/
│ │ └── step.yml
│ ├── 4.0.4/
│ │ └── step.yml
│ ├── 4.1.0/
│ │ └── step.yml
│ ├── 4.2.0/
│ │ └── step.yml
│ ├── 4.3.0/
│ │ └── step.yml
│ ├── 4.4.0/
│ │ └── step.yml
│ ├── 4.5.0/
│ │ └── step.yml
│ ├── 4.6.0/
│ │ └── step.yml
│ ├── 4.7.0/
│ │ └── step.yml
│ ├── 4.7.1/
│ │ └── step.yml
│ ├── 4.7.2/
│ │ └── step.yml
│ ├── 4.7.3/
│ │ └── step.yml
│ ├── 4.7.4/
│ │ └── step.yml
│ ├── 4.7.5/
│ │ └── step.yml
│ ├── 5.0.0/
│ │ └── step.yml
│ ├── 5.0.1/
│ │ └── step.yml
│ ├── 5.1.0/
│ │ └── step.yml
│ ├── 5.1.1/
│ │ └── step.yml
│ ├── 6.0.0/
│ │ └── step.yml
│ ├── 6.0.1/
│ │ └── step.yml
│ ├── 6.1.0/
│ │ └── step.yml
│ ├── 6.1.1/
│ │ └── step.yml
│ ├── 6.1.2/
│ │ └── step.yml
│ ├── 6.1.3/
│ │ └── step.yml
│ ├── 6.2.0/
│ │ └── step.yml
│ ├── 6.2.1/
│ │ └── step.yml
│ ├── 6.2.2/
│ │ └── step.yml
│ ├── 6.2.3/
│ │ └── step.yml
│ ├── 6.2.4/
│ │ └── step.yml
│ └── step-info.yml
├── xcode-test-bundle-builder/
│ ├── 0.0.4/
│ │ └── step.yml
│ ├── 0.0.7/
│ │ └── step.yml
│ └── step-info.yml
├── xcode-test-mac/
│ ├── 1.0.0/
│ │ └── step.yml
│ ├── 1.0.1/
│ │ └── step.yml
│ ├── 1.0.2/
│ │ └── step.yml
│ ├── 1.0.3/
│ │ └── step.yml
│ ├── 1.0.4/
│ │ └── step.yml
│ ├── 1.0.5/
│ │ └── step.yml
│ ├── 1.0.6/
│ │ └── step.yml
│ ├── 1.1.0/
│ │ └── step.yml
│ ├── 1.1.2/
│ │ └── step.yml
│ ├── 1.2.1/
│ │ └── step.yml
│ ├── 1.3.0/
│ │ └── step.yml
│ ├── 1.4.0/
│ │ └── step.yml
│ ├── 1.4.1/
│ │ └── step.yml
│ ├── 1.4.2/
│ │ └── step.yml
│ ├── 1.5.0/
│ │ └── step.yml
│ ├── 1.5.1/
│ │ └── step.yml
│ ├── 1.5.2/
│ │ └── step.yml
│ ├── 1.6.0/
│ │ └── step.yml
│ ├── 1.7.0/
│ │ └── step.yml
│ └── step-info.yml
├── xcode-test-shard-calculation/
│ ├── 0.1.0/
│ │ └── step.yml
│ ├── 0.2.0/
│ │ └── step.yml
│ ├── 0.2.1/
│ │ └── step.yml
│ └── step-info.yml
├── xcode-test-without-building/
│ ├── 0.1.0/
│ │ └── step.yml
│ ├── 0.2.0/
│ │ └── step.yml
│ ├── 0.2.1/
│ │ └── step.yml
│ ├── 0.3.0/
│ │ └── step.yml
│ ├── 0.3.1/
│ │ └── step.yml
│ ├── 0.4.0/
│ │ └── step.yml
│ ├── 0.4.1/
│ │ └── step.yml
│ ├── 0.4.2/
│ │ └── step.yml
│ ├── 0.5.0/
│ │ └── step.yml
│ ├── 0.5.1/
│ │ └── step.yml
│ └── step-info.yml
├── xcodebuild/
│ ├── 0.0.1/
│ │ └── step.yml
│ ├── 0.0.2/
│ │ └── step.yml
│ ├── 0.0.3/
│ │ └── step.yml
│ └── step-info.yml
├── xcodegen/
│ ├── 0.0.5/
│ │ └── step.yml
│ └── step-info.yml
├── xcparse/
│ ├── 0.1.0/
│ │ └── step.yml
│ └── step-info.yml
├── xctest-html-report/
│ ├── 0.1.3/
│ │ └── step.yml
│ ├── 0.2.0/
│ │ └── step.yml
│ ├── 0.2.1/
│ │ └── step.yml
│ ├── 1.0.0/
│ │ └── step.yml
│ └── step-info.yml
├── xcuitestbrowserstack/
│ ├── 1.0.1/
│ │ └── step.yml
│ ├── 1.0.11/
│ │ └── step.yml
│ ├── 1.0.12/
│ │ └── step.yml
│ ├── 1.0.13/
│ │ └── step.yml
│ ├── 1.0.15/
│ │ └── step.yml
│ ├── 1.0.16/
│ │ └── step.yml
│ ├── 1.0.17/
│ │ └── step.yml
│ ├── 1.0.2/
│ │ └── step.yml
│ ├── 1.0.5/
│ │ └── step.yml
│ ├── 1.0.6/
│ │ └── step.yml
│ ├── 1.0.8/
│ │ └── step.yml
│ ├── 1.0.9/
│ │ └── step.yml
│ ├── 2.0.0/
│ │ └── step.yml
│ ├── 2.0.1/
│ │ └── step.yml
│ └── step-info.yml
├── yarn/
│ ├── 0.0.2/
│ │ └── step.yml
│ ├── 0.0.3/
│ │ └── step.yml
│ ├── 0.0.4/
│ │ └── step.yml
│ ├── 0.0.6/
│ │ └── step.yml
│ ├── 0.0.7/
│ │ └── step.yml
│ ├── 0.0.8/
│ │ └── step.yml
│ ├── 0.1.0/
│ │ └── step.yml
│ ├── 0.1.1/
│ │ └── step.yml
│ ├── 0.1.2/
│ │ └── step.yml
│ ├── 0.1.3/
│ │ └── step.yml
│ ├── 1.0.0/
│ │ └── step.yml
│ ├── 2.0.0/
│ │ └── step.yml
│ └── step-info.yml
├── zip-directory-and-export-its-path/
│ ├── 1.0.2/
│ │ └── step.yml
│ └── step-info.yml
├── zipalign-apk/
│ ├── 0.2.0/
│ │ └── step.yml
│ └── step-info.yml
└── zscan-upload-plugin/
├── 1.0.3/
│ └── step.yml
└── step-info.yml
================================================
FILE CONTENTS
================================================
================================================
FILE: LICENSE
================================================
The MIT License (MIT)
Copyright (c) 2015 Bitrise
Permission is hereby granted, free of charge, to any person obtaining a copy
of this software and associated documentation files (the "Software"), to deal
in the Software without restriction, including without limitation the rights
to use, copy, modify, merge, publish, distribute, sublicense, and/or sell
copies of the Software, and to permit persons to whom the Software is
furnished to do so, subject to the following conditions:
The above copyright notice and this permission notice shall be included in all
copies or substantial portions of the Software.
THE SOFTWARE IS PROVIDED "AS IS", WITHOUT WARRANTY OF ANY KIND, EXPRESS OR
IMPLIED, INCLUDING BUT NOT LIMITED TO THE WARRANTIES OF MERCHANTABILITY,
FITNESS FOR A PARTICULAR PURPOSE AND NONINFRINGEMENT. IN NO EVENT SHALL THE
AUTHORS OR COPYRIGHT HOLDERS BE LIABLE FOR ANY CLAIM, DAMAGES OR OTHER
LIABILITY, WHETHER IN AN ACTION OF CONTRACT, TORT OR OTHERWISE, ARISING FROM,
OUT OF OR IN CONNECTION WITH THE SOFTWARE OR THE USE OR OTHER DEALINGS IN THE
SOFTWARE.
================================================
FILE: PULL_REQUEST_TEMPLATE.md
================================================
### What to do if the build fails?
At the moment contributors do not have access to the CI workflow triggered by StepLib PRs. In case of a failed build, we ask for your patience. Maintainers of Bitrise Steplib will sort it out for you or inform you if any further action is needed.
### New Pull Request Checklist
*Please mark the points which you did / accept.*
- [ ] __I will not move an already shared step version's tag to another commit__
- [ ] I read the [Step Development Guideline](https://github.com/bitrise-io/bitrise/blob/master/_docs/step-development-guideline.md)
- [ ] I have a test for my Step, which can be run with `bitrise run test` (in the step's repository)
- [ ] I did run `bitrise run audit-this-step` (in the step's repository - note, if you don't have this workflow in your `bitrise.yml`, [you can copy it from the step template](https://github.com/bitrise-steplib/step-template/blob/master/bitrise.yml).)
- [ ] I read and accept the [Abandoned Step policy](https://github.com/bitrise-io/bitrise-steplib#abandoned-step-policy)
================================================
FILE: README.md
================================================
# Bitrise StepLib
You can find the collection of all [Bitrise integrations](https://www.bitrise.io/integrations) in this repository under [/steps](https://github.com/bitrise-io/bitrise-steplib/tree/master/steps).
## Contribution
If you find something missing from the steps, you can drop us an issue, or [create your own step](https://devcenter.bitrise.io/en/steps-and-workflows/developing-your-own-bitrise-step.html#ot-fltr-modal). See our example for creating & sharing a new step under [/step-template](https://github.com/bitrise-steplib/step-template).
### Important
One PR should contain only one file (except the icon), and one change.
We require to create a new PR after addressing review concerns. This is needed to guarantee that the last (correct) tag/version of the step source repository is referenced.
One PR should contain only one step.
### Install Bitrise CLI
Install the [Bitrise CLI](https://www.bitrise.io/cli) to run `bitrise` on your machine locally.
You can install it via Homebrew:
`brew update && brew install bitrise`
Or check the latest release with instructions at: [https://github.com/bitrise-io/bitrise/releases](https://github.com/bitrise-io/bitrise/releases)
### Share your step
After implementing your own step, you can share it with other Bitrisers using this StepLib via [`stepman`](https://github.com/bitrise-io/stepman).
If you are ready, just run `stepman share` and follow the instructions.
Follow [@bitrise](https://twitter.com/bitrise) on Twitter for #status and step updates 🚀.
## Abandoned Step policy
We try to keep this Step Library up-to-date and active. Steps shared in this collection have to be actively maintained to receive fixes / updates when required (e.g. security issue fixes or general usability fixes).
**If you're a Step maintainer** you're not required to accept every Pull Request sent to your Step **but you should be reachable within a reasonable timeframe**. If we try to contact you several times regarding an important fix/update in your Step and you refuse to answer for several weeks *we might deprecate, remove or replace your Step* in the collection. Abandoned Steps can be a threat for those who use it, please keep this in mind if you decide to share your Step with others!
**If you shared a Step but you're no longer able to or you don't want to maintain it** please create a GitHub issue in this repository (https://github.com/bitrise-io/bitrise-steplib).
**If you're a user of a Step which has critical (security or functionality) issues** please create a ticket in the Step's Issue Tracker (every Step declares the preferred way of reporting issues with the `support_url` attribute - [see](https://github.com/bitrise-io/bitrise-steplib/blob/master/steps/activate-ssh-key/3.1.0/step.yml#L15)) first. If you don't get a response from the Step's maintainer for an extended period (reasonably, in general, for more than a couple of weeks) please create a GitHub issue in this repository (https://github.com/bitrise-io/bitrise-steplib) and we'll try to resolve the issue, following the Abandoned Step policy. *Please be patient* and keep in mind that everyone who contribute to this collection does that with an intention to help You by providing a Step for you to use, don't be rude to Step maintainers!
================================================
FILE: steplib.yml
================================================
---
format_version: 1.0.0
steplib_source: https://github.com/bitrise-io/bitrise-steplib.git
assets_download_base_uri: https://bitrise-steplib-collection.s3.amazonaws.com/steps
download_locations:
- type: zip
src: https://bitrise-steplib-collection.s3.amazonaws.com/step-archives/
- type: git
src: source/git
================================================
FILE: steps/activate-build-cache-for-bazel/1.0.0/step.yml
================================================
title: Activate Bitrise Build Cache for Bazel
summary: |
Activates Bitrise Remote Build Cache for subsequent Bazel builds in the workflows.
description: |
This Step activates Bitrise's remote build cache add-on for subsequent Bazel executions in the workflow.
After this Step executes, Bazel builds will automatically read from the remote cache and push new entries if it's enabled.
website: https://github.com/bitrise-steplib/bitrise-step-activate-build-cache-for-bazel
source_code_url: https://github.com/bitrise-steplib/bitrise-step-activate-build-cache-for-bazel
support_url: https://github.com/bitrise-steplib/bitrise-step-activate-build-cache-for-bazel/issues
published_at: 2024-03-19T13:54:48.081077+01:00
source:
git: https://github.com/bitrise-steplib/bitrise-step-activate-build-cache-for-bazel.git
commit: 77c5bb89d3c255f6961b944b60184d23e74d4225
type_tags:
- utility
toolkit:
bash:
entry_file: step.sh
is_skippable: true
run_if: .IsCI
================================================
FILE: steps/activate-build-cache-for-bazel/1.0.1/step.yml
================================================
title: Activate Bitrise Build Cache for Bazel
summary: |
Activates Bitrise Remote Build Cache for subsequent Bazel builds in the workflows.
description: |
This Step activates Bitrise's remote build cache add-on for subsequent Bazel executions in the workflow.
After this Step executes, Bazel builds will automatically read from the remote cache and push new entries if it's enabled.
website: https://github.com/bitrise-steplib/bitrise-step-activate-build-cache-for-bazel
source_code_url: https://github.com/bitrise-steplib/bitrise-step-activate-build-cache-for-bazel
support_url: https://github.com/bitrise-steplib/bitrise-step-activate-build-cache-for-bazel/issues
published_at: 2024-07-03T08:53:25.668504731Z
source:
git: https://github.com/bitrise-steplib/bitrise-step-activate-build-cache-for-bazel.git
commit: bf80b3428b635ab201102eba89250c963a0e713f
type_tags:
- utility
toolkit:
bash:
entry_file: step.sh
is_skippable: true
run_if: .IsCI
================================================
FILE: steps/activate-build-cache-for-bazel/1.0.2/step.yml
================================================
title: Activate Bitrise Build Cache for Bazel
summary: |
Activates Bitrise Remote Build Cache for subsequent Bazel builds in the workflows.
description: |
This Step activates Bitrise's remote build cache add-on for subsequent Bazel executions in the workflow.
After this Step executes, Bazel builds will automatically read from the remote cache and push new entries if it's enabled.
website: https://github.com/bitrise-steplib/bitrise-step-activate-build-cache-for-bazel
source_code_url: https://github.com/bitrise-steplib/bitrise-step-activate-build-cache-for-bazel
support_url: https://github.com/bitrise-steplib/bitrise-step-activate-build-cache-for-bazel/issues
published_at: 2024-07-04T09:19:51.560238447Z
source:
git: https://github.com/bitrise-steplib/bitrise-step-activate-build-cache-for-bazel.git
commit: d357c44fb74e9022218301c1a75d0a1a7ccb1fe2
type_tags:
- utility
toolkit:
bash:
entry_file: step.sh
is_skippable: true
run_if: .IsCI
================================================
FILE: steps/activate-build-cache-for-bazel/1.0.3/step.yml
================================================
title: Build Cache for Bazel
summary: |
Activates Bitrise Remote Build Cache for subsequent Bazel builds in the workflows.
description: |
This Step activates Bitrise's remote build cache add-on for subsequent Bazel executions in the workflow.
After this Step executes, Bazel builds will automatically read from the remote cache and push new entries if it's enabled.
website: https://github.com/bitrise-steplib/bitrise-step-activate-build-cache-for-bazel
source_code_url: https://github.com/bitrise-steplib/bitrise-step-activate-build-cache-for-bazel
support_url: https://github.com/bitrise-steplib/bitrise-step-activate-build-cache-for-bazel/issues
published_at: 2024-12-09T12:36:03.79513556Z
source:
git: https://github.com/bitrise-steplib/bitrise-step-activate-build-cache-for-bazel.git
commit: 8067cbd719844ecdf1fb89519df7a812b995d633
type_tags:
- utility
toolkit:
bash:
entry_file: step.sh
is_skippable: true
run_if: .IsCI
================================================
FILE: steps/activate-build-cache-for-bazel/1.1.0/step.yml
================================================
title: Build Cache for Bazel
summary: |
Activates Bitrise Remote Build Cache for subsequent Bazel builds in the workflows.
description: |
This Step activates Bitrise's remote build cache add-on for subsequent Bazel executions in the workflow.
After this Step executes, Bazel builds will automatically read from the remote cache and push new entries if it's enabled.
website: https://github.com/bitrise-steplib/bitrise-step-activate-build-cache-for-bazel
source_code_url: https://github.com/bitrise-steplib/bitrise-step-activate-build-cache-for-bazel
support_url: https://github.com/bitrise-steplib/bitrise-step-activate-build-cache-for-bazel/issues
published_at: 2025-01-27T08:26:13.220270491Z
source:
git: https://github.com/bitrise-steplib/bitrise-step-activate-build-cache-for-bazel.git
commit: 75de4455768ca25f4d9a8e1d4f00622338d062c0
type_tags:
- utility
toolkit:
bash:
entry_file: step.sh
is_skippable: true
run_if: .IsCI
inputs:
- enable_rbe: "false"
opts:
description: When enabled, this sets up Bazel to use Bitrise's Remote Build Execution
(RBE) service to execute builds.
is_required: true
summary: Enable Bazel Remote Build Execution (RBE)
title: Enable Bazel RBE
value_options:
- "true"
- "false"
================================================
FILE: steps/activate-build-cache-for-bazel/1.1.1/step.yml
================================================
title: Build Cache for Bazel
summary: |
Activates Bitrise Remote Build Cache for subsequent Bazel builds in the workflows.
description: |
This Step activates Bitrise's remote build cache add-on for subsequent Bazel executions in the workflow.
After this Step executes, Bazel builds will automatically read from the remote cache and push new entries if it's enabled.
website: https://github.com/bitrise-steplib/bitrise-step-activate-build-cache-for-bazel
source_code_url: https://github.com/bitrise-steplib/bitrise-step-activate-build-cache-for-bazel
support_url: https://github.com/bitrise-steplib/bitrise-step-activate-build-cache-for-bazel/issues
published_at: 2025-01-29T08:55:05.915263935Z
source:
git: https://github.com/bitrise-steplib/bitrise-step-activate-build-cache-for-bazel.git
commit: c2ce2ebe4e0b51352855253910458d1227b90430
type_tags:
- utility
toolkit:
bash:
entry_file: step.sh
is_skippable: true
run_if: .IsCI
inputs:
- enable_rbe: "false"
opts:
description: When enabled, this sets up Bazel to use Bitrise's Remote Build Execution
(RBE) service to execute builds.
is_required: true
summary: Enable Bazel Remote Build Execution (RBE)
title: Enable Bazel RBE
value_options:
- "true"
- "false"
================================================
FILE: steps/activate-build-cache-for-bazel/1.1.2/step.yml
================================================
title: Build Cache for Bazel
summary: |
Activates Bitrise Remote Build Cache for subsequent Bazel builds in the workflows.
description: |
This Step activates Bitrise's remote build cache add-on for subsequent Bazel executions in the workflow.
After this Step executes, Bazel builds will automatically read from the remote cache and push new entries if it's enabled.
website: https://github.com/bitrise-steplib/bitrise-step-activate-build-cache-for-bazel
source_code_url: https://github.com/bitrise-steplib/bitrise-step-activate-build-cache-for-bazel
support_url: https://github.com/bitrise-steplib/bitrise-step-activate-build-cache-for-bazel/issues
published_at: 2025-01-31T11:24:13.001627088Z
source:
git: https://github.com/bitrise-steplib/bitrise-step-activate-build-cache-for-bazel.git
commit: 3b9aee467b5aaf275f49f7cafc256514eec08e86
type_tags:
- utility
toolkit:
bash:
entry_file: step.sh
is_skippable: true
run_if: .IsCI
inputs:
- enable_rbe: "false"
opts:
description: When enabled, this sets up Bazel to use Bitrise's Remote Build Execution
(RBE) service to execute builds.
is_required: true
summary: Enable Bazel Remote Build Execution (RBE)
title: Enable Bazel RBE
value_options:
- "true"
- "false"
================================================
FILE: steps/activate-build-cache-for-bazel/1.1.3/step.yml
================================================
title: Build Cache for Bazel
summary: |
Activates Bitrise Remote Build Cache for subsequent Bazel builds in the workflows.
description: |
This Step activates Bitrise's remote build cache add-on for subsequent Bazel executions in the workflow.
After this Step executes, Bazel builds will automatically read from the remote cache and push new entries if it's enabled.
website: https://github.com/bitrise-steplib/bitrise-step-activate-build-cache-for-bazel
source_code_url: https://github.com/bitrise-steplib/bitrise-step-activate-build-cache-for-bazel
support_url: https://github.com/bitrise-steplib/bitrise-step-activate-build-cache-for-bazel/issues
published_at: 2025-03-18T15:00:31.506191721Z
source:
git: https://github.com/bitrise-steplib/bitrise-step-activate-build-cache-for-bazel.git
commit: ad6897bb16c9b8d4fbd6c5cb026e03c74fba678e
type_tags:
- utility
toolkit:
bash:
entry_file: step.sh
is_skippable: true
run_if: .IsCI
inputs:
- enable_rbe: "false"
opts:
description: When enabled, this sets up Bazel to use Bitrise's Remote Build Execution
(RBE) service to execute builds.
is_required: true
summary: Enable Bazel Remote Build Execution (RBE)
title: Enable Bazel RBE
value_options:
- "true"
- "false"
================================================
FILE: steps/activate-build-cache-for-bazel/1.1.4/step.yml
================================================
title: Build Cache for Bazel
summary: |
Activates Bitrise Remote Build Cache for subsequent Bazel builds in the workflows.
description: |
This Step activates Bitrise's remote build cache add-on for subsequent Bazel executions in the workflow.
After this Step executes, Bazel builds will automatically read from the remote cache and push new entries if it's enabled.
website: https://github.com/bitrise-steplib/bitrise-step-activate-build-cache-for-bazel
source_code_url: https://github.com/bitrise-steplib/bitrise-step-activate-build-cache-for-bazel
support_url: https://github.com/bitrise-steplib/bitrise-step-activate-build-cache-for-bazel/issues
published_at: 2025-03-31T11:52:37.746466323Z
source:
git: https://github.com/bitrise-steplib/bitrise-step-activate-build-cache-for-bazel.git
commit: 4f0906e6d72fe539e8ceb3dd85b043c06c586554
type_tags:
- utility
toolkit:
bash:
entry_file: step.sh
is_skippable: true
run_if: .IsCI
inputs:
- enable_rbe: "false"
opts:
description: When enabled, this sets up Bazel to use Bitrise's Remote Build Execution
(RBE) service to execute builds.
is_required: true
summary: Enable Bazel Remote Build Execution (RBE)
title: Enable Bazel RBE
value_options:
- "true"
- "false"
================================================
FILE: steps/activate-build-cache-for-bazel/1.1.5/step.yml
================================================
title: Build Cache for Bazel
summary: |
Activates Bitrise Remote Build Cache for subsequent Bazel builds in the workflows.
description: |
This Step activates Bitrise's remote build cache add-on for subsequent Bazel executions in the workflow.
After this Step executes, Bazel builds will automatically read from the remote cache and push new entries if it's enabled.
website: https://github.com/bitrise-steplib/bitrise-step-activate-build-cache-for-bazel
source_code_url: https://github.com/bitrise-steplib/bitrise-step-activate-build-cache-for-bazel
support_url: https://github.com/bitrise-steplib/bitrise-step-activate-build-cache-for-bazel/issues
published_at: 2025-04-15T08:47:39.308757923Z
source:
git: https://github.com/bitrise-steplib/bitrise-step-activate-build-cache-for-bazel.git
commit: 709710f2ef136c769d92a1b62c58198ea41acd95
type_tags:
- utility
toolkit:
bash:
entry_file: step.sh
is_skippable: true
run_if: .IsCI
inputs:
- enable_rbe: "false"
opts:
description: When enabled, this sets up Bazel to use Bitrise's Remote Build Execution
(RBE) service to execute builds.
is_required: true
summary: Enable Bazel Remote Build Execution (RBE)
title: Enable Bazel RBE
value_options:
- "true"
- "false"
================================================
FILE: steps/activate-build-cache-for-bazel/1.1.6/step.yml
================================================
title: Build Cache for Bazel
summary: |
Activates Bitrise Remote Build Cache for subsequent Bazel builds in the workflows.
description: |
This Step activates Bitrise's remote build cache add-on for subsequent Bazel executions in the workflow.
After this Step executes, Bazel builds will automatically read from the remote cache and push new entries if it's enabled.
website: https://github.com/bitrise-steplib/bitrise-step-activate-build-cache-for-bazel
source_code_url: https://github.com/bitrise-steplib/bitrise-step-activate-build-cache-for-bazel
support_url: https://github.com/bitrise-steplib/bitrise-step-activate-build-cache-for-bazel/issues
published_at: 2025-04-24T14:00:28.354662174Z
source:
git: https://github.com/bitrise-steplib/bitrise-step-activate-build-cache-for-bazel.git
commit: 44e1f07d1e195c1391b9f8453f5fd266d636d4ab
type_tags:
- utility
toolkit:
bash:
entry_file: step.sh
is_skippable: true
run_if: .IsCI
inputs:
- enable_rbe: "false"
opts:
description: When enabled, this sets up Bazel to use Bitrise's Remote Build Execution
(RBE) service to execute builds.
is_required: true
summary: Enable Bazel Remote Build Execution (RBE)
title: Enable Bazel RBE
value_options:
- "true"
- "false"
- opts:
description: When enabled, this sets up Bazel to add timestamps to log messages
during the build.
is_required: true
summary: Add timestamps to build messages
title: Add timestamps to build messages
value_options:
- "true"
- "false"
timestamps: "true"
================================================
FILE: steps/activate-build-cache-for-bazel/1.2.1/step.yml
================================================
title: Build Cache for Bazel
summary: |
Activates Bitrise Remote Build Cache for subsequent Bazel builds in the workflows.
description: |
This Step activates Bitrise's remote build cache add-on for subsequent Bazel executions in the workflow.
After this Step executes, Bazel builds will automatically read from the remote cache and push new entries if it's enabled.
website: https://github.com/bitrise-steplib/bitrise-step-activate-build-cache-for-bazel
source_code_url: https://github.com/bitrise-steplib/bitrise-step-activate-build-cache-for-bazel
support_url: https://github.com/bitrise-steplib/bitrise-step-activate-build-cache-for-bazel/issues
published_at: 2025-07-10T13:09:19.671854113Z
source:
git: https://github.com/bitrise-steplib/bitrise-step-activate-build-cache-for-bazel.git
commit: 1f7f5fc10e48420c43135bdaa521386d8ea6f8d8
type_tags:
- utility
toolkit:
bash:
entry_file: step.sh
is_skippable: true
run_if: .IsCI
inputs:
- enable_rbe: "false"
opts:
description: When enabled, this sets up Bazel to use Bitrise's Remote Build Execution
(RBE) service to execute builds.
is_required: true
summary: Enable Bazel Remote Build Execution (RBE)
title: Enable Bazel RBE
value_options:
- "true"
- "false"
- opts:
description: When enabled, this sets up Bazel to add timestamps to log messages
during the build.
is_required: true
summary: Add timestamps to build messages
title: Add timestamps to build messages
value_options:
- "true"
- "false"
timestamps: "true"
- opts:
is_required: true
summary: Enable logging additional information for troubleshooting
title: Verbose logging
value_options:
- "true"
- "false"
verbose: "false"
================================================
FILE: steps/activate-build-cache-for-bazel/1.2.2/step.yml
================================================
title: Build Cache for Bazel
summary: |
Activates Bitrise Remote Build Cache for subsequent Bazel builds in the workflows.
description: |
This Step activates Bitrise's remote build cache add-on for subsequent Bazel executions in the workflow.
After this Step executes, Bazel builds will automatically read from the remote cache and push new entries if it's enabled.
website: https://github.com/bitrise-steplib/bitrise-step-activate-build-cache-for-bazel
source_code_url: https://github.com/bitrise-steplib/bitrise-step-activate-build-cache-for-bazel
support_url: https://github.com/bitrise-steplib/bitrise-step-activate-build-cache-for-bazel/issues
published_at: 2025-07-10T16:02:17.381418513Z
source:
git: https://github.com/bitrise-steplib/bitrise-step-activate-build-cache-for-bazel.git
commit: bd8a485fe83f8026ad15c8e24ae6ed53bdce167f
type_tags:
- utility
toolkit:
bash:
entry_file: step.sh
is_skippable: true
run_if: .IsCI
inputs:
- enable_rbe: "false"
opts:
description: When enabled, this sets up Bazel to use Bitrise's Remote Build Execution
(RBE) service to execute builds.
is_required: true
summary: Enable Bazel Remote Build Execution (RBE)
title: Enable Bazel RBE
value_options:
- "true"
- "false"
- opts:
description: When enabled, this sets up Bazel to add timestamps to log messages
during the build.
is_required: true
summary: Add timestamps to build messages
title: Add timestamps to build messages
value_options:
- "true"
- "false"
timestamps: "true"
- opts:
is_required: true
summary: Enable logging additional information for troubleshooting
title: Verbose logging
value_options:
- "true"
- "false"
verbose: "false"
================================================
FILE: steps/activate-build-cache-for-bazel/1.2.3/step.yml
================================================
title: Build Cache for Bazel
summary: |
Activates Bitrise Remote Build Cache for subsequent Bazel builds in the workflows.
description: |
This Step activates Bitrise's remote build cache add-on for subsequent Bazel executions in the workflow.
After this Step executes, Bazel builds will automatically read from the remote cache and push new entries if it's enabled.
website: https://github.com/bitrise-steplib/bitrise-step-activate-build-cache-for-bazel
source_code_url: https://github.com/bitrise-steplib/bitrise-step-activate-build-cache-for-bazel
support_url: https://github.com/bitrise-steplib/bitrise-step-activate-build-cache-for-bazel/issues
published_at: 2025-07-31T09:09:50.701591125Z
source:
git: https://github.com/bitrise-steplib/bitrise-step-activate-build-cache-for-bazel.git
commit: 3ca1551056267e3c80354a90ccd1e05c8fe853d2
type_tags:
- utility
toolkit:
bash:
entry_file: step.sh
is_skippable: true
run_if: .IsCI
inputs:
- enable_rbe: "false"
opts:
description: When enabled, this sets up Bazel to use Bitrise's Remote Build Execution
(RBE) service to execute builds.
is_required: true
summary: Enable Bazel Remote Build Execution (RBE)
title: Enable Bazel RBE
value_options:
- "true"
- "false"
- opts:
description: When enabled, this sets up Bazel to add timestamps to log messages
during the build.
is_required: true
summary: Add timestamps to build messages
title: Add timestamps to build messages
value_options:
- "true"
- "false"
timestamps: "true"
- opts:
is_required: true
summary: Enable logging additional information for troubleshooting
title: Verbose logging
value_options:
- "true"
- "false"
verbose: "false"
================================================
FILE: steps/activate-build-cache-for-bazel/step-info.yml
================================================
maintainer: bitrise
================================================
FILE: steps/activate-build-cache-for-gradle/1.0.0/step.yml
================================================
title: Activate Bitrise Build Cache for Gradle
summary: Activates Bitrise Remote Build Cache add-on for subsequent Gradle builds in the
workflow
description: |
This Step activates Bitrise's remote build cache add-on for subsequent Gradle executions in the workflow.
After this Step executes, Gradle builds will automatically read from the remote cache and push new entries if it's enabled.
website: https://github.com/bitrise-steplib/bitrise-step-activate-gradle-remote-cache
source_code_url: https://github.com/bitrise-steplib/bitrise-step-activate-gradle-remote-cache
support_url: https://github.com/bitrise-steplib/bitrise-step-activate-gradle-remote-cache
published_at: 2023-04-24T15:17:29.28468+02:00
source:
git: https://github.com/bitrise-steplib/bitrise-step-activate-gradle-remote-cache.git
commit: 8d9cd958ca84ad07975b29604b77b919175d7e42
type_tags:
- utility
toolkit:
go:
package_name: github.com/bitrise-steplib/bitrise-step-activate-gradle-remote-cache
is_skippable: true
run_if: .IsCI
inputs:
- opts:
is_required: true
summary: Whether the build can not only read, but write new entries to the remote
cache
title: Push new cache entries
value_options:
- "true"
- "false"
push: "true"
- opts:
description: |-
Level of cache entry validation for both uploads and downloads.
Levels:
- `none`: no validation.
- `warning`: print a warning about invalid cache entries, but don't interrupt the build
- `error`: print an error about invalid cache entries and interrupt the build
is_required: true
summary: Level of cache entry validation for both uploads and downloads.
title: Validation level
value_options:
- none
- warning
- error
validation_level: warning
- opts:
is_required: true
summary: Enable logging additional information for troubleshooting
title: Verbose logging
value_options:
- "true"
- "false"
verbose: "false"
================================================
FILE: steps/activate-build-cache-for-gradle/1.0.1/step.yml
================================================
title: Activate Bitrise Build Cache for Gradle
summary: Activates Bitrise Remote Build Cache add-on for subsequent Gradle builds
in the workflow
description: |
This Step activates Bitrise's remote build cache add-on for subsequent Gradle executions in the workflow.
After this Step executes, Gradle builds will automatically read from the remote cache and push new entries if it's enabled.
website: https://github.com/bitrise-steplib/bitrise-step-activate-gradle-remote-cache
source_code_url: https://github.com/bitrise-steplib/bitrise-step-activate-gradle-remote-cache
support_url: https://github.com/bitrise-steplib/bitrise-step-activate-gradle-remote-cache
published_at: 2023-06-30T14:22:20.837998-07:00
source:
git: https://github.com/bitrise-steplib/bitrise-step-activate-gradle-remote-cache.git
commit: 1b8642ecfa4f10e10ac9b0e91f497b95dbaf5663
type_tags:
- utility
toolkit:
go:
package_name: github.com/bitrise-steplib/bitrise-step-activate-gradle-remote-cache
is_skippable: true
run_if: .IsCI
inputs:
- opts:
is_required: true
summary: Whether the build can not only read, but write new entries to the remote
cache
title: Push new cache entries
value_options:
- "true"
- "false"
push: "true"
- opts:
description: |-
Level of cache entry validation for both uploads and downloads.
Levels:
- `none`: no validation.
- `warning`: print a warning about invalid cache entries, but don't interrupt the build
- `error`: print an error about invalid cache entries and interrupt the build
is_required: true
summary: Level of cache entry validation for both uploads and downloads.
title: Validation level
value_options:
- none
- warning
- error
validation_level: warning
- opts:
is_required: true
summary: Enable logging additional information for troubleshooting
title: Verbose logging
value_options:
- "true"
- "false"
verbose: "false"
================================================
FILE: steps/activate-build-cache-for-gradle/1.0.2/step.yml
================================================
title: Activate Bitrise Build Cache for Gradle
summary: Activates Bitrise Remote Build Cache add-on for subsequent Gradle builds
in the workflow
description: |
This Step activates Bitrise's remote build cache add-on for subsequent Gradle executions in the workflow.
After this Step executes, Gradle builds will automatically read from the remote cache and push new entries if it's enabled.
website: https://github.com/bitrise-steplib/bitrise-step-activate-gradle-remote-cache
source_code_url: https://github.com/bitrise-steplib/bitrise-step-activate-gradle-remote-cache
support_url: https://github.com/bitrise-steplib/bitrise-step-activate-gradle-remote-cache
published_at: 2023-07-14T14:38:27.979936064Z
source:
git: https://github.com/bitrise-steplib/bitrise-step-activate-gradle-remote-cache.git
commit: a1a0c3ef5539cea632d292346d69da80e4a5f51b
type_tags:
- utility
toolkit:
go:
package_name: github.com/bitrise-steplib/bitrise-step-activate-gradle-remote-cache
is_skippable: true
run_if: .IsCI
inputs:
- opts:
is_required: true
summary: Whether the build can not only read, but write new entries to the remote
cache
title: Push new cache entries
value_options:
- "true"
- "false"
push: "true"
- opts:
description: |-
Level of cache entry validation for both uploads and downloads.
Levels:
- `none`: no validation.
- `warning`: print a warning about invalid cache entries, but don't interrupt the build
- `error`: print an error about invalid cache entries and interrupt the build
is_required: true
summary: Level of cache entry validation for both uploads and downloads.
title: Validation level
value_options:
- none
- warning
- error
validation_level: warning
- opts:
is_required: true
summary: Enable logging additional information for troubleshooting
title: Verbose logging
value_options:
- "true"
- "false"
verbose: "false"
================================================
FILE: steps/activate-build-cache-for-gradle/1.1.0/step.yml
================================================
title: Activate Bitrise Build Cache Add-On for Gradle
summary: Activates Bitrise Remote Build Cache add-on for subsequent Gradle builds
in the workflow
description: |
This Step activates Bitrise's remote build cache add-on for subsequent Gradle executions in the workflow.
After this Step executes, Gradle builds will automatically read from the remote cache and push new entries if it's enabled.
website: https://github.com/bitrise-steplib/bitrise-step-activate-gradle-remote-cache
source_code_url: https://github.com/bitrise-steplib/bitrise-step-activate-gradle-remote-cache
support_url: https://github.com/bitrise-steplib/bitrise-step-activate-gradle-remote-cache
published_at: 2023-09-08T14:03:40.31439796Z
source:
git: https://github.com/bitrise-steplib/bitrise-step-activate-gradle-remote-cache.git
commit: e9c8658a4a1f6a140fd11cfd3c6e7c2c85782088
type_tags:
- utility
toolkit:
go:
package_name: github.com/bitrise-steplib/bitrise-step-activate-gradle-remote-cache
is_skippable: true
run_if: .IsCI
inputs:
- opts:
is_required: true
summary: Whether the build can not only read, but write new entries to the remote
cache
title: Push new cache entries
value_options:
- "true"
- "false"
push: "true"
- opts:
description: |-
Level of cache entry validation for both uploads and downloads.
Levels:
- `none`: no validation.
- `warning`: print a warning about invalid cache entries, but don't interrupt the build
- `error`: print an error about invalid cache entries and interrupt the build
is_required: true
summary: Level of cache entry validation for both uploads and downloads.
title: Validation level
value_options:
- none
- warning
- error
validation_level: warning
- collect_metrics: "true"
opts:
description: When enabled, this sets up Gradle build metrics collection for the
subsequent Gradle invocations in the workflow. Metrics are sent to [Bitrise
Insights](https://app.bitrise.io/insights).
is_required: true
summary: Collect build metrics in subsequent Gradle executions
title: Collect Gradle build metrics
value_options:
- "true"
- "false"
- opts:
is_required: true
summary: Enable logging additional information for troubleshooting
title: Verbose logging
value_options:
- "true"
- "false"
verbose: "false"
================================================
FILE: steps/activate-build-cache-for-gradle/1.1.1/step.yml
================================================
title: Activate Bitrise Build Cache Add-On for Gradle
summary: Activates Bitrise Remote Build Cache add-on for subsequent Gradle builds
in the workflow
description: |
This Step activates Bitrise's remote build cache add-on for subsequent Gradle executions in the workflow.
After this Step executes, Gradle builds will automatically read from the remote cache and push new entries if it's enabled.
website: https://github.com/bitrise-steplib/bitrise-step-activate-gradle-remote-cache
source_code_url: https://github.com/bitrise-steplib/bitrise-step-activate-gradle-remote-cache
support_url: https://github.com/bitrise-steplib/bitrise-step-activate-gradle-remote-cache
published_at: 2023-10-25T12:43:51.151505012Z
source:
git: https://github.com/bitrise-steplib/bitrise-step-activate-gradle-remote-cache.git
commit: 6fc8b9b2d3f66ab2d4912603e2c01774a33467db
type_tags:
- utility
toolkit:
go:
package_name: github.com/bitrise-steplib/bitrise-step-activate-gradle-remote-cache
is_skippable: true
run_if: .IsCI
inputs:
- opts:
is_required: true
summary: Whether the build can not only read, but write new entries to the remote
cache
title: Push new cache entries
value_options:
- "true"
- "false"
push: "true"
- opts:
description: |-
Level of cache entry validation for both uploads and downloads.
Levels:
- `none`: no validation.
- `warning`: print a warning about invalid cache entries, but don't interrupt the build
- `error`: print an error about invalid cache entries and interrupt the build
is_required: true
summary: Level of cache entry validation for both uploads and downloads.
title: Validation level
value_options:
- none
- warning
- error
validation_level: warning
- collect_metrics: "false"
opts:
description: When enabled, this sets up Gradle build metrics collection for the
subsequent Gradle invocations in the workflow. Metrics are sent to [Bitrise
Insights](https://app.bitrise.io/insights).
is_required: true
summary: Collect build metrics in subsequent Gradle executions
title: Collect Gradle build metrics
value_options:
- "true"
- "false"
- opts:
is_required: true
summary: Enable logging additional information for troubleshooting
title: Verbose logging
value_options:
- "true"
- "false"
verbose: "false"
================================================
FILE: steps/activate-build-cache-for-gradle/2.0.0/step.yml
================================================
title: Activate Bitrise Build Cache Add-On for Gradle
summary: Activates Bitrise Remote Build Cache add-on for subsequent Gradle builds
in the workflow
description: |
This Step activates Bitrise's remote build cache add-on for subsequent Gradle executions in the workflow.
After this Step executes, Gradle builds will automatically read from the remote cache and push new entries if it's enabled.
website: https://github.com/bitrise-steplib/bitrise-step-activate-gradle-remote-cache
source_code_url: https://github.com/bitrise-steplib/bitrise-step-activate-gradle-remote-cache
support_url: https://github.com/bitrise-steplib/bitrise-step-activate-gradle-remote-cache
published_at: 2024-01-31T12:16:00.810062208Z
source:
git: https://github.com/bitrise-steplib/bitrise-step-activate-gradle-remote-cache.git
commit: 3004cc7a460c040fc2a5dc483317b6c02d97afbb
type_tags:
- utility
toolkit:
bash:
entry_file: step.sh
is_skippable: true
run_if: .IsCI
inputs:
- opts:
is_required: true
summary: Whether the build can not only read, but write new entries to the remote
cache
title: Push new cache entries
value_options:
- "true"
- "false"
push: "true"
- opts:
description: |-
Level of cache entry validation for both uploads and downloads.
Levels:
- `none`: no validation.
- `warning`: print a warning about invalid cache entries, but don't interrupt the build
- `error`: print an error about invalid cache entries and interrupt the build
is_required: true
summary: Level of cache entry validation for both uploads and downloads.
title: Validation level
value_options:
- none
- warning
- error
validation_level: warning
- collect_metrics: "false"
opts:
description: When enabled, this sets up Gradle build metrics collection for the
subsequent Gradle invocations in the workflow. Metrics are sent to [Bitrise
Insights](https://app.bitrise.io/insights).
is_required: true
summary: Collect build metrics in subsequent Gradle executions
title: Collect Gradle build metrics
value_options:
- "true"
- "false"
- opts:
is_required: true
summary: Enable logging additional information for troubleshooting
title: Verbose logging
value_options:
- "true"
- "false"
verbose: "false"
================================================
FILE: steps/activate-build-cache-for-gradle/2.0.1/step.yml
================================================
title: Activate Bitrise Build Cache Add-On for Gradle
summary: Activates Bitrise Remote Build Cache add-on for subsequent Gradle builds
in the workflow
description: |
This Step activates Bitrise's remote build cache add-on for subsequent Gradle executions in the workflow.
After this Step executes, Gradle builds will automatically read from the remote cache and push new entries if it's enabled.
website: https://github.com/bitrise-steplib/bitrise-step-activate-gradle-remote-cache
source_code_url: https://github.com/bitrise-steplib/bitrise-step-activate-gradle-remote-cache
support_url: https://github.com/bitrise-steplib/bitrise-step-activate-gradle-remote-cache
published_at: 2024-01-31T15:43:03.944679Z
source:
git: https://github.com/bitrise-steplib/bitrise-step-activate-gradle-remote-cache.git
commit: f51a7a13595b63c68f3267e3245c1b4e011deac7
type_tags:
- utility
toolkit:
bash:
entry_file: step.sh
is_skippable: true
run_if: .IsCI
inputs:
- opts:
is_required: true
summary: Whether the build can not only read, but write new entries to the remote
cache
title: Push new cache entries
value_options:
- "true"
- "false"
push: "true"
- opts:
description: |-
Level of cache entry validation for both uploads and downloads.
Levels:
- `none`: no validation.
- `warning`: print a warning about invalid cache entries, but don't interrupt the build
- `error`: print an error about invalid cache entries and interrupt the build
is_required: true
summary: Level of cache entry validation for both uploads and downloads.
title: Validation level
value_options:
- none
- warning
- error
validation_level: warning
- collect_metrics: "false"
opts:
description: When enabled, this sets up Gradle build metrics collection for the
subsequent Gradle invocations in the workflow. Metrics are sent to [Bitrise
Insights](https://app.bitrise.io/insights).
is_required: true
summary: Collect build metrics in subsequent Gradle executions
title: Collect Gradle build metrics
value_options:
- "true"
- "false"
- opts:
is_required: true
summary: Enable logging additional information for troubleshooting
title: Verbose logging
value_options:
- "true"
- "false"
verbose: "false"
================================================
FILE: steps/activate-build-cache-for-gradle/2.0.2/step.yml
================================================
title: Activate Bitrise Build Cache Add-On for Gradle
summary: Activates Bitrise Remote Build Cache add-on for subsequent Gradle builds
in the workflow
description: |
This Step activates Bitrise's remote build cache add-on for subsequent Gradle executions in the workflow.
After this Step executes, Gradle builds will automatically read from the remote cache and push new entries if it's enabled.
website: https://github.com/bitrise-steplib/bitrise-step-activate-gradle-remote-cache
source_code_url: https://github.com/bitrise-steplib/bitrise-step-activate-gradle-remote-cache
support_url: https://github.com/bitrise-steplib/bitrise-step-activate-gradle-remote-cache
published_at: 2024-02-16T12:01:12.010942635Z
source:
git: https://github.com/bitrise-steplib/bitrise-step-activate-gradle-remote-cache.git
commit: 053cc4d95da4844fa2b8fd68185765e4e7be655f
type_tags:
- utility
toolkit:
bash:
entry_file: step.sh
is_skippable: true
run_if: .IsCI
inputs:
- opts:
is_required: true
summary: Whether the build can not only read, but write new entries to the remote
cache
title: Push new cache entries
value_options:
- "true"
- "false"
push: "true"
- opts:
description: |-
Level of cache entry validation for both uploads and downloads.
Levels:
- `none`: no validation.
- `warning`: print a warning about invalid cache entries, but don't interrupt the build
- `error`: print an error about invalid cache entries and interrupt the build
is_required: true
summary: Level of cache entry validation for both uploads and downloads.
title: Validation level
value_options:
- none
- warning
- error
validation_level: warning
- collect_metrics: "false"
opts:
description: When enabled, this sets up Gradle build metrics collection for the
subsequent Gradle invocations in the workflow. Metrics are sent to [Bitrise
Insights](https://app.bitrise.io/insights).
is_required: true
summary: Collect build metrics in subsequent Gradle executions
title: Collect Gradle build metrics
value_options:
- "true"
- "false"
- opts:
is_required: true
summary: Enable logging additional information for troubleshooting
title: Verbose logging
value_options:
- "true"
- "false"
verbose: "false"
================================================
FILE: steps/activate-build-cache-for-gradle/2.0.3/step.yml
================================================
title: Activate Bitrise Build Cache Add-On for Gradle
summary: Activates Bitrise Remote Build Cache add-on for subsequent Gradle builds
in the workflow
description: |
This Step activates Bitrise's remote build cache add-on for subsequent Gradle executions in the workflow.
After this Step executes, Gradle builds will automatically read from the remote cache and push new entries if it's enabled.
website: https://github.com/bitrise-steplib/bitrise-step-activate-gradle-remote-cache
source_code_url: https://github.com/bitrise-steplib/bitrise-step-activate-gradle-remote-cache
support_url: https://github.com/bitrise-steplib/bitrise-step-activate-gradle-remote-cache
published_at: 2024-02-20T12:52:04.447191065Z
source:
git: https://github.com/bitrise-steplib/bitrise-step-activate-gradle-remote-cache.git
commit: 336ea8d9551862c8ecede3f9fc5795b852fd108c
type_tags:
- utility
toolkit:
bash:
entry_file: step.sh
is_skippable: true
run_if: .IsCI
inputs:
- opts:
is_required: true
summary: Whether the build can not only read, but write new entries to the remote
cache
title: Push new cache entries
value_options:
- "true"
- "false"
push: "true"
- opts:
description: |-
Level of cache entry validation for both uploads and downloads.
Levels:
- `none`: no validation.
- `warning`: print a warning about invalid cache entries, but don't interrupt the build
- `error`: print an error about invalid cache entries and interrupt the build
is_required: true
summary: Level of cache entry validation for both uploads and downloads.
title: Validation level
value_options:
- none
- warning
- error
validation_level: warning
- collect_metrics: "false"
opts:
description: When enabled, this sets up Gradle build metrics collection for the
subsequent Gradle invocations in the workflow. Metrics are sent to [Bitrise
Insights](https://app.bitrise.io/insights).
is_required: true
summary: Collect build metrics in subsequent Gradle executions
title: Collect Gradle build metrics
value_options:
- "true"
- "false"
- opts:
is_required: true
summary: Enable logging additional information for troubleshooting
title: Verbose logging
value_options:
- "true"
- "false"
verbose: "false"
================================================
FILE: steps/activate-build-cache-for-gradle/2.1.0/step.yml
================================================
title: Activate Bitrise Build Cache Add-On for Gradle
summary: Activates Bitrise Remote Build Cache add-on for subsequent Gradle builds
in the workflow
description: |
This Step activates Bitrise's remote build cache add-on for subsequent Gradle executions in the workflow.
After this Step executes, Gradle builds will automatically read from the remote cache and push new entries if it's enabled.
website: https://github.com/bitrise-steplib/bitrise-step-activate-gradle-remote-cache
source_code_url: https://github.com/bitrise-steplib/bitrise-step-activate-gradle-remote-cache
support_url: https://github.com/bitrise-steplib/bitrise-step-activate-gradle-remote-cache
published_at: 2024-02-27T16:06:40.938850215Z
source:
git: https://github.com/bitrise-steplib/bitrise-step-activate-gradle-remote-cache.git
commit: 1f568f218c135875d221a9eec58dcac89c7de994
type_tags:
- utility
toolkit:
bash:
entry_file: step.sh
is_skippable: true
run_if: .IsCI
inputs:
- opts:
is_required: true
summary: Whether the build can not only read, but write new entries to the remote
cache
title: Push new cache entries
value_options:
- "true"
- "false"
push: "true"
- opts:
description: |-
Level of cache entry validation for both uploads and downloads.
Levels:
- `none`: no validation.
- `warning`: print a warning about invalid cache entries, but don't interrupt the build
- `error`: print an error about invalid cache entries and interrupt the build
is_required: true
summary: Level of cache entry validation for both uploads and downloads.
title: Validation level
value_options:
- none
- warning
- error
validation_level: warning
- collect_metrics: "false"
opts:
description: When enabled, this sets up Gradle build metrics collection for the
subsequent Gradle invocations in the workflow. Metrics are sent to [Bitrise
Insights](https://app.bitrise.io/insights).
is_required: true
summary: Collect build metrics in subsequent Gradle executions
title: Collect Gradle build metrics
value_options:
- "true"
- "false"
- opts:
is_required: true
summary: Enable logging additional information for troubleshooting
title: Verbose logging
value_options:
- "true"
- "false"
verbose: "false"
================================================
FILE: steps/activate-build-cache-for-gradle/2.10.0/step.yml
================================================
title: Build Cache for Gradle
summary: Activates Bitrise Remote Build Cache add-on for subsequent Gradle builds
in the workflow
description: |
This Step activates Bitrise's remote build cache add-on for subsequent Gradle executions in the workflow.
After this Step executes, Gradle builds will automatically read from the remote cache and push new entries if it's enabled.
website: https://github.com/bitrise-steplib/bitrise-step-activate-gradle-remote-cache
source_code_url: https://github.com/bitrise-steplib/bitrise-step-activate-gradle-remote-cache
support_url: https://github.com/bitrise-steplib/bitrise-step-activate-gradle-remote-cache
published_at: 2026-02-24T15:08:02.57752264Z
source:
git: https://github.com/bitrise-steplib/bitrise-step-activate-gradle-remote-cache.git
commit: 6148670db99dd04cbb90c548a41d975e3b3571d2
type_tags:
- utility
toolkit:
bash:
entry_file: step.sh
is_skippable: true
run_if: .IsCI
inputs:
- opts:
is_required: true
summary: Whether the build can not only read, but write new entries to the remote
cache
title: Push new cache entries
value_options:
- "true"
- "false"
push: "true"
- opts:
description: |-
Level of cache entry validation for both uploads and downloads.
Levels:
- `none`: no validation.
- `warning`: print a warning about invalid cache entries, but don't interrupt the build
- `error`: print an error about invalid cache entries and interrupt the build
is_required: true
summary: Level of cache entry validation for both uploads and downloads.
title: Validation level
value_options:
- none
- warning
- error
validation_level: warning
- collect_metrics: "true"
opts:
description: When enabled, this sets up Gradle build metrics collection for the
subsequent Gradle invocations in the workflow. Metrics are sent to [Bitrise
Insights](https://app.bitrise.io/insights).
is_required: true
summary: Collect build metrics in subsequent Gradle executions
title: Collect Gradle build metrics
value_options:
- "true"
- "false"
- opts:
is_required: true
summary: Enable logging additional information for troubleshooting
title: Verbose logging
value_options:
- "true"
- "false"
verbose: "false"
================================================
FILE: steps/activate-build-cache-for-gradle/2.11.0/step.yml
================================================
title: Build Cache for Gradle
summary: Activates Bitrise Remote Build Cache add-on for subsequent Gradle builds
in the workflow
description: |
This Step activates Bitrise's remote build cache add-on for subsequent Gradle executions in the workflow.
After this Step executes, Gradle builds will automatically read from the remote cache and push new entries if it's enabled.
website: https://github.com/bitrise-steplib/bitrise-step-activate-gradle-remote-cache
source_code_url: https://github.com/bitrise-steplib/bitrise-step-activate-gradle-remote-cache
support_url: https://github.com/bitrise-steplib/bitrise-step-activate-gradle-remote-cache
published_at: 2026-03-02T12:44:33.858012234Z
source:
git: https://github.com/bitrise-steplib/bitrise-step-activate-gradle-remote-cache.git
commit: b85164292b694066b2407281b0cc8573d7cf6f4d
type_tags:
- utility
toolkit:
bash:
entry_file: step.sh
is_skippable: true
run_if: .IsCI
inputs:
- opts:
is_required: true
summary: Whether the build can not only read, but write new entries to the remote
cache
title: Push new cache entries
value_options:
- "true"
- "false"
push: "true"
- opts:
description: |-
Level of cache entry validation for both uploads and downloads.
Levels:
- `none`: no validation.
- `warning`: print a warning about invalid cache entries, but don't interrupt the build
- `error`: print an error about invalid cache entries and interrupt the build
is_required: true
summary: Level of cache entry validation for both uploads and downloads.
title: Validation level
value_options:
- none
- warning
- error
validation_level: warning
- collect_metrics: "true"
opts:
description: When enabled, this sets up Gradle build metrics collection for the
subsequent Gradle invocations in the workflow. Metrics are sent to [Bitrise
Insights](https://app.bitrise.io/insights).
is_required: true
summary: Collect build metrics in subsequent Gradle executions
title: Collect Gradle build metrics
value_options:
- "true"
- "false"
- opts:
is_required: true
summary: Enable logging additional information for troubleshooting
title: Verbose logging
value_options:
- "true"
- "false"
verbose: "false"
================================================
FILE: steps/activate-build-cache-for-gradle/2.12.0/step.yml
================================================
title: Build Cache for Gradle
summary: Activates Bitrise Remote Build Cache add-on for subsequent Gradle builds
in the workflow
description: |
This Step activates Bitrise's remote build cache add-on for subsequent Gradle executions in the workflow.
After this Step executes, Gradle builds will automatically read from the remote cache and push new entries if it's enabled.
website: https://github.com/bitrise-steplib/bitrise-step-activate-gradle-remote-cache
source_code_url: https://github.com/bitrise-steplib/bitrise-step-activate-gradle-remote-cache
support_url: https://github.com/bitrise-steplib/bitrise-step-activate-gradle-remote-cache
published_at: 2026-03-03T13:01:26.925457776Z
source:
git: https://github.com/bitrise-steplib/bitrise-step-activate-gradle-remote-cache.git
commit: 8dcceef71a141b63fcdfde200f7760c67b3a4e3d
type_tags:
- utility
toolkit:
bash:
entry_file: step.sh
is_skippable: true
run_if: .IsCI
inputs:
- opts:
is_required: true
summary: Whether the build can not only read, but write new entries to the remote
cache
title: Push new cache entries
value_options:
- "true"
- "false"
push: "true"
- opts:
description: |-
Level of cache entry validation for both uploads and downloads.
Levels:
- `none`: no validation.
- `warning`: print a warning about invalid cache entries, but don't interrupt the build
- `error`: print an error about invalid cache entries and interrupt the build
is_required: true
summary: Level of cache entry validation for both uploads and downloads.
title: Validation level
value_options:
- none
- warning
- error
validation_level: warning
- collect_metrics: "true"
opts:
description: When enabled, this sets up Gradle build metrics collection for the
subsequent Gradle invocations in the workflow. Metrics are sent to [Bitrise
Insights](https://app.bitrise.io/insights).
is_required: true
summary: Collect build metrics in subsequent Gradle executions
title: Collect Gradle build metrics
value_options:
- "true"
- "false"
- opts:
is_required: true
summary: Enable logging additional information for troubleshooting
title: Verbose logging
value_options:
- "true"
- "false"
verbose: "false"
================================================
FILE: steps/activate-build-cache-for-gradle/2.13.0/step.yml
================================================
title: Build Cache for Gradle
summary: Activates Bitrise Remote Build Cache add-on for subsequent Gradle builds
in the workflow
description: |
This Step activates Bitrise's remote build cache add-on for subsequent Gradle executions in the workflow.
After this Step executes, Gradle builds will automatically read from the remote cache and push new entries if it's enabled.
website: https://github.com/bitrise-steplib/bitrise-step-activate-gradle-remote-cache
source_code_url: https://github.com/bitrise-steplib/bitrise-step-activate-gradle-remote-cache
support_url: https://github.com/bitrise-steplib/bitrise-step-activate-gradle-remote-cache
published_at: 2026-03-11T14:42:24.789308701Z
source:
git: https://github.com/bitrise-steplib/bitrise-step-activate-gradle-remote-cache.git
commit: 624913294a6cd4ff12a512e8332daf89194016aa
type_tags:
- utility
toolkit:
bash:
entry_file: step.sh
is_skippable: true
run_if: .IsCI
inputs:
- opts:
is_required: true
summary: Whether the build can not only read, but write new entries to the remote
cache
title: Push new cache entries
value_options:
- "true"
- "false"
push: "true"
- opts:
description: |-
Level of cache entry validation for both uploads and downloads.
Levels:
- `none`: no validation.
- `warning`: print a warning about invalid cache entries, but don't interrupt the build
- `error`: print an error about invalid cache entries and interrupt the build
is_required: true
summary: Level of cache entry validation for both uploads and downloads.
title: Validation level
value_options:
- none
- warning
- error
validation_level: warning
- collect_metrics: "true"
opts:
description: When enabled, this sets up Gradle build metrics collection for the
subsequent Gradle invocations in the workflow. Metrics are sent to [Bitrise
Insights](https://app.bitrise.io/insights).
is_required: true
summary: Collect build metrics in subsequent Gradle executions
title: Collect Gradle build metrics
value_options:
- "true"
- "false"
- opts:
is_required: true
summary: Enable logging additional information for troubleshooting
title: Verbose logging
value_options:
- "true"
- "false"
verbose: "false"
================================================
FILE: steps/activate-build-cache-for-gradle/2.13.1/step.yml
================================================
title: Build Cache for Gradle
summary: Activates Bitrise Remote Build Cache add-on for subsequent Gradle builds
in the workflow
description: |
This Step activates Bitrise's remote build cache add-on for subsequent Gradle executions in the workflow.
After this Step executes, Gradle builds will automatically read from the remote cache and push new entries if it's enabled.
website: https://github.com/bitrise-steplib/bitrise-step-activate-gradle-remote-cache
source_code_url: https://github.com/bitrise-steplib/bitrise-step-activate-gradle-remote-cache
support_url: https://github.com/bitrise-steplib/bitrise-step-activate-gradle-remote-cache
published_at: 2026-03-13T15:14:46.589979577Z
source:
git: https://github.com/bitrise-steplib/bitrise-step-activate-gradle-remote-cache.git
commit: 6ab962f5da483873e893dd957003032e1d1cd067
type_tags:
- utility
toolkit:
bash:
entry_file: step.sh
is_skippable: true
run_if: .IsCI
inputs:
- opts:
is_required: true
summary: Whether the build can not only read, but write new entries to the remote
cache
title: Push new cache entries
value_options:
- "true"
- "false"
push: "true"
- opts:
description: |-
Level of cache entry validation for both uploads and downloads.
Levels:
- `none`: no validation.
- `warning`: print a warning about invalid cache entries, but don't interrupt the build
- `error`: print an error about invalid cache entries and interrupt the build
is_required: true
summary: Level of cache entry validation for both uploads and downloads.
title: Validation level
value_options:
- none
- warning
- error
validation_level: warning
- collect_metrics: "true"
opts:
description: When enabled, this sets up Gradle build metrics collection for the
subsequent Gradle invocations in the workflow. Metrics are sent to [Bitrise
Insights](https://app.bitrise.io/insights).
is_required: true
summary: Collect build metrics in subsequent Gradle executions
title: Collect Gradle build metrics
value_options:
- "true"
- "false"
- opts:
is_required: true
summary: Enable logging additional information for troubleshooting
title: Verbose logging
value_options:
- "true"
- "false"
verbose: "false"
================================================
FILE: steps/activate-build-cache-for-gradle/2.13.2/step.yml
================================================
title: Build Cache for Gradle
summary: Activates Bitrise Remote Build Cache add-on for subsequent Gradle builds
in the workflow
description: |
This Step activates Bitrise's remote build cache add-on for subsequent Gradle executions in the workflow.
After this Step executes, Gradle builds will automatically read from the remote cache and push new entries if it's enabled.
website: https://github.com/bitrise-steplib/bitrise-step-activate-gradle-remote-cache
source_code_url: https://github.com/bitrise-steplib/bitrise-step-activate-gradle-remote-cache
support_url: https://github.com/bitrise-steplib/bitrise-step-activate-gradle-remote-cache
published_at: 2026-03-13T16:31:24.478397077Z
source:
git: https://github.com/bitrise-steplib/bitrise-step-activate-gradle-remote-cache.git
commit: 050dfd7ed0eb9412c68079664e90759dcef6e55f
type_tags:
- utility
toolkit:
bash:
entry_file: step.sh
is_skippable: true
run_if: .IsCI
inputs:
- opts:
is_required: true
summary: Whether the build can not only read, but write new entries to the remote
cache
title: Push new cache entries
value_options:
- "true"
- "false"
push: "true"
- opts:
description: |-
Level of cache entry validation for both uploads and downloads.
Levels:
- `none`: no validation.
- `warning`: print a warning about invalid cache entries, but don't interrupt the build
- `error`: print an error about invalid cache entries and interrupt the build
is_required: true
summary: Level of cache entry validation for both uploads and downloads.
title: Validation level
value_options:
- none
- warning
- error
validation_level: warning
- collect_metrics: "true"
opts:
description: When enabled, this sets up Gradle build metrics collection for the
subsequent Gradle invocations in the workflow. Metrics are sent to [Bitrise
Insights](https://app.bitrise.io/insights).
is_required: true
summary: Collect build metrics in subsequent Gradle executions
title: Collect Gradle build metrics
value_options:
- "true"
- "false"
- opts:
is_required: true
summary: Enable logging additional information for troubleshooting
title: Verbose logging
value_options:
- "true"
- "false"
verbose: "false"
================================================
FILE: steps/activate-build-cache-for-gradle/2.13.3/step.yml
================================================
title: Build Cache for Gradle
summary: Activates Bitrise Remote Build Cache add-on for subsequent Gradle builds
in the workflow
description: |
This Step activates Bitrise's remote build cache add-on for subsequent Gradle executions in the workflow.
After this Step executes, Gradle builds will automatically read from the remote cache and push new entries if it's enabled.
website: https://github.com/bitrise-steplib/bitrise-step-activate-gradle-remote-cache
source_code_url: https://github.com/bitrise-steplib/bitrise-step-activate-gradle-remote-cache
support_url: https://github.com/bitrise-steplib/bitrise-step-activate-gradle-remote-cache
published_at: 2026-03-17T11:22:55.083749123Z
source:
git: https://github.com/bitrise-steplib/bitrise-step-activate-gradle-remote-cache.git
commit: f50deddf01f697e70c1a4927056e2119b9212ada
type_tags:
- utility
toolkit:
bash:
entry_file: step.sh
is_skippable: true
run_if: .IsCI
inputs:
- opts:
is_required: true
summary: Whether the build can not only read, but write new entries to the remote
cache
title: Push new cache entries
value_options:
- "true"
- "false"
push: "true"
- opts:
description: |-
Level of cache entry validation for both uploads and downloads.
Levels:
- `none`: no validation.
- `warning`: print a warning about invalid cache entries, but don't interrupt the build
- `error`: print an error about invalid cache entries and interrupt the build
is_required: true
summary: Level of cache entry validation for both uploads and downloads.
title: Validation level
value_options:
- none
- warning
- error
validation_level: warning
- collect_metrics: "true"
opts:
description: When enabled, this sets up Gradle build metrics collection for the
subsequent Gradle invocations in the workflow. Metrics are sent to [Bitrise
Insights](https://app.bitrise.io/insights).
is_required: true
summary: Collect build metrics in subsequent Gradle executions
title: Collect Gradle build metrics
value_options:
- "true"
- "false"
- opts:
is_required: true
summary: Enable logging additional information for troubleshooting
title: Verbose logging
value_options:
- "true"
- "false"
verbose: "false"
================================================
FILE: steps/activate-build-cache-for-gradle/2.13.4/step.yml
================================================
title: Build Cache for Gradle
summary: Activates Bitrise Remote Build Cache add-on for subsequent Gradle builds
in the workflow
description: |
This Step activates Bitrise's remote build cache add-on for subsequent Gradle executions in the workflow.
After this Step executes, Gradle builds will automatically read from the remote cache and push new entries if it's enabled.
website: https://github.com/bitrise-steplib/bitrise-step-activate-gradle-remote-cache
source_code_url: https://github.com/bitrise-steplib/bitrise-step-activate-gradle-remote-cache
support_url: https://github.com/bitrise-steplib/bitrise-step-activate-gradle-remote-cache
published_at: 2026-03-18T12:17:31.651174254Z
source:
git: https://github.com/bitrise-steplib/bitrise-step-activate-gradle-remote-cache.git
commit: 4e82b60844b7875ac763ffa08e0d752e6530b222
type_tags:
- utility
toolkit:
bash:
entry_file: step.sh
is_skippable: true
run_if: .IsCI
inputs:
- opts:
is_required: true
summary: Whether the build can not only read, but write new entries to the remote
cache
title: Push new cache entries
value_options:
- "true"
- "false"
push: "true"
- opts:
description: |-
Level of cache entry validation for both uploads and downloads.
Levels:
- `none`: no validation.
- `warning`: print a warning about invalid cache entries, but don't interrupt the build
- `error`: print an error about invalid cache entries and interrupt the build
is_required: true
summary: Level of cache entry validation for both uploads and downloads.
title: Validation level
value_options:
- none
- warning
- error
validation_level: warning
- collect_metrics: "true"
opts:
description: When enabled, this sets up Gradle build metrics collection for the
subsequent Gradle invocations in the workflow. Metrics are sent to [Bitrise
Insights](https://app.bitrise.io/insights).
is_required: true
summary: Collect build metrics in subsequent Gradle executions
title: Collect Gradle build metrics
value_options:
- "true"
- "false"
- opts:
is_required: true
summary: Enable logging additional information for troubleshooting
title: Verbose logging
value_options:
- "true"
- "false"
verbose: "false"
================================================
FILE: steps/activate-build-cache-for-gradle/2.13.5/step.yml
================================================
title: Build Cache for Gradle
summary: Activates Bitrise Remote Build Cache add-on for subsequent Gradle builds
in the workflow
description: |
This Step activates Bitrise's remote build cache add-on for subsequent Gradle executions in the workflow.
After this Step executes, Gradle builds will automatically read from the remote cache and push new entries if it's enabled.
website: https://github.com/bitrise-steplib/bitrise-step-activate-gradle-remote-cache
source_code_url: https://github.com/bitrise-steplib/bitrise-step-activate-gradle-remote-cache
support_url: https://github.com/bitrise-steplib/bitrise-step-activate-gradle-remote-cache
published_at: 2026-03-30T09:41:32.260992358Z
source:
git: https://github.com/bitrise-steplib/bitrise-step-activate-gradle-remote-cache.git
commit: 96d9116eb2513ccedf4845e78b5c509bf3bdde55
type_tags:
- utility
toolkit:
bash:
entry_file: step.sh
is_skippable: true
run_if: .IsCI
inputs:
- opts:
is_required: true
summary: Whether the build can not only read, but write new entries to the remote
cache
title: Push new cache entries
value_options:
- "true"
- "false"
push: "true"
- opts:
description: |-
Level of cache entry validation for both uploads and downloads.
Levels:
- `none`: no validation.
- `warning`: print a warning about invalid cache entries, but don't interrupt the build
- `error`: print an error about invalid cache entries and interrupt the build
is_required: true
summary: Level of cache entry validation for both uploads and downloads.
title: Validation level
value_options:
- none
- warning
- error
validation_level: warning
- collect_metrics: "true"
opts:
description: When enabled, this sets up Gradle build metrics collection for the
subsequent Gradle invocations in the workflow. Metrics are sent to [Bitrise
Insights](https://app.bitrise.io/insights).
is_required: true
summary: Collect build metrics in subsequent Gradle executions
title: Collect Gradle build metrics
value_options:
- "true"
- "false"
- opts:
is_required: true
summary: Enable logging additional information for troubleshooting
title: Verbose logging
value_options:
- "true"
- "false"
verbose: "false"
================================================
FILE: steps/activate-build-cache-for-gradle/2.13.6/step.yml
================================================
title: Build Cache for Gradle
summary: Activates Bitrise Remote Build Cache add-on for subsequent Gradle builds
in the workflow
description: |
This Step activates Bitrise's remote build cache add-on for subsequent Gradle executions in the workflow.
After this Step executes, Gradle builds will automatically read from the remote cache and push new entries if it's enabled.
website: https://github.com/bitrise-steplib/bitrise-step-activate-gradle-remote-cache
source_code_url: https://github.com/bitrise-steplib/bitrise-step-activate-gradle-remote-cache
support_url: https://github.com/bitrise-steplib/bitrise-step-activate-gradle-remote-cache
published_at: 2026-03-30T10:05:43.831457356Z
source:
git: https://github.com/bitrise-steplib/bitrise-step-activate-gradle-remote-cache.git
commit: bdc91bcf15da9aefbb20642d2af6a0544f0255ea
type_tags:
- utility
toolkit:
bash:
entry_file: step.sh
is_skippable: true
run_if: .IsCI
inputs:
- opts:
is_required: true
summary: Whether the build can not only read, but write new entries to the remote
cache
title: Push new cache entries
value_options:
- "true"
- "false"
push: "true"
- opts:
description: |-
Level of cache entry validation for both uploads and downloads.
Levels:
- `none`: no validation.
- `warning`: print a warning about invalid cache entries, but don't interrupt the build
- `error`: print an error about invalid cache entries and interrupt the build
is_required: true
summary: Level of cache entry validation for both uploads and downloads.
title: Validation level
value_options:
- none
- warning
- error
validation_level: warning
- collect_metrics: "true"
opts:
description: When enabled, this sets up Gradle build metrics collection for the
subsequent Gradle invocations in the workflow. Metrics are sent to [Bitrise
Insights](https://app.bitrise.io/insights).
is_required: true
summary: Collect build metrics in subsequent Gradle executions
title: Collect Gradle build metrics
value_options:
- "true"
- "false"
- opts:
is_required: true
summary: Enable logging additional information for troubleshooting
title: Verbose logging
value_options:
- "true"
- "false"
verbose: "false"
================================================
FILE: steps/activate-build-cache-for-gradle/2.13.7/step.yml
================================================
title: Build Cache for Gradle
summary: Activates Bitrise Remote Build Cache add-on for subsequent Gradle builds
in the workflow
description: |
This Step activates Bitrise's remote build cache add-on for subsequent Gradle executions in the workflow.
After this Step executes, Gradle builds will automatically read from the remote cache and push new entries if it's enabled.
website: https://github.com/bitrise-steplib/bitrise-step-activate-gradle-remote-cache
source_code_url: https://github.com/bitrise-steplib/bitrise-step-activate-gradle-remote-cache
support_url: https://github.com/bitrise-steplib/bitrise-step-activate-gradle-remote-cache
published_at: 2026-03-31T11:39:38.23492577Z
source:
git: https://github.com/bitrise-steplib/bitrise-step-activate-gradle-remote-cache.git
commit: 900d7227b374c70e6fd0b9d8e374310880438de3
type_tags:
- utility
toolkit:
bash:
entry_file: step.sh
is_skippable: true
run_if: .IsCI
inputs:
- opts:
is_required: true
summary: Whether the build can not only read, but write new entries to the remote
cache
title: Push new cache entries
value_options:
- "true"
- "false"
push: "true"
- opts:
description: |-
Level of cache entry validation for both uploads and downloads.
Levels:
- `none`: no validation.
- `warning`: print a warning about invalid cache entries, but don't interrupt the build
- `error`: print an error about invalid cache entries and interrupt the build
is_required: true
summary: Level of cache entry validation for both uploads and downloads.
title: Validation level
value_options:
- none
- warning
- error
validation_level: warning
- collect_metrics: "true"
opts:
description: When enabled, this sets up Gradle build metrics collection for the
subsequent Gradle invocations in the workflow. Metrics are sent to [Bitrise
Insights](https://app.bitrise.io/insights).
is_required: true
summary: Collect build metrics in subsequent Gradle executions
title: Collect Gradle build metrics
value_options:
- "true"
- "false"
- opts:
is_required: true
summary: Enable logging additional information for troubleshooting
title: Verbose logging
value_options:
- "true"
- "false"
verbose: "false"
================================================
FILE: steps/activate-build-cache-for-gradle/2.13.8/step.yml
================================================
title: Build Cache for Gradle
summary: Activates Bitrise Remote Build Cache add-on for subsequent Gradle builds
in the workflow
description: |
This Step activates Bitrise's remote build cache add-on for subsequent Gradle executions in the workflow.
After this Step executes, Gradle builds will automatically read from the remote cache and push new entries if it's enabled.
website: https://github.com/bitrise-steplib/bitrise-step-activate-gradle-remote-cache
source_code_url: https://github.com/bitrise-steplib/bitrise-step-activate-gradle-remote-cache
support_url: https://github.com/bitrise-steplib/bitrise-step-activate-gradle-remote-cache
published_at: 2026-04-01T19:35:20.109273158Z
source:
git: https://github.com/bitrise-steplib/bitrise-step-activate-gradle-remote-cache.git
commit: b94987a8565d2f12d3216df67421e43e06ba7e17
type_tags:
- utility
toolkit:
bash:
entry_file: step.sh
is_skippable: true
run_if: .IsCI
inputs:
- opts:
is_required: true
summary: Whether the build can not only read, but write new entries to the remote
cache
title: Push new cache entries
value_options:
- "true"
- "false"
push: "true"
- opts:
description: |-
Level of cache entry validation for both uploads and downloads.
Levels:
- `none`: no validation.
- `warning`: print a warning about invalid cache entries, but don't interrupt the build
- `error`: print an error about invalid cache entries and interrupt the build
is_required: true
summary: Level of cache entry validation for both uploads and downloads.
title: Validation level
value_options:
- none
- warning
- error
validation_level: warning
- collect_metrics: "true"
opts:
description: When enabled, this sets up Gradle build metrics collection for the
subsequent Gradle invocations in the workflow. Metrics are sent to [Bitrise
Insights](https://app.bitrise.io/insights).
is_required: true
summary: Collect build metrics in subsequent Gradle executions
title: Collect Gradle build metrics
value_options:
- "true"
- "false"
- opts:
is_required: true
summary: Enable logging additional information for troubleshooting
title: Verbose logging
value_options:
- "true"
- "false"
verbose: "false"
================================================
FILE: steps/activate-build-cache-for-gradle/2.13.9/step.yml
================================================
title: Build Cache for Gradle
summary: Activates Bitrise Remote Build Cache add-on for subsequent Gradle builds
in the workflow
description: |
This Step activates Bitrise's remote build cache add-on for subsequent Gradle executions in the workflow.
After this Step executes, Gradle builds will automatically read from the remote cache and push new entries if it's enabled.
website: https://github.com/bitrise-steplib/bitrise-step-activate-gradle-remote-cache
source_code_url: https://github.com/bitrise-steplib/bitrise-step-activate-gradle-remote-cache
support_url: https://github.com/bitrise-steplib/bitrise-step-activate-gradle-remote-cache
published_at: 2026-04-02T16:40:41.61240077Z
source:
git: https://github.com/bitrise-steplib/bitrise-step-activate-gradle-remote-cache.git
commit: 753d7ff388b9823a2e91db65f4a4e1b36588f740
type_tags:
- utility
toolkit:
bash:
entry_file: step.sh
is_skippable: true
run_if: .IsCI
inputs:
- opts:
is_required: true
summary: Whether the build can not only read, but write new entries to the remote
cache
title: Push new cache entries
value_options:
- "true"
- "false"
push: "true"
- opts:
description: |-
Level of cache entry validation for both uploads and downloads.
Levels:
- `none`: no validation.
- `warning`: print a warning about invalid cache entries, but don't interrupt the build
- `error`: print an error about invalid cache entries and interrupt the build
is_required: true
summary: Level of cache entry validation for both uploads and downloads.
title: Validation level
value_options:
- none
- warning
- error
validation_level: warning
- collect_metrics: "true"
opts:
description: When enabled, this sets up Gradle build metrics collection for the
subsequent Gradle invocations in the workflow. Metrics are sent to [Bitrise
Insights](https://app.bitrise.io/insights).
is_required: true
summary: Collect build metrics in subsequent Gradle executions
title: Collect Gradle build metrics
value_options:
- "true"
- "false"
- opts:
is_required: true
summary: Enable logging additional information for troubleshooting
title: Verbose logging
value_options:
- "true"
- "false"
verbose: "false"
================================================
FILE: steps/activate-build-cache-for-gradle/2.14.0/step.yml
================================================
title: Build Cache for Gradle
summary: Activates Bitrise Remote Build Cache add-on for subsequent Gradle builds
in the workflow
description: |
This Step activates Bitrise's remote build cache add-on for subsequent Gradle executions in the workflow.
After this Step executes, Gradle builds will automatically read from the remote cache and push new entries if it's enabled.
website: https://github.com/bitrise-steplib/bitrise-step-activate-gradle-remote-cache
source_code_url: https://github.com/bitrise-steplib/bitrise-step-activate-gradle-remote-cache
support_url: https://github.com/bitrise-steplib/bitrise-step-activate-gradle-remote-cache
published_at: 2026-04-10T14:18:34.827132064Z
source:
git: https://github.com/bitrise-steplib/bitrise-step-activate-gradle-remote-cache.git
commit: 7385a1e2a6b93319ea97c15182020c2f142de57d
type_tags:
- utility
toolkit:
bash:
entry_file: step.sh
is_skippable: true
run_if: .IsCI
inputs:
- opts:
is_required: true
summary: Whether the build can not only read, but write new entries to the remote
cache
title: Push new cache entries
value_options:
- "true"
- "false"
push: "true"
- opts:
description: |-
Level of cache entry validation for both uploads and downloads.
Levels:
- `none`: no validation.
- `warning`: print a warning about invalid cache entries, but don't interrupt the build
- `error`: print an error about invalid cache entries and interrupt the build
is_required: true
summary: Level of cache entry validation for both uploads and downloads.
title: Validation level
value_options:
- none
- warning
- error
validation_level: warning
- collect_metrics: "true"
opts:
description: When enabled, this sets up Gradle build metrics collection for the
subsequent Gradle invocations in the workflow. Metrics are sent to [Bitrise
Insights](https://app.bitrise.io/insights).
is_required: true
summary: Collect build metrics in subsequent Gradle executions
title: Collect Gradle build metrics
value_options:
- "true"
- "false"
- opts:
is_required: true
summary: Enable logging additional information for troubleshooting
title: Verbose logging
value_options:
- "true"
- "false"
verbose: "false"
================================================
FILE: steps/activate-build-cache-for-gradle/2.14.1/step.yml
================================================
title: Build Cache for Gradle
summary: Activates Bitrise Remote Build Cache add-on for subsequent Gradle builds
in the workflow
description: |
This Step activates Bitrise's remote build cache add-on for subsequent Gradle executions in the workflow.
After this Step executes, Gradle builds will automatically read from the remote cache and push new entries if it's enabled.
website: https://github.com/bitrise-steplib/bitrise-step-activate-gradle-remote-cache
source_code_url: https://github.com/bitrise-steplib/bitrise-step-activate-gradle-remote-cache
support_url: https://github.com/bitrise-steplib/bitrise-step-activate-gradle-remote-cache
published_at: 2026-04-14T15:04:37.841827942Z
source:
git: https://github.com/bitrise-steplib/bitrise-step-activate-gradle-remote-cache.git
commit: 7385a1e2a6b93319ea97c15182020c2f142de57d
type_tags:
- utility
toolkit:
bash:
entry_file: step.sh
is_skippable: true
run_if: .IsCI
inputs:
- opts:
is_required: true
summary: Whether the build can not only read, but write new entries to the remote
cache
title: Push new cache entries
value_options:
- "true"
- "false"
push: "true"
- opts:
description: |-
Level of cache entry validation for both uploads and downloads.
Levels:
- `none`: no validation.
- `warning`: print a warning about invalid cache entries, but don't interrupt the build
- `error`: print an error about invalid cache entries and interrupt the build
is_required: true
summary: Level of cache entry validation for both uploads and downloads.
title: Validation level
value_options:
- none
- warning
- error
validation_level: warning
- collect_metrics: "true"
opts:
description: When enabled, this sets up Gradle build metrics collection for the
subsequent Gradle invocations in the workflow. Metrics are sent to [Bitrise
Insights](https://app.bitrise.io/insights).
is_required: true
summary: Collect build metrics in subsequent Gradle executions
title: Collect Gradle build metrics
value_options:
- "true"
- "false"
- opts:
is_required: true
summary: Enable logging additional information for troubleshooting
title: Verbose logging
value_options:
- "true"
- "false"
verbose: "false"
================================================
FILE: steps/activate-build-cache-for-gradle/2.15.0/step.yml
================================================
title: Build Cache for Gradle
summary: Activates Bitrise Remote Build Cache add-on for subsequent Gradle builds
in the workflow
description: |
This Step activates Bitrise's remote build cache add-on for subsequent Gradle executions in the workflow.
After this Step executes, Gradle builds will automatically read from the remote cache and push new entries if it's enabled.
website: https://github.com/bitrise-steplib/bitrise-step-activate-gradle-remote-cache
source_code_url: https://github.com/bitrise-steplib/bitrise-step-activate-gradle-remote-cache
support_url: https://github.com/bitrise-steplib/bitrise-step-activate-gradle-remote-cache
published_at: 2026-04-21T07:32:46.800593292Z
source:
git: https://github.com/bitrise-steplib/bitrise-step-activate-gradle-remote-cache.git
commit: 9d45fb0015f0b9b49a26dee35d4da111fffb8a55
type_tags:
- utility
toolkit:
bash:
entry_file: step.sh
is_skippable: true
run_if: .IsCI
inputs:
- opts:
is_required: true
summary: Whether the build can not only read, but write new entries to the remote
cache
title: Push new cache entries
value_options:
- "true"
- "false"
push: "true"
- opts:
description: |-
Level of cache entry validation for both uploads and downloads.
Levels:
- `none`: no validation.
- `warning`: print a warning about invalid cache entries, but don't interrupt the build
- `error`: print an error about invalid cache entries and interrupt the build
is_required: true
summary: Level of cache entry validation for both uploads and downloads.
title: Validation level
value_options:
- none
- warning
- error
validation_level: warning
- collect_metrics: "true"
opts:
description: When enabled, this sets up Gradle build metrics collection for the
subsequent Gradle invocations in the workflow. Metrics are sent to [Bitrise
Insights](https://app.bitrise.io/insights).
is_required: true
summary: Collect build metrics in subsequent Gradle executions
title: Collect Gradle build metrics
value_options:
- "true"
- "false"
- opts:
is_required: true
summary: Enable logging additional information for troubleshooting
title: Verbose logging
value_options:
- "true"
- "false"
verbose: "false"
================================================
FILE: steps/activate-build-cache-for-gradle/2.16.0/step.yml
================================================
title: Build Cache for Gradle
summary: Activates Bitrise Remote Build Cache add-on for subsequent Gradle builds
in the workflow
description: |
This Step activates Bitrise's remote build cache add-on for subsequent Gradle executions in the workflow.
After this Step executes, Gradle builds will automatically read from the remote cache and push new entries if it's enabled.
website: https://github.com/bitrise-steplib/bitrise-step-activate-gradle-remote-cache
source_code_url: https://github.com/bitrise-steplib/bitrise-step-activate-gradle-remote-cache
support_url: https://github.com/bitrise-steplib/bitrise-step-activate-gradle-remote-cache
published_at: 2026-04-21T11:44:34.422078783Z
source:
git: https://github.com/bitrise-steplib/bitrise-step-activate-gradle-remote-cache.git
commit: 0614e45c0ea5a0e3e8bddaa27d531bf09a4cbbb8
type_tags:
- utility
toolkit:
bash:
entry_file: step.sh
is_skippable: true
run_if: .IsCI
inputs:
- opts:
is_required: true
summary: Whether the build can not only read, but write new entries to the remote
cache
title: Push new cache entries
value_options:
- "true"
- "false"
push: "true"
- opts:
description: |-
Level of cache entry validation for both uploads and downloads.
Levels:
- `none`: no validation.
- `warning`: print a warning about invalid cache entries, but don't interrupt the build
- `error`: print an error about invalid cache entries and interrupt the build
is_required: true
summary: Level of cache entry validation for both uploads and downloads.
title: Validation level
value_options:
- none
- warning
- error
validation_level: warning
- collect_metrics: "true"
opts:
description: When enabled, this sets up Gradle build metrics collection for the
subsequent Gradle invocations in the workflow. Metrics are sent to [Bitrise
Insights](https://app.bitrise.io/insights).
is_required: true
summary: Collect build metrics in subsequent Gradle executions
title: Collect Gradle build metrics
value_options:
- "true"
- "false"
- opts:
is_required: true
summary: Enable logging additional information for troubleshooting
title: Verbose logging
value_options:
- "true"
- "false"
verbose: "false"
================================================
FILE: steps/activate-build-cache-for-gradle/2.16.1/step.yml
================================================
title: Build Cache for Gradle
summary: Activates Bitrise Remote Build Cache add-on for subsequent Gradle builds
in the workflow
description: |
This Step activates Bitrise's remote build cache add-on for subsequent Gradle executions in the workflow.
After this Step executes, Gradle builds will automatically read from the remote cache and push new entries if it's enabled.
website: https://github.com/bitrise-steplib/bitrise-step-activate-gradle-remote-cache
source_code_url: https://github.com/bitrise-steplib/bitrise-step-activate-gradle-remote-cache
support_url: https://github.com/bitrise-steplib/bitrise-step-activate-gradle-remote-cache
published_at: 2026-04-22T13:38:56.652732243Z
source:
git: https://github.com/bitrise-steplib/bitrise-step-activate-gradle-remote-cache.git
commit: a89de7a9dc27fd8f27ca9dd60ed6863122c1f7a0
type_tags:
- utility
toolkit:
bash:
entry_file: step.sh
is_skippable: true
run_if: .IsCI
inputs:
- opts:
is_required: true
summary: Whether the build can not only read, but write new entries to the remote
cache
title: Push new cache entries
value_options:
- "true"
- "false"
push: "true"
- opts:
description: |-
Level of cache entry validation for both uploads and downloads.
Levels:
- `none`: no validation.
- `warning`: print a warning about invalid cache entries, but don't interrupt the build
- `error`: print an error about invalid cache entries and interrupt the build
is_required: true
summary: Level of cache entry validation for both uploads and downloads.
title: Validation level
value_options:
- none
- warning
- error
validation_level: warning
- collect_metrics: "true"
opts:
description: When enabled, this sets up Gradle build metrics collection for the
subsequent Gradle invocations in the workflow. Metrics are sent to [Bitrise
Insights](https://app.bitrise.io/insights).
is_required: true
summary: Collect build metrics in subsequent Gradle executions
title: Collect Gradle build metrics
value_options:
- "true"
- "false"
- opts:
is_required: true
summary: Enable logging additional information for troubleshooting
title: Verbose logging
value_options:
- "true"
- "false"
verbose: "false"
================================================
FILE: steps/activate-build-cache-for-gradle/2.16.2/step.yml
================================================
title: Build Cache for Gradle
summary: Activates Bitrise Remote Build Cache add-on for subsequent Gradle builds
in the workflow
description: |
This Step activates Bitrise's remote build cache add-on for subsequent Gradle executions in the workflow.
After this Step executes, Gradle builds will automatically read from the remote cache and push new entries if it's enabled.
website: https://github.com/bitrise-steplib/bitrise-step-activate-gradle-remote-cache
source_code_url: https://github.com/bitrise-steplib/bitrise-step-activate-gradle-remote-cache
support_url: https://github.com/bitrise-steplib/bitrise-step-activate-gradle-remote-cache
published_at: 2026-04-23T12:22:49.251129197Z
source:
git: https://github.com/bitrise-steplib/bitrise-step-activate-gradle-remote-cache.git
commit: 9b76e1aa1ab3a07654e8f5d93694d20baec0d917
type_tags:
- utility
toolkit:
bash:
entry_file: step.sh
is_skippable: true
run_if: .IsCI
inputs:
- opts:
is_required: true
summary: Whether the build can not only read, but write new entries to the remote
cache
title: Push new cache entries
value_options:
- "true"
- "false"
push: "true"
- opts:
description: |-
Level of cache entry validation for both uploads and downloads.
Levels:
- `none`: no validation.
- `warning`: print a warning about invalid cache entries, but don't interrupt the build
- `error`: print an error about invalid cache entries and interrupt the build
is_required: true
summary: Level of cache entry validation for both uploads and downloads.
title: Validation level
value_options:
- none
- warning
- error
validation_level: warning
- collect_metrics: "true"
opts:
description: When enabled, this sets up Gradle build metrics collection for the
subsequent Gradle invocations in the workflow. Metrics are sent to [Bitrise
Insights](https://app.bitrise.io/insights).
is_required: true
summary: Collect build metrics in subsequent Gradle executions
title: Collect Gradle build metrics
value_options:
- "true"
- "false"
- opts:
is_required: true
summary: Enable logging additional information for troubleshooting
title: Verbose logging
value_options:
- "true"
- "false"
verbose: "false"
================================================
FILE: steps/activate-build-cache-for-gradle/2.17.0/step.yml
================================================
title: Build Cache for Gradle
summary: Activates Bitrise Remote Build Cache add-on for subsequent Gradle builds
in the workflow
description: |
This Step activates Bitrise's remote build cache add-on for subsequent Gradle executions in the workflow.
After this Step executes, Gradle builds will automatically read from the remote cache and push new entries if it's enabled.
website: https://github.com/bitrise-steplib/bitrise-step-activate-gradle-remote-cache
source_code_url: https://github.com/bitrise-steplib/bitrise-step-activate-gradle-remote-cache
support_url: https://github.com/bitrise-steplib/bitrise-step-activate-gradle-remote-cache
published_at: 2026-04-27T13:32:15.194250203Z
source:
git: https://github.com/bitrise-steplib/bitrise-step-activate-gradle-remote-cache.git
commit: d55bf98a4223b6386f6abbc4962b1a278b897a12
type_tags:
- utility
toolkit:
bash:
entry_file: step.sh
is_skippable: true
run_if: .IsCI
inputs:
- opts:
is_required: true
summary: Whether the build can not only read, but write new entries to the remote
cache
title: Push new cache entries
value_options:
- "true"
- "false"
push: "true"
- opts:
description: |-
Level of cache entry validation for both uploads and downloads.
Levels:
- `none`: no validation.
- `warning`: print a warning about invalid cache entries, but don't interrupt the build
- `error`: print an error about invalid cache entries and interrupt the build
is_required: true
summary: Level of cache entry validation for both uploads and downloads.
title: Validation level
value_options:
- none
- warning
- error
validation_level: warning
- collect_metrics: "true"
opts:
description: When enabled, this sets up Gradle build metrics collection for the
subsequent Gradle invocations in the workflow. Metrics are sent to [Bitrise
Insights](https://app.bitrise.io/insights).
is_required: true
summary: Collect build metrics in subsequent Gradle executions
title: Collect Gradle build metrics
value_options:
- "true"
- "false"
- opts:
is_required: true
summary: Enable logging additional information for troubleshooting
title: Verbose logging
value_options:
- "true"
- "false"
verbose: "false"
================================================
FILE: steps/activate-build-cache-for-gradle/2.17.1/step.yml
================================================
title: Build Cache for Gradle
summary: Activates Bitrise Remote Build Cache add-on for subsequent Gradle builds
in the workflow
description: |
This Step activates Bitrise's remote build cache add-on for subsequent Gradle executions in the workflow.
After this Step executes, Gradle builds will automatically read from the remote cache and push new entries if it's enabled.
website: https://github.com/bitrise-steplib/bitrise-step-activate-gradle-remote-cache
source_code_url: https://github.com/bitrise-steplib/bitrise-step-activate-gradle-remote-cache
support_url: https://github.com/bitrise-steplib/bitrise-step-activate-gradle-remote-cache
published_at: 2026-04-28T16:40:57.314753469Z
source:
git: https://github.com/bitrise-steplib/bitrise-step-activate-gradle-remote-cache.git
commit: a09457c1750923598fe96215f218d5254a9d1022
type_tags:
- utility
toolkit:
bash:
entry_file: step.sh
is_skippable: true
run_if: .IsCI
inputs:
- opts:
is_required: true
summary: Whether the build can not only read, but write new entries to the remote
cache
title: Push new cache entries
value_options:
- "true"
- "false"
push: "true"
- opts:
description: |-
Level of cache entry validation for both uploads and downloads.
Levels:
- `none`: no validation.
- `warning`: print a warning about invalid cache entries, but don't interrupt the build
- `error`: print an error about invalid cache entries and interrupt the build
is_required: true
summary: Level of cache entry validation for both uploads and downloads.
title: Validation level
value_options:
- none
- warning
- error
validation_level: warning
- collect_metrics: "true"
opts:
description: When enabled, this sets up Gradle build metrics collection for the
subsequent Gradle invocations in the workflow. Metrics are sent to [Bitrise
Insights](https://app.bitrise.io/insights).
is_required: true
summary: Collect build metrics in subsequent Gradle executions
title: Collect Gradle build metrics
value_options:
- "true"
- "false"
- opts:
is_required: true
summary: Enable logging additional information for troubleshooting
title: Verbose logging
value_options:
- "true"
- "false"
verbose: "false"
================================================
FILE: steps/activate-build-cache-for-gradle/2.17.2/step.yml
================================================
title: Build Cache for Gradle
summary: Activates Bitrise Remote Build Cache add-on for subsequent Gradle builds
in the workflow
description: |
This Step activates Bitrise's remote build cache add-on for subsequent Gradle executions in the workflow.
After this Step executes, Gradle builds will automatically read from the remote cache and push new entries if it's enabled.
website: https://github.com/bitrise-steplib/bitrise-step-activate-gradle-remote-cache
source_code_url: https://github.com/bitrise-steplib/bitrise-step-activate-gradle-remote-cache
support_url: https://github.com/bitrise-steplib/bitrise-step-activate-gradle-remote-cache
published_at: 2026-04-28T18:38:22.691892897Z
source:
git: https://github.com/bitrise-steplib/bitrise-step-activate-gradle-remote-cache.git
commit: 5e14417a153a0f2242d1d54abe7eac1bf8b6a5b9
type_tags:
- utility
toolkit:
bash:
entry_file: step.sh
is_skippable: true
run_if: .IsCI
inputs:
- opts:
is_required: true
summary: Whether the build can not only read, but write new entries to the remote
cache
title: Push new cache entries
value_options:
- "true"
- "false"
push: "true"
- opts:
description: |-
Level of cache entry validation for both uploads and downloads.
Levels:
- `none`: no validation.
- `warning`: print a warning about invalid cache entries, but don't interrupt the build
- `error`: print an error about invalid cache entries and interrupt the build
is_required: true
summary: Level of cache entry validation for both uploads and downloads.
title: Validation level
value_options:
- none
- warning
- error
validation_level: warning
- collect_metrics: "true"
opts:
description: When enabled, this sets up Gradle build metrics collection for the
subsequent Gradle invocations in the workflow. Metrics are sent to [Bitrise
Insights](https://app.bitrise.io/insights).
is_required: true
summary: Collect build metrics in subsequent Gradle executions
title: Collect Gradle build metrics
value_options:
- "true"
- "false"
- opts:
is_required: true
summary: Enable logging additional information for troubleshooting
title: Verbose logging
value_options:
- "true"
- "false"
verbose: "false"
================================================
FILE: steps/activate-build-cache-for-gradle/2.18.0/step.yml
================================================
title: Build Cache for Gradle
summary: Activates Bitrise Remote Build Cache add-on for subsequent Gradle builds
in the workflow
description: |
This Step activates Bitrise's remote build cache add-on for subsequent Gradle executions in the workflow.
After this Step executes, Gradle builds will automatically read from the remote cache and push new entries if it's enabled.
website: https://github.com/bitrise-steplib/bitrise-step-activate-gradle-remote-cache
source_code_url: https://github.com/bitrise-steplib/bitrise-step-activate-gradle-remote-cache
support_url: https://github.com/bitrise-steplib/bitrise-step-activate-gradle-remote-cache
published_at: 2026-04-29T11:09:50.844038312Z
source:
git: https://github.com/bitrise-steplib/bitrise-step-activate-gradle-remote-cache.git
commit: 08a7078abbfebb26cc5ecb7369d642db28665478
type_tags:
- utility
toolkit:
bash:
entry_file: step.sh
is_skippable: true
run_if: .IsCI
inputs:
- opts:
is_required: true
summary: Whether the build can not only read, but write new entries to the remote
cache
title: Push new cache entries
value_options:
- "true"
- "false"
push: "true"
- opts:
description: |-
Level of cache entry validation for both uploads and downloads.
Levels:
- `none`: no validation.
- `warning`: print a warning about invalid cache entries, but don't interrupt the build
- `error`: print an error about invalid cache entries and interrupt the build
is_required: true
summary: Level of cache entry validation for both uploads and downloads.
title: Validation level
value_options:
- none
- warning
- error
validation_level: warning
- collect_metrics: "true"
opts:
description: When enabled, this sets up Gradle build metrics collection for the
subsequent Gradle invocations in the workflow. Metrics are sent to [Bitrise
Insights](https://app.bitrise.io/insights).
is_required: true
summary: Collect build metrics in subsequent Gradle executions
title: Collect Gradle build metrics
value_options:
- "true"
- "false"
- opts:
is_required: true
summary: Enable logging additional information for troubleshooting
title: Verbose logging
value_options:
- "true"
- "false"
verbose: "false"
================================================
FILE: steps/activate-build-cache-for-gradle/2.18.1/step.yml
================================================
title: Build Cache for Gradle
summary: Activates Bitrise Remote Build Cache add-on for subsequent Gradle builds
in the workflow
description: |
This Step activates Bitrise's remote build cache add-on for subsequent Gradle executions in the workflow.
After this Step executes, Gradle builds will automatically read from the remote cache and push new entries if it's enabled.
website: https://github.com/bitrise-steplib/bitrise-step-activate-gradle-remote-cache
source_code_url: https://github.com/bitrise-steplib/bitrise-step-activate-gradle-remote-cache
support_url: https://github.com/bitrise-steplib/bitrise-step-activate-gradle-remote-cache
published_at: 2026-04-29T11:50:21.947087014Z
source:
git: https://github.com/bitrise-steplib/bitrise-step-activate-gradle-remote-cache.git
commit: 54d7e33686d036e0d6113ad6f53906f5e2c9f86c
type_tags:
- utility
toolkit:
bash:
entry_file: step.sh
is_skippable: true
run_if: .IsCI
inputs:
- opts:
is_required: true
summary: Whether the build can not only read, but write new entries to the remote
cache
title: Push new cache entries
value_options:
- "true"
- "false"
push: "true"
- opts:
description: |-
Level of cache entry validation for both uploads and downloads.
Levels:
- `none`: no validation.
- `warning`: print a warning about invalid cache entries, but don't interrupt the build
- `error`: print an error about invalid cache entries and interrupt the build
is_required: true
summary: Level of cache entry validation for both uploads and downloads.
title: Validation level
value_options:
- none
- warning
- error
validation_level: warning
- collect_metrics: "true"
opts:
description: When enabled, this sets up Gradle build metrics collection for the
subsequent Gradle invocations in the workflow. Metrics are sent to [Bitrise
Insights](https://app.bitrise.io/insights).
is_required: true
summary: Collect build metrics in subsequent Gradle executions
title: Collect Gradle build metrics
value_options:
- "true"
- "false"
- opts:
is_required: true
summary: Enable logging additional information for troubleshooting
title: Verbose logging
value_options:
- "true"
- "false"
verbose: "false"
================================================
FILE: steps/activate-build-cache-for-gradle/2.18.2/step.yml
================================================
title: Build Cache for Gradle
summary: Activates Bitrise Remote Build Cache add-on for subsequent Gradle builds
in the workflow
description: |
This Step activates Bitrise's remote build cache add-on for subsequent Gradle executions in the workflow.
After this Step executes, Gradle builds will automatically read from the remote cache and push new entries if it's enabled.
website: https://github.com/bitrise-steplib/bitrise-step-activate-gradle-remote-cache
source_code_url: https://github.com/bitrise-steplib/bitrise-step-activate-gradle-remote-cache
support_url: https://github.com/bitrise-steplib/bitrise-step-activate-gradle-remote-cache
published_at: 2026-04-29T12:32:49.490739664Z
source:
git: https://github.com/bitrise-steplib/bitrise-step-activate-gradle-remote-cache.git
commit: 0c14d7586fbe4bf4f1a49ba882ef8033ac69cbc6
type_tags:
- utility
toolkit:
bash:
entry_file: step.sh
is_skippable: true
run_if: .IsCI
inputs:
- opts:
is_required: true
summary: Whether the build can not only read, but write new entries to the remote
cache
title: Push new cache entries
value_options:
- "true"
- "false"
push: "true"
- opts:
description: |-
Level of cache entry validation for both uploads and downloads.
Levels:
- `none`: no validation.
- `warning`: print a warning about invalid cache entries, but don't interrupt the build
- `error`: print an error about invalid cache entries and interrupt the build
is_required: true
summary: Level of cache entry validation for both uploads and downloads.
title: Validation level
value_options:
- none
- warning
- error
validation_level: warning
- collect_metrics: "true"
opts:
description: When enabled, this sets up Gradle build metrics collection for the
subsequent Gradle invocations in the workflow. Metrics are sent to [Bitrise
Insights](https://app.bitrise.io/insights).
is_required: true
summary: Collect build metrics in subsequent Gradle executions
title: Collect Gradle build metrics
value_options:
- "true"
- "false"
- opts:
is_required: true
summary: Enable logging additional information for troubleshooting
title: Verbose logging
value_options:
- "true"
- "false"
verbose: "false"
================================================
FILE: steps/activate-build-cache-for-gradle/2.18.3/step.yml
================================================
title: Build Cache for Gradle
summary: Activates Bitrise Remote Build Cache add-on for subsequent Gradle builds
in the workflow
description: |
This Step activates Bitrise's remote build cache add-on for subsequent Gradle executions in the workflow.
After this Step executes, Gradle builds will automatically read from the remote cache and push new entries if it's enabled.
website: https://github.com/bitrise-steplib/bitrise-step-activate-gradle-remote-cache
source_code_url: https://github.com/bitrise-steplib/bitrise-step-activate-gradle-remote-cache
support_url: https://github.com/bitrise-steplib/bitrise-step-activate-gradle-remote-cache
published_at: 2026-04-29T14:48:54.169815665Z
source:
git: https://github.com/bitrise-steplib/bitrise-step-activate-gradle-remote-cache.git
commit: b018e2a161ede13fba41e862b352d0d61a2ec980
type_tags:
- utility
toolkit:
bash:
entry_file: step.sh
is_skippable: true
run_if: .IsCI
inputs:
- opts:
is_required: true
summary: Whether the build can not only read, but write new entries to the remote
cache
title: Push new cache entries
value_options:
- "true"
- "false"
push: "true"
- opts:
description: |-
Level of cache entry validation for both uploads and downloads.
Levels:
- `none`: no validation.
- `warning`: print a warning about invalid cache entries, but don't interrupt the build
- `error`: print an error about invalid cache entries and interrupt the build
is_required: true
summary: Level of cache entry validation for both uploads and downloads.
title: Validation level
value_options:
- none
- warning
- error
validation_level: warning
- collect_metrics: "true"
opts:
description: When enabled, this sets up Gradle build metrics collection for the
subsequent Gradle invocations in the workflow. Metrics are sent to [Bitrise
Insights](https://app.bitrise.io/insights).
is_required: true
summary: Collect build metrics in subsequent Gradle executions
title: Collect Gradle build metrics
value_options:
- "true"
- "false"
- opts:
is_required: true
summary: Enable logging additional information for troubleshooting
title: Verbose logging
value_options:
- "true"
- "false"
verbose: "false"
================================================
FILE: steps/activate-build-cache-for-gradle/2.18.4/step.yml
================================================
title: Build Cache for Gradle
summary: Activates Bitrise Remote Build Cache add-on for subsequent Gradle builds
in the workflow
description: |
This Step activates Bitrise's remote build cache add-on for subsequent Gradle executions in the workflow.
After this Step executes, Gradle builds will automatically read from the remote cache and push new entries if it's enabled.
website: https://github.com/bitrise-steplib/bitrise-step-activate-gradle-remote-cache
source_code_url: https://github.com/bitrise-steplib/bitrise-step-activate-gradle-remote-cache
support_url: https://github.com/bitrise-steplib/bitrise-step-activate-gradle-remote-cache
published_at: 2026-04-30T07:10:01.769287809Z
source:
git: https://github.com/bitrise-steplib/bitrise-step-activate-gradle-remote-cache.git
commit: a99f5ab5a272dfd0e5707a91881d69c87aad121a
type_tags:
- utility
toolkit:
bash:
entry_file: step.sh
is_skippable: true
run_if: .IsCI
inputs:
- opts:
is_required: true
summary: Whether the build can not only read, but write new entries to the remote
cache
title: Push new cache entries
value_options:
- "true"
- "false"
push: "true"
- opts:
description: |-
Level of cache entry validation for both uploads and downloads.
Levels:
- `none`: no validation.
- `warning`: print a warning about invalid cache entries, but don't interrupt the build
- `error`: print an error about invalid cache entries and interrupt the build
is_required: true
summary: Level of cache entry validation for both uploads and downloads.
title: Validation level
value_options:
- none
- warning
- error
validation_level: warning
- collect_metrics: "true"
opts:
description: When enabled, this sets up Gradle build metrics collection for the
subsequent Gradle invocations in the workflow. Metrics are sent to [Bitrise
Insights](https://app.bitrise.io/insights).
is_required: true
summary: Collect build metrics in subsequent Gradle executions
title: Collect Gradle build metrics
value_options:
- "true"
- "false"
- opts:
is_required: true
summary: Enable logging additional information for troubleshooting
title: Verbose logging
value_options:
- "true"
- "false"
verbose: "false"
================================================
FILE: steps/activate-build-cache-for-gradle/2.18.5/step.yml
================================================
title: Build Cache for Gradle
summary: Activates Bitrise Remote Build Cache add-on for subsequent Gradle builds
in the workflow
description: |
This Step activates Bitrise's remote build cache add-on for subsequent Gradle executions in the workflow.
After this Step executes, Gradle builds will automatically read from the remote cache and push new entries if it's enabled.
website: https://github.com/bitrise-steplib/bitrise-step-activate-gradle-remote-cache
source_code_url: https://github.com/bitrise-steplib/bitrise-step-activate-gradle-remote-cache
support_url: https://github.com/bitrise-steplib/bitrise-step-activate-gradle-remote-cache
published_at: 2026-04-30T09:39:06.885242964Z
source:
git: https://github.com/bitrise-steplib/bitrise-step-activate-gradle-remote-cache.git
commit: bebeac0566ec3b1afc366dc55c271a9ef30cb6d0
type_tags:
- utility
toolkit:
bash:
entry_file: step.sh
is_skippable: true
run_if: .IsCI
inputs:
- opts:
is_required: true
summary: Whether the build can not only read, but write new entries to the remote
cache
title: Push new cache entries
value_options:
- "true"
- "false"
push: "true"
- opts:
description: |-
Level of cache entry validation for both uploads and downloads.
Levels:
- `none`: no validation.
- `warning`: print a warning about invalid cache entries, but don't interrupt the build
- `error`: print an error about invalid cache entries and interrupt the build
is_required: true
summary: Level of cache entry validation for both uploads and downloads.
title: Validation level
value_options:
- none
- warning
- error
validation_level: warning
- collect_metrics: "true"
opts:
description: When enabled, this sets up Gradle build metrics collection for the
subsequent Gradle invocations in the workflow. Metrics are sent to [Bitrise
Insights](https://app.bitrise.io/insights).
is_required: true
summary: Collect build metrics in subsequent Gradle executions
title: Collect Gradle build metrics
value_options:
- "true"
- "false"
- opts:
is_required: true
summary: Enable logging additional information for troubleshooting
title: Verbose logging
value_options:
- "true"
- "false"
verbose: "false"
================================================
FILE: steps/activate-build-cache-for-gradle/2.18.6/step.yml
================================================
title: Build Cache for Gradle
summary: Activates Bitrise Remote Build Cache add-on for subsequent Gradle builds
in the workflow
description: |
This Step activates Bitrise's remote build cache add-on for subsequent Gradle executions in the workflow.
After this Step executes, Gradle builds will automatically read from the remote cache and push new entries if it's enabled.
website: https://github.com/bitrise-steplib/bitrise-step-activate-gradle-remote-cache
source_code_url: https://github.com/bitrise-steplib/bitrise-step-activate-gradle-remote-cache
support_url: https://github.com/bitrise-steplib/bitrise-step-activate-gradle-remote-cache
published_at: 2026-04-30T11:37:32.992596109Z
source:
git: https://github.com/bitrise-steplib/bitrise-step-activate-gradle-remote-cache.git
commit: aea5db5585fa3f1d5da68f93561ed49ef9eda038
type_tags:
- utility
toolkit:
bash:
entry_file: step.sh
is_skippable: true
run_if: .IsCI
inputs:
- opts:
is_required: true
summary: Whether the build can not only read, but write new entries to the remote
cache
title: Push new cache entries
value_options:
- "true"
- "false"
push: "true"
- opts:
description: |-
Level of cache entry validation for both uploads and downloads.
Levels:
- `none`: no validation.
- `warning`: print a warning about invalid cache entries, but don't interrupt the build
- `error`: print an error about invalid cache entries and interrupt the build
is_required: true
summary: Level of cache entry validation for both uploads and downloads.
title: Validation level
value_options:
- none
- warning
- error
validation_level: warning
- collect_metrics: "true"
opts:
description: When enabled, this sets up Gradle build metrics collection for the
subsequent Gradle invocations in the workflow. Metrics are sent to [Bitrise
Insights](https://app.bitrise.io/insights).
is_required: true
summary: Collect build metrics in subsequent Gradle executions
title: Collect Gradle build metrics
value_options:
- "true"
- "false"
- opts:
is_required: true
summary: Enable logging additional information for troubleshooting
title: Verbose logging
value_options:
- "true"
- "false"
verbose: "false"
================================================
FILE: steps/activate-build-cache-for-gradle/2.18.7/step.yml
================================================
title: Build Cache for Gradle
summary: Activates Bitrise Remote Build Cache add-on for subsequent Gradle builds
in the workflow
description: |
This Step activates Bitrise's remote build cache add-on for subsequent Gradle executions in the workflow.
After this Step executes, Gradle builds will automatically read from the remote cache and push new entries if it's enabled.
website: https://github.com/bitrise-steplib/bitrise-step-activate-gradle-remote-cache
source_code_url: https://github.com/bitrise-steplib/bitrise-step-activate-gradle-remote-cache
support_url: https://github.com/bitrise-steplib/bitrise-step-activate-gradle-remote-cache
published_at: 2026-04-30T12:01:19.928739389Z
source:
git: https://github.com/bitrise-steplib/bitrise-step-activate-gradle-remote-cache.git
commit: 266e2708c0d60ae8ce54e61eb52c183126151b7c
type_tags:
- utility
toolkit:
bash:
entry_file: step.sh
is_skippable: true
run_if: .IsCI
inputs:
- opts:
is_required: true
summary: Whether the build can not only read, but write new entries to the remote
cache
title: Push new cache entries
value_options:
- "true"
- "false"
push: "true"
- opts:
description: |-
Level of cache entry validation for both uploads and downloads.
Levels:
- `none`: no validation.
- `warning`: print a warning about invalid cache entries, but don't interrupt the build
- `error`: print an error about invalid cache entries and interrupt the build
is_required: true
summary: Level of cache entry validation for both uploads and downloads.
title: Validation level
value_options:
- none
- warning
- error
validation_level: warning
- collect_metrics: "true"
opts:
description: When enabled, this sets up Gradle build metrics collection for the
subsequent Gradle invocations in the workflow. Metrics are sent to [Bitrise
Insights](https://app.bitrise.io/insights).
is_required: true
summary: Collect build metrics in subsequent Gradle executions
title: Collect Gradle build metrics
value_options:
- "true"
- "false"
- opts:
is_required: true
summary: Enable logging additional information for troubleshooting
title: Verbose logging
value_options:
- "true"
- "false"
verbose: "false"
================================================
FILE: steps/activate-build-cache-for-gradle/2.18.8/step.yml
================================================
title: Build Cache for Gradle
summary: Activates Bitrise Remote Build Cache add-on for subsequent Gradle builds
in the workflow
description: |
This Step activates Bitrise's remote build cache add-on for subsequent Gradle executions in the workflow.
After this Step executes, Gradle builds will automatically read from the remote cache and push new entries if it's enabled.
website: https://github.com/bitrise-steplib/bitrise-step-activate-gradle-remote-cache
source_code_url: https://github.com/bitrise-steplib/bitrise-step-activate-gradle-remote-cache
support_url: https://github.com/bitrise-steplib/bitrise-step-activate-gradle-remote-cache
published_at: 2026-04-30T15:21:27.406571371Z
source:
git: https://github.com/bitrise-steplib/bitrise-step-activate-gradle-remote-cache.git
commit: 181eac6385e4775102c8e72ae7f87b3b47c23b1b
type_tags:
- utility
toolkit:
bash:
entry_file: step.sh
is_skippable: true
run_if: .IsCI
inputs:
- opts:
is_required: true
summary: Whether the build can not only read, but write new entries to the remote
cache
title: Push new cache entries
value_options:
- "true"
- "false"
push: "true"
- opts:
description: |-
Level of cache entry validation for both uploads and downloads.
Levels:
- `none`: no validation.
- `warning`: print a warning about invalid cache entries, but don't interrupt the build
- `error`: print an error about invalid cache entries and interrupt the build
is_required: true
summary: Level of cache entry validation for both uploads and downloads.
title: Validation level
value_options:
- none
- warning
- error
validation_level: warning
- collect_metrics: "true"
opts:
description: When enabled, this sets up Gradle build metrics collection for the
subsequent Gradle invocations in the workflow. Metrics are sent to [Bitrise
Insights](https://app.bitrise.io/insights).
is_required: true
summary: Collect build metrics in subsequent Gradle executions
title: Collect Gradle build metrics
value_options:
- "true"
- "false"
- opts:
is_required: true
summary: Enable logging additional information for troubleshooting
title: Verbose logging
value_options:
- "true"
- "false"
verbose: "false"
================================================
FILE: steps/activate-build-cache-for-gradle/2.18.9/step.yml
================================================
title: Build Cache for Gradle
summary: Activates Bitrise Remote Build Cache add-on for subsequent Gradle builds
in the workflow
description: |
This Step activates Bitrise's remote build cache add-on for subsequent Gradle executions in the workflow.
After this Step executes, Gradle builds will automatically read from the remote cache and push new entries if it's enabled.
website: https://github.com/bitrise-steplib/bitrise-step-activate-gradle-remote-cache
source_code_url: https://github.com/bitrise-steplib/bitrise-step-activate-gradle-remote-cache
support_url: https://github.com/bitrise-steplib/bitrise-step-activate-gradle-remote-cache
published_at: 2026-04-30T15:57:52.694564218Z
source:
git: https://github.com/bitrise-steplib/bitrise-step-activate-gradle-remote-cache.git
commit: b26a9e613fee0db28f532b882936fcd34716fc3e
type_tags:
- utility
toolkit:
bash:
entry_file: step.sh
is_skippable: true
run_if: .IsCI
inputs:
- opts:
is_required: true
summary: Whether the build can not only read, but write new entries to the remote
cache
title: Push new cache entries
value_options:
- "true"
- "false"
push: "true"
- opts:
description: |-
Level of cache entry validation for both uploads and downloads.
Levels:
- `none`: no validation.
- `warning`: print a warning about invalid cache entries, but don't interrupt the build
- `error`: print an error about invalid cache entries and interrupt the build
is_required: true
summary: Level of cache entry validation for both uploads and downloads.
title: Validation level
value_options:
- none
- warning
- error
validation_level: warning
- collect_metrics: "true"
opts:
description: When enabled, this sets up Gradle build metrics collection for the
subsequent Gradle invocations in the workflow. Metrics are sent to [Bitrise
Insights](https://app.bitrise.io/insights).
is_required: true
summary: Collect build metrics in subsequent Gradle executions
title: Collect Gradle build metrics
value_options:
- "true"
- "false"
- opts:
is_required: true
summary: Enable logging additional information for troubleshooting
title: Verbose logging
value_options:
- "true"
- "false"
verbose: "false"
================================================
FILE: steps/activate-build-cache-for-gradle/2.19.0/step.yml
================================================
title: Build Cache for Gradle
summary: Activates Bitrise Remote Build Cache add-on for subsequent Gradle builds
in the workflow
description: |
This Step activates Bitrise's remote build cache add-on for subsequent Gradle executions in the workflow.
After this Step executes, Gradle builds will automatically read from the remote cache and push new entries if it's enabled.
website: https://github.com/bitrise-steplib/bitrise-step-activate-gradle-remote-cache
source_code_url: https://github.com/bitrise-steplib/bitrise-step-activate-gradle-remote-cache
support_url: https://github.com/bitrise-steplib/bitrise-step-activate-gradle-remote-cache
published_at: 2026-05-05T12:06:30.505645616Z
source:
git: https://github.com/bitrise-steplib/bitrise-step-activate-gradle-remote-cache.git
commit: 65c095748df31573fd3af5cad027c52978b04335
type_tags:
- utility
toolkit:
bash:
entry_file: step.sh
is_skippable: true
run_if: .IsCI
inputs:
- opts:
is_required: true
summary: Whether the build can not only read, but write new entries to the remote
cache
title: Push new cache entries
value_options:
- "true"
- "false"
push: "true"
- opts:
description: |-
Level of cache entry validation for both uploads and downloads.
Levels:
- `none`: no validation.
- `warning`: print a warning about invalid cache entries, but don't interrupt the build
- `error`: print an error about invalid cache entries and interrupt the build
is_required: true
summary: Level of cache entry validation for both uploads and downloads.
title: Validation level
value_options:
- none
- warning
- error
validation_level: warning
- collect_metrics: "true"
opts:
description: When enabled, this sets up Gradle build metrics collection for the
subsequent Gradle invocations in the workflow. Metrics are sent to [Bitrise
Insights](https://app.bitrise.io/insights).
is_required: true
summary: Collect build metrics in subsequent Gradle executions
title: Collect Gradle build metrics
value_options:
- "true"
- "false"
- opts:
is_required: true
summary: Enable logging additional information for troubleshooting
title: Verbose logging
value_options:
- "true"
- "false"
verbose: "false"
================================================
FILE: steps/activate-build-cache-for-gradle/2.2.0/step.yml
================================================
title: Activate Bitrise Build Cache Add-On for Gradle
summary: Activates Bitrise Remote Build Cache add-on for subsequent Gradle builds
in the workflow
description: |
This Step activates Bitrise's remote build cache add-on for subsequent Gradle executions in the workflow.
After this Step executes, Gradle builds will automatically read from the remote cache and push new entries if it's enabled.
website: https://github.com/bitrise-steplib/bitrise-step-activate-gradle-remote-cache
source_code_url: https://github.com/bitrise-steplib/bitrise-step-activate-gradle-remote-cache
support_url: https://github.com/bitrise-steplib/bitrise-step-activate-gradle-remote-cache
published_at: 2024-03-26T12:27:16.004266382Z
source:
git: https://github.com/bitrise-steplib/bitrise-step-activate-gradle-remote-cache.git
commit: 2edfc038a41d3b42cec12f8234a7d733e548d1cc
type_tags:
- utility
toolkit:
bash:
entry_file: step.sh
is_skippable: true
run_if: .IsCI
inputs:
- opts:
is_required: true
summary: Whether the build can not only read, but write new entries to the remote
cache
title: Push new cache entries
value_options:
- "true"
- "false"
push: "true"
- opts:
description: |-
Level of cache entry validation for both uploads and downloads.
Levels:
- `none`: no validation.
- `warning`: print a warning about invalid cache entries, but don't interrupt the build
- `error`: print an error about invalid cache entries and interrupt the build
is_required: true
summary: Level of cache entry validation for both uploads and downloads.
title: Validation level
value_options:
- none
- warning
- error
validation_level: warning
- collect_metrics: "false"
opts:
description: When enabled, this sets up Gradle build metrics collection for the
subsequent Gradle invocations in the workflow. Metrics are sent to [Bitrise
Insights](https://app.bitrise.io/insights).
is_required: true
summary: Collect build metrics in subsequent Gradle executions
title: Collect Gradle build metrics
value_options:
- "true"
- "false"
- opts:
is_required: true
summary: Enable logging additional information for troubleshooting
title: Verbose logging
value_options:
- "true"
- "false"
verbose: "false"
================================================
FILE: steps/activate-build-cache-for-gradle/2.20.0/step.yml
================================================
title: Build Cache for Gradle
summary: Activates Bitrise Remote Build Cache add-on for subsequent Gradle builds
in the workflow
description: |
This Step activates Bitrise's remote build cache add-on for subsequent Gradle executions in the workflow.
After this Step executes, Gradle builds will automatically read from the remote cache and push new entries if it's enabled.
website: https://github.com/bitrise-steplib/bitrise-step-activate-gradle-remote-cache
source_code_url: https://github.com/bitrise-steplib/bitrise-step-activate-gradle-remote-cache
support_url: https://github.com/bitrise-steplib/bitrise-step-activate-gradle-remote-cache
published_at: 2026-05-05T14:45:21.731114537Z
source:
git: https://github.com/bitrise-steplib/bitrise-step-activate-gradle-remote-cache.git
commit: cb3e6bde4d0b6d79819ba1cb8865dbdf2a9f3d64
type_tags:
- utility
toolkit:
bash:
entry_file: step.sh
is_skippable: true
run_if: .IsCI
inputs:
- opts:
is_required: true
summary: Whether the build can not only read, but write new entries to the remote
cache
title: Push new cache entries
value_options:
- "true"
- "false"
push: "true"
- opts:
description: |-
Level of cache entry validation for both uploads and downloads.
Levels:
- `none`: no validation.
- `warning`: print a warning about invalid cache entries, but don't interrupt the build
- `error`: print an error about invalid cache entries and interrupt the build
is_required: true
summary: Level of cache entry validation for both uploads and downloads.
title: Validation level
value_options:
- none
- warning
- error
validation_level: warning
- collect_metrics: "true"
opts:
description: When enabled, this sets up Gradle build metrics collection for the
subsequent Gradle invocations in the workflow. Metrics are sent to [Bitrise
Insights](https://app.bitrise.io/insights).
is_required: true
summary: Collect build metrics in subsequent Gradle executions
title: Collect Gradle build metrics
value_options:
- "true"
- "false"
- opts:
is_required: true
summary: Enable logging additional information for troubleshooting
title: Verbose logging
value_options:
- "true"
- "false"
verbose: "false"
================================================
FILE: steps/activate-build-cache-for-gradle/2.20.1/step.yml
================================================
title: Build Cache for Gradle
summary: Activates Bitrise Remote Build Cache add-on for subsequent Gradle builds
in the workflow
description: |
This Step activates Bitrise's remote build cache add-on for subsequent Gradle executions in the workflow.
After this Step executes, Gradle builds will automatically read from the remote cache and push new entries if it's enabled.
website: https://github.com/bitrise-steplib/bitrise-step-activate-gradle-remote-cache
source_code_url: https://github.com/bitrise-steplib/bitrise-step-activate-gradle-remote-cache
support_url: https://github.com/bitrise-steplib/bitrise-step-activate-gradle-remote-cache
published_at: 2026-05-12T08:58:55.856730738Z
source:
git: https://github.com/bitrise-steplib/bitrise-step-activate-gradle-remote-cache.git
commit: 94373df17d7d34cfe982070b80a6cd1cf6583037
type_tags:
- utility
toolkit:
bash:
entry_file: step.sh
is_skippable: true
run_if: .IsCI
inputs:
- opts:
is_required: true
summary: Whether the build can not only read, but write new entries to the remote
cache
title: Push new cache entries
value_options:
- "true"
- "false"
push: "true"
- opts:
description: |-
Level of cache entry validation for both uploads and downloads.
Levels:
- `none`: no validation.
- `warning`: print a warning about invalid cache entries, but don't interrupt the build
- `error`: print an error about invalid cache entries and interrupt the build
is_required: true
summary: Level of cache entry validation for both uploads and downloads.
title: Validation level
value_options:
- none
- warning
- error
validation_level: warning
- collect_metrics: "true"
opts:
description: When enabled, this sets up Gradle build metrics collection for the
subsequent Gradle invocations in the workflow. Metrics are sent to [Bitrise
Insights](https://app.bitrise.io/insights).
is_required: true
summary: Collect build metrics in subsequent Gradle executions
title: Collect Gradle build metrics
value_options:
- "true"
- "false"
- opts:
is_required: true
summary: Enable logging additional information for troubleshooting
title: Verbose logging
value_options:
- "true"
- "false"
verbose: "false"
================================================
FILE: steps/activate-build-cache-for-gradle/2.3.0/step.yml
================================================
title: Activate Bitrise Build Cache Add-On for Gradle
summary: Activates Bitrise Remote Build Cache add-on for subsequent Gradle builds
in the workflow
description: |
This Step activates Bitrise's remote build cache add-on for subsequent Gradle executions in the workflow.
After this Step executes, Gradle builds will automatically read from the remote cache and push new entries if it's enabled.
website: https://github.com/bitrise-steplib/bitrise-step-activate-gradle-remote-cache
source_code_url: https://github.com/bitrise-steplib/bitrise-step-activate-gradle-remote-cache
support_url: https://github.com/bitrise-steplib/bitrise-step-activate-gradle-remote-cache
published_at: 2024-04-03T12:56:44.890103211Z
source:
git: https://github.com/bitrise-steplib/bitrise-step-activate-gradle-remote-cache.git
commit: efbe378d7817ea3559f5739799b0cc5e96a4b2b1
type_tags:
- utility
toolkit:
bash:
entry_file: step.sh
is_skippable: true
run_if: .IsCI
inputs:
- opts:
is_required: true
summary: Whether the build can not only read, but write new entries to the remote
cache
title: Push new cache entries
value_options:
- "true"
- "false"
push: "true"
- opts:
description: |-
Level of cache entry validation for both uploads and downloads.
Levels:
- `none`: no validation.
- `warning`: print a warning about invalid cache entries, but don't interrupt the build
- `error`: print an error about invalid cache entries and interrupt the build
is_required: true
summary: Level of cache entry validation for both uploads and downloads.
title: Validation level
value_options:
- none
- warning
- error
validation_level: warning
- collect_metrics: "false"
opts:
description: When enabled, this sets up Gradle build metrics collection for the
subsequent Gradle invocations in the workflow. Metrics are sent to [Bitrise
Insights](https://app.bitrise.io/insights).
is_required: true
summary: Collect build metrics in subsequent Gradle executions
title: Collect Gradle build metrics
value_options:
- "true"
- "false"
- opts:
is_required: true
summary: Enable logging additional information for troubleshooting
title: Verbose logging
value_options:
- "true"
- "false"
verbose: "false"
================================================
FILE: steps/activate-build-cache-for-gradle/2.4.0/step.yml
================================================
title: Activate Bitrise Build Cache Add-On for Gradle
summary: Activates Bitrise Remote Build Cache add-on for subsequent Gradle builds
in the workflow
description: |
This Step activates Bitrise's remote build cache add-on for subsequent Gradle executions in the workflow.
After this Step executes, Gradle builds will automatically read from the remote cache and push new entries if it's enabled.
website: https://github.com/bitrise-steplib/bitrise-step-activate-gradle-remote-cache
source_code_url: https://github.com/bitrise-steplib/bitrise-step-activate-gradle-remote-cache
support_url: https://github.com/bitrise-steplib/bitrise-step-activate-gradle-remote-cache
published_at: 2024-04-17T11:17:11.35146825Z
source:
git: https://github.com/bitrise-steplib/bitrise-step-activate-gradle-remote-cache.git
commit: 2fe9df1797c3ed4c05627d00670ae320cb057356
type_tags:
- utility
toolkit:
bash:
entry_file: step.sh
is_skippable: true
run_if: .IsCI
inputs:
- opts:
is_required: true
summary: Whether the build can not only read, but write new entries to the remote
cache
title: Push new cache entries
value_options:
- "true"
- "false"
push: "true"
- opts:
description: |-
Level of cache entry validation for both uploads and downloads.
Levels:
- `none`: no validation.
- `warning`: print a warning about invalid cache entries, but don't interrupt the build
- `error`: print an error about invalid cache entries and interrupt the build
is_required: true
summary: Level of cache entry validation for both uploads and downloads.
title: Validation level
value_options:
- none
- warning
- error
validation_level: warning
- collect_metrics: "true"
opts:
description: When enabled, this sets up Gradle build metrics collection for the
subsequent Gradle invocations in the workflow. Metrics are sent to [Bitrise
Insights](https://app.bitrise.io/insights).
is_required: true
summary: Collect build metrics in subsequent Gradle executions
title: Collect Gradle build metrics
value_options:
- "true"
- "false"
- opts:
is_required: true
summary: Enable logging additional information for troubleshooting
title: Verbose logging
value_options:
- "true"
- "false"
verbose: "false"
================================================
FILE: steps/activate-build-cache-for-gradle/2.5.0/step.yml
================================================
title: Activate Bitrise Build Cache Add-On for Gradle
summary: Activates Bitrise Remote Build Cache add-on for subsequent Gradle builds
in the workflow
description: |
This Step activates Bitrise's remote build cache add-on for subsequent Gradle executions in the workflow.
After this Step executes, Gradle builds will automatically read from the remote cache and push new entries if it's enabled.
website: https://github.com/bitrise-steplib/bitrise-step-activate-gradle-remote-cache
source_code_url: https://github.com/bitrise-steplib/bitrise-step-activate-gradle-remote-cache
support_url: https://github.com/bitrise-steplib/bitrise-step-activate-gradle-remote-cache
published_at: 2024-04-23T13:30:58.940201096Z
source:
git: https://github.com/bitrise-steplib/bitrise-step-activate-gradle-remote-cache.git
commit: a9eb8f5d9e2868b9488f3ce896e5be8bbe5a71e9
type_tags:
- utility
toolkit:
bash:
entry_file: step.sh
is_skippable: true
run_if: .IsCI
inputs:
- opts:
is_required: true
summary: Whether the build can not only read, but write new entries to the remote
cache
title: Push new cache entries
value_options:
- "true"
- "false"
push: "true"
- opts:
description: |-
Level of cache entry validation for both uploads and downloads.
Levels:
- `none`: no validation.
- `warning`: print a warning about invalid cache entries, but don't interrupt the build
- `error`: print an error about invalid cache entries and interrupt the build
is_required: true
summary: Level of cache entry validation for both uploads and downloads.
title: Validation level
value_options:
- none
- warning
- error
validation_level: warning
- collect_metrics: "true"
opts:
description: When enabled, this sets up Gradle build metrics collection for the
subsequent Gradle invocations in the workflow. Metrics are sent to [Bitrise
Insights](https://app.bitrise.io/insights).
is_required: true
summary: Collect build metrics in subsequent Gradle executions
title: Collect Gradle build metrics
value_options:
- "true"
- "false"
- opts:
is_required: true
summary: Enable logging additional information for troubleshooting
title: Verbose logging
value_options:
- "true"
- "false"
verbose: "false"
================================================
FILE: steps/activate-build-cache-for-gradle/2.6.0/step.yml
================================================
title: Activate Bitrise Build Cache Add-On for Gradle
summary: Activates Bitrise Remote Build Cache add-on for subsequent Gradle builds
in the workflow
description: |
This Step activates Bitrise's remote build cache add-on for subsequent Gradle executions in the workflow.
After this Step executes, Gradle builds will automatically read from the remote cache and push new entries if it's enabled.
website: https://github.com/bitrise-steplib/bitrise-step-activate-gradle-remote-cache
source_code_url: https://github.com/bitrise-steplib/bitrise-step-activate-gradle-remote-cache
support_url: https://github.com/bitrise-steplib/bitrise-step-activate-gradle-remote-cache
published_at: 2024-05-09T06:49:25.539591955Z
source:
git: https://github.com/bitrise-steplib/bitrise-step-activate-gradle-remote-cache.git
commit: 9d232a62bbf02e8ad3cd7818ef90eb4fabbbf8b2
type_tags:
- utility
toolkit:
bash:
entry_file: step.sh
is_skippable: true
run_if: .IsCI
inputs:
- opts:
is_required: true
summary: Whether the build can not only read, but write new entries to the remote
cache
title: Push new cache entries
value_options:
- "true"
- "false"
push: "true"
- opts:
description: |-
Level of cache entry validation for both uploads and downloads.
Levels:
- `none`: no validation.
- `warning`: print a warning about invalid cache entries, but don't interrupt the build
- `error`: print an error about invalid cache entries and interrupt the build
is_required: true
summary: Level of cache entry validation for both uploads and downloads.
title: Validation level
value_options:
- none
- warning
- error
validation_level: warning
- collect_metrics: "true"
opts:
description: When enabled, this sets up Gradle build metrics collection for the
subsequent Gradle invocations in the workflow. Metrics are sent to [Bitrise
Insights](https://app.bitrise.io/insights).
is_required: true
summary: Collect build metrics in subsequent Gradle executions
title: Collect Gradle build metrics
value_options:
- "true"
- "false"
- opts:
is_required: true
summary: Enable logging additional information for troubleshooting
title: Verbose logging
value_options:
- "true"
- "false"
verbose: "false"
================================================
FILE: steps/activate-build-cache-for-gradle/2.7.0/step.yml
================================================
title: Activate Bitrise Build Cache Add-On for Gradle
summary: Activates Bitrise Remote Build Cache add-on for subsequent Gradle builds
in the workflow
description: |
This Step activates Bitrise's remote build cache add-on for subsequent Gradle executions in the workflow.
After this Step executes, Gradle builds will automatically read from the remote cache and push new entries if it's enabled.
website: https://github.com/bitrise-steplib/bitrise-step-activate-gradle-remote-cache
source_code_url: https://github.com/bitrise-steplib/bitrise-step-activate-gradle-remote-cache
support_url: https://github.com/bitrise-steplib/bitrise-step-activate-gradle-remote-cache
published_at: 2024-05-14T08:54:06.286353106Z
source:
git: https://github.com/bitrise-steplib/bitrise-step-activate-gradle-remote-cache.git
commit: fc1308fdc697651077655b6419f59173d6791211
type_tags:
- utility
toolkit:
bash:
entry_file: step.sh
is_skippable: true
run_if: .IsCI
inputs:
- opts:
is_required: true
summary: Whether the build can not only read, but write new entries to the remote
cache
title: Push new cache entries
value_options:
- "true"
- "false"
push: "true"
- opts:
description: |-
Level of cache entry validation for both uploads and downloads.
Levels:
- `none`: no validation.
- `warning`: print a warning about invalid cache entries, but don't interrupt the build
- `error`: print an error about invalid cache entries and interrupt the build
is_required: true
summary: Level of cache entry validation for both uploads and downloads.
title: Validation level
value_options:
- none
- warning
- error
validation_level: warning
- collect_metrics: "true"
opts:
description: When enabled, this sets up Gradle build metrics collection for the
subsequent Gradle invocations in the workflow. Metrics are sent to [Bitrise
Insights](https://app.bitrise.io/insights).
is_required: true
summary: Collect build metrics in subsequent Gradle executions
title: Collect Gradle build metrics
value_options:
- "true"
- "false"
- opts:
is_required: true
summary: Enable logging additional information for troubleshooting
title: Verbose logging
value_options:
- "true"
- "false"
verbose: "false"
================================================
FILE: steps/activate-build-cache-for-gradle/2.7.1/step.yml
================================================
title: Activate Bitrise Build Cache Add-On for Gradle
summary: Activates Bitrise Remote Build Cache add-on for subsequent Gradle builds
in the workflow
description: |
This Step activates Bitrise's remote build cache add-on for subsequent Gradle executions in the workflow.
After this Step executes, Gradle builds will automatically read from the remote cache and push new entries if it's enabled.
website: https://github.com/bitrise-steplib/bitrise-step-activate-gradle-remote-cache
source_code_url: https://github.com/bitrise-steplib/bitrise-step-activate-gradle-remote-cache
support_url: https://github.com/bitrise-steplib/bitrise-step-activate-gradle-remote-cache
published_at: 2024-05-16T07:25:51.701672831Z
source:
git: https://github.com/bitrise-steplib/bitrise-step-activate-gradle-remote-cache.git
commit: 5fe5746e06c97d3bed1431c0a1a682f429774ac5
type_tags:
- utility
toolkit:
bash:
entry_file: step.sh
is_skippable: true
run_if: .IsCI
inputs:
- opts:
is_required: true
summary: Whether the build can not only read, but write new entries to the remote
cache
title: Push new cache entries
value_options:
- "true"
- "false"
push: "true"
- opts:
description: |-
Level of cache entry validation for both uploads and downloads.
Levels:
- `none`: no validation.
- `warning`: print a warning about invalid cache entries, but don't interrupt the build
- `error`: print an error about invalid cache entries and interrupt the build
is_required: true
summary: Level of cache entry validation for both uploads and downloads.
title: Validation level
value_options:
- none
- warning
- error
validation_level: warning
- collect_metrics: "true"
opts:
description: When enabled, this sets up Gradle build metrics collection for the
subsequent Gradle invocations in the workflow. Metrics are sent to [Bitrise
Insights](https://app.bitrise.io/insights).
is_required: true
summary: Collect build metrics in subsequent Gradle executions
title: Collect Gradle build metrics
value_options:
- "true"
- "false"
- opts:
is_required: true
summary: Enable logging additional information for troubleshooting
title: Verbose logging
value_options:
- "true"
- "false"
verbose: "false"
================================================
FILE: steps/activate-build-cache-for-gradle/2.7.10/step.yml
================================================
title: Build Cache for Gradle
summary: Activates Bitrise Remote Build Cache add-on for subsequent Gradle builds
in the workflow
description: |
This Step activates Bitrise's remote build cache add-on for subsequent Gradle executions in the workflow.
After this Step executes, Gradle builds will automatically read from the remote cache and push new entries if it's enabled.
website: https://github.com/bitrise-steplib/bitrise-step-activate-gradle-remote-cache
source_code_url: https://github.com/bitrise-steplib/bitrise-step-activate-gradle-remote-cache
support_url: https://github.com/bitrise-steplib/bitrise-step-activate-gradle-remote-cache
published_at: 2024-12-09T13:46:25.722045301Z
source:
git: https://github.com/bitrise-steplib/bitrise-step-activate-gradle-remote-cache.git
commit: 3013c09aa89795912af26160cb900f428d0f4673
type_tags:
- utility
toolkit:
bash:
entry_file: step.sh
is_skippable: true
run_if: .IsCI
inputs:
- opts:
is_required: true
summary: Whether the build can not only read, but write new entries to the remote
cache
title: Push new cache entries
value_options:
- "true"
- "false"
push: "true"
- opts:
description: |-
Level of cache entry validation for both uploads and downloads.
Levels:
- `none`: no validation.
- `warning`: print a warning about invalid cache entries, but don't interrupt the build
- `error`: print an error about invalid cache entries and interrupt the build
is_required: true
summary: Level of cache entry validation for both uploads and downloads.
title: Validation level
value_options:
- none
- warning
- error
validation_level: warning
- collect_metrics: "true"
opts:
description: When enabled, this sets up Gradle build metrics collection for the
subsequent Gradle invocations in the workflow. Metrics are sent to [Bitrise
Insights](https://app.bitrise.io/insights).
is_required: true
summary: Collect build metrics in subsequent Gradle executions
title: Collect Gradle build metrics
value_options:
- "true"
- "false"
- opts:
is_required: true
summary: Enable logging additional information for troubleshooting
title: Verbose logging
value_options:
- "true"
- "false"
verbose: "false"
================================================
FILE: steps/activate-build-cache-for-gradle/2.7.11/step.yml
================================================
title: Build Cache for Gradle
summary: Activates Bitrise Remote Build Cache add-on for subsequent Gradle builds
in the workflow
description: |
This Step activates Bitrise's remote build cache add-on for subsequent Gradle executions in the workflow.
After this Step executes, Gradle builds will automatically read from the remote cache and push new entries if it's enabled.
website: https://github.com/bitrise-steplib/bitrise-step-activate-gradle-remote-cache
source_code_url: https://github.com/bitrise-steplib/bitrise-step-activate-gradle-remote-cache
support_url: https://github.com/bitrise-steplib/bitrise-step-activate-gradle-remote-cache
published_at: 2024-12-09T15:49:56.860632332Z
source:
git: https://github.com/bitrise-steplib/bitrise-step-activate-gradle-remote-cache.git
commit: 5b19ba43f97628884bff493f94c7032d65c9e5ee
type_tags:
- utility
toolkit:
bash:
entry_file: step.sh
is_skippable: true
run_if: .IsCI
inputs:
- opts:
is_required: true
summary: Whether the build can not only read, but write new entries to the remote
cache
title: Push new cache entries
value_options:
- "true"
- "false"
push: "true"
- opts:
description: |-
Level of cache entry validation for both uploads and downloads.
Levels:
- `none`: no validation.
- `warning`: print a warning about invalid cache entries, but don't interrupt the build
- `error`: print an error about invalid cache entries and interrupt the build
is_required: true
summary: Level of cache entry validation for both uploads and downloads.
title: Validation level
value_options:
- none
- warning
- error
validation_level: warning
- collect_metrics: "true"
opts:
description: When enabled, this sets up Gradle build metrics collection for the
subsequent Gradle invocations in the workflow. Metrics are sent to [Bitrise
Insights](https://app.bitrise.io/insights).
is_required: true
summary: Collect build metrics in subsequent Gradle executions
title: Collect Gradle build metrics
value_options:
- "true"
- "false"
- opts:
is_required: true
summary: Enable logging additional information for troubleshooting
title: Verbose logging
value_options:
- "true"
- "false"
verbose: "false"
================================================
FILE: steps/activate-build-cache-for-gradle/2.7.12/step.yml
================================================
title: Build Cache for Gradle
summary: Activates Bitrise Remote Build Cache add-on for subsequent Gradle builds
in the workflow
description: |
This Step activates Bitrise's remote build cache add-on for subsequent Gradle executions in the workflow.
After this Step executes, Gradle builds will automatically read from the remote cache and push new entries if it's enabled.
website: https://github.com/bitrise-steplib/bitrise-step-activate-gradle-remote-cache
source_code_url: https://github.com/bitrise-steplib/bitrise-step-activate-gradle-remote-cache
support_url: https://github.com/bitrise-steplib/bitrise-step-activate-gradle-remote-cache
published_at: 2024-12-12T10:03:19.31376549Z
source:
git: https://github.com/bitrise-steplib/bitrise-step-activate-gradle-remote-cache.git
commit: c28102b1016b8b251af02e1c895086ef09828763
type_tags:
- utility
toolkit:
bash:
entry_file: step.sh
is_skippable: true
run_if: .IsCI
inputs:
- opts:
is_required: true
summary: Whether the build can not only read, but write new entries to the remote
cache
title: Push new cache entries
value_options:
- "true"
- "false"
push: "true"
- opts:
description: |-
Level of cache entry validation for both uploads and downloads.
Levels:
- `none`: no validation.
- `warning`: print a warning about invalid cache entries, but don't interrupt the build
- `error`: print an error about invalid cache entries and interrupt the build
is_required: true
summary: Level of cache entry validation for both uploads and downloads.
title: Validation level
value_options:
- none
- warning
- error
validation_level: warning
- collect_metrics: "true"
opts:
description: When enabled, this sets up Gradle build metrics collection for the
subsequent Gradle invocations in the workflow. Metrics are sent to [Bitrise
Insights](https://app.bitrise.io/insights).
is_required: true
summary: Collect build metrics in subsequent Gradle executions
title: Collect Gradle build metrics
value_options:
- "true"
- "false"
- opts:
is_required: true
summary: Enable logging additional information for troubleshooting
title: Verbose logging
value_options:
- "true"
- "false"
verbose: "false"
================================================
FILE: steps/activate-build-cache-for-gradle/2.7.13/step.yml
================================================
title: Build Cache for Gradle
summary: Activates Bitrise Remote Build Cache add-on for subsequent Gradle builds
in the workflow
description: |
This Step activates Bitrise's remote build cache add-on for subsequent Gradle executions in the workflow.
After this Step executes, Gradle builds will automatically read from the remote cache and push new entries if it's enabled.
website: https://github.com/bitrise-steplib/bitrise-step-activate-gradle-remote-cache
source_code_url: https://github.com/bitrise-steplib/bitrise-step-activate-gradle-remote-cache
support_url: https://github.com/bitrise-steplib/bitrise-step-activate-gradle-remote-cache
published_at: 2025-01-14T08:50:41.564279659Z
source:
git: https://github.com/bitrise-steplib/bitrise-step-activate-gradle-remote-cache.git
commit: 672b3deebab7ac0b613d42a3d11498d38bdaa2a7
type_tags:
- utility
toolkit:
bash:
entry_file: step.sh
is_skippable: true
run_if: .IsCI
inputs:
- opts:
is_required: true
summary: Whether the build can not only read, but write new entries to the remote
cache
title: Push new cache entries
value_options:
- "true"
- "false"
push: "true"
- opts:
description: |-
Level of cache entry validation for both uploads and downloads.
Levels:
- `none`: no validation.
- `warning`: print a warning about invalid cache entries, but don't interrupt the build
- `error`: print an error about invalid cache entries and interrupt the build
is_required: true
summary: Level of cache entry validation for both uploads and downloads.
title: Validation level
value_options:
- none
- warning
- error
validation_level: warning
- collect_metrics: "true"
opts:
description: When enabled, this sets up Gradle build metrics collection for the
subsequent Gradle invocations in the workflow. Metrics are sent to [Bitrise
Insights](https://app.bitrise.io/insights).
is_required: true
summary: Collect build metrics in subsequent Gradle executions
title: Collect Gradle build metrics
value_options:
- "true"
- "false"
- opts:
is_required: true
summary: Enable logging additional information for troubleshooting
title: Verbose logging
value_options:
- "true"
- "false"
verbose: "false"
================================================
FILE: steps/activate-build-cache-for-gradle/2.7.14/step.yml
================================================
title: Build Cache for Gradle
summary: Activates Bitrise Remote Build Cache add-on for subsequent Gradle builds
in the workflow
description: |
This Step activates Bitrise's remote build cache add-on for subsequent Gradle executions in the workflow.
After this Step executes, Gradle builds will automatically read from the remote cache and push new entries if it's enabled.
website: https://github.com/bitrise-steplib/bitrise-step-activate-gradle-remote-cache
source_code_url: https://github.com/bitrise-steplib/bitrise-step-activate-gradle-remote-cache
support_url: https://github.com/bitrise-steplib/bitrise-step-activate-gradle-remote-cache
published_at: 2025-01-16T10:14:19.667361302Z
source:
git: https://github.com/bitrise-steplib/bitrise-step-activate-gradle-remote-cache.git
commit: 1a66cdc623df7261514a18abe820d32d51019a65
type_tags:
- utility
toolkit:
bash:
entry_file: step.sh
is_skippable: true
run_if: .IsCI
inputs:
- opts:
is_required: true
summary: Whether the build can not only read, but write new entries to the remote
cache
title: Push new cache entries
value_options:
- "true"
- "false"
push: "true"
- opts:
description: |-
Level of cache entry validation for both uploads and downloads.
Levels:
- `none`: no validation.
- `warning`: print a warning about invalid cache entries, but don't interrupt the build
- `error`: print an error about invalid cache entries and interrupt the build
is_required: true
summary: Level of cache entry validation for both uploads and downloads.
title: Validation level
value_options:
- none
- warning
- error
validation_level: warning
- collect_metrics: "true"
opts:
description: When enabled, this sets up Gradle build metrics collection for the
subsequent Gradle invocations in the workflow. Metrics are sent to [Bitrise
Insights](https://app.bitrise.io/insights).
is_required: true
summary: Collect build metrics in subsequent Gradle executions
title: Collect Gradle build metrics
value_options:
- "true"
- "false"
- opts:
is_required: true
summary: Enable logging additional information for troubleshooting
title: Verbose logging
value_options:
- "true"
- "false"
verbose: "false"
================================================
FILE: steps/activate-build-cache-for-gradle/2.7.15/step.yml
================================================
title: Build Cache for Gradle
summary: Activates Bitrise Remote Build Cache add-on for subsequent Gradle builds
in the workflow
description: |
This Step activates Bitrise's remote build cache add-on for subsequent Gradle executions in the workflow.
After this Step executes, Gradle builds will automatically read from the remote cache and push new entries if it's enabled.
website: https://github.com/bitrise-steplib/bitrise-step-activate-gradle-remote-cache
source_code_url: https://github.com/bitrise-steplib/bitrise-step-activate-gradle-remote-cache
support_url: https://github.com/bitrise-steplib/bitrise-step-activate-gradle-remote-cache
published_at: 2025-01-20T11:05:36.8709771Z
source:
git: https://github.com/bitrise-steplib/bitrise-step-activate-gradle-remote-cache.git
commit: dd7cd01193c4059260773c153ef4c65a822d8e55
type_tags:
- utility
toolkit:
bash:
entry_file: step.sh
is_skippable: true
run_if: .IsCI
inputs:
- opts:
is_required: true
summary: Whether the build can not only read, but write new entries to the remote
cache
title: Push new cache entries
value_options:
- "true"
- "false"
push: "true"
- opts:
description: |-
Level of cache entry validation for both uploads and downloads.
Levels:
- `none`: no validation.
- `warning`: print a warning about invalid cache entries, but don't interrupt the build
- `error`: print an error about invalid cache entries and interrupt the build
is_required: true
summary: Level of cache entry validation for both uploads and downloads.
title: Validation level
value_options:
- none
- warning
- error
validation_level: warning
- collect_metrics: "true"
opts:
description: When enabled, this sets up Gradle build metrics collection for the
subsequent Gradle invocations in the workflow. Metrics are sent to [Bitrise
Insights](https://app.bitrise.io/insights).
is_required: true
summary: Collect build metrics in subsequent Gradle executions
title: Collect Gradle build metrics
value_options:
- "true"
- "false"
- opts:
is_required: true
summary: Enable logging additional information for troubleshooting
title: Verbose logging
value_options:
- "true"
- "false"
verbose: "false"
================================================
FILE: steps/activate-build-cache-for-gradle/2.7.16/step.yml
================================================
title: Build Cache for Gradle
summary: Activates Bitrise Remote Build Cache add-on for subsequent Gradle builds
in the workflow
description: |
This Step activates Bitrise's remote build cache add-on for subsequent Gradle executions in the workflow.
After this Step executes, Gradle builds will automatically read from the remote cache and push new entries if it's enabled.
website: https://github.com/bitrise-steplib/bitrise-step-activate-gradle-remote-cache
source_code_url: https://github.com/bitrise-steplib/bitrise-step-activate-gradle-remote-cache
support_url: https://github.com/bitrise-steplib/bitrise-step-activate-gradle-remote-cache
published_at: 2025-01-21T10:20:39.157509331Z
source:
git: https://github.com/bitrise-steplib/bitrise-step-activate-gradle-remote-cache.git
commit: 9cbf5d355f8d555cb81baedee7bf2ba7046950d4
type_tags:
- utility
toolkit:
bash:
entry_file: step.sh
is_skippable: true
run_if: .IsCI
inputs:
- opts:
is_required: true
summary: Whether the build can not only read, but write new entries to the remote
cache
title: Push new cache entries
value_options:
- "true"
- "false"
push: "true"
- opts:
description: |-
Level of cache entry validation for both uploads and downloads.
Levels:
- `none`: no validation.
- `warning`: print a warning about invalid cache entries, but don't interrupt the build
- `error`: print an error about invalid cache entries and interrupt the build
is_required: true
summary: Level of cache entry validation for both uploads and downloads.
title: Validation level
value_options:
- none
- warning
- error
validation_level: warning
- collect_metrics: "true"
opts:
description: When enabled, this sets up Gradle build metrics collection for the
subsequent Gradle invocations in the workflow. Metrics are sent to [Bitrise
Insights](https://app.bitrise.io/insights).
is_required: true
summary: Collect build metrics in subsequent Gradle executions
title: Collect Gradle build metrics
value_options:
- "true"
- "false"
- opts:
is_required: true
summary: Enable logging additional information for troubleshooting
title: Verbose logging
value_options:
- "true"
- "false"
verbose: "false"
================================================
FILE: steps/activate-build-cache-for-gradle/2.7.17/step.yml
================================================
title: Build Cache for Gradle
summary: Activates Bitrise Remote Build Cache add-on for subsequent Gradle builds
in the workflow
description: |
This Step activates Bitrise's remote build cache add-on for subsequent Gradle executions in the workflow.
After this Step executes, Gradle builds will automatically read from the remote cache and push new entries if it's enabled.
website: https://github.com/bitrise-steplib/bitrise-step-activate-gradle-remote-cache
source_code_url: https://github.com/bitrise-steplib/bitrise-step-activate-gradle-remote-cache
support_url: https://github.com/bitrise-steplib/bitrise-step-activate-gradle-remote-cache
published_at: 2025-01-27T15:28:58.842828325Z
source:
git: https://github.com/bitrise-steplib/bitrise-step-activate-gradle-remote-cache.git
commit: 62ff5a1e0f41d99a158bdaff05d565d264c9ab31
type_tags:
- utility
toolkit:
bash:
entry_file: step.sh
is_skippable: true
run_if: .IsCI
inputs:
- opts:
is_required: true
summary: Whether the build can not only read, but write new entries to the remote
cache
title: Push new cache entries
value_options:
- "true"
- "false"
push: "true"
- opts:
description: |-
Level of cache entry validation for both uploads and downloads.
Levels:
- `none`: no validation.
- `warning`: print a warning about invalid cache entries, but don't interrupt the build
- `error`: print an error about invalid cache entries and interrupt the build
is_required: true
summary: Level of cache entry validation for both uploads and downloads.
title: Validation level
value_options:
- none
- warning
- error
validation_level: warning
- collect_metrics: "true"
opts:
description: When enabled, this sets up Gradle build metrics collection for the
subsequent Gradle invocations in the workflow. Metrics are sent to [Bitrise
Insights](https://app.bitrise.io/insights).
is_required: true
summary: Collect build metrics in subsequent Gradle executions
title: Collect Gradle build metrics
value_options:
- "true"
- "false"
- opts:
is_required: true
summary: Enable logging additional information for troubleshooting
title: Verbose logging
value_options:
- "true"
- "false"
verbose: "false"
================================================
FILE: steps/activate-build-cache-for-gradle/2.7.18/step.yml
================================================
title: Build Cache for Gradle
summary: Activates Bitrise Remote Build Cache add-on for subsequent Gradle builds
in the workflow
description: |
This Step activates Bitrise's remote build cache add-on for subsequent Gradle executions in the workflow.
After this Step executes, Gradle builds will automatically read from the remote cache and push new entries if it's enabled.
website: https://github.com/bitrise-steplib/bitrise-step-activate-gradle-remote-cache
source_code_url: https://github.com/bitrise-steplib/bitrise-step-activate-gradle-remote-cache
support_url: https://github.com/bitrise-steplib/bitrise-step-activate-gradle-remote-cache
published_at: 2025-01-29T09:32:42.891262216Z
source:
git: https://github.com/bitrise-steplib/bitrise-step-activate-gradle-remote-cache.git
commit: 33d46171f76d737f76eae3a73257a97098f5da2a
type_tags:
- utility
toolkit:
bash:
entry_file: step.sh
is_skippable: true
run_if: .IsCI
inputs:
- opts:
is_required: true
summary: Whether the build can not only read, but write new entries to the remote
cache
title: Push new cache entries
value_options:
- "true"
- "false"
push: "true"
- opts:
description: |-
Level of cache entry validation for both uploads and downloads.
Levels:
- `none`: no validation.
- `warning`: print a warning about invalid cache entries, but don't interrupt the build
- `error`: print an error about invalid cache entries and interrupt the build
is_required: true
summary: Level of cache entry validation for both uploads and downloads.
title: Validation level
value_options:
- none
- warning
- error
validation_level: warning
- collect_metrics: "true"
opts:
description: When enabled, this sets up Gradle build metrics collection for the
subsequent Gradle invocations in the workflow. Metrics are sent to [Bitrise
Insights](https://app.bitrise.io/insights).
is_required: true
summary: Collect build metrics in subsequent Gradle executions
title: Collect Gradle build metrics
value_options:
- "true"
- "false"
- opts:
is_required: true
summary: Enable logging additional information for troubleshooting
title: Verbose logging
value_options:
- "true"
- "false"
verbose: "false"
================================================
FILE: steps/activate-build-cache-for-gradle/2.7.19/step.yml
================================================
title: Build Cache for Gradle
summary: Activates Bitrise Remote Build Cache add-on for subsequent Gradle builds
in the workflow
description: |
This Step activates Bitrise's remote build cache add-on for subsequent Gradle executions in the workflow.
After this Step executes, Gradle builds will automatically read from the remote cache and push new entries if it's enabled.
website: https://github.com/bitrise-steplib/bitrise-step-activate-gradle-remote-cache
source_code_url: https://github.com/bitrise-steplib/bitrise-step-activate-gradle-remote-cache
support_url: https://github.com/bitrise-steplib/bitrise-step-activate-gradle-remote-cache
published_at: 2025-01-30T14:06:49.723702633Z
source:
git: https://github.com/bitrise-steplib/bitrise-step-activate-gradle-remote-cache.git
commit: 5d69be8fa0d5f36f6c1fd21b1bb0c52917a09800
type_tags:
- utility
toolkit:
bash:
entry_file: step.sh
is_skippable: true
run_if: .IsCI
inputs:
- opts:
is_required: true
summary: Whether the build can not only read, but write new entries to the remote
cache
title: Push new cache entries
value_options:
- "true"
- "false"
push: "true"
- opts:
description: |-
Level of cache entry validation for both uploads and downloads.
Levels:
- `none`: no validation.
- `warning`: print a warning about invalid cache entries, but don't interrupt the build
- `error`: print an error about invalid cache entries and interrupt the build
is_required: true
summary: Level of cache entry validation for both uploads and downloads.
title: Validation level
value_options:
- none
- warning
- error
validation_level: warning
- collect_metrics: "true"
opts:
description: When enabled, this sets up Gradle build metrics collection for the
subsequent Gradle invocations in the workflow. Metrics are sent to [Bitrise
Insights](https://app.bitrise.io/insights).
is_required: true
summary: Collect build metrics in subsequent Gradle executions
title: Collect Gradle build metrics
value_options:
- "true"
- "false"
- opts:
is_required: true
summary: Enable logging additional information for troubleshooting
title: Verbose logging
value_options:
- "true"
- "false"
verbose: "false"
================================================
FILE: steps/activate-build-cache-for-gradle/2.7.2/step.yml
================================================
title: Activate Bitrise Build Cache Add-On for Gradle
summary: Activates Bitrise Remote Build Cache add-on for subsequent Gradle builds
in the workflow
description: |
This Step activates Bitrise's remote build cache add-on for subsequent Gradle executions in the workflow.
After this Step executes, Gradle builds will automatically read from the remote cache and push new entries if it's enabled.
website: https://github.com/bitrise-steplib/bitrise-step-activate-gradle-remote-cache
source_code_url: https://github.com/bitrise-steplib/bitrise-step-activate-gradle-remote-cache
support_url: https://github.com/bitrise-steplib/bitrise-step-activate-gradle-remote-cache
published_at: 2024-05-17T14:55:57.451818696Z
source:
git: https://github.com/bitrise-steplib/bitrise-step-activate-gradle-remote-cache.git
commit: 7759efa0a099ed29e7500b3246c28c27977bb638
type_tags:
- utility
toolkit:
bash:
entry_file: step.sh
is_skippable: true
run_if: .IsCI
inputs:
- opts:
is_required: true
summary: Whether the build can not only read, but write new entries to the remote
cache
title: Push new cache entries
value_options:
- "true"
- "false"
push: "true"
- opts:
description: |-
Level of cache entry validation for both uploads and downloads.
Levels:
- `none`: no validation.
- `warning`: print a warning about invalid cache entries, but don't interrupt the build
- `error`: print an error about invalid cache entries and interrupt the build
is_required: true
summary: Level of cache entry validation for both uploads and downloads.
title: Validation level
value_options:
- none
- warning
- error
validation_level: warning
- collect_metrics: "true"
opts:
description: When enabled, this sets up Gradle build metrics collection for the
subsequent Gradle invocations in the workflow. Metrics are sent to [Bitrise
Insights](https://app.bitrise.io/insights).
is_required: true
summary: Collect build metrics in subsequent Gradle executions
title: Collect Gradle build metrics
value_options:
- "true"
- "false"
- opts:
is_required: true
summary: Enable logging additional information for troubleshooting
title: Verbose logging
value_options:
- "true"
- "false"
verbose: "false"
================================================
FILE: steps/activate-build-cache-for-gradle/2.7.20/step.yml
================================================
title: Build Cache for Gradle
summary: Activates Bitrise Remote Build Cache add-on for subsequent Gradle builds
in the workflow
description: |
This Step activates Bitrise's remote build cache add-on for subsequent Gradle executions in the workflow.
After this Step executes, Gradle builds will automatically read from the remote cache and push new entries if it's enabled.
website: https://github.com/bitrise-steplib/bitrise-step-activate-gradle-remote-cache
source_code_url: https://github.com/bitrise-steplib/bitrise-step-activate-gradle-remote-cache
support_url: https://github.com/bitrise-steplib/bitrise-step-activate-gradle-remote-cache
published_at: 2025-01-31T10:30:53.215411656Z
source:
git: https://github.com/bitrise-steplib/bitrise-step-activate-gradle-remote-cache.git
commit: 01979fbb712a2c4c83808c39f23990b6e8fe8409
type_tags:
- utility
toolkit:
bash:
entry_file: step.sh
is_skippable: true
run_if: .IsCI
inputs:
- opts:
is_required: true
summary: Whether the build can not only read, but write new entries to the remote
cache
title: Push new cache entries
value_options:
- "true"
- "false"
push: "true"
- opts:
description: |-
Level of cache entry validation for both uploads and downloads.
Levels:
- `none`: no validation.
- `warning`: print a warning about invalid cache entries, but don't interrupt the build
- `error`: print an error about invalid cache entries and interrupt the build
is_required: true
summary: Level of cache entry validation for both uploads and downloads.
title: Validation level
value_options:
- none
- warning
- error
validation_level: warning
- collect_metrics: "true"
opts:
description: When enabled, this sets up Gradle build metrics collection for the
subsequent Gradle invocations in the workflow. Metrics are sent to [Bitrise
Insights](https://app.bitrise.io/insights).
is_required: true
summary: Collect build metrics in subsequent Gradle executions
title: Collect Gradle build metrics
value_options:
- "true"
- "false"
- opts:
is_required: true
summary: Enable logging additional information for troubleshooting
title: Verbose logging
value_options:
- "true"
- "false"
verbose: "false"
================================================
FILE: steps/activate-build-cache-for-gradle/2.7.21/step.yml
================================================
title: Build Cache for Gradle
summary: Activates Bitrise Remote Build Cache add-on for subsequent Gradle builds
in the workflow
description: |
This Step activates Bitrise's remote build cache add-on for subsequent Gradle executions in the workflow.
After this Step executes, Gradle builds will automatically read from the remote cache and push new entries if it's enabled.
website: https://github.com/bitrise-steplib/bitrise-step-activate-gradle-remote-cache
source_code_url: https://github.com/bitrise-steplib/bitrise-step-activate-gradle-remote-cache
support_url: https://github.com/bitrise-steplib/bitrise-step-activate-gradle-remote-cache
published_at: 2025-02-06T14:00:07.341253501Z
source:
git: https://github.com/bitrise-steplib/bitrise-step-activate-gradle-remote-cache.git
commit: 2e43e9027383e8e6694551fe5f72676235c044b3
type_tags:
- utility
toolkit:
bash:
entry_file: step.sh
is_skippable: true
run_if: .IsCI
inputs:
- opts:
is_required: true
summary: Whether the build can not only read, but write new entries to the remote
cache
title: Push new cache entries
value_options:
- "true"
- "false"
push: "true"
- opts:
description: |-
Level of cache entry validation for both uploads and downloads.
Levels:
- `none`: no validation.
- `warning`: print a warning about invalid cache entries, but don't interrupt the build
- `error`: print an error about invalid cache entries and interrupt the build
is_required: true
summary: Level of cache entry validation for both uploads and downloads.
title: Validation level
value_options:
- none
- warning
- error
validation_level: warning
- collect_metrics: "true"
opts:
description: When enabled, this sets up Gradle build metrics collection for the
subsequent Gradle invocations in the workflow. Metrics are sent to [Bitrise
Insights](https://app.bitrise.io/insights).
is_required: true
summary: Collect build metrics in subsequent Gradle executions
title: Collect Gradle build metrics
value_options:
- "true"
- "false"
- opts:
is_required: true
summary: Enable logging additional information for troubleshooting
title: Verbose logging
value_options:
- "true"
- "false"
verbose: "false"
================================================
FILE: steps/activate-build-cache-for-gradle/2.7.22/step.yml
================================================
title: Build Cache for Gradle
summary: Activates Bitrise Remote Build Cache add-on for subsequent Gradle builds
in the workflow
description: |
This Step activates Bitrise's remote build cache add-on for subsequent Gradle executions in the workflow.
After this Step executes, Gradle builds will automatically read from the remote cache and push new entries if it's enabled.
website: https://github.com/bitrise-steplib/bitrise-step-activate-gradle-remote-cache
source_code_url: https://github.com/bitrise-steplib/bitrise-step-activate-gradle-remote-cache
support_url: https://github.com/bitrise-steplib/bitrise-step-activate-gradle-remote-cache
published_at: 2025-03-04T12:38:43.323862743Z
source:
git: https://github.com/bitrise-steplib/bitrise-step-activate-gradle-remote-cache.git
commit: 45214800122383f444549bcc75e79f9c0e66219a
type_tags:
- utility
toolkit:
bash:
entry_file: step.sh
is_skippable: true
run_if: .IsCI
inputs:
- opts:
is_required: true
summary: Whether the build can not only read, but write new entries to the remote
cache
title: Push new cache entries
value_options:
- "true"
- "false"
push: "true"
- opts:
description: |-
Level of cache entry validation for both uploads and downloads.
Levels:
- `none`: no validation.
- `warning`: print a warning about invalid cache entries, but don't interrupt the build
- `error`: print an error about invalid cache entries and interrupt the build
is_required: true
summary: Level of cache entry validation for both uploads and downloads.
title: Validation level
value_options:
- none
- warning
- error
validation_level: warning
- collect_metrics: "true"
opts:
description: When enabled, this sets up Gradle build metrics collection for the
subsequent Gradle invocations in the workflow. Metrics are sent to [Bitrise
Insights](https://app.bitrise.io/insights).
is_required: true
summary: Collect build metrics in subsequent Gradle executions
title: Collect Gradle build metrics
value_options:
- "true"
- "false"
- opts:
is_required: true
summary: Enable logging additional information for troubleshooting
title: Verbose logging
value_options:
- "true"
- "false"
verbose: "false"
================================================
FILE: steps/activate-build-cache-for-gradle/2.7.23/step.yml
================================================
title: Build Cache for Gradle
summary: Activates Bitrise Remote Build Cache add-on for subsequent Gradle builds
in the workflow
description: |
This Step activates Bitrise's remote build cache add-on for subsequent Gradle executions in the workflow.
After this Step executes, Gradle builds will automatically read from the remote cache and push new entries if it's enabled.
website: https://github.com/bitrise-steplib/bitrise-step-activate-gradle-remote-cache
source_code_url: https://github.com/bitrise-steplib/bitrise-step-activate-gradle-remote-cache
support_url: https://github.com/bitrise-steplib/bitrise-step-activate-gradle-remote-cache
published_at: 2025-03-18T14:59:46.967995125Z
source:
git: https://github.com/bitrise-steplib/bitrise-step-activate-gradle-remote-cache.git
commit: 68b7cea844b00b7aa1dea8bc349898e106b5687d
type_tags:
- utility
toolkit:
bash:
entry_file: step.sh
is_skippable: true
run_if: .IsCI
inputs:
- opts:
is_required: true
summary: Whether the build can not only read, but write new entries to the remote
cache
title: Push new cache entries
value_options:
- "true"
- "false"
push: "true"
- opts:
description: |-
Level of cache entry validation for both uploads and downloads.
Levels:
- `none`: no validation.
- `warning`: print a warning about invalid cache entries, but don't interrupt the build
- `error`: print an error about invalid cache entries and interrupt the build
is_required: true
summary: Level of cache entry validation for both uploads and downloads.
title: Validation level
value_options:
- none
- warning
- error
validation_level: warning
- collect_metrics: "true"
opts:
description: When enabled, this sets up Gradle build metrics collection for the
subsequent Gradle invocations in the workflow. Metrics are sent to [Bitrise
Insights](https://app.bitrise.io/insights).
is_required: true
summary: Collect build metrics in subsequent Gradle executions
title: Collect Gradle build metrics
value_options:
- "true"
- "false"
- opts:
is_required: true
summary: Enable logging additional information for troubleshooting
title: Verbose logging
value_options:
- "true"
- "false"
verbose: "false"
================================================
FILE: steps/activate-build-cache-for-gradle/2.7.24/step.yml
================================================
title: Build Cache for Gradle
summary: Activates Bitrise Remote Build Cache add-on for subsequent Gradle builds
in the workflow
description: |
This Step activates Bitrise's remote build cache add-on for subsequent Gradle executions in the workflow.
After this Step executes, Gradle builds will automatically read from the remote cache and push new entries if it's enabled.
website: https://github.com/bitrise-steplib/bitrise-step-activate-gradle-remote-cache
source_code_url: https://github.com/bitrise-steplib/bitrise-step-activate-gradle-remote-cache
support_url: https://github.com/bitrise-steplib/bitrise-step-activate-gradle-remote-cache
published_at: 2025-03-25T08:40:54.613556685Z
source:
git: https://github.com/bitrise-steplib/bitrise-step-activate-gradle-remote-cache.git
commit: e47a3ef3f2b8ad3cfa946369f5c338e9e45354ca
type_tags:
- utility
toolkit:
bash:
entry_file: step.sh
is_skippable: true
run_if: .IsCI
inputs:
- opts:
is_required: true
summary: Whether the build can not only read, but write new entries to the remote
cache
title: Push new cache entries
value_options:
- "true"
- "false"
push: "true"
- opts:
description: |-
Level of cache entry validation for both uploads and downloads.
Levels:
- `none`: no validation.
- `warning`: print a warning about invalid cache entries, but don't interrupt the build
- `error`: print an error about invalid cache entries and interrupt the build
is_required: true
summary: Level of cache entry validation for both uploads and downloads.
title: Validation level
value_options:
- none
- warning
- error
validation_level: warning
- collect_metrics: "true"
opts:
description: When enabled, this sets up Gradle build metrics collection for the
subsequent Gradle invocations in the workflow. Metrics are sent to [Bitrise
Insights](https://app.bitrise.io/insights).
is_required: true
summary: Collect build metrics in subsequent Gradle executions
title: Collect Gradle build metrics
value_options:
- "true"
- "false"
- opts:
is_required: true
summary: Enable logging additional information for troubleshooting
title: Verbose logging
value_options:
- "true"
- "false"
verbose: "false"
================================================
FILE: steps/activate-build-cache-for-gradle/2.7.25/step.yml
================================================
title: Build Cache for Gradle
summary: Activates Bitrise Remote Build Cache add-on for subsequent Gradle builds
in the workflow
description: |
This Step activates Bitrise's remote build cache add-on for subsequent Gradle executions in the workflow.
After this Step executes, Gradle builds will automatically read from the remote cache and push new entries if it's enabled.
website: https://github.com/bitrise-steplib/bitrise-step-activate-gradle-remote-cache
source_code_url: https://github.com/bitrise-steplib/bitrise-step-activate-gradle-remote-cache
support_url: https://github.com/bitrise-steplib/bitrise-step-activate-gradle-remote-cache
published_at: 2025-03-26T12:48:40.131895624Z
source:
git: https://github.com/bitrise-steplib/bitrise-step-activate-gradle-remote-cache.git
commit: 72d57cb5caf14287efe4fdd226279bffbb04f420
type_tags:
- utility
toolkit:
bash:
entry_file: step.sh
is_skippable: true
run_if: .IsCI
inputs:
- opts:
is_required: true
summary: Whether the build can not only read, but write new entries to the remote
cache
title: Push new cache entries
value_options:
- "true"
- "false"
push: "true"
- opts:
description: |-
Level of cache entry validation for both uploads and downloads.
Levels:
- `none`: no validation.
- `warning`: print a warning about invalid cache entries, but don't interrupt the build
- `error`: print an error about invalid cache entries and interrupt the build
is_required: true
summary: Level of cache entry validation for both uploads and downloads.
title: Validation level
value_options:
- none
- warning
- error
validation_level: warning
- collect_metrics: "true"
opts:
description: When enabled, this sets up Gradle build metrics collection for the
subsequent Gradle invocations in the workflow. Metrics are sent to [Bitrise
Insights](https://app.bitrise.io/insights).
is_required: true
summary: Collect build metrics in subsequent Gradle executions
title: Collect Gradle build metrics
value_options:
- "true"
- "false"
- opts:
is_required: true
summary: Enable logging additional information for troubleshooting
title: Verbose logging
value_options:
- "true"
- "false"
verbose: "false"
================================================
FILE: steps/activate-build-cache-for-gradle/2.7.26/step.yml
================================================
title: Build Cache for Gradle
summary: Activates Bitrise Remote Build Cache add-on for subsequent Gradle builds
in the workflow
description: |
This Step activates Bitrise's remote build cache add-on for subsequent Gradle executions in the workflow.
After this Step executes, Gradle builds will automatically read from the remote cache and push new entries if it's enabled.
website: https://github.com/bitrise-steplib/bitrise-step-activate-gradle-remote-cache
source_code_url: https://github.com/bitrise-steplib/bitrise-step-activate-gradle-remote-cache
support_url: https://github.com/bitrise-steplib/bitrise-step-activate-gradle-remote-cache
published_at: 2025-04-01T15:21:50.585546919Z
source:
git: https://github.com/bitrise-steplib/bitrise-step-activate-gradle-remote-cache.git
commit: cc842c6db5f4fe10e751df3cd273af575b26e100
type_tags:
- utility
toolkit:
bash:
entry_file: step.sh
is_skippable: true
run_if: .IsCI
inputs:
- opts:
is_required: true
summary: Whether the build can not only read, but write new entries to the remote
cache
title: Push new cache entries
value_options:
- "true"
- "false"
push: "true"
- opts:
description: |-
Level of cache entry validation for both uploads and downloads.
Levels:
- `none`: no validation.
- `warning`: print a warning about invalid cache entries, but don't interrupt the build
- `error`: print an error about invalid cache entries and interrupt the build
is_required: true
summary: Level of cache entry validation for both uploads and downloads.
title: Validation level
value_options:
- none
- warning
- error
validation_level: warning
- collect_metrics: "true"
opts:
description: When enabled, this sets up Gradle build metrics collection for the
subsequent Gradle invocations in the workflow. Metrics are sent to [Bitrise
Insights](https://app.bitrise.io/insights).
is_required: true
summary: Collect build metrics in subsequent Gradle executions
title: Collect Gradle build metrics
value_options:
- "true"
- "false"
- opts:
is_required: true
summary: Enable logging additional information for troubleshooting
title: Verbose logging
value_options:
- "true"
- "false"
verbose: "false"
================================================
FILE: steps/activate-build-cache-for-gradle/2.7.27/step.yml
================================================
title: Build Cache for Gradle
summary: Activates Bitrise Remote Build Cache add-on for subsequent Gradle builds
in the workflow
description: |
This Step activates Bitrise's remote build cache add-on for subsequent Gradle executions in the workflow.
After this Step executes, Gradle builds will automatically read from the remote cache and push new entries if it's enabled.
website: https://github.com/bitrise-steplib/bitrise-step-activate-gradle-remote-cache
source_code_url: https://github.com/bitrise-steplib/bitrise-step-activate-gradle-remote-cache
support_url: https://github.com/bitrise-steplib/bitrise-step-activate-gradle-remote-cache
published_at: 2025-04-04T08:25:51.292878312Z
source:
git: https://github.com/bitrise-steplib/bitrise-step-activate-gradle-remote-cache.git
commit: 2626100fcb85d75347013bfca8f3eddedf13280b
type_tags:
- utility
toolkit:
bash:
entry_file: step.sh
is_skippable: true
run_if: .IsCI
inputs:
- opts:
is_required: true
summary: Whether the build can not only read, but write new entries to the remote
cache
title: Push new cache entries
value_options:
- "true"
- "false"
push: "true"
- opts:
description: |-
Level of cache entry validation for both uploads and downloads.
Levels:
- `none`: no validation.
- `warning`: print a warning about invalid cache entries, but don't interrupt the build
- `error`: print an error about invalid cache entries and interrupt the build
is_required: true
summary: Level of cache entry validation for both uploads and downloads.
title: Validation level
value_options:
- none
- warning
- error
validation_level: warning
- collect_metrics: "true"
opts:
description: When enabled, this sets up Gradle build metrics collection for the
subsequent Gradle invocations in the workflow. Metrics are sent to [Bitrise
Insights](https://app.bitrise.io/insights).
is_required: true
summary: Collect build metrics in subsequent Gradle executions
title: Collect Gradle build metrics
value_options:
- "true"
- "false"
- opts:
is_required: true
summary: Enable logging additional information for troubleshooting
title: Verbose logging
value_options:
- "true"
- "false"
verbose: "false"
================================================
FILE: steps/activate-build-cache-for-gradle/2.7.28/step.yml
================================================
title: Build Cache for Gradle
summary: Activates Bitrise Remote Build Cache add-on for subsequent Gradle builds
in the workflow
description: |
This Step activates Bitrise's remote build cache add-on for subsequent Gradle executions in the workflow.
After this Step executes, Gradle builds will automatically read from the remote cache and push new entries if it's enabled.
website: https://github.com/bitrise-steplib/bitrise-step-activate-gradle-remote-cache
source_code_url: https://github.com/bitrise-steplib/bitrise-step-activate-gradle-remote-cache
support_url: https://github.com/bitrise-steplib/bitrise-step-activate-gradle-remote-cache
published_at: 2025-04-04T14:06:59.253832316Z
source:
git: https://github.com/bitrise-steplib/bitrise-step-activate-gradle-remote-cache.git
commit: 23cc6f6c6937d63de2102427735fc3b78bc4db73
type_tags:
- utility
toolkit:
bash:
entry_file: step.sh
is_skippable: true
run_if: .IsCI
inputs:
- opts:
is_required: true
summary: Whether the build can not only read, but write new entries to the remote
cache
title: Push new cache entries
value_options:
- "true"
- "false"
push: "true"
- opts:
description: |-
Level of cache entry validation for both uploads and downloads.
Levels:
- `none`: no validation.
- `warning`: print a warning about invalid cache entries, but don't interrupt the build
- `error`: print an error about invalid cache entries and interrupt the build
is_required: true
summary: Level of cache entry validation for both uploads and downloads.
title: Validation level
value_options:
- none
- warning
- error
validation_level: warning
- collect_metrics: "true"
opts:
description: When enabled, this sets up Gradle build metrics collection for the
subsequent Gradle invocations in the workflow. Metrics are sent to [Bitrise
Insights](https://app.bitrise.io/insights).
is_required: true
summary: Collect build metrics in subsequent Gradle executions
title: Collect Gradle build metrics
value_options:
- "true"
- "false"
- opts:
is_required: true
summary: Enable logging additional information for troubleshooting
title: Verbose logging
value_options:
- "true"
- "false"
verbose: "false"
================================================
FILE: steps/activate-build-cache-for-gradle/2.7.29/step.yml
================================================
title: Build Cache for Gradle
summary: Activates Bitrise Remote Build Cache add-on for subsequent Gradle builds
in the workflow
description: |
This Step activates Bitrise's remote build cache add-on for subsequent Gradle executions in the workflow.
After this Step executes, Gradle builds will automatically read from the remote cache and push new entries if it's enabled.
website: https://github.com/bitrise-steplib/bitrise-step-activate-gradle-remote-cache
source_code_url: https://github.com/bitrise-steplib/bitrise-step-activate-gradle-remote-cache
support_url: https://github.com/bitrise-steplib/bitrise-step-activate-gradle-remote-cache
published_at: 2025-04-09T09:31:43.676939974Z
source:
git: https://github.com/bitrise-steplib/bitrise-step-activate-gradle-remote-cache.git
commit: 3e19606fd9d4df5ec93d75b32869a78f243f8a9c
type_tags:
- utility
toolkit:
bash:
entry_file: step.sh
is_skippable: true
run_if: .IsCI
inputs:
- opts:
is_required: true
summary: Whether the build can not only read, but write new entries to the remote
cache
title: Push new cache entries
value_options:
- "true"
- "false"
push: "true"
- opts:
description: |-
Level of cache entry validation for both uploads and downloads.
Levels:
- `none`: no validation.
- `warning`: print a warning about invalid cache entries, but don't interrupt the build
- `error`: print an error about invalid cache entries and interrupt the build
is_required: true
summary: Level of cache entry validation for both uploads and downloads.
title: Validation level
value_options:
- none
- warning
- error
validation_level: warning
- collect_metrics: "true"
opts:
description: When enabled, this sets up Gradle build metrics collection for the
subsequent Gradle invocations in the workflow. Metrics are sent to [Bitrise
Insights](https://app.bitrise.io/insights).
is_required: true
summary: Collect build metrics in subsequent Gradle executions
title: Collect Gradle build metrics
value_options:
- "true"
- "false"
- opts:
is_required: true
summary: Enable logging additional information for troubleshooting
title: Verbose logging
value_options:
- "true"
- "false"
verbose: "false"
================================================
FILE: steps/activate-build-cache-for-gradle/2.7.3/step.yml
================================================
title: Activate Bitrise Build Cache Add-On for Gradle
summary: Activates Bitrise Remote Build Cache add-on for subsequent Gradle builds
in the workflow
description: |
This Step activates Bitrise's remote build cache add-on for subsequent Gradle executions in the workflow.
After this Step executes, Gradle builds will automatically read from the remote cache and push new entries if it's enabled.
website: https://github.com/bitrise-steplib/bitrise-step-activate-gradle-remote-cache
source_code_url: https://github.com/bitrise-steplib/bitrise-step-activate-gradle-remote-cache
support_url: https://github.com/bitrise-steplib/bitrise-step-activate-gradle-remote-cache
published_at: 2024-05-29T17:00:04.205838589Z
source:
git: https://github.com/bitrise-steplib/bitrise-step-activate-gradle-remote-cache.git
commit: d7de0df25d2f225ef91ededd0be9db474739fafd
type_tags:
- utility
toolkit:
bash:
entry_file: step.sh
is_skippable: true
run_if: .IsCI
inputs:
- opts:
is_required: true
summary: Whether the build can not only read, but write new entries to the remote
cache
title: Push new cache entries
value_options:
- "true"
- "false"
push: "true"
- opts:
description: |-
Level of cache entry validation for both uploads and downloads.
Levels:
- `none`: no validation.
- `warning`: print a warning about invalid cache entries, but don't interrupt the build
- `error`: print an error about invalid cache entries and interrupt the build
is_required: true
summary: Level of cache entry validation for both uploads and downloads.
title: Validation level
value_options:
- none
- warning
- error
validation_level: warning
- collect_metrics: "true"
opts:
description: When enabled, this sets up Gradle build metrics collection for the
subsequent Gradle invocations in the workflow. Metrics are sent to [Bitrise
Insights](https://app.bitrise.io/insights).
is_required: true
summary: Collect build metrics in subsequent Gradle executions
title: Collect Gradle build metrics
value_options:
- "true"
- "false"
- opts:
is_required: true
summary: Enable logging additional information for troubleshooting
title: Verbose logging
value_options:
- "true"
- "false"
verbose: "false"
================================================
FILE: steps/activate-build-cache-for-gradle/2.7.30/step.yml
================================================
title: Build Cache for Gradle
summary: Activates Bitrise Remote Build Cache add-on for subsequent Gradle builds
in the workflow
description: |
This Step activates Bitrise's remote build cache add-on for subsequent Gradle executions in the workflow.
After this Step executes, Gradle builds will automatically read from the remote cache and push new entries if it's enabled.
website: https://github.com/bitrise-steplib/bitrise-step-activate-gradle-remote-cache
source_code_url: https://github.com/bitrise-steplib/bitrise-step-activate-gradle-remote-cache
support_url: https://github.com/bitrise-steplib/bitrise-step-activate-gradle-remote-cache
published_at: 2025-04-10T07:58:22.710228407Z
source:
git: https://github.com/bitrise-steplib/bitrise-step-activate-gradle-remote-cache.git
commit: faa772199b0b435e0bcd54683549c3f28f0a0d1a
type_tags:
- utility
toolkit:
bash:
entry_file: step.sh
is_skippable: true
run_if: .IsCI
inputs:
- opts:
is_required: true
summary: Whether the build can not only read, but write new entries to the remote
cache
title: Push new cache entries
value_options:
- "true"
- "false"
push: "true"
- opts:
description: |-
Level of cache entry validation for both uploads and downloads.
Levels:
- `none`: no validation.
- `warning`: print a warning about invalid cache entries, but don't interrupt the build
- `error`: print an error about invalid cache entries and interrupt the build
is_required: true
summary: Level of cache entry validation for both uploads and downloads.
title: Validation level
value_options:
- none
- warning
- error
validation_level: warning
- collect_metrics: "true"
opts:
description: When enabled, this sets up Gradle build metrics collection for the
subsequent Gradle invocations in the workflow. Metrics are sent to [Bitrise
Insights](https://app.bitrise.io/insights).
is_required: true
summary: Collect build metrics in subsequent Gradle executions
title: Collect Gradle build metrics
value_options:
- "true"
- "false"
- opts:
is_required: true
summary: Enable logging additional information for troubleshooting
title: Verbose logging
value_options:
- "true"
- "false"
verbose: "false"
================================================
FILE: steps/activate-build-cache-for-gradle/2.7.31/step.yml
================================================
title: Build Cache for Gradle
summary: Activates Bitrise Remote Build Cache add-on for subsequent Gradle builds
in the workflow
description: |
This Step activates Bitrise's remote build cache add-on for subsequent Gradle executions in the workflow.
After this Step executes, Gradle builds will automatically read from the remote cache and push new entries if it's enabled.
website: https://github.com/bitrise-steplib/bitrise-step-activate-gradle-remote-cache
source_code_url: https://github.com/bitrise-steplib/bitrise-step-activate-gradle-remote-cache
support_url: https://github.com/bitrise-steplib/bitrise-step-activate-gradle-remote-cache
published_at: 2025-04-30T10:21:57.299470118Z
source:
git: https://github.com/bitrise-steplib/bitrise-step-activate-gradle-remote-cache.git
commit: 8591e8cd8de0d8b76b20713d3f0b8474a21ab850
type_tags:
- utility
toolkit:
bash:
entry_file: step.sh
is_skippable: true
run_if: .IsCI
inputs:
- opts:
is_required: true
summary: Whether the build can not only read, but write new entries to the remote
cache
title: Push new cache entries
value_options:
- "true"
- "false"
push: "true"
- opts:
description: |-
Level of cache entry validation for both uploads and downloads.
Levels:
- `none`: no validation.
- `warning`: print a warning about invalid cache entries, but don't interrupt the build
- `error`: print an error about invalid cache entries and interrupt the build
is_required: true
summary: Level of cache entry validation for both uploads and downloads.
title: Validation level
value_options:
- none
- warning
- error
validation_level: warning
- collect_metrics: "true"
opts:
description: When enabled, this sets up Gradle build metrics collection for the
subsequent Gradle invocations in the workflow. Metrics are sent to [Bitrise
Insights](https://app.bitrise.io/insights).
is_required: true
summary: Collect build metrics in subsequent Gradle executions
title: Collect Gradle build metrics
value_options:
- "true"
- "false"
- opts:
is_required: true
summary: Enable logging additional information for troubleshooting
title: Verbose logging
value_options:
- "true"
- "false"
verbose: "false"
================================================
FILE: steps/activate-build-cache-for-gradle/2.7.32/step.yml
================================================
title: Build Cache for Gradle
summary: Activates Bitrise Remote Build Cache add-on for subsequent Gradle builds
in the workflow
description: |
This Step activates Bitrise's remote build cache add-on for subsequent Gradle executions in the workflow.
After this Step executes, Gradle builds will automatically read from the remote cache and push new entries if it's enabled.
website: https://github.com/bitrise-steplib/bitrise-step-activate-gradle-remote-cache
source_code_url: https://github.com/bitrise-steplib/bitrise-step-activate-gradle-remote-cache
support_url: https://github.com/bitrise-steplib/bitrise-step-activate-gradle-remote-cache
published_at: 2025-05-08T13:02:41.371014847Z
source:
git: https://github.com/bitrise-steplib/bitrise-step-activate-gradle-remote-cache.git
commit: 44eb8f9fdbcaa1f333bce94399a2eac7c9cb6126
type_tags:
- utility
toolkit:
bash:
entry_file: step.sh
is_skippable: true
run_if: .IsCI
inputs:
- opts:
is_required: true
summary: Whether the build can not only read, but write new entries to the remote
cache
title: Push new cache entries
value_options:
- "true"
- "false"
push: "true"
- opts:
description: |-
Level of cache entry validation for both uploads and downloads.
Levels:
- `none`: no validation.
- `warning`: print a warning about invalid cache entries, but don't interrupt the build
- `error`: print an error about invalid cache entries and interrupt the build
is_required: true
summary: Level of cache entry validation for both uploads and downloads.
title: Validation level
value_options:
- none
- warning
- error
validation_level: warning
- collect_metrics: "true"
opts:
description: When enabled, this sets up Gradle build metrics collection for the
subsequent Gradle invocations in the workflow. Metrics are sent to [Bitrise
Insights](https://app.bitrise.io/insights).
is_required: true
summary: Collect build metrics in subsequent Gradle executions
title: Collect Gradle build metrics
value_options:
- "true"
- "false"
- opts:
is_required: true
summary: Enable logging additional information for troubleshooting
title: Verbose logging
value_options:
- "true"
- "false"
verbose: "false"
================================================
FILE: steps/activate-build-cache-for-gradle/2.7.33/step.yml
================================================
title: Build Cache for Gradle
summary: Activates Bitrise Remote Build Cache add-on for subsequent Gradle builds
in the workflow
description: |
This Step activates Bitrise's remote build cache add-on for subsequent Gradle executions in the workflow.
After this Step executes, Gradle builds will automatically read from the remote cache and push new entries if it's enabled.
website: https://github.com/bitrise-steplib/bitrise-step-activate-gradle-remote-cache
source_code_url: https://github.com/bitrise-steplib/bitrise-step-activate-gradle-remote-cache
support_url: https://github.com/bitrise-steplib/bitrise-step-activate-gradle-remote-cache
published_at: 2025-05-09T09:22:54.005022695Z
source:
git: https://github.com/bitrise-steplib/bitrise-step-activate-gradle-remote-cache.git
commit: 670dd19dc91e4887ffb0e504eb77f9f27af9e834
type_tags:
- utility
toolkit:
bash:
entry_file: step.sh
is_skippable: true
run_if: .IsCI
inputs:
- opts:
is_required: true
summary: Whether the build can not only read, but write new entries to the remote
cache
title: Push new cache entries
value_options:
- "true"
- "false"
push: "true"
- opts:
description: |-
Level of cache entry validation for both uploads and downloads.
Levels:
- `none`: no validation.
- `warning`: print a warning about invalid cache entries, but don't interrupt the build
- `error`: print an error about invalid cache entries and interrupt the build
is_required: true
summary: Level of cache entry validation for both uploads and downloads.
title: Validation level
value_options:
- none
- warning
- error
validation_level: warning
- collect_metrics: "true"
opts:
description: When enabled, this sets up Gradle build metrics collection for the
subsequent Gradle invocations in the workflow. Metrics are sent to [Bitrise
Insights](https://app.bitrise.io/insights).
is_required: true
summary: Collect build metrics in subsequent Gradle executions
title: Collect Gradle build metrics
value_options:
- "true"
- "false"
- opts:
is_required: true
summary: Enable logging additional information for troubleshooting
title: Verbose logging
value_options:
- "true"
- "false"
verbose: "false"
================================================
FILE: steps/activate-build-cache-for-gradle/2.7.34/step.yml
================================================
title: Build Cache for Gradle
summary: Activates Bitrise Remote Build Cache add-on for subsequent Gradle builds
in the workflow
description: |
This Step activates Bitrise's remote build cache add-on for subsequent Gradle executions in the workflow.
After this Step executes, Gradle builds will automatically read from the remote cache and push new entries if it's enabled.
website: https://github.com/bitrise-steplib/bitrise-step-activate-gradle-remote-cache
source_code_url: https://github.com/bitrise-steplib/bitrise-step-activate-gradle-remote-cache
support_url: https://github.com/bitrise-steplib/bitrise-step-activate-gradle-remote-cache
published_at: 2025-05-13T09:21:44.194859884Z
source:
git: https://github.com/bitrise-steplib/bitrise-step-activate-gradle-remote-cache.git
commit: 3083f11afbfee25848f960d5b6966de1ada7d8a9
type_tags:
- utility
toolkit:
bash:
entry_file: step.sh
is_skippable: true
run_if: .IsCI
inputs:
- opts:
is_required: true
summary: Whether the build can not only read, but write new entries to the remote
cache
title: Push new cache entries
value_options:
- "true"
- "false"
push: "true"
- opts:
description: |-
Level of cache entry validation for both uploads and downloads.
Levels:
- `none`: no validation.
- `warning`: print a warning about invalid cache entries, but don't interrupt the build
- `error`: print an error about invalid cache entries and interrupt the build
is_required: true
summary: Level of cache entry validation for both uploads and downloads.
title: Validation level
value_options:
- none
- warning
- error
validation_level: warning
- collect_metrics: "true"
opts:
description: When enabled, this sets up Gradle build metrics collection for the
subsequent Gradle invocations in the workflow. Metrics are sent to [Bitrise
Insights](https://app.bitrise.io/insights).
is_required: true
summary: Collect build metrics in subsequent Gradle executions
title: Collect Gradle build metrics
value_options:
- "true"
- "false"
- opts:
is_required: true
summary: Enable logging additional information for troubleshooting
title: Verbose logging
value_options:
- "true"
- "false"
verbose: "false"
================================================
FILE: steps/activate-build-cache-for-gradle/2.7.35/step.yml
================================================
title: Build Cache for Gradle
summary: Activates Bitrise Remote Build Cache add-on for subsequent Gradle builds
in the workflow
description: |
This Step activates Bitrise's remote build cache add-on for subsequent Gradle executions in the workflow.
After this Step executes, Gradle builds will automatically read from the remote cache and push new entries if it's enabled.
website: https://github.com/bitrise-steplib/bitrise-step-activate-gradle-remote-cache
source_code_url: https://github.com/bitrise-steplib/bitrise-step-activate-gradle-remote-cache
support_url: https://github.com/bitrise-steplib/bitrise-step-activate-gradle-remote-cache
published_at: 2025-06-03T11:02:05.718513443Z
source:
git: https://github.com/bitrise-steplib/bitrise-step-activate-gradle-remote-cache.git
commit: b89a2bf54bc0ba7e8f08fe3b104b6b428c1e33fd
type_tags:
- utility
toolkit:
bash:
entry_file: step.sh
is_skippable: true
run_if: .IsCI
inputs:
- opts:
is_required: true
summary: Whether the build can not only read, but write new entries to the remote
cache
title: Push new cache entries
value_options:
- "true"
- "false"
push: "true"
- opts:
description: |-
Level of cache entry validation for both uploads and downloads.
Levels:
- `none`: no validation.
- `warning`: print a warning about invalid cache entries, but don't interrupt the build
- `error`: print an error about invalid cache entries and interrupt the build
is_required: true
summary: Level of cache entry validation for both uploads and downloads.
title: Validation level
value_options:
- none
- warning
- error
validation_level: warning
- collect_metrics: "true"
opts:
description: When enabled, this sets up Gradle build metrics collection for the
subsequent Gradle invocations in the workflow. Metrics are sent to [Bitrise
Insights](https://app.bitrise.io/insights).
is_required: true
summary: Collect build metrics in subsequent Gradle executions
title: Collect Gradle build metrics
value_options:
- "true"
- "false"
- opts:
is_required: true
summary: Enable logging additional information for troubleshooting
title: Verbose logging
value_options:
- "true"
- "false"
verbose: "false"
================================================
FILE: steps/activate-build-cache-for-gradle/2.7.36/step.yml
================================================
title: Build Cache for Gradle
summary: Activates Bitrise Remote Build Cache add-on for subsequent Gradle builds
in the workflow
description: |
This Step activates Bitrise's remote build cache add-on for subsequent Gradle executions in the workflow.
After this Step executes, Gradle builds will automatically read from the remote cache and push new entries if it's enabled.
website: https://github.com/bitrise-steplib/bitrise-step-activate-gradle-remote-cache
source_code_url: https://github.com/bitrise-steplib/bitrise-step-activate-gradle-remote-cache
support_url: https://github.com/bitrise-steplib/bitrise-step-activate-gradle-remote-cache
published_at: 2025-06-04T16:30:03.502635703Z
source:
git: https://github.com/bitrise-steplib/bitrise-step-activate-gradle-remote-cache.git
commit: 6cfb6304c6e7604f6fd0db14f00c22208009233a
type_tags:
- utility
toolkit:
bash:
entry_file: step.sh
is_skippable: true
run_if: .IsCI
inputs:
- opts:
is_required: true
summary: Whether the build can not only read, but write new entries to the remote
cache
title: Push new cache entries
value_options:
- "true"
- "false"
push: "true"
- opts:
description: |-
Level of cache entry validation for both uploads and downloads.
Levels:
- `none`: no validation.
- `warning`: print a warning about invalid cache entries, but don't interrupt the build
- `error`: print an error about invalid cache entries and interrupt the build
is_required: true
summary: Level of cache entry validation for both uploads and downloads.
title: Validation level
value_options:
- none
- warning
- error
validation_level: warning
- collect_metrics: "true"
opts:
description: When enabled, this sets up Gradle build metrics collection for the
subsequent Gradle invocations in the workflow. Metrics are sent to [Bitrise
Insights](https://app.bitrise.io/insights).
is_required: true
summary: Collect build metrics in subsequent Gradle executions
title: Collect Gradle build metrics
value_options:
- "true"
- "false"
- opts:
is_required: true
summary: Enable logging additional information for troubleshooting
title: Verbose logging
value_options:
- "true"
- "false"
verbose: "false"
================================================
FILE: steps/activate-build-cache-for-gradle/2.7.37/step.yml
================================================
title: Build Cache for Gradle
summary: Activates Bitrise Remote Build Cache add-on for subsequent Gradle builds
in the workflow
description: |
This Step activates Bitrise's remote build cache add-on for subsequent Gradle executions in the workflow.
After this Step executes, Gradle builds will automatically read from the remote cache and push new entries if it's enabled.
website: https://github.com/bitrise-steplib/bitrise-step-activate-gradle-remote-cache
source_code_url: https://github.com/bitrise-steplib/bitrise-step-activate-gradle-remote-cache
support_url: https://github.com/bitrise-steplib/bitrise-step-activate-gradle-remote-cache
published_at: 2025-06-11T13:20:13.608073809Z
source:
git: https://github.com/bitrise-steplib/bitrise-step-activate-gradle-remote-cache.git
commit: 2332358e965bfb6216a4c437bf15d92f272ac77e
type_tags:
- utility
toolkit:
bash:
entry_file: step.sh
is_skippable: true
run_if: .IsCI
inputs:
- opts:
is_required: true
summary: Whether the build can not only read, but write new entries to the remote
cache
title: Push new cache entries
value_options:
- "true"
- "false"
push: "true"
- opts:
description: |-
Level of cache entry validation for both uploads and downloads.
Levels:
- `none`: no validation.
- `warning`: print a warning about invalid cache entries, but don't interrupt the build
- `error`: print an error about invalid cache entries and interrupt the build
is_required: true
summary: Level of cache entry validation for both uploads and downloads.
title: Validation level
value_options:
- none
- warning
- error
validation_level: warning
- collect_metrics: "true"
opts:
description: When enabled, this sets up Gradle build metrics collection for the
subsequent Gradle invocations in the workflow. Metrics are sent to [Bitrise
Insights](https://app.bitrise.io/insights).
is_required: true
summary: Collect build metrics in subsequent Gradle executions
title: Collect Gradle build metrics
value_options:
- "true"
- "false"
- opts:
is_required: true
summary: Enable logging additional information for troubleshooting
title: Verbose logging
value_options:
- "true"
- "false"
verbose: "false"
================================================
FILE: steps/activate-build-cache-for-gradle/2.7.38/step.yml
================================================
title: Build Cache for Gradle
summary: Activates Bitrise Remote Build Cache add-on for subsequent Gradle builds
in the workflow
description: |
This Step activates Bitrise's remote build cache add-on for subsequent Gradle executions in the workflow.
After this Step executes, Gradle builds will automatically read from the remote cache and push new entries if it's enabled.
website: https://github.com/bitrise-steplib/bitrise-step-activate-gradle-remote-cache
source_code_url: https://github.com/bitrise-steplib/bitrise-step-activate-gradle-remote-cache
support_url: https://github.com/bitrise-steplib/bitrise-step-activate-gradle-remote-cache
published_at: 2025-06-11T15:03:42.074003661Z
source:
git: https://github.com/bitrise-steplib/bitrise-step-activate-gradle-remote-cache.git
commit: e66112f6242b4e413822020966d66b97bd8f745e
type_tags:
- utility
toolkit:
bash:
entry_file: step.sh
is_skippable: true
run_if: .IsCI
inputs:
- opts:
is_required: true
summary: Whether the build can not only read, but write new entries to the remote
cache
title: Push new cache entries
value_options:
- "true"
- "false"
push: "true"
- opts:
description: |-
Level of cache entry validation for both uploads and downloads.
Levels:
- `none`: no validation.
- `warning`: print a warning about invalid cache entries, but don't interrupt the build
- `error`: print an error about invalid cache entries and interrupt the build
is_required: true
summary: Level of cache entry validation for both uploads and downloads.
title: Validation level
value_options:
- none
- warning
- error
validation_level: warning
- collect_metrics: "true"
opts:
description: When enabled, this sets up Gradle build metrics collection for the
subsequent Gradle invocations in the workflow. Metrics are sent to [Bitrise
Insights](https://app.bitrise.io/insights).
is_required: true
summary: Collect build metrics in subsequent Gradle executions
title: Collect Gradle build metrics
value_options:
- "true"
- "false"
- opts:
is_required: true
summary: Enable logging additional information for troubleshooting
title: Verbose logging
value_options:
- "true"
- "false"
verbose: "false"
================================================
FILE: steps/activate-build-cache-for-gradle/2.7.39/step.yml
================================================
title: Build Cache for Gradle
summary: Activates Bitrise Remote Build Cache add-on for subsequent Gradle builds
in the workflow
description: |
This Step activates Bitrise's remote build cache add-on for subsequent Gradle executions in the workflow.
After this Step executes, Gradle builds will automatically read from the remote cache and push new entries if it's enabled.
website: https://github.com/bitrise-steplib/bitrise-step-activate-gradle-remote-cache
source_code_url: https://github.com/bitrise-steplib/bitrise-step-activate-gradle-remote-cache
support_url: https://github.com/bitrise-steplib/bitrise-step-activate-gradle-remote-cache
published_at: 2025-06-11T16:50:17.259953437Z
source:
git: https://github.com/bitrise-steplib/bitrise-step-activate-gradle-remote-cache.git
commit: ba879d9c6415891af8a21c407f9af26ce70ea0dc
type_tags:
- utility
toolkit:
bash:
entry_file: step.sh
is_skippable: true
run_if: .IsCI
inputs:
- opts:
is_required: true
summary: Whether the build can not only read, but write new entries to the remote
cache
title: Push new cache entries
value_options:
- "true"
- "false"
push: "true"
- opts:
description: |-
Level of cache entry validation for both uploads and downloads.
Levels:
- `none`: no validation.
- `warning`: print a warning about invalid cache entries, but don't interrupt the build
- `error`: print an error about invalid cache entries and interrupt the build
is_required: true
summary: Level of cache entry validation for both uploads and downloads.
title: Validation level
value_options:
- none
- warning
- error
validation_level: warning
- collect_metrics: "true"
opts:
description: When enabled, this sets up Gradle build metrics collection for the
subsequent Gradle invocations in the workflow. Metrics are sent to [Bitrise
Insights](https://app.bitrise.io/insights).
is_required: true
summary: Collect build metrics in subsequent Gradle executions
title: Collect Gradle build metrics
value_options:
- "true"
- "false"
- opts:
is_required: true
summary: Enable logging additional information for troubleshooting
title: Verbose logging
value_options:
- "true"
- "false"
verbose: "false"
================================================
FILE: steps/activate-build-cache-for-gradle/2.7.4/step.yml
================================================
title: Activate Bitrise Build Cache Add-On for Gradle
summary: Activates Bitrise Remote Build Cache add-on for subsequent Gradle builds
in the workflow
description: |
This Step activates Bitrise's remote build cache add-on for subsequent Gradle executions in the workflow.
After this Step executes, Gradle builds will automatically read from the remote cache and push new entries if it's enabled.
website: https://github.com/bitrise-steplib/bitrise-step-activate-gradle-remote-cache
source_code_url: https://github.com/bitrise-steplib/bitrise-step-activate-gradle-remote-cache
support_url: https://github.com/bitrise-steplib/bitrise-step-activate-gradle-remote-cache
published_at: 2024-07-01T14:05:53.681179295Z
source:
git: https://github.com/bitrise-steplib/bitrise-step-activate-gradle-remote-cache.git
commit: 873fd0c62b7742461089babf2fa965cdcd0b4e7a
type_tags:
- utility
toolkit:
bash:
entry_file: step.sh
is_skippable: true
run_if: .IsCI
inputs:
- opts:
is_required: true
summary: Whether the build can not only read, but write new entries to the remote
cache
title: Push new cache entries
value_options:
- "true"
- "false"
push: "true"
- opts:
description: |-
Level of cache entry validation for both uploads and downloads.
Levels:
- `none`: no validation.
- `warning`: print a warning about invalid cache entries, but don't interrupt the build
- `error`: print an error about invalid cache entries and interrupt the build
is_required: true
summary: Level of cache entry validation for both uploads and downloads.
title: Validation level
value_options:
- none
- warning
- error
validation_level: warning
- collect_metrics: "true"
opts:
description: When enabled, this sets up Gradle build metrics collection for the
subsequent Gradle invocations in the workflow. Metrics are sent to [Bitrise
Insights](https://app.bitrise.io/insights).
is_required: true
summary: Collect build metrics in subsequent Gradle executions
title: Collect Gradle build metrics
value_options:
- "true"
- "false"
- opts:
is_required: true
summary: Enable logging additional information for troubleshooting
title: Verbose logging
value_options:
- "true"
- "false"
verbose: "false"
================================================
FILE: steps/activate-build-cache-for-gradle/2.7.40/step.yml
================================================
title: Build Cache for Gradle
summary: Activates Bitrise Remote Build Cache add-on for subsequent Gradle builds
in the workflow
description: |
This Step activates Bitrise's remote build cache add-on for subsequent Gradle executions in the workflow.
After this Step executes, Gradle builds will automatically read from the remote cache and push new entries if it's enabled.
website: https://github.com/bitrise-steplib/bitrise-step-activate-gradle-remote-cache
source_code_url: https://github.com/bitrise-steplib/bitrise-step-activate-gradle-remote-cache
support_url: https://github.com/bitrise-steplib/bitrise-step-activate-gradle-remote-cache
published_at: 2025-06-17T09:40:05.957496929Z
source:
git: https://github.com/bitrise-steplib/bitrise-step-activate-gradle-remote-cache.git
commit: 0f1a598a9be3a25ba8af71c098ddcf99ac288dea
type_tags:
- utility
toolkit:
bash:
entry_file: step.sh
is_skippable: true
run_if: .IsCI
inputs:
- opts:
is_required: true
summary: Whether the build can not only read, but write new entries to the remote
cache
title: Push new cache entries
value_options:
- "true"
- "false"
push: "true"
- opts:
description: |-
Level of cache entry validation for both uploads and downloads.
Levels:
- `none`: no validation.
- `warning`: print a warning about invalid cache entries, but don't interrupt the build
- `error`: print an error about invalid cache entries and interrupt the build
is_required: true
summary: Level of cache entry validation for both uploads and downloads.
title: Validation level
value_options:
- none
- warning
- error
validation_level: warning
- collect_metrics: "true"
opts:
description: When enabled, this sets up Gradle build metrics collection for the
subsequent Gradle invocations in the workflow. Metrics are sent to [Bitrise
Insights](https://app.bitrise.io/insights).
is_required: true
summary: Collect build metrics in subsequent Gradle executions
title: Collect Gradle build metrics
value_options:
- "true"
- "false"
- opts:
is_required: true
summary: Enable logging additional information for troubleshooting
title: Verbose logging
value_options:
- "true"
- "false"
verbose: "false"
================================================
FILE: steps/activate-build-cache-for-gradle/2.7.41/step.yml
================================================
title: Build Cache for Gradle
summary: Activates Bitrise Remote Build Cache add-on for subsequent Gradle builds
in the workflow
description: |
This Step activates Bitrise's remote build cache add-on for subsequent Gradle executions in the workflow.
After this Step executes, Gradle builds will automatically read from the remote cache and push new entries if it's enabled.
website: https://github.com/bitrise-steplib/bitrise-step-activate-gradle-remote-cache
source_code_url: https://github.com/bitrise-steplib/bitrise-step-activate-gradle-remote-cache
support_url: https://github.com/bitrise-steplib/bitrise-step-activate-gradle-remote-cache
published_at: 2025-06-17T11:25:09.801489854Z
source:
git: https://github.com/bitrise-steplib/bitrise-step-activate-gradle-remote-cache.git
commit: 4be4deacde6961b06a10d2f29fe89d4aa61fe6a0
type_tags:
- utility
toolkit:
bash:
entry_file: step.sh
is_skippable: true
run_if: .IsCI
inputs:
- opts:
is_required: true
summary: Whether the build can not only read, but write new entries to the remote
cache
title: Push new cache entries
value_options:
- "true"
- "false"
push: "true"
- opts:
description: |-
Level of cache entry validation for both uploads and downloads.
Levels:
- `none`: no validation.
- `warning`: print a warning about invalid cache entries, but don't interrupt the build
- `error`: print an error about invalid cache entries and interrupt the build
is_required: true
summary: Level of cache entry validation for both uploads and downloads.
title: Validation level
value_options:
- none
- warning
- error
validation_level: warning
- collect_metrics: "true"
opts:
description: When enabled, this sets up Gradle build metrics collection for the
subsequent Gradle invocations in the workflow. Metrics are sent to [Bitrise
Insights](https://app.bitrise.io/insights).
is_required: true
summary: Collect build metrics in subsequent Gradle executions
title: Collect Gradle build metrics
value_options:
- "true"
- "false"
- opts:
is_required: true
summary: Enable logging additional information for troubleshooting
title: Verbose logging
value_options:
- "true"
- "false"
verbose: "false"
================================================
FILE: steps/activate-build-cache-for-gradle/2.7.42/step.yml
================================================
title: Build Cache for Gradle
summary: Activates Bitrise Remote Build Cache add-on for subsequent Gradle builds
in the workflow
description: |
This Step activates Bitrise's remote build cache add-on for subsequent Gradle executions in the workflow.
After this Step executes, Gradle builds will automatically read from the remote cache and push new entries if it's enabled.
website: https://github.com/bitrise-steplib/bitrise-step-activate-gradle-remote-cache
source_code_url: https://github.com/bitrise-steplib/bitrise-step-activate-gradle-remote-cache
support_url: https://github.com/bitrise-steplib/bitrise-step-activate-gradle-remote-cache
published_at: 2025-06-19T08:09:00.892845101Z
source:
git: https://github.com/bitrise-steplib/bitrise-step-activate-gradle-remote-cache.git
commit: 2b9de7f8dc0ed623eda3c1c4290d8fc72bdf872e
type_tags:
- utility
toolkit:
bash:
entry_file: step.sh
is_skippable: true
run_if: .IsCI
inputs:
- opts:
is_required: true
summary: Whether the build can not only read, but write new entries to the remote
cache
title: Push new cache entries
value_options:
- "true"
- "false"
push: "true"
- opts:
description: |-
Level of cache entry validation for both uploads and downloads.
Levels:
- `none`: no validation.
- `warning`: print a warning about invalid cache entries, but don't interrupt the build
- `error`: print an error about invalid cache entries and interrupt the build
is_required: true
summary: Level of cache entry validation for both uploads and downloads.
title: Validation level
value_options:
- none
- warning
- error
validation_level: warning
- collect_metrics: "true"
opts:
description: When enabled, this sets up Gradle build metrics collection for the
subsequent Gradle invocations in the workflow. Metrics are sent to [Bitrise
Insights](https://app.bitrise.io/insights).
is_required: true
summary: Collect build metrics in subsequent Gradle executions
title: Collect Gradle build metrics
value_options:
- "true"
- "false"
- opts:
is_required: true
summary: Enable logging additional information for troubleshooting
title: Verbose logging
value_options:
- "true"
- "false"
verbose: "false"
================================================
FILE: steps/activate-build-cache-for-gradle/2.7.43/step.yml
================================================
title: Build Cache for Gradle
summary: Activates Bitrise Remote Build Cache add-on for subsequent Gradle builds
in the workflow
description: |
This Step activates Bitrise's remote build cache add-on for subsequent Gradle executions in the workflow.
After this Step executes, Gradle builds will automatically read from the remote cache and push new entries if it's enabled.
website: https://github.com/bitrise-steplib/bitrise-step-activate-gradle-remote-cache
source_code_url: https://github.com/bitrise-steplib/bitrise-step-activate-gradle-remote-cache
support_url: https://github.com/bitrise-steplib/bitrise-step-activate-gradle-remote-cache
published_at: 2025-06-25T10:53:58.653095031Z
source:
git: https://github.com/bitrise-steplib/bitrise-step-activate-gradle-remote-cache.git
commit: 0918df815326d1cd302a90c09cca0e62dccf44ba
type_tags:
- utility
toolkit:
bash:
entry_file: step.sh
is_skippable: true
run_if: .IsCI
inputs:
- opts:
is_required: true
summary: Whether the build can not only read, but write new entries to the remote
cache
title: Push new cache entries
value_options:
- "true"
- "false"
push: "true"
- opts:
description: |-
Level of cache entry validation for both uploads and downloads.
Levels:
- `none`: no validation.
- `warning`: print a warning about invalid cache entries, but don't interrupt the build
- `error`: print an error about invalid cache entries and interrupt the build
is_required: true
summary: Level of cache entry validation for both uploads and downloads.
title: Validation level
value_options:
- none
- warning
- error
validation_level: warning
- collect_metrics: "true"
opts:
description: When enabled, this sets up Gradle build metrics collection for the
subsequent Gradle invocations in the workflow. Metrics are sent to [Bitrise
Insights](https://app.bitrise.io/insights).
is_required: true
summary: Collect build metrics in subsequent Gradle executions
title: Collect Gradle build metrics
value_options:
- "true"
- "false"
- opts:
is_required: true
summary: Enable logging additional information for troubleshooting
title: Verbose logging
value_options:
- "true"
- "false"
verbose: "false"
================================================
FILE: steps/activate-build-cache-for-gradle/2.7.44/step.yml
================================================
title: Build Cache for Gradle
summary: Activates Bitrise Remote Build Cache add-on for subsequent Gradle builds
in the workflow
description: |
This Step activates Bitrise's remote build cache add-on for subsequent Gradle executions in the workflow.
After this Step executes, Gradle builds will automatically read from the remote cache and push new entries if it's enabled.
website: https://github.com/bitrise-steplib/bitrise-step-activate-gradle-remote-cache
source_code_url: https://github.com/bitrise-steplib/bitrise-step-activate-gradle-remote-cache
support_url: https://github.com/bitrise-steplib/bitrise-step-activate-gradle-remote-cache
published_at: 2025-06-26T13:40:47.404201394Z
source:
git: https://github.com/bitrise-steplib/bitrise-step-activate-gradle-remote-cache.git
commit: 3b714a7a7434be319f3ee58cdb62da6806299838
type_tags:
- utility
toolkit:
bash:
entry_file: step.sh
is_skippable: true
run_if: .IsCI
inputs:
- opts:
is_required: true
summary: Whether the build can not only read, but write new entries to the remote
cache
title: Push new cache entries
value_options:
- "true"
- "false"
push: "true"
- opts:
description: |-
Level of cache entry validation for both uploads and downloads.
Levels:
- `none`: no validation.
- `warning`: print a warning about invalid cache entries, but don't interrupt the build
- `error`: print an error about invalid cache entries and interrupt the build
is_required: true
summary: Level of cache entry validation for both uploads and downloads.
title: Validation level
value_options:
- none
- warning
- error
validation_level: warning
- collect_metrics: "true"
opts:
description: When enabled, this sets up Gradle build metrics collection for the
subsequent Gradle invocations in the workflow. Metrics are sent to [Bitrise
Insights](https://app.bitrise.io/insights).
is_required: true
summary: Collect build metrics in subsequent Gradle executions
title: Collect Gradle build metrics
value_options:
- "true"
- "false"
- opts:
is_required: true
summary: Enable logging additional information for troubleshooting
title: Verbose logging
value_options:
- "true"
- "false"
verbose: "false"
================================================
FILE: steps/activate-build-cache-for-gradle/2.7.46/step.yml
================================================
title: Build Cache for Gradle
summary: Activates Bitrise Remote Build Cache add-on for subsequent Gradle builds
in the workflow
description: |
This Step activates Bitrise's remote build cache add-on for subsequent Gradle executions in the workflow.
After this Step executes, Gradle builds will automatically read from the remote cache and push new entries if it's enabled.
website: https://github.com/bitrise-steplib/bitrise-step-activate-gradle-remote-cache
source_code_url: https://github.com/bitrise-steplib/bitrise-step-activate-gradle-remote-cache
support_url: https://github.com/bitrise-steplib/bitrise-step-activate-gradle-remote-cache
published_at: 2025-07-01T09:55:06.868121756Z
source:
git: https://github.com/bitrise-steplib/bitrise-step-activate-gradle-remote-cache.git
commit: 7c8036da167b6ad36374be9988b5cbdbba2c946f
type_tags:
- utility
toolkit:
bash:
entry_file: step.sh
is_skippable: true
run_if: .IsCI
inputs:
- opts:
is_required: true
summary: Whether the build can not only read, but write new entries to the remote
cache
title: Push new cache entries
value_options:
- "true"
- "false"
push: "true"
- opts:
description: |-
Level of cache entry validation for both uploads and downloads.
Levels:
- `none`: no validation.
- `warning`: print a warning about invalid cache entries, but don't interrupt the build
- `error`: print an error about invalid cache entries and interrupt the build
is_required: true
summary: Level of cache entry validation for both uploads and downloads.
title: Validation level
value_options:
- none
- warning
- error
validation_level: warning
- collect_metrics: "true"
opts:
description: When enabled, this sets up Gradle build metrics collection for the
subsequent Gradle invocations in the workflow. Metrics are sent to [Bitrise
Insights](https://app.bitrise.io/insights).
is_required: true
summary: Collect build metrics in subsequent Gradle executions
title: Collect Gradle build metrics
value_options:
- "true"
- "false"
- opts:
is_required: true
summary: Enable logging additional information for troubleshooting
title: Verbose logging
value_options:
- "true"
- "false"
verbose: "false"
================================================
FILE: steps/activate-build-cache-for-gradle/2.7.47/step.yml
================================================
title: Build Cache for Gradle
summary: Activates Bitrise Remote Build Cache add-on for subsequent Gradle builds
in the workflow
description: |
This Step activates Bitrise's remote build cache add-on for subsequent Gradle executions in the workflow.
After this Step executes, Gradle builds will automatically read from the remote cache and push new entries if it's enabled.
website: https://github.com/bitrise-steplib/bitrise-step-activate-gradle-remote-cache
source_code_url: https://github.com/bitrise-steplib/bitrise-step-activate-gradle-remote-cache
support_url: https://github.com/bitrise-steplib/bitrise-step-activate-gradle-remote-cache
published_at: 2025-07-01T14:43:04.969363494Z
source:
git: https://github.com/bitrise-steplib/bitrise-step-activate-gradle-remote-cache.git
commit: 57a214f3ecfab20a28e38fd92ff571ec973fc5aa
type_tags:
- utility
toolkit:
bash:
entry_file: step.sh
is_skippable: true
run_if: .IsCI
inputs:
- opts:
is_required: true
summary: Whether the build can not only read, but write new entries to the remote
cache
title: Push new cache entries
value_options:
- "true"
- "false"
push: "true"
- opts:
description: |-
Level of cache entry validation for both uploads and downloads.
Levels:
- `none`: no validation.
- `warning`: print a warning about invalid cache entries, but don't interrupt the build
- `error`: print an error about invalid cache entries and interrupt the build
is_required: true
summary: Level of cache entry validation for both uploads and downloads.
title: Validation level
value_options:
- none
- warning
- error
validation_level: warning
- collect_metrics: "true"
opts:
description: When enabled, this sets up Gradle build metrics collection for the
subsequent Gradle invocations in the workflow. Metrics are sent to [Bitrise
Insights](https://app.bitrise.io/insights).
is_required: true
summary: Collect build metrics in subsequent Gradle executions
title: Collect Gradle build metrics
value_options:
- "true"
- "false"
- opts:
is_required: true
summary: Enable logging additional information for troubleshooting
title: Verbose logging
value_options:
- "true"
- "false"
verbose: "false"
================================================
FILE: steps/activate-build-cache-for-gradle/2.7.48/step.yml
================================================
title: Build Cache for Gradle
summary: Activates Bitrise Remote Build Cache add-on for subsequent Gradle builds
in the workflow
description: |
This Step activates Bitrise's remote build cache add-on for subsequent Gradle executions in the workflow.
After this Step executes, Gradle builds will automatically read from the remote cache and push new entries if it's enabled.
website: https://github.com/bitrise-steplib/bitrise-step-activate-gradle-remote-cache
source_code_url: https://github.com/bitrise-steplib/bitrise-step-activate-gradle-remote-cache
support_url: https://github.com/bitrise-steplib/bitrise-step-activate-gradle-remote-cache
published_at: 2025-07-08T09:34:10.0088445Z
source:
git: https://github.com/bitrise-steplib/bitrise-step-activate-gradle-remote-cache.git
commit: 48d0472c1efdc1d008ddce7955433057e2c13942
type_tags:
- utility
toolkit:
bash:
entry_file: step.sh
is_skippable: true
run_if: .IsCI
inputs:
- opts:
is_required: true
summary: Whether the build can not only read, but write new entries to the remote
cache
title: Push new cache entries
value_options:
- "true"
- "false"
push: "true"
- opts:
description: |-
Level of cache entry validation for both uploads and downloads.
Levels:
- `none`: no validation.
- `warning`: print a warning about invalid cache entries, but don't interrupt the build
- `error`: print an error about invalid cache entries and interrupt the build
is_required: true
summary: Level of cache entry validation for both uploads and downloads.
title: Validation level
value_options:
- none
- warning
- error
validation_level: warning
- collect_metrics: "true"
opts:
description: When enabled, this sets up Gradle build metrics collection for the
subsequent Gradle invocations in the workflow. Metrics are sent to [Bitrise
Insights](https://app.bitrise.io/insights).
is_required: true
summary: Collect build metrics in subsequent Gradle executions
title: Collect Gradle build metrics
value_options:
- "true"
- "false"
- opts:
is_required: true
summary: Enable logging additional information for troubleshooting
title: Verbose logging
value_options:
- "true"
- "false"
verbose: "false"
================================================
FILE: steps/activate-build-cache-for-gradle/2.7.49/step.yml
================================================
title: Build Cache for Gradle
summary: Activates Bitrise Remote Build Cache add-on for subsequent Gradle builds
in the workflow
description: |
This Step activates Bitrise's remote build cache add-on for subsequent Gradle executions in the workflow.
After this Step executes, Gradle builds will automatically read from the remote cache and push new entries if it's enabled.
website: https://github.com/bitrise-steplib/bitrise-step-activate-gradle-remote-cache
source_code_url: https://github.com/bitrise-steplib/bitrise-step-activate-gradle-remote-cache
support_url: https://github.com/bitrise-steplib/bitrise-step-activate-gradle-remote-cache
published_at: 2025-07-08T15:25:01.303980877Z
source:
git: https://github.com/bitrise-steplib/bitrise-step-activate-gradle-remote-cache.git
commit: 8116b48b3a51c835a743c1810ae1bba596eda025
type_tags:
- utility
toolkit:
bash:
entry_file: step.sh
is_skippable: true
run_if: .IsCI
inputs:
- opts:
is_required: true
summary: Whether the build can not only read, but write new entries to the remote
cache
title: Push new cache entries
value_options:
- "true"
- "false"
push: "true"
- opts:
description: |-
Level of cache entry validation for both uploads and downloads.
Levels:
- `none`: no validation.
- `warning`: print a warning about invalid cache entries, but don't interrupt the build
- `error`: print an error about invalid cache entries and interrupt the build
is_required: true
summary: Level of cache entry validation for both uploads and downloads.
title: Validation level
value_options:
- none
- warning
- error
validation_level: warning
- collect_metrics: "true"
opts:
description: When enabled, this sets up Gradle build metrics collection for the
subsequent Gradle invocations in the workflow. Metrics are sent to [Bitrise
Insights](https://app.bitrise.io/insights).
is_required: true
summary: Collect build metrics in subsequent Gradle executions
title: Collect Gradle build metrics
value_options:
- "true"
- "false"
- opts:
is_required: true
summary: Enable logging additional information for troubleshooting
title: Verbose logging
value_options:
- "true"
- "false"
verbose: "false"
================================================
FILE: steps/activate-build-cache-for-gradle/2.7.5/step.yml
================================================
title: Activate Bitrise Build Cache Add-On for Gradle
summary: Activates Bitrise Remote Build Cache add-on for subsequent Gradle builds
in the workflow
description: |
This Step activates Bitrise's remote build cache add-on for subsequent Gradle executions in the workflow.
After this Step executes, Gradle builds will automatically read from the remote cache and push new entries if it's enabled.
website: https://github.com/bitrise-steplib/bitrise-step-activate-gradle-remote-cache
source_code_url: https://github.com/bitrise-steplib/bitrise-step-activate-gradle-remote-cache
support_url: https://github.com/bitrise-steplib/bitrise-step-activate-gradle-remote-cache
published_at: 2024-07-04T09:18:58.387289938Z
source:
git: https://github.com/bitrise-steplib/bitrise-step-activate-gradle-remote-cache.git
commit: de3d2babae03acd712d3134ade7a7342c5cc445e
type_tags:
- utility
toolkit:
bash:
entry_file: step.sh
is_skippable: true
run_if: .IsCI
inputs:
- opts:
is_required: true
summary: Whether the build can not only read, but write new entries to the remote
cache
title: Push new cache entries
value_options:
- "true"
- "false"
push: "true"
- opts:
description: |-
Level of cache entry validation for both uploads and downloads.
Levels:
- `none`: no validation.
- `warning`: print a warning about invalid cache entries, but don't interrupt the build
- `error`: print an error about invalid cache entries and interrupt the build
is_required: true
summary: Level of cache entry validation for both uploads and downloads.
title: Validation level
value_options:
- none
- warning
- error
validation_level: warning
- collect_metrics: "true"
opts:
description: When enabled, this sets up Gradle build metrics collection for the
subsequent Gradle invocations in the workflow. Metrics are sent to [Bitrise
Insights](https://app.bitrise.io/insights).
is_required: true
summary: Collect build metrics in subsequent Gradle executions
title: Collect Gradle build metrics
value_options:
- "true"
- "false"
- opts:
is_required: true
summary: Enable logging additional information for troubleshooting
title: Verbose logging
value_options:
- "true"
- "false"
verbose: "false"
================================================
FILE: steps/activate-build-cache-for-gradle/2.7.50/step.yml
================================================
title: Build Cache for Gradle
summary: Activates Bitrise Remote Build Cache add-on for subsequent Gradle builds
in the workflow
description: |
This Step activates Bitrise's remote build cache add-on for subsequent Gradle executions in the workflow.
After this Step executes, Gradle builds will automatically read from the remote cache and push new entries if it's enabled.
website: https://github.com/bitrise-steplib/bitrise-step-activate-gradle-remote-cache
source_code_url: https://github.com/bitrise-steplib/bitrise-step-activate-gradle-remote-cache
support_url: https://github.com/bitrise-steplib/bitrise-step-activate-gradle-remote-cache
published_at: 2025-07-29T14:06:25.913097146Z
source:
git: https://github.com/bitrise-steplib/bitrise-step-activate-gradle-remote-cache.git
commit: 894aaf01727b2ff22e7bef8df932f44eb27f78fe
type_tags:
- utility
toolkit:
bash:
entry_file: step.sh
is_skippable: true
run_if: .IsCI
inputs:
- opts:
is_required: true
summary: Whether the build can not only read, but write new entries to the remote
cache
title: Push new cache entries
value_options:
- "true"
- "false"
push: "true"
- opts:
description: |-
Level of cache entry validation for both uploads and downloads.
Levels:
- `none`: no validation.
- `warning`: print a warning about invalid cache entries, but don't interrupt the build
- `error`: print an error about invalid cache entries and interrupt the build
is_required: true
summary: Level of cache entry validation for both uploads and downloads.
title: Validation level
value_options:
- none
- warning
- error
validation_level: warning
- collect_metrics: "true"
opts:
description: When enabled, this sets up Gradle build metrics collection for the
subsequent Gradle invocations in the workflow. Metrics are sent to [Bitrise
Insights](https://app.bitrise.io/insights).
is_required: true
summary: Collect build metrics in subsequent Gradle executions
title: Collect Gradle build metrics
value_options:
- "true"
- "false"
- opts:
is_required: true
summary: Enable logging additional information for troubleshooting
title: Verbose logging
value_options:
- "true"
- "false"
verbose: "false"
================================================
FILE: steps/activate-build-cache-for-gradle/2.7.52/step.yml
================================================
title: Build Cache for Gradle
summary: Activates Bitrise Remote Build Cache add-on for subsequent Gradle builds
in the workflow
description: |
This Step activates Bitrise's remote build cache add-on for subsequent Gradle executions in the workflow.
After this Step executes, Gradle builds will automatically read from the remote cache and push new entries if it's enabled.
website: https://github.com/bitrise-steplib/bitrise-step-activate-gradle-remote-cache
source_code_url: https://github.com/bitrise-steplib/bitrise-step-activate-gradle-remote-cache
support_url: https://github.com/bitrise-steplib/bitrise-step-activate-gradle-remote-cache
published_at: 2025-07-31T07:28:28.458151421Z
source:
git: https://github.com/bitrise-steplib/bitrise-step-activate-gradle-remote-cache.git
commit: 6857ca8432484b2360e2379e629df602fb314a80
type_tags:
- utility
toolkit:
bash:
entry_file: step.sh
is_skippable: true
run_if: .IsCI
inputs:
- opts:
is_required: true
summary: Whether the build can not only read, but write new entries to the remote
cache
title: Push new cache entries
value_options:
- "true"
- "false"
push: "true"
- opts:
description: |-
Level of cache entry validation for both uploads and downloads.
Levels:
- `none`: no validation.
- `warning`: print a warning about invalid cache entries, but don't interrupt the build
- `error`: print an error about invalid cache entries and interrupt the build
is_required: true
summary: Level of cache entry validation for both uploads and downloads.
title: Validation level
value_options:
- none
- warning
- error
validation_level: warning
- collect_metrics: "true"
opts:
description: When enabled, this sets up Gradle build metrics collection for the
subsequent Gradle invocations in the workflow. Metrics are sent to [Bitrise
Insights](https://app.bitrise.io/insights).
is_required: true
summary: Collect build metrics in subsequent Gradle executions
title: Collect Gradle build metrics
value_options:
- "true"
- "false"
- opts:
is_required: true
summary: Enable logging additional information for troubleshooting
title: Verbose logging
value_options:
- "true"
- "false"
verbose: "false"
================================================
FILE: steps/activate-build-cache-for-gradle/2.7.53/step.yml
================================================
title: Build Cache for Gradle
summary: Activates Bitrise Remote Build Cache add-on for subsequent Gradle builds
in the workflow
description: |
This Step activates Bitrise's remote build cache add-on for subsequent Gradle executions in the workflow.
After this Step executes, Gradle builds will automatically read from the remote cache and push new entries if it's enabled.
website: https://github.com/bitrise-steplib/bitrise-step-activate-gradle-remote-cache
source_code_url: https://github.com/bitrise-steplib/bitrise-step-activate-gradle-remote-cache
support_url: https://github.com/bitrise-steplib/bitrise-step-activate-gradle-remote-cache
published_at: 2025-09-02T15:52:33.65792468Z
source:
git: https://github.com/bitrise-steplib/bitrise-step-activate-gradle-remote-cache.git
commit: 3cd3e6c5d7ee7ccb0e1caea8750d9f3d6312163e
type_tags:
- utility
toolkit:
bash:
entry_file: step.sh
is_skippable: true
run_if: .IsCI
inputs:
- opts:
is_required: true
summary: Whether the build can not only read, but write new entries to the remote
cache
title: Push new cache entries
value_options:
- "true"
- "false"
push: "true"
- opts:
description: |-
Level of cache entry validation for both uploads and downloads.
Levels:
- `none`: no validation.
- `warning`: print a warning about invalid cache entries, but don't interrupt the build
- `error`: print an error about invalid cache entries and interrupt the build
is_required: true
summary: Level of cache entry validation for both uploads and downloads.
title: Validation level
value_options:
- none
- warning
- error
validation_level: warning
- collect_metrics: "true"
opts:
description: When enabled, this sets up Gradle build metrics collection for the
subsequent Gradle invocations in the workflow. Metrics are sent to [Bitrise
Insights](https://app.bitrise.io/insights).
is_required: true
summary: Collect build metrics in subsequent Gradle executions
title: Collect Gradle build metrics
value_options:
- "true"
- "false"
- opts:
is_required: true
summary: Enable logging additional information for troubleshooting
title: Verbose logging
value_options:
- "true"
- "false"
verbose: "false"
================================================
FILE: steps/activate-build-cache-for-gradle/2.7.54/step.yml
================================================
title: Build Cache for Gradle
summary: Activates Bitrise Remote Build Cache add-on for subsequent Gradle builds
in the workflow
description: |
This Step activates Bitrise's remote build cache add-on for subsequent Gradle executions in the workflow.
After this Step executes, Gradle builds will automatically read from the remote cache and push new entries if it's enabled.
website: https://github.com/bitrise-steplib/bitrise-step-activate-gradle-remote-cache
source_code_url: https://github.com/bitrise-steplib/bitrise-step-activate-gradle-remote-cache
support_url: https://github.com/bitrise-steplib/bitrise-step-activate-gradle-remote-cache
published_at: 2025-09-04T12:16:04.593911938Z
source:
git: https://github.com/bitrise-steplib/bitrise-step-activate-gradle-remote-cache.git
commit: 60b3656c12b9396ee2f97a47e6cfacac4aa9512f
type_tags:
- utility
toolkit:
bash:
entry_file: step.sh
is_skippable: true
run_if: .IsCI
inputs:
- opts:
is_required: true
summary: Whether the build can not only read, but write new entries to the remote
cache
title: Push new cache entries
value_options:
- "true"
- "false"
push: "true"
- opts:
description: |-
Level of cache entry validation for both uploads and downloads.
Levels:
- `none`: no validation.
- `warning`: print a warning about invalid cache entries, but don't interrupt the build
- `error`: print an error about invalid cache entries and interrupt the build
is_required: true
summary: Level of cache entry validation for both uploads and downloads.
title: Validation level
value_options:
- none
- warning
- error
validation_level: warning
- collect_metrics: "true"
opts:
description: When enabled, this sets up Gradle build metrics collection for the
subsequent Gradle invocations in the workflow. Metrics are sent to [Bitrise
Insights](https://app.bitrise.io/insights).
is_required: true
summary: Collect build metrics in subsequent Gradle executions
title: Collect Gradle build metrics
value_options:
- "true"
- "false"
- opts:
is_required: true
summary: Enable logging additional information for troubleshooting
title: Verbose logging
value_options:
- "true"
- "false"
verbose: "false"
================================================
FILE: steps/activate-build-cache-for-gradle/2.7.55/step.yml
================================================
title: Build Cache for Gradle
summary: Activates Bitrise Remote Build Cache add-on for subsequent Gradle builds
in the workflow
description: |
This Step activates Bitrise's remote build cache add-on for subsequent Gradle executions in the workflow.
After this Step executes, Gradle builds will automatically read from the remote cache and push new entries if it's enabled.
website: https://github.com/bitrise-steplib/bitrise-step-activate-gradle-remote-cache
source_code_url: https://github.com/bitrise-steplib/bitrise-step-activate-gradle-remote-cache
support_url: https://github.com/bitrise-steplib/bitrise-step-activate-gradle-remote-cache
published_at: 2025-10-01T13:19:36.586873122Z
source:
git: https://github.com/bitrise-steplib/bitrise-step-activate-gradle-remote-cache.git
commit: 03f357faf37d047f3aa3dc9fb69e0ded5b8a3869
type_tags:
- utility
toolkit:
bash:
entry_file: step.sh
is_skippable: true
run_if: .IsCI
inputs:
- opts:
is_required: true
summary: Whether the build can not only read, but write new entries to the remote
cache
title: Push new cache entries
value_options:
- "true"
- "false"
push: "true"
- opts:
description: |-
Level of cache entry validation for both uploads and downloads.
Levels:
- `none`: no validation.
- `warning`: print a warning about invalid cache entries, but don't interrupt the build
- `error`: print an error about invalid cache entries and interrupt the build
is_required: true
summary: Level of cache entry validation for both uploads and downloads.
title: Validation level
value_options:
- none
- warning
- error
validation_level: warning
- collect_metrics: "true"
opts:
description: When enabled, this sets up Gradle build metrics collection for the
subsequent Gradle invocations in the workflow. Metrics are sent to [Bitrise
Insights](https://app.bitrise.io/insights).
is_required: true
summary: Collect build metrics in subsequent Gradle executions
title: Collect Gradle build metrics
value_options:
- "true"
- "false"
- opts:
is_required: true
summary: Enable logging additional information for troubleshooting
title: Verbose logging
value_options:
- "true"
- "false"
verbose: "false"
================================================
FILE: steps/activate-build-cache-for-gradle/2.7.56/step.yml
================================================
title: Build Cache for Gradle
summary: Activates Bitrise Remote Build Cache add-on for subsequent Gradle builds
in the workflow
description: |
This Step activates Bitrise's remote build cache add-on for subsequent Gradle executions in the workflow.
After this Step executes, Gradle builds will automatically read from the remote cache and push new entries if it's enabled.
website: https://github.com/bitrise-steplib/bitrise-step-activate-gradle-remote-cache
source_code_url: https://github.com/bitrise-steplib/bitrise-step-activate-gradle-remote-cache
support_url: https://github.com/bitrise-steplib/bitrise-step-activate-gradle-remote-cache
published_at: 2025-10-28T09:47:57.802185467Z
source:
git: https://github.com/bitrise-steplib/bitrise-step-activate-gradle-remote-cache.git
commit: bb366b50428ee744b492c2a92867858b655ae663
type_tags:
- utility
toolkit:
bash:
entry_file: step.sh
is_skippable: true
run_if: .IsCI
inputs:
- opts:
is_required: true
summary: Whether the build can not only read, but write new entries to the remote
cache
title: Push new cache entries
value_options:
- "true"
- "false"
push: "true"
- opts:
description: |-
Level of cache entry validation for both uploads and downloads.
Levels:
- `none`: no validation.
- `warning`: print a warning about invalid cache entries, but don't interrupt the build
- `error`: print an error about invalid cache entries and interrupt the build
is_required: true
summary: Level of cache entry validation for both uploads and downloads.
title: Validation level
value_options:
- none
- warning
- error
validation_level: warning
- collect_metrics: "true"
opts:
description: When enabled, this sets up Gradle build metrics collection for the
subsequent Gradle invocations in the workflow. Metrics are sent to [Bitrise
Insights](https://app.bitrise.io/insights).
is_required: true
summary: Collect build metrics in subsequent Gradle executions
title: Collect Gradle build metrics
value_options:
- "true"
- "false"
- opts:
is_required: true
summary: Enable logging additional information for troubleshooting
title: Verbose logging
value_options:
- "true"
- "false"
verbose: "false"
================================================
FILE: steps/activate-build-cache-for-gradle/2.7.57/step.yml
================================================
title: Build Cache for Gradle
summary: Activates Bitrise Remote Build Cache add-on for subsequent Gradle builds
in the workflow
description: |
This Step activates Bitrise's remote build cache add-on for subsequent Gradle executions in the workflow.
After this Step executes, Gradle builds will automatically read from the remote cache and push new entries if it's enabled.
website: https://github.com/bitrise-steplib/bitrise-step-activate-gradle-remote-cache
source_code_url: https://github.com/bitrise-steplib/bitrise-step-activate-gradle-remote-cache
support_url: https://github.com/bitrise-steplib/bitrise-step-activate-gradle-remote-cache
published_at: 2025-10-28T19:11:05.744948966Z
source:
git: https://github.com/bitrise-steplib/bitrise-step-activate-gradle-remote-cache.git
commit: df49e07ac71d5239a74705e8389b911df05184c8
type_tags:
- utility
toolkit:
bash:
entry_file: step.sh
is_skippable: true
run_if: .IsCI
inputs:
- opts:
is_required: true
summary: Whether the build can not only read, but write new entries to the remote
cache
title: Push new cache entries
value_options:
- "true"
- "false"
push: "true"
- opts:
description: |-
Level of cache entry validation for both uploads and downloads.
Levels:
- `none`: no validation.
- `warning`: print a warning about invalid cache entries, but don't interrupt the build
- `error`: print an error about invalid cache entries and interrupt the build
is_required: true
summary: Level of cache entry validation for both uploads and downloads.
title: Validation level
value_options:
- none
- warning
- error
validation_level: warning
- collect_metrics: "true"
opts:
description: When enabled, this sets up Gradle build metrics collection for the
subsequent Gradle invocations in the workflow. Metrics are sent to [Bitrise
Insights](https://app.bitrise.io/insights).
is_required: true
summary: Collect build metrics in subsequent Gradle executions
title: Collect Gradle build metrics
value_options:
- "true"
- "false"
- opts:
is_required: true
summary: Enable logging additional information for troubleshooting
title: Verbose logging
value_options:
- "true"
- "false"
verbose: "false"
================================================
FILE: steps/activate-build-cache-for-gradle/2.7.58/step.yml
================================================
title: Build Cache for Gradle
summary: Activates Bitrise Remote Build Cache add-on for subsequent Gradle builds
in the workflow
description: |
This Step activates Bitrise's remote build cache add-on for subsequent Gradle executions in the workflow.
After this Step executes, Gradle builds will automatically read from the remote cache and push new entries if it's enabled.
website: https://github.com/bitrise-steplib/bitrise-step-activate-gradle-remote-cache
source_code_url: https://github.com/bitrise-steplib/bitrise-step-activate-gradle-remote-cache
support_url: https://github.com/bitrise-steplib/bitrise-step-activate-gradle-remote-cache
published_at: 2025-10-29T10:32:48.4981106Z
source:
git: https://github.com/bitrise-steplib/bitrise-step-activate-gradle-remote-cache.git
commit: 818395ceb854dd569e3b0c9ec55af1167e5441f6
type_tags:
- utility
toolkit:
bash:
entry_file: step.sh
is_skippable: true
run_if: .IsCI
inputs:
- opts:
is_required: true
summary: Whether the build can not only read, but write new entries to the remote
cache
title: Push new cache entries
value_options:
- "true"
- "false"
push: "true"
- opts:
description: |-
Level of cache entry validation for both uploads and downloads.
Levels:
- `none`: no validation.
- `warning`: print a warning about invalid cache entries, but don't interrupt the build
- `error`: print an error about invalid cache entries and interrupt the build
is_required: true
summary: Level of cache entry validation for both uploads and downloads.
title: Validation level
value_options:
- none
- warning
- error
validation_level: warning
- collect_metrics: "true"
opts:
description: When enabled, this sets up Gradle build metrics collection for the
subsequent Gradle invocations in the workflow. Metrics are sent to [Bitrise
Insights](https://app.bitrise.io/insights).
is_required: true
summary: Collect build metrics in subsequent Gradle executions
title: Collect Gradle build metrics
value_options:
- "true"
- "false"
- opts:
is_required: true
summary: Enable logging additional information for troubleshooting
title: Verbose logging
value_options:
- "true"
- "false"
verbose: "false"
================================================
FILE: steps/activate-build-cache-for-gradle/2.7.59/step.yml
================================================
title: Build Cache for Gradle
summary: Activates Bitrise Remote Build Cache add-on for subsequent Gradle builds
in the workflow
description: |
This Step activates Bitrise's remote build cache add-on for subsequent Gradle executions in the workflow.
After this Step executes, Gradle builds will automatically read from the remote cache and push new entries if it's enabled.
website: https://github.com/bitrise-steplib/bitrise-step-activate-gradle-remote-cache
source_code_url: https://github.com/bitrise-steplib/bitrise-step-activate-gradle-remote-cache
support_url: https://github.com/bitrise-steplib/bitrise-step-activate-gradle-remote-cache
published_at: 2025-11-04T14:16:06.495338021Z
source:
git: https://github.com/bitrise-steplib/bitrise-step-activate-gradle-remote-cache.git
commit: 4d90e2d58e971b2f116ef89fad5fc1f2444874cb
type_tags:
- utility
toolkit:
bash:
entry_file: step.sh
is_skippable: true
run_if: .IsCI
inputs:
- opts:
is_required: true
summary: Whether the build can not only read, but write new entries to the remote
cache
title: Push new cache entries
value_options:
- "true"
- "false"
push: "true"
- opts:
description: |-
Level of cache entry validation for both uploads and downloads.
Levels:
- `none`: no validation.
- `warning`: print a warning about invalid cache entries, but don't interrupt the build
- `error`: print an error about invalid cache entries and interrupt the build
is_required: true
summary: Level of cache entry validation for both uploads and downloads.
title: Validation level
value_options:
- none
- warning
- error
validation_level: warning
- collect_metrics: "true"
opts:
description: When enabled, this sets up Gradle build metrics collection for the
subsequent Gradle invocations in the workflow. Metrics are sent to [Bitrise
Insights](https://app.bitrise.io/insights).
is_required: true
summary: Collect build metrics in subsequent Gradle executions
title: Collect Gradle build metrics
value_options:
- "true"
- "false"
- opts:
is_required: true
summary: Enable logging additional information for troubleshooting
title: Verbose logging
value_options:
- "true"
- "false"
verbose: "false"
================================================
FILE: steps/activate-build-cache-for-gradle/2.7.6/step.yml
================================================
title: Activate Bitrise Build Cache Add-On for Gradle
summary: Activates Bitrise Remote Build Cache add-on for subsequent Gradle builds
in the workflow
description: |
This Step activates Bitrise's remote build cache add-on for subsequent Gradle executions in the workflow.
After this Step executes, Gradle builds will automatically read from the remote cache and push new entries if it's enabled.
website: https://github.com/bitrise-steplib/bitrise-step-activate-gradle-remote-cache
source_code_url: https://github.com/bitrise-steplib/bitrise-step-activate-gradle-remote-cache
support_url: https://github.com/bitrise-steplib/bitrise-step-activate-gradle-remote-cache
published_at: 2024-08-05T07:49:08.197071046Z
source:
git: https://github.com/bitrise-steplib/bitrise-step-activate-gradle-remote-cache.git
commit: 9d3291505f347526b5f4adddd82d27e5042a8b92
type_tags:
- utility
toolkit:
bash:
entry_file: step.sh
is_skippable: true
run_if: .IsCI
inputs:
- opts:
is_required: true
summary: Whether the build can not only read, but write new entries to the remote
cache
title: Push new cache entries
value_options:
- "true"
- "false"
push: "true"
- opts:
description: |-
Level of cache entry validation for both uploads and downloads.
Levels:
- `none`: no validation.
- `warning`: print a warning about invalid cache entries, but don't interrupt the build
- `error`: print an error about invalid cache entries and interrupt the build
is_required: true
summary: Level of cache entry validation for both uploads and downloads.
title: Validation level
value_options:
- none
- warning
- error
validation_level: warning
- collect_metrics: "true"
opts:
description: When enabled, this sets up Gradle build metrics collection for the
subsequent Gradle invocations in the workflow. Metrics are sent to [Bitrise
Insights](https://app.bitrise.io/insights).
is_required: true
summary: Collect build metrics in subsequent Gradle executions
title: Collect Gradle build metrics
value_options:
- "true"
- "false"
- opts:
is_required: true
summary: Enable logging additional information for troubleshooting
title: Verbose logging
value_options:
- "true"
- "false"
verbose: "false"
================================================
FILE: steps/activate-build-cache-for-gradle/2.7.60/step.yml
================================================
title: Build Cache for Gradle
summary: Activates Bitrise Remote Build Cache add-on for subsequent Gradle builds
in the workflow
description: |
This Step activates Bitrise's remote build cache add-on for subsequent Gradle executions in the workflow.
After this Step executes, Gradle builds will automatically read from the remote cache and push new entries if it's enabled.
website: https://github.com/bitrise-steplib/bitrise-step-activate-gradle-remote-cache
source_code_url: https://github.com/bitrise-steplib/bitrise-step-activate-gradle-remote-cache
support_url: https://github.com/bitrise-steplib/bitrise-step-activate-gradle-remote-cache
published_at: 2025-11-05T12:41:12.759570793Z
source:
git: https://github.com/bitrise-steplib/bitrise-step-activate-gradle-remote-cache.git
commit: 075d9e2c117d6432960316ca74a693483fd4f21b
type_tags:
- utility
toolkit:
bash:
entry_file: step.sh
is_skippable: true
run_if: .IsCI
inputs:
- opts:
is_required: true
summary: Whether the build can not only read, but write new entries to the remote
cache
title: Push new cache entries
value_options:
- "true"
- "false"
push: "true"
- opts:
description: |-
Level of cache entry validation for both uploads and downloads.
Levels:
- `none`: no validation.
- `warning`: print a warning about invalid cache entries, but don't interrupt the build
- `error`: print an error about invalid cache entries and interrupt the build
is_required: true
summary: Level of cache entry validation for both uploads and downloads.
title: Validation level
value_options:
- none
- warning
- error
validation_level: warning
- collect_metrics: "true"
opts:
description: When enabled, this sets up Gradle build metrics collection for the
subsequent Gradle invocations in the workflow. Metrics are sent to [Bitrise
Insights](https://app.bitrise.io/insights).
is_required: true
summary: Collect build metrics in subsequent Gradle executions
title: Collect Gradle build metrics
value_options:
- "true"
- "false"
- opts:
is_required: true
summary: Enable logging additional information for troubleshooting
title: Verbose logging
value_options:
- "true"
- "false"
verbose: "false"
================================================
FILE: steps/activate-build-cache-for-gradle/2.7.7/step.yml
================================================
title: Activate Bitrise Build Cache Add-On for Gradle
summary: Activates Bitrise Remote Build Cache add-on for subsequent Gradle builds
in the workflow
description: |
This Step activates Bitrise's remote build cache add-on for subsequent Gradle executions in the workflow.
After this Step executes, Gradle builds will automatically read from the remote cache and push new entries if it's enabled.
website: https://github.com/bitrise-steplib/bitrise-step-activate-gradle-remote-cache
source_code_url: https://github.com/bitrise-steplib/bitrise-step-activate-gradle-remote-cache
support_url: https://github.com/bitrise-steplib/bitrise-step-activate-gradle-remote-cache
published_at: 2024-09-30T11:07:17.51029294Z
source:
git: https://github.com/bitrise-steplib/bitrise-step-activate-gradle-remote-cache.git
commit: 15f878aef22cebab1489c7426c61d48b25c6efc3
type_tags:
- utility
toolkit:
bash:
entry_file: step.sh
is_skippable: true
run_if: .IsCI
inputs:
- opts:
is_required: true
summary: Whether the build can not only read, but write new entries to the remote
cache
title: Push new cache entries
value_options:
- "true"
- "false"
push: "true"
- opts:
description: |-
Level of cache entry validation for both uploads and downloads.
Levels:
- `none`: no validation.
- `warning`: print a warning about invalid cache entries, but don't interrupt the build
- `error`: print an error about invalid cache entries and interrupt the build
is_required: true
summary: Level of cache entry validation for both uploads and downloads.
title: Validation level
value_options:
- none
- warning
- error
validation_level: warning
- collect_metrics: "true"
opts:
description: When enabled, this sets up Gradle build metrics collection for the
subsequent Gradle invocations in the workflow. Metrics are sent to [Bitrise
Insights](https://app.bitrise.io/insights).
is_required: true
summary: Collect build metrics in subsequent Gradle executions
title: Collect Gradle build metrics
value_options:
- "true"
- "false"
- opts:
is_required: true
summary: Enable logging additional information for troubleshooting
title: Verbose logging
value_options:
- "true"
- "false"
verbose: "false"
================================================
FILE: steps/activate-build-cache-for-gradle/2.7.8/step.yml
================================================
title: Activate Bitrise Build Cache Add-On for Gradle
summary: Activates Bitrise Remote Build Cache add-on for subsequent Gradle builds
in the workflow
description: |
This Step activates Bitrise's remote build cache add-on for subsequent Gradle executions in the workflow.
After this Step executes, Gradle builds will automatically read from the remote cache and push new entries if it's enabled.
website: https://github.com/bitrise-steplib/bitrise-step-activate-gradle-remote-cache
source_code_url: https://github.com/bitrise-steplib/bitrise-step-activate-gradle-remote-cache
support_url: https://github.com/bitrise-steplib/bitrise-step-activate-gradle-remote-cache
published_at: 2024-12-03T10:52:17.608486736Z
source:
git: https://github.com/bitrise-steplib/bitrise-step-activate-gradle-remote-cache.git
commit: 9201ae9c6dc325380d720243907802971269ab54
type_tags:
- utility
toolkit:
bash:
entry_file: step.sh
is_skippable: true
run_if: .IsCI
inputs:
- opts:
is_required: true
summary: Whether the build can not only read, but write new entries to the remote
cache
title: Push new cache entries
value_options:
- "true"
- "false"
push: "true"
- opts:
description: |-
Level of cache entry validation for both uploads and downloads.
Levels:
- `none`: no validation.
- `warning`: print a warning about invalid cache entries, but don't interrupt the build
- `error`: print an error about invalid cache entries and interrupt the build
is_required: true
summary: Level of cache entry validation for both uploads and downloads.
title: Validation level
value_options:
- none
- warning
- error
validation_level: warning
- collect_metrics: "true"
opts:
description: When enabled, this sets up Gradle build metrics collection for the
subsequent Gradle invocations in the workflow. Metrics are sent to [Bitrise
Insights](https://app.bitrise.io/insights).
is_required: true
summary: Collect build metrics in subsequent Gradle executions
title: Collect Gradle build metrics
value_options:
- "true"
- "false"
- opts:
is_required: true
summary: Enable logging additional information for troubleshooting
title: Verbose logging
value_options:
- "true"
- "false"
verbose: "false"
================================================
FILE: steps/activate-build-cache-for-gradle/2.7.9/step.yml
================================================
title: Build Cache for Gradle
summary: Activates Bitrise Remote Build Cache add-on for subsequent Gradle builds
in the workflow
description: |
This Step activates Bitrise's remote build cache add-on for subsequent Gradle executions in the workflow.
After this Step executes, Gradle builds will automatically read from the remote cache and push new entries if it's enabled.
website: https://github.com/bitrise-steplib/bitrise-step-activate-gradle-remote-cache
source_code_url: https://github.com/bitrise-steplib/bitrise-step-activate-gradle-remote-cache
support_url: https://github.com/bitrise-steplib/bitrise-step-activate-gradle-remote-cache
published_at: 2024-12-09T09:48:17.734324726Z
source:
git: https://github.com/bitrise-steplib/bitrise-step-activate-gradle-remote-cache.git
commit: 5012c78400278f3cec07be0e77dfefc6049bad2d
type_tags:
- utility
toolkit:
bash:
entry_file: step.sh
is_skippable: true
run_if: .IsCI
inputs:
- opts:
is_required: true
summary: Whether the build can not only read, but write new entries to the remote
cache
title: Push new cache entries
value_options:
- "true"
- "false"
push: "true"
- opts:
description: |-
Level of cache entry validation for both uploads and downloads.
Levels:
- `none`: no validation.
- `warning`: print a warning about invalid cache entries, but don't interrupt the build
- `error`: print an error about invalid cache entries and interrupt the build
is_required: true
summary: Level of cache entry validation for both uploads and downloads.
title: Validation level
value_options:
- none
- warning
- error
validation_level: warning
- collect_metrics: "true"
opts:
description: When enabled, this sets up Gradle build metrics collection for the
subsequent Gradle invocations in the workflow. Metrics are sent to [Bitrise
Insights](https://app.bitrise.io/insights).
is_required: true
summary: Collect build metrics in subsequent Gradle executions
title: Collect Gradle build metrics
value_options:
- "true"
- "false"
- opts:
is_required: true
summary: Enable logging additional information for troubleshooting
title: Verbose logging
value_options:
- "true"
- "false"
verbose: "false"
================================================
FILE: steps/activate-build-cache-for-gradle/2.8.0/step.yml
================================================
title: Build Cache for Gradle
summary: Activates Bitrise Remote Build Cache add-on for subsequent Gradle builds
in the workflow
description: |
This Step activates Bitrise's remote build cache add-on for subsequent Gradle executions in the workflow.
After this Step executes, Gradle builds will automatically read from the remote cache and push new entries if it's enabled.
website: https://github.com/bitrise-steplib/bitrise-step-activate-gradle-remote-cache
source_code_url: https://github.com/bitrise-steplib/bitrise-step-activate-gradle-remote-cache
support_url: https://github.com/bitrise-steplib/bitrise-step-activate-gradle-remote-cache
published_at: 2025-11-13T12:27:56.912517408Z
source:
git: https://github.com/bitrise-steplib/bitrise-step-activate-gradle-remote-cache.git
commit: 4747543148fe67268816a7875dac6eec852380ca
type_tags:
- utility
toolkit:
bash:
entry_file: step.sh
is_skippable: true
run_if: .IsCI
inputs:
- opts:
is_required: true
summary: Whether the build can not only read, but write new entries to the remote
cache
title: Push new cache entries
value_options:
- "true"
- "false"
push: "true"
- opts:
description: |-
Level of cache entry validation for both uploads and downloads.
Levels:
- `none`: no validation.
- `warning`: print a warning about invalid cache entries, but don't interrupt the build
- `error`: print an error about invalid cache entries and interrupt the build
is_required: true
summary: Level of cache entry validation for both uploads and downloads.
title: Validation level
value_options:
- none
- warning
- error
validation_level: warning
- collect_metrics: "true"
opts:
description: When enabled, this sets up Gradle build metrics collection for the
subsequent Gradle invocations in the workflow. Metrics are sent to [Bitrise
Insights](https://app.bitrise.io/insights).
is_required: true
summary: Collect build metrics in subsequent Gradle executions
title: Collect Gradle build metrics
value_options:
- "true"
- "false"
- opts:
is_required: true
summary: Enable logging additional information for troubleshooting
title: Verbose logging
value_options:
- "true"
- "false"
verbose: "false"
================================================
FILE: steps/activate-build-cache-for-gradle/2.8.1/step.yml
================================================
title: Build Cache for Gradle
summary: Activates Bitrise Remote Build Cache add-on for subsequent Gradle builds
in the workflow
description: |
This Step activates Bitrise's remote build cache add-on for subsequent Gradle executions in the workflow.
After this Step executes, Gradle builds will automatically read from the remote cache and push new entries if it's enabled.
website: https://github.com/bitrise-steplib/bitrise-step-activate-gradle-remote-cache
source_code_url: https://github.com/bitrise-steplib/bitrise-step-activate-gradle-remote-cache
support_url: https://github.com/bitrise-steplib/bitrise-step-activate-gradle-remote-cache
published_at: 2025-11-19T10:04:45.773021477Z
source:
git: https://github.com/bitrise-steplib/bitrise-step-activate-gradle-remote-cache.git
commit: dddeacd373c69a0d8393d9d0d757aff1e8cf62d1
type_tags:
- utility
toolkit:
bash:
entry_file: step.sh
is_skippable: true
run_if: .IsCI
inputs:
- opts:
is_required: true
summary: Whether the build can not only read, but write new entries to the remote
cache
title: Push new cache entries
value_options:
- "true"
- "false"
push: "true"
- opts:
description: |-
Level of cache entry validation for both uploads and downloads.
Levels:
- `none`: no validation.
- `warning`: print a warning about invalid cache entries, but don't interrupt the build
- `error`: print an error about invalid cache entries and interrupt the build
is_required: true
summary: Level of cache entry validation for both uploads and downloads.
title: Validation level
value_options:
- none
- warning
- error
validation_level: warning
- collect_metrics: "true"
opts:
description: When enabled, this sets up Gradle build metrics collection for the
subsequent Gradle invocations in the workflow. Metrics are sent to [Bitrise
Insights](https://app.bitrise.io/insights).
is_required: true
summary: Collect build metrics in subsequent Gradle executions
title: Collect Gradle build metrics
value_options:
- "true"
- "false"
- opts:
is_required: true
summary: Enable logging additional information for troubleshooting
title: Verbose logging
value_options:
- "true"
- "false"
verbose: "false"
================================================
FILE: steps/activate-build-cache-for-gradle/2.8.2/step.yml
================================================
title: Build Cache for Gradle
summary: Activates Bitrise Remote Build Cache add-on for subsequent Gradle builds
in the workflow
description: |
This Step activates Bitrise's remote build cache add-on for subsequent Gradle executions in the workflow.
After this Step executes, Gradle builds will automatically read from the remote cache and push new entries if it's enabled.
website: https://github.com/bitrise-steplib/bitrise-step-activate-gradle-remote-cache
source_code_url: https://github.com/bitrise-steplib/bitrise-step-activate-gradle-remote-cache
support_url: https://github.com/bitrise-steplib/bitrise-step-activate-gradle-remote-cache
published_at: 2025-11-20T14:43:53.284040504Z
source:
git: https://github.com/bitrise-steplib/bitrise-step-activate-gradle-remote-cache.git
commit: d9c0ab87c8ab9a28ad622b3276b43e1c3258d1cb
type_tags:
- utility
toolkit:
bash:
entry_file: step.sh
is_skippable: true
run_if: .IsCI
inputs:
- opts:
is_required: true
summary: Whether the build can not only read, but write new entries to the remote
cache
title: Push new cache entries
value_options:
- "true"
- "false"
push: "true"
- opts:
description: |-
Level of cache entry validation for both uploads and downloads.
Levels:
- `none`: no validation.
- `warning`: print a warning about invalid cache entries, but don't interrupt the build
- `error`: print an error about invalid cache entries and interrupt the build
is_required: true
summary: Level of cache entry validation for both uploads and downloads.
title: Validation level
value_options:
- none
- warning
- error
validation_level: warning
- collect_metrics: "true"
opts:
description: When enabled, this sets up Gradle build metrics collection for the
subsequent Gradle invocations in the workflow. Metrics are sent to [Bitrise
Insights](https://app.bitrise.io/insights).
is_required: true
summary: Collect build metrics in subsequent Gradle executions
title: Collect Gradle build metrics
value_options:
- "true"
- "false"
- opts:
is_required: true
summary: Enable logging additional information for troubleshooting
title: Verbose logging
value_options:
- "true"
- "false"
verbose: "false"
================================================
FILE: steps/activate-build-cache-for-gradle/2.8.3/step.yml
================================================
title: Build Cache for Gradle
summary: Activates Bitrise Remote Build Cache add-on for subsequent Gradle builds
in the workflow
description: |
This Step activates Bitrise's remote build cache add-on for subsequent Gradle executions in the workflow.
After this Step executes, Gradle builds will automatically read from the remote cache and push new entries if it's enabled.
website: https://github.com/bitrise-steplib/bitrise-step-activate-gradle-remote-cache
source_code_url: https://github.com/bitrise-steplib/bitrise-step-activate-gradle-remote-cache
support_url: https://github.com/bitrise-steplib/bitrise-step-activate-gradle-remote-cache
published_at: 2025-11-26T12:00:13.90558941Z
source:
git: https://github.com/bitrise-steplib/bitrise-step-activate-gradle-remote-cache.git
commit: 5b0530e6b9525a00f47a056b2e8504206a544f6b
type_tags:
- utility
toolkit:
bash:
entry_file: step.sh
is_skippable: true
run_if: .IsCI
inputs:
- opts:
is_required: true
summary: Whether the build can not only read, but write new entries to the remote
cache
title: Push new cache entries
value_options:
- "true"
- "false"
push: "true"
- opts:
description: |-
Level of cache entry validation for both uploads and downloads.
Levels:
- `none`: no validation.
- `warning`: print a warning about invalid cache entries, but don't interrupt the build
- `error`: print an error about invalid cache entries and interrupt the build
is_required: true
summary: Level of cache entry validation for both uploads and downloads.
title: Validation level
value_options:
- none
- warning
- error
validation_level: warning
- collect_metrics: "true"
opts:
description: When enabled, this sets up Gradle build metrics collection for the
subsequent Gradle invocations in the workflow. Metrics are sent to [Bitrise
Insights](https://app.bitrise.io/insights).
is_required: true
summary: Collect build metrics in subsequent Gradle executions
title: Collect Gradle build metrics
value_options:
- "true"
- "false"
- opts:
is_required: true
summary: Enable logging additional information for troubleshooting
title: Verbose logging
value_options:
- "true"
- "false"
verbose: "false"
================================================
FILE: steps/activate-build-cache-for-gradle/2.8.4/step.yml
================================================
title: Build Cache for Gradle
summary: Activates Bitrise Remote Build Cache add-on for subsequent Gradle builds
in the workflow
description: |
This Step activates Bitrise's remote build cache add-on for subsequent Gradle executions in the workflow.
After this Step executes, Gradle builds will automatically read from the remote cache and push new entries if it's enabled.
website: https://github.com/bitrise-steplib/bitrise-step-activate-gradle-remote-cache
source_code_url: https://github.com/bitrise-steplib/bitrise-step-activate-gradle-remote-cache
support_url: https://github.com/bitrise-steplib/bitrise-step-activate-gradle-remote-cache
published_at: 2025-11-28T09:49:28.522401001Z
source:
git: https://github.com/bitrise-steplib/bitrise-step-activate-gradle-remote-cache.git
commit: a83c6fc8591502650d840e395d9c1056fda09601
type_tags:
- utility
toolkit:
bash:
entry_file: step.sh
is_skippable: true
run_if: .IsCI
inputs:
- opts:
is_required: true
summary: Whether the build can not only read, but write new entries to the remote
cache
title: Push new cache entries
value_options:
- "true"
- "false"
push: "true"
- opts:
description: |-
Level of cache entry validation for both uploads and downloads.
Levels:
- `none`: no validation.
- `warning`: print a warning about invalid cache entries, but don't interrupt the build
- `error`: print an error about invalid cache entries and interrupt the build
is_required: true
summary: Level of cache entry validation for both uploads and downloads.
title: Validation level
value_options:
- none
- warning
- error
validation_level: warning
- collect_metrics: "true"
opts:
description: When enabled, this sets up Gradle build metrics collection for the
subsequent Gradle invocations in the workflow. Metrics are sent to [Bitrise
Insights](https://app.bitrise.io/insights).
is_required: true
summary: Collect build metrics in subsequent Gradle executions
title: Collect Gradle build metrics
value_options:
- "true"
- "false"
- opts:
is_required: true
summary: Enable logging additional information for troubleshooting
title: Verbose logging
value_options:
- "true"
- "false"
verbose: "false"
================================================
FILE: steps/activate-build-cache-for-gradle/2.8.7/step.yml
================================================
title: Build Cache for Gradle
summary: Activates Bitrise Remote Build Cache add-on for subsequent Gradle builds
in the workflow
description: |
This Step activates Bitrise's remote build cache add-on for subsequent Gradle executions in the workflow.
After this Step executes, Gradle builds will automatically read from the remote cache and push new entries if it's enabled.
website: https://github.com/bitrise-steplib/bitrise-step-activate-gradle-remote-cache
source_code_url: https://github.com/bitrise-steplib/bitrise-step-activate-gradle-remote-cache
support_url: https://github.com/bitrise-steplib/bitrise-step-activate-gradle-remote-cache
published_at: 2026-01-12T13:56:29.425853921Z
source:
git: https://github.com/bitrise-steplib/bitrise-step-activate-gradle-remote-cache.git
commit: aa978433873857ce3963c1dfa9847f97ac0270d0
type_tags:
- utility
toolkit:
bash:
entry_file: step.sh
is_skippable: true
run_if: .IsCI
inputs:
- opts:
is_required: true
summary: Whether the build can not only read, but write new entries to the remote
cache
title: Push new cache entries
value_options:
- "true"
- "false"
push: "true"
- opts:
description: |-
Level of cache entry validation for both uploads and downloads.
Levels:
- `none`: no validation.
- `warning`: print a warning about invalid cache entries, but don't interrupt the build
- `error`: print an error about invalid cache entries and interrupt the build
is_required: true
summary: Level of cache entry validation for both uploads and downloads.
title: Validation level
value_options:
- none
- warning
- error
validation_level: warning
- collect_metrics: "true"
opts:
description: When enabled, this sets up Gradle build metrics collection for the
subsequent Gradle invocations in the workflow. Metrics are sent to [Bitrise
Insights](https://app.bitrise.io/insights).
is_required: true
summary: Collect build metrics in subsequent Gradle executions
title: Collect Gradle build metrics
value_options:
- "true"
- "false"
- opts:
is_required: true
summary: Enable logging additional information for troubleshooting
title: Verbose logging
value_options:
- "true"
- "false"
verbose: "false"
================================================
FILE: steps/activate-build-cache-for-gradle/2.8.8/step.yml
================================================
title: Build Cache for Gradle
summary: Activates Bitrise Remote Build Cache add-on for subsequent Gradle builds
in the workflow
description: |
This Step activates Bitrise's remote build cache add-on for subsequent Gradle executions in the workflow.
After this Step executes, Gradle builds will automatically read from the remote cache and push new entries if it's enabled.
website: https://github.com/bitrise-steplib/bitrise-step-activate-gradle-remote-cache
source_code_url: https://github.com/bitrise-steplib/bitrise-step-activate-gradle-remote-cache
support_url: https://github.com/bitrise-steplib/bitrise-step-activate-gradle-remote-cache
published_at: 2026-01-13T13:57:11.549370392Z
source:
git: https://github.com/bitrise-steplib/bitrise-step-activate-gradle-remote-cache.git
commit: f51c2ae4556087478577f336479f9de3a6eb2212
type_tags:
- utility
toolkit:
bash:
entry_file: step.sh
is_skippable: true
run_if: .IsCI
inputs:
- opts:
is_required: true
summary: Whether the build can not only read, but write new entries to the remote
cache
title: Push new cache entries
value_options:
- "true"
- "false"
push: "true"
- opts:
description: |-
Level of cache entry validation for both uploads and downloads.
Levels:
- `none`: no validation.
- `warning`: print a warning about invalid cache entries, but don't interrupt the build
- `error`: print an error about invalid cache entries and interrupt the build
is_required: true
summary: Level of cache entry validation for both uploads and downloads.
title: Validation level
value_options:
- none
- warning
- error
validation_level: warning
- collect_metrics: "true"
opts:
description: When enabled, this sets up Gradle build metrics collection for the
subsequent Gradle invocations in the workflow. Metrics are sent to [Bitrise
Insights](https://app.bitrise.io/insights).
is_required: true
summary: Collect build metrics in subsequent Gradle executions
title: Collect Gradle build metrics
value_options:
- "true"
- "false"
- opts:
is_required: true
summary: Enable logging additional information for troubleshooting
title: Verbose logging
value_options:
- "true"
- "false"
verbose: "false"
================================================
FILE: steps/activate-build-cache-for-gradle/2.9.0/step.yml
================================================
title: Build Cache for Gradle
summary: Activates Bitrise Remote Build Cache add-on for subsequent Gradle builds
in the workflow
description: |
This Step activates Bitrise's remote build cache add-on for subsequent Gradle executions in the workflow.
After this Step executes, Gradle builds will automatically read from the remote cache and push new entries if it's enabled.
website: https://github.com/bitrise-steplib/bitrise-step-activate-gradle-remote-cache
source_code_url: https://github.com/bitrise-steplib/bitrise-step-activate-gradle-remote-cache
support_url: https://github.com/bitrise-steplib/bitrise-step-activate-gradle-remote-cache
published_at: 2026-02-12T16:14:03.515880643Z
source:
git: https://github.com/bitrise-steplib/bitrise-step-activate-gradle-remote-cache.git
commit: 9a283fb4ef6ab4b268fde69976ae42458189ac7c
type_tags:
- utility
toolkit:
bash:
entry_file: step.sh
is_skippable: true
run_if: .IsCI
inputs:
- opts:
is_required: true
summary: Whether the build can not only read, but write new entries to the remote
cache
title: Push new cache entries
value_options:
- "true"
- "false"
push: "true"
- opts:
description: |-
Level of cache entry validation for both uploads and downloads.
Levels:
- `none`: no validation.
- `warning`: print a warning about invalid cache entries, but don't interrupt the build
- `error`: print an error about invalid cache entries and interrupt the build
is_required: true
summary: Level of cache entry validation for both uploads and downloads.
title: Validation level
value_options:
- none
- warning
- error
validation_level: warning
- collect_metrics: "true"
opts:
description: When enabled, this sets up Gradle build metrics collection for the
subsequent Gradle invocations in the workflow. Metrics are sent to [Bitrise
Insights](https://app.bitrise.io/insights).
is_required: true
summary: Collect build metrics in subsequent Gradle executions
title: Collect Gradle build metrics
value_options:
- "true"
- "false"
- opts:
is_required: true
summary: Enable logging additional information for troubleshooting
title: Verbose logging
value_options:
- "true"
- "false"
verbose: "false"
================================================
FILE: steps/activate-build-cache-for-gradle/step-info.yml
================================================
maintainer: bitrise
================================================
FILE: steps/activate-build-cache-for-react-native/0.1.0/step.yml
================================================
title: Activate React Native Features
summary: Activates Bitrise Build Cache features for React Native projects
description: |
This Step activates Bitrise Build Cache for all build systems used in a React Native project.
After this Step executes,
- enabling Xcode cache will result in: iOS builds will use the Bitrise Build Cache for Xcode via Xcelerate, with a background proxy started automatically.
- enabling Gradle cache will result in: Android Gradle builds will automatically read from and push entries to the remote cache. C++ native modules will also be compiled using ccache, with a background storage helper started automatically.
website: https://github.com/bitrise-steplib/bitrise-step-activate-react-native-features
source_code_url: https://github.com/bitrise-steplib/bitrise-step-activate-react-native-features
support_url: https://github.com/bitrise-steplib/bitrise-step-activate-react-native-features
published_at: 2026-04-09T12:00:00.000000000Z
source:
git: https://github.com/bitrise-steplib/bitrise-step-activate-react-native-features.git
commit: e96ada56a66bb11c74d923afa2ac662a5235758c
project_type_tags:
- react-native
- ios
- android
type_tags:
- utility
run_if: .IsCI
is_skippable: true
toolkit:
go:
package_name: github.com/bitrise-steplib/bitrise-step-activate-react-native-features
inputs:
# -------------------------------------------------------------------------------
# Xcode cache
# -------------------------------------------------------------------------------
- xcode_cache_enabled: "true"
opts:
title: Enable Xcode cache
summary: Enables Bitrise Build Cache for Xcode using Xcelerate
is_required: true
value_options:
- "true"
- "false"
description: |-
Enables Bitrise Build Cache for Xcode. When enabled, activates Xcelerate and starts the Xcelerate proxy in the background.
# -------------------------------------------------------------------------------
# Gradle cache
# -------------------------------------------------------------------------------
- gradle_cache_enabled: "true"
opts:
title: Enable Gradle cache
summary: Enables Bitrise Build Cache for Gradle
is_required: true
value_options:
- "true"
- "false"
description: |-
Enables Bitrise Build Cache for Gradle. When enabled, activates Gradle cache with analytics and remote cache plugins.
# -------------------------------------------------------------------------------
# Debugging
# -------------------------------------------------------------------------------
- verbose: "false"
opts:
title: Verbose logging
summary: Enable logging additional information for troubleshooting
is_required: true
value_options:
- "true"
- "false"
================================================
FILE: steps/activate-build-cache-for-react-native/0.2.0/step.yml
================================================
title: Build Cache for React Native
summary: Activates Bitrise Build Cache features for React Native projects
description: |
This Step activates Bitrise Build Cache for all build systems used in a React Native project.
After this Step executes,
- enabling Xcode cache will result in: iOS builds will use the Bitrise Build Cache for Xcode via Xcelerate, with a background proxy started automatically.
- enabling Gradle cache will result in: Android Gradle builds will automatically read from and push entries to the remote cache. C++ native modules will also be compiled using ccache, with a background storage helper started automatically.
website: https://github.com/bitrise-steplib/bitrise-step-activate-react-native-features
source_code_url: https://github.com/bitrise-steplib/bitrise-step-activate-react-native-features
support_url: https://github.com/bitrise-steplib/bitrise-step-activate-react-native-features
published_at: 2026-04-15T07:28:02.846206874Z
source:
git: https://github.com/bitrise-steplib/bitrise-step-activate-react-native-features.git
commit: 8f6a31e16cfbd94c5256c2687c2b8720b77e7c25
project_type_tags:
- react-native
- ios
- android
type_tags:
- utility
run_if: .IsCI
is_skippable: true
toolkit:
go:
package_name: github.com/bitrise-steplib/bitrise-step-activate-react-native-features
inputs:
# -------------------------------------------------------------------------------
# Xcode cache
# -------------------------------------------------------------------------------
- xcode_cache_enabled: "true"
opts:
title: Enable Xcode cache
summary: Enables Bitrise Build Cache for Xcode using Xcelerate
is_required: true
value_options:
- "true"
- "false"
description: |-
Enables Bitrise Build Cache for Xcode. When enabled, activates Xcelerate and starts the Xcelerate proxy in the background.
# -------------------------------------------------------------------------------
# Gradle cache
# -------------------------------------------------------------------------------
- gradle_cache_enabled: "true"
opts:
title: Enable Gradle cache
summary: Enables Bitrise Build Cache for Gradle
is_required: true
value_options:
- "true"
- "false"
description: |-
Enables Bitrise Build Cache for Gradle. When enabled, activates Gradle cache with analytics and remote cache plugins.
# -------------------------------------------------------------------------------
# Debugging
# -------------------------------------------------------------------------------
- verbose: "false"
opts:
title: Verbose logging
summary: Enable logging additional information for troubleshooting
is_required: true
value_options:
- "true"
- "false"
================================================
FILE: steps/activate-build-cache-for-react-native/0.3.0/step.yml
================================================
title: Build Cache for React Native
summary: Activates Bitrise Build Cache features for React Native projects
description: |
This Step activates Bitrise Build Cache for all build systems used in a React Native project.
After this Step executes,
- enabling Xcode cache will result in: iOS builds will use the Bitrise Build Cache for Xcode via Xcelerate, with a background proxy started automatically.
- enabling Gradle cache will result in: Android Gradle builds will automatically read from and push entries to the remote cache. C++ native modules will also be compiled using ccache, with a background storage helper started automatically.
website: https://github.com/bitrise-steplib/bitrise-step-activate-react-native-features
source_code_url: https://github.com/bitrise-steplib/bitrise-step-activate-react-native-features
support_url: https://github.com/bitrise-steplib/bitrise-step-activate-react-native-features
published_at: 2026-04-27T11:19:33.07437196Z
source:
git: https://github.com/bitrise-steplib/bitrise-step-activate-react-native-features.git
commit: 32761b808cb4fdecc9fa5c1655aedc7d150cb5f7
executables:
darwin-amd64:
storage_uri: steps/activate-build-cache-for-react-native/0.3.0/bin/activate-build-cache-for-react-native-darwin-amd64
hash: sha256-8d7faad73d8d8f408945910bdb5b0e3f75ed7cdb86464af51351097096c1578f
darwin-arm64:
storage_uri: steps/activate-build-cache-for-react-native/0.3.0/bin/activate-build-cache-for-react-native-darwin-arm64
hash: sha256-fe4fdeed4f95fceb5a9ff23718621de8753fa7a4057b2462f4398aca584e0ebb
linux-amd64:
storage_uri: steps/activate-build-cache-for-react-native/0.3.0/bin/activate-build-cache-for-react-native-linux-amd64
hash: sha256-ae24ba0323bfc23cba5b8acaf370d3bb37f713b30be9c2be3c2faf38b1fbd6d3
linux-arm64:
storage_uri: steps/activate-build-cache-for-react-native/0.3.0/bin/activate-build-cache-for-react-native-linux-arm64
hash: sha256-7110058b0ab42bfe081eda0348f24ea8885ed1f7ccaf2a01d52d1815b7031480
project_type_tags:
- react-native
- ios
- android
type_tags:
- utility
toolkit:
go:
package_name: github.com/bitrise-steplib/bitrise-step-activate-react-native-features
is_skippable: true
run_if: .IsCI
inputs:
- opts:
description: Enables Bitrise Build Cache for Xcode. When enabled, activates Xcelerate
and starts the Xcelerate proxy in the background.
is_required: true
summary: Enables Bitrise Build Cache for Xcode using Xcelerate
title: Enable Xcode cache
value_options:
- "true"
- "false"
xcode_cache_enabled: "true"
- gradle_cache_enabled: "true"
opts:
description: Enables Bitrise Build Cache for Gradle. When enabled, activates Gradle
cache with analytics and remote cache plugins.
is_required: true
summary: Enables Bitrise Build Cache for Gradle
title: Enable Gradle cache
value_options:
- "true"
- "false"
- opts:
is_required: true
summary: Enable logging additional information for troubleshooting
title: Verbose logging
value_options:
- "true"
- "false"
verbose: "false"
================================================
FILE: steps/activate-build-cache-for-react-native/0.4.0/step.yml
================================================
title: Build Cache for React Native
summary: Activates Bitrise Build Cache features for React Native projects
description: |
This Step activates Bitrise Build Cache for all build systems used in a React Native project.
After this Step executes,
- enabling Xcode cache will result in: iOS builds will use the Bitrise Build Cache for Xcode via Xcelerate, with a background proxy started automatically.
- enabling Gradle cache will result in: Android Gradle builds will automatically read from and push entries to the remote cache. C++ native modules will also be compiled using ccache, with a background storage helper started automatically.
website: https://github.com/bitrise-steplib/bitrise-step-activate-react-native-features
source_code_url: https://github.com/bitrise-steplib/bitrise-step-activate-react-native-features
support_url: https://github.com/bitrise-steplib/bitrise-step-activate-react-native-features
published_at: 2026-04-27T14:00:52.952754191Z
source:
git: https://github.com/bitrise-steplib/bitrise-step-activate-react-native-features.git
commit: 838e67f4bb0a4c908e19e7355fd79466ee586a7a
executables:
darwin-amd64:
storage_uri: steps/activate-build-cache-for-react-native/0.4.0/bin/activate-build-cache-for-react-native-darwin-amd64
hash: sha256-c2ec9d0abd14153028efe2e12fd8e33d67a029ef797c9bbff285c3e121b5234e
darwin-arm64:
storage_uri: steps/activate-build-cache-for-react-native/0.4.0/bin/activate-build-cache-for-react-native-darwin-arm64
hash: sha256-4f262071a8bcb935ee71947de684889f7702c15990180d4d9b7a41d99aa72d42
linux-amd64:
storage_uri: steps/activate-build-cache-for-react-native/0.4.0/bin/activate-build-cache-for-react-native-linux-amd64
hash: sha256-ff5029e3e2ad262ecda24482caa3524e963366eaf6ca11dc11a61819938a91ff
linux-arm64:
storage_uri: steps/activate-build-cache-for-react-native/0.4.0/bin/activate-build-cache-for-react-native-linux-arm64
hash: sha256-6478fea860d2a3a3367d202025b40f018af1f3067e591bb6ba52a2689f6cfa0f
project_type_tags:
- react-native
- ios
- android
type_tags:
- utility
toolkit:
go:
package_name: github.com/bitrise-steplib/bitrise-step-activate-react-native-features
is_skippable: true
run_if: .IsCI
inputs:
- opts:
description: Enables Bitrise Build Cache for Xcode. When enabled, activates Xcelerate
and starts the Xcelerate proxy in the background.
is_required: true
summary: Enables Bitrise Build Cache for Xcode using Xcelerate
title: Enable Xcode cache
value_options:
- "true"
- "false"
xcode_cache_enabled: "true"
- gradle_cache_enabled: "true"
opts:
description: Enables Bitrise Build Cache for Gradle. When enabled, activates Gradle
cache with analytics and remote cache plugins.
is_required: true
summary: Enables Bitrise Build Cache for Gradle
title: Enable Gradle cache
value_options:
- "true"
- "false"
- opts:
is_required: true
summary: Enable logging additional information for troubleshooting
title: Verbose logging
value_options:
- "true"
- "false"
verbose: "false"
================================================
FILE: steps/activate-build-cache-for-react-native/0.4.1/step.yml
================================================
title: Build Cache for React Native
summary: Activates Bitrise Build Cache features for React Native projects
description: |
This Step activates Bitrise Build Cache for all build systems used in a React Native project.
After this Step executes,
- enabling Xcode cache will result in: iOS builds will use the Bitrise Build Cache for Xcode via Xcelerate, with a background proxy started automatically.
- enabling Gradle cache will result in: Android Gradle builds will automatically read from and push entries to the remote cache. C++ native modules will also be compiled using ccache, with a background storage helper started automatically.
website: https://github.com/bitrise-steplib/bitrise-step-activate-react-native-features
source_code_url: https://github.com/bitrise-steplib/bitrise-step-activate-react-native-features
support_url: https://github.com/bitrise-steplib/bitrise-step-activate-react-native-features
published_at: 2026-04-28T20:36:27.860435976Z
source:
git: https://github.com/bitrise-steplib/bitrise-step-activate-react-native-features.git
commit: 34387e1657a8fffa1b7495bf3da4d91531f30cb5
executables:
darwin-amd64:
storage_uri: steps/activate-build-cache-for-react-native/0.4.1/bin/activate-build-cache-for-react-native-darwin-amd64
hash: sha256-73497c5acbc9dc4dbf4289ee4f80b8e7bc01da8b73c06f8a269a1fc7b36e11d8
darwin-arm64:
storage_uri: steps/activate-build-cache-for-react-native/0.4.1/bin/activate-build-cache-for-react-native-darwin-arm64
hash: sha256-ec5e6fa440482fbe4c44269dd1f06145b2ca942906bb63a77b01cd79a207b193
linux-amd64:
storage_uri: steps/activate-build-cache-for-react-native/0.4.1/bin/activate-build-cache-for-react-native-linux-amd64
hash: sha256-d5f4ce531265a16da57c1ab3d05c8bebc2906f252c67125ff4ff2533f9f1dd32
linux-arm64:
storage_uri: steps/activate-build-cache-for-react-native/0.4.1/bin/activate-build-cache-for-react-native-linux-arm64
hash: sha256-d3b73f81fed3723fb0201835f0870adbe5d6cf2622f4b9caad2f41c926446565
project_type_tags:
- react-native
- ios
- android
type_tags:
- utility
toolkit:
go:
package_name: github.com/bitrise-steplib/bitrise-step-activate-react-native-features
is_skippable: true
run_if: .IsCI
inputs:
- opts:
description: Enables Bitrise Build Cache for Xcode. When enabled, activates Xcelerate
and starts the Xcelerate proxy in the background.
is_required: true
summary: Enables Bitrise Build Cache for Xcode using Xcelerate
title: Enable Xcode cache
value_options:
- "true"
- "false"
xcode_cache_enabled: "true"
- gradle_cache_enabled: "true"
opts:
description: Enables Bitrise Build Cache for Gradle. When enabled, activates Gradle
cache with analytics and remote cache plugins.
is_required: true
summary: Enables Bitrise Build Cache for Gradle
title: Enable Gradle cache
value_options:
- "true"
- "false"
- opts:
is_required: true
summary: Enable logging additional information for troubleshooting
title: Verbose logging
value_options:
- "true"
- "false"
verbose: "false"
================================================
FILE: steps/activate-build-cache-for-react-native/0.5.0/step.yml
================================================
title: Build Cache for React Native
summary: Activates Bitrise Build Cache features for React Native projects
description: |
This Step activates Bitrise Build Cache for all build systems used in a React Native project.
After this Step executes,
- enabling Xcode cache will result in: iOS builds will use the Bitrise Build Cache for Xcode via Xcelerate, with a background proxy started automatically.
- enabling Gradle cache will result in: Android Gradle builds will automatically read from and push entries to the remote cache. C++ native modules will also be compiled using ccache, with a background storage helper started automatically.
website: https://github.com/bitrise-steplib/bitrise-step-activate-react-native-features
source_code_url: https://github.com/bitrise-steplib/bitrise-step-activate-react-native-features
support_url: https://github.com/bitrise-steplib/bitrise-step-activate-react-native-features
published_at: 2026-04-29T11:05:48.40610511Z
source:
git: https://github.com/bitrise-steplib/bitrise-step-activate-react-native-features.git
commit: 12bf93750d3e053b50666a17c6e1c627a5f2dfde
executables:
darwin-amd64:
storage_uri: steps/activate-build-cache-for-react-native/0.5.0/bin/activate-build-cache-for-react-native-darwin-amd64
hash: sha256-b6cd564952d011ff94a5e5f3cbc6951df887ca3dceac0efc2b595c0fc8c6220f
darwin-arm64:
storage_uri: steps/activate-build-cache-for-react-native/0.5.0/bin/activate-build-cache-for-react-native-darwin-arm64
hash: sha256-2b06b766005b3a9f66471fc862d49881e7c649f8be014148118ae2e5118dd0d4
linux-amd64:
storage_uri: steps/activate-build-cache-for-react-native/0.5.0/bin/activate-build-cache-for-react-native-linux-amd64
hash: sha256-5a0e64c7d73e57a60260347cef30260d2fe14987b39ae95ed7076f251b0ff285
linux-arm64:
storage_uri: steps/activate-build-cache-for-react-native/0.5.0/bin/activate-build-cache-for-react-native-linux-arm64
hash: sha256-37e37fb5b3a9929d78225838d31f0caa51ddeb82202c4f84eceb88c55d64b698
project_type_tags:
- react-native
- ios
- android
type_tags:
- utility
toolkit:
go:
package_name: github.com/bitrise-steplib/bitrise-step-activate-react-native-features
is_skippable: true
run_if: .IsCI
inputs:
- opts:
description: Enables Bitrise Build Cache for Xcode. When enabled, activates Xcelerate
and starts the Xcelerate proxy in the background.
is_required: true
summary: Enables Bitrise Build Cache for Xcode using Xcelerate
title: Enable Xcode cache
value_options:
- "true"
- "false"
xcode_cache_enabled: "true"
- gradle_cache_enabled: "true"
opts:
description: Enables Bitrise Build Cache for Gradle. When enabled, activates Gradle
cache with analytics and remote cache plugins.
is_required: true
summary: Enables Bitrise Build Cache for Gradle
title: Enable Gradle cache
value_options:
- "true"
- "false"
- opts:
is_required: true
summary: Enable logging additional information for troubleshooting
title: Verbose logging
value_options:
- "true"
- "false"
verbose: "false"
================================================
FILE: steps/activate-build-cache-for-react-native/0.5.1/step.yml
================================================
title: Build Cache for React Native
summary: Activates Bitrise Build Cache features for React Native projects
description: |
This Step activates Bitrise Build Cache for all build systems used in a React Native project.
After this Step executes,
- enabling Xcode cache will result in: iOS builds will use the Bitrise Build Cache for Xcode via Xcelerate, with a background proxy started automatically.
- enabling Gradle cache will result in: Android Gradle builds will automatically read from and push entries to the remote cache. C++ native modules will also be compiled using ccache, with a background storage helper started automatically.
website: https://github.com/bitrise-steplib/bitrise-step-activate-react-native-features
source_code_url: https://github.com/bitrise-steplib/bitrise-step-activate-react-native-features
support_url: https://github.com/bitrise-steplib/bitrise-step-activate-react-native-features
published_at: 2026-04-29T11:35:26.909590062Z
source:
git: https://github.com/bitrise-steplib/bitrise-step-activate-react-native-features.git
commit: bc60f70040df9a3f058aad09c9dd243edfd59319
executables:
darwin-amd64:
storage_uri: steps/activate-build-cache-for-react-native/0.5.1/bin/activate-build-cache-for-react-native-darwin-amd64
hash: sha256-8a118fac51c54c25c4198b6501353a80a9dda0c3809681ec03e4ea5a3080117b
darwin-arm64:
storage_uri: steps/activate-build-cache-for-react-native/0.5.1/bin/activate-build-cache-for-react-native-darwin-arm64
hash: sha256-d976e08285212b18d863607687164395d1537a42f0234aba360cd5574626ee9b
linux-amd64:
storage_uri: steps/activate-build-cache-for-react-native/0.5.1/bin/activate-build-cache-for-react-native-linux-amd64
hash: sha256-d1209fd80e26f260e5ccbec6fe339e5bcb9e6e015829316f3cb2cee81445dc6f
linux-arm64:
storage_uri: steps/activate-build-cache-for-react-native/0.5.1/bin/activate-build-cache-for-react-native-linux-arm64
hash: sha256-73407793b691008a008987705b5669ad7a0909b98db5d35ecf4019fe0c02251e
project_type_tags:
- react-native
- ios
- android
type_tags:
- utility
toolkit:
go:
package_name: github.com/bitrise-steplib/bitrise-step-activate-react-native-features
is_skippable: true
run_if: .IsCI
inputs:
- opts:
description: Enables Bitrise Build Cache for Xcode. When enabled, activates Xcelerate
and starts the Xcelerate proxy in the background.
is_required: true
summary: Enables Bitrise Build Cache for Xcode using Xcelerate
title: Enable Xcode cache
value_options:
- "true"
- "false"
xcode_cache_enabled: "true"
- gradle_cache_enabled: "true"
opts:
description: Enables Bitrise Build Cache for Gradle. When enabled, activates Gradle
cache with analytics and remote cache plugins.
is_required: true
summary: Enables Bitrise Build Cache for Gradle
title: Enable Gradle cache
value_options:
- "true"
- "false"
- opts:
is_required: true
summary: Enable logging additional information for troubleshooting
title: Verbose logging
value_options:
- "true"
- "false"
verbose: "false"
================================================
FILE: steps/activate-build-cache-for-react-native/0.5.2/step.yml
================================================
title: Build Cache for React Native
summary: Activates Bitrise Build Cache features for React Native projects
description: |
This Step activates Bitrise Build Cache for all build systems used in a React Native project.
After this Step executes,
- enabling Xcode cache will result in: iOS builds will use the Bitrise Build Cache for Xcode via Xcelerate, with a background proxy started automatically.
- enabling Gradle cache will result in: Android Gradle builds will automatically read from and push entries to the remote cache. C++ native modules will also be compiled using ccache, with a background storage helper started automatically.
website: https://github.com/bitrise-steplib/bitrise-step-activate-react-native-features
source_code_url: https://github.com/bitrise-steplib/bitrise-step-activate-react-native-features
support_url: https://github.com/bitrise-steplib/bitrise-step-activate-react-native-features
published_at: 2026-04-29T12:33:32.525784686Z
source:
git: https://github.com/bitrise-steplib/bitrise-step-activate-react-native-features.git
commit: 9c39597c45aa2695663a3174507a42291a8eeb14
executables:
darwin-amd64:
storage_uri: steps/activate-build-cache-for-react-native/0.5.2/bin/activate-build-cache-for-react-native-darwin-amd64
hash: sha256-204e5870c6538b1ec068c55a3302b35c8bba3e749e485f5f0cf33764a7251666
darwin-arm64:
storage_uri: steps/activate-build-cache-for-react-native/0.5.2/bin/activate-build-cache-for-react-native-darwin-arm64
hash: sha256-a8b0f5160eca2aa275a0846c8869ed28fdcfa57d4aee09919675945867ec47f5
linux-amd64:
storage_uri: steps/activate-build-cache-for-react-native/0.5.2/bin/activate-build-cache-for-react-native-linux-amd64
hash: sha256-0f2f38b739a662132e5d6358ad5682977a5f4f736d4818ce6bd96cf00b511cba
linux-arm64:
storage_uri: steps/activate-build-cache-for-react-native/0.5.2/bin/activate-build-cache-for-react-native-linux-arm64
hash: sha256-4d2221e2a003351a8acdeb5cdd6be6b5ae1e88c33183f81f0ef654820fd6ca6c
project_type_tags:
- react-native
- ios
- android
type_tags:
- utility
toolkit:
go:
package_name: github.com/bitrise-steplib/bitrise-step-activate-react-native-features
is_skippable: true
run_if: .IsCI
inputs:
- opts:
description: Enables Bitrise Build Cache for Xcode. When enabled, activates Xcelerate
and starts the Xcelerate proxy in the background.
is_required: true
summary: Enables Bitrise Build Cache for Xcode using Xcelerate
title: Enable Xcode cache
value_options:
- "true"
- "false"
xcode_cache_enabled: "true"
- gradle_cache_enabled: "true"
opts:
description: Enables Bitrise Build Cache for Gradle. When enabled, activates Gradle
cache with analytics and remote cache plugins.
is_required: true
summary: Enables Bitrise Build Cache for Gradle
title: Enable Gradle cache
value_options:
- "true"
- "false"
- opts:
is_required: true
summary: Enable logging additional information for troubleshooting
title: Verbose logging
value_options:
- "true"
- "false"
verbose: "false"
================================================
FILE: steps/activate-build-cache-for-react-native/0.5.3/step.yml
================================================
title: Build Cache for React Native
summary: Activates Bitrise Build Cache features for React Native projects
description: |
This Step activates Bitrise Build Cache for all build systems used in a React Native project.
After this Step executes,
- enabling Xcode cache will result in: iOS builds will use the Bitrise Build Cache for Xcode via Xcelerate, with a background proxy started automatically.
- enabling Gradle cache will result in: Android Gradle builds will automatically read from and push entries to the remote cache. C++ native modules will also be compiled using ccache, with a background storage helper started automatically.
website: https://github.com/bitrise-steplib/bitrise-step-activate-react-native-features
source_code_url: https://github.com/bitrise-steplib/bitrise-step-activate-react-native-features
support_url: https://github.com/bitrise-steplib/bitrise-step-activate-react-native-features
published_at: 2026-04-29T14:49:38.034274161Z
source:
git: https://github.com/bitrise-steplib/bitrise-step-activate-react-native-features.git
commit: 1d5c25cf68541ad4f4e5ab93706f455f9abade33
executables:
darwin-amd64:
storage_uri: steps/activate-build-cache-for-react-native/0.5.3/bin/activate-build-cache-for-react-native-darwin-amd64
hash: sha256-0c1996c7833ee4f9ceb1a86588e31402991bf6e573c3d63b81ccc24b3bf5498c
darwin-arm64:
storage_uri: steps/activate-build-cache-for-react-native/0.5.3/bin/activate-build-cache-for-react-native-darwin-arm64
hash: sha256-3e251ae7f7634bdf46e52eca62ae04e3b6695c3af0a78b4ce734bf0342951dc0
linux-amd64:
storage_uri: steps/activate-build-cache-for-react-native/0.5.3/bin/activate-build-cache-for-react-native-linux-amd64
hash: sha256-8eeb91b054fa40b602e04f951f862363cbab4337dccca8b7adccb7a81531799e
linux-arm64:
storage_uri: steps/activate-build-cache-for-react-native/0.5.3/bin/activate-build-cache-for-react-native-linux-arm64
hash: sha256-24ded93173c2cd43875041fad3fc2c968ffc8f1766c01c9a97b13e3df87b3e9b
project_type_tags:
- react-native
- ios
- android
type_tags:
- utility
toolkit:
go:
package_name: github.com/bitrise-steplib/bitrise-step-activate-react-native-features
is_skippable: true
run_if: .IsCI
inputs:
- opts:
description: Enables Bitrise Build Cache for Xcode. When enabled, activates Xcelerate
and starts the Xcelerate proxy in the background.
is_required: true
summary: Enables Bitrise Build Cache for Xcode using Xcelerate
title: Enable Xcode cache
value_options:
- "true"
- "false"
xcode_cache_enabled: "true"
- gradle_cache_enabled: "true"
opts:
description: Enables Bitrise Build Cache for Gradle. When enabled, activates Gradle
cache with analytics and remote cache plugins.
is_required: true
summary: Enables Bitrise Build Cache for Gradle
title: Enable Gradle cache
value_options:
- "true"
- "false"
- opts:
is_required: true
summary: Enable logging additional information for troubleshooting
title: Verbose logging
value_options:
- "true"
- "false"
verbose: "false"
================================================
FILE: steps/activate-build-cache-for-react-native/0.5.4/step.yml
================================================
title: Build Cache for React Native
summary: Activates Bitrise Build Cache features for React Native projects
description: |
This Step activates Bitrise Build Cache for all build systems used in a React Native project.
After this Step executes,
- enabling Xcode cache will result in: iOS builds will use the Bitrise Build Cache for Xcode via Xcelerate, with a background proxy started automatically.
- enabling Gradle cache will result in: Android Gradle builds will automatically read from and push entries to the remote cache. C++ native modules will also be compiled using ccache, with a background storage helper started automatically.
website: https://github.com/bitrise-steplib/bitrise-step-activate-react-native-features
source_code_url: https://github.com/bitrise-steplib/bitrise-step-activate-react-native-features
support_url: https://github.com/bitrise-steplib/bitrise-step-activate-react-native-features
published_at: 2026-04-30T09:40:00.116917839Z
source:
git: https://github.com/bitrise-steplib/bitrise-step-activate-react-native-features.git
commit: 59a0e3e3489727caa4191423f4fd007fb4f93243
executables:
darwin-amd64:
storage_uri: steps/activate-build-cache-for-react-native/0.5.4/bin/activate-build-cache-for-react-native-darwin-amd64
hash: sha256-b358e13ab5ea448157070b27686345b4d041e9d4996c5e88ef59c753198f42f0
darwin-arm64:
storage_uri: steps/activate-build-cache-for-react-native/0.5.4/bin/activate-build-cache-for-react-native-darwin-arm64
hash: sha256-d63235fbd29128fdef7ca17299db3f12abf564fb484ca41c068c00e63f212f4f
linux-amd64:
storage_uri: steps/activate-build-cache-for-react-native/0.5.4/bin/activate-build-cache-for-react-native-linux-amd64
hash: sha256-ec7c04082cffecc10952b5c972dfa0c9545337cdcea35c6f450ddc2236d0dbd3
linux-arm64:
storage_uri: steps/activate-build-cache-for-react-native/0.5.4/bin/activate-build-cache-for-react-native-linux-arm64
hash: sha256-7ac883c412781b31cbfc7135d09996c2f8c53154fd91d57bf4039f44c7b538a0
project_type_tags:
- react-native
- ios
- android
type_tags:
- utility
toolkit:
go:
package_name: github.com/bitrise-steplib/bitrise-step-activate-react-native-features
is_skippable: true
run_if: .IsCI
inputs:
- opts:
description: Enables Bitrise Build Cache for Xcode. When enabled, activates Xcelerate
and starts the Xcelerate proxy in the background.
is_required: true
summary: Enables Bitrise Build Cache for Xcode using Xcelerate
title: Enable Xcode cache
value_options:
- "true"
- "false"
xcode_cache_enabled: "true"
- gradle_cache_enabled: "true"
opts:
description: Enables Bitrise Build Cache for Gradle. When enabled, activates Gradle
cache with analytics and remote cache plugins.
is_required: true
summary: Enables Bitrise Build Cache for Gradle
title: Enable Gradle cache
value_options:
- "true"
- "false"
- opts:
is_required: true
summary: Enable logging additional information for troubleshooting
title: Verbose logging
value_options:
- "true"
- "false"
verbose: "false"
================================================
FILE: steps/activate-build-cache-for-react-native/0.5.5/step.yml
================================================
title: Build Cache for React Native
summary: Activates Bitrise Build Cache features for React Native projects
description: |
This Step activates Bitrise Build Cache for all build systems used in a React Native project.
After this Step executes,
- enabling Xcode cache will result in: iOS builds will use the Bitrise Build Cache for Xcode via Xcelerate, with a background proxy started automatically.
- enabling Gradle cache will result in: Android Gradle builds will automatically read from and push entries to the remote cache. C++ native modules will also be compiled using ccache, with a background storage helper started automatically.
website: https://github.com/bitrise-steplib/bitrise-step-activate-react-native-features
source_code_url: https://github.com/bitrise-steplib/bitrise-step-activate-react-native-features
support_url: https://github.com/bitrise-steplib/bitrise-step-activate-react-native-features
published_at: 2026-04-30T12:02:01.494993698Z
source:
git: https://github.com/bitrise-steplib/bitrise-step-activate-react-native-features.git
commit: 1a1ebadc5c50ff527737f8e35fb285f4bc4eb48e
executables:
darwin-amd64:
storage_uri: steps/activate-build-cache-for-react-native/0.5.5/bin/activate-build-cache-for-react-native-darwin-amd64
hash: sha256-35342d4cc6c78abd5c5147f92a212f59824f05fe88b9e7f2f143ae45b311b2c5
darwin-arm64:
storage_uri: steps/activate-build-cache-for-react-native/0.5.5/bin/activate-build-cache-for-react-native-darwin-arm64
hash: sha256-80bb2c94f6ae7c8cc82296ddaceea2b4729c67a73d22bfdaf8a42fffd97304d1
linux-amd64:
storage_uri: steps/activate-build-cache-for-react-native/0.5.5/bin/activate-build-cache-for-react-native-linux-amd64
hash: sha256-fc17b0dddb236d908142effe669822ff877dbad0a907e76030cfb73e5cb03c94
linux-arm64:
storage_uri: steps/activate-build-cache-for-react-native/0.5.5/bin/activate-build-cache-for-react-native-linux-arm64
hash: sha256-8b42a82a730f99eb060f87a3bc63501a4c893be07aa298c7757a7982119076ad
project_type_tags:
- react-native
- ios
- android
type_tags:
- utility
toolkit:
go:
package_name: github.com/bitrise-steplib/bitrise-step-activate-react-native-features
is_skippable: true
run_if: .IsCI
inputs:
- opts:
description: Enables Bitrise Build Cache for Xcode. When enabled, activates Xcelerate
and starts the Xcelerate proxy in the background.
is_required: true
summary: Enables Bitrise Build Cache for Xcode using Xcelerate
title: Enable Xcode cache
value_options:
- "true"
- "false"
xcode_cache_enabled: "true"
- gradle_cache_enabled: "true"
opts:
description: Enables Bitrise Build Cache for Gradle. When enabled, activates Gradle
cache with analytics and remote cache plugins.
is_required: true
summary: Enables Bitrise Build Cache for Gradle
title: Enable Gradle cache
value_options:
- "true"
- "false"
- opts:
is_required: true
summary: Enable logging additional information for troubleshooting
title: Verbose logging
value_options:
- "true"
- "false"
verbose: "false"
================================================
FILE: steps/activate-build-cache-for-react-native/0.5.6/step.yml
================================================
title: Build Cache for React Native
summary: Activates Bitrise Build Cache features for React Native projects
description: |
This Step activates Bitrise Build Cache for all build systems used in a React Native project.
After this Step executes,
- enabling Xcode cache will result in: iOS builds will use the Bitrise Build Cache for Xcode via Xcelerate, with a background proxy started automatically.
- enabling Gradle cache will result in: Android Gradle builds will automatically read from and push entries to the remote cache. C++ native modules will also be compiled using ccache, with a background storage helper started automatically.
website: https://github.com/bitrise-steplib/bitrise-step-activate-react-native-features
source_code_url: https://github.com/bitrise-steplib/bitrise-step-activate-react-native-features
support_url: https://github.com/bitrise-steplib/bitrise-step-activate-react-native-features
published_at: 2026-04-30T15:22:31.689356115Z
source:
git: https://github.com/bitrise-steplib/bitrise-step-activate-react-native-features.git
commit: c5aae7ba287664a9aa076025743d86f754af471d
executables:
darwin-amd64:
storage_uri: steps/activate-build-cache-for-react-native/0.5.6/bin/activate-build-cache-for-react-native-darwin-amd64
hash: sha256-ca57dd1b26def487d8c236e81ccf13effab09e8572dff3f137fb8ab83b85fd12
darwin-arm64:
storage_uri: steps/activate-build-cache-for-react-native/0.5.6/bin/activate-build-cache-for-react-native-darwin-arm64
hash: sha256-f329bdd74ef9479f415e4122c4d224038ab2ec17459847e114c634bb22a26ee7
linux-amd64:
storage_uri: steps/activate-build-cache-for-react-native/0.5.6/bin/activate-build-cache-for-react-native-linux-amd64
hash: sha256-d9e0b97a181e2caf2f4d90821048b226b98e4f8a9e3e90f195ff5861d1213f0d
linux-arm64:
storage_uri: steps/activate-build-cache-for-react-native/0.5.6/bin/activate-build-cache-for-react-native-linux-arm64
hash: sha256-a18c700945c4a4a6f00fa5d995139a5a320fc631fe581b4b7563ded9e807d450
project_type_tags:
- react-native
- ios
- android
type_tags:
- utility
toolkit:
go:
package_name: github.com/bitrise-steplib/bitrise-step-activate-react-native-features
is_skippable: true
run_if: .IsCI
inputs:
- opts:
description: Enables Bitrise Build Cache for Xcode. When enabled, activates Xcelerate
and starts the Xcelerate proxy in the background.
is_required: true
summary: Enables Bitrise Build Cache for Xcode using Xcelerate
title: Enable Xcode cache
value_options:
- "true"
- "false"
xcode_cache_enabled: "true"
- gradle_cache_enabled: "true"
opts:
description: Enables Bitrise Build Cache for Gradle. When enabled, activates Gradle
cache with analytics and remote cache plugins.
is_required: true
summary: Enables Bitrise Build Cache for Gradle
title: Enable Gradle cache
value_options:
- "true"
- "false"
- opts:
is_required: true
summary: Enable logging additional information for troubleshooting
title: Verbose logging
value_options:
- "true"
- "false"
verbose: "false"
================================================
FILE: steps/activate-build-cache-for-react-native/0.5.7/step.yml
================================================
title: Build Cache for React Native
summary: Activates Bitrise Build Cache features for React Native projects
description: |
This Step activates Bitrise Build Cache for all build systems used in a React Native project.
After this Step executes,
- enabling Xcode cache will result in: iOS builds will use the Bitrise Build Cache for Xcode via Xcelerate, with a background proxy started automatically.
- enabling Gradle cache will result in: Android Gradle builds will automatically read from and push entries to the remote cache. C++ native modules will also be compiled using ccache, with a background storage helper started automatically.
website: https://github.com/bitrise-steplib/bitrise-step-activate-react-native-features
source_code_url: https://github.com/bitrise-steplib/bitrise-step-activate-react-native-features
support_url: https://github.com/bitrise-steplib/bitrise-step-activate-react-native-features
published_at: 2026-04-30T15:58:46.21636056Z
source:
git: https://github.com/bitrise-steplib/bitrise-step-activate-react-native-features.git
commit: 500bc61d5aa65d30c7f34edc2c1841428ad953a1
executables:
darwin-amd64:
storage_uri: steps/activate-build-cache-for-react-native/0.5.7/bin/activate-build-cache-for-react-native-darwin-amd64
hash: sha256-43f21698534e32efa4d37f483a973ee61c1d08ccb8a9ec23a7d909c5ec2a6df6
darwin-arm64:
storage_uri: steps/activate-build-cache-for-react-native/0.5.7/bin/activate-build-cache-for-react-native-darwin-arm64
hash: sha256-a8afc563a2d38ac1f87536824fa07707b8fb193a868b60d073284ad6c90ca988
linux-amd64:
storage_uri: steps/activate-build-cache-for-react-native/0.5.7/bin/activate-build-cache-for-react-native-linux-amd64
hash: sha256-b0c11ff6bd7714e84dca6b6ecf359704fbe66706a20bd779d74390d1c18f2be2
linux-arm64:
storage_uri: steps/activate-build-cache-for-react-native/0.5.7/bin/activate-build-cache-for-react-native-linux-arm64
hash: sha256-a37bd032f8dfba44fda8c7ae3c55be2399f73d2c1239daf87c6290e22895cdb0
project_type_tags:
- react-native
- ios
- android
type_tags:
- utility
toolkit:
go:
package_name: github.com/bitrise-steplib/bitrise-step-activate-react-native-features
is_skippable: true
run_if: .IsCI
inputs:
- opts:
description: Enables Bitrise Build Cache for Xcode. When enabled, activates Xcelerate
and starts the Xcelerate proxy in the background.
is_required: true
summary: Enables Bitrise Build Cache for Xcode using Xcelerate
title: Enable Xcode cache
value_options:
- "true"
- "false"
xcode_cache_enabled: "true"
- gradle_cache_enabled: "true"
opts:
description: Enables Bitrise Build Cache for Gradle. When enabled, activates Gradle
cache with analytics and remote cache plugins.
is_required: true
summary: Enables Bitrise Build Cache for Gradle
title: Enable Gradle cache
value_options:
- "true"
- "false"
- opts:
is_required: true
summary: Enable logging additional information for troubleshooting
title: Verbose logging
value_options:
- "true"
- "false"
verbose: "false"
================================================
FILE: steps/activate-build-cache-for-react-native/0.6.0/step.yml
================================================
title: Build Cache for React Native
summary: Activates Bitrise Build Cache features for React Native projects
description: |
This Step activates Bitrise Build Cache for all build systems used in a React Native project.
After this Step executes,
- enabling Xcode cache will result in: iOS builds will use the Bitrise Build Cache for Xcode via Xcelerate, with a background proxy started automatically.
- enabling Gradle cache will result in: Android Gradle builds will automatically read from and push entries to the remote cache. C++ native modules will also be compiled using ccache, with a background storage helper started automatically.
website: https://github.com/bitrise-steplib/bitrise-step-activate-react-native-features
source_code_url: https://github.com/bitrise-steplib/bitrise-step-activate-react-native-features
support_url: https://github.com/bitrise-steplib/bitrise-step-activate-react-native-features
published_at: 2026-05-05T12:08:18.103659759Z
source:
git: https://github.com/bitrise-steplib/bitrise-step-activate-react-native-features.git
commit: 4e26411bc72002d9a1377589af39490f604c363d
executables:
darwin-amd64:
storage_uri: steps/activate-build-cache-for-react-native/0.6.0/bin/activate-build-cache-for-react-native-darwin-amd64
hash: sha256-9debe0909aa80e8da3ef2d840e7ae2072d3b6af80e19410165bd34be2ca3040a
darwin-arm64:
storage_uri: steps/activate-build-cache-for-react-native/0.6.0/bin/activate-build-cache-for-react-native-darwin-arm64
hash: sha256-020965c25885dd95c9ffa862ffa59b32c2bbe202c32afbc6e4556fc182d759f3
linux-amd64:
storage_uri: steps/activate-build-cache-for-react-native/0.6.0/bin/activate-build-cache-for-react-native-linux-amd64
hash: sha256-cfe1c1521fc2c59da8652a1d395bc4ce1734bcc1b88621fe04eea6cd718a6a5c
linux-arm64:
storage_uri: steps/activate-build-cache-for-react-native/0.6.0/bin/activate-build-cache-for-react-native-linux-arm64
hash: sha256-0191b60fcb18adef34667994e5219888b41cc87a9b377014437904ea56bfc868
project_type_tags:
- react-native
- ios
- android
type_tags:
- utility
toolkit:
go:
package_name: github.com/bitrise-steplib/bitrise-step-activate-react-native-features
is_skippable: true
run_if: .IsCI
inputs:
- opts:
description: Enables Bitrise Build Cache for Xcode. When enabled, activates Xcelerate
and starts the Xcelerate proxy in the background.
is_required: true
summary: Enables Bitrise Build Cache for Xcode using Xcelerate
title: Enable Xcode cache
value_options:
- "true"
- "false"
xcode_cache_enabled: "true"
- gradle_cache_enabled: "true"
opts:
description: Enables Bitrise Build Cache for Gradle. When enabled, activates Gradle
cache with analytics and remote cache plugins.
is_required: true
summary: Enables Bitrise Build Cache for Gradle
title: Enable Gradle cache
value_options:
- "true"
- "false"
- opts:
is_required: true
summary: Enable logging additional information for troubleshooting
title: Verbose logging
value_options:
- "true"
- "false"
verbose: "false"
================================================
FILE: steps/activate-build-cache-for-react-native/0.7.0/step.yml
================================================
title: Build Cache for React Native
summary: Activates Bitrise Build Cache features for React Native projects
description: |
This Step activates Bitrise Build Cache for all build systems used in a React Native project.
After this Step executes,
- enabling Xcode cache will result in: iOS builds will use the Bitrise Build Cache for Xcode via Xcelerate, with a background proxy started automatically.
- enabling Gradle cache will result in: Android Gradle builds will automatically read from and push entries to the remote cache. C++ native modules will also be compiled using ccache, with a background storage helper started automatically.
website: https://github.com/bitrise-steplib/bitrise-step-activate-react-native-features
source_code_url: https://github.com/bitrise-steplib/bitrise-step-activate-react-native-features
support_url: https://github.com/bitrise-steplib/bitrise-step-activate-react-native-features
published_at: 2026-05-05T14:46:23.968272196Z
source:
git: https://github.com/bitrise-steplib/bitrise-step-activate-react-native-features.git
commit: 7c1680a1d96c9a3a7d803172d4fbee70ffa8ca76
executables:
darwin-amd64:
storage_uri: steps/activate-build-cache-for-react-native/0.7.0/bin/activate-build-cache-for-react-native-darwin-amd64
hash: sha256-a144c109bdabb83ac764215e65da9aeb475cd3f9a6beecaba6a411c411e13a5d
darwin-arm64:
storage_uri: steps/activate-build-cache-for-react-native/0.7.0/bin/activate-build-cache-for-react-native-darwin-arm64
hash: sha256-a0663f9d17f969545b5e5e7b5d1f63a109715e372ddcfc0413af62330cf13b8b
linux-amd64:
storage_uri: steps/activate-build-cache-for-react-native/0.7.0/bin/activate-build-cache-for-react-native-linux-amd64
hash: sha256-d922d92705482f3cb7c102e488f090593dd177ffb89f962b42af380d95f28d2c
linux-arm64:
storage_uri: steps/activate-build-cache-for-react-native/0.7.0/bin/activate-build-cache-for-react-native-linux-arm64
hash: sha256-f57b5669aebac5ea186c54cb9979411861421ff4b8a595e211936501231a9f51
project_type_tags:
- react-native
- ios
- android
type_tags:
- utility
toolkit:
go:
package_name: github.com/bitrise-steplib/bitrise-step-activate-react-native-features
is_skippable: true
run_if: .IsCI
inputs:
- opts:
description: Enables Bitrise Build Cache for Xcode. When enabled, activates Xcelerate
and starts the Xcelerate proxy in the background.
is_required: true
summary: Enables Bitrise Build Cache for Xcode using Xcelerate
title: Enable Xcode cache
value_options:
- "true"
- "false"
xcode_cache_enabled: "true"
- gradle_cache_enabled: "true"
opts:
description: Enables Bitrise Build Cache for Gradle. When enabled, activates Gradle
cache with analytics and remote cache plugins.
is_required: true
summary: Enables Bitrise Build Cache for Gradle
title: Enable Gradle cache
value_options:
- "true"
- "false"
- opts:
is_required: true
summary: Enable logging additional information for troubleshooting
title: Verbose logging
value_options:
- "true"
- "false"
verbose: "false"
================================================
FILE: steps/activate-build-cache-for-react-native/0.7.1/step.yml
================================================
title: Build Cache for React Native
summary: Activates Bitrise Build Cache features for React Native projects
description: |
This Step activates Bitrise Build Cache for all build systems used in a React Native project.
After this Step executes,
- enabling Xcode cache will result in: iOS builds will use the Bitrise Build Cache for Xcode via Xcelerate, with a background proxy started automatically.
- enabling Gradle cache will result in: Android Gradle builds will automatically read from and push entries to the remote cache. C++ native modules will also be compiled using ccache, with a background storage helper started automatically.
website: https://github.com/bitrise-steplib/bitrise-step-activate-react-native-features
source_code_url: https://github.com/bitrise-steplib/bitrise-step-activate-react-native-features
support_url: https://github.com/bitrise-steplib/bitrise-step-activate-react-native-features
published_at: 2026-05-12T08:59:31.815907543Z
source:
git: https://github.com/bitrise-steplib/bitrise-step-activate-react-native-features.git
commit: 34ba6b685d3f9bd0d38dff152bce6ffb2e233562
executables:
darwin-amd64:
storage_uri: steps/activate-build-cache-for-react-native/0.7.1/bin/activate-build-cache-for-react-native-darwin-amd64
hash: sha256-3288fd95d5731206840e31bcf3c4a4517be4105323269c67be44d1265dee60df
darwin-arm64:
storage_uri: steps/activate-build-cache-for-react-native/0.7.1/bin/activate-build-cache-for-react-native-darwin-arm64
hash: sha256-ad3f03ac7f277b7e0016a34ba3d1cace01e53bbdb2bd7af42620c9ee9d8141cb
linux-amd64:
storage_uri: steps/activate-build-cache-for-react-native/0.7.1/bin/activate-build-cache-for-react-native-linux-amd64
hash: sha256-175870eeed216dbcef7429e91f6fb7475585f92d2a477c28be8aa6e4b63c3502
linux-arm64:
storage_uri: steps/activate-build-cache-for-react-native/0.7.1/bin/activate-build-cache-for-react-native-linux-arm64
hash: sha256-d669d7ae021c8f259d2491cbf3d79312fa9291951e7a0cbc908e4609442c41f4
project_type_tags:
- react-native
- ios
- android
type_tags:
- utility
toolkit:
go:
package_name: github.com/bitrise-steplib/bitrise-step-activate-react-native-features
is_skippable: true
run_if: .IsCI
inputs:
- opts:
description: Enables Bitrise Build Cache for Xcode. When enabled, activates Xcelerate
and starts the Xcelerate proxy in the background.
is_required: true
summary: Enables Bitrise Build Cache for Xcode using Xcelerate
title: Enable Xcode cache
value_options:
- "true"
- "false"
xcode_cache_enabled: "true"
- gradle_cache_enabled: "true"
opts:
description: Enables Bitrise Build Cache for Gradle. When enabled, activates Gradle
cache with analytics and remote cache plugins.
is_required: true
summary: Enables Bitrise Build Cache for Gradle
title: Enable Gradle cache
value_options:
- "true"
- "false"
- opts:
is_required: true
summary: Enable logging additional information for troubleshooting
title: Verbose logging
value_options:
- "true"
- "false"
verbose: "false"
================================================
FILE: steps/activate-build-cache-for-react-native/step-info.yml
================================================
maintainer: bitrise
================================================
FILE: steps/activate-build-cache-for-tuist/1.0.0/step.yml
================================================
title: Activate Remote Tuist Cache
summary: Activates Bitrise Remote Build Cache add-on for subsequent Tuist builds in the workflow
description: |
This Step activates Bitrise's remote build cache add-on for subsequent Tuist executions in the workflow.
After this Step executes, Tuist builds will automatically read from the remote cache and push new entries.
website: https://github.com/bitrise-steplib/bitrise-step-activate-tuist-cache
source_code_url: https://github.com/bitrise-steplib/bitrise-step-activate-tuist-cache
support_url: https://github.com/bitrise-steplib/bitrise-step-activate-tuist-cache
published_at: 2023-04-24T14:52:39.28671+02:00
source:
git: https://github.com/bitrise-steplib/bitrise-step-activate-tuist-cache.git
commit: 7876e59a47b92ab10de2a8cc09d12fcc58d28393
type_tags:
- utility
is_skippable: true
run_if: .IsCI
================================================
FILE: steps/activate-build-cache-for-tuist/1.0.1/step.yml
================================================
title: Activate Bitrise Build Cache for Tuist
summary: Activates Bitrise Remote Build Cache add-on for subsequent Tuist builds in the workflow
description: |
This Step activates Bitrise's remote build cache add-on for subsequent Tuist executions in the workflow.
After this Step executes, Tuist builds will automatically read from the remote cache and push new entries.
website: https://github.com/bitrise-steplib/bitrise-step-activate-tuist-cache
source_code_url: https://github.com/bitrise-steplib/bitrise-step-activate-tuist-cache
support_url: https://github.com/bitrise-steplib/bitrise-step-activate-tuist-cache
published_at: 2023-06-06T15:53:06.752511+02:00
source:
git: https://github.com/bitrise-steplib/bitrise-step-activate-tuist-cache.git
commit: 4bb0c8fae6a9a7afaa9afc0c60e9aac4a0c29436
type_tags:
- utility
is_skippable: true
run_if: .IsCI
================================================
FILE: steps/activate-build-cache-for-tuist/1.0.2/step.yml
================================================
title: Activate Bitrise Build Cache for Tuist
summary: Activates Bitrise Remote Build Cache add-on for subsequent Tuist builds in
the workflow
description: |
This Step activates Bitrise's remote build cache add-on for subsequent Tuist executions in the workflow.
After this Step executes, Tuist builds will automatically read from the remote cache and push new entries.
website: https://github.com/bitrise-steplib/bitrise-step-activate-tuist-cache
source_code_url: https://github.com/bitrise-steplib/bitrise-step-activate-tuist-cache
support_url: https://github.com/bitrise-steplib/bitrise-step-activate-tuist-cache
published_at: 2023-06-30T20:36:14.699365+02:00
source:
git: https://github.com/bitrise-steplib/bitrise-step-activate-tuist-cache.git
commit: 1ec62acc47d6aa64960797fc2cb7e4c41c70ce70
type_tags:
- utility
is_skippable: true
run_if: .IsCI
================================================
FILE: steps/activate-build-cache-for-tuist/1.0.3/step.yml
================================================
title: Activate Bitrise Build Cache for Tuist
summary: Activates Bitrise Remote Build Cache add-on for subsequent Tuist builds in
the workflow
description: |
This Step activates Bitrise's remote build cache add-on for subsequent Tuist executions in the workflow.
After this Step executes, Tuist builds will automatically read from the remote cache and push new entries.
website: https://github.com/bitrise-steplib/bitrise-step-activate-tuist-cache
source_code_url: https://github.com/bitrise-steplib/bitrise-step-activate-tuist-cache
support_url: https://github.com/bitrise-steplib/bitrise-step-activate-tuist-cache
published_at: 2023-07-14T16:36:41.930027+02:00
source:
git: https://github.com/bitrise-steplib/bitrise-step-activate-tuist-cache.git
commit: 4f46a8497048315ca3f0170f480ea07ad0d96528
project_type_tags:
- ios
- macos
type_tags:
- utility
is_skippable: true
run_if: .IsCI
================================================
FILE: steps/activate-build-cache-for-tuist/1.0.4/step.yml
================================================
title: Activate Bitrise Build Cache for Tuist
summary: Activates Bitrise Remote Build Cache add-on for subsequent Tuist builds in
the workflow
description: |
This Step activates Bitrise's remote build cache add-on for subsequent Tuist executions in the workflow.
After this Step executes, Tuist builds will automatically read from the remote cache and push new entries.
website: https://github.com/bitrise-steplib/bitrise-step-activate-tuist-cache
source_code_url: https://github.com/bitrise-steplib/bitrise-step-activate-tuist-cache
support_url: https://github.com/bitrise-steplib/bitrise-step-activate-tuist-cache
published_at: 2023-07-25T09:58:01.891891+02:00
source:
git: https://github.com/bitrise-steplib/bitrise-step-activate-tuist-cache.git
commit: d8a26682256ef71b5ee0669c82935f02c9711391
project_type_tags:
- ios
- macos
type_tags:
- utility
is_skippable: true
run_if: .IsCI
================================================
FILE: steps/activate-build-cache-for-tuist/1.0.5/step.yml
================================================
title: Activate Bitrise Build Cache for Tuist
summary: Activates Bitrise Remote Build Cache add-on for subsequent Tuist builds in
the workflow
description: |
This Step activates Bitrise's remote build cache add-on for subsequent Tuist executions in the workflow.
After this Step executes, Tuist builds will automatically read from the remote cache and push new entries.
website: https://github.com/bitrise-steplib/bitrise-step-activate-tuist-cache
source_code_url: https://github.com/bitrise-steplib/bitrise-step-activate-tuist-cache
support_url: https://github.com/bitrise-steplib/bitrise-step-activate-tuist-cache
published_at: 2023-08-03T15:47:46.012332+02:00
source:
git: https://github.com/bitrise-steplib/bitrise-step-activate-tuist-cache.git
commit: 434e8d2095cd63dce55127605cc1bfcaa674bebb
project_type_tags:
- ios
- macos
type_tags:
- utility
is_skippable: true
run_if: .IsCI
================================================
FILE: steps/activate-build-cache-for-tuist/1.0.6/step.yml
================================================
title: Activate Bitrise Build Cache for Tuist
summary: Activates Bitrise Remote Build Cache add-on for subsequent Tuist builds in
the workflow
description: |
This Step activates Bitrise's remote build cache add-on for subsequent Tuist executions in the workflow.
After this Step executes, Tuist builds will automatically read from the remote cache and push new entries.
website: https://github.com/bitrise-steplib/bitrise-step-activate-tuist-cache
source_code_url: https://github.com/bitrise-steplib/bitrise-step-activate-tuist-cache
support_url: https://github.com/bitrise-steplib/bitrise-step-activate-tuist-cache
published_at: 2023-10-04T12:02:33.510826-04:00
source:
git: https://github.com/bitrise-steplib/bitrise-step-activate-tuist-cache.git
commit: d2a30d8fec48ebe9798e5281ae1a02aecbb0bed4
project_type_tags:
- ios
- macos
type_tags:
- utility
is_skippable: true
run_if: .IsCI
================================================
FILE: steps/activate-build-cache-for-tuist/1.0.7/step.yml
================================================
title: Activate Bitrise Build Cache for Tuist
summary: Activates Bitrise Remote Build Cache add-on for subsequent Tuist builds in
the workflow
description: |
This Step activates Bitrise's remote build cache add-on for subsequent Tuist executions in the workflow.
After this Step executes, Tuist builds will automatically read from the remote cache and push new entries.
website: https://github.com/bitrise-steplib/bitrise-step-activate-tuist-cache
source_code_url: https://github.com/bitrise-steplib/bitrise-step-activate-tuist-cache
support_url: https://github.com/bitrise-steplib/bitrise-step-activate-tuist-cache
published_at: 2023-10-04T14:11:45.96548-04:00
source:
git: https://github.com/bitrise-steplib/bitrise-step-activate-tuist-cache.git
commit: 5c17ce8e8593ab132a87756c87642d08dd0d3408
project_type_tags:
- ios
- macos
type_tags:
- utility
is_skippable: true
run_if: .IsCI
================================================
FILE: steps/activate-build-cache-for-tuist/step-info.yml
================================================
maintainer: bitrise
deprecate_notes: "This step is deprecated. For more information please see: https://bitrise.io/blog/post/tuist-bitrise-build-cache-update"
removal_date: "2024-03-31"
================================================
FILE: steps/activate-build-cache-for-xcode/0.0.1/step.yml
================================================
title: Build Cache for Xcode
summary: Activates Bitrise Remote Build Cache add-on for subsequent Xcode builds in
the workflow
description: |
This Step enables Bitrise's Build Cache Add‑On for Xcode by configuring the environment with the Build Cache CLI.
After this Step runs, Xcode builds invoked via xcodebuild in subsequent workflow steps will automatically read from the remote cache and push new entries when applicable.
The Step adds an alias to ~/.zshrc and ~/.bashrc so the wrapper is available in all following steps; from that point all xcodebuild calls are wrapped to enable compilation caching.
Analytical data (command, duration, cache information, environment) is collected and sent to Bitrise and is available on the Build cache page: https://app.bitrise.io/build-cache
website: https://github.com/bitrise-steplib/bitrise-step-activate-xcode-remote-cache
source_code_url: https://github.com/bitrise-steplib/bitrise-step-activate-xcode-remote-cache
support_url: https://github.com/bitrise-steplib/bitrise-step-activate-xcode-remote-cache
published_at: 2025-09-12T14:41:09.542658+02:00
source:
git: https://github.com/bitrise-steplib/bitrise-step-activate-build-cache-for-xcode.git
commit: eee2ff0639cf8d9b135cc96881b01fb783bfac8a
type_tags:
- utility
toolkit:
bash:
entry_file: step.sh
is_skippable: true
run_if: .IsCI
inputs:
- opts:
is_required: true
summary: Enable logging additional information for troubleshooting
title: Verbose logging
value_options:
- "true"
- "false"
verbose: "false"
================================================
FILE: steps/activate-build-cache-for-xcode/0.0.2/step.yml
================================================
title: Build Cache for Xcode
summary: Activates Bitrise Remote Build Cache add-on for subsequent Xcode builds in
the workflow
description: |
This Step enables Bitrise's Build Cache Add‑On for Xcode by configuring the environment with the Build Cache CLI.
After this Step runs, Xcode builds invoked via xcodebuild in subsequent workflow steps will automatically read from the remote cache and push new entries when applicable.
The Step adds an alias to ~/.zshrc and ~/.bashrc so the wrapper is available in all following steps; from that point all xcodebuild calls are wrapped to enable compilation caching.
Analytical data (command, duration, cache information, environment) is collected and sent to Bitrise and is available on the Build cache page: https://app.bitrise.io/build-cache
website: https://github.com/bitrise-steplib/bitrise-step-activate-xcode-remote-cache
source_code_url: https://github.com/bitrise-steplib/bitrise-step-activate-xcode-remote-cache
support_url: https://github.com/bitrise-steplib/bitrise-step-activate-xcode-remote-cache
published_at: 2025-09-16T09:58:03.433296+02:00
source:
git: https://github.com/bitrise-steplib/bitrise-step-activate-build-cache-for-xcode.git
commit: 4bac0e037cb2a91a0d19626f3302cf731600f968
type_tags:
- utility
toolkit:
bash:
entry_file: step.sh
is_skippable: true
run_if: .IsCI
inputs:
- opts:
is_required: true
summary: Enable logging additional information for troubleshooting
title: Verbose logging
value_options:
- "true"
- "false"
verbose: "false"
- opts:
is_required: true
summary: Whether the build can not only read, but write new entries to the remote
cache
title: Push new cache entries
value_options:
- "true"
- "false"
push: "true"
================================================
FILE: steps/activate-build-cache-for-xcode/0.0.3/step.yml
================================================
title: Build Cache for Xcode
summary: Activates Bitrise Remote Build Cache add-on for subsequent Xcode builds in
the workflow
description: |
This Step enables Bitrise's Build Cache Add‑On for Xcode by configuring the environment with the Build Cache CLI.
After this Step runs, Xcode builds invoked via xcodebuild in subsequent workflow steps will automatically read from the remote cache and push new entries when applicable.
The Step adds an alias to ~/.zshrc and ~/.bashrc so the wrapper is available in all following steps; from that point all xcodebuild calls are wrapped to enable compilation caching.
Analytical data (command, duration, cache information, environment) is collected and sent to Bitrise and is available on the Build cache page: https://app.bitrise.io/build-cache
website: https://github.com/bitrise-steplib/bitrise-step-activate-build-cache-for-xcode
source_code_url: https://github.com/bitrise-steplib/bitrise-step-activate-build-cache-for-xcode
support_url: https://github.com/bitrise-steplib/bitrise-step-activate-build-cache-for-xcode
published_at: 2025-09-16T10:49:00.305809+02:00
source:
git: https://github.com/bitrise-steplib/bitrise-step-activate-build-cache-for-xcode.git
commit: 6c541d013e88ae8c37d626c83d2c5b1d8f3be12e
type_tags:
- utility
toolkit:
bash:
entry_file: step.sh
is_skippable: true
run_if: .IsCI
inputs:
- opts:
is_required: true
summary: Enable logging additional information for troubleshooting
title: Verbose logging
value_options:
- "true"
- "false"
verbose: "false"
- opts:
is_required: true
summary: Whether the build can not only read, but write new entries to the remote
cache
title: Push new cache entries
value_options:
- "true"
- "false"
push: "true"
================================================
FILE: steps/activate-build-cache-for-xcode/0.0.4/step.yml
================================================
title: Build Cache for Xcode
summary: Activates Bitrise Remote Build Cache add-on for subsequent Xcode builds in
the workflow
description: |
This Step enables Bitrise's Build Cache Add‑On for Xcode by configuring the environment with the Build Cache CLI.
After this Step runs, Xcode builds invoked via xcodebuild in subsequent workflow steps will automatically read from the remote cache and push new entries when applicable.
The Step adds an alias to ~/.zshrc and ~/.bashrc so the wrapper is available in all following steps; from that point all xcodebuild calls are wrapped to enable compilation caching.
Analytical data (command, duration, cache information, environment) is collected and sent to Bitrise and is available on the Build cache page: https://app.bitrise.io/build-cache
website: https://github.com/bitrise-steplib/bitrise-step-activate-build-cache-for-xcode
source_code_url: https://github.com/bitrise-steplib/bitrise-step-activate-build-cache-for-xcode
support_url: https://github.com/bitrise-steplib/bitrise-step-activate-build-cache-for-xcode
published_at: 2025-09-18T07:24:32.676998975Z
source:
git: https://github.com/bitrise-steplib/bitrise-step-activate-build-cache-for-xcode.git
commit: 94346b920bbcdfd048f9f50f700fd1f995fc7851
type_tags:
- utility
toolkit:
bash:
entry_file: step.sh
is_skippable: true
run_if: .IsCI
inputs:
- opts:
is_required: true
summary: Enable logging additional information for troubleshooting
title: Verbose logging
value_options:
- "true"
- "false"
verbose: "false"
- cache: "true"
opts:
is_required: true
summary: Whether the build uses the remote cache
title: Use cache
value_options:
- "true"
- "false"
- opts:
is_required: true
summary: Whether the build can not only read, but write new entries to the remote
cache
title: Push new cache entries
value_options:
- "true"
- "false"
push: "true"
================================================
FILE: steps/activate-build-cache-for-xcode/0.10.0/step.yml
================================================
title: Build Cache for Xcode
summary: Activates Bitrise Remote Build Cache add-on for subsequent Xcode builds in
the workflow
description: |
This Step enables Bitrise's Build Cache Add‑On for Xcode by configuring the environment with the Build Cache CLI.
After this Step runs, Xcode builds invoked via xcodebuild in subsequent workflow steps will automatically read from the remote cache and push new entries when applicable.
The Step adds an alias to ~/.zshrc and ~/.bashrc so the wrapper is available in all following steps; from that point all xcodebuild calls are wrapped to enable compilation caching.
Analytical data (command, duration, cache information, environment) is collected and sent to Bitrise and is available on the Build cache page: https://app.bitrise.io/build-cache
website: https://github.com/bitrise-steplib/bitrise-step-activate-build-cache-for-xcode
source_code_url: https://github.com/bitrise-steplib/bitrise-step-activate-build-cache-for-xcode
support_url: https://github.com/bitrise-steplib/bitrise-step-activate-build-cache-for-xcode
published_at: 2026-04-29T11:04:06.557704677Z
source:
git: https://github.com/bitrise-steplib/bitrise-step-activate-build-cache-for-xcode.git
commit: 62daed5152db18e90d8c6a6ba4f6eabc4038dd9e
type_tags:
- utility
toolkit:
bash:
entry_file: step.sh
is_skippable: true
run_if: .IsCI
inputs:
- opts:
is_required: true
summary: Enable logging additional information for troubleshooting
title: Verbose logging
value_options:
- "true"
- "false"
verbose: "false"
- cache: "true"
opts:
is_required: true
summary: Whether the build uses the remote cache
title: Use cache
value_options:
- "true"
- "false"
- opts:
is_required: true
summary: Whether the build can not only read, but write new entries to the remote
cache
title: Push new cache entries
value_options:
- "true"
- "false"
push: "true"
- opts:
is_required: true
summary: |-
Whether Bitrise components should not log anything except the underlying xcodebuild output.
Takes precedence over the 'Verbose logging' and 'Add timestamps' options.
title: Silence all extra Bitrise logging
value_options:
- "true"
- "false"
silent: "false"
- opts:
description: When enabled, the analytics wrapper adds timestamps to xcodebuild
output log messages during the build.
is_required: true
summary: Add timestamps to xcodebuild messages
title: Add timestamps to xcodebuild messages
value_options:
- "true"
- "false"
timestamps: "false"
- cache_skip_flags: "false"
opts:
description: |-
Skip passing cache flags to xcodebuild except the COMPILATION_CACHE_REMOTE_SERVICE_PATH.
Cache will have to be enabled manually in the Xcode project settings. More information can be found at the FAQ
document: https://docs.bitrise.io/en/bitrise-build-cache/build-cache-for-xcode/xcode-compilation-cache-faq.html
is_required: true
summary: Skip passing cache flags to xcodebuild
title: Skip passing cache flags to xcodebuild
value_options:
- "true"
- "false"
================================================
FILE: steps/activate-build-cache-for-xcode/0.10.1/step.yml
================================================
title: Build Cache for Xcode
summary: Activates Bitrise Remote Build Cache add-on for subsequent Xcode builds in
the workflow
description: |
This Step enables Bitrise's Build Cache Add‑On for Xcode by configuring the environment with the Build Cache CLI.
After this Step runs, Xcode builds invoked via xcodebuild in subsequent workflow steps will automatically read from the remote cache and push new entries when applicable.
The Step adds an alias to ~/.zshrc and ~/.bashrc so the wrapper is available in all following steps; from that point all xcodebuild calls are wrapped to enable compilation caching.
Analytical data (command, duration, cache information, environment) is collected and sent to Bitrise and is available on the Build cache page: https://app.bitrise.io/build-cache
website: https://github.com/bitrise-steplib/bitrise-step-activate-build-cache-for-xcode
source_code_url: https://github.com/bitrise-steplib/bitrise-step-activate-build-cache-for-xcode
support_url: https://github.com/bitrise-steplib/bitrise-step-activate-build-cache-for-xcode
published_at: 2026-04-29T11:34:41.506786508Z
source:
git: https://github.com/bitrise-steplib/bitrise-step-activate-build-cache-for-xcode.git
commit: f66f5c2ede52975906712c4f104a1965c29e69d4
type_tags:
- utility
toolkit:
bash:
entry_file: step.sh
is_skippable: true
run_if: .IsCI
inputs:
- opts:
is_required: true
summary: Enable logging additional information for troubleshooting
title: Verbose logging
value_options:
- "true"
- "false"
verbose: "false"
- cache: "true"
opts:
is_required: true
summary: Whether the build uses the remote cache
title: Use cache
value_options:
- "true"
- "false"
- opts:
is_required: true
summary: Whether the build can not only read, but write new entries to the remote
cache
title: Push new cache entries
value_options:
- "true"
- "false"
push: "true"
- opts:
is_required: true
summary: |-
Whether Bitrise components should not log anything except the underlying xcodebuild output.
Takes precedence over the 'Verbose logging' and 'Add timestamps' options.
title: Silence all extra Bitrise logging
value_options:
- "true"
- "false"
silent: "false"
- opts:
description: When enabled, the analytics wrapper adds timestamps to xcodebuild
output log messages during the build.
is_required: true
summary: Add timestamps to xcodebuild messages
title: Add timestamps to xcodebuild messages
value_options:
- "true"
- "false"
timestamps: "false"
- cache_skip_flags: "false"
opts:
description: |-
Skip passing cache flags to xcodebuild except the COMPILATION_CACHE_REMOTE_SERVICE_PATH.
Cache will have to be enabled manually in the Xcode project settings. More information can be found at the FAQ
document: https://docs.bitrise.io/en/bitrise-build-cache/build-cache-for-xcode/xcode-compilation-cache-faq.html
is_required: true
summary: Skip passing cache flags to xcodebuild
title: Skip passing cache flags to xcodebuild
value_options:
- "true"
- "false"
================================================
FILE: steps/activate-build-cache-for-xcode/0.10.2/step.yml
================================================
title: Build Cache for Xcode
summary: Activates Bitrise Remote Build Cache add-on for subsequent Xcode builds in
the workflow
description: |
This Step enables Bitrise's Build Cache Add‑On for Xcode by configuring the environment with the Build Cache CLI.
After this Step runs, Xcode builds invoked via xcodebuild in subsequent workflow steps will automatically read from the remote cache and push new entries when applicable.
The Step adds an alias to ~/.zshrc and ~/.bashrc so the wrapper is available in all following steps; from that point all xcodebuild calls are wrapped to enable compilation caching.
Analytical data (command, duration, cache information, environment) is collected and sent to Bitrise and is available on the Build cache page: https://app.bitrise.io/build-cache
website: https://github.com/bitrise-steplib/bitrise-step-activate-build-cache-for-xcode
source_code_url: https://github.com/bitrise-steplib/bitrise-step-activate-build-cache-for-xcode
support_url: https://github.com/bitrise-steplib/bitrise-step-activate-build-cache-for-xcode
published_at: 2026-04-30T09:39:13.240741999Z
source:
git: https://github.com/bitrise-steplib/bitrise-step-activate-build-cache-for-xcode.git
commit: b739e329c73424190b3796a4f4642dee21c0a9a0
type_tags:
- utility
toolkit:
bash:
entry_file: step.sh
is_skippable: true
run_if: .IsCI
inputs:
- opts:
is_required: true
summary: Enable logging additional information for troubleshooting
title: Verbose logging
value_options:
- "true"
- "false"
verbose: "false"
- cache: "true"
opts:
is_required: true
summary: Whether the build uses the remote cache
title: Use cache
value_options:
- "true"
- "false"
- opts:
is_required: true
summary: Whether the build can not only read, but write new entries to the remote
cache
title: Push new cache entries
value_options:
- "true"
- "false"
push: "true"
- opts:
is_required: true
summary: |-
Whether Bitrise components should not log anything except the underlying xcodebuild output.
Takes precedence over the 'Verbose logging' and 'Add timestamps' options.
title: Silence all extra Bitrise logging
value_options:
- "true"
- "false"
silent: "false"
- opts:
description: When enabled, the analytics wrapper adds timestamps to xcodebuild
output log messages during the build.
is_required: true
summary: Add timestamps to xcodebuild messages
title: Add timestamps to xcodebuild messages
value_options:
- "true"
- "false"
timestamps: "false"
- cache_skip_flags: "false"
opts:
description: |-
Skip passing cache flags to xcodebuild except the COMPILATION_CACHE_REMOTE_SERVICE_PATH.
Cache will have to be enabled manually in the Xcode project settings. More information can be found at the FAQ
document: https://docs.bitrise.io/en/bitrise-build-cache/build-cache-for-xcode/xcode-compilation-cache-faq.html
is_required: true
summary: Skip passing cache flags to xcodebuild
title: Skip passing cache flags to xcodebuild
value_options:
- "true"
- "false"
================================================
FILE: steps/activate-build-cache-for-xcode/0.10.3/step.yml
================================================
title: Build Cache for Xcode
summary: Activates Bitrise Remote Build Cache add-on for subsequent Xcode builds in
the workflow
description: |
This Step enables Bitrise's Build Cache Add‑On for Xcode by configuring the environment with the Build Cache CLI.
After this Step runs, Xcode builds invoked via xcodebuild in subsequent workflow steps will automatically read from the remote cache and push new entries when applicable.
The Step adds an alias to ~/.zshrc and ~/.bashrc so the wrapper is available in all following steps; from that point all xcodebuild calls are wrapped to enable compilation caching.
Analytical data (command, duration, cache information, environment) is collected and sent to Bitrise and is available on the Build cache page: https://app.bitrise.io/build-cache
website: https://github.com/bitrise-steplib/bitrise-step-activate-build-cache-for-xcode
source_code_url: https://github.com/bitrise-steplib/bitrise-step-activate-build-cache-for-xcode
support_url: https://github.com/bitrise-steplib/bitrise-step-activate-build-cache-for-xcode
published_at: 2026-04-30T12:01:16.669716177Z
source:
git: https://github.com/bitrise-steplib/bitrise-step-activate-build-cache-for-xcode.git
commit: 6df27adf7554bd27ef8eec05b29a11fcee0f0c50
type_tags:
- utility
toolkit:
bash:
entry_file: step.sh
is_skippable: true
run_if: .IsCI
inputs:
- opts:
is_required: true
summary: Enable logging additional information for troubleshooting
title: Verbose logging
value_options:
- "true"
- "false"
verbose: "false"
- cache: "true"
opts:
is_required: true
summary: Whether the build uses the remote cache
title: Use cache
value_options:
- "true"
- "false"
- opts:
is_required: true
summary: Whether the build can not only read, but write new entries to the remote
cache
title: Push new cache entries
value_options:
- "true"
- "false"
push: "true"
- opts:
is_required: true
summary: |-
Whether Bitrise components should not log anything except the underlying xcodebuild output.
Takes precedence over the 'Verbose logging' and 'Add timestamps' options.
title: Silence all extra Bitrise logging
value_options:
- "true"
- "false"
silent: "false"
- opts:
description: When enabled, the analytics wrapper adds timestamps to xcodebuild
output log messages during the build.
is_required: true
summary: Add timestamps to xcodebuild messages
title: Add timestamps to xcodebuild messages
value_options:
- "true"
- "false"
timestamps: "false"
- cache_skip_flags: "false"
opts:
description: |-
Skip passing cache flags to xcodebuild except the COMPILATION_CACHE_REMOTE_SERVICE_PATH.
Cache will have to be enabled manually in the Xcode project settings. More information can be found at the FAQ
document: https://docs.bitrise.io/en/bitrise-build-cache/build-cache-for-xcode/xcode-compilation-cache-faq.html
is_required: true
summary: Skip passing cache flags to xcodebuild
title: Skip passing cache flags to xcodebuild
value_options:
- "true"
- "false"
================================================
FILE: steps/activate-build-cache-for-xcode/0.11.0/step.yml
================================================
title: Build Cache for Xcode
summary: Activates Bitrise Remote Build Cache add-on for subsequent Xcode builds in
the workflow
description: |
This Step enables Bitrise's Build Cache Add‑On for Xcode by configuring the environment with the Build Cache CLI.
After this Step runs, Xcode builds invoked via xcodebuild in subsequent workflow steps will automatically read from the remote cache and push new entries when applicable.
The Step adds an alias to ~/.zshrc and ~/.bashrc so the wrapper is available in all following steps; from that point all xcodebuild calls are wrapped to enable compilation caching.
Analytical data (command, duration, cache information, environment) is collected and sent to Bitrise and is available on the Build cache page: https://app.bitrise.io/build-cache
website: https://github.com/bitrise-steplib/bitrise-step-activate-build-cache-for-xcode
source_code_url: https://github.com/bitrise-steplib/bitrise-step-activate-build-cache-for-xcode
support_url: https://github.com/bitrise-steplib/bitrise-step-activate-build-cache-for-xcode
published_at: 2026-05-05T12:07:33.317274355Z
source:
git: https://github.com/bitrise-steplib/bitrise-step-activate-build-cache-for-xcode.git
commit: 1d7ecb1446626fb9be93867b343174f3f48346a2
type_tags:
- utility
toolkit:
bash:
entry_file: step.sh
is_skippable: true
run_if: .IsCI
inputs:
- opts:
is_required: true
summary: Enable logging additional information for troubleshooting
title: Verbose logging
value_options:
- "true"
- "false"
verbose: "false"
- cache: "true"
opts:
is_required: true
summary: Whether the build uses the remote cache
title: Use cache
value_options:
- "true"
- "false"
- opts:
is_required: true
summary: Whether the build can not only read, but write new entries to the remote
cache
title: Push new cache entries
value_options:
- "true"
- "false"
push: "true"
- opts:
is_required: true
summary: |-
Whether Bitrise components should not log anything except the underlying xcodebuild output.
Takes precedence over the 'Verbose logging' and 'Add timestamps' options.
title: Silence all extra Bitrise logging
value_options:
- "true"
- "false"
silent: "false"
- opts:
description: When enabled, the analytics wrapper adds timestamps to xcodebuild
output log messages during the build.
is_required: true
summary: Add timestamps to xcodebuild messages
title: Add timestamps to xcodebuild messages
value_options:
- "true"
- "false"
timestamps: "false"
- cache_skip_flags: "false"
opts:
description: |-
Skip passing cache flags to xcodebuild except the COMPILATION_CACHE_REMOTE_SERVICE_PATH.
Cache will have to be enabled manually in the Xcode project settings. More information can be found at the FAQ
document: https://docs.bitrise.io/en/bitrise-build-cache/build-cache-for-xcode/xcode-compilation-cache-faq.html
is_required: true
summary: Skip passing cache flags to xcodebuild
title: Skip passing cache flags to xcodebuild
value_options:
- "true"
- "false"
================================================
FILE: steps/activate-build-cache-for-xcode/0.12.0/step.yml
================================================
title: Build Cache for Xcode
summary: Activates Bitrise Remote Build Cache add-on for subsequent Xcode builds in
the workflow
description: |
This Step enables Bitrise's Build Cache Add‑On for Xcode by configuring the environment with the Build Cache CLI.
After this Step runs, Xcode builds invoked via xcodebuild in subsequent workflow steps will automatically read from the remote cache and push new entries when applicable.
The Step adds an alias to ~/.zshrc and ~/.bashrc so the wrapper is available in all following steps; from that point all xcodebuild calls are wrapped to enable compilation caching.
Analytical data (command, duration, cache information, environment) is collected and sent to Bitrise and is available on the Build cache page: https://app.bitrise.io/build-cache
website: https://github.com/bitrise-steplib/bitrise-step-activate-build-cache-for-xcode
source_code_url: https://github.com/bitrise-steplib/bitrise-step-activate-build-cache-for-xcode
support_url: https://github.com/bitrise-steplib/bitrise-step-activate-build-cache-for-xcode
published_at: 2026-05-05T14:45:27.984878743Z
source:
git: https://github.com/bitrise-steplib/bitrise-step-activate-build-cache-for-xcode.git
commit: 5f5e882493451122fffe98df772d92f5b7340305
type_tags:
- utility
toolkit:
bash:
entry_file: step.sh
is_skippable: true
run_if: .IsCI
inputs:
- opts:
is_required: true
summary: Enable logging additional information for troubleshooting
title: Verbose logging
value_options:
- "true"
- "false"
verbose: "false"
- cache: "true"
opts:
is_required: true
summary: Whether the build uses the remote cache
title: Use cache
value_options:
- "true"
- "false"
- opts:
is_required: true
summary: Whether the build can not only read, but write new entries to the remote
cache
title: Push new cache entries
value_options:
- "true"
- "false"
push: "true"
- opts:
is_required: true
summary: |-
Whether Bitrise components should not log anything except the underlying xcodebuild output.
Takes precedence over the 'Verbose logging' and 'Add timestamps' options.
title: Silence all extra Bitrise logging
value_options:
- "true"
- "false"
silent: "false"
- opts:
description: When enabled, the analytics wrapper adds timestamps to xcodebuild
output log messages during the build.
is_required: true
summary: Add timestamps to xcodebuild messages
title: Add timestamps to xcodebuild messages
value_options:
- "true"
- "false"
timestamps: "false"
- cache_skip_flags: "false"
opts:
description: |-
Skip passing cache flags to xcodebuild except the COMPILATION_CACHE_REMOTE_SERVICE_PATH.
Cache will have to be enabled manually in the Xcode project settings. More information can be found at the FAQ
document: https://docs.bitrise.io/en/bitrise-build-cache/build-cache-for-xcode/xcode-compilation-cache-faq.html
is_required: true
summary: Skip passing cache flags to xcodebuild
title: Skip passing cache flags to xcodebuild
value_options:
- "true"
- "false"
================================================
FILE: steps/activate-build-cache-for-xcode/0.2.0/step.yml
================================================
title: Build Cache for Xcode
summary: Activates Bitrise Remote Build Cache add-on for subsequent Xcode builds in
the workflow
description: |
This Step enables Bitrise's Build Cache Add‑On for Xcode by configuring the environment with the Build Cache CLI.
After this Step runs, Xcode builds invoked via xcodebuild in subsequent workflow steps will automatically read from the remote cache and push new entries when applicable.
The Step adds an alias to ~/.zshrc and ~/.bashrc so the wrapper is available in all following steps; from that point all xcodebuild calls are wrapped to enable compilation caching.
Analytical data (command, duration, cache information, environment) is collected and sent to Bitrise and is available on the Build cache page: https://app.bitrise.io/build-cache
website: https://github.com/bitrise-steplib/bitrise-step-activate-build-cache-for-xcode
source_code_url: https://github.com/bitrise-steplib/bitrise-step-activate-build-cache-for-xcode
support_url: https://github.com/bitrise-steplib/bitrise-step-activate-build-cache-for-xcode
published_at: 2025-09-24T07:18:10.506908925Z
source:
git: https://github.com/bitrise-steplib/bitrise-step-activate-build-cache-for-xcode.git
commit: 5ded1c235fac99f2536effa7c8cc4b82d14e8c1a
type_tags:
- utility
toolkit:
bash:
entry_file: step.sh
is_skippable: true
run_if: .IsCI
inputs:
- opts:
is_required: true
summary: Enable logging additional information for troubleshooting
title: Verbose logging
value_options:
- "true"
- "false"
verbose: "false"
- cache: "true"
opts:
is_required: true
summary: Whether the build uses the remote cache
title: Use cache
value_options:
- "true"
- "false"
- opts:
is_required: true
summary: Whether the build can not only read, but write new entries to the remote
cache
title: Push new cache entries
value_options:
- "true"
- "false"
push: "true"
- opts:
is_required: true
summary: |-
Whether Bitrise components should not log anything except the underlying xcodebuild output.
Takes precedence over the Verbose logging option.
title: Silence all extra Bitrise logging
value_options:
- "true"
- "false"
silent: "false"
================================================
FILE: steps/activate-build-cache-for-xcode/0.2.1/step.yml
================================================
title: Build Cache for Xcode
summary: Activates Bitrise Remote Build Cache add-on for subsequent Xcode builds in
the workflow
description: |
This Step enables Bitrise's Build Cache Add‑On for Xcode by configuring the environment with the Build Cache CLI.
After this Step runs, Xcode builds invoked via xcodebuild in subsequent workflow steps will automatically read from the remote cache and push new entries when applicable.
The Step adds an alias to ~/.zshrc and ~/.bashrc so the wrapper is available in all following steps; from that point all xcodebuild calls are wrapped to enable compilation caching.
Analytical data (command, duration, cache information, environment) is collected and sent to Bitrise and is available on the Build cache page: https://app.bitrise.io/build-cache
website: https://github.com/bitrise-steplib/bitrise-step-activate-build-cache-for-xcode
source_code_url: https://github.com/bitrise-steplib/bitrise-step-activate-build-cache-for-xcode
support_url: https://github.com/bitrise-steplib/bitrise-step-activate-build-cache-for-xcode
published_at: 2025-09-25T09:54:10.572274595Z
source:
git: https://github.com/bitrise-steplib/bitrise-step-activate-build-cache-for-xcode.git
commit: a94294250bdfdb63e1410984bd2e6ace17713f6e
type_tags:
- utility
toolkit:
bash:
entry_file: step.sh
is_skippable: true
run_if: .IsCI
inputs:
- opts:
is_required: true
summary: Enable logging additional information for troubleshooting
title: Verbose logging
value_options:
- "true"
- "false"
verbose: "false"
- cache: "true"
opts:
is_required: true
summary: Whether the build uses the remote cache
title: Use cache
value_options:
- "true"
- "false"
- opts:
is_required: true
summary: Whether the build can not only read, but write new entries to the remote
cache
title: Push new cache entries
value_options:
- "true"
- "false"
push: "true"
- opts:
is_required: true
summary: |-
Whether Bitrise components should not log anything except the underlying xcodebuild output.
Takes precedence over the Verbose logging option.
title: Silence all extra Bitrise logging
value_options:
- "true"
- "false"
silent: "false"
================================================
FILE: steps/activate-build-cache-for-xcode/0.3.0/step.yml
================================================
title: Build Cache for Xcode
summary: Activates Bitrise Remote Build Cache add-on for subsequent Xcode builds in
the workflow
description: |
This Step enables Bitrise's Build Cache Add‑On for Xcode by configuring the environment with the Build Cache CLI.
After this Step runs, Xcode builds invoked via xcodebuild in subsequent workflow steps will automatically read from the remote cache and push new entries when applicable.
The Step adds an alias to ~/.zshrc and ~/.bashrc so the wrapper is available in all following steps; from that point all xcodebuild calls are wrapped to enable compilation caching.
Analytical data (command, duration, cache information, environment) is collected and sent to Bitrise and is available on the Build cache page: https://app.bitrise.io/build-cache
website: https://github.com/bitrise-steplib/bitrise-step-activate-build-cache-for-xcode
source_code_url: https://github.com/bitrise-steplib/bitrise-step-activate-build-cache-for-xcode
support_url: https://github.com/bitrise-steplib/bitrise-step-activate-build-cache-for-xcode
published_at: 2025-09-29T12:46:58.427174749Z
source:
git: https://github.com/bitrise-steplib/bitrise-step-activate-build-cache-for-xcode.git
commit: 7ba32cda5ce9240288707a57f03527bdce9b823b
type_tags:
- utility
toolkit:
bash:
entry_file: step.sh
is_skippable: true
run_if: .IsCI
inputs:
- opts:
is_required: true
summary: Enable logging additional information for troubleshooting
title: Verbose logging
value_options:
- "true"
- "false"
verbose: "false"
- cache: "true"
opts:
is_required: true
summary: Whether the build uses the remote cache
title: Use cache
value_options:
- "true"
- "false"
- opts:
is_required: true
summary: Whether the build can not only read, but write new entries to the remote
cache
title: Push new cache entries
value_options:
- "true"
- "false"
push: "true"
- opts:
is_required: true
summary: |-
Whether Bitrise components should not log anything except the underlying xcodebuild output.
Takes precedence over the 'Verbose logging' and 'Add timestamps' options.
title: Silence all extra Bitrise logging
value_options:
- "true"
- "false"
silent: "false"
- opts:
description: When enabled, the analytics wrapper adds timestamps to xcodebuild
output log messages during the build.
is_required: true
summary: Add timestamps to xcodebuild messages
title: Add timestamps to xcodebuild messages
value_options:
- "true"
- "false"
timestamps: "false"
================================================
FILE: steps/activate-build-cache-for-xcode/0.3.1/step.yml
================================================
title: Build Cache for Xcode
summary: Activates Bitrise Remote Build Cache add-on for subsequent Xcode builds in
the workflow
description: |
This Step enables Bitrise's Build Cache Add‑On for Xcode by configuring the environment with the Build Cache CLI.
After this Step runs, Xcode builds invoked via xcodebuild in subsequent workflow steps will automatically read from the remote cache and push new entries when applicable.
The Step adds an alias to ~/.zshrc and ~/.bashrc so the wrapper is available in all following steps; from that point all xcodebuild calls are wrapped to enable compilation caching.
Analytical data (command, duration, cache information, environment) is collected and sent to Bitrise and is available on the Build cache page: https://app.bitrise.io/build-cache
website: https://github.com/bitrise-steplib/bitrise-step-activate-build-cache-for-xcode
source_code_url: https://github.com/bitrise-steplib/bitrise-step-activate-build-cache-for-xcode
support_url: https://github.com/bitrise-steplib/bitrise-step-activate-build-cache-for-xcode
published_at: 2025-10-14T08:46:28.00262386Z
source:
git: https://github.com/bitrise-steplib/bitrise-step-activate-build-cache-for-xcode.git
commit: fde9dbf94af906af8c489422f00c687034875e49
type_tags:
- utility
toolkit:
bash:
entry_file: step.sh
is_skippable: true
run_if: .IsCI
inputs:
- opts:
is_required: true
summary: Enable logging additional information for troubleshooting
title: Verbose logging
value_options:
- "true"
- "false"
verbose: "false"
- cache: "true"
opts:
is_required: true
summary: Whether the build uses the remote cache
title: Use cache
value_options:
- "true"
- "false"
- opts:
is_required: true
summary: Whether the build can not only read, but write new entries to the remote
cache
title: Push new cache entries
value_options:
- "true"
- "false"
push: "true"
- opts:
is_required: true
summary: |-
Whether Bitrise components should not log anything except the underlying xcodebuild output.
Takes precedence over the 'Verbose logging' and 'Add timestamps' options.
title: Silence all extra Bitrise logging
value_options:
- "true"
- "false"
silent: "false"
- opts:
description: When enabled, the analytics wrapper adds timestamps to xcodebuild
output log messages during the build.
is_required: true
summary: Add timestamps to xcodebuild messages
title: Add timestamps to xcodebuild messages
value_options:
- "true"
- "false"
timestamps: "false"
================================================
FILE: steps/activate-build-cache-for-xcode/0.3.2/step.yml
================================================
title: Build Cache for Xcode
summary: Activates Bitrise Remote Build Cache add-on for subsequent Xcode builds in
the workflow
description: |
This Step enables Bitrise's Build Cache Add‑On for Xcode by configuring the environment with the Build Cache CLI.
After this Step runs, Xcode builds invoked via xcodebuild in subsequent workflow steps will automatically read from the remote cache and push new entries when applicable.
The Step adds an alias to ~/.zshrc and ~/.bashrc so the wrapper is available in all following steps; from that point all xcodebuild calls are wrapped to enable compilation caching.
Analytical data (command, duration, cache information, environment) is collected and sent to Bitrise and is available on the Build cache page: https://app.bitrise.io/build-cache
website: https://github.com/bitrise-steplib/bitrise-step-activate-build-cache-for-xcode
source_code_url: https://github.com/bitrise-steplib/bitrise-step-activate-build-cache-for-xcode
support_url: https://github.com/bitrise-steplib/bitrise-step-activate-build-cache-for-xcode
published_at: 2025-10-28T14:49:03.626139186Z
source:
git: https://github.com/bitrise-steplib/bitrise-step-activate-build-cache-for-xcode.git
commit: ce7d4b560b22fc5f76a9de5146244bfa8e7e9f1c
type_tags:
- utility
toolkit:
bash:
entry_file: step.sh
is_skippable: true
run_if: .IsCI
inputs:
- opts:
is_required: true
summary: Enable logging additional information for troubleshooting
title: Verbose logging
value_options:
- "true"
- "false"
verbose: "false"
- cache: "true"
opts:
is_required: true
summary: Whether the build uses the remote cache
title: Use cache
value_options:
- "true"
- "false"
- opts:
is_required: true
summary: Whether the build can not only read, but write new entries to the remote
cache
title: Push new cache entries
value_options:
- "true"
- "false"
push: "true"
- opts:
is_required: true
summary: |-
Whether Bitrise components should not log anything except the underlying xcodebuild output.
Takes precedence over the 'Verbose logging' and 'Add timestamps' options.
title: Silence all extra Bitrise logging
value_options:
- "true"
- "false"
silent: "false"
- opts:
description: When enabled, the analytics wrapper adds timestamps to xcodebuild
output log messages during the build.
is_required: true
summary: Add timestamps to xcodebuild messages
title: Add timestamps to xcodebuild messages
value_options:
- "true"
- "false"
timestamps: "false"
================================================
FILE: steps/activate-build-cache-for-xcode/0.3.3/step.yml
================================================
title: Build Cache for Xcode
summary: Activates Bitrise Remote Build Cache add-on for subsequent Xcode builds in
the workflow
description: |
This Step enables Bitrise's Build Cache Add‑On for Xcode by configuring the environment with the Build Cache CLI.
After this Step runs, Xcode builds invoked via xcodebuild in subsequent workflow steps will automatically read from the remote cache and push new entries when applicable.
The Step adds an alias to ~/.zshrc and ~/.bashrc so the wrapper is available in all following steps; from that point all xcodebuild calls are wrapped to enable compilation caching.
Analytical data (command, duration, cache information, environment) is collected and sent to Bitrise and is available on the Build cache page: https://app.bitrise.io/build-cache
website: https://github.com/bitrise-steplib/bitrise-step-activate-build-cache-for-xcode
source_code_url: https://github.com/bitrise-steplib/bitrise-step-activate-build-cache-for-xcode
support_url: https://github.com/bitrise-steplib/bitrise-step-activate-build-cache-for-xcode
published_at: 2025-10-31T09:52:01.821292646Z
source:
git: https://github.com/bitrise-steplib/bitrise-step-activate-build-cache-for-xcode.git
commit: 1e22f4480ec546d66ce83fa9b07afe8309cac383
type_tags:
- utility
toolkit:
bash:
entry_file: step.sh
is_skippable: true
run_if: .IsCI
inputs:
- opts:
is_required: true
summary: Enable logging additional information for troubleshooting
title: Verbose logging
value_options:
- "true"
- "false"
verbose: "false"
- cache: "true"
opts:
is_required: true
summary: Whether the build uses the remote cache
title: Use cache
value_options:
- "true"
- "false"
- opts:
is_required: true
summary: Whether the build can not only read, but write new entries to the remote
cache
title: Push new cache entries
value_options:
- "true"
- "false"
push: "true"
- opts:
is_required: true
summary: |-
Whether Bitrise components should not log anything except the underlying xcodebuild output.
Takes precedence over the 'Verbose logging' and 'Add timestamps' options.
title: Silence all extra Bitrise logging
value_options:
- "true"
- "false"
silent: "false"
- opts:
description: When enabled, the analytics wrapper adds timestamps to xcodebuild
output log messages during the build.
is_required: true
summary: Add timestamps to xcodebuild messages
title: Add timestamps to xcodebuild messages
value_options:
- "true"
- "false"
timestamps: "false"
================================================
FILE: steps/activate-build-cache-for-xcode/0.4.0/step.yml
================================================
title: Build Cache for Xcode
summary: Activates Bitrise Remote Build Cache add-on for subsequent Xcode builds in
the workflow
description: |
This Step enables Bitrise's Build Cache Add‑On for Xcode by configuring the environment with the Build Cache CLI.
After this Step runs, Xcode builds invoked via xcodebuild in subsequent workflow steps will automatically read from the remote cache and push new entries when applicable.
The Step adds an alias to ~/.zshrc and ~/.bashrc so the wrapper is available in all following steps; from that point all xcodebuild calls are wrapped to enable compilation caching.
Analytical data (command, duration, cache information, environment) is collected and sent to Bitrise and is available on the Build cache page: https://app.bitrise.io/build-cache
website: https://github.com/bitrise-steplib/bitrise-step-activate-build-cache-for-xcode
source_code_url: https://github.com/bitrise-steplib/bitrise-step-activate-build-cache-for-xcode
support_url: https://github.com/bitrise-steplib/bitrise-step-activate-build-cache-for-xcode
published_at: 2025-11-19T13:36:51.201673272Z
source:
git: https://github.com/bitrise-steplib/bitrise-step-activate-build-cache-for-xcode.git
commit: 6fb844707437ce369ac7128375dd2d1c93d1958f
type_tags:
- utility
toolkit:
bash:
entry_file: step.sh
is_skippable: true
run_if: .IsCI
inputs:
- opts:
is_required: true
summary: Enable logging additional information for troubleshooting
title: Verbose logging
value_options:
- "true"
- "false"
verbose: "false"
- cache: "true"
opts:
is_required: true
summary: Whether the build uses the remote cache
title: Use cache
value_options:
- "true"
- "false"
- opts:
is_required: true
summary: Whether the build can not only read, but write new entries to the remote
cache
title: Push new cache entries
value_options:
- "true"
- "false"
push: "true"
- opts:
is_required: true
summary: |-
Whether Bitrise components should not log anything except the underlying xcodebuild output.
Takes precedence over the 'Verbose logging' and 'Add timestamps' options.
title: Silence all extra Bitrise logging
value_options:
- "true"
- "false"
silent: "false"
- opts:
description: When enabled, the analytics wrapper adds timestamps to xcodebuild
output log messages during the build.
is_required: true
summary: Add timestamps to xcodebuild messages
title: Add timestamps to xcodebuild messages
value_options:
- "true"
- "false"
timestamps: "false"
- cache_skip_flags: "false"
opts:
description: |-
Skip passing cache flags to xcodebuild except the COMPILATION_CACHE_REMOTE_SERVICE_PATH.
Cache will have to be enabled manually in the Xcode project settings. More information can be found at the FAQ
document: https://docs.bitrise.io/en/bitrise-build-cache/build-cache-for-xcode/xcode-compilation-cache-faq.html
is_required: true
summary: Skip passing cache flags to xcodebuild
title: Skip passing cache flags to xcodebuild
value_options:
- "true"
- "false"
================================================
FILE: steps/activate-build-cache-for-xcode/0.4.1/step.yml
================================================
title: Build Cache for Xcode
summary: Activates Bitrise Remote Build Cache add-on for subsequent Xcode builds in
the workflow
description: |
This Step enables Bitrise's Build Cache Add‑On for Xcode by configuring the environment with the Build Cache CLI.
After this Step runs, Xcode builds invoked via xcodebuild in subsequent workflow steps will automatically read from the remote cache and push new entries when applicable.
The Step adds an alias to ~/.zshrc and ~/.bashrc so the wrapper is available in all following steps; from that point all xcodebuild calls are wrapped to enable compilation caching.
Analytical data (command, duration, cache information, environment) is collected and sent to Bitrise and is available on the Build cache page: https://app.bitrise.io/build-cache
website: https://github.com/bitrise-steplib/bitrise-step-activate-build-cache-for-xcode
source_code_url: https://github.com/bitrise-steplib/bitrise-step-activate-build-cache-for-xcode
support_url: https://github.com/bitrise-steplib/bitrise-step-activate-build-cache-for-xcode
published_at: 2025-11-19T15:33:23.193277318Z
source:
git: https://github.com/bitrise-steplib/bitrise-step-activate-build-cache-for-xcode.git
commit: 711b8663e34f4383ca881cdc41cdc8d98e6bd5b6
type_tags:
- utility
toolkit:
bash:
entry_file: step.sh
is_skippable: true
run_if: .IsCI
inputs:
- opts:
is_required: true
summary: Enable logging additional information for troubleshooting
title: Verbose logging
value_options:
- "true"
- "false"
verbose: "false"
- cache: "true"
opts:
is_required: true
summary: Whether the build uses the remote cache
title: Use cache
value_options:
- "true"
- "false"
- opts:
is_required: true
summary: Whether the build can not only read, but write new entries to the remote
cache
title: Push new cache entries
value_options:
- "true"
- "false"
push: "true"
- opts:
is_required: true
summary: |-
Whether Bitrise components should not log anything except the underlying xcodebuild output.
Takes precedence over the 'Verbose logging' and 'Add timestamps' options.
title: Silence all extra Bitrise logging
value_options:
- "true"
- "false"
silent: "false"
- opts:
description: When enabled, the analytics wrapper adds timestamps to xcodebuild
output log messages during the build.
is_required: true
summary: Add timestamps to xcodebuild messages
title: Add timestamps to xcodebuild messages
value_options:
- "true"
- "false"
timestamps: "false"
- cache_skip_flags: "false"
opts:
description: |-
Skip passing cache flags to xcodebuild except the COMPILATION_CACHE_REMOTE_SERVICE_PATH.
Cache will have to be enabled manually in the Xcode project settings. More information can be found at the FAQ
document: https://docs.bitrise.io/en/bitrise-build-cache/build-cache-for-xcode/xcode-compilation-cache-faq.html
is_required: true
summary: Skip passing cache flags to xcodebuild
title: Skip passing cache flags to xcodebuild
value_options:
- "true"
- "false"
================================================
FILE: steps/activate-build-cache-for-xcode/0.4.2/step.yml
================================================
title: Build Cache for Xcode
summary: Activates Bitrise Remote Build Cache add-on for subsequent Xcode builds in
the workflow
description: |
This Step enables Bitrise's Build Cache Add‑On for Xcode by configuring the environment with the Build Cache CLI.
After this Step runs, Xcode builds invoked via xcodebuild in subsequent workflow steps will automatically read from the remote cache and push new entries when applicable.
The Step adds an alias to ~/.zshrc and ~/.bashrc so the wrapper is available in all following steps; from that point all xcodebuild calls are wrapped to enable compilation caching.
Analytical data (command, duration, cache information, environment) is collected and sent to Bitrise and is available on the Build cache page: https://app.bitrise.io/build-cache
website: https://github.com/bitrise-steplib/bitrise-step-activate-build-cache-for-xcode
source_code_url: https://github.com/bitrise-steplib/bitrise-step-activate-build-cache-for-xcode
support_url: https://github.com/bitrise-steplib/bitrise-step-activate-build-cache-for-xcode
published_at: 2025-12-02T13:05:50.078086376Z
source:
git: https://github.com/bitrise-steplib/bitrise-step-activate-build-cache-for-xcode.git
commit: cd3168c746e435c3b2582d73fa6600f12cc1dc4f
type_tags:
- utility
toolkit:
bash:
entry_file: step.sh
is_skippable: true
run_if: .IsCI
inputs:
- opts:
is_required: true
summary: Enable logging additional information for troubleshooting
title: Verbose logging
value_options:
- "true"
- "false"
verbose: "false"
- cache: "true"
opts:
is_required: true
summary: Whether the build uses the remote cache
title: Use cache
value_options:
- "true"
- "false"
- opts:
is_required: true
summary: Whether the build can not only read, but write new entries to the remote
cache
title: Push new cache entries
value_options:
- "true"
- "false"
push: "true"
- opts:
is_required: true
summary: |-
Whether Bitrise components should not log anything except the underlying xcodebuild output.
Takes precedence over the 'Verbose logging' and 'Add timestamps' options.
title: Silence all extra Bitrise logging
value_options:
- "true"
- "false"
silent: "false"
- opts:
description: When enabled, the analytics wrapper adds timestamps to xcodebuild
output log messages during the build.
is_required: true
summary: Add timestamps to xcodebuild messages
title: Add timestamps to xcodebuild messages
value_options:
- "true"
- "false"
timestamps: "false"
- cache_skip_flags: "false"
opts:
description: |-
Skip passing cache flags to xcodebuild except the COMPILATION_CACHE_REMOTE_SERVICE_PATH.
Cache will have to be enabled manually in the Xcode project settings. More information can be found at the FAQ
document: https://docs.bitrise.io/en/bitrise-build-cache/build-cache-for-xcode/xcode-compilation-cache-faq.html
is_required: true
summary: Skip passing cache flags to xcodebuild
title: Skip passing cache flags to xcodebuild
value_options:
- "true"
- "false"
================================================
FILE: steps/activate-build-cache-for-xcode/0.4.3/step.yml
================================================
title: Build Cache for Xcode
summary: Activates Bitrise Remote Build Cache add-on for subsequent Xcode builds in
the workflow
description: |
This Step enables Bitrise's Build Cache Add‑On for Xcode by configuring the environment with the Build Cache CLI.
After this Step runs, Xcode builds invoked via xcodebuild in subsequent workflow steps will automatically read from the remote cache and push new entries when applicable.
The Step adds an alias to ~/.zshrc and ~/.bashrc so the wrapper is available in all following steps; from that point all xcodebuild calls are wrapped to enable compilation caching.
Analytical data (command, duration, cache information, environment) is collected and sent to Bitrise and is available on the Build cache page: https://app.bitrise.io/build-cache
website: https://github.com/bitrise-steplib/bitrise-step-activate-build-cache-for-xcode
source_code_url: https://github.com/bitrise-steplib/bitrise-step-activate-build-cache-for-xcode
support_url: https://github.com/bitrise-steplib/bitrise-step-activate-build-cache-for-xcode
published_at: 2025-12-08T15:35:14.205828811Z
source:
git: https://github.com/bitrise-steplib/bitrise-step-activate-build-cache-for-xcode.git
commit: d18b3d15931b1c44a6124134e24edcde937c0410
type_tags:
- utility
toolkit:
bash:
entry_file: step.sh
is_skippable: true
run_if: .IsCI
inputs:
- opts:
is_required: true
summary: Enable logging additional information for troubleshooting
title: Verbose logging
value_options:
- "true"
- "false"
verbose: "false"
- cache: "true"
opts:
is_required: true
summary: Whether the build uses the remote cache
title: Use cache
value_options:
- "true"
- "false"
- opts:
is_required: true
summary: Whether the build can not only read, but write new entries to the remote
cache
title: Push new cache entries
value_options:
- "true"
- "false"
push: "true"
- opts:
is_required: true
summary: |-
Whether Bitrise components should not log anything except the underlying xcodebuild output.
Takes precedence over the 'Verbose logging' and 'Add timestamps' options.
title: Silence all extra Bitrise logging
value_options:
- "true"
- "false"
silent: "false"
- opts:
description: When enabled, the analytics wrapper adds timestamps to xcodebuild
output log messages during the build.
is_required: true
summary: Add timestamps to xcodebuild messages
title: Add timestamps to xcodebuild messages
value_options:
- "true"
- "false"
timestamps: "false"
- cache_skip_flags: "false"
opts:
description: |-
Skip passing cache flags to xcodebuild except the COMPILATION_CACHE_REMOTE_SERVICE_PATH.
Cache will have to be enabled manually in the Xcode project settings. More information can be found at the FAQ
document: https://docs.bitrise.io/en/bitrise-build-cache/build-cache-for-xcode/xcode-compilation-cache-faq.html
is_required: true
summary: Skip passing cache flags to xcodebuild
title: Skip passing cache flags to xcodebuild
value_options:
- "true"
- "false"
================================================
FILE: steps/activate-build-cache-for-xcode/0.4.4/step.yml
================================================
title: Build Cache for Xcode
summary: Activates Bitrise Remote Build Cache add-on for subsequent Xcode builds in
the workflow
description: |
This Step enables Bitrise's Build Cache Add‑On for Xcode by configuring the environment with the Build Cache CLI.
After this Step runs, Xcode builds invoked via xcodebuild in subsequent workflow steps will automatically read from the remote cache and push new entries when applicable.
The Step adds an alias to ~/.zshrc and ~/.bashrc so the wrapper is available in all following steps; from that point all xcodebuild calls are wrapped to enable compilation caching.
Analytical data (command, duration, cache information, environment) is collected and sent to Bitrise and is available on the Build cache page: https://app.bitrise.io/build-cache
website: https://github.com/bitrise-steplib/bitrise-step-activate-build-cache-for-xcode
source_code_url: https://github.com/bitrise-steplib/bitrise-step-activate-build-cache-for-xcode
support_url: https://github.com/bitrise-steplib/bitrise-step-activate-build-cache-for-xcode
published_at: 2026-01-23T10:28:57.53333754Z
source:
git: https://github.com/bitrise-steplib/bitrise-step-activate-build-cache-for-xcode.git
commit: ba4c0d3047d0d3c04901370ab1871b90a00d475a
type_tags:
- utility
toolkit:
bash:
entry_file: step.sh
is_skippable: true
run_if: .IsCI
inputs:
- opts:
is_required: true
summary: Enable logging additional information for troubleshooting
title: Verbose logging
value_options:
- "true"
- "false"
verbose: "false"
- cache: "true"
opts:
is_required: true
summary: Whether the build uses the remote cache
title: Use cache
value_options:
- "true"
- "false"
- opts:
is_required: true
summary: Whether the build can not only read, but write new entries to the remote
cache
title: Push new cache entries
value_options:
- "true"
- "false"
push: "true"
- opts:
is_required: true
summary: |-
Whether Bitrise components should not log anything except the underlying xcodebuild output.
Takes precedence over the 'Verbose logging' and 'Add timestamps' options.
title: Silence all extra Bitrise logging
value_options:
- "true"
- "false"
silent: "false"
- opts:
description: When enabled, the analytics wrapper adds timestamps to xcodebuild
output log messages during the build.
is_required: true
summary: Add timestamps to xcodebuild messages
title: Add timestamps to xcodebuild messages
value_options:
- "true"
- "false"
timestamps: "false"
- cache_skip_flags: "false"
opts:
description: |-
Skip passing cache flags to xcodebuild except the COMPILATION_CACHE_REMOTE_SERVICE_PATH.
Cache will have to be enabled manually in the Xcode project settings. More information can be found at the FAQ
document: https://docs.bitrise.io/en/bitrise-build-cache/build-cache-for-xcode/xcode-compilation-cache-faq.html
is_required: true
summary: Skip passing cache flags to xcodebuild
title: Skip passing cache flags to xcodebuild
value_options:
- "true"
- "false"
================================================
FILE: steps/activate-build-cache-for-xcode/0.4.5/step.yml
================================================
title: Build Cache for Xcode
summary: Activates Bitrise Remote Build Cache add-on for subsequent Xcode builds in
the workflow
description: |
This Step enables Bitrise's Build Cache Add‑On for Xcode by configuring the environment with the Build Cache CLI.
After this Step runs, Xcode builds invoked via xcodebuild in subsequent workflow steps will automatically read from the remote cache and push new entries when applicable.
The Step adds an alias to ~/.zshrc and ~/.bashrc so the wrapper is available in all following steps; from that point all xcodebuild calls are wrapped to enable compilation caching.
Analytical data (command, duration, cache information, environment) is collected and sent to Bitrise and is available on the Build cache page: https://app.bitrise.io/build-cache
website: https://github.com/bitrise-steplib/bitrise-step-activate-build-cache-for-xcode
source_code_url: https://github.com/bitrise-steplib/bitrise-step-activate-build-cache-for-xcode
support_url: https://github.com/bitrise-steplib/bitrise-step-activate-build-cache-for-xcode
published_at: 2026-01-27T09:34:12.809933807Z
source:
git: https://github.com/bitrise-steplib/bitrise-step-activate-build-cache-for-xcode.git
commit: 8cb70fd92918ca4f0572840d36553d3bcf075a25
type_tags:
- utility
toolkit:
bash:
entry_file: step.sh
is_skippable: true
run_if: .IsCI
inputs:
- opts:
is_required: true
summary: Enable logging additional information for troubleshooting
title: Verbose logging
value_options:
- "true"
- "false"
verbose: "false"
- cache: "true"
opts:
is_required: true
summary: Whether the build uses the remote cache
title: Use cache
value_options:
- "true"
- "false"
- opts:
is_required: true
summary: Whether the build can not only read, but write new entries to the remote
cache
title: Push new cache entries
value_options:
- "true"
- "false"
push: "true"
- opts:
is_required: true
summary: |-
Whether Bitrise components should not log anything except the underlying xcodebuild output.
Takes precedence over the 'Verbose logging' and 'Add timestamps' options.
title: Silence all extra Bitrise logging
value_options:
- "true"
- "false"
silent: "false"
- opts:
description: When enabled, the analytics wrapper adds timestamps to xcodebuild
output log messages during the build.
is_required: true
summary: Add timestamps to xcodebuild messages
title: Add timestamps to xcodebuild messages
value_options:
- "true"
- "false"
timestamps: "false"
- cache_skip_flags: "false"
opts:
description: |-
Skip passing cache flags to xcodebuild except the COMPILATION_CACHE_REMOTE_SERVICE_PATH.
Cache will have to be enabled manually in the Xcode project settings. More information can be found at the FAQ
document: https://docs.bitrise.io/en/bitrise-build-cache/build-cache-for-xcode/xcode-compilation-cache-faq.html
is_required: true
summary: Skip passing cache flags to xcodebuild
title: Skip passing cache flags to xcodebuild
value_options:
- "true"
- "false"
================================================
FILE: steps/activate-build-cache-for-xcode/0.4.6/step.yml
================================================
title: Build Cache for Xcode
summary: Activates Bitrise Remote Build Cache add-on for subsequent Xcode builds in
the workflow
description: |
This Step enables Bitrise's Build Cache Add‑On for Xcode by configuring the environment with the Build Cache CLI.
After this Step runs, Xcode builds invoked via xcodebuild in subsequent workflow steps will automatically read from the remote cache and push new entries when applicable.
The Step adds an alias to ~/.zshrc and ~/.bashrc so the wrapper is available in all following steps; from that point all xcodebuild calls are wrapped to enable compilation caching.
Analytical data (command, duration, cache information, environment) is collected and sent to Bitrise and is available on the Build cache page: https://app.bitrise.io/build-cache
website: https://github.com/bitrise-steplib/bitrise-step-activate-build-cache-for-xcode
source_code_url: https://github.com/bitrise-steplib/bitrise-step-activate-build-cache-for-xcode
support_url: https://github.com/bitrise-steplib/bitrise-step-activate-build-cache-for-xcode
published_at: 2026-02-03T15:55:26.290266147Z
source:
git: https://github.com/bitrise-steplib/bitrise-step-activate-build-cache-for-xcode.git
commit: 9eacee8582cddef7dc79a6e11e73cde5e68611d3
type_tags:
- utility
toolkit:
bash:
entry_file: step.sh
is_skippable: true
run_if: .IsCI
inputs:
- opts:
is_required: true
summary: Enable logging additional information for troubleshooting
title: Verbose logging
value_options:
- "true"
- "false"
verbose: "false"
- cache: "true"
opts:
is_required: true
summary: Whether the build uses the remote cache
title: Use cache
value_options:
- "true"
- "false"
- opts:
is_required: true
summary: Whether the build can not only read, but write new entries to the remote
cache
title: Push new cache entries
value_options:
- "true"
- "false"
push: "true"
- opts:
is_required: true
summary: |-
Whether Bitrise components should not log anything except the underlying xcodebuild output.
Takes precedence over the 'Verbose logging' and 'Add timestamps' options.
title: Silence all extra Bitrise logging
value_options:
- "true"
- "false"
silent: "false"
- opts:
description: When enabled, the analytics wrapper adds timestamps to xcodebuild
output log messages during the build.
is_required: true
summary: Add timestamps to xcodebuild messages
title: Add timestamps to xcodebuild messages
value_options:
- "true"
- "false"
timestamps: "false"
- cache_skip_flags: "false"
opts:
description: |-
Skip passing cache flags to xcodebuild except the COMPILATION_CACHE_REMOTE_SERVICE_PATH.
Cache will have to be enabled manually in the Xcode project settings. More information can be found at the FAQ
document: https://docs.bitrise.io/en/bitrise-build-cache/build-cache-for-xcode/xcode-compilation-cache-faq.html
is_required: true
summary: Skip passing cache flags to xcodebuild
title: Skip passing cache flags to xcodebuild
value_options:
- "true"
- "false"
================================================
FILE: steps/activate-build-cache-for-xcode/0.4.7/step.yml
================================================
title: Build Cache for Xcode
summary: Activates Bitrise Remote Build Cache add-on for subsequent Xcode builds in
the workflow
description: |
This Step enables Bitrise's Build Cache Add‑On for Xcode by configuring the environment with the Build Cache CLI.
After this Step runs, Xcode builds invoked via xcodebuild in subsequent workflow steps will automatically read from the remote cache and push new entries when applicable.
The Step adds an alias to ~/.zshrc and ~/.bashrc so the wrapper is available in all following steps; from that point all xcodebuild calls are wrapped to enable compilation caching.
Analytical data (command, duration, cache information, environment) is collected and sent to Bitrise and is available on the Build cache page: https://app.bitrise.io/build-cache
website: https://github.com/bitrise-steplib/bitrise-step-activate-build-cache-for-xcode
source_code_url: https://github.com/bitrise-steplib/bitrise-step-activate-build-cache-for-xcode
support_url: https://github.com/bitrise-steplib/bitrise-step-activate-build-cache-for-xcode
published_at: 2026-03-10T15:36:27.842406326Z
source:
git: https://github.com/bitrise-steplib/bitrise-step-activate-build-cache-for-xcode.git
commit: dc1ecee50016b997105ea20a71ff14189af0cbe8
type_tags:
- utility
toolkit:
bash:
entry_file: step.sh
is_skippable: true
run_if: .IsCI
inputs:
- opts:
is_required: true
summary: Enable logging additional information for troubleshooting
title: Verbose logging
value_options:
- "true"
- "false"
verbose: "false"
- cache: "true"
opts:
is_required: true
summary: Whether the build uses the remote cache
title: Use cache
value_options:
- "true"
- "false"
- opts:
is_required: true
summary: Whether the build can not only read, but write new entries to the remote
cache
title: Push new cache entries
value_options:
- "true"
- "false"
push: "true"
- opts:
is_required: true
summary: |-
Whether Bitrise components should not log anything except the underlying xcodebuild output.
Takes precedence over the 'Verbose logging' and 'Add timestamps' options.
title: Silence all extra Bitrise logging
value_options:
- "true"
- "false"
silent: "false"
- opts:
description: When enabled, the analytics wrapper adds timestamps to xcodebuild
output log messages during the build.
is_required: true
summary: Add timestamps to xcodebuild messages
title: Add timestamps to xcodebuild messages
value_options:
- "true"
- "false"
timestamps: "false"
- cache_skip_flags: "false"
opts:
description: |-
Skip passing cache flags to xcodebuild except the COMPILATION_CACHE_REMOTE_SERVICE_PATH.
Cache will have to be enabled manually in the Xcode project settings. More information can be found at the FAQ
document: https://docs.bitrise.io/en/bitrise-build-cache/build-cache-for-xcode/xcode-compilation-cache-faq.html
is_required: true
summary: Skip passing cache flags to xcodebuild
title: Skip passing cache flags to xcodebuild
value_options:
- "true"
- "false"
================================================
FILE: steps/activate-build-cache-for-xcode/0.4.8/step.yml
================================================
title: Build Cache for Xcode
summary: Activates Bitrise Remote Build Cache add-on for subsequent Xcode builds in
the workflow
description: |
This Step enables Bitrise's Build Cache Add‑On for Xcode by configuring the environment with the Build Cache CLI.
After this Step runs, Xcode builds invoked via xcodebuild in subsequent workflow steps will automatically read from the remote cache and push new entries when applicable.
The Step adds an alias to ~/.zshrc and ~/.bashrc so the wrapper is available in all following steps; from that point all xcodebuild calls are wrapped to enable compilation caching.
Analytical data (command, duration, cache information, environment) is collected and sent to Bitrise and is available on the Build cache page: https://app.bitrise.io/build-cache
website: https://github.com/bitrise-steplib/bitrise-step-activate-build-cache-for-xcode
source_code_url: https://github.com/bitrise-steplib/bitrise-step-activate-build-cache-for-xcode
support_url: https://github.com/bitrise-steplib/bitrise-step-activate-build-cache-for-xcode
published_at: 2026-03-23T08:59:24.837665944Z
source:
git: https://github.com/bitrise-steplib/bitrise-step-activate-build-cache-for-xcode.git
commit: f84c4809634b58a5b40e0b7abf4939fd88cc802c
type_tags:
- utility
toolkit:
bash:
entry_file: step.sh
is_skippable: true
run_if: .IsCI
inputs:
- opts:
is_required: true
summary: Enable logging additional information for troubleshooting
title: Verbose logging
value_options:
- "true"
- "false"
verbose: "false"
- cache: "true"
opts:
is_required: true
summary: Whether the build uses the remote cache
title: Use cache
value_options:
- "true"
- "false"
- opts:
is_required: true
summary: Whether the build can not only read, but write new entries to the remote
cache
title: Push new cache entries
value_options:
- "true"
- "false"
push: "true"
- opts:
is_required: true
summary: |-
Whether Bitrise components should not log anything except the underlying xcodebuild output.
Takes precedence over the 'Verbose logging' and 'Add timestamps' options.
title: Silence all extra Bitrise logging
value_options:
- "true"
- "false"
silent: "false"
- opts:
description: When enabled, the analytics wrapper adds timestamps to xcodebuild
output log messages during the build.
is_required: true
summary: Add timestamps to xcodebuild messages
title: Add timestamps to xcodebuild messages
value_options:
- "true"
- "false"
timestamps: "false"
- cache_skip_flags: "false"
opts:
description: |-
Skip passing cache flags to xcodebuild except the COMPILATION_CACHE_REMOTE_SERVICE_PATH.
Cache will have to be enabled manually in the Xcode project settings. More information can be found at the FAQ
document: https://docs.bitrise.io/en/bitrise-build-cache/build-cache-for-xcode/xcode-compilation-cache-faq.html
is_required: true
summary: Skip passing cache flags to xcodebuild
title: Skip passing cache flags to xcodebuild
value_options:
- "true"
- "false"
================================================
FILE: steps/activate-build-cache-for-xcode/0.5.0/step.yml
================================================
title: Build Cache for Xcode
summary: Activates Bitrise Remote Build Cache add-on for subsequent Xcode builds in
the workflow
description: |
This Step enables Bitrise's Build Cache Add‑On for Xcode by configuring the environment with the Build Cache CLI.
After this Step runs, Xcode builds invoked via xcodebuild in subsequent workflow steps will automatically read from the remote cache and push new entries when applicable.
The Step adds an alias to ~/.zshrc and ~/.bashrc so the wrapper is available in all following steps; from that point all xcodebuild calls are wrapped to enable compilation caching.
Analytical data (command, duration, cache information, environment) is collected and sent to Bitrise and is available on the Build cache page: https://app.bitrise.io/build-cache
website: https://github.com/bitrise-steplib/bitrise-step-activate-build-cache-for-xcode
source_code_url: https://github.com/bitrise-steplib/bitrise-step-activate-build-cache-for-xcode
support_url: https://github.com/bitrise-steplib/bitrise-step-activate-build-cache-for-xcode
published_at: 2026-03-26T15:08:21.119821401Z
source:
git: https://github.com/bitrise-steplib/bitrise-step-activate-build-cache-for-xcode.git
commit: bc2e151305eb4f6cd79cd004533f0d3c4870326f
type_tags:
- utility
toolkit:
bash:
entry_file: step.sh
is_skippable: true
run_if: .IsCI
inputs:
- opts:
is_required: true
summary: Enable logging additional information for troubleshooting
title: Verbose logging
value_options:
- "true"
- "false"
verbose: "false"
- cache: "true"
opts:
is_required: true
summary: Whether the build uses the remote cache
title: Use cache
value_options:
- "true"
- "false"
- opts:
is_required: true
summary: Whether the build can not only read, but write new entries to the remote
cache
title: Push new cache entries
value_options:
- "true"
- "false"
push: "true"
- opts:
is_required: true
summary: |-
Whether Bitrise components should not log anything except the underlying xcodebuild output.
Takes precedence over the 'Verbose logging' and 'Add timestamps' options.
title: Silence all extra Bitrise logging
value_options:
- "true"
- "false"
silent: "false"
- opts:
description: When enabled, the analytics wrapper adds timestamps to xcodebuild
output log messages during the build.
is_required: true
summary: Add timestamps to xcodebuild messages
title: Add timestamps to xcodebuild messages
value_options:
- "true"
- "false"
timestamps: "false"
- cache_skip_flags: "false"
opts:
description: |-
Skip passing cache flags to xcodebuild except the COMPILATION_CACHE_REMOTE_SERVICE_PATH.
Cache will have to be enabled manually in the Xcode project settings. More information can be found at the FAQ
document: https://docs.bitrise.io/en/bitrise-build-cache/build-cache-for-xcode/xcode-compilation-cache-faq.html
is_required: true
summary: Skip passing cache flags to xcodebuild
title: Skip passing cache flags to xcodebuild
value_options:
- "true"
- "false"
================================================
FILE: steps/activate-build-cache-for-xcode/0.5.1/step.yml
================================================
title: Build Cache for Xcode
summary: Activates Bitrise Remote Build Cache add-on for subsequent Xcode builds in
the workflow
description: |
This Step enables Bitrise's Build Cache Add‑On for Xcode by configuring the environment with the Build Cache CLI.
After this Step runs, Xcode builds invoked via xcodebuild in subsequent workflow steps will automatically read from the remote cache and push new entries when applicable.
The Step adds an alias to ~/.zshrc and ~/.bashrc so the wrapper is available in all following steps; from that point all xcodebuild calls are wrapped to enable compilation caching.
Analytical data (command, duration, cache information, environment) is collected and sent to Bitrise and is available on the Build cache page: https://app.bitrise.io/build-cache
website: https://github.com/bitrise-steplib/bitrise-step-activate-build-cache-for-xcode
source_code_url: https://github.com/bitrise-steplib/bitrise-step-activate-build-cache-for-xcode
support_url: https://github.com/bitrise-steplib/bitrise-step-activate-build-cache-for-xcode
published_at: 2026-03-30T11:59:11.681063144Z
source:
git: https://github.com/bitrise-steplib/bitrise-step-activate-build-cache-for-xcode.git
commit: f58dceaec1b0d089c6dfe2ac2366b75d59c5673b
type_tags:
- utility
toolkit:
bash:
entry_file: step.sh
is_skippable: true
run_if: .IsCI
inputs:
- opts:
is_required: true
summary: Enable logging additional information for troubleshooting
title: Verbose logging
value_options:
- "true"
- "false"
verbose: "false"
- cache: "true"
opts:
is_required: true
summary: Whether the build uses the remote cache
title: Use cache
value_options:
- "true"
- "false"
- opts:
is_required: true
summary: Whether the build can not only read, but write new entries to the remote
cache
title: Push new cache entries
value_options:
- "true"
- "false"
push: "true"
- opts:
is_required: true
summary: |-
Whether Bitrise components should not log anything except the underlying xcodebuild output.
Takes precedence over the 'Verbose logging' and 'Add timestamps' options.
title: Silence all extra Bitrise logging
value_options:
- "true"
- "false"
silent: "false"
- opts:
description: When enabled, the analytics wrapper adds timestamps to xcodebuild
output log messages during the build.
is_required: true
summary: Add timestamps to xcodebuild messages
title: Add timestamps to xcodebuild messages
value_options:
- "true"
- "false"
timestamps: "false"
- cache_skip_flags: "false"
opts:
description: |-
Skip passing cache flags to xcodebuild except the COMPILATION_CACHE_REMOTE_SERVICE_PATH.
Cache will have to be enabled manually in the Xcode project settings. More information can be found at the FAQ
document: https://docs.bitrise.io/en/bitrise-build-cache/build-cache-for-xcode/xcode-compilation-cache-faq.html
is_required: true
summary: Skip passing cache flags to xcodebuild
title: Skip passing cache flags to xcodebuild
value_options:
- "true"
- "false"
================================================
FILE: steps/activate-build-cache-for-xcode/0.5.2/step.yml
================================================
title: Build Cache for Xcode
summary: Activates Bitrise Remote Build Cache add-on for subsequent Xcode builds in
the workflow
description: |
This Step enables Bitrise's Build Cache Add‑On for Xcode by configuring the environment with the Build Cache CLI.
After this Step runs, Xcode builds invoked via xcodebuild in subsequent workflow steps will automatically read from the remote cache and push new entries when applicable.
The Step adds an alias to ~/.zshrc and ~/.bashrc so the wrapper is available in all following steps; from that point all xcodebuild calls are wrapped to enable compilation caching.
Analytical data (command, duration, cache information, environment) is collected and sent to Bitrise and is available on the Build cache page: https://app.bitrise.io/build-cache
website: https://github.com/bitrise-steplib/bitrise-step-activate-build-cache-for-xcode
source_code_url: https://github.com/bitrise-steplib/bitrise-step-activate-build-cache-for-xcode
support_url: https://github.com/bitrise-steplib/bitrise-step-activate-build-cache-for-xcode
published_at: 2026-03-31T11:39:41.339260329Z
source:
git: https://github.com/bitrise-steplib/bitrise-step-activate-build-cache-for-xcode.git
commit: 26a4e44bd6e70f49bd6603eed8e00f314bb5f1a9
type_tags:
- utility
toolkit:
bash:
entry_file: step.sh
is_skippable: true
run_if: .IsCI
inputs:
- opts:
is_required: true
summary: Enable logging additional information for troubleshooting
title: Verbose logging
value_options:
- "true"
- "false"
verbose: "false"
- cache: "true"
opts:
is_required: true
summary: Whether the build uses the remote cache
title: Use cache
value_options:
- "true"
- "false"
- opts:
is_required: true
summary: Whether the build can not only read, but write new entries to the remote
cache
title: Push new cache entries
value_options:
- "true"
- "false"
push: "true"
- opts:
is_required: true
summary: |-
Whether Bitrise components should not log anything except the underlying xcodebuild output.
Takes precedence over the 'Verbose logging' and 'Add timestamps' options.
title: Silence all extra Bitrise logging
value_options:
- "true"
- "false"
silent: "false"
- opts:
description: When enabled, the analytics wrapper adds timestamps to xcodebuild
output log messages during the build.
is_required: true
summary: Add timestamps to xcodebuild messages
title: Add timestamps to xcodebuild messages
value_options:
- "true"
- "false"
timestamps: "false"
- cache_skip_flags: "false"
opts:
description: |-
Skip passing cache flags to xcodebuild except the COMPILATION_CACHE_REMOTE_SERVICE_PATH.
Cache will have to be enabled manually in the Xcode project settings. More information can be found at the FAQ
document: https://docs.bitrise.io/en/bitrise-build-cache/build-cache-for-xcode/xcode-compilation-cache-faq.html
is_required: true
summary: Skip passing cache flags to xcodebuild
title: Skip passing cache flags to xcodebuild
value_options:
- "true"
- "false"
================================================
FILE: steps/activate-build-cache-for-xcode/0.5.3/step.yml
================================================
title: Build Cache for Xcode
summary: Activates Bitrise Remote Build Cache add-on for subsequent Xcode builds in
the workflow
description: |
This Step enables Bitrise's Build Cache Add‑On for Xcode by configuring the environment with the Build Cache CLI.
After this Step runs, Xcode builds invoked via xcodebuild in subsequent workflow steps will automatically read from the remote cache and push new entries when applicable.
The Step adds an alias to ~/.zshrc and ~/.bashrc so the wrapper is available in all following steps; from that point all xcodebuild calls are wrapped to enable compilation caching.
Analytical data (command, duration, cache information, environment) is collected and sent to Bitrise and is available on the Build cache page: https://app.bitrise.io/build-cache
website: https://github.com/bitrise-steplib/bitrise-step-activate-build-cache-for-xcode
source_code_url: https://github.com/bitrise-steplib/bitrise-step-activate-build-cache-for-xcode
support_url: https://github.com/bitrise-steplib/bitrise-step-activate-build-cache-for-xcode
published_at: 2026-04-02T16:40:49.809777506Z
source:
git: https://github.com/bitrise-steplib/bitrise-step-activate-build-cache-for-xcode.git
commit: 6cf9516153a5cb1412cf13546a6778f30b2c08e7
type_tags:
- utility
toolkit:
bash:
entry_file: step.sh
is_skippable: true
run_if: .IsCI
inputs:
- opts:
is_required: true
summary: Enable logging additional information for troubleshooting
title: Verbose logging
value_options:
- "true"
- "false"
verbose: "false"
- cache: "true"
opts:
is_required: true
summary: Whether the build uses the remote cache
title: Use cache
value_options:
- "true"
- "false"
- opts:
is_required: true
summary: Whether the build can not only read, but write new entries to the remote
cache
title: Push new cache entries
value_options:
- "true"
- "false"
push: "true"
- opts:
is_required: true
summary: |-
Whether Bitrise components should not log anything except the underlying xcodebuild output.
Takes precedence over the 'Verbose logging' and 'Add timestamps' options.
title: Silence all extra Bitrise logging
value_options:
- "true"
- "false"
silent: "false"
- opts:
description: When enabled, the analytics wrapper adds timestamps to xcodebuild
output log messages during the build.
is_required: true
summary: Add timestamps to xcodebuild messages
title: Add timestamps to xcodebuild messages
value_options:
- "true"
- "false"
timestamps: "false"
- cache_skip_flags: "false"
opts:
description: |-
Skip passing cache flags to xcodebuild except the COMPILATION_CACHE_REMOTE_SERVICE_PATH.
Cache will have to be enabled manually in the Xcode project settings. More information can be found at the FAQ
document: https://docs.bitrise.io/en/bitrise-build-cache/build-cache-for-xcode/xcode-compilation-cache-faq.html
is_required: true
summary: Skip passing cache flags to xcodebuild
title: Skip passing cache flags to xcodebuild
value_options:
- "true"
- "false"
================================================
FILE: steps/activate-build-cache-for-xcode/0.6.0/step.yml
================================================
title: Build Cache for Xcode
summary: Activates Bitrise Remote Build Cache add-on for subsequent Xcode builds in
the workflow
description: |
This Step enables Bitrise's Build Cache Add‑On for Xcode by configuring the environment with the Build Cache CLI.
After this Step runs, Xcode builds invoked via xcodebuild in subsequent workflow steps will automatically read from the remote cache and push new entries when applicable.
The Step adds an alias to ~/.zshrc and ~/.bashrc so the wrapper is available in all following steps; from that point all xcodebuild calls are wrapped to enable compilation caching.
Analytical data (command, duration, cache information, environment) is collected and sent to Bitrise and is available on the Build cache page: https://app.bitrise.io/build-cache
website: https://github.com/bitrise-steplib/bitrise-step-activate-build-cache-for-xcode
source_code_url: https://github.com/bitrise-steplib/bitrise-step-activate-build-cache-for-xcode
support_url: https://github.com/bitrise-steplib/bitrise-step-activate-build-cache-for-xcode
published_at: 2026-04-10T14:18:29.919214388Z
source:
git: https://github.com/bitrise-steplib/bitrise-step-activate-build-cache-for-xcode.git
commit: d5d552b3988538412492cb2edc889006d05a7b39
type_tags:
- utility
toolkit:
bash:
entry_file: step.sh
is_skippable: true
run_if: .IsCI
inputs:
- opts:
is_required: true
summary: Enable logging additional information for troubleshooting
title: Verbose logging
value_options:
- "true"
- "false"
verbose: "false"
- cache: "true"
opts:
is_required: true
summary: Whether the build uses the remote cache
title: Use cache
value_options:
- "true"
- "false"
- opts:
is_required: true
summary: Whether the build can not only read, but write new entries to the remote
cache
title: Push new cache entries
value_options:
- "true"
- "false"
push: "true"
- opts:
is_required: true
summary: |-
Whether Bitrise components should not log anything except the underlying xcodebuild output.
Takes precedence over the 'Verbose logging' and 'Add timestamps' options.
title: Silence all extra Bitrise logging
value_options:
- "true"
- "false"
silent: "false"
- opts:
description: When enabled, the analytics wrapper adds timestamps to xcodebuild
output log messages during the build.
is_required: true
summary: Add timestamps to xcodebuild messages
title: Add timestamps to xcodebuild messages
value_options:
- "true"
- "false"
timestamps: "false"
- cache_skip_flags: "false"
opts:
description: |-
Skip passing cache flags to xcodebuild except the COMPILATION_CACHE_REMOTE_SERVICE_PATH.
Cache will have to be enabled manually in the Xcode project settings. More information can be found at the FAQ
document: https://docs.bitrise.io/en/bitrise-build-cache/build-cache-for-xcode/xcode-compilation-cache-faq.html
is_required: true
summary: Skip passing cache flags to xcodebuild
title: Skip passing cache flags to xcodebuild
value_options:
- "true"
- "false"
================================================
FILE: steps/activate-build-cache-for-xcode/0.6.1/step.yml
================================================
title: Build Cache for Xcode
summary: Activates Bitrise Remote Build Cache add-on for subsequent Xcode builds in
the workflow
description: |
This Step enables Bitrise's Build Cache Add‑On for Xcode by configuring the environment with the Build Cache CLI.
After this Step runs, Xcode builds invoked via xcodebuild in subsequent workflow steps will automatically read from the remote cache and push new entries when applicable.
The Step adds an alias to ~/.zshrc and ~/.bashrc so the wrapper is available in all following steps; from that point all xcodebuild calls are wrapped to enable compilation caching.
Analytical data (command, duration, cache information, environment) is collected and sent to Bitrise and is available on the Build cache page: https://app.bitrise.io/build-cache
website: https://github.com/bitrise-steplib/bitrise-step-activate-build-cache-for-xcode
source_code_url: https://github.com/bitrise-steplib/bitrise-step-activate-build-cache-for-xcode
support_url: https://github.com/bitrise-steplib/bitrise-step-activate-build-cache-for-xcode
published_at: 2026-04-14T15:04:47.184499236Z
source:
git: https://github.com/bitrise-steplib/bitrise-step-activate-build-cache-for-xcode.git
commit: d5d552b3988538412492cb2edc889006d05a7b39
type_tags:
- utility
toolkit:
bash:
entry_file: step.sh
is_skippable: true
run_if: .IsCI
inputs:
- opts:
is_required: true
summary: Enable logging additional information for troubleshooting
title: Verbose logging
value_options:
- "true"
- "false"
verbose: "false"
- cache: "true"
opts:
is_required: true
summary: Whether the build uses the remote cache
title: Use cache
value_options:
- "true"
- "false"
- opts:
is_required: true
summary: Whether the build can not only read, but write new entries to the remote
cache
title: Push new cache entries
value_options:
- "true"
- "false"
push: "true"
- opts:
is_required: true
summary: |-
Whether Bitrise components should not log anything except the underlying xcodebuild output.
Takes precedence over the 'Verbose logging' and 'Add timestamps' options.
title: Silence all extra Bitrise logging
value_options:
- "true"
- "false"
silent: "false"
- opts:
description: When enabled, the analytics wrapper adds timestamps to xcodebuild
output log messages during the build.
is_required: true
summary: Add timestamps to xcodebuild messages
title: Add timestamps to xcodebuild messages
value_options:
- "true"
- "false"
timestamps: "false"
- cache_skip_flags: "false"
opts:
description: |-
Skip passing cache flags to xcodebuild except the COMPILATION_CACHE_REMOTE_SERVICE_PATH.
Cache will have to be enabled manually in the Xcode project settings. More information can be found at the FAQ
document: https://docs.bitrise.io/en/bitrise-build-cache/build-cache-for-xcode/xcode-compilation-cache-faq.html
is_required: true
summary: Skip passing cache flags to xcodebuild
title: Skip passing cache flags to xcodebuild
value_options:
- "true"
- "false"
================================================
FILE: steps/activate-build-cache-for-xcode/0.7.0/step.yml
================================================
title: Build Cache for Xcode
summary: Activates Bitrise Remote Build Cache add-on for subsequent Xcode builds in
the workflow
description: |
This Step enables Bitrise's Build Cache Add‑On for Xcode by configuring the environment with the Build Cache CLI.
After this Step runs, Xcode builds invoked via xcodebuild in subsequent workflow steps will automatically read from the remote cache and push new entries when applicable.
The Step adds an alias to ~/.zshrc and ~/.bashrc so the wrapper is available in all following steps; from that point all xcodebuild calls are wrapped to enable compilation caching.
Analytical data (command, duration, cache information, environment) is collected and sent to Bitrise and is available on the Build cache page: https://app.bitrise.io/build-cache
website: https://github.com/bitrise-steplib/bitrise-step-activate-build-cache-for-xcode
source_code_url: https://github.com/bitrise-steplib/bitrise-step-activate-build-cache-for-xcode
support_url: https://github.com/bitrise-steplib/bitrise-step-activate-build-cache-for-xcode
published_at: 2026-04-21T07:32:46.775542252Z
source:
git: https://github.com/bitrise-steplib/bitrise-step-activate-build-cache-for-xcode.git
commit: fb2c23348968cd9fa4a1b20b0bc2ffe713fe763b
type_tags:
- utility
toolkit:
bash:
entry_file: step.sh
is_skippable: true
run_if: .IsCI
inputs:
- opts:
is_required: true
summary: Enable logging additional information for troubleshooting
title: Verbose logging
value_options:
- "true"
- "false"
verbose: "false"
- cache: "true"
opts:
is_required: true
summary: Whether the build uses the remote cache
title: Use cache
value_options:
- "true"
- "false"
- opts:
is_required: true
summary: Whether the build can not only read, but write new entries to the remote
cache
title: Push new cache entries
value_options:
- "true"
- "false"
push: "true"
- opts:
is_required: true
summary: |-
Whether Bitrise components should not log anything except the underlying xcodebuild output.
Takes precedence over the 'Verbose logging' and 'Add timestamps' options.
title: Silence all extra Bitrise logging
value_options:
- "true"
- "false"
silent: "false"
- opts:
description: When enabled, the analytics wrapper adds timestamps to xcodebuild
output log messages during the build.
is_required: true
summary: Add timestamps to xcodebuild messages
title: Add timestamps to xcodebuild messages
value_options:
- "true"
- "false"
timestamps: "false"
- cache_skip_flags: "false"
opts:
description: |-
Skip passing cache flags to xcodebuild except the COMPILATION_CACHE_REMOTE_SERVICE_PATH.
Cache will have to be enabled manually in the Xcode project settings. More information can be found at the FAQ
document: https://docs.bitrise.io/en/bitrise-build-cache/build-cache-for-xcode/xcode-compilation-cache-faq.html
is_required: true
summary: Skip passing cache flags to xcodebuild
title: Skip passing cache flags to xcodebuild
value_options:
- "true"
- "false"
================================================
FILE: steps/activate-build-cache-for-xcode/0.8.0/step.yml
================================================
title: Build Cache for Xcode
summary: Activates Bitrise Remote Build Cache add-on for subsequent Xcode builds in
the workflow
description: |
This Step enables Bitrise's Build Cache Add‑On for Xcode by configuring the environment with the Build Cache CLI.
After this Step runs, Xcode builds invoked via xcodebuild in subsequent workflow steps will automatically read from the remote cache and push new entries when applicable.
The Step adds an alias to ~/.zshrc and ~/.bashrc so the wrapper is available in all following steps; from that point all xcodebuild calls are wrapped to enable compilation caching.
Analytical data (command, duration, cache information, environment) is collected and sent to Bitrise and is available on the Build cache page: https://app.bitrise.io/build-cache
website: https://github.com/bitrise-steplib/bitrise-step-activate-build-cache-for-xcode
source_code_url: https://github.com/bitrise-steplib/bitrise-step-activate-build-cache-for-xcode
support_url: https://github.com/bitrise-steplib/bitrise-step-activate-build-cache-for-xcode
published_at: 2026-04-21T11:44:38.048841858Z
source:
git: https://github.com/bitrise-steplib/bitrise-step-activate-build-cache-for-xcode.git
commit: 09d983542c8d39d1062e1b1f48667323104d950e
type_tags:
- utility
toolkit:
bash:
entry_file: step.sh
is_skippable: true
run_if: .IsCI
inputs:
- opts:
is_required: true
summary: Enable logging additional information for troubleshooting
title: Verbose logging
value_options:
- "true"
- "false"
verbose: "false"
- cache: "true"
opts:
is_required: true
summary: Whether the build uses the remote cache
title: Use cache
value_options:
- "true"
- "false"
- opts:
is_required: true
summary: Whether the build can not only read, but write new entries to the remote
cache
title: Push new cache entries
value_options:
- "true"
- "false"
push: "true"
- opts:
is_required: true
summary: |-
Whether Bitrise components should not log anything except the underlying xcodebuild output.
Takes precedence over the 'Verbose logging' and 'Add timestamps' options.
title: Silence all extra Bitrise logging
value_options:
- "true"
- "false"
silent: "false"
- opts:
description: When enabled, the analytics wrapper adds timestamps to xcodebuild
output log messages during the build.
is_required: true
summary: Add timestamps to xcodebuild messages
title: Add timestamps to xcodebuild messages
value_options:
- "true"
- "false"
timestamps: "false"
- cache_skip_flags: "false"
opts:
description: |-
Skip passing cache flags to xcodebuild except the COMPILATION_CACHE_REMOTE_SERVICE_PATH.
Cache will have to be enabled manually in the Xcode project settings. More information can be found at the FAQ
document: https://docs.bitrise.io/en/bitrise-build-cache/build-cache-for-xcode/xcode-compilation-cache-faq.html
is_required: true
summary: Skip passing cache flags to xcodebuild
title: Skip passing cache flags to xcodebuild
value_options:
- "true"
- "false"
================================================
FILE: steps/activate-build-cache-for-xcode/0.8.1/step.yml
================================================
title: Build Cache for Xcode
summary: Activates Bitrise Remote Build Cache add-on for subsequent Xcode builds in
the workflow
description: |
This Step enables Bitrise's Build Cache Add‑On for Xcode by configuring the environment with the Build Cache CLI.
After this Step runs, Xcode builds invoked via xcodebuild in subsequent workflow steps will automatically read from the remote cache and push new entries when applicable.
The Step adds an alias to ~/.zshrc and ~/.bashrc so the wrapper is available in all following steps; from that point all xcodebuild calls are wrapped to enable compilation caching.
Analytical data (command, duration, cache information, environment) is collected and sent to Bitrise and is available on the Build cache page: https://app.bitrise.io/build-cache
website: https://github.com/bitrise-steplib/bitrise-step-activate-build-cache-for-xcode
source_code_url: https://github.com/bitrise-steplib/bitrise-step-activate-build-cache-for-xcode
support_url: https://github.com/bitrise-steplib/bitrise-step-activate-build-cache-for-xcode
published_at: 2026-04-22T13:38:56.877363543Z
source:
git: https://github.com/bitrise-steplib/bitrise-step-activate-build-cache-for-xcode.git
commit: 9593a9e67f7b25048f6f4a2148d31edc15f72c06
type_tags:
- utility
toolkit:
bash:
entry_file: step.sh
is_skippable: true
run_if: .IsCI
inputs:
- opts:
is_required: true
summary: Enable logging additional information for troubleshooting
title: Verbose logging
value_options:
- "true"
- "false"
verbose: "false"
- cache: "true"
opts:
is_required: true
summary: Whether the build uses the remote cache
title: Use cache
value_options:
- "true"
- "false"
- opts:
is_required: true
summary: Whether the build can not only read, but write new entries to the remote
cache
title: Push new cache entries
value_options:
- "true"
- "false"
push: "true"
- opts:
is_required: true
summary: |-
Whether Bitrise components should not log anything except the underlying xcodebuild output.
Takes precedence over the 'Verbose logging' and 'Add timestamps' options.
title: Silence all extra Bitrise logging
value_options:
- "true"
- "false"
silent: "false"
- opts:
description: When enabled, the analytics wrapper adds timestamps to xcodebuild
output log messages during the build.
is_required: true
summary: Add timestamps to xcodebuild messages
title: Add timestamps to xcodebuild messages
value_options:
- "true"
- "false"
timestamps: "false"
- cache_skip_flags: "false"
opts:
description: |-
Skip passing cache flags to xcodebuild except the COMPILATION_CACHE_REMOTE_SERVICE_PATH.
Cache will have to be enabled manually in the Xcode project settings. More information can be found at the FAQ
document: https://docs.bitrise.io/en/bitrise-build-cache/build-cache-for-xcode/xcode-compilation-cache-faq.html
is_required: true
summary: Skip passing cache flags to xcodebuild
title: Skip passing cache flags to xcodebuild
value_options:
- "true"
- "false"
================================================
FILE: steps/activate-build-cache-for-xcode/0.8.2/step.yml
================================================
title: Build Cache for Xcode
summary: Activates Bitrise Remote Build Cache add-on for subsequent Xcode builds in
the workflow
description: |
This Step enables Bitrise's Build Cache Add‑On for Xcode by configuring the environment with the Build Cache CLI.
After this Step runs, Xcode builds invoked via xcodebuild in subsequent workflow steps will automatically read from the remote cache and push new entries when applicable.
The Step adds an alias to ~/.zshrc and ~/.bashrc so the wrapper is available in all following steps; from that point all xcodebuild calls are wrapped to enable compilation caching.
Analytical data (command, duration, cache information, environment) is collected and sent to Bitrise and is available on the Build cache page: https://app.bitrise.io/build-cache
website: https://github.com/bitrise-steplib/bitrise-step-activate-build-cache-for-xcode
source_code_url: https://github.com/bitrise-steplib/bitrise-step-activate-build-cache-for-xcode
support_url: https://github.com/bitrise-steplib/bitrise-step-activate-build-cache-for-xcode
published_at: 2026-04-23T12:22:49.280370061Z
source:
git: https://github.com/bitrise-steplib/bitrise-step-activate-build-cache-for-xcode.git
commit: 27da8a811a9a910e51bf6f665220543b189d1577
type_tags:
- utility
toolkit:
bash:
entry_file: step.sh
is_skippable: true
run_if: .IsCI
inputs:
- opts:
is_required: true
summary: Enable logging additional information for troubleshooting
title: Verbose logging
value_options:
- "true"
- "false"
verbose: "false"
- cache: "true"
opts:
is_required: true
summary: Whether the build uses the remote cache
title: Use cache
value_options:
- "true"
- "false"
- opts:
is_required: true
summary: Whether the build can not only read, but write new entries to the remote
cache
title: Push new cache entries
value_options:
- "true"
- "false"
push: "true"
- opts:
is_required: true
summary: |-
Whether Bitrise components should not log anything except the underlying xcodebuild output.
Takes precedence over the 'Verbose logging' and 'Add timestamps' options.
title: Silence all extra Bitrise logging
value_options:
- "true"
- "false"
silent: "false"
- opts:
description: When enabled, the analytics wrapper adds timestamps to xcodebuild
output log messages during the build.
is_required: true
summary: Add timestamps to xcodebuild messages
title: Add timestamps to xcodebuild messages
value_options:
- "true"
- "false"
timestamps: "false"
- cache_skip_flags: "false"
opts:
description: |-
Skip passing cache flags to xcodebuild except the COMPILATION_CACHE_REMOTE_SERVICE_PATH.
Cache will have to be enabled manually in the Xcode project settings. More information can be found at the FAQ
document: https://docs.bitrise.io/en/bitrise-build-cache/build-cache-for-xcode/xcode-compilation-cache-faq.html
is_required: true
summary: Skip passing cache flags to xcodebuild
title: Skip passing cache flags to xcodebuild
value_options:
- "true"
- "false"
================================================
FILE: steps/activate-build-cache-for-xcode/0.9.0/step.yml
================================================
title: Build Cache for Xcode
summary: Activates Bitrise Remote Build Cache add-on for subsequent Xcode builds in
the workflow
description: |
This Step enables Bitrise's Build Cache Add‑On for Xcode by configuring the environment with the Build Cache CLI.
After this Step runs, Xcode builds invoked via xcodebuild in subsequent workflow steps will automatically read from the remote cache and push new entries when applicable.
The Step adds an alias to ~/.zshrc and ~/.bashrc so the wrapper is available in all following steps; from that point all xcodebuild calls are wrapped to enable compilation caching.
Analytical data (command, duration, cache information, environment) is collected and sent to Bitrise and is available on the Build cache page: https://app.bitrise.io/build-cache
website: https://github.com/bitrise-steplib/bitrise-step-activate-build-cache-for-xcode
source_code_url: https://github.com/bitrise-steplib/bitrise-step-activate-build-cache-for-xcode
support_url: https://github.com/bitrise-steplib/bitrise-step-activate-build-cache-for-xcode
published_at: 2026-04-27T13:32:17.524457722Z
source:
git: https://github.com/bitrise-steplib/bitrise-step-activate-build-cache-for-xcode.git
commit: fee71c33bcb2aca9911031699435127c9cd83cf1
type_tags:
- utility
toolkit:
bash:
entry_file: step.sh
is_skippable: true
run_if: .IsCI
inputs:
- opts:
is_required: true
summary: Enable logging additional information for troubleshooting
title: Verbose logging
value_options:
- "true"
- "false"
verbose: "false"
- cache: "true"
opts:
is_required: true
summary: Whether the build uses the remote cache
title: Use cache
value_options:
- "true"
- "false"
- opts:
is_required: true
summary: Whether the build can not only read, but write new entries to the remote
cache
title: Push new cache entries
value_options:
- "true"
- "false"
push: "true"
- opts:
is_required: true
summary: |-
Whether Bitrise components should not log anything except the underlying xcodebuild output.
Takes precedence over the 'Verbose logging' and 'Add timestamps' options.
title: Silence all extra Bitrise logging
value_options:
- "true"
- "false"
silent: "false"
- opts:
description: When enabled, the analytics wrapper adds timestamps to xcodebuild
output log messages during the build.
is_required: true
summary: Add timestamps to xcodebuild messages
title: Add timestamps to xcodebuild messages
value_options:
- "true"
- "false"
timestamps: "false"
- cache_skip_flags: "false"
opts:
description: |-
Skip passing cache flags to xcodebuild except the COMPILATION_CACHE_REMOTE_SERVICE_PATH.
Cache will have to be enabled manually in the Xcode project settings. More information can be found at the FAQ
document: https://docs.bitrise.io/en/bitrise-build-cache/build-cache-for-xcode/xcode-compilation-cache-faq.html
is_required: true
summary: Skip passing cache flags to xcodebuild
title: Skip passing cache flags to xcodebuild
value_options:
- "true"
- "false"
================================================
FILE: steps/activate-build-cache-for-xcode/step-info.yml
================================================
maintainer: bitrise
================================================
FILE: steps/activate-gradle-mirrors/0.1.0/step.yml
================================================
title: Activate Gradle Mirrors
summary: Activates Bitrise repository mirrors for subsequent Gradle builds in the
workflow
description: |
This step installs a Gradle init script that redirects repository requests to
Bitrise-hosted mirrors for faster, more reliable dependency resolution in
subsequent Gradle invocations.
The step is gated by the `BITRISE_MAVENCENTRAL_PROXY_ENABLED` environment
variable and only activates when run in a Bitrise datacenter that has a
mirror deployment. In every other case it logs an info message and exits
successfully.
website: https://github.com/bitrise-steplib/bitrise-step-activate-gradle-mirrors
source_code_url: https://github.com/bitrise-steplib/bitrise-step-activate-gradle-mirrors
support_url: https://github.com/bitrise-steplib/bitrise-step-activate-gradle-mirrors
published_at: 2026-04-29T15:26:38.700397+02:00
source:
git: https://github.com/bitrise-steplib/bitrise-step-activate-gradle-mirrors.git
commit: 365f296d6df30cfef52ab593fea3ca83d4dfb588
project_type_tags:
- android
- kotlin-multiplatform
type_tags:
- utility
toolkit:
go:
package_name: github.com/bitrise-steplib/bitrise-step-activate-gradle-mirrors
is_skippable: true
run_if: .IsCI
inputs:
- opts:
is_required: true
summary: Enable logging additional information for troubleshooting
title: Verbose logging
value_options:
- "true"
- "false"
verbose: "false"
================================================
FILE: steps/activate-gradle-mirrors/0.1.1/step.yml
================================================
title: Activate Gradle Mirrors
summary: Activates Bitrise repository mirrors for subsequent Gradle builds in the
workflow
description: |
This step installs a Gradle init script that redirects repository requests to
Bitrise-hosted mirrors for faster, more reliable dependency resolution in
subsequent Gradle invocations.
The step is gated by the `BITRISE_MAVENCENTRAL_PROXY_ENABLED` environment
variable and only activates when run in a Bitrise datacenter that has a
mirror deployment. In every other case it logs an info message and exits
successfully.
website: https://github.com/bitrise-steplib/bitrise-step-activate-gradle-mirrors
source_code_url: https://github.com/bitrise-steplib/bitrise-step-activate-gradle-mirrors
support_url: https://github.com/bitrise-steplib/bitrise-step-activate-gradle-mirrors
published_at: 2026-04-30T07:23:52.790472639Z
source:
git: https://github.com/bitrise-steplib/bitrise-step-activate-gradle-mirrors.git
commit: c9068b5bfec2594d897aa6238491183c235c1554
executables:
darwin-amd64:
storage_uri: steps/activate-gradle-mirrors/0.1.1/bin/activate-gradle-mirrors-darwin-amd64
hash: sha256-073e7ae122e1368ada3d14c7de79dbe95c9265f95d7f1fbdecc15ddbacd91c53
darwin-arm64:
storage_uri: steps/activate-gradle-mirrors/0.1.1/bin/activate-gradle-mirrors-darwin-arm64
hash: sha256-22e91ff20e4b94e7e79e584aadee15ad2555ff8ccf9c9493a0a58f7462b523b0
linux-amd64:
storage_uri: steps/activate-gradle-mirrors/0.1.1/bin/activate-gradle-mirrors-linux-amd64
hash: sha256-356698c4f40dd26287d3bc0d7aa50892e416a687d06369e0b35217066d12fdd6
linux-arm64:
storage_uri: steps/activate-gradle-mirrors/0.1.1/bin/activate-gradle-mirrors-linux-arm64
hash: sha256-019e3f7e477b6bf2e32062b6bd3c05d0c18d59da6a742671a87527de04cbcd09
project_type_tags:
- android
- kotlin-multiplatform
type_tags:
- utility
toolkit:
go:
package_name: github.com/bitrise-steplib/bitrise-step-activate-gradle-mirrors
is_skippable: true
run_if: .IsCI
inputs:
- opts:
is_required: true
summary: Enable logging additional information for troubleshooting
title: Verbose logging
value_options:
- "true"
- "false"
verbose: "false"
================================================
FILE: steps/activate-gradle-mirrors/0.1.2/step.yml
================================================
title: Activate Gradle Mirrors
summary: Activates Bitrise repository mirrors for subsequent Gradle builds in the
workflow
description: |
This step installs a Gradle init script that redirects repository requests to
Bitrise-hosted mirrors for faster, more reliable dependency resolution in
subsequent Gradle invocations.
The step is gated by the `BITRISE_MAVENCENTRAL_PROXY_ENABLED` environment
variable and only activates when run in a Bitrise datacenter that has a
mirror deployment. In every other case it logs an info message and exits
successfully.
website: https://github.com/bitrise-steplib/bitrise-step-activate-gradle-mirrors
source_code_url: https://github.com/bitrise-steplib/bitrise-step-activate-gradle-mirrors
support_url: https://github.com/bitrise-steplib/bitrise-step-activate-gradle-mirrors
published_at: 2026-04-30T10:43:01.056392735Z
source:
git: https://github.com/bitrise-steplib/bitrise-step-activate-gradle-mirrors.git
commit: b4431c1ad7faca0795adde5451e842c7e7bf5902
executables:
darwin-amd64:
storage_uri: steps/activate-gradle-mirrors/0.1.2/bin/activate-gradle-mirrors-darwin-amd64
hash: sha256-c1e1d62b292eec340a49da27dd3acdab4ab9d06e0187a0c13db3f422b51b1a3d
darwin-arm64:
storage_uri: steps/activate-gradle-mirrors/0.1.2/bin/activate-gradle-mirrors-darwin-arm64
hash: sha256-e8bf9c6bba7aa713e0077a856e6780653f5735d89390c03df2431703e9e3a8db
linux-amd64:
storage_uri: steps/activate-gradle-mirrors/0.1.2/bin/activate-gradle-mirrors-linux-amd64
hash: sha256-d0482b3e772414f318b19b894c803d09e4878c6261d90c5fac4b0637c5e3e0e6
linux-arm64:
storage_uri: steps/activate-gradle-mirrors/0.1.2/bin/activate-gradle-mirrors-linux-arm64
hash: sha256-14e10b6776ef67515c38f8f217eb1d33e6eb66c0aaf3e4fc73b33260ec789d01
project_type_tags:
- android
- kotlin-multiplatform
type_tags:
- utility
toolkit:
go:
package_name: github.com/bitrise-steplib/bitrise-step-activate-gradle-mirrors
is_skippable: true
run_if: .IsCI
inputs:
- opts:
is_required: true
summary: Enable logging additional information for troubleshooting
title: Verbose logging
value_options:
- "true"
- "false"
verbose: "false"
================================================
FILE: steps/activate-gradle-mirrors/0.1.3/step.yml
================================================
title: Activate Gradle Mirrors
summary: Activates Bitrise repository mirrors for subsequent Gradle builds in the
workflow
description: |
This step installs a Gradle init script that redirects repository requests to
Bitrise-hosted mirrors for faster, more reliable dependency resolution in
subsequent Gradle invocations.
The step is gated by the `BITRISE_MAVENCENTRAL_PROXY_ENABLED` environment
variable and only activates when run in a Bitrise datacenter that has a
mirror deployment. In every other case it logs an info message and exits
successfully.
website: https://github.com/bitrise-steplib/bitrise-step-activate-gradle-mirrors
source_code_url: https://github.com/bitrise-steplib/bitrise-step-activate-gradle-mirrors
support_url: https://github.com/bitrise-steplib/bitrise-step-activate-gradle-mirrors
published_at: 2026-04-30T12:21:45.558967734Z
source:
git: https://github.com/bitrise-steplib/bitrise-step-activate-gradle-mirrors.git
commit: 09f80545433eb6fd05e80f1c464af8da8dd7e55c
executables:
darwin-amd64:
storage_uri: steps/activate-gradle-mirrors/0.1.3/bin/activate-gradle-mirrors-darwin-amd64
hash: sha256-8f07ec8b5b87d8ea42f160d74f174e214599e97c0d18a2466048f0658d1abf2f
darwin-arm64:
storage_uri: steps/activate-gradle-mirrors/0.1.3/bin/activate-gradle-mirrors-darwin-arm64
hash: sha256-03206f737a1b14f1ceb20bb3f88542a86bd75ca9156eaf9fb1a7dc1f70735caa
linux-amd64:
storage_uri: steps/activate-gradle-mirrors/0.1.3/bin/activate-gradle-mirrors-linux-amd64
hash: sha256-71af5b0313c5a36b1bf97b3f81ddf59fdbacfdfc0fecc51bfeaf4f43bafb1c4c
linux-arm64:
storage_uri: steps/activate-gradle-mirrors/0.1.3/bin/activate-gradle-mirrors-linux-arm64
hash: sha256-4d03646185a5369c62b331536c209463d5ce4c369ec9e2f3bb8849c2ed84e37f
project_type_tags:
- android
- kotlin-multiplatform
type_tags:
- utility
toolkit:
go:
package_name: github.com/bitrise-steplib/bitrise-step-activate-gradle-mirrors
is_skippable: true
run_if: .IsCI
inputs:
- opts:
is_required: true
summary: Enable logging additional information for troubleshooting
title: Verbose logging
value_options:
- "true"
- "false"
verbose: "false"
================================================
FILE: steps/activate-gradle-mirrors/0.1.4/step.yml
================================================
title: Activate Gradle Mirrors
summary: Activates Bitrise repository mirrors for subsequent Gradle builds in the
workflow
description: |
This step installs a Gradle init script that redirects repository requests to
Bitrise-hosted mirrors for faster, more reliable dependency resolution in
subsequent Gradle invocations.
The step is gated by the `BITRISE_MAVENCENTRAL_PROXY_ENABLED` environment
variable and only activates when run in a Bitrise datacenter that has a
mirror deployment. In every other case it logs an info message and exits
successfully.
website: https://github.com/bitrise-steplib/bitrise-step-activate-gradle-mirrors
source_code_url: https://github.com/bitrise-steplib/bitrise-step-activate-gradle-mirrors
support_url: https://github.com/bitrise-steplib/bitrise-step-activate-gradle-mirrors
published_at: 2026-04-30T15:57:56.529606051Z
source:
git: https://github.com/bitrise-steplib/bitrise-step-activate-gradle-mirrors.git
commit: 7d81db43fc5d41d176faab06497ea54e18805c67
executables:
darwin-amd64:
storage_uri: steps/activate-gradle-mirrors/0.1.4/bin/activate-gradle-mirrors-darwin-amd64
hash: sha256-888b9fa199649efa4f374ad8d1f03cb12080d896aa3a3ee2204f0fe47bc92491
darwin-arm64:
storage_uri: steps/activate-gradle-mirrors/0.1.4/bin/activate-gradle-mirrors-darwin-arm64
hash: sha256-7e908cd67d5ac7a1de4e67b61a56047b12337eb8965ad96867c66e4f129ebc02
linux-amd64:
storage_uri: steps/activate-gradle-mirrors/0.1.4/bin/activate-gradle-mirrors-linux-amd64
hash: sha256-b48f9084a617b4607a6ec3e1c75ac72edb8bc8263ea05d902e9979d1ffb9a6a4
linux-arm64:
storage_uri: steps/activate-gradle-mirrors/0.1.4/bin/activate-gradle-mirrors-linux-arm64
hash: sha256-b589792e599e3d53e64dc69eff530446ef63b8c67478f1d68ae8d20991bf42e5
project_type_tags:
- android
- kotlin-multiplatform
type_tags:
- utility
toolkit:
go:
package_name: github.com/bitrise-steplib/bitrise-step-activate-gradle-mirrors
is_skippable: true
run_if: .IsCI
inputs:
- opts:
is_required: true
summary: Enable logging additional information for troubleshooting
title: Verbose logging
value_options:
- "true"
- "false"
verbose: "false"
================================================
FILE: steps/activate-gradle-mirrors/0.2.0/step.yml
================================================
title: Activate Gradle Mirrors
summary: Activates Bitrise repository mirrors for subsequent Gradle builds in the
workflow
description: |
This step installs a Gradle init script that redirects repository requests to
Bitrise-hosted mirrors for faster, more reliable dependency resolution in
subsequent Gradle invocations.
The step is gated by the `BITRISE_MAVENCENTRAL_PROXY_ENABLED` environment
variable and only activates when run in a Bitrise datacenter that has a
mirror deployment. In every other case it logs an info message and exits
successfully.
website: https://github.com/bitrise-steplib/bitrise-step-activate-gradle-mirrors
source_code_url: https://github.com/bitrise-steplib/bitrise-step-activate-gradle-mirrors
support_url: https://github.com/bitrise-steplib/bitrise-step-activate-gradle-mirrors
published_at: 2026-05-05T13:21:46.012673614Z
source:
git: https://github.com/bitrise-steplib/bitrise-step-activate-gradle-mirrors.git
commit: 212cee71bed8c302e1584c421f3103234547b47c
executables:
darwin-amd64:
storage_uri: steps/activate-gradle-mirrors/0.2.0/bin/activate-gradle-mirrors-darwin-amd64
hash: sha256-90b42d8a4c958f4195317668dded9078d0ed9f1df3975bc4e29194311693c5c4
darwin-arm64:
storage_uri: steps/activate-gradle-mirrors/0.2.0/bin/activate-gradle-mirrors-darwin-arm64
hash: sha256-7b7784c92fbac58c07f5d235c22f60fdc5192b0c444d48bac003f4000de4f8f8
linux-amd64:
storage_uri: steps/activate-gradle-mirrors/0.2.0/bin/activate-gradle-mirrors-linux-amd64
hash: sha256-d5f2275eab0ecde0d47a3da85c0926bf31ad9dfe79c734b6e8e731dc6004eab1
linux-arm64:
storage_uri: steps/activate-gradle-mirrors/0.2.0/bin/activate-gradle-mirrors-linux-arm64
hash: sha256-7f487edc1a4344c8e071a69c7f0b3137f1143e246f24bca065e7b44f69ebdd23
project_type_tags:
- android
- kotlin-multiplatform
type_tags:
- utility
toolkit:
go:
package_name: github.com/bitrise-steplib/bitrise-step-activate-gradle-mirrors
is_skippable: true
run_if: .IsCI
inputs:
- opts:
is_required: true
summary: Enable logging additional information for troubleshooting
title: Verbose logging
value_options:
- "true"
- "false"
verbose: "false"
================================================
FILE: steps/activate-gradle-mirrors/step-info.yml
================================================
maintainer: community
================================================
FILE: steps/activate-ssh-key/3.0.2/step.yml
================================================
title: Activate SSH key (RSA private key)
description: |-
Saves the provided **RSA private SSH key** to file
and then loads it into the user's ssh-agent with `ssh-add`.
**The key should not have a passphrase** (should have an empty passphrase).
*Warning: the provided key will overwrite an existing key at
the provided path (if another key at the path already exists).*
It will start the ssh-agent if it can't connect to the agent.
summary: Setup the SSH Key to use with the current workflow
website: https://github.com/bitrise-io/steps-activate-ssh-key
source_code_url: https://github.com/bitrise-io/steps-activate-ssh-key
support_url: https://github.com/bitrise-io/steps-activate-ssh-key/issues
published_at: 2015-09-03T19:21:14.9231203+02:00
source:
git: https://github.com/bitrise-io/steps-activate-ssh-key.git
commit: d4d437de5d7de7cdb4e25116c12fd0344a03923e
host_os_tags:
- osx-10.9
project_type_tags:
- ios
type_tags:
- ssh
is_always_run: false
is_skippable: false
run_if: .IsCI
inputs:
- opts:
is_dont_change_value: true
is_expand: true
title: SSH private key in RSA format
ssh_rsa_private_key: $SSH_RSA_PRIVATE_KEY
- opts:
is_dont_change_value: true
is_expand: true
title: (Optional) path to save the private key.
ssh_key_save_path: $HOME/.ssh/bitrise_step_activate_ssh_key
- is_remove_other_identities: "true"
opts:
description: |-
(Optional) Remove other, previously loaded keys and restart ssh-agent?
Options:
* "true"
* "false"
is_dont_change_value: true
is_expand: false
title: Remove other identities?
value_options:
- "true"
- "false"
================================================
FILE: steps/activate-ssh-key/3.0.3/step.yml
================================================
title: Activate SSH key (RSA private key)
summary: Setup the SSH Key to use with the current workflow
description: |-
Saves the provided **RSA private SSH key** to file
and then loads it into the user's ssh-agent with `ssh-add`.
**The key should not have a passphrase** (should have an empty passphrase).
*Warning: the provided key will overwrite an existing key at
the provided path (if another key at the path already exists).*
It will start the ssh-agent if it can't connect to the agent.
website: https://github.com/bitrise-io/steps-activate-ssh-key
source_code_url: https://github.com/bitrise-io/steps-activate-ssh-key
support_url: https://github.com/bitrise-io/steps-activate-ssh-key/issues
published_at: 2015-10-29T12:00:32.481457224+01:00
source:
git: https://github.com/bitrise-io/steps-activate-ssh-key.git
commit: 5c42e6fe8642d8416faac742b0e137053f9ac9f3
host_os_tags:
- osx-10.9
project_type_tags:
- ios
type_tags:
- ssh
deps:
apt_get:
- name: expect
- name: git
is_always_run: false
is_skippable: false
run_if: .IsCI
inputs:
- opts:
is_dont_change_value: true
is_expand: true
title: SSH private key in RSA format
ssh_rsa_private_key: $SSH_RSA_PRIVATE_KEY
- opts:
is_dont_change_value: true
is_expand: true
title: (Optional) path to save the private key.
ssh_key_save_path: $HOME/.ssh/bitrise_step_activate_ssh_key
- is_remove_other_identities: "true"
opts:
description: |-
(Optional) Remove other, previously loaded keys and restart ssh-agent?
Options:
* "true"
* "false"
is_dont_change_value: true
is_expand: false
title: Remove other identities?
value_options:
- "true"
- "false"
================================================
FILE: steps/activate-ssh-key/3.1.0/step.yml
================================================
title: Activate SSH key (RSA private key)
summary: Setup the SSH Key to use with the current workflow
description: |-
Saves the provided **RSA private SSH key** to file
and then loads it into the user's ssh-agent with `ssh-add`.
**The key should not have a passphrase** (should have an empty passphrase).
*Warning: the provided key will overwrite an existing key at
the provided path (if another key at the path already exists).*
It will start the ssh-agent if it can't connect to the agent.
website: https://github.com/bitrise-io/steps-activate-ssh-key
source_code_url: https://github.com/bitrise-io/steps-activate-ssh-key
support_url: https://github.com/bitrise-io/steps-activate-ssh-key/issues
published_at: 2015-11-26T13:01:12.547208148+01:00
source:
git: https://github.com/bitrise-io/steps-activate-ssh-key.git
commit: ca5c5aec19e237f2394e6a9fa2e9f625d15dd647
host_os_tags:
- osx-10.9
project_type_tags:
- ios
type_tags:
- ssh
deps:
apt_get:
- name: expect
- name: git
is_always_run: false
is_skippable: false
run_if: .IsCI
inputs:
- opts:
is_dont_change_value: true
is_expand: true
title: SSH private key in RSA format
ssh_rsa_private_key: $SSH_RSA_PRIVATE_KEY
- opts:
is_dont_change_value: true
is_expand: true
title: (Optional) path to save the private key.
ssh_key_save_path: $HOME/.ssh/bitrise_step_activate_ssh_key
- is_remove_other_identities: "true"
opts:
description: |-
(Optional) Remove other, previously loaded keys and restart ssh-agent?
Options:
* "true"
* "false"
is_dont_change_value: true
is_expand: false
title: Remove other identities?
value_options:
- "true"
- "false"
outputs:
- SSH_AUTH_SOCK: null
opts:
description: |-
If the `is_should_start_new_agent` option is enabled the no accessible
ssh-agent if found this Step will start a new ssh-agent.
This output environment variable will contain the path of the
SSH Auth Socket, which can be used to access the started ssh-agent.
title: SSH Auth Socker info, in case the ssh-agent was started by this step
================================================
FILE: steps/activate-ssh-key/3.1.1/step.yml
================================================
title: Activate SSH key (RSA private key)
summary: Setup the SSH Key to use with the current workflow
description: |-
Saves the provided **RSA private SSH key** to file
and then loads it into the user's ssh-agent with `ssh-add`.
**The key should not have a passphrase** (should have an empty passphrase).
*Warning: the provided key will overwrite an existing key at
the provided path (if another key at the path already exists).*
It will start the ssh-agent if it can't connect to the agent.
website: https://github.com/bitrise-io/steps-activate-ssh-key
source_code_url: https://github.com/bitrise-io/steps-activate-ssh-key
support_url: https://github.com/bitrise-io/steps-activate-ssh-key/issues
published_at: 2016-08-01T12:03:18.249227437+02:00
source:
git: https://github.com/bitrise-io/steps-activate-ssh-key.git
commit: ba111960d4ef6616a00c162195129e0134e410e6
host_os_tags:
- osx-10.9
type_tags:
- access-control
deps:
apt_get:
- name: expect
- name: git
is_always_run: false
is_skippable: false
run_if: .IsCI
inputs:
- opts:
is_dont_change_value: true
is_expand: true
title: SSH private key in RSA format
ssh_rsa_private_key: $SSH_RSA_PRIVATE_KEY
- opts:
is_dont_change_value: true
is_expand: true
title: (Optional) path to save the private key.
ssh_key_save_path: $HOME/.ssh/bitrise_step_activate_ssh_key
- is_remove_other_identities: "true"
opts:
description: |-
(Optional) Remove other, previously loaded keys and restart ssh-agent?
Options:
* "true"
* "false"
is_dont_change_value: true
is_expand: false
title: Remove other identities?
value_options:
- "true"
- "false"
outputs:
- SSH_AUTH_SOCK: null
opts:
description: |-
If the `is_should_start_new_agent` option is enabled the no accessible
ssh-agent if found this Step will start a new ssh-agent.
This output environment variable will contain the path of the
SSH Auth Socket, which can be used to access the started ssh-agent.
title: SSH Auth Socket info, in case the ssh-agent was started by this step
================================================
FILE: steps/activate-ssh-key/4.0.1/step.yml
================================================
title: Activate SSH key (RSA private key)
summary: Setup the SSH Key to use with the current workflow
description: |-
Saves the provided **RSA private SSH key** to file
and then loads it into the user's ssh-agent with `ssh-add`.
**The key should not have a passphrase** (should have an empty passphrase).
*Warning: the provided key will overwrite an existing key at
the provided path (if another key at the path already exists).*
It will start the ssh-agent if it can't connect to the agent.
website: https://github.com/bitrise-io/steps-activate-ssh-key
source_code_url: https://github.com/bitrise-io/steps-activate-ssh-key
support_url: https://github.com/bitrise-io/steps-activate-ssh-key/issues
published_at: 2018-06-01T16:28:25.6312952+02:00
source:
git: https://github.com/bitrise-io/steps-activate-ssh-key.git
commit: af23332f74c46f529a54cbdd546c93b70e92c3ae
host_os_tags:
- osx-10.9
type_tags:
- access-control
toolkit:
go:
package_name: github.com/bitrise-io/steps-activate-ssh-key
deps:
apt_get:
- name: expect
- name: git
is_always_run: false
is_skippable: false
run_if: .IsCI
inputs:
- opts:
is_dont_change_value: true
is_expand: true
title: SSH private key in RSA format
ssh_rsa_private_key: $SSH_RSA_PRIVATE_KEY
- opts:
is_dont_change_value: true
is_expand: true
title: (Optional) path to save the private key.
ssh_key_save_path: $HOME/.ssh/bitrise_step_activate_ssh_key
- is_remove_other_identities: "true"
opts:
description: |-
(Optional) Remove other, previously loaded keys and restart ssh-agent?
Options:
* "true"
* "false"
is_dont_change_value: true
is_expand: false
title: Remove other identities?
value_options:
- "true"
- "false"
outputs:
- SSH_AUTH_SOCK: null
opts:
description: |-
If the `is_should_start_new_agent` option is enabled the no accessible
ssh-agent if found this Step will start a new ssh-agent.
This output environment variable will contain the path of the
SSH Auth Socket, which can be used to access the started ssh-agent.
title: SSH Auth Socket info, in case the ssh-agent was started by this step
================================================
FILE: steps/activate-ssh-key/4.0.2/step.yml
================================================
title: Activate SSH key (RSA private key)
summary: Setup the SSH Key to use with the current workflow
description: |-
Saves the provided **RSA private SSH key** to file
and then loads it into the user's ssh-agent with `ssh-add`.
**The key should not have a passphrase** (should have an empty passphrase).
*Warning: the provided key will overwrite an existing key at
the provided path (if another key at the path already exists).*
It will start the ssh-agent if it can't connect to the agent.
website: https://github.com/bitrise-io/steps-activate-ssh-key
source_code_url: https://github.com/bitrise-io/steps-activate-ssh-key
support_url: https://github.com/bitrise-io/steps-activate-ssh-key/issues
published_at: 2018-06-08T09:45:40.790981574+02:00
source:
git: https://github.com/bitrise-io/steps-activate-ssh-key.git
commit: 6888940bf5c8dbae7f93f3782b5c8fb339319e16
host_os_tags:
- osx-10.9
type_tags:
- access-control
toolkit:
go:
package_name: github.com/bitrise-io/steps-activate-ssh-key
deps:
apt_get:
- name: expect
- name: git
is_always_run: false
is_skippable: false
run_if: .IsCI
inputs:
- opts:
is_dont_change_value: true
is_expand: true
title: SSH private key in RSA format
ssh_rsa_private_key: $SSH_RSA_PRIVATE_KEY
- opts:
is_dont_change_value: true
is_expand: true
title: (Optional) path to save the private key.
ssh_key_save_path: $HOME/.ssh/bitrise_step_activate_ssh_key
- is_remove_other_identities: "true"
opts:
description: |-
(Optional) Remove other, previously loaded keys and restart ssh-agent?
Options:
* "true"
* "false"
is_dont_change_value: true
is_expand: false
title: Remove other identities?
value_options:
- "true"
- "false"
- opts:
description: Enable verbose log option for better debug
is_expand: true
is_required: true
summary: Enable verbose log option for better debug
title: Enable verbose logging
value_options:
- true
- false
verbose: false
outputs:
- SSH_AUTH_SOCK: null
opts:
description: |-
If the `is_should_start_new_agent` option is enabled the no accessible
ssh-agent if found this Step will start a new ssh-agent.
This output environment variable will contain the path of the
SSH Auth Socket, which can be used to access the started ssh-agent.
title: SSH Auth Socket info, in case the ssh-agent was started by this step
================================================
FILE: steps/activate-ssh-key/4.0.3/step.yml
================================================
title: Activate SSH key (RSA private key)
summary: Setup the SSH Key to use with the current workflow
description: |-
This step saves the provided **RSA private SSH key** to a file
and then loads it into the user's ssh-agent with `ssh-add`.
**The SSH key should not have a passphrase but an empty passphrase**.
*Warning: the provided key will overwrite an existing key at
the specified path (if another key at the path already exists).*
The step will start the ssh-agent if it can't connect to the agent.
website: https://github.com/bitrise-io/steps-activate-ssh-key
source_code_url: https://github.com/bitrise-io/steps-activate-ssh-key
support_url: https://github.com/bitrise-io/steps-activate-ssh-key/issues
published_at: 2018-08-22T09:43:08.222832748Z
source:
git: https://github.com/bitrise-io/steps-activate-ssh-key.git
commit: 29e73e8056a05ecf681ddac659afcfe9f3385a9e
host_os_tags:
- osx-10.9
type_tags:
- access-control
toolkit:
go:
package_name: github.com/bitrise-io/steps-activate-ssh-key
deps:
apt_get:
- name: expect
- name: git
is_always_run: false
is_skippable: false
run_if: .IsCI
inputs:
- opts:
is_dont_change_value: true
is_expand: true
is_sensitive: true
title: SSH private key in RSA format
ssh_rsa_private_key: $SSH_RSA_PRIVATE_KEY
- opts:
is_dont_change_value: true
is_expand: true
title: (Optional) path to save the private key.
ssh_key_save_path: $HOME/.ssh/bitrise_step_activate_ssh_key
- is_remove_other_identities: "true"
opts:
description: |-
(Optional) Remove other or previously loaded keys and restart ssh-agent?
Options:
* "true"
* "false"
is_dont_change_value: true
is_expand: false
title: Remove other identities?
value_options:
- "true"
- "false"
- opts:
description: Enable verbose log option for better debug
is_expand: true
is_required: true
summary: Enable verbose log option for better debug
title: Enable verbose logging
value_options:
- true
- false
verbose: false
outputs:
- SSH_AUTH_SOCK: null
opts:
description: |-
If the `is_should_start_new_agent` option is enabled, and no accessible
ssh-agent is found, the step will start a new ssh-agent.
This output environment variable will contain the path of the
SSH Auth Socket, which can be used to access the started ssh-agent.
title: SSH Auth Socket info, in case the ssh-agent was started by this step
================================================
FILE: steps/activate-ssh-key/4.0.5/step.yml
================================================
title: Activate SSH key (RSA private key)
summary: Setup the SSH Key to use with the current workflow
description: "This Step makes sure Bitrise has access to your repository and thus
able to clone your code to our virtual machines. The Step saves the provided private
key of your SSH keypair to a file and then loads it into the user's ssh-agent with
`ssh-add`.\n\n### Configuring the Step\n\nBy default, you do not have to change
anything about the Step's configuration. All you need to do is make sure that you
registered your key pair on Bitrise and the public key at your Git provider. You
can generate and register an SSH keypair in two ways.\n\n- Automatically during
the [app creation process](https://devcenter.bitrise.io/getting-started/adding-a-new-app/#setting-up-ssh-keys).\n-
Manually during the app creation process or at any other time. You [generate your
own SSH keys](https://devcenter.bitrise.io/faq/how-to-generate-ssh-keypair/) and
register them on Bitrise and at your Git provider. The SSH key should not have a
passphrase! \n\nOptionally, you can save the private key on the virtual machine.
If a key already exists on the path you specified in the **(Optional) path to save
the private key** input, it will be overwritten.\n\n### Troubleshooting\n\nIf the
Step fails, check the public key registered to your Git repository and compare it
to the public key registered on Bitrise. The most frequent issue is that someone
deleted or revoked the key on your Git provider's website.\n\nYou can also set the
**Enable verbose logging** input to `true`. This provides additional information
in the log.\n\n### Useful links\n\n[Setting up SSH keys](https://devcenter.bitrise.io/getting-started/adding-a-new-app/#setting-up-ssh-keys)\n[How
can I generate an SSH key pair?](https://devcenter.bitrise.io/faq/how-to-generate-ssh-keypair/)\n\n###
Related Steps\n\n[Git Clone Repository](https://www.bitrise.io/integrations/steps/git-clone)"
website: https://github.com/bitrise-io/steps-activate-ssh-key
source_code_url: https://github.com/bitrise-io/steps-activate-ssh-key
support_url: https://github.com/bitrise-io/steps-activate-ssh-key/issues
published_at: 2019-12-12T15:21:30.601101962Z
source:
git: https://github.com/bitrise-steplib/steps-activate-ssh-key.git
commit: bf00bf4957c6e0a8e205da9f4601a15fc868144d
host_os_tags:
- osx-10.9
type_tags:
- access-control
toolkit:
go:
package_name: github.com/bitrise-io/steps-activate-ssh-key
deps:
apt_get:
- name: expect
- name: git
is_always_run: false
is_skippable: false
run_if: .IsCI
inputs:
- opts:
is_dont_change_value: true
is_expand: true
is_sensitive: true
title: SSH private key in RSA format
ssh_rsa_private_key: $SSH_RSA_PRIVATE_KEY
- opts:
is_dont_change_value: true
is_expand: true
title: (Optional) path to save the private key.
ssh_key_save_path: $HOME/.ssh/bitrise_step_activate_ssh_key
- is_remove_other_identities: "true"
opts:
description: |-
(Optional) Remove other or previously loaded keys and restart ssh-agent?
Options:
* "true"
* "false"
is_dont_change_value: true
is_expand: false
title: Remove other identities?
value_options:
- "true"
- "false"
- opts:
description: Enable verbose log option for better debug
is_expand: true
is_required: true
summary: Enable verbose log option for better debug
title: Enable verbose logging
value_options:
- "true"
- "false"
verbose: false
outputs:
- SSH_AUTH_SOCK: null
opts:
description: |-
If the `is_should_start_new_agent` option is enabled, and no accessible
ssh-agent is found, the step will start a new ssh-agent.
This output environment variable will contain the path of the
SSH Auth Socket, which can be used to access the started ssh-agent.
title: SSH Auth Socket info, in case the ssh-agent was started by this step
================================================
FILE: steps/activate-ssh-key/4.0.6/step.yml
================================================
title: Activate SSH key (RSA private key)
summary: Setup the SSH Key to use with the current workflow
description: "This Step makes sure Bitrise has access to your repository and thus
able to clone your code to our virtual machines. The Step saves the provided private
key of your SSH keypair to a file and then loads it into the user's ssh-agent with
`ssh-add`.\n\n### Configuring the Step\n\nBy default, you do not have to change
anything about the Step's configuration. All you need to do is make sure that you
registered your key pair on Bitrise and the public key at your Git provider. You
can generate and register an SSH keypair in two ways.\n\n- Automatically during
the [app creation process](https://devcenter.bitrise.io/getting-started/adding-a-new-app/#setting-up-ssh-keys).\n-
Manually during the app creation process or at any other time. You [generate your
own SSH keys](https://devcenter.bitrise.io/faq/how-to-generate-ssh-keypair/) and
register them on Bitrise and at your Git provider. The SSH key should not have a
passphrase! \n\nOptionally, you can save the private key on the virtual machine.
If a key already exists on the path you specified in the **(Optional) path to save
the private key** input, it will be overwritten.\n\n### Troubleshooting\n\nIf the
Step fails, check the public key registered to your Git repository and compare it
to the public key registered on Bitrise. The most frequent issue is that someone
deleted or revoked the key on your Git provider's website.\n\nYou can also set the
**Enable verbose logging** input to `true`. This provides additional information
in the log.\n\n### Useful links\n\n- [Setting up SSH keys](https://devcenter.bitrise.io/getting-started/adding-a-new-app/#setting-up-ssh-keys)\n-
[How can I generate an SSH key pair?](https://devcenter.bitrise.io/faq/how-to-generate-ssh-keypair/)\n\n###
Related Steps\n\n- [Git Clone Repository](https://www.bitrise.io/integrations/steps/git-clone)"
website: https://github.com/bitrise-io/steps-activate-ssh-key
source_code_url: https://github.com/bitrise-io/steps-activate-ssh-key
support_url: https://github.com/bitrise-io/steps-activate-ssh-key/issues
published_at: 2021-05-05T14:19:45.125786875Z
source:
git: https://github.com/bitrise-steplib/steps-activate-ssh-key.git
commit: 17c9d33e3da625774824f1ab1942569b59fcd6dd
host_os_tags:
- osx-10.9
type_tags:
- access-control
toolkit:
go:
package_name: github.com/bitrise-steplib/steps-activate-ssh-key
deps:
apt_get:
- name: expect
- name: git
is_always_run: false
is_skippable: false
run_if: .IsCI
inputs:
- opts:
is_dont_change_value: true
is_expand: true
is_sensitive: true
title: SSH private key in RSA format
ssh_rsa_private_key: $SSH_RSA_PRIVATE_KEY
- opts:
is_dont_change_value: true
is_expand: true
title: (Optional) path to save the private key.
ssh_key_save_path: $HOME/.ssh/bitrise_step_activate_ssh_key
- is_remove_other_identities: "true"
opts:
description: |-
(Optional) Remove other or previously loaded keys and restart ssh-agent?
Options:
* "true"
* "false"
is_dont_change_value: true
is_expand: false
title: Remove other identities?
value_options:
- "true"
- "false"
- opts:
description: Enable verbose log option for better debug
is_expand: true
is_required: true
summary: Enable verbose log option for better debug
title: Enable verbose logging
value_options:
- "true"
- "false"
verbose: false
outputs:
- SSH_AUTH_SOCK: null
opts:
description: |-
If the `is_should_start_new_agent` option is enabled, and no accessible
ssh-agent is found, the step will start a new ssh-agent.
This output environment variable will contain the path of the
SSH Auth Socket, which can be used to access the started ssh-agent.
title: SSH Auth Socket info, in case the ssh-agent was started by this step
================================================
FILE: steps/activate-ssh-key/4.1.0/step.yml
================================================
title: Activate SSH key (RSA private key)
summary: Setup the SSH Key to use with the current workflow
description: "This Step makes sure Bitrise has access to your repository and thus
able to clone your code to our virtual machines. The Step saves the provided private
key of your SSH keypair to a file and then loads it into the user's ssh-agent with
`ssh-add`.\n\n### Configuring the Step\n\nBy default, you do not have to change
anything about the Step's configuration. All you need to do is make sure that you
registered your key pair on Bitrise and the public key at your Git provider. You
can generate and register an SSH keypair in two ways.\n\n- Automatically during
the [app creation process](https://devcenter.bitrise.io/getting-started/adding-a-new-app/#setting-up-ssh-keys).\n-
Manually during the app creation process or at any other time. You [generate your
own SSH keys](https://devcenter.bitrise.io/faq/how-to-generate-ssh-keypair/) and
register them on Bitrise and at your Git provider. The SSH key should not have a
passphrase! \n\nOptionally, you can save the private key on the virtual machine.
If a key already exists on the path you specified in the **(Optional) path to save
the private key** input, it will be overwritten.\n\n### Troubleshooting\n\nIf the
Step fails, check the public key registered to your Git repository and compare it
to the public key registered on Bitrise. The most frequent issue is that someone
deleted or revoked the key on your Git provider's website.\n\nYou can also set the
**Enable verbose logging** input to `true`. This provides additional information
in the log.\n\n### Useful links\n\n- [Setting up SSH keys](https://devcenter.bitrise.io/getting-started/adding-a-new-app/#setting-up-ssh-keys)\n-
[How can I generate an SSH key pair?](https://devcenter.bitrise.io/faq/how-to-generate-ssh-keypair/)\n\n###
Related Steps\n\n- [Git Clone Repository](https://www.bitrise.io/integrations/steps/git-clone)"
website: https://github.com/bitrise-io/steps-activate-ssh-key
source_code_url: https://github.com/bitrise-io/steps-activate-ssh-key
support_url: https://github.com/bitrise-io/steps-activate-ssh-key/issues
published_at: 2021-08-25T12:38:21.03700457Z
source:
git: https://github.com/bitrise-steplib/steps-activate-ssh-key.git
commit: 9f0fc00b7a2483a283c0d82106d6816638ac7d41
host_os_tags:
- osx-10.9
type_tags:
- access-control
toolkit:
go:
package_name: github.com/bitrise-steplib/steps-activate-ssh-key
deps:
apt_get:
- name: expect
- name: git
is_always_run: false
is_skippable: false
run_if: .IsCI
inputs:
- opts:
is_dont_change_value: true
is_expand: true
is_sensitive: true
title: SSH private key in RSA format
ssh_rsa_private_key: $SSH_RSA_PRIVATE_KEY
- opts:
is_dont_change_value: true
is_expand: true
title: (Optional) path to save the private key.
ssh_key_save_path: $HOME/.ssh/bitrise_step_activate_ssh_key
- is_remove_other_identities: "true"
opts:
description: |-
(Optional) Remove other or previously loaded keys and restart ssh-agent?
Options:
* "true"
* "false"
is_dont_change_value: true
is_expand: false
title: Remove other identities?
value_options:
- "true"
- "false"
- opts:
description: Enable verbose log option for better debug
is_expand: true
is_required: true
summary: Enable verbose log option for better debug
title: Enable verbose logging
value_options:
- "true"
- "false"
verbose: false
outputs:
- SSH_AUTH_SOCK: null
opts:
description: |-
If the `is_should_start_new_agent` option is enabled, and no accessible
ssh-agent is found, the step will start a new ssh-agent.
This output environment variable will contain the path of the
SSH Auth Socket, which can be used to access the started ssh-agent.
title: SSH Auth Socket info, in case the ssh-agent was started by this step
================================================
FILE: steps/activate-ssh-key/4.1.1/step.yml
================================================
title: Activate SSH key (RSA private key)
summary: Add your SSH key to the build machine to access private repositories
description: |-
This Step makes sure Bitrise has access to your repository when cloning SSH URLs. The Step saves the provided private key of your SSH keypair to a file and then loads it into the SSH agent.
### Configuring the Step
By default, you do not have to change anything about the Step's configuration.
The step downloads the SSH key defined in your App Settings, so most of the time it's the only thing you need to configure ([more info](https://devcenter.bitrise.io/en/connectivity/configuring-ssh-keys).
All you need to do is make sure that you registered your key pair on Bitrise and the public key at your Git provider. You can generate and register an SSH keypair in two ways.
- Automatically during the [app creation process](https://devcenter.bitrise.io/getting-started/adding-a-new-app/#setting-up-ssh-keys).
- Manually during the app creation process or at any other time. You [generate your own SSH keys](https://devcenter.bitrise.io/faq/how-to-generate-ssh-keypair/) and register them on Bitrise and at your Git provider. The SSH key should not have a passphrase!
Note: if you configure to use HTTPS instead of SSH git access, you don't need to use this Step.
### Troubleshooting
If the Step fails, check the public key registered to your Git repository and compare it to the public key registered on Bitrise. The most frequent issue is that someone deleted or revoked the key on your Git provider's website.
You can also set the **Enable verbose logging** input to `true`. This provides additional information in the log.
### Useful links
- [Setting up SSH keys](https://devcenter.bitrise.io/getting-started/adding-a-new-app/#setting-up-ssh-keys)
- [How can I generate an SSH key pair?](https://devcenter.bitrise.io/faq/how-to-generate-ssh-keypair/)
### Related Steps
- [Git Clone Repository](https://www.bitrise.io/integrations/steps/git-clone)
website: https://github.com/bitrise-steplib/steps-activate-ssh-key
source_code_url: https://github.com/bitrise-steplib/steps-activate-ssh-key
support_url: https://github.com/bitrise-steplib/steps-activate-ssh-key/issues
published_at: 2024-02-15T10:28:29.203495657Z
source:
git: https://github.com/bitrise-steplib/steps-activate-ssh-key.git
commit: 78dae4ddaa4a2c3eddb35a3fc620b5fdf29fc82c
type_tags:
- access-control
toolkit:
go:
package_name: github.com/bitrise-steplib/steps-activate-ssh-key
deps:
apt_get:
- name: expect
- name: git
is_always_run: false
is_skippable: false
run_if: .IsCI
inputs:
- opts:
description: The private key of the SSH keypair in RSA format.
is_dont_change_value: true
is_expand: true
is_sensitive: true
title: SSH private key content
ssh_rsa_private_key: $SSH_RSA_PRIVATE_KEY
- opts:
description: Path where the private key should be saved
is_dont_change_value: true
is_expand: true
title: SSH key save path
ssh_key_save_path: $HOME/.ssh/bitrise_step_activate_ssh_key
- is_remove_other_identities: "true"
opts:
description: |-
When the step detects a running SSH agent and this input is true, it removes all loaded identities and restarts the agent before loading the configured key.
When there is no running SSH agent, this input has no effect.
Note: this only affects the in-memory SSH agent data, keys on disk are not touched.
Options:
* "true"
* "false"
is_expand: false
title: Remove other identities from SSH agent
value_options:
- "true"
- "false"
- opts:
description: Enable verbose log option for better debug
is_expand: true
is_required: true
summary: Enable verbose log option for better debug
title: Enable verbose logging
value_options:
- "true"
- "false"
verbose: "false"
outputs:
- SSH_AUTH_SOCK: null
opts:
description: |-
If the `is_should_start_new_agent` option is enabled, and no accessible ssh-agent is found, the step will start a new ssh-agent.
This output contains the path of the socket created by ssh-agent, which can be used to access the started ssh-agent ([learn more](https://www.man7.org/linux/man-pages/man1/ssh-agent.1.html))
title: SSH agent socket path
================================================
FILE: steps/activate-ssh-key/step-info.yml
================================================
maintainer: bitrise
================================================
FILE: steps/add-trace-sdk/1.0.1/step.yml
================================================
title: Add Trace SDK
summary: Add the Trace SDK during the Xcode build process.
description: "Adds the Trace SDK static library during the Xcode build process into
the resulting app artifact.\n\niOS:\n The step works by linking and modifying the
relevant Xcode project descriptor files to include necessary configurations in `other
linker flags`. These are the following:\n - Trace static library path\n -
System libraries: `C` and `C++` \n - System Framework `SystemConfiguration.framework`\n
\ \n System libraries and frameworks are linked if they are not present. It’s recommended
to add this step just before the Xcode build and archive step. \n This step is
compatible with all Xcode projects that use Swift only, interoperability (mixed)
and Objective-C only languages. \n\n Source code for the iOS SDK can be found here:
https://github.com/bitrise-io/trace-cocoa-sdk\n\nAndroid:\n TBA.\n \nOnce the
app has been deployed, developers can view the results of the app in the Trace addon.\n"
website: https://github.com/bitrise-steplib/bitrise-step-add-trace-sdk
source_code_url: https://github.com/bitrise-steplib/bitrise-step-add-trace-sdk
support_url: https://github.com/bitrise-steplib/bitrise-step-add-trace-sdk/issues
published_at: 2020-07-14T13:41:09.21052+01:00
source:
git: https://github.com/bitrise-steplib/bitrise-step-add-trace-sdk.git
commit: e01ae342db229d45eaa93cff53bc205b1bed3b54
project_type_tags:
- ios
- macos
type_tags:
- utility
is_requires_admin_user: false
inputs:
- opts:
description: A `.xcodeproj` or `.xcworkspace` path.
is_required: true
summary: ""
title: Project (or Workspace) path
project_path: $BITRISE_PROJECT_PATH
- opts:
description: The Scheme to use. For Apple related platforms only
is_required: true
summary: The Scheme to use. For Apple related platforms only
title: Scheme name
scheme: $BITRISE_SCHEME
- lib_version: latest
opts:
description: |-
The version of the Bitrise Trace SDK to link into the app.
List of available releases for Apple related platforms: https://github.com/bitrise-io/trace-cocoa-sdk/releases
is_required: true
summary: The version of the Bitrise Trace SDK to link into the app.
title: Library version
================================================
FILE: steps/add-trace-sdk/1.0.3/step.yml
================================================
title: Add Trace SDK
summary: Add the Trace SDK during the Xcode build process.
description: "Adds the Trace SDK static library during the Xcode build process into
the resulting app artifact.\n\niOS:\n The step works by linking and modifying the
relevant Xcode project descriptor files to include necessary configurations in `other
linker flags`. These are the following:\n - Trace static library path\n -
System libraries: `C` and `C++` \n - System Framework `SystemConfiguration.framework`\n
\ \n System libraries and frameworks are linked if they are not present. It’s recommended
to add this step just before the Xcode build and archive step. \n This step is
compatible with all Xcode projects that use Swift only, interoperability (mixed)
and Objective-C only languages. \n\n Source code for the iOS SDK can be found here:
https://github.com/bitrise-io/trace-cocoa-sdk\n\nAndroid:\n TBA.\n \nOnce the
app has been deployed, developers can view the results of the app in the Trace addon.\n"
website: https://github.com/bitrise-steplib/bitrise-step-add-trace-sdk
source_code_url: https://github.com/bitrise-steplib/bitrise-step-add-trace-sdk
support_url: https://github.com/bitrise-steplib/bitrise-step-add-trace-sdk/issues
published_at: 2020-07-24T13:36:50.662578+01:00
source:
git: https://github.com/bitrise-steplib/bitrise-step-add-trace-sdk.git
commit: 4bfdd2381519881fc9dde40961df68b0a7131653
project_type_tags:
- ios
type_tags:
- utility
is_requires_admin_user: false
inputs:
- opts:
description: A `.xcodeproj` or `.xcworkspace` path.
is_required: true
summary: ""
title: Project (or Workspace) path
project_path: $BITRISE_PROJECT_PATH
- opts:
description: The Scheme to use. For Apple related platforms only
is_required: true
summary: The Scheme to use. For Apple related platforms only
title: Scheme name
scheme: $BITRISE_SCHEME
- lib_version: latest
opts:
description: |-
The version of the Bitrise Trace SDK to link into the app.
List of available releases for Apple related platforms: https://github.com/bitrise-io/trace-cocoa-sdk/releases
is_required: true
summary: The version of the Bitrise Trace SDK to link into the app.
title: Library version
================================================
FILE: steps/add-trace-sdk/1.0.4/step.yml
================================================
title: Add Trace SDK
summary: Add the Trace SDK during the Xcode build process.
description: "Adds the Trace SDK static library during the Xcode build process into
the resulting app artifact.\n\niOS:\n The step works by linking and modifying the
relevant Xcode project descriptor files to include necessary configurations in `other
linker flags`. These are the following:\n - Trace static library path\n -
System libraries: `C` and `C++` \n - System Framework `SystemConfiguration.framework`\n
\ \n System libraries and frameworks are linked if they are not present. It’s recommended
to add this step just before the Xcode build and archive step. \n This step is
compatible with all Xcode projects that use Swift only, interoperability (mixed)
and Objective-C only languages. \n\n Source code for the iOS SDK can be found here:
https://github.com/bitrise-io/trace-cocoa-sdk\n\nAndroid:\n TBA.\n \nOnce the
app has been deployed, developers can view the results of the app in the Trace addon.\n\nTrace:
https://trace.bitrise.io\nWhat's Trace? https://www.bitrise.io/add-ons/trace-mobile-monitoring\nGetting
started guide: https://trace.bitrise.io/o/getting-started\n"
website: https://github.com/bitrise-steplib/bitrise-step-add-trace-sdk
source_code_url: https://github.com/bitrise-steplib/bitrise-step-add-trace-sdk
support_url: https://github.com/bitrise-steplib/bitrise-step-add-trace-sdk/issues
published_at: 2020-08-14T10:11:06.110439+01:00
source:
git: https://github.com/bitrise-steplib/bitrise-step-add-trace-sdk.git
commit: 0889135a9fb9ef1fc6d87cdaf7b736c77e8d9026
project_type_tags:
- ios
type_tags:
- utility
is_requires_admin_user: false
inputs:
- opts:
description: A `.xcodeproj` or `.xcworkspace` path.
is_required: true
summary: ""
title: Project (or Workspace) path
project_path: $BITRISE_PROJECT_PATH
- opts:
description: The Scheme to use. For Apple related platforms only
is_required: true
summary: The Scheme to use. For Apple related platforms only
title: Scheme name
scheme: $BITRISE_SCHEME
- lib_version: latest
opts:
description: |-
The version of the Bitrise Trace SDK to link into the app.
List of available releases for Apple related platforms: https://github.com/bitrise-io/trace-cocoa-sdk/releases
is_required: true
summary: The version of the Bitrise Trace SDK to link into the app.
title: Library version
================================================
FILE: steps/add-trace-sdk/1.1.0/step.yml
================================================
title: Add Trace SDK
summary: Add the Trace SDK during the Xcode build process.
description: "Adds the Trace SDK static library during the Xcode build process into
the resulting app artifact.\n\niOS:\n The step works by linking and modifying the
relevant Xcode project descriptor files to include necessary configurations in `other
linker flags`. These are the following:\n - Trace static library path\n -
System libraries: `C` and `C++` \n - System Framework `SystemConfiguration.framework`\n
\ \n System libraries and frameworks are linked if they are not present. It’s recommended
to add this step just before the Xcode build and archive step. \n This step is
compatible with all Xcode projects that use Swift only, interoperability (mixed)
and Objective-C only languages. \n\n Source code for the iOS SDK can be found here:
https://github.com/bitrise-io/trace-cocoa-sdk\n\nAndroid:\n TBA.\n \nOnce the
app has been deployed, developers can view the results of the app in the Trace addon.\n\nTrace:
https://trace.bitrise.io\nWhat's Trace? https://www.bitrise.io/add-ons/trace-mobile-monitoring\nGetting
started guide: https://trace.bitrise.io/o/getting-started\n"
website: https://github.com/bitrise-steplib/bitrise-step-add-trace-sdk
source_code_url: https://github.com/bitrise-steplib/bitrise-step-add-trace-sdk
support_url: https://github.com/bitrise-steplib/bitrise-step-add-trace-sdk/issues
published_at: 2020-10-28T09:59:12.765071Z
source:
git: https://github.com/bitrise-steplib/bitrise-step-add-trace-sdk.git
commit: 8438a8de7a3be903dcadf9b8d7d396d858809d37
project_type_tags:
- ios
type_tags:
- utility
is_requires_admin_user: false
inputs:
- opts:
description: A `.xcodeproj` or `.xcworkspace` path.
is_required: true
summary: ""
title: Project (or Workspace) path
project_path: $BITRISE_PROJECT_PATH
- opts:
description: The Scheme to use. For Apple related platforms only
is_required: true
summary: The Scheme to use. For Apple related platforms only
title: Scheme name
scheme: $BITRISE_SCHEME
- lib_version: latest
opts:
description: "The version of the Bitrise Trace SDK to link into the app. \n\nList
of available releases for Apple related platforms: https://github.com/bitrise-io/trace-cocoa-sdk/releases"
is_required: true
summary: The version of the Bitrise Trace SDK to link into the app.
title: Library version
================================================
FILE: steps/add-trace-sdk/1.1.1/step.yml
================================================
title: Add Trace SDK
summary: Add the Trace SDK during the Xcode build process.
description: "Adds the Trace SDK static library during the Xcode build process into
the resulting app artifact.\n\niOS:\n The step works by linking and modifying the
relevant Xcode project descriptor files to include necessary configurations in `other
linker flags`. These are the following:\n - Trace static library path\n -
System libraries: `C` and `C++` \n - System Framework `SystemConfiguration.framework`\n
\ \n System libraries and frameworks are linked if they are not present. It’s recommended
to add this step just before the Xcode build and archive step. \n This step is
compatible with all Xcode projects that use Swift only, interoperability (mixed)
and Objective-C only languages. \n\n Source code for the iOS SDK can be found here:
https://github.com/bitrise-io/trace-cocoa-sdk\n\n Supported stack: Xcode 11 and
12\n\nAndroid:\n TBA.\n \nOnce the app has been deployed, developers can view
the results of the app in the Trace addon.\n\nTrace: https://trace.bitrise.io\nWhat's
Trace? https://www.bitrise.io/add-ons/trace-mobile-monitoring\nGetting started guide:
https://trace.bitrise.io/o/getting-started\n"
website: https://github.com/bitrise-steplib/bitrise-step-add-trace-sdk
source_code_url: https://github.com/bitrise-steplib/bitrise-step-add-trace-sdk
support_url: https://github.com/bitrise-steplib/bitrise-step-add-trace-sdk/issues
published_at: 2020-11-03T14:23:51.16195Z
source:
git: https://github.com/bitrise-steplib/bitrise-step-add-trace-sdk.git
commit: 11578ad77bc1a70c1649bfeab1d8a85108f43ff3
project_type_tags:
- ios
type_tags:
- utility
is_requires_admin_user: false
inputs:
- opts:
description: A `.xcodeproj` or `.xcworkspace` path.
is_required: true
summary: ""
title: Project (or Workspace) path
project_path: $BITRISE_PROJECT_PATH
- opts:
description: The Scheme to use. For Apple related platforms only
is_required: true
summary: The Scheme to use. For Apple related platforms only
title: Scheme name
scheme: $BITRISE_SCHEME
- lib_version: latest
opts:
description: "The version of the Bitrise Trace SDK to link into the app. \n\nList
of available releases for Apple related platforms: https://github.com/bitrise-io/trace-cocoa-sdk/releases"
is_required: true
summary: The version of the Bitrise Trace SDK to link into the app.
title: Library version
================================================
FILE: steps/add-trace-sdk/1.2.1/step.yml
================================================
title: Add Trace SDK
summary: Add the Trace SDK during the Xcode build process.
description: "Adds the Trace SDK static library during the Xcode build process into
the resulting app artifact.\n\niOS:\n The step works by linking and modifying the
relevant Xcode project descriptor files to include necessary configurations in `other
linker flags`. These are the following:\n - Trace static library path\n -
System libraries: `C` and `C++` \n - System Framework `SystemConfiguration.framework`\n
\ \n System libraries and frameworks are linked if they are not present. It’s recommended
to add this step just before the Xcode build and archive step. \n This step is
compatible with all Xcode projects that use Swift only, interoperability (mixed)
and Objective-C only languages. \n\n Source code for the iOS SDK can be found here:
https://github.com/bitrise-io/trace-cocoa-sdk\n\n Supported stack: Xcode 11 and
12\n\nAndroid:\n TBA.\n \nOnce the app has been deployed, developers can view
the results of the app in the Trace addon.\n\nTrace: https://trace.bitrise.io\nWhat's
Trace? https://www.bitrise.io/add-ons/trace-mobile-monitoring\nGetting started guide:
https://trace.bitrise.io/o/getting-started\n"
website: https://github.com/bitrise-steplib/bitrise-step-add-trace-sdk
source_code_url: https://github.com/bitrise-steplib/bitrise-step-add-trace-sdk
support_url: https://github.com/bitrise-steplib/bitrise-step-add-trace-sdk/issues
published_at: 2020-11-19T10:07:48.32947Z
source:
git: https://github.com/bitrise-steplib/bitrise-step-add-trace-sdk.git
commit: 2c53c4257c59637f6a846346ec86e628ca92bc3a
project_type_tags:
- ios
type_tags:
- utility
is_requires_admin_user: false
inputs:
- opts:
description: A `.xcodeproj` or `.xcworkspace` path.
is_required: true
summary: ""
title: Project (or Workspace) path
project_path: $BITRISE_PROJECT_PATH
- opts:
description: The Scheme to use. For Apple related platforms only
is_required: true
summary: The Scheme to use. For Apple related platforms only
title: Scheme name
scheme: $BITRISE_SCHEME
- lib_version: latest
opts:
description: |-
The version of the Bitrise Trace SDK to link into the app. Use `latest` to always download the most recent stable release.
List of available releases for Apple related platforms: https://github.com/bitrise-io/trace-cocoa-sdk/releases
is_required: true
summary: The version of the Bitrise Trace SDK to link into the app. See more https://github.com/bitrise-io/trace-cocoa-sdk/releases
title: Library version
================================================
FILE: steps/add-trace-sdk/1.2.2/step.yml
================================================
title: Add Trace SDK
summary: |
Add the Trace SDK before the build process
Important: Please read the Trace license terms in the SDK. By clicking here to add the Trace SDK, you are agreeing to those license terms.
description: "Adds the Trace SDK static library during the Xcode build process into
the resulting app artifact.\n\niOS:\n The step works by linking and modifying the
relevant Xcode project descriptor files to include necessary configurations in `other
linker flags`. These are the following:\n - Trace static library path\n -
System libraries: `C` and `C++` \n - System Framework `SystemConfiguration.framework`\n
\ \n System libraries and frameworks are linked if they are not present. It’s recommended
to add this step just before the Xcode build and archive step. \n This step is
compatible with all Xcode projects that use Swift only, interoperability (mixed)
and Objective-C only languages. \n\n Source code for the iOS SDK can be found here:
https://github.com/bitrise-io/trace-cocoa-sdk\n\n Supported stack: Xcode 11 and
12\n\nAndroid:\nFor Android, please find the details below.\n**Source for Android
step:**\n[https://github.com/bitrise-steplib/bitrise-add-trace-sdk-android](https://github.com/bitrise-steplib/bitrise-add-trace-sdk-android)\n\n
\ \nOnce the app has been deployed, developers can view the results of the app in
the Trace addon.\n\nTrace: https://trace.bitrise.io\nWhat's Trace? https://www.bitrise.io/add-ons/trace-mobile-monitoring\nGetting
started guide: https://trace.bitrise.io/o/getting-started\n"
website: https://github.com/bitrise-steplib/bitrise-step-add-trace-sdk
source_code_url: https://github.com/bitrise-steplib/bitrise-step-add-trace-sdk
support_url: https://github.com/bitrise-steplib/bitrise-step-add-trace-sdk/issues
published_at: 2021-02-08T12:30:46.172739Z
source:
git: https://github.com/bitrise-steplib/bitrise-step-add-trace-sdk.git
commit: 7fd0a48ded1ba7af2c5286d5c3f835c28e613002
project_type_tags:
- ios
type_tags:
- utility
is_requires_admin_user: false
inputs:
- opts:
description: A `.xcodeproj` or `.xcworkspace` path.
is_required: true
summary: ""
title: Project (or Workspace) path
project_path: $BITRISE_PROJECT_PATH
- opts:
description: The Scheme to use. For Apple related platforms only
is_required: true
summary: The Scheme to use. For Apple related platforms only
title: Scheme name
scheme: $BITRISE_SCHEME
- lib_version: latest
opts:
description: |-
The version of the Bitrise Trace SDK to link into the app. Use `latest` to always download the most recent stable release.
List of available releases for Apple related platforms: https://github.com/bitrise-io/trace-cocoa-sdk/releases
is_required: true
summary: The version of the Bitrise Trace SDK to link into the app. See more https://github.com/bitrise-io/trace-cocoa-sdk/releases
title: Library version
================================================
FILE: steps/add-trace-sdk/1.2.3/step.yml
================================================
title: Add Trace SDK
summary: |
Add the Trace SDK before the build process
Important: Please read the Trace license terms in the SDK. By clicking here to add the Trace SDK, you are agreeing to those license terms.
description: "Adds the Trace SDK static library during the Xcode build process into
the resulting app artifact.\n\niOS:\n The step works by linking and modifying the
relevant Xcode project descriptor files to include necessary configurations in `other
linker flags`. These are the following:\n - Trace static library path\n -
System libraries: `C` and `C++` \n - System Framework `SystemConfiguration.framework`\n
\ \n System libraries and frameworks are linked if they are not present. It’s recommended
to add this step just before the Xcode build and archive step. \n This step is
compatible with all Xcode projects that use Swift only, interoperability (mixed)
and Objective-C only languages. \n\n Source code for the iOS SDK can be found here:
https://github.com/bitrise-io/trace-cocoa-sdk\n\n Supported stack: Xcode 11 and
12\n\nAndroid:\nFor Android, please find the details below.\n**Source for Android
step:**\n[https://github.com/bitrise-steplib/bitrise-add-trace-sdk-android](https://github.com/bitrise-steplib/bitrise-add-trace-sdk-android)\n\n
\ \nOnce the app has been deployed, developers can view the results of the app in
the Trace addon.\n\nTrace: https://trace.bitrise.io\nWhat's Trace? https://www.bitrise.io/add-ons/trace-mobile-monitoring\nGetting
started guide: https://trace.bitrise.io/o/getting-started\n"
website: https://github.com/bitrise-steplib/bitrise-step-add-trace-sdk
source_code_url: https://github.com/bitrise-steplib/bitrise-step-add-trace-sdk
support_url: https://github.com/bitrise-steplib/bitrise-step-add-trace-sdk/issues
published_at: 2021-03-19T16:49:24.874462Z
source:
git: https://github.com/bitrise-steplib/bitrise-step-add-trace-sdk.git
commit: 5406d6337b2a7ab727b3fa8c9e1ec75503729e68
project_type_tags:
- ios
type_tags:
- utility
is_requires_admin_user: false
inputs:
- opts:
description: A `.xcodeproj` or `.xcworkspace` path. Must be a relative path
is_required: true
summary: ""
title: Project (or Workspace) path
project_path: $BITRISE_PROJECT_PATH
- opts:
description: The Scheme to use. For Apple related platforms only
is_required: true
summary: The Scheme to use. For Apple related platforms only
title: Scheme name
scheme: $BITRISE_SCHEME
- lib_version: latest
opts:
description: |-
The version of the Bitrise Trace SDK to link into the app. Use `latest` to always download the most recent stable release.
List of available releases for Apple related platforms: https://github.com/bitrise-io/trace-cocoa-sdk/releases
is_required: true
summary: The version of the Bitrise Trace SDK to link into the app. See more https://github.com/bitrise-io/trace-cocoa-sdk/releases
title: Library version
================================================
FILE: steps/add-trace-sdk/1.2.4/step.yml
================================================
title: Add Trace SDK iOS
summary: |
** Add the Trace SDK before the build process **
Important: Please read the Trace license terms in the SDK. By clicking here to add the Trace SDK, you are agreeing to those license terms.
description: "Adds the Trace SDK static library during the Xcode build process into
the resulting app artifact.\n\niOS:\n The step works by linking and modifying the
relevant Xcode project descriptor files to include necessary configurations in `other
linker flags`. These are the following:\n - Trace static library path\n -
System libraries: `C` and `C++` \n - System Framework `SystemConfiguration.framework`\n
\ \n System libraries and frameworks are linked if they are not present. It’s recommended
to add this step just before the Xcode build and archive step. \n This step is
compatible with all Xcode projects that use Swift only, interoperability (mixed)
and Objective-C only languages. \n\n Source code for the iOS SDK can be found here:
https://github.com/bitrise-io/trace-cocoa-sdk\n\n Supported stack: Xcode 11 and
12\n\nAndroid:\nFor Android, please find the details below.\n**Source for Android
step:**\n[https://github.com/bitrise-steplib/bitrise-add-trace-sdk-android](https://github.com/bitrise-steplib/bitrise-add-trace-sdk-android)\n\n
\ \nOnce the app has been deployed, developers can view the results of the app in
the Trace addon.\n\nTrace: https://trace.bitrise.io\nWhat's Trace? https://www.bitrise.io/add-ons/trace-mobile-monitoring\nGetting
started guide: https://trace.bitrise.io/o/getting-started\n"
website: https://github.com/bitrise-steplib/bitrise-step-add-trace-sdk
source_code_url: https://github.com/bitrise-steplib/bitrise-step-add-trace-sdk
support_url: https://github.com/bitrise-steplib/bitrise-step-add-trace-sdk/issues
published_at: 2021-05-12T10:07:10.552605+01:00
source:
git: https://github.com/bitrise-steplib/bitrise-step-add-trace-sdk.git
commit: f9da3d25560d7f393dbc1d8c662787e463e86d71
project_type_tags:
- ios
type_tags:
- utility
is_requires_admin_user: false
inputs:
- opts:
description: A `.xcodeproj` or `.xcworkspace` path. Must be a relative path
is_required: true
summary: ""
title: Project (or Workspace) path
project_path: $BITRISE_PROJECT_PATH
- opts:
description: The Scheme to use. For Apple related platforms only
is_required: true
summary: The Scheme to use. For Apple related platforms only
title: Scheme name
scheme: $BITRISE_SCHEME
- lib_version: latest
opts:
description: |-
The version of the Bitrise Trace SDK to link into the app. Use `latest` to always download the most recent stable release.
List of available releases for Apple related platforms: https://github.com/bitrise-io/trace-cocoa-sdk/releases
is_required: true
summary: The version of the Bitrise Trace SDK to link into the app. See more https://github.com/bitrise-io/trace-cocoa-sdk/releases
title: Library version
================================================
FILE: steps/add-trace-sdk/step-info.yml
================================================
maintainer: bitrise
removal_date: "2022-08-26"
deprecate_notes: |
This step is deprecated as it is not supported anymore.
================================================
FILE: steps/add-trace-sdk-android/0.0.1/step.yml
================================================
title: Add Trace SDK Android
summary: |
Add the Trace SDK before the build process
Important: Please read the Trace license terms in the SDK. By clicking here to add the Trace SDK, you are agreeing to those license terms.
description: |
# Overview
Ensures that Trace is added to a given Android application project. Adds the required
dependency (trace-sdk) and applies plugin (trace-gradle-plugin) if the project not already have them.
This step is needed, when you have not added Trace manually to your project. For manual
installation see the documentation below.
**Use this step before your application is built/assembled with Gradle**
For the known limitations of trace-android-sdk please see the
[README.md](https://github.com/bitrise-io/trace-android-sdk/blob/main/README.md) file.
# Documentation
www.bitrise.io:
[https://devcenter.bitrise.io/monitoring/getting-started-with-trace/](https://devcenter.bitrise.io/monitoring/getting-started-with-trace/)
# About Trace
**Trace:** [https://trace.bitrise.io](https://trace.bitrise.io)
**What's Trace?** [https://www.bitrise.io/add-ons/trace-mobile-monitoring](https://www.bitrise.io/add-ons/trace-mobile-monitoring)
**Getting started guide:** [https://trace.bitrise.io/o/getting-started](https://trace.bitrise.io/o/getting-started)
# iOS
**For iOS, please check this step:**
[https://www.bitrise.io/integrations/steps/add-trace-sdk](https://www.bitrise.io/integrations/steps/add-trace-sdk)
**Source for iOS step:**
[https://github.com/bitrise-steplib/bitrise-step-add-trace-sdk](https://github.com/bitrise-steplib/bitrise-step-add-trace-sdk)
website: https://github.com/bitrise-steplib/bitrise-add-trace-sdk-android
source_code_url: https://github.com/bitrise-steplib/bitrise-add-trace-sdk-android
support_url: https://github.com/bitrise-steplib/bitrise-add-trace-sdk-android/issues
published_at: 2021-02-03T12:48:18.987844+01:00
source:
git: https://github.com/bitrise-steplib/bitrise-add-trace-sdk-android.git
commit: a7bcb1a899bb054915bf3692385bf3a113287737
host_os_tags:
- osx-10.10
- ubuntu-16.04
project_type_tags:
- android
type_tags:
- utility
toolkit:
go:
package_name: github.com/bitrise-steplib/bitrise-add-trace-sdk-android
deps:
brew:
- name: git
- name: wget
apt_get:
- name: git
- name: wget
is_requires_admin_user: true
is_always_run: false
is_skippable: false
run_if: ""
inputs:
- opts:
description: |
The path for the root project. By default it will be the source directory, but in some cases (for example if you
have a monorepo) you may want to specify which directory should be used for this step.
Example: $BITRISE_SOURCE_DIR/myproject1/
is_required: true
summary: Path of the root project
title: Path of the root project
project_path: $BITRISE_SOURCE_DIR
- gradle_options: null
opts:
description: |
Step uses a Gradle task called "injectTrace" to add the required dependencies to the project. Also uses
"verifyTrace" to verify Trace has been applied successfully to the project. For debugging
purposes you may want to add additional flags to them, it would display useful information
if you have any issue with the step.
Examples: "--stactrace", "--info" or "--debug" (without the quote marks).
Note: Multiple entries should be separated with a whitespace character.
Example: "--stacktrace --info" (without the quote marks).
is_required: false
summary: Additional task options for "injectTrace" and "verifyTrace" tasks
title: Gradle Task Options
================================================
FILE: steps/add-trace-sdk-android/0.0.2/step.yml
================================================
title: Add Trace SDK Android
summary: |
Add the Trace SDK before the build process
Important: Please read the Trace license terms in the SDK. By clicking here to add the Trace SDK, you are agreeing to those license terms.
description: |
# Overview
Ensures that Trace is added to a given Android application project. Adds the required
dependency (trace-sdk) and applies plugin (trace-gradle-plugin) if the project not already have them.
This step is needed, when you have not added Trace manually to your project. For manual
installation see the documentation below.
**Use this step before your application is built/assembled with Gradle**
For the known limitations of trace-android-sdk please see the
[README.md](https://github.com/bitrise-io/trace-android-sdk/blob/main/README.md) file.
# Documentation
www.bitrise.io:
[https://devcenter.bitrise.io/monitoring/getting-started-with-trace/](https://devcenter.bitrise.io/monitoring/getting-started-with-trace/)
# About Trace
**Trace:** [https://trace.bitrise.io](https://trace.bitrise.io)
**What's Trace?** [https://www.bitrise.io/add-ons/trace-mobile-monitoring](https://www.bitrise.io/add-ons/trace-mobile-monitoring)
**Getting started guide:** [https://trace.bitrise.io/o/getting-started](https://trace.bitrise.io/o/getting-started)
# iOS
**For iOS, please check this step:**
[https://www.bitrise.io/integrations/steps/add-trace-sdk](https://www.bitrise.io/integrations/steps/add-trace-sdk)
**Source for iOS step:**
[https://github.com/bitrise-steplib/bitrise-step-add-trace-sdk](https://github.com/bitrise-steplib/bitrise-step-add-trace-sdk)
website: https://github.com/bitrise-steplib/bitrise-add-trace-sdk-android
source_code_url: https://github.com/bitrise-steplib/bitrise-add-trace-sdk-android
support_url: https://github.com/bitrise-steplib/bitrise-add-trace-sdk-android/issues
published_at: 2021-02-08T14:13:07.022897+01:00
source:
git: https://github.com/bitrise-steplib/bitrise-add-trace-sdk-android.git
commit: 4ab403a6ad3b605f54fc3b41706af1f2bbc993ef
host_os_tags:
- osx-10.10
- ubuntu-16.04
project_type_tags:
- android
type_tags:
- utility
toolkit:
go:
package_name: github.com/bitrise-steplib/bitrise-add-trace-sdk-android
deps:
brew:
- name: git
- name: wget
apt_get:
- name: git
- name: wget
is_requires_admin_user: true
is_always_run: false
is_skippable: false
run_if: ""
inputs:
- opts:
description: |
The path for the root project. By default it will be the source directory, but in some cases (for example if you
have a monorepo) you may want to specify which directory should be used for this step.
Example: $BITRISE_SOURCE_DIR/myproject1/
is_required: true
summary: Path of the root project
title: Path of the root project
project_path: $BITRISE_SOURCE_DIR
- gradle_options: null
opts:
description: |
Step uses a Gradle task called "injectTrace" to add the required dependencies to the project. Also uses
"verifyTrace" to verify Trace has been applied successfully to the project. For debugging
purposes you may want to add additional flags to them, it would display useful information
if you have any issue with the step.
Examples: "--stactrace", "--info" or "--debug" (without the quote marks).
Note: Multiple entries should be separated with a whitespace character.
Example: "--stacktrace --info" (without the quote marks).
is_required: false
summary: Additional task options for "injectTrace" and "verifyTrace" tasks
title: Gradle Task Options
================================================
FILE: steps/add-trace-sdk-android/0.0.3/step.yml
================================================
title: Add Trace SDK Android
summary: |
Add the Trace SDK before the build process
Important: Please read the Trace license terms in the SDK. By clicking here to add the Trace SDK, you are agreeing to those license terms.
description: |
# Overview
Ensures that Trace is added to a given Android application project. Adds the required
dependency (trace-sdk) and applies plugin (trace-gradle-plugin) if the project not already have them.
This step is needed, when you have not added Trace manually to your project. For manual
installation see the documentation below.
**Use this step before your application is built/assembled with Gradle**
# Documentation
www.bitrise.io:
[https://devcenter.bitrise.io/monitoring/getting-started-with-trace/](https://devcenter.bitrise.io/monitoring/getting-started-with-trace/)
# About Trace
**Trace:** [https://trace.bitrise.io](https://trace.bitrise.io)
**What's Trace?** [https://www.bitrise.io/add-ons/trace-mobile-monitoring](https://www.bitrise.io/add-ons/trace-mobile-monitoring)
**Getting started guide:** [https://trace.bitrise.io/o/getting-started](https://trace.bitrise.io/o/getting-started)
# iOS
**For iOS, please check this step:**
[https://www.bitrise.io/integrations/steps/add-trace-sdk](https://www.bitrise.io/integrations/steps/add-trace-sdk)
**Source for iOS step:**
[https://github.com/bitrise-steplib/bitrise-step-add-trace-sdk](https://github.com/bitrise-steplib/bitrise-step-add-trace-sdk)
website: https://github.com/bitrise-steplib/bitrise-add-trace-sdk-android
source_code_url: https://github.com/bitrise-steplib/bitrise-add-trace-sdk-android
support_url: https://github.com/bitrise-steplib/bitrise-add-trace-sdk-android/issues
published_at: 2021-02-10T17:38:34.717958+01:00
source:
git: https://github.com/bitrise-steplib/bitrise-add-trace-sdk-android.git
commit: 64d26a3304df849f06e49e8d16eb0388d094280e
host_os_tags:
- osx-10.10
- ubuntu-16.04
project_type_tags:
- android
type_tags:
- utility
toolkit:
go:
package_name: github.com/bitrise-steplib/bitrise-add-trace-sdk-android
is_requires_admin_user: true
is_always_run: false
is_skippable: false
run_if: ""
inputs:
- opts:
description: |
The path for the root project. By default it will be the source directory, but in some cases (for example if you
have a monorepo) you may want to specify which directory should be used for this step.
Example: $BITRISE_SOURCE_DIR/myproject1/
is_required: true
summary: Path of the root project
title: Path of the root project
project_path: $BITRISE_SOURCE_DIR
- gradle_options: null
opts:
description: |
Step uses a Gradle task called "injectTrace" to add the required dependencies to the project. Also uses
"verifyTrace" to verify Trace has been applied successfully to the project. For debugging
purposes you may want to add additional flags to them, it would display useful information
if you have any issue with the step.
Examples: "--stactrace", "--info" or "--debug" (without the quote marks).
Note: Multiple entries should be separated with a whitespace character.
Example: "--stacktrace --info" (without the quote marks).
is_required: false
summary: Additional task options for "injectTrace" and "verifyTrace" tasks
title: Gradle Task Options
================================================
FILE: steps/add-trace-sdk-android/0.0.4/step.yml
================================================
title: Add Trace SDK Android
summary: |
Add the Trace SDK before the build process
Important: Please read the Trace license terms in the SDK. By clicking here to add the Trace SDK, you are agreeing to those license terms.
description: |
# Overview
Ensures that Trace is added to a given Android application project. Adds the required
dependency (trace-sdk) and applies the plugin (trace-gradle-plugin) if the project does not already have them.
This step is needed, when you have not added Trace manually to your project. For manual
installation see the documentation below.
**Use this step before your application is built/assembled with Gradle**
# Documentation
www.bitrise.io:
[https://devcenter.bitrise.io/monitoring/getting-started-with-trace/](https://devcenter.bitrise.io/monitoring/getting-started-with-trace/)
# About Trace
**Trace:** [https://trace.bitrise.io](https://trace.bitrise.io)
**What's Trace?** [https://www.bitrise.io/add-ons/trace-mobile-monitoring](https://www.bitrise.io/add-ons/trace-mobile-monitoring)
**Getting started guide:** [https://trace.bitrise.io/o/getting-started](https://trace.bitrise.io/o/getting-started)
# iOS
**For iOS, please check this step:**
[https://www.bitrise.io/integrations/steps/add-trace-sdk](https://www.bitrise.io/integrations/steps/add-trace-sdk)
**Source for iOS step:**
[https://github.com/bitrise-steplib/bitrise-step-add-trace-sdk](https://github.com/bitrise-steplib/bitrise-step-add-trace-sdk)
website: https://github.com/bitrise-steplib/bitrise-add-trace-sdk-android
source_code_url: https://github.com/bitrise-steplib/bitrise-add-trace-sdk-android
support_url: https://github.com/bitrise-steplib/bitrise-add-trace-sdk-android/issues
published_at: 2021-02-15T17:29:47.194001+01:00
source:
git: https://github.com/bitrise-steplib/bitrise-add-trace-sdk-android.git
commit: 0b52859a2278551857aa72c116b46323fd7d838a
host_os_tags:
- osx-10.10
- ubuntu-16.04
project_type_tags:
- android
type_tags:
- utility
toolkit:
go:
package_name: github.com/bitrise-steplib/bitrise-add-trace-sdk-android
is_requires_admin_user: true
is_always_run: false
is_skippable: false
run_if: ""
inputs:
- opts:
description: |
The path for the root project. By default it will be the source directory, but in some cases (for example if you
have a monorepo) you may want to specify which directory should be used for this step.
Example: $BITRISE_SOURCE_DIR/monorepo/myproject1/
is_required: true
summary: Path of the root project
title: Path of the root project
project_path: $BITRISE_SOURCE_DIR/
- gradle_options: null
opts:
description: |
Step uses a Gradle task called "injectTrace" to add the required dependencies to the project. Also uses
"verifyTrace" to verify Trace has been applied successfully to the project. For debugging
purposes you may want to add additional flags to them, it would display useful information
if you have any issue with the step.
Examples: "--stactrace", "--info" or "--debug" (without the quote marks).
Note: Multiple entries should be separated with a whitespace character.
Example: "--stacktrace --info" (without the quote marks).
is_required: false
summary: Additional task options for "injectTrace" and "verifyTrace" tasks
title: Gradle Task Options
================================================
FILE: steps/add-trace-sdk-android/0.0.5/step.yml
================================================
title: Add Trace SDK Android
summary: |
Add the Trace SDK before the build process
Important: Please read the Trace license terms in the SDK. By clicking here to add the Trace SDK, you are agreeing to those license terms.
description: |
# Overview
Ensures that Trace is added to a given Android application project. Adds the required
dependency (trace-sdk) and applies the plugin (trace-gradle-plugin) if the project does not already have them.
This step is needed, when you have not added Trace manually to your project. For manual
installation see the documentation below.
**Use this step before your application is built/assembled with Gradle**
# Documentation
www.bitrise.io:
[https://devcenter.bitrise.io/monitoring/getting-started-with-trace/](https://devcenter.bitrise.io/monitoring/getting-started-with-trace/)
# About Trace
**Trace:** [https://trace.bitrise.io](https://trace.bitrise.io)
**What's Trace?** [https://www.bitrise.io/add-ons/trace-mobile-monitoring](https://www.bitrise.io/add-ons/trace-mobile-monitoring)
**Getting started guide:** [https://trace.bitrise.io/o/getting-started](https://trace.bitrise.io/o/getting-started)
# iOS
**For iOS, please check this step:**
[https://www.bitrise.io/integrations/steps/add-trace-sdk](https://www.bitrise.io/integrations/steps/add-trace-sdk)
**Source for iOS step:**
[https://github.com/bitrise-steplib/bitrise-step-add-trace-sdk](https://github.com/bitrise-steplib/bitrise-step-add-trace-sdk)
website: https://github.com/bitrise-steplib/bitrise-add-trace-sdk-android
source_code_url: https://github.com/bitrise-steplib/bitrise-add-trace-sdk-android
support_url: https://github.com/bitrise-steplib/bitrise-add-trace-sdk-android/issues
published_at: 2021-02-19T16:44:23.206359+01:00
source:
git: https://github.com/bitrise-steplib/bitrise-add-trace-sdk-android.git
commit: 55f50b04a189b351cce7bc2d87bf4f359a0542d0
host_os_tags:
- osx-10.10
- ubuntu-16.04
project_type_tags:
- android
type_tags:
- utility
toolkit:
go:
package_name: github.com/bitrise-steplib/bitrise-add-trace-sdk-android
is_requires_admin_user: true
is_always_run: false
is_skippable: false
run_if: ""
inputs:
- opts:
description: |
The path for the root project. By default it will be the source directory, but in some cases (for example if you
have a monorepo) you may want to specify which directory should be used for this step.
Example: $BITRISE_SOURCE_DIR/monorepo/myproject1/
is_required: true
summary: Path of the root project
title: Path of the root project
project_path: $BITRISE_SOURCE_DIR/
- gradle_options: null
opts:
description: |
Step uses a Gradle task called "injectTrace" to add the required dependencies to the project. Also uses
"verifyTrace" to verify Trace has been applied successfully to the project. For debugging
purposes you may want to add additional flags to them, it would display useful information
if you have any issue with the step.
Examples: "--stactrace", "--info" or "--debug" (without the quote marks).
Note: Multiple entries should be separated with a whitespace character.
Example: "--stacktrace --info" (without the quote marks).
is_required: false
summary: Additional task options for "injectTrace" and "verifyTrace" tasks
title: Gradle Task Options
================================================
FILE: steps/add-trace-sdk-android/0.1.0/step.yml
================================================
title: Add Trace SDK Android
summary: |
Add the Trace SDK before the build process
Important: Please read the Trace license terms in the SDK. By clicking here to add the Trace SDK, you are agreeing to those license terms.
description: |
# Overview
Ensures that Trace is added to a given Android application project. Adds the required
dependency (trace-sdk) and applies the plugin (trace-gradle-plugin) if the project does not already have them.
This step is needed, when you have not added Trace manually to your project. For manual
installation see the documentation below.
**Use this step before your application is built/assembled with Gradle**
# Documentation
www.bitrise.io:
[https://devcenter.bitrise.io/monitoring/getting-started-with-trace/](https://devcenter.bitrise.io/monitoring/getting-started-with-trace/)
# About Trace
**Trace:** [https://trace.bitrise.io](https://trace.bitrise.io)
**What's Trace?** [https://www.bitrise.io/add-ons/trace-mobile-monitoring](https://www.bitrise.io/add-ons/trace-mobile-monitoring)
**Getting started guide:** [https://trace.bitrise.io/o/getting-started](https://trace.bitrise.io/o/getting-started)
# iOS
**For iOS, please check this step:**
[https://www.bitrise.io/integrations/steps/add-trace-sdk](https://www.bitrise.io/integrations/steps/add-trace-sdk)
**Source for iOS step:**
[https://github.com/bitrise-steplib/bitrise-step-add-trace-sdk](https://github.com/bitrise-steplib/bitrise-step-add-trace-sdk)
website: https://github.com/bitrise-steplib/bitrise-add-trace-sdk-android
source_code_url: https://github.com/bitrise-steplib/bitrise-add-trace-sdk-android
support_url: https://github.com/bitrise-steplib/bitrise-add-trace-sdk-android/issues
published_at: 2021-04-16T14:25:34.46134+01:00
source:
git: https://github.com/bitrise-steplib/bitrise-add-trace-sdk-android.git
commit: df0416a92023ffc1375f677c8b0ed364122b9acd
host_os_tags:
- osx-10.10
- ubuntu-16.04
project_type_tags:
- android
type_tags:
- utility
toolkit:
go:
package_name: github.com/bitrise-steplib/bitrise-add-trace-sdk-android
is_requires_admin_user: true
is_always_run: false
is_skippable: false
run_if: ""
inputs:
- opts:
description: |
The path for the root project. By default it will be the source directory, but in some cases (for example if you
have a monorepo) you may want to specify which directory should be used for this step.
Example: $BITRISE_SOURCE_DIR/monorepo/myproject1/
is_required: true
summary: Path of the root project
title: Path of the root project
project_location: $BITRISE_SOURCE_DIR/
- gradle_options: null
opts:
description: |
Step uses a Gradle task called "injectTrace" to add the required dependencies to the project. Also uses
"verifyTrace" to verify Trace has been applied successfully to the project. For debugging
purposes you may want to add additional flags to them, it would display useful information
if you have any issue with the step.
Examples: "--stactrace", "--info" or "--debug" (without the quote marks).
Note: Multiple entries should be separated with a whitespace character.
Example: "--stacktrace --info" (without the quote marks).
is_required: false
summary: Additional task options for "injectTrace" and "verifyTrace" tasks
title: Gradle Task Options
================================================
FILE: steps/add-trace-sdk-android/step-info.yml
================================================
maintainer: bitrise
removal_date: "2022-08-26"
deprecate_notes: |
This step is deprecated as it is not supported anymore.
================================================
FILE: steps/amazon-s3-deploy/3.0.0/step.yml
================================================
title: Deploy to Amazon S3
summary: Upload your iOS Application to Amazon S3
description: |-
Bitrise Step to Deploy an Xcode archive to Amazon S3.
Required: an Xcode Archive Step should run before this Step!
This Step requires an Amazon S3 account.
To register an Amazon S3 account, [click here](http://aws.amazon.com/s3/).
website: https://github.com/bitrise-io/steps-amazon-s3-deploy
source_code_url: https://github.com/bitrise-io/steps-amazon-s3-deploy
support_url: https://github.com/bitrise-io/steps-amazon-s3-deploy/issues
published_at: 2015-09-08T16:23:32.708148287+02:00
source:
git: https://github.com/bitrise-io/steps-amazon-s3-deploy.git
commit: 763999cd449f8d6817aafee5bd801895cb02e72a
host_os_tags:
- osx-10.9
- osx-10.10
project_type_tags:
- ios
type_tags:
- deploy
- amazon
dependencies:
- manager: brew
name: s3cmd
is_requires_admin_user: true
is_always_run: false
is_skippable: false
run_if: ""
inputs:
- ipa_path: $BITRISE_IPA_PATH
opts:
description: ""
is_dont_change_value: false
is_expand: true
is_required: true
summary: ""
title: IPA path
- dsym_path: $BITRISE_DSYM_PATH
opts:
description: ""
is_dont_change_value: false
is_expand: true
is_required: false
summary: ""
title: DSYM path (optional)
- app_slug: $BITRISE_APP_SLUG
opts:
description: ""
is_dont_change_value: false
is_expand: true
is_required: true
summary: ""
title: BITRISE's App-Slug variable (passed automatically on Bitrise)
- build_slug: $BITRISE_BUILD_SLUG
opts:
description: ""
is_dont_change_value: false
is_expand: true
is_required: true
summary: ""
title: BITRISE's Build-Slug variable (passed automatically on Bitrise)
- aws_access_key: ""
opts:
description: ""
is_dont_change_value: false
is_expand: true
is_required: true
summary: ""
title: Amazon AWS Access Key
- aws_secret_key: ""
opts:
description: ""
is_dont_change_value: false
is_expand: true
is_required: true
summary: ""
title: Amazon AWS Secret Access Key
- bucket_name: ""
opts:
description: ""
is_dont_change_value: false
is_expand: true
is_required: true
summary: ""
title: Amazon S3 Bucket Name
- opts:
description: |-
Optional, if no value specified then the default will be:
bitrise_{app_slug}/{timestamp}_build_{build_slug}
is_dont_change_value: false
is_expand: true
is_required: false
summary: ""
title: Amazon S3 File Path In Bucket
path_in_bucket: ""
- file_access_level: public_read
opts:
is_dont_change_value: false
is_expand: false
is_required: true
title: Amazon S3 file access level
value_options:
- private
- public_read
outputs:
- S3_DEPLOY_STEP_URL_IPA: ""
opts:
description: ""
is_dont_change_value: true
is_expand: false
is_required: true
summary: ""
title: Amazon S3 Deploy IPA URL
- S3_DEPLOY_STEP_URL_DSYM: ""
opts:
description: ""
is_dont_change_value: true
is_expand: false
is_required: true
summary: ""
title: Amazon S3 Deploy DSYM URL
- S3_DEPLOY_STEP_URL_PLIST: ""
opts:
description: ""
is_dont_change_value: true
is_expand: false
is_required: true
summary: ""
title: Amazon S3 Deploy .plist URL
- S3_DEPLOY_STEP_STATUS: ""
opts:
description: ""
is_dont_change_value: true
is_expand: false
is_required: true
summary: ""
title: Amazon S3 Deploy result ('success' or 'failed')
- S3_DEPLOY_STEP_EMAIL_READY_URL: ""
opts:
description: |-
In a link-ready format, example:
itms-services://?action=download-manifest&url=...
is_dont_change_value: true
is_expand: false
is_required: true
summary: ""
title: Amazon S3 Deploy .plist URL
================================================
FILE: steps/amazon-s3-deploy/3.1.0/step.yml
================================================
title: Deploy to Amazon S3
summary: Upload your iOS Application to Amazon S3
description: |-
Bitrise Step to Deploy an Xcode archive to Amazon S3.
Required: an Xcode Archive Step should run before this Step!
This Step requires an Amazon S3 account.
To register an Amazon S3 account, [click here](http://aws.amazon.com/s3/).
website: https://github.com/bitrise-io/steps-amazon-s3-deploy
source_code_url: https://github.com/bitrise-io/steps-amazon-s3-deploy
support_url: https://github.com/bitrise-io/steps-amazon-s3-deploy/issues
published_at: 2015-09-10T18:25:13.570266771+02:00
source:
git: https://github.com/bitrise-io/steps-amazon-s3-deploy.git
commit: be125d5884ec40dce334ca155638f28a08d92169
host_os_tags:
- osx-10.9
- osx-10.10
project_type_tags:
- ios
type_tags:
- deploy
- amazon
dependencies:
- manager: brew
name: s3cmd
is_requires_admin_user: true
is_always_run: false
is_skippable: false
run_if: ""
inputs:
- ipa_path: $BITRISE_IPA_PATH
opts:
description: ""
is_dont_change_value: false
is_expand: true
is_required: true
summary: ""
title: IPA path
- dsym_path: $BITRISE_DSYM_PATH
opts:
description: ""
is_dont_change_value: false
is_expand: true
is_required: false
summary: ""
title: DSYM path (optional)
- app_slug: $BITRISE_APP_SLUG
opts:
description: ""
is_dont_change_value: false
is_expand: true
is_required: true
summary: ""
title: BITRISE's App-Slug variable (passed automatically on Bitrise)
- build_slug: $BITRISE_BUILD_SLUG
opts:
description: ""
is_dont_change_value: false
is_expand: true
is_required: true
summary: ""
title: BITRISE's Build-Slug variable (passed automatically on Bitrise)
- aws_access_key: ""
opts:
description: ""
is_dont_change_value: false
is_expand: true
is_required: true
summary: ""
title: Amazon AWS Access Key
- aws_secret_key: ""
opts:
description: ""
is_dont_change_value: false
is_expand: true
is_required: true
summary: ""
title: Amazon AWS Secret Access Key
- bucket_name: ""
opts:
description: ""
is_dont_change_value: false
is_expand: true
is_required: true
summary: ""
title: Amazon S3 Bucket Name
- opts:
description: |-
Optional, if no value specified then the default will be:
bitrise_{app_slug}/{timestamp}_build_{build_slug}
is_dont_change_value: false
is_expand: true
is_required: false
summary: ""
title: Amazon S3 File Path In Bucket
path_in_bucket: ""
- file_access_level: public_read
opts:
is_dont_change_value: false
is_expand: false
is_required: true
title: Amazon S3 file access level
value_options:
- private
- public_read
outputs:
- S3_DEPLOY_STEP_URL_IPA: ""
opts:
description: ""
is_dont_change_value: true
is_expand: false
is_required: true
summary: ""
title: Amazon S3 Deploy IPA URL
- S3_DEPLOY_STEP_URL_DSYM: ""
opts:
description: ""
is_dont_change_value: true
is_expand: false
is_required: true
summary: ""
title: Amazon S3 Deploy DSYM URL
- S3_DEPLOY_STEP_URL_PLIST: ""
opts:
description: ""
is_dont_change_value: true
is_expand: false
is_required: true
summary: ""
title: Amazon S3 Deploy .plist URL
- S3_DEPLOY_STEP_STATUS: ""
opts:
description: ""
is_dont_change_value: true
is_expand: false
is_required: true
summary: ""
title: Amazon S3 Deploy result ('success' or 'failed')
- S3_DEPLOY_STEP_EMAIL_READY_URL: ""
opts:
description: |-
In a link-ready format, example:
itms-services://?action=download-manifest&url=...
is_dont_change_value: true
is_expand: false
is_required: true
summary: ""
title: Amazon S3 Deploy .plist URL
================================================
FILE: steps/amazon-s3-deploy/3.1.1/step.yml
================================================
title: Deploy to Amazon S3
summary: Upload your iOS Application to Amazon S3
description: |-
Bitrise Step to Deploy an Xcode archive to Amazon S3.
Required: an Xcode Archive Step should run before this Step!
This Step requires an Amazon S3 account.
To register an Amazon S3 account, [click here](http://aws.amazon.com/s3/).
website: https://github.com/bitrise-io/steps-amazon-s3-deploy
source_code_url: https://github.com/bitrise-io/steps-amazon-s3-deploy
support_url: https://github.com/bitrise-io/steps-amazon-s3-deploy/issues
published_at: 2015-09-16T14:34:42.580482787+02:00
source:
git: https://github.com/bitrise-io/steps-amazon-s3-deploy.git
commit: a3953cf444dbffb5fcf632d8cbbdf691585115b0
host_os_tags:
- osx-10.9
- osx-10.10
project_type_tags:
- ios
type_tags:
- deploy
- amazon
dependencies:
- manager: brew
name: s3cmd
is_requires_admin_user: true
is_always_run: false
is_skippable: false
run_if: ""
inputs:
- ipa_path: $BITRISE_IPA_PATH
opts:
description: ""
is_dont_change_value: false
is_expand: true
is_required: true
summary: ""
title: IPA path
- dsym_path: $BITRISE_DSYM_PATH
opts:
description: ""
is_dont_change_value: false
is_expand: true
is_required: false
summary: ""
title: DSYM path (optional)
- app_slug: $BITRISE_APP_SLUG
opts:
description: ""
is_dont_change_value: false
is_expand: true
is_required: true
summary: ""
title: BITRISE's App-Slug variable (passed automatically on Bitrise)
- build_slug: $BITRISE_BUILD_SLUG
opts:
description: ""
is_dont_change_value: false
is_expand: true
is_required: true
summary: ""
title: BITRISE's Build-Slug variable (passed automatically on Bitrise)
- aws_access_key: ""
opts:
description: ""
is_dont_change_value: false
is_expand: true
is_required: true
summary: ""
title: Amazon AWS Access Key
- aws_secret_key: ""
opts:
description: ""
is_dont_change_value: false
is_expand: true
is_required: true
summary: ""
title: Amazon AWS Secret Access Key
- bucket_name: ""
opts:
description: ""
is_dont_change_value: false
is_expand: true
is_required: true
summary: ""
title: Amazon S3 Bucket Name
- opts:
description: |-
Optional, if no value specified then the default will be:
bitrise_{app_slug}/{timestamp}_build_{build_slug}
is_dont_change_value: false
is_expand: true
is_required: false
summary: ""
title: Amazon S3 File Path In Bucket
path_in_bucket: ""
- file_access_level: public_read
opts:
is_dont_change_value: false
is_expand: false
is_required: true
title: Amazon S3 file access level
value_options:
- private
- public_read
outputs:
- S3_DEPLOY_STEP_URL_IPA: ""
opts:
description: ""
is_dont_change_value: true
is_expand: false
is_required: true
summary: ""
title: Amazon S3 Deploy IPA URL
- S3_DEPLOY_STEP_URL_DSYM: ""
opts:
description: ""
is_dont_change_value: true
is_expand: false
is_required: true
summary: ""
title: Amazon S3 Deploy DSYM URL
- S3_DEPLOY_STEP_URL_PLIST: ""
opts:
description: ""
is_dont_change_value: true
is_expand: false
is_required: true
summary: ""
title: Amazon S3 Deploy .plist URL
- S3_DEPLOY_STEP_STATUS: ""
opts:
description: ""
is_dont_change_value: true
is_expand: false
is_required: true
summary: ""
title: Amazon S3 Deploy result ('success' or 'failed')
- S3_DEPLOY_STEP_EMAIL_READY_URL: ""
opts:
description: |-
In a link-ready format, example:
itms-services://?action=download-manifest&url=...
is_dont_change_value: true
is_expand: false
is_required: true
summary: ""
title: Amazon S3 Deploy .plist URL
================================================
FILE: steps/amazon-s3-deploy/3.2.0/step.yml
================================================
title: Deploy to Amazon S3
summary: Upload your iOS Application to Amazon S3
description: |-
Bitrise Step to Deploy an Xcode archive to Amazon S3.
Required: an Xcode Archive Step should run before this Step!
This Step requires an Amazon S3 account.
To register an Amazon S3 account, [click here](http://aws.amazon.com/s3/).
website: https://github.com/bitrise-io/steps-amazon-s3-deploy
source_code_url: https://github.com/bitrise-io/steps-amazon-s3-deploy
support_url: https://github.com/bitrise-io/steps-amazon-s3-deploy/issues
published_at: 2015-10-20T12:49:19.364436458+02:00
source:
git: https://github.com/bitrise-io/steps-amazon-s3-deploy.git
commit: 0695e6a76c1a9e16ee7e3b6e98830b20109410cd
host_os_tags:
- osx-10.9
- osx-10.10
project_type_tags:
- ios
type_tags:
- deploy
- amazon
dependencies:
- manager: brew
name: awscli
is_requires_admin_user: true
is_always_run: false
is_skippable: false
run_if: ""
inputs:
- ipa_path: $BITRISE_IPA_PATH
opts:
description: ""
is_dont_change_value: false
is_expand: true
is_required: true
summary: ""
title: IPA path
- dsym_path: $BITRISE_DSYM_PATH
opts:
description: ""
is_dont_change_value: false
is_expand: true
is_required: false
summary: ""
title: DSYM path (optional)
- app_slug: $BITRISE_APP_SLUG
opts:
description: ""
is_dont_change_value: false
is_expand: true
is_required: true
summary: ""
title: BITRISE's App-Slug variable (passed automatically on Bitrise)
- build_slug: $BITRISE_BUILD_SLUG
opts:
description: ""
is_dont_change_value: false
is_expand: true
is_required: true
summary: ""
title: BITRISE's Build-Slug variable (passed automatically on Bitrise)
- aws_access_key: ""
opts:
description: ""
is_dont_change_value: false
is_expand: true
is_required: true
summary: ""
title: Amazon AWS Access Key
- aws_secret_key: ""
opts:
description: ""
is_dont_change_value: false
is_expand: true
is_required: true
summary: ""
title: Amazon AWS Secret Access Key
- bucket_name: ""
opts:
description: ""
is_dont_change_value: false
is_expand: true
is_required: true
summary: ""
title: Amazon S3 Bucket Name
- opts:
description: |-
Optional, if no value specified then the default will be:
bitrise_{app_slug}/{timestamp}_build_{build_slug}
is_dont_change_value: false
is_expand: true
is_required: false
summary: ""
title: Amazon S3 File Path In Bucket
path_in_bucket: ""
- file_access_level: public_read
opts:
is_dont_change_value: false
is_expand: false
is_required: true
title: Amazon S3 file access level
value_options:
- private
- public_read
outputs:
- S3_DEPLOY_STEP_URL_IPA: ""
opts:
description: ""
is_dont_change_value: true
is_expand: false
is_required: true
summary: ""
title: Amazon S3 Deploy IPA URL
- S3_DEPLOY_STEP_URL_DSYM: ""
opts:
description: ""
is_dont_change_value: true
is_expand: false
is_required: true
summary: ""
title: Amazon S3 Deploy DSYM URL
- S3_DEPLOY_STEP_URL_PLIST: ""
opts:
description: ""
is_dont_change_value: true
is_expand: false
is_required: true
summary: ""
title: Amazon S3 Deploy .plist URL
- S3_DEPLOY_STEP_STATUS: ""
opts:
description: ""
is_dont_change_value: true
is_expand: false
is_required: true
summary: ""
title: Amazon S3 Deploy result ('success' or 'failed')
- S3_DEPLOY_STEP_EMAIL_READY_URL: ""
opts:
description: |-
In a link-ready format, example:
itms-services://?action=download-manifest&url=...
is_dont_change_value: true
is_expand: false
is_required: true
summary: ""
title: Amazon S3 Deploy .plist URL
================================================
FILE: steps/amazon-s3-deploy/3.3.0/step.yml
================================================
title: Deploy to Amazon S3
summary: Upload your iOS Application to Amazon S3
description: |-
Bitrise Step to Deploy an Xcode archive to Amazon S3.
Required: an Xcode Archive Step should run before this Step!
This Step requires an Amazon S3 account.
To register an Amazon S3 account, [click here](http://aws.amazon.com/s3/).
website: https://github.com/bitrise-io/steps-amazon-s3-deploy
source_code_url: https://github.com/bitrise-io/steps-amazon-s3-deploy
support_url: https://github.com/bitrise-io/steps-amazon-s3-deploy/issues
published_at: 2016-02-01T18:16:16.364194171+01:00
source:
git: https://github.com/bitrise-io/steps-amazon-s3-deploy.git
commit: b0310698ca843b615c0f7fd1bcbc61ac33f43914
host_os_tags:
- osx-10.9
- osx-10.10
project_type_tags:
- ios
type_tags:
- deploy
- amazon
deps:
brew:
- name: awscli
is_requires_admin_user: true
is_always_run: false
is_skippable: false
run_if: ""
inputs:
- ipa_path: $BITRISE_IPA_PATH
opts:
description: ""
is_required: true
summary: ""
title: IPA path
- dsym_path: $BITRISE_DSYM_PATH
opts:
description: ""
is_required: false
summary: ""
title: DSYM path (optional)
- app_slug: $BITRISE_APP_SLUG
opts:
description: ""
is_required: true
summary: ""
title: BITRISE's App-Slug variable (passed automatically on Bitrise)
- build_slug: $BITRISE_BUILD_SLUG
opts:
description: ""
is_required: true
summary: ""
title: BITRISE's Build-Slug variable (passed automatically on Bitrise)
- aws_access_key: ""
opts:
description: ""
is_required: true
summary: ""
title: Amazon AWS Access Key
- aws_secret_key: ""
opts:
description: ""
is_required: true
summary: ""
title: Amazon AWS Secret Access Key
- bucket_name: ""
opts:
description: ""
is_required: true
summary: ""
title: Amazon S3 Bucket Name
- bucket_region: ""
opts:
description: |
Amazon S3 Bucket Region
If you use default s3 region (us-east-1), you can leave it empty,
otherwise you should provide this input.
summary: ""
title: Amazon S3 Bucket Region
- opts:
description: |-
Optional, if no value specified then the default will be:
bitrise_{app_slug}/{timestamp}_build_{build_slug}
summary: ""
title: Amazon S3 File Path In Bucket
path_in_bucket: ""
- file_access_level: public_read
opts:
is_required: true
title: Amazon S3 file access level
value_options:
- private
- public_read
outputs:
- S3_DEPLOY_STEP_URL_IPA: ""
opts:
description: ""
is_dont_change_value: true
is_expand: false
is_required: true
summary: ""
title: Amazon S3 Deploy IPA URL
- S3_DEPLOY_STEP_URL_DSYM: ""
opts:
description: ""
is_dont_change_value: true
is_expand: false
is_required: true
summary: ""
title: Amazon S3 Deploy DSYM URL
- S3_DEPLOY_STEP_URL_PLIST: ""
opts:
description: ""
is_dont_change_value: true
is_expand: false
is_required: true
summary: ""
title: Amazon S3 Deploy .plist URL
- S3_DEPLOY_STEP_STATUS: ""
opts:
description: ""
is_dont_change_value: true
is_expand: false
is_required: true
summary: ""
title: Amazon S3 Deploy result ('success' or 'failed')
- S3_DEPLOY_STEP_EMAIL_READY_URL: ""
opts:
description: |-
In a link-ready format, example:
itms-services://?action=download-manifest&url=...
is_dont_change_value: true
is_expand: false
is_required: true
summary: ""
title: Amazon S3 Deploy .plist URL
================================================
FILE: steps/amazon-s3-deploy/3.4.0/step.yml
================================================
title: Deploy to Amazon S3
summary: Upload your iOS Application to Amazon S3
description: |-
Bitrise Step to Deploy an Xcode archive to Amazon S3.
Required: an Xcode Archive Step should run before this Step!
This Step requires an Amazon S3 account.
To register an Amazon S3 account, [click here](http://aws.amazon.com/s3/).
website: https://github.com/bitrise-io/steps-amazon-s3-deploy
source_code_url: https://github.com/bitrise-io/steps-amazon-s3-deploy
support_url: https://github.com/bitrise-io/steps-amazon-s3-deploy/issues
published_at: 2016-02-15T14:13:54.589441417+01:00
source:
git: https://github.com/bitrise-io/steps-amazon-s3-deploy.git
commit: 85848a6fb73d328ce863e046ba1daef5f7e451eb
host_os_tags:
- osx-10.9
- osx-10.10
project_type_tags:
- ios
type_tags:
- deploy
- amazon
deps:
brew:
- name: awscli
is_requires_admin_user: true
is_always_run: false
is_skippable: false
run_if: ""
inputs:
- ipa_path: $BITRISE_IPA_PATH
opts:
description: ""
is_required: true
summary: ""
title: IPA path
- dsym_path: $BITRISE_DSYM_PATH
opts:
description: ""
is_required: false
summary: ""
title: DSYM path (optional)
- app_slug: $BITRISE_APP_SLUG
opts:
description: ""
is_required: true
summary: ""
title: BITRISE's App-Slug variable (passed automatically on Bitrise)
- build_slug: $BITRISE_BUILD_SLUG
opts:
description: ""
is_required: true
summary: ""
title: BITRISE's Build-Slug variable (passed automatically on Bitrise)
- aws_access_key: ""
opts:
description: ""
is_required: true
summary: ""
title: Amazon AWS Access Key
- aws_secret_key: ""
opts:
description: ""
is_required: true
summary: ""
title: Amazon AWS Secret Access Key
- bucket_name: ""
opts:
description: ""
is_required: true
summary: ""
title: Amazon S3 Bucket Name
- bucket_region: ""
opts:
description: |
Amazon S3 Bucket Region
If you use default s3 region (us-east-1), you can leave it empty,
otherwise you should provide this input.
summary: ""
title: Amazon S3 Bucket Region
- opts:
description: |-
Optional, if no value specified then the default will be:
bitrise_{app_slug}/{timestamp}_build_{build_slug}
summary: ""
title: Amazon S3 File Path In Bucket
path_in_bucket: ""
- file_access_level: public_read
opts:
is_required: true
title: Amazon S3 file access level
value_options:
- private
- public_read
outputs:
- S3_DEPLOY_STEP_URL_IPA: ""
opts:
description: ""
is_dont_change_value: true
is_expand: false
is_required: true
summary: ""
title: Amazon S3 Deploy IPA URL
- S3_DEPLOY_STEP_URL_DSYM: ""
opts:
description: ""
is_dont_change_value: true
is_expand: false
is_required: true
summary: ""
title: Amazon S3 Deploy DSYM URL
- S3_DEPLOY_STEP_URL_PLIST: ""
opts:
description: ""
is_dont_change_value: true
is_expand: false
is_required: true
summary: ""
title: Amazon S3 Deploy .plist URL
- S3_DEPLOY_STEP_STATUS: ""
opts:
description: ""
is_dont_change_value: true
is_expand: false
is_required: true
summary: ""
title: Amazon S3 Deploy result ('success' or 'failed')
- S3_DEPLOY_STEP_EMAIL_READY_URL: ""
opts:
description: |-
In a link-ready format, example:
itms-services://?action=download-manifest&url=...
is_dont_change_value: true
is_expand: false
is_required: true
summary: ""
title: Amazon S3 Deploy .plist URL
================================================
FILE: steps/amazon-s3-deploy/3.5.0/step.yml
================================================
title: Deploy to Amazon S3
summary: Upload your iOS Application to Amazon S3
description: |-
Bitrise Step to Deploy an Xcode archive to Amazon S3.
Required: an Xcode Archive Step should run before this Step!
This Step requires an Amazon S3 account.
To register an Amazon S3 account, [click here](http://aws.amazon.com/s3/).
website: https://github.com/bitrise-io/steps-amazon-s3-deploy
source_code_url: https://github.com/bitrise-io/steps-amazon-s3-deploy
support_url: https://github.com/bitrise-io/steps-amazon-s3-deploy/issues
published_at: 2016-03-09T16:38:47.576889058+01:00
source:
git: https://github.com/bitrise-io/steps-amazon-s3-deploy.git
commit: 53dd110f68976b23e1444354b665f91b96aa54f6
host_os_tags:
- osx-10.9
- osx-10.10
project_type_tags:
- ios
type_tags:
- deploy
- amazon
deps:
brew:
- name: awscli
is_requires_admin_user: true
is_always_run: false
is_skippable: false
run_if: ""
inputs:
- ipa_path: $BITRISE_IPA_PATH
opts:
description: ""
is_required: true
summary: ""
title: IPA path
- dsym_path: $BITRISE_DSYM_PATH
opts:
description: ""
summary: ""
title: DSYM path (optional)
- app_slug: $BITRISE_APP_SLUG
opts:
description: ""
is_required: true
summary: ""
title: BITRISE's App-Slug variable (passed automatically on Bitrise)
- build_slug: $BITRISE_BUILD_SLUG
opts:
description: ""
is_required: true
summary: ""
title: BITRISE's Build-Slug variable (passed automatically on Bitrise)
- aws_access_key: ""
opts:
description: ""
is_required: true
summary: ""
title: Amazon AWS Access Key
- aws_secret_key: ""
opts:
description: ""
is_required: true
summary: ""
title: Amazon AWS Secret Access Key
- bucket_name: ""
opts:
description: ""
is_required: true
summary: ""
title: Amazon S3 Bucket Name
- bucket_region: ""
opts:
description: |
Amazon S3 Bucket Region
If you use default s3 region (us-east-1), you can leave it empty,
otherwise you should provide this input.
summary: ""
title: Amazon S3 Bucket Region
- opts:
description: |-
Optional, if no value specified then the default will be:
bitrise_$BITRISE_APP_SLUG/${BITRISE_BUILD_TRIGGER_TIMESTAMP}_build_${BITRISE_BUILD_SLUG}
summary: ""
title: Amazon S3 File Path In Bucket
path_in_bucket: bitrise_$BITRISE_APP_SLUG/${BITRISE_BUILD_TRIGGER_TIMESTAMP}_build_${BITRISE_BUILD_SLUG}
- file_access_level: public_read
opts:
is_required: true
title: Amazon S3 file access level
value_options:
- private
- public_read
outputs:
- S3_DEPLOY_STEP_URL_IPA: ""
opts:
description: ""
is_dont_change_value: true
is_expand: false
is_required: true
summary: ""
title: Amazon S3 Deploy IPA URL
- S3_DEPLOY_STEP_URL_DSYM: ""
opts:
description: ""
is_dont_change_value: true
is_expand: false
is_required: true
summary: ""
title: Amazon S3 Deploy DSYM URL
- S3_DEPLOY_STEP_URL_PLIST: ""
opts:
description: ""
is_dont_change_value: true
is_expand: false
is_required: true
summary: ""
title: Amazon S3 Deploy .plist URL
- S3_DEPLOY_STEP_STATUS: ""
opts:
description: ""
is_dont_change_value: true
is_expand: false
is_required: true
summary: ""
title: Amazon S3 Deploy result ('success' or 'failed')
- S3_DEPLOY_STEP_EMAIL_READY_URL: ""
opts:
description: |-
In a link-ready format, example:
itms-services://?action=download-manifest&url=...
is_dont_change_value: true
is_expand: false
is_required: true
summary: ""
title: Amazon S3 Deploy .plist URL
================================================
FILE: steps/amazon-s3-deploy/3.5.1/step.yml
================================================
title: Deploy to Amazon S3
summary: Upload your iOS Application to Amazon S3
description: |-
Bitrise Step to Deploy an Xcode archive to Amazon S3.
Required: an Xcode Archive Step should run before this Step!
This Step requires an Amazon S3 account.
To register an Amazon S3 account, [click here](http://aws.amazon.com/s3/).
website: https://github.com/bitrise-io/steps-amazon-s3-deploy
source_code_url: https://github.com/bitrise-io/steps-amazon-s3-deploy
support_url: https://github.com/bitrise-io/steps-amazon-s3-deploy/issues
published_at: 2016-11-16T14:11:18.462804153+01:00
source:
git: https://github.com/bitrise-io/steps-amazon-s3-deploy.git
commit: e5acd8b6e6ba8334740e2bec898891aad14fcb24
host_os_tags:
- osx-10.9
- osx-10.10
type_tags:
- deploy
deps:
brew:
- name: awscli
is_requires_admin_user: true
is_always_run: false
is_skippable: false
run_if: ""
inputs:
- ipa_path: $BITRISE_IPA_PATH
opts:
description: ""
is_required: true
summary: ""
title: IPA path
- dsym_path: $BITRISE_DSYM_PATH
opts:
description: ""
summary: ""
title: DSYM path (optional)
- app_slug: $BITRISE_APP_SLUG
opts:
description: ""
is_required: true
summary: ""
title: BITRISE's App-Slug variable (passed automatically on Bitrise)
- build_slug: $BITRISE_BUILD_SLUG
opts:
description: ""
is_required: true
summary: ""
title: BITRISE's Build-Slug variable (passed automatically on Bitrise)
- aws_access_key: ""
opts:
description: ""
is_required: true
summary: ""
title: Amazon AWS Access Key
- aws_secret_key: ""
opts:
description: ""
is_required: true
summary: ""
title: Amazon AWS Secret Access Key
- bucket_name: ""
opts:
description: ""
is_required: true
summary: ""
title: Amazon S3 Bucket Name
- bucket_region: ""
opts:
description: |
Amazon S3 Bucket Region
If you use default s3 region (us-east-1), you can leave it empty,
otherwise you should provide this input.
summary: ""
title: Amazon S3 Bucket Region
- opts:
description: |-
Optional, if no value specified then the default will be:
bitrise_$BITRISE_APP_SLUG/${BITRISE_BUILD_TRIGGER_TIMESTAMP}_build_${BITRISE_BUILD_SLUG}
summary: ""
title: Amazon S3 File Path In Bucket
path_in_bucket: bitrise_$BITRISE_APP_SLUG/${BITRISE_BUILD_TRIGGER_TIMESTAMP}_build_${BITRISE_BUILD_SLUG}
- file_access_level: public_read
opts:
is_required: true
title: Amazon S3 file access level
value_options:
- private
- public_read
outputs:
- S3_DEPLOY_STEP_URL_IPA: ""
opts:
description: ""
is_dont_change_value: true
is_expand: false
is_required: true
summary: ""
title: Amazon S3 Deploy IPA URL
- S3_DEPLOY_STEP_URL_DSYM: ""
opts:
description: ""
is_dont_change_value: true
is_expand: false
is_required: true
summary: ""
title: Amazon S3 Deploy DSYM URL
- S3_DEPLOY_STEP_URL_PLIST: ""
opts:
description: ""
is_dont_change_value: true
is_expand: false
is_required: true
summary: ""
title: Amazon S3 Deploy .plist URL
- S3_DEPLOY_STEP_STATUS: ""
opts:
description: ""
is_dont_change_value: true
is_expand: false
is_required: true
summary: ""
title: Amazon S3 Deploy result ('success' or 'failed')
- S3_DEPLOY_STEP_EMAIL_READY_URL: ""
opts:
description: |-
In a link-ready format, example:
itms-services://?action=download-manifest&url=...
is_dont_change_value: true
is_expand: false
is_required: true
summary: ""
title: Amazon S3 Deploy .plist URL
================================================
FILE: steps/amazon-s3-deploy/3.5.3/step.yml
================================================
title: Deploy to Amazon S3
summary: Upload your iOS Application to Amazon S3
description: |-
Bitrise Step to Deploy an Xcode archive to Amazon S3.
Required: an Xcode Archive Step should run before this Step!
This Step requires an Amazon S3 account.
To register an Amazon S3 account, [click here](http://aws.amazon.com/s3/).
website: https://github.com/bitrise-io/steps-amazon-s3-deploy
source_code_url: https://github.com/bitrise-io/steps-amazon-s3-deploy
support_url: https://github.com/bitrise-io/steps-amazon-s3-deploy/issues
published_at: !!timestamp 2018-04-04T14:29:44.045971011+02:00
source:
git: https://github.com/bitrise-io/steps-amazon-s3-deploy.git
commit: 57dec28be8c19bc1dff8ba11f4764fda8bbb21a0
host_os_tags:
- osx-10.9
- osx-10.10
type_tags:
- deploy
deps:
brew:
- name: awscli
is_requires_admin_user: true
is_always_run: false
is_skippable: false
run_if: ""
inputs:
- ipa_path: $BITRISE_IPA_PATH
opts:
description: ""
is_required: true
summary: ""
title: IPA path
- dsym_path: $BITRISE_DSYM_PATH
opts:
description: ""
summary: ""
title: DSYM path (optional)
- app_slug: $BITRISE_APP_SLUG
opts:
description: ""
is_required: true
summary: ""
title: BITRISE's App-Slug variable (passed automatically on Bitrise)
- build_slug: $BITRISE_BUILD_SLUG
opts:
description: ""
is_required: true
summary: ""
title: BITRISE's Build-Slug variable (passed automatically on Bitrise)
- aws_access_key: ""
opts:
description: ""
is_required: true
summary: ""
title: Amazon AWS Access Key
- aws_secret_key: ""
opts:
description: ""
is_required: true
summary: ""
title: Amazon AWS Secret Access Key
- bucket_name: ""
opts:
description: ""
is_required: true
summary: ""
title: Amazon S3 Bucket Name
- bucket_region: ""
opts:
description: |
Amazon S3 Bucket Region
If you use default s3 region (us-east-1), you can leave it empty,
otherwise you should provide this input.
summary: ""
title: Amazon S3 Bucket Region
- opts:
description: |-
Optional, if no value specified then the default will be:
bitrise_$BITRISE_APP_SLUG/${BITRISE_BUILD_TRIGGER_TIMESTAMP}_build_${BITRISE_BUILD_SLUG}
summary: ""
title: Amazon S3 File Path In Bucket
path_in_bucket: bitrise_$BITRISE_APP_SLUG/${BITRISE_BUILD_TRIGGER_TIMESTAMP}_build_${BITRISE_BUILD_SLUG}
- file_access_level: public_read
opts:
is_required: true
title: Amazon S3 file access level
value_options:
- private
- public_read
outputs:
- S3_DEPLOY_STEP_URL_IPA: ""
opts:
description: ""
is_dont_change_value: true
is_expand: false
is_required: true
summary: ""
title: Amazon S3 Deploy IPA URL
- S3_DEPLOY_STEP_URL_DSYM: ""
opts:
description: ""
is_dont_change_value: true
is_expand: false
is_required: true
summary: ""
title: Amazon S3 Deploy DSYM URL
- S3_DEPLOY_STEP_URL_PLIST: ""
opts:
description: ""
is_dont_change_value: true
is_expand: false
is_required: true
summary: ""
title: Amazon S3 Deploy .plist URL
- S3_DEPLOY_STEP_STATUS: ""
opts:
description: ""
is_dont_change_value: true
is_expand: false
is_required: true
summary: ""
title: Amazon S3 Deploy result ('success' or 'failed')
- S3_DEPLOY_STEP_EMAIL_READY_URL: ""
opts:
description: |-
In a link-ready format, example:
itms-services://?action=download-manifest&url=...
is_dont_change_value: true
is_expand: false
is_required: true
summary: ""
title: Amazon S3 Deploy .plist URL
================================================
FILE: steps/amazon-s3-deploy/3.5.4/step.yml
================================================
title: Deploy to Amazon S3
summary: Upload your iOS Application to Amazon S3
description: |-
Bitrise Step to Deploy an Xcode archive to Amazon S3.
Required: an Xcode Archive Step should run before this Step!
This Step requires an Amazon S3 account.
To register an Amazon S3 account, [click here](http://aws.amazon.com/s3/).
website: https://github.com/bitrise-io/steps-amazon-s3-deploy
source_code_url: https://github.com/bitrise-io/steps-amazon-s3-deploy
support_url: https://github.com/bitrise-io/steps-amazon-s3-deploy/issues
published_at: 2018-04-16T11:40:14.580837653+02:00
source:
git: https://github.com/bitrise-io/steps-amazon-s3-deploy.git
commit: 2f6ab262e0595a6bc2b4dcb6a4b343ae560e4887
host_os_tags:
- osx-10.9
- osx-10.10
type_tags:
- deploy
deps:
brew:
- name: awscli
is_requires_admin_user: true
is_always_run: false
is_skippable: false
run_if: ""
inputs:
- ipa_path: $BITRISE_IPA_PATH
opts:
description: ""
is_required: true
summary: ""
title: IPA path
- dsym_path: $BITRISE_DSYM_PATH
opts:
description: ""
summary: ""
title: DSYM path (optional)
- app_slug: $BITRISE_APP_SLUG
opts:
description: ""
is_required: true
summary: ""
title: BITRISE's App-Slug variable (passed automatically on Bitrise)
- build_slug: $BITRISE_BUILD_SLUG
opts:
description: ""
is_required: true
summary: ""
title: BITRISE's Build-Slug variable (passed automatically on Bitrise)
- aws_access_key: ""
opts:
description: ""
is_required: true
summary: ""
title: Amazon AWS Access Key
- aws_secret_key: ""
opts:
description: ""
is_required: true
summary: ""
title: Amazon AWS Secret Access Key
- bucket_name: ""
opts:
description: ""
is_required: true
summary: ""
title: Amazon S3 Bucket Name
- bucket_region: ""
opts:
description: |
Amazon S3 Bucket Region
If you use default s3 region (us-east-1), you can leave it empty,
otherwise you should provide this input.
summary: ""
title: Amazon S3 Bucket Region
- opts:
description: |-
Optional, if no value specified then the default will be:
bitrise_$BITRISE_APP_SLUG/${BITRISE_BUILD_TRIGGER_TIMESTAMP}_build_${BITRISE_BUILD_SLUG}
summary: ""
title: Amazon S3 File Path In Bucket
path_in_bucket: bitrise_$BITRISE_APP_SLUG/${BITRISE_BUILD_TRIGGER_TIMESTAMP}_build_${BITRISE_BUILD_SLUG}
- file_access_level: public_read
opts:
is_required: true
title: Amazon S3 file access level
value_options:
- private
- public_read
outputs:
- S3_DEPLOY_STEP_URL_IPA: ""
opts:
description: ""
is_dont_change_value: true
is_expand: false
is_required: true
summary: ""
title: Amazon S3 Deploy IPA URL
- S3_DEPLOY_STEP_URL_DSYM: ""
opts:
description: ""
is_dont_change_value: true
is_expand: false
is_required: true
summary: ""
title: Amazon S3 Deploy DSYM URL
- S3_DEPLOY_STEP_URL_PLIST: ""
opts:
description: ""
is_dont_change_value: true
is_expand: false
is_required: true
summary: ""
title: Amazon S3 Deploy .plist URL
- S3_DEPLOY_STEP_STATUS: ""
opts:
description: ""
is_dont_change_value: true
is_expand: false
is_required: true
summary: ""
title: Amazon S3 Deploy result ('success' or 'failed')
- S3_DEPLOY_STEP_EMAIL_READY_URL: ""
opts:
description: |-
In a link-ready format, example:
itms-services://?action=download-manifest&url=...
is_dont_change_value: true
is_expand: false
is_required: true
summary: ""
title: Amazon S3 Deploy .plist URL
================================================
FILE: steps/amazon-s3-deploy/3.5.6/step.yml
================================================
title: Deploy to Amazon S3
summary: Upload your iOS Application to Amazon S3
description: "This step deploys an Xcode archive to Amazon S3.\nRequirements: An Xcode
Archive Step must run before this step and you must have an Amazon S3 account. \nTo
register an Amazon S3 account, [click here](http://aws.amazon.com/s3/)."
website: https://github.com/bitrise-io/steps-amazon-s3-deploy
source_code_url: https://github.com/bitrise-io/steps-amazon-s3-deploy
support_url: https://github.com/bitrise-io/steps-amazon-s3-deploy/issues
published_at: 2018-08-31T12:41:26.107542729Z
source:
git: https://github.com/bitrise-io/steps-amazon-s3-deploy.git
commit: e67bc1a7a87199e78771a90e31e90b1a0e7ea983
project_type_tags:
- ios
- react-native
- xamarin
- cordova
- ionic
type_tags:
- deploy
deps:
brew:
- name: awscli
is_requires_admin_user: true
is_always_run: false
is_skippable: false
run_if: ""
inputs:
- ipa_path: $BITRISE_IPA_PATH
opts:
description: ""
is_required: true
summary: ""
title: IPA path
- dsym_path: $BITRISE_DSYM_PATH
opts:
description: ""
summary: ""
title: DSYM path (optional)
- app_slug: $BITRISE_APP_SLUG
opts:
description: ""
is_expand: true
is_required: true
is_sensitive: true
summary: ""
title: BITRISE's App-Slug variable (passed automatically on Bitrise)
- build_slug: $BITRISE_BUILD_SLUG
opts:
description: ""
is_expand: true
is_required: true
is_sensitive: true
summary: ""
title: BITRISE's Build-Slug variable (passed automatically on Bitrise)
- aws_access_key: ""
opts:
description: ""
is_expand: true
is_required: true
is_sensitive: true
summary: ""
title: Amazon AWS Access Key
- aws_secret_key: ""
opts:
description: ""
is_expand: true
is_required: true
is_sensitive: true
summary: ""
title: Amazon AWS Secret Access Key
- bucket_name: ""
opts:
description: ""
is_required: true
summary: ""
title: Amazon S3 Bucket Name
- bucket_region: ""
opts:
description: |
Amazon S3 Bucket Region
If you use default s3 region (us-east-1), you can leave it empty,
otherwise you should provide this input.
summary: ""
title: Amazon S3 Bucket Region
- opts:
description: |-
Optional, if there is no specified value, then the default will be:
bitrise_$BITRISE_APP_SLUG/${BITRISE_BUILD_TRIGGER_TIMESTAMP}_build_${BITRISE_BUILD_SLUG}
summary: ""
title: Amazon S3 File Path In Bucket
path_in_bucket: bitrise_$BITRISE_APP_SLUG/${BITRISE_BUILD_TRIGGER_TIMESTAMP}_build_${BITRISE_BUILD_SLUG}
- file_access_level: public_read
opts:
is_required: true
title: Amazon S3 file access level
value_options:
- private
- public_read
outputs:
- S3_DEPLOY_STEP_URL_IPA: ""
opts:
description: ""
is_dont_change_value: true
is_expand: false
is_required: true
summary: ""
title: Amazon S3 Deploy IPA URL
- S3_DEPLOY_STEP_URL_DSYM: ""
opts:
description: ""
is_dont_change_value: true
is_expand: false
is_required: true
summary: ""
title: Amazon S3 Deploy DSYM URL
- S3_DEPLOY_STEP_URL_PLIST: ""
opts:
description: ""
is_dont_change_value: true
is_expand: false
is_required: true
summary: ""
title: Amazon S3 Deploy .plist URL
- S3_DEPLOY_STEP_STATUS: ""
opts:
description: ""
is_dont_change_value: true
is_expand: false
is_required: true
summary: ""
title: Amazon S3 Deploy result ('success' or 'failed')
- S3_DEPLOY_STEP_EMAIL_READY_URL: ""
opts:
description: |-
In a link-ready format, for example:
itms-services://?action=download-manifest&url=...
is_dont_change_value: true
is_expand: false
is_required: true
summary: ""
title: Amazon S3 Deploy .plist URL
================================================
FILE: steps/amazon-s3-deploy/3.5.7/step.yml
================================================
title: Deploy to Amazon S3
summary: Upload your iOS Application to Amazon S3
description: "This step deploys an Xcode archive to Amazon S3.\nRequirements: An Xcode
Archive Step must run before this step and you must have an Amazon S3 account. \nTo
register an Amazon S3 account, [click here](http://aws.amazon.com/s3/)."
website: https://github.com/bitrise-io/steps-amazon-s3-deploy
source_code_url: https://github.com/bitrise-io/steps-amazon-s3-deploy
support_url: https://github.com/bitrise-io/steps-amazon-s3-deploy/issues
published_at: 2018-09-13T09:16:07.117061453Z
source:
git: https://github.com/bitrise-io/steps-amazon-s3-deploy.git
commit: 1561f7d7a99a730dba8aa4357cf87ff8a00b2e2f
project_type_tags:
- ios
- react-native
- xamarin
- cordova
- ionic
type_tags:
- deploy
deps:
brew:
- name: awscli
is_requires_admin_user: true
is_always_run: false
is_skippable: false
run_if: ""
inputs:
- ipa_path: $BITRISE_IPA_PATH
opts:
description: ""
is_required: true
summary: ""
title: IPA path
- dsym_path: $BITRISE_DSYM_PATH
opts:
description: ""
summary: ""
title: DSYM path (optional)
- app_slug: $BITRISE_APP_SLUG
opts:
description: ""
is_expand: true
is_required: true
summary: ""
title: BITRISE's App-Slug variable (passed automatically on Bitrise)
- build_slug: $BITRISE_BUILD_SLUG
opts:
description: ""
is_expand: true
is_required: true
summary: ""
title: BITRISE's Build-Slug variable (passed automatically on Bitrise)
- aws_access_key: ""
opts:
description: ""
is_expand: true
is_required: true
is_sensitive: true
summary: ""
title: Amazon AWS Access Key
- aws_secret_key: ""
opts:
description: ""
is_expand: true
is_required: true
is_sensitive: true
summary: ""
title: Amazon AWS Secret Access Key
- bucket_name: ""
opts:
description: ""
is_required: true
summary: ""
title: Amazon S3 Bucket Name
- bucket_region: ""
opts:
description: |
Amazon S3 Bucket Region
If you use default s3 region (us-east-1), you can leave it empty,
otherwise you should provide this input.
summary: ""
title: Amazon S3 Bucket Region
- opts:
description: |-
Optional, if there is no specified value, then the default will be:
bitrise_$BITRISE_APP_SLUG/${BITRISE_BUILD_TRIGGER_TIMESTAMP}_build_${BITRISE_BUILD_SLUG}
summary: ""
title: Amazon S3 File Path In Bucket
path_in_bucket: bitrise_$BITRISE_APP_SLUG/${BITRISE_BUILD_TRIGGER_TIMESTAMP}_build_${BITRISE_BUILD_SLUG}
- file_access_level: public_read
opts:
is_required: true
title: Amazon S3 file access level
value_options:
- private
- public_read
outputs:
- S3_DEPLOY_STEP_URL_IPA: ""
opts:
description: ""
is_dont_change_value: true
is_expand: false
is_required: true
summary: ""
title: Amazon S3 Deploy IPA URL
- S3_DEPLOY_STEP_URL_DSYM: ""
opts:
description: ""
is_dont_change_value: true
is_expand: false
is_required: true
summary: ""
title: Amazon S3 Deploy DSYM URL
- S3_DEPLOY_STEP_URL_PLIST: ""
opts:
description: ""
is_dont_change_value: true
is_expand: false
is_required: true
summary: ""
title: Amazon S3 Deploy .plist URL
- S3_DEPLOY_STEP_STATUS: ""
opts:
description: ""
is_dont_change_value: true
is_expand: false
is_required: true
summary: ""
title: Amazon S3 Deploy result ('success' or 'failed')
- S3_DEPLOY_STEP_EMAIL_READY_URL: ""
opts:
description: |-
In a link-ready format, for example:
itms-services://?action=download-manifest&url=...
is_dont_change_value: true
is_expand: false
is_required: true
summary: ""
title: Amazon S3 Deploy .plist URL
================================================
FILE: steps/amazon-s3-deploy/3.5.8/step.yml
================================================
title: Deploy to Amazon S3
summary: Upload your iOS Application to Amazon S3
description: "This step deploys an Xcode archive to Amazon S3.\nRequirements: An Xcode
Archive Step must run before this step and you must have an Amazon S3 account. \nTo
register an Amazon S3 account, [click here](http://aws.amazon.com/s3/)."
website: https://github.com/bitrise-io/steps-amazon-s3-deploy
source_code_url: https://github.com/bitrise-io/steps-amazon-s3-deploy
support_url: https://github.com/bitrise-io/steps-amazon-s3-deploy/issues
published_at: 2019-10-15T09:12:50.778245022Z
source:
git: https://github.com/bitrise-steplib/steps-amazon-s3-deploy.git
commit: 6065f531dfa1cccbd9cd08c13ff529e608515b3b
project_type_tags:
- ios
- react-native
- xamarin
- cordova
- ionic
- flutter
type_tags:
- deploy
deps:
brew:
- name: awscli
is_requires_admin_user: true
is_always_run: false
is_skippable: false
run_if: ""
inputs:
- ipa_path: $BITRISE_IPA_PATH
opts:
description: ""
is_required: true
summary: ""
title: IPA path
- dsym_path: $BITRISE_DSYM_PATH
opts:
description: ""
summary: ""
title: DSYM path (optional)
- app_slug: $BITRISE_APP_SLUG
opts:
description: ""
is_expand: true
is_required: true
summary: ""
title: BITRISE's App-Slug variable (passed automatically on Bitrise)
- build_slug: $BITRISE_BUILD_SLUG
opts:
description: ""
is_expand: true
is_required: true
summary: ""
title: BITRISE's Build-Slug variable (passed automatically on Bitrise)
- aws_access_key: ""
opts:
description: ""
is_expand: true
is_required: true
is_sensitive: true
summary: ""
title: Amazon AWS Access Key
- aws_secret_key: ""
opts:
description: ""
is_expand: true
is_required: true
is_sensitive: true
summary: ""
title: Amazon AWS Secret Access Key
- bucket_name: ""
opts:
description: ""
is_required: true
summary: ""
title: Amazon S3 Bucket Name
- bucket_region: ""
opts:
description: |
Amazon S3 Bucket Region
If you use default s3 region (us-east-1), you can leave it empty,
otherwise you should provide this input.
summary: ""
title: Amazon S3 Bucket Region
- opts:
description: |-
Optional, if there is no specified value, then the default will be:
bitrise_$BITRISE_APP_SLUG/${BITRISE_BUILD_TRIGGER_TIMESTAMP}_build_${BITRISE_BUILD_SLUG}
summary: ""
title: Amazon S3 File Path In Bucket
path_in_bucket: bitrise_$BITRISE_APP_SLUG/${BITRISE_BUILD_TRIGGER_TIMESTAMP}_build_${BITRISE_BUILD_SLUG}
- file_access_level: public_read
opts:
is_required: true
title: Amazon S3 file access level
value_options:
- private
- public_read
outputs:
- S3_DEPLOY_STEP_URL_IPA: ""
opts:
description: ""
is_dont_change_value: true
is_expand: false
is_required: true
summary: ""
title: Amazon S3 Deploy IPA URL
- S3_DEPLOY_STEP_URL_DSYM: ""
opts:
description: ""
is_dont_change_value: true
is_expand: false
is_required: true
summary: ""
title: Amazon S3 Deploy DSYM URL
- S3_DEPLOY_STEP_URL_PLIST: ""
opts:
description: ""
is_dont_change_value: true
is_expand: false
is_required: true
summary: ""
title: Amazon S3 Deploy .plist URL
- S3_DEPLOY_STEP_STATUS: ""
opts:
description: ""
is_dont_change_value: true
is_expand: false
is_required: true
summary: ""
title: Amazon S3 Deploy result ('success' or 'failed')
- S3_DEPLOY_STEP_EMAIL_READY_URL: ""
opts:
description: |-
In a link-ready format, for example:
itms-services://?action=download-manifest&url=...
is_dont_change_value: true
is_expand: false
is_required: true
summary: ""
title: Amazon S3 Deploy .plist URL
================================================
FILE: steps/amazon-s3-deploy/3.5.9/step.yml
================================================
title: Deploy to Amazon S3
summary: Uploads your iOS application to Amazon S3.
description: |-
[This Step](https://github.com/bitrise-steplib/steps-amazon-s3-deploy) deploys an Xcode archive to [Amazon S3](https://aws.amazon.com/s3/).
### Configuring the Step
Before you start:
- To deploy to S3 with this Step, you must have an Amazon S3 account with your credentials at hand. If you don't have one yet, go ahead and [create one](https://aws.amazon.com/s3/).
1. Add the **IPA path** in the respective field.
2. You can optionally add the **DSYM path** (debug symbols file) too.
3. The **BITRISE's App-Slug variable** and the **BITRISE's Build-Slug variable** are passed automatically on Bitrise.
5. Add the **Amazon AWS Access Key** and the **Amazon AWS Secret Access Key**. These were created [when you signed up for an AWS account](https://docs.aws.amazon.com/powershell/latest/userguide/pstools-appendix-sign-up.html). If you don't have these keys, you can create them through the [IAM console](https://signin.aws.amazon.com/signin?redirect_uri=https%3A%2F%2Fconsole.aws.amazon.com%2Fiam%2F%3Fstate%3DhashArgs%2523%26isauthcode%3Dtrue&client_id=arn%3Aaws%3Aiam%3A%3A015428540659%3Auser%2Fiam&forceMobileApp=0&code_challenge=Dm2ZFAI7S6azuYUUgSfUmQygOH0QNANyPFzDZ6FHeSc&code_challenge_method=SHA-256).
6. Add the **Amazon S3 Bucket Name**.
7. Add the **Amazon S3 Bucket Region** which you [specified when creating a bucket in AWS](https://docs.aws.amazon.com/AmazonS3/latest/userguide/UsingBucket.html). If you use the default s3 region (us-east-1), you can leave this field empty.
8. Add the **Amazon S3 File Path in Bucket** which is the URL of the bucket.
9. Select the **Amazon S3 file access level** which can be `public_read` or `private`.
### Useful links
- [Deploying an iOS app](https://devcenter.bitrise.io/deploy/ios-deploy/ios-deploy-index/)
- [Code signing an iOS app](https://devcenter.bitrise.io/code-signing/ios-code-signing/code-signing-index/)
### Related Steps
- [iOS Auto Provision with App Store Connect API](https://www.bitrise.io/integrations/steps/ios-auto-provision-appstoreconnect)
- [Amazon S3 Bucket Sync](https://www.bitrise.io/integrations/steps/amazon-s3-upload)
website: https://github.com/bitrise-io/steps-amazon-s3-deploy
source_code_url: https://github.com/bitrise-io/steps-amazon-s3-deploy
support_url: https://github.com/bitrise-io/steps-amazon-s3-deploy/issues
published_at: 2021-06-25T08:12:03.089103471Z
source:
git: https://github.com/bitrise-steplib/steps-amazon-s3-deploy.git
commit: 910a47002bb3944bd081df7cd456a0c9d953cbdf
project_type_tags:
- ios
- react-native
- xamarin
- cordova
- ionic
- flutter
type_tags:
- deploy
deps:
brew:
- name: awscli
is_requires_admin_user: true
is_always_run: false
is_skippable: false
run_if: ""
inputs:
- ipa_path: $BITRISE_IPA_PATH
opts:
description: ""
is_required: true
summary: ""
title: IPA path
- dsym_path: $BITRISE_DSYM_PATH
opts:
description: ""
summary: ""
title: DSYM path (optional)
- app_slug: $BITRISE_APP_SLUG
opts:
description: ""
is_expand: true
is_required: true
summary: ""
title: BITRISE's App-Slug variable (passed automatically on Bitrise)
- build_slug: $BITRISE_BUILD_SLUG
opts:
description: ""
is_expand: true
is_required: true
summary: ""
title: BITRISE's Build-Slug variable (passed automatically on Bitrise)
- aws_access_key: ""
opts:
description: ""
is_expand: true
is_required: true
is_sensitive: true
summary: ""
title: Amazon AWS Access Key
- aws_secret_key: ""
opts:
description: ""
is_expand: true
is_required: true
is_sensitive: true
summary: ""
title: Amazon AWS Secret Access Key
- bucket_name: ""
opts:
description: ""
is_required: true
summary: ""
title: Amazon S3 Bucket Name
- bucket_region: ""
opts:
description: |
Amazon S3 Bucket Region
If you use default s3 region (us-east-1), you can leave it empty,
otherwise you should provide this input.
summary: ""
title: Amazon S3 Bucket Region
- opts:
description: |-
Optional, if there is no specified value, then the default will be:
bitrise_$BITRISE_APP_SLUG/${BITRISE_BUILD_TRIGGER_TIMESTAMP}_build_${BITRISE_BUILD_SLUG}
summary: ""
title: Amazon S3 File Path In Bucket
path_in_bucket: bitrise_$BITRISE_APP_SLUG/${BITRISE_BUILD_TRIGGER_TIMESTAMP}_build_${BITRISE_BUILD_SLUG}
- file_access_level: public_read
opts:
is_required: true
title: Amazon S3 file access level
value_options:
- private
- public_read
outputs:
- S3_DEPLOY_STEP_URL_IPA: ""
opts:
description: ""
is_dont_change_value: true
is_expand: false
is_required: true
summary: ""
title: Amazon S3 Deploy IPA URL
- S3_DEPLOY_STEP_URL_DSYM: ""
opts:
description: ""
is_dont_change_value: true
is_expand: false
is_required: true
summary: ""
title: Amazon S3 Deploy DSYM URL
- S3_DEPLOY_STEP_URL_PLIST: ""
opts:
description: ""
is_dont_change_value: true
is_expand: false
is_required: true
summary: ""
title: Amazon S3 Deploy .plist URL
- S3_DEPLOY_STEP_STATUS: ""
opts:
description: ""
is_dont_change_value: true
is_expand: false
is_required: true
summary: ""
title: Amazon S3 Deploy result ('success' or 'failed')
- S3_DEPLOY_STEP_EMAIL_READY_URL: ""
opts:
description: |-
In a link-ready format, for example:
itms-services://?action=download-manifest&url=...
is_dont_change_value: true
is_expand: false
is_required: true
summary: ""
title: Amazon S3 Deploy .plist URL
================================================
FILE: steps/amazon-s3-deploy/step-info.yml
================================================
maintainer: bitrise
deprecate_notes: |
This step is deprecated. Please use the build distribution feature: https://docs.bitrise.io/en/release-management/build-distribution/distributing-builds-to-testers.html
removal_date: "2026-05-31"
================================================
FILE: steps/amazon-s3-upload/3.0.0/step.yml
================================================
title: Amazon S3 Bucket Sync
summary: Fill your Amazon S3 Bucket with contents from the VM
description: |-
Syncs the given local folder with an S3 bucket.
This Step requires an Amazon S3 registration.
To register an Amazon S3 account, [click here](http://aws.amazon.com/s3/).
# Warning!
It will perform a one-direction sync, removing every file and folder from
the bucket which is not present in the local, input folder!
website: https://github.com/bitrise-io/steps-amazon-s3-upload
source_code_url: https://github.com/bitrise-io/steps-amazon-s3-upload
support_url: https://github.com/bitrise-io/steps-amazon-s3-upload/issues
published_at: 2015-09-08T15:21:42.914704779+02:00
source:
git: https://github.com/bitrise-io/steps-amazon-s3-upload.git
commit: fa19800d9e5fe766cdf2ecbb2663807bd58a14b2
host_os_tags:
- osx-10.9
- osx-10.10
type_tags:
- deploy
- upload
- uploader
- amazon
dependencies:
- manager: brew
name: s3cmd
is_requires_admin_user: false
is_always_run: false
is_skippable: false
run_if: ""
inputs:
- access_key_id: ""
opts:
description: ""
is_dont_change_value: false
is_expand: false
is_required: true
summary: ""
title: AWS Access Key
- opts:
description: ""
is_dont_change_value: false
is_expand: false
is_required: true
summary: ""
title: AWS Secret Key
secret_access_key: ""
- opts:
description: ""
is_dont_change_value: false
is_expand: false
is_required: true
summary: ""
title: S3 Bucket Name
upload_bucket: ""
- opts:
description: |
If you want to sync only the content of
the folder but don't want to create the folder then you
should append a slash at the end of the path. Example: ./folder/
is_dont_change_value: false
is_expand: true
is_required: true
summary: ""
title: Local path to upload
upload_local_path: ""
- acl_control: private
opts:
description: ""
is_dont_change_value: false
is_expand: false
is_required: true
summary: ""
title: Access Control
value_options:
- public-read
- private
================================================
FILE: steps/amazon-s3-upload/3.1.0/step.yml
================================================
title: Amazon S3 Bucket Sync
summary: Amazon S3 Bucket Sync
description: |-
Syncs the given local folder with an S3 bucket.
This Step requires an Amazon S3 registration.
To register an Amazon S3 account, [click here](http://aws.amazon.com/s3/).
# Warning!
It will perform a one-direction sync, removing every file and folder from
the bucket which is not present in the local, input folder!
website: https://github.com/bitrise-io/steps-amazon-s3-upload
source_code_url: https://github.com/bitrise-io/steps-amazon-s3-upload
support_url: https://github.com/bitrise-io/steps-amazon-s3-upload/issues
published_at: 2015-10-20T14:50:27.14371816+02:00
source:
git: https://github.com/bitrise-io/steps-amazon-s3-upload.git
commit: 282509840441eb26839e4226d9d84e9b07224e41
host_os_tags:
- osx-10.9
- osx-10.10
type_tags:
- deploy
- upload
- uploader
- amazon
dependencies:
- manager: brew
name: awscli
is_requires_admin_user: false
is_always_run: false
is_skippable: false
run_if: ""
inputs:
- access_key_id: ""
opts:
description: ""
is_dont_change_value: false
is_expand: false
is_required: true
summary: ""
title: AWS Access Key
- opts:
description: ""
is_dont_change_value: false
is_expand: false
is_required: true
summary: ""
title: AWS Secret Key
secret_access_key: ""
- opts:
description: ""
is_dont_change_value: false
is_expand: false
is_required: true
summary: ""
title: S3 Bucket Name
upload_bucket: ""
- opts:
description: |
If you want to sync only the content of
the folder but don't want to create the folder then you
should append a slash at the end of the path. Example: ./folder/
is_dont_change_value: false
is_expand: true
is_required: true
summary: ""
title: Local path to upload
upload_local_path: ""
- acl_control: private
opts:
description: ""
is_dont_change_value: false
is_expand: false
is_required: true
summary: ""
title: Access Control
value_options:
- public-read
- private
- opts:
description: ""
is_dont_change_value: false
is_expand: false
is_required: true
summary: |-
If set to "true" it'll only set ACL for changed objects, which is
way faster to do than to check and set every objects' ACL.
Generally, you can keep this option on "yes" to get a speed boost,
and you should only change it to "false" if you changed the
ACL option (in order to force set every object's ACL to the specified one).
title: Set ACL only on changed objects?
value_options:
- "true"
- "false"
set_acl_only_on_changed_objets: "true"
================================================
FILE: steps/amazon-s3-upload/3.1.1/step.yml
================================================
title: Amazon S3 Bucket Sync
summary: Amazon S3 Bucket Sync
description: |-
Syncs the given local folder with an S3 bucket.
This Step requires an Amazon S3 registration.
To register an Amazon S3 account, [click here](http://aws.amazon.com/s3/).
# Warning!
It will perform a one-direction sync, removing every file and folder from
the bucket which is not present in the local, input folder!
website: https://github.com/bitrise-io/steps-amazon-s3-upload
source_code_url: https://github.com/bitrise-io/steps-amazon-s3-upload
support_url: https://github.com/bitrise-io/steps-amazon-s3-upload/issues
published_at: 2016-04-19T13:48:15.711316002+02:00
source:
git: https://github.com/bitrise-io/steps-amazon-s3-upload.git
commit: 36ed6ca8683e0b6a9e0b4cd74fa8c3fb9f2d03be
host_os_tags:
- osx-10.9
- osx-10.10
type_tags:
- deploy
- upload
- uploader
- amazon
deps:
brew:
- name: awscli
is_requires_admin_user: false
is_always_run: false
is_skippable: false
run_if: ""
inputs:
- access_key_id: ""
opts:
description: ""
is_required: true
summary: ""
title: AWS Access Key
- opts:
description: ""
is_required: true
summary: ""
title: AWS Secret Key
secret_access_key: ""
- opts:
description: ""
is_required: true
summary: ""
title: S3 Bucket Name
upload_bucket: ""
- opts:
description: |
If you want to sync only the content of
the folder but don't want to create the folder then you
should append a slash at the end of the path. Example: ./folder/
is_required: true
summary: ""
title: Local path to upload
upload_local_path: ""
- acl_control: private
opts:
description: ""
is_required: true
summary: ""
title: Access Control
value_options:
- public-read
- private
- opts:
description: ""
is_required: true
summary: |-
If set to "true" it'll only set ACL for changed objects, which is
way faster to do than to check and set every objects' ACL.
Generally, you can keep this option on "yes" to get a speed boost,
and you should only change it to "false" if you changed the
ACL option (in order to force set every object's ACL to the specified one).
title: Set ACL only on changed objects?
value_options:
- "true"
- "false"
set_acl_only_on_changed_objets: "true"
- aws_region: ""
opts:
description: |
If you want to specify a different AWS region of the bucket. Leave
empty to use the default config/env setting.
summary: ""
title: AWS Region
================================================
FILE: steps/amazon-s3-upload/3.1.2/step.yml
================================================
title: Amazon S3 Bucket Sync
summary: Amazon S3 Bucket Sync
description: |-
Syncs the given local folder with an S3 bucket.
This Step requires an Amazon S3 registration.
To register an Amazon S3 account, [click here](http://aws.amazon.com/s3/).
# Warning!
It will perform a one-direction sync, removing every file and folder from
the bucket which is not present in the local, input folder!
website: https://github.com/bitrise-io/steps-amazon-s3-upload
source_code_url: https://github.com/bitrise-io/steps-amazon-s3-upload
support_url: https://github.com/bitrise-io/steps-amazon-s3-upload/issues
published_at: 2016-06-16T12:45:13.485714232+02:00
source:
git: https://github.com/bitrise-io/steps-amazon-s3-upload.git
commit: 003a890a0fbb55628f1a1d87d362d46573cbb789
host_os_tags:
- osx-10.9
- osx-10.10
type_tags:
- deploy
- upload
- uploader
- amazon
deps:
brew:
- name: awscli
apt_get:
- name: awscli
is_requires_admin_user: false
is_always_run: false
is_skippable: false
run_if: ""
inputs:
- access_key_id: ""
opts:
description: ""
is_required: true
summary: ""
title: AWS Access Key
- opts:
description: ""
is_required: true
summary: ""
title: AWS Secret Key
secret_access_key: ""
- opts:
description: ""
is_required: true
summary: ""
title: S3 Bucket Name
upload_bucket: ""
- opts:
description: |
If you want to sync only the content of
the folder but don't want to create the folder then you
should append a slash at the end of the path. Example: ./folder/
is_required: true
summary: ""
title: Local path to upload
upload_local_path: ""
- acl_control: private
opts:
description: ""
is_required: true
summary: ""
title: Access Control
value_options:
- public-read
- private
- opts:
description: ""
is_required: true
summary: |-
If set to "true" it'll only set ACL for changed objects, which is
way faster to do than to check and set every objects' ACL.
Generally, you can keep this option on "yes" to get a speed boost,
and you should only change it to "false" if you changed the
ACL option (in order to force set every object's ACL to the specified one).
title: Set ACL only on changed objects?
value_options:
- "true"
- "false"
set_acl_only_on_changed_objets: "true"
- aws_region: ""
opts:
description: |
If you want to specify a different AWS region of the bucket. Leave
empty to use the default config/env setting.
summary: ""
title: AWS Region
================================================
FILE: steps/amazon-s3-upload/3.1.3/step.yml
================================================
title: Amazon S3 Bucket Sync
summary: Amazon S3 Bucket Sync
description: |-
Syncs the given local folder with an S3 bucket.
This Step requires an Amazon S3 registration.
To register an Amazon S3 account, [click here](http://aws.amazon.com/s3/).
# Warning!
It will perform a one-direction sync, removing every file and folder from
the bucket which is not present in the local, input folder!
website: https://github.com/bitrise-io/steps-amazon-s3-upload
source_code_url: https://github.com/bitrise-io/steps-amazon-s3-upload
support_url: https://github.com/bitrise-io/steps-amazon-s3-upload/issues
published_at: 2016-06-24T14:34:03.416955182+02:00
source:
git: https://github.com/bitrise-io/steps-amazon-s3-upload.git
commit: 7d3a0206d3ca99568e0ecd7866f987510a9748f8
host_os_tags:
- osx-10.9
- osx-10.10
type_tags:
- deploy
deps:
brew:
- name: awscli
apt_get:
- name: awscli
is_requires_admin_user: false
is_always_run: false
is_skippable: false
run_if: ""
inputs:
- access_key_id: ""
opts:
description: ""
is_required: true
summary: ""
title: AWS Access Key
- opts:
description: ""
is_required: true
summary: ""
title: AWS Secret Key
secret_access_key: ""
- opts:
description: ""
is_required: true
summary: ""
title: S3 Bucket Name
upload_bucket: ""
- opts:
description: |
If you want to sync only the content of
the folder but don't want to create the folder then you
should append a slash at the end of the path. Example: ./folder/
is_required: true
summary: ""
title: Local path to upload
upload_local_path: ""
- acl_control: private
opts:
description: ""
is_required: true
summary: ""
title: Access Control
value_options:
- public-read
- private
- opts:
description: ""
is_required: true
summary: |-
If set to "true" it'll only set ACL for changed objects, which is
way faster to do than to check and set every objects' ACL.
Generally, you can keep this option on "yes" to get a speed boost,
and you should only change it to "false" if you changed the
ACL option (in order to force set every object's ACL to the specified one).
title: Set ACL only on changed objects?
value_options:
- "true"
- "false"
set_acl_only_on_changed_objets: "true"
- aws_region: ""
opts:
description: |
If you want to specify a different AWS region of the bucket. Leave
empty to use the default config/env setting.
summary: ""
title: AWS Region
================================================
FILE: steps/amazon-s3-upload/3.1.4/step.yml
================================================
title: Amazon S3 Bucket Sync
summary: Amazon S3 Bucket Sync
description: |-
Amazon S3 Bucket Sync step syncs the given local folder with an S3 bucket.
This step requires an Amazon S3 registration.
To register an Amazon S3 account, [click here](http://aws.amazon.com/s3/).
# Warning!
This step will perform a one-direction sync, removing every file and folder from
the bucket which is not present in the local input folder!
website: https://github.com/bitrise-io/steps-amazon-s3-upload
source_code_url: https://github.com/bitrise-io/steps-amazon-s3-upload
support_url: https://github.com/bitrise-io/steps-amazon-s3-upload/issues
published_at: 2018-08-31T11:12:40.418675898Z
source:
git: https://github.com/bitrise-io/steps-amazon-s3-upload.git
commit: 7690776dca854fe98edf0a5c52a81bb6a77d2a9a
type_tags:
- deploy
deps:
brew:
- name: awscli
apt_get:
- name: awscli
is_requires_admin_user: false
is_always_run: false
is_skippable: false
run_if: ""
inputs:
- access_key_id: ""
opts:
description: ""
is_expand: true
is_required: true
is_sensitive: true
summary: ""
title: AWS Access Key
- opts:
description: ""
is_expand: true
is_required: true
is_sensitive: true
summary: ""
title: AWS Secret Key
secret_access_key: ""
- opts:
description: ""
is_required: true
summary: ""
title: S3 Bucket Name
upload_bucket: ""
- opts:
description: |
If you want to sync only the content of
the folder but don't want to create the folder, then you
should append a slash at the end of the path. For example: ./folder/
is_required: true
summary: ""
title: Local path to upload
upload_local_path: ""
- acl_control: private
opts:
description: ""
is_required: true
summary: ""
title: Access Control
value_options:
- public-read
- private
- opts:
description: ""
is_required: true
summary: |-
If it is set to "true", it'll only set ACL for changed objects, which is
way faster to do than to check and set every objects' ACL.
Generally, you can keep this option on "yes" to get a speed boost,
and you should only change it to "false" if you changed the
ACL option (to set every object's ACL to the specified one).
title: Set ACL only on changed objects?
value_options:
- "true"
- "false"
set_acl_only_on_changed_objets: "true"
- aws_region: ""
opts:
description: |
Here you can specify a different AWS region of the bucket. You can leave
it empty to use the default config/env setting.
summary: ""
title: AWS Region
================================================
FILE: steps/amazon-s3-upload/3.1.5/step.yml
================================================
title: Amazon S3 Bucket Sync
summary: Amazon S3 Bucket Sync
description: |-
Amazon S3 Bucket Sync step syncs the given local folder with an S3 bucket.
This step requires an Amazon S3 registration.
To register an Amazon S3 account, [click here](http://aws.amazon.com/s3/).
# Warning!
This step will perform a one-direction sync, removing every file and folder from
the bucket which is not present in the local input folder!
website: https://github.com/bitrise-io/steps-amazon-s3-upload
source_code_url: https://github.com/bitrise-io/steps-amazon-s3-upload
support_url: https://github.com/bitrise-io/steps-amazon-s3-upload/issues
published_at: 2021-09-17T08:15:20.187953442Z
source:
git: https://github.com/bitrise-steplib/steps-amazon-s3-upload.git
commit: 0b535b9624c4aa77e295c417936593edc5e9af09
type_tags:
- deploy
deps:
brew:
- name: awscli
apt_get:
- name: awscli
is_requires_admin_user: false
is_always_run: false
is_skippable: false
run_if: ""
inputs:
- access_key_id: ""
opts:
description: ""
is_expand: true
is_required: true
is_sensitive: true
summary: ""
title: AWS Access Key
- opts:
description: ""
is_expand: true
is_required: true
is_sensitive: true
summary: ""
title: AWS Secret Key
secret_access_key: ""
- opts:
description: ""
is_required: true
summary: ""
title: S3 Bucket Name
upload_bucket: ""
- opts:
description: |
If you want to sync only the content of
the folder but don't want to create the folder, then you
should append a slash at the end of the path. For example: ./folder/
is_required: true
summary: ""
title: Local path to upload
upload_local_path: ""
- acl_control: private
opts:
description: ""
is_required: true
summary: ""
title: Access Control
value_options:
- public-read
- private
- opts:
description: ""
is_required: true
summary: |-
If it is set to "true", it'll only set ACL for changed objects, which is
way faster to do than to check and set every objects' ACL.
Generally, you can keep this option on "yes" to get a speed boost,
and you should only change it to "false" if you changed the
ACL option (to set every object's ACL to the specified one).
title: Set ACL only on changed objects?
value_options:
- "true"
- "false"
set_acl_only_on_changed_objets: "true"
- aws_region: ""
opts:
description: |
Here you can specify a different AWS region of the bucket. You can leave
it empty to use the default config/env setting.
summary: ""
title: AWS Region
================================================
FILE: steps/amazon-s3-upload/step-info.yml
================================================
maintainer: bitrise
deprecate_notes: |
This step is deprecated. Please use the new official Amazon S3 step: https://bitrise.io/integrations/steps/aws-s3-upload
removal_date: "2026-05-31"
================================================
FILE: steps/amazon-s3-uploader/1.0.1/step.yml
================================================
title: Amazon S3 File uploader
summary: Upload a file to Amazon S3
description: |-
Bitrise Step to upload a file to Amazon S3.
This Step requires an Amazon S3 account.
To register an Amazon S3 account, [click here](http://aws.amazon.com/s3/).
website: https://github.com/scruffyfox/bitrise-amazon-s3-uploader
source_code_url: https://github.com/scruffyfox/bitrise-amazon-s3-uploader
support_url: https://github.com/scruffyfox/bitrise-amazon-s3-uploader/issues
published_at: 2016-09-16T16:24:30.382339161+01:00
source:
git: https://github.com/scruffyfox/bitrise-amazon-s3-uploader.git
commit: 2f622cb773b8a4f5dc5a16eac25579818b6a86a4
type_tags:
- deploy
deps:
brew:
- name: awscli
bin_name: aws
apt_get:
- name: awscli
bin_name: aws
is_requires_admin_user: true
is_always_run: false
is_skippable: false
run_if: ""
inputs:
- file_path: ""
opts:
description: ""
is_required: true
summary: Path to the file to be uploaded
title: File path
- app_slug: $BITRISE_APP_SLUG
opts:
description: ""
is_required: true
summary: ""
title: BITRISE's App-Slug variable (passed automatically on Bitrise)
- build_slug: $BITRISE_BUILD_SLUG
opts:
description: ""
is_required: true
summary: ""
title: BITRISE's Build-Slug variable (passed automatically on Bitrise)
- aws_access_key: ""
opts:
description: ""
is_required: true
summary: ""
title: Amazon AWS Access Key
- aws_secret_key: ""
opts:
description: ""
is_required: true
summary: ""
title: Amazon AWS Secret Access Key
- bucket_name: ""
opts:
description: ""
is_required: true
summary: ""
title: Amazon S3 Bucket Name
- bucket_region: ""
opts:
description: |
Amazon S3 Bucket Region
If you use default s3 region (us-east-1), you can leave it empty,
otherwise you should provide this input.
summary: ""
title: Amazon S3 Bucket Region
- opts:
description: |-
Optional, if no value specified then the default will be:
bitrise_$BITRISE_APP_SLUG/${BITRISE_BUILD_TRIGGER_TIMESTAMP}_build_${BITRISE_BUILD_SLUG}
summary: ""
title: Amazon S3 File Path In Bucket
path_in_bucket: bitrise_$BITRISE_APP_SLUG/${BITRISE_BUILD_TRIGGER_TIMESTAMP}_build_${BITRISE_BUILD_SLUG}
- file_access_level: public_read
opts:
is_required: true
title: Amazon S3 file access level
value_options:
- private
- public_read
outputs:
- S3_UPLOAD_STEP_URL: ""
opts:
description: ""
is_dont_change_value: true
is_expand: false
is_required: true
summary: Url generated for the uploaded file
title: Amazon S3 Deploy URL
- S3_UPLOAD_STEP_STATUS: ""
opts:
description: ""
is_dont_change_value: true
is_expand: false
is_required: true
summary: ""
title: Amazon S3 Deploy result ('success' or 'failed')
================================================
FILE: steps/amazon-s3-uploader/step-info.yml
================================================
maintainer: community
deprecate_notes: |
This step is deprecated. Please use the new official Amazon S3 step: https://bitrise.io/integrations/steps/aws-s3-upload
removal_date: "2026-05-31"
================================================
FILE: steps/android-build/0.10.0/step.yml
================================================
title: Android Build
summary: Builds your Android project with gradle.
description: Builds your Android project with gradle.
website: https://github.com/bitrise-steplib/bitrise-step-android-build
source_code_url: https://github.com/bitrise-steplib/bitrise-step-android-build
support_url: https://github.com/bitrise-steplib/bitrise-step-android-build/issues
published_at: 2019-05-24T14:37:28.600701733Z
source:
git: https://github.com/bitrise-steplib/bitrise-step-android-build.git
commit: 4ba2a407db08bae27768cd1728823d1183e248ed
host_os_tags:
- osx-10.10
- ubuntu-16.04
project_type_tags:
- android
- react-native
type_tags:
- build
toolkit:
go:
package_name: github.com/bitrise-steplib/bitrise-step-android-build
is_requires_admin_user: true
is_always_run: false
is_skippable: false
inputs:
- opts:
description: The root directory of your android project, for example, where your
root build gradle file exist (also gradlew, settings.gradle, etc...)
is_required: true
summary: The root directory of your android project, for example, where your root
build gradle file exist (also gradlew, settings.gradle, etc...)
title: Project Location
project_location: $BITRISE_SOURCE_DIR
- module: ""
opts:
description: |
Set the module that you want to build. To see your available modules please open your project in Android Studio and go in [Project Structure] and see the list on the left.
is_required: false
summary: |
Set the module that you want to build. To see your available modules please open your project in Android Studio and go in [Project Structure] and see the list on the left.
title: Module
- opts:
description: |
Set the variant that you want to build. To see your available variants please open your project in Android Studio and go in [Project Structure] -> variants section.
is_required: false
summary: |
Set the variant that you want to build. To see your available variants please open your project in Android Studio and go in [Project Structure] -> variants section.
title: Variant
variant: ""
- build_type: apk
opts:
description: |
Set the build type that you want to build.
is_required: true
summary: |
Set the build type that you want to build.
title: Build type
value_options:
- apk
- aab
- app_path_pattern: |-
*/build/outputs/apk/*.apk
*/build/outputs/bundle/*.aab
opts:
category: Options
description: |
Will find the APK or AAB files - `depending on the build type input` - with the given pattern.
Separate patters with a newline.
**Note**
The step will export only the selected artifact type - `build type` - even if the filter would accept other artifact types as well.
is_required: true
summary: Will find the APK or AAB files - `depending on the build type input`
- with the given pattern.
title: App artifact (.apk, .aab) location pattern
- cache_level: only_deps
opts:
category: Options
description: |-
`all` - will cache build cache and dependencies
`only_deps` - will cache dependencies only
`none` - will not cache anything
is_required: true
title: Set the level of cache
value_options:
- all
- only_deps
- none
- arguments: null
opts:
category: Options
description: Extra arguments passed to the gradle task
is_required: false
summary: Extra arguments passed to the gradle task
title: Additional Gradle Arguments
- apk_path_pattern: null
opts:
category: Deprecated
description: |
This input is **DEPRECATED** - use the App location pattern input instead
Will find the APK files with the given pattern.
summary: This input is **DEPRECATED** - use the App location pattern input instead
title: APK location pattern
outputs:
- BITRISE_APK_PATH: null
opts:
description: |-
This output will include the path of the generated APK
after filtering based on the filter inputs.
If the build generates more than one APK which fulfills the
filter inputs, this output will contain the last one's path.
summary: Path of the generated (and copied) APK - after filtering.
title: Path of the generated APK
- BITRISE_APK_PATH_LIST: null
opts:
description: |-
This output will include the paths of the generated APKs
after filtering based on the filter inputs.
The paths are separated with `|` character, for example, `app-armeabi-v7a-debug.apk|app-mips-debug.apk|app-x86-debug.apk`
summary: List of the generated (and copied) APK paths - after filtering.
title: List of the generated APK paths
- BITRISE_AAB_PATH: null
opts:
description: |-
This output will include the path of the generated AAB
after filtering based on the filter inputs.
If the build generates more than one AAB which fulfills the
filter inputs, this output will contain the last one's path.
summary: Path of the generated (and copied) AAB - after filtering.
title: Path of the generated AAB
- BITRISE_AAB_PATH_LIST: null
opts:
description: |-
This output will include the paths of the generated AABs
after filtering based on the filter inputs.
The paths are separated with `|` character, for example, `app--debug.aab|app-mips-debug.aab`
summary: List of the generated (and copied) AAB paths - after filtering.
title: List of the generated AAB paths
- BITRISE_MAPPING_PATH: null
opts:
description: |-
This output will include the path of the generated mapping.txt.
If more than one mapping.txt exist in the project, this output will contain the last one's path.
summary: Path of the generated (and copied) mapping.txt.
title: Path of the generated mapping.txt
================================================
FILE: steps/android-build/0.10.1/step.yml
================================================
title: Android Build
summary: Builds your Android project with gradle.
description: Builds your Android project with gradle.
website: https://github.com/bitrise-steplib/bitrise-step-android-build
source_code_url: https://github.com/bitrise-steplib/bitrise-step-android-build
support_url: https://github.com/bitrise-steplib/bitrise-step-android-build/issues
published_at: 2020-04-24T21:05:30.902538941Z
source:
git: https://github.com/bitrise-steplib/bitrise-step-android-build.git
commit: 01c86abe34690c0fdf5c3f09213dde0acb5ff8da
host_os_tags:
- osx-10.10
- ubuntu-16.04
project_type_tags:
- android
- react-native
type_tags:
- build
toolkit:
go:
package_name: github.com/bitrise-steplib/bitrise-step-android-build
is_requires_admin_user: true
is_always_run: false
is_skippable: false
inputs:
- opts:
description: The root directory of your android project, for example, where your
root build gradle file exist (also gradlew, settings.gradle, etc...)
is_required: true
summary: The root directory of your android project, for example, where your root
build gradle file exist (also gradlew, settings.gradle, etc...)
title: Project Location
project_location: $BITRISE_SOURCE_DIR
- module: ""
opts:
description: |
Set the module that you want to build. To see your available modules please open your project in Android Studio and go in [Project Structure] and see the list on the left.
is_required: false
summary: |
Set the module that you want to build. To see your available modules please open your project in Android Studio and go in [Project Structure] and see the list on the left.
title: Module
- opts:
description: |
Set the variant that you want to build. To see your available variants please open your project in Android Studio and go in [Project Structure] -> variants section.
is_required: false
summary: |
Set the variant that you want to build. To see your available variants please open your project in Android Studio and go in [Project Structure] -> variants section.
title: Variant
variant: ""
- build_type: apk
opts:
description: |
Set the build type that you want to build.
is_required: true
summary: |
Set the build type that you want to build.
title: Build type
value_options:
- apk
- aab
- app_path_pattern: |-
*/build/outputs/apk/*.apk
*/build/outputs/bundle/*.aab
opts:
category: Options
description: |
Will find the APK or AAB files - `depending on the build type input` - with the given pattern.
Separate patters with a newline.
**Note**
The step will export only the selected artifact type - `build type` - even if the filter would accept other artifact types as well.
is_required: true
summary: Will find the APK or AAB files - `depending on the build type input`
- with the given pattern.
title: App artifact (.apk, .aab) location pattern
- cache_level: only_deps
opts:
category: Options
description: |-
`all` - will cache build cache and dependencies
`only_deps` - will cache dependencies only
`none` - will not cache anything
is_required: true
title: Set the level of cache
value_options:
- all
- only_deps
- none
- arguments: null
opts:
category: Options
description: Extra arguments passed to the gradle task
is_required: false
summary: Extra arguments passed to the gradle task
title: Additional Gradle Arguments
- apk_path_pattern: null
opts:
category: Deprecated
description: |
This input is **DEPRECATED** - use the App location pattern input instead
Will find the APK files with the given pattern.
summary: This input is **DEPRECATED** - use the App location pattern input instead
title: APK location pattern
outputs:
- BITRISE_APK_PATH: null
opts:
description: |-
This output will include the path of the generated APK
after filtering based on the filter inputs.
If the build generates more than one APK which fulfills the
filter inputs, this output will contain the last one's path.
summary: Path of the generated (and copied) APK - after filtering.
title: Path of the generated APK
- BITRISE_APK_PATH_LIST: null
opts:
description: |-
This output will include the paths of the generated APKs
after filtering based on the filter inputs.
The paths are separated with `|` character, for example, `app-armeabi-v7a-debug.apk|app-mips-debug.apk|app-x86-debug.apk`
summary: List of the generated (and copied) APK paths - after filtering.
title: List of the generated APK paths
- BITRISE_AAB_PATH: null
opts:
description: |-
This output will include the path of the generated AAB
after filtering based on the filter inputs.
If the build generates more than one AAB which fulfills the
filter inputs, this output will contain the last one's path.
summary: Path of the generated (and copied) AAB - after filtering.
title: Path of the generated AAB
- BITRISE_AAB_PATH_LIST: null
opts:
description: |-
This output will include the paths of the generated AABs
after filtering based on the filter inputs.
The paths are separated with `|` character, for example, `app--debug.aab|app-mips-debug.aab`
summary: List of the generated (and copied) AAB paths - after filtering.
title: List of the generated AAB paths
- BITRISE_MAPPING_PATH: null
opts:
description: |-
This output will include the path of the generated mapping.txt.
If more than one mapping.txt exist in the project, this output will contain the last one's path.
summary: Path of the generated (and copied) mapping.txt.
title: Path of the generated mapping.txt
================================================
FILE: steps/android-build/0.10.2/step.yml
================================================
title: Android Build
summary: Builds your Android project with gradle.
description: Builds your Android project with gradle.
website: https://github.com/bitrise-steplib/bitrise-step-android-build
source_code_url: https://github.com/bitrise-steplib/bitrise-step-android-build
support_url: https://github.com/bitrise-steplib/bitrise-step-android-build/issues
published_at: 2020-09-02T09:59:16.604112066Z
source:
git: https://github.com/bitrise-steplib/bitrise-step-android-build.git
commit: ea67157a75f83a57fe5a338f73ed72a5a4264701
host_os_tags:
- osx-10.10
- ubuntu-16.04
project_type_tags:
- android
- react-native
type_tags:
- build
toolkit:
go:
package_name: github.com/bitrise-steplib/bitrise-step-android-build
is_requires_admin_user: true
is_always_run: false
is_skippable: false
inputs:
- opts:
description: The root directory of your android project, for example, where your
root build gradle file exist (also gradlew, settings.gradle, etc...)
is_required: true
summary: The root directory of your android project, for example, where your root
build gradle file exist (also gradlew, settings.gradle, etc...)
title: Project Location
project_location: $BITRISE_SOURCE_DIR
- module: ""
opts:
description: |
Set the module that you want to build. To see your available modules please open your project in Android Studio and go in [Project Structure] and see the list on the left.
is_required: false
summary: |
Set the module that you want to build. To see your available modules please open your project in Android Studio and go in [Project Structure] and see the list on the left.
title: Module
- opts:
description: |
Set the variant that you want to build. To see your available variants please open your project in Android Studio and go in [Project Structure] -> variants section.
is_required: false
summary: |
Set the variant that you want to build. To see your available variants please open your project in Android Studio and go in [Project Structure] -> variants section.
title: Variant
variant: ""
- build_type: apk
opts:
description: |
Set the build type that you want to build.
is_required: true
summary: |
Set the build type that you want to build.
title: Build type
value_options:
- apk
- aab
- app_path_pattern: |-
*/build/outputs/apk/*.apk
*/build/outputs/bundle/*.aab
opts:
category: Options
description: |
Will find the APK or AAB files - `depending on the build type input` - with the given pattern.
Separate patters with a newline.
**Note**
The step will export only the selected artifact type - `build type` - even if the filter would accept other artifact types as well.
is_required: true
summary: Will find the APK or AAB files - `depending on the build type input`
- with the given pattern.
title: App artifact (.apk, .aab) location pattern
- cache_level: only_deps
opts:
category: Options
description: |-
`all` - will cache build cache and dependencies
`only_deps` - will cache dependencies only
`none` - will not cache anything
is_required: true
title: Set the level of cache
value_options:
- all
- only_deps
- none
- arguments: null
opts:
category: Options
description: Extra arguments passed to the gradle task
is_required: false
summary: Extra arguments passed to the gradle task
title: Additional Gradle Arguments
- apk_path_pattern: null
opts:
category: Deprecated
description: |
This input is **DEPRECATED** - use the App location pattern input instead
Will find the APK files with the given pattern.
summary: This input is **DEPRECATED** - use the App location pattern input instead
title: APK location pattern
outputs:
- BITRISE_APK_PATH: null
opts:
description: |-
This output will include the path of the generated APK
after filtering based on the filter inputs.
If the build generates more than one APK which fulfills the
filter inputs, this output will contain the last one's path.
summary: Path of the generated (and copied) APK - after filtering.
title: Path of the generated APK
- BITRISE_APK_PATH_LIST: null
opts:
description: |-
This output will include the paths of the generated APKs
after filtering based on the filter inputs.
The paths are separated with `|` character, for example, `app-armeabi-v7a-debug.apk|app-mips-debug.apk|app-x86-debug.apk`
summary: List of the generated (and copied) APK paths - after filtering.
title: List of the generated APK paths
- BITRISE_AAB_PATH: null
opts:
description: |-
This output will include the path of the generated AAB
after filtering based on the filter inputs.
If the build generates more than one AAB which fulfills the
filter inputs, this output will contain the last one's path.
summary: Path of the generated (and copied) AAB - after filtering.
title: Path of the generated AAB
- BITRISE_AAB_PATH_LIST: null
opts:
description: |-
This output will include the paths of the generated AABs
after filtering based on the filter inputs.
The paths are separated with `|` character, for example, `app--debug.aab|app-mips-debug.aab`
summary: List of the generated (and copied) AAB paths - after filtering.
title: List of the generated AAB paths
- BITRISE_MAPPING_PATH: null
opts:
description: |-
This output will include the path of the generated mapping.txt.
If more than one mapping.txt exist in the project, this output will contain the last one's path.
summary: Path of the generated (and copied) mapping.txt.
title: Path of the generated mapping.txt
================================================
FILE: steps/android-build/0.10.3/step.yml
================================================
title: Android Build
summary: Builds your Android project with Gradle.
description: "\nThe Step builds your Android project on Bitrise with Gradle commands:
it installs all dependences that are listed in the project's `build.gradle` file,
and builds and exports either an APK or an AAB. \nOnce the file is exported, it
is available for other Steps in your Workflow.\n\nYou can select the module and
the variant you want to use for the build.\n\n### Configuring the Step \n\n1. Make
sure the **Project Location** input points to the root directory of your Android
project.\n1. In the **Module** input, set the module that you want to build.\n \n
\ You can find the available modules in Android Studio.\n\n1. In the **Variant**
input, set the variant that you want to build. \n \n You can find the available
variants in Android Studio.\n \n1. In the **Build type** input, select the file
type you want to build. \n\n The options are:\n - `apk`\n - `aab`\n \n1.
In the **Options** input group, you can set more advanced configuration options
for the Step:\n\n - In the **App artifact (.apk, .aab) location pattern** input,
you can tell the Step where to look for the APK or AAB files in your project to
export them. \n For the vast majority of Android projects, the default values
do NOT need to be changed.\n \n - In the **Additional Gradle Arguments**, you
can add additional command line arguments to the Gradle task. Read more about [Gradle's
Command Line Interface](https://docs.gradle.org/current/userguide/command_line_interface.html).\n
\ \n - The **Set the level of cache** input allows you to set what will be cached
during the build: everything, dependencies only, or nothing.\n \n### Troubleshooting
\n\nBe aware that an APK or AAB built by the Step is still unsigned: code signing
is performed either in Gradle itself or by other Steps. To be able to deploy your
APK or AAB to an online store, you need code signing. \n\nIf you want to build a
custom module or variant, always check that the value you set in the respective
input is correct. A typo means your build will fail; if the module or variant does
not exist in Android Studio, the build will fail.\n \n### Useful links\n\n- [Getting
started with Android apps](https://devcenter.bitrise.io/getting-started/getting-started-with-android-apps/)\n-
[Deploying Android apps](https://devcenter.bitrise.io/deploy/android-deploy/deploying-android-apps/)\n-
[Generating and deploying Android app bundles](https://devcenter.bitrise.io/deploy/android-deploy/generating-and-deploying-android-app-bundles/)\n-
[Gradle's Command Line Interface](https://docs.gradle.org/current/userguide/command_line_interface.html)\n\n###
Related Steps \n\n- [Gradle Runner](https://www.bitrise.io/integrations/steps/gradle-runner)\n-
[Android Sign](https://www.bitrise.io/integrations/steps/sign-apk)\n- [Install missing
Android SDK components](https://www.bitrise.io/integrations/steps/install-missing-android-tools)"
website: https://github.com/bitrise-steplib/bitrise-step-android-build
source_code_url: https://github.com/bitrise-steplib/bitrise-step-android-build
support_url: https://github.com/bitrise-steplib/bitrise-step-android-build/issues
published_at: 2020-12-10T08:43:04.365483747Z
source:
git: https://github.com/bitrise-steplib/bitrise-step-android-build.git
commit: c8661adc2e5a033205ce2c529a57ae87aa4469ba
host_os_tags:
- osx-10.10
- ubuntu-16.04
project_type_tags:
- android
- react-native
type_tags:
- build
toolkit:
go:
package_name: github.com/bitrise-steplib/bitrise-step-android-build
is_requires_admin_user: true
is_always_run: false
is_skippable: false
inputs:
- opts:
description: The root directory of your Android project. For example, where your
root build gradle file exist (also gradlew, settings.gradle, and so on)
is_required: true
summary: The root directory of your Android project.
title: Project Location
project_location: $BITRISE_SOURCE_DIR
- module: ""
opts:
description: |
Set the module that you want to build. To see your available modules, please open your project in Android Studio and go in [Project Structure] and see the list on the left.
is_required: false
summary: |
Set the module that you want to build. To see your available modules, please open your project in Android Studio and go in [Project Structure] and see the list on the left.
title: Module
- opts:
description: |
Set the variant(s) that you want to build. To see your available variants, please open your project in Android Studio and go in [Project Structure] -> variants section.
You can set multiple variants separated by `\n` character. For instance: `- variant: myvariant1\nmyvariant2`.
is_required: false
summary: |
Set the variant(s) that you want to build. To see your available variants, please open your project in Android Studio and go in [Project Structure] -> variants section.
title: Variant
variant: ""
- build_type: apk
opts:
description: |
Set the build type that you want to build.
is_required: true
summary: |
Set the build type that you want to build.
title: Build type
value_options:
- apk
- aab
- app_path_pattern: |-
*/build/outputs/apk/*.apk
*/build/outputs/bundle/*.aab
opts:
category: Options
description: |
Will find the APK or AAB files - depending on the **Build type** input - with the given pattern.
Separate patterns with a newline.
**Note**
The Step will export only the selected artifact type even if the filter would accept other artifact types as well.
is_required: true
summary: Will find the APK or AAB files - depending on the **Build type** input
- with the given pattern.
title: App artifact (.apk, .aab) location pattern
- cache_level: only_deps
opts:
category: Options
description: |-
`all` - The Step will cache build cache and the dependencies
`only_deps` - The Step will cache dependencies only
`none` - The Step will not cache anything
is_required: true
title: Set the level of cache
value_options:
- all
- only_deps
- none
- arguments: null
opts:
category: Options
description: Extra arguments passed to the gradle task
is_required: false
summary: Extra arguments passed to the gradle task
title: Additional Gradle Arguments
- apk_path_pattern: null
opts:
category: Deprecated
description: |
This input is **DEPRECATED** - use the App location pattern input instead
Will find the APK files with the given pattern.
summary: This input is **DEPRECATED** - use the App location pattern input instead
title: APK location pattern
outputs:
- BITRISE_APK_PATH: null
opts:
description: |-
This output will include the path of the generated APK
after filtering based on the filter inputs.
If the build generates more than one APK which fulfills the
filter inputs, this output will contain the last one's path.
summary: Path of the generated (and copied) APK - after filtering.
title: Path of the generated APK
- BITRISE_APK_PATH_LIST: null
opts:
description: |-
This output will include the paths of the generated APKs
after filtering based on the filter inputs.
The paths are separated with `|` character, for example, `app-armeabi-v7a-debug.apk|app-mips-debug.apk|app-x86-debug.apk`
summary: List of the generated (and copied) APK paths - after filtering.
title: List of the generated APK paths
- BITRISE_AAB_PATH: null
opts:
description: |-
This output will include the path of the generated AAB
after filtering based on the filter inputs.
If the build generates more than one AAB which fulfills the
filter inputs, this output will contain the last one's path.
summary: Path of the generated (and copied) AAB - after filtering.
title: Path of the generated AAB
- BITRISE_AAB_PATH_LIST: null
opts:
description: |-
This output will include the paths of the generated AABs
after filtering based on the filter inputs.
The paths are separated with `|` character, for example, `app--debug.aab|app-mips-debug.aab`
summary: List of the generated (and copied) AAB paths - after filtering.
title: List of the generated AAB paths
- BITRISE_MAPPING_PATH: null
opts:
description: |-
This output will include the path of the generated mapping.txt.
If more than one mapping.txt exist in the project, this output will contain the last one's path.
summary: Path of the generated (and copied) mapping.txt.
title: Path of the generated mapping.txt
================================================
FILE: steps/android-build/0.10.4/step.yml
================================================
title: Android Build
summary: Builds your Android project with Gradle.
description: "\nThe Step builds your Android project on Bitrise with Gradle commands:
it installs all dependences that are listed in the project's `build.gradle` file,
and builds and exports either an APK or an AAB. \nOnce the file is exported, it
is available for other Steps in your Workflow.\n\nYou can select the module and
the variant you want to use for the build.\n\n### Configuring the Step \n\n1. Make
sure the **Project Location** input points to the root directory of your Android
project.\n1. In the **Module** input, set the module that you want to build.\n \n
\ You can find the available modules in Android Studio.\n\n1. In the **Variant**
input, set the variant that you want to build. \n \n You can find the available
variants in Android Studio.\n \n1. In the **Build type** input, select the file
type you want to build. \n\n The options are:\n - `apk`\n - `aab`\n \n1.
In the **Options** input group, you can set more advanced configuration options
for the Step:\n\n - In the **App artifact (.apk, .aab) location pattern** input,
you can tell the Step where to look for the APK or AAB files in your project to
export them. \n For the vast majority of Android projects, the default values
do NOT need to be changed.\n \n - In the **Additional Gradle Arguments**, you
can add additional command line arguments to the Gradle task. Read more about [Gradle's
Command Line Interface](https://docs.gradle.org/current/userguide/command_line_interface.html).\n
\ \n - The **Set the level of cache** input allows you to set what will be cached
during the build: everything, dependencies only, or nothing.\n \n### Troubleshooting
\n\nBe aware that an APK or AAB built by the Step is still unsigned: code signing
is performed either in Gradle itself or by other Steps. To be able to deploy your
APK or AAB to an online store, you need code signing. \n\nIf you want to build a
custom module or variant, always check that the value you set in the respective
input is correct. A typo means your build will fail; if the module or variant does
not exist in Android Studio, the build will fail.\n \n### Useful links\n\n- [Getting
started with Android apps](https://devcenter.bitrise.io/getting-started/getting-started-with-android-apps/)\n-
[Deploying Android apps](https://devcenter.bitrise.io/deploy/android-deploy/deploying-android-apps/)\n-
[Generating and deploying Android app bundles](https://devcenter.bitrise.io/deploy/android-deploy/generating-and-deploying-android-app-bundles/)\n-
[Gradle's Command Line Interface](https://docs.gradle.org/current/userguide/command_line_interface.html)\n\n###
Related Steps \n\n- [Gradle Runner](https://www.bitrise.io/integrations/steps/gradle-runner)\n-
[Android Sign](https://www.bitrise.io/integrations/steps/sign-apk)\n- [Install missing
Android SDK components](https://www.bitrise.io/integrations/steps/install-missing-android-tools)"
website: https://github.com/bitrise-steplib/bitrise-step-android-build
source_code_url: https://github.com/bitrise-steplib/bitrise-step-android-build
support_url: https://github.com/bitrise-steplib/bitrise-step-android-build/issues
published_at: 2021-05-28T07:51:31.99332069Z
source:
git: https://github.com/bitrise-steplib/bitrise-step-android-build.git
commit: 84b5cbb44231b20e0490706a98956c6b664bb395
host_os_tags:
- osx-10.10
- ubuntu-16.04
project_type_tags:
- android
- react-native
type_tags:
- build
toolkit:
go:
package_name: github.com/bitrise-steplib/bitrise-step-android-build
is_requires_admin_user: true
is_always_run: false
is_skippable: false
inputs:
- opts:
description: The root directory of your Android project. For example, where your
root build gradle file exist (also gradlew, settings.gradle, and so on)
is_required: true
summary: The root directory of your Android project.
title: Project Location
project_location: $BITRISE_SOURCE_DIR
- module: ""
opts:
description: |
Set the module that you want to build. To see your available modules, please open your project in Android Studio and go in [Project Structure] and see the list on the left.
is_required: false
summary: |
Set the module that you want to build. To see your available modules, please open your project in Android Studio and go in [Project Structure] and see the list on the left.
title: Module
- opts:
description: |
Set the variant(s) that you want to build. To see your available variants, please open your project in Android Studio and go in [Project Structure] -> variants section.
You can set multiple variants separated by `\n` character. For instance: `- variant: myvariant1\nmyvariant2`.
is_required: false
summary: |
Set the variant(s) that you want to build. To see your available variants, please open your project in Android Studio and go in [Project Structure] -> variants section.
title: Variant
variant: ""
- build_type: apk
opts:
description: |
Set the build type that you want to build.
is_required: true
summary: |
Set the build type that you want to build.
title: Build type
value_options:
- apk
- aab
- app_path_pattern: |-
*/build/outputs/apk/*.apk
*/build/outputs/bundle/*.aab
opts:
category: Options
description: |
Will find the APK or AAB files - depending on the **Build type** input - with the given pattern.
Separate patterns with a newline.
**Note**
The Step will export only the selected artifact type even if the filter would accept other artifact types as well.
is_required: true
summary: Will find the APK or AAB files - depending on the **Build type** input
- with the given pattern.
title: App artifact (.apk, .aab) location pattern
- cache_level: only_deps
opts:
category: Options
description: |-
`all` - The Step will cache build cache and the dependencies
`only_deps` - The Step will cache dependencies only
`none` - The Step will not cache anything
is_required: true
title: Set the level of cache
value_options:
- all
- only_deps
- none
- arguments: null
opts:
category: Options
description: Extra arguments passed to the gradle task
is_required: false
summary: Extra arguments passed to the gradle task
title: Additional Gradle Arguments
- apk_path_pattern: null
opts:
category: Deprecated
description: |
This input is **DEPRECATED** - use the App location pattern input instead
Will find the APK files with the given pattern.
summary: This input is **DEPRECATED** - use the App location pattern input instead
title: APK location pattern
outputs:
- BITRISE_APK_PATH: null
opts:
description: |-
This output will include the path of the generated APK
after filtering based on the filter inputs.
If the build generates more than one APK which fulfills the
filter inputs, this output will contain the last one's path.
summary: Path of the generated (and copied) APK - after filtering.
title: Path of the generated APK
- BITRISE_APK_PATH_LIST: null
opts:
description: |-
This output will include the paths of the generated APKs
after filtering based on the filter inputs.
The paths are separated with `|` character, for example, `app-armeabi-v7a-debug.apk|app-mips-debug.apk|app-x86-debug.apk`
summary: List of the generated (and copied) APK paths - after filtering.
title: List of the generated APK paths
- BITRISE_AAB_PATH: null
opts:
description: |-
This output will include the path of the generated AAB
after filtering based on the filter inputs.
If the build generates more than one AAB which fulfills the
filter inputs, this output will contain the last one's path.
summary: Path of the generated (and copied) AAB - after filtering.
title: Path of the generated AAB
- BITRISE_AAB_PATH_LIST: null
opts:
description: |-
This output will include the paths of the generated AABs
after filtering based on the filter inputs.
The paths are separated with `|` character, for example, `app--debug.aab|app-mips-debug.aab`
summary: List of the generated (and copied) AAB paths - after filtering.
title: List of the generated AAB paths
- BITRISE_MAPPING_PATH: null
opts:
description: |-
This output will include the path of the generated mapping.txt.
If more than one mapping.txt exist in the project, this output will contain the last one's path.
summary: Path of the generated (and copied) mapping.txt.
title: Path of the generated mapping.txt
================================================
FILE: steps/android-build/0.9.0/step.yml
================================================
title: Android Build
summary: Builds your Android project with gradle.
description: Builds your Android project with gradle.
website: https://github.com/bitrise-steplib/bitrise-step-android-build
source_code_url: https://github.com/bitrise-steplib/bitrise-step-android-build
support_url: https://github.com/bitrise-steplib/bitrise-step-android-build/issues
published_at: !!timestamp 2018-03-29T11:30:43.460247665+02:00
source:
git: https://github.com/bitrise-steplib/bitrise-step-android-build.git
commit: 534321783aba658c2b7c334b90f9d68618eed1c4
host_os_tags:
- osx-10.10
- ubuntu-16.04
project_type_tags:
- android
- react-native
type_tags:
- test
toolkit:
go:
package_name: github.com/bitrise-steplib/bitrise-step-android-build
is_requires_admin_user: true
is_always_run: false
is_skippable: false
inputs:
- opts:
description: 'The root directory of your android project, e.g.: where your root
build gradle file exist (also gradlew, settings.gradle, etc...)'
is_required: true
summary: 'The root directory of your android project, e.g.: where your root build
gradle file exist (also gradlew, settings.gradle, etc...)'
title: Project Location
project_location: $BITRISE_SOURCE_DIR
- module: ""
opts:
description: |
Set the module that you want to build. To see your available modules please open your project in Android Studio and go in [Project Structure] and see the list on the left.
is_required: false
summary: |
Set the module that you want to build. To see your available modules please open your project in Android Studio and go in [Project Structure] and see the list on the left.
title: Module
- opts:
description: |
Set the variant that you want to build. To see your available variants please open your project in Android Studio and go in [Project Structure] -> variants section.
is_required: false
summary: |
Set the variant that you want to build. To see your available variants please open your project in Android Studio and go in [Project Structure] -> variants section.
title: Variant
variant: ""
- apk_path_pattern: '*/build/outputs/apk/*.apk'
opts:
category: APK Export Options
description: Will find the APK files with the given pattern.
is_required: true
summary: Will find the APK files with the given pattern.
title: APK location pattern
outputs:
- BITRISE_APK_PATH: null
opts:
description: |-
This output will include the path of the generated APK,
after filtering based on the filter inputs.
If the build generates more than one APK which fulfills the
filter inputs this output will contain the last one's path.
summary: Path of the generated (and copied) APK - after filtering.
title: Path of the generated APK
- BITRISE_APK_PATH_LIST: null
opts:
description: |-
This output will include the paths of the generated APKs,
after filtering based on the filter inputs.
The paths are separated with `|` character, eg: `app-armeabi-v7a-debug.apk|app-mips-debug.apk|app-x86-debug.apk`
summary: List of the generated (and copied) APK paths - after filtering.
title: List of the generated APK paths
- BITRISE_MAPPING_PATH: null
opts:
description: |-
This output will include the path of the generated mapping.txt.
If more than one mapping.txt exist in project this output will contain the last one's path.
summary: Path of the generated (and copied) mapping.txt.
title: Path of the generated mapping.txt
================================================
FILE: steps/android-build/0.9.1/step.yml
================================================
title: Android Build
summary: Builds your Android project with gradle.
description: Builds your Android project with gradle.
website: https://github.com/bitrise-steplib/bitrise-step-android-build
source_code_url: https://github.com/bitrise-steplib/bitrise-step-android-build
support_url: https://github.com/bitrise-steplib/bitrise-step-android-build/issues
published_at: !!timestamp 2018-04-03T11:47:26.134777578+02:00
source:
git: https://github.com/bitrise-steplib/bitrise-step-android-build.git
commit: 18de17bb9a720a7f45cf012b06518ae3612c3dc7
host_os_tags:
- osx-10.10
- ubuntu-16.04
project_type_tags:
- android
- react-native
type_tags:
- build
toolkit:
go:
package_name: github.com/bitrise-steplib/bitrise-step-android-build
is_requires_admin_user: true
is_always_run: false
is_skippable: false
inputs:
- opts:
description: 'The root directory of your android project, e.g.: where your root
build gradle file exist (also gradlew, settings.gradle, etc...)'
is_required: true
summary: 'The root directory of your android project, e.g.: where your root build
gradle file exist (also gradlew, settings.gradle, etc...)'
title: Project Location
project_location: $BITRISE_SOURCE_DIR
- module: ""
opts:
description: |
Set the module that you want to build. To see your available modules please open your project in Android Studio and go in [Project Structure] and see the list on the left.
is_required: false
summary: |
Set the module that you want to build. To see your available modules please open your project in Android Studio and go in [Project Structure] and see the list on the left.
title: Module
- opts:
description: |
Set the variant that you want to build. To see your available variants please open your project in Android Studio and go in [Project Structure] -> variants section.
is_required: false
summary: |
Set the variant that you want to build. To see your available variants please open your project in Android Studio and go in [Project Structure] -> variants section.
title: Variant
variant: ""
- apk_path_pattern: '*/build/outputs/apk/*.apk'
opts:
category: APK Export Options
description: Will find the APK files with the given pattern.
is_required: true
summary: Will find the APK files with the given pattern.
title: APK location pattern
outputs:
- BITRISE_APK_PATH: null
opts:
description: |-
This output will include the path of the generated APK,
after filtering based on the filter inputs.
If the build generates more than one APK which fulfills the
filter inputs this output will contain the last one's path.
summary: Path of the generated (and copied) APK - after filtering.
title: Path of the generated APK
- BITRISE_APK_PATH_LIST: null
opts:
description: |-
This output will include the paths of the generated APKs,
after filtering based on the filter inputs.
The paths are separated with `|` character, eg: `app-armeabi-v7a-debug.apk|app-mips-debug.apk|app-x86-debug.apk`
summary: List of the generated (and copied) APK paths - after filtering.
title: List of the generated APK paths
- BITRISE_MAPPING_PATH: null
opts:
description: |-
This output will include the path of the generated mapping.txt.
If more than one mapping.txt exist in project this output will contain the last one's path.
summary: Path of the generated (and copied) mapping.txt.
title: Path of the generated mapping.txt
================================================
FILE: steps/android-build/0.9.2/step.yml
================================================
title: Android Build
summary: Builds your Android project with gradle.
description: Builds your Android project with gradle.
website: https://github.com/bitrise-steplib/bitrise-step-android-build
source_code_url: https://github.com/bitrise-steplib/bitrise-step-android-build
support_url: https://github.com/bitrise-steplib/bitrise-step-android-build/issues
published_at: 2018-05-02T12:47:52.70496816+02:00
source:
git: https://github.com/bitrise-steplib/bitrise-step-android-build.git
commit: 75e3f3d3daa8a9558518ce170d74ef7c30949be2
host_os_tags:
- osx-10.10
- ubuntu-16.04
project_type_tags:
- android
- react-native
type_tags:
- build
toolkit:
go:
package_name: github.com/bitrise-steplib/bitrise-step-android-build
is_requires_admin_user: true
is_always_run: false
is_skippable: false
inputs:
- opts:
description: 'The root directory of your android project, e.g.: where your root
build gradle file exist (also gradlew, settings.gradle, etc...)'
is_required: true
summary: 'The root directory of your android project, e.g.: where your root build
gradle file exist (also gradlew, settings.gradle, etc...)'
title: Project Location
project_location: $BITRISE_SOURCE_DIR
- module: ""
opts:
description: |
Set the module that you want to build. To see your available modules please open your project in Android Studio and go in [Project Structure] and see the list on the left.
is_required: false
summary: |
Set the module that you want to build. To see your available modules please open your project in Android Studio and go in [Project Structure] and see the list on the left.
title: Module
- opts:
description: |
Set the variant that you want to build. To see your available variants please open your project in Android Studio and go in [Project Structure] -> variants section.
is_required: false
summary: |
Set the variant that you want to build. To see your available variants please open your project in Android Studio and go in [Project Structure] -> variants section.
title: Variant
variant: ""
- apk_path_pattern: '*/build/outputs/apk/*.apk'
opts:
category: Options
description: Will find the APK files with the given pattern.
is_required: true
summary: Will find the APK files with the given pattern.
title: APK location pattern
- cache_level: only_deps
opts:
category: Options
description: |-
`all` - will cache build cache and dependencies
`only_deps` - will cache dependencies only
`none` - will not cache anything
is_required: true
title: Set the level of cache
value_options:
- all
- only_deps
- none
- arguments: null
opts:
category: Options
description: Extra arguments passed to the gradle task
is_required: false
summary: Extra arguments passed to the gradle task
title: Additional Gradle Arguments
outputs:
- BITRISE_APK_PATH: null
opts:
description: |-
This output will include the path of the generated APK,
after filtering based on the filter inputs.
If the build generates more than one APK which fulfills the
filter inputs this output will contain the last one's path.
summary: Path of the generated (and copied) APK - after filtering.
title: Path of the generated APK
- BITRISE_APK_PATH_LIST: null
opts:
description: |-
This output will include the paths of the generated APKs,
after filtering based on the filter inputs.
The paths are separated with `|` character, eg: `app-armeabi-v7a-debug.apk|app-mips-debug.apk|app-x86-debug.apk`
summary: List of the generated (and copied) APK paths - after filtering.
title: List of the generated APK paths
- BITRISE_MAPPING_PATH: null
opts:
description: |-
This output will include the path of the generated mapping.txt.
If more than one mapping.txt exist in project this output will contain the last one's path.
summary: Path of the generated (and copied) mapping.txt.
title: Path of the generated mapping.txt
================================================
FILE: steps/android-build/0.9.3/step.yml
================================================
title: Android Build
summary: Builds your Android project with gradle.
description: Builds your Android project with gradle.
website: https://github.com/bitrise-steplib/bitrise-step-android-build
source_code_url: https://github.com/bitrise-steplib/bitrise-step-android-build
support_url: https://github.com/bitrise-steplib/bitrise-step-android-build/issues
published_at: 2018-05-09T15:33:45.48696137+02:00
source:
git: https://github.com/bitrise-steplib/bitrise-step-android-build.git
commit: 041761f735f9b988c2120ed45addf781a621cdaf
host_os_tags:
- osx-10.10
- ubuntu-16.04
project_type_tags:
- android
- react-native
type_tags:
- build
toolkit:
go:
package_name: github.com/bitrise-steplib/bitrise-step-android-build
is_requires_admin_user: true
is_always_run: false
is_skippable: false
inputs:
- opts:
description: 'The root directory of your android project, e.g.: where your root
build gradle file exist (also gradlew, settings.gradle, etc...)'
is_required: true
summary: 'The root directory of your android project, e.g.: where your root build
gradle file exist (also gradlew, settings.gradle, etc...)'
title: Project Location
project_location: $BITRISE_SOURCE_DIR
- module: ""
opts:
description: |
Set the module that you want to build. To see your available modules please open your project in Android Studio and go in [Project Structure] and see the list on the left.
is_required: false
summary: |
Set the module that you want to build. To see your available modules please open your project in Android Studio and go in [Project Structure] and see the list on the left.
title: Module
- opts:
description: |
Set the variant that you want to build. To see your available variants please open your project in Android Studio and go in [Project Structure] -> variants section.
is_required: false
summary: |
Set the variant that you want to build. To see your available variants please open your project in Android Studio and go in [Project Structure] -> variants section.
title: Variant
variant: ""
- apk_path_pattern: '*/build/outputs/apk/*.apk'
opts:
category: Options
description: Will find the APK files with the given pattern.
is_required: true
summary: Will find the APK files with the given pattern.
title: APK location pattern
- cache_level: only_deps
opts:
category: Options
description: |-
`all` - will cache build cache and dependencies
`only_deps` - will cache dependencies only
`none` - will not cache anything
is_required: true
title: Set the level of cache
value_options:
- all
- only_deps
- none
- arguments: null
opts:
category: Options
description: Extra arguments passed to the gradle task
is_required: false
summary: Extra arguments passed to the gradle task
title: Additional Gradle Arguments
outputs:
- BITRISE_APK_PATH: null
opts:
description: |-
This output will include the path of the generated APK,
after filtering based on the filter inputs.
If the build generates more than one APK which fulfills the
filter inputs this output will contain the last one's path.
summary: Path of the generated (and copied) APK - after filtering.
title: Path of the generated APK
- BITRISE_APK_PATH_LIST: null
opts:
description: |-
This output will include the paths of the generated APKs,
after filtering based on the filter inputs.
The paths are separated with `|` character, eg: `app-armeabi-v7a-debug.apk|app-mips-debug.apk|app-x86-debug.apk`
summary: List of the generated (and copied) APK paths - after filtering.
title: List of the generated APK paths
- BITRISE_MAPPING_PATH: null
opts:
description: |-
This output will include the path of the generated mapping.txt.
If more than one mapping.txt exist in project this output will contain the last one's path.
summary: Path of the generated (and copied) mapping.txt.
title: Path of the generated mapping.txt
================================================
FILE: steps/android-build/0.9.4/step.yml
================================================
title: Android Build
summary: Builds your Android project with gradle.
description: Builds your Android project with gradle.
website: https://github.com/bitrise-steplib/bitrise-step-android-build
source_code_url: https://github.com/bitrise-steplib/bitrise-step-android-build
support_url: https://github.com/bitrise-steplib/bitrise-step-android-build/issues
published_at: 2018-05-23T15:14:12.225877854+02:00
source:
git: https://github.com/bitrise-steplib/bitrise-step-android-build.git
commit: 9e4f55f0532997933c1df82928ba4638e51cc058
host_os_tags:
- osx-10.10
- ubuntu-16.04
project_type_tags:
- android
- react-native
type_tags:
- build
toolkit:
go:
package_name: github.com/bitrise-steplib/bitrise-step-android-build
is_requires_admin_user: true
is_always_run: false
is_skippable: false
inputs:
- opts:
description: 'The root directory of your android project, e.g.: where your root
build gradle file exist (also gradlew, settings.gradle, etc...)'
is_required: true
summary: 'The root directory of your android project, e.g.: where your root build
gradle file exist (also gradlew, settings.gradle, etc...)'
title: Project Location
project_location: $BITRISE_SOURCE_DIR
- module: ""
opts:
description: |
Set the module that you want to build. To see your available modules please open your project in Android Studio and go in [Project Structure] and see the list on the left.
is_required: false
summary: |
Set the module that you want to build. To see your available modules please open your project in Android Studio and go in [Project Structure] and see the list on the left.
title: Module
- opts:
description: |
Set the variant that you want to build. To see your available variants please open your project in Android Studio and go in [Project Structure] -> variants section.
is_required: false
summary: |
Set the variant that you want to build. To see your available variants please open your project in Android Studio and go in [Project Structure] -> variants section.
title: Variant
variant: ""
- apk_path_pattern: '*/build/outputs/apk/*.apk'
opts:
category: Options
description: Will find the APK files with the given pattern.
is_required: true
summary: Will find the APK files with the given pattern.
title: APK location pattern
- cache_level: only_deps
opts:
category: Options
description: |-
`all` - will cache build cache and dependencies
`only_deps` - will cache dependencies only
`none` - will not cache anything
is_required: true
title: Set the level of cache
value_options:
- all
- only_deps
- none
- arguments: null
opts:
category: Options
description: Extra arguments passed to the gradle task
is_required: false
summary: Extra arguments passed to the gradle task
title: Additional Gradle Arguments
outputs:
- BITRISE_APK_PATH: null
opts:
description: |-
This output will include the path of the generated APK,
after filtering based on the filter inputs.
If the build generates more than one APK which fulfills the
filter inputs this output will contain the last one's path.
summary: Path of the generated (and copied) APK - after filtering.
title: Path of the generated APK
- BITRISE_APK_PATH_LIST: null
opts:
description: |-
This output will include the paths of the generated APKs,
after filtering based on the filter inputs.
The paths are separated with `|` character, eg: `app-armeabi-v7a-debug.apk|app-mips-debug.apk|app-x86-debug.apk`
summary: List of the generated (and copied) APK paths - after filtering.
title: List of the generated APK paths
- BITRISE_MAPPING_PATH: null
opts:
description: |-
This output will include the path of the generated mapping.txt.
If more than one mapping.txt exist in project this output will contain the last one's path.
summary: Path of the generated (and copied) mapping.txt.
title: Path of the generated mapping.txt
================================================
FILE: steps/android-build/0.9.5/step.yml
================================================
title: Android Build
summary: Builds your Android project with gradle.
description: Builds your Android project with gradle.
website: https://github.com/bitrise-steplib/bitrise-step-android-build
source_code_url: https://github.com/bitrise-steplib/bitrise-step-android-build
support_url: https://github.com/bitrise-steplib/bitrise-step-android-build/issues
published_at: 2018-08-17T13:46:07.603768321Z
source:
git: https://github.com/bitrise-steplib/bitrise-step-android-build.git
commit: e209a75ea1cfaa24a836df7cd1408d63c9d424de
host_os_tags:
- osx-10.10
- ubuntu-16.04
project_type_tags:
- android
- react-native
type_tags:
- build
toolkit:
go:
package_name: github.com/bitrise-steplib/bitrise-step-android-build
is_requires_admin_user: true
is_always_run: false
is_skippable: false
inputs:
- opts:
description: The root directory of your android project, for example, where your
root build gradle file exist (also gradlew, settings.gradle, etc...)
is_required: true
summary: The root directory of your android project, for example, where your root
build gradle file exist (also gradlew, settings.gradle, etc...)
title: Project Location
project_location: $BITRISE_SOURCE_DIR
- module: ""
opts:
description: |
Set the module that you want to build. To see your available modules please open your project in Android Studio and go in [Project Structure] and see the list on the left.
is_required: false
summary: |
Set the module that you want to build. To see your available modules please open your project in Android Studio and go in [Project Structure] and see the list on the left.
title: Module
- opts:
description: |
Set the variant that you want to build. To see your available variants please open your project in Android Studio and go in [Project Structure] -> variants section.
is_required: false
summary: |
Set the variant that you want to build. To see your available variants please open your project in Android Studio and go in [Project Structure] -> variants section.
title: Variant
variant: ""
- apk_path_pattern: '*/build/outputs/apk/*.apk'
opts:
category: Options
description: Will find the APK files with the given pattern.
is_required: true
summary: Will find the APK files with the given pattern.
title: APK location pattern
- cache_level: only_deps
opts:
category: Options
description: |-
`all` - will cache build cache and dependencies
`only_deps` - will cache dependencies only
`none` - will not cache anything
is_required: true
title: Set the level of cache
value_options:
- all
- only_deps
- none
- arguments: null
opts:
category: Options
description: Extra arguments passed to the gradle task
is_required: false
summary: Extra arguments passed to the gradle task
title: Additional Gradle Arguments
outputs:
- BITRISE_APK_PATH: null
opts:
description: |-
This output will include the path of the generated APK
after filtering based on the filter inputs.
If the build generates more than one APK which fulfills the
filter inputs, this output will contain the last one's path.
summary: Path of the generated (and copied) APK - after filtering.
title: Path of the generated APK
- BITRISE_APK_PATH_LIST: null
opts:
description: |-
This output will include the paths of the generated APKs
after filtering based on the filter inputs.
The paths are separated with `|` character, for example, `app-armeabi-v7a-debug.apk|app-mips-debug.apk|app-x86-debug.apk`
summary: List of the generated (and copied) APK paths - after filtering.
title: List of the generated APK paths
- BITRISE_MAPPING_PATH: null
opts:
description: |-
This output will include the path of the generated mapping.txt.
If more than one mapping.txt exist in the project, this output will contain the last one's path.
summary: Path of the generated (and copied) mapping.txt.
title: Path of the generated mapping.txt
================================================
FILE: steps/android-build/0.9.6/step.yml
================================================
title: Android Build
summary: Builds your Android project with gradle.
description: Builds your Android project with gradle.
website: https://github.com/bitrise-steplib/bitrise-step-android-build
source_code_url: https://github.com/bitrise-steplib/bitrise-step-android-build
support_url: https://github.com/bitrise-steplib/bitrise-step-android-build/issues
published_at: 2019-03-14T14:59:00.758256711Z
source:
git: https://github.com/bitrise-steplib/bitrise-step-android-build.git
commit: bd9b4143512019e1aaf21f885376f93c959be4f7
host_os_tags:
- osx-10.10
- ubuntu-16.04
project_type_tags:
- android
- react-native
type_tags:
- build
toolkit:
go:
package_name: github.com/bitrise-steplib/bitrise-step-android-build
is_requires_admin_user: true
is_always_run: false
is_skippable: false
inputs:
- opts:
description: The root directory of your android project, for example, where your
root build gradle file exist (also gradlew, settings.gradle, etc...)
is_required: true
summary: The root directory of your android project, for example, where your root
build gradle file exist (also gradlew, settings.gradle, etc...)
title: Project Location
project_location: $BITRISE_SOURCE_DIR
- module: ""
opts:
description: |
Set the module that you want to build. To see your available modules please open your project in Android Studio and go in [Project Structure] and see the list on the left.
is_required: false
summary: |
Set the module that you want to build. To see your available modules please open your project in Android Studio and go in [Project Structure] and see the list on the left.
title: Module
- opts:
description: |
Set the variant that you want to build. To see your available variants please open your project in Android Studio and go in [Project Structure] -> variants section.
is_required: false
summary: |
Set the variant that you want to build. To see your available variants please open your project in Android Studio and go in [Project Structure] -> variants section.
title: Variant
variant: ""
- apk_path_pattern: '*/build/outputs/apk/*.apk'
opts:
category: Options
description: Will find the APK files with the given pattern.
is_required: true
summary: Will find the APK files with the given pattern.
title: APK location pattern
- cache_level: only_deps
opts:
category: Options
description: |-
`all` - will cache build cache and dependencies
`only_deps` - will cache dependencies only
`none` - will not cache anything
is_required: true
title: Set the level of cache
value_options:
- all
- only_deps
- none
- arguments: null
opts:
category: Options
description: Extra arguments passed to the gradle task
is_required: false
summary: Extra arguments passed to the gradle task
title: Additional Gradle Arguments
outputs:
- BITRISE_APK_PATH: null
opts:
description: |-
This output will include the path of the generated APK
after filtering based on the filter inputs.
If the build generates more than one APK which fulfills the
filter inputs, this output will contain the last one's path.
summary: Path of the generated (and copied) APK - after filtering.
title: Path of the generated APK
- BITRISE_APK_PATH_LIST: null
opts:
description: |-
This output will include the paths of the generated APKs
after filtering based on the filter inputs.
The paths are separated with `|` character, for example, `app-armeabi-v7a-debug.apk|app-mips-debug.apk|app-x86-debug.apk`
summary: List of the generated (and copied) APK paths - after filtering.
title: List of the generated APK paths
- BITRISE_MAPPING_PATH: null
opts:
description: |-
This output will include the path of the generated mapping.txt.
If more than one mapping.txt exist in the project, this output will contain the last one's path.
summary: Path of the generated (and copied) mapping.txt.
title: Path of the generated mapping.txt
================================================
FILE: steps/android-build/1.0.0/step.yml
================================================
title: Android Build
summary: Builds your Android project with Gradle.
description: "\nThe Step builds your Android project on Bitrise with Gradle commands:
it installs all dependences that are listed in the project's `build.gradle` file,
and builds and exports either an APK or an AAB. \nOnce the file is exported, it
is available for other Steps in your Workflow.\n\nYou can select the module and
the variant you want to use for the build.\n\n### Configuring the Step \n\n1. Make
sure the **Project Location** input points to the root directory of your Android
project.\n1. In the **Module** input, set the module that you want to build.\n \n
\ You can find the available modules in Android Studio.\n\n1. In the **Variant**
input, set the variant that you want to build. \n \n You can find the available
variants in Android Studio.\n \n1. In the **Build type** input, select the file
type you want to build. \n\n The options are:\n - `apk`\n - `aab`\n \n1.
In the **Options** input group, you can set more advanced configuration options
for the Step:\n\n - In the **App artifact (.apk, .aab) location pattern** input,
you can tell the Step where to look for the APK or AAB files in your project to
export them. \n For the vast majority of Android projects, the default values
do NOT need to be changed.\n \n - In the **Additional Gradle Arguments**, you
can add additional command line arguments to the Gradle task. Read more about [Gradle's
Command Line Interface](https://docs.gradle.org/current/userguide/command_line_interface.html).\n
\ \n - The **Set the level of cache** input allows you to set what will be cached
during the build: everything, dependencies only, or nothing.\n \n### Troubleshooting
\n\nBe aware that an APK or AAB built by the Step is still unsigned: code signing
is performed either in Gradle itself or by other Steps. To be able to deploy your
APK or AAB to an online store, you need code signing. \n\nIf you want to build a
custom module or variant, always check that the value you set in the respective
input is correct. A typo means your build will fail; if the module or variant does
not exist in Android Studio, the build will fail.\n \n### Useful links\n\n- [Getting
started with Android apps](https://devcenter.bitrise.io/getting-started/getting-started-with-android-apps/)\n-
[Deploying Android apps](https://devcenter.bitrise.io/deploy/android-deploy/deploying-android-apps/)\n-
[Generating and deploying Android app bundles](https://devcenter.bitrise.io/deploy/android-deploy/generating-and-deploying-android-app-bundles/)\n-
[Gradle's Command Line Interface](https://docs.gradle.org/current/userguide/command_line_interface.html)\n\n###
Related Steps \n\n- [Gradle Runner](https://www.bitrise.io/integrations/steps/gradle-runner)\n-
[Android Sign](https://www.bitrise.io/integrations/steps/sign-apk)\n- [Install missing
Android SDK components](https://www.bitrise.io/integrations/steps/install-missing-android-tools)"
website: https://github.com/bitrise-steplib/bitrise-step-android-build
source_code_url: https://github.com/bitrise-steplib/bitrise-step-android-build
support_url: https://github.com/bitrise-steplib/bitrise-step-android-build/issues
published_at: 2021-08-25T08:31:25.402721632Z
source:
git: https://github.com/bitrise-steplib/bitrise-step-android-build.git
commit: 6930079046321080a933e7f599666b6b3d8bbcee
host_os_tags:
- osx-10.10
- ubuntu-16.04
project_type_tags:
- android
- react-native
type_tags:
- build
toolkit:
go:
package_name: github.com/bitrise-steplib/bitrise-step-android-build
is_requires_admin_user: true
is_always_run: false
is_skippable: false
inputs:
- opts:
description: The root directory of your Android project. For example, where your
root build gradle file exist (also gradlew, settings.gradle, and so on)
is_required: true
summary: The root directory of your Android project.
title: Project Location
project_location: $BITRISE_SOURCE_DIR
- module: ""
opts:
description: |
Set the module that you want to build. To see your available modules, please open your project in Android Studio and go in [Project Structure] and see the list on the left.
is_required: false
summary: |
Set the module that you want to build. To see your available modules, please open your project in Android Studio and go in [Project Structure] and see the list on the left.
title: Module
- opts:
description: |
Set the variant(s) that you want to build. To see your available variants, please open your project in Android Studio and go in [Project Structure] -> variants section.
You can set multiple variants separated by `\n` character. For instance: `- variant: myvariant1\nmyvariant2`.
is_required: false
summary: |
Set the variant(s) that you want to build. To see your available variants, please open your project in Android Studio and go in [Project Structure] -> variants section.
title: Variant
variant: ""
- build_type: apk
opts:
description: |
Set the build type that you want to build.
is_required: true
summary: |
Set the build type that you want to build.
title: Build type
value_options:
- apk
- aab
- app_path_pattern: |-
*/build/outputs/apk/*.apk
*/build/outputs/bundle/*.aab
opts:
category: Options
description: |
Will find the APK or AAB files - depending on the **Build type** input - with the given pattern.
Separate patterns with a newline.
**Note**
The Step will export only the selected artifact type even if the filter would accept other artifact types as well.
is_required: true
summary: Will find the APK or AAB files - depending on the **Build type** input
- with the given pattern.
title: App artifact (.apk, .aab) location pattern
- cache_level: only_deps
opts:
category: Options
description: |-
`all` - The Step will cache build cache and the dependencies
`only_deps` - The Step will cache dependencies only
`none` - The Step will not cache anything
is_required: true
title: Set the level of cache
value_options:
- all
- only_deps
- none
- arguments: null
opts:
category: Options
description: Extra arguments passed to the gradle task
is_required: false
summary: Extra arguments passed to the gradle task
title: Additional Gradle Arguments
outputs:
- BITRISE_APK_PATH: null
opts:
description: |-
This output will include the path of the generated APK
after filtering based on the filter inputs.
If the build generates more than one APK which fulfills the
filter inputs, this output will contain the last one's path.
summary: Path of the generated (and copied) APK - after filtering.
title: Path of the generated APK
- BITRISE_APK_PATH_LIST: null
opts:
description: |-
This output will include the paths of the generated APKs
after filtering based on the filter inputs.
The paths are separated with `|` character, for example, `app-armeabi-v7a-debug.apk|app-mips-debug.apk|app-x86-debug.apk`
summary: List of the generated (and copied) APK paths - after filtering.
title: List of the generated APK paths
- BITRISE_AAB_PATH: null
opts:
description: |-
This output will include the path of the generated AAB
after filtering based on the filter inputs.
If the build generates more than one AAB which fulfills the
filter inputs, this output will contain the last one's path.
summary: Path of the generated (and copied) AAB - after filtering.
title: Path of the generated AAB
- BITRISE_AAB_PATH_LIST: null
opts:
description: |-
This output will include the paths of the generated AABs
after filtering based on the filter inputs.
The paths are separated with `|` character, for example, `app--debug.aab|app-mips-debug.aab`
summary: List of the generated (and copied) AAB paths - after filtering.
title: List of the generated AAB paths
- BITRISE_MAPPING_PATH: null
opts:
description: |-
This output will include the path of the generated mapping.txt.
If more than one mapping.txt exist in the project, this output will contain the last one's path.
summary: Path of the generated (and copied) mapping.txt.
title: Path of the generated mapping.txt
================================================
FILE: steps/android-build/1.0.1/step.yml
================================================
title: Android Build
summary: Builds your Android project with Gradle.
description: |2-
The Step builds your Android project on Bitrise with Gradle commands: it installs all dependences that are listed in the project's `build.gradle` file, and builds and exports either an APK or an AAB.
Once the file is exported, it is available for other Steps in your Workflow.
You can select the module and the variant you want to use for the build.
### Configuring the Step
1. Make sure the **Project Location** input points to the root directory of your Android project.
1. In the **Module** input, set the module that you want to build.
You can find the available modules in Android Studio.
1. In the **Variant** input, set the variant that you want to build.
You can find the available variants in Android Studio.
1. In the **Build type** input, select the file type you want to build.
The options are:
- `apk`
- `aab`
1. In the **Options** input group, you can set more advanced configuration options for the Step:
- In the **App artifact (.apk, .aab) location pattern** input, you can tell the Step where to look for the APK or AAB files in your project to export them.
For the vast majority of Android projects, the default values do NOT need to be changed.
- In the **Additional Gradle Arguments**, you can add additional command line arguments to the Gradle task. Read more about [Gradle's Command Line Interface](https://docs.gradle.org/current/userguide/command_line_interface.html).
- The **Set the level of cache** input allows you to set what will be cached during the build: everything, dependencies only, or nothing.
### Troubleshooting
Be aware that an APK or AAB built by the Step is still unsigned: code signing is performed either in Gradle itself or by other Steps. To be able to deploy your APK or AAB to an online store, you need code signing.
If you want to build a custom module or variant, always check that the value you set in the respective input is correct. A typo means your build will fail; if the module or variant does not exist in Android Studio, the build will fail.
### Useful links
- [Getting started with Android apps](https://devcenter.bitrise.io/getting-started/getting-started-with-android-apps/)
- [Deploying Android apps](https://devcenter.bitrise.io/deploy/android-deploy/deploying-android-apps/)
- [Generating and deploying Android app bundles](https://devcenter.bitrise.io/deploy/android-deploy/generating-and-deploying-android-app-bundles/)
- [Gradle's Command Line Interface](https://docs.gradle.org/current/userguide/command_line_interface.html)
### Related Steps
- [Gradle Runner](https://www.bitrise.io/integrations/steps/gradle-runner)
- [Android Sign](https://www.bitrise.io/integrations/steps/sign-apk)
- [Install missing Android SDK components](https://www.bitrise.io/integrations/steps/install-missing-android-tools)
website: https://github.com/bitrise-steplib/bitrise-step-android-build
source_code_url: https://github.com/bitrise-steplib/bitrise-step-android-build
support_url: https://github.com/bitrise-steplib/bitrise-step-android-build/issues
published_at: 2021-11-09T13:15:16.553346237Z
source:
git: https://github.com/bitrise-steplib/bitrise-step-android-build.git
commit: ab02569279ab7cac49772cec4ed0a95dd2dd153d
host_os_tags:
- osx-10.10
- ubuntu-16.04
project_type_tags:
- android
- react-native
type_tags:
- build
toolkit:
go:
package_name: github.com/bitrise-steplib/bitrise-step-android-build
is_requires_admin_user: true
is_always_run: false
is_skippable: false
inputs:
- opts:
description: The root directory of your Android project. For example, where your
root build gradle file exist (also gradlew, settings.gradle, and so on)
is_required: true
summary: The root directory of your Android project.
title: Project Location
project_location: $BITRISE_SOURCE_DIR
- module: ""
opts:
description: |
Set the module that you want to build. To see your available modules, please open your project in Android Studio and go in [Project Structure] and see the list on the left.
is_required: false
summary: |
Set the module that you want to build. To see your available modules, please open your project in Android Studio and go in [Project Structure] and see the list on the left.
title: Module
- opts:
description: |
Set the variant(s) that you want to build. To see your available variants, please open your project in Android Studio and go in [Project Structure] -> variants section.
You can set multiple variants separated by `\n` character. For instance: `- variant: myvariant1\nmyvariant2`.
is_required: false
summary: |
Set the variant(s) that you want to build. To see your available variants, please open your project in Android Studio and go in [Project Structure] -> variants section.
title: Variant
variant: ""
- build_type: apk
opts:
description: |
Set the build type that you want to build.
is_required: true
summary: |
Set the build type that you want to build.
title: Build type
value_options:
- apk
- aab
- app_path_pattern: |-
*/build/outputs/apk/*.apk
*/build/outputs/bundle/*.aab
opts:
category: Options
description: |
Will find the APK or AAB files - depending on the **Build type** input - with the given pattern.
Separate patterns with a newline.
**Note**
The Step will export only the selected artifact type even if the filter would accept other artifact types as well.
is_required: true
summary: Will find the APK or AAB files - depending on the **Build type** input
- with the given pattern.
title: App artifact (.apk, .aab) location pattern
- cache_level: only_deps
opts:
category: Options
description: |-
`all` - The Step will cache build cache and the dependencies
`only_deps` - The Step will cache dependencies only
`none` - The Step will not cache anything
is_required: true
title: Set the level of cache
value_options:
- all
- only_deps
- none
- arguments: null
opts:
category: Options
description: Extra arguments passed to the gradle task
is_required: false
summary: Extra arguments passed to the gradle task
title: Additional Gradle Arguments
outputs:
- BITRISE_APK_PATH: null
opts:
description: |-
This output will include the path of the generated APK
after filtering based on the filter inputs.
If the build generates more than one APK which fulfills the
filter inputs, this output will contain the last one's path.
summary: Path of the generated (and copied) APK - after filtering.
title: Path of the generated APK
- BITRISE_APK_PATH_LIST: null
opts:
description: |-
This output will include the paths of the generated APKs
after filtering based on the filter inputs.
The paths are separated with `|` character, for example, `app-armeabi-v7a-debug.apk|app-mips-debug.apk|app-x86-debug.apk`
summary: List of the generated (and copied) APK paths - after filtering.
title: List of the generated APK paths
- BITRISE_AAB_PATH: null
opts:
description: |-
This output will include the path of the generated AAB
after filtering based on the filter inputs.
If the build generates more than one AAB which fulfills the
filter inputs, this output will contain the last one's path.
summary: Path of the generated (and copied) AAB - after filtering.
title: Path of the generated AAB
- BITRISE_AAB_PATH_LIST: null
opts:
description: |-
This output will include the paths of the generated AABs
after filtering based on the filter inputs.
The paths are separated with `|` character, for example, `app--debug.aab|app-mips-debug.aab`
summary: List of the generated (and copied) AAB paths - after filtering.
title: List of the generated AAB paths
- BITRISE_MAPPING_PATH: null
opts:
description: |-
This output will include the path of the generated mapping.txt.
If more than one mapping.txt exist in the project, this output will contain the last one's path.
summary: Path of the generated (and copied) mapping.txt.
title: Path of the generated mapping.txt
================================================
FILE: steps/android-build/1.0.2/step.yml
================================================
title: Android Build
summary: Builds your Android project with Gradle.
description: |2-
The Step builds your Android project on Bitrise with Gradle commands: it installs all dependencies that are listed in the project's `build.gradle` file, and builds and exports either an APK or an AAB.
Once the file is exported, it is available for other Steps in your Workflow.
You can select the module and the variant you want to use for the build.
### Configuring the Step
1. Make sure the **Project Location** input points to the root directory of your Android project.
1. In the **Module** input, set the module that you want to build.
You can find the available modules in Android Studio.
1. In the **Variant** input, set the variant that you want to build.
You can find the available variants in Android Studio.
1. In the **Build type** input, select the file type you want to build.
The options are:
- `apk`
- `aab`
1. In the **Options** input group, you can set more advanced configuration options for the Step:
- In the **App artifact (.apk, .aab) location pattern** input, you can tell the Step where to look for the APK or AAB files in your project to export them.
For the vast majority of Android projects, the default values do NOT need to be changed.
- In the **Additional Gradle Arguments**, you can add additional command line arguments to the Gradle task. Read more about [Gradle's Command Line Interface](https://docs.gradle.org/current/userguide/command_line_interface.html).
- The **Set the level of cache** input allows you to set what will be cached during the build: everything, dependencies only, or nothing.
### Troubleshooting
Be aware that an APK or AAB built by the Step is still unsigned: code signing is performed either in Gradle itself or by other Steps. To be able to deploy your APK or AAB to an online store, you need code signing.
If you want to build a custom module or variant, always check that the value you set in the respective input is correct. A typo means your build will fail; if the module or variant does not exist in Android Studio, the build will fail.
### Useful links
- [Getting started with Android apps](https://devcenter.bitrise.io/getting-started/getting-started-with-android-apps/)
- [Deploying Android apps](https://devcenter.bitrise.io/deploy/android-deploy/deploying-android-apps/)
- [Generating and deploying Android app bundles](https://devcenter.bitrise.io/deploy/android-deploy/generating-and-deploying-android-app-bundles/)
- [Gradle's Command Line Interface](https://docs.gradle.org/current/userguide/command_line_interface.html)
### Related Steps
- [Gradle Runner](https://www.bitrise.io/integrations/steps/gradle-runner)
- [Android Sign](https://www.bitrise.io/integrations/steps/sign-apk)
- [Install missing Android SDK components](https://www.bitrise.io/integrations/steps/install-missing-android-tools)
website: https://github.com/bitrise-steplib/bitrise-step-android-build
source_code_url: https://github.com/bitrise-steplib/bitrise-step-android-build
support_url: https://github.com/bitrise-steplib/bitrise-step-android-build/issues
published_at: 2022-02-23T08:20:58.13153333Z
source:
git: https://github.com/bitrise-steplib/bitrise-step-android-build.git
commit: 10926630dc97bd1c4722726c88a1c25d1841ed2e
host_os_tags:
- osx-10.10
- ubuntu-16.04
project_type_tags:
- android
- react-native
type_tags:
- build
toolkit:
go:
package_name: github.com/bitrise-steplib/bitrise-step-android-build
is_requires_admin_user: true
is_always_run: false
is_skippable: false
inputs:
- opts:
description: The root directory of your Android project. For example, where your
root build gradle file exist (also gradlew, settings.gradle, and so on)
is_required: true
summary: The root directory of your Android project.
title: Project Location
project_location: $BITRISE_SOURCE_DIR
- module: ""
opts:
description: |
Set the module that you want to build. To see your available modules, please open your project in Android Studio and go in [Project Structure] and see the list on the left.
is_required: false
summary: |
Set the module that you want to build. To see your available modules, please open your project in Android Studio and go in [Project Structure] and see the list on the left.
title: Module
- opts:
description: |
Set the variant(s) that you want to build. To see your available variants, please open your project in Android Studio and go in [Project Structure] -> variants section.
You can set multiple variants separated by `\n` character. For instance: `- variant: myvariant1\nmyvariant2`.
is_required: false
summary: |
Set the variant(s) that you want to build. To see your available variants, please open your project in Android Studio and go in [Project Structure] -> variants section.
title: Variant
variant: ""
- build_type: apk
opts:
description: |
Set the build type that you want to build.
is_required: true
summary: |
Set the build type that you want to build.
title: Build type
value_options:
- apk
- aab
- app_path_pattern: |-
*/build/outputs/apk/*.apk
*/build/outputs/bundle/*.aab
opts:
category: Options
description: |
Will find the APK or AAB files - depending on the **Build type** input - with the given pattern.
Separate patterns with a newline.
**Note**
The Step will export only the selected artifact type even if the filter would accept other artifact types as well.
is_required: true
summary: Will find the APK or AAB files - depending on the **Build type** input
- with the given pattern.
title: App artifact (.apk, .aab) location pattern
- cache_level: only_deps
opts:
category: Options
description: |-
`all` - The Step will cache build cache and the dependencies
`only_deps` - The Step will cache dependencies only
`none` - The Step will not cache anything
is_required: true
title: Set the level of cache
value_options:
- all
- only_deps
- none
- arguments: null
opts:
category: Options
description: Extra arguments passed to the gradle task
is_required: false
summary: Extra arguments passed to the gradle task
title: Additional Gradle Arguments
outputs:
- BITRISE_APK_PATH: null
opts:
description: |-
This output will include the path of the generated APK
after filtering based on the filter inputs.
If the build generates more than one APK which fulfills the
filter inputs, this output will contain the last one's path.
summary: Path of the generated (and copied) APK - after filtering.
title: Path of the generated APK
- BITRISE_APK_PATH_LIST: null
opts:
description: |-
This output will include the paths of the generated APKs
after filtering based on the filter inputs.
The paths are separated with `|` character, for example, `app-armeabi-v7a-debug.apk|app-mips-debug.apk|app-x86-debug.apk`
summary: List of the generated (and copied) APK paths - after filtering.
title: List of the generated APK paths
- BITRISE_AAB_PATH: null
opts:
description: |-
This output will include the path of the generated AAB
after filtering based on the filter inputs.
If the build generates more than one AAB which fulfills the
filter inputs, this output will contain the last one's path.
summary: Path of the generated (and copied) AAB - after filtering.
title: Path of the generated AAB
- BITRISE_AAB_PATH_LIST: null
opts:
description: |-
This output will include the paths of the generated AABs
after filtering based on the filter inputs.
The paths are separated with `|` character, for example, `app--debug.aab|app-mips-debug.aab`
summary: List of the generated (and copied) AAB paths - after filtering.
title: List of the generated AAB paths
- BITRISE_MAPPING_PATH: null
opts:
description: |-
This output will include the path of the generated mapping.txt.
If more than one mapping.txt exist in the project, this output will contain the last one's path.
summary: Path of the generated (and copied) mapping.txt.
title: Path of the generated mapping.txt
================================================
FILE: steps/android-build/1.0.3/step.yml
================================================
title: Android Build
summary: Builds your Android project with Gradle.
description: |2-
The Step builds your Android project on Bitrise with Gradle commands: it installs all dependencies that are listed in the project's `build.gradle` file, and builds and exports either an APK or an AAB.
Once the file is exported, it is available for other Steps in your Workflow.
You can select the module and the variant you want to use for the build.
### Configuring the Step
1. Make sure the **Project Location** input points to the root directory of your Android project.
1. In the **Module** input, set the module that you want to build.
You can find the available modules in Android Studio.
1. In the **Variant** input, set the variant that you want to build.
You can find the available variants in Android Studio.
1. In the **Build type** input, select the file type you want to build.
The options are:
- `apk`
- `aab`
1. In the **Options** input group, you can set more advanced configuration options for the Step:
- In the **App artifact (.apk, .aab) location pattern** input, you can tell the Step where to look for the APK or AAB files in your project to export them.
For the vast majority of Android projects, the default values do NOT need to be changed.
- In the **Additional Gradle Arguments**, you can add additional command line arguments to the Gradle task. Read more about [Gradle's Command Line Interface](https://docs.gradle.org/current/userguide/command_line_interface.html).
- The **Set the level of cache** input allows you to set what will be cached during the build: everything, dependencies only, or nothing.
### Troubleshooting
Be aware that an APK or AAB built by the Step is still unsigned: code signing is performed either in Gradle itself or by other Steps. To be able to deploy your APK or AAB to an online store, you need code signing.
If you want to build a custom module or variant, always check that the value you set in the respective input is correct. A typo means your build will fail; if the module or variant does not exist in Android Studio, the build will fail.
### Useful links
- [Getting started with Android apps](https://devcenter.bitrise.io/getting-started/getting-started-with-android-apps/)
- [Deploying Android apps](https://devcenter.bitrise.io/deploy/android-deploy/deploying-android-apps/)
- [Generating and deploying Android app bundles](https://devcenter.bitrise.io/deploy/android-deploy/generating-and-deploying-android-app-bundles/)
- [Gradle's Command Line Interface](https://docs.gradle.org/current/userguide/command_line_interface.html)
### Related Steps
- [Gradle Runner](https://www.bitrise.io/integrations/steps/gradle-runner)
- [Android Sign](https://www.bitrise.io/integrations/steps/sign-apk)
- [Install missing Android SDK components](https://www.bitrise.io/integrations/steps/install-missing-android-tools)
website: https://github.com/bitrise-steplib/bitrise-step-android-build
source_code_url: https://github.com/bitrise-steplib/bitrise-step-android-build
support_url: https://github.com/bitrise-steplib/bitrise-step-android-build/issues
published_at: 2022-07-14T11:57:21.450658123Z
source:
git: https://github.com/bitrise-steplib/bitrise-step-android-build.git
commit: 7e46991accbfc939719e9c77bc41b6a32299990c
host_os_tags:
- osx-10.10
- ubuntu-16.04
project_type_tags:
- android
- react-native
type_tags:
- build
toolkit:
go:
package_name: github.com/bitrise-steplib/bitrise-step-android-build
is_requires_admin_user: true
is_always_run: false
is_skippable: false
inputs:
- opts:
description: The root directory of your Android project. For example, where your
root build gradle file exist (also gradlew, settings.gradle, and so on)
is_required: true
summary: The root directory of your Android project.
title: Project Location
project_location: $BITRISE_SOURCE_DIR
- module: ""
opts:
description: |
Set the module that you want to build. To see your available modules, please open your project in Android Studio and go in [Project Structure] and see the list on the left.
is_required: false
summary: |
Set the module that you want to build. To see your available modules, please open your project in Android Studio and go in [Project Structure] and see the list on the left.
title: Module
- opts:
description: |
Set the variant(s) that you want to build. To see your available variants, open your project in Android Studio and go in [Project Structure] -> variants section.
You can set multiple variants separated by a new line (`\n`), such as `myvariant1\nmyvariant2`.
is_required: false
summary: Set the build variant you want to create, such as `debug` or `myflavorRelease`.
To see your available variants, open your project in Android Studio and go in
[Project Structure] -> variants section.
title: Variant
variant: ""
- build_type: apk
opts:
description: |
Set the build type that you want to build.
is_required: true
summary: |
Set the build type that you want to build.
title: Build type
value_options:
- apk
- aab
- app_path_pattern: |-
*/build/outputs/apk/*.apk
*/build/outputs/bundle/*.aab
opts:
category: Options
description: |
Will find the APK or AAB files - depending on the **Build type** input - with the given pattern.
Separate patterns with a newline.
**Note**
The Step will export only the selected artifact type even if the filter would accept other artifact types as well.
is_required: true
summary: Will find the APK or AAB files - depending on the **Build type** input
- with the given pattern.
title: App artifact (.apk, .aab) location pattern
- cache_level: only_deps
opts:
category: Options
description: |-
`all` - The Step will cache build cache and the dependencies
`only_deps` - The Step will cache dependencies only
`none` - The Step will not cache anything
is_required: true
title: Set the level of cache
value_options:
- all
- only_deps
- none
- arguments: null
opts:
category: Options
description: Extra arguments passed to the gradle task
is_required: false
summary: Extra arguments passed to the gradle task
title: Additional Gradle Arguments
outputs:
- BITRISE_APK_PATH: null
opts:
description: |-
This output will include the path of the generated APK
after filtering based on the filter inputs.
If the build generates more than one APK which fulfills the
filter inputs, this output will contain the last one's path.
summary: Path of the generated (and copied) APK - after filtering.
title: Path of the generated APK
- BITRISE_APK_PATH_LIST: null
opts:
description: |-
This output will include the paths of the generated APKs
after filtering based on the filter inputs.
The paths are separated with `|` character, for example, `app-armeabi-v7a-debug.apk|app-mips-debug.apk|app-x86-debug.apk`
summary: List of the generated (and copied) APK paths - after filtering.
title: List of the generated APK paths
- BITRISE_AAB_PATH: null
opts:
description: |-
This output will include the path of the generated AAB
after filtering based on the filter inputs.
If the build generates more than one AAB which fulfills the
filter inputs, this output will contain the last one's path.
summary: Path of the generated (and copied) AAB - after filtering.
title: Path of the generated AAB
- BITRISE_AAB_PATH_LIST: null
opts:
description: |-
This output will include the paths of the generated AABs
after filtering based on the filter inputs.
The paths are separated with `|` character, for example, `app--debug.aab|app-mips-debug.aab`
summary: List of the generated (and copied) AAB paths - after filtering.
title: List of the generated AAB paths
- BITRISE_MAPPING_PATH: null
opts:
description: |-
This output will include the path of the generated mapping.txt.
If more than one mapping.txt exist in the project, this output will contain the last one's path.
summary: Path of the generated (and copied) mapping.txt.
title: Path of the generated mapping.txt
================================================
FILE: steps/android-build/1.0.4/step.yml
================================================
title: Android Build
summary: Builds your Android project with Gradle.
description: |2-
The Step builds your Android project on Bitrise with Gradle commands: it installs all dependencies that are listed in the project's `build.gradle` file, and builds and exports either an APK or an AAB.
Once the file is exported, it is available for other Steps in your Workflow.
You can select the module and the variant you want to use for the build.
### Configuring the Step
1. Make sure the **Project Location** input points to the root directory of your Android project.
1. In the **Module** input, set the module that you want to build.
You can find the available modules in Android Studio.
1. In the **Variant** input, set the variant that you want to build.
You can find the available variants in Android Studio.
1. In the **Build type** input, select the file type you want to build.
The options are:
- `apk`
- `aab`
1. In the **Options** input group, you can set more advanced configuration options for the Step:
- In the **App artifact (.apk, .aab) location pattern** input, you can tell the Step where to look for the APK or AAB files in your project to export them.
For the vast majority of Android projects, the default values do NOT need to be changed.
- In the **Additional Gradle Arguments**, you can add additional command line arguments to the Gradle task. Read more about [Gradle's Command Line Interface](https://docs.gradle.org/current/userguide/command_line_interface.html).
- The **Set the level of cache** input allows you to set what will be cached during the build: everything, dependencies only, or nothing.
### Troubleshooting
Be aware that an APK or AAB built by the Step is still unsigned: code signing is performed either in Gradle itself or by other Steps. To be able to deploy your APK or AAB to an online store, you need code signing.
If you want to build a custom module or variant, always check that the value you set in the respective input is correct. A typo means your build will fail; if the module or variant does not exist in Android Studio, the build will fail.
### Useful links
- [Getting started with Android apps](https://devcenter.bitrise.io/getting-started/getting-started-with-android-apps/)
- [Deploying Android apps](https://devcenter.bitrise.io/deploy/android-deploy/deploying-android-apps/)
- [Generating and deploying Android app bundles](https://devcenter.bitrise.io/deploy/android-deploy/generating-and-deploying-android-app-bundles/)
- [Gradle's Command Line Interface](https://docs.gradle.org/current/userguide/command_line_interface.html)
### Related Steps
- [Gradle Runner](https://www.bitrise.io/integrations/steps/gradle-runner)
- [Android Sign](https://www.bitrise.io/integrations/steps/sign-apk)
- [Install missing Android SDK components](https://www.bitrise.io/integrations/steps/install-missing-android-tools)
website: https://github.com/bitrise-steplib/bitrise-step-android-build
source_code_url: https://github.com/bitrise-steplib/bitrise-step-android-build
support_url: https://github.com/bitrise-steplib/bitrise-step-android-build/issues
published_at: 2022-07-14T16:29:58.083630742Z
source:
git: https://github.com/bitrise-steplib/bitrise-step-android-build.git
commit: fe475b3da876a88e0f7a7db1bff6106533f96058
host_os_tags:
- osx-10.10
- ubuntu-16.04
project_type_tags:
- android
- react-native
type_tags:
- build
toolkit:
go:
package_name: github.com/bitrise-steplib/bitrise-step-android-build
is_requires_admin_user: true
is_always_run: false
is_skippable: false
inputs:
- opts:
description: The root directory of your Android project. For example, where your
root build gradle file exist (also gradlew, settings.gradle, and so on)
is_required: true
summary: The root directory of your Android project.
title: Project Location
project_location: $BITRISE_SOURCE_DIR
- module: ""
opts:
description: |
Set the module that you want to build. To see your available modules, please open your project in Android Studio and go in [Project Structure] and see the list on the left.
is_required: false
summary: |
Set the module that you want to build. To see your available modules, please open your project in Android Studio and go in [Project Structure] and see the list on the left.
title: Module
- opts:
description: |
Set the variant(s) that you want to build. To see your available variants, open your project in Android Studio and go in [Project Structure] -> variants section.
You can set multiple variants separated by a new line (`\n`), such as `myvariant1\nmyvariant2`.
is_required: false
summary: Set the build variant you want to create, such as `debug` or `myflavorRelease`.
To see your available variants, open your project in Android Studio and go in
[Project Structure] -> variants section.
title: Variant
variant: ""
- build_type: apk
opts:
description: |
Set the build type that you want to build.
is_required: true
summary: |
Set the build type that you want to build.
title: Build type
value_options:
- apk
- aab
- app_path_pattern: |-
*/build/outputs/apk/*.apk
*/build/outputs/bundle/*.aab
opts:
category: Options
description: |
Will find the APK or AAB files - depending on the **Build type** input - with the given pattern.
Separate patterns with a newline.
**Note**
The Step will export only the selected artifact type even if the filter would accept other artifact types as well.
is_required: true
summary: Will find the APK or AAB files - depending on the **Build type** input
- with the given pattern.
title: App artifact (.apk, .aab) location pattern
- cache_level: only_deps
opts:
category: Options
description: |-
`all` - The Step will cache build cache and the dependencies
`only_deps` - The Step will cache dependencies only
`none` - The Step will not cache anything
is_required: true
title: Set the level of cache
value_options:
- all
- only_deps
- none
- arguments: null
opts:
category: Options
description: Extra arguments passed to the gradle task
is_required: false
summary: Extra arguments passed to the gradle task
title: Additional Gradle Arguments
outputs:
- BITRISE_APK_PATH: null
opts:
description: |-
This output will include the path of the generated APK
after filtering based on the filter inputs.
If the build generates more than one APK which fulfills the
filter inputs, this output will contain the last one's path.
summary: Path of the generated (and copied) APK - after filtering.
title: Path of the generated APK
- BITRISE_APK_PATH_LIST: null
opts:
description: |-
This output will include the paths of the generated APKs
after filtering based on the filter inputs.
The paths are separated with `|` character, for example, `app-armeabi-v7a-debug.apk|app-mips-debug.apk|app-x86-debug.apk`
summary: List of the generated (and copied) APK paths - after filtering.
title: List of the generated APK paths
- BITRISE_AAB_PATH: null
opts:
description: |-
This output will include the path of the generated AAB
after filtering based on the filter inputs.
If the build generates more than one AAB which fulfills the
filter inputs, this output will contain the last one's path.
summary: Path of the generated (and copied) AAB - after filtering.
title: Path of the generated AAB
- BITRISE_AAB_PATH_LIST: null
opts:
description: |-
This output will include the paths of the generated AABs
after filtering based on the filter inputs.
The paths are separated with `|` character, for example, `app--debug.aab|app-mips-debug.aab`
summary: List of the generated (and copied) AAB paths - after filtering.
title: List of the generated AAB paths
- BITRISE_MAPPING_PATH: null
opts:
description: |-
This output will include the path of the generated mapping.txt.
If more than one mapping.txt exist in the project, this output will contain the last one's path.
summary: Path of the generated (and copied) mapping.txt.
title: Path of the generated mapping.txt
================================================
FILE: steps/android-build/1.0.5/step.yml
================================================
title: Android Build
summary: Builds your Android project with Gradle.
description: |2-
The Step builds your Android project on Bitrise with Gradle commands: it installs all dependencies that are listed in the project's `build.gradle` file, and builds and exports either an APK or an AAB.
Once the file is exported, it is available for other Steps in your Workflow.
You can select the module and the variant you want to use for the build.
### Configuring the Step
1. Make sure the **Project Location** input points to the root directory of your Android project.
1. In the **Module** input, set the module that you want to build.
You can find the available modules in Android Studio.
1. In the **Variant** input, set the variant that you want to build.
You can find the available variants in Android Studio.
1. In the **Build type** input, select the file type you want to build.
The options are:
- `apk`
- `aab`
1. In the **Options** input group, you can set more advanced configuration options for the Step:
- In the **App artifact (.apk, .aab) location pattern** input, you can tell the Step where to look for the APK or AAB files in your project to export them.
For the vast majority of Android projects, the default values do NOT need to be changed.
- In the **Additional Gradle Arguments**, you can add additional command line arguments to the Gradle task. Read more about [Gradle's Command Line Interface](https://docs.gradle.org/current/userguide/command_line_interface.html).
- The **Set the level of cache** input allows you to set what will be cached during the build: everything, dependencies only, or nothing.
### Troubleshooting
Be aware that an APK or AAB built by the Step is still unsigned: code signing is performed either in Gradle itself or by other Steps. To be able to deploy your APK or AAB to an online store, you need code signing.
If you want to build a custom module or variant, always check that the value you set in the respective input is correct. A typo means your build will fail; if the module or variant does not exist in Android Studio, the build will fail.
### Useful links
- [Getting started with Android apps](https://devcenter.bitrise.io/getting-started/getting-started-with-android-apps/)
- [Deploying Android apps](https://devcenter.bitrise.io/deploy/android-deploy/deploying-android-apps/)
- [Generating and deploying Android app bundles](https://devcenter.bitrise.io/deploy/android-deploy/generating-and-deploying-android-app-bundles/)
- [Gradle's Command Line Interface](https://docs.gradle.org/current/userguide/command_line_interface.html)
### Related Steps
- [Gradle Runner](https://www.bitrise.io/integrations/steps/gradle-runner)
- [Android Sign](https://www.bitrise.io/integrations/steps/sign-apk)
- [Install missing Android SDK components](https://www.bitrise.io/integrations/steps/install-missing-android-tools)
website: https://github.com/bitrise-steplib/bitrise-step-android-build
source_code_url: https://github.com/bitrise-steplib/bitrise-step-android-build
support_url: https://github.com/bitrise-steplib/bitrise-step-android-build/issues
published_at: 2022-07-18T10:13:00.652404741Z
source:
git: https://github.com/bitrise-steplib/bitrise-step-android-build.git
commit: 1f52f436a3be83d27917dac8a00b2e1b2a08331b
host_os_tags:
- osx-10.10
- ubuntu-16.04
project_type_tags:
- android
- react-native
type_tags:
- build
toolkit:
go:
package_name: github.com/bitrise-steplib/bitrise-step-android-build
is_requires_admin_user: true
is_always_run: false
is_skippable: false
inputs:
- opts:
description: The root directory of your Android project. For example, where your
root build gradle file exist (also gradlew, settings.gradle, and so on)
is_required: true
summary: The root directory of your Android project.
title: Project Location
project_location: $BITRISE_SOURCE_DIR
- module: ""
opts:
description: |
Set the module that you want to build. To see your available modules, please open your project in Android Studio and go in [Project Structure] and see the list on the left.
is_required: false
summary: |
Set the module that you want to build. To see your available modules, please open your project in Android Studio and go in [Project Structure] and see the list on the left.
title: Module
- opts:
description: |
Set the build variants you want to create. To see your available variants, open your project in Android Studio and go in [Project Structure] -> variants section.
This input also accepts multiple variants, separated by a line break.
is_required: false
summary: Set the build variants you want to create, such as `debug` or `myflavorRelease`.
To see your available variants, open your project in Android Studio and go in
[Project Structure] -> variants section.
title: Variant
variant: ""
- build_type: apk
opts:
description: |
Set the build type that you want to build.
is_required: true
summary: |
Set the build type that you want to build.
title: Build type
value_options:
- apk
- aab
- app_path_pattern: |-
*/build/outputs/apk/*.apk
*/build/outputs/bundle/*.aab
opts:
category: Options
description: |
Will find the APK or AAB files - depending on the **Build type** input - with the given pattern.
Separate patterns with a newline.
**Note**
The Step will export only the selected artifact type even if the filter would accept other artifact types as well.
is_required: true
summary: Will find the APK or AAB files - depending on the **Build type** input
- with the given pattern.
title: App artifact (.apk, .aab) location pattern
- cache_level: only_deps
opts:
category: Options
description: |-
`all` - The Step will cache build cache and the dependencies
`only_deps` - The Step will cache dependencies only
`none` - The Step will not cache anything
is_required: true
title: Set the level of cache
value_options:
- all
- only_deps
- none
- arguments: null
opts:
category: Options
description: Extra arguments passed to the gradle task
is_required: false
summary: Extra arguments passed to the gradle task
title: Additional Gradle Arguments
outputs:
- BITRISE_APK_PATH: null
opts:
description: |-
This output will include the path of the generated APK
after filtering based on the filter inputs.
If the build generates more than one APK which fulfills the
filter inputs, this output will contain the last one's path.
summary: Path of the generated (and copied) APK - after filtering.
title: Path of the generated APK
- BITRISE_APK_PATH_LIST: null
opts:
description: |-
This output will include the paths of the generated APKs
after filtering based on the filter inputs.
The paths are separated with `|` character, for example, `app-armeabi-v7a-debug.apk|app-mips-debug.apk|app-x86-debug.apk`
summary: List of the generated (and copied) APK paths - after filtering.
title: List of the generated APK paths
- BITRISE_AAB_PATH: null
opts:
description: |-
This output will include the path of the generated AAB
after filtering based on the filter inputs.
If the build generates more than one AAB which fulfills the
filter inputs, this output will contain the last one's path.
summary: Path of the generated (and copied) AAB - after filtering.
title: Path of the generated AAB
- BITRISE_AAB_PATH_LIST: null
opts:
description: |-
This output will include the paths of the generated AABs
after filtering based on the filter inputs.
The paths are separated with `|` character, for example, `app--debug.aab|app-mips-debug.aab`
summary: List of the generated (and copied) AAB paths - after filtering.
title: List of the generated AAB paths
- BITRISE_MAPPING_PATH: null
opts:
description: |-
This output will include the path of the generated mapping.txt.
If more than one mapping.txt exist in the project, this output will contain the last one's path.
summary: Path of the generated (and copied) mapping.txt.
title: Path of the generated mapping.txt
================================================
FILE: steps/android-build/1.0.6/step.yml
================================================
title: Android Build
summary: Builds your Android project with Gradle.
description: |2-
The Step builds your Android project on Bitrise with Gradle commands: it installs all dependencies that are listed in the project's `build.gradle` file, and builds and exports either an APK or an AAB.
Once the file is exported, it is available for other Steps in your Workflow.
You can select the module and the variant you want to use for the build.
### Configuring the Step
1. Make sure the **Project Location** input points to the root directory of your Android project.
1. In the **Module** input, set the module that you want to build.
You can find the available modules in Android Studio.
1. In the **Variant** input, set the variant that you want to build.
You can find the available variants in Android Studio.
1. In the **Build type** input, select the file type you want to build.
The options are:
- `apk`
- `aab`
1. In the **Options** input group, you can set more advanced configuration options for the Step:
- In the **App artifact (.apk, .aab) location pattern** input, you can tell the Step where to look for the APK or AAB files in your project to export them.
For the vast majority of Android projects, the default values do NOT need to be changed.
- In the **Additional Gradle Arguments**, you can add additional command line arguments to the Gradle task. Read more about [Gradle's Command Line Interface](https://docs.gradle.org/current/userguide/command_line_interface.html).
- The **Set the level of cache** input allows you to set what will be cached during the build: everything, dependencies only, or nothing.
### Troubleshooting
Be aware that an APK or AAB built by the Step is still unsigned: code signing is performed either in Gradle itself or by other Steps. To be able to deploy your APK or AAB to an online store, you need code signing.
If you want to build a custom module or variant, always check that the value you set in the respective input is correct. A typo means your build will fail; if the module or variant does not exist in Android Studio, the build will fail.
### Useful links
- [Getting started with Android apps](https://devcenter.bitrise.io/getting-started/getting-started-with-android-apps/)
- [Deploying Android apps](https://devcenter.bitrise.io/deploy/android-deploy/deploying-android-apps/)
- [Generating and deploying Android app bundles](https://devcenter.bitrise.io/deploy/android-deploy/generating-and-deploying-android-app-bundles/)
- [Gradle's Command Line Interface](https://docs.gradle.org/current/userguide/command_line_interface.html)
### Related Steps
- [Gradle Runner](https://www.bitrise.io/integrations/steps/gradle-runner)
- [Android Sign](https://www.bitrise.io/integrations/steps/sign-apk)
- [Install missing Android SDK components](https://www.bitrise.io/integrations/steps/install-missing-android-tools)
website: https://github.com/bitrise-steplib/bitrise-step-android-build
source_code_url: https://github.com/bitrise-steplib/bitrise-step-android-build
support_url: https://github.com/bitrise-steplib/bitrise-step-android-build/issues
published_at: 2025-11-14T12:44:21.724936714Z
source:
git: https://github.com/bitrise-steplib/bitrise-step-android-build.git
commit: c3322b474c9549344344d6e90fb629632a609034
host_os_tags:
- osx-10.10
- ubuntu-16.04
project_type_tags:
- android
- cordova
- flutter
- ionic
- kotlin-multiplatform
- react-native
type_tags:
- build
toolkit:
go:
package_name: github.com/bitrise-steplib/bitrise-step-android-build
is_requires_admin_user: true
is_always_run: false
is_skippable: false
inputs:
- opts:
description: The root directory of your Android project. For example, where your
root build gradle file exist (also gradlew, settings.gradle, and so on)
is_required: true
summary: The root directory of your Android project.
title: Project Location
project_location: $BITRISE_SOURCE_DIR
- module: ""
opts:
description: |
Set the module that you want to build. To see your available modules, please open your project in Android Studio and go in [Project Structure] and see the list on the left.
is_required: false
summary: |
Set the module that you want to build. To see your available modules, please open your project in Android Studio and go in [Project Structure] and see the list on the left.
title: Module
- opts:
description: |
Set the build variants you want to create. To see your available variants, open your project in Android Studio and go in [Project Structure] -> variants section.
This input also accepts multiple variants, separated by a line break.
is_required: false
summary: Set the build variants you want to create, such as `debug` or `myflavorRelease`.
To see your available variants, open your project in Android Studio and go in
[Project Structure] -> variants section.
title: Variant
variant: ""
- build_type: apk
opts:
description: |
Set the build type that you want to build.
is_required: true
summary: |
Set the build type that you want to build.
title: Build type
value_options:
- apk
- aab
- app_path_pattern: |-
*/build/outputs/apk/*.apk
*/build/outputs/bundle/*.aab
opts:
category: Options
description: |
Will find the APK or AAB files - depending on the **Build type** input - with the given pattern.
Separate patterns with a newline.
**Note**
The Step will export only the selected artifact type even if the filter would accept other artifact types as well.
is_required: true
summary: Will find the APK or AAB files - depending on the **Build type** input
- with the given pattern.
title: App artifact (.apk, .aab) location pattern
- arguments: null
opts:
category: Options
description: Extra arguments passed to the gradle task
is_required: false
summary: Extra arguments passed to the gradle task
title: Additional Gradle Arguments
outputs:
- BITRISE_APK_PATH: null
opts:
description: |-
This output will include the path of the generated APK
after filtering based on the filter inputs.
If the build generates more than one APK which fulfills the
filter inputs, this output will contain the last one's path.
summary: Path of the generated (and copied) APK - after filtering.
title: Path of the generated APK
- BITRISE_APK_PATH_LIST: null
opts:
description: |-
This output will include the paths of the generated APKs
after filtering based on the filter inputs.
The paths are separated with `|` character, for example, `app-armeabi-v7a-debug.apk|app-mips-debug.apk|app-x86-debug.apk`
summary: List of the generated (and copied) APK paths - after filtering.
title: List of the generated APK paths
- BITRISE_AAB_PATH: null
opts:
description: |-
This output will include the path of the generated AAB
after filtering based on the filter inputs.
If the build generates more than one AAB which fulfills the
filter inputs, this output will contain the last one's path.
summary: Path of the generated (and copied) AAB - after filtering.
title: Path of the generated AAB
- BITRISE_AAB_PATH_LIST: null
opts:
description: |-
This output will include the paths of the generated AABs
after filtering based on the filter inputs.
The paths are separated with `|` character, for example, `app--debug.aab|app-mips-debug.aab`
summary: List of the generated (and copied) AAB paths - after filtering.
title: List of the generated AAB paths
- BITRISE_MAPPING_PATH: null
opts:
description: |-
This output will include the path of the generated mapping.txt.
If more than one mapping.txt exist in the project, this output will contain the last one's path.
summary: Path of the generated (and copied) mapping.txt.
title: Path of the generated mapping.txt
================================================
FILE: steps/android-build/1.1.0/step.yml
================================================
title: Android Build
summary: Builds your Android project with Gradle.
description: |2-
The Step builds your Android project on Bitrise with Gradle commands: it installs all dependencies that are listed in the project's `build.gradle` file, and builds and exports either an APK or an AAB.
Once the file is exported, it is available for other Steps in your Workflow.
You can select the module and the variant you want to use for the build.
### Configuring the Step
1. Make sure the **Project Location** input points to the root directory of your Android project.
1. In the **Module** input, set the module that you want to build.
You can find the available modules in Android Studio.
1. In the **Variant** input, set the variant that you want to build.
You can find the available variants in Android Studio.
1. In the **Build type** input, select the file type you want to build.
The options are:
- `apk`
- `aab`
1. In the **Options** input group, you can set more advanced configuration options for the Step:
- In the **App artifact (.apk, .aab) location pattern** input, you can tell the Step where to look for the APK or AAB files in your project to export them.
For the vast majority of Android projects, the default values do NOT need to be changed.
- In the **Additional Gradle Arguments**, you can add additional command line arguments to the Gradle task. Read more about [Gradle's Command Line Interface](https://docs.gradle.org/current/userguide/command_line_interface.html).
- The **Set the level of cache** input allows you to set what will be cached during the build: everything, dependencies only, or nothing.
### Troubleshooting
Be aware that an APK or AAB built by the Step is still unsigned: code signing is performed either in Gradle itself or by other Steps. To be able to deploy your APK or AAB to an online store, you need code signing.
If you want to build a custom module or variant, always check that the value you set in the respective input is correct. A typo means your build will fail; if the module or variant does not exist in Android Studio, the build will fail.
### Useful links
- [Getting started with Android apps](https://devcenter.bitrise.io/getting-started/getting-started-with-android-apps/)
- [Deploying Android apps](https://devcenter.bitrise.io/deploy/android-deploy/deploying-android-apps/)
- [Generating and deploying Android app bundles](https://devcenter.bitrise.io/deploy/android-deploy/generating-and-deploying-android-app-bundles/)
- [Gradle's Command Line Interface](https://docs.gradle.org/current/userguide/command_line_interface.html)
### Related Steps
- [Gradle Runner](https://www.bitrise.io/integrations/steps/gradle-runner)
- [Android Sign](https://www.bitrise.io/integrations/steps/sign-apk)
- [Install missing Android SDK components](https://www.bitrise.io/integrations/steps/install-missing-android-tools)
website: https://github.com/bitrise-steplib/bitrise-step-android-build
source_code_url: https://github.com/bitrise-steplib/bitrise-step-android-build
support_url: https://github.com/bitrise-steplib/bitrise-step-android-build/issues
published_at: 2026-04-23T17:38:13.428737+02:00
source:
git: https://github.com/bitrise-steplib/bitrise-step-android-build.git
commit: 8af70c42dcf95d3142a52dcdfe561b35abb0c7ef
host_os_tags:
- osx-10.10
- ubuntu-16.04
project_type_tags:
- android
- cordova
- flutter
- ionic
- kotlin-multiplatform
- react-native
type_tags:
- build
toolkit:
go:
package_name: github.com/bitrise-steplib/bitrise-step-android-build
is_requires_admin_user: true
is_always_run: false
is_skippable: false
inputs:
- opts:
description: The root directory of your Android project. For example, where your
root build gradle file exist (also gradlew, settings.gradle, and so on)
is_required: true
summary: The root directory of your Android project.
title: Project Location
project_location: $BITRISE_SOURCE_DIR
- module: ""
opts:
description: |
Set the module that you want to build. To see your available modules, please open your project in Android Studio and go in [Project Structure] and see the list on the left.
is_required: false
summary: |
Set the module that you want to build. To see your available modules, please open your project in Android Studio and go in [Project Structure] and see the list on the left.
title: Module
- opts:
description: |
Set the build variants you want to create. To see your available variants, open your project in Android Studio and go in [Project Structure] -> variants section.
This input also accepts multiple variants, separated by a line break.
is_required: false
summary: Set the build variants you want to create, such as `debug` or `myflavorRelease`.
To see your available variants, open your project in Android Studio and go in
[Project Structure] -> variants section.
title: Variant
variant: ""
- build_type: apk
opts:
description: |
Set the build type that you want to build.
is_required: true
summary: |
Set the build type that you want to build.
title: Build type
value_options:
- apk
- aab
- app_path_pattern: |-
*/build/outputs/apk/*.apk
*/build/outputs/bundle/*.aab
opts:
category: Options
description: |
Will find the APK or AAB files - depending on the **Build type** input - with the given pattern.
Separate patterns with a newline.
**Note**
The Step will export only the selected artifact type even if the filter would accept other artifact types as well.
is_required: true
summary: Will find the APK or AAB files - depending on the **Build type** input
- with the given pattern.
title: App artifact (.apk, .aab) location pattern
- arguments: null
opts:
category: Options
description: Extra arguments passed to the gradle task
is_required: false
summary: Extra arguments passed to the gradle task
title: Additional Gradle Arguments
outputs:
- BITRISE_APK_PATH: null
opts:
description: |-
This output will include the path of the generated APK
after filtering based on the filter inputs.
If the build generates more than one APK which fulfills the
filter inputs, this output will contain the last one's path.
summary: Path of the generated (and copied) APK - after filtering.
title: Path of the generated APK
- BITRISE_APK_PATH_LIST: null
opts:
description: |-
This output will include the paths of the generated APKs
after filtering based on the filter inputs.
The paths are separated with `|` character, for example, `app-armeabi-v7a-debug.apk|app-mips-debug.apk|app-x86-debug.apk`
summary: List of the generated (and copied) APK paths - after filtering.
title: List of the generated APK paths
- BITRISE_AAB_PATH: null
opts:
description: |-
This output will include the path of the generated AAB
after filtering based on the filter inputs.
If the build generates more than one AAB which fulfills the
filter inputs, this output will contain the last one's path.
summary: Path of the generated (and copied) AAB - after filtering.
title: Path of the generated AAB
- BITRISE_AAB_PATH_LIST: null
opts:
description: |-
This output will include the paths of the generated AABs
after filtering based on the filter inputs.
The paths are separated with `|` character, for example, `app--debug.aab|app-mips-debug.aab`
summary: List of the generated (and copied) AAB paths - after filtering.
title: List of the generated AAB paths
- BITRISE_MAPPING_PATH: null
opts:
description: |-
This output will include the path of the generated mapping.txt.
If more than one mapping.txt exist in the project, this output will contain the last one's path.
summary: Path of the generated (and copied) mapping.txt.
title: Path of the generated mapping.txt
================================================
FILE: steps/android-build/step-info.yml
================================================
maintainer: bitrise
================================================
FILE: steps/android-build-for-ui-testing/0.1.0/step.yml
================================================
title: Android Build for UI Testing
summary: Builds your Android project with gradle with the belonging AndroidTest variant.
description: Builds your Android project with gradle with the belonging AndroidTest
variant.
website: https://github.com/bitrise-steplib/bitrise-step-android-build-for-ui-testing
source_code_url: https://github.com/bitrise-steplib/bitrise-step-android-build-for-ui-testing
support_url: https://github.com/bitrise-steplib/bitrise-step-android-build-for-ui-testing/issues
published_at: 2019-01-11T11:33:11.886725521Z
source:
git: https://github.com/bitrise-steplib/bitrise-step-android-build-for-ui-testing.git
commit: 914037dbb2bf67e403faf0ce25d6506e4127ecb9
project_type_tags:
- android
- react-native
type_tags:
- build
toolkit:
go:
package_name: github.com/bitrise-steplib/bitrise-step-android-build-for-ui-testing
is_requires_admin_user: true
is_always_run: false
is_skippable: false
run_if: ""
inputs:
- opts:
description: The root directory of your android project, for example, where your
root build gradle file exist (also gradlew, settings.gradle, etc...)
is_required: true
summary: The root directory of your android project, for example, where your root
build gradle file exist (also gradlew, settings.gradle, etc...)
title: Project Location
project_location: $BITRISE_SOURCE_DIR
- module: ""
opts:
description: |
Set the module that you want to build. To see your available modules please open your project in Android Studio and go in [Project Structure] and see the list on the left.
is_required: true
summary: |
Set the module that you want to build. To see your available modules please open your project in Android Studio and go in [Project Structure] and see the list on the left.
title: Module
- opts:
description: |
Set the variant that you want to build. To see your available variants please open your project in Android Studio and go in [Project Structure] -> variants section.
is_required: true
summary: |
Set the variant that you want to build. To see your available variants please open your project in Android Studio and go in [Project Structure] -> variants section.
title: Variant
variant: ""
- apk_path_pattern: '*/build/outputs/apk/*.apk'
opts:
category: Options
description: Will find the APK files with the given pattern.
is_required: true
summary: Will find the APK files with the given pattern.
title: APK location pattern
- cache_level: only_deps
opts:
category: Options
description: |-
`all` - will cache build cache and dependencies
`only_deps` - will cache dependencies only
`none` - will not cache anything
is_required: true
title: Set the level of cache
value_options:
- all
- only_deps
- none
- arguments: null
opts:
category: Options
description: Extra arguments passed to the gradle task
is_required: false
summary: Extra arguments passed to the gradle task
title: Additional Gradle Arguments
outputs:
- BITRISE_APK_PATH: null
opts:
description: |-
This output will include the path of the generated APK
after filtering based on the filter inputs.
summary: Path of the generated (and copied) APK - after filtering.
title: Path of the generated APK
- BITRISE_TEST_APK_PATH: null
opts:
description: |-
This output will include the path of the generated test APK
after filtering based on the filter inputs.
summary: Path of the generated (and copied) test APK - after filtering.
title: Path of the generated test APK
================================================
FILE: steps/android-build-for-ui-testing/0.1.1/step.yml
================================================
title: Android Build for UI Testing
summary: Builds your Android project with gradle with the belonging AndroidTest variant.
description: Builds your Android project with gradle with the belonging AndroidTest
variant.
website: https://github.com/bitrise-steplib/bitrise-step-android-build-for-ui-testing
source_code_url: https://github.com/bitrise-steplib/bitrise-step-android-build-for-ui-testing
support_url: https://github.com/bitrise-steplib/bitrise-step-android-build-for-ui-testing/issues
published_at: 2019-03-14T14:58:35.456053745Z
source:
git: https://github.com/bitrise-steplib/bitrise-step-android-build-for-ui-testing.git
commit: 8a02f7acb3f2c1972b7207902dfba60367a7d536
project_type_tags:
- android
- react-native
type_tags:
- build
toolkit:
go:
package_name: github.com/bitrise-steplib/bitrise-step-android-build-for-ui-testing
is_requires_admin_user: true
is_always_run: false
is_skippable: false
run_if: ""
inputs:
- opts:
description: The root directory of your android project, for example, where your
root build gradle file exist (also gradlew, settings.gradle, etc...)
is_required: true
summary: The root directory of your android project, for example, where your root
build gradle file exist (also gradlew, settings.gradle, etc...)
title: Project Location
project_location: $BITRISE_SOURCE_DIR
- module: ""
opts:
description: |
Set the module that you want to build. To see your available modules please open your project in Android Studio and go in [Project Structure] and see the list on the left.
is_required: true
summary: |
Set the module that you want to build. To see your available modules please open your project in Android Studio and go in [Project Structure] and see the list on the left.
title: Module
- opts:
description: |
Set the variant that you want to build. To see your available variants please open your project in Android Studio and go in [Project Structure] -> variants section.
is_required: true
summary: |
Set the variant that you want to build. To see your available variants please open your project in Android Studio and go in [Project Structure] -> variants section.
title: Variant
variant: ""
- apk_path_pattern: '*/build/outputs/apk/*.apk'
opts:
category: Options
description: Will find the APK files with the given pattern.
is_required: true
summary: Will find the APK files with the given pattern.
title: APK location pattern
- cache_level: only_deps
opts:
category: Options
description: |-
`all` - will cache build cache and dependencies
`only_deps` - will cache dependencies only
`none` - will not cache anything
is_required: true
title: Set the level of cache
value_options:
- all
- only_deps
- none
- arguments: null
opts:
category: Options
description: Extra arguments passed to the gradle task
is_required: false
summary: Extra arguments passed to the gradle task
title: Additional Gradle Arguments
outputs:
- BITRISE_APK_PATH: null
opts:
description: |-
This output will include the path of the generated APK
after filtering based on the filter inputs.
summary: Path of the generated (and copied) APK - after filtering.
title: Path of the generated APK
- BITRISE_TEST_APK_PATH: null
opts:
description: |-
This output will include the path of the generated test APK
after filtering based on the filter inputs.
summary: Path of the generated (and copied) test APK - after filtering.
title: Path of the generated test APK
================================================
FILE: steps/android-build-for-ui-testing/0.1.2/step.yml
================================================
title: Android Build for UI Testing
summary: Builds your Android project with gradle with the belonging AndroidTest variant.
description: Builds your Android project with gradle with the belonging AndroidTest
variant.
website: https://github.com/bitrise-steplib/bitrise-step-android-build-for-ui-testing
source_code_url: https://github.com/bitrise-steplib/bitrise-step-android-build-for-ui-testing
support_url: https://github.com/bitrise-steplib/bitrise-step-android-build-for-ui-testing/issues
published_at: 2020-04-24T20:45:13.795565464Z
source:
git: https://github.com/bitrise-steplib/bitrise-step-android-build-for-ui-testing.git
commit: daa908208e5f854b35098dd24f90fff4de56adf0
project_type_tags:
- android
- react-native
type_tags:
- build
toolkit:
go:
package_name: github.com/bitrise-steplib/bitrise-step-android-build-for-ui-testing
is_requires_admin_user: true
is_always_run: false
is_skippable: false
run_if: ""
inputs:
- opts:
description: The root directory of your android project, for example, where your
root build gradle file exist (also gradlew, settings.gradle, etc...)
is_required: true
summary: The root directory of your android project, for example, where your root
build gradle file exist (also gradlew, settings.gradle, etc...)
title: Project Location
project_location: $BITRISE_SOURCE_DIR
- module: ""
opts:
description: |
Set the module that you want to build. To see your available modules please open your project in Android Studio and go in [Project Structure] and see the list on the left.
is_required: true
summary: |
Set the module that you want to build. To see your available modules please open your project in Android Studio and go in [Project Structure] and see the list on the left.
title: Module
- opts:
description: |
Set the variant that you want to build. To see your available variants please open your project in Android Studio and go in [Project Structure] -> variants section.
is_required: true
summary: |
Set the variant that you want to build. To see your available variants please open your project in Android Studio and go in [Project Structure] -> variants section.
title: Variant
variant: ""
- apk_path_pattern: '*/build/outputs/apk/*.apk'
opts:
category: Options
description: Will find the APK files with the given pattern.
is_required: true
summary: Will find the APK files with the given pattern.
title: APK location pattern
- cache_level: only_deps
opts:
category: Options
description: |-
`all` - will cache build cache and dependencies
`only_deps` - will cache dependencies only
`none` - will not cache anything
is_required: true
title: Set the level of cache
value_options:
- all
- only_deps
- none
- arguments: null
opts:
category: Options
description: Extra arguments passed to the gradle task
is_required: false
summary: Extra arguments passed to the gradle task
title: Additional Gradle Arguments
outputs:
- BITRISE_APK_PATH: null
opts:
description: |-
This output will include the path of the generated APK
after filtering based on the filter inputs.
summary: Path of the generated (and copied) APK - after filtering.
title: Path of the generated APK
- BITRISE_TEST_APK_PATH: null
opts:
description: |-
This output will include the path of the generated test APK
after filtering based on the filter inputs.
summary: Path of the generated (and copied) test APK - after filtering.
title: Path of the generated test APK
================================================
FILE: steps/android-build-for-ui-testing/0.1.3/step.yml
================================================
title: Android Build for UI Testing
summary: Builds your Android project with gradle with the belonging AndroidTest variant.
description: Builds your Android project with gradle with the belonging AndroidTest
variant.
website: https://github.com/bitrise-steplib/bitrise-step-android-build-for-ui-testing
source_code_url: https://github.com/bitrise-steplib/bitrise-step-android-build-for-ui-testing
support_url: https://github.com/bitrise-steplib/bitrise-step-android-build-for-ui-testing/issues
published_at: 2020-11-25T14:52:40.388696881Z
source:
git: https://github.com/bitrise-steplib/bitrise-step-android-build-for-ui-testing.git
commit: ffff234b0d635cce005becfca22f753b33adbd19
project_type_tags:
- android
- react-native
type_tags:
- build
toolkit:
go:
package_name: github.com/bitrise-steplib/bitrise-step-android-build-for-ui-testing
is_requires_admin_user: true
is_always_run: false
is_skippable: false
run_if: ""
inputs:
- opts:
description: The root directory of your android project, for example, where your
root build gradle file exist (also gradlew, settings.gradle, etc...)
is_required: true
summary: The root directory of your android project, for example, where your root
build gradle file exist (also gradlew, settings.gradle, etc...)
title: Project Location
project_location: $BITRISE_SOURCE_DIR
- module: ""
opts:
description: |
Set the module that you want to build. To see your available modules please open your project in Android Studio and go in [Project Structure] and see the list on the left.
is_required: true
summary: |
Set the module that you want to build. To see your available modules please open your project in Android Studio and go in [Project Structure] and see the list on the left.
title: Module
- opts:
description: |
Set the variant that you want to build. To see your available variants please open your project in Android Studio and go in [Project Structure] -> variants section.
is_required: true
summary: |
Set the variant that you want to build. To see your available variants please open your project in Android Studio and go in [Project Structure] -> variants section.
title: Variant
variant: ""
- apk_path_pattern: '*/build/outputs/apk/*.apk'
opts:
category: Options
description: Will find the APK files with the given pattern.
is_required: true
summary: Will find the APK files with the given pattern.
title: APK location pattern
- cache_level: only_deps
opts:
category: Options
description: |-
`all` - will cache build cache and dependencies
`only_deps` - will cache dependencies only
`none` - will not cache anything
is_required: true
title: Set the level of cache
value_options:
- all
- only_deps
- none
- arguments: null
opts:
category: Options
description: Extra arguments passed to the gradle task
is_required: false
summary: Extra arguments passed to the gradle task
title: Additional Gradle Arguments
outputs:
- BITRISE_APK_PATH: null
opts:
description: |-
This output will include the path of the generated APK
after filtering based on the filter inputs.
summary: Path of the generated (and copied) APK - after filtering.
title: Path of the generated APK
- BITRISE_TEST_APK_PATH: null
opts:
description: |-
This output will include the path of the generated test APK
after filtering based on the filter inputs.
summary: Path of the generated (and copied) test APK - after filtering.
title: Path of the generated test APK
================================================
FILE: steps/android-build-for-ui-testing/0.1.4/step.yml
================================================
title: Android Build for UI Testing
summary: Builds your Android project with gradle with the belonging AndroidTest variant.
description: Builds your Android project with gradle with the belonging AndroidTest
variant.
website: https://github.com/bitrise-steplib/bitrise-step-android-build-for-ui-testing
source_code_url: https://github.com/bitrise-steplib/bitrise-step-android-build-for-ui-testing
support_url: https://github.com/bitrise-steplib/bitrise-step-android-build-for-ui-testing/issues
published_at: 2021-05-28T12:52:59.366614897Z
source:
git: https://github.com/bitrise-steplib/bitrise-step-android-build-for-ui-testing.git
commit: 5023d0f4953924b23d60a4531b35ff564f929e98
project_type_tags:
- android
- react-native
type_tags:
- build
toolkit:
go:
package_name: github.com/bitrise-steplib/bitrise-step-android-build-for-ui-testing
is_requires_admin_user: true
is_always_run: false
is_skippable: false
run_if: ""
inputs:
- opts:
description: The root directory of your android project, for example, where your
root build gradle file exist (also gradlew, settings.gradle, etc...)
is_required: true
summary: The root directory of your android project, for example, where your root
build gradle file exist (also gradlew, settings.gradle, etc...)
title: Project Location
project_location: $BITRISE_SOURCE_DIR
- module: ""
opts:
description: |
Set the module that you want to build. To see your available modules please open your project in Android Studio and go in [Project Structure] and see the list on the left.
is_required: true
summary: |
Set the module that you want to build. To see your available modules please open your project in Android Studio and go in [Project Structure] and see the list on the left.
title: Module
- opts:
description: |
Set the variant that you want to build. To see your available variants please open your project in Android Studio and go in [Project Structure] -> variants section.
is_required: true
summary: |
Set the variant that you want to build. To see your available variants please open your project in Android Studio and go in [Project Structure] -> variants section.
title: Variant
variant: ""
- apk_path_pattern: '*/build/outputs/apk/*.apk'
opts:
category: Options
description: Will find the APK files with the given pattern.
is_required: true
summary: Will find the APK files with the given pattern.
title: APK location pattern
- cache_level: only_deps
opts:
category: Options
description: |-
`all` - will cache build cache and dependencies
`only_deps` - will cache dependencies only
`none` - will not cache anything
is_required: true
title: Set the level of cache
value_options:
- all
- only_deps
- none
- arguments: null
opts:
category: Options
description: Extra arguments passed to the gradle task
is_required: false
summary: Extra arguments passed to the gradle task
title: Additional Gradle Arguments
outputs:
- BITRISE_APK_PATH: null
opts:
description: |-
This output will include the path of the generated APK
after filtering based on the filter inputs.
summary: Path of the generated (and copied) APK - after filtering.
title: Path of the generated APK
- BITRISE_TEST_APK_PATH: null
opts:
description: |-
This output will include the path of the generated test APK
after filtering based on the filter inputs.
summary: Path of the generated (and copied) test APK - after filtering.
title: Path of the generated test APK
================================================
FILE: steps/android-build-for-ui-testing/0.1.5/step.yml
================================================
title: Android Build for UI Testing
summary: Builds your Android project with Gradle with the belonging AndroidTest variant.
description: "[This Step](https://github.com/bitrise-steplib/bitrise-step-android-build-for-ui-testing)
generates all the APKs you need to run instrumentation tests for your Android app:
both an APK from your app and the belonging test APK, for example, `:app:assembleDemoDebug`,
`:app:assembleDemoDebugAndroidTest`\n \n ### Configuring the Step\n 1. Add the **Project
Location** which is the root directory of your Android project.\n 2. Set the **Module**
you want to build. To see your available modules, open your project in Android Studio
and go to **Project Structure** and see the list on the left.\n 3. Set the **Variant**
you want to build. To see your available variants, open your project in Android
Studio and go to **Project Structure** and then the **variants** section.\n Under
**Options**:\n 4. Set the **APK location pattern**: Once the build has run, the
Step finds the APK files with the given pattern.\n 5. **Set the level of cache**
where `all` caches build cache and dependencies, `only_deps` caches dependencies
only, `none` does not cache anything.\n 6. If you wish to pass any extra Gradle
arguments to the gradle task, you can add those in the **Additional Gradle Arguments**
input.\n\n ### Useful links\n- [Testing with Bitrise](https://devcenter.bitrise.io/testing/testing-index/)\n-
[Deploying an Android app with Bitrise](https://devcenter.bitrise.io/deploy/android-deploy/android-deployment-index/)\n\n###
Related Steps\n- [Android Build](https://www.bitrise.io/integrations/steps/android-build)\n-
[Gradle Runner](https://www.bitrise.io/integrations/steps/gradle-runner)"
website: https://github.com/bitrise-steplib/bitrise-step-android-build-for-ui-testing
source_code_url: https://github.com/bitrise-steplib/bitrise-step-android-build-for-ui-testing
support_url: https://github.com/bitrise-steplib/bitrise-step-android-build-for-ui-testing/issues
published_at: 2021-06-24T15:41:07.662994538Z
source:
git: https://github.com/bitrise-steplib/bitrise-step-android-build-for-ui-testing.git
commit: c85ab833f88b39cfa27abd5b84dafc6b879cbaef
project_type_tags:
- android
- react-native
type_tags:
- build
toolkit:
go:
package_name: github.com/bitrise-steplib/bitrise-step-android-build-for-ui-testing
is_requires_admin_user: true
is_always_run: false
is_skippable: false
run_if: ""
inputs:
- opts:
description: The root directory of your android project, for example, where your
root build gradle file exist (also gradlew, settings.gradle, etc...)
is_required: true
summary: The root directory of your android project, for example, where your root
build gradle file exist (also gradlew, settings.gradle, etc...)
title: Project Location
project_location: $BITRISE_SOURCE_DIR
- module: ""
opts:
description: |
Set the module that you want to build. To see your available modules please open your project in Android Studio and go in [Project Structure] and see the list on the left.
is_required: true
summary: |
Set the module that you want to build. To see your available modules please open your project in Android Studio and go in [Project Structure] and see the list on the left.
title: Module
- opts:
description: |
Set the variant that you want to build. To see your available variants please open your project in Android Studio and go in [Project Structure] -> variants section.
is_required: true
summary: |
Set the variant that you want to build. To see your available variants please open your project in Android Studio and go in [Project Structure] -> variants section.
title: Variant
variant: ""
- apk_path_pattern: '*/build/outputs/apk/*.apk'
opts:
category: Options
description: Will find the APK files with the given pattern.
is_required: true
summary: Will find the APK files with the given pattern.
title: APK location pattern
- cache_level: only_deps
opts:
category: Options
description: |-
`all` - will cache build cache and dependencies
`only_deps` - will cache dependencies only
`none` - will not cache anything
is_required: true
title: Set the level of cache
value_options:
- all
- only_deps
- none
- arguments: null
opts:
category: Options
description: Extra arguments passed to the gradle task
is_required: false
summary: Extra arguments passed to the gradle task
title: Additional Gradle Arguments
outputs:
- BITRISE_APK_PATH: null
opts:
description: |-
This output will include the path of the generated APK
after filtering based on the filter inputs.
summary: Path of the generated (and copied) APK - after filtering.
title: Path of the generated APK
- BITRISE_TEST_APK_PATH: null
opts:
description: |-
This output will include the path of the generated test APK
after filtering based on the filter inputs.
summary: Path of the generated (and copied) test APK - after filtering.
title: Path of the generated test APK
================================================
FILE: steps/android-build-for-ui-testing/0.1.6/step.yml
================================================
title: Android Build for UI Testing
summary: Builds your Android project with Gradle with the belonging AndroidTest variant.
description: |-
[This Step](https://github.com/bitrise-steplib/bitrise-step-android-build-for-ui-testing) generates all the APKs you need to run instrumentation tests for your Android app: both an APK from your app and the belonging test APK, for example, `:app:assembleDemoDebug`, `:app:assembleDemoDebugAndroidTest`
### Configuring the Step
1. Add the **Project Location** which is the root directory of your Android project.
2. Set the **Module** you want to build. To see your available modules, open your project in Android Studio and go to **Project Structure** and see the list on the left.
3. Set the **Variant** you want to build. To see your available variants, open your project in Android Studio and go to **Project Structure** and then the **variants** section.
Under **Options**:
4. Set the **APK location pattern**: Once the build has run, the Step finds the APK files with the given pattern.
5. **Set the level of cache** where `all` caches build cache and dependencies, `only_deps` caches dependencies only, `none` does not cache anything.
6. If you wish to pass any extra Gradle arguments to the gradle task, you can add those in the **Additional Gradle Arguments** input.
### Useful links
- [Testing with Bitrise](https://devcenter.bitrise.io/testing/testing-index/)
- [Deploying an Android app with Bitrise](https://devcenter.bitrise.io/deploy/android-deploy/android-deployment-index/)
### Related Steps
- [Android Build](https://www.bitrise.io/integrations/steps/android-build)
- [Gradle Runner](https://www.bitrise.io/integrations/steps/gradle-runner)
website: https://github.com/bitrise-steplib/bitrise-step-android-build-for-ui-testing
source_code_url: https://github.com/bitrise-steplib/bitrise-step-android-build-for-ui-testing
support_url: https://github.com/bitrise-steplib/bitrise-step-android-build-for-ui-testing/issues
published_at: 2021-11-09T13:13:48.615405438Z
source:
git: https://github.com/bitrise-steplib/bitrise-step-android-build-for-ui-testing.git
commit: 05414286cf8ac74687de66884b0a5e1ee07344d6
project_type_tags:
- android
- react-native
type_tags:
- build
toolkit:
go:
package_name: github.com/bitrise-steplib/bitrise-step-android-build-for-ui-testing
is_requires_admin_user: true
is_always_run: false
is_skippable: false
run_if: ""
inputs:
- opts:
is_required: true
summary: The root directory of your android project, for example, where your root
build gradle file exist (also gradlew, settings.gradle, etc...)
title: Project Location
project_location: $BITRISE_SOURCE_DIR
- module: ""
opts:
is_required: true
summary: |
Set the module that you want to build. To see your available modules please open your project in Android Studio and go in [Project Structure] and see the list on the left.
title: Module
- opts:
is_required: true
summary: |
Set the variant that you want to build. To see your available variants please open your project in Android Studio and go in [Project Structure] -> variants section.
title: Variant
variant: ""
- apk_path_pattern: '*/build/outputs/apk/*.apk'
opts:
category: Options
is_required: true
summary: Will find the APK files with the given pattern.
title: APK location pattern
- cache_level: only_deps
opts:
category: Options
description: |-
`all` - will cache build cache and dependencies
`only_deps` - will cache dependencies only
`none` - will not cache anything
is_required: true
title: Set the level of cache
value_options:
- all
- only_deps
- none
- arguments: null
opts:
category: Options
is_required: false
summary: Extra arguments passed to the gradle task
title: Additional Gradle Arguments
outputs:
- BITRISE_APK_PATH: null
opts:
description: |-
This output will include the path of the generated APK
after filtering based on the filter inputs.
summary: Path of the generated (and copied) APK - after filtering.
title: Path of the generated APK
- BITRISE_TEST_APK_PATH: null
opts:
description: |-
This output will include the path of the generated test APK
after filtering based on the filter inputs.
summary: Path of the generated (and copied) test APK - after filtering.
title: Path of the generated test APK
================================================
FILE: steps/android-build-for-ui-testing/0.1.7/step.yml
================================================
title: Android Build for UI Testing
summary: Builds your Android project with Gradle with the belonging AndroidTest variant.
description: |-
[This Step](https://github.com/bitrise-steplib/bitrise-step-android-build-for-ui-testing) generates all the APKs you need to run instrumentation tests for your Android app: both an APK from your app and the belonging test APK, for example, `:app:assembleDemoDebug`, `:app:assembleDemoDebugAndroidTest`
### Configuring the Step
1. Add the **Project Location** which is the root directory of your Android project.
2. Set the **Module** you want to build. To see your available modules, open your project in Android Studio and go to **Project Structure** and see the list on the left.
3. Set the **Variant** you want to build. To see your available variants, open your project in Android Studio and go to **Project Structure** and then the **variants** section.
Under **Options**:
4. Set the **APK location pattern**: Once the build has run, the Step finds the APK files with the given pattern.
5. **Set the level of cache** where `all` caches build cache and dependencies, `only_deps` caches dependencies only, `none` does not cache anything.
6. If you wish to pass any extra Gradle arguments to the gradle task, you can add those in the **Additional Gradle Arguments** input.
### Useful links
- [Testing with Bitrise](https://devcenter.bitrise.io/testing/testing-index/)
- [Deploying an Android app with Bitrise](https://devcenter.bitrise.io/deploy/android-deploy/android-deployment-index/)
### Related Steps
- [Android Build](https://www.bitrise.io/integrations/steps/android-build)
- [Gradle Runner](https://www.bitrise.io/integrations/steps/gradle-runner)
website: https://github.com/bitrise-steplib/bitrise-step-android-build-for-ui-testing
source_code_url: https://github.com/bitrise-steplib/bitrise-step-android-build-for-ui-testing
support_url: https://github.com/bitrise-steplib/bitrise-step-android-build-for-ui-testing/issues
published_at: 2021-11-22T15:57:43.303035343Z
source:
git: https://github.com/bitrise-steplib/bitrise-step-android-build-for-ui-testing.git
commit: 88443b350d734172afcb3ee2099a098585c381f9
project_type_tags:
- android
- react-native
type_tags:
- build
toolkit:
go:
package_name: github.com/bitrise-steplib/bitrise-step-android-build-for-ui-testing
is_requires_admin_user: true
is_always_run: false
is_skippable: false
run_if: ""
inputs:
- opts:
is_required: true
summary: The root directory of your android project, for example, where your root
build gradle file exist (also gradlew, settings.gradle, etc...)
title: Project Location
project_location: $BITRISE_SOURCE_DIR
- module: ""
opts:
description: |
Set the module to build. Valid syntax examples: `app`, `feature:nested-module`
To see your available modules please open your project in Android Studio and go in [Project Structure] and see the list on the left.
is_required: true
summary: 'Set the module to build. Valid syntax examples: `app`, `feature:nested-module`'
title: Module
- opts:
is_required: true
summary: |
Set the variant that you want to build. To see your available variants please open your project in Android Studio and go in [Project Structure] -> variants section.
title: Variant
variant: ""
- apk_path_pattern: '*/build/outputs/apk/*.apk'
opts:
category: Options
is_required: true
summary: Will find the APK files with the given pattern.
title: APK location pattern
- cache_level: only_deps
opts:
category: Options
description: |-
`all` - will cache build cache and dependencies
`only_deps` - will cache dependencies only
`none` - will not cache anything
is_required: true
title: Set the level of cache
value_options:
- all
- only_deps
- none
- arguments: null
opts:
category: Options
is_required: false
summary: Extra arguments passed to the gradle task
title: Additional Gradle Arguments
outputs:
- BITRISE_APK_PATH: null
opts:
description: |-
This output will include the path of the generated APK
after filtering based on the filter inputs.
summary: Path of the generated (and copied) APK - after filtering.
title: Path of the generated APK
- BITRISE_TEST_APK_PATH: null
opts:
description: |-
This output will include the path of the generated test APK
after filtering based on the filter inputs.
summary: Path of the generated (and copied) test APK - after filtering.
title: Path of the generated test APK
================================================
FILE: steps/android-build-for-ui-testing/0.1.8/step.yml
================================================
title: Android Build for UI Testing
summary: Builds your Android project with Gradle with the belonging AndroidTest variant.
description: |-
[This Step](https://github.com/bitrise-steplib/bitrise-step-android-build-for-ui-testing) generates all the APKs you need to run instrumentation tests for your Android app: both an APK from your app and the belonging test APK, for example, `:app:assembleDemoDebug`, `:app:assembleDemoDebugAndroidTest`
### Configuring the Step
1. Add the **Project Location** which is the root directory of your Android project.
2. Set the **Module** you want to build. To see your available modules, open your project in Android Studio and go to **Project Structure** and see the list on the left.
3. Set the **Variant** you want to build. To see your available variants, open your project in Android Studio and go to **Project Structure** and then the **variants** section.
Under **Options**:
4. Set the **APK location pattern**: Once the build has run, the Step finds the APK files with the given pattern.
5. **Set the level of cache** where `all` caches build cache and dependencies, `only_deps` caches dependencies only, `none` does not cache anything.
6. If you wish to pass any extra Gradle arguments to the gradle task, you can add those in the **Additional Gradle Arguments** input.
### Useful links
- [Testing with Bitrise](https://devcenter.bitrise.io/testing/testing-index/)
- [Deploying an Android app with Bitrise](https://devcenter.bitrise.io/deploy/android-deploy/android-deployment-index/)
### Related Steps
- [Android Build](https://www.bitrise.io/integrations/steps/android-build)
- [Gradle Runner](https://www.bitrise.io/integrations/steps/gradle-runner)
website: https://github.com/bitrise-steplib/bitrise-step-android-build-for-ui-testing
source_code_url: https://github.com/bitrise-steplib/bitrise-step-android-build-for-ui-testing
support_url: https://github.com/bitrise-steplib/bitrise-step-android-build-for-ui-testing/issues
published_at: 2025-10-31T10:00:24.545465935Z
source:
git: https://github.com/bitrise-steplib/bitrise-step-android-build-for-ui-testing.git
commit: 7b2605127f7698a2ee0af4b0eebcf68accb20c53
project_type_tags:
- android
- react-native
type_tags:
- build
toolkit:
go:
package_name: github.com/bitrise-steplib/bitrise-step-android-build-for-ui-testing
is_requires_admin_user: true
is_always_run: false
is_skippable: false
run_if: ""
inputs:
- opts:
is_required: true
summary: The root directory of your android project, for example, where your root
build gradle file exist (also gradlew, settings.gradle, etc...)
title: Project Location
project_location: $BITRISE_SOURCE_DIR
- module: ""
opts:
description: |
Set the module to build. Valid syntax examples: `app`, `feature:nested-module`
To see your available modules please open your project in Android Studio and go in [Project Structure] and see the list on the left.
is_required: true
summary: 'Set the module to build. Valid syntax examples: `app`, `feature:nested-module`'
title: Module
- opts:
is_required: true
summary: |
Set the variant that you want to build. To see your available variants please open your project in Android Studio and go in [Project Structure] -> variants section.
title: Variant
variant: ""
- apk_path_pattern: '*/build/outputs/apk/*.apk'
opts:
category: Options
is_required: true
summary: Will find the APK files with the given pattern.
title: APK location pattern
- cache_level: only_deps
opts:
category: Options
description: |-
`all` - will cache build cache and dependencies
`only_deps` - will cache dependencies only
`none` - will not cache anything
is_required: true
title: Set the level of cache
value_options:
- all
- only_deps
- none
- arguments: null
opts:
category: Options
is_required: false
summary: Extra arguments passed to the gradle task
title: Additional Gradle Arguments
outputs:
- BITRISE_APK_PATH: null
opts:
description: |-
This output will include the path of the generated APK
after filtering based on the filter inputs.
summary: Path of the generated (and copied) APK - after filtering.
title: Path of the generated APK
- BITRISE_TEST_APK_PATH: null
opts:
description: |-
This output will include the path of the generated test APK
after filtering based on the filter inputs.
summary: Path of the generated (and copied) test APK - after filtering.
title: Path of the generated test APK
================================================
FILE: steps/android-build-for-ui-testing/0.1.9/step.yml
================================================
title: Android Build for UI Testing
summary: Builds your Android project with Gradle with the belonging AndroidTest variant.
description: |-
[This Step](https://github.com/bitrise-steplib/bitrise-step-android-build-for-ui-testing) generates all the APKs you need to run instrumentation tests for your Android app: both an APK from your app and the belonging test APK, for example, `:app:assembleDemoDebug`, `:app:assembleDemoDebugAndroidTest`
### Configuring the Step
1. Add the **Project Location** which is the root directory of your Android project.
2. Set the **Module** you want to build. To see your available modules, open your project in Android Studio and go to **Project Structure** and see the list on the left.
3. Set the **Variant** you want to build. To see your available variants, open your project in Android Studio and go to **Project Structure** and then the **variants** section.
Under **Options**:
4. Set the **APK location pattern**: Once the build has run, the Step finds the APK files with the given pattern.
5. **Set the level of cache** where `all` caches build cache and dependencies, `only_deps` caches dependencies only, `none` does not cache anything.
6. If you wish to pass any extra Gradle arguments to the gradle task, you can add those in the **Additional Gradle Arguments** input.
### Useful links
- [Testing with Bitrise](https://devcenter.bitrise.io/testing/testing-index/)
- [Deploying an Android app with Bitrise](https://devcenter.bitrise.io/deploy/android-deploy/android-deployment-index/)
### Related Steps
- [Android Build](https://www.bitrise.io/integrations/steps/android-build)
- [Gradle Runner](https://www.bitrise.io/integrations/steps/gradle-runner)
website: https://github.com/bitrise-steplib/bitrise-step-android-build-for-ui-testing
source_code_url: https://github.com/bitrise-steplib/bitrise-step-android-build-for-ui-testing
support_url: https://github.com/bitrise-steplib/bitrise-step-android-build-for-ui-testing/issues
published_at: 2025-11-10T13:21:06.689090942Z
source:
git: https://github.com/bitrise-steplib/bitrise-step-android-build-for-ui-testing.git
commit: b46078d270aa7241b5587a0bafafaae1a0fc960d
project_type_tags:
- android
- cordova
- flutter
- ionic
- kotlin-multiplatform
- react-native
type_tags:
- build
toolkit:
go:
package_name: github.com/bitrise-steplib/bitrise-step-android-build-for-ui-testing
is_requires_admin_user: true
is_always_run: false
is_skippable: false
run_if: ""
inputs:
- opts:
is_required: true
summary: The root directory of your android project, for example, where your root
build gradle file exist (also gradlew, settings.gradle, etc...)
title: Project Location
project_location: $BITRISE_SOURCE_DIR
- module: ""
opts:
description: |
Set the module to build. Valid syntax examples: `app`, `feature:nested-module`
To see your available modules please open your project in Android Studio and go in [Project Structure] and see the list on the left.
is_required: true
summary: 'Set the module to build. Valid syntax examples: `app`, `feature:nested-module`'
title: Module
- opts:
is_required: true
summary: |
Set the variant that you want to build. To see your available variants please open your project in Android Studio and go in [Project Structure] -> variants section.
title: Variant
variant: ""
- apk_path_pattern: '*/build/outputs/apk/*.apk'
opts:
category: Options
is_required: true
summary: Will find the APK files with the given pattern.
title: APK location pattern
- cache_level: only_deps
opts:
category: Options
description: |-
`all` - will cache build cache and dependencies
`only_deps` - will cache dependencies only
`none` - will not cache anything
is_required: true
title: Set the level of cache
value_options:
- all
- only_deps
- none
- arguments: null
opts:
category: Options
is_required: false
summary: Extra arguments passed to the gradle task
title: Additional Gradle Arguments
outputs:
- BITRISE_APK_PATH: null
opts:
description: |-
This output will include the path of the generated APK
after filtering based on the filter inputs.
summary: Path of the generated (and copied) APK - after filtering.
title: Path of the generated APK
- BITRISE_TEST_APK_PATH: null
opts:
description: |-
This output will include the path of the generated test APK
after filtering based on the filter inputs.
summary: Path of the generated (and copied) test APK - after filtering.
title: Path of the generated test APK
================================================
FILE: steps/android-build-for-ui-testing/step-info.yml
================================================
maintainer: bitrise
================================================
FILE: steps/android-detekt/0.0.2/step.yml
================================================
title: Android Detekt
summary: |
This step runs detekt gradle task on your project.
description: |
This step runs detekt gradle task on your project.
website: https://github.com/dzinek/bitrise-step-android-detekt
source_code_url: https://github.com/dzinek/bitrise-step-android-detekt
support_url: https://github.com/dzinek/bitrise-step-android-detekt/issues
published_at: 2019-02-04T06:52:05.394754+01:00
source:
git: https://github.com/dzinek/bitrise-step-android-detekt.git
commit: 32358164f04f1996c577f6b581f5f1d244ea5990
host_os_tags:
- osx-10.10
- ubuntu-16.04
project_type_tags:
- android
type_tags:
- test
toolkit:
go:
package_name: github.com/dzinek/bitrise-step-android-detekt
deps:
apt_get:
- name: git
is_requires_admin_user: true
is_always_run: false
is_skippable: false
inputs:
- opts:
description: The root directory of your android project, for example, where your
root build gradle file exists (also gradlew, settings.gradle, etc...)
is_required: true
summary: The root directory of your android project, for example, where your root
build gradle file exists (also gradlew, settings.gradle, etc...)
title: Project Location
project_location: $BITRISE_SOURCE_DIR
- module: ""
opts:
description: |
Set the module that you want to run detekt. To see your available modules please open your project in Android Studio and go in [Project Structure] and see the list on the left.
is_required: false
summary: |
Set the module that you want to run detekt. To see your available modules please open your project in Android Studio and go in [Project Structure] and see the list on the left.
title: Module
- opts:
category: Options
description: |
Will find the report file with the given pattern. If you need the xml file then you can use: "*/build/reports/detekt/detekt*.xml"
is_required: true
summary: |
Will find the report file with the given pattern. If you need the xml file then you can use: "*/build/reports/detekt/detekt*.xml"
title: Report location pattern
report_path_pattern: '*/build/reports/detekt/detekt*.html'
- cache_level: only_deps
opts:
category: Options
description: |-
`all` - will cache build cache and dependencies
`only_deps` - will cache dependencies only
`none` - will not cache anything
is_required: true
title: Set the level of cache
value_options:
- all
- only_deps
- none
- arguments: null
opts:
category: Options
description: Extra arguments passed to the gradle task
is_required: false
summary: Extra arguments passed to the gradle task
title: Additional Gradle Arguments
================================================
FILE: steps/android-detekt/0.0.3/step.yml
================================================
title: Android Detekt
summary: |
This step runs detekt gradle task on your project.
description: |
This step runs detekt gradle task on your project.
website: https://github.com/dzinek/bitrise-step-android-detekt
source_code_url: https://github.com/dzinek/bitrise-step-android-detekt
support_url: https://github.com/dzinek/bitrise-step-android-detekt/issues
published_at: 2020-03-31T01:05:34.697406+02:00
source:
git: https://github.com/dzinek/bitrise-step-android-detekt.git
commit: 1c0a9f3a08f4100b036103775f67dcaa1a0b087c
host_os_tags:
- osx-10.10
- ubuntu-16.04
project_type_tags:
- android
type_tags:
- test
toolkit:
go:
package_name: github.com/dzinek/bitrise-step-android-detekt
deps:
apt_get:
- name: git
is_requires_admin_user: true
is_always_run: false
is_skippable: false
inputs:
- opts:
description: The root directory of your android project, for example, where your
root build gradle file exists (also gradlew, settings.gradle, etc...)
is_required: true
summary: The root directory of your android project, for example, where your root
build gradle file exists (also gradlew, settings.gradle, etc...)
title: Project Location
project_location: $BITRISE_SOURCE_DIR
- module: ""
opts:
description: |
Set the module that you want to run detekt. To see your available modules please open your project in Android Studio and go in [Project Structure] and see the list on the left.
is_required: false
summary: |
Set the module that you want to run detekt. To see your available modules please open your project in Android Studio and go in [Project Structure] and see the list on the left.
title: Module
- opts:
category: Options
description: |
Will find the report file with the given pattern. If you need the xml file then you can use: "*/build/reports/detekt/detekt*.xml"
is_required: true
summary: |
Will find the report file with the given pattern. If you need the xml file then you can use: "*/build/reports/detekt/detekt*.xml"
title: Report location pattern
report_path_pattern: '*/build/reports/detekt/detekt*.html'
- cache_level: only_deps
opts:
category: Options
description: |-
`all` - will cache build cache and dependencies
`only_deps` - will cache dependencies only
`none` - will not cache anything
is_required: true
title: Set the level of cache
value_options:
- all
- only_deps
- none
- arguments: null
opts:
category: Options
description: Extra arguments passed to the gradle task
is_required: false
summary: Extra arguments passed to the gradle task
title: Additional Gradle Arguments
================================================
FILE: steps/android-detekt/step-info.yml
================================================
maintainer: community
================================================
FILE: steps/android-instrumented-test/0.1.0/step.yml
================================================
title: Android Instrumented Test
summary: Runs Instrumented tests on an existing APK
description: Runs Instrumented tests on an existing APK
website: https://github.com/bitrise-steplib/bitrise-step-android-instrumented-test
source_code_url: https://github.com/bitrise-steplib/bitrise-step-android-instrumented-test
support_url: https://github.com/bitrise-steplib/bitrise-step-android-instrumented-test/issues
published_at: 2022-06-28T08:38:59.19506-05:00
source:
git: https://github.com/bitrise-steplib/bitrise-step-android-instrumented-test.git
commit: 30dd54e3850db8b804e5dcd3acae2cc19dbf924e
project_type_tags:
- android
type_tags:
- test
toolkit:
go:
package_name: github.com/bitrise-steplib/bitrise-step-android-instrumented-test
inputs:
- main_apk_path: $BITRISE_APK_PATH
opts:
description: The path to the app's main APK
is_required: true
summary: The path to the app's main APK
title: Main APK path
- opts:
description: The path to the app's test APK
is_required: true
summary: The path to the app's test APK
title: Test APK path
test_apk_path: $BITRISE_TEST_APK_PATH
- opts:
description: The name of the test runner
is_required: true
summary: The name of the test runner
title: Test runner class
test_runner_class: androidx.test.runner.AndroidJUnitRunner
- additional_testing_options: ""
opts:
description: |-
A space-delimited list of additional options to pass to the test runner
Example:
If a value of `KEY1 true KEY2 false` is passed to this input,
then it will be passed to the `adb` command like so:
```shell
adb shell am instrument -e "KEY1" "true" "KEY2" "false" [...]
```
See the [`adb` documentation](https://developer.android.com/studio/command-line/adb#am) for more info.
summary: A space-delimited list of additional options to pass to the test runner
title: Additional testing options
================================================
FILE: steps/android-instrumented-test/0.1.1/step.yml
================================================
title: Android Instrumented Test
summary: Runs Instrumented tests on an existing APK
description: Runs Instrumented tests on an existing APK
website: https://github.com/bitrise-steplib/bitrise-step-android-instrumented-test
source_code_url: https://github.com/bitrise-steplib/bitrise-step-android-instrumented-test
support_url: https://github.com/bitrise-steplib/bitrise-step-android-instrumented-test/issues
published_at: 2023-07-24T13:32:30.362292292Z
source:
git: https://github.com/bitrise-steplib/bitrise-step-android-instrumented-test.git
commit: 35984f7c637778c37f22a8d16e05af9ad76bdad4
project_type_tags:
- android
type_tags:
- test
toolkit:
go:
package_name: github.com/bitrise-steplib/bitrise-step-android-instrumented-test
inputs:
- main_apk_path: $BITRISE_APK_PATH
opts:
description: The path to the app's main APK
is_required: true
summary: The path to the app's main APK
title: Main APK path
- opts:
description: The path to the app's test APK
is_required: true
summary: The path to the app's test APK
title: Test APK path
test_apk_path: $BITRISE_TEST_APK_PATH
- opts:
description: The name of the test runner
is_required: true
summary: The name of the test runner
title: Test runner class
test_runner_class: androidx.test.runner.AndroidJUnitRunner
- additional_testing_options: ""
opts:
description: |-
A space-delimited list of additional options to pass to the test runner
Example:
If a value of `KEY1 true KEY2 false` is passed to this input,
then it will be passed to the `adb` command like so:
```shell
adb shell am instrument -e "KEY1" "true" "KEY2" "false" [...]
```
See the [`adb` documentation](https://developer.android.com/studio/command-line/adb#am) for more info.
summary: A space-delimited list of additional options to pass to the test runner
title: Additional testing options
================================================
FILE: steps/android-instrumented-test/0.1.2/step.yml
================================================
title: Android Instrumented Test
summary: Runs Instrumented tests on an existing APK
description: Runs Instrumented tests on an existing APK
website: https://github.com/bitrise-steplib/bitrise-step-android-instrumented-test
source_code_url: https://github.com/bitrise-steplib/bitrise-step-android-instrumented-test
support_url: https://github.com/bitrise-steplib/bitrise-step-android-instrumented-test/issues
published_at: 2025-11-14T12:46:32.554922281Z
source:
git: https://github.com/bitrise-steplib/bitrise-step-android-instrumented-test.git
commit: 26ef745d63863c7a072e4063fa5f08a60b288ef4
project_type_tags:
- android
- cordova
- flutter
- ionic
- kotlin-multiplatform
- react-native
type_tags:
- test
toolkit:
go:
package_name: github.com/bitrise-steplib/bitrise-step-android-instrumented-test
inputs:
- main_apk_path: $BITRISE_APK_PATH
opts:
description: The path to the app's main APK
is_required: true
summary: The path to the app's main APK
title: Main APK path
- opts:
description: The path to the app's test APK
is_required: true
summary: The path to the app's test APK
title: Test APK path
test_apk_path: $BITRISE_TEST_APK_PATH
- opts:
description: The name of the test runner
is_required: true
summary: The name of the test runner
title: Test runner class
test_runner_class: androidx.test.runner.AndroidJUnitRunner
- additional_testing_options: ""
opts:
description: |-
A space-delimited list of additional options to pass to the test runner
Example:
If a value of `KEY1 true KEY2 false` is passed to this input,
then it will be passed to the `adb` command like so:
```shell
adb shell am instrument -e "KEY1" "true" "KEY2" "false" [...]
```
See the [`adb` documentation](https://developer.android.com/studio/command-line/adb#am) for more info.
summary: A space-delimited list of additional options to pass to the test runner
title: Additional testing options
================================================
FILE: steps/android-instrumented-test/step-info.yml
================================================
maintainer: bitrise
================================================
FILE: steps/android-lint/0.9.0/step.yml
================================================
title: Android Lint
summary: Runs lint gradle task on your project.
description: Runs lint gradle task on your project.
website: https://github.com/bitrise-steplib/bitrise-step-android-lint
source_code_url: https://github.com/bitrise-steplib/bitrise-step-android-lint
support_url: https://github.com/bitrise-steplib/bitrise-step-android-lint/issues
published_at: !!timestamp 2018-03-22T14:31:26.216598122+01:00
source:
git: https://github.com/bitrise-steplib/bitrise-step-android-lint.git
commit: 0e89ce7f00a06ee57c54b074989c203410da8a74
host_os_tags:
- osx-10.10
- ubuntu-16.04
project_type_tags:
- android
- react-native
type_tags:
- test
toolkit:
go:
package_name: github.com/bitrise-steplib/bitrise-step-android-lint
is_requires_admin_user: true
is_always_run: false
is_skippable: false
inputs:
- opts:
description: 'The root directory of your android project, e.g.: where your root
build gradle file exist (also gradlew, settings.gradle, etc...)'
is_required: true
summary: 'The root directory of your android project, e.g.: where your root build
gradle file exist (also gradlew, settings.gradle, etc...)'
title: Project Location
project_location: $BITRISE_SOURCE_DIR
- module: ""
opts:
description: |
Set the module that you want to lint. To see your available modules please open your project in Android Studio and go in [Project Structure] and see the list on the left.
is_required: false
summary: |
Set the module that you want to lint. To see your available modules please open your project in Android Studio and go in [Project Structure] and see the list on the left.
title: Module
- opts:
description: |
Set the variant that you want to lint. To see your available variants please open your project in Android Studio and go in [Project Structure] -> variants section.
is_required: false
summary: |
Set the variant that you want to lint. To see your available variants please open your project in Android Studio and go in [Project Structure] -> variants section.
title: Variant
variant: ""
- opts:
category: Report Export Options
description: |
Will find the report file with the given pattern. If you need the xml file then you can use: "*/build/reports/lint-results*.xml"
is_required: true
summary: |
Will find the report file with the given pattern. If you need the xml file then you can use: "*/build/reports/lint-results*.xml"
title: Report location pattern
report_path_pattern: '*/build/reports/lint-results*.html'
================================================
FILE: steps/android-lint/0.9.1/step.yml
================================================
title: Android Lint
summary: Runs lint gradle task on your project.
description: Runs lint gradle task on your project.
website: https://github.com/bitrise-steplib/bitrise-step-android-lint
source_code_url: https://github.com/bitrise-steplib/bitrise-step-android-lint
support_url: https://github.com/bitrise-steplib/bitrise-step-android-lint/issues
published_at: 2018-05-02T12:43:14.432324737+02:00
source:
git: https://github.com/bitrise-steplib/bitrise-step-android-lint.git
commit: ea9b335bb05c7007d70fd001bc26baf047aea6f3
host_os_tags:
- osx-10.10
- ubuntu-16.04
project_type_tags:
- android
- react-native
type_tags:
- test
toolkit:
go:
package_name: github.com/bitrise-steplib/bitrise-step-android-lint
is_requires_admin_user: true
is_always_run: false
is_skippable: false
inputs:
- opts:
description: 'The root directory of your android project, e.g.: where your root
build gradle file exist (also gradlew, settings.gradle, etc...)'
is_required: true
summary: 'The root directory of your android project, e.g.: where your root build
gradle file exist (also gradlew, settings.gradle, etc...)'
title: Project Location
project_location: $BITRISE_SOURCE_DIR
- module: ""
opts:
description: |
Set the module that you want to lint. To see your available modules please open your project in Android Studio and go in [Project Structure] and see the list on the left.
is_required: false
summary: |
Set the module that you want to lint. To see your available modules please open your project in Android Studio and go in [Project Structure] and see the list on the left.
title: Module
- opts:
description: |
Set the variant that you want to lint. To see your available variants please open your project in Android Studio and go in [Project Structure] -> variants section.
is_required: false
summary: |
Set the variant that you want to lint. To see your available variants please open your project in Android Studio and go in [Project Structure] -> variants section.
title: Variant
variant: ""
- opts:
category: Options
description: |
Will find the report file with the given pattern. If you need the xml file then you can use: "*/build/reports/lint-results*.xml"
is_required: true
summary: |
Will find the report file with the given pattern. If you need the xml file then you can use: "*/build/reports/lint-results*.xml"
title: Report location pattern
report_path_pattern: '*/build/reports/lint-results*.html'
- cache_level: only_deps
opts:
category: Options
description: |-
`all` - will cache build cache and dependencies
`only_deps` - will cache dependencies only
`none` - will not cache anything
is_required: true
title: Set the level of cache
value_options:
- all
- only_deps
- none
- arguments: null
opts:
category: Options
description: Extra arguments passed to the gradle task
is_required: false
summary: Extra arguments passed to the gradle task
title: Additional Gradle Arguments
================================================
FILE: steps/android-lint/0.9.10/step.yml
================================================
title: Android Lint
summary: Runs Lint on your Android project source files and detects potential syntax
errors to keep your code error free.
description: |-
It highlights the code line where the error is found, explains the type of error and suggests corrections. The Step does not make the build fail if it spots any structural errors in your code. If you have inserted the **Deploy to Bitrise.io** Step in the Workflow, the tes results will be available in a viewable or downloadable Lint Report HTML or XML file which you can access on the Build's APPS & ARTIFACTS page.
### Configuring the Step
1. Set the **Project Location** input which, by default, points to the root directory of your Android project.
2. Set the module and variant you wish to lint in the **Module** and **Variant** fields.
Optionally, you can modify these inputs:
1. You can specify where the Lint reports should be found once the Step has run if you overwrite the **Report location pattern** input.
2. You can set if the Step should cache build outputs and dependencies, only the dependencies or nothing at all in the **Set level of cache** input.
3. You can set any gradle argument to the gradle task in the **Additional Gradle Arguments** input.
### Troubleshooting
Make sure you insert the Step before a build Step.
Make sure you type the correct module and variant names in the respective fields of the Step. If you are unsure about the exact names, you can check them in the **Project Structure** dialog of your project in Android Studio.
### Useful links
- [Improve your code with lint checks](https://developer.android.com/studio/write/lint)
### Related Steps
- [Android Build](https://www.bitrise.io/integrations/steps/android-build)
- [Android Unit Test](https://www.bitrise.io/integrations/steps/android-unit-test)
- [[BETA] Virtual Device Testing for Android](https://www.bitrise.io/integrations/steps/virtual-device-testing-for-android)
website: https://github.com/bitrise-steplib/bitrise-step-android-lint
source_code_url: https://github.com/bitrise-steplib/bitrise-step-android-lint
support_url: https://github.com/bitrise-steplib/bitrise-step-android-lint/issues
published_at: 2021-11-08T09:56:34.10549279Z
source:
git: https://github.com/bitrise-steplib/bitrise-step-android-lint.git
commit: de8726d7c43c2d3de51c23b0bcbe76ec42b120b1
host_os_tags:
- osx-10.10
- ubuntu-16.04
project_type_tags:
- android
- react-native
type_tags:
- test
toolkit:
go:
package_name: github.com/bitrise-steplib/bitrise-step-android-lint
is_requires_admin_user: true
is_always_run: false
is_skippable: false
inputs:
- opts:
description: The root directory of your android project, for example, where your
root build gradle file exists (also gradlew, settings.gradle, etc...)
is_required: true
summary: The root directory of your android project, for example, where your root
build gradle file exists (also gradlew, settings.gradle, etc...)
title: Project Location
project_location: $BITRISE_SOURCE_DIR
- module: ""
opts:
description: |
Set the module that you want to lint. To see your available modules please open your project in Android Studio and go in [Project Structure] and see the list on the left.
is_required: false
summary: |
Set the module that you want to lint. To see your available modules please open your project in Android Studio and go in [Project Structure] and see the list on the left.
title: Module
- opts:
description: |
Set the variant that you want to lint. To see your available variants please open your project in Android Studio and go in [Project Structure] -> variants section.
is_required: false
summary: |
Set the variant that you want to lint. To see your available variants please open your project in Android Studio and go in [Project Structure] -> variants section.
title: Variant
variant: ""
- opts:
category: Options
description: |
Will find the report file with the given pattern. If you need the xml file then you can use: "*/build/reports/lint-results*.xml"
is_required: true
summary: |
Will find the report file with the given pattern. If you need the xml file then you can use: "*/build/reports/lint-results*.xml"
title: Report location pattern
report_path_pattern: '*/build/reports/lint-results*.html'
- cache_level: only_deps
opts:
category: Options
description: |-
`all` - will cache build cache and dependencies
`only_deps` - will cache dependencies only
`none` - will not cache anything
is_required: true
title: Set the level of cache
value_options:
- all
- only_deps
- none
- arguments: null
opts:
category: Options
description: Extra arguments passed to the gradle task
is_required: false
summary: Extra arguments passed to the gradle task
title: Additional Gradle Arguments
================================================
FILE: steps/android-lint/0.9.11/step.yml
================================================
title: Android Lint
summary: Runs Lint on your Android project source files and detects potential syntax
errors to keep your code error free.
description: |-
It highlights the code line where the error is found, explains the type of error and suggests corrections. The Step does not make the build fail if it spots any structural errors in your code. If you have inserted the **Deploy to Bitrise.io** Step in the Workflow, the tes results will be available in a viewable or downloadable Lint Report HTML or XML file which you can access on the Build's APPS & ARTIFACTS page.
### Configuring the Step
1. Set the **Project Location** input which, by default, points to the root directory of your Android project.
2. Set the module and variant you wish to lint in the **Module** and **Variant** fields.
Optionally, you can modify these inputs:
1. You can specify where the Lint reports should be found once the Step has run if you overwrite the **Report location pattern** input.
2. You can set if the Step should cache build outputs and dependencies, only the dependencies or nothing at all in the **Set level of cache** input.
3. You can set any gradle argument to the gradle task in the **Additional Gradle Arguments** input.
### Troubleshooting
Make sure you insert the Step before a build Step.
Make sure you type the correct module and variant names in the respective fields of the Step. If you are unsure about the exact names, you can check them in the **Project Structure** dialog of your project in Android Studio.
### Useful links
- [Improve your code with lint checks](https://developer.android.com/studio/write/lint)
### Related Steps
- [Android Build](https://www.bitrise.io/integrations/steps/android-build)
- [Android Unit Test](https://www.bitrise.io/integrations/steps/android-unit-test)
- [[BETA] Virtual Device Testing for Android](https://www.bitrise.io/integrations/steps/virtual-device-testing-for-android)
website: https://github.com/bitrise-steplib/bitrise-step-android-lint
source_code_url: https://github.com/bitrise-steplib/bitrise-step-android-lint
support_url: https://github.com/bitrise-steplib/bitrise-step-android-lint/issues
published_at: 2022-02-23T08:20:03.97327161Z
source:
git: https://github.com/bitrise-steplib/bitrise-step-android-lint.git
commit: 379c820c7713997eb706b7ff4e18b6642c720a8f
host_os_tags:
- osx-10.10
- ubuntu-16.04
project_type_tags:
- android
- react-native
type_tags:
- test
toolkit:
go:
package_name: github.com/bitrise-steplib/bitrise-step-android-lint
is_requires_admin_user: true
is_always_run: false
is_skippable: false
inputs:
- opts:
description: The root directory of your android project, for example, where your
root build gradle file exists (also gradlew, settings.gradle, etc...)
is_required: true
summary: The root directory of your android project, for example, where your root
build gradle file exists (also gradlew, settings.gradle, etc...)
title: Project Location
project_location: $BITRISE_SOURCE_DIR
- module: ""
opts:
description: |
Set the module that you want to lint. To see your available modules please open your project in Android Studio and go in [Project Structure] and see the list on the left.
is_required: false
summary: |
Set the module that you want to lint. To see your available modules please open your project in Android Studio and go in [Project Structure] and see the list on the left.
title: Module
- opts:
description: |
Set the variant that you want to lint. To see your available variants please open your project in Android Studio and go in [Project Structure] -> variants section.
is_required: false
summary: |
Set the variant that you want to lint. To see your available variants please open your project in Android Studio and go in [Project Structure] -> variants section.
title: Variant
variant: ""
- opts:
category: Options
description: |
Will find the report file with the given pattern. If you need the xml file then you can use: "*/build/reports/lint-results*.xml"
is_required: true
summary: |
Will find the report file with the given pattern. If you need the xml file then you can use: "*/build/reports/lint-results*.xml"
title: Report location pattern
report_path_pattern: '*/build/reports/lint-results*.html'
- cache_level: only_deps
opts:
category: Options
description: |-
`all` - will cache build cache and dependencies
`only_deps` - will cache dependencies only
`none` - will not cache anything
is_required: true
title: Set the level of cache
value_options:
- all
- only_deps
- none
- arguments: null
opts:
category: Options
description: Extra arguments passed to the gradle task
is_required: false
summary: Extra arguments passed to the gradle task
title: Additional Gradle Arguments
================================================
FILE: steps/android-lint/0.9.12/step.yml
================================================
title: Android Lint
summary: Runs Lint on your Android project source files and detects potential syntax
errors to keep your code error free.
description: |-
It highlights the code line where the error is found, explains the type of error and suggests corrections. The Step does not make the build fail if it spots any structural errors in your code. If you have inserted the **Deploy to Bitrise.io** Step in the Workflow, the tes results will be available in a viewable or downloadable Lint Report HTML or XML file which you can access on the Build's APPS & ARTIFACTS page.
### Configuring the Step
1. Set the **Project Location** input which, by default, points to the root directory of your Android project.
2. Set the module and variant you wish to lint in the **Module** and **Variant** fields.
Optionally, you can modify these inputs:
1. You can specify where the Lint reports should be found once the Step has run if you overwrite the **Report location pattern** input.
2. You can set if the Step should cache build outputs and dependencies, only the dependencies or nothing at all in the **Set level of cache** input.
3. You can set any gradle argument to the gradle task in the **Additional Gradle Arguments** input.
### Troubleshooting
Make sure you insert the Step before a build Step.
Make sure you type the correct module and variant names in the respective fields of the Step. If you are unsure about the exact names, you can check them in the **Project Structure** dialog of your project in Android Studio.
### Useful links
- [Improve your code with lint checks](https://developer.android.com/studio/write/lint)
### Related Steps
- [Android Build](https://www.bitrise.io/integrations/steps/android-build)
- [Android Unit Test](https://www.bitrise.io/integrations/steps/android-unit-test)
- [[BETA] Virtual Device Testing for Android](https://www.bitrise.io/integrations/steps/virtual-device-testing-for-android)
website: https://github.com/bitrise-steplib/bitrise-step-android-lint
source_code_url: https://github.com/bitrise-steplib/bitrise-step-android-lint
support_url: https://github.com/bitrise-steplib/bitrise-step-android-lint/issues
published_at: 2025-11-18T09:15:23.162068754Z
source:
git: https://github.com/bitrise-steplib/bitrise-step-android-lint.git
commit: 2ea35ded0377ad1a9e2e2056807f5434d33c1bad
host_os_tags:
- osx-10.10
- ubuntu-16.04
project_type_tags:
- android
- cordova
- flutter
- ionic
- kotlin-multiplatform
- react-native
type_tags:
- test
toolkit:
go:
package_name: github.com/bitrise-steplib/bitrise-step-android-lint
is_requires_admin_user: true
is_always_run: false
is_skippable: false
inputs:
- opts:
description: The root directory of your android project, for example, where your
root build gradle file exists (also gradlew, settings.gradle, etc...)
is_required: true
summary: The root directory of your android project, for example, where your root
build gradle file exists (also gradlew, settings.gradle, etc...)
title: Project Location
project_location: $BITRISE_SOURCE_DIR
- module: ""
opts:
description: |
Set the module that you want to lint. To see your available modules please open your project in Android Studio and go in [Project Structure] and see the list on the left.
is_required: false
summary: |
Set the module that you want to lint. To see your available modules please open your project in Android Studio and go in [Project Structure] and see the list on the left.
title: Module
- opts:
description: |
Set the variant that you want to lint. To see your available variants please open your project in Android Studio and go in [Project Structure] -> variants section.
is_required: false
summary: |
Set the variant that you want to lint. To see your available variants please open your project in Android Studio and go in [Project Structure] -> variants section.
title: Variant
variant: ""
- opts:
category: Options
description: |
Will find the report file with the given pattern. If you need the xml file then you can use: "*/build/reports/lint-results*.xml"
is_required: true
summary: |
Will find the report file with the given pattern. If you need the xml file then you can use: "*/build/reports/lint-results*.xml"
title: Report location pattern
report_path_pattern: '*/build/reports/lint-results*.html'
- cache_level: only_deps
opts:
category: Options
description: |-
`all` - will cache build cache and dependencies
`only_deps` - will cache dependencies only
`none` - will not cache anything
is_required: true
title: Set the level of cache
value_options:
- all
- only_deps
- none
- arguments: null
opts:
category: Options
description: Extra arguments passed to the gradle task
is_required: false
summary: Extra arguments passed to the gradle task
title: Additional Gradle Arguments
================================================
FILE: steps/android-lint/0.9.13/step.yml
================================================
title: Android Lint
summary: Runs Lint on your Android project source files and detects potential syntax
errors to keep your code error free.
description: |-
It highlights the code line where the error is found, explains the type of error and suggests corrections. The Step does not make the build fail if it spots any structural errors in your code. If you have inserted the **Deploy to Bitrise.io** Step in the Workflow, the tes results will be available in a viewable or downloadable Lint Report HTML or XML file which you can access on the Build's APPS & ARTIFACTS page.
### Configuring the Step
1. Set the **Project Location** input which, by default, points to the root directory of your Android project.
2. Set the module and variant you wish to lint in the **Module** and **Variant** fields.
Optionally, you can modify these inputs:
1. You can specify where the Lint reports should be found once the Step has run if you overwrite the **Report location pattern** input.
2. You can set if the Step should cache build outputs and dependencies, only the dependencies or nothing at all in the **Set level of cache** input.
3. You can set any gradle argument to the gradle task in the **Additional Gradle Arguments** input.
### Troubleshooting
Make sure you insert the Step before a build Step.
Make sure you type the correct module and variant names in the respective fields of the Step. If you are unsure about the exact names, you can check them in the **Project Structure** dialog of your project in Android Studio.
### Useful links
- [Improve your code with lint checks](https://developer.android.com/studio/write/lint)
### Related Steps
- [Android Build](https://www.bitrise.io/integrations/steps/android-build)
- [Android Unit Test](https://www.bitrise.io/integrations/steps/android-unit-test)
- [[BETA] Virtual Device Testing for Android](https://www.bitrise.io/integrations/steps/virtual-device-testing-for-android)
website: https://github.com/bitrise-steplib/bitrise-step-android-lint
source_code_url: https://github.com/bitrise-steplib/bitrise-step-android-lint
support_url: https://github.com/bitrise-steplib/bitrise-step-android-lint/issues
published_at: 2026-02-02T11:14:34.387799105Z
source:
git: https://github.com/bitrise-steplib/bitrise-step-android-lint.git
commit: 6d612b1000ffb820c1976430b77ac4e9a90b8b34
host_os_tags:
- osx-10.10
- ubuntu-16.04
project_type_tags:
- android
- cordova
- flutter
- ionic
- kotlin-multiplatform
- react-native
type_tags:
- test
toolkit:
go:
package_name: github.com/bitrise-steplib/bitrise-step-android-lint
is_requires_admin_user: true
is_always_run: false
is_skippable: false
inputs:
- opts:
description: The root directory of your android project, for example, where your
root build gradle file exists (also gradlew, settings.gradle, etc...)
is_required: true
summary: The root directory of your android project, for example, where your root
build gradle file exists (also gradlew, settings.gradle, etc...)
title: Project Location
project_location: $BITRISE_SOURCE_DIR
- module: ""
opts:
description: |
Set the module that you want to lint. To see your available modules please open your project in Android Studio and go in [Project Structure] and see the list on the left.
is_required: false
summary: |
Set the module that you want to lint. To see your available modules please open your project in Android Studio and go in [Project Structure] and see the list on the left.
title: Module
- opts:
description: |
Set the variant that you want to lint. To see your available variants please open your project in Android Studio and go in [Project Structure] -> variants section.
is_required: false
summary: |
Set the variant that you want to lint. To see your available variants please open your project in Android Studio and go in [Project Structure] -> variants section.
title: Variant
variant: ""
- opts:
category: Options
description: |
Will find the report file with the given pattern. If you need the xml file then you can use: "*/build/reports/lint-results*.xml"
is_required: true
summary: |
Will find the report file with the given pattern. If you need the xml file then you can use: "*/build/reports/lint-results*.xml"
title: Report location pattern
report_path_pattern: '*/build/reports/lint-results*.html'
- cache_level: only_deps
opts:
category: Options
description: |-
`all` - will cache build cache and dependencies
`only_deps` - will cache dependencies only
`none` - will not cache anything
is_required: true
title: Set the level of cache
value_options:
- all
- only_deps
- none
- arguments: null
opts:
category: Options
description: Extra arguments passed to the gradle task
is_required: false
summary: Extra arguments passed to the gradle task
title: Additional Gradle Arguments
================================================
FILE: steps/android-lint/0.9.14/step.yml
================================================
title: Android Lint
summary: Runs Lint on your Android project source files and detects potential syntax
errors to keep your code error free.
description: |-
It highlights the code line where the error is found, explains the type of error and suggests corrections. The Step does not make the build fail if it spots any structural errors in your code. If you have inserted the **Deploy to Bitrise.io** Step in the Workflow, the tes results will be available in a viewable or downloadable Lint Report HTML or XML file which you can access on the Build's APPS & ARTIFACTS page.
### Configuring the Step
1. Set the **Project Location** input which, by default, points to the root directory of your Android project.
2. Set the module and variant you wish to lint in the **Module** and **Variant** fields.
Optionally, you can modify these inputs:
1. You can specify where the Lint reports should be found once the Step has run if you overwrite the **Report location pattern** input.
2. You can set if the Step should cache build outputs and dependencies, only the dependencies or nothing at all in the **Set level of cache** input.
3. You can set any gradle argument to the gradle task in the **Additional Gradle Arguments** input.
### Troubleshooting
Make sure you insert the Step before a build Step.
Make sure you type the correct module and variant names in the respective fields of the Step. If you are unsure about the exact names, you can check them in the **Project Structure** dialog of your project in Android Studio.
### Useful links
- [Improve your code with lint checks](https://developer.android.com/studio/write/lint)
### Related Steps
- [Android Build](https://www.bitrise.io/integrations/steps/android-build)
- [Android Unit Test](https://www.bitrise.io/integrations/steps/android-unit-test)
- [[BETA] Virtual Device Testing for Android](https://www.bitrise.io/integrations/steps/virtual-device-testing-for-android)
website: https://github.com/bitrise-steplib/bitrise-step-android-lint
source_code_url: https://github.com/bitrise-steplib/bitrise-step-android-lint
support_url: https://github.com/bitrise-steplib/bitrise-step-android-lint/issues
published_at: 2026-03-02T09:43:52.366748462Z
source:
git: https://github.com/bitrise-steplib/bitrise-step-android-lint.git
commit: 63b4b07b6f7cf04bcbc208818b5dca46b84642fd
executables:
darwin-amd64:
storage_uri: steps/android-lint/0.9.14/bin/android-lint-darwin-amd64
hash: sha256-8a1d00f7d740b4e7cf1981cd2094d76bffaab8831a4b04586f950fd4ee6fa197
darwin-arm64:
storage_uri: steps/android-lint/0.9.14/bin/android-lint-darwin-arm64
hash: sha256-652b30bee446aa28fdd81cc685b752d1e0997a412ffc0a50ba078bad4a072d90
linux-amd64:
storage_uri: steps/android-lint/0.9.14/bin/android-lint-linux-amd64
hash: sha256-84477435e62f546258a8522c9641024c3652b9d61cc25466ea9991afeec04114
linux-arm64:
storage_uri: steps/android-lint/0.9.14/bin/android-lint-linux-arm64
hash: sha256-34086ec9b01562c37cceadd05e4481dd5d577cadaa0eca21a1f6c8ac156bb6c0
host_os_tags:
- osx-10.10
- ubuntu-16.04
project_type_tags:
- android
- cordova
- flutter
- ionic
- kotlin-multiplatform
- react-native
type_tags:
- test
toolkit:
go:
package_name: github.com/bitrise-steplib/bitrise-step-android-lint
is_requires_admin_user: true
is_always_run: false
is_skippable: false
inputs:
- opts:
description: The root directory of your android project, for example, where your
root build gradle file exists (also gradlew, settings.gradle, etc...)
is_required: true
summary: The root directory of your android project, for example, where your root
build gradle file exists (also gradlew, settings.gradle, etc...)
title: Project Location
project_location: $BITRISE_SOURCE_DIR
- module: ""
opts:
description: |
Set the module that you want to lint. To see your available modules please open your project in Android Studio and go in [Project Structure] and see the list on the left.
is_required: false
summary: |
Set the module that you want to lint. To see your available modules please open your project in Android Studio and go in [Project Structure] and see the list on the left.
title: Module
- opts:
description: |
Set the variant that you want to lint. To see your available variants please open your project in Android Studio and go in [Project Structure] -> variants section.
is_required: false
summary: |
Set the variant that you want to lint. To see your available variants please open your project in Android Studio and go in [Project Structure] -> variants section.
title: Variant
variant: ""
- opts:
category: Options
description: |
Will find the report file with the given pattern. If you need the xml file then you can use: "*/build/reports/lint-results*.xml"
is_required: true
summary: |
Will find the report file with the given pattern. If you need the xml file then you can use: "*/build/reports/lint-results*.xml"
title: Report location pattern
report_path_pattern: '*/build/reports/lint-results*.html'
- cache_level: only_deps
opts:
category: Options
description: |-
`all` - will cache build cache and dependencies
`only_deps` - will cache dependencies only
`none` - will not cache anything
is_required: true
title: Set the level of cache
value_options:
- all
- only_deps
- none
- arguments: null
opts:
category: Options
description: Extra arguments passed to the gradle task
is_required: false
summary: Extra arguments passed to the gradle task
title: Additional Gradle Arguments
================================================
FILE: steps/android-lint/0.9.2/step.yml
================================================
title: Android Lint
summary: Runs lint gradle task on your project.
description: Runs lint gradle task on your project.
website: https://github.com/bitrise-steplib/bitrise-step-android-lint
source_code_url: https://github.com/bitrise-steplib/bitrise-step-android-lint
support_url: https://github.com/bitrise-steplib/bitrise-step-android-lint/issues
published_at: 2018-05-23T15:16:52.992466727+02:00
source:
git: https://github.com/bitrise-steplib/bitrise-step-android-lint.git
commit: 8b5597a0ea586579b6fd6698e2111ea13659a0f2
host_os_tags:
- osx-10.10
- ubuntu-16.04
project_type_tags:
- android
- react-native
type_tags:
- test
toolkit:
go:
package_name: github.com/bitrise-steplib/bitrise-step-android-lint
is_requires_admin_user: true
is_always_run: false
is_skippable: false
inputs:
- opts:
description: 'The root directory of your android project, e.g.: where your root
build gradle file exist (also gradlew, settings.gradle, etc...)'
is_required: true
summary: 'The root directory of your android project, e.g.: where your root build
gradle file exist (also gradlew, settings.gradle, etc...)'
title: Project Location
project_location: $BITRISE_SOURCE_DIR
- module: ""
opts:
description: |
Set the module that you want to lint. To see your available modules please open your project in Android Studio and go in [Project Structure] and see the list on the left.
is_required: false
summary: |
Set the module that you want to lint. To see your available modules please open your project in Android Studio and go in [Project Structure] and see the list on the left.
title: Module
- opts:
description: |
Set the variant that you want to lint. To see your available variants please open your project in Android Studio and go in [Project Structure] -> variants section.
is_required: false
summary: |
Set the variant that you want to lint. To see your available variants please open your project in Android Studio and go in [Project Structure] -> variants section.
title: Variant
variant: ""
- opts:
category: Options
description: |
Will find the report file with the given pattern. If you need the xml file then you can use: "*/build/reports/lint-results*.xml"
is_required: true
summary: |
Will find the report file with the given pattern. If you need the xml file then you can use: "*/build/reports/lint-results*.xml"
title: Report location pattern
report_path_pattern: '*/build/reports/lint-results*.html'
- cache_level: only_deps
opts:
category: Options
description: |-
`all` - will cache build cache and dependencies
`only_deps` - will cache dependencies only
`none` - will not cache anything
is_required: true
title: Set the level of cache
value_options:
- all
- only_deps
- none
- arguments: null
opts:
category: Options
description: Extra arguments passed to the gradle task
is_required: false
summary: Extra arguments passed to the gradle task
title: Additional Gradle Arguments
================================================
FILE: steps/android-lint/0.9.4/step.yml
================================================
title: Android Lint
summary: Runs lint gradle task on your project.
description: Runs lint gradle task on your project.
website: https://github.com/bitrise-steplib/bitrise-step-android-lint
source_code_url: https://github.com/bitrise-steplib/bitrise-step-android-lint
support_url: https://github.com/bitrise-steplib/bitrise-step-android-lint/issues
published_at: 2018-06-29T14:43:34.144796202+02:00
source:
git: https://github.com/bitrise-steplib/bitrise-step-android-lint.git
commit: 61682434a650a82adf0aaddca2fa0a48f22b3182
host_os_tags:
- osx-10.10
- ubuntu-16.04
project_type_tags:
- android
- react-native
type_tags:
- test
toolkit:
go:
package_name: github.com/bitrise-steplib/bitrise-step-android-lint
is_requires_admin_user: true
is_always_run: false
is_skippable: false
inputs:
- opts:
description: 'The root directory of your android project, e.g.: where your root
build gradle file exist (also gradlew, settings.gradle, etc...)'
is_required: true
summary: 'The root directory of your android project, e.g.: where your root build
gradle file exist (also gradlew, settings.gradle, etc...)'
title: Project Location
project_location: $BITRISE_SOURCE_DIR
- module: ""
opts:
description: |
Set the module that you want to lint. To see your available modules please open your project in Android Studio and go in [Project Structure] and see the list on the left.
is_required: false
summary: |
Set the module that you want to lint. To see your available modules please open your project in Android Studio and go in [Project Structure] and see the list on the left.
title: Module
- opts:
description: |
Set the variant that you want to lint. To see your available variants please open your project in Android Studio and go in [Project Structure] -> variants section.
is_required: false
summary: |
Set the variant that you want to lint. To see your available variants please open your project in Android Studio and go in [Project Structure] -> variants section.
title: Variant
variant: ""
- opts:
category: Options
description: |
Will find the report file with the given pattern. If you need the xml file then you can use: "*/build/reports/lint-results*.xml"
is_required: true
summary: |
Will find the report file with the given pattern. If you need the xml file then you can use: "*/build/reports/lint-results*.xml"
title: Report location pattern
report_path_pattern: '*/build/reports/lint-results*.html'
- cache_level: only_deps
opts:
category: Options
description: |-
`all` - will cache build cache and dependencies
`only_deps` - will cache dependencies only
`none` - will not cache anything
is_required: true
title: Set the level of cache
value_options:
- all
- only_deps
- none
- arguments: null
opts:
category: Options
description: Extra arguments passed to the gradle task
is_required: false
summary: Extra arguments passed to the gradle task
title: Additional Gradle Arguments
================================================
FILE: steps/android-lint/0.9.5/step.yml
================================================
title: Android Lint
summary: This step runs lint gradle task on your project.
description: This step runs lint gradle task on your project.
website: https://github.com/bitrise-steplib/bitrise-step-android-lint
source_code_url: https://github.com/bitrise-steplib/bitrise-step-android-lint
support_url: https://github.com/bitrise-steplib/bitrise-step-android-lint/issues
published_at: 2018-10-29T13:39:24.293713488Z
source:
git: https://github.com/bitrise-steplib/bitrise-step-android-lint.git
commit: 8fdc72eb7f80638eeaf92c1bba9bbf06031dc28e
host_os_tags:
- osx-10.10
- ubuntu-16.04
project_type_tags:
- android
- react-native
type_tags:
- test
toolkit:
go:
package_name: github.com/bitrise-steplib/bitrise-step-android-lint
is_requires_admin_user: true
is_always_run: false
is_skippable: false
inputs:
- opts:
description: The root directory of your android project, for example, where your
root build gradle file exists (also gradlew, settings.gradle, etc...)
is_required: true
summary: The root directory of your android project, for example, where your root
build gradle file exists (also gradlew, settings.gradle, etc...)
title: Project Location
project_location: $BITRISE_SOURCE_DIR
- module: ""
opts:
description: |
Set the module that you want to lint. To see your available modules please open your project in Android Studio and go in [Project Structure] and see the list on the left.
is_required: false
summary: |
Set the module that you want to lint. To see your available modules please open your project in Android Studio and go in [Project Structure] and see the list on the left.
title: Module
- opts:
description: |
Set the variant that you want to lint. To see your available variants please open your project in Android Studio and go in [Project Structure] -> variants section.
is_required: false
summary: |
Set the variant that you want to lint. To see your available variants please open your project in Android Studio and go in [Project Structure] -> variants section.
title: Variant
variant: ""
- opts:
category: Options
description: |
Will find the report file with the given pattern. If you need the xml file then you can use: "*/build/reports/lint-results*.xml"
is_required: true
summary: |
Will find the report file with the given pattern. If you need the xml file then you can use: "*/build/reports/lint-results*.xml"
title: Report location pattern
report_path_pattern: '*/build/reports/lint-results*.html'
- cache_level: only_deps
opts:
category: Options
description: |-
`all` - will cache build cache and dependencies
`only_deps` - will cache dependencies only
`none` - will not cache anything
is_required: true
title: Set the level of cache
value_options:
- all
- only_deps
- none
- arguments: null
opts:
category: Options
description: Extra arguments passed to the gradle task
is_required: false
summary: Extra arguments passed to the gradle task
title: Additional Gradle Arguments
================================================
FILE: steps/android-lint/0.9.6/step.yml
================================================
title: Android Lint
summary: This step runs lint gradle task on your project.
description: This step runs lint gradle task on your project.
website: https://github.com/bitrise-steplib/bitrise-step-android-lint
source_code_url: https://github.com/bitrise-steplib/bitrise-step-android-lint
support_url: https://github.com/bitrise-steplib/bitrise-step-android-lint/issues
published_at: 2019-03-14T14:58:53.356958732Z
source:
git: https://github.com/bitrise-steplib/bitrise-step-android-lint.git
commit: 960fc806a066bae5f8a38fd5e076f80dcc87b181
host_os_tags:
- osx-10.10
- ubuntu-16.04
project_type_tags:
- android
- react-native
type_tags:
- test
toolkit:
go:
package_name: github.com/bitrise-steplib/bitrise-step-android-lint
is_requires_admin_user: true
is_always_run: false
is_skippable: false
inputs:
- opts:
description: The root directory of your android project, for example, where your
root build gradle file exists (also gradlew, settings.gradle, etc...)
is_required: true
summary: The root directory of your android project, for example, where your root
build gradle file exists (also gradlew, settings.gradle, etc...)
title: Project Location
project_location: $BITRISE_SOURCE_DIR
- module: ""
opts:
description: |
Set the module that you want to lint. To see your available modules please open your project in Android Studio and go in [Project Structure] and see the list on the left.
is_required: false
summary: |
Set the module that you want to lint. To see your available modules please open your project in Android Studio and go in [Project Structure] and see the list on the left.
title: Module
- opts:
description: |
Set the variant that you want to lint. To see your available variants please open your project in Android Studio and go in [Project Structure] -> variants section.
is_required: false
summary: |
Set the variant that you want to lint. To see your available variants please open your project in Android Studio and go in [Project Structure] -> variants section.
title: Variant
variant: ""
- opts:
category: Options
description: |
Will find the report file with the given pattern. If you need the xml file then you can use: "*/build/reports/lint-results*.xml"
is_required: true
summary: |
Will find the report file with the given pattern. If you need the xml file then you can use: "*/build/reports/lint-results*.xml"
title: Report location pattern
report_path_pattern: '*/build/reports/lint-results*.html'
- cache_level: only_deps
opts:
category: Options
description: |-
`all` - will cache build cache and dependencies
`only_deps` - will cache dependencies only
`none` - will not cache anything
is_required: true
title: Set the level of cache
value_options:
- all
- only_deps
- none
- arguments: null
opts:
category: Options
description: Extra arguments passed to the gradle task
is_required: false
summary: Extra arguments passed to the gradle task
title: Additional Gradle Arguments
================================================
FILE: steps/android-lint/0.9.7/step.yml
================================================
title: Android Lint
summary: Runs Lint on your Android project source files and detects potential syntax
errors to keep your code error free.
description: |-
It highlights the code line where the error is found, explains the type of error and suggests corrections. The Step does not make the build fail if it spots any structural errors in your code. If you have inserted the **Deploy to Bitrise.io** Step in the Workflow, the tes results will be available in a viewable or downloadable Lint Report HTML or XML file which you can access on the Build's APPS & ARTIFACTS page.
### Configuring the Step
1. Set the **Project Location** input which, by default, points to the root directory of your Android project.
2. Set the module and variant you wish to lint in the **Module** and **Variant** fields.
Optionally, you can modify these inputs:
1. You can specify where the Lint reports should be found once the Step has run if you overwrite the **Report location pattern** input.
2. You can set if the Step should cache build outputs and dependencies, only the dependencies or nothing at all in the **Set level of cache** input.
3. You can set any gradle argument to the gradle task in the **Additional Gradle Arguments** input.
### Troubleshooting
Make sure you insert the Step before a build Step.
Make sure you type the correct module and variant names in the respective fields of the Step. If you are unsure about the exact names, you can check them in the **Project Structure** dialog of your project in Android Studio.
### Useful links
- [Improve your code with lint checks](https://developer.android.com/studio/write/lint)
### Related Steps
- [Android Build](https://www.bitrise.io/integrations/steps/android-build)
- [Android Unit Test](https://www.bitrise.io/integrations/steps/android-unit-test)
- [[BETA] Virtual Device Testing for Android](https://www.bitrise.io/integrations/steps/virtual-device-testing-for-android)
website: https://github.com/bitrise-steplib/bitrise-step-android-lint
source_code_url: https://github.com/bitrise-steplib/bitrise-step-android-lint
support_url: https://github.com/bitrise-steplib/bitrise-step-android-lint/issues
published_at: 2020-01-13T08:32:58.861993297Z
source:
git: https://github.com/bitrise-steplib/bitrise-step-android-lint.git
commit: 1ef53e35109f99b0e085ebd887567bebaa2af8dd
host_os_tags:
- osx-10.10
- ubuntu-16.04
project_type_tags:
- android
- react-native
type_tags:
- test
toolkit:
go:
package_name: github.com/bitrise-steplib/bitrise-step-android-lint
is_requires_admin_user: true
is_always_run: false
is_skippable: false
inputs:
- opts:
description: The root directory of your android project, for example, where your
root build gradle file exists (also gradlew, settings.gradle, etc...)
is_required: true
summary: The root directory of your android project, for example, where your root
build gradle file exists (also gradlew, settings.gradle, etc...)
title: Project Location
project_location: $BITRISE_SOURCE_DIR
- module: ""
opts:
description: |
Set the module that you want to lint. To see your available modules please open your project in Android Studio and go in [Project Structure] and see the list on the left.
is_required: false
summary: |
Set the module that you want to lint. To see your available modules please open your project in Android Studio and go in [Project Structure] and see the list on the left.
title: Module
- opts:
description: |
Set the variant that you want to lint. To see your available variants please open your project in Android Studio and go in [Project Structure] -> variants section.
is_required: false
summary: |
Set the variant that you want to lint. To see your available variants please open your project in Android Studio and go in [Project Structure] -> variants section.
title: Variant
variant: ""
- opts:
category: Options
description: |
Will find the report file with the given pattern. If you need the xml file then you can use: "*/build/reports/lint-results*.xml"
is_required: true
summary: |
Will find the report file with the given pattern. If you need the xml file then you can use: "*/build/reports/lint-results*.xml"
title: Report location pattern
report_path_pattern: '*/build/reports/lint-results*.html'
- cache_level: only_deps
opts:
category: Options
description: |-
`all` - will cache build cache and dependencies
`only_deps` - will cache dependencies only
`none` - will not cache anything
is_required: true
title: Set the level of cache
value_options:
- all
- only_deps
- none
- arguments: null
opts:
category: Options
description: Extra arguments passed to the gradle task
is_required: false
summary: Extra arguments passed to the gradle task
title: Additional Gradle Arguments
================================================
FILE: steps/android-lint/0.9.8/step.yml
================================================
title: Android Lint
summary: Runs Lint on your Android project source files and detects potential syntax
errors to keep your code error free.
description: |-
It highlights the code line where the error is found, explains the type of error and suggests corrections. The Step does not make the build fail if it spots any structural errors in your code. If you have inserted the **Deploy to Bitrise.io** Step in the Workflow, the tes results will be available in a viewable or downloadable Lint Report HTML or XML file which you can access on the Build's APPS & ARTIFACTS page.
### Configuring the Step
1. Set the **Project Location** input which, by default, points to the root directory of your Android project.
2. Set the module and variant you wish to lint in the **Module** and **Variant** fields.
Optionally, you can modify these inputs:
1. You can specify where the Lint reports should be found once the Step has run if you overwrite the **Report location pattern** input.
2. You can set if the Step should cache build outputs and dependencies, only the dependencies or nothing at all in the **Set level of cache** input.
3. You can set any gradle argument to the gradle task in the **Additional Gradle Arguments** input.
### Troubleshooting
Make sure you insert the Step before a build Step.
Make sure you type the correct module and variant names in the respective fields of the Step. If you are unsure about the exact names, you can check them in the **Project Structure** dialog of your project in Android Studio.
### Useful links
- [Improve your code with lint checks](https://developer.android.com/studio/write/lint)
### Related Steps
- [Android Build](https://www.bitrise.io/integrations/steps/android-build)
- [Android Unit Test](https://www.bitrise.io/integrations/steps/android-unit-test)
- [[BETA] Virtual Device Testing for Android](https://www.bitrise.io/integrations/steps/virtual-device-testing-for-android)
website: https://github.com/bitrise-steplib/bitrise-step-android-lint
source_code_url: https://github.com/bitrise-steplib/bitrise-step-android-lint
support_url: https://github.com/bitrise-steplib/bitrise-step-android-lint/issues
published_at: 2020-11-25T14:48:35.844179195Z
source:
git: https://github.com/bitrise-steplib/bitrise-step-android-lint.git
commit: 83326f5b7c81e8c1b27c53e03150ae22e9204b76
host_os_tags:
- osx-10.10
- ubuntu-16.04
project_type_tags:
- android
- react-native
type_tags:
- test
toolkit:
go:
package_name: github.com/bitrise-steplib/bitrise-step-android-lint
is_requires_admin_user: true
is_always_run: false
is_skippable: false
inputs:
- opts:
description: The root directory of your android project, for example, where your
root build gradle file exists (also gradlew, settings.gradle, etc...)
is_required: true
summary: The root directory of your android project, for example, where your root
build gradle file exists (also gradlew, settings.gradle, etc...)
title: Project Location
project_location: $BITRISE_SOURCE_DIR
- module: ""
opts:
description: |
Set the module that you want to lint. To see your available modules please open your project in Android Studio and go in [Project Structure] and see the list on the left.
is_required: false
summary: |
Set the module that you want to lint. To see your available modules please open your project in Android Studio and go in [Project Structure] and see the list on the left.
title: Module
- opts:
description: |
Set the variant that you want to lint. To see your available variants please open your project in Android Studio and go in [Project Structure] -> variants section.
is_required: false
summary: |
Set the variant that you want to lint. To see your available variants please open your project in Android Studio and go in [Project Structure] -> variants section.
title: Variant
variant: ""
- opts:
category: Options
description: |
Will find the report file with the given pattern. If you need the xml file then you can use: "*/build/reports/lint-results*.xml"
is_required: true
summary: |
Will find the report file with the given pattern. If you need the xml file then you can use: "*/build/reports/lint-results*.xml"
title: Report location pattern
report_path_pattern: '*/build/reports/lint-results*.html'
- cache_level: only_deps
opts:
category: Options
description: |-
`all` - will cache build cache and dependencies
`only_deps` - will cache dependencies only
`none` - will not cache anything
is_required: true
title: Set the level of cache
value_options:
- all
- only_deps
- none
- arguments: null
opts:
category: Options
description: Extra arguments passed to the gradle task
is_required: false
summary: Extra arguments passed to the gradle task
title: Additional Gradle Arguments
================================================
FILE: steps/android-lint/0.9.9/step.yml
================================================
title: Android Lint
summary: Runs Lint on your Android project source files and detects potential syntax
errors to keep your code error free.
description: |-
It highlights the code line where the error is found, explains the type of error and suggests corrections. The Step does not make the build fail if it spots any structural errors in your code. If you have inserted the **Deploy to Bitrise.io** Step in the Workflow, the tes results will be available in a viewable or downloadable Lint Report HTML or XML file which you can access on the Build's APPS & ARTIFACTS page.
### Configuring the Step
1. Set the **Project Location** input which, by default, points to the root directory of your Android project.
2. Set the module and variant you wish to lint in the **Module** and **Variant** fields.
Optionally, you can modify these inputs:
1. You can specify where the Lint reports should be found once the Step has run if you overwrite the **Report location pattern** input.
2. You can set if the Step should cache build outputs and dependencies, only the dependencies or nothing at all in the **Set level of cache** input.
3. You can set any gradle argument to the gradle task in the **Additional Gradle Arguments** input.
### Troubleshooting
Make sure you insert the Step before a build Step.
Make sure you type the correct module and variant names in the respective fields of the Step. If you are unsure about the exact names, you can check them in the **Project Structure** dialog of your project in Android Studio.
### Useful links
- [Improve your code with lint checks](https://developer.android.com/studio/write/lint)
### Related Steps
- [Android Build](https://www.bitrise.io/integrations/steps/android-build)
- [Android Unit Test](https://www.bitrise.io/integrations/steps/android-unit-test)
- [[BETA] Virtual Device Testing for Android](https://www.bitrise.io/integrations/steps/virtual-device-testing-for-android)
website: https://github.com/bitrise-steplib/bitrise-step-android-lint
source_code_url: https://github.com/bitrise-steplib/bitrise-step-android-lint
support_url: https://github.com/bitrise-steplib/bitrise-step-android-lint/issues
published_at: 2021-05-28T08:06:54.079258192Z
source:
git: https://github.com/bitrise-steplib/bitrise-step-android-lint.git
commit: c9f79992f4ce8508274b825332d7f8f2b2a72d22
host_os_tags:
- osx-10.10
- ubuntu-16.04
project_type_tags:
- android
- react-native
type_tags:
- test
toolkit:
go:
package_name: github.com/bitrise-steplib/bitrise-step-android-lint
is_requires_admin_user: true
is_always_run: false
is_skippable: false
inputs:
- opts:
description: The root directory of your android project, for example, where your
root build gradle file exists (also gradlew, settings.gradle, etc...)
is_required: true
summary: The root directory of your android project, for example, where your root
build gradle file exists (also gradlew, settings.gradle, etc...)
title: Project Location
project_location: $BITRISE_SOURCE_DIR
- module: ""
opts:
description: |
Set the module that you want to lint. To see your available modules please open your project in Android Studio and go in [Project Structure] and see the list on the left.
is_required: false
summary: |
Set the module that you want to lint. To see your available modules please open your project in Android Studio and go in [Project Structure] and see the list on the left.
title: Module
- opts:
description: |
Set the variant that you want to lint. To see your available variants please open your project in Android Studio and go in [Project Structure] -> variants section.
is_required: false
summary: |
Set the variant that you want to lint. To see your available variants please open your project in Android Studio and go in [Project Structure] -> variants section.
title: Variant
variant: ""
- opts:
category: Options
description: |
Will find the report file with the given pattern. If you need the xml file then you can use: "*/build/reports/lint-results*.xml"
is_required: true
summary: |
Will find the report file with the given pattern. If you need the xml file then you can use: "*/build/reports/lint-results*.xml"
title: Report location pattern
report_path_pattern: '*/build/reports/lint-results*.html'
- cache_level: only_deps
opts:
category: Options
description: |-
`all` - will cache build cache and dependencies
`only_deps` - will cache dependencies only
`none` - will not cache anything
is_required: true
title: Set the level of cache
value_options:
- all
- only_deps
- none
- arguments: null
opts:
category: Options
description: Extra arguments passed to the gradle task
is_required: false
summary: Extra arguments passed to the gradle task
title: Additional Gradle Arguments
================================================
FILE: steps/android-lint/step-info.yml
================================================
maintainer: bitrise
================================================
FILE: steps/android-manifest-info/1.0.0/step.yml
================================================
title: Android Manifest Info
summary: Extracts Android manifest attributes to environment variables.
description: |-
Read Android manifest attriubtes from `AndroidManifest.xml` file,
then export that data to environment variables prefixed with **AMI_**.
After this you can use these environment variables in other steps.
website: https://github.com/tomcurran/bitrise-step-android-manifest-info
source_code_url: https://github.com/tomcurran/bitrise-step-android-manifest-info
support_url: https://github.com/tomcurran/bitrise-step-android-manifest-info/issues
published_at: 2017-01-29T02:05:10.79863906Z
source:
git: https://github.com/tomcurran/bitrise-step-android-manifest-info.git
commit: 7a52b46c5dd4f14d9e3148b7e2ec6cccbf579ae2
host_os_tags:
- osx-10.10
project_type_tags:
- android
- xamarin
type_tags:
- build
- utils
- versioning
is_always_run: false
is_skippable: false
inputs:
- manifest_file: $BITRISE_ANDROID_MANIFEST_PATH
opts:
description: |
Path to the given project's AndroidManifest.xml file.
is_required: true
summary: ""
title: AndroidManifest.xml file path
outputs:
- AMI_VERSION_CODE: null
opts:
title: Version Code (versionCode from AndroidManifest.xml)
- AMI_VERSION_NAME: null
opts:
title: Version Name (versionName from AndroidManifest.xml)
- AMI_PACKAGE_NAME: null
opts:
title: Package Name (package from AndroidManifest.xml)
- AMI_MIN_SDK_VERSION: null
opts:
title: Minimum SDK Version (minSdkVersion from AndroidManifest.xml)
- TARGETSDKVERSION: null
opts:
title: Target SDK Version (targetSdkVersion from AndroidManifest.xml)
================================================
FILE: steps/android-manifest-info/1.0.1/step.yml
================================================
title: Android Manifest Info
summary: Extracts Android manifest attributes to environment variables.
description: |-
Read Android manifest attriubtes from `AndroidManifest.xml` file,
then export that data to environment variables prefixed with **AMI_**.
After this you can use these environment variables in other steps.
website: https://github.com/tomcurran/bitrise-step-android-manifest-info
source_code_url: https://github.com/tomcurran/bitrise-step-android-manifest-info
support_url: https://github.com/tomcurran/bitrise-step-android-manifest-info/issues
published_at: 2017-01-29T19:35:51.993488403Z
source:
git: https://github.com/tomcurran/bitrise-step-android-manifest-info.git
commit: 79b3826e8e584ccb6b8bceb21a97906bc684312b
host_os_tags:
- osx-10.10
project_type_tags:
- android
- xamarin
- cordova
- ionic
- react-native
type_tags:
- artifact-info
is_always_run: false
is_skippable: false
inputs:
- manifest_file: $BITRISE_ANDROID_MANIFEST_PATH
opts:
description: |
Path to the given project's AndroidManifest.xml file.
is_required: true
summary: ""
title: AndroidManifest.xml file path
outputs:
- AMI_VERSION_CODE: null
opts:
title: Version Code (versionCode from AndroidManifest.xml)
- AMI_VERSION_NAME: null
opts:
title: Version Name (versionName from AndroidManifest.xml)
- AMI_PACKAGE_NAME: null
opts:
title: Package Name (package from AndroidManifest.xml)
- AMI_MIN_SDK_VERSION: null
opts:
title: Minimum SDK Version (minSdkVersion from AndroidManifest.xml)
- AMI_TARGET_SDK_VERSION: null
opts:
title: Target SDK Version (targetSdkVersion from AndroidManifest.xml)
================================================
FILE: steps/android-manifest-info/1.0.2/step.yml
================================================
title: Android Manifest Info
summary: Extracts Android manifest attributes to environment variables.
description: |-
Read Android manifest attriubtes from `AndroidManifest.xml` file,
then export that data to environment variables prefixed with **AMI_**.
After this you can use these environment variables in other steps.
website: https://github.com/tomcurran/bitrise-step-android-manifest-info
source_code_url: https://github.com/tomcurran/bitrise-step-android-manifest-info
support_url: https://github.com/tomcurran/bitrise-step-android-manifest-info/issues
published_at: 2018-01-18T23:28:30.018621Z
source:
git: https://github.com/tomcurran/bitrise-step-android-manifest-info.git
commit: d85f7a37476f419390dec2459f1c80f99078a4bd
host_os_tags:
- osx-10.10
project_type_tags:
- android
- xamarin
- cordova
- ionic
- react-native
type_tags:
- artifact-info
is_always_run: false
is_skippable: false
inputs:
- manifest_file: $BITRISE_ANDROID_MANIFEST_PATH
opts:
description: |
Path to the given project's AndroidManifest.xml file.
is_required: true
summary: ""
title: AndroidManifest.xml file path
outputs:
- AMI_VERSION_CODE: null
opts:
title: Version Code (versionCode from AndroidManifest.xml)
- AMI_VERSION_NAME: null
opts:
title: Version Name (versionName from AndroidManifest.xml)
- AMI_PACKAGE_NAME: null
opts:
title: Package Name (package from AndroidManifest.xml)
- AMI_MIN_SDK_VERSION: null
opts:
title: Minimum SDK Version (minSdkVersion from AndroidManifest.xml)
- AMI_TARGET_SDK_VERSION: null
opts:
title: Target SDK Version (targetSdkVersion from AndroidManifest.xml)
================================================
FILE: steps/android-manifest-info/step-info.yml
================================================
maintainer: community
================================================
FILE: steps/android-screenrecord-start/0.9.0/step.yml
================================================
title: Android Screenrecord Start
summary: Start recording an Android device's screen.
description: Start recording an Android device's screen.
website: https://github.com/bitrise-steplib/steps-android-screenrecord-start
source_code_url: https://github.com/bitrise-steplib/steps-android-screenrecord-start
support_url: https://github.com/bitrise-steplib/steps-android-screenrecord-start/issues
published_at: 2017-12-20T11:18:41.171970361+01:00
source:
git: https://github.com/bitrise-steplib/steps-android-screenrecord-start.git
commit: 3e83238c5c6fb5d27a955e2f3b3d24c5120dd428
host_os_tags:
- ubuntu
type_tags:
- utility
toolkit:
go:
package_name: github.com/bitrise-steplib/steps-android-screenrecord-start
deps:
brew:
- name: go
apt_get:
- name: golang
bin_name: go
is_requires_admin_user: true
is_always_run: false
is_skippable: true
inputs:
- opts:
description: Make sure this input's value is unique. This ID will be included
in the recorded file's name to be able to separate records, and also `Stop Screenrecord
Android` step will need this ID to know which record need to be stopped.
is_expand: true
is_required: true
summary: Make sure this input's value is unique. This ID will be included in the
recorded file's name to be able to separate records, and also `Stop Screenrecord
Android` step will need this ID to know which record need to be stopped.
title: Record ID
record_id: record0
- emulator_serial: $BITRISE_EMULATOR_SERIAL
opts:
description: The commands will be sent to the emulator that has the given serial.
is_expand: true
is_required: true
summary: The commands will be sent to the emulator that has the given serial.
title: Emulator serial
outputs:
- BITRISE_RECORD_ID: null
opts:
description: The started record's ID
summary: The started record's ID
title: Record ID
================================================
FILE: steps/android-screenrecord-start/step-info.yml
================================================
deprecate_notes: |
This step is deprecated, android emulators no longer support screen recording
maintainer: bitrise
removal_date: "2018-09-20"
================================================
FILE: steps/android-screenrecord-stop/0.9.0/step.yml
================================================
title: Android Screenrecord Stop
summary: Stop an Android device's screen recording and pulls the recorded video under
BITRISE_DEPLOY_DIR
description: Stop an Android device's screen recording and pulls the recorded video
under BITRISE_DEPLOY_DIR
website: https://github.com/bitrise-steplib/steps-android-screenrecord-stop
source_code_url: https://github.com/bitrise-steplib/steps-android-screenrecord-stop
support_url: https://github.com/bitrise-steplib/steps-android-screenrecord-stop/issues
published_at: 2017-12-20T11:51:07.464074046+01:00
source:
git: https://github.com/bitrise-steplib/steps-android-screenrecord-stop.git
commit: d5180e9ddd1bae5bb5cc61ae59ceb83d9e4ecd16
host_os_tags:
- ubuntu
type_tags:
- utility
toolkit:
go:
package_name: github.com/bitrise-steplib/steps-android-screenrecord-stop
deps:
brew:
- name: go
- name: ffmpeg
apt_get:
- name: ffmpeg
- name: golang
bin_name: go
is_requires_admin_user: true
is_always_run: false
is_skippable: true
inputs:
- opts:
description: The record running with this ID will be stopped and the finished
video will be downloaded from the device.
is_expand: true
is_required: true
summary: The record running with this ID will be stopped and the finished video
will be downloaded from the device.
title: Record ID
record_id: $BITRISE_RECORD_ID
- opts:
description: Remove sequentially duplicate frames with FFmpeg by dropping frames
that do not differ greatly from the previous frame in order to reduce frame
rate, video length and file size.
is_expand: true
is_required: true
summary: Remove sequentially duplicate frames with FFmpeg by dropping frames that
do not differ greatly from the previous frame in order to reduce frame rate,
video length and file size.
title: Remove Duplicate Frames
value_options:
- "true"
- "false"
remove_frames: "false"
- emulator_serial: $BITRISE_EMULATOR_SERIAL
opts:
description: The commands will be sent to the emulator that has the given serial.
is_expand: true
is_required: true
summary: The commands will be sent to the emulator that has the given serial.
title: Emulator serial
================================================
FILE: steps/android-screenrecord-stop/step-info.yml
================================================
deprecate_notes: |
This step is deprecated, android emulators no longer support screen recording
maintainer: bitrise
removal_date: "2018-09-20"
================================================
FILE: steps/android-sdk-add-on-installer/0.0.1/step.yml
================================================
title: Android SDK Add-on Installer
summary: |
Step to install an Android SDK Add-on locally
description: |
This step will download a specific version of the Android SDK Add-on into the Bitrise VM, allowing apps to build its code linking against this add-on code
website: https://github.com/FutureWorkshops/bitrise-step-android-sdk-add-on-installer
source_code_url: https://github.com/FutureWorkshops/bitrise-step-android-sdk-add-on-installer
support_url: https://github.com/FutureWorkshops/bitrise-step-android-sdk-add-on-installer
published_at: 2021-04-20T00:04:44.634593+02:00
source:
git: https://github.com/FutureWorkshops/bitrise-step-android-sdk-add-on-installer.git
commit: e57e0115c2e2c2d000ab47d637d1c557429e7ec3
host_os_tags:
- osx-10.10
- ubuntu-16.04
project_type_tags:
- android
- xamarin
- react-native
- cordova
- ionic
type_tags:
- installer
toolkit:
go:
package_name: github.com/FutureWorkshops/bitrise-step-android-sdk-add-on-installer
deps:
brew:
- name: go
- name: unzip
apt_get:
- name: golang
bin_name: go
- name: unzip
is_requires_admin_user: true
is_always_run: false
is_skippable: false
inputs:
- android_sdk_path: $ANDROID_HOME
opts:
is_expand: true
is_required: true
title: Path to the Android SDK folders in the machine
- add_on_url: null
opts:
description: |
The Android SDK Manager Add-on definition is a XML file that is responsible to define how an extra is added to the
$ANDROID_HOME path.
is_expand: true
is_required: true
summary: URL to the android Add-on XML definition
title: Add-on URL
- opts:
category: Debug
description: Enable verbose logging?
is_required: true
title: Enable verbose logging?
value_options:
- "yes"
- "no"
verbose_log: "no"
- opts:
category: Debug
description: |-
If enabled, the step will calculate the checksum of the downloaded file, based in the type specified in the XML. If the local file
do not match the XML data, the step will fail.
is_required: true
title: Validate downloaded file checksum?
value_options:
- "yes"
- "no"
validate_checksum: "no"
outputs:
- ADD_ON_SDK_PATH: null
opts:
summary: Path to the installed SDK
title: Local Path of Addon
================================================
FILE: steps/android-sdk-add-on-installer/step-info.yml
================================================
maintainer: community
================================================
FILE: steps/android-sdk-update/1.0.1/step.yml
================================================
title: Android SDK Update
summary: |-
Need to install or update a packge from Android SDK Manager?
Use this Step to install and update them as you wish!
description: Install the necessary sdk tools to compile your application
website: https://github.com/guitcastro/steps-update-sdk
source_code_url: https://github.com/guitcastro/steps-update-sdk
support_url: https://github.com/guitcastro/steps-update-sdk/issues
published_at: 2015-12-21T18:51:40.042362954-02:00
source:
git: https://github.com/guitcastro/steps-update-sdk.git
commit: 141c81917e966d8674904c042b0e5029c8880152
host_os_tags:
- osx-10.10
project_type_tags:
- android
type_tags:
- android
- build
is_requires_admin_user: false
is_always_run: false
is_skippable: false
run_if: ""
inputs:
- opts:
description: Enable this option to update the Android SDK Tools.
summary: ""
title: Update Android SDK Tools
value_options:
- "on"
- "off"
tools: "off"
- opts:
description: Select which version of Android SDK Platform-tools should be installed.
is_required: true
title: Android SDK Platform-tools version
value_options:
- stable
- preview
- both
- none
platform_tools: none
- build_tools: ""
opts:
description: |-
Comma separated list of all Build-tools versions that should be installed.
Example: `23.0.2,22.0.1`
*Leave it empty if you don't want to install any Build tool.*
summary: 'Example: 23.0.2,22.0.1'
title: Android SDK Build-tools versions
- opts:
description: |-
Comma separated list of all platform versions that should be installed.
Example: `23,22,17`
*Leave it empty if you don't want to install any SDK version.*
summary: 'Example: 23,22,17'
title: Android SDK Platform versions
sdk_version: ""
- opts:
description: |-
Comma separated list of all system images that should be installed.
Use `android list --all -e` to get the names of all available SystemImages.
Example: `sys-img-armeabi-v7a-android-tv-23,sys-img-armeabi-v7a-android-22`
*Leave it empty if you don't want to install any System Image.*
summary: 'Example: sys-img-armeabi-v7a-android-tv-23,sys-img-armeabi-v7a-android-22'
title: System Images
system_images: ""
================================================
FILE: steps/android-sdk-update/1.0.2/step.yml
================================================
title: Android SDK Update
summary: |-
Need to install or update a packge from Android SDK Manager?
Use this Step to install and update them as you wish!
description: Install the necessary sdk tools to compile your application
website: https://github.com/guitcastro/steps-update-sdk
source_code_url: https://github.com/guitcastro/steps-update-sdk
support_url: https://github.com/guitcastro/steps-update-sdk/issues
published_at: 2017-03-18T00:33:48.816322159-03:00
source:
git: https://github.com/guitcastro/steps-update-sdk.git
commit: acc051f9d96d0987d1848b4578c5ed49f2d88b73
host_os_tags:
- osx-10.10
project_type_tags:
- android
- xamarin
- cordova
- ionic
- react-native
type_tags:
- installer
is_requires_admin_user: false
is_always_run: false
is_skippable: false
run_if: ""
inputs:
- opts:
description: Enable this option to update the Android SDK Tools.
summary: ""
title: Update Android SDK Tools
value_options:
- "on"
- "off"
tools: "off"
- opts:
description: Select which version of Android SDK Platform-tools should be installed.
is_required: true
title: Android SDK Platform-tools version
value_options:
- stable
- preview
- both
- none
platform_tools: none
- build_tools: ""
opts:
description: |-
Comma separated list of all Build-tools versions that should be installed.
Example: `23.0.2,22.0.1`
*Leave it empty if you don't want to install any Build tool.*
summary: 'Example: 23.0.2,22.0.1'
title: Android SDK Build-tools versions
- opts:
description: |-
Comma separated list of all platform versions that should be installed.
Example: `23,22,17`
*Leave it empty if you don't want to install any SDK version.*
summary: 'Example: 23,22,17'
title: Android SDK Platform versions
sdk_version: ""
- opts:
description: |-
Comma separated list of all system images that should be installed.
Use `android list --all -e` to get the names of all available SystemImages.
Example: `sys-img-armeabi-v7a-android-tv-23,sys-img-armeabi-v7a-android-22`
*Leave it empty if you don't want to install any System Image.*
summary: 'Example: system-images;android-20;android-wear;x86,system-images;android-20;android-tv;armeabi-v7a'
title: System Images
system_images: ""
================================================
FILE: steps/android-sdk-update/1.0.4/step.yml
================================================
title: Android SDK Update
summary: |-
Need to install or update a packge from Android SDK Manager?
Use this Step to install and update them as you wish!
description: Install the necessary sdk tools to compile your application
website: https://github.com/guitcastro/steps-update-sdk
source_code_url: https://github.com/guitcastro/steps-update-sdk
support_url: https://github.com/guitcastro/steps-update-sdk/issues
published_at: 2017-05-31T17:19:32.768808446-03:00
source:
git: https://github.com/guitcastro/steps-update-sdk.git
commit: 8cf06500b2b661930672d8e78ecc5fa4935a08fb
host_os_tags:
- osx-10.10
project_type_tags:
- android
- xamarin
- cordova
- ionic
- react-native
type_tags:
- installer
is_requires_admin_user: false
is_always_run: false
is_skippable: false
run_if: ""
inputs:
- opts:
description: Enable this option to update the Android SDK Tools.
summary: ""
title: Update Android SDK Tools
value_options:
- "on"
- "off"
tools: "off"
- opts:
description: Select which version of Android SDK Platform-tools should be installed.
is_required: true
title: Android SDK Platform-tools version
value_options:
- stable
- preview
- both
- none
platform_tools: none
- build_tools: ""
opts:
description: |-
Comma separated list of all Build-tools versions that should be installed.
Example: `23.0.2,22.0.1`
*Leave it empty if you don't want to install any Build tool.*
summary: 'Example: 23.0.2,22.0.1'
title: Android SDK Build-tools versions
- opts:
description: |-
Comma separated list of all platform versions that should be installed.
Example: `23,22,17`
*Leave it empty if you don't want to install any SDK version.*
summary: 'Example: 23,22,17'
title: Android SDK Platform versions
sdk_version: ""
- opts:
description: |-
Comma separated list of all system images that should be installed.
Use `android list --all -e` to get the names of all available SystemImages.
Example: `sys-img-armeabi-v7a-android-tv-23,sys-img-armeabi-v7a-android-22`
*Leave it empty if you don't want to install any System Image.*
summary: 'Example: system-images;android-20;android-wear;x86,system-images;android-20;android-tv;armeabi-v7a'
title: System Images
system_images: ""
================================================
FILE: steps/android-sdk-update/1.0.6/step.yml
================================================
title: Android SDK Update
summary: |-
Need to install or update a packge from Android SDK Manager?
Use this Step to install and update them as you wish!
description: Install the necessary sdk tools to compile your application
website: https://github.com/guitcastro/steps-update-sdk
source_code_url: https://github.com/guitcastro/steps-update-sdk
support_url: https://github.com/guitcastro/steps-update-sdk/issues
published_at: 2017-07-18T16:40:00.250198428-03:00
source:
git: https://github.com/guitcastro/steps-update-sdk.git
commit: fb76af2d0e6137bc09b7c432ce22d119d1f9e754
host_os_tags:
- osx-10.10
project_type_tags:
- android
- xamarin
- cordova
- ionic
- react-native
type_tags:
- installer
is_requires_admin_user: false
is_always_run: false
is_skippable: false
run_if: ""
inputs:
- opts:
description: Enable this option to update the Android SDK Tools.
summary: ""
title: Update Android SDK Tools
value_options:
- "on"
- "off"
tools: "off"
- opts:
description: Select which version of Android SDK Platform-tools should be installed.
is_required: true
title: Android SDK Platform-tools version
value_options:
- stable
- preview
- both
- none
platform_tools: none
- build_tools: ""
opts:
description: |-
Comma separated list of all Build-tools versions that should be installed.
Example: `23.0.2,22.0.1`
*Leave it empty if you don't want to install any Build tool.*
summary: 'Example: 23.0.2,22.0.1'
title: Android SDK Build-tools versions
- opts:
description: "Comma separated list of all platform versions that should be installed.\n\nExample:
`23,22,17`\n\n*Leave it empty if you don't want to install any SDK version.*
\ "
summary: 'Example: 23,22,17'
title: Android SDK Platform versions
sdk_version: ""
- opts:
description: |-
Comma separated list of all system images that should be installed.
Use `android list --all -e` to get the names of all available SystemImages.
Example: `sys-img-armeabi-v7a-android-tv-23,sys-img-armeabi-v7a-android-22`
*Leave it empty if you don't want to install any System Image.*
summary: 'Example: extras;google;googlee_play_services,extras;google;m2repository,extras;android;m2repository,add-ons;addon-google_apis-google-15,system-images;android-20;android-wear;x86,system-images;android-20;android-tv;armeabi-v7a'
title: System Images and others
system_images: ""
================================================
FILE: steps/android-sdk-update/step-info.yml
================================================
maintainer: community
================================================
FILE: steps/android-unit-test/0.10.0/step.yml
================================================
title: Android Unit Test
summary: This step runs your Android project's unit tests.
description: This step runs your Android project's unit tests.
website: https://github.com/bitrise-steplib/bitrise-step-android-unit-test
source_code_url: https://github.com/bitrise-steplib/bitrise-step-android-unit-test
support_url: https://github.com/bitrise-steplib/bitrise-step-android-unit-test/issues
published_at: 2019-05-10T15:12:00.52861022Z
source:
git: https://github.com/bitrise-steplib/bitrise-step-android-unit-test.git
commit: 55470cf914e07f5bfffe25f5d73cb72dfdffff3e
host_os_tags:
- osx-10.10
- ubuntu-16.04
project_type_tags:
- android
- react-native
type_tags:
- test
toolkit:
go:
package_name: github.com/bitrise-steplib/bitrise-step-android-unit-test
is_requires_admin_user: true
is_always_run: false
is_skippable: false
inputs:
- opts:
description: The root directory of your android project, for example, where your
root build gradle file exists (also gradlew, settings.gradle, etc...)
is_required: true
summary: The root directory of your android project, for example, where your root
build gradle file exists (also gradlew, settings.gradle, etc...)
title: Project Location
project_location: $BITRISE_SOURCE_DIR
- module: ""
opts:
description: |
Set the module that you want to test. To see your available modules, please open your project in Android Studio and go to [Project Structure] and see the list on the left.
is_required: false
summary: |
Set the module that you want to test. To see your available modules, please open your project in Android Studio and go to [Project Structure] and see the list on the left.
title: Module
- opts:
description: |
Set the variant that you want to test. To see your available variants, please open your project in Android Studio and go to [Project Structure] -> variants section.
is_required: false
summary: |
Set the variant that you want to test. To see your available variants, please open your project in Android Studio and go to [Project Structure] -> variants section.
title: Variant
variant: ""
- arguments: null
opts:
category: Options
description: Extra arguments passed to the gradle task
is_required: false
summary: Extra arguments passed to the gradle task
title: Additional Gradle Arguments
- opts:
category: Options
description: Will find the report dir with the given pattern.
is_required: true
summary: Will find the report dir with the given pattern.
title: Report location pattern
report_path_pattern: '*build/reports'
- opts:
category: Options
description: Will find test-results dir with the given pattern.
is_required: true
summary: Will find the test-results dir with the given pattern.
title: Test results location pattern
result_path_pattern: '*build/test-results'
- cache_level: only_deps
opts:
category: Options
description: |-
`all` - will cache build-cache and dependencies
`only_deps` - will cache dependencies only
`none` - won't cache any of the above
is_required: true
title: Set the level of cache
value_options:
- all
- only_deps
- none
================================================
FILE: steps/android-unit-test/0.11.0/step.yml
================================================
title: Android Unit Test
summary: This step runs your Android project's unit tests.
description: This step runs your Android project's unit tests.
website: https://github.com/bitrise-steplib/bitrise-step-android-unit-test
source_code_url: https://github.com/bitrise-steplib/bitrise-step-android-unit-test
support_url: https://github.com/bitrise-steplib/bitrise-step-android-unit-test/issues
published_at: 2019-05-31T13:20:45.384381408Z
source:
git: https://github.com/bitrise-steplib/bitrise-step-android-unit-test.git
commit: 428918d36f02330b62c83cdbe2e968784e9dac1b
host_os_tags:
- osx-10.10
- ubuntu-16.04
project_type_tags:
- android
- react-native
type_tags:
- test
toolkit:
go:
package_name: github.com/bitrise-steplib/bitrise-step-android-unit-test
is_requires_admin_user: true
is_always_run: false
is_skippable: false
inputs:
- opts:
description: The root directory of your android project, for example, where your
root build gradle file exists (also gradlew, settings.gradle, etc...)
is_required: true
summary: The root directory of your android project, for example, where your root
build gradle file exists (also gradlew, settings.gradle, etc...)
title: Project Location
project_location: $BITRISE_SOURCE_DIR
- module: ""
opts:
description: |
Set the module that you want to test. To see your available modules, please open your project in Android Studio and go to [Project Structure] and see the list on the left.
is_required: false
summary: |
Set the module that you want to test. To see your available modules, please open your project in Android Studio and go to [Project Structure] and see the list on the left.
title: Module
- opts:
description: |
Set the variant that you want to test. To see your available variants, please open your project in Android Studio and go to [Project Structure] -> variants section.
is_required: false
summary: |
Set the variant that you want to test. To see your available variants, please open your project in Android Studio and go to [Project Structure] -> variants section.
title: Variant
variant: ""
- arguments: null
opts:
category: Options
description: Extra arguments passed to the gradle task
is_required: false
summary: Extra arguments passed to the gradle task
title: Additional Gradle Arguments
- opts:
category: Options
description: Will find the report dir with the given pattern.
is_required: true
summary: Will find the report dir with the given pattern.
title: Report location pattern
report_path_pattern: '*build/reports'
- opts:
category: Options
description: Will find test-results dir with the given pattern.
is_required: true
summary: Will find the test-results dir with the given pattern.
title: Test results location pattern
result_path_pattern: '*build/test-results'
- cache_level: only_deps
opts:
category: Options
description: |-
`all` - will cache build-cache and dependencies
`only_deps` - will cache dependencies only
`none` - won't cache any of the above
is_required: true
title: Set the level of cache
value_options:
- all
- only_deps
- none
- is_debug: "false"
opts:
category: Debug
description: The step will print more verbose logs if enabled.
is_required: true
summary: The step will print more verbose logs if enabled.
title: Enable Debug Mode
value_options:
- "false"
- "true"
================================================
FILE: steps/android-unit-test/0.11.1/step.yml
================================================
title: Android Unit Test
summary: This step runs your Android project's unit tests.
description: This step runs your Android project's unit tests.
website: https://github.com/bitrise-steplib/bitrise-step-android-unit-test
source_code_url: https://github.com/bitrise-steplib/bitrise-step-android-unit-test
support_url: https://github.com/bitrise-steplib/bitrise-step-android-unit-test/issues
published_at: 2019-06-04T15:36:08.714263749Z
source:
git: https://github.com/bitrise-steplib/bitrise-step-android-unit-test.git
commit: dd2535d711f8515202beb3f02ef43c9b2c268b5b
host_os_tags:
- osx-10.10
- ubuntu-16.04
project_type_tags:
- android
- react-native
type_tags:
- test
toolkit:
go:
package_name: github.com/bitrise-steplib/bitrise-step-android-unit-test
is_requires_admin_user: true
is_always_run: false
is_skippable: false
inputs:
- opts:
description: The root directory of your android project, for example, where your
root build gradle file exists (also gradlew, settings.gradle, etc...)
is_required: true
summary: The root directory of your android project, for example, where your root
build gradle file exists (also gradlew, settings.gradle, etc...)
title: Project Location
project_location: $BITRISE_SOURCE_DIR
- module: ""
opts:
description: |
Set the module that you want to test. To see your available modules, please open your project in Android Studio and go to [Project Structure] and see the list on the left.
is_required: false
summary: |
Set the module that you want to test. To see your available modules, please open your project in Android Studio and go to [Project Structure] and see the list on the left.
title: Module
- opts:
description: |
Set the variant that you want to test. To see your available variants, please open your project in Android Studio and go to [Project Structure] -> variants section.
is_required: false
summary: |
Set the variant that you want to test. To see your available variants, please open your project in Android Studio and go to [Project Structure] -> variants section.
title: Variant
variant: ""
- arguments: null
opts:
category: Options
description: Extra arguments passed to the gradle task
is_required: false
summary: Extra arguments passed to the gradle task
title: Additional Gradle Arguments
- opts:
category: Options
description: Will find the report dir with the given pattern.
is_required: true
summary: Will find the report dir with the given pattern.
title: Report location pattern
report_path_pattern: '*build/reports'
- opts:
category: Options
description: Will find test-results dir with the given pattern.
is_required: true
summary: Will find the test-results dir with the given pattern.
title: Test results location pattern
result_path_pattern: '*build/test-results'
- cache_level: only_deps
opts:
category: Options
description: |-
`all` - will cache build-cache and dependencies
`only_deps` - will cache dependencies only
`none` - won't cache any of the above
is_required: true
title: Set the level of cache
value_options:
- all
- only_deps
- none
- is_debug: "false"
opts:
category: Debug
description: The step will print more verbose logs if enabled.
is_required: true
summary: The step will print more verbose logs if enabled.
title: Enable Debug Mode
value_options:
- "false"
- "true"
================================================
FILE: steps/android-unit-test/0.9.0/step.yml
================================================
title: Android Unit Test
summary: Runs your Android project's unit tests.
description: Runs your Android project's unit tests.
website: https://github.com/bitrise-steplib/bitrise-step-android-unit-test
source_code_url: https://github.com/bitrise-steplib/bitrise-step-android-unit-test
support_url: https://github.com/bitrise-steplib/bitrise-step-android-unit-test/issues
published_at: !!timestamp 2018-04-04T12:46:14.69292473+02:00
source:
git: https://github.com/bitrise-steplib/bitrise-step-android-unit-test.git
commit: 7c41a81d35e8d3d8502b7a25a2028ed723e0ca23
host_os_tags:
- osx-10.10
- ubuntu-16.04
project_type_tags:
- android
- react-native
type_tags:
- test
toolkit:
go:
package_name: github.com/bitrise-steplib/bitrise-step-android-unit-test
is_requires_admin_user: true
is_always_run: false
is_skippable: false
inputs:
- opts:
description: 'The root directory of your android project, e.g.: where your root
build gradle file exist (also gradlew, settings.gradle, etc...)'
is_required: true
summary: 'The root directory of your android project, e.g.: where your root build
gradle file exist (also gradlew, settings.gradle, etc...)'
title: Project Location
project_location: $BITRISE_SOURCE_DIR
- module: ""
opts:
description: |
Set the module that you want to test. To see your available modules please open your project in Android Studio and go in [Project Structure] and see the list on the left.
is_required: false
summary: |
Set the module that you want to test. To see your available modules please open your project in Android Studio and go in [Project Structure] and see the list on the left.
title: Module
- opts:
description: |
Set the variant that you want to test. To see your available variants please open your project in Android Studio and go in [Project Structure] -> variants section.
is_required: false
summary: |
Set the variant that you want to test. To see your available variants please open your project in Android Studio and go in [Project Structure] -> variants section.
title: Variant
variant: ""
- opts:
category: Export Options
description: Will find the report dir with the given pattern.
is_required: true
summary: Will find the report dir with the given pattern.
title: Report location pattern
report_path_pattern: '*build/reports'
- opts:
category: Export Options
description: Will find test-results dir with the given pattern.
is_required: true
summary: Will find the test-results dir with the given pattern.
title: Test results location pattern
result_path_pattern: '*build/test-results'
================================================
FILE: steps/android-unit-test/0.9.2/step.yml
================================================
title: Android Unit Test
summary: Runs your Android project's unit tests.
description: Runs your Android project's unit tests.
website: https://github.com/bitrise-steplib/bitrise-step-android-unit-test
source_code_url: https://github.com/bitrise-steplib/bitrise-step-android-unit-test
support_url: https://github.com/bitrise-steplib/bitrise-step-android-unit-test/issues
published_at: 2018-04-23T10:14:43.932928818+02:00
source:
git: https://github.com/bitrise-steplib/bitrise-step-android-unit-test.git
commit: 3d89f92d6f4cff8aa2a07de986cfdd7935eb69a8
host_os_tags:
- osx-10.10
- ubuntu-16.04
project_type_tags:
- android
- react-native
type_tags:
- test
toolkit:
go:
package_name: github.com/bitrise-steplib/bitrise-step-android-unit-test
is_requires_admin_user: true
is_always_run: false
is_skippable: false
inputs:
- opts:
description: 'The root directory of your android project, e.g.: where your root
build gradle file exist (also gradlew, settings.gradle, etc...)'
is_required: true
summary: 'The root directory of your android project, e.g.: where your root build
gradle file exist (also gradlew, settings.gradle, etc...)'
title: Project Location
project_location: $BITRISE_SOURCE_DIR
- module: ""
opts:
description: |
Set the module that you want to test. To see your available modules please open your project in Android Studio and go in [Project Structure] and see the list on the left.
is_required: false
summary: |
Set the module that you want to test. To see your available modules please open your project in Android Studio and go in [Project Structure] and see the list on the left.
title: Module
- opts:
description: |
Set the variant that you want to test. To see your available variants please open your project in Android Studio and go in [Project Structure] -> variants section.
is_required: false
summary: |
Set the variant that you want to test. To see your available variants please open your project in Android Studio and go in [Project Structure] -> variants section.
title: Variant
variant: ""
- arguments: null
opts:
category: Options
description: Extra arguments passed to the gradle task
is_required: false
summary: Extra arguments passed to the gradle task
title: Additional Gradle Arguments
- opts:
category: Options
description: Will find the report dir with the given pattern.
is_required: true
summary: Will find the report dir with the given pattern.
title: Report location pattern
report_path_pattern: '*build/reports'
- opts:
category: Options
description: Will find test-results dir with the given pattern.
is_required: true
summary: Will find the test-results dir with the given pattern.
title: Test results location pattern
result_path_pattern: '*build/test-results'
- cache_level: only_deps
opts:
category: Options
description: |-
`all` - will cache build-cache and dependencies
`only_deps` - will cache dependencies only
`none` - won't cache any of the above
is_required: true
title: Set the level of cache
value_options:
- all
- only_deps
- none
================================================
FILE: steps/android-unit-test/0.9.3/step.yml
================================================
title: Android Unit Test
summary: Runs your Android project's unit tests.
description: Runs your Android project's unit tests.
website: https://github.com/bitrise-steplib/bitrise-step-android-unit-test
source_code_url: https://github.com/bitrise-steplib/bitrise-step-android-unit-test
support_url: https://github.com/bitrise-steplib/bitrise-step-android-unit-test/issues
published_at: 2018-05-23T15:26:42.968819074+02:00
source:
git: https://github.com/bitrise-steplib/bitrise-step-android-unit-test.git
commit: f8d54c03abe3e2b09c3ec11d71c8dfa45b6e181c
host_os_tags:
- osx-10.10
- ubuntu-16.04
project_type_tags:
- android
- react-native
type_tags:
- test
toolkit:
go:
package_name: github.com/bitrise-steplib/bitrise-step-android-unit-test
is_requires_admin_user: true
is_always_run: false
is_skippable: false
inputs:
- opts:
description: 'The root directory of your android project, e.g.: where your root
build gradle file exist (also gradlew, settings.gradle, etc...)'
is_required: true
summary: 'The root directory of your android project, e.g.: where your root build
gradle file exist (also gradlew, settings.gradle, etc...)'
title: Project Location
project_location: $BITRISE_SOURCE_DIR
- module: ""
opts:
description: |
Set the module that you want to test. To see your available modules please open your project in Android Studio and go in [Project Structure] and see the list on the left.
is_required: false
summary: |
Set the module that you want to test. To see your available modules please open your project in Android Studio and go in [Project Structure] and see the list on the left.
title: Module
- opts:
description: |
Set the variant that you want to test. To see your available variants please open your project in Android Studio and go in [Project Structure] -> variants section.
is_required: false
summary: |
Set the variant that you want to test. To see your available variants please open your project in Android Studio and go in [Project Structure] -> variants section.
title: Variant
variant: ""
- arguments: null
opts:
category: Options
description: Extra arguments passed to the gradle task
is_required: false
summary: Extra arguments passed to the gradle task
title: Additional Gradle Arguments
- opts:
category: Options
description: Will find the report dir with the given pattern.
is_required: true
summary: Will find the report dir with the given pattern.
title: Report location pattern
report_path_pattern: '*build/reports'
- opts:
category: Options
description: Will find test-results dir with the given pattern.
is_required: true
summary: Will find the test-results dir with the given pattern.
title: Test results location pattern
result_path_pattern: '*build/test-results'
- cache_level: only_deps
opts:
category: Options
description: |-
`all` - will cache build-cache and dependencies
`only_deps` - will cache dependencies only
`none` - won't cache any of the above
is_required: true
title: Set the level of cache
value_options:
- all
- only_deps
- none
================================================
FILE: steps/android-unit-test/0.9.4/step.yml
================================================
title: Android Unit Test
summary: This step runs your Android project's unit tests.
description: This step runs your Android project's unit tests.
website: https://github.com/bitrise-steplib/bitrise-step-android-unit-test
source_code_url: https://github.com/bitrise-steplib/bitrise-step-android-unit-test
support_url: https://github.com/bitrise-steplib/bitrise-step-android-unit-test/issues
published_at: 2018-10-24T10:26:11.028083639Z
source:
git: https://github.com/bitrise-steplib/bitrise-step-android-unit-test.git
commit: ab10871cdde264bd3716ebc7ffadb944784e2f70
host_os_tags:
- osx-10.10
- ubuntu-16.04
project_type_tags:
- android
- react-native
type_tags:
- test
toolkit:
go:
package_name: github.com/bitrise-steplib/bitrise-step-android-unit-test
is_requires_admin_user: true
is_always_run: false
is_skippable: false
inputs:
- opts:
description: The root directory of your android project, for example, where your
root build gradle file exists (also gradlew, settings.gradle, etc...)
is_required: true
summary: The root directory of your android project, for example, where your root
build gradle file exists (also gradlew, settings.gradle, etc...)
title: Project Location
project_location: $BITRISE_SOURCE_DIR
- module: ""
opts:
description: |
Set the module that you want to test. To see your available modules, please open your project in Android Studio and go to [Project Structure] and see the list on the left.
is_required: false
summary: |
Set the module that you want to test. To see your available modules, please open your project in Android Studio and go to [Project Structure] and see the list on the left.
title: Module
- opts:
description: |
Set the variant that you want to test. To see your available variants, please open your project in Android Studio and go to [Project Structure] -> variants section.
is_required: false
summary: |
Set the variant that you want to test. To see your available variants, please open your project in Android Studio and go to [Project Structure] -> variants section.
title: Variant
variant: ""
- arguments: null
opts:
category: Options
description: Extra arguments passed to the gradle task
is_required: false
summary: Extra arguments passed to the gradle task
title: Additional Gradle Arguments
- opts:
category: Options
description: Will find the report dir with the given pattern.
is_required: true
summary: Will find the report dir with the given pattern.
title: Report location pattern
report_path_pattern: '*build/reports'
- opts:
category: Options
description: Will find test-results dir with the given pattern.
is_required: true
summary: Will find the test-results dir with the given pattern.
title: Test results location pattern
result_path_pattern: '*build/test-results'
- cache_level: only_deps
opts:
category: Options
description: |-
`all` - will cache build-cache and dependencies
`only_deps` - will cache dependencies only
`none` - won't cache any of the above
is_required: true
title: Set the level of cache
value_options:
- all
- only_deps
- none
================================================
FILE: steps/android-unit-test/0.9.5/step.yml
================================================
title: Android Unit Test
summary: This step runs your Android project's unit tests.
description: This step runs your Android project's unit tests.
website: https://github.com/bitrise-steplib/bitrise-step-android-unit-test
source_code_url: https://github.com/bitrise-steplib/bitrise-step-android-unit-test
support_url: https://github.com/bitrise-steplib/bitrise-step-android-unit-test/issues
published_at: 2018-10-29T11:49:53.412800334Z
source:
git: https://github.com/bitrise-steplib/bitrise-step-android-unit-test.git
commit: b066992f1bb47fbcd9c2d17c7be772f3966fdf19
host_os_tags:
- osx-10.10
- ubuntu-16.04
project_type_tags:
- android
- react-native
type_tags:
- test
toolkit:
go:
package_name: github.com/bitrise-steplib/bitrise-step-android-unit-test
is_requires_admin_user: true
is_always_run: false
is_skippable: false
inputs:
- opts:
description: The root directory of your android project, for example, where your
root build gradle file exists (also gradlew, settings.gradle, etc...)
is_required: true
summary: The root directory of your android project, for example, where your root
build gradle file exists (also gradlew, settings.gradle, etc...)
title: Project Location
project_location: $BITRISE_SOURCE_DIR
- module: ""
opts:
description: |
Set the module that you want to test. To see your available modules, please open your project in Android Studio and go to [Project Structure] and see the list on the left.
is_required: false
summary: |
Set the module that you want to test. To see your available modules, please open your project in Android Studio and go to [Project Structure] and see the list on the left.
title: Module
- opts:
description: |
Set the variant that you want to test. To see your available variants, please open your project in Android Studio and go to [Project Structure] -> variants section.
is_required: false
summary: |
Set the variant that you want to test. To see your available variants, please open your project in Android Studio and go to [Project Structure] -> variants section.
title: Variant
variant: ""
- arguments: null
opts:
category: Options
description: Extra arguments passed to the gradle task
is_required: false
summary: Extra arguments passed to the gradle task
title: Additional Gradle Arguments
- opts:
category: Options
description: Will find the report dir with the given pattern.
is_required: true
summary: Will find the report dir with the given pattern.
title: Report location pattern
report_path_pattern: '*build/reports'
- opts:
category: Options
description: Will find test-results dir with the given pattern.
is_required: true
summary: Will find the test-results dir with the given pattern.
title: Test results location pattern
result_path_pattern: '*build/test-results'
- cache_level: only_deps
opts:
category: Options
description: |-
`all` - will cache build-cache and dependencies
`only_deps` - will cache dependencies only
`none` - won't cache any of the above
is_required: true
title: Set the level of cache
value_options:
- all
- only_deps
- none
================================================
FILE: steps/android-unit-test/0.9.6/step.yml
================================================
title: Android Unit Test
summary: This step runs your Android project's unit tests.
description: This step runs your Android project's unit tests.
website: https://github.com/bitrise-steplib/bitrise-step-android-unit-test
source_code_url: https://github.com/bitrise-steplib/bitrise-step-android-unit-test
support_url: https://github.com/bitrise-steplib/bitrise-step-android-unit-test/issues
published_at: 2019-03-14T14:58:18.911376758Z
source:
git: https://github.com/bitrise-steplib/bitrise-step-android-unit-test.git
commit: d2fd457bb55fbb962c10392ce323f51085b7c2af
host_os_tags:
- osx-10.10
- ubuntu-16.04
project_type_tags:
- android
- react-native
type_tags:
- test
toolkit:
go:
package_name: github.com/bitrise-steplib/bitrise-step-android-unit-test
is_requires_admin_user: true
is_always_run: false
is_skippable: false
inputs:
- opts:
description: The root directory of your android project, for example, where your
root build gradle file exists (also gradlew, settings.gradle, etc...)
is_required: true
summary: The root directory of your android project, for example, where your root
build gradle file exists (also gradlew, settings.gradle, etc...)
title: Project Location
project_location: $BITRISE_SOURCE_DIR
- module: ""
opts:
description: |
Set the module that you want to test. To see your available modules, please open your project in Android Studio and go to [Project Structure] and see the list on the left.
is_required: false
summary: |
Set the module that you want to test. To see your available modules, please open your project in Android Studio and go to [Project Structure] and see the list on the left.
title: Module
- opts:
description: |
Set the variant that you want to test. To see your available variants, please open your project in Android Studio and go to [Project Structure] -> variants section.
is_required: false
summary: |
Set the variant that you want to test. To see your available variants, please open your project in Android Studio and go to [Project Structure] -> variants section.
title: Variant
variant: ""
- arguments: null
opts:
category: Options
description: Extra arguments passed to the gradle task
is_required: false
summary: Extra arguments passed to the gradle task
title: Additional Gradle Arguments
- opts:
category: Options
description: Will find the report dir with the given pattern.
is_required: true
summary: Will find the report dir with the given pattern.
title: Report location pattern
report_path_pattern: '*build/reports'
- opts:
category: Options
description: Will find test-results dir with the given pattern.
is_required: true
summary: Will find the test-results dir with the given pattern.
title: Test results location pattern
result_path_pattern: '*build/test-results'
- cache_level: only_deps
opts:
category: Options
description: |-
`all` - will cache build-cache and dependencies
`only_deps` - will cache dependencies only
`none` - won't cache any of the above
is_required: true
title: Set the level of cache
value_options:
- all
- only_deps
- none
================================================
FILE: steps/android-unit-test/1.0.0/step.yml
================================================
title: Android Unit Test
summary: This step runs your Android project's unit tests.
description: This step runs your Android project's unit tests.
website: https://github.com/bitrise-steplib/bitrise-step-android-unit-test
source_code_url: https://github.com/bitrise-steplib/bitrise-step-android-unit-test
support_url: https://github.com/bitrise-steplib/bitrise-step-android-unit-test/issues
published_at: 2019-08-30T13:17:52.665032945Z
source:
git: https://github.com/bitrise-steplib/bitrise-step-android-unit-test.git
commit: 9d5c1d4e8630a28a5d0d4a23fd29f15b02d45d75
host_os_tags:
- osx-10.10
- ubuntu-16.04
project_type_tags:
- android
- react-native
type_tags:
- test
toolkit:
go:
package_name: github.com/bitrise-steplib/bitrise-step-android-unit-test
is_requires_admin_user: true
is_always_run: false
is_skippable: false
inputs:
- opts:
description: The root directory of your android project, for example, where your
root build gradle file exists (also gradlew, settings.gradle, etc...)
is_required: true
summary: The root directory of your android project, for example, where your root
build gradle file exists (also gradlew, settings.gradle, etc...)
title: Project Location
project_location: $BITRISE_SOURCE_DIR
- module: ""
opts:
description: |
Set the module that you want to test. To see your available modules, please open your project in Android Studio and go to [Project Structure] and see the list on the left.
is_required: false
summary: |
Set the module that you want to test. To see your available modules, please open your project in Android Studio and go to [Project Structure] and see the list on the left.
title: Module
- opts:
description: |
Set the variant that you want to test. To see your available variants, please open your project in Android Studio and go to [Project Structure] -> variants section.
is_required: false
summary: |
Set the variant that you want to test. To see your available variants, please open your project in Android Studio and go to [Project Structure] -> variants section.
title: Variant
variant: ""
- arguments: null
opts:
category: Options
description: Extra arguments passed to the gradle task
is_required: false
summary: Extra arguments passed to the gradle task
title: Additional Gradle Arguments
- opts:
category: Options
description: "The step will use this pattern to export __Local unit test HTML
results__. \nThe whole HTML results directory will be zipped and moved to the
`$BITRISE_DEPLOY_DIR`.\n\nYou need to override this input if you have custom
output dir set for Local unit test HTML results. \nThe pattern needs to be
relative to the selected module's directory.\n\nExample 1: app module and debug
variant is selected and the HTML report is generated at:\n\n- `/app/build/reports/tests/testDebugUnitTest`\n\nthis
case use: `*build/reports/tests/testDebugUnitTest` pattern.\n\nExample 2: app
module and NO variant is selected and the HTML reports are generated at:\n\n-
`/app/build/reports/tests/testDebugUnitTest`\n- `/app/build/reports/tests/testReleaseUnitTest`\n\nto
export every variant's reports use: `*build/reports/tests` pattern."
is_required: true
title: Local unit test HTML result directory pattern
report_path_pattern: '*build/reports/tests'
- opts:
category: Options
description: "The step will use this pattern to export __Local unit test XML results__.
\ \nThe whole XML results directory will be zipped and moved to the `$BITRISE_DEPLOY_DIR`
\ \nand the result files will be deployed to the Ship Addon.\n\nYou need to
override this input if you have custom output dir set for Local unit test XML
results. \nThe pattern needs to be relative to the selected module's directory.\n\nExample
1: app module and debug variant is selected and the XML report is generated
at:\n\n- `/app/build/test-results/testDebugUnitTest`\n\nthis
case use: `*build/test-results/testDebugUnitTest` pattern.\n\nExample 2: app
module and NO variant is selected and the XML reports are generated at:\n\n-
`/app/build/test-results/testDebugUnitTest`\n- `/app/build/test-results/testReleaseUnitTest`\n\nto
export every variant's reports use: `*build/test-results` pattern."
is_required: true
title: Local unit test XML result directory pattern
result_path_pattern: '*build/test-results'
- cache_level: only_deps
opts:
category: Options
description: |-
`all` - will cache build-cache and dependencies
`only_deps` - will cache dependencies only
`none` - won't cache any of the above
is_required: true
title: Set the level of cache
value_options:
- all
- only_deps
- none
- is_debug: "false"
opts:
category: Debug
description: The step will print more verbose logs if enabled.
is_required: true
summary: The step will print more verbose logs if enabled.
title: Enable Debug Mode
value_options:
- "false"
- "true"
================================================
FILE: steps/android-unit-test/1.0.1/step.yml
================================================
title: Android Unit Test
summary: This step runs your Android project's unit tests.
description: This step runs your Android project's unit tests.
website: https://github.com/bitrise-steplib/bitrise-step-android-unit-test
source_code_url: https://github.com/bitrise-steplib/bitrise-step-android-unit-test
support_url: https://github.com/bitrise-steplib/bitrise-step-android-unit-test/issues
published_at: 2020-04-24T21:04:02.756435284Z
source:
git: https://github.com/bitrise-steplib/bitrise-step-android-unit-test.git
commit: 76e5f6b0dd8d00ccae20a010cd44a6f80716bd11
host_os_tags:
- osx-10.10
- ubuntu-16.04
project_type_tags:
- android
- react-native
type_tags:
- test
toolkit:
go:
package_name: github.com/bitrise-steplib/bitrise-step-android-unit-test
is_requires_admin_user: true
is_always_run: false
is_skippable: false
inputs:
- opts:
description: The root directory of your android project, for example, where your
root build gradle file exists (also gradlew, settings.gradle, etc...)
is_required: true
summary: The root directory of your android project, for example, where your root
build gradle file exists (also gradlew, settings.gradle, etc...)
title: Project Location
project_location: $BITRISE_SOURCE_DIR
- module: ""
opts:
description: |
Set the module that you want to test. To see your available modules, please open your project in Android Studio and go to [Project Structure] and see the list on the left.
is_required: false
summary: |
Set the module that you want to test. To see your available modules, please open your project in Android Studio and go to [Project Structure] and see the list on the left.
title: Module
- opts:
description: |
Set the variant that you want to test. To see your available variants, please open your project in Android Studio and go to [Project Structure] -> variants section.
is_required: false
summary: |
Set the variant that you want to test. To see your available variants, please open your project in Android Studio and go to [Project Structure] -> variants section.
title: Variant
variant: ""
- arguments: null
opts:
category: Options
description: Extra arguments passed to the gradle task
is_required: false
summary: Extra arguments passed to the gradle task
title: Additional Gradle Arguments
- opts:
category: Options
description: "The step will use this pattern to export __Local unit test HTML
results__. \nThe whole HTML results directory will be zipped and moved to the
`$BITRISE_DEPLOY_DIR`.\n\nYou need to override this input if you have custom
output dir set for Local unit test HTML results. \nThe pattern needs to be
relative to the selected module's directory.\n\nExample 1: app module and debug
variant is selected and the HTML report is generated at:\n\n- `/app/build/reports/tests/testDebugUnitTest`\n\nthis
case use: `*build/reports/tests/testDebugUnitTest` pattern.\n\nExample 2: app
module and NO variant is selected and the HTML reports are generated at:\n\n-
`/app/build/reports/tests/testDebugUnitTest`\n- `/app/build/reports/tests/testReleaseUnitTest`\n\nto
export every variant's reports use: `*build/reports/tests` pattern."
is_required: true
title: Local unit test HTML result directory pattern
report_path_pattern: '*build/reports/tests'
- opts:
category: Options
description: "The step will use this pattern to export __Local unit test XML results__.
\ \nThe whole XML results directory will be zipped and moved to the `$BITRISE_DEPLOY_DIR`
\ \nand the result files will be deployed to the Ship Addon.\n\nYou need to
override this input if you have custom output dir set for Local unit test XML
results. \nThe pattern needs to be relative to the selected module's directory.\n\nExample
1: app module and debug variant is selected and the XML report is generated
at:\n\n- `/app/build/test-results/testDebugUnitTest`\n\nthis
case use: `*build/test-results/testDebugUnitTest` pattern.\n\nExample 2: app
module and NO variant is selected and the XML reports are generated at:\n\n-
`/app/build/test-results/testDebugUnitTest`\n- `/app/build/test-results/testReleaseUnitTest`\n\nto
export every variant's reports use: `*build/test-results` pattern."
is_required: true
title: Local unit test XML result directory pattern
result_path_pattern: '*build/test-results'
- cache_level: only_deps
opts:
category: Options
description: |-
`all` - will cache build-cache and dependencies
`only_deps` - will cache dependencies only
`none` - won't cache any of the above
is_required: true
title: Set the level of cache
value_options:
- all
- only_deps
- none
- is_debug: "false"
opts:
category: Debug
description: The step will print more verbose logs if enabled.
is_required: true
summary: The step will print more verbose logs if enabled.
title: Enable Debug Mode
value_options:
- "false"
- "true"
================================================
FILE: steps/android-unit-test/1.0.2/step.yml
================================================
title: Android Unit Test
summary: This step runs your Android project's unit tests.
description: This step runs your Android project's unit tests.
website: https://github.com/bitrise-steplib/bitrise-step-android-unit-test
source_code_url: https://github.com/bitrise-steplib/bitrise-step-android-unit-test
support_url: https://github.com/bitrise-steplib/bitrise-step-android-unit-test/issues
published_at: 2020-09-02T10:00:21.25275027Z
source:
git: https://github.com/bitrise-steplib/bitrise-step-android-unit-test.git
commit: 0fa88871b67a43bf43d31e6cf6d37729559f375e
host_os_tags:
- osx-10.10
- ubuntu-16.04
project_type_tags:
- android
- react-native
type_tags:
- test
toolkit:
go:
package_name: github.com/bitrise-steplib/bitrise-step-android-unit-test
is_requires_admin_user: true
is_always_run: false
is_skippable: false
inputs:
- opts:
description: The root directory of your android project, for example, where your
root build gradle file exists (also gradlew, settings.gradle, etc...)
is_required: true
summary: The root directory of your android project, for example, where your root
build gradle file exists (also gradlew, settings.gradle, etc...)
title: Project Location
project_location: $BITRISE_SOURCE_DIR
- module: ""
opts:
description: |
Set the module that you want to test. To see your available modules, please open your project in Android Studio and go to [Project Structure] and see the list on the left.
is_required: false
summary: |
Set the module that you want to test. To see your available modules, please open your project in Android Studio and go to [Project Structure] and see the list on the left.
title: Module
- opts:
description: |
Set the variant that you want to test. To see your available variants, please open your project in Android Studio and go to [Project Structure] -> variants section.
is_required: false
summary: |
Set the variant that you want to test. To see your available variants, please open your project in Android Studio and go to [Project Structure] -> variants section.
title: Variant
variant: ""
- arguments: null
opts:
category: Options
description: Extra arguments passed to the gradle task
is_required: false
summary: Extra arguments passed to the gradle task
title: Additional Gradle Arguments
- opts:
category: Options
description: "The step will use this pattern to export __Local unit test HTML
results__. \nThe whole HTML results directory will be zipped and moved to the
`$BITRISE_DEPLOY_DIR`.\n\nYou need to override this input if you have custom
output dir set for Local unit test HTML results. \nThe pattern needs to be
relative to the selected module's directory.\n\nExample 1: app module and debug
variant is selected and the HTML report is generated at:\n\n- `/app/build/reports/tests/testDebugUnitTest`\n\nthis
case use: `*build/reports/tests/testDebugUnitTest` pattern.\n\nExample 2: app
module and NO variant is selected and the HTML reports are generated at:\n\n-
`/app/build/reports/tests/testDebugUnitTest`\n- `/app/build/reports/tests/testReleaseUnitTest`\n\nto
export every variant's reports use: `*build/reports/tests` pattern."
is_required: true
title: Local unit test HTML result directory pattern
report_path_pattern: '*build/reports/tests'
- opts:
category: Options
description: "The step will use this pattern to export __Local unit test XML results__.
\ \nThe whole XML results directory will be zipped and moved to the `$BITRISE_DEPLOY_DIR`
\ \nand the result files will be deployed to the Ship Addon.\n\nYou need to
override this input if you have custom output dir set for Local unit test XML
results. \nThe pattern needs to be relative to the selected module's directory.\n\nExample
1: app module and debug variant is selected and the XML report is generated
at:\n\n- `/app/build/test-results/testDebugUnitTest`\n\nthis
case use: `*build/test-results/testDebugUnitTest` pattern.\n\nExample 2: app
module and NO variant is selected and the XML reports are generated at:\n\n-
`/app/build/test-results/testDebugUnitTest`\n- `/app/build/test-results/testReleaseUnitTest`\n\nto
export every variant's reports use: `*build/test-results` pattern."
is_required: true
title: Local unit test XML result directory pattern
result_path_pattern: '*build/test-results'
- cache_level: only_deps
opts:
category: Options
description: |-
`all` - will cache build-cache and dependencies
`only_deps` - will cache dependencies only
`none` - won't cache any of the above
is_required: true
title: Set the level of cache
value_options:
- all
- only_deps
- none
- is_debug: "false"
opts:
category: Debug
description: The step will print more verbose logs if enabled.
is_required: true
summary: The step will print more verbose logs if enabled.
title: Enable Debug Mode
value_options:
- "false"
- "true"
================================================
FILE: steps/android-unit-test/1.0.3/step.yml
================================================
title: Android Unit Test
summary: This step runs your Android project's unit tests.
description: This step runs your Android project's unit tests.
website: https://github.com/bitrise-steplib/bitrise-step-android-unit-test
source_code_url: https://github.com/bitrise-steplib/bitrise-step-android-unit-test
support_url: https://github.com/bitrise-steplib/bitrise-step-android-unit-test/issues
published_at: 2021-04-07T07:46:54.862092587Z
source:
git: https://github.com/bitrise-steplib/bitrise-step-android-unit-test.git
commit: f9e6c6cf664ff7b4e2a02b8cfac5297b63bc6fde
host_os_tags:
- osx-10.10
- ubuntu-16.04
project_type_tags:
- android
- react-native
type_tags:
- test
toolkit:
go:
package_name: github.com/bitrise-steplib/bitrise-step-android-unit-test
is_requires_admin_user: true
is_always_run: false
is_skippable: false
inputs:
- opts:
description: The root directory of your android project, for example, where your
root build gradle file exists (also gradlew, settings.gradle, etc...)
is_required: true
summary: The root directory of your android project, for example, where your root
build gradle file exists (also gradlew, settings.gradle, etc...)
title: Project Location
project_location: $BITRISE_SOURCE_DIR
- module: ""
opts:
description: "Set the module that you want to test. \nTo see your available modules,
please open your project in Android Studio, go to **Project Structure** and
see the list on the left. \nLeave this input blank to test all modules.\n"
is_required: false
summary: |
Set the module that you want to test.
title: Module
- opts:
description: "Set the variant that you want to test. \nTo see your available
variants, please open your project in Android Studio, go to **Project Structure**,
then to the **variants** section. \nLeave this input blank to test all variants.\n"
is_required: false
summary: |
Set the variant that you want to test.
title: Variant
variant: ""
- arguments: null
opts:
category: Options
description: Extra arguments passed to the gradle task
is_required: false
summary: Extra arguments passed to the gradle task
title: Additional Gradle Arguments
- opts:
category: Options
description: "The step will use this pattern to export __Local unit test HTML
results__. \nThe whole HTML results directory will be zipped and moved to the
`$BITRISE_DEPLOY_DIR`.\n\nYou need to override this input if you have custom
output dir set for Local unit test HTML results. \nThe pattern needs to be
relative to the selected module's directory.\n\nExample 1: app module and debug
variant is selected and the HTML report is generated at:\n\n- `/app/build/reports/tests/testDebugUnitTest`\n\nthis
case use: `*build/reports/tests/testDebugUnitTest` pattern.\n\nExample 2: app
module and NO variant is selected and the HTML reports are generated at:\n\n-
`/app/build/reports/tests/testDebugUnitTest`\n- `/app/build/reports/tests/testReleaseUnitTest`\n\nto
export every variant's reports use: `*build/reports/tests` pattern."
is_required: true
title: Local unit test HTML result directory pattern
report_path_pattern: '*build/reports/tests'
- opts:
category: Options
description: "The step will use this pattern to export __Local unit test XML results__.
\ \nThe whole XML results directory will be zipped and moved to the `$BITRISE_DEPLOY_DIR`
\ \nand the result files will be deployed to the Ship Addon.\n\nYou need to
override this input if you have custom output dir set for Local unit test XML
results. \nThe pattern needs to be relative to the selected module's directory.\n\nExample
1: app module and debug variant is selected and the XML report is generated
at:\n\n- `/app/build/test-results/testDebugUnitTest`\n\nthis
case use: `*build/test-results/testDebugUnitTest` pattern.\n\nExample 2: app
module and NO variant is selected and the XML reports are generated at:\n\n-
`/app/build/test-results/testDebugUnitTest`\n- `/app/build/test-results/testReleaseUnitTest`\n\nto
export every variant's reports use: `*build/test-results` pattern."
is_required: true
title: Local unit test XML result directory pattern
result_path_pattern: '*build/test-results'
- cache_level: only_deps
opts:
category: Options
description: |-
`all` - will cache build-cache and dependencies
`only_deps` - will cache dependencies only
`none` - won't cache any of the above
is_required: true
title: Set the level of cache
value_options:
- all
- only_deps
- none
- is_debug: "false"
opts:
category: Debug
description: The step will print more verbose logs if enabled.
is_required: true
summary: The step will print more verbose logs if enabled.
title: Enable Debug Mode
value_options:
- "false"
- "true"
================================================
FILE: steps/android-unit-test/1.0.4/step.yml
================================================
title: Android Unit Test
summary: This step runs your Android project's unit tests.
description: This step runs your Android project's unit tests.
website: https://github.com/bitrise-steplib/bitrise-step-android-unit-test
source_code_url: https://github.com/bitrise-steplib/bitrise-step-android-unit-test
support_url: https://github.com/bitrise-steplib/bitrise-step-android-unit-test/issues
published_at: 2021-05-28T08:33:46.788663638Z
source:
git: https://github.com/bitrise-steplib/bitrise-step-android-unit-test.git
commit: 15e66bf3dd9cc5cf7fd3e53043dee229edbca28c
host_os_tags:
- osx-10.10
- ubuntu-16.04
project_type_tags:
- android
- react-native
type_tags:
- test
toolkit:
go:
package_name: github.com/bitrise-steplib/bitrise-step-android-unit-test
is_requires_admin_user: true
is_always_run: false
is_skippable: false
inputs:
- opts:
description: The root directory of your android project, for example, where your
root build gradle file exists (also gradlew, settings.gradle, etc...)
is_required: true
summary: The root directory of your android project, for example, where your root
build gradle file exists (also gradlew, settings.gradle, etc...)
title: Project Location
project_location: $BITRISE_SOURCE_DIR
- module: ""
opts:
description: "Set the module that you want to test. \nTo see your available modules,
please open your project in Android Studio, go to **Project Structure** and
see the list on the left. \nLeave this input blank to test all modules.\n"
is_required: false
summary: |
Set the module that you want to test.
title: Module
- opts:
description: "Set the variant that you want to test. \nTo see your available
variants, please open your project in Android Studio, go to **Project Structure**,
then to the **variants** section. \nLeave this input blank to test all variants.\n"
is_required: false
summary: |
Set the variant that you want to test.
title: Variant
variant: ""
- arguments: null
opts:
category: Options
description: Extra arguments passed to the gradle task
is_required: false
summary: Extra arguments passed to the gradle task
title: Additional Gradle Arguments
- opts:
category: Options
description: "The step will use this pattern to export __Local unit test HTML
results__. \nThe whole HTML results directory will be zipped and moved to the
`$BITRISE_DEPLOY_DIR`.\n\nYou need to override this input if you have custom
output dir set for Local unit test HTML results. \nThe pattern needs to be
relative to the selected module's directory.\n\nExample 1: app module and debug
variant is selected and the HTML report is generated at:\n\n- `/app/build/reports/tests/testDebugUnitTest`\n\nthis
case use: `*build/reports/tests/testDebugUnitTest` pattern.\n\nExample 2: app
module and NO variant is selected and the HTML reports are generated at:\n\n-
`/app/build/reports/tests/testDebugUnitTest`\n- `/app/build/reports/tests/testReleaseUnitTest`\n\nto
export every variant's reports use: `*build/reports/tests` pattern."
is_required: true
title: Local unit test HTML result directory pattern
report_path_pattern: '*build/reports/tests'
- opts:
category: Options
description: "The step will use this pattern to export __Local unit test XML results__.
\ \nThe whole XML results directory will be zipped and moved to the `$BITRISE_DEPLOY_DIR`
\ \nand the result files will be deployed to the Ship Addon.\n\nYou need to
override this input if you have custom output dir set for Local unit test XML
results. \nThe pattern needs to be relative to the selected module's directory.\n\nExample
1: app module and debug variant is selected and the XML report is generated
at:\n\n- `/app/build/test-results/testDebugUnitTest`\n\nthis
case use: `*build/test-results/testDebugUnitTest` pattern.\n\nExample 2: app
module and NO variant is selected and the XML reports are generated at:\n\n-
`/app/build/test-results/testDebugUnitTest`\n- `/app/build/test-results/testReleaseUnitTest`\n\nto
export every variant's reports use: `*build/test-results` pattern."
is_required: true
title: Local unit test XML result directory pattern
result_path_pattern: '*build/test-results'
- cache_level: only_deps
opts:
category: Options
description: |-
`all` - will cache build-cache and dependencies
`only_deps` - will cache dependencies only
`none` - won't cache any of the above
is_required: true
title: Set the level of cache
value_options:
- all
- only_deps
- none
- is_debug: "false"
opts:
category: Debug
description: The step will print more verbose logs if enabled.
is_required: true
summary: The step will print more verbose logs if enabled.
title: Enable Debug Mode
value_options:
- "false"
- "true"
================================================
FILE: steps/android-unit-test/1.0.5/step.yml
================================================
title: Android Unit Test
summary: This step runs your Android project's unit tests.
description: This step runs your Android project's unit tests.
website: https://github.com/bitrise-steplib/bitrise-step-android-unit-test
source_code_url: https://github.com/bitrise-steplib/bitrise-step-android-unit-test
support_url: https://github.com/bitrise-steplib/bitrise-step-android-unit-test/issues
published_at: 2021-11-09T13:17:14.597945447Z
source:
git: https://github.com/bitrise-steplib/bitrise-step-android-unit-test.git
commit: ca1455796fbb1e09325b4ad910b197a91935dc6c
host_os_tags:
- osx-10.10
- ubuntu-16.04
project_type_tags:
- android
- react-native
type_tags:
- test
toolkit:
go:
package_name: github.com/bitrise-steplib/bitrise-step-android-unit-test
is_requires_admin_user: true
is_always_run: false
is_skippable: false
inputs:
- opts:
description: The root directory of your android project, for example, where your
root build gradle file exists (also gradlew, settings.gradle, etc...)
is_required: true
summary: The root directory of your android project, for example, where your root
build gradle file exists (also gradlew, settings.gradle, etc...)
title: Project Location
project_location: $BITRISE_SOURCE_DIR
- module: ""
opts:
description: "Set the module that you want to test. \nTo see your available modules,
please open your project in Android Studio, go to **Project Structure** and
see the list on the left. \nLeave this input blank to test all modules.\n"
is_required: false
summary: |
Set the module that you want to test.
title: Module
- opts:
description: "Set the variant that you want to test. \nTo see your available
variants, please open your project in Android Studio, go to **Project Structure**,
then to the **variants** section. \nLeave this input blank to test all variants.\n"
is_required: false
summary: |
Set the variant that you want to test.
title: Variant
variant: ""
- arguments: null
opts:
category: Options
description: Extra arguments passed to the gradle task
is_required: false
summary: Extra arguments passed to the gradle task
title: Additional Gradle Arguments
- opts:
category: Options
description: "The step will use this pattern to export __Local unit test HTML
results__. \nThe whole HTML results directory will be zipped and moved to the
`$BITRISE_DEPLOY_DIR`.\n\nYou need to override this input if you have custom
output dir set for Local unit test HTML results. \nThe pattern needs to be
relative to the selected module's directory.\n\nExample 1: app module and debug
variant is selected and the HTML report is generated at:\n\n- `/app/build/reports/tests/testDebugUnitTest`\n\nthis
case use: `*build/reports/tests/testDebugUnitTest` pattern.\n\nExample 2: app
module and NO variant is selected and the HTML reports are generated at:\n\n-
`/app/build/reports/tests/testDebugUnitTest`\n- `/app/build/reports/tests/testReleaseUnitTest`\n\nto
export every variant's reports use: `*build/reports/tests` pattern."
is_required: true
title: Local unit test HTML result directory pattern
report_path_pattern: '*build/reports/tests'
- opts:
category: Options
description: "The step will use this pattern to export __Local unit test XML results__.
\ \nThe whole XML results directory will be zipped and moved to the `$BITRISE_DEPLOY_DIR`
\ \nand the result files will be deployed to the Ship Addon.\n\nYou need to
override this input if you have custom output dir set for Local unit test XML
results. \nThe pattern needs to be relative to the selected module's directory.\n\nExample
1: app module and debug variant is selected and the XML report is generated
at:\n\n- `/app/build/test-results/testDebugUnitTest`\n\nthis
case use: `*build/test-results/testDebugUnitTest` pattern.\n\nExample 2: app
module and NO variant is selected and the XML reports are generated at:\n\n-
`/app/build/test-results/testDebugUnitTest`\n- `/app/build/test-results/testReleaseUnitTest`\n\nto
export every variant's reports use: `*build/test-results` pattern."
is_required: true
title: Local unit test XML result directory pattern
result_path_pattern: '*build/test-results'
- cache_level: only_deps
opts:
category: Options
description: |-
`all` - will cache build-cache and dependencies
`only_deps` - will cache dependencies only
`none` - won't cache any of the above
is_required: true
title: Set the level of cache
value_options:
- all
- only_deps
- none
- is_debug: "false"
opts:
category: Debug
description: The step will print more verbose logs if enabled.
is_required: true
summary: The step will print more verbose logs if enabled.
title: Enable Debug Mode
value_options:
- "false"
- "true"
================================================
FILE: steps/android-unit-test/1.0.6/step.yml
================================================
title: Android Unit Test
summary: This step runs your Android project's unit tests.
description: This step runs your Android project's unit tests.
website: https://github.com/bitrise-steplib/bitrise-step-android-unit-test
source_code_url: https://github.com/bitrise-steplib/bitrise-step-android-unit-test
support_url: https://github.com/bitrise-steplib/bitrise-step-android-unit-test/issues
published_at: 2022-02-23T08:18:53.194059419Z
source:
git: https://github.com/bitrise-steplib/bitrise-step-android-unit-test.git
commit: f6fe0b870df5c43925cc713c2ea72a08f792149b
host_os_tags:
- osx-10.10
- ubuntu-16.04
project_type_tags:
- android
- react-native
type_tags:
- test
toolkit:
go:
package_name: github.com/bitrise-steplib/bitrise-step-android-unit-test
is_requires_admin_user: true
is_always_run: false
is_skippable: false
inputs:
- opts:
description: The root directory of your android project, for example, where your
root build gradle file exists (also gradlew, settings.gradle, etc...)
is_required: true
summary: The root directory of your android project, for example, where your root
build gradle file exists (also gradlew, settings.gradle, etc...)
title: Project Location
project_location: $BITRISE_SOURCE_DIR
- module: ""
opts:
description: "Set the module that you want to test. \nTo see your available modules,
please open your project in Android Studio, go to **Project Structure** and
see the list on the left. \nLeave this input blank to test all modules.\n"
is_required: false
summary: |
Set the module that you want to test.
title: Module
- opts:
description: "Set the variant that you want to test. \nTo see your available
variants, please open your project in Android Studio, go to **Project Structure**,
then to the **variants** section. \nLeave this input blank to test all variants.\n"
is_required: false
summary: |
Set the variant that you want to test.
title: Variant
variant: ""
- arguments: null
opts:
category: Options
description: Extra arguments passed to the gradle task
is_required: false
summary: Extra arguments passed to the gradle task
title: Additional Gradle Arguments
- opts:
category: Options
description: "The step will use this pattern to export __Local unit test HTML
results__. \nThe whole HTML results directory will be zipped and moved to the
`$BITRISE_DEPLOY_DIR`.\n\nYou need to override this input if you have custom
output dir set for Local unit test HTML results. \nThe pattern needs to be
relative to the selected module's directory.\n\nExample 1: app module and debug
variant is selected and the HTML report is generated at:\n\n- `/app/build/reports/tests/testDebugUnitTest`\n\nthis
case use: `*build/reports/tests/testDebugUnitTest` pattern.\n\nExample 2: app
module and NO variant is selected and the HTML reports are generated at:\n\n-
`/app/build/reports/tests/testDebugUnitTest`\n- `/app/build/reports/tests/testReleaseUnitTest`\n\nto
export every variant's reports use: `*build/reports/tests` pattern."
is_required: true
title: Local unit test HTML result directory pattern
report_path_pattern: '*build/reports/tests'
- opts:
category: Options
description: "The step will use this pattern to export __Local unit test XML results__.
\ \nThe whole XML results directory will be zipped and moved to the `$BITRISE_DEPLOY_DIR`
\ \nand the result files will be deployed to the Ship Addon.\n\nYou need to
override this input if you have custom output dir set for Local unit test XML
results. \nThe pattern needs to be relative to the selected module's directory.\n\nExample
1: app module and debug variant is selected and the XML report is generated
at:\n\n- `/app/build/test-results/testDebugUnitTest`\n\nthis
case use: `*build/test-results/testDebugUnitTest` pattern.\n\nExample 2: app
module and NO variant is selected and the XML reports are generated at:\n\n-
`/app/build/test-results/testDebugUnitTest`\n- `/app/build/test-results/testReleaseUnitTest`\n\nto
export every variant's reports use: `*build/test-results` pattern."
is_required: true
title: Local unit test XML result directory pattern
result_path_pattern: '*build/test-results'
- cache_level: only_deps
opts:
category: Options
description: |-
`all` - will cache build-cache and dependencies
`only_deps` - will cache dependencies only
`none` - won't cache any of the above
is_required: true
title: Set the level of cache
value_options:
- all
- only_deps
- none
- is_debug: "false"
opts:
category: Debug
description: The step will print more verbose logs if enabled.
is_required: true
summary: The step will print more verbose logs if enabled.
title: Enable Debug Mode
value_options:
- "false"
- "true"
================================================
FILE: steps/android-unit-test/1.1.0/step.yml
================================================
title: Android Unit Test
summary: This step runs your Android project's unit tests.
description: This step runs your Android project's unit tests.
website: https://github.com/bitrise-steplib/bitrise-step-android-unit-test
source_code_url: https://github.com/bitrise-steplib/bitrise-step-android-unit-test
support_url: https://github.com/bitrise-steplib/bitrise-step-android-unit-test/issues
published_at: 2025-08-04T07:39:40.000403613Z
source:
git: https://github.com/bitrise-steplib/bitrise-step-android-unit-test.git
commit: 3019f21819f5599f801025e3f507735c97af9722
host_os_tags:
- osx-10.10
- ubuntu-16.04
project_type_tags:
- android
- react-native
type_tags:
- test
toolkit:
go:
package_name: github.com/bitrise-steplib/bitrise-step-android-unit-test
is_requires_admin_user: true
is_always_run: false
is_skippable: false
inputs:
- opts:
description: The root directory of your android project, for example, where your
root build gradle file exists (also gradlew, settings.gradle, etc...)
is_required: true
summary: The root directory of your android project, for example, where your root
build gradle file exists (also gradlew, settings.gradle, etc...)
title: Project Location
project_location: $BITRISE_SOURCE_DIR
- module: ""
opts:
description: |
Set the module that you want to test.
To see your available modules, please open your project in Android Studio, go to **Project Structure** and see the list on the left.
Leave this input blank to test all modules.
is_required: false
summary: |
Set the module that you want to test.
title: Module
- opts:
description: |
Set the variant that you want to test.
To see your available variants, please open your project in Android Studio, go to **Project Structure**, then to the **variants** section.
Leave this input blank to test all variants.
is_required: false
summary: |
Set the variant that you want to test.
title: Variant
variant: ""
- arguments: null
opts:
category: Options
description: Extra arguments passed to the gradle task
is_required: false
summary: Extra arguments passed to the gradle task
title: Additional Gradle Arguments
- opts:
category: Options
description: |-
The step will use this pattern to export __Local unit test HTML results__.
The whole HTML results directory will be zipped and moved to the `$BITRISE_DEPLOY_DIR`.
You need to override this input if you have custom output dir set for Local unit test HTML results.
The pattern needs to be relative to the selected module's directory.
Example 1: app module and debug variant is selected and the HTML report is generated at:
- `/app/build/reports/tests/testDebugUnitTest`
this case use: `*build/reports/tests/testDebugUnitTest` pattern.
Example 2: app module and NO variant is selected and the HTML reports are generated at:
- `/app/build/reports/tests/testDebugUnitTest`
- `/app/build/reports/tests/testReleaseUnitTest`
to export every variant's reports use: `*build/reports/tests` pattern.
is_required: true
title: Local unit test HTML result directory pattern
report_path_pattern: '*build/reports/tests'
- opts:
category: Options
description: |-
The step will use this pattern to export __Local unit test XML results__.
The whole XML results directory will be zipped and moved to the `$BITRISE_DEPLOY_DIR`
and the result files will be deployed to the Ship Addon.
You need to override this input if you have custom output dir set for Local unit test XML results.
The pattern needs to be relative to the selected module's directory.
Example 1: app module and debug variant is selected and the XML report is generated at:
- `/app/build/test-results/testDebugUnitTest`
this case use: `*build/test-results/testDebugUnitTest` pattern.
Example 2: app module and NO variant is selected and the XML reports are generated at:
- `/app/build/test-results/testDebugUnitTest`
- `/app/build/test-results/testReleaseUnitTest`
to export every variant's reports use: `*build/test-results` pattern.
is_required: true
title: Local unit test XML result directory pattern
result_path_pattern: '*build/test-results'
- is_debug: "false"
opts:
category: Debug
description: The step will print more verbose logs if enabled.
is_required: true
summary: The step will print more verbose logs if enabled.
title: Enable Debug Mode
value_options:
- "false"
- "true"
outputs:
- BITRISE_FLAKY_TEST_CASES: null
opts:
description: |-
A test case is considered flaky if it has failed at least once, but passed at least once as well.
The list contains the test cases in the following format:
```
- TestSuit_1.TestClass_1.TestName_1
- TestSuit_1.TestClass_1.TestName_2
- TestSuit_1.TestClass_2.TestName_1
- TestSuit_2.TestClass_1.TestName_1
...
```
title: List of flaky test cases
================================================
FILE: steps/android-unit-test/1.2.0/step.yml
================================================
title: Android Unit Test
summary: This step runs your Android project's unit tests.
description: This step runs your Android project's unit tests.
website: https://github.com/bitrise-steplib/bitrise-step-android-unit-test
source_code_url: https://github.com/bitrise-steplib/bitrise-step-android-unit-test
support_url: https://github.com/bitrise-steplib/bitrise-step-android-unit-test/issues
published_at: 2025-09-30T13:45:03.70192349Z
source:
git: https://github.com/bitrise-steplib/bitrise-step-android-unit-test.git
commit: 41045b1268ad551dfdcf97442108bc0c1b019f43
host_os_tags:
- osx-10.10
- ubuntu-16.04
project_type_tags:
- android
- react-native
type_tags:
- test
toolkit:
go:
package_name: github.com/bitrise-steplib/bitrise-step-android-unit-test
is_requires_admin_user: true
is_always_run: false
is_skippable: false
inputs:
- opts:
description: The root directory of your android project, for example, where your
root build gradle file exists (also gradlew, settings.gradle, etc...)
is_required: true
summary: The root directory of your android project, for example, where your root
build gradle file exists (also gradlew, settings.gradle, etc...)
title: Project Location
project_location: $BITRISE_SOURCE_DIR
- module: ""
opts:
description: |
Set the module that you want to test.
To see your available modules, please open your project in Android Studio, go to **Project Structure** and see the list on the left.
Leave this input blank to test all modules.
is_required: false
summary: |
Set the module that you want to test.
title: Module
- opts:
description: |
Set the variant that you want to test.
To see your available variants, please open your project in Android Studio, go to **Project Structure**, then to the **variants** section.
Leave this input blank to test all variants.
is_required: false
summary: |
Set the variant that you want to test.
title: Variant
variant: ""
- arguments: null
opts:
category: Options
description: Extra arguments passed to the gradle task
is_required: false
summary: Extra arguments passed to the gradle task
title: Additional Gradle Arguments
- opts:
category: Options
description: |-
The step will use this pattern to export __Local unit test HTML results__.
The whole HTML results directory will be zipped and moved to the `$BITRISE_DEPLOY_DIR`.
You need to override this input if you have custom output dir set for Local unit test HTML results.
The pattern needs to be relative to the selected module's directory.
Example 1: app module and debug variant is selected and the HTML report is generated at:
- `/app/build/reports/tests/testDebugUnitTest`
this case use: `*build/reports/tests/testDebugUnitTest` pattern.
Example 2: app module and NO variant is selected and the HTML reports are generated at:
- `/app/build/reports/tests/testDebugUnitTest`
- `/app/build/reports/tests/testReleaseUnitTest`
to export every variant's reports use: `*build/reports/tests` pattern.
is_required: true
title: Local unit test HTML result directory pattern
report_path_pattern: '*build/reports/tests'
- opts:
category: Options
description: |-
The step will use this pattern to export __Local unit test XML results__.
The whole XML results directory will be zipped and moved to the `$BITRISE_DEPLOY_DIR`
and the result files will be deployed to the Ship Addon.
You need to override this input if you have custom output dir set for Local unit test XML results.
The pattern needs to be relative to the selected module's directory.
Example 1: app module and debug variant is selected and the XML report is generated at:
- `/app/build/test-results/testDebugUnitTest`
this case use: `*build/test-results/testDebugUnitTest` pattern.
Example 2: app module and NO variant is selected and the XML reports are generated at:
- `/app/build/test-results/testDebugUnitTest`
- `/app/build/test-results/testReleaseUnitTest`
to export every variant's reports use: `*build/test-results` pattern.
is_required: true
title: Local unit test XML result directory pattern
result_path_pattern: '*build/test-results'
- is_debug: "false"
opts:
category: Debug
description: The step will print more verbose logs if enabled.
is_required: true
summary: The step will print more verbose logs if enabled.
title: Enable Debug Mode
value_options:
- "false"
- "true"
- opts:
category: Debug
summary: JSON list of tests added to quarantine on Bitrise.io, quarantined tests
are excluded from test runs.
title: Quarantined tests
quarantined_tests: $BITRISE_QUARANTINED_TESTS_JSON
outputs:
- BITRISE_FLAKY_TEST_CASES: null
opts:
description: |-
A test case is considered flaky if it has failed at least once, but passed at least once as well.
The list contains the test cases in the following format:
```
- TestSuit_1.TestClass_1.TestName_1
- TestSuit_1.TestClass_1.TestName_2
- TestSuit_1.TestClass_2.TestName_1
- TestSuit_2.TestClass_1.TestName_1
...
```
title: List of flaky test cases
================================================
FILE: steps/android-unit-test/1.2.1/step.yml
================================================
title: Android Unit Test
summary: This step runs your Android project's unit tests.
description: This step runs your Android project's unit tests.
website: https://github.com/bitrise-steplib/bitrise-step-android-unit-test
source_code_url: https://github.com/bitrise-steplib/bitrise-step-android-unit-test
support_url: https://github.com/bitrise-steplib/bitrise-step-android-unit-test/issues
published_at: 2025-11-10T13:52:40.678714154Z
source:
git: https://github.com/bitrise-steplib/bitrise-step-android-unit-test.git
commit: 612d8564242be44d7b4c886129f8f97bdc86034a
host_os_tags:
- osx-10.10
- ubuntu-16.04
project_type_tags:
- android
- cordova
- flutter
- ionic
- kotlin-multiplatform
- react-native
type_tags:
- test
toolkit:
go:
package_name: github.com/bitrise-steplib/bitrise-step-android-unit-test
is_requires_admin_user: true
is_always_run: false
is_skippable: false
inputs:
- opts:
description: The root directory of your android project, for example, where your
root build gradle file exists (also gradlew, settings.gradle, etc...)
is_required: true
summary: The root directory of your android project, for example, where your root
build gradle file exists (also gradlew, settings.gradle, etc...)
title: Project Location
project_location: $BITRISE_SOURCE_DIR
- module: ""
opts:
description: |
Set the module that you want to test.
To see your available modules, please open your project in Android Studio, go to **Project Structure** and see the list on the left.
Leave this input blank to test all modules.
is_required: false
summary: |
Set the module that you want to test.
title: Module
- opts:
description: |
Set the variant that you want to test.
To see your available variants, please open your project in Android Studio, go to **Project Structure**, then to the **variants** section.
Leave this input blank to test all variants.
is_required: false
summary: |
Set the variant that you want to test.
title: Variant
variant: ""
- arguments: null
opts:
category: Options
description: Extra arguments passed to the gradle task
is_required: false
summary: Extra arguments passed to the gradle task
title: Additional Gradle Arguments
- opts:
category: Options
description: |-
The step will use this pattern to export __Local unit test HTML results__.
The whole HTML results directory will be zipped and moved to the `$BITRISE_DEPLOY_DIR`.
You need to override this input if you have custom output dir set for Local unit test HTML results.
The pattern needs to be relative to the selected module's directory.
Example 1: app module and debug variant is selected and the HTML report is generated at:
- `/app/build/reports/tests/testDebugUnitTest`
this case use: `*build/reports/tests/testDebugUnitTest` pattern.
Example 2: app module and NO variant is selected and the HTML reports are generated at:
- `/app/build/reports/tests/testDebugUnitTest`
- `/app/build/reports/tests/testReleaseUnitTest`
to export every variant's reports use: `*build/reports/tests` pattern.
is_required: true
title: Local unit test HTML result directory pattern
report_path_pattern: '*build/reports/tests'
- opts:
category: Options
description: |-
The step will use this pattern to export __Local unit test XML results__.
The whole XML results directory will be zipped and moved to the `$BITRISE_DEPLOY_DIR`
and the result files will be deployed to the Ship Addon.
You need to override this input if you have custom output dir set for Local unit test XML results.
The pattern needs to be relative to the selected module's directory.
Example 1: app module and debug variant is selected and the XML report is generated at:
- `/app/build/test-results/testDebugUnitTest`
this case use: `*build/test-results/testDebugUnitTest` pattern.
Example 2: app module and NO variant is selected and the XML reports are generated at:
- `/app/build/test-results/testDebugUnitTest`
- `/app/build/test-results/testReleaseUnitTest`
to export every variant's reports use: `*build/test-results` pattern.
is_required: true
title: Local unit test XML result directory pattern
result_path_pattern: '*build/test-results'
- is_debug: "false"
opts:
category: Debug
description: The step will print more verbose logs if enabled.
is_required: true
summary: The step will print more verbose logs if enabled.
title: Enable Debug Mode
value_options:
- "false"
- "true"
- opts:
category: Debug
summary: JSON list of tests added to quarantine on Bitrise.io, quarantined tests
are excluded from test runs.
title: Quarantined tests
quarantined_tests: $BITRISE_QUARANTINED_TESTS_JSON
outputs:
- BITRISE_FLAKY_TEST_CASES: null
opts:
description: |-
A test case is considered flaky if it has failed at least once, but passed at least once as well.
The list contains the test cases in the following format:
```
- TestSuit_1.TestClass_1.TestName_1
- TestSuit_1.TestClass_1.TestName_2
- TestSuit_1.TestClass_2.TestName_1
- TestSuit_2.TestClass_1.TestName_1
...
```
title: List of flaky test cases
================================================
FILE: steps/android-unit-test/1.2.2/step.yml
================================================
title: Android Unit Test
summary: This step runs your Android project's unit tests.
description: This step runs your Android project's unit tests.
website: https://github.com/bitrise-steplib/bitrise-step-android-unit-test
source_code_url: https://github.com/bitrise-steplib/bitrise-step-android-unit-test
support_url: https://github.com/bitrise-steplib/bitrise-step-android-unit-test/issues
published_at: 2026-02-02T11:14:49.745543538Z
source:
git: https://github.com/bitrise-steplib/bitrise-step-android-unit-test.git
commit: 72f46d000aed21753f9c2b43eddecb7445b01ddc
host_os_tags:
- osx-10.10
- ubuntu-16.04
project_type_tags:
- android
- cordova
- flutter
- ionic
- kotlin-multiplatform
- react-native
type_tags:
- test
toolkit:
go:
package_name: github.com/bitrise-steplib/bitrise-step-android-unit-test
is_requires_admin_user: true
is_always_run: false
is_skippable: false
inputs:
- opts:
description: The root directory of your android project, for example, where your
root build gradle file exists (also gradlew, settings.gradle, etc...)
is_required: true
summary: The root directory of your android project, for example, where your root
build gradle file exists (also gradlew, settings.gradle, etc...)
title: Project Location
project_location: $BITRISE_SOURCE_DIR
- module: ""
opts:
description: |
Set the module that you want to test.
To see your available modules, please open your project in Android Studio, go to **Project Structure** and see the list on the left.
Leave this input blank to test all modules.
is_required: false
summary: |
Set the module that you want to test.
title: Module
- opts:
description: |
Set the variant that you want to test.
To see your available variants, please open your project in Android Studio, go to **Project Structure**, then to the **variants** section.
Leave this input blank to test all variants.
is_required: false
summary: |
Set the variant that you want to test.
title: Variant
variant: ""
- arguments: null
opts:
category: Options
description: Extra arguments passed to the gradle task
is_required: false
summary: Extra arguments passed to the gradle task
title: Additional Gradle Arguments
- opts:
category: Options
description: |-
The step will use this pattern to export __Local unit test HTML results__.
The whole HTML results directory will be zipped and moved to the `$BITRISE_DEPLOY_DIR`.
You need to override this input if you have custom output dir set for Local unit test HTML results.
The pattern needs to be relative to the selected module's directory.
Example 1: app module and debug variant is selected and the HTML report is generated at:
- `/app/build/reports/tests/testDebugUnitTest`
this case use: `*build/reports/tests/testDebugUnitTest` pattern.
Example 2: app module and NO variant is selected and the HTML reports are generated at:
- `/app/build/reports/tests/testDebugUnitTest`
- `/app/build/reports/tests/testReleaseUnitTest`
to export every variant's reports use: `*build/reports/tests` pattern.
is_required: true
title: Local unit test HTML result directory pattern
report_path_pattern: '*build/reports/tests'
- opts:
category: Options
description: |-
The step will use this pattern to export __Local unit test XML results__.
The whole XML results directory will be zipped and moved to the `$BITRISE_DEPLOY_DIR`
and the result files will be deployed to the Ship Addon.
You need to override this input if you have custom output dir set for Local unit test XML results.
The pattern needs to be relative to the selected module's directory.
Example 1: app module and debug variant is selected and the XML report is generated at:
- `/app/build/test-results/testDebugUnitTest`
this case use: `*build/test-results/testDebugUnitTest` pattern.
Example 2: app module and NO variant is selected and the XML reports are generated at:
- `/app/build/test-results/testDebugUnitTest`
- `/app/build/test-results/testReleaseUnitTest`
to export every variant's reports use: `*build/test-results` pattern.
is_required: true
title: Local unit test XML result directory pattern
result_path_pattern: '*build/test-results'
- is_debug: "false"
opts:
category: Debug
description: The step will print more verbose logs if enabled.
is_required: true
summary: The step will print more verbose logs if enabled.
title: Enable Debug Mode
value_options:
- "false"
- "true"
- opts:
category: Debug
summary: JSON list of tests added to quarantine on Bitrise.io, quarantined tests
are excluded from test runs.
title: Quarantined tests
quarantined_tests: $BITRISE_QUARANTINED_TESTS_JSON
outputs:
- BITRISE_FLAKY_TEST_CASES: null
opts:
description: |-
A test case is considered flaky if it has failed at least once, but passed at least once as well.
The list contains the test cases in the following format:
```
- TestSuit_1.TestClass_1.TestName_1
- TestSuit_1.TestClass_1.TestName_2
- TestSuit_1.TestClass_2.TestName_1
- TestSuit_2.TestClass_1.TestName_1
...
```
title: List of flaky test cases
================================================
FILE: steps/android-unit-test/1.2.3/step.yml
================================================
title: Android Unit Test
summary: This step runs your Android project's unit tests.
description: This step runs your Android project's unit tests.
website: https://github.com/bitrise-steplib/bitrise-step-android-unit-test
source_code_url: https://github.com/bitrise-steplib/bitrise-step-android-unit-test
support_url: https://github.com/bitrise-steplib/bitrise-step-android-unit-test/issues
published_at: 2026-02-13T14:53:26.157019013Z
source:
git: https://github.com/bitrise-steplib/bitrise-step-android-unit-test.git
commit: 4b799ec38fa555acf295ff0ed17b46962def2671
executables:
darwin-amd64:
storage_uri: steps/android-unit-test/1.2.3/bin/android-unit-test-darwin-amd64
hash: sha256-5d38d4d3ca4f58e92d59e4aad339197a47b91eaa6a06b8bb956acf7d3c199054
darwin-arm64:
storage_uri: steps/android-unit-test/1.2.3/bin/android-unit-test-darwin-arm64
hash: sha256-dde38c8fa7032a6d2383aa0eb189e226dfc8576fe1dd21e7e3c7e554bb09f504
linux-amd64:
storage_uri: steps/android-unit-test/1.2.3/bin/android-unit-test-linux-amd64
hash: sha256-1d9d945effb24303aebdad75896fbd4703670ba8ebaeaaaad004d8050017877d
linux-arm64:
storage_uri: steps/android-unit-test/1.2.3/bin/android-unit-test-linux-arm64
hash: sha256-41f87a2ebac9b43c46d72a96ae38d50665b8624e85298a5efafecde649f82c3c
host_os_tags:
- osx-10.10
- ubuntu-16.04
project_type_tags:
- android
- cordova
- flutter
- ionic
- kotlin-multiplatform
- react-native
type_tags:
- test
toolkit:
go:
package_name: github.com/bitrise-steplib/bitrise-step-android-unit-test
is_requires_admin_user: true
is_always_run: false
is_skippable: false
inputs:
- opts:
description: The root directory of your android project, for example, where your
root build gradle file exists (also gradlew, settings.gradle, etc...)
is_required: true
summary: The root directory of your android project, for example, where your root
build gradle file exists (also gradlew, settings.gradle, etc...)
title: Project Location
project_location: $BITRISE_SOURCE_DIR
- module: ""
opts:
description: |
Set the module that you want to test.
To see your available modules, please open your project in Android Studio, go to **Project Structure** and see the list on the left.
Leave this input blank to test all modules.
is_required: false
summary: |
Set the module that you want to test.
title: Module
- opts:
description: |
Set the variant that you want to test.
To see your available variants, please open your project in Android Studio, go to **Project Structure**, then to the **variants** section.
Leave this input blank to test all variants.
is_required: false
summary: |
Set the variant that you want to test.
title: Variant
variant: ""
- arguments: null
opts:
category: Options
description: Extra arguments passed to the gradle task
is_required: false
summary: Extra arguments passed to the gradle task
title: Additional Gradle Arguments
- opts:
category: Options
description: |-
The step will use this pattern to export __Local unit test HTML results__.
The whole HTML results directory will be zipped and moved to the `$BITRISE_DEPLOY_DIR`.
You need to override this input if you have custom output dir set for Local unit test HTML results.
The pattern needs to be relative to the selected module's directory.
Example 1: app module and debug variant is selected and the HTML report is generated at:
- `/app/build/reports/tests/testDebugUnitTest`
this case use: `*build/reports/tests/testDebugUnitTest` pattern.
Example 2: app module and NO variant is selected and the HTML reports are generated at:
- `/app/build/reports/tests/testDebugUnitTest`
- `/app/build/reports/tests/testReleaseUnitTest`
to export every variant's reports use: `*build/reports/tests` pattern.
is_required: true
title: Local unit test HTML result directory pattern
report_path_pattern: '*build/reports/tests'
- opts:
category: Options
description: |-
The step will use this pattern to export __Local unit test XML results__.
The whole XML results directory will be zipped and moved to the `$BITRISE_DEPLOY_DIR`
and the result files will be deployed to the Ship Addon.
You need to override this input if you have custom output dir set for Local unit test XML results.
The pattern needs to be relative to the selected module's directory.
Example 1: app module and debug variant is selected and the XML report is generated at:
- `/app/build/test-results/testDebugUnitTest`
this case use: `*build/test-results/testDebugUnitTest` pattern.
Example 2: app module and NO variant is selected and the XML reports are generated at:
- `/app/build/test-results/testDebugUnitTest`
- `/app/build/test-results/testReleaseUnitTest`
to export every variant's reports use: `*build/test-results` pattern.
is_required: true
title: Local unit test XML result directory pattern
result_path_pattern: '*build/test-results'
- is_debug: "false"
opts:
category: Debug
description: The step will print more verbose logs if enabled.
is_required: true
summary: The step will print more verbose logs if enabled.
title: Enable Debug Mode
value_options:
- "false"
- "true"
- opts:
category: Debug
summary: JSON list of tests added to quarantine on Bitrise.io, quarantined tests
are excluded from test runs.
title: Quarantined tests
quarantined_tests: $BITRISE_QUARANTINED_TESTS_JSON
outputs:
- BITRISE_FLAKY_TEST_CASES: null
opts:
description: |-
A test case is considered flaky if it has failed at least once, but passed at least once as well.
The list contains the test cases in the following format:
```
- TestSuit_1.TestClass_1.TestName_1
- TestSuit_1.TestClass_1.TestName_2
- TestSuit_1.TestClass_2.TestName_1
- TestSuit_2.TestClass_1.TestName_1
...
```
title: List of flaky test cases
================================================
FILE: steps/android-unit-test/1.2.4/step.yml
================================================
title: Android Unit Test
summary: This step runs your Android project's unit tests.
description: This step runs your Android project's unit tests.
website: https://github.com/bitrise-steplib/bitrise-step-android-unit-test
source_code_url: https://github.com/bitrise-steplib/bitrise-step-android-unit-test
support_url: https://github.com/bitrise-steplib/bitrise-step-android-unit-test/issues
published_at: 2026-03-09T13:27:51.153207087Z
source:
git: https://github.com/bitrise-steplib/bitrise-step-android-unit-test.git
commit: 7fe00a907b7db49a1685496bbe1f466dac402a92
executables:
darwin-amd64:
storage_uri: steps/android-unit-test/1.2.4/bin/android-unit-test-darwin-amd64
hash: sha256-2e455a3aa3e5593c3406af975ae71bc139d624b3b6953e36c334a046821bac95
darwin-arm64:
storage_uri: steps/android-unit-test/1.2.4/bin/android-unit-test-darwin-arm64
hash: sha256-fef43e5a7f1fc7fad8a56e2842021483e854681fdd1042610ebe5bced635f719
linux-amd64:
storage_uri: steps/android-unit-test/1.2.4/bin/android-unit-test-linux-amd64
hash: sha256-8353f606f8e0100766621fbe4575906b8a6a66b6678dcb2c677b7573c8917c8f
linux-arm64:
storage_uri: steps/android-unit-test/1.2.4/bin/android-unit-test-linux-arm64
hash: sha256-35c7f6e1c60f7510df739d86bd7bb9915de14817c7b35acc520f8b9af4305464
host_os_tags:
- osx-10.10
- ubuntu-16.04
project_type_tags:
- android
- cordova
- flutter
- ionic
- kotlin-multiplatform
- react-native
type_tags:
- test
toolkit:
go:
package_name: github.com/bitrise-steplib/bitrise-step-android-unit-test
is_requires_admin_user: true
is_always_run: false
is_skippable: false
inputs:
- opts:
description: The root directory of your android project, for example, where your
root build gradle file exists (also gradlew, settings.gradle, etc...)
is_required: true
summary: The root directory of your android project, for example, where your root
build gradle file exists (also gradlew, settings.gradle, etc...)
title: Project Location
project_location: $BITRISE_SOURCE_DIR
- module: ""
opts:
description: |
Set the module that you want to test.
To see your available modules, please open your project in Android Studio, go to **Project Structure** and see the list on the left.
Leave this input blank to test all modules.
is_required: false
summary: |
Set the module that you want to test.
title: Module
- opts:
description: |
Set the variant that you want to test.
To see your available variants, please open your project in Android Studio, go to **Project Structure**, then to the **variants** section.
Leave this input blank to test all variants.
is_required: false
summary: |
Set the variant that you want to test.
title: Variant
variant: ""
- arguments: null
opts:
category: Options
description: Extra arguments passed to the gradle task
is_required: false
summary: Extra arguments passed to the gradle task
title: Additional Gradle Arguments
- opts:
category: Options
description: |-
The step will use this pattern to export __Local unit test HTML results__.
The whole HTML results directory will be zipped and moved to the `$BITRISE_DEPLOY_DIR`.
You need to override this input if you have custom output dir set for Local unit test HTML results.
The pattern needs to be relative to the selected module's directory.
Example 1: app module and debug variant is selected and the HTML report is generated at:
- `/app/build/reports/tests/testDebugUnitTest`
this case use: `*build/reports/tests/testDebugUnitTest` pattern.
Example 2: app module and NO variant is selected and the HTML reports are generated at:
- `/app/build/reports/tests/testDebugUnitTest`
- `/app/build/reports/tests/testReleaseUnitTest`
to export every variant's reports use: `*build/reports/tests` pattern.
is_required: true
title: Local unit test HTML result directory pattern
report_path_pattern: '*build/reports/tests'
- opts:
category: Options
description: |-
The step will use this pattern to export __Local unit test XML results__.
The whole XML results directory will be zipped and moved to the `$BITRISE_DEPLOY_DIR`
and the result files will be deployed to the Ship Addon.
You need to override this input if you have custom output dir set for Local unit test XML results.
The pattern needs to be relative to the selected module's directory.
Example 1: app module and debug variant is selected and the XML report is generated at:
- `/app/build/test-results/testDebugUnitTest`
this case use: `*build/test-results/testDebugUnitTest` pattern.
Example 2: app module and NO variant is selected and the XML reports are generated at:
- `/app/build/test-results/testDebugUnitTest`
- `/app/build/test-results/testReleaseUnitTest`
to export every variant's reports use: `*build/test-results` pattern.
is_required: true
title: Local unit test XML result directory pattern
result_path_pattern: '*build/test-results'
- is_debug: "false"
opts:
category: Debug
description: The step will print more verbose logs if enabled.
is_required: true
summary: The step will print more verbose logs if enabled.
title: Enable Debug Mode
value_options:
- "false"
- "true"
- opts:
category: Debug
summary: JSON list of tests added to quarantine on Bitrise.io, quarantined tests
are excluded from test runs.
title: Quarantined tests
quarantined_tests: $BITRISE_QUARANTINED_TESTS_JSON
outputs:
- BITRISE_FLAKY_TEST_CASES: null
opts:
description: |-
A test case is considered flaky if it has failed at least once, but passed at least once as well.
The list contains the test cases in the following format:
```
- TestSuit_1.TestClass_1.TestName_1
- TestSuit_1.TestClass_1.TestName_2
- TestSuit_1.TestClass_2.TestName_1
- TestSuit_2.TestClass_1.TestName_1
...
```
title: List of flaky test cases
================================================
FILE: steps/android-unit-test/1.2.5/step.yml
================================================
title: Android Unit Test
summary: This step runs your Android project's unit tests.
description: This step runs your Android project's unit tests.
website: https://github.com/bitrise-steplib/bitrise-step-android-unit-test
source_code_url: https://github.com/bitrise-steplib/bitrise-step-android-unit-test
support_url: https://github.com/bitrise-steplib/bitrise-step-android-unit-test/issues
published_at: 2026-03-26T13:12:13.575411912Z
source:
git: https://github.com/bitrise-steplib/bitrise-step-android-unit-test.git
commit: 805f654006f2939d9a28d9370b4f66fc53dc7a56
executables:
darwin-amd64:
storage_uri: steps/android-unit-test/1.2.5/bin/android-unit-test-darwin-amd64
hash: sha256-d77edd0cd6464322bdc9a607c8d403763c7422933b8676bb9b69e1d23a4defe6
darwin-arm64:
storage_uri: steps/android-unit-test/1.2.5/bin/android-unit-test-darwin-arm64
hash: sha256-7565e4168e29ce65dd971d0f0d493cf53ea547678f2dd4a38fca9d1ab8db42a3
linux-amd64:
storage_uri: steps/android-unit-test/1.2.5/bin/android-unit-test-linux-amd64
hash: sha256-87837c5ee3e977d2617654ea51614c505d8c80526aec6a84f28f413fd6827a7a
linux-arm64:
storage_uri: steps/android-unit-test/1.2.5/bin/android-unit-test-linux-arm64
hash: sha256-8b92df152b8a4ee86fa348a930c6d44fcdd5c9ddfa8f8e5b32126e1bc1187f61
host_os_tags:
- osx-10.10
- ubuntu-16.04
project_type_tags:
- android
- cordova
- flutter
- ionic
- kotlin-multiplatform
- react-native
type_tags:
- test
toolkit:
go:
package_name: github.com/bitrise-steplib/bitrise-step-android-unit-test
is_requires_admin_user: true
is_always_run: false
is_skippable: false
inputs:
- opts:
description: The root directory of your android project, for example, where your
root build gradle file exists (also gradlew, settings.gradle, etc...)
is_required: true
summary: The root directory of your android project, for example, where your root
build gradle file exists (also gradlew, settings.gradle, etc...)
title: Project Location
project_location: $BITRISE_SOURCE_DIR
- module: ""
opts:
description: |
Set the module that you want to test.
To see your available modules, please open your project in Android Studio, go to **Project Structure** and see the list on the left.
Leave this input blank to test all modules.
is_required: false
summary: |
Set the module that you want to test.
title: Module
- opts:
description: |
Set the variant that you want to test.
To see your available variants, please open your project in Android Studio, go to **Project Structure**, then to the **variants** section.
Leave this input blank to test all variants.
is_required: false
summary: |
Set the variant that you want to test.
title: Variant
variant: ""
- arguments: null
opts:
category: Options
description: Extra arguments passed to the gradle task
is_required: false
summary: Extra arguments passed to the gradle task
title: Additional Gradle Arguments
- opts:
category: Options
description: |-
The step will use this pattern to export __Local unit test HTML results__.
The whole HTML results directory will be zipped and moved to the `$BITRISE_DEPLOY_DIR`.
You need to override this input if you have custom output dir set for Local unit test HTML results.
The pattern needs to be relative to the selected module's directory.
Example 1: app module and debug variant is selected and the HTML report is generated at:
- `/app/build/reports/tests/testDebugUnitTest`
this case use: `*build/reports/tests/testDebugUnitTest` pattern.
Example 2: app module and NO variant is selected and the HTML reports are generated at:
- `/app/build/reports/tests/testDebugUnitTest`
- `/app/build/reports/tests/testReleaseUnitTest`
to export every variant's reports use: `*build/reports/tests` pattern.
is_required: true
title: Local unit test HTML result directory pattern
report_path_pattern: '*build/reports/tests'
- opts:
category: Options
description: |-
The step will use this pattern to export __Local unit test XML results__.
The whole XML results directory will be zipped and moved to the `$BITRISE_DEPLOY_DIR`
and the result files will be deployed to the Ship Addon.
You need to override this input if you have custom output dir set for Local unit test XML results.
The pattern needs to be relative to the selected module's directory.
Example 1: app module and debug variant is selected and the XML report is generated at:
- `/app/build/test-results/testDebugUnitTest`
this case use: `*build/test-results/testDebugUnitTest` pattern.
Example 2: app module and NO variant is selected and the XML reports are generated at:
- `/app/build/test-results/testDebugUnitTest`
- `/app/build/test-results/testReleaseUnitTest`
to export every variant's reports use: `*build/test-results` pattern.
is_required: true
title: Local unit test XML result directory pattern
result_path_pattern: '*build/test-results'
- is_debug: "false"
opts:
category: Debug
description: The step will print more verbose logs if enabled.
is_required: true
summary: The step will print more verbose logs if enabled.
title: Enable Debug Mode
value_options:
- "false"
- "true"
- opts:
category: Debug
summary: JSON list of tests added to quarantine on Bitrise.io, quarantined tests
are excluded from test runs.
title: Quarantined tests
quarantined_tests: $BITRISE_QUARANTINED_TESTS_JSON
outputs:
- BITRISE_FLAKY_TEST_CASES: null
opts:
description: |-
A test case is considered flaky if it has failed at least once, but passed at least once as well.
The list contains the test cases in the following format:
```
- TestSuit_1.TestClass_1.TestName_1
- TestSuit_1.TestClass_1.TestName_2
- TestSuit_1.TestClass_2.TestName_1
- TestSuit_2.TestClass_1.TestName_1
...
```
title: List of flaky test cases
================================================
FILE: steps/android-unit-test/step-info.yml
================================================
maintainer: bitrise
================================================
FILE: steps/apispotter-test-runner/0.0.1/step.yml
================================================
title: ApiSpotter Test Group Runner
summary: |
Run your ApiSpotter tests and get the test result to your Bitrise build.
description: |
ApiSpotter (https://apispotter.com) is an online tool for testing, monitoring and documenting your API systems.
It makes you sure that your API's are up and running as they should.
Use this step to run your test groups on APISpotter and retrieve their results.
Make sure your API's are working before build complete.
website: https://github.com/loopdigital/bitrise-step-apispotter-test-runner
source_code_url: https://github.com/loopdigital/bitrise-step-apispotter-test-runner
support_url: https://github.com/loopdigital/bitrise-step-apispotter-test-runner/issues
published_at: 2018-08-16T14:55:41.386017695+03:00
source:
git: https://github.com/loopdigital/bitrise-step-apispotter-test-runner.git
commit: 8ece866dd6372940318520b97d430b928e8135b5
host_os_tags:
- osx-10.10
- ubuntu-16.04
type_tags:
- utility
toolkit:
bash:
entry_file: step.sh
is_requires_admin_user: true
is_always_run: true
is_skippable: false
run_if: ""
inputs:
- apispotter_api_token: null
opts:
description: |
Your user API token from ApiSpotter.
You can get it from your account settings page.
is_expand: true
is_required: true
title: ApiSpotter User API Token
- apispotter_test_group_id: null
opts:
description: |
The ID of the test group you would like to run.
is_expand: true
is_required: true
title: Test Group ID
- abort_build: "no"
opts:
description: "Abort the current build if we detect that your API's having some
troubles.\n\nWith this option set to 'no', build will not be aborted if the
test result is false, it will only abort when a fatal error occur. (Like internal
errors or exceptions, if we can't run the test group.) \nIf you set this option
to 'yes', build will be aborted when the retrieved test result is false too.
\n"
summary: Abort the current build if we detect that your API's having some troubles.
title: Abort The Current Build
value_options:
- "yes"
- "no"
outputs:
- AS_RUN_RESULT: null
opts:
description: |
Boolean value of the requested test group run result.
title: Test Group Run Result
- AS_ERROR_MESSAGE: null
opts:
description: "If any type of error occurs in the process, you can retrieve the
error message with this variable. \n"
title: Error Message
================================================
FILE: steps/apispotter-test-runner/step-info.yml
================================================
maintainer: community
================================================
FILE: steps/apk-info/1.0.4/step.yml
================================================
title: APK info
summary: APK Android info provider
description: Provides all possible Android APK information as package name, version
name or version code.
website: https://github.com/thefuntasty/bitrise-step-apk-info
source_code_url: https://github.com/thefuntasty/bitrise-step-apk-info
support_url: https://github.com/thefuntasty/bitrise-step-apk-info/issues
published_at: 2016-10-19T15:35:00.882498804+02:00
source:
git: https://github.com/thefuntasty/bitrise-step-apk-info.git
commit: 104e26a8800fc9363658b5837cf4747e5f26b032
project_type_tags:
- android
type_tags:
- android
- apk
is_requires_admin_user: false
is_always_run: false
is_skippable: false
inputs:
- apk_path: $BITRISE_APK_PATH
opts:
description: |
File path to APK file to get info from.
is_required: true
title: APK file path
outputs:
- ANDROID_APP_PACKAGE_NAME: null
opts:
description: Android application package name, ex. com.package.my
title: Android application package name
- ANDROID_APK_FILE_SIZE: null
opts:
description: Android APK file size, in bytes
title: Android APK file size
- ANDROID_APP_NAME: null
opts:
description: Android application name from APK
title: Android application name
- ANDROID_APP_VERSION_NAME: null
opts:
description: Android application version name from APK, ex. 1.0.0
title: Android application version name
- ANDROID_APP_VERSION_CODE: null
opts:
description: Android application version code from APK, ex. 10
title: Android application version code
- ANDROID_ICON_PATH: null
opts:
description: File path to android application icon
title: File path to icon
================================================
FILE: steps/apk-info/1.1.0/step.yml
================================================
title: APK info
summary: APK Android info provider
description: Provides all possible Android APK information as package name, version
name or version code.
website: https://github.com/thefuntasty/bitrise-step-apk-info
source_code_url: https://github.com/thefuntasty/bitrise-step-apk-info
support_url: https://github.com/thefuntasty/bitrise-step-apk-info/issues
published_at: 2016-10-20T09:55:26.379142783+02:00
source:
git: https://github.com/thefuntasty/bitrise-step-apk-info.git
commit: d38bd460cc5070d16885ece2eceb96184e8cd3ef
project_type_tags:
- android
type_tags:
- android
- apk
is_requires_admin_user: false
is_always_run: false
is_skippable: false
inputs:
- apk_path: $BITRISE_APK_PATH
opts:
description: |
File path to APK file to get info from.
is_required: true
title: APK file path
outputs:
- ANDROID_APP_PACKAGE_NAME: null
opts:
description: Android application package name, ex. com.package.my
title: Android application package name
- ANDROID_APK_FILE_SIZE: null
opts:
description: Android APK file size, in bytes
title: Android APK file size
- ANDROID_APP_NAME: null
opts:
description: Android application name from APK
title: Android application name
- ANDROID_APP_VERSION_NAME: null
opts:
description: Android application version name from APK, ex. 1.0.0
title: Android application version name
- ANDROID_APP_VERSION_CODE: null
opts:
description: Android application version code from APK, ex. 10
title: Android application version code
- ANDROID_ICON_PATH: null
opts:
description: File path to android application icon
title: File path to icon
================================================
FILE: steps/apk-info/1.1.1/step.yml
================================================
title: APK info
summary: APK Android info provider
description: Provides all possible Android APK information as package name, version
name or version code.
website: https://github.com/thefuntasty/bitrise-step-apk-info
source_code_url: https://github.com/thefuntasty/bitrise-step-apk-info
support_url: https://github.com/thefuntasty/bitrise-step-apk-info/issues
published_at: 2016-10-20T16:15:52.183384837+02:00
source:
git: https://github.com/thefuntasty/bitrise-step-apk-info.git
commit: 6079303ef24037208fb6437ecd6af1f4ea4bd439
project_type_tags:
- android
type_tags:
- android
- apk
is_requires_admin_user: false
is_always_run: false
is_skippable: false
inputs:
- apk_path: $BITRISE_APK_PATH
opts:
description: |
File path to APK file to get info from.
is_required: true
title: APK file path
outputs:
- ANDROID_APP_PACKAGE_NAME: null
opts:
description: Android application package name, ex. com.package.my
title: Android application package name
- ANDROID_APK_FILE_SIZE: null
opts:
description: Android APK file size, in bytes
title: Android APK file size
- ANDROID_APP_NAME: null
opts:
description: Android application name from APK
title: Android application name
- ANDROID_APP_VERSION_NAME: null
opts:
description: Android application version name from APK, ex. 1.0.0
title: Android application version name
- ANDROID_APP_VERSION_CODE: null
opts:
description: Android application version code from APK, ex. 10
title: Android application version code
- ANDROID_ICON_PATH: null
opts:
description: File path to android application icon
title: File path to icon
================================================
FILE: steps/apk-info/1.2.0/step.yml
================================================
title: APK info
summary: APK Android info provider
description: Provides all possible Android APK information as package name, version
name or version code.
website: https://github.com/thefuntasty/bitrise-step-apk-info
source_code_url: https://github.com/thefuntasty/bitrise-step-apk-info
support_url: https://github.com/thefuntasty/bitrise-step-apk-info/issues
published_at: 2017-01-03T20:39:11.298726262+01:00
source:
git: https://github.com/thefuntasty/bitrise-step-apk-info.git
commit: ea19668e5088dc517d5631941026347e78e7173f
project_type_tags:
- android
type_tags:
- android
- apk
is_requires_admin_user: false
is_always_run: false
is_skippable: false
inputs:
- apk_path: $BITRISE_APK_PATH
opts:
description: |
File path to APK file to get info from.
is_required: true
title: APK file path
outputs:
- ANDROID_APP_PACKAGE_NAME: null
opts:
description: Android application package name, ex. com.package.my
title: Android application package name
- ANDROID_APK_FILE_SIZE: null
opts:
description: Android APK file size, in bytes
title: Android APK file size
- ANDROID_APP_NAME: null
opts:
description: Android application name from APK
title: Android application name
- ANDROID_APP_VERSION_NAME: null
opts:
description: Android application version name from APK, ex. 1.0.0
title: Android application version name
- ANDROID_APP_VERSION_CODE: null
opts:
description: Android application version code from APK, ex. 10
title: Android application version code
- ANDROID_ICON_PATH: null
opts:
description: File path to android application icon
title: File path to icon
================================================
FILE: steps/apk-info/1.2.1/step.yml
================================================
title: APK info
summary: APK Android info provider
description: Provides all possible Android APK information as package name, version
name or version code.
website: https://github.com/thefuntasty/bitrise-step-apk-info
source_code_url: https://github.com/thefuntasty/bitrise-step-apk-info
support_url: https://github.com/thefuntasty/bitrise-step-apk-info/issues
published_at: 2017-01-04T10:06:25.318699526+01:00
source:
git: https://github.com/thefuntasty/bitrise-step-apk-info.git
commit: 9dda88ddbea00c03deb973576f716abbf1c55e9e
project_type_tags:
- android
type_tags:
- android
- apk
is_requires_admin_user: false
is_always_run: false
is_skippable: false
inputs:
- apk_path: $BITRISE_APK_PATH
opts:
description: |
File path to APK file to get info from.
is_required: true
title: APK file path
outputs:
- ANDROID_APP_PACKAGE_NAME: null
opts:
description: Android application package name, ex. com.package.my
title: Android application package name
- ANDROID_APK_FILE_SIZE: null
opts:
description: Android APK file size, in bytes
title: Android APK file size
- ANDROID_APP_NAME: null
opts:
description: Android application name from APK
title: Android application name
- ANDROID_APP_VERSION_NAME: null
opts:
description: Android application version name from APK, ex. 1.0.0
title: Android application version name
- ANDROID_APP_VERSION_CODE: null
opts:
description: Android application version code from APK, ex. 10
title: Android application version code
- ANDROID_ICON_PATH: null
opts:
description: File path to android application icon
title: File path to icon
================================================
FILE: steps/apk-info/1.2.2/step.yml
================================================
title: APK info
summary: APK Android info provider
description: Provides all possible Android APK information as package name, version
name or version code.
website: https://github.com/thefuntasty/bitrise-step-apk-info
source_code_url: https://github.com/thefuntasty/bitrise-step-apk-info
support_url: https://github.com/thefuntasty/bitrise-step-apk-info/issues
published_at: 2017-01-13T15:44:35.290816965+01:00
source:
git: https://github.com/thefuntasty/bitrise-step-apk-info.git
commit: 053af0b89c101ab87de1db9fd70d9b78430974ce
project_type_tags:
- android
- xamarin
- cordova
- ionic
- react-native
type_tags:
- "artifact info"
is_requires_admin_user: false
is_always_run: false
is_skippable: false
inputs:
- apk_path: $BITRISE_APK_PATH
opts:
description: |
File path to APK file to get info from.
is_required: true
title: APK file path
outputs:
- ANDROID_APP_PACKAGE_NAME: null
opts:
description: Android application package name, ex. com.package.my
title: Android application package name
- ANDROID_APK_FILE_SIZE: null
opts:
description: Android APK file size, in bytes
title: Android APK file size
- ANDROID_APP_NAME: null
opts:
description: Android application name from APK
title: Android application name
- ANDROID_APP_VERSION_NAME: null
opts:
description: Android application version name from APK, ex. 1.0.0
title: Android application version name
- ANDROID_APP_VERSION_CODE: null
opts:
description: Android application version code from APK, ex. 10
title: Android application version code
- ANDROID_ICON_PATH: null
opts:
description: File path to android application icon
title: File path to icon
================================================
FILE: steps/apk-info/1.2.3/step.yml
================================================
title: APK info
summary: APK Android info provider
description: Provides all possible Android APK information as package name, version
name or version code.
website: https://github.com/thefuntasty/bitrise-step-apk-info
source_code_url: https://github.com/thefuntasty/bitrise-step-apk-info
support_url: https://github.com/thefuntasty/bitrise-step-apk-info/issues
published_at: 2017-06-29T10:57:06.839233486+02:00
source:
git: https://github.com/thefuntasty/bitrise-step-apk-info.git
commit: 8aa691f70c60416b3c3d30002797a3775875a351
project_type_tags:
- android
type_tags:
- utility
is_requires_admin_user: false
is_always_run: false
is_skippable: false
inputs:
- apk_path: $BITRISE_APK_PATH
opts:
description: |
File path to APK file to get info from.
is_required: true
title: APK file path
outputs:
- ANDROID_APP_PACKAGE_NAME: null
opts:
description: Android application package name, ex. com.package.my
title: Android application package name
- ANDROID_APK_FILE_SIZE: null
opts:
description: Android APK file size, in bytes
title: Android APK file size
- ANDROID_APP_NAME: null
opts:
description: Android application name from APK
title: Android application name
- ANDROID_APP_VERSION_NAME: null
opts:
description: Android application version name from APK, ex. 1.0.0
title: Android application version name
- ANDROID_APP_VERSION_CODE: null
opts:
description: Android application version code from APK, ex. 10
title: Android application version code
- ANDROID_ICON_PATH: null
opts:
description: File path to android application icon
title: File path to icon
================================================
FILE: steps/apk-info/1.3.0/step.yml
================================================
title: APK info
summary: APK Android info provider
description: Provides all possible Android APK information as package name, version
name or version code.
website: https://github.com/thefuntasty/bitrise-step-apk-info
source_code_url: https://github.com/thefuntasty/bitrise-step-apk-info
support_url: https://github.com/thefuntasty/bitrise-step-apk-info/issues
published_at: 2017-08-18T13:28:30.970744569+02:00
source:
git: https://github.com/thefuntasty/bitrise-step-apk-info.git
commit: db6870adc885e1eb25433a1ef6a5e7b3081b7f20
project_type_tags:
- android
- xamarin
- cordova
- ionic
- react-native
type_tags:
- utility
is_requires_admin_user: false
is_always_run: false
is_skippable: false
inputs:
- apk_path: $BITRISE_APK_PATH
opts:
description: |
File path to APK file to get info from.
is_required: true
title: APK file path
outputs:
- ANDROID_APP_PACKAGE_NAME: null
opts:
description: Android application package name, ex. com.package.my
title: Android application package name
- ANDROID_APK_FILE_SIZE: null
opts:
description: Android APK file size, in bytes
title: Android APK file size
- ANDROID_APP_NAME: null
opts:
description: Android application name from APK
title: Android application name
- ANDROID_APP_VERSION_NAME: null
opts:
description: Android application version name from APK, ex. 1.0.0
title: Android application version name
- ANDROID_APP_VERSION_CODE: null
opts:
description: Android application version code from APK, ex. 10
title: Android application version code
- ANDROID_ICON_PATH: null
opts:
description: File path to android application icon
title: File path to icon
================================================
FILE: steps/apk-info/1.4.0/step.yml
================================================
title: APK info
summary: APK Android info provider
description: Provides all possible Android APK information as package name, version
name or version code.
website: https://github.com/thefuntasty/bitrise-step-apk-info
source_code_url: https://github.com/thefuntasty/bitrise-step-apk-info
support_url: https://github.com/thefuntasty/bitrise-step-apk-info/issues
published_at: 2018-02-03T21:09:29.224001+01:00
source:
git: https://github.com/thefuntasty/bitrise-step-apk-info.git
commit: 5d5d3cd0155b868cf10a754adf4cbb7aee461dba
project_type_tags:
- android
- xamarin
- cordova
- ionic
- react-native
type_tags:
- artifact-info
is_requires_admin_user: false
is_always_run: false
is_skippable: false
inputs:
- apk_path: $BITRISE_APK_PATH
opts:
description: |
File path to APK file to get info from.
is_required: true
title: APK file path
outputs:
- ANDROID_APP_PACKAGE_NAME: null
opts:
description: Android application package name, ex. com.package.my
title: Android application package name
- ANDROID_APK_FILE_SIZE: null
opts:
description: Android APK file size, in bytes
title: Android APK file size
- ANDROID_APP_NAME: null
opts:
description: Android application name from APK
title: Android application name
- ANDROID_APP_VERSION_NAME: null
opts:
description: Android application version name from APK, ex. 1.0.0
title: Android application version name
- ANDROID_APP_VERSION_CODE: null
opts:
description: Android application version code from APK, ex. 10
title: Android application version code
- ANDROID_ICON_PATH: null
opts:
description: File path to android application icon
title: File path to icon
================================================
FILE: steps/apk-info/1.4.1/step.yml
================================================
title: APK info
summary: APK Android info provider
description: Provides all possible Android APK information as package name, version
name or version code.
website: https://github.com/thefuntasty/bitrise-step-apk-info
source_code_url: https://github.com/thefuntasty/bitrise-step-apk-info
support_url: https://github.com/thefuntasty/bitrise-step-apk-info/issues
published_at: 2018-08-27T08:46:03.274386929+02:00
source:
git: https://github.com/thefuntasty/bitrise-step-apk-info.git
commit: 7b402d3fcf60cd844a4641dfc248c8868e036a10
project_type_tags:
- android
- xamarin
- cordova
- ionic
- react-native
type_tags:
- artifact-info
is_requires_admin_user: false
is_always_run: false
is_skippable: false
inputs:
- apk_path: $BITRISE_APK_PATH
opts:
description: |
File path to APK file to get info from.
is_required: true
title: APK file path
outputs:
- ANDROID_APP_PACKAGE_NAME: null
opts:
description: Android application package name, ex. com.package.my
title: Android application package name
- ANDROID_APK_FILE_SIZE: null
opts:
description: Android APK file size, in bytes
title: Android APK file size
- ANDROID_APP_NAME: null
opts:
description: Android application name from APK
title: Android application name
- ANDROID_APP_VERSION_NAME: null
opts:
description: Android application version name from APK, ex. 1.0.0
title: Android application version name
- ANDROID_APP_VERSION_CODE: null
opts:
description: Android application version code from APK, ex. 10
title: Android application version code
- ANDROID_ICON_PATH: null
opts:
description: File path to android application icon
title: File path to icon
================================================
FILE: steps/apk-info/1.4.2/step.yml
================================================
title: APK info
summary: APK Android info provider
description: Provides all possible Android APK information as package name, version
name or version code.
website: https://github.com/thefuntasty/bitrise-step-apk-info
source_code_url: https://github.com/thefuntasty/bitrise-step-apk-info
support_url: https://github.com/thefuntasty/bitrise-step-apk-info/issues
published_at: 2018-09-12T09:40:47.241293411+02:00
source:
git: https://github.com/thefuntasty/bitrise-step-apk-info.git
commit: 57774f6c167a3db9d0b4ef1eb412bbb92221eb29
project_type_tags:
- android
- xamarin
- cordova
- ionic
- react-native
type_tags:
- artifact-info
is_requires_admin_user: false
is_always_run: false
is_skippable: false
inputs:
- apk_path: $BITRISE_APK_PATH
opts:
description: |
File path to APK file to get info from.
is_required: true
title: APK file path
outputs:
- ANDROID_APP_PACKAGE_NAME: null
opts:
description: Android application package name, ex. com.package.my
title: Android application package name
- ANDROID_APK_FILE_SIZE: null
opts:
description: Android APK file size, in bytes
title: Android APK file size
- ANDROID_APP_NAME: null
opts:
description: Android application name from APK
title: Android application name
- ANDROID_APP_VERSION_NAME: null
opts:
description: Android application version name from APK, ex. 1.0.0
title: Android application version name
- ANDROID_APP_VERSION_CODE: null
opts:
description: Android application version code from APK, ex. 10
title: Android application version code
- ANDROID_ICON_PATH: null
opts:
description: File path to android application icon
title: File path to icon
================================================
FILE: steps/apk-info/1.4.4/step.yml
================================================
title: APK info
summary: APK Android info provider
description: Provides all possible Android APK information as package name, version
name or version code.
website: https://github.com/thefuntasty/bitrise-step-apk-info
source_code_url: https://github.com/thefuntasty/bitrise-step-apk-info
support_url: https://github.com/thefuntasty/bitrise-step-apk-info/issues
published_at: 2019-04-17T15:07:28.566349757+02:00
source:
git: https://github.com/thefuntasty/bitrise-step-apk-info.git
commit: 50026bd18253adca731b5b752cfbb01082081c23
project_type_tags:
- android
- xamarin
- cordova
- ionic
- react-native
type_tags:
- artifact-info
is_requires_admin_user: false
is_always_run: false
is_skippable: false
inputs:
- apk_path: $BITRISE_APK_PATH
opts:
description: |
File path to APK file to get info from.
is_required: true
title: APK file path
outputs:
- ANDROID_APP_PACKAGE_NAME: null
opts:
description: Android application package name, ex. com.package.my
title: Android application package name
- ANDROID_APK_FILE_SIZE: null
opts:
description: Android APK file size, in bytes
title: Android APK file size
- ANDROID_APP_NAME: null
opts:
description: Android application name from APK
title: Android application name
- ANDROID_APP_VERSION_NAME: null
opts:
description: Android application version name from APK, ex. 1.0.0
title: Android application version name
- ANDROID_APP_VERSION_CODE: null
opts:
description: Android application version code from APK, ex. 10
title: Android application version code
- ANDROID_ICON_PATH: null
opts:
description: File path to android application icon
title: File path to icon
================================================
FILE: steps/apk-info/1.4.5/step.yml
================================================
title: APK info
summary: APK Android info provider
description: Provides all possible Android APK information as package name, version
name or version code.
website: https://github.com/thefuntasty/bitrise-step-apk-info
source_code_url: https://github.com/thefuntasty/bitrise-step-apk-info
support_url: https://github.com/thefuntasty/bitrise-step-apk-info/issues
published_at: 2020-04-16T09:44:38.920347+02:00
source:
git: https://github.com/futuredapp/bitrise-step-apk-info.git
commit: fce22a7a9cbf3c4c42e1afff1032c8d8981edacc
project_type_tags:
- android
- xamarin
- cordova
- ionic
- react-native
type_tags:
- artifact-info
is_requires_admin_user: false
is_always_run: false
is_skippable: false
inputs:
- apk_path: $BITRISE_APK_PATH
opts:
description: |
File path to APK file to get info from.
is_required: true
title: APK file path
outputs:
- ANDROID_APP_PACKAGE_NAME: null
opts:
description: Android application package name, ex. com.package.my
title: Android application package name
- ANDROID_APK_FILE_SIZE: null
opts:
description: Android APK file size, in bytes
title: Android APK file size
- ANDROID_APP_NAME: null
opts:
description: Android application name from APK
title: Android application name
- ANDROID_APP_VERSION_NAME: null
opts:
description: Android application version name from APK, ex. 1.0.0
title: Android application version name
- ANDROID_APP_VERSION_CODE: null
opts:
description: Android application version code from APK, ex. 10
title: Android application version code
- ANDROID_ICON_PATH: null
opts:
description: File path to android application icon
title: File path to icon
================================================
FILE: steps/apk-info/1.4.6/step.yml
================================================
title: APK info
summary: APK Android info provider
description: Provides all possible Android APK information as package name, version
name or version code.
website: https://github.com/thefuntasty/bitrise-step-apk-info
source_code_url: https://github.com/thefuntasty/bitrise-step-apk-info
support_url: https://github.com/thefuntasty/bitrise-step-apk-info/issues
published_at: 2021-06-02T20:24:31.688097+02:00
source:
git: https://github.com/futuredapp/bitrise-step-apk-info.git
commit: 2897c74e1af045467695842ff1d84622848d9079
project_type_tags:
- android
- xamarin
- cordova
- ionic
- react-native
type_tags:
- artifact-info
is_requires_admin_user: false
is_always_run: false
is_skippable: false
inputs:
- apk_path: $BITRISE_APK_PATH
opts:
description: |
File path to APK file to get info from.
is_required: true
title: APK file path
outputs:
- ANDROID_APP_PACKAGE_NAME: null
opts:
description: Android application package name, ex. com.package.my
title: Android application package name
- ANDROID_APK_FILE_SIZE: null
opts:
description: Android APK file size, in bytes
title: Android APK file size
- ANDROID_APP_NAME: null
opts:
description: Android application name from APK
title: Android application name
- ANDROID_APP_VERSION_NAME: null
opts:
description: Android application version name from APK, ex. 1.0.0
title: Android application version name
- ANDROID_APP_VERSION_CODE: null
opts:
description: Android application version code from APK, ex. 10
title: Android application version code
- ANDROID_ICON_PATH: null
opts:
description: File path to android application icon
title: File path to icon
================================================
FILE: steps/apk-info/1.4.7/step.yml
================================================
title: APK info
summary: APK Android info provider
description: Provides all possible Android APK information as package name, version
name or version code.
website: https://github.com/thefuntasty/bitrise-step-apk-info
source_code_url: https://github.com/thefuntasty/bitrise-step-apk-info
support_url: https://github.com/thefuntasty/bitrise-step-apk-info/issues
published_at: 2025-12-01T11:27:03.389818+01:00
source:
git: https://github.com/futuredapp/bitrise-step-apk-info.git
commit: fab654713ec1327dc68106bbf023a35e1f01ebd3
project_type_tags:
- android
- xamarin
- cordova
- ionic
- react-native
type_tags:
- artifact-info
is_requires_admin_user: false
is_always_run: false
is_skippable: false
inputs:
- apk_path: $BITRISE_APK_PATH
opts:
description: |
File path to APK file to get info from.
is_required: true
title: APK file path
outputs:
- ANDROID_APP_PACKAGE_NAME: null
opts:
description: Android application package name, ex. com.package.my
title: Android application package name
- ANDROID_APK_FILE_SIZE: null
opts:
description: Android APK file size, in bytes
title: Android APK file size
- ANDROID_APP_NAME: null
opts:
description: Android application name from APK
title: Android application name
- ANDROID_APP_VERSION_NAME: null
opts:
description: Android application version name from APK, ex. 1.0.0
title: Android application version name
- ANDROID_APP_VERSION_CODE: null
opts:
description: Android application version code from APK, ex. 10
title: Android application version code
- ANDROID_ICON_PATH: null
opts:
description: File path to android application icon
title: File path to icon
================================================
FILE: steps/apk-info/step-info.yml
================================================
maintainer: community
================================================
FILE: steps/app-center-launch-test-android/1.0.0/step.yml
================================================
title: App Center Launch Test Android
summary: |
Run App Center launch test for android
description: |
Verify that your build works on a real device by running a launch test on a real device
website: https://github.com/tomcurran/bitrise-step-app-center-launch-test-android
source_code_url: https://github.com/tomcurran/bitrise-step-app-center-launch-test-android
support_url: https://github.com/tomcurran/bitrise-step-app-center-launch-test-android/issues
published_at: 2018-01-28T12:01:08.598154Z
source:
git: https://github.com/tomcurran/bitrise-step-app-center-launch-test-android.git
commit: 818a3fc0a61c2de7e1ecdd06570365f86dd51a30
host_os_tags:
- osx-10.10
- ubuntu-16.04
project_type_tags:
- ios
- macos
- android
- xamarin
- react-native
- cordova
- ionic
type_tags:
- test
toolkit:
bash:
entry_file: step.sh
deps:
brew:
- name: npm
apt_get:
- name: npm
is_requires_admin_user: true
is_always_run: false
is_skippable: false
run_if: ""
inputs:
- app_path: $BITRISE_APK_PATH
opts:
description: |
App file path, for example to an APK file for Android.
is_expand: true
is_required: true
summary: ""
title: App path
- app_center_app: $APP_CENTER_APP
opts:
description: |
Get all available apps using cli "appcenter apps list".
is_expand: true
is_required: true
summary: username/app_name or org/app_name
title: App Center app
- app_center_token: $APP_CENTER_TOKEN
opts:
description: |
Create API token using cli "appcenter tokens create".
is_expand: true
is_required: true
summary: App Ceneter APK token with access to app specified in app_center_app
title: App Center API token
================================================
FILE: steps/app-center-launch-test-android/step-info.yml
================================================
maintainer: community
================================================
FILE: steps/app-gallery-deploy/1.0.0/step.yml
================================================
title: Deploy to Huawei App Gallery
summary: |
Uploads APK to Huawei App Gallery
description: |
This step is based on [Huawei Publishing API](https://developer.huawei.com/consumer/en/service/hms/catalog/AGCConnectAPI.html?page=hmssdk_appGalleryConnect_getstarted)
website: https://github.com/FutureMind/bitrise-step-huawei-app-gallery-apk-distribution
source_code_url: https://github.com/FutureMind/bitrise-step-huawei-app-gallery-apk-distribution
support_url: https://github.com/FutureMind/bitrise-step-huawei-app-gallery-apk-distribution/issues
published_at: 2020-01-20T13:19:43.423533+01:00
source:
git: https://github.com/FutureMind/bitrise-step-huawei-app-gallery-apk-distribution.git
commit: f79d0b1208466246453a8edada218b4eba556775
host_os_tags:
- osx-10.10
- ubuntu-16.04
project_type_tags:
- android
- xamarin
- react-native
- flutter
type_tags:
- deploy
toolkit:
bash:
entry_file: step.sh
deps:
brew:
- name: jq
apt_get:
- name: jq
is_requires_admin_user: true
is_always_run: false
is_skippable: false
run_if: ""
inputs:
- apk_path: $BITRISE_APK_PATH
opts:
description: Path to generated APK file to deploy.
is_expand: true
is_required: true
title: APK path
- huawei_filename: build_${BITRISE_BUILD_NUMBER}.apk
opts:
description: Unique name of APK file upload.
is_expand: true
is_required: true
title: File name
- huawei_app_id: null
opts:
description: App ID can be found in App information tab.
is_expand: true
is_required: true
title: App ID
- huawei_client_id: null
opts:
description: Client ID generated in `Users and permissions -> Api Key -> AppGalleryConnect
API`
is_expand: true
is_required: true
title: Client ID
- huawei_client_secret: null
opts:
description: Client Secret generated in `Users and permissions -> Api Key -> AppGalleryConnect
API`
is_expand: true
is_required: true
is_sensitive: true
title: Client Secret
- lang: en-EN
opts:
description: For more languages refer to [Language Types](https://developer.huawei.com/consumer/en/service/hms/catalog/AGCConnectAPI.html?page=hmssdk_appGalleryConnect_api_reference_language_type)
is_expand: true
is_required: true
title: Language Type
================================================
FILE: steps/app-gallery-deploy/1.0.1/step.yml
================================================
title: Deploy to Huawei App Gallery
summary: |
Uploads APK to Huawei App Gallery
description: |
This step is based on [Huawei Publishing API](https://developer.huawei.com/consumer/en/service/hms/catalog/AGCConnectAPI.html?page=hmssdk_appGalleryConnect_getstarted)
website: https://github.com/FutureMind/bitrise-step-huawei-app-gallery-apk-distribution
source_code_url: https://github.com/FutureMind/bitrise-step-huawei-app-gallery-apk-distribution
support_url: https://github.com/FutureMind/bitrise-step-huawei-app-gallery-apk-distribution/issues
published_at: 2020-07-14T13:09:41.3999029+02:00
source:
git: https://github.com/FutureMind/bitrise-step-huawei-app-gallery-apk-distribution.git
commit: dc099afb0e871eea5c70dff738cb6e401e3fbe9c
host_os_tags:
- osx-10.10
- ubuntu-16.04
project_type_tags:
- android
- xamarin
- react-native
- flutter
type_tags:
- deploy
toolkit:
bash:
entry_file: step.sh
deps:
brew:
- name: jq
apt_get:
- name: jq
is_requires_admin_user: true
is_always_run: false
is_skippable: false
run_if: ""
inputs:
- apk_path: $BITRISE_APK_PATH
opts:
category: Config
description: Path to generated APK file to deploy.
is_expand: true
is_required: true
title: APK path
- huawei_filename: build_${BITRISE_BUILD_NUMBER}.apk
opts:
category: Config
description: Unique name of APK file upload.
is_expand: true
is_required: true
title: File name
- huawei_app_id: null
opts:
category: Config
description: App ID can be found in App information tab.
is_expand: true
is_required: true
title: App ID
- huawei_client_id: null
opts:
category: Config
description: Client ID generated in `Users and permissions -> Api Key -> AppGalleryConnect
API`
is_expand: true
is_required: true
title: Client ID
- huawei_client_secret: null
opts:
category: Config
description: Client Secret generated in `Users and permissions -> Api Key -> AppGalleryConnect
API`
is_expand: true
is_required: true
is_sensitive: true
title: Client Secret
- lang: en-EN
opts:
category: Config
description: For more languages refer to [Language Types](https://developer.huawei.com/consumer/en/doc/development/AppGallery-connect-Guides/agcapi-reference-langtype)
is_expand: true
is_required: true
title: Language Type
- opts:
category: Debug
description: |
If debug=yes the step will print debug infos
title: Show debug logs?
value_options:
- "no"
- "yes"
show_debug_logs: "no"
================================================
FILE: steps/app-gallery-deploy/1.1.0/step.yml
================================================
title: Deploy to Huawei App Gallery
summary: |
Uploads APK/AAB to Huawei App Gallery
description: |
This step is based on [Huawei Publishing API](https://developer.huawei.com/consumer/en/service/hms/catalog/AGCConnectAPI.html?page=hmssdk_appGalleryConnect_getstarted)
website: https://github.com/FutureMind/bitrise-step-huawei-app-gallery-apk-distribution
source_code_url: https://github.com/FutureMind/bitrise-step-huawei-app-gallery-apk-distribution
support_url: https://github.com/FutureMind/bitrise-step-huawei-app-gallery-apk-distribution/issues
published_at: 2020-07-23T09:18:35.3690867+02:00
source:
git: https://github.com/FutureMind/bitrise-step-huawei-app-gallery-apk-distribution.git
commit: d0541f53aa8b4bd6895e69b8f6ac0ddff03a775a
host_os_tags:
- osx-10.10
- ubuntu-16.04
project_type_tags:
- android
- xamarin
- react-native
- flutter
type_tags:
- deploy
toolkit:
bash:
entry_file: step.sh
deps:
brew:
- name: jq
apt_get:
- name: jq
is_requires_admin_user: true
is_always_run: false
is_skippable: false
run_if: ""
inputs:
- file_path: $BITRISE_APK_PATH
opts:
category: Config
description: Path to generated APK/AAB file to deploy.
is_expand: true
is_required: true
title: File path
- huawei_filename: build_${BITRISE_BUILD_NUMBER}.apk
opts:
category: Config
description: Unique name of APK/AAB file upload.
is_expand: true
is_required: true
title: File name
- huawei_app_id: null
opts:
category: Config
description: App ID can be found in App information tab.
is_expand: true
is_required: true
title: App ID
- huawei_client_id: null
opts:
category: Config
description: Client ID generated in `Users and permissions -> Api Key -> AppGalleryConnect
API`
is_expand: true
is_required: true
title: Client ID
- huawei_client_secret: null
opts:
category: Config
description: Client Secret generated in `Users and permissions -> Api Key -> AppGalleryConnect
API`
is_expand: true
is_required: true
is_sensitive: true
title: Client Secret
- lang: en-EN
opts:
category: Config
description: For more languages refer to [Language Types](https://developer.huawei.com/consumer/en/doc/development/AppGallery-connect-Guides/agcapi-reference-langtype)
is_expand: true
is_required: true
title: Language Type
- opts:
category: Debug
description: |
If debug=yes the step will print debug infos
title: Show debug logs?
value_options:
- "no"
- "yes"
show_debug_logs: "no"
================================================
FILE: steps/app-gallery-deploy/step-info.yml
================================================
maintainer: community
================================================
FILE: steps/app-ray-mobile-security/1.3.9/step.yml
================================================
title: App-Ray Mobile Security
summary: |
Mobile application security testing with App-Ray's engine via API
description: |
Fully automated mobile application security testing identifies vulnerabilities, mitigate risks, comply with regulations whether you are developer, CISO, CEO.
website: https://app-ray.co/
source_code_url: https://github.com/App-Ray/bitrise-step-app-ray-mobile-security
support_url: https://github.com/App-Ray/bitrise-step-app-ray-mobile-security/issues
published_at: 2021-01-11T19:17:36.637764711+01:00
source:
git: https://github.com/App-Ray/bitrise-step-app-ray-mobile-security.git
commit: dd94f3e7af0b91ebdd0f12a8cc594449729fa1cd
host_os_tags:
- osx-10.10
- ubuntu-16.04
type_tags:
- test
toolkit:
bash:
entry_file: step.sh
deps:
brew:
- name: curl
apt_get:
- name: curl
is_requires_admin_user: true
is_always_run: false
is_skippable: false
run_if: ""
inputs:
- base_url: null
opts:
description: |-
Your App-Ray base URL
Example https://demo.app-ray.co/
URL MUST end with /
is_required: true
summary: "Your App-Ray base URL \nExample https://demo.app-ray.co/"
title: AppRay instance base URL
- app_path: null
opts:
description: Path to the app file you want to upload, generated by Bitrise, usually
like $BITRISE\_APK\_PATH or $BITRISE\_IPA\_PATH. AAB is also supported
is_expand: true
is_required: true
summary: The app file you want to upload, usually like $BITRISE\_APK\_PATH or
$BITRISE\_IPA\_PATH
title: APK, AAB or IPA file path
- appray_api_token: null
opts:
description: Your App-Ray authentication token, it can be a one time token or
a permanent token
is_required: true
is_sensitive: true
summary: App-Ray API authentication token
title: App-Ray API token
- opts:
description: Score from 0 to 100
is_required: true
summary: |-
Risk Score treshold of which to decide if the analysis was succesful on the application
Value 0-100, where 100 is the highest risk
title: Risk Score treshold
score_treshold: null
- opts:
category: Options
description: |-
The step will use this pattern to export security analysis XML results.
The pattern needs to be relative to the selected module's directory.
The pattern MUST end with /
is_expand: true
is_required: false
summary: Step will use this directory pattern to export test XML results. If left
blank no results will be saved
title: Test XML result directory pattern
result_path: '*build/test-results/'
outputs:
- APP_RAY_RISK_SCORE: null
opts:
description: |
Analysis result risk score
summary: App-Ray analysis result risk score
title: App-Ray Risk Score
================================================
FILE: steps/app-ray-mobile-security/step-info.yml
================================================
maintainer: verified
================================================
FILE: steps/appaloosa/1.0.0/step.yml
================================================
title: Publish to Appaloosa Store
summary: This step allows you to publish your application to your private app store
on Appaloosa Store
description: |
Bitrise Step to Deploy an iOS IPA to Appaloosa-Store.
Required: an Xcode Archive Step should run before this Step!
This step requires an Appaloosa-Store account or an email address to create your account
website: https://www.appaloosa-store.com
source_code_url: https://github.com/appaloosa-store/bitrise_appaloosa
support_url: https://github.com/appaloosa-store/bitrise_appaloosa/issues
published_at: 2015-10-26T09:49:37.761092326+01:00
source:
git: https://github.com/appaloosa-store/bitrise_appaloosa.git
commit: 7a549a1dcfc8c6b9961d59c3fd4e76a911a5b389
host_os_tags:
- osx-10.9
- osx-10.10
project_type_tags:
- ios
type_tags:
- deploy
- appaloosa
- appaloosa-store
is_requires_admin_user: true
is_always_run: false
is_skippable: false
run_if: ""
inputs:
- bitrise_ipa_path: $BITRISE_IPA_PATH
opts:
description: This is the variable of your IPA path on Bitrise
is_dont_change_value: false
is_expand: true
is_required: true
summary: ""
title: IPA PATH
- opts:
description: |-
***Only if you haven't created an account on Appaloosa yet.***
You'll receive an email with your credentials to access your private store.
is_dont_change_value: false
is_expand: true
is_required: false
summary: If you don't have an account we'll automatically create one for you.
At the end of the step you'll receive an email with your credentials to access
your store, and install your application. For all future runs of this step,
remove your email address and setup this step as a registered user.
title: User Email Address
user_email: null
- appaloosa_api_key: null
opts:
description: '***Only if you are already registered on Appaloosa***'
is_dont_change_value: false
is_expand: true
is_required: false
summary: This is your unique Appaloosa API Key that can be found in your user's
profile on Appaloosa
title: User API Key
- opts:
description: |-
***Only if you are already registered on Appaloosa***
This is the store id of the store you want your application uploaded to.
is_dont_change_value: false
is_expand: true
is_required: false
summary: You can find this value in your store settings
title: Store ID
store_id: null
- opts:
description: URL (jpg or png)
is_dont_change_value: false
is_expand: true
is_required: false
summary: Enter the url of your first screenshot
title: SCREENSHOT 1
screenshot1: null
- opts:
description: URL (jpg or png)
is_dont_change_value: false
is_expand: true
is_required: false
summary: Enter the url of your second screenshot
title: SCREENSHOT 2
screenshot2: null
- opts:
description: URL (jpg or png)
is_dont_change_value: false
is_expand: true
is_required: false
summary: Enter the url of your third screenshot
title: SCREENSHOT 3
screenshot3: null
- opts:
description: URL (jpg or png)
is_dont_change_value: false
is_expand: true
is_required: false
summary: Enter the url of your fourth screenshot
title: SCREENSHOT 4
screenshot4: null
- opts:
description: URL (jpg or png)
is_dont_change_value: false
is_expand: true
is_required: false
summary: Enter the url of your fifth screenshot
title: SCREENSHOT 5
screenshot5: null
- description: null
opts:
description: Description or changelog for your application
is_dont_change_value: false
is_expand: true
is_required: false
summary: This is the description for your application. You can have a different
description for each version for your application.
title: Description
- group_ids: null
opts:
description: |-
***Only for registered users. ***
Groups ids of the groups you want your application published to. If you do not specify at least one group id, you will have to change the visibility directly on Appaloosa website.
is_dont_change_value: false
is_expand: true
is_required: false
summary: You can target specific groups on Appaloosa and publish your application
only to the users of these groups.
title: Group IDs
================================================
FILE: steps/appaloosa/1.1.0/step.yml
================================================
title: Publish to Appaloosa Store
summary: This step allows you to publish your application to your private app store
on Appaloosa Store
description: |
Bitrise Step to Deploy an iOS IPA to Appaloosa-Store.
Required: an Xcode Archive Step should run before this Step!
This step requires an Appaloosa-Store account or an email address to create your account
website: https://www.appaloosa-store.com
source_code_url: https://github.com/appaloosa-store/bitrise_appaloosa
support_url: https://github.com/appaloosa-store/bitrise_appaloosa/issues
published_at: 2015-12-07T18:46:02.426518391+01:00
source:
git: https://github.com/appaloosa-store/bitrise_appaloosa.git
commit: ab2f0a9f075027d3b25d44f1b66da1ac66fb25e3
host_os_tags:
- osx-10.9
- osx-10.10
project_type_tags:
- ios
type_tags:
- deploy
- appaloosa
- appaloosa-store
is_requires_admin_user: true
is_always_run: false
is_skippable: false
run_if: ""
inputs:
- bitrise_ipa_path: $BITRISE_IPA_PATH
opts:
description: This is the variable of your IPA path on Bitrise
is_dont_change_value: false
is_expand: true
is_required: true
summary: ""
title: IPA PATH
- opts:
description: |-
***Only if you haven't created an account on Appaloosa yet.***
You'll receive an email with your credentials to access your private store.
is_dont_change_value: false
is_expand: true
is_required: false
summary: If you don't have an account we'll automatically create one for you.
At the end of the step you'll receive an email with your credentials to access
your store, and install your application. For all future runs of this step,
remove your email address and setup this step as a registered user.
title: User Email Address
user_email: null
- appaloosa_api_key: null
opts:
description: '***Only if you are already registered on Appaloosa***'
is_dont_change_value: false
is_expand: true
is_required: false
summary: This is your unique Appaloosa API Key that can be found in your user's
profile on Appaloosa
title: User API Key
- opts:
description: |-
***Only if you are already registered on Appaloosa***
This is the store id of the store you want your application uploaded to.
is_dont_change_value: false
is_expand: true
is_required: false
summary: You can find this value in your store settings
title: Store ID
store_id: null
- opts:
description: URL (jpg or png)
is_dont_change_value: false
is_expand: true
is_required: false
summary: Enter the url of your first screenshot
title: SCREENSHOT 1
screenshot1: null
- opts:
description: URL (jpg or png)
is_dont_change_value: false
is_expand: true
is_required: false
summary: Enter the url of your second screenshot
title: SCREENSHOT 2
screenshot2: null
- opts:
description: URL (jpg or png)
is_dont_change_value: false
is_expand: true
is_required: false
summary: Enter the url of your third screenshot
title: SCREENSHOT 3
screenshot3: null
- opts:
description: URL (jpg or png)
is_dont_change_value: false
is_expand: true
is_required: false
summary: Enter the url of your fourth screenshot
title: SCREENSHOT 4
screenshot4: null
- opts:
description: URL (jpg or png)
is_dont_change_value: false
is_expand: true
is_required: false
summary: Enter the url of your fifth screenshot
title: SCREENSHOT 5
screenshot5: null
- description: null
opts:
description: Description or changelog for your application
is_dont_change_value: false
is_expand: true
is_required: false
summary: This is the description for your application. You can have a different
description for each version for your application.
title: Description
- group_ids: null
opts:
description: |-
***Only for registered users. ***
Groups ids of the groups you want your application published to. If you do not specify at least one group id, you will have to change the visibility directly on Appaloosa website.
is_dont_change_value: false
is_expand: true
is_required: false
summary: You can target specific groups on Appaloosa and publish your application
only to the users of these groups.
title: Group IDs
================================================
FILE: steps/appaloosa/1.2.0/step.yml
================================================
title: Publish to Appaloosa Store
summary: This step allows you to publish your application to your private app store
on Appaloosa Store
description: |
Bitrise Step to Deploy an iOS IPA to Appaloosa-Store.
Required: an Xcode Archive Step should run before this Step!
This step requires an Appaloosa-Store account or an email address to create your account
website: https://www.appaloosa-store.com
source_code_url: https://github.com/appaloosa-store/bitrise_appaloosa
support_url: https://github.com/appaloosa-store/bitrise_appaloosa/issues
published_at: 2016-10-13T14:27:48.012057922+02:00
source:
git: https://github.com/appaloosa-store/bitrise_appaloosa.git
commit: daa18c207fb0a6c00cd586fd071bc559c1a6946a
host_os_tags:
- osx-10.9
- osx-10.10
project_type_tags:
- ios
type_tags:
- deploy
- appaloosa
- appaloosa-store
is_requires_admin_user: true
is_always_run: false
is_skippable: false
run_if: ""
inputs:
- bitrise_ipa_path: $BITRISE_IPA_PATH
opts:
description: This is the variable of your IPA path on Bitrise
is_dont_change_value: false
is_expand: true
is_required: true
summary: ""
title: IPA PATH
- opts:
description: |-
***Only if you haven't created an account on Appaloosa yet.***
You'll receive an email with your credentials to access your private store.
is_dont_change_value: false
is_expand: true
is_required: false
summary: If you don't have an account we'll automatically create one for you.
At the end of the step you'll receive an email with your credentials to access
your store, and install your application. For all future runs of this step,
remove your email address and setup this step as a registered user.
title: User Email Address
user_email: null
- appaloosa_api_key: null
opts:
description: '***Only if you are already registered on Appaloosa***'
is_dont_change_value: false
is_expand: true
is_required: false
summary: This is your unique Appaloosa API Key that can be found in your user's
profile on Appaloosa
title: User API Key
- opts:
description: |-
***Only if you are already registered on Appaloosa***
This is the store id of the store you want your application uploaded to.
is_dont_change_value: false
is_expand: true
is_required: false
summary: You can find this value in your store settings
title: Store ID
store_id: null
- opts:
description: URL (jpg or png)
is_dont_change_value: false
is_expand: true
is_required: false
summary: Enter the url of your first screenshot
title: SCREENSHOT 1
screenshot1: null
- opts:
description: URL (jpg or png)
is_dont_change_value: false
is_expand: true
is_required: false
summary: Enter the url of your second screenshot
title: SCREENSHOT 2
screenshot2: null
- opts:
description: URL (jpg or png)
is_dont_change_value: false
is_expand: true
is_required: false
summary: Enter the url of your third screenshot
title: SCREENSHOT 3
screenshot3: null
- opts:
description: URL (jpg or png)
is_dont_change_value: false
is_expand: true
is_required: false
summary: Enter the url of your fourth screenshot
title: SCREENSHOT 4
screenshot4: null
- opts:
description: URL (jpg or png)
is_dont_change_value: false
is_expand: true
is_required: false
summary: Enter the url of your fifth screenshot
title: SCREENSHOT 5
screenshot5: null
- description: null
opts:
description: Description for your application
is_dont_change_value: false
is_expand: true
is_required: false
summary: This is the description for your application. You can have a different
description for each version for your application.
title: Description
- changelog: null
opts:
description: Changelog for your application
is_dont_change_value: false
is_expand: true
is_required: false
summary: This is the changelog for your application. You can have a different
changelog for each version for your application.
title: Changelog
- group_ids: null
opts:
description: |-
***Only for registered users. ***
Groups ids of the groups you want your application published to. If you do not specify at least one group id, you will have to change the visibility directly on Appaloosa website.
is_dont_change_value: false
is_expand: true
is_required: false
summary: You can target specific groups on Appaloosa and publish your application
only to the users of these groups.
title: Group IDs
================================================
FILE: steps/appaloosa/1.2.1/step.yml
================================================
title: Publish to Appaloosa Store
summary: This step allows you to publish your application to your private app store
on Appaloosa Store
description: |
Bitrise Step to Deploy an iOS IPA to Appaloosa-Store.
Required: an Xcode Archive Step should run before this Step!
This step requires an Appaloosa-Store account or an email address to create your account
website: https://www.appaloosa-store.com
source_code_url: https://github.com/appaloosa-store/bitrise_appaloosa
support_url: https://github.com/appaloosa-store/bitrise_appaloosa/issues
published_at: 2016-10-14T14:24:27.089688+02:00
source:
git: https://github.com/appaloosa-store/bitrise_appaloosa.git
commit: a15d9815b44e8d33269778e3c67cef60934b49a2
host_os_tags:
- osx-10.9
- osx-10.10
project_type_tags:
- ios
type_tags:
- deploy
- appaloosa
- appaloosa-store
is_requires_admin_user: true
is_always_run: false
is_skippable: false
run_if: ""
inputs:
- bitrise_ipa_path: $BITRISE_IPA_PATH
opts:
description: This is the variable of your IPA path on Bitrise
is_dont_change_value: false
is_expand: true
is_required: true
summary: ""
title: IPA PATH
- opts:
description: |-
***Only if you haven't created an account on Appaloosa yet.***
You'll receive an email with your credentials to access your private store.
is_dont_change_value: false
is_expand: true
is_required: false
summary: If you don't have an account we'll automatically create one for you.
At the end of the step you'll receive an email with your credentials to access
your store, and install your application. For all future runs of this step,
remove your email address and setup this step as a registered user.
title: User Email Address
user_email: null
- appaloosa_api_key: null
opts:
description: '***Only if you are already registered on Appaloosa***'
is_dont_change_value: false
is_expand: true
is_required: false
summary: This is your unique Appaloosa API Key that can be found in your user's
profile on Appaloosa
title: User API Key
- opts:
description: |-
***Only if you are already registered on Appaloosa***
This is the store id of the store you want your application uploaded to.
is_dont_change_value: false
is_expand: true
is_required: false
summary: You can find this value in your store settings
title: Store ID
store_id: null
- opts:
description: URL (jpg or png)
is_dont_change_value: false
is_expand: true
is_required: false
summary: Enter the url of your first screenshot
title: SCREENSHOT 1
screenshot1: null
- opts:
description: URL (jpg or png)
is_dont_change_value: false
is_expand: true
is_required: false
summary: Enter the url of your second screenshot
title: SCREENSHOT 2
screenshot2: null
- opts:
description: URL (jpg or png)
is_dont_change_value: false
is_expand: true
is_required: false
summary: Enter the url of your third screenshot
title: SCREENSHOT 3
screenshot3: null
- opts:
description: URL (jpg or png)
is_dont_change_value: false
is_expand: true
is_required: false
summary: Enter the url of your fourth screenshot
title: SCREENSHOT 4
screenshot4: null
- opts:
description: URL (jpg or png)
is_dont_change_value: false
is_expand: true
is_required: false
summary: Enter the url of your fifth screenshot
title: SCREENSHOT 5
screenshot5: null
- description: null
opts:
description: Description for your application
is_dont_change_value: false
is_expand: true
is_required: false
summary: This is the description for your application. You can have a different
description for each version for your application.
title: Description
- changelog: null
opts:
description: Changelog for your application
is_dont_change_value: false
is_expand: true
is_required: false
summary: This is the changelog for your application. You can have a different
changelog for each version for your application.
title: Changelog
- group_ids: null
opts:
description: |-
***Only for registered users. ***
Groups ids of the groups you want your application published to. If you do not specify at least one group id, you will have to change the visibility directly on Appaloosa website.
is_dont_change_value: false
is_expand: true
is_required: false
summary: You can target specific groups on Appaloosa and publish your application
only to the users of these groups.
title: Group IDs
================================================
FILE: steps/appaloosa/1.2.3/step.yml
================================================
title: Publish to Appaloosa Store
summary: This step allows you to publish your application to your private app store
on Appaloosa Store
description: |
Bitrise Step to Deploy an iOS IPA to Appaloosa-Store.
Required: an Xcode Archive Step should run before this Step!
This step requires an Appaloosa-Store account or an email address to create your account
website: https://www.appaloosa-store.com
source_code_url: https://github.com/appaloosa-store/bitrise_appaloosa
support_url: https://github.com/appaloosa-store/bitrise_appaloosa/issues
published_at: 2016-10-19T13:12:18.714797437+02:00
source:
git: https://github.com/appaloosa-store/bitrise_appaloosa.git
commit: 38d2d6132fc1365c3650159a758bf495305372fe
host_os_tags:
- osx-10.9
- osx-10.10
project_type_tags:
- ios
type_tags:
- deploy
- appaloosa
- appaloosa-store
is_requires_admin_user: true
is_always_run: false
is_skippable: false
run_if: ""
inputs:
- bitrise_ipa_path: $BITRISE_IPA_PATH
opts:
description: This is the variable of your IPA path on Bitrise
is_dont_change_value: false
is_expand: true
is_required: true
summary: ""
title: IPA PATH
- opts:
description: |-
***Only if you haven't created an account on Appaloosa yet.***
You'll receive an email with your credentials to access your private store.
is_dont_change_value: false
is_expand: true
is_required: false
summary: If you don't have an account we'll automatically create one for you.
At the end of the step you'll receive an email with your credentials to access
your store, and install your application. For all future runs of this step,
remove your email address and setup this step as a registered user.
title: User Email Address
user_email: null
- appaloosa_api_key: null
opts:
description: '***Only if you are already registered on Appaloosa***'
is_dont_change_value: false
is_expand: true
is_required: false
summary: This is your unique Appaloosa API Key that can be found in your user's
profile on Appaloosa
title: User API Key
- opts:
description: |-
***Only if you are already registered on Appaloosa***
This is the store id of the store you want your application uploaded to.
is_dont_change_value: false
is_expand: true
is_required: false
summary: You can find this value in your store settings
title: Store ID
store_id: null
- opts:
description: URL (jpg or png)
is_dont_change_value: false
is_expand: true
is_required: false
summary: Enter the url of your first screenshot
title: SCREENSHOT 1
screenshot1: null
- opts:
description: URL (jpg or png)
is_dont_change_value: false
is_expand: true
is_required: false
summary: Enter the url of your second screenshot
title: SCREENSHOT 2
screenshot2: null
- opts:
description: URL (jpg or png)
is_dont_change_value: false
is_expand: true
is_required: false
summary: Enter the url of your third screenshot
title: SCREENSHOT 3
screenshot3: null
- opts:
description: URL (jpg or png)
is_dont_change_value: false
is_expand: true
is_required: false
summary: Enter the url of your fourth screenshot
title: SCREENSHOT 4
screenshot4: null
- opts:
description: URL (jpg or png)
is_dont_change_value: false
is_expand: true
is_required: false
summary: Enter the url of your fifth screenshot
title: SCREENSHOT 5
screenshot5: null
- description: null
opts:
description: Description for your application
is_dont_change_value: false
is_expand: true
is_required: false
summary: This is the description for your application. You can have a different
description for each version for your application.
title: Description
- changelog: null
opts:
description: Changelog for your application
is_dont_change_value: false
is_expand: true
is_required: false
summary: This is the changelog for your application. You can have a different
changelog for each version for your application.
title: Changelog
- group_ids: null
opts:
description: |-
***Only for registered users. ***
Groups ids of the groups you want your application published to. If you do not specify at least one group id, you will have to change the visibility directly on Appaloosa website.
is_dont_change_value: false
is_expand: true
is_required: false
summary: You can target specific groups on Appaloosa and publish your application
only to the users of these groups.
title: Group IDs
================================================
FILE: steps/appaloosa/1.3.0/step.yml
================================================
title: Publish to Appaloosa Store
summary: This step allows you to publish your application to your private app store
on Appaloosa Store
description: |
Bitrise Step to Deploy an iOS .ipa or Android .apk to Appaloosa-Store.
Required:
For iOS: an Xcode Archive Step should run before this Step!
For Android: an apk should exist
This step requires an Appaloosa-Store account or an email address to create your account
website: https://www.appaloosa-store.com
source_code_url: https://github.com/appaloosa-store/bitrise_appaloosa
support_url: https://github.com/appaloosa-store/bitrise_appaloosa/issues
published_at: 2016-11-15T15:00:39.505566497+01:00
source:
git: https://github.com/appaloosa-store/bitrise_appaloosa.git
commit: 30664f05e6f05ae94d5d0f448835a5000c3a412e
host_os_tags:
- osx-10.9
- osx-10.10
project_type_tags:
- ios
- android
- xamarin
- cordova
- ionic
- react-native
type_tags:
- deploy
is_requires_admin_user: true
is_always_run: false
is_skippable: false
run_if: ""
inputs:
- bitrise_ipa_path: $BITRISE_IPA_PATH
opts:
description: This is the path to your binary on Bitrise
is_dont_change_value: false
is_expand: true
is_required: true
summary: ""
title: BINARY PATH
- opts:
description: |-
***Only if you haven't created an account on Appaloosa yet.***
You'll receive an email with your credentials to access your private store.
is_dont_change_value: false
is_expand: true
is_required: false
summary: If you don't have an account we'll automatically create one for you.
At the end of the step you'll receive an email with your credentials to access
your store, and install your application. For all future runs of this step,
remove your email address and setup this step as a registered user.
title: User Email Address
user_email: null
- appaloosa_api_key: null
opts:
description: '***Only if you are already registered on Appaloosa***'
is_dont_change_value: false
is_expand: true
is_required: false
summary: This is your unique Appaloosa API Key that can be found in your user's
profile on Appaloosa
title: User API Key
- opts:
description: |-
***Only if you are already registered on Appaloosa***
This is the store id of the store you want your application uploaded to.
is_dont_change_value: false
is_expand: true
is_required: false
summary: You can find this value in your store settings
title: Store ID
store_id: null
- opts:
description: URL (jpg or png)
is_dont_change_value: false
is_expand: true
is_required: false
summary: Enter the url of your first screenshot
title: SCREENSHOT 1
screenshot1: null
- opts:
description: URL (jpg or png)
is_dont_change_value: false
is_expand: true
is_required: false
summary: Enter the url of your second screenshot
title: SCREENSHOT 2
screenshot2: null
- opts:
description: URL (jpg or png)
is_dont_change_value: false
is_expand: true
is_required: false
summary: Enter the url of your third screenshot
title: SCREENSHOT 3
screenshot3: null
- opts:
description: URL (jpg or png)
is_dont_change_value: false
is_expand: true
is_required: false
summary: Enter the url of your fourth screenshot
title: SCREENSHOT 4
screenshot4: null
- opts:
description: URL (jpg or png)
is_dont_change_value: false
is_expand: true
is_required: false
summary: Enter the url of your fifth screenshot
title: SCREENSHOT 5
screenshot5: null
- description: null
opts:
description: Description for your application
is_dont_change_value: false
is_expand: true
is_required: false
summary: This is the description for your application. You can have a different
description for each version for your application.
title: Description
- changelog: null
opts:
description: Changelog for your application
is_dont_change_value: false
is_expand: true
is_required: false
summary: This is the changelog for your application. You can have a different
changelog for each version for your application.
title: Changelog
- group_ids: null
opts:
description: |-
***Only for registered users. ***
Groups ids of the groups you want your application published to. If you do not specify at least one group id, you will have to change the visibility directly on Appaloosa website.
is_dont_change_value: false
is_expand: true
is_required: false
summary: You can target specific groups on Appaloosa and publish your application
only to the users of these groups.
title: Group IDs
================================================
FILE: steps/appaloosa/1.4.0/step.yml
================================================
title: Publish to Appaloosa Store
summary: This step allows you to publish your application to your private app store
on Appaloosa Store
description: |
Bitrise Step to Deploy an iOS .ipa or Android .apk to Appaloosa-Store.
Required:
For iOS: an ipa should have been generated before running this step.
For Android: an apk should have been generated before running this step.
This step requires an Appaloosa-Store account.
website: https://www.appaloosa-store.com
source_code_url: https://github.com/appaloosa-store/bitrise_appaloosa
support_url: https://github.com/appaloosa-store/bitrise_appaloosa/issues
published_at: 2016-11-15T15:00:39.505566497+01:00
source:
git: https://github.com/appaloosa-store/bitrise_appaloosa.git
commit: 30664f05e6f05ae94d5d0f448835a5000c3a412e
host_os_tags:
- osx-10.9
- osx-10.10
project_type_tags:
- ios
- android
- xamarin
- cordova
- ionic
- react-native
type_tags:
- deploy
is_requires_admin_user: true
is_always_run: false
is_skippable: false
run_if: ""
inputs:
- bitrise_ipa_path: $BITRISE_IPA_PATH
opts:
description: This is the path to your binary on Bitrise
is_dont_change_value: false
is_expand: true
is_required: true
summary: ""
title: BINARY PATH
- appaloosa_api_key: null
opts:
description: 'This is your unique Appaloosa API Key that can be found in your settings'
is_dont_change_value: false
is_expand: true
is_required: false
is_sensitive: true
summary: You can find this value in your store settings
title: User API Key
- opts:
description: 'This is the store id of the store you want your application uploaded to.'
is_dont_change_value: false
is_expand: true
is_required: false
summary: You can find this value in your store settings
title: Store ID
store_id: null
- opts:
description: URL (jpg or png)
is_dont_change_value: false
is_expand: true
is_required: false
summary: Enter the url of your first screenshot
title: SCREENSHOT 1
screenshot1: null
- opts:
description: URL (jpg or png)
is_dont_change_value: false
is_expand: true
is_required: false
summary: Enter the url of your second screenshot
title: SCREENSHOT 2
screenshot2: null
- opts:
description: URL (jpg or png)
is_dont_change_value: false
is_expand: true
is_required: false
summary: Enter the url of your third screenshot
title: SCREENSHOT 3
screenshot3: null
- opts:
description: URL (jpg or png)
is_dont_change_value: false
is_expand: true
is_required: false
summary: Enter the url of your fourth screenshot
title: SCREENSHOT 4
screenshot4: null
- opts:
description: URL (jpg or png)
is_dont_change_value: false
is_expand: true
is_required: false
summary: Enter the url of your fifth screenshot
title: SCREENSHOT 5
screenshot5: null
- description: null
opts:
description: Description for your application
is_dont_change_value: false
is_expand: true
is_required: false
summary: This is the description for your application. You can have a different
description for each version for your application.
title: Description
- changelog: null
opts:
description: Changelog for your application
is_dont_change_value: false
is_expand: true
is_required: false
summary: This is the changelog for your application. You can have a different
changelog for each version for your application.
title: Changelog
- group_ids: null
opts:
description: 'Groups ids of the groups you want your application published to. If you do not specify at least one group id, you will have to change the visibility directly on Appaloosa website.'
is_dont_change_value: false
is_expand: true
is_required: false
summary: You can target specific groups on Appaloosa and publish your application
only to the users of these groups.
title: Group IDs
================================================
FILE: steps/appaloosa/1.5.0/step.yml
================================================
title: Publish to Appaloosa Store
summary: This step allows you to publish your application to your private app store
on Appaloosa Store
description: |
Bitrise Step to Deploy an iOS .ipa or Android (.apk, .aab) to Appaloosa-Store.
Required:
For iOS: an ipa should have been generated before running this step.
For Android: an apk or aab should have been generated before running this step.
This step requires an Appaloosa-Store account.
website: https://www.appaloosa-store.com
source_code_url: https://github.com/appaloosa-store/bitrise_appaloosa
support_url: https://github.com/appaloosa-store/bitrise_appaloosa/issues
published_at: 2016-11-15T15:00:39.505566497+01:00
source:
git: https://github.com/appaloosa-store/bitrise_appaloosa.git
commit: 2d776f2b7bc7a87f5f3e0a95b0ac6480d6e0ddf9
host_os_tags:
- osx-10.9
- osx-10.10
project_type_tags:
- ios
- android
- xamarin
- cordova
- ionic
- react-native
type_tags:
- deploy
is_requires_admin_user: true
is_always_run: false
is_skippable: false
run_if: ""
inputs:
- bitrise_ipa_path: $BITRISE_IPA_PATH
opts:
description: This is the path to your binary on Bitrise
is_dont_change_value: false
is_expand: true
is_required: true
summary: ""
title: BINARY PATH
- appaloosa_api_key: null
opts:
description: 'This is your unique Appaloosa API Key that can be found in your settings'
is_dont_change_value: false
is_expand: true
is_required: false
is_sensitive: true
summary: You can find this value in your store settings
title: User API Key
- opts:
description: 'This is the store id of the store you want your application uploaded to.'
is_dont_change_value: false
is_expand: true
is_required: false
summary: You can find this value in your store settings
title: Store ID
store_id: null
- opts:
description: URL (jpg or png)
is_dont_change_value: false
is_expand: true
is_required: false
summary: Enter the url of your first screenshot
title: SCREENSHOT 1
screenshot1: null
- opts:
description: URL (jpg or png)
is_dont_change_value: false
is_expand: true
is_required: false
summary: Enter the url of your second screenshot
title: SCREENSHOT 2
screenshot2: null
- opts:
description: URL (jpg or png)
is_dont_change_value: false
is_expand: true
is_required: false
summary: Enter the url of your third screenshot
title: SCREENSHOT 3
screenshot3: null
- opts:
description: URL (jpg or png)
is_dont_change_value: false
is_expand: true
is_required: false
summary: Enter the url of your fourth screenshot
title: SCREENSHOT 4
screenshot4: null
- opts:
description: URL (jpg or png)
is_dont_change_value: false
is_expand: true
is_required: false
summary: Enter the url of your fifth screenshot
title: SCREENSHOT 5
screenshot5: null
- description: null
opts:
description: Description for your application
is_dont_change_value: false
is_expand: true
is_required: false
summary: This is the description for your application. You can have a different
description for each version for your application.
title: Description
- changelog: null
opts:
description: Changelog for your application
is_dont_change_value: false
is_expand: true
is_required: false
summary: This is the changelog for your application. You can have a different
changelog for each version for your application.
title: Changelog
- group_ids: null
opts:
description: 'Groups ids of the groups you want your application published to. If you do not specify at least one group id, you will have to change the visibility directly on Appaloosa website.'
is_dont_change_value: false
is_expand: true
is_required: false
summary: You can target specific groups on Appaloosa and publish your application
only to the users of these groups.
title: Group IDs
================================================
FILE: steps/appaloosa/step-info.yml
================================================
maintainer: verified
================================================
FILE: steps/appcenter-apk-upload/0.0.1/step.yml
================================================
title: Deploy to AppCenter - apk & mapping
summary: |
Upload apk and mapping.txt to Microsoft AppCenter
description: |
This step is upload Android apk archive file to AppCenter support mapping.txt.
website: https://github.com/kanari3/bitrise-step-appcenter-apk-upload
source_code_url: https://github.com/kanari3/bitrise-step-appcenter-apk-upload
support_url: https://github.com/kanari3/bitrise-step-appcenter-apk-upload/issues
published_at: 2019-07-25T00:12:17.685785+09:00
source:
git: https://github.com/kanari3/bitrise-step-appcenter-apk-upload.git
commit: 8fd5f903714eba07ef2451c27de74607528e3c4c
host_os_tags:
- osx-10.10
- ubuntu-16.04
project_type_tags:
- android
type_tags:
- deploy
toolkit:
bash:
entry_file: step.sh
deps:
brew:
- name: jq
- name: curl
apt_get:
- name: jq
- name: curl
is_requires_admin_user: true
is_always_run: false
is_skippable: false
run_if: ""
inputs:
- app_id: $APP_CENTER_RELEASE_NOTE
opts:
description: |
Doesn't support markdown format.
is_required: false
summary: for AppCenter Release Note Message
title: AppCenter Release Note
- app_id: $APP_PROJECT_NAME
opts:
description: |
Target project inclued by setting.gradle
is_required: true
summary: Application Project file name.
title: App Project Name
- app_id: $APP_CENTER_APP_ID
opts:
description: |
AppCenter Application Identifier is a combination of your Organization/Owner Name
and an Application Name.
For example: "MyOrganization/MyApplication"
is_required: true
summary: AppCenter application identifier (Owner + App Name).
title: Application Identifier
- api_token: $APP_CENTER_ACCESS_TOKEN
opts:
description: |
[Obtain API Token from AppCenter](https://appcenter.ms/settings/apitokens)
is_required: true
is_sensitive: true
title: AppCenter API Token
- distribution_group: $APP_CENTER_DISTRIBUTION_GROUP
opts:
description: |
For example and default: "Collaborators"
is_required: true
title: AppCenter Distribution Group Name
================================================
FILE: steps/appcenter-apk-upload/step-info.yml
================================================
maintainer: community
removal_date: "2026-08-08"
deprecate_notes: |
App Center is deprecated.
We recommend to use [Bitrise Release Management](https://docs.bitrise.io/en/release-management.html) and [Bitrise CodePush](https://docs.bitrise.io/en/release-management/codepush/about-codepush.html).
================================================
FILE: steps/appcenter-app-release/1.0.0/step.yml
================================================
title: AppCenter App Release
summary: |
Release an application on Microsoft AppCenter
description: |
Release an application on Microsoft AppCenter
website: https://github.com/fileformat/bitrise-step-appcenter-app-release
source_code_url: https://github.com/fileformat/bitrise-step-appcenter-app-release
support_url: https://github.com/fileformat/bitrise-step-appcenter-app-release/issues
published_at: 2019-07-01T10:50:42.111187111-04:00
source:
git: https://github.com/fileformat/bitrise-step-appcenter-app-release.git
commit: e064d73405ff8c29ffaaf712fd7002083e8113ca
host_os_tags:
- osx-10.10
- ubuntu-16.04
type_tags:
- deploy
toolkit:
bash:
entry_file: step.sh
deps:
brew:
- name: jq
- name: curl
apt_get:
- name: jq
- name: curl
is_requires_admin_user: true
is_always_run: false
is_skippable: false
run_if: ""
inputs:
- appcenter_api_token: $APPCENTER_API_TOKEN
opts:
is_expand: true
is_required: true
is_sensitive: true
title: AppCenter API Token
- appcenter_name: $APPCENTER_NAME
opts:
is_expand: true
is_required: true
title: AppCenter Application Name
- appcenter_org: $APPCENTER_ORG
opts:
is_expand: true
is_required: true
title: AppCenter Organization
- artifact_path: $ARTIFACT_PATH
opts:
is_expand: true
is_required: true
title: path to the built application file (.ipa or .apk)
================================================
FILE: steps/appcenter-app-release/1.0.1/step.yml
================================================
title: AppCenter App Release
summary: |
Release an application on Microsoft AppCenter
description: |
Release an application on Microsoft AppCenter
website: https://github.com/fileformat/bitrise-step-appcenter-app-release
source_code_url: https://github.com/fileformat/bitrise-step-appcenter-app-release
support_url: https://github.com/fileformat/bitrise-step-appcenter-app-release/issues
published_at: 2019-09-04T15:29:27.480646-04:00
source:
git: https://github.com/fileformat/bitrise-step-appcenter-app-release.git
commit: 6e49525cb88bec3f4e098b314c4586d57b4b7274
host_os_tags:
- osx-10.10
- ubuntu-16.04
type_tags:
- deploy
toolkit:
bash:
entry_file: step.sh
deps:
brew:
- name: jq
- name: curl
apt_get:
- name: jq
- name: curl
is_requires_admin_user: true
is_always_run: false
is_skippable: false
run_if: ""
inputs:
- appcenter_api_token: $APPCENTER_API_TOKEN
opts:
is_expand: true
is_required: true
is_sensitive: true
title: AppCenter API Token
- appcenter_name: $APPCENTER_NAME
opts:
is_expand: true
is_required: true
title: AppCenter Application Name
- appcenter_org: $APPCENTER_ORG
opts:
is_expand: true
is_required: true
title: AppCenter Organization
- artifact_path: $ARTIFACT_PATH
opts:
is_expand: true
is_required: true
title: path to the built application file (.ipa or .apk)
- distribution_groups: $DISTRIBUTION_GROUPS
opts:
description: Groups should be comma separated e.g. group1, group2. If not specified,
artifact will be sent to all distribution groups
is_expand: true
is_required: false
title: AppCenter distribution groups
- opts:
is_expand: true
is_required: false
title: Uploaded build related release notes
release_notes: $RELEASE_NOTES
================================================
FILE: steps/appcenter-app-release/1.0.3/step.yml
================================================
title: AppCenter App Release
summary: |
Release an application on Microsoft AppCenter
description: |
Release an application on Microsoft AppCenter
website: https://github.com/fileformat/bitrise-step-appcenter-app-release
source_code_url: https://github.com/fileformat/bitrise-step-appcenter-app-release
support_url: https://github.com/fileformat/bitrise-step-appcenter-app-release/issues
published_at: 2019-10-01T11:02:36.233008-04:00
source:
git: https://github.com/fileformat/bitrise-step-appcenter-app-release.git
commit: 347097e2f25e382e34119e8ee919355986dbcd1f
host_os_tags:
- osx-10.10
- ubuntu-16.04
type_tags:
- deploy
toolkit:
bash:
entry_file: step.sh
deps:
brew:
- name: jq
- name: curl
apt_get:
- name: jq
- name: curl
is_requires_admin_user: true
is_always_run: false
is_skippable: false
run_if: ""
inputs:
- appcenter_api_token: $APPCENTER_API_TOKEN
opts:
is_expand: true
is_required: true
is_sensitive: true
title: AppCenter API Token
- appcenter_name: $APPCENTER_NAME
opts:
is_expand: true
is_required: true
title: AppCenter Application Name
- appcenter_org: $APPCENTER_ORG
opts:
is_expand: true
is_required: true
title: AppCenter Organization
- artifact_path: $ARTIFACT_PATH
opts:
is_expand: true
is_required: true
title: path to the built application file (.ipa or .apk)
- distribution_groups: $DISTRIBUTION_GROUPS
opts:
description: Groups should be comma separated e.g. group1, group2. If not specified,
artifact will be sent to all distribution groups
is_expand: true
is_required: false
title: AppCenter distribution groups
- notify_testers: $NOTIFY_TESTERS
opts:
is_expand: true
is_required: false
summary: Do you want to notify testers of a new release (default = true)
title: Notify testers?
value_options:
- "true"
- "false"
- opts:
is_expand: true
is_required: false
title: Uploaded build related release notes
release_notes: $RELEASE_NOTES
================================================
FILE: steps/appcenter-app-release/1.0.5/step.yml
================================================
title: AppCenter App Release
summary: |
Release an application on Microsoft AppCenter
description: |
Release an application on Microsoft AppCenter
website: https://github.com/fileformat/bitrise-step-appcenter-app-release
source_code_url: https://github.com/fileformat/bitrise-step-appcenter-app-release
support_url: https://github.com/fileformat/bitrise-step-appcenter-app-release/issues
published_at: 2019-11-22T11:09:49.651925-05:00
source:
git: https://github.com/fileformat/bitrise-step-appcenter-app-release.git
commit: caa8294515c2902721a1d72b831446d2ea89bd1c
host_os_tags:
- osx-10.10
- ubuntu-16.04
type_tags:
- deploy
toolkit:
bash:
entry_file: step.sh
deps:
brew:
- name: jq
- name: curl
apt_get:
- name: jq
- name: curl
is_requires_admin_user: true
is_always_run: false
is_skippable: false
run_if: ""
inputs:
- appcenter_api_token: $APPCENTER_API_TOKEN
opts:
is_expand: true
is_required: true
is_sensitive: true
title: AppCenter API Token
- appcenter_name: $APPCENTER_NAME
opts:
is_expand: true
is_required: true
title: AppCenter Application Name
- appcenter_org: $APPCENTER_ORG
opts:
is_expand: true
is_required: true
title: AppCenter Organization
- artifact_path: $ARTIFACT_PATH
opts:
is_expand: true
is_required: true
title: path to the built application file (.ipa or .apk)
- distribution_groups: $DISTRIBUTION_GROUPS
opts:
description: Groups should be comma separated e.g. group1, group2. If not specified,
artifact will be sent to all distribution groups
is_expand: true
is_required: false
title: AppCenter distribution groups
- mandatory_update: $MANDATORY_UPDATE
opts:
description: Whether this release is a mandatory update (default = false)
is_expand: true
is_required: false
title: AppCenter Mandatory Update flag
value_options:
- "true"
- "false"
- notify_testers: $NOTIFY_TESTERS
opts:
is_expand: true
is_required: false
summary: Do you want to notify testers of a new release (default = true)
title: Notify testers?
value_options:
- "true"
- "false"
- opts:
is_expand: true
is_required: false
title: Uploaded build related release notes
release_notes: $RELEASE_NOTES
outputs:
- APPCENTER_DOWNLOAD_URL: $APPCENTER_DOWNLOAD_URL
opts:
title: Download URL from AppCenter
================================================
FILE: steps/appcenter-app-release/step-info.yml
================================================
maintainer: community
removal_date: "2022-11-06"
deprecate_notes: |
This step is no longer maintained by its author.
It's recommended to use the new AppCenter steps created and maintained by Bitrise:
- For iOS, use the [AppCenter iOS Deploy](https://github.com/bitrise-steplib/steps-appcenter-deploy-ios) Step instead
- For Android, use the [AppCenter Android Deploy](https://github.com/bitrise-steplib/steps-appcenter-deploy-android) Step instead
================================================
FILE: steps/appcenter-codepush-release-react-native/0.0.1/step.yml
================================================
title: AppCenter CodePush Release React Native
summary: |
Release a React Native update to AppCenter CodePush
description: |
Utilise appcenter-cli command appcenter codepush release-react to release an update
website: https://github.com/adrianchinghc/bitrise-step-appcenter-codepush-release-react-native
source_code_url: https://github.com/adrianchinghc/bitrise-step-appcenter-codepush-release-react-native
support_url: https://github.com/adrianchinghc/bitrise-step-appcenter-codepush-release-react-native/issues
published_at: !!timestamp 2018-03-21T03:24:18.183703631+08:00
source:
git: https://github.com/adrianchinghc/bitrise-step-appcenter-codepush-release-react-native.git
commit: bdbfa011fc1469fd2cb583f3cc732cfc01e013b8
host_os_tags:
- osx-10.10
- ubuntu-16.04
project_type_tags:
- react-native
type_tags:
- deploy
toolkit:
bash:
entry_file: step.sh
deps:
brew:
- name: node
apt_get:
- name: node
is_requires_admin_user: true
is_always_run: false
is_skippable: false
run_if: ""
inputs:
- opts:
description: |
Path where the React Native project is located.
is_required: true
title: React Native Project Root
react_native_project_root: $REACT_NATIVE_PROJECT_ROOT
- app_id: $APPCENTER_APP_ID
opts:
description: |
AppCenter Application Identifier is a combination of your Organization/Owner Name and an Application Name.
For example: "Upstack-Studio/bitrise-android"
is_required: true
summary: AppCenter application identifier (Organization/Owner Name + App Name).
title: AppCenter App ID
- api_token: $APPCENTER_API_TOKEN
opts:
description: |
AppCenter API Token can be obtained from [here]](https://appcenter.ms/settings/apitokens).
New API Token > Enter a description for the token > Select Full Access > Add New API Token
is_required: true
title: AppCenter API Token
- env: 'prod'
opts:
description: |
Choices for environments [here](https://github.com/Microsoft/appcenter-cli/blob/61bd72c1dcabeb876ee14fcaa316fd6b367b49a6/src/commands/codepush/lib/environment.ts#L18)
is_required: true
title: Environment
- options:
opts:
description: |
Any extra options that you would like to concat to the release-react command
is_required: false
title: Extra Options
================================================
FILE: steps/appcenter-codepush-release-react-native/0.0.2/step.yml
================================================
title: AppCenter CodePush Release React Native
summary: |
Release a React Native update to AppCenter CodePush
description: |
Utilise appcenter-cli command appcenter codepush release-react to release an update
website: https://github.com/adrianchinghc/bitrise-step-appcenter-codepush-release-react-native
source_code_url: https://github.com/adrianchinghc/bitrise-step-appcenter-codepush-release-react-native
support_url: https://github.com/adrianchinghc/bitrise-step-appcenter-codepush-release-react-native/issues
published_at: 2018-07-24T12:10:48.971190291+08:00
source:
git: https://github.com/adrianchinghc/bitrise-step-appcenter-codepush-release-react-native.git
commit: c6cb21acbdefcc8f230d459bcdb940d17fa58135
host_os_tags:
- osx-10.10
- ubuntu-16.04
project_type_tags:
- react-native
type_tags:
- deploy
toolkit:
bash:
entry_file: step.sh
deps:
brew:
- name: node
apt_get:
- name: node
is_requires_admin_user: true
is_always_run: false
is_skippable: false
run_if: ""
inputs:
- opts:
description: |
Path where the React Native project is located.
is_required: true
title: React Native Project Root
react_native_project_root: $REACT_NATIVE_PROJECT_ROOT
- app_id: $APPCENTER_APP_ID
opts:
description: |
AppCenter Application Identifier is a combination of your Organization/Owner Name and an Application Name.
For example: "Upstack-Studio/bitrise-android"
is_required: true
summary: AppCenter application identifier (Organization/Owner Name + App Name).
title: AppCenter App ID
- api_token: $APPCENTER_API_TOKEN
opts:
description: |
AppCenter API Token can be obtained from [here]](https://appcenter.ms/settings/apitokens).
New API Token > Enter a description for the token > Select Full Access > Add New API Token
is_required: true
title: AppCenter API Token
- deployment: Staging
opts:
description: |
This specifies which deployment you want to release the update to. This defaults to Staging, but when you're ready to deploy to Production, or one of your own custom deployments, just explicitly set this argument. See [here](https://docs.microsoft.com/en-us/appcenter/distribution/codepush/cli#deployment-name-parameter) for details.
is_required: true
title: Deployment
- options: null
opts:
description: |
Any extra options that you would like to concat to the release-react command. Eg. "-m --disable-duplicate-release-error"
is_required: false
title: Extra Options
================================================
FILE: steps/appcenter-codepush-release-react-native/0.0.3/step.yml
================================================
title: AppCenter CodePush Release React Native
summary: |
Release a React Native update to AppCenter CodePush
description: |
Utilise appcenter-cli command appcenter codepush release-react to release an update
website: https://github.com/adrianchinghc/bitrise-step-appcenter-codepush-release-react-native
source_code_url: https://github.com/adrianchinghc/bitrise-step-appcenter-codepush-release-react-native
support_url: https://github.com/adrianchinghc/bitrise-step-appcenter-codepush-release-react-native/issues
published_at: 2021-03-24T17:24:07.835473+08:00
source:
git: https://github.com/adrianchinghc/bitrise-step-appcenter-codepush-release-react-native.git
commit: dc8cee3b16aaf5ae2ca377422cb74f3bff1e7dff
host_os_tags:
- osx-10.10
- ubuntu-16.04
project_type_tags:
- react-native
type_tags:
- deploy
toolkit:
bash:
entry_file: step.sh
deps:
brew:
- name: node
apt_get:
- name: node
is_requires_admin_user: true
is_always_run: false
is_skippable: false
run_if: ""
inputs:
- opts:
description: |
Path where the React Native project is located.
is_required: true
title: React Native Project Root
react_native_project_root: $REACT_NATIVE_PROJECT_ROOT
- app_id: $APPCENTER_APP_ID
opts:
description: |
AppCenter Application Identifier is a combination of your Organization/Owner Name and an Application Name.
For example: `Upstack-Studio/bitrise-android`
is_required: true
summary: AppCenter application identifier (Organization/Owner Name + App Name).
title: AppCenter App ID
- api_token: $APPCENTER_API_TOKEN
opts:
description: |
AppCenter API Token can be obtained from [here](https://appcenter.ms/settings/apitokens). `New API Token` > `Enter a description for the token` > `Select Full Access` > `Add New API Token`
is_required: true
is_sensitive: true
title: AppCenter API Token
- deployment: Staging
opts:
description: |
This specifies which deployment you want to release the update to. This defaults to Staging, but when you're ready to deploy to Production, or one of your own custom deployments, just explicitly set this argument. See [here](https://docs.microsoft.com/en-us/appcenter/distribution/codepush/cli#deployment-name-parameter) for details.
is_required: true
title: Deployment
- description: null
opts:
description: |
Specify an optional "change log" for the deployment.
is_required: false
title: Description
- options: null
opts:
description: |
Any extra options that you would like to concat to the release-react command. Eg. "-m --disable-duplicate-release-error"
is_required: false
title: Extra Options
================================================
FILE: steps/appcenter-codepush-release-react-native/step-info.yml
================================================
maintainer: community
removal_date: "2026-08-08"
deprecate_notes: |
App Center is deprecated.
We recommend to use [Bitrise Release Management](https://docs.bitrise.io/en/release-management.html) and [Bitrise CodePush](https://docs.bitrise.io/en/release-management/codepush/about-codepush.html).
================================================
FILE: steps/appcenter-deploy-android/1.0.0/step.yml
================================================
title: AppCenter Android Deploy
summary: Deploy your awesome Android app to AppCenter.
description: Deploy an Android application to [AppCenter](https://appcenter.ms).
website: https://github.com/bitrise-steplib/steps-appcenter-deploy-android
source_code_url: https://github.com/bitrise-steplib/steps-appcenter-deploy-android
support_url: https://github.com/bitrise-steplib/steps-appcenter-deploy-android/issues
published_at: 2019-11-26T14:38:45.813756844Z
source:
git: https://github.com/bitrise-steplib/steps-appcenter-deploy-android.git
commit: 0c5eb1ad4f7f7ca9bce75a819894e0c9241ec0cd
project_type_tags:
- android
- xamarin
- cordova
- ionic
- react-native
- flutter
type_tags:
- deploy
toolkit:
go:
package_name: github.com/bitrise-steplib/steps-appcenter-deploy-android
is_always_run: false
is_skippable: false
inputs:
- app_path: $BITRISE_APP_PATH
opts:
description: |-
Path to binary file
For APKs, only single or universal APKs are supported: https://docs.microsoft.com/en-us/appcenter/build/react-native/android/#63-building-multiple-apks
is_required: true
summary: Path to binary file
title: APP path
- mapping_path: null
opts:
description: Path to an Android mapping.txt file.
summary: Path to an Android mapping.txt file.
title: mapping.txt file path
- api_token: null
opts:
description: App Center API token
is_required: true
is_sensitive: true
summary: App Center API token
title: API Token
- opts:
description: |-
Owner of the App Center app.
For an app owned by a user, the URL in App Center might look like https://appcenter.ms/users/JoshuaWeber/apps/APIExample.
Here, the {owner_name} is JoshuaWeber. For an app owned by an org, the URL might be
https://appcenter.ms/orgs/Microsoft/apps/APIExample and the {owner_name} would be Microsoft
is_required: true
summary: Owner of the App Center app
title: Owner name
owner_name: null
- app_name: null
opts:
description: |-
The name of the App Center app.
For an app owned by a user, the URL in App Center might look like https://appcenter.ms/users/JoshuaWeber/apps/APIExample.
Here, the {app_name} is ApiExample.
is_required: true
summary: The name of the App Center app
title: App name
- distribution_group: null
opts:
description: |-
User groups you wish to distribute the app. One group name per line.
Distribution of AAB is supported only for Google Play store deployment: https://docs.microsoft.com/en-us/appcenter/distribution/uploading#android
summary: User groups you wish to distribute the app. One group name per line.
title: Distribution groups
- distribution_store: null
opts:
description: |-
Distribution stores you wish to distribute the app. One store name per line.
Distribution of AAB is supported only for Google Play store deployment: https://docs.microsoft.com/en-us/appcenter/distribution/uploading#android
summary: Distribution stores you wish to distribute the app. One store name per
line.
title: Distribution stores
- distribution_tester: null
opts:
description: |-
List of individual testers. One email per line.
Distribution of AAB is supported only for Google Play store deployment: https://docs.microsoft.com/en-us/appcenter/distribution/uploading#android
summary: List of individual testers. One email per line.
title: Testers
- opts:
description: Additional notes for the deployed artifact.
summary: Release notes text
title: Release notes text
release_notes: Release notes
- notify_testers: "yes"
opts:
description: Send notification email to testers and distribution groups.
is_required: true
summary: Send notification email to testers and distribution groups.
title: Notify Testers
value_options:
- "yes"
- "no"
- mandatory: "no"
opts:
description: Enforce installation of distribution version. Requires SDK integration.
is_required: true
summary: Enforce installation of distribution version. Requires SDK integration.
title: Mandatory
value_options:
- "no"
- "yes"
- debug: "no"
opts:
description: Enable verbose logs
is_required: true
summary: Enable verbose logs
title: Debug
value_options:
- "no"
- "yes"
outputs:
- APPCENTER_DEPLOY_STATUS: null
opts:
description: 'Deployment status: ''success'' or ''failed'''
summary: 'Deployment status: ''success'' or ''failed'''
title: Deployment status
- APPCENTER_DEPLOY_INSTALL_URL: null
opts:
description: Install page URL of the newly deployed version.
summary: Install page URL of the newly deployed version
title: Install page URL
- APPCENTER_DEPLOY_DOWNLOAD_URL: null
opts:
description: Download URL of the newly deployed version.
summary: Download URL of the newly deployed version
title: Download URL
- APPCENTER_PUBLIC_INSTALL_PAGE_URL: null
opts:
description: Public install page URL of the latest version.
summary: Public install page URL of the latest version
title: Public install page URL
================================================
FILE: steps/appcenter-deploy-android/1.0.1/step.yml
================================================
title: AppCenter Android Deploy
summary: Deploy your awesome Android app to AppCenter.
description: Deploy an Android application to [AppCenter](https://appcenter.ms).
website: https://github.com/bitrise-steplib/steps-appcenter-deploy-android
source_code_url: https://github.com/bitrise-steplib/steps-appcenter-deploy-android
support_url: https://github.com/bitrise-steplib/steps-appcenter-deploy-android/issues
published_at: 2019-12-10T15:16:51.146344226Z
source:
git: https://github.com/bitrise-steplib/steps-appcenter-deploy-android.git
commit: 1947d021cba299356fb6fe8a8c2a979c608ef6f4
project_type_tags:
- android
- xamarin
- cordova
- ionic
- react-native
- flutter
type_tags:
- deploy
toolkit:
go:
package_name: github.com/bitrise-steplib/steps-appcenter-deploy-android
is_always_run: false
is_skippable: false
inputs:
- app_path: $BITRISE_APP_PATH
opts:
description: |-
Path to binary file
For APKs, only single or universal APKs are supported: https://docs.microsoft.com/en-us/appcenter/build/react-native/android/#63-building-multiple-apks
is_required: true
summary: Path to binary file
title: APP path
- mapping_path: null
opts:
description: Path to an Android mapping.txt file.
summary: Path to an Android mapping.txt file.
title: mapping.txt file path
- api_token: null
opts:
description: App Center API token
is_required: true
is_sensitive: true
summary: App Center API token
title: API Token
- opts:
description: |-
Owner of the App Center app.
For an app owned by a user, the URL in App Center might look like https://appcenter.ms/users/JoshuaWeber/apps/APIExample.
Here, the {owner_name} is JoshuaWeber. For an app owned by an org, the URL might be
https://appcenter.ms/orgs/Microsoft/apps/APIExample and the {owner_name} would be Microsoft
is_required: true
summary: Owner of the App Center app
title: Owner name
owner_name: null
- app_name: null
opts:
description: |-
The name of the App Center app.
For an app owned by a user, the URL in App Center might look like https://appcenter.ms/users/JoshuaWeber/apps/APIExample.
Here, the {app_name} is ApiExample.
is_required: true
summary: The name of the App Center app
title: App name
- distribution_group: null
opts:
description: |-
User groups you wish to distribute the app. One group name per line.
Distribution of AAB is supported only for Google Play store deployment: https://docs.microsoft.com/en-us/appcenter/distribution/uploading#android
summary: User groups you wish to distribute the app. One group name per line.
title: Distribution groups
- distribution_store: null
opts:
description: |-
Distribution stores you wish to distribute the app. One store name per line.
Distribution of AAB is supported only for Google Play store deployment: https://docs.microsoft.com/en-us/appcenter/distribution/uploading#android
summary: Distribution stores you wish to distribute the app. One store name per
line.
title: Distribution stores
- distribution_tester: null
opts:
description: |-
List of individual testers. One email per line.
Distribution of AAB is supported only for Google Play store deployment: https://docs.microsoft.com/en-us/appcenter/distribution/uploading#android
summary: List of individual testers. One email per line.
title: Testers
- opts:
description: Additional notes for the deployed artifact.
summary: Release notes text
title: Release notes text
release_notes: Release notes
- notify_testers: "yes"
opts:
description: Send notification email to testers and distribution groups.
is_required: true
summary: Send notification email to testers and distribution groups.
title: Notify Testers
value_options:
- "yes"
- "no"
- mandatory: "no"
opts:
description: Enforce installation of distribution version. Requires SDK integration.
is_required: true
summary: Enforce installation of distribution version. Requires SDK integration.
title: Mandatory
value_options:
- "no"
- "yes"
- debug: "no"
opts:
description: Enable verbose logs
is_required: true
summary: Enable verbose logs
title: Debug
value_options:
- "no"
- "yes"
outputs:
- APPCENTER_DEPLOY_STATUS: null
opts:
description: 'Deployment status: ''success'' or ''failed'''
summary: 'Deployment status: ''success'' or ''failed'''
title: Deployment status
- APPCENTER_DEPLOY_INSTALL_URL: null
opts:
description: Install page URL of the newly deployed version.
summary: Install page URL of the newly deployed version
title: Install page URL
- APPCENTER_DEPLOY_DOWNLOAD_URL: null
opts:
description: Download URL of the newly deployed version.
summary: Download URL of the newly deployed version
title: Download URL
- APPCENTER_PUBLIC_INSTALL_PAGE_URL: null
opts:
description: Public install page URL of the latest version.
summary: Public install page URL of the latest version
title: Public install page URL
================================================
FILE: steps/appcenter-deploy-android/1.0.2/step.yml
================================================
title: AppCenter Android Deploy
summary: Deploy your awesome Android app to AppCenter.
description: Deploy an Android application to [AppCenter](https://appcenter.ms).
website: https://github.com/bitrise-steplib/steps-appcenter-deploy-android
source_code_url: https://github.com/bitrise-steplib/steps-appcenter-deploy-android
support_url: https://github.com/bitrise-steplib/steps-appcenter-deploy-android/issues
published_at: 2020-09-02T10:36:06.638925259Z
source:
git: https://github.com/bitrise-steplib/steps-appcenter-deploy-android.git
commit: 3c0ca221d52f3262c2010b8809107de15a08853c
project_type_tags:
- android
- xamarin
- cordova
- ionic
- react-native
- flutter
type_tags:
- deploy
toolkit:
go:
package_name: github.com/bitrise-steplib/steps-appcenter-deploy-android
is_always_run: false
is_skippable: false
inputs:
- app_path: $BITRISE_APP_PATH
opts:
description: |-
Path to binary file
For APKs, only single or universal APKs are supported: https://docs.microsoft.com/en-us/appcenter/build/react-native/android/#63-building-multiple-apks
is_required: true
summary: Path to binary file
title: APP path
- mapping_path: null
opts:
description: Path to an Android mapping.txt file.
summary: Path to an Android mapping.txt file.
title: mapping.txt file path
- api_token: null
opts:
description: App Center API token
is_required: true
is_sensitive: true
summary: App Center API token
title: API Token
- opts:
description: |-
Owner of the App Center app.
For an app owned by a user, the URL in App Center might look like https://appcenter.ms/users/JoshuaWeber/apps/APIExample.
Here, the {owner_name} is JoshuaWeber. For an app owned by an org, the URL might be
https://appcenter.ms/orgs/Microsoft/apps/APIExample and the {owner_name} would be Microsoft
is_required: true
summary: Owner of the App Center app
title: Owner name
owner_name: null
- app_name: null
opts:
description: |-
The name of the App Center app.
For an app owned by a user, the URL in App Center might look like https://appcenter.ms/users/JoshuaWeber/apps/APIExample.
Here, the {app_name} is ApiExample.
is_required: true
summary: The name of the App Center app
title: App name
- distribution_group: null
opts:
description: |-
User groups you wish to distribute the app. One group name per line.
Distribution of AAB is supported only for Google Play store deployment: https://docs.microsoft.com/en-us/appcenter/distribution/uploading#android
summary: User groups you wish to distribute the app. One group name per line.
title: Distribution groups
- distribution_store: null
opts:
description: |-
Distribution stores you wish to distribute the app. One store name per line.
Distribution of AAB is supported only for Google Play store deployment: https://docs.microsoft.com/en-us/appcenter/distribution/uploading#android
summary: Distribution stores you wish to distribute the app. One store name per
line.
title: Distribution stores
- distribution_tester: null
opts:
description: |-
List of individual testers. One email per line.
Distribution of AAB is supported only for Google Play store deployment: https://docs.microsoft.com/en-us/appcenter/distribution/uploading#android
summary: List of individual testers. One email per line.
title: Testers
- opts:
description: Additional notes for the deployed artifact.
summary: Release notes text
title: Release notes text
release_notes: Release notes
- notify_testers: "yes"
opts:
description: Send notification email to testers and distribution groups.
is_required: true
summary: Send notification email to testers and distribution groups.
title: Notify Testers
value_options:
- "yes"
- "no"
- mandatory: "no"
opts:
description: Enforce installation of distribution version. Requires SDK integration.
is_required: true
summary: Enforce installation of distribution version. Requires SDK integration.
title: Mandatory
value_options:
- "no"
- "yes"
- debug: "no"
opts:
description: Enable verbose logs
is_required: true
summary: Enable verbose logs
title: Debug
value_options:
- "no"
- "yes"
outputs:
- APPCENTER_DEPLOY_STATUS: null
opts:
description: 'Deployment status: ''success'' or ''failed'''
summary: 'Deployment status: ''success'' or ''failed'''
title: Deployment status
- APPCENTER_DEPLOY_INSTALL_URL: null
opts:
description: Install page URL of the newly deployed version.
summary: Install page URL of the newly deployed version
title: Install page URL
- APPCENTER_DEPLOY_DOWNLOAD_URL: null
opts:
description: Download URL of the newly deployed version.
summary: Download URL of the newly deployed version
title: Download URL
- APPCENTER_PUBLIC_INSTALL_PAGE_URL: null
opts:
description: Public install page URL of the latest version.
summary: Public install page URL of the latest version
title: Public install page URL
- APPCENTER_RELEASE_PAGE_URL: null
opts:
description: URL to the release page containing release notes, easily share with
business partners and QA for testing.
summary: URL to the release page containing release notes.
title: Release Page URL
================================================
FILE: steps/appcenter-deploy-android/1.1.0/step.yml
================================================
title: AppCenter Android Deploy
summary: Deploy your awesome Android app to AppCenter.
description: Deploy an Android application to [AppCenter](https://appcenter.ms).
website: https://github.com/bitrise-steplib/steps-appcenter-deploy-android
source_code_url: https://github.com/bitrise-steplib/steps-appcenter-deploy-android
support_url: https://github.com/bitrise-steplib/steps-appcenter-deploy-android/issues
published_at: 2020-09-25T09:24:01.531290521Z
source:
git: https://github.com/bitrise-steplib/steps-appcenter-deploy-android.git
commit: 6408133236abf61f266d53f0d3563c56d4edf301
project_type_tags:
- android
- xamarin
- cordova
- ionic
- react-native
- flutter
type_tags:
- deploy
toolkit:
go:
package_name: github.com/bitrise-steplib/steps-appcenter-deploy-android
is_always_run: false
is_skippable: false
inputs:
- app_path: $BITRISE_APP_PATH
opts:
description: |-
Path to binary file
For APKs, only single or universal APKs are supported: https://docs.microsoft.com/en-us/appcenter/build/react-native/android/#63-building-multiple-apks
is_required: true
summary: Path to binary file
title: APP path
- mapping_path: null
opts:
description: Path to an Android mapping.txt file.
summary: Path to an Android mapping.txt file.
title: mapping.txt file path
- api_token: null
opts:
description: App Center API token
is_required: true
is_sensitive: true
summary: App Center API token
title: API Token
- opts:
description: |-
Owner of the App Center app.
For an app owned by a user, the URL in App Center might look like https://appcenter.ms/users/JoshuaWeber/apps/APIExample.
Here, the {owner_name} is JoshuaWeber. For an app owned by an org, the URL might be
https://appcenter.ms/orgs/Microsoft/apps/APIExample and the {owner_name} would be Microsoft
is_required: true
summary: Owner of the App Center app
title: Owner name
owner_name: null
- app_name: null
opts:
description: |-
The name of the App Center app.
For an app owned by a user, the URL in App Center might look like https://appcenter.ms/users/JoshuaWeber/apps/APIExample.
Here, the {app_name} is ApiExample.
is_required: true
summary: The name of the App Center app
title: App name
- distribution_group: null
opts:
description: |-
User groups you wish to distribute the app. One group name per line.
Distribution of AAB is supported only for Google Play store deployment: https://docs.microsoft.com/en-us/appcenter/distribution/uploading#android
summary: User groups you wish to distribute the app. One group name per line.
title: Distribution groups
- distribution_store: null
opts:
description: |-
Distribution stores you wish to distribute the app. One store name per line.
Distribution of AAB is supported only for Google Play store deployment: https://docs.microsoft.com/en-us/appcenter/distribution/uploading#android
summary: Distribution stores you wish to distribute the app. One store name per
line.
title: Distribution stores
- distribution_tester: null
opts:
description: |-
List of individual testers. One email per line.
Distribution of AAB is supported only for Google Play store deployment: https://docs.microsoft.com/en-us/appcenter/distribution/uploading#android
summary: List of individual testers. One email per line.
title: Testers
- opts:
description: Additional notes for the deployed artifact.
summary: Release notes text
title: Release notes text
release_notes: Release notes
- notify_testers: "yes"
opts:
description: Send notification email to testers and distribution groups.
is_required: true
summary: Send notification email to testers and distribution groups.
title: Notify Testers
value_options:
- "yes"
- "no"
- mandatory: "no"
opts:
description: Enforce installation of distribution version. Requires SDK integration.
is_required: true
summary: Enforce installation of distribution version. Requires SDK integration.
title: Mandatory
value_options:
- "no"
- "yes"
- debug: "no"
opts:
description: Enable verbose logs
is_required: true
summary: Enable verbose logs
title: Debug
value_options:
- "no"
- "yes"
outputs:
- APPCENTER_DEPLOY_STATUS: null
opts:
description: 'Deployment status: ''success'' or ''failed'''
summary: 'Deployment status: ''success'' or ''failed'''
title: Deployment status
- APPCENTER_DEPLOY_INSTALL_URL: null
opts:
description: Install page URL of the newly deployed version.
summary: Install page URL of the newly deployed version
title: Install page URL
- APPCENTER_DEPLOY_DOWNLOAD_URL: null
opts:
description: Download URL of the newly deployed version.
summary: Download URL of the newly deployed version
title: Download URL
- APPCENTER_DEPLOY_RELEASE_ID: null
opts:
description: ID of the new release for later retrieval via App Center APIs.
summary: ID of the new release for later retrieval via App Center APIs.
title: Release ID
- APPCENTER_PUBLIC_INSTALL_PAGE_URL: null
opts:
description: Public install page URL of the latest version.
summary: Public install page URL of the latest version
title: Public install page URL
- APPCENTER_RELEASE_PAGE_URL: null
opts:
description: URL to the release page containing release notes, easily share with
business partners and QA for testing.
summary: URL to the release page containing release notes.
title: Release Page URL
================================================
FILE: steps/appcenter-deploy-android/2.0.0/step.yml
================================================
title: AppCenter Android Deploy
summary: Deploy your awesome Android app to AppCenter.
description: Deploy an Android application to [AppCenter](https://appcenter.ms).
website: https://github.com/bitrise-steplib/steps-appcenter-deploy-android
source_code_url: https://github.com/bitrise-steplib/steps-appcenter-deploy-android
support_url: https://github.com/bitrise-steplib/steps-appcenter-deploy-android/issues
published_at: 2020-12-16T12:42:08.970623593Z
source:
git: https://github.com/bitrise-steplib/steps-appcenter-deploy-android.git
commit: 29195d883bc9b3b650f06ac9c32882ae3d73da39
project_type_tags:
- android
- xamarin
- cordova
- ionic
- react-native
- flutter
type_tags:
- deploy
toolkit:
go:
package_name: github.com/bitrise-steplib/steps-appcenter-deploy-android
is_always_run: false
is_skippable: false
inputs:
- app_path: $BITRISE_APP_PATH
opts:
description: |-
Path to binary file
For APKs, only single or universal APKs are supported: https://docs.microsoft.com/en-us/appcenter/build/react-native/android/#63-building-multiple-apks
is_required: true
summary: Path to binary file
title: APP path
- mapping_path: null
opts:
description: Path to an Android mapping.txt file.
summary: Path to an Android mapping.txt file.
title: mapping.txt file path
- api_token: null
opts:
description: App Center API token
is_required: true
is_sensitive: true
summary: App Center API token
title: API Token
- opts:
description: |-
Owner of the App Center app.
For an app owned by a user, the URL in App Center might look like https://appcenter.ms/users/JoshuaWeber/apps/APIExample.
Here, the {owner_name} is JoshuaWeber. For an app owned by an org, the URL might be
https://appcenter.ms/orgs/Microsoft/apps/APIExample and the {owner_name} would be Microsoft
is_required: true
summary: Owner of the App Center app
title: Owner name
owner_name: null
- app_name: null
opts:
description: |-
The name of the App Center app.
For an app owned by a user, the URL in App Center might look like https://appcenter.ms/users/JoshuaWeber/apps/APIExample.
Here, the {app_name} is ApiExample.
is_required: true
summary: The name of the App Center app
title: App name
- distribution_group: null
opts:
description: |-
User groups you wish to distribute the app. One group name per line.
Distribution of AAB is supported only for Google Play store deployment: https://docs.microsoft.com/en-us/appcenter/distribution/uploading#android
is_required: true
summary: User groups you wish to distribute the app. One group name per line.
title: Distribution groups
- distribution_store: null
opts:
description: |-
Distribution stores you wish to distribute the app. One store name per line.
Distribution of AAB is supported only for Google Play store deployment: https://docs.microsoft.com/en-us/appcenter/distribution/uploading#android
summary: Distribution stores you wish to distribute the app. One store name per
line.
title: Distribution stores
- distribution_tester: null
opts:
description: |-
List of individual testers. One email per line.
Distribution of AAB is supported only for Google Play store deployment: https://docs.microsoft.com/en-us/appcenter/distribution/uploading#android
summary: List of individual testers. One email per line.
title: Testers
- opts:
description: Additional notes for the deployed artifact.
summary: Release notes text
title: Release notes text
release_notes: Release notes
- notify_testers: "yes"
opts:
description: Send notification email to testers and distribution groups.
is_required: true
summary: Send notification email to testers and distribution groups.
title: Notify Testers
value_options:
- "yes"
- "no"
- mandatory: "no"
opts:
description: Enforce installation of distribution version. Requires SDK integration.
is_required: true
summary: Enforce installation of distribution version. Requires SDK integration.
title: Mandatory
value_options:
- "no"
- "yes"
- debug: "no"
opts:
description: Enable verbose logs
is_required: true
summary: Enable verbose logs
title: Debug
value_options:
- "no"
- "yes"
outputs:
- APPCENTER_DEPLOY_STATUS: null
opts:
description: 'Deployment status: ''success'' or ''failed'''
summary: 'Deployment status: ''success'' or ''failed'''
title: Deployment status
- APPCENTER_DEPLOY_INSTALL_URL: null
opts:
description: Install page URL of the newly deployed version.
summary: Install page URL of the newly deployed version
title: Install page URL
- APPCENTER_DEPLOY_DOWNLOAD_URL: null
opts:
description: Download URL of the newly deployed version.
summary: Download URL of the newly deployed version
title: Download URL
- APPCENTER_DEPLOY_RELEASE_ID: null
opts:
description: ID of the new release for later retrieval via App Center APIs.
summary: ID of the new release for later retrieval via App Center APIs.
title: Release ID
- APPCENTER_PUBLIC_INSTALL_PAGE_URL: null
opts:
description: Public install page URL of the latest version.
summary: Public install page URL of the latest version
title: Public install page URL
- APPCENTER_PUBLIC_INSTALL_PAGE_URLS: null
opts:
description: When a group is public the step will AppCenter provides and the step
exports a public install page URL.
summary: Comma-separated list of the public install pages URL.
title: Comma-separated public install pages by groups
- APPCENTER_RELEASE_PAGE_URL: null
opts:
description: URL to the release page containing release notes, easily share with
business partners and QA for testing.
summary: URL to the release page containing release notes.
title: Release Page URL
================================================
FILE: steps/appcenter-deploy-android/2.0.1/step.yml
================================================
title: AppCenter Android Deploy
summary: Deploy your awesome Android app to AppCenter.
description: Deploy an Android application to [AppCenter](https://appcenter.ms).
website: https://github.com/bitrise-steplib/steps-appcenter-deploy-android
source_code_url: https://github.com/bitrise-steplib/steps-appcenter-deploy-android
support_url: https://github.com/bitrise-steplib/steps-appcenter-deploy-android/issues
published_at: 2021-01-12T12:23:34.413069704Z
source:
git: https://github.com/bitrise-steplib/steps-appcenter-deploy-android.git
commit: 17c3521aedb18274a7cae73e26ac9dcc8b0622a1
project_type_tags:
- android
- xamarin
- cordova
- ionic
- react-native
- flutter
type_tags:
- deploy
toolkit:
go:
package_name: github.com/bitrise-steplib/steps-appcenter-deploy-android
is_always_run: false
is_skippable: false
inputs:
- app_path: $BITRISE_APP_PATH
opts:
description: |-
Path to binary file
For APKs, only single or universal APKs are supported: https://docs.microsoft.com/en-us/appcenter/build/react-native/android/#63-building-multiple-apks
is_required: true
summary: Path to binary file
title: APP path
- mapping_path: null
opts:
description: Path to an Android mapping.txt file.
summary: Path to an Android mapping.txt file.
title: mapping.txt file path
- api_token: null
opts:
description: App Center API token
is_required: true
is_sensitive: true
summary: App Center API token
title: API Token
- opts:
description: |-
Owner of the App Center app.
For an app owned by a user, the URL in App Center might look like https://appcenter.ms/users/JoshuaWeber/apps/APIExample.
Here, the {owner_name} is JoshuaWeber. For an app owned by an org, the URL might be
https://appcenter.ms/orgs/Microsoft/apps/APIExample and the {owner_name} would be Microsoft
is_required: true
summary: Owner of the App Center app
title: Owner name
owner_name: null
- app_name: null
opts:
description: |-
The name of the App Center app.
For an app owned by a user, the URL in App Center might look like https://appcenter.ms/users/JoshuaWeber/apps/APIExample.
Here, the {app_name} is ApiExample.
is_required: true
summary: The name of the App Center app
title: App name
- distribution_group: null
opts:
description: |-
User groups you wish to distribute the app. One group name per line.
Distribution of AAB is supported only for Google Play store deployment: https://docs.microsoft.com/en-us/appcenter/distribution/uploading#android
is_required: true
summary: User groups you wish to distribute the app. One group name per line.
title: Distribution groups
- distribution_store: null
opts:
description: |-
Distribution stores you wish to distribute the app. One store name per line.
Distribution of AAB is supported only for Google Play store deployment: https://docs.microsoft.com/en-us/appcenter/distribution/uploading#android
summary: Distribution stores you wish to distribute the app. One store name per
line.
title: Distribution stores
- distribution_tester: null
opts:
description: |-
List of individual testers. One email per line.
Distribution of AAB is supported only for Google Play store deployment: https://docs.microsoft.com/en-us/appcenter/distribution/uploading#android
summary: List of individual testers. One email per line.
title: Testers
- opts:
description: Additional notes for the deployed artifact.
summary: Release notes text
title: Release notes text
release_notes: Release notes
- notify_testers: "yes"
opts:
description: Send notification email to testers and distribution groups.
is_required: true
summary: Send notification email to testers and distribution groups.
title: Notify Testers
value_options:
- "yes"
- "no"
- mandatory: "no"
opts:
description: Enforce installation of distribution version. Requires SDK integration.
is_required: true
summary: Enforce installation of distribution version. Requires SDK integration.
title: Mandatory
value_options:
- "no"
- "yes"
- debug: "no"
opts:
description: Enable verbose logs
is_required: true
summary: Enable verbose logs
title: Debug
value_options:
- "no"
- "yes"
outputs:
- APPCENTER_DEPLOY_STATUS: null
opts:
description: 'Deployment status: ''success'' or ''failed'''
summary: 'Deployment status: ''success'' or ''failed'''
title: Deployment status
- APPCENTER_DEPLOY_INSTALL_URL: null
opts:
description: Install page URL of the newly deployed version.
summary: Install page URL of the newly deployed version
title: Install page URL
- APPCENTER_DEPLOY_DOWNLOAD_URL: null
opts:
description: Download URL of the newly deployed version.
summary: Download URL of the newly deployed version
title: Download URL
- APPCENTER_DEPLOY_RELEASE_ID: null
opts:
description: ID of the new release for later retrieval via App Center APIs.
summary: ID of the new release for later retrieval via App Center APIs.
title: Release ID
- APPCENTER_PUBLIC_INSTALL_PAGE_URL: null
opts:
description: Public install page URL of the latest version.
summary: Public install page URL of the latest version
title: Public install page URL
- APPCENTER_PUBLIC_INSTALL_PAGE_URLS: null
opts:
description: When a group is public the step will AppCenter provides and the step
exports a public install page URL.
summary: Comma-separated list of the public install pages URL.
title: Comma-separated public install pages by groups
- APPCENTER_RELEASE_PAGE_URL: null
opts:
description: URL to the release page containing release notes, easily share with
business partners and QA for testing.
summary: URL to the release page containing release notes.
title: Release Page URL
================================================
FILE: steps/appcenter-deploy-android/2.0.2/step.yml
================================================
title: AppCenter Android Deploy
summary: Deploy your awesome Android app to AppCenter.
description: Deploy an Android application to [AppCenter](https://appcenter.ms).
website: https://github.com/bitrise-steplib/steps-appcenter-deploy-android
source_code_url: https://github.com/bitrise-steplib/steps-appcenter-deploy-android
support_url: https://github.com/bitrise-steplib/steps-appcenter-deploy-android/issues
published_at: 2021-01-13T09:59:12.992816851Z
source:
git: https://github.com/bitrise-steplib/steps-appcenter-deploy-android.git
commit: a416c2ba131027775756abb847f182a9d76e9900
project_type_tags:
- android
- xamarin
- cordova
- ionic
- react-native
- flutter
type_tags:
- deploy
toolkit:
go:
package_name: github.com/bitrise-steplib/steps-appcenter-deploy-android
is_always_run: false
is_skippable: false
inputs:
- app_path: $BITRISE_APP_PATH
opts:
description: |-
Path to binary file
For APKs, only single or universal APKs are supported: https://docs.microsoft.com/en-us/appcenter/build/react-native/android/#63-building-multiple-apks
is_required: true
summary: Path to binary file
title: APP path
- mapping_path: null
opts:
description: Path to an Android mapping.txt file.
summary: Path to an Android mapping.txt file.
title: mapping.txt file path
- api_token: null
opts:
description: App Center API token
is_required: true
is_sensitive: true
summary: App Center API token
title: API Token
- opts:
description: |-
Owner of the App Center app.
For an app owned by a user, the URL in App Center might look like https://appcenter.ms/users/JoshuaWeber/apps/APIExample.
Here, the {owner_name} is JoshuaWeber. For an app owned by an org, the URL might be
https://appcenter.ms/orgs/Microsoft/apps/APIExample and the {owner_name} would be Microsoft
is_required: true
summary: Owner of the App Center app
title: Owner name
owner_name: null
- app_name: null
opts:
description: |-
The name of the App Center app.
For an app owned by a user, the URL in App Center might look like https://appcenter.ms/users/JoshuaWeber/apps/APIExample.
Here, the {app_name} is ApiExample.
is_required: true
summary: The name of the App Center app
title: App name
- distribution_group: null
opts:
description: |-
User groups you wish to distribute the app. One group name per line.
Distribution of AAB is supported only for Google Play store deployment: https://docs.microsoft.com/en-us/appcenter/distribution/uploading#android
is_required: true
summary: User groups you wish to distribute the app. One group name per line.
title: Distribution groups
- distribution_store: null
opts:
description: |-
Distribution stores you wish to distribute the app. One store name per line.
Distribution of AAB is supported only for Google Play store deployment: https://docs.microsoft.com/en-us/appcenter/distribution/uploading#android
summary: Distribution stores you wish to distribute the app. One store name per
line.
title: Distribution stores
- distribution_tester: null
opts:
description: |-
List of individual testers. One email per line.
Distribution of AAB is supported only for Google Play store deployment: https://docs.microsoft.com/en-us/appcenter/distribution/uploading#android
summary: List of individual testers. One email per line.
title: Testers
- opts:
description: Additional notes for the deployed artifact.
summary: Release notes text
title: Release notes text
release_notes: Release notes
- notify_testers: "yes"
opts:
description: Send notification email to testers and distribution groups.
is_required: true
summary: Send notification email to testers and distribution groups.
title: Notify Testers
value_options:
- "yes"
- "no"
- mandatory: "no"
opts:
description: Enforce installation of distribution version. Requires SDK integration.
is_required: true
summary: Enforce installation of distribution version. Requires SDK integration.
title: Mandatory
value_options:
- "no"
- "yes"
- debug: "no"
opts:
description: Enable verbose logs
is_required: true
summary: Enable verbose logs
title: Debug
value_options:
- "no"
- "yes"
outputs:
- APPCENTER_DEPLOY_STATUS: null
opts:
description: 'Deployment status: ''success'' or ''failed'''
summary: 'Deployment status: ''success'' or ''failed'''
title: Deployment status
- APPCENTER_DEPLOY_INSTALL_URL: null
opts:
description: Install page URL of the newly deployed version.
summary: Install page URL of the newly deployed version
title: Install page URL
- APPCENTER_DEPLOY_DOWNLOAD_URL: null
opts:
description: Download URL of the newly deployed version.
summary: Download URL of the newly deployed version
title: Download URL
- APPCENTER_DEPLOY_RELEASE_ID: null
opts:
description: ID of the new release for later retrieval via App Center APIs.
summary: ID of the new release for later retrieval via App Center APIs.
title: Release ID
- APPCENTER_PUBLIC_INSTALL_PAGE_URL: null
opts:
description: Public install page URL of the latest version.
summary: Public install page URL of the latest version
title: Public install page URL
- APPCENTER_PUBLIC_INSTALL_PAGE_URLS: null
opts:
description: When a group is public the step will AppCenter provides and the step
exports a public install page URL.
summary: Comma-separated list of the public install pages URL.
title: Comma-separated public install pages by groups
- APPCENTER_RELEASE_PAGE_URL: null
opts:
description: URL to the release page containing release notes, easily share with
business partners and QA for testing.
summary: URL to the release page containing release notes.
title: Release Page URL
================================================
FILE: steps/appcenter-deploy-android/2.1.0/step.yml
================================================
title: AppCenter Android Deploy
summary: Deploy your awesome Android app to AppCenter.
description: Deploy an Android application to [AppCenter](https://appcenter.ms).
website: https://github.com/bitrise-steplib/steps-appcenter-deploy-android
source_code_url: https://github.com/bitrise-steplib/steps-appcenter-deploy-android
support_url: https://github.com/bitrise-steplib/steps-appcenter-deploy-android/issues
published_at: 2021-05-12T14:42:53.059706067Z
source:
git: https://github.com/bitrise-steplib/steps-appcenter-deploy-android.git
commit: 412c3c60260dcfdd37efc06ffb5114867f6b95f8
project_type_tags:
- android
- xamarin
- cordova
- ionic
- react-native
- flutter
type_tags:
- deploy
toolkit:
go:
package_name: github.com/bitrise-steplib/steps-appcenter-deploy-android
is_always_run: false
is_skippable: false
inputs:
- app_path: $BITRISE_APP_PATH
opts:
description: |-
Path to binary file
For APKs, only single or universal APKs are supported: https://docs.microsoft.com/en-us/appcenter/build/react-native/android/#63-building-multiple-apks
is_required: true
summary: Path to binary file
title: APP path
- mapping_path: null
opts:
description: Path to an Android mapping.txt file.
summary: Path to an Android mapping.txt file.
title: mapping.txt file path
- api_token: null
opts:
description: App Center API token
is_required: true
is_sensitive: true
summary: App Center API token
title: API Token
- opts:
description: |-
Owner of the App Center app.
For an app owned by a user, the URL in App Center might look like https://appcenter.ms/users/JoshuaWeber/apps/APIExample.
Here, the {owner_name} is JoshuaWeber. For an app owned by an org, the URL might be
https://appcenter.ms/orgs/Microsoft/apps/APIExample and the {owner_name} would be Microsoft
is_required: true
summary: Owner of the App Center app
title: Owner name
owner_name: null
- app_name: null
opts:
description: |-
The name of the App Center app.
For an app owned by a user, the URL in App Center might look like https://appcenter.ms/users/JoshuaWeber/apps/APIExample.
Here, the {app_name} is ApiExample.
is_required: true
summary: The name of the App Center app
title: App name
- distribution_group: null
opts:
description: |-
User groups you wish to distribute the app. One group name per line.
Distribution of AAB is supported only for Google Play store deployment: https://docs.microsoft.com/en-us/appcenter/distribution/uploading#android
summary: User groups you wish to distribute the app. One group name per line.
title: Distribution groups
- distribution_store: null
opts:
description: |-
Distribution stores you wish to distribute the app. One store name per line.
Distribution of AAB is supported only for Google Play store deployment: https://docs.microsoft.com/en-us/appcenter/distribution/uploading#android
summary: Distribution stores you wish to distribute the app. One store name per
line.
title: Distribution stores
- distribution_tester: null
opts:
description: |-
List of individual testers. One email per line.
Distribution of AAB is supported only for Google Play store deployment: https://docs.microsoft.com/en-us/appcenter/distribution/uploading#android
summary: List of individual testers. One email per line.
title: Testers
- opts:
description: Additional notes for the deployed artifact.
summary: Release notes text
title: Release notes text
release_notes: Release notes
- notify_testers: "yes"
opts:
description: Send notification email to testers and distribution groups.
is_required: true
summary: Send notification email to testers and distribution groups.
title: Notify Testers
value_options:
- "yes"
- "no"
- mandatory: "no"
opts:
description: Enforce installation of distribution version. Requires SDK integration.
is_required: true
summary: Enforce installation of distribution version. Requires SDK integration.
title: Mandatory
value_options:
- "no"
- "yes"
- debug: "no"
opts:
description: Enable verbose logs
is_required: true
summary: Enable verbose logs
title: Debug
value_options:
- "no"
- "yes"
outputs:
- APPCENTER_DEPLOY_STATUS: null
opts:
description: 'Deployment status: ''success'' or ''failed'''
summary: 'Deployment status: ''success'' or ''failed'''
title: Deployment status
- APPCENTER_DEPLOY_INSTALL_URL: null
opts:
description: Install page URL of the newly deployed version.
summary: Install page URL of the newly deployed version
title: Install page URL
- APPCENTER_DEPLOY_DOWNLOAD_URL: null
opts:
description: Download URL of the newly deployed version.
summary: Download URL of the newly deployed version
title: Download URL
- APPCENTER_DEPLOY_RELEASE_ID: null
opts:
description: ID of the new release for later retrieval via App Center APIs.
summary: ID of the new release for later retrieval via App Center APIs.
title: Release ID
- APPCENTER_PUBLIC_INSTALL_PAGE_URL: null
opts:
description: Public install page URL of the latest version.
summary: Public install page URL of the latest version
title: Public install page URL
- APPCENTER_PUBLIC_INSTALL_PAGE_URLS: null
opts:
description: When a group is public the step will AppCenter provides and the step
exports a public install page URL.
summary: Comma-separated list of the public install pages URL.
title: Comma-separated public install pages by groups
- APPCENTER_RELEASE_PAGE_URL: null
opts:
description: URL to the release page containing release notes, easily share with
business partners and QA for testing.
summary: URL to the release page containing release notes.
title: Release Page URL
================================================
FILE: steps/appcenter-deploy-android/2.1.1/step.yml
================================================
title: AppCenter Android Deploy
summary: Distribute your Android app through [Microsoft App Center](https://appcenter.ms/).
description: |-
[This Step](https://github.com/bitrise-steplib/steps-appcenter-deploy-android) integrates with the [App Center](https://appcenter.ms/)'s Distribution service and enables you to distribute your apps seamlessly to different stores, for example, App Store, MS Intune, user groups or even individual testers.
### Configuring the Step
Before you start:
The Step requires an active MS App Center account.
1. Add the **APP path** which points to a binary file.
2. Add the **mapping.txt file path**.
3. Add the App Center **API token**.
4. Add the **Owner name**, which means the owner of the App Center app. For an app owned by a user, the URL in App Center can look like this https://appcenter.ms/users/JoshuaWeber/apps/APIExample where the {ownername} is JoshuaWeber. For an app owned by an organization, the URL can be, for example, https://appcenter.ms/orgs/Microsoft/apps/APIExample where the {ownername} is Microsoft.
5. Add the **App name** which is the name of the App Center app. For an app owned by a user, the URL in App Center might look like this: https://appcenter.ms/users/JoshuaWeber/apps/APIExample where the {app_name} is APIExample.
6. Add the **Distribution groups** which means the user groups you wish to distribute the app to. Please add one group name per line.
7. Add the **Distribution stores** where you wish to distribute the app to. Please add one store name per line.
8. Add the **Testers** who you wish to send the app to via email. Please add one email address per line.
9. Add any **Release notes for the deployed artifact**.
10. Send notification emails to testers and distribution groups with the **Notify Testers** input.
11. You can enforce the installation of a distribution version with the **Mandatory** input set to `yes`.
12. If you set the **Debug** input to `yes`, you can enable verbose logs.
### Useful links
- [About Android deployment with Bitrise](https://devcenter.bitrise.io/deploy/android-deploy/android-deployment-index/)
- [About Android code signing](https://devcenter.bitrise.io/code-signing/android-code-signing/android-code-signing-index/)
### Related Steps
- [Deploy to Huawei App Gallery](https://www.bitrise.io/integrations/steps/app-gallery-deploy)
- [Google Play Deploy](https://www.bitrise.io/integrations/steps/google-play-deploy)
website: https://github.com/bitrise-steplib/steps-appcenter-deploy-android
source_code_url: https://github.com/bitrise-steplib/steps-appcenter-deploy-android
support_url: https://github.com/bitrise-steplib/steps-appcenter-deploy-android/issues
published_at: 2021-06-25T07:14:11.674056296Z
source:
git: https://github.com/bitrise-steplib/steps-appcenter-deploy-android.git
commit: 7abb6cd5a561d7af8be91a9603693323fd6f5e85
project_type_tags:
- android
- xamarin
- cordova
- ionic
- react-native
- flutter
type_tags:
- deploy
toolkit:
go:
package_name: github.com/bitrise-steplib/steps-appcenter-deploy-android
is_always_run: false
is_skippable: false
inputs:
- app_path: $BITRISE_APP_PATH
opts:
description: |-
Path to binary file
For APKs, only single or universal APKs are supported: https://docs.microsoft.com/en-us/appcenter/build/react-native/android/#63-building-multiple-apks
is_required: true
summary: Path to binary file
title: APP path
- mapping_path: null
opts:
description: Path to an Android mapping.txt file.
summary: Path to an Android mapping.txt file.
title: mapping.txt file path
- api_token: null
opts:
description: App Center API token
is_required: true
is_sensitive: true
summary: App Center API token
title: API Token
- opts:
description: |-
Owner of the App Center app.
For an app owned by a user, the URL in App Center might look like https://appcenter.ms/users/JoshuaWeber/apps/APIExample.
Here, the {owner_name} is JoshuaWeber. For an app owned by an org, the URL might be
https://appcenter.ms/orgs/Microsoft/apps/APIExample and the {owner_name} would be Microsoft
is_required: true
summary: Owner of the App Center app
title: Owner name
owner_name: null
- app_name: null
opts:
description: |-
The name of the App Center app.
For an app owned by a user, the URL in App Center might look like https://appcenter.ms/users/JoshuaWeber/apps/APIExample.
Here, the {app_name} is ApiExample.
is_required: true
summary: The name of the App Center app
title: App name
- distribution_group: null
opts:
description: |-
User groups you wish to distribute the app. One group name per line.
Distribution of AAB is supported only for Google Play store deployment: https://docs.microsoft.com/en-us/appcenter/distribution/uploading#android
summary: User groups you wish to distribute the app. One group name per line.
title: Distribution groups
- distribution_store: null
opts:
description: |-
Distribution stores you wish to distribute the app. One store name per line.
Distribution of AAB is supported only for Google Play store deployment: https://docs.microsoft.com/en-us/appcenter/distribution/uploading#android
summary: Distribution stores you wish to distribute the app. One store name per
line.
title: Distribution stores
- distribution_tester: null
opts:
description: |-
List of individual testers. One email per line.
Distribution of AAB is supported only for Google Play store deployment: https://docs.microsoft.com/en-us/appcenter/distribution/uploading#android
summary: List of individual testers. One email per line.
title: Testers
- opts:
description: Additional notes for the deployed artifact.
summary: Release notes text
title: Release notes text
release_notes: Release notes
- notify_testers: "yes"
opts:
description: Send notification email to testers and distribution groups.
is_required: true
summary: Send notification email to testers and distribution groups.
title: Notify Testers
value_options:
- "yes"
- "no"
- mandatory: "no"
opts:
description: Enforce installation of distribution version. Requires SDK integration.
is_required: true
summary: Enforce installation of distribution version. Requires SDK integration.
title: Mandatory
value_options:
- "no"
- "yes"
- debug: "no"
opts:
description: Enable verbose logs
is_required: true
summary: Enable verbose logs
title: Debug
value_options:
- "no"
- "yes"
outputs:
- APPCENTER_DEPLOY_STATUS: null
opts:
description: 'Deployment status: ''success'' or ''failed'''
summary: 'Deployment status: ''success'' or ''failed'''
title: Deployment status
- APPCENTER_DEPLOY_INSTALL_URL: null
opts:
description: Install page URL of the newly deployed version.
summary: Install page URL of the newly deployed version
title: Install page URL
- APPCENTER_DEPLOY_DOWNLOAD_URL: null
opts:
description: Download URL of the newly deployed version.
summary: Download URL of the newly deployed version
title: Download URL
- APPCENTER_DEPLOY_RELEASE_ID: null
opts:
description: ID of the new release for later retrieval via App Center APIs.
summary: ID of the new release for later retrieval via App Center APIs.
title: Release ID
- APPCENTER_PUBLIC_INSTALL_PAGE_URL: null
opts:
description: Public install page URL of the latest version.
summary: Public install page URL of the latest version
title: Public install page URL
- APPCENTER_PUBLIC_INSTALL_PAGE_URLS: null
opts:
description: When a group is public the step will AppCenter provides and the step
exports a public install page URL.
summary: Comma-separated list of the public install pages URL.
title: Comma-separated public install pages by groups
- APPCENTER_RELEASE_PAGE_URL: null
opts:
description: URL to the release page containing release notes, easily share with
business partners and QA for testing.
summary: URL to the release page containing release notes.
title: Release Page URL
================================================
FILE: steps/appcenter-deploy-android/2.1.2/step.yml
================================================
title: AppCenter Android Deploy
summary: Distribute your Android app through [Microsoft App Center](https://appcenter.ms/).
description: |-
[This Step](https://github.com/bitrise-steplib/steps-appcenter-deploy-android) integrates with the [App Center](https://appcenter.ms/)'s Distribution service and enables you to distribute your apps seamlessly to different stores, for example, App Store, MS Intune, user groups or even individual testers.
### Configuring the Step
Before you start:
The Step requires an active MS App Center account.
1. Add the **APP path** which points to a binary file.
2. Add the **mapping.txt file path**.
3. Add the App Center **API token**.
4. Add the **Owner name**, which means the owner of the App Center app. For an app owned by a user, the URL in App Center can look like this https://appcenter.ms/users/JoshuaWeber/apps/APIExample where the {ownername} is JoshuaWeber. For an app owned by an organization, the URL can be, for example, https://appcenter.ms/orgs/Microsoft/apps/APIExample where the {ownername} is Microsoft.
5. Add the **App name** which is the name of the App Center app. For an app owned by a user, the URL in App Center might look like this: https://appcenter.ms/users/JoshuaWeber/apps/APIExample where the {app_name} is APIExample.
6. Add the **Distribution groups** which means the user groups you wish to distribute the app to. Please add one group name per line.
7. Add the **Distribution stores** where you wish to distribute the app to. Please add one store name per line.
8. Add the **Testers** who you wish to send the app to via email. Please add one email address per line.
9. Add any **Release notes for the deployed artifact**.
10. Send notification emails to testers and distribution groups with the **Notify Testers** input.
11. You can enforce the installation of a distribution version with the **Mandatory** input set to `yes`.
12. If you set the **Debug** input to `yes`, you can enable verbose logs.
### Useful links
- [About Android deployment with Bitrise](https://devcenter.bitrise.io/deploy/android-deploy/android-deployment-index/)
- [About Android code signing](https://devcenter.bitrise.io/code-signing/android-code-signing/android-code-signing-index/)
### Related Steps
- [Deploy to Huawei App Gallery](https://www.bitrise.io/integrations/steps/app-gallery-deploy)
- [Google Play Deploy](https://www.bitrise.io/integrations/steps/google-play-deploy)
website: https://github.com/bitrise-steplib/steps-appcenter-deploy-android
source_code_url: https://github.com/bitrise-steplib/steps-appcenter-deploy-android
support_url: https://github.com/bitrise-steplib/steps-appcenter-deploy-android/issues
published_at: 2021-12-09T13:39:59.147780768Z
source:
git: https://github.com/bitrise-steplib/steps-appcenter-deploy-android.git
commit: 0b97fa8454360060fcc9c66668deff0e0bb64a3c
project_type_tags:
- android
- xamarin
- cordova
- ionic
- react-native
- flutter
type_tags:
- deploy
toolkit:
go:
package_name: github.com/bitrise-steplib/steps-appcenter-deploy-android
is_always_run: false
is_skippable: false
inputs:
- app_path: $BITRISE_APP_PATH
opts:
description: |-
Path to binary file
For APKs, only single or universal APKs are supported: https://docs.microsoft.com/en-us/appcenter/build/react-native/android/#63-building-multiple-apks
is_required: true
summary: Path to binary file
title: APP path
- mapping_path: null
opts:
description: Path to an Android mapping.txt file.
summary: Path to an Android mapping.txt file.
title: mapping.txt file path
- api_token: null
opts:
description: App Center API token
is_required: true
is_sensitive: true
summary: App Center API token
title: API Token
- opts:
description: |-
Owner of the App Center app.
For an app owned by a user, the URL in App Center might look like https://appcenter.ms/users/JoshuaWeber/apps/APIExample.
Here, the {owner_name} is JoshuaWeber. For an app owned by an org, the URL might be
https://appcenter.ms/orgs/Microsoft/apps/APIExample and the {owner_name} would be Microsoft
is_required: true
summary: Owner of the App Center app
title: Owner name
owner_name: null
- app_name: null
opts:
description: |-
The name of the App Center app.
For an app owned by a user, the URL in App Center might look like https://appcenter.ms/users/JoshuaWeber/apps/APIExample.
Here, the {app_name} is ApiExample.
is_required: true
summary: The name of the App Center app
title: App name
- distribution_group: null
opts:
description: |-
User groups you wish to distribute the app. One group name per line.
Distribution of AAB is supported only for Google Play store deployment: https://docs.microsoft.com/en-us/appcenter/distribution/uploading#android
summary: User groups you wish to distribute the app. One group name per line.
title: Distribution groups
- distribution_store: null
opts:
description: |-
Distribution stores you wish to distribute the app. One store name per line.
Distribution of AAB is supported only for Google Play store deployment: https://docs.microsoft.com/en-us/appcenter/distribution/uploading#android
summary: Distribution stores you wish to distribute the app. One store name per
line.
title: Distribution stores
- distribution_tester: null
opts:
description: |-
List of individual testers. One email per line.
Distribution of AAB is supported only for Google Play store deployment: https://docs.microsoft.com/en-us/appcenter/distribution/uploading#android
summary: List of individual testers. One email per line.
title: Testers
- opts:
description: Additional notes for the deployed artifact.
summary: Release notes text
title: Release notes text
release_notes: Release notes
- notify_testers: "yes"
opts:
description: Send notification email to testers and distribution groups.
is_required: true
summary: Send notification email to testers and distribution groups.
title: Notify Testers
value_options:
- "yes"
- "no"
- mandatory: "no"
opts:
description: Enforce installation of distribution version. Requires SDK integration.
is_required: true
summary: Enforce installation of distribution version. Requires SDK integration.
title: Mandatory
value_options:
- "no"
- "yes"
- debug: "no"
opts:
description: Enable verbose logs
is_required: true
summary: Enable verbose logs
title: Debug
value_options:
- "no"
- "yes"
outputs:
- APPCENTER_DEPLOY_STATUS: null
opts:
description: 'Deployment status: ''success'' or ''failed'''
summary: 'Deployment status: ''success'' or ''failed'''
title: Deployment status
- APPCENTER_DEPLOY_INSTALL_URL: null
opts:
description: Install page URL of the newly deployed version.
summary: Install page URL of the newly deployed version
title: Install page URL
- APPCENTER_DEPLOY_DOWNLOAD_URL: null
opts:
description: Download URL of the newly deployed version.
summary: Download URL of the newly deployed version
title: Download URL
- APPCENTER_DEPLOY_RELEASE_ID: null
opts:
description: ID of the new release for later retrieval via App Center APIs.
summary: ID of the new release for later retrieval via App Center APIs.
title: Release ID
- APPCENTER_PUBLIC_INSTALL_PAGE_URL: null
opts:
description: Public install page URL of the latest version.
summary: Public install page URL of the latest version
title: Public install page URL
- APPCENTER_PUBLIC_INSTALL_PAGE_URLS: null
opts:
description: When a group is public the step will AppCenter provides and the step
exports a public install page URL.
summary: Comma-separated list of the public install pages URL.
title: Comma-separated public install pages by groups
- APPCENTER_RELEASE_PAGE_URL: null
opts:
description: URL to the release page containing release notes, easily share with
business partners and QA for testing.
summary: URL to the release page containing release notes.
title: Release Page URL
================================================
FILE: steps/appcenter-deploy-android/2.2.0/step.yml
================================================
title: AppCenter Android Deploy
summary: Distribute your Android app through [Microsoft App Center](https://appcenter.ms/).
description: |-
[This Step](https://github.com/bitrise-steplib/steps-appcenter-deploy-android) integrates with the [App Center](https://appcenter.ms/)'s Distribution service and enables you to distribute your apps seamlessly to different stores, for example, App Store, MS Intune, user groups or even individual testers.
### Configuring the Step
Before you start:
The Step requires an active MS App Center account.
1. Add the **APP path** which points to a binary file.
2. Add the **mapping.txt file path**.
3. Add the App Center **API token**.
4. Add the **Owner name**, which means the owner of the App Center app. For an app owned by a user, the URL in App Center can look like this https://appcenter.ms/users/JoshuaWeber/apps/APIExample where the {ownername} is JoshuaWeber. For an app owned by an organization, the URL can be, for example, https://appcenter.ms/orgs/Microsoft/apps/APIExample where the {ownername} is Microsoft.
5. Add the **App name** which is the name of the App Center app. For an app owned by a user, the URL in App Center might look like this: https://appcenter.ms/users/JoshuaWeber/apps/APIExample where the {app_name} is APIExample.
6. Add the **Distribution groups** which means the user groups you wish to distribute the app to. Please add one group name per line.
7. Add the **Distribution stores** where you wish to distribute the app to. Please add one store name per line.
8. Add the **Testers** who you wish to send the app to via email. Please add one email address per line.
9. Add any **Release notes for the deployed artifact**.
10. Send notification emails to testers and distribution groups with the **Notify Testers** input.
11. You can enforce the installation of a distribution version with the **Mandatory** input set to `yes`.
12. If you set the **Debug** input to `yes`, you can enable verbose logs.
### Useful links
- [About Android deployment with Bitrise](https://devcenter.bitrise.io/deploy/android-deploy/android-deployment-index/)
- [About Android code signing](https://devcenter.bitrise.io/code-signing/android-code-signing/android-code-signing-index/)
### Related Steps
- [Deploy to Huawei App Gallery](https://www.bitrise.io/integrations/steps/app-gallery-deploy)
- [Google Play Deploy](https://www.bitrise.io/integrations/steps/google-play-deploy)
website: https://github.com/bitrise-steplib/steps-appcenter-deploy-android
source_code_url: https://github.com/bitrise-steplib/steps-appcenter-deploy-android
support_url: https://github.com/bitrise-steplib/steps-appcenter-deploy-android/issues
published_at: 2022-01-21T14:54:23.145759439Z
source:
git: https://github.com/bitrise-steplib/steps-appcenter-deploy-android.git
commit: 3390b3e63e545a46ec0eb3004dfd5b0c5b4ba72c
project_type_tags:
- android
- xamarin
- cordova
- ionic
- react-native
- flutter
type_tags:
- deploy
toolkit:
go:
package_name: github.com/bitrise-steplib/steps-appcenter-deploy-android
is_always_run: false
is_skippable: false
inputs:
- app_path: $BITRISE_APP_PATH
opts:
description: |-
Path to binary file
For APKs, only single or universal APKs are supported: https://docs.microsoft.com/en-us/appcenter/build/react-native/android/#63-building-multiple-apks
is_required: true
summary: Path to binary file
title: APP path
- mapping_path: null
opts:
description: Path to an Android mapping.txt file.
summary: Path to an Android mapping.txt file.
title: mapping.txt file path
- api_token: null
opts:
description: App Center API token
is_required: true
is_sensitive: true
summary: App Center API token
title: API Token
- opts:
description: |-
Owner of the App Center app.
For an app owned by a user, the URL in App Center might look like https://appcenter.ms/users/JoshuaWeber/apps/APIExample.
Here, the {owner_name} is JoshuaWeber. For an app owned by an org, the URL might be
https://appcenter.ms/orgs/Microsoft/apps/APIExample and the {owner_name} would be Microsoft
is_required: true
summary: Owner of the App Center app
title: Owner name
owner_name: null
- app_name: null
opts:
description: |-
The name of the App Center app.
For an app owned by a user, the URL in App Center might look like https://appcenter.ms/users/JoshuaWeber/apps/APIExample.
Here, the {app_name} is ApiExample.
is_required: true
summary: The name of the App Center app
title: App name
- distribution_group: null
opts:
description: |-
User groups you wish to distribute the app. One group name per line.
Distribution of AAB is supported only for Google Play store deployment: https://docs.microsoft.com/en-us/appcenter/distribution/uploading#android
summary: User groups you wish to distribute the app. One group name per line.
title: Distribution groups
- distribution_store: null
opts:
description: |-
Distribution stores you wish to distribute the app. One store name per line.
Distribution of AAB is supported only for Google Play store deployment: https://docs.microsoft.com/en-us/appcenter/distribution/uploading#android
summary: Distribution stores you wish to distribute the app. One store name per
line.
title: Distribution stores
- distribution_tester: null
opts:
description: |-
List of individual testers. One email per line.
Distribution of AAB is supported only for Google Play store deployment: https://docs.microsoft.com/en-us/appcenter/distribution/uploading#android
summary: List of individual testers. One email per line.
title: Testers
- opts:
description: Additional notes for the deployed artifact.
summary: Release notes text
title: Release notes text
release_notes: Release notes
- notify_testers: "yes"
opts:
description: Send notification email to testers and distribution groups.
is_required: true
summary: Send notification email to testers and distribution groups.
title: Notify Testers
value_options:
- "yes"
- "no"
- mandatory: "no"
opts:
description: Enforce installation of distribution version. Requires SDK integration.
is_required: true
summary: Enforce installation of distribution version. Requires SDK integration.
title: Mandatory
value_options:
- "no"
- "yes"
- debug: "no"
opts:
description: Enable verbose logs
is_required: true
summary: Enable verbose logs
title: Debug
value_options:
- "no"
- "yes"
- all_distribution_groups: "no"
opts:
description: Distribute the app to all user groups on that app. Enabling this
options makes it ignore distribution_group.
summary: Distribute the app to all user groups on that app.
title: All distribution groups
value_options:
- "no"
- "yes"
outputs:
- APPCENTER_DEPLOY_STATUS: null
opts:
description: 'Deployment status: ''success'' or ''failed'''
summary: 'Deployment status: ''success'' or ''failed'''
title: Deployment status
- APPCENTER_DEPLOY_INSTALL_URL: null
opts:
description: Install page URL of the newly deployed version.
summary: Install page URL of the newly deployed version
title: Install page URL
- APPCENTER_DEPLOY_DOWNLOAD_URL: null
opts:
description: Download URL of the newly deployed version.
summary: Download URL of the newly deployed version
title: Download URL
- APPCENTER_DEPLOY_RELEASE_ID: null
opts:
description: ID of the new release for later retrieval via App Center APIs.
summary: ID of the new release for later retrieval via App Center APIs.
title: Release ID
- APPCENTER_PUBLIC_INSTALL_PAGE_URL: null
opts:
description: Public install page URL of the latest version.
summary: Public install page URL of the latest version
title: Public install page URL
- APPCENTER_PUBLIC_INSTALL_PAGE_URLS: null
opts:
description: When a group is public the step will AppCenter provides and the step
exports a public install page URL.
summary: Comma-separated list of the public install pages URL.
title: Comma-separated public install pages by groups
- APPCENTER_RELEASE_PAGE_URL: null
opts:
description: URL to the release page containing release notes, easily share with
business partners and QA for testing.
summary: URL to the release page containing release notes.
title: Release Page URL
================================================
FILE: steps/appcenter-deploy-android/2.2.1/step.yml
================================================
title: AppCenter Android Deploy
summary: Distribute your Android app through [Microsoft App Center](https://appcenter.ms/).
description: |-
[This Step](https://github.com/bitrise-steplib/steps-appcenter-deploy-android) integrates with the [App Center](https://appcenter.ms/)'s Distribution service and enables you to distribute your apps seamlessly to different stores, for example, App Store, MS Intune, user groups or even individual testers.
### Configuring the Step
Before you start:
The Step requires an active MS App Center account.
1. Add the **APP path** which points to a binary file.
2. Add the **mapping.txt file path**.
3. Add the App Center **API token**.
4. Add the **Owner name**, which means the owner of the App Center app. For an app owned by a user, the URL in App Center can look like this https://appcenter.ms/users/JoshuaWeber/apps/APIExample where the {ownername} is JoshuaWeber. For an app owned by an organization, the URL can be, for example, https://appcenter.ms/orgs/Microsoft/apps/APIExample where the {ownername} is Microsoft.
5. Add the **App name** which is the name of the App Center app. For an app owned by a user, the URL in App Center might look like this: https://appcenter.ms/users/JoshuaWeber/apps/APIExample where the {app_name} is APIExample.
6. Add the **Distribution groups** which means the user groups you wish to distribute the app to. Please add one group name per line.
7. Add the **Distribution stores** where you wish to distribute the app to. Please add one store name per line.
8. Add the **Testers** who you wish to send the app to via email. Please add one email address per line.
9. Add any **Release notes for the deployed artifact**.
10. Send notification emails to testers and distribution groups with the **Notify Testers** input.
11. You can enforce the installation of a distribution version with the **Mandatory** input set to `yes`.
12. If you set the **Debug** input to `yes`, you can enable verbose logs.
### Useful links
- [About Android deployment with Bitrise](https://devcenter.bitrise.io/deploy/android-deploy/android-deployment-index/)
- [About Android code signing](https://devcenter.bitrise.io/code-signing/android-code-signing/android-code-signing-index/)
### Related Steps
- [Deploy to Huawei App Gallery](https://www.bitrise.io/integrations/steps/app-gallery-deploy)
- [Google Play Deploy](https://www.bitrise.io/integrations/steps/google-play-deploy)
website: https://github.com/bitrise-steplib/steps-appcenter-deploy-android
source_code_url: https://github.com/bitrise-steplib/steps-appcenter-deploy-android
support_url: https://github.com/bitrise-steplib/steps-appcenter-deploy-android/issues
published_at: 2022-07-27T14:29:17.289340852Z
source:
git: https://github.com/bitrise-steplib/steps-appcenter-deploy-android.git
commit: bb33fa4e3ab76222252eee6c4653c53804360dbb
project_type_tags:
- android
- cordova
- ionic
- react-native
- flutter
type_tags:
- deploy
toolkit:
go:
package_name: github.com/bitrise-steplib/steps-appcenter-deploy-android
is_always_run: false
is_skippable: false
inputs:
- app_path: $BITRISE_APP_PATH
opts:
description: |-
Path to binary file
For APKs, only single or universal APKs are supported: https://docs.microsoft.com/en-us/appcenter/build/react-native/android/#63-building-multiple-apks
is_required: true
summary: Path to binary file
title: APP path
- mapping_path: null
opts:
description: Path to an Android mapping.txt file.
summary: Path to an Android mapping.txt file.
title: mapping.txt file path
- api_token: null
opts:
description: App Center API token
is_required: true
is_sensitive: true
summary: App Center API token
title: API Token
- opts:
description: |-
Owner of the App Center app.
For an app owned by a user, the URL in App Center might look like https://appcenter.ms/users/JoshuaWeber/apps/APIExample.
Here, the {owner_name} is JoshuaWeber. For an app owned by an org, the URL might be
https://appcenter.ms/orgs/Microsoft/apps/APIExample and the {owner_name} would be Microsoft
is_required: true
summary: Owner of the App Center app
title: Owner name
owner_name: null
- app_name: null
opts:
description: |-
The name of the App Center app.
For an app owned by a user, the URL in App Center might look like https://appcenter.ms/users/JoshuaWeber/apps/APIExample.
Here, the {app_name} is ApiExample.
is_required: true
summary: The name of the App Center app
title: App name
- distribution_group: null
opts:
description: |-
User groups you wish to distribute the app. One group name per line.
Distribution of AAB is supported only for Google Play store deployment: https://docs.microsoft.com/en-us/appcenter/distribution/uploading#android
summary: User groups you wish to distribute the app. One group name per line.
title: Distribution groups
- distribution_store: null
opts:
description: |-
Distribution stores you wish to distribute the app. One store name per line.
Distribution of AAB is supported only for Google Play store deployment: https://docs.microsoft.com/en-us/appcenter/distribution/uploading#android
summary: Distribution stores you wish to distribute the app. One store name per
line.
title: Distribution stores
- distribution_tester: null
opts:
description: |-
List of individual testers. One email per line.
Distribution of AAB is supported only for Google Play store deployment: https://docs.microsoft.com/en-us/appcenter/distribution/uploading#android
summary: List of individual testers. One email per line.
title: Testers
- opts:
description: Additional notes for the deployed artifact.
summary: Release notes text
title: Release notes text
release_notes: Release notes
- notify_testers: "yes"
opts:
description: Send notification email to testers and distribution groups.
is_required: true
summary: Send notification email to testers and distribution groups.
title: Notify Testers
value_options:
- "yes"
- "no"
- mandatory: "no"
opts:
description: Enforce installation of distribution version. Requires SDK integration.
is_required: true
summary: Enforce installation of distribution version. Requires SDK integration.
title: Mandatory
value_options:
- "no"
- "yes"
- debug: "no"
opts:
description: Enable verbose logs
is_required: true
summary: Enable verbose logs
title: Debug
value_options:
- "no"
- "yes"
- all_distribution_groups: "no"
opts:
description: Distribute the app to all user groups on that app. Enabling this
options makes it ignore distribution_group.
summary: Distribute the app to all user groups on that app.
title: All distribution groups
value_options:
- "no"
- "yes"
outputs:
- APPCENTER_DEPLOY_STATUS: null
opts:
description: 'Deployment status: ''success'' or ''failed'''
summary: 'Deployment status: ''success'' or ''failed'''
title: Deployment status
- APPCENTER_DEPLOY_INSTALL_URL: null
opts:
description: Install page URL of the newly deployed version.
summary: Install page URL of the newly deployed version
title: Install page URL
- APPCENTER_DEPLOY_DOWNLOAD_URL: null
opts:
description: Download URL of the newly deployed version.
summary: Download URL of the newly deployed version
title: Download URL
- APPCENTER_DEPLOY_RELEASE_ID: null
opts:
description: ID of the new release for later retrieval via App Center APIs.
summary: ID of the new release for later retrieval via App Center APIs.
title: Release ID
- APPCENTER_PUBLIC_INSTALL_PAGE_URL: null
opts:
description: Public install page URL of the latest version.
summary: Public install page URL of the latest version
title: Public install page URL
- APPCENTER_PUBLIC_INSTALL_PAGE_URLS: null
opts:
description: When a group is public the step will AppCenter provides and the step
exports a public install page URL.
summary: Comma-separated list of the public install pages URL.
title: Comma-separated public install pages by groups
- APPCENTER_RELEASE_PAGE_URL: null
opts:
description: URL to the release page containing release notes, easily share with
business partners and QA for testing.
summary: URL to the release page containing release notes.
title: Release Page URL
================================================
FILE: steps/appcenter-deploy-android/2.2.2/step.yml
================================================
title: AppCenter Android Deploy
summary: Distribute your Android app through [Microsoft App Center](https://appcenter.ms/).
description: |-
[This Step](https://github.com/bitrise-steplib/steps-appcenter-deploy-android) integrates with the [App Center](https://appcenter.ms/)'s Distribution service and enables you to distribute your apps seamlessly to different stores, for example, App Store, MS Intune, user groups or even individual testers.
### Configuring the Step
Before you start:
The Step requires an active MS App Center account.
1. Add the **APP path** which points to a binary file.
2. Add the **mapping.txt file path**.
3. Add the App Center **API token**.
4. Add the **Owner name**, which means the owner of the App Center app. For an app owned by a user, the URL in App Center can look like this https://appcenter.ms/users/JoshuaWeber/apps/APIExample where the {ownername} is JoshuaWeber. For an app owned by an organization, the URL can be, for example, https://appcenter.ms/orgs/Microsoft/apps/APIExample where the {ownername} is Microsoft.
5. Add the **App name** which is the name of the App Center app. For an app owned by a user, the URL in App Center might look like this: https://appcenter.ms/users/JoshuaWeber/apps/APIExample where the {app_name} is APIExample.
6. Add the **Distribution groups** which means the user groups you wish to distribute the app to. Please add one group name per line.
7. Add the **Distribution stores** where you wish to distribute the app to. Please add one store name per line.
8. Add the **Testers** who you wish to send the app to via email. Please add one email address per line.
9. Add any **Release notes for the deployed artifact**.
10. Send notification emails to testers and distribution groups with the **Notify Testers** input.
11. You can enforce the installation of a distribution version with the **Mandatory** input set to `yes`.
12. If you set the **Debug** input to `yes`, you can enable verbose logs.
### Useful links
- [About Android deployment with Bitrise](https://devcenter.bitrise.io/deploy/android-deploy/android-deployment-index/)
- [About Android code signing](https://devcenter.bitrise.io/code-signing/android-code-signing/android-code-signing-index/)
### Related Steps
- [Deploy to Huawei App Gallery](https://www.bitrise.io/integrations/steps/app-gallery-deploy)
- [Google Play Deploy](https://www.bitrise.io/integrations/steps/google-play-deploy)
website: https://github.com/bitrise-steplib/steps-appcenter-deploy-android
source_code_url: https://github.com/bitrise-steplib/steps-appcenter-deploy-android
support_url: https://github.com/bitrise-steplib/steps-appcenter-deploy-android/issues
published_at: 2023-08-03T08:18:38.245095734Z
source:
git: https://github.com/bitrise-steplib/steps-appcenter-deploy-android.git
commit: 32924202bdfd43c339e3cfef649fd2c1ac184357
project_type_tags:
- android
- cordova
- ionic
- react-native
- flutter
type_tags:
- deploy
toolkit:
go:
package_name: github.com/bitrise-steplib/steps-appcenter-deploy-android
is_always_run: false
is_skippable: false
inputs:
- app_path: $BITRISE_APP_PATH
opts:
description: |-
Path to binary file
For APKs, only single or universal APKs are supported: https://docs.microsoft.com/en-us/appcenter/build/react-native/android/#63-building-multiple-apks
is_required: true
summary: Path to binary file
title: APP path
- mapping_path: null
opts:
description: Path to an Android mapping.txt file.
summary: Path to an Android mapping.txt file.
title: mapping.txt file path
- api_token: null
opts:
description: App Center API token
is_required: true
is_sensitive: true
summary: App Center API token
title: API Token
- opts:
description: |-
Owner of the App Center app.
For an app owned by a user, the URL in App Center might look like https://appcenter.ms/users/JoshuaWeber/apps/APIExample.
Here, the {owner_name} is JoshuaWeber. For an app owned by an org, the URL might be
https://appcenter.ms/orgs/Microsoft/apps/APIExample and the {owner_name} would be Microsoft
is_required: true
summary: Owner of the App Center app
title: Owner name
owner_name: null
- app_name: null
opts:
description: |-
The name of the App Center app.
For an app owned by a user, the URL in App Center might look like https://appcenter.ms/users/JoshuaWeber/apps/APIExample.
Here, the {app_name} is ApiExample.
is_required: true
summary: The name of the App Center app
title: App name
- distribution_group: null
opts:
description: |-
User groups you wish to distribute the app. One group name per line.
Distribution of AAB is supported only for Google Play store deployment: https://docs.microsoft.com/en-us/appcenter/distribution/uploading#android
summary: User groups you wish to distribute the app. One group name per line.
title: Distribution groups
- distribution_store: null
opts:
description: |-
Distribution stores you wish to distribute the app. One store name per line.
Distribution of AAB is supported only for Google Play store deployment: https://docs.microsoft.com/en-us/appcenter/distribution/uploading#android
summary: Distribution stores you wish to distribute the app. One store name per
line.
title: Distribution stores
- distribution_tester: null
opts:
description: |-
List of individual testers. One email per line.
Distribution of AAB is supported only for Google Play store deployment: https://docs.microsoft.com/en-us/appcenter/distribution/uploading#android
summary: List of individual testers. One email per line.
title: Testers
- opts:
description: Additional notes for the deployed artifact.
summary: Release notes text
title: Release notes text
release_notes: Release notes
- notify_testers: "yes"
opts:
description: Send notification email to testers and distribution groups.
is_required: true
summary: Send notification email to testers and distribution groups.
title: Notify Testers
value_options:
- "yes"
- "no"
- mandatory: "no"
opts:
description: Enforce installation of distribution version. Requires SDK integration.
is_required: true
summary: Enforce installation of distribution version. Requires SDK integration.
title: Mandatory
value_options:
- "no"
- "yes"
- debug: "no"
opts:
description: Enable verbose logs
is_required: true
summary: Enable verbose logs
title: Debug
value_options:
- "no"
- "yes"
- all_distribution_groups: "no"
opts:
description: Distribute the app to all user groups on that app. Enabling this
options makes it ignore distribution_group.
summary: Distribute the app to all user groups on that app.
title: All distribution groups
value_options:
- "no"
- "yes"
outputs:
- APPCENTER_DEPLOY_STATUS: null
opts:
description: 'Deployment status: ''success'' or ''failed'''
summary: 'Deployment status: ''success'' or ''failed'''
title: Deployment status
- APPCENTER_DEPLOY_INSTALL_URL: null
opts:
description: Install page URL of the newly deployed version.
summary: Install page URL of the newly deployed version
title: Install page URL
- APPCENTER_DEPLOY_DOWNLOAD_URL: null
opts:
description: Download URL of the newly deployed version.
summary: Download URL of the newly deployed version
title: Download URL
- APPCENTER_DEPLOY_RELEASE_ID: null
opts:
description: ID of the new release for later retrieval via App Center APIs.
summary: ID of the new release for later retrieval via App Center APIs.
title: Release ID
- APPCENTER_PUBLIC_INSTALL_PAGE_URL: null
opts:
description: Public install page URL of the latest version.
summary: Public install page URL of the latest version
title: Public install page URL
- APPCENTER_PUBLIC_INSTALL_PAGE_URLS: null
opts:
description: When a group is public the step will AppCenter provides and the step
exports a public install page URL.
summary: Comma-separated list of the public install pages URL.
title: Comma-separated public install pages by groups
- APPCENTER_RELEASE_PAGE_URL: null
opts:
description: URL to the release page containing release notes, easily share with
business partners and QA for testing.
summary: URL to the release page containing release notes.
title: Release Page URL
================================================
FILE: steps/appcenter-deploy-android/2.2.3/step.yml
================================================
title: AppCenter Android Deploy
summary: Distribute your Android app through [Microsoft App Center](https://appcenter.ms/).
description: |-
[This Step](https://github.com/bitrise-steplib/steps-appcenter-deploy-android) integrates with the [App Center](https://appcenter.ms/)'s Distribution service and enables you to distribute your apps seamlessly to different stores, for example, App Store, MS Intune, user groups or even individual testers.
### Configuring the Step
Before you start:
The Step requires an active MS App Center account.
1. Add the **APP path** which points to a binary file.
2. Add the **mapping.txt file path**.
3. Add the App Center **API token**.
4. Add the **Owner name**, which means the owner of the App Center app. For an app owned by a user, the URL in App Center can look like this https://appcenter.ms/users/JoshuaWeber/apps/APIExample where the {ownername} is JoshuaWeber. For an app owned by an organization, the URL can be, for example, https://appcenter.ms/orgs/Microsoft/apps/APIExample where the {ownername} is Microsoft.
5. Add the **App name** which is the name of the App Center app. For an app owned by a user, the URL in App Center might look like this: https://appcenter.ms/users/JoshuaWeber/apps/APIExample where the {app_name} is APIExample.
6. Add the **Distribution groups** which means the user groups you wish to distribute the app to. Please add one group name per line.
7. Add the **Distribution stores** where you wish to distribute the app to. Please add one store name per line.
8. Add the **Testers** who you wish to send the app to via email. Please add one email address per line.
9. Add any **Release notes for the deployed artifact**.
10. Send notification emails to testers and distribution groups with the **Notify Testers** input.
11. You can enforce the installation of a distribution version with the **Mandatory** input set to `yes`.
12. If you set the **Debug** input to `yes`, you can enable verbose logs.
### Useful links
- [About Android deployment with Bitrise](https://devcenter.bitrise.io/deploy/android-deploy/android-deployment-index/)
- [About Android code signing](https://devcenter.bitrise.io/code-signing/android-code-signing/android-code-signing-index/)
### Related Steps
- [Deploy to Huawei App Gallery](https://www.bitrise.io/integrations/steps/app-gallery-deploy)
- [Google Play Deploy](https://www.bitrise.io/integrations/steps/google-play-deploy)
website: https://github.com/bitrise-steplib/steps-appcenter-deploy-android
source_code_url: https://github.com/bitrise-steplib/steps-appcenter-deploy-android
support_url: https://github.com/bitrise-steplib/steps-appcenter-deploy-android/issues
published_at: 2023-10-09T08:59:39.929529758Z
source:
git: https://github.com/bitrise-steplib/steps-appcenter-deploy-android.git
commit: de7c76ece787bab144e12ff79345ecdf60f7b995
project_type_tags:
- android
- cordova
- ionic
- react-native
- flutter
type_tags:
- deploy
toolkit:
go:
package_name: github.com/bitrise-steplib/steps-appcenter-deploy-android
is_always_run: false
is_skippable: false
inputs:
- app_path: $BITRISE_APP_PATH
opts:
description: |-
Path to binary file
For APKs, only single or universal APKs are supported: https://docs.microsoft.com/en-us/appcenter/build/react-native/android/#63-building-multiple-apks
is_required: true
summary: Path to binary file
title: APP path
- mapping_path: null
opts:
description: Path to an Android mapping.txt file.
summary: Path to an Android mapping.txt file.
title: mapping.txt file path
- api_token: null
opts:
description: App Center API token
is_required: true
is_sensitive: true
summary: App Center API token
title: API Token
- opts:
description: |-
Owner of the App Center app.
For an app owned by a user, the URL in App Center might look like https://appcenter.ms/users/JoshuaWeber/apps/APIExample.
Here, the {owner_name} is JoshuaWeber. For an app owned by an org, the URL might be
https://appcenter.ms/orgs/Microsoft/apps/APIExample and the {owner_name} would be Microsoft
is_required: true
summary: Owner of the App Center app
title: Owner name
owner_name: null
- app_name: null
opts:
description: |-
The name of the App Center app.
For an app owned by a user, the URL in App Center might look like https://appcenter.ms/users/JoshuaWeber/apps/APIExample.
Here, the {app_name} is ApiExample.
is_required: true
summary: The name of the App Center app
title: App name
- distribution_group: null
opts:
description: |-
User groups you wish to distribute the app. One group name per line.
Distribution of AAB is supported only for Google Play store deployment: https://docs.microsoft.com/en-us/appcenter/distribution/uploading#android
summary: User groups you wish to distribute the app. One group name per line.
title: Distribution groups
- distribution_store: null
opts:
description: |-
Distribution stores you wish to distribute the app. One store name per line.
Distribution of AAB is supported only for Google Play store deployment: https://docs.microsoft.com/en-us/appcenter/distribution/uploading#android
summary: Distribution stores you wish to distribute the app. One store name per
line.
title: Distribution stores
- distribution_tester: null
opts:
description: |-
List of individual testers. One email per line.
Distribution of AAB is supported only for Google Play store deployment: https://docs.microsoft.com/en-us/appcenter/distribution/uploading#android
summary: List of individual testers. One email per line.
title: Testers
- opts:
description: Additional notes for the deployed artifact.
summary: Release notes text
title: Release notes text
release_notes: Release notes
- notify_testers: "yes"
opts:
description: Send notification email to testers and distribution groups.
is_required: true
summary: Send notification email to testers and distribution groups.
title: Notify Testers
value_options:
- "yes"
- "no"
- mandatory: "no"
opts:
description: Enforce installation of distribution version. Requires SDK integration.
is_required: true
summary: Enforce installation of distribution version. Requires SDK integration.
title: Mandatory
value_options:
- "no"
- "yes"
- debug: "no"
opts:
description: Enable verbose logs
is_required: true
summary: Enable verbose logs
title: Debug
value_options:
- "no"
- "yes"
- all_distribution_groups: "no"
opts:
description: Distribute the app to all user groups on that app. Enabling this
options makes it ignore distribution_group.
summary: Distribute the app to all user groups on that app.
title: All distribution groups
value_options:
- "no"
- "yes"
outputs:
- APPCENTER_DEPLOY_STATUS: null
opts:
description: 'Deployment status: ''success'' or ''failed'''
summary: 'Deployment status: ''success'' or ''failed'''
title: Deployment status
- APPCENTER_DEPLOY_INSTALL_URL: null
opts:
description: Install page URL of the newly deployed version.
summary: Install page URL of the newly deployed version
title: Install page URL
- APPCENTER_DEPLOY_DOWNLOAD_URL: null
opts:
description: Download URL of the newly deployed version.
summary: Download URL of the newly deployed version
title: Download URL
- APPCENTER_DEPLOY_RELEASE_ID: null
opts:
description: ID of the new release for later retrieval via App Center APIs.
summary: ID of the new release for later retrieval via App Center APIs.
title: Release ID
- APPCENTER_PUBLIC_INSTALL_PAGE_URL: null
opts:
description: Public install page URL of the latest version.
summary: Public install page URL of the latest version
title: Public install page URL
- APPCENTER_PUBLIC_INSTALL_PAGE_URLS: null
opts:
description: When a group is public the step will AppCenter provides and the step
exports a public install page URL.
summary: Comma-separated list of the public install pages URL.
title: Comma-separated public install pages by groups
- APPCENTER_RELEASE_PAGE_URL: null
opts:
description: URL to the release page containing release notes, easily share with
business partners and QA for testing.
summary: URL to the release page containing release notes.
title: Release Page URL
================================================
FILE: steps/appcenter-deploy-android/step-info.yml
================================================
maintainer: bitrise
removal_date: "2026-08-08"
deprecate_notes: |
App Center is deprecated.
We recommend to use [Bitrise Release Management](https://docs.bitrise.io/en/release-management.html) and [Bitrise CodePush](https://docs.bitrise.io/en/release-management/codepush/about-codepush.html).
================================================
FILE: steps/appcenter-deploy-ios/1.0.0/step.yml
================================================
title: AppCenter iOS Deploy
summary: Deploy your awesome iOS app to App Center.
description: Deploy an iOS application to [AppCenter](https://appcenter.ms).
website: https://github.com/bitrise-steplib/steps-appcenter-deploy-ios
source_code_url: https://github.com/bitrise-steplib/steps-appcenter-deploy-ios
support_url: https://github.com/bitrise-steplib/steps-appcenter-deploy-ios/issues
published_at: 2019-11-26T14:37:36.373448806Z
source:
git: https://github.com/bitrise-steplib/steps-appcenter-deploy-ios.git
commit: a756aaa213dd51e6d6e25532ad22832b00970e36
project_type_tags:
- xamarin
- cordova
- ionic
- react-native
- flutter
type_tags:
- deploy
toolkit:
go:
package_name: github.com/bitrise-steplib/steps-appcenter-deploy-ios
is_always_run: false
is_skippable: false
inputs:
- ipa_path: $BITRISE_IPA_PATH
opts:
description: Path to a binary file
is_required: true
summary: Path to a binary file
title: IPA path
- dsym_zip_path: $BITRISE_DSYM_PATH
opts:
description: Path to a DSYM.zip file
summary: Path to a DSYM.zip file
title: DSYM.zip file path
- api_token: null
opts:
description: App Center API token
is_required: true
is_sensitive: true
summary: App Center API token
title: API Token
- opts:
description: |-
Owner of the App Center app.
For an app owned by a user, the URL in App Center might look like https://appcenter.ms/users/JoshuaWeber/apps/APIExample.
Here, the {owner_name} is JoshuaWeber. For an app owned by an org, the URL might be
https://appcenter.ms/orgs/Microsoft/apps/APIExample and the {owner_name} would be Microsoft
is_required: true
summary: Owner of the App Center app
title: Owner name
owner_name: null
- app_name: null
opts:
description: |-
The name of the App Center app.
For an app owned by a user, the URL in App Center might look like https://appcenter.ms/users/JoshuaWeber/apps/APIExample.
Here, the {app_name} is ApiExample.
is_required: true
summary: The name of the App Center app
title: App name
- distribution_group: null
opts:
description: User groups you wish to distribute the app. One group name per line.
summary: User groups you wish to distribute the app. One group name per line.
title: Distribution groups
- distribution_store: null
opts:
description: Distribution stores you wish to distribute the app. One store name
per line.
summary: Distribution stores you wish to distribute the app. One store name per
line.
title: Distribution stores
- distribution_tester: null
opts:
description: List of individual testers. One email per line.
summary: List of individual testers. One email per line.
title: Testers
- opts:
description: Release notes text
summary: Release notes text
title: Release notes for the deployed artifact.
release_notes: Release notes
- notify_testers: "yes"
opts:
description: Send notification email to testers and distribution groups.
is_required: true
summary: Send notification email to testers and distribution groups.
title: Notify Testers
value_options:
- "yes"
- "no"
- mandatory: "no"
opts:
description: Enforce installation of distribution version. Requires SDK integration.
is_required: true
summary: Enforce installation of distribution version. Requires SDK integration.
title: Mandatory update
value_options:
- "no"
- "yes"
- debug: "no"
opts:
description: Enable verbose logs
is_required: true
summary: Enable verbose logs
title: Debug
value_options:
- "no"
- "yes"
outputs:
- APPCENTER_DEPLOY_STATUS: null
opts:
description: 'Deployment result: ''success'' or ''failed'''
summary: 'Deployment result: ''success'' or ''failed'''
title: Deployment status
- APPCENTER_DEPLOY_INSTALL_URL: ""
opts:
description: Install page URL of the newly deployed version
summary: Install page URL of the newly deployed version
title: Install page URL
- APPCENTER_DEPLOY_DOWNLOAD_URL: ""
opts:
description: Download URL of the newly deployed version
summary: Download URL of the newly deployed version
title: Download URL
- APPCENTER_PUBLIC_INSTALL_PAGE_URL: ""
opts:
description: Public install page URL of the latest version
summary: Public install page URL of the latest version
title: Public install page URL
================================================
FILE: steps/appcenter-deploy-ios/1.1.0/step.yml
================================================
title: AppCenter iOS Deploy
summary: Deploy your awesome iOS app to App Center.
description: Deploy an iOS application to [AppCenter](https://appcenter.ms).
website: https://github.com/bitrise-steplib/steps-appcenter-deploy-ios
source_code_url: https://github.com/bitrise-steplib/steps-appcenter-deploy-ios
support_url: https://github.com/bitrise-steplib/steps-appcenter-deploy-ios/issues
published_at: 2020-09-25T09:24:42.620639402Z
source:
git: https://github.com/bitrise-steplib/steps-appcenter-deploy-ios.git
commit: ad21da815b53fe75d581f0ce507b92827c67acbb
project_type_tags:
- xamarin
- cordova
- ionic
- react-native
- flutter
type_tags:
- deploy
toolkit:
go:
package_name: github.com/bitrise-steplib/steps-appcenter-deploy-ios
is_always_run: false
is_skippable: false
inputs:
- ipa_path: $BITRISE_IPA_PATH
opts:
description: Path to a binary file
is_required: true
summary: Path to a binary file
title: IPA path
- dsym_zip_path: $BITRISE_DSYM_PATH
opts:
description: Path to a DSYM.zip file
summary: Path to a DSYM.zip file
title: DSYM.zip file path
- api_token: null
opts:
description: App Center API token
is_required: true
is_sensitive: true
summary: App Center API token
title: API Token
- opts:
description: |-
Owner of the App Center app.
For an app owned by a user, the URL in App Center might look like https://appcenter.ms/users/JoshuaWeber/apps/APIExample.
Here, the {owner_name} is JoshuaWeber. For an app owned by an org, the URL might be
https://appcenter.ms/orgs/Microsoft/apps/APIExample and the {owner_name} would be Microsoft
is_required: true
summary: Owner of the App Center app
title: Owner name
owner_name: null
- app_name: null
opts:
description: |-
The name of the App Center app.
For an app owned by a user, the URL in App Center might look like https://appcenter.ms/users/JoshuaWeber/apps/APIExample.
Here, the {app_name} is ApiExample.
is_required: true
summary: The name of the App Center app
title: App name
- distribution_group: null
opts:
description: User groups you wish to distribute the app. One group name per line.
summary: User groups you wish to distribute the app. One group name per line.
title: Distribution groups
- distribution_store: null
opts:
description: Distribution stores you wish to distribute the app. One store name
per line.
summary: Distribution stores you wish to distribute the app. One store name per
line.
title: Distribution stores
- distribution_tester: null
opts:
description: List of individual testers. One email per line.
summary: List of individual testers. One email per line.
title: Testers
- opts:
description: Release notes text
summary: Release notes text
title: Release notes for the deployed artifact.
release_notes: Release notes
- notify_testers: "yes"
opts:
description: Send notification email to testers and distribution groups.
is_required: true
summary: Send notification email to testers and distribution groups.
title: Notify Testers
value_options:
- "yes"
- "no"
- mandatory: "no"
opts:
description: Enforce installation of distribution version. Requires SDK integration.
is_required: true
summary: Enforce installation of distribution version. Requires SDK integration.
title: Mandatory update
value_options:
- "no"
- "yes"
- debug: "no"
opts:
description: Enable verbose logs
is_required: true
summary: Enable verbose logs
title: Debug
value_options:
- "no"
- "yes"
outputs:
- APPCENTER_DEPLOY_STATUS: null
opts:
description: 'Deployment result: ''success'' or ''failed'''
summary: 'Deployment result: ''success'' or ''failed'''
title: Deployment status
- APPCENTER_DEPLOY_INSTALL_URL: ""
opts:
description: Install page URL of the newly deployed version
summary: Install page URL of the newly deployed version
title: Install page URL
- APPCENTER_DEPLOY_DOWNLOAD_URL: ""
opts:
description: Download URL of the newly deployed version
summary: Download URL of the newly deployed version
title: Download URL
- APPCENTER_PUBLIC_INSTALL_PAGE_URL: ""
opts:
description: Public install page URL of the latest version
summary: Public install page URL of the latest version
title: Public install page URL
- APPCENTER_DEPLOY_RELEASE_ID: null
opts:
description: ID of the new release for later retrieval via App Center APIs.
summary: ID of the new release for later retrieval via App Center APIs.
title: Release ID
================================================
FILE: steps/appcenter-deploy-ios/2.0.0/step.yml
================================================
title: AppCenter iOS Deploy
summary: Deploy your awesome iOS app to App Center.
description: Deploy an iOS application to [AppCenter](https://appcenter.ms).
website: https://github.com/bitrise-steplib/steps-appcenter-deploy-ios
source_code_url: https://github.com/bitrise-steplib/steps-appcenter-deploy-ios
support_url: https://github.com/bitrise-steplib/steps-appcenter-deploy-ios/issues
published_at: 2020-12-16T12:42:44.450536761Z
source:
git: https://github.com/bitrise-steplib/steps-appcenter-deploy-ios.git
commit: eac9055034fd8103bbf1eeaa8682738027571af6
project_type_tags:
- xamarin
- cordova
- ionic
- react-native
- flutter
type_tags:
- deploy
toolkit:
go:
package_name: github.com/bitrise-steplib/steps-appcenter-deploy-ios
is_always_run: false
is_skippable: false
inputs:
- ipa_path: $BITRISE_IPA_PATH
opts:
description: Path to a binary file
is_required: true
summary: Path to a binary file
title: IPA path
- dsym_zip_path: $BITRISE_DSYM_PATH
opts:
description: Path to a DSYM.zip file
summary: Path to a DSYM.zip file
title: DSYM.zip file path
- api_token: null
opts:
description: App Center API token
is_required: true
is_sensitive: true
summary: App Center API token
title: API Token
- opts:
description: |-
Owner of the App Center app.
For an app owned by a user, the URL in App Center might look like https://appcenter.ms/users/JoshuaWeber/apps/APIExample.
Here, the {owner_name} is JoshuaWeber. For an app owned by an org, the URL might be
https://appcenter.ms/orgs/Microsoft/apps/APIExample and the {owner_name} would be Microsoft
is_required: true
summary: Owner of the App Center app
title: Owner name
owner_name: null
- app_name: null
opts:
description: |-
The name of the App Center app.
For an app owned by a user, the URL in App Center might look like https://appcenter.ms/users/JoshuaWeber/apps/APIExample.
Here, the {app_name} is ApiExample.
is_required: true
summary: The name of the App Center app
title: App name
- distribution_group: null
opts:
description: User groups you wish to distribute the app. One group name per line.
is_required: true
summary: User groups you wish to distribute the app. One group name per line.
title: Distribution groups
- distribution_store: null
opts:
description: Distribution stores you wish to distribute the app. One store name
per line.
summary: Distribution stores you wish to distribute the app. One store name per
line.
title: Distribution stores
- distribution_tester: null
opts:
description: List of individual testers. One email per line.
summary: List of individual testers. One email per line.
title: Testers
- opts:
description: Release notes text
summary: Release notes text
title: Release notes for the deployed artifact.
release_notes: Release notes
- notify_testers: "yes"
opts:
description: Send notification email to testers and distribution groups.
is_required: true
summary: Send notification email to testers and distribution groups.
title: Notify Testers
value_options:
- "yes"
- "no"
- mandatory: "no"
opts:
description: Enforce installation of distribution version. Requires SDK integration.
is_required: true
summary: Enforce installation of distribution version. Requires SDK integration.
title: Mandatory update
value_options:
- "no"
- "yes"
- debug: "no"
opts:
description: Enable verbose logs
is_required: true
summary: Enable verbose logs
title: Debug
value_options:
- "no"
- "yes"
outputs:
- APPCENTER_DEPLOY_STATUS: null
opts:
description: 'Deployment result: ''success'' or ''failed'''
summary: 'Deployment result: ''success'' or ''failed'''
title: Deployment status
- APPCENTER_DEPLOY_INSTALL_URL: ""
opts:
description: Install page URL of the newly deployed version
summary: Install page URL of the newly deployed version
title: Install page URL
- APPCENTER_DEPLOY_DOWNLOAD_URL: ""
opts:
description: Download URL of the newly deployed version
summary: Download URL of the newly deployed version
title: Download URL
- APPCENTER_PUBLIC_INSTALL_PAGE_URL: ""
opts:
description: Public install page URL of the latest version
summary: Public install page URL of the latest version
title: Public install page URL
- APPCENTER_PUBLIC_INSTALL_PAGE_URLS: null
opts:
description: When a group is public the step will AppCenter provides and the step
exports a public install page URL.
summary: Comma-separated list of the public install pages URL.
title: Comma-separated public install pages by groups
- APPCENTER_DEPLOY_RELEASE_ID: null
opts:
description: ID of the new release for later retrieval via App Center APIs.
summary: ID of the new release for later retrieval via App Center APIs.
title: Release ID
================================================
FILE: steps/appcenter-deploy-ios/2.0.1/step.yml
================================================
title: AppCenter iOS Deploy
summary: Deploy your awesome iOS app to App Center.
description: Deploy an iOS application to [AppCenter](https://appcenter.ms).
website: https://github.com/bitrise-steplib/steps-appcenter-deploy-ios
source_code_url: https://github.com/bitrise-steplib/steps-appcenter-deploy-ios
support_url: https://github.com/bitrise-steplib/steps-appcenter-deploy-ios/issues
published_at: 2021-01-12T12:23:51.845656713Z
source:
git: https://github.com/bitrise-steplib/steps-appcenter-deploy-ios.git
commit: d1dcd5a0247f0208f89d129ba507521fd79dcec2
project_type_tags:
- xamarin
- cordova
- ionic
- react-native
- flutter
type_tags:
- deploy
toolkit:
go:
package_name: github.com/bitrise-steplib/steps-appcenter-deploy-ios
is_always_run: false
is_skippable: false
inputs:
- ipa_path: $BITRISE_IPA_PATH
opts:
description: Path to a binary file
is_required: true
summary: Path to a binary file
title: IPA path
- dsym_zip_path: $BITRISE_DSYM_PATH
opts:
description: Path to a DSYM.zip file
summary: Path to a DSYM.zip file
title: DSYM.zip file path
- api_token: null
opts:
description: App Center API token
is_required: true
is_sensitive: true
summary: App Center API token
title: API Token
- opts:
description: |-
Owner of the App Center app.
For an app owned by a user, the URL in App Center might look like https://appcenter.ms/users/JoshuaWeber/apps/APIExample.
Here, the {owner_name} is JoshuaWeber. For an app owned by an org, the URL might be
https://appcenter.ms/orgs/Microsoft/apps/APIExample and the {owner_name} would be Microsoft
is_required: true
summary: Owner of the App Center app
title: Owner name
owner_name: null
- app_name: null
opts:
description: |-
The name of the App Center app.
For an app owned by a user, the URL in App Center might look like https://appcenter.ms/users/JoshuaWeber/apps/APIExample.
Here, the {app_name} is ApiExample.
is_required: true
summary: The name of the App Center app
title: App name
- distribution_group: null
opts:
description: User groups you wish to distribute the app. One group name per line.
is_required: true
summary: User groups you wish to distribute the app. One group name per line.
title: Distribution groups
- distribution_store: null
opts:
description: Distribution stores you wish to distribute the app. One store name
per line.
summary: Distribution stores you wish to distribute the app. One store name per
line.
title: Distribution stores
- distribution_tester: null
opts:
description: List of individual testers. One email per line.
summary: List of individual testers. One email per line.
title: Testers
- opts:
description: Release notes text
summary: Release notes text
title: Release notes for the deployed artifact.
release_notes: Release notes
- notify_testers: "yes"
opts:
description: Send notification email to testers and distribution groups.
is_required: true
summary: Send notification email to testers and distribution groups.
title: Notify Testers
value_options:
- "yes"
- "no"
- mandatory: "no"
opts:
description: Enforce installation of distribution version. Requires SDK integration.
is_required: true
summary: Enforce installation of distribution version. Requires SDK integration.
title: Mandatory update
value_options:
- "no"
- "yes"
- debug: "no"
opts:
description: Enable verbose logs
is_required: true
summary: Enable verbose logs
title: Debug
value_options:
- "no"
- "yes"
outputs:
- APPCENTER_DEPLOY_STATUS: null
opts:
description: 'Deployment result: ''success'' or ''failed'''
summary: 'Deployment result: ''success'' or ''failed'''
title: Deployment status
- APPCENTER_DEPLOY_INSTALL_URL: ""
opts:
description: Install page URL of the newly deployed version
summary: Install page URL of the newly deployed version
title: Install page URL
- APPCENTER_DEPLOY_DOWNLOAD_URL: ""
opts:
description: Download URL of the newly deployed version
summary: Download URL of the newly deployed version
title: Download URL
- APPCENTER_PUBLIC_INSTALL_PAGE_URL: ""
opts:
description: Public install page URL of the latest version
summary: Public install page URL of the latest version
title: Public install page URL
- APPCENTER_PUBLIC_INSTALL_PAGE_URLS: null
opts:
description: When a group is public the step will AppCenter provides and the step
exports a public install page URL.
summary: Comma-separated list of the public install pages URL.
title: Comma-separated public install pages by groups
- APPCENTER_DEPLOY_RELEASE_ID: null
opts:
description: ID of the new release for later retrieval via App Center APIs.
summary: ID of the new release for later retrieval via App Center APIs.
title: Release ID
================================================
FILE: steps/appcenter-deploy-ios/2.0.2/step.yml
================================================
title: AppCenter iOS Deploy
summary: Deploy your awesome iOS app to App Center.
description: Deploy an iOS application to [AppCenter](https://appcenter.ms).
website: https://github.com/bitrise-steplib/steps-appcenter-deploy-ios
source_code_url: https://github.com/bitrise-steplib/steps-appcenter-deploy-ios
support_url: https://github.com/bitrise-steplib/steps-appcenter-deploy-ios/issues
published_at: 2021-01-13T10:11:16.401356238Z
source:
git: https://github.com/bitrise-steplib/steps-appcenter-deploy-ios.git
commit: 9bd0610d9544b2b9052fddc7f96a3fd6a18dc820
project_type_tags:
- xamarin
- cordova
- ionic
- react-native
- flutter
type_tags:
- deploy
toolkit:
go:
package_name: github.com/bitrise-steplib/steps-appcenter-deploy-ios
is_always_run: false
is_skippable: false
inputs:
- ipa_path: $BITRISE_IPA_PATH
opts:
description: Path to a binary file
is_required: true
summary: Path to a binary file
title: IPA path
- dsym_zip_path: $BITRISE_DSYM_PATH
opts:
description: Path to a DSYM.zip file
summary: Path to a DSYM.zip file
title: DSYM.zip file path
- api_token: null
opts:
description: App Center API token
is_required: true
is_sensitive: true
summary: App Center API token
title: API Token
- opts:
description: |-
Owner of the App Center app.
For an app owned by a user, the URL in App Center might look like https://appcenter.ms/users/JoshuaWeber/apps/APIExample.
Here, the {owner_name} is JoshuaWeber. For an app owned by an org, the URL might be
https://appcenter.ms/orgs/Microsoft/apps/APIExample and the {owner_name} would be Microsoft
is_required: true
summary: Owner of the App Center app
title: Owner name
owner_name: null
- app_name: null
opts:
description: |-
The name of the App Center app.
For an app owned by a user, the URL in App Center might look like https://appcenter.ms/users/JoshuaWeber/apps/APIExample.
Here, the {app_name} is ApiExample.
is_required: true
summary: The name of the App Center app
title: App name
- distribution_group: null
opts:
description: User groups you wish to distribute the app. One group name per line.
is_required: true
summary: User groups you wish to distribute the app. One group name per line.
title: Distribution groups
- distribution_store: null
opts:
description: Distribution stores you wish to distribute the app. One store name
per line.
summary: Distribution stores you wish to distribute the app. One store name per
line.
title: Distribution stores
- distribution_tester: null
opts:
description: List of individual testers. One email per line.
summary: List of individual testers. One email per line.
title: Testers
- opts:
description: Release notes text
summary: Release notes text
title: Release notes for the deployed artifact.
release_notes: Release notes
- notify_testers: "yes"
opts:
description: Send notification email to testers and distribution groups.
is_required: true
summary: Send notification email to testers and distribution groups.
title: Notify Testers
value_options:
- "yes"
- "no"
- mandatory: "no"
opts:
description: Enforce installation of distribution version. Requires SDK integration.
is_required: true
summary: Enforce installation of distribution version. Requires SDK integration.
title: Mandatory update
value_options:
- "no"
- "yes"
- debug: "no"
opts:
description: Enable verbose logs
is_required: true
summary: Enable verbose logs
title: Debug
value_options:
- "no"
- "yes"
outputs:
- APPCENTER_DEPLOY_STATUS: null
opts:
description: 'Deployment result: ''success'' or ''failed'''
summary: 'Deployment result: ''success'' or ''failed'''
title: Deployment status
- APPCENTER_DEPLOY_INSTALL_URL: ""
opts:
description: Install page URL of the newly deployed version
summary: Install page URL of the newly deployed version
title: Install page URL
- APPCENTER_DEPLOY_DOWNLOAD_URL: ""
opts:
description: Download URL of the newly deployed version
summary: Download URL of the newly deployed version
title: Download URL
- APPCENTER_PUBLIC_INSTALL_PAGE_URL: ""
opts:
description: Public install page URL of the latest version
summary: Public install page URL of the latest version
title: Public install page URL
- APPCENTER_PUBLIC_INSTALL_PAGE_URLS: null
opts:
description: When a group is public the step will AppCenter provides and the step
exports a public install page URL.
summary: Comma-separated list of the public install pages URL.
title: Comma-separated public install pages by groups
- APPCENTER_DEPLOY_RELEASE_ID: null
opts:
description: ID of the new release for later retrieval via App Center APIs.
summary: ID of the new release for later retrieval via App Center APIs.
title: Release ID
================================================
FILE: steps/appcenter-deploy-ios/2.1.0/step.yml
================================================
title: AppCenter iOS Deploy
summary: Deploy your awesome iOS app to App Center.
description: Deploy an iOS application to [AppCenter](https://appcenter.ms).
website: https://github.com/bitrise-steplib/steps-appcenter-deploy-ios
source_code_url: https://github.com/bitrise-steplib/steps-appcenter-deploy-ios
support_url: https://github.com/bitrise-steplib/steps-appcenter-deploy-ios/issues
published_at: 2021-05-13T08:28:34.697416698Z
source:
git: https://github.com/bitrise-steplib/steps-appcenter-deploy-ios.git
commit: 8aab34dac2e9ccc603cab02fef486cfd764b1f61
project_type_tags:
- xamarin
- cordova
- ionic
- react-native
- flutter
type_tags:
- deploy
toolkit:
go:
package_name: github.com/bitrise-steplib/steps-appcenter-deploy-ios
is_always_run: false
is_skippable: false
inputs:
- ipa_path: $BITRISE_IPA_PATH
opts:
description: Path to a binary file
is_required: true
summary: Path to a binary file
title: IPA path
- dsym_zip_path: $BITRISE_DSYM_PATH
opts:
description: Path to a DSYM.zip file
summary: Path to a DSYM.zip file
title: DSYM.zip file path
- api_token: null
opts:
description: App Center API token
is_required: true
is_sensitive: true
summary: App Center API token
title: API Token
- opts:
description: |-
Owner of the App Center app.
For an app owned by a user, the URL in App Center might look like https://appcenter.ms/users/JoshuaWeber/apps/APIExample.
Here, the {owner_name} is JoshuaWeber. For an app owned by an org, the URL might be
https://appcenter.ms/orgs/Microsoft/apps/APIExample and the {owner_name} would be Microsoft
is_required: true
summary: Owner of the App Center app
title: Owner name
owner_name: null
- app_name: null
opts:
description: |-
The name of the App Center app.
For an app owned by a user, the URL in App Center might look like https://appcenter.ms/users/JoshuaWeber/apps/APIExample.
Here, the {app_name} is ApiExample.
is_required: true
summary: The name of the App Center app
title: App name
- distribution_group: null
opts:
description: User groups you wish to distribute the app. One group name per line.
summary: User groups you wish to distribute the app. One group name per line.
title: Distribution groups
- distribution_store: null
opts:
description: Distribution stores you wish to distribute the app. One store name
per line.
summary: Distribution stores you wish to distribute the app. One store name per
line.
title: Distribution stores
- distribution_tester: null
opts:
description: List of individual testers. One email per line.
summary: List of individual testers. One email per line.
title: Testers
- opts:
description: Release notes text
summary: Release notes text
title: Release notes for the deployed artifact.
release_notes: Release notes
- notify_testers: "yes"
opts:
description: Send notification email to testers and distribution groups.
is_required: true
summary: Send notification email to testers and distribution groups.
title: Notify Testers
value_options:
- "yes"
- "no"
- mandatory: "no"
opts:
description: Enforce installation of distribution version. Requires SDK integration.
is_required: true
summary: Enforce installation of distribution version. Requires SDK integration.
title: Mandatory update
value_options:
- "no"
- "yes"
- debug: "no"
opts:
description: Enable verbose logs
is_required: true
summary: Enable verbose logs
title: Debug
value_options:
- "no"
- "yes"
outputs:
- APPCENTER_DEPLOY_STATUS: null
opts:
description: 'Deployment result: ''success'' or ''failed'''
summary: 'Deployment result: ''success'' or ''failed'''
title: Deployment status
- APPCENTER_DEPLOY_INSTALL_URL: ""
opts:
description: Install page URL of the newly deployed version
summary: Install page URL of the newly deployed version
title: Install page URL
- APPCENTER_DEPLOY_DOWNLOAD_URL: ""
opts:
description: Download URL of the newly deployed version
summary: Download URL of the newly deployed version
title: Download URL
- APPCENTER_PUBLIC_INSTALL_PAGE_URL: ""
opts:
description: Public install page URL of the latest version
summary: Public install page URL of the latest version
title: Public install page URL
- APPCENTER_PUBLIC_INSTALL_PAGE_URLS: null
opts:
description: When a group is public the step will AppCenter provides and the step
exports a public install page URL.
summary: Comma-separated list of the public install pages URL.
title: Comma-separated public install pages by groups
- APPCENTER_DEPLOY_RELEASE_ID: null
opts:
description: ID of the new release for later retrieval via App Center APIs.
summary: ID of the new release for later retrieval via App Center APIs.
title: Release ID
================================================
FILE: steps/appcenter-deploy-ios/2.1.1/step.yml
================================================
title: AppCenter iOS Deploy
summary: Distribute your iOS app through Microsoft App Center.
description: |-
[This Step](https://github.com/bitrise-steplib/steps-appcenter-deploy-ios) integrates with the [App Center](https://appcenter.ms/)'s Distribution service and enables you to distribute your apps seamlessly to different stores, for example, App Store, MS Intune, user groups or even individual testers.
### Configuring the Step
Before you start:
The Step requires an active MS App Center account.
1. Add the **IPA path** which points to a binary file.
2. Add the **DSYM.zip file path**.
3. Add the AppCenter **API token**.
4. Add the **Owner name**, which means the owner of the App Center app. For an app owned by a user, the URL in App Center can look like this https://appcenter.ms/users/JoshuaWeber/apps/APIExample where the {ownername} is JoshuaWeber. For an app owned by an organization, the URL can be, for example, https://appcenter.ms/orgs/Microsoft/apps/APIExample where the {ownername} is Microsoft.
5. Add the **App name** which is the name of the App Center app. For an app owned by a user, the URL in App Center might look like this: https://appcenter.ms/users/JoshuaWeber/apps/APIExample where the {app_name} is APIExample.
6. Add the **Distribution groups** which means the user groups you wish to distribute the app to. Please add one group name per line.
7. Add the **Distribution stores** where you wish to distribute the app to. Please add one store name per line.
8. Add the **Testers** who you wish to send the app to via email. Please add one email address per line.
9. Add any **Release notes for the deployed artifact**.
10. Send notification emails to testers and distribution groups with the **Notify Testers** input.
11. You can enforce the installation of a distribution version with the **Mandatory update** input set to `yes`.
12. If you set the **Debug** input to `yes`, you can enable verbose logs.
### Useful links
- [About iOS deployment with Bitrise]https://devcenter.bitrise.io/deploy/ios-deploy/ios-deploy-index/()
- [About iOS code signing](https://devcenter.bitrise.io/code-signing/ios-code-signing/code-signing-index/)
### Related Steps
- [Deploy to iTunes Connect](https://www.bitrise.io/integrations/steps/deploy-to-itunesconnect-deliver)
- [Deploy to iTunes Connect - Application Loader](https://www.bitrise.io/integrations/steps/deploy-to-itunesconnect-application-loader)
website: https://github.com/bitrise-steplib/steps-appcenter-deploy-ios
source_code_url: https://github.com/bitrise-steplib/steps-appcenter-deploy-ios
support_url: https://github.com/bitrise-steplib/steps-appcenter-deploy-ios/issues
published_at: 2021-06-24T15:55:13.221055708Z
source:
git: https://github.com/bitrise-steplib/steps-appcenter-deploy-ios.git
commit: 64ecbc696f2274baea2e744545d93afb344aaf87
project_type_tags:
- xamarin
- cordova
- ionic
- react-native
- flutter
type_tags:
- deploy
toolkit:
go:
package_name: github.com/bitrise-steplib/steps-appcenter-deploy-ios
is_always_run: false
is_skippable: false
inputs:
- ipa_path: $BITRISE_IPA_PATH
opts:
description: Path to a binary file
is_required: true
summary: Path to a binary file
title: IPA path
- dsym_zip_path: $BITRISE_DSYM_PATH
opts:
description: Path to a DSYM.zip file
summary: Path to a DSYM.zip file
title: DSYM.zip file path
- api_token: null
opts:
description: App Center API token
is_required: true
is_sensitive: true
summary: App Center API token
title: API Token
- opts:
description: |-
Owner of the App Center app.
For an app owned by a user, the URL in App Center might look like https://appcenter.ms/users/JoshuaWeber/apps/APIExample.
Here, the {owner_name} is JoshuaWeber. For an app owned by an org, the URL might be
https://appcenter.ms/orgs/Microsoft/apps/APIExample and the {owner_name} would be Microsoft
is_required: true
summary: Owner of the App Center app
title: Owner name
owner_name: null
- app_name: null
opts:
description: |-
The name of the App Center app.
For an app owned by a user, the URL in App Center might look like https://appcenter.ms/users/JoshuaWeber/apps/APIExample.
Here, the {app_name} is ApiExample.
is_required: true
summary: The name of the App Center app
title: App name
- distribution_group: null
opts:
description: User groups you wish to distribute the app. One group name per line.
summary: User groups you wish to distribute the app. One group name per line.
title: Distribution groups
- distribution_store: null
opts:
description: Distribution stores you wish to distribute the app. One store name
per line.
summary: Distribution stores you wish to distribute the app. One store name per
line.
title: Distribution stores
- distribution_tester: null
opts:
description: List of individual testers. One email per line.
summary: List of individual testers. One email per line.
title: Testers
- opts:
description: Release notes text
summary: Release notes text
title: Release notes for the deployed artifact.
release_notes: Release notes
- notify_testers: "yes"
opts:
description: Send notification email to testers and distribution groups.
is_required: true
summary: Send notification email to testers and distribution groups.
title: Notify Testers
value_options:
- "yes"
- "no"
- mandatory: "no"
opts:
description: Enforce installation of distribution version. Requires SDK integration.
is_required: true
summary: Enforce installation of distribution version. Requires SDK integration.
title: Mandatory update
value_options:
- "no"
- "yes"
- debug: "no"
opts:
description: Enable verbose logs
is_required: true
summary: Enable verbose logs
title: Debug
value_options:
- "no"
- "yes"
outputs:
- APPCENTER_DEPLOY_STATUS: null
opts:
description: 'Deployment result: ''success'' or ''failed'''
summary: 'Deployment result: ''success'' or ''failed'''
title: Deployment status
- APPCENTER_DEPLOY_INSTALL_URL: ""
opts:
description: Install page URL of the newly deployed version
summary: Install page URL of the newly deployed version
title: Install page URL
- APPCENTER_DEPLOY_DOWNLOAD_URL: ""
opts:
description: Download URL of the newly deployed version
summary: Download URL of the newly deployed version
title: Download URL
- APPCENTER_PUBLIC_INSTALL_PAGE_URL: ""
opts:
description: Public install page URL of the latest version
summary: Public install page URL of the latest version
title: Public install page URL
- APPCENTER_PUBLIC_INSTALL_PAGE_URLS: null
opts:
description: When a group is public the step will AppCenter provides and the step
exports a public install page URL.
summary: Comma-separated list of the public install pages URL.
title: Comma-separated public install pages by groups
- APPCENTER_DEPLOY_RELEASE_ID: null
opts:
description: ID of the new release for later retrieval via App Center APIs.
summary: ID of the new release for later retrieval via App Center APIs.
title: Release ID
================================================
FILE: steps/appcenter-deploy-ios/2.1.2/step.yml
================================================
title: AppCenter iOS Deploy
summary: Distribute your iOS app through Microsoft App Center.
description: |-
[This Step](https://github.com/bitrise-steplib/steps-appcenter-deploy-ios) integrates with the [App Center](https://appcenter.ms/)'s Distribution service and enables you to distribute your apps seamlessly to different stores, for example, App Store, MS Intune, user groups or even individual testers.
### Configuring the Step
Before you start:
The Step requires an active MS App Center account.
1. Add the **IPA path** which points to a binary file.
2. Add the **DSYM.zip file path**.
3. Add the AppCenter **API token**.
4. Add the **Owner name**, which means the owner of the App Center app. For an app owned by a user, the URL in App Center can look like this https://appcenter.ms/users/JoshuaWeber/apps/APIExample where the {ownername} is JoshuaWeber. For an app owned by an organization, the URL can be, for example, https://appcenter.ms/orgs/Microsoft/apps/APIExample where the {ownername} is Microsoft.
5. Add the **App name** which is the name of the App Center app. For an app owned by a user, the URL in App Center might look like this: https://appcenter.ms/users/JoshuaWeber/apps/APIExample where the {app_name} is APIExample.
6. Add the **Distribution groups** which means the user groups you wish to distribute the app to. Please add one group name per line.
7. Add the **Distribution stores** where you wish to distribute the app to. Please add one store name per line.
8. Add the **Testers** who you wish to send the app to via email. Please add one email address per line.
9. Add any **Release notes for the deployed artifact**.
10. Send notification emails to testers and distribution groups with the **Notify Testers** input.
11. You can enforce the installation of a distribution version with the **Mandatory update** input set to `yes`.
12. If you set the **Debug** input to `yes`, you can enable verbose logs.
### Useful links
- [About iOS deployment with Bitrise]https://devcenter.bitrise.io/deploy/ios-deploy/ios-deploy-index/()
- [About iOS code signing](https://devcenter.bitrise.io/code-signing/ios-code-signing/code-signing-index/)
### Related Steps
- [Deploy to iTunes Connect](https://www.bitrise.io/integrations/steps/deploy-to-itunesconnect-deliver)
- [Deploy to iTunes Connect - Application Loader](https://www.bitrise.io/integrations/steps/deploy-to-itunesconnect-application-loader)
website: https://github.com/bitrise-steplib/steps-appcenter-deploy-ios
source_code_url: https://github.com/bitrise-steplib/steps-appcenter-deploy-ios
support_url: https://github.com/bitrise-steplib/steps-appcenter-deploy-ios/issues
published_at: 2021-09-16T15:33:59.250468501Z
source:
git: https://github.com/bitrise-steplib/steps-appcenter-deploy-ios.git
commit: bce482a130c778c1d486b38568b6062a71f4148a
project_type_tags:
- xamarin
- cordova
- ionic
- react-native
- flutter
type_tags:
- deploy
toolkit:
go:
package_name: github.com/bitrise-steplib/steps-appcenter-deploy-ios
is_always_run: false
is_skippable: false
inputs:
- ipa_path: $BITRISE_IPA_PATH
opts:
description: Path to a binary file
is_required: true
summary: Path to a binary file
title: IPA path
- dsym_zip_path: $BITRISE_DSYM_PATH
opts:
description: Path to a DSYM.zip file
summary: Path to a DSYM.zip file
title: DSYM.zip file path
- api_token: null
opts:
description: App Center API token
is_required: true
is_sensitive: true
summary: App Center API token
title: API Token
- opts:
description: |-
Owner of the App Center app.
For an app owned by a user, the URL in App Center might look like https://appcenter.ms/users/JoshuaWeber/apps/APIExample.
Here, the {owner_name} is JoshuaWeber. For an app owned by an org, the URL might be
https://appcenter.ms/orgs/Microsoft/apps/APIExample and the {owner_name} would be Microsoft
is_required: true
summary: Owner of the App Center app
title: Owner name
owner_name: null
- app_name: null
opts:
description: |-
The name of the App Center app.
For an app owned by a user, the URL in App Center might look like https://appcenter.ms/users/JoshuaWeber/apps/APIExample.
Here, the {app_name} is ApiExample.
is_required: true
summary: The name of the App Center app
title: App name
- distribution_group: null
opts:
description: User groups you wish to distribute the app. One group name per line.
summary: User groups you wish to distribute the app. One group name per line.
title: Distribution groups
- distribution_store: null
opts:
description: Distribution stores you wish to distribute the app. One store name
per line.
summary: Distribution stores you wish to distribute the app. One store name per
line.
title: Distribution stores
- distribution_tester: null
opts:
description: List of individual testers. One email per line.
summary: List of individual testers. One email per line.
title: Testers
- opts:
description: Release notes text
summary: Release notes text
title: Release notes for the deployed artifact.
release_notes: Release notes
- notify_testers: "yes"
opts:
description: Send notification email to testers and distribution groups.
is_required: true
summary: Send notification email to testers and distribution groups.
title: Notify Testers
value_options:
- "yes"
- "no"
- mandatory: "no"
opts:
description: Enforce installation of distribution version. Requires SDK integration.
is_required: true
summary: Enforce installation of distribution version. Requires SDK integration.
title: Mandatory update
value_options:
- "no"
- "yes"
- debug: "no"
opts:
description: Enable verbose logs
is_required: true
summary: Enable verbose logs
title: Debug
value_options:
- "no"
- "yes"
outputs:
- APPCENTER_DEPLOY_STATUS: null
opts:
description: 'Deployment result: ''success'' or ''failed'''
summary: 'Deployment result: ''success'' or ''failed'''
title: Deployment status
- APPCENTER_DEPLOY_INSTALL_URL: ""
opts:
description: Install page URL of the newly deployed version
summary: Install page URL of the newly deployed version
title: Install page URL
- APPCENTER_DEPLOY_DOWNLOAD_URL: ""
opts:
description: Download URL of the newly deployed version
summary: Download URL of the newly deployed version
title: Download URL
- APPCENTER_PUBLIC_INSTALL_PAGE_URL: ""
opts:
description: Public install page URL of the latest version
summary: Public install page URL of the latest version
title: Public install page URL
- APPCENTER_PUBLIC_INSTALL_PAGE_URLS: null
opts:
description: When a group is public the step will AppCenter provides and the step
exports a public install page URL.
summary: Comma-separated list of the public install pages URL.
title: Comma-separated public install pages by groups
- APPCENTER_DEPLOY_RELEASE_ID: null
opts:
description: ID of the new release for later retrieval via App Center APIs.
summary: ID of the new release for later retrieval via App Center APIs.
title: Release ID
================================================
FILE: steps/appcenter-deploy-ios/2.2.0/step.yml
================================================
title: AppCenter iOS Deploy
summary: Distribute your iOS app through Microsoft App Center.
description: |-
[This Step](https://github.com/bitrise-steplib/steps-appcenter-deploy-ios) integrates with the [App Center](https://appcenter.ms/)'s Distribution service and enables you to distribute your apps seamlessly to different stores, for example, App Store, MS Intune, user groups or even individual testers.
### Configuring the Step
Before you start:
The Step requires an active MS App Center account.
1. Add the **IPA path** which points to a binary file.
2. Add the **DSYM.zip file path**.
3. Add the AppCenter **API token**.
4. Add the **Owner name**, which means the owner of the App Center app. For an app owned by a user, the URL in App Center can look like this https://appcenter.ms/users/JoshuaWeber/apps/APIExample where the {ownername} is JoshuaWeber. For an app owned by an organization, the URL can be, for example, https://appcenter.ms/orgs/Microsoft/apps/APIExample where the {ownername} is Microsoft.
5. Add the **App name** which is the name of the App Center app. For an app owned by a user, the URL in App Center might look like this: https://appcenter.ms/users/JoshuaWeber/apps/APIExample where the {app_name} is APIExample.
6. Add the **Distribution groups** which means the user groups you wish to distribute the app to. Please add one group name per line.
7. Add the **Distribution stores** where you wish to distribute the app to. Please add one store name per line.
8. Add the **Testers** who you wish to send the app to via email. Please add one email address per line.
9. Add any **Release notes for the deployed artifact**.
10. Send notification emails to testers and distribution groups with the **Notify Testers** input.
11. You can enforce the installation of a distribution version with the **Mandatory update** input set to `yes`.
12. If you set the **Debug** input to `yes`, you can enable verbose logs.
### Useful links
- [About iOS deployment with Bitrise]https://devcenter.bitrise.io/deploy/ios-deploy/ios-deploy-index/()
- [About iOS code signing](https://devcenter.bitrise.io/code-signing/ios-code-signing/code-signing-index/)
### Related Steps
- [Deploy to iTunes Connect](https://www.bitrise.io/integrations/steps/deploy-to-itunesconnect-deliver)
- [Deploy to iTunes Connect - Application Loader](https://www.bitrise.io/integrations/steps/deploy-to-itunesconnect-application-loader)
website: https://github.com/bitrise-steplib/steps-appcenter-deploy-ios
source_code_url: https://github.com/bitrise-steplib/steps-appcenter-deploy-ios
support_url: https://github.com/bitrise-steplib/steps-appcenter-deploy-ios/issues
published_at: 2022-01-25T10:08:12.925669492Z
source:
git: https://github.com/bitrise-steplib/steps-appcenter-deploy-ios.git
commit: 9521becda0f81f2491a7cd8155758e260b1563a7
project_type_tags:
- xamarin
- cordova
- ionic
- react-native
- flutter
type_tags:
- deploy
toolkit:
go:
package_name: github.com/bitrise-steplib/steps-appcenter-deploy-ios
is_always_run: false
is_skippable: false
inputs:
- ipa_path: $BITRISE_IPA_PATH
opts:
description: Path to a binary file
is_required: true
summary: Path to a binary file
title: IPA path
- dsym_zip_path: $BITRISE_DSYM_PATH
opts:
description: Path to a DSYM.zip file
summary: Path to a DSYM.zip file
title: DSYM.zip file path
- api_token: null
opts:
description: App Center API token
is_required: true
is_sensitive: true
summary: App Center API token
title: API Token
- opts:
description: |-
Owner of the App Center app.
For an app owned by a user, the URL in App Center might look like https://appcenter.ms/users/JoshuaWeber/apps/APIExample.
Here, the {owner_name} is JoshuaWeber. For an app owned by an org, the URL might be
https://appcenter.ms/orgs/Microsoft/apps/APIExample and the {owner_name} would be Microsoft
is_required: true
summary: Owner of the App Center app
title: Owner name
owner_name: null
- app_name: null
opts:
description: |-
The name of the App Center app.
For an app owned by a user, the URL in App Center might look like https://appcenter.ms/users/JoshuaWeber/apps/APIExample.
Here, the {app_name} is ApiExample.
is_required: true
summary: The name of the App Center app
title: App name
- distribution_group: null
opts:
description: User groups you wish to distribute the app. One group name per line.
summary: User groups you wish to distribute the app. One group name per line.
title: Distribution groups
- distribution_store: null
opts:
description: Distribution stores you wish to distribute the app. One store name
per line.
summary: Distribution stores you wish to distribute the app. One store name per
line.
title: Distribution stores
- distribution_tester: null
opts:
description: List of individual testers. One email per line.
summary: List of individual testers. One email per line.
title: Testers
- opts:
description: Release notes text
summary: Release notes text
title: Release notes for the deployed artifact.
release_notes: Release notes
- notify_testers: "yes"
opts:
description: Send notification email to testers and distribution groups.
is_required: true
summary: Send notification email to testers and distribution groups.
title: Notify Testers
value_options:
- "yes"
- "no"
- mandatory: "no"
opts:
description: Enforce installation of distribution version. Requires SDK integration.
is_required: true
summary: Enforce installation of distribution version. Requires SDK integration.
title: Mandatory update
value_options:
- "no"
- "yes"
- debug: "no"
opts:
description: Enable verbose logs
is_required: true
summary: Enable verbose logs
title: Debug
value_options:
- "no"
- "yes"
- all_distribution_groups: "no"
opts:
description: Distribute the app to all user groups on that app. Enabling this
options makes it ignore distribution_group.
summary: Distribute the app to all user groups on that app.
title: All distribution groups
value_options:
- "no"
- "yes"
outputs:
- APPCENTER_DEPLOY_STATUS: null
opts:
description: 'Deployment result: ''success'' or ''failed'''
summary: 'Deployment result: ''success'' or ''failed'''
title: Deployment status
- APPCENTER_DEPLOY_INSTALL_URL: ""
opts:
description: Install page URL of the newly deployed version
summary: Install page URL of the newly deployed version
title: Install page URL
- APPCENTER_DEPLOY_DOWNLOAD_URL: ""
opts:
description: Download URL of the newly deployed version
summary: Download URL of the newly deployed version
title: Download URL
- APPCENTER_PUBLIC_INSTALL_PAGE_URL: ""
opts:
description: Public install page URL of the latest version
summary: Public install page URL of the latest version
title: Public install page URL
- APPCENTER_PUBLIC_INSTALL_PAGE_URLS: null
opts:
description: When a group is public the step will AppCenter provides and the step
exports a public install page URL.
summary: Comma-separated list of the public install pages URL.
title: Comma-separated public install pages by groups
- APPCENTER_DEPLOY_RELEASE_ID: null
opts:
description: ID of the new release for later retrieval via App Center APIs.
summary: ID of the new release for later retrieval via App Center APIs.
title: Release ID
================================================
FILE: steps/appcenter-deploy-ios/2.2.1/step.yml
================================================
title: AppCenter iOS Deploy
summary: Distribute your iOS app through Microsoft App Center.
description: |-
[This Step](https://github.com/bitrise-steplib/steps-appcenter-deploy-ios) integrates with the [App Center](https://appcenter.ms/)'s Distribution service and enables you to distribute your apps seamlessly to different stores, for example, App Store, MS Intune, user groups or even individual testers.
### Configuring the Step
Before you start:
The Step requires an active MS App Center account.
1. Add the **IPA path** which points to a binary file.
2. Add the **DSYM.zip file path**.
3. Add the AppCenter **API token**.
4. Add the **Owner name**, which means the owner of the App Center app. For an app owned by a user, the URL in App Center can look like this https://appcenter.ms/users/JoshuaWeber/apps/APIExample where the {ownername} is JoshuaWeber. For an app owned by an organization, the URL can be, for example, https://appcenter.ms/orgs/Microsoft/apps/APIExample where the {ownername} is Microsoft.
5. Add the **App name** which is the name of the App Center app. For an app owned by a user, the URL in App Center might look like this: https://appcenter.ms/users/JoshuaWeber/apps/APIExample where the {app_name} is APIExample.
6. Add the **Distribution groups** which means the user groups you wish to distribute the app to. Please add one group name per line.
7. Add the **Distribution stores** where you wish to distribute the app to. Please add one store name per line.
8. Add the **Testers** who you wish to send the app to via email. Please add one email address per line.
9. Add any **Release notes for the deployed artifact**.
10. Send notification emails to testers and distribution groups with the **Notify Testers** input.
11. You can enforce the installation of a distribution version with the **Mandatory update** input set to `yes`.
12. If you set the **Debug** input to `yes`, you can enable verbose logs.
### Useful links
- [About iOS deployment with Bitrise]https://devcenter.bitrise.io/deploy/ios-deploy/ios-deploy-index/()
- [About iOS code signing](https://devcenter.bitrise.io/code-signing/ios-code-signing/code-signing-index/)
### Related Steps
- [Deploy to iTunes Connect](https://www.bitrise.io/integrations/steps/deploy-to-itunesconnect-deliver)
- [Deploy to iTunes Connect - Application Loader](https://www.bitrise.io/integrations/steps/deploy-to-itunesconnect-application-loader)
website: https://github.com/bitrise-steplib/steps-appcenter-deploy-ios
source_code_url: https://github.com/bitrise-steplib/steps-appcenter-deploy-ios
support_url: https://github.com/bitrise-steplib/steps-appcenter-deploy-ios/issues
published_at: 2023-08-03T08:20:34.006542299Z
source:
git: https://github.com/bitrise-steplib/steps-appcenter-deploy-ios.git
commit: 5644edec67aec758dd5a152fad09f7fb114fad08
project_type_tags:
- xamarin
- cordova
- ionic
- react-native
- flutter
type_tags:
- deploy
toolkit:
go:
package_name: github.com/bitrise-steplib/steps-appcenter-deploy-ios
is_always_run: false
is_skippable: false
inputs:
- ipa_path: $BITRISE_IPA_PATH
opts:
description: Path to a binary file
is_required: true
summary: Path to a binary file
title: IPA path
- dsym_zip_path: $BITRISE_DSYM_PATH
opts:
description: Path to a DSYM.zip file
summary: Path to a DSYM.zip file
title: DSYM.zip file path
- api_token: null
opts:
description: App Center API token
is_required: true
is_sensitive: true
summary: App Center API token
title: API Token
- opts:
description: |-
Owner of the App Center app.
For an app owned by a user, the URL in App Center might look like https://appcenter.ms/users/JoshuaWeber/apps/APIExample.
Here, the {owner_name} is JoshuaWeber. For an app owned by an org, the URL might be
https://appcenter.ms/orgs/Microsoft/apps/APIExample and the {owner_name} would be Microsoft
is_required: true
summary: Owner of the App Center app
title: Owner name
owner_name: null
- app_name: null
opts:
description: |-
The name of the App Center app.
For an app owned by a user, the URL in App Center might look like https://appcenter.ms/users/JoshuaWeber/apps/APIExample.
Here, the {app_name} is ApiExample.
is_required: true
summary: The name of the App Center app
title: App name
- distribution_group: null
opts:
description: User groups you wish to distribute the app. One group name per line.
summary: User groups you wish to distribute the app. One group name per line.
title: Distribution groups
- distribution_store: null
opts:
description: Distribution stores you wish to distribute the app. One store name
per line.
summary: Distribution stores you wish to distribute the app. One store name per
line.
title: Distribution stores
- distribution_tester: null
opts:
description: List of individual testers. One email per line.
summary: List of individual testers. One email per line.
title: Testers
- opts:
description: Release notes text
summary: Release notes text
title: Release notes for the deployed artifact.
release_notes: Release notes
- notify_testers: "yes"
opts:
description: Send notification email to testers and distribution groups.
is_required: true
summary: Send notification email to testers and distribution groups.
title: Notify Testers
value_options:
- "yes"
- "no"
- mandatory: "no"
opts:
description: Enforce installation of distribution version. Requires SDK integration.
is_required: true
summary: Enforce installation of distribution version. Requires SDK integration.
title: Mandatory update
value_options:
- "no"
- "yes"
- debug: "no"
opts:
description: Enable verbose logs
is_required: true
summary: Enable verbose logs
title: Debug
value_options:
- "no"
- "yes"
- all_distribution_groups: "no"
opts:
description: Distribute the app to all user groups on that app. Enabling this
options makes it ignore distribution_group.
summary: Distribute the app to all user groups on that app.
title: All distribution groups
value_options:
- "no"
- "yes"
outputs:
- APPCENTER_DEPLOY_STATUS: null
opts:
description: 'Deployment result: ''success'' or ''failed'''
summary: 'Deployment result: ''success'' or ''failed'''
title: Deployment status
- APPCENTER_DEPLOY_INSTALL_URL: ""
opts:
description: Install page URL of the newly deployed version
summary: Install page URL of the newly deployed version
title: Install page URL
- APPCENTER_DEPLOY_DOWNLOAD_URL: ""
opts:
description: Download URL of the newly deployed version
summary: Download URL of the newly deployed version
title: Download URL
- APPCENTER_PUBLIC_INSTALL_PAGE_URL: ""
opts:
description: Public install page URL of the latest version
summary: Public install page URL of the latest version
title: Public install page URL
- APPCENTER_PUBLIC_INSTALL_PAGE_URLS: null
opts:
description: When a group is public the step will AppCenter provides and the step
exports a public install page URL.
summary: Comma-separated list of the public install pages URL.
title: Comma-separated public install pages by groups
- APPCENTER_DEPLOY_RELEASE_ID: null
opts:
description: ID of the new release for later retrieval via App Center APIs.
summary: ID of the new release for later retrieval via App Center APIs.
title: Release ID
================================================
FILE: steps/appcenter-deploy-ios/2.2.2/step.yml
================================================
title: AppCenter iOS Deploy
summary: Distribute your iOS app through Microsoft App Center.
description: |-
[This Step](https://github.com/bitrise-steplib/steps-appcenter-deploy-ios) integrates with the [App Center](https://appcenter.ms/)'s Distribution service and enables you to distribute your apps seamlessly to different stores, for example, App Store, MS Intune, user groups or even individual testers.
### Configuring the Step
Before you start:
The Step requires an active MS App Center account.
1. Add the **IPA path** which points to a binary file.
2. Add the **DSYM.zip file path**.
3. Add the AppCenter **API token**.
4. Add the **Owner name**, which means the owner of the App Center app. For an app owned by a user, the URL in App Center can look like this https://appcenter.ms/users/JoshuaWeber/apps/APIExample where the {ownername} is JoshuaWeber. For an app owned by an organization, the URL can be, for example, https://appcenter.ms/orgs/Microsoft/apps/APIExample where the {ownername} is Microsoft.
5. Add the **App name** which is the name of the App Center app. For an app owned by a user, the URL in App Center might look like this: https://appcenter.ms/users/JoshuaWeber/apps/APIExample where the {app_name} is APIExample.
6. Add the **Distribution groups** which means the user groups you wish to distribute the app to. Please add one group name per line.
7. Add the **Distribution stores** where you wish to distribute the app to. Please add one store name per line.
8. Add the **Testers** who you wish to send the app to via email. Please add one email address per line.
9. Add any **Release notes for the deployed artifact**.
10. Send notification emails to testers and distribution groups with the **Notify Testers** input.
11. You can enforce the installation of a distribution version with the **Mandatory update** input set to `yes`.
12. If you set the **Debug** input to `yes`, you can enable verbose logs.
### Useful links
- [About iOS deployment with Bitrise]https://devcenter.bitrise.io/deploy/ios-deploy/ios-deploy-index/()
- [About iOS code signing](https://devcenter.bitrise.io/code-signing/ios-code-signing/code-signing-index/)
### Related Steps
- [Deploy to iTunes Connect](https://www.bitrise.io/integrations/steps/deploy-to-itunesconnect-deliver)
- [Deploy to iTunes Connect - Application Loader](https://www.bitrise.io/integrations/steps/deploy-to-itunesconnect-application-loader)
website: https://github.com/bitrise-steplib/steps-appcenter-deploy-ios
source_code_url: https://github.com/bitrise-steplib/steps-appcenter-deploy-ios
support_url: https://github.com/bitrise-steplib/steps-appcenter-deploy-ios/issues
published_at: 2023-10-09T08:41:52.513899345Z
source:
git: https://github.com/bitrise-steplib/steps-appcenter-deploy-ios.git
commit: 574f77d1868f8da20ec36e882c8b134c8c0eda5f
project_type_tags:
- xamarin
- cordova
- ionic
- react-native
- flutter
type_tags:
- deploy
toolkit:
go:
package_name: github.com/bitrise-steplib/steps-appcenter-deploy-ios
is_always_run: false
is_skippable: false
inputs:
- ipa_path: $BITRISE_IPA_PATH
opts:
description: Path to a binary file
is_required: true
summary: Path to a binary file
title: IPA path
- dsym_zip_path: $BITRISE_DSYM_PATH
opts:
description: Path to a DSYM.zip file
summary: Path to a DSYM.zip file
title: DSYM.zip file path
- api_token: null
opts:
description: App Center API token
is_required: true
is_sensitive: true
summary: App Center API token
title: API Token
- opts:
description: |-
Owner of the App Center app.
For an app owned by a user, the URL in App Center might look like https://appcenter.ms/users/JoshuaWeber/apps/APIExample.
Here, the {owner_name} is JoshuaWeber. For an app owned by an org, the URL might be
https://appcenter.ms/orgs/Microsoft/apps/APIExample and the {owner_name} would be Microsoft
is_required: true
summary: Owner of the App Center app
title: Owner name
owner_name: null
- app_name: null
opts:
description: |-
The name of the App Center app.
For an app owned by a user, the URL in App Center might look like https://appcenter.ms/users/JoshuaWeber/apps/APIExample.
Here, the {app_name} is ApiExample.
is_required: true
summary: The name of the App Center app
title: App name
- distribution_group: null
opts:
description: User groups you wish to distribute the app. One group name per line.
summary: User groups you wish to distribute the app. One group name per line.
title: Distribution groups
- distribution_store: null
opts:
description: Distribution stores you wish to distribute the app. One store name
per line.
summary: Distribution stores you wish to distribute the app. One store name per
line.
title: Distribution stores
- distribution_tester: null
opts:
description: List of individual testers. One email per line.
summary: List of individual testers. One email per line.
title: Testers
- opts:
description: Release notes text
summary: Release notes text
title: Release notes for the deployed artifact.
release_notes: Release notes
- notify_testers: "yes"
opts:
description: Send notification email to testers and distribution groups.
is_required: true
summary: Send notification email to testers and distribution groups.
title: Notify Testers
value_options:
- "yes"
- "no"
- mandatory: "no"
opts:
description: Enforce installation of distribution version. Requires SDK integration.
is_required: true
summary: Enforce installation of distribution version. Requires SDK integration.
title: Mandatory update
value_options:
- "no"
- "yes"
- debug: "no"
opts:
description: Enable verbose logs
is_required: true
summary: Enable verbose logs
title: Debug
value_options:
- "no"
- "yes"
- all_distribution_groups: "no"
opts:
description: Distribute the app to all user groups on that app. Enabling this
options makes it ignore distribution_group.
summary: Distribute the app to all user groups on that app.
title: All distribution groups
value_options:
- "no"
- "yes"
outputs:
- APPCENTER_DEPLOY_STATUS: null
opts:
description: 'Deployment result: ''success'' or ''failed'''
summary: 'Deployment result: ''success'' or ''failed'''
title: Deployment status
- APPCENTER_DEPLOY_INSTALL_URL: ""
opts:
description: Install page URL of the newly deployed version
summary: Install page URL of the newly deployed version
title: Install page URL
- APPCENTER_DEPLOY_DOWNLOAD_URL: ""
opts:
description: Download URL of the newly deployed version
summary: Download URL of the newly deployed version
title: Download URL
- APPCENTER_PUBLIC_INSTALL_PAGE_URL: ""
opts:
description: Public install page URL of the latest version
summary: Public install page URL of the latest version
title: Public install page URL
- APPCENTER_PUBLIC_INSTALL_PAGE_URLS: null
opts:
description: When a group is public the step will AppCenter provides and the step
exports a public install page URL.
summary: Comma-separated list of the public install pages URL.
title: Comma-separated public install pages by groups
- APPCENTER_DEPLOY_RELEASE_ID: null
opts:
description: ID of the new release for later retrieval via App Center APIs.
summary: ID of the new release for later retrieval via App Center APIs.
title: Release ID
================================================
FILE: steps/appcenter-deploy-ios/step-info.yml
================================================
maintainer: bitrise
removal_date: "2026-08-08"
deprecate_notes: |
App Center is deprecated.
We recommend to use [Bitrise Release Management](https://docs.bitrise.io/en/release-management.html) and [Bitrise CodePush](https://docs.bitrise.io/en/release-management/codepush/about-codepush.html).
================================================
FILE: steps/appcenter-dsym-upload/0.1.2/step.yml
================================================
title: AppCenter dSYM upload
summary: |
Upload dSYM to Microsoft AppCenter
description: "This step uploads dSYM to AppCenter using official CLI.\nThe step is
relevant only for iOS projects (including Xamarin.iOS).\n\nBy default $BITRISE_DSYM_PATH
env used to lookup for dSYM file.\nIf an archive step used as part of the workflow
then a default value can be used \nfor `dsym_path` variable\n\nIt is important to
[obtain API Token from AppCenter](https://appcenter.ms/settings/apitokens)\nto use
this step.\n"
website: https://github.com/alexshikov/bitrise-step-appcenter-dsym-upload
source_code_url: https://github.com/alexshikov/bitrise-step-appcenter-dsym-upload
support_url: https://github.com/alexshikov/bitrise-step-appcenter-dsym-upload/issues
published_at: 2017-12-18T13:20:30.338428+02:00
source:
git: https://github.com/alexshikov/bitrise-step-appcenter-dsym-upload.git
commit: c705e034afdadc7887e3458c9d8a8ae60a34b08a
host_os_tags:
- osx-10.10
- ubuntu-16.04
project_type_tags:
- ios
type_tags:
- deploy
toolkit:
bash:
entry_file: step.sh
deps:
brew:
- name: node
apt_get:
- name: node
is_requires_admin_user: true
is_always_run: false
is_skippable: false
run_if: ""
inputs:
- dsym_path: $BITRISE_DSYM_PATH
opts:
description: |
A path to dSYM file to upload.
is_required: true
title: dSYM path
- app_id: $BITRISE_APPCENTER_APP_ID
opts:
description: |
AppCenter Application Identifier is a combination of your Organization/Owner Name
and an Application Name.
For example: "MyOrganization/MyApplication"
is_required: true
summary: AppCenter application identifier (Owner + App Name).
title: Application Identifier
- api_token: $BITRISE_APPCENTER_API_TOKEN
opts:
description: |
[Obtain API Token from AppCenter](https://appcenter.ms/settings/apitokens)
is_required: true
title: AppCenter API Token
================================================
FILE: steps/appcenter-dsym-upload/0.1.3/step.yml
================================================
title: AppCenter dSYM upload
summary: |
Upload dSYM to Microsoft AppCenter
description: "This step uploads dSYM to AppCenter using official CLI.\nThe step is
relevant only for iOS projects (including Xamarin.iOS).\n\nBy default $BITRISE_DSYM_PATH
env used to lookup for dSYM file.\nIf an archive step used as part of the workflow
then a default value can be used \nfor `dsym_path` variable\n\nIt is important to
[obtain API Token from AppCenter](https://appcenter.ms/settings/apitokens)\nto use
this step.\n"
website: https://github.com/alexshikov/bitrise-step-appcenter-dsym-upload
source_code_url: https://github.com/alexshikov/bitrise-step-appcenter-dsym-upload
support_url: https://github.com/alexshikov/bitrise-step-appcenter-dsym-upload/issues
published_at: 2018-02-23T13:15:57.923773+02:00
source:
git: https://github.com/alexshikov/bitrise-step-appcenter-dsym-upload.git
commit: 42bb29ba2f557877bf8bea996452a60c2162d47c
host_os_tags:
- osx-10.10
- ubuntu-16.04
project_type_tags:
- ios
type_tags:
- deploy
toolkit:
bash:
entry_file: step.sh
deps:
brew:
- name: node
apt_get:
- name: node
is_requires_admin_user: true
is_always_run: false
is_skippable: false
run_if: ""
inputs:
- dsym_path: $BITRISE_DSYM_PATH
opts:
description: |
A path to dSYM file to upload.
is_required: true
title: dSYM path
- app_id: $BITRISE_APPCENTER_APP_ID
opts:
description: |
AppCenter Application Identifier is a combination of your Organization/Owner Name
and an Application Name.
For example: "MyOrganization/MyApplication"
is_required: true
summary: AppCenter application identifier (Owner + App Name).
title: Application Identifier
- api_token: $BITRISE_APPCENTER_API_TOKEN
opts:
description: |
[Obtain API Token from AppCenter](https://appcenter.ms/settings/apitokens)
is_required: true
title: AppCenter API Token
================================================
FILE: steps/appcenter-dsym-upload/step-info.yml
================================================
maintainer: community
removal_date: "2026-08-08"
deprecate_notes: |
App Center is deprecated.
We recommend to use [Bitrise Release Management](https://docs.bitrise.io/en/release-management.html) and [Bitrise CodePush](https://docs.bitrise.io/en/release-management/codepush/about-codepush.html).
================================================
FILE: steps/appcenter-ipa-upload/0.0.2/step.yml
================================================
title: AppCenter ipa upload
summary: |
Upload ipa to Microsoft AppCenter
description: |
This step is upload iOS ipa archive file to AppCenter.
Using AppCenter CLI.
website: https://github.com/kanari3/bitrise-step-appcenter-ipa-upload
source_code_url: https://github.com/kanari3/bitrise-step-appcenter-ipa-upload
support_url: https://github.com/kanari3/bitrise-step-appcenter-ipa-upload/issues
published_at: 2019-07-15T21:29:09.119266+09:00
source:
git: https://github.com/kanari3/bitrise-step-appcenter-ipa-upload.git
commit: 2e9810e71558b613a495c1169644d2038c51adca
host_os_tags:
- osx-10.10
- ubuntu-16.04
project_type_tags:
- ios
type_tags:
- deploy
toolkit:
bash:
entry_file: step.sh
is_requires_admin_user: true
is_always_run: false
is_skippable: false
run_if: ""
inputs:
- app_id: $APP_CENTER_APP_ID
opts:
description: |
AppCenter Application Identifier is a combination of your Organization/Owner Name
and an Application Name.
For example: "MyOrganization/MyApplication"
is_required: true
summary: AppCenter application identifier (Owner + App Name).
title: Application Identifier
- api_token: $APP_CENTER_ACCESS_TOKEN
opts:
description: |
[Obtain API Token from AppCenter](https://appcenter.ms/settings/apitokens)
is_required: true
is_sensitive: true
title: AppCenter API Token
- distribution_group: $APP_CENTER_DISTRIBUTION_GROUP
opts:
description: |
For example and default: "Collaborators"
is_required: true
title: AppCenter Distribution Group Name
================================================
FILE: steps/appcenter-ipa-upload/0.0.3/step.yml
================================================
title: AppCenter ipa upload
summary: |
Upload ipa to Microsoft AppCenter
description: |
This step is upload iOS ipa archive file to AppCenter.
Using AppCenter CLI.
website: https://github.com/kanari3/bitrise-step-appcenter-ipa-upload
source_code_url: https://github.com/kanari3/bitrise-step-appcenter-ipa-upload
support_url: https://github.com/kanari3/bitrise-step-appcenter-ipa-upload/issues
published_at: 2020-05-14T20:48:51.96485+09:00
source:
git: https://github.com/kanari3/bitrise-step-appcenter-ipa-upload.git
commit: 3417e68a91b0305cd3a89cbd718107666dd4257d
host_os_tags:
- osx-10.10
- ubuntu-16.04
project_type_tags:
- ios
type_tags:
- deploy
toolkit:
bash:
entry_file: step.sh
is_requires_admin_user: true
is_always_run: false
is_skippable: false
run_if: ""
inputs:
- app_id: $APP_CENTER_APP_ID
opts:
description: |
AppCenter Application Identifier is a combination of your Organization/Owner Name
and an Application Name.
For example: "MyOrganization/MyApplication"
is_required: true
summary: AppCenter application identifier (Owner + App Name).
title: Application Identifier
- api_token: $APP_CENTER_ACCESS_TOKEN
opts:
description: |
[Obtain API Token from AppCenter](https://appcenter.ms/settings/apitokens)
is_required: true
is_sensitive: true
title: AppCenter API Token
- distribution_group: $APP_CENTER_DISTRIBUTION_GROUP
opts:
description: |
For example and default: "Collaborators"
is_required: true
title: AppCenter Distribution Group Name
- build_message: $APP_CENTER_BUILD_MESSAGE
opts:
description: |
Build message that will appear under the build in AppCenter's list of builds.
is_required: true
title: AppCenter Build Message to share in the build.
================================================
FILE: steps/appcenter-ipa-upload/0.0.4/step.yml
================================================
title: AppCenter ipa upload
summary: |
Upload ipa to Microsoft AppCenter
description: |
This step is upload iOS ipa archive file to AppCenter.
Using AppCenter CLI.
website: https://github.com/kanari3/bitrise-step-appcenter-ipa-upload
source_code_url: https://github.com/kanari3/bitrise-step-appcenter-ipa-upload
support_url: https://github.com/kanari3/bitrise-step-appcenter-ipa-upload/issues
published_at: 2021-10-07T04:12:37.337295+09:00
source:
git: https://github.com/kanari3/bitrise-step-appcenter-ipa-upload.git
commit: 258ec1c071f0577e2763429f1cbb95d5c9a16609
host_os_tags:
- osx-10.10
- ubuntu-16.04
project_type_tags:
- ios
type_tags:
- deploy
toolkit:
bash:
entry_file: step.sh
is_requires_admin_user: true
is_always_run: false
is_skippable: false
run_if: ""
inputs:
- app_id: $APP_CENTER_APP_ID
opts:
description: |
AppCenter Application Identifier is a combination of your Organization/Owner Name
and an Application Name.
For example: "MyOrganization/MyApplication"
is_required: true
summary: AppCenter application identifier (Owner + App Name).
title: Application Identifier
- api_token: $APP_CENTER_ACCESS_TOKEN
opts:
description: |
[Obtain API Token from AppCenter](https://appcenter.ms/settings/apitokens)
is_required: true
is_sensitive: true
title: AppCenter API Token
- distribution_group: $APP_CENTER_DISTRIBUTION_GROUP
opts:
description: |
For example and default: "Collaborators"
is_required: true
title: AppCenter Distribution Group Name
- build_message: $APP_CENTER_BUILD_MESSAGE
opts:
description: |
Build message that will appear under the build in AppCenter's list of builds.
is_required: false
title: (optional) AppCenter Build Message to share in the build.
================================================
FILE: steps/appcenter-ipa-upload/step-info.yml
================================================
maintainer: community
removal_date: "2026-08-08"
deprecate_notes: |
App Center is deprecated.
We recommend to use [Bitrise Release Management](https://docs.bitrise.io/en/release-management.html) and [Bitrise CodePush](https://docs.bitrise.io/en/release-management/codepush/about-codepush.html).
================================================
FILE: steps/appcenter-test/0.9.0/step.yml
================================================
title: App Center upload and schedule tests
summary: Uploads and schedules tests on Microsoft App Center
description: |-
Uploads and schedules tests on Microsoft App Center.
Appium, Espresso, Calabash Xamarin.UITest and XCUITest tests can be uploaded.
Setup Instructions:
1. Prepare your test for upload: [https://docs.microsoft.com/en-us/appcenter/test-cloud/preparing-for-upload/](https://docs.microsoft.com/en-us/appcenter/test-cloud/preparing-for-upload/)
1. Create an App Center project: [https://appcenter.ms/apps](https://appcenter.ms/apps)
1. Navigate to Test runs tab and start a New test run:
- Select devices
- Configure test run
- On Submit tab you will find every required input for the step
- Click on Done
website: https://github.com/bitrise-steplib/steps-appcenter-test
source_code_url: https://github.com/bitrise-steplib/steps-appcenter-test
support_url: https://github.com/bitrise-steplib/steps-appcenter-test/issues
published_at: 2018-04-26T14:00:51.279392903+02:00
source:
git: https://github.com/bitrise-steplib/steps-appcenter-test.git
commit: 913608ceb0cb9f507b831c6ffb05c35d7096f291
type_tags:
- test
toolkit:
go:
package_name: github.com/bitrise-steplib/steps-appcenter-test
is_requires_admin_user: true
is_always_run: false
is_skippable: false
run_if: ""
inputs:
- opts:
description: '[Install the appcenter-cli](https://github.com/Microsoft/appcenter-cli#installation)
and run `appcenter tokens create` to generate a new API token.'
is_expand: true
is_required: true
summary: API token
title: API token
token: null
- app: null
opts:
description: Specify app in the / format
is_expand: true
is_required: true
summary: Specify app in the / format
title: Target App on App Center
- framework: null
opts:
description: |-
The used testing framework name.
Available options:
- `appium` - for Appium tests
- `espresso` - for Espresso tests
- `calabash` - for Calabash tests
- `uitest` - for Xamarin.UITests
- `xcuitest` - for XCUITest
is_expand: true
is_required: true
summary: The used testing framework name
title: Test framework
- devices: null
opts:
description: Device selection slug
is_expand: true
is_required: true
summary: Device selection slug
title: Device selection slug
- opts:
description: Name of the test series.
is_expand: true
is_required: true
summary: Name of the test series
title: Name of the test series
series: null
- locale: en_US
opts:
description: The system locale for the test run.
is_expand: true
is_required: true
summary: The system locale for the test run
title: The system locale for the test run
- app_path: null
opts:
description: |-
Path to an application file.
Can be an .ipa or .apk file.
is_expand: true
is_required: true
summary: Path to an application file
title: Path to an application file
- dsym_dir: null
opts:
description: Path to the directory with iOS symbol files.
is_expand: true
summary: Path to the directory with iOS symbol files
title: Path to the directory with iOS symbol files
- opts:
description: |-
Path to the test directory.
- For Appium tests: path to the directory with the Appium tests (usually /target/upload)
- For Espresso tests: path to the Espresso output directory (usually /build/outputs/apk)
- For Calabash tests: path to the Calabash workspace directory (usually /features)
- For Xamarin.UITest tests: path to the directory with the built test assemblies (usually /bin/)
- For XCUITest tests: path to the build output directory (usually /Build/Products/Debug-iphoneos)
is_expand: true
is_required: true
summary: Path to the test directory
title: Path to the test directory
test_dir: null
================================================
FILE: steps/appcenter-test/0.9.1/step.yml
================================================
title: App Center upload and schedule tests
summary: Uploads and schedules tests on Microsoft App Center
description: |-
Uploads and schedules tests on Microsoft App Center.
Appium, Espresso, Calabash Xamarin.UITest and XCUITest tests can be uploaded.
Setup Instructions:
1. Prepare your test for upload: [https://docs.microsoft.com/en-us/appcenter/test-cloud/preparing-for-upload/](https://docs.microsoft.com/en-us/appcenter/test-cloud/preparing-for-upload/)
1. Create an App Center project: [https://appcenter.ms/apps](https://appcenter.ms/apps)
1. Navigate to Test runs tab and start a New test run:
- Select devices
- Configure test run
- On Submit tab you will find every required input for the step
- Click on Done
website: https://github.com/bitrise-steplib/steps-appcenter-test
source_code_url: https://github.com/bitrise-steplib/steps-appcenter-test
support_url: https://github.com/bitrise-steplib/steps-appcenter-test/issues
published_at: 2018-05-30T11:09:25.312167837+02:00
source:
git: https://github.com/bitrise-steplib/steps-appcenter-test.git
commit: 0479c92f1552a983d5ae7511c62568e9a7b54e07
type_tags:
- test
toolkit:
go:
package_name: github.com/bitrise-steplib/steps-appcenter-test
is_requires_admin_user: true
is_always_run: false
is_skippable: false
run_if: ""
inputs:
- opts:
description: '[Install the appcenter-cli](https://github.com/Microsoft/appcenter-cli#installation)
and run `appcenter tokens create` to generate a new API token.'
is_expand: true
is_required: true
summary: API token
title: API token
token: null
- app: null
opts:
description: Specify app in the / format
is_expand: true
is_required: true
summary: Specify app in the / format
title: Target App on App Center
- framework: null
opts:
description: |-
The used testing framework name.
Available options:
- `appium` - for Appium tests
- `espresso` - for Espresso tests
- `calabash` - for Calabash tests
- `uitest` - for Xamarin.UITests
- `xcuitest` - for XCUITest
is_expand: true
is_required: true
summary: The used testing framework name
title: Test framework
- devices: null
opts:
description: Device selection slug
is_expand: true
is_required: true
summary: Device selection slug
title: Device selection slug
- opts:
description: Name of the test series.
is_expand: true
is_required: true
summary: Name of the test series
title: Name of the test series
series: null
- locale: en_US
opts:
description: The system locale for the test run.
is_expand: true
is_required: true
summary: The system locale for the test run
title: The system locale for the test run
- app_path: null
opts:
description: |-
Path to an application file.
Can be an .ipa or .apk file.
is_expand: true
is_required: true
summary: Path to an application file
title: Path to an application file
- dsym_dir: null
opts:
description: Path to the directory with iOS symbol files.
is_expand: true
summary: Path to the directory with iOS symbol files
title: Path to the directory with iOS symbol files
- opts:
description: |-
Path to the test directory.
- For Appium tests: path to the directory with the Appium tests (usually /target/upload)
- For Espresso tests: path to the Espresso output directory (usually /build/outputs/apk)
- For Calabash tests: path to the Calabash workspace directory (usually /features)
- For Xamarin.UITest tests: path to the directory with the built test assemblies (usually /bin/)
- For XCUITest tests: path to the build output directory (usually /Build/Products/Debug-iphoneos)
is_expand: true
is_required: true
summary: Path to the test directory
title: Path to the test directory
test_dir: null
- additional_options: null
opts:
description: |-
Options added to the end of the test run.
You can use multiple options, separated by a space
character. Example `--include-category A|B|C --exclude-cataegory D`
is_expand: true
is_required: false
summary: Additional options for test run
title: Additional options for test run
================================================
FILE: steps/appcenter-test/0.9.2/step.yml
================================================
title: App Center upload and schedule tests
summary: This step uploads and schedules tests on Microsoft App Center.
description: |-
This step uploads and schedules tests on Microsoft App Center.
Appium, Espresso, Calabash Xamarin.UITest and XCUITest tests can be uploaded.
Setup instructions:
1. Prepare your test for upload: [https://docs.microsoft.com/en-us/appcenter/test-cloud/preparing-for-upload/](https://docs.microsoft.com/en-us/appcenter/test-cloud/preparing-for-upload/)
1. Create an App Center project: [https://appcenter.ms/apps](https://appcenter.ms/apps)
1. Navigate to Test runs tab and start a New test run:
- Select devices
- Configure test run
- On the Submit tab, you will find every required input for the step
- Click Done
website: https://github.com/bitrise-steplib/steps-appcenter-test
source_code_url: https://github.com/bitrise-steplib/steps-appcenter-test
support_url: https://github.com/bitrise-steplib/steps-appcenter-test/issues
published_at: 2018-08-31T11:05:44.472286611Z
source:
git: https://github.com/bitrise-steplib/steps-appcenter-test.git
commit: 85a0aa10c73c56f1dc82564415dcdc1c87d02ee6
type_tags:
- test
toolkit:
go:
package_name: github.com/bitrise-steplib/steps-appcenter-test
is_requires_admin_user: true
is_always_run: false
is_skippable: false
run_if: ""
inputs:
- opts:
description: '[Install the appcenter-cli](https://github.com/Microsoft/appcenter-cli#installation)
and run `appcenter tokens create` to generate a new API token.'
is_expand: true
is_required: true
is_sensitive: true
summary: API token
title: API token
token: null
- app: null
opts:
description: Specify app in the / format
is_expand: true
is_required: true
summary: Specify app in the / format
title: Target App on App Center
- framework: null
opts:
description: |-
The used testing framework name.
Available options:
- `appium` - for Appium tests
- `espresso` - for Espresso tests
- `calabash` - for Calabash tests
- `uitest` - for Xamarin.UITests
- `xcuitest` - for XCUITest
is_expand: true
is_required: true
summary: The used testing framework name
title: Test framework
- devices: null
opts:
description: Device selection slug
is_expand: true
is_required: true
summary: Device selection slug
title: Device selection slug
- opts:
description: Name of the test series.
is_expand: true
is_required: true
summary: Name of the test series
title: Name of the test series
series: null
- locale: en_US
opts:
description: The system locale for the test run.
is_expand: true
is_required: true
summary: The system locale for the test run
title: The system locale for the test run
- app_path: null
opts:
description: |-
Path to an application file.
Can be an .ipa or an .apk file.
is_expand: true
is_required: true
summary: Path to an application file
title: Path to an application file
- dsym_dir: null
opts:
description: Path to the directory with iOS symbol files.
is_expand: true
summary: Path to the directory with iOS symbol files
title: Path to the directory with iOS symbol files
- opts:
description: |-
Path to the test directory.
- For Appium tests: path to the directory with the Appium tests (usually /target/upload)
- For Espresso tests: path to the Espresso output directory (usually /build/outputs/apk)
- For Calabash tests: path to the Calabash workspace directory (usually /features)
- For Xamarin.UITest tests: path to the directory with the built test assemblies (usually /bin/)
- For XCUITest tests: path to the build output directory (usually /Build/Products/Debug-iphoneos)
is_expand: true
is_required: true
summary: Path to the test directory
title: Path to the test directory
test_dir: null
- additional_options: null
opts:
description: |-
Options added to the end of the test run.
You can use multiple options, separated by a space
character. Example `--include-category A|B|C --exclude-cataegory D`
is_expand: true
is_required: false
summary: Additional options for test run
title: Additional options for test run
================================================
FILE: steps/appcenter-test/step-info.yml
================================================
maintainer: bitrise
removal_date: "2026-08-08"
deprecate_notes: |
App Center is deprecated.
We recommend to use [Bitrise Release Management](https://docs.bitrise.io/en/release-management.html) and [Bitrise CodePush](https://docs.bitrise.io/en/release-management/codepush/about-codepush.html).
================================================
FILE: steps/appdome-build-2secure-android/1.0.12/step.yml
================================================
title: Appdome-Build-2Secure for Android
summary: |
Builds a mobile app using Appdome's platform
description: |
Integration that allows activating security and app protection features, building and signing mobile apps using Appdome's API. For details see: https://www.appdome.com/how-to/appsec-release-orchestration/mobile-appsec-cicd/use-appdome-build-2secure-step-for-bitrise
website: https://github.com/Appdome/bitrise-step-appdome-build-2secure-android
source_code_url: https://github.com/Appdome/bitrise-step-appdome-build-2secure-android
support_url: https://github.com/Appdome/bitrise-step-appdome-build-2secure-android/issues
published_at: 2023-06-27T16:03:13.933774+03:00
source:
git: https://github.com/Appdome/bitrise-step-appdome-build-2secure-android.git
commit: ed3e54bea3dd0be05e5d2693bfd9780d9e4f8fda
project_type_tags:
- android
type_tags:
- build
- code-sign
toolkit:
bash:
entry_file: step.sh
deps:
brew:
- name: curl
apt_get:
- name: curl
inputs:
- app_location: null
opts:
is_required: true
summary: URL to app file (apk/aab) or an EnvVar representing its path (i.e. $BITRISE_APK_PATH
or $BITRISE_AAB_PATH)
title: App file URL or EnvVar
- fusion_set_id: null
opts:
is_required: true
title: Fusion set ID
- opts:
is_required: false
title: Team ID
team_id: null
- opts:
description: App signing method
is_required: true
title: Signing Method
value_options:
- On-Appdome
- Private-Signing
- Auto-Dev-Signing
sign_method: On-Appdome
- gp_signing: "false"
opts:
description: Sign the app for Google Play? If 'true', requires $SIGN_FINGERPRINT
in the Secrets tab.
is_required: true
title: Google Play Signing?
value_options:
- "true"
- "false"
- build_logs: "false"
opts:
description: Build the app with Appdome's Diagnostic Logs
is_required: true
title: Build With Diagnostic Logs
value_options:
- "true"
- "false"
outputs:
- APPDOME_SECURED_APK_PATH: null
opts:
description: |
Local path of the secured .apk file. Available when 'Signing Method' set to 'On-Appdome' or 'Private-Signing'
summary: Local path of the secured .apk file
title: Secured .apk file path
- APPDOME_SECURED_AAB_PATH: null
opts:
description: |
Local path of the secured .aab file. Available when 'Signing Method' set to 'On-Appdome' or 'Private-Signing'
summary: Local path of the secured .aab file
title: Secured .aab file path
- APPDOME_PRIVATE_SIGN_SCRIPT_PATH: null
opts:
description: |
Local path of the .sh sign script file. Available when 'Signing Method' set to 'Auto-Dev-Signing'
summary: Local path of the .sh sign script file
title: .sh sign script file path
- APPDOME_CERTIFICATE_PATH: null
opts:
summary: Local path of the Certified Secure Certificate .pdf file
title: Certified Secure Certificate .pdf file path
================================================
FILE: steps/appdome-build-2secure-android/1.0.5/step.yml
================================================
title: Appdome-Build-2Secure for Android
summary: |
Builds a mobile app using Appdome's platform
description: |
Integration that allows activating security and app protection features, building and signing mobile apps using Appdome's API. For details see: https://www.appdome.com/how-to/appsec-release-orchestration/mobile-appsec-cicd/use-appdome-build-2secure-step-for-bitrise
website: https://github.com/Appdome/bitrise-step-appdome-build-2secure-android
source_code_url: https://github.com/Appdome/bitrise-step-appdome-build-2secure-android
support_url: https://github.com/Appdome/bitrise-step-appdome-build-2secure-android/issues
published_at: 2023-05-09T11:27:43.406105+03:00
source:
git: https://github.com/Appdome/bitrise-step-appdome-build-2secure-android.git
commit: bacf66f4a8dae4f03daca821a2de1260ca04078b
project_type_tags:
- android
type_tags:
- build
- code-sign
toolkit:
bash:
entry_file: step.sh
deps:
brew:
- name: curl
apt_get:
- name: curl
inputs:
- app_location: null
opts:
is_required: true
summary: URL to app file (apk/aab) or an EnvVar representing its path (i.e. $BITRISE_APK_PATH
or $BITRISE_AAB_PATH)
title: App file URL or EnvVar
- fusion_set_id: null
opts:
is_required: true
title: Fusion set ID
- opts:
is_required: false
title: Team ID
team_id: null
- opts:
description: App signing method
is_required: true
title: Signing Method
value_options:
- On-Appdome
- Private-Signing
- Auto-Dev-Signing
sign_method: On-Appdome
- gp_signing: "true"
opts:
description: Sign the app for Google Play? If 'true', requires $SIGN_FINGERPRINT
in the Secrets tab.
is_required: true
title: Google Play Signing?
value_options:
- "true"
- "false"
================================================
FILE: steps/appdome-build-2secure-android/1.0.7/step.yml
================================================
title: Appdome-Build-2Secure for Android
summary: |
Builds a mobile app using Appdome's platform
description: |
Integration that allows activating security and app protection features, building and signing mobile apps using Appdome's API. For details see: https://www.appdome.com/how-to/appsec-release-orchestration/mobile-appsec-cicd/use-appdome-build-2secure-step-for-bitrise
website: https://github.com/Appdome/bitrise-step-appdome-build-2secure-android
source_code_url: https://github.com/Appdome/bitrise-step-appdome-build-2secure-android
support_url: https://github.com/Appdome/bitrise-step-appdome-build-2secure-android/issues
published_at: 2023-05-21T18:14:24.326262+03:00
source:
git: https://github.com/Appdome/bitrise-step-appdome-build-2secure-android.git
commit: 5f67a7a9eb2c5eadee63c0267f5f5e4b3cdeeb1e
project_type_tags:
- android
type_tags:
- build
- code-sign
toolkit:
bash:
entry_file: step.sh
deps:
brew:
- name: curl
apt_get:
- name: curl
inputs:
- app_location: null
opts:
is_required: true
summary: URL to app file (apk/aab) or an EnvVar representing its path (i.e. $BITRISE_APK_PATH
or $BITRISE_AAB_PATH)
title: App file URL or EnvVar
- fusion_set_id: null
opts:
is_required: true
title: Fusion set ID
- opts:
is_required: false
title: Team ID
team_id: null
- opts:
description: App signing method
is_required: true
title: Signing Method
value_options:
- On-Appdome
- Private-Signing
- Auto-Dev-Signing
sign_method: On-Appdome
- gp_signing: "false"
opts:
description: Sign the app for Google Play? If 'true', requires $SIGN_FINGERPRINT
in the Secrets tab.
is_required: true
title: Google Play Signing?
value_options:
- "true"
- "false"
outputs:
- APPDOME_SECURED_APK_PATH: null
opts:
description: |
Local path of the secured .apk file. Available when 'Signing Method' set to 'On-Appdome' or 'Private-Signing'
summary: Local path of the secured .apk file
title: Secured .apk file path
- APPDOME_SECURED_AAB_PATH: null
opts:
description: |
Local path of the secured .aab file. Available when 'Signing Method' set to 'On-Appdome' or 'Private-Signing'
summary: Local path of the secured .aab file
title: Secured .aab file path
- APPDOME_PRIVATE_SIGN_SCRIPT_PATH: null
opts:
description: |
Local path of the .sh sign script file. Available when 'Signing Method' set to 'Auto-Dev-Signing'
summary: Local path of the .sh sign script file
title: .sh sign script file path
- APPDOME_CERTIFICATE_PATH: null
opts:
summary: Local path of the Certified Secure Certificate .pdf file
title: Certified Secure Certificate .pdf file path
================================================
FILE: steps/appdome-build-2secure-android/2.0.0/step.yml
================================================
title: Appdome-Build-2Secure for Android
summary: |
Builds a mobile app using Appdome's platform
description: |
Integration that allows activating security and app protection features, building and signing mobile apps using Appdome's API. For details see: https://www.appdome.com/how-to/appsec-release-orchestration/mobile-appsec-cicd/use-appdome-build-2secure-step-for-bitrise
website: https://github.com/Appdome/bitrise-step-appdome-build-2secure-android
source_code_url: https://github.com/Appdome/bitrise-step-appdome-build-2secure-android
support_url: https://github.com/Appdome/bitrise-step-appdome-build-2secure-android/issues
published_at: 2023-07-12T10:53:07.558334+03:00
source:
git: https://github.com/Appdome/bitrise-step-appdome-build-2secure-android.git
commit: 3454e77f745fe74de2659b67b203d26aa0e5f780
project_type_tags:
- android
type_tags:
- build
- code-sign
toolkit:
bash:
entry_file: step_init.sh
deps:
brew:
- name: curl
apt_get:
- name: curl
inputs:
- app_location: null
opts:
is_required: true
summary: URL to app file (apk/aab) or an EnvVar representing its path (i.e. $BITRISE_APK_PATH
or $BITRISE_AAB_PATH)
title: App file URL or EnvVar
- fusion_set_id: null
opts:
is_required: true
title: Fusion set ID
- opts:
is_required: false
title: Team ID
team_id: null
- opts:
description: App signing method
is_required: true
title: Signing Method
value_options:
- On-Appdome
- Private-Signing
- Auto-Dev-Signing
sign_method: On-Appdome
- gp_signing: "false"
opts:
category: Google Signing
description: Sign the app for Google Play? If 'true', requires $SIGN_FINGERPRINT
in the Secrets tab.
is_required: true
title: Google Play Signing
value_options:
- "true"
- "false"
- google_fingerprint: $GOOGLE_SIGN_FINGERPRINT
opts:
category: Google Signing
description: Google Sign Fingerprint for Google Play singing, or its Secret variable
name.
is_required: false
title: Google Sign Fingerprint
- fingerprint: $SIGN_FINGERPRINT
opts:
category: Private/Auto-Dev Signing
description: Sign Fingerprint (not for Google Play singing), or its Secret variable
name.
is_required: false
title: Sign Fingerprint
- opts:
description: Select 'true' to create a Universal.apk file (applies to .aab app
types only).
is_required: false
title: Secondary Output
value_options:
- "true"
- "false"
secondary_output: "false"
- build_logs: "false"
opts:
description: Build the app with Appdome's Diagnostic Logs
is_required: true
title: Build With Diagnostic Logs
value_options:
- "true"
- "false"
- build_to_test: None
opts:
description: Select a device cloud vendor this build will be ready for testing
on. Select None for a production build or for a vendor not in the list.
is_required: true
title: Build to test Vendor
value_options:
- None
- Bitbar
- Browserstack
- Saucelabs
- Lambdatest
outputs:
- APPDOME_SECURED_APK_PATH: null
opts:
description: |
Local path of the secured .apk file. Available when 'Signing Method' set to 'On-Appdome' or 'Private-Signing'
summary: Local path of the secured .apk file
title: Secured .apk file path
- APPDOME_SECURED_AAB_PATH: null
opts:
description: |
Local path of the secured .aab file. Available when 'Signing Method' set to 'On-Appdome' or 'Private-Signing'
summary: Local path of the secured .aab file
title: Secured .aab file path
- APPDOME_SECURED_SO_PATH: null
opts:
description: |
Local path of the secured secondary output file (Appdome_Universal.apk). Available if Secondary Output is set to 'true' and the original app is .aab type.
summary: Local path of the secured secondary output file (Appdome_Universal.apk)
title: Secured secondary output file path (Appdome_Universal.apk)
- APPDOME_PRIVATE_SIGN_SCRIPT_PATH: null
opts:
description: |
Local path of the .sh sign script file. Available when 'Signing Method' set to 'Auto-Dev-Signing'
summary: Local path of the .sh sign script file
title: .sh sign script file path
- APPDOME_CERTIFICATE_PATH: null
opts:
summary: Local path of the Certified Secure Certificate .pdf file
title: Certified Secure Certificate .pdf file path
================================================
FILE: steps/appdome-build-2secure-android/3.0.0/step.yml
================================================
title: Appdome-Build-2Secure for Android
summary: |
Builds a mobile app using Appdome's platform
description: |
Integration that allows activating security and app protection features, building and signing mobile apps using Appdome's API. For details see: https://www.appdome.com/how-to/appsec-release-orchestration/mobile-appsec-cicd/use-appdome-build-2secure-step-for-bitrise
website: https://github.com/Appdome/bitrise-step-appdome-build-2secure-android
source_code_url: https://github.com/Appdome/bitrise-step-appdome-build-2secure-android
support_url: https://github.com/Appdome/bitrise-step-appdome-build-2secure-android/issues
published_at: 2023-08-13T12:15:36.722066+03:00
source:
git: https://github.com/Appdome/bitrise-step-appdome-build-2secure-android.git
commit: 6933e473dcd17ae5274068c9a9ac8241c8897ee2
project_type_tags:
- android
type_tags:
- build
- code-sign
toolkit:
bash:
entry_file: step_init.sh
deps:
brew:
- name: curl
apt_get:
- name: curl
inputs:
- app_location: null
opts:
is_required: true
summary: URL to app file (apk/aab) or an EnvVar representing its path (i.e. $BITRISE_APK_PATH
or $BITRISE_AAB_PATH)
title: App file URL or EnvVar
- opts:
is_required: false
summary: Output app file name. The file extension (aab/apk) will be the same as
the original app. If not specified, the default output file will be same as
the original app but with Appdome_ prefix.
title: Output file name (without extension)
output_filename: null
- fusion_set_id: null
opts:
is_required: true
title: Fusion set ID
- opts:
is_required: false
title: Team ID
team_id: null
- opts:
description: App signing method
is_required: true
title: Signing Method
value_options:
- On-Appdome
- Private-Signing
- Auto-Dev-Signing
sign_method: On-Appdome
- gp_signing: "false"
opts:
category: Google Signing
description: Sign the app for Google Play? If 'true', requires $SIGN_FINGERPRINT
in the Secrets tab.
is_required: true
title: Google Play Signing
value_options:
- "true"
- "false"
- google_fingerprint: $GOOGLE_SIGN_FINGERPRINT
opts:
category: Google Signing
description: Google Sign Fingerprint for Google Play singing, or its Secret variable
name.
is_required: false
title: Google Sign Fingerprint
- fingerprint: $SIGN_FINGERPRINT
opts:
category: Private/Auto-Dev Signing
description: Sign Fingerprint (not for Google Play singing), or its Secret variable
name.
is_required: false
title: Sign Fingerprint
- opts:
description: Select 'true' to create a Universal.apk file (applies to .aab app
types only).
is_required: false
title: Secondary Output
value_options:
- "true"
- "false"
secondary_output: "false"
- build_logs: "false"
opts:
description: Build the app with Appdome's Diagnostic Logs
is_required: true
title: Build With Diagnostic Logs
value_options:
- "true"
- "false"
- build_to_test: None
opts:
description: Select a device cloud vendor this build will be ready for testing
on. Select None for a production build or for a vendor not in the list.
is_required: true
title: Build to test Vendor
value_options:
- None
- Bitbar
- Browserstack
- Saucelabs
- Lambdatest
outputs:
- APPDOME_SECURED_APK_PATH: null
opts:
description: |
Local path of the secured .apk file. Available when 'Signing Method' set to 'On-Appdome' or 'Private-Signing'
summary: Local path of the secured .apk file
title: Secured .apk file path
- APPDOME_SECURED_AAB_PATH: null
opts:
description: |
Local path of the secured .aab file. Available when 'Signing Method' set to 'On-Appdome' or 'Private-Signing'
summary: Local path of the secured .aab file
title: Secured .aab file path
- APPDOME_SECURED_SO_PATH: null
opts:
description: |
Local path of the secured secondary output file (universal apk). Available if Secondary Output is set to 'true' and the original app is .aab type
summary: Local path of the secured secondary output file
title: Secured secondary output file path (universal apk)
- APPDOME_PRIVATE_SIGN_SCRIPT_PATH: null
opts:
description: |
Local path of the .sh sign script file. Available when 'Signing Method' set to 'Auto-Dev-Signing'
summary: Local path of the .sh sign script file
title: .sh sign script file path
- APPDOME_CERTIFICATE_PATH: null
opts:
summary: Local path of the Certified Secure Certificate .pdf file
title: Certified Secure Certificate .pdf file path
================================================
FILE: steps/appdome-build-2secure-android/3.2.0/step.yml
================================================
title: Appdome-Build-2Secure for Android
summary: |
Builds a mobile app using Appdome's platform
description: |
Integration that allows activating security and app protection features, building and signing mobile apps using Appdome's API. For details see: https://www.appdome.com/how-to/appsec-release-orchestration/mobile-appsec-cicd/use-appdome-build-2secure-step-for-bitrise
website: https://github.com/Appdome/bitrise-step-appdome-build-2secure-android
source_code_url: https://github.com/Appdome/bitrise-step-appdome-build-2secure-android
support_url: https://github.com/Appdome/bitrise-step-appdome-build-2secure-android/issues
published_at: 2024-08-19T13:49:51.361285+03:00
source:
git: https://github.com/Appdome/bitrise-step-appdome-build-2secure-android.git
commit: b38a88f644eea60308aa458de0d3ffdc087764e9
project_type_tags:
- android
type_tags:
- build
- code-sign
toolkit:
bash:
entry_file: step_init.sh
deps:
brew:
- name: curl
apt_get:
- name: curl
inputs:
- app_location: null
opts:
is_required: true
summary: URL to app file (apk/aab) or an EnvVar representing its path (i.e. $BITRISE_APK_PATH
or $BITRISE_AAB_PATH)
title: App file URL or EnvVar
- opts:
is_required: false
summary: Output app file name. The file extension (aab/apk) will be the same as
the original app. If not specified, the default output file will be same as
the original app but with Appdome_ prefix.
title: Output file name (without extension)
output_filename: null
- fusion_set_id: null
opts:
is_required: true
title: Fusion set ID
- opts:
is_required: false
title: Team ID
team_id: null
- opts:
description: App signing method
is_required: true
title: Signing Method
value_options:
- On-Appdome
- Private-Signing
- Auto-Dev-Signing
sign_method: On-Appdome
- gp_signing: "false"
opts:
category: Google Signing
description: Sign the app for Google Play? If 'true', requires $SIGN_FINGERPRINT
in the Secrets tab.
is_required: true
title: Google Play Signing
value_options:
- "true"
- "false"
- google_fingerprint: $GOOGLE_SIGN_FINGERPRINT
opts:
category: Google Signing
description: Google Sign Fingerprint for Google Play singing, or its Secret variable
name.
is_required: false
title: Google Sign Fingerprint
- fingerprint: $SIGN_FINGERPRINT
opts:
category: Private/Auto-Dev Signing
description: Sign Fingerprint (not for Google Play singing), or its Secret variable
name.
is_required: false
title: Sign Fingerprint
- opts:
description: Select 'true' to create a Universal.apk file (applies to .aab app
types only).
is_required: false
title: Secondary Output
value_options:
- "true"
- "false"
secondary_output: "false"
- build_logs: "false"
opts:
description: Build the app with Appdome's Diagnostic Logs
is_required: true
title: Build With Diagnostic Logs
value_options:
- "true"
- "false"
- build_to_test: None
opts:
description: Select a device cloud vendor this build will be ready for testing
on. Select None for a production build or for a vendor not in the list.
is_required: true
title: Build to test Vendor
value_options:
- None
- AWS device farm
- Bitbar
- Browserstack
- Firebase
- Katalon
- Kobiton
- Lambdatest
- Perfecto
- Tosca
- Saucelabs
outputs:
- APPDOME_SECURED_APK_PATH: null
opts:
description: |
Local path of the secured .apk file. Available when 'Signing Method' set to 'On-Appdome' or 'Private-Signing'
summary: Local path of the secured .apk file
title: Secured .apk file path
- APPDOME_SECURED_AAB_PATH: null
opts:
description: |
Local path of the secured .aab file. Available when 'Signing Method' set to 'On-Appdome' or 'Private-Signing'
summary: Local path of the secured .aab file
title: Secured .aab file path
- APPDOME_SECURED_SO_PATH: null
opts:
description: |
Local path of the secured secondary output file (universal apk). Available if Secondary Output is set to 'true' and the original app is .aab type
summary: Local path of the secured secondary output file
title: Secured secondary output file path (universal apk)
- APPDOME_PRIVATE_SIGN_SCRIPT_PATH: null
opts:
description: |
Local path of the .sh sign script file. Available when 'Signing Method' set to 'Auto-Dev-Signing'
summary: Local path of the .sh sign script file
title: .sh sign script file path
- APPDOME_CERTIFICATE_PATH: null
opts:
summary: Local path of the Certified Secure Certificate .pdf file
title: Certified Secure Certificate .pdf file path
================================================
FILE: steps/appdome-build-2secure-android/3.3.1/step.yml
================================================
title: Appdome-Build-2Secure for Android
summary: |
Builds a mobile app using Appdome's platform
description: |
Integration that allows activating security and app protection features, building and signing mobile apps using Appdome's API. For details see: https://www.appdome.com/how-to/appsec-release-orchestration/mobile-appsec-cicd/use-appdome-build-2secure-step-for-bitrise
website: https://github.com/Appdome/bitrise-step-appdome-build-2secure-android
source_code_url: https://github.com/Appdome/bitrise-step-appdome-build-2secure-android
support_url: https://github.com/Appdome/bitrise-step-appdome-build-2secure-android/issues
published_at: 2024-10-31T21:59:47.773733+02:00
source:
git: https://github.com/Appdome/bitrise-step-appdome-build-2secure-android.git
commit: e80589f229be29724f1ec848b7d0cee9ca595450
project_type_tags:
- android
type_tags:
- build
- code-sign
toolkit:
bash:
entry_file: step_init.sh
deps:
brew:
- name: curl
apt_get:
- name: curl
inputs:
- app_location: null
opts:
is_required: true
summary: URL to app file (apk/aab) or an EnvVar representing its path (i.e. $BITRISE_APK_PATH
or $BITRISE_AAB_PATH)
title: App file URL or EnvVar
- opts:
is_required: false
summary: Output app file name. The file extension (aab/apk) will be the same as
the original app. If not specified, the default output file will be same as
the original app but with Appdome_ prefix.
title: Output file name (without extension)
output_filename: null
- fusion_set_id: null
opts:
is_required: true
title: Fusion set ID
- opts:
is_required: false
title: Team ID
team_id: null
- opts:
description: App signing method
is_required: true
title: Signing Method
value_options:
- On-Appdome
- Private-Signing
- Auto-Dev-Signing
sign_method: On-Appdome
- gp_signing: "false"
opts:
category: Google Signing
description: Sign the app for Google Play? If 'true', requires $SIGN_FINGERPRINT
in the Secrets tab.
is_required: true
title: Google Play Signing
value_options:
- "true"
- "false"
- google_fingerprint: $GOOGLE_SIGN_FINGERPRINT
opts:
category: Google Signing
description: Google Sign Fingerprint for Google Play singing, or its Secret variable
name.
is_required: false
title: Google Sign Fingerprint
- fingerprint: $SIGN_FINGERPRINT
opts:
category: Private/Auto-Dev Signing
description: Sign Fingerprint (not for Google Play singing), or its Secret variable
name.
is_required: false
title: Sign Fingerprint
- opts:
description: Select 'true' to create a Universal.apk file (applies to .aab app
types only).
is_required: false
title: Secondary Output
value_options:
- "true"
- "false"
secondary_output: "false"
- build_logs: "false"
opts:
description: Build the app with Appdome's Diagnostic Logs
is_required: true
title: Build With Diagnostic Logs
value_options:
- "true"
- "false"
- build_to_test: None
opts:
description: Select a device cloud vendor this build will be ready for testing
on. Select None for a production build or for a vendor not in the list.
is_required: true
title: Build to test Vendor
value_options:
- None
- AWS_device_farm
- Bitbar
- Browserstack
- Firebase
- Katalon
- Kobiton
- Lambdatest
- Perfecto
- Tosca
- Saucelabs
- opts:
is_required: false
summary: File name of the workflow logs.
title: Workflow output logs file name
workflow_output_logs: null
outputs:
- APPDOME_SECURED_APK_PATH: null
opts:
description: |
Local path of the secured .apk file. Available when 'Signing Method' set to 'On-Appdome' or 'Private-Signing'
summary: Local path of the secured .apk file
title: Secured .apk file path
- APPDOME_SECURED_AAB_PATH: null
opts:
description: |
Local path of the secured .aab file. Available when 'Signing Method' set to 'On-Appdome' or 'Private-Signing'
summary: Local path of the secured .aab file
title: Secured .aab file path
- APPDOME_SECURED_SO_PATH: null
opts:
description: |
Local path of the secured secondary output file (universal apk). Available if Secondary Output is set to 'true' and the original app is .aab type
summary: Local path of the secured secondary output file
title: Secured secondary output file path (universal apk)
- APPDOME_PRIVATE_SIGN_SCRIPT_PATH: null
opts:
description: |
Local path of the .sh sign script file. Available when 'Signing Method' set to 'Auto-Dev-Signing'
summary: Local path of the .sh sign script file
title: .sh sign script file path
- APPDOME_CERTIFICATE_PATH: null
opts:
summary: Local path of the Certified Secure Certificate .pdf file
title: Certified Secure Certificate .pdf file path
- APPDOME_WORKFLOW_LOGS: null
opts:
summary: Local path of the Appdome workflow logs file
title: Appdome workflow logs file
================================================
FILE: steps/appdome-build-2secure-android/3.4.1/step.yml
================================================
title: Appdome-Build-2Secure for Android
summary: |
Builds a mobile app using Appdome's platform
description: |
Integration that allows activating security and app protection features, building and signing mobile apps using Appdome's API. For details see: https://www.appdome.com/how-to/appsec-release-orchestration/mobile-appsec-cicd/use-appdome-build-2secure-step-for-bitrise
website: https://github.com/Appdome/bitrise-step-appdome-build-2secure-android
source_code_url: https://github.com/Appdome/bitrise-step-appdome-build-2secure-android
support_url: https://github.com/Appdome/bitrise-step-appdome-build-2secure-android/issues
published_at: 2025-03-20T11:03:46.939024+02:00
source:
git: https://github.com/Appdome/bitrise-step-appdome-build-2secure-android.git
commit: d74ab90bd5a960402543d2a8bf419052d0c1545c
project_type_tags:
- android
type_tags:
- build
- code-sign
toolkit:
bash:
entry_file: step_init.sh
deps:
brew:
- name: curl
apt_get:
- name: curl
inputs:
- app_location: null
opts:
is_required: true
summary: URL to app file (apk/aab) or an EnvVar representing its path (i.e. $BITRISE_APK_PATH
or $BITRISE_AAB_PATH)
title: App file URL or EnvVar
- opts:
is_required: false
summary: Output app file name. The file extension (aab/apk) will be the same as
the original app. If not specified, the default output file will be same as
the original app but with Appdome_ prefix.
title: Output file name (without extension)
output_filename: null
- fusion_set_id: null
opts:
is_required: true
title: Fusion set ID
- opts:
is_required: false
title: Team ID
team_id: null
- opts:
description: App signing method
is_required: true
title: Signing Method
value_options:
- On-Appdome
- Private-Signing
- Auto-Dev-Signing
sign_method: On-Appdome
- gp_signing: "false"
opts:
category: Google Signing
description: Sign the app for Google Play? If 'true', requires $SIGN_FINGERPRINT
in the Secrets tab.
is_required: true
title: Google Play Signing
value_options:
- "true"
- "false"
- google_fingerprint: $GOOGLE_SIGN_FINGERPRINT
opts:
category: Google Signing
description: Google Sign Fingerprint for Google Play singing, or its Secret variable
name.
is_required: false
title: Google Sign Fingerprint
- fingerprint: $SIGN_FINGERPRINT
opts:
category: Private/Auto-Dev Signing
description: Sign Fingerprint (not for Google Play singing), or its Secret variable
name.
is_required: false
title: Sign Fingerprint
- download_deobfuscation: "true"
opts:
category: Deobfuscation Options
description: Select 'true' to download Appdome deobfuscation mapping zip file
to the Artifacts section.
is_required: false
summary: Select 'true' to download Appdome deobfuscation mapping zip file to the
Artifacts section.
title: Download deobfuscation mapping file?
value_options:
- "true"
- "false"
- crashlytics_app_id: null
opts:
category: Deobfuscation Options
description: Crashlytics App ID as appears in the Firebase account, for auto upload
Appdome deobfuscation mapping file.
is_required: false
title: Crashlytics App ID
- datadog_api_key: null
opts:
category: Deobfuscation Options
description: Datadog API Key, for auto upload Appdome deobfuscation mapping file.
is_required: false
title: Datadog API Key
- opts:
description: Select 'true' to create a Universal.apk file (applies to .aab app
types only).
is_required: false
title: Secondary Output
value_options:
- "true"
- "false"
secondary_output: "false"
- build_logs: "false"
opts:
description: Build the app with Appdome's Diagnostic Logs
is_required: true
title: Build With Diagnostic Logs
value_options:
- "true"
- "false"
- build_to_test: None
opts:
description: Select a device cloud vendor this build will be ready for testing
on. Select None for a production build or for a vendor not in the list.
is_required: true
title: Build to test Vendor
value_options:
- None
- AWS_device_farm
- Bitbar
- Browserstack
- Firebase
- Katalon
- Kobiton
- Lambdatest
- Perfecto
- Tosca
- Saucelabs
- opts:
is_required: false
summary: File name of the workflow logs.
title: Workflow output logs file name
workflow_output_logs: null
outputs:
- APPDOME_SECURED_APK_PATH: null
opts:
description: |
Local path of the secured .apk file. Available when 'Signing Method' set to 'On-Appdome' or 'Private-Signing'
summary: Local path of the secured .apk file
title: Secured .apk file path
- APPDOME_SECURED_AAB_PATH: null
opts:
description: |
Local path of the secured .aab file. Available when 'Signing Method' set to 'On-Appdome' or 'Private-Signing'
summary: Local path of the secured .aab file
title: Secured .aab file path
- APPDOME_SECURED_SO_PATH: null
opts:
description: |
Local path of the secured secondary output file (universal apk). Available if Secondary Output is set to 'true' and the original app is .aab type
summary: Local path of the secured secondary output file
title: Secured secondary output file path (universal apk)
- APPDOME_PRIVATE_SIGN_SCRIPT_PATH: null
opts:
description: |
Local path of the .sh sign script file. Available when 'Signing Method' set to 'Auto-Dev-Signing'
summary: Local path of the .sh sign script file
title: .sh sign script file path
- APPDOME_CERTIFICATE_PATH: null
opts:
summary: Local path of the Certified Secure Certificate .pdf file
title: Certified Secure Certificate .pdf file path
- APPDOME_WORKFLOW_LOGS: null
opts:
summary: Local path of the Appdome workflow logs file
title: Appdome workflow logs file
================================================
FILE: steps/appdome-build-2secure-android/3.5.0/step.yml
================================================
title: Appdome-Build-2Secure for Android
summary: |
Builds a mobile app using Appdome's platform
description: |
Integration that allows activating security and app protection features, building and signing mobile apps using Appdome's API. For details see: https://www.appdome.com/how-to/appsec-release-orchestration/mobile-appsec-cicd/use-appdome-build-2secure-step-for-bitrise
website: https://github.com/Appdome/bitrise-step-appdome-build-2secure-android
source_code_url: https://github.com/Appdome/bitrise-step-appdome-build-2secure-android
support_url: https://github.com/Appdome/bitrise-step-appdome-build-2secure-android/issues
published_at: 2026-02-01T16:04:35.159228+02:00
source:
git: https://github.com/Appdome/bitrise-step-appdome-build-2secure-android.git
commit: 09c548a96cde19ed6f417be5db6b8152f8316b15
project_type_tags:
- android
type_tags:
- build
- code-sign
toolkit:
bash:
entry_file: step_init.sh
deps:
brew:
- name: curl
apt_get:
- name: curl
inputs:
- app_location: null
opts:
is_required: true
summary: URL to app file (apk/aab) or an EnvVar representing its path (i.e. $BITRISE_APK_PATH
or $BITRISE_AAB_PATH)
title: App file URL or EnvVar
- opts:
is_required: false
summary: Output app file name. The file extension (aab/apk) will be the same as
the original app. If not specified, the default output file will be same as
the original app but with Appdome_ prefix.
title: Output file name (without extension)
output_filename: null
- fusion_set_id: null
opts:
is_required: true
title: Fusion set ID
- opts:
is_required: false
title: Team ID
team_id: null
- opts:
description: App signing method
is_required: true
title: Signing Method
value_options:
- On-Appdome
- Private-Signing
- Auto-Dev-Signing
sign_method: On-Appdome
- multiple_trusted_signing_certs_path: null
opts:
category: Multiple Trusted Signing Certificates
description: 'Path to file containing multiple trusted signing certificates, or
an EnvVar representing its path (e.g. $MULTIPLE_TRUSTED_CERTS_PATH). Note: Multiple
Trusted Signing Certificates can''t work alongside ''Google Signing'' or ''Private/Auto-Dev-Signing''
categories.'
is_required: false
summary: Path to file containing multiple trusted signing certificates (or an
EnvVar representing the path)
title: Multiple Trusted Signing Certificates file path
- gp_signing: "false"
opts:
category: Google Signing
description: Sign the app for Google Play? If 'true', requires $SIGN_FINGERPRINT
in the Secrets tab.
is_required: true
title: Google Play Signing
value_options:
- "true"
- "false"
- google_fingerprint: $GOOGLE_SIGN_FINGERPRINT
opts:
category: Google Signing
description: Google Sign Fingerprint for Google Play singing, or its Secret variable
name.
is_required: false
title: Google Sign Fingerprint
- fingerprint: $SIGN_FINGERPRINT
opts:
category: Private/Auto-Dev Signing
description: Sign Fingerprint (not for Google Play singing), or its Secret variable
name.
is_required: false
title: Sign Fingerprint
- download_deobfuscation: "true"
opts:
category: Deobfuscation Options
description: Select 'true' to download Appdome deobfuscation mapping zip file
to the Artifacts section.
is_required: false
summary: Select 'true' to download Appdome deobfuscation mapping zip file to the
Artifacts section.
title: Download deobfuscation mapping file?
value_options:
- "true"
- "false"
- crashlytics_app_id: null
opts:
category: Deobfuscation Options
description: Crashlytics App ID as appears in the Firebase account, for auto upload
Appdome deobfuscation mapping file.
is_required: false
title: Crashlytics App ID
- datadog_api_key: null
opts:
category: Deobfuscation Options
description: Datadog API Key, for auto upload Appdome deobfuscation mapping file.
is_required: false
title: Datadog API Key
- opts:
description: Select 'true' to create a Universal.apk file (applies to .aab app
types only).
is_required: false
title: Secondary Output
value_options:
- "true"
- "false"
secondary_output: "false"
- build_logs: "false"
opts:
description: Build the app with Appdome's Diagnostic Logs
is_required: true
title: Build With Diagnostic Logs
value_options:
- "true"
- "false"
- build_to_test: None
opts:
description: Select a device cloud vendor this build will be ready for testing
on. Select None for a production build or for a vendor not in the list.
is_required: true
title: Build to test Vendor
value_options:
- None
- AWS_device_farm
- Bitbar
- Browserstack
- Firebase
- Katalon
- Kobiton
- Lambdatest
- Perfecto
- Tosca
- Saucelabs
- opts:
is_required: false
summary: File name of the workflow logs.
title: Workflow output logs file name
workflow_output_logs: null
outputs:
- APPDOME_SECURED_APK_PATH: null
opts:
description: |
Local path of the secured .apk file. Available when 'Signing Method' set to 'On-Appdome' or 'Private-Signing'
summary: Local path of the secured .apk file
title: Secured .apk file path
- APPDOME_SECURED_AAB_PATH: null
opts:
description: |
Local path of the secured .aab file. Available when 'Signing Method' set to 'On-Appdome' or 'Private-Signing'
summary: Local path of the secured .aab file
title: Secured .aab file path
- APPDOME_SECURED_SO_PATH: null
opts:
description: |
Local path of the secured secondary output file (universal apk). Available if Secondary Output is set to 'true' and the original app is .aab type
summary: Local path of the secured secondary output file
title: Secured secondary output file path (universal apk)
- APPDOME_PRIVATE_SIGN_SCRIPT_PATH: null
opts:
description: |
Local path of the .sh sign script file. Available when 'Signing Method' set to 'Auto-Dev-Signing'
summary: Local path of the .sh sign script file
title: .sh sign script file path
- APPDOME_CERTIFICATE_PATH: null
opts:
summary: Local path of the Certified Secure Certificate .pdf file
title: Certified Secure Certificate .pdf file path
- APPDOME_WORKFLOW_LOGS: null
opts:
summary: Local path of the Appdome workflow logs file
title: Appdome workflow logs file
================================================
FILE: steps/appdome-build-2secure-android/3.6.0/step.yml
================================================
title: Appdome-Build-2Secure for Android
summary: |
Builds a mobile app using Appdome's platform
description: |
Integration that allows activating security and app protection features, building and signing mobile apps using Appdome's API. For details see: https://www.appdome.com/how-to/appsec-release-orchestration/mobile-appsec-cicd/use-appdome-build-2secure-step-for-bitrise
website: https://github.com/Appdome/bitrise-step-appdome-build-2secure-android
source_code_url: https://github.com/Appdome/bitrise-step-appdome-build-2secure-android
support_url: https://github.com/Appdome/bitrise-step-appdome-build-2secure-android/issues
published_at: 2026-03-30T13:56:47.880158+03:00
source:
git: https://github.com/Appdome/bitrise-step-appdome-build-2secure-android.git
commit: 78745644884ada60181d926689cf9b72826bf92b
project_type_tags:
- android
type_tags:
- build
- code-sign
toolkit:
bash:
entry_file: step_init.sh
deps:
brew:
- name: curl
apt_get:
- name: curl
inputs:
- app_location: null
opts:
is_required: true
summary: URL to app file (apk/aab) or an EnvVar representing its path (i.e. $BITRISE_APK_PATH
or $BITRISE_AAB_PATH)
title: App file URL or EnvVar
- opts:
is_required: false
summary: Output app file name. The file extension (aab/apk) will be the same as
the original app. If not specified, the default output file will be same as
the original app but with Appdome_ prefix.
title: Output file name (without extension)
output_filename: null
- fusion_set_id: null
opts:
is_required: true
title: Fusion set ID
- opts:
is_required: false
title: Team ID
team_id: null
- opts:
description: App signing method
is_required: true
title: Signing Method
value_options:
- On-Appdome
- Private-Signing
- Auto-Dev-Signing
sign_method: On-Appdome
- android_keystore_url_env: null
opts:
category: On-Appdome Signing
description: Variable name from Project settings → Code Signing (no $). E.g. BITRISEIO_ANDROID_KEYSTORE_4_URL.
Leave empty for default primary or _1 keystore.
is_required: false
summary: Bitrise Code Signing keystore URL variable; password, alias, and key
password env names are derived from it.
title: Keystore URL — env var name
- multiple_trusted_signing_certs_path: null
opts:
category: Multiple Trusted Signing Certificates
description: 'Path to file containing multiple trusted signing certificates, or
an EnvVar representing its path (e.g. $MULTIPLE_TRUSTED_CERTS_PATH). Note: Multiple
Trusted Signing Certificates can''t work alongside ''Google Signing'' or ''Private/Auto-Dev-Signing''
categories.'
is_required: false
summary: Path to file containing multiple trusted signing certificates (or an
EnvVar representing the path)
title: Multiple Trusted Signing Certificates file path
- gp_signing: "false"
opts:
category: Google Signing
description: Sign the app for Google Play? If 'true', requires $SIGN_FINGERPRINT
in the Secrets tab.
is_required: true
title: Google Play Signing
value_options:
- "true"
- "false"
- google_fingerprint: $GOOGLE_SIGN_FINGERPRINT
opts:
category: Google Signing
description: Google Sign Fingerprint for Google Play singing, or its Secret variable
name.
is_required: false
title: Google Sign Fingerprint
- fingerprint: $SIGN_FINGERPRINT
opts:
category: Private/Auto-Dev Signing
description: Sign Fingerprint (not for Google Play singing), or its Secret variable
name.
is_required: false
title: Sign Fingerprint
- download_deobfuscation: "true"
opts:
category: Deobfuscation Options
description: Select 'true' to download Appdome deobfuscation mapping zip file
to the Artifacts section.
is_required: false
summary: Select 'true' to download Appdome deobfuscation mapping zip file to the
Artifacts section.
title: Download deobfuscation mapping file?
value_options:
- "true"
- "false"
- crashlytics_app_id: null
opts:
category: Deobfuscation Options
description: Crashlytics App ID as appears in the Firebase account, for auto upload
Appdome deobfuscation mapping file.
is_required: false
title: Crashlytics App ID
- datadog_api_key: null
opts:
category: Deobfuscation Options
description: Datadog API Key, for auto upload Appdome deobfuscation mapping file.
is_required: false
title: Datadog API Key
- opts:
description: Select 'true' to create a Universal.apk file (applies to .aab app
types only).
is_required: false
title: Secondary Output
value_options:
- "true"
- "false"
secondary_output: "false"
- build_logs: "false"
opts:
description: Build the app with Appdome's Diagnostic Logs
is_required: true
title: Build With Diagnostic Logs
value_options:
- "true"
- "false"
- build_to_test: None
opts:
description: Select a device cloud vendor this build will be ready for testing
on. Select None for a production build or for a vendor not in the list.
is_required: true
title: Build to test Vendor
value_options:
- None
- AWS_device_farm
- Bitbar
- Browserstack
- Firebase
- Katalon
- Kobiton
- Lambdatest
- Perfecto
- Tosca
- Saucelabs
- opts:
is_required: false
summary: File name of the workflow logs.
title: Workflow output logs file name
workflow_output_logs: null
outputs:
- APPDOME_SECURED_APK_PATH: null
opts:
description: |
Local path of the secured .apk file. Available when 'Signing Method' set to 'On-Appdome' or 'Private-Signing'
summary: Local path of the secured .apk file
title: Secured .apk file path
- APPDOME_SECURED_AAB_PATH: null
opts:
description: |
Local path of the secured .aab file. Available when 'Signing Method' set to 'On-Appdome' or 'Private-Signing'
summary: Local path of the secured .aab file
title: Secured .aab file path
- APPDOME_SECURED_SO_PATH: null
opts:
description: |
Local path of the secured secondary output file (universal apk). Available if Secondary Output is set to 'true' and the original app is .aab type
summary: Local path of the secured secondary output file
title: Secured secondary output file path (universal apk)
- APPDOME_PRIVATE_SIGN_SCRIPT_PATH: null
opts:
description: |
Local path of the .sh sign script file. Available when 'Signing Method' set to 'Auto-Dev-Signing'
summary: Local path of the .sh sign script file
title: .sh sign script file path
- APPDOME_CERTIFICATE_PATH: null
opts:
summary: Local path of the Certified Secure Certificate .pdf file
title: Certified Secure Certificate .pdf file path
- APPDOME_WORKFLOW_LOGS: null
opts:
summary: Local path of the Appdome workflow logs file
title: Appdome workflow logs file
================================================
FILE: steps/appdome-build-2secure-android/step-info.yml
================================================
maintainer: verified
================================================
FILE: steps/appdome-build-2secure-ios/1.0.12/step.yml
================================================
title: Appdome-Build-2Secure for iOS
summary: |
Builds an iOS mobile app using Appdome's platform
description: |
Integration that allows activating security and app protection features, building and signing mobile apps using Appdome's API. For details see: https://www.appdome.com/how-to/appsec-release-orchestration/mobile-appsec-cicd/use-appdome-build-2secure-step-for-bitrise
website: https://github.com/Appdome/bitrise-step-appdome-build-2secure-ios
source_code_url: https://github.com/Appdome/bitrise-step-appdome-build-2secure-ios
support_url: https://github.com/Appdome/bitrise-step-appdome-build-2secure-ios/issues
published_at: 2023-06-27T16:05:25.418104+03:00
source:
git: https://github.com/Appdome/bitrise-step-appdome-build-2secure-ios.git
commit: 33bc74d294a4e22295f826987e959bc6ba0adf80
project_type_tags:
- ios
type_tags:
- build
- code-sign
toolkit:
bash:
entry_file: step.sh
deps:
brew:
- name: curl
apt_get:
- name: curl
inputs:
- app_location: $BITRISE_IPA_PATH
opts:
is_required: true
summary: URL to app file (ipa) or an EnvVar representing its path (i.e. $BITRISE_IPA_PATH)
title: App file URL or EnvVar
- fusion_set_id: null
opts:
is_required: true
title: Fusion set ID
- opts:
is_required: false
title: Team ID
team_id: null
- opts:
description: App signing method
is_required: true
title: Signing Method
value_options:
- On-Appdome
- Private-Signing
- Auto-Dev-Signing
sign_method: On-Appdome
- entitlements: null
opts:
description: iOS Entitlement EnvVar/s (separated by space), required for Auto-Dev-Singing
and On-Appdome Signing.
is_required: false
title: iOS Entitlement EnvVar/s
- build_logs: "false"
opts:
description: Build the app with Appdome's Diagnostic Logs
is_required: true
title: Build With Diagnostic Logs
value_options:
- "true"
- "false"
outputs:
- APPDOME_SECURED_IPA_PATH: null
opts:
description: |
Local path of the secured .ipa file. Available when 'Signing Method' set to 'On-Appdome' or 'Private-Signing'
summary: Local path of the secured .ipa file
title: Secured .ipa file path
- APPDOME_PRIVATE_SIGN_SCRIPT_PATH: null
opts:
description: |
Local path of the .sh sign script file. Available when 'Signing Method' set to 'Auto-Dev-Signing'
summary: Local path of the .sh sign script file
title: .sh sign script file path
- APPDOME_CERTIFICATE_PATH: null
opts:
summary: Local path of the Certified Secure Certificate .pdf file
title: Certified Secure Certificate .pdf file path
================================================
FILE: steps/appdome-build-2secure-ios/1.0.5/step.yml
================================================
title: Appdome-Build-2Secure for iOS
summary: |
Builds an iOS mobile app using Appdome's platform
description: |
Integration that allows activating security and app protection features, building and signing mobile apps using Appdome's API. For details see: https://www.appdome.com/how-to/appsec-release-orchestration/mobile-appsec-cicd/use-appdome-build-2secure-step-for-bitrise
website: https://github.com/Appdome/bitrise-step-appdome-build-2secure-ios
source_code_url: https://github.com/Appdome/bitrise-step-appdome-build-2secure-ios
support_url: https://github.com/Appdome/bitrise-step-appdome-build-2secure-ios/issues
published_at: 2023-05-09T14:14:21.5537+03:00
source:
git: https://github.com/Appdome/bitrise-step-appdome-build-2secure-ios.git
commit: 7de2a623cc5cd7dc3417acc9ee2e4f9fcdab6201
project_type_tags:
- ios
type_tags:
- build
- code-sign
toolkit:
bash:
entry_file: step.sh
deps:
brew:
- name: curl
apt_get:
- name: curl
inputs:
- app_location: $BITRISE_IPA_PATH
opts:
is_required: true
summary: URL to app file (ipa) or an EnvVar representing its path (i.e. $BITRISE_IPA_PATH)
title: App file URL or EnvVar
- fusion_set_id: null
opts:
is_required: true
title: Fusion set ID
- opts:
is_required: false
title: Team ID
team_id: null
- opts:
description: App signing method
is_required: true
title: Signing Method
value_options:
- On-Appdome
- Private-Signing
- Auto-Dev-Signing
sign_method: On-Appdome
- entitlements: null
opts:
description: iOS Entitlement EnvVar/s (separated by space)
is_required: true
title: iOS Entitlement EnvVar/s
================================================
FILE: steps/appdome-build-2secure-ios/1.0.6/step.yml
================================================
title: Appdome-Build-2Secure for iOS
summary: |
Builds an iOS mobile app using Appdome's platform
description: |
Integration that allows activating security and app protection features, building and signing mobile apps using Appdome's API. For details see: https://www.appdome.com/how-to/appsec-release-orchestration/mobile-appsec-cicd/use-appdome-build-2secure-step-for-bitrise
website: https://github.com/Appdome/bitrise-step-appdome-build-2secure-ios
source_code_url: https://github.com/Appdome/bitrise-step-appdome-build-2secure-ios
support_url: https://github.com/Appdome/bitrise-step-appdome-build-2secure-ios/issues
published_at: 2023-05-21T18:05:04.002205+03:00
source:
git: https://github.com/Appdome/bitrise-step-appdome-build-2secure-ios.git
commit: dee73db1790b0b29068b733343e4d602065c5b9c
project_type_tags:
- ios
type_tags:
- build
- code-sign
toolkit:
bash:
entry_file: step.sh
deps:
brew:
- name: curl
apt_get:
- name: curl
inputs:
- app_location: $BITRISE_IPA_PATH
opts:
is_required: true
summary: URL to app file (ipa) or an EnvVar representing its path (i.e. $BITRISE_IPA_PATH)
title: App file URL or EnvVar
- fusion_set_id: null
opts:
is_required: true
title: Fusion set ID
- opts:
is_required: false
title: Team ID
team_id: null
- opts:
description: App signing method
is_required: true
title: Signing Method
value_options:
- On-Appdome
- Private-Signing
- Auto-Dev-Signing
sign_method: On-Appdome
- entitlements: null
opts:
description: iOS Entitlement EnvVar/s (separated by space)
is_required: true
title: iOS Entitlement EnvVar/s
outputs:
- APPDOME_SECURED_IPA_PATH: null
opts:
description: |
Local path of the secured .ipa file. Available when 'Signing Method' set to 'On-Appdome' or 'Private-Signing'
summary: Local path of the secured .ipa file
title: Secured .ipa file path
- APPDOME_PRIVATE_SIGN_SCRIPT_PATH: null
opts:
description: |
Local path of the .sh sign script file. Available when 'Signing Method' set to 'Auto-Dev-Signing'
summary: Local path of the .sh sign script file
title: .sh sign script file path
- APPDOME_CERTIFICATE_PATH: null
opts:
summary: Local path of the Certified Secure Certificate .pdf file
title: Certified Secure Certificate .pdf file path
================================================
FILE: steps/appdome-build-2secure-ios/2.0.0/step.yml
================================================
title: Appdome-Build-2Secure for iOS
summary: |
Builds an iOS mobile app using Appdome's platform
description: |
Integration that allows activating security and app protection features, building and signing mobile apps using Appdome's API. For details see: https://www.appdome.com/how-to/appsec-release-orchestration/mobile-appsec-cicd/use-appdome-build-2secure-step-for-bitrise
website: https://github.com/Appdome/bitrise-step-appdome-build-2secure-ios
source_code_url: https://github.com/Appdome/bitrise-step-appdome-build-2secure-ios
support_url: https://github.com/Appdome/bitrise-step-appdome-build-2secure-ios/issues
published_at: 2023-07-12T16:37:39.10928+03:00
source:
git: https://github.com/Appdome/bitrise-step-appdome-build-2secure-ios.git
commit: b531b999f484193b96432755da9b1ee9e69a5938
project_type_tags:
- ios
type_tags:
- build
- code-sign
toolkit:
bash:
entry_file: step_init.sh
deps:
brew:
- name: curl
apt_get:
- name: curl
inputs:
- app_location: $BITRISE_IPA_PATH
opts:
is_required: true
summary: URL to app file (ipa) or an EnvVar representing its path (i.e. $BITRISE_IPA_PATH)
title: App file URL or EnvVar
- fusion_set_id: null
opts:
is_required: true
title: Fusion set ID
- opts:
is_required: false
title: Team ID
team_id: null
- opts:
description: App signing method
is_required: true
title: Signing Method
value_options:
- On-Appdome
- Private-Signing
- Auto-Dev-Signing
sign_method: On-Appdome
- certificate_file: null
opts:
description: Code signing cetificate file name (from the uploaded code signing
certificates) to use. If not provided, the LAST certificate among the uploaded
files to 'Code Signing & Files' section will be used. If you don't know the
file name of the certificate you want to use, download the certificate from
the Code Signing & Files section to your computer and type here its file name
and extension as was downloaded. Only ONE certificate file is supported.
is_required: false
title: Code signing cetificates (.p12) file name
- opts:
description: List of provisioning profile file name/s (with no file extension,
separated by commas) from the uploaded provisioning profiles to use. If not
provided, all provisioning profiles uploaded to 'Code Signing & Files' section
will be used.
is_required: false
title: Provisioning profile file name/s
provisioning_profiles: null
- entitlements: null
opts:
description: iOS Entitlement EnvVar/s (separated by space), required for Auto-Dev-Singing
and On-Appdome Signing.
is_required: false
title: iOS Entitlement EnvVar/s
- build_logs: "false"
opts:
description: Build the app with Appdome's Diagnostic Logs
is_required: true
title: Build With Diagnostic Logs
value_options:
- "true"
- "false"
- build_to_test: None
opts:
description: Select a device cloud vendor this build will be ready for testing
on. Select None for a production build or for a vendor not in the list.
is_required: true
title: Build to test Vendor
value_options:
- None
- Bitbar
- Browserstack
- Saucelabs
- Lambdatest
outputs:
- APPDOME_SECURED_IPA_PATH: null
opts:
description: |
Local path of the secured .ipa file. Available when 'Signing Method' set to 'On-Appdome' or 'Private-Signing'
summary: Local path of the secured .ipa file
title: Secured .ipa file path
- APPDOME_PRIVATE_SIGN_SCRIPT_PATH: null
opts:
description: |
Local path of the .sh sign script file. Available when 'Signing Method' set to 'Auto-Dev-Signing'
summary: Local path of the .sh sign script file
title: .sh sign script file path
- APPDOME_CERTIFICATE_PATH: null
opts:
summary: Local path of the Certified Secure Certificate .pdf file
title: Certified Secure Certificate .pdf file path
================================================
FILE: steps/appdome-build-2secure-ios/3.0.0/step.yml
================================================
title: Appdome-Build-2Secure for iOS
summary: |
Builds an iOS mobile app using Appdome's platform
description: |
Integration that allows activating security and app protection features, building and signing mobile apps using Appdome's API. For details see: https://www.appdome.com/how-to/appsec-release-orchestration/mobile-appsec-cicd/use-appdome-build-2secure-step-for-bitrise
website: https://github.com/Appdome/bitrise-step-appdome-build-2secure-ios
source_code_url: https://github.com/Appdome/bitrise-step-appdome-build-2secure-ios
support_url: https://github.com/Appdome/bitrise-step-appdome-build-2secure-ios/issues
published_at: 2023-08-11T09:36:54.586355+03:00
source:
git: https://github.com/Appdome/bitrise-step-appdome-build-2secure-ios.git
commit: 634a0ddd6abfb9361940824f901e8d1a8be21b8b
project_type_tags:
- ios
type_tags:
- build
- code-sign
toolkit:
bash:
entry_file: step_init.sh
deps:
brew:
- name: curl
apt_get:
- name: curl
inputs:
- app_location: $BITRISE_IPA_PATH
opts:
is_required: true
summary: URL to app file (ipa) or an EnvVar representing its path (i.e. $BITRISE_IPA_PATH)
title: App file URL or EnvVar
- opts:
is_required: false
summary: Output app file name (without extension). If not populated, the default
output file name will be the same as the original app but with Appdome_ prefix.
title: Output file name (without extension)
output_filename: null
- fusion_set_id: null
opts:
is_required: true
title: Fusion set ID
- opts:
is_required: false
title: Team ID
team_id: null
- opts:
description: App signing method
is_required: true
title: Signing Method
value_options:
- On-Appdome
- Private-Signing
- Auto-Dev-Signing
sign_method: On-Appdome
- certificate_file: null
opts:
description: Code signing cetificate file name (from the uploaded code signing
certificates) to use. If not provided, the LAST certificate among the uploaded
files to 'Code Signing & Files' section will be used. If you don't know the
file name of the certificate you want to use, download the certificate from
the Code Signing & Files section to your computer and type here its file name
and extension as was downloaded. Only ONE certificate file is supported.
is_required: false
title: Code signing cetificates (.p12) file name
- opts:
description: List of provisioning profile file name/s (with no file extension,
separated by commas) from the uploaded provisioning profiles to use. If not
provided, all provisioning profiles uploaded to 'Code Signing & Files' section
will be used.
is_required: false
title: Provisioning profile file name/s
provisioning_profiles: null
- entitlements: null
opts:
description: iOS Entitlement EnvVar/s (separated by space), required for Auto-Dev-Singing
and On-Appdome Signing.
is_required: false
title: iOS Entitlement EnvVar/s
- build_logs: "false"
opts:
description: Build the app with Appdome's Diagnostic Logs
is_required: true
title: Build With Diagnostic Logs
value_options:
- "true"
- "false"
- build_to_test: None
opts:
description: Select a device cloud vendor this build will be ready for testing
on. Select None for a production build or for a vendor not in the list.
is_required: true
title: Build to test Vendor
value_options:
- None
- Bitbar
- Browserstack
- Saucelabs
- Lambdatest
outputs:
- APPDOME_SECURED_IPA_PATH: null
opts:
description: |
Local path of the secured .ipa file. Available when 'Signing Method' set to 'On-Appdome' or 'Private-Signing'
summary: Local path of the secured .ipa file
title: Secured .ipa file path
- APPDOME_PRIVATE_SIGN_SCRIPT_PATH: null
opts:
description: |
Local path of the .sh sign script file. Available when 'Signing Method' set to 'Auto-Dev-Signing'
summary: Local path of the .sh sign script file
title: .sh sign script file path
- APPDOME_CERTIFICATE_PATH: null
opts:
summary: Local path of the Certified Secure Certificate .pdf file
title: Certified Secure Certificate .pdf file path
================================================
FILE: steps/appdome-build-2secure-ios/3.1.0/step.yml
================================================
title: Appdome-Build-2Secure for iOS
summary: |
Builds an iOS mobile app using Appdome's platform
description: |
Integration that allows activating security and app protection features, building and signing mobile apps using Appdome's API. For details see: https://www.appdome.com/how-to/appsec-release-orchestration/mobile-appsec-cicd/use-appdome-build-2secure-step-for-bitrise
website: https://github.com/Appdome/bitrise-step-appdome-build-2secure-ios
source_code_url: https://github.com/Appdome/bitrise-step-appdome-build-2secure-ios
support_url: https://github.com/Appdome/bitrise-step-appdome-build-2secure-ios/issues
published_at: 2024-08-19T13:23:28.948749+03:00
source:
git: https://github.com/Appdome/bitrise-step-appdome-build-2secure-ios.git
commit: bd405ed42557ee19b4f3c52c0c583469b63122eb
project_type_tags:
- ios
type_tags:
- build
- code-sign
toolkit:
bash:
entry_file: step_init.sh
deps:
brew:
- name: curl
apt_get:
- name: curl
inputs:
- app_location: $BITRISE_IPA_PATH
opts:
is_required: true
summary: URL to app file (ipa) or an EnvVar representing its path (i.e. $BITRISE_IPA_PATH)
title: App file URL or EnvVar
- opts:
is_required: false
summary: Output app file name (without extension). If not populated, the default
output file name will be the same as the original app but with Appdome_ prefix.
title: Output file name (without extension)
output_filename: null
- fusion_set_id: null
opts:
is_required: true
title: Fusion set ID
- opts:
is_required: false
title: Team ID
team_id: null
- opts:
description: App signing method
is_required: true
title: Signing Method
value_options:
- On-Appdome
- Private-Signing
- Auto-Dev-Signing
sign_method: On-Appdome
- certificate_file: null
opts:
description: Code signing cetificate file name (from the uploaded code signing
certificates) to use. If not provided, the LAST certificate among the uploaded
files to 'Code Signing & Files' section will be used. If you don't know the
file name of the certificate you want to use, download the certificate from
the Code Signing & Files section to your computer and type here its file name
and extension as was downloaded. Only ONE certificate file is supported.
is_required: false
title: Code signing cetificates (.p12) file name
- opts:
description: List of provisioning profile file name/s (with no file extension,
separated by commas) from the uploaded provisioning profiles to use. If not
provided, all provisioning profiles uploaded to 'Code Signing & Files' section
will be used.
is_required: false
title: Provisioning profile file name/s
provisioning_profiles: null
- entitlements: null
opts:
description: iOS Entitlement EnvVar/s (separated by space), required for Auto-Dev-Singing
and On-Appdome Signing.
is_required: false
title: iOS Entitlement EnvVar/s
- build_logs: "false"
opts:
description: Build the app with Appdome's Diagnostic Logs
is_required: true
title: Build With Diagnostic Logs
value_options:
- "true"
- "false"
- build_to_test: None
opts:
description: Select a device cloud vendor this build will be ready for testing
on. Select None for a production build or for a vendor not in the list.
is_required: true
title: Build to test Vendor
value_options:
- None
- AWS device farm
- Bitbar
- Browserstack
- Firebase
- Katalon
- Kobiton
- Lambdatest
- Perfecto
- Tosca
- Saucelabs
outputs:
- APPDOME_SECURED_IPA_PATH: null
opts:
description: |
Local path of the secured .ipa file. Available when 'Signing Method' set to 'On-Appdome' or 'Private-Signing'
summary: Local path of the secured .ipa file
title: Secured .ipa file path
- APPDOME_PRIVATE_SIGN_SCRIPT_PATH: null
opts:
description: |
Local path of the .sh sign script file. Available when 'Signing Method' set to 'Auto-Dev-Signing'
summary: Local path of the .sh sign script file
title: .sh sign script file path
- APPDOME_CERTIFICATE_PATH: null
opts:
summary: Local path of the Certified Secure Certificate .pdf file
title: Certified Secure Certificate .pdf file path
================================================
FILE: steps/appdome-build-2secure-ios/3.1.1/step.yml
================================================
title: Appdome-Build-2Secure for iOS
summary: |
Builds an iOS mobile app using Appdome's platform
description: |
Integration that allows activating security and app protection features, building and signing mobile apps using Appdome's API. For details see: https://www.appdome.com/how-to/appsec-release-orchestration/mobile-appsec-cicd/use-appdome-build-2secure-step-for-bitrise
website: https://github.com/Appdome/bitrise-step-appdome-build-2secure-ios
source_code_url: https://github.com/Appdome/bitrise-step-appdome-build-2secure-ios
support_url: https://github.com/Appdome/bitrise-step-appdome-build-2secure-ios/issues
published_at: 2024-08-27T10:43:20.247755+03:00
source:
git: https://github.com/Appdome/bitrise-step-appdome-build-2secure-ios.git
commit: 0571e76f16bcc45701d54464d5e2e4fb4b9df418
project_type_tags:
- ios
type_tags:
- build
- code-sign
toolkit:
bash:
entry_file: step_init.sh
deps:
brew:
- name: curl
apt_get:
- name: curl
inputs:
- app_location: $BITRISE_IPA_PATH
opts:
is_required: true
summary: URL to app file (ipa) or an EnvVar representing its path (i.e. $BITRISE_IPA_PATH)
title: App file URL or EnvVar
- opts:
is_required: false
summary: Output app file name (without extension). If not populated, the default
output file name will be the same as the original app but with Appdome_ prefix.
title: Output file name (without extension)
output_filename: null
- fusion_set_id: null
opts:
is_required: true
title: Fusion set ID
- opts:
is_required: false
title: Team ID
team_id: null
- opts:
description: App signing method
is_required: true
title: Signing Method
value_options:
- On-Appdome
- Private-Signing
- Auto-Dev-Signing
sign_method: On-Appdome
- certificate_file: null
opts:
description: Code signing cetificate file name (from the uploaded code signing
certificates) to use. If not provided, the LAST certificate among the uploaded
files to 'Code Signing & Files' section will be used. If you don't know the
file name of the certificate you want to use, download the certificate from
the Code Signing & Files section to your computer and type here its file name
and extension as was downloaded. Only ONE certificate file is supported.
is_required: false
title: Code signing cetificates (.p12) file name
- opts:
description: List of provisioning profile file name/s (with no file extension,
separated by commas) from the uploaded provisioning profiles to use. If not
provided, all provisioning profiles uploaded to 'Code Signing & Files' section
will be used.
is_required: false
title: Provisioning profile file name/s
provisioning_profiles: null
- entitlements: null
opts:
description: iOS Entitlement EnvVar/s (separated by space), required for Auto-Dev-Singing
and On-Appdome Signing.
is_required: false
title: iOS Entitlement EnvVar/s
- build_logs: "false"
opts:
description: Build the app with Appdome's Diagnostic Logs
is_required: true
title: Build With Diagnostic Logs
value_options:
- "true"
- "false"
- build_to_test: None
opts:
description: Select a device cloud vendor this build will be ready for testing
on. Select None for a production build or for a vendor not in the list.
is_required: true
title: Build to test Vendor
value_options:
- None
- AWS_device_farm
- Bitbar
- Browserstack
- Firebase
- Katalon
- Kobiton
- Lambdatest
- Perfecto
- Tosca
- Saucelabs
outputs:
- APPDOME_SECURED_IPA_PATH: null
opts:
description: |
Local path of the secured .ipa file. Available when 'Signing Method' set to 'On-Appdome' or 'Private-Signing'
summary: Local path of the secured .ipa file
title: Secured .ipa file path
- APPDOME_PRIVATE_SIGN_SCRIPT_PATH: null
opts:
description: |
Local path of the .sh sign script file. Available when 'Signing Method' set to 'Auto-Dev-Signing'
summary: Local path of the .sh sign script file
title: .sh sign script file path
- APPDOME_CERTIFICATE_PATH: null
opts:
summary: Local path of the Certified Secure Certificate .pdf file
title: Certified Secure Certificate .pdf file path
================================================
FILE: steps/appdome-build-2secure-ios/3.2.0/step.yml
================================================
title: Appdome-Build-2Secure for iOS
summary: |
Builds an iOS mobile app using Appdome's platform
description: |
Integration that allows activating security and app protection features, building and signing mobile apps using Appdome's API. For details see: https://www.appdome.com/how-to/appsec-release-orchestration/mobile-appsec-cicd/use-appdome-build-2secure-step-for-bitrise
website: https://github.com/Appdome/bitrise-step-appdome-build-2secure-ios
source_code_url: https://github.com/Appdome/bitrise-step-appdome-build-2secure-ios
support_url: https://github.com/Appdome/bitrise-step-appdome-build-2secure-ios/issues
published_at: 2024-10-15T18:05:12.882312+03:00
source:
git: https://github.com/Appdome/bitrise-step-appdome-build-2secure-ios.git
commit: 1dbd0e62a3b6d637865cdbd10eb3653d8609e731
project_type_tags:
- ios
type_tags:
- build
- code-sign
toolkit:
bash:
entry_file: step_init.sh
deps:
brew:
- name: curl
apt_get:
- name: curl
inputs:
- app_location: $BITRISE_IPA_PATH
opts:
is_required: true
summary: URL to app file (ipa) or an EnvVar representing its path (i.e. $BITRISE_IPA_PATH)
title: App file URL or EnvVar
- opts:
is_required: false
summary: Output app file name (without extension). If not populated, the default
output file name will be the same as the original app but with Appdome_ prefix.
title: Output file name (without extension)
output_filename: null
- fusion_set_id: null
opts:
is_required: true
title: Fusion set ID
- opts:
is_required: false
title: Team ID
team_id: null
- opts:
description: App signing method
is_required: true
title: Signing Method
value_options:
- On-Appdome
- Private-Signing
- Auto-Dev-Signing
sign_method: On-Appdome
- certificate_file: null
opts:
description: Code signing cetificate file name (from the uploaded code signing
certificates) to use. If not provided, the LAST certificate among the uploaded
files to 'Code Signing & Files' section will be used. If you don't know the
file name of the certificate you want to use, download the certificate from
the Code Signing & Files section to your computer and type here its file name
and extension as was downloaded. Only ONE certificate file is supported.
is_required: false
title: Code signing cetificates (.p12) file name
- opts:
description: List of provisioning profile file name/s (with no file extension,
separated by commas) from the uploaded provisioning profiles to use. If not
provided, all provisioning profiles uploaded to 'Code Signing & Files' section
will be used.
is_required: false
title: Provisioning profile file name/s
provisioning_profiles: null
- entitlements: null
opts:
description: iOS Entitlement EnvVar/s (separated by space), required for Auto-Dev-Singing
and On-Appdome Signing.
is_required: false
title: iOS Entitlement EnvVar/s
- build_logs: "false"
opts:
description: Build the app with Appdome's Diagnostic Logs
is_required: true
title: Build With Diagnostic Logs
value_options:
- "true"
- "false"
- build_to_test: None
opts:
description: Select a device cloud vendor this build will be ready for testing
on. Select None for a production build or for a vendor not in the list.
is_required: true
title: Build to test Vendor
value_options:
- None
- AWS_device_farm
- Bitbar
- Browserstack
- Firebase
- Katalon
- Kobiton
- Lambdatest
- Perfecto
- Tosca
- Saucelabs
- opts:
is_required: false
summary: File name of the workflow logs.
title: Workflow output logs file name
workflow_output_logs: null
outputs:
- APPDOME_SECURED_IPA_PATH: null
opts:
description: |
Local path of the secured .ipa file. Available when 'Signing Method' set to 'On-Appdome' or 'Private-Signing'
summary: Local path of the secured .ipa file
title: Secured .ipa file path
- APPDOME_PRIVATE_SIGN_SCRIPT_PATH: null
opts:
description: |
Local path of the .sh sign script file. Available when 'Signing Method' set to 'Auto-Dev-Signing'
summary: Local path of the .sh sign script file
title: .sh sign script file path
- APPDOME_CERTIFICATE_PATH: null
opts:
summary: Local path of the Certified Secure Certificate .pdf file
title: Certified Secure Certificate .pdf file path
- APPDOME_WORKFLOW_LOGS: null
opts:
summary: Local path of the Appdome workflow logs file
title: Appdome workflow logs file
================================================
FILE: steps/appdome-build-2secure-ios/step-info.yml
================================================
maintainer: verified
================================================
FILE: steps/appetize-deploy/0.1.3/step.yml
================================================
title: Appetize.io deploy
summary: Deploy the app to Appetize.io
description: Deploy the app to Appetize.io
website: https://github.com/dag-io/appetize-deploy-step
source_code_url: https://github.com/dag-io/appetize-deploy-step.git
support_url: https://github.com/dag-io/appetize-deploy-step/issues
published_at: 2016-06-02T17:29:18.851622215+02:00
source:
git: https://github.com/dag-io/appetize-deploy-step.git
commit: cce2b50b313197d23061197f3132163d30bb1a09
host_os_tags:
- ubuntu-14.04
- osx-10.11
project_type_tags:
- ios
- android
- xamarin
- cordova
- ionic
- react-native
type_tags:
- deploy
deps:
apt_get:
- name: php7.0
is_requires_admin_user: false
is_always_run: false
is_skippable: true
run_if: .IsCI | and (not .IsPR)
inputs:
- app_path: null
opts:
description: The full path to the application file (.app or .apk)
is_expand: true
is_required: true
summary: The full path to the application file (.app or .apk)
title: Application path
- opts:
description: Is your app an Android or iOS app ?
is_expand: true
is_required: true
summary: Is your app an Android or iOS app ?
title: Platform
value_options:
- ios
- android
platform: ios
- appetize_token: null
opts:
description: The token provided by Appetize.io
is_expand: true
is_required: true
summary: The token provided by Appetize.io
title: Appetize.io token
- opts:
description: The public key in case you want to deploy this to build to an existing
app
is_expand: true
is_required: false
summary: The public key in case you want to deploy this to build to an existing
app
title: Public key
public_key: null
outputs:
- APPETIZE_APP_URL: null
opts:
description: The public URL to use the app
is_expand: false
is_required: true
summary: The public URL to use the app
title: Public URL for the app
================================================
FILE: steps/appetize-deploy/0.10.0/step.yml
================================================
title: Appetize.io deploy
summary: Deploy your app to Appetize.io
description: |-
The Step deploys your app to [Appetize.io](https://appetize.io/). This way you can run your app in your browser for app demos, training, customer support, development, testing, etc.
### Configuring the Step
1. Specify the path of the application in the **Application path** input.
**NOTE:** For iOS, provide the `.app` bundle or `.zip` or a `.tar.gz` file containing your compressed .app bundle. For Android, provide the `.apk` containing your app.
2. Add your Appetize API token to the **Appetize.io API Token** input.
You can read about the Appetize REST API here: [Appetize REST API Overview](https://docs.appetize.io/rest-api/overview)
3. (Optional) Add the public key of an existing app to the **Public key** input if you want to deploy this build to an existing app.
4. Set the **Enable verbose logging** to `true` to enable extended logs for debugging.
### Troubleshooting
* [Android Troubleshooting](https://docs.appetize.io/platform/uploading-apps/android#troubleshooting)
* [iOS Troubleshooting](https://docs.appetize.io/platform/uploading-apps/ios#troubleshooting)
### Useful links
* [Appetize REST API Overview](https://docs.appetize.io/rest-api/overview)
### Related Steps
* [Xcode Build for Simulator](https://bitrise.io/integrations/steps/xcode-build-for-simulator)
* [Android Build](https://www.bitrise.io/integrations/steps/android-build)
* [Gradle Runner](https://www.bitrise.io/integrations/steps/gradle-runner)
website: https://github.com/bitrise-steplib/steps-appetize-io-deploy
source_code_url: https://github.com/bitrise-steplib/steps-appetize-io-deploy
support_url: https://github.com/bitrise-steplib/steps-appetize-io-deploy/issues
published_at: 2023-10-03T11:51:36.895004952Z
source:
git: https://github.com/bitrise-steplib/steps-appetize-io-deploy.git
commit: 8364b2ff12db5e0bafccce83b7b677baa9a9f8c2
type_tags:
- deploy
toolkit:
go:
package_name: github.com/bitrise-steplib/steps-appetize-io-deploy
inputs:
- app_path: null
opts:
description: |-
The full path to the application file (.app, .zip, .tar.gz, or .apk)
**NOTE:** For iOS, provide the `.app` bundle or `.zip` or a `.tar.gz` file containing your compressed .app bundle. For Android, provide the `.apk` containing your app.
is_required: true
summary: The full path to the application file (.app, .zip, .tar.gz, or .apk)
title: Application path
- appetize_token: null
opts:
description: |-
The token provided by Appetize.io
**NOTE:** All users with admin or developer roles may request an API token after logging in and navigating to your [Account Dashboard](https://appetize.io/account).
is_required: true
is_sensitive: true
summary: The API token provided by Appetize.io
title: Appetize.io API Token
- opts:
description: The public key in case you want to deploy this build to an existing
app
is_required: false
summary: The public key in case you want to deploy this build to an existing app
title: Public key
public_key: null
- appetize_api: '@api.appetize.io/v1/apps'
opts:
description: Allows for customized Appetize.io api endpoints, default is @api.appetize.io/v1/apps
is_required: true
summary: Allows for customized Appetize.io api endpoints, default is @api.appetize.io/v1/apps
title: Appetize.io api endpoint
- appetize_host: appetize.io
opts:
description: Allows for customized Appetize.io hosts, default is appetize.io
is_required: true
summary: Allows for customized Appetize.io hosts, default is appetize.io
title: Appetize.io host
- opts:
description: Enable verbose log option for better debugging
is_expand: true
is_required: true
summary: Enable verbose log option for better debugging
title: Enable verbose logging
value_options:
- "true"
- "false"
verbose: "false"
outputs:
- APPETIZE_APP_URL: null
opts:
description: The public URL to use the app
is_expand: false
is_required: true
summary: The public URL to use the app
title: Public URL for the app
================================================
FILE: steps/appetize-deploy/0.9.0/step.yml
================================================
title: Appetize.io deploy
summary: Deploy the app to Appetize.io
description: "Deploy your app to Appetize.io and run it in your browser.\nFor app
demos, training, customer support, development, testing, and more.\n\n**NOTE:**
For iOS, provide a `.zip` or `.tar.gz` file containing your compressed .app bundle
or the `.app` bundle. For Android, provide the `.apk` containing your app. "
website: https://github.com/bitrise-steplib/steps-appetize-io-deploy
source_code_url: https://github.com/bitrise-steplib/steps-appetize-io-deploy
support_url: https://github.com/bitrise-steplib/steps-appetize-io-deploy/issues
published_at: 2018-06-08T10:13:42.715871756+02:00
source:
git: https://github.com/bitrise-steplib/steps-appetize-io-deploy.git
commit: df109f715e013131cb47199949b5efdeb9bfa0d8
type_tags:
- deploy
toolkit:
go:
package_name: github.com/bitrise-steplib/steps-appetize-io-deploy
deps:
brew:
- name: go
apt_get:
- name: go
inputs:
- app_path: null
opts:
description: "The full path to the application file (.app, .zip, .tar.gz, or .apk)\n\n**NOTE:**
For iOS, provide a `.zip` or `.tar.gz` file containing your compressed .app
bundle or the `.app` bundle. For Android, provide the `.apk` containing your
app. "
is_expand: true
is_required: true
summary: The full path to the application file (.app, .zip, .tar.gz, or .apk)
title: Application path
- appetize_token: null
opts:
description: |-
The token provided by Appetize.io
**NOTE:** You can reaquest an api token for Appetioze.io here:
[Appetize.io/request-api-token](https://appetize.io/docs#request-api-token)
is_expand: true
is_required: true
summary: The token provided by Appetize.io
title: Appetize.io token
- opts:
description: The public key in case you want to deploy this to build to an existing
app
is_expand: true
is_required: false
summary: The public key in case you want to deploy this to build to an existing
app
title: Public key
public_key: null
- opts:
description: Enable verbose log option for better debug
is_expand: true
is_required: true
summary: Enable verbose log option for better debug
title: Enable verbose logging
value_options:
- true
- false
verbose: false
outputs:
- APPETIZE_APP_URL: null
opts:
description: The public URL to use the app
is_expand: false
is_required: true
summary: The public URL to use the app
title: Public URL for the app
================================================
FILE: steps/appetize-deploy/0.9.1/step.yml
================================================
title: Appetize.io deploy
summary: Deploy the app to Appetize.io
description: "Deploy your app to Appetize.io and run it in your browser.\nFor app
demos, training, customer support, development, testing, and more.\n\n**NOTE:**
For iOS, provide a `.zip` or `.tar.gz` file containing your compressed .app bundle
or the `.app` bundle. For Android, provide the `.apk` containing your app. "
website: https://github.com/bitrise-steplib/steps-appetize-io-deploy
source_code_url: https://github.com/bitrise-steplib/steps-appetize-io-deploy
support_url: https://github.com/bitrise-steplib/steps-appetize-io-deploy/issues
published_at: 2018-07-16T10:27:21.438395014+02:00
source:
git: https://github.com/bitrise-steplib/steps-appetize-io-deploy.git
commit: da19cebf2a207a6c9f3db8e632ac518b262f02ad
type_tags:
- deploy
toolkit:
go:
package_name: github.com/bitrise-steplib/steps-appetize-io-deploy
deps:
brew:
- name: go
apt_get:
- name: go
inputs:
- app_path: null
opts:
description: "The full path to the application file (.app, .zip, .tar.gz, or .apk)\n\n**NOTE:**
For iOS, provide a `.zip` or `.tar.gz` file containing your compressed .app
bundle or the `.app` bundle. For Android, provide the `.apk` containing your
app. "
is_expand: true
is_required: true
summary: The full path to the application file (.app, .zip, .tar.gz, or .apk)
title: Application path
- appetize_token: null
opts:
description: |-
The token provided by Appetize.io
**NOTE:** You can reaquest an api token for Appetioze.io here:
[Appetize.io/request-api-token](https://appetize.io/docs#request-api-token)
is_expand: true
is_required: true
summary: The token provided by Appetize.io
title: Appetize.io token
- opts:
description: The public key in case you want to deploy this to build to an existing
app
is_expand: true
is_required: false
summary: The public key in case you want to deploy this to build to an existing
app
title: Public key
public_key: null
- opts:
description: Enable verbose log option for better debug
is_expand: true
is_required: true
summary: Enable verbose log option for better debug
title: Enable verbose logging
value_options:
- true
- false
verbose: false
outputs:
- APPETIZE_APP_URL: null
opts:
description: The public URL to use the app
is_expand: false
is_required: true
summary: The public URL to use the app
title: Public URL for the app
================================================
FILE: steps/appetize-deploy/0.9.3/step.yml
================================================
title: Appetize.io deploy
summary: Deploy your app to Appetize.io
description: "Deploy your app to [Appetize.io](https://appetize.io/) and run it in
your browser.\nFor app demos, training, customer support, development, testing,
and more.\n\n**NOTE:** For iOS, provide a `.zip` or a `.tar.gz` file containing
your compressed .app bundle or the `.app` bundle. For Android, provide the `.apk`
containing your app. "
website: https://github.com/bitrise-steplib/steps-appetize-io-deploy
source_code_url: https://github.com/bitrise-steplib/steps-appetize-io-deploy
support_url: https://github.com/bitrise-steplib/steps-appetize-io-deploy/issues
published_at: 2018-08-31T10:53:44.558425652Z
source:
git: https://github.com/bitrise-steplib/steps-appetize-io-deploy.git
commit: 6aa16b2880d1ee5bf80abc56614dbee6dd75b958
type_tags:
- deploy
toolkit:
go:
package_name: github.com/bitrise-steplib/steps-appetize-io-deploy
deps:
brew:
- name: go
apt_get:
- name: go
inputs:
- app_path: null
opts:
description: "The full path to the application file (.app, .zip, .tar.gz, or .apk)\n\n**NOTE:**
For iOS, provide a `.zip` or `.tar.gz` file containing your compressed .app
bundle or the `.app` bundle. For Android, provide the `.apk` containing your
app. "
is_required: true
summary: The full path to the application file (.app, .zip, .tar.gz, or .apk)
title: Application path
- appetize_token: null
opts:
description: |-
The token provided by Appetize.io
**NOTE:** You can reaquest an api token for Appetioze.io here:
[Appetize.io/request-api-token](https://appetize.io/docs#request-api-token)
is_required: true
is_sensitive: true
summary: The token provided by Appetize.io
title: Appetize.io token
- opts:
description: The public key in case you want to deploy this to build to an existing
app
is_required: false
summary: The public key in case you want to deploy this to build to an existing
app
title: Public key
public_key: null
- opts:
description: Enable verbose log option for better debug
is_expand: true
is_required: true
summary: Enable verbose log option for better debug
title: Enable verbose logging
value_options:
- "true"
- "false"
verbose: "false"
outputs:
- APPETIZE_APP_URL: null
opts:
description: The public URL to use the app
is_expand: false
is_required: true
summary: The public URL to use the app
title: Public URL for the app
================================================
FILE: steps/appetize-deploy/0.9.4/step.yml
================================================
title: Appetize.io deploy
summary: Deploy your app to Appetize.io
description: "Deploy your app to [Appetize.io](https://appetize.io/) and run it in
your browser.\nFor app demos, training, customer support, development, testing,
and more.\n\n**NOTE:** For iOS, provide a `.zip` or a `.tar.gz` file containing
your compressed .app bundle or the `.app` bundle. For Android, provide the `.apk`
containing your app. "
website: https://github.com/bitrise-steplib/steps-appetize-io-deploy
source_code_url: https://github.com/bitrise-steplib/steps-appetize-io-deploy
support_url: https://github.com/bitrise-steplib/steps-appetize-io-deploy/issues
published_at: 2019-12-17T09:27:06.889342486Z
source:
git: https://github.com/bitrise-steplib/steps-appetize-io-deploy.git
commit: d8af79622e3970e4efc22ee90e7f952bcbdbf704
type_tags:
- deploy
toolkit:
go:
package_name: github.com/bitrise-steplib/steps-appetize-io-deploy
inputs:
- app_path: null
opts:
description: "The full path to the application file (.app, .zip, .tar.gz, or .apk)\n\n**NOTE:**
For iOS, provide a `.zip` or `.tar.gz` file containing your compressed .app
bundle or the `.app` bundle. For Android, provide the `.apk` containing your
app. "
is_required: true
summary: The full path to the application file (.app, .zip, .tar.gz, or .apk)
title: Application path
- appetize_token: null
opts:
description: |-
The token provided by Appetize.io
**NOTE:** You can reaquest an api token for Appetize.io here:
[Appetize.io/request-api-token](https://appetize.io/docs#request-api-token)
is_required: true
is_sensitive: true
summary: The token provided by Appetize.io
title: Appetize.io token
- opts:
description: The public key in case you want to deploy this build to an existing
app
is_required: false
summary: The public key in case you want to deploy this build to an existing app
title: Public key
public_key: null
- opts:
description: Enable verbose log option for better debugging
is_expand: true
is_required: true
summary: Enable verbose log option for better debugging
title: Enable verbose logging
value_options:
- "true"
- "false"
verbose: "false"
outputs:
- APPETIZE_APP_URL: null
opts:
description: The public URL to use the app
is_expand: false
is_required: true
summary: The public URL to use the app
title: Public URL for the app
================================================
FILE: steps/appetize-deploy/0.9.5/step.yml
================================================
title: Appetize.io deploy
summary: Deploy your app to Appetize.io
description: |-
The Step deploys your app to [Appetize.io](https://appetize.io/). This way you can run your app in your browser for app demos, training, customer support, development, testing, etc.
### Configuring the Step
1. Specify the path of the application in the **Application path** input.
**NOTE:** For iOS, provide the `.app` bundle or `.zip` or a `.tar.gz` file containing your compressed .app bundle. For Android, provide the `.apk` containing your app.
1. Add your Appetize.io API token to the **Appetize.io token** input.
You can read about the Appetize.io API here: [Appetize.io API Overview](https://docs.appetize.io/api/overview)
1. (Optional) Add the public key of an existing app to the **Public key** input if you want to deploy this build to an existing app.
1. Set the **Enable verbose logging** to `true` to enable extended logs for debugging.
### Troubleshooting
### Useful links
* [Appetize.io API Overview](https://docs.appetize.io/api/overview)
### Related Steps
* [Xcode Archive & Export for iOS](https://www.bitrise.io/integrations/steps/xcode-archive)
* [Xcode Archive for Mac](https://github.com/bitrise-steplib/steps-xcode-archive-mac)
* [Gradle Runner](https://www.bitrise.io/integrations/steps/gradle-runner)
* [Android Build](https://www.bitrise.io/integrations/steps/android-build)
website: https://github.com/bitrise-steplib/steps-appetize-io-deploy
source_code_url: https://github.com/bitrise-steplib/steps-appetize-io-deploy
support_url: https://github.com/bitrise-steplib/steps-appetize-io-deploy/issues
published_at: 2023-10-03T11:50:22.92638014Z
source:
git: https://github.com/bitrise-steplib/steps-appetize-io-deploy.git
commit: 34ad14f7e15bde89b5ffcb40b7e6ae301d549d65
type_tags:
- deploy
toolkit:
go:
package_name: github.com/bitrise-steplib/steps-appetize-io-deploy
inputs:
- app_path: null
opts:
description: |-
The full path to the application file (.app, .zip, .tar.gz, or .apk)
**NOTE:** For iOS, provide the `.app` bundle or `.zip` or a `.tar.gz` file containing your compressed .app bundle. For Android, provide the `.apk` containing your app.
is_required: true
summary: The full path to the application file (.app, .zip, .tar.gz, or .apk)
title: Application path
- appetize_token: null
opts:
description: |-
The token provided by Appetize.io
**NOTE:** You can request an API token for Appetize.io here:
[Appetize.io/request-api-token](https://appetize.io/docs#request-api-token)
is_required: true
is_sensitive: true
summary: The token provided by Appetize.io
title: Appetize.io token
- opts:
description: The public key in case you want to deploy this build to an existing
app
is_required: false
summary: The public key in case you want to deploy this build to an existing app
title: Public key
public_key: null
- opts:
description: Enable verbose log option for better debugging
is_expand: true
is_required: true
summary: Enable verbose log option for better debugging
title: Enable verbose logging
value_options:
- "true"
- "false"
verbose: "false"
outputs:
- APPETIZE_APP_URL: null
opts:
description: The public URL to use the app
is_expand: false
is_required: true
summary: The public URL to use the app
title: Public URL for the app
================================================
FILE: steps/appetize-deploy/step-info.yml
================================================
maintainer: bitrise
================================================
FILE: steps/appgallery-deploy/0.9.0/step.yml
================================================
title: Deploy to Huawei App Gallery
summary: Uploads APK/AAB to Huawei App Gallery
description: "This step deploys a .apk/.aab file to Huawei App Gallery.\nIt's based on [AppGallery Connect API](https://developer.huawei.com/consumer/en/doc/development/AppGallery-connect-Guides/agcapi-getstarted)."
website: https://github.com/ferPrieto/steps-app-gallery-deploy
source_code_url: https://github.com/ferPrieto/steps-app-gallery-deploy
support_url: https://github.com/ferPrieto/steps-app-gallery-deploy/issues
published_at: 2020-12-13T23:39:33+00:00
source:
git: https://github.com/ferPrieto/steps-app-gallery-deploy.git
commit: 6d0cc1649adf7ca185ce4c910b2f59d6227e835d
host_os_tags:
- osx-10.10
- ubuntu-16.04
project_type_tags:
- android
- xamarin
- react-native
- flutter
type_tags:
- deploy
is_requires_admin_user: true
is_always_run: false
is_skippable: false
run_if: ""
deps:
brew:
- name: jq
apt_get:
- name: jq
toolkit:
bash:
entry_file: step.sh
inputs:
- file_path: $BITRISE_APK_PATH
opts:
category: Config
title: File path
description: Path to generated APK/AAB file to deploy.
is_expand: true
is_required: true
- huawei_filename: app_release_${BITRISE_BUILD_NUMBER}.apk
opts:
category: Config
title: File name
description: Unique name of APK/AAB file upload.
is_expand: true
is_required: true
- huawei_app_id:
opts:
category: Config
title: App ID
description: App ID can be found in the `App information` section in App Gallery Connect.
is_expand: true
is_required: true
- huawei_client_id:
opts:
category: Config
title: Client ID
description: Client ID generated in `AppGallery Connect -> Users and permissions -> API key -> Connect API -> API client`
is_expand: true
is_required: true
- huawei_client_secret:
opts:
category: Config
description: Key Secret generated in `AppGallery Connect -> Users and permissions -> API key -> Connect API -> API client`
title: Key
is_expand: true
is_required: true
is_sensitive: true
- lang: en-GB
opts:
category: Config
title: Language Type
description: For more languages refer to [Language Types](https://developer.huawei.com/consumer/en/doc/development/AppGallery-connect-Guides/agcapi-reference-langtype)
is_expand: true
is_required: false
- release_type: 1
opts:
category: Config
title: Release Type
description: App release mode (1 - on the entire network | 3 - by phase)[Release Type](https://developer.huawei.com/consumer/en/doc/development/AppGallery-connect-References/agcapi-app-submit-with-file_v2)
is_expand: true
is_required: false
- show_debug_logs: "no"
opts:
category: Debug
title: "Show debug logs?"
description: |
If debug=yes the step will print debug infos
value_options:
- "no"
- "yes"
================================================
FILE: steps/appgallery-deploy/1.0.0/step.yml
================================================
title: Deploy to Huawei App Gallery
summary: Uploads and releases apps to Huawei App Gallery
description: |-
Uploads and releases apps to Huawei App Gallery.
This step is based on [AppGallery Connect API](https://developer.huawei.com/consumer/en/doc/development/AppGallery-connect-Guides/agcapi-getstarted)
website: https://github.com/ferPrieto/steps-app-gallery-deploy
source_code_url: https://github.com/ferPrieto/steps-app-gallery-deploy
support_url: https://github.com/ferPrieto/steps-app-gallery-deploy/issues
published_at: 2021-01-20T15:10:31.098379Z
source:
git: https://github.com/ferPrieto/steps-app-gallery-deploy.git
commit: abb6d03b8242d7baf1512df95f50c75e736c8f65
host_os_tags:
- osx-10.10
- ubuntu-16.04
project_type_tags:
- android
- xamarin
- react-native
- flutter
type_tags:
- deploy
toolkit:
bash:
entry_file: step.sh
deps:
brew:
- name: jq
apt_get:
- name: jq
is_requires_admin_user: true
is_always_run: false
is_skippable: false
run_if: ""
inputs:
- file_path: $BITRISE_APK_PATH
opts:
category: Config
description: Path to generated APK/AAB file to deploy.
is_expand: true
is_required: true
title: File path
- huawei_filename: app_release_${BITRISE_BUILD_NUMBER}.apk
opts:
category: Config
description: Unique name of APK/AAB file upload.
is_expand: true
is_required: true
title: File name
- huawei_app_id: null
opts:
category: Config
description: App ID can be found in the `App information` section in App Gallery
Connect.
is_expand: true
is_required: true
title: App ID
- huawei_client_id: null
opts:
category: Config
description: Client ID generated in `AppGallery Connect -> Users and permissions
-> API key -> Connect API -> API client`
is_expand: true
is_required: true
title: Client ID
- huawei_client_secret: null
opts:
category: Config
description: Key Secret generated in `AppGallery Connect -> Users and permissions
-> API key -> Connect API -> API client`
is_expand: true
is_required: true
is_sensitive: true
title: Key
- lang: en-GB
opts:
category: Config
description: For more languages refer to [Language Types](https://developer.huawei.com/consumer/en/doc/development/AppGallery-connect-Guides/agcapi-reference-langtype)
is_expand: true
is_required: false
title: Language Type
- opts:
category: Config
description: App release mode (1 - on the entire network | 3 - by phase)[Release
Type](https://developer.huawei.com/consumer/en/doc/development/AppGallery-connect-References/agcapi-app-submit-with-file_v2)
is_expand: true
is_required: false
title: Release Type
release_type: 1
- opts:
category: Debug
description: |
If debug=yes the step will print debug infos
title: Show debug logs?
value_options:
- "no"
- "yes"
show_debug_logs: "no"
================================================
FILE: steps/appgallery-deploy/1.5.0/step.yml
================================================
title: Deploy to Huawei App Gallery
summary: Uploads and releases apps to Huawei App Gallery
description: |-
Uploads and releases apps to Huawei App Gallery.
This step is based on [AppGallery Connect API](https://developer.huawei.com/consumer/en/doc/development/AppGallery-connect-Guides/agcapi-getstarted)
website: https://github.com/ferPrieto/steps-app-gallery-deploy
source_code_url: https://github.com/ferPrieto/steps-app-gallery-deploy
support_url: https://github.com/ferPrieto/steps-app-gallery-deploy/issues
published_at: 2021-02-16T13:54:29.036326Z
source:
git: https://github.com/ferPrieto/steps-app-gallery-deploy.git
commit: 1ca84c79dc1cc0fa4556651875305eee6e2bbc87
host_os_tags:
- osx-10.10
- ubuntu-16.04
project_type_tags:
- android
- xamarin
- react-native
- flutter
type_tags:
- deploy
toolkit:
bash:
entry_file: step.sh
deps:
brew:
- name: jq
apt_get:
- name: jq
is_requires_admin_user: true
is_always_run: true
is_skippable: false
run_if: ""
inputs:
- file_path: $BITRISE_APK_PATH
opts:
category: Config
description: Path to generated APK/AAB file to deploy.
is_expand: true
is_required: true
title: File path
- huawei_filename: app_release_${BITRISE_BUILD_NUMBER}.apk
opts:
category: Config
description: Unique name of APK/AAB file upload.
is_expand: true
is_required: true
title: File name
- huawei_app_id: null
opts:
category: Config
description: App ID can be found in the `App information` section in App Gallery
Connect.
is_expand: true
is_required: true
title: App ID
- huawei_client_id: null
opts:
category: Config
description: Client ID generated in `AppGallery Connect -> Users and permissions
-> API key -> Connect API -> API client`
is_expand: true
is_required: true
title: Client ID
- huawei_client_secret: null
opts:
category: Config
description: Key Secret generated in `AppGallery Connect -> Users and permissions
-> API key -> Connect API -> API client`
is_expand: true
is_required: true
is_sensitive: true
title: Key
- opts:
category: Config
description: App release mode (Entire network | By phase)[Release Type](https://developer.huawei.com/consumer/en/doc/development/AppGallery-connect-References/agcapi-app-submit-with-file_v2)
is_expand: true
is_required: true
title: Release Type
value_options:
- Entire Network
- By Phase
release_type: Entire Network
- opts:
category: Config
description: By default is marked as For Review (true). Setting to false will
submit the relase as a Draft.
is_expand: true
is_required: false
title: Submit for Review
submit_for_review: true
- opts:
category: Phase
description: Start time of the validity period of the release by phase. The value
is UTC time in the following format yyyy-MM-ddTHH:mm:ssZZ. Example:2021-02-17T13:20:15
is_expand: true
is_required: false
title: Phase Release Start Time
phase_release_start_time: null
- opts:
category: Phase
description: End time of the validity period of the release by phase. The value
is UTC time in the following format yyyy-MM-ddTHH:mm:ssZZ. Example:2021-02-20T07:05:15
is_expand: true
is_required: false
title: Scheduled Release Time
phase_release_end_time: null
- opts:
category: Phase
description: Percentage of target users of release by phase.Enter an integer or
decimal greater than 0 and less than 100. The value can contain up to two decimal
places. For a version released by phase, the release percentage must increase
gradually for different phases.
is_expand: true
is_required: false
title: Phase Release Percentage
phase_release_percentage: null
- opts:
category: Phase
description: Remarks of the phased release, such as release features, with up
to 500 characters. The description is not displayed to users or Huawei reviewers.
It is displayed only on the version information page for your reference.
is_expand: true
is_required: false
title: Phase Description
phase_release_description: null
- opts:
category: Debug
description: |
If debug=yes the step will print debug infos
title: Show debug logs?
value_options:
- "no"
- "yes"
show_debug_logs: "no"
================================================
FILE: steps/appgallery-deploy/1.5.1/step.yml
================================================
title: Deploy to Huawei App Gallery
summary: Uploads and releases apps to Huawei App Gallery
description: |-
Uploads and releases apps to Huawei App Gallery.
This step is based on [AppGallery Connect API](https://developer.huawei.com/consumer/en/doc/development/AppGallery-connect-Guides/agcapi-getstarted)
website: https://github.com/ferPrieto/steps-app-gallery-deploy
source_code_url: https://github.com/ferPrieto/steps-app-gallery-deploy
support_url: https://github.com/ferPrieto/steps-app-gallery-deploy/issues
published_at: 2021-02-23T15:06:39.301374Z
source:
git: https://github.com/ferPrieto/steps-app-gallery-deploy.git
commit: a78aae58e21f29bd38068708813188d5ea74d946
host_os_tags:
- osx-10.10
- ubuntu-16.04
project_type_tags:
- android
- xamarin
- react-native
- flutter
type_tags:
- deploy
toolkit:
bash:
entry_file: step.sh
deps:
brew:
- name: jq
apt_get:
- name: jq
is_requires_admin_user: true
is_always_run: true
is_skippable: false
run_if: ""
inputs:
- file_path: $BITRISE_APK_PATH
opts:
category: Config
description: Path to generated APK/AAB file to deploy.
is_expand: true
is_required: true
title: File path
- huawei_filename: app_release_${BITRISE_BUILD_NUMBER}.apk
opts:
category: Config
description: Unique name of APK/AAB file upload.
is_expand: true
is_required: true
title: File name
- huawei_app_id: null
opts:
category: Config
description: App ID can be found in the `App information` section in App Gallery
Connect.
is_expand: true
is_required: true
title: App ID
- huawei_client_id: null
opts:
category: Config
description: Client ID generated in `AppGallery Connect -> Users and permissions
-> API key -> Connect API -> API client`
is_expand: true
is_required: true
title: Client ID
- huawei_client_secret: null
opts:
category: Config
description: Key Secret generated in `AppGallery Connect -> Users and permissions
-> API key -> Connect API -> API client`
is_expand: true
is_required: true
is_sensitive: true
title: Key
- opts:
category: Config
description: App release mode (Entire network | By phase)[Release Type](https://developer.huawei.com/consumer/en/doc/development/AppGallery-connect-References/agcapi-app-submit-with-file_v2)
is_expand: true
is_required: true
title: Release Type
value_options:
- Entire Network
- By Phase
release_type: Entire Network
- opts:
category: Config
description: By default is marked as For Review ("true"). Setting to "false" will
submit the relase as a Draft.
is_expand: true
is_required: false
title: Submit for Review
value_options:
- "true"
- "false"
submit_for_review: "true"
- opts:
category: Phase
description: Start time of the validity period of the release by phase. The value
is UTC time in the following format yyyy-MM-ddTHH:mm:ssZZ. Example:2021-02-17T13:20:15
is_expand: true
is_required: false
title: Phase Release Start Time
phase_release_start_time: null
- opts:
category: Phase
description: End time of the validity period of the release by phase. The value
is UTC time in the following format yyyy-MM-ddTHH:mm:ssZZ. Example:2021-02-20T07:05:15
is_expand: true
is_required: false
title: Phase Release End Time
phase_release_end_time: null
- opts:
category: Phase
description: Percentage of target users of release by phase.Enter an integer or
decimal greater than 0 and less than 100. The value can contain up to two decimal
places. For a version released by phase, the release percentage must increase
gradually for different phases.
is_expand: true
is_required: false
title: Phase Release Percentage
phase_release_percentage: null
- opts:
category: Phase
description: Remarks of the phased release, such as release features, with up
to 500 characters. The description is not displayed to users or Huawei reviewers.
It is displayed only on the version information page for your reference.
is_expand: true
is_required: false
title: Phase Description
phase_release_description: null
- opts:
category: Debug
description: |
If debug=yes the step will print debug infos
title: Show debug logs?
value_options:
- "no"
- "yes"
show_debug_logs: "no"
================================================
FILE: steps/appgallery-deploy/1.5.2/step.yml
================================================
title: Deploy to Huawei App Gallery
summary: Uploads and releases apps to Huawei App Gallery
description: |-
Uploads and releases apps to Huawei App Gallery.
This step is based on [AppGallery Connect API](https://developer.huawei.com/consumer/en/doc/development/AppGallery-connect-Guides/agcapi-getstarted)
website: https://github.com/ferPrieto/steps-app-gallery-deploy
source_code_url: https://github.com/ferPrieto/steps-app-gallery-deploy
support_url: https://github.com/ferPrieto/steps-app-gallery-deploy/issues
published_at: 2021-02-24T00:13:08.968898Z
source:
git: https://github.com/ferPrieto/steps-app-gallery-deploy.git
commit: 85a1a415ed943218a803b57ed94e9c8d84612817
host_os_tags:
- osx-10.10
- ubuntu-16.04
project_type_tags:
- android
- xamarin
- react-native
- flutter
type_tags:
- deploy
toolkit:
bash:
entry_file: step.sh
deps:
brew:
- name: jq
apt_get:
- name: jq
is_requires_admin_user: true
is_always_run: true
is_skippable: false
run_if: ""
inputs:
- file_path: $BITRISE_APK_PATH
opts:
category: Config
description: Path to generated APK/AAB file to deploy.
is_expand: true
is_required: true
title: File path
- huawei_filename: app_release_${BITRISE_BUILD_NUMBER}.apk
opts:
category: Config
description: Unique name of APK/AAB file upload.
is_expand: true
is_required: true
title: File name
- huawei_app_id: null
opts:
category: Config
description: App ID can be found in the `App information` section in App Gallery
Connect.
is_expand: true
is_required: true
title: App ID
- huawei_client_id: null
opts:
category: Config
description: Client ID generated in `AppGallery Connect -> Users and permissions
-> API key -> Connect API -> API client`
is_expand: true
is_required: true
title: Client ID
- huawei_client_secret: null
opts:
category: Config
description: Key Secret generated in `AppGallery Connect -> Users and permissions
-> API key -> Connect API -> API client`
is_expand: true
is_required: true
is_sensitive: true
title: Key
- opts:
category: Config
description: App release mode (Entire network | By phase)[Release Type](https://developer.huawei.com/consumer/en/doc/development/AppGallery-connect-References/agcapi-app-submit-with-file_v2)
is_expand: true
is_required: true
title: Release Type
value_options:
- Entire Network
- By Phase
release_type: Entire Network
- opts:
category: Config
description: By default is marked as For Review ("true"). Setting to "false" will
submit the relase as a Draft.
is_expand: true
is_required: false
title: Submit for Review
value_options:
- "true"
- "false"
submit_for_review: "true"
- opts:
category: Phase
description: Start time of the validity period of the release by phase. The value
is UTC time in the following format yyyy-MM-ddTHH:mm:ssZZ. Example:2021-02-17T13:20:15
is_expand: true
is_required: false
title: Phase Release Start Time
phase_release_start_time: null
- opts:
category: Phase
description: End time of the validity period of the release by phase. The value
is UTC time in the following format yyyy-MM-ddTHH:mm:ssZZ. Example:2021-02-20T07:05:15
is_expand: true
is_required: false
title: Phase Release End Time
phase_release_end_time: null
- opts:
category: Phase
description: Percentage of target users of release by phase.Enter an integer or
decimal greater than 0 and less than 100. The value can contain up to two decimal
places. For a version released by phase, the release percentage must increase
gradually for different phases.
is_expand: true
is_required: false
title: Phase Release Percentage
phase_release_percentage: null
- opts:
category: Phase
description: Remarks of the phased release, such as release features, with up
to 500 characters. The description is not displayed to users or Huawei reviewers.
It is displayed only on the version information page for your reference.
is_expand: true
is_required: false
title: Phase Description
phase_release_description: null
- opts:
category: Debug
description: |
If debug=yes the step will print debug infos
title: Show debug logs?
value_options:
- "no"
- "yes"
show_debug_logs: "no"
================================================
FILE: steps/appgallery-deploy/1.5.3/step.yml
================================================
title: Deploy to Huawei App Gallery
summary: Uploads and releases apps to Huawei App Gallery
description: |-
Uploads and releases apps to Huawei App Gallery.
This step is based on [AppGallery Connect API](https://developer.huawei.com/consumer/en/doc/development/AppGallery-connect-Guides/agcapi-getstarted)
website: https://github.com/ferPrieto/steps-app-gallery-deploy
source_code_url: https://github.com/ferPrieto/steps-app-gallery-deploy
support_url: https://github.com/ferPrieto/steps-app-gallery-deploy/issues
published_at: 2021-02-25T14:27:02.612966Z
source:
git: https://github.com/ferPrieto/steps-app-gallery-deploy.git
commit: 7b04772072d6f6ae79a21dfbd4e9791d29f59eb5
host_os_tags:
- osx-10.10
- ubuntu-16.04
project_type_tags:
- android
- xamarin
- react-native
- flutter
type_tags:
- deploy
toolkit:
bash:
entry_file: step.sh
deps:
brew:
- name: jq
apt_get:
- name: jq
is_requires_admin_user: true
is_always_run: true
is_skippable: false
run_if: ""
inputs:
- file_path: $BITRISE_APK_PATH
opts:
category: Config
description: Path to generated APK/AAB file to deploy.
is_expand: true
is_required: true
title: File path
- huawei_filename: app_release_${BITRISE_BUILD_NUMBER}.apk
opts:
category: Config
description: Unique name of APK/AAB file upload.
is_expand: true
is_required: true
title: File name
- huawei_app_id: null
opts:
category: Config
description: App ID can be found in the `App information` section in App Gallery
Connect.
is_expand: true
is_required: true
title: App ID
- huawei_client_id: null
opts:
category: Config
description: Client ID generated in `AppGallery Connect -> Users and permissions
-> API key -> Connect API -> API client`
is_expand: true
is_required: true
title: Client ID
- huawei_client_secret: null
opts:
category: Config
description: Key Secret generated in `AppGallery Connect -> Users and permissions
-> API key -> Connect API -> API client`
is_expand: true
is_required: true
is_sensitive: true
title: Key
- opts:
category: Config
description: App release mode (Entire network | By phase)[Release Type](https://developer.huawei.com/consumer/en/doc/development/AppGallery-connect-References/agcapi-app-submit-with-file_v2)
is_expand: true
is_required: true
title: Release Type
value_options:
- Entire Network
- By Phase
release_type: Entire Network
- opts:
category: Config
description: By default is marked as For Review ("true"). Setting to "false" will
submit the relase as a Draft.
is_expand: true
is_required: false
title: Submit for Review
value_options:
- "true"
- "false"
submit_for_review: "true"
- opts:
category: Phase
description: Start time of the validity period of the release by phase. The value
is UTC time in the following format yyyy-MM-ddTHH:mm:ssZZ. Example:2021-02-17T13:20:15
is_expand: true
is_required: false
title: Phase Release Start Time
phase_release_start_time: null
- opts:
category: Phase
description: End time of the validity period of the release by phase. The value
is UTC time in the following format yyyy-MM-ddTHH:mm:ssZZ. Example:2021-02-20T07:05:15
is_expand: true
is_required: false
title: Phase Release End Time
phase_release_end_time: null
- opts:
category: Phase
description: Percentage of target users of release by phase.Enter an integer or
decimal greater than 0 and less than 100. The value can contain up to two decimal
places. For a version released by phase, the release percentage must increase
gradually for different phases.
is_expand: true
is_required: false
title: Phase Release Percentage
phase_release_percentage: null
- opts:
category: Phase
description: Remarks of the phased release, such as release features, with up
to 500 characters. The description is not displayed to users or Huawei reviewers.
It is displayed only on the version information page for your reference.
is_expand: true
is_required: false
title: Phase Description
phase_release_description: null
- opts:
category: Debug
description: |
If debug=yes the step will print debug infos
title: Show debug logs?
value_options:
- "no"
- "yes"
show_debug_logs: "no"
================================================
FILE: steps/appgallery-deploy/1.5.4/step.yml
================================================
title: Deploy to Huawei App Gallery
summary: Uploads and releases apps to Huawei App Gallery
description: |-
Uploads and releases apps to Huawei App Gallery.
This step is based on [AppGallery Connect API](https://developer.huawei.com/consumer/en/doc/development/AppGallery-connect-Guides/agcapi-getstarted)
website: https://github.com/ferPrieto/steps-app-gallery-deploy
source_code_url: https://github.com/ferPrieto/steps-app-gallery-deploy
support_url: https://github.com/ferPrieto/steps-app-gallery-deploy/issues
published_at: 2021-08-07T13:50:16.273005+01:00
source:
git: https://github.com/ferPrieto/steps-app-gallery-deploy.git
commit: ef7f72862c80b8028c3e8ff50c5365b44cc3b232
host_os_tags:
- osx-10.10
- ubuntu-16.04
project_type_tags:
- android
- xamarin
- react-native
- flutter
type_tags:
- deploy
toolkit:
bash:
entry_file: step.sh
deps:
brew:
- name: jq
apt_get:
- name: jq
is_requires_admin_user: true
is_always_run: true
is_skippable: false
run_if: ""
inputs:
- file_path: $BITRISE_APK_PATH
opts:
category: Config
description: Path to generated APK/AAB file to deploy.
is_expand: true
is_required: true
title: File path
- huawei_filename: app_release_${BITRISE_BUILD_NUMBER}.apk
opts:
category: Config
description: Unique name of APK/AAB file upload.
is_expand: true
is_required: true
title: File name
- huawei_app_id: null
opts:
category: Config
description: App ID can be found in the `App information` section in App Gallery
Connect.
is_expand: true
is_required: true
title: App ID
- huawei_client_id: null
opts:
category: Config
description: Client ID generated in `AppGallery Connect -> Users and permissions
-> API key -> Connect API -> API client`
is_expand: true
is_required: true
title: Client ID
- huawei_client_secret: null
opts:
category: Config
description: Key Secret generated in `AppGallery Connect -> Users and permissions
-> API key -> Connect API -> API client`
is_expand: true
is_required: true
is_sensitive: true
title: Key
- opts:
category: Config
description: App release mode (Entire network | By phase)[Release Type](https://developer.huawei.com/consumer/en/doc/development/AppGallery-connect-References/agcapi-app-submit-with-file_v2)
is_expand: true
is_required: true
title: Release Type
value_options:
- Entire Network
- By Phase
release_type: Entire Network
- opts:
category: Config
description: By default is marked as For Review ("true"). Setting to "false" will
submit the relase as a Draft.
is_expand: true
is_required: false
title: Submit for Review
value_options:
- "true"
- "false"
submit_for_review: "true"
- opts:
category: Phase
description: Start time of the validity period of the release by phase. The value
is UTC time in the following format yyyy-MM-ddTHH:mm:ssZZ. Example:2021-02-17T13:20:15
is_expand: true
is_required: false
title: Phase Release Start Time
phase_release_start_time: null
- opts:
category: Phase
description: End time of the validity period of the release by phase. The value
is UTC time in the following format yyyy-MM-ddTHH:mm:ssZZ. Example:2021-02-20T07:05:15
is_expand: true
is_required: false
title: Phase Release End Time
phase_release_end_time: null
- opts:
category: Phase
description: Percentage of target users of release by phase.Enter an integer or
decimal greater than 0 and less than 100. The value can contain up to two decimal
places. For a version released by phase, the release percentage must increase
gradually for different phases.
is_expand: true
is_required: false
title: Phase Release Percentage
phase_release_percentage: null
- opts:
category: Phase
description: Remarks of the phased release, such as release features, with up
to 500 characters. The description is not displayed to users or Huawei reviewers.
It is displayed only on the version information page for your reference.
is_expand: true
is_required: false
title: Phase Description
phase_release_description: null
- opts:
category: Debug
description: |
If debug=yes the step will print debug infos
title: Show debug logs?
value_options:
- "no"
- "yes"
show_debug_logs: "no"
================================================
FILE: steps/appgallery-deploy/1.5.5/step.yml
================================================
title: Deploy to Huawei App Gallery
summary: Uploads and releases apps to Huawei App Gallery
description: |-
Uploads and releases apps to Huawei App Gallery.
This step is based on [AppGallery Connect API](https://developer.huawei.com/consumer/en/doc/development/AppGallery-connect-Guides/agcapi-getstarted)
website: https://github.com/ferPrieto/steps-app-gallery-deploy
source_code_url: https://github.com/ferPrieto/steps-app-gallery-deploy
support_url: https://github.com/ferPrieto/steps-app-gallery-deploy/issues
published_at: 2021-08-09T15:34:25.744735+01:00
source:
git: https://github.com/ferPrieto/steps-app-gallery-deploy.git
commit: 5e35cedfa8fd2a5d46cb203114e8f8bacae1c88e
host_os_tags:
- osx-10.10
- ubuntu-16.04
project_type_tags:
- android
- xamarin
- react-native
- flutter
- cordova
- ionic
type_tags:
- deploy
toolkit:
bash:
entry_file: step.sh
deps:
brew:
- name: jq
apt_get:
- name: jq
is_requires_admin_user: true
is_always_run: true
is_skippable: false
run_if: ""
inputs:
- file_path: $BITRISE_APK_PATH
opts:
category: Config
description: Path to generated APK/AAB file to deploy.
is_expand: true
is_required: true
title: File path
- huawei_filename: app_release_${BITRISE_BUILD_NUMBER}.apk
opts:
category: Config
description: Unique name of APK/AAB file upload.
is_expand: true
is_required: true
title: File name
- huawei_app_id: null
opts:
category: Config
description: App ID can be found in the `App information` section in App Gallery
Connect.
is_expand: true
is_required: true
title: App ID
- huawei_client_id: null
opts:
category: Config
description: Client ID generated in `AppGallery Connect -> Users and permissions
-> API key -> Connect API -> API client`
is_expand: true
is_required: true
title: Client ID
- huawei_client_secret: null
opts:
category: Config
description: Key Secret generated in `AppGallery Connect -> Users and permissions
-> API key -> Connect API -> API client`
is_expand: true
is_required: true
is_sensitive: true
title: Key
- opts:
category: Config
description: App release mode (Entire network | By phase)[Release Type](https://developer.huawei.com/consumer/en/doc/development/AppGallery-connect-References/agcapi-app-submit-with-file_v2)
is_expand: true
is_required: true
title: Release Type
value_options:
- Entire Network
- By Phase
release_type: Entire Network
- opts:
category: Config
description: By default is marked as For Review ("true"). Setting to "false" will
submit the relase as a Draft.
is_expand: true
is_required: false
title: Submit for Review
value_options:
- "true"
- "false"
submit_for_review: "true"
- opts:
category: Phase
description: Start time of the validity period of the release by phase. The value
is UTC time in the following format yyyy-MM-ddTHH:mm:ssZZ. Example:2021-02-17T13:20:15
is_expand: true
is_required: false
title: Phase Release Start Time
phase_release_start_time: null
- opts:
category: Phase
description: End time of the validity period of the release by phase. The value
is UTC time in the following format yyyy-MM-ddTHH:mm:ssZZ. Example:2021-02-20T07:05:15
is_expand: true
is_required: false
title: Phase Release End Time
phase_release_end_time: null
- opts:
category: Phase
description: Percentage of target users of release by phase. Enter an integer
or decimal greater than 0 and less than 100. The value can contain up to two
decimal places. For a version released by phase, the release percentage must
increase gradually for different phases.
is_expand: true
is_required: false
title: Phase Release Percentage
phase_release_percentage: null
- opts:
category: Phase
description: Remarks of the phased release, such as release features, with up
to 500 characters. The description is not displayed to users or Huawei reviewers.
It is displayed only on the version information page for your reference.
is_expand: true
is_required: false
title: Phase Description
phase_release_description: null
- opts:
category: Debug
description: |
If debug=yes the step will print debug infos
title: Show debug logs?
value_options:
- "no"
- "yes"
show_debug_logs: "no"
================================================
FILE: steps/appgallery-deploy/1.5.6/step.yml
================================================
title: Deploy to Huawei App Gallery
summary: Uploads and releases apps to Huawei App Gallery
description: |-
Uploads and releases apps to Huawei App Gallery.
This step is based on [AppGallery Connect API](https://developer.huawei.com/consumer/en/doc/development/AppGallery-connect-Guides/agcapi-getstarted)
website: https://github.com/ferPrieto/steps-app-gallery-deploy
source_code_url: https://github.com/ferPrieto/steps-app-gallery-deploy
support_url: https://github.com/ferPrieto/steps-app-gallery-deploy/issues
published_at: 2023-10-02T10:07:24.329817+01:00
source:
git: https://github.com/ferPrieto/steps-app-gallery-deploy.git
commit: 569805655afd5e556935388beb3f77865a1901ba
host_os_tags:
- osx-10.10
- ubuntu-16.04
project_type_tags:
- android
- xamarin
- react-native
- flutter
- cordova
- ionic
type_tags:
- deploy
toolkit:
bash:
entry_file: step.sh
deps:
brew:
- name: jq
apt_get:
- name: jq
is_requires_admin_user: true
is_always_run: true
is_skippable: false
run_if: ""
inputs:
- file_path: $BITRISE_APK_PATH
opts:
category: Config
description: Path to generated APK/AAB file to deploy.
is_expand: true
is_required: true
title: File path
- huawei_filename: app_release_${BITRISE_BUILD_NUMBER}.apk
opts:
category: Config
description: Unique name of APK/AAB file upload.
is_expand: true
is_required: true
title: File name
- huawei_app_id: null
opts:
category: Config
description: App ID can be found in the `App information` section in App Gallery
Connect.
is_expand: true
is_required: true
title: App ID
- huawei_client_id: null
opts:
category: Config
description: Client ID generated in `AppGallery Connect -> Users and permissions
-> API key -> Connect API -> API client`
is_expand: true
is_required: true
title: Client ID
- huawei_client_secret: null
opts:
category: Config
description: Key Secret generated in `AppGallery Connect -> Users and permissions
-> API key -> Connect API -> API client`
is_expand: true
is_required: true
is_sensitive: true
title: Key
- opts:
category: Config
description: App release mode (Entire network | By phase)[Release Type](https://developer.huawei.com/consumer/en/doc/development/AppGallery-connect-References/agcapi-app-submit-with-file_v2)
is_expand: true
is_required: true
title: Release Type
value_options:
- Entire Network
- By Phase
release_type: Entire Network
- opts:
category: Config
description: By default is marked as For Review ("true"). Setting to "false" will
submit the relase as a Draft.
is_expand: true
is_required: false
title: Submit for Review
value_options:
- "true"
- "false"
submit_for_review: "true"
- opts:
category: Phase
description: Start time of the validity period of the release by phase. The value
is UTC time in the following format yyyy-MM-ddTHH:mm:ssZZ. Example:2021-02-17T13:20:15
is_expand: true
is_required: false
title: Phase Release Start Time
phase_release_start_time: null
- opts:
category: Phase
description: End time of the validity period of the release by phase. The value
is UTC time in the following format yyyy-MM-ddTHH:mm:ssZZ. Example:2021-02-20T07:05:15
is_expand: true
is_required: false
title: Phase Release End Time
phase_release_end_time: null
- opts:
category: Phase
description: Percentage of target users of release by phase. Enter an integer
or decimal greater than 0 and less than 100. The value can contain up to two
decimal places. For a version released by phase, the release percentage must
increase gradually for different phases.
is_expand: true
is_required: false
title: Phase Release Percentage
phase_release_percentage: null
- opts:
category: Phase
description: Remarks of the phased release, such as release features, with up
to 500 characters. The description is not displayed to users or Huawei reviewers.
It is displayed only on the version information page for your reference.
is_expand: true
is_required: false
title: Phase Description
phase_release_description: null
- opts:
category: Debug
description: |
If debug=yes the step will print debug infos
title: Show debug logs?
value_options:
- "no"
- "yes"
show_debug_logs: "no"
================================================
FILE: steps/appgallery-deploy/1.5.7/step.yml
================================================
title: Deploy to Huawei App Gallery
summary: Uploads and releases apps to Huawei App Gallery
description: |-
Uploads and releases apps to Huawei App Gallery.
This step is based on [AppGallery Connect API](https://developer.huawei.com/consumer/en/doc/development/AppGallery-connect-Guides/agcapi-getstarted)
website: https://github.com/ferPrieto/steps-app-gallery-deploy
source_code_url: https://github.com/ferPrieto/steps-app-gallery-deploy
support_url: https://github.com/ferPrieto/steps-app-gallery-deploy/issues
published_at: 2023-10-12T11:01:51.611027+01:00
source:
git: https://github.com/ferPrieto/steps-app-gallery-deploy.git
commit: b58ef32e772f8cfef63c95b0ad94c4a87b216896
host_os_tags:
- osx-10.10
- ubuntu-16.04
project_type_tags:
- android
- xamarin
- react-native
- flutter
- cordova
- ionic
type_tags:
- deploy
toolkit:
bash:
entry_file: step.sh
deps:
brew:
- name: jq
apt_get:
- name: jq
is_requires_admin_user: true
is_always_run: true
is_skippable: false
run_if: ""
inputs:
- file_path: $BITRISE_APK_PATH
opts:
category: Config
description: Path to generated APK/AAB file to deploy.
is_expand: true
is_required: true
title: File path
- huawei_filename: app_release_${BITRISE_BUILD_NUMBER}.apk
opts:
category: Config
description: Unique name of APK/AAB file upload.
is_expand: true
is_required: true
title: File name
- huawei_app_id: null
opts:
category: Config
description: App ID can be found in the `App information` section in App Gallery
Connect.
is_expand: true
is_required: true
title: App ID
- huawei_client_id: null
opts:
category: Config
description: Client ID generated in `AppGallery Connect -> Users and permissions
-> API key -> Connect API -> API client`
is_expand: true
is_required: true
title: Client ID
- huawei_client_secret: null
opts:
category: Config
description: Key Secret generated in `AppGallery Connect -> Users and permissions
-> API key -> Connect API -> API client`
is_expand: true
is_required: true
is_sensitive: true
title: Key
- opts:
category: Config
description: App release mode (Entire network | By phase)[Release Type](https://developer.huawei.com/consumer/en/doc/development/AppGallery-connect-References/agcapi-app-submit-with-file_v2)
is_expand: true
is_required: true
title: Release Type
value_options:
- Entire Network
- By Phase
release_type: Entire Network
- opts:
category: Config
description: By default is marked as For Review ("true"). Setting to "false" will
submit the relase as a Draft.
is_expand: true
is_required: false
title: Submit for Review
value_options:
- "true"
- "false"
submit_for_review: "true"
- opts:
category: Phase
description: Start time of the validity period of the release by phase. The value
is UTC time in the following format yyyy-MM-ddTHH:mm:ssZZ. Example:2021-02-17T13:20:15
is_expand: true
is_required: false
title: Phase Release Start Time
phase_release_start_time: null
- opts:
category: Phase
description: End time of the validity period of the release by phase. The value
is UTC time in the following format yyyy-MM-ddTHH:mm:ssZZ. Example:2021-02-20T07:05:15
is_expand: true
is_required: false
title: Phase Release End Time
phase_release_end_time: null
- opts:
category: Phase
description: Percentage of target users of release by phase. Enter an integer
or decimal greater than 0 and less than 100. The value can contain up to two
decimal places. For a version released by phase, the release percentage must
increase gradually for different phases.
is_expand: true
is_required: false
title: Phase Release Percentage
phase_release_percentage: null
- opts:
category: Phase
description: Remarks of the phased release, such as release features, with up
to 500 characters. The description is not displayed to users or Huawei reviewers.
It is displayed only on the version information page for your reference.
is_expand: true
is_required: false
title: Phase Description
phase_release_description: null
- opts:
category: Debug
description: |
If debug=yes the step will print debug infos
title: Show debug logs?
value_options:
- "no"
- "yes"
show_debug_logs: "no"
================================================
FILE: steps/appgallery-deploy/1.5.8/step.yml
================================================
title: Deploy to Huawei App Gallery
summary: Uploads and releases apps to Huawei App Gallery
description: |-
Uploads and releases apps to Huawei App Gallery.
This step is based on [AppGallery Connect API](https://developer.huawei.com/consumer/en/doc/development/AppGallery-connect-Guides/agcapi-getstarted)
website: https://github.com/ferPrieto/steps-app-gallery-deploy
source_code_url: https://github.com/ferPrieto/steps-app-gallery-deploy
support_url: https://github.com/ferPrieto/steps-app-gallery-deploy/issues
published_at: 2025-07-12T14:04:08.335762+01:00
source:
git: https://github.com/ferPrieto/steps-app-gallery-deploy.git
commit: 7a9e31e3981d2d32d2cd50c7a1f4c5789a2c84e4
host_os_tags:
- osx-10.10
- ubuntu-16.04
project_type_tags:
- android
- xamarin
- react-native
- flutter
- cordova
- ionic
type_tags:
- deploy
toolkit:
bash:
entry_file: step.sh
deps:
brew:
- name: jq
apt_get:
- name: jq
is_requires_admin_user: true
is_always_run: true
is_skippable: false
run_if: ""
inputs:
- file_path: $BITRISE_APK_PATH
opts:
category: Config
description: Path to generated APK/AAB file to deploy.
is_expand: true
is_required: true
title: File path
- huawei_filename: app_release_${BITRISE_BUILD_NUMBER}.apk
opts:
category: Config
description: Unique name of APK/AAB file upload.
is_expand: true
is_required: true
title: File name
- huawei_app_id: null
opts:
category: Config
description: App ID can be found in the `App information` section in App Gallery
Connect.
is_expand: true
is_required: true
title: App ID
- huawei_client_id: null
opts:
category: Config
description: Client ID generated in `AppGallery Connect -> Users and permissions
-> API key -> Connect API -> API client`. For 19-digit Client IDs, wrap the
value in quotes to avoid precision issues.
is_expand: true
is_required: true
title: Client ID
- huawei_client_secret: null
opts:
category: Config
description: Key Secret generated in `AppGallery Connect -> Users and permissions
-> API key -> Connect API -> API client`
is_expand: true
is_required: true
is_sensitive: true
title: Key
- opts:
category: Config
description: App release mode (Entire network | By phase)[Release Type](https://developer.huawei.com/consumer/en/doc/development/AppGallery-connect-References/agcapi-app-submit-with-file_v2)
is_expand: true
is_required: true
title: Release Type
value_options:
- Entire Network
- By Phase
release_type: Entire Network
- opts:
category: Config
description: By default is marked as For Review ("true"). Setting to "false" will
submit the relase as a Draft.
is_expand: true
is_required: false
title: Submit for Review
value_options:
- "true"
- "false"
submit_for_review: "true"
- opts:
category: Phase
description: Start time of the validity period of the release by phase. The value
is UTC time in the following format yyyy-MM-ddTHH:mm:ssZZ. Example:2021-02-17T13:20:15
is_expand: true
is_required: false
title: Phase Release Start Time
phase_release_start_time: null
- opts:
category: Phase
description: End time of the validity period of the release by phase. The value
is UTC time in the following format yyyy-MM-ddTHH:mm:ssZZ. Example:2021-02-20T07:05:15
is_expand: true
is_required: false
title: Phase Release End Time
phase_release_end_time: null
- opts:
category: Phase
description: Percentage of target users of release by phase. Enter an integer
or decimal greater than 0 and less than 100. The value can contain up to two
decimal places. For a version released by phase, the release percentage must
increase gradually for different phases.
is_expand: true
is_required: false
title: Phase Release Percentage
phase_release_percentage: null
- opts:
category: Phase
description: Remarks of the phased release, such as release features, with up
to 500 characters. The description is not displayed to users or Huawei reviewers.
It is displayed only on the version information page for your reference.
is_expand: true
is_required: false
title: Phase Description
phase_release_description: null
- opts:
category: Debug
description: |
If debug=yes the step will print debug infos
title: Show debug logs?
value_options:
- "no"
- "yes"
show_debug_logs: "no"
================================================
FILE: steps/appgallery-deploy/1.5.9/step.yml
================================================
title: Deploy to Huawei App Gallery
summary: Uploads and releases apps to Huawei App Gallery
description: |-
Uploads and releases apps to Huawei App Gallery.
This step is based on [AppGallery Connect API](https://developer.huawei.com/consumer/en/doc/development/AppGallery-connect-Guides/agcapi-getstarted)
website: https://github.com/ferPrieto/steps-app-gallery-deploy
source_code_url: https://github.com/ferPrieto/steps-app-gallery-deploy
support_url: https://github.com/ferPrieto/steps-app-gallery-deploy/issues
published_at: 2025-07-16T22:06:34.652451+01:00
source:
git: https://github.com/ferPrieto/steps-app-gallery-deploy.git
commit: c97a512508c886cefba3c494ce441aae0ca14f31
host_os_tags:
- osx-10.10
- ubuntu-16.04
project_type_tags:
- android
- xamarin
- react-native
- flutter
- cordova
- ionic
type_tags:
- deploy
toolkit:
bash:
entry_file: step.sh
deps:
brew:
- name: jq
apt_get:
- name: jq
is_requires_admin_user: true
is_always_run: true
is_skippable: false
run_if: ""
inputs:
- file_path: $BITRISE_APK_PATH
opts:
category: Config
description: Path to generated APK/AAB file to deploy.
is_expand: true
is_required: true
title: File path
- huawei_filename: app_release_${BITRISE_BUILD_NUMBER}.apk
opts:
category: Config
description: Unique name of APK/AAB file upload.
is_expand: true
is_required: true
title: File name
- huawei_app_id: null
opts:
category: Config
description: App ID can be found in the `App information` section in App Gallery
Connect.
is_expand: true
is_required: true
title: App ID
- huawei_client_id: null
opts:
category: Config
description: Client ID generated in `AppGallery Connect -> Users and permissions
-> API key -> Connect API -> API client`. For 19-digit Client IDs, wrap the
value in quotes to avoid precision issues.
is_expand: true
is_required: true
title: Client ID
- huawei_client_secret: null
opts:
category: Config
description: Key Secret generated in `AppGallery Connect -> Users and permissions
-> API key -> Connect API -> API client`
is_expand: true
is_required: true
is_sensitive: true
title: Key
- opts:
category: Config
description: App release mode (Entire network | By phase)[Release Type](https://developer.huawei.com/consumer/en/doc/development/AppGallery-connect-References/agcapi-app-submit-with-file_v2)
is_expand: true
is_required: true
title: Release Type
value_options:
- Entire Network
- By Phase
release_type: Entire Network
- opts:
category: Config
description: By default is marked as For Review ("true"). Setting to "false" will
submit the relase as a Draft.
is_expand: true
is_required: false
title: Submit for Review
value_options:
- "true"
- "false"
submit_for_review: "true"
- opts:
category: Phase
description: Start time of the validity period of the release by phase. The value
is UTC time in the following format yyyy-MM-ddTHH:mm:ssZZ. Example:2021-02-17T13:20:15
is_expand: true
is_required: false
title: Phase Release Start Time
phase_release_start_time: null
- opts:
category: Phase
description: End time of the validity period of the release by phase. The value
is UTC time in the following format yyyy-MM-ddTHH:mm:ssZZ. Example:2021-02-20T07:05:15
is_expand: true
is_required: false
title: Phase Release End Time
phase_release_end_time: null
- opts:
category: Phase
description: Percentage of target users of release by phase. Enter an integer
or decimal greater than 0 and less than 100. The value can contain up to two
decimal places. For a version released by phase, the release percentage must
increase gradually for different phases.
is_expand: true
is_required: false
title: Phase Release Percentage
phase_release_percentage: null
- opts:
category: Phase
description: Remarks of the phased release, such as release features, with up
to 500 characters. The description is not displayed to users or Huawei reviewers.
It is displayed only on the version information page for your reference.
is_expand: true
is_required: false
title: Phase Description
phase_release_description: null
- opts:
category: Debug
description: |
If debug=yes the step will print debug infos
title: Show debug logs?
value_options:
- "no"
- "yes"
show_debug_logs: "no"
================================================
FILE: steps/appgallery-deploy/step-info.yml
================================================
maintainer: verified
================================================
FILE: steps/appium-server/0.0.2/step.yml
================================================
title: Run Appium Server
summary: |
Install and Run Appium Server
description: |
Install and Run Appium Server on Bitrise to be able to run our mobile automated tests
website: https://github.com/moatazeldebsy/bitrise-step-appium-server
source_code_url: https://github.com/moatazeldebsy/bitrise-step-appium-server
support_url: https://github.com/moatazeldebsy/bitrise-step-appium-server/issues
published_at: 2021-08-18T23:06:40.395281+02:00
source:
git: https://github.com/moatazeldebsy/bitrise-step-appium-server.git
commit: a42128594674b52114a883558124aad26af8f38f
host_os_tags:
- osx-10.10
- ubuntu-16.04
project_type_tags:
- ios
- android
- react-native
type_tags:
- utility
toolkit:
bash:
entry_file: step.sh
deps:
brew:
- name: nodejs
apt_get:
- name: nodejs
is_requires_admin_user: true
is_always_run: false
is_skippable: false
run_if: ""
inputs:
- appium_version: v1.21.0
opts:
description: "Specify the Appium version that you want to install for example
v1.21.0 \n"
is_expand: false
is_required: true
summary: Specify the Appium version that you want to install
title: Appium Version
value_options:
- v1.21.0
- v1.20.2
================================================
FILE: steps/appium-server/0.0.4/step.yml
================================================
title: Run Appium Server
summary: |
Install and Run Appium Server
description: |
Install and Run Appium Server on Bitrise to be able to run our mobile automated tests
website: https://github.com/moatazeldebsy/bitrise-step-appium-server
source_code_url: https://github.com/moatazeldebsy/bitrise-step-appium-server
support_url: https://github.com/moatazeldebsy/bitrise-step-appium-server/issues
published_at: 2021-08-27T16:04:04.474263+02:00
source:
git: https://github.com/moatazeldebsy/bitrise-step-appium-server.git
commit: 6a427500aee5a429f61d1bda9632a7e30ec455d0
host_os_tags:
- osx-10.10
- ubuntu-16.04
project_type_tags:
- ios
- android
- react-native
type_tags:
- test
toolkit:
bash:
entry_file: step.sh
deps:
brew:
- name: nodejs
apt_get:
- name: nodejs
is_requires_admin_user: true
is_always_run: false
is_skippable: false
run_if: ""
inputs:
- appium_version: v1.21.0
opts:
description: |
Specify the Appium version that you want to install for example v1.21.0.
is_expand: false
is_required: true
summary: Specify the Appium version that you want to install
title: Appium Version
================================================
FILE: steps/appium-server/0.0.5/step.yml
================================================
title: Run Appium Server
summary: |
Install and Run Appium Server
description: |
Install and Run Appium Server on Bitrise to be able to run our mobile automated tests
website: https://github.com/moatazeldebsy/bitrise-step-appium-server
source_code_url: https://github.com/moatazeldebsy/bitrise-step-appium-server
support_url: https://github.com/moatazeldebsy/bitrise-step-appium-server/issues
published_at: 2022-11-11T15:37:52.793685+01:00
source:
git: https://github.com/moatazeldebsy/bitrise-step-appium-server.git
commit: 06cee7a3276a99d324c17c092ff04a1c1a0a099b
host_os_tags:
- osx-10.10
- ubuntu-16.04
project_type_tags:
- ios
- android
- react-native
type_tags:
- utility
toolkit:
bash:
entry_file: step.sh
deps:
brew:
- name: nodejs
apt_get:
- name: nodejs
is_requires_admin_user: true
is_always_run: false
is_skippable: false
run_if: ""
inputs:
- appium_version: next
opts:
description: |
Specify the Appium version that you want to install for example v1.21.0.
is_expand: false
is_required: true
summary: Specify the Appium version that you want to install
title: Appium Version
================================================
FILE: steps/appium-server/0.0.6/step.yml
================================================
title: Run Appium Server
summary: |
Install and Run Appium Server
description: |
Install and Run Appium Server on Bitrise to be able to run our mobile automated tests
website: https://github.com/moatazeldebsy/bitrise-step-appium-server
source_code_url: https://github.com/moatazeldebsy/bitrise-step-appium-server
support_url: https://github.com/moatazeldebsy/bitrise-step-appium-server/issues
published_at: 2023-01-31T12:47:30.187595+01:00
source:
git: https://github.com/moatazeldebsy/bitrise-step-appium-server.git
commit: a5061208a33adf794534bfd6c09ee7e7c6d6292a
host_os_tags:
- osx-10.10
- ubuntu-16.04
project_type_tags:
- ios
- android
- react-native
type_tags:
- utility
toolkit:
bash:
entry_file: step.sh
deps:
brew:
- name: nodejs
apt_get:
- name: nodejs
is_requires_admin_user: true
is_always_run: false
is_skippable: false
run_if: ""
inputs:
- appium_version: next
opts:
description: |
Specify the Appium version that you want to install for example v1.21.0.
is_expand: false
is_required: true
summary: Specify the Appium version that you want to install
title: Appium Version
================================================
FILE: steps/appium-server/step-info.yml
================================================
maintainer: community
================================================
FILE: steps/applivery-android/0.1.0/step.yml
================================================
title: Applivery.com Android Deploy
summary: Deploy your awesome Android Application to Applivery.com
description: |-
Deploy an Android application to [Applivery](http://www.applivery.com),
add notes and notify testers.
Register a Applivery account at [http://www.applivery..com/](http://www.applivery.com)
and create an App to utilize this step.
You also need to get your *Account API Key* for you account and the *App Id* for the app.
website: https://github.com/applivery/steps-applivery-android-deploy
source_code_url: https://github.com/applivery/steps-applivery-android-deploy
support_url: https://github.com/applivery/steps-applivery-android-deploy/issues
published_at: 2016-02-09T23:36:10.028033474+01:00
source:
git: https://github.com/applivery/steps-applivery-android-deploy.git
commit: f76628cef4a36049026b74d0a96eabdc5d3f7e8e
host_os_tags:
- ubuntu
- osx-10.10
project_type_tags:
- android
type_tags:
- deploy
- Applivery
is_requires_admin_user: false
is_always_run: false
is_skippable: false
run_if: .IsCI
inputs:
- apk_path: $BITRISE_APK_PATH
opts:
description: ""
is_required: true
summary: ""
title: APK file path
- api_token: ""
opts:
description: |-
This is the API Key to access your account.
## Where to get the Applivery Account API Key?
Sign in to your [Applivery.com](http://dashboard.applivery.com) account,
click on Developers menu option from the left side menu and copy it from the
Account API Key section.
is_required: true
summary: ""
title: Account API Key
- app_id: ""
opts:
description: |-
This is the App Id that identifies your App in Applivery.com
## Where to get the App Id?
Sign in to your [Applivery.com](http://dashboard.applivery.com) account,
click on Applications menu option from the left side menu, click on the desired App.
You'll find the App Id inside the (i) information block (written in red).
is_required: false
summary: ""
title: 'Applivery: App ID'
- notes: Deployed with Bitrise Applivery.com Android Deploy Step.
opts:
description: Additional build/release notes
summary: ""
title: Notes attached to the deploy
- notify: "true"
opts:
description: This flag allows you to automatically notify your testers vía email.
is_required: true
summary: ""
title: Notify Testers?
value_options:
- "true"
- "false"
- opts:
description: Comma-separated list of tags
is_required: false
summary: ""
title: (Optional) Comma-separated list of tags
tags: ""
- opts:
description: Human readable version name for this build.
summary: ""
title: (Optional) Human readable version name
version_name: ""
outputs:
- APPLIVERY_DEPLOY_STATUS: null
opts:
description: ""
summary: ""
title: 'Deployment result: ''success'' or ''failed'''
================================================
FILE: steps/applivery-android/0.2.0/step.yml
================================================
title: Applivery.com Android Deploy
summary: Deploy your awesome Android Application to Applivery.com
description: |-
Deploy an Android application to [Applivery](http://www.applivery.com),
add notes and notify testers.
Register a Applivery account at [http://www.applivery..com/](http://www.applivery.com)
and create an App to utilize this step.
You also need to get your *Account API Key* for you account and the *App Id* for the app.
website: https://github.com/applivery/steps-applivery-android-deploy
source_code_url: https://github.com/applivery/steps-applivery-android-deploy
support_url: https://github.com/applivery/steps-applivery-android-deploy/issues
published_at: 2016-04-28T01:02:47.449031585+02:00
source:
git: https://github.com/applivery/steps-applivery-android-deploy.git
commit: 89c14039fb7936d5557305586f621831f48969f5
host_os_tags:
- ubuntu
- osx-10.10
project_type_tags:
- android
type_tags:
- deploy
- Applivery
is_requires_admin_user: false
is_always_run: false
is_skippable: false
run_if: .IsCI
inputs:
- apk_path: $BITRISE_APK_PATH
opts:
description: ""
is_required: true
summary: ""
title: APK file path
- api_token: $APPLIVERY_API_TOKEN
opts:
description: |-
This is the API Key to access your account.
## Where to get the Applivery Account API Key?
Sign in to your [Applivery.com](http://dashboard.applivery.com) account,
click on Developers menu option from the left side menu and copy it from the
Account API Key section.
is_required: true
summary: ""
title: Account API Key
- app_id: $APPLIVERY_APP_ID
opts:
description: |-
This is the App Id that identifies your App in Applivery.com
## Where to get the App Id?
Sign in to your [Applivery.com](http://dashboard.applivery.com) account,
click on Applications menu option from the left side menu, click on the desired App.
You'll find the App Id inside the (i) information block (written in red).
is_required: false
summary: ""
title: 'Applivery: App ID'
- notes: Deployed with Bitrise Applivery.com Android Deploy Step.
opts:
description: Additional build/release notes
summary: ""
title: Notes attached to the deploy
- notify: "true"
opts:
description: This flag allows you to automatically notify your testers vía email.
is_required: true
summary: ""
title: Notify Testers?
value_options:
- "true"
- "false"
- opts:
description: Comma-separated list of tags
is_required: false
summary: ""
title: (Optional) Comma-separated list of tags
tags: ""
- opts:
description: Human readable version name for this build.
summary: ""
title: (Optional) Human readable version name
version_name: ""
outputs:
- APPLIVERY_DEPLOY_STATUS: null
opts:
description: ""
summary: ""
title: 'Deployment result: ''success'' or ''failed'''
================================================
FILE: steps/applivery-android/0.2.1/step.yml
================================================
title: Applivery.com Android Deploy
summary: Deploy your awesome Android Application to Applivery.com
description: |-
Deploy an Android application to [Applivery](http://www.applivery.com),
add notes and notify testers.
Register a Applivery account at [http://www.applivery..com/](http://www.applivery.com)
and create an App to utilize this step.
You also need to get your *Account API Key* for you account and the *App Id* for the app.
website: https://github.com/applivery/steps-applivery-android-deploy
source_code_url: https://github.com/applivery/steps-applivery-android-deploy
support_url: https://github.com/applivery/steps-applivery-android-deploy/issues
published_at: 2017-01-04T14:03:34.982420013+01:00
source:
git: https://github.com/applivery/steps-applivery-android-deploy.git
commit: d464399d4454709804d3c9d347afa12d20ae7d8a
host_os_tags:
- ubuntu
- osx-10.10
project_type_tags:
- android
- xamarin
- cordova
- ionic
- react-native
type_tags:
- deploy
is_requires_admin_user: false
is_always_run: false
is_skippable: false
run_if: .IsCI
inputs:
- apk_path: $BITRISE_APK_PATH
opts:
description: ""
is_required: true
summary: ""
title: APK file path
- api_token: $APPLIVERY_API_TOKEN
opts:
description: |-
This is the API Key to access your account.
## Where to get the Applivery Account API Key?
Sign in to your [Applivery.com](http://dashboard.applivery.com) account,
click on Developers menu option from the left side menu and copy it from the
Account API Key section.
is_required: true
summary: ""
title: Account API Key
- app_id: $APPLIVERY_APP_ID
opts:
description: |-
This is the App Id that identifies your App in Applivery.com
## Where to get the App Id?
Sign in to your [Applivery.com](http://dashboard.applivery.com) account,
click on Applications menu option from the left side menu, click on the desired App.
You'll find the App Id inside the (i) information block (written in red).
is_required: false
summary: ""
title: 'Applivery: App ID'
- notes: Deployed with Bitrise Applivery.com Android Deploy Step.
opts:
description: Additional build/release notes
summary: ""
title: Notes attached to the deploy
- notify: "true"
opts:
description: This flag allows you to automatically notify your testers vía email.
is_required: true
summary: ""
title: Notify Testers?
value_options:
- "true"
- "false"
- autoremove: "true"
opts:
description: Automatically remove the oldest build before uploading a new one
to prevent reaching your account limits.
is_required: false
summary: ""
title: Automatically remove the oldest build?
value_options:
- "true"
- "false"
- opts:
description: Comma-separated list of tags to easily identify the build
is_required: false
summary: ""
title: (Optional) Comma-separated list of tags
tags: ""
- opts:
description: Human readable version name for this build.
summary: ""
title: (Optional) Human readable version name
version_name: ""
outputs:
- APPLIVERY_DEPLOY_STATUS: null
opts:
description: ""
summary: ""
title: 'Deployment result: ''success'' or ''failed'''
================================================
FILE: steps/applivery-android/0.3.0/step.yml
================================================
title: Applivery.com v3 Android Deploy
summary: Deploy your awesome Android App to Applivery.com
description: |-
Deploy an Android application to [Applivery](http://www.applivery.com),
add notes and notify Collaborators and Employees.
Register a Applivery account at [http://www.applivery..com/](http://www.applivery.com)
and create an App to utilize this step.
You also need to get your *App Token* of your App that can be found under your App Settings.
website: https://github.com/applivery/steps-applivery-android-deploy
source_code_url: https://github.com/applivery/steps-applivery-android-deploy
support_url: https://github.com/applivery/steps-applivery-android-deploy/issues
published_at: 2019-06-04T18:14:41.973346+02:00
source:
git: https://github.com/applivery/steps-applivery-android-deploy.git
commit: 1f0215d8e5c934c2821b114ea488e9dd83295fa2
host_os_tags:
- ubuntu
- osx-10.10
project_type_tags:
- android
type_tags:
- deploy
is_requires_admin_user: false
is_always_run: false
is_skippable: false
run_if: .IsCI
inputs:
- apk_path: $BITRISE_APK_PATH
opts:
description: ""
is_required: true
summary: ""
title: APK file path
- appToken: $APPLIVERY_APP_TOKEN
opts:
description: |-
This is your App Token
## Where to get the Applivery Account API Key?
Sign in to your [Applivery](http://dashboard.applivery.io) account,
click on your App and the navigate to the Settings menu option. Scroll down to the Integrations section and click on New Token button to generate a new token. Then, copy & paste it here. [Read more](https://www.applivery.com/docs/rest-api/authentication/)
is_required: true
summary: ""
title: App Token
- changelog: ""
opts:
description: Additional build/release notes or changelog attached to the deploy
summary: ""
title: (Optional) Changelog or release notes
- notifyCollaborators: "true"
opts:
description: This flag allows you to automatically notify your project Collaborators
vía email.
is_required: true
summary: ""
title: Notify Collaborators?
value_options:
- "true"
- "false"
- notifyEmployees: "true"
opts:
description: This flag allows you to automatically notify your project Employees
vía email.
is_required: true
summary: ""
title: Notify Employees?
value_options:
- "true"
- "false"
- notifyMessage: ""
opts:
description: Notification message to be sent along with the email notification
summary: ""
title: (Optional) Notification message
- opts:
description: Comma-separated list of tags to easily identify the build
is_required: false
summary: ""
title: (Optional) Comma-separated list of tags
tags: ""
- opts:
description: Human readable version name for this build.
summary: ""
title: (Optional) Human readable version name
versionName: ""
outputs:
- APPLIVERY_DEPLOY_STATUS: null
opts:
description: ""
summary: ""
title: 'Deployment result: ''success'' or ''failed'''
================================================
FILE: steps/applivery-android/0.3.1/step.yml
================================================
title: Applivery.com v3 Android Deploy
summary: Deploy your awesome Android App to Applivery.com
description: |-
Deploy an Android application to [Applivery](http://www.applivery.com),
add notes and notify Collaborators and Employees.
Register a Applivery account at [http://www.applivery..com/](http://www.applivery.com)
and create an App to utilize this step.
You also need to get your *App Token* of your App that can be found under your App Settings.
website: https://github.com/applivery/steps-applivery-android-deploy
source_code_url: https://github.com/applivery/steps-applivery-android-deploy
support_url: https://github.com/applivery/steps-applivery-android-deploy/issues
published_at: 2019-06-14T12:33:24.455085+02:00
source:
git: https://github.com/applivery/steps-applivery-android-deploy.git
commit: ee4d75cd1334830168fb2cd87d2ed3e7f38a52db
host_os_tags:
- ubuntu
- osx-10.10
project_type_tags:
- android
type_tags:
- deploy
is_requires_admin_user: false
is_always_run: false
is_skippable: false
run_if: .IsCI
inputs:
- apk_path: $BITRISE_APK_PATH
opts:
description: ""
is_required: true
summary: ""
title: APK file path
- appToken: $APPLIVERY_APP_TOKEN
opts:
description: |-
This is your App Token
## Where to get the Applivery Account API Key?
Sign in to your [Applivery](http://dashboard.applivery.io) account,
click on your App and the navigate to the Settings menu option. Scroll down to the Integrations section and click on New Token button to generate a new token. Then, copy & paste it here. [Read more](https://www.applivery.com/docs/rest-api/authentication/)
is_required: true
summary: ""
title: App Token
- changelog: ""
opts:
description: Additional build/release notes or changelog attached to the deploy
summary: ""
title: (Optional) Changelog or release notes
- notifyCollaborators: "true"
opts:
description: This flag allows you to automatically notify your project Collaborators
vía email.
is_required: true
summary: ""
title: Notify Collaborators?
value_options:
- "true"
- "false"
- notifyEmployees: "true"
opts:
description: This flag allows you to automatically notify your project Employees
vía email.
is_required: true
summary: ""
title: Notify Employees?
value_options:
- "true"
- "false"
- notifyMessage: ""
opts:
description: Notification message to be sent along with the email notification
summary: ""
title: (Optional) Notification message
- opts:
description: Comma-separated list of tags to easily identify the build
is_required: false
summary: ""
title: (Optional) Comma-separated list of tags
tags: ""
- opts:
description: Human readable version name for this build.
summary: ""
title: (Optional) Human readable version name
versionName: ""
outputs:
- APPLIVERY_DEPLOY_STATUS: null
opts:
description: ""
summary: ""
title: 'Deployment result: ''success'' or ''failed'''
================================================
FILE: steps/applivery-android/0.3.2/step.yml
================================================
title: Applivery.com Android Deploy
summary: Deploy your awesome Android App to Applivery.com
description: |-
Deploy an Android application to [Applivery](http://www.applivery.com),
add notes and notify Collaborators and Employees.
Register a Applivery account at [http://www.applivery..com/](http://www.applivery.com)
and create an App to utilize this step.
You also need to get your *App Token* of your App that can be found under your App Settings.
website: https://github.com/applivery/steps-applivery-android-deploy
source_code_url: https://github.com/applivery/steps-applivery-android-deploy
support_url: https://github.com/applivery/steps-applivery-android-deploy/issues
published_at: 2019-06-14T17:00:20.975236+02:00
source:
git: https://github.com/applivery/steps-applivery-android-deploy.git
commit: 19012f619eda2a0cffe1cbae4f16507cb2f64dbf
host_os_tags:
- ubuntu
- osx-10.10
project_type_tags:
- android
type_tags:
- deploy
is_requires_admin_user: false
is_always_run: false
is_skippable: false
run_if: .IsCI
inputs:
- apk_path: $BITRISE_APK_PATH
opts:
description: ""
is_required: true
summary: ""
title: APK file path
- appToken: $APPLIVERY_APP_TOKEN
opts:
description: |-
This is your App Token
## Where to get the Applivery Account API Key?
Sign in to your [Applivery](http://dashboard.applivery.io) account,
click on your App and the navigate to the Settings menu option. Scroll down to the Integrations section and click on New Token button to generate a new token. Then, copy & paste it here. [Read more](https://www.applivery.com/docs/rest-api/authentication/)
is_required: true
summary: ""
title: App Token
- changelog: ""
opts:
description: Additional build/release notes or changelog attached to the deploy
summary: ""
title: (Optional) Changelog or release notes
- notifyCollaborators: "true"
opts:
description: This flag allows you to automatically notify your project Collaborators
vía email.
is_required: true
summary: ""
title: Notify Collaborators?
value_options:
- "true"
- "false"
- notifyEmployees: "true"
opts:
description: This flag allows you to automatically notify your project Employees
vía email.
is_required: true
summary: ""
title: Notify Employees?
value_options:
- "true"
- "false"
- notifyMessage: ""
opts:
description: Notification message to be sent along with the email notification
summary: ""
title: (Optional) Notification message
- opts:
description: Comma-separated list of tags to easily identify the build
is_required: false
summary: ""
title: (Optional) Comma-separated list of tags
tags: ""
- opts:
description: Human readable version name for this build.
summary: ""
title: (Optional) Human readable version name
versionName: ""
outputs:
- APPLIVERY_DEPLOY_STATUS: null
opts:
description: ""
summary: ""
title: 'Deployment result: ''success'' or ''failed'''
================================================
FILE: steps/applivery-android/0.3.3/step.yml
================================================
title: Applivery.com Android Deploy
summary: Deploy your awesome Android App to Applivery.com
description: |-
Deploy an Android application to [Applivery](http://www.applivery.com),
add notes and notify Collaborators and Employees.
Register a Applivery account at [http://www.applivery..com/](http://www.applivery.com)
and create an App to utilize this step.
You also need to get your *App Token* of your App that can be found under your App Settings.
website: https://github.com/applivery/steps-applivery-android-deploy
source_code_url: https://github.com/applivery/steps-applivery-android-deploy
support_url: https://github.com/applivery/steps-applivery-android-deploy/issues
published_at: 2020-03-26T16:25:05.770629+01:00
source:
git: https://github.com/applivery/steps-applivery-android-deploy.git
commit: c135fabb437e4209acedaa99342e8affe5070449
host_os_tags:
- ubuntu
- osx-10.10
project_type_tags:
- android
type_tags:
- deploy
is_requires_admin_user: false
is_always_run: false
is_skippable: false
run_if: .IsCI
inputs:
- apk_path: $BITRISE_APK_PATH
opts:
description: ""
is_required: false
summary: ""
title: APK file path
- aab_path: $BITRISE_AAB_PATH
opts:
description: ""
is_required: false
summary: ""
title: AAB file path
- appToken: $APPLIVERY_APP_TOKEN
opts:
description: |-
This is your App Token
## Where to get the Applivery Account API Key?
Sign in to your [Applivery](http://dashboard.applivery.io) account,
click on your App and the navigate to the Settings menu option. Scroll down to the Integrations section and click on New Token button to generate a new token. Then, copy & paste it here. [Read more](https://www.applivery.com/docs/rest-api/authentication/)
is_required: true
summary: ""
title: App Token
- changelog: ""
opts:
description: Additional build/release notes or changelog attached to the deploy
summary: ""
title: (Optional) Changelog or release notes
- notifyCollaborators: "true"
opts:
description: This flag allows you to automatically notify your project Collaborators
vía email.
is_required: true
summary: ""
title: Notify Collaborators?
value_options:
- "true"
- "false"
- notifyEmployees: "true"
opts:
description: This flag allows you to automatically notify your project Employees
vía email.
is_required: true
summary: ""
title: Notify Employees?
value_options:
- "true"
- "false"
- notifyMessage: ""
opts:
description: Notification message to be sent along with the email notification
summary: ""
title: (Optional) Notification message
- opts:
description: Comma-separated list of tags to easily identify the build
is_required: false
summary: ""
title: (Optional) Comma-separated list of tags
tags: ""
- opts:
description: Human readable version name for this build.
summary: ""
title: (Optional) Human readable version name
versionName: ""
outputs:
- APPLIVERY_DEPLOY_STATUS: null
opts:
description: ""
summary: ""
title: 'Deployment result: ''success'' or ''failed'''
================================================
FILE: steps/applivery-android/0.3.4/step.yml
================================================
title: Applivery.com Android Deploy
summary: Deploy your awesome Android App to Applivery.com
description: |-
Deploy an Android application to [Applivery](http://www.applivery.com),
add notes and notify Collaborators and Employees.
Register a Applivery account at [http://www.applivery..com/](http://www.applivery.com)
and create an App to utilize this step.
You also need to get your *App Token* of your App that can be found under your App Settings.
website: https://github.com/applivery/steps-applivery-android-deploy
source_code_url: https://github.com/applivery/steps-applivery-android-deploy
support_url: https://github.com/applivery/steps-applivery-android-deploy/issues
published_at: 2020-06-08T21:37:04.862208+02:00
source:
git: https://github.com/applivery/steps-applivery-android-deploy.git
commit: c135fabb437e4209acedaa99342e8affe5070449
host_os_tags:
- ubuntu
- osx-10.10
project_type_tags:
- android
type_tags:
- deploy
is_requires_admin_user: false
is_always_run: false
is_skippable: false
run_if: .IsCI
inputs:
- apk_path: $BITRISE_APK_PATH
opts:
description: ""
is_required: false
summary: ""
title: APK file path
- aab_path: $BITRISE_AAB_PATH
opts:
description: ""
is_required: false
summary: ""
title: AAB file path
- appToken: $APPLIVERY_APP_TOKEN
opts:
description: |-
This is your App Token
## Where to get the Applivery Account API Key?
Sign in to your [Applivery](http://dashboard.applivery.io) account,
click on your App and the navigate to the Settings menu option. Scroll down to the Integrations section and click on New Token button to generate a new token. Then, copy & paste it here. [Read more](https://www.applivery.com/docs/rest-api/authentication/)
is_required: true
summary: ""
title: App Token
- changelog: ""
opts:
description: Additional build/release notes or changelog attached to the deploy
summary: ""
title: (Optional) Changelog or release notes
- notifyCollaborators: "true"
opts:
description: This flag allows you to automatically notify your project Collaborators
vía email.
is_required: true
summary: ""
title: Notify Collaborators?
value_options:
- "true"
- "false"
- notifyEmployees: "true"
opts:
description: This flag allows you to automatically notify your project Employees
vía email.
is_required: true
summary: ""
title: Notify Employees?
value_options:
- "true"
- "false"
- notifyMessage: ""
opts:
description: Notification message to be sent along with the email notification
summary: ""
title: (Optional) Notification message
- opts:
description: Comma-separated list of tags to easily identify the build
is_required: false
summary: ""
title: (Optional) Comma-separated list of tags
tags: ""
- opts:
description: Human readable version name for this build.
summary: ""
title: (Optional) Human readable version name
versionName: ""
outputs:
- APPLIVERY_DEPLOY_STATUS: null
opts:
description: ""
summary: ""
title: 'Deployment result: ''success'' or ''failed'''
================================================
FILE: steps/applivery-android/1.0.0/step.yml
================================================
title: Applivery.com Android Deploy
summary: Deploy your awesome Android App to Applivery.com
description: |-
Deploy an Android application to [Applivery](http://www.applivery.com),
add notes and notify Collaborators and Employees.
Register a Applivery account at [http://www.applivery..com/](http://www.applivery.com)
and create an App to utilize this step.
You also need to get your *App Token* of your App that can be found under your App Settings.
website: https://github.com/applivery/steps-applivery-android-deploy
source_code_url: https://github.com/applivery/steps-applivery-android-deploy
support_url: https://github.com/applivery/steps-applivery-android-deploy/issues
published_at: 2021-01-31T23:05:14.478861+01:00
source:
git: https://github.com/applivery/steps-applivery-android-deploy.git
commit: 033b9d477facdbb43c0bf88a64f341e01ccffc51
host_os_tags:
- ubuntu
- osx-10.10
project_type_tags:
- android
type_tags:
- deploy
is_requires_admin_user: false
is_always_run: false
is_skippable: false
run_if: .IsCI
inputs:
- apk_path: $BITRISE_APK_PATH
opts:
description: ""
is_required: false
summary: ""
title: APK file path
- aab_path: $BITRISE_AAB_PATH
opts:
description: ""
is_required: false
summary: ""
title: AAB file path
- appToken: $APPLIVERY_APP_TOKEN
opts:
description: |-
This is your App Token
## Where to get the Applivery Account API Key?
Sign in to your [Applivery](http://dashboard.applivery.io) account,
click on your App and the navigate to the Settings menu option. Scroll down to the Integrations section and click on New Token button to generate a new token. Then, copy & paste it here. [Read more](https://www.applivery.com/docs/rest-api/authentication/)
is_required: true
summary: ""
title: App Token
- changelog: ""
opts:
description: Additional build/release notes or changelog attached to the deploy
summary: ""
title: (Optional) Changelog or release notes
- notifyCollaborators: "true"
opts:
description: This flag allows you to automatically notify your project Collaborators
vía email.
is_required: true
summary: ""
title: Notify Collaborators?
value_options:
- "true"
- "false"
- notifyEmployees: "true"
opts:
description: This flag allows you to automatically notify your project Employees
vía email.
is_required: true
summary: ""
title: Notify Employees?
value_options:
- "true"
- "false"
- notifyMessage: ""
opts:
description: Notification message to be sent along with the email notification
summary: ""
title: (Optional) Notification message
- opts:
description: Comma-separated list of tags to easily identify the build
is_required: false
summary: ""
title: (Optional) Comma-separated list of tags
tags: ""
- opts:
description: Human readable version name for this build.
summary: ""
title: (Optional) Human readable version name
versionName: ""
- filter: ""
opts:
description: 'Comma-separated list of groups that will be notified. i.e.: group1,group2|group3
= (group1 AND group2) OR (group3)'
is_required: false
summary: ""
title: (Optional) Comma-separated list of groups that will be notified
outputs:
- APPLIVERY_DEPLOY_STATUS: null
opts:
description: ""
summary: ""
title: 'Deployment result: ''success'' or ''failed'''
================================================
FILE: steps/applivery-android/1.0.1/step.yml
================================================
title: Applivery.com Android Deploy
summary: Deploy your awesome Android App to Applivery.com
description: |-
Deploy an Android application to [Applivery](http://www.applivery.com),
add notes and notify Collaborators and Employees.
Register a Applivery account at [http://www.applivery..com/](http://www.applivery.com)
and create an App to utilize this step.
You also need to get your *App Token* of your App that can be found under your App Settings.
website: https://github.com/applivery/steps-applivery-android-deploy
source_code_url: https://github.com/applivery/steps-applivery-android-deploy
support_url: https://github.com/applivery/steps-applivery-android-deploy/issues
published_at: 2025-01-30T11:10:55.913686+01:00
source:
git: https://github.com/applivery/steps-applivery-android-deploy.git
commit: 9c1e292a034a8ac1464d0e437ce0ee779ef728ef
host_os_tags:
- ubuntu
- osx-10.10
project_type_tags:
- android
type_tags:
- deploy
is_requires_admin_user: false
is_always_run: false
is_skippable: false
run_if: .IsCI
inputs:
- apk_path: $BITRISE_APK_PATH
opts:
description: ""
is_required: false
summary: ""
title: APK file path
- aab_path: $BITRISE_AAB_PATH
opts:
description: ""
is_required: false
summary: ""
title: AAB file path
- appToken: $APPLIVERY_APP_TOKEN
opts:
description: |-
This is your App Token
## Where to get the Applivery Account API Key?
Sign in to your [Applivery](http://dashboard.applivery.io) account,
click on your App and the navigate to the Settings menu option. Scroll down to the Integrations section and click on New Token button to generate a new token. Then, copy & paste it here. [Read more](https://www.applivery.com/docs/rest-api/authentication/)
is_required: true
summary: ""
title: App Token
- changelog: ""
opts:
description: Additional build/release notes or changelog attached to the deploy
summary: ""
title: (Optional) Changelog or release notes
- notifyCollaborators: "true"
opts:
description: This flag allows you to automatically notify your project Collaborators
vía email.
is_required: true
summary: ""
title: Notify Collaborators?
value_options:
- "true"
- "false"
- notifyEmployees: "true"
opts:
description: This flag allows you to automatically notify your project Employees
vía email.
is_required: true
summary: ""
title: Notify Employees?
value_options:
- "true"
- "false"
- notifyMessage: ""
opts:
description: Notification message to be sent along with the email notification
summary: ""
title: (Optional) Notification message
- opts:
description: Comma-separated list of tags to easily identify the build
is_required: false
summary: ""
title: (Optional) Comma-separated list of tags
tags: ""
- opts:
description: Human readable version name for this build.
summary: ""
title: (Optional) Human readable version name
versionName: ""
- filter: ""
opts:
description: 'Comma-separated list of groups that will be notified. i.e.: group1,group2|group3
= (group1 AND group2) OR (group3)'
is_required: false
summary: ""
title: (Optional) Comma-separated list of groups that will be notified
outputs:
- APPLIVERY_DEPLOY_STATUS: null
opts:
description: ""
summary: ""
title: 'Deployment result: ''success'' or ''failed'''
================================================
FILE: steps/applivery-android/step-info.yml
================================================
maintainer: verified
================================================
FILE: steps/applivery-ios/0.1.1/step.yml
================================================
title: Applivery.com iOS Deploy
summary: Deploy your awesome iOS Application to Applivery.com
description: |-
Deploy an iOS application to [Applivery](http://www.applivery.com),
add notes and notify testers.
Register a Applivery account at [http://www.applivery..com/](http://www.applivery.com)
and create an App to utilize this step.
You also need to get your *Account API Key* for you account and the *App Id* for the app.
website: https://github.com/applivery/steps-applivery-ios-deploy
source_code_url: https://github.com/applivery/steps-applivery-ios-deploy
support_url: https://github.com/applivery/steps-applivery-ios-deploy/issues
published_at: 2016-02-08T21:08:30.248904107+01:00
source:
git: https://github.com/applivery/steps-applivery-ios-deploy.git
commit: e770b31324534126ba52a2ed84027dc86999e035
host_os_tags:
- osx-10.10
project_type_tags:
- ios
type_tags:
- deploy
- Applivery
- iOS
is_requires_admin_user: false
is_always_run: false
is_skippable: false
run_if: .IsCI
inputs:
- ipa_path: $BITRISE_IPA_PATH
opts:
description: ""
is_required: true
summary: ""
title: IPA file path
- api_token: ""
opts:
description: |-
This is the API Key to access your account.
## Where to get the Applivery Account API Key?
Sign in to your [Applivery.com](http://dashboard.applivery.com) account,
click on Developers menu option from the left side menu and copy it from the
Account API Key section.
is_required: true
summary: ""
title: Account API Key
- app_id: ""
opts:
description: |-
This is the App Id that identifies your App in Applivery.com
## Where to get the App Id?
Sign in to your [Applivery.com](http://dashboard.applivery.com) account,
click on Applications menu option from the left side menu, click on the desired App.
You'll find the App Id inside the (i) information block (written in red).
is_required: false
summary: ""
title: 'Applivery: App ID'
- notes: Deployed with Bitrise Applivery.com iOS Deploy Step.
opts:
description: Additional build/release notes
summary: ""
title: Notes attached to the deploy
- notify: "true"
opts:
description: This flag allows you to automatically notify your testers vía email.
is_required: true
summary: ""
title: Notify Testers?
value_options:
- "true"
- "false"
- opts:
description: Comma-separated list of tags
is_required: false
summary: ""
title: (Optional) Comma-separated list of tags
tags: ""
- opts:
description: Human readable version name for this build.
summary: ""
title: (Optional) Human readable version name
version_name: ""
outputs:
- APPLIVERY_DEPLOY_STATUS: null
opts:
description: ""
summary: ""
title: 'Deployment result: ''success'' or ''failed'''
================================================
FILE: steps/applivery-ios/0.2.0/step.yml
================================================
title: Applivery.com iOS Deploy
summary: Deploy your awesome iOS Application to Applivery.com
description: |-
Deploy an iOS application to [Applivery](http://www.applivery.com),
add notes and notify testers.
Register a Applivery account at [http://www.applivery..com/](http://www.applivery.com)
and create an App to utilize this step.
You also need to get your *Account API Key* for you account and the *App Id* for the app.
website: https://github.com/applivery/steps-applivery-ios-deploy
source_code_url: https://github.com/applivery/steps-applivery-ios-deploy
support_url: https://github.com/applivery/steps-applivery-ios-deploy/issues
published_at: 2016-04-28T00:57:25.625748376+02:00
source:
git: https://github.com/applivery/steps-applivery-ios-deploy.git
commit: fcfa296d86595058db86ffdce7a1dfc26f017c52
host_os_tags:
- osx-10.10
project_type_tags:
- ios
type_tags:
- deploy
- Applivery
- iOS
is_requires_admin_user: false
is_always_run: false
is_skippable: false
run_if: .IsCI
inputs:
- ipa_path: $BITRISE_IPA_PATH
opts:
description: ""
is_required: true
summary: ""
title: IPA file path
- api_token: $APPLIVERY_API_TOKEN
opts:
description: |-
This is the API Key to access your account.
## Where to get the Applivery Account API Key?
Sign in to your [Applivery.com](http://dashboard.applivery.com) account,
click on Developers menu option from the left side menu and copy it from the
Account API Key section.
is_required: true
summary: ""
title: Account API Key
- app_id: $APPLIVERY_APP_ID
opts:
description: |-
This is the App Id that identifies your App in Applivery.com
## Where to get the App Id?
Sign in to your [Applivery.com](http://dashboard.applivery.com) account,
click on Applications menu option from the left side menu, click on the desired App.
You'll find the App Id inside the (i) information block (written in red).
is_required: false
summary: ""
title: 'Applivery: App ID'
- notes: Deployed with Bitrise Applivery.com iOS Deploy Step.
opts:
description: Additional build/release notes
summary: ""
title: Notes attached to the deploy
- notify: "true"
opts:
description: This flag allows you to automatically notify your testers vía email.
is_required: true
summary: ""
title: Notify Testers?
value_options:
- "true"
- "false"
- opts:
description: Comma-separated list of tags
is_required: false
summary: ""
title: (Optional) Comma-separated list of tags
tags: ""
- opts:
description: Human readable version name for this build.
summary: ""
title: (Optional) Human readable version name
version_name: ""
outputs:
- APPLIVERY_DEPLOY_STATUS: null
opts:
description: ""
summary: ""
title: 'Deployment result: ''success'' or ''failed'''
================================================
FILE: steps/applivery-ios/0.2.1/step.yml
================================================
title: Applivery.com iOS Deploy
summary: Deploy your awesome iOS Application to Applivery.com
description: |-
Deploy an iOS application to [Applivery](http://www.applivery.com),
add notes and notify testers.
Register a Applivery account at [http://www.applivery..com/](http://www.applivery.com)
and create an App to utilize this step.
You also need to get your *Account API Key* for you account and the *App Id* for the app.
website: https://github.com/applivery/steps-applivery-ios-deploy
source_code_url: https://github.com/applivery/steps-applivery-ios-deploy
support_url: https://github.com/applivery/steps-applivery-ios-deploy/issues
published_at: 2017-01-04T14:02:04.895044503+01:00
source:
git: https://github.com/applivery/steps-applivery-ios-deploy.git
commit: d26536b4a5f2f148058aaf9623dc5c52c791a477
host_os_tags:
- osx-10.10
project_type_tags:
- ios
- xamarin
- cordova
- ionic
- react-native
type_tags:
- deploy
is_requires_admin_user: false
is_always_run: false
is_skippable: false
run_if: .IsCI
inputs:
- ipa_path: $BITRISE_IPA_PATH
opts:
description: ""
is_required: true
summary: ""
title: IPA file path
- api_token: $APPLIVERY_API_TOKEN
opts:
description: |-
This is the API Key to access your account.
## Where to get the Applivery Account API Key?
Sign in to your [Applivery.com](http://dashboard.applivery.com) account,
click on Developers menu option from the left side menu and copy it from the
Account API Key section.
is_required: true
summary: ""
title: Account API Key
- app_id: $APPLIVERY_APP_ID
opts:
description: |-
This is the App Id that identifies your App in Applivery.com
## Where to get the App Id?
Sign in to your [Applivery.com](http://dashboard.applivery.com) account,
click on Applications menu option from the left side menu, click on the desired App.
You'll find the App Id inside the (i) information block (written in red).
is_required: false
summary: ""
title: 'Applivery: App ID'
- notes: Deployed with Bitrise Applivery.com iOS Deploy Step.
opts:
description: Additional build/release notes
summary: ""
title: Release notes
- notify: "true"
opts:
description: This flag allows you to automatically notify your testers vía email.
is_required: true
summary: ""
title: Notify Testers?
value_options:
- "true"
- "false"
- autoremove: "true"
opts:
description: Automatically remove the oldest build before uploading a new one
to prevent reaching your account limits.
is_required: false
summary: ""
title: (Optional) Automatically remove the oldest build?
value_options:
- "true"
- "false"
- opts:
description: Comma-separated list of tags to easily identify the build
is_required: false
summary: ""
title: (Optional) Comma-separated list of tags
tags: ""
- opts:
description: Human readable version name for this build.
summary: ""
title: (Optional) Human readable version name
version_name: ""
outputs:
- APPLIVERY_DEPLOY_STATUS: null
opts:
description: ""
summary: ""
title: 'Deployment result: ''success'' or ''failed'''
================================================
FILE: steps/applivery-ios/0.3.0/step.yml
================================================
title: Applivery.com v3 iOS Deploy
summary: Deploy your awesome iOS App to Applivery.com
description: |-
Deploy an iOS application to [Applivery](http://www.applivery.com),
add notes and notify Collaborators and Employees.
Register a Applivery account at [http://www.applivery..com/](http://www.applivery.com)
and create an App to utilize this step.
You also need to get your *App Token* of your App that can be found under your App Settings.
website: https://github.com/applivery/steps-applivery-ios-deploy
source_code_url: https://github.com/applivery/steps-applivery-ios-deploy
support_url: https://github.com/applivery/steps-applivery-ios-deploy/issues
published_at: 2019-06-04T18:13:07.508147+02:00
source:
git: https://github.com/applivery/steps-applivery-ios-deploy.git
commit: 29d9bf9f15dd71010eccc1dab1239b6dd1830b9b
host_os_tags:
- ubuntu
- osx-10.10
project_type_tags:
- ios
type_tags:
- deploy
is_requires_admin_user: false
is_always_run: false
is_skippable: false
run_if: .IsCI
inputs:
- IPA_path: $BITRISE_IPA_PATH
opts:
description: ""
is_required: true
summary: ""
title: IPA file path
- appToken: $APPLIVERY_APP_TOKEN
opts:
description: |-
This is your App Token
## Where to get the Applivery Account API Key?
Sign in to your [Applivery](http://dashboard.applivery.io) account,
click on your App and the navigate to the Settings menu option. Scroll down to the Integrations section and click on New Token button to generate a new token. Then, copy & paste it here. [Read more](https://www.applivery.com/docs/rest-api/authentication/)
is_required: true
summary: ""
title: App Token
- changelog: ""
opts:
description: Additional build/release notes or changelog attached to the deploy
summary: ""
title: (Optional) Changelog or release notes
- notifyCollaborators: "true"
opts:
description: This flag allows you to automatically notify your project Collaborators
vía email.
is_required: true
summary: ""
title: Notify Collaborators?
value_options:
- "true"
- "false"
- notifyEmployees: "true"
opts:
description: This flag allows you to automatically notify your project Employees
vía email.
is_required: true
summary: ""
title: Notify Employees?
value_options:
- "true"
- "false"
- notifyMessage: ""
opts:
description: Notification message to be sent along with the email notification
summary: ""
title: (Optional) Notification message
- opts:
description: Comma-separated list of tags to easily identify the build
is_required: false
summary: ""
title: (Optional) Comma-separated list of tags
tags: ""
- opts:
description: Human readable version name for this build.
summary: ""
title: (Optional) Human readable version name
versionName: ""
outputs:
- APPLIVERY_DEPLOY_STATUS: null
opts:
description: ""
summary: ""
title: 'Deployment result: ''success'' or ''failed'''
================================================
FILE: steps/applivery-ios/0.3.1/step.yml
================================================
title: Applivery.com iOS Deploy
summary: Deploy your awesome iOS App to Applivery.com
description: |-
Deploy an iOS application to [Applivery](http://www.applivery.com),
add notes and notify Collaborators and Employees.
Register a Applivery account at [http://www.applivery.com/](http://www.applivery.com)
and create an App to utilize this step.
You also need to get your *App Token* of your App that can be found under your App Settings.
website: https://github.com/applivery/steps-applivery-ios-deploy
source_code_url: https://github.com/applivery/steps-applivery-ios-deploy
support_url: https://github.com/applivery/steps-applivery-ios-deploy/issues
published_at: 2019-06-14T17:20:45.281533+02:00
source:
git: https://github.com/applivery/steps-applivery-ios-deploy.git
commit: 29d5d7a23a201cc363208650dcdd6c32cfcc9241
host_os_tags:
- ubuntu
- osx-10.10
project_type_tags:
- ios
type_tags:
- deploy
is_requires_admin_user: false
is_always_run: false
is_skippable: false
run_if: .IsCI
inputs:
- ipa_path: $BITRISE_IPA_PATH
opts:
description: ""
is_required: true
summary: ""
title: IPA file path
- appToken: $APPLIVERY_APP_TOKEN
opts:
description: |-
This is your App Token
## Where to get the Applivery Account API Key?
Sign in to your [Applivery](http://dashboard.applivery.io) account,
click on your App and the navigate to the Settings menu option. Scroll down to the Integrations section and click on New Token button to generate a new token. Then, copy & paste it here. [Read more](https://www.applivery.com/docs/rest-api/authentication/)
is_required: true
summary: ""
title: App Token
- changelog: ""
opts:
description: Additional build/release notes or changelog attached to the deploy
summary: ""
title: (Optional) Changelog or release notes
- notifyCollaborators: "true"
opts:
description: This flag allows you to automatically notify your project Collaborators
vía email.
is_required: true
summary: ""
title: Notify Collaborators?
value_options:
- "true"
- "false"
- notifyEmployees: "true"
opts:
description: This flag allows you to automatically notify your project Employees
vía email.
is_required: true
summary: ""
title: Notify Employees?
value_options:
- "true"
- "false"
- notifyMessage: ""
opts:
description: Notification message to be sent along with the email notification
summary: ""
title: (Optional) Notification message
- opts:
description: Comma-separated list of tags to easily identify the build
is_required: false
summary: ""
title: (Optional) Comma-separated list of tags
tags: ""
- opts:
description: Human readable version name for this build.
summary: ""
title: (Optional) Human readable version name
versionName: ""
- opts:
description: If you enable this option the step will download your code signing
files from Bitrise Code Signing Tab and it will upload it to Applivery.
is_required: true
summary: Applivery will use these files to help you fix installation issues with
your endusers by analyzing those files.
title: Enable to upload certificates and provisioning profiles to Applivery.
value_options:
- "true"
- "false"
uploadCodeSigning: "false"
outputs:
- APPLIVERY_DEPLOY_STATUS: null
opts:
description: ""
summary: ""
title: 'Deployment result: ''success'' or ''failed'''
================================================
FILE: steps/applivery-ios/0.3.2/step.yml
================================================
title: Applivery.com iOS Deploy
summary: Deploy your awesome iOS App to Applivery.com
description: |-
Deploy an iOS application to [Applivery](http://www.applivery.com),
add notes and notify Collaborators and Employees.
Register a Applivery account at [http://www.applivery.com/](http://www.applivery.com)
and create an App to utilize this step.
You also need to get your *App Token* of your App that can be found under your App Settings.
website: https://github.com/applivery/steps-applivery-ios-deploy
source_code_url: https://github.com/applivery/steps-applivery-ios-deploy
support_url: https://github.com/applivery/steps-applivery-ios-deploy/issues
published_at: 2020-06-08T21:41:42.464006+02:00
source:
git: https://github.com/applivery/steps-applivery-ios-deploy.git
commit: 13355a4fc2dda1a1297fb8a6ae6175ae4e814653
host_os_tags:
- ubuntu
- osx-10.10
project_type_tags:
- ios
type_tags:
- deploy
is_requires_admin_user: false
is_always_run: false
is_skippable: false
run_if: .IsCI
inputs:
- ipa_path: $BITRISE_IPA_PATH
opts:
description: ""
is_required: true
summary: ""
title: IPA file path
- appToken: $APPLIVERY_APP_TOKEN
opts:
description: |-
This is your App Token
## Where to get the Applivery Account API Key?
Sign in to your [Applivery](http://dashboard.applivery.io) account,
click on your App and the navigate to the Settings menu option. Scroll down to the Integrations section and click on New Token button to generate a new token. Then, copy & paste it here. [Read more](https://www.applivery.com/docs/rest-api/authentication/)
is_required: true
summary: ""
title: App Token
- changelog: ""
opts:
description: Additional build/release notes or changelog attached to the deploy
summary: ""
title: (Optional) Changelog or release notes
- notifyCollaborators: "true"
opts:
description: This flag allows you to automatically notify your project Collaborators
vía email.
is_required: true
summary: ""
title: Notify Collaborators?
value_options:
- "true"
- "false"
- notifyEmployees: "true"
opts:
description: This flag allows you to automatically notify your project Employees
vía email.
is_required: true
summary: ""
title: Notify Employees?
value_options:
- "true"
- "false"
- notifyMessage: ""
opts:
description: Notification message to be sent along with the email notification
summary: ""
title: (Optional) Notification message
- opts:
description: Comma-separated list of tags to easily identify the build
is_required: false
summary: ""
title: (Optional) Comma-separated list of tags
tags: ""
- opts:
description: Human readable version name for this build.
summary: ""
title: (Optional) Human readable version name
versionName: ""
- opts:
description: If you enable this option the step will download your code signing
files from Bitrise Code Signing Tab and it will upload it to Applivery.
is_required: true
summary: Applivery will use these files to help you fix installation issues with
your endusers by analyzing those files.
title: Enable to upload certificates and provisioning profiles to Applivery.
value_options:
- "true"
- "false"
uploadCodeSigning: "false"
outputs:
- APPLIVERY_DEPLOY_STATUS: null
opts:
description: ""
summary: ""
title: 'Deployment result: ''success'' or ''failed'''
================================================
FILE: steps/applivery-ios/1.0.0/step.yml
================================================
title: Applivery.com iOS Deploy
summary: Deploy your awesome iOS App to Applivery.com
description: |-
Deploy an iOS application to [Applivery](http://www.applivery.com),
add notes and notify Collaborators and Employees.
Register a Applivery account at [http://www.applivery.com/](http://www.applivery.com)
and create an App to utilize this step.
You also need to get your *App Token* of your App that can be found under your App Settings.
website: https://github.com/applivery/steps-applivery-ios-deploy
source_code_url: https://github.com/applivery/steps-applivery-ios-deploy
support_url: https://github.com/applivery/steps-applivery-ios-deploy/issues
published_at: 2021-01-31T23:28:08.574208+01:00
source:
git: https://github.com/applivery/steps-applivery-ios-deploy.git
commit: 8ebcd01013efeabf07ea53248da4d49b0a7c4825
host_os_tags:
- ubuntu
- osx-10.10
project_type_tags:
- ios
type_tags:
- deploy
is_requires_admin_user: false
is_always_run: false
is_skippable: false
run_if: .IsCI
inputs:
- ipa_path: $BITRISE_IPA_PATH
opts:
description: ""
is_required: true
summary: ""
title: IPA file path
- appToken: $APPLIVERY_APP_TOKEN
opts:
description: |-
This is your App Token
## Where to get the Applivery Account API Key?
Sign in to your [Applivery](http://dashboard.applivery.io) account,
click on your App and the navigate to the Settings menu option. Scroll down to the Integrations section and click on New Token button to generate a new token. Then, copy & paste it here. [Read more](https://www.applivery.com/docs/rest-api/authentication/)
is_required: true
summary: ""
title: App Token
- changelog: ""
opts:
description: Additional build/release notes or changelog attached to the deploy
summary: ""
title: (Optional) Changelog or release notes
- notifyCollaborators: "true"
opts:
description: This flag allows you to automatically notify your project Collaborators
vía email.
is_required: true
summary: ""
title: Notify Collaborators?
value_options:
- "true"
- "false"
- notifyEmployees: "true"
opts:
description: This flag allows you to automatically notify your project Employees
vía email.
is_required: true
summary: ""
title: Notify Employees?
value_options:
- "true"
- "false"
- notifyMessage: ""
opts:
description: Notification message to be sent along with the email notification
summary: ""
title: (Optional) Notification message
- opts:
description: Comma-separated list of tags to easily identify the build
is_required: false
summary: ""
title: (Optional) Comma-separated list of tags
tags: ""
- opts:
description: Human readable version name for this build.
summary: ""
title: (Optional) Human readable version name
versionName: ""
- opts:
description: If you enable this option the step will download your code signing
files from Bitrise Code Signing Tab and it will upload it to Applivery.
is_required: true
summary: Applivery will use these files to help you fix installation issues with
your endusers by analyzing those files.
title: Enable to upload certificates and provisioning profiles to Applivery.
value_options:
- "true"
- "false"
uploadCodeSigning: "false"
- filter: ""
opts:
description: 'Comma-separated list of groups that will be notified. i.e.: group1,group2|group3
= (group1 AND group2) OR (group3)'
is_required: false
summary: ""
title: (Optional) Comma-separated list of groups that will be notified
outputs:
- APPLIVERY_DEPLOY_STATUS: null
opts:
description: ""
summary: ""
title: 'Deployment result: ''success'' or ''failed'''
================================================
FILE: steps/applivery-ios/1.0.1/step.yml
================================================
title: Applivery.com iOS Deploy
summary: Deploy your awesome iOS App to Applivery.com
description: |-
Deploy an iOS application to [Applivery](http://www.applivery.com),
add notes and notify Collaborators and Employees.
Register a Applivery account at [http://www.applivery.com/](http://www.applivery.com)
and create an App to utilize this step.
You also need to get your *App Token* of your App that can be found under your App Settings.
website: https://github.com/applivery/steps-applivery-ios-deploy
source_code_url: https://github.com/applivery/steps-applivery-ios-deploy
support_url: https://github.com/applivery/steps-applivery-ios-deploy/issues
published_at: 2024-05-27T12:27:58.840935+02:00
source:
git: https://github.com/applivery/steps-applivery-ios-deploy.git
commit: 3d5f6e737d3ed2593cbb6685994fc8fb61bf0f84
host_os_tags:
- ubuntu
- osx-10.10
project_type_tags:
- ios
type_tags:
- deploy
is_requires_admin_user: false
is_always_run: false
is_skippable: false
run_if: .IsCI
inputs:
- ipa_path: $BITRISE_IPA_PATH
opts:
description: ""
is_required: true
summary: ""
title: IPA file path
- appToken: $APPLIVERY_APP_TOKEN
opts:
description: |-
This is your App Token
## Where to get the Applivery Account API Key?
Sign in to your [Applivery](http://dashboard.applivery.io) account,
click on your App and the navigate to the Settings menu option. Scroll down to the Integrations section and click on New Token button to generate a new token. Then, copy & paste it here. [Read more](https://www.applivery.com/docs/rest-api/authentication/)
is_required: true
summary: ""
title: App Token
- changelog: ""
opts:
description: Additional build/release notes or changelog attached to the deploy
summary: ""
title: (Optional) Changelog or release notes
- notifyCollaborators: "true"
opts:
description: This flag allows you to automatically notify your project Collaborators
vía email.
is_required: true
summary: ""
title: Notify Collaborators?
value_options:
- "true"
- "false"
- notifyEmployees: "true"
opts:
description: This flag allows you to automatically notify your project Employees
vía email.
is_required: true
summary: ""
title: Notify Employees?
value_options:
- "true"
- "false"
- notifyMessage: ""
opts:
description: Notification message to be sent along with the email notification
summary: ""
title: (Optional) Notification message
- opts:
description: Comma-separated list of tags to easily identify the build
is_required: false
summary: ""
title: (Optional) Comma-separated list of tags
tags: ""
- opts:
description: Human readable version name for this build.
summary: ""
title: (Optional) Human readable version name
versionName: ""
- opts:
description: If you enable this option the step will download your code signing
files from Bitrise Code Signing Tab and it will upload it to Applivery.
is_required: true
summary: Applivery will use these files to help you fix installation issues with
your endusers by analyzing those files.
title: Enable to upload certificates and provisioning profiles to Applivery.
value_options:
- "true"
- "false"
uploadCodeSigning: "false"
- filter: ""
opts:
description: 'Comma-separated list of groups that will be notified. i.e.: group1,group2|group3
= (group1 AND group2) OR (group3)'
is_required: false
summary: ""
title: (Optional) Comma-separated list of groups that will be notified
outputs:
- APPLIVERY_DEPLOY_STATUS: null
opts:
description: ""
summary: ""
title: 'Deployment result: ''success'' or ''failed'''
================================================
FILE: steps/applivery-ios/step-info.yml
================================================
maintainer: verified
================================================
FILE: steps/apps-decompiler/1.0.1/step.yml
================================================
title: Mobile apps decompiler
summary: |
Decompile mobile APK and/or IPA to look inside
description: |
Decompile mobile APK and/or IPA to look inside
### Troubleshooting
- Be aware, you have to launch this step after the compilation step ("Android Build" for android, "Xcode Archive" for iOS)
- Launch "Deploy to Bitrise.io" step after this one to deploy report files to artifacts
website: https://github.com/odemolliens/bitrise-step-apps-decompiler
source_code_url: https://github.com/odemolliens/bitrise-step-apps-decompiler
support_url: https://github.com/odemolliens/bitrise-step-apps-decompiler/issues
published_at: 2021-01-25T09:05:10.83394+01:00
source:
git: https://github.com/odemolliens/bitrise-step-apps-decompiler.git
commit: f34307a75dbe37cda5252dbf1c02a49f83972893
host_os_tags:
- osx-10.10
- ubuntu-16.04
project_type_tags:
- ios
- android
- react-native
- flutter
type_tags:
- utility
toolkit:
bash:
entry_file: step.sh
deps:
brew:
- name: jq
- name: apktool
is_requires_admin_user: false
is_always_run: false
is_skippable: false
inputs:
- decompile_android: "yes"
opts:
is_expand: true
is_required: true
summary: Do you want decompile Android APK?
title: Decompile Android APK
value_options:
- "yes"
- "no"
- decompile_ios: "yes"
opts:
is_expand: true
is_required: true
summary: Do you want decompile iOS IPA?
title: Decompile iOS IPA
value_options:
- "yes"
- "no"
- opts:
description: |
You can use the artifacts from another bitrise build of the same project.
If you launch this step on the build where you launched Android build step eg. you don't have to set this key
is_expand: true
is_required: false
summary: Build slug of the build where you have the APK/IPA into artifacts
title: External Build slug
outside_build_slug: null
- android_apk_path: $BITRISE_APK_PATH
opts:
description: |
You have to set this key if you launch this step directly in the build where you generate your APK, in that case, be careful to launch it necessarily after these build steps
- `Android Build` for android
Otherwis, you can launch this step in another Bitrise build, in that case, you don't need to setup this key but `outside_build_slug` to download your APK to do quality checks
is_expand: true
is_required: true
title: APK path
- ios_ipa_path: $BITRISE_IPA_PATH
opts:
description: |
You have to set this key if you launch this step directly in the build where you generate your IPA, in that case, be careful to launch it necessarily after these build steps
- `Xcode Archive` for iOS
Otherwis, you can launch this step in another Bitrise build, in that case, you don't need to setup this key but `outside_build_slug` to download your IPA to do quality checks
is_expand: true
is_required: true
title: IPA path
================================================
FILE: steps/apps-decompiler/1.0.2/step.yml
================================================
title: Mobile apps decompiler
summary: |
Decompile mobile APK and/or IPA to look inside
description: |
Decompile mobile APK and/or IPA to look inside
### Troubleshooting
- Be aware, you have to launch this step after the compilation step ("Android Build" for android, "Xcode Archive" for iOS)
- Launch "Deploy to Bitrise.io" step after this one to deploy report files to artifacts
website: https://github.com/odemolliens/bitrise-step-apps-decompiler
source_code_url: https://github.com/odemolliens/bitrise-step-apps-decompiler
support_url: https://github.com/odemolliens/bitrise-step-apps-decompiler/issues
published_at: 2021-01-28T12:06:32.492436+01:00
source:
git: https://github.com/odemolliens/bitrise-step-apps-decompiler.git
commit: c2b1259d1171cab5fbaea8463c4aae734a78dba6
host_os_tags:
- osx-10.10
- ubuntu-16.04
project_type_tags:
- ios
- android
- react-native
- flutter
type_tags:
- utility
toolkit:
bash:
entry_file: step.sh
deps:
brew:
- name: jq
- name: apktool
is_requires_admin_user: false
is_always_run: false
is_skippable: false
inputs:
- decompile_android: "yes"
opts:
is_expand: true
is_required: true
summary: Do you want decompile Android APK?
title: Decompile Android APK
value_options:
- "yes"
- "no"
- decompile_ios: "yes"
opts:
is_expand: true
is_required: true
summary: Do you want decompile iOS IPA?
title: Decompile iOS IPA
value_options:
- "yes"
- "no"
- opts:
description: |
You can use the artifacts from another bitrise build of the same project.
If you launch this step on the build where you launched Android build step eg. you don't have to set this key
is_expand: true
is_required: false
summary: Build slug of the build where you have the APK/IPA into artifacts
title: External Build slug
outside_build_slug: null
- android_apk_path: $BITRISE_APK_PATH
opts:
description: |
You have to set this key if you launch this step directly in the build where you generate your APK, in that case, be careful to launch it necessarily after these build steps
- `Android Build` for android
Otherwis, you can launch this step in another Bitrise build, in that case, you don't need to setup this key but `outside_build_slug` to download your APK to do quality checks
is_expand: true
is_required: true
title: APK path
- ios_ipa_path: $BITRISE_IPA_PATH
opts:
description: |
You have to set this key if you launch this step directly in the build where you generate your IPA, in that case, be careful to launch it necessarily after these build steps
- `Xcode Archive` for iOS
Otherwis, you can launch this step in another Bitrise build, in that case, you don't need to setup this key but `outside_build_slug` to download your IPA to do quality checks
is_expand: true
is_required: true
title: IPA path
================================================
FILE: steps/apps-decompiler/1.0.3/step.yml
================================================
title: Mobile apps decompiler
summary: |
Decompile mobile APK and/or IPA to look inside
description: |
Decompile mobile APK and/or IPA to look inside
### Troubleshooting
- Be aware, you have to launch this step after the compilation step ("Android Build" for android, "Xcode Archive" for iOS)
- Launch "Deploy to Bitrise.io" step after this one to deploy report files to artifacts
website: https://github.com/odemolliens/bitrise-step-apps-decompiler
source_code_url: https://github.com/odemolliens/bitrise-step-apps-decompiler
support_url: https://github.com/odemolliens/bitrise-step-apps-decompiler/issues
published_at: 2021-02-04T13:51:59.397006+01:00
source:
git: https://github.com/odemolliens/bitrise-step-apps-decompiler.git
commit: d6cf3d7977fd440a9f964310348c1732d864c087
host_os_tags:
- osx-10.10
- ubuntu-16.04
project_type_tags:
- ios
- android
- react-native
- flutter
type_tags:
- utility
toolkit:
bash:
entry_file: step.sh
deps:
brew:
- name: jq
- name: apktool
is_requires_admin_user: false
is_always_run: false
is_skippable: false
inputs:
- decompile_android: "yes"
opts:
is_expand: true
is_required: true
summary: Do you want decompile Android APK?
title: Decompile Android APK
value_options:
- "yes"
- "no"
- decompile_ios: "yes"
opts:
is_expand: true
is_required: true
summary: Do you want decompile iOS IPA?
title: Decompile iOS IPA
value_options:
- "yes"
- "no"
- opts:
description: |
You can use the artifacts from another bitrise build of the same project.
If you launch this step on the build where you launched Android build step eg. you don't have to set this key
is_expand: true
is_required: false
summary: Build slug of the build where you have the APK/IPA into artifacts
title: External Build slug
outside_build_slug: null
- android_apk_path: $BITRISE_APK_PATH
opts:
description: |
You have to set this key if you launch this step directly in the build where you generate your APK, in that case, be careful to launch it necessarily after these build steps
- `Android Build` for android
Otherwis, you can launch this step in another Bitrise build, in that case, you don't need to setup this key but `outside_build_slug` to download your APK to do quality checks
is_expand: true
is_required: true
title: APK path
- ios_ipa_path: $BITRISE_IPA_PATH
opts:
description: |
You have to set this key if you launch this step directly in the build where you generate your IPA, in that case, be careful to launch it necessarily after these build steps
- `Xcode Archive` for iOS
Otherwis, you can launch this step in another Bitrise build, in that case, you don't need to setup this key but `outside_build_slug` to download your IPA to do quality checks
is_expand: true
is_required: true
title: IPA path
================================================
FILE: steps/apps-decompiler/step-info.yml
================================================
maintainer: community
================================================
FILE: steps/apptestai-test/0.1.0/step.yml
================================================
title: apptest.ai Test
summary: |
Bitrise step for apptest.ai test execution
description: |
Bitrise step for apptest.ai test execution.
Input your apptest.ai Access Key, Project ID, Package file path
refer to more information from https://app.apptest.ai/#/main/integrations
We recommend to use Access Key using bitrise workflow secret variable.
website: https://github.com/forcemax/bitrise-step-apptestai-test
source_code_url: https://github.com/forcemax/bitrise-step-apptestai-test
support_url: https://github.com/forcemax/bitrise-step-apptestai-test/issues
published_at: 2020-04-02T15:15:51.7726+09:00
source:
git: https://github.com/forcemax/bitrise-step-apptestai-test.git
commit: 0c74c431abce60886a627ebc023e970b33bf5208
host_os_tags:
- osx-10.14
- ubuntu-16.04
project_type_tags:
- ios
- android
type_tags:
- test
toolkit:
go:
package_name: github.com/forcemax/bitrise-step-apptestai-test
deps: {}
is_requires_admin_user: false
is_always_run: false
is_skippable: false
run_if: ""
inputs:
- access_key:
opts:
description: 'Access key to use for apptest.ai test. (e.g.: ci_support:4b55ec5999ea636b0aafb402816ac50b)'
is_expand: true
is_required: true
is_sensitive: true
title: 'Access key to use for apptest.ai test.'
- project_id:
opts:
description: 'Project ID to use for apptest.ai test. (e.g. 19049)'
is_expand: true
is_required: true
title: 'Project ID to use for apptest.ai test.'
- binary_path:
opts:
description: 'Package file path. You can use $BITRISE_APK_PATH or $BITRISE_IPA_PATH or app file path. supported file type: apk,ipa,xapk'
is_expand: true
is_required: true
title: 'Package file path.'
- testset_name:
opts:
description: 'Specify test set name.'
is_expand: true
is_required: false
title: 'Specify test set name.'
- time_limit:
opts:
description: 'Specify test time limit (minutes) (range: 5 - 30). If the value is empty, it follows the time-limit saved in the project.'
is_expand: true
is_required: false
title: 'Specify test time limit.'
- use_vo:
opts:
description: 'Whether AT&T Video Optimizer(ARO) is used. (true|false)'
is_expand: true
is_required: false
title: 'Whether AT&T Video Optimizer(ARO) is used.'
- callback:
opts:
description: 'Callback URL to be called after test completion.'
is_expand: true
is_required: false
title: 'Callback URL to be called after test completion.'
- login_id:
opts:
description: 'ID of the test account required to test the app. If the value is empty, it follows the time-limit saved in the project.'
is_expand: true
is_required: false
is_sensitive: true
title: 'ID of the test account required to test the app.'
- login_pw:
opts:
description: 'Password of the test account required to test the app. If the value is empty, it follows the time-limit saved in the project.'
is_expand: true
is_required: false
is_sensitive: true
title: 'Password of the test account required to test the app.'
================================================
FILE: steps/apptestai-test/step-info.yml
================================================
maintainer: community
================================================
FILE: steps/apt-get-install/0.10.0/step.yml
================================================
title: apt-get install
summary: |
Install or upgrade packages with apt-get
description: |
Install or upgrade packages with apt-get
website: https://github.com/bitrise-steplib/steps-apt-get-install
source_code_url: https://github.com/bitrise-steplib/steps-apt-get-install
support_url: https://github.com/bitrise-steplib/steps-apt-get-install/issues
published_at: 2019-11-04T14:47:50.397507394Z
source:
git: https://github.com/bitrise-steplib/steps-apt-get-install.git
commit: 44c9fe8318037f71b5ce21c17b854dcda2ced80a
host_os_tags:
- ubuntu
type_tags:
- installer
toolkit:
go:
package_name: github.com/bitrise-steplib/steps-apt-get-install
is_requires_admin_user: true
is_always_run: false
is_skippable: false
run_if: ""
inputs:
- opts:
description: Name of the packages to install/upgrade, separated with spaces
is_expand: true
is_required: true
summary: Name of the packages to install/upgrade, separated with spaces
title: Name of the packages to install/upgrade, separated with spaces
value_options: []
packages: null
- options: null
opts:
description: |
Flags to pass to the apt-get install/upgrade command.
`apt-get install/upgrade -y [options] [packages]`
is_expand: true
is_required: false
summary: Options for apt-get install/upgrade
title: Options for apt-get install/upgrade
value_options: []
- opts:
description: |
If set the step will upgrade the defined packages by calling `apt-get upgrade -y [options] [packages]` command.
Otherwise the step calls `apt-get install -y [options] [packages]`
is_expand: true
is_required: false
summary: Upgrade packages if previously installed
title: Upgrade packages if previously installed
value_options:
- "yes"
- "no"
upgrade: "yes"
- cache_level: all
opts:
category: Options
description: |-
Sets the level of cache.
'all' enables the caching of all files under /var/cache/apt/archives folder (default directory for apt cache).
'none' disables the caching for the step.
is_required: true
summary: Sets the level of cache
title: Cache level
value_options:
- all
- none
================================================
FILE: steps/apt-get-install/0.10.1/step.yml
================================================
title: apt-get install
summary: Install or upgrade packages on Ubuntu with apt-get.
description: |-
[This Step](https://www.bitrise.io/integrations/steps/apt-get-install) integrates with the Advanced Package Tool (APT) command line tool to install and upgrade packages.
### Configuring the Step
1. Add the **Name of the packages to install/upgrade, separated with spaces**.
2. Add flags to pass on to the `apt-get` command in the **Options for apt-get install/upgrade** input.
3. Allow upgrades to previously installed packages with the **Upgrade packages if previously installed** input.
Under **Options**:
4. Set the level of cache in the **Cache level** input.
### Useful links
- [Installing any additional tools](https://devcenter.bitrise.io/tips-and-tricks/install-additional-tools/#apt-get-on-linux)
### Related Steps
- [Brew Install](https://www.bitrise.io/integrations/steps/brew-install)
- [Flutter Install](https://www.bitrise.io/integrations/steps/flutter-installer)
website: https://github.com/bitrise-steplib/steps-apt-get-install
source_code_url: https://github.com/bitrise-steplib/steps-apt-get-install
support_url: https://github.com/bitrise-steplib/steps-apt-get-install/issues
published_at: 2021-07-21T10:11:55.028203785Z
source:
git: https://github.com/bitrise-steplib/steps-apt-get-install.git
commit: 6c27f0d7f0dd51cfc67eec8c22fd9526a9523820
host_os_tags:
- ubuntu
type_tags:
- installer
toolkit:
go:
package_name: github.com/bitrise-steplib/steps-apt-get-install
is_requires_admin_user: true
is_always_run: false
is_skippable: false
run_if: ""
inputs:
- opts:
description: Name of the packages to install/upgrade, separated with spaces
is_expand: true
is_required: true
summary: Name of the packages to install/upgrade, separated with spaces
title: Name of the packages to install/upgrade, separated with spaces
value_options: []
packages: null
- options: null
opts:
description: |
Flags to pass to the `apt-get install/upgrade` command.
`apt-get install/upgrade -y [options] [packages]`
is_expand: true
is_required: false
summary: Options for apt-get install/upgrade
title: Options for apt-get install/upgrade
value_options: []
- opts:
description: |
If set to `"yes"`, the step will upgrade the defined packages by calling `apt-get upgrade -y [options] [packages]` command.
Otherwise the step calls `apt-get install -y [options] [packages]`
is_expand: true
is_required: false
summary: Upgrade packages if previously installed
title: Upgrade packages if previously installed
value_options:
- "yes"
- "no"
upgrade: "yes"
- cache_level: all
opts:
category: Options
description: |-
Sets the level of cache.
'all' enables the caching of all files under /var/cache/apt/archives folder (default directory for apt cache).
'none' disables the caching for the step.
is_required: true
summary: Sets the level of cache
title: Cache level
value_options:
- all
- none
================================================
FILE: steps/apt-get-install/0.9.0/step.yml
================================================
title: apt-get install
summary: |
Install or upgrade packages with apt-get
description: |
Install or upgrade packages with apt-get
website: https://github.com/bitrise-steplib/steps-apt-get-install
source_code_url: https://github.com/bitrise-steplib/steps-apt-get-install
support_url: https://github.com/bitrise-steplib/steps-apt-get-install/issues
published_at: 2017-10-30T13:48:44.706918231+01:00
source:
git: https://github.com/bitrise-steplib/steps-apt-get-install.git
commit: 0561642b4ec224e02697e55636bc52631cd45c45
host_os_tags:
- ubuntu
type_tags:
- installer
toolkit:
go:
package_name: github.com/bitrise-steplib/steps-apt-get-install
is_requires_admin_user: true
is_always_run: false
is_skippable: false
run_if: ""
inputs:
- opts:
description: Name of the packages to install/upgrade
is_expand: true
is_required: true
summary: Name of the packages to install/upgrade
title: Name of the packages to install/upgrade
value_options: []
packages: null
- options: null
opts:
description: |
Flags to pass to the apt-get install/upgrade command.
`apt-get install/upgrade -y [options] [packages]`
is_expand: true
is_required: false
summary: Options for apt-get install/upgrade
title: Options for apt-get install/upgrade
value_options: []
- opts:
description: |
If set the step will upgrade the defined packages by calling `apt-get upgrade -y [options] [packages]` command.
Otherwise the step calls `apt-get install -y [options] [packages]`
is_expand: true
is_required: false
summary: Upgrade packages if previously installed
title: Upgrade packages if previously installed
value_options:
- "yes"
- "no"
upgrade: "yes"
================================================
FILE: steps/apt-get-install/0.9.1/step.yml
================================================
title: apt-get install
summary: |
Install or upgrade packages with apt-get
description: |
Install or upgrade packages with apt-get
website: https://github.com/bitrise-steplib/steps-apt-get-install
source_code_url: https://github.com/bitrise-steplib/steps-apt-get-install
support_url: https://github.com/bitrise-steplib/steps-apt-get-install/issues
published_at: 2019-06-26T14:42:19.040757125Z
source:
git: https://github.com/bitrise-steplib/steps-apt-get-install.git
commit: 19f57b2aed33a964f96130ddaa02feb100ab6792
host_os_tags:
- ubuntu
type_tags:
- installer
toolkit:
go:
package_name: github.com/bitrise-steplib/steps-apt-get-install
is_requires_admin_user: true
is_always_run: false
is_skippable: false
run_if: ""
inputs:
- opts:
description: Name of the packages to install/upgrade, separated with spaces
is_expand: true
is_required: true
summary: Name of the packages to install/upgrade, separated with spaces
title: Name of the packages to install/upgrade, separated with spaces
value_options: []
packages: null
- options: null
opts:
description: |
Flags to pass to the apt-get install/upgrade command.
`apt-get install/upgrade -y [options] [packages]`
is_expand: true
is_required: false
summary: Options for apt-get install/upgrade
title: Options for apt-get install/upgrade
value_options: []
- opts:
description: |
If set the step will upgrade the defined packages by calling `apt-get upgrade -y [options] [packages]` command.
Otherwise the step calls `apt-get install -y [options] [packages]`
is_expand: true
is_required: false
summary: Upgrade packages if previously installed
title: Upgrade packages if previously installed
value_options:
- "yes"
- "no"
upgrade: "yes"
================================================
FILE: steps/apt-get-install/step-info.yml
================================================
maintainer: bitrise
================================================
FILE: steps/artifact-pull/1.0.0/step.yml
================================================
title: Artifact pull
summary: Step to pull artifacts of a pipeline
description: |-
The step downloads build artifacts of a pipeline to a local folder.
By default, all artifacts generated by any workflow of the pipeline are downloaded. This can be limited
by setting the `artifact_sources` input variable.
Please note that this step is designed to be executed on the CI only.
website: https://github.com/bitrise-steplib/steps-artifact-pull
source_code_url: https://github.com/bitrise-steplib/steps-artifact-pull
support_url: https://github.com/bitrise-steplib/steps-artifact-pull/issues
published_at: 2022-07-07T10:25:37.52419-05:00
source:
git: https://github.com/bitrise-steplib/bitrise-step-artifact-pull.git
commit: 9991a40d2454eca425f8462a018409eaaf657443
type_tags:
- utility
toolkit:
go:
package_name: github.com/bitrise-steplib/steps-artifact-pull
is_always_run: false
is_skippable: false
inputs:
- opts:
is_required: true
summary: Enable logging additional information for debugging
title: Enable verbose logging
value_options:
- "true"
- "false"
verbose: "false"
- artifact_sources: .*
opts:
description: |-
A comma separated list of workflows and stage
paths, which can generate artifacts.
You need to use the `{stage}.{workflow}` syntax.
The "dot" character is the delimiter between
the stage and the workflow.
You can use regular expressions.
If you leave it empty, the default value
will be the ".*" (star), which means, it will
get every artifact from every workflow.
Do not forget to escape the special chatacters.
summary: |-
The list of the stage and workflow
paths, which can generate artifacts.
title: Artifact source
- export_map: ""
opts:
description: |-
Variable export map, use the following regular expression syntax to collect the downloaded file's locations into separated environment variables (do not forget to escape the special chatacters):
DOWNLOADED_APKS: .*\.apk
DOWNLOADED_TEST_RESULTS: .*\.result
DOCS: .*\.txt,.*\.doc
is_expand: false
is_required: true
title: Output variable export map
- finished_stage: $BITRISEIO_FINISHED_STAGES
opts:
is_dont_change_value: true
is_required: true
summary: This is a JSON representation of the finished stages for which the step
can download build artifacts.
title: The finished stages for which artifacts are available to download
- bitrise_api_base_url: https://api.bitrise.io
opts:
is_dont_change_value: true
is_required: true
summary: The base URL of the Bitrise API used to process the download requests.
title: Bitrise API base URL
- bitrise_api_access_token: $BITRISEIO_ARTIFACT_PULL_TOKEN
opts:
is_dont_change_value: true
is_expand: true
is_sensitive: true
summary: The OAuth access token that authorizes to call the Bitrise API.
title: Access token to call the Bitrise API
outputs:
- BITRISE_ARTIFACT_PATHS: null
opts:
summary: An absolute path list of the downloaded artifacts. The list is separated
with pipe (|) characters.
title: Pulled artifacts locations
================================================
FILE: steps/artifact-pull/1.0.1/step.yml
================================================
title: Artifact pull
summary: Step to pull artifacts of a pipeline
description: |-
The step downloads build artifacts of a pipeline to a local folder.
By default, all artifacts generated by any workflow of the pipeline are downloaded. This can be limited
by setting the `artifact_sources` input variable.
Please note that this step is designed to be executed on the CI only.
website: https://github.com/bitrise-steplib/bitrise-step-artifact-pull
source_code_url: https://github.com/bitrise-steplib/bitrise-step-artifact-pull
support_url: https://github.com/bitrise-steplib/bitrise-step-artifact-pull/issues
published_at: 2022-08-04T14:18:02.468733819Z
source:
git: https://github.com/bitrise-steplib/bitrise-step-artifact-pull.git
commit: 6f5a62f5636d4f167c0fe48868a673a63ae394e3
type_tags:
- utility
toolkit:
go:
package_name: github.com/bitrise-steplib/bitrise-step-artifact-pull
is_always_run: false
is_skippable: false
inputs:
- opts:
is_required: true
summary: Enable logging additional information for debugging
title: Enable verbose logging
value_options:
- "true"
- "false"
verbose: "false"
- artifact_sources: .*
opts:
description: |-
A comma separated list of workflows and stage paths, which can generate artifacts.
You need to use the `{stage}.{workflow}` syntax.
The "dot" character is the delimiter between the stage and the workflow.
You can use regular expressions.
The default value (`.*`) means: get every artifact from every workflow.
Do not forget to escape the special characters.
If you want to match all workflow from a stage then you need to escape the `.` separator and the use the `.*` any characters regex like `{stage-name}\..*`.
summary: |-
The list of the stage and workflow
paths, which can generate artifacts.
title: Artifact source
- export_map: ""
opts:
description: |-
Variable export map, use the following regular expression syntax to collect the downloaded file's locations into separated environment variables (do not forget to escape the special chatacters):
DOWNLOADED_APKS: .*\.apk
DOWNLOADED_TEST_RESULTS: .*\.result
DOCS: .*\.txt,.*\.doc
is_expand: false
is_required: true
title: Output variable export map
- finished_stage: $BITRISEIO_FINISHED_STAGES
opts:
is_dont_change_value: true
is_required: true
summary: This is a JSON representation of the finished stages for which the step
can download build artifacts.
title: The finished stages for which artifacts are available to download
- bitrise_api_base_url: https://api.bitrise.io
opts:
is_dont_change_value: true
is_required: true
summary: The base URL of the Bitrise API used to process the download requests.
title: Bitrise API base URL
- bitrise_api_access_token: $BITRISEIO_ARTIFACT_PULL_TOKEN
opts:
is_dont_change_value: true
is_expand: true
is_sensitive: true
summary: The OAuth access token that authorizes to call the Bitrise API.
title: Access token to call the Bitrise API
outputs:
- BITRISE_ARTIFACT_PATHS: null
opts:
summary: An absolute path list of the downloaded artifacts. The list is separated
with pipe (|) characters.
title: Pulled artifacts locations
================================================
FILE: steps/artifact-pull/step-info.yml
================================================
maintainer: bitrise
removal_date: "2023-04-13"
deprecate_notes: |
This Step is deprecated, please use the [Pull Intermediate Files](https://github.com/bitrise-steplib/bitrise-step-pull-intermediate-files) Step instead.
More info and a migration guide can be found [here](https://github.com/bitrise-steplib/bitrise-step-pull-intermediate-files/releases/tag/1.0.0).
================================================
FILE: steps/ascii-generator/1.0.3/step.yml
================================================
title: ASCII art generator
summary: |
Add a random Bitrise ASCII art to your build log
description: |
Add a random Bitrise ASCII art to your build log
website: https://github.com/bitrise-steplib/bitrise-step-ascii-art-generator
source_code_url: https://github.com/bitrise-steplib/bitrise-step-ascii-art-generator
support_url: https://github.com/bitrise-steplib/bitrise-step-ascii-art-generator/issues
published_at: 2018-12-20T17:12:45.860373785+01:00
source:
git: https://github.com/bitrise-steplib/bitrise-step-ascii-art-generator.git
commit: 9c5977234bf30bac168f684c522ca8c281cb563a
host_os_tags:
- osx-10.10
- ubuntu-16.04
type_tags:
- utility
toolkit:
go:
package_name: github.com/bitrise-steplib/bitrise-step-ascii-art-generator
is_requires_admin_user: true
is_always_run: false
is_skippable: false
inputs:
- addon_url: $BITRISE_SAMPLE_ADDON_URL
opts:
is_expand: true
is_required: true
summary: URL of the ASCII generator addon
title: URL of the ASCII generator addon
value_options: []
- access_token: $BITRISE_SAMPLE_ADDON_ACCESS_KEY
opts:
is_expand: true
is_required: true
is_sensitive: true
summary: Access token for ASCII generator addon, which gets generated at the provisioning
title: Access token for the ASCII generator addon
value_options: []
outputs:
- BITRISE_ASCII_ART: null
opts:
summary: The Bitrise ASCII art fetched from the generator add-on
title: Generated random Bitrise ASCII art
================================================
FILE: steps/ascii-generator/1.0.4/step.yml
================================================
title: ASCII art generator
summary: |
Add a random Bitrise ASCII art to your build log
description: |
Add a random Bitrise ASCII art to your build log
website: https://github.com/bitrise-steplib/bitrise-step-ascii-art-generator
source_code_url: https://github.com/bitrise-steplib/bitrise-step-ascii-art-generator
support_url: https://github.com/bitrise-steplib/bitrise-step-ascii-art-generator/issues
published_at: 2019-05-08T17:57:21.319301+02:00
source:
git: https://github.com/bitrise-steplib/bitrise-step-ascii-art-generator.git
commit: 380f3c5374ec77592a762663483c36f47184ab0c
host_os_tags:
- osx-10.10
- ubuntu-16.04
type_tags:
- utility
toolkit:
go:
package_name: github.com/bitrise-steplib/bitrise-step-ascii-art-generator
is_requires_admin_user: true
is_always_run: false
is_skippable: false
inputs:
- addon_url: $BITRISE_SAMPLE_ADDON_URL
opts:
is_expand: true
is_required: true
summary: URL of the ASCII generator addon
title: URL of the ASCII generator addon
value_options: []
- access_token: $BITRISE_SAMPLE_ADDON_ACCESS_TOKEN
opts:
is_expand: true
is_required: true
is_sensitive: true
summary: Access token for ASCII generator addon, which gets generated at the provisioning
title: Access token for the ASCII generator addon
value_options: []
outputs:
- BITRISE_ASCII_ART: null
opts:
summary: The Bitrise ASCII art fetched from the generator add-on
title: Generated random Bitrise ASCII art
================================================
FILE: steps/ascii-generator/step-info.yml
================================================
maintainer: bitrise
================================================
FILE: steps/authenticate-host-with-netrc/0.9.0/step.yml
================================================
title: Authenticate host with netrc
summary: Adds your authentication config to the .netrc file
description: |-
Adds your authentication config to the .netrc file.
If you already has a .netrc file, the step will create a backup of the original, and appends the configs to the current one.
website: https://github.com/bitrise-steplib/steps-authenticate-host-with-netrc
source_code_url: https://github.com/bitrise-steplib/steps-authenticate-host-with-netrc
support_url: https://github.com/bitrise-steplib/steps-authenticate-host-with-netrc/issues
published_at: 2017-04-13T16:07:01.842544289+02:00
source:
git: https://github.com/bitrise-steplib/steps-authenticate-host-with-netrc.git
commit: 8d2b815fa92df234f854fb09b8eeeb43357a2ca4
type_tags:
- utility
toolkit:
go:
package_name: github.com/bitrise-steplib/steps-authenticate-host-with-netrc
deps:
brew:
- name: go
apt_get:
- name: golang
bin_name: go
is_requires_admin_user: true
is_always_run: false
is_skippable: false
inputs:
- host: null
opts:
description: |-
The host where username and password will be used.
For example: github.com
is_required: true
summary: ""
title: Host
- opts:
is_required: true
summary: The username used for the host to authenticate.
title: Username
username: null
- opts:
description: The password used for the host to authenticate.
is_required: true
title: Password
password: null
================================================
FILE: steps/authenticate-host-with-netrc/0.9.2/step.yml
================================================
title: Authenticate host with netrc
summary: Adds your authentication config to the .netrc file
description: |-
Adds your authentication config to the .netrc file.
If you already has a .netrc file, the step will create a backup of the original, and appends the configs to the current one.
website: https://github.com/bitrise-steplib/steps-authenticate-host-with-netrc
source_code_url: https://github.com/bitrise-steplib/steps-authenticate-host-with-netrc
support_url: https://github.com/bitrise-steplib/steps-authenticate-host-with-netrc/issues
published_at: 2018-02-13T13:48:40.21354024+01:00
source:
git: https://github.com/bitrise-steplib/steps-authenticate-host-with-netrc.git
commit: 300fa060cc6699d748ca0a33836da6dd4e7e2d77
type_tags:
- access-control
toolkit:
go:
package_name: github.com/bitrise-steplib/steps-authenticate-host-with-netrc
deps:
brew:
- name: go
apt_get:
- name: golang
bin_name: go
is_requires_admin_user: true
is_always_run: false
is_skippable: false
inputs:
- host: null
opts:
description: |-
The host where username and password will be used.
For example: github.com
is_required: true
summary: ""
title: Host
- opts:
is_required: true
summary: The username used for the host to authenticate.
title: Username
username: null
- opts:
description: The password (or Auth Token / Access Token) used for the host to
authenticate.
is_required: true
title: Password / Auth Token / Access Token
password: null
================================================
FILE: steps/authenticate-host-with-netrc/0.9.3/step.yml
================================================
title: Authenticate host with netrc
summary: Adds your authentication config to the .netrc file
description: |-
Adds your authentication config to the .netrc file.
If you already has a .netrc file, the step will create a backup of the original, and appends the configs to the current one.
website: https://github.com/bitrise-steplib/steps-authenticate-host-with-netrc
source_code_url: https://github.com/bitrise-steplib/steps-authenticate-host-with-netrc
support_url: https://github.com/bitrise-steplib/steps-authenticate-host-with-netrc/issues
published_at: !!timestamp 2018-05-04T17:03:16.138150869+02:00
source:
git: https://github.com/bitrise-steplib/steps-authenticate-host-with-netrc.git
commit: b112b2419e5000d94e33849a9855761a4c5a96d8
type_tags:
- access-control
toolkit:
go:
package_name: github.com/bitrise-steplib/steps-authenticate-host-with-netrc
deps:
brew:
- name: go
apt_get:
- name: golang
bin_name: go
is_requires_admin_user: true
is_always_run: false
is_skippable: false
inputs:
- host: null
opts:
description: |-
The host where username and password will be used.
For example: github.com
is_required: true
summary: ""
title: Host
- opts:
is_required: true
summary: The username used for the host to authenticate.
title: Username
username: null
- opts:
description: The password (or Auth Token / Access Token) used for the host to
authenticate.
is_required: true
title: Password / Auth Token / Access Token
password: null
================================================
FILE: steps/authenticate-host-with-netrc/0.9.4/step.yml
================================================
title: Authenticate host with netrc
summary: Adds your authentication config to the .netrc file
description: |-
Adds your authentication config to the .netrc file.
If you already have a .netrc file, the step will create a backup of the original, and appends the configs to the current one.
website: https://github.com/bitrise-steplib/steps-authenticate-host-with-netrc
source_code_url: https://github.com/bitrise-steplib/steps-authenticate-host-with-netrc
support_url: https://github.com/bitrise-steplib/steps-authenticate-host-with-netrc/issues
published_at: 2018-08-31T11:13:14.811353457Z
source:
git: https://github.com/bitrise-steplib/steps-authenticate-host-with-netrc.git
commit: 9acdb22de1c4825db6c46c29f7cfd25b9ed33f85
type_tags:
- access-control
toolkit:
go:
package_name: github.com/bitrise-steplib/steps-authenticate-host-with-netrc
deps:
brew:
- name: go
apt_get:
- name: golang
bin_name: go
is_requires_admin_user: true
is_always_run: false
is_skippable: false
inputs:
- host: null
opts:
description: |-
The host where the username and password will be used.
For example: github.com
is_required: true
summary: ""
title: Host
- opts:
is_required: true
is_sensitive: true
summary: The username used for the host to authenticate.
title: Username
username: null
- opts:
description: The password (or Auth Token/Access Token) used for the host to authenticate.
is_required: true
is_sensitive: true
title: Password/Auth Token/Access Token
password: null
================================================
FILE: steps/authenticate-host-with-netrc/0.9.5/step.yml
================================================
title: Authenticate host with netrc
summary: Adds your authentication configuration to the `.netrc` file.
description: |-
[This Step](https://github.com/bitrise-steplib/steps-authenticate-host-with-netrc) adds the authentication configuration (host name, login name and password string) to the `.netrc` file .
The Step lets you store your remote credentials on the build VM once so that later steps can use the credentials for authentication instead of requiring manual input. Examples include HTTPS git clone URLs with OAuth token-based authentication (instead of authenticating with SSH key).
Please note that if you already have a `.netrc` file, the Step will create a backup of the original, and appends the configs to the current one.
### Configuring the Step
1.Add the **Host** name, where the username and password will be used, for example, github.com.
2.Add the **Username**.
3.Add the password or the authentication token/ access token in the respective field which will be used by the host to authenticate you.
### Useful links
- [Learn more what the .netrc file format comprises of](https://everything.curl.dev/usingcurl/netrc#the-netrc-file-format)
### Related Steps
- [Activate SSH key (RSA private key)](https://www.bitrise.io/integrations/steps/activate-ssh-key)
- [Connect to OpenVPN Server](https://www.bitrise.io/integrations/steps/flutter-installer)
website: https://github.com/bitrise-steplib/steps-authenticate-host-with-netrc
source_code_url: https://github.com/bitrise-steplib/steps-authenticate-host-with-netrc
support_url: https://github.com/bitrise-steplib/steps-authenticate-host-with-netrc/issues
published_at: 2021-07-21T14:07:25.70325756Z
source:
git: https://github.com/bitrise-steplib/steps-authenticate-host-with-netrc.git
commit: cfd20d42a5df681730a790e0e66f91f8b2135694
type_tags:
- access-control
toolkit:
go:
package_name: github.com/bitrise-steplib/steps-authenticate-host-with-netrc
deps:
brew:
- name: go
apt_get:
- name: golang
bin_name: go
is_requires_admin_user: true
is_always_run: false
is_skippable: false
inputs:
- host: null
opts:
description: |-
The host where the username and password will be used.
For example: github.com
is_required: true
summary: ""
title: Host
- opts:
is_required: true
is_sensitive: true
summary: The username used for the host to authenticate.
title: Username
username: null
- opts:
description: The password (or Auth Token/Access Token) used for the host to authenticate.
is_required: true
is_sensitive: true
title: Password/Auth Token/Access Token
password: null
================================================
FILE: steps/authenticate-host-with-netrc/0.9.6/step.yml
================================================
title: Authenticate host with netrc
summary: Adds your authentication configuration to the `.netrc` file.
description: |-
[This Step](https://github.com/bitrise-steplib/steps-authenticate-host-with-netrc) adds the authentication configuration (host name, login name and password string) to the `.netrc` file .
The Step lets you store your remote credentials on the build VM once so that later steps can use the credentials for authentication instead of requiring manual input. Examples include HTTPS git clone URLs with OAuth token-based authentication (instead of authenticating with SSH key).
Please note that if you already have a `.netrc` file, the Step will create a backup of the original, and appends the configs to the current one.
### Configuring the Step
1.Add the **Host** name, where the username and password will be used, for example, github.com.
2.Add the **Username**.
3.Add the password or the authentication token/ access token in the respective field which will be used by the host to authenticate you.
### Useful links
- [Learn more what the .netrc file format comprises of](https://everything.curl.dev/usingcurl/netrc#the-netrc-file-format)
### Related Steps
- [Activate SSH key (RSA private key)](https://www.bitrise.io/integrations/steps/activate-ssh-key)
- [Connect to OpenVPN Server](https://www.bitrise.io/integrations/steps/flutter-installer)
website: https://github.com/bitrise-steplib/steps-authenticate-host-with-netrc
source_code_url: https://github.com/bitrise-steplib/steps-authenticate-host-with-netrc
support_url: https://github.com/bitrise-steplib/steps-authenticate-host-with-netrc/issues
published_at: 2021-10-28T10:11:24.162751267Z
source:
git: https://github.com/bitrise-steplib/steps-authenticate-host-with-netrc.git
commit: bd3986570f629ed6895016e8964ac283f81a8902
type_tags:
- access-control
toolkit:
go:
package_name: github.com/bitrise-steplib/steps-authenticate-host-with-netrc
deps:
brew:
- name: go
apt_get:
- name: golang
bin_name: go
is_requires_admin_user: true
is_always_run: false
is_skippable: false
inputs:
- host: null
opts:
description: |-
The host where the username and password will be used.
For example: github.com
is_required: true
title: Host
- opts:
description: The username used for the host to authenticate.
is_required: true
is_sensitive: true
title: Username
username: null
- opts:
description: The password (or Auth Token/Access Token) used for the host to authenticate.
is_required: true
is_sensitive: true
title: Password/Auth Token/Access Token
password: null
================================================
FILE: steps/authenticate-host-with-netrc/0.9.7/step.yml
================================================
title: Authenticate host with netrc
summary: Adds your authentication configuration to the `.netrc` file.
description: |-
[This Step](https://github.com/bitrise-steplib/steps-authenticate-host-with-netrc) adds the authentication configuration (host name, login name and password string) to the `.netrc` file .
The Step lets you store your remote credentials on the build VM once so that later steps can use the credentials for authentication instead of requiring manual input. Examples include HTTPS git clone URLs with OAuth token-based authentication (instead of authenticating with SSH key).
Please note that if you already have a `.netrc` file, the Step will create a backup of the original, and appends the configs to the current one.
### Configuring the Step
1.Add the **Host** name, where the username and password will be used, for example, github.com.
2.Add the **Username**.
3.Add the password or the authentication token/ access token in the respective field which will be used by the host to authenticate you.
### Useful links
- [Learn more what the .netrc file format comprises of](https://everything.curl.dev/usingcurl/netrc#the-netrc-file-format)
### Related Steps
- [Activate SSH key (RSA private key)](https://www.bitrise.io/integrations/steps/activate-ssh-key)
- [Connect to OpenVPN Server](https://www.bitrise.io/integrations/steps/flutter-installer)
website: https://github.com/bitrise-steplib/steps-authenticate-host-with-netrc
source_code_url: https://github.com/bitrise-steplib/steps-authenticate-host-with-netrc
support_url: https://github.com/bitrise-steplib/steps-authenticate-host-with-netrc/issues
published_at: 2023-02-16T10:56:27.535947167Z
source:
git: https://github.com/bitrise-steplib/steps-authenticate-host-with-netrc.git
commit: 8cb845d52e28737766ca0fdf9e7d512ac1d25812
type_tags:
- access-control
toolkit:
go:
package_name: github.com/bitrise-steplib/steps-authenticate-host-with-netrc
deps:
brew:
- name: go
apt_get:
- name: golang
bin_name: go
is_requires_admin_user: true
is_always_run: false
is_skippable: false
inputs:
- host: null
opts:
description: |-
The host where the username and password will be used.
For example: github.com
is_required: true
title: Host
- opts:
description: The username used for the host to authenticate.
is_required: true
is_sensitive: true
title: Username
username: null
- opts:
description: The password (or Auth Token/Access Token) used for the host to authenticate.
is_required: true
is_sensitive: true
title: Password/Auth Token/Access Token
password: null
================================================
FILE: steps/authenticate-host-with-netrc/0.9.8/step.yml
================================================
title: Authenticate host with netrc
summary: Adds your authentication configuration to the `.netrc` file.
description: |-
[This Step](https://github.com/bitrise-steplib/steps-authenticate-host-with-netrc) adds the authentication configuration (host name, login name and password string) to the `.netrc` file .
The Step lets you store your remote credentials on the build VM once so that later steps can use the credentials for authentication instead of requiring manual input. Examples include HTTPS git clone URLs with OAuth token-based authentication (instead of authenticating with SSH key).
Please note that if you already have a `.netrc` file, the Step will create a backup of the original, and appends the configs to the current one.
### Configuring the Step
1.Add the **Host** name, where the username and password will be used, for example, github.com.
2.Add the **Username**.
3.Add the password or the authentication token/ access token in the respective field which will be used by the host to authenticate you.
### Useful links
- [Learn more what the .netrc file format comprises of](https://everything.curl.dev/usingcurl/netrc#the-netrc-file-format)
### Related Steps
- [Activate SSH key (RSA private key)](https://www.bitrise.io/integrations/steps/activate-ssh-key)
- [Connect to OpenVPN Server](https://www.bitrise.io/integrations/steps/flutter-installer)
website: https://github.com/bitrise-steplib/steps-authenticate-host-with-netrc
source_code_url: https://github.com/bitrise-steplib/steps-authenticate-host-with-netrc
support_url: https://github.com/bitrise-steplib/steps-authenticate-host-with-netrc/issues
published_at: 2023-07-11T08:44:41.341029103Z
source:
git: https://github.com/bitrise-steplib/steps-authenticate-host-with-netrc.git
commit: 91fcd09b2017f5eccce2e3a850dec9336015a31f
type_tags:
- access-control
toolkit:
go:
package_name: github.com/bitrise-steplib/steps-authenticate-host-with-netrc
deps:
brew:
- name: go
apt_get:
- name: golang
bin_name: go
is_requires_admin_user: true
is_always_run: false
is_skippable: false
inputs:
- host: null
opts:
description: |-
The host where the username and password will be used.
For example: github.com
is_required: true
title: Host
- opts:
description: The username used for the host to authenticate.
is_required: true
is_sensitive: true
title: Username
username: null
- opts:
description: The password (or Auth Token/Access Token) used for the host to authenticate.
is_required: true
is_sensitive: true
title: Password/Auth Token/Access Token
password: null
================================================
FILE: steps/authenticate-host-with-netrc/0.9.9/step.yml
================================================
title: Authenticate host with netrc
summary: Adds your authentication configuration to the `.netrc` file.
description: |-
[This Step](https://github.com/bitrise-steplib/steps-authenticate-host-with-netrc) adds the authentication configuration (host name, login name and password string) to the `.netrc` file .
The Step lets you store your remote credentials on the build VM once so that later steps can use the credentials for authentication instead of requiring manual input. Examples include HTTPS git clone URLs with OAuth token-based authentication (instead of authenticating with SSH key).
Please note that if you already have a `.netrc` file, the Step will create a backup of the original, and appends the configs to the current one.
### Configuring the Step
1.Add the **Host** name, where the username and password will be used, for example, github.com.
2.Add the **Username**.
3.Add the password or the authentication token/ access token in the respective field which will be used by the host to authenticate you.
### Useful links
- [Learn more what the .netrc file format comprises of](https://everything.curl.dev/usingcurl/netrc#the-netrc-file-format)
### Related Steps
- [Activate SSH key (RSA private key)](https://www.bitrise.io/integrations/steps/activate-ssh-key)
- [Connect to OpenVPN Server](https://www.bitrise.io/integrations/steps/flutter-installer)
website: https://github.com/bitrise-steplib/steps-authenticate-host-with-netrc
source_code_url: https://github.com/bitrise-steplib/steps-authenticate-host-with-netrc
support_url: https://github.com/bitrise-steplib/steps-authenticate-host-with-netrc/issues
published_at: 2025-06-04T12:28:07.086084037Z
source:
git: https://github.com/bitrise-steplib/steps-authenticate-host-with-netrc.git
commit: a21bc03a3ab4829294cdef6127710cc5d22ced7d
type_tags:
- access-control
toolkit:
go:
package_name: github.com/bitrise-steplib/steps-authenticate-host-with-netrc
deps:
brew:
- name: go
apt_get:
- name: golang
bin_name: go
is_requires_admin_user: true
is_always_run: false
is_skippable: false
inputs:
- host: null
opts:
description: |-
The host where the username and password will be used.
For example: github.com
is_required: true
title: Host
- opts:
description: The username used for the host to authenticate.
is_required: true
is_sensitive: true
title: Username
username: null
- opts:
description: The password (or Auth Token/Access Token) used for the host to authenticate.
is_required: true
is_sensitive: true
title: Password/Auth Token/Access Token
password: null
================================================
FILE: steps/authenticate-host-with-netrc/step-info.yml
================================================
maintainer: bitrise
================================================
FILE: steps/authenticate-with-aws/0.0.1/step.yml
================================================
title: Authenticate with Amazon Web Services (AWS)
summary: The step authenticates with AWS using an OIDC token.
description: |-
This step authenticates with Amazon Web Services (AWS) using an OpenID Connect (OIDC) token.
It retrieves an identity token from Bitrise, assumes the specified AWS role using the token, and generates temporary AWS credentials.
The generated AWS credentials are then set as environment variables (`AWS_ACCESS_KEY_ID`, `AWS_SECRET_ACCESS_KEY`, and `AWS_SESSION_TOKEN`) for use in subsequent steps.
website: https://github.com/bitrise-steplib/bitrise-step-authenticate-with-aws
source_code_url: https://github.com/bitrise-steplib/bitrise-step-authenticate-with-aws
support_url: https://github.com/bitrise-steplib/bitrise-step-authenticate-with-aws/issues
published_at: 2025-10-31T11:35:55.043551+01:00
source:
git: https://github.com/bitrise-steplib/bitrise-step-authenticate-with-aws.git
commit: 03e9a6319d4488d9c51f17f80f440cfcadfd5578
type_tags:
- utility
toolkit:
go:
package_name: github.com/bitrise-steplib/bitrise-step-authenticate-with-aws
inputs:
- audience: null
opts:
category: Identity token
description: |-
The audience for the identity token.
This could be the URL of the service you want to access with the token or a specific identifier provided by the service.
is_required: true
summary: The audience for the identity token.
title: Token audience
- opts:
category: Identity token
description: |-
The ARN of the AWS role to assume.
You can find the ARN in the AWS Management Console under IAM roles.
is_required: true
summary: The ARN of the AWS role to assume.
title: AWS Role ARN
role_arn: null
- opts:
category: Identity token
description: The AWS region to use.
is_required: true
summary: The AWS region to use.
title: AWS Region
region: us-east-1
- opts:
category: Identity token
description: |-
The session name for the assumed role.
If not provided, a default name will be generated with the format `bitrise-`.
is_required: false
summary: The session name for the assumed role.
title: AWS Session Name
session_name: bitrise-$BITRISE_BUILD_NUMBER
- docker_login: "false"
opts:
category: Docker
description: |-
Performs Docker login with an auth token.
It is supported only on the Linux stacks.
is_required: true
summary: Performs Docker login with an auth token.
title: Docker login
value_options:
- "true"
- "false"
- build_url: $BITRISE_BUILD_URL
opts:
category: Debug
description: |-
Unique build URL of this build on Bitrise.io.
By default the step will use the Bitrise API.
is_dont_change_value: true
is_required: true
summary: Unique build URL of this build on Bitrise.io.
title: Bitrise build url
- build_api_token: $BITRISE_BUILD_API_TOKEN
opts:
category: Debug
description: |-
The build's API Token for the build on Bitrise.io
This will be used to communicate with the Bitrise API
is_required: true
is_sensitive: true
summary: The build's API Token for the build on Bitrise.io
title: Bitrise build token
- opts:
category: Debug
is_required: true
summary: Enable logging additional information for debugging.
title: Enable verbose logging
value_options:
- "true"
- "false"
verbose: "false"
outputs:
- AWS_ACCESS_KEY_ID: null
opts:
summary: The newly generated AWS access key ID.
title: AWS Access Key ID
- AWS_SECRET_ACCESS_KEY: null
opts:
summary: The newly generated AWS secret access key.
title: AWS Secret Access Key
- AWS_SESSION_TOKEN: null
opts:
summary: The newly generated AWS session token.
title: AWS Session Token
================================================
FILE: steps/authenticate-with-aws/step-info.yml
================================================
maintainer: bitrise
================================================
FILE: steps/authenticate-with-bitbucket-oauth/0.10.0/step.yml
================================================
title: Authenticate with Bitbucket OAuth
summary: Adds your Bitbucket OAuth config to the .netrc file
description: |-
Adds your Bitbucket OAuth config to the .netrc file.
If you already have a .netrc file, the step will create a backup of the original, and appends the configs to the current one.
website: https://github.com/bitrise-steplib/steps-authenticate-with-bitbucket-oauth
source_code_url: https://github.com/bitrise-steplib/steps-authenticate-with-bitbucket-oauth
support_url: https://github.com/bitrise-steplib/steps-authenticate-with-bitbucket-oauth/issues
published_at: 2018-08-31T08:10:11.499913905Z
source:
git: https://github.com/bitrise-steplib/steps-authenticate-with-bitbucket-oauth.git
commit: 40e5e3ee730385da8ed5ef72ac5bd8550becf4d6
type_tags:
- utility
toolkit:
go:
package_name: github.com/bitrise-steplib/steps-authenticate-with-bitbucket-oauth
deps:
brew:
- name: go
apt_get:
- name: golang
bin_name: go
is_requires_admin_user: true
is_always_run: false
is_skippable: false
inputs:
- opts:
is_expand: true
is_required: true
is_sensitive: true
summary: The username used for Bitbucket to login.
title: Bitbucket username
username: null
- access_token: null
opts:
description: |-
To get your Bitbucket App Password, follow the instructions below:
1. Log into your Bitbucket account
2. In the upper-right corner of any page, click your profile photo, then click **Bitbucket Settings**.
3. In the left sidebar, click **App passwords**.
4. Click **Create app password**.
5. Give your password a descriptive label.
6. Select the permissions you'd like to grant to this token.
7. Click **Create**.
is_expand: true
is_required: true
is_sensitive: true
title: App Password
================================================
FILE: steps/authenticate-with-bitbucket-oauth/0.10.1/step.yml
================================================
title: Authenticate with Bitbucket OAuth
summary: Adds your Bitbucket OAuth configuration to the `.netrc` file.
description: |-
[This Step](https://github.com/bitrise-steplib/steps-authenticate-with-bitbucket-oauth) adds the authentication configuration (Bitbucket username and App password) to the `.netrc` file .
Please note that if you already have a `.netrc` file, the Step will create a backup of the original, and appends the configs to the current one.
### Configuring the Step
1.Add your **Bitbucket username**.
2. Add your Bitbucket **App Password**.
To get your Bitbucket App Password, follow the instructions below:
1. Log into your Bitbucket account.
2. In the left sidebar, click **App passwords**.
3. Click **Create app password**.
4. Give your password a descriptive label.
5. Select the permissions you'd like to grant to this token.
6. Click **Create**.
### Useful links
- [Learn more what the .netrc file format comprises of](https://everything.curl.dev/usingcurl/netrc#the-netrc-file-format)
### Related Steps
- [Activate SSH key (RSA private key)](https://www.bitrise.io/integrations/steps/activate-ssh-key)
- [Connect to OpenVPN Server](https://www.bitrise.io/integrations/steps/open-vpn)
website: https://github.com/bitrise-steplib/steps-authenticate-with-bitbucket-oauth
source_code_url: https://github.com/bitrise-steplib/steps-authenticate-with-bitbucket-oauth
support_url: https://github.com/bitrise-steplib/steps-authenticate-with-bitbucket-oauth/issues
published_at: 2021-07-21T09:57:16.194029839Z
source:
git: https://github.com/bitrise-steplib/steps-authenticate-with-bitbucket-oauth.git
commit: 867c641baa7af3ac4d24b03a834c77dfcbc3106b
type_tags:
- utility
toolkit:
go:
package_name: github.com/bitrise-steplib/steps-authenticate-with-bitbucket-oauth
deps:
brew:
- name: go
apt_get:
- name: golang
bin_name: go
is_requires_admin_user: true
is_always_run: false
is_skippable: false
inputs:
- opts:
is_expand: true
is_required: true
is_sensitive: true
summary: The username used for Bitbucket to login.
title: Bitbucket username
username: null
- access_token: null
opts:
description: |-
To get your Bitbucket App Password, follow the instructions below:
1. Log into your Bitbucket account
2. In the upper-right corner of any page, click your profile photo, then click **Bitbucket Settings**.
3. In the left sidebar, click **App passwords**.
4. Click **Create app password**.
5. Give your password a descriptive label.
6. Select the permissions you'd like to grant to this token.
7. Click **Create**.
is_expand: true
is_required: true
is_sensitive: true
title: App Password
================================================
FILE: steps/authenticate-with-bitbucket-oauth/0.10.2/step.yml
================================================
title: Authenticate with Bitbucket OAuth
summary: Adds your Bitbucket OAuth configuration to the `.netrc` file.
description: |-
[This Step](https://github.com/bitrise-steplib/steps-authenticate-with-bitbucket-oauth) adds the authentication configuration (Bitbucket username and App password) to the `.netrc` file .
Please note that if you already have a `.netrc` file, the Step will create a backup of the original, and appends the configs to the current one.
### Configuring the Step
1.Add your **Bitbucket username**.
2. Add your Bitbucket **App Password**.
To get your Bitbucket App Password, follow the instructions below:
1. Log into your Bitbucket account.
2. In the left sidebar, click **App passwords**.
3. Click **Create app password**.
4. Give your password a descriptive label.
5. Select the permissions you'd like to grant to this token.
6. Click **Create**.
### Useful links
- [Learn more what the .netrc file format comprises of](https://everything.curl.dev/usingcurl/netrc#the-netrc-file-format)
### Related Steps
- [Activate SSH key (RSA private key)](https://www.bitrise.io/integrations/steps/activate-ssh-key)
- [Connect to OpenVPN Server](https://www.bitrise.io/integrations/steps/open-vpn)
website: https://github.com/bitrise-steplib/steps-authenticate-with-bitbucket-oauth
source_code_url: https://github.com/bitrise-steplib/steps-authenticate-with-bitbucket-oauth
support_url: https://github.com/bitrise-steplib/steps-authenticate-with-bitbucket-oauth/issues
published_at: 2022-11-01T10:07:52.260023979Z
source:
git: https://github.com/bitrise-steplib/steps-authenticate-with-bitbucket-oauth.git
commit: d189ec8e3344e64a3a47abb98348db517cc48d22
type_tags:
- utility
toolkit:
go:
package_name: github.com/bitrise-steplib/steps-authenticate-with-bitbucket-oauth
deps:
brew:
- name: go
apt_get:
- name: golang
bin_name: go
is_requires_admin_user: true
is_always_run: false
is_skippable: false
inputs:
- opts:
is_expand: true
is_required: true
is_sensitive: true
summary: The username used for Bitbucket to login.
title: Bitbucket username
username: null
- access_token: null
opts:
description: |-
To get your Bitbucket App Password, follow the instructions below:
1. Log into your Bitbucket account
2. In the upper-right corner of any page, click your profile photo, then click **Bitbucket Settings**.
3. In the left sidebar, click **App passwords**.
4. Click **Create app password**.
5. Give your password a descriptive label.
6. Select the permissions you'd like to grant to this token.
7. Click **Create**.
is_expand: true
is_required: true
is_sensitive: true
title: App Password
================================================
FILE: steps/authenticate-with-bitbucket-oauth/0.10.3/step.yml
================================================
title: Authenticate with Bitbucket OAuth
summary: Adds your Bitbucket OAuth configuration to the `.netrc` file.
description: |-
[This Step](https://github.com/bitrise-steplib/steps-authenticate-with-bitbucket-oauth) adds the authentication configuration (Bitbucket username and App password) to the `.netrc` file .
Please note that if you already have a `.netrc` file, the Step will create a backup of the original, and appends the configs to the current one.
### Configuring the Step
1. Add your **Bitbucket username**.
2. Add your Bitbucket **App Password**.
To get your Bitbucket App Password, follow the instructions below:
1. Log into your Bitbucket account.
2. In the left sidebar, click **App passwords**.
3. Click **Create app password**.
4. Give your password a descriptive label.
5. Select the permissions you'd like to grant to this token.
6. Click **Create**.
### Useful links
- [Learn more what the .netrc file format comprises of](https://everything.curl.dev/usingcurl/netrc#the-netrc-file-format)
### Related Steps
- [Activate SSH key (RSA private key)](https://www.bitrise.io/integrations/steps/activate-ssh-key)
- [Connect to OpenVPN Server](https://www.bitrise.io/integrations/steps/open-vpn)
website: https://github.com/bitrise-steplib/steps-authenticate-with-bitbucket-oauth
source_code_url: https://github.com/bitrise-steplib/steps-authenticate-with-bitbucket-oauth
support_url: https://github.com/bitrise-steplib/steps-authenticate-with-bitbucket-oauth/issues
published_at: 2026-01-29T16:09:24.765354694Z
source:
git: https://github.com/bitrise-steplib/steps-authenticate-with-bitbucket-oauth.git
commit: 33f32d030e43dc776d3768ab56825a1d2f105519
type_tags:
- utility
toolkit:
go:
package_name: github.com/bitrise-steplib/steps-authenticate-with-bitbucket-oauth
is_requires_admin_user: true
is_always_run: false
is_skippable: false
inputs:
- opts:
is_expand: true
is_required: true
is_sensitive: true
summary: The username used for Bitbucket to login.
title: Bitbucket username
username: null
- access_token: null
opts:
description: |-
To get your Bitbucket App Password, follow the instructions below:
1. Log into your Bitbucket account
2. In the upper-right corner of any page, click your profile photo, then click **Bitbucket Settings**.
3. In the left sidebar, click **App passwords**.
4. Click **Create app password**.
5. Give your password a descriptive label.
6. Select the permissions you'd like to grant to this token.
7. Click **Create**.
is_expand: true
is_required: true
is_sensitive: true
title: App Password
================================================
FILE: steps/authenticate-with-bitbucket-oauth/0.9.0/step.yml
================================================
title: Authenticate with Bitbucket OAuth
summary: Adds your Bitbucket OAuth config to the .netrc file
description: |-
Adds your Bitbucket OAuth config to the .netrc file.
If you already has a .netrc file, the step will create a backup of the original, and appends the configs to the current one.
website: https://github.com/bitrise-steplib/steps-authenticate-with-bitbucket-oauth
source_code_url: https://github.com/bitrise-steplib/steps-authenticate-with-bitbucket-oauth
support_url: https://github.com/bitrise-steplib/steps-authenticate-with-bitbucket-oauth/issues
published_at: 2017-04-26T13:46:22.656723978+02:00
source:
git: https://github.com/bitrise-steplib/steps-authenticate-with-bitbucket-oauth.git
commit: 55d79d4233845840c49d0673141b5d83fe5218dd
type_tags:
- utility
toolkit:
go:
package_name: github.com/bitrise-steplib/steps-authenticate-with-bitbucket-oauth
deps:
brew:
- name: go
apt_get:
- name: golang
bin_name: go
is_requires_admin_user: true
is_always_run: false
is_skippable: false
inputs:
- opts:
is_required: true
summary: The username used for Bitbucket to login.
title: Bitbucket username
username: null
- access_token: null
opts:
description: |-
To get your Bitbucket App Password, follow the instructions below:
1) Login to yout Bitbucket account
2) In the upper-right corner of any page, click your profile photo, then click **Bitbucket Settings**.
3) In the left sidebar, click **App passwords**.
4) Click **Create app password**.
5) Give your password a descriptive label.
6) Select the permissions you'd like to grant this token.
7) Click **Create**.
is_required: true
title: App Password
================================================
FILE: steps/authenticate-with-bitbucket-oauth/step-info.yml
================================================
maintainer: bitrise
================================================
FILE: steps/authenticate-with-gcp/0.0.1/step.yml
================================================
title: Authenticate with Google Cloud Platform (GCP)
summary: The step authenticates with GCP using a service account key.
description: |-
This step authenticates with Google Cloud Platform (GCP) using a service account key.
It generates a Google auth token and sets the `GOOGLE_APPLICATION_CREDENTIALS` environment variable.
The step can also log in to Docker to the supplied Artifact Registry locations.
website: https://github.com/bitrise-steplib/bitrise-step-authenticate-with-gcp
source_code_url: https://github.com/bitrise-steplib/bitrise-step-authenticate-with-gcp
support_url: https://github.com/bitrise-steplib/bitrise-step-authenticate-with-gcp/issues
published_at: 2025-07-24T11:09:18.001509+02:00
source:
git: https://github.com/bitrise-steplib/bitrise-step-authenticate-with-gcp.git
commit: f24aff6380913575e2fda8a36b611b5057ff88c2
type_tags:
- utility
toolkit:
go:
package_name: github.com/bitrise-steplib/bitrise-step-authenticate-with-gcp
inputs:
- opts:
description: |-
The service account key in JSON format.
You can generate a service account key in the Google Cloud Console. Make sure to grant the necessary permissions to the service account.
The step will use this key to authenticate with GCP and generate a Google auth token.
is_required: true
is_sensitive: true
summary: The service account key in JSON format.
title: Service account key
service_account_key: null
- docker_login: "false"
opts:
category: Docker
description: |-
Performs Docker login with an auth token.
The step will log in to the Artifact Registry locations specified in the `artifact_registry_locations` input.
It is supported only on the Linux stacks.
is_required: true
summary: Performs Docker login with an auth token.
title: Docker login
value_options:
- "true"
- "false"
- artifact_registry_locations: null
opts:
category: Docker
description: |-
A newline (`\n`) separated list of Artifact Registry locations to log in to.
The step will log in to the specified locations using the Google auth token generated from the service account key.
These locations can point ot either the deprecated Container Registry or the new Artifact Registry.
summary: A newline (`\n`) separated list of Artifact Registry locations to log
in to.
title: Artifact Registry locations
- opts:
category: Debugging
is_required: true
summary: Enable logging additional information for debugging.
title: Enable verbose logging
value_options:
- "true"
- "false"
verbose: "false"
outputs:
- GOOGLE_AUTH_TOKEN: null
opts:
summary: |-
The generated Google auth token.
This token can be used to authenticate with GCP services.
title: Google auth token
- GOOGLE_APPLICATION_CREDENTIALS: null
opts:
summary: |-
The path to the service account key file.
This file is used by GCP SDKs and libraries to authenticate with GCP services.
title: Google credentials path
================================================
FILE: steps/authenticate-with-gcp/0.0.4/step.yml
================================================
title: Authenticate with Google Cloud Platform (GCP)
summary: The step authenticates with GCP using a service account key.
description: |-
This step authenticates with Google Cloud Platform (GCP) using a service account key.
It generates a Google auth token and sets the `GOOGLE_APPLICATION_CREDENTIALS` environment variable.
The step can also log in to Docker to the supplied Artifact Registry locations.
website: https://github.com/bitrise-steplib/bitrise-step-authenticate-with-gcp
source_code_url: https://github.com/bitrise-steplib/bitrise-step-authenticate-with-gcp
support_url: https://github.com/bitrise-steplib/bitrise-step-authenticate-with-gcp/issues
published_at: 2025-11-19T13:07:07.260955266Z
source:
git: https://github.com/bitrise-steplib/bitrise-step-authenticate-with-gcp.git
commit: b147cc0fc20ae38739dad8d90803e56490146f74
type_tags:
- utility
toolkit:
go:
package_name: github.com/bitrise-steplib/bitrise-step-authenticate-with-gcp
inputs:
- opts:
category: Service account
description: |-
The service account key in JSON format.
You can generate a service account key in the Google Cloud Console. Make sure to grant the necessary permissions to the service account.
The step will use this key to authenticate with GCP and generate a Google auth token.
is_sensitive: true
summary: The service account key in JSON format.
title: Service account key
service_account_key: null
- client_config: null
opts:
category: Identity token
description: |-
Client config in JSON format.
You can generate a client config in the Google Cloud Console. Make sure to grant the necessary permissions to the client.
is_sensitive: true
summary: Client config in JSON format.
title: Client config
- audience: null
opts:
category: Identity token
description: |-
The audience for the identity token.
This could be the URL of the service you want to access with the token or a specific identifier provided by the service.
summary: The audience for the identity token.
title: Token audience
- docker_login: "false"
opts:
category: Docker
description: |-
Performs Docker login with an auth token.
The step will log in to the Artifact Registry locations specified in the `artifact_registry_locations` input.
It is supported only on the Linux stacks.
is_required: true
summary: Performs Docker login with an auth token.
title: Docker login
value_options:
- "true"
- "false"
- artifact_registry_locations: null
opts:
category: Docker
description: |-
A newline (`\n`) separated list of Artifact Registry locations to log in to.
The step will log in to the specified locations using the Google auth token generated from the service account key.
These locations can point ot either the deprecated Container Registry or the new Artifact Registry.
summary: A newline (`\n`) separated list of Artifact Registry locations to log
in to.
title: Artifact Registry locations
- build_url: $BITRISE_BUILD_URL
opts:
category: Debug
description: |-
Unique build URL of this build on Bitrise.io.
By default the step will use the Bitrise API.
is_dont_change_value: true
is_required: true
summary: Unique build URL of this build on Bitrise.io.
title: Bitrise build url
- build_api_token: $BITRISE_BUILD_API_TOKEN
opts:
category: Debug
description: |-
The build's API Token for the build on Bitrise.io
This will be used to communicate with the Bitrise API
is_required: true
is_sensitive: true
summary: The build's API Token for the build on Bitrise.io
title: Bitrise build token
- opts:
category: Debugging
is_required: true
summary: Enable logging additional information for debugging.
title: Enable verbose logging
value_options:
- "true"
- "false"
verbose: "false"
outputs:
- GOOGLE_AUTH_TOKEN: null
opts:
summary: |-
The generated Google auth token.
This token can be used to authenticate with GCP services.
title: Google auth token
- GOOGLE_APPLICATION_CREDENTIALS: null
opts:
summary: |-
The path to the service account key file.
This file is used by GCP SDKs and libraries to authenticate with GCP services.
title: Google credentials path
================================================
FILE: steps/authenticate-with-gcp/step-info.yml
================================================
maintainer: bitrise
================================================
FILE: steps/authenticate-with-github-oauth/0.9.0/step.yml
================================================
title: Authenticate with GitHub OAuth
summary: Adds your GitHub OAuth config to the .netrc file
description: |-
Adds your GitHub OAuth config to the .netrc file.
If you already has a .netrc file, the step will create a backup of the original, and appends the configs to the current one.
website: https://github.com/bitrise-steplib/steps-authenticate-with-github-oauth
source_code_url: https://github.com/bitrise-steplib/steps-authenticate-with-github-oauth
support_url: https://github.com/bitrise-steplib/steps-authenticate-with-github-oauth/issues
published_at: 2017-04-20T12:54:31.297075924+02:00
source:
git: https://github.com/bitrise-steplib/steps-authenticate-with-github-oauth.git
commit: 954d2660a4c75a452a3b99e1f8a28b87893ac145
type_tags:
- utility
toolkit:
go:
package_name: github.com/bitrise-steplib/steps-authenticate-with-github-oauth
deps:
brew:
- name: go
apt_get:
- name: golang
bin_name: go
is_requires_admin_user: true
is_always_run: false
is_skippable: false
inputs:
- opts:
is_required: true
summary: The username used for GitHub to login.
title: GitHub username
username: null
- access_token: null
opts:
description: |-
To get your GitHub Personal Access Token, follow the instructions below:
1) Login to yout GitHub account
2) In the upper-right corner of any page, click your profile photo, then click **Settings**.
3) In the left sidebar, click **Personal access tokens**.
4) Click **Generate new token**.
5) Give your token a descriptive name.
6) Select the scopes, or permissions, you'd like to grant this token.
7) Click Generate token.
is_required: true
title: Personal Access Token
================================================
FILE: steps/authenticate-with-github-oauth/0.9.1/step.yml
================================================
title: Authenticate with GitHub OAuth
summary: Adds your GitHub OAuth config to the .netrc file
description: |-
Adds your GitHub OAuth config to the .netrc file.
If you already has a .netrc file, the step will create a backup of the original, and appends the configs to the current one.
website: https://github.com/bitrise-steplib/steps-authenticate-with-github-oauth
source_code_url: https://github.com/bitrise-steplib/steps-authenticate-with-github-oauth
support_url: https://github.com/bitrise-steplib/steps-authenticate-with-github-oauth/issues
published_at: !!timestamp 2018-03-21T14:06:08.805031579+01:00
source:
git: https://github.com/bitrise-steplib/steps-authenticate-with-github-oauth.git
commit: 3601e31f2f536f2d3b2c61f5e3f57f691f84645d
type_tags:
- utility
toolkit:
go:
package_name: github.com/bitrise-steplib/steps-authenticate-with-github-oauth
deps:
brew:
- name: go
apt_get:
- name: golang
bin_name: go
is_requires_admin_user: true
is_always_run: false
is_skippable: false
inputs:
- opts:
is_required: true
summary: The username used for GitHub to login.
title: GitHub username
username: null
- access_token: null
opts:
description: |-
To get your GitHub Personal Access Token, follow the instructions below:
1) Login to yout GitHub account
2) In the upper-right corner of any page, click your profile photo, then click **Settings**.
3) In the left sidebar, click **Personal access tokens**.
4) Click **Generate new token**.
5) Give your token a descriptive name.
6) Select the scopes, or permissions, you'd like to grant this token.
7) Click Generate token.
is_required: true
title: Personal Access Token
================================================
FILE: steps/authenticate-with-github-oauth/0.9.2/step.yml
================================================
title: Authenticate with GitHub OAuth
summary: This step adds your GitHub OAuth config to the .netrc file.
description: |-
Adds your GitHub OAuth config to the .netrc file.
If you already have a .netrc file, the step will create a backup of the original, and appends the configs to the current one.
website: https://github.com/bitrise-steplib/steps-authenticate-with-github-oauth
source_code_url: https://github.com/bitrise-steplib/steps-authenticate-with-github-oauth
support_url: https://github.com/bitrise-steplib/steps-authenticate-with-github-oauth/issues
published_at: 2018-08-31T08:47:57.893584428Z
source:
git: https://github.com/bitrise-steplib/steps-authenticate-with-github-oauth.git
commit: 5c3baff136d95c4017959255c1dd8c774841f3e7
type_tags:
- utility
toolkit:
go:
package_name: github.com/bitrise-steplib/steps-authenticate-with-github-oauth
deps:
brew:
- name: go
apt_get:
- name: golang
bin_name: go
is_requires_admin_user: true
is_always_run: false
is_skippable: false
inputs:
- opts:
is_expand: true
is_required: true
is_sensitive: true
summary: The username used for GitHub to login.
title: GitHub username
username: null
- access_token: null
opts:
description: |-
To get your GitHub Personal Access Token, follow the instructions below:
1. Login to yout GitHub account.
2. In the upper-right corner of any page, click your profile photo, then click **Settings**.
3. In the left sidebar, click **Personal access tokens**.
4. Click **Generate new token**.
5. Give your token a descriptive name.
6. Select the scopes or permissions, you'd like to grant this token.
7. Click **Generate token**.
is_expand: true
is_required: true
is_sensitive: true
title: Personal Access Token
================================================
FILE: steps/authenticate-with-github-oauth/0.9.3/step.yml
================================================
title: Authenticate with GitHub OAuth
summary: Adds your GitHub OAuth config to the `.netrc` file.
description: |-
[This Step](https://github.com/bitrise-steplib/steps-authenticate-with-github-oauth) writes GitHub OAuth configs to the `.netrc` file, so every single network call pointing to [github.com](https://github.com/) or [api.github.com](https://api.github.com/) hosts will be accessed with the given Personal Access Token and the GitHub username.
Please note that this Step must come before any other git Step in your Workflow, therefore, it can be, for example, the first Step in your Workflow.
### Configuring the Step
1. Add your **GitHub username** in the respective input field.
2. Add your GitHub **Personal Access Token** in the respective input field.
To get your GitHub Personal Access Token, follow these steps:
1. Login to your GitHub account.
2. In the upper-right corner of any page, click your profile photo, then click **Settings**.
3. In the left sidebar, click **Personal access tokens**.
4. Click **Generate new token**.
5. Give your token a descriptive name.
6. Select the scopes, or permissions you’d like to grant this token with.
7. Click **Generate token**.
### Useful links
- [Connecting your GitHub/GitLab/Bitbucket account to Bitrise](https://devcenter.bitrise.io/getting-started/connecting-to-services/connecting-account-bitrise/)
### Related Steps
- [Bitrise.io Cache:Pull](https://www.bitrise.io/integrations/steps/cache-pull)
- [Git Clone Repository](https://www.bitrise.io/integrations/steps/git-clone)
website: https://github.com/bitrise-steplib/steps-authenticate-with-github-oauth
source_code_url: https://github.com/bitrise-steplib/steps-authenticate-with-github-oauth
support_url: https://github.com/bitrise-steplib/steps-authenticate-with-github-oauth/issues
published_at: 2021-07-19T14:56:24.775170507Z
source:
git: https://github.com/bitrise-steplib/steps-authenticate-with-github-oauth.git
commit: 525a1e8c52506289af02e80b37e13b020959b0fb
type_tags:
- utility
toolkit:
go:
package_name: github.com/bitrise-steplib/steps-authenticate-with-github-oauth
deps:
brew:
- name: go
apt_get:
- name: golang
bin_name: go
is_requires_admin_user: true
is_always_run: false
is_skippable: false
inputs:
- opts:
is_expand: true
is_required: true
is_sensitive: true
summary: The username used for GitHub to login.
title: GitHub username
username: null
- access_token: null
opts:
description: |-
To get your GitHub Personal Access Token, follow the instructions below:
1. Login to yout GitHub account.
2. In the upper-right corner of any page, click your profile photo, then click **Settings**.
3. In the left sidebar, click **Personal access tokens**.
4. Click **Generate new token**.
5. Give your token a descriptive name.
6. Select the scopes or permissions, you'd like to grant this token.
7. Click **Generate token**.
is_expand: true
is_required: true
is_sensitive: true
title: Personal Access Token
================================================
FILE: steps/authenticate-with-github-oauth/0.9.4/step.yml
================================================
title: Authenticate with GitHub OAuth
summary: Adds your GitHub OAuth config to the `.netrc` file.
description: |-
[This Step](https://github.com/bitrise-steplib/steps-authenticate-with-github-oauth) writes GitHub OAuth configs to the `.netrc` file, so every single network call pointing to [github.com](https://github.com/) or [api.github.com](https://api.github.com/) hosts will be accessed with the given Personal Access Token and the GitHub username.
Please note that this Step must come before any other git Step in your Workflow, therefore, it can be, for example, the first Step in your Workflow.
### Configuring the Step
1. Add your **GitHub username** in the respective input field.
2. Add your GitHub **Personal Access Token** in the respective input field.
To get your GitHub Personal Access Token, follow these steps:
1. Login to your GitHub account.
2. In the upper-right corner of any page, click your profile photo, then click **Settings**.
3. In the left sidebar, click **Personal access tokens**.
4. Click **Generate new token**.
5. Give your token a descriptive name.
6. Select the scopes, or permissions you’d like to grant this token with.
7. Click **Generate token**.
### Useful links
- [Connecting your GitHub/GitLab/Bitbucket account to Bitrise](https://devcenter.bitrise.io/getting-started/connecting-to-services/connecting-account-bitrise/)
### Related Steps
- [Bitrise.io Cache:Pull](https://www.bitrise.io/integrations/steps/cache-pull)
- [Git Clone Repository](https://www.bitrise.io/integrations/steps/git-clone)
website: https://github.com/bitrise-steplib/steps-authenticate-with-github-oauth
source_code_url: https://github.com/bitrise-steplib/steps-authenticate-with-github-oauth
support_url: https://github.com/bitrise-steplib/steps-authenticate-with-github-oauth/issues
published_at: 2022-08-09T14:27:50.619871578Z
source:
git: https://github.com/bitrise-steplib/steps-authenticate-with-github-oauth.git
commit: 90f4d5a8570602a53e5dfe4f3d4c7e4540c63cbb
type_tags:
- utility
toolkit:
go:
package_name: github.com/bitrise-steplib/steps-authenticate-with-github-oauth
deps:
brew:
- name: go
apt_get:
- name: golang
bin_name: go
is_requires_admin_user: true
is_always_run: false
is_skippable: false
inputs:
- opts:
is_expand: true
is_required: true
is_sensitive: true
summary: The username used for GitHub to login.
title: GitHub username
username: null
- access_token: null
opts:
description: |-
To get your GitHub Personal Access Token, follow the instructions below:
1. Login to yout GitHub account.
2. In the upper-right corner of any page, click your profile photo, then click **Settings**.
3. In the left sidebar, click **Personal access tokens**.
4. Click **Generate new token**.
5. Give your token a descriptive name.
6. Select the scopes or permissions, you'd like to grant this token.
7. Click **Generate token**.
is_expand: true
is_required: true
is_sensitive: true
title: Personal Access Token
================================================
FILE: steps/authenticate-with-github-oauth/step-info.yml
================================================
maintainer: bitrise
================================================
FILE: steps/autify-test-run/1.0.0/step.yml
================================================
title: Autify test run
summary: |
Run a test plan on Autify for Mobile.
description: |
[Autify for Mobile](https://autify.com/mobile) is a test automation platform for your native app.
This step allows you to upload your app built in the previous steps to Autify and start a pre-recorded test plan against the build.
Optionally, this step can wait until the test plan finishes and fail if it doesn't pass.
Also, you can specify already uploaded build and just start a test plan against it.
If you want to upload your app to Autify, you need to build your app first by `Android Build`, `Xcode build for simulator`, etc.
and refer the target build path (*.apk or *.app) at `Build path to test` input.
website: https://github.com/autifyhq/bitrise-step-autify-test-run
source_code_url: https://github.com/autifyhq/bitrise-step-autify-test-run
support_url: https://github.com/autifyhq/bitrise-step-autify-test-run/issues
published_at: 2022-09-06T08:38:52.032898-07:00
source:
git: https://github.com/autifyhq/bitrise-step-autify-test-run.git
commit: 81b2de30d3a68cbe5e7a39adf5e00af10fc014a4
project_type_tags:
- ios
- android
- react-native
- cordova
- ionic
- flutter
type_tags:
- test
toolkit:
bash:
entry_file: step.sh
inputs:
- access_token: null
opts:
is_expand: true
is_required: true
is_sensitive: true
summary: Personal Access Token of Autify for Mobile
title: Access token of Autify for Mobile
- autify_test_url: null
opts:
is_expand: true
is_required: true
summary: Autify for Mobile URL of your test plan. For example, `https://mobile-app.autify.com/projects/AAA/test_plans/BBB`
title: URL of a test plan
- build_id: null
opts:
is_expand: true
summary: Autify for Mobile build ID you already uploaded before.
title: Build ID to test (Either "Build ID to test" or "Build path to test" is
required.)
- build_path: null
opts:
is_expand: true
summary: |-
The file location of your build file i.e. /path/to/ios.app or /path/to/android.apk.
Typically, it's `$BITRISE_APP_DIR_PATH` for `Xcode build for simulator` step or `$BITRISE_APK_PATH` for `Android build` step.
title: Build path to test (Either "Build ID to test" or "Build path to test" is
required.)
- opts:
title: Wait for the finish of test
value_options:
- "true"
- "false"
wait: "false"
- opts:
title: Timeout seconds while waiting the finish of test
timeout: 300
- autify_path: autify
opts:
is_expand: true
title: A path to Autify CLI
outputs:
- AUTIFY_TEST_RESULT_URL: null
opts:
title: URL to see the test result at Autify for Mobile
- AUTIFY_BUILD_ID: null
opts:
title: Used build id on Autify for Mobile
- AUTIFY_TEST_RUN_EXIT_CODE: null
opts:
title: Exit code of the step
================================================
FILE: steps/autify-test-run/1.0.1/step.yml
================================================
title: Autify Test Run
summary: |
Run a test plan on Autify for Mobile.
description: |
[Autify for Mobile](https://autify.com/mobile) is a test automation platform for your native app.
This step allows you to upload your app built in the previous steps to Autify and start a pre-recorded test plan against the build.
Optionally, this step can wait until the test plan finishes and fail if it doesn't pass.
Also, you can specify already uploaded build and just start a test plan against it.
If you want to upload your app to Autify, you need to build your app first by `Android Build`, `Xcode build for simulator`, etc.
and refer the target build path (*.apk or *.app) at `Build path to test` input.
website: https://github.com/autifyhq/bitrise-step-autify-test-run
source_code_url: https://github.com/autifyhq/bitrise-step-autify-test-run
support_url: https://github.com/autifyhq/bitrise-step-autify-test-run/issues
published_at: 2022-09-08T09:45:07.487401-07:00
source:
git: https://github.com/autifyhq/bitrise-step-autify-test-run.git
commit: d6101b79f8410d6d055d98fc88e91afec0628cb5
project_type_tags:
- ios
- android
- react-native
- cordova
- ionic
- flutter
type_tags:
- test
toolkit:
bash:
entry_file: step.sh
inputs:
- access_token: null
opts:
is_expand: true
is_required: true
is_sensitive: true
summary: Personal Access Token of Autify for Mobile
title: Access token of Autify for Mobile
- autify_test_url: null
opts:
is_expand: true
is_required: true
summary: Autify for Mobile URL of your test plan. For example, `https://mobile-app.autify.com/projects/AAA/test_plans/BBB`
title: URL of a test plan
- build_id: null
opts:
is_expand: true
summary: Autify for Mobile build ID you already uploaded before.
title: Build ID to test (Either "Build ID to test" or "Build path to test" is
required.)
- build_path: null
opts:
is_expand: true
summary: |-
The file location of your build file i.e. /path/to/ios.app or /path/to/android.apk.
Typically, it's `$BITRISE_APP_DIR_PATH` for `Xcode build for simulator` step or `$BITRISE_APK_PATH` for `Android build` step.
title: Build path to test (Either "Build ID to test" or "Build path to test" is
required.)
- opts:
title: Wait for the finish of test
value_options:
- "true"
- "false"
wait: "false"
- opts:
title: Timeout seconds while waiting the finish of test
timeout: 300
- autify_path: autify
opts:
is_expand: true
title: A path to Autify CLI
outputs:
- AUTIFY_TEST_RESULT_URL: null
opts:
title: URL to see the test result at Autify for Mobile
- AUTIFY_BUILD_ID: null
opts:
title: Used build id on Autify for Mobile
- AUTIFY_TEST_RUN_EXIT_CODE: null
opts:
title: Exit code of the step
================================================
FILE: steps/autify-test-run/1.1.0/step.yml
================================================
title: Autify Test Run
summary: |
Run a test plan on Autify for Mobile.
description: |
[Autify for Mobile](https://autify.com/mobile) is a test automation platform for your native app.
This step allows you to upload your app built in the previous steps to Autify and start a pre-recorded test plan against the build.
Optionally, this step can wait until the test plan finishes and fail if it doesn't pass.
Also, you can specify already uploaded build and just start a test plan against it.
If you want to upload your app to Autify, you need to build your app first by `Android Build`, `Xcode build for simulator`, etc.
and refer the target build path (*.apk or *.app) at `Build path to test` input.
website: https://github.com/autifyhq/bitrise-step-autify-test-run
source_code_url: https://github.com/autifyhq/bitrise-step-autify-test-run
support_url: https://github.com/autifyhq/bitrise-step-autify-test-run/issues
published_at: 2022-09-29T20:46:37.817606921Z
source:
git: https://github.com/autifyhq/bitrise-step-autify-test-run.git
commit: 7b8b6ce6c5735748cc0df491c0e98d5a5da73c26
project_type_tags:
- ios
- android
- react-native
- cordova
- ionic
- flutter
type_tags:
- test
toolkit:
bash:
entry_file: step.sh
inputs:
- access_token: null
opts:
is_expand: true
is_required: true
is_sensitive: true
summary: Personal Access Token of Autify for Mobile
title: Access token of Autify for Mobile
- autify_test_url: null
opts:
is_expand: true
is_required: true
summary: Autify for Mobile URL of your test plan. For example, `https://mobile-app.autify.com/projects/AAA/test_plans/BBB`
title: URL of a test plan
- build_id: null
opts:
is_expand: true
summary: Autify for Mobile build ID you already uploaded before.
title: Build ID to test (Either "Build ID to test" or "Build path to test" is
required.)
- build_path: null
opts:
is_expand: true
summary: |-
The file location of your build file i.e. /path/to/ios.app or /path/to/android.apk.
Typically, it's `$BITRISE_APP_DIR_PATH` for `Xcode build for simulator` step or `$BITRISE_APK_PATH` for `Android build` step.
title: Build path to test (Either "Build ID to test" or "Build path to test" is
required.)
- opts:
title: Wait for the finish of test
value_options:
- "true"
- "false"
wait: "false"
- opts:
title: Timeout seconds while waiting the finish of test
timeout: 300
- autify_path: autify
opts:
is_expand: true
title: A path to Autify CLI
- autify_cli_installer_url: https://autify-cli-assets.s3.amazonaws.com/autify-cli/channels/stable/install-cicd.bash
opts:
is_expand: true
title: Autify CLI installer URL
outputs:
- AUTIFY_TEST_RESULT_URL: null
opts:
title: URL to see the test result at Autify for Mobile
- AUTIFY_BUILD_ID: null
opts:
title: Used build id on Autify for Mobile
- AUTIFY_TEST_RUN_EXIT_CODE: null
opts:
title: Exit code of the step
================================================
FILE: steps/autify-test-run/step-info.yml
================================================
maintainer: verified
================================================
FILE: steps/autify-upload/0.0.1/step.yml
================================================
title: |
Autify Upload
summary: |
Uploads your build to Autify.
description: |-
Uploads you build `.app` to [Autify](https://autify.com/mobile) using Autify's API. You can upload the iOS build with the Step.
This Step, however, does NOT generate your build: to create a `.app` file, you need the right step. For example, `Xcode build for simulator` Step or any other Step can generate a build. Add task URL
website: https://github.com/autifyhq/bitrise-step-autify-upload
source_code_url: https://github.com/autifyhq/bitrise-step-autify-upload
support_url: https://github.com/autifyhq/bitrise-step-autify-upload/issues
published_at: 2021-06-09T05:12:39.441439+09:00
source:
git: https://github.com/autifyhq/bitrise-step-autify-upload.git
commit: 15809911647ee0fad8527ee92810755b76faec14
host_os_tags:
- osx-10.10
project_type_tags:
- ios
- xamarin
- react-native
- cordova
- ionic
- flutter
type_tags:
- test
toolkit:
bash:
entry_file: step.sh
is_always_run: false
is_skippable: false
run_if: ""
inputs:
- app_dir_path: $BITRISE_APP_DIR_PATH
opts:
description: |-
A `.app` path.
This path is generated in the previous step. For example:
- The `Xcode build for simulator` Step generate a app directory as `$BITRISE_APP_DIR_PATH`
is_required: true
summary: null
title: App directory path
- opts:
description: |-
The Project ID can be found in the Auitify URL. For example:
- `autify.com/projects/`
is_required: true
summary: null
title: Autify project id
project_id: null
- opts:
description: You can generate a Personal Access Token from Autify's Settings page.
Note that this value is associated with a specific user, as the name implies.
is_required: true
is_sensitive: true
summary: null
title: Autify Personal Access Token
upload_token: null
outputs:
- AUTIFY_UPLOAD_STEP_RESULT_JSON: null
opts:
description: This is the response to the API used to upload the build
summary: Response when uploading the build
title: Autify Upload Step Result JSON
================================================
FILE: steps/autify-upload/0.0.2/step.yml
================================================
title: |
Autify Upload
summary: |
Uploads your build to Autify.
description: |-
Uploads you build `.app` to [Autify](https://autify.com/mobile) using [Autify's API](https://mobile-app.autify.com/api/docs/index.html). You can upload the iOS build with the Step.
This Step, however, does NOT generate your build: to create a `.app` file, you need the right step. For example, `Xcode build for simulator` Step or any other Step can generate a build
website: https://github.com/autifyhq/bitrise-step-autify-upload
source_code_url: https://github.com/autifyhq/bitrise-step-autify-upload
support_url: https://github.com/autifyhq/bitrise-step-autify-upload/issues
published_at: 2021-12-14T05:27:01.003204+09:00
source:
git: https://github.com/autifyhq/bitrise-step-autify-upload.git
commit: 6ac944710c030a2a0ee09c92fc94310f9ce2a62e
project_type_tags:
- ios
- xamarin
- react-native
- cordova
- ionic
- flutter
type_tags:
- test
toolkit:
bash:
entry_file: step.sh
is_always_run: false
is_skippable: false
run_if: ""
inputs:
- app_dir_path: $BITRISE_APP_DIR_PATH
opts:
description: |-
A `.app` path.
This path is generated in the previous step. For example:
- The `Xcode build for simulator` Step generate a app directory as `$BITRISE_APP_DIR_PATH`
is_required: true
summary: null
title: App directory path
- opts:
description: |-
The Project ID can be found in the Auitify URL. For example:
- `autify.com/projects/`
is_required: true
summary: null
title: Autify project id
project_id: null
- opts:
description: You can generate a Personal Access Token from Autify's Settings page.
Note that this value is associated with a specific user, as the name implies.
is_required: true
is_sensitive: true
summary: null
title: Autify Personal Access Token
upload_token: null
outputs:
- AUTIFY_UPLOAD_STEP_RESULT_JSON: null
opts:
description: This is the response to the API used to upload the build
summary: Response when uploading the build
title: Autify Upload Step Result JSON
================================================
FILE: steps/autify-upload/0.0.3/step.yml
================================================
title: |
Autify Upload
summary: |
Uploads your build to Autify.
description: |-
Uploads you build `.app` to [Autify](https://autify.com/mobile) using [Autify's API](https://mobile-app.autify.com/api/docs/index.html). You can upload the iOS build with the Step.
This Step, however, does NOT generate your build: to create a `.app` file, you need the right step. For example, `Xcode build for simulator` Step or any other Step can generate a build
website: https://github.com/autifyhq/bitrise-step-autify-upload
source_code_url: https://github.com/autifyhq/bitrise-step-autify-upload
support_url: https://github.com/autifyhq/bitrise-step-autify-upload/issues
published_at: 2022-08-10T09:28:51.758942+09:00
source:
git: https://github.com/autifyhq/bitrise-step-autify-upload.git
commit: f5c883060a80a678520020d2f6797e8ec35010cc
project_type_tags:
- ios
- xamarin
- react-native
- cordova
- ionic
- flutter
type_tags:
- test
toolkit:
bash:
entry_file: step.sh
is_always_run: false
is_skippable: false
run_if: ""
inputs:
- app_dir_path: $BITRISE_APP_DIR_PATH
opts:
description: |-
A `.app` path.
This path is generated in the previous step. For example:
- The `Xcode build for simulator` Step generate a app directory as `$BITRISE_APP_DIR_PATH`
is_required: true
summary: null
title: App directory path
- opts:
description: |-
The Project ID can be found in the Auitify URL. For example:
- `autify.com/projects/{Project ID}`
is_required: true
summary: null
title: Autify project id
project_id: null
- opts:
description: You can generate a Personal Access Token from Autify's Settings page.
Note that this value is associated with a specific user, as the name implies.
is_required: true
is_sensitive: true
summary: null
title: Autify Personal Access Token
upload_token: null
outputs:
- AUTIFY_UPLOAD_STEP_RESULT_JSON: null
opts:
description: This is the response to the API used to upload the build
summary: Response when uploading the build
title: Autify Upload Step Result JSON
================================================
FILE: steps/autify-upload/1.0.0/step.yml
================================================
title: Autify Upload
summary: |
Upload a build file to Autify for Mobile.
description: |
[Autify for Mobile](https://autify.com/mobile) is a test automation platform for your native app.
This step allows you to upload your app built in the previous steps to Autify.
You need to build your app first by `Android Build`, `Xcode build for simulator`, etc.
and refer the target build path (*.apk or *.app) at `Build path to test` input.
website: https://github.com/autifyhq/bitrise-step-autify-upload
source_code_url: https://github.com/autifyhq/bitrise-step-autify-upload
support_url: https://github.com/autifyhq/bitrise-step-autify-upload/issues
published_at: 2022-09-06T08:41:08.550307-07:00
source:
git: https://github.com/autifyhq/bitrise-step-autify-upload.git
commit: ab3293c0f2575e19f731032ea191747a90f34a29
project_type_tags:
- ios
- android
- react-native
- cordova
- ionic
- flutter
type_tags:
- test
toolkit:
bash:
entry_file: step.sh
inputs:
- access_token: null
opts:
is_expand: true
is_required: true
is_sensitive: true
summary: Personal Access Token of Autify for Mobile
title: Access token of Autify for Mobile
- opts:
is_expand: true
is_required: true
summary: Your workspace ID of Autify for Mobile to upload the build
title: Workspace ID to upload
workspace_id: null
- build_path: null
opts:
is_expand: true
is_required: true
summary: |-
The file location of your build file i.e. /path/to/ios.app or /path/to/android.apk.
Typically, it's `$BITRISE_APP_DIR_PATH` for `Xcode build for simulator` step or `$BITRISE_APK_PATH` for `Android build` step.
title: Build path to upload
- autify_path: autify
opts:
is_expand: true
title: A path to Autify CLI
outputs:
- AUTIFY_BUILD_ID: null
opts:
title: Uploaded build id on Autify for Mobile
- AUTIFY_UPLOAD_EXIT_CODE: null
opts:
title: Exit code of the step
================================================
FILE: steps/autify-upload/1.1.0/step.yml
================================================
title: Autify Upload
summary: |
Upload a build file to Autify for Mobile.
description: |
[Autify for Mobile](https://autify.com/mobile) is a test automation platform for your native app.
This step allows you to upload your app built in the previous steps to Autify.
You need to build your app first by `Android Build`, `Xcode build for simulator`, etc.
and refer the target build path (*.apk or *.app) at `Build path to test` input.
website: https://github.com/autifyhq/bitrise-step-autify-upload
source_code_url: https://github.com/autifyhq/bitrise-step-autify-upload
support_url: https://github.com/autifyhq/bitrise-step-autify-upload/issues
published_at: 2022-09-29T20:47:23.028758865Z
source:
git: https://github.com/autifyhq/bitrise-step-autify-upload.git
commit: f209c48fd9db74c92439a06d47d122c715b82da3
project_type_tags:
- ios
- android
- react-native
- cordova
- ionic
- flutter
type_tags:
- test
toolkit:
bash:
entry_file: step.sh
inputs:
- access_token: null
opts:
is_expand: true
is_required: true
is_sensitive: true
summary: Personal Access Token of Autify for Mobile
title: Access token of Autify for Mobile
- opts:
is_expand: true
is_required: true
summary: Your workspace ID of Autify for Mobile to upload the build
title: Workspace ID to upload
workspace_id: null
- build_path: null
opts:
is_expand: true
is_required: true
summary: |-
The file location of your build file i.e. /path/to/ios.app or /path/to/android.apk.
Typically, it's `$BITRISE_APP_DIR_PATH` for `Xcode build for simulator` step or `$BITRISE_APK_PATH` for `Android build` step.
title: Build path to upload
- autify_path: autify
opts:
is_expand: true
title: A path to Autify CLI
- autify_cli_installer_url: https://autify-cli-assets.s3.amazonaws.com/autify-cli/channels/stable/install-cicd.bash
opts:
is_expand: true
title: Autify CLI installer URL
outputs:
- AUTIFY_BUILD_ID: null
opts:
title: Uploaded build id on Autify for Mobile
- AUTIFY_UPLOAD_EXIT_CODE: null
opts:
title: Exit code of the step
================================================
FILE: steps/autify-upload/step-info.yml
================================================
maintainer: verified
================================================
FILE: steps/avd-manager/0.9.1/step.yml
================================================
title: AVD Manager
summary: Create and run Android Virtual Device
description: Create and run Android Virtual Device
website: https://github.com/bitrise-steplib/steps-avd-manager
source_code_url: https://github.com/bitrise-steplib/steps-avd-manager
support_url: https://github.com/bitrise-steplib/steps-avd-manager/issues
published_at: 2017-12-01T15:45:31.799247621+01:00
source:
git: https://github.com/bitrise-steplib/steps-avd-manager.git
commit: 2cb213006948bccae20100cb4e14e82c6965de7c
host_os_tags:
- osx-10.10
project_type_tags:
- android
type_tags:
- script
toolkit:
go:
package_name: github.com/bitrise-steplib/steps-avd-manager
deps:
brew:
- name: go
apt_get:
- name: golang
bin_name: go
is_requires_admin_user: true
is_always_run: false
is_skippable: false
run_if: ""
inputs:
- opts:
description: Set the device profile to create the new AVD. This profile contains
all the parameters of the devices. To see the complete list of available profiles
please use the `avdmanager list device` command.
is_expand: true
is_required: true
summary: Set the device profile to create the new AVD. This profile contains all
the parameters of the devices. To see the complete list of available profiles
please use the `avdmanager list device` command.
title: Device Profile
value_options:
- tv_1080p
- tv_720p
- wear_round
- wear_round_chin_320_290
- wear_square
- Galaxy Nexus
- Nexus 10
- Nexus 4
- Nexus 5
- Nexus 5X
- Nexus 6
- Nexus 6P
- Nexus 7 2013
- Nexus 7
- Nexus 9
- Nexus One
- Nexus S
- pixel
- pixel_c
- pixel_xl
- 2.7in QVGA
- 2.7in QVGA slider
- 3.2in HVGA slider (ADP1)
- 3.2in QVGA (ADP2)
- 3.3in WQVGA
- 3.4in WQVGA
- 3.7 FWVGA slider
- 3.7in WVGA (Nexus One)
- 4in WVGA (Nexus S)
- 4.65in 720p (Galaxy Nexus)
- 4.7in WXGA
- 5.1in WVGA
- 5.4in FWVGA
- 7in WSVGA (Tablet)
- 10.1in WXGA (Tablet)
profile: Nexus 5X
- opts:
description: The device will run with the specified version of android.
is_expand: true
is_required: true
summary: The device will run with the specified version of android.
title: Android API Level
version: 26
- opts:
description: Select OS tag to have the required toolset on the device.
is_expand: true
is_required: true
summary: Select OS tag to have the required toolset on the device.
title: OS Tag
value_options:
- google_apis
- google_apis_playstore
- android-wear
- android-tv
- default
tag: google_apis
- opts:
category: Customize
description: If set to `true` then the step will print emulator logs
is_expand: true
is_required: true
summary: If set to `true` then the step will print emulator logs
title: Verbose Mode
value_options:
- "true"
- "false"
verbose_mode: false
- opts:
category: Customize
description: Set the device to the selected orientation.
is_expand: true
is_required: true
summary: Set the device to the selected orientation.
title: Orientation
value_options:
- portrait
- landscape
orientation: portrait
- opts:
category: Customize
description: Set the device's display resolution. This field will override the
device profile's default resolution, if you need the device profile's default
resolution leave this field empty.
is_expand: true
is_required: false
summary: Set the device's display resolution. This field will override the device
profile's default resolution, if you need the device profile's default resolution
leave this field empty.
title: Resolution
resolution: 240x426
- density: 120
opts:
category: Customize
description: Set the device's display density. This field will override the device
profile's default density, if you need the device profile's default density
leave this field empty.
is_expand: true
is_required: false
summary: Set the device's display density. This field will override the device
profile's default density, if you need the device profile's default density
leave this field empty.
title: Density
- emulator_id: emulator
opts:
category: Customize
description: Set the device's ID. (This will be the name under $HOME/.android/avd/)
is_expand: true
is_required: true
summary: Set the device's ID. (This will be the name under $HOME/.android/avd/)
title: ID
- custom_hw_config: |-
disk.dataPartition.size=1024M
hw.camera.back=emulated
hw.camera.front=emulated
hw.keyboard=yes
hw.gpu.enabled=true
hw.gpu.mode=swiftshader
hw.ramSize=1536
runtime.network.latency=none
runtime.network.speed=full
showDeviceFrame=no
skin.dynamic=yes
skin.path=_no_skin
skin.path.backup=_no_skin
vm.heapSize=384
opts:
category: Customize
description: |-
Will append, replace or remove your config entries to the default device hardware config.
Usage: one config per line in the format `key=value`
For example: `hw.gpu.enabled=false`
Append:
If the given `key` is not in the config already, it will be added.
Remove:
Set your key without value, for example: `key=`. It will be removed from the default device config.
Replace:
If the given `key` is already in the config, the `value` will be replaced.
is_expand: true
is_required: false
summary: |-
Will append, replace or remove your config entries to the default device hardware config.
Usage: one config per line in the format `key=value`
For example: `hw.gpu.enabled=false`
Append:
If the given `key` is not in the config already, it will be added.
Remove:
Set your key without value, for example: `key=`. It will be removed from the default device config.
Replace:
If the given `key` is already in the config, the `value` will be replaced.
title: Custom hardware config
- opts:
category: Customize
description: Overwrite AVD images if already exists.
is_expand: true
is_required: true
summary: Overwrite AVD images if already exists.
title: Overwrite
value_options:
- "true"
- "false"
overwrite: true
- custom_command_flags: -no-window -no-audio -debug-init
opts:
category: Customize
description: Flags used when running the command to start the emulator.
is_expand: true
is_required: false
summary: Flags used when running the command to start the emulator.
title: Start AVD command flags
- emulator_abi: x86
opts:
category: Customize
description: Select which ABI to use running the emulator. Availability depends
on API level. Please use `sdkmanager --list` command to see the available ABIs.
is_expand: true
is_required: true
summary: Select which ABI to use running the emulator. Availability depends on
API level. Please use `sdkmanager --list` command to see the available ABIs.
title: Emulator ABI
value_options:
- x86
- armeabi-v7a
- arm64-v8a
- x86_64
- mips
outputs:
- BITRISE_EMULATOR_SERIAL: null
opts:
description: Booted emulator serial
title: Emulator serial
================================================
FILE: steps/avd-manager/0.9.2/step.yml
================================================
title: AVD Manager
summary: Create and run Android Virtual Device
description: Create and run Android Virtual Device
website: https://github.com/bitrise-steplib/steps-avd-manager
source_code_url: https://github.com/bitrise-steplib/steps-avd-manager
support_url: https://github.com/bitrise-steplib/steps-avd-manager/issues
published_at: 2017-12-20T11:04:35.985026322+01:00
source:
git: https://github.com/bitrise-steplib/steps-avd-manager.git
commit: b7b59cee5cf3ffbf712d976ea2c2a783709919b0
host_os_tags:
- osx-10.10
project_type_tags:
- android
type_tags:
- utility
toolkit:
go:
package_name: github.com/bitrise-steplib/steps-avd-manager
deps:
brew:
- name: go
apt_get:
- name: golang
bin_name: go
is_requires_admin_user: true
is_always_run: false
is_skippable: false
run_if: ""
inputs:
- opts:
description: Set the device profile to create the new AVD. This profile contains
all the parameters of the devices. To see the complete list of available profiles
please use the `avdmanager list device` command.
is_expand: true
is_required: true
summary: Set the device profile to create the new AVD. This profile contains all
the parameters of the devices. To see the complete list of available profiles
please use the `avdmanager list device` command.
title: Device Profile
value_options:
- tv_1080p
- tv_720p
- wear_round
- wear_round_chin_320_290
- wear_square
- Galaxy Nexus
- Nexus 10
- Nexus 4
- Nexus 5
- Nexus 5X
- Nexus 6
- Nexus 6P
- Nexus 7 2013
- Nexus 7
- Nexus 9
- Nexus One
- Nexus S
- pixel
- pixel_c
- pixel_xl
- 2.7in QVGA
- 2.7in QVGA slider
- 3.2in HVGA slider (ADP1)
- 3.2in QVGA (ADP2)
- 3.3in WQVGA
- 3.4in WQVGA
- 3.7 FWVGA slider
- 3.7in WVGA (Nexus One)
- 4in WVGA (Nexus S)
- 4.65in 720p (Galaxy Nexus)
- 4.7in WXGA
- 5.1in WVGA
- 5.4in FWVGA
- 7in WSVGA (Tablet)
- 10.1in WXGA (Tablet)
profile: Nexus 5X
- opts:
description: The device will run with the specified version of android.
is_expand: true
is_required: true
summary: The device will run with the specified version of android.
title: Android API Level
version: 26
- opts:
description: Select OS tag to have the required toolset on the device.
is_expand: true
is_required: true
summary: Select OS tag to have the required toolset on the device.
title: OS Tag
value_options:
- google_apis
- google_apis_playstore
- android-wear
- android-tv
- default
tag: google_apis
- opts:
category: Customize
description: If set to `true` then the step will print emulator logs
is_expand: true
is_required: true
summary: If set to `true` then the step will print emulator logs
title: Verbose Mode
value_options:
- "true"
- "false"
verbose_mode: false
- opts:
category: Customize
description: Set the device to the selected orientation.
is_expand: true
is_required: true
summary: Set the device to the selected orientation.
title: Orientation
value_options:
- portrait
- landscape
orientation: portrait
- opts:
category: Customize
description: Set the device's display resolution. This field will override the
device profile's default resolution, if you need the device profile's default
resolution leave this field empty.
is_expand: true
is_required: false
summary: Set the device's display resolution. This field will override the device
profile's default resolution, if you need the device profile's default resolution
leave this field empty.
title: Resolution
resolution: 240x426
- density: 120
opts:
category: Customize
description: Set the device's display density. This field will override the device
profile's default density, if you need the device profile's default density
leave this field empty.
is_expand: true
is_required: false
summary: Set the device's display density. This field will override the device
profile's default density, if you need the device profile's default density
leave this field empty.
title: Density
- emulator_id: emulator
opts:
category: Customize
description: Set the device's ID. (This will be the name under $HOME/.android/avd/)
is_expand: true
is_required: true
summary: Set the device's ID. (This will be the name under $HOME/.android/avd/)
title: ID
- custom_hw_config: |-
disk.dataPartition.size=1024M
hw.camera.back=emulated
hw.camera.front=emulated
hw.keyboard=yes
hw.gpu.enabled=true
hw.gpu.mode=swiftshader
hw.ramSize=1536
runtime.network.latency=none
runtime.network.speed=full
showDeviceFrame=no
skin.dynamic=yes
skin.path=_no_skin
skin.path.backup=_no_skin
vm.heapSize=384
opts:
category: Customize
description: |-
Will append, replace or remove your config entries to the default device hardware config.
Usage: one config per line in the format `key=value`
For example: `hw.gpu.enabled=false`
Append:
If the given `key` is not in the config already, it will be added.
Remove:
Set your key without value, for example: `key=`. It will be removed from the default device config.
Replace:
If the given `key` is already in the config, the `value` will be replaced.
is_expand: true
is_required: false
summary: |-
Will append, replace or remove your config entries to the default device hardware config.
Usage: one config per line in the format `key=value`
For example: `hw.gpu.enabled=false`
Append:
If the given `key` is not in the config already, it will be added.
Remove:
Set your key without value, for example: `key=`. It will be removed from the default device config.
Replace:
If the given `key` is already in the config, the `value` will be replaced.
title: Custom hardware config
- opts:
category: Customize
description: Overwrite AVD images if already exists.
is_expand: true
is_required: true
summary: Overwrite AVD images if already exists.
title: Overwrite
value_options:
- "true"
- "false"
overwrite: true
- custom_command_flags: -no-window -no-audio -debug-init
opts:
category: Customize
description: Flags used when running the command to start the emulator.
is_expand: true
is_required: false
summary: Flags used when running the command to start the emulator.
title: Start AVD command flags
- emulator_abi: x86
opts:
category: Customize
description: Select which ABI to use running the emulator. Availability depends
on API level. Please use `sdkmanager --list` command to see the available ABIs.
is_expand: true
is_required: true
summary: Select which ABI to use running the emulator. Availability depends on
API level. Please use `sdkmanager --list` command to see the available ABIs.
title: Emulator ABI
value_options:
- x86
- armeabi-v7a
- arm64-v8a
- x86_64
- mips
outputs:
- BITRISE_EMULATOR_SERIAL: null
opts:
description: Booted emulator serial
title: Emulator serial
================================================
FILE: steps/avd-manager/1.0.0/step.yml
================================================
title: AVD Manager
summary: Create and run Android Virtual Device
description: Create and run Android Virtual Device
website: https://github.com/bitrise-steplib/steps-avd-manager
source_code_url: https://github.com/bitrise-steplib/steps-avd-manager
support_url: https://github.com/bitrise-steplib/steps-avd-manager/issues
published_at: 2019-11-29T09:10:47.909560831Z
source:
git: https://github.com/bitrise-steplib/steps-avd-manager.git
commit: 9f3acec7876c827c22b1391e14e7d7fe0c0fe507
host_os_tags:
- osx-10.10
type_tags:
- utility
toolkit:
go:
package_name: github.com/bitrise-steplib/steps-avd-manager
is_requires_admin_user: true
is_always_run: false
is_skippable: false
run_if: ""
inputs:
- opts:
description: Set the device profile to create the new AVD. This profile contains
all the parameters of the devices. To see the complete list of available profiles
please use the `avdmanager list device` command.
is_required: true
summary: Set the device profile to create the new AVD. This profile contains all
the parameters of the devices. To see the complete list of available profiles
please use the `avdmanager list device` command.
title: Device Profile
profile: pixel
- api_level: 26
opts:
description: The device will run with the specified version of android.
is_required: true
summary: The device will run with the specified version of android.
title: Android API Level
- opts:
description: Select OS tag to have the required toolset on the device.
is_expand: true
is_required: true
summary: Select OS tag to have the required toolset on the device.
title: OS Tag
value_options:
- google_apis
- google_apis_playstore
- android-wear
- android-tv
- default
tag: google_apis
- abi: x86
opts:
category: Debug
description: Select which ABI to use running the emulator. Availability depends
on API level. Please use `sdkmanager --list` command to see the available ABIs.
is_expand: true
is_required: true
summary: Select which ABI to use running the emulator. Availability depends on
API level. Please use `sdkmanager --list` command to see the available ABIs.
title: ABI
value_options:
- x86
- x86_64
- armeabi-v7a
- arm64-v8a
- mips
- emulator_id: emulator
opts:
category: Debug
description: Set the device's ID. (This will be the name under $HOME/.android/avd/)
is_required: true
summary: Set the device's ID. (This will be the name under $HOME/.android/avd/)
title: ID
- create_command_flags: --sdcard 512M
opts:
category: Debug
description: Flags used when running the command to create the emulator.
is_required: false
summary: Flags used when running the command to create the emulator.
title: Create AVD command flags
- opts:
category: Debug
description: Flags used when running the command to start the emulator.
is_required: false
summary: Flags used when running the command to start the emulator.
title: Start AVD command flags
start_command_flags: -camera-back none -camera-front none
- emulator_channel: "0"
opts:
category: Debug
description: Select which channel to use with `sdkmanager` to fetch `emulator`
package. Available channels are 0 (Stable), 1 (Beta), 2 (Dev), and 3 (Canary).
is_expand: true
is_required: true
summary: Select which channel to use with `sdkmanager` to fetch `emulator` package.
Available channels are 0 (Stable), 1 (Beta), 2 (Dev), and 3 (Canary).
title: Emulator channel
value_options:
- "0"
- "1"
- "2"
- "3"
outputs:
- BITRISE_EMULATOR_SERIAL: null
opts:
description: Booted emulator serial
title: Emulator serial
================================================
FILE: steps/avd-manager/1.0.1/step.yml
================================================
title: AVD Manager
summary: Create and run Android Virtual Device
description: Create and run Android Virtual Device
website: https://github.com/bitrise-steplib/steps-avd-manager
source_code_url: https://github.com/bitrise-steplib/steps-avd-manager
support_url: https://github.com/bitrise-steplib/steps-avd-manager/issues
published_at: 2019-12-09T14:53:28.773467259Z
source:
git: https://github.com/bitrise-steplib/steps-avd-manager.git
commit: 0d1ffeb956f3721fcd0671952a9774537b16a7b0
host_os_tags:
- osx-10.10
type_tags:
- utility
toolkit:
go:
package_name: github.com/bitrise-steplib/steps-avd-manager
is_requires_admin_user: true
is_always_run: false
is_skippable: false
run_if: ""
inputs:
- opts:
description: Set the device profile to create the new AVD. This profile contains
all the parameters of the devices. To see the complete list of available profiles
please use the `avdmanager list device` command.
is_required: true
summary: Set the device profile to create the new AVD. This profile contains all
the parameters of the devices. To see the complete list of available profiles
please use the `avdmanager list device` command.
title: Device Profile
profile: pixel
- api_level: 26
opts:
description: The device will run with the specified version of android.
is_required: true
summary: The device will run with the specified version of android.
title: Android API Level
- opts:
description: Select OS tag to have the required toolset on the device.
is_expand: true
is_required: true
summary: Select OS tag to have the required toolset on the device.
title: OS Tag
value_options:
- google_apis
- google_apis_playstore
- android-wear
- android-tv
- default
tag: google_apis
- abi: x86
opts:
category: Debug
description: Select which ABI to use running the emulator. Availability depends
on API level. Please use `sdkmanager --list` command to see the available ABIs.
is_expand: true
is_required: true
summary: Select which ABI to use running the emulator. Availability depends on
API level. Please use `sdkmanager --list` command to see the available ABIs.
title: ABI
value_options:
- x86
- x86_64
- armeabi-v7a
- arm64-v8a
- mips
- emulator_id: emulator
opts:
category: Debug
description: Set the device's ID. (This will be the name under $HOME/.android/avd/)
is_required: true
summary: Set the device's ID. (This will be the name under $HOME/.android/avd/)
title: ID
- create_command_flags: --sdcard 512M
opts:
category: Debug
description: Flags used when running the command to create the emulator.
is_required: false
summary: Flags used when running the command to create the emulator.
title: Create AVD command flags
- opts:
category: Debug
description: Flags used when running the command to start the emulator.
is_required: false
summary: Flags used when running the command to start the emulator.
title: Start AVD command flags
start_command_flags: -camera-back none -camera-front none
- emulator_channel: "0"
opts:
category: Debug
description: Select which channel to use with `sdkmanager` to fetch `emulator`
package. Available channels are 0 (Stable), 1 (Beta), 2 (Dev), and 3 (Canary).
is_expand: true
is_required: true
summary: Select which channel to use with `sdkmanager` to fetch `emulator` package.
Available channels are 0 (Stable), 1 (Beta), 2 (Dev), and 3 (Canary).
title: Emulator channel
value_options:
- "0"
- "1"
- "2"
- "3"
outputs:
- BITRISE_EMULATOR_SERIAL: null
opts:
description: Booted emulator serial
title: Emulator serial
================================================
FILE: steps/avd-manager/1.0.2/step.yml
================================================
title: AVD Manager
summary: Create an Android emulator with the AVD Manager Step.
description: |-
Test your project in an Android emulator with the AVD Manager. Once some basic inputs are set, the Step checks the requirements, downloads and installs the packages before creating and starting the emulator.
### Configuring the Step
1. Add the **AVD Manager** Step to your Workflow as one of the first Steps in your Workflow.
2. Set the **Device Profile** to create a new Android virtual device. To see the complete list of available profiles, use the `avdmanager list device` command.
3. Set the **Android API Level**. The new virtual device will run with the specified Android version.
4. Select an **OS Tag** to have the required toolset on the new virtual device.
### Troubleshooting
The emulator needs some time to boot up. The earlier you place the Step in your Workflow, the more tasks, such as cloning or caching, you can complete in your Workflow before the emulator starts working.
We recommend that you also add **Wait for Android emulator** Step to your Workflow as it acts as a shield preventing the AVD Manager to kick in too early. Make sure you add the **Wait for Android emulator** Step BEFORE the Step with which you want to use the **AVD Manager**.
### Useful links
- [Getting started with Android apps](https://devcenter.bitrise.io/getting-started/getting-started-with-android-apps/)
- [Device testing for Android](https://devcenter.bitrise.io/testing/device-testing-for-android/)
- [About Test Reports](https://devcenter.bitrise.io/testing/test-reports/)
### Related Steps
- [Wait for Android emulator](https://www.bitrise.io/integrations/steps/wait-for-android-emulator)
- [Android Build for UI testing](https://www.bitrise.io/integrations/steps/android-build-for-ui-testing)
website: https://github.com/bitrise-steplib/steps-avd-manager
source_code_url: https://github.com/bitrise-steplib/steps-avd-manager
support_url: https://github.com/bitrise-steplib/steps-avd-manager/issues
published_at: 2020-11-20T12:28:51.692898261Z
source:
git: https://github.com/bitrise-steplib/steps-avd-manager.git
commit: d46b9e1c64fb711400d0d4ac0414ea3df53ce46e
host_os_tags:
- osx-10.10
type_tags:
- utility
toolkit:
go:
package_name: github.com/bitrise-steplib/steps-avd-manager
is_requires_admin_user: true
is_always_run: false
is_skippable: false
run_if: ""
inputs:
- opts:
description: Set the device profile to create the new AVD. This profile contains
all the parameters of the devices. To see the complete list of available profiles
please use the `avdmanager list device` command.
is_required: true
summary: Set the device profile to create the new AVD. This profile contains all
the parameters of the devices. To see the complete list of available profiles
please use the `avdmanager list device` command.
title: Device Profile
profile: pixel
- api_level: 26
opts:
description: The device will run with the specified version of android.
is_required: true
summary: The device will run with the specified version of android.
title: Android API Level
- opts:
description: Select OS tag to have the required toolset on the device.
is_expand: true
is_required: true
summary: Select OS tag to have the required toolset on the device.
title: OS Tag
value_options:
- google_apis
- google_apis_playstore
- android-wear
- android-tv
- default
tag: google_apis
- abi: x86
opts:
category: Debug
description: Select which ABI to use running the emulator. Availability depends
on API level. Please use `sdkmanager --list` command to see the available ABIs.
is_expand: true
is_required: true
summary: Select which ABI to use running the emulator. Availability depends on
API level. Please use `sdkmanager --list` command to see the available ABIs.
title: ABI
value_options:
- x86
- x86_64
- armeabi-v7a
- arm64-v8a
- mips
- emulator_id: emulator
opts:
category: Debug
description: Set the device's ID. (This will be the name under $HOME/.android/avd/)
is_required: true
summary: Set the device's ID. (This will be the name under $HOME/.android/avd/)
title: ID
- create_command_flags: --sdcard 512M
opts:
category: Debug
description: Flags used when running the command to create the emulator.
is_required: false
summary: Flags used when running the command to create the emulator.
title: Create AVD command flags
- opts:
category: Debug
description: Flags used when running the command to start the emulator.
is_required: false
summary: Flags used when running the command to start the emulator.
title: Start AVD command flags
start_command_flags: -camera-back none -camera-front none
- emulator_channel: "0"
opts:
category: Debug
description: Select which channel to use with `sdkmanager` to fetch `emulator`
package. Available channels are 0 (Stable), 1 (Beta), 2 (Dev), and 3 (Canary).
is_expand: true
is_required: true
summary: Select which channel to use with `sdkmanager` to fetch `emulator` package.
Available channels are 0 (Stable), 1 (Beta), 2 (Dev), and 3 (Canary).
title: Emulator channel
value_options:
- "0"
- "1"
- "2"
- "3"
outputs:
- BITRISE_EMULATOR_SERIAL: null
opts:
description: Booted emulator serial
title: Emulator serial
================================================
FILE: steps/avd-manager/1.0.3/step.yml
================================================
title: AVD Manager
summary: Create an Android emulator with the AVD Manager Step.
description: |-
Test your project in an Android emulator with the AVD Manager. Once some basic inputs are set, the Step checks the requirements, downloads and installs the packages before creating and starting the emulator.
### Configuring the Step
1. Add the **AVD Manager** Step to your Workflow as one of the first Steps in your Workflow.
2. Set the **Device Profile** to create a new Android virtual device. To see the complete list of available profiles, use the `avdmanager list device` command.
3. Set the **Android API Level**. The new virtual device will run with the specified Android version.
4. Select an **OS Tag** to have the required toolset on the new virtual device.
### Troubleshooting
The emulator needs some time to boot up. The earlier you place the Step in your Workflow, the more tasks, such as cloning or caching, you can complete in your Workflow before the emulator starts working.
We recommend that you also add **Wait for Android emulator** Step to your Workflow as it acts as a shield preventing the AVD Manager to kick in too early. Make sure you add the **Wait for Android emulator** Step BEFORE the Step with which you want to use the **AVD Manager**.
### Useful links
- [Getting started with Android apps](https://devcenter.bitrise.io/getting-started/getting-started-with-android-apps/)
- [Device testing for Android](https://devcenter.bitrise.io/testing/device-testing-for-android/)
- [About Test Reports](https://devcenter.bitrise.io/testing/test-reports/)
### Related Steps
- [Wait for Android emulator](https://www.bitrise.io/integrations/steps/wait-for-android-emulator)
- [Android Build for UI testing](https://www.bitrise.io/integrations/steps/android-build-for-ui-testing)
website: https://github.com/bitrise-steplib/steps-avd-manager
source_code_url: https://github.com/bitrise-steplib/steps-avd-manager
support_url: https://github.com/bitrise-steplib/steps-avd-manager/issues
published_at: 2021-06-25T12:16:38.197258009Z
source:
git: https://github.com/bitrise-steplib/steps-avd-manager.git
commit: dd09e2ee12aba7274cb034bcc8cccba32c1b4131
host_os_tags:
- osx-10.10
type_tags:
- utility
toolkit:
go:
package_name: github.com/bitrise-steplib/steps-avd-manager
is_requires_admin_user: true
is_always_run: false
is_skippable: false
run_if: ""
inputs:
- opts:
description: Set the device profile to create the new AVD. This profile contains
all the parameters of the devices. To see the complete list of available profiles
please use the `avdmanager list device` command.
is_required: true
summary: Set the device profile to create the new AVD. This profile contains all
the parameters of the devices. To see the complete list of available profiles
please use the `avdmanager list device` command.
title: Device Profile
profile: pixel
- api_level: 26
opts:
description: The device will run with the specified version of android.
is_required: true
summary: The device will run with the specified version of android.
title: Android API Level
- opts:
description: Select OS tag to have the required toolset on the device.
is_expand: true
is_required: true
summary: Select OS tag to have the required toolset on the device.
title: OS Tag
value_options:
- google_apis
- google_apis_playstore
- android-wear
- android-tv
- default
tag: google_apis
- abi: x86
opts:
category: Debug
description: Select which ABI to use running the emulator. Availability depends
on API level. Please use `sdkmanager --list` command to see the available ABIs.
is_expand: true
is_required: true
summary: Select which ABI to use running the emulator. Availability depends on
API level. Please use `sdkmanager --list` command to see the available ABIs.
title: ABI
value_options:
- x86
- x86_64
- armeabi-v7a
- arm64-v8a
- mips
- emulator_id: emulator
opts:
category: Debug
description: Set the device's ID. (This will be the name under $HOME/.android/avd/)
is_required: true
summary: Set the device's ID. (This will be the name under $HOME/.android/avd/)
title: ID
- create_command_flags: --sdcard 512M
opts:
category: Debug
description: Flags used when running the command to create the emulator.
is_required: false
summary: Flags used when running the command to create the emulator.
title: Create AVD command flags
- opts:
category: Debug
description: Flags used when running the command to start the emulator.
is_required: false
summary: Flags used when running the command to start the emulator.
title: Start AVD command flags
start_command_flags: -camera-back none -camera-front none
- emulator_channel: "0"
opts:
category: Debug
description: Select which channel to use with `sdkmanager` to fetch `emulator`
package. Available channels are 0 (Stable), 1 (Beta), 2 (Dev), and 3 (Canary).
is_expand: true
is_required: true
summary: Select which channel to use with `sdkmanager` to fetch `emulator` package.
Available channels are 0 (Stable), 1 (Beta), 2 (Dev), and 3 (Canary).
title: Emulator channel
value_options:
- "0"
- "1"
- "2"
- "3"
outputs:
- BITRISE_EMULATOR_SERIAL: null
opts:
description: Booted emulator serial
title: Emulator serial
================================================
FILE: steps/avd-manager/1.0.4/step.yml
================================================
title: AVD Manager
summary: Create an Android emulator with the AVD Manager Step.
description: |-
Test your project in an Android emulator with the AVD Manager. Once some basic inputs are set, the Step checks the requirements, downloads and installs the packages before creating and starting the emulator.
### Configuring the Step
1. Add the **AVD Manager** Step to your Workflow as one of the first Steps in your Workflow.
2. Set the **Device Profile** to create a new Android virtual device. To see the complete list of available profiles, use the `avdmanager list device` command.
3. Set the **Android API Level**. The new virtual device will run with the specified Android version.
4. Select an **OS Tag** to have the required toolset on the new virtual device.
### Troubleshooting
The emulator needs some time to boot up. The earlier you place the Step in your Workflow, the more tasks, such as cloning or caching, you can complete in your Workflow before the emulator starts working.
We recommend that you also add **Wait for Android emulator** Step to your Workflow as it acts as a shield preventing the AVD Manager to kick in too early. Make sure you add the **Wait for Android emulator** Step BEFORE the Step with which you want to use the **AVD Manager**.
### Useful links
- [Getting started with Android apps](https://devcenter.bitrise.io/getting-started/getting-started-with-android-apps/)
- [Device testing for Android](https://devcenter.bitrise.io/testing/device-testing-for-android/)
- [About Test Reports](https://devcenter.bitrise.io/testing/test-reports/)
### Related Steps
- [Wait for Android emulator](https://www.bitrise.io/integrations/steps/wait-for-android-emulator)
- [Android Build for UI testing](https://www.bitrise.io/integrations/steps/android-build-for-ui-testing)
website: https://github.com/bitrise-steplib/steps-avd-manager
source_code_url: https://github.com/bitrise-steplib/steps-avd-manager
support_url: https://github.com/bitrise-steplib/steps-avd-manager/issues
published_at: 2021-10-04T13:01:00.710607342Z
source:
git: https://github.com/bitrise-steplib/steps-avd-manager.git
commit: 2850730d7019c511e744ef4def536117dfcd1e36
host_os_tags:
- osx-10.10
type_tags:
- utility
toolkit:
go:
package_name: github.com/bitrise-steplib/steps-avd-manager
is_requires_admin_user: true
is_always_run: false
is_skippable: false
run_if: ""
inputs:
- opts:
description: Set the device profile to create the new AVD. This profile contains
all the parameters of the devices. To see the complete list of available profiles
please use the `avdmanager list device` command.
is_required: true
summary: Set the device profile to create the new AVD. This profile contains all
the parameters of the devices. To see the complete list of available profiles
please use the `avdmanager list device` command.
title: Device Profile
profile: pixel
- api_level: 26
opts:
description: The device will run with the specified version of android.
is_required: true
summary: The device will run with the specified version of android.
title: Android API Level
- opts:
description: Select OS tag to have the required toolset on the device.
is_expand: true
is_required: true
summary: Select OS tag to have the required toolset on the device.
title: OS Tag
value_options:
- google_apis
- google_apis_playstore
- android-wear
- android-tv
- default
tag: google_apis
- abi: x86
opts:
category: Debug
description: Select which ABI to use running the emulator. Availability depends
on API level. Please use `sdkmanager --list` command to see the available ABIs.
is_expand: true
is_required: true
summary: Select which ABI to use running the emulator. Availability depends on
API level. Please use `sdkmanager --list` command to see the available ABIs.
title: ABI
value_options:
- x86
- x86_64
- armeabi-v7a
- arm64-v8a
- mips
- emulator_id: emulator
opts:
category: Debug
description: Set the device's ID. (This will be the name under $HOME/.android/avd/)
is_required: true
summary: Set the device's ID. (This will be the name under $HOME/.android/avd/)
title: ID
- create_command_flags: --sdcard 512M
opts:
category: Debug
description: Flags used when running the command to create the emulator.
is_required: false
summary: Flags used when running the command to create the emulator.
title: Create AVD command flags
- opts:
category: Debug
description: Flags used when running the command to start the emulator.
is_required: false
summary: Flags used when running the command to start the emulator.
title: Start AVD command flags
start_command_flags: -camera-back none -camera-front none
- emulator_channel: "0"
opts:
category: Debug
description: Select which channel to use with `sdkmanager` to fetch `emulator`
package. Available channels are 0 (Stable), 1 (Beta), 2 (Dev), and 3 (Canary).
is_expand: true
is_required: true
summary: Select which channel to use with `sdkmanager` to fetch `emulator` package.
Available channels are 0 (Stable), 1 (Beta), 2 (Dev), and 3 (Canary).
title: Emulator channel
value_options:
- "0"
- "1"
- "2"
- "3"
outputs:
- BITRISE_EMULATOR_SERIAL: null
opts:
description: Booted emulator serial
title: Emulator serial
================================================
FILE: steps/avd-manager/1.1.0/step.yml
================================================
title: AVD Manager
summary: Create and boot an Android emulator used for device testing
description: |-
Run instrumented and UI tests on a virtual Android device. Once some basic inputs are set, the Step checks the requirements, downloads the selected system image before creating and starting the emulator.
### Configuring the Step
1. Add the **AVD Manager** Step to your Workflow as one of the first Steps in your Workflow.
2. Set the **Device Profile** to create a new Android virtual device. To see the complete list of available profiles, use the `avdmanager list device` command and use the `id` value for this input.
3. Set the **Android API Level**. The new virtual device will run with the specified Android version.
4. Select an **OS Tag** to have the required toolset on the new virtual device.
Some system images are pre-installed on the virtual machines. In this case the step won't have to spend time downloading the requested image. To check the list of pre-installed images for each stack, visit the [system reports](https://github.com/bitrise-io/bitrise.io/tree/master/system_reports).
### Troubleshooting
The emulator needs some time to boot up. The earlier you place the Step in your Workflow, the more tasks, such as cloning or caching, you can complete in your Workflow before the emulator starts working.
We recommend that you also add **Wait for Android emulator** Step to your Workflow as it acts as a shield preventing the AVD Manager to kick in too early. Make sure you add the **Wait for Android emulator** Step BEFORE the Step with which you want to use the **AVD Manager**.
### Useful links
- [Getting started with Android apps](https://devcenter.bitrise.io/getting-started/getting-started-with-android-apps/)
- [Device testing for Android](https://devcenter.bitrise.io/testing/device-testing-for-android/)
- [About Test Reports](https://devcenter.bitrise.io/testing/test-reports/)
### Related Steps
- [Wait for Android emulator](https://www.bitrise.io/integrations/steps/wait-for-android-emulator)
- [Android Build for UI testing](https://www.bitrise.io/integrations/steps/android-build-for-ui-testing)
website: https://github.com/bitrise-steplib/steps-avd-manager
source_code_url: https://github.com/bitrise-steplib/steps-avd-manager
support_url: https://github.com/bitrise-steplib/steps-avd-manager/issues
published_at: 2022-05-18T10:12:57.558272713Z
source:
git: https://github.com/bitrise-steplib/steps-avd-manager.git
commit: 0dd41db07c364875216bcba56e9e229251c99046
type_tags:
- utility
toolkit:
go:
package_name: github.com/bitrise-steplib/steps-avd-manager
is_requires_admin_user: true
is_always_run: false
is_skippable: false
inputs:
- opts:
description: This profile contains all the parameters of the devices. To see the
complete list of available profiles use the `avdmanager list device` command
locally and use the `id` value for this input.
is_required: true
summary: Set the device profile to create the new AVD.
title: Device Profile
profile: pixel
- api_level: 26
opts:
description: The device will run with the specified version of android.
is_required: true
summary: The device will run with the specified version of android.
title: Android API Level
- opts:
description: Select OS tag to have the required toolset on the device.
is_expand: true
is_required: true
summary: Select OS tag to have the required toolset on the device.
title: OS Tag
value_options:
- google_apis
- google_apis_playstore
- google_atd
- aosp_atd
- android-wear
- android-tv
- default
tag: google_apis
- abi: x86
opts:
category: Debug
description: Select which ABI to use running the emulator. Availability depends
on API level. Please use `sdkmanager --list` command to see the available ABIs.
is_expand: true
is_required: true
summary: Select which ABI to use running the emulator. Availability depends on
API level. Please use `sdkmanager --list` command to see the available ABIs.
title: ABI
value_options:
- x86
- x86_64
- armeabi-v7a
- arm64-v8a
- mips
- emulator_id: emulator
opts:
category: Debug
description: Set the device's ID. (This will be the name under $HOME/.android/avd/)
is_required: true
summary: Set the device's ID. (This will be the name under $HOME/.android/avd/)
title: ID
- create_command_flags: --sdcard 512M
opts:
category: Debug
description: Flags used when running the command to create the emulator.
is_required: false
summary: Flags used when running the command to create the emulator.
title: Create AVD command flags
- opts:
category: Debug
description: Flags used when running the command to start the emulator.
is_required: false
summary: Flags used when running the command to start the emulator.
title: Start AVD command flags
start_command_flags: -camera-back none -camera-front none
- emulator_channel: "0"
opts:
category: Debug
description: Select which channel to use with `sdkmanager` to fetch `emulator`
package. Available channels are 0 (Stable), 1 (Beta), 2 (Dev), and 3 (Canary).
is_expand: true
is_required: true
summary: Select which channel to use with `sdkmanager` to fetch `emulator` package.
Available channels are 0 (Stable), 1 (Beta), 2 (Dev), and 3 (Canary).
title: Emulator channel
value_options:
- "0"
- "1"
- "2"
- "3"
outputs:
- BITRISE_EMULATOR_SERIAL: null
opts:
description: Booted emulator serial
title: Emulator serial
================================================
FILE: steps/avd-manager/1.1.1/step.yml
================================================
title: AVD Manager
summary: Create and boot an Android emulator used for device testing
description: |-
Run instrumented and UI tests on a virtual Android device. Once some basic inputs are set, the Step checks the requirements, downloads the selected system image before creating and starting the emulator.
### Configuring the Step
1. Add the **AVD Manager** Step to your Workflow as one of the first Steps in your Workflow.
2. Set the **Device Profile** to create a new Android virtual device. To see the complete list of available profiles, use the `avdmanager list device` command and use the `id` value for this input.
3. Set the **Android API Level**. The new virtual device will run with the specified Android version.
4. Select an **OS Tag** to have the required toolset on the new virtual device.
Some system images are pre-installed on the virtual machines. In this case the step won't have to spend time downloading the requested image. To check the list of pre-installed images for each stack, visit the [system reports](https://github.com/bitrise-io/bitrise.io/tree/master/system_reports).
### Troubleshooting
The emulator needs some time to boot up. The earlier you place the Step in your Workflow, the more tasks, such as cloning or caching, you can complete in your Workflow before the emulator starts working.
We recommend that you also add **Wait for Android emulator** Step to your Workflow as it acts as a shield preventing the AVD Manager to kick in too early. Make sure you add the **Wait for Android emulator** Step BEFORE the Step with which you want to use the **AVD Manager**.
### Useful links
- [Getting started with Android apps](https://devcenter.bitrise.io/getting-started/getting-started-with-android-apps/)
- [Device testing for Android](https://devcenter.bitrise.io/testing/device-testing-for-android/)
- [About Test Reports](https://devcenter.bitrise.io/testing/test-reports/)
### Related Steps
- [Wait for Android emulator](https://www.bitrise.io/integrations/steps/wait-for-android-emulator)
- [Android Build for UI testing](https://www.bitrise.io/integrations/steps/android-build-for-ui-testing)
website: https://github.com/bitrise-steplib/steps-avd-manager
source_code_url: https://github.com/bitrise-steplib/steps-avd-manager
support_url: https://github.com/bitrise-steplib/steps-avd-manager/issues
published_at: 2022-07-07T08:37:01.320369676Z
source:
git: https://github.com/bitrise-steplib/steps-avd-manager.git
commit: e7f4b61ed2452023dc1a66cf94323d5f3b8199bb
type_tags:
- utility
toolkit:
go:
package_name: github.com/bitrise-steplib/steps-avd-manager
is_requires_admin_user: true
is_always_run: false
is_skippable: false
inputs:
- opts:
description: |
The profile contains parameters of the device, such as screen size and resolution.
To see the complete list of available profiles use the `avdmanager list device` command locally and use the `id` value for this input.
is_required: true
summary: Device profile to use when creating the virtual device.
title: Device Profile ID
profile: pixel
- api_level: 26
opts:
description: The device will run with the specified version of android.
is_required: true
summary: The device will run with the specified version of android.
title: Android API Level
- opts:
description: Select OS tag to have the required toolset on the device.
is_expand: true
is_required: true
summary: Select OS tag to have the required toolset on the device.
title: OS Tag
value_options:
- google_apis
- google_apis_playstore
- google_atd
- aosp_atd
- android-wear
- android-tv
- default
tag: google_apis
- abi: x86
opts:
category: Debug
description: Select which ABI to use running the emulator. Availability depends
on API level. Please use `sdkmanager --list` command to see the available ABIs.
is_expand: true
is_required: true
summary: Select which ABI to use running the emulator. Availability depends on
API level. Please use `sdkmanager --list` command to see the available ABIs.
title: ABI
value_options:
- x86
- x86_64
- armeabi-v7a
- arm64-v8a
- mips
- emulator_id: emulator
opts:
category: Debug
description: Set the device's ID. (This will be the name under $HOME/.android/avd/)
is_required: true
summary: Set the device's ID. (This will be the name under $HOME/.android/avd/)
title: ID
- create_command_flags: --sdcard 512M
opts:
category: Debug
description: Flags used when running the command to create the emulator.
is_required: false
summary: Flags used when running the command to create the emulator.
title: Create AVD command flags
- opts:
category: Debug
description: Flags used when running the command to start the emulator.
is_required: false
summary: Flags used when running the command to start the emulator.
title: Start AVD command flags
start_command_flags: -camera-back none -camera-front none
- emulator_channel: "0"
opts:
category: Debug
description: Select which channel to use with `sdkmanager` to fetch `emulator`
package. Available channels are 0 (Stable), 1 (Beta), 2 (Dev), and 3 (Canary).
is_expand: true
is_required: true
summary: Select which channel to use with `sdkmanager` to fetch `emulator` package.
Available channels are 0 (Stable), 1 (Beta), 2 (Dev), and 3 (Canary).
title: Emulator channel
value_options:
- "0"
- "1"
- "2"
- "3"
outputs:
- BITRISE_EMULATOR_SERIAL: null
opts:
description: Booted emulator serial
title: Emulator serial
================================================
FILE: steps/avd-manager/1.1.2/step.yml
================================================
title: AVD Manager
summary: Create and boot an Android emulator used for device testing
description: |-
Run instrumented and UI tests on a virtual Android device. Once some basic inputs are set, the Step checks the requirements, downloads the selected system image before creating and starting the emulator.
**Warning:** This Step is not yet supported on Apple Silicon (M1) machines. If you cannot find a solution to this error, try running this Workflow on an Intel-based machine type.
### Configuring the Step
1. Add the **AVD Manager** Step to your Workflow as one of the first Steps in your Workflow.
2. Set the **Device Profile** to create a new Android virtual device. To see the complete list of available profiles, use the `avdmanager list device` command and use the `id` value for this input.
3. Set the **Android API Level**. The new virtual device will run with the specified Android version.
4. Select an **OS Tag** to have the required toolset on the new virtual device.
Some system images are pre-installed on the virtual machines. In this case the step won't have to spend time downloading the requested image. To check the list of pre-installed images for each stack, visit the [system reports](https://github.com/bitrise-io/bitrise.io/tree/master/system_reports).
### Troubleshooting
The emulator needs some time to boot up. The earlier you place the Step in your Workflow, the more tasks, such as cloning or caching, you can complete in your Workflow before the emulator starts working.
We recommend that you also add **Wait for Android emulator** Step to your Workflow as it acts as a shield preventing the AVD Manager to kick in too early. Make sure you add the **Wait for Android emulator** Step BEFORE the Step with which you want to use the **AVD Manager**.
### Useful links
- [Getting started with Android apps](https://devcenter.bitrise.io/getting-started/getting-started-with-android-apps/)
- [Device testing for Android](https://devcenter.bitrise.io/testing/device-testing-for-android/)
- [About Test Reports](https://devcenter.bitrise.io/testing/test-reports/)
### Related Steps
- [Wait for Android emulator](https://www.bitrise.io/integrations/steps/wait-for-android-emulator)
- [Android Build for UI testing](https://www.bitrise.io/integrations/steps/android-build-for-ui-testing)
website: https://github.com/bitrise-steplib/steps-avd-manager
source_code_url: https://github.com/bitrise-steplib/steps-avd-manager
support_url: https://github.com/bitrise-steplib/steps-avd-manager/issues
published_at: 2022-07-18T14:21:27.935844946Z
source:
git: https://github.com/bitrise-steplib/steps-avd-manager.git
commit: f6ddcd9ce0aa9df0519df3e6899e31e9b57451dc
type_tags:
- utility
toolkit:
go:
package_name: github.com/bitrise-steplib/steps-avd-manager
is_requires_admin_user: true
is_always_run: false
is_skippable: false
inputs:
- opts:
description: |
The profile contains parameters of the device, such as screen size and resolution.
To see the complete list of available profiles use the `avdmanager list device` command locally and use the `id` value for this input.
is_required: true
summary: Device profile to use when creating the virtual device.
title: Device Profile ID
profile: pixel
- api_level: 26
opts:
description: The device will run with the specified version of android.
is_required: true
summary: The device will run with the specified version of android.
title: Android API Level
- opts:
description: Select OS tag to have the required toolset on the device.
is_expand: true
is_required: true
summary: Select OS tag to have the required toolset on the device.
title: OS Tag
value_options:
- google_apis
- google_apis_playstore
- google_atd
- aosp_atd
- android-wear
- android-tv
- default
tag: google_apis
- abi: x86
opts:
category: Debug
description: Select which ABI to use running the emulator. Availability depends
on API level. Please use `sdkmanager --list` command to see the available ABIs.
is_expand: true
is_required: true
summary: Select which ABI to use running the emulator. Availability depends on
API level. Please use `sdkmanager --list` command to see the available ABIs.
title: ABI
value_options:
- x86
- x86_64
- armeabi-v7a
- arm64-v8a
- mips
- emulator_id: emulator
opts:
category: Debug
description: Set the device's ID. (This will be the name under $HOME/.android/avd/)
is_required: true
summary: Set the device's ID. (This will be the name under $HOME/.android/avd/)
title: ID
- create_command_flags: --sdcard 512M
opts:
category: Debug
description: Flags used when running the command to create the emulator.
is_required: false
summary: Flags used when running the command to create the emulator.
title: Create AVD command flags
- opts:
category: Debug
description: Flags used when running the command to start the emulator.
is_required: false
summary: Flags used when running the command to start the emulator.
title: Start AVD command flags
start_command_flags: -camera-back none -camera-front none
- emulator_channel: "0"
opts:
category: Debug
description: Select which channel to use with `sdkmanager` to fetch `emulator`
package. Available channels are 0 (Stable), 1 (Beta), 2 (Dev), and 3 (Canary).
is_expand: true
is_required: true
summary: Select which channel to use with `sdkmanager` to fetch `emulator` package.
Available channels are 0 (Stable), 1 (Beta), 2 (Dev), and 3 (Canary).
title: Emulator channel
value_options:
- "0"
- "1"
- "2"
- "3"
outputs:
- BITRISE_EMULATOR_SERIAL: null
opts:
description: Booted emulator serial
title: Emulator serial
================================================
FILE: steps/avd-manager/1.2.0/step.yml
================================================
title: AVD Manager
summary: Create and boot an Android emulator used for device testing
description: |-
Run instrumented and UI tests on a virtual Android device. Once some basic inputs are set, the Step checks the requirements, downloads the selected system image before creating and starting the emulator.
**Warning:** This Step is not yet supported on Apple Silicon (M1) machines. If you cannot find a solution to this error, try running this Workflow on an Intel-based machine type.
### Configuring the Step
1. Add the **AVD Manager** Step to your Workflow as one of the first Steps in your Workflow.
2. Set the **Device Profile** to create a new Android virtual device. To see the complete list of available profiles, use the `avdmanager list device` command and use the `id` value for this input.
3. Set the **Android API Level**. The new virtual device will run with the specified Android version.
4. Select an **OS Tag** to have the required toolset on the new virtual device.
Some system images are pre-installed on the virtual machines. In this case the step won't have to spend time downloading the requested image. To check the list of pre-installed images for each stack, visit the [system reports](https://github.com/bitrise-io/bitrise.io/tree/master/system_reports).
### Troubleshooting
The emulator needs some time to boot up. The earlier you place the Step in your Workflow, the more tasks, such as cloning or caching, you can complete in your Workflow before the emulator starts working.
We recommend that you also add **Wait for Android emulator** Step to your Workflow as it acts as a shield preventing the AVD Manager to kick in too early. Make sure you add the **Wait for Android emulator** Step BEFORE the Step with which you want to use the **AVD Manager**.
### Useful links
- [Getting started with Android apps](https://devcenter.bitrise.io/getting-started/getting-started-with-android-apps/)
- [Device testing for Android](https://devcenter.bitrise.io/testing/device-testing-for-android/)
- [About Test Reports](https://devcenter.bitrise.io/testing/test-reports/)
### Related Steps
- [Wait for Android emulator](https://www.bitrise.io/integrations/steps/wait-for-android-emulator)
- [Android Build for UI testing](https://www.bitrise.io/integrations/steps/android-build-for-ui-testing)
website: https://github.com/bitrise-steplib/steps-avd-manager
source_code_url: https://github.com/bitrise-steplib/steps-avd-manager
support_url: https://github.com/bitrise-steplib/steps-avd-manager/issues
published_at: 2022-09-01T10:20:51.688411844Z
source:
git: https://github.com/bitrise-steplib/steps-avd-manager.git
commit: 4eb065786a6f6eef9462502426392c45445a71f1
type_tags:
- utility
toolkit:
go:
package_name: github.com/bitrise-steplib/steps-avd-manager
is_requires_admin_user: true
is_always_run: false
is_skippable: false
inputs:
- opts:
description: |
The profile contains parameters of the device, such as screen size and resolution.
To see the complete list of available profiles use the `avdmanager list device` command locally and use the `id` value for this input.
is_required: true
summary: Device profile to use when creating the virtual device.
title: Device Profile ID
profile: pixel
- api_level: 26
opts:
description: The device will run with the specified version of android.
is_required: true
summary: The device will run with the specified version of android.
title: Android API Level
- opts:
description: Select OS tag to have the required toolset on the device.
is_expand: true
is_required: true
summary: Select OS tag to have the required toolset on the device.
title: OS Tag
value_options:
- google_apis
- google_apis_playstore
- google_atd
- aosp_atd
- android-wear
- android-tv
- default
tag: google_apis
- abi: x86
opts:
category: Debug
description: Select which ABI to use running the emulator. Availability depends
on API level. Please use `sdkmanager --list` command to see the available ABIs.
is_expand: true
is_required: true
summary: Select which ABI to use running the emulator. Availability depends on
API level. Please use `sdkmanager --list` command to see the available ABIs.
title: ABI
value_options:
- x86
- x86_64
- armeabi-v7a
- arm64-v8a
- mips
- emulator_id: emulator
opts:
category: Debug
description: Set the device's ID. (This will be the name under $HOME/.android/avd/)
is_required: true
summary: Set the device's ID. (This will be the name under $HOME/.android/avd/)
title: ID
- create_command_flags: --sdcard 512M
opts:
category: Debug
description: Flags used when running the command to create the emulator.
is_required: false
summary: Flags used when running the command to create the emulator.
title: Create AVD command flags
- opts:
category: Debug
description: Flags used when running the command to start the emulator.
is_required: false
summary: Flags used when running the command to start the emulator.
title: Start AVD command flags
start_command_flags: -camera-back none -camera-front none
- emulator_channel: no update
opts:
category: Debug
description: |-
Select which channel to use with `sdkmanager` to fetch *emulator* package. Available options are no update, or channels 0 (Stable), 1 (Beta), 2 (Dev), and 3 (Canary).
- `no update`: The *emulator* preinstalled on the Stack will be used. *system-image* will be updated to the latest Stable version.
To update *emulator* and *system image* to the latest available in a given channel:
- `0`: Stable channel
- `1`: Beta channel
- `2`: Dev channel
- `3`: Canary channel
is_expand: true
is_required: true
summary: Select which channel to use with `sdkmanager` to fetch *emulator* package.
Available options are no update, or channels 0 (Stable), 1 (Beta), 2 (Dev),
and 3 (Canary).
title: Emulator channel
value_options:
- no update
- "0"
- "1"
- "2"
- "3"
- headless_mode: "yes"
opts:
category: Debug
description: |-
In headless mode the emulator is not launched in the foreground.
If this input is set, the emulator will not be visible but tests (even the screenshots) will run just like if the emulator ran in the foreground.
is_required: true
summary: In headless mode the emulator is not launched in the foreground.
title: Run the emulator in headless mode
value_options:
- "yes"
- "no"
outputs:
- BITRISE_EMULATOR_SERIAL: null
opts:
description: Booted emulator serial
title: Emulator serial
================================================
FILE: steps/avd-manager/1.2.1/step.yml
================================================
title: AVD Manager
summary: Create and boot an Android emulator used for device testing
description: |-
Run instrumented and UI tests on a virtual Android device. Once some basic inputs are set, the Step checks the requirements, downloads the selected system image before creating and starting the emulator.
**Warning:** This Step is not yet supported on Apple Silicon (M1) machines. If you cannot find a solution to this error, try running this Workflow on an Intel-based machine type.
### Configuring the Step
1. Add the **AVD Manager** Step to your Workflow as one of the first Steps in your Workflow.
2. Set the **Device Profile** to create a new Android virtual device. To see the complete list of available profiles, use the `avdmanager list device` command and use the `id` value for this input.
3. Set the **Android API Level**. The new virtual device will run with the specified Android version.
4. Select an **OS Tag** to have the required toolset on the new virtual device.
Some system images are pre-installed on the virtual machines. In this case the step won't have to spend time downloading the requested image. To check the list of pre-installed images for each stack, visit the [system reports](https://stacks.bitrise.io).
### Troubleshooting
The emulator needs some time to boot up. The earlier you place the Step in your Workflow, the more tasks, such as cloning or caching, you can complete in your Workflow before the emulator starts working.
We recommend that you also add **Wait for Android emulator** Step to your Workflow as it acts as a shield preventing the AVD Manager to kick in too early. Make sure you add the **Wait for Android emulator** Step BEFORE the Step with which you want to use the **AVD Manager**.
### Useful links
- [Getting started with Android apps](https://devcenter.bitrise.io/getting-started/getting-started-with-android-apps/)
- [Device testing for Android](https://devcenter.bitrise.io/testing/device-testing-for-android/)
- [About Test Reports](https://devcenter.bitrise.io/testing/test-reports/)
### Related Steps
- [Wait for Android emulator](https://www.bitrise.io/integrations/steps/wait-for-android-emulator)
- [Android Build for UI testing](https://www.bitrise.io/integrations/steps/android-build-for-ui-testing)
website: https://github.com/bitrise-steplib/steps-avd-manager
source_code_url: https://github.com/bitrise-steplib/steps-avd-manager
support_url: https://github.com/bitrise-steplib/steps-avd-manager/issues
published_at: 2023-09-18T13:22:47.529952991Z
source:
git: https://github.com/bitrise-steplib/steps-avd-manager.git
commit: 2f405f12e5a07a7c34c97616cb4179bd822adb23
type_tags:
- utility
toolkit:
go:
package_name: github.com/bitrise-steplib/steps-avd-manager
is_requires_admin_user: true
is_always_run: false
is_skippable: false
inputs:
- opts:
description: |
The profile contains parameters of the device, such as screen size and resolution.
To see the complete list of available profiles use the `avdmanager list device` command locally and use the `id` value for this input.
is_required: true
summary: Device profile to use when creating the virtual device.
title: Device Profile ID
profile: pixel
- api_level: 26
opts:
description: The device will run with the specified version of android.
is_required: true
summary: The device will run with the specified version of android.
title: Android API Level
- opts:
description: Select OS tag to have the required toolset on the device.
is_expand: true
is_required: true
summary: Select OS tag to have the required toolset on the device.
title: OS Tag
value_options:
- google_apis
- google_apis_playstore
- google_atd
- aosp_atd
- android-wear
- android-tv
- default
tag: google_apis
- abi: x86
opts:
category: Debug
description: Select which ABI to use running the emulator. Availability depends
on API level. Please use `sdkmanager --list` command to see the available ABIs.
is_expand: true
is_required: true
summary: Select which ABI to use running the emulator. Availability depends on
API level. Please use `sdkmanager --list` command to see the available ABIs.
title: ABI
value_options:
- x86
- x86_64
- armeabi-v7a
- arm64-v8a
- mips
- emulator_id: emulator
opts:
category: Debug
description: Set the device's ID. (This will be the name under $HOME/.android/avd/)
is_required: true
summary: Set the device's ID. (This will be the name under $HOME/.android/avd/)
title: ID
- create_command_flags: --sdcard 512M
opts:
category: Debug
description: Flags used when running the command to create the emulator.
is_required: false
summary: Flags used when running the command to create the emulator.
title: Create AVD command flags
- opts:
category: Debug
description: Flags used when running the command to start the emulator.
is_required: false
summary: Flags used when running the command to start the emulator.
title: Start AVD command flags
start_command_flags: -camera-back none -camera-front none
- emulator_channel: no update
opts:
category: Debug
description: |-
Select which channel to use with `sdkmanager` to fetch *emulator* package. Available options are no update, or channels 0 (Stable), 1 (Beta), 2 (Dev), and 3 (Canary).
- `no update`: The *emulator* preinstalled on the Stack will be used. *system-image* will be updated to the latest Stable version.
To update *emulator* and *system image* to the latest available in a given channel:
- `0`: Stable channel
- `1`: Beta channel
- `2`: Dev channel
- `3`: Canary channel
is_expand: true
is_required: true
summary: Select which channel to use with `sdkmanager` to fetch *emulator* package.
Available options are no update, or channels 0 (Stable), 1 (Beta), 2 (Dev),
and 3 (Canary).
title: Emulator channel
value_options:
- no update
- "0"
- "1"
- "2"
- "3"
- headless_mode: "yes"
opts:
category: Debug
description: |-
In headless mode the emulator is not launched in the foreground.
If this input is set, the emulator will not be visible but tests (even the screenshots) will run just like if the emulator ran in the foreground.
is_required: true
summary: In headless mode the emulator is not launched in the foreground.
title: Run the emulator in headless mode
value_options:
- "yes"
- "no"
outputs:
- BITRISE_EMULATOR_SERIAL: null
opts:
description: Booted emulator serial
title: Emulator serial
================================================
FILE: steps/avd-manager/1.3.0/step.yml
================================================
title: AVD Manager
summary: Create and boot an Android emulator used for device testing
description: |-
Run instrumented and UI tests on a virtual Android device. Once some basic inputs are set, the Step checks the requirements, downloads the selected system image before creating and starting the emulator.
**Warning:** Android emulators can't run on Apple Silicon build machines. Until nested virtualization becomes supported, you should run emulator tests on Linux machines.
### Configuring the Step
1. Add the **AVD Manager** Step to your Workflow as one of the first Steps in your Workflow.
2. Set the **Device Profile** to create a new Android virtual device. To see the complete list of available profiles, use the `avdmanager list device` command and use the `id` value for this input.
3. Set the **Android API Level**. The new virtual device will run with the specified Android version.
4. Select an **OS Tag** to have the required toolset on the new virtual device.
Some system images are pre-installed on the virtual machines. In this case the step won't have to spend time downloading the requested image. To check the list of pre-installed images for each stack, visit the [system reports](https://stacks.bitrise.io).
### Troubleshooting
The emulator needs some time to boot up. The earlier you place the Step in your Workflow, the more tasks, such as cloning or caching, you can complete in your Workflow before the emulator starts working.
We recommend that you also add **Wait for Android emulator** Step to your Workflow as it acts as a shield preventing the AVD Manager to kick in too early. Make sure you add the **Wait for Android emulator** Step BEFORE the Step with which you want to use the **AVD Manager**.
### Useful links
- [Getting started with Android apps](https://devcenter.bitrise.io/getting-started/getting-started-with-android-apps/)
- [Device testing for Android](https://devcenter.bitrise.io/testing/device-testing-for-android/)
- [About Test Reports](https://devcenter.bitrise.io/testing/test-reports/)
### Related Steps
- [Wait for Android emulator](https://www.bitrise.io/integrations/steps/wait-for-android-emulator)
- [Android Build for UI testing](https://www.bitrise.io/integrations/steps/android-build-for-ui-testing)
website: https://github.com/bitrise-steplib/steps-avd-manager
source_code_url: https://github.com/bitrise-steplib/steps-avd-manager
support_url: https://github.com/bitrise-steplib/steps-avd-manager/issues
published_at: 2024-11-22T14:15:05.30224367Z
source:
git: https://github.com/bitrise-steplib/steps-avd-manager.git
commit: 70b5f4f35674c8634a14c1f23fca0521ae4be124
type_tags:
- test
toolkit:
go:
package_name: github.com/bitrise-steplib/steps-avd-manager
is_always_run: false
is_skippable: false
inputs:
- opts:
description: |
The profile contains parameters of the device, such as screen size and resolution.
To see the complete list of available profiles use the `avdmanager list device` command locally and use the `id` value for this input.
is_required: true
summary: Device profile to use when creating the virtual device.
title: Device Profile ID
profile: pixel
- api_level: 26
opts:
description: The device will run with the specified system image version.
is_required: true
summary: The device will run with the specified system image version.
title: Android API Level
- opts:
description: Select OS tag to have the required toolset on the device.
is_expand: true
is_required: true
summary: Select OS tag to have the required toolset on the device.
title: OS Tag
value_options:
- google_apis
- google_apis_playstore
- google_atd
- aosp_atd
- android-wear
- android-tv
- default
tag: google_apis
- abi: x86
opts:
category: Advanced
description: Select which ABI to use running the emulator. Availability depends
on API level. Please use `sdkmanager --list` command to see the available ABIs.
is_expand: true
is_required: true
summary: Select which ABI to use running the emulator. Availability depends on
API level. Please use `sdkmanager --list` command to see the available ABIs.
title: ABI
value_options:
- x86
- x86_64
- armeabi-v7a
- arm64-v8a
- mips
- emulator_id: emulator
opts:
category: Advanced
description: Set the device's ID. (This will be the name under $HOME/.android/avd/)
is_required: true
summary: Set the device's ID. (This will be the name under $HOME/.android/avd/)
title: ID
- create_command_flags: --sdcard 2048M
opts:
category: Advanced
description: Flags used when running the command to create the emulator.
is_required: false
summary: Flags used when running the command to create the emulator.
title: Create AVD command flags
- opts:
category: Advanced
description: Flags used when running the command to start the emulator.
is_required: false
summary: Flags used when running the command to start the emulator.
title: Start AVD command flags
start_command_flags: -camera-back none -camera-front none
- emulator_build_number: preinstalled
opts:
category: Emulator
description: |-
Allows installing a specific emulator version at runtime. The default value (`preinstalled`) will use the emulator version preinstalled on the Stack, which is updated regularly to the latest stable version.
See available build numbers [here](https://developer.android.com/studio/emulator_archive) (you need the last segment of the download URL). Note: this input expects the **build number**, not the **version number**.
When this input set to a specific build number, the `emulator_channel` input should be set to `no update`.
title: Emulator build number
- emulator_channel: no update
opts:
category: Emulator
description: |-
Select which channel to use with `sdkmanager` to fetch *emulator* package. Available options are no update, or channels 0 (Stable), 1 (Beta), 2 (Dev), and 3 (Canary).
- `no update`: The *emulator* preinstalled on the Stack will be used. *system-image* will be updated to the latest Stable version.
To update *emulator* and *system image* to the latest available in a given channel:
- `0`: Stable channel
- `1`: Beta channel
- `2`: Dev channel
- `3`: Canary channel
When this input set to a specific channel, the `emulator_build_number` input should be set to `preinstalled`.
is_expand: true
is_required: true
summary: Select which channel to use with `sdkmanager` to fetch *emulator* package.
Available options are no update, or channels 0 (Stable), 1 (Beta), 2 (Dev),
and 3 (Canary).
title: Emulator channel
value_options:
- no update
- "0"
- "1"
- "2"
- "3"
- headless_mode: "yes"
opts:
category: Emulator
description: |-
In headless mode the emulator is not launched in the foreground.
If this input is set, the emulator will not be visible but tests (even the screenshots) will run just like if the emulator ran in the foreground.
is_required: true
summary: In headless mode the emulator is not launched in the foreground.
title: Run the emulator in headless mode
value_options:
- "yes"
- "no"
outputs:
- BITRISE_EMULATOR_SERIAL: null
opts:
description: Booted emulator serial
title: Emulator serial
================================================
FILE: steps/avd-manager/2.0.0/step.yml
================================================
title: AVD Manager
summary: Create and boot an Android emulator used for device testing
description: |-
Run instrumented and UI tests on a virtual Android device. Once some basic inputs are set, the Step checks the requirements, downloads the selected system image before creating and starting the emulator.
**Warning:** Android emulators can't run on Apple Silicon build machines. Until nested virtualization becomes supported, you should run emulator tests on Linux machines.
### Configuring the Step
1. Add the **AVD Manager** Step to your Workflow as one of the first Steps in your Workflow.
2. Set the **Device Profile** to create a new Android virtual device. To see the complete list of available profiles, use the `avdmanager list device` command and use the `id` value for this input.
3. Set the **Android API Level**. The new virtual device will run with the specified Android version.
4. Select an **OS Tag** to have the required toolset on the new virtual device.
Some system images are pre-installed on the virtual machines. In this case the step won't have to spend time downloading the requested image. To check the list of pre-installed images for each stack, visit the [system reports](https://stacks.bitrise.io).
### Troubleshooting
The emulator needs some time to boot up. The earlier you place the Step in your Workflow, the more tasks, such as cloning or caching, you can complete in your Workflow before the emulator starts working.
We recommend that you also add **Wait for Android emulator** Step to your Workflow as it acts as a shield preventing the AVD Manager to kick in too early. Make sure you add the **Wait for Android emulator** Step BEFORE the Step with which you want to use the **AVD Manager**.
### Useful links
- [Getting started with Android apps](https://devcenter.bitrise.io/getting-started/getting-started-with-android-apps/)
- [Device testing for Android](https://devcenter.bitrise.io/testing/device-testing-for-android/)
- [About Test Reports](https://devcenter.bitrise.io/testing/test-reports/)
### Related Steps
- [Wait for Android emulator](https://www.bitrise.io/integrations/steps/wait-for-android-emulator)
- [Android Build for UI testing](https://www.bitrise.io/integrations/steps/android-build-for-ui-testing)
website: https://github.com/bitrise-steplib/steps-avd-manager
source_code_url: https://github.com/bitrise-steplib/steps-avd-manager
support_url: https://github.com/bitrise-steplib/steps-avd-manager/issues
published_at: 2024-11-29T12:28:52.138387147Z
source:
git: https://github.com/bitrise-steplib/steps-avd-manager.git
commit: 22f530768a1e8afae85f7d03ebe949ed850d1abe
type_tags:
- test
toolkit:
go:
package_name: github.com/bitrise-steplib/steps-avd-manager
is_always_run: false
is_skippable: false
inputs:
- opts:
description: |
The profile contains parameters of the device, such as screen size and resolution.
To see the complete list of available profiles use the `avdmanager list device` command locally and use the `id` value for this input.
is_required: true
summary: Device profile to use when creating the virtual device.
title: Device Profile ID
profile: pixel
- api_level: 26
opts:
description: The device will run with the specified system image version.
is_required: true
summary: The device will run with the specified system image version.
title: Android API Level
- opts:
description: Select OS tag to have the required toolset on the device.
is_expand: true
is_required: true
summary: Select OS tag to have the required toolset on the device.
title: OS Tag
value_options:
- google_apis
- google_apis_playstore
- google_atd
- aosp_atd
- android-wear
- android-tv
- default
tag: google_apis
- abi: x86
opts:
category: Advanced
description: Select which ABI to use running the emulator. Availability depends
on API level. Please use `sdkmanager --list` command to see the available ABIs.
is_expand: true
is_required: true
summary: Select which ABI to use running the emulator. Availability depends on
API level. Please use `sdkmanager --list` command to see the available ABIs.
title: ABI
value_options:
- x86
- x86_64
- armeabi-v7a
- arm64-v8a
- mips
- disable_animations: "yes"
opts:
category: Advanced
description: |-
Disable animations on the emulator in order to make tests faster and more stable.
Animations can be enabled/disabled from the test code too, so if your tests do need animations, set this step input to `no` and control the settings yourself.
is_required: true
summary: Disable animations on the emulator in order to make tests faster and
more stable.
title: Disable animations
value_options:
- "yes"
- "no"
- emulator_id: emulator
opts:
category: Advanced
description: Set the device's ID. (This will be the name under $HOME/.android/avd/)
is_required: true
summary: Set the device's ID. (This will be the name under $HOME/.android/avd/)
title: ID
- create_command_flags: --sdcard 2048M
opts:
category: Advanced
description: Flags used when running the command to create the emulator.
is_required: false
summary: Flags used when running the command to create the emulator.
title: Create AVD command flags
- opts:
category: Advanced
description: Flags used when running the command to start the emulator.
is_required: false
summary: Flags used when running the command to start the emulator.
title: Start AVD command flags
start_command_flags: -camera-back none -camera-front none
- emulator_build_number: preinstalled
opts:
category: Emulator
description: |-
Allows installing a specific emulator version at runtime. The default value (`preinstalled`) will use the emulator version preinstalled on the Stack, which is updated regularly to the latest stable version.
See available build numbers [here](https://developer.android.com/studio/emulator_archive). You need the last segment of the download URL, for example, build number `12658423` from `emulator-linux_x64-12658423.zip`. Note: this input expects the **build number**, not the **version number**.
When this input set to a specific build number, the `emulator_channel` input should be set to `no update`.
title: Emulator build number
- emulator_channel: no update
opts:
category: Emulator
description: |-
Select which channel to use with `sdkmanager` to fetch *emulator* package. Available options are no update, or channels 0 (Stable), 1 (Beta), 2 (Dev), and 3 (Canary).
- `no update`: The *emulator* preinstalled on the Stack will be used. *system-image* will be updated to the latest Stable version.
To update *emulator* and *system image* to the latest available in a given channel:
- `0`: Stable channel
- `1`: Beta channel
- `2`: Dev channel
- `3`: Canary channel
When this input set to a specific channel, the `emulator_build_number` input should be set to `preinstalled`.
is_expand: true
is_required: true
summary: Select which channel to use with `sdkmanager` to fetch *emulator* package.
Available options are no update, or channels 0 (Stable), 1 (Beta), 2 (Dev),
and 3 (Canary).
title: Emulator channel
value_options:
- no update
- "0"
- "1"
- "2"
- "3"
- headless_mode: "yes"
opts:
category: Emulator
description: |-
In headless mode the emulator is not launched in the foreground.
If this input is set, the emulator will not be visible but tests (even the screenshots) will run just like if the emulator ran in the foreground.
is_required: true
summary: In headless mode the emulator is not launched in the foreground.
title: Run the emulator in headless mode
value_options:
- "yes"
- "no"
outputs:
- BITRISE_EMULATOR_SERIAL: null
opts:
description: Booted emulator serial
title: Emulator serial
================================================
FILE: steps/avd-manager/2.0.1/step.yml
================================================
title: AVD Manager
summary: Create and boot an Android emulator used for device testing
description: |-
Run instrumented and UI tests on a virtual Android device. Once some basic inputs are set, the Step checks the requirements, downloads the selected system image before creating and starting the emulator.
**Warning:** Android emulators can't run on Apple Silicon build machines. Until nested virtualization becomes supported, you should run emulator tests on Linux machines.
### Configuring the Step
1. Add the **AVD Manager** Step to your Workflow as one of the first Steps in your Workflow.
2. Set the **Device Profile** to create a new Android virtual device. To see the complete list of available profiles, use the `avdmanager list device` command and use the `id` value for this input.
3. Set the **Android API Level**. The new virtual device will run with the specified Android version.
4. Select an **OS Tag** to have the required toolset on the new virtual device.
Some system images are pre-installed on the virtual machines. In this case the step won't have to spend time downloading the requested image. To check the list of pre-installed images for each stack, visit the [system reports](https://stacks.bitrise.io).
By default, the Step waits for the emulator to boot up and disables system animations in order to make tests faster and more reliable. If you want to disable these, set the **Disable animations** input to `no`. In this case, make sure to add the [Wait for Android emulator Step](https://github.com/bitrise-steplib/steps-wait-for-android-emulator) to the right part of your workflow.
### Useful links
- [Getting started with Android apps](https://devcenter.bitrise.io/getting-started/getting-started-with-android-apps/)
- [Device testing for Android](https://devcenter.bitrise.io/testing/device-testing-for-android/)
- [About Test Reports](https://devcenter.bitrise.io/testing/test-reports/)
### Related Steps
- [Wait for Android emulator](https://www.bitrise.io/integrations/steps/wait-for-android-emulator)
- [Android Build for UI testing](https://www.bitrise.io/integrations/steps/android-build-for-ui-testing)
website: https://github.com/bitrise-steplib/steps-avd-manager
source_code_url: https://github.com/bitrise-steplib/steps-avd-manager
support_url: https://github.com/bitrise-steplib/steps-avd-manager/issues
published_at: 2025-01-23T15:36:57.655790823Z
source:
git: https://github.com/bitrise-steplib/steps-avd-manager.git
commit: 9bc13d4d1fbb99751a8027855fd2aa6f9ce17d5c
type_tags:
- test
toolkit:
go:
package_name: github.com/bitrise-steplib/steps-avd-manager
is_always_run: false
is_skippable: false
inputs:
- opts:
description: |
The profile contains parameters of the device, such as screen size and resolution.
To see the complete list of available profiles use the `avdmanager list device` command locally and use the `id` value for this input.
is_required: true
summary: Device profile to use when creating the virtual device.
title: Device Profile ID
profile: pixel
- api_level: 26
opts:
description: The device will run with the specified system image version.
is_required: true
summary: The device will run with the specified system image version.
title: Android API Level
- opts:
description: Select OS tag to have the required toolset on the device.
is_expand: true
is_required: true
summary: Select OS tag to have the required toolset on the device.
title: OS Tag
value_options:
- google_apis
- google_apis_playstore
- google_atd
- aosp_atd
- android-wear
- android-tv
- default
tag: google_apis
- abi: x86
opts:
category: Advanced
description: Select which ABI to use running the emulator. Availability depends
on API level. Please use `sdkmanager --list` command to see the available ABIs.
is_expand: true
is_required: true
summary: Select which ABI to use running the emulator. Availability depends on
API level. Please use `sdkmanager --list` command to see the available ABIs.
title: ABI
value_options:
- x86
- x86_64
- armeabi-v7a
- arm64-v8a
- mips
- disable_animations: "yes"
opts:
category: Advanced
description: |-
Disable animations on the emulator in order to make tests faster and more stable.
Note: when this input is `yes`, the step will pause and wait for the device to boot up.
Animations can be enabled/disabled from the test code too, so if your tests do need animations, set this step input to `no` and control the settings yourself.
is_required: true
summary: Disable animations on the emulator in order to make tests faster and
more stable.
title: Disable animations
value_options:
- "yes"
- "no"
- emulator_id: emulator
opts:
category: Advanced
description: Set the device's ID. (This will be the name under $HOME/.android/avd/)
is_required: true
summary: Set the device's ID. (This will be the name under $HOME/.android/avd/)
title: ID
- create_command_flags: --sdcard 2048M
opts:
category: Advanced
description: Flags used when running the command to create the emulator.
is_required: false
summary: Flags used when running the command to create the emulator.
title: Create AVD command flags
- opts:
category: Advanced
description: Flags used when running the command to start the emulator.
is_required: false
summary: Flags used when running the command to start the emulator.
title: Start AVD command flags
start_command_flags: -camera-back none -camera-front none
- emulator_build_number: preinstalled
opts:
category: Emulator
description: |-
Allows installing a specific emulator version at runtime. The default value (`preinstalled`) will use the emulator version preinstalled on the Stack, which is updated regularly to the latest stable version.
See available build numbers [here](https://developer.android.com/studio/emulator_archive). You need the last segment of the download URL, for example, build number `12658423` from `emulator-linux_x64-12658423.zip`. Note: this input expects the **build number**, not the **version number**.
When this input set to a specific build number, the `emulator_channel` input should be set to `no update`.
title: Emulator build number
- emulator_channel: no update
opts:
category: Emulator
description: |-
Select which channel to use with `sdkmanager` to fetch *emulator* package. Available options are no update, or channels 0 (Stable), 1 (Beta), 2 (Dev), and 3 (Canary).
- `no update`: The *emulator* preinstalled on the Stack will be used. *system-image* will be updated to the latest Stable version.
To update *emulator* and *system image* to the latest available in a given channel:
- `0`: Stable channel
- `1`: Beta channel
- `2`: Dev channel
- `3`: Canary channel
When this input set to a specific channel, the `emulator_build_number` input should be set to `preinstalled`.
is_expand: true
is_required: true
summary: Select which channel to use with `sdkmanager` to fetch *emulator* package.
Available options are no update, or channels 0 (Stable), 1 (Beta), 2 (Dev),
and 3 (Canary).
title: Emulator channel
value_options:
- no update
- "0"
- "1"
- "2"
- "3"
- headless_mode: "yes"
opts:
category: Emulator
description: |-
In headless mode the emulator is not launched in the foreground.
If this input is set, the emulator will not be visible but tests (even the screenshots) will run just like if the emulator ran in the foreground.
is_required: true
summary: In headless mode the emulator is not launched in the foreground.
title: Run the emulator in headless mode
value_options:
- "yes"
- "no"
outputs:
- BITRISE_EMULATOR_SERIAL: null
opts:
description: Booted emulator serial
title: Emulator serial
================================================
FILE: steps/avd-manager/2.0.2/step.yml
================================================
title: AVD Manager
summary: Create and boot an Android emulator used for device testing
description: |-
Run instrumented and UI tests on a virtual Android device. Once some basic inputs are set, the Step checks the requirements, downloads the selected system image before creating and starting the emulator.
**Warning:** Android emulators can't run on Apple Silicon build machines. Until nested virtualization becomes supported, you should run emulator tests on Linux machines.
### Configuring the Step
1. Add the **AVD Manager** Step to your Workflow as one of the first Steps in your Workflow.
2. Set the **Device Profile** to create a new Android virtual device. To see the complete list of available profiles, use the `avdmanager list device` command and use the `id` value for this input.
3. Set the **Android API Level**. The new virtual device will run with the specified Android version.
4. Select an **OS Tag** to have the required toolset on the new virtual device.
Some system images are pre-installed on the virtual machines. In this case the step won't have to spend time downloading the requested image. To check the list of pre-installed images for each stack, visit the [system reports](https://stacks.bitrise.io).
By default, the Step waits for the emulator to boot up and disables system animations in order to make tests faster and more reliable. If you want to disable these, set the **Disable animations** input to `no`. In this case, make sure to add the [Wait for Android emulator Step](https://github.com/bitrise-steplib/steps-wait-for-android-emulator) to the right part of your workflow.
### Useful links
- [Getting started with Android apps](https://devcenter.bitrise.io/getting-started/getting-started-with-android-apps/)
- [Device testing for Android](https://devcenter.bitrise.io/testing/device-testing-for-android/)
- [About Test Reports](https://devcenter.bitrise.io/testing/test-reports/)
### Related Steps
- [Wait for Android emulator](https://www.bitrise.io/integrations/steps/wait-for-android-emulator)
- [Android Build for UI testing](https://www.bitrise.io/integrations/steps/android-build-for-ui-testing)
website: https://github.com/bitrise-steplib/steps-avd-manager
source_code_url: https://github.com/bitrise-steplib/steps-avd-manager
support_url: https://github.com/bitrise-steplib/steps-avd-manager/issues
published_at: 2025-08-13T09:49:35.673737614Z
source:
git: https://github.com/bitrise-steplib/steps-avd-manager.git
commit: 30bae41ae6d430512e1b41d2a79c54362b96e8f2
type_tags:
- test
toolkit:
go:
package_name: github.com/bitrise-steplib/steps-avd-manager
is_always_run: false
is_skippable: false
inputs:
- opts:
description: |
The profile contains parameters of the device, such as screen size and resolution.
To see the complete list of available profiles use the `avdmanager list device` command locally and use the `id` value for this input.
is_required: true
summary: Device profile to use when creating the virtual device.
title: Device Profile ID
profile: pixel
- api_level: 26
opts:
description: The device will run with the specified system image version.
is_required: true
summary: The device will run with the specified system image version.
title: Android API Level
- opts:
description: Select OS tag to have the required toolset on the device.
is_expand: true
is_required: true
summary: Select OS tag to have the required toolset on the device.
title: OS Tag
value_options:
- google_apis
- google_apis_ps16k
- google_apis_playstore
- google_apis_playstore_ps16k
- google_atd
- aosp_atd
- android-wear
- android-tv
- default
tag: google_apis
- abi: x86
opts:
category: Advanced
description: Select which ABI to use running the emulator. Availability depends
on API level. Please use `sdkmanager --list` command to see the available ABIs.
is_expand: true
is_required: true
summary: Select which ABI to use running the emulator. Availability depends on
API level. Please use `sdkmanager --list` command to see the available ABIs.
title: ABI
value_options:
- x86
- x86_64
- armeabi-v7a
- arm64-v8a
- mips
- disable_animations: "yes"
opts:
category: Advanced
description: |-
Disable animations on the emulator in order to make tests faster and more stable.
Note: when this input is `yes`, the step will pause and wait for the device to boot up.
Animations can be enabled/disabled from the test code too, so if your tests do need animations, set this step input to `no` and control the settings yourself.
is_required: true
summary: Disable animations on the emulator in order to make tests faster and
more stable.
title: Disable animations
value_options:
- "yes"
- "no"
- emulator_id: emulator
opts:
category: Advanced
description: Set the device's ID. (This will be the name under $HOME/.android/avd/)
is_required: true
summary: Set the device's ID. (This will be the name under $HOME/.android/avd/)
title: ID
- create_command_flags: --sdcard 2048M
opts:
category: Advanced
description: Flags used when running the command to create the emulator.
is_required: false
summary: Flags used when running the command to create the emulator.
title: Create AVD command flags
- opts:
category: Advanced
description: Flags used when running the command to start the emulator.
is_required: false
summary: Flags used when running the command to start the emulator.
title: Start AVD command flags
start_command_flags: -camera-back none -camera-front none
- emulator_build_number: preinstalled
opts:
category: Emulator
description: |-
Allows installing a specific emulator version at runtime. The default value (`preinstalled`) will use the emulator version preinstalled on the Stack, which is updated regularly to the latest stable version.
See available build numbers [here](https://developer.android.com/studio/emulator_archive). You need the last segment of the download URL, for example, build number `12658423` from `emulator-linux_x64-12658423.zip`. Note: this input expects the **build number**, not the **version number**.
When this input set to a specific build number, the `emulator_channel` input should be set to `no update`.
title: Emulator build number
- emulator_channel: no update
opts:
category: Emulator
description: |-
Select which channel to use with `sdkmanager` to fetch *emulator* package. Available options are no update, or channels 0 (Stable), 1 (Beta), 2 (Dev), and 3 (Canary).
- `no update`: The *emulator* preinstalled on the Stack will be used. *system-image* will be updated to the latest Stable version.
To update *emulator* and *system image* to the latest available in a given channel:
- `0`: Stable channel
- `1`: Beta channel
- `2`: Dev channel
- `3`: Canary channel
When this input set to a specific channel, the `emulator_build_number` input should be set to `preinstalled`.
is_expand: true
is_required: true
summary: Select which channel to use with `sdkmanager` to fetch *emulator* package.
Available options are no update, or channels 0 (Stable), 1 (Beta), 2 (Dev),
and 3 (Canary).
title: Emulator channel
value_options:
- no update
- "0"
- "1"
- "2"
- "3"
- headless_mode: "yes"
opts:
category: Emulator
description: |-
In headless mode the emulator is not launched in the foreground.
If this input is set, the emulator will not be visible but tests (even the screenshots) will run just like if the emulator ran in the foreground.
is_required: true
summary: In headless mode the emulator is not launched in the foreground.
title: Run the emulator in headless mode
value_options:
- "yes"
- "no"
outputs:
- BITRISE_EMULATOR_SERIAL: null
opts:
description: Booted emulator serial
title: Emulator serial
================================================
FILE: steps/avd-manager/step-info.yml
================================================
maintainer: bitrise
================================================
FILE: steps/aws-device-farm-file-deploy/0.0.1/step.yml
================================================
title: Amazon Device Farm File Deploy
summary: Amazon Device Farm File Deploy
description: |-
Uploads file (i.e. test package, app data, etc.) to device farm
This Step requires an Amazon Device Farm registration. To register an account, [click here](https://aws.amazon.com/device-farm/)
website: https://github.com/peartherapeutics/bitrise-aws-device-farm-file-deploy
source_code_url: https://github.com/peartherapeutics/bitrise-aws-device-farm-file-deploy
support_url: https://github.com/peartherapeutics/bitrise-aws-device-farm-file-deploy/issues
published_at: 2016-09-21T15:09:57.928508568-07:00
source:
git: https://github.com/peartherapeutics/bitrise-aws-device-farm-file-deploy.git
commit: 10505476e1a0dcf4ab004c71c147daba89e9fd9d
host_os_tags:
- linux
- osx-10.9
- osx-10.10
type_tags:
- test
- amazon
- device-farm
deps:
brew:
- name: awscli
apt_get:
- name: awscli
is_requires_admin_user: false
is_always_run: false
is_skippable: false
run_if: ""
inputs:
- access_key_id: ""
opts:
description: ""
is_required: true
summary: ""
title: AWS Access Key
- opts:
description: ""
is_required: true
summary: ""
title: AWS Secret Key
secret_access_key: ""
- device_farm_project: ""
opts:
description: Project ARNs can be obtained using the AWS CLI 'devicefarm list-projects'
command.
is_required: true
summary: ""
title: Device Farm Project ARN
- opts:
description: Path of file to upload. If this is a test package, aws-device-farm-runner
can be configured to use the latest package with this name.
is_required: true
summary: ""
title: Upload File Path
upload_file_path: ""
- opts:
description: ex. APPIUM_PYTHON_TEST_PACKAGE. See http://docs.aws.amazon.com/devicefarm/latest/APIReference/API_Upload.html#devicefarm-Type-Upload-type
is_required: true
summary: ""
title: Upload Type
upload_type: ""
- aws_region: ""
opts:
description: |
If you want to specify a different AWS region. Leave
empty to use the default config/env setting.
summary: ""
title: AWS Region
================================================
FILE: steps/aws-device-farm-file-deploy/0.0.2/step.yml
================================================
title: Amazon Device Farm File Deploy
summary: Amazon Device Farm File Deploy
description: |-
Uploads file (i.e. test package, app data, etc.) to device farm
This Step requires an Amazon Device Farm registration. To register an account, [click here](https://aws.amazon.com/device-farm/)
website: https://github.com/peartherapeutics/bitrise-aws-device-farm-file-deploy
source_code_url: https://github.com/peartherapeutics/bitrise-aws-device-farm-file-deploy
support_url: https://github.com/peartherapeutics/bitrise-aws-device-farm-file-deploy/issues
published_at: 2016-09-22T15:27:51.58994299-07:00
source:
git: https://github.com/peartherapeutics/bitrise-aws-device-farm-file-deploy.git
commit: 9336ff44d80618c9362156773924cadc5694331a
host_os_tags:
- linux
- osx-10.9
- osx-10.10
project_type_tags:
- ios
- android
- xamarin
- cordova
- ionic
- react-native
type_tags:
- test
deps:
brew:
- name: awscli
bin_name: aws
apt_get:
- name: awscli
bin_name: aws
is_requires_admin_user: false
is_always_run: false
is_skippable: false
run_if: ""
inputs:
- access_key_id: $AWS_ACCESS_KEY
opts:
description: ""
is_required: true
summary: ""
title: AWS Access Key
- opts:
description: ""
is_required: true
summary: ""
title: AWS Secret Key
secret_access_key: $AWS_SECRET_KEY
- aws_region: $AWS_REGION
opts:
description: |
If you want to specify a different AWS region. Leave
empty to use the default config/env setting.
summary: ""
title: AWS Region
- device_farm_project: ""
opts:
description: Project ARNs can be obtained using the AWS CLI 'devicefarm list-projects'
command.
is_required: true
summary: ""
title: Device Farm Project ARN
- opts:
description: Path of file to upload. If this is a test package, aws-device-farm-runner
can be configured to use the latest package with this name.
is_required: true
summary: ""
title: Upload File Path
upload_file_path: ""
- opts:
description: ex. APPIUM_PYTHON_TEST_PACKAGE. See http://docs.aws.amazon.com/devicefarm/latest/APIReference/API_Upload.html#devicefarm-Type-Upload-type
is_required: true
summary: ""
title: Upload Type
upload_type: ""
================================================
FILE: steps/aws-device-farm-file-deploy/0.0.3/step.yml
================================================
title: Amazon Device Farm File Deploy
summary: Amazon Device Farm File Deploy
description: |-
Uploads file (i.e. test package, app data, etc.) to device farm
This Step requires an Amazon Device Farm registration. To register an account, [click here](https://aws.amazon.com/device-farm/)
website: https://github.com/peartherapeutics/bitrise-aws-device-farm-file-deploy
source_code_url: https://github.com/peartherapeutics/bitrise-aws-device-farm-file-deploy
support_url: https://github.com/peartherapeutics/bitrise-aws-device-farm-file-deploy/issues
published_at: 2017-05-12T10:18:40.515728783-07:00
source:
git: https://github.com/peartherapeutics/bitrise-aws-device-farm-file-deploy.git
commit: 1cbc7c6403295ccb3dd33df6c7ca51c89b8409cd
host_os_tags:
- linux
- osx-10.9
- osx-10.10
type_tags:
- test
deps:
brew:
- name: awscli
bin_name: aws
apt_get:
- name: awscli
bin_name: aws
is_requires_admin_user: false
is_always_run: false
is_skippable: false
run_if: ""
inputs:
- access_key_id: $AWS_ACCESS_KEY
opts:
description: ""
is_required: true
summary: ""
title: AWS Access Key
- opts:
description: ""
is_required: true
summary: ""
title: AWS Secret Key
secret_access_key: $AWS_SECRET_KEY
- aws_region: $AWS_REGION
opts:
description: |
If you want to specify a different AWS region. Leave
empty to use the default config/env setting.
summary: ""
title: AWS Region
- device_farm_project: ""
opts:
description: Project ARNs can be obtained using the AWS CLI 'devicefarm list-projects'
command.
is_required: true
summary: ""
title: Device Farm Project ARN
- opts:
description: Path of file to upload. If this is a test package, aws-device-farm-runner
can be configured to use the latest package with this name.
is_required: true
summary: ""
title: Upload File Path
upload_file_path: ""
- opts:
description: ex. APPIUM_PYTHON_TEST_PACKAGE. See http://docs.aws.amazon.com/devicefarm/latest/APIReference/API_Upload.html#devicefarm-Type-Upload-type
is_required: true
summary: ""
title: Upload Type
upload_type: ""
================================================
FILE: steps/aws-device-farm-file-deploy/0.0.4/step.yml
================================================
title: Amazon Device Farm File Deploy
summary: Amazon Device Farm File Deploy
description: |-
Uploads file (i.e. test package, app data, etc.) to device farm. Intended to be used with the [aws-device-farm-runner](https://github.com/peartherapeutics/bitrise-aws-device-farm-runner) step.
This step requires an Amazon Device Farm registration. [Please read the aws-device-farm-runner wiki for setup instructions](https://github.com/peartherapeutics/bitrise-aws-device-farm-runner/wiki).
website: https://github.com/peartherapeutics/bitrise-aws-device-farm-file-deploy
source_code_url: https://github.com/peartherapeutics/bitrise-aws-device-farm-file-deploy
support_url: https://github.com/peartherapeutics/bitrise-aws-device-farm-file-deploy/issues
published_at: 2017-06-21T10:06:03.777420191-07:00
source:
git: https://github.com/peartherapeutics/bitrise-aws-device-farm-file-deploy.git
commit: ff1e2ce0484920b5afce94bfccf2cca66111dd55
host_os_tags:
- linux
- osx-10.9
- osx-10.10
type_tags:
- test
- deploy
deps:
brew:
- name: awscli
bin_name: aws
apt_get:
- name: awscli
bin_name: aws
is_requires_admin_user: false
is_always_run: false
is_skippable: false
run_if: ""
inputs:
- access_key_id: $AWS_ACCESS_KEY
opts:
description: Access key for your AWS/IAM user. Define this as a secret environment
variable in your workflow.
is_required: true
summary: ""
title: AWS Access Key
- opts:
description: Secret key for your AWS/IAM user. Define this as a secret environment
variable in your workflow.
is_required: true
summary: ""
title: AWS Secret Key
secret_access_key: $AWS_SECRET_KEY
- aws_region: $AWS_REGION
opts:
description: |
If you want to specify a different AWS region. Leave
empty to use the default config/env setting.
summary: ""
title: AWS Region
- device_farm_project: ""
opts:
description: Project ARNs can be obtained using the [AWS CLI](https://aws.amazon.com/cli/)
`devicefarm list-projects` command.
is_required: true
summary: ""
title: Device Farm Project ARN
- opts:
description: Path of file to upload. If this is a test package, [aws-device-farm-runner](https://github.com/peartherapeutics/bitrise-aws-device-farm-runner)
can be configured to use the latest package with this name.
is_required: true
summary: ""
title: Upload File Path
upload_file_path: ""
- opts:
description: ex. `APPIUM_PYTHON_TEST_PACKAGE`. See [Upload.type documentation](http://docs.aws.amazon.com/devicefarm/latest/APIReference/API_Upload.html#devicefarm-Type-Upload-type).
is_required: true
summary: ""
title: Upload Type
upload_type: ""
outputs:
- BITRISE_DEVICEFARM_UPLOAD_ARN: null
opts:
description: ARN identifier of successfully uploaded file
title: Upload ARN
================================================
FILE: steps/aws-device-farm-file-deploy/step-info.yml
================================================
maintainer: community
================================================
FILE: steps/aws-device-farm-runner/0.0.2/step.yml
================================================
title: Amazon Device Farm Runner
summary: Amazon Device Farm Runner
description: |-
Deploys app to device farm and starts a test run with a preconfigured test package and device pool.
This Step requires an Amazon Device Farm registration. To register an account, [click here](https://aws.amazon.com/device-farm/)
website: https://github.com/peartherapeutics/bitrise-aws-device-farm-runner
source_code_url: https://github.com/peartherapeutics/bitrise-aws-device-farm-runner
support_url: https://github.com/peartherapeutics/bitrise-aws-device-farm-runner/issues
published_at: 2016-09-23T11:23:05.808962866-07:00
source:
git: https://github.com/peartherapeutics/bitrise-aws-device-farm-runner.git
commit: 6289c7b0cf2038cdc06d185d0c55eae926d70b51
host_os_tags:
- linux
- osx-10.9
- osx-10.10
type_tags:
- test
- amazon
- device-farm
deps:
brew:
- name: awscli
bin_name: aws
apt_get:
- name: awscli
bin_name: aws
is_requires_admin_user: false
is_always_run: false
is_skippable: false
run_if: ""
inputs:
- access_key_id: $AWS_ACCESS_KEY
opts:
description: ""
is_required: true
summary: ""
title: AWS Access Key
- opts:
description: ""
is_required: true
summary: ""
title: AWS Secret Key
secret_access_key: $AWS_SECRET_KEY
- device_farm_project: ""
opts:
description: Project ARNs can be obtained using the AWS CLI 'devicefarm list-projects'
command.
is_required: true
summary: ""
title: Device Farm Project ARN
- opts:
description: Filename of test package to run, the latest package with this name
will be used.
is_required: true
summary: ""
title: Test Package Filename
test_package_name: ""
- opts:
description: See http://docs.aws.amazon.com/devicefarm/latest/APIReference/API_Test.html#devicefarm-Type-Test-type
is_required: true
summary: ""
title: Test Type
test_type: ""
- opts:
description: ""
is_required: true
summary: ""
title: Platform
value_options:
- ios
- android
- ios+android
platform: ios+android
- ipa_path: $BITRISE_IPA_PATH
opts:
description: Required for iOS runs.
title: IPA file path
- ios_pool: ""
opts:
description: Required for iOS runs. ARNs can be obtained using the AWS CLI 'devicefarm
list-device-pools' command.
title: Device Farm iOS Device Pool ARN
- apk_path: $BITRISE_SIGNED_APK_PATH
opts:
description: Required for Android runs.
title: APK file path
- android_pool: ""
opts:
description: Required for Android runs. ARNs can be obtained using the AWS CLI
'devicefarm list-device-pools' command.
title: Device Farm Android Device Pool ARN
- opts:
description: |
If you want to specify a name, this prefix will be used
followed by platform and bitrise build number.
summary: ""
title: Run Name Prefix
run_name_prefix: ""
- build_version: $BITRISE_BUILD_NUMBER
opts:
description: Build number
is_required: true
title: Build Number
- aws_region: $AWS_REGION
opts:
description: |
If you want to specify a different AWS region. Leave
empty to use the default config/env setting.
summary: ""
title: AWS Region
================================================
FILE: steps/aws-device-farm-runner/0.0.3/step.yml
================================================
title: Amazon Device Farm Runner
summary: Amazon Device Farm Runner
description: |-
Deploys app to device farm and starts a test run with a preconfigured test package and device pool.
This Step requires an Amazon Device Farm registration. To register an account, [click here](https://aws.amazon.com/device-farm/)
Use the [aws-device-farm-file-deploy](https://github.com/peartherapeutics/bitrise-aws-device-farm-file-deploy) step to upload your latest test package (and extra app data if required) before this step runs.
website: https://github.com/peartherapeutics/bitrise-aws-device-farm-runner
source_code_url: https://github.com/peartherapeutics/bitrise-aws-device-farm-runner
support_url: https://github.com/peartherapeutics/bitrise-aws-device-farm-runner/issues
published_at: 2016-12-09T15:06:14.344739677-08:00
source:
git: https://github.com/peartherapeutics/bitrise-aws-device-farm-runner.git
commit: 2cd694b2faf2f02eced82ccdbb8d8bc30dd23082
host_os_tags:
- linux
- osx-10.9
- osx-10.10
type_tags:
- test
- amazon
- device-farm
deps:
brew:
- name: awscli
bin_name: aws
apt_get:
- name: awscli
bin_name: aws
is_requires_admin_user: false
is_always_run: false
is_skippable: false
run_if: ""
inputs:
- access_key_id: $AWS_ACCESS_KEY
opts:
description: ""
is_required: true
summary: ""
title: AWS Access Key
- opts:
description: ""
is_required: true
summary: ""
title: AWS Secret Key
secret_access_key: $AWS_SECRET_KEY
- device_farm_project: ""
opts:
description: Project ARNs can be obtained using the AWS CLI 'devicefarm list-projects'
command.
is_required: true
summary: ""
title: Device Farm Project ARN
- opts:
description: |-
Filename of test package to run.
This should be a filename (not a path) that matches the name of the test bundle previously uploaded with the aws-device-farm-file-deploy step.
The most recently uploaded package with this name will be used.
is_required: true
summary: ""
title: Test Package Filename
test_package_name: ""
- opts:
description: See http://docs.aws.amazon.com/devicefarm/latest/APIReference/API_Test.html#devicefarm-Type-Test-type
is_required: true
summary: ""
title: Test Type
test_type: ""
- opts:
description: ""
is_required: true
summary: ""
title: Platform
value_options:
- ios
- android
- ios+android
platform: ios+android
- ipa_path: $BITRISE_IPA_PATH
opts:
description: Required for iOS runs.
title: IPA file path
- ios_pool: ""
opts:
description: Required for iOS runs. ARNs can be obtained using the AWS CLI 'devicefarm
list-device-pools' command.
title: Device Farm iOS Device Pool ARN
- apk_path: $BITRISE_SIGNED_APK_PATH
opts:
description: Required for Android runs.
title: APK file path
- android_pool: ""
opts:
description: Required for Android runs. ARNs can be obtained using the AWS CLI
'devicefarm list-device-pools' command.
title: Device Farm Android Device Pool ARN
- opts:
description: |
If you want to specify a name, this prefix will be used
followed by platform and bitrise build number.
summary: ""
title: Run Name Prefix
run_name_prefix: ""
- build_version: $BITRISE_BUILD_NUMBER
opts:
description: Build number
is_required: true
title: Build Number
- aws_region: $AWS_REGION
opts:
description: |
If you want to specify a different AWS region. Leave
empty to use the default config/env setting.
summary: ""
title: AWS Region
================================================
FILE: steps/aws-device-farm-runner/0.0.4/step.yml
================================================
title: Amazon Device Farm Runner
summary: Amazon Device Farm Runner
description: |-
Deploys app to device farm and starts a test run with a preconfigured test package and device pool.
This Step requires an Amazon Device Farm registration. To register an account, [click here](https://aws.amazon.com/device-farm/)
Use the [aws-device-farm-file-deploy](https://github.com/peartherapeutics/bitrise-aws-device-farm-file-deploy) step to upload your latest test package (and extra app data if required) before this step runs.
website: https://github.com/peartherapeutics/bitrise-aws-device-farm-runner
source_code_url: https://github.com/peartherapeutics/bitrise-aws-device-farm-runner
support_url: https://github.com/peartherapeutics/bitrise-aws-device-farm-runner/issues
published_at: 2016-12-13T09:53:47.263729195-08:00
source:
git: https://github.com/peartherapeutics/bitrise-aws-device-farm-runner.git
commit: 21b689a8ca74dd0236c25a695a7a5cb124f12d79
host_os_tags:
- linux
- osx-10.9
- osx-10.10
project_type_tags:
- ios
- android
- xamarin
- cordova
- ionic
- react-native
type_tags:
- test
deps:
brew:
- name: awscli
bin_name: aws
- name: jq
bin_name: jq
apt_get:
- name: awscli
bin_name: aws
- name: jq
bin_name: jq
is_requires_admin_user: false
is_always_run: false
is_skippable: false
run_if: ""
inputs:
- access_key_id: $AWS_ACCESS_KEY
opts:
description: ""
is_required: true
summary: ""
title: AWS Access Key
- opts:
description: ""
is_required: true
summary: ""
title: AWS Secret Key
secret_access_key: $AWS_SECRET_KEY
- device_farm_project: ""
opts:
description: Project ARNs can be obtained using the AWS CLI 'devicefarm list-projects'
command.
is_required: true
summary: ""
title: Device Farm Project ARN
- opts:
description: |-
Filename of test package to run.
This should be a filename (not a path) that matches the name of the test bundle previously uploaded with the aws-device-farm-file-deploy step.
The most recently uploaded package with this name will be used.
is_required: true
summary: ""
title: Test Package Filename
test_package_name: ""
- opts:
description: See http://docs.aws.amazon.com/devicefarm/latest/APIReference/API_Test.html#devicefarm-Type-Test-type
is_required: true
summary: ""
title: Test Type
test_type: ""
- opts:
description: ""
is_required: true
summary: ""
title: Platform
value_options:
- ios
- android
- ios+android
platform: ios+android
- ipa_path: $BITRISE_IPA_PATH
opts:
description: Required for iOS runs.
title: IPA file path
- ios_pool: ""
opts:
description: Required for iOS runs. ARNs can be obtained using the AWS CLI 'devicefarm
list-device-pools' command.
title: Device Farm iOS Device Pool ARN
- apk_path: $BITRISE_SIGNED_APK_PATH
opts:
description: Required for Android runs.
title: APK file path
- android_pool: ""
opts:
description: Required for Android runs. ARNs can be obtained using the AWS CLI
'devicefarm list-device-pools' command.
title: Device Farm Android Device Pool ARN
- opts:
description: |
If you want to specify a name, this prefix will be used
followed by platform and bitrise build number.
summary: ""
title: Run Name Prefix
run_name_prefix: ""
- build_version: $BITRISE_BUILD_NUMBER
opts:
description: Build number
is_required: true
title: Build Number
- aws_region: $AWS_REGION
opts:
description: |
If you want to specify a different AWS region. Leave
empty to use the default config/env setting.
summary: ""
title: AWS Region
- opts:
description: |-
If set to true, the script waits for the test run to complete on
Devicefarm before returning success/failure. This will slow down your
Bitrise runs, however allows you to make decisions in subsequent steps
based on success/failure of the tests.
title: Whether or not to wait for the test results from Devicefarm
run_wait_for_results: "true"
- opts:
description: |-
Depending on your tests, you may or may not wish to fail the step if
DeviceFarm returns a WARNED result. Only takes effect if
run_wait_for_results is also enabled.
title: Fail if the DeviceFarm results return result of WARNED
run_fail_on_warning: "true"
outputs:
- BITRISE_DEVICEFARM_RESULTS_RAW: null
opts:
description: This is the full results of the run in JSON from AWS Device Farm
title: The full output from the device farm run
- BITRISE_DEVICEFARM_RESULTS_SUMMARY: null
opts:
description: A nice summary suitable for feeding into something like a slack message.
title: A human-readable summary of the results.
================================================
FILE: steps/aws-device-farm-runner/0.0.5/step.yml
================================================
title: Amazon Device Farm Runner
summary: Amazon Device Farm Runner
description: Deploys app to device farm and starts a test run. [Please see the wiki
for setup instructions](https://github.com/peartherapeutics/bitrise-aws-device-farm-runner/wiki).
website: https://github.com/peartherapeutics/bitrise-aws-device-farm-runner
source_code_url: https://github.com/peartherapeutics/bitrise-aws-device-farm-runner
support_url: https://github.com/peartherapeutics/bitrise-aws-device-farm-runner/issues
published_at: 2017-06-21T09:19:56.224790211-07:00
source:
git: https://github.com/peartherapeutics/bitrise-aws-device-farm-runner.git
commit: 8e6dc423971abd4f8784505e241f09d47e4830a4
host_os_tags:
- linux
- osx-10.9
- osx-10.10
type_tags:
- test
deps:
brew:
- name: awscli
bin_name: aws
- name: jq
bin_name: jq
apt_get:
- name: awscli
bin_name: aws
- name: jq
bin_name: jq
is_requires_admin_user: false
is_always_run: false
is_skippable: false
run_if: ""
inputs:
- access_key_id: $AWS_ACCESS_KEY
opts:
description: Access key for your AWS/IAM user. Define this as a secret environment
variable in your workflow.
is_required: true
summary: ""
title: AWS Access Key
- opts:
description: Secret key for your AWS/IAM user. Define this as a secret environment
variable in your workflow.
is_required: true
summary: ""
title: AWS Secret Key
secret_access_key: $AWS_SECRET_KEY
- device_farm_project: ""
opts:
description: Project ARNs can be obtained using the AWS CLI `devicefarm list-projects`
command.
is_required: true
summary: ""
title: Device Farm Project ARN
- billing_method: METERED
opts:
description: This step specifies the billing methodfor your test run. Use `METERED`
for free tier and pay-as-you-go billing, and `UNMETERED` to use [pre-paid device
slots](https://docs.aws.amazon.com/devicefarm/latest/developerguide/how-to-purchase-device-slots.html).
is_required: false
summary: ""
title: Billing Method
value_options:
- METERED
- UNMETERED
- opts:
description: |-
Filename of test package to run.
This should be a filename (not a path) that matches the name of the test bundle previously uploaded with the [aws-device-farm-file-deploy](https://github.com/peartherapeutics/bitrise-aws-device-farm-file-deploy) step.
The most recently uploaded package with this name will be used.
is_required: true
summary: ""
title: Test Package Filename
test_package_name: ""
- opts:
description: '[See the Test.type documentation](http://docs.aws.amazon.com/devicefarm/latest/APIReference/API_Test.html#devicefarm-Type-Test-type).'
is_required: true
summary: ""
title: Test Type
test_type: ""
- opts:
description: ""
is_required: true
summary: ""
title: Platform
value_options:
- ios
- android
- ios+android
platform: ios+android
- ipa_path: $BITRISE_IPA_PATH
opts:
description: Required for iOS runs.
title: IPA file path
- ios_pool: ""
opts:
description: Required for iOS runs. ARNs can be obtained using the AWS CLI `devicefarm
list-device-pools` command.
title: Device Farm iOS Device Pool ARN
- apk_path: $BITRISE_SIGNED_APK_PATH
opts:
description: Required for Android runs.
title: APK file path
- android_pool: ""
opts:
description: Required for Android runs. ARNs can be obtained using the AWS CLI
`devicefarm list-device-pools` command.
title: Device Farm Android Device Pool ARN
- opts:
description: |
If you want to specify a name, this prefix will be used
followed by platform and bitrise build number.
summary: ""
title: Run Name Prefix
run_name_prefix: ""
- build_version: $BITRISE_BUILD_NUMBER
opts:
description: Build number
is_required: true
title: Build Number
- aws_region: $AWS_REGION
opts:
description: |
If you want to specify a different AWS region. Leave
empty to use the default config/env setting.
summary: ""
title: AWS Region
- opts:
description: |-
If set to true, the script waits for the test run to complete on
Device farm before returning success/failure. This will slow down your
Bitrise runs, however allows you to make decisions in subsequent steps
based on success/failure of the tests.
title: Whether or not to wait for the test results from device farm
value_options:
- "true"
- "false"
run_wait_for_results: "true"
- opts:
description: |-
Depending on your tests, you may or may not wish to fail the step if
Device farm returns a WARNED result. Only takes effect if
`run_wait_for_results` is also enabled.
title: Fail if the device farm results return result of WARNED
value_options:
- "true"
- "false"
run_fail_on_warning: "true"
outputs:
- BITRISE_DEVICEFARM_RESULTS_RAW: null
opts:
description: This is the full results of the run in JSON from AWS Device Farm
title: The full output from the device farm run
- BITRISE_DEVICEFARM_RESULTS_SUMMARY: null
opts:
description: A nice summary suitable for feeding into something like a slack message.
title: A human-readable summary of the results.
================================================
FILE: steps/aws-device-farm-runner/0.0.6/step.yml
================================================
title: Amazon Device Farm Runner
summary: Amazon Device Farm Runner
description: Deploys app to device farm and starts a test run. [Please see the wiki
for setup instructions](https://github.com/peartherapeutics/bitrise-aws-device-farm-runner/wiki).
website: https://github.com/peartherapeutics/bitrise-aws-device-farm-runner
source_code_url: https://github.com/peartherapeutics/bitrise-aws-device-farm-runner
support_url: https://github.com/peartherapeutics/bitrise-aws-device-farm-runner/issues
published_at: 2017-08-02T14:53:42.980457224-07:00
source:
git: https://github.com/peartherapeutics/bitrise-aws-device-farm-runner.git
commit: 6c107aaf92cf0244d9b494fd678ed29425c4273a
host_os_tags:
- linux
- osx-10.9
- osx-10.10
type_tags:
- test
deps:
brew:
- name: awscli
bin_name: aws
- name: jq
bin_name: jq
apt_get:
- name: awscli
bin_name: aws
- name: jq
bin_name: jq
is_requires_admin_user: false
is_always_run: false
is_skippable: false
run_if: ""
inputs:
- access_key_id: $AWS_ACCESS_KEY
opts:
description: Access key for your AWS/IAM user. Define this as a secret environment
variable in your workflow.
is_required: true
summary: ""
title: AWS Access Key
- opts:
description: Secret key for your AWS/IAM user. Define this as a secret environment
variable in your workflow.
is_required: true
summary: ""
title: AWS Secret Key
secret_access_key: $AWS_SECRET_KEY
- device_farm_project: ""
opts:
description: Project ARNs can be obtained using the AWS CLI `devicefarm list-projects`
command.
is_required: true
summary: ""
title: Device Farm Project ARN
- billing_method: METERED
opts:
description: This step specifies the billing method for your test run. Use `METERED`
for free tier and pay-as-you-go billing, and `UNMETERED` to use [pre-paid device
slots](https://docs.aws.amazon.com/devicefarm/latest/developerguide/how-to-purchase-device-slots.html).
is_required: false
summary: ""
title: Billing Method
value_options:
- METERED
- UNMETERED
- opts:
description: |-
Filename of test package to run.
This should be a filename (not a path) that matches the name of the test bundle previously uploaded with the [aws-device-farm-file-deploy](https://github.com/peartherapeutics/bitrise-aws-device-farm-file-deploy) step.
The most recently uploaded package with this name will be used.
is_required: true
summary: ""
title: Test Package Filename
test_package_name: ""
- opts:
description: '[See the Test.type documentation](http://docs.aws.amazon.com/devicefarm/latest/APIReference/API_Test.html#devicefarm-Type-Test-type).'
is_required: true
summary: ""
title: Test Type
test_type: ""
- filter: ""
opts:
description: This step adds the opportunity to filter your tests. For example
com.android.abc.test1. [See the ScheduleRunTest.filter documentation](https://docs.aws.amazon.com/devicefarm/latest/APIReference/API_ScheduleRunTest.html#devicefarm-Type-ScheduleRunTest-filter).
is_required: false
summary: ""
title: Test Filter
- opts:
description: ""
is_required: true
summary: ""
title: Platform
value_options:
- ios
- android
- ios+android
platform: ios+android
- ipa_path: $BITRISE_IPA_PATH
opts:
description: Required for iOS runs.
title: IPA file path
- ios_pool: ""
opts:
description: Required for iOS runs. ARNs can be obtained using the AWS CLI `devicefarm
list-device-pools` command.
title: Device Farm iOS Device Pool ARN
- apk_path: $BITRISE_SIGNED_APK_PATH
opts:
description: Required for Android runs.
title: APK file path
- android_pool: ""
opts:
description: Required for Android runs. ARNs can be obtained using the AWS CLI
`devicefarm list-device-pools` command.
title: Device Farm Android Device Pool ARN
- opts:
description: |
If you want to specify a name, this prefix will be used
followed by platform and bitrise build number.
summary: ""
title: Run Name Prefix
run_name_prefix: ""
- build_version: $BITRISE_BUILD_NUMBER
opts:
description: Build number
is_required: true
title: Build Number
- aws_region: $AWS_REGION
opts:
description: |
If you want to specify a different AWS region. Leave
empty to use the default config/env setting.
summary: ""
title: AWS Region
- opts:
description: |-
If set to true, the script waits for the test run to complete on
Device farm before returning success/failure. This will slow down your
Bitrise runs, however allows you to make decisions in subsequent steps
based on success/failure of the tests.
title: Whether or not to wait for the test results from device farm
value_options:
- "true"
- "false"
run_wait_for_results: "true"
- opts:
description: |-
Depending on your tests, you may or may not wish to fail the step if
Device farm returns a WARNED result. Only takes effect if
`run_wait_for_results` is also enabled.
title: Fail if the device farm results return result of WARNED
value_options:
- "true"
- "false"
run_fail_on_warning: "true"
outputs:
- BITRISE_DEVICEFARM_RESULTS_RAW: null
opts:
description: This is the full results of the run in JSON from AWS Device Farm
title: The full output from the device farm run
- BITRISE_DEVICEFARM_RESULTS_SUMMARY: null
opts:
description: A nice summary suitable for feeding into something like a slack message.
title: A human-readable summary of the results.
================================================
FILE: steps/aws-device-farm-runner/0.0.7/step.yml
================================================
title: Amazon Device Farm Runner
summary: Amazon Device Farm Runner
description: Deploys app to device farm and starts a test run. [Please see the wiki
for setup instructions](https://github.com/peartherapeutics/bitrise-aws-device-farm-runner/wiki).
website: https://github.com/peartherapeutics/bitrise-aws-device-farm-runner
source_code_url: https://github.com/peartherapeutics/bitrise-aws-device-farm-runner
support_url: https://github.com/peartherapeutics/bitrise-aws-device-farm-runner/issues
published_at: 2017-08-22T10:41:26.570632632-07:00
source:
git: https://github.com/peartherapeutics/bitrise-aws-device-farm-runner.git
commit: 161322fbcfbc33d0b01044fda0de1d6cceac6dfb
host_os_tags:
- linux
- osx-10.9
- osx-10.10
type_tags:
- test
deps:
brew:
- name: awscli
bin_name: aws
- name: jq
bin_name: jq
apt_get:
- name: awscli
bin_name: aws
- name: jq
bin_name: jq
is_requires_admin_user: false
is_always_run: false
is_skippable: false
run_if: ""
inputs:
- access_key_id: $AWS_ACCESS_KEY
opts:
description: Access key for your AWS/IAM user. Define this as a secret environment
variable in your workflow.
is_required: true
summary: ""
title: AWS Access Key
- opts:
description: Secret key for your AWS/IAM user. Define this as a secret environment
variable in your workflow.
is_required: true
summary: ""
title: AWS Secret Key
secret_access_key: $AWS_SECRET_KEY
- device_farm_project: ""
opts:
description: Project ARNs can be obtained using the AWS CLI `devicefarm list-projects`
command.
is_required: true
summary: ""
title: Device Farm Project ARN
- billing_method: METERED
opts:
description: This step specifies the billing method for your test run. Use `METERED`
for free tier and pay-as-you-go billing, and `UNMETERED` to use [pre-paid device
slots](https://docs.aws.amazon.com/devicefarm/latest/developerguide/how-to-purchase-device-slots.html).
is_required: false
summary: ""
title: Billing Method
value_options:
- METERED
- UNMETERED
- locale: en_US
opts:
description: The locale as ISO language and country code to be used by the test
devices
is_required: false
summary: ""
title: The locale for the devices to use
value_options:
- ar_IL
- bg_BG
- ca_ES
- zh_CN
- zh_TW
- hr_HR
- cs_CZ
- da_DK
- nl_BE
- nl_NL
- en_AU
- en_GB
- en_CA
- en_IE
- en_IN
- en_NZ
- en_US
- fi_FI
- fr_BE
- fr_CA
- fr_FR
- fr_CH
- de_AT
- de_DE
- de_LI
- de_CH
- el_GR
- he_IL
- hi_IN
- hu_HU
- id_ID
- it_IT
- it_CH
- ja_JP
- ko_KR
- lv_LV
- lt_LT
- nb_NO
- pl_PL
- ro_RO
- ru_RU
- sr_RS
- sk_SK
- sl_SI
- es_ES
- es_US
- sv_SE
- tl_PH
- th_TH
- tr_TR
- uk_UA
- vi_VN
- opts:
description: |-
Filename of test package to run.
This should be a filename (not a path) that matches the name of the test bundle previously uploaded with the [aws-device-farm-file-deploy](https://github.com/peartherapeutics/bitrise-aws-device-farm-file-deploy) step.
The most recently uploaded package with this name will be used.
is_required: true
summary: ""
title: Test Package Filename
test_package_name: ""
- opts:
description: '[See the Test.type documentation](http://docs.aws.amazon.com/devicefarm/latest/APIReference/API_Test.html#devicefarm-Type-Test-type).'
is_required: true
summary: ""
title: Test Type
test_type: ""
- filter: ""
opts:
description: This step adds the opportunity to filter your tests. For example
com.android.abc.test1. [See the ScheduleRunTest.filter documentation](https://docs.aws.amazon.com/devicefarm/latest/APIReference/API_ScheduleRunTest.html#devicefarm-Type-ScheduleRunTest-filter).
is_required: false
summary: ""
title: Test Filter
- opts:
description: ""
is_required: true
summary: ""
title: Platform
value_options:
- ios
- android
- ios+android
platform: ios+android
- ipa_path: $BITRISE_IPA_PATH
opts:
description: Required for iOS runs.
title: IPA file path
- ios_pool: ""
opts:
description: Required for iOS runs. ARNs can be obtained using the AWS CLI `devicefarm
list-device-pools` command.
title: Device Farm iOS Device Pool ARN
- apk_path: $BITRISE_SIGNED_APK_PATH
opts:
description: Required for Android runs.
title: APK file path
- android_pool: ""
opts:
description: Required for Android runs. ARNs can be obtained using the AWS CLI
`devicefarm list-device-pools` command.
title: Device Farm Android Device Pool ARN
- opts:
description: |
If you want to specify a name, this prefix will be used
followed by platform and bitrise build number.
summary: ""
title: Run Name Prefix
run_name_prefix: ""
- build_version: $BITRISE_BUILD_NUMBER
opts:
description: Build number
is_required: true
title: Build Number
- aws_region: $AWS_REGION
opts:
description: |
If you want to specify a different AWS region. Leave
empty to use the default config/env setting.
summary: ""
title: AWS Region
- opts:
description: |-
If set to true, the script waits for the test run to complete on
Device farm before returning success/failure. This will slow down your
Bitrise runs, however allows you to make decisions in subsequent steps
based on success/failure of the tests.
title: Whether or not to wait for the test results from device farm
value_options:
- "true"
- "false"
run_wait_for_results: "true"
- opts:
description: |-
Depending on your tests, you may or may not wish to fail the step if
Device farm returns a WARNED result. Only takes effect if
`run_wait_for_results` is also enabled.
title: Fail if the device farm results return result of WARNED
value_options:
- "true"
- "false"
run_fail_on_warning: "true"
outputs:
- BITRISE_DEVICEFARM_RESULTS_RAW: null
opts:
description: This is the full results of the run in JSON from AWS Device Farm
title: The full output from the device farm run
- BITRISE_DEVICEFARM_RESULTS_SUMMARY: null
opts:
description: A nice summary suitable for feeding into something like a slack message.
title: A human-readable summary of the results.
================================================
FILE: steps/aws-device-farm-runner/0.0.8/step.yml
================================================
title: Amazon Device Farm Runner
summary: Amazon Device Farm Runner
description: Deploys app to device farm and starts a test run. [Please see the wiki
for setup instructions](https://github.com/peartherapeutics/bitrise-aws-device-farm-runner/wiki).
website: https://github.com/lautarochiarle/bitrise-aws-device-farm-runner
source_code_url: https://github.com/lautarochiarle/bitrise-aws-device-farm-runner
support_url: https://github.com/lautarochiarle/bitrise-aws-device-farm-runner/issues
published_at: 2020-07-20T11:19:20.051479742-03:00
source:
git: https://github.com/lautarochiarle/bitrise-aws-device-farm-runner.git
commit: c76d89246c8d5f59d7f27e4567beed41137436c1
host_os_tags:
- linux
- osx-10.9
- osx-10.10
type_tags:
- test
deps:
brew:
- name: awscli
bin_name: aws
- name: jq
bin_name: jq
apt_get:
- name: awscli
bin_name: aws
- name: jq
bin_name: jq
is_requires_admin_user: false
is_always_run: false
is_skippable: false
run_if: ""
inputs:
- access_key_id: ""
opts:
description: Access key for your AWS/IAM user. Define this as a secret environment
variable in your workflow.
is_required: true
is_sensitive: true
summary: ""
title: AWS Access Key
- opts:
description: Secret key for your AWS/IAM user. Define this as a secret environment
variable in your workflow.
is_required: true
is_sensitive: true
summary: ""
title: AWS Secret Key
secret_access_key: ""
- device_farm_project: ""
opts:
description: Project ARNs can be obtained using the AWS CLI `devicefarm list-projects`
command.
is_required: true
summary: ""
title: Device Farm Project ARN
- billing_method: METERED
opts:
description: This step specifies the billing method for your test run. Use `METERED`
for free tier and pay-as-you-go billing, and `UNMETERED` to use [pre-paid device
slots](https://docs.aws.amazon.com/devicefarm/latest/developerguide/how-to-purchase-device-slots.html).
is_required: false
summary: ""
title: Billing Method
value_options:
- METERED
- UNMETERED
- locale: en_US
opts:
description: The locale as ISO language and country code to be used by the test
devices
is_required: false
summary: ""
title: The locale for the devices to use
value_options:
- ar_IL
- bg_BG
- ca_ES
- zh_CN
- zh_TW
- hr_HR
- cs_CZ
- da_DK
- nl_BE
- nl_NL
- en_AU
- en_GB
- en_CA
- en_IE
- en_IN
- en_NZ
- en_US
- fi_FI
- fr_BE
- fr_CA
- fr_FR
- fr_CH
- de_AT
- de_DE
- de_LI
- de_CH
- el_GR
- he_IL
- hi_IN
- hu_HU
- id_ID
- it_IT
- it_CH
- ja_JP
- ko_KR
- lv_LV
- lt_LT
- nb_NO
- pl_PL
- ro_RO
- ru_RU
- sr_RS
- sk_SK
- sl_SI
- es_ES
- es_US
- sv_SE
- tl_PH
- th_TH
- tr_TR
- uk_UA
- vi_VN
- opts:
description: |-
Filename of test package to run.
This should be a filename (not a path) that matches the name of the test bundle previously uploaded with the [aws-device-farm-file-deploy](https://github.com/peartherapeutics/bitrise-aws-device-farm-file-deploy) step.
The most recently uploaded package with this name will be used.
is_required: true
summary: ""
title: Test Package Filename
test_package_name: ""
- opts:
description: '[See the Test.type documentation](http://docs.aws.amazon.com/devicefarm/latest/APIReference/API_Test.html#devicefarm-Type-Test-type).'
is_required: true
summary: ""
title: Test Type
test_type: ""
- filter: ""
opts:
description: This step adds the opportunity to filter your tests. For example
com.android.abc.test1. [See the ScheduleRunTest.filter documentation](https://docs.aws.amazon.com/devicefarm/latest/APIReference/API_ScheduleRunTest.html#devicefarm-Type-ScheduleRunTest-filter).
is_required: false
summary: ""
title: Test Filter
- opts:
description: Environment ARNs can be obtained using the AWS CLI `devicefarm list-uploads`
command.
is_required: false
summary: ""
title: Device Farm Custom TestSpec ARN
test_spec: $TEST_SPEC
- opts:
description: ""
is_required: true
summary: ""
title: Platform
value_options:
- ios
- android
- ios+android
platform: ios+android
- ipa_path: $BITRISE_IPA_PATH
opts:
description: Required for iOS runs.
title: IPA file path
- ios_pool: ""
opts:
description: Required for iOS runs. ARNs can be obtained using the AWS CLI `devicefarm
list-device-pools` command.
title: Device Farm iOS Device Pool ARN
- apk_path: $BITRISE_SIGNED_APK_PATH
opts:
description: Required for Android runs.
title: APK file path
- android_pool: ""
opts:
description: Required for Android runs. ARNs can be obtained using the AWS CLI
`devicefarm list-device-pools` command.
title: Device Farm Android Device Pool ARN
- opts:
description: |
If you want to specify a name, this prefix will be used
followed by platform and bitrise build number.
summary: ""
title: Run Name Prefix
run_name_prefix: ""
- build_version: $BITRISE_BUILD_NUMBER
opts:
description: Build number
is_required: true
title: Build Number
- aws_region: ""
opts:
description: |
If you want to specify a different AWS region. Leave
empty to use the default config/env setting.
is_sensitive: true
summary: ""
title: AWS Region
- opts:
description: |-
If set to true, the script waits for the test run to complete on
Device farm before returning success/failure. This will slow down your
Bitrise runs, however allows you to make decisions in subsequent steps
based on success/failure of the tests.
title: Whether or not to wait for the test results from device farm
value_options:
- "true"
- "false"
run_wait_for_results: "true"
- opts:
description: |-
Depending on your tests, you may or may not wish to fail the step if
Device farm returns a WARNED result. Only takes effect if
`run_wait_for_results` is also enabled.
title: Fail if the device farm results return result of WARNED
value_options:
- "true"
- "false"
run_fail_on_warning: "true"
outputs:
- BITRISE_DEVICEFARM_RESULTS_RAW: null
opts:
description: This is the full results of the run in JSON from AWS Device Farm
title: The full output from the device farm run
- BITRISE_DEVICEFARM_RESULTS_SUMMARY: null
opts:
description: A nice summary suitable for feeding into something like a slack message.
title: A human-readable summary of the results.
================================================
FILE: steps/aws-device-farm-runner/step-info.yml
================================================
maintainer: community
================================================
FILE: steps/aws-s3-upload/0.0.1/step.yml
================================================
title: Amazon Web Services (AWS) S3 Upload
summary: The Step uploads a file to an Amazon S3 bucket.
description: |-
The Step uploads a file to an Amazon S3 bucket.
It can handle both files and directories, uploading the contents to the specified S3 bucket with the desired access control settings.
Using the Authenticate with AWS Step beforehand is recommended to securely provide short lived AWS credentials.
website: https://github.com/bitrise-steplib/bitrise-step-aws-s3-upload
source_code_url: https://github.com/bitrise-steplib/bitrise-step-aws-s3-upload
support_url: https://github.com/bitrise-steplib/bitrise-step-aws-s3-upload/issues
published_at: 2025-10-31T14:07:40.715424+01:00
source:
git: https://github.com/bitrise-steplib/bitrise-step-aws-s3-upload.git
commit: 30bc2a24c71ddac5fb2ad427186efce3b0637511
type_tags:
- utility
toolkit:
go:
package_name: github.com/bitrise-steplib/bitrise-step-aws-s3-upload
inputs:
- opts:
description: |-
Path to a file or folder to be uploaded.
You can use absolute or relative paths.
is_required: true
summary: Path to a file or folder to be uploaded.
title: Path
path: null
- bucket_name: null
opts:
description: Name of the S3 bucket to upload the file to.
is_required: true
summary: Name of the S3 bucket to upload the file to.
title: Bucket Name
- bucket_prefix: null
opts:
description: |-
Path in the S3 bucket where the file will be uploaded.
If not provided, the file will be uploaded to the root of the bucket with its original filename.
is_required: false
summary: Path in the S3 bucket where the file will be uploaded.
title: Bucket Prefix
- acl_control: private
opts:
description: The access control level for the uploaded file.
is_required: true
summary: The access control level for the uploaded file.
title: Access Control
value_options:
- private
- public-read
- opts:
description: The AWS region to use.
is_required: true
summary: The AWS region to use.
title: Region
region: us-east-1
- access_key_id: $AWS_ACCESS_KEY_ID
opts:
category: AWS Credentials
description: |-
The AWS Access Key ID.
You can provide it directly or use the Authenticate with AWS Step.
is_dont_change_value: true
is_required: true
summary: The AWS Access Key ID.
title: AWS Access Key ID
- opts:
category: AWS Credentials
description: |-
The AWS Secret Access Key.
You can provide it directly or use the Authenticate with AWS Step.
is_dont_change_value: true
is_required: true
summary: The AWS Secret Access Key.
title: AWS Secret Access Key
secret_access_key: $AWS_SECRET_ACCESS_KEY
- opts:
category: AWS Credentials
description: |-
The AWS Session Token.
You can provide it directly or use the Authenticate with AWS Step.
is_dont_change_value: true
is_required: false
summary: The AWS Session Token.
title: AWS Session Token
session_token: $AWS_SESSION_TOKEN
- opts:
category: Debug
is_required: true
summary: Enable logging additional information for debugging.
title: Enable verbose logging
value_options:
- "true"
- "false"
verbose: "false"
================================================
FILE: steps/aws-s3-upload/step-info.yml
================================================
maintainer: bitrise
================================================
FILE: steps/aws-secrets-manager/0.0.1/step.yml
================================================
title: Fetch secrets
summary: Fetch secrets from AWS Secrets Manager
description: |
The main intention of this custom step is to allow us to store sensitive data on AWS Secrets Manager, and fetching them on-demand during Bitrise workflow execution.
When a Bitrise workflow runs, this step fetches the secrets from AWS Secrets Manager, based on the list of secrets provided as input.
Each secret stored on AWS Secrets Manager is represented as a JSON object. For each secret that it fetches, it then retrieve the JSON object value from the secret's JSON object, using a specified JSON object key. The value is then stored in an environment variable, exported and propagated to be consumed in subsequent steps in the workflow.
website: https://github.com/MoneyLion/bitrise-step-aws-secrets-manager
source_code_url: https://github.com/MoneyLion/bitrise-step-aws-secrets-manager
support_url: https://github.com/MoneyLion/bitrise-step-aws-secrets-manager/issues
published_at: 2020-10-15T16:26:03.236312+08:00
source:
git: https://github.com/MoneyLion/bitrise-step-aws-secrets-manager.git
commit: 59a6b3e2cd6e06cacca07c74c5be176428e50d3d
type_tags:
- utility
toolkit:
go:
package_name: moneylion.com/security/bitrise-step-aws-secrets-manager
is_requires_admin_user: true
is_always_run: false
is_skippable: false
inputs:
- aws_access_key_id: $AWS_ACCESS_KEY_ID
opts:
description: The access key ID for your AWS IAM user
is_required: true
is_sensitive: true
summary: AWS Access Key ID
title: AWS Access Key ID
- aws_secret_access_key: $AWS_SECRET_ACCESS_KEY
opts:
description: The secret access key for your AWS IAM user
is_required: true
is_sensitive: true
summary: AWS Secret Access Key
title: AWS Secret Access Key
- aws_default_region: $AWS_DEFAULT_REGION
opts:
description: The AWS region where the secrets are created
is_required: true
is_sensitive: true
summary: AWS region
title: AWS region
- aws_role_arn: $AWS_ROLE_ARN
opts:
description: The ARN of AWS IAM role to assume. This role should have the necessary
permission to read secrets from AWS Secrets Manager.
is_required: true
is_sensitive: true
summary: ARN of AWS IAM role to assume
title: AWS Role ARN
- opts:
description: |
The newline separated list of secrets to be fetched from AWS Secrets Manager.
Each secret itself consists of three components:
- The ARN of the secret. This can be either full ARN, or partial ARN, which contains only the name of the secret, without the six random character suffix.
- The secret's JSON object key. The JSON object key for identifying the value that we want to retrieve in the secret's JSON object.
- The environment variable to store the value in. The environment variable where the JSON object value, identified by the JSON object key, is stored in.
is_required: true
summary: |
Newline separated list of secret. Each secret is delimited with hash symbol, consisting of the secret ARN, the secret's JSON object key, and the environment variable in which to store the corresponding JSON object value in.
Example: `arn:aws:secretsmanager:us-east-1:123456789012:secret:db-credential#username#USERNAME`.
title: Secret list
secret_list: null
================================================
FILE: steps/aws-secrets-manager/0.0.2/step.yml
================================================
title: Fetch secrets
summary: Fetch secrets from AWS Secrets Manager
description: |
The main intention of this custom step is to allow us to store sensitive data on AWS Secrets Manager, and fetching them on-demand during Bitrise workflow execution.
When a Bitrise workflow runs, this step fetches the secrets from AWS Secrets Manager, based on the list of secrets provided as input.
Each secret stored on AWS Secrets Manager is represented as a JSON object. For each secret that it fetches, it then retrieve the JSON object value from the secret's JSON object, using a specified JSON object key. The value is then stored in an environment variable, exported and propagated to be consumed in subsequent steps in the workflow.
website: https://github.com/MoneyLion/bitrise-step-aws-secrets-manager
source_code_url: https://github.com/MoneyLion/bitrise-step-aws-secrets-manager
support_url: https://github.com/MoneyLion/bitrise-step-aws-secrets-manager/issues
published_at: 2020-11-13T14:50:21.621537+08:00
source:
git: https://github.com/MoneyLion/bitrise-step-aws-secrets-manager.git
commit: 58b123623a351dcbe1621af4784d096caf3f58b9
type_tags:
- utility
toolkit:
go:
package_name: moneylion.com/security/bitrise-step-aws-secrets-manager
is_requires_admin_user: true
is_always_run: false
is_skippable: false
inputs:
- aws_access_key_id: $AWS_ACCESS_KEY_ID
opts:
description: The access key ID for your AWS IAM user
is_required: true
is_sensitive: true
summary: AWS Access Key ID
title: AWS Access Key ID
- aws_secret_access_key: $AWS_SECRET_ACCESS_KEY
opts:
description: The secret access key for your AWS IAM user
is_required: true
is_sensitive: true
summary: AWS Secret Access Key
title: AWS Secret Access Key
- aws_default_region: $AWS_DEFAULT_REGION
opts:
description: The AWS region where the secrets are created
is_required: true
is_sensitive: true
summary: AWS region
title: AWS region
- aws_role_arn: $AWS_ROLE_ARN
opts:
description: The ARN of AWS IAM role to assume. This role should have the necessary
permission to read secrets from AWS Secrets Manager.
is_required: true
is_sensitive: true
summary: ARN of AWS IAM role to assume
title: AWS Role ARN
- opts:
description: |
The newline separated list of secrets to be fetched from AWS Secrets Manager.
Each secret itself consists of three components:
- The ARN of the secret. This can be either full ARN, or partial ARN, which contains only the name of the secret, without the six random character suffix.
- The secret's JSON object key. The JSON object key for identifying the value that we want to retrieve in the secret's JSON object.
- The environment variable to store the value in. The environment variable where the JSON object value, identified by the JSON object key, is stored in.
is_required: true
summary: |
Newline separated list of secret. Each secret is delimited with hash symbol, consisting of the secret ARN, the secret's JSON object key, and the environment variable in which to store the corresponding JSON object value in.
Example: `arn:aws:secretsmanager:us-east-1:123456789012:secret:db-credential#username#USERNAME`.
title: Secret list
secret_list: null
================================================
FILE: steps/aws-secrets-manager/1.0.0/step.yml
================================================
title: Fetch secrets from AWS Secrets Manager
summary: Fetch secrets from AWS Secrets Manager
description: |
The main intention of this Step is to allow storage of sensitive data on AWS Secrets Manager, and fetching them on-demand during Bitrise workflow execution.
When a workflow runs, the Step fetches a list of specified secrets from AWS Secrets Manager.
The fetched secrets are then propagated into subsequent steps in the workflow.
The Step uses AWS SDK for Go v2 with the default config loader. This means for authenticating with AWS, you may:
- Use static AWS credentials via environment variable, e.g. `AWS_ACCESS_KEY_ID` and `AWS_SECRET_ACCESS_KEY`.
- Use shared configuration files, e.g. `AWS_PROFILE`.
Checkout the main repository README for more usage guide.
website: https://github.com/MoneyLion/bitrise-step-aws-secrets-manager
source_code_url: https://github.com/MoneyLion/bitrise-step-aws-secrets-manager
support_url: https://github.com/MoneyLion/bitrise-step-aws-secrets-manager/issues
published_at: 2021-07-21T21:06:31.545432+08:00
source:
git: https://github.com/MoneyLion/bitrise-step-aws-secrets-manager.git
commit: 18db9fda4e3bbeb88b47e75f4bb4cde7ca0ba1eb
type_tags:
- utility
toolkit:
go:
package_name: moneylion.com/security/bitrise-step-aws-secrets-manager
is_requires_admin_user: true
is_always_run: false
is_skippable: false
inputs:
- aws_access_key_id: ""
opts:
description: The AWS Access Key ID. If you are supplying this input, ensure the
variable is named exactly `AWS_ACCESS_KEY_ID`.
is_sensitive: true
summary: AWS access key ID
title: AWS access key ID
- aws_secret_access_key: ""
opts:
description: The AWS secret access key. If you are supplying this input, ensure
the variable is named exactly `AWS_SECRET_ACCESS_KEY`.
is_sensitive: true
summary: AWS secret access key
title: AWS secret access key
- aws_region: ""
opts:
description: The AWS region to operate in. If you are supplying this input, ensure
the variable is named exactly `AWS_DEFAULT_REGION` or `AWS_REGION`.
summary: AWS region
title: AWS region
- aws_iam_role_arn: ""
opts:
description: The ARN of AWS IAM role to assume. This role should have the necessary
permission to read secrets from AWS Secrets Manager.
summary: The ARN of AWS IAM role to assume.
title: AWS IAM role ARN
- opts:
description: |
A newline separated list of secrets to fetch from AWS Secrets Manager.
Each line is in the form of:
```
# #
```
For example, given the secret with an ARN `arn:aws:secret-1`, and a secret value:
```
{
"username": "admin",
"password": "str0ngpassword"
}
```
Specifying this line in the secret list:
```
arn:aws:secret-1 # username # USERNAME
```
Fetches the secret, retrieves the JSON value under the key `username`, and store that value in the `USERNAME` environment variable. `$USERNAME` will now contain the value `admin`.
is_required: true
summary: A list of secrets to fetch.
title: Secret list
secret_list: null
================================================
FILE: steps/aws-secrets-manager/2.0.0/step.yml
================================================
title: Fetch secrets from AWS Secrets Manager
summary: Fetch secrets from AWS Secrets Manager
description: |
This Step fetches secrets on-demand from AWS Secrets Manager, during Bitrise workflow execution.
The fetched secrets are then propagated into subsequent steps in the workflow.
Include this Step in your workflow, for example:
```yaml
workflows:
foo:
steps:
- aws-secrets-manager@x.x.x:
inputs:
- aws_access_key_id: $AWS_ACCESS_KEY_ID
- aws_secret_access_key: $AWS_SECRET_ACCESS_KEY
- aws_default_region: a-region-1
- secret_list: |
arn:aws:secret-1 # username # USERNAME
arn:aws:secret-2 # password # PASSWORD
- script@1:
inputs:
- content: |
#!/bin/bash
#
# Access your secrets via $USERNAME and $PASSWORD
```
Checkout the main repository README for more usage guide.
website: https://github.com/MoneyLion/bitrise-step-aws-secrets-manager
source_code_url: https://github.com/MoneyLion/bitrise-step-aws-secrets-manager
support_url: https://github.com/MoneyLion/bitrise-step-aws-secrets-manager/issues
published_at: 2021-07-25T05:57:58.17624+08:00
source:
git: https://github.com/MoneyLion/bitrise-step-aws-secrets-manager.git
commit: 72b0bb599fa60abad1e423f92c6f4a969771106d
type_tags:
- utility
toolkit:
go:
package_name: moneylion.com/security/bitrise-step-aws-secrets-manager
is_requires_admin_user: true
is_always_run: false
is_skippable: false
inputs:
- aws_access_key_id: ""
opts:
description: AWS access key ID.
is_sensitive: true
summary: AWS access key ID.
title: AWS access key ID
- aws_secret_access_key: ""
opts:
description: AWS secret access key.
is_sensitive: true
summary: AWS secret access key.
title: AWS secret access key
- aws_default_region: ""
opts:
description: AWS region to operate in.
summary: AWS region to operate in.
title: AWS region
- aws_profile: ""
opts:
description: An AWS named profile in shared configuration file.
summary: An AWS named profile in shared configuration file.
title: AWS named profile
- aws_iam_role_arn: ""
opts:
description: The ARN of AWS IAM role to assume.
summary: The ARN of AWS IAM role to assume.
title: AWS IAM role ARN
- opts:
description: |
A newline separated list of secrets to fetch from AWS Secrets Manager.
Each line is in the form of:
```
# #
```
For example, given the secret with an ARN `arn:aws:secret-1`, and a secret value:
```
{
"username": "admin",
"password": "str0ngpassword"
}
```
Specifying this line in the secret list:
```
arn:aws:secret-1 # username # USERNAME
```
Fetches the secret, retrieves the JSON value under the key `username`, and store that value in the `USERNAME` environment variable. `$USERNAME` will now contain the value `admin`.
is_required: true
summary: A list of secrets to fetch.
title: Secret list
secret_list: null
================================================
FILE: steps/aws-secrets-manager/2.1.0/step.yml
================================================
title: Fetch secrets from AWS Secrets Manager
summary: Fetch secrets from AWS Secrets Manager
description: |
This Step fetches secrets on-demand from AWS Secrets Manager, during Bitrise workflow execution.
The fetched secrets are then propagated into subsequent steps in the workflow.
Include this Step in your workflow, for example:
```yaml
workflows:
foo:
steps:
- aws-secrets-manager@x.x.x:
inputs:
- aws_access_key_id: $AWS_ACCESS_KEY_ID
- aws_secret_access_key: $AWS_SECRET_ACCESS_KEY
- aws_default_region: a-region-1
- secret_list: |
arn:aws:secret-1 # username # USERNAME
arn:aws:secret-2 # password # PASSWORD
- script@1:
inputs:
- content: |
#!/bin/bash
#
# Access your secrets via $USERNAME and $PASSWORD
```
Checkout the main repository README for more usage guide.
website: https://github.com/MoneyLion/bitrise-step-aws-secrets-manager
source_code_url: https://github.com/MoneyLion/bitrise-step-aws-secrets-manager
support_url: https://github.com/MoneyLion/bitrise-step-aws-secrets-manager/issues
published_at: 2022-03-01T22:24:56.567286+08:00
source:
git: https://github.com/MoneyLion/bitrise-step-aws-secrets-manager.git
commit: ca54ddf8f393d583dc302c25569073f6c08bd343
type_tags:
- utility
toolkit:
go:
package_name: moneylion.com/security/bitrise-step-aws-secrets-manager
is_requires_admin_user: true
is_always_run: false
is_skippable: false
inputs:
- aws_access_key_id: ""
opts:
description: AWS access key ID.
is_sensitive: true
summary: AWS access key ID.
title: AWS access key ID
- aws_secret_access_key: ""
opts:
description: AWS secret access key.
is_sensitive: true
summary: AWS secret access key.
title: AWS secret access key
- aws_default_region: ""
opts:
description: AWS region to operate in.
summary: AWS region to operate in.
title: AWS region
- aws_profile: ""
opts:
description: An AWS named profile in shared configuration file.
summary: An AWS named profile in shared configuration file.
title: AWS named profile
- aws_iam_role_arn: ""
opts:
description: The ARN of AWS IAM role to assume.
summary: The ARN of AWS IAM role to assume.
title: AWS IAM role ARN
- opts:
description: |
A newline separated list of secrets to fetch from AWS Secrets Manager.
Each line is in the form of:
```
# #
```
For example, given the secret with an ARN `arn:aws:secret-1`, and a secret value:
```
{
"username": "admin",
"password": "str0ngpassword"
}
```
Specifying this line in the secret list:
```
arn:aws:secret-1 # username # USERNAME
```
Fetches the secret, retrieves the JSON value under the key `username`, and store that value in the `USERNAME` environment variable. `$USERNAME` will now contain the value `admin`.
is_required: true
summary: A list of secrets to fetch.
title: Secret list
secret_list: null
================================================
FILE: steps/aws-secrets-manager/2.2.0/step.yml
================================================
title: Fetch secrets from AWS Secrets Manager
summary: Fetch secrets from AWS Secrets Manager
description: |
This Step fetches secrets on-demand from AWS Secrets Manager, during Bitrise workflow execution.
The fetched secrets are then propagated into subsequent steps in the workflow.
This step can detect if it should parse the SecretString as JSON or as regular text. No extra configuration required.
Include this Step in your workflow, for example:
```yaml
workflows:
foo:
steps:
- aws-secrets-manager@x.x.x:
inputs:
- aws_access_key_id: $AWS_ACCESS_KEY_ID
- aws_secret_access_key: $AWS_SECRET_ACCESS_KEY
- aws_default_region: a-region-1
- secret_list: |
arn:aws:secret-1 # username # USERNAME
arn:aws:secret-2 # password # PASSWORD
- script@1:
inputs:
- content: |
#!/bin/bash
#
# Access your secrets via $USERNAME and $PASSWORD
```
Checkout the main repository README for more usage guide.
website: https://github.com/MoneyLion/bitrise-step-aws-secrets-manager
source_code_url: https://github.com/MoneyLion/bitrise-step-aws-secrets-manager
support_url: https://github.com/MoneyLion/bitrise-step-aws-secrets-manager/issues
published_at: 2023-02-08T13:18:09.982416+08:00
source:
git: https://github.com/MoneyLion/bitrise-step-aws-secrets-manager.git
commit: 1ddeccc3207abc94a39603f96b3a9d432ba952b4
type_tags:
- utility
toolkit:
go:
package_name: moneylion.com/security/bitrise-step-aws-secrets-manager
is_requires_admin_user: true
is_always_run: false
is_skippable: false
inputs:
- aws_access_key_id: ""
opts:
description: AWS access key ID.
is_sensitive: true
summary: AWS access key ID.
title: AWS access key ID
- aws_secret_access_key: ""
opts:
description: AWS secret access key.
is_sensitive: true
summary: AWS secret access key.
title: AWS secret access key
- aws_default_region: ""
opts:
description: AWS region to operate in.
summary: AWS region to operate in.
title: AWS region
- aws_profile: ""
opts:
description: An AWS named profile in shared configuration file.
summary: An AWS named profile in shared configuration file.
title: AWS named profile
- aws_iam_role_arn: ""
opts:
description: The ARN of AWS IAM role to assume.
summary: The ARN of AWS IAM role to assume.
title: AWS IAM role ARN
- opts:
description: |
A newline separated list of secrets to fetch from AWS Secrets Manager.
Each line is in the form of:
```
# #
```
For example, given the secret with an ARN `arn:aws:secret-1`, and a secret value:
```
{
"username": "admin",
"password": "str0ngpassword"
}
```
Specifying this line in the secret list:
```
arn:aws:secret-1 # username # USERNAME
```
Fetches the secret, retrieves the JSON value under the key `username`, and store that value in the `USERNAME` environment variable. `$USERNAME` will now contain the value `admin`.
is_required: true
summary: A list of secrets to fetch.
title: Secret list
secret_list: null
================================================
FILE: steps/aws-secrets-manager/step-info.yml
================================================
maintainer: community
================================================
FILE: steps/azure-devops-status/1.0.0/step.yml
================================================
title: Azure DevOps status
summary: |
Update commit status for Azure DevOps repositories
description: |
Update commit status for Azure DevOps repositories.
This step always runs, no matter if build succeeded or failed.
website: https://github.com/mediusoft/bitrise-step-azure-devops-status
source_code_url: https://github.com/mediusoft/bitrise-step-azure-devops-status
support_url: https://github.com/mediusoft/bitrise-step-azure-devops-status/issues
published_at: 2020-03-15T20:28:19.936735+02:00
source:
git: https://github.com/mediusoft/bitrise-step-azure-devops-status.git
commit: 3c853bceaf36f19e011b1517e67349d320d313cf
host_os_tags:
- osx-10.10
- ubuntu-16.04
type_tags:
- utility
toolkit:
bash:
entry_file: step.sh
deps:
brew:
- name: curl
apt_get:
- name: curl
is_requires_admin_user: false
is_always_run: true
is_skippable: true
run_if: not (enveq "BITRISE_GIT_COMMIT" "")
inputs:
- devops_user: $AZURE_DEVOPS_USER
opts:
description: |
Azure DevOps user name.
Can also be taken from env var `AZURE_DEVOPS_USER`.
is_expand: true
is_required: true
is_sensitive: true
title: Azure DevOps user name
- devops_pat: $AZURE_DEVOPS_PAT
opts:
description: |
Azure DevOps Personal Access Token.
Can also be taken from env var `AZURE_DEVOPS_PAT`.
is_expand: true
is_required: true
is_sensitive: true
title: Azure DevOps Personal Access Token
- devops_organization: $AZURE_DEVOPS_ORGANIZATION
opts:
description: |
Azure DevOps organization.
Can also be taken from env var `AZURE_DEVOPS_ORGANIZATION`.
is_expand: true
is_required: true
title: Azure DevOps organization
- devops_project: $AZURE_DEVOPS_PROJECT
opts:
description: |
Azure DevOps project.
Can also be taken from env var `AZURE_DEVOPS_PROJECT`.
is_expand: true
is_required: true
title: Azure DevOps project
- devops_repository_id: $AZURE_DEVOPS_REPOSITORY_ID
opts:
description: |
Azure DevOps repository ID.
Can also be taken from env var `AZURE_DEVOPS_REPOSITORY_ID`.
is_expand: true
is_required: true
title: Azure DevOps repository ID
- devops_commit_state: auto
opts:
description: |
Status to set on commit.
Possible values are `auto`, `error`, `failed`, `notApplicable`, `notSet`, `pending`, `succeeded`.
If set to `auto` then step will automatically set 'succeeded' or 'failed' based on build status.
is_expand: true
is_required: true
title: Commit status
value_options:
- auto
- pending
- succeeded
- failed
- error
- notSet
- notApplicable
- devops_description: ""
opts:
description: "Status description. \nTypically describes current state of the status.\n"
is_expand: true
is_required: false
title: Commit status description
- devops_target_url: $BITRISE_BUILD_URL
opts:
description: |
URL with status details.
is_expand: true
is_required: true
title: Target URL
- devops_context_name: build/$BITRISE_APP_TITLE
opts:
description: "Name identifier of the status. \nCannot be empty.\n"
is_expand: true
is_required: true
title: Name identifier
- devops_context_genre: continuous-integration
opts:
description: "Genre of the status. \nTypically name of the service/tool generating
the status, can be empty.\n"
is_expand: true
is_required: false
title: Status genre
================================================
FILE: steps/azure-devops-status/1.0.1/step.yml
================================================
title: Azure DevOps status
summary: |
Update commit status for Azure DevOps repositories
description: |
Update commit status for Azure DevOps repositories.
This step always runs, no matter if build succeeded or failed.
website: https://github.com/mediusoft/bitrise-step-azure-devops-status
source_code_url: https://github.com/mediusoft/bitrise-step-azure-devops-status
support_url: https://github.com/mediusoft/bitrise-step-azure-devops-status/issues
published_at: 2020-03-17T00:04:11.37749+02:00
source:
git: https://github.com/mediusoft/bitrise-step-azure-devops-status.git
commit: 1c28119b926f95b405ddad80b258ce9e414d44bf
host_os_tags:
- osx-10.10
- ubuntu-16.04
type_tags:
- utility
toolkit:
bash:
entry_file: step.sh
deps:
brew:
- name: curl
apt_get:
- name: curl
is_requires_admin_user: false
is_always_run: true
is_skippable: true
run_if: not (enveq "BITRISE_GIT_COMMIT" "")
inputs:
- devops_user: $AZURE_DEVOPS_USER
opts:
description: |
Azure DevOps user name.
Can also be taken from secret `AZURE_DEVOPS_USER`. Cannot be empty.
is_expand: true
is_required: true
is_sensitive: true
title: Azure DevOps user name
- devops_pat: $AZURE_DEVOPS_PAT
opts:
description: |
Azure DevOps Personal Access Token.
Can also be taken from secret `AZURE_DEVOPS_PAT`. Cannot be empty.
is_expand: true
is_required: true
is_sensitive: true
title: Azure DevOps Personal Access Token
- devops_organization: $AZURE_DEVOPS_ORGANIZATION
opts:
description: |
Azure DevOps organization.
Can also be taken from env var `AZURE_DEVOPS_ORGANIZATION`. Cannot be empty.
is_expand: true
is_required: true
title: Azure DevOps organization
- devops_project: $AZURE_DEVOPS_PROJECT
opts:
description: |
Azure DevOps project.
Can also be taken from env var `AZURE_DEVOPS_PROJECT`. Cannot be empty.
is_expand: true
is_required: true
title: Azure DevOps project
- devops_repository_id: $AZURE_DEVOPS_REPOSITORY_ID
opts:
description: |
Azure DevOps repository ID.
Can also be taken from env var `AZURE_DEVOPS_REPOSITORY_ID`. Cannot be empty.
is_expand: true
is_required: true
title: Azure DevOps repository ID
- devops_commit_state: auto
opts:
description: |
Status to set on commit.
Possible values are `auto`, `error`, `failed`, `notApplicable`, `notSet`, `pending`, `succeeded`.
If set to `auto` then step will automatically set `succeeded` or `failed` based on build status.
is_expand: true
is_required: true
title: Commit status
value_options:
- auto
- pending
- succeeded
- failed
- error
- notSet
- notApplicable
- devops_description: ""
opts:
description: "Status description.\n\nTypically describes current state of the
status. \nIf no value provided, then will be set to `$BITRISE_APP_TITLE build
#$BITRISE_BUILD_NUMBER $state`.\n"
is_expand: true
is_required: false
title: Commit status description
- devops_target_url: $BITRISE_BUILD_URL
opts:
description: |
URL with status details.
This URL will be opened when status description is clicked from Azure DevOps. Cannot be empty
is_expand: true
is_required: true
title: Target URL
- devops_context_name: build/$BITRISE_APP_TITLE
opts:
description: |
Name identifier of the status.
Typically name of the build pipeline/configuration. Cannot be empty.
is_expand: true
is_required: true
title: Name identifier
- devops_context_genre: continuous-integration
opts:
description: |
Genre of the status.
Typically name of the service/tool generating the status. Can be empty.
is_expand: true
is_required: false
title: Status genre
================================================
FILE: steps/azure-devops-status/step-info.yml
================================================
maintainer: community
================================================
FILE: steps/badgetizr/3.0.3/step.yml
================================================
source:
git: https://github.com/aiKrice/homebrew-badgetizr.git
commit: 18db6c368edc4f16628a12ad43602ceac6603727
title: Badgetizr
summary: Automatically add custom badges to pull/merge requests - boost productivity and streamline code reviews
description: |
Badgetizr automatically adds customizable badges to your GitHub and GitLab pull/merge requests to boost team productivity.
Features:
- Track ticket references automatically from PR titles
- Identify work-in-progress pull requests clearly
- Monitor CI/CD status without clicking through pipelines
- Visualize completion status of checklists and tasks
- Highlight target branches for better merge awareness
This step works on both macOS and Linux stacks by cloning the repository and running the badgetizr script.
maintainer: community
website: https://github.com/aiKrice/homebrew-badgetizr
source_code_url: https://github.com/aiKrice/homebrew-badgetizr
support_url: https://github.com/aiKrice/homebrew-badgetizr/issues
published_at: 2025-12-17T00:00:00Z
type_tags:
- notification
is_requires_admin_user: false
is_always_run: false
is_skippable: false
toolkit:
bash:
entry_file: step.sh
deps:
brew:
- name: gh
- name: glab
apt_get:
- name: wget
inputs:
- pr_id: "$BITRISE_PULL_REQUEST"
opts:
title: "Pull/Merge Request ID"
summary: "The ID of the pull request or merge request"
description: |
The ID number of the pull/merge request where badges will be added.
For GitHub: Use `$BITRISE_PULL_REQUEST` or `$PR_NUMBER`
For GitLab: Use `$BITRISE_PULL_REQUEST` or your custom variable
is_required: true
- configuration: ".badgetizr.yml"
opts:
title: "Configuration file path"
summary: "Path to the badgetizr configuration file"
description: |
Path to the YAML configuration file that defines which badges to display.
Default: `.badgetizr.yml`
is_required: true
- pr_destination_branch:
opts:
title: "PR destination branch"
summary: "Target branch for the pull/merge request"
description: |
The branch that the PR/MR is targeting. Required when branch badge is enabled.
For GitHub: Use `$BITRISEIO_GIT_BRANCH_DEST`
For GitLab: Use your target branch variable
is_required: false
- pr_build_number:
opts:
title: "Build number"
summary: "Current build number"
description: |
The build number to display in the CI badge. Use `$BITRISE_BUILD_NUMBER`.
Required when CI badge is enabled without ci_status.
is_required: false
- pr_build_url:
opts:
title: "Build URL"
summary: "URL to the current build"
description: |
The URL to the build page. Use `$BITRISE_BUILD_URL`.
Required when CI badge is enabled.
is_required: false
- ci_status:
opts:
title: "CI Status"
summary: "Current CI/CD pipeline status"
description: |
Controls the CI badge color and behavior.
**Modes:**
- **automatic** (recommended for final status): Auto-detect from Bitrise environment
- Uses $BITRISE_BUILD_STATUS and $BITRISE_PIPELINE_BUILD_STATUS
- Returns "passed" (green) or "failed" (red) at build end
**⚠️ IMPORTANT - Timing:**
- MUST be used as the FINAL step in your workflow
- Place AFTER all build, test, and deploy steps complete
- Only then will $BITRISE_BUILD_STATUS reflect the true final status
**Example workflow:**
```yaml
workflows:
primary:
steps:
- git-clone: {}
- script: { title: "Build" }
- script: { title: "Test" }
- script: { title: "Deploy" }
- badgetizr: { ci_status: "automatic" } # ← Final step
```
- **Manual status** (for intermediate steps or custom control):
- started = yellow (use for running/in-progress builds at workflow START)
- passed = green
- warning = orange
- failed = red
**Use cases:**
- Show "started" at beginning of workflow
- Update to "passed"/"failed" at specific checkpoints
- Custom statuses for complex multi-stage pipelines
- **Empty**: Build number mode - static badge with build number (requires --pr-build-number)
is_required: false
value_options:
- "automatic"
- "started"
- "passed"
- "warning"
- "failed"
- ci_text:
opts:
title: "CI Badge Text"
summary: "Custom text for the CI badge"
description: |
Custom text to display in the CI badge.
If not provided, defaults to the status or build number.
is_required: false
- provider: "github"
opts:
title: "Provider"
summary: "Force specific provider (github or gitlab)"
description: |
Force a specific provider. If not set, auto-detection will be used.
Valid values: github, gitlab
is_required: false
value_options:
- "github"
- "gitlab"
- github_token:
opts:
title: "GitHub Token"
summary: "GitHub authentication token"
description: |
GitHub personal access token or `$GITHUB_TOKEN` for authentication.
Required when using GitHub provider.
is_required: false
is_sensitive: true
is_expand: true
- gitlab_token:
opts:
title: "GitLab Token"
summary: "GitLab authentication token"
description: |
GitLab personal access token for authentication.
Required when using GitLab provider.
is_required: false
is_sensitive: true
is_expand: true
- gitlab_host:
opts:
title: "GitLab Host"
summary: "GitLab instance hostname"
description: |
GitLab instance hostname (e.g., gitlab.example.com).
Only needed for self-managed GitLab instances. Defaults to gitlab.com.
is_required: false
================================================
FILE: steps/badgetizr/step-info.yml
================================================
maintainer: community
================================================
FILE: steps/beat-android-code-stats/0.0.2/step.yml
================================================
title: Android code stats
summary: |
Generates some Android project stats
description: |
Generates some variables for Android project stats
website: https://github.com/luismunyoz/bitrise-step-beat-android-code-stats
source_code_url: https://github.com/luismunyoz/bitrise-step-beat-android-code-stats
support_url: https://github.com/luismunyoz/bitrise-step-beat-android-code-stats/issues
published_at: 2021-02-15T09:32:24.642047+01:00
source:
git: https://github.com/luismunyoz/bitrise-step-beat-android-code-stats.git
commit: 66b93dc2032902bdf3babf70d0c8ca9e29f90602
host_os_tags:
- osx-10.10
- ubuntu-16.04
project_type_tags:
- android
type_tags:
- utility
toolkit:
bash:
entry_file: step.sh
deps:
brew:
- name: cloc
apt_get:
- name: cloc
is_requires_admin_user: false
is_always_run: false
is_skippable: true
inputs:
- opts:
description: The root directory of your Android project. For example, where your
root build gradle file exist (also gradlew, settings.gradle, and so on)
is_required: true
summary: The root directory of your Android project.
title: Project Location
project_location: $BITRISE_PROJECT_PATH
outputs:
- KOTLIN_LINES_CODE: null
opts:
summary: Lines of code written in Kotlin
title: Kotlin lines of code
- JAVA_LINES_CODE: null
opts:
summary: Lines of code written in Java
title: Java lines of code
- XML_LINES_CODE: null
opts:
summary: Lines of code written in XML
title: XML lines of code
- KOTLIN_PERCENTAGE_CODE: null
opts:
summary: Percentage of the code written in Kotlin
title: Kotlin percentage of code
- JAVA_PERCENTAGE_CODE: null
opts:
summary: Percentage of the code written in Java
title: Java percentage of code
- DOCUMENTATION_FILES: null
opts:
summary: Number of documentation files in the project
title: Documentation files
- UNIT_TESTS_COUNT: null
opts:
summary: Number of unit tests in the project
title: Unit tests
- UI_TESTS_COUNT: null
opts:
summary: Number of UI tests in the project
title: UI tests
- MVP_PRESENTERS_COUNT: null
opts:
summary: Number of MVP Presenters in the project
title: MVP Presenters
- VIEWMODEL_COUNT: null
opts:
summary: Number of ViewModels in the project
title: ViewModels
================================================
FILE: steps/beat-android-code-stats/step-info.yml
================================================
maintainer: community
================================================
FILE: steps/bitbucket-server-post-build-status/0.0.10/step.yml
================================================
title: Bitbucket server post build status
summary: |
Post build status to bitbucket server
description: |
Post build status to bitbucket server
website: https://github.com/teameh/bitrise-step-bitbucket-server-post-build-status
source_code_url: https://github.com/teameh/bitrise-step-bitbucket-server-post-build-status
support_url: https://github.com/teameh/bitrise-step-bitbucket-server-post-build-status/issues
published_at: 2020-04-16T14:38:44.138332+02:00
source:
git: https://github.com/teameh/bitrise-step-bitbucket-server-post-build-status.git
commit: e9c2699942f07972e16bc4c2ed6e24ad74849b2b
host_os_tags:
- osx-10.10
- ubuntu-16.04
type_tags:
- notification
toolkit:
bash:
entry_file: step.sh
is_requires_admin_user: false
is_always_run: true
is_skippable: true
inputs:
- domain: null
opts:
description: Full domain name without protocol eg 'my-domain.com'
is_required: true
summary: Full domain name without protocol eg 'my-domain.com'
title: Bitbucket Server domain name
- opts:
description: The username used to make REST calls to bitbucket server
is_required: true
summary: The username used to make REST calls to bitbucket server
title: Bitbucket Server username
username: null
- opts:
description: The password for the bitbucket server username
is_required: true
is_sensitive: true
summary: The password for the bitbucket server username
title: Bitbucket Server password
password: null
- opts:
description: |-
If not set to `AUTO`, this step will set a specific status instead of reporting the current build status.
Can be one of `AUTO`, `INPROGRESS`, `SUCCESSFUL`, or `FAILED`.
If you don't set this option, or select `AUTO`, the step will send `SUCCESSFUL` status if the current build status is `SUCCESSFUL`
(no step failed previously) and `FAILED` status if the build previously failed.
Use this to report `INPROGRESS` for builds that are just started.
summary: Override bitrise build status
title: Set Specific Status
value_options:
- AUTO
- INPROGRESS
- SUCCESSFUL
- FAILED
preset_status: AUTO
- git_clone_commit_hash: $GIT_CLONE_COMMIT_HASH
opts:
is_required: true
title: Git commit hash
- app_title: $BITRISE_APP_TITLE
opts:
is_dont_change_value: true
is_required: true
title: Bitrise app title
- build_number: $BITRISE_BUILD_NUMBER
opts:
is_dont_change_value: true
is_required: true
title: Bitrise build number
- build_url: $BITRISE_BUILD_URL
opts:
is_dont_change_value: true
is_required: true
title: Bitrise build url
- opts:
is_dont_change_value: true
is_required: true
title: Bitrise triggered workflow id
triggered_workflow_id: $BITRISE_TRIGGERED_WORKFLOW_ID
================================================
FILE: steps/bitbucket-server-post-build-status/0.0.11/step.yml
================================================
title: Bitbucket server post build status
summary: |
Post build status to bitbucket server
description: |
Post build status to bitbucket server
website: https://github.com/teameh/bitrise-step-bitbucket-server-post-build-status
source_code_url: https://github.com/teameh/bitrise-step-bitbucket-server-post-build-status
support_url: https://github.com/teameh/bitrise-step-bitbucket-server-post-build-status/issues
published_at: 2020-04-23T19:48:26.712315+02:00
source:
git: https://github.com/teameh/bitrise-step-bitbucket-server-post-build-status.git
commit: 8be387006477f130bc0e54c9cf1f95beb24bf542
host_os_tags:
- osx-10.10
- ubuntu-16.04
type_tags:
- notification
toolkit:
bash:
entry_file: step.sh
is_requires_admin_user: false
is_always_run: true
is_skippable: true
inputs:
- domain: null
opts:
description: Full domain name without protocol eg 'my-domain.com'
is_required: true
summary: Full domain name without protocol eg 'my-domain.com'
title: Bitbucket Server domain name
- opts:
description: The username used to make REST calls to bitbucket server
is_required: true
summary: The username used to make REST calls to bitbucket server
title: Bitbucket Server username
username: null
- opts:
description: The password for the bitbucket server username
is_required: true
is_sensitive: true
summary: The password for the bitbucket server username
title: Bitbucket Server password
password: null
- opts:
description: |-
If not set to `AUTO`, this step will set a specific status instead of reporting the current build status.
Can be one of `AUTO`, `INPROGRESS`, `SUCCESSFUL`, or `FAILED`.
If you don't set this option, or select `AUTO`, the step will send `SUCCESSFUL` status if the current build status is `SUCCESSFUL`
(no step failed previously) and `FAILED` status if the build previously failed.
Use this to report `INPROGRESS` for builds that are just started.
summary: Override bitrise build status
title: Set Specific Status
value_options:
- AUTO
- INPROGRESS
- SUCCESSFUL
- FAILED
preset_status: AUTO
- git_clone_commit_hash: $GIT_CLONE_COMMIT_HASH
opts:
is_required: true
title: Git commit hash
- app_title: $BITRISE_APP_TITLE
opts:
is_dont_change_value: true
is_required: true
title: Bitrise app title
- build_number: $BITRISE_BUILD_NUMBER
opts:
is_dont_change_value: true
is_required: true
title: Bitrise build number
- build_url: $BITRISE_BUILD_URL
opts:
is_dont_change_value: true
is_required: true
title: Bitrise build url
- opts:
is_dont_change_value: true
is_required: true
title: Bitrise triggered workflow id
triggered_workflow_id: $BITRISE_TRIGGERED_WORKFLOW_ID
================================================
FILE: steps/bitbucket-server-post-build-status/0.0.12/step.yml
================================================
title: Bitbucket server post build status
summary: |
Post build status to bitbucket server
description: |
Post build status to bitbucket server
website: https://github.com/teameh/bitrise-step-bitbucket-server-post-build-status
source_code_url: https://github.com/teameh/bitrise-step-bitbucket-server-post-build-status
support_url: https://github.com/teameh/bitrise-step-bitbucket-server-post-build-status/issues
published_at: 2021-11-12T17:41:22.424761+01:00
source:
git: https://github.com/teameh/bitrise-step-bitbucket-server-post-build-status.git
commit: 1d7dd9fc055a80b976d89fdab9943b2c293d7387
host_os_tags:
- osx-10.10
- ubuntu-16.04
type_tags:
- notification
toolkit:
bash:
entry_file: step.sh
is_requires_admin_user: false
is_always_run: true
is_skippable: true
inputs:
- domain: null
opts:
description: Full domain name without protocol eg 'my-domain.com'
is_required: true
summary: Full domain name without protocol eg 'my-domain.com'
title: Bitbucket Server domain name
- opts:
description: The username used to make REST calls to bitbucket server
is_required: true
summary: The username used to make REST calls to bitbucket server
title: Bitbucket Server username
username: null
- opts:
description: The password for the bitbucket server username
is_required: true
is_sensitive: true
summary: The password for the bitbucket server username
title: Bitbucket Server password
password: null
- opts:
description: |-
If not set to `AUTO`, this step will set a specific status instead of reporting the current build status.
Can be one of `AUTO`, `INPROGRESS`, `SUCCESSFUL`, or `FAILED`.
If you don't set this option, or select `AUTO`, the step will send `SUCCESSFUL` status if the current build status is `SUCCESSFUL`
(no step failed previously) and `FAILED` status if the build previously failed.
Use this to report `INPROGRESS` for builds that are just started.
summary: Override bitrise build status
title: Set Specific Status
value_options:
- AUTO
- INPROGRESS
- SUCCESSFUL
- FAILED
preset_status: AUTO
- git_clone_commit_hash: $GIT_CLONE_COMMIT_HASH
opts:
is_required: true
title: Git commit hash
- app_title: $BITRISE_APP_TITLE
opts:
is_dont_change_value: true
is_required: true
title: Bitrise app title
- build_number: $BITRISE_BUILD_NUMBER
opts:
is_dont_change_value: true
is_required: true
title: Bitrise build number
- build_url: $BITRISE_BUILD_URL
opts:
is_dont_change_value: true
is_required: true
title: Bitrise build url
- opts:
is_dont_change_value: true
is_required: true
title: Bitrise triggered workflow id
triggered_workflow_id: $BITRISE_TRIGGERED_WORKFLOW_ID
================================================
FILE: steps/bitbucket-server-post-build-status/0.0.13/step.yml
================================================
title: Bitbucket server post build status
summary: |
Post build status to bitbucket server
description: |
Post build status to bitbucket server
website: https://github.com/teameh/bitrise-step-bitbucket-server-post-build-status
source_code_url: https://github.com/teameh/bitrise-step-bitbucket-server-post-build-status
support_url: https://github.com/teameh/bitrise-step-bitbucket-server-post-build-status/issues
published_at: 2022-06-14T09:58:53.464212+02:00
source:
git: https://github.com/teameh/bitrise-step-bitbucket-server-post-build-status.git
commit: 08702dc3d799b8671b47078e328cb21518a8de4a
host_os_tags:
- osx-10.10
- ubuntu-16.04
type_tags:
- notification
toolkit:
bash:
entry_file: step.sh
is_requires_admin_user: false
is_always_run: true
is_skippable: true
inputs:
- domain: null
opts:
description: Full domain name without protocol eg 'my-domain.com'
is_required: true
summary: Full domain name without protocol eg 'my-domain.com'
title: Bitbucket Server domain name
- opts:
description: The username used to make REST calls to bitbucket server
is_required: true
summary: The username used to make REST calls to bitbucket server
title: Bitbucket Server username
username: null
- opts:
description: The password for the bitbucket server username
is_required: true
is_sensitive: true
summary: The password for the bitbucket server username
title: Bitbucket Server password
password: null
- opts:
description: |-
If not set to `AUTO`, this step will set a specific status instead of reporting the current build status.
Can be one of `AUTO`, `INPROGRESS`, `SUCCESSFUL`, or `FAILED`.
If you don't set this option, or select `AUTO`, the step will send `SUCCESSFUL` status if the current build status is `SUCCESSFUL`
(no step failed previously) and `FAILED` status if the build previously failed.
Use this to report `INPROGRESS` for builds that are just started.
summary: Override bitrise build status
title: Set Specific Status
value_options:
- AUTO
- INPROGRESS
- SUCCESSFUL
- FAILED
preset_status: AUTO
- git_clone_commit_hash: $GIT_CLONE_COMMIT_HASH
opts:
is_required: true
title: Git commit hash
- app_title: $BITRISE_APP_TITLE
opts:
is_dont_change_value: true
is_required: true
title: Bitrise app title
- build_number: $BITRISE_BUILD_NUMBER
opts:
is_dont_change_value: true
is_required: true
title: Bitrise build number
- build_url: $BITRISE_BUILD_URL
opts:
is_dont_change_value: true
is_required: true
title: Bitrise build url
- opts:
is_dont_change_value: true
is_required: true
title: Bitrise triggered workflow id
triggered_workflow_id: $BITRISE_TRIGGERED_WORKFLOW_ID
================================================
FILE: steps/bitbucket-server-post-build-status/0.0.8/step.yml
================================================
title: Bitbucket server post build status
summary: |
Post build status to bitbucket server
description: |
Post build status to bitbucket server
website: https://github.com/teameh/bitrise-step-bitbucket-server-post-build-status
source_code_url: https://github.com/teameh/bitrise-step-bitbucket-server-post-build-status
support_url: https://github.com/teameh/bitrise-step-bitbucket-server-post-build-status/issues
published_at: 2020-01-14T22:21:58.87928+01:00
source:
git: https://github.com/teameh/bitrise-step-bitbucket-server-post-build-status.git
commit: 09749b47e4aa02c41e36069be447370497253799
host_os_tags:
- osx-10.10
- ubuntu-16.04
type_tags:
- notification
toolkit:
bash:
entry_file: step.sh
is_requires_admin_user: false
is_always_run: true
is_skippable: true
inputs:
- domain: null
opts:
description: Full domain name without protocol eg 'my-domain.com'
is_required: true
summary: Full domain name without protocol eg 'my-domain.com'
title: Bitbucket Server domain name
- opts:
description: The username used to make REST calls to bitbucket server
is_required: true
summary: The username used to make REST calls to bitbucket server
title: Bitbucket Server username
username: null
- opts:
description: The password for the bitbucket server username
is_required: true
is_sensitive: true
summary: The password for the bitbucket server username
title: Bitbucket Server password
password: null
- opts:
description: |-
If set, this step will set a specific status instead of reporting the current build status.
Can be one of `AUTO`, `INPROGRESS`, `SUCCESSFUL`, or `FAILED`.
If you don't set this option, or select `AUTO`, the step will send `SUCCESSFUL` status if the current build status is `SUCCESSFUL`
(no step failed previously) and `FAILED` status if the build previously failed.
Use this to report `INPROGRESS` for builds that are just started.
summary: Override bitrise build status
title: Set Specific Status
value_options:
- AUTO
- INPROGRESS
- SUCCESSFUL
- FAILED
preset_status: AUTO
- git_clone_commit_hash: $GIT_CLONE_COMMIT_HASH
opts:
is_required: true
title: Git commit hash
- app_title: $BITRISE_APP_TITLE
opts:
is_dont_change_value: true
is_required: true
title: Bitrise app title
- build_number: $BITRISE_BUILD_NUMBER
opts:
is_dont_change_value: true
is_required: true
title: Bitrise build number
- build_url: $BITRISE_BUILD_URL
opts:
is_dont_change_value: true
is_required: true
title: Bitrise build url
- opts:
is_dont_change_value: true
is_required: true
title: Bitrise triggered workflow id
triggered_workflow_id: $BITRISE_TRIGGERED_WORKFLOW_ID
================================================
FILE: steps/bitbucket-server-post-build-status/0.0.9/step.yml
================================================
title: Bitbucket server post build status
summary: |
Post build status to bitbucket server
description: |
Post build status to bitbucket server
website: https://github.com/teameh/bitrise-step-bitbucket-server-post-build-status
source_code_url: https://github.com/teameh/bitrise-step-bitbucket-server-post-build-status
support_url: https://github.com/teameh/bitrise-step-bitbucket-server-post-build-status/issues
published_at: 2020-01-21T16:06:15.174176+01:00
source:
git: https://github.com/teameh/bitrise-step-bitbucket-server-post-build-status.git
commit: 5697327a4f8f8c975982659ee34fd06595fd79b2
host_os_tags:
- osx-10.10
- ubuntu-16.04
type_tags:
- notification
toolkit:
bash:
entry_file: step.sh
is_requires_admin_user: false
is_always_run: true
is_skippable: true
inputs:
- domain: null
opts:
description: Full domain name without protocol eg 'my-domain.com'
is_required: true
summary: Full domain name without protocol eg 'my-domain.com'
title: Bitbucket Server domain name
- opts:
description: The username used to make REST calls to bitbucket server
is_required: true
summary: The username used to make REST calls to bitbucket server
title: Bitbucket Server username
username: null
- opts:
description: The password for the bitbucket server username
is_required: true
is_sensitive: true
summary: The password for the bitbucket server username
title: Bitbucket Server password
password: null
- opts:
description: |-
If not set to `AUTO`, this step will set a specific status instead of reporting the current build status.
Can be one of `AUTO`, `INPROGRESS`, `SUCCESSFUL`, or `FAILED`.
If you don't set this option, or select `AUTO`, the step will send `SUCCESSFUL` status if the current build status is `SUCCESSFUL`
(no step failed previously) and `FAILED` status if the build previously failed.
Use this to report `INPROGRESS` for builds that are just started.
summary: Override bitrise build status
title: Set Specific Status
value_options:
- AUTO
- INPROGRESS
- SUCCESSFUL
- FAILED
preset_status: AUTO
- git_clone_commit_hash: $GIT_CLONE_COMMIT_HASH
opts:
is_dont_change_value: true
is_required: true
title: Git commit hash
- app_title: $BITRISE_APP_TITLE
opts:
is_dont_change_value: true
is_required: true
title: Bitrise app title
- build_number: $BITRISE_BUILD_NUMBER
opts:
is_dont_change_value: true
is_required: true
title: Bitrise build number
- build_url: $BITRISE_BUILD_URL
opts:
is_dont_change_value: true
is_required: true
title: Bitrise build url
- opts:
is_dont_change_value: true
is_required: true
title: Bitrise triggered workflow id
triggered_workflow_id: $BITRISE_TRIGGERED_WORKFLOW_ID
================================================
FILE: steps/bitbucket-server-post-build-status/step-info.yml
================================================
maintainer: community
================================================
FILE: steps/bitbucket-snippet-runner/0.1.0/step.yml
================================================
title: Bitbucket Snippet Runner
summary: "Found a great Bitbucket Snippet that you'd like to use during your workflow?
\ \nJust add the raw URL, Bitrise will download it and run it as a bash script!\n"
description: "Downloads the content of the input url and runs it as a bash script.
\ \nFor example you can provide a Bitbucket Snippet url.\n"
website: https://github.com/waracle/bitrise-step-bitbucket-snippet-runner
source_code_url: https://github.com/waracle/bitrise-step-bitbucket-snippet-runner
support_url: https://github.com/waracle/bitrise-step-bitbucket-snippet-runner/issues
published_at: 2017-09-01T14:52:03.922219085+01:00
source:
git: https://github.com/waracle/bitrise-step-bitbucket-snippet-runner.git
commit: 7ff971e9c97760d99340d839b6aafe55632cb1c7
host_os_tags:
- osx-10.10
- ubuntu-16.04
type_tags:
- utility
toolkit:
bash:
entry_file: step.sh
deps:
brew:
- name: git
- name: wget
- name: jq
apt_get:
- name: git
- name: wget
- name: jq
is_requires_admin_user: true
is_always_run: false
is_skippable: false
run_if: ""
inputs:
- opts:
description: |
The snippet to run can be private or public, hosted on cloud or server based Bitbucket accounts
is_expand: true
is_required: true
summary: |
The Bitbucket url of the snippet to run
https://bitbucket.org/snippets//
Example: https://bitbucket.org/snippets/waracle/xLMA9q
title: Snippet URL
value_options: []
script_url: null
- opts:
is_required: false
summary: The Bitbucket username to access the snippet with.
title: Username
username: $BITBUCKET_USERNAME
- opts:
is_required: false
summary: The password (or *app* password if 2FA is enabled) for the user to authenticate
against.
title: Password
password: $BITBUCKET_PASSWORD
- is_debug: "no"
opts:
category: Debug
description: |
If debug=yes the step will print debug infos about
the working dir, tmp file path, exit code, etc.
title: Debug print?
value_options:
- "no"
- "yes"
================================================
FILE: steps/bitbucket-snippet-runner/1.0.0/step.yml
================================================
title: Bitbucket Snippet Runner
summary: "Found a great Bitbucket Snippet that you'd like to use during your workflow?
\ \nJust add the raw URL, Bitrise will download it and run it as a bash script!\n"
description: "Downloads the content of the input url and runs it as a bash script.
\ \nFor example you can provide a Bitbucket Snippet url.\n"
website: https://github.com/waracle/bitrise-step-bitbucket-snippet-runner
source_code_url: https://github.com/waracle/bitrise-step-bitbucket-snippet-runner
support_url: https://github.com/waracle/bitrise-step-bitbucket-snippet-runner/issues
published_at: 2017-09-19T16:09:14.899480353+01:00
source:
git: https://github.com/waracle/bitrise-step-bitbucket-snippet-runner.git
commit: f724a9eea9ea72cdb312ec94a49f6e5a982326ac
host_os_tags:
- osx-10.10
- ubuntu-16.04
type_tags:
- utility
toolkit:
bash:
entry_file: step.sh
deps:
brew:
- name: git
- name: wget
- name: jq
apt_get:
- name: git
- name: wget
- name: jq
is_requires_admin_user: true
is_always_run: false
is_skippable: false
run_if: ""
inputs:
- opts:
description: |
The snippet to run can be private or public, hosted on cloud or server based Bitbucket accounts
is_expand: true
is_required: true
summary: |
The Bitbucket url of the snippet to run
https://bitbucket.org/snippets//
Example: https://bitbucket.org/snippets/waracle/xLMA9q
title: Snippet URL
value_options: []
script_url: null
- opts:
is_required: false
summary: The Bitbucket username to access the snippet with.
title: Username
username: $BITBUCKET_USERNAME
- opts:
is_required: false
summary: The password (or *app* password if 2FA is enabled) for the user to authenticate
against.
title: Password
password: $BITBUCKET_PASSWORD
- opts:
category: Config
description: "This directory will be set as the current working\ndirectory for
the script.\nAny relative path in the Script (content) will be\nrelative to
this directory. \n"
title: Working directory
working_dir: $BITRISE_SOURCE_DIR
- is_debug: "no"
opts:
category: Debug
description: |
If debug=yes the step will print debug infos about
the working dir, tmp file path, exit code, etc.
title: Debug print?
value_options:
- "no"
- "yes"
================================================
FILE: steps/bitbucket-snippet-runner/1.1.0/step.yml
================================================
title: Bitbucket Snippet Runner
summary: "Found a great Bitbucket Snippet that you'd like to use during your workflow?
\ \nJust add the raw URL, Bitrise will download it and run it as a bash script!\n"
description: "Downloads the content of the input url and runs it as a bash script.
\ \nFor example you can provide a Bitbucket Snippet url.\n"
website: https://github.com/waracle/bitrise-step-bitbucket-snippet-runner
source_code_url: https://github.com/waracle/bitrise-step-bitbucket-snippet-runner
support_url: https://github.com/waracle/bitrise-step-bitbucket-snippet-runner/issues
published_at: 2017-09-22T11:26:38.593604819+01:00
source:
git: https://github.com/waracle/bitrise-step-bitbucket-snippet-runner.git
commit: 8a58ce63f187ea75ca71691a8e75c13ddf0100d3
host_os_tags:
- osx-10.10
- ubuntu-16.04
type_tags:
- utility
toolkit:
bash:
entry_file: step.sh
deps:
brew:
- name: git
- name: wget
- name: jq
apt_get:
- name: git
- name: wget
- name: jq
is_requires_admin_user: true
is_always_run: false
is_skippable: false
run_if: ""
inputs:
- opts:
category: Config
description: |
The snippet to run can be private or public, hosted on cloud or server based Bitbucket accounts
is_expand: true
is_required: true
summary: |
The Bitbucket url of the snippet to run
https://bitbucket.org/snippets//
Example: https://bitbucket.org/snippets/waracle/xLMA9q
title: Snippet URL
value_options: []
script_url: null
- opts:
category: Config
is_required: false
summary: The Bitbucket username to access the snippet with.
title: Username
username: $BITBUCKET_USERNAME
- opts:
category: Config
is_required: false
summary: The password (or *app* password if 2FA is enabled) for the user to authenticate
against.
title: Password
password: $BITBUCKET_PASSWORD
- opts:
category: Config
description: "This directory will be set as the current working\ndirectory for
the script.\nAny relative path in the Script (content) will be\nrelative to
this directory. \n"
is_required: false
title: Working directory
working_dir: $BITRISE_SOURCE_DIR
- opts:
category: Config
description: |
Allows passing of arguments to be passed
into the downloaded script
is_required: false
title: Script Arguments
script_args: null
- is_debug: "no"
opts:
category: Debug
description: |
If debug=yes the step will print debug infos about
the working dir, tmp file path, exit code, etc.
title: Debug print?
value_options:
- "no"
- "yes"
================================================
FILE: steps/bitbucket-snippet-runner/1.1.1/step.yml
================================================
title: Bitbucket Snippet Runner
summary: "Found a great Bitbucket Snippet that you'd like to use during your workflow?
\ \nJust add the raw URL, Bitrise will download it and run it as a bash script!\n"
description: "Downloads the content of the input url and runs it as a bash script.
\ \nFor example you can provide a Bitbucket Snippet url.\n"
website: https://github.com/waracle/bitrise-step-bitbucket-snippet-runner
source_code_url: https://github.com/waracle/bitrise-step-bitbucket-snippet-runner
support_url: https://github.com/waracle/bitrise-step-bitbucket-snippet-runner/issues
published_at: 2018-01-26T14:07:48.711174Z
source:
git: https://github.com/waracle/bitrise-step-bitbucket-snippet-runner.git
commit: ddeebb540610bbfb0e3c8f55a781102eb2194145
host_os_tags:
- osx-10.10
- ubuntu-16.04
type_tags:
- utility
toolkit:
bash:
entry_file: step.sh
deps:
brew:
- name: git
- name: wget
- name: jq
apt_get:
- name: git
- name: wget
- name: jq
is_requires_admin_user: true
is_always_run: false
is_skippable: false
run_if: ""
inputs:
- opts:
category: Config
description: |
The snippet to run can be private or public, hosted on cloud or server based Bitbucket accounts
is_expand: true
is_required: true
summary: |
The Bitbucket url of the snippet to run
https://bitbucket.org/snippets//
Example: https://bitbucket.org/snippets/waracle/xLMA9q
title: Snippet URL
value_options: []
script_url: null
- opts:
category: Config
is_required: false
summary: The Bitbucket username to access the snippet with.
title: Username
username: $BITBUCKET_USERNAME
- opts:
category: Config
is_required: false
summary: The password (or *app* password if 2FA is enabled) for the user to authenticate
against.
title: Password
password: $BITBUCKET_PASSWORD
- opts:
category: Config
description: "This directory will be set as the current working\ndirectory for
the script.\nAny relative path in the Script (content) will be\nrelative to
this directory. \n"
is_required: false
title: Working directory
working_dir: $BITRISE_SOURCE_DIR
- opts:
category: Config
description: |
Allows passing of arguments to be passed
into the downloaded script
is_required: false
title: Script Arguments
script_args: null
- is_debug: "no"
opts:
category: Debug
description: |
If debug=yes the step will print debug infos about
the working dir, tmp file path, exit code, etc.
title: Debug print?
value_options:
- "no"
- "yes"
================================================
FILE: steps/bitbucket-snippet-runner/1.2.0/step.yml
================================================
title: Bitbucket Snippet Runner
summary: "Found a great Bitbucket Snippet that you'd like to use during your workflow?
\ \nJust add the raw URL, Bitrise will download it and run it as a bash script!\n"
description: "Downloads the content of the input url and runs it as a bash script.
\ \nFor example you can provide a Bitbucket Snippet url.\n"
website: https://github.com/waracle/bitrise-step-bitbucket-snippet-runner
source_code_url: https://github.com/waracle/bitrise-step-bitbucket-snippet-runner
support_url: https://github.com/waracle/bitrise-step-bitbucket-snippet-runner/issues
published_at: 2018-02-26T16:04:46.489891Z
source:
git: https://github.com/waracle/bitrise-step-bitbucket-snippet-runner.git
commit: e8dedef3bbf75247a9f69c4fe6526003ebc671c2
host_os_tags:
- osx-10.10
- ubuntu-16.04
type_tags:
- utility
toolkit:
bash:
entry_file: step.sh
deps:
brew:
- name: git
- name: wget
- name: jq
apt_get:
- name: git
- name: wget
- name: jq
is_requires_admin_user: true
is_always_run: false
is_skippable: false
run_if: ""
inputs:
- opts:
category: Config
description: |
The snippet to run can be private or public, hosted on cloud or server based Bitbucket accounts
is_expand: true
is_required: true
summary: |
The Bitbucket url of the snippet to run
https://bitbucket.org/snippets//
Example: https://bitbucket.org/snippets/waracle/xLMA9q
title: Snippet URL
value_options: []
script_url: null
- opts:
category: Config
is_required: false
summary: The Bitbucket username to access the snippet with.
title: Username
username: $BITBUCKET_USERNAME
- opts:
category: Config
is_required: false
summary: The password (or *app* password if 2FA is enabled) for the user to authenticate
against.
title: Password
password: $BITBUCKET_PASSWORD
- opts:
category: Config
description: "This directory will be set as the current working\ndirectory for
the script.\nAny relative path in the Script (content) will be\nrelative to
this directory. \n"
is_required: false
title: Working directory
working_dir: $BITRISE_SOURCE_DIR
- opts:
category: Config
description: |
Allows passing of arguments to be passed
into the downloaded script
is_required: false
title: Script Arguments
script_args: null
- is_debug: "no"
opts:
category: Debug
description: |
If debug=yes the step will print debug infos about
the working dir, tmp file path, exit code, etc.
title: Debug print?
value_options:
- "no"
- "yes"
================================================
FILE: steps/bitbucket-snippet-runner/step-info.yml
================================================
maintainer: community
================================================
FILE: steps/bitrise-aws-device-farm-runner/step-info.yml
================================================
maintainer: community
================================================
FILE: steps/bitrise-run/0.9.0/step.yml
================================================
title: Bitrise Run
summary: Runs a specified workflow from the given bitrise.yml
description: Runs a specified workflow from the given bitrise.yml
website: https://github.com/bitrise-steplib/step-bitrise-run
source_code_url: https://github.com/bitrise-steplib/step-bitrise-run
support_url: https://github.com/bitrise-steplib/step-bitrise-run/issues
published_at: 2017-10-11T12:12:42.175939663+02:00
source:
git: https://github.com/bitrise-steplib/steps-bitrise-run.git
commit: b7c9611bbaf953498cc49714bcca51cd6f6d7073
host_os_tags:
- osx-10.10
- ubuntu-16.04
type_tags:
- utility
is_requires_admin_user: true
is_always_run: false
is_skippable: false
run_if: ""
inputs:
- opts:
description: ID (name) of the Bitrise workflow to run
is_expand: true
is_required: true
summary: ID (name) of the Bitrise workflow to run
title: Workflow ID
workflow_id: $BITRISE_TRIGGERED_WORKFLOW_ID
- bitrise_config_path: ./bitrise.yml
opts:
description: The Bitrise configuration (bitrise.yml) file path
is_expand: true
is_required: true
summary: The Bitrise configuration (bitrise.yml) file path
title: bitrise.yml path
================================================
FILE: steps/bitrise-run/0.9.1/step.yml
================================================
title: Bitrise Run
summary: Runs a specified workflow from the given bitrise.yml
description: Runs a specified workflow from the given bitrise.yml
website: https://github.com/bitrise-steplib/steps-bitrise-run
source_code_url: https://github.com/bitrise-steplib/steps-bitrise-run
support_url: https://github.com/bitrise-steplib/steps-bitrise-run/issues
published_at: 2018-02-07T13:08:39.32139366+01:00
source:
git: https://github.com/bitrise-steplib/steps-bitrise-run.git
commit: 03ff77b448d7482f8c201853ee1256fb38f6647a
host_os_tags:
- osx-10.10
- ubuntu-16.04
type_tags:
- utility
is_requires_admin_user: true
is_always_run: false
is_skippable: false
run_if: ""
inputs:
- opts:
description: ID (name) of the Bitrise workflow to run
is_expand: true
is_required: true
summary: ID (name) of the Bitrise workflow to run
title: Workflow ID
workflow_id: $BITRISE_TRIGGERED_WORKFLOW_ID
- bitrise_config_path: ./bitrise.yml
opts:
description: The Bitrise configuration (bitrise.yml) file path
is_expand: true
is_required: true
summary: The Bitrise configuration (bitrise.yml) file path
title: bitrise.yml path
================================================
FILE: steps/bitrise-run/0.9.2/step.yml
================================================
title: Bitrise Run
summary: Runs a specified Workflow from the `bitrise.yml` file.
description: |-
This Step runs a specified Workflow from the targeted `bitrise.yml` file.
### Configuring the Step
1. Set the **Workflow ID** input. It uses the `$BITRISE_TRIGGERED_WORKFLOW_ID` Environment Variable (Env Var) by default. This Env Var is automatically set to the Workflow that triggered the build.
2. Set the **bitrise.yml path**. It's populated with `./bitrise.yml` path by default.
### Troubleshooting
Please make sure that you select an existing Workflow ID.
Please make sure that you set a correct and existing `bitrise.yml` file path.
### Related Steps
- [Bitrise Start Build](https://www.bitrise.io/integrations/steps/build-router-start)
- [Bitrise Wait for Build](https://www.bitrise.io/integrations/steps/build-router-wait)
website: https://github.com/bitrise-steplib/steps-bitrise-run
source_code_url: https://github.com/bitrise-steplib/steps-bitrise-run
support_url: https://github.com/bitrise-steplib/steps-bitrise-run/issues
published_at: 2021-10-18T11:29:28.044384891Z
source:
git: https://github.com/bitrise-steplib/steps-bitrise-run.git
commit: 11504e76c3af7f0677e0ad1fa42ed8df0e013eeb
host_os_tags:
- osx-10.10
- ubuntu-16.04
type_tags:
- utility
is_requires_admin_user: true
is_always_run: false
is_skippable: false
run_if: ""
inputs:
- opts:
description: |-
ID (name) of the workflow to run.
It must exist in the bitrise.yml file.
is_expand: true
is_required: true
summary: ID (name) of the workflow to run.
title: Workflow ID
workflow_id: $BITRISE_TRIGGERED_WORKFLOW_ID
- bitrise_config_path: ./bitrise.yml
opts:
is_expand: true
is_required: true
summary: The Bitrise configuration (bitrise.yml) file path.
title: bitrise.yml path
================================================
FILE: steps/bitrise-run/step-info.yml
================================================
maintainer: bitrise
================================================
FILE: steps/bitrise-snyk-scan/0.1.0/step.yml
================================================
title: Bitrise Snyk scan
summary: |
This is a step to run snyk SAST and dependencies scanning for mobile apps
description: |
This is a step to run snyk SAST and dependencies scanning for mobile apps
website: https://github.com/Zegocover/bitrise-snyk-scan
source_code_url: https://github.com/Zegocover/bitrise-snyk-scan
support_url: https://github.com/Zegocover/bitrise-snyk-scan/issues
published_at: 2022-11-15T12:27:15.382324Z
source:
git: https://github.com/Zegocover/bitrise-snyk-scan.git
commit: de3b281aea40136b79b0b04260d4d5b0f66ca8b3
type_tags:
- test
is_always_run: true
is_skippable: true
run_if: ""
inputs:
- opts:
is_expand: false
is_required: true
title: Project's OS
value_options:
- "ios"
- "android"
os_list: ios
- opts:
is_expand: false
is_required: true
summary: Severity threshold (cannot be set to critical - not supported by 'snyk
code'
title: Severity threshold
value_options:
- "low"
- "medium"
- "high"
severity_threshold: low
- opts:
is_expand: false
is_required: true
summary: Organisation name used to configure snyk organisation setting
title: Organisation name
org_name: null
- opts:
is_dont_change_value: true
is_expand: true
is_required: true
is_sensitive: true
title: Snyk authentication token
snyk_auth_token: $SNYK_AUTH_TOKEN
- js_scan: false
opts:
is_expand: false
is_required: false
title: Project is using javascript
value_options:
- "true"
- "false"
================================================
FILE: steps/bitrise-snyk-scan/step-info.yml
================================================
maintainer: community
================================================
FILE: steps/bitrise-step-appdome-build-2secure-ios/1.0.2/step.yml
================================================
title: Appdome-Build-2Secure step for iOS
summary: |
Builds an iOS mobile app using Appdome's platform
description: |
Integration that allows activating security and app protection features, bulding and signing mobile apps using Appdome's API. For detailes see: https://www.appdome.com/how-to/appsec-release-orchestration/mobile-appsec-cicd/use-appdome-build-2secure-step-for-bitrise
website: https://github.com/Appdome/bitrise_build-2secure-ios
source_code_url: https://github.com/Appdome/bitrise_build-2secure-ios
support_url: https://github.com/Appdome/bitrise_build-2secure-ios/issues
published_at: 2023-04-23T10:59:00.488173+03:00
source:
git: https://github.com/Appdome/bitrise-step-appdome-build-2secure-ios.git
commit: 8c31b1530cc5ee7c7bfe5e6e50918a1bd38d4a61
project_type_tags:
- ios
type_tags:
- build
- code-sign
toolkit:
bash:
entry_file: step.sh
inputs:
- app_location: $BITRISE_IPA_PATH
opts:
is_required: true
summary: URL to app file
title: App file URL
- fusion_set_id: null
opts:
is_required: true
title: Fusion set ID
- opts:
is_required: false
title: Team ID
team_id: null
- opts:
description: App signing method
is_required: true
title: Signing Method
value_options:
- On-Appdome
- Private-Signing
- Auto-Dev-Signing
sign_method: On-Appdome
- entitlements: null
opts:
description: iOS Entitlement EnvVar/s (separated by space)
is_required: true
title: iOS Entitlement EnvVar/s
================================================
FILE: steps/bitrise-step-appdome-build-2secure-ios/step-info.yml
================================================
maintainer: community
removal_date: "2023-06-11"
deprecate_notes: |
This step is deprecated as it was replaced by appdome-build-2secure-ios, and it is no longer maintained.
================================================
FILE: steps/bitrise-step-appledoc/1.0.2/step.yml
================================================
title: Appledoc
summary: This step allows the creation of apple docs
description: This step allows the creation of apple docs HTML files from a template,
and code comments.
website: https://github.com/FutureWorkshops/bitrise-step-appledoc
source_code_url: https://github.com/FutureWorkshops/bitrise-step-appledoc
published_at: 2019-08-22T16:13:29.664503+02:00
source:
git: https://github.com/FutureWorkshops/bitrise-step-appledoc.git
commit: abbf9fd315669905a205afc70d8f7fc67651f278
host_os_tags:
- osx-10.14
project_type_tags:
- ios
- xamarin
type_tags:
- utility
deps: {}
is_requires_admin_user: true
is_always_run: false
is_skippable: false
run_if: ""
inputs:
- opts:
description: Documentation will be generated for the source files found at this
location.
is_expand: true
is_required: true
summary: The path to the directory containing the source files to process.
title: Source files
value_options: []
source_path: ""
- appledoc_conf: config.plist
opts:
description: This file contains all the necessary configuration to run appledoc.
is_expand: true
is_required: true
summary: The configuration file of appledoc.
title: Appledoc configuration plist
value_options: []
- opts:
description: The readme will be included as the landing page of the docs.
is_expand: true
is_required: true
summary: The path to a README.md to include in the docs.
title: Readme path
value_options: []
readme_path: ""
- opts:
description: This archive contains the generated appledocs.
is_expand: true
is_required: true
summary: The filepath of the final zip archive.
title: Output file
value_options: []
output_file: docs.zip
================================================
FILE: steps/bitrise-step-appledoc/step-info.yml
================================================
maintainer: community
================================================
FILE: steps/bitrise-step-eschecker/0.0.1/step.yml
================================================
title: esChecker, by eShard
summary: |
Run Mobile Application Security Testing using esChecker
description: |
Run esChecker analyses on new application builds directly from Bitrise.
website: https://github.com/eshard/bitrise-step-eschecker
source_code_url: https://github.com/eshard/bitrise-step-eschecker
support_url: https://github.com/eshard/bitrise-step-eschecker/issues
published_at: 2022-12-07T17:37:01.44587+01:00
source:
git: https://github.com/eshard/bitrise-step-eschecker.git
commit: cfa105125ac67168579a86f39b013e1bd195110b
type_tags:
- test
toolkit:
bash:
entry_file: step.sh
inputs:
- opts:
description: |
Path to the binary file to be tested
is_required: true
summary: The app file you want to test.
title: A Bitrise generated APK or IPA path
upload_path: null
- eschecker_token: null
opts:
description: |
esChecker token generated from esChecker UI.
is_required: true
is_sensitive: true
summary: Your esChecker API token, get it from https://eschecker.eshard.com/rest-api
title: esChecker API token
- eschecker_app_id: null
opts:
description: |
Application ID in esChecker
is_required: true
summary: Unique ID of your application in esChecker, get it from the `App Information`
tab of the app
title: Application ID
- eschecker_campaign_id: null
opts:
description: |
Campaign ID in esChecker
is_required: true
summary: Unique ID of the campaign you can to run in esChecker
title: Campaign ID
outputs:
- eschecker_pdf_report: null
opts:
description: |
PDF export of the esChecker report.
summary: Contains all relevant information oo an esChecker Campaign.
title: esChecker report PDF
================================================
FILE: steps/bitrise-step-eschecker/step-info.yml
================================================
maintainer: community
================================================
FILE: steps/bitrise-step-export-universal-apk/0.1.1/step.yml
================================================
title: Export Universal APK
summary: |
Exports a universal APK from an Android App Bundle.
description: |
This Step generates a universal APK from an Android App Bundle, and exports it to the `$BITRISE_APK_PATH` Environment Variable so that the next Step or [Ship add-on](https://devcenter.bitrise.io/deploy/ship/) can pick it up. The Step also signs the generated APK with the keystore file you uploaded to the [Code Signing](https://devcenter.bitrise.io/code-signing/android-code-signing/android-code-signing-index/) tab or, if there was no keystore available, it signs the APK with a debug keystore file.
### Configuring the Step
1. Insert the Step after a build Step in your Workflow.
2. The **Android App Bundle path** input field is automatically filled out by the output of the previous build Step.
3. The **Keystore URL** is automatically filled out based on the uploaded keystore file on the **Code Signing** tab.
4. If the keystore file is uploaded to the **Code Signing** tab, the **Keystore alias**, **Keystore password**, and **Private key password** inputs are automatically populated.
5. The latest Bundletool version is set in the respective input. If, for any reason, you wish to use an older version, you can add it here, but make sure you use the [correct version](https://github.com/google/bundletool/releases).
### Troubleshooting
This Step works with Bundletool's latest version which is automatically set in the respective Step input. If you wish to switch to an older version, you have to add it manually. Make sure you add the [correct version](https://github.com/google/bundletool/releases), otherwise the Step will fail.
### Useful links
- [Android code signing](https://devcenter.bitrise.io/code-signing/android-code-signing/android-code-signing-index/)
- [Deploying and Android app](https://devcenter.bitrise.io/deploy/android-deploy/android-deployment-index/)
### Related Steps
- [Android Sign](https://www.bitrise.io/integrations/steps/sign-apk)
- [Android Build](https://www.bitrise.io/integrations/steps/android-build)
website: https://github.com/bitrise-steplib/bitrise-step-export-universal-apk
source_code_url: https://github.com/bitrise-steplib/bitrise-step-export-universal-apk
support_url: https://github.com/bitrise-steplib/bitrise-step-export-universal-apk/issues
published_at: 2020-07-29T12:34:47.2133096Z
source:
git: https://github.com/bitrise-steplib/bitrise-step-export-universal-apk.git
commit: a582681d23d651a5947f0c150c802872b289ad58
host_os_tags:
- osx-10.10
- ubuntu-16.04
project_type_tags:
- android
type_tags:
- test
toolkit:
go:
package_name: github.com/bitrise-steplib/bitrise-step-export-universal-apk
is_requires_admin_user: true
is_always_run: false
is_skippable: false
run_if: ""
inputs:
- aab_path: $BITRISE_AAB_PATH
opts:
description: |
The **Android App Bundle path** input field is automatically filled out by the output of the previous build Step
is_expand: true
is_required: true
summary: Android App Bundle file (`.aab`) path
title: Android App Bundle path
- keystore_url: $BITRISEIO_ANDROID_KEYSTORE_URL
opts:
description: ""
is_required: true
is_sensitive: true
summary: The keystore file's URL which is generated when you upload the file to
the Code Signing tab.
title: Keystore URL
- keystore_password: $BITRISEIO_ANDROID_KEYSTORE_PASSWORD
opts:
description: ""
is_required: true
is_sensitive: true
summary: The password you added to the keystore.
title: Keystore password
- keystore_alias: $BITRISEIO_ANDROID_KEYSTORE_ALIAS
opts:
description: ""
is_required: true
is_sensitive: true
summary: Identifier name you added to the keystore.
title: Keystore alias
- opts:
description: null
is_sensitive: true
summary: Password you added to the private key.
title: Private key password
private_key_password: $BITRISEIO_ANDROID_KEYSTORE_PRIVATE_KEY_PASSWORD
- bundletool_version: 1.0.0
opts:
description: If you wish to set a specific version, add it here based on [Bundletool's
official release](https://github.com/google/bundletool/releases) page.
is_expand: true
summary: You can override this Bundletool version if you need a specific one.
title: Bundletool version
outputs:
- BITRISE_APK_PATH: null
opts:
description: ""
summary: The APK is exported to this output Environment Variable and can be picked
up by the next Step or Ship.
title: The exported APK's path
================================================
FILE: steps/bitrise-step-export-universal-apk/0.1.2/step.yml
================================================
title: Export Universal APK
summary: |
Exports a universal APK from an Android App Bundle.
description: |
This Step generates a universal APK from an Android App Bundle, and exports it to the `$BITRISE_APK_PATH` Environment Variable so that the next Step or [Ship add-on](https://devcenter.bitrise.io/deploy/ship/) can pick it up. The Step also signs the generated APK with the keystore file you uploaded to the [Code Signing](https://devcenter.bitrise.io/code-signing/android-code-signing/android-code-signing-index/) tab or, if there was no keystore available, it signs the APK with a debug keystore file.
### Configuring the Step
1. Insert the Step after a build Step in your Workflow.
2. The **Android App Bundle path** input field is automatically filled out by the output of the previous build Step.
3. The **Keystore URL** is automatically filled out based on the uploaded keystore file on the **Code Signing** tab.
4. If the keystore file is uploaded to the **Code Signing** tab, the **Keystore alias**, **Keystore password**, and **Private key password** inputs are automatically populated.
5. The latest Bundletool version is set in the respective input. If, for any reason, you wish to use an older version, you can add it here, but make sure you use the [correct version](https://github.com/google/bundletool/releases).
### Troubleshooting
This Step works with Bundletool's latest version which is automatically set in the respective Step input. If you wish to switch to an older version, you have to add it manually. Make sure you add the [correct version](https://github.com/google/bundletool/releases), otherwise the Step will fail.
### Useful links
- [Android code signing](https://devcenter.bitrise.io/code-signing/android-code-signing/android-code-signing-index/)
- [Deploying and Android app](https://devcenter.bitrise.io/deploy/android-deploy/android-deployment-index/)
### Related Steps
- [Android Sign](https://www.bitrise.io/integrations/steps/sign-apk)
- [Android Build](https://www.bitrise.io/integrations/steps/android-build)
website: https://github.com/bitrise-steplib/bitrise-step-export-universal-apk
source_code_url: https://github.com/bitrise-steplib/bitrise-step-export-universal-apk
support_url: https://github.com/bitrise-steplib/bitrise-step-export-universal-apk/issues
published_at: 2021-10-05T07:38:36.616905339Z
source:
git: https://github.com/bitrise-steplib/bitrise-step-export-universal-apk.git
commit: 51999c4a8dba345a80f4847cd2e7438d3cc07906
host_os_tags:
- osx-10.10
- ubuntu-16.04
project_type_tags:
- android
type_tags:
- test
toolkit:
go:
package_name: github.com/bitrise-steplib/bitrise-step-export-universal-apk
is_requires_admin_user: true
is_always_run: false
is_skippable: false
run_if: ""
inputs:
- aab_path: $BITRISE_AAB_PATH
opts:
description: |
The **Android App Bundle path** input field is automatically filled out by the output of the previous build Step
is_expand: true
is_required: true
summary: Android App Bundle file (`.aab`) path
title: Android App Bundle path
- keystore_url: $BITRISEIO_ANDROID_KEYSTORE_URL
opts:
description: ""
is_required: true
is_sensitive: true
summary: The keystore file's URL which is generated when you upload the file to
the Code Signing tab.
title: Keystore URL
- keystore_password: $BITRISEIO_ANDROID_KEYSTORE_PASSWORD
opts:
description: ""
is_required: true
is_sensitive: true
summary: The password you added to the keystore.
title: Keystore password
- keystore_alias: $BITRISEIO_ANDROID_KEYSTORE_ALIAS
opts:
description: ""
is_required: true
is_sensitive: true
summary: Identifier name you added to the keystore.
title: Keystore alias
- opts:
description: null
is_sensitive: true
summary: Password you added to the private key.
title: Private key password
private_key_password: $BITRISEIO_ANDROID_KEYSTORE_PRIVATE_KEY_PASSWORD
- bundletool_version: 1.8.1
opts:
description: If you wish to set a specific version, add it here based on [Bundletool's
official release](https://github.com/google/bundletool/releases) page.
is_expand: true
summary: You can override this Bundletool version if you need a specific one.
title: Bundletool version
outputs:
- BITRISE_APK_PATH: null
opts:
description: ""
summary: The APK is exported to this output Environment Variable and can be picked
up by the next Step or Ship.
title: The exported APK's path
================================================
FILE: steps/bitrise-step-export-universal-apk/0.1.3/step.yml
================================================
title: Export Universal APK
summary: |
Exports a universal APK from an Android App Bundle.
description: |
This Step generates a universal APK from an Android App Bundle, and exports it to the `$BITRISE_APK_PATH` Environment Variable so that the next Step or [Ship add-on](https://devcenter.bitrise.io/deploy/ship/) can pick it up. The Step also signs the generated APK with the keystore file you uploaded to the [Code Signing](https://devcenter.bitrise.io/code-signing/android-code-signing/android-code-signing-index/) tab or, if there was no keystore available, it signs the APK with a debug keystore file.
### Configuring the Step
1. Insert the Step after a build Step in your Workflow.
2. The **Android App Bundle path** input field is automatically filled out by the output of the previous build Step.
3. The **Keystore URL** is automatically filled out based on the uploaded keystore file on the **Code Signing** tab.
4. If the keystore file is uploaded to the **Code Signing** tab, the **Keystore alias**, **Keystore password**, and **Private key password** inputs are automatically populated.
5. The latest Bundletool version is set in the respective input. If, for any reason, you wish to use an older version, you can add it here, but make sure you use the [correct version](https://github.com/google/bundletool/releases).
### Troubleshooting
This Step works with Bundletool's latest version which is automatically set in the respective Step input. If you wish to switch to an older version, you have to add it manually. Make sure you add the [correct version](https://github.com/google/bundletool/releases), otherwise the Step will fail.
### Useful links
- [Android code signing](https://devcenter.bitrise.io/code-signing/android-code-signing/android-code-signing-index/)
- [Deploying and Android app](https://devcenter.bitrise.io/deploy/android-deploy/android-deployment-index/)
### Related Steps
- [Android Sign](https://www.bitrise.io/integrations/steps/sign-apk)
- [Android Build](https://www.bitrise.io/integrations/steps/android-build)
website: https://github.com/bitrise-steplib/bitrise-step-export-universal-apk
source_code_url: https://github.com/bitrise-steplib/bitrise-step-export-universal-apk
support_url: https://github.com/bitrise-steplib/bitrise-step-export-universal-apk/issues
published_at: 2023-08-28T09:42:39.845366736Z
source:
git: https://github.com/bitrise-steplib/bitrise-step-export-universal-apk.git
commit: 5455537f21c4acd90ee60628f89156211aecea3a
host_os_tags:
- osx-10.10
- ubuntu-16.04
project_type_tags:
- android
type_tags:
- test
toolkit:
go:
package_name: github.com/bitrise-steplib/bitrise-step-export-universal-apk
is_requires_admin_user: true
is_always_run: false
is_skippable: false
run_if: ""
inputs:
- aab_path: $BITRISE_AAB_PATH
opts:
description: |
The **Android App Bundle path** input field is automatically filled out by the output of the previous build Step
is_expand: true
is_required: true
summary: Android App Bundle file (`.aab`) path
title: Android App Bundle path
- keystore_url: $BITRISEIO_ANDROID_KEYSTORE_URL
opts:
description: ""
is_required: true
is_sensitive: true
summary: The keystore file's URL which is generated when you upload the file to
the Code Signing tab.
title: Keystore URL
- keystore_password: $BITRISEIO_ANDROID_KEYSTORE_PASSWORD
opts:
description: ""
is_required: true
is_sensitive: true
summary: The password you added to the keystore.
title: Keystore password
- keystore_alias: $BITRISEIO_ANDROID_KEYSTORE_ALIAS
opts:
description: ""
is_required: true
is_sensitive: true
summary: Identifier name you added to the keystore.
title: Keystore alias
- opts:
description: null
is_sensitive: true
summary: Password you added to the private key.
title: Private key password
private_key_password: $BITRISEIO_ANDROID_KEYSTORE_PRIVATE_KEY_PASSWORD
- bundletool_version: 1.8.1
opts:
description: If you wish to set a specific version, add it here based on [Bundletool's
official release](https://github.com/google/bundletool/releases) page.
is_expand: true
summary: You can override this Bundletool version if you need a specific one.
title: Bundletool version
outputs:
- BITRISE_APK_PATH: null
opts:
description: ""
summary: The APK is exported to this output Environment Variable and can be picked
up by the next Step or Ship.
title: The exported APK's path
================================================
FILE: steps/bitrise-step-export-universal-apk/0.1.4/step.yml
================================================
title: Export Universal APK
summary: |
Exports a universal APK from an Android App Bundle.
description: |
This Step generates a universal APK from an Android App Bundle, and exports it to the `$BITRISE_APK_PATH` Environment Variable so that the next Step or [Ship add-on](https://devcenter.bitrise.io/deploy/ship/) can pick it up. The Step also signs the generated APK with the keystore file you uploaded to the [Code Signing](https://devcenter.bitrise.io/code-signing/android-code-signing/android-code-signing-index/) tab or, if there was no keystore available, it signs the APK with a debug keystore file.
### Configuring the Step
1. Insert the Step after a build Step in your Workflow.
2. The **Android App Bundle path** input field is automatically filled out by the output of the previous build Step.
3. The **Keystore URL** is automatically filled out based on the uploaded keystore file on the **Code Signing** tab.
4. If the keystore file is uploaded to the **Code Signing** tab, the **Keystore alias**, **Keystore password**, and **Private key password** inputs are automatically populated.
5. The latest Bundletool version is set in the respective input. If, for any reason, you wish to use an older version, you can add it here, but make sure you use the [correct version](https://github.com/google/bundletool/releases).
### Troubleshooting
This Step works with Bundletool's latest version which is automatically set in the respective Step input. If you wish to switch to an older version, you have to add it manually. Make sure you add the [correct version](https://github.com/google/bundletool/releases), otherwise the Step will fail.
### Useful links
- [Android code signing](https://devcenter.bitrise.io/code-signing/android-code-signing/android-code-signing-index/)
- [Deploying and Android app](https://devcenter.bitrise.io/deploy/android-deploy/android-deployment-index/)
### Related Steps
- [Android Sign](https://www.bitrise.io/integrations/steps/sign-apk)
- [Android Build](https://www.bitrise.io/integrations/steps/android-build)
website: https://github.com/bitrise-steplib/bitrise-step-export-universal-apk
source_code_url: https://github.com/bitrise-steplib/bitrise-step-export-universal-apk
support_url: https://github.com/bitrise-steplib/bitrise-step-export-universal-apk/issues
published_at: 2025-11-14T13:13:39.701980048Z
source:
git: https://github.com/bitrise-steplib/bitrise-step-export-universal-apk.git
commit: 17ff53debcf18029defefe113008c904d3551281
project_type_tags:
- android
- cordova
- flutter
- ionic
- kotlin-multiplatform
- react-native
type_tags:
- utility
toolkit:
go:
package_name: github.com/bitrise-steplib/bitrise-step-export-universal-apk
is_requires_admin_user: true
is_always_run: false
is_skippable: false
run_if: ""
inputs:
- aab_path: $BITRISE_AAB_PATH
opts:
description: The **Android App Bundle path** input field is automatically filled
out by the output of the previous build Step
is_expand: true
is_required: true
summary: Android App Bundle file (`.aab`) path
title: Android App Bundle path
- keystore_url: $BITRISEIO_ANDROID_KEYSTORE_URL
opts:
is_required: true
is_sensitive: true
summary: The keystore file's URL which is generated when you upload the file to
the Code Signing tab.
title: Keystore URL
- keystore_password: $BITRISEIO_ANDROID_KEYSTORE_PASSWORD
opts:
is_required: true
is_sensitive: true
summary: The password you added to the keystore.
title: Keystore password
- keystore_alias: $BITRISEIO_ANDROID_KEYSTORE_ALIAS
opts:
is_required: true
is_sensitive: true
summary: Identifier name you added to the keystore.
title: Keystore alias
- opts:
is_sensitive: true
summary: Password you added to the private key.
title: Private key password
private_key_password: $BITRISEIO_ANDROID_KEYSTORE_PRIVATE_KEY_PASSWORD
- bundletool_version: 1.8.1
opts:
description: If you wish to set a specific version, add it here based on [Bundletool's
official release](https://github.com/google/bundletool/releases) page.
is_expand: true
summary: You can override this Bundletool version if you need a specific one.
title: Bundletool version
outputs:
- BITRISE_APK_PATH: null
opts:
summary: The APK is exported to this output Environment Variable and can be picked
up by the next Step or Ship.
title: The exported APK's path
================================================
FILE: steps/bitrise-step-export-universal-apk/step-info.yml
================================================
maintainer: bitrise
================================================
FILE: steps/bitrise-step-icon-overlay/1.0.1/step.yml
================================================
title: Icon overlay
summary: This step allow to print any text on top of the app's icon in order to distinguish
different builds
description: ""
website: https://github.com/FutureWorkshops/bitrise-step-icon-overlay
source_code_url: https://github.com/FutureWorkshops/bitrise-step-icon-overlay
published_at: 2019-08-22T17:10:52.188049+02:00
source:
git: https://github.com/FutureWorkshops/bitrise-step-icon-overlay.git
commit: eafd98b021fe857821bcd4294972df686ed9353c
host_os_tags:
- osx-10.14
project_type_tags:
- ios
- xamarin
type_tags:
- utility
deps:
brew:
- name: imagemagick
apt_get:
- name: imagemagick
is_requires_admin_user: true
is_always_run: false
is_skippable: false
run_if: ""
inputs:
- iconsbundle_name: AppIcon.appiconset
opts:
description: The name of the appiconset file including the extension '.appiconset'
is_expand: true
is_required: true
summary: The name of the appiconset file inside the xcasset.
title: Icon bundle name
- opts:
description: Folder where the project and the asset files are stored in the repository.
is_expand: true
is_required: true
summary: Folder where the project and the asset files are stored in the repository.
title: Project Location
project_location: .
- opts:
description: The first six characters of this text will be displayed at the bottom
on top of the app's icon image
is_expand: true
is_required: true
summary: The text to print over the app icon (6 characters maximum).
title: Overlay text
overlay_text: $BITRISE_GIT_COMMIT
================================================
FILE: steps/bitrise-step-icon-overlay/2.0.0/step.yml
================================================
title: Icon overlay
summary: This step allow to print any text on top of the app's icon in order to distinguish
different builds
description: ""
website: https://github.com/OhMyApp/bitrise-step-icon-overlay
source_code_url: https://github.com/OhMyApp/bitrise-step-icon-overlay
support_url: https://github.com/OhMyApp/bitrise-step-icon-overlay/issues
published_at: 2026-04-12T16:07:47.648173+02:00
source:
git: https://github.com/OhMyApp/bitrise-step-icon-overlay.git
commit: 024993fe55cf9b6ade979f821a47ff551a7d8ba2
project_type_tags:
- ios
- xamarin
type_tags:
- utility
deps:
brew:
- name: imagemagick
apt_get:
- name: imagemagick
is_requires_admin_user: true
is_always_run: false
is_skippable: false
run_if: ""
inputs:
- iconsbundle_name: AppIcon.appiconset
opts:
description: The name of the appiconset file including the extension '.appiconset'
is_expand: true
is_required: true
summary: The name of the appiconset file inside the xcasset.
title: Icon bundle name
- opts:
description: Folder where the project and the asset files are stored in the repository.
is_expand: true
is_required: true
summary: Folder where the project and the asset files are stored in the repository.
title: Project Location
project_location: .
- opts:
description: The first six characters of this text will be displayed at the bottom
on top of the app's icon image
is_expand: true
is_required: true
summary: The text to print over the app icon (6 characters maximum).
title: Overlay text
overlay_text: $BITRISE_GIT_COMMIT
- font: /System/Library/Fonts/Supplemental/Arial.ttf
opts:
description: Arial by default.
is_expand: true
is_required: false
summary: The font used for the text.
title: Font
================================================
FILE: steps/bitrise-step-icon-overlay/step-info.yml
================================================
maintainer: community
================================================
FILE: steps/bitrise-step-ionic-build/0.0.1/step.yml
================================================
title: Ionic Build
summary: |
The Step runs ionic build with the arguments you provide.
description: |
The Step runs ionic build with the arguments you provide.
website: https://github.com/non-binary/bitrise-step-ionic-build
source_code_url: https://github.com/non-binary/bitrise-step-ionic-build
support_url: https://github.com/non-binary/bitrise-step-ionic-build/issues
published_at: 2020-06-05T18:31:09.731777-04:00
source:
git: https://github.com/non-binary/bitrise-step-ionic-build.git
commit: 8621bfc85a5419c3169cc2c29b6baad8731a06c5
host_os_tags:
- osx-10.10
- ubuntu-16.04
project_type_tags:
- ionic
type_tags:
- build
toolkit:
bash:
entry_file: step.sh
is_requires_admin_user: true
is_always_run: false
is_skippable: false
run_if: ""
inputs:
- opts:
description: |
Set to yes if you want `--prod` to be used.
is_expand: true
is_required: true
summary: To use the production configuration.
title: Production Configuration
value_options:
- "yes"
- "no"
production_mode: "no"
- options: ""
opts:
description: |
You can pass additional options to this command to customize your build (just the flag).
Flags that are available can be found here: https://ionicframework.com/docs/cli/commands/build#advanced-options.
is_expand: true
is_required: false
summary: To optionally use advanced options flags.
title: Options
================================================
FILE: steps/bitrise-step-ionic-build/step-info.yml
================================================
maintainer: community
================================================
FILE: steps/bitrise-step-multikey-restore-cache/0.1.0/step.yml
================================================
title: Multikey Restore Cache
summary: Restores build cache using a cache keys. This Step needs to be used in combination
with **Multikey Save Cache** or **Save Cache**.
description: |
Restores items from the cache based on a list of keys.
The format of the keys input is the following:
```
KEY1 || KEY1_ALTERNATIVE1 || KEY1_ALTERNATIVE2
KEY2
KEY3 || KEY3_ALTERNATIVE1
```
The number of keys and paths for each are limited to a number of 10. Commas (`,`) and equal signs (`=`) are not allowed in keys. See templates that can be used in the keys below.
Example (somewhat artificial):
```
multikey_0 || multikey_0_fallback
multikey_1
multikey_2 || multikey_2_fallback
```
This Step needs to be used in combination with **Multikey Save Cache** or **Save Cache**.
#### About key-based caching
Key-based caching is a concept where cache archives are saved and restored using a unique cache key. One Bitrise project can have multiple cache archives stored simultaneously, and the **Multikey Restore Cache** step downloads a cache archive associated with the key provided as a Step input.
Caches can become outdated across builds when something changes in the project (for example, a dependency gets upgraded to a new version). In this case, a new (unique) cache key is needed to save the new cache contents. This is possible if the cache key is dynamic and changes based on the project state (for example, a checksum of the dependency lockfile is part of the cache key). If you use the same dynamic cache key when restoring the cache, the Step will download the most relevant cache archive available.
Key-based caching is platform-agnostic and can be used to cache anything by carefully selecting the cache key and the files/folders to include in the cache.
#### Templates
The Step requires a string key to use when downloading a cache archive. In order to always download the most relevant cache archive for each build, the cache key input can contain template elements. The Step evaluates the key template at runtime and the final key value can change based on the build environment or files in the repo.
The following variables are supported in cache keys input:
- `cache-key-{{ .Branch }}`: Current git branch the build runs on
- `cache-key-{{ .CommitHash }}`: SHA-256 hash of the git commit the build runs on
- `cache-key-{{ .Workflow }}`: Current Bitrise workflow name (eg. `primary`)
- `{{ .Arch }}-cache-key`: Current CPU architecture (`amd64` or `arm64`)
- `{{ .OS }}-cache-key`: Current operating system (`linux` or `darwin`)
Functions available in a template:
`checksum`: This function takes one or more file paths and computes the SHA256 [checksum](https://en.wikipedia.org/wiki/Checksum) of the file contents. This is useful for creating unique cache keys based on files that describe content to cache.
Examples of using `checksum`:
- `cache-key-{{ checksum "package-lock.json" }}`
- `cache-key-{{ checksum "**/Package.resolved" }}`
- `cache-key-{{ checksum "**/*.gradle*" "gradle.properties" }}`
`getenv`: This function returns the value of an environment variable or an empty string if the variable is not defined.
Examples of `getenv`:
- `cache-key-{{ getenv "PR" }}`
- `cache-key-{{ getenv "BITRISEIO_PIPELINE_ID" }}`
#### Key matching and fallback keys
The most straightforward use case is that a cache archive is downloaded and restored if the provided key matches a cache archive uploaded previously using the Save Cache Step. Stored cache archives are scoped to the Bitrise project. Builds can restore caches saved by any previous Workflow run on any Bitrise Stack.
It's possible to define more than one key in the cache keys input. You can specify additional alternative keys by appending them with `||` in the same line as the key. The list is in priority order, so the Step will first try to find a match for the first key you provided, and if there is no cache stored for the key, it will move on to find a match for the second key (and so on).
In addition to listing multiple keys, each key can be a prefix of a saved cache key and still get a matching cache archive. For example, the key `my-cache-` can match an existing archive saved with the key `my-cache-a6a102ff`.
We recommend configuring the keys in a way that the first key is an exact match to a checksum key, and to use a more generic prefix key as a fallback:
```
inputs:
key: |
multikey_0 || multikey_0_fallback
multikey
```
#### Related steps
[Save cache](https://github.com/bitrise-steplib/bitrise-step-save-cache/)
website: https://github.com/bitrise-steplib/bitrise-step-restore-cache
source_code_url: https://github.com/bitrise-steplib/bitrise-step-restore-cache
support_url: https://github.com/bitrise-steplib/bitrise-step-restore-cache/issues
published_at: 2025-08-05T14:48:22.923282+02:00
source:
git: https://github.com/bitrise-steplib/bitrise-step-multikey-restore-cache.git
commit: 246caa5e66015b3d5dbc08dd224bc290c2cbb0d8
type_tags:
- utility
toolkit:
go:
package_name: github.com/bitrise-steplib/bitrise-step-restore-cache
deps:
brew:
- name: zstd
apt_get:
- name: zstd
is_skippable: true
run_if: .IsCI
inputs:
- keys: null
opts:
description: |-
Keys used for restoring a cache archive. One cache key per line in priority order.
The key supports template elements for creating dynamic cache keys. These dynamic keys change the final key value based on the build environment or files in the repo in order to create new cache archives. See the Step description for more details and examples.
The maximum length of a key is 512 characters (longer keys get truncated) and you can list at most 8 keys using this input. Commas (`,`) are not allowed in keys.
is_required: true
summary: Keys used for restoring a cache archive. The key can contain template
elements.
title: Cache keys
- opts:
is_required: true
summary: Enable logging additional information for troubleshooting.
title: Verbose logging
value_options:
- "true"
- "false"
verbose: "false"
- opts:
category: Debugging
description: |-
Number of retries to attempt when downloading a cache archive fails.
The value 0 means no retries are attempted.
is_required: true
summary: Number of retries to attempt when downloading a cache archive fails.
title: Number of retries
retries: 3
outputs:
- BITRISE_CACHE_HIT: null
opts:
description: |-
Indicates if a cache entry was restored. Possible values:
- `exact`: Exact cache hit for the first requested cache key
- `partial`: Cache hit for a key other than the first
- `false` No cache hit, nothing was restored
title: Cache hit
================================================
FILE: steps/bitrise-step-multikey-restore-cache/0.1.1/step.yml
================================================
title: Multikey Restore Cache
summary: Restores build cache using a cache keys. This Step needs to be used in combination
with **Multikey Save Cache** or **Save Cache**.
description: |
Restores items from the cache based on a list of keys.
The format of the keys input is the following:
```
KEY1 || KEY1_ALTERNATIVE1 || KEY1_ALTERNATIVE2
KEY2
KEY3 || KEY3_ALTERNATIVE1
```
The number of keys and paths for each are limited to a number of 10. Commas (`,`) and equal signs (`=`) are not allowed in keys. See templates that can be used in the keys below.
Example (somewhat artificial):
```
multikey_0 || multikey_0_fallback
multikey_1
multikey_2 || multikey_2_fallback
```
This Step needs to be used in combination with **Multikey Save Cache** or **Save Cache**.
#### About key-based caching
Key-based caching is a concept where cache archives are saved and restored using a unique cache key. One Bitrise project can have multiple cache archives stored simultaneously, and the **Multikey Restore Cache** step downloads a cache archive associated with the key provided as a Step input.
Caches can become outdated across builds when something changes in the project (for example, a dependency gets upgraded to a new version). In this case, a new (unique) cache key is needed to save the new cache contents. This is possible if the cache key is dynamic and changes based on the project state (for example, a checksum of the dependency lockfile is part of the cache key). If you use the same dynamic cache key when restoring the cache, the Step will download the most relevant cache archive available.
Key-based caching is platform-agnostic and can be used to cache anything by carefully selecting the cache key and the files/folders to include in the cache.
#### Templates
The Step requires a string key to use when downloading a cache archive. In order to always download the most relevant cache archive for each build, the cache key input can contain template elements. The Step evaluates the key template at runtime and the final key value can change based on the build environment or files in the repo.
The following variables are supported in cache keys input:
- `cache-key-{{ .Branch }}`: Current git branch the build runs on
- `cache-key-{{ .CommitHash }}`: SHA-256 hash of the git commit the build runs on
- `cache-key-{{ .Workflow }}`: Current Bitrise workflow name (eg. `primary`)
- `{{ .Arch }}-cache-key`: Current CPU architecture (`amd64` or `arm64`)
- `{{ .OS }}-cache-key`: Current operating system (`linux` or `darwin`)
Functions available in a template:
`checksum`: This function takes one or more file paths and computes the SHA256 [checksum](https://en.wikipedia.org/wiki/Checksum) of the file contents. This is useful for creating unique cache keys based on files that describe content to cache.
Examples of using `checksum`:
- `cache-key-{{ checksum "package-lock.json" }}`
- `cache-key-{{ checksum "**/Package.resolved" }}`
- `cache-key-{{ checksum "**/*.gradle*" "gradle.properties" }}`
`getenv`: This function returns the value of an environment variable or an empty string if the variable is not defined.
Examples of `getenv`:
- `cache-key-{{ getenv "PR" }}`
- `cache-key-{{ getenv "BITRISEIO_PIPELINE_ID" }}`
#### Key matching and fallback keys
The most straightforward use case is that a cache archive is downloaded and restored if the provided key matches a cache archive uploaded previously using the Save Cache Step. Stored cache archives are scoped to the Bitrise project. Builds can restore caches saved by any previous Workflow run on any Bitrise Stack.
It's possible to define more than one key in the cache keys input. You can specify additional alternative keys by appending them with `||` in the same line as the key. The list is in priority order, so the Step will first try to find a match for the first key you provided, and if there is no cache stored for the key, it will move on to find a match for the second key (and so on).
In addition to listing multiple keys, each key can be a prefix of a saved cache key and still get a matching cache archive. For example, the key `my-cache-` can match an existing archive saved with the key `my-cache-a6a102ff`.
We recommend configuring the keys in a way that the first key is an exact match to a checksum key, and to use a more generic prefix key as a fallback:
```
inputs:
key: |
multikey_0 || multikey_0_fallback
multikey
```
#### Related steps
[Save cache](https://github.com/bitrise-steplib/bitrise-step-save-cache/)
website: https://github.com/bitrise-steplib/bitrise-step-multikey-restore-cache
source_code_url: https://github.com/bitrise-steplib/bitrise-step-multikey-restore-cache
support_url: https://github.com/bitrise-steplib/bitrise-step-multikey-restore-cache/issues
published_at: 2025-09-30T11:20:43.600861847Z
source:
git: https://github.com/bitrise-steplib/bitrise-step-multikey-restore-cache.git
commit: a6a94e060c006222ab1f9899f0112ce0eb340a14
type_tags:
- utility
toolkit:
go:
package_name: github.com/bitrise-steplib/bitrise-step-multikey-restore-cache
deps:
brew:
- name: zstd
apt_get:
- name: zstd
is_skippable: true
run_if: .IsCI
inputs:
- keys: null
opts:
description: |-
Keys used for restoring a cache archive. One cache key per line in priority order.
The key supports template elements for creating dynamic cache keys. These dynamic keys change the final key value based on the build environment or files in the repo in order to create new cache archives. See the Step description for more details and examples.
The maximum length of a key is 512 characters (longer keys get truncated) and you can list at most 8 keys using this input. Commas (`,`) are not allowed in keys.
is_required: true
summary: Keys used for restoring a cache archive. The key can contain template
elements.
title: Cache keys
- opts:
is_required: true
summary: Enable logging additional information for troubleshooting.
title: Verbose logging
value_options:
- "true"
- "false"
verbose: "false"
- opts:
category: Debugging
description: |-
Number of retries to attempt when downloading a cache archive fails.
The value 0 means no retries are attempted.
is_required: true
summary: Number of retries to attempt when downloading a cache archive fails.
title: Number of retries
retries: 3
outputs:
- BITRISE_CACHE_HIT: null
opts:
description: |-
Indicates if a cache entry was restored. Possible values:
- `exact`: Exact cache hit for the first requested cache key
- `partial`: Cache hit for a key other than the first
- `false` No cache hit, nothing was restored
title: Cache hit
================================================
FILE: steps/bitrise-step-multikey-restore-cache/step-info.yml
================================================
maintainer: bitrise
================================================
FILE: steps/bitrise-step-multikey-save-cache/0.1.0/step.yml
================================================
title: Multikey Save Cache
summary: Saves items to the cache based on key-value pairs. This Step needs to be
used in combination with **Multikey Restore Cache** or **Restore Cache**.
description: |
Saves items to the cache based on an input in the form of:
```
OPTIONAL_UNIQUNESS_PREFIX KEY1 = PATH1, PATH2, ...
OPTIONAL_UNIQUNESS_PREFIX KEY2 = PATH3, ...
```
where `OPTIONAL_UNIQUNESS_PREFIX` is `[u]` and means that the key in the given line is unique (see **Restore Cache**).
The number of keys and paths for each are limited to a number of 10. The maximum length of a key is 512 characters (longer keys get truncated). Commas (`,`) and equal signs (`=`) are not allowed in keys neither in paths.
See templates that can be used in the keys below. The path list is a list of files and folders to include in the cache, separated by a comma (`,`). Each path can contain wildcards (`*` and `**`) that are evaluated at runtime.
Example (somewhat artificial):
```
[u] multikey_0 = e2e/tmp/multikey_0.txt
[u] multikey_1 = e2e/tmp/multikey_1_0.txt, e2e/tmp/multikey_1_1.txt
[u]multikey_2=e2e/tmp/multikey_2_0.txt,e2e/tmp/multikey_2_1.txt
multikey_3 = e2e/tmp/multikey_3.txt
multikey_4 = e2e/tmp/multikey_4_0.txt, e2e/tmp/multikey_4_1.txt
multikey_5=e2e/tmp/multikey_5_0.txt,e2e/tmp/multikey_5_1.txt
```
This Step needs to be used in combination with **Multikey Restore Cache** or **Restore Cache**.
#### About key-based caching
Key-based caching is a concept where cache archives are saved and restored using a unique cache key. One Bitrise project can have multiple cache archives stored simultaneously, and the **Restore Cache Step** downloads a cache archive associated with the key provided as a Step input. The **Save Cache** Step is responsible for uploading the cache archive with an exact key.
Caches can become outdated across builds when something changes in the project (for example, a dependency gets upgraded to a new version). In this case, a new (unique) cache key is needed to save the new cache contents. This is possible if the cache key is dynamic and changes based on the project state (for example, a checksum of the dependency lockfile is part of the cache key). If you use the same dynamic cache key when restoring the cache, the Step will download the most relevant cache archive available.
Key-based caching is platform-agnostic and can be used to cache anything by carefully selecting the cache key and the files/folders to include in the cache.
#### Templates
The Step requires a string key to use when uploading a cache archive. In order to always download the most relevant cache archive for each build, the cache key input can contain template elements. The **Restore cache Step** evaluates the key template at runtime and the final key value can change based on the build environment or files in the repo. Similarly, the **Save cache** Step also uses templates to compute a unique cache key when uploading a cache archive.
The following variables are supported in the **Cache key** input:
- `cache-key-{{ .Branch }}`: Current git branch the build runs on
- `cache-key-{{ .CommitHash }}`: SHA-256 hash of the git commit the build runs on
- `cache-key-{{ .Workflow }}`: Current Bitrise workflow name (eg. `primary`)
- `{{ .Arch }}-cache-key`: Current CPU architecture (`amd64` or `arm64`)
- `{{ .OS }}-cache-key`: Current operating system (`linux` or `darwin`)
Functions available in a template:
`checksum`: This function takes one or more file paths and computes the SHA256 [checksum](https://en.wikipedia.org/wiki/Checksum) of the file contents. This is useful for creating unique cache keys based on files that describe content to cache.
Examples of using `checksum`:
- `cache-key-{{ checksum "package-lock.json" }}`
- `cache-key-{{ checksum "**/Package.resolved" }}`
- `cache-key-{{ checksum "**/*.gradle*" "gradle.properties" }}`
`getenv`: This function returns the value of an environment variable or an empty string if the variable is not defined.
Examples of `getenv`:
- `cache-key-{{ getenv "PR" }}`
- `cache-key-{{ getenv "BITRISEIO_PIPELINE_ID" }}`
#### Key matching
The most straightforward use case is when both the **Multikey save cache** and **Multikey restore cache** steps use the same exact key to transfer cache between builds. Stored cache archives are scoped to the Bitrise project. Builds can restore caches saved by any previous Workflow run on any Bitrise Stack.
Unlike this Step, the **Multikey restore cache** Step can define multiple keys as fallbacks when there is no match for the first cache key. See the docs of the [**Multikey restore cache** step](https://github.com/bitrise-steplib/bitrise-step-multikey-restore-cache/) for more details.
#### Skip saving the cache
The Step can decide to skip saving a new cache entry to avoid unnecessary work. This happens when there is a previously restored cache in the same workflow and the new cache would have the same contents as the one restored. Make sure to use unique cache keys with a checksum, and enable the **Unique cache key** input for the most optimal execution.
#### Related steps
[Multikey Restore Cache](https://github.com/bitrise-steplib/bitrise-step-multikey-restore-cache/)
website: https://github.com/bitrise-steplib/bitrise-step-multikey-save-cache
source_code_url: https://github.com/bitrise-steplib/bitrise-step-multikey-save-cache
support_url: https://github.com/bitrise-steplib/bitrise-step-multikey-save-cache/issues
published_at: 2025-07-29T15:15:28.858711+02:00
source:
git: https://github.com/bitrise-steplib/bitrise-step-multikey-save-cache.git
commit: bd30e324ae227fb5d4b6321e1de397a2dc9f52ad
type_tags:
- utility
toolkit:
go:
package_name: github.com/bitrise-steplib/bitrise-step-multikey-save-cache
deps:
brew:
- name: zstd
apt_get:
- name: zstd
is_skippable: true
run_if: .IsCI
inputs:
- key_path_pairs: null
opts:
description: |-
A mapping used to define the cache keys and the paths to include in the cache archive. The format is:
```
OPTIONAL_UNIQUNESS_PREFIX KEY1 = PATH1, PATH2, ...
OPTIONAL_UNIQUNESS_PREFIX KEY2 = PATH3, ...
```
where `OPTIONAL_UNIQUNESS_PREFIX` is `[u]` and means that the key in the given line is unique (see **Restore Cache**). The number of keys and paths for each are limited to a number of 10
The maximum length of a key is 512 characters (longer keys get truncated). Commas (`,`) and equal signs (`=`) are not allowed in keys neither in paths.
The key supports template elements for creating dynamic cache keys. These dynamic keys change the final key value based on the build environment or files in the repo in order to create new cache archives. See the Step description for more details and examples.
is_required: true
summary: A key -> path list mapping. This can contain template elements.
title: Cache key -> path list pairs
- opts:
is_required: true
summary: Enable logging additional information for troubleshooting
title: Verbose logging
value_options:
- "true"
- "false"
verbose: "false"
- compression_level: 3
opts:
is_required: false
summary: Zstd compression level to control speed / archive size. Set to 1 for
fastest option. Valid values are between 1 and 19. Defaults to 3.
title: Compression level
- custom_tar_args: null
opts:
description: |-
Additional arguments to pass to the tar command when creating the cache archive.
The arguments are passed directly to the `tar` command. Use this input to customize the behavior of the tar command when creating the cache archive
(these are appended to the default arguments used by the step).
Example: `--format posix`
is_required: false
summary: Additional arguments to pass to the tar command when creating the cache
archive.
title: Custom tar arguments
================================================
FILE: steps/bitrise-step-multikey-save-cache/step-info.yml
================================================
maintainer: bitrise
================================================
FILE: steps/bitrise-step-nowsecure-auto-analysis/0.1.1/step.yml
================================================
title: NowSecure Auto Analysis
summary: |
Performs security analysis using NowSecure Auto (https://lab.nowsecure.com/).
description: |
Performs security analysis using NowSecure Auto (https://lab.nowsecure.com/).
website: https://github.com/sp3nx0r/bitrise-step-nowsecure-auto-analysis
source_code_url: https://github.com/sp3nx0r/bitrise-step-nowsecure-auto-analysis
support_url: https://github.com/sp3nx0r/bitrise-step-nowsecure-auto-analysis/issues
published_at: 2020-01-21T09:47:07.099682099-06:00
source:
git: https://github.com/sp3nx0r/bitrise-step-nowsecure-auto-analysis.git
commit: 77680c2a364c9b0a253570cadbaf7c65922ce08c
host_os_tags:
- osx-10.10
- ubuntu-16.04
type_tags:
- test
toolkit:
bash:
entry_file: step.sh
deps:
brew:
- name: curl
apt_get:
- name: curl
is_requires_admin_user: false
is_always_run: false
is_skippable: false
run_if: ""
inputs:
- opts:
description: |
This usually gets generated by the the "Gradle Runner" or "XCode Archive & Export" step
is_required: true
summary: The app file you want to upload to BrowserStack, usually $BITRISE\_APK\_PATH
or $BITRISE\_IPA\_PATH
title: A Bitrise generated APK or IPA path
upload_path: null
- nowsecure_api_token: null
opts:
description: |
NowSecure token generated from NowSecure Auto console
is_required: true
is_sensitive: true
summary: Your NowSecure Auto API token
title: NowSecure Auto API token
- nowsecure_group_id: null
opts:
description: |
NowSecure Group ID which is required only if your NowSecure token has access to multiple groups
is_required: false
is_sensitive: true
summary: Your NowSecure Auto group ID for this app
title: NowSecure Auto group ID
================================================
FILE: steps/bitrise-step-nowsecure-auto-analysis/0.1.3/step.yml
================================================
title: NowSecure Auto Analysis
summary: |
Performs security analysis using NowSecure Auto (https://lab.nowsecure.com/).
description: |
Performs security analysis using NowSecure Auto (https://lab.nowsecure.com/).
website: https://github.com/sp3nx0r/bitrise-step-nowsecure-auto-analysis
source_code_url: https://github.com/sp3nx0r/bitrise-step-nowsecure-auto-analysis
support_url: https://github.com/sp3nx0r/bitrise-step-nowsecure-auto-analysis/issues
published_at: 2020-12-03T20:35:10.759739869-06:00
source:
git: https://github.com/sp3nx0r/bitrise-step-nowsecure-auto-analysis.git
commit: 9e97312648f29ed8da11596128c233a54c246229
host_os_tags:
- osx-10.10
- ubuntu-16.04
type_tags:
- test
toolkit:
bash:
entry_file: step.sh
deps:
brew:
- name: curl
apt_get:
- name: curl
is_requires_admin_user: false
is_always_run: false
is_skippable: false
run_if: ""
inputs:
- opts:
description: |
This usually gets generated by the the "Gradle Runner" or "XCode Archive & Export" step
is_required: true
summary: The app file you want to upload to BrowserStack, usually $BITRISE\_APK\_PATH
or $BITRISE\_IPA\_PATH
title: A Bitrise generated APK or IPA path
upload_path: null
- nowsecure_api_token: null
opts:
description: |
NowSecure token generated from NowSecure Auto console
is_required: true
is_sensitive: true
summary: Your NowSecure Auto API token
title: NowSecure Auto API token
- nowsecure_group_id: null
opts:
description: |
NowSecure Group ID which is required only if your NowSecure token has access to multiple groups
is_required: false
is_sensitive: true
summary: Your NowSecure Auto group ID for this app
title: NowSecure Auto group ID
================================================
FILE: steps/bitrise-step-nowsecure-auto-analysis/0.1.4/step.yml
================================================
title: NowSecure Platform Analysis
summary: |
Performs security analysis using NowSecure Platform (https://lab.nowsecure.com/).
description: |
Performs security analysis using NowSecure Platform (https://lab.nowsecure.com/).
website: https://github.com/nowsecure/bitrise-step-nowsecure-auto-analysis
source_code_url: https://github.com/nowsecure/bitrise-step-nowsecure-auto-analysis
support_url: https://support.nowsecure.com
published_at: 2022-01-27T12:40:41.910877-08:00
source:
git: https://github.com/nowsecure/bitrise-step-nowsecure-auto-analysis.git
commit: 57cf75ad057d67ffb039c29be7840b50dc6e2f53
host_os_tags:
- osx-10.10
- ubuntu-16.04
type_tags:
- test
toolkit:
bash:
entry_file: step.sh
deps:
brew:
- name: curl
apt_get:
- name: curl
is_requires_admin_user: false
is_always_run: false
is_skippable: false
run_if: ""
inputs:
- opts:
description: |
This usually gets generated by the the "Gradle Runner" or "XCode Archive & Export" step
is_required: true
summary: The app file you want to upload to BrowserStack, usually $BITRISE\_APK\_PATH
or $BITRISE\_IPA\_PATH
title: A Bitrise generated APK or IPA path
upload_path: null
- nowsecure_api_token: null
opts:
description: |
NowSecure token generated from NowSecure Platform console
is_required: true
is_sensitive: true
summary: Your NowSecure Platform API token
title: NowSecure Platform API token
- nowsecure_group_id: null
opts:
description: |
NowSecure Group ID which is required only if your NowSecure token has access to multiple groups
is_required: false
is_sensitive: true
summary: Your NowSecure Platform group ID for this app
title: NowSecure Platform group ID
================================================
FILE: steps/bitrise-step-nowsecure-auto-analysis/step-info.yml
================================================
maintainer: verified
================================================
FILE: steps/bitrise-step-qyrus-mobility-test-runner-android/0.0.1/step.yml
================================================
title: Qyrus Mobile Runner Android
summary: Upload apk and ipa to Qyrus platform, triggers the tests.
description: |
This step uploads the apk or ipa to Qyrus test platform, runs the test on real devices.
website: https://github.com/qyrusai/bitrise-step-qyrus-mobility-test-runner-android
source_code_url: https://github.com/qyrusai/bitrise-step-qyrus-mobility-test-runner-android
support_url: https://github.com/qyrusai/bitrise-step-qyrus-mobility-test-runner-android/issues
published_at: 2021-11-22T15:42:32.198078+05:30
source:
git: https://github.com/QyrusAI/bitrise-step-qyrus-mobility-test-runner-android.git
commit: 722203873bdb01644bf4cf00a82169659dfdb741
host_os_tags:
- osx-10.10
- ubuntu-16.04
type_tags:
- test
toolkit:
bash:
entry_file: step.sh
deps:
brew:
- name: node
apt_get:
- name: nodejs
is_requires_admin_user: true
is_always_run: false
is_skippable: false
run_if: ""
inputs:
- gateway_url: null
opts:
description: |
Enter the url of the gateway which is provided by Qyrus else
contact support@qyrus.com
is_required: true
summary: Qyrus provided gateway url
title: Gateway URL
- opts:
description: |
This usually gets generated by the the "Gradle Runner" or "XCode Archive & Export" step
is_required: true
summary: The app file you want to upload to BrowserStack, usually $BITRISE\_APK\_PATH
or $BITRISE\_IPA\_PATH
title: A Bitrise generated APK or IPA path
upload_path: null
- opts:
description: |
The username used to run devops tasks on Qyrus.
is_required: true
summary: Your Qyrus devops username
title: Qyrus Username
qyrus_username: null
- opts:
description: |
The password used to run devops tasks on Qyrus.
is_required: true
is_sensitive: true
summary: Your Qyrus devops password
title: Qyrus Password
qyrus_password: null
- opts:
description: |
Team name you can find by logging into Qyrus app. Copy the team name and paste it.
is_required: true
summary: Enter the team name
title: Qyrus Team Name
qyrus_team_name: null
- opts:
description: |
Project name you can find by logging into Qyrus app. Copy the team name and paste it.
is_required: true
summary: Enter the project name
title: Qyrus Project Name
qyrus_project_name: null
- opts:
description: |
Suite name you can find by logging into Qyrus app. Copy the team name and paste it.
is_required: true
summary: Enter the project name
title: Qyrus Suite Name
qyrus_suite_name: null
- app_activity: null
opts:
description: |
Enter android app activity which will be in the form of com.example.splash_screen
is_required: true
summary: Enter your android app activity
title: App Activity
- device_pool_name: null
opts:
description: |
Specify your device pool name which you created on Qyrus,
a device pool will have list of devices added and a test
run will happen on a device from the pool.
is_required: true
summary: Enter device pool name created on Qyrus
title: Device pool name
- enable_debug: "no"
opts:
description: |
Step prints additional debug information if this option
is enabled
is_required: true
title: Debug mode
value_options:
- "yes"
- "no"
- opts:
description: |
If you just want to run tests without upload app
change the option to no.
is_required: true
title: Upload app
value_options:
- "yes"
- "no"
upload_app: "no"
outputs:
- QYRUS_TEST_REPORT_URL: null
opts:
description: |
The output of test is the report URL which can be used
to download and analyse the test steps
summary: Its the report download URL
title: Qyrus report download url
================================================
FILE: steps/bitrise-step-qyrus-mobility-test-runner-android/0.0.2/step.yml
================================================
title: Qyrus App Automate
summary: Upload an app to Qyrus and run tests.
description: "This step uploads a provided app apk/ipa to Qyrus. It then will execute
the tests for the provided apks/ipas in Qyrus. \nQyrus is a end to end testing platform
designed to test Web, Mobile and APIs for all digital enterprises. With its codeless
approach to testing Web, Mobile & APIs, Qyrus is the fastest way to start the journey
of automated testing for your enterprise.\n"
website: https://github.com/qyrusai/bitrise-step-qyrus-mobility-test-runner-android
source_code_url: https://github.com/qyrusai/bitrise-step-qyrus-mobility-test-runner-android
support_url: https://github.com/qyrusai/bitrise-step-qyrus-mobility-test-runner-android/issues
published_at: 2021-11-24T01:57:41.720214+05:30
source:
git: https://github.com/QyrusAI/bitrise-step-qyrus-mobility-test-runner-android.git
commit: 4280247b93d0c985f095143d3a84bd882e44d463
host_os_tags:
- osx-10.10
- ubuntu-16.04
type_tags:
- test
toolkit:
bash:
entry_file: step.sh
deps:
brew:
- name: node
apt_get:
- name: nodejs
is_requires_admin_user: true
is_always_run: false
is_skippable: false
run_if: ""
inputs:
- enable_debug: "no"
opts:
description: |
Step prints additional debug information if this option
is enabled
is_required: true
title: Debug mode
value_options:
- "yes"
- "no"
- opts:
description: |
If you just want to run tests without upload app
change the option to no.
is_required: true
title: Upload app
value_options:
- "yes"
- "no"
upload_app: "no"
- gateway_url: null
opts:
description: |
Enter the url of the gateway which is provided by Qyrus else
contact support@qyrus.com
is_required: true
summary: Qyrus provided gateway url
title: Gateway URL
- opts:
description: |
This usually gets generated by the the "Gradle Runner" or "XCode Archive & Export" step
is_required: true
summary: The app file you want to upload to Qyrus, usually $BITRISE\_APK\_PATH
or $BITRISE\_IPA\_PATH
title: A Bitrise generated APK or IPA path
upload_path: null
- opts:
description: |
The username used to run devops tasks on Qyrus.
is_required: true
summary: Your Qyrus devops username
title: Qyrus Username
qyrus_username: null
- opts:
description: |
The password used to run devops tasks on Qyrus.
is_required: true
is_sensitive: true
summary: Your Qyrus devops password
title: Qyrus Password
qyrus_password: null
- opts:
description: |
Team name you can find by logging into Qyrus app. Copy the team name and paste it.
is_required: true
summary: Enter the team name
title: Qyrus Team Name
qyrus_team_name: null
- opts:
description: |
Project name you can find by logging into Qyrus app. Copy the team name and paste it.
is_required: true
summary: Enter the project name
title: Qyrus Project Name
qyrus_project_name: null
- opts:
description: |
Suite name you can find by logging into Qyrus app. Copy the team name and paste it.
is_required: true
summary: Enter the project name
title: Qyrus Suite Name
qyrus_suite_name: null
- app_activity: null
opts:
description: |
Enter android app activity which will be in the form of com.example.splash_screen
is_required: false
summary: Enter your android app activity
title: App Activity
- bundle_id: null
opts:
description: |
Enter iOS app bundleId which will be in the form of com.example.splash_screen
is_required: false
summary: Enter your iOS app bundle id
title: Bundle Id
- device_pool_name: null
opts:
description: |
Specify your device pool name which you created on Qyrus,
a device pool will have list of devices added and a test
run will happen on a device from the pool.
is_required: true
summary: Enter device pool name created on Qyrus
title: device_pool_name
outputs:
- QYRUS_TEST_REPORT_URL: null
opts:
description: |
The output of test is the report URL which can be used
to download and analyse the test steps
summary: Its the report download URL
title: Qyrus report download url
================================================
FILE: steps/bitrise-step-qyrus-mobility-test-runner-android/step-info.yml
================================================
maintainer: community
================================================
FILE: steps/bitrise-step-stamp-appicon-with-version-number/1.0.0/step.yml
================================================
title: Stamp AppIcon with version number
summary: |
This script will use ImageMagick to stamp the version number to all icons.
description: |
Stamps version "version(build number)" to the bottom of the icon.
website: https://github.com/ollitapa/bitrise-step-stamp-appicon-with-version-number
source_code_url: https://github.com/ollitapa/bitrise-step-stamp-appicon-with-version-number
support_url: https://github.com/ollitapa/bitrise-step-stamp-appicon-with-version-number/issues
published_at: !!timestamp 2018-04-04T16:50:55.395108202+03:00
source:
git: https://github.com/ollitapa/bitrise-step-stamp-appicon-with-version-number.git
commit: 5c7c44df263ab5201f14dfcb7be2eeb95417bce0
host_os_tags:
- osx-10.10
- ubuntu-16.04
project_type_tags:
- ios
type_tags:
- deploy
toolkit:
go:
package_name: github.com/ollitapa/bitrise-step-stamp-appicon-with-version-number
deps:
brew:
- name: imagemagick
apt_get:
- name: imagemagick
is_requires_admin_user: false
is_always_run: false
is_skippable: true
run_if: "true"
inputs:
- opts:
description: |
Relative path to icons for example `Project/General.xcassets/AppIcon.appiconset`
is_expand: true
is_required: true
summary: Relative path to icons
title: Path to icons of the project
value_options: []
stamp_path_to_icons: null
- opts:
description: |
Version number or string for example 0.1 or Dev
is_expand: true
is_required: true
summary: Version number or string
title: Version number or string
value_options: []
stamp_version: null
- opts:
description: |
Build number to stamp on the icon. Defaults to BITRISE_BUILD_NUMBER
is_expand: true
is_required: true
summary: Build number to stamp on the icon
title: Build number to stamp on the icon
value_options: []
stamp_build_number: $BITRISE_BUILD_NUMBER
================================================
FILE: steps/bitrise-step-stamp-appicon-with-version-number/1.2.0/step.yml
================================================
title: Stamp AppIcon with version number
summary: |
This step will use ImageMagick to stamp the version number to all icons.
description: |
Stamps version "version(build number)" to the bottom of the icon.
website: https://github.com/ollitapa/bitrise-step-stamp-appicon-with-version-number
source_code_url: https://github.com/ollitapa/bitrise-step-stamp-appicon-with-version-number
support_url: https://github.com/ollitapa/bitrise-step-stamp-appicon-with-version-number/issues
published_at: 2020-03-25T08:34:01.972373+02:00
source:
git: https://github.com/ollitapa/bitrise-step-stamp-appicon-with-version-number.git
commit: 3fd47f61abba83b6f7500958dfe4cd0e8569ec8b
host_os_tags:
- osx-10.10
- ubuntu-16.04
type_tags:
- deploy
toolkit:
go:
package_name: github.com/ollitapa/bitrise-step-stamp-appicon-with-version-number
deps:
brew:
- name: imagemagick
- name: ghostscript
apt_get:
- name: imagemagick
- name: ghostscript
is_requires_admin_user: false
is_always_run: false
is_skippable: false
run_if: "true"
inputs:
- opts:
description: |
Relative path to icons for example `Project/General.xcassets/AppIcon.appiconset`
is_expand: true
is_required: true
summary: Relative path to icons
title: Path to icons of the project
value_options: []
stamp_path_to_icons: null
- opts:
description: |
Version number or string for example 0.1 or Dev
is_expand: true
is_required: true
summary: Version number or string
title: Version number or string
value_options: []
stamp_version: null
- opts:
description: |
Build number to stamp on the icon. Defaults to `BITRISE_BUILD_NUMBER`
is_expand: true
is_required: true
summary: Build number to stamp on the icon
title: Build number to stamp on the icon
value_options: []
stamp_build_number: $BITRISE_BUILD_NUMBER
- foreground_color: white
opts:
description: |
Foreground color (text color) of the stamp. Defaults to "white"
is_expand: true
is_required: true
summary: Foreground color of the stamp
title: Foreground color of the stamp
value_options: []
- background_color: '#0008'
opts:
description: |
Background color of the stamp. Defaults to translucent black
is_expand: true
is_required: true
summary: Background color of the stamp
title: Background color of the stamp
value_options: []
================================================
FILE: steps/bitrise-step-stamp-appicon-with-version-number/step-info.yml
================================================
maintainer: community
================================================
FILE: steps/bitrise-step-version-pre-release-info/1.0.3/step.yml
================================================
title: Version pre-release info
summary: Generate version containing pre-release information (`v1.0.0-alpha.1`, `2.4.1.beta+2`,
`v2.0-rc.3`) based on git tags.
description: |-
This step extends version provided as a parameter (`Version number`) with a pre-release identifier (`Pre-release identifier`, e.g. `alpha`, `beta`, `rc`)
and a pre-release number. The pre-release number is automatically incremented based on the existing git tags.
If there are no tags for the provided version, pre-release number is set to the initial value (`Pre-release initial value`).
Pre-release information is exported to the following environment variables:
- **APP_PRE_RELEASE_INFO** (e.g. `rc.3`)
- **APP_VERSION_WITH_PRE_RELEASE_INFO** (e.g. `v2.0-rc.3`)
You can use these environment variables in next steps (e.g. when creating a git tag).
website: https://github.com/pmkowal/bitrise-step-version-pre-release-info
source_code_url: https://github.com/pmkowal/bitrise-step-version-pre-release-info
support_url: https://github.com/pmkowal/bitrise-step-version-pre-release-info/issues
published_at: 2018-11-29T19:23:57.27884901+01:00
source:
git: https://github.com/pmkowal/bitrise-step-version-pre-release-info.git
commit: d8a701c649719538ba3249e58a5339325d556dda
host_os_tags:
- osx-10.10
type_tags:
- deploy
- utility
- build
deps:
brew:
- name: git
is_requires_admin_user: false
is_always_run: false
is_skippable: false
run_if: ""
inputs:
- opts:
description: |
e.g.: `1.0.0`
is_required: true
title: Version number
version_number: $XPI_VERSION
- opts:
description: |
e.g.: `alpha`, `beta`, `rc`
is_required: true
title: Pre-release identifier
pre_release_identifier: beta
- opts:
description: |
If there are no tags, pre-release number is set to this value
is_required: true
title: Pre-release initial value
pre_release_initial_value: 1
- opts:
description: |
e.g. [v]2.0-rc.3
is_required: false
title: Version prefix
version_prefix: v
- opts:
description: |
e.g. 2.0[-]rc.3
is_required: false
title: Pre-release identifier prefix
pre_release_identifier_prefix: '-'
- opts:
description: |
e.g. 2.0-rc[.]3
is_required: false
title: Pre-release number prefix
pre_release_number_prefix: .
outputs:
- APP_VERSION_PRE_RELEASE_INFO: null
opts:
title: Pre-release info (e.g. `rc.3`)
- APP_VERSION_WITH_PRE_RELEASE_INFO: null
opts:
title: Version number containing pre-release info (e.g. `v2.0-rc.3`)
================================================
FILE: steps/bitrise-step-version-pre-release-info/1.1.0/step.yml
================================================
title: Version pre-release info
summary: Generate version containing pre-release information (`v1.0.0-alpha.1`, `2.4.1.249-beta+2`,
`v2.0-rc.3`) based on git tags.
description: |-
This step extends version and build number provided as parameters (`Version number`, `Build number`) with a pre-release identifier (`Pre-release identifier`, e.g. `alpha`, `beta`, `rc`)
and a pre-release number. The build number is optional and it's not incremented. The pre-release number is automatically incremented based on the existing git tags.
If there are no tags for the provided version, pre-release number is set to the initial value (`Pre-release initial value`).
Pre-release information is exported to the following environment variables:
- **APP_PRE_RELEASE_INFO** (e.g. `rc.3`)
- **APP_VERSION_WITH_PRE_RELEASE_INFO** (e.g. `v2.0-rc.3`)
You can use these environment variables in next steps (e.g. when creating a git tag).
website: https://github.com/pmkowal/bitrise-step-version-pre-release-info
source_code_url: https://github.com/pmkowal/bitrise-step-version-pre-release-info
support_url: https://github.com/pmkowal/bitrise-step-version-pre-release-info/issues
published_at: 2019-07-04T22:43:13.648325605+02:00
source:
git: https://github.com/pmkowal/bitrise-step-version-pre-release-info.git
commit: 527f277b60600054075de63ae598996c7c2ae317
host_os_tags:
- osx-10.10
type_tags:
- deploy
- utility
- build
deps:
brew:
- name: git
is_requires_admin_user: false
is_always_run: false
is_skippable: false
run_if: ""
inputs:
- opts:
description: |
e.g.: `1.0.0`
is_required: true
title: Version number
version_number: $XPI_VERSION
- build_number: $BITRISE_BUILD_NUMBER
opts:
description: |
e.g.: `463`
is_required: false
title: Build number
- opts:
description: |
e.g.: `alpha`, `beta`, `rc`
is_required: true
title: Pre-release identifier
pre_release_identifier: beta
- opts:
description: |
If there are no tags, pre-release number is set to this value
is_required: true
title: Pre-release initial value
pre_release_initial_value: 1
- opts:
description: |
e.g. [v]2.0-rc.3
is_required: false
title: Version prefix
version_prefix: v
- build_prefix: .
opts:
description: |
e.g.: `2.0[.]463-rc.3`
is_required: true
title: Build prefix
- opts:
description: |
e.g. 2.0[-]rc.3
is_required: false
title: Pre-release identifier prefix
pre_release_identifier_prefix: '-'
- opts:
description: |
e.g. 2.0-rc[.]3
is_required: false
title: Pre-release number prefix
pre_release_number_prefix: .
outputs:
- APP_VERSION_PRE_RELEASE_INFO: null
opts:
title: Pre-release info (e.g. `rc.3`)
- APP_VERSION_WITH_PRE_RELEASE_INFO: null
opts:
title: Version number containing pre-release info (e.g. `v2.0-rc.3`)
================================================
FILE: steps/bitrise-step-version-pre-release-info/step-info.yml
================================================
maintainer: community
================================================
FILE: steps/bitrise-step-xctest-cobertura-xml/1.0.0/step.yml
================================================
title: Convert XCTest result to Cobertura XML
summary: |
Converts XCTest results to cobertura compatible xml
description: |
Converts test results from XCTest step to Cobertura formatted xml to be uploaded to Coveralls or Sonarqube
website: https://github.com/ollitapa/bitrise-step-xctest-cobertura-xml
source_code_url: https://github.com/ollitapa/bitrise-step-xctest-cobertura-xml
support_url: https://github.com/ollitapa/bitrise-step-xctest-cobertura-xml/issues
published_at: 2020-01-13T09:46:15.420146+02:00
source:
git: https://github.com/ollitapa/bitrise-step-xctest-cobertura-xml.git
commit: c7a5ab2fb18259aebcf86ff5c8f8ac288a4a0dbe
host_os_tags:
- osx-10.10
project_type_tags:
- ios
- macos
- xamarin
- react-native
- cordova
- ionic
- flutter
type_tags:
- utility
toolkit:
go:
package_name: github.com/ollitapa/bitrise-step-xctest-cobertura-xml
is_requires_admin_user: false
is_always_run: true
is_skippable: false
run_if: ""
inputs:
- opts:
description: |
Path to XCTest result bundle, usually located in `..../DerivedData//Logs/Test`
Bitrise Xcode test step provides this in variable `$BITRISE_XCRESULT_PATH`
is_expand: true
is_required: true
summary: Path to XCTest result bundle
title: Path to XCTest result bundle
value_options: []
path_to_xcresult: $BITRISE_XCRESULT_PATH
- opts:
description: |
Directory where to put the resulting `coverage.json` and `cobertura.xml`
Default is `$BITRISE_DEPLOY_DIR`
is_expand: true
is_required: true
summary: Directory where to put the resulting cobertura.xml
title: Directory where to put the resulting cobertura.xml
value_options: []
xml_output_dir: $BITRISE_DEPLOY_DIR
outputs:
- COVERAGE_XML_TEST_RESULT_PATH: null
opts:
description: |
Path to the resulting `cobertura.xml`
summary: Path to the resulting `cobertura.xml`
title: Path to the resulting cobertura.xml
- COVERAGE_JSON_TEST_RESULT_PATH: null
opts:
description: Path to the resulting `coverage.json`
summary: Path to the resulting `coverage.json`
title: Path to the resulting coverage.json
================================================
FILE: steps/bitrise-step-xctest-cobertura-xml/1.1.0/step.yml
================================================
title: Convert XCTest result to Cobertura XML
summary: |
Converts XCTest results to cobertura compatible xml
description: |
Converts test results from XCTest step to Cobertura formatted xml to be uploaded to Coveralls or Sonarqube
website: https://github.com/ollitapa/bitrise-step-xctest-cobertura-xml
source_code_url: https://github.com/ollitapa/bitrise-step-xctest-cobertura-xml
support_url: https://github.com/ollitapa/bitrise-step-xctest-cobertura-xml/issues
published_at: 2020-03-27T11:15:58.609528+02:00
source:
git: https://github.com/ollitapa/bitrise-step-xctest-cobertura-xml.git
commit: e1d25a018c6bf6106e68895cd8841ba6d0de19cf
host_os_tags:
- osx-10.10
project_type_tags:
- ios
- macos
- xamarin
- react-native
- cordova
- ionic
- flutter
type_tags:
- utility
toolkit:
go:
package_name: github.com/ollitapa/bitrise-step-xctest-cobertura-xml
is_requires_admin_user: false
is_always_run: true
is_skippable: false
run_if: ""
inputs:
- opts:
description: |
Path to XCTest result bundle, usually located in `..../DerivedData//Logs/Test`
Bitrise Xcode test step provides this in variable `$BITRISE_XCRESULT_PATH`
is_expand: true
is_required: true
summary: Path to XCTest result bundle
title: Path to XCTest result bundle
value_options: []
path_to_xcresult: $BITRISE_XCRESULT_PATH
- opts:
description: |
Directory where to put the resulting `coverage.json` and `cobertura.xml`
Default is `$BITRISE_DEPLOY_DIR`
is_expand: true
is_required: true
summary: Directory where to put the resulting cobertura.xml
title: Directory where to put the resulting cobertura.xml
value_options: []
xml_output_dir: $BITRISE_DEPLOY_DIR
- opts:
description: |
Directory where the source files that used by xcode to create the test "Path to the resulting coverage.json"
This directory is referenced by the item of cobertura xml.
Default is `$BITRISE_SOURCE_DIR`
is_expand: true
is_required: true
summary: Directory where the source files are located.
title: Directory where the source files are located.
value_options: []
path_to_source_dir: $BITRISE_SOURCE_DIR
outputs:
- COVERAGE_XML_TEST_RESULT_PATH: null
opts:
description: |
Path to the resulting `cobertura.xml`
summary: Path to the resulting `cobertura.xml`
title: Path to the resulting cobertura.xml
- COVERAGE_JSON_TEST_RESULT_PATH: null
opts:
description: Path to the resulting `coverage.json`
summary: Path to the resulting `coverage.json`
title: Path to the resulting coverage.json
================================================
FILE: steps/bitrise-step-xctest-cobertura-xml/1.2.0/step.yml
================================================
title: Convert XCTest result to Cobertura XML
summary: |
Converts XCTest results to cobertura compatible xml
description: |
Converts test results from XCTest step to Cobertura formatted xml to be uploaded to Coveralls or Sonarqube
website: https://github.com/ollitapa/bitrise-step-xctest-cobertura-xml
source_code_url: https://github.com/ollitapa/bitrise-step-xctest-cobertura-xml
support_url: https://github.com/ollitapa/bitrise-step-xctest-cobertura-xml/issues
published_at: 2020-05-18T11:45:52.567908+03:00
source:
git: https://github.com/ollitapa/bitrise-step-xctest-cobertura-xml.git
commit: e9d93fba557f15023d7077f10e438148a47dbc8e
host_os_tags:
- osx-10.10
project_type_tags:
- ios
- macos
- xamarin
- react-native
- cordova
- ionic
- flutter
type_tags:
- utility
toolkit:
go:
package_name: github.com/ollitapa/bitrise-step-xctest-cobertura-xml
is_requires_admin_user: false
is_always_run: true
is_skippable: false
run_if: ""
inputs:
- opts:
description: |
Path to XCTest result bundle, usually located in `..../DerivedData//Logs/Test`
Bitrise Xcode test step provides this in variable `$BITRISE_XCRESULT_PATH`
is_expand: true
is_required: true
summary: Path to XCTest result bundle
title: Path to XCTest result bundle
value_options: []
path_to_xcresult: $BITRISE_XCRESULT_PATH
- opts:
description: |
Directory where to put the resulting `coverage.json` and `cobertura.xml`
Default is `$BITRISE_DEPLOY_DIR`
is_expand: true
is_required: true
summary: Directory where to put the resulting cobertura.xml
title: Directory where to put the resulting cobertura.xml
value_options: []
xml_output_dir: $BITRISE_DEPLOY_DIR
- opts:
description: |
Directory where the source files that used by xcode to create the test "Path to the resulting coverage.json"
This directory is referenced by the item of cobertura xml.
Default is `$BITRISE_SOURCE_DIR`
is_expand: true
is_required: true
summary: Directory where the source files are located.
title: Directory where the source files are located.
value_options: []
path_to_source_dir: $BITRISE_SOURCE_DIR
outputs:
- COVERAGE_XML_TEST_RESULT_PATH: null
opts:
description: |
Path to the resulting `cobertura.xml`
summary: Path to the resulting `cobertura.xml`
title: Path to the resulting cobertura.xml
- COVERAGE_JSON_TEST_RESULT_PATH: null
opts:
description: Path to the resulting `coverage.json`
summary: Path to the resulting `coverage.json`
title: Path to the resulting coverage.json
================================================
FILE: steps/bitrise-step-xctest-cobertura-xml/step-info.yml
================================================
maintainer: community
================================================
FILE: steps/bitrise-to-appscan/0.2.4/step.yml
================================================
title: AppScan Security Analysis
summary: Performs security analysis using the IBM AppScan Cloud.
description: |
Performs security analysis using the IBM AppScan Cloud.
website: https://github.com/ipiranga-atq/bitrise_appscan_step
source_code_url: https://github.com/ipiranga-atq/bitrise_appscan_step
support_url: https://github.com/ipiranga-atq/bitrise_appscan_step/issues
published_at: 2018-09-28T15:14:10.722212144-03:00
source:
git: https://github.com/ipiranga-atq/bitrise_appscan_step.git
commit: b1623ebc6a5858092ce936919b6a074c45fd0146
host_os_tags:
- osx-10.10
- ubuntu-16.04
type_tags:
- test
toolkit:
go:
package_name: github.com/ipiranga-atq/bitrise_appscan_step
is_requires_admin_user: false
is_always_run: false
is_skippable: true
run_if: ""
inputs:
- app_path: $BITRISE_APK_PATH
opts:
description: |
Recommended is *$BITRISE_APK_PATH* or *$BITRISE_IPA_PATH*.
is_expand: true
is_required: true
title: Path to the applications IPA/PATH.
- app_name: null
opts:
description: |
(If no application is found with the given name, the step will fail)
is_expand: true
is_required: true
title: Application's Name on AppScan
- opts:
is_expand: true
is_required: true
is_sensitive: true
title: Username for AppScan
user_name: null
- opts:
is_expand: true
is_required: true
is_sensitive: true
title: Password for AppScan
user_password: null
- app_user: null
opts:
description: |
Username to log in the application
is_expand: true
is_required: false
is_sensitive: true
title: Application's Username
- app_password: null
opts:
description: |
Password to log in the application
is_expand: true
is_required: false
is_sensitive: true
title: Application's Password
- opts:
description: |
The Presence Id to access the private network of the application.
is_expand: true
is_required: false
title: Presence Id
presence_id: null
================================================
FILE: steps/bitrise-to-appscan/step-info.yml
================================================
maintainer: community
================================================
FILE: steps/bluepill-build-test-for-ios/0.2.6/step.yml
================================================
title: Bluepill Build/Test for iOS
summary: Build and run parallel UI/Unit tests for iOS using LinkedIn's bluepill testing
tool
description: Run tests in parallel by using multiple simulators. Generate a JUnit
report after each test run.
website: https://github.com/HealthEngineAU/bitrise-step-bluepill-build-test-for-ios
source_code_url: https://github.com/HealthEngineAU/bitrise-step-bluepill-build-test-for-ios
support_url: https://github.com/HealthEngineAU/bitrise-step-bluepill-build-test-for-ios/issues
published_at: 2019-07-11T11:50:55.339419+08:00
source:
git: https://github.com/HealthEngineAU/bitrise-step-bluepill-build-test-for-ios.git
commit: 38f3436a2845cc8081c38a0df9c83e807d332299
host_os_tags:
- osx-10.10
project_type_tags:
- ios
type_tags:
- build
- test
is_requires_admin_user: true
is_always_run: false
is_skippable: false
inputs:
- bluepill_version: bluepill_4_1_1__xcode_10_2
opts:
is_required: true
summary: Which version of Bluepill to install/run?
title: Bluepill Version
value_options:
- bluepill_4_1_1__xcode_10_2
- bluepill_3_1_1__xcode_10_1
- bluepill_3_1_0__xcode_10_0
- bluepill_2_4_0__xcode_9_4
- bluepill_2_3_1__xcode_9_3
- bluepill_2_2_0__xcode_9_2
- bluepill_2_1_0__xcode_9_1
- bluepill_2_0_2__xcode_9_0
- bluepill_1_1_2__xcode_8_3
- opts:
is_expand: true
is_required: true
summary: Target name in bundle (e.g. 'MyApp')
title: Target Name
target_name: ""
- opts:
is_expand: true
is_required: true
summary: Xcode scheme (e.g. 'MyApp')
title: Scheme
scheme: ""
- opts:
is_expand: true
is_required: true
summary: Xcode workspace file (e.g. MyApp.xcworkspace)
title: Workspace File
workspace: ""
- device_type: iPhone 6
opts:
is_expand: true
is_required: true
summary: iOS Device to build/run (e.g. 'iPhone 6', 'iPad Pro (12.9-inch)')
title: Device Type
- ios_version: "12.2"
opts:
is_expand: true
is_required: true
summary: iOS Version to build/run simulators (e.g. '11.0', '12.2')
title: iOS Version
- derived_data_path: ""
opts:
is_expand: true
is_required: true
summary: Derived data directory (e.g. 'build')
title: Derived Data Path
- bluepill_output_dir: bluepill-output
opts:
is_expand: true
is_required: true
summary: 'Directory to place all the bluepill logs/results files. Individual test
reports will sit inside this directory, named like: "iPhone SE - 12.2 - TIMESTAMP"'
title: Bluepill Logs Path
- num_simulators: 4
opts:
is_expand: true
is_required: true
summary: Number of iOS simulators to run in parallel.
title: Num. Simulators (-n)
- failure_tolerance: 0
opts:
is_expand: true
is_required: true
summary: Number of times to retry on test failures.
title: Failure Tolerance (-f)
- opts:
is_required: true
summary: When Failure Tolerance is above zero, only retry tests that failed.
title: Only Retry Failed Tests? (-F)
value_options:
- "true"
- "false"
retry_only_failed_tests: "false"
- additional_bluepill_args: ""
opts:
is_expand: true
is_required: false
summary: See https://github.com/linkedin/bluepill for a full list of supported
argumentss.
title: Additional Bluepill Arguments
- fail_build_if_coverage_fails: "false"
opts:
summary: Fail the build if Bluepill fails to gather valid coverage data (e.g.
`${bluepill_output_dir}/${target_name}.app.coverage.txt`)
title: Fail Build on Invalid Coverage Data
value_options:
- "false"
- "true"
- opts:
is_expand: true
is_required: true
summary: Environment variable to capture test results as a human-readable string.
This will also produce a Markdown-formatted copy with the `_MARKDOWN` suffix.
e.g. (`MY_RESULT` and `MY_RESULT_MARKDOWN`)
title: Test Results Output Environment Variable
test_result_env_var: TEST_RESULTS
================================================
FILE: steps/bluepill-build-test-for-ios/0.2.7/step.yml
================================================
title: Bluepill Build/Test for iOS
summary: Build and run parallel UI/Unit tests for iOS using LinkedIn's bluepill testing
tool
description: Run tests in parallel by using multiple simulators. Generate a JUnit
report after each test run.
website: https://github.com/HealthEngineAU/bitrise-step-bluepill-build-test-for-ios
source_code_url: https://github.com/HealthEngineAU/bitrise-step-bluepill-build-test-for-ios
support_url: https://github.com/HealthEngineAU/bitrise-step-bluepill-build-test-for-ios/issues
published_at: 2019-07-18T11:43:18.16339+08:00
source:
git: https://github.com/HealthEngineAU/bitrise-step-bluepill-build-test-for-ios.git
commit: 4e55fe66aa418ebcb5cf7fad1cc0ac267f9c71a7
host_os_tags:
- osx-10.10
project_type_tags:
- ios
type_tags:
- build
- test
is_requires_admin_user: true
is_always_run: false
is_skippable: false
inputs:
- bluepill_version: bluepill_4_1_1__xcode_10_2
opts:
is_required: true
summary: Which version of Bluepill to install/run?
title: Bluepill Version
value_options:
- bluepill_4_1_1__xcode_10_2
- bluepill_3_1_1__xcode_10_1
- bluepill_3_1_0__xcode_10_0
- bluepill_2_4_0__xcode_9_4
- bluepill_2_3_1__xcode_9_3
- bluepill_2_2_0__xcode_9_2
- bluepill_2_1_0__xcode_9_1
- bluepill_2_0_2__xcode_9_0
- bluepill_1_1_2__xcode_8_3
- opts:
is_expand: true
is_required: true
summary: Target name in bundle (e.g. 'MyApp')
title: Target Name
target_name: ""
- opts:
is_expand: true
is_required: true
summary: Xcode scheme (e.g. 'MyApp')
title: Scheme
scheme: ""
- opts:
is_expand: true
is_required: true
summary: Xcode workspace file (e.g. MyApp.xcworkspace)
title: Workspace File
workspace: ""
- device_type: iPhone 6
opts:
is_expand: true
is_required: true
summary: iOS Device to build/run (e.g. 'iPhone 6', 'iPad Pro (12.9-inch)')
title: Device Type
- ios_version: "12.2"
opts:
is_expand: true
is_required: true
summary: iOS Version to build/run simulators (e.g. '11.0', '12.2')
title: iOS Version
- derived_data_path: ""
opts:
is_expand: true
is_required: true
summary: Derived data directory (e.g. 'build')
title: Derived Data Path
- generate_coverage: "true"
opts:
is_required: true
summary: Generate code coverage for the build.
title: Generate Coverage
value_options:
- "true"
- "false"
- bluepill_output_dir: bluepill-output
opts:
is_expand: true
is_required: true
summary: 'Directory to place all the bluepill logs/results files. Individual test
reports will sit inside this directory, named like: "iPhone SE - 12.2 - TIMESTAMP"'
title: Bluepill Logs Path
- num_simulators: 4
opts:
is_expand: true
is_required: true
summary: Number of iOS simulators to run in parallel.
title: Num. Simulators (-n)
- failure_tolerance: 0
opts:
is_expand: true
is_required: true
summary: Number of times to retry on test failures.
title: Failure Tolerance (-f)
- opts:
is_required: true
summary: When Failure Tolerance is above zero, only retry tests that failed.
title: Only Retry Failed Tests? (-F)
value_options:
- "true"
- "false"
retry_only_failed_tests: "false"
- additional_xcodebuild_args: ""
opts:
is_expand: true
is_required: false
summary: Additional arguments to send to `xcodebuild`
title: Additional Xcodebuild Arguments
- additional_bluepill_args: ""
opts:
is_expand: true
is_required: false
summary: See https://github.com/linkedin/bluepill for a full list of supported
argumentss.
title: Additional Bluepill Arguments
- fail_build_if_coverage_fails: "false"
opts:
summary: Fail the build if Bluepill fails to gather valid coverage data (e.g.
`${bluepill_output_dir}/${target_name}.app.coverage.txt`)
title: Fail Build on Invalid Coverage Data
value_options:
- "false"
- "true"
- opts:
is_expand: true
is_required: true
summary: Environment variable to capture test results as a human-readable string.
This will also produce a Markdown-formatted copy with the `_MARKDOWN` suffix.
e.g. (`MY_RESULT` and `MY_RESULT_MARKDOWN`)
title: Test Results Output Environment Variable
test_result_env_var: TEST_RESULTS
================================================
FILE: steps/bluepill-build-test-for-ios/0.3.0/step.yml
================================================
title: Bluepill Build/Test for iOS
summary: Build and run parallel UI/Unit tests for iOS using LinkedIn's bluepill testing
tool
description: Run tests in parallel by using multiple simulators. Generate a JUnit
report after each test run.
website: https://github.com/HealthEngineAU/bitrise-step-bluepill-build-test-for-ios
source_code_url: https://github.com/HealthEngineAU/bitrise-step-bluepill-build-test-for-ios
support_url: https://github.com/HealthEngineAU/bitrise-step-bluepill-build-test-for-ios/issues
published_at: 2019-10-28T13:55:28.84506+08:00
source:
git: https://github.com/HealthEngineAU/bitrise-step-bluepill-build-test-for-ios.git
commit: 321f91524eb35fa0da986f0d938a383a26830db7
host_os_tags:
- osx-10.10
project_type_tags:
- ios
type_tags:
- build
- test
is_requires_admin_user: true
is_always_run: false
is_skippable: false
inputs:
- bluepill_version: bluepill_5_0_0__xcode_11_0
opts:
is_required: true
summary: Which version of Bluepill to install/run?
title: Bluepill Version
value_options:
- bluepill_5_0_0__xcode_11_0
- bluepill_4_1_1__xcode_10_2
- bluepill_3_1_1__xcode_10_1
- bluepill_3_1_0__xcode_10_0
- bluepill_2_4_0__xcode_9_4
- bluepill_2_3_1__xcode_9_3
- bluepill_2_2_0__xcode_9_2
- bluepill_2_1_0__xcode_9_1
- bluepill_2_0_2__xcode_9_0
- bluepill_1_1_2__xcode_8_3
- opts:
is_expand: true
is_required: true
summary: Target name in bundle (e.g. 'MyApp')
title: Target Name
target_name: ""
- opts:
is_expand: true
is_required: true
summary: Xcode scheme (e.g. 'MyApp')
title: Scheme
scheme: ""
- opts:
is_expand: true
is_required: true
summary: Xcode workspace file (e.g. MyApp.xcworkspace)
title: Workspace File
workspace: ""
- device_type: iPhone 6
opts:
is_expand: true
is_required: true
summary: iOS Device to build/run (e.g. 'iPhone 6', 'iPad Pro (12.9-inch)')
title: Device Type
- ios_version: "13.0"
opts:
is_expand: true
is_required: true
summary: iOS Version to build/run simulators (e.g. '12.2', '13.0')
title: iOS Version
- derived_data_path: ""
opts:
is_expand: true
is_required: true
summary: Derived data directory (e.g. 'build')
title: Derived Data Path
- generate_coverage: "true"
opts:
is_required: true
summary: Generate code coverage for the build.
title: Generate Coverage
value_options:
- "true"
- "false"
- bluepill_output_dir: bluepill-output
opts:
is_expand: true
is_required: true
summary: 'Directory to place all the bluepill logs/results files. Individual test
reports will sit inside this directory, named like: "iPhone SE - 12.2 - TIMESTAMP"'
title: Bluepill Logs Path
- num_simulators: 4
opts:
is_expand: true
is_required: true
summary: Number of iOS simulators to run in parallel.
title: Num. Simulators (-n)
- failure_tolerance: 0
opts:
is_expand: true
is_required: true
summary: Number of times to retry on test failures.
title: Failure Tolerance (-f)
- opts:
is_required: true
summary: When Failure Tolerance is above zero, only retry tests that failed.
title: Only Retry Failed Tests? (-F)
value_options:
- "true"
- "false"
retry_only_failed_tests: "false"
- additional_xcodebuild_args: ""
opts:
is_expand: true
is_required: false
summary: Additional arguments to send to `xcodebuild`
title: Additional Xcodebuild Arguments
- additional_bluepill_args: ""
opts:
is_expand: true
is_required: false
summary: See https://github.com/linkedin/bluepill for a full list of supported
argumentss.
title: Additional Bluepill Arguments
- fail_build_if_coverage_fails: "false"
opts:
summary: Fail the build if Bluepill fails to gather valid coverage data (e.g.
`${bluepill_output_dir}/${target_name}.app.coverage.txt`)
title: Fail Build on Invalid Coverage Data
value_options:
- "false"
- "true"
- opts:
is_expand: true
is_required: true
summary: Environment variable to capture test results as a human-readable string.
This will also produce a Markdown-formatted copy with the `_MARKDOWN` suffix.
e.g. (`MY_RESULT` and `MY_RESULT_MARKDOWN`)
title: Test Results Output Environment Variable
test_result_env_var: TEST_RESULTS
================================================
FILE: steps/bluepill-build-test-for-ios/0.4.0/step.yml
================================================
title: Bluepill Build/Test for iOS
summary: Build and run parallel UI/Unit tests for iOS using LinkedIn's bluepill testing
tool
description: Run tests in parallel by using multiple simulators. Generate a JUnit
report after each test run.
website: https://github.com/HealthEngineAU/bitrise-step-bluepill-build-test-for-ios
source_code_url: https://github.com/HealthEngineAU/bitrise-step-bluepill-build-test-for-ios
support_url: https://github.com/HealthEngineAU/bitrise-step-bluepill-build-test-for-ios/issues
published_at: 2019-12-11T11:05:26.727538+08:00
source:
git: https://github.com/HealthEngineAU/bitrise-step-bluepill-build-test-for-ios.git
commit: 51a77e3847a29a0d5ea21903ae7d5c99d20c708c
host_os_tags:
- osx-10.10
project_type_tags:
- ios
type_tags:
- build
- test
is_requires_admin_user: true
is_always_run: false
is_skippable: false
inputs:
- bluepill_version: bluepill_5_1_1__xcode_11_2
opts:
is_required: true
summary: Which version of Bluepill to install/run?
title: Bluepill Version
value_options:
- bluepill_5_1_1__xcode_11_2
- bluepill_5_0_0__xcode_11_0
- bluepill_4_1_1__xcode_10_2
- bluepill_3_1_1__xcode_10_1
- bluepill_3_1_0__xcode_10_0
- bluepill_2_4_0__xcode_9_4
- bluepill_2_3_1__xcode_9_3
- bluepill_2_2_0__xcode_9_2
- bluepill_2_1_0__xcode_9_1
- bluepill_2_0_2__xcode_9_0
- bluepill_1_1_2__xcode_8_3
- opts:
is_expand: true
is_required: true
summary: Target name in bundle (e.g. 'MyApp')
title: Target Name
target_name: ""
- opts:
is_expand: true
is_required: true
summary: Xcode scheme (e.g. 'MyApp')
title: Scheme
scheme: ""
- opts:
is_expand: true
is_required: true
summary: Xcode workspace file (e.g. MyApp.xcworkspace)
title: Workspace File
workspace: ""
- device_type: iPhone 11
opts:
is_expand: true
is_required: true
summary: iOS Device to build/run (e.g. 'iPhone 11', 'iPad Pro (12.9-inch) (3rd
generation)')
title: Device Type
- ios_version: "13.2"
opts:
is_expand: true
is_required: true
summary: iOS Version to build/run simulators (e.g. '12.4', '13.2')
title: iOS Version
- derived_data_path: ""
opts:
is_expand: true
is_required: true
summary: Derived data directory (e.g. 'build')
title: Derived Data Path
- generate_coverage: "true"
opts:
is_required: true
summary: Generate code coverage for the build.
title: Generate Coverage
value_options:
- "true"
- "false"
- bluepill_output_dir: bluepill-output
opts:
is_expand: true
is_required: true
summary: 'Directory to place all the bluepill logs/results files. Individual test
reports will sit inside this directory, named like: "iPhone SE - 12.2 - TIMESTAMP"'
title: Bluepill Logs Path
- num_simulators: 4
opts:
is_expand: true
is_required: true
summary: Number of iOS simulators to run in parallel.
title: Num. Simulators (-n)
- failure_tolerance: 0
opts:
is_expand: true
is_required: true
summary: Number of times to retry on test failures.
title: Failure Tolerance (-f)
- opts:
is_required: true
summary: When Failure Tolerance is above zero, only retry tests that failed.
title: Only Retry Failed Tests? (-F)
value_options:
- "true"
- "false"
retry_only_failed_tests: "false"
- additional_xcodebuild_args: ""
opts:
is_expand: true
is_required: false
summary: Additional arguments to send to `xcodebuild`
title: Additional Xcodebuild Arguments
- additional_bluepill_args: ""
opts:
is_expand: true
is_required: false
summary: See https://github.com/linkedin/bluepill for a full list of supported
argumentss.
title: Additional Bluepill Arguments
- fail_build_if_coverage_fails: "false"
opts:
summary: Fail the build if Bluepill fails to gather valid coverage data (e.g.
`${bluepill_output_dir}/${target_name}.app.coverage.txt`)
title: Fail Build on Invalid Coverage Data
value_options:
- "false"
- "true"
- opts:
is_expand: true
is_required: true
summary: Environment variable to capture test results as a human-readable string.
This will also produce a Markdown-formatted copy with the `_MARKDOWN` suffix.
e.g. (`MY_RESULT` and `MY_RESULT_MARKDOWN`)
title: Test Results Output Environment Variable
test_result_env_var: TEST_RESULTS
================================================
FILE: steps/bluepill-build-test-for-ios/step-info.yml
================================================
maintainer: community
================================================
FILE: steps/bower/0.1.2/step.yml
================================================
title: Run bower command
summary: Runs `bower` with the given command and args.
description: Runs `bower` with the given command and args.
website: https://github.com/nhammond101/steps-bower
source_code_url: https://github.com/nhammond101/steps-bower
support_url: https://github.com/nhammond101/steps-bower/issues
published_at: 2016-11-23T12:58:05.247749879Z
source:
git: https://github.com/nhammond101/steps-bower.git
commit: b3cdda75d4541afacc08826a328c285d5e7225f1
type_tags:
- bower
deps:
brew:
- name: npm
inputs:
- opts:
description: |
Working directory of the step.
You can leave it empty to not change it.
title: Working directory
workdir: $BITRISE_SOURCE_DIR
- command: null
opts:
description: Specify the command to run with `bower`. For example `install`, or
`test`.
title: The `bower` command to run
- args: null
opts:
description: |-
Arguments are added to the `bower` command. You can specify multiple arguments, separated
by a space character. For example `-dd -ll`
title: Arguments for running `bower` commands
- is_debug: "no"
opts:
description: |
If debug=yes the step will print debug infos about
the working dir, tmp file path, exit code, etc.
title: Debug?
value_options:
- "no"
- "yes"
================================================
FILE: steps/bower/0.1.3/step.yml
================================================
title: Run bower command
summary: Runs `bower` with the given command and args.
description: Runs `bower` with the given command and args.
website: https://github.com/nhammond101/steps-bower
source_code_url: https://github.com/nhammond101/steps-bower
support_url: https://github.com/nhammond101/steps-bower/issues
published_at: 2016-12-02T10:46:39.400538674Z
source:
git: https://github.com/nhammond101/steps-bower.git
commit: f01eca0dffbc693d959bb6758cfb07c72de72077
project_type_tags:
- web
type_tags:
- installer
deps:
brew:
- name: npm
inputs:
- opts:
description: |
Working directory of the step.
You can leave it empty to not change it.
title: Working directory
workdir: $BITRISE_SOURCE_DIR
- command: null
opts:
description: Specify the command to run with `bower`. For example `install`, or
`test`.
title: The `bower` command to run
- args: null
opts:
description: |-
Arguments are added to the `bower` command. You can specify multiple arguments, separated
by a space character Nb. --allow-root is appended automatically. For example `--save`
title: Arguments for running `bower` commands
- is_debug: "no"
opts:
description: |
If debug=yes the step will print debug infos about
the working dir, tmp file path, exit code, etc.
title: Debug?
value_options:
- "no"
- "yes"
================================================
FILE: steps/bower/step-info.yml
================================================
maintainer: community
================================================
FILE: steps/brew-install/0.10.0/step.yml
================================================
title: Brew install
summary: Install or upgrade formula with brew
description: Install or upgrade formula with brew
website: https://github.com/bitrise-steplib/steps-brew-install
source_code_url: https://github.com/bitrise-steplib/steps-brew-install
support_url: https://github.com/bitrise-steplib/steps-brew-install/issues
published_at: 2019-09-04T14:05:28.633248533Z
source:
git: https://github.com/bitrise-steplib/steps-brew-install.git
commit: f852abd2db2d170f23829787ec472e397f90662f
type_tags:
- installer
toolkit:
go:
package_name: github.com/bitrise-steplib/steps-brew-install
inputs:
- opts:
description: Name of the formula to install/upgrade
is_expand: true
is_required: true
summary: Name of the formula to install/upgrade
title: Name of the formula to install/upgrade
packages: null
- options: null
opts:
description: |
Flags to pass to the bew install/reinstall command.
`brew install/reinstall [options] [packages]`
is_expand: true
summary: Options for Brew install/upgrade
title: Options for Brew install/upgrade
- opts:
description: |
If set the step will upgrade the defined packages by calling `brew reinstall [options] [packages]` command.
Otherwise the step calls `brew install [options] [packages]`
is_expand: true
summary: Upgrade formula if previously installed
title: Upgrade formula if previously installed
value_options:
- "yes"
- "no"
upgrade: "yes"
- cache_enabled: "no"
opts:
category: Cache
description: |
Select if the contents of ~/Library/Caches/Homebrew directory should be cached.
`true`: Mark brew installers to be cached.
`false`: Do not use cache.
is_required: true
title: Cache
value_options:
- "yes"
- "no"
- opts:
description: Enable verbose logging?
is_required: true
title: Enable verbose logging?
value_options:
- "yes"
- "no"
verbose_log: "no"
================================================
FILE: steps/brew-install/0.10.2/step.yml
================================================
title: Brew install
summary: Install or upgrade formula with brew
description: Install or upgrade formula with brew
website: https://github.com/bitrise-steplib/steps-brew-install
source_code_url: https://github.com/bitrise-steplib/steps-brew-install
support_url: https://github.com/bitrise-steplib/steps-brew-install/issues
published_at: 2019-10-03T11:22:45.452593286Z
source:
git: https://github.com/bitrise-steplib/steps-brew-install.git
commit: f307d278e39a32b2301b6a4fcb03b977c1561d63
type_tags:
- installer
toolkit:
go:
package_name: github.com/bitrise-steplib/steps-brew-install
inputs:
- opts:
is_required: true
summary: Name of the formula to install/reinstall.
title: Formula name
packages: null
- opts:
description: |
If set to `"yes"`, the step will upgrade the defined packages by calling `brew reinstall [options] [packages]` command.
Otherwise the step calls `brew install [options] [packages]`.
is_required: true
summary: Upgrade formula if previously installed?
title: Upgrade formula?
value_options:
- "yes"
- "no"
upgrade: "yes"
- options: null
opts:
description: |
Flags to pass to the brew install/reinstall command.
`brew install/reinstall [options] [packages]`
summary: Flags to pass to the brew install/reinstall command.
title: Brew install/reinstall options
- cache_enabled: "no"
opts:
description: |
If set to `"yes"` the contents of `~/Library/Caches/Homebrew` directory will be cached.
is_required: true
summary: Should the step collect files to be cached?
title: Enable cache?
value_options:
- "yes"
- "no"
- opts:
is_required: true
summary: Should the step print more detailed log?
title: Enable verbose logging?
value_options:
- "yes"
- "no"
verbose_log: "no"
================================================
FILE: steps/brew-install/0.11.0/step.yml
================================================
title: Brew install
summary: Install or upgrade formula with brew
description: Install or upgrade formula with brew
website: https://github.com/bitrise-steplib/steps-brew-install
source_code_url: https://github.com/bitrise-steplib/steps-brew-install
support_url: https://github.com/bitrise-steplib/steps-brew-install/issues
published_at: 2020-09-23T14:21:39.060674976Z
source:
git: https://github.com/bitrise-steplib/steps-brew-install.git
commit: fa006cfaa3102ff923083b6f90a08ef278be94cb
type_tags:
- installer
toolkit:
go:
package_name: github.com/bitrise-steplib/steps-brew-install
inputs:
- opts:
is_required: true
summary: Name of the formula to install/reinstall.
title: Formula name
packages: null
- opts:
description: |
If set to `"yes"`, the step will upgrade the defined packages by calling `brew reinstall [options] [packages]` command.
Otherwise the step calls `brew install [options] [packages]`.
is_required: true
summary: Upgrade formula if previously installed?
title: Upgrade formula?
value_options:
- "yes"
- "no"
upgrade: "yes"
- options: null
opts:
description: |
Flags to pass to the brew install/reinstall command.
`brew install/reinstall [options] [packages]`
summary: Flags to pass to the brew install/reinstall command.
title: Brew install/reinstall options
- cache_enabled: "no"
opts:
description: |
If set to `"yes"` the contents of `~/Library/Caches/Homebrew` directory will be cached.
is_required: true
summary: Should the step collect files to be cached?
title: Enable cache?
value_options:
- "yes"
- "no"
- opts:
is_required: true
summary: Should the step print more detailed log?
title: Enable verbose logging?
value_options:
- "yes"
- "no"
verbose_log: "no"
================================================
FILE: steps/brew-install/0.11.1/step.yml
================================================
title: Brew install
summary: Install or upgrade dependencies with Homebrew.
description: "\nInstall or upgrade dependencies using Homebrew, a package manager
for MacOS. \n\n### Configuring the Step \n\nHomebrew defines the available packages
as formulae. Our Step needs the name of the Homebrew formulae you want to use. \n\n1.
In the **Formula name** input, put the name of the formula you want to download.
\n1. In the **Upgrade formula?** input, set the default behavior for previously
installed packages. If the input is set to `yes`, the Step will call `brew reinstall`
to upgrade them to the latest version.\n1. In the **Brew install/reinstall options**
input, you can set additional flags for the `brew install` or `brew reinstall` commands.
\n For the possible options, see [Homebrew's documentation](https://docs.brew.sh/Manpage#install-options-formulacask).\n
\ \n### Useful links\n\n- [Homebrew documentation](https://docs.brew.sh/Manpage)\n-
[Caching Homebrew installers](https://devcenter.bitrise.io/builds/caching/caching-homebrew-installers/)\n\n###
Related Steps \n\n- [Run yarn command](https://www.bitrise.io/integrations/steps/yarn)\n-
[Run npm command](https://www.bitrise.io/integrations/steps/npm)"
website: https://github.com/bitrise-steplib/steps-brew-install
source_code_url: https://github.com/bitrise-steplib/steps-brew-install
support_url: https://github.com/bitrise-steplib/steps-brew-install/issues
published_at: 2020-11-19T16:47:56.779628511Z
source:
git: https://github.com/bitrise-steplib/steps-brew-install.git
commit: 84e475ef1abc35842dab480c223e6310fe5442af
type_tags:
- installer
toolkit:
go:
package_name: github.com/bitrise-steplib/steps-brew-install
inputs:
- opts:
is_required: true
summary: Name of the formula to install/reinstall.
title: Formula name
packages: null
- opts:
description: |
If set to `"yes"`, the step will upgrade the defined packages by calling `brew reinstall [options] [packages]` command.
Otherwise the step calls `brew install [options] [packages]`.
is_required: true
summary: Upgrade formula if previously installed?
title: Upgrade formula?
value_options:
- "yes"
- "no"
upgrade: "yes"
- options: null
opts:
description: |
Flags to pass to the brew install/reinstall command.
`brew install/reinstall [options] [packages]`
summary: Flags to pass to the brew install/reinstall command.
title: Brew install/reinstall options
- cache_enabled: "no"
opts:
description: |
If set to `"yes"` the contents of `~/Library/Caches/Homebrew` directory will be cached.
is_required: true
summary: Should the step collect files to be cached?
title: Enable cache?
value_options:
- "yes"
- "no"
- opts:
is_required: true
summary: Should the step print more detailed log?
title: Enable verbose logging?
value_options:
- "yes"
- "no"
verbose_log: "no"
================================================
FILE: steps/brew-install/0.12.0/step.yml
================================================
title: Brew install
summary: Install or upgrade dependencies with Homebrew.
description: "\nInstall or upgrade dependencies using Homebrew, a package manager
for MacOS. \n\n### Configuring the Step \n\nHomebrew defines the available packages
as formulae. Our Step needs the name of the Homebrew formulae you want to use. \n\n1.
In the **Formula name** input, put the name of the formula you want to download.
\n1. In the **Upgrade formula?** input, set the default behavior for previously
installed packages. If the input is set to `yes`, the Step will call `brew reinstall`
to upgrade them to the latest version.\n1. In the **Brew install/reinstall options**
input, you can set additional flags for the `brew install` or `brew reinstall` commands.
\n For the possible options, see [Homebrew's documentation](https://docs.brew.sh/Manpage#install-options-formulacask).\n
\ \n### Useful links\n\n- [Homebrew documentation](https://docs.brew.sh/Manpage)\n-
[Caching Homebrew installers](https://devcenter.bitrise.io/builds/caching/caching-homebrew-installers/)\n\n###
Related Steps \n\n- [Run yarn command](https://www.bitrise.io/integrations/steps/yarn)\n-
[Run npm command](https://www.bitrise.io/integrations/steps/npm)"
website: https://github.com/bitrise-steplib/steps-brew-install
source_code_url: https://github.com/bitrise-steplib/steps-brew-install
support_url: https://github.com/bitrise-steplib/steps-brew-install/issues
published_at: 2021-10-07T11:24:00.840784548Z
source:
git: https://github.com/bitrise-steplib/steps-brew-install.git
commit: 9ae4dc4bad6d53b113bdd550aff60192e57c3bef
type_tags:
- installer
toolkit:
go:
package_name: github.com/bitrise-steplib/steps-brew-install
inputs:
- opts:
is_required: false
summary: Name of the formula to install/reinstall. Must be specified when `use_brewfile`
is not `yes`
title: Formula name
packages: null
- opts:
description: |
If set to `"yes"`, the step will upgrade the defined packages by calling `brew reinstall [options] [packages]` command.
Otherwise the step calls `brew install [options] [packages]`.
is_required: true
summary: Upgrade formula if previously installed?
title: Upgrade formula?
value_options:
- "yes"
- "no"
upgrade: "yes"
- opts:
description: |
If set to `"yes"`, the step will install packages in the Brewfile by running `brew bundle`. If no Brewfile path is set, it assumes a Brewfile exists in the current directory.
is_required: false
summary: Installs packages using a Brewfile
title: Use a Brewfile to install packages?
value_options:
- "yes"
- "no"
use_brewfile: "no"
- brewfile_path: null
opts:
description: |
If set, `use_brewfile` must be set to `yes`
is_required: false
summary: Installs packages from a Brewfile at the specified path
title: Path to the Brewfile
- options: null
opts:
description: |
Flags to pass to the brew install/reinstall command.
`brew install/reinstall [options] [packages]`
summary: Flags to pass to the brew install/reinstall command.
title: Brew install/reinstall options
- cache_enabled: "no"
opts:
description: |
If set to `"yes"` the contents of `~/Library/Caches/Homebrew` directory will be cached.
is_required: true
summary: Should the step collect files to be cached?
title: Enable cache?
value_options:
- "yes"
- "no"
- opts:
is_required: true
summary: Should the step print more detailed log?
title: Enable verbose logging?
value_options:
- "yes"
- "no"
verbose_log: "no"
================================================
FILE: steps/brew-install/0.12.1/step.yml
================================================
title: Brew install
summary: Install or upgrade dependencies with Homebrew.
description: "\nInstall or upgrade dependencies using Homebrew, a package manager
for MacOS. \n\n### Configuring the Step \n\nHomebrew defines the available packages
as formulae. Our Step needs the name of the Homebrew formulae you want to use, either
specified as a step input, or from a Brewfile in the project's source.\n\nTo specify
formulae in the step configuration\n\n1. In the **Formula name** input, put the
name of the formula you want to download. \n1. In the **Upgrade formula?** input,
set the default behavior for previously installed packages. If the input is set
to `yes`, the Step will call `brew reinstall` to upgrade them to the latest version.\n1.
In the **Brew install/reinstall options** input, you can set additional flags for
the `brew install` or `brew reinstall` commands. \n For the possible options,
see [Homebrew's documentation](https://docs.brew.sh/Manpage#install-options-formulacask).\n\nAlternatively
you can install formulae using a Brewfile\n\n1. Add a `Brewfile` to the root of
the project's source. For the format of the Brewfile, see the [Homebrew Bundle documentation](https://github.com/Homebrew/homebrew-bundle#usage)\n1.
Set the **Use a Brewfile to install packages?** input to \"yes\". \n1. (optional)
Set the **Path to the Brewfile** input if it is not in the root of the project's
source\n\n### Useful links\n\n- [Homebrew documentation](https://docs.brew.sh/Manpage)\n-
[Caching Homebrew installers](https://devcenter.bitrise.io/builds/caching/caching-homebrew-installers/)\n\n###
Related Steps \n\n- [Run yarn command](https://www.bitrise.io/integrations/steps/yarn)\n-
[Run npm command](https://www.bitrise.io/integrations/steps/npm)"
website: https://github.com/bitrise-steplib/steps-brew-install
source_code_url: https://github.com/bitrise-steplib/steps-brew-install
support_url: https://github.com/bitrise-steplib/steps-brew-install/issues
published_at: 2021-10-08T13:11:40.022856808Z
source:
git: https://github.com/bitrise-steplib/steps-brew-install.git
commit: 0b454ca6435917dfe967d75d0ea19ae23c1210f9
type_tags:
- installer
toolkit:
go:
package_name: github.com/bitrise-steplib/steps-brew-install
inputs:
- opts:
is_required: false
summary: Name of the formula to install/reinstall. Must be specified when `use_brewfile`
is not `yes`
title: Formula name
packages: null
- opts:
description: |
If set to `"yes"`, the step will upgrade the defined packages by calling `brew reinstall [options] [packages]` command.
Otherwise the step calls `brew install [options] [packages]`.
summary: Upgrade formula if previously installed?
title: Upgrade formula?
value_options:
- "yes"
- "no"
upgrade: "yes"
- opts:
description: |
If set to `"yes"`, the step will install packages in the Brewfile by running `brew bundle`. If no Brewfile path is set, it assumes a Brewfile exists in the current directory.
is_required: false
summary: Installs packages using a Brewfile
title: Use a Brewfile to install packages?
value_options:
- "yes"
- "no"
use_brewfile: "no"
- brewfile_path: null
opts:
description: |
If set, `use_brewfile` must be set to `yes`. Path must end with `Brewfile`
is_required: false
summary: Installs packages from a Brewfile at the specified path
title: Path to the Brewfile
- options: null
opts:
description: |
Flags to pass to the brew install/reinstall command.
`brew install/reinstall [options] [packages]`
summary: Flags to pass to the brew install/reinstall command.
title: Brew install/reinstall options
- cache_enabled: "no"
opts:
description: |
If set to `"yes"` the contents of `~/Library/Caches/Homebrew` directory will be cached.
is_required: true
summary: Should the step collect files to be cached?
title: Enable cache?
value_options:
- "yes"
- "no"
- opts:
is_required: true
summary: Should the step print more detailed log?
title: Enable verbose logging?
value_options:
- "yes"
- "no"
verbose_log: "no"
================================================
FILE: steps/brew-install/0.12.2/step.yml
================================================
title: Brew install
summary: Install or upgrade dependencies with Homebrew.
description: "\nInstall or upgrade dependencies using Homebrew, a package manager
for MacOS. \n\n### Configuring the Step \n\nHomebrew defines the available packages
as formulae. Our Step needs the name of the Homebrew formulae you want to use, either
specified as a step input, or from a Brewfile in the project's source.\n\nTo specify
formulae in the step configuration\n\n1. In the **Formula name** input, put the
name of the formula you want to download. \n1. In the **Upgrade formula?** input,
set the default behavior for previously installed packages. If the input is set
to `yes`, the Step will call `brew reinstall` to upgrade them to the latest version.\n1.
In the **Brew install/reinstall options** input, you can set additional flags for
the `brew install` or `brew reinstall` commands. \n For the possible options,
see [Homebrew's documentation](https://docs.brew.sh/Manpage#install-options-formulacask).\n\nAlternatively
you can install formulae using a Brewfile\n\n1. Add a `Brewfile` to the root of
the project's source. For the format of the Brewfile, see the [Homebrew Bundle documentation](https://github.com/Homebrew/homebrew-bundle#usage)\n1.
Set the **Use a Brewfile to install packages?** input to \"yes\". \n1. (optional)
Set the **Path to the Brewfile** input if it is not in the root of the project's
source\n\n### Useful links\n\n- [Homebrew documentation](https://docs.brew.sh/Manpage)\n-
[Caching Homebrew installers](https://devcenter.bitrise.io/builds/caching/caching-homebrew-installers/)\n\n###
Related Steps \n\n- [Run yarn command](https://www.bitrise.io/integrations/steps/yarn)\n-
[Run npm command](https://www.bitrise.io/integrations/steps/npm)"
website: https://github.com/bitrise-steplib/steps-brew-install
source_code_url: https://github.com/bitrise-steplib/steps-brew-install
support_url: https://github.com/bitrise-steplib/steps-brew-install/issues
published_at: 2023-05-18T12:01:25.919537441Z
source:
git: https://github.com/bitrise-steplib/steps-brew-install.git
commit: 19807654133026007b9ff208d06d6c3b66efde1a
type_tags:
- installer
toolkit:
go:
package_name: github.com/bitrise-steplib/steps-brew-install
inputs:
- opts:
is_required: false
summary: Name of the formula to install/reinstall. Must be specified when `use_brewfile`
is not `yes`
title: Formula name
packages: null
- opts:
description: |
If set to `"yes"`, the step will upgrade the defined packages by calling `brew reinstall [options] [packages]` command.
Otherwise the step calls `brew install [options] [packages]`.
summary: Upgrade formula if previously installed?
title: Upgrade formula?
value_options:
- "yes"
- "no"
upgrade: "yes"
- opts:
description: |
If set to `"yes"`, the step will install packages in the Brewfile by running `brew bundle`. If no Brewfile path is set, it assumes a Brewfile exists in the current directory.
is_required: false
summary: Installs packages using a Brewfile
title: Use a Brewfile to install packages?
value_options:
- "yes"
- "no"
use_brewfile: "no"
- brewfile_path: null
opts:
description: |
If set, `use_brewfile` must be set to `yes`. Path must end with `Brewfile`
is_required: false
summary: Installs packages from a Brewfile at the specified path
title: Path to the Brewfile
- options: null
opts:
description: |
Flags to pass to the brew install/reinstall command.
`brew install/reinstall [options] [packages]`
summary: Flags to pass to the brew install/reinstall command.
title: Brew install/reinstall options
- cache_enabled: "no"
opts:
description: |
If set to `"yes"` the contents of `~/Library/Caches/Homebrew` directory will be cached.
is_required: true
summary: Should the step collect files to be cached?
title: Enable cache?
value_options:
- "yes"
- "no"
- opts:
is_required: true
summary: Should the step print more detailed log?
title: Enable verbose logging?
value_options:
- "yes"
- "no"
verbose_log: "no"
================================================
FILE: steps/brew-install/0.12.3/step.yml
================================================
title: Brew install
summary: Install or upgrade dependencies with Homebrew.
description: "\nInstall or upgrade dependencies using Homebrew, a package manager
for MacOS. \n\n### Configuring the Step \n\nHomebrew defines the available packages
as formulae. Our Step needs the name of the Homebrew formulae you want to use, either
specified as a step input, or from a Brewfile in the project's source.\n\nTo specify
formulae in the step configuration\n\n1. In the **Formula name** input, put the
name of the formula you want to download. \n1. In the **Upgrade formula?** input,
set the default behavior for previously installed packages. If the input is set
to `yes`, the Step will call `brew reinstall` to upgrade them to the latest version.\n1.
In the **Brew install/reinstall options** input, you can set additional flags for
the `brew install` or `brew reinstall` commands. \n For the possible options,
see [Homebrew's documentation](https://docs.brew.sh/Manpage#install-options-formulacask).\n\nAlternatively
you can install formulae using a Brewfile\n\n1. Add a `Brewfile` to the root of
the project's source. For the format of the Brewfile, see the [Homebrew Bundle documentation](https://github.com/Homebrew/homebrew-bundle#usage)\n1.
Set the **Use a Brewfile to install packages?** input to \"yes\". \n1. (optional)
Set the **Path to the Brewfile** input if it is not in the root of the project's
source\n\n### Useful links\n\n- [Homebrew documentation](https://docs.brew.sh/Manpage)\n-
[Caching Homebrew installers](https://devcenter.bitrise.io/builds/caching/caching-homebrew-installers/)\n\n###
Related Steps \n\n- [Run yarn command](https://www.bitrise.io/integrations/steps/yarn)\n-
[Run npm command](https://www.bitrise.io/integrations/steps/npm)"
website: https://github.com/bitrise-steplib/steps-brew-install
source_code_url: https://github.com/bitrise-steplib/steps-brew-install
support_url: https://github.com/bitrise-steplib/steps-brew-install/issues
published_at: 2023-06-23T12:10:42.618033739Z
source:
git: https://github.com/bitrise-steplib/steps-brew-install.git
commit: fab2305911fba702b13984571b3f256ecb73245b
type_tags:
- installer
toolkit:
go:
package_name: github.com/bitrise-steplib/steps-brew-install
inputs:
- opts:
is_required: false
summary: Name of the formula to install/reinstall. Must be specified when `use_brewfile`
is not `yes`
title: Formula name
packages: null
- opts:
description: |
If set to `"yes"`, the step will upgrade the defined packages by calling `brew reinstall [options] [packages]` command.
Otherwise the step calls `brew install [options] [packages]`.
summary: Upgrade formula if previously installed?
title: Upgrade formula?
value_options:
- "yes"
- "no"
upgrade: "yes"
- opts:
description: |
If set to `"yes"`, the step will install packages in the Brewfile by running `brew bundle`. If no Brewfile path is set, it assumes a Brewfile exists in the current directory.
is_required: false
summary: Installs packages using a Brewfile
title: Use a Brewfile to install packages?
value_options:
- "yes"
- "no"
use_brewfile: "no"
- brewfile_path: null
opts:
description: |
If set, `use_brewfile` must be set to `yes`. Path must end with `Brewfile`
is_required: false
summary: Installs packages from a Brewfile at the specified path
title: Path to the Brewfile
- options: null
opts:
description: |
Flags to pass to the brew install/reinstall command.
`brew install/reinstall [options] [packages]`
summary: Flags to pass to the brew install/reinstall command.
title: Brew install/reinstall options
- cache_enabled: "no"
opts:
description: |
If set to `"yes"` the contents of `~/Library/Caches/Homebrew` directory will be cached.
is_required: true
summary: Should the step collect files to be cached?
title: Enable cache?
value_options:
- "yes"
- "no"
- opts:
is_required: true
summary: Should the step print more detailed log?
title: Enable verbose logging?
value_options:
- "yes"
- "no"
verbose_log: "no"
================================================
FILE: steps/brew-install/0.12.4/step.yml
================================================
title: Brew install
summary: Install or upgrade dependencies with Homebrew.
description: |-
Install or upgrade dependencies using Homebrew, a package manager for MacOS.
### Configuring the Step
Homebrew defines the available packages as formulae. Our Step needs the name of the Homebrew formulae you want to use, either specified as a step input, or from a Brewfile in the project's source.
To specify formulae in the step configuration
1. In the **Formula name** input, put the name of the formula you want to download.
1. In the **Upgrade formula?** input, set the default behavior for previously installed packages. If the input is set to `yes`, the Step will call `brew reinstall` to upgrade them to the latest version.
1. In the **Brew install/reinstall options** input, you can set additional flags for the `brew install` or `brew reinstall` commands.
For the possible options, see [Homebrew's documentation](https://docs.brew.sh/Manpage#install-options-formulacask).
Alternatively you can install formulae using a Brewfile
1. Add a `Brewfile` to the root of the project's source. For the format of the Brewfile, see the [Homebrew Bundle documentation](https://github.com/Homebrew/homebrew-bundle#usage)
1. Set the **Use a Brewfile to install packages?** input to "yes".
1. (optional) Set the **Path to the Brewfile** input if it is not in the root of the project's source
### Useful links
- [Homebrew documentation](https://docs.brew.sh/Manpage)
- [Caching Homebrew installers](https://devcenter.bitrise.io/builds/caching/caching-homebrew-installers/)
### Related Steps
- [Run yarn command](https://www.bitrise.io/integrations/steps/yarn)
- [Run npm command](https://www.bitrise.io/integrations/steps/npm)
website: https://github.com/bitrise-steplib/steps-brew-install
source_code_url: https://github.com/bitrise-steplib/steps-brew-install
support_url: https://github.com/bitrise-steplib/steps-brew-install/issues
published_at: 2024-04-25T13:10:22.067116681Z
source:
git: https://github.com/bitrise-steplib/steps-brew-install.git
commit: f03437263660f7e9ec6fe626cdc6e4519e2eebe3
project_type_tags:
- ios
- macos
- cordova
- ionic
- react-native
- flutter
type_tags:
- installer
toolkit:
go:
package_name: github.com/bitrise-steplib/steps-brew-install
inputs:
- opts:
description: |-
Name of the formulas to install. Multiple formulas can be specified by separating them with a space, e.g. `git-lfs sqlite pipx`
This input must be specified when `use_brewfile` is `no`
is_required: false
title: Formulas to install
packages: null
- opts:
description: |
If set to `"yes"`, the step will upgrade the defined packages by calling `brew reinstall [options] [packages]` command.
Otherwise the step calls `brew install [options] [packages]`.
summary: Upgrade formula if previously installed?
title: Upgrade formula?
value_options:
- "yes"
- "no"
upgrade: "yes"
- opts:
description: |
If set to `"yes"`, the step will install packages in the Brewfile by running `brew bundle`. If no Brewfile path is set, it assumes a Brewfile exists in the current directory.
is_required: false
summary: Installs packages using a Brewfile
title: Use a Brewfile to install packages?
value_options:
- "yes"
- "no"
use_brewfile: "no"
- brewfile_path: null
opts:
description: |
If set, `use_brewfile` must be set to `yes`. Path must end with `Brewfile`
is_required: false
summary: Installs packages from a Brewfile at the specified path
title: Path to the Brewfile
- options: null
opts:
description: |
Flags to pass to the brew install/reinstall command.
`brew install/reinstall [options] [packages]`
summary: Flags to pass to the brew install/reinstall command.
title: Brew install/reinstall options
- cache_enabled: "no"
opts:
description: |
If set to `"yes"` the contents of `~/Library/Caches/Homebrew` directory will be cached.
is_required: true
summary: Should the step collect files to be cached?
title: Enable cache?
value_options:
- "yes"
- "no"
- opts:
is_required: true
summary: Should the step print more detailed log?
title: Enable verbose logging?
value_options:
- "yes"
- "no"
verbose_log: "no"
================================================
FILE: steps/brew-install/0.9.0/step.yml
================================================
title: Brew install
summary: |
Install or upgrade formula with brew
description: |
Install or upgrade formula with brew
website: https://github.com/bitrise-steplib/steps-brew-install
source_code_url: https://github.com/bitrise-steplib/steps-brew-install
support_url: https://github.com/bitrise-steplib/steps-brew-install/issues
published_at: 2017-10-27T17:22:48.641520695+02:00
source:
git: https://github.com/bitrise-steplib/steps-brew-install.git
commit: 2f3c953e7178a92e3d05ed67d91a01c181f0675a
host_os_tags:
- osx-10.10
type_tags:
- installer
toolkit:
go:
package_name: github.com/bitrise-steplib/steps-brew-install
is_requires_admin_user: true
is_always_run: false
is_skippable: false
run_if: ""
inputs:
- opts:
description: Name of the formula to install/upgrade
is_expand: true
is_required: true
summary: Name of the formula to install/upgrade
title: Name of the formula to install/upgrade
value_options: []
packages: null
- options: null
opts:
description: |
Flags to pass to the bew install/reinstall command.
`brew install/reinstall [options] [packages]`
is_expand: true
is_required: false
summary: Options for Brew install/upgrade
title: Options for Brew install/upgrade
value_options: []
- opts:
description: |
If set the step will upgrade the defined packages by calling `brew reinstall [options] [packages]` command.
Otherwise the step calls `brew install [options] [packages]`
is_expand: true
is_required: false
summary: Upgrade formula if previously installed
title: Upgrade formula if previously installed
value_options:
- "yes"
- "no"
upgrade: "yes"
================================================
FILE: steps/brew-install/1.0.0/step.yml
================================================
title: Brew install
summary: Install or upgrade dependencies with Homebrew.
description: |-
Install or upgrade dependencies using Homebrew, a package manager for MacOS.
### Configuring the Step
Homebrew defines the available packages as formulae. Our Step needs the name of the Homebrew formulae you want to use, either specified as a step input, or from a Brewfile in the project's source.
To specify formulae in the step configuration
1. In the **Formula name** input, put the name of the formula you want to download.
1. In the **Upgrade formula?** input, set the default behavior for previously installed packages. If the input is set to `yes`, the Step will call `brew reinstall` to upgrade them to the latest version.
1. In the **Brew install/reinstall options** input, you can set additional flags for the `brew install` or `brew reinstall` commands.
For the possible options, see [Homebrew's documentation](https://docs.brew.sh/Manpage#install-options-formulacask).
Alternatively you can install formulae using a Brewfile
1. Add a `Brewfile` to the root of the project's source. For the format of the Brewfile, see the [Homebrew Bundle documentation](https://github.com/Homebrew/homebrew-bundle#usage)
1. Set the **Use a Brewfile to install packages?** input to "yes".
1. (optional) Set the **Path to the Brewfile** input if it is not in the root of the project's source
### Useful links
- [Homebrew documentation](https://docs.brew.sh/Manpage)
### Related Steps
- [Run yarn command](https://www.bitrise.io/integrations/steps/yarn)
- [Run npm command](https://www.bitrise.io/integrations/steps/npm)
website: https://github.com/bitrise-steplib/steps-brew-install
source_code_url: https://github.com/bitrise-steplib/steps-brew-install
support_url: https://github.com/bitrise-steplib/steps-brew-install/issues
published_at: 2024-04-30T12:38:50.831106751Z
source:
git: https://github.com/bitrise-steplib/steps-brew-install.git
commit: 46c19dbb3454a99bd8988f321bc76cb6e2472f54
project_type_tags:
- ios
- macos
- cordova
- ionic
- react-native
- flutter
type_tags:
- installer
toolkit:
go:
package_name: github.com/bitrise-steplib/steps-brew-install
inputs:
- opts:
description: |-
Name of the formulas to install. Multiple formulas can be specified by separating them with a space, e.g. `git-lfs sqlite pipx`
This input must be specified when `use_brewfile` is `no`
is_required: false
title: Formulas to install
packages: null
- opts:
description: |
If set to `"yes"`, the step will upgrade the defined packages by calling `brew reinstall [options] [packages]` command.
Otherwise the step calls `brew install [options] [packages]`.
summary: Upgrade formula if previously installed?
title: Upgrade formula?
value_options:
- "yes"
- "no"
upgrade: "yes"
- opts:
description: |
If set to `no`, the step won't upgrade other **installed packages** that depend on the package to be installed.
This helps predictability and install times, but sometimes could cause problems with existing installed packages if they are not compatible with the newly installed package (Homebrew is an evergreen package manager by design). More information is available [here](https://docs.brew.sh/FAQ#why-does-brew-upgrade-formula-or-brew-install-formula-also-upgrade-a-bunch-of-other-stuff) and [here](https://docs.brew.sh/Manpage#install-options-formulacask-).
If you experience a broken package, set this input to `yes`.
This input controls the `HOMEBREW_NO_INSTALLED_DEPENDENTS_CHECK` env var.
title: Upgrade dependent packages
value_options:
- "yes"
- "no"
upgrade_dependents: "no"
- opts:
description: |
If set to `"yes"`, the step will install packages in the Brewfile by running `brew bundle`. If no Brewfile path is set, it assumes a Brewfile exists in the current directory.
is_required: false
summary: Installs packages using a Brewfile
title: Use a Brewfile to install packages?
value_options:
- "yes"
- "no"
use_brewfile: "no"
- brewfile_path: null
opts:
description: |
If set, `use_brewfile` must be set to `yes`. Path must end with `Brewfile`
is_required: false
summary: Installs packages from a Brewfile at the specified path
title: Path to the Brewfile
- options: null
opts:
description: |
Flags to pass to the brew install/reinstall command.
`brew install/reinstall [options] [packages]`
summary: Flags to pass to the brew install/reinstall command.
title: Brew install/reinstall options
- opts:
is_required: true
summary: Should the step print more detailed log?
title: Enable verbose logging?
value_options:
- "yes"
- "no"
verbose_log: "no"
================================================
FILE: steps/brew-install/1.0.1/step.yml
================================================
title: Brew install
summary: Install or upgrade dependencies with Homebrew.
description: |-
Install or upgrade dependencies using Homebrew, a package manager for MacOS.
### Configuring the Step
Homebrew defines the available packages as formulae. Our Step needs the name of the Homebrew formulae you want to use, either specified as a step input, or from a Brewfile in the project's source.
To specify formulae in the step configuration
1. In the **Formula name** input, put the name of the formula you want to download.
1. In the **Upgrade formula?** input, set the default behavior for previously installed packages. If the input is set to `yes`, the Step will call `brew reinstall` to upgrade them to the latest version.
1. In the **Brew install/reinstall options** input, you can set additional flags for the `brew install` or `brew reinstall` commands.
For the possible options, see [Homebrew's documentation](https://docs.brew.sh/Manpage#install-options-formulacask).
Alternatively you can install formulae using a Brewfile
1. Add a `Brewfile` to the root of the project's source. For the format of the Brewfile, see the [Homebrew Bundle documentation](https://github.com/Homebrew/homebrew-bundle#usage)
1. Set the **Use a Brewfile to install packages?** input to "yes".
1. (optional) Set the **Path to the Brewfile** input if it is not in the root of the project's source
### Useful links
- [Homebrew documentation](https://docs.brew.sh/Manpage)
### Related Steps
- [Run yarn command](https://www.bitrise.io/integrations/steps/yarn)
- [Run npm command](https://www.bitrise.io/integrations/steps/npm)
website: https://github.com/bitrise-steplib/steps-brew-install
source_code_url: https://github.com/bitrise-steplib/steps-brew-install
support_url: https://github.com/bitrise-steplib/steps-brew-install/issues
published_at: 2025-11-14T13:11:05.534535404Z
source:
git: https://github.com/bitrise-steplib/steps-brew-install.git
commit: d95cf3095856c807d3f6bb58ce7ff79bb9dd1236
type_tags:
- installer
toolkit:
go:
package_name: github.com/bitrise-steplib/steps-brew-install
inputs:
- opts:
description: |-
Name of the formulas to install. Multiple formulas can be specified by separating them with a space, e.g. `git-lfs sqlite pipx`
This input must be specified when `use_brewfile` is `no`
is_required: false
title: Formulas to install
packages: null
- opts:
description: |
If set to `"yes"`, the step will upgrade the defined packages by calling `brew reinstall [options] [packages]` command.
Otherwise the step calls `brew install [options] [packages]`.
summary: Upgrade formula if previously installed?
title: Upgrade formula?
value_options:
- "yes"
- "no"
upgrade: "yes"
- opts:
description: |
If set to `no`, the step won't upgrade other **installed packages** that depend on the package to be installed.
This helps predictability and install times, but sometimes could cause problems with existing installed packages if they are not compatible with the newly installed package (Homebrew is an evergreen package manager by design). More information is available [here](https://docs.brew.sh/FAQ#why-does-brew-upgrade-formula-or-brew-install-formula-also-upgrade-a-bunch-of-other-stuff) and [here](https://docs.brew.sh/Manpage#install-options-formulacask-).
If you experience a broken package, set this input to `yes`.
This input controls the `HOMEBREW_NO_INSTALLED_DEPENDENTS_CHECK` env var.
title: Upgrade dependent packages
value_options:
- "yes"
- "no"
upgrade_dependents: "no"
- opts:
description: |
If set to `"yes"`, the step will install packages in the Brewfile by running `brew bundle`. If no Brewfile path is set, it assumes a Brewfile exists in the current directory.
is_required: false
summary: Installs packages using a Brewfile
title: Use a Brewfile to install packages?
value_options:
- "yes"
- "no"
use_brewfile: "no"
- brewfile_path: null
opts:
description: |
If set, `use_brewfile` must be set to `yes`. Path must end with `Brewfile`
is_required: false
summary: Installs packages from a Brewfile at the specified path
title: Path to the Brewfile
- options: null
opts:
description: |
Flags to pass to the brew install/reinstall command.
`brew install/reinstall [options] [packages]`
summary: Flags to pass to the brew install/reinstall command.
title: Brew install/reinstall options
- opts:
is_required: true
summary: Should the step print more detailed log?
title: Enable verbose logging?
value_options:
- "yes"
- "no"
verbose_log: "no"
================================================
FILE: steps/brew-install/step-info.yml
================================================
maintainer: bitrise
================================================
FILE: steps/browserstack-app-live-upload/1.0.0/step.yml
================================================
title: Browserstack App Live Upload
summary: |
Uploads your APK or IPA to Browserstack for interactive app testing.
description: |
Uploads your APK or IPA to Browserstack for interactive app testing. You can find your username and access key at https://www.browserstack.com/accounts/settings
website: https://github.com/andrewmarmion/bitrise-step-browserstack-app-live-upload
source_code_url: https://github.com/andrewmarmion/bitrise-step-browserstack-app-live-upload
support_url: https://github.com/andrewmarmion/bitrise-step-browserstack-app-live-upload/issues
published_at: 2019-10-10T16:51:25.06298+01:00
source:
git: https://github.com/andrewmarmion/bitrise-step-browserstack-app-live-upload.git
commit: d7100a123466d55bae8f93d536bdd3c7be8a4dca
host_os_tags:
- osx-10.10
- ubuntu-16.04
project_type_tags:
- ios
- android
- xamarin
- react-native
- cordova
- ionic
- flutter
type_tags:
- deploy
toolkit:
bash:
entry_file: step.sh
is_requires_admin_user: true
is_always_run: false
is_skippable: false
run_if: ""
inputs:
- apk_ipa_filepath: null
opts:
description: |
The app file you want to upload to BrowserStack, usually $BITRISE\_APK\_PATH or $BITRISE\_IPA\_PATH.
is_expand: true
is_required: true
summary: Location of the IPA or APK that you want to upload.
title: Location of the IPA or APK
- browserstack_username: null
opts:
description: |
The username you use to log into Browserstack.
is_expand: true
is_required: true
is_sensitive: true
summary: The username you use to log into Browserstack.
title: Browserstack Username
- browserstack_access_key: null
opts:
description: |
The access key for your Browserstack account.
is_expand: true
is_required: true
is_sensitive: true
summary: The access key for your Browserstack account.
title: Browserstack Access Key
================================================
FILE: steps/browserstack-app-live-upload/step-info.yml
================================================
maintainer: community
================================================
FILE: steps/browserstack-bitrise-espresso-step/1.0.0/step.yml
================================================
title: BrowserStack App Automate - Espresso
summary: |
Run your Espresso tests on BrowserStack App Automate
description: |
Run your Espresso tests on BrowserStack App Automate. This step collects the built APK from $BITRISE_APK_PATH and test apk from `$BITRISE_TEST_APK_PATH` Environment Variables
website: https://www.browserstack.com/app-automate
source_code_url: https://github.com/browserstack/browserstack-bitrise-espresso-step
support_url: https://github.com/browserstack/browserstack-bitrise-espresso-step/issues
published_at: 2022-08-16T20:35:40.110892+05:30
source:
git: https://github.com/browserstack/browserstack-bitrise-espresso-step.git
commit: 180c566836b44627cf5bbb28e4e9acb771877b2e
host_os_tags:
- osx-10.10
- ubuntu-16.04
project_type_tags:
- android
type_tags:
- test
toolkit:
go:
package_name: github.com/browserstack/browserstack-bitrise-espresso-step
deps:
brew:
- name: git
- name: wget
apt_get:
- name: git
- name: wget
is_requires_admin_user: true
is_always_run: false
is_skippable: false
run_if: ""
inputs:
- browserstack_username: null
opts:
category: Authentication
description: Username of the BrowserStack account
is_required: true
is_sensitive: true
summary: Username for the BrowserStack account
title: BrowserStack username
- browserstack_accesskey: null
opts:
category: Authentication
description: Access Key of the BrowserStack account
is_required: true
is_sensitive: true
summary: Accesskey for the BrowserStack account
title: BrowserStack accesskey
- android_app_under_test: $BITRISE_APK_PATH
opts:
category: App & Test Suite
description: Path of the app (.apk) file
is_expand: true
is_required: true
summary: Path to the app .apk file
title: Android app under test
- espresso_test_suite: $BITRISE_TEST_APK_PATH
opts:
category: App & Test Suite
description: Path of the test suite (.apk) file
is_expand: true
is_required: true
summary: Path to the testsuite .apk file
title: Espresso test suite
- devices_list: null
opts:
category: Devices
description: "Name of one or more device-OS combination in new line \nFor example:\n\n`Samsung
Galaxy S9 Plus-9.0`\n\n`Google Pixel 3a-9.0`\n"
is_expand: true
is_required: true
summary: Name of one or more device-OS combination in new line from the [device list](https://www.browserstack.com/list-of-browsers-and-platforms/app_automate).
title: Devices
- instrumentation_logs: "true"
opts:
category: Debug logs
description: Instrumentation logs are a comprehensive record of your Espresso
test executions that helps you identify all the steps executed in the test.
summary: Enable Instrumentation Logs generated by AndroidJunitRunner
title: Instrumentation logs
value_options:
- "true"
- "false"
- network_logs: "false"
opts:
category: Debug logs
description: 'Network logs captures the network traffic, latency, HTTP requests
and responses in the HAR (HTTP Archive) format. '
summary: Enable network traffic, latency, HTTP requests and responses in the HAR
(HTTP Archive) format
title: Network Logs
value_options:
- "true"
- "false"
- device_logs: "false"
opts:
category: Debug logs
description: Device logs are system logs specific to your application generated
by Android logcat that help you debug any test crashes.
summary: Enable logs generated by Android logcat
title: Android logcat logs
value_options:
- "true"
- "false"
- debug_screenshots: "false"
opts:
category: Debug logs
description: Screenshots makes it easier to identify the exact step in your test
where the failure occurred, especially any layout or design-related issues.
summary: Capture the screenshots in your tests
title: Capture Screenshots
value_options:
- "true"
- "false"
- opts:
category: Debug logs
description: Video recording helps you view the entire test execution and helps
debug any failed test.
summary: Enable the video of the test run
title: Video recording
value_options:
- "true"
- "false"
video_recording: "true"
- opts:
category: Test Configuration
description: A project name helps you group multiple Espresso test executions
under a single project.
summary: Project name of the tests.
title: Project name
project: null
- filter_test: null
opts:
category: Test Configuration
description: |
Provide key-value pairs of filters to run tests: class, package, annotation, size
For example: class com.foo.AddToCartClass,class com.foo.CheckoutClass
package com.foo
Learn more.(https://www.browserstack.com/docs/app-automate/espresso/select-test-cases)
summary: Provide a comma-separated list of class or test names followed by supported
filtering strategies.
title: Filter tests
- opts:
category: Test Configuration
description: Test sharding splits and run test cases into different group called
shards. This behaviour is helpful when your test-suite has a large number of
test cases. [Learn more.](https://www.browserstack.com/docs/app-automate/espresso/test-sharding)
summary: 'Enable test sharding to split tests cases into different groups instead
of running them sequentially. '
title: Test sharding
use_test_sharding: null
- clear_app_data: "false"
opts:
category: Test Configuration
description: An app might need clean state of the app storage to run every test
case. Use this feature to clear app data after every test run. [Learn more.](https://www.browserstack.com/docs/app-automate/espresso/clear-app-data)
summary: Enable to clear app data after every test run
title: Clear app data
value_options:
- "true"
- "false"
- opts:
category: Test Configuration
description: The single runner invocation feature runs each test case in a single
process that reduces the overall build time. [Learn more.](https://www.browserstack.com/docs/app-automate/espresso/single-runner-invocation)
summary: Enable to run each test case in a single process to reduce overall build
time.
title: Single runner invocation
value_options:
- "true"
- "false"
use_single_runner_invocation: "false"
- opts:
category: Test Configuration
description: A callback URL helps you enable BrowserStack notify you upon the
completion of all builds under a given project. You will receive a callback
if no new builds triggered for 5 minutes and all existing builds have completed
their execution.This parameter requires that the Project name parameter also
be set.
summary: 'A callback URL to enable BrowserStack notify about completion of build
under a given project. '
title: Notify project status
project_notify_url: null
- opts:
category: Test Configuration
description: Enable local testing to retrieve app data hosted on local/private
servers
summary: Enable local testing to retrieve app data hosted on local/private servers
title: Local testing
value_options:
- "true"
- "false"
use_local: "false"
- opts:
category: Test Configuration
description: A mock web server mocks the behavior of an actual remote server.
This makes it easy to test different scenarios without depending on your remote
server and without having to make changes to your remote server. Local Testing,
Network logs, and IP geolocation will not work if you are using a mock server.
[Learn more.](https://www.browserstack.com/docs/app-automate/espresso/use-mock-server)
summary: Enable to mock a web server in your espresso tests to mock your API responses.
Learn more.
title: Mock server
value_options:
- "true"
- "false"
use_mock_server: "false"
- api_params: null
opts:
category: Test Configuration
description: |
New line key-value pairs of capabilities provided by BrowserStack.
For example:
coverage=true
geoLocation=CN
[Learn about more capabilities.](https://www.browserstack.com/docs/app-automate/api-reference/espresso/builds#execute-a-build)
summary: New line key-value pairs of capabilities provided by BrowserStack.
title: Test capabilities
- check_build_status: "true"
opts:
category: Test Configuration
description: Wait for build results
summary: Wait for BrowserStack to complete the execution and get the test results
title: Build Status
value_options:
- "true"
- "false"
outputs:
- BROWSERSTACK_BUILD_URL: null
opts:
description: BrowserStack Dashboard url for the executed build
summary: BrowserStack Dashboard url for the executed build
title: BrowserStack Dashboard url
- BROWSERSTACK_BUILD_STATUS: null
opts:
description: |
Status of the executed build. Check values [here:] (https://www.browserstack.com/docs/app-automate/espresso/view-test-results)
summary: BrowserStack build status
title: BrowserStack Build Status
================================================
FILE: steps/browserstack-bitrise-espresso-step/step-info.yml
================================================
maintainer: verified
================================================
FILE: steps/browserstack-bitrise-xcui-step/1.0.0/step.yml
================================================
title: BrowserStack App Automate - XCUITest
summary: |
Run your XCUITest tests on BrowserStack App Automate
description: |
Run your XCUITest tests on BrowserStack App Automate. This step collects the built IPA from `$BITRISE_IPA_PATH` and test suite from `$BITRISE_BUNDLE_PATH` Environment Variables
website: https://github.com/browserstack/browserstack-bitrise-xcui-step
source_code_url: https://github.com/browserstack/browserstack-bitrise-xcui-step
support_url: https://github.com/browserstack/browserstack-bitrise-xcui-step/issues
published_at: 2022-08-16T20:11:30.271023+05:30
source:
git: https://github.com/browserstack/browserstack-bitrise-xcui-step.git
commit: cd90e8eafe9e9130ea792e98b76b9e79eedde467
host_os_tags:
- osx-10.10
- ubuntu-16.04
project_type_tags:
- ios
type_tags:
- test
toolkit:
go:
package_name: github.com/browserstack/browserstack-bitrise-xcui-step
deps:
brew:
- name: git
- name: wget
apt_get:
- name: git
- name: wget
is_requires_admin_user: true
is_always_run: false
is_skippable: false
run_if: ""
inputs:
- browserstack_username: null
opts:
description: Username of the BrowserStack account
is_required: true
is_sensitive: true
summary: Username for the BrowserStack account
title: BrowserStack username
- browserstack_accesskey: null
opts:
description: Access Key of the BrowserStack account
is_required: true
is_sensitive: true
summary: Accesskey for the BrowserStack account
title: BrowserStack accesskey
- app_ipa_path: $BITRISE_IPA_PATH
opts:
description: Path of the app (.ipa) file
is_expand: true
is_required: true
summary: Path to the app (.ipa) file
title: iOS app under test
- opts:
description: Path of the output bundle (.app) file. Add either the `$BITRISE_TEST_BUNDLE_PATH`
(generated from the "Xcode Build for testing for iOS" step) or the absolute
path of the output bundle file
is_expand: true
is_required: true
summary: Path of the output bundle file
title: XCUI test suite
xcui_test_suite: $BITRISE_TEST_BUNDLE_PATH
- devices_list: null
opts:
description: "Name of one or more device-OS combination in new line \n For example:\n
\n `iPhone 11-13`\n \n `iPhone XS-15`\n \n [View supported device-OS combinations](https://www.browserstack.com/list-of-browsers-and-platforms/app_automate)\n"
is_expand: true
is_required: true
summary: Name of one or more device-OS combination in new line from the [device
list](https://www.browserstack.com/list-of-browsers-and-platforms/app_automate).
title: Devices
- instrumentation_logs: "true"
opts:
category: Debug logs
description: Instrumentation logs are a comprehensive record of your XCUITest
test executions that helps you identify all the steps executed in the test.
summary: Generate instrumentation logs of the test session
title: Instrumentation logs
value_options:
- "true"
- "false"
- network_logs: "false"
opts:
category: Debug logs
description: 'Network logs captures the network traffic, latency, HTTP requests
and responses in the HAR (HTTP Archive) format. '
summary: Generate network logs of your XCUI test sessions to capture network traffic,
latency, etc.
title: Network Logs
value_options:
- "true"
- "false"
- device_logs: "false"
opts:
category: Debug logs
description: Device logs are system logs specific to your application generated
by iOS device
summary: Generate device logs
title: Device Logs
value_options:
- "true"
- "false"
- debug_screenshots: "false"
opts:
category: Debug logs
description: Screenshots makes it easier to identify the exact step in your test
where the failure occurred, especially any layout or design-related issues.
summary: Capture the screenshots of the test execution
title: Capture Screenshots
value_options:
- "true"
- "false"
- opts:
category: Debug logs
description: Video recording helps you view the entire test execution and helps
debug any failed test.
summary: Record video of the test execution
title: Video recording
value_options:
- "true"
- "false"
video_recording: "true"
- opts:
category: Test Configuration
description: A project name helps you group multiple XCUITest test executions
under a single project.
summary: Project name of the tests.
title: Project name
project: null
- opts:
category: Test Configuration
description: |
A callback URL helps you enable BrowserStack notify you upon the completion of all builds under a given project. You will receive a callback if no new builds triggered for 5 minutes and all existing builds have completed their execution.
This parameter requires that the **Project name** parameter also be set.
summary: A callback URL to enable BrowserStack notify about completion of build
under a given project.
title: Notify project status
project_notify_url: null
- opts:
category: Test Configuration
description: Enable local testing to retrieve app data hosted on local/private
servers
summary: Enable local testing to retrieve app data hosted on local/private servers
title: Local testing
value_options:
- "true"
- "false"
use_local: "false"
- opts:
category: Test Configuration
description: |
Enable test sharding to split tests cases into different groups instead of running them sequentially.
Add the sharding value json here. Examples:
Input for only-testing strategy:
`{"numberOfShards": 2, "mapping": [{"name": "Shard 1", "strategy": "only-testing", "values": ["SampleXCUITestsClass/testAlert", "SampleXCUITestsClass/testText"]}, {"name": "Shard 2", "strategy": "only-testing", "values": ["SampleXCUITestsClass/testLogin"]}]}`
Input for skip-testing strategy:
`{"numberOfShards": 2, "mapping": [{"name": "Shard 1", "strategy": "skip-testing", "values": ["SampleXCUITestsClass/testAlert"]}, {"name": "Shard 2", "strategy": "skip-testing", "values": ["SampleXCUITestsClass/testText"]}]}`
summary: Test sharding splits and run test cases into different group called shards.
This behaviour is helpful when your test-suite has a large number of test cases.
[Learn more.](https://www.browserstack.com/docs/app-automate/xcuitest/test-sharding)
title: Test sharding
use_test_sharding: null
- filter_test: null
opts:
category: Test Configuration
description: |
Provide a comma-separated list of class or test names followed by supported filters: "only-testing" and "skip-testing".
For example: `only-testing SampleXCUITestsClass/testAlertTest`
[Learn more](https://www.browserstack.com/docs/app-automate/xcuitest/select-test-cases)
summary: Provide a comma-separated list of class or test names followed by supported
filtering strategies.
title: Filter test cases
- opts:
category: Test Configuration
description: Enable to run runtime discoverable tests or dynamic tests. [Learn
more](https://www.browserstack.com/docs/app-automate/xcuitest/dynamic-tests)
summary: Enable to run runtime discoverable tests or dynamic tests. [Learn more](https://www.browserstack.com/docs/app-automate/xcuitest/dynamic-tests)
title: Run dynamic tests
value_options:
- "true"
- "false"
use_dynamic_tests: "false"
- check_build_status: "true"
opts:
category: Test Configuration
description: 'Enable to let the pipeline wait for build results '
summary: 'Enable to let the pipeline wait for build results '
title: Build Status
value_options:
- "true"
- "false"
- api_params: null
opts:
category: Test Configuration
description: |
New line key-value pairs of capabilities provided by BrowserStack.
For example:
coverage=true
geoLocation=CN
[Learn about more capabilities.](https://www.browserstack.com/docs/app-automate/api-reference/xcuitest/builds#execute-a-build)
summary: New line key-value pairs of capabilities provided by BrowserStack.
title: Test capabilities
outputs:
- BROWSERSTACK_BUILD_URL: null
opts:
description: BrowserStack Dashboard url for the executed build
summary: BrowserStack Dashboard url for the executed build
title: BrowserStack Dashboard url
- BROWSERSTACK_BUILD_STATUS: null
opts:
description: Status of the executed build. Check values [here:] (https://www.browserstack.com/docs/app-automate/xcui/view-test-results)
summary: BrowserStack build status
title: BrowserStack Build Status
================================================
FILE: steps/browserstack-bitrise-xcui-step/1.0.1/step.yml
================================================
title: BrowserStack App Automate - XCUITest
summary: |
Run your XCUITest tests on BrowserStack App Automate
description: |
Run your XCUITest tests on BrowserStack App Automate. This step collects the built IPA from `$BITRISE_IPA_PATH` and test suite from `$BITRISE_BUNDLE_PATH` Environment Variables
website: https://github.com/browserstack/browserstack-bitrise-xcui-step
source_code_url: https://github.com/browserstack/browserstack-bitrise-xcui-step
support_url: https://github.com/browserstack/browserstack-bitrise-xcui-step/issues
published_at: 2022-09-22T20:38:19.560375+05:30
source:
git: https://github.com/browserstack/browserstack-bitrise-xcui-step.git
commit: 480c4bbdb8eb57b7eb5a995228d9b76d646ad0c2
host_os_tags:
- osx-10.10
- ubuntu-16.04
project_type_tags:
- ios
type_tags:
- test
toolkit:
go:
package_name: github.com/browserstack/browserstack-bitrise-xcui-step
deps:
brew:
- name: git
- name: wget
apt_get:
- name: git
- name: wget
is_requires_admin_user: true
is_always_run: false
is_skippable: false
run_if: ""
inputs:
- browserstack_username: null
opts:
description: Username of the BrowserStack account
is_required: true
is_sensitive: true
summary: Username for the BrowserStack account
title: BrowserStack username
- browserstack_accesskey: null
opts:
description: Access Key of the BrowserStack account
is_required: true
is_sensitive: true
summary: Accesskey for the BrowserStack account
title: BrowserStack accesskey
- app_ipa_path: $BITRISE_IPA_PATH
opts:
description: Path of the app (.ipa) file
is_expand: true
is_required: true
summary: Path to the app (.ipa) file
title: iOS app under test
- opts:
description: Path of the output bundle (.app) file. Add either the $BITRISE_TEST_BUNDLE_PATH
(generated from the "Xcode Build for testing for iOS" step) or the absolute
path of the output bundle file
is_expand: true
is_required: true
summary: Path of the output bundle file
title: XCUI test suite
xcui_test_suite: $BITRISE_TEST_BUNDLE_PATH
- devices_list: null
opts:
description: "Name of one or more device-OS combination in new line \n For example:\n
\n `iPhone 11-13`\n \n `iPhone XS-15`\n \n [View supported device-OS combinations](https://www.browserstack.com/list-of-browsers-and-platforms/app_automate)\n"
is_expand: true
is_required: true
summary: Name of one or more device-OS combination in new line from the [device
list](https://www.browserstack.com/list-of-browsers-and-platforms/app_automate).
title: Devices
- instrumentation_logs: "true"
opts:
category: Debug logs
description: Instrumentation logs are a comprehensive record of your XCUITest
test executions that helps you identify all the steps executed in the test.
summary: Generate instrumentation logs of the test session
title: Instrumentation logs
value_options:
- "true"
- "false"
- network_logs: "false"
opts:
category: Debug logs
description: 'Network logs captures the network traffic, latency, HTTP requests
and responses in the HAR (HTTP Archive) format. '
summary: Generate network logs of your XCUI test sessions to capture network traffic,
latency, etc.
title: Network Logs
value_options:
- "true"
- "false"
- device_logs: "false"
opts:
category: Debug logs
description: Device logs are system logs specific to your application generated
by iOS device
summary: Generate device logs
title: Device Logs
value_options:
- "true"
- "false"
- debug_screenshots: "false"
opts:
category: Debug logs
description: Screenshots makes it easier to identify the exact step in your test
where the failure occurred, especially any layout or design-related issues.
summary: Capture the screenshots of the test execution
title: Capture Screenshots
value_options:
- "true"
- "false"
- opts:
category: Debug logs
description: Video recording helps you view the entire test execution and helps
debug any failed test.
summary: Record video of the test execution
title: Video recording
value_options:
- "true"
- "false"
video_recording: "true"
- opts:
category: Test Configuration
description: A project name helps you group multiple XCUITest test executions
under a single project.
summary: Project name of the tests.
title: Project name
project: null
- opts:
category: Test Configuration
description: |
A callback URL helps you enable BrowserStack notify you upon the completion of all builds under a given project. You will receive a callback if no new builds triggered for 5 minutes and all existing builds have completed their execution.
This parameter requires that the **Project name** parameter also be set.
summary: A callback URL to enable BrowserStack notify about completion of build
under a given project.
title: Notify project status
project_notify_url: null
- opts:
category: Test Configuration
description: Enable local testing to retrieve app data hosted on local/private
servers
summary: Enable local testing to retrieve app data hosted on local/private servers
title: Local testing
value_options:
- "true"
- "false"
use_local: "false"
- opts:
category: Test Configuration
description: |
Enable test sharding to split tests cases into different groups instead of running them sequentially.
Add the sharding value json here. Examples:
Input for only-testing strategy:
`{"numberOfShards": 2, "mapping": [{"name": "Shard 1", "strategy": "only-testing", "values": ["SampleXCUITestsClass/testAlert", "SampleXCUITestsClass/testText"]}, {"name": "Shard 2", "strategy": "only-testing", "values": ["SampleXCUITestsClass/testLogin"]}]}`
Input for skip-testing strategy:
`{"numberOfShards": 2, "mapping": [{"name": "Shard 1", "strategy": "skip-testing", "values": ["SampleXCUITestsClass/testAlert"]}, {"name": "Shard 2", "strategy": "skip-testing", "values": ["SampleXCUITestsClass/testText"]}]}`
summary: Test sharding splits and run test cases into different group called shards.
This behaviour is helpful when your test-suite has a large number of test cases.
[Learn more.](https://www.browserstack.com/docs/app-automate/xcuitest/test-sharding)
title: Test sharding
use_test_sharding: null
- filter_test: null
opts:
category: Test Configuration
description: |
Provide a comma-separated list of class or test names followed by supported filters: "only-testing" and "skip-testing".
For example: `only-testing SampleXCUITestsClass/testAlertTest`
[Learn more](https://www.browserstack.com/docs/app-automate/xcuitest/select-test-cases)
summary: Provide a comma-separated list of class or test names followed by supported
filtering strategies.
title: Filter test cases
- opts:
category: Test Configuration
description: Enable to run runtime discoverable tests or dynamic tests. [Learn
more](https://www.browserstack.com/docs/app-automate/xcuitest/dynamic-tests)
summary: Enable to run runtime discoverable tests or dynamic tests. [Learn more](https://www.browserstack.com/docs/app-automate/xcuitest/dynamic-tests)
title: Run dynamic tests
value_options:
- "true"
- "false"
use_dynamic_tests: "false"
- check_build_status: "true"
opts:
category: Test Configuration
description: 'Enable to let the pipeline wait for build results '
summary: 'Enable to let the pipeline wait for build results '
title: Build Status
value_options:
- "true"
- "false"
- api_params: null
opts:
category: Test Configuration
description: |
New line key-value pairs of capabilities provided by BrowserStack.
For example:
coverage=true
geoLocation=CN
[Learn about more capabilities.](https://www.browserstack.com/docs/app-automate/api-reference/xcuitest/builds#execute-a-build)
summary: New line key-value pairs of capabilities provided by BrowserStack.
title: Test capabilities
outputs:
- BROWSERSTACK_BUILD_URL: null
opts:
description: BrowserStack Dashboard url for the executed build
summary: BrowserStack Dashboard url for the executed build
title: BrowserStack Dashboard url
- BROWSERSTACK_BUILD_STATUS: null
opts:
description: |
Status of the executed build. Check values [here:] (https://www.browserstack.com/docs/app-automate/xcui/view-test-results)
summary: BrowserStack build status
title: BrowserStack Build Status
================================================
FILE: steps/browserstack-bitrise-xcui-step/step-info.yml
================================================
maintainer: verified
================================================
FILE: steps/browserstack-espresso-app-automate/0.3.0/step.yml
================================================
title: BrowserStack App Automate
summary: |
Upload an app apk and an Espresso test apk to BrowserStack and run tests with App Automate.
description: |
This step uploads a provided app apk and test apk to browserstack. It then will execute the Espresso Tests for the provided apks in BrowserStacks app automate.
website: https://github.com/fernanthonies/bitrise-step-browserstack-espresso-app-automate
source_code_url: https://github.com/fernanthonies/bitrise-step-browserstack-espresso-app-automate
support_url: https://github.com/fernanthonies/bitrise-step-browserstack-espresso-app-automate/issues
published_at: 2019-01-30T11:33:43.007202-06:00
source:
git: https://github.com/fernanthonies/bitrise-step-browserstack-espresso-app-automate.git
commit: 9bd67786b66b7c0618379fd53926d20a66ad7a8a
host_os_tags:
- osx-10.10
- ubuntu-16.04
project_type_tags:
- android
- xamarin
type_tags:
- utility
deps:
brew:
- name: curl
apt_get:
- name: curl
is_requires_admin_user: true
is_always_run: false
is_skippable: false
run_if: ""
inputs:
- app_apk_path: $BITRISE_APK_PATH
opts:
description: |
The .apk file for your app
is_expand: true
is_required: true
summary: Path to the app .apk file
title: App apk path
- opts:
description: |
The test .apk file for your app, likely generated by the Android Build for UI Testing step
is_expand: true
is_required: true
summary: Path to the espresso test .apk file
title: Test suite apk path
test_apk_path: $BITRISE_TEST_APK_PATH
- browserstack_username: null
opts:
description: ""
is_expand: true
is_required: true
is_sensitive: true
summary: Your username for browserstack
title: BrowserStack username
- browserstack_access_key: null
opts:
description: ""
is_expand: true
is_required: true
is_sensitive: true
summary: Your username for browserstack
title: BrowserStack access key
- browserstack_device_list: '"Google Pixel-8.0", "Google Pixel-7.1"'
opts:
category: Automated Test Options
description: |
Provide a comma separated list of Device and OS version you want to run your tests on, with quotes. Acceptable format example: "Google Pixel-8.0", "Google Pixel-7.1"
A list of available device and OS combinations can be found [here](https://www.browserstack.com/list-of-browsers-and-platforms/app_automate)
is_expand: true
is_required: true
summary: A comma separated list of desired test devices
title: Device list
- browserstack_package: null
opts:
category: Automated Test Options
description: |
Set this parameter to test only some selected packages. Acceptable format is: "com.browserstack", "com.browserstack1"
is_required: false
summary: Set this parameter to test only some selected packages.
title: Package
- browserstack_class: null
opts:
category: Automated Test Options
description: |
Set this parameter to test only some selected classes. Acceptable format is: "com.browserstack.class1", "com.browserstack.class2"
is_required: false
summary: |
Set this parameter to test only some selected classes.
title: Class
- browserstack_annotation: null
opts:
category: Automated Test Options
description: |
Set this parameter if you want to run tests only for particular annotations. Acceptable format is: "P1", "P2"
is_required: false
summary: |
Set this parameter if you want to run tests only for particular annotations.
title: Annotation
- browserstack_size: null
opts:
category: Automated Test Options
description: Set this parameter if you want to run tests that have @SmallTest,
@MediumTest and @LargeTest annotations.
is_required: false
summary: |
Set this parameter if you want to run tests that have @SmallTest, @MediumTest and @LargeTest annotations.
title: Size
- browserstack_device_logs: "true"
opts:
category: Automated Test Options
description: Set this parameter if you want to enable the device logs
is_required: false
summary: Set this parameter if you want to enable the device logs
title: Device Logs
value_options:
- "true"
- "false"
- browserstack_video: "true"
opts:
category: Automated Test Options
description: Set this parameter if you want to enable the video of the test run.
By default it's set to true.
is_required: false
summary: Set this parameter if you want to enable the video of the test run.
title: Video
value_options:
- "true"
- "false"
- browserstack_local: "false"
opts:
category: Automated Test Options
description: Set this parameter if you want to enable local testing. By default
its set to false
is_required: false
summary: Set this parameter if you want to enable local testing.
title: Local
value_options:
- "true"
- "false"
- browserstack_local_identifier: null
opts:
category: Automated Test Options
description: If you are using same account to test multiple applications, you
can setup named connection using the localIdentifier option.
is_required: false
summary: If you are using same account to test multiple applications, you can
setup named connection using the localIdentifier option.
title: Local Identifier
- browserstack_gps_location: 40.730610,-73.935242
opts:
category: Automated Test Options
description: |
Required if you want to simulate the location of the device to a particular GPS location. Acceptable range for latitude is -90 to +90 and for longitude is -180 to +180. Example: "40.730610,-73.935242"
is_required: false
summary: Required if you want to simulate the location of the device to a particular
GPS location.
title: GPS Location
- browserstack_language: null
opts:
category: Automated Test Options
description: |
Set this parameter if you want to change the language to test localization of your App. Example: "fr"
is_required: false
summary: |
Set this parameter if you want to change the language to test localization of your App.
title: Language
- browserstack_locale: null
opts:
category: Automated Test Options
description: |
Set this parameter if you want to change the locale to test localization of your App. Example: "fr"
is_required: false
summary: |
Set this parameter if you want to change the locale to test localization of your App.
title: Locale
- callback_url: null
opts:
category: Automated Test Options
is_expand: false
is_required: false
summary: Set the callback url where we can send a confirmation once your test
execution is completed
title: Callback Url
outputs:
- BUILD_ID: null
opts:
summary: The Build ID for this test run in BrowserStack
title: Build ID
================================================
FILE: steps/browserstack-espresso-app-automate/step-info.yml
================================================
maintainer: community
================================================
FILE: steps/browserstack-upload/0.1.3/step.yml
================================================
title: browserstack-upload
summary: |
Upload APK/IPA files to BrowserStack's App Automate
description: |
Upload your build files to Browserstack for remote device testing. Upload your IPA/APK file to BrowserStack App Automation and get back the app's url for your remote device tests.
website: https://github.com/marcelkalveram/bitrise-step-browserstack-upload
source_code_url: https://github.com/marcelkalveram/bitrise-step-browserstack-upload
support_url: https://github.com/marcelkalveram/bitrise-step-browserstack-upload/issues
published_at: 2018-10-15T23:42:44.579154284+02:00
source:
git: https://github.com/marcelkalveram/bitrise-step-browserstack-upload.git
commit: cbc5f80199abad4bc78289eb42d8a815b2f57f4a
host_os_tags:
- osx-10.10
project_type_tags:
- ios
- android
- xamarin
- react-native
- cordova
- ionic
type_tags:
- utility
- test
toolkit:
bash:
entry_file: step.sh
deps:
brew:
- name: git
- name: wget
- name: jq
apt_get:
- name: git
- name: wget
- name: jq
is_requires_admin_user: true
is_always_run: false
is_skippable: false
run_if: ""
inputs:
- opts:
description: |
This usually gets generated by the the "Gradle Runner" or "XCode Archive & Export" step
is_required: true
summary: The app file you want to upload to BrowserStack, usually $BITRISE\_APK\_PATH
or $BITRISE\_IPA\_PATH
title: A Bitrise generated APK or IPA path
upload_path: $BITRISE_APK_PATH
- browserstack_username: $BROWSERSTACK_USERNAME
opts:
description: |
The username you use to log into your Browserstack account
is_required: true
is_sensitive: true
summary: Your Browserstack username
title: Browserstack username
- browserstack_access_key: $BROWSERSTACK_ACCESS_KEY
opts:
description: |
The access key you use to log into your Browserstack account
is_required: true
is_sensitive: true
summary: Your Browserstack access key
title: Browserstack access key
outputs:
- BROWSERSTACK_APP_URL: null
opts:
description: "The app url returned by Browserstack App Automate with the following
format \"bs://...\"\". \nUse this in your remote device tests, usually through
your capabilities configuration\n"
summary: The app URL used in your App Automate's remote device tests
title: Browserstack App Automate App URL
================================================
FILE: steps/browserstack-upload/0.1.4/step.yml
================================================
title: browserstack-upload
summary: |
Upload APK/IPA files to BrowserStack's App Automate
description: |
Upload your build files to Browserstack for remote device testing. Upload your IPA/APK file to BrowserStack App Automation and get back the app's url for your remote device tests.
website: https://github.com/marcelkalveram/bitrise-step-browserstack-upload
source_code_url: https://github.com/marcelkalveram/bitrise-step-browserstack-upload
support_url: https://github.com/marcelkalveram/bitrise-step-browserstack-upload/issues
published_at: 2019-10-25T11:17:57.226211+02:00
source:
git: https://github.com/marcelkalveram/bitrise-step-browserstack-upload.git
commit: 3a619edc2f2f8faf3d83e3739bd33ff41a3bb647
host_os_tags:
- osx-10.10
project_type_tags:
- ios
- android
- xamarin
- react-native
- cordova
- ionic
type_tags:
- test
toolkit:
bash:
entry_file: step.sh
deps:
brew:
- name: git
- name: wget
- name: jq
apt_get:
- name: git
- name: wget
- name: jq
is_requires_admin_user: true
is_always_run: false
is_skippable: false
run_if: ""
inputs:
- opts:
description: |
This usually gets generated by the the "Gradle Runner" or "XCode Archive & Export" step
is_required: true
summary: The app file you want to upload to BrowserStack, usually $BITRISE\_APK\_PATH
or $BITRISE\_IPA\_PATH
title: A Bitrise generated APK or IPA path
upload_path: $BITRISE_APK_PATH
- browserstack_username: $BROWSERSTACK_USERNAME
opts:
description: |
The username you use to log into your Browserstack account
is_required: true
is_sensitive: true
summary: Your Browserstack username
title: Browserstack username
- browserstack_access_key: $BROWSERSTACK_ACCESS_KEY
opts:
description: |
The access key you use to log into your Browserstack account
is_required: true
is_sensitive: true
summary: Your Browserstack access key
title: Browserstack access key
- custom_id: null
opts:
summary: Custom id to distinguish uploads in case there are multiple apps
title: Custom Id
outputs:
- BROWSERSTACK_APP_URL: null
opts:
description: "The app url returned by Browserstack App Automate with the following
format \"bs://...\"\". \nUse this in your remote device tests, usually through
your capabilities configuration\n"
summary: The app URL used in your App Automate's remote device tests
title: Browserstack App Automate App URL
================================================
FILE: steps/browserstack-upload/step-info.yml
================================================
maintainer: community
================================================
FILE: steps/build-number-adjust/1.0.0/step.yml
================================================
title: Adjust BuildNumber
summary: Adjust the $BITRISE_BUILD_NUMBER
description: |-
In some cases you want to use the $BITRISE_BUILD_NUMBER for setting version info, but for some reason
you want to add, substract or just change the variable (for example when migrating from another build system
and you already have a certain build number to start with)
website: https://github.com/stefandevo/bitrise-buildnumberadjust-step
source_code_url: https://github.com/stefandevo/bitrise-buildnumberadjust-step
support_url: https://github.com/stefandevo/bitrise-buildnumberadjust-step/issues
published_at: 2017-05-02T18:37:35.12670068+02:00
source:
git: https://github.com/stefandevo/bitrise-buildnumberadjust-step.git
commit: 93b784999facfcea50c464aada4dde0e3905eeb1
type_tags:
- utility
is_requires_admin_user: false
is_always_run: false
is_skippable: false
inputs:
- change: null
opts:
description: |
Just change the $BITRISE_BUILD_NUMBER value
is_expand: true
is_required: false
title: Change Build Number
- increase: null
opts:
description: |
Add a certain number to the current $BITRISE_BUILD_NUMBER value
is_expand: true
is_required: false
title: Increase Value
- decrease: null
opts:
description: |
Substract a certain number of to the current $BITRISE_BUILD_NUMBER value
is_expand: true
is_required: false
title: Decrease Value
outputs:
- BITRISE_BUILD_NUMBER: null
opts:
description: ""
title: Adjusted BITRISE_BUILD_NUMBER value
================================================
FILE: steps/build-number-adjust/step-info.yml
================================================
maintainer: community
removal_date: "2024-06-20"
deprecate_notes: "This community step is no longer available as a GitHub repo."
================================================
FILE: steps/build-router-start/0.10.0/step.yml
================================================
title: Bitrise Start Build
summary: Starts the given workflows in the same app
description: Starts the given workflows in the same app
website: https://github.com/bitrise-steplib/bitrise-step-build-router-start
source_code_url: https://github.com/bitrise-steplib/bitrise-step-build-router-start
support_url: https://github.com/bitrise-steplib/bitrise-step-build-router-start/issues
published_at: 2018-08-31T08:04:26.041242318Z
source:
git: https://github.com/bitrise-steplib/bitrise-step-build-router-start.git
commit: 55c041556b225b93a798e70edef26445d01ee2e9
type_tags:
- utility
toolkit:
go:
package_name: github.com/bitrise-steplib/bitrise-step-build-router-start
is_always_run: false
is_skippable: false
inputs:
- access_token: null
opts:
description: "Your access token\n\nTo acquire a `Personal Access Token` for your
user, sign in with that user on [bitrise.io](https://bitrise.io), \ngo to your
`Account Settings` page, and select the [Security tab](https://www.bitrise.io/me/profile#/security)
on the left side.\n"
is_expand: true
is_required: true
is_sensitive: true
summary: Your access token
title: Bitrise Access Token
- opts:
description: The workflow(s) to start. One workflow per line.
is_required: true
summary: The workflow(s) to start. One workflow per line.
title: Workflows
workflows: null
- opts:
description: Should the step wait for the builds to be finished?
is_required: false
summary: Should the step wait for the builds to be finished?
title: Wait for builds
value_options:
- "false"
- "true"
wait_for_builds: "false"
outputs:
- ROUTER_STARTED_BUILD_SLUGS: null
opts:
description: Newline separated list of started build slugs.
summary: Newline separated list of started build slugs.
title: Started Build Slugs
================================================
FILE: steps/build-router-start/0.11.1/step.yml
================================================
title: Bitrise Start Build
summary: Starts the given workflows in the same app
description: Starts the given workflows in the same app
website: https://github.com/bitrise-steplib/bitrise-step-build-router-start
source_code_url: https://github.com/bitrise-steplib/bitrise-step-build-router-start
support_url: https://github.com/bitrise-steplib/bitrise-step-build-router-start/issues
published_at: 2018-09-12T15:03:57.427775503Z
source:
git: https://github.com/bitrise-steplib/bitrise-step-build-router-start.git
commit: dfa563784e24268a58c4b7d8776d834ca48e928f
type_tags:
- utility
toolkit:
go:
package_name: github.com/bitrise-steplib/bitrise-step-build-router-start
is_always_run: false
is_skippable: false
inputs:
- access_token: null
opts:
description: "Your access token\n\nTo acquire a `Personal Access Token` for your
user, sign in with that user on [bitrise.io](https://bitrise.io), \ngo to your
`Account Settings` page, and select the [Security tab](https://www.bitrise.io/me/profile#/security)
on the left side.\n"
is_expand: true
is_required: true
is_sensitive: true
summary: Your access token
title: Bitrise Access Token
- opts:
description: The workflow(s) to start. One workflow per line.
is_required: true
summary: The workflow(s) to start. One workflow per line.
title: Workflows
workflows: null
- environment_key_list: null
opts:
description: "The keys of the envs which will be shared with the triggered workflows\n\n\n**FORMAT**
Seperate the keys with new line. E.g: \n`ENV_1\nENV_2\nENV_3`"
is_expand: false
is_required: false
summary: The keys of the envs which will be shared with the triggered workflows.
title: Environments to share
- opts:
description: Should the step wait for the builds to be finished?
is_required: false
summary: Should the step wait for the builds to be finished?
title: Wait for builds
value_options:
- "false"
- "true"
wait_for_builds: "false"
outputs:
- ROUTER_STARTED_BUILD_SLUGS: null
opts:
description: Newline separated list of started build slugs.
summary: Newline separated list of started build slugs.
title: Started Build Slugs
================================================
FILE: steps/build-router-start/0.11.2/step.yml
================================================
title: Bitrise Start Build
summary: Starts the given workflows in the same app
description: Starts the given workflows in the same app
website: https://github.com/bitrise-steplib/bitrise-step-build-router-start
source_code_url: https://github.com/bitrise-steplib/bitrise-step-build-router-start
support_url: https://github.com/bitrise-steplib/bitrise-step-build-router-start/issues
published_at: 2019-02-01T15:16:43.274008692Z
source:
git: https://github.com/bitrise-steplib/bitrise-step-build-router-start.git
commit: 864b685e012a125341898f3875e7594e16cf8d4c
type_tags:
- utility
toolkit:
go:
package_name: github.com/bitrise-steplib/bitrise-step-build-router-start
is_always_run: false
is_skippable: false
inputs:
- access_token: null
opts:
description: "Your access token\n\nTo acquire a `Personal Access Token` for your
user, sign in with that user on [bitrise.io](https://bitrise.io), \ngo to your
`Account Settings` page, and select the [Security tab](https://www.bitrise.io/me/profile#/security)
on the left side.\n"
is_expand: true
is_required: true
is_sensitive: true
summary: Your access token
title: Bitrise Access Token
- opts:
description: The workflow(s) to start. One workflow per line.
is_required: true
summary: The workflow(s) to start. One workflow per line.
title: Workflows
workflows: null
- environment_key_list: null
opts:
description: "The keys of the envs which will be shared with the triggered workflows\n\n\n**FORMAT**
Seperate the keys with new line. E.g: \n`ENV_1\nENV_2\nENV_3`"
is_expand: false
is_required: false
summary: The keys of the envs which will be shared with the triggered workflows.
title: Environments to share
- opts:
description: Should the step wait for the builds to be finished?
is_required: false
summary: Should the step wait for the builds to be finished?
title: Wait for builds
value_options:
- "false"
- "true"
wait_for_builds: "false"
outputs:
- ROUTER_STARTED_BUILD_SLUGS: null
opts:
description: Newline separated list of started build slugs.
summary: Newline separated list of started build slugs.
title: Started Build Slugs
================================================
FILE: steps/build-router-start/0.11.3/step.yml
================================================
title: Bitrise Start Build
summary: Starts the given workflows in the same app
description: Starts the given workflows in the same app
website: https://github.com/bitrise-steplib/bitrise-step-build-router-start
source_code_url: https://github.com/bitrise-steplib/bitrise-step-build-router-start
support_url: https://github.com/bitrise-steplib/bitrise-step-build-router-start/issues
published_at: 2019-07-16T06:28:31.292700808Z
source:
git: https://github.com/bitrise-steplib/bitrise-step-build-router-start.git
commit: 9a51d1a3693bf151a051708038b97ab0750b3574
type_tags:
- utility
toolkit:
go:
package_name: github.com/bitrise-steplib/bitrise-step-build-router-start
is_always_run: false
is_skippable: false
inputs:
- access_token: null
opts:
description: "Your access token\n\nTo acquire a `Personal Access Token` for your
user, sign in with that user on [bitrise.io](https://bitrise.io), \ngo to your
`Account Settings` page, and select the [Security tab](https://www.bitrise.io/me/profile#/security)
on the left side.\n"
is_expand: true
is_required: true
is_sensitive: true
summary: Your access token
title: Bitrise Access Token
- opts:
description: The workflow(s) to start. One workflow per line.
is_required: true
summary: The workflow(s) to start. One workflow per line.
title: Workflows
workflows: null
- environment_key_list: null
opts:
description: "The keys of the envs which will be shared with the triggered workflows\n\n\n**FORMAT**
Seperate the keys with new line. E.g: \n`ENV_1\nENV_2\nENV_3`"
is_expand: false
is_required: false
summary: The keys of the envs which will be shared with the triggered workflows.
title: Environments to share
- opts:
description: Should the step wait for the builds to be finished?
is_required: false
summary: Should the step wait for the builds to be finished?
title: Wait for builds
value_options:
- "false"
- "true"
wait_for_builds: "false"
outputs:
- ROUTER_STARTED_BUILD_SLUGS: null
opts:
description: Newline separated list of started build slugs.
summary: Newline separated list of started build slugs.
title: Started Build Slugs
================================================
FILE: steps/build-router-start/0.12.0/step.yml
================================================
title: Bitrise Start Build
summary: Starts the given workflows in the same app
description: Starts the given workflows in the same app
website: https://github.com/bitrise-steplib/bitrise-step-build-router-start
source_code_url: https://github.com/bitrise-steplib/bitrise-step-build-router-start
support_url: https://github.com/bitrise-steplib/bitrise-step-build-router-start/issues
published_at: 2020-05-13T09:30:37.006516905Z
source:
git: https://github.com/bitrise-steplib/bitrise-step-build-router-start.git
commit: 8c34093730ac44ce30902d8865e99492ae1df41d
type_tags:
- utility
toolkit:
go:
package_name: github.com/bitrise-steplib/bitrise-step-build-router-start
is_always_run: false
is_skippable: false
inputs:
- access_token: null
opts:
description: "Your access token\n\nTo acquire a `Personal Access Token` for your
user, sign in with that user on [bitrise.io](https://bitrise.io), \ngo to your
`Account Settings` page, and select the [Security tab](https://www.bitrise.io/me/profile#/security)
on the left side.\n"
is_expand: true
is_required: true
is_sensitive: true
summary: Your access token
title: Bitrise Access Token
- opts:
description: The workflow(s) to start. One workflow per line.
is_required: true
summary: The workflow(s) to start. One workflow per line.
title: Workflows
workflows: null
- environment_key_list: null
opts:
description: "The keys of the envs which will be shared with the triggered workflows\n\n\n**FORMAT**
Seperate the keys with new line. E.g: \n`ENV_1\nENV_2\nENV_3`"
is_expand: false
is_required: false
summary: The keys of the envs which will be shared with the triggered workflows.
title: Environments to share
- opts:
description: Should the step wait for the builds to be finished?
is_required: false
summary: Should the step wait for the builds to be finished?
title: Wait for builds
value_options:
- "false"
- "true"
wait_for_builds: "false"
- opts:
description: You can enable the verbose log for easier debugging.
is_required: true
title: Enable verbose log?
value_options:
- "yes"
- "no"
verbose: "no"
outputs:
- ROUTER_STARTED_BUILD_SLUGS: null
opts:
description: Newline separated list of started build slugs.
summary: Newline separated list of started build slugs.
title: Started Build Slugs
================================================
FILE: steps/build-router-start/0.12.1/step.yml
================================================
title: Bitrise Start Build
summary: Starts the given workflows in the same app
description: Starts the given workflows in the same app
website: https://github.com/bitrise-steplib/bitrise-step-build-router-start
source_code_url: https://github.com/bitrise-steplib/bitrise-step-build-router-start
support_url: https://github.com/bitrise-steplib/bitrise-step-build-router-start/issues
published_at: 2020-05-19T11:57:56.901341958Z
source:
git: https://github.com/bitrise-steplib/bitrise-step-build-router-start.git
commit: ce48df3e40459dc74439a42f0ff4b8d06003cd65
type_tags:
- utility
toolkit:
go:
package_name: github.com/bitrise-steplib/bitrise-step-build-router-start
is_always_run: false
is_skippable: false
inputs:
- access_token: null
opts:
description: "Your access token\n\nTo acquire a `Personal Access Token` for your
user, sign in with that user on [bitrise.io](https://bitrise.io), \ngo to your
`Account Settings` page, and select the [Security tab](https://www.bitrise.io/me/profile#/security)
on the left side.\n"
is_expand: true
is_required: true
is_sensitive: true
summary: Your access token
title: Bitrise Access Token
- opts:
description: The workflow(s) to start. One workflow per line.
is_required: true
summary: The workflow(s) to start. One workflow per line.
title: Workflows
workflows: null
- environment_key_list: null
opts:
description: "The keys of the envs which will be shared with the triggered workflows\n\n\n**FORMAT**
Seperate the keys with new line. E.g: \n`ENV_1\nENV_2\nENV_3`"
is_expand: false
is_required: false
summary: The keys of the envs which will be shared with the triggered workflows.
title: Environments to share
- opts:
description: Should the step wait for the builds to be finished?
is_required: false
summary: Should the step wait for the builds to be finished?
title: Wait for builds
value_options:
- "false"
- "true"
wait_for_builds: "false"
- opts:
description: You can enable the verbose log for easier debugging.
is_required: true
title: Enable verbose log?
value_options:
- "yes"
- "no"
verbose: "no"
outputs:
- ROUTER_STARTED_BUILD_SLUGS: null
opts:
description: Newline separated list of started build slugs.
summary: Newline separated list of started build slugs.
title: Started Build Slugs
================================================
FILE: steps/build-router-start/0.13.0/step.yml
================================================
title: Bitrise Start Build
summary: Starts the given workflows in the same app
description: Starts the given workflows in the same app
website: https://github.com/bitrise-steplib/bitrise-step-build-router-start
source_code_url: https://github.com/bitrise-steplib/bitrise-step-build-router-start
support_url: https://github.com/bitrise-steplib/bitrise-step-build-router-start/issues
published_at: 2020-07-20T18:30:56.144691991Z
source:
git: https://github.com/bitrise-steplib/bitrise-step-build-router-start.git
commit: 7b09287ecbe125d0e309de222e2317a8d762a3f0
type_tags:
- utility
toolkit:
go:
package_name: github.com/bitrise-steplib/bitrise-step-build-router-start
is_always_run: false
is_skippable: false
inputs:
- access_token: null
opts:
description: "Your access token\n\nTo acquire a `Personal Access Token` for your
user, sign in with that user on [bitrise.io](https://bitrise.io), \ngo to your
`Account Settings` page, and select the [Security tab](https://www.bitrise.io/me/profile#/security)
on the left side.\n"
is_expand: true
is_required: true
is_sensitive: true
summary: Your access token
title: Bitrise Access Token
- opts:
description: The workflow(s) to start. One workflow per line.
is_required: true
summary: The workflow(s) to start. One workflow per line.
title: Workflows
workflows: null
- environment_key_list: null
opts:
description: "The keys of the envs which will be shared with the triggered workflows\n\n\n**FORMAT**
Seperate the keys with new line. E.g: \n`ENV_1\nENV_2\nENV_3`"
is_expand: false
is_required: false
summary: The keys of the envs which will be shared with the triggered workflows.
title: Environments to share
- opts:
description: Should the step wait for the builds to be finished?
is_required: false
summary: Should the step wait for the builds to be finished?
title: Wait for builds
value_options:
- "false"
- "true"
wait_for_builds: "false"
- build_artifacts_save_path: null
opts:
description: |
This is where the artifacts will be saved to so you can access them in the workflow
is_required: false
is_sensitive: false
summary: This is where the artifacts will be saved to if wait_for_builds == true
title: Path to save the Artifacts in (leave empty to not save artifacts)
- opts:
description: You can enable the verbose log for easier debugging.
is_required: true
title: Enable verbose log?
value_options:
- "yes"
- "no"
verbose: "no"
outputs:
- ROUTER_STARTED_BUILD_SLUGS: null
opts:
description: Newline separated list of started build slugs.
summary: Newline separated list of started build slugs.
title: Started Build Slugs
================================================
FILE: steps/build-router-start/0.14.0/step.yml
================================================
title: Bitrise Start Build
summary: Starts the given workflows in the same app
description: Starts the given workflows in the same app
website: https://github.com/bitrise-steplib/bitrise-step-build-router-start
source_code_url: https://github.com/bitrise-steplib/bitrise-step-build-router-start
support_url: https://github.com/bitrise-steplib/bitrise-step-build-router-start/issues
published_at: 2020-08-05T16:47:54.606978353Z
source:
git: https://github.com/bitrise-steplib/bitrise-step-build-router-start.git
commit: 63a29bf46ca6346a88030bd5208163e241cff8f8
type_tags:
- utility
toolkit:
go:
package_name: github.com/bitrise-steplib/bitrise-step-build-router-start
is_always_run: false
is_skippable: false
inputs:
- access_token: null
opts:
description: "Your access token\n\nTo acquire a `Personal Access Token` for your
user, sign in with that user on [bitrise.io](https://bitrise.io), \ngo to your
`Account Settings` page, and select the [Security tab](https://www.bitrise.io/me/profile#/security)
on the left side.\n"
is_expand: true
is_required: true
is_sensitive: true
summary: Your access token
title: Bitrise Access Token
- opts:
description: The workflow(s) to start. One workflow per line.
is_required: true
summary: The workflow(s) to start. One workflow per line.
title: Workflows
workflows: null
- environment_key_list: null
opts:
description: "The keys of the envs which will be shared with the triggered workflows\n\n\n**FORMAT**
Seperate the keys with new line. E.g: \n`ENV_1\nENV_2\nENV_3`"
is_expand: false
is_required: false
summary: The keys of the envs which will be shared with the triggered workflows.
title: Environments to share
- opts:
description: Should the step wait for the builds to be finished?
is_required: false
summary: Should the step wait for the builds to be finished?
title: Wait for builds
value_options:
- "false"
- "true"
wait_for_builds: "false"
- build_artifacts_save_path: null
opts:
description: |
This is where the artifacts will be saved to so you can access them in the workflow
is_required: false
is_sensitive: false
summary: This is where the artifacts will be saved to if wait_for_builds == true
title: Path to save the Artifacts in (leave empty to not save artifacts)
- abort_on_fail: "no"
opts:
description: Abort all started builds if any build fails
is_required: true
is_sensitive: false
title: Abort all if any fail
value_options:
- "yes"
- "no"
- opts:
description: You can enable the verbose log for easier debugging.
is_required: true
title: Enable verbose log?
value_options:
- "yes"
- "no"
verbose: "no"
outputs:
- ROUTER_STARTED_BUILD_SLUGS: null
opts:
description: Newline separated list of started build slugs.
summary: Newline separated list of started build slugs.
title: Started Build Slugs
================================================
FILE: steps/build-router-start/0.14.1/step.yml
================================================
title: Bitrise Start Build
summary: Starts the given workflows in the same app
description: Starts the given workflows in the same app
website: https://github.com/bitrise-steplib/bitrise-step-build-router-start
source_code_url: https://github.com/bitrise-steplib/bitrise-step-build-router-start
support_url: https://github.com/bitrise-steplib/bitrise-step-build-router-start/issues
published_at: 2021-07-01T21:37:18.587148995Z
source:
git: https://github.com/bitrise-steplib/bitrise-step-build-router-start.git
commit: 91166a6c3f4c7d1bdbfc8ebd1178eb879a7a3b9e
type_tags:
- utility
toolkit:
go:
package_name: github.com/bitrise-steplib/bitrise-step-build-router-start
is_always_run: false
is_skippable: false
inputs:
- access_token: null
opts:
description: "Your access token\n\nTo acquire a `Personal Access Token` for your
user, sign in with that user on [bitrise.io](https://bitrise.io), \ngo to your
`Account Settings` page, and select the [Security tab](https://www.bitrise.io/me/profile#/security)
on the left side.\n"
is_expand: true
is_required: true
is_sensitive: true
summary: Your access token
title: Bitrise Access Token
- opts:
description: The workflow(s) to start. One workflow per line.
is_required: true
summary: The workflow(s) to start. One workflow per line.
title: Workflows
workflows: null
- environment_key_list: null
opts:
description: "The keys of the envs which will be shared with the triggered workflows\n\n\n**FORMAT**
Seperate the keys with new line. E.g: \n`ENV_1\nENV_2\nENV_3`"
is_expand: false
is_required: false
summary: The keys of the envs which will be shared with the triggered workflows.
title: Environments to share
- opts:
description: Should the step wait for the builds to be finished?
is_required: false
summary: Should the step wait for the builds to be finished?
title: Wait for builds
value_options:
- "false"
- "true"
wait_for_builds: "false"
- build_artifacts_save_path: null
opts:
description: |
This is where the artifacts will be saved to so you can access them in the workflow
is_required: false
is_sensitive: false
summary: This is where the artifacts will be saved to if wait_for_builds == true
title: Path to save the Artifacts in (leave empty to not save artifacts)
- abort_on_fail: "no"
opts:
description: Abort all started builds if any build fails
is_required: true
is_sensitive: false
title: Abort all if any fail
value_options:
- "yes"
- "no"
- opts:
description: You can enable the verbose log for easier debugging.
is_required: true
title: Enable verbose log?
value_options:
- "yes"
- "no"
verbose: "no"
outputs:
- ROUTER_STARTED_BUILD_SLUGS: null
opts:
description: Newline separated list of started build slugs.
summary: Newline separated list of started build slugs.
title: Started Build Slugs
================================================
FILE: steps/build-router-start/0.14.2/step.yml
================================================
title: Bitrise Start Build
summary: Starts a new build with the specified Workflow(s).
description: "The Step starts a new build of the same app. In combination with the
**Bitrise Wait for Build** Step you can use this Step to start multiple builds that
run in parallel at the same time. You can put this Step in a Workflow that is triggered
by a code push or pull request and use this Step to trigger multiple other builds
at the same time. \n\nTo do that, you need multiple concurrencies - at least two!
You also need a Personal Access Token to use the Step: [check out our guide](https://devcenter.bitrise.io/getting-started/account-security/#generating-personal-access-tokens-manually)
on how to generate the token.\n\n### Configuring the Step \n\nBefore you run a build
with this Step, make sure you have your Personal Access Token stored in a [Secret
Environment Variable](https://devcenter.bitrise.io/builds/env-vars-secret-env-vars/#adding-a-secret-env-var).\n\nNote
that all builds you trigger using this Step will have the same build number! \n\n
\ 1. Set up at least two Workflows in the Workflow Editor: one will contain the
Step, the other will be triggered by the Step. \n You can set up as many Workflows
as you wish: your number of concurrencies limit the number of Workflows you can
run simultaneously.\n 2. Add the **Bitrise Start Build** Step to the part of the
Workflow where you want to trigger another build. \n 3. Add the Secret Env Var
storing your Personal Access Token to the **Bitrise Access Token** input of the
**Bitrise Start Build** Step: click the **Select secret variable** button, and choose
the key you created.\n 4. Find the **Workflows** input of the **Bitrise Start Build**
Step, and add the Workflow(s) you want to run. \n 5. In the **Environments to share**
input, add Environment Variables (Env Vars) that you want to share between the builds
triggered by the Step. \n 6. Add the **Bitrise Wait for Build** Step to the end
of Workflow that contains the **Bitrise Start Build** Step. \n 7. Add the Secret
Env Var storing your Personal Access Token to the **Bitrise Access Token** input
of the **Bitrise Wait for Build** Step: click the **Select secret variable** button,
and choose the key you created.\n 8. In the **Build slugs** input, define the builds
for the Step. \n The build slugs you need are stored by the **Bitrise Start
Build** Step in the `$ROUTER_STARTED_BUILD_SLUGS` Env Var. As long as the builds
defined by the slugs are running, the Step will hold the build it is running in.
The build will fail if any of the builds included in the Step fail.\n 9. Optionally,
you can save the build artifacts from the builds and configure the Step to abort
all builds if any of the builds fail:\n - In **The path of the build artifacts**
input, set where you'd like to save the artifacts. \n The value of the input
must be an actual, existing path, ending with `/`. The `BITRISE_DEPLOY_DIR` Environment
Variable is NOT a valid value.\n - Set the **Abort all builds if one fails**
input to either `yes` or `no`. \n Please note that the build artifacts of child
Workflows - Workflows triggered by this Step - will be only available if the child
Workflow contains a **Deploy to Bitrise.io** Step.\n\n### Troubleshooting \n\n-
Make sure you have both the **Bitrise Start Build** and the **Bitrise Wait for Build**
Steps in the right place in your initial Workflow. \n- Always check all your builds:
if your concurrencies are taken up by other builds, this Step cannot start new ones.
\n- Your Personal Access Token can expire! Make sure it's still valid - without
it, you can't start new builds with this Step. \n\n### Useful links \n\n- [Starting
parallel builds with a single Workflow](https://devcenter.bitrise.io/builds/triggering-builds/trigger-multiple-Workflows/)\n\n###
Related Steps \n\n- [Bitrise Wait for Build](https://www.bitrise.io/integrations/steps/build-router-start)\n-
[Bitrise Run](https://www.bitrise.io/integrations/steps/bitrise-run)\n- [Build Status
Change](https://www.bitrise.io/integrations/steps/build-status-change)"
website: https://github.com/bitrise-steplib/bitrise-step-build-router-start
source_code_url: https://github.com/bitrise-steplib/bitrise-step-build-router-start
support_url: https://github.com/bitrise-steplib/bitrise-step-build-router-start/issues
published_at: 2021-09-13T11:58:51.344829553Z
source:
git: https://github.com/bitrise-steplib/bitrise-step-build-router-start.git
commit: 0e94e7718f8cf0d5c457591c6f64dee70f591049
type_tags:
- utility
toolkit:
go:
package_name: github.com/bitrise-steplib/bitrise-step-build-router-start
is_always_run: false
is_skippable: false
inputs:
- access_token: null
opts:
description: "Your access token\n\nTo acquire a `Personal Access Token` for your
user, sign in with that user on [bitrise.io](https://bitrise.io), \ngo to your
`Account Settings` page, and select the [Security tab](https://www.bitrise.io/me/profile#/security)
on the left side.\n"
is_expand: true
is_required: true
is_sensitive: true
summary: Your access token
title: Bitrise Access Token
- opts:
description: The Workflow(s) to start. One Workflow per line.
is_required: true
summary: The Workflow(s) to start. One Workflow per line.
title: Workflows
workflows: null
- environment_key_list: null
opts:
description: "The keys of the envs which will be shared with the triggered Workflows\n\n\n**FORMAT**
Seperate the keys with new line. E.g: \n`ENV_1\nENV_2\nENV_3`"
is_expand: false
is_required: false
summary: The keys of the envs which will be shared with the triggered Workflows.
title: Environments to share
- opts:
description: Should the Step wait for the builds to be finished?
is_required: false
summary: Should the Step wait for the builds to be finished?
title: Wait for builds
value_options:
- "false"
- "true"
wait_for_builds: "false"
- build_artifacts_save_path: null
opts:
description: "The path where build artifacts will be saved to if the **Wait for
builds** input is set to `true`. \n\nPlease note that the path must be an actual,
existing path, ending with `/`. The `BITRISE_DEPLOY_DIR` Environment Variable
is NOT a valid value. \n\nNote that when this Step triggers a Workflow, the
artifacts of the triggered Workflow are only available to the Workflow that
contains this Step, and not other Workflows. \nThe triggered Workflow MUST have
a **Deploy to Bitrise.io** Step to deploy build artifacts!\n"
is_required: false
is_sensitive: false
summary: The path that the build artifacts will be saved to if the **Wait for
builds** input is set to `true`.
title: The path of the build artifacts
- abort_on_fail: "no"
opts:
description: Abort all started builds if any build fails
is_required: true
is_sensitive: false
title: Abort all builds if any of them
value_options:
- "yes"
- "no"
- opts:
description: You can enable the verbose log for easier debugging.
is_required: true
title: Enable verbose log?
value_options:
- "yes"
- "no"
verbose: "no"
outputs:
- ROUTER_STARTED_BUILD_SLUGS: null
opts:
description: Newline separated list of started build slugs.
summary: Newline separated list of started build slugs.
title: Started Build Slugs
================================================
FILE: steps/build-router-start/0.14.3/step.yml
================================================
title: Bitrise Start Build
summary: Starts a new build with the specified Workflow(s).
description: "The Step starts a new build of the same app. In combination with the
**Bitrise Wait for Build** Step you can use this Step to start multiple builds that
run in parallel at the same time. You can put this Step in a Workflow that is triggered
by a code push or pull request and use this Step to trigger multiple other builds
at the same time. \n\nTo do that, you need multiple concurrencies - at least two!
You also need a Personal Access Token to use the Step: [check out our guide](https://devcenter.bitrise.io/getting-started/account-security/#generating-personal-access-tokens-manually)
on how to generate the token.\n\nIf manual build approval is enabled for the project,
this step won't be able to start new builds automatically.\n\n### Configuring the
Step \n\nBefore you run a build with this Step, make sure you have your Personal
Access Token stored in a [Secret Environment Variable](https://devcenter.bitrise.io/builds/env-vars-secret-env-vars/#adding-a-secret-env-var).\n\nNote
that all builds you trigger using this Step will have the same build number! \n\n
\ 1. Set up at least two Workflows in the Workflow Editor: one will contain the
Step, the other will be triggered by the Step. \n You can set up as many Workflows
as you wish: your number of concurrencies limit the number of Workflows you can
run simultaneously.\n 2. Add the **Bitrise Start Build** Step to the part of the
Workflow where you want to trigger another build. \n 3. Add the Secret Env Var
storing your Personal Access Token to the **Bitrise Access Token** input of the
**Bitrise Start Build** Step: click the **Select secret variable** button, and choose
the key you created.\n 4. Find the **Workflows** input of the **Bitrise Start Build**
Step, and add the Workflow(s) you want to run. \n 5. In the **Environments to share**
input, add Environment Variables (Env Vars) that you want to share between the builds
triggered by the Step. \n 6. Add the **Bitrise Wait for Build** Step to the end
of Workflow that contains the **Bitrise Start Build** Step. \n 7. Add the Secret
Env Var storing your Personal Access Token to the **Bitrise Access Token** input
of the **Bitrise Wait for Build** Step: click the **Select secret variable** button,
and choose the key you created.\n 8. In the **Build slugs** input, define the builds
for the Step. \n The build slugs you need are stored by the **Bitrise Start
Build** Step in the `$ROUTER_STARTED_BUILD_SLUGS` Env Var. As long as the builds
defined by the slugs are running, the Step will hold the build it is running in.
The build will fail if any of the builds included in the Step fail.\n 9. Optionally,
you can save the build artifacts from the builds and configure the Step to abort
all builds if any of the builds fail:\n - In **The path of the build artifacts**
input, set where you'd like to save the artifacts. \n The value of the input
must be an actual, existing path, ending with `/`. The `BITRISE_DEPLOY_DIR` Environment
Variable is NOT a valid value.\n - Set the **Abort all builds if one fails**
input to either `yes` or `no`. \n Please note that the build artifacts of child
Workflows - Workflows triggered by this Step - will be only available if the child
Workflow contains a **Deploy to Bitrise.io** Step.\n\n### Troubleshooting \n\n-
Make sure you have both the **Bitrise Start Build** and the **Bitrise Wait for Build**
Steps in the right place in your initial Workflow. \n- Always check all your builds:
if your concurrencies are taken up by other builds, this Step cannot start new ones.
\n- Your Personal Access Token can expire! Make sure it's still valid - without
it, you can't start new builds with this Step. \n\n### Useful links \n\n- [Starting
parallel builds with a single Workflow](https://devcenter.bitrise.io/builds/triggering-builds/trigger-multiple-workflows/)
\n\n\n### Related Steps \n\n- [Bitrise Wait for Build](https://www.bitrise.io/integrations/steps/build-router-start)\n-
[Bitrise Run](https://www.bitrise.io/integrations/steps/bitrise-run)\n- [Build Status
Change](https://www.bitrise.io/integrations/steps/build-status-change)"
website: https://github.com/bitrise-steplib/bitrise-step-build-router-start
source_code_url: https://github.com/bitrise-steplib/bitrise-step-build-router-start
support_url: https://github.com/bitrise-steplib/bitrise-step-build-router-start/issues
published_at: 2021-09-27T14:10:57.908078119Z
source:
git: https://github.com/bitrise-steplib/bitrise-step-build-router-start.git
commit: 65b6db13972d0b8e491565455b334df766348e9d
type_tags:
- utility
toolkit:
go:
package_name: github.com/bitrise-steplib/bitrise-step-build-router-start
is_always_run: false
is_skippable: false
inputs:
- access_token: null
opts:
description: "Your access token\n\nTo acquire a `Personal Access Token` for your
user, sign in with that user on [bitrise.io](https://bitrise.io), \ngo to your
`Account Settings` page, and select the [Security tab](https://www.bitrise.io/me/profile#/security)
on the left side.\n"
is_expand: true
is_required: true
is_sensitive: true
summary: Your access token
title: Bitrise Access Token
- opts:
description: The Workflow(s) to start. One Workflow per line.
is_required: true
summary: The Workflow(s) to start. One Workflow per line.
title: Workflows
workflows: null
- environment_key_list: null
opts:
description: "The keys of the envs which will be shared with the triggered Workflows\n\n\n**FORMAT**
Seperate the keys with new line. E.g: \n`ENV_1\nENV_2\nENV_3`"
is_expand: false
is_required: false
summary: The keys of the envs which will be shared with the triggered Workflows.
title: Environments to share
- opts:
description: Should the Step wait for the builds to be finished?
is_required: false
summary: Should the Step wait for the builds to be finished?
title: Wait for builds
value_options:
- "false"
- "true"
wait_for_builds: "false"
- build_artifacts_save_path: null
opts:
description: "The path where build artifacts will be saved to if the **Wait for
builds** input is set to `true`. \n\nPlease note that the path must be an actual,
existing path, ending with `/`. The `BITRISE_DEPLOY_DIR` Environment Variable
is NOT a valid value. \n\nNote that when this Step triggers a Workflow, the
artifacts of the triggered Workflow are only available to the Workflow that
contains this Step, and not other Workflows. \nThe triggered Workflow MUST have
a **Deploy to Bitrise.io** Step to deploy build artifacts!\n"
is_required: false
is_sensitive: false
summary: The path that the build artifacts will be saved to if the **Wait for
builds** input is set to `true`.
title: The path of the build artifacts
- abort_on_fail: "no"
opts:
description: Abort all started builds if any build fails
is_required: true
is_sensitive: false
title: Abort all builds if any of them
value_options:
- "yes"
- "no"
- opts:
description: You can enable the verbose log for easier debugging.
is_required: true
title: Enable verbose log?
value_options:
- "yes"
- "no"
verbose: "no"
outputs:
- ROUTER_STARTED_BUILD_SLUGS: null
opts:
description: Newline separated list of started build slugs.
summary: Newline separated list of started build slugs.
title: Started Build Slugs
================================================
FILE: steps/build-router-start/0.14.4/step.yml
================================================
title: Bitrise Start Build
summary: Starts a new build with the specified Workflow(s).
description: "The Step starts a new build of the same app. In combination with the
**Bitrise Wait for Build** Step you can use this Step to start multiple builds that
run in parallel at the same time. You can put this Step in a Workflow that is triggered
by a code push or pull request and use this Step to trigger multiple other builds
at the same time. \n\nTo do that, you need multiple concurrencies - at least two!
You also need a Personal Access Token to use the Step: [check out our guide](https://devcenter.bitrise.io/getting-started/account-security/#generating-personal-access-tokens-manually)
on how to generate the token.\n\nIf manual build approval is enabled for the project,
this step won't be able to start new builds automatically.\n\n### Configuring the
Step \n\nBefore you run a build with this Step, make sure you have your Personal
Access Token stored in a [Secret Environment Variable](https://devcenter.bitrise.io/builds/env-vars-secret-env-vars/#adding-a-secret-env-var).\n\nNote
that all builds you trigger using this Step will have the same build number! \n\n
\ 1. Set up at least two Workflows in the Workflow Editor: one will contain the
Step, the other will be triggered by the Step. \n You can set up as many Workflows
as you wish: your number of concurrencies limit the number of Workflows you can
run simultaneously.\n 2. Add the **Bitrise Start Build** Step to the part of the
Workflow where you want to trigger another build. \n 3. Add the Secret Env Var
storing your Personal Access Token to the **Bitrise Access Token** input of the
**Bitrise Start Build** Step: click the **Select secret variable** button, and choose
the key you created.\n 4. Find the **Workflows** input of the **Bitrise Start Build**
Step, and add the Workflow(s) you want to run. \n 5. In the **Environments to share**
input, add Environment Variables (Env Vars) that you want to share between the builds
triggered by the Step. \n 6. Add the **Bitrise Wait for Build** Step to the end
of Workflow that contains the **Bitrise Start Build** Step. \n 7. Add the Secret
Env Var storing your Personal Access Token to the **Bitrise Access Token** input
of the **Bitrise Wait for Build** Step: click the **Select secret variable** button,
and choose the key you created.\n 8. In the **Build slugs** input, define the builds
for the Step. \n The build slugs you need are stored by the **Bitrise Start
Build** Step in the `$ROUTER_STARTED_BUILD_SLUGS` Env Var. As long as the builds
defined by the slugs are running, the Step will hold the build it is running in.
The build will fail if any of the builds included in the Step fail.\n 9. Optionally,
you can save the build artifacts from the builds and configure the Step to abort
all builds if any of the builds fail:\n - In **The path of the build artifacts**
input, set where you'd like to save the artifacts. \n The value of the input
must be an actual, existing path, ending with `/`.\n - Set the **Abort all builds
if one fails** input to either `yes` or `no`. \n Please note that the build
artifacts of child Workflows - Workflows triggered by this Step - will be only available
if the child Workflow contains a **Deploy to Bitrise.io** Step.\n\n### Troubleshooting
\n\n- Make sure you have both the **Bitrise Start Build** and the **Bitrise Wait
for Build** Steps in the right place in your initial Workflow. \n- Always check
all your builds: if your concurrencies are taken up by other builds, this Step cannot
start new ones. \n- Your Personal Access Token can expire! Make sure it's still
valid - without it, you can't start new builds with this Step. \n\n### Useful links
\n\n- [Starting parallel builds with a single Workflow](https://devcenter.bitrise.io/builds/triggering-builds/trigger-multiple-workflows/)
\n\n\n### Related Steps \n\n- [Bitrise Wait for Build](https://www.bitrise.io/integrations/steps/build-router-start)\n-
[Bitrise Run](https://www.bitrise.io/integrations/steps/bitrise-run)\n- [Build Status
Change](https://www.bitrise.io/integrations/steps/build-status-change)"
website: https://github.com/bitrise-steplib/bitrise-step-build-router-start
source_code_url: https://github.com/bitrise-steplib/bitrise-step-build-router-start
support_url: https://github.com/bitrise-steplib/bitrise-step-build-router-start/issues
published_at: 2022-03-01T10:38:55.83004121Z
source:
git: https://github.com/bitrise-steplib/bitrise-step-build-router-start.git
commit: 18c3e2b28690a1eb958b5968adc89a4affe51d7e
type_tags:
- utility
toolkit:
go:
package_name: github.com/bitrise-steplib/bitrise-step-build-router-start
is_always_run: false
is_skippable: false
inputs:
- access_token: null
opts:
description: "Your access token\n\nTo acquire a `Personal Access Token` for your
user, sign in with that user on [bitrise.io](https://bitrise.io), \ngo to your
`Account Settings` page, and select the [Security tab](https://www.bitrise.io/me/profile#/security)
on the left side.\n"
is_expand: true
is_required: true
is_sensitive: true
summary: Your access token
title: Bitrise Access Token
- opts:
description: The Workflow(s) to start. One Workflow per line.
is_required: true
summary: The Workflow(s) to start. One Workflow per line.
title: Workflows
workflows: null
- environment_key_list: null
opts:
description: "The keys of the envs which will be shared with the triggered Workflows\n\n\n**FORMAT**
Seperate the keys with new line. E.g: \n`ENV_1\nENV_2\nENV_3`"
is_expand: false
is_required: false
summary: The keys of the envs which will be shared with the triggered Workflows.
title: Environments to share
- opts:
description: Should the Step wait for the builds to be finished?
is_required: false
summary: Should the Step wait for the builds to be finished?
title: Wait for builds
value_options:
- "false"
- "true"
wait_for_builds: "false"
- build_artifacts_save_path: null
opts:
description: "The path where build artifacts will be saved to if the **Wait for
builds** input is set to `true`. \n\nNote that when this Step triggers a Workflow,
the artifacts of the triggered Workflow are only available to the Workflow that
contains this Step, and not other Workflows. \nThe triggered Workflow MUST have
a **Deploy to Bitrise.io** Step to deploy build artifacts!\n"
is_required: false
is_sensitive: false
summary: The path that the build artifacts will be saved to if the **Wait for
builds** input is set to `true`.
title: The path of the build artifacts
- abort_on_fail: "no"
opts:
description: Abort all started builds if any build fails
is_required: true
is_sensitive: false
title: Abort all builds if any of them
value_options:
- "yes"
- "no"
- opts:
description: You can enable the verbose log for easier debugging.
is_required: true
title: Enable verbose log?
value_options:
- "yes"
- "no"
verbose: "no"
outputs:
- ROUTER_STARTED_BUILD_SLUGS: null
opts:
description: Newline separated list of started build slugs.
summary: Newline separated list of started build slugs.
title: Started Build Slugs
================================================
FILE: steps/build-router-start/0.14.5/step.yml
================================================
title: Bitrise Start Build
summary: Starts a new build with the specified Workflow(s).
description: "The Step starts a new build of the same app with specified Workflow(s).
On its own, the Step can be used to start multiple builds that run in parallel.
In combination with the **Bitrise Wait for Build** Step, you can also add additional
Steps to run in parallel while the triggered builds are running. For an example,
check out our [Start builds from a parent Workflow](https://devcenter.bitrise.io/en/steps-and-workflows/generic-workflow-recipes/start--parallel--builds-from-the-workflow.html##)
Workflow Recipe. \nYou can put this Step in a Workflow that is triggered by a code
push or pull request and use this Step to trigger multiple other builds at the same
time. \n\nTo do that, you need multiple concurrencies - at least two! You also need
a Personal Access Token to use the Step: [check out our guide](https://devcenter.bitrise.io/getting-started/account-security/#generating-personal-access-tokens-manually)
on how to generate the token.\n\nIf manual build approval is enabled for the project,
this step won't be able to start new builds automatically.\n\n### Configuring the
Step \n\nBefore you run a build with this Step, make sure you have your Personal
Access Token stored in a [Secret Environment Variable](https://devcenter.bitrise.io/builds/env-vars-secret-env-vars/#adding-a-secret-env-var).\n\nNote
that all builds you trigger using this Step will have the same build number! \n\n
\ 1. Set up at least two Workflows in the Workflow Editor: one will contain the
Step, the other will be triggered by the Step. \n You can set up as many Workflows
as you wish: your number of concurrencies limit the number of Workflows you can
run simultaneously.\n 2. Add the **Bitrise Start Build** Step to the part of the
Workflow where you want to trigger another build. \n 3. Add the Secret Env Var
storing your Personal Access Token to the **Bitrise Access Token** input of the
**Bitrise Start Build** Step: click the **Select secret variable** button, and choose
the key you created.\n 4. Find the **Workflows** input of the **Bitrise Start Build**
Step, and add the Workflow(s) you want to run. \n 5. In the **Environments to share**
input, add Environment Variables (Env Vars) that you want to share between the builds
triggered by the Step.\n 6. (Optional) You can set the **Wait for builds** input
to `true` if you would like to pause the current build until the triggered build(s)
are finished. \n 7. (Optional) You can add any Step you would like to run in parallel
while the triggered Workflow(s) are running in the parent Workflow.\n Make sure
to add the **Bitrise Wait for Build** Step to the end of Workflow.\n 8. Add the
Secret Env Var storing your Personal Access Token to the **Bitrise Access Token**
input of the **Bitrise Wait for Build** Step: click the **Select secret variable**
button, and choose the key you created.\n 9. In the **Build slugs** input, define
the builds for the Step. \n The build slugs you need are stored by the **Bitrise
Start Build** Step in the `$ROUTER_STARTED_BUILD_SLUGS` Env Var. As long as the
builds defined by the slugs are running, the Step will hold the build it is running
in. The build will fail if any of the builds included in the Step fail.\n 10. Optionally,
you can save the build artifacts from the builds and configure the Step to abort
all builds if any of the builds fail:\n - In **The path of the build artifacts**
input, set where you'd like to save the artifacts. \n The value of the input
must be an actual, existing path, ending with `/`.\n - Set the **Abort all builds
if one fails** input to either `yes` or `no`. \n Please note that the build
artifacts of child Workflows - Workflows triggered by this Step - will be only available
if the child Workflow contains a **Deploy to Bitrise.io** Step.\n\n### Troubleshooting
\n\n- Make sure you have both the **Bitrise Start Build** and the **Bitrise Wait
for Build** Steps in the right place in your initial Workflow. \n- Always check
all your builds: if your concurrencies are taken up by other builds, this Step cannot
start new ones. \n- Your Personal Access Token can expire! Make sure it's still
valid - without it, you can't start new builds with this Step. \n\n### Useful links
\n\n- [Starting parallel builds with a single Workflow](https://devcenter.bitrise.io/builds/triggering-builds/trigger-multiple-workflows/)\n-
[Start builds from a parent Workflow](https://devcenter.bitrise.io/en/steps-and-workflows/generic-workflow-recipes/start--parallel--builds-from-the-workflow.html##)
\ \n\n\n### Related Steps \n\n- [Bitrise Wait for Build](https://www.bitrise.io/integrations/steps/build-router-wait)\n-
[Bitrise Run](https://www.bitrise.io/integrations/steps/bitrise-run)\n- [Build Status
Change](https://www.bitrise.io/integrations/steps/build-status-change)"
website: https://github.com/bitrise-steplib/bitrise-step-build-router-start
source_code_url: https://github.com/bitrise-steplib/bitrise-step-build-router-start
support_url: https://github.com/bitrise-steplib/bitrise-step-build-router-start/issues
published_at: 2022-08-01T15:43:30.713049078Z
source:
git: https://github.com/bitrise-steplib/bitrise-step-build-router-start.git
commit: 931fe89f1d06a049e1c996b119c84f5dc3f9ba58
type_tags:
- utility
toolkit:
go:
package_name: github.com/bitrise-steplib/bitrise-step-build-router-start
is_always_run: false
is_skippable: false
inputs:
- access_token: null
opts:
description: "Your access token\n\nTo acquire a `Personal Access Token` for your
user, sign in with that user on [bitrise.io](https://bitrise.io), \ngo to your
`Account Settings` page, and select the [Security tab](https://www.bitrise.io/me/profile#/security)
on the left side.\n"
is_expand: true
is_required: true
is_sensitive: true
summary: Your access token
title: Bitrise Access Token
- opts:
description: The Workflow(s) to start. One Workflow per line.
is_required: true
summary: The Workflow(s) to start. One Workflow per line.
title: Workflows
workflows: null
- environment_key_list: null
opts:
description: "The keys of the envs which will be shared with the triggered Workflows\n\n\n**FORMAT**
Seperate the keys with new line. E.g: \n`ENV_1\nENV_2\nENV_3`"
is_expand: false
is_required: false
summary: The keys of the envs which will be shared with the triggered Workflows.
title: Environments to share
- opts:
description: Should the Step wait for the builds to be finished?
is_required: false
summary: Should the Step wait for the builds to be finished?
title: Wait for builds
value_options:
- "false"
- "true"
wait_for_builds: "false"
- build_artifacts_save_path: null
opts:
description: "The path where build artifacts will be saved to if the **Wait for
builds** input is set to `true`. \n\nNote that when this Step triggers a Workflow,
the artifacts of the triggered Workflow are only available to the Workflow that
contains this Step, and not other Workflows. \nThe triggered Workflow MUST have
a **Deploy to Bitrise.io** Step to deploy build artifacts!\n"
is_required: false
is_sensitive: false
summary: The path that the build artifacts will be saved to if the **Wait for
builds** input is set to `true`.
title: The path of the build artifacts
- abort_on_fail: "no"
opts:
description: Abort all started builds if any build fails
is_required: true
is_sensitive: false
title: Abort all builds if any of them
value_options:
- "yes"
- "no"
- opts:
description: You can enable the verbose log for easier debugging.
is_required: true
title: Enable verbose log?
value_options:
- "yes"
- "no"
verbose: "no"
outputs:
- ROUTER_STARTED_BUILD_SLUGS: null
opts:
description: Newline separated list of started build slugs.
summary: Newline separated list of started build slugs.
title: Started Build Slugs
================================================
FILE: steps/build-router-start/0.14.6/step.yml
================================================
title: Bitrise Start Build
summary: Starts a new build with the specified Workflow(s).
description: "The Step starts a new build of the same app with specified Workflow(s).
On its own, the Step can be used to start multiple builds that run in parallel.
In combination with the **Bitrise Wait for Build** Step, you can also add additional
Steps to run in parallel while the triggered builds are running. For an example,
check out our [Start builds from a parent Workflow](https://devcenter.bitrise.io/en/steps-and-workflows/generic-workflow-recipes/start--parallel--builds-from-the-workflow.html##)
Workflow Recipe. \nYou can put this Step in a Workflow that is triggered by a code
push or pull request and use this Step to trigger multiple other builds at the same
time. \n\nTo do that, you need multiple concurrencies - at least two! You also need
a Personal Access Token to use the Step: [check out our guide](https://devcenter.bitrise.io/getting-started/account-security/#generating-personal-access-tokens-manually)
on how to generate the token.\n\nIf manual build approval is enabled for the project,
this step won't be able to start new builds automatically.\n\n### Configuring the
Step \n\nBefore you run a build with this Step, make sure you have your Personal
Access Token stored in a [Secret Environment Variable](https://devcenter.bitrise.io/builds/env-vars-secret-env-vars/#adding-a-secret-env-var).\n\nNote
that all builds you trigger using this Step will have the same build number! \n\n
\ 1. Set up at least two Workflows in the Workflow Editor: one will contain the
Step, the other will be triggered by the Step. \n You can set up as many Workflows
as you wish: your number of concurrencies limit the number of Workflows you can
run simultaneously.\n 2. Add the **Bitrise Start Build** Step to the part of the
Workflow where you want to trigger another build. \n 3. Add the Secret Env Var
storing your Personal Access Token to the **Bitrise Access Token** input of the
**Bitrise Start Build** Step: click the **Select secret variable** button, and choose
the key you created.\n 4. Find the **Workflows** input of the **Bitrise Start Build**
Step, and add the Workflow(s) you want to run. \n 5. In the **Environments to share**
input, add Environment Variables (Env Vars) that you want to share between the builds
triggered by the Step.\n 6. (Optional) You can set the **Wait for builds** input
to `true` if you would like to pause the current build until the triggered build(s)
are finished. \n 7. (Optional) You can add any Step you would like to run in parallel
while the triggered Workflow(s) are running in the parent Workflow.\n Make sure
to add the **Bitrise Wait for Build** Step to the end of Workflow.\n 8. Add the
Secret Env Var storing your Personal Access Token to the **Bitrise Access Token**
input of the **Bitrise Wait for Build** Step: click the **Select secret variable**
button, and choose the key you created.\n 9. In the **Build slugs** input, define
the builds for the Step. \n The build slugs you need are stored by the **Bitrise
Start Build** Step in the `$ROUTER_STARTED_BUILD_SLUGS` Env Var. As long as the
builds defined by the slugs are running, the Step will hold the build it is running
in. The build will fail if any of the builds included in the Step fail.\n 10. Optionally,
you can save the build artifacts from the builds and configure the Step to abort
all builds if any of the builds fail:\n - In **The path of the build artifacts**
input, set where you'd like to save the artifacts. \n The value of the input
must be an actual, existing path, ending with `/`.\n - Set the **Abort all builds
if one fails** input to either `yes` or `no`. \n Please note that the build
artifacts of child Workflows - Workflows triggered by this Step - will be only available
if the child Workflow contains a **Deploy to Bitrise.io** Step.\n\n### Troubleshooting
\n\n- Make sure you have both the **Bitrise Start Build** and the **Bitrise Wait
for Build** Steps in the right place in your initial Workflow. \n- Always check
all your builds: if your concurrencies are taken up by other builds, this Step cannot
start new ones. \n- Your Personal Access Token can expire! Make sure it's still
valid - without it, you can't start new builds with this Step. \n\n### Useful links
\n\n- [Starting parallel builds with a single Workflow](https://devcenter.bitrise.io/builds/triggering-builds/trigger-multiple-workflows/)\n-
[Start builds from a parent Workflow](https://devcenter.bitrise.io/en/steps-and-workflows/generic-workflow-recipes/start--parallel--builds-from-the-workflow.html##)
\ \n\n\n### Related Steps \n\n- [Bitrise Wait for Build](https://www.bitrise.io/integrations/steps/build-router-wait)\n-
[Bitrise Run](https://www.bitrise.io/integrations/steps/bitrise-run)\n- [Build Status
Change](https://www.bitrise.io/integrations/steps/build-status-change)"
website: https://github.com/bitrise-steplib/bitrise-step-build-router-start
source_code_url: https://github.com/bitrise-steplib/bitrise-step-build-router-start
support_url: https://github.com/bitrise-steplib/bitrise-step-build-router-start/issues
published_at: 2022-08-09T10:07:04.465910714Z
source:
git: https://github.com/bitrise-steplib/bitrise-step-build-router-start.git
commit: b134fc58b80f0761ee6c4e324f91b5540152a12b
type_tags:
- utility
toolkit:
go:
package_name: github.com/bitrise-steplib/bitrise-step-build-router-start
is_always_run: false
is_skippable: false
inputs:
- access_token: null
opts:
description: "Your access token\n\nTo acquire a `Personal Access Token` for your
user, sign in with that user on [bitrise.io](https://bitrise.io), \ngo to your
`Account Settings` page, and select the [Security tab](https://www.bitrise.io/me/profile#/security)
on the left side.\n"
is_expand: true
is_required: true
is_sensitive: true
summary: Your access token
title: Bitrise Access Token
- opts:
description: The Workflow(s) to start. One Workflow per line.
is_required: true
summary: The Workflow(s) to start. One Workflow per line.
title: Workflows
workflows: null
- environment_key_list: null
opts:
description: |-
The keys of the envs which will be shared with the triggered Workflows.
**FORMAT** Seperate the keys with new line. E.g:
`ENV_1`
`ENV_2`
`ENV_3`
is_expand: false
is_required: false
summary: The keys of the envs which will be shared with the triggered Workflows.
title: Environments to share
- opts:
description: Should the Step wait for the builds to be finished?
is_required: false
summary: Should the Step wait for the builds to be finished?
title: Wait for builds
value_options:
- "false"
- "true"
wait_for_builds: "false"
- build_artifacts_save_path: null
opts:
description: "The path where build artifacts will be saved to if the **Wait for
builds** input is set to `true`. \n\nNote that when this Step triggers a Workflow,
the artifacts of the triggered Workflow are only available to the Workflow that
contains this Step, and not other Workflows. \nThe triggered Workflow MUST have
a **Deploy to Bitrise.io** Step to deploy build artifacts!\n"
is_required: false
is_sensitive: false
summary: The path that the build artifacts will be saved to if the **Wait for
builds** input is set to `true`.
title: The path of the build artifacts
- abort_on_fail: "no"
opts:
description: Abort all started builds if any build fails
is_required: true
is_sensitive: false
title: Abort all builds if any of them
value_options:
- "yes"
- "no"
- opts:
description: You can enable the verbose log for easier debugging.
is_required: true
title: Enable verbose log?
value_options:
- "yes"
- "no"
verbose: "no"
outputs:
- ROUTER_STARTED_BUILD_SLUGS: null
opts:
description: Newline separated list of started build slugs.
summary: Newline separated list of started build slugs.
title: Started Build Slugs
================================================
FILE: steps/build-router-start/0.14.7/step.yml
================================================
title: Bitrise Start Build
summary: Starts a new build with the specified Workflow(s).
description: |-
The Step starts a new build of the same app with specified Workflow(s). On its own, the Step can be used to start multiple builds that run in parallel. In combination with the **Bitrise Wait for Build** Step, you can also add additional Steps to run in parallel while the triggered builds are running. For an example, check out our [Start builds from a parent Workflow](https://devcenter.bitrise.io/en/steps-and-workflows/generic-workflow-recipes/start--parallel--builds-from-the-workflow.html##) Workflow Recipe.
You can put this Step in a Workflow that is triggered by a code push or pull request and use this Step to trigger multiple other builds at the same time.
To do that, you need multiple concurrencies - at least two! You also need a Personal Access Token to use the Step: [check out our guide](https://devcenter.bitrise.io/getting-started/account-security/#generating-personal-access-tokens-manually) on how to generate the token.
If manual build approval is enabled for the project, this step won't be able to start new builds automatically.
### Configuring the Step
Before you run a build with this Step, make sure you have your Personal Access Token stored in a [Secret Environment Variable](https://devcenter.bitrise.io/builds/env-vars-secret-env-vars/#adding-a-secret-env-var).
Note that all builds you trigger using this Step will have the same build number!
1. Set up at least two Workflows in the Workflow Editor: one will contain the Step, the other will be triggered by the Step.
You can set up as many Workflows as you wish: your number of concurrencies limit the number of Workflows you can run simultaneously.
2. Add the **Bitrise Start Build** Step to the part of the Workflow where you want to trigger another build.
3. Add the Secret Env Var storing your Personal Access Token to the **Bitrise Access Token** input of the **Bitrise Start Build** Step: click the **Select secret variable** button, and choose the key you created.
4. Find the **Workflows** input of the **Bitrise Start Build** Step, and add the Workflow(s) you want to run.
5. In the **Environments to share** input, add Environment Variables (Env Vars) that you want to share between the builds triggered by the Step.
6. (Optional) You can set the **Wait for builds** input to `true` if you would like to pause the current build until the triggered build(s) are finished.
7. (Optional) You can add any Step you would like to run in parallel while the triggered Workflow(s) are running in the parent Workflow.
Make sure to add the **Bitrise Wait for Build** Step to the end of Workflow.
8. Add the Secret Env Var storing your Personal Access Token to the **Bitrise Access Token** input of the **Bitrise Wait for Build** Step: click the **Select secret variable** button, and choose the key you created.
9. In the **Build slugs** input, define the builds for the Step.
The build slugs you need are stored by the **Bitrise Start Build** Step in the `$ROUTER_STARTED_BUILD_SLUGS` Env Var. As long as the builds defined by the slugs are running, the Step will hold the build it is running in. The build will fail if any of the builds included in the Step fail.
10. Optionally, you can save the build artifacts from the builds and configure the Step to abort all builds if any of the builds fail:
- In **The path of the build artifacts** input, set where you'd like to save the artifacts.
The value of the input must be an actual, existing path, ending with `/`.
- Set the **Abort all builds if one fails** input to either `yes` or `no`.
Please note that the build artifacts of child Workflows - Workflows triggered by this Step - will be only available if the child Workflow contains a **Deploy to Bitrise.io** Step.
### Troubleshooting
- Make sure you have both the **Bitrise Start Build** and the **Bitrise Wait for Build** Steps in the right place in your initial Workflow.
- Always check all your builds: if your concurrencies are taken up by other builds, this Step cannot start new ones.
- Your Personal Access Token can expire! Make sure it's still valid - without it, you can't start new builds with this Step.
### Useful links
- [Starting parallel builds with a single Workflow](https://devcenter.bitrise.io/builds/triggering-builds/trigger-multiple-workflows/)
- [Start builds from a parent Workflow](https://devcenter.bitrise.io/en/steps-and-workflows/generic-workflow-recipes/start--parallel--builds-from-the-workflow.html##)
### Related Steps
- [Bitrise Wait for Build](https://www.bitrise.io/integrations/steps/build-router-wait)
- [Bitrise Run](https://www.bitrise.io/integrations/steps/bitrise-run)
- [Build Status Change](https://www.bitrise.io/integrations/steps/build-status-change)
website: https://github.com/bitrise-steplib/bitrise-step-build-router-start
source_code_url: https://github.com/bitrise-steplib/bitrise-step-build-router-start
support_url: https://github.com/bitrise-steplib/bitrise-step-build-router-start/issues
published_at: 2024-11-15T10:06:10.256582766Z
source:
git: https://github.com/bitrise-steplib/bitrise-step-build-router-start.git
commit: 47e940d4e0867b61e93459b3d2b8caabc33ae4ec
type_tags:
- utility
toolkit:
go:
package_name: github.com/bitrise-steplib/bitrise-step-build-router-start
is_always_run: false
is_skippable: false
inputs:
- access_token: null
opts:
description: |
Your access token
To acquire a `Personal Access Token` for your user, sign in with that user on [bitrise.io](https://bitrise.io),
go to your `Account Settings` page, and select the [Security tab](https://www.bitrise.io/me/profile#/security) on the left side.
is_expand: true
is_required: true
is_sensitive: true
summary: Your access token
title: Bitrise Access Token
- opts:
description: The Workflow(s) to start. One Workflow per line.
is_required: true
summary: The Workflow(s) to start. One Workflow per line.
title: Workflows
workflows: null
- environment_key_list: null
opts:
description: |-
The keys of the envs which will be shared with the triggered Workflows.
**FORMAT** Seperate the keys with new line. E.g:
`ENV_1`
`ENV_2`
`ENV_3`
is_expand: false
is_required: false
summary: The keys of the envs which will be shared with the triggered Workflows.
title: Environments to share
- opts:
description: Should the Step wait for the builds to be finished?
is_required: false
summary: Should the Step wait for the builds to be finished?
title: Wait for builds
value_options:
- "false"
- "true"
wait_for_builds: "false"
- build_artifacts_save_path: null
opts:
description: |
The path where build artifacts will be saved to if the **Wait for builds** input is set to `true`.
Note that when this Step triggers a Workflow, the artifacts of the triggered Workflow are only available to the Workflow that contains this Step, and not other Workflows.
The triggered Workflow MUST have a **Deploy to Bitrise.io** Step to deploy build artifacts!
is_required: false
is_sensitive: false
summary: The path that the build artifacts will be saved to if the **Wait for
builds** input is set to `true`.
title: The path of the build artifacts
- abort_on_fail: "no"
opts:
description: Abort all started builds if any build fails
is_required: true
is_sensitive: false
title: Abort all builds if any of them
value_options:
- "yes"
- "no"
- opts:
description: You can enable the verbose log for easier debugging.
is_required: true
title: Enable verbose log?
value_options:
- "yes"
- "no"
verbose: "no"
outputs:
- ROUTER_STARTED_BUILD_SLUGS: null
opts:
description: Newline separated list of started build slugs.
summary: Newline separated list of started build slugs.
title: Started Build Slugs
================================================
FILE: steps/build-router-start/0.9.0/step.yml
================================================
title: Bitrise Start Build
summary: Starts the given workflows in the same app
description: Starts the given workflows in the same app
website: https://github.com/bitrise-steplib/bitrise-step-build-router-start
source_code_url: https://github.com/bitrise-steplib/bitrise-step-build-router-start
support_url: https://github.com/bitrise-steplib/bitrise-step-build-router-start/issues
published_at: 2018-04-19T16:17:00.302411204+02:00
source:
git: https://github.com/bitrise-steplib/bitrise-step-build-router-start.git
commit: 52e6fb7e14e7a9e9c327f0e627dc3a34c5ed7cc0
host_os_tags:
- osx-10.10
- ubuntu-16.04
type_tags:
- utility
toolkit:
go:
package_name: github.com/bitrise-steplib/bitrise-step-build-router-start
is_always_run: false
is_skippable: false
inputs:
- access_token: null
opts:
description: "Your access token that has access to the app in you want to run
workflows.\n\nTo acquire a Personal Access Token for your user, sign in with
that user on [bitrise.io](https://bitrise.io), \ngo to your Account Settings
page, and select the [Security tab](https://www.bitrise.io/me/profile#/security)
on the left side.\n"
is_required: true
summary: Your access token that has access to the app in you want to run workflows.
title: Bitrise Access Token
- opts:
description: The workflow(s) to start. One workflow per line.
is_required: true
summary: The workflow(s) to start. One workflow per line.
title: Workflows
workflows: null
- opts:
description: Shall the step wait for the builds to be finished?
is_required: false
summary: Shall the step wait for the builds to be finished?
title: Wait for builds
value_options:
- "false"
- "true"
wait_for_builds: "false"
outputs:
- ROUTER_STARTED_BUILD_SLUGS: null
opts:
description: Newline separated list of started build slugs.
summary: Newline separated list of started build slugs.
title: Started Build Slugs
================================================
FILE: steps/build-router-start/step-info.yml
================================================
maintainer: bitrise
================================================
FILE: steps/build-router-wait/0.10.0/step.yml
================================================
title: Bitrise Wait for Build
summary: Waiting for the given builds to be finished
description: Waiting for the given builds to be finished
website: https://github.com/bitrise-steplib/bitrise-step-build-router-wait
source_code_url: https://github.com/bitrise-steplib/bitrise-step-build-router-wait
support_url: https://github.com/bitrise-steplib/bitrise-step-build-router-wait/issues
published_at: 2020-05-13T09:47:52.501673394Z
source:
git: https://github.com/bitrise-steplib/bitrise-step-build-router-wait.git
commit: 228e3592e85beaf6e7bacb8f564bd2651ae2193f
host_os_tags:
- osx-10.10
- ubuntu-16.04
type_tags:
- utility
toolkit:
go:
package_name: github.com/bitrise-steplib/bitrise-step-build-router-wait
is_always_run: true
is_skippable: false
inputs:
- access_token: null
opts:
description: "Your access token\n\nTo acquire a `Personal Access Token` for your
user, sign in with that user on [bitrise.io](https://bitrise.io), \ngo to your
`Account Settings` page, and select the [Security tab](https://www.bitrise.io/me/profile#/security)
on the left side.\n"
is_required: true
is_sensitive: true
summary: Your access token
title: Bitrise Access Token
- buildslugs: $ROUTER_STARTED_BUILD_SLUGS
opts:
description: The build slug(s) to check. One build slug per line.
is_required: true
summary: The build slug(s) to check. One build slug per line.
title: Build Slugs
- opts:
description: You can enable the verbose log for easier debugging.
is_required: true
title: Enable verbose log?
value_options:
- "yes"
- "no"
verbose: "no"
================================================
FILE: steps/build-router-wait/0.10.1/step.yml
================================================
title: Bitrise Wait for Build
summary: Waiting for the given builds to be finished
description: Waiting for the given builds to be finished
website: https://github.com/bitrise-steplib/bitrise-step-build-router-wait
source_code_url: https://github.com/bitrise-steplib/bitrise-step-build-router-wait
support_url: https://github.com/bitrise-steplib/bitrise-step-build-router-wait/issues
published_at: 2020-05-19T13:37:04.878962882Z
source:
git: https://github.com/bitrise-steplib/bitrise-step-build-router-wait.git
commit: 97ec5358a6295397b74f617895fd70057093bbb3
host_os_tags:
- osx-10.10
- ubuntu-16.04
type_tags:
- utility
toolkit:
go:
package_name: github.com/bitrise-steplib/bitrise-step-build-router-wait
is_always_run: true
is_skippable: false
inputs:
- access_token: null
opts:
description: "Your access token\n\nTo acquire a `Personal Access Token` for your
user, sign in with that user on [bitrise.io](https://bitrise.io), \ngo to your
`Account Settings` page, and select the [Security tab](https://www.bitrise.io/me/profile#/security)
on the left side.\n"
is_required: true
is_sensitive: true
summary: Your access token
title: Bitrise Access Token
- buildslugs: $ROUTER_STARTED_BUILD_SLUGS
opts:
description: The build slug(s) to check. One build slug per line.
is_required: true
summary: The build slug(s) to check. One build slug per line.
title: Build Slugs
- opts:
description: You can enable the verbose log for easier debugging.
is_required: true
title: Enable verbose log?
value_options:
- "yes"
- "no"
verbose: "no"
================================================
FILE: steps/build-router-wait/0.11.0/step.yml
================================================
title: Bitrise Wait for Build
summary: Waiting for the given builds to be finished
description: Waiting for the given builds to be finished
website: https://github.com/bitrise-steplib/bitrise-step-build-router-wait
source_code_url: https://github.com/bitrise-steplib/bitrise-step-build-router-wait
support_url: https://github.com/bitrise-steplib/bitrise-step-build-router-wait/issues
published_at: 2020-07-20T18:29:50.046353452Z
source:
git: https://github.com/bitrise-steplib/bitrise-step-build-router-wait.git
commit: 44aeeefb8aec15f878ae38d20045202cd8a3309d
host_os_tags:
- osx-10.10
- ubuntu-16.04
type_tags:
- utility
toolkit:
go:
package_name: github.com/bitrise-steplib/bitrise-step-build-router-wait
is_always_run: true
is_skippable: false
inputs:
- access_token: null
opts:
description: "Your access token\n\nTo acquire a `Personal Access Token` for your
user, sign in with that user on [bitrise.io](https://bitrise.io), \ngo to your
`Account Settings` page, and select the [Security tab](https://www.bitrise.io/me/profile#/security)
on the left side.\n"
is_required: true
is_sensitive: true
summary: Your access token
title: Bitrise Access Token
- buildslugs: $ROUTER_STARTED_BUILD_SLUGS
opts:
description: The build slug(s) to check. One build slug per line.
is_required: true
summary: The build slug(s) to check. One build slug per line.
title: Build Slugs
- build_artifacts_save_path: null
opts:
description: |
This is where the artifacts will be saved to so you can access them in the workflow
is_required: false
is_sensitive: false
summary: This is where the artifacts will be saved to
title: Path to save the Artifacts in (leave empty to not save artifacts)
- opts:
description: You can enable the verbose log for easier debugging.
is_required: true
title: Enable verbose log?
value_options:
- "yes"
- "no"
verbose: "no"
================================================
FILE: steps/build-router-wait/0.12.0/step.yml
================================================
title: Bitrise Wait for Build
summary: Waiting for the given builds to be finished
description: Waiting for the given builds to be finished
website: https://github.com/bitrise-steplib/bitrise-step-build-router-wait
source_code_url: https://github.com/bitrise-steplib/bitrise-step-build-router-wait
support_url: https://github.com/bitrise-steplib/bitrise-step-build-router-wait/issues
published_at: 2020-08-05T16:50:40.533100729Z
source:
git: https://github.com/bitrise-steplib/bitrise-step-build-router-wait.git
commit: b79b54d67c22cd0b6d9c5701a2acc74698d249b5
host_os_tags:
- osx-10.10
- ubuntu-16.04
type_tags:
- utility
toolkit:
go:
package_name: github.com/bitrise-steplib/bitrise-step-build-router-wait
is_always_run: true
is_skippable: false
inputs:
- access_token: null
opts:
description: "Your access token\n\nTo acquire a `Personal Access Token` for your
user, sign in with that user on [bitrise.io](https://bitrise.io), \ngo to your
`Account Settings` page, and select the [Security tab](https://www.bitrise.io/me/profile#/security)
on the left side.\n"
is_required: true
is_sensitive: true
summary: Your access token
title: Bitrise Access Token
- buildslugs: $ROUTER_STARTED_BUILD_SLUGS
opts:
description: The build slug(s) to check. One build slug per line.
is_required: true
summary: The build slug(s) to check. One build slug per line.
title: Build Slugs
- build_artifacts_save_path: null
opts:
description: |
This is where the artifacts will be saved to so you can access them in the workflow
is_required: false
is_sensitive: false
summary: This is where the artifacts will be saved to
title: Path to save the Artifacts in (leave empty to not save artifacts)
- abort_on_fail: "no"
opts:
description: Abort all started builds if any build fails
is_required: true
is_sensitive: false
title: Abort all if any fail
value_options:
- "yes"
- "no"
- opts:
description: You can enable the verbose log for easier debugging.
is_required: true
title: Enable verbose log?
value_options:
- "yes"
- "no"
verbose: "no"
================================================
FILE: steps/build-router-wait/0.12.1/step.yml
================================================
title: Bitrise Wait for Build
summary: The Step pauses the current build until another running build is finished.
description: "\"The Step pauses the current build until another running build or builds
are finished. The Step checks statuses of the builds defined in the Step. The builds
are defined in the **Build slugs** input: you can add these slugs manually but the
typical use case is to use the Environment Variable exported by the **Bitrise Start
Build** Step. \n\n As long as the builds defined by the slugs are running, the Step
will hold the build it is running in. The build will fail if any of the builds included
in the Step fail.\n \n ### Configuring the Step \n \n Before you run a build with
this Step, make sure you have your Personal Access Token stored in a [Secret Environment
Variable](https://devcenter.bitrise.io/builds/env-vars-secret-env-vars/#adding-a-secret-env-var).\n
\n This Step is generally used in combination with the **Bitrise Start Build** Step
which starts other builds in parallel with the current one. The build that triggered
the parallel builds needs to wait for those builds to finish in order to report
a successful or a failed build: this Step ensures the build is on hold until the
other builds are finished.\n \n 1. Set up at least two Workflows in the Workflow
Editor: one will contain the Step, the other will be triggered by the Step. \n You
can set up as many Workflows as you wish: your number of concurrencies limit the
number of Workflows you can run simultaneously.\n 2. Add the **Bitrise Start Build**
Step to the part of the Workflow where you want to trigger another build. \n 3.
Add the Secret Env Var storing your Personal Access Token to the **Bitrise Access
Token** input of the **Bitrise Start Build** Step: click the **Select secret variable**
button, and choose the key you created.\n 4. Find the **Workflows** input of the
**Bitrise Start Build** Step, and add the Workflow(s) you want to run. \n 5. In
the **Environments to share** input, add Environment Variables (Env Vars) that you
want to share between the builds triggered by the Step. \n 6. Add the **Bitrise
Wait for Build** Step to the end of Workflow that contains the **Bitrise Start Build**
Step. \n 7. Add the Secret Env Var storing your Personal Access Token to the **Bitrise
Access Token** input of the **Bitrise Wait for Build** Step: click the **Select
secret variable** button, and choose the key you created.\n 8. In the **Build slugs**
input, define the builds for the Step. \n The build slugs you need are stored
by the **Bitrise Start Build** Step in the `$ROUTER_STARTED_BUILD_SLUGS` Env Var.
As long as the builds defined by the slugs are running, the Step will hold the build
it is running in. The build will fail if any of the builds included in the Step
fail.\n 9. Optionally, you can save the build artifacts from the builds and configure
the Step to abort all builds if any of the builds fail:\n - In **The path of
the build artifacts** input, set where you'd like to save the artifacts. \n -
Set the **Abort all builds if one fails** input to either `yes` or `no`.\n \n ###
Troubleshooting \n\n - Make sure you have both the **Bitrise Start Build** and
the **Bitrise Wait for Build** Steps in the right place in your initial Workflow.
\n - Your Personal Access Token can expire! Make sure it's still valid - without
it, you can't start new builds with this Step. \n\n ### Useful links \n\n - [Starting
parallel builds with a single Workflow](https://devcenter.bitrise.io/builds/triggering-builds/trigger-multiple-workflows/)\n\n
\ ### Related Steps \n\n - [Bitrise Start Build](https://www.bitrise.io/integrations/steps/build-router-wait)\n
\ - [Bitrise Run](https://www.bitrise.io/integrations/steps/bitrise-run)\n - [Build
Status Change](https://www.bitrise.io/integrations/steps/build-status-change)"
website: https://github.com/bitrise-steplib/bitrise-step-build-router-wait
source_code_url: https://github.com/bitrise-steplib/bitrise-step-build-router-wait
support_url: https://github.com/bitrise-steplib/bitrise-step-build-router-wait/issues
published_at: 2020-11-19T16:52:36.027727324Z
source:
git: https://github.com/bitrise-steplib/bitrise-step-build-router-wait.git
commit: 97214bff857c3d8d4665a47905ae5ae1c54b2916
host_os_tags:
- osx-10.10
- ubuntu-16.04
type_tags:
- utility
toolkit:
go:
package_name: github.com/bitrise-steplib/bitrise-step-build-router-wait
is_always_run: true
is_skippable: false
inputs:
- access_token: null
opts:
description: "Your Personal Access Token\n\nTo acquire a Personal Access Token
for your user, sign in with that user on [bitrise.io](https://bitrise.io), \ngo
to your **Account settings** page, and select the [**Security** tab](https://www.bitrise.io/me/profile#/security)
on the left side.\n"
is_required: true
is_sensitive: true
summary: Your Personal Access Token
title: Bitrise Access Token
- buildslugs: $ROUTER_STARTED_BUILD_SLUGS
opts:
description: The build slug(s) to check. One build slug per line. We recommend
using the $ROUTER_STARTED_BUILD_SLUGS Env Var exported by the **Bitrise Start
Build** Step.
is_required: true
summary: The build slug(s) to check. One build slug per line.
title: Build slugs
- build_artifacts_save_path: null
opts:
description: |
The provided path is where Bitrise will save your build artifacts so you can access them in the Workflow. Leave it empty if you don't want to save artifacts.
is_required: false
is_sensitive: false
summary: The provided path is where Bitrise will save your build artifacts.
title: The path of the build artifacts
- abort_on_fail: "no"
opts:
description: Abort all started builds if any of the builds fails.
is_required: true
is_sensitive: false
title: Abort all builds if one fails
value_options:
- "yes"
- "no"
- opts:
description: You can enable the verbose log for easier debugging.
is_required: true
title: Enable verbose log?
value_options:
- "yes"
- "no"
verbose: "no"
================================================
FILE: steps/build-router-wait/0.12.2/step.yml
================================================
title: Bitrise Wait for Build
summary: The Step pauses the current build until another running build is finished.
description: "\"The Step pauses the current build until another running build or builds
are finished. The Step checks statuses of the builds defined in the Step. The builds
are defined in the **Build slugs** input: you can add these slugs manually but the
typical use case is to use the Environment Variable exported by the **Bitrise Start
Build** Step. \n\n As long as the builds defined by the slugs are running, the Step
will hold the build it is running in. The build will fail if any of the builds included
in the Step fail.\n \n ### Configuring the Step \n \n Before you run a build with
this Step, make sure you have your Personal Access Token stored in a [Secret Environment
Variable](https://devcenter.bitrise.io/builds/env-vars-secret-env-vars/#adding-a-secret-env-var).\n
\n This Step is generally used in combination with the **Bitrise Start Build** Step
which starts other builds in parallel with the current one. The build that triggered
the parallel builds needs to wait for those builds to finish in order to report
a successful or a failed build: this Step ensures the build is on hold until the
other builds are finished.\n \n 1. Set up at least two Workflows in the Workflow
Editor: one will contain the Step, the other will be triggered by the Step. \n You
can set up as many Workflows as you wish: your number of concurrencies limit the
number of Workflows you can run simultaneously.\n 2. Add the **Bitrise Start Build**
Step to the part of the Workflow where you want to trigger another build. \n 3.
Add the Secret Env Var storing your Personal Access Token to the **Bitrise Access
Token** input of the **Bitrise Start Build** Step: click the **Select secret variable**
button, and choose the key you created.\n 4. Find the **Workflows** input of the
**Bitrise Start Build** Step, and add the Workflow(s) you want to run. \n 5. In
the **Environments to share** input, add Environment Variables (Env Vars) that you
want to share between the builds triggered by the Step. \n 6. Add the **Bitrise
Wait for Build** Step to the end of Workflow that contains the **Bitrise Start Build**
Step. \n 7. Add the Secret Env Var storing your Personal Access Token to the **Bitrise
Access Token** input of the **Bitrise Wait for Build** Step: click the **Select
secret variable** button, and choose the key you created.\n 8. In the **Build slugs**
input, define the builds for the Step. \n The build slugs you need are stored
by the **Bitrise Start Build** Step in the `$ROUTER_STARTED_BUILD_SLUGS` Env Var.
As long as the builds defined by the slugs are running, the Step will hold the build
it is running in. The build will fail if any of the builds included in the Step
fail.\n 9. Optionally, you can save the build artifacts from the builds and configure
the Step to abort all builds if any of the builds fail:\n - In **The path of
the build artifacts** input, set where you'd like to save the artifacts. \n -
Set the **Abort all builds if one fails** input to either `yes` or `no`.\n \n ###
Troubleshooting \n\n - Make sure you have both the **Bitrise Start Build** and
the **Bitrise Wait for Build** Steps in the right place in your initial Workflow.
\n - Your Personal Access Token can expire! Make sure it's still valid - without
it, you can't start new builds with this Step. \n\n ### Useful links \n\n - [Starting
parallel builds with a single Workflow](https://devcenter.bitrise.io/builds/triggering-builds/trigger-multiple-workflows/)\n\n
\ ### Related Steps \n\n - [Bitrise Start Build](https://www.bitrise.io/integrations/steps/build-router-wait)\n
\ - [Bitrise Run](https://www.bitrise.io/integrations/steps/bitrise-run)\n - [Build
Status Change](https://www.bitrise.io/integrations/steps/build-status-change)"
website: https://github.com/bitrise-steplib/bitrise-step-build-router-wait
source_code_url: https://github.com/bitrise-steplib/bitrise-step-build-router-wait
support_url: https://github.com/bitrise-steplib/bitrise-step-build-router-wait/issues
published_at: 2021-07-01T21:41:37.250796883Z
source:
git: https://github.com/bitrise-steplib/bitrise-step-build-router-wait.git
commit: 01e869a1a5950cb19aba8d6932768b4d98c35c57
host_os_tags:
- osx-10.10
- ubuntu-16.04
type_tags:
- utility
toolkit:
go:
package_name: github.com/bitrise-steplib/bitrise-step-build-router-wait
is_always_run: true
is_skippable: false
inputs:
- access_token: null
opts:
description: "Your Personal Access Token\n\nTo acquire a Personal Access Token
for your user, sign in with that user on [bitrise.io](https://bitrise.io), \ngo
to your **Account settings** page, and select the [**Security** tab](https://www.bitrise.io/me/profile#/security)
on the left side.\n"
is_required: true
is_sensitive: true
summary: Your Personal Access Token
title: Bitrise Access Token
- buildslugs: $ROUTER_STARTED_BUILD_SLUGS
opts:
description: The build slug(s) to check. One build slug per line. We recommend
using the $ROUTER_STARTED_BUILD_SLUGS Env Var exported by the **Bitrise Start
Build** Step.
is_required: true
summary: The build slug(s) to check. One build slug per line.
title: Build slugs
- build_artifacts_save_path: null
opts:
description: |
The provided path is where Bitrise will save your build artifacts so you can access them in the Workflow. Leave it empty if you don't want to save artifacts.
is_required: false
is_sensitive: false
summary: The provided path is where Bitrise will save your build artifacts.
title: The path of the build artifacts
- abort_on_fail: "no"
opts:
description: Abort all started builds if any of the builds fails.
is_required: true
is_sensitive: false
title: Abort all builds if one fails
value_options:
- "yes"
- "no"
- opts:
description: You can enable the verbose log for easier debugging.
is_required: true
title: Enable verbose log?
value_options:
- "yes"
- "no"
verbose: "no"
================================================
FILE: steps/build-router-wait/0.12.3/step.yml
================================================
title: Bitrise Wait for Build
summary: The Step pauses the current build until another running build is finished.
description: "The Step pauses the current build until another running build or builds
are finished. The Step checks statuses of the builds defined in the Step. The builds
are defined in the **Build slugs** input: you can add these slugs manually but the
typical use case is to use the Environment Variable exported by the **Bitrise Start
Build** Step. \n\nAs long as the builds defined by the slugs are running, the Step
will hold the build it is running in. The build will fail if any of the builds included
in the Step fail.\n\n### Configuring the Step \n\nBefore you run a build with this
Step, make sure you have your Personal Access Token stored in a [Secret Environment
Variable](https://devcenter.bitrise.io/builds/env-vars-secret-env-vars/#adding-a-secret-env-var).\n\nThis
Step is generally used in combination with the **Bitrise Start Build** Step which
starts other builds in parallel with the current one. The build that triggered the
parallel builds needs to wait for those builds to finish in order to report a successful
or a failed build: this Step ensures the build is on hold until the other builds
are finished.\n\n 1. Set up at least two Workflows in the Workflow Editor: one will
contain the Step, the other will be triggered by the Step. \n You can set up
as many Workflows as you wish: your number of concurrencies limit the number of
Workflows you can run simultaneously.\n 2. Add the **Bitrise Start Build** Step
to the part of the Workflow where you want to trigger another build. \n 3. Add the
Secret Env Var storing your Personal Access Token to the **Bitrise Access Token**
input of the **Bitrise Start Build** Step: click the **Select secret variable**
button, and choose the key you created.\n 4. Find the **Workflows** input of the
**Bitrise Start Build** Step, and add the Workflow(s) you want to run. \n 5. In
the **Environments to share** input, add Environment Variables (Env Vars) that you
want to share between the builds triggered by the Step.\n 6. Optionally, you can
add any Step you would like to run in parallel while the triggered Workflow(s) are
running in the parent Workflow.\n 7. Add the **Bitrise Wait for Build** Step to
the end of Workflow that contains the **Bitrise Start Build** Step. \n 8. Add the
Secret Env Var storing your Personal Access Token to the **Bitrise Access Token**
input of the **Bitrise Wait for Build** Step: click the **Select secret variable**
button, and choose the key you created.\n 9. In the **Build slugs** input, define
the builds for the Step. \n The build slugs you need are stored by the **Bitrise
Start Build** Step in the `$ROUTER_STARTED_BUILD_SLUGS` Env Var. As long as the
builds defined by the slugs are running, the Step will hold the build it is running
in. The build will fail if any of the builds included in the Step fail.\n 10. Optionally,
you can save the build artifacts from the builds and configure the Step to abort
all builds if any of the builds fail:\n - In **The path of the build artifacts**
input, set where you'd like to save the artifacts. \n - Set the **Abort all builds
if one fails** input to either `yes` or `no`.\n \n ### Troubleshooting \n\n - Make
sure you have both the **Bitrise Start Build** and the **Bitrise Wait for Build**
Steps in the right place in your initial Workflow. \n - Your Personal Access Token
can expire! Make sure it's still valid - without it, you can't start new builds
with this Step. \n\n ### Useful links \n\n - [Starting parallel builds with a single
Workflow](https://devcenter.bitrise.io/builds/triggering-builds/trigger-multiple-workflows/)\n
- [Start builds from a parent Workflow](https://devcenter.bitrise.io/en/steps-and-workflows/generic-workflow-recipes/start--parallel--builds-from-the-workflow.html)\n\n
### Related Steps \n\n - [Bitrise Start Build](https://www.bitrise.io/integrations/steps/build-router-start)\n
- [Bitrise Run](https://www.bitrise.io/integrations/steps/bitrise-run)\n - [Build
Status Change](https://www.bitrise.io/integrations/steps/build-status-change)"
website: https://github.com/bitrise-steplib/bitrise-step-build-router-wait
source_code_url: https://github.com/bitrise-steplib/bitrise-step-build-router-wait
support_url: https://github.com/bitrise-steplib/bitrise-step-build-router-wait/issues
published_at: 2022-06-29T12:52:41.290660346Z
source:
git: https://github.com/bitrise-steplib/bitrise-step-build-router-wait.git
commit: 3fb7b33276a215d31f892979ec231a161fd1cead
host_os_tags:
- osx-10.10
- ubuntu-16.04
type_tags:
- utility
toolkit:
go:
package_name: github.com/bitrise-steplib/bitrise-step-build-router-wait
is_always_run: true
is_skippable: false
inputs:
- access_token: null
opts:
description: "Your Personal Access Token\n\nTo acquire a Personal Access Token
for your user, sign in with that user on [bitrise.io](https://bitrise.io), \ngo
to your **Account settings** page, and select the [**Security** tab](https://www.bitrise.io/me/profile#/security)
on the left side.\n"
is_required: true
is_sensitive: true
summary: Your Personal Access Token
title: Bitrise Access Token
- buildslugs: $ROUTER_STARTED_BUILD_SLUGS
opts:
description: The build slug(s) to check. One build slug per line. We recommend
using the $ROUTER_STARTED_BUILD_SLUGS Env Var exported by the **Bitrise Start
Build** Step.
is_required: true
summary: The build slug(s) to check. One build slug per line.
title: Build slugs
- build_artifacts_save_path: null
opts:
description: |
The provided path is where Bitrise will save your build artifacts so you can access them in the Workflow. Leave it empty if you don't want to save artifacts.
is_required: false
is_sensitive: false
summary: The provided path is where Bitrise will save your build artifacts.
title: The path of the build artifacts
- abort_on_fail: "no"
opts:
description: Abort all started builds if any of the builds fails.
is_required: true
is_sensitive: false
title: Abort all builds if one fails
value_options:
- "yes"
- "no"
- opts:
description: You can enable the verbose log for easier debugging.
is_required: true
title: Enable verbose log?
value_options:
- "yes"
- "no"
verbose: "no"
================================================
FILE: steps/build-router-wait/0.12.4/step.yml
================================================
title: Bitrise Wait for Build
summary: The Step pauses the current build until another running build is finished.
description: "The Step pauses the current build until another running build or builds
are finished. The Step checks statuses of the builds defined in the Step. The builds
are defined in the **Build slugs** input: you can add these slugs manually but the
typical use case is to use the Environment Variable exported by the **Bitrise Start
Build** Step. \n\nAs long as the builds defined by the slugs are running, the Step
will hold the build it is running in. The build will fail if any of the builds included
in the Step fail.\n\n### Configuring the Step \n\nBefore you run a build with this
Step, make sure you have your Personal Access Token stored in a [Secret Environment
Variable](https://devcenter.bitrise.io/builds/env-vars-secret-env-vars/#adding-a-secret-env-var).\n\nThis
Step is generally used in combination with the **Bitrise Start Build** Step which
starts other builds in parallel with the current one. The build that triggered the
parallel builds needs to wait for those builds to finish in order to report a successful
or a failed build: this Step ensures the build is on hold until the other builds
are finished.\n\n 1. Set up at least two Workflows in the Workflow Editor: one will
contain the Step, the other will be triggered by the Step. \n You can set up
as many Workflows as you wish: your number of concurrencies limit the number of
Workflows you can run simultaneously.\n 2. Add the **Bitrise Start Build** Step
to the part of the Workflow where you want to trigger another build. \n 3. Add the
Secret Env Var storing your Personal Access Token to the **Bitrise Access Token**
input of the **Bitrise Start Build** Step: click the **Select secret variable**
button, and choose the key you created.\n 4. Find the **Workflows** input of the
**Bitrise Start Build** Step, and add the Workflow(s) you want to run. \n 5. In
the **Environments to share** input, add Environment Variables (Env Vars) that you
want to share between the builds triggered by the Step.\n 6. Optionally, you can
add any Step you would like to run in parallel while the triggered Workflow(s) are
running in the parent Workflow.\n 7. Add the **Bitrise Wait for Build** Step to
the end of Workflow that contains the **Bitrise Start Build** Step. \n 8. Add the
Secret Env Var storing your Personal Access Token to the **Bitrise Access Token**
input of the **Bitrise Wait for Build** Step: click the **Select secret variable**
button, and choose the key you created.\n 9. In the **Build slugs** input, define
the builds for the Step. \n The build slugs you need are stored by the **Bitrise
Start Build** Step in the `$ROUTER_STARTED_BUILD_SLUGS` Env Var. As long as the
builds defined by the slugs are running, the Step will hold the build it is running
in. The build will fail if any of the builds included in the Step fail.\n 10. Optionally,
you can save the build artifacts from the builds and configure the Step to abort
all builds if any of the builds fail:\n - In **The path of the build artifacts**
input, set where you'd like to save the artifacts. \n - Set the **Abort all builds
if one fails** input to either `yes` or `no`.\n \n ### Troubleshooting \n\n - Make
sure you have both the **Bitrise Start Build** and the **Bitrise Wait for Build**
Steps in the right place in your initial Workflow. \n - Your Personal Access Token
can expire! Make sure it's still valid - without it, you can't start new builds
with this Step. \n\n ### Useful links \n\n - [Starting parallel builds with a single
Workflow](https://devcenter.bitrise.io/builds/triggering-builds/trigger-multiple-workflows/)\n
- [Start builds from a parent Workflow](https://devcenter.bitrise.io/en/steps-and-workflows/generic-workflow-recipes/start--parallel--builds-from-the-workflow.html)\n\n
### Related Steps \n\n - [Bitrise Start Build](https://www.bitrise.io/integrations/steps/build-router-start)\n
- [Bitrise Run](https://www.bitrise.io/integrations/steps/bitrise-run)\n - [Build
Status Change](https://www.bitrise.io/integrations/steps/build-status-change)"
website: https://github.com/bitrise-steplib/bitrise-step-build-router-wait
source_code_url: https://github.com/bitrise-steplib/bitrise-step-build-router-wait
support_url: https://github.com/bitrise-steplib/bitrise-step-build-router-wait/issues
published_at: 2022-08-01T17:23:46.121677247Z
source:
git: https://github.com/bitrise-steplib/bitrise-step-build-router-wait.git
commit: 7c158823042454c60dd0bb3e5360d4d72c82ef5e
host_os_tags:
- osx-10.10
- ubuntu-16.04
type_tags:
- utility
toolkit:
go:
package_name: github.com/bitrise-steplib/bitrise-step-build-router-wait
is_always_run: true
is_skippable: false
inputs:
- access_token: null
opts:
description: "Your Personal Access Token\n\nTo acquire a Personal Access Token
for your user, sign in with that user on [bitrise.io](https://bitrise.io), \ngo
to your **Account settings** page, and select the [**Security** tab](https://www.bitrise.io/me/profile#/security)
on the left side.\n"
is_required: true
is_sensitive: true
summary: Your Personal Access Token
title: Bitrise Access Token
- buildslugs: $ROUTER_STARTED_BUILD_SLUGS
opts:
description: The build slug(s) to check. One build slug per line. We recommend
using the $ROUTER_STARTED_BUILD_SLUGS Env Var exported by the **Bitrise Start
Build** Step.
is_required: true
summary: The build slug(s) to check. One build slug per line.
title: Build slugs
- build_artifacts_save_path: null
opts:
description: |
The provided path is where Bitrise will save your build artifacts so you can access them in the Workflow. Leave it empty if you don't want to save artifacts.
is_required: false
is_sensitive: false
summary: The provided path is where Bitrise will save your build artifacts.
title: The path of the build artifacts
- abort_on_fail: "no"
opts:
description: Abort all started builds if any of the builds fails.
is_required: true
is_sensitive: false
title: Abort all builds if one fails
value_options:
- "yes"
- "no"
- opts:
description: You can enable the verbose log for easier debugging.
is_required: true
title: Enable verbose log?
value_options:
- "yes"
- "no"
verbose: "no"
================================================
FILE: steps/build-router-wait/0.9.0/step.yml
================================================
title: Bitrise Wait for Build
summary: Waiting for the given builds to be finished
description: Waiting for the given builds to be finished
website: https://github.com/bitrise-steplib/bitrise-step-build-router-wait
source_code_url: https://github.com/bitrise-steplib/bitrise-step-build-router-wait
support_url: https://github.com/bitrise-steplib/bitrise-step-build-router-wait/issues
published_at: 2018-04-20T12:34:24.60152076+02:00
source:
git: https://github.com/bitrise-steplib/bitrise-step-build-router-wait.git
commit: c595844e99d819af24eadec34a4c24cecad804aa
host_os_tags:
- osx-10.10
- ubuntu-16.04
type_tags:
- utility
toolkit:
go:
package_name: github.com/bitrise-steplib/bitrise-step-build-router-wait
is_always_run: true
is_skippable: false
inputs:
- access_token: null
opts:
description: "Your access token that has access to the app in you want to run
workflows.\n\nTo acquire a Personal Access Token for your user, sign in with
that user on [bitrise.io](https://bitrise.io), \ngo to your Account Settings
page, and select the [Security tab](https://www.bitrise.io/me/profile#/security)
on the left side.\n"
is_required: true
summary: Your access token that has access to the app in you want to run workflows.
title: Bitrise Access Token
- buildslugs: $ROUTER_STARTED_BUILD_SLUGS
opts:
description: The build slug(s) to check. One build slug per line.
is_required: true
summary: The build slug(s) to check. One build slug per line.
title: Build Slugs
================================================
FILE: steps/build-router-wait/0.9.1/step.yml
================================================
title: Bitrise Wait for Build
summary: Waiting for the given builds to be finished
description: Waiting for the given builds to be finished
website: https://github.com/bitrise-steplib/bitrise-step-build-router-wait
source_code_url: https://github.com/bitrise-steplib/bitrise-step-build-router-wait
support_url: https://github.com/bitrise-steplib/bitrise-step-build-router-wait/issues
published_at: 2018-08-31T12:30:11.080236326Z
source:
git: https://github.com/bitrise-steplib/bitrise-step-build-router-wait.git
commit: 4ca295ac2f35b74ef1b71d143d26c41a0fcde059
host_os_tags:
- osx-10.10
- ubuntu-16.04
type_tags:
- utility
toolkit:
go:
package_name: github.com/bitrise-steplib/bitrise-step-build-router-wait
is_always_run: true
is_skippable: false
inputs:
- access_token: null
opts:
description: "Your access token\n\nTo acquire a `Personal Access Token` for your
user, sign in with that user on [bitrise.io](https://bitrise.io), \ngo to your
`Account Settings` page, and select the [Security tab](https://www.bitrise.io/me/profile#/security)
on the left side.\n"
is_required: true
is_sensitive: true
summary: Your access token
title: Bitrise Access Token
- buildslugs: $ROUTER_STARTED_BUILD_SLUGS
opts:
description: The build slug(s) to check. One build slug per line.
is_required: true
summary: The build slug(s) to check. One build slug per line.
title: Build Slugs
================================================
FILE: steps/build-router-wait/0.9.2/step.yml
================================================
title: Bitrise Wait for Build
summary: Waiting for the given builds to be finished
description: Waiting for the given builds to be finished
website: https://github.com/bitrise-steplib/bitrise-step-build-router-wait
source_code_url: https://github.com/bitrise-steplib/bitrise-step-build-router-wait
support_url: https://github.com/bitrise-steplib/bitrise-step-build-router-wait/issues
published_at: 2019-11-08T09:51:52.525417026Z
source:
git: https://github.com/bitrise-steplib/bitrise-step-build-router-wait.git
commit: 9c76b93ba043c0fe99386645820a36eaae9ef21c
host_os_tags:
- osx-10.10
- ubuntu-16.04
type_tags:
- utility
toolkit:
go:
package_name: github.com/bitrise-steplib/bitrise-step-build-router-wait
is_always_run: true
is_skippable: false
inputs:
- access_token: null
opts:
description: "Your access token\n\nTo acquire a `Personal Access Token` for your
user, sign in with that user on [bitrise.io](https://bitrise.io), \ngo to your
`Account Settings` page, and select the [Security tab](https://www.bitrise.io/me/profile#/security)
on the left side.\n"
is_required: true
is_sensitive: true
summary: Your access token
title: Bitrise Access Token
- buildslugs: $ROUTER_STARTED_BUILD_SLUGS
opts:
description: The build slug(s) to check. One build slug per line.
is_required: true
summary: The build slug(s) to check. One build slug per line.
title: Build Slugs
================================================
FILE: steps/build-router-wait/step-info.yml
================================================
maintainer: bitrise
================================================
FILE: steps/build-status-change/0.1.1/step.yml
================================================
title: Build Status Change
summary: Exports environment variables to be able to detect if the currently running
build's status has changed to a previous one.
description: Exports environment variables to be able to detect if the currently running
build's status has changed to a previous one.
website: https://github.com/bitrise-steplib/bitrise-step-build-status-change
source_code_url: https://github.com/bitrise-steplib/bitrise-step-build-status-change
support_url: https://github.com/bitrise-steplib/bitrise-step-build-status-change/issues
published_at: 2019-05-03T14:07:35.9285827Z
source:
git: https://github.com/bitrise-steplib/bitrise-step-build-status-change.git
commit: f29dfc0d45da286cf6d37776fab197476bc21cef
type_tags:
- utility
toolkit:
go:
package_name: github.com/bitrise-steplib/bitrise-step-build-status-change
is_always_run: true
is_skippable: true
inputs:
- access_token: null
opts:
description: Your access token for the account that has access to the Bitrise
app.
is_required: true
is_sensitive: true
summary: Your access token for the account that has access to the Bitrise app.
title: Bitrise Access Token
outputs:
- BUILD_STATUS_CHANGED: null
opts:
description: True if the actual build status is different from the previous one.
summary: True if the actual build status is different from the previous one.
title: Build Status Changed
- PREVIOUS_BUILD_STATUS: null
opts:
description: Status text of the previous build.
summary: Status text of the previous build.
title: Previous Build Status
================================================
FILE: steps/build-status-change/0.1.2/step.yml
================================================
title: Build Status Change
summary: Exports environment variables to be able to detect if the currently running
build's status has changed to a previous one.
description: Exports environment variables to be able to detect if the currently running
build's status has changed to a previous one.
website: https://github.com/bitrise-steplib/bitrise-step-build-status-change
source_code_url: https://github.com/bitrise-steplib/bitrise-step-build-status-change
support_url: https://github.com/bitrise-steplib/bitrise-step-build-status-change/issues
published_at: 2019-12-17T09:44:38.58146885Z
source:
git: https://github.com/bitrise-steplib/bitrise-step-build-status-change.git
commit: bb65d7e73d2bc668f8712dd7f47e4a1df3ea5237
type_tags:
- utility
toolkit:
go:
package_name: github.com/bitrise-steplib/bitrise-step-build-status-change
is_always_run: true
is_skippable: true
inputs:
- access_token: null
opts:
description: Your access token for the account that has access to the Bitrise
app.
is_required: true
is_sensitive: true
summary: Your access token for the account that has access to the Bitrise app.
title: Bitrise Access Token
- opts:
description: Enable debug logging, if set to "yes".
is_required: true
summary: Enable debug level logging, if set to "yes".
title: Enable verbose logging?
value_options:
- "no"
- "yes"
verbose: "no"
outputs:
- BUILD_STATUS_CHANGED: null
opts:
description: True if the actual build status is different from the previous one.
summary: True if the actual build status is different from the previous one.
title: Build Status Changed
- PREVIOUS_BUILD_STATUS: null
opts:
description: Status text of the previous build.
summary: Status text of the previous build.
title: Previous Build Status
================================================
FILE: steps/build-status-change/step-info.yml
================================================
maintainer: bitrise
================================================
FILE: steps/bundle-universal-apk/0.0.2/step.yml
================================================
title: Bundle Universal Apk
summary: |
Generates an universal apk from an app bundle
description: |
Runs a bundletool that gets an app bundle path and generates an universal apk that it can be upload to alternative app stores or test platforms.
website: https://github.com/ch4vi/bitrise-step-bundle-universal-apk
source_code_url: https://github.com/ch4vi/bitrise-step-bundle-universal-apk
support_url: https://github.com/ch4vi/bitrise-step-bundle-universal-apk/issues
published_at: 2019-01-24T15:12:40.106954+01:00
source:
git: https://github.com/ch4vi/bitrise-step-bundle-universal-apk.git
commit: 9d6aa9a9987b71eb2f160af8db92839488e04321
host_os_tags:
- osx-10.10
- ubuntu-16.04
project_type_tags:
- android
type_tags:
- build
toolkit:
bash:
entry_file: step.sh
deps:
brew:
- name: unzip
- name: wget
- name: curl
apt_get:
- name: unzip
- name: wget
- name: curl
is_requires_admin_user: true
is_always_run: false
is_skippable: false
run_if: ""
inputs:
- aab_path: $BITRISE_AAB_PATH
opts:
description: |-
Path(s) to the build artifact file `.aab`. You can build the bundle running `:bundleRelease` gradle task
Format examples:
- `/path/to/my/app.aab`
is_required: true
summary: '`Android App Bundle (.aab)`'
title: Build artifact path.
- keystore_url: $BITRISEIO_ANDROID_KEYSTORE_URL
opts:
description: |-
For remote keystores you can provide any download location (ex: https://URL/TO/keystore.jks).
For local keystores provide file path url. (ex: file://PATH/TO/keystore.jks).
is_required: true
is_sensitive: true
summary: ""
title: Keystore url
- keystore_password: $BITRISEIO_ANDROID_KEYSTORE_PASSWORD
opts:
description: ""
is_required: true
is_sensitive: true
summary: ""
title: Keystore password
- keystore_alias: $BITRISEIO_ANDROID_KEYSTORE_ALIAS
opts:
description: ""
is_required: true
is_sensitive: true
summary: ""
title: Keystore alias
- keystore_alias_password: $BITRISEIO_ANDROID_KEYSTORE_ALIAS_PASSWORD
opts:
description: ""
is_required: true
is_sensitive: true
summary: ""
title: Keystore alias password
outputs:
- BITRISE_APK_PATH: null
opts:
description: |
You can upload this apk to alternative app stores or your test platform
summary: This is the path to the universal apk signed with the passed keystore
title: Path to the universal apk
================================================
FILE: steps/bundle-universal-apk/0.0.3/step.yml
================================================
title: Bundle Universal Apk
summary: |
Generates an universal apk from an app bundle
description: |
Runs a bundletool that gets an app bundle path and generates an universal apk that it can be upload to alternative app stores or test platforms.
website: https://github.com/ch4vi/bitrise-step-bundle-universal-apk
source_code_url: https://github.com/ch4vi/bitrise-step-bundle-universal-apk
support_url: https://github.com/ch4vi/bitrise-step-bundle-universal-apk/issues
published_at: 2019-02-04T12:02:54.817601+01:00
source:
git: https://github.com/ch4vi/bitrise-step-bundle-universal-apk.git
commit: 7c7e986769f360b13524f036bc13fae0790a8dce
host_os_tags:
- osx-10.10
- ubuntu-16.04
project_type_tags:
- android
type_tags:
- build
toolkit:
bash:
entry_file: step.sh
deps:
brew:
- name: unzip
- name: wget
- name: curl
apt_get:
- name: unzip
- name: wget
- name: curl
is_requires_admin_user: true
is_always_run: false
is_skippable: false
run_if: ""
inputs:
- aab_path: $BITRISE_AAB_PATH
opts:
description: |-
Path(s) to the build artifact file `.aab`. You can build the bundle running `:bundleRelease` gradle task
Format examples:
- `/path/to/my/app.aab`
is_required: true
summary: '`Android App Bundle (.aab)`'
title: Build artifact path.
- keystore_url: $BITRISEIO_ANDROID_KEYSTORE_URL
opts:
description: |-
For remote keystores you can provide any download location (ex: https://URL/TO/keystore.jks).
For local keystores provide file path url. (ex: file://PATH/TO/keystore.jks).
is_required: true
is_sensitive: true
summary: ""
title: Keystore url
- keystore_password: $BITRISEIO_ANDROID_KEYSTORE_PASSWORD
opts:
description: ""
is_required: true
is_sensitive: true
summary: ""
title: Keystore password
- keystore_alias: $BITRISEIO_ANDROID_KEYSTORE_ALIAS
opts:
description: ""
is_required: true
is_sensitive: true
summary: ""
title: Keystore alias
- keystore_alias_password: $BITRISEIO_ANDROID_KEYSTORE_ALIAS_PASSWORD
opts:
description: ""
is_required: true
is_sensitive: true
summary: ""
title: Keystore alias password
outputs:
- BITRISE_APK_PATH: null
opts:
description: |
You can upload this apk to alternative app stores or your test platform
summary: This is the path to the universal apk signed with the passed keystore
title: Path to the universal apk
================================================
FILE: steps/bundle-universal-apk/0.0.4/step.yml
================================================
title: Bundle Universal Apk
summary: |
Generates an universal apk from an app bundle
description: |
Runs a bundletool that gets an app bundle path and generates an universal apk that it can be upload to alternative app stores or test platforms.
website: https://github.com/ch4vi/bitrise-step-bundle-universal-apk
source_code_url: https://github.com/ch4vi/bitrise-step-bundle-universal-apk
support_url: https://github.com/ch4vi/bitrise-step-bundle-universal-apk/issues
published_at: 2019-03-05T16:07:44.355859+01:00
source:
git: https://github.com/ch4vi/bitrise-step-bundle-universal-apk.git
commit: 780f9c2305fefcf3d62fe5e231152da2f6fa0367
host_os_tags:
- osx-10.10
- ubuntu-16.04
project_type_tags:
- android
type_tags:
- build
toolkit:
bash:
entry_file: step.sh
deps:
brew:
- name: unzip
- name: wget
- name: curl
apt_get:
- name: unzip
- name: wget
- name: curl
is_requires_admin_user: true
is_always_run: false
is_skippable: false
run_if: ""
inputs:
- aab_path: $BITRISE_AAB_PATH
opts:
description: |-
Path(s) to the build artifact file `.aab`. You can build the bundle running `:bundleRelease` gradle task
Format examples:
- `/path/to/my/app.aab`
is_required: true
summary: '`Android App Bundle (.aab)`'
title: Build artifact path.
- apk_name: $BITRISE_APK_RESULT_NAME
opts:
description: |-
The name must end with .apk
Format examples:
- `apk_name.apk` or `apk_name`
is_required: false
summary: '`Name of the resulting apk`'
title: Universal apk name
- keystore_url: $BITRISEIO_ANDROID_KEYSTORE_URL
opts:
description: |-
For remote keystores you can provide any download location (ex: https://URL/TO/keystore.jks).
For local keystores provide file path url. (ex: file://PATH/TO/keystore.jks).
is_required: true
is_sensitive: true
summary: ""
title: Keystore url
- keystore_password: $BITRISEIO_ANDROID_KEYSTORE_PASSWORD
opts:
description: ""
is_required: true
is_sensitive: true
summary: ""
title: Keystore password
- keystore_alias: $BITRISEIO_ANDROID_KEYSTORE_ALIAS
opts:
description: ""
is_required: true
is_sensitive: true
summary: ""
title: Keystore alias
- keystore_alias_password: $BITRISEIO_ANDROID_KEYSTORE_ALIAS_PASSWORD
opts:
description: ""
is_required: true
is_sensitive: true
summary: ""
title: Keystore alias password
outputs:
- BITRISE_APK_PATH: null
opts:
description: |
You can upload this apk to alternative app stores or your test platform
summary: This is the path to the universal apk signed with the passed keystore
title: Path to the universal apk
================================================
FILE: steps/bundle-universal-apk/0.0.5/step.yml
================================================
title: Bundle Universal Apk
summary: |
Generates an universal apk from an app bundle
description: |
Runs a bundletool that gets an app bundle path and generates an universal apk that it can be upload to alternative app stores or test platforms.
website: https://github.com/ch4vi/bitrise-step-bundle-universal-apk
source_code_url: https://github.com/ch4vi/bitrise-step-bundle-universal-apk
support_url: https://github.com/ch4vi/bitrise-step-bundle-universal-apk/issues
published_at: 2019-03-12T09:27:31.634368+01:00
source:
git: https://github.com/ch4vi/bitrise-step-bundle-universal-apk.git
commit: a4f7dc0bc35274c28ea6c872b30c4dac576226f7
host_os_tags:
- osx-10.10
- ubuntu-16.04
project_type_tags:
- android
type_tags:
- build
toolkit:
bash:
entry_file: step.sh
deps:
brew:
- name: unzip
- name: wget
- name: curl
apt_get:
- name: unzip
- name: wget
- name: curl
is_requires_admin_user: true
is_always_run: false
is_skippable: false
run_if: ""
inputs:
- aab_path: $BITRISE_AAB_PATH
opts:
description: |-
Path(s) to the build artifact file `.aab`. You can build the bundle running `:bundleRelease` gradle task
Format examples:
- `/path/to/my/app.aab`
is_required: true
summary: '`Android App Bundle (.aab)`'
title: Build artifact path.
- apk_name: $BITRISE_APK_RESULT_NAME
opts:
description: |-
The name must end with .apk
Format examples:
- `apk_name.apk` or `apk_name`
is_required: false
summary: '`Name of the resulting apk`'
title: Universal apk name
- keystore_url: $BITRISEIO_ANDROID_KEYSTORE_URL
opts:
description: |-
For remote keystores you can provide any download location (ex: https://URL/TO/keystore.jks).
For local keystores provide file path url. (ex: file://PATH/TO/keystore.jks).
is_required: true
is_sensitive: true
summary: ""
title: Keystore url
- keystore_password: $BITRISEIO_ANDROID_KEYSTORE_PASSWORD
opts:
description: ""
is_required: true
is_sensitive: true
summary: ""
title: Keystore password
- keystore_alias: $BITRISEIO_ANDROID_KEYSTORE_ALIAS
opts:
description: ""
is_required: true
is_sensitive: true
summary: ""
title: Keystore alias
- keystore_alias_password: $BITRISEIO_ANDROID_KEYSTORE_ALIAS_PASSWORD
opts:
description: ""
is_required: true
is_sensitive: true
summary: ""
title: Keystore alias password
outputs:
- BITRISE_APK_PATH: null
opts:
description: |
You can upload this apk to an alternative app stores or your test platform
summary: Path to the universal apk signed with the given keystore
title: Universal apk path
- BITRISE_APK_DIR: null
opts:
description: |
You can upload this directory to an alternative app stores or your test platform
summary: Path to directory where all the apk's are stored after the step.
title: Apk direcotry
================================================
FILE: steps/bundle-universal-apk/0.0.6/step.yml
================================================
title: Bundle Universal Apk
summary: |
Generates an universal apk from an app bundle
description: |
Runs a bundletool that gets an app bundle path and generates an universal apk that it can be upload to alternative app stores or test platforms.
website: https://github.com/ch4vi/bitrise-step-bundle-universal-apk
source_code_url: https://github.com/ch4vi/bitrise-step-bundle-universal-apk
support_url: https://github.com/ch4vi/bitrise-step-bundle-universal-apk/issues
published_at: 2019-10-25T13:42:24.097604+02:00
source:
git: https://github.com/ch4vi/bitrise-step-bundle-universal-apk.git
commit: b3be8f910c7a76aa722e59700957cf9a058535fb
host_os_tags:
- osx-10.10
- ubuntu-16.04
project_type_tags:
- android
type_tags:
- build
toolkit:
bash:
entry_file: step.sh
deps:
brew:
- name: unzip
- name: wget
- name: curl
apt_get:
- name: unzip
- name: wget
- name: curl
is_requires_admin_user: true
is_always_run: false
is_skippable: false
run_if: ""
inputs:
- aab_path: $BITRISE_AAB_PATH
opts:
description: |-
Path(s) to the build artifact file `.aab`. You can build the bundle running `:bundleRelease` gradle task
Format examples:
- `/path/to/my/app.aab`
is_required: true
summary: '`Android App Bundle (.aab)`'
title: Build artifact path.
- apk_name: $BITRISE_APK_OUTPUT_NAME
opts:
description: |-
The name must end with .apk
Format examples:
- `apk_name.apk` or `apk_name`
is_required: false
summary: '`Name of the resulting apk`'
title: Universal apk name
- apk_output_dir: $BITRISE_APK_OUTPUT_DIR
opts:
description: |-
If no Apk otuput dir is provided, the apk's will be at $BITRISE_APK_DIR
Format examples:
- `$BITRISE_DEPLOY_DIR`
is_required: false
summary: '`Path where the apk''s will be moved after`'
title: APK's output directory
- keystore_url: $BITRISEIO_ANDROID_KEYSTORE_URL
opts:
description: |-
For remote keystores you can provide any download location (ex: https://URL/TO/keystore.jks).
For local keystores provide file path url. (ex: file://PATH/TO/keystore.jks).
is_required: true
is_sensitive: true
summary: ""
title: Keystore url
- keystore_password: $BITRISEIO_ANDROID_KEYSTORE_PASSWORD
opts:
description: ""
is_required: true
is_sensitive: true
summary: ""
title: Keystore password
- keystore_alias: $BITRISEIO_ANDROID_KEYSTORE_ALIAS
opts:
description: ""
is_required: true
is_sensitive: true
summary: ""
title: Keystore alias
- keystore_alias_password: $BITRISEIO_ANDROID_KEYSTORE_ALIAS_PASSWORD
opts:
description: ""
is_required: true
is_sensitive: true
summary: ""
title: Keystore alias password
outputs:
- BITRISE_APK_PATH: null
opts:
description: |
You can upload this apk to an alternative app stores or your test platform
summary: Path to the universal apk signed with the given keystore
title: Universal apk path
- BITRISE_APK_DIR: null
opts:
description: |
You can upload this directory to an alternative app stores or your test platform
summary: Path to directory where all the apk's are stored after the step.
title: Apk direcotry
================================================
FILE: steps/bundle-universal-apk/step-info.yml
================================================
maintainer: community
================================================
FILE: steps/bundler/0.0.1/step.yml
================================================
title: Bundler
summary: Bundler
description: Bundler
website: https://github.com/chrisfuller/bitrise-step-bundler
source_code_url: https://github.com/chrisfuller/bitrise-step-bundler
support_url: https://github.com/chrisfuller/bitrise-step-bundler/issues
published_at: 2019-08-25T17:06:28.030329-07:00
source:
git: https://github.com/chrisfuller/bitrise-step-bundler.git
commit: 149ca2687cbe8080812daea6d7a408a4e5e7517e
host_os_tags:
- osx
type_tags:
- utility
- dependency
toolkit:
bash:
entry_file: step.sh
is_requires_admin_user: false
is_always_run: false
is_skippable: false
inputs:
- bundle_install_jobs: "4"
opts:
description: |
The maximum number of parallel download and install jobs.
is_expand: true
is_required: true
title: --jobs
- bundle_install_retry: "1"
opts:
description: |
The number of times to retry failed network or git requests.
is_expand: true
is_required: true
title: --retry
================================================
FILE: steps/bundler/0.0.2/step.yml
================================================
title: Bundler
summary: Install Ruby Dependencies with Bundler
description: Install Ruby Dependencies with Bundler
website: https://github.com/chrisfuller/bitrise-step-bundler
source_code_url: https://github.com/chrisfuller/bitrise-step-bundler
support_url: https://github.com/chrisfuller/bitrise-step-bundler/issues
published_at: 2019-09-03T02:30:23.222685-07:00
source:
git: https://github.com/chrisfuller/bitrise-step-bundler.git
commit: c8bc9835332d7d618f02ff4897ebfe017713ef15
host_os_tags:
- osx
type_tags:
- utility
- dependency
toolkit:
bash:
entry_file: step.sh
is_requires_admin_user: false
is_always_run: false
is_skippable: false
inputs:
- bundle_install_jobs: "4"
opts:
description: |
The maximum number of parallel download and install jobs.
is_expand: true
is_required: true
title: --jobs
- bundle_install_retry: "1"
opts:
description: |
The number of times to retry failed network or git requests.
is_expand: true
is_required: true
title: --retry
================================================
FILE: steps/bundler/0.0.3/step.yml
================================================
title: Bundler
summary: Install Ruby Dependencies with Bundler
description: Install Ruby Dependencies with Bundler
website: https://github.com/chrisfuller/bitrise-step-bundler
source_code_url: https://github.com/chrisfuller/bitrise-step-bundler
support_url: https://github.com/chrisfuller/bitrise-step-bundler/issues
published_at: 2019-09-08T16:41:15.363368-07:00
source:
git: https://github.com/chrisfuller/bitrise-step-bundler.git
commit: 5941e841a021216b90c13e32f1b38bfdc7ac6691
host_os_tags:
- osx
- ubuntu
type_tags:
- utility
- dependency
toolkit:
bash:
entry_file: step.sh
is_requires_admin_user: false
is_always_run: false
is_skippable: false
inputs:
- bundle_install_jobs: "4"
opts:
description: |
The maximum number of parallel download and install jobs.
is_expand: true
is_required: true
title: --jobs
- bundle_install_retry: "1"
opts:
description: |
The number of times to retry failed network or git requests.
is_expand: true
is_required: true
title: --retry
================================================
FILE: steps/bundler/0.0.4/step.yml
================================================
title: Bundler
summary: Install Ruby Dependencies with Bundler
description: Install Ruby Dependencies with Bundler
website: https://github.com/chrisfuller/bitrise-step-bundler
source_code_url: https://github.com/chrisfuller/bitrise-step-bundler
support_url: https://github.com/chrisfuller/bitrise-step-bundler/issues
published_at: 2019-09-11T08:58:52.875111-07:00
source:
git: https://github.com/chrisfuller/bitrise-step-bundler.git
commit: 0e27995bfe32237fe7b61fa64445cc6885dae03e
host_os_tags:
- osx
- ubuntu
type_tags:
- dependency
toolkit:
bash:
entry_file: step.sh
is_requires_admin_user: false
is_always_run: false
is_skippable: false
inputs:
- bundle_install_jobs: "4"
opts:
description: |
The value of the `--jobs` Bundler option.
is_expand: true
is_required: true
title: The maximum number of parallel download and install jobs.
- bundle_install_retry: "1"
opts:
description: |
The value of the `--retry` Bundler option.
is_expand: true
is_required: true
title: The number of times to retry failed network or git requests.
================================================
FILE: steps/bundler/step-info.yml
================================================
maintainer: community
================================================
FILE: steps/cache-pull/0.9.0/step.yml
================================================
title: Bitrise.io Cache:Pull [BETA]
summary: WIP
description: WIP
website: https://github.com/bitrise-steplib/steps-cache-pull
source_code_url: https://github.com/bitrise-steplib/steps-cache-pull.git
support_url: https://github.com/bitrise-steplib/steps-cache-pull/issues
published_at: 2016-04-13T16:18:48.559722571+02:00
source:
git: https://github.com/bitrise-steplib/steps-cache-pull.git
commit: a888a463aa719766ad011d084c445b79c2a77c85
host_os_tags:
- osx-10.10
- ubuntu-14.04
type_tags:
- bitrise.io
- cache
deps:
apt_get:
- name: rsync
- name: tar
is_requires_admin_user: false
is_always_run: false
is_skippable: true
run_if: .IsCI
inputs:
- opts:
description: Working directory path - should be an absolute path.
summary: Working directory path
title: Working directory path
workdir: $BITRISE_SOURCE_DIR
- is_debug_mode: "false"
opts:
description: If debug mode is enabled the step will print verbose logs
is_required: true
summary: If debug mode is enabled the step will print verbose logs
title: Debug mode?
value_options:
- "true"
- "false"
- cache_api_url: $BITRISE_CACHE_API_URL
opts:
description: Cache API URL
is_dont_change_value: true
is_required: true
summary: Cache API URL
title: Cache API URL
outputs:
- BITRISE_CACHE_INFO_PATH: null
opts:
description: Path to the uncompressed cache-info.json
title: Bitrise Cache-Info (JSON) file path
================================================
FILE: steps/cache-pull/0.9.1/step.yml
================================================
title: Bitrise.io Cache:Pull [BETA]
summary: Download Build Cache from Bitrise.io
description: |-
Downloads the Build Cache from Bitrise.io, and moves the files back to
their original place.
You can find a setup and tips & tricks guide on the Bitrise DevCenter
at [http://devcenter.bitrise.io/docs/using-the-build-cache](http://devcenter.bitrise.io/docs/using-the-build-cache).
website: https://github.com/bitrise-steplib/steps-cache-pull
source_code_url: https://github.com/bitrise-steplib/steps-cache-pull.git
support_url: https://github.com/bitrise-steplib/steps-cache-pull/issues
published_at: 2016-04-20T11:35:10.976596542+02:00
source:
git: https://github.com/bitrise-steplib/steps-cache-pull.git
commit: 60ed678708702719d6331f0abc7312b02af003fb
host_os_tags:
- osx-10.10
- ubuntu-14.04
type_tags:
- bitrise.io
- cache
deps:
apt_get:
- name: rsync
- name: tar
is_requires_admin_user: false
is_always_run: false
is_skippable: true
run_if: .IsCI
inputs:
- opts:
description: Working directory path - should be an absolute path.
summary: Working directory path
title: Working directory path
workdir: $BITRISE_SOURCE_DIR
- is_debug_mode: "false"
opts:
description: If debug mode is enabled the step will print verbose logs
is_required: true
summary: If debug mode is enabled the step will print verbose logs
title: Debug mode?
value_options:
- "true"
- "false"
- cache_api_url: $BITRISE_CACHE_API_URL
opts:
description: Cache API URL
is_dont_change_value: true
is_required: true
summary: Cache API URL
title: Cache API URL
outputs:
- BITRISE_CACHE_INFO_PATH: null
opts:
description: Path to the uncompressed cache-info.json
title: Bitrise Cache-Info (JSON) file path
================================================
FILE: steps/cache-pull/0.9.2/step.yml
================================================
title: Bitrise.io Cache:Pull
summary: Download Build Cache from Bitrise.io
description: |-
Downloads the Build Cache from Bitrise.io, and moves the files back to
their original place.
You can find a setup and tips & tricks guide on the Bitrise DevCenter
at [http://devcenter.bitrise.io/caching/about-caching/](http://devcenter.bitrise.io/caching/about-caching/).
website: https://github.com/bitrise-steplib/steps-cache-pull
source_code_url: https://github.com/bitrise-steplib/steps-cache-pull.git
support_url: https://github.com/bitrise-steplib/steps-cache-pull/issues
published_at: 2017-01-24T21:38:29.244611111+01:00
source:
git: https://github.com/bitrise-steplib/steps-cache-pull.git
commit: 582f304450221e1771c3ccff2c1377abb000cd64
host_os_tags:
- osx-10.10
- ubuntu-14.04
type_tags:
- utility
deps:
apt_get:
- name: rsync
- name: tar
is_requires_admin_user: false
is_always_run: false
is_skippable: true
run_if: .IsCI
inputs:
- opts:
description: Working directory path - should be an absolute path.
summary: Working directory path
title: Working directory path
workdir: $BITRISE_SOURCE_DIR
- is_debug_mode: "false"
opts:
description: If debug mode is enabled the step will print verbose logs
is_required: true
summary: If debug mode is enabled the step will print verbose logs
title: Debug mode?
value_options:
- "true"
- "false"
- cache_api_url: $BITRISE_CACHE_API_URL
opts:
description: Cache API URL
is_dont_change_value: true
is_required: true
summary: Cache API URL
title: Cache API URL
outputs:
- BITRISE_CACHE_INFO_PATH: null
opts:
description: Path to the uncompressed cache-info.json
title: Bitrise Cache-Info (JSON) file path
================================================
FILE: steps/cache-pull/0.9.4/step.yml
================================================
title: Bitrise.io Cache:Pull
summary: Download Build Cache from Bitrise.io
description: |-
Downloads the Build Cache from Bitrise.io, and moves the files back to
their original place.
You can find a setup and tips & tricks guide on the Bitrise DevCenter
at [http://devcenter.bitrise.io/caching/about-caching/](http://devcenter.bitrise.io/caching/about-caching/).
website: https://github.com/bitrise-steplib/steps-cache-pull
source_code_url: https://github.com/bitrise-steplib/steps-cache-pull.git
support_url: https://github.com/bitrise-steplib/steps-cache-pull/issues
published_at: 2017-05-25T15:24:47.69329435+02:00
source:
git: https://github.com/bitrise-steplib/steps-cache-pull.git
commit: 5d5eaaf418fcb0c6ddc287cb1a672f5d6f3852db
host_os_tags:
- osx-10.10
- ubuntu-14.04
type_tags:
- utility
deps:
apt_get:
- name: rsync
- name: tar
is_requires_admin_user: false
is_always_run: false
is_skippable: true
run_if: .IsCI
inputs:
- opts:
description: Working directory path - should be an absolute path.
summary: Working directory path
title: Working directory path
workdir: $BITRISE_SOURCE_DIR
- is_debug_mode: "false"
opts:
description: If debug mode is enabled the step will print verbose logs
is_required: true
summary: If debug mode is enabled the step will print verbose logs
title: Debug mode?
value_options:
- "true"
- "false"
- cache_api_url: $BITRISE_CACHE_API_URL
opts:
description: Cache API URL
is_dont_change_value: true
is_required: true
summary: Cache API URL
title: Cache API URL
outputs:
- BITRISE_CACHE_INFO_PATH: null
opts:
description: Path to the uncompressed cache-info.json
title: Bitrise Cache-Info (JSON) file path
================================================
FILE: steps/cache-pull/1.0.0/step.yml
================================================
title: Bitrise.io Cache:Pull
summary: Download Build Cache from Bitrise.io
description: |-
Downloads the Build Cache from Bitrise.io, and moves the files back to
their original place.
You can find a setup and tips & tricks guide on the Bitrise DevCenter
at [http://devcenter.bitrise.io/caching/about-caching/](http://devcenter.bitrise.io/caching/about-caching/).
website: https://github.com/bitrise-steplib/steps-cache-pull
source_code_url: https://github.com/bitrise-steplib/steps-cache-pull.git
support_url: https://github.com/bitrise-steplib/steps-cache-pull/issues
published_at: 2017-05-26T16:08:45.88575208+02:00
source:
git: https://github.com/bitrise-steplib/steps-cache-pull.git
commit: b74a8e2e0825a588081c7a10a189da5a0e1257ed
host_os_tags:
- osx-10.10
- ubuntu-14.04
type_tags:
- utility
deps:
apt_get:
- name: rsync
- name: tar
is_requires_admin_user: false
is_always_run: false
is_skippable: true
run_if: .IsCI
inputs:
- opts:
description: Working directory path - should be an absolute path.
summary: Working directory path
title: Working directory path
workdir: $BITRISE_SOURCE_DIR
- is_debug_mode: "false"
opts:
description: If debug mode is enabled the step will print verbose logs
is_required: true
summary: If debug mode is enabled the step will print verbose logs
title: Debug mode?
value_options:
- "true"
- "false"
- cache_api_url: $BITRISE_CACHE_API_URL
opts:
description: Cache API URL
is_dont_change_value: true
is_required: true
summary: Cache API URL
title: Cache API URL
outputs:
- BITRISE_CACHE_INFO_PATH: null
opts:
description: Path to the uncompressed cache-info.json
title: Bitrise Cache-Info (JSON) file path
================================================
FILE: steps/cache-pull/2.0.0/step.yml
================================================
title: Bitrise.io Cache:Pull
summary: Download Build Cache from Bitrise.io
description: |-
Downloads the Build Cache from Bitrise.io, and moves the files back to
their original place.
You can find a setup and tips & tricks guide on the Bitrise DevCenter
at [http://devcenter.bitrise.io/caching/about-caching/](http://devcenter.bitrise.io/caching/about-caching/).
website: https://github.com/bitrise-steplib/steps-cache-pull
source_code_url: https://github.com/bitrise-steplib/steps-cache-pull.git
support_url: https://github.com/bitrise-steplib/steps-cache-pull/issues
published_at: 2017-09-26T16:19:36.336485711+02:00
source:
git: https://github.com/bitrise-steplib/steps-cache-pull.git
commit: be822420a0144c34ed1d5a3e093fd534260b67c8
host_os_tags:
- osx-10.10
- ubuntu-14.04
type_tags:
- utility
toolkit:
go:
package_name: github.com/bitrise-steplib/steps-cache-pull
deps:
apt_get:
- name: rsync
- name: tar
is_requires_admin_user: false
is_always_run: false
is_skippable: true
run_if: .IsCI
inputs:
- opts:
description: Working directory path - should be an absolute path.
summary: Working directory path
title: Working directory path
workdir: $BITRISE_SOURCE_DIR
- is_debug_mode: "false"
opts:
description: If debug mode is enabled the step will print verbose logs
is_required: true
summary: If debug mode is enabled the step will print verbose logs
title: Debug mode?
value_options:
- "true"
- "false"
- cache_api_url: $BITRISE_CACHE_API_URL
opts:
description: Cache API URL
is_dont_change_value: true
is_required: true
summary: Cache API URL
title: Cache API URL
outputs:
- BITRISE_CACHE_INFO_PATH: null
opts:
description: Path to the uncompressed cache-info.json
title: Bitrise Cache-Info (JSON) file path
================================================
FILE: steps/cache-pull/2.0.1/step.yml
================================================
title: Bitrise.io Cache:Pull
summary: Download Build Cache from Bitrise.io
description: |-
Downloads the Build Cache from Bitrise.io, and moves the files back to
their original place.
You can find a setup and tips & tricks guide on the Bitrise DevCenter
at [http://devcenter.bitrise.io/caching/about-caching/](http://devcenter.bitrise.io/caching/about-caching/).
website: https://github.com/bitrise-steplib/steps-cache-pull
source_code_url: https://github.com/bitrise-steplib/steps-cache-pull.git
support_url: https://github.com/bitrise-steplib/steps-cache-pull/issues
published_at: 2017-12-04T13:14:46.805494797+01:00
source:
git: https://github.com/bitrise-steplib/steps-cache-pull.git
commit: 4c2ed8c1fbe1b9a28beaa5c89439f8a9be775793
host_os_tags:
- osx-10.10
- ubuntu-14.04
type_tags:
- utility
toolkit:
go:
package_name: github.com/bitrise-steplib/steps-cache-pull
deps:
apt_get:
- name: rsync
- name: tar
is_requires_admin_user: false
is_always_run: false
is_skippable: true
run_if: .IsCI
inputs:
- opts:
description: Working directory path - should be an absolute path.
summary: Working directory path
title: Working directory path
workdir: $BITRISE_SOURCE_DIR
- is_debug_mode: "false"
opts:
description: If debug mode is enabled the step will print verbose logs
is_required: true
summary: If debug mode is enabled the step will print verbose logs
title: Debug mode?
value_options:
- "true"
- "false"
- cache_api_url: $BITRISE_CACHE_API_URL
opts:
description: Cache API URL
is_dont_change_value: true
is_required: true
summary: Cache API URL
title: Cache API URL
outputs:
- BITRISE_CACHE_INFO_PATH: null
opts:
description: Path to the uncompressed cache-info.json
title: Bitrise Cache-Info (JSON) file path
================================================
FILE: steps/cache-pull/2.1.0/step.yml
================================================
title: Bitrise.io Cache:Pull
summary: Download Build Cache from Bitrise.io
description: |-
Downloads the Build Cache from Bitrise.io, and moves the files back to
their original place.
For more information on setting it up and for tips & tricks, head over to our Bitrise DevCenter
at [http://devcenter.bitrise.io/caching/about-caching/](http://devcenter.bitrise.io/caching/about-caching/).
website: https://github.com/bitrise-steplib/steps-cache-pull
source_code_url: https://github.com/bitrise-steplib/steps-cache-pull.git
support_url: https://github.com/bitrise-steplib/steps-cache-pull/issues
published_at: 2019-07-31T07:46:16.391239715Z
source:
git: https://github.com/bitrise-steplib/steps-cache-pull.git
commit: e597469c16788103b08f3abc9583235a6002189e
host_os_tags:
- osx-10.10
- ubuntu-14.04
type_tags:
- utility
toolkit:
go:
package_name: github.com/bitrise-steplib/steps-cache-pull
deps:
apt_get:
- name: tar
is_requires_admin_user: false
is_always_run: false
is_skippable: true
run_if: .IsCI
inputs:
- opts:
description: Working directory path - should be an absolute path.
summary: Working directory path
title: Working directory path
workdir: $BITRISE_SOURCE_DIR
- is_debug_mode: "false"
opts:
description: If debug mode is enabled, the step will print verbose logs
is_required: true
summary: If debug mode is enabled, the step will print verbose logs
title: Debug mode?
value_options:
- "true"
- "false"
- cache_api_url: $BITRISE_CACHE_API_URL
opts:
description: Cache API URL
is_dont_change_value: true
summary: Cache API URL
title: Cache API URL
================================================
FILE: steps/cache-pull/2.1.1/step.yml
================================================
title: Bitrise.io Cache:Pull
summary: Download Build Cache from Bitrise.io
description: |-
Downloads the Build Cache from Bitrise.io, and moves the files back to
their original place.
For more information on setting it up and for tips & tricks, head over to our Bitrise DevCenter
at [http://devcenter.bitrise.io/caching/about-caching/](http://devcenter.bitrise.io/caching/about-caching/).
website: https://github.com/bitrise-steplib/steps-cache-pull
source_code_url: https://github.com/bitrise-steplib/steps-cache-pull.git
support_url: https://github.com/bitrise-steplib/steps-cache-pull/issues
published_at: 2019-09-16T14:49:21.515743981Z
source:
git: https://github.com/bitrise-steplib/steps-cache-pull.git
commit: d584736cc2785a6bdbd6cce9b70573297f7729be
host_os_tags:
- osx-10.10
- ubuntu-14.04
type_tags:
- utility
toolkit:
go:
package_name: github.com/bitrise-steplib/steps-cache-pull
deps:
apt_get:
- name: tar
is_requires_admin_user: false
is_always_run: false
is_skippable: true
run_if: .IsCI
inputs:
- opts:
description: Working directory path - should be an absolute path.
summary: Working directory path
title: Working directory path
workdir: $BITRISE_SOURCE_DIR
- is_debug_mode: "false"
opts:
description: If debug mode is enabled, the step will print verbose logs
is_required: true
summary: If debug mode is enabled, the step will print verbose logs
title: Debug mode?
value_options:
- "true"
- "false"
- cache_api_url: $BITRISE_CACHE_API_URL
opts:
description: Cache API URL
is_dont_change_value: true
summary: Cache API URL
title: Cache API URL
================================================
FILE: steps/cache-pull/2.1.2/step.yml
================================================
title: Bitrise.io Cache:Pull
summary: Download Build Cache from Bitrise.io
description: |-
Downloads the Build Cache from Bitrise.io, and moves the files back to
their original place.
For more information on setting it up and for tips & tricks, head over to our Bitrise DevCenter
at [http://devcenter.bitrise.io/caching/about-caching/](http://devcenter.bitrise.io/caching/about-caching/).
website: https://github.com/bitrise-steplib/steps-cache-pull
source_code_url: https://github.com/bitrise-steplib/steps-cache-pull.git
support_url: https://github.com/bitrise-steplib/steps-cache-pull/issues
published_at: 2019-11-26T16:03:38.823187845Z
source:
git: https://github.com/bitrise-steplib/steps-cache-pull.git
commit: 3117c54a706e0081471f7dcd7b407aeff51da1be
host_os_tags:
- osx-10.10
- ubuntu-14.04
type_tags:
- utility
toolkit:
go:
package_name: github.com/bitrise-steplib/steps-cache-pull
deps:
apt_get:
- name: tar
is_requires_admin_user: false
is_always_run: false
is_skippable: true
run_if: .IsCI
inputs:
- opts:
description: Working directory path - should be an absolute path.
summary: Working directory path
title: Working directory path
workdir: $BITRISE_SOURCE_DIR
- is_debug_mode: "false"
opts:
description: If debug mode is enabled, the step will print verbose logs
is_required: true
summary: If debug mode is enabled, the step will print verbose logs
title: Debug mode?
value_options:
- "true"
- "false"
- cache_api_url: $BITRISE_CACHE_API_URL
opts:
description: Cache API URL
is_dont_change_value: true
summary: Cache API URL
title: Cache API URL
================================================
FILE: steps/cache-pull/2.1.3/step.yml
================================================
title: Bitrise.io Cache:Pull
summary: Download the build cache from bitrise.io.
description: |-
Downloads the build cache from bitrise.io, and moves the files back to
their original place. The aim is to speed up your builds as not having to download every single dependency every time can be a serious timesaver.
### Configuring the Step
To be able to pull from a previous build's cache, you need two things.
1. The **Cache:Push** Step at the end of your Workflow.
2. At least one successful build on the same branch in the last seven days.
If there was no successful build on the branch in question in the last seven days, the cache automatically gets deleted.
### Troubleshooting
If the Step fails, check the time of the latest build. If there was a successful build in the last seven days, check if the Workflow included the **Cache:Push** Step.
If the **Cache:Push** Step was present, check the inputs of the Step. It's possible, for example, that the provided cache path is incorrect.
### Useful links
[Caching](https://devcenter.bitrise.io/builds/caching/about-caching-index/)
### Related Steps
[Cache:Push](https://www.bitrise.io/integrations/steps/cache-push)
[Run CocoaPods install](https://www.bitrise.io/integrations/steps/cocoapods-install)
[Run npm command](https://www.bitrise.io/integrations/steps/npm)
[yarn](https://www.bitrise.io/integrations/steps/yarn)
website: https://github.com/bitrise-steplib/steps-cache-pull
source_code_url: https://github.com/bitrise-steplib/steps-cache-pull.git
support_url: https://github.com/bitrise-steplib/steps-cache-pull/issues
published_at: 2019-12-10T12:58:41.252120819Z
source:
git: https://github.com/bitrise-steplib/steps-cache-pull.git
commit: 0517fc3cae2bfcb1ab42db2139321d3853a2660e
host_os_tags:
- osx-10.10
- ubuntu-14.04
type_tags:
- utility
toolkit:
go:
package_name: github.com/bitrise-steplib/steps-cache-pull
deps:
apt_get:
- name: tar
is_requires_admin_user: false
is_always_run: false
is_skippable: true
run_if: .IsCI
inputs:
- opts:
description: Working directory path - should be an absolute path.
summary: Working directory path
title: Working directory path
workdir: $BITRISE_SOURCE_DIR
- is_debug_mode: "false"
opts:
description: If debug mode is enabled, the step will print verbose logs
is_required: true
summary: If debug mode is enabled, the step will print verbose logs
title: Debug mode?
value_options:
- "true"
- "false"
- cache_api_url: $BITRISE_CACHE_API_URL
opts:
description: Cache API URL
is_dont_change_value: true
summary: Cache API URL
title: Cache API URL
================================================
FILE: steps/cache-pull/2.1.4/step.yml
================================================
title: Bitrise.io Cache:Pull
summary: Download the build cache from bitrise.io.
description: |-
Downloads the build cache from bitrise.io, and moves the files back to
their original place. The aim is to speed up your builds as not having to download every single dependency every time can be a serious timesaver.
### Configuring the Step
To be able to pull from a previous build's cache, you need two things.
1. The **Cache:Push** Step at the end of your Workflow.
2. At least one successful build on the same branch in the last seven days.
If there was no successful build on the branch in question in the last seven days, the cache automatically gets deleted.
### Troubleshooting
If the Step fails, check the time of the latest build. If there was a successful build in the last seven days, check if the Workflow included the **Cache:Push** Step.
If the **Cache:Push** Step was present, check the inputs of the Step. It's possible, for example, that the provided cache path is incorrect.
### Useful links
- [Caching](https://devcenter.bitrise.io/builds/caching/about-caching-index/)
### Related Steps
- [Cache:Push](https://www.bitrise.io/integrations/steps/cache-push)
- [Run CocoaPods install](https://www.bitrise.io/integrations/steps/cocoapods-install)
- [Run npm command](https://www.bitrise.io/integrations/steps/npm)
- [yarn](https://www.bitrise.io/integrations/steps/yarn)
website: https://github.com/bitrise-steplib/steps-cache-pull
source_code_url: https://github.com/bitrise-steplib/steps-cache-pull.git
support_url: https://github.com/bitrise-steplib/steps-cache-pull/issues
published_at: 2020-02-13T14:51:45.811395168Z
source:
git: https://github.com/bitrise-steplib/steps-cache-pull.git
commit: 5c3ffa53c8c94729f6e08d97b0fe9a5c260b2cec
host_os_tags:
- osx-10.10
- ubuntu-14.04
type_tags:
- utility
toolkit:
go:
package_name: github.com/bitrise-steplib/steps-cache-pull
deps:
apt_get:
- name: tar
is_requires_admin_user: false
is_always_run: false
is_skippable: true
run_if: .IsCI
inputs:
- opts:
description: Working directory path - should be an absolute path.
summary: Working directory path
title: Working directory path
workdir: $BITRISE_SOURCE_DIR
- is_debug_mode: "false"
opts:
description: If debug mode is enabled, the step will print verbose logs
is_required: true
summary: If debug mode is enabled, the step will print verbose logs
title: Debug mode?
value_options:
- "true"
- "false"
- cache_api_url: $BITRISE_CACHE_API_URL
opts:
description: Cache API URL
is_dont_change_value: true
summary: Cache API URL
title: Cache API URL
================================================
FILE: steps/cache-pull/2.1.5/step.yml
================================================
title: Bitrise.io Cache:Pull
summary: Download the build cache from bitrise.io.
description: |-
Downloads the build cache from bitrise.io, and moves the files back to
their original place. The aim is to speed up your builds as not having to download every single dependency every time can be a serious timesaver.
### Configuring the Step
To be able to pull from a previous build's cache, you need two things.
1. The **Cache:Push** Step at the end of your Workflow.
2. At least one successful build on the same branch in the last seven days.
If there was no successful build on the branch in question in the last seven days, the cache automatically gets deleted.
### Troubleshooting
If the Step fails, check the time of the latest build. If there was a successful build in the last seven days, check if the Workflow included the **Cache:Push** Step.
If the **Cache:Push** Step was present, check the inputs of the Step. It's possible, for example, that the provided cache path is incorrect.
### Useful links
- [Caching](https://devcenter.bitrise.io/builds/caching/about-caching-index/)
### Related Steps
- [Cache:Push](https://www.bitrise.io/integrations/steps/cache-push)
- [Run CocoaPods install](https://www.bitrise.io/integrations/steps/cocoapods-install)
- [Run npm command](https://www.bitrise.io/integrations/steps/npm)
- [yarn](https://www.bitrise.io/integrations/steps/yarn)
website: https://github.com/bitrise-steplib/steps-cache-pull
source_code_url: https://github.com/bitrise-steplib/steps-cache-pull.git
support_url: https://github.com/bitrise-steplib/steps-cache-pull/issues
published_at: 2020-08-28T08:45:10.833575393Z
source:
git: https://github.com/bitrise-steplib/steps-cache-pull.git
commit: 374582060769cdd26c8208dcb29e8a17a17f681a
host_os_tags:
- osx-10.10
- ubuntu-14.04
type_tags:
- utility
toolkit:
go:
package_name: github.com/bitrise-steplib/steps-cache-pull
deps:
apt_get:
- name: tar
is_requires_admin_user: false
is_always_run: false
is_skippable: true
run_if: .IsCI
inputs:
- opts:
description: Working directory path - should be an absolute path.
summary: Working directory path
title: Working directory path
workdir: $BITRISE_SOURCE_DIR
- is_debug_mode: "false"
opts:
description: If debug mode is enabled, the step will print verbose logs
is_required: true
summary: If debug mode is enabled, the step will print verbose logs
title: Debug mode?
value_options:
- "true"
- "false"
- cache_api_url: $BITRISE_CACHE_API_URL
opts:
description: Cache API URL
is_dont_change_value: true
summary: Cache API URL
title: Cache API URL
================================================
FILE: steps/cache-pull/2.1.6/step.yml
================================================
title: Bitrise.io Cache:Pull
summary: Download the build cache from bitrise.io.
description: |-
Downloads the build cache from bitrise.io, and moves the files back to
their original place. The aim is to speed up your builds as not having to download every single dependency every time can be a serious timesaver.
### Configuring the Step
To be able to pull from a previous build's cache, you need two things.
1. The **Cache:Push** Step at the end of your Workflow.
2. At least one successful build on the same branch in the last seven days.
If there was no successful build on the branch in question in the last seven days, the cache automatically gets deleted.
### Troubleshooting
If the Step fails, check the time of the latest build. If there was a successful build in the last seven days, check if the Workflow included the **Cache:Push** Step.
If the **Cache:Push** Step was present, check the inputs of the Step. It's possible, for example, that the provided cache path is incorrect.
### Useful links
- [Caching](https://devcenter.bitrise.io/builds/caching/about-caching-index/)
### Related Steps
- [Cache:Push](https://www.bitrise.io/integrations/steps/cache-push)
- [Run CocoaPods install](https://www.bitrise.io/integrations/steps/cocoapods-install)
- [Run npm command](https://www.bitrise.io/integrations/steps/npm)
- [yarn](https://www.bitrise.io/integrations/steps/yarn)
website: https://github.com/bitrise-steplib/steps-cache-pull
source_code_url: https://github.com/bitrise-steplib/steps-cache-pull.git
support_url: https://github.com/bitrise-steplib/steps-cache-pull/issues
published_at: 2020-09-03T10:57:29.501693496Z
source:
git: https://github.com/bitrise-steplib/steps-cache-pull.git
commit: 1eefc5a4e54aab40d8241d9e48b80965de87084c
host_os_tags:
- osx-10.10
- ubuntu-14.04
type_tags:
- utility
toolkit:
go:
package_name: github.com/bitrise-steplib/steps-cache-pull
deps:
apt_get:
- name: tar
is_requires_admin_user: false
is_always_run: false
is_skippable: true
run_if: .IsCI
inputs:
- opts:
description: Working directory path - should be an absolute path.
summary: Working directory path
title: Working directory path
workdir: $BITRISE_SOURCE_DIR
- is_debug_mode: "false"
opts:
description: If debug mode is enabled, the step will print verbose logs
is_required: true
summary: If debug mode is enabled, the step will print verbose logs
title: Debug mode?
value_options:
- "true"
- "false"
- cache_api_url: $BITRISE_CACHE_API_URL
opts:
description: Cache API URL
is_dont_change_value: true
summary: Cache API URL
title: Cache API URL
================================================
FILE: steps/cache-pull/2.3.0/step.yml
================================================
title: Bitrise.io Cache:Pull
summary: Download the build cache from bitrise.io.
description: |-
Downloads the build cache from bitrise.io, and moves the files back to
their original place. The aim is to speed up your builds as not having to download every single dependency every time can be a serious timesaver.
### Configuring the Step
To be able to pull from a previous build's cache, you need two things.
1. The **Cache:Push** Step at the end of your Workflow.
2. At least one successful build on the same branch in the last seven days.
If there was no successful build on the branch in question in the last seven days, the cache automatically gets deleted.
### Troubleshooting
If the Step fails, check the time of the latest build. If there was a successful build in the last seven days, check if the Workflow included the **Cache:Push** Step.
If the **Cache:Push** Step was present, check the inputs of the Step. It's possible, for example, that the provided cache path is incorrect.
### Useful links
- [Caching](https://devcenter.bitrise.io/builds/caching/about-caching-index/)
### Related Steps
- [Cache:Push](https://www.bitrise.io/integrations/steps/cache-push)
- [Run CocoaPods install](https://www.bitrise.io/integrations/steps/cocoapods-install)
- [Run npm command](https://www.bitrise.io/integrations/steps/npm)
- [yarn](https://www.bitrise.io/integrations/steps/yarn)
website: https://github.com/bitrise-steplib/steps-cache-pull
source_code_url: https://github.com/bitrise-steplib/steps-cache-pull.git
support_url: https://github.com/bitrise-steplib/steps-cache-pull/issues
published_at: 2020-10-30T08:08:36.974821487Z
source:
git: https://github.com/bitrise-steplib/steps-cache-pull.git
commit: 98851de3dee34acec45b501bb72000d0de4c0406
host_os_tags:
- osx-10.10
- ubuntu-14.04
type_tags:
- utility
toolkit:
go:
package_name: github.com/bitrise-steplib/steps-cache-pull
deps:
apt_get:
- name: tar
is_requires_admin_user: false
is_always_run: false
is_skippable: true
run_if: .IsCI
inputs:
- opts:
description: Working directory path - should be an absolute path.
summary: Working directory path
title: Working directory path
workdir: $BITRISE_SOURCE_DIR
- cache_api_url: $BITRISE_CACHE_API_URL
opts:
description: Cache API URL
is_dont_change_value: true
summary: Cache API URL
title: Cache API URL
- is_debug_mode: "false"
opts:
is_required: true
summary: If enabled, the step will print verbose logs.
title: Enable verbose logging
value_options:
- "true"
- "false"
- extract_to_relative_path: "false"
opts:
category: Debug
is_dont_change_value: true
is_required: true
summary: Should we extract the archive content under current working directory?
title: Extract to relative path?
value_options:
- "true"
- "false"
- allow_fallback: "true"
opts:
category: Debug
is_dont_change_value: true
is_required: true
title: Allow fallback cache extraction?
value_options:
- "true"
- "false"
================================================
FILE: steps/cache-pull/2.4.0/step.yml
================================================
title: Bitrise.io Cache:Pull
summary: Download the build cache from bitrise.io.
description: |-
Downloads the build cache from bitrise.io, and moves the files back to
their original place. The aim is to speed up your builds as not having to download every single dependency every time can be a serious timesaver.
### Configuring the Step
To be able to pull from a previous build's cache, you need two things.
1. The **Cache:Push** Step at the end of your Workflow.
2. At least one successful build on the same branch in the last seven days.
If there was no successful build on the branch in question in the last seven days, the cache automatically gets deleted.
### Troubleshooting
If the Step fails, check the time of the latest build. If there was a successful build in the last seven days, check if the Workflow included the **Cache:Push** Step.
If the **Cache:Push** Step was present, check the inputs of the Step. It's possible, for example, that the provided cache path is incorrect.
### Useful links
- [Caching](https://devcenter.bitrise.io/builds/caching/about-caching-index/)
### Related Steps
- [Cache:Push](https://www.bitrise.io/integrations/steps/cache-push)
- [Run CocoaPods install](https://www.bitrise.io/integrations/steps/cocoapods-install)
- [Run npm command](https://www.bitrise.io/integrations/steps/npm)
- [yarn](https://www.bitrise.io/integrations/steps/yarn)
website: https://github.com/bitrise-steplib/steps-cache-pull
source_code_url: https://github.com/bitrise-steplib/steps-cache-pull.git
support_url: https://github.com/bitrise-steplib/steps-cache-pull/issues
published_at: 2020-12-02T14:16:32.83367111Z
source:
git: https://github.com/bitrise-steplib/steps-cache-pull.git
commit: 110adc795816f919359ccc3a19da3926ec9fe416
host_os_tags:
- osx-10.10
- ubuntu-14.04
type_tags:
- utility
toolkit:
go:
package_name: github.com/bitrise-steplib/steps-cache-pull
deps:
apt_get:
- name: tar
is_requires_admin_user: false
is_always_run: false
is_skippable: true
run_if: .IsCI
inputs:
- opts:
description: Working directory path - should be an absolute path.
summary: Working directory path
title: Working directory path
workdir: $BITRISE_SOURCE_DIR
- cache_api_url: $BITRISE_CACHE_API_URL
opts:
description: Cache API URL
is_dont_change_value: true
summary: Cache API URL
title: Cache API URL
- is_debug_mode: "false"
opts:
is_required: true
summary: If enabled, the step will print verbose logs.
title: Enable verbose logging
value_options:
- "true"
- "false"
- extract_to_relative_path: "false"
opts:
category: Debug
is_dont_change_value: true
is_required: true
summary: Should we extract the archive content under current working directory?
title: Extract to relative path?
value_options:
- "true"
- "false"
- allow_fallback: "true"
opts:
category: Debug
is_dont_change_value: true
is_required: true
title: Allow fallback cache extraction?
value_options:
- "true"
- "false"
================================================
FILE: steps/cache-pull/2.5.0/step.yml
================================================
title: Bitrise.io Cache:Pull
summary: Download the build cache from bitrise.io.
description: |-
Downloads the build cache from bitrise.io, and moves the files back to
their original place. The aim is to speed up your builds as not having to download every single dependency every time can be a serious timesaver.
### Configuring the Step
To be able to pull from a previous build's cache, you need two things.
1. The **Cache:Push** Step at the end of your Workflow.
2. At least one successful build on the same branch in the last seven days.
If there was no successful build on the branch in question in the last seven days, the cache automatically gets deleted.
### Troubleshooting
If the Step fails, check the time of the latest build. If there was a successful build in the last seven days, check if the Workflow included the **Cache:Push** Step.
If the **Cache:Push** Step was present, check the inputs of the Step. It's possible, for example, that the provided cache path is incorrect.
### Useful links
- [Caching](https://devcenter.bitrise.io/builds/caching/about-caching-index/)
### Related Steps
- [Cache:Push](https://www.bitrise.io/integrations/steps/cache-push)
- [Run CocoaPods install](https://www.bitrise.io/integrations/steps/cocoapods-install)
- [Run npm command](https://www.bitrise.io/integrations/steps/npm)
- [yarn](https://www.bitrise.io/integrations/steps/yarn)
website: https://github.com/bitrise-steplib/steps-cache-pull
source_code_url: https://github.com/bitrise-steplib/steps-cache-pull.git
support_url: https://github.com/bitrise-steplib/steps-cache-pull/issues
published_at: 2021-02-05T13:55:45.706010167Z
source:
git: https://github.com/bitrise-steplib/steps-cache-pull.git
commit: f0d513ac1880cc3480eea547b47bdd07813b8b18
host_os_tags:
- osx-10.10
- ubuntu-14.04
type_tags:
- utility
toolkit:
go:
package_name: github.com/bitrise-steplib/steps-cache-pull
deps:
apt_get:
- name: tar
is_requires_admin_user: false
is_always_run: false
is_skippable: true
run_if: .IsCI
inputs:
- opts:
description: Working directory path - should be an absolute path.
summary: Working directory path
title: Working directory path
workdir: $BITRISE_SOURCE_DIR
- cache_api_url: $BITRISE_CACHE_API_URL
opts:
description: Cache API URL
is_dont_change_value: true
summary: Cache API URL
title: Cache API URL
- is_debug_mode: "false"
opts:
is_required: true
summary: If enabled, the step will print verbose logs.
title: Enable verbose logging
value_options:
- "true"
- "false"
- extract_to_relative_path: "false"
opts:
category: Debug
is_dont_change_value: true
is_required: true
summary: Should we extract the archive content under current working directory?
title: Extract to relative path?
value_options:
- "true"
- "false"
- allow_fallback: "true"
opts:
category: Debug
is_dont_change_value: true
is_required: true
title: Allow fallback cache extraction?
value_options:
- "true"
- "false"
================================================
FILE: steps/cache-pull/2.6.0/step.yml
================================================
title: Bitrise.io Cache:Pull
summary: Download the build cache from bitrise.io.
description: |-
Downloads the build cache from bitrise.io, and moves the files back to
their original place. The aim is to speed up your builds as not having to download every single dependency every time can be a serious timesaver.
### Configuring the Step
To be able to pull from a previous build's cache, you need two things.
1. The **Cache:Push** Step at the end of your Workflow.
2. At least one successful build on the same branch in the last seven days.
If there was no successful build on the branch in question in the last seven days, the cache automatically gets deleted.
### Troubleshooting
If the Step fails, check the time of the latest build. If there was a successful build in the last seven days, check if the Workflow included the **Cache:Push** Step.
If the **Cache:Push** Step was present, check the inputs of the Step. It's possible, for example, that the provided cache path is incorrect.
### Useful links
- [Caching](https://devcenter.bitrise.io/builds/caching/about-caching-index/)
### Related Steps
- [Cache:Push](https://www.bitrise.io/integrations/steps/cache-push)
- [Run CocoaPods install](https://www.bitrise.io/integrations/steps/cocoapods-install)
- [Run npm command](https://www.bitrise.io/integrations/steps/npm)
- [yarn](https://www.bitrise.io/integrations/steps/yarn)
website: https://github.com/bitrise-steplib/steps-cache-pull
source_code_url: https://github.com/bitrise-steplib/steps-cache-pull.git
support_url: https://github.com/bitrise-steplib/steps-cache-pull/issues
published_at: 2022-05-25T14:02:03.47052731Z
source:
git: https://github.com/bitrise-steplib/steps-cache-pull.git
commit: 27d2d450a2fa7c6ace5ee461e952021f1cabe439
host_os_tags:
- osx-10.10
- ubuntu-14.04
type_tags:
- utility
toolkit:
go:
package_name: github.com/bitrise-steplib/steps-cache-pull
deps:
apt_get:
- name: tar
is_requires_admin_user: false
is_always_run: false
is_skippable: true
run_if: .IsCI
inputs:
- opts:
description: Working directory path - should be an absolute path.
summary: Working directory path
title: Working directory path
workdir: $BITRISE_SOURCE_DIR
- cache_api_url: $BITRISE_CACHE_API_URL
opts:
description: Cache API URL
is_dont_change_value: true
summary: Cache API URL
title: Cache API URL
- is_debug_mode: "false"
opts:
is_required: true
summary: If enabled, the step will print verbose logs.
title: Enable verbose logging
value_options:
- "true"
- "false"
- extract_to_relative_path: "false"
opts:
category: Debug
is_dont_change_value: true
is_required: true
summary: Should we extract the archive content under current working directory?
title: Extract to relative path?
value_options:
- "true"
- "false"
- allow_fallback: "true"
opts:
category: Debug
is_dont_change_value: true
is_required: true
title: Allow fallback cache extraction?
value_options:
- "true"
- "false"
================================================
FILE: steps/cache-pull/2.6.1/step.yml
================================================
title: Bitrise.io Cache:Pull
summary: Download the build cache from bitrise.io.
description: |-
Downloads the build cache from bitrise.io, and moves the files back to
their original place. The aim is to speed up your builds as not having to download every single dependency every time can be a serious timesaver.
### Configuring the Step
To be able to pull from a previous build's cache, you need two things.
1. The **Cache:Push** Step at the end of your Workflow.
2. At least one successful build on the same branch in the last seven days.
If there was no successful build on the branch in question in the last seven days, the cache automatically gets deleted.
### Troubleshooting
If the Step fails, check the time of the latest build. If there was a successful build in the last seven days, check if the Workflow included the **Cache:Push** Step.
If the **Cache:Push** Step was present, check the inputs of the Step. It's possible, for example, that the provided cache path is incorrect.
### Useful links
- [Caching](https://devcenter.bitrise.io/builds/caching/about-caching-index/)
### Related Steps
- [Cache:Push](https://www.bitrise.io/integrations/steps/cache-push)
- [Run CocoaPods install](https://www.bitrise.io/integrations/steps/cocoapods-install)
- [Run npm command](https://www.bitrise.io/integrations/steps/npm)
- [yarn](https://www.bitrise.io/integrations/steps/yarn)
website: https://github.com/bitrise-steplib/steps-cache-pull
source_code_url: https://github.com/bitrise-steplib/steps-cache-pull.git
support_url: https://github.com/bitrise-steplib/steps-cache-pull/issues
published_at: 2022-06-28T06:52:39.57447806Z
source:
git: https://github.com/bitrise-steplib/steps-cache-pull.git
commit: a6b4345d40b7eefad09e4ce14caeed04886ac3f8
host_os_tags:
- osx-10.10
- ubuntu-14.04
type_tags:
- utility
toolkit:
go:
package_name: github.com/bitrise-steplib/steps-cache-pull
deps:
apt_get:
- name: tar
is_requires_admin_user: false
is_always_run: false
is_skippable: true
run_if: .IsCI
inputs:
- opts:
description: Working directory path - should be an absolute path.
summary: Working directory path
title: Working directory path
workdir: $BITRISE_SOURCE_DIR
- cache_api_url: $BITRISE_CACHE_API_URL
opts:
description: Cache API URL
is_dont_change_value: true
summary: Cache API URL
title: Cache API URL
- is_debug_mode: "false"
opts:
is_required: true
summary: If enabled, the step will print verbose logs.
title: Enable verbose logging
value_options:
- "true"
- "false"
- extract_to_relative_path: "false"
opts:
category: Debug
is_dont_change_value: true
is_required: true
summary: Should we extract the archive content under current working directory?
title: Extract to relative path?
value_options:
- "true"
- "false"
- allow_fallback: "true"
opts:
category: Debug
is_dont_change_value: true
is_required: true
title: Allow fallback cache extraction?
value_options:
- "true"
- "false"
================================================
FILE: steps/cache-pull/2.7.0/step.yml
================================================
title: Bitrise.io Cache:Pull
summary: Download the build cache from bitrise.io.
description: |-
Downloads the build cache from bitrise.io, and moves the files back to
their original place. The aim is to speed up your builds as not having to download every single dependency every time can be a serious timesaver.
### Configuring the Step
To be able to pull from a previous build's cache, you need two things.
1. The **Cache:Push** Step at the end of your Workflow.
2. At least one successful build on the same branch in the last seven days.
If there was no successful build on the branch in question in the last seven days, the cache automatically gets deleted.
### Troubleshooting
If the Step fails, check the time of the latest build. If there was a successful build in the last seven days, check if the Workflow included the **Cache:Push** Step.
If the **Cache:Push** Step was present, check the inputs of the Step. It's possible, for example, that the provided cache path is incorrect.
### Useful links
- [Caching](https://devcenter.bitrise.io/builds/caching/about-caching-index/)
### Related Steps
- [Cache:Push](https://www.bitrise.io/integrations/steps/cache-push)
- [Run CocoaPods install](https://www.bitrise.io/integrations/steps/cocoapods-install)
- [Run npm command](https://www.bitrise.io/integrations/steps/npm)
- [yarn](https://www.bitrise.io/integrations/steps/yarn)
website: https://github.com/bitrise-steplib/steps-cache-pull
source_code_url: https://github.com/bitrise-steplib/steps-cache-pull.git
support_url: https://github.com/bitrise-steplib/steps-cache-pull/issues
published_at: 2022-07-14T12:18:58.05073766Z
source:
git: https://github.com/bitrise-steplib/steps-cache-pull.git
commit: 43c8047f9bd3b471cd5ea8ecb49827fc5444cb41
host_os_tags:
- osx-10.10
- ubuntu-14.04
type_tags:
- utility
toolkit:
go:
package_name: github.com/bitrise-steplib/steps-cache-pull
deps:
apt_get:
- name: tar
is_requires_admin_user: false
is_always_run: false
is_skippable: true
run_if: .IsCI
inputs:
- opts:
description: Working directory path - should be an absolute path.
summary: Working directory path
title: Working directory path
workdir: $BITRISE_SOURCE_DIR
- cache_api_url: $BITRISE_CACHE_API_URL
opts:
description: Cache API URL
is_dont_change_value: true
summary: Cache API URL
title: Cache API URL
- is_debug_mode: "false"
opts:
is_required: true
summary: If enabled, the step will print verbose logs.
title: Enable verbose logging
value_options:
- "true"
- "false"
- extract_to_relative_path: "false"
opts:
category: Debug
is_dont_change_value: true
is_required: true
summary: Should we extract the archive content under current working directory?
title: Extract to relative path?
value_options:
- "true"
- "false"
- allow_fallback: "true"
opts:
category: Debug
is_dont_change_value: true
is_required: true
title: Allow fallback cache extraction?
value_options:
- "true"
- "false"
- ignore_stack_difference: "false"
opts:
is_required: false
summary: Allow to use the same cache across different Bitrise stacks. Use at your
own risk, it might cause build problems.
title: Ignore stack difference
value_options:
- "true"
- "false"
================================================
FILE: steps/cache-pull/2.7.1/step.yml
================================================
title: Bitrise.io Cache:Pull
summary: Download the build cache from bitrise.io.
description: |-
Downloads the build cache from bitrise.io, and moves the files back to
their original place. The aim is to speed up your builds as not having to download every single dependency every time can be a serious timesaver.
### Configuring the Step
To be able to pull from a previous build's cache, you need two things.
1. The **Cache:Push** Step at the end of your Workflow.
2. At least one successful build on the same branch in the last seven days.
If there was no successful build on the branch in question in the last seven days, the cache automatically gets deleted.
### Troubleshooting
If the Step fails, check the time of the latest build. If there was a successful build in the last seven days, check if the Workflow included the **Cache:Push** Step.
If the **Cache:Push** Step was present, check the inputs of the Step. It's possible, for example, that the provided cache path is incorrect.
### Useful links
- [Caching](https://devcenter.bitrise.io/builds/caching/about-caching-index/)
### Related Steps
- [Cache:Push](https://www.bitrise.io/integrations/steps/cache-push)
- [Run CocoaPods install](https://www.bitrise.io/integrations/steps/cocoapods-install)
- [Run npm command](https://www.bitrise.io/integrations/steps/npm)
- [yarn](https://www.bitrise.io/integrations/steps/yarn)
website: https://github.com/bitrise-steplib/steps-cache-pull
source_code_url: https://github.com/bitrise-steplib/steps-cache-pull.git
support_url: https://github.com/bitrise-steplib/steps-cache-pull/issues
published_at: 2022-08-08T13:24:21.583156972Z
source:
git: https://github.com/bitrise-steplib/steps-cache-pull.git
commit: 02d25fa07cc1755b043298faffa6dda49d16811c
host_os_tags:
- osx-10.10
- ubuntu-14.04
type_tags:
- utility
toolkit:
go:
package_name: github.com/bitrise-steplib/steps-cache-pull
deps:
apt_get:
- name: tar
is_requires_admin_user: false
is_always_run: false
is_skippable: true
run_if: .IsCI
inputs:
- opts:
description: Working directory path - should be an absolute path.
summary: Working directory path
title: Working directory path
workdir: $BITRISE_SOURCE_DIR
- cache_api_url: $BITRISE_CACHE_API_URL
opts:
description: Cache API URL
is_dont_change_value: true
summary: Cache API URL
title: Cache API URL
- is_debug_mode: "false"
opts:
is_required: true
summary: If enabled, the step will print verbose logs.
title: Enable verbose logging
value_options:
- "true"
- "false"
- extract_to_relative_path: "false"
opts:
category: Debug
is_dont_change_value: true
is_required: true
summary: Should we extract the archive content under current working directory?
title: Extract to relative path?
value_options:
- "true"
- "false"
- allow_fallback: "true"
opts:
category: Debug
is_dont_change_value: true
is_required: true
title: Allow fallback cache extraction?
value_options:
- "true"
- "false"
- ignore_stack_difference: "false"
opts:
is_required: false
summary: Allow to use the same cache across different Bitrise stacks. Use at your
own risk, it might cause build problems.
title: Ignore stack difference
value_options:
- "true"
- "false"
================================================
FILE: steps/cache-pull/2.7.2/step.yml
================================================
title: Bitrise.io Cache:Pull
summary: Download the build cache from bitrise.io.
description: |-
Downloads the build cache from bitrise.io, and moves the files back to
their original place. The aim is to speed up your builds as not having to download every single dependency every time can be a serious timesaver.
### Configuring the Step
To be able to pull from a previous build's cache, you need two things.
1. The **Cache:Push** Step at the end of your Workflow.
2. At least one successful build on the same branch in the last seven days.
If there was no successful build on the branch in question in the last seven days, the cache automatically gets deleted.
### Troubleshooting
If the Step fails, check the time of the latest build. If there was a successful build in the last seven days, check if the Workflow included the **Cache:Push** Step.
If the **Cache:Push** Step was present, check the inputs of the Step. It's possible, for example, that the provided cache path is incorrect.
### Useful links
- [Caching](https://devcenter.bitrise.io/builds/caching/about-caching-index/)
### Related Steps
- [Cache:Push](https://www.bitrise.io/integrations/steps/cache-push)
- [Run CocoaPods install](https://www.bitrise.io/integrations/steps/cocoapods-install)
- [Run npm command](https://www.bitrise.io/integrations/steps/npm)
- [yarn](https://www.bitrise.io/integrations/steps/yarn)
website: https://github.com/bitrise-steplib/steps-cache-pull
source_code_url: https://github.com/bitrise-steplib/steps-cache-pull.git
support_url: https://github.com/bitrise-steplib/steps-cache-pull/issues
published_at: 2022-09-07T13:31:05.076017764Z
source:
git: https://github.com/bitrise-steplib/steps-cache-pull.git
commit: d22f399218153c59b8cb520eb4a8473b7c824d9f
host_os_tags:
- osx-10.10
- ubuntu-14.04
type_tags:
- utility
toolkit:
go:
package_name: github.com/bitrise-steplib/steps-cache-pull
deps:
apt_get:
- name: tar
is_requires_admin_user: false
is_always_run: false
is_skippable: true
run_if: .IsCI
inputs:
- opts:
description: Working directory path - should be an absolute path.
summary: Working directory path
title: Working directory path
workdir: $BITRISE_SOURCE_DIR
- cache_api_url: $BITRISE_CACHE_API_URL
opts:
description: Cache API URL
is_dont_change_value: true
summary: Cache API URL
title: Cache API URL
- is_debug_mode: "false"
opts:
is_required: true
summary: If enabled, the step will print verbose logs.
title: Enable verbose logging
value_options:
- "true"
- "false"
- extract_to_relative_path: "false"
opts:
category: Debug
is_dont_change_value: true
is_required: true
summary: Should we extract the archive content under current working directory?
title: Extract to relative path?
value_options:
- "true"
- "false"
- allow_fallback: "true"
opts:
category: Debug
is_dont_change_value: true
is_required: true
title: Allow fallback cache extraction?
value_options:
- "true"
- "false"
- ignore_stack_difference: "false"
opts:
is_required: false
summary: Allow to use the same cache across different Bitrise stacks. Use at your
own risk, it might cause build problems.
title: Ignore stack difference
value_options:
- "true"
- "false"
================================================
FILE: steps/cache-pull/step-info.yml
================================================
maintainer: bitrise
removal_date: "2025-04-11"
deprecate_notes: |
The branch-based caching steps are deprecated and being replaced by key-based caching.
Check out our migration guide: [Migrating from branch-based caching to key-based caching](https://devcenter.bitrise.io/en/dependencies-and-caching/branch-based-caching/migrating-from-branch-based-caching-to-key-based-caching.html).
================================================
FILE: steps/cache-push/0.9.0/step.yml
================================================
title: Bitrise.io Cache:Push [BETA]
summary: WIP
description: |-
WIP
It won't upload if the Cache did not change, nor in case of PullRequest build.
website: https://github.com/bitrise-steplib/steps-cache-push
source_code_url: https://github.com/bitrise-steplib/steps-cache-push.git
support_url: https://github.com/bitrise-steplib/steps-cache-push/issues
published_at: 2016-04-13T16:20:27.064787455+02:00
source:
git: https://github.com/bitrise-steplib/steps-cache-push.git
commit: d92ce9091bc52951d5a193bd70c3e16d28564a09
host_os_tags:
- osx-10.10
- ubuntu-14.04
type_tags:
- bitrise.io
- cache
deps:
apt_get:
- name: rsync
- name: tar
is_requires_admin_user: false
is_always_run: false
is_skippable: true
run_if: .IsCI | and (not .IsPR)
inputs:
- cache_paths: |
$BITRISE_CACHE_DIR
./Pods -> ./Podfile.lock
$HOME/.gradle/wrapper
./.gradle
opts:
description: |-
Cache these paths. Separate paths with a newline.
A path item can be either a file or a directory.
is_required: true
summary: Cache these paths. Separate paths with a newline.
title: Cache paths
- ignore_check_on_paths: ""
opts:
description: |-
These paths will be ignored from change checking.
If something changed under the specified path(s) and nothing else changed
then the cache won't be updated.
**These paths are NOT ignored from the cache**, if a path is located
inside a specified Cache Path item it'll be included in the cache,
just won't be checked for changes.
Important: you can't ignore a path which results in an invalid cache item.
For example, if you specify the path `a/path/to/cache` to be cached, you
can't ignore `a/path/to`, as that would ignore every file from checking
for a change - no fingerprint could be generated for `a/path/to/cache`.
You're free to ignore paths inside a Cache Path however, e.g.
if path is `a/path/to/cache` you're free to ignore `a/path/to/cache/.ignore-me`,
unless that's the only file inside `a/path/to/cache`.
The point is: you should not specify an ignore rule which would completely
ignore a specified Cache Path item, as that would result in a path which
can't be checked for updates/changes/fingerprints.
summary: Ignore these Paths when checking for cache changes
title: Ignore Paths from change check
- opts:
description: Working directory path - should be an absolute path.
summary: Working directory path
title: Working directory path
workdir: $BITRISE_SOURCE_DIR
- is_debug_mode: "false"
opts:
description: If debug mode is enabled the step will print verbose logs
is_required: true
summary: If debug mode is enabled the step will print verbose logs
title: Debug mode?
value_options:
- "true"
- "false"
- cache_api_url: $BITRISE_CACHE_API_URL
opts:
description: Cache Upload URL
is_dont_change_value: true
is_required: true
summary: Cache Upload URL
title: 'TMP: Cache Upload URL'
- compare_cache_info_path: $BITRISE_CACHE_INFO_PATH
opts:
description: |-
Compare the fingerprints against this Cache Info, to see if cache
update/upload is required or not.
is_dont_change_value: true
is_required: true
summary: Compare the fingerprints against this Cache Info
title: Cache Info file path, for compare
================================================
FILE: steps/cache-push/0.9.1/step.yml
================================================
title: Bitrise.io Cache:Push [BETA]
summary: WIP
description: It won't upload if the Cache did not change, nor in case of PullRequest
build.
website: https://github.com/bitrise-steplib/steps-cache-push
source_code_url: https://github.com/bitrise-steplib/steps-cache-push.git
support_url: https://github.com/bitrise-steplib/steps-cache-push/issues
published_at: 2016-04-15T18:17:04.700062962+02:00
source:
git: https://github.com/bitrise-steplib/steps-cache-push.git
commit: b984a1c7db4579c5ff87bfe2bce3aee34eb92b78
host_os_tags:
- osx-10.10
- ubuntu-14.04
type_tags:
- bitrise.io
- cache
deps:
apt_get:
- name: rsync
- name: tar
is_requires_admin_user: false
is_always_run: false
is_skippable: true
run_if: .IsCI | and (not .IsPR)
inputs:
- cache_paths: |
$BITRISE_CACHE_DIR
./Pods -> ./Podfile.lock
$HOME/.gradle
./.gradle
opts:
description: |-
Cache these paths. Separate paths with a newline.
A path item can be either a file or a directory.
You can also specify an "update indicator file" with the `->`
syntax: `update/this -> if/this/file/is/updated`.
*The indicator can only be a file!*
If you have a path in the list which doesn't exist that will not cause
this Step to fail. It'll be logged but the Step will try to gather
as many specified & valid paths as it can, and just print warning
about the invalid items.
is_required: true
summary: Cache these paths. Separate paths with a newline.
title: Cache paths
- ignore_check_on_paths: |-
$HOME/.gradle/caches/*.lock
./.gradle/*.lock
./.gradle/*.bin
opts:
description: |-
These paths will be ignored from change checking.
If something changed under the specified path(s) and nothing else changed
then the cache won't be updated.
**These paths are NOT ignored from the cache**, if a path is located
inside a specified Cache Path item it'll be included in the cache,
just won't be checked for changes.
The path can also include the `*` wildcard character, which will
do a **string** based compare (e.g. `a/*/b` will match `a/1/2/3/b` too,
not just `a/x/b`).
Important: you can't ignore a path which results in an invalid cache item.
For example, if you specify the path `a/path/to/cache` to be cached, you
can't ignore `a/path/to`, as that would ignore every file from checking
for a change - no fingerprint could be generated for `a/path/to/cache`.
You're free to ignore paths inside a Cache Path however, e.g.
if path is `a/path/to/cache` you're free to ignore `a/path/to/cache/.ignore-me`,
unless that's the only file inside `a/path/to/cache`.
The point is: you should not specify an ignore rule which would completely
ignore a specified Cache Path item, as that would result in a path which
can't be checked for updates/changes/fingerprints.
summary: Ignore these Paths when checking for cache changes
title: Ignore Paths from change check
- opts:
description: Working directory path - should be an absolute path.
summary: Working directory path
title: Working directory path
workdir: $BITRISE_SOURCE_DIR
- fingerprint_method: file-content-hash
opts:
description: |-
The specified Fingerprint Method will be used to calculate
fingerprints for the cached files.
The (file) fingerprint is used to check whether
the cached files did change - if it changed a new cache will be generated,
if the fingerprint matches the previous cache version's fingerprint then
no new cache will be generated.
**Regardless of which method you choose** the following file attributes will
be used to create the fingerprint **in addition** to the method you choose:
* File path
* File size
* File permission bits
Information about the options:
* `file-content-hash` : create a file content checksum hash for every file in the cache,
and use that as the fingerprint source of the file. This means that **the full file content will be loaded** in
order to create the checksum hash!
* `file-mod-time` : use the file's "modified at" time information. For larger files this method
can be significantly faster, as the file don't have to be loaded to calculate this information!
**Note**: in case of "update indicator files" the fingerprint method will always be `file-content-hash`,
regardless of which option you select here.
summary: Fingerprint method, used for checking file changes.
title: Fingerprint Method
value_options:
- file-content-hash
- file-mod-time
- is_debug_mode: "false"
opts:
description: If debug mode is enabled the step will print verbose logs
is_required: true
summary: If debug mode is enabled the step will print verbose logs
title: Debug mode?
value_options:
- "true"
- "false"
- cache_api_url: $BITRISE_CACHE_API_URL
opts:
description: Cache Upload URL
is_dont_change_value: true
is_required: true
summary: Cache Upload URL
title: 'TMP: Cache Upload URL'
- compare_cache_info_path: $BITRISE_CACHE_INFO_PATH
opts:
description: |-
Compare the fingerprints against this Cache Info, to see if cache
update/upload is required or not.
is_dont_change_value: true
is_required: true
summary: Compare the fingerprints against this Cache Info
title: Cache Info file path, for compare
================================================
FILE: steps/cache-push/0.9.2/step.yml
================================================
title: Bitrise.io Cache:Push [BETA]
summary: Updates the Cache, if required
description: |-
This Step checks whether the Cache have to be updated (based on the
`Cache Paths` and `Ignore Paths from change check` inputs),
and if it have to be it will create a new cache archive and upload it.
It won't update/upload the Cache if the Cache did not change,
nor in case of Pull Request builds (unless you change the `run_if` property of the Step).
You can find a setup and tips & tricks guide on the Bitrise DevCenter
at [http://devcenter.bitrise.io/docs/using-the-build-cache](http://devcenter.bitrise.io/docs/using-the-build-cache).
website: https://github.com/bitrise-steplib/steps-cache-push
source_code_url: https://github.com/bitrise-steplib/steps-cache-push.git
support_url: https://github.com/bitrise-steplib/steps-cache-push/issues
published_at: 2016-04-20T11:37:56.014160296+02:00
source:
git: https://github.com/bitrise-steplib/steps-cache-push.git
commit: f11171e91e836020f7b6ded6d0345d0ac42d52d4
host_os_tags:
- osx-10.10
- ubuntu-14.04
type_tags:
- bitrise.io
- cache
deps:
apt_get:
- name: rsync
- name: tar
is_requires_admin_user: false
is_always_run: false
is_skippable: true
run_if: .IsCI | and (not .IsPR)
inputs:
- cache_paths: |
$BITRISE_CACHE_DIR
./Pods -> ./Podfile.lock
$HOME/.gradle
./.gradle
opts:
description: |-
Cache these paths. Separate paths with a newline.
A path item can be either a file or a directory.
You can also specify an "update indicator file" with the `->`
syntax: `update/this -> if/this/file/is/updated`.
*The indicator can only be a file!*
If you have a path in the list which doesn't exist that will not cause
this Step to fail. It'll be logged but the Step will try to gather
as many specified & valid paths as it can, and just print warning
about the invalid items.
is_required: true
summary: Cache these paths. Separate paths with a newline.
title: Cache paths
- ignore_check_on_paths: |-
$HOME/.gradle/caches/*.lock
./.gradle/*.lock
./.gradle/*.bin
opts:
description: |-
These paths will be ignored from change checking.
If something changed under the specified path(s) and nothing else changed
then the cache won't be updated.
**These paths are NOT ignored from the cache**, if a path is located
inside a specified Cache Path item it'll be included in the cache,
just won't be checked for changes.
The path can also include the `*` wildcard character, which will
do a **string** based compare (e.g. `a/*/b` will match `a/1/2/3/b` too,
not just `a/x/b`).
Important: you can't ignore a path which results in an invalid cache item.
For example, if you specify the path `a/path/to/cache` to be cached, you
can't ignore `a/path/to`, as that would ignore every file from checking
for a change - no fingerprint could be generated for `a/path/to/cache`.
You're free to ignore paths inside a Cache Path however, e.g.
if path is `a/path/to/cache` you're free to ignore `a/path/to/cache/.ignore-me`,
unless that's the only file inside `a/path/to/cache`.
The point is: you should not specify an ignore rule which would completely
ignore a specified Cache Path item, as that would result in a path which
can't be checked for updates/changes/fingerprints.
summary: Ignore these Paths when checking for cache changes
title: Ignore Paths from change check
- opts:
description: Working directory path - should be an absolute path.
summary: Working directory path
title: Working directory path
workdir: $BITRISE_SOURCE_DIR
- fingerprint_method: file-content-hash
opts:
description: |-
The specified Fingerprint Method will be used to calculate
fingerprints for the cached files.
The (file) fingerprint is used to check whether
the cached files did change - if it changed a new cache will be generated,
if the fingerprint matches the previous cache version's fingerprint then
no new cache will be generated.
**Regardless of which method you choose** the following file attributes will
be used to create the fingerprint **in addition** to the method you choose:
* File path
* File size
* File permission bits
Information about the options:
* `file-content-hash` : create a file content checksum hash for every file in the cache,
and use that as the fingerprint source of the file. This means that **the full file content will be loaded** in
order to create the checksum hash!
* `file-mod-time` : use the file's "modified at" time information. For larger files this method
can be significantly faster, as the file don't have to be loaded to calculate this information!
**Note**: in case of "update indicator files" the fingerprint method will always be `file-content-hash`,
regardless of which option you select here.
summary: Fingerprint method, used for checking file changes.
title: Fingerprint Method
value_options:
- file-content-hash
- file-mod-time
- is_debug_mode: "false"
opts:
description: If debug mode is enabled the step will print verbose logs
is_required: true
summary: If debug mode is enabled the step will print verbose logs
title: Debug mode?
value_options:
- "true"
- "false"
- cache_api_url: $BITRISE_CACHE_API_URL
opts:
description: Cache Upload URL
is_dont_change_value: true
is_required: true
summary: Cache Upload URL
title: 'TMP: Cache Upload URL'
- compare_cache_info_path: $BITRISE_CACHE_INFO_PATH
opts:
description: |-
Compare the fingerprints against this Cache Info, to see if cache
update/upload is required or not.
is_dont_change_value: true
is_required: true
summary: Compare the fingerprints against this Cache Info
title: Cache Info file path, for compare
================================================
FILE: steps/cache-push/0.9.3/step.yml
================================================
title: Bitrise.io Cache:Push [BETA]
summary: Updates the Cache, if required
description: |-
This Step checks whether the Cache have to be updated (based on the
`Cache Paths` and `Ignore Paths from change check` inputs),
and if it have to be it will create a new cache archive and upload it.
It won't update/upload the Cache if the Cache did not change,
nor in case of Pull Request builds (unless you change the `run_if` property of the Step).
You can find a setup and tips & tricks guide on the Bitrise DevCenter
at [http://devcenter.bitrise.io/docs/using-the-build-cache](http://devcenter.bitrise.io/docs/using-the-build-cache).
website: https://github.com/bitrise-steplib/steps-cache-push
source_code_url: https://github.com/bitrise-steplib/steps-cache-push.git
support_url: https://github.com/bitrise-steplib/steps-cache-push/issues
published_at: 2016-04-25T21:10:32.062430991+02:00
source:
git: https://github.com/bitrise-steplib/steps-cache-push.git
commit: ac9b7e9f4f7ba827a5f5c47449223bf043a2d24a
host_os_tags:
- osx-10.10
- ubuntu-14.04
type_tags:
- bitrise.io
- cache
deps:
apt_get:
- name: rsync
- name: tar
is_requires_admin_user: false
is_always_run: false
is_skippable: true
run_if: .IsCI | and (not .IsPR)
inputs:
- cache_paths: |
$BITRISE_CACHE_DIR
./Pods -> ./Podfile.lock
$HOME/.gradle
./.gradle
opts:
description: |-
Cache these paths. Separate paths with a newline.
A path item can be either a file or a directory.
You can also specify an "update indicator file" with the `->`
syntax: `update/this -> if/this/file/is/updated`.
*The indicator can only be a file!*
If you have a path in the list which doesn't exist that will not cause
this Step to fail. It'll be logged but the Step will try to gather
as many specified & valid paths as it can, and just print warning
about the invalid items.
is_required: true
summary: Cache these paths. Separate paths with a newline.
title: Cache paths
- ignore_check_on_paths: |-
$HOME/.gradle/caches/*.lock
$HOME/.gradle/caches/*.bin
./.gradle/*.lock
./.gradle/*.bin
opts:
description: |-
These paths will be ignored from change checking.
If something changed under the specified path(s) and nothing else changed
then the cache won't be updated.
**These paths are NOT ignored from the cache**, if a path is located
inside a specified Cache Path item it'll be included in the cache,
just won't be checked for changes.
The path can also include the `*` wildcard character, which will
do a **string** based compare (e.g. `a/*/b` will match `a/1/2/3/b` too,
not just `a/x/b`).
Important: you can't ignore a path which results in an invalid cache item.
For example, if you specify the path `a/path/to/cache` to be cached, you
can't ignore `a/path/to`, as that would ignore every file from checking
for a change - no fingerprint could be generated for `a/path/to/cache`.
You're free to ignore paths inside a Cache Path however, e.g.
if path is `a/path/to/cache` you're free to ignore `a/path/to/cache/.ignore-me`,
unless that's the only file inside `a/path/to/cache`.
The point is: you should not specify an ignore rule which would completely
ignore a specified Cache Path item, as that would result in a path which
can't be checked for updates/changes/fingerprints.
summary: Ignore these Paths when checking for cache changes
title: Ignore Paths from change check
- opts:
description: Working directory path - should be an absolute path.
summary: Working directory path
title: Working directory path
workdir: $BITRISE_SOURCE_DIR
- fingerprint_method: file-content-hash
opts:
description: |-
The specified Fingerprint Method will be used to calculate
fingerprints for the cached files.
The (file) fingerprint is used to check whether
the cached files did change - if it changed a new cache will be generated,
if the fingerprint matches the previous cache version's fingerprint then
no new cache will be generated.
**Regardless of which method you choose** the following file attributes will
be used to create the fingerprint **in addition** to the method you choose:
* File path
* File size
* File permission bits
Information about the options:
* `file-content-hash` : create a file content checksum hash for every file in the cache,
and use that as the fingerprint source of the file. This means that **the full file content will be loaded** in
order to create the checksum hash!
* `file-mod-time` : use the file's "modified at" time information. For larger files this method
can be significantly faster, as the file don't have to be loaded to calculate this information!
**Note**: in case of "update indicator files" the fingerprint method will always be `file-content-hash`,
regardless of which option you select here.
summary: Fingerprint method, used for checking file changes.
title: Fingerprint Method
value_options:
- file-content-hash
- file-mod-time
- is_debug_mode: "false"
opts:
description: If debug mode is enabled the step will print verbose logs
is_required: true
summary: If debug mode is enabled the step will print verbose logs
title: Debug mode?
value_options:
- "true"
- "false"
- cache_api_url: $BITRISE_CACHE_API_URL
opts:
description: Cache Upload URL
is_dont_change_value: true
is_required: true
summary: Cache Upload URL
title: 'TMP: Cache Upload URL'
- compare_cache_info_path: $BITRISE_CACHE_INFO_PATH
opts:
description: |-
Compare the fingerprints against this Cache Info, to see if cache
update/upload is required or not.
is_dont_change_value: true
is_required: true
summary: Compare the fingerprints against this Cache Info
title: Cache Info file path, for compare
================================================
FILE: steps/cache-push/0.9.4/step.yml
================================================
title: Bitrise.io Cache:Push
summary: Updates the Cache, if required
description: |-
This Step checks whether the Cache have to be updated (based on the
`Cache Paths` and `Ignore Paths from change check` inputs),
and if it have to be it will create a new cache archive and upload it.
It won't update/upload the Cache if the Cache did not change,
nor in case of Pull Request builds (unless you change the `run_if` property of the Step).
You can find a setup and tips & tricks guide on the Bitrise DevCenter
at [http://devcenter.bitrise.io/caching/about-caching/](http://devcenter.bitrise.io/caching/about-caching/).
website: https://github.com/bitrise-steplib/steps-cache-push
source_code_url: https://github.com/bitrise-steplib/steps-cache-push.git
support_url: https://github.com/bitrise-steplib/steps-cache-push/issues
published_at: 2017-01-24T21:43:03.078107607+01:00
source:
git: https://github.com/bitrise-steplib/steps-cache-push.git
commit: 2da1564f54bb15f5c9b75419c6a7840efe81e481
host_os_tags:
- osx-10.10
- ubuntu-14.04
type_tags:
- utility
deps:
apt_get:
- name: rsync
- name: tar
is_requires_admin_user: false
is_always_run: false
is_skippable: true
run_if: .IsCI | and (not .IsPR)
inputs:
- cache_paths: |
$BITRISE_CACHE_DIR
./Pods -> ./Podfile.lock
$HOME/.gradle
./.gradle
opts:
description: |-
Cache these paths. Separate paths with a newline.
A path item can be either a file or a directory.
You can also specify an "update indicator file" with the `->`
syntax: `update/this -> if/this/file/is/updated`.
*The indicator can only be a file!*
If you have a path in the list which doesn't exist that will not cause
this Step to fail. It'll be logged but the Step will try to gather
as many specified & valid paths as it can, and just print warning
about the invalid items.
is_required: true
summary: Cache these paths. Separate paths with a newline.
title: Cache paths
- ignore_check_on_paths: |-
$HOME/.gradle/caches/*.lock
$HOME/.gradle/caches/*.bin
./.gradle/*.lock
./.gradle/*.bin
opts:
description: |-
These paths will be ignored from change checking.
If something changed under the specified path(s) and nothing else changed
then the cache won't be updated.
**These paths are NOT ignored from the cache**, if a path is located
inside a specified Cache Path item it'll be included in the cache,
just won't be checked for changes.
The path can also include the `*` wildcard character, which will
do a **string** based compare (e.g. `a/*/b` will match `a/1/2/3/b` too,
not just `a/x/b`).
Important: you can't ignore a path which results in an invalid cache item.
For example, if you specify the path `a/path/to/cache` to be cached, you
can't ignore `a/path/to`, as that would ignore every file from checking
for a change - no fingerprint could be generated for `a/path/to/cache`.
You're free to ignore paths inside a Cache Path however, e.g.
if path is `a/path/to/cache` you're free to ignore `a/path/to/cache/.ignore-me`,
unless that's the only file inside `a/path/to/cache`.
The point is: you should not specify an ignore rule which would completely
ignore a specified Cache Path item, as that would result in a path which
can't be checked for updates/changes/fingerprints.
summary: Ignore these Paths when checking for cache changes
title: Ignore Paths from change check
- opts:
description: Working directory path - should be an absolute path.
summary: Working directory path
title: Working directory path
workdir: $BITRISE_SOURCE_DIR
- fingerprint_method: file-content-hash
opts:
description: |-
The specified Fingerprint Method will be used to calculate
fingerprints for the cached files.
The (file) fingerprint is used to check whether
the cached files did change - if it changed a new cache will be generated,
if the fingerprint matches the previous cache version's fingerprint then
no new cache will be generated.
**Regardless of which method you choose** the following file attributes will
be used to create the fingerprint **in addition** to the method you choose:
* File path
* File size
* File permission bits
Information about the options:
* `file-content-hash` : create a file content checksum hash for every file in the cache,
and use that as the fingerprint source of the file. This means that **the full file content will be loaded** in
order to create the checksum hash!
* `file-mod-time` : use the file's "modified at" time information. For larger files this method
can be significantly faster, as the file don't have to be loaded to calculate this information!
**Note**: in case of "update indicator files" the fingerprint method will always be `file-content-hash`,
regardless of which option you select here.
summary: Fingerprint method, used for checking file changes.
title: Fingerprint Method
value_options:
- file-content-hash
- file-mod-time
- is_debug_mode: "false"
opts:
description: If debug mode is enabled the step will print verbose logs
is_required: true
summary: If debug mode is enabled the step will print verbose logs
title: Debug mode?
value_options:
- "true"
- "false"
- cache_api_url: $BITRISE_CACHE_API_URL
opts:
description: Cache Upload URL
is_dont_change_value: true
is_required: true
summary: Cache Upload URL
title: 'TMP: Cache Upload URL'
- compare_cache_info_path: $BITRISE_CACHE_INFO_PATH
opts:
description: |-
Compare the fingerprints against this Cache Info, to see if cache
update/upload is required or not.
is_dont_change_value: true
is_required: true
summary: Compare the fingerprints against this Cache Info
title: Cache Info file path, for compare
================================================
FILE: steps/cache-push/0.9.6/step.yml
================================================
title: Bitrise.io Cache:Push
summary: Updates the Cache, if required
description: |-
This Step checks whether the Cache have to be updated (based on the
`Cache Paths` and `Ignore Paths from change check` inputs),
and if it have to be it will create a new cache archive and upload it.
It won't update/upload the Cache if the Cache did not change,
nor in case of Pull Request builds (unless you change the `run_if` property of the Step).
You can find a setup and tips & tricks guide on the Bitrise DevCenter
at [http://devcenter.bitrise.io/caching/about-caching/](http://devcenter.bitrise.io/caching/about-caching/).
website: https://github.com/bitrise-steplib/steps-cache-push
source_code_url: https://github.com/bitrise-steplib/steps-cache-push.git
support_url: https://github.com/bitrise-steplib/steps-cache-push/issues
published_at: 2017-05-25T15:28:41.595572648+02:00
source:
git: https://github.com/bitrise-steplib/steps-cache-push.git
commit: ced70be20dc008861f1de95da7a50240cbdbf5f5
host_os_tags:
- osx-10.10
- ubuntu-14.04
type_tags:
- utility
deps:
apt_get:
- name: rsync
- name: tar
is_requires_admin_user: false
is_always_run: false
is_skippable: true
run_if: .IsCI | and (not .IsPR)
inputs:
- cache_paths: |
$BITRISE_CACHE_DIR
./Pods -> ./Podfile.lock
$HOME/.gradle
./.gradle
opts:
description: |-
Cache these paths. Separate paths with a newline.
A path item can be either a file or a directory.
You can also specify an "update indicator file" with the `->`
syntax: `update/this -> if/this/file/is/updated`.
*The indicator can only be a file!*
If you have a path in the list which doesn't exist that will not cause
this Step to fail. It'll be logged but the Step will try to gather
as many specified & valid paths as it can, and just print warning
about the invalid items.
is_required: true
summary: Cache these paths. Separate paths with a newline.
title: Cache paths
- ignore_check_on_paths: |-
$HOME/.gradle/caches/*.lock
$HOME/.gradle/caches/*.bin
./.gradle/*.lock
./.gradle/*.bin
opts:
description: |-
These paths will be ignored from change checking.
If something changed under the specified path(s) and nothing else changed
then the cache won't be updated.
**These paths are NOT ignored from the cache**, if a path is located
inside a specified Cache Path item it'll be included in the cache,
just won't be checked for changes.
The path can also include the `*` wildcard character, which will
do a **string** based compare (e.g. `a/*/b` will match `a/1/2/3/b` too,
not just `a/x/b`).
Important: you can't ignore a path which results in an invalid cache item.
For example, if you specify the path `a/path/to/cache` to be cached, you
can't ignore `a/path/to`, as that would ignore every file from checking
for a change - no fingerprint could be generated for `a/path/to/cache`.
You're free to ignore paths inside a Cache Path however, e.g.
if path is `a/path/to/cache` you're free to ignore `a/path/to/cache/.ignore-me`,
unless that's the only file inside `a/path/to/cache`.
The point is: you should not specify an ignore rule which would completely
ignore a specified Cache Path item, as that would result in a path which
can't be checked for updates/changes/fingerprints.
summary: Ignore these Paths when checking for cache changes
title: Ignore Paths from change check
- opts:
description: Working directory path - should be an absolute path.
summary: Working directory path
title: Working directory path
workdir: $BITRISE_SOURCE_DIR
- fingerprint_method: file-content-hash
opts:
description: |-
The specified Fingerprint Method will be used to calculate
fingerprints for the cached files.
The (file) fingerprint is used to check whether
the cached files did change - if it changed a new cache will be generated,
if the fingerprint matches the previous cache version's fingerprint then
no new cache will be generated.
**Regardless of which method you choose** the following file attributes will
be used to create the fingerprint **in addition** to the method you choose:
* File path
* File size
* File permission bits
Information about the options:
* `file-content-hash` : create a file content checksum hash for every file in the cache,
and use that as the fingerprint source of the file. This means that **the full file content will be loaded** in
order to create the checksum hash!
* `file-mod-time` : use the file's "modified at" time information. For larger files this method
can be significantly faster, as the file don't have to be loaded to calculate this information!
**Note**: in case of "update indicator files" the fingerprint method will always be `file-content-hash`,
regardless of which option you select here.
summary: Fingerprint method, used for checking file changes.
title: Fingerprint Method
value_options:
- file-content-hash
- file-mod-time
- is_debug_mode: "false"
opts:
description: If debug mode is enabled the step will print verbose logs
is_required: true
summary: If debug mode is enabled the step will print verbose logs
title: Debug mode?
value_options:
- "true"
- "false"
- compress_archive: "false"
opts:
description: If compress cache set to `true`, then it will upload a compressed
archive.
is_required: true
summary: If compress cache set to `true`, then it will upload a compressed archive.
title: Compress cache?
value_options:
- "true"
- "false"
- bitrise_cache_include_paths: $BITRISE_CACHE_INCLUDE_PATHS
opts:
is_dont_change_value: true
is_required: true
summary: Collected dependencies by steps from the build
title: Cache paths collected runtime
- bitrise_cache_exclude_paths: $BITRISE_CACHE_EXCLUDE_PATHS
opts:
is_dont_change_value: true
is_required: true
summary: Collected regularly changing files or extensions by steps from the build
title: Ignore paths collected runtime
- cache_api_url: $BITRISE_CACHE_API_URL
opts:
description: Cache Upload URL
is_dont_change_value: true
is_required: true
summary: Cache Upload URL
title: 'TMP: Cache Upload URL'
- compare_cache_info_path: $BITRISE_CACHE_INFO_PATH
opts:
description: |-
Compare the fingerprints against this Cache Info, to see if cache
update/upload is required or not.
is_dont_change_value: true
is_required: true
summary: Compare the fingerprints against this Cache Info
title: Cache Info file path, for compare
================================================
FILE: steps/cache-push/1.0.0/step.yml
================================================
title: Bitrise.io Cache:Push
summary: Updates the Cache, if required
description: |-
This Step checks whether the Cache have to be updated (based on the
`Cache Paths` and `Ignore Paths from change check` inputs),
and if it have to be it will create a new cache archive and upload it.
It won't update/upload the Cache if the Cache did not change,
nor in case of Pull Request builds (unless you change the `run_if` property of the Step).
You can find a setup and tips & tricks guide on the Bitrise DevCenter
at [http://devcenter.bitrise.io/caching/about-caching/](http://devcenter.bitrise.io/caching/about-caching/).
website: https://github.com/bitrise-steplib/steps-cache-push
source_code_url: https://github.com/bitrise-steplib/steps-cache-push.git
support_url: https://github.com/bitrise-steplib/steps-cache-push/issues
published_at: 2017-05-26T16:12:48.706808259+02:00
source:
git: https://github.com/bitrise-steplib/steps-cache-push.git
commit: 0b614664850d56082802a65b1cc9f17076f8faea
host_os_tags:
- osx-10.10
- ubuntu-14.04
type_tags:
- utility
deps:
apt_get:
- name: rsync
- name: tar
is_requires_admin_user: false
is_always_run: false
is_skippable: true
run_if: .IsCI | and (not .IsPR)
inputs:
- cache_paths: null
opts:
description: |-
Cache these paths. Separate paths with a newline.
A path item can be either a file or a directory.
You can also specify an "update indicator file" with the `->`
syntax: `update/this -> if/this/file/is/updated`.
*The indicator can only be a file!*
If you have a path in the list which doesn't exist that will not cause
this Step to fail. It'll be logged but the Step will try to gather
as many specified & valid paths as it can, and just print warning
about the invalid items.
summary: Cache these paths. Separate paths with a newline.
title: Cache paths
- ignore_check_on_paths: null
opts:
description: |-
These paths will be ignored from change checking.
If something changed under the specified path(s) and nothing else changed
then the cache won't be updated.
**These paths are NOT ignored from the cache**, if a path is located
inside a specified Cache Path item it'll be included in the cache,
just won't be checked for changes.
The path can also include the `*` wildcard character, which will
do a **string** based compare (e.g. `a/*/b` will match `a/1/2/3/b` too,
not just `a/x/b`).
Important: you can't ignore a path which results in an invalid cache item.
For example, if you specify the path `a/path/to/cache` to be cached, you
can't ignore `a/path/to`, as that would ignore every file from checking
for a change - no fingerprint could be generated for `a/path/to/cache`.
You're free to ignore paths inside a Cache Path however, e.g.
if path is `a/path/to/cache` you're free to ignore `a/path/to/cache/.ignore-me`,
unless that's the only file inside `a/path/to/cache`.
The point is: you should not specify an ignore rule which would completely
ignore a specified Cache Path item, as that would result in a path which
can't be checked for updates/changes/fingerprints.
summary: Ignore these Paths when checking for cache changes
title: Ignore Paths from change check
- opts:
description: Working directory path - should be an absolute path.
summary: Working directory path
title: Working directory path
workdir: $BITRISE_SOURCE_DIR
- fingerprint_method: file-content-hash
opts:
description: |-
The specified Fingerprint Method will be used to calculate
fingerprints for the cached files.
The (file) fingerprint is used to check whether
the cached files did change - if it changed a new cache will be generated,
if the fingerprint matches the previous cache version's fingerprint then
no new cache will be generated.
**Regardless of which method you choose** the following file attributes will
be used to create the fingerprint **in addition** to the method you choose:
* File path
* File size
* File permission bits
Information about the options:
* `file-content-hash` : create a file content checksum hash for every file in the cache,
and use that as the fingerprint source of the file. This means that **the full file content will be loaded** in
order to create the checksum hash!
* `file-mod-time` : use the file's "modified at" time information. For larger files this method
can be significantly faster, as the file don't have to be loaded to calculate this information!
**Note**: in case of "update indicator files" the fingerprint method will always be `file-content-hash`,
regardless of which option you select here.
summary: Fingerprint method, used for checking file changes.
title: Fingerprint Method
value_options:
- file-content-hash
- file-mod-time
- is_debug_mode: "false"
opts:
description: If debug mode is enabled the step will print verbose logs
is_required: true
summary: If debug mode is enabled the step will print verbose logs
title: Debug mode?
value_options:
- "true"
- "false"
- compress_archive: "false"
opts:
description: If compress cache set to `true`, then it will upload a compressed
archive.
is_required: true
summary: If compress cache set to `true`, then it will upload a compressed archive.
title: Compress cache?
value_options:
- "true"
- "false"
- bitrise_cache_include_paths: $BITRISE_CACHE_INCLUDE_PATHS
opts:
is_dont_change_value: true
is_required: true
summary: Collected dependencies by steps from the build
title: Cache paths collected runtime
- bitrise_cache_exclude_paths: $BITRISE_CACHE_EXCLUDE_PATHS
opts:
is_dont_change_value: true
is_required: true
summary: Collected regularly changing files or extensions by steps from the build
title: Ignore paths collected runtime
- cache_api_url: $BITRISE_CACHE_API_URL
opts:
description: Cache Upload URL
is_dont_change_value: true
is_required: true
summary: Cache Upload URL
title: 'TMP: Cache Upload URL'
- compare_cache_info_path: $BITRISE_CACHE_INFO_PATH
opts:
description: |-
Compare the fingerprints against this Cache Info, to see if cache
update/upload is required or not.
is_dont_change_value: true
is_required: true
summary: Compare the fingerprints against this Cache Info
title: Cache Info file path, for compare
================================================
FILE: steps/cache-push/1.1.0/step.yml
================================================
title: Bitrise.io Cache:Push
summary: Updates the Cache, if required
description: |-
This Step checks whether the Cache have to be updated (based on the
`Cache Paths` and `Ignore Paths from change check` inputs),
and if it have to be it will create a new cache archive and upload it.
It won't update/upload the Cache if the Cache did not change,
nor in case of Pull Request builds (unless you change the `run_if` property of the Step).
You can find a setup and tips & tricks guide on the Bitrise DevCenter
at [http://devcenter.bitrise.io/caching/about-caching/](http://devcenter.bitrise.io/caching/about-caching/).
website: https://github.com/bitrise-steplib/steps-cache-push
source_code_url: https://github.com/bitrise-steplib/steps-cache-push.git
support_url: https://github.com/bitrise-steplib/steps-cache-push/issues
published_at: 2017-05-31T16:50:17.972459775+02:00
source:
git: https://github.com/bitrise-steplib/steps-cache-push.git
commit: 5f422d43576266395935224fe73e2a062e3b7da6
host_os_tags:
- osx-10.10
- ubuntu-14.04
type_tags:
- utility
deps:
apt_get:
- name: rsync
- name: tar
is_requires_admin_user: false
is_always_run: false
is_skippable: true
run_if: .IsCI | and (not .IsPR)
inputs:
- cache_paths: null
opts:
description: |-
Cache these paths. Separate paths with a newline.
A path item can be either a file or a directory.
You can also specify an "update indicator file" with the `->`
syntax: `update/this -> if/this/file/is/updated`.
*The indicator can only be a file!*
If you have a path in the list which doesn't exist that will not cause
this Step to fail. It'll be logged but the Step will try to gather
as many specified & valid paths as it can, and just print warning
about the invalid items.
summary: Cache these paths. Separate paths with a newline.
title: Cache paths
- ignore_check_on_paths: null
opts:
description: "These paths will be ignored from change checking.\nIf something
changed under the specified path(s) and nothing else changed\nthen the cache
won't be updated.\n\n**Paths are not prefixed with `!` will NOT ignored from
the cache archive**,\nif a path is located inside a specified Cache Path item
and not prefixed with `!`,\nit'll be included in the cache archive, just won't
be checked for changes. \n\nThe path can also include `*`, `**`, `/`.\n`*` will
do path element replace (e.g. `a/*/b` will match `a/x/b`).\n`**` will do path
part replace (e.g. `a/**/b` will match `a/x/y/z/b`).\nTo exclude full directory
like: `/my/full/path`, just simply put a `/` behind of it,\nso it will be `/my/full/path/`.\n\nImportant:
you can't ignore a path which results in an invalid cache item.\nFor example,
if you specify the path `a/path/to/cache` to be cached, you\ncan't ignore `a/path/to`,
as that would ignore every file from checking\nfor a change - no fingerprint
could be generated for `a/path/to/cache`.\nYou're free to ignore paths inside
a Cache Path however, e.g.\nif path is `a/path/to/cache` you're free to ignore
`a/path/to/cache/.ignore-me`,\nunless that's the only file inside `a/path/to/cache`.\n\nThe
point is: you should not specify an ignore rule which would completely\nignore
a specified Cache Path item, as that would result in a path which\ncan't be
checked for updates/changes/fingerprints."
summary: Ignore these Paths when checking for cache changes
title: Ignore Paths from change check
- opts:
description: Working directory path - should be an absolute path.
summary: Working directory path
title: Working directory path
workdir: $BITRISE_SOURCE_DIR
- fingerprint_method: file-content-hash
opts:
description: |-
The specified Fingerprint Method will be used to calculate
fingerprints for the cached files.
The (file) fingerprint is used to check whether
the cached files did change - if it changed a new cache will be generated,
if the fingerprint matches the previous cache version's fingerprint then
no new cache will be generated.
**Regardless of which method you choose** the following file attributes will
be used to create the fingerprint **in addition** to the method you choose:
* File path
* File size
* File permission bits
Information about the options:
* `file-content-hash` : create a file content checksum hash for every file in the cache,
and use that as the fingerprint source of the file. This means that **the full file content will be loaded** in
order to create the checksum hash!
* `file-mod-time` : use the file's "modified at" time information. For larger files this method
can be significantly faster, as the file don't have to be loaded to calculate this information!
**Note**: in case of "update indicator files" the fingerprint method will always be `file-content-hash`,
regardless of which option you select here.
summary: Fingerprint method, used for checking file changes.
title: Fingerprint Method
value_options:
- file-content-hash
- file-mod-time
- is_debug_mode: "false"
opts:
description: If debug mode is enabled the step will print verbose logs
is_required: true
summary: If debug mode is enabled the step will print verbose logs
title: Debug mode?
value_options:
- "true"
- "false"
- compress_archive: "false"
opts:
description: If compress cache set to `true`, then it will upload a compressed
archive.
is_required: true
summary: If compress cache set to `true`, then it will upload a compressed archive.
title: Compress cache?
value_options:
- "true"
- "false"
- bitrise_cache_include_paths: $BITRISE_CACHE_INCLUDE_PATHS
opts:
is_dont_change_value: true
is_required: true
summary: Collected dependencies by steps from the build
title: Cache paths collected runtime
- bitrise_cache_exclude_paths: $BITRISE_CACHE_EXCLUDE_PATHS
opts:
is_dont_change_value: true
is_required: true
summary: Collected regularly changing files or extensions by steps from the build
title: Ignore paths collected runtime
- cache_api_url: $BITRISE_CACHE_API_URL
opts:
description: Cache Upload URL
is_dont_change_value: true
is_required: true
summary: Cache Upload URL
title: 'TMP: Cache Upload URL'
- compare_cache_info_path: $BITRISE_CACHE_INFO_PATH
opts:
description: |-
Compare the fingerprints against this Cache Info, to see if cache
update/upload is required or not.
is_dont_change_value: true
is_required: true
summary: Compare the fingerprints against this Cache Info
title: Cache Info file path, for compare
================================================
FILE: steps/cache-push/1.1.1/step.yml
================================================
title: Bitrise.io Cache:Push
summary: Updates the Cache, if required
description: |-
This Step checks whether the Cache have to be updated (based on the
`Cache Paths` and `Ignore Paths from change check` inputs),
and if it have to be it will create a new cache archive and upload it.
It won't update/upload the Cache if the Cache did not change,
nor in case of Pull Request builds (unless you change the `run_if` property of the Step).
You can find a setup and tips & tricks guide on the Bitrise DevCenter
at [http://devcenter.bitrise.io/caching/about-caching/](http://devcenter.bitrise.io/caching/about-caching/).
website: https://github.com/bitrise-steplib/steps-cache-push
source_code_url: https://github.com/bitrise-steplib/steps-cache-push.git
support_url: https://github.com/bitrise-steplib/steps-cache-push/issues
published_at: 2017-06-26T16:52:45.450269192+02:00
source:
git: https://github.com/bitrise-steplib/steps-cache-push.git
commit: 815d3b4d8e4a20b9a27217b497a57f5cccb35898
host_os_tags:
- osx-10.10
- ubuntu-14.04
type_tags:
- utility
deps:
apt_get:
- name: rsync
- name: tar
is_requires_admin_user: false
is_always_run: false
is_skippable: true
run_if: .IsCI | and (not .IsPR)
inputs:
- cache_paths: null
opts:
description: |-
Cache these paths. Separate paths with a newline.
A path item can be either a file or a directory.
You can also specify an "update indicator file" with the `->`
syntax: `update/this -> if/this/file/is/updated`.
*The indicator can only be a file!*
If you have a path in the list which doesn't exist that will not cause
this Step to fail. It'll be logged but the Step will try to gather
as many specified & valid paths as it can, and just print warning
about the invalid items.
summary: Cache these paths. Separate paths with a newline.
title: Cache paths
- ignore_check_on_paths: null
opts:
description: "These paths will be ignored from change checking.\nIf something
changed under the specified path(s) and nothing else changed\nthen the cache
won't be updated.\n\n**Paths are not prefixed with `!` will NOT ignored from
the cache archive**,\nif a path is located inside a specified Cache Path item
and not prefixed with `!`,\nit'll be included in the cache archive, just won't
be checked for changes. \n\nThe path can also include `*`, `**`, `/`.\n`*` will
do path element replace (e.g. `a/*/b` will match `a/x/b`).\n`**` will do path
part replace (e.g. `a/**/b` will match `a/x/y/z/b`).\nTo exclude full directory
like: `/my/full/path`, just simply put a `/` behind of it,\nso it will be `/my/full/path/`.\n\nImportant:
you can't ignore a path which results in an invalid cache item.\nFor example,
if you specify the path `a/path/to/cache` to be cached, you\ncan't ignore `a/path/to`,
as that would ignore every file from checking\nfor a change - no fingerprint
could be generated for `a/path/to/cache`.\nYou're free to ignore paths inside
a Cache Path however, e.g.\nif path is `a/path/to/cache` you're free to ignore
`a/path/to/cache/.ignore-me`,\nunless that's the only file inside `a/path/to/cache`.\n\nThe
point is: you should not specify an ignore rule which would completely\nignore
a specified Cache Path item, as that would result in a path which\ncan't be
checked for updates/changes/fingerprints."
summary: Ignore these Paths when checking for cache changes
title: Ignore Paths from change check
- opts:
description: Working directory path - should be an absolute path.
summary: Working directory path
title: Working directory path
workdir: $BITRISE_SOURCE_DIR
- fingerprint_method: file-content-hash
opts:
description: |-
The specified Fingerprint Method will be used to calculate
fingerprints for the cached files.
The (file) fingerprint is used to check whether
the cached files did change - if it changed a new cache will be generated,
if the fingerprint matches the previous cache version's fingerprint then
no new cache will be generated.
**Regardless of which method you choose** the following file attributes will
be used to create the fingerprint **in addition** to the method you choose:
* File path
* File size
* File permission bits
Information about the options:
* `file-content-hash` : create a file content checksum hash for every file in the cache,
and use that as the fingerprint source of the file. This means that **the full file content will be loaded** in
order to create the checksum hash!
* `file-mod-time` : use the file's "modified at" time information. For larger files this method
can be significantly faster, as the file don't have to be loaded to calculate this information!
**Note**: in case of "update indicator files" the fingerprint method will always be `file-content-hash`,
regardless of which option you select here.
summary: Fingerprint method, used for checking file changes.
title: Fingerprint Method
value_options:
- file-content-hash
- file-mod-time
- is_debug_mode: "false"
opts:
description: If debug mode is enabled the step will print verbose logs
is_required: true
summary: If debug mode is enabled the step will print verbose logs
title: Debug mode?
value_options:
- "true"
- "false"
- compress_archive: "false"
opts:
description: If compress cache set to `true`, then it will upload a compressed
archive.
is_required: true
summary: If compress cache set to `true`, then it will upload a compressed archive.
title: Compress cache?
value_options:
- "true"
- "false"
- bitrise_cache_include_paths: $BITRISE_CACHE_INCLUDE_PATHS
opts:
is_dont_change_value: true
is_required: true
summary: Collected dependencies by steps from the build
title: Cache paths collected runtime
- bitrise_cache_exclude_paths: $BITRISE_CACHE_EXCLUDE_PATHS
opts:
is_dont_change_value: true
is_required: true
summary: Collected regularly changing files or extensions by steps from the build
title: Ignore paths collected runtime
- cache_api_url: $BITRISE_CACHE_API_URL
opts:
description: Cache Upload URL
is_dont_change_value: true
is_required: true
summary: Cache Upload URL
title: 'TMP: Cache Upload URL'
- compare_cache_info_path: $BITRISE_CACHE_INFO_PATH
opts:
description: |-
Compare the fingerprints against this Cache Info, to see if cache
update/upload is required or not.
is_dont_change_value: true
is_required: true
summary: Compare the fingerprints against this Cache Info
title: Cache Info file path, for compare
================================================
FILE: steps/cache-push/1.1.3/step.yml
================================================
title: Bitrise.io Cache:Push
summary: Updates the Cache, if required
description: |-
This Step checks whether the Cache have to be updated (based on the
`Cache Paths` and `Ignore Paths from change check` inputs),
and if it have to be it will create a new cache archive and upload it.
It won't update/upload the Cache if the Cache did not change,
nor in case of Pull Request builds (unless you change the `run_if` property of the Step).
You can find a setup and tips & tricks guide on the Bitrise DevCenter
at [http://devcenter.bitrise.io/caching/about-caching/](http://devcenter.bitrise.io/caching/about-caching/).
website: https://github.com/bitrise-steplib/steps-cache-push
source_code_url: https://github.com/bitrise-steplib/steps-cache-push.git
support_url: https://github.com/bitrise-steplib/steps-cache-push/issues
published_at: 2017-07-04T15:44:00.951870409+02:00
source:
git: https://github.com/bitrise-steplib/steps-cache-push.git
commit: 689c1dbb4d1844f22ba7b73a74af89be81b7af78
host_os_tags:
- osx-10.10
- ubuntu-14.04
type_tags:
- utility
toolkit:
go:
package_name: github.com/bitrise-steplib/steps-cache-push
deps:
apt_get:
- name: rsync
- name: tar
is_requires_admin_user: false
is_always_run: false
is_skippable: true
run_if: .IsCI | and (not .IsPR)
inputs:
- cache_paths: null
opts:
description: |-
Cache these paths. Separate paths with a newline.
A path item can be either a file or a directory.
You can also specify an "update indicator file" with the `->`
syntax: `update/this -> if/this/file/is/updated`.
*The indicator can only be a file!*
If you have a path in the list which doesn't exist that will not cause
this Step to fail. It'll be logged but the Step will try to gather
as many specified & valid paths as it can, and just print warning
about the invalid items.
summary: Cache these paths. Separate paths with a newline.
title: Cache paths
- ignore_check_on_paths: null
opts:
description: "These paths will be ignored from change checking.\nIf something
changed under the specified path(s) and nothing else changed\nthen the cache
won't be updated.\n\n**Paths are not prefixed with `!` will NOT ignored from
the cache archive**,\nif a path is located inside a specified Cache Path item
and not prefixed with `!`,\nit'll be included in the cache archive, just won't
be checked for changes. \n\nThe path can also include `*`, `**`, `/`.\n`*` will
do path element replace (e.g. `a/*/b` will match `a/x/b`).\n`**` will do path
part replace (e.g. `a/**/b` will match `a/x/y/z/b`).\nTo exclude full directory
like: `/my/full/path`, just simply put a `/` behind of it,\nso it will be `/my/full/path/`.\n\nImportant:
you can't ignore a path which results in an invalid cache item.\nFor example,
if you specify the path `a/path/to/cache` to be cached, you\ncan't ignore `a/path/to`,
as that would ignore every file from checking\nfor a change - no fingerprint
could be generated for `a/path/to/cache`.\nYou're free to ignore paths inside
a Cache Path however, e.g.\nif path is `a/path/to/cache` you're free to ignore
`a/path/to/cache/.ignore-me`,\nunless that's the only file inside `a/path/to/cache`.\n\nThe
point is: you should not specify an ignore rule which would completely\nignore
a specified Cache Path item, as that would result in a path which\ncan't be
checked for updates/changes/fingerprints."
summary: Ignore these Paths when checking for cache changes
title: Ignore Paths from change check
- opts:
description: Working directory path - should be an absolute path.
summary: Working directory path
title: Working directory path
workdir: $BITRISE_SOURCE_DIR
- fingerprint_method: file-content-hash
opts:
description: |-
The specified Fingerprint Method will be used to calculate
fingerprints for the cached files.
The (file) fingerprint is used to check whether
the cached files did change - if it changed a new cache will be generated,
if the fingerprint matches the previous cache version's fingerprint then
no new cache will be generated.
**Regardless of which method you choose** the following file attributes will
be used to create the fingerprint **in addition** to the method you choose:
* File path
* File size
* File permission bits
Information about the options:
* `file-content-hash` : create a file content checksum hash for every file in the cache,
and use that as the fingerprint source of the file. This means that **the full file content will be loaded** in
order to create the checksum hash!
* `file-mod-time` : use the file's "modified at" time information. For larger files this method
can be significantly faster, as the file don't have to be loaded to calculate this information!
**Note**: in case of "update indicator files" the fingerprint method will always be `file-content-hash`,
regardless of which option you select here.
summary: Fingerprint method, used for checking file changes.
title: Fingerprint Method
value_options:
- file-content-hash
- file-mod-time
- is_debug_mode: "false"
opts:
description: If debug mode is enabled the step will print verbose logs
is_required: true
summary: If debug mode is enabled the step will print verbose logs
title: Debug mode?
value_options:
- "true"
- "false"
- compress_archive: "false"
opts:
description: If compress cache set to `true`, then it will upload a compressed
archive.
is_required: true
summary: If compress cache set to `true`, then it will upload a compressed archive.
title: Compress cache?
value_options:
- "true"
- "false"
- bitrise_cache_include_paths: $BITRISE_CACHE_INCLUDE_PATHS
opts:
is_dont_change_value: true
is_required: true
summary: Collected dependencies by steps from the build
title: Cache paths collected runtime
- bitrise_cache_exclude_paths: $BITRISE_CACHE_EXCLUDE_PATHS
opts:
is_dont_change_value: true
is_required: true
summary: Collected regularly changing files or extensions by steps from the build
title: Ignore paths collected runtime
- cache_api_url: $BITRISE_CACHE_API_URL
opts:
description: Cache Upload URL
is_dont_change_value: true
is_required: true
summary: Cache Upload URL
title: 'TMP: Cache Upload URL'
- compare_cache_info_path: $BITRISE_CACHE_INFO_PATH
opts:
description: |-
Compare the fingerprints against this Cache Info, to see if cache
update/upload is required or not.
is_dont_change_value: true
is_required: true
summary: Compare the fingerprints against this Cache Info
title: Cache Info file path, for compare
================================================
FILE: steps/cache-push/1.1.4/step.yml
================================================
title: Bitrise.io Cache:Push
summary: Updates the Cache, if required
description: |-
This Step checks whether the Cache have to be updated (based on the
`Cache Paths` and `Ignore Paths from change check` inputs),
and if it have to be it will create a new cache archive and upload it.
It won't update/upload the Cache if the Cache did not change,
nor in case of Pull Request builds (unless you change the `run_if` property of the Step).
You can find a setup and tips & tricks guide on the Bitrise DevCenter
at [http://devcenter.bitrise.io/caching/about-caching/](http://devcenter.bitrise.io/caching/about-caching/).
website: https://github.com/bitrise-steplib/steps-cache-push
source_code_url: https://github.com/bitrise-steplib/steps-cache-push.git
support_url: https://github.com/bitrise-steplib/steps-cache-push/issues
published_at: 2017-08-04T15:06:51.622133832+02:00
source:
git: https://github.com/bitrise-steplib/steps-cache-push.git
commit: bc384c8ef395cf38eadb1e4318622b1665efdb4b
host_os_tags:
- osx-10.10
- ubuntu-14.04
type_tags:
- utility
toolkit:
go:
package_name: github.com/bitrise-steplib/steps-cache-push
deps:
apt_get:
- name: rsync
- name: tar
is_requires_admin_user: false
is_always_run: false
is_skippable: true
run_if: .IsCI | and (not .IsPR)
inputs:
- cache_paths: null
opts:
description: |-
Cache these paths. Separate paths with a newline.
A path item can be either a file or a directory.
You can also specify an "update indicator file" with the `->`
syntax: `update/this -> if/this/file/is/updated`.
*The indicator can only be a file!*
If you have a path in the list which doesn't exist that will not cause
this Step to fail. It'll be logged but the Step will try to gather
as many specified & valid paths as it can, and just print warning
about the invalid items.
summary: Cache these paths. Separate paths with a newline.
title: Cache paths
- ignore_check_on_paths: null
opts:
description: "These paths will be ignored from change checking.\nIf something
changed under the specified path(s) and nothing else changed\nthen the cache
won't be updated.\n\n**Paths are not prefixed with `!` will NOT ignored from
the cache archive**,\nif a path is located inside a specified Cache Path item
and not prefixed with `!`,\nit'll be included in the cache archive, just won't
be checked for changes. \n\nThe path can also include `*`, `**`, `/`.\n`*` will
do path element replace (e.g. `a/*/b` will match `a/x/b`).\n`**` will do path
part replace (e.g. `a/**/b` will match `a/x/y/z/b`).\nTo exclude full directory
like: `/my/full/path`, just simply put a `/` behind of it,\nso it will be `/my/full/path/`.\n\nImportant:
you can't ignore a path which results in an invalid cache item.\nFor example,
if you specify the path `a/path/to/cache` to be cached, you\ncan't ignore `a/path/to`,
as that would ignore every file from checking\nfor a change - no fingerprint
could be generated for `a/path/to/cache`.\nYou're free to ignore paths inside
a Cache Path however, e.g.\nif path is `a/path/to/cache` you're free to ignore
`a/path/to/cache/.ignore-me`,\nunless that's the only file inside `a/path/to/cache`.\n\nThe
point is: you should not specify an ignore rule which would completely\nignore
a specified Cache Path item, as that would result in a path which\ncan't be
checked for updates/changes/fingerprints."
summary: Ignore these Paths when checking for cache changes
title: Ignore Paths from change check
- opts:
description: Working directory path - should be an absolute path.
summary: Working directory path
title: Working directory path
workdir: $BITRISE_SOURCE_DIR
- fingerprint_method: file-content-hash
opts:
description: |-
The specified Fingerprint Method will be used to calculate
fingerprints for the cached files.
The (file) fingerprint is used to check whether
the cached files did change - if it changed a new cache will be generated,
if the fingerprint matches the previous cache version's fingerprint then
no new cache will be generated.
**Regardless of which method you choose** the following file attributes will
be used to create the fingerprint **in addition** to the method you choose:
* File path
* File size
* File permission bits
Information about the options:
* `file-content-hash` : create a file content checksum hash for every file in the cache,
and use that as the fingerprint source of the file. This means that **the full file content will be loaded** in
order to create the checksum hash!
* `file-mod-time` : use the file's "modified at" time information. For larger files this method
can be significantly faster, as the file don't have to be loaded to calculate this information!
**Note**: in case of "update indicator files" the fingerprint method will always be `file-content-hash`,
regardless of which option you select here.
summary: Fingerprint method, used for checking file changes.
title: Fingerprint Method
value_options:
- file-content-hash
- file-mod-time
- is_debug_mode: "false"
opts:
description: If debug mode is enabled the step will print verbose logs
is_required: true
summary: If debug mode is enabled the step will print verbose logs
title: Debug mode?
value_options:
- "true"
- "false"
- compress_archive: "false"
opts:
description: If compress cache set to `true`, then it will upload a compressed
archive.
is_required: true
summary: If compress cache set to `true`, then it will upload a compressed archive.
title: Compress cache?
value_options:
- "true"
- "false"
- bitrise_cache_include_paths: $BITRISE_CACHE_INCLUDE_PATHS
opts:
is_dont_change_value: true
is_required: true
summary: Collected dependencies by steps from the build
title: Cache paths collected runtime
- bitrise_cache_exclude_paths: $BITRISE_CACHE_EXCLUDE_PATHS
opts:
is_dont_change_value: true
is_required: true
summary: Collected regularly changing files or extensions by steps from the build
title: Ignore paths collected runtime
- cache_api_url: $BITRISE_CACHE_API_URL
opts:
description: Cache Upload URL
is_dont_change_value: true
is_required: true
summary: Cache Upload URL
title: 'TMP: Cache Upload URL'
- compare_cache_info_path: $BITRISE_CACHE_INFO_PATH
opts:
description: |-
Compare the fingerprints against this Cache Info, to see if cache
update/upload is required or not.
is_dont_change_value: true
is_required: true
summary: Compare the fingerprints against this Cache Info
title: Cache Info file path, for compare
================================================
FILE: steps/cache-push/2.0.0/step.yml
================================================
title: Bitrise.io Cache:Push
summary: Updates the Cache, if required
description: |-
This Step checks whether the Cache have to be updated (based on the
`Cache Paths` and `Ignore Paths from change check` inputs),
and if it have to be it will create a new cache archive and upload it.
It won't update/upload the Cache if the Cache did not change,
nor in case of Pull Request builds (unless you change the `run_if` property of the Step).
You can find a setup and tips & tricks guide on the Bitrise DevCenter
at [http://devcenter.bitrise.io/caching/about-caching/](http://devcenter.bitrise.io/caching/about-caching/).
website: https://github.com/bitrise-steplib/steps-cache-push
source_code_url: https://github.com/bitrise-steplib/steps-cache-push.git
support_url: https://github.com/bitrise-steplib/steps-cache-push/issues
published_at: 2017-09-26T16:22:31.428258216+02:00
source:
git: https://github.com/bitrise-steplib/steps-cache-push.git
commit: 1bd0a0b4dd038143b9e18643c9f82ff9e3f79b44
host_os_tags:
- osx-10.10
- ubuntu-14.04
type_tags:
- utility
toolkit:
go:
package_name: github.com/bitrise-steplib/steps-cache-push
deps:
apt_get:
- name: tar
is_requires_admin_user: false
is_always_run: false
is_skippable: true
run_if: .IsCI | and (not .IsPR)
inputs:
- cache_paths: null
opts:
description: |-
Cache these paths. Separate paths with a newline.
A path item can be either a file or a directory.
You can also specify an "update indicator file" with the `->`
syntax: `update/this -> if/this/file/is/updated`.
*The indicator can only be a file!*
If you have a path in the list which doesn't exist that will not cause
this Step to fail. It'll be logged but the Step will try to gather
as many specified & valid paths as it can, and just print warning
about the invalid items.
summary: Cache these paths. Separate paths with a newline.
title: Cache paths
- ignore_check_on_paths: null
opts:
description: "These paths will be ignored from change checking.\nIf something
changed under the specified path(s) and nothing else changed\nthen the cache
won't be updated.\n\n**Paths are not prefixed with `!` will NOT ignored from
the cache archive**,\nif a path is located inside a specified Cache Path item
and not prefixed with `!`,\nit'll be included in the cache archive, just won't
be checked for changes. \n\nThe path can also include `*`, `**`, `/`.\n`*` will
do path element replace (e.g. `a/*/b` will match `a/x/b`).\n`**` will do path
part replace (e.g. `a/**/b` will match `a/x/y/z/b`).\nTo exclude full directory
like: `/my/full/path`, just simply put a `/` behind of it,\nso it will be `/my/full/path/`.\n\nImportant:
you can't ignore a path which results in an invalid cache item.\nFor example,
if you specify the path `a/path/to/cache` to be cached, you\ncan't ignore `a/path/to`,
as that would ignore every file from checking\nfor a change - no fingerprint
could be generated for `a/path/to/cache`.\nYou're free to ignore paths inside
a Cache Path however, e.g.\nif path is `a/path/to/cache` you're free to ignore
`a/path/to/cache/.ignore-me`,\nunless that's the only file inside `a/path/to/cache`.\n\nThe
point is: you should not specify an ignore rule which would completely\nignore
a specified Cache Path item, as that would result in a path which\ncan't be
checked for updates/changes/fingerprints."
summary: Ignore these Paths when checking for cache changes
title: Ignore Paths from change check
- opts:
description: Working directory path - should be an absolute path.
summary: Working directory path
title: Working directory path
workdir: $BITRISE_SOURCE_DIR
- fingerprint_method: file-content-hash
opts:
description: |-
The specified Fingerprint Method will be used to calculate
fingerprints for the cached files.
The (file) fingerprint is used to check whether
the cached files did change - if it changed a new cache will be generated,
if the fingerprint matches the previous cache version's fingerprint then
no new cache will be generated.
**Regardless of which method you choose** the following file attributes will
be used to create the fingerprint **in addition** to the method you choose:
* File path
* File size
* File permission bits
Information about the options:
* `file-content-hash` : create a file content checksum hash for every file in the cache,
and use that as the fingerprint source of the file. This means that **the full file content will be loaded** in
order to create the checksum hash!
* `file-mod-time` : use the file's "modified at" time information. For larger files this method
can be significantly faster, as the file don't have to be loaded to calculate this information!
**Note**: in case of "update indicator files" the fingerprint method will always be `file-content-hash`,
regardless of which option you select here.
summary: Fingerprint method, used for checking file changes.
title: Fingerprint Method
value_options:
- file-content-hash
- file-mod-time
- is_debug_mode: "false"
opts:
description: If debug mode is enabled the step will print verbose logs
is_required: true
summary: If debug mode is enabled the step will print verbose logs
title: Debug mode?
value_options:
- "true"
- "false"
- compress_archive: "false"
opts:
description: If compress cache set to `true`, then it will upload a compressed
archive.
is_required: true
summary: If compress cache set to `true`, then it will upload a compressed archive.
title: Compress cache?
value_options:
- "true"
- "false"
- bitrise_cache_include_paths: $BITRISE_CACHE_INCLUDE_PATHS
opts:
is_dont_change_value: true
is_required: true
summary: Collected dependencies by steps from the build
title: Cache paths collected runtime
- bitrise_cache_exclude_paths: $BITRISE_CACHE_EXCLUDE_PATHS
opts:
is_dont_change_value: true
is_required: true
summary: Collected regularly changing files or extensions by steps from the build
title: Ignore paths collected runtime
- cache_api_url: $BITRISE_CACHE_API_URL
opts:
description: Cache Upload URL
is_dont_change_value: true
is_required: true
summary: Cache Upload URL
title: 'TMP: Cache Upload URL'
- compare_cache_info_path: $BITRISE_CACHE_INFO_PATH
opts:
description: |-
Compare the fingerprints against this Cache Info, to see if cache
update/upload is required or not.
is_dont_change_value: true
is_required: true
summary: Compare the fingerprints against this Cache Info
title: Cache Info file path, for compare
================================================
FILE: steps/cache-push/2.0.1/step.yml
================================================
title: Bitrise.io Cache:Push
summary: Updates the Cache, if required
description: |-
This Step checks whether the Cache have to be updated (based on the
`Cache Paths` and `Ignore Paths from change check` inputs),
and if it have to be it will create a new cache archive and upload it.
It won't update/upload the Cache if the Cache did not change,
nor in case of Pull Request builds (unless you change the `run_if` property of the Step).
You can find a setup and tips & tricks guide on the Bitrise DevCenter
at [http://devcenter.bitrise.io/caching/about-caching/](http://devcenter.bitrise.io/caching/about-caching/).
website: https://github.com/bitrise-steplib/steps-cache-push
source_code_url: https://github.com/bitrise-steplib/steps-cache-push.git
support_url: https://github.com/bitrise-steplib/steps-cache-push/issues
published_at: 2017-09-27T14:33:31.271479016+02:00
source:
git: https://github.com/bitrise-steplib/steps-cache-push.git
commit: 6659a2345f185a64e1b5fa6f2bff09b831c1cd16
host_os_tags:
- osx-10.10
- ubuntu-14.04
type_tags:
- utility
toolkit:
go:
package_name: github.com/bitrise-steplib/steps-cache-push
deps:
apt_get:
- name: tar
is_requires_admin_user: false
is_always_run: false
is_skippable: true
run_if: .IsCI | and (not .IsPR)
inputs:
- cache_paths: null
opts:
description: |-
Cache these paths. Separate paths with a newline.
A path item can be either a file or a directory.
You can also specify an "update indicator file" with the `->`
syntax: `update/this -> if/this/file/is/updated`.
*The indicator can only be a file!*
If you have a path in the list which doesn't exist that will not cause
this Step to fail. It'll be logged but the Step will try to gather
as many specified & valid paths as it can, and just print warning
about the invalid items.
summary: Cache these paths. Separate paths with a newline.
title: Cache paths
- ignore_check_on_paths: null
opts:
description: "These paths will be ignored from change checking.\nIf something
changed under the specified path(s) and nothing else changed\nthen the cache
won't be updated.\n\n**Paths are not prefixed with `!` will NOT ignored from
the cache archive**,\nif a path is located inside a specified Cache Path item
and not prefixed with `!`,\nit'll be included in the cache archive, just won't
be checked for changes. \n\nThe path can also include `*`, `**`, `/`.\n`*` will
do path element replace (e.g. `a/*/b` will match `a/x/b`).\n`**` will do path
part replace (e.g. `a/**/b` will match `a/x/y/z/b`).\nTo exclude full directory
like: `/my/full/path`, just simply put a `/` behind of it,\nso it will be `/my/full/path/`.\n\nImportant:
you can't ignore a path which results in an invalid cache item.\nFor example,
if you specify the path `a/path/to/cache` to be cached, you\ncan't ignore `a/path/to`,
as that would ignore every file from checking\nfor a change - no fingerprint
could be generated for `a/path/to/cache`.\nYou're free to ignore paths inside
a Cache Path however, e.g.\nif path is `a/path/to/cache` you're free to ignore
`a/path/to/cache/.ignore-me`,\nunless that's the only file inside `a/path/to/cache`.\n\nThe
point is: you should not specify an ignore rule which would completely\nignore
a specified Cache Path item, as that would result in a path which\ncan't be
checked for updates/changes/fingerprints."
summary: Ignore these Paths when checking for cache changes
title: Ignore Paths from change check
- opts:
description: Working directory path - should be an absolute path.
summary: Working directory path
title: Working directory path
workdir: $BITRISE_SOURCE_DIR
- fingerprint_method: file-content-hash
opts:
description: |-
The specified Fingerprint Method will be used to calculate
fingerprints for the cached files.
The (file) fingerprint is used to check whether
the cached files did change - if it changed a new cache will be generated,
if the fingerprint matches the previous cache version's fingerprint then
no new cache will be generated.
**Regardless of which method you choose** the following file attributes will
be used to create the fingerprint **in addition** to the method you choose:
* File path
* File size
* File permission bits
Information about the options:
* `file-content-hash` : create a file content checksum hash for every file in the cache,
and use that as the fingerprint source of the file. This means that **the full file content will be loaded** in
order to create the checksum hash!
* `file-mod-time` : use the file's "modified at" time information. For larger files this method
can be significantly faster, as the file don't have to be loaded to calculate this information!
**Note**: in case of "update indicator files" the fingerprint method will always be `file-content-hash`,
regardless of which option you select here.
summary: Fingerprint method, used for checking file changes.
title: Fingerprint Method
value_options:
- file-content-hash
- file-mod-time
- is_debug_mode: "false"
opts:
description: If debug mode is enabled the step will print verbose logs
is_required: true
summary: If debug mode is enabled the step will print verbose logs
title: Debug mode?
value_options:
- "true"
- "false"
- compress_archive: "false"
opts:
description: If compress cache set to `true`, then it will upload a compressed
archive.
is_required: true
summary: If compress cache set to `true`, then it will upload a compressed archive.
title: Compress cache?
value_options:
- "true"
- "false"
- bitrise_cache_include_paths: $BITRISE_CACHE_INCLUDE_PATHS
opts:
is_dont_change_value: true
is_required: true
summary: Collected dependencies by steps from the build
title: Cache paths collected runtime
- bitrise_cache_exclude_paths: $BITRISE_CACHE_EXCLUDE_PATHS
opts:
is_dont_change_value: true
is_required: true
summary: Collected regularly changing files or extensions by steps from the build
title: Ignore paths collected runtime
- cache_api_url: $BITRISE_CACHE_API_URL
opts:
description: Cache Upload URL
is_dont_change_value: true
is_required: true
summary: Cache Upload URL
title: 'TMP: Cache Upload URL'
- compare_cache_info_path: $BITRISE_CACHE_INFO_PATH
opts:
description: |-
Compare the fingerprints against this Cache Info, to see if cache
update/upload is required or not.
is_dont_change_value: true
is_required: true
summary: Compare the fingerprints against this Cache Info
title: Cache Info file path, for compare
================================================
FILE: steps/cache-push/2.0.2/step.yml
================================================
title: Bitrise.io Cache:Push
summary: Updates the Cache, if required
description: |-
This Step checks whether the Cache have to be updated (based on the
`Cache Paths` and `Ignore Paths from change check` inputs),
and if it have to be it will create a new cache archive and upload it.
It won't update/upload the Cache if the Cache did not change,
nor in case of Pull Request builds (unless you change the `run_if` property of the Step).
You can find a setup and tips & tricks guide on the Bitrise DevCenter
at [http://devcenter.bitrise.io/caching/about-caching/](http://devcenter.bitrise.io/caching/about-caching/).
website: https://github.com/bitrise-steplib/steps-cache-push
source_code_url: https://github.com/bitrise-steplib/steps-cache-push.git
support_url: https://github.com/bitrise-steplib/steps-cache-push/issues
published_at: 2017-10-10T15:49:08.530462222+02:00
source:
git: https://github.com/bitrise-steplib/steps-cache-push.git
commit: 4ba1ed81ef5c28dcb3220df3fdd72aebd588d682
host_os_tags:
- osx-10.10
- ubuntu-14.04
type_tags:
- utility
toolkit:
go:
package_name: github.com/bitrise-steplib/steps-cache-push
deps:
apt_get:
- name: tar
is_requires_admin_user: false
is_always_run: false
is_skippable: true
run_if: .IsCI | and (not .IsPR)
inputs:
- cache_paths: null
opts:
description: |-
Cache these paths. Separate paths with a newline.
A path item can be either a file or a directory.
You can also specify an "update indicator file" with the `->`
syntax: `update/this -> if/this/file/is/updated`.
*The indicator can only be a file!*
If you have a path in the list which doesn't exist that will not cause
this Step to fail. It'll be logged but the Step will try to gather
as many specified & valid paths as it can, and just print warning
about the invalid items.
summary: Cache these paths. Separate paths with a newline.
title: Cache paths
- ignore_check_on_paths: null
opts:
description: "These paths will be ignored from change checking.\nIf something
changed under the specified path(s) and nothing else changed\nthen the cache
won't be updated.\n\n**Paths are not prefixed with `!` will NOT ignored from
the cache archive**,\nif a path is located inside a specified Cache Path item
and not prefixed with `!`,\nit'll be included in the cache archive, just won't
be checked for changes. \n\nThe path can also include `*`, `**`, `/`.\n`*` will
do path element replace (e.g. `a/*/b` will match `a/x/b`).\n`**` will do path
part replace (e.g. `a/**/b` will match `a/x/y/z/b`).\nTo exclude full directory
like: `/my/full/path`, just simply put a `/` behind of it,\nso it will be `/my/full/path/`.\n\nImportant:
you can't ignore a path which results in an invalid cache item.\nFor example,
if you specify the path `a/path/to/cache` to be cached, you\ncan't ignore `a/path/to`,
as that would ignore every file from checking\nfor a change - no fingerprint
could be generated for `a/path/to/cache`.\nYou're free to ignore paths inside
a Cache Path however, e.g.\nif path is `a/path/to/cache` you're free to ignore
`a/path/to/cache/.ignore-me`,\nunless that's the only file inside `a/path/to/cache`.\n\nThe
point is: you should not specify an ignore rule which would completely\nignore
a specified Cache Path item, as that would result in a path which\ncan't be
checked for updates/changes/fingerprints."
summary: Ignore these Paths when checking for cache changes
title: Ignore Paths from change check
- opts:
description: Working directory path - should be an absolute path.
summary: Working directory path
title: Working directory path
workdir: $BITRISE_SOURCE_DIR
- fingerprint_method: file-content-hash
opts:
description: |-
The specified Fingerprint Method will be used to calculate
fingerprints for the cached files.
The (file) fingerprint is used to check whether
the cached files did change - if it changed a new cache will be generated,
if the fingerprint matches the previous cache version's fingerprint then
no new cache will be generated.
**Regardless of which method you choose** the following file attributes will
be used to create the fingerprint **in addition** to the method you choose:
* File path
* File size
* File permission bits
Information about the options:
* `file-content-hash` : create a file content checksum hash for every file in the cache,
and use that as the fingerprint source of the file. This means that **the full file content will be loaded** in
order to create the checksum hash!
* `file-mod-time` : use the file's "modified at" time information. For larger files this method
can be significantly faster, as the file don't have to be loaded to calculate this information!
**Note**: in case of "update indicator files" the fingerprint method will always be `file-content-hash`,
regardless of which option you select here.
summary: Fingerprint method, used for checking file changes.
title: Fingerprint Method
value_options:
- file-content-hash
- file-mod-time
- is_debug_mode: "false"
opts:
description: If debug mode is enabled the step will print verbose logs
is_required: true
summary: If debug mode is enabled the step will print verbose logs
title: Debug mode?
value_options:
- "true"
- "false"
- compress_archive: "false"
opts:
description: If compress cache set to `true`, then it will upload a compressed
archive.
is_required: true
summary: If compress cache set to `true`, then it will upload a compressed archive.
title: Compress cache?
value_options:
- "true"
- "false"
- bitrise_cache_include_paths: $BITRISE_CACHE_INCLUDE_PATHS
opts:
is_dont_change_value: true
is_required: true
summary: Collected dependencies by steps from the build
title: Cache paths collected runtime
- bitrise_cache_exclude_paths: $BITRISE_CACHE_EXCLUDE_PATHS
opts:
is_dont_change_value: true
is_required: true
summary: Collected regularly changing files or extensions by steps from the build
title: Ignore paths collected runtime
- cache_api_url: $BITRISE_CACHE_API_URL
opts:
description: Cache Upload URL
is_dont_change_value: true
is_required: true
summary: Cache Upload URL
title: 'TMP: Cache Upload URL'
- compare_cache_info_path: $BITRISE_CACHE_INFO_PATH
opts:
description: |-
Compare the fingerprints against this Cache Info, to see if cache
update/upload is required or not.
is_dont_change_value: true
is_required: true
summary: Compare the fingerprints against this Cache Info
title: Cache Info file path, for compare
================================================
FILE: steps/cache-push/2.0.3/step.yml
================================================
title: Bitrise.io Cache:Push
summary: Updates the Cache, if required
description: |-
This Step checks whether the Cache have to be updated (based on the
`Cache Paths` and `Ignore Paths from change check` inputs),
and if it have to be it will create a new cache archive and upload it.
It won't update/upload the Cache if the Cache did not change,
nor in case of Pull Request builds (unless you change the `run_if` property of the Step).
You can find a setup and tips & tricks guide on the Bitrise DevCenter
at [http://devcenter.bitrise.io/caching/about-caching/](http://devcenter.bitrise.io/caching/about-caching/).
website: https://github.com/bitrise-steplib/steps-cache-push
source_code_url: https://github.com/bitrise-steplib/steps-cache-push.git
support_url: https://github.com/bitrise-steplib/steps-cache-push/issues
published_at: 2017-11-23T16:24:39.837780321+01:00
source:
git: https://github.com/bitrise-steplib/steps-cache-push.git
commit: 7f267e29be97268b08cd558a7c155c403c9eb30a
host_os_tags:
- osx-10.10
- ubuntu-14.04
type_tags:
- utility
toolkit:
go:
package_name: github.com/bitrise-steplib/steps-cache-push
deps:
apt_get:
- name: tar
is_requires_admin_user: false
is_always_run: false
is_skippable: true
run_if: .IsCI | and (not .IsPR)
inputs:
- cache_paths: null
opts:
description: |-
Cache these paths. Separate paths with a newline.
A path item can be either a file or a directory.
You can also specify an "update indicator file" with the `->`
syntax: `update/this -> if/this/file/is/updated`.
*The indicator can only be a file!*
If you have a path in the list which doesn't exist that will not cause
this Step to fail. It'll be logged but the Step will try to gather
as many specified & valid paths as it can, and just print warning
about the invalid items.
summary: Cache these paths. Separate paths with a newline.
title: Cache paths
- ignore_check_on_paths: null
opts:
description: "These paths will be ignored from change checking.\nIf something
changed under the specified path(s) and nothing else changed\nthen the cache
won't be updated.\n\n**Paths are not prefixed with `!` will NOT ignored from
the cache archive**,\nif a path is located inside a specified Cache Path item
and not prefixed with `!`,\nit'll be included in the cache archive, just won't
be checked for changes. \n\nThe path can also include `*`, `**`, `/`.\n`*` will
do path element replace (e.g. `a/*/b` will match `a/x/b`).\n`**` will do path
part replace (e.g. `a/**/b` will match `a/x/y/z/b`).\nTo exclude full directory
like: `/my/full/path`, just simply put a `/` behind of it,\nso it will be `/my/full/path/`.\n\nImportant:
you can't ignore a path which results in an invalid cache item.\nFor example,
if you specify the path `a/path/to/cache` to be cached, you\ncan't ignore `a/path/to`,
as that would ignore every file from checking\nfor a change - no fingerprint
could be generated for `a/path/to/cache`.\nYou're free to ignore paths inside
a Cache Path however, e.g.\nif path is `a/path/to/cache` you're free to ignore
`a/path/to/cache/.ignore-me`,\nunless that's the only file inside `a/path/to/cache`.\n\nThe
point is: you should not specify an ignore rule which would completely\nignore
a specified Cache Path item, as that would result in a path which\ncan't be
checked for updates/changes/fingerprints."
summary: Ignore these Paths when checking for cache changes
title: Ignore Paths from change check
- opts:
description: Working directory path - should be an absolute path.
summary: Working directory path
title: Working directory path
workdir: $BITRISE_SOURCE_DIR
- fingerprint_method: file-content-hash
opts:
description: |-
The specified Fingerprint Method will be used to calculate
fingerprints for the cached files.
The (file) fingerprint is used to check whether
the cached files did change - if it changed a new cache will be generated,
if the fingerprint matches the previous cache version's fingerprint then
no new cache will be generated.
**Regardless of which method you choose** the following file attributes will
be used to create the fingerprint **in addition** to the method you choose:
* File path
* File size
* File permission bits
Information about the options:
* `file-content-hash` : create a file content checksum hash for every file in the cache,
and use that as the fingerprint source of the file. This means that **the full file content will be loaded** in
order to create the checksum hash!
* `file-mod-time` : use the file's "modified at" time information. For larger files this method
can be significantly faster, as the file don't have to be loaded to calculate this information!
**Note**: in case of "update indicator files" the fingerprint method will always be `file-content-hash`,
regardless of which option you select here.
summary: Fingerprint method, used for checking file changes.
title: Fingerprint Method
value_options:
- file-content-hash
- file-mod-time
- is_debug_mode: "false"
opts:
description: If debug mode is enabled the step will print verbose logs
is_required: true
summary: If debug mode is enabled the step will print verbose logs
title: Debug mode?
value_options:
- "true"
- "false"
- compress_archive: "false"
opts:
description: If compress cache set to `true`, then it will upload a compressed
archive.
is_required: true
summary: If compress cache set to `true`, then it will upload a compressed archive.
title: Compress cache?
value_options:
- "true"
- "false"
- bitrise_cache_include_paths: $BITRISE_CACHE_INCLUDE_PATHS
opts:
is_dont_change_value: true
is_required: true
summary: Collected dependencies by steps from the build
title: Cache paths collected runtime
- bitrise_cache_exclude_paths: $BITRISE_CACHE_EXCLUDE_PATHS
opts:
is_dont_change_value: true
is_required: true
summary: Collected regularly changing files or extensions by steps from the build
title: Ignore paths collected runtime
- cache_api_url: $BITRISE_CACHE_API_URL
opts:
description: Cache Upload URL
is_dont_change_value: true
is_required: true
summary: Cache Upload URL
title: 'TMP: Cache Upload URL'
- compare_cache_info_path: $BITRISE_CACHE_INFO_PATH
opts:
description: |-
Compare the fingerprints against this Cache Info, to see if cache
update/upload is required or not.
is_dont_change_value: true
is_required: true
summary: Compare the fingerprints against this Cache Info
title: Cache Info file path, for compare
================================================
FILE: steps/cache-push/2.0.4/step.yml
================================================
title: Bitrise.io Cache:Push
summary: Updates the Cache, if required
description: |-
This Step checks whether the Cache have to be updated (based on the
`Cache Paths` and `Ignore Paths from change check` inputs),
and if it have to be it will create a new cache archive and upload it.
It won't update/upload the Cache if the Cache did not change,
nor in case of Pull Request builds (unless you change the `run_if` property of the Step).
You can find a setup and tips & tricks guide on the Bitrise DevCenter
at [http://devcenter.bitrise.io/caching/about-caching/](http://devcenter.bitrise.io/caching/about-caching/).
website: https://github.com/bitrise-steplib/steps-cache-push
source_code_url: https://github.com/bitrise-steplib/steps-cache-push.git
support_url: https://github.com/bitrise-steplib/steps-cache-push/issues
published_at: 2018-01-26T13:32:07.329829902+01:00
source:
git: https://github.com/bitrise-steplib/steps-cache-push.git
commit: 1e4186d1f85def111294ecf6a04619e93b81a1a1
host_os_tags:
- osx-10.10
- ubuntu-14.04
type_tags:
- utility
toolkit:
go:
package_name: github.com/bitrise-steplib/steps-cache-push
deps:
apt_get:
- name: tar
is_requires_admin_user: false
is_always_run: false
is_skippable: true
run_if: .IsCI | and (not .IsPR)
inputs:
- cache_paths: |
$BITRISE_CACHE_DIR
opts:
description: |-
Cache these paths. Separate paths with a newline.
A path item can be either a file or a directory.
You can also specify an "update indicator file" with the `->`
syntax: `update/this -> if/this/file/is/updated`.
*The indicator can only be a file!*
If you have a path in the list which doesn't exist that will not cause
this Step to fail. It'll be logged but the Step will try to gather
as many specified & valid paths as it can, and just print warning
about the invalid items.
summary: Cache these paths. Separate paths with a newline.
title: Cache paths
- ignore_check_on_paths: null
opts:
description: "These paths will be ignored from change checking.\nIf something
changed under the specified path(s) and nothing else changed\nthen the cache
won't be updated.\n\n**Paths are not prefixed with `!` will NOT ignored from
the cache archive**,\nif a path is located inside a specified Cache Path item
and not prefixed with `!`,\nit'll be included in the cache archive, just won't
be checked for changes. \n\nThe path can also include `*`, `**`, `/`.\n`*` will
do path element replace (e.g. `a/*/b` will match `a/x/b`).\n`**` will do path
part replace (e.g. `a/**/b` will match `a/x/y/z/b`).\nTo exclude full directory
like: `/my/full/path`, just simply put a `/` behind of it,\nso it will be `/my/full/path/`.\n\nImportant:
you can't ignore a path which results in an invalid cache item.\nFor example,
if you specify the path `a/path/to/cache` to be cached, you\ncan't ignore `a/path/to`,
as that would ignore every file from checking\nfor a change - no fingerprint
could be generated for `a/path/to/cache`.\nYou're free to ignore paths inside
a Cache Path however, e.g.\nif path is `a/path/to/cache` you're free to ignore
`a/path/to/cache/.ignore-me`,\nunless that's the only file inside `a/path/to/cache`.\n\nThe
point is: you should not specify an ignore rule which would completely\nignore
a specified Cache Path item, as that would result in a path which\ncan't be
checked for updates/changes/fingerprints."
summary: Ignore these Paths when checking for cache changes
title: Ignore Paths from change check
- opts:
description: Working directory path - should be an absolute path.
summary: Working directory path
title: Working directory path
workdir: $BITRISE_SOURCE_DIR
- fingerprint_method: file-content-hash
opts:
description: |-
The specified Fingerprint Method will be used to calculate
fingerprints for the cached files.
The (file) fingerprint is used to check whether
the cached files did change - if it changed a new cache will be generated,
if the fingerprint matches the previous cache version's fingerprint then
no new cache will be generated.
**Regardless of which method you choose** the following file attributes will
be used to create the fingerprint **in addition** to the method you choose:
* File path
* File size
* File permission bits
Information about the options:
* `file-content-hash` : create a file content checksum hash for every file in the cache,
and use that as the fingerprint source of the file. This means that **the full file content will be loaded** in
order to create the checksum hash!
* `file-mod-time` : use the file's "modified at" time information. For larger files this method
can be significantly faster, as the file don't have to be loaded to calculate this information!
**Note**: in case of "update indicator files" the fingerprint method will always be `file-content-hash`,
regardless of which option you select here.
summary: Fingerprint method, used for checking file changes.
title: Fingerprint Method
value_options:
- file-content-hash
- file-mod-time
- is_debug_mode: "false"
opts:
description: If debug mode is enabled the step will print verbose logs
is_required: true
summary: If debug mode is enabled the step will print verbose logs
title: Debug mode?
value_options:
- "true"
- "false"
- compress_archive: "false"
opts:
description: If compress cache set to `true`, then it will upload a compressed
archive.
is_required: true
summary: If compress cache set to `true`, then it will upload a compressed archive.
title: Compress cache?
value_options:
- "true"
- "false"
- bitrise_cache_include_paths: $BITRISE_CACHE_INCLUDE_PATHS
opts:
is_dont_change_value: true
is_required: true
summary: Collected dependencies by steps from the build
title: Cache paths collected runtime
- bitrise_cache_exclude_paths: $BITRISE_CACHE_EXCLUDE_PATHS
opts:
is_dont_change_value: true
is_required: true
summary: Collected regularly changing files or extensions by steps from the build
title: Ignore paths collected runtime
- cache_api_url: $BITRISE_CACHE_API_URL
opts:
description: Cache Upload URL
is_dont_change_value: true
is_required: true
summary: Cache Upload URL
title: 'TMP: Cache Upload URL'
- compare_cache_info_path: $BITRISE_CACHE_INFO_PATH
opts:
description: |-
Compare the fingerprints against this Cache Info, to see if cache
update/upload is required or not.
is_dont_change_value: true
is_required: true
summary: Compare the fingerprints against this Cache Info
title: Cache Info file path, for compare
================================================
FILE: steps/cache-push/2.0.5/step.yml
================================================
title: Bitrise.io Cache:Push
summary: Updates the Cache, if required
description: |-
This Step checks whether the Cache have to be updated (based on the
`Cache Paths` and `Ignore Paths from change check` inputs),
and if it have to be it will create a new cache archive and upload it.
It won't update/upload the Cache if the Cache did not change,
nor in case of Pull Request builds (unless you change the `run_if` property of the Step).
You can find a setup and tips & tricks guide on the Bitrise DevCenter
at [http://devcenter.bitrise.io/caching/about-caching/](http://devcenter.bitrise.io/caching/about-caching/).
website: https://github.com/bitrise-steplib/steps-cache-push
source_code_url: https://github.com/bitrise-steplib/steps-cache-push.git
support_url: https://github.com/bitrise-steplib/steps-cache-push/issues
published_at: 2018-01-31T15:55:43.791898978+01:00
source:
git: https://github.com/bitrise-steplib/steps-cache-push.git
commit: 1625d22863a08160560b988078d19af6f6d0d47e
host_os_tags:
- osx-10.10
- ubuntu-14.04
type_tags:
- utility
toolkit:
go:
package_name: github.com/bitrise-steplib/steps-cache-push
deps:
apt_get:
- name: tar
is_requires_admin_user: false
is_always_run: false
is_skippable: true
run_if: .IsCI | and (not .IsPR)
inputs:
- cache_paths: |
$BITRISE_CACHE_DIR
opts:
description: |-
Cache these paths. Separate paths with a newline.
A path item can be either a file or a directory.
You can also specify an "update indicator file" with the `->`
syntax: `update/this -> if/this/file/is/updated`.
*The indicator can only be a file!*
If you have a path in the list which doesn't exist that will not cause
this Step to fail. It'll be logged but the Step will try to gather
as many specified & valid paths as it can, and just print warning
about the invalid items.
summary: Cache these paths. Separate paths with a newline.
title: Cache paths
- ignore_check_on_paths: null
opts:
description: "These paths will be ignored from change checking.\nIf something
changed under the specified path(s) and nothing else changed\nthen the cache
won't be updated.\n\n**Paths are not prefixed with `!` will NOT ignored from
the cache archive**,\nif a path is located inside a specified Cache Path item
and not prefixed with `!`,\nit'll be included in the cache archive, just won't
be checked for changes. \n\nThe path can also include `*`, `**`, `/`.\n`*` will
do path element replace (e.g. `a/*/b` will match `a/x/b`).\n`**` will do path
part replace (e.g. `a/**/b` will match `a/x/y/z/b`).\nTo exclude full directory
like: `/my/full/path`, just simply put a `/` behind of it,\nso it will be `/my/full/path/`.\n\nImportant:
you can't ignore a path which results in an invalid cache item.\nFor example,
if you specify the path `a/path/to/cache` to be cached, you\ncan't ignore `a/path/to`,
as that would ignore every file from checking\nfor a change - no fingerprint
could be generated for `a/path/to/cache`.\nYou're free to ignore paths inside
a Cache Path however, e.g.\nif path is `a/path/to/cache` you're free to ignore
`a/path/to/cache/.ignore-me`,\nunless that's the only file inside `a/path/to/cache`.\n\nThe
point is: you should not specify an ignore rule which would completely\nignore
a specified Cache Path item, as that would result in a path which\ncan't be
checked for updates/changes/fingerprints."
summary: Ignore these Paths when checking for cache changes
title: Ignore Paths from change check
- opts:
description: Working directory path - should be an absolute path.
summary: Working directory path
title: Working directory path
workdir: $BITRISE_SOURCE_DIR
- fingerprint_method: file-content-hash
opts:
description: |-
The specified Fingerprint Method will be used to calculate
fingerprints for the cached files.
The (file) fingerprint is used to check whether
the cached files did change - if it changed a new cache will be generated,
if the fingerprint matches the previous cache version's fingerprint then
no new cache will be generated.
**Regardless of which method you choose** the following file attributes will
be used to create the fingerprint **in addition** to the method you choose:
* File path
* File size
* File permission bits
Information about the options:
* `file-content-hash` : create a file content checksum hash for every file in the cache,
and use that as the fingerprint source of the file. This means that **the full file content will be loaded** in
order to create the checksum hash!
* `file-mod-time` : use the file's "modified at" time information. For larger files this method
can be significantly faster, as the file don't have to be loaded to calculate this information!
**Note**: in case of "update indicator files" the fingerprint method will always be `file-content-hash`,
regardless of which option you select here.
summary: Fingerprint method, used for checking file changes.
title: Fingerprint Method
value_options:
- file-content-hash
- file-mod-time
- is_debug_mode: "false"
opts:
description: If debug mode is enabled the step will print verbose logs
is_required: true
summary: If debug mode is enabled the step will print verbose logs
title: Debug mode?
value_options:
- "true"
- "false"
- compress_archive: "false"
opts:
description: If compress cache set to `true`, then it will upload a compressed
archive.
is_required: true
summary: If compress cache set to `true`, then it will upload a compressed archive.
title: Compress cache?
value_options:
- "true"
- "false"
- bitrise_cache_include_paths: $BITRISE_CACHE_INCLUDE_PATHS
opts:
is_dont_change_value: true
is_required: true
summary: Collected dependencies by steps from the build
title: Cache paths collected runtime
- bitrise_cache_exclude_paths: $BITRISE_CACHE_EXCLUDE_PATHS
opts:
is_dont_change_value: true
is_required: true
summary: Collected regularly changing files or extensions by steps from the build
title: Ignore paths collected runtime
- cache_api_url: $BITRISE_CACHE_API_URL
opts:
description: Cache Upload URL
is_dont_change_value: true
is_required: true
summary: Cache Upload URL
title: 'TMP: Cache Upload URL'
- compare_cache_info_path: $BITRISE_CACHE_INFO_PATH
opts:
description: |-
Compare the fingerprints against this Cache Info, to see if cache
update/upload is required or not.
is_dont_change_value: true
is_required: true
summary: Compare the fingerprints against this Cache Info
title: Cache Info file path, for compare
================================================
FILE: steps/cache-push/2.1.0/step.yml
================================================
title: Bitrise.io Cache:Push
summary: Updates the Cache, if required
description: |-
This step checks whether the cache has to be updated (based on the
`Cache Paths` and `Ignore Paths from change check` inputs).
If it has to be updated, the step will create a new cache archive and upload it.
It won't update/upload the cache if the cache did not change,
nor in the case of Pull Request builds (unless you change the `run_if` property of the Step).
For more information on setup and tips & tricks, check out our [Bitrise DevCenter guide](http://devcenter.bitrise.io/caching/about-caching/).
website: https://github.com/bitrise-steplib/steps-cache-push
source_code_url: https://github.com/bitrise-steplib/steps-cache-push.git
support_url: https://github.com/bitrise-steplib/steps-cache-push/issues
published_at: 2019-03-20T10:07:32.946564502Z
source:
git: https://github.com/bitrise-steplib/steps-cache-push.git
commit: 7f7710fed5ab024de45c7511e217f5feb42ba03a
host_os_tags:
- osx-10.10
- ubuntu-14.04
type_tags:
- utility
toolkit:
go:
package_name: github.com/bitrise-steplib/steps-cache-push
deps:
apt_get:
- name: tar
is_requires_admin_user: false
is_always_run: false
is_skippable: true
run_if: .IsCI | and (not .IsPR)
inputs:
- cache_paths: |
$BITRISE_CACHE_DIR
opts:
description: |-
Cache these paths. Separate paths with a newline.
A path item can be either a file or a directory.
You can also specify an "update indicator file" with the `->`
syntax: `update/this -> if/this/file/is/updated`.
*The indicator can only be a file!*
If you have a path in the list which doesn't exist that will not cause
this step to fail. It'll be logged but the step will try to gather
as many specified & valid paths as it can, and just print a warning
about the invalid items.
summary: Cache these paths. Separate paths with a newline.
title: Cache paths
- ignore_check_on_paths: null
opts:
description: "These paths will be ignored from change checking.\nIf something
has changed under the specified path(s) and nothing else has changed,\nthen
the cache won't be updated.\n\n**Paths prefixed with an `!` will get ignored
from the cache archive**.\nIf a path is located inside a specified Cache Path
item and not prefixed with an `!`,\nit'll be included in the cache archive,
but won't be checked for changes. \n\nThe path can also include `*`, `**`, `/`.\n`*`
will replace a path element (for example, `a/*/b` will match `a/x/b`).\n`**`
will replace part of a path (for example, `a/**/b` will match `a/x/y/z/b`).\nTo
exclude a full directory like `/my/full/path`, simply put a `/` behind `/my/full/path`,\nso
it will be `/my/full/path/`.\n\nImportant: you can't ignore a path which results
in an invalid cache item.\nFor example, if you specify the path `a/path/to/cache`
to be cached, you\ncan't ignore `a/path/to`, as that would ignore every file
from checking\nfor a change and no fingerprint could be generated for `a/path/to/cache`.\nYou
can ignore paths inside a Cache Path, however, if, for example, a path is `a/path/to/cache`,
you can ignore `a/path/to/cache/.ignore-me`,\nunless that's the only file inside
`a/path/to/cache`.\n\nThe point is: you should not specify an ignore rule which
would completely\nignore a specified Cache Path item, as that would result in
a path which\ncan't be checked for updates,changes or fingerprints."
summary: Define the paths which have to be ignored when checking for cache changes.
title: Ignore Paths from change check
- opts:
description: Working directory path - should be an absolute path.
summary: Working directory path
title: Working directory path
workdir: $BITRISE_SOURCE_DIR
- fingerprint_method: file-content-hash
opts:
description: |-
The specified Fingerprint Method will be used to calculate
fingerprints for the cached files.
The (file) fingerprint is used to check whether
the cached files did change - if it changed, a new cache will be generated.
If the fingerprint matches the previous cache version's fingerprint, then
no new cache will be generated.
**Regardless of which method you choose** the following file attributes will
be used to create the fingerprint **in addition** to the method you choose:
* File path
* File size
* File permission bits
Information about the options:
* `file-content-hash` : create a file content checksum hash for every file in the cache,
and use that as the fingerprint source of the file. This means that **the full file content will be loaded** in
order to create the checksum hash!
* `file-mod-time` : use the file's "modified at" time information. For larger files this method
can be significantly faster, as the file doesn't have to be loaded to calculate this information!
**Note**: in case of "update indicator files", the fingerprint method will always be `file-content-hash`,
regardless of which option you select here.
summary: Fingerprint method, used for checking file changes.
title: Fingerprint Method
value_options:
- file-content-hash
- file-mod-time
- is_debug_mode: "false"
opts:
description: If debug mode is enabled the step will print verbose logs.
is_required: true
summary: If debug mode is enabled, the step will print verbose logs.
title: Debug mode?
value_options:
- "true"
- "false"
- compress_archive: "false"
opts:
description: If Compress cache is set to `true`, then it will upload a compressed
archive.
is_required: true
summary: If Compress cache is set to `true`, then it will upload a compressed
archive.
title: Compress cache?
value_options:
- "true"
- "false"
- bitrise_cache_include_paths: $BITRISE_CACHE_INCLUDE_PATHS
opts:
is_dont_change_value: true
is_required: true
summary: Collected dependencies by steps from the build
title: Cache paths collected by steps
- bitrise_cache_exclude_paths: $BITRISE_CACHE_EXCLUDE_PATHS
opts:
is_dont_change_value: true
is_required: true
summary: Changing files or extensions are collected regularly by steps from the
build.
title: Ignore paths collected by steps
- cache_api_url: $BITRISE_CACHE_API_URL
opts:
description: Cache Upload URL
is_dont_change_value: true
is_required: true
summary: Cache Upload URL
title: 'TMP: Cache Upload URL'
================================================
FILE: steps/cache-push/2.1.1/step.yml
================================================
title: Bitrise.io Cache:Push
summary: Updates the Cache, if required
description: |-
This step checks whether the cache has to be updated (based on the
`Cache Paths` and `Ignore Paths from change check` inputs).
If it has to be updated, the step will create a new cache archive and upload it.
It won't update/upload the cache if the cache did not change,
nor in the case of Pull Request builds (unless you change the `run_if` property of the Step).
For more information on setup and tips & tricks, check out our [Bitrise DevCenter guide](http://devcenter.bitrise.io/caching/about-caching/).
website: https://github.com/bitrise-steplib/steps-cache-push
source_code_url: https://github.com/bitrise-steplib/steps-cache-push.git
support_url: https://github.com/bitrise-steplib/steps-cache-push/issues
published_at: 2019-03-26T09:15:44.786419483Z
source:
git: https://github.com/bitrise-steplib/steps-cache-push.git
commit: 271dc5b19e3b1d639e210094066c7141c904599f
host_os_tags:
- osx-10.10
- ubuntu-14.04
type_tags:
- utility
toolkit:
go:
package_name: github.com/bitrise-steplib/steps-cache-push
deps:
apt_get:
- name: tar
is_requires_admin_user: false
is_always_run: false
is_skippable: true
run_if: .IsCI | and (not .IsPR)
inputs:
- cache_paths: |
$BITRISE_CACHE_DIR
opts:
description: |-
Cache these paths. Separate paths with a newline.
A path item can be either a file or a directory.
You can also specify an "update indicator file" with the `->`
syntax: `update/this -> if/this/file/is/updated`.
*The indicator can only be a file!*
If you have a path in the list which doesn't exist that will not cause
this step to fail. It'll be logged but the step will try to gather
as many specified & valid paths as it can, and just print a warning
about the invalid items.
summary: Cache these paths. Separate paths with a newline.
title: Cache paths
- ignore_check_on_paths: null
opts:
description: "These paths will be ignored from change checking.\nIf something
has changed under the specified path(s) and nothing else has changed,\nthen
the cache won't be updated.\n\n**Paths prefixed with an `!` will get ignored
from the cache archive**.\nIf a path is located inside a specified Cache Path
item and not prefixed with an `!`,\nit'll be included in the cache archive,
but won't be checked for changes. \n\nThe path can also include `*`, `**`, `/`.\n`*`
will replace a path element (for example, `a/*/b` will match `a/x/b`).\n`**`
will replace part of a path (for example, `a/**/b` will match `a/x/y/z/b`).\nTo
exclude a full directory like `/my/full/path`, simply put a `/` behind `/my/full/path`,\nso
it will be `/my/full/path/`.\n\nImportant: you can't ignore a path which results
in an invalid cache item.\nFor example, if you specify the path `a/path/to/cache`
to be cached, you\ncan't ignore `a/path/to`, as that would ignore every file
from checking\nfor a change and no fingerprint could be generated for `a/path/to/cache`.\nYou
can ignore paths inside a Cache Path, however, if, for example, a path is `a/path/to/cache`,
you can ignore `a/path/to/cache/.ignore-me`,\nunless that's the only file inside
`a/path/to/cache`.\n\nThe point is: you should not specify an ignore rule which
would completely\nignore a specified Cache Path item, as that would result in
a path which\ncan't be checked for updates,changes or fingerprints."
summary: Define the paths which have to be ignored when checking for cache changes.
title: Ignore Paths from change check
- opts:
description: Working directory path - should be an absolute path.
summary: Working directory path
title: Working directory path
workdir: $BITRISE_SOURCE_DIR
- fingerprint_method: file-content-hash
opts:
description: |-
The specified Fingerprint Method will be used to calculate
fingerprints for the cached files.
The (file) fingerprint is used to check whether
the cached files did change - if it changed, a new cache will be generated.
If the fingerprint matches the previous cache version's fingerprint, then
no new cache will be generated.
**Regardless of which method you choose** the following file attributes will
be used to create the fingerprint **in addition** to the method you choose:
* File path
* File size
* File permission bits
Information about the options:
* `file-content-hash` : create a file content checksum hash for every file in the cache,
and use that as the fingerprint source of the file. This means that **the full file content will be loaded** in
order to create the checksum hash!
* `file-mod-time` : use the file's "modified at" time information. For larger files this method
can be significantly faster, as the file doesn't have to be loaded to calculate this information!
**Note**: in case of "update indicator files", the fingerprint method will always be `file-content-hash`,
regardless of which option you select here.
summary: Fingerprint method, used for checking file changes.
title: Fingerprint Method
value_options:
- file-content-hash
- file-mod-time
- is_debug_mode: "false"
opts:
description: If debug mode is enabled the step will print verbose logs.
is_required: true
summary: If debug mode is enabled, the step will print verbose logs.
title: Debug mode?
value_options:
- "true"
- "false"
- compress_archive: "false"
opts:
description: If Compress cache is set to `true`, then it will upload a compressed
archive.
is_required: true
summary: If Compress cache is set to `true`, then it will upload a compressed
archive.
title: Compress cache?
value_options:
- "true"
- "false"
- bitrise_cache_include_paths: $BITRISE_CACHE_INCLUDE_PATHS
opts:
is_dont_change_value: true
is_required: true
summary: Collected dependencies by steps from the build
title: Cache paths collected by steps
- bitrise_cache_exclude_paths: $BITRISE_CACHE_EXCLUDE_PATHS
opts:
is_dont_change_value: true
is_required: true
summary: Changing files or extensions are collected regularly by steps from the
build.
title: Ignore paths collected by steps
- cache_api_url: $BITRISE_CACHE_API_URL
opts:
description: Cache Upload URL
is_dont_change_value: true
is_required: true
summary: Cache Upload URL
title: 'TMP: Cache Upload URL'
================================================
FILE: steps/cache-push/2.2.0/step.yml
================================================
title: Bitrise.io Cache:Push
summary: Updates the Cache, if required
description: |-
This step checks whether the cache has to be updated (based on the
`Cache Paths` and `Ignore Paths from change check` inputs).
If it has to be updated, the step will create a new cache archive and upload it.
It won't update/upload the cache if the cache did not change,
nor in the case of Pull Request builds (unless you change the `run_if` property of the Step).
For more information on setup and tips & tricks, check out our [Bitrise DevCenter guide](http://devcenter.bitrise.io/caching/about-caching/).
website: https://github.com/bitrise-steplib/steps-cache-push
source_code_url: https://github.com/bitrise-steplib/steps-cache-push.git
support_url: https://github.com/bitrise-steplib/steps-cache-push/issues
published_at: 2019-05-16T13:57:04.391320918Z
source:
git: https://github.com/bitrise-steplib/steps-cache-push.git
commit: 43d9deb931bf7155941fa7f3b21d494df852753d
host_os_tags:
- osx-10.10
- ubuntu-14.04
type_tags:
- utility
toolkit:
go:
package_name: github.com/bitrise-steplib/steps-cache-push
deps:
apt_get:
- name: tar
is_requires_admin_user: false
is_always_run: false
is_skippable: true
run_if: .IsCI | and (not .IsPR)
inputs:
- cache_paths: |
$BITRISE_CACHE_DIR
opts:
description: |-
Cache these paths. Separate paths with a newline.
A path item can be either a file or a directory.
You can also specify an "update indicator file" with the `->`
syntax: `update/this -> if/this/file/is/updated`.
*The indicator can only be a file!*
If you have a path in the list which doesn't exist that will not cause
this step to fail. It'll be logged but the step will try to gather
as many specified & valid paths as it can, and just print a warning
about the invalid items.
summary: Cache these paths. Separate paths with a newline.
title: Cache paths
- ignore_check_on_paths: null
opts:
description: "These paths will be ignored from change checking.\nIf something
has changed under the specified path(s) and nothing else has changed,\nthen
the cache won't be updated.\n\n**Paths prefixed with an `!` will get ignored
from the cache archive**.\nIf a path is located inside a specified Cache Path
item and not prefixed with an `!`,\nit'll be included in the cache archive,
but won't be checked for changes. \n\nThe path can also include `*`, `**`, `/`.\n`*`
will replace a path element (for example, `a/*/b` will match `a/x/b`).\n`**`
will replace part of a path (for example, `a/**/b` will match `a/x/y/z/b`).\nTo
exclude a full directory like `/my/full/path`, simply put a `/` behind `/my/full/path`,\nso
it will be `/my/full/path/`.\n\nImportant: you can't ignore a path which results
in an invalid cache item.\nFor example, if you specify the path `a/path/to/cache`
to be cached, you\ncan't ignore `a/path/to`, as that would ignore every file
from checking\nfor a change and no fingerprint could be generated for `a/path/to/cache`.\nYou
can ignore paths inside a Cache Path, however, if, for example, a path is `a/path/to/cache`,
you can ignore `a/path/to/cache/.ignore-me`,\nunless that's the only file inside
`a/path/to/cache`.\n\nThe point is: you should not specify an ignore rule which
would completely\nignore a specified Cache Path item, as that would result in
a path which\ncan't be checked for updates,changes or fingerprints."
summary: Define the paths which have to be ignored when checking for cache changes.
title: Ignore Paths from change check
- opts:
description: Working directory path - should be an absolute path.
summary: Working directory path
title: Working directory path
workdir: $BITRISE_SOURCE_DIR
- fingerprint_method: file-content-hash
opts:
description: |-
The specified Fingerprint Method will be used to calculate
fingerprints for the cached files.
The (file) fingerprint is used to check whether
the cached files did change - if it changed, a new cache will be generated.
If the fingerprint matches the previous cache version's fingerprint, then
no new cache will be generated.
**Regardless of which method you choose** the following file attributes will
be used to create the fingerprint **in addition** to the method you choose:
* File path
* File size
* File permission bits
Information about the options:
* `file-content-hash` : create a file content checksum hash for every file in the cache,
and use that as the fingerprint source of the file. This means that **the full file content will be loaded** in
order to create the checksum hash!
* `file-mod-time` : use the file's "modified at" time information. For larger files this method
can be significantly faster, as the file doesn't have to be loaded to calculate this information!
**Note**: in case of "update indicator files", the fingerprint method will always be `file-content-hash`,
regardless of which option you select here.
summary: Fingerprint method, used for checking file changes.
title: Fingerprint Method
value_options:
- file-content-hash
- file-mod-time
- is_debug_mode: "false"
opts:
description: If debug mode is enabled the step will print verbose logs.
is_required: true
summary: If debug mode is enabled, the step will print verbose logs.
title: Debug mode?
value_options:
- "true"
- "false"
- compress_archive: "false"
opts:
description: If Compress cache is set to `true`, then it will upload a compressed
archive.
is_required: true
summary: If Compress cache is set to `true`, then it will upload a compressed
archive.
title: Compress cache?
value_options:
- "true"
- "false"
- bitrise_cache_include_paths: $BITRISE_CACHE_INCLUDE_PATHS
opts:
is_dont_change_value: true
is_required: true
summary: Collected dependencies by steps from the build
title: Cache paths collected by steps
- bitrise_cache_exclude_paths: $BITRISE_CACHE_EXCLUDE_PATHS
opts:
is_dont_change_value: true
is_required: true
summary: Changing files or extensions are collected regularly by steps from the
build.
title: Ignore paths collected by steps
- cache_api_url: $BITRISE_CACHE_API_URL
opts:
description: Cache Upload URL
is_dont_change_value: true
is_required: true
summary: Cache Upload URL
title: 'TMP: Cache Upload URL'
================================================
FILE: steps/cache-push/2.2.1/step.yml
================================================
title: Bitrise.io Cache:Push
summary: Updates the Cache, if required
description: |-
This step checks whether the cache has to be updated (based on the
`Cache Paths` and `Ignore Paths from change check` inputs).
If it has to be updated, the step will create a new cache archive and upload it.
It won't update/upload the cache if the cache did not change,
nor in the case of Pull Request builds (unless you change the `run_if` property of the Step).
For more information on setup and tips & tricks, check out our [Bitrise DevCenter guide](http://devcenter.bitrise.io/caching/about-caching/).
website: https://github.com/bitrise-steplib/steps-cache-push
source_code_url: https://github.com/bitrise-steplib/steps-cache-push.git
support_url: https://github.com/bitrise-steplib/steps-cache-push/issues
published_at: 2019-10-10T13:23:07.49798563Z
source:
git: https://github.com/bitrise-steplib/steps-cache-push.git
commit: b966f9de2aa606f7199ff87f4570744d253c3e64
host_os_tags:
- osx-10.10
- ubuntu-14.04
type_tags:
- utility
toolkit:
go:
package_name: github.com/bitrise-steplib/steps-cache-push
deps:
apt_get:
- name: tar
is_requires_admin_user: false
is_always_run: false
is_skippable: true
run_if: .IsCI | and (not .IsPR)
inputs:
- cache_paths: |
$BITRISE_CACHE_DIR
opts:
description: |-
Cache these paths. Separate paths with a newline.
A path item can be either a file or a directory.
You can also specify an "update indicator file" with the `->`
syntax: `update/this -> if/this/file/is/updated`.
*The indicator can only be a file!*
If you have a path in the list which doesn't exist that will not cause
this step to fail. It'll be logged but the step will try to gather
as many specified & valid paths as it can, and just print a warning
about the invalid items.
summary: Cache these paths. Separate paths with a newline.
title: Cache paths
- ignore_check_on_paths: null
opts:
description: "These paths will be ignored from change checking.\nIf something
has changed under the specified path(s) and nothing else has changed,\nthen
the cache won't be updated.\n\n**Paths prefixed with an `!` will get ignored
from the cache archive**.\nIf a path is located inside a specified Cache Path
item and not prefixed with an `!`,\nit'll be included in the cache archive,
but won't be checked for changes. \n\nThe path can also include `*`, `**`, `/`.\n`*`
will replace a path element (for example, `a/*/b` will match `a/x/b`).\n`**`
will replace part of a path (for example, `a/**/b` will match `a/x/y/z/b`).\nTo
exclude a full directory like `/my/full/path`, simply put a `/` behind `/my/full/path`,\nso
it will be `/my/full/path/`.\n\nImportant: you can't ignore a path which results
in an invalid cache item.\nFor example, if you specify the path `a/path/to/cache`
to be cached, you\ncan't ignore `a/path/to`, as that would ignore every file
from checking\nfor a change and no fingerprint could be generated for `a/path/to/cache`.\nYou
can ignore paths inside a Cache Path, however, if, for example, a path is `a/path/to/cache`,
you can ignore `a/path/to/cache/.ignore-me`,\nunless that's the only file inside
`a/path/to/cache`.\n\nThe point is: you should not specify an ignore rule which
would completely\nignore a specified Cache Path item, as that would result in
a path which\ncan't be checked for updates,changes or fingerprints."
summary: Define the paths which have to be ignored when checking for cache changes.
title: Ignore Paths from change check
- opts:
description: Working directory path - should be an absolute path.
summary: Working directory path
title: Working directory path
workdir: $BITRISE_SOURCE_DIR
- fingerprint_method: file-content-hash
opts:
description: |-
The specified Fingerprint Method will be used to calculate
fingerprints for the cached files.
The (file) fingerprint is used to check whether
the cached files did change - if it changed, a new cache will be generated.
If the fingerprint matches the previous cache version's fingerprint, then
no new cache will be generated.
**Regardless of which method you choose** the following file attributes will
be used to create the fingerprint **in addition** to the method you choose:
* File path
* File size
* File permission bits
Information about the options:
* `file-content-hash` : create a file content checksum hash for every file in the cache,
and use that as the fingerprint source of the file. This means that **the full file content will be loaded** in
order to create the checksum hash!
* `file-mod-time` : use the file's "modified at" time information. For larger files this method
can be significantly faster, as the file doesn't have to be loaded to calculate this information!
**Note**: in case of "update indicator files", the fingerprint method will always be `file-content-hash`,
regardless of which option you select here.
summary: Fingerprint method, used for checking file changes.
title: Fingerprint Method
value_options:
- file-content-hash
- file-mod-time
- is_debug_mode: "false"
opts:
description: If debug mode is enabled the step will print verbose logs.
is_required: true
summary: If debug mode is enabled, the step will print verbose logs.
title: Debug mode?
value_options:
- "true"
- "false"
- compress_archive: "false"
opts:
description: If Compress cache is set to `true`, then it will upload a compressed
archive.
is_required: true
summary: If Compress cache is set to `true`, then it will upload a compressed
archive.
title: Compress cache?
value_options:
- "true"
- "false"
- bitrise_cache_include_paths: $BITRISE_CACHE_INCLUDE_PATHS
opts:
is_dont_change_value: true
is_required: true
summary: Collected dependencies by steps from the build
title: Cache paths collected by steps
- bitrise_cache_exclude_paths: $BITRISE_CACHE_EXCLUDE_PATHS
opts:
is_dont_change_value: true
is_required: true
summary: Changing files or extensions are collected regularly by steps from the
build.
title: Ignore paths collected by steps
- cache_api_url: $BITRISE_CACHE_API_URL
opts:
description: Cache Upload URL
is_dont_change_value: true
is_required: true
summary: Cache Upload URL
title: Cache Upload URL
================================================
FILE: steps/cache-push/2.2.2/step.yml
================================================
title: Bitrise.io Cache:Push
summary: Updates the Cache, if required
description: |-
This step checks whether the cache has to be updated (based on the
`Cache Paths` and `Ignore Paths from change check` inputs).
If it has to be updated, the step will create a new cache archive and upload it.
It won't update/upload the cache if the cache did not change,
nor in the case of Pull Request builds (unless you change the `run_if` property of the Step).
For more information on setup and tips & tricks, check out our [Bitrise DevCenter guide](http://devcenter.bitrise.io/caching/about-caching/).
website: https://github.com/bitrise-steplib/steps-cache-push
source_code_url: https://github.com/bitrise-steplib/steps-cache-push.git
support_url: https://github.com/bitrise-steplib/steps-cache-push/issues
published_at: 2019-11-15T18:00:26.719481848Z
source:
git: https://github.com/bitrise-steplib/steps-cache-push.git
commit: f935d7cfd70525b7a0ff29295cccd59a4dff6ee8
host_os_tags:
- osx-10.10
- ubuntu-14.04
type_tags:
- utility
toolkit:
go:
package_name: github.com/bitrise-steplib/steps-cache-push
deps:
apt_get:
- name: tar
is_requires_admin_user: false
is_always_run: false
is_skippable: true
run_if: .IsCI | and (not .IsPR)
inputs:
- cache_paths: |
$BITRISE_CACHE_DIR
opts:
description: |-
Cache these paths. Separate paths with a newline.
A path item can be either a file or a directory.
You can also specify an "update indicator file" with the `->`
syntax: `update/this -> if/this/file/is/updated`.
*The indicator can only be a file!*
If you have a path in the list which doesn't exist that will not cause
this step to fail. It'll be logged but the step will try to gather
as many specified & valid paths as it can, and just print a warning
about the invalid items.
summary: Cache these paths. Separate paths with a newline.
title: Cache paths
- ignore_check_on_paths: null
opts:
description: "These paths will be ignored from change checking.\nIf something
has changed under the specified path(s) and nothing else has changed,\nthen
the cache won't be updated.\n\n**Paths prefixed with an `!` will get ignored
from the cache archive**.\nIf a path is located inside a specified Cache Path
item and not prefixed with an `!`,\nit'll be included in the cache archive,
but won't be checked for changes. \n\nThe path can also include `*`, `**`, `/`.\n`*`
will replace a path element (for example, `a/*/b` will match `a/x/b`).\n`**`
will replace part of a path (for example, `a/**/b` will match `a/x/y/z/b`).\nTo
exclude a full directory like `/my/full/path`, simply put a `/` behind `/my/full/path`,\nso
it will be `/my/full/path/`.\n\nImportant: you can't ignore a path which results
in an invalid cache item.\nFor example, if you specify the path `a/path/to/cache`
to be cached, you\ncan't ignore `a/path/to`, as that would ignore every file
from checking\nfor a change and no fingerprint could be generated for `a/path/to/cache`.\nYou
can ignore paths inside a Cache Path, however, if, for example, a path is `a/path/to/cache`,
you can ignore `a/path/to/cache/.ignore-me`,\nunless that's the only file inside
`a/path/to/cache`.\n\nThe point is: you should not specify an ignore rule which
would completely\nignore a specified Cache Path item, as that would result in
a path which\ncan't be checked for updates,changes or fingerprints."
summary: Define the paths which have to be ignored when checking for cache changes.
title: Ignore Paths from change check
- opts:
description: Working directory path - should be an absolute path.
summary: Working directory path
title: Working directory path
workdir: $BITRISE_SOURCE_DIR
- fingerprint_method: file-content-hash
opts:
description: |-
The specified Fingerprint Method will be used to calculate
fingerprints for the cached files.
The (file) fingerprint is used to check whether
the cached files did change - if it changed, a new cache will be generated.
If the fingerprint matches the previous cache version's fingerprint, then
no new cache will be generated.
**Regardless of which method you choose** the following file attributes will
be used to create the fingerprint **in addition** to the method you choose:
* File path
* File size
* File permission bits
Information about the options:
* `file-content-hash` : create a file content checksum hash for every file in the cache,
and use that as the fingerprint source of the file. This means that **the full file content will be loaded** in
order to create the checksum hash!
* `file-mod-time` : use the file's "modified at" time information. For larger files this method
can be significantly faster, as the file doesn't have to be loaded to calculate this information!
**Note**: in case of "update indicator files", the fingerprint method will always be `file-content-hash`,
regardless of which option you select here.
summary: Fingerprint method, used for checking file changes.
title: Fingerprint Method
value_options:
- file-content-hash
- file-mod-time
- is_debug_mode: "false"
opts:
description: If debug mode is enabled the step will print verbose logs.
is_required: true
summary: If debug mode is enabled, the step will print verbose logs.
title: Debug mode?
value_options:
- "true"
- "false"
- compress_archive: "false"
opts:
description: If Compress cache is set to `true`, then it will upload a compressed
archive.
is_required: true
summary: If Compress cache is set to `true`, then it will upload a compressed
archive.
title: Compress cache?
value_options:
- "true"
- "false"
- bitrise_cache_include_paths: $BITRISE_CACHE_INCLUDE_PATHS
opts:
is_dont_change_value: true
is_required: true
summary: Collected dependencies by steps from the build
title: Cache paths collected by steps
- bitrise_cache_exclude_paths: $BITRISE_CACHE_EXCLUDE_PATHS
opts:
is_dont_change_value: true
is_required: true
summary: Changing files or extensions are collected regularly by steps from the
build.
title: Ignore paths collected by steps
- cache_api_url: $BITRISE_CACHE_API_URL
opts:
description: Cache Upload URL
is_dont_change_value: true
is_required: true
summary: Cache Upload URL
title: Cache Upload URL
================================================
FILE: steps/cache-push/2.2.3/step.yml
================================================
title: Bitrise.io Cache:Push
summary: Updates the Cache, if required
description: |-
This step checks whether the cache has to be updated (based on the
`Cache Paths` and `Ignore Paths from change check` inputs).
If it has to be updated, the step will create a new cache archive and upload it.
It won't update/upload the cache if the cache did not change,
nor in the case of Pull Request builds (unless you change the `run_if` property of the Step).
For more information on setup and tips & tricks, check out our [Bitrise DevCenter guide](http://devcenter.bitrise.io/caching/about-caching/).
website: https://github.com/bitrise-steplib/steps-cache-push
source_code_url: https://github.com/bitrise-steplib/steps-cache-push.git
support_url: https://github.com/bitrise-steplib/steps-cache-push/issues
published_at: 2019-11-26T14:41:46.52280457Z
source:
git: https://github.com/bitrise-steplib/steps-cache-push.git
commit: febc82b3cff84ff5dca6a85f4f6f6e019ae6f5bb
host_os_tags:
- osx-10.10
- ubuntu-14.04
type_tags:
- utility
toolkit:
go:
package_name: github.com/bitrise-steplib/steps-cache-push
deps:
apt_get:
- name: tar
is_requires_admin_user: false
is_always_run: false
is_skippable: true
run_if: .IsCI | and (not .IsPR)
inputs:
- cache_paths: |
$BITRISE_CACHE_DIR
opts:
description: |-
Cache these paths. Separate paths with a newline.
A path item can be either a file or a directory.
You can also specify an "update indicator file" with the `->`
syntax: `update/this -> if/this/file/is/updated`.
*The indicator can only be a file!*
If you have a path in the list which doesn't exist that will not cause
this step to fail. It'll be logged but the step will try to gather
as many specified & valid paths as it can, and just print a warning
about the invalid items.
summary: Cache these paths. Separate paths with a newline.
title: Cache paths
- ignore_check_on_paths: null
opts:
description: "These paths will be ignored from change checking.\nIf something
has changed under the specified path(s) and nothing else has changed,\nthen
the cache won't be updated.\n\n**Paths prefixed with an `!` will get ignored
from the cache archive**.\nIf a path is located inside a specified Cache Path
item and not prefixed with an `!`,\nit'll be included in the cache archive,
but won't be checked for changes. \n\nThe path can also include `*`, `**`, `/`.\n`*`
will replace a path element (for example, `a/*/b` will match `a/x/b`).\n`**`
will replace part of a path (for example, `a/**/b` will match `a/x/y/z/b`).\nTo
exclude a full directory like `/my/full/path`, simply put a `/` behind `/my/full/path`,\nso
it will be `/my/full/path/`.\n\nImportant: you can't ignore a path which results
in an invalid cache item.\nFor example, if you specify the path `a/path/to/cache`
to be cached, you\ncan't ignore `a/path/to`, as that would ignore every file
from checking\nfor a change and no fingerprint could be generated for `a/path/to/cache`.\nYou
can ignore paths inside a Cache Path, however, if, for example, a path is `a/path/to/cache`,
you can ignore `a/path/to/cache/.ignore-me`,\nunless that's the only file inside
`a/path/to/cache`.\n\nThe point is: you should not specify an ignore rule which
would completely\nignore a specified Cache Path item, as that would result in
a path which\ncan't be checked for updates,changes or fingerprints."
summary: Define the paths which have to be ignored when checking for cache changes.
title: Ignore Paths from change check
- opts:
description: Working directory path - should be an absolute path.
summary: Working directory path
title: Working directory path
workdir: $BITRISE_SOURCE_DIR
- fingerprint_method: file-content-hash
opts:
description: |-
The specified Fingerprint Method will be used to calculate
fingerprints for the cached files.
The (file) fingerprint is used to check whether
the cached files did change - if it changed, a new cache will be generated.
If the fingerprint matches the previous cache version's fingerprint, then
no new cache will be generated.
**Regardless of which method you choose** the following file attributes will
be used to create the fingerprint **in addition** to the method you choose:
* File path
* File size
* File permission bits
Information about the options:
* `file-content-hash` : create a file content checksum hash for every file in the cache,
and use that as the fingerprint source of the file. This means that **the full file content will be loaded** in
order to create the checksum hash!
* `file-mod-time` : use the file's "modified at" time information. For larger files this method
can be significantly faster, as the file doesn't have to be loaded to calculate this information!
**Note**: in case of "update indicator files", the fingerprint method will always be `file-content-hash`,
regardless of which option you select here.
summary: Fingerprint method, used for checking file changes.
title: Fingerprint Method
value_options:
- file-content-hash
- file-mod-time
- is_debug_mode: "false"
opts:
description: If debug mode is enabled the step will print verbose logs.
is_required: true
summary: If debug mode is enabled, the step will print verbose logs.
title: Debug mode?
value_options:
- "true"
- "false"
- compress_archive: "false"
opts:
description: If Compress cache is set to `true`, then it will upload a compressed
archive.
is_required: true
summary: If Compress cache is set to `true`, then it will upload a compressed
archive.
title: Compress cache?
value_options:
- "true"
- "false"
- bitrise_cache_include_paths: $BITRISE_CACHE_INCLUDE_PATHS
opts:
is_dont_change_value: true
is_required: true
summary: Collected dependencies by steps from the build
title: Cache paths collected by steps
- bitrise_cache_exclude_paths: $BITRISE_CACHE_EXCLUDE_PATHS
opts:
is_dont_change_value: true
is_required: true
summary: Changing files or extensions are collected regularly by steps from the
build.
title: Ignore paths collected by steps
- cache_api_url: $BITRISE_CACHE_API_URL
opts:
description: Cache Upload URL
is_dont_change_value: true
is_required: true
summary: Cache Upload URL
title: Cache Upload URL
================================================
FILE: steps/cache-push/2.2.4/step.yml
================================================
title: Bitrise.io Cache:Push
summary: Updates the Cache, if required
description: "Checks whether cache has to be updated based on the **Cache Paths**
and **Ignore Paths** inputs.\nIf it does, the Step creates a new cache archive and
uploads it. \nIt won't update/upload the cache if the cache hasn't changed nor in
the case of a pull request unless you change the Step's `run_if` property. \nFor
caching, you will need the **Bitrise.io Cache:Pull** Step at the beginning of your
Workflow (after the **Git Clone Repository** Step but before a dependency installer
Step) to download the previous cache, if any. \nThe **Bitrise.io Cache:Push** Step
should be the very last Step in your Workflow.\n\n### Configuring the Step\n\n1.
Cache any directory or file by adding it in the **Cache paths** field.\nFor most
cases, caching will automatically work based on your native build and testing Steps
as these automatically configure cache paths in your cache Steps.\nIf adding multiple
paths, separate them with a newline.\nIf you have a path in the list which does
not exist, it will not cause the Step to fail. \nYou can also specify an update
indicator file with the `->` syntax, for example, `update/this -> if/this/file/is/updated.`
\nPlease note the indicator points to a file and not to a folder.\n2. In the **Ignore
Paths from change check** field, you can set any path which you don't want to do
change analysis for.\n- Paths prefixed with an `!` will get ignored from the cache
archive.\n- The path can also include `*`, `**`, `/`. \nThe `*` will replace a path
element, the `**` will replace part of a path. \nTo exclude a full directory, simply
put a `/` behind the directory.\nNote that you can't ignore a path which results
in an invalid cache item.\n3. Modify **Working directory** if you wish to set relative
cache paths and reference them from a working directory other than `$BITRISE_SOURCE_DIR`.\n4.
Select a **Fingerprint Method** option (`file-content-hash` or `file-mod-time`)
to detect changes in a directory, file, or in an update indicator file. \nIf changes
are detected, new cache gets generated.\n5. If you set **Debug mode?** input to
`true`, the Step will print out more detailed logs.\n6. With **Compress cache?**
input set to `true`, you can compress the cache archive for faster uploads and downloads,
especially useful for node-modules and other huge dependency folders.\n7. In `Ignore
paths collected by steps` you can set which files or extensions should be ignored
by the Step during the build.\n8. `Cache Upload URL` shows the URL where the cache
gets uploaded.\n\n### Troubleshooting\nWe recommend you do not cache any dependency
manager lock file (for example, `package.lock`, `gemfile.lock`, `podfile.lock`)
as it would override the lock file in your repository.\n\n### Useful links\n- [About
caching](https://devcenter.bitrise.io/builds/caching/about-caching-index/)\n- [Caching
Cocoapods](https://devcenter.bitrise.io/builds/caching/caching-cocoapods/)\n- [Caching
Gradle](https://devcenter.bitrise.io/builds/caching/caching-gradle/)\n\n### Related
Steps\n- [Bitrise.io Cache:Pull](https://www.bitrise.io/integrations/steps/cache-pull)\n-
[Git Clone Repository](https://www.bitrise.io/integrations/steps/git-clone)"
website: https://github.com/bitrise-steplib/steps-cache-push
source_code_url: https://github.com/bitrise-steplib/steps-cache-push.git
support_url: https://github.com/bitrise-steplib/steps-cache-push/issues
published_at: 2020-05-28T06:55:31.002559337Z
source:
git: https://github.com/bitrise-steplib/steps-cache-push.git
commit: 51479b03f622c3510b182423d5a6a45d7df4f465
host_os_tags:
- osx-10.10
- ubuntu-14.04
type_tags:
- utility
toolkit:
go:
package_name: github.com/bitrise-steplib/steps-cache-push
deps:
apt_get:
- name: tar
is_requires_admin_user: false
is_always_run: false
is_skippable: true
run_if: .IsCI | and (not .IsPR)
inputs:
- cache_paths: |
$BITRISE_CACHE_DIR
opts:
description: |-
Cache these paths. Separate paths with a newline.
A path item can be either a file or a directory.
You can also specify an "update indicator file" with the `->`
syntax: `update/this -> if/this/file/is/updated`.
*The indicator can only be a file!*
If you have a path in the list which doesn't exist that will not cause
this step to fail. It'll be logged but the step will try to gather
as many specified & valid paths as it can, and just print a warning
about the invalid items.
summary: Cache these paths. Separate paths with a newline.
title: Cache paths
- ignore_check_on_paths: null
opts:
description: "These paths will be ignored from change checking.\nIf something
has changed under the specified path(s) and nothing else has changed,\nthen
the cache won't be updated.\n\n**Paths prefixed with an `!` will get ignored
from the cache archive**.\nIf a path is located inside a specified Cache Path
item and not prefixed with an `!`,\nit'll be included in the cache archive,
but won't be checked for changes. \n\nThe path can also include `*`, `**`, `/`.\n`*`
will replace a path element (for example, `a/*/b` will match `a/x/b`).\n`**`
will replace part of a path (for example, `a/**/b` will match `a/x/y/z/b`).\nTo
exclude a full directory like `/my/full/path`, simply put a `/` behind `/my/full/path`,\nso
it will be `/my/full/path/`.\n\nImportant: you can't ignore a path which results
in an invalid cache item.\nFor example, if you specify the path `a/path/to/cache`
to be cached, you\ncan't ignore `a/path/to`, as that would ignore every file
from checking\nfor a change and no fingerprint could be generated for `a/path/to/cache`.\nYou
can ignore paths inside a Cache Path, however, if, for example, a path is `a/path/to/cache`,
you can ignore `a/path/to/cache/.ignore-me`,\nunless that's the only file inside
`a/path/to/cache`.\n\nThe point is: you should not specify an ignore rule which
would completely\nignore a specified Cache Path item, as that would result in
a path which\ncan't be checked for updates,changes or fingerprints."
summary: Define the paths which have to be ignored when checking for cache changes.
title: Ignore Paths from change check
- opts:
description: Working directory path - should be an absolute path.
summary: Working directory path
title: Working directory path
workdir: $BITRISE_SOURCE_DIR
- fingerprint_method: file-content-hash
opts:
description: |-
The specified Fingerprint Method will be used to calculate
fingerprints for the cached files.
The (file) fingerprint is used to check whether
the cached files did change - if it changed, a new cache will be generated.
If the fingerprint matches the previous cache version's fingerprint, then
no new cache will be generated.
**Regardless of which method you choose** the following file attributes will
be used to create the fingerprint **in addition** to the method you choose:
* File path
* File size
* File permission bits
Information about the options:
* `file-content-hash` : create a file content checksum hash for every file in the cache,
and use that as the fingerprint source of the file. This means that **the full file content will be loaded** in
order to create the checksum hash!
* `file-mod-time` : use the file's "modified at" time information. For larger files this method
can be significantly faster, as the file doesn't have to be loaded to calculate this information!
**Note**: in case of "update indicator files", the fingerprint method will always be `file-content-hash`,
regardless of which option you select here.
summary: Fingerprint method, used for checking file changes.
title: Fingerprint Method
value_options:
- file-content-hash
- file-mod-time
- is_debug_mode: "false"
opts:
description: If debug mode is enabled the step will print verbose logs.
is_required: true
summary: If debug mode is enabled, the step will print verbose logs.
title: Debug mode?
value_options:
- "true"
- "false"
- compress_archive: "false"
opts:
description: If Compress cache is set to `true`, then it will upload a compressed
archive.
is_required: true
summary: If Compress cache is set to `true`, then it will upload a compressed
archive.
title: Compress cache?
value_options:
- "true"
- "false"
- bitrise_cache_include_paths: $BITRISE_CACHE_INCLUDE_PATHS
opts:
is_dont_change_value: true
is_required: true
summary: Collected dependencies by steps from the build
title: Cache paths collected by steps
- bitrise_cache_exclude_paths: $BITRISE_CACHE_EXCLUDE_PATHS
opts:
is_dont_change_value: true
is_required: true
summary: Changing files or extensions are collected regularly by steps from the
build.
title: Ignore paths collected by steps
- cache_api_url: $BITRISE_CACHE_API_URL
opts:
description: Cache Upload URL
is_dont_change_value: true
is_required: true
summary: Cache Upload URL
title: Cache Upload URL
================================================
FILE: steps/cache-push/2.3.0/step.yml
================================================
title: Bitrise.io Cache:Push
summary: Updates the Cache, if required
description: "Checks whether cache has to be updated based on the **Cache Paths**
and **Ignore Paths** inputs.\nIf it does, the Step creates a new cache archive and
uploads it. \nIt won't update/upload the cache if the cache hasn't changed nor in
the case of a pull request unless you change the Step's `run_if` property. \nFor
caching, you will need the **Bitrise.io Cache:Pull** Step at the beginning of your
Workflow (after the **Git Clone Repository** Step but before a dependency installer
Step) to download the previous cache, if any. \nThe **Bitrise.io Cache:Push** Step
should be the very last Step in your Workflow.\n\n### Configuring the Step\n\n1.
Cache any directory or file by adding it in the **Cache paths** field.\nFor most
cases, caching will automatically work based on your native build and testing Steps
as these automatically configure cache paths in your cache Steps.\nIf adding multiple
paths, separate them with a newline.\nIf you have a path in the list which does
not exist, it will not cause the Step to fail. \nYou can also specify an update
indicator file with the `->` syntax, for example, `update/this -> if/this/file/is/updated.`
\nPlease note the indicator points to a file and not to a folder.\n2. In the **Ignore
Paths from change check** field, you can set any path which you don't want to do
change analysis for.\n- Paths prefixed with an `!` will get ignored from the cache
archive.\n- The path can also include `*`, `**`, `/`. \nThe `*` will replace a path
element, the `**` will replace part of a path. \nTo exclude a full directory, simply
put a `/` behind the directory.\nNote that you can't ignore a path which results
in an invalid cache item.\n3. Modify **Working directory** if you wish to set relative
cache paths and reference them from a working directory other than `$BITRISE_SOURCE_DIR`.\n4.
Select a **Fingerprint Method** option (`file-content-hash` or `file-mod-time`)
to detect changes in a directory, file, or in an update indicator file. \nIf changes
are detected, new cache gets generated.\n5. If you set **Debug mode?** input to
`true`, the Step will print out more detailed logs.\n6. With **Compress cache?**
input set to `true`, you can compress the cache archive for faster uploads and downloads,
especially useful for node-modules and other huge dependency folders.\n7. In `Ignore
paths collected by steps` you can set which files or extensions should be ignored
by the Step during the build.\n8. `Cache Upload URL` shows the URL where the cache
gets uploaded.\n\n### Troubleshooting\nWe recommend you do not cache any dependency
manager lock file (for example, `package.lock`, `gemfile.lock`, `podfile.lock`)
as it would override the lock file in your repository.\n\n### Useful links\n- [About
caching](https://devcenter.bitrise.io/builds/caching/about-caching-index/)\n- [Caching
Cocoapods](https://devcenter.bitrise.io/builds/caching/caching-cocoapods/)\n- [Caching
Gradle](https://devcenter.bitrise.io/builds/caching/caching-gradle/)\n\n### Related
Steps\n- [Bitrise.io Cache:Pull](https://www.bitrise.io/integrations/steps/cache-pull)\n-
[Git Clone Repository](https://www.bitrise.io/integrations/steps/git-clone)"
website: https://github.com/bitrise-steplib/steps-cache-push
source_code_url: https://github.com/bitrise-steplib/steps-cache-push.git
support_url: https://github.com/bitrise-steplib/steps-cache-push/issues
published_at: 2020-06-09T14:24:29.932785882Z
source:
git: https://github.com/bitrise-steplib/steps-cache-push.git
commit: af27a1087f5b6ba234986ea4011b665efacbb8a6
host_os_tags:
- osx-10.10
- ubuntu-14.04
type_tags:
- utility
toolkit:
go:
package_name: github.com/bitrise-steplib/steps-cache-push
deps:
apt_get:
- name: tar
is_requires_admin_user: false
is_always_run: false
is_skippable: true
run_if: .IsCI | and (not .IsPR)
inputs:
- cache_paths: |
$BITRISE_CACHE_DIR
opts:
description: |-
Cache these paths. Separate paths with a newline.
A path item can be either a file or a directory.
You can also specify an "update indicator file" with the `->`
syntax: `update/this -> if/this/file/is/updated`.
*The indicator can only be a file!*
If you have a path in the list which doesn't exist that will not cause
this step to fail. It'll be logged but the step will try to gather
as many specified & valid paths as it can, and just print a warning
about the invalid items.
summary: Cache these paths. Separate paths with a newline.
title: Cache paths
- ignore_check_on_paths: null
opts:
description: "These paths will be ignored from change checking.\nIf something
has changed under the specified path(s) and nothing else has changed,\nthen
the cache won't be updated.\n\n**Paths prefixed with an `!` will get ignored
from the cache archive**.\nIf a path is located inside a specified Cache Path
item and not prefixed with an `!`,\nit'll be included in the cache archive,
but won't be checked for changes. \n\nThe path can also include `*`, `**`, `/`.\n`*`
will replace a path element (for example, `a/*/b` will match `a/x/b`).\n`**`
will replace part of a path (for example, `a/**/b` will match `a/x/y/z/b`).\nTo
exclude a full directory like `/my/full/path`, simply put a `/` behind `/my/full/path`,\nso
it will be `/my/full/path/`.\n\nImportant: you can't ignore a path which results
in an invalid cache item.\nFor example, if you specify the path `a/path/to/cache`
to be cached, you\ncan't ignore `a/path/to`, as that would ignore every file
from checking\nfor a change and no fingerprint could be generated for `a/path/to/cache`.\nYou
can ignore paths inside a Cache Path, however, if, for example, a path is `a/path/to/cache`,
you can ignore `a/path/to/cache/.ignore-me`,\nunless that's the only file inside
`a/path/to/cache`.\n\nThe point is: you should not specify an ignore rule which
would completely\nignore a specified Cache Path item, as that would result in
a path which\ncan't be checked for updates,changes or fingerprints."
summary: Define the paths which have to be ignored when checking for cache changes.
title: Ignore Paths from change check
- opts:
description: Working directory path - should be an absolute path.
summary: Working directory path
title: Working directory path
workdir: $BITRISE_SOURCE_DIR
- fingerprint_method: file-content-hash
opts:
description: |-
The specified Fingerprint Method will be used to calculate
fingerprints for the cached files.
The (file) fingerprint is used to check whether
the cached files did change - if it changed, a new cache will be generated.
If the fingerprint matches the previous cache version's fingerprint, then
no new cache will be generated.
**Regardless of which method you choose** the following file attributes will
be used to create the fingerprint **in addition** to the method you choose:
* File path
* File size
* File permission bits
Information about the options:
* `file-content-hash` : create a file content checksum hash for every file in the cache,
and use that as the fingerprint source of the file. This means that **the full file content will be loaded** in
order to create the checksum hash!
* `file-mod-time` : use the file's "modified at" time information. For larger files this method
can be significantly faster, as the file doesn't have to be loaded to calculate this information!
**Note**: in case of "update indicator files", the fingerprint method will always be `file-content-hash`,
regardless of which option you select here.
summary: Fingerprint method, used for checking file changes.
title: Fingerprint Method
value_options:
- file-content-hash
- file-mod-time
- is_debug_mode: "false"
opts:
description: If debug mode is enabled the step will print verbose logs.
is_required: true
summary: If debug mode is enabled, the step will print verbose logs.
title: Debug mode?
value_options:
- "true"
- "false"
- compress_archive: "false"
opts:
description: If Compress cache is set to `true`, then it will upload a compressed
archive.
is_required: true
summary: If Compress cache is set to `true`, then it will upload a compressed
archive.
title: Compress cache?
value_options:
- "true"
- "false"
- bitrise_cache_include_paths: $BITRISE_CACHE_INCLUDE_PATHS
opts:
is_dont_change_value: true
is_required: true
summary: Collected dependencies by steps from the build
title: Cache paths collected by steps
- bitrise_cache_exclude_paths: $BITRISE_CACHE_EXCLUDE_PATHS
opts:
is_dont_change_value: true
is_required: true
summary: Changing files or extensions are collected regularly by steps from the
build.
title: Ignore paths collected by steps
- cache_api_url: $BITRISE_CACHE_API_URL
opts:
description: Cache Upload URL
is_dont_change_value: true
is_required: true
summary: Cache Upload URL
title: Cache Upload URL
================================================
FILE: steps/cache-push/2.3.1/step.yml
================================================
title: Bitrise.io Cache:Push
summary: Updates the Cache, if required
description: "Checks whether cache has to be updated based on the **Cache Paths**
and **Ignore Paths** inputs.\nIf it does, the Step creates a new cache archive and
uploads it. \nIt won't update/upload the cache if the cache hasn't changed nor in
the case of a pull request unless you change the Step's `run_if` property. \nFor
caching, you will need the **Bitrise.io Cache:Pull** Step at the beginning of your
Workflow (after the **Git Clone Repository** Step but before a dependency installer
Step) to download the previous cache, if any. \nThe **Bitrise.io Cache:Push** Step
should be the very last Step in your Workflow.\n\n### Configuring the Step\n\n1.
Cache any directory or file by adding it in the **Cache paths** field.\nFor most
cases, caching will automatically work based on your native build and testing Steps
as these automatically configure cache paths in your cache Steps.\nIf adding multiple
paths, separate them with a newline.\nIf you have a path in the list which does
not exist, it will not cause the Step to fail. \nYou can also specify an update
indicator file with the `->` syntax, for example, `update/this -> if/this/file/is/updated.`
\nPlease note the indicator points to a file and not to a folder.\n2. In the **Ignore
Paths from change check** field, you can set any path which you don't want to do
change analysis for.\n- Paths prefixed with an `!` will get ignored from the cache
archive.\n- The path can also include `*`, `**`, `/`. \nThe `*` will replace a path
element, the `**` will replace part of a path. \nTo exclude a full directory, simply
put a `/` behind the directory.\nNote that you can't ignore a path which results
in an invalid cache item.\n3. Modify **Working directory** if you wish to set relative
cache paths and reference them from a working directory other than `$BITRISE_SOURCE_DIR`.\n4.
Select a **Fingerprint Method** option (`file-content-hash` or `file-mod-time`)
to detect changes in a directory, file, or in an update indicator file. \nIf changes
are detected, new cache gets generated.\n5. If you set **Debug mode?** input to
`true`, the Step will print out more detailed logs.\n6. With **Compress cache?**
input set to `true`, you can compress the cache archive for faster uploads and downloads,
especially useful for node-modules and other huge dependency folders.\n7. In `Ignore
paths collected by steps` you can set which files or extensions should be ignored
by the Step during the build.\n8. `Cache Upload URL` shows the URL where the cache
gets uploaded.\n\n### Troubleshooting\nWe recommend you do not cache any dependency
manager lock file (for example, `package.lock`, `gemfile.lock`, `podfile.lock`)
as it would override the lock file in your repository.\n\n### Useful links\n- [About
caching](https://devcenter.bitrise.io/builds/caching/about-caching-index/)\n- [Caching
Cocoapods](https://devcenter.bitrise.io/builds/caching/caching-cocoapods/)\n- [Caching
Gradle](https://devcenter.bitrise.io/builds/caching/caching-gradle/)\n\n### Related
Steps\n- [Bitrise.io Cache:Pull](https://www.bitrise.io/integrations/steps/cache-pull)\n-
[Git Clone Repository](https://www.bitrise.io/integrations/steps/git-clone)"
website: https://github.com/bitrise-steplib/steps-cache-push
source_code_url: https://github.com/bitrise-steplib/steps-cache-push.git
support_url: https://github.com/bitrise-steplib/steps-cache-push/issues
published_at: 2020-08-28T08:44:03.702168935Z
source:
git: https://github.com/bitrise-steplib/steps-cache-push.git
commit: a5e43ae6ac5e0478feae7dea2b688bf317097f3b
host_os_tags:
- osx-10.10
- ubuntu-14.04
type_tags:
- utility
toolkit:
go:
package_name: github.com/bitrise-steplib/steps-cache-push
deps:
apt_get:
- name: tar
is_requires_admin_user: false
is_always_run: false
is_skippable: true
run_if: .IsCI | and (not .IsPR)
inputs:
- cache_paths: |
$BITRISE_CACHE_DIR
opts:
description: |-
Cache these paths. Separate paths with a newline.
A path item can be either a file or a directory.
You can also specify an "update indicator file" with the `->`
syntax: `update/this -> if/this/file/is/updated`.
*The indicator can only be a file!*
If you have a path in the list which doesn't exist that will not cause
this step to fail. It'll be logged but the step will try to gather
as many specified & valid paths as it can, and just print a warning
about the invalid items.
summary: Cache these paths. Separate paths with a newline.
title: Cache paths
- ignore_check_on_paths: null
opts:
description: "These paths will be ignored from change checking.\nIf something
has changed under the specified path(s) and nothing else has changed,\nthen
the cache won't be updated.\n\n**Paths prefixed with an `!` will get ignored
from the cache archive**.\nIf a path is located inside a specified Cache Path
item and not prefixed with an `!`,\nit'll be included in the cache archive,
but won't be checked for changes. \n\nThe path can also include `*`, `**`, `/`.\n`*`
will replace a path element (for example, `a/*/b` will match `a/x/b`).\n`**`
will replace part of a path (for example, `a/**/b` will match `a/x/y/z/b`).\nTo
exclude a full directory like `/my/full/path`, simply put a `/` behind `/my/full/path`,\nso
it will be `/my/full/path/`.\n\nImportant: you can't ignore a path which results
in an invalid cache item.\nFor example, if you specify the path `a/path/to/cache`
to be cached, you\ncan't ignore `a/path/to`, as that would ignore every file
from checking\nfor a change and no fingerprint could be generated for `a/path/to/cache`.\nYou
can ignore paths inside a Cache Path, however, if, for example, a path is `a/path/to/cache`,
you can ignore `a/path/to/cache/.ignore-me`,\nunless that's the only file inside
`a/path/to/cache`.\n\nThe point is: you should not specify an ignore rule which
would completely\nignore a specified Cache Path item, as that would result in
a path which\ncan't be checked for updates,changes or fingerprints."
summary: Define the paths which have to be ignored when checking for cache changes.
title: Ignore Paths from change check
- opts:
description: Working directory path - should be an absolute path.
summary: Working directory path
title: Working directory path
workdir: $BITRISE_SOURCE_DIR
- fingerprint_method: file-content-hash
opts:
description: |-
The specified Fingerprint Method will be used to calculate
fingerprints for the cached files.
The (file) fingerprint is used to check whether
the cached files did change - if it changed, a new cache will be generated.
If the fingerprint matches the previous cache version's fingerprint, then
no new cache will be generated.
**Regardless of which method you choose** the following file attributes will
be used to create the fingerprint **in addition** to the method you choose:
* File path
* File size
* File permission bits
Information about the options:
* `file-content-hash` : create a file content checksum hash for every file in the cache,
and use that as the fingerprint source of the file. This means that **the full file content will be loaded** in
order to create the checksum hash!
* `file-mod-time` : use the file's "modified at" time information. For larger files this method
can be significantly faster, as the file doesn't have to be loaded to calculate this information!
**Note**: in case of "update indicator files", the fingerprint method will always be `file-content-hash`,
regardless of which option you select here.
summary: Fingerprint method, used for checking file changes.
title: Fingerprint Method
value_options:
- file-content-hash
- file-mod-time
- is_debug_mode: "false"
opts:
description: If debug mode is enabled the step will print verbose logs.
is_required: true
summary: If debug mode is enabled, the step will print verbose logs.
title: Debug mode?
value_options:
- "true"
- "false"
- compress_archive: "false"
opts:
description: If Compress cache is set to `true`, then it will upload a compressed
archive.
is_required: true
summary: If Compress cache is set to `true`, then it will upload a compressed
archive.
title: Compress cache?
value_options:
- "true"
- "false"
- bitrise_cache_include_paths: $BITRISE_CACHE_INCLUDE_PATHS
opts:
is_dont_change_value: true
is_required: true
summary: Collected dependencies by steps from the build
title: Cache paths collected by steps
- bitrise_cache_exclude_paths: $BITRISE_CACHE_EXCLUDE_PATHS
opts:
is_dont_change_value: true
is_required: true
summary: Changing files or extensions are collected regularly by steps from the
build.
title: Ignore paths collected by steps
- cache_api_url: $BITRISE_CACHE_API_URL
opts:
description: Cache Upload URL
is_dont_change_value: true
is_required: true
summary: Cache Upload URL
title: Cache Upload URL
================================================
FILE: steps/cache-push/2.3.2/step.yml
================================================
title: Bitrise.io Cache:Push
summary: Updates the Cache, if required
description: "Checks whether cache has to be updated based on the **Cache Paths**
and **Ignore Paths** inputs.\nIf it does, the Step creates a new cache archive and
uploads it. \nIt won't update/upload the cache if the cache hasn't changed nor in
the case of a pull request unless you change the Step's `run_if` property. \nFor
caching, you will need the **Bitrise.io Cache:Pull** Step at the beginning of your
Workflow (after the **Git Clone Repository** Step but before a dependency installer
Step) to download the previous cache, if any. \nThe **Bitrise.io Cache:Push** Step
should be the very last Step in your Workflow.\n\n### Configuring the Step\n\n1.
Cache any directory or file by adding it in the **Cache paths** field.\nFor most
cases, caching will automatically work based on your native build and testing Steps
as these automatically configure cache paths in your cache Steps.\nIf adding multiple
paths, separate them with a newline.\nIf you have a path in the list which does
not exist, it will not cause the Step to fail. \nYou can also specify an update
indicator file with the `->` syntax, for example, `update/this -> if/this/file/is/updated.`
\nPlease note the indicator points to a file and not to a folder.\n2. In the **Ignore
Paths from change check** field, you can set any path which you don't want to do
change analysis for.\n- Paths prefixed with an `!` will get ignored from the cache
archive.\n- The path can also include `*`, `**`, `/`. \nThe `*` will replace a path
element, the `**` will replace part of a path. \nTo exclude a full directory, simply
put a `/` behind the directory.\nNote that you can't ignore a path which results
in an invalid cache item.\n3. Modify **Working directory** if you wish to set relative
cache paths and reference them from a working directory other than `$BITRISE_SOURCE_DIR`.\n4.
Select a **Fingerprint Method** option (`file-content-hash` or `file-mod-time`)
to detect changes in a directory, file, or in an update indicator file. \nIf changes
are detected, new cache gets generated.\n5. If you set **Debug mode?** input to
`true`, the Step will print out more detailed logs.\n6. With **Compress cache?**
input set to `true`, you can compress the cache archive for faster uploads and downloads,
especially useful for node-modules and other huge dependency folders.\n7. In `Ignore
paths collected by steps` you can set which files or extensions should be ignored
by the Step during the build.\n8. `Cache Upload URL` shows the URL where the cache
gets uploaded.\n\n### Troubleshooting\nWe recommend you do not cache any dependency
manager lock file (for example, `package.lock`, `gemfile.lock`, `podfile.lock`)
as it would override the lock file in your repository.\n\n### Useful links\n- [About
caching](https://devcenter.bitrise.io/builds/caching/about-caching-index/)\n- [Caching
Cocoapods](https://devcenter.bitrise.io/builds/caching/caching-cocoapods/)\n- [Caching
Gradle](https://devcenter.bitrise.io/builds/caching/caching-gradle/)\n\n### Related
Steps\n- [Bitrise.io Cache:Pull](https://www.bitrise.io/integrations/steps/cache-pull)\n-
[Git Clone Repository](https://www.bitrise.io/integrations/steps/git-clone)"
website: https://github.com/bitrise-steplib/steps-cache-push
source_code_url: https://github.com/bitrise-steplib/steps-cache-push.git
support_url: https://github.com/bitrise-steplib/steps-cache-push/issues
published_at: 2020-09-03T10:58:27.297006438Z
source:
git: https://github.com/bitrise-steplib/steps-cache-push.git
commit: 4311cd87125b74e84670ef98eeb197cfc3b83865
host_os_tags:
- osx-10.10
- ubuntu-14.04
type_tags:
- utility
toolkit:
go:
package_name: github.com/bitrise-steplib/steps-cache-push
deps:
apt_get:
- name: tar
is_requires_admin_user: false
is_always_run: false
is_skippable: true
run_if: .IsCI | and (not .IsPR)
inputs:
- cache_paths: |
$BITRISE_CACHE_DIR
opts:
description: |-
Cache these paths. Separate paths with a newline.
A path item can be either a file or a directory.
You can also specify an "update indicator file" with the `->`
syntax: `update/this -> if/this/file/is/updated`.
*The indicator can only be a file!*
If you have a path in the list which doesn't exist that will not cause
this step to fail. It'll be logged but the step will try to gather
as many specified & valid paths as it can, and just print a warning
about the invalid items.
summary: Cache these paths. Separate paths with a newline.
title: Cache paths
- ignore_check_on_paths: null
opts:
description: "These paths will be ignored from change checking.\nIf something
has changed under the specified path(s) and nothing else has changed,\nthen
the cache won't be updated.\n\n**Paths prefixed with an `!` will get ignored
from the cache archive**.\nIf a path is located inside a specified Cache Path
item and not prefixed with an `!`,\nit'll be included in the cache archive,
but won't be checked for changes. \n\nThe path can also include `*`, `**`, `/`.\n`*`
will replace a path element (for example, `a/*/b` will match `a/x/b`).\n`**`
will replace part of a path (for example, `a/**/b` will match `a/x/y/z/b`).\nTo
exclude a full directory like `/my/full/path`, simply put a `/` behind `/my/full/path`,\nso
it will be `/my/full/path/`.\n\nImportant: you can't ignore a path which results
in an invalid cache item.\nFor example, if you specify the path `a/path/to/cache`
to be cached, you\ncan't ignore `a/path/to`, as that would ignore every file
from checking\nfor a change and no fingerprint could be generated for `a/path/to/cache`.\nYou
can ignore paths inside a Cache Path, however, if, for example, a path is `a/path/to/cache`,
you can ignore `a/path/to/cache/.ignore-me`,\nunless that's the only file inside
`a/path/to/cache`.\n\nThe point is: you should not specify an ignore rule which
would completely\nignore a specified Cache Path item, as that would result in
a path which\ncan't be checked for updates,changes or fingerprints."
summary: Define the paths which have to be ignored when checking for cache changes.
title: Ignore Paths from change check
- opts:
description: Working directory path - should be an absolute path.
summary: Working directory path
title: Working directory path
workdir: $BITRISE_SOURCE_DIR
- fingerprint_method: file-content-hash
opts:
description: |-
The specified Fingerprint Method will be used to calculate
fingerprints for the cached files.
The (file) fingerprint is used to check whether
the cached files did change - if it changed, a new cache will be generated.
If the fingerprint matches the previous cache version's fingerprint, then
no new cache will be generated.
**Regardless of which method you choose** the following file attributes will
be used to create the fingerprint **in addition** to the method you choose:
* File path
* File size
* File permission bits
Information about the options:
* `file-content-hash` : create a file content checksum hash for every file in the cache,
and use that as the fingerprint source of the file. This means that **the full file content will be loaded** in
order to create the checksum hash!
* `file-mod-time` : use the file's "modified at" time information. For larger files this method
can be significantly faster, as the file doesn't have to be loaded to calculate this information!
**Note**: in case of "update indicator files", the fingerprint method will always be `file-content-hash`,
regardless of which option you select here.
summary: Fingerprint method, used for checking file changes.
title: Fingerprint Method
value_options:
- file-content-hash
- file-mod-time
- is_debug_mode: "false"
opts:
description: If debug mode is enabled the step will print verbose logs.
is_required: true
summary: If debug mode is enabled, the step will print verbose logs.
title: Debug mode?
value_options:
- "true"
- "false"
- compress_archive: "false"
opts:
description: If Compress cache is set to `true`, then it will upload a compressed
archive.
is_required: true
summary: If Compress cache is set to `true`, then it will upload a compressed
archive.
title: Compress cache?
value_options:
- "true"
- "false"
- bitrise_cache_include_paths: $BITRISE_CACHE_INCLUDE_PATHS
opts:
is_dont_change_value: true
is_required: true
summary: Collected dependencies by steps from the build
title: Cache paths collected by steps
- bitrise_cache_exclude_paths: $BITRISE_CACHE_EXCLUDE_PATHS
opts:
is_dont_change_value: true
is_required: true
summary: Changing files or extensions are collected regularly by steps from the
build.
title: Ignore paths collected by steps
- cache_api_url: $BITRISE_CACHE_API_URL
opts:
description: Cache Upload URL
is_dont_change_value: true
is_required: true
summary: Cache Upload URL
title: Cache Upload URL
================================================
FILE: steps/cache-push/2.4.0/step.yml
================================================
title: Bitrise.io Cache:Push
summary: Updates the Cache, if required
description: "Checks whether cache has to be updated based on the **Cache Paths**
and **Ignore Paths** inputs.\nIf it does, the Step creates a new cache archive and
uploads it. \nIt won't update/upload the cache if the cache hasn't changed nor in
the case of a pull request unless you change the Step's `run_if` property. \nFor
caching, you will need the **Bitrise.io Cache:Pull** Step at the beginning of your
Workflow (after the **Git Clone Repository** Step but before a dependency installer
Step) to download the previous cache, if any. \nThe **Bitrise.io Cache:Push** Step
should be the very last Step in your Workflow.\n\n### Configuring the Step\n\n1.
Cache any directory or file by adding it in the **Cache paths** field.\nFor most
cases, caching will automatically work based on your native build and testing Steps
as these automatically configure cache paths in your cache Steps.\nIf adding multiple
paths, separate them with a newline.\nIf you have a path in the list which does
not exist, it will not cause the Step to fail. \nYou can also specify an update
indicator file with the `->` syntax, for example, `update/this -> if/this/file/is/updated.`
\nPlease note the indicator points to a file and not to a folder.\n2. In the **Ignore
Paths from change check** field, you can set any path which you don't want to do
change analysis for.\n- Paths prefixed with an `!` will get ignored from the cache
archive.\n- The path can also include `*`, `**`, `/`. \nThe `*` will replace a path
element, the `**` will replace part of a path. \nTo exclude a full directory, simply
put a `/` behind the directory.\nNote that you can't ignore a path which results
in an invalid cache item.\n3. Modify **Working directory** if you wish to set relative
cache paths and reference them from a working directory other than `$BITRISE_SOURCE_DIR`.\n4.
Select a **Fingerprint Method** option (`file-content-hash` or `file-mod-time`)
to detect changes in a directory, file, or in an update indicator file. \nIf changes
are detected, new cache gets generated.\n5. If you set **Debug mode?** input to
`true`, the Step will print out more detailed logs.\n6. With **Compress cache?**
input set to `true`, you can compress the cache archive for faster uploads and downloads,
especially useful for node-modules and other huge dependency folders.\n7. In `Ignore
paths collected by steps` you can set which files or extensions should be ignored
by the Step during the build.\n8. `Cache Upload URL` shows the URL where the cache
gets uploaded.\n\n### Troubleshooting\nWe recommend you do not cache any dependency
manager lock file (for example, `package.lock`, `gemfile.lock`, `podfile.lock`)
as it would override the lock file in your repository.\n\n### Useful links\n- [About
caching](https://devcenter.bitrise.io/builds/caching/about-caching-index/)\n- [Caching
Cocoapods](https://devcenter.bitrise.io/builds/caching/caching-cocoapods/)\n- [Caching
Gradle](https://devcenter.bitrise.io/builds/caching/caching-gradle/)\n\n### Related
Steps\n- [Bitrise.io Cache:Pull](https://www.bitrise.io/integrations/steps/cache-pull)\n-
[Git Clone Repository](https://www.bitrise.io/integrations/steps/git-clone)"
website: https://github.com/bitrise-steplib/steps-cache-push
source_code_url: https://github.com/bitrise-steplib/steps-cache-push.git
support_url: https://github.com/bitrise-steplib/steps-cache-push/issues
published_at: 2020-12-02T14:26:20.636411742Z
source:
git: https://github.com/bitrise-steplib/steps-cache-push.git
commit: acb955b85681f5d4c280b07be8b9de9a1d09cd0d
host_os_tags:
- osx-10.10
- ubuntu-14.04
type_tags:
- utility
toolkit:
go:
package_name: github.com/bitrise-steplib/steps-cache-push
deps:
apt_get:
- name: tar
is_requires_admin_user: false
is_always_run: false
is_skippable: true
run_if: .IsCI | and (not .IsPR)
inputs:
- cache_paths: |
$BITRISE_CACHE_DIR
opts:
description: |-
Cache these paths. Separate paths with a newline.
A path item can be either a file or a directory.
You can also specify an "update indicator file" with the `->`
syntax: `update/this -> if/this/file/is/updated`.
*The indicator can only be a file!*
If you have a path in the list which doesn't exist that will not cause
this step to fail. It'll be logged but the step will try to gather
as many specified & valid paths as it can, and just print a warning
about the invalid items.
summary: Cache these paths. Separate paths with a newline.
title: Cache paths
- ignore_check_on_paths: null
opts:
description: "These paths will be ignored from change checking.\nIf something
has changed under the specified path(s) and nothing else has changed,\nthen
the cache won't be updated.\n\n**Paths prefixed with an `!` will get ignored
from the cache archive**.\nIf a path is located inside a specified Cache Path
item and not prefixed with an `!`,\nit'll be included in the cache archive,
but won't be checked for changes. \n\nThe path can also include `*`, `**`, `/`.\n`*`
will replace a path element (for example, `a/*/b` will match `a/x/b`).\n`**`
will replace part of a path (for example, `a/**/b` will match `a/x/y/z/b`).\nTo
exclude a full directory like `/my/full/path`, simply put a `/` behind `/my/full/path`,\nso
it will be `/my/full/path/`.\n\nImportant: you can't ignore a path which results
in an invalid cache item.\nFor example, if you specify the path `a/path/to/cache`
to be cached, you\ncan't ignore `a/path/to`, as that would ignore every file
from checking\nfor a change and no fingerprint could be generated for `a/path/to/cache`.\nYou
can ignore paths inside a Cache Path, however, if, for example, a path is `a/path/to/cache`,
you can ignore `a/path/to/cache/.ignore-me`,\nunless that's the only file inside
`a/path/to/cache`.\n\nThe point is: you should not specify an ignore rule which
would completely\nignore a specified Cache Path item, as that would result in
a path which\ncan't be checked for updates,changes or fingerprints."
summary: Define the paths which have to be ignored when checking for cache changes.
title: Ignore Paths from change check
- opts:
description: Working directory path - should be an absolute path.
summary: Working directory path
title: Working directory path
workdir: $BITRISE_SOURCE_DIR
- fingerprint_method: file-content-hash
opts:
description: |-
The specified Fingerprint Method will be used to calculate
fingerprints for the cached files.
The (file) fingerprint is used to check whether
the cached files did change - if it changed, a new cache will be generated.
If the fingerprint matches the previous cache version's fingerprint, then
no new cache will be generated.
**Regardless of which method you choose** the following file attributes will
be used to create the fingerprint **in addition** to the method you choose:
* File path
* File size
* File permission bits
Information about the options:
* `file-content-hash` : create a file content checksum hash for every file in the cache,
and use that as the fingerprint source of the file. This means that **the full file content will be loaded** in
order to create the checksum hash!
* `file-mod-time` : use the file's "modified at" time information. For larger files this method
can be significantly faster, as the file doesn't have to be loaded to calculate this information!
**Note**: in case of "update indicator files", the fingerprint method will always be `file-content-hash`,
regardless of which option you select here.
summary: Fingerprint method, used for checking file changes.
title: Fingerprint Method
value_options:
- file-content-hash
- file-mod-time
- is_debug_mode: "false"
opts:
description: If debug mode is enabled the step will print verbose logs.
is_required: true
summary: If debug mode is enabled, the step will print verbose logs.
title: Debug mode?
value_options:
- "true"
- "false"
- compress_archive: "false"
opts:
description: If Compress cache is set to `true`, then it will upload a compressed
archive.
is_required: true
summary: If Compress cache is set to `true`, then it will upload a compressed
archive.
title: Compress cache?
value_options:
- "true"
- "false"
- bitrise_cache_include_paths: $BITRISE_CACHE_INCLUDE_PATHS
opts:
is_dont_change_value: true
is_required: true
summary: Collected dependencies by steps from the build
title: Cache paths collected by steps
- bitrise_cache_exclude_paths: $BITRISE_CACHE_EXCLUDE_PATHS
opts:
is_dont_change_value: true
is_required: true
summary: Changing files or extensions are collected regularly by steps from the
build.
title: Ignore paths collected by steps
- cache_api_url: $BITRISE_CACHE_API_URL
opts:
description: Cache Upload URL
is_dont_change_value: true
is_required: true
summary: Cache Upload URL
title: Cache Upload URL
================================================
FILE: steps/cache-push/2.4.1/step.yml
================================================
title: Bitrise.io Cache:Push
summary: Updates the Cache, if required
description: "Checks whether cache has to be updated based on the **Cache Paths**
and **Ignore Paths** inputs.\nIf it does, the Step creates a new cache archive and
uploads it. \nIt won't update/upload the cache if the cache hasn't changed nor in
the case of a pull request unless you change the Step's `run_if` property. \nFor
caching, you will need the **Bitrise.io Cache:Pull** Step at the beginning of your
Workflow (after the **Git Clone Repository** Step but before a dependency installer
Step) to download the previous cache, if any. \nThe **Bitrise.io Cache:Push** Step
should be the very last Step in your Workflow.\n\n### Configuring the Step\n\n1.
Cache any directory or file by adding it in the **Cache paths** field.\nFor most
cases, caching will automatically work based on your native build and testing Steps
as these automatically configure cache paths in your cache Steps.\nIf adding multiple
paths, separate them with a newline.\nIf you have a path in the list which does
not exist, it will not cause the Step to fail. \nYou can also specify an update
indicator file with the `->` syntax, for example, `update/this -> if/this/file/is/updated.`
\nPlease note the indicator points to a file and not to a folder.\n2. In the **Ignore
Paths from change check** field, you can set any path which you don't want to do
change analysis for.\n- Paths prefixed with an `!` will get ignored from the cache
archive.\n- The path can also include `*`, `**`, `/`. \nThe `*` will replace a path
element, the `**` will replace part of a path. \nTo exclude a full directory, simply
put a `/` behind the directory.\nNote that you can't ignore a path which results
in an invalid cache item.\n3. Modify **Working directory** if you wish to set relative
cache paths and reference them from a working directory other than `$BITRISE_SOURCE_DIR`.\n4.
Select a **Fingerprint Method** option (`file-content-hash` or `file-mod-time`)
to detect changes in a directory, file, or in an update indicator file. \nIf changes
are detected, new cache gets generated.\n5. If you set **Debug mode?** input to
`true`, the Step will print out more detailed logs.\n6. With **Compress cache?**
input set to `true`, you can compress the cache archive for faster uploads and downloads,
especially useful for node-modules and other huge dependency folders.\n7. In `Ignore
paths collected by steps` you can set which files or extensions should be ignored
by the Step during the build.\n8. `Cache Upload URL` shows the URL where the cache
gets uploaded.\n\n### Troubleshooting\nWe recommend you do not cache any dependency
manager lock file (for example, `package.lock`, `gemfile.lock`, `podfile.lock`)
as it would override the lock file in your repository.\n\n### Useful links\n- [About
caching](https://devcenter.bitrise.io/builds/caching/about-caching-index/)\n- [Caching
Cocoapods](https://devcenter.bitrise.io/builds/caching/caching-cocoapods/)\n- [Caching
Gradle](https://devcenter.bitrise.io/builds/caching/caching-gradle/)\n\n### Related
Steps\n- [Bitrise.io Cache:Pull](https://www.bitrise.io/integrations/steps/cache-pull)\n-
[Git Clone Repository](https://www.bitrise.io/integrations/steps/git-clone)"
website: https://github.com/bitrise-steplib/steps-cache-push
source_code_url: https://github.com/bitrise-steplib/steps-cache-push.git
support_url: https://github.com/bitrise-steplib/steps-cache-push/issues
published_at: 2020-12-11T20:36:10.744228152Z
source:
git: https://github.com/bitrise-steplib/steps-cache-push.git
commit: 83c9a81f8229609f2586d9f2012d722fafa773a9
host_os_tags:
- osx-10.10
- ubuntu-14.04
type_tags:
- utility
toolkit:
go:
package_name: github.com/bitrise-steplib/steps-cache-push
deps:
apt_get:
- name: tar
is_requires_admin_user: false
is_always_run: false
is_skippable: true
run_if: .IsCI | and (not .IsPR)
inputs:
- cache_paths: |
$BITRISE_CACHE_DIR
opts:
description: |-
Cache these paths. Separate paths with a newline.
A path item can be either a file or a directory.
You can also specify an "update indicator file" with the `->`
syntax: `update/this -> if/this/file/is/updated`.
*The indicator can only be a file!*
If you have a path in the list which doesn't exist that will not cause
this step to fail. It'll be logged but the step will try to gather
as many specified & valid paths as it can, and just print a warning
about the invalid items.
summary: Cache these paths. Separate paths with a newline.
title: Cache paths
- ignore_check_on_paths: null
opts:
description: "These paths will be ignored from change checking.\nIf something
has changed under the specified path(s) and nothing else has changed,\nthen
the cache won't be updated.\n\n**Paths prefixed with an `!` will get ignored
from the cache archive**.\nIf a path is located inside a specified Cache Path
item and not prefixed with an `!`,\nit'll be included in the cache archive,
but won't be checked for changes. \n\nThe path can also include `*`, `**`, `/`.\n`*`
will replace a path element (for example, `a/*/b` will match `a/x/b`).\n`**`
will replace part of a path (for example, `a/**/b` will match `a/x/y/z/b`).\nTo
exclude a full directory like `/my/full/path`, simply put a `/` behind `/my/full/path`,\nso
it will be `/my/full/path/`.\n\nImportant: you can't ignore a path which results
in an invalid cache item.\nFor example, if you specify the path `a/path/to/cache`
to be cached, you\ncan't ignore `a/path/to`, as that would ignore every file
from checking\nfor a change and no fingerprint could be generated for `a/path/to/cache`.\nYou
can ignore paths inside a Cache Path, however, if, for example, a path is `a/path/to/cache`,
you can ignore `a/path/to/cache/.ignore-me`,\nunless that's the only file inside
`a/path/to/cache`.\n\nThe point is: you should not specify an ignore rule which
would completely\nignore a specified Cache Path item, as that would result in
a path which\ncan't be checked for updates,changes or fingerprints."
summary: Define the paths which have to be ignored when checking for cache changes.
title: Ignore Paths from change check
- opts:
description: Working directory path - should be an absolute path.
summary: Working directory path
title: Working directory path
workdir: $BITRISE_SOURCE_DIR
- fingerprint_method: file-content-hash
opts:
description: |-
The specified Fingerprint Method will be used to calculate
fingerprints for the cached files.
The (file) fingerprint is used to check whether
the cached files did change - if it changed, a new cache will be generated.
If the fingerprint matches the previous cache version's fingerprint, then
no new cache will be generated.
**Regardless of which method you choose** the following file attributes will
be used to create the fingerprint **in addition** to the method you choose:
* File path
* File size
* File permission bits
Information about the options:
* `file-content-hash` : create a file content checksum hash for every file in the cache,
and use that as the fingerprint source of the file. This means that **the full file content will be loaded** in
order to create the checksum hash!
* `file-mod-time` : use the file's "modified at" time information. For larger files this method
can be significantly faster, as the file doesn't have to be loaded to calculate this information!
**Note**: in case of "update indicator files", the fingerprint method will always be `file-content-hash`,
regardless of which option you select here.
summary: Fingerprint method, used for checking file changes.
title: Fingerprint Method
value_options:
- file-content-hash
- file-mod-time
- is_debug_mode: "false"
opts:
description: If debug mode is enabled the step will print verbose logs.
is_required: true
summary: If debug mode is enabled, the step will print verbose logs.
title: Debug mode?
value_options:
- "true"
- "false"
- compress_archive: "false"
opts:
description: If Compress cache is set to `true`, then it will upload a compressed
archive.
is_required: true
summary: If Compress cache is set to `true`, then it will upload a compressed
archive.
title: Compress cache?
value_options:
- "true"
- "false"
- bitrise_cache_include_paths: $BITRISE_CACHE_INCLUDE_PATHS
opts:
is_dont_change_value: true
is_required: true
summary: Collected dependencies by steps from the build
title: Cache paths collected by steps
- bitrise_cache_exclude_paths: $BITRISE_CACHE_EXCLUDE_PATHS
opts:
is_dont_change_value: true
is_required: true
summary: Changing files or extensions are collected regularly by steps from the
build.
title: Ignore paths collected by steps
- cache_api_url: $BITRISE_CACHE_API_URL
opts:
description: Cache Upload URL
is_dont_change_value: true
is_required: true
summary: Cache Upload URL
title: Cache Upload URL
================================================
FILE: steps/cache-push/2.5.0/step.yml
================================================
title: Bitrise.io Cache:Push
summary: Updates the Cache, if required
description: "Checks whether cache has to be updated based on the **Cache Paths**
and **Ignore Paths** inputs.\nIf it does, the Step creates a new cache archive and
uploads it. \nIt won't update/upload the cache if the cache hasn't changed nor in
the case of a pull request unless you change the Step's `run_if` property. \nFor
caching, you will need the **Bitrise.io Cache:Pull** Step at the beginning of your
Workflow (after the **Git Clone Repository** Step but before a dependency installer
Step) to download the previous cache, if any. \nThe **Bitrise.io Cache:Push** Step
should be the very last Step in your Workflow.\n\n### Configuring the Step\n\n1.
Cache any directory or file by adding it in the **Cache paths** field.\nFor most
cases, caching will automatically work based on your native build and testing Steps
as these automatically configure cache paths in your cache Steps.\nIf adding multiple
paths, separate them with a newline.\nIf you have a path in the list which does
not exist, it will not cause the Step to fail. \nYou can also specify an update
indicator file with the `->` syntax, for example, `update/this -> if/this/file/is/updated.`
\nPlease note the indicator points to a file and not to a folder.\n2. In the **Ignore
Paths from change check** field, you can set any path which you don't want to do
change analysis for.\n- Paths prefixed with an `!` will get ignored from the cache
archive.\n- The path can also include `*`, `**`, `/`. \nThe `*` will replace a path
element, the `**` will replace part of a path. \nTo exclude a full directory, simply
put a `/` behind the directory.\nNote that you can't ignore a path which results
in an invalid cache item.\n3. Modify **Working directory** if you wish to set relative
cache paths and reference them from a working directory other than `$BITRISE_SOURCE_DIR`.\n4.
Select a **Fingerprint Method** option (`file-content-hash` or `file-mod-time`)
to detect changes in a directory, file, or in an update indicator file. \nIf changes
are detected, new cache gets generated.\n5. If you set **Debug mode?** input to
`true`, the Step will print out more detailed logs.\n6. With **Compress cache?**
input set to `true`, you can compress the cache archive for faster uploads and downloads,
especially useful for node-modules and other huge dependency folders.\n7. In `Ignore
paths collected by steps` you can set which files or extensions should be ignored
by the Step during the build.\n8. `Cache Upload URL` shows the URL where the cache
gets uploaded.\n\n### Troubleshooting\nWe recommend you do not cache any dependency
manager lock file (for example, `package.lock`, `gemfile.lock`, `podfile.lock`)
as it would override the lock file in your repository.\n\n### Useful links\n- [About
caching](https://devcenter.bitrise.io/builds/caching/about-caching-index/)\n- [Caching
Cocoapods](https://devcenter.bitrise.io/builds/caching/caching-cocoapods/)\n- [Caching
Gradle](https://devcenter.bitrise.io/builds/caching/caching-gradle/)\n\n### Related
Steps\n- [Bitrise.io Cache:Pull](https://www.bitrise.io/integrations/steps/cache-pull)\n-
[Git Clone Repository](https://www.bitrise.io/integrations/steps/git-clone)"
website: https://github.com/bitrise-steplib/steps-cache-push
source_code_url: https://github.com/bitrise-steplib/steps-cache-push.git
support_url: https://github.com/bitrise-steplib/steps-cache-push/issues
published_at: 2021-02-03T16:33:17.508965069Z
source:
git: https://github.com/bitrise-steplib/steps-cache-push.git
commit: ddeb86dc5c0a193da443c41f28d55edf866953e0
host_os_tags:
- osx-10.10
- ubuntu-14.04
type_tags:
- utility
toolkit:
go:
package_name: github.com/bitrise-steplib/steps-cache-push
deps:
apt_get:
- name: tar
is_requires_admin_user: false
is_always_run: false
is_skippable: true
run_if: .IsCI | and (not .IsPR)
inputs:
- cache_paths: null
opts:
description: |-
Cache these paths. Separate paths with a newline.
A path item can be either a file or a directory.
You can also specify an "update indicator file" with the `->`
syntax: `update/this -> if/this/file/is/updated`.
*The indicator can only be a file!*
If you have a path in the list which doesn't exist that will not cause
this step to fail. It'll be logged but the step will try to gather
as many specified & valid paths as it can, and just print a warning
about the invalid items.
summary: Cache these paths. Separate paths with a newline.
title: Cache paths
- ignore_check_on_paths: null
opts:
description: "These paths will be ignored from change checking.\nIf something
has changed under the specified path(s) and nothing else has changed,\nthen
the cache won't be updated.\n\n**Paths prefixed with an `!` will get ignored
from the cache archive**.\nIf a path is located inside a specified Cache Path
item and not prefixed with an `!`,\nit'll be included in the cache archive,
but won't be checked for changes. \n\nThe path can also include `*`, `**`, `/`.\n`*`
will replace a path element (for example, `a/*/b` will match `a/x/b`).\n`**`
will replace part of a path (for example, `a/**/b` will match `a/x/y/z/b`).\nTo
exclude a full directory like `/my/full/path`, simply put a `/` behind `/my/full/path`,\nso
it will be `/my/full/path/`.\n\nImportant: you can't ignore a path which results
in an invalid cache item.\nFor example, if you specify the path `a/path/to/cache`
to be cached, you\ncan't ignore `a/path/to`, as that would ignore every file
from checking\nfor a change and no fingerprint could be generated for `a/path/to/cache`.\nYou
can ignore paths inside a Cache Path, however, if, for example, a path is `a/path/to/cache`,
you can ignore `a/path/to/cache/.ignore-me`,\nunless that's the only file inside
`a/path/to/cache`.\n\nThe point is: you should not specify an ignore rule which
would completely\nignore a specified Cache Path item, as that would result in
a path which\ncan't be checked for updates,changes or fingerprints."
summary: Define the paths which have to be ignored when checking for cache changes.
title: Ignore Paths from change check
- opts:
description: Working directory path - should be an absolute path.
summary: Working directory path
title: Working directory path
workdir: $BITRISE_SOURCE_DIR
- fingerprint_method: file-content-hash
opts:
description: |-
The specified Fingerprint Method will be used to calculate
fingerprints for the cached files.
The (file) fingerprint is used to check whether
the cached files did change - if it changed, a new cache will be generated.
If the fingerprint matches the previous cache version's fingerprint, then
no new cache will be generated.
**Regardless of which method you choose** the following file attributes will
be used to create the fingerprint **in addition** to the method you choose:
* File path
* File size
* File permission bits
Information about the options:
* `file-content-hash` : create a file content checksum hash for every file in the cache,
and use that as the fingerprint source of the file. This means that **the full file content will be loaded** in
order to create the checksum hash!
* `file-mod-time` : use the file's "modified at" time information. For larger files this method
can be significantly faster, as the file doesn't have to be loaded to calculate this information!
**Note**: in case of "update indicator files", the fingerprint method will always be `file-content-hash`,
regardless of which option you select here.
summary: Fingerprint method, used for checking file changes.
title: Fingerprint Method
value_options:
- file-content-hash
- file-mod-time
- is_debug_mode: "false"
opts:
description: If debug mode is enabled the step will print verbose logs.
is_required: true
summary: If debug mode is enabled, the step will print verbose logs.
title: Debug mode?
value_options:
- "true"
- "false"
- compress_archive: "false"
opts:
description: If Compress cache is set to `true`, then it will upload a compressed
archive.
is_required: true
summary: If Compress cache is set to `true`, then it will upload a compressed
archive.
title: Compress cache?
value_options:
- "true"
- "false"
- bitrise_cache_include_paths: $BITRISE_CACHE_INCLUDE_PATHS
opts:
is_dont_change_value: true
is_required: true
summary: Collected dependencies by steps from the build
title: Cache paths collected by steps
- bitrise_cache_exclude_paths: $BITRISE_CACHE_EXCLUDE_PATHS
opts:
is_dont_change_value: true
is_required: true
summary: Changing files or extensions are collected regularly by steps from the
build.
title: Ignore paths collected by steps
- cache_api_url: $BITRISE_CACHE_API_URL
opts:
description: Cache Upload URL
is_dont_change_value: true
is_required: true
summary: Cache Upload URL
title: Cache Upload URL
================================================
FILE: steps/cache-push/2.5.1/step.yml
================================================
title: Bitrise.io Cache:Push
summary: Updates the Cache, if required
description: "Checks whether cache has to be updated based on the **Cache Paths**
and **Ignore Paths** inputs.\nIf it does, the Step creates a new cache archive and
uploads it. \nIt won't update/upload the cache if the cache hasn't changed nor in
the case of a pull request unless you change the Step's `run_if` property. \nFor
caching, you will need the **Bitrise.io Cache:Pull** Step at the beginning of your
Workflow (after the **Git Clone Repository** Step but before a dependency installer
Step) to download the previous cache, if any. \nThe **Bitrise.io Cache:Push** Step
should be the very last Step in your Workflow.\n\n### Configuring the Step\n\n1.
Cache any directory or file by adding it in the **Cache paths** field.\nFor most
cases, caching will automatically work based on your native build and testing Steps
as these automatically configure cache paths in your cache Steps.\nIf adding multiple
paths, separate them with a newline.\nIf you have a path in the list which does
not exist, it will not cause the Step to fail. \nYou can also specify an update
indicator file with the `->` syntax, for example, `update/this -> if/this/file/is/updated.`
\nPlease note the indicator points to a file and not to a folder.\n2. In the **Ignore
Paths from change check** field, you can set any path which you don't want to do
change analysis for.\n- Paths prefixed with an `!` will get ignored from the cache
archive.\n- The path can also include `*`, `**`, `/`. \nThe `*` will replace a path
element, the `**` will replace part of a path. \nTo exclude a full directory, simply
put a `/` behind the directory.\nNote that you can't ignore a path which results
in an invalid cache item.\n3. Modify **Working directory** if you wish to set relative
cache paths and reference them from a working directory other than `$BITRISE_SOURCE_DIR`.\n4.
Select a **Fingerprint Method** option (`file-content-hash` or `file-mod-time`)
to detect changes in a directory, file, or in an update indicator file. \nIf changes
are detected, new cache gets generated.\n5. If you set **Debug mode?** input to
`true`, the Step will print out more detailed logs.\n6. With **Compress cache?**
input set to `true`, you can compress the cache archive for faster uploads and downloads,
especially useful for node-modules and other huge dependency folders.\n7. In `Ignore
paths collected by steps` you can set which files or extensions should be ignored
by the Step during the build.\n8. `Cache Upload URL` shows the URL where the cache
gets uploaded.\n\n### Troubleshooting\nWe recommend you do not cache any dependency
manager lock file (for example, `package.lock`, `gemfile.lock`, `podfile.lock`)
as it would override the lock file in your repository.\n\n### Useful links\n- [About
caching](https://devcenter.bitrise.io/builds/caching/about-caching-index/)\n- [Caching
Cocoapods](https://devcenter.bitrise.io/builds/caching/caching-cocoapods/)\n- [Caching
Gradle](https://devcenter.bitrise.io/builds/caching/caching-gradle/)\n\n### Related
Steps\n- [Bitrise.io Cache:Pull](https://www.bitrise.io/integrations/steps/cache-pull)\n-
[Git Clone Repository](https://www.bitrise.io/integrations/steps/git-clone)"
website: https://github.com/bitrise-steplib/steps-cache-push
source_code_url: https://github.com/bitrise-steplib/steps-cache-push.git
support_url: https://github.com/bitrise-steplib/steps-cache-push/issues
published_at: 2021-06-01T08:59:26.487159511Z
source:
git: https://github.com/bitrise-steplib/steps-cache-push.git
commit: 42ba67bb29267bf65b8955d0d0e1739f1c218fff
host_os_tags:
- osx-10.10
- ubuntu-14.04
type_tags:
- utility
toolkit:
go:
package_name: github.com/bitrise-steplib/steps-cache-push
deps:
apt_get:
- name: tar
is_requires_admin_user: false
is_always_run: false
is_skippable: true
run_if: .IsCI | and (not .IsPR)
inputs:
- cache_paths: null
opts:
description: |-
Cache these paths. Separate paths with a newline.
A path item can be either a file or a directory.
You can also specify an "update indicator file" with the `->`
syntax: `update/this -> if/this/file/is/updated`.
*The indicator can only be a file!*
If you have a path in the list which doesn't exist that will not cause
this step to fail. It'll be logged but the step will try to gather
as many specified & valid paths as it can, and just print a warning
about the invalid items.
summary: Cache these paths. Separate paths with a newline.
title: Cache paths
- ignore_check_on_paths: null
opts:
description: "These paths will be ignored from change checking.\nIf something
has changed under the specified path(s) and nothing else has changed,\nthen
the cache won't be updated.\n\n**Paths prefixed with an `!` will get ignored
from the cache archive**.\nIf a path is located inside a specified Cache Path
item and not prefixed with an `!`,\nit'll be included in the cache archive,
but won't be checked for changes. \n\nThe path can also include `*`, `**`, `/`.\n`*`
will replace a path element (for example, `a/*/b` will match `a/x/b`).\n`**`
will replace part of a path (for example, `a/**/b` will match `a/x/y/z/b`).\nTo
exclude a full directory like `/my/full/path`, simply put a `/` behind `/my/full/path`,\nso
it will be `/my/full/path/`.\n\nImportant: you can't ignore a path which results
in an invalid cache item.\nFor example, if you specify the path `a/path/to/cache`
to be cached, you\ncan't ignore `a/path/to`, as that would ignore every file
from checking\nfor a change and no fingerprint could be generated for `a/path/to/cache`.\nYou
can ignore paths inside a Cache Path, however, if, for example, a path is `a/path/to/cache`,
you can ignore `a/path/to/cache/.ignore-me`,\nunless that's the only file inside
`a/path/to/cache`.\n\nThe point is: you should not specify an ignore rule which
would completely\nignore a specified Cache Path item, as that would result in
a path which\ncan't be checked for updates,changes or fingerprints."
summary: Define the paths which have to be ignored when checking for cache changes.
title: Ignore Paths from change check
- opts:
description: Working directory path - should be an absolute path.
summary: Working directory path
title: Working directory path
workdir: $BITRISE_SOURCE_DIR
- fingerprint_method: file-content-hash
opts:
description: |-
The specified Fingerprint Method will be used to calculate
fingerprints for the cached files.
The (file) fingerprint is used to check whether
the cached files did change - if it changed, a new cache will be generated.
If the fingerprint matches the previous cache version's fingerprint, then
no new cache will be generated.
**Regardless of which method you choose** the following file attributes will
be used to create the fingerprint **in addition** to the method you choose:
* File path
* File size
* File permission bits
Information about the options:
* `file-content-hash` : create a file content checksum hash for every file in the cache,
and use that as the fingerprint source of the file. This means that **the full file content will be loaded** in
order to create the checksum hash!
* `file-mod-time` : use the file's "modified at" time information. For larger files this method
can be significantly faster, as the file doesn't have to be loaded to calculate this information!
**Note**: in case of "update indicator files", the fingerprint method will always be `file-content-hash`,
regardless of which option you select here.
summary: Fingerprint method, used for checking file changes.
title: Fingerprint Method
value_options:
- file-content-hash
- file-mod-time
- is_debug_mode: "false"
opts:
description: If debug mode is enabled the step will print verbose logs.
is_required: true
summary: If debug mode is enabled, the step will print verbose logs.
title: Debug mode?
value_options:
- "true"
- "false"
- compress_archive: "false"
opts:
description: If Compress cache is set to `true`, then it will upload a compressed
archive.
is_required: true
summary: If Compress cache is set to `true`, then it will upload a compressed
archive.
title: Compress cache?
value_options:
- "true"
- "false"
- bitrise_cache_include_paths: $BITRISE_CACHE_INCLUDE_PATHS
opts:
is_dont_change_value: true
is_required: true
summary: Collected dependencies by steps from the build
title: Cache paths collected by steps
- bitrise_cache_exclude_paths: $BITRISE_CACHE_EXCLUDE_PATHS
opts:
is_dont_change_value: true
is_required: true
summary: Changing files or extensions are collected regularly by steps from the
build.
title: Ignore paths collected by steps
- cache_api_url: $BITRISE_CACHE_API_URL
opts:
description: Cache Upload URL
is_dont_change_value: true
is_required: true
summary: Cache Upload URL
title: Cache Upload URL
================================================
FILE: steps/cache-push/2.6.0/step.yml
================================================
title: Bitrise.io Cache:Push
summary: Updates the Cache, if required
description: "Checks whether cache has to be updated based on the **Cache Paths**
and **Ignore Paths** inputs.\nIf it does, the Step creates a new cache archive and
uploads it. \nIt won't update/upload the cache if the cache hasn't changed nor in
the case of a pull request unless you change the Step's `run_if` property. \nFor
caching, you will need the **Bitrise.io Cache:Pull** Step at the beginning of your
Workflow (after the **Git Clone Repository** Step but before a dependency installer
Step) to download the previous cache, if any. \nThe **Bitrise.io Cache:Push** Step
should be the very last Step in your Workflow.\n\n### Configuring the Step\n\n1.
Cache any directory or file by adding it in the **Cache paths** field.\nFor most
cases, caching will automatically work based on your native build and testing Steps
as these automatically configure cache paths in your cache Steps.\nIf adding multiple
paths, separate them with a newline.\nIf you have a path in the list which does
not exist, it will not cause the Step to fail. \nYou can also specify an update
indicator file with the `->` syntax, for example, `update/this -> if/this/file/is/updated.`
\nPlease note the indicator points to a file and not to a folder.\n2. In the **Ignore
Paths from change check** field, you can set any path which you don't want to do
change analysis for.\n- Paths prefixed with an `!` will get ignored from the cache
archive.\n- The path can also include `*`, `**`, `/`. \nThe `*` will replace a path
element, the `**` will replace part of a path. \nTo exclude a full directory, simply
put a `/` behind the directory.\nNote that you can't ignore a path which results
in an invalid cache item.\n3. Modify **Working directory** if you wish to set relative
cache paths and reference them from a working directory other than `$BITRISE_SOURCE_DIR`.\n4.
Select a **Fingerprint Method** option (`file-content-hash` or `file-mod-time`)
to detect changes in a directory, file, or in an update indicator file. \nIf changes
are detected, new cache gets generated.\n5. If you set **Debug mode?** input to
`true`, the Step will print out more detailed logs.\n6. With **Compress cache?**
input set to `true`, you can compress the cache archive for faster uploads and downloads,
especially useful for node-modules and other huge dependency folders.\n7. In `Ignore
paths collected by steps` you can set which files or extensions should be ignored
by the Step during the build.\n8. `Cache Upload URL` shows the URL where the cache
gets uploaded.\n\n### Troubleshooting\nWe recommend you do not cache any dependency
manager lock file (for example, `package.lock`, `gemfile.lock`, `podfile.lock`)
as it would override the lock file in your repository.\n\n### Useful links\n- [About
caching](https://devcenter.bitrise.io/builds/caching/about-caching-index/)\n- [Caching
Cocoapods](https://devcenter.bitrise.io/builds/caching/caching-cocoapods/)\n- [Caching
Gradle](https://devcenter.bitrise.io/builds/caching/caching-gradle/)\n\n### Related
Steps\n- [Bitrise.io Cache:Pull](https://www.bitrise.io/integrations/steps/cache-pull)\n-
[Git Clone Repository](https://www.bitrise.io/integrations/steps/git-clone)"
website: https://github.com/bitrise-steplib/steps-cache-push
source_code_url: https://github.com/bitrise-steplib/steps-cache-push.git
support_url: https://github.com/bitrise-steplib/steps-cache-push/issues
published_at: 2021-09-03T12:01:58.337196091Z
source:
git: https://github.com/bitrise-steplib/steps-cache-push.git
commit: dbada48e00031538650408b0dab0ca302df61a42
host_os_tags:
- osx-10.10
- ubuntu-14.04
type_tags:
- utility
toolkit:
go:
package_name: github.com/bitrise-steplib/steps-cache-push
deps:
apt_get:
- name: tar
is_requires_admin_user: false
is_always_run: false
is_skippable: true
run_if: .IsCI | and (not .IsPR)
inputs:
- cache_paths: null
opts:
description: |-
Cache these paths. Separate paths with a newline.
A path item can be either a file or a directory.
You can also specify an "update indicator file" with the `->`
syntax: `update/this -> if/this/file/is/updated`.
*The indicator can only be a file!*
If you have a path in the list which doesn't exist that will not cause
this step to fail. It'll be logged but the step will try to gather
as many specified & valid paths as it can, and just print a warning
about the invalid items.
summary: Cache these paths. Separate paths with a newline.
title: Cache paths
- ignore_check_on_paths: null
opts:
description: "These paths will be ignored from change checking.\nIf something
has changed under the specified path(s) and nothing else has changed,\nthen
the cache won't be updated.\n\n**Paths prefixed with an `!` will get ignored
from the cache archive**.\nIf a path is located inside a specified Cache Path
item and not prefixed with an `!`,\nit'll be included in the cache archive,
but won't be checked for changes. \n\nThe path can also include `*`, `**`, `/`.\n`*`
will replace a path element (for example, `a/*/b` will match `a/x/b`).\n`**`
will replace part of a path (for example, `a/**/b` will match `a/x/y/z/b`).\nTo
exclude a full directory like `/my/full/path`, simply put a `/` behind `/my/full/path`,\nso
it will be `/my/full/path/`.\n\nImportant: you can't ignore a path which results
in an invalid cache item.\nFor example, if you specify the path `a/path/to/cache`
to be cached, you\ncan't ignore `a/path/to`, as that would ignore every file
from checking\nfor a change and no fingerprint could be generated for `a/path/to/cache`.\nYou
can ignore paths inside a Cache Path, however, if, for example, a path is `a/path/to/cache`,
you can ignore `a/path/to/cache/.ignore-me`,\nunless that's the only file inside
`a/path/to/cache`.\n\nThe point is: you should not specify an ignore rule which
would completely\nignore a specified Cache Path item, as that would result in
a path which\ncan't be checked for updates,changes or fingerprints."
summary: Define the paths which have to be ignored when checking for cache changes.
title: Ignore Paths from change check
- opts:
description: Working directory path - should be an absolute path.
summary: Working directory path
title: Working directory path
workdir: $BITRISE_SOURCE_DIR
- fingerprint_method: file-content-hash
opts:
description: |-
The specified Fingerprint Method will be used to calculate
fingerprints for the cached files.
The (file) fingerprint is used to check whether
the cached files did change - if it changed, a new cache will be generated.
If the fingerprint matches the previous cache version's fingerprint, then
no new cache will be generated.
**Regardless of which method you choose** the following file attributes will
be used to create the fingerprint **in addition** to the method you choose:
* File path
* File size
* File permission bits
Information about the options:
* `file-content-hash` : create a file content checksum hash for every file in the cache,
and use that as the fingerprint source of the file. This means that **the full file content will be loaded** in
order to create the checksum hash!
* `file-mod-time` : use the file's "modified at" time information. For larger files this method
can be significantly faster, as the file doesn't have to be loaded to calculate this information!
**Note**: in case of "update indicator files", the fingerprint method will always be `file-content-hash`,
regardless of which option you select here.
summary: Fingerprint method, used for checking file changes.
title: Fingerprint Method
value_options:
- file-content-hash
- file-mod-time
- is_debug_mode: "false"
opts:
description: If debug mode is enabled the step will print verbose logs.
is_required: true
summary: If debug mode is enabled, the step will print verbose logs.
title: Debug mode?
value_options:
- "true"
- "false"
- compress_archive: "false"
opts:
description: If Compress cache is set to `true`, then it will upload a compressed
archive.
is_required: true
summary: If Compress cache is set to `true`, then it will upload a compressed
archive.
title: Compress cache?
value_options:
- "true"
- "false"
- bitrise_cache_include_paths: $BITRISE_CACHE_INCLUDE_PATHS
opts:
is_dont_change_value: true
is_required: true
summary: Collected dependencies by steps from the build
title: Cache paths collected by steps
- bitrise_cache_exclude_paths: $BITRISE_CACHE_EXCLUDE_PATHS
opts:
is_dont_change_value: true
is_required: true
summary: Changing files or extensions are collected regularly by steps from the
build.
title: Ignore paths collected by steps
- cache_api_url: $BITRISE_CACHE_API_URL
opts:
description: Cache Upload URL
is_dont_change_value: true
is_required: true
summary: Cache Upload URL
title: Cache Upload URL
================================================
FILE: steps/cache-push/2.7.0/step.yml
================================================
title: Bitrise.io Cache:Push
summary: Updates the Cache, if required
description: "Checks whether cache has to be updated based on the **Cache Paths**
and **Ignore Paths** inputs.\nIf it does, the Step creates a new cache archive and
uploads it. \nIt won't update/upload the cache if the cache hasn't changed nor in
the case of a pull request unless you change the Step's `run_if` property. \nFor
caching, you will need the **Bitrise.io Cache:Pull** Step at the beginning of your
Workflow (after the **Git Clone Repository** Step but before a dependency installer
Step) to download the previous cache, if any. \nThe **Bitrise.io Cache:Push** Step
should be the very last Step in your Workflow.\n\n### Configuring the Step\n\n1.
Cache any directory or file by adding it in the **Cache paths** field.\nFor most
cases, caching will automatically work based on your native build and testing Steps
as these automatically configure cache paths in your cache Steps.\nIf adding multiple
paths, separate them with a newline.\nIf you have a path in the list which does
not exist, it will not cause the Step to fail. \nYou can also specify an update
indicator file with the `->` syntax, for example, `update/this -> if/this/file/is/updated.`
\nPlease note the indicator points to a file and not to a folder.\n2. In the **Ignore
Paths from change check** field, you can set any path which you don't want to do
change analysis for.\n- Paths prefixed with an `!` will get ignored from the cache
archive.\n- The path can also include `*`, `**`, `/`. \nThe `*` will replace a path
element, the `**` will replace part of a path. \nTo exclude a full directory, simply
put a `/` behind the directory.\nNote that you can't ignore a path which results
in an invalid cache item.\n3. Modify **Working directory** if you wish to set relative
cache paths and reference them from a working directory other than `$BITRISE_SOURCE_DIR`.\n4.
Select a **Fingerprint Method** option (`file-content-hash` or `file-mod-time`)
to detect changes in a directory, file, or in an update indicator file. \nIf changes
are detected, new cache gets generated.\n5. If you set **Debug mode?** input to
`true`, the Step will print out more detailed logs.\n6. With **Compress cache?**
input set to `true`, you can compress the cache archive for faster uploads and downloads,
especially useful for node-modules and other huge dependency folders.\n7. In `Ignore
paths collected by steps` you can set which files or extensions should be ignored
by the Step during the build.\n8. `Cache Upload URL` shows the URL where the cache
gets uploaded.\n\n### Troubleshooting\nWe recommend you do not cache any dependency
manager lock file (for example, `package.lock`, `gemfile.lock`, `podfile.lock`)
as it would override the lock file in your repository.\n\n### Useful links\n- [About
caching](https://devcenter.bitrise.io/builds/caching/about-caching-index/)\n- [Caching
Cocoapods](https://devcenter.bitrise.io/builds/caching/caching-cocoapods/)\n- [Caching
Gradle](https://devcenter.bitrise.io/builds/caching/caching-gradle/)\n\n### Related
Steps\n- [Bitrise.io Cache:Pull](https://www.bitrise.io/integrations/steps/cache-pull)\n-
[Git Clone Repository](https://www.bitrise.io/integrations/steps/git-clone)"
website: https://github.com/bitrise-steplib/steps-cache-push
source_code_url: https://github.com/bitrise-steplib/steps-cache-push.git
support_url: https://github.com/bitrise-steplib/steps-cache-push/issues
published_at: 2022-05-17T12:23:39.60033785Z
source:
git: https://github.com/bitrise-steplib/steps-cache-push.git
commit: 4d9f583bb3ab1fc00715475200bda20a0ade524b
host_os_tags:
- osx-10.10
- ubuntu-14.04
type_tags:
- utility
toolkit:
go:
package_name: github.com/bitrise-steplib/steps-cache-push
deps:
apt_get:
- name: tar
is_requires_admin_user: false
is_always_run: false
is_skippable: true
run_if: .IsCI | and (not .IsPR)
inputs:
- cache_paths: null
opts:
description: |-
Cache these paths. Separate paths with a newline.
A path item can be either a file or a directory.
You can also specify an "update indicator file" with the `->`
syntax: `update/this -> if/this/file/is/updated`.
*The indicator can only be a file!*
If you have a path in the list which doesn't exist that will not cause
this step to fail. It'll be logged but the step will try to gather
as many specified & valid paths as it can, and just print a warning
about the invalid items.
summary: Cache these paths. Separate paths with a newline.
title: Cache paths
- ignore_check_on_paths: null
opts:
description: "These paths will be ignored from change checking.\nIf something
has changed under the specified path(s) and nothing else has changed,\nthen
the cache won't be updated.\n\n**Paths prefixed with an `!` will get ignored
from the cache archive**.\nIf a path is located inside a specified Cache Path
item and not prefixed with an `!`,\nit'll be included in the cache archive,
but won't be checked for changes. \n\nThe path can also include `*`, `**`, `/`.\n`*`
will replace a path element (for example, `a/*/b` will match `a/x/b`).\n`**`
will replace part of a path (for example, `a/**/b` will match `a/x/y/z/b`).\nTo
exclude a full directory like `/my/full/path`, simply put a `/` behind `/my/full/path`,\nso
it will be `/my/full/path/`.\n\nImportant: you can't ignore a path which results
in an invalid cache item.\nFor example, if you specify the path `a/path/to/cache`
to be cached, you\ncan't ignore `a/path/to`, as that would ignore every file
from checking\nfor a change and no fingerprint could be generated for `a/path/to/cache`.\nYou
can ignore paths inside a Cache Path, however, if, for example, a path is `a/path/to/cache`,
you can ignore `a/path/to/cache/.ignore-me`,\nunless that's the only file inside
`a/path/to/cache`.\n\nThe point is: you should not specify an ignore rule which
would completely\nignore a specified Cache Path item, as that would result in
a path which\ncan't be checked for updates,changes or fingerprints."
summary: Define the paths which have to be ignored when checking for cache changes.
title: Ignore Paths from change check
- opts:
description: Working directory path - should be an absolute path.
summary: Working directory path
title: Working directory path
workdir: $BITRISE_SOURCE_DIR
- fingerprint_method: file-content-hash
opts:
description: |-
The specified Fingerprint Method will be used to calculate
fingerprints for the cached files.
The (file) fingerprint is used to check whether
the cached files did change - if it changed, a new cache will be generated.
If the fingerprint matches the previous cache version's fingerprint, then
no new cache will be generated.
**Regardless of which method you choose** the following file attributes will
be used to create the fingerprint **in addition** to the method you choose:
* File path
* File size
* File permission bits
Information about the options:
* `file-content-hash` : create a file content checksum hash for every file in the cache,
and use that as the fingerprint source of the file. This means that **the full file content will be loaded** in
order to create the checksum hash!
* `file-mod-time` : use the file's "modified at" time information. For larger files this method
can be significantly faster, as the file doesn't have to be loaded to calculate this information!
**Note**: in case of "update indicator files", the fingerprint method will always be `file-content-hash`,
regardless of which option you select here.
summary: Fingerprint method, used for checking file changes.
title: Fingerprint Method
value_options:
- file-content-hash
- file-mod-time
- is_debug_mode: "false"
opts:
description: If debug mode is enabled the step will print verbose logs.
is_required: true
summary: If debug mode is enabled, the step will print verbose logs.
title: Debug mode?
value_options:
- "true"
- "false"
- compress_archive: "false"
opts:
description: If Compress cache is set to `true`, then it will upload a compressed
archive.
is_required: true
summary: If Compress cache is set to `true`, then it will upload a compressed
archive.
title: Compress cache?
value_options:
- "true"
- "false"
- bitrise_cache_include_paths: $BITRISE_CACHE_INCLUDE_PATHS
opts:
is_dont_change_value: true
is_required: true
summary: Collected dependencies by steps from the build
title: Cache paths collected by steps
- bitrise_cache_exclude_paths: $BITRISE_CACHE_EXCLUDE_PATHS
opts:
is_dont_change_value: true
is_required: true
summary: Changing files or extensions are collected regularly by steps from the
build.
title: Ignore paths collected by steps
- cache_api_url: $BITRISE_CACHE_API_URL
opts:
description: Cache Upload URL
is_dont_change_value: true
is_required: true
summary: Cache Upload URL
title: Cache Upload URL
================================================
FILE: steps/cache-push/2.7.1/step.yml
================================================
title: Bitrise.io Cache:Push
summary: Updates the Cache, if required
description: "Checks whether cache has to be updated based on the **Cache Paths**
and **Ignore Paths** inputs.\nIf it does, the Step creates a new cache archive and
uploads it. \nIt won't update/upload the cache if the cache hasn't changed nor in
the case of a pull request unless you change the Step's `run_if` property. \nFor
caching, you will need the **Bitrise.io Cache:Pull** Step at the beginning of your
Workflow (after the **Git Clone Repository** Step but before a dependency installer
Step) to download the previous cache, if any. \nThe **Bitrise.io Cache:Push** Step
should be the very last Step in your Workflow.\n\n### Configuring the Step\n\n1.
Cache any directory or file by adding it in the **Cache paths** field.\nFor most
cases, caching will automatically work based on your native build and testing Steps
as these automatically configure cache paths in your cache Steps.\nIf adding multiple
paths, separate them with a newline.\nIf you have a path in the list which does
not exist, it will not cause the Step to fail. \nYou can also specify an update
indicator file with the `->` syntax, for example, `update/this -> if/this/file/is/updated.`
\nPlease note the indicator points to a file and not to a folder.\n2. In the **Ignore
Paths from change check** field, you can set any path which you don't want to do
change analysis for.\n- Paths prefixed with an `!` will get ignored from the cache
archive.\n- The path can also include `*`, `**`, `/`. \nThe `*` will replace a path
element, the `**` will replace part of a path. \nTo exclude a full directory, simply
put a `/` behind the directory.\nNote that you can't ignore a path which results
in an invalid cache item.\n3. Modify **Working directory** if you wish to set relative
cache paths and reference them from a working directory other than `$BITRISE_SOURCE_DIR`.\n4.
Select a **Fingerprint Method** option (`file-content-hash` or `file-mod-time`)
to detect changes in a directory, file, or in an update indicator file. \nIf changes
are detected, new cache gets generated.\n5. If you set **Debug mode?** input to
`true`, the Step will print out more detailed logs.\n6. With **Compress cache?**
input set to `true`, you can compress the cache archive for faster uploads and downloads,
especially useful for node-modules and other huge dependency folders.\n7. In `Ignore
paths collected by steps` you can set which files or extensions should be ignored
by the Step during the build.\n8. `Cache Upload URL` shows the URL where the cache
gets uploaded.\n\n### Troubleshooting\nWe recommend you do not cache any dependency
manager lock file (for example, `package.lock`, `gemfile.lock`, `podfile.lock`)
as it would override the lock file in your repository.\n\n### Useful links\n- [About
caching](https://devcenter.bitrise.io/builds/caching/about-caching-index/)\n- [Caching
Cocoapods](https://devcenter.bitrise.io/builds/caching/caching-cocoapods/)\n- [Caching
Gradle](https://devcenter.bitrise.io/builds/caching/caching-gradle/)\n\n### Related
Steps\n- [Bitrise.io Cache:Pull](https://www.bitrise.io/integrations/steps/cache-pull)\n-
[Git Clone Repository](https://www.bitrise.io/integrations/steps/git-clone)"
website: https://github.com/bitrise-steplib/steps-cache-push
source_code_url: https://github.com/bitrise-steplib/steps-cache-push.git
support_url: https://github.com/bitrise-steplib/steps-cache-push/issues
published_at: 2022-05-20T15:04:58.949481039Z
source:
git: https://github.com/bitrise-steplib/steps-cache-push.git
commit: f1aa51a651f8b4076f61a1f099ee0cc954711634
host_os_tags:
- osx-10.10
- ubuntu-14.04
type_tags:
- utility
toolkit:
go:
package_name: github.com/bitrise-steplib/steps-cache-push
deps:
apt_get:
- name: tar
is_requires_admin_user: false
is_always_run: false
is_skippable: true
run_if: .IsCI | and (not .IsPR)
inputs:
- cache_paths: null
opts:
description: |-
Cache these paths. Separate paths with a newline.
A path item can be either a file or a directory.
You can also specify an "update indicator file" with the `->`
syntax: `update/this -> if/this/file/is/updated`.
*The indicator can only be a file!*
If you have a path in the list which doesn't exist that will not cause
this step to fail. It'll be logged but the step will try to gather
as many specified & valid paths as it can, and just print a warning
about the invalid items.
summary: Cache these paths. Separate paths with a newline.
title: Cache paths
- ignore_check_on_paths: null
opts:
description: "These paths will be ignored from change checking.\nIf something
has changed under the specified path(s) and nothing else has changed,\nthen
the cache won't be updated.\n\n**Paths prefixed with an `!` will get ignored
from the cache archive**.\nIf a path is located inside a specified Cache Path
item and not prefixed with an `!`,\nit'll be included in the cache archive,
but won't be checked for changes. \n\nThe path can also include `*`, `**`, `/`.\n`*`
will replace a path element (for example, `a/*/b` will match `a/x/b`).\n`**`
will replace part of a path (for example, `a/**/b` will match `a/x/y/z/b`).\nTo
exclude a full directory like `/my/full/path`, simply put a `/` behind `/my/full/path`,\nso
it will be `/my/full/path/`.\n\nImportant: you can't ignore a path which results
in an invalid cache item.\nFor example, if you specify the path `a/path/to/cache`
to be cached, you\ncan't ignore `a/path/to`, as that would ignore every file
from checking\nfor a change and no fingerprint could be generated for `a/path/to/cache`.\nYou
can ignore paths inside a Cache Path, however, if, for example, a path is `a/path/to/cache`,
you can ignore `a/path/to/cache/.ignore-me`,\nunless that's the only file inside
`a/path/to/cache`.\n\nThe point is: you should not specify an ignore rule which
would completely\nignore a specified Cache Path item, as that would result in
a path which\ncan't be checked for updates,changes or fingerprints."
summary: Define the paths which have to be ignored when checking for cache changes.
title: Ignore Paths from change check
- opts:
description: Working directory path - should be an absolute path.
summary: Working directory path
title: Working directory path
workdir: $BITRISE_SOURCE_DIR
- fingerprint_method: file-content-hash
opts:
description: |-
The specified Fingerprint Method will be used to calculate
fingerprints for the cached files.
The (file) fingerprint is used to check whether
the cached files did change - if it changed, a new cache will be generated.
If the fingerprint matches the previous cache version's fingerprint, then
no new cache will be generated.
**Regardless of which method you choose** the following file attributes will
be used to create the fingerprint **in addition** to the method you choose:
* File path
* File size
* File permission bits
Information about the options:
* `file-content-hash` : create a file content checksum hash for every file in the cache,
and use that as the fingerprint source of the file. This means that **the full file content will be loaded** in
order to create the checksum hash!
* `file-mod-time` : use the file's "modified at" time information. For larger files this method
can be significantly faster, as the file doesn't have to be loaded to calculate this information!
**Note**: in case of "update indicator files", the fingerprint method will always be `file-content-hash`,
regardless of which option you select here.
summary: Fingerprint method, used for checking file changes.
title: Fingerprint Method
value_options:
- file-content-hash
- file-mod-time
- is_debug_mode: "false"
opts:
description: If debug mode is enabled the step will print verbose logs.
is_required: true
summary: If debug mode is enabled, the step will print verbose logs.
title: Debug mode?
value_options:
- "true"
- "false"
- compress_archive: "false"
opts:
description: If Compress cache is set to `true`, then it will upload a compressed
archive.
is_required: true
summary: If Compress cache is set to `true`, then it will upload a compressed
archive.
title: Compress cache?
value_options:
- "true"
- "false"
- bitrise_cache_include_paths: $BITRISE_CACHE_INCLUDE_PATHS
opts:
is_dont_change_value: true
is_required: true
summary: Collected dependencies by steps from the build
title: Cache paths collected by steps
- bitrise_cache_exclude_paths: $BITRISE_CACHE_EXCLUDE_PATHS
opts:
is_dont_change_value: true
is_required: true
summary: Changing files or extensions are collected regularly by steps from the
build.
title: Ignore paths collected by steps
- cache_api_url: $BITRISE_CACHE_API_URL
opts:
description: Cache Upload URL
is_dont_change_value: true
is_required: true
summary: Cache Upload URL
title: Cache Upload URL
================================================
FILE: steps/cache-push/step-info.yml
================================================
maintainer: bitrise
removal_date: "2025-04-11"
deprecate_notes: |
The branch-based caching steps are deprecated and being replaced by key-based caching.
Check out our migration guide: [Migrating from branch-based caching to key-based caching](https://devcenter.bitrise.io/en/dependencies-and-caching/branch-based-caching/migrating-from-branch-based-caching-to-key-based-caching.html).
================================================
FILE: steps/cakebuild/1.0.0/step.yml
================================================
title: Execute Cake C# Script
summary: Cake (C# Make) is a cross platform build automation system
description: "Cake (C# Make) is a cross platform build automation system with a C#
DSL to do things like compiling code, \ncopy files/folders, running unit tests,
compress files and build NuGet packages. \nMore info: https://cakebuild.net/"
website: https://github.com/stefandevo/bitrise-cake-step
source_code_url: https://github.com/stefandevo/bitrise-cake-step
support_url: https://github.com/stefandevo/bitrise-cake-step/issues
published_at: 2017-04-25T12:54:20.55383053+02:00
source:
git: https://github.com/stefandevo/bitrise-cake-step.git
commit: 6cd05453ce279b129513e426351e2edb00663baa
host_os_tags:
- osx-10.10
project_type_tags:
- xamarin
type_tags:
- build
is_requires_admin_user: false
is_always_run: false
is_skippable: false
inputs:
- opts:
description: |
Name of the script to execute. Default is build.cake
is_expand: true
is_required: true
title: Script
script: build.cake
- dotnetcore: "no"
opts:
description: |
Is the project a .NET Core project? Default is no.
is_expand: true
is_required: true
title: .NET Core Needed?
value_options:
- "yes"
- "no"
- opts:
description: |
Target name to execute. Default is Default
is_expand: true
is_required: true
title: Target
target: Default
- configuration: Release
opts:
description: |
Configuration to build. Default is Release.
is_expand: true
is_required: true
title: Configuration
- opts:
description: |
Specifies the amount of information to be displayed (quiet, minimal, normal, verbose, diagnostic).
is_expand: true
is_required: true
title: Verbosity
value_options:
- quiet
- minimal
- normal
- verbose
- diagnostic
verbosity: normal
================================================
FILE: steps/cakebuild/1.0.1/step.yml
================================================
title: Cake Script
summary: Cake (C# Make) is a cross platform build automation system
description: "Cake (C# Make) is a cross platform build automation system with a C#
DSL to do things like compiling code, \ncopy files/folders, running unit tests,
compress files and build NuGet packages. \nMore info: https://cakebuild.net/"
website: https://github.com/stefandevo/bitrise-cake-step
source_code_url: https://github.com/stefandevo/bitrise-cake-step
support_url: https://github.com/stefandevo/bitrise-cake-step/issues
published_at: 2017-04-27T22:54:16.974189021+02:00
source:
git: https://github.com/stefandevo/bitrise-cake-step.git
commit: ec50ab6d13f13369f052d7aff03d125fb38021a6
host_os_tags:
- osx-10.10
project_type_tags:
- xamarin
type_tags:
- build
is_requires_admin_user: false
is_always_run: false
is_skippable: false
inputs:
- opts:
description: |
Name of the script to execute. Default is build.cake
is_expand: true
is_required: true
title: Script
script: build.cake
- dotnetcore: "no"
opts:
description: |
Is the project a .NET Core project? Default is no.
is_expand: true
is_required: true
title: .NET Core Needed?
value_options:
- "yes"
- "no"
- opts:
description: |
Target name to execute. Default is Default
is_expand: true
is_required: true
title: Target
target: Default
- configuration: Release
opts:
description: |
Configuration to build. Default is Release.
is_expand: true
is_required: true
title: Configuration
- opts:
description: |
Specifies the amount of information to be displayed (quiet, minimal, normal, verbose, diagnostic).
is_expand: true
is_required: true
title: Verbosity
value_options:
- quiet
- minimal
- normal
- verbose
- diagnostic
verbosity: normal
================================================
FILE: steps/cakebuild/1.0.2/step.yml
================================================
title: Cake Script
summary: Cake (C# Make) is a cross platform build automation system
description: "Cake (C# Make) is a cross platform build automation system with a C#
DSL to do things like compiling code, \ncopy files/folders, running unit tests,
compress files and build NuGet packages. \nMore info: http://cakebuild.net/"
website: https://github.com/cake-build/bitrise-cake-step
source_code_url: https://github.com/cake-build/bitrise-cake-step
support_url: https://github.com/cake-build/bitrise-cake-step/issues
published_at: 2017-04-28T13:30:51.935075275+02:00
source:
git: https://github.com/cake-build/bitrise-cake-step.git
commit: 9f83c661ae9fadb56bd3a58ad7e24cdc48873dea
host_os_tags:
- osx-10.10
project_type_tags:
- xamarin
type_tags:
- build
is_requires_admin_user: false
is_always_run: false
is_skippable: false
inputs:
- opts:
description: |
Name of the script to execute. Default is build.cake
is_expand: true
is_required: true
title: Script
script: build.cake
- dotnetcore: "no"
opts:
description: |
Is the project a .NET Core project? Default is no.
is_expand: true
is_required: true
title: .NET Core Needed?
value_options:
- "yes"
- "no"
- opts:
description: |
Target name to execute. Default is Default
is_expand: true
is_required: true
title: Target
target: Default
- configuration: Release
opts:
description: |
Configuration to build. Default is Release.
is_expand: true
is_required: true
title: Configuration
- opts:
description: |
Specifies the amount of information to be displayed (quiet, minimal, normal, verbose, diagnostic).
is_expand: true
is_required: true
title: Verbosity
value_options:
- quiet
- minimal
- normal
- verbose
- diagnostic
verbosity: normal
================================================
FILE: steps/cakebuild/1.0.3/step.yml
================================================
title: Cake Script
summary: Cake (C# Make) is a cross platform build automation system
description: "Cake (C# Make) is a cross platform build automation system with a C#
DSL to do things like compiling code, \ncopy files/folders, running unit tests,
compress files and build NuGet packages. \nMore info: http://cakebuild.net/"
website: https://github.com/cake-build/bitrise-cake-step
source_code_url: https://github.com/cake-build/bitrise-cake-step
support_url: https://github.com/cake-build/bitrise-cake-step/issues
published_at: 2017-04-30T17:05:10.352420098+02:00
source:
git: https://github.com/cake-build/bitrise-cake-step.git
commit: cc49ae420e67319814560f11688c39cae59f580a
host_os_tags:
- osx-10.10
project_type_tags:
- xamarin
type_tags:
- build
is_requires_admin_user: false
is_always_run: false
is_skippable: false
inputs:
- opts:
description: |
Name of the script to execute. Default is build.cake
is_expand: true
is_required: true
title: Script
script: build.cake
- dotnetcore: "no"
opts:
description: |
Is the project a .NET Core project? Default is no.
is_expand: true
is_required: true
title: .NET Core Needed?
value_options:
- "yes"
- "no"
- opts:
description: |
Target name to execute. Default is Default
is_expand: true
is_required: true
title: Target
target: Default
- configuration: Release
opts:
description: |
Configuration to build. Default is Release.
is_expand: true
is_required: true
title: Configuration
- opts:
description: |
Specifies the amount of information to be displayed (quiet, minimal, normal, verbose, diagnostic).
is_expand: true
is_required: true
title: Verbosity
value_options:
- quiet
- minimal
- normal
- verbose
- diagnostic
verbosity: normal
================================================
FILE: steps/cakebuild/1.0.4/step.yml
================================================
title: Cake Script
summary: Cake (C# Make) is a cross platform build automation system
description: "Cake (C# Make) is a cross platform build automation system with a C#
DSL to do things like compiling code, \ncopy files/folders, running unit tests,
compress files and build NuGet packages. \nMore info: https://cakebuild.net/"
website: https://github.com/cake-build/bitrise-cake-step
source_code_url: https://github.com/cake-build/bitrise-cake-step
support_url: https://github.com/cake-build/bitrise-cake-step/issues
published_at: 2018-03-07T10:52:32.572679+01:00
source:
git: https://github.com/cake-build/bitrise-cake-step.git
commit: 5eaa3dc63c8ddcad9b0ff8ae58c6fe0e7af4b21f
host_os_tags:
- osx-10.10
project_type_tags:
- xamarin
type_tags:
- build
is_requires_admin_user: false
is_always_run: false
is_skippable: false
inputs:
- opts:
description: |
Name of the script to execute. Default is build.cake
is_expand: true
is_required: true
title: Script
script: build.cake
- opts:
description: |
Target name to execute. Default is Default
is_expand: true
is_required: true
title: Target
target: Default
- configuration: Release
opts:
description: |
Configuration to build. Default is Release.
is_expand: true
is_required: true
title: Configuration
- opts:
description: |
Specifies the amount of information to be displayed (quiet, minimal, normal, verbose, diagnostic).
is_expand: true
is_required: true
title: Verbosity
value_options:
- quiet
- minimal
- normal
- verbose
- diagnostic
verbosity: normal
================================================
FILE: steps/cakebuild/1.0.5/step.yml
================================================
title: Cake Script
summary: Cake (C# Make) is a cross platform build automation system
description: "Cake (C# Make) is a cross platform build automation system with a C#
DSL to do things like compiling code, \ncopy files/folders, running unit tests,
compress files and build NuGet packages. \nMore info: https://cakebuild.net/"
website: https://github.com/cake-build/bitrise-cake-step
source_code_url: https://github.com/cake-build/bitrise-cake-step
support_url: https://github.com/cake-build/bitrise-cake-step/issues
published_at: 2018-03-08T20:41:33.325992+01:00
source:
git: https://github.com/cake-build/bitrise-cake-step.git
commit: 29425670048f3e15c7a7de001ab6cd8926f16602
host_os_tags:
- osx-10.10
project_type_tags:
- xamarin
type_tags:
- build
is_requires_admin_user: false
is_always_run: false
is_skippable: false
inputs:
- opts:
description: |
Name of the script to execute. Default is build.cake
is_expand: true
is_required: true
title: Script
script: build.cake
- opts:
description: |
Target name to execute. Default is Default
is_expand: true
is_required: true
title: Target
target: Default
- configuration: Release
opts:
description: |
Configuration to build. Default is Release.
is_expand: true
is_required: true
title: Configuration
- opts:
description: |
Specifies the amount of information to be displayed (quiet, minimal, normal, verbose, diagnostic).
is_expand: true
is_required: true
title: Verbosity
value_options:
- quiet
- minimal
- normal
- verbose
- diagnostic
verbosity: normal
- nuget_source_name: null
opts:
description: |
Name to use for specified NuGet private source in the NuGet source list.
summary: ""
title: NuGet private source name
- nuget_source_path_or_url: null
opts:
description: |
Path or URL of the NuGet private package(s) source.
summary: ""
title: NuGet private source path / url
- nuget_source_username: null
opts:
description: |
UserName to be used when connecting to an authenticated source.
summary: ""
title: NuGet private source username
- nuget_source_password: null
opts:
description: Password to be used when connecting to an authenticated source.
summary: ""
title: NuGet private source password
================================================
FILE: steps/cakebuild/1.0.6/step.yml
================================================
title: Cake Script
summary: Cake (C# Make) is a cross platform build automation system
description: "Cake (C# Make) is a cross platform build automation system with a C#
DSL to do things like compiling code, \ncopy files/folders, running unit tests,
compress files and build NuGet packages. \nMore info: https://cakebuild.net/"
website: https://github.com/cake-build/bitrise-cake-step
source_code_url: https://github.com/cake-build/bitrise-cake-step
support_url: https://github.com/cake-build/bitrise-cake-step/issues
published_at: 2018-03-08T23:14:54.207488+01:00
source:
git: https://github.com/cake-build/bitrise-cake-step.git
commit: 3f1104b84e8faabbe55c1b63abc42fd898036a62
host_os_tags:
- osx-10.10
project_type_tags:
- xamarin
type_tags:
- build
is_requires_admin_user: false
is_always_run: false
is_skippable: false
inputs:
- opts:
description: |
Name of the script to execute. Default is build.cake
is_expand: true
is_required: true
title: Script
script: build.cake
- opts:
description: |
Target name to execute. Default is Default
is_expand: true
is_required: true
title: Target
target: Default
- configuration: Release
opts:
description: |
Configuration to build. Default is Release.
is_expand: true
is_required: true
title: Configuration
- opts:
description: |
Specifies the amount of information to be displayed (quiet, minimal, normal, verbose, diagnostic).
is_expand: true
is_required: true
title: Verbosity
value_options:
- quiet
- minimal
- normal
- verbose
- diagnostic
verbosity: normal
- nuget_source_name: null
opts:
description: |
Name to use for specified NuGet private source in the NuGet source list.
summary: ""
title: NuGet private source name
- nuget_source_path_or_url: null
opts:
description: |
Path or URL of the NuGet private package(s) source.
summary: ""
title: NuGet private source path / url
- nuget_source_username: null
opts:
description: |
UserName to be used when connecting to an authenticated source.
summary: ""
title: NuGet private source username
- nuget_source_password: null
opts:
description: Password to be used when connecting to an authenticated source.
summary: ""
title: NuGet private source password
================================================
FILE: steps/cakebuild/1.0.7/step.yml
================================================
title: Cake Script
summary: Cake (C# Make) is a cross platform build automation system
description: "Cake (C# Make) is a cross platform build automation system with a C#
DSL to do things like compiling code, \ncopy files/folders, running unit tests,
compress files and build NuGet packages. \nMore info: https://cakebuild.net/"
website: https://github.com/cake-build/bitrise-cake-step
source_code_url: https://github.com/cake-build/bitrise-cake-step
support_url: https://github.com/cake-build/bitrise-cake-step/issues
published_at: 2018-03-09T11:21:52.664581+01:00
source:
git: https://github.com/cake-build/bitrise-cake-step.git
commit: 8913a0b3a4acc0cdc8d82bd825351af285221fbb
host_os_tags:
- osx-10.10
project_type_tags:
- xamarin
type_tags:
- build
is_requires_admin_user: false
is_always_run: false
is_skippable: false
inputs:
- opts:
description: |
Name of the script to execute. Default is build.cake
is_expand: true
is_required: true
title: Script
script: build.cake
- opts:
description: |
Target name to execute. Default is Default
is_expand: true
is_required: true
title: Target
target: Default
- configuration: Release
opts:
description: |
Configuration to build. Default is Release.
is_expand: true
is_required: true
title: Configuration
- opts:
description: |
Specifies the amount of information to be displayed (quiet, minimal, normal, verbose, diagnostic).
is_expand: true
is_required: true
title: Verbosity
value_options:
- quiet
- minimal
- normal
- verbose
- diagnostic
verbosity: normal
- nuget_source_name: null
opts:
description: |
Name to use for specified NuGet private source in the NuGet source list.
summary: ""
title: NuGet private source name
- nuget_source_path_or_url: null
opts:
description: |
Path or URL of the NuGet private package(s) source.
summary: ""
title: NuGet private source path / url
- nuget_source_username: null
opts:
description: |
UserName to be used when connecting to an authenticated source.
summary: ""
title: NuGet private source username
- nuget_source_password: null
opts:
description: Password to be used when connecting to an authenticated source.
summary: ""
title: NuGet private source password
================================================
FILE: steps/cakebuild/1.0.8/step.yml
================================================
title: Cake Script
summary: Cake (C# Make) is a cross platform build automation system
description: "Cake (C# Make) is a cross platform build automation system with a C#
DSL to do things like compiling code, \ncopy files/folders, running unit tests,
compress files and build NuGet packages. \nMore info: https://cakebuild.net/"
website: https://github.com/cake-build/bitrise-cake-step
source_code_url: https://github.com/cake-build/bitrise-cake-step
support_url: https://github.com/cake-build/bitrise-cake-step/issues
published_at: 2018-04-19T00:17:15.686104+02:00
source:
git: https://github.com/cake-build/bitrise-cake-step.git
commit: 5d490cf665426ac770f37e4a6695f80942466d30
host_os_tags:
- osx-10.10
project_type_tags:
- xamarin
type_tags:
- build
is_requires_admin_user: false
is_always_run: false
is_skippable: false
inputs:
- opts:
description: |
Name of the script to execute. Default is build.cake
is_expand: true
is_required: true
title: Script
script: build.cake
- opts:
description: |
Target name to execute. Default is Default
is_expand: true
is_required: true
title: Target
target: Default
- configuration: Release
opts:
description: |
Configuration to build. Default is Release.
is_expand: true
is_required: true
title: Configuration
- opts:
description: |
Specifies the amount of information to be displayed (quiet, minimal, normal, verbose, diagnostic).
is_expand: true
is_required: true
title: Verbosity
value_options:
- quiet
- minimal
- normal
- verbose
- diagnostic
verbosity: normal
- custom_args: null
opts:
description: |
Custom arguments to add to the build script
is_expand: true
is_required: false
title: Custom arguments
- nuget_source_name: null
opts:
description: |
Name to use for specified NuGet private source in the NuGet source list.
summary: ""
title: NuGet private source name
- nuget_source_path_or_url: null
opts:
description: |
Path or URL of the NuGet private package(s) source.
summary: ""
title: NuGet private source path / url
- nuget_source_username: null
opts:
description: |
UserName to be used when connecting to an authenticated source.
summary: ""
title: NuGet private source username
- nuget_source_password: null
opts:
description: Password to be used when connecting to an authenticated source.
summary: ""
title: NuGet private source password
================================================
FILE: steps/cakebuild/1.0.9/step.yml
================================================
title: Cake Script
summary: Cake (C# Make) is a cross platform build automation system
description: "Cake (C# Make) is a cross platform build automation system with a C#
DSL to do things like compiling code, \ncopy files/folders, running unit tests,
compress files and build NuGet packages. \nMore info: https://cakebuild.net/"
website: https://github.com/cake-build/bitrise-cake-step
source_code_url: https://github.com/cake-build/bitrise-cake-step
support_url: https://github.com/cake-build/bitrise-cake-step/issues
published_at: 2018-04-19T12:41:36.550613+02:00
source:
git: https://github.com/cake-build/bitrise-cake-step.git
commit: 16714950bb1c90c02a0bf3b5219a5a92dabc1e4c
host_os_tags:
- osx-10.10
project_type_tags:
- xamarin
type_tags:
- build
is_requires_admin_user: false
is_always_run: false
is_skippable: false
inputs:
- opts:
description: |
Name of the script to execute. Default is build.cake
is_expand: true
is_required: true
title: Script
script: build.cake
- opts:
description: |
Target name to execute. Default is Default
is_expand: true
is_required: true
title: Target
target: Default
- configuration: Release
opts:
description: |
Configuration to build. Default is Release.
is_expand: true
is_required: true
title: Configuration
- opts:
description: |
Specifies the amount of information to be displayed (quiet, minimal, normal, verbose, diagnostic).
is_expand: true
is_required: true
title: Verbosity
value_options:
- quiet
- minimal
- normal
- verbose
- diagnostic
verbosity: normal
- custom_args: null
opts:
description: |
Custom arguments to add to the build script
is_expand: false
is_required: false
title: Custom arguments
- nuget_source_name: null
opts:
description: |
Name to use for specified NuGet private source in the NuGet source list.
summary: ""
title: NuGet private source name
- nuget_source_path_or_url: null
opts:
description: |
Path or URL of the NuGet private package(s) source.
summary: ""
title: NuGet private source path / url
- nuget_source_username: null
opts:
description: |
UserName to be used when connecting to an authenticated source.
summary: ""
title: NuGet private source username
- nuget_source_password: null
opts:
description: |
Password to be used when connecting to an authenticated source.
summary: ""
title: NuGet private source password
================================================
FILE: steps/cakebuild/step-info.yml
================================================
maintainer: community
================================================
FILE: steps/calabash-android-uitest/0.9.0/step.yml
================================================
title: Step Calabash android UITest
summary: Step Calabash android UITest
description: Step Calabash android UITest
website: https://github.com/bitrise-steplib/steps-calabash-android-uitest
source_code_url: https://github.com/bitrise-steplib/steps-calabash-android-uitest
support_url: https://github.com/bitrise-steplib/steps-calabash-android-uitest/issues
published_at: 2015-12-21T12:47:57.895124084+01:00
source:
git: https://github.com/bitrise-steplib/steps-calabash-android-uitest.git
commit: b8a99d76d2552a52619f725448dfd429a54aacf7
host_os_tags:
- osx-10.10
project_type_tags:
- android
type_tags:
- testing
is_requires_admin_user: false
is_always_run: false
is_skippable: false
run_if: ""
inputs:
- apk_path: null
opts:
description: |
APK path
is_expand: true
is_required: true
title: APK path
outputs:
- BITRISE_XAMARIN_TEST_RESULT: null
opts:
title: Result of the tests. 'succeeded' or 'failed'.
value_options:
- succeeded
- failed
================================================
FILE: steps/calabash-android-uitest/0.9.1/step.yml
================================================
title: Calabash Android UI test
summary: Calabash Android UI test step
description: Calabash Android UI test step
website: https://github.com/bitrise-steplib/steps-calabash-android-uitest
source_code_url: https://github.com/bitrise-steplib/steps-calabash-android-uitest
support_url: https://github.com/bitrise-steplib/steps-calabash-android-uitest/issues
published_at: 2016-03-09T15:44:21.785795151+01:00
source:
git: https://github.com/bitrise-steplib/steps-calabash-android-uitest.git
commit: d1fd87aacdbeb76be7aaf6fc3a21305821ac6ab5
host_os_tags:
- osx-10.10
project_type_tags:
- android
type_tags:
- testing
is_requires_admin_user: false
is_always_run: false
is_skippable: false
run_if: ""
inputs:
- apk_path: $BITRISE_APK_PATH
opts:
description: |
APK path
is_expand: true
is_required: true
title: APK path
outputs:
- BITRISE_XAMARIN_TEST_RESULT: null
opts:
title: Result of the tests. 'succeeded' or 'failed'.
value_options:
- succeeded
- failed
================================================
FILE: steps/calabash-android-uitest/1.0.0/step.yml
================================================
title: Calabash Android UI test
summary: Calabash Android UI test step
description: Calabash Android UI test step
website: https://github.com/bitrise-steplib/steps-calabash-android-uitest
source_code_url: https://github.com/bitrise-steplib/steps-calabash-android-uitest
support_url: https://github.com/bitrise-steplib/steps-calabash-android-uitest/issues
published_at: 2016-10-26T14:24:38.950120692+02:00
source:
git: https://github.com/bitrise-steplib/steps-calabash-android-uitest.git
commit: f2d52945390ddef84a0cbf6609bcd337c2cd6099
host_os_tags:
- osx-10.10
project_type_tags:
- android
type_tags:
- testing
toolkit:
go:
package_name: github.com/bitrise-steplib/steps-calabash-android-uitest
deps:
brew:
- name: go
apt_get:
- name: golang
bin_name: go
is_requires_admin_user: true
is_always_run: false
is_skippable: false
inputs:
- apk_path: $BITRISE_APK_PATH
opts:
description: |
APK path
is_expand: true
is_required: true
title: APK path
- calabash_android_version: null
opts:
description: |
calabash-android gem version to use.
__If this input specifies the gem version, this version will be used, even `gem_file_path` provided.__
If `calabash_android_version` not specified:
- gem version will be used specified by Gemfile at `gem_file_path`
- if Gemfile not exist with calabash-android gem, latest version will be used
title: calabash-android gem version
- gem_file_path: $BITRISE_SOURCE_DIR/Gemfile
opts:
description: |
Path to the Gemfile which contains calabash-android gem.
If Gemfile not exist or does not contain calabash-android gem:
- if `calabash_android_version` not specified, latest version will be used
title: Gemfile path
outputs:
- BITRISE_XAMARIN_TEST_RESULT: null
opts:
title: Result of the tests. 'succeeded' or 'failed'.
value_options:
- succeeded
- failed
================================================
FILE: steps/calabash-android-uitest/1.1.0/step.yml
================================================
title: Calabash Android UI test
summary: Calabash Android UI test step
description: Calabash Android UI test step
website: https://github.com/bitrise-steplib/steps-calabash-android-uitest
source_code_url: https://github.com/bitrise-steplib/steps-calabash-android-uitest
support_url: https://github.com/bitrise-steplib/steps-calabash-android-uitest/issues
published_at: 2017-01-23T09:59:49.804675278+01:00
source:
git: https://github.com/bitrise-steplib/steps-calabash-android-uitest.git
commit: 6cbd08c4d181f39c6af2cbc1206fe270d5fa167f
host_os_tags:
- osx-10.10
project_type_tags:
- android
type_tags:
- testing
toolkit:
go:
package_name: github.com/bitrise-steplib/steps-calabash-android-uitest
deps:
brew:
- name: go
apt_get:
- name: golang
bin_name: go
is_requires_admin_user: true
is_always_run: false
is_skippable: false
inputs:
- opts:
description: "Path to the directory, which contains your calabash features directory.\n\nFor
emxaple:\nIf calabash features directory path is: `CreditCardValidator.Droid/features`,
\ \nthen work_dir should be: `CreditCardValidator.Droid`"
is_required: true
title: Directory of your calabash features
work_dir: null
- gem_file_path: $work_dir/Gemfile
opts:
description: |
Path to the Gemfile which contains calabash-android gem.
If Gemfile not exist or does not contain calabash-android gem:
- if `calabash_android_version` not specified, latest version will be used
title: Gemfile path
- apk_path: $BITRISE_APK_PATH
opts:
description: |
Path to the APK to test.
__The APK should have Internet permission.__
In case of Xamarin:
Use an APK, which not built using Shared mono runtime (_Shared mono runtime is enabled by default in DEBUG builds_).
is_expand: true
is_required: true
title: APK path
- android_home: $ANDROID_HOME
opts:
description: |
Path to the Android Home Directory.
is_expand: true
is_required: true
title: Android Home Directory
- calabash_android_version: null
opts:
description: |
calabash-android gem version to use.
__If this input specifies the gem version, this version will be used, even `gem_file_path` provided.__
If `calabash_android_version` not specified:
- gem version will be used specified by Gemfile at `gem_file_path`
- if Gemfile not exist with calabash-android gem, latest version will be used
title: calabash-android gem version
outputs:
- BITRISE_XAMARIN_TEST_RESULT: null
opts:
title: Result of the tests. 'succeeded' or 'failed'.
value_options:
- succeeded
- failed
================================================
FILE: steps/calabash-android-uitest/1.2.0/step.yml
================================================
title: Calabash Android UI test
summary: Calabash Android UI test step
description: Calabash Android UI test step
website: https://github.com/bitrise-steplib/steps-calabash-android-uitest
source_code_url: https://github.com/bitrise-steplib/steps-calabash-android-uitest
support_url: https://github.com/bitrise-steplib/steps-calabash-android-uitest/issues
published_at: 2017-02-20T16:10:28.208396213+01:00
source:
git: https://github.com/bitrise-steplib/steps-calabash-android-uitest.git
commit: 14c3f17b46b0160ef7123d5a9c1da61512b17637
host_os_tags:
- osx-10.10
project_type_tags:
- android
type_tags:
- testing
toolkit:
go:
package_name: github.com/bitrise-steplib/steps-calabash-android-uitest
deps:
brew:
- name: go
apt_get:
- name: golang
bin_name: go
is_requires_admin_user: true
is_always_run: false
is_skippable: false
inputs:
- opts:
description: "Path to the directory, which contains your calabash features directory.\n\nFor
emxaple:\nIf calabash features directory path is: `CreditCardValidator.Droid/features`,
\ \nthen work_dir should be: `CreditCardValidator.Droid`"
is_required: true
title: Directory of your calabash features
work_dir: null
- gem_file_path: $work_dir/Gemfile
opts:
description: |
Path to the Gemfile which contains calabash-android gem.
If Gemfile not exist or does not contain calabash-android gem:
- if `calabash_android_version` not specified, latest version will be used
title: Gemfile path
- apk_path: $BITRISE_APK_PATH
opts:
description: |
Path to the APK to test.
__The APK should have Internet permission.__
In case of Xamarin:
Use an APK, which not built using Shared mono runtime (_Shared mono runtime is enabled by default in DEBUG builds_).
is_expand: true
is_required: true
title: APK path
- additional_options: --format html --out $BITRISE_DEPLOY_DIR/calabash-android_report.html
opts:
description: |
Options added to the end of the `calabash-android run` call.
title: Additional options for `calabash-android run` call
- android_home: $ANDROID_HOME
opts:
description: |
Path to the Android Home Directory.
is_expand: true
is_required: true
title: Android Home Directory
- calabash_android_version: null
opts:
description: |
calabash-android gem version to use.
__If this input specifies the gem version, this version will be used, even `gem_file_path` provided.__
If `calabash_android_version` not specified:
- gem version will be used specified by Gemfile at `gem_file_path`
- if Gemfile not exist with calabash-android gem, latest version will be used
title: calabash-android gem version
outputs:
- BITRISE_XAMARIN_TEST_RESULT: null
opts:
title: Result of the tests. 'succeeded' or 'failed'.
value_options:
- succeeded
- failed
================================================
FILE: steps/calabash-android-uitest/1.2.1/step.yml
================================================
title: Calabash Android UI test
summary: Calabash Android UI test step
description: Calabash Android UI test step
website: https://github.com/bitrise-steplib/steps-calabash-android-uitest
source_code_url: https://github.com/bitrise-steplib/steps-calabash-android-uitest
support_url: https://github.com/bitrise-steplib/steps-calabash-android-uitest/issues
published_at: 2017-03-06T13:24:40.160003636+01:00
source:
git: https://github.com/bitrise-steplib/steps-calabash-android-uitest.git
commit: f18958faae9b475932a6ece9facf9c11ab6ceb18
host_os_tags:
- osx-10.10
project_type_tags:
- android
- xamarin
- cordova
- ionic
- react-native
type_tags:
- test
toolkit:
go:
package_name: github.com/bitrise-steplib/steps-calabash-android-uitest
deps:
brew:
- name: go
apt_get:
- name: golang
bin_name: go
is_requires_admin_user: true
is_always_run: false
is_skippable: false
inputs:
- opts:
description: "Path to the directory, which contains your calabash features directory.\n\nFor
emxaple:\nIf calabash features directory path is: `CreditCardValidator.Droid/features`,
\ \nthen work_dir should be: `CreditCardValidator.Droid`"
is_required: true
title: Directory of your calabash features
work_dir: null
- gem_file_path: $work_dir/Gemfile
opts:
description: |
Path to the Gemfile which contains calabash-android gem.
If Gemfile not exist or does not contain calabash-android gem:
- if `calabash_android_version` not specified, latest version will be used
title: Gemfile path
- apk_path: $BITRISE_APK_PATH
opts:
description: |
Path to the APK to test.
__The APK should have Internet permission.__
In case of Xamarin:
Use an APK, which not built using Shared mono runtime (_Shared mono runtime is enabled by default in DEBUG builds_).
is_expand: true
is_required: true
title: APK path
- additional_options: --format html --out $BITRISE_DEPLOY_DIR/calabash-android_report.html
opts:
description: |
Options added to the end of the `calabash-android run` call.
title: Additional options for `calabash-android run` call
- android_home: $ANDROID_HOME
opts:
description: |
Path to the Android Home Directory.
is_expand: true
is_required: true
title: Android Home Directory
- calabash_android_version: null
opts:
description: |
calabash-android gem version to use.
__If this input specifies the gem version, this version will be used, even `gem_file_path` provided.__
If `calabash_android_version` not specified:
- gem version will be used specified by Gemfile at `gem_file_path`
- if Gemfile not exist with calabash-android gem, latest version will be used
title: calabash-android gem version
outputs:
- BITRISE_XAMARIN_TEST_RESULT: null
opts:
title: Result of the tests. 'succeeded' or 'failed'.
value_options:
- succeeded
- failed
================================================
FILE: steps/calabash-android-uitest/step-info.yml
================================================
maintainer: bitrise
================================================
FILE: steps/calabash-ios-uitest/0.9.0/step.yml
================================================
title: Step Calabash iOS UITest
summary: Step Calabash iOS UITest
description: Step Calabash iOS UITest
website: https://github.com/bitrise-steplib/steps-calabash-ios-uitest
source_code_url: https://github.com/bitrise-steplib/steps-calabash-ios-uitest
support_url: https://github.com/bitrise-steplib/steps-calabash-ios-uitest/issues
published_at: 2015-12-21T10:55:20.13729491+01:00
source:
git: https://github.com/bitrise-steplib/steps-calabash-ios-uitest.git
commit: c2323838b7f9ac7d55b2838996aaaf2b6588cb9f
host_os_tags:
- osx-10.10
project_type_tags:
- xamarin
type_tags:
- testing
is_requires_admin_user: true
is_always_run: false
is_skippable: false
run_if: ""
inputs:
- opts:
description: |
Set it as it is shown in
Xcode's device selection dropdown UI.
A couple of examples (the
actual available options depend on which versions
are installed):
* iPhone 6
* iPhone 6 Plus
* iPad
* iPad Air
is_expand: true
is_required: true
title: Device
simulator_device: iPhone 6
- opts:
description: |
A couple of format examples:
* iOS 8.4
* iOS 9.1
is_expand: true
is_required: false
title: OS version
simulator_os_version: null
outputs:
- BITRISE_XAMARIN_TEST_RESULT: null
opts:
title: Result of the tests. 'succeeded' or 'failed'.
value_options:
- succeeded
- failed
================================================
FILE: steps/calabash-ios-uitest/0.9.1/step.yml
================================================
title: Calabash iOS UI test
summary: Calabash iOS UI test step
description: Calabash iOS UI test step
website: https://github.com/bitrise-steplib/steps-calabash-ios-uitest
source_code_url: https://github.com/bitrise-steplib/steps-calabash-ios-uitest
support_url: https://github.com/bitrise-steplib/steps-calabash-ios-uitest/issues
published_at: 2016-03-09T15:46:53.800915637+01:00
source:
git: https://github.com/bitrise-steplib/steps-calabash-ios-uitest.git
commit: 70365e88315188fd71c7436136eb74012eb302d1
host_os_tags:
- osx-10.10
project_type_tags:
- xamarin
type_tags:
- testing
is_requires_admin_user: true
is_always_run: false
is_skippable: false
run_if: ""
inputs:
- opts:
description: |
Set it as it is shown in
Xcode's device selection dropdown UI.
A couple of examples (the
actual available options depend on which versions
are installed):
* iPhone 6
* iPhone 6 Plus
* iPad
* iPad Air
is_expand: true
is_required: true
title: Device
simulator_device: iPhone 6
- opts:
description: |
A couple of format examples:
* iOS 8.4
* iOS 9.1
is_expand: true
is_required: false
title: OS version
simulator_os_version: null
outputs:
- BITRISE_XAMARIN_TEST_RESULT: null
opts:
title: Result of the tests. 'succeeded' or 'failed'.
value_options:
- succeeded
- failed
================================================
FILE: steps/calabash-ios-uitest/1.0.0/step.yml
================================================
title: Calabash iOS UI test
summary: Calabash iOS UI test step
description: Calabash iOS UI test step
website: https://github.com/bitrise-steplib/steps-calabash-ios-uitest
source_code_url: https://github.com/bitrise-steplib/steps-calabash-ios-uitest
support_url: https://github.com/bitrise-steplib/steps-calabash-ios-uitest/issues
published_at: 2016-10-25T17:03:37.369897394+02:00
source:
git: https://github.com/bitrise-steplib/steps-calabash-ios-uitest.git
commit: c562fb7161e2a7893961e5c442111f382fa90d15
host_os_tags:
- osx-10.10
project_type_tags:
- xamarin
type_tags:
- testing
toolkit:
go:
package_name: github.com/bitrise-steplib/steps-calabash-ios-uitest
deps:
brew:
- name: go
apt_get:
- name: golang
bin_name: go
is_requires_admin_user: true
is_always_run: false
is_skippable: false
inputs:
- opts:
description: |
Set it as it is shown in
Xcode's device selection dropdown UI.
A couple of examples (the
actual available options depend on which versions
are installed):
* iPhone 6
* iPhone 6 Plus
* iPad
* iPad Air
is_required: true
title: Device
simulator_device: iPhone 6
- opts:
description: |
A couple of format examples:
* iOS 8.4
* iOS 9.3
* latest
is_required: true
title: OS version
simulator_os_version: latest
- calabash_cucumber_version: null
opts:
description: |
calabash-cucumber gem version to use.
__If this input specifies the gem version, this version will be used, even `gem_file_path` provided.__
If `calabash_cucumber_version` not specified:
- gem version will be used specified by Gemfile at `gem_file_path`
- if Gemfile not exist with calabash-cucumber gem, latest version will be used
title: calabash-cucumber gem version
- gem_file_path: $BITRISE_SOURCE_DIR/Gemfile
opts:
description: |
Path to the Gemfile which contains calabash-cucumber gem.
If Gemfile not exist or does not contain calabash-cucumber gem:
- if `calabash_cucumber_version` not specified, latest version will be used
title: Gemfile path
outputs:
- BITRISE_XAMARIN_TEST_RESULT: null
opts:
title: Result of the tests. 'succeeded' or 'failed'.
value_options:
- succeeded
- failed
================================================
FILE: steps/calabash-ios-uitest/1.1.0/step.yml
================================================
title: Calabash iOS UI test
summary: Calabash iOS UI test step
description: Calabash iOS UI test step
website: https://github.com/bitrise-steplib/steps-calabash-ios-uitest
source_code_url: https://github.com/bitrise-steplib/steps-calabash-ios-uitest
support_url: https://github.com/bitrise-steplib/steps-calabash-ios-uitest/issues
published_at: 2016-10-26T13:43:26.361846907+02:00
source:
git: https://github.com/bitrise-steplib/steps-calabash-ios-uitest.git
commit: 676177084935c23b65c5fc3dd6dba01ebbd869fa
host_os_tags:
- osx-10.10
project_type_tags:
- xamarin
type_tags:
- testing
toolkit:
go:
package_name: github.com/bitrise-steplib/steps-calabash-ios-uitest
deps:
brew:
- name: go
apt_get:
- name: golang
bin_name: go
is_requires_admin_user: true
is_always_run: false
is_skippable: false
inputs:
- opts:
description: |
Set it as it is shown in
Xcode's device selection dropdown UI.
A couple of examples (the
actual available options depend on which versions
are installed):
* iPhone 6
* iPhone 6 Plus
* iPad
* iPad Air
is_required: true
title: Device
simulator_device: iPhone 6
- opts:
description: |
A couple of format examples:
* iOS 8.4
* iOS 9.3
* latest
is_required: true
title: OS version
simulator_os_version: latest
- calabash_cucumber_version: null
opts:
description: |
calabash-cucumber gem version to use.
__If this input specifies the gem version, this version will be used, even `gem_file_path` provided.__
If `calabash_cucumber_version` not specified:
- gem version will be used specified by Gemfile at `gem_file_path`
- if Gemfile not exist with calabash-cucumber gem, latest version will be used
title: calabash-cucumber gem version
- gem_file_path: $BITRISE_SOURCE_DIR/Gemfile
opts:
description: |
Path to the Gemfile which contains calabash-cucumber gem.
If Gemfile not exist or does not contain calabash-cucumber gem:
- if `calabash_cucumber_version` not specified, latest version will be used
title: Gemfile path
outputs:
- BITRISE_XAMARIN_TEST_RESULT: null
opts:
title: Result of the tests. 'succeeded' or 'failed'.
value_options:
- succeeded
- failed
================================================
FILE: steps/calabash-ios-uitest/1.2.1/step.yml
================================================
title: Calabash iOS UI test
summary: Calabash iOS UI test step
description: Calabash iOS UI test step
website: https://github.com/bitrise-steplib/steps-calabash-ios-uitest
source_code_url: https://github.com/bitrise-steplib/steps-calabash-ios-uitest
support_url: https://github.com/bitrise-steplib/steps-calabash-ios-uitest/issues
published_at: 2017-01-20T15:39:38.273636469+01:00
source:
git: https://github.com/bitrise-steplib/steps-calabash-ios-uitest.git
commit: 4a557b5451e851799642e56208c3dcd952c7bf1e
host_os_tags:
- osx-10.10
project_type_tags:
- ios
type_tags:
- testing
toolkit:
go:
package_name: github.com/bitrise-steplib/steps-calabash-ios-uitest
deps:
brew:
- name: go
apt_get:
- name: golang
bin_name: go
is_requires_admin_user: true
is_always_run: false
is_skippable: false
inputs:
- opts:
description: "Path to the directory, which contains your calabash features directory.\n\nFor
emxaple:\nIf calabash features directory path is: `CreditCardValidator.iOS/features`,
\ \nthen work_dir should be: `CreditCardValidator.iOS`"
is_required: true
title: Directory of your calabash features
work_dir: null
- gem_file_path: $work_dir/Gemfile
opts:
description: |
Path to the Gemfile which contains calabash-cucumber gem.
If Gemfile not exist or does not contain calabash-cucumber gem:
- if `calabash_cucumber_version` input not specified, latest version will be used
title: Gemfile path
- app_path: $BITRISE_APP_PATH
opts:
description: |-
Path to the iOS .app file, which supports selected simulator `Device` architecture.
__In case of Xamarin .app file:__
You can ensure `Supported architectures` in your project's `Project Options/Code Generation and Runtime/Supported architectures`.
If `i386` architecture is selected, simulator device should be a 32-bit device.
If `x86_64` architecture is selected, simulator device should be a 64-bit device.
If `i386 + x86_64` architecture is selected, simulator can be both 32-bit and 64-bit device.
title: Path to the iOS .app file to test
- opts:
description: |
Set it as it is shown in
Xcode's device selection dropdown UI.
A couple of examples (the
actual available options depend on which versions
are installed):
* iPhone 6
* iPhone 6 Plus
* iPad
* iPad Air
is_required: true
title: Device
simulator_device: iPhone 6
- opts:
description: |
A couple of format examples:
* iOS 8.4
* iOS 9.3
* latest
is_required: true
title: OS version
simulator_os_version: latest
- calabash_cucumber_version: null
opts:
description: |
calabash-cucumber gem version to use.
__If this input specifies the gem version, this version will be used, even `gem_file_path` provided.__
If `calabash_cucumber_version` not specified:
- gem version will be used specified by Gemfile at `gem_file_path`
- if Gemfile not exist with calabash-cucumber gem, latest version will be used
title: calabash-cucumber gem version
outputs:
- BITRISE_XAMARIN_TEST_RESULT: null
opts:
title: Result of the tests. 'succeeded' or 'failed'.
value_options:
- succeeded
- failed
================================================
FILE: steps/calabash-ios-uitest/1.3.0/step.yml
================================================
title: Calabash iOS UI test
summary: Calabash iOS UI test step
description: Calabash iOS UI test step
website: https://github.com/bitrise-steplib/steps-calabash-ios-uitest
source_code_url: https://github.com/bitrise-steplib/steps-calabash-ios-uitest
support_url: https://github.com/bitrise-steplib/steps-calabash-ios-uitest/issues
published_at: 2017-02-20T16:59:24.195495186+01:00
source:
git: https://github.com/bitrise-steplib/steps-calabash-ios-uitest.git
commit: 5e2f25353acb8a58178f6ac21970341a57515164
host_os_tags:
- osx-10.10
project_type_tags:
- ios
type_tags:
- testing
toolkit:
go:
package_name: github.com/bitrise-steplib/steps-calabash-ios-uitest
deps:
brew:
- name: go
apt_get:
- name: golang
bin_name: go
is_requires_admin_user: true
is_always_run: false
is_skippable: false
inputs:
- opts:
description: "Path to the directory, which contains your calabash features directory.\n\nFor
emxaple:\nIf calabash features directory path is: `CreditCardValidator.iOS/features`,
\ \nthen work_dir should be: `CreditCardValidator.iOS`"
is_required: true
title: Directory of your calabash features
work_dir: null
- gem_file_path: $work_dir/Gemfile
opts:
description: |
Path to the Gemfile which contains calabash-cucumber gem.
If Gemfile not exist or does not contain calabash-cucumber gem:
- if `calabash_cucumber_version` input not specified, latest version will be used
title: Gemfile path
- app_path: $BITRISE_APP_PATH
opts:
description: |-
Path to the iOS .app file, which supports selected simulator `Device` architecture.
__In case of Xamarin .app file:__
You can ensure `Supported architectures` in your project's `Project Options/Code Generation and Runtime/Supported architectures`.
If `i386` architecture is selected, simulator device should be a 32-bit device.
If `x86_64` architecture is selected, simulator device should be a 64-bit device.
If `i386 + x86_64` architecture is selected, simulator can be both 32-bit and 64-bit device.
title: Path to the iOS .app file to test
- opts:
description: |
Set it as it is shown in
Xcode's device selection dropdown UI.
A couple of examples (the
actual available options depend on which versions
are installed):
* iPhone 6
* iPhone 6 Plus
* iPad
* iPad Air
is_required: true
title: Device
simulator_device: iPhone 6
- opts:
description: |
A couple of format examples:
* iOS 8.4
* iOS 9.3
* latest
is_required: true
title: OS version
simulator_os_version: latest
- additional_options: --format html --out $BITRISE_DEPLOY_DIR/calabash-android_report.html
opts:
description: |
Options added to the end of the `cucumber` call.
title: Additional options for `cucumber` call
- calabash_cucumber_version: null
opts:
description: |
calabash-cucumber gem version to use.
__If this input specifies the gem version, this version will be used, even `gem_file_path` provided.__
If `calabash_cucumber_version` not specified:
- gem version will be used specified by Gemfile at `gem_file_path`
- if Gemfile not exist with calabash-cucumber gem, latest version will be used
title: calabash-cucumber gem version
outputs:
- BITRISE_XAMARIN_TEST_RESULT: null
opts:
title: Result of the tests. 'succeeded' or 'failed'.
value_options:
- succeeded
- failed
================================================
FILE: steps/calabash-ios-uitest/1.3.1/step.yml
================================================
title: Calabash iOS UI test
summary: Calabash iOS UI test step
description: Calabash iOS UI test step
website: https://github.com/bitrise-steplib/steps-calabash-ios-uitest
source_code_url: https://github.com/bitrise-steplib/steps-calabash-ios-uitest
support_url: https://github.com/bitrise-steplib/steps-calabash-ios-uitest/issues
published_at: 2017-03-06T11:02:04.98460934+01:00
source:
git: https://github.com/bitrise-steplib/steps-calabash-ios-uitest.git
commit: 0e89afb3532d79fefe9e14e99e771f85d12c3fef
host_os_tags:
- osx-10.10
project_type_tags:
- ios
- xamarin
- cordova
- ionic
- react-native
type_tags:
- test
toolkit:
go:
package_name: github.com/bitrise-steplib/steps-calabash-ios-uitest
deps:
brew:
- name: go
apt_get:
- name: golang
bin_name: go
is_requires_admin_user: true
is_always_run: false
is_skippable: false
inputs:
- opts:
description: "Path to the directory, which contains your calabash features directory.\n\nFor
emxaple:\nIf calabash features directory path is: `CreditCardValidator.iOS/features`,
\ \nthen work_dir should be: `CreditCardValidator.iOS`"
is_required: true
title: Directory of your calabash features
work_dir: null
- gem_file_path: $work_dir/Gemfile
opts:
description: |
Path to the Gemfile which contains calabash-cucumber gem.
If Gemfile not exist or does not contain calabash-cucumber gem:
- if `calabash_cucumber_version` input not specified, latest version will be used
title: Gemfile path
- app_path: $BITRISE_APP_PATH
opts:
description: |-
Path to the iOS .app file, which supports selected simulator `Device` architecture.
__In case of Xamarin .app file:__
You can ensure `Supported architectures` in your project's `Project Options/Code Generation and Runtime/Supported architectures`.
If `i386` architecture is selected, simulator device should be a 32-bit device.
If `x86_64` architecture is selected, simulator device should be a 64-bit device.
If `i386 + x86_64` architecture is selected, simulator can be both 32-bit and 64-bit device.
title: Path to the iOS .app file to test
- opts:
description: |
Set it as it is shown in
Xcode's device selection dropdown UI.
A couple of examples (the
actual available options depend on which versions
are installed):
* iPhone 6
* iPhone 6 Plus
* iPad
* iPad Air
is_required: true
title: Device
simulator_device: iPhone 6
- opts:
description: |
A couple of format examples:
* iOS 8.4
* iOS 9.3
* latest
is_required: true
title: OS version
simulator_os_version: latest
- additional_options: --format html --out $BITRISE_DEPLOY_DIR/calabash-ios_report.html
opts:
description: |
Options added to the end of the `cucumber` call.
title: Additional options for `cucumber` call
- calabash_cucumber_version: null
opts:
description: |
calabash-cucumber gem version to use.
__If this input specifies the gem version, this version will be used, even `gem_file_path` provided.__
If `calabash_cucumber_version` not specified:
- gem version will be used specified by Gemfile at `gem_file_path`
- if Gemfile not exist with calabash-cucumber gem, latest version will be used
title: calabash-cucumber gem version
outputs:
- BITRISE_XAMARIN_TEST_RESULT: null
opts:
title: Result of the tests. 'succeeded' or 'failed'.
value_options:
- succeeded
- failed
================================================
FILE: steps/calabash-ios-uitest/step-info.yml
================================================
maintainer: bitrise
================================================
FILE: steps/carthage/1.0.0/step.yml
================================================
title: Carthage
summary: Installs and updates Carthage to the latest available version and runs selected
Carthage command.
description: |-
Installs and updates Carthage to the latest available version and runs selected Carthage command.
For more information about Carthage, visit the [Carthage GitHub page](https://github.com/Carthage/Carthage).
website: https://github.com/bitrise-steplib/steps-carthage
source_code_url: https://github.com/bitrise-steplib/steps-carthage
support_url: https://github.com/bitrise-steplib/steps-carthage/issues
published_at: 2015-09-30T10:11:10.013990903-07:00
source:
git: https://github.com/bitrise-steplib/steps-carthage.git
commit: 832df9d4d8ee954b962f6e7f907951e5783fc413
host_os_tags:
- osx-10.10
project_type_tags:
- ios
type_tags:
- carthage
- system
dependencies:
- manager: brew
name: carthage
is_requires_admin_user: false
is_always_run: false
is_skippable: false
run_if: ""
inputs:
- carthage_command: bootstrap
opts:
description: |-
Select a command to set up your dependencies with.
* `bootstrap`: initializes the project with checking out & building all dependencies. (default)
* `update`: updates all dependencies.
* `build`: builds all checked out items.
summary: Select a command to set up your dependencies with.
title: Carthage command to run
value_options:
- bootstrap
- update
- build
- no_use_binaries: "false"
opts:
summary: |-
Use this flag to make sure Carthage checks out all dependencies (otherwise
it defaults to binary framework releases). False by default.
title: Set no use binaries flag
value_options:
- "true"
- "false"
================================================
FILE: steps/carthage/1.0.1/step.yml
================================================
title: Carthage
summary: Installs and updates Carthage to the latest available version and runs selected
Carthage command.
description: |-
Installs and updates Carthage to the latest available version and runs selected Carthage command.
For more information about Carthage, visit the [Carthage GitHub page](https://github.com/Carthage/Carthage).
website: https://github.com/bitrise-steplib/steps-carthage
source_code_url: https://github.com/bitrise-steplib/steps-carthage
support_url: https://github.com/bitrise-steplib/steps-carthage/issues
published_at: 2015-10-27T16:10:16.581565978+01:00
source:
git: https://github.com/bitrise-steplib/steps-carthage.git
commit: 4011cb9de65bc3561e0d137b8d40bd44ed93d217
host_os_tags:
- osx-10.10
project_type_tags:
- ios
type_tags:
- carthage
- system
is_requires_admin_user: false
is_always_run: false
is_skippable: false
run_if: ""
inputs:
- carthage_command: bootstrap
opts:
description: |-
Select a command to set up your dependencies with.
* `bootstrap`: initializes the project with checking out & building all dependencies. (default)
* `update`: updates all dependencies.
* `build`: builds all checked out items.
summary: Select a command to set up your dependencies with.
title: Carthage command to run
value_options:
- bootstrap
- update
- build
- no_use_binaries: "false"
opts:
summary: |-
Use this flag to make sure Carthage checks out all dependencies (otherwise
it defaults to binary framework releases). False by default.
title: Set no use binaries flag
value_options:
- "true"
- "false"
- opts:
summary: Use this flag to have a verbose output of the carthage command. False
by default.
title: Set verbose output flag
value_options:
- "true"
- "false"
verbose_output: "false"
- carthage_version: default
opts:
summary: Specify system default, or latest (0.9.4) Carthage to use
title: Carthage version
value_options:
- default
- 0.9.4
- opts:
description: |
This directory will be set as the current working
directory for the carthage command.
title: Working directory
working_dir: null
================================================
FILE: steps/carthage/1.0.2/step.yml
================================================
title: Carthage
summary: Installs and updates Carthage to the latest available version and runs selected
Carthage command.
description: |-
Installs and updates Carthage to the latest available version and runs selected Carthage command.
For more information about Carthage, visit the [Carthage GitHub page](https://github.com/Carthage/Carthage).
website: https://github.com/bitrise-steplib/steps-carthage
source_code_url: https://github.com/bitrise-steplib/steps-carthage
support_url: https://github.com/bitrise-steplib/steps-carthage/issues
published_at: 2015-11-06T08:32:58.942443976+01:00
source:
git: https://github.com/bitrise-steplib/steps-carthage.git
commit: daf9135550fb65ed0f9d291e357d9259d4ff5ba6
host_os_tags:
- osx-10.10
project_type_tags:
- ios
type_tags:
- carthage
- system
is_requires_admin_user: false
is_always_run: false
is_skippable: false
run_if: ""
inputs:
- carthage_command: bootstrap
opts:
description: |-
Select a command to set up your dependencies with.
* `bootstrap`: initializes the project with checking out & building all dependencies. (default)
* `update`: updates all dependencies.
* `build`: builds all checked out items.
summary: Select a command to set up your dependencies with.
title: Carthage command to run
value_options:
- bootstrap
- update
- build
- no_use_binaries: "false"
opts:
summary: |-
Use this flag to make sure Carthage checks out all dependencies (otherwise
it defaults to binary framework releases). False by default.
title: Set no use binaries flag
value_options:
- "true"
- "false"
- opts:
summary: Use this flag to have a verbose output of the carthage command. False
by default.
title: Set verbose output flag
value_options:
- "true"
- "false"
verbose_output: "false"
- carthage_version: default
opts:
summary: Specify system default, or latest (0.9.4) Carthage to use
title: Carthage version
value_options:
- default
- 0.9.4
- opts:
description: |
This directory will be set as the current working
directory for the carthage command.
title: Working directory
working_dir: null
================================================
FILE: steps/carthage/1.0.3/step.yml
================================================
title: Carthage
summary: Installs and updates Carthage to the latest available version and runs selected
Carthage command.
description: |-
Installs and updates Carthage to the latest available version and runs selected Carthage command.
For more information about Carthage, visit the [Carthage GitHub page](https://github.com/Carthage/Carthage).
website: https://github.com/bitrise-steplib/steps-carthage
source_code_url: https://github.com/bitrise-steplib/steps-carthage
support_url: https://github.com/bitrise-steplib/steps-carthage/issues
published_at: 2015-11-25T11:16:52.17736794+01:00
source:
git: https://github.com/bitrise-steplib/steps-carthage.git
commit: 5825a8ce53dc8ea91b6240295ba6ec88b3a1517c
host_os_tags:
- osx-10.10
project_type_tags:
- ios
type_tags:
- carthage
- system
is_requires_admin_user: false
is_always_run: false
is_skippable: false
run_if: ""
inputs:
- carthage_command: bootstrap
opts:
description: |-
Select a command to set up your dependencies with.
* `bootstrap`: initializes the project with checking out & building all dependencies. (default)
* `update`: updates all dependencies.
* `build`: builds all checked out items.
summary: Select a command to set up your dependencies with.
title: Carthage command to run
value_options:
- bootstrap
- update
- build
- no_use_binaries: "false"
opts:
summary: |-
Use this flag to make sure Carthage checks out all dependencies (otherwise
it defaults to binary framework releases). False by default.
title: Set no use binaries flag
value_options:
- "true"
- "false"
- opts:
summary: Use this flag to have a verbose output of the carthage command. False
by default.
title: Set verbose output flag
value_options:
- "true"
- "false"
verbose_output: "false"
- opts:
description: |
This directory will be set as the current working
directory for the carthage command.
title: Working directory
working_dir: null
================================================
FILE: steps/carthage/1.0.4/step.yml
================================================
title: Carthage
summary: Installs and updates Carthage to the latest available version and runs selected
Carthage command.
description: |-
Installs and updates Carthage to the latest available version and runs selected Carthage command.
For more information about Carthage, visit the [Carthage GitHub page](https://github.com/Carthage/Carthage).
website: https://github.com/bitrise-steplib/steps-carthage
source_code_url: https://github.com/bitrise-steplib/steps-carthage
support_url: https://github.com/bitrise-steplib/steps-carthage/issues
published_at: 2015-11-28T23:15:53.627741292+01:00
source:
git: https://github.com/bitrise-steplib/steps-carthage.git
commit: f955d6f6393bd1b1daf2a9479b6e116fc99dfcb1
host_os_tags:
- osx-10.10
project_type_tags:
- ios
type_tags:
- carthage
- system
is_requires_admin_user: false
is_always_run: false
is_skippable: false
run_if: ""
inputs:
- carthage_command: bootstrap
opts:
description: |-
Select a command to set up your dependencies with.
* `bootstrap`: initializes the project with checking out & building all dependencies. (default)
* `update`: updates all dependencies.
* `build`: builds all checked out items.
summary: Select a command to set up your dependencies with.
title: Carthage command to run
value_options:
- bootstrap
- update
- build
- no_use_binaries: "false"
opts:
summary: |-
Use this flag to make sure Carthage checks out all dependencies (otherwise
it defaults to binary framework releases). False by default.
title: Set no use binaries flag
value_options:
- "true"
- "false"
- opts:
summary: Use this flag to have a verbose output of the carthage command. False
by default.
title: Set verbose output flag
value_options:
- "true"
- "false"
verbose_output: "false"
- opts:
description: |
This directory will be set as the current working
directory for the carthage command.
title: Working directory
working_dir: null
- opts:
description: |
Choose which platform to build your dependencies for.
title: Platform
value_options:
- iOS
- Mac
- iOS,Mac
platform: iOS
================================================
FILE: steps/carthage/1.0.5/step.yml
================================================
title: Carthage
summary: Installs and updates Carthage to the latest available version and runs selected
Carthage command.
description: |-
Installs and updates Carthage to the latest available version and runs selected Carthage command.
For more information about Carthage, visit the [Carthage GitHub page](https://github.com/Carthage/Carthage).
website: https://github.com/bitrise-steplib/steps-carthage
source_code_url: https://github.com/bitrise-steplib/steps-carthage
support_url: https://github.com/bitrise-steplib/steps-carthage/issues
published_at: 2015-12-13T14:00:54.436772834-05:00
source:
git: https://github.com/bitrise-steplib/steps-carthage.git
commit: 6e5c311f8addc58dacbfab8370171c0debf5b7df
host_os_tags:
- osx-10.10
project_type_tags:
- ios
type_tags:
- carthage
- system
is_requires_admin_user: false
is_always_run: false
is_skippable: false
run_if: ""
inputs:
- carthage_command: bootstrap
opts:
description: |-
Select a command to set up your dependencies with.
* `bootstrap`: initializes the project with checking out & building all dependencies. (default)
* `update`: updates all dependencies.
* `build`: builds all checked out items.
summary: Select a command to set up your dependencies with.
title: Carthage command to run
value_options:
- bootstrap
- update
- build
- no_use_binaries: "false"
opts:
summary: |-
Use this flag to make sure Carthage checks out all dependencies (otherwise
it defaults to binary framework releases). False by default.
title: Set no use binaries flag
value_options:
- "true"
- "false"
- opts:
summary: Use this flag to have a verbose output of the carthage command. False
by default.
title: Set verbose output flag
value_options:
- "true"
- "false"
verbose_output: "false"
- opts:
summary: Use this flag to use ssh when cloning the repos. False by default.
title: Set ssh flag
value_options:
- "true"
- "false"
ssh_output: "false"
- opts:
description: |
This directory will be set as the current working
directory for the carthage command.
title: Working directory
working_dir: null
- opts:
description: |
Choose which platform to build your dependencies for.
title: Platform
value_options:
- iOS
- Mac
- iOS,Mac
platform: iOS
================================================
FILE: steps/carthage/1.0.6/step.yml
================================================
title: Carthage
summary: Installs and updates Carthage to the latest available version and runs selected
Carthage command.
description: |-
Installs and updates Carthage to the latest available version and runs selected Carthage command.
For more information about Carthage, visit the [Carthage GitHub page](https://github.com/Carthage/Carthage).
website: https://github.com/bitrise-steplib/steps-carthage
source_code_url: https://github.com/bitrise-steplib/steps-carthage
support_url: https://github.com/bitrise-steplib/steps-carthage/issues
published_at: 2016-01-09T15:03:54.312100561+01:00
source:
git: https://github.com/bitrise-steplib/steps-carthage.git
commit: c116e5609903706f284347b3028f9d19ad68e2c9
host_os_tags:
- osx-10.10
project_type_tags:
- ios
type_tags:
- carthage
- system
is_requires_admin_user: false
is_always_run: false
is_skippable: false
run_if: ""
inputs:
- carthage_command: update
opts:
description: |-
Select a command to set up your dependencies with.
* `bootstrap`: initializes the project with checking out & building all dependencies. (default)
* `update`: updates all dependencies.
* `build`: builds all checked out items.
summary: Select a command to set up your dependencies with.
title: Carthage command to run
value_options:
- bootstrap
- update
- build
- no_use_binaries: "false"
opts:
summary: |-
Use this flag to make sure Carthage checks out all dependencies (otherwise
it defaults to binary framework releases). False by default.
title: Set no use binaries flag
value_options:
- "true"
- "false"
- opts:
summary: Use this flag to have a verbose output of the carthage command. False
by default.
title: Set verbose output flag
value_options:
- "true"
- "false"
verbose_output: "false"
- opts:
summary: Use this flag to use ssh when cloning the repos. False by default.
title: Set ssh flag
value_options:
- "true"
- "false"
ssh_output: "false"
- opts:
description: |
This directory will be set as the current working
directory for the carthage command.
title: Working directory
working_dir: null
- opts:
description: |
Choose which platform to build your dependencies for.
title: Platform
value_options:
- iOS
- Mac
- iOS,Mac
platform: iOS
- carthage_options: null
opts:
description: |-
Options added to the end of the Carthage call.
You can use multiple options, separated by a space
character.
title: Additional options for `carthage` command
================================================
FILE: steps/carthage/1.0.7/step.yml
================================================
title: Carthage
summary: Installs and updates Carthage to the latest available version and runs selected
Carthage command.
description: |-
Installs and updates Carthage to the latest available version and runs selected Carthage command.
For more information about Carthage, visit the [Carthage GitHub page](https://github.com/Carthage/Carthage).
website: https://github.com/bitrise-steplib/steps-carthage
source_code_url: https://github.com/bitrise-steplib/steps-carthage
support_url: https://github.com/bitrise-steplib/steps-carthage/issues
published_at: 2016-01-27T09:03:45.204827659+01:00
source:
git: https://github.com/bitrise-steplib/steps-carthage.git
commit: 833b276a303381122d8c16aaddd4ac75ff2863ce
host_os_tags:
- osx-10.10
project_type_tags:
- ios
type_tags:
- carthage
- system
is_requires_admin_user: false
is_always_run: false
is_skippable: false
run_if: ""
inputs:
- carthage_command: update
opts:
description: |-
Select a command to set up your dependencies with.
* `bootstrap`: initializes the project with checking out & building all dependencies. (default)
* `update`: updates all dependencies.
* `build`: builds all checked out items.
summary: Select a command to set up your dependencies with.
title: Carthage command to run
value_options:
- bootstrap
- update
- build
- no_use_binaries: "false"
opts:
summary: |-
Use this flag to make sure Carthage checks out all dependencies (otherwise
it defaults to binary framework releases). False by default.
title: Set no use binaries flag
value_options:
- "true"
- "false"
- opts:
summary: Use this flag to have a verbose output of the carthage command. False
by default.
title: Set verbose output flag
value_options:
- "true"
- "false"
verbose_output: "false"
- opts:
summary: Use this flag to use ssh when cloning the repos. False by default.
title: Set ssh flag
value_options:
- "true"
- "false"
ssh_output: "false"
- opts:
description: |
This directory will be set as the current working
directory for the carthage command.
title: Working directory
working_dir: null
- opts:
description: |
Choose which platform to build your dependencies for.
title: Platform
value_options:
- iOS
- Mac
- iOS,Mac
- tvOS
- all
platform: iOS
- carthage_options: null
opts:
description: |-
Options added to the end of the Carthage call.
You can use multiple options, separated by a space
character.
title: Additional options for `carthage` command
================================================
FILE: steps/carthage/1.0.8/step.yml
================================================
title: Carthage
summary: Installs and updates Carthage to the latest available version and runs selected
Carthage command.
description: |-
Installs and updates Carthage to the latest available version and runs selected Carthage command.
For more information about Carthage, visit the [Carthage GitHub page](https://github.com/Carthage/Carthage).
website: https://github.com/bitrise-steplib/steps-carthage
source_code_url: https://github.com/bitrise-steplib/steps-carthage
support_url: https://github.com/bitrise-steplib/steps-carthage/issues
published_at: 2016-02-04T13:23:53.000208105+01:00
source:
git: https://github.com/bitrise-steplib/steps-carthage.git
commit: 1effd0f4e354a63eae96f43de288f8bd0e54f56d
host_os_tags:
- osx-10.10
project_type_tags:
- ios
type_tags:
- carthage
- system
deps:
brew:
- name: carthage
is_requires_admin_user: false
is_always_run: false
is_skippable: false
run_if: ""
inputs:
- carthage_command: update
opts:
description: |-
Select a command to set up your dependencies with.
* `bootstrap`: initializes the project with checking out & building all dependencies. (default)
* `update`: updates all dependencies.
* `build`: builds all checked out items.
summary: Select a command to set up your dependencies with.
title: Carthage command to run
value_options:
- bootstrap
- update
- build
- no_use_binaries: "false"
opts:
summary: |-
Use this flag to make sure Carthage checks out all dependencies (otherwise
it defaults to binary framework releases). False by default.
title: Set no use binaries flag
value_options:
- "true"
- "false"
- opts:
summary: Use this flag to have a verbose output of the carthage command. False
by default.
title: Set verbose output flag
value_options:
- "true"
- "false"
verbose_output: "false"
- opts:
summary: Use this flag to use ssh when cloning the repos. False by default.
title: Set ssh flag
value_options:
- "true"
- "false"
ssh_output: "false"
- opts:
description: |
This directory will be set as the current working
directory for the carthage command.
title: Working directory
working_dir: null
- opts:
description: |
Choose which platform to build your dependencies for.
title: Platform
value_options:
- iOS
- Mac
- iOS,Mac
- tvOS
- all
platform: iOS
- carthage_options: null
opts:
description: |-
Options added to the end of the Carthage call.
You can use multiple options, separated by a space
character.
title: Additional options for `carthage` command
================================================
FILE: steps/carthage/2.0.0/step.yml
================================================
title: Carthage
summary: Installs and updates Carthage to the latest available version and runs selected
Carthage command.
description: |-
Installs and updates Carthage to the latest available version and runs selected Carthage command.
For more information about Carthage, visit the [Carthage GitHub page](https://github.com/Carthage/Carthage).
website: https://github.com/bitrise-steplib/steps-carthage
source_code_url: https://github.com/bitrise-steplib/steps-carthage
support_url: https://github.com/bitrise-steplib/steps-carthage/issues
published_at: 2016-02-16T13:24:47.516629701+01:00
source:
git: https://github.com/bitrise-steplib/steps-carthage.git
commit: 11a34efd1d91bf3526c55e9774712810656a2617
host_os_tags:
- osx-10.10
project_type_tags:
- ios
type_tags:
- carthage
- system
deps:
brew:
- name: carthage
is_requires_admin_user: false
is_always_run: false
is_skippable: false
run_if: ""
inputs:
- carthage_command: update
opts:
description: |-
Select a command to set up your dependencies with.
* `bootstrap`: initializes the project with checking out & building all dependencies. (default)
* `update`: updates all dependencies.
* `build`: builds all checked out items.
summary: Select a command to set up your dependencies with.
title: Carthage command to run
value_options:
- bootstrap
- update
- build
- no_use_binaries: "false"
opts:
summary: |-
Use this flag to make sure Carthage checks out all dependencies (otherwise
it defaults to binary framework releases). False by default.
title: Set no use binaries flag
value_options:
- "true"
- "false"
- opts:
summary: Use this flag to have a verbose output of the carthage command. False
by default.
title: Set verbose output flag
value_options:
- "true"
- "false"
verbose_output: "false"
- opts:
summary: Use this flag to use ssh when cloning the repos. False by default.
title: Set ssh flag
value_options:
- "true"
- "false"
ssh_output: "false"
- opts:
description: |
This directory will be set as the current working
directory for the carthage command.
title: Working directory
working_dir: null
- opts:
description: |
Choose which platform to build your dependencies for.
title: Platform
value_options:
- iOS
- Mac
- iOS,Mac
- tvOS
- all
platform: iOS
- carthage_options: null
opts:
description: |-
Options added to the end of the Carthage call.
You can use multiple options, separated by a space
character.
title: Additional options for `carthage` command
================================================
FILE: steps/carthage/2.0.1/step.yml
================================================
title: Carthage
summary: Installs and updates Carthage to the latest available version and runs selected
Carthage command.
description: |-
Installs and updates Carthage to the latest available version and runs selected Carthage command.
For more information about Carthage, visit the [Carthage GitHub page](https://github.com/Carthage/Carthage).
website: https://github.com/bitrise-steplib/steps-carthage
source_code_url: https://github.com/bitrise-steplib/steps-carthage
support_url: https://github.com/bitrise-steplib/steps-carthage/issues
published_at: 2016-03-01T20:09:00.543133063+01:00
source:
git: https://github.com/bitrise-steplib/steps-carthage.git
commit: 703f0c9f27c1e1a8d5e0f3fd4a6ad114ebd5a899
host_os_tags:
- osx-10.10
project_type_tags:
- ios
type_tags:
- carthage
- system
deps:
brew:
- name: carthage
is_requires_admin_user: false
is_always_run: false
is_skippable: false
run_if: ""
inputs:
- carthage_command: update
opts:
description: |-
Select a command to set up your dependencies with.
* `bootstrap`: initializes the project with checking out & building all dependencies. (default)
* `update`: updates all dependencies.
* `build`: builds all checked out items.
summary: Select a command to set up your dependencies with.
title: Carthage command to run
value_options:
- bootstrap
- update
- build
- no_use_binaries: "false"
opts:
summary: |-
Use this flag to make sure Carthage checks out all dependencies (otherwise
it defaults to binary framework releases). False by default.
title: Set no use binaries flag
value_options:
- "true"
- "false"
- opts:
summary: Use this flag to have a verbose output of the carthage command. False
by default.
title: Set verbose output flag
value_options:
- "true"
- "false"
verbose_output: "false"
- opts:
summary: Use this flag to use ssh when cloning the repos. False by default.
title: Set ssh flag
value_options:
- "true"
- "false"
ssh_output: "false"
- opts:
description: |
This directory will be set as the current working
directory for the carthage command.
title: Working directory
working_dir: null
- opts:
description: |
Choose which platform to build your dependencies for.
title: Platform
value_options:
- iOS
- Mac
- iOS,Mac
- tvOS
- all
platform: iOS
- carthage_options: null
opts:
description: |-
Options added to the end of the Carthage call.
You can use multiple options, separated by a space
character.
title: Additional options for `carthage` command
================================================
FILE: steps/carthage/2.0.2/step.yml
================================================
title: Carthage
summary: Installs and updates Carthage to the latest available version and runs selected
Carthage command.
description: |-
Installs and updates Carthage to the latest available version and runs selected Carthage command.
For more information about Carthage, visit the [Carthage GitHub page](https://github.com/Carthage/Carthage).
website: https://github.com/bitrise-steplib/steps-carthage
source_code_url: https://github.com/bitrise-steplib/steps-carthage
support_url: https://github.com/bitrise-steplib/steps-carthage/issues
published_at: 2016-04-25T15:22:11.293557635+02:00
source:
git: https://github.com/bitrise-steplib/steps-carthage.git
commit: 9b018394627823f766201a7d89f117b55af8b5c0
host_os_tags:
- osx-10.10
project_type_tags:
- ios
type_tags:
- carthage
- system
deps:
brew:
- name: carthage
is_requires_admin_user: false
is_always_run: false
is_skippable: false
run_if: ""
inputs:
- carthage_command: update
opts:
description: |-
Select a command to set up your dependencies with.
* `bootstrap`: initializes the project with checking out & building all dependencies. (default)
* `update`: updates all dependencies.
* `build`: builds all checked out items.
summary: Select a command to set up your dependencies with.
title: Carthage command to run
value_options:
- bootstrap
- update
- build
- no_use_binaries: "false"
opts:
summary: |-
Use this flag to make sure Carthage checks out all dependencies (otherwise
it defaults to binary framework releases). False by default.
title: Set no use binaries flag
value_options:
- "true"
- "false"
- opts:
summary: Use this flag to have a verbose output of the carthage command. False
by default.
title: Set verbose output flag
value_options:
- "true"
- "false"
verbose_output: "false"
- opts:
summary: Use this flag to use ssh when cloning the repos. False by default.
title: Set ssh flag
value_options:
- "true"
- "false"
ssh_output: "false"
- opts:
description: |
This directory will be set as the current working
directory for the carthage command.
title: Working directory
working_dir: $BITRISE_SOURCE_DIR
- opts:
description: |
Choose which platform to build your dependencies for.
title: Platform
value_options:
- iOS
- Mac
- iOS,Mac
- tvOS
- all
platform: iOS
- carthage_options: null
opts:
description: |-
Options added to the end of the Carthage call.
You can use multiple options, separated by a space
character.
title: Additional options for `carthage` command
================================================
FILE: steps/carthage/2.1.0/step.yml
================================================
title: Carthage
summary: Installs and updates Carthage to the latest available version and runs selected
Carthage command.
description: |-
Installs and updates Carthage to the latest available version and runs selected Carthage command.
For more information about Carthage, visit the [Carthage GitHub page](https://github.com/Carthage/Carthage).
website: https://github.com/bitrise-steplib/steps-carthage
source_code_url: https://github.com/bitrise-steplib/steps-carthage
support_url: https://github.com/bitrise-steplib/steps-carthage/issues
published_at: 2016-05-07T17:11:48.64762042+02:00
source:
git: https://github.com/bitrise-steplib/steps-carthage.git
commit: 6c2119092ca2fe493828c699ec1c59f76f5dd0a7
host_os_tags:
- osx-10.10
project_type_tags:
- ios
type_tags:
- carthage
- system
deps:
brew:
- name: carthage
is_requires_admin_user: false
is_always_run: false
is_skippable: false
run_if: ""
inputs:
- carthage_command: update
opts:
description: |-
Select a command to set up your dependencies with.
* `bootstrap`: initializes the project with checking out & building all dependencies. (default)
* `update`: updates all dependencies.
* `build`: builds all checked out items.
summary: Select a command to set up your dependencies with.
title: Carthage command to run
value_options:
- bootstrap
- update
- build
- no_use_binaries: "false"
opts:
summary: |-
Use this flag to make sure Carthage checks out all dependencies (otherwise
it defaults to binary framework releases). False by default.
title: Set no use binaries flag
value_options:
- "true"
- "false"
- opts:
summary: Use this flag to have a verbose output of the carthage command. False
by default.
title: Set verbose output flag
value_options:
- "true"
- "false"
verbose_output: "false"
- opts:
summary: Use this flag to use ssh when cloning the repos. False by default.
title: Set ssh flag
value_options:
- "true"
- "false"
ssh_output: "false"
- opts:
description: |
This directory will be set as the current working
directory for the carthage command.
title: Working directory
working_dir: $BITRISE_SOURCE_DIR
- opts:
description: |
Choose which platform to build your dependencies for.
title: Platform
value_options:
- iOS
- Mac
- iOS,Mac
- tvOS
- all
platform: iOS
- carthage_options: null
opts:
description: |-
Options added to the end of the Carthage call.
You can use multiple options, separated by a space
character.
title: Additional options for `carthage` command
================================================
FILE: steps/carthage/2.1.1/step.yml
================================================
title: Carthage
summary: Installs and updates Carthage to the latest available version and runs selected
Carthage command.
description: |-
Installs and updates Carthage to the latest available version and runs selected Carthage command.
For more information about Carthage, visit the [Carthage GitHub page](https://github.com/Carthage/Carthage).
website: https://github.com/bitrise-steplib/steps-carthage
source_code_url: https://github.com/bitrise-steplib/steps-carthage
support_url: https://github.com/bitrise-steplib/steps-carthage/issues
published_at: 2016-05-19T23:17:26.811712728+02:00
source:
git: https://github.com/bitrise-steplib/steps-carthage.git
commit: 21df866eb148bb9ed76066f9d99dfae8bd4d14d5
host_os_tags:
- osx-10.10
project_type_tags:
- ios
type_tags:
- carthage
- system
deps:
brew:
- name: carthage
is_requires_admin_user: false
is_always_run: false
is_skippable: false
run_if: ""
inputs:
- carthage_command: update
opts:
description: |-
Select a command to set up your dependencies with.
* `bootstrap`: initializes the project with checking out & building all dependencies. (default)
* `update`: updates all dependencies.
* `build`: builds all checked out items.
summary: Select a command to set up your dependencies with.
title: Carthage command to run
value_options:
- bootstrap
- update
- build
- no_use_binaries: "false"
opts:
summary: |-
Use this flag to make sure Carthage checks out all dependencies (otherwise
it defaults to binary framework releases). False by default.
title: Set no use binaries flag
value_options:
- "true"
- "false"
- opts:
summary: Use this flag to have a verbose output of the carthage command. False
by default.
title: Set verbose output flag
value_options:
- "true"
- "false"
verbose_output: "false"
- opts:
summary: Use this flag to use ssh when cloning the repos. False by default.
title: Set ssh flag
value_options:
- "true"
- "false"
ssh_output: "false"
- opts:
description: |
This directory will be set as the current working
directory for the carthage command.
title: Working directory
working_dir: $BITRISE_SOURCE_DIR
- opts:
description: |
Choose which platform to build your dependencies for.
title: Platform
value_options:
- iOS
- Mac
- iOS,Mac
- tvOS
- all
platform: iOS
- carthage_options: null
opts:
description: |-
Options added to the end of the Carthage call.
You can use multiple options, separated by a space
character.
title: Additional options for `carthage` command
================================================
FILE: steps/carthage/2.1.2/step.yml
================================================
title: Carthage
summary: Installs and updates Carthage to the latest available version and runs selected
Carthage command.
description: |-
Installs and updates Carthage to the latest available version and runs selected Carthage command.
For more information about Carthage, visit the [Carthage GitHub page](https://github.com/Carthage/Carthage).
website: https://github.com/bitrise-steplib/steps-carthage
source_code_url: https://github.com/bitrise-steplib/steps-carthage
support_url: https://github.com/bitrise-steplib/steps-carthage/issues
published_at: 2016-07-12T11:39:42.182725985+02:00
source:
git: https://github.com/bitrise-steplib/steps-carthage.git
commit: c6d3aabf1c567b5ed8822b3f265ece1332ca35ab
host_os_tags:
- osx-10.10
project_type_tags:
- ios
type_tags:
- carthage
- system
deps:
brew:
- name: carthage
is_requires_admin_user: false
is_always_run: false
is_skippable: false
run_if: ""
inputs:
- carthage_command: update
opts:
description: |-
Select a command to set up your dependencies with.
* `bootstrap`: initializes the project with checking out & building all dependencies. (default)
* `update`: updates all dependencies.
* `build`: builds all checked out items.
summary: Select a command to set up your dependencies with.
title: Carthage command to run
value_options:
- bootstrap
- update
- build
- no_use_binaries: "false"
opts:
summary: |-
Use this flag to make sure Carthage checks out all dependencies (otherwise
it defaults to binary framework releases). False by default.
title: Set no use binaries flag
value_options:
- "true"
- "false"
- opts:
summary: Use this flag to have a verbose output of the carthage command. False
by default.
title: Set verbose output flag
value_options:
- "true"
- "false"
verbose_output: "false"
- opts:
summary: Use this flag to use ssh when cloning the repos. False by default.
title: Set ssh flag
value_options:
- "true"
- "false"
ssh_output: "false"
- opts:
description: |
This directory will be set as the current working
directory for the carthage command.
title: Working directory
working_dir: $BITRISE_SOURCE_DIR
- opts:
description: |
Choose which platform to build your dependencies for.
title: Platform
value_options:
- iOS
- Mac
- iOS,Mac
- tvOS
- all
platform: iOS
- carthage_options: null
opts:
description: |-
Options added to the end of the Carthage call.
You can use multiple options, separated by a space
character.
title: Additional options for `carthage` command
================================================
FILE: steps/carthage/2.2.0/step.yml
================================================
title: Carthage
summary: Installs and updates Carthage to the latest available version and runs selected
Carthage command.
description: |-
Installs and updates Carthage to the latest available version and runs selected Carthage command.
For more information about Carthage, visit the [Carthage GitHub page](https://github.com/Carthage/Carthage).
website: https://github.com/bitrise-steplib/steps-carthage
source_code_url: https://github.com/bitrise-steplib/steps-carthage
support_url: https://github.com/bitrise-steplib/steps-carthage/issues
published_at: 2016-08-09T12:23:30.703108963+02:00
source:
git: https://github.com/bitrise-steplib/steps-carthage.git
commit: 0f957ebf25ab188ce5826fb77be89d003a648e9e
host_os_tags:
- osx-10.10
project_type_tags:
- ios
type_tags:
- carthage
- system
deps:
brew:
- name: carthage
is_requires_admin_user: false
is_always_run: false
is_skippable: false
run_if: ""
inputs:
- carthage_command: update
opts:
description: |-
Select a command to set up your dependencies with.
* `bootstrap`: initializes the project with checking out & building all dependencies. (default)
* `update`: updates all dependencies.
* `build`: builds all checked out items.
summary: Select a command to set up your dependencies with.
title: Carthage command to run
value_options:
- bootstrap
- update
- build
- checkout
- no_use_binaries: "false"
opts:
summary: |-
Use this flag to make sure Carthage checks out all dependencies (otherwise
it defaults to binary framework releases). False by default.
title: Set no use binaries flag
value_options:
- "true"
- "false"
- opts:
summary: Use this flag to have a verbose output of the carthage command. False
by default.
title: Set verbose output flag
value_options:
- "true"
- "false"
verbose_output: "false"
- opts:
summary: Use this flag to use ssh when cloning the repos. False by default.
title: Set ssh flag
value_options:
- "true"
- "false"
ssh_output: "false"
- opts:
description: |
This directory will be set as the current working
directory for the carthage command.
title: Working directory
working_dir: $BITRISE_SOURCE_DIR
- opts:
description: |
Choose which platform to build your dependencies for.
title: Platform
value_options:
- iOS
- Mac
- iOS,Mac
- tvOS
- all
platform: iOS
- carthage_options: null
opts:
description: |-
Options added to the end of the Carthage call.
You can use multiple options, separated by a space
character.
title: Additional options for `carthage` command
================================================
FILE: steps/carthage/2.3.0/step.yml
================================================
title: Carthage
summary: Installs and updates Carthage to the latest available version and runs selected
Carthage command.
description: |-
Installs and updates Carthage to the latest available version and runs selected Carthage command.
For more information about Carthage, visit the [Carthage GitHub page](https://github.com/Carthage/Carthage).
website: https://github.com/bitrise-steplib/steps-carthage
source_code_url: https://github.com/bitrise-steplib/steps-carthage
support_url: https://github.com/bitrise-steplib/steps-carthage/issues
published_at: 2016-09-12T15:25:29.585572924+02:00
source:
git: https://github.com/bitrise-steplib/steps-carthage.git
commit: 0dd1ff3bfceb57753f413a00c2008d5363104fc3
host_os_tags:
- osx-10.10
project_type_tags:
- ios
type_tags:
- carthage
- system
deps:
brew:
- name: carthage
is_requires_admin_user: false
is_always_run: false
is_skippable: false
run_if: ""
inputs:
- carthage_command: update
opts:
description: |-
Select a command to set up your dependencies with.
* `bootstrap`: initializes the project with checking out & building all dependencies. (default)
* `update`: updates all dependencies.
* `build`: builds all checked out items.
summary: Select a command to set up your dependencies with.
title: Carthage command to run
value_options:
- bootstrap
- update
- build
- checkout
- no_use_binaries: "false"
opts:
summary: |-
Use this flag to make sure Carthage checks out all dependencies (otherwise
it defaults to binary framework releases). False by default.
title: Set no use binaries flag
value_options:
- "true"
- "false"
- opts:
summary: Use this flag to have a verbose output of the carthage command. False
by default.
title: Set verbose output flag
value_options:
- "true"
- "false"
verbose_output: "false"
- opts:
summary: Use this flag to use ssh when cloning the repos. False by default.
title: Set ssh flag
value_options:
- "true"
- "false"
ssh_output: "false"
- opts:
description: |
This directory will be set as the current working
directory for the carthage command.
title: Working directory
working_dir: $BITRISE_SOURCE_DIR
- opts:
description: |
Choose which platform to build your dependencies for.
title: Platform
value_options:
- iOS
- Mac
- iOS,Mac
- tvOS
- all
platform: iOS
- carthage_options: null
opts:
description: |-
Options added to the end of the Carthage call.
You can use multiple options, separated by a space
character.
title: Additional options for `carthage` command
================================================
FILE: steps/carthage/2.4.0/step.yml
================================================
title: Carthage
summary: Installs and updates Carthage to the latest available version and runs selected
Carthage command.
description: |-
Installs and updates Carthage to the latest available version and runs selected Carthage command.
For more information about Carthage, visit the [Carthage GitHub page](https://github.com/Carthage/Carthage).
website: https://github.com/bitrise-steplib/steps-carthage
source_code_url: https://github.com/bitrise-steplib/steps-carthage
support_url: https://github.com/bitrise-steplib/steps-carthage/issues
published_at: 2016-09-26T12:51:47.073843718+02:00
source:
git: https://github.com/bitrise-steplib/steps-carthage.git
commit: d956cbaae5af18832a049a8f7926cf4e67248318
host_os_tags:
- osx-10.10
project_type_tags:
- ios
type_tags:
- carthage
- system
deps:
brew:
- name: carthage
is_requires_admin_user: false
is_always_run: false
is_skippable: false
run_if: ""
inputs:
- github_access_token: null
opts:
description: "Use this input to avoid Github rate limit issues.\n\nSee the github's
guide: [Creating an access token for command-line use](https://help.github.com/articles/creating-an-access-token-for-command-line-use/),
\ \nhow to create Personal Access Token.\n\n__UNCHECK EVERY SCOPE BOX__ when
creating this token. There is no reason this token needs access to private information."
title: Github Personal Access Token
- carthage_command: update
opts:
description: |-
Select a command to set up your dependencies with.
* `bootstrap`: initializes the project with checking out & building all dependencies. (default)
* `update`: updates all dependencies.
* `build`: builds all checked out items.
summary: Select a command to set up your dependencies with.
title: Carthage command to run
value_options:
- bootstrap
- update
- build
- checkout
- no_use_binaries: "false"
opts:
summary: |-
Use this flag to make sure Carthage checks out all dependencies (otherwise
it defaults to binary framework releases). False by default.
title: Set no use binaries flag
value_options:
- "true"
- "false"
- opts:
summary: Use this flag to have a verbose output of the carthage command. False
by default.
title: Set verbose output flag
value_options:
- "true"
- "false"
verbose_output: "false"
- opts:
summary: Use this flag to use ssh when cloning the repos. False by default.
title: Set ssh flag
value_options:
- "true"
- "false"
ssh_output: "false"
- opts:
description: |
This directory will be set as the current working
directory for the carthage command.
title: Working directory
working_dir: $BITRISE_SOURCE_DIR
- opts:
description: |
Choose which platform to build your dependencies for.
title: Platform
value_options:
- iOS
- Mac
- iOS,Mac
- tvOS
- all
platform: iOS
- carthage_options: null
opts:
description: |-
Options added to the end of the Carthage call.
You can use multiple options, separated by a space
character.
title: Additional options for `carthage` command
================================================
FILE: steps/carthage/3.0.0/step.yml
================================================
title: Carthage
summary: Runs selected Carthage command.
description: |-
Runs selected Carthage command.
For more information about Carthage, visit the [Carthage GitHub page](https://github.com/Carthage/Carthage).
website: https://github.com/bitrise-steplib/steps-carthage
source_code_url: https://github.com/bitrise-steplib/steps-carthage
support_url: https://github.com/bitrise-steplib/steps-carthage/issues
published_at: 2016-11-18T12:28:37.362873487+01:00
source:
git: https://github.com/bitrise-steplib/steps-carthage.git
commit: e8e99608cd4dbf06b49ef79447faf654cbe97c1b
host_os_tags:
- osx-10.10
project_type_tags:
- ios
type_tags:
- carthage
- system
toolkit:
go:
package_name: github.com/bitrise-steplib/steps-carthage
deps:
brew:
- name: go
- name: carthage
apt_get:
- name: golang
bin_name: go
is_requires_admin_user: false
is_always_run: false
is_skippable: false
inputs:
- github_access_token: $GITHUB_ACCESS_TOKEN
opts:
description: "Use this input to avoid Github rate limit issues.\n\nSee the github's
guide: [Creating an access token for command-line use](https://help.github.com/articles/creating-an-access-token-for-command-line-use/),
\ \nhow to create Personal Access Token.\n\n__UNCHECK EVERY SCOPE BOX__ when
creating this token. There is no reason this token needs access to private information."
title: Github Personal Access Token
- carthage_command: update
opts:
description: |-
Select a command to set up your dependencies with.
To see available commands run: `carthage help` on your local machine.
summary: Select a command to set up your dependencies with.
title: Carthage command to run
- carthage_options: null
opts:
description: "Options added to the end of the Carthage call.\nYou can use multiple
options, separated by a space character.\n\nTo see available command's options,
call: `carthage help COMMAND` \n\nFormat example: `--platform ios`"
title: Additional options for `carthage` command
================================================
FILE: steps/carthage/3.0.1/step.yml
================================================
title: Carthage
summary: Runs selected Carthage command.
description: |-
Runs selected Carthage command.
For more information about Carthage, visit the [Carthage GitHub page](https://github.com/Carthage/Carthage).
website: https://github.com/bitrise-steplib/steps-carthage
source_code_url: https://github.com/bitrise-steplib/steps-carthage
support_url: https://github.com/bitrise-steplib/steps-carthage/issues
published_at: 2016-12-12T15:55:59.430230419+01:00
source:
git: https://github.com/bitrise-steplib/steps-carthage.git
commit: e7af260128212d47ce353ef964d6a4b00de2ea08
host_os_tags:
- osx-10.10
project_type_tags:
- ios
type_tags:
- carthage
- system
toolkit:
go:
package_name: github.com/bitrise-steplib/steps-carthage
deps:
brew:
- name: go
- name: carthage
apt_get:
- name: golang
bin_name: go
is_requires_admin_user: false
is_always_run: false
is_skippable: false
inputs:
- github_access_token: $GITHUB_ACCESS_TOKEN
opts:
description: "Use this input to avoid Github rate limit issues.\n\nSee the github's
guide: [Creating an access token for command-line use](https://help.github.com/articles/creating-an-access-token-for-command-line-use/),
\ \nhow to create Personal Access Token.\n\n__UNCHECK EVERY SCOPE BOX__ when
creating this token. There is no reason this token needs access to private information."
title: Github Personal Access Token
- carthage_command: update
opts:
description: |-
Select a command to set up your dependencies with.
To see available commands run: `carthage help` on your local machine.
summary: Select a command to set up your dependencies with.
title: Carthage command to run
- carthage_options: null
opts:
description: "Options added to the end of the Carthage call.\nYou can use multiple
options, separated by a space character.\n\nTo see available command's options,
call: `carthage help COMMAND` \n\nFormat example: `--platform ios`"
title: Additional options for `carthage` command
================================================
FILE: steps/carthage/3.0.2/step.yml
================================================
title: Carthage
summary: Runs selected Carthage command.
description: |-
Runs selected Carthage command.
For more information about Carthage, visit the [Carthage GitHub page](https://github.com/Carthage/Carthage).
website: https://github.com/bitrise-steplib/steps-carthage
source_code_url: https://github.com/bitrise-steplib/steps-carthage
support_url: https://github.com/bitrise-steplib/steps-carthage/issues
published_at: 2016-12-19T15:49:57.840253427+01:00
source:
git: https://github.com/bitrise-steplib/steps-carthage.git
commit: 1f253bcf19c7277fcdf428ed14d77573a48c5429
host_os_tags:
- osx-10.10
project_type_tags:
- ios
- macos
type_tags:
- carthage
- system
toolkit:
go:
package_name: github.com/bitrise-steplib/steps-carthage
deps:
brew:
- name: go
- name: carthage
apt_get:
- name: golang
bin_name: go
is_requires_admin_user: false
is_always_run: false
is_skippable: false
inputs:
- github_access_token: $GITHUB_ACCESS_TOKEN
opts:
description: "Use this input to avoid Github rate limit issues.\n\nSee the github's
guide: [Creating an access token for command-line use](https://help.github.com/articles/creating-an-access-token-for-command-line-use/),
\ \nhow to create Personal Access Token.\n\n__UNCHECK EVERY SCOPE BOX__ when
creating this token. There is no reason this token needs access to private information."
title: Github Personal Access Token
- carthage_command: update
opts:
description: |-
Select a command to set up your dependencies with.
To see available commands run: `carthage help` on your local machine.
summary: Select a command to set up your dependencies with.
title: Carthage command to run
- carthage_options: null
opts:
description: "Options added to the end of the Carthage call.\nYou can use multiple
options, separated by a space character.\n\nTo see available command's options,
call: `carthage help COMMAND` \n\nFormat example: `--platform ios`"
title: Additional options for `carthage` command
================================================
FILE: steps/carthage/3.0.3/step.yml
================================================
title: Carthage
summary: Runs selected Carthage command.
description: |-
Runs selected Carthage command.
For more information about Carthage, visit the [Carthage GitHub page](https://github.com/Carthage/Carthage).
website: https://github.com/bitrise-steplib/steps-carthage
source_code_url: https://github.com/bitrise-steplib/steps-carthage
support_url: https://github.com/bitrise-steplib/steps-carthage/issues
published_at: 2017-01-03T11:34:18.819624914+01:00
source:
git: https://github.com/bitrise-steplib/steps-carthage.git
commit: e84925394a76566594848fcc387292617baa4984
host_os_tags:
- osx-10.10
project_type_tags:
- ios
- macos
type_tags:
- carthage
- system
toolkit:
go:
package_name: github.com/bitrise-steplib/steps-carthage
deps:
brew:
- name: go
- name: carthage
apt_get:
- name: golang
bin_name: go
is_requires_admin_user: false
is_always_run: false
is_skippable: false
inputs:
- github_access_token: $GITHUB_ACCESS_TOKEN
opts:
description: "Use this input to avoid Github rate limit issues.\n\nSee the github's
guide: [Creating an access token for command-line use](https://help.github.com/articles/creating-an-access-token-for-command-line-use/),
\ \nhow to create Personal Access Token.\n\n__UNCHECK EVERY SCOPE BOX__ when
creating this token. There is no reason this token needs access to private information."
title: Github Personal Access Token
- carthage_command: update
opts:
description: |-
Select a command to set up your dependencies with.
To see available commands run: `carthage help` on your local machine.
summary: Select a command to set up your dependencies with.
title: Carthage command to run
- carthage_options: null
opts:
description: "Options added to the end of the Carthage call.\nYou can use multiple
options, separated by a space character.\n\nTo see available command's options,
call: `carthage help COMMAND` \n\nFormat example: `--platform ios`"
title: Additional options for `carthage` command
================================================
FILE: steps/carthage/3.0.4/step.yml
================================================
title: Carthage
summary: Runs selected Carthage command.
description: |-
Runs selected Carthage command.
For more information about Carthage, visit the [Carthage GitHub page](https://github.com/Carthage/Carthage).
website: https://github.com/bitrise-steplib/steps-carthage
source_code_url: https://github.com/bitrise-steplib/steps-carthage
support_url: https://github.com/bitrise-steplib/steps-carthage/issues
published_at: 2017-01-11T15:45:54.117541909+01:00
source:
git: https://github.com/bitrise-steplib/steps-carthage.git
commit: 19048885d49d1429d8998f5eb0c7dbdab12086e8
host_os_tags:
- osx-10.10
project_type_tags:
- ios
- macos
type_tags:
- carthage
- system
toolkit:
go:
package_name: github.com/bitrise-steplib/steps-carthage
deps:
brew:
- name: go
- name: carthage
apt_get:
- name: golang
bin_name: go
is_requires_admin_user: false
is_always_run: false
is_skippable: false
inputs:
- github_access_token: $GITHUB_ACCESS_TOKEN
opts:
description: "Use this input to avoid Github rate limit issues.\n\nSee the github's
guide: [Creating an access token for command-line use](https://help.github.com/articles/creating-an-access-token-for-command-line-use/),
\ \nhow to create Personal Access Token.\n\n__UNCHECK EVERY SCOPE BOX__ when
creating this token. There is no reason this token needs access to private information."
title: Github Personal Access Token
- carthage_command: bootstrap
opts:
description: |-
Select a command to set up your dependencies with.
To see available commands run: `carthage help` on your local machine.
summary: Select a command to set up your dependencies with.
title: Carthage command to run
- carthage_options: null
opts:
description: "Options added to the end of the Carthage call.\nYou can use multiple
options, separated by a space character.\n\nTo see available command's options,
call: `carthage help COMMAND` \n\nFormat example: `--platform ios`"
title: Additional options for `carthage` command
================================================
FILE: steps/carthage/3.0.5/step.yml
================================================
title: Carthage
summary: Runs selected Carthage command.
description: |-
Runs selected Carthage command.
For more information about Carthage, visit the [Carthage GitHub page](https://github.com/Carthage/Carthage).
website: https://github.com/bitrise-steplib/steps-carthage
source_code_url: https://github.com/bitrise-steplib/steps-carthage
support_url: https://github.com/bitrise-steplib/steps-carthage/issues
published_at: 2017-02-01T13:57:24.375055358+01:00
source:
git: https://github.com/bitrise-steplib/steps-carthage.git
commit: 39303ea45753d75082554f0a54a17921e25f2023
host_os_tags:
- osx-10.10
project_type_tags:
- ios
- macos
type_tags:
- carthage
- system
toolkit:
go:
package_name: github.com/bitrise-steplib/steps-carthage
deps:
brew:
- name: go
- name: carthage
apt_get:
- name: golang
bin_name: go
is_requires_admin_user: false
is_always_run: false
is_skippable: false
inputs:
- github_access_token: $GITHUB_ACCESS_TOKEN
opts:
description: "Use this input to avoid Github rate limit issues.\n\nSee the github's
guide: [Creating an access token for command-line use](https://help.github.com/articles/creating-an-access-token-for-command-line-use/),
\ \nhow to create Personal Access Token.\n\n__UNCHECK EVERY SCOPE BOX__ when
creating this token. There is no reason this token needs access to private information."
title: Github Personal Access Token
- carthage_command: bootstrap
opts:
description: |-
Select a command to set up your dependencies with.
To see available commands run: `carthage help` on your local machine.
summary: Select a command to set up your dependencies with.
title: Carthage command to run
- carthage_options: null
opts:
description: "Options added to the end of the Carthage call.\nYou can use multiple
options, separated by a space character.\n\nTo see available command's options,
call: `carthage help COMMAND` \n\nFormat example: `--platform ios`"
title: Additional options for `carthage` command
================================================
FILE: steps/carthage/3.0.6/step.yml
================================================
title: Carthage
summary: Runs selected Carthage command.
description: |-
Runs selected Carthage command.
For more information about Carthage, visit the [Carthage GitHub page](https://github.com/Carthage/Carthage).
website: https://github.com/bitrise-steplib/steps-carthage
source_code_url: https://github.com/bitrise-steplib/steps-carthage
support_url: https://github.com/bitrise-steplib/steps-carthage/issues
published_at: 2017-03-06T14:14:57.06436769+01:00
source:
git: https://github.com/bitrise-steplib/steps-carthage.git
commit: 22804da8e664ce140aab0818fc7087b39d9ce2c4
host_os_tags:
- osx-10.10
project_type_tags:
- ios
- macos
type_tags:
- dependency
toolkit:
go:
package_name: github.com/bitrise-steplib/steps-carthage
deps:
brew:
- name: go
- name: carthage
apt_get:
- name: golang
bin_name: go
is_requires_admin_user: false
is_always_run: false
is_skippable: false
inputs:
- github_access_token: $GITHUB_ACCESS_TOKEN
opts:
description: "Use this input to avoid Github rate limit issues.\n\nSee the github's
guide: [Creating an access token for command-line use](https://help.github.com/articles/creating-an-access-token-for-command-line-use/),
\ \nhow to create Personal Access Token.\n\n__UNCHECK EVERY SCOPE BOX__ when
creating this token. There is no reason this token needs access to private information."
title: Github Personal Access Token
- carthage_command: bootstrap
opts:
description: |-
Select a command to set up your dependencies with.
To see available commands run: `carthage help` on your local machine.
summary: Select a command to set up your dependencies with.
title: Carthage command to run
- carthage_options: null
opts:
description: "Options added to the end of the Carthage call.\nYou can use multiple
options, separated by a space character.\n\nTo see available command's options,
call: `carthage help COMMAND` \n\nFormat example: `--platform ios`"
title: Additional options for `carthage` command
================================================
FILE: steps/carthage/3.1.2/step.yml
================================================
title: Carthage
summary: Runs selected Carthage command.
description: |-
Runs selected Carthage command.
For more information about Carthage, visit the [Carthage GitHub page](https://github.com/Carthage/Carthage).
website: https://github.com/bitrise-steplib/steps-carthage
source_code_url: https://github.com/bitrise-steplib/steps-carthage
support_url: https://github.com/bitrise-steplib/steps-carthage/issues
published_at: 2017-06-08T11:25:53.64580968+02:00
source:
git: https://github.com/bitrise-steplib/steps-carthage.git
commit: 1fa4d7b2849ce0b5594591a0143b7c14424c769d
host_os_tags:
- osx-10.10
project_type_tags:
- ios
- macos
type_tags:
- dependency
toolkit:
go:
package_name: github.com/bitrise-steplib/steps-carthage
deps:
brew:
- name: go
- name: carthage
apt_get:
- name: golang
bin_name: go
is_requires_admin_user: false
is_always_run: false
is_skippable: false
inputs:
- github_access_token: $GITHUB_ACCESS_TOKEN
opts:
description: "Use this input to avoid Github rate limit issues.\n\nSee the github's
guide: [Creating an access token for command-line use](https://help.github.com/articles/creating-an-access-token-for-command-line-use/),
\ \nhow to create Personal Access Token.\n\n__UNCHECK EVERY SCOPE BOX__ when
creating this token. There is no reason this token needs access to private information."
title: Github Personal Access Token
- carthage_command: bootstrap
opts:
description: |-
Select a command to set up your dependencies with.
To see available commands run: `carthage help` on your local machine.
summary: Select a command to set up your dependencies with.
title: Carthage command to run
- carthage_options: null
opts:
description: "Options added to the end of the Carthage call.\nYou can use multiple
options, separated by a space character.\n\nTo see available command's options,
call: `carthage help COMMAND` \n\nFormat example: `--platform ios`"
title: Additional options for `carthage` command
================================================
FILE: steps/carthage/3.1.3/step.yml
================================================
title: Carthage
summary: Runs selected Carthage command.
description: |-
Runs selected Carthage command. The step will cache your dependencies only when using `bootstrap` as `carthage_command` and you have `cache-pull` and `cache-push` steps in your workflow.
For more information about Carthage, visit the [Carthage GitHub page](https://github.com/Carthage/Carthage).
website: https://github.com/bitrise-steplib/steps-carthage
source_code_url: https://github.com/bitrise-steplib/steps-carthage
support_url: https://github.com/bitrise-steplib/steps-carthage/issues
published_at: 2017-12-04T12:18:05.545729597+01:00
source:
git: https://github.com/bitrise-steplib/steps-carthage.git
commit: 79218595dd57a97c50e442f10e8163f07efafec7
host_os_tags:
- osx-10.10
project_type_tags:
- ios
- macos
type_tags:
- dependency
toolkit:
go:
package_name: github.com/bitrise-steplib/steps-carthage
deps:
brew:
- name: go
- name: carthage
apt_get:
- name: golang
bin_name: go
is_requires_admin_user: false
is_always_run: false
is_skippable: false
inputs:
- github_access_token: $GITHUB_ACCESS_TOKEN
opts:
description: "Use this input to avoid Github rate limit issues.\n\nSee the github's
guide: [Creating an access token for command-line use](https://help.github.com/articles/creating-an-access-token-for-command-line-use/),
\ \nhow to create Personal Access Token.\n\n__UNCHECK EVERY SCOPE BOX__ when
creating this token. There is no reason this token needs access to private information."
title: Github Personal Access Token
- carthage_command: bootstrap
opts:
description: |-
Select a command to set up your dependencies with.
The step will cache your dependencies only when using `bootstrap` in this input and you have `cache-pull` and `cache-push` steps in your workflow.
To see available commands run: `carthage help` on your local machine.
summary: Select a command to set up your dependencies with. The step will cache
your dependencies only when using `bootstrap` in this input and you have `cache-pull`
and `cache-push` steps in your workflow.
title: Carthage command to run
- carthage_options: null
opts:
description: "Options added to the end of the Carthage call.\nYou can use multiple
options, separated by a space character.\n\nTo see available command's options,
call: `carthage help COMMAND` \n\nFormat example: `--platform ios`"
title: Additional options for `carthage` command
================================================
FILE: steps/carthage/3.1.4/step.yml
================================================
title: Carthage
summary: Runs selected Carthage command.
description: |-
Runs selected Carthage command. The step will cache your dependencies only when using `bootstrap` as `carthage_command` and you have `cache-pull` and `cache-push` steps in your workflow.
For more information about Carthage, visit the [Carthage GitHub page](https://github.com/Carthage/Carthage).
website: https://github.com/bitrise-steplib/steps-carthage
source_code_url: https://github.com/bitrise-steplib/steps-carthage
support_url: https://github.com/bitrise-steplib/steps-carthage/issues
published_at: !!timestamp 2018-05-07T15:35:42.565180175+02:00
source:
git: https://github.com/bitrise-steplib/steps-carthage.git
commit: e03a1aeda9ed7307ee5e0a171d197c2a6e665dfb
host_os_tags:
- osx-10.10
project_type_tags:
- ios
- macos
type_tags:
- dependency
toolkit:
go:
package_name: github.com/bitrise-steplib/steps-carthage
deps:
brew:
- name: go
- name: carthage
apt_get:
- name: golang
bin_name: go
is_requires_admin_user: false
is_always_run: false
is_skippable: false
inputs:
- carthage_command: bootstrap
opts:
description: |-
Select a command to set up your dependencies with.
The step will cache your dependencies only when using `bootstrap` in this input and you have `cache-pull` and `cache-push` steps in your workflow.
To see available commands run: `carthage help` on your local machine.
summary: Select a command to set up your dependencies with. The step will cache
your dependencies only when using `bootstrap` in this input and you have `cache-pull`
and `cache-push` steps in your workflow.
title: Carthage command to run
- carthage_options: null
opts:
description: "Options added to the end of the Carthage call.\nYou can use multiple
options, separated by a space character.\n\nTo see available command's options,
call: `carthage help COMMAND` \n\nFormat example: `--platform ios`"
title: Additional options for `carthage` command
- github_access_token: $GITHUB_ACCESS_TOKEN
opts:
description: "Use this input to avoid Github rate limit issues.\n\nSee the github's
guide: [Creating an access token for command-line use](https://help.github.com/articles/creating-an-access-token-for-command-line-use/),
\ \nhow to create Personal Access Token.\n\n__UNCHECK EVERY SCOPE BOX__ when
creating this token. There is no reason this token needs access to private information."
title: Github Personal Access Token
================================================
FILE: steps/carthage/3.1.5/step.yml
================================================
title: Carthage
summary: Runs selected Carthage command.
description: |-
Runs selected Carthage command. The step will cache your dependencies only when using `bootstrap` as `carthage_command` and you have `cache-pull` and `cache-push` steps in your workflow.
For more information about Carthage, visit the [Carthage GitHub page](https://github.com/Carthage/Carthage).
website: https://github.com/bitrise-steplib/steps-carthage
source_code_url: https://github.com/bitrise-steplib/steps-carthage
support_url: https://github.com/bitrise-steplib/steps-carthage/issues
published_at: 2018-08-22T11:49:19.177848396Z
source:
git: https://github.com/bitrise-steplib/steps-carthage.git
commit: 0b9a4a3c9617a8382567237ffd6eab12b27a883c
host_os_tags:
- osx-10.10
project_type_tags:
- ios
- macos
type_tags:
- dependency
toolkit:
go:
package_name: github.com/bitrise-steplib/steps-carthage
deps:
brew:
- name: go
- name: carthage
apt_get:
- name: golang
bin_name: go
is_requires_admin_user: false
is_always_run: false
is_skippable: false
inputs:
- carthage_command: bootstrap
opts:
description: |-
Select a command to set up your dependencies.
The step will cache your dependencies only when using `bootstrap` in this input and you have `cache-pull` and `cache-push` steps in your workflow.
To see available commands run: `carthage help` on your local machine.
summary: Select a command to set up your dependencies. The step will cache your
dependencies only when using `bootstrap` in this input and you have `cache-pull`
and `cache-push` steps in your workflow.
title: Carthage command to run
- carthage_options: null
opts:
description: "Options added to the end of the Carthage call.\nYou can use multiple
options, separated by a space character.\n\nTo see available command's options,
call `carthage help COMMAND` \n\nFormat example: `--platform ios`"
title: Additional options for `carthage` command
- github_access_token: $GITHUB_ACCESS_TOKEN
opts:
description: "Use this input to avoid Github rate limit issues.\n\nSee the github's
guide: [Creating an access token for command-line use](https://help.github.com/articles/creating-an-access-token-for-command-line-use/),
\ \nhow to create Personal Access Token.\n\n__UNCHECK EVERY SCOPE BOX__ when
creating this token. There is no reason this token needs access to private information."
is_sensitive: true
title: Github Personal Access Token
================================================
FILE: steps/carthage/3.1.6/step.yml
================================================
title: Carthage
summary: Runs selected Carthage command.
description: |-
Runs selected Carthage command. The step will cache your dependencies only when using `bootstrap` as `carthage_command` and you have `cache-pull` and `cache-push` steps in your workflow.
For more information about Carthage, visit the [Carthage GitHub page](https://github.com/Carthage/Carthage).
website: https://github.com/bitrise-steplib/steps-carthage
source_code_url: https://github.com/bitrise-steplib/steps-carthage
support_url: https://github.com/bitrise-steplib/steps-carthage/issues
published_at: 2018-12-14T15:03:32.614119707Z
source:
git: https://github.com/bitrise-steplib/steps-carthage.git
commit: cd8fba24290cf52d48ac947681cd179686d6cce3
host_os_tags:
- osx-10.10
project_type_tags:
- ios
- macos
type_tags:
- dependency
toolkit:
go:
package_name: github.com/bitrise-steplib/steps-carthage
deps:
brew:
- name: go
- name: carthage
apt_get:
- name: golang
bin_name: go
is_requires_admin_user: false
is_always_run: false
is_skippable: false
inputs:
- carthage_command: bootstrap
opts:
description: |-
Select a command to set up your dependencies.
The step will cache your dependencies only when using `bootstrap` in this input and you have `cache-pull` and `cache-push` steps in your workflow.
To see available commands run: `carthage help` on your local machine.
is_required: true
summary: Select a command to set up your dependencies. The step will cache your
dependencies only when using `bootstrap` in this input and you have `cache-pull`
and `cache-push` steps in your workflow.
title: Carthage command to run
- carthage_options: null
opts:
description: "Options added to the end of the Carthage call.\nYou can use multiple
options, separated by a space character.\n\nTo see available command's options,
call `carthage help COMMAND` \n\nFormat example: `--platform ios`"
title: Additional options for `carthage` command
- github_access_token: $GITHUB_ACCESS_TOKEN
opts:
description: "Use this input to avoid Github rate limit issues.\n\nSee the github's
guide: [Creating an access token for command-line use](https://help.github.com/articles/creating-an-access-token-for-command-line-use/),
\ \nhow to create Personal Access Token.\n\n__UNCHECK EVERY SCOPE BOX__ when
creating this token. There is no reason this token needs access to private information."
is_sensitive: true
title: Github Personal Access Token
================================================
FILE: steps/carthage/3.1.7/step.yml
================================================
title: Carthage
summary: Runs selected Carthage command.
description: |-
Runs selected Carthage command. The step will cache your dependencies only when using `bootstrap` as `carthage_command` and you have `cache-pull` and `cache-push` steps in your workflow.
For more information about Carthage, visit the [Carthage GitHub page](https://github.com/Carthage/Carthage).
website: https://github.com/bitrise-steplib/steps-carthage
source_code_url: https://github.com/bitrise-steplib/steps-carthage
support_url: https://github.com/bitrise-steplib/steps-carthage/issues
published_at: 2019-01-04T14:41:50.191277284Z
source:
git: https://github.com/bitrise-steplib/steps-carthage.git
commit: 4fd1c3c8a64f3cd694e25b2e5f758827803b8ca7
host_os_tags:
- osx-10.10
project_type_tags:
- ios
- macos
type_tags:
- dependency
toolkit:
go:
package_name: github.com/bitrise-steplib/steps-carthage
deps:
brew:
- name: go
- name: carthage
apt_get:
- name: golang
bin_name: go
is_requires_admin_user: false
is_always_run: false
is_skippable: false
inputs:
- carthage_command: bootstrap
opts:
description: |-
Select a command to set up your dependencies.
The step will cache your dependencies only when using `bootstrap` in this input and you have `cache-pull` and `cache-push` steps in your workflow.
To see available commands run: `carthage help` on your local machine.
is_required: true
summary: Select a command to set up your dependencies. The step will cache your
dependencies only when using `bootstrap` in this input and you have `cache-pull`
and `cache-push` steps in your workflow.
title: Carthage command to run
- carthage_options: null
opts:
description: "Options added to the end of the Carthage call.\nYou can use multiple
options, separated by a space character.\n\nTo see available command's options,
call `carthage help COMMAND` \n\nFormat example: `--platform ios`"
title: Additional options for `carthage` command
- github_access_token: $GITHUB_ACCESS_TOKEN
opts:
description: "Use this input to avoid Github rate limit issues.\n\nSee the github's
guide: [Creating an access token for command-line use](https://help.github.com/articles/creating-an-access-token-for-command-line-use/),
\ \nhow to create Personal Access Token.\n\n__UNCHECK EVERY SCOPE BOX__ when
creating this token. There is no reason this token needs access to private information."
is_sensitive: true
title: Github Personal Access Token
================================================
FILE: steps/carthage/3.2.0/step.yml
================================================
title: Carthage
summary: Runs selected Carthage command.
description: |-
Runs selected Carthage command. The step will cache your dependencies only when using `bootstrap` as `carthage_command` and you have `cache-pull` and `cache-push` steps in your workflow.
For more information about Carthage, visit the [Carthage GitHub page](https://github.com/Carthage/Carthage).
website: https://github.com/bitrise-steplib/steps-carthage
source_code_url: https://github.com/bitrise-steplib/steps-carthage
support_url: https://github.com/bitrise-steplib/steps-carthage/issues
published_at: 2019-04-16T09:18:12.267124112Z
source:
git: https://github.com/bitrise-steplib/steps-carthage.git
commit: c7fd0c7768b7752b28e9f9d59546bd922fe9f72c
host_os_tags:
- osx-10.10
project_type_tags:
- ios
- macos
type_tags:
- dependency
toolkit:
go:
package_name: github.com/bitrise-steplib/steps-carthage
deps:
brew:
- name: go
- name: carthage
apt_get:
- name: golang
bin_name: go
is_requires_admin_user: false
is_always_run: false
is_skippable: false
inputs:
- carthage_command: bootstrap
opts:
description: |-
Select a command to set up your dependencies.
The step will cache your dependencies only when using `bootstrap` in this input and you have `cache-pull` and `cache-push` steps in your workflow.
To see available commands run: `carthage help` on your local machine.
is_required: true
summary: Select a command to set up your dependencies. The step will cache your
dependencies only when using `bootstrap` in this input and you have `cache-pull`
and `cache-push` steps in your workflow.
title: Carthage command to run
- carthage_options: null
opts:
description: "Options added to the end of the Carthage call.\nYou can use multiple
options, separated by a space character.\n\nTo see available command's options,
call `carthage help COMMAND` \n\nFormat example: `--platform ios`"
title: Additional options for `carthage` command
- github_access_token: $GITHUB_ACCESS_TOKEN
opts:
description: "Use this input to avoid Github rate limit issues.\n\nSee the github's
guide: [Creating an access token for command-line use](https://help.github.com/articles/creating-an-access-token-for-command-line-use/),
\ \nhow to create Personal Access Token.\n\n__UNCHECK EVERY SCOPE BOX__ when
creating this token. There is no reason this token needs access to private information."
is_sensitive: true
title: Github Personal Access Token
- opts:
category: Debug
description: Enable verbose logging?
is_required: true
title: Enable verbose logging?
value_options:
- "yes"
- "no"
verbose_log: "no"
================================================
FILE: steps/carthage/3.2.1/step.yml
================================================
title: Carthage
summary: Runs selected Carthage command.
description: |-
Runs selected Carthage command. The step will cache your dependencies only when using `bootstrap` as `carthage_command` and you have `cache-pull` and `cache-push` steps in your workflow.
For more information about Carthage, visit the [Carthage GitHub page](https://github.com/Carthage/Carthage).
website: https://github.com/bitrise-steplib/steps-carthage
source_code_url: https://github.com/bitrise-steplib/steps-carthage
support_url: https://github.com/bitrise-steplib/steps-carthage/issues
published_at: 2019-06-17T09:54:13.248592987Z
source:
git: https://github.com/bitrise-steplib/steps-carthage.git
commit: 16195e3c0c71ecbe27da75824068c6809cde0199
host_os_tags:
- osx-10.10
project_type_tags:
- ios
- macos
type_tags:
- dependency
toolkit:
go:
package_name: github.com/bitrise-steplib/steps-carthage
deps:
brew:
- name: go
- name: carthage
apt_get:
- name: golang
bin_name: go
is_requires_admin_user: false
is_always_run: false
is_skippable: false
inputs:
- carthage_command: bootstrap
opts:
description: |-
Select a command to set up your dependencies.
The step will cache your dependencies only when using `bootstrap` in this input and you have `cache-pull` and `cache-push` steps in your workflow.
To see available commands run: `carthage help` on your local machine.
is_required: true
summary: Select a command to set up your dependencies. The step will cache your
dependencies only when using `bootstrap` in this input and you have `cache-pull`
and `cache-push` steps in your workflow.
title: Carthage command to run
- carthage_options: null
opts:
description: "Options added to the end of the Carthage call.\nYou can use multiple
options, separated by a space character.\n\nTo see available command's options,
call `carthage help COMMAND` \n\nFormat example: `--platform ios`"
title: Additional options for `carthage` command
- github_access_token: $GITHUB_ACCESS_TOKEN
opts:
description: "Use this input to avoid Github rate limit issues.\n\nSee the github's
guide: [Creating an access token for command-line use](https://help.github.com/articles/creating-an-access-token-for-command-line-use/),
\ \nhow to create Personal Access Token.\n\n__UNCHECK EVERY SCOPE BOX__ when
creating this token. There is no reason this token needs access to private information."
is_sensitive: true
title: Github Personal Access Token
- opts:
category: Debug
description: Enable verbose logging?
is_required: true
title: Enable verbose logging?
value_options:
- "yes"
- "no"
verbose_log: "no"
================================================
FILE: steps/carthage/3.2.2/step.yml
================================================
title: Carthage
summary: Runs selected Carthage command.
description: |-
Runs selected Carthage command. The step will cache your dependencies only when using `bootstrap` as `carthage_command` and you have `cache-pull` and `cache-push` steps in your workflow.
For more information about Carthage, visit the [Carthage GitHub page](https://github.com/Carthage/Carthage).
website: https://github.com/bitrise-steplib/steps-carthage
source_code_url: https://github.com/bitrise-steplib/steps-carthage
support_url: https://github.com/bitrise-steplib/steps-carthage/issues
published_at: 2019-10-11T08:33:34.056777359Z
source:
git: https://github.com/bitrise-steplib/steps-carthage.git
commit: b77ae268a51afba1028176fc8425599399c21e83
host_os_tags:
- osx-10.10
project_type_tags:
- ios
- macos
- cordova
- ionic
- react-native
- flutter
type_tags:
- dependency
toolkit:
go:
package_name: github.com/bitrise-steplib/steps-carthage
deps:
brew:
- name: go
- name: carthage
apt_get:
- name: golang
bin_name: go
is_requires_admin_user: false
is_always_run: false
is_skippable: false
inputs:
- carthage_command: bootstrap
opts:
description: |-
Select a command to set up your dependencies.
The step will cache your dependencies only when using `bootstrap` in this input and you have `cache-pull` and `cache-push` steps in your workflow.
To see available commands run: `carthage help` on your local machine.
is_required: true
summary: Select a command to set up your dependencies. The step will cache your
dependencies only when using `bootstrap` in this input and you have `cache-pull`
and `cache-push` steps in your workflow.
title: Carthage command to run
- carthage_options: null
opts:
description: "Options added to the end of the Carthage call.\nYou can use multiple
options, separated by a space character.\n\nTo see available command's options,
call `carthage help COMMAND` \n\nFormat example: `--platform ios`"
title: Additional options for `carthage` command
- github_access_token: $GITHUB_ACCESS_TOKEN
opts:
description: "Use this input to avoid Github rate limit issues.\n\nSee the github's
guide: [Creating an access token for command-line use](https://help.github.com/articles/creating-an-access-token-for-command-line-use/),
\ \nhow to create Personal Access Token.\n\n__UNCHECK EVERY SCOPE BOX__ when
creating this token. There is no reason this token needs access to private information."
is_sensitive: true
title: Github Personal Access Token
- opts:
category: Debug
description: Enable verbose logging?
is_required: true
title: Enable verbose logging?
value_options:
- "yes"
- "no"
verbose_log: "no"
================================================
FILE: steps/carthage/3.2.3/step.yml
================================================
title: Carthage
summary: Runs the selected Carthage command.
description: |-
Downloads and builds the dependencies your Cocoa application needs.
### Configuring the Step
1. Add the **Carthage** Step in your Workflow.
2. Select `bootstrap` Carthage command in the **Carthage command to run** input. Make sure you have the **Bitrise.io Cache:Pull** Step before and the **Bitrise.io Cache:Push** Step after the **Carthage** Step in your Workflow to cache files and speed up your Bitrise build.
2. Provide your GitHub credentials in the **GitHub Personal Access Token** input to avoid GitHub rate limit issues. Don't worry, your credentials are safe with us since we store them encrypted and do not print them out in build logs.
3. Optionally, you can provide any extra flag for the Carthage command you wish to run in the **Additional options for Carthage command** input.
5. To get more information printed out, set the **Enable verbose logging** to `yes`.
### Troubleshooting
It is important that you use `bootstrap` Carthage command, as this is the only command that can leverage the cache! If you run, for example, the `update` command, it won't generate the required cache information, because the `update` command will disregard the available files or the cache.
### Useful links
- [Official Carthage documentation](https://github.com/Carthage/Carthage)
- [About Secrets and Env Vars ](https://devcenter.bitrise.io/builds/env-vars-secret-env-vars/)
### Related Steps
- [Bitrise.io Cache Push](https://www.bitrise.io/integrations/steps/cache-push)
- [Bitrise.io Cache Pull](https://www.bitrise.io/integrations/steps/cache-pull)
- [iOS Auto Provision](https://www.bitrise.io/integrations/steps/ios-auto-provision)
website: https://github.com/bitrise-steplib/steps-carthage
source_code_url: https://github.com/bitrise-steplib/steps-carthage
support_url: https://github.com/bitrise-steplib/steps-carthage/issues
published_at: 2020-05-28T09:17:16.783444487Z
source:
git: https://github.com/bitrise-steplib/steps-carthage.git
commit: 499b84ff2a0a0d48e14e6973e64daacc9face68f
host_os_tags:
- osx-10.10
project_type_tags:
- ios
- macos
- cordova
- ionic
- react-native
- flutter
type_tags:
- dependency
toolkit:
go:
package_name: github.com/bitrise-steplib/steps-carthage
deps:
brew:
- name: go
- name: carthage
apt_get:
- name: golang
bin_name: go
is_requires_admin_user: false
is_always_run: false
is_skippable: false
inputs:
- carthage_command: bootstrap
opts:
description: |-
Select a command to set up your dependencies.
The step will cache your dependencies only when using `bootstrap` in this input and you have `cache-pull` and `cache-push` steps in your workflow.
To see available commands run: `carthage help` on your local machine.
is_required: true
summary: Select a command to set up your dependencies. The step will cache your
dependencies only when using `bootstrap` in this input and you have `cache-pull`
and `cache-push` steps in your workflow.
title: Carthage command to run
- carthage_options: null
opts:
description: "Options added to the end of the Carthage call.\nYou can use multiple
options, separated by a space character.\n\nTo see available command's options,
call `carthage help COMMAND` \n\nFormat example: `--platform ios`"
title: Additional options for `carthage` command
- github_access_token: $GITHUB_ACCESS_TOKEN
opts:
description: "Use this input to avoid Github rate limit issues.\n\nSee the github's
guide: [Creating an access token for command-line use](https://help.github.com/articles/creating-an-access-token-for-command-line-use/),
\ \nhow to create Personal Access Token.\n\n__UNCHECK EVERY SCOPE BOX__ when
creating this token. There is no reason this token needs access to private information."
is_sensitive: true
title: Github Personal Access Token
- opts:
category: Debug
description: Enable verbose logging?
is_required: true
title: Enable verbose logging?
value_options:
- "yes"
- "no"
verbose_log: "no"
================================================
FILE: steps/carthage/3.2.4/step.yml
================================================
title: Carthage
summary: Runs the selected Carthage command.
description: |-
Downloads and builds the dependencies your Cocoa application needs.
### Configuring the Step
1. Add the **Carthage** Step in your Workflow.
2. Select `bootstrap` Carthage command in the **Carthage command to run** input. Make sure you have the **Bitrise.io Cache:Pull** Step before and the **Bitrise.io Cache:Push** Step after the **Carthage** Step in your Workflow to cache files and speed up your Bitrise build.
2. Provide your GitHub credentials in the **GitHub Personal Access Token** input to avoid GitHub rate limit issues. Don't worry, your credentials are safe with us since we store them encrypted and do not print them out in build logs.
3. Optionally, you can provide any extra flag for the Carthage command you wish to run in the **Additional options for Carthage command** input.
5. To get more information printed out, set the **Enable verbose logging** to `yes`.
### Troubleshooting
It is important that you use `bootstrap` Carthage command, as this is the only command that can leverage the cache! If you run, for example, the `update` command, it won't generate the required cache information, because the `update` command will disregard the available files or the cache.
### Useful links
- [Official Carthage documentation](https://github.com/Carthage/Carthage)
- [About Secrets and Env Vars ](https://devcenter.bitrise.io/builds/env-vars-secret-env-vars/)
### Related Steps
- [Bitrise.io Cache Push](https://www.bitrise.io/integrations/steps/cache-push)
- [Bitrise.io Cache Pull](https://www.bitrise.io/integrations/steps/cache-pull)
- [iOS Auto Provision](https://www.bitrise.io/integrations/steps/ios-auto-provision)
website: https://github.com/bitrise-steplib/steps-carthage
source_code_url: https://github.com/bitrise-steplib/steps-carthage
support_url: https://github.com/bitrise-steplib/steps-carthage/issues
published_at: 2020-10-20T09:33:47.410039459Z
source:
git: https://github.com/bitrise-steplib/steps-carthage.git
commit: 6702c999b3e387404abad0bfd8bc8a05a18d08de
host_os_tags:
- osx-10.10
project_type_tags:
- ios
- macos
- cordova
- ionic
- react-native
- flutter
type_tags:
- dependency
toolkit:
go:
package_name: github.com/bitrise-steplib/steps-carthage
deps:
brew:
- name: go
- name: carthage
apt_get:
- name: golang
bin_name: go
is_requires_admin_user: false
is_always_run: false
is_skippable: false
inputs:
- carthage_command: bootstrap
opts:
description: |-
Select a command to set up your dependencies.
The step will cache your dependencies only when using `bootstrap` in this input and you have `cache-pull` and `cache-push` steps in your workflow.
To see available commands run: `carthage help` on your local machine.
is_required: true
summary: Select a command to set up your dependencies. The step will cache your
dependencies only when using `bootstrap` in this input and you have `cache-pull`
and `cache-push` steps in your workflow.
title: Carthage command to run
- carthage_options: null
opts:
description: "Options added to the end of the Carthage call.\nYou can use multiple
options, separated by a space character.\n\nTo see available command's options,
call `carthage help COMMAND` \n\nFormat example: `--platform ios`"
title: Additional options for `carthage` command
- github_access_token: $GITHUB_ACCESS_TOKEN
opts:
description: "Use this input to avoid Github rate limit issues.\n\nSee the github's
guide: [Creating an access token for command-line use](https://help.github.com/articles/creating-an-access-token-for-command-line-use/),
\ \nhow to create Personal Access Token.\n\n__UNCHECK EVERY SCOPE BOX__ when
creating this token. There is no reason this token needs access to private information."
is_sensitive: true
title: Github Personal Access Token
- opts:
description: |-
Use this input to provide an `xcconfig` file as a workaround for the Xcode 12 issue. For more information, see [the Github issue](https://github.com/Carthage/Carthage/issues/3019).
Can either be a local file provided with the `file://` scheme (like `file://path/to/file.xcconfig`) or an URL (like https://domain.com/file.xconfig).
title: Custom xcconfig file to add to Carthage environment
xcconfig: null
- opts:
category: Debug
description: Enable verbose logging?
is_required: true
title: Enable verbose logging?
value_options:
- "yes"
- "no"
verbose_log: "no"
================================================
FILE: steps/carthage/3.2.5/step.yml
================================================
title: Carthage
summary: Runs the selected Carthage command.
description: |-
Downloads and builds the dependencies your Cocoa application needs.
### Configuring the Step
1. Add the **Carthage** Step in your Workflow.
2. Select `bootstrap` Carthage command in the **Carthage command to run** input. Make sure you have the **Bitrise.io Cache:Pull** Step before and the **Bitrise.io Cache:Push** Step after the **Carthage** Step in your Workflow to cache files and speed up your Bitrise build.
2. Provide your GitHub credentials in the **GitHub Personal Access Token** input to avoid GitHub rate limit issues. Don't worry, your credentials are safe with us since we store them encrypted and do not print them out in build logs.
3. Optionally, you can provide any extra flag for the Carthage command you wish to run in the **Additional options for Carthage command** input.
5. To get more information printed out, set the **Enable verbose logging** to `yes`.
### Troubleshooting
It is important that you use `bootstrap` Carthage command, as this is the only command that can leverage the cache! If you run, for example, the `update` command, it won't generate the required cache information, because the `update` command will disregard the available files or the cache.
### Useful links
- [Official Carthage documentation](https://github.com/Carthage/Carthage)
- [About Secrets and Env Vars ](https://devcenter.bitrise.io/builds/env-vars-secret-env-vars/)
### Related Steps
- [Bitrise.io Cache Push](https://www.bitrise.io/integrations/steps/cache-push)
- [Bitrise.io Cache Pull](https://www.bitrise.io/integrations/steps/cache-pull)
- [iOS Auto Provision](https://www.bitrise.io/integrations/steps/ios-auto-provision)
website: https://github.com/bitrise-steplib/steps-carthage
source_code_url: https://github.com/bitrise-steplib/steps-carthage
support_url: https://github.com/bitrise-steplib/steps-carthage/issues
published_at: 2025-11-11T08:08:56.609293873Z
source:
git: https://github.com/bitrise-steplib/steps-carthage.git
commit: d5fcfc35dbc106cb3de574e0f527d033cc7fe373
host_os_tags:
- osx-10.10
project_type_tags:
- cordova
- flutter
- ionic
- ios
- kotlin-multiplatform
- macos
- react-native
type_tags:
- dependency
toolkit:
go:
package_name: github.com/bitrise-steplib/steps-carthage
deps:
brew:
- name: carthage
is_requires_admin_user: false
is_always_run: false
is_skippable: false
inputs:
- carthage_command: bootstrap
opts:
description: |-
Select a command to set up your dependencies.
The step will cache your dependencies only when using `bootstrap` in this input and you have `cache-pull` and `cache-push` steps in your workflow.
To see available commands run: `carthage help` on your local machine.
is_required: true
summary: Select a command to set up your dependencies. The step will cache your
dependencies only when using `bootstrap` in this input and you have `cache-pull`
and `cache-push` steps in your workflow.
title: Carthage command to run
- carthage_options: null
opts:
description: |-
Options added to the end of the Carthage call.
You can use multiple options, separated by a space character.
To see available command's options, call `carthage help COMMAND`
Format example: `--platform ios`
title: Additional options for `carthage` command
- github_access_token: $GITHUB_ACCESS_TOKEN
opts:
description: |-
Use this input to avoid Github rate limit issues.
See the github's guide: [Creating an access token for command-line use](https://help.github.com/articles/creating-an-access-token-for-command-line-use/),
how to create Personal Access Token.
__UNCHECK EVERY SCOPE BOX__ when creating this token. There is no reason this token needs access to private information.
is_sensitive: true
title: Github Personal Access Token
- opts:
description: |-
Use this input to provide an `xcconfig` file as a workaround for the Xcode 12 issue. For more information, see [the Github issue](https://github.com/Carthage/Carthage/issues/3019).
Can either be a local file provided with the `file://` scheme (like `file://path/to/file.xcconfig`) or an URL (like https://domain.com/file.xconfig).
title: Custom xcconfig file to add to Carthage environment
xcconfig: null
- opts:
category: Debug
description: Enable verbose logging?
is_required: true
title: Enable verbose logging?
value_options:
- "yes"
- "no"
verbose_log: "no"
================================================
FILE: steps/carthage/step-info.yml
================================================
maintainer: bitrise
================================================
FILE: steps/certificate-and-profile-installer/1.1.0/step.yml
================================================
title: Certificate and profile installer
summary: |-
Need to use your Provisioning Profile and Certificate? Use this Step to
add them to the keychain and use it as you wish! No worries, as our security
policy goes, the VM is reverted after running the workflow so there's no
trace of these left on them.
description: Downloads and installs the certificate and the mobile provisioning profiles
website: https://github.com/bitrise-io/steps-certificate-and-profile-installer
source_code_url: https://github.com/bitrise-io/steps-certificate-and-profile-installer
support_url: https://github.com/bitrise-io/steps-certificate-and-profile-installer/issues
published_at: 2015-09-08T20:42:31.613406136+02:00
source:
git: https://github.com/bitrise-io/steps-certificate-and-profile-installer.git
commit: 70d1670d587d826de7aca508d1d870e2cfb8b5e4
host_os_tags:
- osx-10.10
project_type_tags:
- ios
type_tags:
- security
is_requires_admin_user: false
is_always_run: false
is_skippable: false
run_if: .IsCI
inputs:
- certificate_url: $BITRISE_CERTIFICATE_URL
opts:
description: |
URL of the certificate to download
is_dont_change_value: false
is_expand: true
is_required: true
summary: ""
title: Certificate URL
- certificate_passphrase: $BITRISE_CERTIFICATE_PASSPHRASE
opts:
description: |
Certificate passphrase
is_dont_change_value: false
is_expand: true
is_required: true
summary: ""
title: Certificate passphrase
- opts:
description: |
URL of the provisioning profile to download
is_dont_change_value: false
is_expand: true
is_required: true
summary: ""
title: Provisioning profile URL
provisioning_profile_url: $BITRISE_PROVISION_URL
- keychain_path: $HOME/Library/Keychains/login.keychain
opts:
description: ""
is_dont_change_value: false
is_expand: true
is_required: true
summary: ""
title: Keychain Path
- keychain_password: $BITRISE_KEYCHAIN_PASSWORD
opts:
description: ""
is_dont_change_value: false
is_expand: true
is_required: true
summary: ""
title: Keychain's password
================================================
FILE: steps/certificate-and-profile-installer/1.1.1/step.yml
================================================
title: Certificate and profile installer
summary: |-
Need to use your Provisioning Profile and Certificate? Use this Step to
add them to the keychain and use it as you wish! No worries, as our security
policy goes, the VM is reverted after running the workflow so there's no
trace of these left on them.
description: Downloads and installs the certificate and the mobile provisioning profiles
website: https://github.com/bitrise-io/steps-certificate-and-profile-installer
source_code_url: https://github.com/bitrise-io/steps-certificate-and-profile-installer
support_url: https://github.com/bitrise-io/steps-certificate-and-profile-installer/issues
published_at: 2015-09-12T13:09:48.258176257+02:00
source:
git: https://github.com/bitrise-io/steps-certificate-and-profile-installer.git
commit: dc2daacc26007f8f2f8ae98eba0afd7548d2cc19
host_os_tags:
- osx-10.10
project_type_tags:
- ios
type_tags:
- security
is_requires_admin_user: false
is_always_run: false
is_skippable: false
run_if: .IsCI
inputs:
- certificate_url: $BITRISE_CERTIFICATE_URL
opts:
description: |
URL of the certificate to download
is_dont_change_value: false
is_expand: true
is_required: true
summary: ""
title: Certificate URL
- certificate_passphrase: $BITRISE_CERTIFICATE_PASSPHRASE
opts:
description: |
Certificate passphrase
is_dont_change_value: false
is_expand: true
is_required: false
summary: ""
title: Certificate passphrase
- opts:
description: |
URL of the provisioning profile to download
is_dont_change_value: false
is_expand: true
is_required: true
summary: ""
title: Provisioning profile URL
provisioning_profile_url: $BITRISE_PROVISION_URL
- keychain_path: $HOME/Library/Keychains/login.keychain
opts:
description: ""
is_dont_change_value: false
is_expand: true
is_required: true
summary: ""
title: Keychain Path
- keychain_password: $BITRISE_KEYCHAIN_PASSWORD
opts:
description: ""
is_dont_change_value: false
is_expand: true
is_required: true
summary: ""
title: Keychain's password
================================================
FILE: steps/certificate-and-profile-installer/1.10.0/step.yml
================================================
title: Certificate and profile installer
summary: Downloads and installs the certificate and the mobile provisioning profiles
description: |-
Need to use your Provisioning Profiles and Certificates? Use this Step to
add them to the keychain and use it as you wish! No worries, as our security
policy goes, the VM is reverted after running the workflow so there's no
trace of these left on them.
website: https://github.com/bitrise-io/steps-certificate-and-profile-installer
source_code_url: https://github.com/bitrise-io/steps-certificate-and-profile-installer
support_url: https://github.com/bitrise-io/steps-certificate-and-profile-installer/issues
published_at: 2018-07-05T15:08:56.053716284+02:00
source:
git: https://github.com/bitrise-io/steps-certificate-and-profile-installer.git
commit: 95edb3f054d2f1ccab2b8b80dcc4282e4931a488
host_os_tags:
- osx-10.10
project_type_tags:
- ios
- macos
- xamarin
- cordova
- ionic
- react-native
type_tags:
- code-sign
toolkit:
go:
package_name: github.com/bitrise-io/steps-certificate-and-profile-installer
deps:
brew:
- name: go
apt_get:
- name: golang
bin_name: go
is_requires_admin_user: false
is_always_run: false
is_skippable: false
run_if: .IsCI
inputs:
- certificate_url: $BITRISE_CERTIFICATE_URL
opts:
description: |
URL of the certificate to download. Multiple URLs can be
specified, separated by a pipe (`|`) character.
You can specify a local path as well, using the `file://` scheme.
Example: `file://./Cert.p12`
title: Certificate URL
- certificate_passphrase: $BITRISE_CERTIFICATE_PASSPHRASE
opts:
description: |
Certificate passphrase. Multiple passphrases can be
specified, separated by a pipe (`|`) character.
Specified Certificate passphrase count should match the count of the certificate urls.
Format example:
- 1 certificate provided with passphrase: `PASS`
- 1 certificate provided without passphrase: ``
- 3 certificates provided, none of them has passphrase: `||`
- 3 certificates provided, only the 2. one has passphrase: `|PASS|`
title: Certificate passphrase
- opts:
description: |
URL of the provisioning profile to download. Multiple URLs can be
specified, separated by a pipe (`|`) character.
You can specify a local path as well, using the `file://` scheme.
Example: `file://./BuildAnything.mobileprovision`
title: Provisioning profile URL
provisioning_profile_url: $BITRISE_PROVISION_URL
- keychain_path: $HOME/Library/Keychains/login.keychain
opts:
is_required: true
title: Keychain Path
- keychain_password: $BITRISE_KEYCHAIN_PASSWORD
opts:
is_required: true
title: Keychain's password
- install_defaults: "yes"
opts:
category: Default Codesign Files
description: Installs default (Bitrise) Wildcard Provisioning Profile and Codesign
Certificate for testing.
summary: Installs default (Bitrise) Wildcard Codesign Files.
title: Installs default Codesign Files
value_options:
- "no"
- "yes"
- default_certificate_url: $BITRISE_DEFAULT_CERTIFICATE_URL
opts:
category: Default Codesign Files
description: |
URL of the default certificate.
You can specify a local path as well, using the `file://` scheme.
Example: `file://./Cert.p12`
title: Default Certificate URL
- default_certificate_passphrase: $BITRISE_DEFAULT_CERTIFICATE_PASSPHRASE
opts:
category: Default Codesign Files
description: |
Certificate passphrase of the default certificate.
title: Default Certificate passphrase
- default_provisioning_profile_url: $BITRISE_DEFAULT_PROVISION_URL
opts:
category: Default Codesign Files
description: |
URL of the default provisioning profile to download.
You can specify a local path as well, using the `file://` scheme.
Example: `file://./BuildAnything.mobileprovision`
title: Default Provisioning profile URL
================================================
FILE: steps/certificate-and-profile-installer/1.10.1/step.yml
================================================
title: Certificate and profile installer
summary: Downloads and installs the certificate and the mobile provisioning profiles
description: |-
Need to use your Provisioning Profiles and Certificates? Use this Step to
add them to the keychain and use it as you wish! No worries, as our security
policy goes, the VM is reverted after running the workflow so there's no
trace of these left on them.
website: https://github.com/bitrise-io/steps-certificate-and-profile-installer
source_code_url: https://github.com/bitrise-io/steps-certificate-and-profile-installer
support_url: https://github.com/bitrise-io/steps-certificate-and-profile-installer/issues
published_at: 2018-08-22T12:12:24.145450751Z
source:
git: https://github.com/bitrise-io/steps-certificate-and-profile-installer.git
commit: a03d4cd955e177eed8e95b9c3fc6bd61601d16da
host_os_tags:
- osx-10.10
project_type_tags:
- ios
- macos
- xamarin
- cordova
- ionic
- react-native
type_tags:
- code-sign
toolkit:
go:
package_name: github.com/bitrise-io/steps-certificate-and-profile-installer
deps:
brew:
- name: go
apt_get:
- name: golang
bin_name: go
is_requires_admin_user: false
is_always_run: false
is_skippable: false
run_if: .IsCI
inputs:
- certificate_url: $BITRISE_CERTIFICATE_URL
opts:
description: |
URL of the certificate to download. Multiple URLs can be
specified, separated by a pipe (`|`) character.
You can specify a local path as well, using the `file://` scheme.
For example `file://./Cert.p12`
is_sensitive: true
title: Certificate URL
- certificate_passphrase: $BITRISE_CERTIFICATE_PASSPHRASE
opts:
description: |
Certificate passphrase. Multiple passphrases can be
specified, separated by a pipe (`|`) character.
Specified Certificate passphrase count should match the count of the certificate urls.
Format example:
- 1 certificate provided with passphrase: `PASS`
- 1 certificate provided without passphrase: ``
- 3 certificates provided, none of them has passphrase: `||`
- 3 certificates provided, only the 2. one has passphrase: `|PASS|`
is_sensitive: true
title: Certificate passphrase
- opts:
description: |
URL of the provisioning profile to download. Multiple URLs can be
specified, separated by a pipe (`|`) character.
You can specify a local path as well, using the `file://` scheme.
For example `file://./BuildAnything.mobileprovision`
is_sensitive: true
title: Provisioning profile URL
provisioning_profile_url: $BITRISE_PROVISION_URL
- keychain_path: $HOME/Library/Keychains/login.keychain
opts:
is_required: true
title: Keychain Path
- keychain_password: $BITRISE_KEYCHAIN_PASSWORD
opts:
is_required: true
is_sensitive: true
title: Keychain's password
- install_defaults: "yes"
opts:
category: Default Codesign Files
description: Installs default (Bitrise) Wildcard Provisioning Profile and Codesign
Certificate for testing.
summary: Installs default (Bitrise) Wildcard Codesign Files.
title: Installs default Codesign Files
value_options:
- "no"
- "yes"
- default_certificate_url: $BITRISE_DEFAULT_CERTIFICATE_URL
opts:
category: Default Codesign Files
description: |
URL of the default certificate.
You can specify a local path as well, using the `file://` scheme.
For example `file://./Cert.p12`
is_sensitive: true
title: Default Certificate URL
- default_certificate_passphrase: $BITRISE_DEFAULT_CERTIFICATE_PASSPHRASE
opts:
category: Default Codesign Files
description: |
Certificate passphrase of the default certificate.
is_sensitive: true
title: Default Certificate passphrase
- default_provisioning_profile_url: $BITRISE_DEFAULT_PROVISION_URL
opts:
category: Default Codesign Files
description: |
URL of the default provisioning profile to download.
You can specify a local path as well, using the `file://` scheme.
For example `file://./BuildAnything.mobileprovision`
is_sensitive: true
title: Default Provisioning profile URL
================================================
FILE: steps/certificate-and-profile-installer/1.10.2/step.yml
================================================
title: Certificate and profile installer
summary: Downloads and installs the Apple code signing certificates and provisioning
profiles.
description: |-
The Step installs those .p12 certificate files and provisioning profiles that you uploaded to your app's **Code Signing** tab. You can upload multiple versions of any code signing file.
### Configuring the Step
By default, the Step requires no configuration. To be able to use it, you only need to upload a .p12 certificate and a matching provisioning profile to the **Code signing** tab.
However, if your certificates have passphrases, you need to make sure that passphrase is available for the Step.
1. Create a [Secret Env Var](https://devcenter.bitrise.io/builds/env-vars-secret-env-vars/) that contains the passphrase.
1. Insert that Secret to the **Certificate passphrase** input.
Similarly, you can set the path to the Keychain that should be used in the **Keychain path** input, and set a password for the Keychain in the **Keychain's password** input.
### Troubleshooting
In the case of most code signing issues, it's the **Xcode Archive & Export for iOS** Step that fails, not this one. If this Step fails, there's a couple of things you can do first.
- Check the certificate passphrase, the Keychain path and the Keychain password.
- Make sure you uploaded the required code signing files.
### Useful links
[iOS code signing](https://devcenter.bitrise.io/code-signing/ios-code-signing/code-signing-index/)
[iOS deployment](https://devcenter.bitrise.io/deploy/ios-deploy/ios-deploy-index/)
### Related Steps
[iOS Auto Provision](https://www.bitrise.io/integrations/steps/ios-auto-provision)
[Xcode Archive & Export for iOS](https://www.bitrise.io/integrations/steps/xcode-archive)
[Deploy to iTunesConnect](https://www.bitrise.io/integrations/steps/deploy-to-itunesconnect-deliver)
website: https://github.com/bitrise-steplib/steps-certificate-and-profile-installer
source_code_url: https://github.com/bitrise-steplib/steps-certificate-and-profile-installer
support_url: https://github.com/bitrise-steplib/steps-certificate-and-profile-installer/issues
published_at: 2019-12-12T14:10:49.438785564Z
source:
git: https://github.com/bitrise-steplib/steps-certificate-and-profile-installer.git
commit: adeac771f6a22a2cdd36e764998192f1107bf338
host_os_tags:
- osx-10.10
project_type_tags:
- ios
- macos
- xamarin
- cordova
- ionic
- react-native
- flutter
type_tags:
- code-sign
toolkit:
go:
package_name: github.com/bitrise-steplib/steps-certificate-and-profile-installer
deps:
brew:
- name: go
apt_get:
- name: golang
bin_name: go
is_requires_admin_user: false
is_always_run: false
is_skippable: false
run_if: .IsCI
inputs:
- certificate_url: $BITRISE_CERTIFICATE_URL
opts:
description: |
URL of the certificate to download. Multiple URLs can be
specified, separated by a pipe (`|`) character.
You can specify a local path as well, using the `file://` scheme.
For example `file://./Cert.p12`
is_sensitive: true
title: Certificate URL
- certificate_passphrase: $BITRISE_CERTIFICATE_PASSPHRASE
opts:
description: |
Certificate passphrase. Multiple passphrases can be
specified, separated by a pipe (`|`) character.
Specified Certificate passphrase count should match the count of the certificate urls.
Format example:
- 1 certificate provided with passphrase: `PASS`
- 1 certificate provided without passphrase: ``
- 3 certificates provided, none of them has passphrase: `||`
- 3 certificates provided, only the 2. one has passphrase: `|PASS|`
is_sensitive: true
title: Certificate passphrase
- opts:
description: |
URL of the provisioning profile to download. Multiple URLs can be
specified, separated by a pipe (`|`) character.
You can specify a local path as well, using the `file://` scheme.
For example `file://./BuildAnything.mobileprovision`
is_sensitive: true
title: Provisioning profile URL
provisioning_profile_url: $BITRISE_PROVISION_URL
- keychain_path: $HOME/Library/Keychains/login.keychain
opts:
is_required: true
title: Keychain Path
- keychain_password: $BITRISE_KEYCHAIN_PASSWORD
opts:
is_required: true
is_sensitive: true
title: Keychain's password
- install_defaults: "yes"
opts:
category: Default Codesign Files
description: Installs default (Bitrise) Wildcard Provisioning Profile and Codesign
Certificate for testing.
summary: Installs default (Bitrise) Wildcard Codesign Files.
title: Installs default Codesign Files
value_options:
- "no"
- "yes"
- default_certificate_url: $BITRISE_DEFAULT_CERTIFICATE_URL
opts:
category: Default Codesign Files
description: |
URL of the default certificate.
You can specify a local path as well, using the `file://` scheme.
For example `file://./Cert.p12`
is_sensitive: true
title: Default Certificate URL
- default_certificate_passphrase: $BITRISE_DEFAULT_CERTIFICATE_PASSPHRASE
opts:
category: Default Codesign Files
description: |
Certificate passphrase of the default certificate.
is_sensitive: true
title: Default Certificate passphrase
- default_provisioning_profile_url: $BITRISE_DEFAULT_PROVISION_URL
opts:
category: Default Codesign Files
description: |
URL of the default provisioning profile to download.
You can specify a local path as well, using the `file://` scheme.
For example `file://./BuildAnything.mobileprovision`
is_sensitive: true
title: Default Provisioning profile URL
================================================
FILE: steps/certificate-and-profile-installer/1.10.3/step.yml
================================================
title: Certificate and profile installer
summary: Downloads and installs the Apple code signing certificates and provisioning
profiles.
description: |-
The Step installs those .p12 certificate files and provisioning profiles that you uploaded to your app's **Code Signing** tab. You can upload multiple versions of any code signing file.
### Configuring the Step
By default, the Step requires no configuration. To be able to use it, you only need to upload a .p12 certificate and a matching provisioning profile to the **Code signing** tab.
However, if your certificates have passphrases, you need to make sure that passphrase is available for the Step.
1. Create a [Secret Env Var](https://devcenter.bitrise.io/builds/env-vars-secret-env-vars/) that contains the passphrase.
1. Insert that Secret to the **Certificate passphrase** input.
Similarly, you can set the path to the Keychain that should be used in the **Keychain path** input, and set a password for the Keychain in the **Keychain's password** input.
### Troubleshooting
In the case of most code signing issues, it's the **Xcode Archive & Export for iOS** Step that fails, not this one. If this Step fails, there's a couple of things you can do first.
- Check the certificate passphrase, the Keychain path and the Keychain password.
- Make sure you uploaded the required code signing files.
### Useful links
- [iOS code signing](https://devcenter.bitrise.io/code-signing/ios-code-signing/code-signing-index/)
- [iOS deployment](https://devcenter.bitrise.io/deploy/ios-deploy/ios-deploy-index/)
### Related Steps
- [iOS Auto Provision](https://www.bitrise.io/integrations/steps/ios-auto-provision)
- [Xcode Archive & Export for iOS](https://www.bitrise.io/integrations/steps/xcode-archive)
- [Deploy to iTunesConnect](https://www.bitrise.io/integrations/steps/deploy-to-itunesconnect-deliver)
website: https://github.com/bitrise-steplib/steps-certificate-and-profile-installer
source_code_url: https://github.com/bitrise-steplib/steps-certificate-and-profile-installer
support_url: https://github.com/bitrise-steplib/steps-certificate-and-profile-installer/issues
published_at: 2020-02-13T16:15:38.518433934Z
source:
git: https://github.com/bitrise-steplib/steps-certificate-and-profile-installer.git
commit: 2bba6a2304ffd0abfdf440d79b1e4fa261a31517
host_os_tags:
- osx-10.10
project_type_tags:
- ios
- macos
- xamarin
- cordova
- ionic
- react-native
- flutter
type_tags:
- code-sign
toolkit:
go:
package_name: github.com/bitrise-steplib/steps-certificate-and-profile-installer
deps:
brew:
- name: go
apt_get:
- name: golang
bin_name: go
is_requires_admin_user: false
is_always_run: false
is_skippable: false
run_if: .IsCI
inputs:
- certificate_url: $BITRISE_CERTIFICATE_URL
opts:
description: |
URL of the certificate to download. Multiple URLs can be
specified, separated by a pipe (`|`) character.
You can specify a local path as well, using the `file://` scheme.
For example `file://./Cert.p12`
is_sensitive: true
title: Certificate URL
- certificate_passphrase: $BITRISE_CERTIFICATE_PASSPHRASE
opts:
description: |
Certificate passphrase. Multiple passphrases can be
specified, separated by a pipe (`|`) character.
Specified Certificate passphrase count should match the count of the certificate urls.
Format example:
- 1 certificate provided with passphrase: `PASS`
- 1 certificate provided without passphrase: ``
- 3 certificates provided, none of them has passphrase: `||`
- 3 certificates provided, only the 2. one has passphrase: `|PASS|`
is_sensitive: true
title: Certificate passphrase
- opts:
description: |
URL of the provisioning profile to download. Multiple URLs can be
specified, separated by a pipe (`|`) character.
You can specify a local path as well, using the `file://` scheme.
For example `file://./BuildAnything.mobileprovision`
is_sensitive: true
title: Provisioning profile URL
provisioning_profile_url: $BITRISE_PROVISION_URL
- keychain_path: $HOME/Library/Keychains/login.keychain
opts:
is_required: true
title: Keychain Path
- keychain_password: $BITRISE_KEYCHAIN_PASSWORD
opts:
is_required: true
is_sensitive: true
title: Keychain's password
- install_defaults: "yes"
opts:
category: Default Codesign Files
description: Installs default (Bitrise) Wildcard Provisioning Profile and Codesign
Certificate for testing.
summary: Installs default (Bitrise) Wildcard Codesign Files.
title: Installs default Codesign Files
value_options:
- "no"
- "yes"
- default_certificate_url: $BITRISE_DEFAULT_CERTIFICATE_URL
opts:
category: Default Codesign Files
description: |
URL of the default certificate.
You can specify a local path as well, using the `file://` scheme.
For example `file://./Cert.p12`
is_sensitive: true
title: Default Certificate URL
- default_certificate_passphrase: $BITRISE_DEFAULT_CERTIFICATE_PASSPHRASE
opts:
category: Default Codesign Files
description: |
Certificate passphrase of the default certificate.
is_sensitive: true
title: Default Certificate passphrase
- default_provisioning_profile_url: $BITRISE_DEFAULT_PROVISION_URL
opts:
category: Default Codesign Files
description: |
URL of the default provisioning profile to download.
You can specify a local path as well, using the `file://` scheme.
For example `file://./BuildAnything.mobileprovision`
is_sensitive: true
title: Default Provisioning profile URL
================================================
FILE: steps/certificate-and-profile-installer/1.10.4/step.yml
================================================
title: Certificate and profile installer
summary: Downloads and installs the Apple code signing certificates and provisioning
profiles.
description: |-
The Step installs those .p12 certificate files and provisioning profiles that you uploaded to your app's **Code Signing** tab. You can upload multiple versions of any code signing file.
### Configuring the Step
By default, the Step requires no configuration. To be able to use it, you only need to upload a .p12 certificate and a matching provisioning profile to the **Code signing** tab.
However, if your certificates have passphrases, you need to make sure that passphrase is available for the Step.
1. Create a [Secret Env Var](https://devcenter.bitrise.io/builds/env-vars-secret-env-vars/) that contains the passphrase.
1. Insert that Secret to the **Certificate passphrase** input.
Similarly, you can set the path to the Keychain that should be used in the **Keychain path** input, and set a password for the Keychain in the **Keychain's password** input.
### Troubleshooting
In the case of most code signing issues, it's the **Xcode Archive & Export for iOS** Step that fails, not this one. If this Step fails, there's a couple of things you can do first.
- Check the certificate passphrase, the Keychain path and the Keychain password.
- Make sure you uploaded the required code signing files.
### Useful links
- [iOS code signing](https://devcenter.bitrise.io/code-signing/ios-code-signing/code-signing-index/)
- [iOS deployment](https://devcenter.bitrise.io/deploy/ios-deploy/ios-deploy-index/)
### Related Steps
- [iOS Auto Provision](https://www.bitrise.io/integrations/steps/ios-auto-provision)
- [Xcode Archive & Export for iOS](https://www.bitrise.io/integrations/steps/xcode-archive)
- [Deploy to iTunesConnect](https://www.bitrise.io/integrations/steps/deploy-to-itunesconnect-deliver)
website: https://github.com/bitrise-steplib/steps-certificate-and-profile-installer
source_code_url: https://github.com/bitrise-steplib/steps-certificate-and-profile-installer
support_url: https://github.com/bitrise-steplib/steps-certificate-and-profile-installer/issues
published_at: 2022-01-27T14:37:51.004599045Z
source:
git: https://github.com/bitrise-steplib/steps-certificate-and-profile-installer.git
commit: 102f49f39f5169ecad39f12e0c0c2c0fb3994d5e
host_os_tags:
- osx-10.10
project_type_tags:
- ios
- macos
- xamarin
- cordova
- ionic
- react-native
- flutter
type_tags:
- code-sign
toolkit:
go:
package_name: github.com/bitrise-steplib/steps-certificate-and-profile-installer
deps:
brew:
- name: go
apt_get:
- name: golang
bin_name: go
is_requires_admin_user: false
is_always_run: false
is_skippable: false
run_if: .IsCI
inputs:
- certificate_url: $BITRISE_CERTIFICATE_URL
opts:
description: |
URL of the certificate to download. Multiple URLs can be
specified, separated by a pipe (`|`) character.
You can specify a local path as well, using the `file://` scheme.
For example `file://./Cert.p12`
is_sensitive: true
title: Certificate URL
- certificate_passphrase: $BITRISE_CERTIFICATE_PASSPHRASE
opts:
description: |
Certificate passphrase. Multiple passphrases can be
specified, separated by a pipe (`|`) character.
Specified Certificate passphrase count should match the count of the certificate urls.
Format example:
- 1 certificate provided with passphrase: `PASS`
- 1 certificate provided without passphrase: ``
- 3 certificates provided, none of them has passphrase: `||`
- 3 certificates provided, only the 2. one has passphrase: `|PASS|`
is_sensitive: true
title: Certificate passphrase
- opts:
description: |
URL of the provisioning profile to download. Multiple URLs can be
specified, separated by a pipe (`|`) character.
You can specify a local path as well, using the `file://` scheme.
For example `file://./BuildAnything.mobileprovision`
is_sensitive: true
title: Provisioning profile URL
provisioning_profile_url: $BITRISE_PROVISION_URL
- keychain_path: $HOME/Library/Keychains/login.keychain
opts:
is_required: true
title: Keychain Path
- keychain_password: $BITRISE_KEYCHAIN_PASSWORD
opts:
is_required: true
is_sensitive: true
title: Keychain's password
- install_defaults: "yes"
opts:
category: Default Codesign Files
description: Installs default (Bitrise) Wildcard Provisioning Profile and Codesign
Certificate for testing.
summary: Installs default (Bitrise) Wildcard Codesign Files.
title: Installs default Codesign Files
value_options:
- "no"
- "yes"
- default_certificate_url: $BITRISE_DEFAULT_CERTIFICATE_URL
opts:
category: Default Codesign Files
description: |
URL of the default certificate.
You can specify a local path as well, using the `file://` scheme.
For example `file://./Cert.p12`
is_sensitive: true
title: Default Certificate URL
- default_certificate_passphrase: $BITRISE_DEFAULT_CERTIFICATE_PASSPHRASE
opts:
category: Default Codesign Files
description: |
Certificate passphrase of the default certificate.
is_sensitive: true
title: Default Certificate passphrase
- default_provisioning_profile_url: $BITRISE_DEFAULT_PROVISION_URL
opts:
category: Default Codesign Files
description: |
URL of the default provisioning profile to download.
You can specify a local path as well, using the `file://` scheme.
For example `file://./BuildAnything.mobileprovision`
is_sensitive: true
title: Default Provisioning profile URL
================================================
FILE: steps/certificate-and-profile-installer/1.10.5/step.yml
================================================
title: Certificate and profile installer
summary: Downloads and installs the Apple code signing certificates and provisioning
profiles.
description: |-
The Step installs those .p12 certificate files and provisioning profiles that you uploaded to your app's **Code Signing** tab. You can upload multiple versions of any code signing file.
### Configuring the Step
By default, the Step requires no configuration. To be able to use it, you only need to upload a .p12 certificate and a matching provisioning profile to the **Code signing** tab.
However, if your certificates have passphrases, you need to make sure that passphrase is available for the Step.
1. Create a [Secret Env Var](https://devcenter.bitrise.io/builds/env-vars-secret-env-vars/) that contains the passphrase.
1. Insert that Secret to the **Certificate passphrase** input.
Similarly, you can set the path to the Keychain that should be used in the **Keychain path** input, and set a password for the Keychain in the **Keychain's password** input.
### Troubleshooting
In the case of most code signing issues, it's the **Xcode Archive & Export for iOS** Step that fails, not this one. If this Step fails, there's a couple of things you can do first.
- Check the certificate passphrase, the Keychain path and the Keychain password.
- Make sure you uploaded the required code signing files.
### Useful links
- [iOS code signing](https://devcenter.bitrise.io/code-signing/ios-code-signing/code-signing-index/)
- [iOS deployment](https://devcenter.bitrise.io/deploy/ios-deploy/ios-deploy-index/)
### Related Steps
- [iOS Auto Provision](https://www.bitrise.io/integrations/steps/ios-auto-provision)
- [Xcode Archive & Export for iOS](https://www.bitrise.io/integrations/steps/xcode-archive)
- [Deploy to iTunesConnect](https://www.bitrise.io/integrations/steps/deploy-to-itunesconnect-deliver)
website: https://github.com/bitrise-steplib/steps-certificate-and-profile-installer
source_code_url: https://github.com/bitrise-steplib/steps-certificate-and-profile-installer
support_url: https://github.com/bitrise-steplib/steps-certificate-and-profile-installer/issues
published_at: 2022-05-31T14:59:25.895869739Z
source:
git: https://github.com/bitrise-steplib/steps-certificate-and-profile-installer.git
commit: 280c4dad6f93346ac49c7e00e36053c9d3adea3d
host_os_tags:
- osx-10.10
project_type_tags:
- ios
- macos
- xamarin
- cordova
- ionic
- react-native
- flutter
type_tags:
- code-sign
toolkit:
go:
package_name: github.com/bitrise-steplib/steps-certificate-and-profile-installer
deps:
brew:
- name: go
apt_get:
- name: golang
bin_name: go
is_requires_admin_user: false
is_always_run: false
is_skippable: false
run_if: .IsCI
inputs:
- certificate_url: $BITRISE_CERTIFICATE_URL
opts:
description: |
URL of the certificate to download. Multiple URLs can be
specified, separated by a pipe (`|`) character.
You can specify a local path as well, using the `file://` scheme.
For example `file://./Cert.p12`
is_sensitive: true
title: Certificate URL
- certificate_passphrase: $BITRISE_CERTIFICATE_PASSPHRASE
opts:
description: |
Certificate passphrase. Multiple passphrases can be
specified, separated by a pipe character (`|`).
Specified Certificate passphrase count should match the count of the certificate urls.
Pipe characters in passphrases are not supported.
Format example:
- 1 certificate provided with passphrase: `PASS`
- 1 certificate provided without passphrase: ``
- 3 certificates provided, none of them has passphrase: `||`
- 3 certificates provided, only the 2. one has passphrase: `|PASS|`
is_sensitive: true
title: Certificate passphrase
- opts:
description: |
URL of the provisioning profile to download. Multiple URLs can be
specified, separated by a pipe (`|`) character.
You can specify a local path as well, using the `file://` scheme.
For example `file://./BuildAnything.mobileprovision`
is_sensitive: true
title: Provisioning profile URL
provisioning_profile_url: $BITRISE_PROVISION_URL
- keychain_path: $HOME/Library/Keychains/login.keychain
opts:
is_required: true
summary: Path to the Keychain where the code signing certificates will be installed.
title: Keychain Path
- keychain_password: $BITRISE_KEYCHAIN_PASSWORD
opts:
is_required: true
is_sensitive: true
summary: Password for the provided Keychain.
title: Keychain password
- install_defaults: "yes"
opts:
category: Default Codesign Files
description: Installs default (Bitrise) Wildcard Provisioning Profile and Codesign
Certificate for testing.
summary: Installs default (Bitrise) Wildcard Codesign Files.
title: Installs default Codesign Files
value_options:
- "no"
- "yes"
- default_certificate_url: $BITRISE_DEFAULT_CERTIFICATE_URL
opts:
category: Default Codesign Files
description: |
URL of the default certificate.
You can specify a local path as well, using the `file://` scheme.
For example `file://./Cert.p12`
is_sensitive: true
title: Default Certificate URL
- default_certificate_passphrase: $BITRISE_DEFAULT_CERTIFICATE_PASSPHRASE
opts:
category: Default Codesign Files
description: |
Passphrase of the default Certificate.
is_sensitive: true
title: Default Certificate passphrase
- default_provisioning_profile_url: $BITRISE_DEFAULT_PROVISION_URL
opts:
category: Default Codesign Files
description: |
URL of the default provisioning profile to download.
You can specify a local path as well, using the `file://` scheme.
For example `file://./BuildAnything.mobileprovision`
is_sensitive: true
title: Default Provisioning profile URL
================================================
FILE: steps/certificate-and-profile-installer/1.10.6/step.yml
================================================
title: Certificate and profile installer
summary: Downloads and installs the Apple code signing certificates and provisioning
profiles.
description: |-
The Step installs those .p12 certificate files and provisioning profiles that you uploaded to your app's **Code Signing** tab. You can upload multiple versions of any code signing file.
### Configuring the Step
By default, the Step requires no configuration. To be able to use it, you only need to upload a .p12 certificate and a matching provisioning profile to the **Code signing** tab.
However, if your certificates have passphrases, you need to make sure that passphrase is available for the Step.
1. Create a [Secret Env Var](https://devcenter.bitrise.io/builds/env-vars-secret-env-vars/) that contains the passphrase.
1. Insert that Secret to the **Certificate passphrase** input.
Similarly, you can set the path to the Keychain that should be used in the **Keychain path** input, and set a password for the Keychain in the **Keychain's password** input.
### Troubleshooting
In the case of most code signing issues, it's the **Xcode Archive & Export for iOS** Step that fails, not this one. If this Step fails, there's a couple of things you can do first.
- Check the certificate passphrase, the Keychain path and the Keychain password.
- Make sure you uploaded the required code signing files.
### Useful links
- [iOS code signing](https://devcenter.bitrise.io/code-signing/ios-code-signing/code-signing-index/)
- [iOS deployment](https://devcenter.bitrise.io/deploy/ios-deploy/ios-deploy-index/)
### Related Steps
- [iOS Auto Provision](https://www.bitrise.io/integrations/steps/ios-auto-provision)
- [Xcode Archive & Export for iOS](https://www.bitrise.io/integrations/steps/xcode-archive)
- [Deploy to iTunesConnect](https://www.bitrise.io/integrations/steps/deploy-to-itunesconnect-deliver)
website: https://github.com/bitrise-steplib/steps-certificate-and-profile-installer
source_code_url: https://github.com/bitrise-steplib/steps-certificate-and-profile-installer
support_url: https://github.com/bitrise-steplib/steps-certificate-and-profile-installer/issues
published_at: 2023-01-06T14:13:54.216752147Z
source:
git: https://github.com/bitrise-steplib/steps-certificate-and-profile-installer.git
commit: b113c98f09ce02e1bc7c60c87d9b53ed25605c97
project_type_tags:
- ios
- macos
- cordova
- ionic
- react-native
- flutter
type_tags:
- code-sign
toolkit:
go:
package_name: github.com/bitrise-steplib/steps-certificate-and-profile-installer
is_requires_admin_user: false
is_always_run: false
is_skippable: false
run_if: .IsCI
inputs:
- certificate_url: $BITRISE_CERTIFICATE_URL
opts:
description: |
URL of the certificate to download. Multiple URLs can be
specified, separated by a pipe (`|`) character.
You can specify a local path as well, using the `file://` scheme.
For example `file://./Cert.p12`
is_sensitive: true
title: Certificate URL
- certificate_passphrase: $BITRISE_CERTIFICATE_PASSPHRASE
opts:
description: |
Certificate passphrase. Multiple passphrases can be
specified, separated by a pipe character (`|`).
Specified Certificate passphrase count should match the count of the certificate urls.
Pipe characters in passphrases are not supported.
Format example:
- 1 certificate provided with passphrase: `PASS`
- 1 certificate provided without passphrase: ``
- 3 certificates provided, none of them has passphrase: `||`
- 3 certificates provided, only the 2. one has passphrase: `|PASS|`
is_sensitive: true
title: Certificate passphrase
- opts:
description: |
URL of the provisioning profile to download. Multiple URLs can be
specified, separated by a pipe (`|`) character.
You can specify a local path as well, using the `file://` scheme.
For example `file://./BuildAnything.mobileprovision`
is_sensitive: true
title: Provisioning profile URL
provisioning_profile_url: $BITRISE_PROVISION_URL
- keychain_path: $HOME/Library/Keychains/login.keychain
opts:
is_required: true
summary: Path to the Keychain where the code signing certificates will be installed.
title: Keychain Path
- keychain_password: $BITRISE_KEYCHAIN_PASSWORD
opts:
is_required: true
is_sensitive: true
summary: Password for the provided Keychain.
title: Keychain password
- install_defaults: "yes"
opts:
category: Default Codesign Files
description: Installs default (Bitrise) Wildcard Provisioning Profile and Codesign
Certificate for testing.
summary: Installs default (Bitrise) Wildcard Codesign Files.
title: Installs default Codesign Files
value_options:
- "no"
- "yes"
- default_certificate_url: $BITRISE_DEFAULT_CERTIFICATE_URL
opts:
category: Default Codesign Files
description: |
URL of the default certificate.
You can specify a local path as well, using the `file://` scheme.
For example `file://./Cert.p12`
is_sensitive: true
title: Default Certificate URL
- default_certificate_passphrase: $BITRISE_DEFAULT_CERTIFICATE_PASSPHRASE
opts:
category: Default Codesign Files
description: |
Passphrase of the default Certificate.
is_sensitive: true
title: Default Certificate passphrase
- default_provisioning_profile_url: $BITRISE_DEFAULT_PROVISION_URL
opts:
category: Default Codesign Files
description: |
URL of the default provisioning profile to download.
You can specify a local path as well, using the `file://` scheme.
For example `file://./BuildAnything.mobileprovision`
is_sensitive: true
title: Default Provisioning profile URL
================================================
FILE: steps/certificate-and-profile-installer/1.11.0/step.yml
================================================
title: Certificate and profile installer
summary: Downloads and installs the Apple code signing certificates and provisioning
profiles.
description: |-
The Step installs those .p12 certificate files and provisioning profiles that you uploaded to your app's **Code Signing** tab. You can upload multiple versions of any code signing file.
### Configuring the Step
By default, the Step requires no configuration. To be able to use it, you only need to upload a .p12 certificate and a matching provisioning profile to the **Code signing** tab.
However, if your certificates have passphrases, you need to make sure that passphrase is available for the Step.
1. Create a [Secret Env Var](https://devcenter.bitrise.io/builds/env-vars-secret-env-vars/) that contains the passphrase.
1. Insert that Secret to the **Certificate passphrase** input.
Similarly, you can set the path to the Keychain that should be used in the **Keychain path** input, and set a password for the Keychain in the **Keychain's password** input.
### Troubleshooting
In the case of most code signing issues, it's the **Xcode Archive & Export for iOS** Step that fails, not this one. If this Step fails, there's a couple of things you can do first.
- Check the certificate passphrase, the Keychain path and the Keychain password.
- Make sure you uploaded the required code signing files.
### Useful links
- [iOS code signing](https://devcenter.bitrise.io/code-signing/ios-code-signing/code-signing-index/)
- [iOS deployment](https://devcenter.bitrise.io/deploy/ios-deploy/ios-deploy-index/)
### Related Steps
- [iOS Auto Provision](https://www.bitrise.io/integrations/steps/ios-auto-provision)
- [Xcode Archive & Export for iOS](https://www.bitrise.io/integrations/steps/xcode-archive)
- [Deploy to iTunesConnect](https://www.bitrise.io/integrations/steps/deploy-to-itunesconnect-deliver)
website: https://github.com/bitrise-steplib/steps-certificate-and-profile-installer
source_code_url: https://github.com/bitrise-steplib/steps-certificate-and-profile-installer
support_url: https://github.com/bitrise-steplib/steps-certificate-and-profile-installer/issues
published_at: 2023-08-30T06:21:35.689533933Z
source:
git: https://github.com/bitrise-steplib/steps-certificate-and-profile-installer.git
commit: 904379c99832962da0a591f0bc7902acb4f687a1
project_type_tags:
- ios
- macos
- cordova
- ionic
- react-native
- flutter
type_tags:
- code-sign
toolkit:
go:
package_name: github.com/bitrise-steplib/steps-certificate-and-profile-installer
is_requires_admin_user: false
is_always_run: false
is_skippable: false
run_if: .IsCI
inputs:
- certificate_url: $BITRISE_CERTIFICATE_URL
opts:
description: |
URL of the certificate to download. Multiple URLs can be
specified, separated by a pipe (`|`) character.
You can specify a local path as well, using the `file://` scheme.
For example `file://./Cert.p12`
is_sensitive: true
title: Certificate URL
- certificate_passphrase: $BITRISE_CERTIFICATE_PASSPHRASE
opts:
description: |
Certificate passphrase. Multiple passphrases can be
specified, separated by a pipe character (`|`).
Specified Certificate passphrase count should match the count of the certificate urls.
Pipe characters in passphrases are not supported.
Format example:
- 1 certificate provided with passphrase: `PASS`
- 1 certificate provided without passphrase: ``
- 3 certificates provided, none of them has passphrase: `||`
- 3 certificates provided, only the 2. one has passphrase: `|PASS|`
is_sensitive: true
title: Certificate passphrase
- opts:
description: |
URL of the provisioning profile to download. Multiple URLs can be
specified, separated by a pipe (`|`) character.
You can specify a local path as well, using the `file://` scheme.
For example `file://./BuildAnything.mobileprovision`
is_sensitive: true
title: Provisioning profile URL
provisioning_profile_url: $BITRISE_PROVISION_URL
- keychain_path: $HOME/Library/Keychains/login.keychain
opts:
is_required: true
summary: Path to the Keychain where the code signing certificates will be installed.
title: Keychain Path
- keychain_password: $BITRISE_KEYCHAIN_PASSWORD
opts:
is_required: true
is_sensitive: true
summary: Password for the provided Keychain.
title: Keychain password
- install_defaults: "yes"
opts:
category: Default Codesign Files
description: Installs default (Bitrise) Wildcard Provisioning Profile and Codesign
Certificate for testing.
summary: Installs default (Bitrise) Wildcard Codesign Files.
title: Installs default Codesign Files
value_options:
- "no"
- "yes"
- default_certificate_url: $BITRISE_DEFAULT_CERTIFICATE_URL
opts:
category: Default Codesign Files
description: |
URL of the default certificate.
You can specify a local path as well, using the `file://` scheme.
For example `file://./Cert.p12`
is_sensitive: true
title: Default Certificate URL
- default_certificate_passphrase: $BITRISE_DEFAULT_CERTIFICATE_PASSPHRASE
opts:
category: Default Codesign Files
description: |
Passphrase of the default Certificate.
is_sensitive: true
title: Default Certificate passphrase
- default_provisioning_profile_url: $BITRISE_DEFAULT_PROVISION_URL
opts:
category: Default Codesign Files
description: |
URL of the default provisioning profile to download.
You can specify a local path as well, using the `file://` scheme.
For example `file://./BuildAnything.mobileprovision`
is_sensitive: true
title: Default Provisioning profile URL
================================================
FILE: steps/certificate-and-profile-installer/1.11.1/step.yml
================================================
title: Certificate and profile installer
summary: Downloads and installs the Apple code signing certificates and provisioning
profiles.
description: |-
The Step installs those .p12 certificate files and provisioning profiles that you uploaded to your app's **Code Signing** tab. You can upload multiple versions of any code signing file.
### Configuring the Step
By default, the Step requires no configuration. To be able to use it, you only need to upload a .p12 certificate and a matching provisioning profile to the **Code signing** tab.
However, if your certificates have passphrases, you need to make sure that passphrase is available for the Step.
1. Create a [Secret Env Var](https://devcenter.bitrise.io/builds/env-vars-secret-env-vars/) that contains the passphrase.
1. Insert that Secret to the **Certificate passphrase** input.
Similarly, you can set the path to the Keychain that should be used in the **Keychain path** input, and set a password for the Keychain in the **Keychain's password** input.
### Troubleshooting
In the case of most code signing issues, it's the **Xcode Archive & Export for iOS** Step that fails, not this one. If this Step fails, there's a couple of things you can do first.
- Check the certificate passphrase, the Keychain path and the Keychain password.
- Make sure you uploaded the required code signing files.
### Useful links
- [iOS code signing](https://devcenter.bitrise.io/code-signing/ios-code-signing/code-signing-index/)
- [iOS deployment](https://devcenter.bitrise.io/deploy/ios-deploy/ios-deploy-index/)
### Related Steps
- [iOS Auto Provision](https://www.bitrise.io/integrations/steps/ios-auto-provision)
- [Xcode Archive & Export for iOS](https://www.bitrise.io/integrations/steps/xcode-archive)
- [Deploy to iTunesConnect](https://www.bitrise.io/integrations/steps/deploy-to-itunesconnect-deliver)
website: https://github.com/bitrise-steplib/steps-certificate-and-profile-installer
source_code_url: https://github.com/bitrise-steplib/steps-certificate-and-profile-installer
support_url: https://github.com/bitrise-steplib/steps-certificate-and-profile-installer/issues
published_at: 2024-01-29T19:03:49.983090072Z
source:
git: https://github.com/bitrise-steplib/steps-certificate-and-profile-installer.git
commit: b4a283a10b90e6e591856b0d70656df0b75fc923
project_type_tags:
- ios
- macos
- cordova
- ionic
- react-native
- flutter
type_tags:
- code-sign
toolkit:
go:
package_name: github.com/bitrise-steplib/steps-certificate-and-profile-installer
is_requires_admin_user: false
is_always_run: false
is_skippable: false
run_if: .IsCI
inputs:
- certificate_url: $BITRISE_CERTIFICATE_URL
opts:
description: |
URL of the certificate to download. Multiple URLs can be
specified, separated by a pipe (`|`) character.
You can specify a local path as well, using the `file://` scheme.
For example `file://./Cert.p12`
is_sensitive: true
title: Certificate URL
- certificate_passphrase: $BITRISE_CERTIFICATE_PASSPHRASE
opts:
description: |
Certificate passphrase. Multiple passphrases can be
specified, separated by a pipe character (`|`).
Specified Certificate passphrase count should match the count of the certificate urls.
Pipe characters in passphrases are not supported.
Format example:
- 1 certificate provided with passphrase: `PASS`
- 1 certificate provided without passphrase: ``
- 3 certificates provided, none of them has passphrase: `||`
- 3 certificates provided, only the 2. one has passphrase: `|PASS|`
is_sensitive: true
title: Certificate passphrase
- opts:
description: |
URL of the provisioning profile to download. Multiple URLs can be
specified, separated by a pipe (`|`) character.
You can specify a local path as well, using the `file://` scheme.
For example `file://./BuildAnything.mobileprovision`
is_sensitive: true
title: Provisioning profile URL
provisioning_profile_url: $BITRISE_PROVISION_URL
- keychain_path: $HOME/Library/Keychains/login.keychain
opts:
is_required: true
summary: Path to the Keychain where the code signing certificates will be installed.
title: Keychain Path
- keychain_password: $BITRISE_KEYCHAIN_PASSWORD
opts:
is_required: true
is_sensitive: true
summary: Password for the provided Keychain.
title: Keychain password
- install_defaults: "yes"
opts:
category: Default Codesign Files
description: Installs default (Bitrise) Wildcard Provisioning Profile and Codesign
Certificate for testing.
summary: Installs default (Bitrise) Wildcard Codesign Files.
title: Installs default Codesign Files
value_options:
- "no"
- "yes"
- default_certificate_url: $BITRISE_DEFAULT_CERTIFICATE_URL
opts:
category: Default Codesign Files
description: |
URL of the default certificate.
You can specify a local path as well, using the `file://` scheme.
For example `file://./Cert.p12`
is_sensitive: true
title: Default Certificate URL
- default_certificate_passphrase: $BITRISE_DEFAULT_CERTIFICATE_PASSPHRASE
opts:
category: Default Codesign Files
description: |
Passphrase of the default Certificate.
is_sensitive: true
title: Default Certificate passphrase
- default_provisioning_profile_url: $BITRISE_DEFAULT_PROVISION_URL
opts:
category: Default Codesign Files
description: |
URL of the default provisioning profile to download.
You can specify a local path as well, using the `file://` scheme.
For example `file://./BuildAnything.mobileprovision`
is_sensitive: true
title: Default Provisioning profile URL
================================================
FILE: steps/certificate-and-profile-installer/1.11.2/step.yml
================================================
title: Certificate and profile installer
summary: Downloads and installs the Apple code signing certificates and provisioning
profiles.
description: |-
The Step installs those .p12 certificate files and provisioning profiles that you uploaded to your app's **Code Signing** tab. You can upload multiple versions of any code signing file.
### Configuring the Step
By default, the Step requires no configuration. To be able to use it, you only need to upload a .p12 certificate and a matching provisioning profile to the **Code signing** tab.
However, if your certificates have passphrases, you need to make sure that passphrase is available for the Step.
1. Create a [Secret Env Var](https://devcenter.bitrise.io/builds/env-vars-secret-env-vars/) that contains the passphrase.
1. Insert that Secret to the **Certificate passphrase** input.
Similarly, you can set the path to the Keychain that should be used in the **Keychain path** input, and set a password for the Keychain in the **Keychain's password** input.
### Troubleshooting
In the case of most code signing issues, it's the **Xcode Archive & Export for iOS** Step that fails, not this one. If this Step fails, there's a couple of things you can do first.
- Check the certificate passphrase, the Keychain path and the Keychain password.
- Make sure you uploaded the required code signing files.
### Useful links
- [iOS code signing](https://devcenter.bitrise.io/code-signing/ios-code-signing/code-signing-index/)
- [iOS deployment](https://devcenter.bitrise.io/deploy/ios-deploy/ios-deploy-index/)
### Related Steps
- [iOS Auto Provision](https://www.bitrise.io/integrations/steps/ios-auto-provision)
- [Xcode Archive & Export for iOS](https://www.bitrise.io/integrations/steps/xcode-archive)
- [Deploy to iTunesConnect](https://www.bitrise.io/integrations/steps/deploy-to-itunesconnect-deliver)
website: https://github.com/bitrise-steplib/steps-certificate-and-profile-installer
source_code_url: https://github.com/bitrise-steplib/steps-certificate-and-profile-installer
support_url: https://github.com/bitrise-steplib/steps-certificate-and-profile-installer/issues
published_at: 2024-02-15T08:41:39.358309133Z
source:
git: https://github.com/bitrise-steplib/steps-certificate-and-profile-installer.git
commit: 2184d651f98a082eae3ebe0bb962c349866ad8eb
project_type_tags:
- ios
- macos
- cordova
- ionic
- react-native
- flutter
type_tags:
- code-sign
toolkit:
go:
package_name: github.com/bitrise-steplib/steps-certificate-and-profile-installer
is_requires_admin_user: false
is_always_run: false
is_skippable: false
run_if: .IsCI
inputs:
- certificate_url: $BITRISE_CERTIFICATE_URL
opts:
description: |
URL of the certificate to download. Multiple URLs can be
specified, separated by a pipe (`|`) character.
You can specify a local path as well, using the `file://` scheme.
For example `file://./Cert.p12`
is_sensitive: true
title: Certificate URL
- certificate_passphrase: $BITRISE_CERTIFICATE_PASSPHRASE
opts:
description: |
Certificate passphrase. Multiple passphrases can be
specified, separated by a pipe character (`|`).
Specified Certificate passphrase count should match the count of the certificate urls.
Pipe characters in passphrases are not supported.
Format example:
- 1 certificate provided with passphrase: `PASS`
- 1 certificate provided without passphrase: ``
- 3 certificates provided, none of them has passphrase: `||`
- 3 certificates provided, only the 2. one has passphrase: `|PASS|`
is_sensitive: true
title: Certificate passphrase
- opts:
description: |
URL of the provisioning profile to download. Multiple URLs can be
specified, separated by a pipe (`|`) character.
You can specify a local path as well, using the `file://` scheme.
For example `file://./BuildAnything.mobileprovision`
is_sensitive: true
title: Provisioning profile URL
provisioning_profile_url: $BITRISE_PROVISION_URL
- keychain_path: $HOME/Library/Keychains/login.keychain
opts:
is_required: true
summary: Path to the Keychain where the code signing certificates will be installed.
title: Keychain Path
- keychain_password: $BITRISE_KEYCHAIN_PASSWORD
opts:
is_required: true
is_sensitive: true
summary: Password for the provided Keychain.
title: Keychain password
- install_defaults: "yes"
opts:
category: Default Codesign Files
description: Installs default (Bitrise) Wildcard Provisioning Profile and Codesign
Certificate for testing.
summary: Installs default (Bitrise) Wildcard Codesign Files.
title: Installs default Codesign Files
value_options:
- "no"
- "yes"
- default_certificate_url: $BITRISE_DEFAULT_CERTIFICATE_URL
opts:
category: Default Codesign Files
description: |
URL of the default certificate.
You can specify a local path as well, using the `file://` scheme.
For example `file://./Cert.p12`
is_sensitive: true
title: Default Certificate URL
- default_certificate_passphrase: $BITRISE_DEFAULT_CERTIFICATE_PASSPHRASE
opts:
category: Default Codesign Files
description: |
Passphrase of the default Certificate.
is_sensitive: true
title: Default Certificate passphrase
- default_provisioning_profile_url: $BITRISE_DEFAULT_PROVISION_URL
opts:
category: Default Codesign Files
description: |
URL of the default provisioning profile to download.
You can specify a local path as well, using the `file://` scheme.
For example `file://./BuildAnything.mobileprovision`
is_sensitive: true
title: Default Provisioning profile URL
================================================
FILE: steps/certificate-and-profile-installer/1.11.3/step.yml
================================================
title: Certificate and profile installer
summary: Downloads and installs the Apple code signing certificates and provisioning
profiles.
description: |-
The Step installs those .p12 certificate files and provisioning profiles that you uploaded to your app's **Code Signing** tab. You can upload multiple versions of any code signing file.
### Configuring the Step
By default, the Step requires no configuration. To be able to use it, you only need to upload a .p12 certificate and a matching provisioning profile to the **Code signing** tab.
However, if your certificates have passphrases, you need to make sure that passphrase is available for the Step.
1. Create a [Secret Env Var](https://devcenter.bitrise.io/builds/env-vars-secret-env-vars/) that contains the passphrase.
1. Insert that Secret to the **Certificate passphrase** input.
Similarly, you can set the path to the Keychain that should be used in the **Keychain path** input, and set a password for the Keychain in the **Keychain's password** input.
### Troubleshooting
In the case of most code signing issues, it's the **Xcode Archive & Export for iOS** Step that fails, not this one. If this Step fails, there's a couple of things you can do first.
- Check the certificate passphrase, the Keychain path and the Keychain password.
- Make sure you uploaded the required code signing files.
### Useful links
- [iOS code signing](https://devcenter.bitrise.io/code-signing/ios-code-signing/code-signing-index/)
- [iOS deployment](https://devcenter.bitrise.io/deploy/ios-deploy/ios-deploy-index/)
### Related Steps
- [iOS Auto Provision](https://www.bitrise.io/integrations/steps/ios-auto-provision)
- [Xcode Archive & Export for iOS](https://www.bitrise.io/integrations/steps/xcode-archive)
- [Deploy to iTunesConnect](https://www.bitrise.io/integrations/steps/deploy-to-itunesconnect-deliver)
website: https://github.com/bitrise-steplib/steps-certificate-and-profile-installer
source_code_url: https://github.com/bitrise-steplib/steps-certificate-and-profile-installer
support_url: https://github.com/bitrise-steplib/steps-certificate-and-profile-installer/issues
published_at: 2024-02-16T09:53:29.801866375Z
source:
git: https://github.com/bitrise-steplib/steps-certificate-and-profile-installer.git
commit: 6eb01257fcc50554f09ab3ebfcb72b6db6f75788
project_type_tags:
- ios
- macos
- cordova
- ionic
- react-native
- flutter
type_tags:
- code-sign
toolkit:
go:
package_name: github.com/bitrise-steplib/steps-certificate-and-profile-installer
is_requires_admin_user: false
is_always_run: false
is_skippable: false
run_if: .IsCI
inputs:
- certificate_url: $BITRISE_CERTIFICATE_URL
opts:
description: |
URL of the certificate to download. Multiple URLs can be
specified, separated by a pipe (`|`) character.
You can specify a local path as well, using the `file://` scheme.
For example `file://./Cert.p12`
is_sensitive: true
title: Certificate URL
- certificate_passphrase: $BITRISE_CERTIFICATE_PASSPHRASE
opts:
description: |
Certificate passphrase. Multiple passphrases can be
specified, separated by a pipe character (`|`).
Specified Certificate passphrase count should match the count of the certificate urls.
Pipe characters in passphrases are not supported.
Format example:
- 1 certificate provided with passphrase: `PASS`
- 1 certificate provided without passphrase: ``
- 3 certificates provided, none of them has passphrase: `||`
- 3 certificates provided, only the 2. one has passphrase: `|PASS|`
is_sensitive: true
title: Certificate passphrase
- opts:
description: |
URL of the provisioning profile to download. Multiple URLs can be
specified, separated by a pipe (`|`) character.
You can specify a local path as well, using the `file://` scheme.
For example `file://./BuildAnything.mobileprovision`
is_sensitive: true
title: Provisioning profile URL
provisioning_profile_url: $BITRISE_PROVISION_URL
- keychain_path: $HOME/Library/Keychains/login.keychain
opts:
is_required: true
summary: Path to the Keychain where the code signing certificates will be installed.
title: Keychain Path
- keychain_password: $BITRISE_KEYCHAIN_PASSWORD
opts:
is_required: true
is_sensitive: true
summary: Password for the provided Keychain.
title: Keychain password
- install_defaults: "yes"
opts:
category: Default Codesign Files
description: Installs default (Bitrise) Wildcard Provisioning Profile and Codesign
Certificate for testing.
summary: Installs default (Bitrise) Wildcard Codesign Files.
title: Installs default Codesign Files
value_options:
- "no"
- "yes"
- default_certificate_url: $BITRISE_DEFAULT_CERTIFICATE_URL
opts:
category: Default Codesign Files
description: |
URL of the default certificate.
You can specify a local path as well, using the `file://` scheme.
For example `file://./Cert.p12`
is_sensitive: true
title: Default Certificate URL
- default_certificate_passphrase: $BITRISE_DEFAULT_CERTIFICATE_PASSPHRASE
opts:
category: Default Codesign Files
description: |
Passphrase of the default Certificate.
is_sensitive: true
title: Default Certificate passphrase
- default_provisioning_profile_url: $BITRISE_DEFAULT_PROVISION_URL
opts:
category: Default Codesign Files
description: |
URL of the default provisioning profile to download.
You can specify a local path as well, using the `file://` scheme.
For example `file://./BuildAnything.mobileprovision`
is_sensitive: true
title: Default Provisioning profile URL
================================================
FILE: steps/certificate-and-profile-installer/1.11.4/step.yml
================================================
title: Certificate and profile installer
summary: Downloads and installs the Apple code signing certificates and provisioning
profiles.
description: |-
The Step installs those .p12 certificate files and provisioning profiles that you uploaded to your app's **Code Signing** tab. You can upload multiple versions of any code signing file.
### Configuring the Step
By default, the Step requires no configuration. To be able to use it, you only need to upload a .p12 certificate and a matching provisioning profile to the **Code signing** tab.
However, if your certificates have passphrases, you need to make sure that passphrase is available for the Step.
1. Create a [Secret Env Var](https://devcenter.bitrise.io/builds/env-vars-secret-env-vars/) that contains the passphrase.
1. Insert that Secret to the **Certificate passphrase** input.
Similarly, you can set the path to the Keychain that should be used in the **Keychain path** input, and set a password for the Keychain in the **Keychain's password** input.
### Troubleshooting
In the case of most code signing issues, it's the **Xcode Archive & Export for iOS** Step that fails, not this one. If this Step fails, there's a couple of things you can do first.
- Check the certificate passphrase, the Keychain path and the Keychain password.
- Make sure you uploaded the required code signing files.
### Useful links
- [iOS code signing](https://devcenter.bitrise.io/code-signing/ios-code-signing/code-signing-index/)
- [iOS deployment](https://devcenter.bitrise.io/deploy/ios-deploy/ios-deploy-index/)
### Related Steps
- [iOS Auto Provision](https://www.bitrise.io/integrations/steps/ios-auto-provision)
- [Xcode Archive & Export for iOS](https://www.bitrise.io/integrations/steps/xcode-archive)
- [Deploy to iTunesConnect](https://www.bitrise.io/integrations/steps/deploy-to-itunesconnect-deliver)
website: https://github.com/bitrise-steplib/steps-certificate-and-profile-installer
source_code_url: https://github.com/bitrise-steplib/steps-certificate-and-profile-installer
support_url: https://github.com/bitrise-steplib/steps-certificate-and-profile-installer/issues
published_at: 2024-08-23T12:58:34.654804507Z
source:
git: https://github.com/bitrise-steplib/steps-certificate-and-profile-installer.git
commit: ae6aadf210f01b414e43b94f603d59d2813b1ed9
project_type_tags:
- ios
- macos
- cordova
- ionic
- react-native
- flutter
type_tags:
- code-sign
toolkit:
go:
package_name: github.com/bitrise-steplib/steps-certificate-and-profile-installer
is_requires_admin_user: false
is_always_run: false
is_skippable: false
run_if: .IsCI
inputs:
- certificate_url: $BITRISE_CERTIFICATE_URL
opts:
description: |
URL of the certificate to download. Multiple URLs can be
specified, separated by a pipe (`|`) character.
You can specify a local path as well, using the `file://` scheme.
For example `file://./Cert.p12`
is_sensitive: true
title: Certificate URL
- certificate_passphrase: $BITRISE_CERTIFICATE_PASSPHRASE
opts:
description: |
Certificate passphrase. Multiple passphrases can be
specified, separated by a pipe character (`|`).
Specified Certificate passphrase count should match the count of the certificate urls.
Pipe characters in passphrases are not supported.
Format example:
- 1 certificate provided with passphrase: `PASS`
- 1 certificate provided without passphrase: ``
- 3 certificates provided, none of them has passphrase: `||`
- 3 certificates provided, only the 2. one has passphrase: `|PASS|`
is_sensitive: true
title: Certificate passphrase
- opts:
description: |
URL of the provisioning profile to download. Multiple URLs can be
specified, separated by a pipe (`|`) character.
You can specify a local path as well, using the `file://` scheme.
For example `file://./BuildAnything.mobileprovision`
is_sensitive: true
title: Provisioning profile URL
provisioning_profile_url: $BITRISE_PROVISION_URL
- keychain_path: $HOME/Library/Keychains/login.keychain
opts:
is_required: true
summary: Path to the Keychain where the code signing certificates will be installed.
title: Keychain Path
- keychain_password: $BITRISE_KEYCHAIN_PASSWORD
opts:
is_required: true
is_sensitive: true
summary: Password for the provided Keychain.
title: Keychain password
- install_defaults: "yes"
opts:
category: Default Codesign Files
description: Installs default (Bitrise) Wildcard Provisioning Profile and Codesign
Certificate for testing.
summary: Installs default (Bitrise) Wildcard Codesign Files.
title: Installs default Codesign Files
value_options:
- "no"
- "yes"
- default_certificate_url: $BITRISE_DEFAULT_CERTIFICATE_URL
opts:
category: Default Codesign Files
description: |
URL of the default certificate.
You can specify a local path as well, using the `file://` scheme.
For example `file://./Cert.p12`
is_sensitive: true
title: Default Certificate URL
- default_certificate_passphrase: $BITRISE_DEFAULT_CERTIFICATE_PASSPHRASE
opts:
category: Default Codesign Files
description: |
Passphrase of the default Certificate.
is_sensitive: true
title: Default Certificate passphrase
- default_provisioning_profile_url: $BITRISE_DEFAULT_PROVISION_URL
opts:
category: Default Codesign Files
description: |
URL of the default provisioning profile to download.
You can specify a local path as well, using the `file://` scheme.
For example `file://./BuildAnything.mobileprovision`
is_sensitive: true
title: Default Provisioning profile URL
- opts:
is_required: true
summary: Enable logging additional information for troubleshooting
title: Verbose logging
value_options:
- "true"
- "false"
verbose: "false"
================================================
FILE: steps/certificate-and-profile-installer/1.11.5/step.yml
================================================
title: Certificate and profile installer
summary: Downloads and installs the Apple code signing certificates and provisioning
profiles.
description: |-
The Step installs those .p12 certificate files and provisioning profiles that you uploaded to your app's **Code Signing** tab. You can upload multiple versions of any code signing file.
### Configuring the Step
By default, the Step requires no configuration. To be able to use it, you only need to upload a .p12 certificate and a matching provisioning profile to the **Code signing** tab.
However, if your certificates have passphrases, you need to make sure that passphrase is available for the Step.
1. Create a [Secret Env Var](https://devcenter.bitrise.io/builds/env-vars-secret-env-vars/) that contains the passphrase.
1. Insert that Secret to the **Certificate passphrase** input.
Similarly, you can set the path to the Keychain that should be used in the **Keychain path** input, and set a password for the Keychain in the **Keychain's password** input.
### Troubleshooting
In the case of most code signing issues, it's the **Xcode Archive & Export for iOS** Step that fails, not this one. If this Step fails, there's a couple of things you can do first.
- Check the certificate passphrase, the Keychain path and the Keychain password.
- Make sure you uploaded the required code signing files.
### Useful links
- [iOS code signing](https://devcenter.bitrise.io/code-signing/ios-code-signing/code-signing-index/)
- [iOS deployment](https://devcenter.bitrise.io/deploy/ios-deploy/ios-deploy-index/)
### Related Steps
- [iOS Auto Provision](https://www.bitrise.io/integrations/steps/ios-auto-provision)
- [Xcode Archive & Export for iOS](https://www.bitrise.io/integrations/steps/xcode-archive)
- [Deploy to iTunesConnect](https://www.bitrise.io/integrations/steps/deploy-to-itunesconnect-deliver)
website: https://github.com/bitrise-steplib/steps-certificate-and-profile-installer
source_code_url: https://github.com/bitrise-steplib/steps-certificate-and-profile-installer
support_url: https://github.com/bitrise-steplib/steps-certificate-and-profile-installer/issues
published_at: 2025-11-13T08:24:19.181689181Z
source:
git: https://github.com/bitrise-steplib/steps-certificate-and-profile-installer.git
commit: 0536140cd8f5a8257e07e695d44f77bb349e2b12
project_type_tags:
- cordova
- flutter
- ionic
- ios
- kotlin-multiplatform
- macos
- react-native
type_tags:
- code-sign
toolkit:
go:
package_name: github.com/bitrise-steplib/steps-certificate-and-profile-installer
is_requires_admin_user: false
is_always_run: false
is_skippable: false
run_if: .IsCI
inputs:
- certificate_url: $BITRISE_CERTIFICATE_URL
opts:
description: |
URL of the certificate to download. Multiple URLs can be
specified, separated by a pipe (`|`) character.
You can specify a local path as well, using the `file://` scheme.
For example `file://./Cert.p12`
is_sensitive: true
title: Certificate URL
- certificate_passphrase: $BITRISE_CERTIFICATE_PASSPHRASE
opts:
description: |
Certificate passphrase. Multiple passphrases can be
specified, separated by a pipe character (`|`).
Specified Certificate passphrase count should match the count of the certificate urls.
Pipe characters in passphrases are not supported.
Format example:
- 1 certificate provided with passphrase: `PASS`
- 1 certificate provided without passphrase: ``
- 3 certificates provided, none of them has passphrase: `||`
- 3 certificates provided, only the 2. one has passphrase: `|PASS|`
is_sensitive: true
title: Certificate passphrase
- opts:
description: |
URL of the provisioning profile to download. Multiple URLs can be
specified, separated by a pipe (`|`) character.
You can specify a local path as well, using the `file://` scheme.
For example `file://./BuildAnything.mobileprovision`
is_sensitive: true
title: Provisioning profile URL
provisioning_profile_url: $BITRISE_PROVISION_URL
- keychain_path: $HOME/Library/Keychains/login.keychain
opts:
is_required: true
summary: Path to the Keychain where the code signing certificates will be installed.
title: Keychain Path
- keychain_password: $BITRISE_KEYCHAIN_PASSWORD
opts:
is_required: true
is_sensitive: true
summary: Password for the provided Keychain.
title: Keychain password
- install_defaults: "yes"
opts:
category: Default Codesign Files
description: Installs default (Bitrise) Wildcard Provisioning Profile and Codesign
Certificate for testing.
summary: Installs default (Bitrise) Wildcard Codesign Files.
title: Installs default Codesign Files
value_options:
- "no"
- "yes"
- default_certificate_url: $BITRISE_DEFAULT_CERTIFICATE_URL
opts:
category: Default Codesign Files
description: |
URL of the default certificate.
You can specify a local path as well, using the `file://` scheme.
For example `file://./Cert.p12`
is_sensitive: true
title: Default Certificate URL
- default_certificate_passphrase: $BITRISE_DEFAULT_CERTIFICATE_PASSPHRASE
opts:
category: Default Codesign Files
description: |
Passphrase of the default Certificate.
is_sensitive: true
title: Default Certificate passphrase
- default_provisioning_profile_url: $BITRISE_DEFAULT_PROVISION_URL
opts:
category: Default Codesign Files
description: |
URL of the default provisioning profile to download.
You can specify a local path as well, using the `file://` scheme.
For example `file://./BuildAnything.mobileprovision`
is_sensitive: true
title: Default Provisioning profile URL
- opts:
is_required: true
summary: Enable logging additional information for troubleshooting
title: Verbose logging
value_options:
- "true"
- "false"
verbose: "false"
================================================
FILE: steps/certificate-and-profile-installer/1.2.0/step.yml
================================================
title: Certificate and profile installer
summary: |-
Need to use your Provisioning Profile and Certificate? Use this Step to
add them to the keychain and use it as you wish! No worries, as our security
policy goes, the VM is reverted after running the workflow so there's no
trace of these left on them.
description: Downloads and installs the certificate and the mobile provisioning profiles
website: https://github.com/bitrise-io/steps-certificate-and-profile-installer
source_code_url: https://github.com/bitrise-io/steps-certificate-and-profile-installer
support_url: https://github.com/bitrise-io/steps-certificate-and-profile-installer/issues
published_at: 2015-09-14T14:15:22.562810649+02:00
source:
git: https://github.com/bitrise-io/steps-certificate-and-profile-installer.git
commit: 38cc056cb996ea63daaba8044ce6abc16a9ded07
host_os_tags:
- osx-10.10
project_type_tags:
- ios
type_tags:
- security
is_requires_admin_user: false
is_always_run: false
is_skippable: false
run_if: .IsCI
inputs:
- certificate_url: $BITRISE_CERTIFICATE_URL
opts:
description: |
URL of the certificate to download
is_dont_change_value: false
is_expand: true
is_required: true
summary: ""
title: Certificate URL
- certificate_passphrase: $BITRISE_CERTIFICATE_PASSPHRASE
opts:
description: |
Certificate passphrase
is_dont_change_value: false
is_expand: true
is_required: false
summary: ""
title: Certificate passphrase
- opts:
description: |
URL of the provisioning profile to download
is_dont_change_value: false
is_expand: true
is_required: true
summary: ""
title: Provisioning profile URL
provisioning_profile_url: $BITRISE_PROVISION_URL
- keychain_path: $HOME/Library/Keychains/login.keychain
opts:
description: ""
is_dont_change_value: false
is_expand: true
is_required: true
summary: ""
title: Keychain Path
- keychain_password: $BITRISE_KEYCHAIN_PASSWORD
opts:
description: ""
is_dont_change_value: false
is_expand: true
is_required: true
summary: ""
title: Keychain's password
outputs:
- BITRISE_PROVISIONING_PROFILE_ID: null
opts:
description: |-
**Will only export the Profile ID if you specify
a single Provisioning Profile!**
title: Activated Provisioning Profile ID
- BITRISE_CODE_SIGN_IDENTITY: null
opts:
title: Activated Code Signing Certificate ID
================================================
FILE: steps/certificate-and-profile-installer/1.2.1/step.yml
================================================
title: Certificate and profile installer
summary: Certificate and profile installer
description: Downloads and installs the certificate and the mobile provisioning profiles
website: https://github.com/bitrise-io/steps-certificate-and-profile-installer
source_code_url: https://github.com/bitrise-io/steps-certificate-and-profile-installer
support_url: https://github.com/bitrise-io/steps-certificate-and-profile-installer/issues
published_at: 2015-09-24T21:02:51.766572121+02:00
source:
git: https://github.com/bitrise-io/steps-certificate-and-profile-installer.git
commit: 57f127a6366b7308241d7f84764be0ee5102281a
host_os_tags:
- osx-10.10
project_type_tags:
- ios
type_tags:
- security
is_requires_admin_user: false
is_always_run: false
is_skippable: false
run_if: .IsCI
inputs:
- certificate_url: $BITRISE_CERTIFICATE_URL
opts:
description: |
URL of the certificate to download
is_dont_change_value: false
is_expand: true
is_required: true
summary: ""
title: Certificate URL
- certificate_passphrase: $BITRISE_CERTIFICATE_PASSPHRASE
opts:
description: |
Certificate passphrase
is_dont_change_value: false
is_expand: true
is_required: false
summary: ""
title: Certificate passphrase
- opts:
description: |
URL of the provisioning profile to download
is_dont_change_value: false
is_expand: true
is_required: true
summary: ""
title: Provisioning profile URL
provisioning_profile_url: $BITRISE_PROVISION_URL
- keychain_path: $HOME/Library/Keychains/login.keychain
opts:
description: ""
is_dont_change_value: false
is_expand: true
is_required: true
summary: ""
title: Keychain Path
- keychain_password: $BITRISE_KEYCHAIN_PASSWORD
opts:
description: ""
is_dont_change_value: false
is_expand: true
is_required: true
summary: ""
title: Keychain's password
outputs:
- BITRISE_PROVISIONING_PROFILE_ID: null
opts:
description: |-
**Will only export the Profile ID if you specify
a single Provisioning Profile!**
title: Activated Provisioning Profile ID
- BITRISE_CODE_SIGN_IDENTITY: null
opts:
title: Activated Code Signing Certificate ID
================================================
FILE: steps/certificate-and-profile-installer/1.2.2/step.yml
================================================
title: Certificate and profile installer
summary: |-
Need to use your Provisioning Profile and Certificate? Use this Step to
add them to the keychain and use it as you wish! No worries, as our security
policy goes, the VM is reverted after running the workflow so there's no
trace of these left on them.
description: Downloads and installs the certificate and the mobile provisioning profiles
website: https://github.com/bitrise-io/steps-certificate-and-profile-installer
source_code_url: https://github.com/bitrise-io/steps-certificate-and-profile-installer
support_url: https://github.com/bitrise-io/steps-certificate-and-profile-installer/issues
published_at: 2015-11-06T19:18:07.468318355+01:00
source:
git: https://github.com/bitrise-io/steps-certificate-and-profile-installer.git
commit: f61d71f413ddb2b6ee6d4c6f8ba6f847a477e881
host_os_tags:
- osx-10.10
project_type_tags:
- ios
type_tags:
- security
is_requires_admin_user: false
is_always_run: false
is_skippable: false
run_if: .IsCI
inputs:
- certificate_url: $BITRISE_CERTIFICATE_URL
opts:
description: |
URL of the certificate to download
is_dont_change_value: false
is_expand: true
is_required: true
summary: ""
title: Certificate URL
- certificate_passphrase: $BITRISE_CERTIFICATE_PASSPHRASE
opts:
description: |
Certificate passphrase
is_dont_change_value: false
is_expand: true
is_required: false
summary: ""
title: Certificate passphrase
- opts:
description: |
URL of the provisioning profile to download
is_dont_change_value: false
is_expand: true
is_required: true
summary: ""
title: Provisioning profile URL
provisioning_profile_url: $BITRISE_PROVISION_URL
- keychain_path: $HOME/Library/Keychains/login.keychain
opts:
description: ""
is_dont_change_value: false
is_expand: true
is_required: true
summary: ""
title: Keychain Path
- keychain_password: $BITRISE_KEYCHAIN_PASSWORD
opts:
description: ""
is_dont_change_value: false
is_expand: true
is_required: true
summary: ""
title: Keychain's password
outputs:
- BITRISE_PROVISIONING_PROFILE_ID: null
opts:
description: |-
**Will only export the Profile ID if you specify
a single Provisioning Profile!**
title: Activated Provisioning Profile ID
- BITRISE_CODE_SIGN_IDENTITY: null
opts:
title: Activated Code Signing Certificate ID
================================================
FILE: steps/certificate-and-profile-installer/1.3.0/step.yml
================================================
title: Certificate and profile installer
summary: |-
Need to use your Provisioning Profile and Certificate? Use this Step to
add them to the keychain and use it as you wish! No worries, as our security
policy goes, the VM is reverted after running the workflow so there's no
trace of these left on them.
description: Downloads and installs the certificate and the mobile provisioning profiles
website: https://github.com/bitrise-io/steps-certificate-and-profile-installer
source_code_url: https://github.com/bitrise-io/steps-certificate-and-profile-installer
support_url: https://github.com/bitrise-io/steps-certificate-and-profile-installer/issues
published_at: 2015-11-23T14:33:44.221787557+01:00
source:
git: https://github.com/bitrise-io/steps-certificate-and-profile-installer.git
commit: 49a3fc24a1402a43e5d8db20ea891168be9e383d
host_os_tags:
- osx-10.10
project_type_tags:
- ios
type_tags:
- security
is_requires_admin_user: false
is_always_run: false
is_skippable: false
run_if: .IsCI
inputs:
- certificate_url: $BITRISE_CERTIFICATE_URL
opts:
description: |
URL of the certificate to download
is_dont_change_value: false
is_expand: true
is_required: true
summary: ""
title: Certificate URL
- certificate_passphrase: $BITRISE_CERTIFICATE_PASSPHRASE
opts:
description: |
Certificate passphrase
is_dont_change_value: false
is_expand: true
is_required: false
summary: ""
title: Certificate passphrase
- opts:
description: |
URL of the provisioning profile to download
is_dont_change_value: false
is_expand: true
is_required: true
summary: ""
title: Provisioning profile URL
provisioning_profile_url: $BITRISE_PROVISION_URL
- keychain_path: $HOME/Library/Keychains/login.keychain
opts:
description: ""
is_dont_change_value: false
is_expand: true
is_required: true
summary: ""
title: Keychain Path
- keychain_password: $BITRISE_KEYCHAIN_PASSWORD
opts:
description: ""
is_dont_change_value: false
is_expand: true
is_required: true
summary: ""
title: Keychain's password
outputs:
- BITRISE_PROVISIONING_PROFILE_ID: null
opts:
description: |-
**Will only export the Profile ID if you specify
a single Provisioning Profile!**
title: Activated Provisioning Profile ID
- BITRISE_CODE_SIGN_IDENTITY: null
opts:
title: Activated Code Signing Certificate ID
================================================
FILE: steps/certificate-and-profile-installer/1.4.0/step.yml
================================================
title: Certificate and profile installer
summary: |-
Need to use your Provisioning Profile and Certificate? Use this Step to
add them to the keychain and use it as you wish! No worries, as our security
policy goes, the VM is reverted after running the workflow so there's no
trace of these left on them.
description: Downloads and installs the certificate and the mobile provisioning profiles
website: https://github.com/bitrise-io/steps-certificate-and-profile-installer
source_code_url: https://github.com/bitrise-io/steps-certificate-and-profile-installer
support_url: https://github.com/bitrise-io/steps-certificate-and-profile-installer/issues
published_at: 2015-12-11T13:52:56.343779626+01:00
source:
git: https://github.com/bitrise-io/steps-certificate-and-profile-installer.git
commit: 5da704a8b7ec72c1d03be1c17188aabf98f829aa
host_os_tags:
- osx-10.10
project_type_tags:
- ios
type_tags:
- security
is_requires_admin_user: false
is_always_run: false
is_skippable: false
run_if: .IsCI
inputs:
- certificate_url: $BITRISE_CERTIFICATE_URL
opts:
description: |
URL of the certificate to download.
You can specify a local path as well, using the `file://` scheme.
Example: `file://./Cert.p12`
is_dont_change_value: false
is_expand: true
is_required: true
summary: ""
title: Certificate URL
- certificate_passphrase: $BITRISE_CERTIFICATE_PASSPHRASE
opts:
description: |
Certificate passphrase
is_dont_change_value: false
is_expand: true
is_required: false
summary: ""
title: Certificate passphrase
- opts:
description: |
URL of the provisioning profile to download. Multiple URLs can be
specified, separated by a pipe (`|`) character.
You can specify a local path as well, using the `file://` scheme.
Example: `file://./BuildAnything.mobileprovision`
is_dont_change_value: false
is_expand: true
is_required: true
summary: ""
title: Provisioning profile URL
provisioning_profile_url: $BITRISE_PROVISION_URL
- keychain_path: $HOME/Library/Keychains/login.keychain
opts:
description: ""
is_dont_change_value: false
is_expand: true
is_required: true
summary: ""
title: Keychain Path
- keychain_password: $BITRISE_KEYCHAIN_PASSWORD
opts:
description: ""
is_dont_change_value: false
is_expand: true
is_required: true
summary: ""
title: Keychain's password
outputs:
- BITRISE_PROVISIONING_PROFILE_ID: null
opts:
description: |-
**Will only export the Profile ID if you specify
a single Provisioning Profile!**
title: Activated Provisioning Profile ID
- BITRISE_CODE_SIGN_IDENTITY: null
opts:
title: Activated Code Signing Certificate ID
================================================
FILE: steps/certificate-and-profile-installer/1.4.1/step.yml
================================================
title: Certificate and profile installer
summary: |-
Need to use your Provisioning Profile and Certificate? Use this Step to
add them to the keychain and use it as you wish! No worries, as our security
policy goes, the VM is reverted after running the workflow so there's no
trace of these left on them.
description: Downloads and installs the certificate and the mobile provisioning profiles
website: https://github.com/bitrise-io/steps-certificate-and-profile-installer
source_code_url: https://github.com/bitrise-io/steps-certificate-and-profile-installer
support_url: https://github.com/bitrise-io/steps-certificate-and-profile-installer/issues
published_at: 2016-04-21T19:53:55.517140135+02:00
source:
git: https://github.com/bitrise-io/steps-certificate-and-profile-installer.git
commit: 78f3f0d3e9fb48331612da1a13e351e7d0d0ab35
host_os_tags:
- osx-10.10
project_type_tags:
- ios
type_tags:
- security
is_requires_admin_user: false
is_always_run: false
is_skippable: false
run_if: .IsCI
inputs:
- certificate_url: $BITRISE_CERTIFICATE_URL
opts:
description: |
URL of the certificate to download.
You can specify a local path as well, using the `file://` scheme.
Example: `file://./Cert.p12`
is_dont_change_value: false
is_expand: true
is_required: true
summary: ""
title: Certificate URL
- certificate_passphrase: $BITRISE_CERTIFICATE_PASSPHRASE
opts:
description: |
Certificate passphrase
is_dont_change_value: false
is_expand: true
is_required: false
summary: ""
title: Certificate passphrase
- opts:
description: |
URL of the provisioning profile to download. Multiple URLs can be
specified, separated by a pipe (`|`) character.
You can specify a local path as well, using the `file://` scheme.
Example: `file://./BuildAnything.mobileprovision`
is_dont_change_value: false
is_expand: true
is_required: true
summary: ""
title: Provisioning profile URL
provisioning_profile_url: $BITRISE_PROVISION_URL
- keychain_path: $HOME/Library/Keychains/login.keychain
opts:
description: ""
is_dont_change_value: false
is_expand: true
is_required: true
summary: ""
title: Keychain Path
- keychain_password: $BITRISE_KEYCHAIN_PASSWORD
opts:
description: ""
is_dont_change_value: false
is_expand: true
is_required: true
summary: ""
title: Keychain's password
outputs:
- BITRISE_PROVISIONING_PROFILE_ID: null
opts:
description: |-
**Will only export the Profile ID if you specify
a single Provisioning Profile!**
title: Activated Provisioning Profile ID
- BITRISE_CODE_SIGN_IDENTITY: null
opts:
title: Activated Code Signing Certificate ID
================================================
FILE: steps/certificate-and-profile-installer/1.4.2/step.yml
================================================
title: Certificate and profile installer
summary: |-
Need to use your Provisioning Profile and Certificate? Use this Step to
add them to the keychain and use it as you wish! No worries, as our security
policy goes, the VM is reverted after running the workflow so there's no
trace of these left on them.
description: Downloads and installs the certificate and the mobile provisioning profiles
website: https://github.com/bitrise-io/steps-certificate-and-profile-installer
source_code_url: https://github.com/bitrise-io/steps-certificate-and-profile-installer
support_url: https://github.com/bitrise-io/steps-certificate-and-profile-installer/issues
published_at: 2016-04-22T17:22:25.903151648+02:00
source:
git: https://github.com/bitrise-io/steps-certificate-and-profile-installer.git
commit: 2f5b45a3ff5a7df7521bef111717b15f6aeb5be5
host_os_tags:
- osx-10.10
project_type_tags:
- ios
type_tags:
- security
is_requires_admin_user: false
is_always_run: false
is_skippable: false
run_if: .IsCI
inputs:
- certificate_url: $BITRISE_CERTIFICATE_URL
opts:
description: |
URL of the certificate to download.
You can specify a local path as well, using the `file://` scheme.
Example: `file://./Cert.p12`
is_dont_change_value: false
is_expand: true
is_required: true
summary: ""
title: Certificate URL
- certificate_passphrase: $BITRISE_CERTIFICATE_PASSPHRASE
opts:
description: |
Certificate passphrase
is_dont_change_value: false
is_expand: true
is_required: false
summary: ""
title: Certificate passphrase
- opts:
description: |
URL of the provisioning profile to download. Multiple URLs can be
specified, separated by a pipe (`|`) character.
You can specify a local path as well, using the `file://` scheme.
Example: `file://./BuildAnything.mobileprovision`
is_dont_change_value: false
is_expand: true
is_required: true
summary: ""
title: Provisioning profile URL
provisioning_profile_url: $BITRISE_PROVISION_URL
- keychain_path: $HOME/Library/Keychains/login.keychain
opts:
description: ""
is_dont_change_value: false
is_expand: true
is_required: true
summary: ""
title: Keychain Path
- keychain_password: $BITRISE_KEYCHAIN_PASSWORD
opts:
description: ""
is_dont_change_value: false
is_expand: true
is_required: true
summary: ""
title: Keychain's password
outputs:
- BITRISE_PROVISIONING_PROFILE_ID: null
opts:
description: |-
**Will only export the Profile ID if you specify
a single Provisioning Profile!**
title: Activated Provisioning Profile ID
- BITRISE_PROVISIONING_PROFILE_PATH: null
opts:
description: |-
**Will only export the Profile Path if you specify
a single Provisioning Profile!**
title: Activated Provisioning Profile Path
- BITRISE_CODE_SIGN_IDENTITY: null
opts:
title: Activated Code Signing Certificate ID
================================================
FILE: steps/certificate-and-profile-installer/1.5.0/step.yml
================================================
title: Certificate and profile installer
summary: |-
Need to use your Provisioning Profile and Certificate? Use this Step to
add them to the keychain and use it as you wish! No worries, as our security
policy goes, the VM is reverted after running the workflow so there's no
trace of these left on them.
description: Downloads and installs the certificate and the mobile provisioning profiles
website: https://github.com/bitrise-io/steps-certificate-and-profile-installer
source_code_url: https://github.com/bitrise-io/steps-certificate-and-profile-installer
support_url: https://github.com/bitrise-io/steps-certificate-and-profile-installer/issues
published_at: 2016-06-01T12:57:53.050189478+02:00
source:
git: https://github.com/bitrise-io/steps-certificate-and-profile-installer.git
commit: 0c9db391991a27838a43509c7b77c9cdc4acf779
host_os_tags:
- osx-10.10
project_type_tags:
- ios
type_tags:
- security
is_requires_admin_user: false
is_always_run: false
is_skippable: false
run_if: .IsCI
inputs:
- certificate_url: $BITRISE_CERTIFICATE_URL
opts:
description: |
URL of the certificate to download.
You can specify a local path as well, using the `file://` scheme.
Example: `file://./Cert.p12`
is_required: true
summary: ""
title: Certificate URL
- certificate_passphrase: $BITRISE_CERTIFICATE_PASSPHRASE
opts:
description: |
Certificate passphrase
summary: ""
title: Certificate passphrase
- opts:
description: |
URL of the provisioning profile to download. Multiple URLs can be
specified, separated by a pipe (`|`) character.
You can specify a local path as well, using the `file://` scheme.
Example: `file://./BuildAnything.mobileprovision`
is_required: true
summary: ""
title: Provisioning profile URL
provisioning_profile_url: $BITRISE_PROVISION_URL
- keychain_path: $HOME/Library/Keychains/login.keychain
opts:
description: ""
is_required: true
summary: ""
title: Keychain Path
- keychain_password: $BITRISE_KEYCHAIN_PASSWORD
opts:
description: ""
is_required: true
summary: ""
title: Keychain's password
- default_certificate_url: $BITRISE_DEFAULT_CERTIFICATE_URL
opts:
description: |
URL of the default certificate.
You can specify a local path as well, using the `file://` scheme.
Example: `file://./Cert.p12`
summary: ""
title: Default Certificate URL
- default_certificate_passphrase: $BITRISE_DEFAULT_CERTIFICATE_PASSPHRASE
opts:
description: |
Certificate passphrase of the default certificate.
summary: ""
title: Default Certificate passphrase
- default_provisioning_profile_url: $BITRISE_DEFAULT_PROVISION_URL
opts:
description: |
URL of the default provisioning profile to download.
You can specify a local path as well, using the `file://` scheme.
Example: `file://./BuildAnything.mobileprovision`
is_required: true
summary: ""
title: Default Provisioning profile URL
================================================
FILE: steps/certificate-and-profile-installer/1.5.2/step.yml
================================================
title: Certificate and profile installer
summary: |-
Need to use your Provisioning Profile and Certificate? Use this Step to
add them to the keychain and use it as you wish! No worries, as our security
policy goes, the VM is reverted after running the workflow so there's no
trace of these left on them.
description: Downloads and installs the certificate and the mobile provisioning profiles
website: https://github.com/bitrise-io/steps-certificate-and-profile-installer
source_code_url: https://github.com/bitrise-io/steps-certificate-and-profile-installer
support_url: https://github.com/bitrise-io/steps-certificate-and-profile-installer/issues
published_at: 2016-06-07T13:59:04.104192547+02:00
source:
git: https://github.com/bitrise-io/steps-certificate-and-profile-installer.git
commit: e8ea2f15b6763db491d48faa1a854d0ff4bd7096
host_os_tags:
- osx-10.10
project_type_tags:
- ios
type_tags:
- security
is_requires_admin_user: false
is_always_run: false
is_skippable: false
run_if: .IsCI
inputs:
- certificate_url: $BITRISE_CERTIFICATE_URL
opts:
description: |
URL of the certificate to download.
You can specify a local path as well, using the `file://` scheme.
Example: `file://./Cert.p12`
summary: ""
title: Certificate URL
- certificate_passphrase: $BITRISE_CERTIFICATE_PASSPHRASE
opts:
description: |
Certificate passphrase
summary: ""
title: Certificate passphrase
- opts:
description: |
URL of the provisioning profile to download. Multiple URLs can be
specified, separated by a pipe (`|`) character.
You can specify a local path as well, using the `file://` scheme.
Example: `file://./BuildAnything.mobileprovision`
summary: ""
title: Provisioning profile URL
provisioning_profile_url: $BITRISE_PROVISION_URL
- keychain_path: $HOME/Library/Keychains/login.keychain
opts:
description: ""
is_required: true
summary: ""
title: Keychain Path
- keychain_password: $BITRISE_KEYCHAIN_PASSWORD
opts:
description: ""
is_required: true
summary: ""
title: Keychain's password
- default_certificate_url: $BITRISE_DEFAULT_CERTIFICATE_URL
opts:
description: |
URL of the default certificate.
You can specify a local path as well, using the `file://` scheme.
Example: `file://./Cert.p12`
summary: ""
title: Default Certificate URL
- default_certificate_passphrase: $BITRISE_DEFAULT_CERTIFICATE_PASSPHRASE
opts:
description: |
Certificate passphrase of the default certificate.
summary: ""
title: Default Certificate passphrase
- default_provisioning_profile_url: $BITRISE_DEFAULT_PROVISION_URL
opts:
description: |
URL of the default provisioning profile to download.
You can specify a local path as well, using the `file://` scheme.
Example: `file://./BuildAnything.mobileprovision`
summary: ""
title: Default Provisioning profile URL
================================================
FILE: steps/certificate-and-profile-installer/1.6.0/step.yml
================================================
title: Certificate and profile installer
summary: |-
Need to use your Provisioning Profile and Certificate? Use this Step to
add them to the keychain and use it as you wish! No worries, as our security
policy goes, the VM is reverted after running the workflow so there's no
trace of these left on them.
description: Downloads and installs the certificate and the mobile provisioning profiles
website: https://github.com/bitrise-io/steps-certificate-and-profile-installer
source_code_url: https://github.com/bitrise-io/steps-certificate-and-profile-installer
support_url: https://github.com/bitrise-io/steps-certificate-and-profile-installer/issues
published_at: 2016-07-12T12:27:06.700374181+02:00
source:
git: https://github.com/bitrise-io/steps-certificate-and-profile-installer.git
commit: d68aa75337a6c94d34b7ab2a7bda0939ae7ea470
host_os_tags:
- osx-10.10
project_type_tags:
- ios
type_tags:
- security
is_requires_admin_user: false
is_always_run: false
is_skippable: false
run_if: .IsCI
inputs:
- certificate_url: $BITRISE_CERTIFICATE_URL
opts:
description: |
URL of the certificate to download.
You can specify a local path as well, using the `file://` scheme.
Example: `file://./Cert.p12`
title: Certificate URL
- certificate_passphrase: $BITRISE_CERTIFICATE_PASSPHRASE
opts:
description: |
Certificate passphrase
title: Certificate passphrase
- opts:
description: |
URL of the provisioning profile to download. Multiple URLs can be
specified, separated by a pipe (`|`) character.
You can specify a local path as well, using the `file://` scheme.
Example: `file://./BuildAnything.mobileprovision`
title: Provisioning profile URL
provisioning_profile_url: $BITRISE_PROVISION_URL
- keychain_path: $HOME/Library/Keychains/login.keychain
opts:
is_required: true
title: Keychain Path
- keychain_password: $BITRISE_KEYCHAIN_PASSWORD
opts:
is_required: true
title: Keychain's password
- default_certificate_url: $BITRISE_DEFAULT_CERTIFICATE_URL
opts:
description: |
URL of the default certificate.
You can specify a local path as well, using the `file://` scheme.
Example: `file://./Cert.p12`
title: Default Certificate URL
- default_certificate_passphrase: $BITRISE_DEFAULT_CERTIFICATE_PASSPHRASE
opts:
description: |
Certificate passphrase of the default certificate.
title: Default Certificate passphrase
- default_provisioning_profile_url: $BITRISE_DEFAULT_PROVISION_URL
opts:
description: |
URL of the default provisioning profile to download.
You can specify a local path as well, using the `file://` scheme.
Example: `file://./BuildAnything.mobileprovision`
title: Default Provisioning profile URL
- export_certificate_and_profile_infos: "false"
opts:
description: "Set this input to `\"true\"` to allow exporting:\n\n- `BITRISE_PROVISIONING_PROFILE_ID`\n-
\ `BITRISE_PROVISIONING_PROFILE_PATH`\n- `BITRISE_CODE_SIGN_IDENTITY`\n\n__Notes__:\n\n-
BITRISE_PROVISIONING_PROFILE_ID and BITRISE_PROVISIONING_PROFILE_PATH: \n
\ Will only export the Profile ID and path if you specify a __single__ Provisioning
Profile URL as `provisioning_profile_url` input value, or\n if you leave `provisioning_profile_url`
empty, then Default Provisioning Profile will be exported (if defined)!\n- BITRISE_CODE_SIGN_IDENTITY:
\ \n Will export the Certificate Identity defined with `certificate_url`, if
`certificate_url` is empty, then \n default Certificate Identity will be exported
(if defined)!\n- __Do not use this input if it is not neccessery__, instead
specify the profiles direct where you want to use them: \n __Code Signing
Identity may contains special characters, exporting these as an environment
variable could break the next steps.__\n"
title: Should export Certificate and Provisioning Profile infos
value_options:
- "true"
- "false"
outputs:
- BITRISE_PROVISIONING_PROFILE_ID: null
opts:
title: Activated Provisioning Profile ID
- BITRISE_PROVISIONING_PROFILE_PATH: null
opts:
title: Activated Provisioning Profile Path
- BITRISE_CODE_SIGN_IDENTITY: null
opts:
title: Activated Code Signing Identity
================================================
FILE: steps/certificate-and-profile-installer/1.7.0/step.yml
================================================
title: Certificate and profile installer
summary: |-
Need to use your Provisioning Profile and Certificate? Use this Step to
add them to the keychain and use it as you wish! No worries, as our security
policy goes, the VM is reverted after running the workflow so there's no
trace of these left on them.
description: Downloads and installs the certificate and the mobile provisioning profiles
website: https://github.com/bitrise-io/steps-certificate-and-profile-installer
source_code_url: https://github.com/bitrise-io/steps-certificate-and-profile-installer
support_url: https://github.com/bitrise-io/steps-certificate-and-profile-installer/issues
published_at: 2016-09-15T16:06:13.359204541+02:00
source:
git: https://github.com/bitrise-io/steps-certificate-and-profile-installer.git
commit: 3b93dbdc063cbf68ef79e936cd12602768b8f2c0
host_os_tags:
- osx-10.10
project_type_tags:
- ios
type_tags:
- security
toolkit:
go:
package_name: github.com/bitrise-io/steps-certificate-and-profile-installer
deps:
brew:
- name: go
apt_get:
- name: golang
bin_name: go
is_requires_admin_user: false
is_always_run: false
is_skippable: false
run_if: .IsCI
inputs:
- certificate_url: $BITRISE_CERTIFICATE_URL
opts:
description: |
URL of the certificate to download. Multiple URLs can be
specified, separated by a pipe (`|`) character.
You can specify a local path as well, using the `file://` scheme.
Example: `file://./Cert.p12`
title: Certificate URL
- certificate_passphrase: $BITRISE_CERTIFICATE_PASSPHRASE
opts:
description: |
Certificate passphrase. Multiple passphrases can be
specified, separated by a pipe (`|`) character.
Specified Certificate passphrase count should match the count of the certificate urls.
Format example:
- 1 certificate provided with passphrase: `PASS`
- 1 certificate provided without passphrase: ``
- 3 certificates provided, none of them has passphrase: `||`
- 3 certificates provided, only the 2. one has passphrase: `|PASS|`
title: Certificate passphrase
- opts:
description: |
URL of the provisioning profile to download. Multiple URLs can be
specified, separated by a pipe (`|`) character.
You can specify a local path as well, using the `file://` scheme.
Example: `file://./BuildAnything.mobileprovision`
title: Provisioning profile URL
provisioning_profile_url: $BITRISE_PROVISION_URL
- keychain_path: $HOME/Library/Keychains/login.keychain
opts:
is_required: true
title: Keychain Path
- keychain_password: $BITRISE_KEYCHAIN_PASSWORD
opts:
is_required: true
title: Keychain's password
- default_certificate_url: $BITRISE_DEFAULT_CERTIFICATE_URL
opts:
description: |
URL of the default certificate.
You can specify a local path as well, using the `file://` scheme.
Example: `file://./Cert.p12`
title: Default Certificate URL
- default_certificate_passphrase: $BITRISE_DEFAULT_CERTIFICATE_PASSPHRASE
opts:
description: |
Certificate passphrase of the default certificate.
title: Default Certificate passphrase
- default_provisioning_profile_url: $BITRISE_DEFAULT_PROVISION_URL
opts:
description: |
URL of the default provisioning profile to download.
You can specify a local path as well, using the `file://` scheme.
Example: `file://./BuildAnything.mobileprovision`
title: Default Provisioning profile URL
================================================
FILE: steps/certificate-and-profile-installer/1.8.0/step.yml
================================================
title: Certificate and profile installer
summary: |-
Need to use your Provisioning Profile and Certificate? Use this Step to
add them to the keychain and use it as you wish! No worries, as our security
policy goes, the VM is reverted after running the workflow so there's no
trace of these left on them.
description: Downloads and installs the certificate and the mobile provisioning profiles
website: https://github.com/bitrise-io/steps-certificate-and-profile-installer
source_code_url: https://github.com/bitrise-io/steps-certificate-and-profile-installer
support_url: https://github.com/bitrise-io/steps-certificate-and-profile-installer/issues
published_at: 2016-10-25T14:29:17.041202838+02:00
source:
git: https://github.com/bitrise-io/steps-certificate-and-profile-installer.git
commit: 48466c9990a833337c72f37585042288453d4725
host_os_tags:
- osx-10.10
project_type_tags:
- ios
type_tags:
- security
toolkit:
go:
package_name: github.com/bitrise-io/steps-certificate-and-profile-installer
deps:
brew:
- name: go
apt_get:
- name: golang
bin_name: go
is_requires_admin_user: false
is_always_run: false
is_skippable: false
run_if: .IsCI
inputs:
- certificate_url: $BITRISE_CERTIFICATE_URL
opts:
description: |
URL of the certificate to download. Multiple URLs can be
specified, separated by a pipe (`|`) character.
You can specify a local path as well, using the `file://` scheme.
Example: `file://./Cert.p12`
title: Certificate URL
- certificate_passphrase: $BITRISE_CERTIFICATE_PASSPHRASE
opts:
description: |
Certificate passphrase. Multiple passphrases can be
specified, separated by a pipe (`|`) character.
Specified Certificate passphrase count should match the count of the certificate urls.
Format example:
- 1 certificate provided with passphrase: `PASS`
- 1 certificate provided without passphrase: ``
- 3 certificates provided, none of them has passphrase: `||`
- 3 certificates provided, only the 2. one has passphrase: `|PASS|`
title: Certificate passphrase
- opts:
description: |
URL of the provisioning profile to download. Multiple URLs can be
specified, separated by a pipe (`|`) character.
You can specify a local path as well, using the `file://` scheme.
Example: `file://./BuildAnything.mobileprovision`
title: Provisioning profile URL
provisioning_profile_url: $BITRISE_PROVISION_URL
- keychain_path: $HOME/Library/Keychains/login.keychain
opts:
is_required: true
title: Keychain Path
- keychain_password: $BITRISE_KEYCHAIN_PASSWORD
opts:
is_required: true
title: Keychain's password
- default_certificate_url: $BITRISE_DEFAULT_CERTIFICATE_URL
opts:
description: |
URL of the default certificate.
You can specify a local path as well, using the `file://` scheme.
Example: `file://./Cert.p12`
title: Default Certificate URL
- default_certificate_passphrase: $BITRISE_DEFAULT_CERTIFICATE_PASSPHRASE
opts:
description: |
Certificate passphrase of the default certificate.
title: Default Certificate passphrase
- default_provisioning_profile_url: $BITRISE_DEFAULT_PROVISION_URL
opts:
description: |
URL of the default provisioning profile to download.
You can specify a local path as well, using the `file://` scheme.
Example: `file://./BuildAnything.mobileprovision`
title: Default Provisioning profile URL
================================================
FILE: steps/certificate-and-profile-installer/1.8.1/step.yml
================================================
title: Certificate and profile installer
summary: |-
Need to use your Provisioning Profile and Certificate? Use this Step to
add them to the keychain and use it as you wish! No worries, as our security
policy goes, the VM is reverted after running the workflow so there's no
trace of these left on them.
description: Downloads and installs the certificate and the mobile provisioning profiles
website: https://github.com/bitrise-io/steps-certificate-and-profile-installer
source_code_url: https://github.com/bitrise-io/steps-certificate-and-profile-installer
support_url: https://github.com/bitrise-io/steps-certificate-and-profile-installer/issues
published_at: 2016-10-28T17:54:34.898391536+02:00
source:
git: https://github.com/bitrise-io/steps-certificate-and-profile-installer.git
commit: e018fc70b01a7ef014b6a8bb1b474c7b26947776
host_os_tags:
- osx-10.10
project_type_tags:
- ios
type_tags:
- security
toolkit:
go:
package_name: github.com/bitrise-io/steps-certificate-and-profile-installer
deps:
brew:
- name: go
apt_get:
- name: golang
bin_name: go
is_requires_admin_user: false
is_always_run: false
is_skippable: false
run_if: .IsCI
inputs:
- certificate_url: $BITRISE_CERTIFICATE_URL
opts:
description: |
URL of the certificate to download. Multiple URLs can be
specified, separated by a pipe (`|`) character.
You can specify a local path as well, using the `file://` scheme.
Example: `file://./Cert.p12`
title: Certificate URL
- certificate_passphrase: $BITRISE_CERTIFICATE_PASSPHRASE
opts:
description: |
Certificate passphrase. Multiple passphrases can be
specified, separated by a pipe (`|`) character.
Specified Certificate passphrase count should match the count of the certificate urls.
Format example:
- 1 certificate provided with passphrase: `PASS`
- 1 certificate provided without passphrase: ``
- 3 certificates provided, none of them has passphrase: `||`
- 3 certificates provided, only the 2. one has passphrase: `|PASS|`
title: Certificate passphrase
- opts:
description: |
URL of the provisioning profile to download. Multiple URLs can be
specified, separated by a pipe (`|`) character.
You can specify a local path as well, using the `file://` scheme.
Example: `file://./BuildAnything.mobileprovision`
title: Provisioning profile URL
provisioning_profile_url: $BITRISE_PROVISION_URL
- keychain_path: $HOME/Library/Keychains/login.keychain
opts:
is_required: true
title: Keychain Path
- keychain_password: $BITRISE_KEYCHAIN_PASSWORD
opts:
is_required: true
title: Keychain's password
- default_certificate_url: $BITRISE_DEFAULT_CERTIFICATE_URL
opts:
description: |
URL of the default certificate.
You can specify a local path as well, using the `file://` scheme.
Example: `file://./Cert.p12`
title: Default Certificate URL
- default_certificate_passphrase: $BITRISE_DEFAULT_CERTIFICATE_PASSPHRASE
opts:
description: |
Certificate passphrase of the default certificate.
title: Default Certificate passphrase
- default_provisioning_profile_url: $BITRISE_DEFAULT_PROVISION_URL
opts:
description: |
URL of the default provisioning profile to download.
You can specify a local path as well, using the `file://` scheme.
Example: `file://./BuildAnything.mobileprovision`
title: Default Provisioning profile URL
================================================
FILE: steps/certificate-and-profile-installer/1.8.2/step.yml
================================================
title: Certificate and profile installer
summary: |-
Need to use your Provisioning Profile and Certificate? Use this Step to
add them to the keychain and use it as you wish! No worries, as our security
policy goes, the VM is reverted after running the workflow so there's no
trace of these left on them.
description: Downloads and installs the certificate and the mobile provisioning profiles
website: https://github.com/bitrise-io/steps-certificate-and-profile-installer
source_code_url: https://github.com/bitrise-io/steps-certificate-and-profile-installer
support_url: https://github.com/bitrise-io/steps-certificate-and-profile-installer/issues
published_at: 2016-12-20T13:42:23.047198886+01:00
source:
git: https://github.com/bitrise-io/steps-certificate-and-profile-installer.git
commit: 71d1deaf3627ff4ee73175a8800dade1197aa43d
host_os_tags:
- osx-10.10
project_type_tags:
- ios
- macos
type_tags:
- security
toolkit:
go:
package_name: github.com/bitrise-io/steps-certificate-and-profile-installer
deps:
brew:
- name: go
apt_get:
- name: golang
bin_name: go
is_requires_admin_user: false
is_always_run: false
is_skippable: false
run_if: .IsCI
inputs:
- certificate_url: $BITRISE_CERTIFICATE_URL
opts:
description: |
URL of the certificate to download. Multiple URLs can be
specified, separated by a pipe (`|`) character.
You can specify a local path as well, using the `file://` scheme.
Example: `file://./Cert.p12`
title: Certificate URL
- certificate_passphrase: $BITRISE_CERTIFICATE_PASSPHRASE
opts:
description: |
Certificate passphrase. Multiple passphrases can be
specified, separated by a pipe (`|`) character.
Specified Certificate passphrase count should match the count of the certificate urls.
Format example:
- 1 certificate provided with passphrase: `PASS`
- 1 certificate provided without passphrase: ``
- 3 certificates provided, none of them has passphrase: `||`
- 3 certificates provided, only the 2. one has passphrase: `|PASS|`
title: Certificate passphrase
- opts:
description: |
URL of the provisioning profile to download. Multiple URLs can be
specified, separated by a pipe (`|`) character.
You can specify a local path as well, using the `file://` scheme.
Example: `file://./BuildAnything.mobileprovision`
title: Provisioning profile URL
provisioning_profile_url: $BITRISE_PROVISION_URL
- keychain_path: $HOME/Library/Keychains/login.keychain
opts:
is_required: true
title: Keychain Path
- keychain_password: $BITRISE_KEYCHAIN_PASSWORD
opts:
is_required: true
title: Keychain's password
- default_certificate_url: $BITRISE_DEFAULT_CERTIFICATE_URL
opts:
description: |
URL of the default certificate.
You can specify a local path as well, using the `file://` scheme.
Example: `file://./Cert.p12`
title: Default Certificate URL
- default_certificate_passphrase: $BITRISE_DEFAULT_CERTIFICATE_PASSPHRASE
opts:
description: |
Certificate passphrase of the default certificate.
title: Default Certificate passphrase
- default_provisioning_profile_url: $BITRISE_DEFAULT_PROVISION_URL
opts:
description: |
URL of the default provisioning profile to download.
You can specify a local path as well, using the `file://` scheme.
Example: `file://./BuildAnything.mobileprovision`
title: Default Provisioning profile URL
================================================
FILE: steps/certificate-and-profile-installer/1.8.3/step.yml
================================================
title: Certificate and profile installer
summary: |-
Need to use your Provisioning Profile and Certificate? Use this Step to
add them to the keychain and use it as you wish! No worries, as our security
policy goes, the VM is reverted after running the workflow so there's no
trace of these left on them.
description: Downloads and installs the certificate and the mobile provisioning profiles
website: https://github.com/bitrise-io/steps-certificate-and-profile-installer
source_code_url: https://github.com/bitrise-io/steps-certificate-and-profile-installer
support_url: https://github.com/bitrise-io/steps-certificate-and-profile-installer/issues
published_at: 2017-03-03T13:56:10.46146506+01:00
source:
git: https://github.com/bitrise-io/steps-certificate-and-profile-installer.git
commit: 7de9c807a6386da8aa41e1d318dff7eb244cbdfe
host_os_tags:
- osx-10.10
project_type_tags:
- ios
- macos
type_tags:
- security
toolkit:
go:
package_name: github.com/bitrise-io/steps-certificate-and-profile-installer
deps:
brew:
- name: go
apt_get:
- name: golang
bin_name: go
is_requires_admin_user: false
is_always_run: false
is_skippable: false
run_if: .IsCI
inputs:
- certificate_url: $BITRISE_CERTIFICATE_URL
opts:
description: |
URL of the certificate to download. Multiple URLs can be
specified, separated by a pipe (`|`) character.
You can specify a local path as well, using the `file://` scheme.
Example: `file://./Cert.p12`
title: Certificate URL
- certificate_passphrase: $BITRISE_CERTIFICATE_PASSPHRASE
opts:
description: |
Certificate passphrase. Multiple passphrases can be
specified, separated by a pipe (`|`) character.
Specified Certificate passphrase count should match the count of the certificate urls.
Format example:
- 1 certificate provided with passphrase: `PASS`
- 1 certificate provided without passphrase: ``
- 3 certificates provided, none of them has passphrase: `||`
- 3 certificates provided, only the 2. one has passphrase: `|PASS|`
title: Certificate passphrase
- opts:
description: |
URL of the provisioning profile to download. Multiple URLs can be
specified, separated by a pipe (`|`) character.
You can specify a local path as well, using the `file://` scheme.
Example: `file://./BuildAnything.mobileprovision`
title: Provisioning profile URL
provisioning_profile_url: $BITRISE_PROVISION_URL
- keychain_path: $HOME/Library/Keychains/login.keychain
opts:
is_required: true
title: Keychain Path
- keychain_password: $BITRISE_KEYCHAIN_PASSWORD
opts:
is_required: true
title: Keychain's password
- default_certificate_url: $BITRISE_DEFAULT_CERTIFICATE_URL
opts:
description: |
URL of the default certificate.
You can specify a local path as well, using the `file://` scheme.
Example: `file://./Cert.p12`
title: Default Certificate URL
- default_certificate_passphrase: $BITRISE_DEFAULT_CERTIFICATE_PASSPHRASE
opts:
description: |
Certificate passphrase of the default certificate.
title: Default Certificate passphrase
- default_provisioning_profile_url: $BITRISE_DEFAULT_PROVISION_URL
opts:
description: |
URL of the default provisioning profile to download.
You can specify a local path as well, using the `file://` scheme.
Example: `file://./BuildAnything.mobileprovision`
title: Default Provisioning profile URL
================================================
FILE: steps/certificate-and-profile-installer/1.8.4/step.yml
================================================
title: Certificate and profile installer
summary: |-
Need to use your Provisioning Profile and Certificate? Use this Step to
add them to the keychain and use it as you wish! No worries, as our security
policy goes, the VM is reverted after running the workflow so there's no
trace of these left on them.
description: Downloads and installs the certificate and the mobile provisioning profiles
website: https://github.com/bitrise-io/steps-certificate-and-profile-installer
source_code_url: https://github.com/bitrise-io/steps-certificate-and-profile-installer
support_url: https://github.com/bitrise-io/steps-certificate-and-profile-installer/issues
published_at: 2017-03-10T12:31:55.848765014+01:00
source:
git: https://github.com/bitrise-io/steps-certificate-and-profile-installer.git
commit: a4bb22a04885827bb1cb75e69841dd895fa80178
host_os_tags:
- osx-10.10
project_type_tags:
- ios
- macos
type_tags:
- security
toolkit:
go:
package_name: github.com/bitrise-io/steps-certificate-and-profile-installer
deps:
brew:
- name: go
apt_get:
- name: golang
bin_name: go
is_requires_admin_user: false
is_always_run: false
is_skippable: false
run_if: .IsCI
inputs:
- certificate_url: $BITRISE_CERTIFICATE_URL
opts:
description: |
URL of the certificate to download. Multiple URLs can be
specified, separated by a pipe (`|`) character.
You can specify a local path as well, using the `file://` scheme.
Example: `file://./Cert.p12`
title: Certificate URL
- certificate_passphrase: $BITRISE_CERTIFICATE_PASSPHRASE
opts:
description: |
Certificate passphrase. Multiple passphrases can be
specified, separated by a pipe (`|`) character.
Specified Certificate passphrase count should match the count of the certificate urls.
Format example:
- 1 certificate provided with passphrase: `PASS`
- 1 certificate provided without passphrase: ``
- 3 certificates provided, none of them has passphrase: `||`
- 3 certificates provided, only the 2. one has passphrase: `|PASS|`
title: Certificate passphrase
- opts:
description: |
URL of the provisioning profile to download. Multiple URLs can be
specified, separated by a pipe (`|`) character.
You can specify a local path as well, using the `file://` scheme.
Example: `file://./BuildAnything.mobileprovision`
title: Provisioning profile URL
provisioning_profile_url: $BITRISE_PROVISION_URL
- keychain_path: $HOME/Library/Keychains/login.keychain
opts:
is_required: true
title: Keychain Path
- keychain_password: $BITRISE_KEYCHAIN_PASSWORD
opts:
is_required: true
title: Keychain's password
- default_certificate_url: $BITRISE_DEFAULT_CERTIFICATE_URL
opts:
description: |
URL of the default certificate.
You can specify a local path as well, using the `file://` scheme.
Example: `file://./Cert.p12`
title: Default Certificate URL
- default_certificate_passphrase: $BITRISE_DEFAULT_CERTIFICATE_PASSPHRASE
opts:
description: |
Certificate passphrase of the default certificate.
title: Default Certificate passphrase
- default_provisioning_profile_url: $BITRISE_DEFAULT_PROVISION_URL
opts:
description: |
URL of the default provisioning profile to download.
You can specify a local path as well, using the `file://` scheme.
Example: `file://./BuildAnything.mobileprovision`
title: Default Provisioning profile URL
================================================
FILE: steps/certificate-and-profile-installer/1.8.5/step.yml
================================================
title: Certificate and profile installer
summary: |-
Need to use your Provisioning Profile and Certificate? Use this Step to
add them to the keychain and use it as you wish! No worries, as our security
policy goes, the VM is reverted after running the workflow so there's no
trace of these left on them.
description: Downloads and installs the certificate and the mobile provisioning profiles
website: https://github.com/bitrise-io/steps-certificate-and-profile-installer
source_code_url: https://github.com/bitrise-io/steps-certificate-and-profile-installer
support_url: https://github.com/bitrise-io/steps-certificate-and-profile-installer/issues
published_at: 2017-04-13T16:16:58.592052244+02:00
source:
git: https://github.com/bitrise-io/steps-certificate-and-profile-installer.git
commit: e3f15723924295822594dc9ebf1f6f5c01d423a3
host_os_tags:
- osx-10.10
project_type_tags:
- ios
- macos
- xamarin
- cordova
- ionic
- react-native
type_tags:
- "code sign"
toolkit:
go:
package_name: github.com/bitrise-io/steps-certificate-and-profile-installer
deps:
brew:
- name: go
apt_get:
- name: golang
bin_name: go
is_requires_admin_user: false
is_always_run: false
is_skippable: false
run_if: .IsCI
inputs:
- certificate_url: $BITRISE_CERTIFICATE_URL
opts:
description: |
URL of the certificate to download. Multiple URLs can be
specified, separated by a pipe (`|`) character.
You can specify a local path as well, using the `file://` scheme.
Example: `file://./Cert.p12`
title: Certificate URL
- certificate_passphrase: $BITRISE_CERTIFICATE_PASSPHRASE
opts:
description: |
Certificate passphrase. Multiple passphrases can be
specified, separated by a pipe (`|`) character.
Specified Certificate passphrase count should match the count of the certificate urls.
Format example:
- 1 certificate provided with passphrase: `PASS`
- 1 certificate provided without passphrase: ``
- 3 certificates provided, none of them has passphrase: `||`
- 3 certificates provided, only the 2. one has passphrase: `|PASS|`
title: Certificate passphrase
- opts:
description: |
URL of the provisioning profile to download. Multiple URLs can be
specified, separated by a pipe (`|`) character.
You can specify a local path as well, using the `file://` scheme.
Example: `file://./BuildAnything.mobileprovision`
title: Provisioning profile URL
provisioning_profile_url: $BITRISE_PROVISION_URL
- keychain_path: $HOME/Library/Keychains/login.keychain
opts:
is_required: true
title: Keychain Path
- keychain_password: $BITRISE_KEYCHAIN_PASSWORD
opts:
is_required: true
title: Keychain's password
- default_certificate_url: $BITRISE_DEFAULT_CERTIFICATE_URL
opts:
description: |
URL of the default certificate.
You can specify a local path as well, using the `file://` scheme.
Example: `file://./Cert.p12`
title: Default Certificate URL
- default_certificate_passphrase: $BITRISE_DEFAULT_CERTIFICATE_PASSPHRASE
opts:
description: |
Certificate passphrase of the default certificate.
title: Default Certificate passphrase
- default_provisioning_profile_url: $BITRISE_DEFAULT_PROVISION_URL
opts:
description: |
URL of the default provisioning profile to download.
You can specify a local path as well, using the `file://` scheme.
Example: `file://./BuildAnything.mobileprovision`
title: Default Provisioning profile URL
================================================
FILE: steps/certificate-and-profile-installer/1.8.6/step.yml
================================================
title: Certificate and profile installer
summary: |-
Need to use your Provisioning Profile and Certificate? Use this Step to
add them to the keychain and use it as you wish! No worries, as our security
policy goes, the VM is reverted after running the workflow so there's no
trace of these left on them.
description: Downloads and installs the certificate and the mobile provisioning profiles
website: https://github.com/bitrise-io/steps-certificate-and-profile-installer
source_code_url: https://github.com/bitrise-io/steps-certificate-and-profile-installer
support_url: https://github.com/bitrise-io/steps-certificate-and-profile-installer/issues
published_at: 2017-06-12T15:11:14.675803995+02:00
source:
git: https://github.com/bitrise-io/steps-certificate-and-profile-installer.git
commit: 0f42d5b101d0bcf3754b8a18087df2a57467de2b
host_os_tags:
- osx-10.10
project_type_tags:
- ios
- macos
- xamarin
- cordova
- ionic
- react-native
type_tags:
- code-sign
toolkit:
go:
package_name: github.com/bitrise-io/steps-certificate-and-profile-installer
deps:
brew:
- name: go
apt_get:
- name: golang
bin_name: go
is_requires_admin_user: false
is_always_run: false
is_skippable: false
run_if: .IsCI
inputs:
- certificate_url: $BITRISE_CERTIFICATE_URL
opts:
category: Config
description: |
URL of the certificate to download. Multiple URLs can be
specified, separated by a pipe (`|`) character.
You can specify a local path as well, using the `file://` scheme.
Example: `file://./Cert.p12`
title: Certificate URL
- certificate_passphrase: $BITRISE_CERTIFICATE_PASSPHRASE
opts:
category: Config
description: |
Certificate passphrase. Multiple passphrases can be
specified, separated by a pipe (`|`) character.
Specified Certificate passphrase count should match the count of the certificate urls.
Format example:
- 1 certificate provided with passphrase: `PASS`
- 1 certificate provided without passphrase: ``
- 3 certificates provided, none of them has passphrase: `||`
- 3 certificates provided, only the 2. one has passphrase: `|PASS|`
title: Certificate passphrase
- opts:
category: Config
description: |
URL of the provisioning profile to download. Multiple URLs can be
specified, separated by a pipe (`|`) character.
You can specify a local path as well, using the `file://` scheme.
Example: `file://./BuildAnything.mobileprovision`
title: Provisioning profile URL
provisioning_profile_url: $BITRISE_PROVISION_URL
- keychain_path: $HOME/Library/Keychains/login.keychain
opts:
category: Config
is_required: true
title: Keychain Path
- keychain_password: $BITRISE_KEYCHAIN_PASSWORD
opts:
category: Config
is_required: true
title: Keychain's password
- default_certificate_url: $BITRISE_DEFAULT_CERTIFICATE_URL
opts:
category: Debug
description: |
URL of the default certificate.
You can specify a local path as well, using the `file://` scheme.
Example: `file://./Cert.p12`
title: Default Certificate URL
- default_certificate_passphrase: $BITRISE_DEFAULT_CERTIFICATE_PASSPHRASE
opts:
category: Debug
description: |
Certificate passphrase of the default certificate.
title: Default Certificate passphrase
- default_provisioning_profile_url: $BITRISE_DEFAULT_PROVISION_URL
opts:
category: Debug
description: |
URL of the default provisioning profile to download.
You can specify a local path as well, using the `file://` scheme.
Example: `file://./BuildAnything.mobileprovision`
title: Default Provisioning profile URL
================================================
FILE: steps/certificate-and-profile-installer/1.8.7/step.yml
================================================
title: Certificate and profile installer
summary: |-
Need to use your Provisioning Profile and Certificate? Use this Step to
add them to the keychain and use it as you wish! No worries, as our security
policy goes, the VM is reverted after running the workflow so there's no
trace of these left on them.
description: Downloads and installs the certificate and the mobile provisioning profiles
website: https://github.com/bitrise-io/steps-certificate-and-profile-installer
source_code_url: https://github.com/bitrise-io/steps-certificate-and-profile-installer
support_url: https://github.com/bitrise-io/steps-certificate-and-profile-installer/issues
published_at: 2017-07-24T17:15:14.117067266+02:00
source:
git: https://github.com/bitrise-io/steps-certificate-and-profile-installer.git
commit: 3c6dd1cf1e3ebdc44e4888c035b6be735ab61c59
host_os_tags:
- osx-10.10
project_type_tags:
- ios
- macos
- xamarin
- cordova
- ionic
- react-native
type_tags:
- code-sign
toolkit:
go:
package_name: github.com/bitrise-io/steps-certificate-and-profile-installer
deps:
brew:
- name: go
apt_get:
- name: golang
bin_name: go
is_requires_admin_user: false
is_always_run: false
is_skippable: false
run_if: .IsCI
inputs:
- certificate_url: $BITRISE_CERTIFICATE_URL
opts:
category: Config
description: |
URL of the certificate to download. Multiple URLs can be
specified, separated by a pipe (`|`) character.
You can specify a local path as well, using the `file://` scheme.
Example: `file://./Cert.p12`
title: Certificate URL
- certificate_passphrase: $BITRISE_CERTIFICATE_PASSPHRASE
opts:
category: Config
description: |
Certificate passphrase. Multiple passphrases can be
specified, separated by a pipe (`|`) character.
Specified Certificate passphrase count should match the count of the certificate urls.
Format example:
- 1 certificate provided with passphrase: `PASS`
- 1 certificate provided without passphrase: ``
- 3 certificates provided, none of them has passphrase: `||`
- 3 certificates provided, only the 2. one has passphrase: `|PASS|`
title: Certificate passphrase
- opts:
category: Config
description: |
URL of the provisioning profile to download. Multiple URLs can be
specified, separated by a pipe (`|`) character.
You can specify a local path as well, using the `file://` scheme.
Example: `file://./BuildAnything.mobileprovision`
title: Provisioning profile URL
provisioning_profile_url: $BITRISE_PROVISION_URL
- keychain_path: $HOME/Library/Keychains/login.keychain
opts:
category: Config
is_required: true
title: Keychain Path
- keychain_password: $BITRISE_KEYCHAIN_PASSWORD
opts:
category: Config
is_required: true
title: Keychain's password
- default_certificate_url: $BITRISE_DEFAULT_CERTIFICATE_URL
opts:
category: Debug
description: |
URL of the default certificate.
You can specify a local path as well, using the `file://` scheme.
Example: `file://./Cert.p12`
title: Default Certificate URL
- default_certificate_passphrase: $BITRISE_DEFAULT_CERTIFICATE_PASSPHRASE
opts:
category: Debug
description: |
Certificate passphrase of the default certificate.
title: Default Certificate passphrase
- default_provisioning_profile_url: $BITRISE_DEFAULT_PROVISION_URL
opts:
category: Debug
description: |
URL of the default provisioning profile to download.
You can specify a local path as well, using the `file://` scheme.
Example: `file://./BuildAnything.mobileprovision`
title: Default Provisioning profile URL
================================================
FILE: steps/certificate-and-profile-installer/1.8.8/step.yml
================================================
title: Certificate and profile installer
summary: |-
Need to use your Provisioning Profile and Certificate? Use this Step to
add them to the keychain and use it as you wish! No worries, as our security
policy goes, the VM is reverted after running the workflow so there's no
trace of these left on them.
description: Downloads and installs the certificate and the mobile provisioning profiles
website: https://github.com/bitrise-io/steps-certificate-and-profile-installer
source_code_url: https://github.com/bitrise-io/steps-certificate-and-profile-installer
support_url: https://github.com/bitrise-io/steps-certificate-and-profile-installer/issues
published_at: 2017-08-11T10:29:44.475244016+02:00
source:
git: https://github.com/bitrise-io/steps-certificate-and-profile-installer.git
commit: 31a5db1ac71e1c4e25450fef9e0181b0d344bef0
host_os_tags:
- osx-10.10
project_type_tags:
- ios
- macos
- xamarin
- cordova
- ionic
- react-native
type_tags:
- code-sign
toolkit:
go:
package_name: github.com/bitrise-io/steps-certificate-and-profile-installer
deps:
brew:
- name: go
apt_get:
- name: golang
bin_name: go
is_requires_admin_user: false
is_always_run: false
is_skippable: false
run_if: .IsCI
inputs:
- certificate_url: $BITRISE_CERTIFICATE_URL
opts:
category: Config
description: |
URL of the certificate to download. Multiple URLs can be
specified, separated by a pipe (`|`) character.
You can specify a local path as well, using the `file://` scheme.
Example: `file://./Cert.p12`
title: Certificate URL
- certificate_passphrase: $BITRISE_CERTIFICATE_PASSPHRASE
opts:
category: Config
description: |
Certificate passphrase. Multiple passphrases can be
specified, separated by a pipe (`|`) character.
Specified Certificate passphrase count should match the count of the certificate urls.
Format example:
- 1 certificate provided with passphrase: `PASS`
- 1 certificate provided without passphrase: ``
- 3 certificates provided, none of them has passphrase: `||`
- 3 certificates provided, only the 2. one has passphrase: `|PASS|`
title: Certificate passphrase
- opts:
category: Config
description: |
URL of the provisioning profile to download. Multiple URLs can be
specified, separated by a pipe (`|`) character.
You can specify a local path as well, using the `file://` scheme.
Example: `file://./BuildAnything.mobileprovision`
title: Provisioning profile URL
provisioning_profile_url: $BITRISE_PROVISION_URL
- keychain_path: $HOME/Library/Keychains/login.keychain
opts:
category: Config
is_required: true
title: Keychain Path
- keychain_password: $BITRISE_KEYCHAIN_PASSWORD
opts:
category: Config
is_required: true
title: Keychain's password
- default_certificate_url: $BITRISE_DEFAULT_CERTIFICATE_URL
opts:
category: Debug
description: |
URL of the default certificate.
You can specify a local path as well, using the `file://` scheme.
Example: `file://./Cert.p12`
title: Default Certificate URL
- default_certificate_passphrase: $BITRISE_DEFAULT_CERTIFICATE_PASSPHRASE
opts:
category: Debug
description: |
Certificate passphrase of the default certificate.
title: Default Certificate passphrase
- default_provisioning_profile_url: $BITRISE_DEFAULT_PROVISION_URL
opts:
category: Debug
description: |
URL of the default provisioning profile to download.
You can specify a local path as well, using the `file://` scheme.
Example: `file://./BuildAnything.mobileprovision`
title: Default Provisioning profile URL
================================================
FILE: steps/certificate-and-profile-installer/1.9.0/step.yml
================================================
title: Certificate and profile installer
summary: |-
Need to use your Provisioning Profile and Certificate? Use this Step to
add them to the keychain and use it as you wish! No worries, as our security
policy goes, the VM is reverted after running the workflow so there's no
trace of these left on them.
description: Downloads and installs the certificate and the mobile provisioning profiles
website: https://github.com/bitrise-io/steps-certificate-and-profile-installer
source_code_url: https://github.com/bitrise-io/steps-certificate-and-profile-installer
support_url: https://github.com/bitrise-io/steps-certificate-and-profile-installer/issues
published_at: 2017-09-29T13:33:45.791847322+02:00
source:
git: https://github.com/bitrise-io/steps-certificate-and-profile-installer.git
commit: 1b0e0a5984c01f503006e5160dfebb77d648f6a0
host_os_tags:
- osx-10.10
project_type_tags:
- ios
- macos
- xamarin
- cordova
- ionic
- react-native
type_tags:
- code-sign
toolkit:
go:
package_name: github.com/bitrise-io/steps-certificate-and-profile-installer
deps:
brew:
- name: go
apt_get:
- name: golang
bin_name: go
is_requires_admin_user: false
is_always_run: false
is_skippable: false
run_if: .IsCI
inputs:
- certificate_url: $BITRISE_CERTIFICATE_URL
opts:
category: Config
description: |
URL of the certificate to download. Multiple URLs can be
specified, separated by a pipe (`|`) character.
You can specify a local path as well, using the `file://` scheme.
Example: `file://./Cert.p12`
title: Certificate URL
- certificate_passphrase: $BITRISE_CERTIFICATE_PASSPHRASE
opts:
category: Config
description: |
Certificate passphrase. Multiple passphrases can be
specified, separated by a pipe (`|`) character.
Specified Certificate passphrase count should match the count of the certificate urls.
Format example:
- 1 certificate provided with passphrase: `PASS`
- 1 certificate provided without passphrase: ``
- 3 certificates provided, none of them has passphrase: `||`
- 3 certificates provided, only the 2. one has passphrase: `|PASS|`
title: Certificate passphrase
- opts:
category: Config
description: |
URL of the provisioning profile to download. Multiple URLs can be
specified, separated by a pipe (`|`) character.
You can specify a local path as well, using the `file://` scheme.
Example: `file://./BuildAnything.mobileprovision`
title: Provisioning profile URL
provisioning_profile_url: $BITRISE_PROVISION_URL
- keychain_path: $HOME/Library/Keychains/login.keychain
opts:
category: Config
is_required: true
title: Keychain Path
- keychain_password: $BITRISE_KEYCHAIN_PASSWORD
opts:
category: Config
is_required: true
title: Keychain's password
- default_certificate_url: $BITRISE_DEFAULT_CERTIFICATE_URL
opts:
category: Debug
description: |
URL of the default certificate.
You can specify a local path as well, using the `file://` scheme.
Example: `file://./Cert.p12`
title: Default Certificate URL
- default_certificate_passphrase: $BITRISE_DEFAULT_CERTIFICATE_PASSPHRASE
opts:
category: Debug
description: |
Certificate passphrase of the default certificate.
title: Default Certificate passphrase
- default_provisioning_profile_url: $BITRISE_DEFAULT_PROVISION_URL
opts:
category: Debug
description: |
URL of the default provisioning profile to download.
You can specify a local path as well, using the `file://` scheme.
Example: `file://./BuildAnything.mobileprovision`
title: Default Provisioning profile URL
================================================
FILE: steps/certificate-and-profile-installer/1.9.1/step.yml
================================================
title: Certificate and profile installer
summary: |-
Need to use your Provisioning Profile and Certificate? Use this Step to
add them to the keychain and use it as you wish! No worries, as our security
policy goes, the VM is reverted after running the workflow so there's no
trace of these left on them.
description: Downloads and installs the certificate and the mobile provisioning profiles
website: https://github.com/bitrise-io/steps-certificate-and-profile-installer
source_code_url: https://github.com/bitrise-io/steps-certificate-and-profile-installer
support_url: https://github.com/bitrise-io/steps-certificate-and-profile-installer/issues
published_at: 2017-10-06T17:31:39.56672712+02:00
source:
git: https://github.com/bitrise-io/steps-certificate-and-profile-installer.git
commit: 822430417b0eb2c105271064b657dc4dd9c866a7
host_os_tags:
- osx-10.10
project_type_tags:
- ios
- macos
- xamarin
- cordova
- ionic
- react-native
type_tags:
- code-sign
toolkit:
go:
package_name: github.com/bitrise-io/steps-certificate-and-profile-installer
deps:
brew:
- name: go
apt_get:
- name: golang
bin_name: go
is_requires_admin_user: false
is_always_run: false
is_skippable: false
run_if: .IsCI
inputs:
- certificate_url: $BITRISE_CERTIFICATE_URL
opts:
category: Config
description: |
URL of the certificate to download. Multiple URLs can be
specified, separated by a pipe (`|`) character.
You can specify a local path as well, using the `file://` scheme.
Example: `file://./Cert.p12`
title: Certificate URL
- certificate_passphrase: $BITRISE_CERTIFICATE_PASSPHRASE
opts:
category: Config
description: |
Certificate passphrase. Multiple passphrases can be
specified, separated by a pipe (`|`) character.
Specified Certificate passphrase count should match the count of the certificate urls.
Format example:
- 1 certificate provided with passphrase: `PASS`
- 1 certificate provided without passphrase: ``
- 3 certificates provided, none of them has passphrase: `||`
- 3 certificates provided, only the 2. one has passphrase: `|PASS|`
title: Certificate passphrase
- opts:
category: Config
description: |
URL of the provisioning profile to download. Multiple URLs can be
specified, separated by a pipe (`|`) character.
You can specify a local path as well, using the `file://` scheme.
Example: `file://./BuildAnything.mobileprovision`
title: Provisioning profile URL
provisioning_profile_url: $BITRISE_PROVISION_URL
- keychain_path: $HOME/Library/Keychains/login.keychain
opts:
category: Config
is_required: true
title: Keychain Path
- keychain_password: $BITRISE_KEYCHAIN_PASSWORD
opts:
category: Config
is_required: true
title: Keychain's password
- default_certificate_url: $BITRISE_DEFAULT_CERTIFICATE_URL
opts:
category: Debug
description: |
URL of the default certificate.
You can specify a local path as well, using the `file://` scheme.
Example: `file://./Cert.p12`
title: Default Certificate URL
- default_certificate_passphrase: $BITRISE_DEFAULT_CERTIFICATE_PASSPHRASE
opts:
category: Debug
description: |
Certificate passphrase of the default certificate.
title: Default Certificate passphrase
- default_provisioning_profile_url: $BITRISE_DEFAULT_PROVISION_URL
opts:
category: Debug
description: |
URL of the default provisioning profile to download.
You can specify a local path as well, using the `file://` scheme.
Example: `file://./BuildAnything.mobileprovision`
title: Default Provisioning profile URL
================================================
FILE: steps/certificate-and-profile-installer/1.9.2/step.yml
================================================
title: Certificate and profile installer
summary: |-
Need to use your Provisioning Profiles and Certificates? Use this Step to
add them to the keychain and use it as you wish! No worries, as our security
policy goes, the VM is reverted after running the workflow so there's no
trace of these left on them.
description: Downloads and installs the certificate and the mobile provisioning profiles
website: https://github.com/bitrise-io/steps-certificate-and-profile-installer
source_code_url: https://github.com/bitrise-io/steps-certificate-and-profile-installer
support_url: https://github.com/bitrise-io/steps-certificate-and-profile-installer/issues
published_at: 2017-10-20T17:36:05.282296374+02:00
source:
git: https://github.com/bitrise-io/steps-certificate-and-profile-installer.git
commit: 2af25e7ce666deac70968b71aa7bd276f104481d
host_os_tags:
- osx-10.10
project_type_tags:
- ios
- macos
- xamarin
- cordova
- ionic
- react-native
type_tags:
- code-sign
toolkit:
go:
package_name: github.com/bitrise-io/steps-certificate-and-profile-installer
deps:
brew:
- name: go
apt_get:
- name: golang
bin_name: go
is_requires_admin_user: false
is_always_run: false
is_skippable: false
run_if: .IsCI
inputs:
- certificate_url: $BITRISE_CERTIFICATE_URL
opts:
category: Config
description: |
URL of the certificate to download. Multiple URLs can be
specified, separated by a pipe (`|`) character.
You can specify a local path as well, using the `file://` scheme.
Example: `file://./Cert.p12`
title: Certificate URL
- certificate_passphrase: $BITRISE_CERTIFICATE_PASSPHRASE
opts:
category: Config
description: |
Certificate passphrase. Multiple passphrases can be
specified, separated by a pipe (`|`) character.
Specified Certificate passphrase count should match the count of the certificate urls.
Format example:
- 1 certificate provided with passphrase: `PASS`
- 1 certificate provided without passphrase: ``
- 3 certificates provided, none of them has passphrase: `||`
- 3 certificates provided, only the 2. one has passphrase: `|PASS|`
title: Certificate passphrase
- opts:
category: Config
description: |
URL of the provisioning profile to download. Multiple URLs can be
specified, separated by a pipe (`|`) character.
You can specify a local path as well, using the `file://` scheme.
Example: `file://./BuildAnything.mobileprovision`
title: Provisioning profile URL
provisioning_profile_url: $BITRISE_PROVISION_URL
- keychain_path: $HOME/Library/Keychains/login.keychain
opts:
category: Config
is_required: true
title: Keychain Path
- keychain_password: $BITRISE_KEYCHAIN_PASSWORD
opts:
category: Config
is_required: true
title: Keychain's password
- default_certificate_url: $BITRISE_DEFAULT_CERTIFICATE_URL
opts:
category: Debug
description: |
URL of the default certificate.
You can specify a local path as well, using the `file://` scheme.
Example: `file://./Cert.p12`
title: Default Certificate URL
- default_certificate_passphrase: $BITRISE_DEFAULT_CERTIFICATE_PASSPHRASE
opts:
category: Debug
description: |
Certificate passphrase of the default certificate.
title: Default Certificate passphrase
- default_provisioning_profile_url: $BITRISE_DEFAULT_PROVISION_URL
opts:
category: Debug
description: |
URL of the default provisioning profile to download.
You can specify a local path as well, using the `file://` scheme.
Example: `file://./BuildAnything.mobileprovision`
title: Default Provisioning profile URL
================================================
FILE: steps/certificate-and-profile-installer/1.9.3/step.yml
================================================
title: Certificate and profile installer
summary: |-
Need to use your Provisioning Profiles and Certificates? Use this Step to
add them to the keychain and use it as you wish! No worries, as our security
policy goes, the VM is reverted after running the workflow so there's no
trace of these left on them.
description: Downloads and installs the certificate and the mobile provisioning profiles
website: https://github.com/bitrise-io/steps-certificate-and-profile-installer
source_code_url: https://github.com/bitrise-io/steps-certificate-and-profile-installer
support_url: https://github.com/bitrise-io/steps-certificate-and-profile-installer/issues
published_at: !!timestamp 2018-05-07T13:14:05.692541576+02:00
source:
git: https://github.com/bitrise-io/steps-certificate-and-profile-installer.git
commit: d482bca5fd93d5163509e092e999c50ac87638fb
host_os_tags:
- osx-10.10
project_type_tags:
- ios
- macos
- xamarin
- cordova
- ionic
- react-native
type_tags:
- code-sign
toolkit:
go:
package_name: github.com/bitrise-io/steps-certificate-and-profile-installer
deps:
brew:
- name: go
apt_get:
- name: golang
bin_name: go
is_requires_admin_user: false
is_always_run: false
is_skippable: false
run_if: .IsCI
inputs:
- certificate_url: $BITRISE_CERTIFICATE_URL
opts:
description: |
URL of the certificate to download. Multiple URLs can be
specified, separated by a pipe (`|`) character.
You can specify a local path as well, using the `file://` scheme.
Example: `file://./Cert.p12`
title: Certificate URL
- certificate_passphrase: $BITRISE_CERTIFICATE_PASSPHRASE
opts:
description: |
Certificate passphrase. Multiple passphrases can be
specified, separated by a pipe (`|`) character.
Specified Certificate passphrase count should match the count of the certificate urls.
Format example:
- 1 certificate provided with passphrase: `PASS`
- 1 certificate provided without passphrase: ``
- 3 certificates provided, none of them has passphrase: `||`
- 3 certificates provided, only the 2. one has passphrase: `|PASS|`
title: Certificate passphrase
- opts:
description: |
URL of the provisioning profile to download. Multiple URLs can be
specified, separated by a pipe (`|`) character.
You can specify a local path as well, using the `file://` scheme.
Example: `file://./BuildAnything.mobileprovision`
title: Provisioning profile URL
provisioning_profile_url: $BITRISE_PROVISION_URL
- keychain_path: $HOME/Library/Keychains/login.keychain
opts:
is_required: true
title: Keychain Path
- keychain_password: $BITRISE_KEYCHAIN_PASSWORD
opts:
is_required: true
title: Keychain's password
- install_defaults: "yes"
opts:
category: Default Codesign Files
description: Installs default (Bitrise) Wildcard Provisioning Profile and Codesign
Certificate for testing.
summary: Installs default (Bitrise) Wildcard Codesign Files.
title: Installs default Codesign Files
value_options:
- "no"
- "yes"
- default_certificate_url: $BITRISE_DEFAULT_CERTIFICATE_URL
opts:
category: Default Codesign Files
description: |
URL of the default certificate.
You can specify a local path as well, using the `file://` scheme.
Example: `file://./Cert.p12`
title: Default Certificate URL
- default_certificate_passphrase: $BITRISE_DEFAULT_CERTIFICATE_PASSPHRASE
opts:
category: Default Codesign Files
description: |
Certificate passphrase of the default certificate.
title: Default Certificate passphrase
- default_provisioning_profile_url: $BITRISE_DEFAULT_PROVISION_URL
opts:
category: Default Codesign Files
description: |
URL of the default provisioning profile to download.
You can specify a local path as well, using the `file://` scheme.
Example: `file://./BuildAnything.mobileprovision`
title: Default Provisioning profile URL
================================================
FILE: steps/certificate-and-profile-installer/step-info.yml
================================================
maintainer: bitrise
================================================
FILE: steps/change-android-applicationid/1.0.0/step.yml
================================================
title: Change Android applicationId
summary: Updates the Android applicationId in your project's `build.gradle` file.
description: |-
Modifies the applicationId of your Android app by updating applicationId in your project's `build.gradle` file before you'd publish your app to Google Play Store.
### Configuring the Step
1. Insert the **Change Android applicationId** Step before a build Step such as **Android Build** or **Gradle Runner** in your Workflow.
2. Click the Step to modify its input fields.
3. Add the file path to the **Path to the build.gradle file** so that the Step knows where to find the file that contains the applicationId attributes.
4. Provide a new applicationId in the **New applicationId** input. If you leave this input empty, the previous applicationId will be displayed on Google Play Store. The input's value must be a string in this format.
### Troubleshooting
The **Change Android applicationId** Step must be inserted BEFORE the **Android Build** Step as the former makes sure you upload the build with the right applicationId to Google Play Store.
### Related Steps
- [Android Sign](https://www.bitrise.io/integrations/steps/sign-apk)
- [Android Build](https://www.bitrise.io/integrations/steps/android-build)
- [Gradle Runner](https://www.bitrise.io/integrations/steps/gradle-runner)
website: https://github.com/gambit66/bitrise-steps-change-android-applicationId
source_code_url: https://github.com/gambit66/bitrise-steps-change-android-applicationId
support_url: https://github.com/gambit66/bitrise-steps-change-android-applicationId
published_at: 2022-01-27T16:09:21.626071+02:00
source:
git: https://github.com/gambit66/bitrise-steps-change-android-applicationId.git
commit: 108a5c7494319d12a11f50b34105600ac7fc73d0
project_type_tags:
- android
- react-native
- cordova
- ionic
- flutter
type_tags:
- utility
toolkit:
go:
package_name: github.com/gambit66/bitrise-steps-change-android-applicationId
is_always_run: false
is_skippable: false
run_if: ""
inputs:
- build_gradle_path: $BITRISE_SOURCE_DIR/app/build.gradle
opts:
is_required: true
summary: Path to the build.gradle file shows the applicationId setting.
title: Path to the build.gradle file
- new_application_id: null
opts:
description: "New applicationId to set. \nSpecify a string value, such as `com.mycompany.myapp`."
is_required: true
summary: New applicationId to set.
title: New applicationId
outputs:
- ANDROID_APPLICATION_ID: null
opts:
title: Final Android applicationId in build.gradle file
================================================
FILE: steps/change-android-applicationid/step-info.yml
================================================
maintainer: community
================================================
FILE: steps/change-android-versioncode-and-versionname/0.9.0/step.yml
================================================
title: Change Android versionCode and versionName
summary: Change Android versionCode and versionName in build.gradle file.
description: Set or bump your Android project's versionCode and versionName in build.gradle
file.
website: https://github.com/bitrise-community/steps-change-android-versioncode-and-versionname
source_code_url: https://github.com/bitrise-community/steps-change-android-versioncode-and-versionname
support_url: https://github.com/bitrise-community/steps-change-android-versioncode-and-versionname
published_at: 2017-06-08T15:44:52.93020351+02:00
source:
git: https://github.com/bitrise-community/steps-change-android-versioncode-and-versionname.git
commit: de6981df8233a356a3694a540598a2cc40a3090f
host_os_tags:
- osx-10.10
- ubuntu-16.04
project_type_tags:
- android
- react-native
- cordova
- ionic
type_tags:
- utility
toolkit:
go:
package_name: github.com/bitrise-community/steps-change-android-versioncode-and-versionname
is_requires_admin_user: true
is_always_run: false
is_skippable: false
run_if: ""
inputs:
- build_gradle_path: Path to the build.gradle file shows the versionCode and versionName
settings
opts:
is_required: true
summary: Path to the build.gradle file shows the versionCode and versionName settings.
title: Path to the build.gradle file
- new_version_code: null
opts:
description: |-
New versionCode to set.
Leave this input empty to do not modify versionCode.
summary: New versionCode to set.
title: New versionCode
- new_version_name: null
opts:
description: |-
New versionName to set.
Leave this input empty to do not modify versionName.
summary: New versionName to set.
title: New versionName
================================================
FILE: steps/change-android-versioncode-and-versionname/1.0.0/step.yml
================================================
title: Change Android versionCode and versionName
summary: Change Android versionCode and versionName in build.gradle file.
description: Change your Android project's versionCode and versionName in build.gradle
file.
website: https://github.com/bitrise-community/steps-change-android-versioncode-and-versionname
source_code_url: https://github.com/bitrise-community/steps-change-android-versioncode-and-versionname
support_url: https://github.com/bitrise-community/steps-change-android-versioncode-and-versionname
published_at: 2018-01-24T14:39:59.791566+01:00
source:
git: https://github.com/bitrise-community/steps-change-android-versioncode-and-versionname.git
commit: ab1e3600b7962b1dfbece8607acc1d8ffcfa93ff
host_os_tags:
- osx-10.10
- ubuntu-16.04
project_type_tags:
- android
- react-native
- cordova
- ionic
type_tags:
- utility
toolkit:
go:
package_name: github.com/bitrise-community/steps-change-android-versioncode-and-versionname
is_requires_admin_user: true
is_always_run: false
is_skippable: false
run_if: ""
inputs:
- build_gradle_path: null
opts:
is_required: true
summary: Path to the build.gradle file shows the versionCode and versionName settings.
title: Path to the build.gradle file
- new_version_name: null
opts:
description: |-
New versionName to set.
Leave this input empty to do not modify versionName.
summary: New versionName to set.
title: New versionName
- new_version_code: null
opts:
description: |-
New versionCode to set.
Leave this input empty to do not modify versionCode.
summary: New versionCode to set.
title: New versionCode
- opts:
description: |-
Offset value for versionCode.
Leave this input empty to do not modify versionCode.
summary: Offset value for versionCode.
title: versionCode Offset
version_code_offset: null
outputs:
- ANDROID_VERSION_NAME: null
opts:
title: Final Android versionName in build.gradle file
- ANDROID_VERSION_CODE: null
opts:
title: Final Android versionCode in build.gradle file
================================================
FILE: steps/change-android-versioncode-and-versionname/1.0.1/step.yml
================================================
title: Change Android versionCode and versionName
summary: Change Android versionCode and versionName in build.gradle file.
description: Change your Android project's versionCode and versionName in build.gradle
file.
website: https://github.com/bitrise-community/steps-change-android-versioncode-and-versionname
source_code_url: https://github.com/bitrise-community/steps-change-android-versioncode-and-versionname
support_url: https://github.com/bitrise-community/steps-change-android-versioncode-and-versionname
published_at: !!timestamp 2018-03-29T15:22:52.276541532+02:00
source:
git: https://github.com/bitrise-community/steps-change-android-versioncode-and-versionname.git
commit: bce347f8236432c5a1546ba24d52a33190e0dc60
host_os_tags:
- osx-10.10
- ubuntu-16.04
project_type_tags:
- android
- react-native
- cordova
- ionic
type_tags:
- utility
toolkit:
go:
package_name: github.com/bitrise-community/steps-change-android-versioncode-and-versionname
is_requires_admin_user: true
is_always_run: false
is_skippable: false
run_if: ""
inputs:
- build_gradle_path: $BITRISE_SOURCE_DIR/app/build.gradle
opts:
is_required: true
summary: Path to the build.gradle file shows the versionCode and versionName settings.
title: Path to the build.gradle file
- new_version_name: null
opts:
description: |-
New versionName to set.
For example: 1.0.0
Leave this input empty to do not modify versionName.
summary: |-
New versionName to set.
For example: 1.0.0
Leave this input empty to do not modify versionName.
title: New versionName
- new_version_code: $BITRISE_BUILD_NUMBER
opts:
description: "New versionCode to set.\n\nFor example: 1\n\nLeave this input empty
to do not modify versionCode. "
summary: "New versionCode to set.\n\nFor example: 1\n\nLeave this input empty
to do not modify versionCode. "
title: New versionCode
- opts:
description: |-
Offset value for versionCode.
For example: 1
Leave empty if you want the exact value you set in
`New versionCode` input otherwise it will be added to it.
summary: |-
Offset value for versionCode.
For example: 1
Leave empty if you want the exact value you set in
`New versionCode` input otherwise it will be added to it.
title: versionCode Offset
version_code_offset: null
outputs:
- ANDROID_VERSION_NAME: null
opts:
title: Final Android versionName in build.gradle file
- ANDROID_VERSION_CODE: null
opts:
title: Final Android versionCode in build.gradle file
================================================
FILE: steps/change-android-versioncode-and-versionname/1.1.0/step.yml
================================================
title: Change Android versionCode and versionName
summary: Change Android versionCode and versionName in build.gradle file.
description: Change your Android project's versionCode and versionName in build.gradle
file.
website: https://github.com/bitrise-community/steps-change-android-versioncode-and-versionname
source_code_url: https://github.com/bitrise-community/steps-change-android-versioncode-and-versionname
support_url: https://github.com/bitrise-community/steps-change-android-versioncode-and-versionname
published_at: !!timestamp 2018-04-26T13:08:38.136734716+02:00
source:
git: https://github.com/bitrise-community/steps-change-android-versioncode-and-versionname.git
commit: a84f5a93c71e940e9f87e06ec77d140db4411855
host_os_tags:
- osx-10.10
- ubuntu-16.04
project_type_tags:
- android
- react-native
- cordova
- ionic
type_tags:
- utility
toolkit:
go:
package_name: github.com/bitrise-community/steps-change-android-versioncode-and-versionname
is_requires_admin_user: true
is_always_run: false
is_skippable: false
run_if: ""
inputs:
- build_gradle_path: $BITRISE_SOURCE_DIR/app/build.gradle
opts:
is_required: true
summary: Path to the build.gradle file shows the versionCode and versionName settings.
title: Path to the build.gradle file
- new_version_name: null
opts:
description: |-
New versionName to set.
For example: 1.0.0
Leave this input empty to do not modify versionName.
summary: |-
New versionName to set.
For example: 1.0.0
Leave this input empty to do not modify versionName.
title: New versionName
- new_version_code: $BITRISE_BUILD_NUMBER
opts:
description: "New versionCode to set.\n\nFor example: 1\n\nLeave this input empty
to do not modify versionCode. "
summary: "New versionCode to set.\n\nFor example: 1\n\nLeave this input empty
to do not modify versionCode. "
title: New versionCode
- opts:
description: |-
Offset value for versionCode.
For example: 1
Leave empty if you want the exact value you set in
`New versionCode` input otherwise it will be added to it.
summary: |-
Offset value for versionCode.
For example: 1
Leave empty if you want the exact value you set in
`New versionCode` input otherwise it will be added to it.
title: versionCode Offset
version_code_offset: null
outputs:
- ANDROID_VERSION_NAME: null
opts:
title: Final Android versionName in build.gradle file
- ANDROID_VERSION_CODE: null
opts:
title: Final Android versionCode in build.gradle file
================================================
FILE: steps/change-android-versioncode-and-versionname/1.1.1/step.yml
================================================
title: Change Android versionCode and versionName
summary: Change Android versionCode and versionName in build.gradle file.
description: Change your Android project's versionCode and versionName in build.gradle
file.
website: https://github.com/bitrise-community/steps-change-android-versioncode-and-versionname
source_code_url: https://github.com/bitrise-community/steps-change-android-versioncode-and-versionname
support_url: https://github.com/bitrise-community/steps-change-android-versioncode-and-versionname
published_at: 2018-05-30T14:30:28.617480918+02:00
source:
git: https://github.com/bitrise-community/steps-change-android-versioncode-and-versionname.git
commit: a54ad9f155890423d6bff0e74b567a47b7838090
host_os_tags:
- osx-10.10
- ubuntu-16.04
project_type_tags:
- android
- react-native
- cordova
- ionic
type_tags:
- utility
toolkit:
go:
package_name: github.com/bitrise-community/steps-change-android-versioncode-and-versionname
is_requires_admin_user: true
is_always_run: false
is_skippable: false
run_if: ""
inputs:
- build_gradle_path: $BITRISE_SOURCE_DIR/app/build.gradle
opts:
is_required: true
summary: Path to the build.gradle file shows the versionCode and versionName settings.
title: Path to the build.gradle file
- new_version_name: null
opts:
description: |-
New versionName to set.
For example: 1.0.0
Leave this input empty to do not modify versionName.
summary: |-
New versionName to set.
For example: 1.0.0
Leave this input empty to do not modify versionName.
title: New versionName
- new_version_code: $BITRISE_BUILD_NUMBER
opts:
description: "New versionCode to set.\n\nFor example: 1\n\nLeave this input empty
to do not modify versionCode. "
summary: "New versionCode to set.\n\nFor example: 1\n\nLeave this input empty
to do not modify versionCode. "
title: New versionCode
- opts:
description: |-
Offset value for versionCode.
For example: 1
Leave empty if you want the exact value you set in
`New versionCode` input otherwise it will be added to it.
summary: |-
Offset value for versionCode.
For example: 1
Leave empty if you want the exact value you set in
`New versionCode` input otherwise it will be added to it.
title: versionCode Offset
version_code_offset: null
outputs:
- ANDROID_VERSION_NAME: null
opts:
title: Final Android versionName in build.gradle file
- ANDROID_VERSION_CODE: null
opts:
title: Final Android versionCode in build.gradle file
================================================
FILE: steps/change-android-versioncode-and-versionname/1.2.0/step.yml
================================================
title: Change Android versionCode and versionName
summary: Change Android versionCode and versionName in build.gradle file.
description: Change your Android project's versionCode and versionName in build.gradle
file.
website: https://github.com/bitrise-steplib/steps-change-android-versioncode-and-versionname
source_code_url: https://github.com/bitrise-steplib/steps-change-android-versioncode-and-versionname
support_url: https://github.com/bitrise-steplib/steps-change-android-versioncode-and-versionname
published_at: 2019-11-08T13:54:54.514943446Z
source:
git: https://github.com/bitrise-steplib/steps-change-android-versioncode-and-versionname.git
commit: 638551a410bd4355239d3f669cad7c80a1ee29ca
host_os_tags:
- osx-10.10
- ubuntu-16.04
project_type_tags:
- android
- react-native
- cordova
- ionic
- flutter
type_tags:
- utility
toolkit:
go:
package_name: github.com/bitrise-steplib/steps-change-android-versioncode-and-versionname
is_requires_admin_user: true
is_always_run: false
is_skippable: false
run_if: ""
inputs:
- build_gradle_path: $BITRISE_SOURCE_DIR/app/build.gradle
opts:
is_required: true
summary: Path to the build.gradle file shows the versionCode and versionName settings.
title: Path to the build.gradle file
- new_version_name: null
opts:
description: |-
New versionName to set.
For example: 1.0.0
Leave this input empty so that versionName remains unchanged.
summary: |-
New versionName to set.
For example: 1.0.0
Leave this input empty so that versionName remains unchanged.
title: New versionName
- new_version_code: $BITRISE_BUILD_NUMBER
opts:
description: "New versionCode to set.\n\nFor example: 1\n\nLeave this input empty
so that versionCode remains unchanged. "
summary: "New versionCode to set.\n\nFor example: 1\n\nLeave this input empty
to do not modify versionCode. "
title: New versionCode
- opts:
description: |-
Offset value for versionCode.
For example: 1
Leave this input empty if you want the exact value you set in
`New versionCode` input otherwise it will be added to it.
summary: |-
Offset value for versionCode.
For example: 1
Leave this input empty if you want the exact value you set in
`New versionCode` input otherwise it will be added to it.
title: versionCode Offset
version_code_offset: null
outputs:
- ANDROID_VERSION_NAME: null
opts:
title: Final Android versionName in build.gradle file
- ANDROID_VERSION_CODE: null
opts:
title: Final Android versionCode in build.gradle file
================================================
FILE: steps/change-android-versioncode-and-versionname/1.2.1/step.yml
================================================
title: Change Android versionCode and versionName
summary: Change Android versionCode and versionName in build.gradle file.
description: Change your Android project's versionCode and versionName in build.gradle
file.
website: https://github.com/bitrise-steplib/steps-change-android-versioncode-and-versionname
source_code_url: https://github.com/bitrise-steplib/steps-change-android-versioncode-and-versionname
support_url: https://github.com/bitrise-steplib/steps-change-android-versioncode-and-versionname
published_at: 2019-11-11T10:41:38.513157243Z
source:
git: https://github.com/bitrise-steplib/steps-change-android-versioncode-and-versionname.git
commit: 13dbe83cefc3b674d09a3cab96f434ba3d3343a3
host_os_tags:
- osx-10.10
- ubuntu-16.04
project_type_tags:
- android
- react-native
- cordova
- ionic
- flutter
type_tags:
- utility
toolkit:
go:
package_name: github.com/bitrise-steplib/steps-change-android-versioncode-and-versionname
is_requires_admin_user: true
is_always_run: false
is_skippable: false
run_if: ""
inputs:
- build_gradle_path: $BITRISE_SOURCE_DIR/app/build.gradle
opts:
is_required: true
summary: Path to the build.gradle file shows the versionCode and versionName settings.
title: Path to the build.gradle file
- new_version_name: null
opts:
description: |-
New versionName to set.
For example: 1.0.0
Leave this input empty so that versionName remains unchanged.
summary: |-
New versionName to set.
For example: 1.0.0
Leave this input empty so that versionName remains unchanged.
title: New versionName
- new_version_code: $BITRISE_BUILD_NUMBER
opts:
description: "New versionCode to set.\n\nFor example: 1\n\nLeave this input empty
so that versionCode remains unchanged. "
summary: "New versionCode to set.\n\nFor example: 1\n\nLeave this input empty
to do not modify versionCode. "
title: New versionCode
- opts:
description: |-
Offset value for versionCode.
For example: 1
Leave this input empty if you want the exact value you set in
`New versionCode` input otherwise it will be added to it.
summary: |-
Offset value for versionCode.
For example: 1
Leave this input empty if you want the exact value you set in
`New versionCode` input otherwise it will be added to it.
title: versionCode Offset
version_code_offset: null
outputs:
- ANDROID_VERSION_NAME: null
opts:
title: Final Android versionName in build.gradle file
- ANDROID_VERSION_CODE: null
opts:
title: Final Android versionCode in build.gradle file
================================================
FILE: steps/change-android-versioncode-and-versionname/1.2.2/step.yml
================================================
title: Change Android versionCode and versionName
summary: Updates the Android versionCode and versionName in your project's `build.gradle`
file.
description: |-
Modifies the version information of your Android app by updating versionCode and versionName attributes in your project's `build.gradle` file before you'd publish your app to Google Play Store.
### Configuring the Step
1. Insert the **Change Android versionCode and versionName** Step before a build Step such as **Android Build** or **Gradle Runner** in your Workflow.
2. Click the Step to modify its input fields.
3. Add the file path to the **Path to the build.gradle file** so that the Step knows where to find the file that contains the versionCode and versionName attributes.
4. Provide a new versionName in the **New versionName** input. If you leave this input empty, the previous versionName will be displayed on Google Play Store. The input's value must be a string in this format `..`.
5. Provide a versionCode in the **New versionCode** input to track app versions. If you leave this input empty, you will release your app with the version that is already set in the `build.gradle` file's `versionCode` attribute. The input's value must be an integer.
If you wish to offset the value you set in the **New versionCode** input, then you can use the **versionCode Offset** input to add the offset integer value here. This number will be added to the versionCode's value.
### Troubleshooting
The **Change Android versionCode and versionName** Step must be inserted BEFORE the **Android Build** Step as the former makes sure you upload the build with the right versionCode and versionName to Google Play Store.
### Useful links
[About Android versionCode and versionNumber](https://developer.android.com/studio/publish/versioning)
[Build versioning](https://devcenter.bitrise.io/builds/build-numbering-and-app-versioning/)
### Related Steps
[Android Sign](https://www.bitrise.io/integrations/steps/sign-apk)
[Android Build](https://www.bitrise.io/integrations/steps/android-build)
[Gradle Runner](https://www.bitrise.io/integrations/steps/gradle-runner)
website: https://github.com/bitrise-community/steps-change-android-versioncode-and-versionname
source_code_url: https://github.com/bitrise-community/steps-change-android-versioncode-and-versionname
support_url: https://github.com/bitrise-community/steps-change-android-versioncode-and-versionname
published_at: 2020-01-09T09:40:05.826373216Z
source:
git: https://github.com/bitrise-steplib/steps-change-android-versioncode-and-versionname.git
commit: ad7b04b90c323444a9bd119115ac752a4cb485cd
host_os_tags:
- osx-10.10
- ubuntu-16.04
project_type_tags:
- android
- react-native
- cordova
- ionic
- flutter
type_tags:
- utility
toolkit:
go:
package_name: github.com/bitrise-steplib/steps-change-android-versioncode-and-versionname
is_requires_admin_user: true
is_always_run: false
is_skippable: false
run_if: ""
inputs:
- build_gradle_path: $BITRISE_SOURCE_DIR/app/build.gradle
opts:
is_required: true
summary: Path to the build.gradle file shows the versionCode and versionName settings.
title: Path to the build.gradle file
- new_version_name: null
opts:
description: |-
New versionName to set.
For example: 1.0.0
Leave this input empty so that versionName remains unchanged.
summary: |-
New versionName to set.
For example: 1.0.0
Leave this input empty so that versionName remains unchanged.
title: New versionName
- new_version_code: $BITRISE_BUILD_NUMBER
opts:
description: "New versionCode to set.\n\nFor example: 1\n\nLeave this input empty
so that versionCode remains unchanged. "
summary: "New versionCode to set.\n\nFor example: 1\n\nLeave this input empty
to do not modify versionCode. "
title: New versionCode
- opts:
description: |-
Offset value for versionCode.
For example: 1
Leave this input empty if you want the exact value you set in
`New versionCode` input otherwise it will be added to it.
summary: |-
Offset value for versionCode.
For example: 1
Leave this input empty if you want the exact value you set in
`New versionCode` input otherwise it will be added to it.
title: versionCode Offset
version_code_offset: null
outputs:
- ANDROID_VERSION_NAME: null
opts:
title: Final Android versionName in build.gradle file
- ANDROID_VERSION_CODE: null
opts:
title: Final Android versionCode in build.gradle file
================================================
FILE: steps/change-android-versioncode-and-versionname/1.2.3/step.yml
================================================
title: Change Android versionCode and versionName
summary: Updates the Android versionCode and versionName in your project's `build.gradle`
file.
description: |-
Modifies the version information of your Android app by updating versionCode and versionName attributes in your project's `build.gradle` file before you'd publish your app to Google Play Store.
### Configuring the Step
1. Insert the **Change Android versionCode and versionName** Step before a build Step such as **Android Build** or **Gradle Runner** in your Workflow.
2. Click the Step to modify its input fields.
3. Add the file path to the **Path to the build.gradle file** so that the Step knows where to find the file that contains the versionCode and versionName attributes.
4. Provide a new versionName in the **New versionName** input. If you leave this input empty, the previous versionName will be displayed on Google Play Store. The input's value must be a string in this format `..`.
5. Provide a versionCode in the **New versionCode** input to track app versions. If you leave this input empty, you will release your app with the version that is already set in the `build.gradle` file's `versionCode` attribute. The input's value must be an integer.
If you wish to offset the value you set in the **New versionCode** input, then you can use the **versionCode Offset** input to add the offset integer value here. This number will be added to the versionCode's value.
### Troubleshooting
The **Change Android versionCode and versionName** Step must be inserted BEFORE the **Android Build** Step as the former makes sure you upload the build with the right versionCode and versionName to Google Play Store.
### Useful links
- [About Android versionCode and versionNumber](https://developer.android.com/studio/publish/versioning)
- [Build versioning](https://devcenter.bitrise.io/builds/build-numbering-and-app-versioning/)
### Related Steps
- [Android Sign](https://www.bitrise.io/integrations/steps/sign-apk)
- [Android Build](https://www.bitrise.io/integrations/steps/android-build)
- [Gradle Runner](https://www.bitrise.io/integrations/steps/gradle-runner)
website: https://github.com/bitrise-community/steps-change-android-versioncode-and-versionname
source_code_url: https://github.com/bitrise-community/steps-change-android-versioncode-and-versionname
support_url: https://github.com/bitrise-community/steps-change-android-versioncode-and-versionname
published_at: 2020-02-13T16:14:22.671904901Z
source:
git: https://github.com/bitrise-steplib/steps-change-android-versioncode-and-versionname.git
commit: 00d989bfc8a69a834b70222e4499d81cf9582556
host_os_tags:
- osx-10.10
- ubuntu-16.04
project_type_tags:
- android
- react-native
- cordova
- ionic
- flutter
type_tags:
- utility
toolkit:
go:
package_name: github.com/bitrise-steplib/steps-change-android-versioncode-and-versionname
is_requires_admin_user: true
is_always_run: false
is_skippable: false
run_if: ""
inputs:
- build_gradle_path: $BITRISE_SOURCE_DIR/app/build.gradle
opts:
is_required: true
summary: Path to the build.gradle file shows the versionCode and versionName settings.
title: Path to the build.gradle file
- new_version_name: null
opts:
description: |-
New versionName to set.
For example: 1.0.0
Leave this input empty so that versionName remains unchanged.
summary: |-
New versionName to set.
For example: 1.0.0
Leave this input empty so that versionName remains unchanged.
title: New versionName
- new_version_code: $BITRISE_BUILD_NUMBER
opts:
description: "New versionCode to set.\n\nFor example: 1\n\nLeave this input empty
so that versionCode remains unchanged. "
summary: "New versionCode to set.\n\nFor example: 1\n\nLeave this input empty
to do not modify versionCode. "
title: New versionCode
- opts:
description: |-
Offset value for versionCode.
For example: 1
Leave this input empty if you want the exact value you set in
`New versionCode` input otherwise it will be added to it.
summary: |-
Offset value for versionCode.
For example: 1
Leave this input empty if you want the exact value you set in
`New versionCode` input otherwise it will be added to it.
title: versionCode Offset
version_code_offset: null
outputs:
- ANDROID_VERSION_NAME: null
opts:
title: Final Android versionName in build.gradle file
- ANDROID_VERSION_CODE: null
opts:
title: Final Android versionCode in build.gradle file
================================================
FILE: steps/change-android-versioncode-and-versionname/1.2.4/step.yml
================================================
title: Change Android versionCode and versionName
summary: Updates the Android versionCode and versionName in your project's `build.gradle`
file.
description: |-
Modifies the version information of your Android app by updating versionCode and versionName attributes in your project's `build.gradle` file before you'd publish your app to Google Play Store.
### Configuring the Step
1. Insert the **Change Android versionCode and versionName** Step before a build Step such as **Android Build** or **Gradle Runner** in your Workflow.
2. Click the Step to modify its input fields.
3. Add the file path to the **Path to the build.gradle file** so that the Step knows where to find the file that contains the versionCode and versionName attributes.
4. Provide a new versionName in the **New versionName** input. If you leave this input empty, the previous versionName will be displayed on Google Play Store. The input's value must be a string in this format `..`.
5. Provide a versionCode in the **New versionCode** input to track app versions. If you leave this input empty, you will release your app with the version that is already set in the `build.gradle` file's `versionCode` attribute. The input's value must be an integer.
If you wish to offset the value you set in the **New versionCode** input, then you can use the **versionCode Offset** input to add the offset integer value here. This number will be added to the versionCode's value.
### Troubleshooting
The **Change Android versionCode and versionName** Step must be inserted BEFORE the **Android Build** Step as the former makes sure you upload the build with the right versionCode and versionName to Google Play Store.
### Useful links
- [About Android versionCode and versionNumber](https://developer.android.com/studio/publish/versioning)
- [Build versioning](https://devcenter.bitrise.io/builds/build-numbering-and-app-versioning/)
### Related Steps
- [Android Sign](https://www.bitrise.io/integrations/steps/sign-apk)
- [Android Build](https://www.bitrise.io/integrations/steps/android-build)
- [Gradle Runner](https://www.bitrise.io/integrations/steps/gradle-runner)
website: https://github.com/bitrise-community/steps-change-android-versioncode-and-versionname
source_code_url: https://github.com/bitrise-community/steps-change-android-versioncode-and-versionname
support_url: https://github.com/bitrise-community/steps-change-android-versioncode-and-versionname
published_at: 2021-04-09T13:11:32.158824109Z
source:
git: https://github.com/bitrise-steplib/steps-change-android-versioncode-and-versionname.git
commit: 40c2b0c1d5b2e3946d672f0785b38339ed0a4cc2
host_os_tags:
- osx-10.10
- ubuntu-16.04
project_type_tags:
- android
- react-native
- cordova
- ionic
- flutter
type_tags:
- utility
toolkit:
go:
package_name: github.com/bitrise-steplib/steps-change-android-versioncode-and-versionname
is_requires_admin_user: true
is_always_run: false
is_skippable: false
run_if: ""
inputs:
- build_gradle_path: $BITRISE_SOURCE_DIR/app/build.gradle
opts:
is_required: true
summary: Path to the build.gradle file shows the versionCode and versionName settings.
title: Path to the build.gradle file
- new_version_name: null
opts:
description: "New versionName to set. \nSpecify a string value, such as `\"1.0.0\"`.
\ \nIf the specified value is not surranded by double quote (`\"`) characters,
the step will add them. \nLeave this input empty so that versionName remains
unchanged."
summary: New versionName to set.
title: New versionName
- new_version_code: $BITRISE_BUILD_NUMBER
opts:
description: "New versionCode to set. \nSpecify a positive integer value, such
as `1`. \nThe greatest value Google Play allows for versionCode is 2100000000.
\ \nLeave this input empty so that versionCode remains unchanged."
summary: New versionCode to set.
title: New versionCode
- opts:
description: "Offset value to add to `New versionCode`, for example: `1`. \nLeave
this input empty if you want the exact value you set in `New versionCode` input."
summary: Offset value to add to `New versionCode`.
title: versionCode Offset
version_code_offset: null
outputs:
- ANDROID_VERSION_NAME: null
opts:
title: Final Android versionName in build.gradle file
- ANDROID_VERSION_CODE: null
opts:
title: Final Android versionCode in build.gradle file
================================================
FILE: steps/change-android-versioncode-and-versionname/1.3.0/step.yml
================================================
title: Change Android versionCode and versionName
summary: Updates the Android versionCode and versionName in your project's `build.gradle`
file.
description: |-
Modifies the version information of your Android app by updating versionCode and versionName attributes in your project's `build.gradle` file before you'd publish your app to Google Play Store.
### Configuring the Step
1. Insert the **Change Android versionCode and versionName** Step before a build Step such as **Android Build** or **Gradle Runner** in your Workflow.
2. Click the Step to modify its input fields.
3. Add the file path to the **Path to the build.gradle file** so that the Step knows where to find the file that contains the versionCode and versionName attributes.
4. Provide a new versionName in the **New versionName** input. If you leave this input empty, the previous versionName will be displayed on Google Play Store. The input's value must be a string in this format `..`.
5. Provide a versionCode in the **New versionCode** input to track app versions. If you leave this input empty, you will release your app with the version that is already set in the `build.gradle` file's `versionCode` attribute. The input's value must be an integer.
If you wish to offset the value you set in the **New versionCode** input, then you can use the **versionCode Offset** input to add the offset integer value here. This number will be added to the versionCode's value.
### Troubleshooting
The **Change Android versionCode and versionName** Step must be inserted BEFORE the **Android Build** Step as the former makes sure you upload the build with the right versionCode and versionName to Google Play Store.
### Useful links
- [About Android versionCode and versionNumber](https://developer.android.com/studio/publish/versioning)
- [Build versioning](https://devcenter.bitrise.io/builds/build-numbering-and-app-versioning/)
### Related Steps
- [Android Sign](https://www.bitrise.io/integrations/steps/sign-apk)
- [Android Build](https://www.bitrise.io/integrations/steps/android-build)
- [Gradle Runner](https://www.bitrise.io/integrations/steps/gradle-runner)
website: https://github.com/bitrise-community/steps-change-android-versioncode-and-versionname
source_code_url: https://github.com/bitrise-community/steps-change-android-versioncode-and-versionname
support_url: https://github.com/bitrise-community/steps-change-android-versioncode-and-versionname
published_at: 2021-08-31T09:20:13.535442016Z
source:
git: https://github.com/bitrise-steplib/steps-change-android-versioncode-and-versionname.git
commit: b76a3241af83dc8cc474d4988eb0c33c8e3cc6e6
host_os_tags:
- osx-10.10
- ubuntu-16.04
project_type_tags:
- android
- react-native
- cordova
- ionic
- flutter
type_tags:
- utility
toolkit:
go:
package_name: github.com/bitrise-steplib/steps-change-android-versioncode-and-versionname
is_requires_admin_user: true
is_always_run: false
is_skippable: false
run_if: ""
inputs:
- build_gradle_path: $BITRISE_SOURCE_DIR/app/build.gradle
opts:
is_required: true
summary: Path to the build.gradle file shows the versionCode and versionName settings.
title: Path to the build.gradle file
- new_version_name: null
opts:
description: "New versionName to set. \nSpecify a string value, such as `\"1.0.0\"`.
\ \nIf the specified value is not surranded by double quote (`\"`) characters,
the step will add them. \nLeave this input empty so that versionName remains
unchanged."
summary: New versionName to set.
title: New versionName
- new_version_code: $BITRISE_BUILD_NUMBER
opts:
description: "New versionCode to set. \nSpecify a positive integer value, such
as `1`. \nThe greatest value Google Play allows for versionCode is 2100000000.
\ \nClear this input's default value to leave the versionCode unchanged."
summary: New versionCode to set.
title: New versionCode
- opts:
description: "Offset value to add to `New versionCode`, for example: `1`. \nLeave
this input empty if you want the exact value you set in `New versionCode` input."
summary: Offset value to add to `New versionCode`.
title: versionCode Offset
version_code_offset: null
outputs:
- ANDROID_VERSION_NAME: null
opts:
title: Final Android versionName in build.gradle file
- ANDROID_VERSION_CODE: null
opts:
title: Final Android versionCode in build.gradle file
================================================
FILE: steps/change-android-versioncode-and-versionname/1.3.1/step.yml
================================================
title: Change Android versionCode and versionName
summary: Updates the Android versionCode and versionName in your project's `build.gradle`
file.
description: |-
Modifies the version information of your Android app by updating versionCode and versionName attributes in your project's `build.gradle` file before you'd publish your app to Google Play Store.
### Configuring the Step
1. Insert the **Change Android versionCode and versionName** Step before a build Step such as **Android Build** or **Gradle Runner** in your Workflow.
2. Click the Step to modify its input fields.
3. Add the file path to the **Path to the build.gradle file** so that the Step knows where to find the file that contains the versionCode and versionName attributes.
4. Provide a new versionName in the **New versionName** input. If you leave this input empty, the previous versionName will be displayed on Google Play Store. The input's value must be a string in this format `..`.
5. Provide a versionCode in the **New versionCode** input to track app versions. If you leave this input empty, you will release your app with the version that is already set in the `build.gradle` file's `versionCode` attribute. The input's value must be an integer.
If you wish to offset the value you set in the **New versionCode** input, then you can use the **versionCode Offset** input to add the offset integer value here. This number will be added to the versionCode's value.
### Troubleshooting
The **Change Android versionCode and versionName** Step must be inserted BEFORE the **Android Build** Step as the former makes sure you upload the build with the right versionCode and versionName to Google Play Store.
### Useful links
- [About Android versionCode and versionNumber](https://developer.android.com/studio/publish/versioning)
- [Build versioning](https://devcenter.bitrise.io/builds/build-numbering-and-app-versioning/)
### Related Steps
- [Android Sign](https://www.bitrise.io/integrations/steps/sign-apk)
- [Android Build](https://www.bitrise.io/integrations/steps/android-build)
- [Gradle Runner](https://www.bitrise.io/integrations/steps/gradle-runner)
website: https://github.com/bitrise-community/steps-change-android-versioncode-and-versionname
source_code_url: https://github.com/bitrise-community/steps-change-android-versioncode-and-versionname
support_url: https://github.com/bitrise-community/steps-change-android-versioncode-and-versionname
published_at: 2024-04-16T10:25:23.340008099Z
source:
git: https://github.com/bitrise-steplib/steps-change-android-versioncode-and-versionname.git
commit: aafc3a83555497f47c9fd69bb34afef06886f6f1
host_os_tags:
- osx-10.10
- ubuntu-16.04
project_type_tags:
- android
- react-native
- cordova
- ionic
- flutter
type_tags:
- utility
toolkit:
go:
package_name: github.com/bitrise-steplib/steps-change-android-versioncode-and-versionname
is_requires_admin_user: true
is_always_run: false
is_skippable: false
run_if: ""
inputs:
- build_gradle_path: $BITRISE_SOURCE_DIR/app/build.gradle
opts:
is_required: true
summary: Path to the build.gradle file shows the versionCode and versionName settings.
title: Path to the build.gradle file
- new_version_name: null
opts:
description: "New versionName to set. \nSpecify a string value, such as `\"1.0.0\"`.
\ \nIf the specified value is not surranded by double quote (`\"`) characters,
the step will add them. \nLeave this input empty so that versionName remains
unchanged."
summary: New versionName to set.
title: New versionName
- new_version_code: $BITRISE_BUILD_NUMBER
opts:
description: "New versionCode to set. \nSpecify a positive integer value, such
as `1`. \nThe greatest value Google Play allows for versionCode is 2100000000.
\ \nClear this input's default value to leave the versionCode unchanged."
summary: New versionCode to set.
title: New versionCode
- opts:
description: "Offset value to add to `New versionCode`, for example: `1`. \nLeave
this input empty if you want the exact value you set in `New versionCode` input."
summary: Offset value to add to `New versionCode`.
title: versionCode Offset
version_code_offset: null
outputs:
- ANDROID_VERSION_NAME: null
opts:
title: Final Android versionName in build.gradle file
- ANDROID_VERSION_CODE: null
opts:
title: Final Android versionCode in build.gradle file
================================================
FILE: steps/change-android-versioncode-and-versionname/1.3.2/step.yml
================================================
title: Change Android versionCode and versionName
summary: Updates the Android versionCode and versionName in your project's `build.gradle`
file.
description: |-
Modifies the version information of your Android app by updating versionCode and versionName attributes in your project's `build.gradle` file before you'd publish your app to Google Play Store.
### Configuring the Step
1. Insert the **Change Android versionCode and versionName** Step before a build Step such as **Android Build** or **Gradle Runner** in your Workflow.
2. Click the Step to modify its input fields.
3. Add the file path to the **Path to the build.gradle file** so that the Step knows where to find the file that contains the versionCode and versionName attributes.
4. Provide a new versionName in the **New versionName** input. If you leave this input empty, the previous versionName will be displayed on Google Play Store. The input's value must be a string in this format `..`.
5. Provide a versionCode in the **New versionCode** input to track app versions. If you leave this input empty, you will release your app with the version that is already set in the `build.gradle` file's `versionCode` attribute. The input's value must be an integer.
If you wish to offset the value you set in the **New versionCode** input, then you can use the **versionCode Offset** input to add the offset integer value here. This number will be added to the versionCode's value.
### Troubleshooting
The **Change Android versionCode and versionName** Step must be inserted BEFORE the **Android Build** Step as the former makes sure you upload the build with the right versionCode and versionName to Google Play Store.
### Useful links
- [About Android versionCode and versionNumber](https://developer.android.com/studio/publish/versioning)
- [Build versioning](https://devcenter.bitrise.io/builds/build-numbering-and-app-versioning/)
### Related Steps
- [Android Sign](https://www.bitrise.io/integrations/steps/sign-apk)
- [Android Build](https://www.bitrise.io/integrations/steps/android-build)
- [Gradle Runner](https://www.bitrise.io/integrations/steps/gradle-runner)
website: https://github.com/bitrise-community/steps-change-android-versioncode-and-versionname
source_code_url: https://github.com/bitrise-community/steps-change-android-versioncode-and-versionname
support_url: https://github.com/bitrise-community/steps-change-android-versioncode-and-versionname
published_at: 2025-11-14T12:45:22.30645714Z
source:
git: https://github.com/bitrise-steplib/steps-change-android-versioncode-and-versionname.git
commit: 33b9248fe360b008d2a056d13cafdc96c87acc6f
host_os_tags:
- osx-10.10
- ubuntu-16.04
project_type_tags:
- android
- cordova
- flutter
- ionic
- kotlin-multiplatform
- react-native
type_tags:
- utility
toolkit:
go:
package_name: github.com/bitrise-steplib/steps-change-android-versioncode-and-versionname
is_requires_admin_user: true
is_always_run: false
is_skippable: false
run_if: ""
inputs:
- build_gradle_path: $BITRISE_SOURCE_DIR/app/build.gradle
opts:
is_required: true
summary: Path to the build.gradle file shows the versionCode and versionName settings.
title: Path to the build.gradle file
- new_version_name: null
opts:
description: |-
New versionName to set.
Specify a string value, such as `"1.0.0"`.
If the specified value is not surranded by double quote (`"`) characters, the step will add them.
Leave this input empty so that versionName remains unchanged.
summary: New versionName to set.
title: New versionName
- new_version_code: $BITRISE_BUILD_NUMBER
opts:
description: |-
New versionCode to set.
Specify a positive integer value, such as `1`.
The greatest value Google Play allows for versionCode is 2100000000.
Clear this input's default value to leave the versionCode unchanged.
summary: New versionCode to set.
title: New versionCode
- opts:
description: |-
Offset value to add to `New versionCode`, for example: `1`.
Leave this input empty if you want the exact value you set in `New versionCode` input.
summary: Offset value to add to `New versionCode`.
title: versionCode Offset
version_code_offset: null
outputs:
- ANDROID_VERSION_NAME: null
opts:
description: The final Android versionName set in the build.gradle file after
the Step execution.
title: Final Android versionName in build.gradle file
- ANDROID_VERSION_CODE: null
opts:
description: The final Android versionCode set in the build.gradle file after
the Step execution.
title: Final Android versionCode in build.gradle file
================================================
FILE: steps/change-android-versioncode-and-versionname/step-info.yml
================================================
maintainer: bitrise
================================================
FILE: steps/change-value/1.0.1/step.yml
================================================
title: Change value in file
summary: Change value in file. (e.g. constants)
description: Change value in file. (e.g. constants)
website: https://github.com/bitrise-community/steps-change-value
source_code_url: https://github.com/bitrise-community/steps-change-value
support_url: https://github.com/bitrise-community/steps-change-value/issues
published_at: 2016-06-15T21:38:10.028822047+03:00
source:
git: https://github.com/bitrise-community/steps-change-value.git
commit: ccdfb68e12dc54683f6b4f7deef1fa9fa9702da6
type_tags:
- utility
inputs:
- file: null
opts:
description: |
The file that you want to change a value.
is_required: true
summary: ""
title: File path
- old_value: null
opts:
description: |
current value in file
is_required: true
summary: For replace
title: Old value
- new_value: null
opts:
description: |
new value
is_required: true
summary: To replace
title: New value
- opts:
is_required: false
summary: For debug
title: Show old and new file content
value_options:
- "true"
- "false"
show_file: "false"
- notfound_exit: "true"
opts:
is_required: false
summary: To mark a step as "Failed" if value for replacing isn't found.
title: Mark as "Failed" if value isn't found.
value_options:
- "true"
- "false"
================================================
FILE: steps/change-value/1.1.0/step.yml
================================================
title: Change value in file
summary: Change value in file. (e.g. constants)
description: Change value in file. (e.g. constants)
website: https://github.com/bitrise-community/steps-change-value
source_code_url: https://github.com/bitrise-community/steps-change-value
support_url: https://github.com/bitrise-community/steps-change-value/issues
published_at: 2017-06-01T22:39:23.437467209+02:00
source:
git: https://github.com/bitrise-community/steps-change-value.git
commit: 9ee4c026ecba828de47220536f2c4f86b60ff6f1
type_tags:
- utility
toolkit:
go:
package_name: github.com/bitrise-community/steps-change-value
inputs:
- file: null
opts:
description: |
The file that you want to change a value.
is_required: true
summary: ""
title: File path
- old_value: null
opts:
description: |
current value in file
is_required: true
summary: For replace
title: Old value
- new_value: null
opts:
description: |
new value
is_required: true
summary: To replace
title: New value
- opts:
summary: For debug
title: Show old and new file content
value_options:
- "true"
- "false"
show_file: "false"
- notfound_exit: "true"
opts:
summary: To mark a step as "Failed" if value for replacing isn't found.
title: Mark as "Failed" if value isn't found.
value_options:
- "true"
- "false"
================================================
FILE: steps/change-value/1.1.1/step.yml
================================================
title: Change value in file
summary: Change value in file. (e.g. constants)
description: Change value in file. (e.g. constants)
website: https://github.com/bitrise-steplib/steps-change-value
source_code_url: https://github.com/bitrise-steplib/steps-change-value
support_url: https://github.com/bitrise-steplib/steps-change-value/issues
published_at: 2020-09-21T09:31:06.524544486Z
source:
git: https://github.com/bitrise-steplib/steps-change-value.git
commit: 0e1b11a92d02ab6524b1a21db0bdda58b0ae0379
type_tags:
- utility
toolkit:
go:
package_name: github.com/bitrise-steplib/steps-change-value
inputs:
- file: null
opts:
description: |
The file that you want to change a value.
is_required: true
summary: ""
title: File path
- old_value: null
opts:
description: |
current value in file
is_required: true
summary: For replace
title: Old value
- new_value: null
opts:
description: |
new value
is_required: true
summary: To replace
title: New value
- opts:
summary: For debug
title: Show old and new file content
value_options:
- "true"
- "false"
show_file: "false"
- notfound_exit: "true"
opts:
summary: To mark a step as "Failed" if value for replacing isn't found.
title: Mark as "Failed" if value isn't found.
value_options:
- "true"
- "false"
================================================
FILE: steps/change-value/1.1.3/step.yml
================================================
title: Change value in file
summary: Change value in file. (e.g. constants)
description: Change value in file. (e.g. constants)
website: https://github.com/bitrise-steplib/steps-change-value
source_code_url: https://github.com/bitrise-steplib/steps-change-value
support_url: https://github.com/bitrise-steplib/steps-change-value/issues
published_at: 2020-10-01T11:54:18.09757465Z
source:
git: https://github.com/bitrise-steplib/steps-change-value.git
commit: f4ef12c326b23c6fa4b7b14b77d0c95b41cfad3c
type_tags:
- utility
toolkit:
go:
package_name: github.com/bitrise-steplib/steps-change-value
inputs:
- file: null
opts:
description: |
The file in which you want to change a value.
is_required: true
summary: Target file path
title: File path
- old_value: null
opts:
description: |
current value in file
is_required: true
summary: For replace
title: Old value
- new_value: null
opts:
description: |
new value
is_required: true
summary: To replace
title: New value
- opts:
summary: For debug
title: Show old and new file content
value_options:
- "true"
- "false"
show_file: "false"
- notfound_exit: "true"
opts:
summary: To mark a step as "Failed" if value for replacing isn't found.
title: Mark as "Failed" if value isn't found.
value_options:
- "true"
- "false"
================================================
FILE: steps/change-value/2.0.0/step.yml
================================================
title: Change value in file
summary: Changes a selected value in a targeted file.
description: |-
This Step changes a selected value in a targeted file, for example, constants.
### Configuring the Step
1. Set the **File path** in which you want to change a value.
2. Set the **Current value** which needs to be changed.
3. Set the **New value**.
### Troubleshooting
Please make sure that your targeted file path is correct, existing and relative from the root folder.
Please make sure that you set a correct **Current value** which exists in the the targeted file. You must define this value.
Please make sure that you define the New value.
### Related Steps
- [Change Working Directory for subsequent Steps](https://www.bitrise.io/integrations/steps/change-workdir)
website: https://github.com/bitrise-steplib/steps-change-value
source_code_url: https://github.com/bitrise-steplib/steps-change-value
support_url: https://github.com/bitrise-steplib/steps-change-value/issues
published_at: 2021-09-21T11:28:01.237472945Z
source:
git: https://github.com/bitrise-steplib/steps-change-value.git
commit: fd31ec09f72d2264fce82c7f8d65ed40c651830e
type_tags:
- utility
toolkit:
go:
package_name: github.com/bitrise-steplib/steps-change-value
inputs:
- file: null
opts:
is_required: true
summary: The target file path in which you want to change a value.
title: File path
- old_value: null
opts:
is_required: true
summary: The current value which needs to be changed in the target file.
title: Current value
- new_value: null
opts:
is_required: true
summary: The new value you want to write to the target file.
title: New value
- opts:
title: Print file content before and after the value change
value_options:
- "true"
- "false"
show_file: "false"
- notfound_exit: "true"
opts:
title: Mark the Step as "Failed" if the selected value isn't found
value_options:
- "true"
- "false"
================================================
FILE: steps/change-value/step-info.yml
================================================
maintainer: bitrise
================================================
FILE: steps/change-workdir/1.0.0/step.yml
================================================
title: Change Working Directory for subsequent Steps
summary: Set bitrise source directory (BITRISE_SOURCE_DIR) to specified path.
description: |-
By setting `$BITRISE_SOURCE_DIR` to the specified path every subsequent
Step will run with this path as it's base Working Directory.
Useful for projects which expect a fixed project/workspace hierarchy,
like `Go` which requires the project inside a "workspace" with
the structure: `$GOPATH/src/domain/user/project`.
website: https://github.com/bitrise-io/steps-change-workdir
source_code_url: https://github.com/bitrise-io/steps-change-workdir
support_url: https://github.com/bitrise-io/steps-change-workdir/issues
published_at: 2015-09-29T13:13:55.78560927+02:00
source:
git: https://github.com/bitrise-io/steps-change-workdir.git
commit: 0c1593a490c834cee8468dd4a32ae7bec5d417ad
host_os_tags:
- osx-10.10
is_requires_admin_user: false
is_always_run: false
is_skippable: false
run_if: .IsCI
inputs:
- opts:
description: ""
is_dont_change_value: false
is_expand: true
is_required: true
summary: New working directory path
title: Directory path
value_options: []
path: null
- is_create_path: "true"
opts:
description: ""
is_dont_change_value: false
is_expand: false
is_required: true
summary: Enable/disable the creation of the directory path in case it doesn't
exist yet.
title: Create path if doesn't exist?
value_options:
- "true"
- "false"
================================================
FILE: steps/change-workdir/1.0.1/step.yml
================================================
title: Change Working Directory for subsequent Steps
summary: Set bitrise source directory (BITRISE_SOURCE_DIR) to specified path.
description: |-
By setting `$BITRISE_SOURCE_DIR` to the specified path every subsequent
Step will run with this path as it's base Working Directory.
Useful for projects which expect a fixed project/workspace hierarchy,
like `Go` which requires the project inside a "workspace" with
the structure: `$GOPATH/src/domain/user/project`.
website: https://github.com/bitrise-io/steps-change-workdir
source_code_url: https://github.com/bitrise-io/steps-change-workdir
support_url: https://github.com/bitrise-io/steps-change-workdir/issues
published_at: 2016-05-02T17:42:03.858229042+02:00
source:
git: https://github.com/bitrise-io/steps-change-workdir.git
commit: 94c58915edb11972def5c266396613b7fb35a686
host_os_tags:
- osx-10.10
type_tags:
- utility
is_requires_admin_user: false
is_always_run: false
is_skippable: false
inputs:
- opts:
description: ""
is_dont_change_value: false
is_expand: true
is_required: true
summary: New working directory path
title: Directory path
value_options: []
path: null
- is_create_path: "true"
opts:
description: ""
is_dont_change_value: false
is_expand: false
is_required: true
summary: Enable/disable the creation of the directory path in case it doesn't
exist yet.
title: Create path if doesn't exist?
value_options:
- "true"
- "false"
================================================
FILE: steps/change-workdir/1.0.2/step.yml
================================================
title: Change Working Directory for subsequent Steps
summary: Set bitrise source directory (BITRISE_SOURCE_DIR) to a specified path.
description: |-
By setting `$BITRISE_SOURCE_DIR` to the specified path every subsequent
Step will run with this path as its base Working Directory.
Useful for projects which expect a fixed project/workspace hierarchy,
like `Go` which requires the project inside a "workspace" with
the structure: `$GOPATH/src/domain/user/project`.
website: https://github.com/bitrise-io/steps-change-workdir
source_code_url: https://github.com/bitrise-io/steps-change-workdir
support_url: https://github.com/bitrise-io/steps-change-workdir/issues
published_at: 2018-12-20T12:33:58.172380707Z
source:
git: https://github.com/bitrise-io/steps-change-workdir.git
commit: ff6b146dc48366c37b1f5db0e3c213aa4f16fe69
host_os_tags:
- osx-10.10
type_tags:
- utility
is_requires_admin_user: false
is_always_run: false
is_skippable: false
inputs:
- opts:
description: ""
is_dont_change_value: false
is_expand: true
is_required: true
summary: New working directory path
title: Directory path
value_options: []
path: null
- is_create_path: "true"
opts:
description: ""
is_dont_change_value: false
is_expand: false
is_required: true
summary: Enable/disable the creation of the directory path in case it doesn't
exist yet.
title: Create path if doesn't exist?
value_options:
- "true"
- "false"
================================================
FILE: steps/change-workdir/1.0.3/step.yml
================================================
title: Change Working Directory for subsequent Steps
summary: Set bitrise source directory (`BITRISE_SOURCE_DIR`) to a specified path.
description: |-
By setting `$BITRISE_SOURCE_DIR` to the specified path every subsequent
Step will run with this path as its base Working Directory.
Useful for projects which expect a fixed project/workspace hierarchy,
like `Go` which requires the project inside a "workspace" with
the structure: `$GOPATH/src/domain/user/project`.
website: https://github.com/bitrise-io/steps-change-workdir
source_code_url: https://github.com/bitrise-io/steps-change-workdir
support_url: https://github.com/bitrise-io/steps-change-workdir/issues
published_at: 2020-09-03T09:09:53.735576754Z
source:
git: https://github.com/bitrise-steplib/steps-change-workdir.git
commit: 5a24bad8029a435421dafddb73c9c80e6b7767da
host_os_tags:
- osx-10.10
type_tags:
- utility
is_requires_admin_user: false
is_always_run: false
is_skippable: false
inputs:
- opts:
description: ""
is_dont_change_value: false
is_expand: true
is_required: true
summary: New working directory path
title: Directory path
value_options: []
path: null
- is_create_path: "true"
opts:
description: ""
is_dont_change_value: false
is_expand: false
is_required: true
summary: Enable/disable the creation of the directory path in case it doesn't
exist yet.
title: Create path if doesn't exist?
value_options:
- "true"
- "false"
================================================
FILE: steps/change-workdir/step-info.yml
================================================
maintainer: bitrise
================================================
FILE: steps/check-certificate/1.0.0/step.yml
================================================
title: Check certificate against host
summary: This step allows you to check a certificate against a host, and send an email
in the case it is invalid.
description: This step allows you to check a certificate against a host, and send
an email in the case it is invalid.
website: https://github.com/FutureWorkshops/bitrise-step-check-certificate
source_code_url: https://github.com/FutureWorkshops/bitrise-step-check-certificate.git
support_url: https://github.com/FutureWorkshops/bitrise-step-check-certificate/issues
published_at: 2019-10-25T23:24:54.650585+02:00
source:
git: https://github.com/FutureWorkshops/bitrise-step-check-certificate.git
commit: d985c6d08ee9098b2d9798162962736858d9f5ba
project_type_tags:
- ios
- macos
- android
- react-native
- xamarin
type_tags:
- utility
- notification
is_requires_admin_user: false
is_always_run: false
is_skippable: false
run_if: .IsCI
inputs:
- opts:
description: SMTP server used to send the notification email
is_expand: true
is_required: true
summary: SMTP server used to send the notification email
title: SMTP server
smtp_server: ""
- opts:
description: In case that the certificate is invalid, this email will be used
to send the notification email
is_expand: true
is_required: true
is_sensitive: true
summary: The email that will be used to send the error notification
title: Sender email
sender_email: ""
- opts:
description: The password that will be used to authenticate the sender
is_expand: true
is_required: true
is_sensitive: true
summary: The password that will be used to authenticate the sender
title: Sender password
sender_password: ""
- certificate_file: ""
opts:
description: The path to the certificate file that will be used to check
is_expand: true
is_required: true
summary: The path to the certificate file that will be used to check
title: Certificate file path
- host: ""
opts:
description: Host of the server that will be validated against
is_expand: true
is_required: true
summary: Host of the server that will be validated against
title: Server host
- opts:
description: Port of the server that will be validated against
is_expand: true
is_required: true
summary: Port of the server that will be validated against
title: Server port
port: "443"
- opts:
description: Number of months were the certificate becomes invalid
is_expand: true
is_required: true
summary: Number of months were the certificate becomes invalid
title: Number of months were the certificate becomes invalid
validation: "3"
- notification_target: ""
opts:
description: Email that will receive the notification in the case of an invalid
certificate
is_expand: true
is_required: true
summary: Email that will receive the notification in the case of an invalid certificate
title: Email to notify
- opts:
description: Name of the project were this certificate is used. This is used in
the notification email to give more context
is_expand: true
is_required: false
summary: Name of the project were this certificate is used
title: Project name
project: ""
================================================
FILE: steps/check-certificate/step-info.yml
================================================
maintainer: community
================================================
FILE: steps/chuck-norris/1.0.1/step.yml
================================================
title: Chuck Norris
summary: |
Adds random Chuck Norris jokes to build log.
description: |
Uses [Chuck Norris Jokes Api](https://api.chucknorris.io) or other compatible one to add random joke to build log.
website: https://github.com/DroidsOnRoids/bitrise-step-chuck-norris
source_code_url: https://github.com/DroidsOnRoids/bitrise-step-chuck-norris
support_url: https://github.com/DroidsOnRoids/bitrise-step-chuck-norris/issues
published_at: 2018-10-17T02:45:14.651508066+02:00
source:
git: https://github.com/DroidsOnRoids/bitrise-step-chuck-norris.git
commit: f8b862507775742d7c952f293b27ef97db1000df
host_os_tags:
- osx-10.10
- ubuntu-16.04
type_tags:
- utility
toolkit:
go:
package_name: github.com/DroidsOnRoids/bitrise-step-chuck-norris
is_requires_admin_user: false
is_always_run: true
is_skippable: true
run_if: ""
inputs:
- category: null
opts:
is_expand: true
is_required: false
summary: |
Optional category of the joke, see [list of available categories](https://api.chucknorris.io/jokes/categories).
If empty joke won't be restricted to any category.
title: Joke category, optional.
- api_base_url: https://api.chucknorris.io
opts:
is_expand: true
is_required: true
summary: |
Base URL of the API. Defaults to _https://api.chucknorris.io_. See
[chuck-api](https://github.com/chucknorris-io/chuck-api) for more info about running your own backend.
title: API base URL
outputs:
- CHUCK_NORRIS_JOKE: null
opts:
summary: Random joke about Chuck Norris from API
title: Random Chuck Norris joke text
================================================
FILE: steps/chuck-norris/step-info.yml
================================================
maintainer: community
================================================
FILE: steps/close-jira-tasks/1.0.0/step.yml
================================================
title: close-jira-tasks
summary: |
Step moves Jira tasks from given initial state to target state if their ids are in git log
description: |
Step searches Jira project for tasks that are in `from_status` (e.g. `Deploying`) state
and after successful build moves them to `to_status` (e.g. `Stabilization on QA`) state.
This is useful if you use smart commits in Jira, e.g. if your commit message
includes `TEST-123 #Do`.
This would cause the issue TEST-123 to transition according to `Do` keyword.
The step works for multiple issues mentioned in last 100 commits, so if
you finished multiple tasks it should move all of them to the `to_status` state
provided they are in `from_status` at the moment of execution.
The step can also add custom value to the custom field in the Jira issue e.g. version of the app.
website: https://github.com/orestesgaolin/bitrise-close-jira-tasks
source_code_url: https://github.com/orestesgaolin/bitrise-close-jira-tasks
support_url: https://github.com/orestesgaolin/bitrise-close-jira-tasks/issues
published_at: 2019-10-17T22:06:57.040904+02:00
source:
git: https://github.com/orestesgaolin/bitrise-close-jira-tasks.git
commit: d870ad85bb907c116429b2dada5324b0a5a8f6bc
host_os_tags:
- osx-10.10
- ubuntu-16.04
type_tags:
- utility
toolkit:
bash:
entry_file: step.sh
deps:
brew:
- name: git
- name: jq
apt_get:
- name: git
- name: jq
is_requires_admin_user: true
is_always_run: false
is_skippable: false
run_if: ""
inputs:
- jira_project_name: ""
opts:
description: |
This will be used by script to determine tasks ids in git log e.g. TEST-123
is_expand: true
is_required: true
summary: Acronym used in Jira e.g. TEMP, GAS, TEST
title: Jira project name
- jira_url: ""
opts:
description: |
This can be e.g. https://company.atlassian.net
is_expand: true
is_required: true
summary: Base URL to company Jira
title: Jira project URL
- jira_token: $JIRA_TOKEN
opts:
description: |
You should use secret environment variable
is_expand: true
is_required: true
is_sensitive: true
summary: Token used to authenticate to Jira
title: Jira API token
- from_status: Deploying
opts:
description: |
Status of tasks which are closed by developer and are currently being dpeloyed (may be a column name in Jira)
is_expand: true
is_required: true
summary: Status of tasks which are closed by developer
title: Initial status
- opts:
description: |
Status of tasks which were deployed successfully (may be a column name in Jira)
is_expand: true
is_required: true
summary: Status of tasks which were deployed successfully
title: Initial status
to_status: Stabilization on QA
- custom_jira_field: ""
opts:
description: |
This should be in format `customfield_xxxxx`
is_expand: true
is_required: false
summary: Current version number will be set in this custom field of Jira issues
title: Custom field to update version number
- opts:
description: |
You should use Bitrise env variable
is_expand: true
is_required: false
summary: Current version number will be set in `custom_jira_field` of Jira issues
title: App version
version: $BITRISE_BUILD_NUMBER
================================================
FILE: steps/close-jira-tasks/step-info.yml
================================================
maintainer: community
================================================
FILE: steps/cocoapod-key/1.0.1/step.yml
================================================
title: Install cocoapod keys
summary: This step allows you to install & configure a set of keys
description: Through the use of the gem cocoapod-keys, this step creates secure values
to be useb by your application
website: https://github.com/FutureWorkshops/bitrise-step-cocoapod-key
source_code_url: https://github.com/FutureWorkshops/bitrise-step-cocoapod-key.git
support_url: https://github.com/FutureWorkshops/bitrise-step-cocoapod-key/issues
published_at: 2019-02-19T16:12:18.759751+01:00
source:
git: https://github.com/FutureWorkshops/bitrise-step-cocoapod-key.git
commit: 4a16ba1032f16cc8698b833a2251c0f77bdbf0b6
host_os_tags:
- osx-10.10
project_type_tags:
- ios
- macos
- react-native
- xamarin
type_tags:
- installer
- utility
is_requires_admin_user: false
is_always_run: false
is_skippable: false
run_if: .IsCI
inputs:
- opts:
description: In case that your workspace has multiple projects, and multiple targets,
a `pod key` command may fail because of the conflict in the configuration list.
This solves this issue
is_expand: true
is_required: false
summary: The name of the project. It will be used to resolve project conflict,
in the case of multiple targets in the workspace
title: Project name
project_name: ""
- keys: ""
opts:
description: The list of keys that will be set. With `|` as a separator. It needs
to match the order and size of the `values` property
is_expand: true
is_required: true
summary: The list of keys that will be set. With `|` as a separator
title: Keys
- opts:
description: The list of values that will be set. With `|` as a separator. It
needs to match the order and size of the `keys` property
is_expand: true
is_required: true
summary: The list of values that will be set. With `|` as a separator.
title: Values
values: ""
================================================
FILE: steps/cocoapod-key/1.0.2/step.yml
================================================
title: Install cocoapod keys
summary: This step allows you to install & configure a set of keys
description: Through the use of the gem cocoapod-keys, this step creates secure values
to be useb by your application
website: https://github.com/FutureWorkshops/bitrise-step-cocoapod-key
source_code_url: https://github.com/FutureWorkshops/bitrise-step-cocoapod-key.git
support_url: https://github.com/FutureWorkshops/bitrise-step-cocoapod-key/issues
published_at: 2019-10-25T19:04:45.353733+02:00
source:
git: https://github.com/FutureWorkshops/bitrise-step-cocoapod-key.git
commit: d3e24368a33dde7e5f9779140a5cc944f784e4fe
host_os_tags:
- osx-10.10
project_type_tags:
- ios
- macos
- react-native
- xamarin
type_tags:
- installer
- utility
is_requires_admin_user: false
is_always_run: false
is_skippable: false
run_if: .IsCI
inputs:
- opts:
description: In case that your workspace has multiple projects, and multiple targets,
a `pod key` command may fail because of the conflict in the configuration list.
This solves this issue
is_expand: true
is_required: false
summary: The name of the project. It will be used to resolve project conflict,
in the case of multiple targets in the workspace
title: Project name
project_name: ""
- opts:
description: In case where the Podfile is not hosted at the root of the repo,
this variable can be used to point to the right place
is_expand: true
is_required: true
summary: Path where the Podfile configuration is hosted
title: Podfile path
podfile_path: ./
- keys: ""
opts:
description: The list of keys that will be set. With `|` as a separator. It needs
to match the order and size of the `values` property
is_expand: true
is_required: true
summary: The list of keys that will be set. With `|` as a separator
title: Keys
- opts:
description: The list of values that will be set. With `|` as a separator. It
needs to match the order and size of the `keys` property
is_expand: true
is_required: true
summary: The list of values that will be set. With `|` as a separator.
title: Values
values: ""
================================================
FILE: steps/cocoapod-key/1.1.0/step.yml
================================================
title: Install cocoapod keys
summary: This step allows you to install & configure a set of keys
description: Through the use of the gem cocoapod-keys, this step creates secure values
to be useb by your application
website: https://github.com/FutureWorkshops/bitrise-step-cocoapod-key
source_code_url: https://github.com/FutureWorkshops/bitrise-step-cocoapod-key.git
support_url: https://github.com/FutureWorkshops/bitrise-step-cocoapod-key/issues
published_at: 2020-07-17T18:06:55.794907+02:00
source:
git: https://github.com/FutureWorkshops/bitrise-step-cocoapod-key.git
commit: 3fa8087566dbf90ea595af77e895331a84c7c1af
host_os_tags:
- osx-10.10
project_type_tags:
- ios
- macos
- react-native
- xamarin
type_tags:
- installer
- utility
is_requires_admin_user: false
is_always_run: false
is_skippable: false
run_if: .IsCI
inputs:
- opts:
description: In case that your workspace has multiple projects, and multiple targets,
a `pod key` command may fail because of the conflict in the configuration list.
This solves this issue
is_expand: true
is_required: false
summary: The name of the project. It will be used to resolve project conflict,
in the case of multiple targets in the workspace
title: Project name
project_name: ""
- opts:
description: In case where the Podfile is not hosted at the root of the repo,
this variable can be used to point to the right place
is_expand: true
is_required: true
summary: Path where the Podfile configuration is hosted
title: Podfile path
podfile_path: ./
- keys: ""
opts:
description: The list of keys that will be set. With `|` as a separator. It needs
to match the order and size of the `values` property
is_expand: true
is_required: false
summary: The list of keys that will be set. With `|` as a separator. If you leave
this empty, the step will only install the necessary gems
title: Keys
- opts:
description: The list of values that will be set. With `|` as a separator. It
needs to match the order and size of the `keys` property
is_expand: true
is_required: false
summary: The list of values that will be set. With `|` as a separator. If you
leave this empty, the step will only install the necessary gems
title: Values
values: ""
================================================
FILE: steps/cocoapod-key/2.0.0/step.yml
================================================
title: Install cocoapod keys
summary: This step allows you to install cocoapo-keys
description: This step simply install the dependecies of cocoapo-keys, so the plugin
can be used by a following cocoapods step.
website: https://github.com/FutureWorkshops/bitrise-step-cocoapod-key
source_code_url: https://github.com/FutureWorkshops/bitrise-step-cocoapod-key.git
support_url: https://github.com/FutureWorkshops/bitrise-step-cocoapod-key/issues
published_at: 2021-04-14T23:56:28.084761+02:00
source:
git: https://github.com/FutureWorkshops/bitrise-step-cocoapod-key.git
commit: e790310c83b68665d3084a08244ab64b99c02e34
host_os_tags:
- osx-10.10
project_type_tags:
- ios
- macos
- react-native
- xamarin
type_tags:
- installer
- utility
is_requires_admin_user: false
is_always_run: false
is_skippable: false
run_if: .IsCI
inputs:
- opts:
description: In case that your workspace has multiple projects, and multiple targets,
a `pod key` command may fail because of the conflict in the configuration list.
This solves this issue
is_expand: true
is_required: false
summary: The name of the project. It will be used to resolve project conflict,
in the case of multiple targets in the workspace
title: Project name
project_name: ""
- opts:
description: In case where the Podfile is not hosted at the root of the repo,
this variable can be used to point to the right place
is_expand: true
is_required: true
summary: Path where the Podfile configuration is hosted
title: Podfile path
podfile_path: ./
- keys: ""
opts:
category: Ignored
description: |-
Previously, this was used to run `pod keys set $KEY $VALUE`, but, on a CI environment, it is better if this is store in the SECRETS of the application.
Cocoapod-keys can fetch values from the environment. So, if you have a key named `MyKey`, you just need to create a secret with the same name: `MeyKey = Value`.
This is safer since the value never leaves Bitrise secrets, and avoids having it leaked on logs.
This variable is still listed in the step to avoid that someone that upgrades looses its info. But, it is no longer used.
is_expand: true
is_required: false
summary: Given that this is not the best approach to cocoapod-keys on CI, the
list of keys is no longer used.
title: Keys (No longer used)
- opts:
category: Ignored
description: |-
Previously, this was used to run `pod keys set $KEY $VALUE`, but, on a CI environment, it is better if this is store in the SECRETS of the application.
Cocoapod-keys can fetch values from the environment. So, if you have a key named `MyKey`, you just need to create a secret with the same name: `MeyKey = Value`.
This is safer since the value never leaves Bitrise secrets, and avoids having it leaked on logs.
This variable is still listed in the step to avoid that someone that upgrades looses its info. But, it is no longer used.
is_expand: true
is_required: false
summary: Given that this is not the best approach to cocoapod-keys on CI, the
list of values is no longer used.
title: Values (No longer used)
values: ""
================================================
FILE: steps/cocoapod-key/step-info.yml
================================================
maintainer: community
================================================
FILE: steps/cocoapods-dependency-check/0.0.1/step.yml
================================================
title: cocoapods-dependency-check
summary: |
OWASP dependency analysis for iOS / CocoaPods
description: |
Uses jeremylong/DependencyCheck to search Podfile.lock for CVE vulnerabilites.
The generated HTML document will be placed into BITRISE_DEPLOY_DIR by default.
Remember to run the "Deploy to bitrise.io" step in order to persist artifacts.
website: https://github.com/johnjcsmith/bitrise-step-cocoapods-dependency-checker
source_code_url: https://github.com/johnjcsmith/bitrise-step-cocoapods-dependency-checker
support_url: https://github.com/johnjcsmith/bitrise-step-cocoapods-dependency-checker/issues
published_at: 2018-08-02T18:41:13.220054924+09:30
source:
git: https://github.com/johnjcsmith/bitrise-step-cocoapods-dependency-checker.git
commit: 539aff879569d0d78ee2c5df527ad19c849164d0
host_os_tags:
- osx-10.10
project_type_tags:
- ios
type_tags:
- dependency
toolkit:
bash:
entry_file: step.sh
deps:
brew:
- name: git
- name: dependency-check
is_requires_admin_user: true
is_always_run: false
is_skippable: false
run_if: ""
inputs:
- opts:
is_required: true
title: Source Code Directory path
source_root_path: $BITRISE_SOURCE_DIR
- app_title: $BITRISE_APP_TITLE
opts:
is_required: true
title: App title
- deploy_dir: $BITRISE_DEPLOY_DIR
opts:
is_required: true
title: Deploy directory to output scan artifacts
- opts:
description: |
(Optional) will default to $BITRISE_SOURCE_DIR/Podfile.lock
is_expand: true
is_required: false
summary: The path to your Podfile.lock file.
title: Podfile.lock path
value_options: []
podfile_lock_path: $BITRISE_SOURCE_DIR/Podfile.lock
- fail_on_cvss_level: 11
opts:
description: |-
(Optional) Specifies if the build should be failed
if a CVSS score above a specified level is identified.
The default is 11; since
the CVSS scores are 0-10, by default the
build will never fail.
is_expand: true
is_required: false
summary: Sepcifies what level of CVSS should trigger a build failure
title: Fail on CVSS Level
value_options: []
================================================
FILE: steps/cocoapods-dependency-check/0.0.2/step.yml
================================================
title: cocoapods-dependency-check
summary: |
OWASP dependency analysis for iOS / CocoaPods
description: |
Uses jeremylong/DependencyCheck to search Podfile.lock for CVE vulnerabilites.
The generated HTML document will be placed into BITRISE_DEPLOY_DIR by default.
Remember to run the "Deploy to bitrise.io" step in order to persist artifacts.
website: https://github.com/johnjcsmith/bitrise-step-cocoapods-dependency-checker
source_code_url: https://github.com/johnjcsmith/bitrise-step-cocoapods-dependency-checker
support_url: https://github.com/johnjcsmith/bitrise-step-cocoapods-dependency-checker/issues
published_at: 2021-05-20T21:00:56.062738+09:30
source:
git: https://github.com/johnjcsmith/bitrise-step-cocoapods-dependency-checker.git
commit: b5a3e927b2a6d67a541e93ad979f46c2f57e56e5
host_os_tags:
- osx-10.10
project_type_tags:
- ios
type_tags:
- dependency
toolkit:
bash:
entry_file: step.sh
deps:
brew:
- name: git
- name: dependency-check
is_requires_admin_user: true
is_always_run: false
is_skippable: false
run_if: ""
inputs:
- opts:
is_required: true
title: Source Code Directory path
source_root_path: $BITRISE_SOURCE_DIR
- app_title: $BITRISE_APP_TITLE
opts:
is_required: true
title: App title
- deploy_dir: $BITRISE_DEPLOY_DIR
opts:
is_required: true
title: Deploy directory to output scan artifacts
- opts:
description: |
(Optional) will default to $BITRISE_SOURCE_DIR/Podfile.lock
is_expand: true
is_required: false
summary: The path to your Podfile.lock file.
title: Podfile.lock path
value_options: []
podfile_lock_path: $BITRISE_SOURCE_DIR/Podfile.lock
- fail_on_cvss_level: 11
opts:
description: |-
(Optional) Specifies if the build should be failed
if a CVSS score above a specified level is identified.
The default is 11; since
the CVSS scores are 0-10, by default the
build will never fail.
is_expand: true
is_required: false
summary: Sepcifies what level of CVSS should trigger a build failure
title: Fail on CVSS Level
value_options: []
================================================
FILE: steps/cocoapods-dependency-check/step-info.yml
================================================
maintainer: community
================================================
FILE: steps/cocoapods-install/1.0.0/step.yml
================================================
title: Run CocoaPods install
description: Run CocoaPods install (`$ pod install`) in your App's directory.
summary: |-
You don't need to keep the installed pods in your repo, simply add this step
and Bitrise will do the pod install for you on the VM!
website: https://github.com/bitrise-io/steps-cocoapods-install
source_code_url: https://github.com/bitrise-io/steps-cocoapods-install
support_url: https://github.com/bitrise-io/steps-cocoapods-install/issues
published_at: 2015-09-03T21:53:22.634653249+02:00
source:
git: https://github.com/bitrise-io/steps-cocoapods-install.git
commit: eafe1df6d114b263142450105ee434775b19fbaf
host_os_tags:
- osx-10.10
project_type_tags:
- ios
type_tags:
- xcode
- cocoapods
- pod
is_requires_admin_user: false
is_always_run: false
is_skippable: false
inputs:
- opts:
is_expand: true
is_required: true
title: Source Code Directory path.
source_root_path: $BITRISE_SOURCE_DIR
- is_update_cocoapods: "true"
opts:
description: |
Should update the installed CocoaPods version before using it?
is_expand: false
is_required: true
title: Update CocoaPods version?
value_options:
- "true"
- "false"
================================================
FILE: steps/cocoapods-install/1.0.1/step.yml
================================================
title: Run CocoaPods install
description: Run CocoaPods install (`$ pod install`) in your App's directory.
summary: |-
You don't need to keep the installed pods in your repo, simply add this step
and Bitrise will do the pod install for you on the VM!
website: https://github.com/bitrise-io/steps-cocoapods-install
source_code_url: https://github.com/bitrise-io/steps-cocoapods-install
support_url: https://github.com/bitrise-io/steps-cocoapods-install/issues
published_at: 2015-09-03T22:06:42.215452936+02:00
source:
git: https://github.com/bitrise-io/steps-cocoapods-install.git
commit: 4365217c355a830c0127a643c62c804b6706ff79
host_os_tags:
- osx-10.10
project_type_tags:
- ios
type_tags:
- xcode
- cocoapods
- pod
is_requires_admin_user: false
is_always_run: false
is_skippable: false
inputs:
- opts:
is_expand: true
is_required: true
title: Source Code Directory path.
source_root_path: $BITRISE_SOURCE_DIR
- is_update_cocoapods: "true"
opts:
description: |
Should update the installed CocoaPods version before using it?
is_expand: false
is_required: true
title: Update CocoaPods version?
value_options:
- "true"
- "false"
================================================
FILE: steps/cocoapods-install/1.0.2/step.yml
================================================
title: Run CocoaPods install
summary: |-
You don't need to keep the installed pods in your repo, simply add this step
and Bitrise will do the pod install for you on the VM!
description: Run CocoaPods install (`$ pod install`) in your App's directory.
website: https://github.com/bitrise-io/steps-cocoapods-install
source_code_url: https://github.com/bitrise-io/steps-cocoapods-install
support_url: https://github.com/bitrise-io/steps-cocoapods-install/issues
published_at: 2015-09-21T14:46:55.154530128+02:00
source:
git: https://github.com/bitrise-io/steps-cocoapods-install.git
commit: d2b3466ae88bc7b86581120d9d2c54ade94438a7
host_os_tags:
- osx-10.10
project_type_tags:
- ios
type_tags:
- xcode
- cocoapods
- pod
is_requires_admin_user: false
is_always_run: false
is_skippable: false
inputs:
- opts:
is_expand: true
is_required: true
title: Source Code Directory path.
source_root_path: $BITRISE_SOURCE_DIR
- is_update_cocoapods: "true"
opts:
description: |
Should update the installed CocoaPods version before using it?
is_expand: false
is_required: true
title: Update CocoaPods version?
value_options:
- "true"
- "false"
================================================
FILE: steps/cocoapods-install/1.0.3/step.yml
================================================
title: Run CocoaPods install
summary: |-
You don't need to keep the installed pods in your repo, simply add this step
and Bitrise will do the pod install for you on the VM!
description: Run CocoaPods install (`$ pod install`) in your App's directory.
website: https://github.com/bitrise-io/steps-cocoapods-install
source_code_url: https://github.com/bitrise-io/steps-cocoapods-install
support_url: https://github.com/bitrise-io/steps-cocoapods-install/issues
published_at: 2015-10-05T14:24:34.792859893+02:00
source:
git: https://github.com/bitrise-io/steps-cocoapods-install.git
commit: 1a9b6077b32debef39e2999f00a046cd9f5c110f
host_os_tags:
- osx-10.10
project_type_tags:
- ios
type_tags:
- xcode
- cocoapods
- pod
is_requires_admin_user: false
is_always_run: false
is_skippable: false
inputs:
- opts:
is_expand: true
is_required: true
title: Source Code Directory path.
source_root_path: $BITRISE_SOURCE_DIR
- is_update_cocoapods: "true"
opts:
description: |
Should update the installed CocoaPods version before using it?
is_expand: false
is_required: true
title: Update CocoaPods version?
value_options:
- "true"
- "false"
================================================
FILE: steps/cocoapods-install/1.1.0/step.yml
================================================
title: Run CocoaPods install
summary: |-
You don't need to keep the installed pods in your repo, simply add this step
and Bitrise will do the pod install for you on the VM!
description: Run CocoaPods install (`$ pod install`) in your App's directory.
website: https://github.com/bitrise-io/steps-cocoapods-install
source_code_url: https://github.com/bitrise-io/steps-cocoapods-install
support_url: https://github.com/bitrise-io/steps-cocoapods-install/issues
published_at: 2016-01-11T10:42:25.932239552+01:00
source:
git: https://github.com/bitrise-io/steps-cocoapods-install.git
commit: b2f6195fb6f136fad10c55b0683eebdf4de68dfa
host_os_tags:
- osx-10.10
project_type_tags:
- ios
type_tags:
- xcode
- cocoapods
- pod
is_requires_admin_user: false
is_always_run: false
is_skippable: false
inputs:
- opts:
is_expand: true
is_required: true
title: Source Code Directory path.
source_root_path: $BITRISE_SOURCE_DIR
- is_update_cocoapods: "false"
opts:
description: |
Should update the system installed CocoaPods
to the latest version?
is_expand: false
is_required: true
title: Update CocoaPods version?
value_options:
- "true"
- "false"
================================================
FILE: steps/cocoapods-install/1.10.0/step.yml
================================================
title: Run CocoaPods install
summary: |-
You don't need to keep the installed pods in your repo, simply add this step
and Bitrise will do the pod install for you on the VM!
description: |-
Run CocoaPods install (`$ pod install`) in your App's directory.
CocoaPods version is determined based on the Podfile.lock or
on the Gemfile.lock (if Podfile.lock does not exist in the Podfile's
directory and Gemfile.lock contains cocoapods gem)
in the Podfile's directory.
website: https://github.com/bitrise-io/steps-cocoapods-install
source_code_url: https://github.com/bitrise-io/steps-cocoapods-install
support_url: https://github.com/bitrise-io/steps-cocoapods-install/issues
published_at: 2019-11-08T15:40:08.92570964Z
source:
git: https://github.com/bitrise-steplib/steps-cocoapods-install.git
commit: d4de433402427fae3b084a103d5242956e045379
host_os_tags:
- osx-10.10
project_type_tags:
- ios
- macos
- cordova
- ionic
- react-native
- flutter
type_tags:
- dependency
toolkit:
go:
package_name: github.com/bitrise-io/steps-cocoapods-install
deps:
brew:
- name: go
apt_get:
- name: golang
bin_name: go
is_requires_admin_user: true
is_always_run: false
is_skippable: false
inputs:
- opts:
is_required: true
title: Source Code Directory path.
source_root_path: $BITRISE_SOURCE_DIR
- opts:
description: |-
(optional) `Podfile` path, relative to the `source_root_path`.
If not provided, the Step will search for root Podfile,
and run `pod install` with.
summary: (optional) Podfile path, relative to the source_root_path
title: Podfile path
podfile_path: ""
- is_update_cocoapods: "false"
opts:
description: |
__Deprecated!__
CocoaPods version is determined based on the Podfile.lock or the Gemfile.lock in the Podfile's directory.
is_expand: false
is_required: true
title: Update CocoaPods to the latest version?
value_options:
- "true"
- "false"
- install_cocoapods_version: ""
opts:
description: |
__Deprecated!__
CocoaPods version is determined based on the Podfile.lock or the Gemfile.lock in the Podfile's directory.
title: Install specified CocoaPods version
- opts:
description: |
(optional) True to execute the command in verbose mode or false to execute it without verbose
is_expand: false
is_required: false
title: Execute cocoapods in verbose mode?
value_options:
- "true"
- "false"
verbose: "true"
- is_cache_disabled: "false"
opts:
description: "True to disable pods caching \n"
is_expand: false
is_required: false
title: Disable built-in cache
value_options:
- "true"
- "false"
================================================
FILE: steps/cocoapods-install/1.10.1/step.yml
================================================
title: Run CocoaPods install
summary: |-
You don't need to keep the installed pods in your repo. Simply add this Step
and Bitrise will do the pod install for you on the VM!
description: "\nCocoaPods is a dependency manager for Swift and Objective-C projects.
This Step uses CocoaPods' `pod install` command to install your dependencies on
the virtual machine where your Bitrise build runs. \nCocoaPods version is determined
based on the Podfile.lock file or on the Gemfile.lock file. If the version is specified
in the Podfile.lock file and the version range specified in the Gemfile.lock file
\ \ncontains that version, then that version will be installed. Otherwise, the Cocoapods
version in the Podfile.lock will be installed as a global gem. \nIf no Cocoapods
version is defined in the Podfile.lock, the preinstalled sytem Cocoapods version
will be used.\n\n### Configuring the Step\n\n1. Set the **Source Code Directory
path** to the path of your app's source code.\n\n1. Optionally, provide a Podfile
in the **Podfile path** input.\n\n Without a specific Podfile, the Step does a
recursive search for the Podfile in the root of your app's directory, and uses the
first Podfile it finds.\n\n### Troubleshooting\n\nIf the Step fails, check out the
Podfile and the Gemfile of your app. Make sure there is no compatibility issue with
the different versions of your Pods. \nCheck that both Podfile.lock and Gemfile.lock
is committed and the Cocoapods versions defined in both match.\n\nYou can set the
**Execute cocoapods in verbose mode?** input to true to get detailed logs of the
Step.\n\n### Useful links\n\n* [Caching Cocoapods](https://devcenter.bitrise.io/builds/caching/caching-cocoapods/)\n*
[Include your dependencies in your repository](https://devcenter.bitrise.io/tips-and-tricks/optimize-your-build-times/#include-your-dependencies-in-your-repository)\n\n###
Related Steps\n\n* [Run yarn command](https://www.bitrise.io/integrations/steps/yarn)\n*
[Carthage](https://www.bitrise.io/integrations/steps/carthage)"
website: https://github.com/bitrise-io/steps-cocoapods-install
source_code_url: https://github.com/bitrise-io/steps-cocoapods-install
support_url: https://github.com/bitrise-io/steps-cocoapods-install/issues
published_at: 2020-01-14T15:31:47.625216571Z
source:
git: https://github.com/bitrise-steplib/steps-cocoapods-install.git
commit: b1b2c84add0d26c2d1a7b965722ecd73ca5473fe
host_os_tags:
- osx-10.10
project_type_tags:
- ios
- macos
- cordova
- ionic
- react-native
- flutter
type_tags:
- dependency
toolkit:
go:
package_name: github.com/bitrise-io/steps-cocoapods-install
deps:
brew:
- name: go
apt_get:
- name: golang
bin_name: go
is_requires_admin_user: true
is_always_run: false
is_skippable: false
inputs:
- opts:
is_required: true
title: Source Code Directory path.
source_root_path: $BITRISE_SOURCE_DIR
- opts:
description: |-
(optional) `Podfile` path, relative to the `source_root_path`.
If not provided, the Step will search for root Podfile,
and run `pod install` with.
summary: (optional) Podfile path, relative to the source_root_path
title: Podfile path
podfile_path: ""
- is_update_cocoapods: "false"
opts:
description: |
__Deprecated!__
CocoaPods version is determined based on the Podfile.lock or the Gemfile.lock in the Podfile's directory.
is_expand: false
is_required: true
title: Update CocoaPods to the latest version?
value_options:
- "true"
- "false"
- install_cocoapods_version: ""
opts:
description: |
__Deprecated!__
CocoaPods version is determined based on the Podfile.lock or the Gemfile.lock in the Podfile's directory.
title: Install specified CocoaPods version
- opts:
description: |
(optional) True to execute the command in verbose mode or false to execute it without verbose
is_expand: false
is_required: false
title: Execute cocoapods in verbose mode?
value_options:
- "true"
- "false"
verbose: "true"
- is_cache_disabled: "false"
opts:
description: "True to disable pods caching \n"
is_expand: false
is_required: false
title: Disable built-in cache
value_options:
- "true"
- "false"
================================================
FILE: steps/cocoapods-install/1.11.0/step.yml
================================================
title: Run CocoaPods install
summary: |-
You don't need to keep the installed pods in your repo. Simply add this Step
and Bitrise will do the pod install for you on the VM!
description: "\nCocoaPods is a dependency manager for Swift and Objective-C projects.
This Step uses CocoaPods' `pod install` command to install your dependencies on
the virtual machine where your Bitrise build runs. \nCocoaPods version is determined
based on the Podfile.lock file or on the Gemfile.lock file. If your Gemfile.lock
file contains the `cocoapods` gem then the step will call `pod install` with `bundle
exec`. Otherwise, the Cocoapods version in the Podfile.lock will be installed as
a global gem.\nIf no Cocoapods version is defined in Podfile.lock or Gemfile.lock,
the preinstalled sytem Cocoapods version will be used.\n\n### Configuring the Step\n\n1.
Set the **Source Code Directory path** to the path of your app's source code.\n\n1.
Optionally, provide a Podfile in the **Podfile path** input.\n\n Without a specific
Podfile, the Step does a recursive search for the Podfile in the root of your app's
directory, and uses the first Podfile it finds.\n\n### Troubleshooting\n\nIf the
Step fails, check out the Podfile and the Gemfile of your app. Make sure there is
no compatibility issue with the different versions of your Pods. \nCheck that both
Podfile.lock and Gemfile.lock is committed and the Cocoapods versions defined in
both match.\n\nYou can set the **Execute cocoapods in verbose mode?** input to true
to get detailed logs of the Step.\n\n### Useful links\n\n* [Caching Cocoapods](https://devcenter.bitrise.io/builds/caching/caching-cocoapods/)\n*
[Include your dependencies in your repository](https://devcenter.bitrise.io/tips-and-tricks/optimize-your-build-times/#include-your-dependencies-in-your-repository)\n\n###
Related Steps\n\n* [Run yarn command](https://www.bitrise.io/integrations/steps/yarn)\n*
[Carthage](https://www.bitrise.io/integrations/steps/carthage)"
website: https://github.com/bitrise-io/steps-cocoapods-install
source_code_url: https://github.com/bitrise-io/steps-cocoapods-install
support_url: https://github.com/bitrise-io/steps-cocoapods-install/issues
published_at: 2020-03-19T08:48:21.376090196Z
source:
git: https://github.com/bitrise-steplib/steps-cocoapods-install.git
commit: 84faecd4c459175bc0246cceeb34fb4d838d70d8
host_os_tags:
- osx-10.10
project_type_tags:
- ios
- macos
- cordova
- ionic
- react-native
- flutter
type_tags:
- dependency
toolkit:
go:
package_name: github.com/bitrise-io/steps-cocoapods-install
deps:
brew:
- name: go
apt_get:
- name: golang
bin_name: go
is_requires_admin_user: true
is_always_run: false
is_skippable: false
inputs:
- opts:
is_required: true
title: Source Code Directory path.
source_root_path: $BITRISE_SOURCE_DIR
- opts:
description: |-
(optional) `Podfile` path, relative to the `source_root_path`.
If not provided, the Step will search for root Podfile,
and run `pod install` with.
summary: (optional) Podfile path, relative to the source_root_path
title: Podfile path
podfile_path: ""
- is_update_cocoapods: "false"
opts:
description: |
__Deprecated!__
CocoaPods version is determined based on the Podfile.lock or the Gemfile.lock in the Podfile's directory.
is_expand: false
is_required: true
title: Update CocoaPods to the latest version?
value_options:
- "true"
- "false"
- install_cocoapods_version: ""
opts:
description: |
__Deprecated!__
CocoaPods version is determined based on the Podfile.lock or the Gemfile.lock in the Podfile's directory.
title: Install specified CocoaPods version
- opts:
description: |
(optional) True to execute the command in verbose mode or false to execute it without verbose
is_expand: false
is_required: false
title: Execute cocoapods in verbose mode?
value_options:
- "true"
- "false"
verbose: "true"
- is_cache_disabled: "false"
opts:
description: "True to disable pods caching \n"
is_expand: false
is_required: false
title: Disable built-in cache
value_options:
- "true"
- "false"
================================================
FILE: steps/cocoapods-install/1.2.0/step.yml
================================================
title: Run CocoaPods install
summary: |-
You don't need to keep the installed pods in your repo, simply add this step
and Bitrise will do the pod install for you on the VM!
description: Run CocoaPods install (`$ pod install`) in your App's directory.
website: https://github.com/bitrise-io/steps-cocoapods-install
source_code_url: https://github.com/bitrise-io/steps-cocoapods-install
support_url: https://github.com/bitrise-io/steps-cocoapods-install/issues
published_at: 2016-04-13T17:42:41.972675095+02:00
source:
git: https://github.com/bitrise-io/steps-cocoapods-install.git
commit: 27ee14cae1562c1f62d71edb796f8f95140898da
host_os_tags:
- osx-10.10
project_type_tags:
- ios
type_tags:
- xcode
- cocoapods
- pod
is_requires_admin_user: false
is_always_run: false
is_skippable: false
inputs:
- opts:
is_expand: true
is_required: true
title: Source Code Directory path.
source_root_path: $BITRISE_SOURCE_DIR
- is_update_cocoapods: "false"
opts:
description: |
Should update the system installed CocoaPods
to the latest version?
is_expand: false
is_required: true
title: Update CocoaPods version?
value_options:
- "true"
- "false"
================================================
FILE: steps/cocoapods-install/1.2.1/step.yml
================================================
title: Run CocoaPods install
summary: |-
You don't need to keep the installed pods in your repo, simply add this step
and Bitrise will do the pod install for you on the VM!
description: Run CocoaPods install (`$ pod install`) in your App's directory.
website: https://github.com/bitrise-io/steps-cocoapods-install
source_code_url: https://github.com/bitrise-io/steps-cocoapods-install
support_url: https://github.com/bitrise-io/steps-cocoapods-install/issues
published_at: 2016-05-19T11:47:12.983878172+02:00
source:
git: https://github.com/bitrise-io/steps-cocoapods-install.git
commit: 3cf12db215cab82304764193d03e48139638c82a
host_os_tags:
- osx-10.10
project_type_tags:
- ios
type_tags:
- xcode
- cocoapods
- pod
is_requires_admin_user: false
is_always_run: false
is_skippable: false
inputs:
- opts:
is_required: true
title: Source Code Directory path.
source_root_path: $BITRISE_SOURCE_DIR
- is_update_cocoapods: "false"
opts:
description: |
Should update the system installed CocoaPods
to the latest version?
is_expand: false
is_required: true
title: Update CocoaPods version?
value_options:
- "true"
- "false"
================================================
FILE: steps/cocoapods-install/1.3.0/step.yml
================================================
title: Run CocoaPods install
summary: |-
You don't need to keep the installed pods in your repo, simply add this step
and Bitrise will do the pod install for you on the VM!
description: Run CocoaPods install (`$ pod install`) in your App's directory.
website: https://github.com/bitrise-io/steps-cocoapods-install
source_code_url: https://github.com/bitrise-io/steps-cocoapods-install
support_url: https://github.com/bitrise-io/steps-cocoapods-install/issues
published_at: 2016-05-21T14:08:17.560682779+02:00
source:
git: https://github.com/bitrise-io/steps-cocoapods-install.git
commit: 3bde37937e59fe987b4845c929b23e411969876b
host_os_tags:
- osx-10.10
project_type_tags:
- ios
type_tags:
- xcode
- cocoapods
- pod
is_requires_admin_user: false
is_always_run: false
is_skippable: false
inputs:
- opts:
is_required: true
title: Source Code Directory path.
source_root_path: $BITRISE_SOURCE_DIR
- opts:
description: |-
(optional) `Podfile` path, relative to the `source_root_path`.
If not provided, the Step will search for Podfiles,
and run `pod install` with every `Podfile` it finds.
summary: (optional) Podfile path, relative to the source_root_path
title: Podfile path
podfile_path: ""
- is_update_cocoapods: "false"
opts:
description: |
Should update the system installed CocoaPods
to the latest version?
is_expand: false
is_required: true
title: Update CocoaPods version?
value_options:
- "true"
- "false"
================================================
FILE: steps/cocoapods-install/1.4.0/step.yml
================================================
title: Run CocoaPods install
summary: |-
You don't need to keep the installed pods in your repo, simply add this step
and Bitrise will do the pod install for you on the VM!
description: Run CocoaPods install (`$ pod install`) in your App's directory.
website: https://github.com/bitrise-io/steps-cocoapods-install
source_code_url: https://github.com/bitrise-io/steps-cocoapods-install
support_url: https://github.com/bitrise-io/steps-cocoapods-install/issues
published_at: 2016-05-24T14:17:47.613423406+02:00
source:
git: https://github.com/bitrise-io/steps-cocoapods-install.git
commit: 168af0c0cff69be6c702a052f9dfd1161a1ee098
host_os_tags:
- osx-10.10
project_type_tags:
- ios
type_tags:
- xcode
- cocoapods
- pod
is_requires_admin_user: false
is_always_run: false
is_skippable: false
inputs:
- opts:
is_required: true
title: Source Code Directory path.
source_root_path: $BITRISE_SOURCE_DIR
- opts:
description: |-
(optional) `Podfile` path, relative to the `source_root_path`.
If not provided, the Step will search for Podfiles,
and run `pod install` with every `Podfile` it finds.
summary: (optional) Podfile path, relative to the source_root_path
title: Podfile path
podfile_path: ""
- is_update_cocoapods: "false"
opts:
description: |
[Deprecated!] Use `install_cocoapods_version` input instead of this.
Should update the system installed CocoaPods
to the latest version?
is_expand: false
is_required: true
title: Update CocoaPods to the latest version?
value_options:
- "true"
- "false"
- install_cocoapods_version: ""
opts:
description: |
Install specified CocoaPods version.
Leave it empty to use system installed version of CocoaPods.
Format examles:
- 0.39.0.beta.1
- 1.0.0
- latest
title: Install specified CocoaPods version
================================================
FILE: steps/cocoapods-install/1.4.1/step.yml
================================================
title: Run CocoaPods install
summary: |-
You don't need to keep the installed pods in your repo, simply add this step
and Bitrise will do the pod install for you on the VM!
description: Run CocoaPods install (`$ pod install`) in your App's directory.
website: https://github.com/bitrise-io/steps-cocoapods-install
source_code_url: https://github.com/bitrise-io/steps-cocoapods-install
support_url: https://github.com/bitrise-io/steps-cocoapods-install/issues
published_at: 2016-06-13T15:44:04.143616284+02:00
source:
git: https://github.com/bitrise-io/steps-cocoapods-install.git
commit: f8327bb4b51c02aaa047c6e2632ec138b5991eda
host_os_tags:
- osx-10.10
project_type_tags:
- ios
type_tags:
- xcode
- cocoapods
- pod
is_requires_admin_user: false
is_always_run: false
is_skippable: false
inputs:
- opts:
is_required: true
title: Source Code Directory path.
source_root_path: $BITRISE_SOURCE_DIR
- opts:
description: |-
(optional) `Podfile` path, relative to the `source_root_path`.
If not provided, the Step will search for Podfiles,
and run `pod install` with every `Podfile` it finds.
summary: (optional) Podfile path, relative to the source_root_path
title: Podfile path
podfile_path: ""
- is_update_cocoapods: "false"
opts:
description: |
[Deprecated!] Use `install_cocoapods_version` input instead of this.
Should update the system installed CocoaPods
to the latest version?
is_expand: false
is_required: true
title: Update CocoaPods to the latest version?
value_options:
- "true"
- "false"
- install_cocoapods_version: ""
opts:
description: |
Install specified CocoaPods version.
Leave it empty to use system installed version of CocoaPods.
Format examles:
- 0.39.0.beta.1
- 1.0.0
- latest
title: Install specified CocoaPods version
================================================
FILE: steps/cocoapods-install/1.4.2/step.yml
================================================
title: Run CocoaPods install
summary: |-
You don't need to keep the installed pods in your repo, simply add this step
and Bitrise will do the pod install for you on the VM!
description: Run CocoaPods install (`$ pod install`) in your App's directory.
website: https://github.com/bitrise-io/steps-cocoapods-install
source_code_url: https://github.com/bitrise-io/steps-cocoapods-install
support_url: https://github.com/bitrise-io/steps-cocoapods-install/issues
published_at: 2016-06-14T10:47:47.979146336+02:00
source:
git: https://github.com/bitrise-io/steps-cocoapods-install.git
commit: 09bc0fcd7dbdee24cd07a2c3bcd1fae72eed2ad5
host_os_tags:
- osx-10.10
project_type_tags:
- ios
type_tags:
- xcode
- cocoapods
- pod
is_requires_admin_user: false
is_always_run: false
is_skippable: false
inputs:
- opts:
is_required: true
title: Source Code Directory path.
source_root_path: $BITRISE_SOURCE_DIR
- opts:
description: |-
(optional) `Podfile` path, relative to the `source_root_path`.
If not provided, the Step will search for Podfiles,
and run `pod install` with every `Podfile` it finds.
summary: (optional) Podfile path, relative to the source_root_path
title: Podfile path
podfile_path: ""
- is_update_cocoapods: "false"
opts:
description: |
[Deprecated!] Use `install_cocoapods_version` input instead of this.
Should update the system installed CocoaPods
to the latest version?
is_expand: false
is_required: true
title: Update CocoaPods to the latest version?
value_options:
- "true"
- "false"
- install_cocoapods_version: ""
opts:
description: |
Install specified CocoaPods version.
Leave it empty to use system installed version of CocoaPods.
Format examles:
- 0.39.0.beta.1
- 1.0.0
- latest
title: Install specified CocoaPods version
================================================
FILE: steps/cocoapods-install/1.5.0/step.yml
================================================
title: Run CocoaPods install
summary: |-
You don't need to keep the installed pods in your repo, simply add this step
and Bitrise will do the pod install for you on the VM!
description: Run CocoaPods install (`$ pod install`) in your App's directory.
website: https://github.com/bitrise-io/steps-cocoapods-install
source_code_url: https://github.com/bitrise-io/steps-cocoapods-install
support_url: https://github.com/bitrise-io/steps-cocoapods-install/issues
published_at: 2016-06-29T12:11:34.056164837+02:00
source:
git: https://github.com/bitrise-io/steps-cocoapods-install.git
commit: f47861fd1127fc39ce704680fc204e6888a8f88f
host_os_tags:
- osx-10.10
project_type_tags:
- ios
type_tags:
- xcode
- cocoapods
- pod
is_requires_admin_user: true
is_always_run: false
is_skippable: false
inputs:
- opts:
is_required: true
title: Source Code Directory path.
source_root_path: $BITRISE_SOURCE_DIR
- opts:
description: |-
(optional) `Podfile` path, relative to the `source_root_path`.
If not provided, the Step will search for root Podfile,
and run `pod install` with.
summary: (optional) Podfile path, relative to the source_root_path
title: Podfile path
podfile_path: ""
- is_update_cocoapods: "false"
opts:
description: |
__Deprecated!__
CocoaPods version is determined based on the Gemfile.lock or the Podfile.lock in the Podfile's directory.
is_expand: false
is_required: true
title: Update CocoaPods to the latest version?
value_options:
- "true"
- "false"
- install_cocoapods_version: ""
opts:
description: |
__Deprecated!__
CocoaPods version is determined based on the Gemfile.lock or the Podfile.lock in the Podfile's directory.
title: Install specified CocoaPods version
================================================
FILE: steps/cocoapods-install/1.5.1/step.yml
================================================
title: Run CocoaPods install
summary: |-
You don't need to keep the installed pods in your repo, simply add this step
and Bitrise will do the pod install for you on the VM!
description: Run CocoaPods install (`$ pod install`) in your App's directory.
website: https://github.com/bitrise-io/steps-cocoapods-install
source_code_url: https://github.com/bitrise-io/steps-cocoapods-install
support_url: https://github.com/bitrise-io/steps-cocoapods-install/issues
published_at: 2016-06-29T14:20:23.965654195+02:00
source:
git: https://github.com/bitrise-io/steps-cocoapods-install.git
commit: d3edec56c8c4c55a351b38f37685b522bad33bf0
host_os_tags:
- osx-10.10
project_type_tags:
- ios
type_tags:
- xcode
- cocoapods
- pod
is_requires_admin_user: true
is_always_run: false
is_skippable: false
inputs:
- opts:
is_required: true
title: Source Code Directory path.
source_root_path: $BITRISE_SOURCE_DIR
- opts:
description: |-
(optional) `Podfile` path, relative to the `source_root_path`.
If not provided, the Step will search for root Podfile,
and run `pod install` with.
summary: (optional) Podfile path, relative to the source_root_path
title: Podfile path
podfile_path: ""
- is_update_cocoapods: "false"
opts:
description: |
__Deprecated!__
CocoaPods version is determined based on the Gemfile.lock or the Podfile.lock in the Podfile's directory.
is_expand: false
is_required: true
title: Update CocoaPods to the latest version?
value_options:
- "true"
- "false"
- install_cocoapods_version: ""
opts:
description: |
__Deprecated!__
CocoaPods version is determined based on the Gemfile.lock or the Podfile.lock in the Podfile's directory.
title: Install specified CocoaPods version
================================================
FILE: steps/cocoapods-install/1.5.2/step.yml
================================================
title: Run CocoaPods install
summary: |-
You don't need to keep the installed pods in your repo, simply add this step
and Bitrise will do the pod install for you on the VM!
description: Run CocoaPods install (`$ pod install`) in your App's directory.
website: https://github.com/bitrise-io/steps-cocoapods-install
source_code_url: https://github.com/bitrise-io/steps-cocoapods-install
support_url: https://github.com/bitrise-io/steps-cocoapods-install/issues
published_at: 2016-06-30T16:34:26.013453549+02:00
source:
git: https://github.com/bitrise-io/steps-cocoapods-install.git
commit: f95316811feb396f431832f9c0cd8ad3ec8183dd
host_os_tags:
- osx-10.10
project_type_tags:
- ios
type_tags:
- xcode
- cocoapods
- pod
is_requires_admin_user: true
is_always_run: false
is_skippable: false
inputs:
- opts:
is_required: true
title: Source Code Directory path.
source_root_path: $BITRISE_SOURCE_DIR
- opts:
description: |-
(optional) `Podfile` path, relative to the `source_root_path`.
If not provided, the Step will search for root Podfile,
and run `pod install` with.
summary: (optional) Podfile path, relative to the source_root_path
title: Podfile path
podfile_path: ""
- is_update_cocoapods: "false"
opts:
description: |
__Deprecated!__
CocoaPods version is determined based on the Gemfile.lock or the Podfile.lock in the Podfile's directory.
is_expand: false
is_required: true
title: Update CocoaPods to the latest version?
value_options:
- "true"
- "false"
- install_cocoapods_version: ""
opts:
description: |
__Deprecated!__
CocoaPods version is determined based on the Gemfile.lock or the Podfile.lock in the Podfile's directory.
title: Install specified CocoaPods version
================================================
FILE: steps/cocoapods-install/1.5.3/step.yml
================================================
title: Run CocoaPods install
summary: |-
You don't need to keep the installed pods in your repo, simply add this step
and Bitrise will do the pod install for you on the VM!
description: Run CocoaPods install (`$ pod install`) in your App's directory.
website: https://github.com/bitrise-io/steps-cocoapods-install
source_code_url: https://github.com/bitrise-io/steps-cocoapods-install
support_url: https://github.com/bitrise-io/steps-cocoapods-install/issues
published_at: 2016-07-13T12:54:42.497504685+02:00
source:
git: https://github.com/bitrise-io/steps-cocoapods-install.git
commit: e174573f1e63e654569991a8523f50be8f6158e3
host_os_tags:
- osx-10.10
project_type_tags:
- ios
type_tags:
- xcode
- cocoapods
- pod
is_requires_admin_user: true
is_always_run: false
is_skippable: false
inputs:
- opts:
is_required: true
title: Source Code Directory path.
source_root_path: $BITRISE_SOURCE_DIR
- opts:
description: |-
(optional) `Podfile` path, relative to the `source_root_path`.
If not provided, the Step will search for root Podfile,
and run `pod install` with.
summary: (optional) Podfile path, relative to the source_root_path
title: Podfile path
podfile_path: ""
- is_update_cocoapods: "false"
opts:
description: |
__Deprecated!__
CocoaPods version is determined based on the Gemfile.lock or the Podfile.lock in the Podfile's directory.
is_expand: false
is_required: true
title: Update CocoaPods to the latest version?
value_options:
- "true"
- "false"
- install_cocoapods_version: ""
opts:
description: |
__Deprecated!__
CocoaPods version is determined based on the Gemfile.lock or the Podfile.lock in the Podfile's directory.
title: Install specified CocoaPods version
================================================
FILE: steps/cocoapods-install/1.5.4/step.yml
================================================
title: Run CocoaPods install
summary: |-
You don't need to keep the installed pods in your repo, simply add this step
and Bitrise will do the pod install for you on the VM!
description: Run CocoaPods install (`$ pod install`) in your App's directory.
website: https://github.com/bitrise-io/steps-cocoapods-install
source_code_url: https://github.com/bitrise-io/steps-cocoapods-install
support_url: https://github.com/bitrise-io/steps-cocoapods-install/issues
published_at: 2016-07-20T13:28:54.316939496+02:00
source:
git: https://github.com/bitrise-io/steps-cocoapods-install.git
commit: 1ca4ad3cf3cebd492e8e08df9cfd2f3793a803d3
host_os_tags:
- osx-10.10
project_type_tags:
- ios
type_tags:
- xcode
- cocoapods
- pod
is_requires_admin_user: true
is_always_run: false
is_skippable: false
inputs:
- opts:
is_required: true
title: Source Code Directory path.
source_root_path: $BITRISE_SOURCE_DIR
- opts:
description: |-
(optional) `Podfile` path, relative to the `source_root_path`.
If not provided, the Step will search for root Podfile,
and run `pod install` with.
summary: (optional) Podfile path, relative to the source_root_path
title: Podfile path
podfile_path: ""
- is_update_cocoapods: "false"
opts:
description: |
__Deprecated!__
CocoaPods version is determined based on the Gemfile.lock or the Podfile.lock in the Podfile's directory.
is_expand: false
is_required: true
title: Update CocoaPods to the latest version?
value_options:
- "true"
- "false"
- install_cocoapods_version: ""
opts:
description: |
__Deprecated!__
CocoaPods version is determined based on the Gemfile.lock or the Podfile.lock in the Podfile's directory.
title: Install specified CocoaPods version
================================================
FILE: steps/cocoapods-install/1.5.5/step.yml
================================================
title: Run CocoaPods install
summary: |-
You don't need to keep the installed pods in your repo, simply add this step
and Bitrise will do the pod install for you on the VM!
description: Run CocoaPods install (`$ pod install`) in your App's directory.
website: https://github.com/bitrise-io/steps-cocoapods-install
source_code_url: https://github.com/bitrise-io/steps-cocoapods-install
support_url: https://github.com/bitrise-io/steps-cocoapods-install/issues
published_at: 2016-08-11T15:44:36.911707651+02:00
source:
git: https://github.com/bitrise-io/steps-cocoapods-install.git
commit: 25cdf57f3c941d92b17ebbb8edc1efd95fe9bb13
host_os_tags:
- osx-10.10
project_type_tags:
- ios
type_tags:
- xcode
- cocoapods
- pod
is_requires_admin_user: true
is_always_run: false
is_skippable: false
inputs:
- opts:
is_required: true
title: Source Code Directory path.
source_root_path: $BITRISE_SOURCE_DIR
- opts:
description: |-
(optional) `Podfile` path, relative to the `source_root_path`.
If not provided, the Step will search for root Podfile,
and run `pod install` with.
summary: (optional) Podfile path, relative to the source_root_path
title: Podfile path
podfile_path: ""
- is_update_cocoapods: "false"
opts:
description: |
__Deprecated!__
CocoaPods version is determined based on the Gemfile.lock or the Podfile.lock in the Podfile's directory.
is_expand: false
is_required: true
title: Update CocoaPods to the latest version?
value_options:
- "true"
- "false"
- install_cocoapods_version: ""
opts:
description: |
__Deprecated!__
CocoaPods version is determined based on the Gemfile.lock or the Podfile.lock in the Podfile's directory.
title: Install specified CocoaPods version
================================================
FILE: steps/cocoapods-install/1.5.6/step.yml
================================================
title: Run CocoaPods install
summary: |-
You don't need to keep the installed pods in your repo, simply add this step
and Bitrise will do the pod install for you on the VM!
description: Run CocoaPods install (`$ pod install`) in your App's directory.
website: https://github.com/bitrise-io/steps-cocoapods-install
source_code_url: https://github.com/bitrise-io/steps-cocoapods-install
support_url: https://github.com/bitrise-io/steps-cocoapods-install/issues
published_at: 2016-08-19T15:38:10.89274923+02:00
source:
git: https://github.com/bitrise-io/steps-cocoapods-install.git
commit: 84937421683c9073f2590e4dfcb0d8cb7bfa3b10
host_os_tags:
- osx-10.10
project_type_tags:
- ios
type_tags:
- xcode
- cocoapods
- pod
is_requires_admin_user: true
is_always_run: false
is_skippable: false
inputs:
- opts:
is_required: true
title: Source Code Directory path.
source_root_path: $BITRISE_SOURCE_DIR
- opts:
description: |-
(optional) `Podfile` path, relative to the `source_root_path`.
If not provided, the Step will search for root Podfile,
and run `pod install` with.
summary: (optional) Podfile path, relative to the source_root_path
title: Podfile path
podfile_path: ""
- is_update_cocoapods: "false"
opts:
description: |
__Deprecated!__
CocoaPods version is determined based on the Gemfile.lock or the Podfile.lock in the Podfile's directory.
is_expand: false
is_required: true
title: Update CocoaPods to the latest version?
value_options:
- "true"
- "false"
- install_cocoapods_version: ""
opts:
description: |
__Deprecated!__
CocoaPods version is determined based on the Gemfile.lock or the Podfile.lock in the Podfile's directory.
title: Install specified CocoaPods version
================================================
FILE: steps/cocoapods-install/1.5.7/step.yml
================================================
title: Run CocoaPods install
summary: |-
You don't need to keep the installed pods in your repo, simply add this step
and Bitrise will do the pod install for you on the VM!
description: Run CocoaPods install (`$ pod install`) in your App's directory.
website: https://github.com/bitrise-io/steps-cocoapods-install
source_code_url: https://github.com/bitrise-io/steps-cocoapods-install
support_url: https://github.com/bitrise-io/steps-cocoapods-install/issues
published_at: 2016-09-07T08:47:56.957111565+02:00
source:
git: https://github.com/bitrise-io/steps-cocoapods-install.git
commit: e58541432fcb37e90dc075c0537a834bebb70169
host_os_tags:
- osx-10.10
project_type_tags:
- ios
type_tags:
- xcode
- cocoapods
- pod
is_requires_admin_user: true
is_always_run: false
is_skippable: false
inputs:
- opts:
is_required: true
title: Source Code Directory path.
source_root_path: $BITRISE_SOURCE_DIR
- opts:
description: |-
(optional) `Podfile` path, relative to the `source_root_path`.
If not provided, the Step will search for root Podfile,
and run `pod install` with.
summary: (optional) Podfile path, relative to the source_root_path
title: Podfile path
podfile_path: ""
- is_update_cocoapods: "false"
opts:
description: |
__Deprecated!__
CocoaPods version is determined based on the Gemfile.lock or the Podfile.lock in the Podfile's directory.
is_expand: false
is_required: true
title: Update CocoaPods to the latest version?
value_options:
- "true"
- "false"
- install_cocoapods_version: ""
opts:
description: |
__Deprecated!__
CocoaPods version is determined based on the Gemfile.lock or the Podfile.lock in the Podfile's directory.
title: Install specified CocoaPods version
- opts:
description: |
(optional) True to execute the command in verbose mode or false to execute it without verbose
is_expand: false
is_required: false
title: Execute cocoapods in verbose mode?
value_options:
- "true"
- "false"
verbose: "true"
================================================
FILE: steps/cocoapods-install/1.5.8/step.yml
================================================
title: Run CocoaPods install
summary: |-
You don't need to keep the installed pods in your repo, simply add this step
and Bitrise will do the pod install for you on the VM!
description: "Run CocoaPods install (`$ pod install`) in your App's directory.\n\nCocoaPods
version is determined based on the Gemfile.lock or (if not exists or does not contain
cocoapods gem) \non the Podfile.lock in the Podfile's directory."
website: https://github.com/bitrise-io/steps-cocoapods-install
source_code_url: https://github.com/bitrise-io/steps-cocoapods-install
support_url: https://github.com/bitrise-io/steps-cocoapods-install/issues
published_at: 2016-12-05T16:35:04.476558335+01:00
source:
git: https://github.com/bitrise-io/steps-cocoapods-install.git
commit: 549511f511075290a92ee07eac2ac03665911151
host_os_tags:
- osx-10.10
project_type_tags:
- ios
type_tags:
- xcode
- cocoapods
- pod
toolkit:
go:
package_name: github.com/bitrise-io/steps-cocoapods-install
deps:
brew:
- name: go
apt_get:
- name: golang
bin_name: go
is_requires_admin_user: true
is_always_run: false
is_skippable: false
inputs:
- opts:
is_required: true
title: Source Code Directory path.
source_root_path: $BITRISE_SOURCE_DIR
- opts:
description: |-
(optional) `Podfile` path, relative to the `source_root_path`.
If not provided, the Step will search for root Podfile,
and run `pod install` with.
summary: (optional) Podfile path, relative to the source_root_path
title: Podfile path
podfile_path: ""
- is_update_cocoapods: "false"
opts:
description: |
__Deprecated!__
CocoaPods version is determined based on the Gemfile.lock or the Podfile.lock in the Podfile's directory.
is_expand: false
is_required: true
title: Update CocoaPods to the latest version?
value_options:
- "true"
- "false"
- install_cocoapods_version: ""
opts:
description: |
__Deprecated!__
CocoaPods version is determined based on the Gemfile.lock or the Podfile.lock in the Podfile's directory.
title: Install specified CocoaPods version
- opts:
description: |
(optional) True to execute the command in verbose mode or false to execute it without verbose
is_expand: false
is_required: false
title: Execute cocoapods in verbose mode?
value_options:
- "true"
- "false"
verbose: "true"
================================================
FILE: steps/cocoapods-install/1.5.9/step.yml
================================================
title: Run CocoaPods install
summary: |-
You don't need to keep the installed pods in your repo, simply add this step
and Bitrise will do the pod install for you on the VM!
description: "Run CocoaPods install (`$ pod install`) in your App's directory.\n\nCocoaPods
version is determined based on the Gemfile.lock or (if not exists or does not contain
cocoapods gem) \non the Podfile.lock in the Podfile's directory."
website: https://github.com/bitrise-io/steps-cocoapods-install
source_code_url: https://github.com/bitrise-io/steps-cocoapods-install
support_url: https://github.com/bitrise-io/steps-cocoapods-install/issues
published_at: 2016-12-19T16:23:13.293331236+01:00
source:
git: https://github.com/bitrise-io/steps-cocoapods-install.git
commit: a6e6a66565a1bb30023015607889e12dd8e07cc9
host_os_tags:
- osx-10.10
project_type_tags:
- ios
- macos
type_tags:
- xcode
- cocoapods
- pod
toolkit:
go:
package_name: github.com/bitrise-io/steps-cocoapods-install
deps:
brew:
- name: go
apt_get:
- name: golang
bin_name: go
is_requires_admin_user: true
is_always_run: false
is_skippable: false
inputs:
- opts:
is_required: true
title: Source Code Directory path.
source_root_path: $BITRISE_SOURCE_DIR
- opts:
description: |-
(optional) `Podfile` path, relative to the `source_root_path`.
If not provided, the Step will search for root Podfile,
and run `pod install` with.
summary: (optional) Podfile path, relative to the source_root_path
title: Podfile path
podfile_path: ""
- is_update_cocoapods: "false"
opts:
description: |
__Deprecated!__
CocoaPods version is determined based on the Gemfile.lock or the Podfile.lock in the Podfile's directory.
is_expand: false
is_required: true
title: Update CocoaPods to the latest version?
value_options:
- "true"
- "false"
- install_cocoapods_version: ""
opts:
description: |
__Deprecated!__
CocoaPods version is determined based on the Gemfile.lock or the Podfile.lock in the Podfile's directory.
title: Install specified CocoaPods version
- opts:
description: |
(optional) True to execute the command in verbose mode or false to execute it without verbose
is_expand: false
is_required: false
title: Execute cocoapods in verbose mode?
value_options:
- "true"
- "false"
verbose: "true"
================================================
FILE: steps/cocoapods-install/1.6.0/step.yml
================================================
title: Run CocoaPods install
summary: |-
You don't need to keep the installed pods in your repo, simply add this step
and Bitrise will do the pod install for you on the VM!
description: |-
Run CocoaPods install (`$ pod install`) in your App's directory.
CocoaPods version is determined based on the Podfile.lock or
on the Gemfile.lock (if Podfile.lock does not exist in the Podfile's
directory and Gemfile.lock contains cocoapods gem)
in the Podfile's directory.
website: https://github.com/bitrise-io/steps-cocoapods-install
source_code_url: https://github.com/bitrise-io/steps-cocoapods-install
support_url: https://github.com/bitrise-io/steps-cocoapods-install/issues
published_at: 2017-01-10T15:19:32.344773291+01:00
source:
git: https://github.com/bitrise-io/steps-cocoapods-install.git
commit: fb82227760bf4cc7d750fe5e2cc260ecd10a85c8
host_os_tags:
- osx-10.10
project_type_tags:
- ios
- macos
type_tags:
- xcode
- cocoapods
- pod
toolkit:
go:
package_name: github.com/bitrise-io/steps-cocoapods-install
deps:
brew:
- name: go
apt_get:
- name: golang
bin_name: go
is_requires_admin_user: true
is_always_run: false
is_skippable: false
inputs:
- opts:
is_required: true
title: Source Code Directory path.
source_root_path: $BITRISE_SOURCE_DIR
- opts:
description: |-
(optional) `Podfile` path, relative to the `source_root_path`.
If not provided, the Step will search for root Podfile,
and run `pod install` with.
summary: (optional) Podfile path, relative to the source_root_path
title: Podfile path
podfile_path: ""
- is_update_cocoapods: "false"
opts:
description: |
__Deprecated!__
CocoaPods version is determined based on the Podfile.lock or the Gemfile.lock in the Podfile's directory.
is_expand: false
is_required: true
title: Update CocoaPods to the latest version?
value_options:
- "true"
- "false"
- install_cocoapods_version: ""
opts:
description: |
__Deprecated!__
CocoaPods version is determined based on the Podfile.lock or the Gemfile.lock in the Podfile's directory.
title: Install specified CocoaPods version
- opts:
description: |
(optional) True to execute the command in verbose mode or false to execute it without verbose
is_expand: false
is_required: false
title: Execute cocoapods in verbose mode?
value_options:
- "true"
- "false"
verbose: "true"
================================================
FILE: steps/cocoapods-install/1.6.1/step.yml
================================================
title: Run CocoaPods install
summary: |-
You don't need to keep the installed pods in your repo, simply add this step
and Bitrise will do the pod install for you on the VM!
description: |-
Run CocoaPods install (`$ pod install`) in your App's directory.
CocoaPods version is determined based on the Podfile.lock or
on the Gemfile.lock (if Podfile.lock does not exist in the Podfile's
directory and Gemfile.lock contains cocoapods gem)
in the Podfile's directory.
website: https://github.com/bitrise-io/steps-cocoapods-install
source_code_url: https://github.com/bitrise-io/steps-cocoapods-install
support_url: https://github.com/bitrise-io/steps-cocoapods-install/issues
published_at: 2017-01-16T13:37:35.216464982+01:00
source:
git: https://github.com/bitrise-io/steps-cocoapods-install.git
commit: a99782e9604f4cc8a002618e4d54ca351b2048a7
host_os_tags:
- osx-10.10
project_type_tags:
- ios
- macos
type_tags:
- dependency
toolkit:
go:
package_name: github.com/bitrise-io/steps-cocoapods-install
deps:
brew:
- name: go
apt_get:
- name: golang
bin_name: go
is_requires_admin_user: true
is_always_run: false
is_skippable: false
inputs:
- opts:
is_required: true
title: Source Code Directory path.
source_root_path: $BITRISE_SOURCE_DIR
- opts:
description: |-
(optional) `Podfile` path, relative to the `source_root_path`.
If not provided, the Step will search for root Podfile,
and run `pod install` with.
summary: (optional) Podfile path, relative to the source_root_path
title: Podfile path
podfile_path: ""
- is_update_cocoapods: "false"
opts:
description: |
__Deprecated!__
CocoaPods version is determined based on the Podfile.lock or the Gemfile.lock in the Podfile's directory.
is_expand: false
is_required: true
title: Update CocoaPods to the latest version?
value_options:
- "true"
- "false"
- install_cocoapods_version: ""
opts:
description: |
__Deprecated!__
CocoaPods version is determined based on the Podfile.lock or the Gemfile.lock in the Podfile's directory.
title: Install specified CocoaPods version
- opts:
description: |
(optional) True to execute the command in verbose mode or false to execute it without verbose
is_expand: false
is_required: false
title: Execute cocoapods in verbose mode?
value_options:
- "true"
- "false"
verbose: "true"
================================================
FILE: steps/cocoapods-install/1.7.1/step.yml
================================================
title: Run CocoaPods install
summary: |-
You don't need to keep the installed pods in your repo, simply add this step
and Bitrise will do the pod install for you on the VM!
description: |-
Run CocoaPods install (`$ pod install`) in your App's directory.
CocoaPods version is determined based on the Podfile.lock or
on the Gemfile.lock (if Podfile.lock does not exist in the Podfile's
directory and Gemfile.lock contains cocoapods gem)
in the Podfile's directory.
website: https://github.com/bitrise-io/steps-cocoapods-install
source_code_url: https://github.com/bitrise-io/steps-cocoapods-install
support_url: https://github.com/bitrise-io/steps-cocoapods-install/issues
published_at: 2017-06-08T11:52:46.033477265+02:00
source:
git: https://github.com/bitrise-io/steps-cocoapods-install.git
commit: 17fbf1707eb09af9347ccff20ac4e42e7045e330
host_os_tags:
- osx-10.10
project_type_tags:
- ios
- macos
type_tags:
- dependency
toolkit:
go:
package_name: github.com/bitrise-io/steps-cocoapods-install
deps:
brew:
- name: go
apt_get:
- name: golang
bin_name: go
is_requires_admin_user: true
is_always_run: false
is_skippable: false
inputs:
- opts:
is_required: true
title: Source Code Directory path.
source_root_path: $BITRISE_SOURCE_DIR
- opts:
description: |-
(optional) `Podfile` path, relative to the `source_root_path`.
If not provided, the Step will search for root Podfile,
and run `pod install` with.
summary: (optional) Podfile path, relative to the source_root_path
title: Podfile path
podfile_path: ""
- is_update_cocoapods: "false"
opts:
description: |
__Deprecated!__
CocoaPods version is determined based on the Podfile.lock or the Gemfile.lock in the Podfile's directory.
is_expand: false
is_required: true
title: Update CocoaPods to the latest version?
value_options:
- "true"
- "false"
- install_cocoapods_version: ""
opts:
description: |
__Deprecated!__
CocoaPods version is determined based on the Podfile.lock or the Gemfile.lock in the Podfile's directory.
title: Install specified CocoaPods version
- opts:
description: |
(optional) True to execute the command in verbose mode or false to execute it without verbose
is_expand: false
is_required: false
title: Execute cocoapods in verbose mode?
value_options:
- "true"
- "false"
verbose: "true"
================================================
FILE: steps/cocoapods-install/1.7.2/step.yml
================================================
title: Run CocoaPods install
summary: |-
You don't need to keep the installed pods in your repo, simply add this step
and Bitrise will do the pod install for you on the VM!
description: |-
Run CocoaPods install (`$ pod install`) in your App's directory.
CocoaPods version is determined based on the Podfile.lock or
on the Gemfile.lock (if Podfile.lock does not exist in the Podfile's
directory and Gemfile.lock contains cocoapods gem)
in the Podfile's directory.
website: https://github.com/bitrise-io/steps-cocoapods-install
source_code_url: https://github.com/bitrise-io/steps-cocoapods-install
support_url: https://github.com/bitrise-io/steps-cocoapods-install/issues
published_at: 2017-10-27T14:43:52.576400543+02:00
source:
git: https://github.com/bitrise-io/steps-cocoapods-install.git
commit: 46db2b4643b74326901641d95003677320c9ed07
host_os_tags:
- osx-10.10
project_type_tags:
- ios
- macos
type_tags:
- dependency
toolkit:
go:
package_name: github.com/bitrise-io/steps-cocoapods-install
deps:
brew:
- name: go
apt_get:
- name: golang
bin_name: go
is_requires_admin_user: true
is_always_run: false
is_skippable: false
inputs:
- opts:
is_required: true
title: Source Code Directory path.
source_root_path: $BITRISE_SOURCE_DIR
- opts:
description: |-
(optional) `Podfile` path, relative to the `source_root_path`.
If not provided, the Step will search for root Podfile,
and run `pod install` with.
summary: (optional) Podfile path, relative to the source_root_path
title: Podfile path
podfile_path: ""
- is_update_cocoapods: "false"
opts:
description: |
__Deprecated!__
CocoaPods version is determined based on the Podfile.lock or the Gemfile.lock in the Podfile's directory.
is_expand: false
is_required: true
title: Update CocoaPods to the latest version?
value_options:
- "true"
- "false"
- install_cocoapods_version: ""
opts:
description: |
__Deprecated!__
CocoaPods version is determined based on the Podfile.lock or the Gemfile.lock in the Podfile's directory.
title: Install specified CocoaPods version
- opts:
description: |
(optional) True to execute the command in verbose mode or false to execute it without verbose
is_expand: false
is_required: false
title: Execute cocoapods in verbose mode?
value_options:
- "true"
- "false"
verbose: "true"
- is_cache_disabled: "false"
opts:
description: "True to disable pods caching \n"
is_expand: false
is_required: false
title: Disable built-in cache
value_options:
- "true"
- "false"
================================================
FILE: steps/cocoapods-install/1.8.0/step.yml
================================================
title: Run CocoaPods install
summary: |-
You don't need to keep the installed pods in your repo, simply add this step
and Bitrise will do the pod install for you on the VM!
description: |-
Run CocoaPods install (`$ pod install`) in your App's directory.
CocoaPods version is determined based on the Podfile.lock or
on the Gemfile.lock (if Podfile.lock does not exist in the Podfile's
directory and Gemfile.lock contains cocoapods gem)
in the Podfile's directory.
website: https://github.com/bitrise-io/steps-cocoapods-install
source_code_url: https://github.com/bitrise-io/steps-cocoapods-install
support_url: https://github.com/bitrise-io/steps-cocoapods-install/issues
published_at: 2019-07-18T11:45:19.628717016Z
source:
git: https://github.com/bitrise-steplib/steps-cocoapods-install.git
commit: 1a276f4ffcf6efd1fcff11fdbcacb9c08993723f
host_os_tags:
- osx-10.10
project_type_tags:
- ios
- macos
type_tags:
- dependency
toolkit:
go:
package_name: github.com/bitrise-io/steps-cocoapods-install
deps:
brew:
- name: go
apt_get:
- name: golang
bin_name: go
is_requires_admin_user: true
is_always_run: false
is_skippable: false
inputs:
- opts:
is_required: true
title: Source Code Directory path.
source_root_path: $BITRISE_SOURCE_DIR
- opts:
description: |-
(optional) `Podfile` path, relative to the `source_root_path`.
If not provided, the Step will search for root Podfile,
and run `pod install` with.
summary: (optional) Podfile path, relative to the source_root_path
title: Podfile path
podfile_path: ""
- is_update_cocoapods: "false"
opts:
description: |
__Deprecated!__
CocoaPods version is determined based on the Podfile.lock or the Gemfile.lock in the Podfile's directory.
is_expand: false
is_required: true
title: Update CocoaPods to the latest version?
value_options:
- "true"
- "false"
- install_cocoapods_version: ""
opts:
description: |
__Deprecated!__
CocoaPods version is determined based on the Podfile.lock or the Gemfile.lock in the Podfile's directory.
title: Install specified CocoaPods version
- opts:
description: |
(optional) True to execute the command in verbose mode or false to execute it without verbose
is_expand: false
is_required: false
title: Execute cocoapods in verbose mode?
value_options:
- "true"
- "false"
verbose: "true"
- is_cache_disabled: "false"
opts:
description: "True to disable pods caching \n"
is_expand: false
is_required: false
title: Disable built-in cache
value_options:
- "true"
- "false"
================================================
FILE: steps/cocoapods-install/1.9.0/step.yml
================================================
title: Run CocoaPods install
summary: |-
You don't need to keep the installed pods in your repo, simply add this step
and Bitrise will do the pod install for you on the VM!
description: |-
Run CocoaPods install (`$ pod install`) in your App's directory.
CocoaPods version is determined based on the Podfile.lock or
on the Gemfile.lock (if Podfile.lock does not exist in the Podfile's
directory and Gemfile.lock contains cocoapods gem)
in the Podfile's directory.
website: https://github.com/bitrise-io/steps-cocoapods-install
source_code_url: https://github.com/bitrise-io/steps-cocoapods-install
support_url: https://github.com/bitrise-io/steps-cocoapods-install/issues
published_at: 2019-10-07T13:04:28.289296742Z
source:
git: https://github.com/bitrise-steplib/steps-cocoapods-install.git
commit: b9b0fe33f245f2ef636d77337e7081504dbef8cb
host_os_tags:
- osx-10.10
project_type_tags:
- ios
- macos
type_tags:
- dependency
toolkit:
go:
package_name: github.com/bitrise-io/steps-cocoapods-install
deps:
brew:
- name: go
apt_get:
- name: golang
bin_name: go
is_requires_admin_user: true
is_always_run: false
is_skippable: false
inputs:
- opts:
is_required: true
title: Source Code Directory path.
source_root_path: $BITRISE_SOURCE_DIR
- opts:
description: |-
(optional) `Podfile` path, relative to the `source_root_path`.
If not provided, the Step will search for root Podfile,
and run `pod install` with.
summary: (optional) Podfile path, relative to the source_root_path
title: Podfile path
podfile_path: ""
- is_update_cocoapods: "false"
opts:
description: |
__Deprecated!__
CocoaPods version is determined based on the Podfile.lock or the Gemfile.lock in the Podfile's directory.
is_expand: false
is_required: true
title: Update CocoaPods to the latest version?
value_options:
- "true"
- "false"
- install_cocoapods_version: ""
opts:
description: |
__Deprecated!__
CocoaPods version is determined based on the Podfile.lock or the Gemfile.lock in the Podfile's directory.
title: Install specified CocoaPods version
- opts:
description: |
(optional) True to execute the command in verbose mode or false to execute it without verbose
is_expand: false
is_required: false
title: Execute cocoapods in verbose mode?
value_options:
- "true"
- "false"
verbose: "true"
- is_cache_disabled: "false"
opts:
description: "True to disable pods caching \n"
is_expand: false
is_required: false
title: Disable built-in cache
value_options:
- "true"
- "false"
================================================
FILE: steps/cocoapods-install/1.9.1/step.yml
================================================
title: Run CocoaPods install
summary: |-
You don't need to keep the installed pods in your repo, simply add this step
and Bitrise will do the pod install for you on the VM!
description: |-
Run CocoaPods install (`$ pod install`) in your App's directory.
CocoaPods version is determined based on the Podfile.lock or
on the Gemfile.lock (if Podfile.lock does not exist in the Podfile's
directory and Gemfile.lock contains cocoapods gem)
in the Podfile's directory.
website: https://github.com/bitrise-io/steps-cocoapods-install
source_code_url: https://github.com/bitrise-io/steps-cocoapods-install
support_url: https://github.com/bitrise-io/steps-cocoapods-install/issues
published_at: 2019-10-15T09:16:46.24261624Z
source:
git: https://github.com/bitrise-steplib/steps-cocoapods-install.git
commit: 173de380033e9364c810864cdd2577800a55adf9
host_os_tags:
- osx-10.10
project_type_tags:
- ios
- macos
- cordova
- ionic
- react-native
- flutter
type_tags:
- dependency
toolkit:
go:
package_name: github.com/bitrise-io/steps-cocoapods-install
deps:
brew:
- name: go
apt_get:
- name: golang
bin_name: go
is_requires_admin_user: true
is_always_run: false
is_skippable: false
inputs:
- opts:
is_required: true
title: Source Code Directory path.
source_root_path: $BITRISE_SOURCE_DIR
- opts:
description: |-
(optional) `Podfile` path, relative to the `source_root_path`.
If not provided, the Step will search for root Podfile,
and run `pod install` with.
summary: (optional) Podfile path, relative to the source_root_path
title: Podfile path
podfile_path: ""
- is_update_cocoapods: "false"
opts:
description: |
__Deprecated!__
CocoaPods version is determined based on the Podfile.lock or the Gemfile.lock in the Podfile's directory.
is_expand: false
is_required: true
title: Update CocoaPods to the latest version?
value_options:
- "true"
- "false"
- install_cocoapods_version: ""
opts:
description: |
__Deprecated!__
CocoaPods version is determined based on the Podfile.lock or the Gemfile.lock in the Podfile's directory.
title: Install specified CocoaPods version
- opts:
description: |
(optional) True to execute the command in verbose mode or false to execute it without verbose
is_expand: false
is_required: false
title: Execute cocoapods in verbose mode?
value_options:
- "true"
- "false"
verbose: "true"
- is_cache_disabled: "false"
opts:
description: "True to disable pods caching \n"
is_expand: false
is_required: false
title: Disable built-in cache
value_options:
- "true"
- "false"
================================================
FILE: steps/cocoapods-install/2.0.0/step.yml
================================================
title: Run CocoaPods install
summary: |-
You don't need to keep the installed pods in your repo. Simply add this Step
and Bitrise will do the pod install for you on the VM!
description: "\nCocoaPods is a dependency manager for Swift and Objective-C projects.
This Step uses CocoaPods' `pod install` command to install your dependencies on
the virtual machine where your Bitrise build runs. \nCocoaPods version is determined
based on the Podfile.lock file or on the Gemfile.lock file. If your Gemfile.lock
file contains the `cocoapods` gem then the step will call `pod install` with `bundle
exec`. Otherwise, the Cocoapods version in the Podfile.lock will be installed as
a global gem.\nIf no Cocoapods version is defined in Podfile.lock or Gemfile.lock,
the preinstalled sytem Cocoapods version will be used.\n\n### Configuring the Step\n\n1.
Set the **Source Code Directory path** to the path of your app's source code.\n\n1.
Optionally, provide a Podfile in the **Podfile path** input.\n\n Without a specific
Podfile, the Step does a recursive search for the Podfile in the root of your app's
directory, and uses the first Podfile it finds.\n\n### Troubleshooting\n\nIf the
Step fails, check out the Podfile and the Gemfile of your app. Make sure there is
no compatibility issue with the different versions of your Pods. \nCheck that both
Podfile.lock and Gemfile.lock is committed and the Cocoapods versions defined in
both match.\n\nYou can set the **Execute cocoapods in verbose mode?** input to true
to get detailed logs of the Step.\n\n### Useful links\n\n* [Caching Cocoapods](https://devcenter.bitrise.io/builds/caching/caching-cocoapods/)\n*
[Include your dependencies in your repository](https://devcenter.bitrise.io/tips-and-tricks/optimize-your-build-times/#include-your-dependencies-in-your-repository)\n\n###
Related Steps\n\n* [Run yarn command](https://www.bitrise.io/integrations/steps/yarn)\n*
[Carthage](https://www.bitrise.io/integrations/steps/carthage)"
website: https://github.com/bitrise-io/steps-cocoapods-install
source_code_url: https://github.com/bitrise-io/steps-cocoapods-install
support_url: https://github.com/bitrise-io/steps-cocoapods-install/issues
published_at: 2021-02-08T12:02:01.818811936Z
source:
git: https://github.com/bitrise-steplib/steps-cocoapods-install.git
commit: ce4795f317e3d48e9f3ca0e759875d33562f5f6b
host_os_tags:
- osx-10.10
project_type_tags:
- ios
- macos
- cordova
- ionic
- react-native
- flutter
type_tags:
- dependency
toolkit:
go:
package_name: github.com/bitrise-steplib/steps-cocoapods-install
is_requires_admin_user: true
is_always_run: false
is_skippable: false
inputs:
- opts:
is_required: true
title: Source Code Directory path.
source_root_path: $BITRISE_SOURCE_DIR
- opts:
description: |-
(optional) `Podfile` path, relative to the `source_root_path`.
If not provided, the Step will search for root Podfile,
and run `pod install` with.
summary: (optional) Podfile path, relative to the source_root_path
title: Podfile path
podfile_path: ""
- opts:
description: |
(optional) True to execute the command in verbose mode or false to execute it without verbose
is_expand: false
is_required: false
title: Execute cocoapods in verbose mode?
value_options:
- "true"
- "false"
verbose: "true"
- is_cache_disabled: "false"
opts:
description: "True to disable pods caching \n"
is_expand: false
is_required: false
title: Disable built-in cache
value_options:
- "true"
- "false"
================================================
FILE: steps/cocoapods-install/2.1.0/step.yml
================================================
title: Run CocoaPods install
summary: |-
You don't need to keep the installed pods in your repo. Simply add this Step
and Bitrise will do the pod install for you on the VM!
description: "\nCocoaPods is a dependency manager for Swift and Objective-C projects.
This Step uses CocoaPods' `pod install` command to install your dependencies on
the virtual machine where your Bitrise build runs. \nCocoaPods version is determined
based on the Podfile.lock file or on the Gemfile.lock file. If your Gemfile.lock
file contains the `cocoapods` gem then the step will call `pod install` with `bundle
exec`. Otherwise, the Cocoapods version in the Podfile.lock will be installed as
a global gem.\nIf no Cocoapods version is defined in Podfile.lock or Gemfile.lock,
the preinstalled sytem Cocoapods version will be used.\n\n### Configuring the Step\n\n1.
Set the **Source Code Directory path** to the path of your app's source code.\n\n1.
Optionally, provide a Podfile in the **Podfile path** input.\n\n Without a specific
Podfile, the Step does a recursive search for the Podfile in the root of your app's
directory, and uses the first Podfile it finds.\n\n### Troubleshooting\n\nIf the
Step fails, check out the Podfile and the Gemfile of your app. Make sure there is
no compatibility issue with the different versions of your Pods. \nCheck that both
Podfile.lock and Gemfile.lock is committed and the Cocoapods versions defined in
both match.\n\nYou can set the **Execute cocoapods in verbose mode?** input to true
to get detailed logs of the Step.\n\n### Useful links\n\n* [Caching Cocoapods](https://devcenter.bitrise.io/builds/caching/caching-cocoapods/)\n*
[Include your dependencies in your repository](https://devcenter.bitrise.io/tips-and-tricks/optimize-your-build-times/#include-your-dependencies-in-your-repository)\n\n###
Related Steps\n\n* [Run yarn command](https://www.bitrise.io/integrations/steps/yarn)\n*
[Carthage](https://www.bitrise.io/integrations/steps/carthage)"
website: https://github.com/bitrise-io/steps-cocoapods-install
source_code_url: https://github.com/bitrise-io/steps-cocoapods-install
support_url: https://github.com/bitrise-io/steps-cocoapods-install/issues
published_at: 2021-02-17T15:09:37.029036098Z
source:
git: https://github.com/bitrise-steplib/steps-cocoapods-install.git
commit: eef47b51862962c967572fbb77686bdcd25a00c6
host_os_tags:
- osx-10.10
project_type_tags:
- ios
- macos
- cordova
- ionic
- react-native
- flutter
type_tags:
- dependency
toolkit:
go:
package_name: github.com/bitrise-steplib/steps-cocoapods-install
is_requires_admin_user: true
is_always_run: false
is_skippable: false
inputs:
- opts:
is_required: true
title: Source Code Directory path.
source_root_path: $BITRISE_SOURCE_DIR
- opts:
description: |-
(optional) `Podfile` path, relative to the `source_root_path`.
If not provided, the Step will search for root Podfile,
and run `pod install` with.
summary: (optional) Podfile path, relative to the source_root_path
title: Podfile path
podfile_path: ""
- opts:
description: |
(optional) True to execute the command in verbose mode or false to execute it without verbose
is_expand: false
is_required: false
title: Execute cocoapods in verbose mode?
value_options:
- "true"
- "false"
verbose: "false"
- is_cache_disabled: "false"
opts:
description: |
True to disable pods caching
is_expand: false
is_required: false
title: Disable built-in cache
value_options:
- "true"
- "false"
================================================
FILE: steps/cocoapods-install/2.2.0/step.yml
================================================
title: Run CocoaPods install
summary: |-
You don't need to keep the installed Pods in your repo. Simply add this Step
and Bitrise will do the Pod install for you on the VM!
description: "\nCocoaPods is a dependency manager for Swift and Objective-C projects.
This Step uses CocoaPods' `pod install` or `pod update` command to install your
dependencies on the virtual machine where your Bitrise build runs. \nCocoaPods
version is determined based on the Podfile.lock file or on the Gemfile.lock file.
If your Gemfile.lock file contains the `cocoapods` gem, then the Step will call
the pod `install` command with `bundle exec`. Otherwise, the Cocoapods version in
the Podfile.lock will be installed as a global gem.\nIf no Cocoapods version is
defined in Podfile.lock or Gemfile.lock, the preinstalled sytem Cocoapods version
will be used.\n\n### Configuring the Step\n\n1. Set the **Source Code Directory
path** to the path of your app's source code.\n\n1. Optionally, provide a Podfile
in the **Podfile path** input.\n\n Without a specific Podfile, the Step does a
recursive search for the Podfile in the root of your app's directory, and uses the
first Podfile it finds.\n\n### Troubleshooting\n\nIf the Step fails, check out the
Podfile and the Gemfile of your app. Make sure there is no compatibility issue with
the different versions of your Pods. \nCheck that both Podfile.lock and Gemfile.lock
is committed and the Cocoapods versions defined in both match.\n\nYou can set the
**Execute cocoapods in verbose mode?** input to true to get detailed logs of the
Step.\n\n### Useful links\n\n* [Caching Cocoapods](https://devcenter.bitrise.io/builds/caching/caching-cocoapods/)\n*
[Include your dependencies in your repository](https://devcenter.bitrise.io/tips-and-tricks/optimize-your-build-times/#include-your-dependencies-in-your-repository)\n\n###
Related Steps\n\n* [Run yarn command](https://www.bitrise.io/integrations/steps/yarn)\n*
[Carthage](https://www.bitrise.io/integrations/steps/carthage)"
website: https://github.com/bitrise-io/steps-cocoapods-install
source_code_url: https://github.com/bitrise-io/steps-cocoapods-install
support_url: https://github.com/bitrise-io/steps-cocoapods-install/issues
published_at: 2021-05-12T13:06:14.534918413Z
source:
git: https://github.com/bitrise-steplib/steps-cocoapods-install.git
commit: 3fc15ef88c794827fc6fc38e3a5cb52f5a03c339
host_os_tags:
- osx-10.10
project_type_tags:
- ios
- macos
- cordova
- ionic
- react-native
- flutter
type_tags:
- dependency
toolkit:
go:
package_name: github.com/bitrise-steplib/steps-cocoapods-install
is_requires_admin_user: true
is_always_run: false
is_skippable: false
inputs:
- command: install
opts:
description: "Use pod `install` to download the explicit version listed in the
Podfile.lock without trying to check if a newer version is available. \nUse
pod `update` to update every Pod listed in your Podfile to the latest version
possible."
is_required: true
title: CocoaPods command
value_options:
- install
- update
- opts:
description: "Directory path where the project's Podfile (and optionally Gemfile)
is placed. \nCocoaPods commands will be executed in this directory."
is_required: true
title: Workdir
source_root_path: $BITRISE_SOURCE_DIR
- opts:
description: By specifying this input `Workdir` gets overriden by the provided
file's directory path.
title: Podfile path
podfile_path: ""
- opts:
description: |
If enabled the `--verbose` flag will be appended to all CocoaPods commands.
title: Execute all CocoaPods commands in verbose mode?
value_options:
- "true"
- "false"
verbose: "false"
- is_cache_disabled: "false"
opts:
description: "By default the Step adds the Pods directory in the `Workdir` to
the Bitrise Build Cache. \nSet this input to disable automatic cache item collection
for this Step.\n"
title: Disable automatic cache item collection
value_options:
- "true"
- "false"
================================================
FILE: steps/cocoapods-install/2.2.1/step.yml
================================================
title: Run CocoaPods install
summary: This Step uses CocoaPods' `pod install` or `pod update` command to install
your dependencies.
description: |2-
CocoaPods is a dependency manager for Swift and Objective-C projects. This Step uses CocoaPods' `pod install` or `pod update` command to install your dependencies on the virtual machine where your Bitrise build runs.
CocoaPods version is determined based on the Podfile.lock file or on the Gemfile.lock file. If your Gemfile.lock file contains the `cocoapods` gem, then the Step will call the pod `install` command with `bundle exec`. Otherwise, the Cocoapods version in the Podfile.lock will be installed as a global gem.
If no Cocoapods version is defined in Podfile.lock or Gemfile.lock, the preinstalled sytem Cocoapods version will be used.
### Configuring the Step
1. Set the **Source Code Directory path** to the path of your app's source code.
1. Optionally, provide a Podfile in the **Podfile path** input.
Without a specific Podfile, the Step does a recursive search for the Podfile in the root of your app's directory, and uses the first Podfile it finds.
### Troubleshooting
If the Step fails, check out the Podfile and the Gemfile of your app. Make sure there is no compatibility issue with the different versions of your Pods.
Check that both Podfile.lock and Gemfile.lock is committed and the Cocoapods versions defined in both match.
You can set the **Execute cocoapods in verbose mode?** input to true to get detailed logs of the Step.
### Useful links
* [Caching Cocoapods](https://devcenter.bitrise.io/builds/caching/caching-cocoapods/)
* [Include your dependencies in your repository](https://devcenter.bitrise.io/tips-and-tricks/optimize-your-build-times/#include-your-dependencies-in-your-repository)
### Related Steps
* [Run yarn command](https://www.bitrise.io/integrations/steps/yarn)
* [Carthage](https://www.bitrise.io/integrations/steps/carthage)
website: https://github.com/bitrise-io/steps-cocoapods-install
source_code_url: https://github.com/bitrise-io/steps-cocoapods-install
support_url: https://github.com/bitrise-io/steps-cocoapods-install/issues
published_at: 2022-02-22T16:12:47.014794064Z
source:
git: https://github.com/bitrise-steplib/steps-cocoapods-install.git
commit: dd4b16b082e0e74f87c1ebba92cc15ae165a8cb1
project_type_tags:
- ios
- macos
- cordova
- ionic
- react-native
- flutter
type_tags:
- dependency
toolkit:
go:
package_name: github.com/bitrise-steplib/steps-cocoapods-install
is_always_run: false
is_skippable: false
inputs:
- command: install
opts:
description: |
CocoaPods command to use for installing dependencies.
Available options:
- `install`: Use `pod install` to download the explicit version listed in the Podfile.lock without trying to check if a newer version is available.
- `update`: Use `pod update` to update every Pod listed in your Podfile to the latest version possible.
is_required: true
summary: CocoaPods command to use for installing dependencies.
title: CocoaPods command
value_options:
- install
- update
- opts:
description: |
Directory path where the project's Podfile (and optionally Gemfile) is placed.
CocoaPods commands will be executed in this directory.
is_required: true
summary: Directory path where the project's Podfile (and optionally Gemfile) is
placed.
title: Workdir
source_root_path: $BITRISE_SOURCE_DIR
- opts:
description: |-
Path of the project's Podfile.
By specifying this input `Workdir` gets overriden by the provided file's directory path.
summary: Path of the project's Podfile.
title: Podfile path
podfile_path: ""
- opts:
description: |
Execute all CocoaPods commands in verbose mode.
If enabled the `--verbose` flag will be appended to all CocoaPods commands.
summary: Execute all CocoaPods commands in verbose mode.
title: Enable verbose logging
value_options:
- "true"
- "false"
verbose: "false"
- is_cache_disabled: "false"
opts:
description: |
Disables automatic cache content collection.
By default the Step adds the Pods directory in the `Workdir` to the Bitrise Build Cache.
Set this input to disable automatic cache item collection for this Step.
summary: Disables automatic cache content collection.
title: Disable collecting cache content
value_options:
- "true"
- "false"
================================================
FILE: steps/cocoapods-install/2.3.0/step.yml
================================================
title: Run CocoaPods install
summary: This Step uses CocoaPods' `pod install` or `pod update` command to install
your dependencies.
description: |2-
CocoaPods is a dependency manager for Swift and Objective-C projects. This Step uses CocoaPods' `pod install` or `pod update` command to install your dependencies on the virtual machine where your Bitrise build runs.
CocoaPods version is determined based on the Podfile.lock file or on the Gemfile.lock file. If your Gemfile.lock file contains the `cocoapods` gem, then the Step will call the pod `install` command with `bundle exec`. Otherwise, the Cocoapods version in the Podfile.lock will be installed as a global gem.
If no Cocoapods version is defined in Podfile.lock or Gemfile.lock, the preinstalled sytem Cocoapods version will be used.
### Configuring the Step
1. Set the **Source Code Directory path** to the path of your app's source code.
1. Optionally, provide a Podfile in the **Podfile path** input.
Without a specific Podfile, the Step does a recursive search for the Podfile in the root of your app's directory, and uses the first Podfile it finds.
### Troubleshooting
If the Step fails, check out the Podfile and the Gemfile of your app. Make sure there is no compatibility issue with the different versions of your Pods.
Check that both Podfile.lock and Gemfile.lock is committed and the Cocoapods versions defined in both match.
You can set the **Execute cocoapods in verbose mode?** input to true to get detailed logs of the Step.
### Useful links
* [Caching Cocoapods](https://devcenter.bitrise.io/builds/caching/caching-cocoapods/)
* [Include your dependencies in your repository](https://devcenter.bitrise.io/tips-and-tricks/optimize-your-build-times/#include-your-dependencies-in-your-repository)
### Related Steps
* [Run yarn command](https://www.bitrise.io/integrations/steps/yarn)
* [Carthage](https://www.bitrise.io/integrations/steps/carthage)
website: https://github.com/bitrise-io/steps-cocoapods-install
source_code_url: https://github.com/bitrise-io/steps-cocoapods-install
support_url: https://github.com/bitrise-io/steps-cocoapods-install/issues
published_at: 2022-06-09T18:53:11.895220784Z
source:
git: https://github.com/bitrise-steplib/steps-cocoapods-install.git
commit: ec9bc34b5c7884e7e347f1ffa25afae948943cda
project_type_tags:
- ios
- macos
- cordova
- ionic
- react-native
- flutter
type_tags:
- dependency
toolkit:
go:
package_name: github.com/bitrise-steplib/steps-cocoapods-install
is_always_run: false
is_skippable: false
inputs:
- command: install
opts:
description: |
CocoaPods command to use for installing dependencies.
Available options:
- `install`: Use `pod install` to download the explicit version listed in the Podfile.lock without trying to check if a newer version is available.
- `update`: Use `pod update` to update every Pod listed in your Podfile to the latest version possible.
is_required: true
summary: CocoaPods command to use for installing dependencies.
title: CocoaPods command
value_options:
- install
- update
- opts:
description: |
Directory path where the project's Podfile (and optionally Gemfile) is placed.
CocoaPods commands will be executed in this directory.
is_required: true
summary: Directory path where the project's Podfile (and optionally Gemfile) is
placed.
title: Workdir
source_root_path: $BITRISE_SOURCE_DIR
- opts:
description: |-
Path of the project's Podfile.
By specifying this input `Workdir` gets overriden by the provided file's directory path.
summary: Path of the project's Podfile.
title: Podfile path
podfile_path: ""
- opts:
description: |
Execute all CocoaPods commands in verbose mode.
If enabled the `--verbose` flag will be appended to all CocoaPods commands.
summary: Execute all CocoaPods commands in verbose mode.
title: Enable verbose logging
value_options:
- "true"
- "false"
verbose: "false"
- is_cache_disabled: "false"
opts:
description: |
Disables automatic cache content collection.
By default the Step adds the Pods directory in the `Workdir` to the Bitrise Build Cache.
Set this input to disable automatic cache item collection for this Step.
summary: Disables automatic cache content collection.
title: Disable collecting cache content
value_options:
- "true"
- "false"
================================================
FILE: steps/cocoapods-install/2.3.1/step.yml
================================================
title: Run CocoaPods install
summary: This Step uses CocoaPods' `pod install` or `pod update` command to install
your dependencies.
description: |2-
CocoaPods is a dependency manager for Swift and Objective-C projects. This Step uses CocoaPods' `pod install` or `pod update` command to install your dependencies on the virtual machine where your Bitrise build runs.
CocoaPods version is determined based on the Podfile.lock file or on the Gemfile.lock file. If your Gemfile.lock file contains the `cocoapods` gem, then the Step will call the pod `install` command with `bundle exec`. Otherwise, the Cocoapods version in the Podfile.lock will be installed as a global gem.
If no Cocoapods version is defined in Podfile.lock or Gemfile.lock, the preinstalled sytem Cocoapods version will be used.
### Configuring the Step
1. Set the **Source Code Directory path** to the path of your app's source code.
1. Optionally, provide a Podfile in the **Podfile path** input.
Without a specific Podfile, the Step does a recursive search for the Podfile in the root of your app's directory, and uses the first Podfile it finds.
### Troubleshooting
If the Step fails, check out the Podfile and the Gemfile of your app. Make sure there is no compatibility issue with the different versions of your Pods.
Check that both Podfile.lock and Gemfile.lock is committed and the Cocoapods versions defined in both match.
You can set the **Execute cocoapods in verbose mode?** input to true to get detailed logs of the Step.
### Useful links
* [Caching Cocoapods](https://devcenter.bitrise.io/builds/caching/caching-cocoapods/)
* [Include your dependencies in your repository](https://devcenter.bitrise.io/tips-and-tricks/optimize-your-build-times/#include-your-dependencies-in-your-repository)
### Related Steps
* [Run yarn command](https://www.bitrise.io/integrations/steps/yarn)
* [Carthage](https://www.bitrise.io/integrations/steps/carthage)
website: https://github.com/bitrise-io/steps-cocoapods-install
source_code_url: https://github.com/bitrise-io/steps-cocoapods-install
support_url: https://github.com/bitrise-io/steps-cocoapods-install/issues
published_at: 2022-11-30T16:25:57.72341754Z
source:
git: https://github.com/bitrise-steplib/steps-cocoapods-install.git
commit: 1ae8eacb3cf5081f71037385e2d56ffbf3f00b45
project_type_tags:
- ios
- macos
- cordova
- ionic
- react-native
- flutter
type_tags:
- dependency
toolkit:
go:
package_name: github.com/bitrise-steplib/steps-cocoapods-install
is_always_run: false
is_skippable: false
inputs:
- command: install
opts:
description: |
CocoaPods command to use for installing dependencies.
Available options:
- `install`: Use `pod install` to download the explicit version listed in the Podfile.lock without trying to check if a newer version is available.
- `update`: Use `pod update` to update every Pod listed in your Podfile to the latest version possible.
is_required: true
summary: CocoaPods command to use for installing dependencies.
title: CocoaPods command
value_options:
- install
- update
- opts:
description: |
Directory path where the project's Podfile (and optionally Gemfile) is placed.
CocoaPods commands will be executed in this directory.
is_required: true
summary: Directory path where the project's Podfile (and optionally Gemfile) is
placed.
title: Workdir
source_root_path: $BITRISE_SOURCE_DIR
- opts:
description: |-
Path of the project's Podfile.
By specifying this input `Workdir` gets overriden by the provided file's directory path.
summary: Path of the project's Podfile.
title: Podfile path
podfile_path: ""
- opts:
description: |
Execute all CocoaPods commands in verbose mode.
If enabled the `--verbose` flag will be appended to all CocoaPods commands.
summary: Execute all CocoaPods commands in verbose mode.
title: Enable verbose logging
value_options:
- "true"
- "false"
verbose: "false"
- is_cache_disabled: "false"
opts:
description: |
Disables automatic cache content collection.
By default the Step adds the Pods directory in the `Workdir` to the Bitrise Build Cache.
Set this input to disable automatic cache item collection for this Step.
summary: Disables automatic cache content collection.
title: Disable collecting cache content
value_options:
- "true"
- "false"
================================================
FILE: steps/cocoapods-install/2.3.2/step.yml
================================================
title: Run CocoaPods install
summary: This Step uses CocoaPods' `pod install` or `pod update` command to install
your dependencies.
description: |2-
CocoaPods is a dependency manager for Swift and Objective-C projects. This Step uses CocoaPods' `pod install` or `pod update` command to install your dependencies on the virtual machine where your Bitrise build runs.
CocoaPods version is determined based on the Podfile.lock file or on the Gemfile.lock file. If your Gemfile.lock file contains the `cocoapods` gem, then the Step will call the pod `install` command with `bundle exec`. Otherwise, the Cocoapods version in the Podfile.lock will be installed as a global gem.
If no Cocoapods version is defined in Podfile.lock or Gemfile.lock, the preinstalled sytem Cocoapods version will be used.
### Configuring the Step
1. Set the **Source Code Directory path** to the path of your app's source code.
1. Optionally, provide a Podfile in the **Podfile path** input.
Without a specific Podfile, the Step does a recursive search for the Podfile in the root of your app's directory, and uses the first Podfile it finds.
### Troubleshooting
If the Step fails, check out the Podfile and the Gemfile of your app. Make sure there is no compatibility issue with the different versions of your Pods.
Check that both Podfile.lock and Gemfile.lock is committed and the Cocoapods versions defined in both match.
You can set the **Execute cocoapods in verbose mode?** input to true to get detailed logs of the Step.
### Useful links
* [Caching Cocoapods](https://devcenter.bitrise.io/builds/caching/caching-cocoapods/)
* [Include your dependencies in your repository](https://devcenter.bitrise.io/tips-and-tricks/optimize-your-build-times/#include-your-dependencies-in-your-repository)
### Related Steps
* [Run yarn command](https://www.bitrise.io/integrations/steps/yarn)
* [Carthage](https://www.bitrise.io/integrations/steps/carthage)
website: https://github.com/bitrise-io/steps-cocoapods-install
source_code_url: https://github.com/bitrise-io/steps-cocoapods-install
support_url: https://github.com/bitrise-io/steps-cocoapods-install/issues
published_at: 2023-02-07T08:53:15.871754629Z
source:
git: https://github.com/bitrise-steplib/steps-cocoapods-install.git
commit: ad1981e92c9792e26d735360928f147a71dcfa12
project_type_tags:
- ios
- macos
- cordova
- ionic
- react-native
- flutter
type_tags:
- dependency
toolkit:
go:
package_name: github.com/bitrise-steplib/steps-cocoapods-install
is_always_run: false
is_skippable: false
inputs:
- command: install
opts:
description: |
CocoaPods command to use for installing dependencies.
Available options:
- `install`: Use `pod install` to download the explicit version listed in the Podfile.lock without trying to check if a newer version is available.
- `update`: Use `pod update` to update every Pod listed in your Podfile to the latest version possible.
is_required: true
summary: CocoaPods command to use for installing dependencies.
title: CocoaPods command
value_options:
- install
- update
- opts:
description: |
Directory path where the project's Podfile (and optionally Gemfile) is placed.
CocoaPods commands will be executed in this directory.
is_required: true
summary: Directory path where the project's Podfile (and optionally Gemfile) is
placed.
title: Workdir
source_root_path: $BITRISE_SOURCE_DIR
- opts:
description: |-
Path of the project's Podfile.
By specifying this input `Workdir` gets overriden by the provided file's directory path.
summary: Path of the project's Podfile.
title: Podfile path
podfile_path: ""
- opts:
description: |
Execute all CocoaPods commands in verbose mode.
If enabled the `--verbose` flag will be appended to all CocoaPods commands.
summary: Execute all CocoaPods commands in verbose mode.
title: Enable verbose logging
value_options:
- "true"
- "false"
verbose: "false"
- is_cache_disabled: "false"
opts:
description: |
Disables automatic cache content collection.
By default the Step adds the Pods directory in the `Workdir` to the Bitrise Build Cache.
Set this input to disable automatic cache item collection for this Step.
summary: Disables automatic cache content collection.
title: Disable collecting cache content
value_options:
- "true"
- "false"
================================================
FILE: steps/cocoapods-install/2.3.3/step.yml
================================================
title: Run CocoaPods install
summary: This Step uses CocoaPods' `pod install` or `pod update` command to install
your dependencies.
description: |2-
CocoaPods is a dependency manager for Swift and Objective-C projects. This Step uses CocoaPods' `pod install` or `pod update` command to install your dependencies on the virtual machine where your Bitrise build runs.
CocoaPods version is determined based on the Podfile.lock file or on the Gemfile.lock file. If your Gemfile.lock file contains the `cocoapods` gem, then the Step will call the pod `install` command with `bundle exec`. Otherwise, the Cocoapods version in the Podfile.lock will be installed as a global gem.
If no Cocoapods version is defined in Podfile.lock or Gemfile.lock, the preinstalled sytem Cocoapods version will be used.
### Configuring the Step
1. Set the **Source Code Directory path** to the path of your app's source code.
1. Optionally, provide a Podfile in the **Podfile path** input.
Without a specific Podfile, the Step does a recursive search for the Podfile in the root of your app's directory, and uses the first Podfile it finds.
### Troubleshooting
If the Step fails, check out the Podfile and the Gemfile of your app. Make sure there is no compatibility issue with the different versions of your Pods.
Check that both Podfile.lock and Gemfile.lock is committed and the Cocoapods versions defined in both match.
You can set the **Execute cocoapods in verbose mode?** input to true to get detailed logs of the Step.
### Useful links
* [Caching Cocoapods](https://devcenter.bitrise.io/builds/caching/caching-cocoapods/)
* [Include your dependencies in your repository](https://devcenter.bitrise.io/tips-and-tricks/optimize-your-build-times/#include-your-dependencies-in-your-repository)
### Related Steps
* [Run yarn command](https://www.bitrise.io/integrations/steps/yarn)
* [Carthage](https://www.bitrise.io/integrations/steps/carthage)
website: https://github.com/bitrise-io/steps-cocoapods-install
source_code_url: https://github.com/bitrise-io/steps-cocoapods-install
support_url: https://github.com/bitrise-io/steps-cocoapods-install/issues
published_at: 2023-03-29T07:50:14.341128984Z
source:
git: https://github.com/bitrise-steplib/steps-cocoapods-install.git
commit: 53dc1dd5ce7cb9da27c8ca7631735be374e05bc5
project_type_tags:
- ios
- macos
- cordova
- ionic
- react-native
- flutter
type_tags:
- dependency
toolkit:
go:
package_name: github.com/bitrise-steplib/steps-cocoapods-install
is_always_run: false
is_skippable: false
inputs:
- command: install
opts:
description: |
CocoaPods command to use for installing dependencies.
Available options:
- `install`: Use `pod install` to download the explicit version listed in the Podfile.lock without trying to check if a newer version is available.
- `update`: Use `pod update` to update every Pod listed in your Podfile to the latest version possible.
is_required: true
summary: CocoaPods command to use for installing dependencies.
title: CocoaPods command
value_options:
- install
- update
- opts:
description: |
Directory path where the project's Podfile (and optionally Gemfile) is placed.
CocoaPods commands will be executed in this directory.
is_required: true
summary: Directory path where the project's Podfile (and optionally Gemfile) is
placed.
title: Workdir
source_root_path: $BITRISE_SOURCE_DIR
- opts:
description: |-
Path of the project's Podfile.
By specifying this input `Workdir` gets overriden by the provided file's directory path.
summary: Path of the project's Podfile.
title: Podfile path
podfile_path: ""
- opts:
description: |
Execute all CocoaPods commands in verbose mode.
If enabled the `--verbose` flag will be appended to all CocoaPods commands.
summary: Execute all CocoaPods commands in verbose mode.
title: Enable verbose logging
value_options:
- "true"
- "false"
verbose: "false"
- is_cache_disabled: "false"
opts:
description: |
Disables automatic cache content collection.
By default the Step adds the Pods directory in the `Workdir` to the Bitrise Build Cache.
Set this input to disable automatic cache item collection for this Step.
summary: Disables automatic cache content collection.
title: Disable collecting cache content
value_options:
- "true"
- "false"
================================================
FILE: steps/cocoapods-install/2.3.4/step.yml
================================================
title: Run CocoaPods install
summary: This Step uses CocoaPods' `pod install` or `pod update` command to install
your dependencies.
description: |2-
CocoaPods is a dependency manager for Swift and Objective-C projects. This Step uses CocoaPods' `pod install` or `pod update` command to install your dependencies on the virtual machine where your Bitrise build runs.
CocoaPods version is determined based on the Podfile.lock file or on the Gemfile.lock file. If your Gemfile.lock file contains the `cocoapods` gem, then the Step will call the pod `install` command with `bundle exec`. Otherwise, the Cocoapods version in the Podfile.lock will be installed as a global gem.
If no Cocoapods version is defined in Podfile.lock or Gemfile.lock, the preinstalled sytem Cocoapods version will be used.
### Configuring the Step
1. Set the **Source Code Directory path** to the path of your app's source code.
1. Optionally, provide a Podfile in the **Podfile path** input.
Without a specific Podfile, the Step does a recursive search for the Podfile in the root of your app's directory, and uses the first Podfile it finds.
### Troubleshooting
If the Step fails, check out the Podfile and the Gemfile of your app. Make sure there is no compatibility issue with the different versions of your Pods.
Check that both Podfile.lock and Gemfile.lock is committed and the Cocoapods versions defined in both match.
You can set the **Execute cocoapods in verbose mode?** input to true to get detailed logs of the Step.
### Useful links
* [Caching Cocoapods](https://devcenter.bitrise.io/builds/caching/caching-cocoapods/)
* [Include your dependencies in your repository](https://devcenter.bitrise.io/tips-and-tricks/optimize-your-build-times/#include-your-dependencies-in-your-repository)
### Related Steps
* [Run yarn command](https://www.bitrise.io/integrations/steps/yarn)
* [Carthage](https://www.bitrise.io/integrations/steps/carthage)
website: https://github.com/bitrise-io/steps-cocoapods-install
source_code_url: https://github.com/bitrise-io/steps-cocoapods-install
support_url: https://github.com/bitrise-io/steps-cocoapods-install/issues
published_at: 2023-08-22T13:26:59.824813463Z
source:
git: https://github.com/bitrise-steplib/steps-cocoapods-install.git
commit: 75dd45d47a09aecdec2f90738ebb78afc677a8dd
project_type_tags:
- ios
- macos
- cordova
- ionic
- react-native
- flutter
type_tags:
- dependency
toolkit:
go:
package_name: github.com/bitrise-steplib/steps-cocoapods-install
is_always_run: false
is_skippable: false
inputs:
- command: install
opts:
description: |
CocoaPods command to use for installing dependencies.
Available options:
- `install`: Use `pod install` to download the explicit version listed in the Podfile.lock without trying to check if a newer version is available.
- `update`: Use `pod update` to update every Pod listed in your Podfile to the latest version possible.
is_required: true
summary: CocoaPods command to use for installing dependencies.
title: CocoaPods command
value_options:
- install
- update
- opts:
description: |
Directory path where the project's Podfile (and optionally Gemfile) is placed.
CocoaPods commands will be executed in this directory.
is_required: true
summary: Directory path where the project's Podfile (and optionally Gemfile) is
placed.
title: Workdir
source_root_path: $BITRISE_SOURCE_DIR
- opts:
description: |-
Path of the project's Podfile.
By specifying this input `Workdir` gets overriden by the provided file's directory path.
summary: Path of the project's Podfile.
title: Podfile path
podfile_path: ""
- opts:
description: |
Execute all CocoaPods commands in verbose mode.
If enabled the `--verbose` flag will be appended to all CocoaPods commands.
summary: Execute all CocoaPods commands in verbose mode.
title: Enable verbose logging
value_options:
- "true"
- "false"
verbose: "false"
- is_cache_disabled: "false"
opts:
description: |
Disables automatic cache content collection.
By default the Step adds the Pods directory in the `Workdir` to the Bitrise Build Cache.
Set this input to disable automatic cache item collection for this Step.
summary: Disables automatic cache content collection.
title: Disable collecting cache content
value_options:
- "true"
- "false"
================================================
FILE: steps/cocoapods-install/2.3.5/step.yml
================================================
title: Run CocoaPods install
summary: This Step uses CocoaPods' `pod install` or `pod update` command to install
your dependencies.
description: |2-
CocoaPods is a dependency manager for Swift and Objective-C projects. This Step uses CocoaPods' `pod install` or `pod update` command to install your dependencies on the virtual machine where your Bitrise build runs.
CocoaPods version is determined based on the Podfile.lock file or on the Gemfile.lock file. If your Gemfile.lock file contains the `cocoapods` gem, then the Step will call the pod `install` command with `bundle exec`. Otherwise, the Cocoapods version in the Podfile.lock will be installed as a global gem.
If no Cocoapods version is defined in Podfile.lock or Gemfile.lock, the preinstalled sytem Cocoapods version will be used.
### Configuring the Step
1. Set the **Source Code Directory path** to the path of your app's source code.
1. Optionally, provide a Podfile in the **Podfile path** input.
Without a specific Podfile, the Step does a recursive search for the Podfile in the root of your app's directory, and uses the first Podfile it finds.
### Troubleshooting
If the Step fails, check out the Podfile and the Gemfile of your app. Make sure there is no compatibility issue with the different versions of your Pods.
Check that both Podfile.lock and Gemfile.lock is committed and the Cocoapods versions defined in both match.
You can set the **Execute cocoapods in verbose mode?** input to true to get detailed logs of the Step.
### Useful links
* [Caching Cocoapods](https://devcenter.bitrise.io/builds/caching/caching-cocoapods/)
* [Include your dependencies in your repository](https://devcenter.bitrise.io/tips-and-tricks/optimize-your-build-times/#include-your-dependencies-in-your-repository)
### Related Steps
* [Run yarn command](https://www.bitrise.io/integrations/steps/yarn)
* [Carthage](https://www.bitrise.io/integrations/steps/carthage)
website: https://github.com/bitrise-io/steps-cocoapods-install
source_code_url: https://github.com/bitrise-io/steps-cocoapods-install
support_url: https://github.com/bitrise-io/steps-cocoapods-install/issues
published_at: 2023-08-30T06:19:36.719282348Z
source:
git: https://github.com/bitrise-steplib/steps-cocoapods-install.git
commit: b29272c16b6af54fc59402185221ffa40668b7a7
project_type_tags:
- ios
- macos
- cordova
- ionic
- react-native
- flutter
type_tags:
- dependency
toolkit:
go:
package_name: github.com/bitrise-steplib/steps-cocoapods-install
is_always_run: false
is_skippable: false
inputs:
- command: install
opts:
description: |
CocoaPods command to use for installing dependencies.
Available options:
- `install`: Use `pod install` to download the explicit version listed in the Podfile.lock without trying to check if a newer version is available.
- `update`: Use `pod update` to update every Pod listed in your Podfile to the latest version possible.
is_required: true
summary: CocoaPods command to use for installing dependencies.
title: CocoaPods command
value_options:
- install
- update
- opts:
description: |
Directory path where the project's Podfile (and optionally Gemfile) is placed.
CocoaPods commands will be executed in this directory.
is_required: true
summary: Directory path where the project's Podfile (and optionally Gemfile) is
placed.
title: Workdir
source_root_path: $BITRISE_SOURCE_DIR
- opts:
description: |-
Path of the project's Podfile.
By specifying this input `Workdir` gets overriden by the provided file's directory path.
summary: Path of the project's Podfile.
title: Podfile path
podfile_path: ""
- opts:
description: |
Execute all CocoaPods commands in verbose mode.
If enabled the `--verbose` flag will be appended to all CocoaPods commands.
summary: Execute all CocoaPods commands in verbose mode.
title: Enable verbose logging
value_options:
- "true"
- "false"
verbose: "false"
- is_cache_disabled: "false"
opts:
description: |
Disables automatic cache content collection.
By default the Step adds the Pods directory in the `Workdir` to the Bitrise Build Cache.
Set this input to disable automatic cache item collection for this Step.
summary: Disables automatic cache content collection.
title: Disable collecting cache content
value_options:
- "true"
- "false"
================================================
FILE: steps/cocoapods-install/2.4.0/step.yml
================================================
title: Run CocoaPods install
summary: This Step uses CocoaPods' `pod install` or `pod update` command to install
your dependencies.
description: |2-
CocoaPods is a dependency manager for Swift and Objective-C projects. This Step uses CocoaPods' `pod install` or `pod update` command to install your dependencies on the virtual machine where your Bitrise build runs.
CocoaPods version is determined based on the Podfile.lock file or on the Gemfile.lock file. If your Gemfile.lock file contains the `cocoapods` gem, then the Step will call the pod `install` command with `bundle exec`. Otherwise, the Cocoapods version in the Podfile.lock will be installed as a global gem.
If no Cocoapods version is defined in Podfile.lock or Gemfile.lock, the preinstalled sytem Cocoapods version will be used.
### Configuring the Step
1. Set the **Source Code Directory path** to the path of your app's source code.
1. Optionally, provide a Podfile in the **Podfile path** input.
Without a specific Podfile, the Step does a recursive search for the Podfile in the root of your app's directory, and uses the first Podfile it finds.
### Troubleshooting
If the Step fails, check out the Podfile and the Gemfile of your app. Make sure there is no compatibility issue with the different versions of your Pods.
Check that both Podfile.lock and Gemfile.lock is committed and the Cocoapods versions defined in both match.
You can set the **Execute cocoapods in verbose mode?** input to true to get detailed logs of the Step.
### Useful links
* [Caching Cocoapods](https://devcenter.bitrise.io/builds/caching/caching-cocoapods/)
* [Include your dependencies in your repository](https://devcenter.bitrise.io/tips-and-tricks/optimize-your-build-times/#include-your-dependencies-in-your-repository)
### Related Steps
* [Run yarn command](https://www.bitrise.io/integrations/steps/yarn)
* [Carthage](https://www.bitrise.io/integrations/steps/carthage)
website: https://github.com/bitrise-io/steps-cocoapods-install
source_code_url: https://github.com/bitrise-io/steps-cocoapods-install
support_url: https://github.com/bitrise-io/steps-cocoapods-install/issues
published_at: 2023-09-11T11:13:21.967268586Z
source:
git: https://github.com/bitrise-steplib/steps-cocoapods-install.git
commit: b2a6b7fe17795a9921406becf31c6fc4caadc3f7
project_type_tags:
- ios
- macos
- cordova
- ionic
- react-native
- flutter
type_tags:
- dependency
toolkit:
go:
package_name: github.com/bitrise-steplib/steps-cocoapods-install
is_always_run: false
is_skippable: false
inputs:
- command: install
opts:
description: |
CocoaPods command to use for installing dependencies.
Available options:
- `install`: Use `pod install` to download the explicit version listed in the Podfile.lock without trying to check if a newer version is available.
- `update`: Use `pod update` to update every Pod listed in your Podfile to the latest version possible.
is_required: true
summary: CocoaPods command to use for installing dependencies.
title: CocoaPods command
value_options:
- install
- update
- opts:
description: |
Directory path where the project's Podfile (and optionally Gemfile) is placed.
CocoaPods commands will be executed in this directory.
is_required: true
summary: Directory path where the project's Podfile (and optionally Gemfile) is
placed.
title: Workdir
source_root_path: $BITRISE_SOURCE_DIR
- opts:
description: |-
Path of the project's Podfile.
By specifying this input `Workdir` gets overriden by the provided file's directory path.
summary: Path of the project's Podfile.
title: Podfile path
podfile_path: ""
- opts:
description: |
Execute all CocoaPods commands in verbose mode.
If enabled the `--verbose` flag will be appended to all CocoaPods commands.
summary: Execute all CocoaPods commands in verbose mode.
title: Enable verbose logging
value_options:
- "true"
- "false"
verbose: "false"
- is_cache_disabled: "false"
opts:
description: |
Disables automatic cache content collection.
By default the Step adds the Pods directory in the `Workdir` to the Bitrise Build Cache.
Set this input to disable automatic cache item collection for this Step.
summary: Disables automatic cache content collection.
title: Disable collecting cache content
value_options:
- "true"
- "false"
================================================
FILE: steps/cocoapods-install/2.4.1/step.yml
================================================
title: Run CocoaPods install
summary: This Step uses CocoaPods' `pod install` or `pod update` command to install
your dependencies.
description: |2-
CocoaPods is a dependency manager for Swift and Objective-C projects. This Step uses CocoaPods' `pod install` or `pod update` command to install your dependencies on the virtual machine where your Bitrise build runs.
CocoaPods version is determined based on the Podfile.lock file or on the Gemfile.lock file. If your Gemfile.lock file contains the `cocoapods` gem, then the Step will call the pod `install` command with `bundle exec`. Otherwise, the Cocoapods version in the Podfile.lock will be installed as a global gem.
If no Cocoapods version is defined in Podfile.lock or Gemfile.lock, the preinstalled sytem Cocoapods version will be used.
### Configuring the Step
1. Set the **Source Code Directory path** to the path of your app's source code.
1. Optionally, provide a Podfile in the **Podfile path** input.
Without a specific Podfile, the Step does a recursive search for the Podfile in the root of your app's directory, and uses the first Podfile it finds.
### Troubleshooting
If the Step fails, check out the Podfile and the Gemfile of your app. Make sure there is no compatibility issue with the different versions of your Pods.
Check that both Podfile.lock and Gemfile.lock is committed and the Cocoapods versions defined in both match.
You can set the **Execute cocoapods in verbose mode?** input to true to get detailed logs of the Step.
### Useful links
* [Caching Cocoapods](https://devcenter.bitrise.io/builds/caching/caching-cocoapods/)
* [Include your dependencies in your repository](https://devcenter.bitrise.io/tips-and-tricks/optimize-your-build-times/#include-your-dependencies-in-your-repository)
### Related Steps
* [Run yarn command](https://www.bitrise.io/integrations/steps/yarn)
* [Carthage](https://www.bitrise.io/integrations/steps/carthage)
website: https://github.com/bitrise-io/steps-cocoapods-install
source_code_url: https://github.com/bitrise-io/steps-cocoapods-install
support_url: https://github.com/bitrise-io/steps-cocoapods-install/issues
published_at: 2024-04-16T10:17:25.14647669Z
source:
git: https://github.com/bitrise-steplib/steps-cocoapods-install.git
commit: 6506fe8f51893cb1b18f0f5b94fda608d5b8b249
project_type_tags:
- ios
- macos
- cordova
- ionic
- react-native
- flutter
type_tags:
- dependency
toolkit:
go:
package_name: github.com/bitrise-steplib/steps-cocoapods-install
is_always_run: false
is_skippable: false
inputs:
- command: install
opts:
description: |
CocoaPods command to use for installing dependencies.
Available options:
- `install`: Use `pod install` to download the explicit version listed in the Podfile.lock without trying to check if a newer version is available.
- `update`: Use `pod update` to update every Pod listed in your Podfile to the latest version possible.
is_required: true
summary: CocoaPods command to use for installing dependencies.
title: CocoaPods command
value_options:
- install
- update
- opts:
description: |
Directory path where the project's Podfile (and optionally Gemfile) is placed.
CocoaPods commands will be executed in this directory.
is_required: true
summary: Directory path where the project's Podfile (and optionally Gemfile) is
placed.
title: Workdir
source_root_path: $BITRISE_SOURCE_DIR
- opts:
description: |-
Path of the project's Podfile.
By specifying this input `Workdir` gets overriden by the provided file's directory path.
summary: Path of the project's Podfile.
title: Podfile path
podfile_path: ""
- opts:
description: |
Execute all CocoaPods commands in verbose mode.
If enabled the `--verbose` flag will be appended to all CocoaPods commands.
summary: Execute all CocoaPods commands in verbose mode.
title: Enable verbose logging
value_options:
- "true"
- "false"
verbose: "false"
- is_cache_disabled: "false"
opts:
description: |
Disables automatic cache content collection.
By default the Step adds the Pods directory in the `Workdir` to the Bitrise Build Cache.
Set this input to disable automatic cache item collection for this Step.
summary: Disables automatic cache content collection.
title: Disable collecting cache content
value_options:
- "true"
- "false"
================================================
FILE: steps/cocoapods-install/2.4.2/step.yml
================================================
title: Run CocoaPods install
summary: This Step uses CocoaPods' `pod install` or `pod update` command to install
your dependencies.
description: |2-
CocoaPods is a dependency manager for Swift and Objective-C projects. This Step uses CocoaPods' `pod install` or `pod update` command to install your dependencies on the virtual machine where your Bitrise build runs.
CocoaPods version is determined based on the Podfile.lock file or on the Gemfile.lock file. If your Gemfile.lock file contains the `cocoapods` gem, then the Step will call the pod `install` command with `bundle exec`. Otherwise, the Cocoapods version in the Podfile.lock will be installed as a global gem.
If no Cocoapods version is defined in Podfile.lock or Gemfile.lock, the preinstalled sytem Cocoapods version will be used.
### Configuring the Step
1. Set the **Source Code Directory path** to the path of your app's source code.
1. Optionally, provide a Podfile in the **Podfile path** input.
Without a specific Podfile, the Step does a recursive search for the Podfile in the root of your app's directory, and uses the first Podfile it finds.
### Troubleshooting
If the Step fails, check out the Podfile and the Gemfile of your app. Make sure there is no compatibility issue with the different versions of your Pods.
Check that both Podfile.lock and Gemfile.lock is committed and the Cocoapods versions defined in both match.
You can set the **Execute cocoapods in verbose mode?** input to true to get detailed logs of the Step.
### Useful links
* [Caching Cocoapods](https://devcenter.bitrise.io/builds/caching/caching-cocoapods/)
* [Include your dependencies in your repository](https://devcenter.bitrise.io/tips-and-tricks/optimize-your-build-times/#include-your-dependencies-in-your-repository)
### Related Steps
* [Run yarn command](https://www.bitrise.io/integrations/steps/yarn)
* [Carthage](https://www.bitrise.io/integrations/steps/carthage)
website: https://github.com/bitrise-io/steps-cocoapods-install
source_code_url: https://github.com/bitrise-io/steps-cocoapods-install
support_url: https://github.com/bitrise-io/steps-cocoapods-install/issues
published_at: 2024-04-19T12:39:07.730497932Z
source:
git: https://github.com/bitrise-steplib/steps-cocoapods-install.git
commit: a3b881e11d1f5ade2d0b7e76190890c535595649
project_type_tags:
- ios
- macos
- cordova
- ionic
- react-native
- flutter
type_tags:
- dependency
toolkit:
go:
package_name: github.com/bitrise-steplib/steps-cocoapods-install
is_always_run: false
is_skippable: false
inputs:
- command: install
opts:
description: |
CocoaPods command to use for installing dependencies.
Available options:
- `install`: Use `pod install` to download the explicit version listed in the Podfile.lock without trying to check if a newer version is available.
- `update`: Use `pod update` to update every Pod listed in your Podfile to the latest version possible.
is_required: true
summary: CocoaPods command to use for installing dependencies.
title: CocoaPods command
value_options:
- install
- update
- opts:
description: |
Directory path where the project's Podfile (and optionally Gemfile) is placed.
CocoaPods commands will be executed in this directory.
is_required: true
summary: Directory path where the project's Podfile (and optionally Gemfile) is
placed.
title: Workdir
source_root_path: $BITRISE_SOURCE_DIR
- opts:
description: |-
Path of the project's Podfile.
By specifying this input `Workdir` gets overriden by the provided file's directory path.
summary: Path of the project's Podfile.
title: Podfile path
podfile_path: ""
- opts:
description: |
Execute all CocoaPods commands in verbose mode.
If enabled the `--verbose` flag will be appended to all CocoaPods commands.
summary: Execute all CocoaPods commands in verbose mode.
title: Enable verbose logging
value_options:
- "true"
- "false"
verbose: "false"
- is_cache_disabled: "false"
opts:
description: |
Disables automatic cache content collection.
By default the Step adds the Pods directory in the `Workdir` to the Bitrise Build Cache.
Set this input to disable automatic cache item collection for this Step.
summary: Disables automatic cache content collection.
title: Disable collecting cache content
value_options:
- "true"
- "false"
================================================
FILE: steps/cocoapods-install/2.4.3/step.yml
================================================
title: Run CocoaPods install
summary: This Step uses CocoaPods' `pod install` or `pod update` command to install
your dependencies.
description: |2-
CocoaPods is a dependency manager for Swift and Objective-C projects. This Step uses CocoaPods' `pod install` or `pod update` command to install your dependencies on the virtual machine where your Bitrise build runs.
CocoaPods version is determined based on the Podfile.lock file or on the Gemfile.lock file. If your Gemfile.lock file contains the `cocoapods` gem, then the Step will call the pod `install` command with `bundle exec`. Otherwise, the Cocoapods version in the Podfile.lock will be installed as a global gem.
If no Cocoapods version is defined in Podfile.lock or Gemfile.lock, the preinstalled sytem Cocoapods version will be used.
### Configuring the Step
1. Set the **Source Code Directory path** to the path of your app's source code.
1. Optionally, provide a Podfile in the **Podfile path** input.
Without a specific Podfile, the Step does a recursive search for the Podfile in the root of your app's directory, and uses the first Podfile it finds.
### Troubleshooting
If the Step fails, check out the Podfile and the Gemfile of your app. Make sure there is no compatibility issue with the different versions of your Pods.
Check that both Podfile.lock and Gemfile.lock is committed and the Cocoapods versions defined in both match.
You can set the **Execute cocoapods in verbose mode?** input to true to get detailed logs of the Step.
### Useful links
* [Caching Cocoapods](https://devcenter.bitrise.io/builds/caching/caching-cocoapods/)
* [Include your dependencies in your repository](https://devcenter.bitrise.io/tips-and-tricks/optimize-your-build-times/#include-your-dependencies-in-your-repository)
### Related Steps
* [Run yarn command](https://www.bitrise.io/integrations/steps/yarn)
* [Carthage](https://www.bitrise.io/integrations/steps/carthage)
website: https://github.com/bitrise-io/steps-cocoapods-install
source_code_url: https://github.com/bitrise-io/steps-cocoapods-install
support_url: https://github.com/bitrise-io/steps-cocoapods-install/issues
published_at: 2025-11-11T08:06:42.785703149Z
source:
git: https://github.com/bitrise-steplib/steps-cocoapods-install.git
commit: 83cec746b299af6644131610aba0791344c1dbb0
project_type_tags:
- cordova
- flutter
- ionic
- ios
- kotlin-multiplatform
- macos
- react-native
type_tags:
- dependency
toolkit:
go:
package_name: github.com/bitrise-steplib/steps-cocoapods-install
is_always_run: false
is_skippable: false
inputs:
- command: install
opts:
description: |
CocoaPods command to use for installing dependencies.
Available options:
- `install`: Use `pod install` to download the explicit version listed in the Podfile.lock without trying to check if a newer version is available.
- `update`: Use `pod update` to update every Pod listed in your Podfile to the latest version possible.
is_required: true
summary: CocoaPods command to use for installing dependencies.
title: CocoaPods command
value_options:
- install
- update
- opts:
description: |
Directory path where the project's Podfile (and optionally Gemfile) is placed.
CocoaPods commands will be executed in this directory.
is_required: true
summary: Directory path where the project's Podfile (and optionally Gemfile) is
placed.
title: Workdir
source_root_path: $BITRISE_SOURCE_DIR
- opts:
description: |-
Path of the project's Podfile.
By specifying this input `Workdir` gets overriden by the provided file's directory path.
summary: Path of the project's Podfile.
title: Podfile path
podfile_path: ""
- opts:
description: |
Execute all CocoaPods commands in verbose mode.
If enabled the `--verbose` flag will be appended to all CocoaPods commands.
summary: Execute all CocoaPods commands in verbose mode.
title: Enable verbose logging
value_options:
- "true"
- "false"
verbose: "false"
- is_cache_disabled: "false"
opts:
description: |
Disables automatic cache content collection.
By default the Step adds the Pods directory in the `Workdir` to the Bitrise Build Cache.
Set this input to disable automatic cache item collection for this Step.
summary: Disables automatic cache content collection.
title: Disable collecting cache content
value_options:
- "true"
- "false"
================================================
FILE: steps/cocoapods-install/3.0.0/step.yml
================================================
title: Run CocoaPods install
summary: This Step uses CocoaPods' `pod install` or `pod update` command to install
your dependencies.
description: |2-
CocoaPods is a dependency manager for Swift and Objective-C projects. This Step uses CocoaPods' `pod install` or `pod update` command to install your dependencies on the virtual machine where your Bitrise build runs.
CocoaPods version is determined based on the Podfile.lock file or on the Gemfile.lock file. If your Gemfile.lock file contains the `cocoapods` gem, then the Step will call the pod `install` command with `bundle exec`. Otherwise, the Cocoapods version in the Podfile.lock will be installed as a global gem.
If no Cocoapods version is defined in Podfile.lock or Gemfile.lock, the preinstalled sytem Cocoapods version will be used.
### Configuring the Step
1. Set the **Source Code Directory path** to the path of your app's source code.
1. Optionally, provide a Podfile in the **Podfile path** input.
Without a specific Podfile, the Step does a recursive search for the Podfile in the root of your app's directory, and uses the first Podfile it finds.
### Troubleshooting
If the Step fails, check out the Podfile and the Gemfile of your app. Make sure there is no compatibility issue with the different versions of your Pods.
Check that both Podfile.lock and Gemfile.lock is committed and the Cocoapods versions defined in both match.
You can set the **Execute cocoapods in verbose mode?** input to true to get detailed logs of the Step.
### Useful links
* [Cache save](https://github.com/bitrise-steplib/bitrise-step-save-cocoapods-cache) and [restore](https://github.com/bitrise-steplib/bitrise-step-restore-cocoapods-cache) steps
* [Include your dependencies in your repository](https://devcenter.bitrise.io/tips-and-tricks/optimize-your-build-times/#include-your-dependencies-in-your-repository)
### Related Steps
* [Run yarn command](https://www.bitrise.io/integrations/steps/yarn)
* [Carthage](https://www.bitrise.io/integrations/steps/carthage)
website: https://github.com/bitrise-io/steps-cocoapods-install
source_code_url: https://github.com/bitrise-io/steps-cocoapods-install
support_url: https://github.com/bitrise-io/steps-cocoapods-install/issues
published_at: 2026-01-29T10:52:46.298540752Z
source:
git: https://github.com/bitrise-steplib/steps-cocoapods-install.git
commit: a4f132a11a5c32e9db998c63f04cce639e7dd848
project_type_tags:
- cordova
- flutter
- ionic
- ios
- kotlin-multiplatform
- macos
- react-native
type_tags:
- dependency
toolkit:
go:
package_name: github.com/bitrise-steplib/steps-cocoapods-install
is_always_run: false
is_skippable: false
inputs:
- command: install
opts:
description: |
CocoaPods command to use for installing dependencies.
Available options:
- `install`: Use `pod install` to download the explicit version listed in the Podfile.lock without trying to check if a newer version is available.
- `update`: Use `pod update` to update every Pod listed in your Podfile to the latest version possible.
is_required: true
summary: CocoaPods command to use for installing dependencies.
title: CocoaPods command
value_options:
- install
- update
- opts:
description: |
Directory path where the project's Podfile (and optionally Gemfile) is placed.
CocoaPods commands will be executed in this directory.
is_required: true
summary: Directory path where the project's Podfile (and optionally Gemfile) is
placed.
title: Workdir
source_root_path: $BITRISE_SOURCE_DIR
- opts:
description: |-
Path of the project's Podfile.
By specifying this input `Workdir` gets overriden by the provided file's directory path.
summary: Path of the project's Podfile.
title: Podfile path
podfile_path: ""
- opts:
description: |
Execute all CocoaPods commands in verbose mode.
If enabled the `--verbose` flag will be appended to all CocoaPods commands.
summary: Execute all CocoaPods commands in verbose mode.
title: Enable verbose logging
value_options:
- "true"
- "false"
verbose: "false"
================================================
FILE: steps/cocoapods-install/step-info.yml
================================================
maintainer: bitrise
================================================
FILE: steps/cocoaseeds-install/1.0.0/step.yml
================================================
title: Run CocoaSeeds install
summary: |-
You don't need to keep the installed seeds in your repo, simply add this step
and Bitrise will do the seed install for you on the VM!
description: Run CocoaSeeds install (`$ seed install`) in your App's directory.
website: https://github.com/Frugghi/cocoaseeds-bitrise
source_code_url: https://github.com/Frugghi/cocoaseeds-bitrise
support_url: https://github.com/Frugghi/cocoaseeds-bitrise/issues
published_at: 2016-05-09T04:06:27.666182532+02:00
source:
git: https://github.com/Frugghi/cocoaseeds-bitrise.git
commit: 110014bb17d8d761647b2146619923f524fe4250
host_os_tags:
- osx-10.10
project_type_tags:
- ios
type_tags:
- dependency
is_requires_admin_user: false
is_always_run: false
is_skippable: false
inputs:
- opts:
is_expand: true
is_required: true
title: Source Code Directory path.
source_root_path: $BITRISE_SOURCE_DIR
================================================
FILE: steps/cocoaseeds-install/step-info.yml
================================================
maintainer: community
================================================
FILE: steps/code-signing-setting-patch/1.0.4/step.yml
================================================
title: Code Signing Setting Patch
summary: |
Patch xcode's signing config for specific key and provisioning profile
description: |
Patch xcode's signing config for specific key and provisioning profile
website: https://github.com/j796160836/bitrise-step-code-signing-setting-patch
source_code_url: https://github.com/j796160836/bitrise-step-code-signing-setting-patch
support_url: https://github.com/j796160836/bitrise-step-code-signing-setting-patch/issues
published_at: 2019-12-05T14:56:04.819635+08:00
source:
git: https://github.com/j796160836/bitrise-step-code-signing-setting-patch.git
commit: 99a14f5751560cd6fb1737907a1bc698a62394a1
host_os_tags:
- osx-10.10
project_type_tags:
- ios
type_tags:
- utility
- code-sign
toolkit:
bash:
entry_file: step.sh
is_requires_admin_user: false
is_always_run: false
is_skippable: false
run_if: ""
inputs:
- opts:
description: "Your project.xcodeproj file path. (e.g. MyAwesomeProject/MyAwesomeProject.xcodeproj)
\ \nEven if provide `.xcodeproj` path even if using `.xcworkspace`.\n"
is_expand: true
is_required: true
summary: Your project.xcodeproj file path.
title: Xcode project.xcodeproj Path
value_options: []
xcode_xcodeproj_file: null
- opts:
description: |
Your target name of your xcode project. (e.g. MyAwesomeProject)
is_expand: true
is_required: true
summary: Project Target Name
title: Project Target
value_options: []
project_target: null
- code_sign_style: Automatic
opts:
description: "The **CODE__SIGN__STYLE** value will be replaced. \nValue either
`Automatic` or `Manual`.\n"
is_expand: true
is_required: true
summary: The **CODE__SIGN__STYLE** value will be replaced.
title: Code Sign Style
value_options:
- Automatic
- Manual
- debug_development_team: null
opts:
description: "The **debug configurations** of **DEVELOPMENT_TEAM** value will
be replaced. \nLeft blank means `None`.\n"
is_expand: true
is_required: false
summary: The **debug configurations** of **DEVELOPMENT_TEAM** value will be replaced.
title: Development Team (Debug)
value_options: []
- debug_code_sign_identity: null
opts:
description: "The **debug configurations** of **CODE__SIGN__IDENTITY** value will
be replaced. \nValue will be `iPhone Developer`, `iPhone Distribution` or
others.\n"
is_expand: true
is_required: true
summary: The **debug configurations** of **CODE__SIGN__IDENTITY** value will be
replaced.
title: Code Sign Identity (Debug)
value_options: []
- debug_provisioning_profile_specifier: null
opts:
description: "The **debug configurations** of **PROVISIONING__PROFILE__SPECIFIER**
value will be replaced. \nPlease specify the provisioning profile name which
is same as one created at **Certificates, Identifiers & Profiles** at **Apple
Developer Program**. \nDon't foget to upload that provisioning profile file.\n"
is_expand: true
is_required: true
summary: The **debug configurations** of **PROVISIONING__PROFILE__SPECIFIER**
value will be replaced.
title: Provisioning Profile Specifier (Debug)
value_options: []
- opts:
description: "The **release configurations** of **DEVELOPMENT_TEAM** value will
be replaced. \nLeft blank means `None`.\n"
is_expand: true
is_required: false
summary: The **release configurations** of **DEVELOPMENT_TEAM** value will be
replaced.
title: Development Team (Release)
value_options: []
release_development_team: null
- opts:
description: "The **release configurations** of **CODE__SIGN__IDENTITY** value
will be replaced. \nValue will be `iPhone Developer`, `iPhone Distribution`
or others.\n"
is_expand: true
is_required: true
summary: The **release configurations** of **CODE__SIGN__IDENTITY** value will
be replaced.
title: Code Sign Identity (Release)
value_options: []
release_code_sign_identity: null
- opts:
description: "The **release configurations** of **PROVISIONING__PROFILE__SPECIFIER**
value will be replaced. \nPlease specify the provisioning profile name which
is same as one created at **Certificates, Identifiers & Profiles** at **Apple
Developer Program**. \nDon't foget to upload that provisioning profile file.\n"
is_expand: true
is_required: true
summary: The **release configurations** of **PROVISIONING__PROFILE__SPECIFIER**
value will be replaced.
title: Provisioning Profile Specifier (Release)
value_options: []
release_provisioning_profile_specifier: null
- dry_run: "no"
opts:
description: |
If set this value `yes`, it will Dry-run this steps to preview the signing settings.
is_expand: true
is_required: true
summary: If set this value `yes`, it will Dry-run this steps to preview the signing
settings.
title: Dry-run preview (settings preview)
value_options:
- "no"
- "yes"
================================================
FILE: steps/code-signing-setting-patch/1.0.5/step.yml
================================================
title: Code Signing Setting Patch
summary: |
Patch xcode's signing config for specific key and provisioning profile
description: |
Patch xcode's signing config for specific key and provisioning profile
website: https://github.com/j796160836/bitrise-step-code-signing-setting-patch
source_code_url: https://github.com/j796160836/bitrise-step-code-signing-setting-patch
support_url: https://github.com/j796160836/bitrise-step-code-signing-setting-patch/issues
published_at: 2025-02-02T22:42:26.764028+08:00
source:
git: https://github.com/j796160836/bitrise-step-code-signing-setting-patch.git
commit: b3310ccb1c8bbc2eeddd7337441220b4ef9a0574
host_os_tags:
- osx-10.10
project_type_tags:
- ios
type_tags:
- utility
- code-sign
toolkit:
bash:
entry_file: step.sh
is_requires_admin_user: false
is_always_run: false
is_skippable: false
run_if: ""
inputs:
- opts:
description: "Your project.xcodeproj file path. (e.g. MyAwesomeProject/MyAwesomeProject.xcodeproj)
\ \nEven if provide `.xcodeproj` path even if using `.xcworkspace`.\n"
is_expand: true
is_required: true
summary: Your project.xcodeproj file path.
title: Xcode project.xcodeproj Path
value_options: []
xcode_xcodeproj_file: null
- opts:
description: |
Your target name of your xcode project. (e.g. MyAwesomeProject)
is_expand: true
is_required: true
summary: Project Target Name
title: Project Target
value_options: []
project_target: null
- code_sign_style: Automatic
opts:
description: "The **CODE__SIGN__STYLE** value will be replaced. \nValue either
`Automatic` or `Manual`.\n"
is_expand: true
is_required: true
summary: The **CODE__SIGN__STYLE** value will be replaced.
title: Code Sign Style
value_options:
- Automatic
- Manual
- debug_development_configuration: null
opts:
description: |
The **debug configuration** value will be replaced.
Please set your value, or by default you have to use `Debug`.
is_expand: true
is_required: true
summary: The **debug configuration** value will be replaced.
title: Development Configuration (Debug)
value_options: []
- debug_development_team: null
opts:
description: |
The **debug configurations** of **DEVELOPMENT_TEAM** value will be replaced.
Left blank means `None`.
is_expand: true
is_required: false
summary: The **debug configurations** of **DEVELOPMENT_TEAM** value will be replaced.
title: Development Team (Debug)
value_options: []
- debug_code_sign_identity: null
opts:
description: "The **debug configurations** of **CODE__SIGN__IDENTITY** value will
be replaced. \nValue will be `iPhone Developer`, `iPhone Distribution` or
others.\n"
is_expand: true
is_required: true
summary: The **debug configurations** of **CODE__SIGN__IDENTITY** value will be
replaced.
title: Code Sign Identity (Debug)
value_options: []
- debug_provisioning_profile_specifier: null
opts:
description: "The **debug configurations** of **PROVISIONING__PROFILE__SPECIFIER**
value will be replaced. \nPlease specify the provisioning profile name which
is same as one created at **Certificates, Identifiers & Profiles** at **Apple
Developer Program**. \nDon't foget to upload that provisioning profile file.\n"
is_expand: true
is_required: true
summary: The **debug configurations** of **PROVISIONING__PROFILE__SPECIFIER**
value will be replaced.
title: Provisioning Profile Specifier (Debug)
value_options: []
- opts:
description: |
The **release configuration** value will be replaced.
Please set your value, or by default you have to use `Release`.
is_expand: true
is_required: true
summary: The **release configuration** value will be replaced.
title: Release Configuration (Release)
value_options: []
release_configuration: null
- opts:
description: "The **release configurations** of **DEVELOPMENT_TEAM** value will
be replaced. \nLeft blank means `None`.\n"
is_expand: true
is_required: false
summary: The **release configurations** of **DEVELOPMENT_TEAM** value will be
replaced.
title: Development Team (Release)
value_options: []
release_development_team: null
- opts:
description: "The **release configurations** of **CODE__SIGN__IDENTITY** value
will be replaced. \nValue will be `iPhone Developer`, `iPhone Distribution`
or others.\n"
is_expand: true
is_required: true
summary: The **release configurations** of **CODE__SIGN__IDENTITY** value will
be replaced.
title: Code Sign Identity (Release)
value_options: []
release_code_sign_identity: null
- opts:
description: "The **release configurations** of **PROVISIONING__PROFILE__SPECIFIER**
value will be replaced. \nPlease specify the provisioning profile name which
is same as one created at **Certificates, Identifiers & Profiles** at **Apple
Developer Program**. \nDon't foget to upload that provisioning profile file.\n"
is_expand: true
is_required: true
summary: The **release configurations** of **PROVISIONING__PROFILE__SPECIFIER**
value will be replaced.
title: Provisioning Profile Specifier (Release)
value_options: []
release_provisioning_profile_specifier: null
- dry_run: "no"
opts:
description: |
If set this value `yes`, it will Dry-run this steps to preview the signing settings.
is_expand: true
is_required: true
summary: If set this value `yes`, it will Dry-run this steps to preview the signing
settings.
title: Dry-run preview (settings preview)
value_options:
- "no"
- "yes"
================================================
FILE: steps/code-signing-setting-patch/step-info.yml
================================================
maintainer: community
================================================
FILE: steps/codecov/1.0.0/step.yml
================================================
title: Codecov
summary: Upload your code coverage files to Codecov.io
description: Reduce technical debt with visualized test performance, faster code reviews
and workflow enhancements. You can now upload your code coverage files to Codecov
every time you kick off a build!
website: https://github.com/bitrise-io/steps-codecov
source_code_url: https://github.com/bitrise-io/steps-codecov
support_url: https://github.com/bitrise-io/steps-codecov/issues
published_at: 2015-10-28T16:54:02.524489434Z
source:
git: https://github.com/bitrise-io/steps-codecov.git
commit: be8d5b2e4a0a49f1db7d3c2ff758b3562eae7d41
host_os_tags:
- osx-10.10
project_type_tags:
- ios
type_tags:
- build
- xcode
- code_coverage
is_requires_admin_user: false
is_always_run: false
is_skippable: true
inputs:
- CODECOV_TOKEN: null
opts:
description: |
Codecov.io repository upload token
is_expand: true
is_required: true
title: Codecov.io token
================================================
FILE: steps/codecov/1.0.1/step.yml
================================================
title: Codecov
summary: Upload your code coverage files to Codecov.io
description: |-
Reduce technical debt with visualized test performance,
faster code reviews and workflow enhancements.
You can now upload your code coverage files to Codecov every time you kick off a build!
website: https://github.com/bitrise-io/steps-codecov
source_code_url: https://github.com/bitrise-io/steps-codecov
support_url: https://github.com/bitrise-io/steps-codecov/issues
published_at: 2016-04-28T16:38:51.519615349+02:00
source:
git: https://github.com/bitrise-io/steps-codecov.git
commit: 8d358bd1097328e459609053acd856200d3abf6e
host_os_tags:
- osx-10.10
- ubuntu-14.04
project_type_tags:
- ios
- android
type_tags:
- build
- xcode
- code_coverage
is_requires_admin_user: false
is_always_run: false
is_skippable: true
inputs:
- CODECOV_TOKEN: null
opts:
description: |
Codecov.io repository upload token
is_required: true
title: Codecov.io token
================================================
FILE: steps/codecov/1.1.0/step.yml
================================================
title: Codecov
summary: Upload your code coverage files to Codecov.io
description: |-
Reduce technical debt with visualized test performance,
faster code reviews and workflow enhancements.
You can now upload your code coverage files to Codecov every time you kick off a build!
website: https://github.com/bitrise-io/steps-codecov
source_code_url: https://github.com/bitrise-io/steps-codecov
support_url: https://github.com/bitrise-io/steps-codecov/issues
published_at: 2016-07-11T17:24:49.447100846+02:00
source:
git: https://github.com/bitrise-io/steps-codecov.git
commit: 69f404fbbd740092d667f7244f783e46a4272ea2
host_os_tags:
- osx-10.10
- ubuntu-14.04
project_type_tags:
- ios
- android
type_tags:
- build
- xcode
- code_coverage
is_requires_admin_user: false
is_always_run: false
is_skippable: true
inputs:
- CODECOV_TOKEN: null
opts:
description: |
Codecov.io repository upload token
is_required: true
title: Codecov.io token
- opts:
description: |-
Options to pass along to the Codecov uploader.
You can use multiple options, separated by a space.
Review all options at https://github.com/codecov/codecov-bash
Example: `--codecov -F unittests -J '^Project'`
title: Additional options for Codecov call
other_options: --codecov
================================================
FILE: steps/codecov/1.1.1/step.yml
================================================
title: Codecov
summary: Upload your code coverage files to Codecov.io
description: |-
Reduce technical debt with visualized test performance,
faster code reviews and workflow enhancements.
You can now upload your code coverage files to Codecov every time you kick off a build!
website: https://github.com/bitrise-io/steps-codecov
source_code_url: https://github.com/bitrise-io/steps-codecov
support_url: https://github.com/bitrise-io/steps-codecov/issues
published_at: 2016-07-13T12:03:19.662386335+02:00
source:
git: https://github.com/bitrise-io/steps-codecov.git
commit: 344275f40f99507cb3b992ed6063467a2078f82f
host_os_tags:
- osx-10.10
- ubuntu-14.04
project_type_tags:
- ios
- android
type_tags:
- build
- xcode
- code_coverage
is_requires_admin_user: false
is_always_run: false
is_skippable: true
inputs:
- CODECOV_TOKEN: null
opts:
description: |
Codecov.io repository upload token
is_required: true
title: Codecov.io token
- opts:
description: |-
Options to pass along to the Codecov uploader.
You can use multiple options, separated by a space.
Review all options at https://github.com/codecov/codecov-bash
Example: `--codecov -F unittests -J '^Project'`
title: Additional options for Codecov call
other_options: --codecov
================================================
FILE: steps/codecov/1.1.2/step.yml
================================================
title: Codecov
summary: Upload your code coverage files to Codecov.io
description: |-
Reduce technical debt with visualized test performance,
faster code reviews and workflow enhancements.
You can now upload your code coverage files to Codecov every time you kick off a build!
website: https://github.com/bitrise-io/steps-codecov
source_code_url: https://github.com/bitrise-io/steps-codecov
support_url: https://github.com/bitrise-io/steps-codecov/issues
published_at: 2016-07-15T17:40:04.615161953+02:00
source:
git: https://github.com/bitrise-io/steps-codecov.git
commit: 3f61db9b48088e5a9d34a27a8021802cd331284f
host_os_tags:
- osx-10.10
- ubuntu-14.04
project_type_tags:
- ios
- android
type_tags:
- build
- xcode
- code_coverage
is_requires_admin_user: false
is_always_run: false
is_skippable: true
inputs:
- CODECOV_TOKEN: null
opts:
description: |
Codecov.io repository upload token
is_required: true
title: Codecov.io token
- opts:
description: |-
Options to pass along to the Codecov uploader.
You can use multiple options, separated by a space.
Review all options at https://github.com/codecov/codecov-bash
Example: `--codecov -F unittests -J '^Project'`
title: Additional options for Codecov call
other_options: null
================================================
FILE: steps/codecov/1.1.3/step.yml
================================================
title: Codecov
summary: Upload your code coverage files to Codecov.io
description: |-
Reduce technical debt with visualized test performance,
faster code reviews and workflow enhancements.
You can now upload your code coverage files to Codecov every time you kick off a build!
website: https://github.com/bitrise-io/steps-codecov
source_code_url: https://github.com/bitrise-io/steps-codecov
support_url: https://github.com/bitrise-io/steps-codecov/issues
published_at: 2016-07-19T14:43:50.145455121+02:00
source:
git: https://github.com/bitrise-io/steps-codecov.git
commit: e245505a2069a8e9fce6e13d743d0930847808cd
host_os_tags:
- osx-10.10
- ubuntu-14.04
project_type_tags:
- ios
- android
type_tags:
- build
- xcode
- code_coverage
is_requires_admin_user: false
is_always_run: false
is_skippable: true
inputs:
- CODECOV_TOKEN: null
opts:
description: |
Codecov.io repository upload token
is_required: true
title: Codecov.io token
- opts:
description: |-
Options to pass along to the Codecov uploader.
You can use multiple options, separated by a space.
Review all options at https://github.com/codecov/codecov-bash
Example: `-F unittests -J '^Project'`
title: Additional options for Codecov call
other_options: null
================================================
FILE: steps/codecov/1.1.4/step.yml
================================================
title: Codecov
summary: Upload your code coverage files to Codecov.io
description: |-
Reduce technical debt with visualized test performance,
faster code reviews and workflow enhancements.
You can now upload your code coverage files to Codecov every time you kick off a build!
website: https://github.com/bitrise-io/steps-codecov
source_code_url: https://github.com/bitrise-io/steps-codecov
support_url: https://github.com/bitrise-io/steps-codecov/issues
published_at: 2017-03-20T11:14:29.540634683+01:00
source:
git: https://github.com/bitrise-io/steps-codecov.git
commit: ee08758b36b54b8d1aab3b70519a27adff4542b4
host_os_tags:
- osx-10.10
- ubuntu-14.04
type_tags:
- test
is_requires_admin_user: false
is_always_run: false
is_skippable: true
inputs:
- CODECOV_TOKEN: null
opts:
description: |
Codecov.io repository upload token
is_required: true
title: Codecov.io token
- opts:
description: |-
Options to pass along to the Codecov uploader.
You can use multiple options, separated by a space.
Review all options at https://github.com/codecov/codecov-bash
Example: `-F unittests -J '^Project'`
title: Additional options for Codecov call
other_options: null
================================================
FILE: steps/codecov/1.1.5/step.yml
================================================
title: Codecov
summary: Upload your code coverage files to Codecov.io
description: |-
Reduce technical debt with visualized test performance,
faster code reviews and workflow enhancements.
Now you can upload your code coverage files to Codecov every time you kick off a build!
website: https://github.com/bitrise-io/steps-codecov
source_code_url: https://github.com/bitrise-io/steps-codecov
support_url: https://github.com/bitrise-io/steps-codecov/issues
published_at: 2018-09-11T13:53:17.863038343Z
source:
git: https://github.com/bitrise-io/steps-codecov.git
commit: b4a7715b6b80f69b8eb39ea4ff432f0a08f19ea1
host_os_tags:
- osx-10.10
- ubuntu-14.04
type_tags:
- test
is_requires_admin_user: false
is_always_run: false
is_skippable: true
inputs:
- CODECOV_TOKEN: null
opts:
description: |
Codecov.io repository upload token
is_required: true
is_sensitive: true
title: Codecov.io token
- opts:
description: |-
Options to pass along to the Codecov uploader.
You can use multiple options, separated by a space.
Review all options at https://github.com/codecov/codecov-bash
For example, `-F unittests -J '^Project'`
title: Additional options for Codecov call
other_options: null
================================================
FILE: steps/codecov/1.1.6/step.yml
================================================
title: Codecov
summary: Upload your code coverage files to Codecov.io
description: |-
Reduce technical debt with visualized test performance,
faster code reviews and workflow enhancements.
Now you can upload your code coverage files to Codecov every time you kick off a build!
website: https://github.com/bitrise-io/steps-codecov
source_code_url: https://github.com/bitrise-io/steps-codecov
support_url: https://github.com/bitrise-io/steps-codecov/issues
published_at: 2019-08-15T14:28:40.435575278Z
source:
git: https://github.com/bitrise-steplib/steps-codecov.git
commit: abb26e0a2a1e7feefee0982e13c07f2da00cfb07
host_os_tags:
- osx-10.10
- ubuntu-14.04
type_tags:
- test
is_requires_admin_user: false
is_always_run: false
is_skippable: true
inputs:
- CODECOV_TOKEN: null
opts:
description: |
Codecov.io repository upload token
is_required: true
is_sensitive: true
title: Codecov.io token
- opts:
description: |-
Options to pass along to the Codecov uploader.
You can use multiple options, separated by a space.
Review all options at https://github.com/codecov/codecov-bash
For example, `-F unittests -J '^Project'`
title: Additional options for Codecov call
other_options: -C $BITRISE_GIT_COMMIT
================================================
FILE: steps/codecov/2.0.0/step.yml
================================================
title: Codecov
summary: Upload your code coverage files to Codecov.io
description: |-
Reduce technical debt with visualized test performance,
faster code reviews and workflow enhancements.
Now you can upload your code coverage files to Codecov every time you kick off a build!
website: https://codecov.io
source_code_url: https://github.com/codecov/codecov-bitrise
support_url: https://community.codecov.io
published_at: 2020-09-16T18:12:34.566646-04:00
source:
git: https://github.com/codecov/codecov-bitrise.git
commit: 238e44c7c53a19327d1262ff87fe14ebd6f188a5
host_os_tags:
- osx-10.10
- ubuntu-14.04
type_tags:
- test
is_requires_admin_user: false
is_always_run: false
is_skippable: true
inputs:
- CODECOV_TOKEN: null
opts:
description: |
Codecov.io repository upload token
is_required: true
is_sensitive: true
title: Codecov.io token
- opts:
description: |-
Options to pass along to the Codecov uploader.
You can use multiple options, separated by a space.
Review all options at https://github.com/codecov/codecov-bash
For example, `-F unittests -J '^Project'`
title: Additional options for Codecov call
other_options: -C $BITRISE_GIT_COMMIT
================================================
FILE: steps/codecov/2.0.1/step.yml
================================================
title: Codecov
summary: Upload your code coverage files to Codecov.io
description: |-
Reduce technical debt with visualized test performance,
faster code reviews and workflow enhancements.
Now you can upload your code coverage files to Codecov every time you kick off a build!
website: https://codecov.io
source_code_url: https://github.com/codecov/codecov-bitrise
support_url: https://community.codecov.io
published_at: 2020-11-16T14:11:31.606197-05:00
source:
git: https://github.com/codecov/codecov-bitrise.git
commit: 3b298fe8b9de89b884e0a9ab1704eaf431e22700
host_os_tags:
- osx-10.10
- ubuntu-14.04
type_tags:
- test
is_requires_admin_user: false
is_always_run: false
is_skippable: true
inputs:
- CODECOV_TOKEN: null
opts:
description: |
Codecov.io repository upload token
is_required: true
is_sensitive: true
title: Codecov.io token
- opts:
description: |-
Options to pass along to the Codecov uploader.
You can use multiple options, separated by a space.
Review all options at https://github.com/codecov/codecov-bash
For example, `-F unittests -J '^Project'`
title: Additional options for Codecov call
other_options: -C $BITRISE_GIT_COMMIT
================================================
FILE: steps/codecov/2.0.2/step.yml
================================================
title: Codecov
summary: Upload your code coverage files to Codecov.io
description: |-
Reduce technical debt with visualized test performance,
faster code reviews and workflow enhancements.
Now you can upload your code coverage files to Codecov every time you kick off a build!
website: https://codecov.io
source_code_url: https://github.com/codecov/codecov-bitrise
support_url: https://community.codecov.io
published_at: 2021-05-04T10:41:06.65984-04:00
source:
git: https://github.com/codecov/codecov-bitrise.git
commit: 04929d3db1d00a97cd84d5ad4fb8d77da7a02da2
host_os_tags:
- osx-10.10
- ubuntu-14.04
type_tags:
- test
is_requires_admin_user: false
is_always_run: false
is_skippable: true
inputs:
- CODECOV_TOKEN: null
opts:
description: |
Codecov.io repository upload token
is_required: true
is_sensitive: true
title: Codecov.io token
- opts:
description: |-
Options to pass along to the Codecov uploader.
You can use multiple options, separated by a space.
Review all options at https://github.com/codecov/codecov-bash
For example, `-F unittests -J '^Project'`
title: Additional options for Codecov call
other_options: -C $BITRISE_GIT_COMMIT
================================================
FILE: steps/codecov/3.0.0/step.yml
================================================
title: Codecov
summary: Upload your code coverage files to Codecov.io
description: |-
Reduce technical debt with visualized test performance,
faster code reviews and workflow enhancements.
Now you can upload your code coverage files to Codecov every time you kick off a build!
website: https://codecov.io
source_code_url: https://github.com/codecov/codecov-bitrise
support_url: https://community.codecov.io
published_at: 2021-08-06T12:32:31.826056-04:00
source:
git: https://github.com/codecov/codecov-bitrise.git
commit: 31f43b1ede55e770d642280d97e16e4a166c4d16
host_os_tags:
- osx-10.10
- ubuntu-14.04
type_tags:
- test
is_requires_admin_user: false
is_always_run: false
is_skippable: true
inputs:
- CODECOV_TOKEN: null
opts:
description: |
Codecov.io repository upload token
is_required: true
is_sensitive: true
title: Codecov.io token
- OS: null
opts:
description: |
Name of the OS being used (options are "alpine" | "linux" | "macos")
is_required: true
is_sensitive: false
title: OS Name
- opts:
description: |-
Options to pass along to the Codecov uploader.
You can use multiple options, separated by a space.
Review all options at https://github.com/codecov/uploader
title: Additional options for Codecov call
other_options: -C $BITRISE_GIT_COMMIT
================================================
FILE: steps/codecov/3.0.1/step.yml
================================================
title: Codecov
summary: Upload your code coverage files to Codecov.io
description: |-
Reduce technical debt with visualized test performance,
faster code reviews and workflow enhancements.
Now you can upload your code coverage files to Codecov every time you kick off a build!
website: https://codecov.io
source_code_url: https://github.com/codecov/codecov-bitrise
support_url: https://community.codecov.io
published_at: 2021-08-30T16:12:16.005905-04:00
source:
git: https://github.com/codecov/codecov-bitrise.git
commit: 269473d94131c80d70d7a2e2c52ab32b70f0e6ec
host_os_tags:
- osx-10.10
- ubuntu-14.04
type_tags:
- test
is_requires_admin_user: false
is_always_run: false
is_skippable: true
inputs:
- CODECOV_TOKEN: null
opts:
description: |
Codecov.io repository upload token
is_required: true
is_sensitive: true
title: Codecov.io token
- OS: null
opts:
description: |
Name of the OS being used (options are "alpine" | "linux" | "macos")
is_required: true
is_sensitive: false
title: OS Name
- opts:
description: |-
Options to pass along to the Codecov uploader.
You can use multiple options, separated by a space.
Review all options at https://github.com/codecov/uploader
title: Additional options for Codecov call
other_options: -C $BITRISE_GIT_COMMIT
================================================
FILE: steps/codecov/3.1.0/step.yml
================================================
title: Codecov
summary: Upload your code coverage files to Codecov.io
description: |-
Reduce technical debt with visualized test performance,
faster code reviews and workflow enhancements.
Now you can upload your code coverage files to Codecov every time you kick off a build!
website: https://codecov.io
source_code_url: https://github.com/codecov/codecov-bitrise
support_url: https://community.codecov.io
published_at: 2021-09-13T09:20:23.565651-04:00
source:
git: https://github.com/codecov/codecov-bitrise.git
commit: 60c8786caa552e69dae61ef9bb94a68a7d686ac5
host_os_tags:
- osx-10.10
- ubuntu-14.04
type_tags:
- test
is_requires_admin_user: false
is_always_run: false
is_skippable: true
inputs:
- CODECOV_TOKEN: null
opts:
description: |
Codecov.io repository upload token
is_required: true
is_sensitive: true
title: Codecov.io token
- OS: null
opts:
description: |
Name of the OS being used (options are "alpine" | "linux" | "macos")
is_required: true
is_sensitive: false
title: OS Name
- VERSION: latest
opts:
description: |
Version of the Codecov Uploader to use (e.g. `v0.1.0_8880`)
is_required: false
is_sensitive: false
title: Uploader Version
- opts:
description: |-
Options to pass along to the Codecov uploader.
You can use multiple options, separated by a space.
Review all options at https://github.com/codecov/uploader
title: Additional options for Codecov call
other_options: -C $BITRISE_GIT_COMMIT
================================================
FILE: steps/codecov/3.1.1/step.yml
================================================
title: Codecov
summary: Upload your code coverage files to Codecov.io
description: |-
Reduce technical debt with visualized test performance,
faster code reviews and workflow enhancements.
Now you can upload your code coverage files to Codecov every time you kick off a build!
website: https://codecov.io
source_code_url: https://github.com/codecov/codecov-bitrise
support_url: https://community.codecov.io
published_at: 2021-09-24T10:04:16.692375-04:00
source:
git: https://github.com/codecov/codecov-bitrise.git
commit: 6e8817d21009d9aabf9ca67bdf684fcc6afdc257
host_os_tags:
- osx-10.10
- ubuntu-14.04
type_tags:
- test
is_requires_admin_user: false
is_always_run: false
is_skippable: true
inputs:
- CODECOV_TOKEN: null
opts:
description: |
Codecov.io repository upload token
is_required: true
is_sensitive: true
title: Codecov.io token
- OS: null
opts:
description: |
Name of the OS being used (options are "alpine" | "linux" | "macos")
is_required: true
is_sensitive: false
title: OS Name
- VERSION: latest
opts:
description: |
Version of the Codecov Uploader to use (e.g. `v0.1.0_8880`)
is_required: false
is_sensitive: false
title: Uploader Version
- opts:
description: |-
Options to pass along to the Codecov uploader.
You can use multiple options, separated by a space.
Review all options at https://github.com/codecov/uploader
title: Additional options for Codecov call
other_options: -C $BITRISE_GIT_COMMIT
================================================
FILE: steps/codecov/3.1.2/step.yml
================================================
title: Codecov
summary: Upload your code coverage files to Codecov.io
description: |-
Reduce technical debt with visualized test performance,
faster code reviews and workflow enhancements.
Now you can upload your code coverage files to Codecov every time you kick off a build!
website: https://codecov.io
source_code_url: https://github.com/codecov/codecov-bitrise
support_url: https://community.codecov.io
published_at: 2021-10-05T08:44:25.695726-04:00
source:
git: https://github.com/codecov/codecov-bitrise.git
commit: cdc645fdb07dcf05f1d170de0a4de2dd891fa929
host_os_tags:
- osx-10.10
- ubuntu-14.04
type_tags:
- test
is_requires_admin_user: false
is_always_run: false
is_skippable: true
inputs:
- CODECOV_TOKEN: null
opts:
description: |
Codecov.io repository upload token
is_required: true
is_sensitive: true
title: Codecov.io token
- OS: null
opts:
description: |
Name of the OS being used (options are "alpine" | "linux" | "macos")
is_required: true
is_sensitive: false
title: OS Name
- VERSION: latest
opts:
description: |
Version of the Codecov Uploader to use (e.g. `v0.1.0_8880`)
is_required: false
is_sensitive: false
title: Uploader Version
- opts:
description: |-
Options to pass along to the Codecov uploader.
You can use multiple options, separated by a space.
Review all options at https://github.com/codecov/uploader
title: Additional options for Codecov call
other_options: -C $BITRISE_GIT_COMMIT
================================================
FILE: steps/codecov/3.1.3/step.yml
================================================
title: Codecov
summary: Upload your code coverage files to Codecov.io
description: |-
Reduce technical debt with visualized test performance,
faster code reviews and workflow enhancements.
Now you can upload your code coverage files to Codecov every time you kick off a build!
website: https://codecov.io
source_code_url: https://github.com/codecov/codecov-bitrise
support_url: https://community.codecov.io
published_at: 2022-03-21T14:12:20.467504-04:00
source:
git: https://github.com/codecov/codecov-bitrise.git
commit: 32742fd32ec5a23ea1b66d58345e1120b906d0d7
host_os_tags:
- osx-10.10
- ubuntu-14.04
type_tags:
- test
is_requires_admin_user: false
is_always_run: false
is_skippable: true
inputs:
- CODECOV_TOKEN: null
opts:
description: |
Codecov.io repository upload token
is_required: true
is_sensitive: true
title: Codecov.io token
- OS: null
opts:
description: |
Name of the OS being used (options are "alpine" | "linux" | "macos")
is_required: true
is_sensitive: false
title: OS Name
- VERSION: latest
opts:
description: |
Version of the Codecov Uploader to use (e.g. `v0.1.0_8880`)
is_required: false
is_sensitive: false
title: Uploader Version
- opts:
description: |-
Options to pass along to the Codecov uploader.
You can use multiple options, separated by a space.
Review all options at https://github.com/codecov/uploader
title: Additional options for Codecov call
other_options: -C $GIT_CLONE_COMMIT_HASH
================================================
FILE: steps/codecov/3.2.0/step.yml
================================================
title: Codecov
summary: Upload your code coverage files to Codecov.io
description: |-
Reduce technical debt with visualized test performance,
faster code reviews and workflow enhancements.
Now you can upload your code coverage files to Codecov every time you kick off a build!
website: https://codecov.io
source_code_url: https://github.com/codecov/codecov-bitrise
support_url: https://community.codecov.io
published_at: 2022-10-12T14:50:29.30384-04:00
source:
git: https://github.com/codecov/codecov-bitrise.git
commit: a8c71eac593f622e49d26fceed644cb2feac3992
type_tags:
- test
is_requires_admin_user: false
is_always_run: false
is_skippable: true
inputs:
- CODECOV_TOKEN: null
opts:
description: |
Codecov.io repository upload token
is_required: true
is_sensitive: true
title: Codecov.io token
- OS: null
opts:
description: |
Name of the OS being used (options are "alpine" | "linux" | "macos")
is_required: true
is_sensitive: false
title: OS Name
- VERSION: latest
opts:
description: |
Version of the Codecov Uploader to use (e.g. `v0.1.0_8880`)
is_required: false
is_sensitive: false
title: Uploader Version
- XCODE_ARCHIVE_PATH: null
opts:
description: |
Specify the xcode archive path. Likely specified as the -resultBundlePath and should end in .xcresult. Only needed if running with xcode support
is_required: false
is_sensitive: false
title: Xcode archive path
- opts:
description: |-
Options to pass along to the Codecov uploader.
You can use multiple options, separated by a space.
Review all options at https://github.com/codecov/uploader
title: Additional options for Codecov call
other_options: -C $GIT_CLONE_COMMIT_HASH
================================================
FILE: steps/codecov/3.3.0/step.yml
================================================
title: Codecov
summary: Upload your code coverage files to Codecov.io
description: |-
Reduce technical debt with visualized test performance,
faster code reviews and workflow enhancements.
Now you can upload your code coverage files to Codecov every time you kick off a build!
website: https://codecov.io
source_code_url: https://github.com/codecov/codecov-bitrise
support_url: https://community.codecov.io
published_at: 2023-06-27T09:35:26.180619-04:00
source:
git: https://github.com/codecov/codecov-bitrise.git
commit: 133598e022aca08c75e8af1d32a4a794010336c0
type_tags:
- test
is_requires_admin_user: false
is_always_run: false
is_skippable: true
inputs:
- CODECOV_TOKEN: null
opts:
description: |
Codecov.io repository upload token
is_required: true
is_sensitive: true
title: Codecov.io token
- OS: null
opts:
description: |
Name of the OS being used (options are "alpine" | "linux" | "macos")
is_required: true
is_sensitive: false
title: OS Name
- VERSION: latest
opts:
description: |
Version of the Codecov Uploader to use (e.g. `v0.6.1`)
is_required: false
is_sensitive: false
title: Uploader Version
- XCODE_ARCHIVE_PATH: null
opts:
description: |
--Deprecating-- Specify the xcode archive path. Likely specified as the -resultBundlePath and should end in .xcresult. Only needed if running with xcode support
title: '[Deprecating] Xcode archive path'
- ENABLE_SWIFT_CONVERSION: "false"
opts:
description: |
Enable swift coverage conversation.
is_required: false
is_sensitive: false
title: Enable swift coverage
value_options:
- "true"
- "false"
- SWIFT_PROJECT: null
opts:
description: |
Specify the swift project. Will only work properly if ENABLE_SWIFT_CONVERSION is set to `true`
is_required: false
is_sensitive: false
title: Swift project name
- opts:
description: |-
Options to pass along to the Codecov uploader.
You can use multiple options, separated by a space.
Review all options at https://github.com/codecov/uploader
title: Additional options for Codecov call
other_options: -C $GIT_CLONE_COMMIT_HASH
================================================
FILE: steps/codecov/3.3.1/step.yml
================================================
title: Codecov
summary: Upload your code coverage files to Codecov.io
description: |-
Reduce technical debt with visualized test performance,
faster code reviews and workflow enhancements.
Now you can upload your code coverage files to Codecov every time you kick off a build!
website: https://codecov.io
source_code_url: https://github.com/codecov/codecov-bitrise
support_url: https://community.codecov.io
published_at: 2023-08-01T08:05:02.04114-07:00
source:
git: https://github.com/codecov/codecov-bitrise.git
commit: 8227aa35554f73cc9069890acd077db4e76ba2f6
type_tags:
- test
is_requires_admin_user: false
is_always_run: false
is_skippable: true
inputs:
- CODECOV_TOKEN: null
opts:
description: |
Codecov.io repository upload token
is_required: true
is_sensitive: true
title: Codecov.io token
- OS: null
opts:
description: |
Name of the OS being used (options are "alpine" | "linux" | "macos")
is_required: true
is_sensitive: false
title: OS Name
- VERSION: latest
opts:
description: |
Version of the Codecov Uploader to use (e.g. `v0.6.1`)
is_required: false
is_sensitive: false
title: Uploader Version
- XCODE_ARCHIVE_PATH: null
opts:
description: |
--Deprecating-- Specify the xcode archive path. Likely specified as the -resultBundlePath and should end in .xcresult. Only needed if running with xcode support
title: '[Deprecating] Xcode archive path'
- ENABLE_SWIFT_CONVERSION: null
opts:
description: |
Enable swift coverage conversation by setting to 'true'.
is_required: false
is_sensitive: false
title: Enable swift coverage
- SWIFT_PROJECT: null
opts:
description: |
Specify the swift project. Will only work properly if ENABLE_SWIFT_CONVERSION is set to `true`
is_required: false
is_sensitive: false
title: Swift project name
- opts:
description: |-
Options to pass along to the Codecov uploader.
You can use multiple options, separated by a space.
Review all options at https://github.com/codecov/uploader
title: Additional options for Codecov call
other_options: -C $GIT_CLONE_COMMIT_HASH
================================================
FILE: steps/codecov/3.3.2/step.yml
================================================
title: Codecov
summary: Upload your code coverage files to Codecov.io
description: |-
Reduce technical debt with visualized test performance,
faster code reviews and workflow enhancements.
Now you can upload your code coverage files to Codecov every time you kick off a build!
website: https://codecov.io
source_code_url: https://github.com/codecov/codecov-bitrise
support_url: https://community.codecov.io
published_at: 2023-08-30T10:15:25.114054-07:00
source:
git: https://github.com/codecov/codecov-bitrise.git
commit: 3eb71a9c1046c65138b5ef3d4b651806383d3e62
type_tags:
- test
is_requires_admin_user: false
is_always_run: false
is_skippable: true
inputs:
- CODECOV_TOKEN: null
opts:
description: |
Codecov.io repository upload token
is_required: true
is_sensitive: true
title: Codecov.io token
- OS: null
opts:
description: |
Name of the OS being used (options are "alpine" | "linux" | "macos")
is_required: true
is_sensitive: false
title: OS Name
- VERSION: latest
opts:
description: |
Version of the Codecov Uploader to use (e.g. `v0.6.1`)
is_required: false
is_sensitive: false
title: Uploader Version
- XCODE_ARCHIVE_PATH: null
opts:
description: |
--Deprecating-- Specify the xcode archive path. Likely specified as the -resultBundlePath and should end in .xcresult. Only needed if running with xcode support
title: '[Deprecating] Xcode archive path'
- ENABLE_SWIFT_CONVERSION: null
opts:
description: |
Enable swift coverage conversation by setting to 'true'.
is_required: false
is_sensitive: false
title: Enable swift coverage
- SWIFT_PROJECT: null
opts:
description: |
Specify the swift project. Will only work properly if ENABLE_SWIFT_CONVERSION is set to `true`
is_required: false
is_sensitive: false
title: Swift project name
- opts:
description: |-
Options to pass along to the Codecov uploader.
You can use multiple options, separated by a space.
Review all options at https://github.com/codecov/uploader
title: Additional options for Codecov call
other_options: -C $GIT_CLONE_COMMIT_HASH
================================================
FILE: steps/codecov/3.3.3/step.yml
================================================
title: Codecov
summary: Upload your code coverage files to Codecov.io
description: |-
Reduce technical debt with visualized test performance,
faster code reviews and workflow enhancements.
Now you can upload your code coverage files to Codecov every time you kick off a build!
website: https://codecov.io
source_code_url: https://github.com/codecov/codecov-bitrise
support_url: https://community.codecov.io
published_at: 2023-09-15T09:34:57.29313-07:00
source:
git: https://github.com/codecov/codecov-bitrise.git
commit: e8d493c4251ae0d9032d54f17b97ff9351982bf3
type_tags:
- test
is_requires_admin_user: false
is_always_run: false
is_skippable: true
inputs:
- CODECOV_TOKEN: null
opts:
description: |
Codecov.io repository upload token
is_required: true
is_sensitive: true
title: Codecov.io token
- OS: null
opts:
description: |
Name of the OS being used (options are "alpine" | "linux" | "macos")
is_required: true
is_sensitive: false
title: OS Name
- VERSION: latest
opts:
description: |
Version of the Codecov Uploader to use (e.g. `v0.6.1`)
is_required: false
is_sensitive: false
title: Uploader Version
- XCODE_ARCHIVE_PATH: null
opts:
description: |
--Deprecating-- Specify the xcode archive path. Likely specified as the -resultBundlePath and should end in .xcresult. Only needed if running with xcode support
title: '[Deprecating] Xcode archive path'
- ENABLE_SWIFT_CONVERSION: null
opts:
description: |
Enable swift coverage conversation by setting to 'true'.
is_required: false
is_sensitive: false
title: Enable swift coverage
- SWIFT_PROJECT: null
opts:
description: |
Specify the swift project. Will only work properly if ENABLE_SWIFT_CONVERSION is set to `true`
is_required: false
is_sensitive: false
title: Swift project name
- opts:
description: |-
Options to pass along to the Codecov uploader.
You can use multiple options, separated by a space.
Review all options at https://github.com/codecov/uploader
title: Additional options for Codecov call
other_options: -C $GIT_CLONE_COMMIT_HASH
================================================
FILE: steps/codecov/4.0.0/step.yml
================================================
title: Codecov
summary: Upload your code coverage files to Codecov.io
description: |-
Reduce technical debt with visualized test performance,
faster code reviews and workflow enhancements.
Now you can upload your code coverage files to Codecov
every time you kick off a build!
website: https://codecov.io
source_code_url: https://github.com/codecov/codecov-bitrise
support_url: https://community.codecov.io
published_at: 2024-10-18T09:37:03.510925-05:00
source:
git: https://github.com/codecov/codecov-bitrise.git
commit: ed2fe9c5c9b9a87e07d4e3547ffb6000651b35d8
type_tags:
- test
is_requires_admin_user: false
is_always_run: false
is_skippable: true
inputs:
- CC_BINARY: null
opts:
description: The file location of a pre-downloaded version of the CLI. If specified,
integrity checking will be bypassed.
is_required: false
is_sensitive: false
title: binary
- CC_BRANCH: null
opts:
description: Branch to which this commit belongs
is_required: false
is_sensitive: false
title: branch
- CC_BUILD: null
opts:
description: Specify the build number manually
is_required: false
is_sensitive: false
title: build
- CC_BUILD_URL: null
opts:
description: The URL of the build where this is running
is_required: false
is_sensitive: false
title: build_url
- CC_CODE: null
opts:
description: The code of the report if using local upload. If unsure, leave default.
Read more here https://docs.codecov.com/docs/the-codecov-cli#how-to-use-local-upload
is_required: false
is_sensitive: false
title: code
- CC_DIR: null
opts:
description: Folder to search for coverage files. Default to the current working
directory
is_required: false
is_sensitive: false
title: dir
- CC_DISABLE_FILE_FIXES: "false"
opts:
description: Disable file fixes to ignore common lines from coverage (e.g. blank
lines or empty brackets). Read more here https://docs.codecov.com/docs/fixing-reports
is_required: false
is_sensitive: false
title: disable_file_fixes
value_options:
- "true"
- "false"
- CC_DISABLE_SEARCH: "false"
opts:
description: Disable search for coverage files. This is helpful when specifying
what files you want to upload with the files option.
is_required: false
is_sensitive: false
title: disable_search
value_options:
- "true"
- "false"
- CC_DRY_RUN: "false"
opts:
description: Don't upload files to Codecov.
is_required: false
is_sensitive: false
title: dry_run
value_options:
- "true"
- "false"
- CC_ENTERPRISE_URL: null
opts:
description: Set to the Codecov instance URl. Only applicable to some Enterprise
users.
is_required: false
is_sensitive: false
title: enterprise_url
- CC_ENV: null
opts:
description: Specify environment variables to be included with this build
is_required: false
is_sensitive: false
title: env
- CC_EXCLUDES: null
opts:
description: Comma-separated list of folders to exclude from search.
is_required: false
is_sensitive: false
title: excludes
- CC_FAIL_ON_ERROR: "false"
opts:
description: Exit with non-zero code in case of error.
is_required: false
is_sensitive: false
title: fail_on_error
value_options:
- "true"
- "false"
- CC_FILES: null
opts:
description: Comma-separated list of explicit files to upload. These will be added
to the coverage files found for upload. If you wish to only upload the specified
files, please consider using disable-search to disable uploading other files.
is_required: false
is_sensitive: false
title: files
- CC_FLAGS: null
opts:
description: Comma-separated list of flags to upload to group coverage metrics.
is_required: false
is_sensitive: false
title: flags
- CC_GCOV_ARGS: null
opts:
description: Extra arguments to pass to gcov
is_required: false
is_sensitive: false
title: gcov_args
- CC_GCOV_EXECUTABLE: null
opts:
description: gcov executable to run. Defaults to 'gcov'
is_required: false
is_sensitive: false
title: gcov_executable
- CC_GCOV_IGNORE: null
opts:
description: Paths to ignore during gcov gathering
is_required: false
is_sensitive: false
title: gcov_ignore
- CC_GCOV_INCLUDE: null
opts:
description: Paths to include during gcov gathering
is_required: false
is_sensitive: false
title: gcov_include
- CC_GIT_SERVICE: null
opts:
description: One of [github|gitlab|bitbucket|github_enterprise|gitlab_enterprise|bitbucket_server]
is_required: false
is_sensitive: false
title: git_service
- CC_HANDLE_NO_REPORTS_FOUND: "false"
opts:
description: Raise no exceptions when no coverage reports are found.
is_required: false
is_sensitive: false
title: handle_no_reports_found
value_options:
- "true"
- "false"
- CC_JOB_CODE: null
opts:
description: ""
is_required: false
is_sensitive: false
title: job_code
- CC_LEGACY: "false"
opts:
description: Use the legacy upload endpoint.
is_required: false
is_sensitive: false
title: legacy
value_options:
- "true"
- "false"
- CC_NAME: null
opts:
description: Custom defined name of the upload. Visible in Codecov UI
is_required: false
is_sensitive: false
title: name
- CC_NETWORK_FILTER: null
opts:
description: Specify a filter on the files listed in the network section of the
Codecov report. This will only add files whose path begin with the specified
filter. Useful for upload-specific path fixing.
is_required: false
is_sensitive: false
title: network_filter
- CC_NETWORK_PREFIX: null
opts:
description: Specify a prefix on files listed in the network section of the Codecov
report. Useful to help resolve path fixing.
is_required: false
is_sensitive: false
title: network_prefix
- CC_NETWORK_ROOT_FOLDER: null
opts:
description: Root folder from which to consider paths on the network section.
Defaults to current working directory.
is_required: false
is_sensitive: false
title: network_root_folder
- CC_PARENT_SHA: null
opts:
description: SHA (with 40 chars) of what should be the parent of this commit.
is_required: false
is_sensitive: false
title: parent_sha
- CC_PLUGINS: null
opts:
description: Comma-separated list of plugins to run. Specify `noop` to turn off
all plugins
is_required: false
is_sensitive: false
title: plugins
- CC_PR: null
opts:
description: Specify the pull request number manually. Used to override pre-existing
CI environment variables.
is_required: false
is_sensitive: false
title: pr
- CC_REPORT_TYPE: null
opts:
description: The type of file to upload, coverage by default. Possible values
are "testing", "coverage".
is_required: false
is_sensitive: false
title: report_type
- CC_SHA: null
opts:
description: Commit SHA (with 40 chars)
is_required: false
is_sensitive: false
title: sha
- CC_SKIP_VALIDATION: "false"
opts:
description: Skip integrity checking of the CLI. This is NOT recommended.
is_required: false
is_sensitive: false
title: skip_validation
value_options:
- "true"
- "false"
- CC_SLUG: null
opts:
description: Set to the owner/repo slug used instead of the private repo token.
Only applicable to some Enterprise users.
is_required: false
is_sensitive: false
title: slug
- CC_SWIFT_PROJECT: null
opts:
description: Specify the swift project name. Useful for optimization.
is_required: false
is_sensitive: false
title: swift_project
- CC_TOKEN: null
opts:
description: The repository upload token given in Codecov.io
is_required: false
is_sensitive: false
title: token
- CC_VERBOSE: "false"
opts:
description: Use verbose logging in the CLI
is_required: false
is_sensitive: false
title: verbose
value_options:
- "true"
- "false"
- CC_VERSION: latest
opts:
description: Which version of the Codecov CLI to use (defaults to 'latest')
is_required: false
is_sensitive: false
title: version
================================================
FILE: steps/codecov/4.1.0/step.yml
================================================
title: Codecov
summary: Upload your code coverage files to Codecov.io
description: |-
Reduce technical debt with visualized test performance,
faster code reviews and workflow enhancements.
Now you can upload your code coverage files to Codecov
every time you kick off a build!
website: https://codecov.io
source_code_url: https://github.com/codecov/codecov-bitrise
support_url: https://community.codecov.io
published_at: 2024-12-05T18:13:55.079548-03:00
source:
git: https://github.com/codecov/codecov-bitrise.git
commit: 38be381ae4d5ee1b0909e3211e4460e0ff441526
type_tags:
- test
is_requires_admin_user: false
is_always_run: false
is_skippable: true
inputs:
- CC_BINARY: null
opts:
description: The file location of a pre-downloaded version of the CLI. If specified,
integrity checking will be bypassed.
is_required: false
is_sensitive: false
title: binary
- CC_BRANCH: null
opts:
description: Branch to which this commit belongs
is_required: false
is_sensitive: false
title: branch
- CC_BUILD: null
opts:
description: Specify the build number manually
is_required: false
is_sensitive: false
title: build
- CC_BUILD_URL: null
opts:
description: The URL of the build where this is running
is_required: false
is_sensitive: false
title: build_url
- CC_CODE: null
opts:
description: The code of the report if using local upload. If unsure, leave default.
Read more here https://docs.codecov.com/docs/the-codecov-cli#how-to-use-local-upload
is_required: false
is_sensitive: false
title: code
- CC_DIR: null
opts:
description: Folder to search for coverage files. Default to the current working
directory
is_required: false
is_sensitive: false
title: dir
- CC_DISABLE_FILE_FIXES: "false"
opts:
description: Disable file fixes to ignore common lines from coverage (e.g. blank
lines or empty brackets). Read more here https://docs.codecov.com/docs/fixing-reports
is_required: false
is_sensitive: false
title: disable_file_fixes
value_options:
- "true"
- "false"
- CC_DISABLE_SEARCH: "false"
opts:
description: Disable search for coverage files. This is helpful when specifying
what files you want to upload with the files option.
is_required: false
is_sensitive: false
title: disable_search
value_options:
- "true"
- "false"
- CC_DRY_RUN: "false"
opts:
description: Don't upload files to Codecov.
is_required: false
is_sensitive: false
title: dry_run
value_options:
- "true"
- "false"
- CC_ENTERPRISE_URL: null
opts:
description: Set to the Codecov instance URl. Only applicable to some Enterprise
users.
is_required: false
is_sensitive: false
title: enterprise_url
- CC_ENV: null
opts:
description: Specify environment variables to be included with this build
is_required: false
is_sensitive: false
title: env
- CC_EXCLUDES: null
opts:
description: Comma-separated list of folders to exclude from search.
is_required: false
is_sensitive: false
title: excludes
- CC_FAIL_ON_ERROR: "false"
opts:
description: Exit with non-zero code in case of error.
is_required: false
is_sensitive: false
title: fail_on_error
value_options:
- "true"
- "false"
- CC_FILES: null
opts:
description: Comma-separated list of explicit files to upload. These will be added
to the coverage files found for upload. If you wish to only upload the specified
files, please consider using disable-search to disable uploading other files.
is_required: false
is_sensitive: false
title: files
- CC_FLAGS: null
opts:
description: Comma-separated list of flags to upload to group coverage metrics.
is_required: false
is_sensitive: false
title: flags
- CC_GCOV_ARGS: null
opts:
description: Extra arguments to pass to gcov
is_required: false
is_sensitive: false
title: gcov_args
- CC_GCOV_EXECUTABLE: null
opts:
description: gcov executable to run. Defaults to 'gcov'
is_required: false
is_sensitive: false
title: gcov_executable
- CC_GCOV_IGNORE: null
opts:
description: Paths to ignore during gcov gathering
is_required: false
is_sensitive: false
title: gcov_ignore
- CC_GCOV_INCLUDE: null
opts:
description: Paths to include during gcov gathering
is_required: false
is_sensitive: false
title: gcov_include
- CC_GIT_SERVICE: null
opts:
description: One of [github|gitlab|bitbucket|github_enterprise|gitlab_enterprise|bitbucket_server]
is_required: false
is_sensitive: false
title: git_service
- CC_HANDLE_NO_REPORTS_FOUND: "false"
opts:
description: Raise no exceptions when no coverage reports are found.
is_required: false
is_sensitive: false
title: handle_no_reports_found
value_options:
- "true"
- "false"
- CC_JOB_CODE: null
opts:
description: ""
is_required: false
is_sensitive: false
title: job_code
- CC_LEGACY: "false"
opts:
description: Use the legacy upload endpoint.
is_required: false
is_sensitive: false
title: legacy
value_options:
- "true"
- "false"
- CC_NAME: null
opts:
description: Custom defined name of the upload. Visible in Codecov UI
is_required: false
is_sensitive: false
title: name
- CC_NETWORK_FILTER: null
opts:
description: Specify a filter on the files listed in the network section of the
Codecov report. This will only add files whose path begin with the specified
filter. Useful for upload-specific path fixing.
is_required: false
is_sensitive: false
title: network_filter
- CC_NETWORK_PREFIX: null
opts:
description: Specify a prefix on files listed in the network section of the Codecov
report. Useful to help resolve path fixing.
is_required: false
is_sensitive: false
title: network_prefix
- CC_NETWORK_ROOT_FOLDER: null
opts:
description: Root folder from which to consider paths on the network section.
Defaults to current working directory.
is_required: false
is_sensitive: false
title: network_root_folder
- CC_PARENT_SHA: null
opts:
description: SHA (with 40 chars) of what should be the parent of this commit.
is_required: false
is_sensitive: false
title: parent_sha
- CC_PLUGINS: null
opts:
description: Comma-separated list of plugins to run. Specify `noop` to turn off
all plugins
is_required: false
is_sensitive: false
title: plugins
- CC_PR: null
opts:
description: Specify the pull request number manually. Used to override pre-existing
CI environment variables.
is_required: false
is_sensitive: false
title: pr
- CC_REPORT_TYPE: null
opts:
description: The type of file to upload, coverage by default. Possible values
are "testing", "coverage".
is_required: false
is_sensitive: false
title: report_type
- CC_SHA: null
opts:
description: Commit SHA (with 40 chars)
is_required: false
is_sensitive: false
title: sha
- CC_SKIP_VALIDATION: "false"
opts:
description: Skip integrity checking of the CLI. This is NOT recommended.
is_required: false
is_sensitive: false
title: skip_validation
value_options:
- "true"
- "false"
- CC_SLUG: null
opts:
description: Set to the owner/repo slug used instead of the private repo token.
Only applicable to some Enterprise users.
is_required: false
is_sensitive: false
title: slug
- CC_SWIFT_PROJECT: null
opts:
description: Specify the swift project name. Useful for optimization.
is_required: false
is_sensitive: false
title: swift_project
- CC_TOKEN: null
opts:
description: The repository upload token given in Codecov.io
is_required: false
is_sensitive: false
title: token
- CC_VERBOSE: "false"
opts:
description: Use verbose logging in the CLI
is_required: false
is_sensitive: false
title: verbose
value_options:
- "true"
- "false"
- CC_VERSION: latest
opts:
description: Which version of the Codecov CLI to use (defaults to 'latest')
is_required: false
is_sensitive: false
title: version
================================================
FILE: steps/codecov/step-info.yml
================================================
maintainer: verified
================================================
FILE: steps/codified-security-bitrise/1.0.0/step.yml
================================================
title: Codified Security
summary: This step uploads your app to Codified Security for automated mobile app
security testing
description: |-
This step uploads your app to Codified Security for automated mobile app security testing.
https://codifiedsecurity.com
website: https://bitbucket.org/codifiedldn/codified-security-bitrise
published_at: 2017-04-24T11:19:06.686290651+02:00
source:
git: https://bitbucket.org/codifiedldn/codified-security-bitrise.git
commit: d941c0e648ec869b99ea746fb423482903a8a069
project_type_tags:
- ios
- android
- xamarin
type_tags:
- test
is_requires_admin_user: false
is_always_run: false
inputs:
- codified_security_api_key: $CODIFIED_SECURITY_API_KEY
opts:
description: You can obtain your key from https://dashboard.codifiedsecurity.com/settings.
You'll find it under Integrations tab as Api Key.
is_required: true
title: Codified Security API Key
- ipa_path: $BITRISE_IPA_PATH
opts:
is_required: false
title: IPA path
- apk_path: $BITRISE_APK_PATH
opts:
is_required: false
title: APK path
================================================
FILE: steps/codified-security-bitrise/1.0.1/step.yml
================================================
title: Codified Security
summary: This step uploads your app to Codified Security for automated mobile app
security testing
description: |-
This step uploads your app to Codified Security for automated mobile app security testing.
https://codifiedsecurity.com
website: https://bitbucket.org/codifiedldn/codified-security-bitrise
published_at: 2017-05-26T15:43:23.984921125+02:00
source:
git: https://bitbucket.org/codifiedldn/codified-security-bitrise.git
commit: c8fccd8db19339f1fd9bdf80712f0c03b3c84ea8
project_type_tags:
- ios
- android
- xamarin
type_tags:
- test
is_requires_admin_user: false
is_always_run: false
inputs:
- codified_security_api_key: $CODIFIED_SECURITY_API_KEY
opts:
description: You can obtain your key from https://dashboard.codifiedsecurity.com/settings.
You'll find it under Integrations tab as Api Key.
is_required: true
title: Codified Security API Key
- ipa_path: $BITRISE_IPA_PATH
opts:
is_required: false
title: IPA path
- apk_path: $BITRISE_APK_PATH
opts:
is_required: false
title: APK path
================================================
FILE: steps/codified-security-bitrise/2.0.0/step.yml
================================================
title: Codified Security
summary: This step uploads your app to Codified Security for automated mobile app
security testing
description: |-
This step uploads your app to Codified Security for automated mobile app security testing.
https://codifiedsecurity.com
website: https://bitbucket.org/codifiedldn/codified-security-bitrise
published_at: 2017-06-29T15:45:26.487157365+02:00
source:
git: https://bitbucket.org/codifiedldn/codified-security-bitrise.git
commit: 9e4a89d93d5fe903a9b73b929706552a2e216b0f
project_type_tags:
- ios
- android
- xamarin
type_tags:
- test
is_requires_admin_user: false
is_always_run: false
inputs:
- codified_security_api_key: $CODIFIED_SECURITY_API_KEY
opts:
description: You can get your key from https://dashboard.codifiedsecurity.com/settings.
You'll find it under Integrations tab as Api Key.
is_required: true
title: Codified Security API Key
- app_path: $BITRISE_APK_PATH
opts:
is_required: false
title: Path to your IPA or APK file
- is_xamarin_ios: "false"
opts:
description: |-
You'll need to specify the path to your iOS project directory. Also make sure to build your Xamarin project in Debug mode! Instructions for this are in the User Guide.
Options:
* "true"
* "false"
is_required: false
title: Select true if you want to upload a Xamarin.iOS app
value_options:
- "true"
- "false"
- opts:
is_required: false
title: Path to your iOS project folder
xamarin_ios_project_folder: ""
================================================
FILE: steps/codified-security-bitrise/step-info.yml
================================================
maintainer: community
================================================
FILE: steps/comment-on-github-pull-request/0.10.0/step.yml
================================================
title: Comment on GitHub Pull Request
summary: |
Comment on [GitHub](https://github.com) Pull Request or Issue
description: |
You can send a new or update an existing comment on [GitHub](https://github.com) Pull Request or Issue.
To setup a **GitHub personal access token** visit: https://github.com/settings/tokens
website: https://github.com/kvvzr/bitrise-step-comment-on-github-pull-request
source_code_url: https://github.com/kvvzr/bitrise-step-comment-on-github-pull-request
support_url: https://github.com/kvvzr/bitrise-step-comment-on-github-pull-request/issues
published_at: 2021-04-07T23:26:39.794231+09:00
source:
git: https://github.com/kvvzr/bitrise-step-comment-on-github-pull-request.git
commit: 2be634ec1b191490629f7046da33986fb7ceb154
host_os_tags:
- osx-10.10
- ubuntu-16.04
type_tags:
- notification
toolkit:
go:
package_name: github.com/kvvzr/bitrise-step-comment-on-github-pull-request
is_requires_admin_user: true
is_always_run: true
is_skippable: false
run_if: ""
inputs:
- opts:
description: |
To setup a **GitHub personal access token** visit: https://github.com/settings/tokens
Add repo(Full control of private repositories) scope to the generated token, to allow to comment on GitHub Pull Request or Issue.
is_required: true
is_sensitive: true
title: GitHub personal access token
personal_access_token: null
- body: null
opts:
description: |
Text of the message to send.
is_required: true
title: Body
- opts:
description: |
The URL for target GitHub Repository.
is_required: true
title: Repository URL
repository_url: $GIT_REPOSITORY_URL
- issue_number: $BITRISE_PULL_REQUEST
opts:
description: |
Number of GitHub Pull request or Issue.
is_required: true
title: GitHub PullRequest or Issue number
- api_base_url: https://api.github.com
opts:
description: The URL for GitHub or GitHub Enterprise API
is_required: true
title: GitHub API Base URL
- opts:
description: |
If set and a commment with the given tag exists, it updates the comment instead of posting a new one.
If no comment with the given tag exists, a new comment is posted.
The tag should be a unique string that will be added to end of the comment's content. The step automatically extends the tag to be enclosed in square brackets.
is_required: false
title: Update comment tag
update_comment_tag: null
================================================
FILE: steps/comment-on-github-pull-request/0.10.1/step.yml
================================================
title: Comment on GitHub Pull Request
summary: |
Comment on [GitHub](https://github.com) Pull Request or Issue
description: |
You can send a new or update an existing comment on [GitHub](https://github.com) Pull Request or Issue.
To setup a **GitHub personal access token** visit: https://github.com/settings/tokens
website: https://github.com/kvvzr/bitrise-step-comment-on-github-pull-request
source_code_url: https://github.com/kvvzr/bitrise-step-comment-on-github-pull-request
support_url: https://github.com/kvvzr/bitrise-step-comment-on-github-pull-request/issues
published_at: 2022-01-12T15:48:34.293359+09:00
source:
git: https://github.com/kvvzr/bitrise-step-comment-on-github-pull-request.git
commit: b55f8aa3e25aaf5c4831cc8dd793e14ad26badb7
host_os_tags:
- osx-10.10
- ubuntu-16.04
type_tags:
- notification
toolkit:
go:
package_name: github.com/kvvzr/bitrise-step-comment-on-github-pull-request
is_requires_admin_user: true
is_always_run: true
is_skippable: false
run_if: ""
inputs:
- opts:
description: |
To setup a **GitHub personal access token** visit: https://github.com/settings/tokens
Add repo(Full control of private repositories) scope to the generated token, to allow to comment on GitHub Pull Request or Issue.
is_required: true
is_sensitive: true
title: GitHub personal access token
personal_access_token: null
- body: null
opts:
description: |
Text of the message to send.
is_required: true
title: Body
- opts:
description: |
The URL for target GitHub Repository.
is_required: true
title: Repository URL
repository_url: $GIT_REPOSITORY_URL
- issue_number: $BITRISE_PULL_REQUEST
opts:
description: |
Number of GitHub Pull request or Issue.
is_required: true
title: GitHub PullRequest or Issue number
- api_base_url: https://api.github.com
opts:
description: The URL for GitHub or GitHub Enterprise API
is_required: true
title: GitHub API Base URL
- opts:
description: |
If set and a commment with the given tag exists, it updates the comment instead of posting a new one.
If no comment with the given tag exists, a new comment is posted.
The tag should be a unique string that will be added to end of the comment's content. The step automatically extends the tag to be enclosed in square brackets.
is_required: false
title: Update comment tag
update_comment_tag: null
================================================
FILE: steps/comment-on-github-pull-request/0.11.0/step.yml
================================================
title: Comment on GitHub Pull Request
summary: |
Comment on [GitHub](https://github.com) Pull Request or Issue
description: |
You can send a new or update an existing comment on [GitHub](https://github.com) Pull Request or Issue.
To setup a **GitHub personal access token** visit: https://github.com/settings/tokens
website: https://github.com/kvvzr/bitrise-step-comment-on-github-pull-request
source_code_url: https://github.com/kvvzr/bitrise-step-comment-on-github-pull-request
support_url: https://github.com/kvvzr/bitrise-step-comment-on-github-pull-request/issues
published_at: 2022-01-26T13:09:52.992066+09:00
source:
git: https://github.com/kvvzr/bitrise-step-comment-on-github-pull-request.git
commit: 2210ec500688c8d1abe503e93e946f4529724dde
host_os_tags:
- osx-10.10
- ubuntu-16.04
type_tags:
- notification
toolkit:
go:
package_name: github.com/kvvzr/bitrise-step-comment-on-github-pull-request
is_requires_admin_user: true
is_always_run: true
is_skippable: false
run_if: ""
inputs:
- opts:
description: |
To setup a **GitHub personal access token** visit: https://github.com/settings/tokens
Add repo(Full control of private repositories) scope to the generated token, to allow to comment on GitHub Pull Request or Issue.
is_required: true
is_sensitive: true
title: GitHub personal access token
personal_access_token: null
- body: null
opts:
description: |
Text of the message to send.
is_required: true
title: Body
- opts:
description: |
The URL for target GitHub Repository.
is_required: true
title: Repository URL
repository_url: $GIT_REPOSITORY_URL
- issue_number: $BITRISE_PULL_REQUEST
opts:
description: |
Number of GitHub Pull request or Issue.
is_required: true
title: GitHub PullRequest or Issue number
- api_base_url: https://api.github.com
opts:
description: The URL for GitHub or GitHub Enterprise API
is_required: true
title: GitHub API Base URL
- opts:
description: |
If set and a commment with the given tag exists, it updates the comment instead of posting a new one.
If no comment with the given tag exists, a new comment is posted.
The tag should be a unique string that will be added to end of the comment's content. The step automatically extends the tag to be enclosed in square brackets.
is_required: false
title: Update comment tag
update_comment_tag: null
================================================
FILE: steps/comment-on-github-pull-request/0.9.0/step.yml
================================================
title: Comment on GitHub Pull Request
summary: |
Comment on [GitHub](https://github.com) Pull Request or Issue
description: |
You can send a any comment on [GitHub](https://github.com) Pull Request or Issue.
To setup a **GitHub personal access token** visit: https://github.com/settings/tokens
website: https://github.com/kvvzr/bitrise-step-comment-on-github-pull-request
source_code_url: https://github.com/kvvzr/bitrise-step-comment-on-github-pull-request
support_url: https://github.com/kvvzr/bitrise-step-comment-on-github-pull-request/issues
published_at: 2018-10-29T15:54:43.074321937+09:00
source:
git: https://github.com/kvvzr/bitrise-step-comment-on-github-pull-request.git
commit: b35e1ddf95b4ef2b254312db4438b31dc3719aee
host_os_tags:
- osx-10.10
- ubuntu-16.04
type_tags:
- notification
toolkit:
go:
package_name: github.com/kvvzr/bitrise-step-comment-on-github-pull-request
deps:
brew:
- name: git
- name: wget
apt_get:
- name: git
- name: wget
is_requires_admin_user: true
is_always_run: false
is_skippable: false
run_if: ""
inputs:
- opts:
description: |
To setup a **GitHub personal access token** visit: https://github.com/settings/tokens
Add repo/repo:status scope to the generated token, to allow to comment on GitHub Pull Request or Issue.
is_required: true
is_sensitive: true
title: GitHub personal access token
personal_access_token: null
- body: null
opts:
description: |
Text of the message to send.
is_required: true
title: Body
- opts:
description: |
The URL for target GitHub Repository.
is_required: true
title: Repository URL
repository_url: $GIT_REPOSITORY_URL
- issue_number: $BITRISE_PULL_REQUEST
opts:
description: |
Number of GitHub Pull request or Issue.
is_required: true
title: GitHub PullRequest or Issue number
================================================
FILE: steps/comment-on-github-pull-request/0.9.1/step.yml
================================================
title: Comment on GitHub Pull Request
summary: |
Comment on [GitHub](https://github.com) Pull Request or Issue
description: |
You can send a comment on [GitHub](https://github.com) Pull Request or Issue.
To setup a **GitHub personal access token** visit: https://github.com/settings/tokens
website: https://github.com/kvvzr/bitrise-step-comment-on-github-pull-request
source_code_url: https://github.com/kvvzr/bitrise-step-comment-on-github-pull-request
support_url: https://github.com/kvvzr/bitrise-step-comment-on-github-pull-request/issues
published_at: 2018-11-07T11:59:16.01073495+09:00
source:
git: https://github.com/kvvzr/bitrise-step-comment-on-github-pull-request.git
commit: 2e76dfe6fded792627688529aca2f2f4bdff7184
host_os_tags:
- osx-10.10
- ubuntu-16.04
type_tags:
- notification
toolkit:
go:
package_name: github.com/kvvzr/bitrise-step-comment-on-github-pull-request
is_requires_admin_user: true
is_always_run: true
is_skippable: false
run_if: ""
inputs:
- opts:
description: |
To setup a **GitHub personal access token** visit: https://github.com/settings/tokens
Add repo/repo:status scope to the generated token, to allow to comment on GitHub Pull Request or Issue.
is_required: true
is_sensitive: true
title: GitHub personal access token
personal_access_token: null
- body: null
opts:
description: |
Text of the message to send.
is_required: true
title: Body
- opts:
description: |
The URL for target GitHub Repository.
is_required: true
title: Repository URL
repository_url: $GIT_REPOSITORY_URL
- issue_number: $BITRISE_PULL_REQUEST
opts:
description: |
Number of GitHub Pull request or Issue.
is_required: true
title: GitHub PullRequest or Issue number
================================================
FILE: steps/comment-on-github-pull-request/0.9.2/step.yml
================================================
title: Comment on GitHub Pull Request
summary: |
Comment on [GitHub](https://github.com) Pull Request or Issue
description: |
You can send a comment on [GitHub](https://github.com) Pull Request or Issue.
To setup a **GitHub personal access token** visit: https://github.com/settings/tokens
website: https://github.com/kvvzr/bitrise-step-comment-on-github-pull-request
source_code_url: https://github.com/kvvzr/bitrise-step-comment-on-github-pull-request
support_url: https://github.com/kvvzr/bitrise-step-comment-on-github-pull-request/issues
published_at: 2018-12-05T22:20:32.738919158+09:00
source:
git: https://github.com/kvvzr/bitrise-step-comment-on-github-pull-request.git
commit: f5b99e126d901e77066b963e311be53af6de482d
host_os_tags:
- osx-10.10
- ubuntu-16.04
type_tags:
- notification
toolkit:
go:
package_name: github.com/kvvzr/bitrise-step-comment-on-github-pull-request
is_requires_admin_user: true
is_always_run: true
is_skippable: false
run_if: ""
inputs:
- opts:
description: |
To setup a **GitHub personal access token** visit: https://github.com/settings/tokens
Add repo(Full control of private repositories) scope to the generated token, to allow to comment on GitHub Pull Request or Issue.
is_required: true
is_sensitive: true
title: GitHub personal access token
personal_access_token: null
- body: null
opts:
description: |
Text of the message to send.
is_required: true
title: Body
- opts:
description: |
The URL for target GitHub Repository.
is_required: true
title: Repository URL
repository_url: $GIT_REPOSITORY_URL
- issue_number: $BITRISE_PULL_REQUEST
opts:
description: |
Number of GitHub Pull request or Issue.
is_required: true
title: GitHub PullRequest or Issue number
================================================
FILE: steps/comment-on-github-pull-request/0.9.3/step.yml
================================================
title: Comment on GitHub Pull Request
summary: |
Comment on [GitHub](https://github.com) Pull Request or Issue
description: |
You can send a comment on [GitHub](https://github.com) Pull Request or Issue.
To setup a **GitHub personal access token** visit: https://github.com/settings/tokens
website: https://github.com/kvvzr/bitrise-step-comment-on-github-pull-request
source_code_url: https://github.com/kvvzr/bitrise-step-comment-on-github-pull-request
support_url: https://github.com/kvvzr/bitrise-step-comment-on-github-pull-request/issues
published_at: 2019-02-15T12:18:36.816506201+09:00
source:
git: https://github.com/kvvzr/bitrise-step-comment-on-github-pull-request.git
commit: 37a692511ecaa1d369d44b7ce5284d6961258d4d
host_os_tags:
- osx-10.10
- ubuntu-16.04
type_tags:
- notification
toolkit:
go:
package_name: github.com/kvvzr/bitrise-step-comment-on-github-pull-request
is_requires_admin_user: true
is_always_run: true
is_skippable: false
run_if: ""
inputs:
- opts:
description: |
To setup a **GitHub personal access token** visit: https://github.com/settings/tokens
Add repo(Full control of private repositories) scope to the generated token, to allow to comment on GitHub Pull Request or Issue.
is_required: true
is_sensitive: true
title: GitHub personal access token
personal_access_token: null
- body: null
opts:
description: |
Text of the message to send.
is_required: true
title: Body
- opts:
description: |
The URL for target GitHub Repository.
is_required: true
title: Repository URL
repository_url: $GIT_REPOSITORY_URL
- issue_number: $BITRISE_PULL_REQUEST
opts:
description: |
Number of GitHub Pull request or Issue.
is_required: true
title: GitHub PullRequest or Issue number
- api_base_url: https://api.github.com
opts:
description: The URL for GitHub or GitHub Enterprise API
is_required: true
title: GitHub API Base URL
================================================
FILE: steps/comment-on-github-pull-request/0.9.4/step.yml
================================================
title: Comment on GitHub Pull Request
summary: |
Comment on [GitHub](https://github.com) Pull Request or Issue
description: |
You can send a comment on [GitHub](https://github.com) Pull Request or Issue.
To setup a **GitHub personal access token** visit: https://github.com/settings/tokens
website: https://github.com/kvvzr/bitrise-step-comment-on-github-pull-request
source_code_url: https://github.com/kvvzr/bitrise-step-comment-on-github-pull-request
support_url: https://github.com/kvvzr/bitrise-step-comment-on-github-pull-request/issues
published_at: 2020-09-10T01:06:46.649843+09:00
source:
git: https://github.com/kvvzr/bitrise-step-comment-on-github-pull-request.git
commit: c6a68e01e1bbf57b6a00ed7e75deb21c4bcf16f2
host_os_tags:
- osx-10.10
- ubuntu-16.04
type_tags:
- notification
toolkit:
go:
package_name: github.com/kvvzr/bitrise-step-comment-on-github-pull-request
is_requires_admin_user: true
is_always_run: true
is_skippable: false
run_if: ""
inputs:
- opts:
description: |
To setup a **GitHub personal access token** visit: https://github.com/settings/tokens
Add repo(Full control of private repositories) scope to the generated token, to allow to comment on GitHub Pull Request or Issue.
is_required: true
is_sensitive: true
title: GitHub personal access token
personal_access_token: null
- body: null
opts:
description: |
Text of the message to send.
is_required: true
title: Body
- opts:
description: |
The URL for target GitHub Repository.
is_required: true
title: Repository URL
repository_url: $GIT_REPOSITORY_URL
- issue_number: $BITRISE_PULL_REQUEST
opts:
description: |
Number of GitHub Pull request or Issue.
is_required: true
title: GitHub PullRequest or Issue number
- api_base_url: https://api.github.com
opts:
description: The URL for GitHub or GitHub Enterprise API
is_required: true
title: GitHub API Base URL
================================================
FILE: steps/comment-on-github-pull-request/step-info.yml
================================================
maintainer: community
================================================
FILE: steps/configcat-feature-flag-sync/0.0.10/step.yml
================================================
title: ConfigCat Feature Flag Sync
summary: Scans the source code for feature flags and uploads the references to the
ConfigCat Dashboard
description: "This Step helps you get rid of technical debt by scanning the source
code and highlighting the feature flag usages for each feature flag on the [ConfigCat
Dashboard](https://app.configcat.com/).\n\n[ConfigCat](https://configcat.com/) is
a hosted service for feature flag and configuration management. It enables you to
decouple feature releases from code deployments. \n\n## Configuring the Step\n\n1.
Log in to [ConfigCat](https://app.configcat.com/)\n1. Create new [ConfigCat Public
Management API credentials](https://app.configcat.com/my-account/public-api-credentials/)
\n1. Store your credentials in the following Bitrise secret environment variables:
`CONFIGCAT_API_USER`, `CONFIGCAT_API_PASS`.\n1. Add your [ConfigCat config ID](https://configcat.com/docs/advanced/code-references/overview#config-id)
to the `ConfigCat Config ID` input variable of this step (`configcat_config_id`
in bitrise.yml). The config ID tells the step which feature flags it should search
for in your source code.\n\nFor more information about code reference scanning,
see the [documentation](https://configcat.com/docs/advanced/code-references/overview/).\n\n###
Code snippet on the ConfigCat Dashboard\n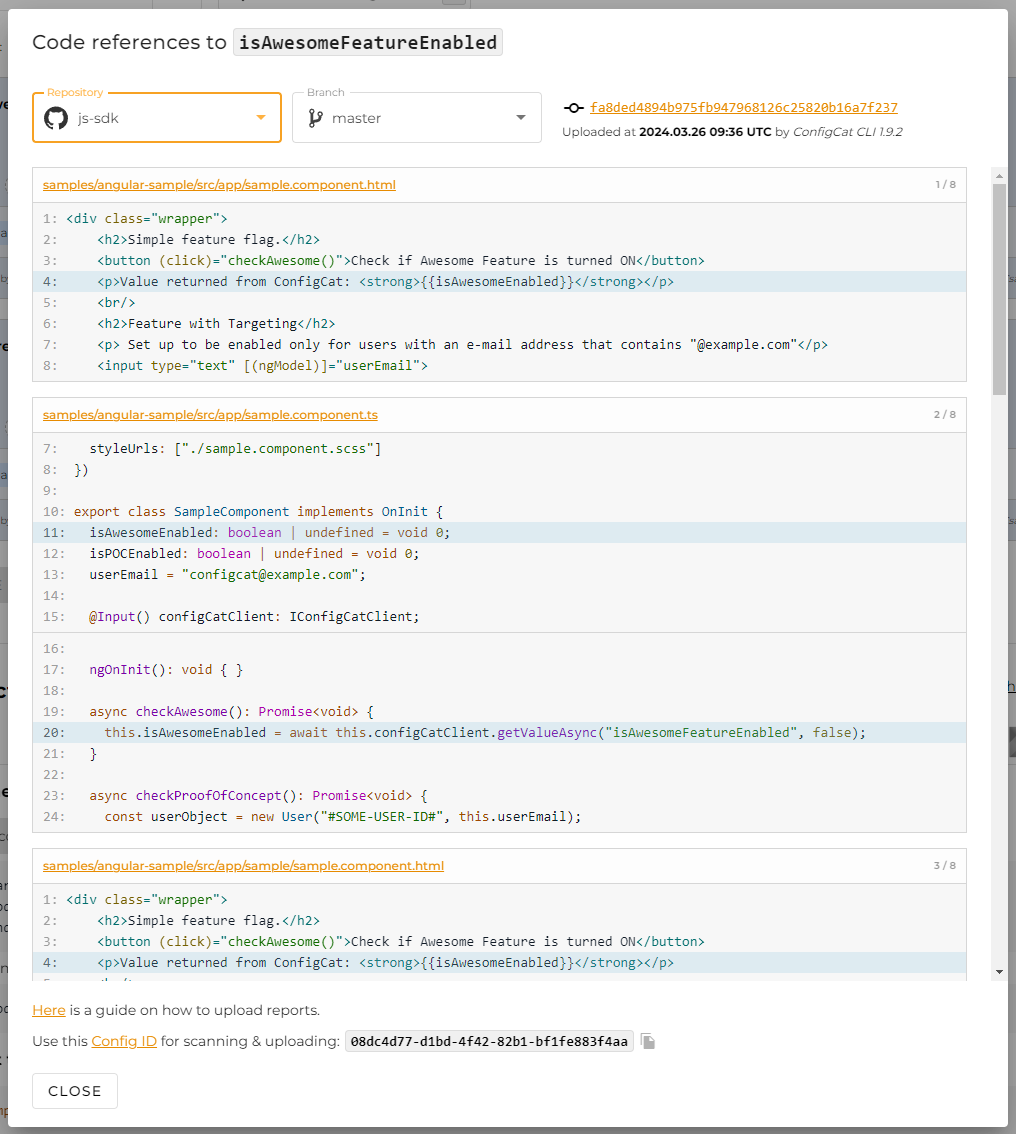"
website: https://configcat.com/
source_code_url: https://github.com/configcat/bitrise-step-configcat-feature-flag-sync/
support_url: https://configcat.com/support/
published_at: 2025-08-07T15:40:44.041101+02:00
source:
git: https://github.com/configcat/bitrise-step-configcat-feature-flag-sync.git
commit: 53bcc2b45e399d5fafb72080509bac01f555fe53
host_os_tags:
- osx-10.10
- ubuntu-16.04
type_tags:
- utility
toolkit:
bash:
entry_file: step.sh
deps:
brew:
- name: curl
apt_get:
- name: curl
is_requires_admin_user: true
is_always_run: false
is_skippable: false
inputs:
- configcat_api_host: api.configcat.com
opts:
is_required: true
summary: Full domain name without protocol e.g. 'api.configcat.com'
title: ConfigCat Public Management API host
- configcat_config_id: null
opts:
is_required: true
summary: The [config ID](https://configcat.com/docs/advanced/code-references/overview#config-id)
tells the step which feature flags it should search for in your source code.
title: ConfigCat Config ID
- line_count: 4
opts:
summary: The ConfigCat Dashboard will display a few lines of your source code
around the feature flag reference. You can set here how many lines of code you
want to include before and after the reference line.
title: 'Code snippet line count before and after the reference line (min: 1, max:
10)'
- exclude_keys: ""
opts:
summary: e.g. 'featureFlagToExclude1 featureFlagToExclude2'.
title: List of feature flag keys that must be excluded from the scan report
- alias_patterns: ""
opts:
summary: The regex pattern must include the CC_KEY placeholder that represents
the actual feature flag or setting key in your code e.g. '(\w+) = :CC_KEY,const
(\w+) = feature_flags\.enabled\(:CC_KEY\)'.
title: Comma delimited list of custom regex patterns used to search for additional
aliases
- opts:
summary: The regex pattern must include the CC_KEY placeholder that represents
the actual feature flag or setting key in your code e.g. 'feature_flags\.enabled\(:CC_KEY\)'.
title: Comma delimited list of custom regex patterns that describe additional
feature flag key usages
usage_patterns: ""
- opts:
summary: e.g. 'subfolder/to/scan'.
title: Sub-folder to scan, relative to the repository root folder
sub_folder: null
- opts:
summary: Turns on or off detailed logging.
title: Detailed logging
value_options:
- "false"
- "true"
verbose: "false"
================================================
FILE: steps/configcat-feature-flag-sync/0.0.11/step.yml
================================================
title: ConfigCat Feature Flag Sync
summary: Scans the source code for feature flags and uploads the references to the
ConfigCat Dashboard
description: "This Step helps you get rid of technical debt by scanning the source
code and highlighting the feature flag usages for each feature flag on the [ConfigCat
Dashboard](https://app.configcat.com/).\n\n[ConfigCat](https://configcat.com/) is
a hosted service for feature flag and configuration management. It enables you to
decouple feature releases from code deployments. \n\n## Configuring the Step\n\n1.
Log in to [ConfigCat](https://app.configcat.com/)\n1. Create new [ConfigCat Public
Management API credentials](https://app.configcat.com/my-account/public-api-credentials/)
\n1. Store your credentials in the following Bitrise secret environment variables:
`CONFIGCAT_API_USER`, `CONFIGCAT_API_PASS`.\n1. Add your [ConfigCat config ID](https://configcat.com/docs/advanced/code-references/overview#config-id)
to the `ConfigCat Config ID` input variable of this step (`configcat_config_id`
in bitrise.yml). The config ID tells the step which feature flags it should search
for in your source code.\n\nFor more information about code reference scanning,
see the [documentation](https://configcat.com/docs/advanced/code-references/overview/).\n\n###
Code snippet on the ConfigCat Dashboard\n"
website: https://configcat.com/
source_code_url: https://github.com/configcat/bitrise-step-configcat-feature-flag-sync/
support_url: https://configcat.com/support/
published_at: 2026-02-05T22:19:15.566555+01:00
source:
git: https://github.com/configcat/bitrise-step-configcat-feature-flag-sync.git
commit: 7d899575f69da8f7fe7863aecd1006d5c85285e7
host_os_tags:
- osx-10.10
- ubuntu-16.04
type_tags:
- utility
toolkit:
bash:
entry_file: step.sh
deps:
brew:
- name: curl
apt_get:
- name: curl
is_requires_admin_user: true
is_always_run: false
is_skippable: false
inputs:
- configcat_api_host: api.configcat.com
opts:
is_required: true
summary: Full domain name without protocol e.g. 'api.configcat.com'
title: ConfigCat Public Management API host
- configcat_config_id: null
opts:
is_required: true
summary: The [config ID](https://configcat.com/docs/advanced/code-references/overview#config-id)
tells the step which feature flags it should search for in your source code.
title: ConfigCat Config ID
- line_count: 4
opts:
summary: The ConfigCat Dashboard will display a few lines of your source code
around the feature flag reference. You can set here how many lines of code you
want to include before and after the reference line.
title: 'Code snippet line count before and after the reference line (min: 1, max:
10)'
- exclude_keys: ""
opts:
summary: e.g. 'featureFlagToExclude1 featureFlagToExclude2'.
title: List of feature flag keys that must be excluded from the scan report
- alias_patterns: ""
opts:
summary: The regex pattern must include the CC_KEY placeholder that represents
the actual feature flag or setting key in your code e.g. '(\w+) = :CC_KEY,const
(\w+) = feature_flags\.enabled\(:CC_KEY\)'.
title: Comma delimited list of custom regex patterns used to search for additional
aliases
- opts:
summary: The regex pattern must include the CC_KEY placeholder that represents
the actual feature flag or setting key in your code e.g. 'feature_flags\.enabled\(:CC_KEY\)'.
title: Comma delimited list of custom regex patterns that describe additional
feature flag key usages
usage_patterns: ""
- opts:
summary: e.g. 'subfolder/to/scan'.
title: Sub-folder to scan, relative to the repository root folder
sub_folder: null
- opts:
summary: Turns on or off detailed logging.
title: Detailed logging
value_options:
- "false"
- "true"
verbose: "false"
================================================
FILE: steps/configcat-feature-flag-sync/0.0.2/step.yml
================================================
title: ConfigCat Feature Flag Sync
summary: Scans the source code for feature flags and uploads the references to the
ConfigCat Dashboard
description: "This Step helps you get rid of technical debt by scanning the source
code and highlighting the feature flag usages for each feature flag on the [ConfigCat
Dashboard](https://app.configcat.com/).\n\n## Configuring the Step\n\n1. Log in
to [ConfigCat](https://app.configcat.com/)\n1. Create new [ConfigCat Public Management
API credentials](https://app.configcat.com/my-account/public-api-credentials/) \n1.
Store your credentials in the following Bitrise secret environment variables: `CONFIGCAT_API_USER`,
`CONFIGCAT_API_PASS`.\n1. Add your [ConfigCat config ID](https://configcat.com/docs/advanced/code-references/overview#config-id)
to the `ConfigCat Config ID` input variable of this step (`configcat_config_id`
in bitrise.yml). The config ID tells the step which feature flags it should search
for in your source code.\n\nFor more information about code reference scanning,
see the [documentation](https://configcat.com/docs/advanced/code-references/overview/).\n\n###
Code snippet on the ConfigCat Dashboard\n"
website: https://configcat.com/
source_code_url: https://github.com/configcat/bitrise-step-configcat-feature-flag-sync/
support_url: https://configcat.com/support/
published_at: 2022-05-05T16:54:00.310438+02:00
source:
git: https://github.com/configcat/bitrise-step-configcat-feature-flag-sync.git
commit: 836a4f0f44149093946676e2e315c65f0592b021
host_os_tags:
- osx-10.10
- ubuntu-16.04
type_tags:
- utility
toolkit:
bash:
entry_file: step.sh
deps:
brew:
- name: curl
apt_get:
- name: curl
is_requires_admin_user: true
is_always_run: false
is_skippable: false
inputs:
- configcat_api_host: api.configcat.com
opts:
is_required: true
summary: Full domain name without protocol e.g. 'api.configcat.com'
title: ConfigCat Public Management API host
- configcat_config_id: null
opts:
is_required: true
summary: The [config ID](https://configcat.com/docs/advanced/code-references/overview#config-id)
tells the step which feature flags it should search for in your source code.
title: ConfigCat Config ID
- line_count: 4
opts:
summary: The ConfigCat Dashboard will display a few lines of your source code
around the feature flag reference. You can set here how many lines of code you
want to include before and after the reference line.
title: 'Code snippet line count before and after the reference line (min: 1, max:
10)'
- opts:
summary: e.g. 'subfolder/to/scan'
title: Sub-folder to scan, relative to the repository root folder
sub_folder: null
- opts:
summary: Turns on or off detailed logging
title: Detailed logging
value_options:
- "false"
- "true"
verbose: "false"
================================================
FILE: steps/configcat-feature-flag-sync/0.0.3/step.yml
================================================
title: ConfigCat Feature Flag Sync
summary: Scans the source code for feature flags and uploads the references to the
ConfigCat Dashboard
description: "This Step helps you get rid of technical debt by scanning the source
code and highlighting the feature flag usages for each feature flag on the [ConfigCat
Dashboard](https://app.configcat.com/).\n\n[ConfigCat](https://configcat.com/) is
a hosted service for feature flag and configuration management. It enables you to
decouple feature releases from code deployments. \n\n## Configuring the Step\n\n1.
Log in to [ConfigCat](https://app.configcat.com/)\n1. Create new [ConfigCat Public
Management API credentials](https://app.configcat.com/my-account/public-api-credentials/)
\n1. Store your credentials in the following Bitrise secret environment variables:
`CONFIGCAT_API_USER`, `CONFIGCAT_API_PASS`.\n1. Add your [ConfigCat config ID](https://configcat.com/docs/advanced/code-references/overview#config-id)
to the `ConfigCat Config ID` input variable of this step (`configcat_config_id`
in bitrise.yml). The config ID tells the step which feature flags it should search
for in your source code.\n\nFor more information about code reference scanning,
see the [documentation](https://configcat.com/docs/advanced/code-references/overview/).\n\n###
Code snippet on the ConfigCat Dashboard\n"
website: https://configcat.com/
source_code_url: https://github.com/configcat/bitrise-step-configcat-feature-flag-sync/
support_url: https://configcat.com/support/
published_at: 2022-05-19T16:26:12.700284+02:00
source:
git: https://github.com/configcat/bitrise-step-configcat-feature-flag-sync.git
commit: 7a89f32f7ff97e8922c1c8c4d1059d9f47f3df28
host_os_tags:
- osx-10.10
- ubuntu-16.04
type_tags:
- utility
toolkit:
bash:
entry_file: step.sh
deps:
brew:
- name: curl
apt_get:
- name: curl
is_requires_admin_user: true
is_always_run: false
is_skippable: false
inputs:
- configcat_api_host: api.configcat.com
opts:
is_required: true
summary: Full domain name without protocol e.g. 'api.configcat.com'
title: ConfigCat Public Management API host
- configcat_config_id: null
opts:
is_required: true
summary: The [config ID](https://configcat.com/docs/advanced/code-references/overview#config-id)
tells the step which feature flags it should search for in your source code.
title: ConfigCat Config ID
- line_count: 4
opts:
summary: The ConfigCat Dashboard will display a few lines of your source code
around the feature flag reference. You can set here how many lines of code you
want to include before and after the reference line.
title: 'Code snippet line count before and after the reference line (min: 1, max:
10)'
- opts:
summary: e.g. 'subfolder/to/scan'
title: Sub-folder to scan, relative to the repository root folder
sub_folder: null
- opts:
summary: Turns on or off detailed logging
title: Detailed logging
value_options:
- "false"
- "true"
verbose: "false"
================================================
FILE: steps/configcat-feature-flag-sync/0.0.4/step.yml
================================================
title: ConfigCat Feature Flag Sync
summary: Scans the source code for feature flags and uploads the references to the
ConfigCat Dashboard
description: "This Step helps you get rid of technical debt by scanning the source
code and highlighting the feature flag usages for each feature flag on the [ConfigCat
Dashboard](https://app.configcat.com/).\n\n[ConfigCat](https://configcat.com/) is
a hosted service for feature flag and configuration management. It enables you to
decouple feature releases from code deployments. \n\n## Configuring the Step\n\n1.
Log in to [ConfigCat](https://app.configcat.com/)\n1. Create new [ConfigCat Public
Management API credentials](https://app.configcat.com/my-account/public-api-credentials/)
\n1. Store your credentials in the following Bitrise secret environment variables:
`CONFIGCAT_API_USER`, `CONFIGCAT_API_PASS`.\n1. Add your [ConfigCat config ID](https://configcat.com/docs/advanced/code-references/overview#config-id)
to the `ConfigCat Config ID` input variable of this step (`configcat_config_id`
in bitrise.yml). The config ID tells the step which feature flags it should search
for in your source code.\n\nFor more information about code reference scanning,
see the [documentation](https://configcat.com/docs/advanced/code-references/overview/).\n\n###
Code snippet on the ConfigCat Dashboard\n"
website: https://configcat.com/
source_code_url: https://github.com/configcat/bitrise-step-configcat-feature-flag-sync/
support_url: https://configcat.com/support/
published_at: 2022-10-09T23:36:25.104429+02:00
source:
git: https://github.com/configcat/bitrise-step-configcat-feature-flag-sync.git
commit: c61cbf49c9725f56eb7b590829b8e810fc53c6b3
host_os_tags:
- osx-10.10
- ubuntu-16.04
type_tags:
- utility
toolkit:
bash:
entry_file: step.sh
deps:
brew:
- name: curl
apt_get:
- name: curl
is_requires_admin_user: true
is_always_run: false
is_skippable: false
inputs:
- configcat_api_host: api.configcat.com
opts:
is_required: true
summary: Full domain name without protocol e.g. 'api.configcat.com'
title: ConfigCat Public Management API host
- configcat_config_id: null
opts:
is_required: true
summary: The [config ID](https://configcat.com/docs/advanced/code-references/overview#config-id)
tells the step which feature flags it should search for in your source code.
title: ConfigCat Config ID
- line_count: 4
opts:
summary: The ConfigCat Dashboard will display a few lines of your source code
around the feature flag reference. You can set here how many lines of code you
want to include before and after the reference line.
title: 'Code snippet line count before and after the reference line (min: 1, max:
10)'
- opts:
summary: e.g. 'subfolder/to/scan'
title: Sub-folder to scan, relative to the repository root folder
sub_folder: null
- opts:
summary: Turns on or off detailed logging
title: Detailed logging
value_options:
- "false"
- "true"
verbose: "false"
================================================
FILE: steps/configcat-feature-flag-sync/0.0.5/step.yml
================================================
title: ConfigCat Feature Flag Sync
summary: Scans the source code for feature flags and uploads the references to the
ConfigCat Dashboard
description: "This Step helps you get rid of technical debt by scanning the source
code and highlighting the feature flag usages for each feature flag on the [ConfigCat
Dashboard](https://app.configcat.com/).\n\n[ConfigCat](https://configcat.com/) is
a hosted service for feature flag and configuration management. It enables you to
decouple feature releases from code deployments. \n\n## Configuring the Step\n\n1.
Log in to [ConfigCat](https://app.configcat.com/)\n1. Create new [ConfigCat Public
Management API credentials](https://app.configcat.com/my-account/public-api-credentials/)
\n1. Store your credentials in the following Bitrise secret environment variables:
`CONFIGCAT_API_USER`, `CONFIGCAT_API_PASS`.\n1. Add your [ConfigCat config ID](https://configcat.com/docs/advanced/code-references/overview#config-id)
to the `ConfigCat Config ID` input variable of this step (`configcat_config_id`
in bitrise.yml). The config ID tells the step which feature flags it should search
for in your source code.\n\nFor more information about code reference scanning,
see the [documentation](https://configcat.com/docs/advanced/code-references/overview/).\n\n###
Code snippet on the ConfigCat Dashboard\n"
website: https://configcat.com/
source_code_url: https://github.com/configcat/bitrise-step-configcat-feature-flag-sync/
support_url: https://configcat.com/support/
published_at: 2023-04-05T14:21:04.53816+02:00
source:
git: https://github.com/configcat/bitrise-step-configcat-feature-flag-sync.git
commit: e5a64660a98abd0c85f98cc2b1bf086a6230fb71
host_os_tags:
- osx-10.10
- ubuntu-16.04
type_tags:
- utility
toolkit:
bash:
entry_file: step.sh
deps:
brew:
- name: curl
apt_get:
- name: curl
is_requires_admin_user: true
is_always_run: false
is_skippable: false
inputs:
- configcat_api_host: api.configcat.com
opts:
is_required: true
summary: Full domain name without protocol e.g. 'api.configcat.com'
title: ConfigCat Public Management API host
- configcat_config_id: null
opts:
is_required: true
summary: The [config ID](https://configcat.com/docs/advanced/code-references/overview#config-id)
tells the step which feature flags it should search for in your source code.
title: ConfigCat Config ID
- line_count: 4
opts:
summary: The ConfigCat Dashboard will display a few lines of your source code
around the feature flag reference. You can set here how many lines of code you
want to include before and after the reference line.
title: 'Code snippet line count before and after the reference line (min: 1, max:
10)'
- opts:
summary: e.g. 'subfolder/to/scan'
title: Sub-folder to scan, relative to the repository root folder
sub_folder: null
- opts:
summary: Turns on or off detailed logging
title: Detailed logging
value_options:
- "false"
- "true"
verbose: "false"
================================================
FILE: steps/configcat-feature-flag-sync/0.0.6/step.yml
================================================
title: ConfigCat Feature Flag Sync
summary: Scans the source code for feature flags and uploads the references to the
ConfigCat Dashboard
description: "This Step helps you get rid of technical debt by scanning the source
code and highlighting the feature flag usages for each feature flag on the [ConfigCat
Dashboard](https://app.configcat.com/).\n\n[ConfigCat](https://configcat.com/) is
a hosted service for feature flag and configuration management. It enables you to
decouple feature releases from code deployments. \n\n## Configuring the Step\n\n1.
Log in to [ConfigCat](https://app.configcat.com/)\n1. Create new [ConfigCat Public
Management API credentials](https://app.configcat.com/my-account/public-api-credentials/)
\n1. Store your credentials in the following Bitrise secret environment variables:
`CONFIGCAT_API_USER`, `CONFIGCAT_API_PASS`.\n1. Add your [ConfigCat config ID](https://configcat.com/docs/advanced/code-references/overview#config-id)
to the `ConfigCat Config ID` input variable of this step (`configcat_config_id`
in bitrise.yml). The config ID tells the step which feature flags it should search
for in your source code.\n\nFor more information about code reference scanning,
see the [documentation](https://configcat.com/docs/advanced/code-references/overview/).\n\n###
Code snippet on the ConfigCat Dashboard\n"
website: https://configcat.com/
source_code_url: https://github.com/configcat/bitrise-step-configcat-feature-flag-sync/
support_url: https://configcat.com/support/
published_at: 2023-08-17T12:08:16.406568+02:00
source:
git: https://github.com/configcat/bitrise-step-configcat-feature-flag-sync.git
commit: 23b378dc335e8c90ec5ef6c26d98688a11fc77d2
host_os_tags:
- osx-10.10
- ubuntu-16.04
type_tags:
- utility
toolkit:
bash:
entry_file: step.sh
deps:
brew:
- name: curl
apt_get:
- name: curl
is_requires_admin_user: true
is_always_run: false
is_skippable: false
inputs:
- configcat_api_host: api.configcat.com
opts:
is_required: true
summary: Full domain name without protocol e.g. 'api.configcat.com'
title: ConfigCat Public Management API host
- configcat_config_id: null
opts:
is_required: true
summary: The [config ID](https://configcat.com/docs/advanced/code-references/overview#config-id)
tells the step which feature flags it should search for in your source code.
title: ConfigCat Config ID
- line_count: 4
opts:
summary: The ConfigCat Dashboard will display a few lines of your source code
around the feature flag reference. You can set here how many lines of code you
want to include before and after the reference line.
title: 'Code snippet line count before and after the reference line (min: 1, max:
10)'
- opts:
summary: e.g. 'subfolder/to/scan'
title: Sub-folder to scan, relative to the repository root folder
sub_folder: null
- opts:
summary: Turns on or off detailed logging
title: Detailed logging
value_options:
- "false"
- "true"
verbose: "false"
================================================
FILE: steps/configcat-feature-flag-sync/0.0.7/step.yml
================================================
title: ConfigCat Feature Flag Sync
summary: Scans the source code for feature flags and uploads the references to the
ConfigCat Dashboard
description: "This Step helps you get rid of technical debt by scanning the source
code and highlighting the feature flag usages for each feature flag on the [ConfigCat
Dashboard](https://app.configcat.com/).\n\n[ConfigCat](https://configcat.com/) is
a hosted service for feature flag and configuration management. It enables you to
decouple feature releases from code deployments. \n\n## Configuring the Step\n\n1.
Log in to [ConfigCat](https://app.configcat.com/)\n1. Create new [ConfigCat Public
Management API credentials](https://app.configcat.com/my-account/public-api-credentials/)
\n1. Store your credentials in the following Bitrise secret environment variables:
`CONFIGCAT_API_USER`, `CONFIGCAT_API_PASS`.\n1. Add your [ConfigCat config ID](https://configcat.com/docs/advanced/code-references/overview#config-id)
to the `ConfigCat Config ID` input variable of this step (`configcat_config_id`
in bitrise.yml). The config ID tells the step which feature flags it should search
for in your source code.\n\nFor more information about code reference scanning,
see the [documentation](https://configcat.com/docs/advanced/code-references/overview/).\n\n###
Code snippet on the ConfigCat Dashboard\n"
website: https://configcat.com/
source_code_url: https://github.com/configcat/bitrise-step-configcat-feature-flag-sync/
support_url: https://configcat.com/support/
published_at: 2023-10-12T21:45:01.677942+02:00
source:
git: https://github.com/configcat/bitrise-step-configcat-feature-flag-sync.git
commit: 8c29c52d855ed7211c537485c49f8967d328942b
host_os_tags:
- osx-10.10
- ubuntu-16.04
type_tags:
- utility
toolkit:
bash:
entry_file: step.sh
deps:
brew:
- name: curl
apt_get:
- name: curl
is_requires_admin_user: true
is_always_run: false
is_skippable: false
inputs:
- configcat_api_host: api.configcat.com
opts:
is_required: true
summary: Full domain name without protocol e.g. 'api.configcat.com'
title: ConfigCat Public Management API host
- configcat_config_id: null
opts:
is_required: true
summary: The [config ID](https://configcat.com/docs/advanced/code-references/overview#config-id)
tells the step which feature flags it should search for in your source code.
title: ConfigCat Config ID
- line_count: 4
opts:
summary: The ConfigCat Dashboard will display a few lines of your source code
around the feature flag reference. You can set here how many lines of code you
want to include before and after the reference line.
title: 'Code snippet line count before and after the reference line (min: 1, max:
10)'
- opts:
summary: e.g. 'subfolder/to/scan'
title: Sub-folder to scan, relative to the repository root folder
sub_folder: null
- opts:
summary: Turns on or off detailed logging
title: Detailed logging
value_options:
- "false"
- "true"
verbose: "false"
================================================
FILE: steps/configcat-feature-flag-sync/0.0.8/step.yml
================================================
title: ConfigCat Feature Flag Sync
summary: Scans the source code for feature flags and uploads the references to the
ConfigCat Dashboard
description: "This Step helps you get rid of technical debt by scanning the source
code and highlighting the feature flag usages for each feature flag on the [ConfigCat
Dashboard](https://app.configcat.com/).\n\n[ConfigCat](https://configcat.com/) is
a hosted service for feature flag and configuration management. It enables you to
decouple feature releases from code deployments. \n\n## Configuring the Step\n\n1.
Log in to [ConfigCat](https://app.configcat.com/)\n1. Create new [ConfigCat Public
Management API credentials](https://app.configcat.com/my-account/public-api-credentials/)
\n1. Store your credentials in the following Bitrise secret environment variables:
`CONFIGCAT_API_USER`, `CONFIGCAT_API_PASS`.\n1. Add your [ConfigCat config ID](https://configcat.com/docs/advanced/code-references/overview#config-id)
to the `ConfigCat Config ID` input variable of this step (`configcat_config_id`
in bitrise.yml). The config ID tells the step which feature flags it should search
for in your source code.\n\nFor more information about code reference scanning,
see the [documentation](https://configcat.com/docs/advanced/code-references/overview/).\n\n###
Code snippet on the ConfigCat Dashboard\n"
website: https://configcat.com/
source_code_url: https://github.com/configcat/bitrise-step-configcat-feature-flag-sync/
support_url: https://configcat.com/support/
published_at: 2024-04-11T15:23:29.986976+02:00
source:
git: https://github.com/configcat/bitrise-step-configcat-feature-flag-sync.git
commit: 6e5a96302954bcedf5a81974d70edd6b38c524bb
host_os_tags:
- osx-10.10
- ubuntu-16.04
type_tags:
- utility
toolkit:
bash:
entry_file: step.sh
deps:
brew:
- name: curl
apt_get:
- name: curl
is_requires_admin_user: true
is_always_run: false
is_skippable: false
inputs:
- configcat_api_host: api.configcat.com
opts:
is_required: true
summary: Full domain name without protocol e.g. 'api.configcat.com'
title: ConfigCat Public Management API host
- configcat_config_id: null
opts:
is_required: true
summary: The [config ID](https://configcat.com/docs/advanced/code-references/overview#config-id)
tells the step which feature flags it should search for in your source code.
title: ConfigCat Config ID
- line_count: 4
opts:
summary: The ConfigCat Dashboard will display a few lines of your source code
around the feature flag reference. You can set here how many lines of code you
want to include before and after the reference line.
title: 'Code snippet line count before and after the reference line (min: 1, max:
10)'
- opts:
summary: e.g. 'subfolder/to/scan'
title: Sub-folder to scan, relative to the repository root folder
sub_folder: null
- opts:
summary: Turns on or off detailed logging
title: Detailed logging
value_options:
- "false"
- "true"
verbose: "false"
================================================
FILE: steps/configcat-feature-flag-sync/0.0.9/step.yml
================================================
title: ConfigCat Feature Flag Sync
summary: Scans the source code for feature flags and uploads the references to the
ConfigCat Dashboard
description: "This Step helps you get rid of technical debt by scanning the source
code and highlighting the feature flag usages for each feature flag on the [ConfigCat
Dashboard](https://app.configcat.com/).\n\n[ConfigCat](https://configcat.com/) is
a hosted service for feature flag and configuration management. It enables you to
decouple feature releases from code deployments. \n\n## Configuring the Step\n\n1.
Log in to [ConfigCat](https://app.configcat.com/)\n1. Create new [ConfigCat Public
Management API credentials](https://app.configcat.com/my-account/public-api-credentials/)
\n1. Store your credentials in the following Bitrise secret environment variables:
`CONFIGCAT_API_USER`, `CONFIGCAT_API_PASS`.\n1. Add your [ConfigCat config ID](https://configcat.com/docs/advanced/code-references/overview#config-id)
to the `ConfigCat Config ID` input variable of this step (`configcat_config_id`
in bitrise.yml). The config ID tells the step which feature flags it should search
for in your source code.\n\nFor more information about code reference scanning,
see the [documentation](https://configcat.com/docs/advanced/code-references/overview/).\n\n###
Code snippet on the ConfigCat Dashboard\n"
website: https://configcat.com/
source_code_url: https://github.com/configcat/bitrise-step-configcat-feature-flag-sync/
support_url: https://configcat.com/support/
published_at: 2024-09-05T11:50:30.594669+02:00
source:
git: https://github.com/configcat/bitrise-step-configcat-feature-flag-sync.git
commit: a27868235c227bcda815ee0e1430c7fdd6c66b18
host_os_tags:
- osx-10.10
- ubuntu-16.04
type_tags:
- utility
toolkit:
bash:
entry_file: step.sh
deps:
brew:
- name: curl
apt_get:
- name: curl
is_requires_admin_user: true
is_always_run: false
is_skippable: false
inputs:
- configcat_api_host: api.configcat.com
opts:
is_required: true
summary: Full domain name without protocol e.g. 'api.configcat.com'
title: ConfigCat Public Management API host
- configcat_config_id: null
opts:
is_required: true
summary: The [config ID](https://configcat.com/docs/advanced/code-references/overview#config-id)
tells the step which feature flags it should search for in your source code.
title: ConfigCat Config ID
- line_count: 4
opts:
summary: The ConfigCat Dashboard will display a few lines of your source code
around the feature flag reference. You can set here how many lines of code you
want to include before and after the reference line.
title: 'Code snippet line count before and after the reference line (min: 1, max:
10)'
- exclude_keys: ""
opts:
summary: e.g. 'featureFlagToExclude1 featureFlagToExclude2'.
title: List of feature flag keys that must be excluded from the scan report
- alias_patterns: ""
opts:
summary: The regex pattern must include the CC_KEY placeholder that represents
the actual feature flag or setting key in your code e.g. '(\w+) = :CC_KEY,const
(\w+) = feature_flags\.enabled\(:CC_KEY\)'.
title: Comma delimited list of custom regex patterns used to search for additional
aliases
- opts:
summary: The regex pattern must include the CC_KEY placeholder that represents
the actual feature flag or setting key in your code e.g. 'feature_flags\.enabled\(:CC_KEY\)'.
title: Comma delimited list of custom regex patterns that describe additional
feature flag key usages
usage_patterns: ""
- opts:
summary: e.g. 'subfolder/to/scan'.
title: Sub-folder to scan, relative to the repository root folder
sub_folder: null
- opts:
summary: Turns on or off detailed logging.
title: Detailed logging
value_options:
- "false"
- "true"
verbose: "false"
================================================
FILE: steps/configcat-feature-flag-sync/step-info.yml
================================================
maintainer: verified
================================================
FILE: steps/connect-to-fortigate-sslvpn/1.0.0/step.yml
================================================
title: Connect to Fortigate SSLVPN
summary: |
Connect to Fortigate SSL VPN
description: |
Bitrise step to connect to Fortigate SSL VPN
website: https://github.com/vielasis/bitrise-step-connect-to-fortigate-sslvpn
source_code_url: https://github.com/vielasis/bitrise-step-connect-to-fortigate-sslvpn
support_url: https://github.com/vielasis/bitrise-step-connect-to-fortigate-sslvpn/issues
published_at: 2022-04-22T17:58:29.568466499+08:00
source:
git: https://github.com/vielasis/bitrise-step-connect-to-fortigate-sslvpn.git
commit: 269900157ef7ca8a1cb2808871757ef9d3c5f7e8
host_os_tags:
- osx-10.10
- ubuntu-20.04
type_tags:
- utility
toolkit:
bash:
entry_file: step.sh
deps:
brew:
- name: openfortivpn
apt_get:
- name: openfortivpn
is_requires_admin_user: true
is_always_run: false
is_skippable: false
run_if: ""
inputs:
- ftg_host: null
opts:
is_expand: true
is_required: true
summary: Can be an IPv4 address on a FQDN
title: Remote Gateway
- ftg_port: 443
opts:
is_expand: true
is_required: true
summary: 'VPN Port (default: 443)'
title: Remote Gateway Port
- ftg_username: null
opts:
is_expand: true
is_required: true
summary: Fortigate username
title: Username
- ftg_password: null
opts:
is_expand: true
is_required: true
is_sensitive: true
summary: Fortigate password
title: Password
- ftg_trusted_certs: null
opts:
is_expand: true
is_required: false
summary: Passed to --trusted-cert option. Split cert entries with a newline `\n.`
*DO NOT* end with newline
title: Trusted certs
- ftg_logfile: $BITRISE_DEPLOY_DIR/fortigate.log
opts:
is_expand: true
is_required: true
summary: Defaults to `$BITRISE_DEPLOY_DIR/fortigate.log`
title: Log file path
- ip_hosts: null
opts:
is_expand: true
is_required: false
summary: Lits of entries to be appended to /etc/hosts. Separate entries with a
newline `\n`
title: /etc/hosts
- ip_routes: null
opts:
is_expand: true
is_required: false
summary: List of IP Addresses to route to the ppp gateway. Separate entries with
a newline `\n.` *DO NOT* end with newline
title: IP Addresses to route
================================================
FILE: steps/connect-to-fortigate-sslvpn/step-info.yml
================================================
maintainer: community
================================================
FILE: steps/cordova-android/0.9.0/step.yml
================================================
title: Cordova Android
summary: This step allows you to build cordova-based Android projects.
description: |-
The Cordova CLI is the main tool to use for the cross-platform workflow
described in the [Overview](https://cordova.apache.org/docs/en/latest/guide/overview/index.html).
website: https://github.com/donvigo/steps-cordova-install
source_code_url: https://github.com/donvigo/steps-cordova-install
support_url: https://github.com/donvigo/steps-cordova-install/issues
published_at: 2016-02-15T22:19:45.080250673+02:00
source:
git: https://github.com/donvigo/steps-cordova-android.git
commit: 04a6e4c317927c7b50a0cf143c4619a5030fe2a4
host_os_tags:
- ubuntu
project_type_tags:
- android
type_tags:
- cordova
- build
is_requires_admin_user: false
is_always_run: false
is_skippable: false
inputs:
- cordova_command: build
opts:
description: Run `cordova --help` to check list of available commands.
is_required: true
title: Cordova command to run.
- opts:
description: |
Choose which platform to build your dependencies for.
is_required: true
title: Platform to build.
value_options:
- android
platform: android
- build_options: --verbose
opts:
description: |-
Options added to the end of the Cordova call.
You can use multiple options, separated by a space
character. For example: `--verbose`; `--debug`
`--release --buildConfig=..\myBuildConfig.json`
is_required: false
title: Additional options for `cordova` command
================================================
FILE: steps/cordova-android/0.9.1/step.yml
================================================
title: Cordova Android
summary: This step allows you to build cordova-based Android projects.
description: |-
The Cordova CLI is the main tool to use for the cross-platform workflow
described in the [Overview](https://cordova.apache.org/docs/en/latest/guide/overview/index.html).
website: https://github.com/vgaidarji/steps-cordova-android
source_code_url: https://github.com/vgaidarji/steps-cordova-android
support_url: https://github.com/vgaidarji/steps-cordova-android/issues
published_at: 2016-02-28T14:49:58.572507477+02:00
source:
git: https://github.com/vgaidarji/steps-cordova-android.git
commit: 788167433919e56b4232c021673c481130d80f44
host_os_tags:
- ubuntu
project_type_tags:
- android
type_tags:
- cordova
- build
is_requires_admin_user: false
is_always_run: false
is_skippable: false
inputs:
- cordova_command: build
opts:
description: Run `cordova --help` to check list of available commands.
is_required: true
title: Cordova command to run.
- opts:
description: |
Choose which platform to build your dependencies for.
is_required: true
title: Platform to build.
value_options:
- android
platform: android
- build_options: --verbose
opts:
description: |-
Options added to the end of the Cordova call.
You can use multiple options, separated by a space
character. For example: `--verbose`; `--debug`
`--release --buildConfig=..\myBuildConfig.json`
is_required: false
title: Additional options for `cordova` command
================================================
FILE: steps/cordova-android/0.9.2/step.yml
================================================
title: Cordova Android
summary: This step allows you to build cordova-based Android projects.
description: |-
The Cordova CLI is the main tool to use for the cross-platform workflow
described in the [Overview](https://cordova.apache.org/docs/en/latest/guide/overview/index.html).
website: https://github.com/vgaidarji/steps-cordova-android
source_code_url: https://github.com/vgaidarji/steps-cordova-android
support_url: https://github.com/vgaidarji/steps-cordova-android/issues
published_at: 2016-02-28T18:03:02.902627117+02:00
source:
git: https://github.com/vgaidarji/steps-cordova-android.git
commit: 4a5490fb1d1ab65b77a6287742bf9d064d7b7258
host_os_tags:
- ubuntu
project_type_tags:
- cordova
type_tags:
- build
is_requires_admin_user: false
is_always_run: false
is_skippable: false
inputs:
- cordova_command: build
opts:
description: Run `cordova --help` to check list of available commands.
is_required: true
title: Cordova command to run.
- opts:
description: |
Choose which platform to build your dependencies for.
is_required: true
title: Platform to build.
value_options:
- android
platform_name: android
- build_options: --verbose
opts:
description: |-
Options added to the end of the Cordova call.
You can use multiple options, separated by a space
character. For example: `--verbose`; `--debug`
`--release --buildConfig=..\myBuildConfig.json`
is_required: false
title: Additional options for `cordova` command
================================================
FILE: steps/cordova-android/step-info.yml
================================================
maintainer: community
================================================
FILE: steps/cordova-archive/0.9.0/step.yml
================================================
title: Cordova archive
summary: Archives your Cordova project
description: |-
Archives your Cordova project.
For first the step prepare your Cordova project by calling:
- `cordova "platform" "rm" ""`
- `cordova "platform" "add" ""`
then it archives the project by calling:
- `cordova "build" "--debug|--release" "--device|--emulator" "" "--buildConfig=$BITRISE_CORDOVA_BUILD_CONFIGURATION"`
website: https://github.com/bitrise-community/steps-cordova-archive
source_code_url: https://github.com/bitrise-community/steps-cordova-archive
support_url: https://github.com/bitrise-community/steps-cordova-archive/issues
published_at: 2017-04-27T16:43:54.212250194+02:00
source:
git: https://github.com/bitrise-steplib/steps-cordova-archive.git
commit: 1dc4368a29133df02e4826ca2d4e70c6c3446238
project_type_tags:
- cordova
type_tags:
- build
toolkit:
go:
package_name: github.com/bitrise-community/steps-cordova-archive
deps:
brew:
- name: go
- name: gradle
inputs:
- opts:
description: Root directory of your Cordova project, where your Cordova config.xml
exists.
is_required: true
summary: ""
title: Working directory
workdir: $BITRISE_SOURCE_DIR
- opts:
description: |-
Specify this input to apply cordova-cli commands to desired platforms only.
`cordova build [OTHER_PARAMS] `
is_required: true
title: Platform to use in cordova-cli commands
value_options:
- ios,android
- ios
- android
platform: ios,android
- configuration: release
opts:
description: |-
Specify build command configuration.
`cordova build [OTHER_PARAMS] [--release | --debug]`
is_required: true
title: Build command configuration
value_options:
- release
- debug
- opts:
description: |-
Specify build command target.
`cordova build [OTHER_PARAMS] [--device | --emulator]`
is_required: true
title: Build command target
value_options:
- device
- emulator
target: device
- build_config: $BITRISE_CORDOVA_BUILD_CONFIGURATION
opts:
description: Path to the build configuration file (build.json), which describes
code signing properties.
title: Build configuration path, to describe code signing properties
- options: null
opts:
description: |-
Use this input to specify custom options, to append to the end of the cordova-cli build command.
Example:
- `--browserify`
`cordova build [OTHER_PARAMS] [options]`
title: Options to append to the cordova-cli build command
outputs:
- BITRISE_IPA_PATH: null
opts:
title: The created ios .ipa file's path
- BITRISE_APP_PATH: null
opts:
title: The created ios .app file's path
- BITRISE_DSYM_DIR_PATH: null
opts:
title: The created ios .dSYM dir's path
- BITRISE_DSYM_PATH: null
opts:
title: The created ios .dSYM.zip file's path
- BITRISE_APK_PATH: ""
opts:
title: The created android .apk file's path
================================================
FILE: steps/cordova-archive/0.9.1/step.yml
================================================
title: Cordova archive
summary: Archives your Cordova project
description: |-
Archives your Cordova project.
For first the step prepare your Cordova project by calling:
- `cordova "platform" "rm" ""`
- `cordova "platform" "add" ""`
then it archives the project by calling:
- `cordova "build" "--debug|--release" "--device|--emulator" "" "--buildConfig=$BITRISE_CORDOVA_BUILD_CONFIGURATION"`
website: https://github.com/bitrise-community/steps-cordova-archive
source_code_url: https://github.com/bitrise-community/steps-cordova-archive
support_url: https://github.com/bitrise-community/steps-cordova-archive/issues
published_at: 2017-04-28T15:22:04.504982933+02:00
source:
git: https://github.com/bitrise-steplib/steps-cordova-archive.git
commit: b938c2c3503ef8754b0cb97cf3eaf91fb2c3fb68
project_type_tags:
- cordova
type_tags:
- build
toolkit:
go:
package_name: github.com/bitrise-community/steps-cordova-archive
deps:
brew:
- name: go
- name: gradle
inputs:
- opts:
description: Root directory of your Cordova project, where your Cordova config.xml
exists.
is_required: true
summary: ""
title: Working directory
workdir: $BITRISE_SOURCE_DIR
- opts:
description: |-
Specify this input to apply cordova-cli commands to desired platforms only.
`cordova build [OTHER_PARAMS] `
is_required: true
title: Platform to use in cordova-cli commands
value_options:
- ios,android
- ios
- android
platform: ios,android
- configuration: release
opts:
description: |-
Specify build command configuration.
`cordova build [OTHER_PARAMS] [--release | --debug]`
is_required: true
title: Build command configuration
value_options:
- release
- debug
- opts:
description: |-
Specify build command target.
`cordova build [OTHER_PARAMS] [--device | --emulator]`
is_required: true
title: Build command target
value_options:
- device
- emulator
target: device
- build_config: $BITRISE_CORDOVA_BUILD_CONFIGURATION
opts:
description: Path to the build configuration file (build.json), which describes
code signing properties.
title: Build configuration path, to describe code signing properties
- options: null
opts:
description: |-
Use this input to specify custom options, to append to the end of the cordova-cli build command.
Example:
- `--browserify`
`cordova build [OTHER_PARAMS] [options]`
title: Options to append to the cordova-cli build command
outputs:
- BITRISE_IPA_PATH: null
opts:
title: The created ios .ipa file's path
- BITRISE_APP_DIR_PATH: null
opts:
title: The created ios .app dir's path
- BITRISE_APP_PATH: null
opts:
title: The created ios .app.zip file's path
- BITRISE_DSYM_DIR_PATH: null
opts:
title: The created ios .dSYM dir's path
- BITRISE_DSYM_PATH: null
opts:
title: The created ios .dSYM.zip file's path
- BITRISE_APK_PATH: ""
opts:
title: The created android .apk file's path
================================================
FILE: steps/cordova-archive/0.9.2/step.yml
================================================
title: Cordova archive
summary: Archives your Cordova project
description: |-
Archives your Cordova project.
For first the step prepare your Cordova project by calling:
- `cordova "platform" "rm" ""`
- `cordova "platform" "add" ""`
then it archives the project by calling:
- `cordova "build" "--debug|--release" "--device|--emulator" "" "--buildConfig=$BITRISE_CORDOVA_BUILD_CONFIGURATION"`
website: https://github.com/bitrise-community/steps-cordova-archive
source_code_url: https://github.com/bitrise-community/steps-cordova-archive
support_url: https://github.com/bitrise-community/steps-cordova-archive/issues
published_at: 2017-05-25T16:54:22.262135603+02:00
source:
git: https://github.com/bitrise-community/steps-cordova-archive.git
commit: 30035e80b2596941b263fc0b96efafee47fdc074
project_type_tags:
- cordova
type_tags:
- build
toolkit:
go:
package_name: github.com/bitrise-community/steps-cordova-archive
deps:
brew:
- name: go
- name: gradle
inputs:
- opts:
description: Root directory of your Cordova project, where your Cordova config.xml
exists.
is_required: true
summary: ""
title: Working directory
workdir: $BITRISE_SOURCE_DIR
- opts:
description: |-
Specify this input to apply cordova-cli commands to desired platforms only.
`cordova build [OTHER_PARAMS] `
is_required: true
title: Platform to use in cordova-cli commands
value_options:
- ios,android
- ios
- android
platform: ios,android
- configuration: release
opts:
description: |-
Specify build command configuration.
`cordova build [OTHER_PARAMS] [--release | --debug]`
is_required: true
title: Build command configuration
value_options:
- release
- debug
- opts:
description: |-
Specify build command target.
`cordova build [OTHER_PARAMS] [--device | --emulator]`
is_required: true
title: Build command target
value_options:
- device
- emulator
target: device
- cordova_version: null
opts:
description: |-
The version of cordova you want to use.
If value is set to `latest`, the step will update to the latest cordova version.
Leave this input empty to use the preinstalled cordova version.
title: Cordova version
- build_config: $BITRISE_CORDOVA_BUILD_CONFIGURATION
opts:
description: Path to the build configuration file (build.json), which describes
code signing properties.
title: Build configuration path, to describe code signing properties
- options: null
opts:
description: |-
Use this input to specify custom options, to append to the end of the cordova-cli build command.
Example:
- `--browserify`
`cordova build [OTHER_PARAMS] [options]`
title: Options to append to the cordova-cli build command
outputs:
- BITRISE_IPA_PATH: null
opts:
title: The created ios .ipa file's path
- BITRISE_APP_DIR_PATH: null
opts:
title: The created ios .app dir's path
- BITRISE_APP_PATH: null
opts:
title: The created ios .app.zip file's path
- BITRISE_DSYM_DIR_PATH: null
opts:
title: The created ios .dSYM dir's path
- BITRISE_DSYM_PATH: null
opts:
title: The created ios .dSYM.zip file's path
- BITRISE_APK_PATH: ""
opts:
title: The created android .apk file's path
================================================
FILE: steps/cordova-archive/0.9.3/step.yml
================================================
title: Cordova archive
summary: Archives your Cordova project
description: |-
Archives your Cordova project.
For first the step prepare your Cordova project by calling:
- `cordova "platform" "rm" ""`
- `cordova "platform" "add" ""`
then it archives the project by calling:
- `cordova "build" "--debug|--release" "--device|--emulator" "" "--buildConfig=$BITRISE_CORDOVA_BUILD_CONFIGURATION"`
website: https://github.com/bitrise-community/steps-cordova-archive
source_code_url: https://github.com/bitrise-community/steps-cordova-archive
support_url: https://github.com/bitrise-community/steps-cordova-archive/issues
published_at: 2017-08-09T15:00:09.496671528+02:00
source:
git: https://github.com/bitrise-community/steps-cordova-archive.git
commit: b7718917e90b7e7e030668b9240fdea516557d73
project_type_tags:
- cordova
type_tags:
- build
toolkit:
go:
package_name: github.com/bitrise-community/steps-cordova-archive
deps:
brew:
- name: go
- name: gradle
inputs:
- opts:
description: Root directory of your Cordova project, where your Cordova config.xml
exists.
is_required: true
summary: ""
title: Working directory
workdir: $BITRISE_SOURCE_DIR
- opts:
description: |-
Specify this input to apply cordova-cli commands to desired platforms only.
`cordova build [OTHER_PARAMS] `
is_required: true
title: Platform to use in cordova-cli commands
value_options:
- ios,android
- ios
- android
platform: ios,android
- configuration: release
opts:
description: |-
Specify build command configuration.
`cordova build [OTHER_PARAMS] [--release | --debug]`
is_required: true
title: Build command configuration
value_options:
- release
- debug
- opts:
description: |-
Specify build command target.
`cordova build [OTHER_PARAMS] [--device | --emulator]`
is_required: true
title: Build command target
value_options:
- device
- emulator
target: device
- cordova_version: null
opts:
description: |-
The version of cordova you want to use.
If value is set to `latest`, the step will update to the latest cordova version.
Leave this input empty to use the preinstalled cordova version.
title: Cordova version
- build_config: $BITRISE_CORDOVA_BUILD_CONFIGURATION
opts:
description: Path to the build configuration file (build.json), which describes
code signing properties.
title: Build configuration path, to describe code signing properties
- options: null
opts:
description: |-
Use this input to specify custom options, to append to the end of the cordova-cli build command.
Example:
- `--browserify`
`cordova build [OTHER_PARAMS] [options]`
title: Options to append to the cordova-cli build command
outputs:
- BITRISE_IPA_PATH: null
opts:
title: The created ios .ipa file's path
- BITRISE_APP_DIR_PATH: null
opts:
title: The created ios .app dir's path
- BITRISE_APP_PATH: null
opts:
title: The created ios .app.zip file's path
- BITRISE_DSYM_DIR_PATH: null
opts:
title: The created ios .dSYM dir's path
- BITRISE_DSYM_PATH: null
opts:
title: The created ios .dSYM.zip file's path
- BITRISE_APK_PATH: ""
opts:
title: The created android .apk file's path
================================================
FILE: steps/cordova-archive/1.0.0/step.yml
================================================
title: Cordova archive
summary: Archives your Cordova project
description: |-
Archives your Cordova project.
For first the step prepare your Cordova project by calling:
- `cordova "platform" "rm" ""`
- `cordova "platform" "add" ""`
then it archives the project by calling:
- `cordova "build" "--debug|--release" "--device|--emulator" "" "--buildConfig=$BITRISE_CORDOVA_BUILD_CONFIGURATION"`
website: https://github.com/bitrise-community/steps-cordova-archive
source_code_url: https://github.com/bitrise-community/steps-cordova-archive
support_url: https://github.com/bitrise-community/steps-cordova-archive/issues
published_at: 2017-10-02T14:03:26.318499115+02:00
source:
git: https://github.com/bitrise-community/steps-cordova-archive.git
commit: e39d64e77951f2de2c0790946853f74c30f88454
project_type_tags:
- cordova
type_tags:
- build
toolkit:
go:
package_name: github.com/bitrise-community/steps-cordova-archive
deps:
brew:
- name: go
- name: gradle
inputs:
- opts:
description: |-
Specify this input to apply cordova-cli commands to desired platforms only.
`cordova build [OTHER_PARAMS] `
is_required: true
title: Platform to use in cordova-cli commands
value_options:
- ios,android
- ios
- android
platform: ios,android
- configuration: release
opts:
description: |-
Specify build command configuration.
`cordova build [OTHER_PARAMS] [--release | --debug]`
is_required: true
title: Build command configuration
value_options:
- release
- debug
- opts:
description: |-
Specify build command target.
`cordova build [OTHER_PARAMS] [--device | --emulator]`
is_required: true
title: Build command target
value_options:
- device
- emulator
target: device
- build_config: $BITRISE_CORDOVA_BUILD_CONFIGURATION
opts:
description: Path to the build configuration file (build.json), which describes
code signing properties.
title: Build configuration path, to describe code signing properties
- opts:
description: |-
Specify whether to remove platforms and then re-add (overwrites some config.xml values).
`cordova platform rm `
is_required: true
title: Should remove platforms as prepare step?
value_options:
- "true"
- "false"
readd_platform: "true"
- cordova_version: null
opts:
description: |-
The version of cordova you want to use.
If value is set to `latest`, the step will update to the latest cordova version.
Leave this input empty to use the preinstalled cordova version.
title: Cordova version
- opts:
description: Root directory of your Cordova project, where your Cordova config.xml
exists.
is_required: true
summary: ""
title: Working directory
workdir: $BITRISE_SOURCE_DIR
- options: null
opts:
description: |-
Use this input to specify custom options, to append to the end of the cordova-cli build command.
Example:
- `--browserify`
`cordova build [OTHER_PARAMS] [options]`
title: Options to append to the cordova-cli build command
outputs:
- BITRISE_IPA_PATH: null
opts:
title: The created ios .ipa file's path
- BITRISE_APP_DIR_PATH: null
opts:
title: The created ios .app dir's path
- BITRISE_APP_PATH: null
opts:
title: The created ios .app.zip file's path
- BITRISE_DSYM_DIR_PATH: null
opts:
title: The created ios .dSYM dir's path
- BITRISE_DSYM_PATH: null
opts:
title: The created ios .dSYM.zip file's path
- BITRISE_APK_PATH: ""
opts:
title: The created android .apk file's path
================================================
FILE: steps/cordova-archive/1.0.1/step.yml
================================================
title: Cordova archive
summary: Archives your Cordova project
description: |-
Archives your Cordova project.
For first the step prepare your Cordova project by calling:
- `cordova "platform" "rm" ""`
- `cordova "platform" "add" ""`
then it archives the project by calling:
- `cordova "build" "--debug|--release" "--device|--emulator" "" "--buildConfig=$BITRISE_CORDOVA_BUILD_CONFIGURATION"`
website: https://github.com/bitrise-community/steps-cordova-archive
source_code_url: https://github.com/bitrise-community/steps-cordova-archive
support_url: https://github.com/bitrise-community/steps-cordova-archive/issues
published_at: 2017-12-18T16:07:24.787327714+01:00
source:
git: https://github.com/bitrise-community/steps-cordova-archive.git
commit: 56137b9802075cd8c2896740bd2c62b9e539de7b
project_type_tags:
- cordova
type_tags:
- build
toolkit:
go:
package_name: github.com/bitrise-community/steps-cordova-archive
deps:
brew:
- name: go
- name: gradle
inputs:
- opts:
description: |-
Specify this input to apply cordova-cli commands to desired platforms only.
`cordova build [OTHER_PARAMS] `
is_required: true
title: Platform to use in cordova-cli commands
value_options:
- ios,android
- ios
- android
platform: ios,android
- configuration: release
opts:
description: |-
Specify build command configuration.
`cordova build [OTHER_PARAMS] [--release | --debug]`
is_required: true
title: Build command configuration
value_options:
- release
- debug
- opts:
description: |-
Specify build command target.
`cordova build [OTHER_PARAMS] [--device | --emulator]`
is_required: true
title: Build command target
value_options:
- device
- emulator
target: device
- build_config: $BITRISE_CORDOVA_BUILD_CONFIGURATION
opts:
description: Path to the build configuration file (build.json), which describes
code signing properties.
title: Build configuration path, to describe code signing properties
- opts:
description: |-
Specify whether to remove platforms and then re-add (overwrites some config.xml values).
`cordova platform rm `
is_required: true
title: Should remove platforms as prepare step?
value_options:
- "true"
- "false"
readd_platform: "true"
- cordova_version: null
opts:
description: |-
The version of cordova you want to use.
If value is set to `latest`, the step will update to the latest cordova version.
Leave this input empty to use the preinstalled cordova version.
title: Cordova version
- opts:
description: Root directory of your Cordova project, where your Cordova config.xml
exists.
is_required: true
summary: ""
title: Working directory
workdir: $BITRISE_SOURCE_DIR
- options: null
opts:
description: |-
Use this input to specify custom options, to append to the end of the cordova-cli build command.
Example:
- `--browserify`
`cordova build [OTHER_PARAMS] [options]`
title: Options to append to the cordova-cli build command
outputs:
- BITRISE_IPA_PATH: null
opts:
title: The created ios .ipa file's path
- BITRISE_APP_DIR_PATH: null
opts:
title: The created ios .app dir's path
- BITRISE_APP_PATH: null
opts:
title: The created ios .app.zip file's path
- BITRISE_DSYM_DIR_PATH: null
opts:
title: The created ios .dSYM dir's path
- BITRISE_DSYM_PATH: null
opts:
title: The created ios .dSYM.zip file's path
- BITRISE_APK_PATH: ""
opts:
title: The created android .apk file's path
================================================
FILE: steps/cordova-archive/1.1.0/step.yml
================================================
title: Cordova archive
summary: Archives your Cordova project
description: |-
Archives your Cordova project.
For first the step prepare your Cordova project by calling:
- `cordova "platform" "rm" ""`
- `cordova "platform" "add" ""`
then it archives the project by calling:
- `cordova "build" "--debug|--release" "--device|--emulator" "" "--buildConfig=$BITRISE_CORDOVA_BUILD_CONFIGURATION"`
website: https://github.com/bitrise-community/steps-cordova-archive
source_code_url: https://github.com/bitrise-community/steps-cordova-archive
support_url: https://github.com/bitrise-community/steps-cordova-archive/issues
published_at: 2018-02-13T13:42:26.891039899+01:00
source:
git: https://github.com/bitrise-community/steps-cordova-archive.git
commit: 72c27b335d4b87cf0683158daa586c8b642608a8
project_type_tags:
- cordova
type_tags:
- build
toolkit:
go:
package_name: github.com/bitrise-community/steps-cordova-archive
deps:
brew:
- name: go
- name: gradle
inputs:
- opts:
description: |-
Specify this input to apply cordova-cli commands to desired platforms only.
`cordova build [OTHER_PARAMS] `
is_required: true
title: Platform to use in cordova-cli commands
value_options:
- ios,android
- ios
- android
platform: ios,android
- configuration: release
opts:
description: |-
Specify build command configuration.
`cordova build [OTHER_PARAMS] [--release | --debug]`
is_required: true
title: Build command configuration
value_options:
- release
- debug
- opts:
description: |-
Specify build command target.
`cordova build [OTHER_PARAMS] [--device | --emulator]`
is_required: true
title: Build command target
value_options:
- device
- emulator
target: device
- build_config: $BITRISE_CORDOVA_BUILD_CONFIGURATION
opts:
description: Path to the build configuration file (build.json), which describes
code signing properties.
title: Build configuration path, to describe code signing properties
- opts:
description: |-
Specify whether to remove platforms and then re-add (overwrites some config.xml values).
`cordova platform rm `
is_required: true
title: Should remove platforms as prepare step?
value_options:
- "true"
- "false"
readd_platform: "true"
- cordova_version: null
opts:
description: |-
The version of cordova you want to use.
If value is set to `latest`, the step will update to the latest cordova version.
Leave this input empty to use the preinstalled cordova version.
title: Cordova version
- opts:
description: Root directory of your Cordova project, where your Cordova config.xml
exists.
is_required: true
summary: ""
title: Working directory
workdir: $BITRISE_SOURCE_DIR
- options: null
opts:
description: |-
Use this input to specify custom options, to append to the end of the cordova-cli build command.
Example:
- `--browserify`
`cordova build [OTHER_PARAMS] [options]`
title: Options to append to the cordova-cli build command
outputs:
- BITRISE_IPA_PATH: null
opts:
title: The created ios .ipa file's path
- BITRISE_APP_DIR_PATH: null
opts:
title: The created ios .app dir's path
- BITRISE_APP_PATH: null
opts:
title: The created ios .app.zip file's path
- BITRISE_DSYM_DIR_PATH: null
opts:
title: The created ios .dSYM dir's path
- BITRISE_DSYM_PATH: null
opts:
title: The created ios .dSYM.zip file's path
- BITRISE_APK_PATH: ""
opts:
title: The created android .apk file's path
================================================
FILE: steps/cordova-archive/1.1.1/step.yml
================================================
title: Cordova archive
summary: Archives your Cordova project
description: |-
Archives your Cordova project.
For first the step prepare your Cordova project by calling:
- `cordova "platform" "rm" ""`
- `cordova "platform" "add" ""`
then it archives the project by calling:
- `cordova "build" "--debug|--release" "--device|--emulator" "" "--buildConfig=$BITRISE_CORDOVA_BUILD_CONFIGURATION"`
website: https://github.com/bitrise-community/steps-cordova-archive
source_code_url: https://github.com/bitrise-community/steps-cordova-archive
support_url: https://github.com/bitrise-community/steps-cordova-archive/issues
published_at: 2018-03-05T11:53:35.022717+01:00
source:
git: https://github.com/bitrise-community/steps-cordova-archive.git
commit: 5625552ad051b91f58963d3795b047a228cdb0a6
project_type_tags:
- cordova
type_tags:
- build
toolkit:
go:
package_name: github.com/bitrise-community/steps-cordova-archive
deps:
brew:
- name: go
- name: gradle
inputs:
- opts:
description: |-
Specify this input to apply cordova-cli commands to desired platforms only.
`cordova build [OTHER_PARAMS] `
is_required: true
title: Platform to use in cordova-cli commands
value_options:
- ios,android
- ios
- android
platform: ios,android
- configuration: release
opts:
description: |-
Specify build command configuration.
`cordova build [OTHER_PARAMS] [--release | --debug]`
is_required: true
title: Build command configuration
value_options:
- release
- debug
- opts:
description: |-
Specify build command target.
`cordova build [OTHER_PARAMS] [--device | --emulator]`
is_required: true
title: Build command target
value_options:
- device
- emulator
target: device
- build_config: $BITRISE_CORDOVA_BUILD_CONFIGURATION
opts:
description: Path to the build configuration file (build.json), which describes
code signing properties.
title: Build configuration path, to describe code signing properties
- opts:
description: |-
Specify whether to remove platforms and then re-add (overwrites some config.xml values).
`cordova platform rm `
is_required: true
title: Should remove platforms as prepare step?
value_options:
- "true"
- "false"
readd_platform: "true"
- cordova_version: null
opts:
description: |-
The version of cordova you want to use.
If value is set to `latest`, the step will update to the latest cordova version.
Leave this input empty to use the preinstalled cordova version.
title: Cordova version
- opts:
description: Root directory of your Cordova project, where your Cordova config.xml
exists.
is_required: true
summary: ""
title: Working directory
workdir: $BITRISE_SOURCE_DIR
- options: null
opts:
description: |-
Use this input to specify custom options, to append to the end of the cordova-cli build command.
Example:
- `--browserify`
`cordova build [OTHER_PARAMS] [options]`
title: Options to append to the cordova-cli build command
outputs:
- BITRISE_IPA_PATH: null
opts:
title: The created ios .ipa file's path
- BITRISE_APP_DIR_PATH: null
opts:
title: The created ios .app dir's path
- BITRISE_APP_PATH: null
opts:
title: The created ios .app.zip file's path
- BITRISE_DSYM_DIR_PATH: null
opts:
title: The created ios .dSYM dir's path
- BITRISE_DSYM_PATH: null
opts:
title: The created ios .dSYM.zip file's path
- BITRISE_APK_PATH: ""
opts:
title: The created android .apk file's path
================================================
FILE: steps/cordova-archive/1.2.0/step.yml
================================================
title: Cordova archive
summary: Archives your Cordova project
description: "Archives your Cordova project.\n\nFirst, the step prepare your Cordova
project by calling either:\n\n- `cordova \"platform\" \"rm\" \"\"`\n-
`cordova \"platform\" \"add\" \"\"`\n\nOr: \n\n- `cordova \"prepare\"
\"\"`\n\nThen it archives the project by calling:\n\n- `cordova \"build\"
\"--debug|--release\" \"--device|--emulator\" \"\" \"--buildConfig=$BITRISE_CORDOVA_BUILD_CONFIGURATION\"`"
website: https://github.com/bitrise-community/steps-cordova-archive
source_code_url: https://github.com/bitrise-community/steps-cordova-archive
support_url: https://github.com/bitrise-community/steps-cordova-archive/issues
published_at: 2018-10-26T12:09:57.028090822+02:00
source:
git: https://github.com/bitrise-community/steps-cordova-archive.git
commit: 1e872120c8990fe15db05af655a078f736930277
project_type_tags:
- cordova
type_tags:
- build
toolkit:
go:
package_name: github.com/bitrise-community/steps-cordova-archive
deps:
brew:
- name: go
- name: gradle
inputs:
- opts:
description: |-
Specify this input to apply cordova-cli commands to the desired platforms only.
`cordova build [OTHER_PARAMS] `
is_required: true
title: Platform to use in cordova-cli commands
value_options:
- ios,android
- ios
- android
platform: ios,android
- configuration: release
opts:
description: |-
Specify build command configuration.
`cordova build [OTHER_PARAMS] [--release | --debug]`
is_required: true
title: Build command configuration
value_options:
- release
- debug
- opts:
description: |-
Specify build command target.
`cordova build [OTHER_PARAMS] [--device | --emulator]`
is_required: true
title: Build command target
value_options:
- device
- emulator
target: device
- build_config: $BITRISE_CORDOVA_BUILD_CONFIGURATION
opts:
description: Path to the build configuration file (build.json), which describes
code signing properties.
title: Build configuration path to describe code signing properties
- add_platform: "true"
opts:
description: |-
Specify whether to add platforms during prepare. If false, prepare command will be used instead.
`cordova platform add ` or `cordova prepare `
is_required: true
title: Should add platforms as part of the prepare step?
value_options:
- "true"
- "false"
- opts:
description: |-
Specify whether to remove platforms and then re-add (overwrites some config.xml values).
Only applies if _"Should add platforms as prepare step?"_ is `true`.
`cordova platform rm `
is_required: true
title: Should remove platforms as part of the prepare step?
value_options:
- "true"
- "false"
readd_platform: "true"
- cordova_version: null
opts:
description: |-
The version of cordova you want to use.
If the value is set to `latest`, the step will update to the latest cordova version.
Leave this input field empty to use the preinstalled cordova version.
title: Cordova version
- opts:
description: Root directory of your Cordova project, where your Cordova config.xml
exists.
is_required: true
summary: ""
title: Working directory
workdir: $BITRISE_SOURCE_DIR
- options: null
opts:
description: |-
Use this input to specify custom options, to append to the end of the cordova-cli build command.
For Xcode 10 build issues add `--buildFlag="-UseModernBuildSystem=0"` to options string.
Example:
- `--browserify`
`cordova build [OTHER_PARAMS] [options]`
title: Options to append to the cordova-cli build command
outputs:
- BITRISE_IPA_PATH: null
opts:
title: The created ios .ipa file's path
- BITRISE_APP_DIR_PATH: null
opts:
title: The created ios .app dir's path
- BITRISE_APP_PATH: null
opts:
title: The created ios .app.zip file's path
- BITRISE_DSYM_DIR_PATH: null
opts:
title: The created ios .dSYM dir's path
- BITRISE_DSYM_PATH: null
opts:
title: The created ios .dSYM.zip file's path
- BITRISE_APK_PATH: ""
opts:
title: The created android .apk file's path
================================================
FILE: steps/cordova-archive/1.2.1/step.yml
================================================
title: Cordova archive
summary: Archives your Cordova project
description: "Archives your Cordova project.\n\nFirst, the step prepare your Cordova
project by calling either:\n\n- `cordova \"platform\" \"rm\" \"\"`\n-
`cordova \"platform\" \"add\" \"\"`\n\nOr: \n\n- `cordova \"prepare\"
\"\"`\n\nThen it archives the project by calling:\n\n- `cordova \"build\"
\"--debug|--release\" \"--device|--emulator\" \"\" \"--buildConfig=$BITRISE_CORDOVA_BUILD_CONFIGURATION\"`"
website: https://github.com/bitrise-community/steps-cordova-archive
source_code_url: https://github.com/bitrise-community/steps-cordova-archive
support_url: https://github.com/bitrise-community/steps-cordova-archive/issues
published_at: 2018-11-07T12:44:30.363913092+01:00
source:
git: https://github.com/bitrise-community/steps-cordova-archive.git
commit: 062927fdd284a46cd97b6c67f4e8be11bbd44328
project_type_tags:
- cordova
type_tags:
- build
toolkit:
go:
package_name: github.com/bitrise-community/steps-cordova-archive
deps:
brew:
- name: go
- name: gradle
inputs:
- opts:
description: |-
Specify this input to apply cordova-cli commands to the desired platforms only.
`cordova build [OTHER_PARAMS] `
is_required: true
title: Platform to use in cordova-cli commands
value_options:
- ios,android
- ios
- android
platform: ios,android
- configuration: release
opts:
description: |-
Specify build command configuration.
`cordova build [OTHER_PARAMS] [--release | --debug]`
is_required: true
title: Build command configuration
value_options:
- release
- debug
- opts:
description: |-
Specify build command target.
`cordova build [OTHER_PARAMS] [--device | --emulator]`
is_required: true
title: Build command target
value_options:
- device
- emulator
target: device
- build_config: $BITRISE_CORDOVA_BUILD_CONFIGURATION
opts:
description: Path to the build configuration file (build.json), which describes
code signing properties.
title: Build configuration path to describe code signing properties
- add_platform: "true"
opts:
description: |-
Specify whether to add platforms during prepare. If false, prepare command will be used instead.
`cordova platform add ` or `cordova prepare `
is_required: true
title: Should add platforms as part of the prepare step?
value_options:
- "true"
- "false"
- opts:
description: |-
Specify whether to remove platforms and then re-add (overwrites some config.xml values).
Only applies if _"Should add platforms as prepare step?"_ is `true`.
`cordova platform rm `
is_required: true
title: Should remove platforms as part of the prepare step?
value_options:
- "true"
- "false"
readd_platform: "true"
- cordova_version: null
opts:
description: |-
The version of cordova you want to use.
If the value is set to `latest`, the step will update to the latest cordova version.
Leave this input field empty to use the preinstalled cordova version.
title: Cordova version
- opts:
description: Root directory of your Cordova project, where your Cordova config.xml
exists.
is_required: true
summary: ""
title: Working directory
workdir: $BITRISE_SOURCE_DIR
- options: null
opts:
description: |-
Use this input to specify custom options, to append to the end of the cordova-cli build command.
For Xcode 10 build issues add `--buildFlag="-UseModernBuildSystem=0"` to options string.
Example:
- `--browserify`
`cordova build [OTHER_PARAMS] [options]`
title: Options to append to the cordova-cli build command
outputs:
- BITRISE_IPA_PATH: null
opts:
title: The created ios .ipa file's path
- BITRISE_APP_DIR_PATH: null
opts:
title: The created ios .app dir's path
- BITRISE_APP_PATH: null
opts:
title: The created ios .app.zip file's path
- BITRISE_DSYM_DIR_PATH: null
opts:
title: The created ios .dSYM dir's path
- BITRISE_DSYM_PATH: null
opts:
title: The created ios .dSYM.zip file's path
- BITRISE_APK_PATH: ""
opts:
title: The created android .apk file's path
================================================
FILE: steps/cordova-archive/2.0.0/step.yml
================================================
title: Cordova archive
summary: Archives your Cordova project
description: |-
Archives your Cordova project.
First, the step prepares your Cordova project by calling:
- `cordova "prepare" ""`
Then it archives the project by calling:
- `cordova "compile" "--debug|--release" "--device|--emulator" "" "--buildConfig=$BITRISE_CORDOVA_BUILD_CONFIGURATION"`
website: https://github.com/bitrise-community/steps-cordova-archive
source_code_url: https://github.com/bitrise-community/steps-cordova-archive
support_url: https://github.com/bitrise-community/steps-cordova-archive/issues
published_at: 2018-12-14T11:00:30.805598872Z
source:
git: https://github.com/bitrise-community/steps-cordova-archive.git
commit: 3095639b003c278870bdba1c67dd8c1f1bdb76c3
project_type_tags:
- cordova
type_tags:
- build
toolkit:
go:
package_name: github.com/bitrise-community/steps-cordova-archive
deps:
brew:
- name: go
- name: gradle
inputs:
- opts:
description: |-
Specify this input to apply cordova-cli commands to the desired platforms only.
`cordova build [OTHER_PARAMS] `
is_required: true
title: Platform to use in cordova-cli commands
value_options:
- ios,android
- ios
- android
platform: ios,android
- configuration: release
opts:
description: |-
Specify build command configuration.
`cordova build [OTHER_PARAMS] [--release | --debug]`
is_required: true
title: Build command configuration
value_options:
- release
- debug
- opts:
description: |-
Specify build command target.
`cordova build [OTHER_PARAMS] [--device | --emulator]`
is_required: true
title: Build command target
value_options:
- device
- emulator
target: device
- build_config: $BITRISE_CORDOVA_BUILD_CONFIGURATION
opts:
description: Path to the build configuration file (build.json), which describes
code signing properties.
title: Build configuration path to describe code signing properties
- opts:
description: |-
Should be left at the default (true) value, except if the cordova-prepare step is used.
- true: `cordova prepare ` followed by `cordova compile `
- false: `cordova compile `
is_required: true
title: Should `cordova prepare` be executed before `cordova compile`?
value_options:
- "true"
- "false"
run_cordova_prepare: "true"
- cordova_version: null
opts:
description: |-
The version of cordova you want to use.
If the value is set to `latest`, the step will update to the latest cordova version.
Leave this input field empty to use the preinstalled cordova version.
title: Cordova version
- opts:
description: Root directory of your Cordova project, where your Cordova config.xml
exists.
is_required: true
summary: ""
title: Working directory
workdir: $BITRISE_SOURCE_DIR
- options: --buildFlag="-UseModernBuildSystem=0"
opts:
description: |-
Use this input to specify custom options, to append to the end of the cordova-cli build command.
Cordova does not yet support the new build system made default in XCode 10 (https://github.com/apache/cordova-ios/issues/407).
To use the legacy build system add `--buildFlag="-UseModernBuildSystem=0"` to the options string.
Example:
- `--browserify`
`cordova build [OTHER_PARAMS] [options]`
title: Options to append to the cordova-cli build command
outputs:
- BITRISE_IPA_PATH: null
opts:
title: The created ios .ipa file's path
- BITRISE_APP_DIR_PATH: null
opts:
title: The created ios .app dir's path
- BITRISE_APP_PATH: null
opts:
title: The created ios .app.zip file's path
- BITRISE_DSYM_DIR_PATH: null
opts:
title: The created ios .dSYM dir's path
- BITRISE_DSYM_PATH: null
opts:
title: The created ios .dSYM.zip file's path
- BITRISE_APK_PATH: ""
opts:
title: The created android .apk file's path
================================================
FILE: steps/cordova-archive/2.1.0/step.yml
================================================
title: Cordova archive
summary: Archives your Cordova project
description: |-
Archives your Cordova project.
First, the step prepares your Cordova project by calling:
- `cordova "prepare" ""`
Then it archives the project by calling:
- `cordova "compile" "--debug|--release" "--device|--emulator" "" "--buildConfig=$BITRISE_CORDOVA_BUILD_CONFIGURATION"`
website: https://github.com/bitrise-community/steps-cordova-archive
source_code_url: https://github.com/bitrise-community/steps-cordova-archive
support_url: https://github.com/bitrise-community/steps-cordova-archive/issues
published_at: 2019-09-23T08:44:57.626931011Z
source:
git: https://github.com/bitrise-steplib/steps-cordova-archive.git
commit: 186a448946a263b9a8df5d768cafbe88a5cdba1d
project_type_tags:
- cordova
type_tags:
- build
toolkit:
go:
package_name: github.com/bitrise-community/steps-cordova-archive
deps:
brew:
- name: go
- name: gradle
inputs:
- opts:
description: |-
Specify this input to apply cordova-cli commands to the desired platforms only.
`cordova build [OTHER_PARAMS] `
is_required: true
title: Platform to use in cordova-cli commands
value_options:
- ios,android
- ios
- android
platform: ios,android
- configuration: release
opts:
description: |-
Specify build command configuration.
`cordova build [OTHER_PARAMS] [--release | --debug]`
is_required: true
title: Build command configuration
value_options:
- release
- debug
- opts:
description: |-
Specify build command target.
`cordova build [OTHER_PARAMS] [--device | --emulator]`
is_required: true
title: Build command target
value_options:
- device
- emulator
target: device
- build_config: $BITRISE_CORDOVA_BUILD_CONFIGURATION
opts:
description: Path to the build configuration file (build.json), which describes
code signing properties.
title: Build configuration path to describe code signing properties
- opts:
description: |-
Should be left at the default (true) value, except if the cordova-prepare step is used.
- true: `cordova prepare ` followed by `cordova compile `
- false: `cordova compile `
is_required: true
title: Should `cordova prepare` be executed before `cordova compile`?
value_options:
- "true"
- "false"
run_cordova_prepare: "true"
- cordova_version: null
opts:
description: |-
The version of cordova you want to use.
If the value is set to `latest`, the step will update to the latest cordova version.
Leave this input field empty to use the preinstalled cordova version.
title: Cordova version
- opts:
description: Root directory of your Cordova project, where your Cordova config.xml
exists.
is_required: true
summary: ""
title: Working directory
workdir: $BITRISE_SOURCE_DIR
- options: --buildFlag="-UseModernBuildSystem=0"
opts:
description: |-
Use this input to specify custom options, to append to the end of the cordova-cli build command.
Cordova does not yet support the new build system made default in XCode 10 (https://github.com/apache/cordova-ios/issues/407).
To use the legacy build system add `--buildFlag="-UseModernBuildSystem=0"` to the options string.
Example:
- `--browserify`
`cordova build [OTHER_PARAMS] [options]`
title: Options to append to the cordova-cli build command
- cache_local_deps: "false"
opts:
category: Cache
description: |
Select if the contents of node_modules directory should be cached.
`true`: Mark local dependencies to be cached.
`false`: Do not use cache.
is_required: true
title: Cache node_modules
value_options:
- "true"
- "false"
outputs:
- BITRISE_IPA_PATH: null
opts:
title: The created ios .ipa file's path
- BITRISE_APP_DIR_PATH: null
opts:
title: The created ios .app dir's path
- BITRISE_APP_PATH: null
opts:
title: The created ios .app.zip file's path
- BITRISE_DSYM_DIR_PATH: null
opts:
title: The created ios .dSYM dir's path
- BITRISE_DSYM_PATH: null
opts:
title: The created ios .dSYM.zip file's path
- BITRISE_APK_PATH: ""
opts:
title: The created android .apk file's path
================================================
FILE: steps/cordova-archive/2.1.1/step.yml
================================================
title: Cordova archive
summary: Archives your Cordova project
description: |-
Archives your Cordova project.
First, the step prepares your Cordova project by calling:
- `cordova "prepare" ""`
Then it archives the project by calling:
- `cordova "compile" "--debug|--release" "--device|--emulator" "" "--buildConfig=$BITRISE_CORDOVA_BUILD_CONFIGURATION"`
website: https://github.com/bitrise-community/steps-cordova-archive
source_code_url: https://github.com/bitrise-community/steps-cordova-archive
support_url: https://github.com/bitrise-community/steps-cordova-archive/issues
published_at: 2020-05-07T08:03:51.244809194Z
source:
git: https://github.com/bitrise-steplib/steps-cordova-archive.git
commit: c50d99250d37dd50655568c2a3f5d3f7879e6b6a
project_type_tags:
- cordova
type_tags:
- build
toolkit:
go:
package_name: github.com/bitrise-community/steps-cordova-archive
deps:
brew:
- name: node
- name: gradle
inputs:
- opts:
description: |-
Specify this input to apply cordova-cli commands to the desired platforms only.
`cordova build [OTHER_PARAMS] `
is_required: true
title: Platform to use in cordova-cli commands
value_options:
- ios,android
- ios
- android
platform: ios,android
- configuration: release
opts:
description: |-
Specify build command configuration.
`cordova build [OTHER_PARAMS] [--release | --debug]`
is_required: true
title: Build command configuration
value_options:
- release
- debug
- opts:
description: |-
Specify build command target.
`cordova build [OTHER_PARAMS] [--device | --emulator]`
is_required: true
title: Build command target
value_options:
- device
- emulator
target: device
- build_config: $BITRISE_CORDOVA_BUILD_CONFIGURATION
opts:
description: Path to the build configuration file (build.json), which describes
code signing properties.
title: Build configuration path to describe code signing properties
- opts:
description: |-
Should be left at the default (true) value, except if the cordova-prepare step is used.
- true: `cordova prepare ` followed by `cordova compile `
- false: `cordova compile `
is_required: true
title: Should `cordova prepare` be executed before `cordova compile`?
value_options:
- "true"
- "false"
run_cordova_prepare: "true"
- cordova_version: null
opts:
description: |-
The version of cordova you want to use.
If the value is set to `latest`, the step will update to the latest cordova version.
Leave this input field empty to use the preinstalled cordova version.
title: Cordova version
- opts:
description: Root directory of your Cordova project, where your Cordova config.xml
exists.
is_required: true
summary: ""
title: Working directory
workdir: $BITRISE_SOURCE_DIR
- options: --buildFlag="-UseModernBuildSystem=0"
opts:
description: |-
Use this input to specify custom options, to append to the end of the cordova-cli build command.
Cordova does not yet support the new build system made default in XCode 10 (https://github.com/apache/cordova-ios/issues/407).
To use the legacy build system add `--buildFlag="-UseModernBuildSystem=0"` to the options string.
Example:
- `--browserify`
`cordova build [OTHER_PARAMS] [options]`
title: Options to append to the cordova-cli build command
- cache_local_deps: "false"
opts:
category: Cache
description: |
Select if the contents of node_modules directory should be cached.
`true`: Mark local dependencies to be cached.
`false`: Do not use cache.
is_required: true
title: Cache node_modules
value_options:
- "true"
- "false"
outputs:
- BITRISE_IPA_PATH: null
opts:
title: The created ios .ipa file's path
- BITRISE_APP_DIR_PATH: null
opts:
title: The created ios .app dir's path
- BITRISE_APP_PATH: null
opts:
title: The created ios .app.zip file's path
- BITRISE_DSYM_DIR_PATH: null
opts:
title: The created ios .dSYM dir's path
- BITRISE_DSYM_PATH: null
opts:
title: The created ios .dSYM.zip file's path
- BITRISE_APK_PATH: ""
opts:
title: The created android .apk file's path
================================================
FILE: steps/cordova-archive/2.2.0/step.yml
================================================
title: Cordova archive
summary: Archives your Cordova project
description: |-
Archives your Cordova project.
First, the step prepares your Cordova project by calling:
- `cordova "prepare" ""`
Then it archives the project by calling:
- `cordova "compile" "--debug|--release" "--device|--emulator" "" "--buildConfig=$BITRISE_CORDOVA_BUILD_CONFIGURATION"`
website: https://github.com/bitrise-community/steps-cordova-archive
source_code_url: https://github.com/bitrise-community/steps-cordova-archive
support_url: https://github.com/bitrise-community/steps-cordova-archive/issues
published_at: 2020-05-28T10:49:57.448804131Z
source:
git: https://github.com/bitrise-steplib/steps-cordova-archive.git
commit: 4e18940442eac2c08c98d5964daaa8f9fc518a9e
project_type_tags:
- cordova
type_tags:
- build
toolkit:
go:
package_name: github.com/bitrise-community/steps-cordova-archive
deps:
brew:
- name: node
- name: gradle
inputs:
- opts:
description: |-
Specify this input to apply cordova-cli commands to the desired platforms only.
`cordova build [OTHER_PARAMS] `
is_required: true
title: Platform to use in cordova-cli commands
value_options:
- ios,android
- ios
- android
platform: ios,android
- configuration: release
opts:
description: |-
Specify build command configuration.
`cordova build [OTHER_PARAMS] [--release | --debug]`
is_required: true
title: Build command configuration
value_options:
- release
- debug
- opts:
description: |-
Specify build command target.
`cordova build [OTHER_PARAMS] [--device | --emulator]`
is_required: true
title: Build command target
value_options:
- device
- emulator
target: device
- build_config: $BITRISE_CORDOVA_BUILD_CONFIGURATION
opts:
description: Path to the build configuration file (build.json), which describes
code signing properties.
title: Build configuration path to describe code signing properties
- opts:
description: |-
Should be left at the default (true) value, except if the cordova-prepare step is used.
- true: `cordova prepare ` followed by `cordova compile `
- false: `cordova compile `
is_required: true
title: Should `cordova prepare` be executed before `cordova compile`?
value_options:
- "true"
- "false"
run_cordova_prepare: "true"
- cordova_version: null
opts:
description: |-
The version of cordova you want to use.
If the value is set to `latest`, the step will update to the latest cordova version.
Leave this input field empty to use the preinstalled cordova version.
title: Cordova version
- opts:
description: Root directory of your Cordova project, where your Cordova config.xml
exists.
is_required: true
summary: ""
title: Working directory
workdir: $BITRISE_SOURCE_DIR
- options: --buildFlag="-UseModernBuildSystem=0"
opts:
description: |-
Use this input to specify custom options, to append to the end of the cordova-cli build command.
Add `-- --packageType="bundle"` to build an Android bundle (aab). (https://github.com/apache/cordova-android/pull/764)
The new Xcode build system is now supported in cordova-ios@5.0.0 (https://github.com/apache/cordova-ios/issues/407).
To use the legacy build system add `--buildFlag="-UseModernBuildSystem=0"` to the options string.
Example:
- `--browserify`
`cordova build [OTHER_PARAMS] [options]`
title: Options to append to the cordova-cli build command
- cache_local_deps: "false"
opts:
category: Cache
description: |
Select if the contents of node_modules directory should be cached.
`true`: Mark local dependencies to be cached.
`false`: Do not use cache.
is_required: true
title: Cache node_modules
value_options:
- "true"
- "false"
outputs:
- BITRISE_IPA_PATH: null
opts:
title: The created ios .ipa file's path
- BITRISE_APP_DIR_PATH: null
opts:
title: The created ios .app dir's path
- BITRISE_APP_PATH: null
opts:
title: The created ios .app.zip file's path
- BITRISE_DSYM_DIR_PATH: null
opts:
title: The created ios .dSYM dir's path
- BITRISE_DSYM_PATH: null
opts:
title: The created ios .dSYM.zip file's path
- BITRISE_APK_PATH: ""
opts:
title: The created android .apk file's path
- BITRISE_AAB_PATH: ""
opts:
title: The created android .aab file's path
================================================
FILE: steps/cordova-archive/2.2.1/step.yml
================================================
title: Cordova Archive
summary: Creates an archive of your Cordova project by calling `cordova prepare` and
then `cordova compile`, using your Cordova build configuration.
description: "\nThe Step creates an archive of your Cordova project: it prepares the
project by calling `cordova prepare` and then archives it by calling `cordova compile`
with the Cordova CLI.\n\nIf you want to perform code signing on your app, the Step
requires the **Generate Cordova build configuration** Step: this Step provides the
configuration for the **Cordova Archive** Step.\n\n### Configuring the Step\n\nThe
Step needs to know the platform (iOS, Android, or both), the mode (release or debug),
and the target (device or emulator) of your build. You decide whether you want the
Step to run the `cordova prepare` command or you want to use the **Cordova Prepare**
Step.\n\n1. In the **Platform to use in cordova-cli commands** input, set the platforms
you need.\n1. In the **Build command configuration** input, set the build mode for
the app.\n\n This can be either `release` or `debug`.\n\n1. In the **Build command
target** input, set whether you want to build the app for a device or an emulator.\n\n1.
If you use the **Cordova Prepare** Step, set the **Should `cordova prepare` be executed
before `cordova compile`?** input to `false`.\n\n1. If you want to deploy your app,
the **Build configuration path to describe code signing properties** input should
be set to `$BITRISE_CORDOVA_BUILD_CONFIGURATION`.\n\n This Environment Variable
is exposed by the **Generate Cordova build configuration** Step.\n\n### Troubleshooting\n\n-
If you run a `release` build, make sure that your code signing configurations are
correct. The Step will fail if the **Generate Cordova build configuration** Step
does not have the required code signing inputs - for example, if you mean to deploy
an iOS app to the App Store, you need a Distribution code signing identity. And
of course check the code signing files that you uploaded to Bitrise! \n\n\n### Useful
links\n\n- [Getting started with Ionic/Cordova apps](https://devcenter.bitrise.io/getting-started/getting-started-with-ionic-cordova-apps/)\n\n###
Related Steps\n\n- [Generate Cordova build configuration](https://www.bitrise.io/integrations/steps/generate-cordova-build-configuration)\n-
[Cordova Prepare](https://www.bitrise.io/integrations/steps/cordova-prepare)\n-
[Manipulate Cordova config.xml](https://www.bitrise.io/integrations/steps/cordova-config)"
website: https://github.com/bitrise-community/steps-cordova-archive
source_code_url: https://github.com/bitrise-community/steps-cordova-archive
support_url: https://github.com/bitrise-community/steps-cordova-archive/issues
published_at: 2020-11-20T20:14:28.635492968Z
source:
git: https://github.com/bitrise-steplib/steps-cordova-archive.git
commit: 3a2e2fa0563a1932515385ac844db716946d452a
project_type_tags:
- cordova
type_tags:
- build
toolkit:
go:
package_name: github.com/bitrise-community/steps-cordova-archive
deps:
brew:
- name: node
- name: gradle
inputs:
- opts:
description: |-
Specify this input to apply cordova-cli commands to the desired platforms only.
`cordova build [OTHER_PARAMS] `
is_required: true
title: Platform to use in cordova-cli commands
value_options:
- ios,android
- ios
- android
platform: ios,android
- configuration: release
opts:
description: |-
Specify build command configuration.
`cordova build [OTHER_PARAMS] [--release | --debug]`
is_required: true
title: Build command configuration
value_options:
- release
- debug
- opts:
description: |-
Specify build command target.
`cordova build [OTHER_PARAMS] [--device | --emulator]`
is_required: true
title: Build command target
value_options:
- device
- emulator
target: device
- build_config: $BITRISE_CORDOVA_BUILD_CONFIGURATION
opts:
description: Path to the build configuration file (build.json), which describes
code signing properties.
title: Build configuration path to describe code signing properties
- opts:
description: |-
Should be left at the default (true) value, except if the cordova-prepare step is used.
- true: `cordova prepare ` followed by `cordova compile `
- false: `cordova compile `
is_required: true
title: Should `cordova prepare` be executed before `cordova compile`?
value_options:
- "true"
- "false"
run_cordova_prepare: "true"
- cordova_version: null
opts:
description: |-
The version of cordova you want to use.
If the value is set to `latest`, the step will update to the latest cordova version.
Leave this input field empty to use the preinstalled cordova version.
title: Cordova version
- opts:
description: Root directory of your Cordova project, where your Cordova config.xml
exists.
is_required: true
summary: ""
title: Working directory
workdir: $BITRISE_SOURCE_DIR
- options: --buildFlag="-UseModernBuildSystem=0"
opts:
description: |-
Use this input to specify custom options, to append to the end of the cordova-cli build command.
Add `-- --packageType="bundle"` to build an Android bundle (aab). (https://github.com/apache/cordova-android/pull/764)
The new Xcode build system is now supported in cordova-ios@5.0.0 (https://github.com/apache/cordova-ios/issues/407).
To use the legacy build system add `--buildFlag="-UseModernBuildSystem=0"` to the options string.
Example:
- `--browserify`
`cordova build [OTHER_PARAMS] [options]`
title: Options to append to the cordova-cli build command
- cache_local_deps: "false"
opts:
category: Cache
description: |
Select if the contents of node_modules directory should be cached.
`true`: Mark local dependencies to be cached.
`false`: Do not use cache.
is_required: true
title: Cache node_modules
value_options:
- "true"
- "false"
outputs:
- BITRISE_IPA_PATH: null
opts:
title: The created ios .ipa file's path
- BITRISE_APP_DIR_PATH: null
opts:
title: The created ios .app dir's path
- BITRISE_APP_PATH: null
opts:
title: The created ios .app.zip file's path
- BITRISE_DSYM_DIR_PATH: null
opts:
title: The created ios .dSYM dir's path
- BITRISE_DSYM_PATH: null
opts:
title: The created ios .dSYM.zip file's path
- BITRISE_APK_PATH: ""
opts:
title: The created android .apk file's path
- BITRISE_AAB_PATH: ""
opts:
title: The created android .aab file's path
================================================
FILE: steps/cordova-archive/2.3.0/step.yml
================================================
title: Cordova Archive
summary: Creates an archive of your Cordova project by calling `cordova prepare` and
then `cordova compile`, using your Cordova build configuration.
description: "\nThe Step creates an archive of your Cordova project: it prepares the
project by calling `cordova prepare` and then archives it by calling `cordova compile`
with the Cordova CLI.\n\nIf you want to perform code signing on your app, the Step
requires the **Generate Cordova build configuration** Step: this Step provides the
configuration for the **Cordova Archive** Step.\n\n### Configuring the Step\n\nThe
Step needs to know the platform (iOS, Android, or both), the mode (release or debug),
and the target (device or emulator) of your build. You decide whether you want the
Step to run the `cordova prepare` command or you want to use the **Cordova Prepare**
Step.\n\n1. In the **Platform to use in cordova-cli commands** input, set the platforms
you need.\n1. In the **Build command configuration** input, set the build mode for
the app.\n\n This can be either `release` or `debug`.\n\n1. In the **Build command
target** input, set whether you want to build the app for a device or an emulator.\n\n1.
If you use the **Cordova Prepare** Step, set the **Should `cordova prepare` be executed
before `cordova compile`?** input to `false`.\n\n1. If you want to deploy your app,
the **Build configuration path to describe code signing properties** input should
be set to `$BITRISE_CORDOVA_BUILD_CONFIGURATION`.\n\n This Environment Variable
is exposed by the **Generate Cordova build configuration** Step.\n\n### Troubleshooting\n\n-
If you run a `release` build, make sure that your code signing configurations are
correct. The Step will fail if the **Generate Cordova build configuration** Step
does not have the required code signing inputs - for example, if you mean to deploy
an iOS app to the App Store, you need a Distribution code signing identity. And
of course check the code signing files that you uploaded to Bitrise! \n\n\n### Useful
links\n\n- [Getting started with Ionic/Cordova apps](https://devcenter.bitrise.io/getting-started/getting-started-with-ionic-cordova-apps/)\n\n###
Related Steps\n\n- [Generate Cordova build configuration](https://www.bitrise.io/integrations/steps/generate-cordova-build-configuration)\n-
[Cordova Prepare](https://www.bitrise.io/integrations/steps/cordova-prepare)\n-
[Manipulate Cordova config.xml](https://www.bitrise.io/integrations/steps/cordova-config)"
website: https://github.com/bitrise-community/steps-cordova-archive
source_code_url: https://github.com/bitrise-community/steps-cordova-archive
support_url: https://github.com/bitrise-community/steps-cordova-archive/issues
published_at: 2021-05-12T12:56:19.570748707Z
source:
git: https://github.com/bitrise-steplib/steps-cordova-archive.git
commit: e6c828de732f8133f0364d04f16218671d24e565
project_type_tags:
- cordova
type_tags:
- build
toolkit:
go:
package_name: github.com/bitrise-community/steps-cordova-archive
deps:
brew:
- name: node
- name: gradle
inputs:
- opts:
description: |-
Specify this input to apply cordova-cli commands to the desired platforms only.
`cordova build [OTHER_PARAMS] `
is_required: true
title: Platform to use in cordova-cli commands
value_options:
- ios,android
- ios
- android
platform: ios,android
- configuration: release
opts:
description: |-
Specify build command configuration.
`cordova build [OTHER_PARAMS] [--release | --debug]`
is_required: true
title: Build command configuration
value_options:
- release
- debug
- opts:
description: |-
Specify build command target.
`cordova build [OTHER_PARAMS] [--device | --emulator]`
is_required: true
title: Build command target
value_options:
- device
- emulator
target: device
- build_config: $BITRISE_CORDOVA_BUILD_CONFIGURATION
opts:
description: Path to the build configuration file (build.json), which describes
code signing properties.
title: Build configuration path to describe code signing properties
- opts:
description: |-
Should be left at the default (true) value, except if the cordova-prepare step is used.
- true: `cordova prepare ` followed by `cordova compile `
- false: `cordova compile `
is_required: true
title: Should `cordova prepare` be executed before `cordova compile`?
value_options:
- "true"
- "false"
run_cordova_prepare: "true"
- cordova_version: null
opts:
description: |-
The version of cordova you want to use.
If the value is set to `latest`, the step will update to the latest cordova version.
Leave this input field empty to use the preinstalled cordova version.
title: Cordova version
- opts:
description: Root directory of your Cordova project, where your Cordova config.xml
exists.
is_required: true
summary: ""
title: Working directory
workdir: $BITRISE_SOURCE_DIR
- options: --buildFlag="-UseModernBuildSystem=0"
opts:
description: |-
Use this input to specify custom options, to append to the end of the cordova-cli build command.
Add `-- --packageType="bundle"` to build an Android bundle (aab). (https://github.com/apache/cordova-android/pull/764)
The new Xcode build system is now supported in cordova-ios@5.0.0 (https://github.com/apache/cordova-ios/issues/407).
To use the legacy build system add `--buildFlag="-UseModernBuildSystem=0"` to the options string.
Example:
- `--browserify`
`cordova build [OTHER_PARAMS] [options]`
title: Options to append to the cordova-cli build command
- cache_local_deps: "false"
opts:
category: Cache
description: |
Select if the contents of node_modules directory should be cached.
`true`: Mark local dependencies to be cached.
`false`: Do not use cache.
is_required: true
title: Cache node_modules
value_options:
- "true"
- "false"
outputs:
- BITRISE_IPA_PATH: null
opts:
title: The created ios .ipa file's path
- BITRISE_APP_DIR_PATH: null
opts:
title: The created ios .app dir's path
- BITRISE_APP_PATH: null
opts:
title: The created ios .app.zip file's path
- BITRISE_DSYM_DIR_PATH: null
opts:
title: The created ios .dSYM dir's path
- BITRISE_DSYM_PATH: null
opts:
title: The created ios .dSYM.zip file's path
- BITRISE_APK_PATH: ""
opts:
title: The created android .apk file's path
- BITRISE_AAB_PATH: ""
opts:
title: The created android .aab file's path
================================================
FILE: steps/cordova-archive/2.4.0/step.yml
================================================
title: Cordova Archive
summary: Creates an archive of your Cordova project by calling `cordova prepare` and
then `cordova compile`, using your Cordova build configuration.
description: "\nThe Step creates an archive of your Cordova project: it prepares the
project by calling `cordova prepare` and then archives it by calling `cordova compile`
with the Cordova CLI.\n\nIf you want to perform code signing on your app, the Step
requires the **Generate Cordova build configuration** Step: this Step provides the
configuration for the **Cordova Archive** Step.\n\n### Configuring the Step\n\nThe
Step needs to know the platform (iOS, Android, or both), the mode (release or debug),
and the target (device or emulator) of your build. You decide whether you want the
Step to run the `cordova prepare` command or you want to use the **Cordova Prepare**
Step.\n\n1. In the **Platform to use in cordova-cli commands** input, set the platforms
you need.\n1. In the **Build command configuration** input, set the build mode for
the app.\n\n This can be either `release` or `debug`.\n\n1. In the **Build command
target** input, set whether you want to build the app for a device or an emulator.\n\n1.
If you use the **Cordova Prepare** Step, set the **Should `cordova prepare` be executed
before `cordova compile`?** input to `false`.\n\n1. If you want to deploy your app,
the **Build configuration path to describe code signing properties** input should
be set to `$BITRISE_CORDOVA_BUILD_CONFIGURATION`.\n\n This Environment Variable
is exposed by the **Generate Cordova build configuration** Step.\n\n### Troubleshooting\n\n-
If you run a `release` build, make sure that your code signing configurations are
correct. The Step will fail if the **Generate Cordova build configuration** Step
does not have the required code signing inputs - for example, if you mean to deploy
an iOS app to the App Store, you need a Distribution code signing identity. And
of course check the code signing files that you uploaded to Bitrise! \n\n\n### Useful
links\n\n- [Getting started with Ionic/Cordova apps](https://devcenter.bitrise.io/getting-started/getting-started-with-ionic-cordova-apps/)\n\n###
Related Steps\n\n- [Generate Cordova build configuration](https://www.bitrise.io/integrations/steps/generate-cordova-build-configuration)\n-
[Cordova Prepare](https://www.bitrise.io/integrations/steps/cordova-prepare)\n-
[Manipulate Cordova config.xml](https://www.bitrise.io/integrations/steps/cordova-config)"
website: https://github.com/bitrise-steplib/steps-cordova-archive
source_code_url: https://github.com/bitrise-steplib/steps-cordova-archive
support_url: https://github.com/bitrise-steplib/steps-cordova-archive/issues
published_at: 2021-08-02T15:13:06.834521845Z
source:
git: https://github.com/bitrise-steplib/steps-cordova-archive.git
commit: 8cf33557d25ac32ace74ee33e218c9e2623386ff
project_type_tags:
- cordova
type_tags:
- build
toolkit:
go:
package_name: github.com/bitrise-steplib/steps-cordova-archive
deps:
brew:
- name: node
- name: gradle
inputs:
- opts:
description: |-
Specify this input to apply cordova-cli commands to the desired platforms only.
`cordova build [OTHER_PARAMS] `
is_required: true
title: Platform to use in cordova-cli commands
value_options:
- ios,android
- ios
- android
platform: ios,android
- configuration: release
opts:
description: |-
Specify build command configuration.
`cordova build [OTHER_PARAMS] [--release | --debug]`
is_required: true
title: Build command configuration
value_options:
- release
- debug
- opts:
description: |-
Specify build command target.
`cordova build [OTHER_PARAMS] [--device | --emulator]`
is_required: true
title: Build command target
value_options:
- device
- emulator
target: device
- build_config: $BITRISE_CORDOVA_BUILD_CONFIGURATION
opts:
description: Path to the build configuration file (build.json), which describes
code signing properties.
title: Build configuration path to describe code signing properties
- opts:
description: |-
Should be left at the default (true) value, except if the cordova-prepare step is used.
- true: `cordova prepare ` followed by `cordova compile `
- false: `cordova compile `
is_required: true
title: Should `cordova prepare` be executed before `cordova compile`?
value_options:
- "true"
- "false"
run_cordova_prepare: "true"
- cordova_version: null
opts:
description: |-
The version of cordova you want to use.
If the value is set to `latest`, the step will update to the latest cordova version.
Leave this input field empty to use the preinstalled cordova version.
title: Cordova version
- opts:
description: Root directory of your Cordova project, where your Cordova config.xml
exists.
is_required: true
summary: ""
title: Working directory
workdir: $BITRISE_SOURCE_DIR
- options: --buildFlag="-UseModernBuildSystem=0"
opts:
description: |-
Use this input to specify custom options, to append to the end of the cordova-cli build command.
The new Xcode build system is now supported in cordova-ios@5.0.0 (https://github.com/apache/cordova-ios/issues/407).
To use the legacy build system add `--buildFlag="-UseModernBuildSystem=0"` to the options string.
Example:
- `--browserify`
`cordova build [OTHER_PARAMS] [options]`
title: Options to append to the cordova-cli build command
- cache_local_deps: "false"
opts:
category: Cache
description: |
Select if the contents of node_modules directory should be cached.
`true`: Mark local dependencies to be cached.
`false`: Do not use cache.
is_required: true
title: Cache node_modules
value_options:
- "true"
- "false"
- android_app_type: apk
opts:
category: Android
description: Distribution type when building the Android app
is_required: true
summary: Distribution type when building the Android app
title: Android app type
value_options:
- apk
- aab
outputs:
- BITRISE_IPA_PATH: null
opts:
title: The created ios .ipa file's path
- BITRISE_APP_DIR_PATH: null
opts:
title: The created ios .app dir's path
- BITRISE_APP_PATH: null
opts:
title: The created ios .app.zip file's path
- BITRISE_DSYM_DIR_PATH: null
opts:
title: The created ios .dSYM dir's path
- BITRISE_DSYM_PATH: null
opts:
title: The created ios .dSYM.zip file's path
- BITRISE_APK_PATH: ""
opts:
title: The created android .apk file's path
- BITRISE_AAB_PATH: ""
opts:
title: The created android .aab file's path
================================================
FILE: steps/cordova-archive/3.0.0/step.yml
================================================
title: Cordova Archive
summary: Creates an archive of your Cordova project by calling `cordova prepare` and
then `cordova compile`, using your Cordova build configuration.
description: "\nThe Step creates an archive of your Cordova project: it prepares the
project by calling `cordova prepare` and then archives it by calling `cordova compile`
with the Cordova CLI.\n\nIf you want to perform code signing on your app, the Step
requires the **Generate Cordova build configuration** Step: this Step provides the
configuration for the **Cordova Archive** Step.\n\n### Configuring the Step\n\nThe
Step needs to know the platform (iOS, Android, or both), the mode (release or debug),
and the target (device or emulator) of your build. You decide whether you want the
Step to run the `cordova prepare` command or you want to use the **Cordova Prepare**
Step.\n\n1. In the **Platform to use in cordova-cli commands** input, set the platforms
you need.\n1. In the **Build command configuration** input, set the build mode for
the app.\n\n This can be either `release` or `debug`.\n\n1. In the **Build command
target** input, set whether you want to build the app for a device or an emulator.\n\n1.
If you use the **Cordova Prepare** Step, set the **Should `cordova prepare` be executed
before `cordova compile`?** input to `false`.\n\n1. If you want to deploy your app,
the **Build configuration path to describe code signing properties** input should
be set to `$BITRISE_CORDOVA_BUILD_CONFIGURATION`.\n\n This Environment Variable
is exposed by the **Generate Cordova build configuration** Step.\n\n### Troubleshooting\n\n-
If you run a `release` build, make sure that your code signing configurations are
correct. The Step will fail if the **Generate Cordova build configuration** Step
does not have the required code signing inputs - for example, if you mean to deploy
an iOS app to the App Store, you need a Distribution code signing identity. And
of course check the code signing files that you uploaded to Bitrise! \n\n\n### Useful
links\n\n- [Getting started with Ionic/Cordova apps](https://devcenter.bitrise.io/getting-started/getting-started-with-ionic-cordova-apps/)\n\n###
Related Steps\n\n- [Generate Cordova build configuration](https://www.bitrise.io/integrations/steps/generate-cordova-build-configuration)\n-
[Cordova Prepare](https://www.bitrise.io/integrations/steps/cordova-prepare)\n-
[Manipulate Cordova config.xml](https://www.bitrise.io/integrations/steps/cordova-config)"
website: https://github.com/bitrise-steplib/steps-cordova-archive
source_code_url: https://github.com/bitrise-steplib/steps-cordova-archive
support_url: https://github.com/bitrise-steplib/steps-cordova-archive/issues
published_at: 2021-10-06T07:02:52.614653452Z
source:
git: https://github.com/bitrise-steplib/steps-cordova-archive.git
commit: 1535ba35e5a72e34865599bc4d63dd9a81bc34a1
project_type_tags:
- cordova
type_tags:
- build
toolkit:
go:
package_name: github.com/bitrise-steplib/steps-cordova-archive
deps:
brew:
- name: node
- name: gradle
inputs:
- opts:
description: |-
Specify this input to apply cordova-cli commands to the desired platforms only.
`cordova build [OTHER_PARAMS] `
is_required: true
title: Platform to use in cordova-cli commands
value_options:
- ios,android
- ios
- android
platform: ios,android
- configuration: release
opts:
description: |-
Specify build command configuration.
`cordova build [OTHER_PARAMS] [--release | --debug]`
is_required: true
title: Build command configuration
value_options:
- release
- debug
- opts:
description: |-
Specify build command target.
`cordova build [OTHER_PARAMS] [--device | --emulator]`
is_required: true
title: Build command target
value_options:
- device
- emulator
target: device
- build_config: $BITRISE_CORDOVA_BUILD_CONFIGURATION
opts:
description: Path to the build configuration file (build.json), which describes
code signing properties.
title: Build configuration path to describe code signing properties
- opts:
description: |-
Should be left at the default (true) value, except if the cordova-prepare step is used.
- true: `cordova prepare ` followed by `cordova compile `
- false: `cordova compile