...
```
使用`LABEL`指定元数据时,一条`LABEL`指定可以指定一或多条元数据,指定多条元数据时不同元数据之间通过空格分隔。推荐将所有的元数据通过一条`LABEL`指令指定,以免生成过多的中间镜像。
如,通过`LABEL`指定一些元数据:
```
LABEL version="1.0" description="这是一个Web服务器" by="IT笔录"
```
指定后可以通过`docker inspect`查看:
```
$sudo docker inspect itbilu/test
"Labels": {
"version": "1.0",
"description": "这是一个Web服务器",
"by": "IT笔录"
},
```
*注意;*`Dockerfile`中还有个`MAINTAINER`命令,该命令用于指定镜像作者。但`MAINTAINER`并不推荐使用,更推荐使用`LABEL`来指定镜像作者。如:
```
LABEL maintainer="itbilu.com"
```
### USER(指定当前用户)
> `USER` 指令和 `WORKDIR` 相似,都是改变环境状态并影响以后的层。`WORKDIR` 是改变工作目录,`USER` 则是改变之后层的执行 `RUN`, `CMD` 以及 `ENTRYPOINT` 这类命令的身份。
>
> 当然,和 `WORKDIR` 一样,`USER` 只是帮助你切换到指定用户而已,这个用户必须是事先建立好的,否则无法切换。
格式:`USER <用户名>[:<用户组>]`
示例 1:
```dockerfile
RUN groupadd -r redis && useradd -r -g redis redis
USER redis
RUN [ "redis-server" ]
```
如果以 `root` 执行的脚本,在执行期间希望改变身份,比如希望以某个已经建立好的用户来运行某个服务进程,不要使用 `su`或者 `sudo`,这些都需要比较麻烦的配置,而且在 TTY 缺失的环境下经常出错。建议使用 [`gosu`](https://github.com/tianon/gosu)。
```dockerfile
# 建立 redis 用户,并使用 gosu 换另一个用户执行命令
RUN groupadd -r redis && useradd -r -g redis redis
# 下载 gosu
RUN wget -O /usr/local/bin/gosu "https://github.com/tianon/gosu/releases/download/1.7/gosu-amd64" \
&& chmod +x /usr/local/bin/gosu \
&& gosu nobody true
# 设置 CMD,并以另外的用户执行
CMD [ "exec", "gosu", "redis", "redis-server" ]
```
### HEALTHCHECK(健康检查)
格式:
- `HEALTHCHECK [选项] CMD <命令>`:设置检查容器健康状况的命令
- `HEALTHCHECK NONE`:如果基础镜像有健康检查指令,使用这行可以屏蔽掉其健康检查指令
`HEALTHCHECK` 指令是告诉 Docker 应该如何进行判断容器的状态是否正常,这是 Docker 1.12 引入的新指令。
在没有 `HEALTHCHECK` 指令前,Docker 引擎只可以通过容器内主进程是否退出来判断容器是否状态异常。很多情况下这没问题,但是如果程序进入死锁状态,或者死循环状态,应用进程并不退出,但是该容器已经无法提供服务了。在 1.12 以前,Docker 不会检测到容器的这种状态,从而不会重新调度,导致可能会有部分容器已经无法提供服务了却还在接受用户请求。
而自 1.12 之后,Docker 提供了 `HEALTHCHECK` 指令,通过该指令指定一行命令,用这行命令来判断容器主进程的服务状态是否还正常,从而比较真实的反应容器实际状态。
当在一个镜像指定了 `HEALTHCHECK` 指令后,用其启动容器,初始状态会为 `starting`,在 `HEALTHCHECK` 指令检查成功后变为 `healthy`,如果连续一定次数失败,则会变为 `unhealthy`。
`HEALTHCHECK` 支持下列选项:
- `--interval=<间隔>`:两次健康检查的间隔,默认为 30 秒;
- `--timeout=<时长>`:健康检查命令运行超时时间,如果超过这个时间,本次健康检查就被视为失败,默认 30 秒;
- `--retries=<次数>`:当连续失败指定次数后,则将容器状态视为 `unhealthy`,默认 3 次。
和 `CMD`, `ENTRYPOINT` 一样,`HEALTHCHECK` 只可以出现一次,如果写了多个,只有最后一个生效。
在 `HEALTHCHECK [选项] CMD` 后面的命令,格式和 `ENTRYPOINT` 一样,分为 `shell` 格式,和 `exec` 格式。命令的返回值决定了该次健康检查的成功与否:`0`:成功;`1`:失败;`2`:保留,不要使用这个值。
假设我们有个镜像是个最简单的 Web 服务,我们希望增加健康检查来判断其 Web 服务是否在正常工作,我们可以用 `curl` 来帮助判断,其 `Dockerfile` 的 `HEALTHCHECK` 可以这么写:
```dockerfile
FROM nginx
RUN apt-get update && apt-get install -y curl && rm -rf /var/lib/apt/lists/*
HEALTHCHECK --interval=5s --timeout=3s \
CMD curl -fs http://localhost/ || exit 1
```
这里我们设置了每 5 秒检查一次(这里为了试验所以间隔非常短,实际应该相对较长),如果健康检查命令超过 3 秒没响应就视为失败,并且使用 `curl -fs http://localhost/ || exit 1` 作为健康检查命令。
使用 `docker build` 来构建这个镜像:
```bash
$ docker build -t myweb:v1 .
```
构建好了后,我们启动一个容器:
```bash
$ docker run -d --name web -p 80:80 myweb:v1
```
当运行该镜像后,可以通过 `docker container ls` 看到最初的状态为 `(health: starting)`:
```bash
$ docker container ls
CONTAINER ID IMAGE COMMAND CREATED STATUS PORTS NAMES
03e28eb00bd0 myweb:v1 "nginx -g 'daemon off" 3 seconds ago Up 2 seconds (health: starting) 80/tcp, 443/tcp web
```
在等待几秒钟后,再次 `docker container ls`,就会看到健康状态变化为了 `(healthy)`:
```bash
$ docker container ls
CONTAINER ID IMAGE COMMAND CREATED STATUS PORTS NAMES
03e28eb00bd0 myweb:v1 "nginx -g 'daemon off" 18 seconds ago Up 16 seconds (healthy) 80/tcp, 443/tcp web
```
如果健康检查连续失败超过了重试次数,状态就会变为 `(unhealthy)`。
为了帮助排障,健康检查命令的输出(包括 `stdout` 以及 `stderr`)都会被存储于健康状态里,可以用 `docker inspect` 来查看。
```bash
$ docker inspect --format '{{json .State.Health}}' web | python -m json.tool
{
"FailingStreak": 0,
"Log": [
{
"End": "2016-11-25T14:35:37.940957051Z",
"ExitCode": 0,
"Output": "\n\n\nWelcome to nginx!\n\n\n\nWelcome to nginx!
\nIf you see this page, the nginx web server is successfully installed and\nworking. Further configuration is required.
\n\nFor online documentation and support please refer to\nnginx.org.
\nCommercial support is available at\nnginx.com.
\n\nThank you for using nginx.
\n\n\n",
"Start": "2016-11-25T14:35:37.780192565Z"
}
],
"Status": "healthy"
}
```
### ONBUILD(为他人作嫁衣裳)
格式:`ONBUILD <其它指令>`。
`ONBUILD` 是一个特殊的指令,它后面跟的是其它指令,比如 `RUN`, `COPY` 等,而这些指令,在当前镜像构建时并不会被执行。只有当以当前镜像为基础镜像,去构建下一级镜像的时候才会被执行。
`Dockerfile` 中的其它指令都是为了定制当前镜像而准备的,唯有 `ONBUILD` 是为了帮助别人定制自己而准备的。
假设我们要制作 Node.js 所写的应用的镜像。我们都知道 Node.js 使用 `npm` 进行包管理,所有依赖、配置、启动信息等会放到 `package.json` 文件里。在拿到程序代码后,需要先进行 `npm install` 才可以获得所有需要的依赖。然后就可以通过 `npm start`来启动应用。因此,一般来说会这样写 `Dockerfile`:
```dockerfile
FROM node:slim
RUN mkdir /app
WORKDIR /app
COPY ./package.json /app
RUN [ "npm", "install" ]
COPY . /app/
CMD [ "npm", "start" ]
```
把这个 `Dockerfile` 放到 Node.js 项目的根目录,构建好镜像后,就可以直接拿来启动容器运行。但是如果我们还有第二个 Node.js 项目也差不多呢?好吧,那就再把这个 `Dockerfile` 复制到第二个项目里。那如果有第三个项目呢?再复制么?文件的副本越多,版本控制就越困难,让我们继续看这样的场景维护的问题。
如果第一个 Node.js 项目在开发过程中,发现这个 `Dockerfile` 里存在问题,比如敲错字了、或者需要安装额外的包,然后开发人员修复了这个 `Dockerfile`,再次构建,问题解决。第一个项目没问题了,但是第二个项目呢?虽然最初 `Dockerfile` 是复制、粘贴自第一个项目的,但是并不会因为第一个项目修复了他们的 `Dockerfile`,而第二个项目的 `Dockerfile` 就会被自动修复。
那么我们可不可以做一个基础镜像,然后各个项目使用这个基础镜像呢?这样基础镜像更新,各个项目不用同步 `Dockerfile`的变化,重新构建后就继承了基础镜像的更新?好吧,可以,让我们看看这样的结果。那么上面的这个 `Dockerfile` 就会变为:
```dockerfile
FROM node:slim
RUN mkdir /app
WORKDIR /app
CMD [ "npm", "start" ]
```
这里我们把项目相关的构建指令拿出来,放到子项目里去。假设这个基础镜像的名字为 `my-node` 的话,各个项目内的自己的 `Dockerfile` 就变为:
```dockerfile
FROM my-node
COPY ./package.json /app
RUN [ "npm", "install" ]
COPY . /app/
```
基础镜像变化后,各个项目都用这个 `Dockerfile` 重新构建镜像,会继承基础镜像的更新。
那么,问题解决了么?没有。准确说,只解决了一半。如果这个 `Dockerfile` 里面有些东西需要调整呢?比如 `npm install` 都需要加一些参数,那怎么办?这一行 `RUN` 是不可能放入基础镜像的,因为涉及到了当前项目的 `./package.json`,难道又要一个个修改么?所以说,这样制作基础镜像,只解决了原来的 `Dockerfile` 的前 4 条指令的变化问题,而后面三条指令的变化则完全没办法处理。
`ONBUILD` 可以解决这个问题。让我们用 `ONBUILD` 重新写一下基础镜像的 `Dockerfile`:
```dockerfile
FROM node:slim
RUN mkdir /app
WORKDIR /app
ONBUILD COPY ./package.json /app
ONBUILD RUN [ "npm", "install" ]
ONBUILD COPY . /app/
CMD [ "npm", "start" ]
```
这次我们回到原始的 `Dockerfile`,但是这次将项目相关的指令加上 `ONBUILD`,这样在构建基础镜像的时候,这三行并不会被执行。然后各个项目的 `Dockerfile` 就变成了简单地:
```dockerfile
FROM my-node
```
是的,只有这么一行。当在各个项目目录中,用这个只有一行的 `Dockerfile` 构建镜像时,之前基础镜像的那三行 `ONBUILD` 就会开始执行,成功的将当前项目的代码复制进镜像、并且针对本项目执行 `npm install`,生成应用镜像。
## 二、最佳实践
有任何的问题或建议,欢迎给我留言 :laughing:
## 参考资料
- [Dockerfie 官方文档](https://docs.docker.com/engine/reference/builder/)
- [Best practices for writing Dockerfiles](https://docs.docker.com/develop/develop-images/dockerfile_best-practices/)
- [Docker 官方镜像 Dockerfile](https://github.com/docker-library/docs)
- [Dockerfile 指令详解](https://yeasy.gitbooks.io/docker_practice/content/image/dockerfile/)
================================================
FILE: docs/docker/docker-quickstart.md
================================================
# Docker 快速入门
- [一、Docker 的简介](#一docker-的简介)
- [二、Docker 的运维](#二docker-的运维)
- [三、hello world 实例](#三hello-world-实例)
- [四、制作 Docker 容器](#四制作-docker-容器)
- [参考资料](#参考资料)
## 一、Docker 的简介
### 什么是 Docker
> **Docker 属于 Linux 容器的一种封装,提供简单易用的容器使用接口。**
它是目前最流行的 Linux 容器解决方案。
Docker 将应用程序与该程序的依赖,打包在一个文件里面。运行这个文件,就会生成一个虚拟容器。程序在这个虚拟容器里运行,就好像在真实的物理机上运行一样。有了 Docker,就不用担心环境问题。
总体来说,Docker 的接口相当简单,用户可以方便地创建和使用容器,把自己的应用放入容器。容器还可以进行版本管理、复制、分享、修改,就像管理普通的代码一样。
### 为什么需要 Docker
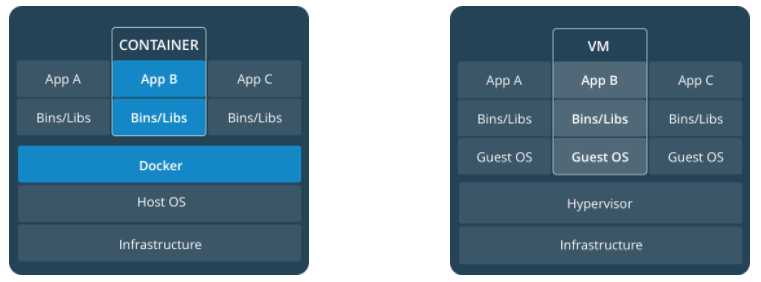
- **更高效的利用系统资源** - 由于容器不需要进行硬件虚拟以及运行完整操作系统等额外开销,`Docker` 对系统资源的利用率更高。无论是应用执行速度、内存损耗或者文件存储速度,都要比传统虚拟机技术更高效。因此,相比虚拟机技术,一个相同配置的主机,往往可以运行更多数量的应用。
- **更快速的启动时间** - 传统的虚拟机技术启动应用服务往往需要数分钟,而 `Docker` 容器应用,由于直接运行于宿主内核,无需启动完整的操作系统,因此可以做到秒级、甚至毫秒级的启动时间。大大的节约了开发、测试、部署的时间。
- **一致的运行环境** - 开发过程中一个常见的问题是环境一致性问题。由于开发环境、测试环境、生产环境不一致,导致有些 bug 并未在开发过程中被发现。而 `Docker` 的镜像提供了除内核外完整的运行时环境,确保了应用运行环境一致性,从而不会再出现 _「这段代码在我机器上没问题啊」_ 这类问题。
- **持续交付和部署** - 对开发和运维([DevOps](https://zh.wikipedia.org/wiki/DevOps))人员来说,最希望的就是一次创建或配置,可以在任意地方正常运行。使用 `Docker` 可以通过定制应用镜像来实现持续集成、持续交付、部署。开发人员可以通过 [Dockerfile](https://yeasy.gitbooks.io/docker_practice/image/dockerfile) 来进行镜像构建,并结合 [持续集成(Continuous Integration)](https://en.wikipedia.org/wiki/Continuous_integration) 系统进行集成测试,而运维人员则可以直接在生产环境中快速部署该镜像,甚至结合 [持续部署(Continuous Delivery/Deployment)](https://en.wikipedia.org/wiki/Continuous_delivery) 系统进行自动部署。而且使用 [`Dockerfile`](https://yeasy.gitbooks.io/docker_practice/image/build.html) 使镜像构建透明化,不仅仅开发团队可以理解应用运行环境,也方便运维团队理解应用运行所需条件,帮助更好的生产环境中部署该镜像。
- **更轻松的迁移** - 由于 `Docker` 确保了执行环境的一致性,使得应用的迁移更加容易。`Docker` 可以在很多平台上运行,无论是物理机、虚拟机、公有云、私有云,甚至是笔记本,其运行结果是一致的。因此用户可以很轻易的将在一个平台上运行的应用,迁移到另一个平台上,而不用担心运行环境的变化导致应用无法正常运行的情况。
- **更轻松的维护和扩展** - `Docker` 使用的分层存储以及镜像的技术,使得应用重复部分的复用更为容易,也使得应用的维护更新更加简单,基于基础镜像进一步扩展镜像也变得非常简单。此外,`Docker` 团队同各个开源项目团队一起维护了一大批高质量的 [官方镜像](https://hub.docker.com/search/?type=image&image_filter=official),既可以直接在生产环境使用,又可以作为基础进一步定制,大大的降低了应用服务的镜像制作成本。
### Docker 的主要用途
Docker 提供了被称为容器的松散隔离环境,在环境中可以打包和运行应用程序。隔离和安全性允许您在给定主机上同时运行多个容器。容器是轻量级的,因为它们不需要管理程序的额外负载,而是直接在主机的内核中运行。这意味着您可以在给定的硬件组合上运行更多容器,而不是使用虚拟机。你甚至可以在实际上是虚拟机的主机中运行 Docker 容器!
Docker 的主要用途,目前有三大类。
- **提供一次性的环境。**比如,本地测试他人的软件、持续集成的时候提供单元测试和构建的环境。
- **提供弹性的云服务。**因为 Docker 容器可以随开随关,很适合动态扩容和缩容。
- **组建微服务架构。**通过多个容器,一台机器可以跑多个服务,因此在本机就可以模拟出微服务架构。
### Docker 的核心概念
#### 镜像
Docker 把应用程序及其依赖,打包在镜像(Image)文件里面。
我们都知道,操作系统分为内核和用户空间。对于 Linux 而言,内核启动后,会挂载 root 文件系统为其提供用户空间支持。而 Docker 镜像(Image),就相当于是一个 root 文件系统。比如官方镜像 ubuntu:18.04 就包含了完整的一套 Ubuntu 18.04 最小系统的 root 文件系统。
Docker 镜像是一个特殊的文件系统,除了提供容器运行时所需的程序、库、资源、配置等文件外,还包含了一些为运行时准备的一些配置参数(如匿名卷、环境变量、用户等)。镜像不包含任何动态数据,其内容在构建之后也不会被改变。
**分层存储**
因为镜像包含操作系统完整的 root 文件系统,其体积往往是庞大的,因此在 Docker 设计时,就充分利用 Union FS 的技术,将其设计为分层存储的架构。所以严格来说,镜像并非是像一个 ISO 那样的打包文件,镜像只是一个虚拟的概念,其实际体现并非由一个文件组成,而是由一组文件系统组成,或者说,由多层文件系统联合组成。
镜像构建时,会一层层构建,前一层是后一层的基础。每一层构建完就不会再发生改变,后一层上的任何改变只发生在自己这一层。比如,删除前一层文件的操作,实际不是真的删除前一层的文件,而是仅在当前层标记为该文件已删除。在最终容器运行的时候,虽然不会看到这个文件,但是实际上该文件会一直跟随镜像。因此,在构建镜像的时候,需要额外小心,每一层尽量只包含该层需要添加的东西,任何额外的东西应该在该层构建结束前清理掉。
分层存储的特征还使得镜像的复用、定制变的更为容易。甚至可以用之前构建好的镜像作为基础层,然后进一步添加新的层,以定制自己所需的内容,构建新的镜像。
#### 容器
镜像(`Image`)和容器(`Container`)的关系,就像是面向对象程序设计中的 `类` 和 `实例` 一样,镜像是静态的定义,容器是镜像运行时的实体。容器可以被创建、启动、停止、删除、暂停等。
容器的实质是进程,但与直接在宿主执行的进程不同,容器进程运行于属于自己的独立的 [命名空间](https://en.wikipedia.org/wiki/Linux_namespaces)。因此容器可以拥有自己的 `root` 文件系统、自己的网络配置、自己的进程空间,甚至自己的用户 ID 空间。容器内的进程是运行在一个隔离的环境里,使用起来,就好像是在一个独立于宿主的系统下操作一样。这种特性使得容器封装的应用比直接在宿主运行更加安全。也因为这种隔离的特性,很多人初学 Docker 时常常会混淆容器和虚拟机。
前面讲过镜像使用的是分层存储,容器也是如此。每一个容器运行时,是以镜像为基础层,在其上创建一个当前容器的存储层,我们可以称这个为容器运行时读写而准备的存储层为**容器存储层**。
容器存储层的生存周期和容器一样,容器消亡时,容器存储层也随之消亡。因此,任何保存于容器存储层的信息都会随容器删除而丢失。
按照 Docker 最佳实践的要求,容器不应该向其存储层内写入任何数据,容器存储层要保持无状态化。所有的文件写入操作,都应该使用 [数据卷(Volume)](https://yeasy.gitbooks.io/docker_practice/content/data_management/volume.html)、或者绑定宿主目录,在这些位置的读写会跳过容器存储层,直接对宿主(或网络存储)发生读写,其性能和稳定性更高。
数据卷的生存周期独立于容器,容器消亡,数据卷不会消亡。因此,使用数据卷后,容器删除或者重新运行之后,数据却不会丢失。
#### 仓库
镜像构建完成后,可以很容易的在当前宿主机上运行,但是,如果需要在其它服务器上使用这个镜像,我们就需要一个集中的存储、分发镜像的服务,[Docker Registry](https://yeasy.gitbooks.io/docker_practice/content/repository/registry.html) 就是这样的服务。
一个 **Docker Registry** 中可以包含多个**仓库**(`Repository`);每个仓库可以包含多个**标签**(`Tag`);每个标签对应一个镜像。
通常,一个仓库会包含同一个软件不同版本的镜像,而标签就常用于对应该软件的各个版本。我们可以通过 `<仓库名>:<标签>` 的格式来指定具体是这个软件哪个版本的镜像。如果不给出标签,将以 `latest` 作为默认标签。
以 [Ubuntu 镜像](https://store.docker.com/images/ubuntu) 为例,`ubuntu` 是仓库的名字,其内包含有不同的版本标签,如,`16.04`, `18.04`。我们可以通过 `ubuntu:14.04`,或者 `ubuntu:18.04` 来具体指定所需哪个版本的镜像。如果忽略了标签,比如 `ubuntu`,那将视为 `ubuntu:latest`。
仓库名经常以 _两段式路径_ 形式出现,比如 `jwilder/nginx-proxy`,前者往往意味着 Docker Registry 多用户环境下的用户名,后者则往往是对应的软件名。但这并非绝对,取决于所使用的具体 Docker Registry 的软件或服务。
## 二、Docker 的运维
不同操作系统环境下安装 Docker 的方式有所不同,详情可以参:
- [Docker 官方安装指南](https://docs.docker.com/install/)
- [安装 Docker(中文)](https://docker_practice.gitee.io/install/)
国内访问 Docker 比较慢,如果需要提速,可以参考 [镜像加速器](https://docker_practice.gitee.io/install/mirror.html)
安装完成后,运行下面的命令,验证是否安装成功。
- `docker version`
- `docker info`
Docker 需要用户具有 sudo 权限,为了避免每次命令都输入`sudo`,可以把用户加入 Docker 用户组([官方文档](https://docs.docker.com/install/linux/linux-postinstall/#manage-docker-as-a-non-root-user))。
```bash
$ sudo usermod -aG docker $USER
```
Docker 是服务器----客户端架构。命令行运行`docker`命令的时候,需要本机有 Docker 服务。如果这项服务没有启动,可以用下面的命令启动([官方文档](https://docs.docker.com/config/daemon/systemd/))。
```bash
# service 命令的用法
$ sudo service docker start
# systemctl 命令的用法
$ sudo systemctl start docker
```
## 三、Hello World 实例
下面,我们通过最简单的 image 文件"[hello world"](https://hub.docker.com/r/library/hello-world/),感受一下 Docker。
需要说明的是,国内连接 Docker 的官方仓库很慢,还会断线,需要将默认仓库改成国内的镜像网站,具体的修改方法在[下一篇文章](http://www.ruanyifeng.com/blog/2018/02/docker-wordpress-tutorial.html)的第一节。有需要的朋友,可以先看一下。
首先,运行下面的命令,将 image 文件从仓库抓取到本地。
> ```bash
> $ docker image pull library/hello-world
> ```
上面代码中,`docker image pull`是抓取 image 文件的命令。`library/hello-world`是 image 文件在仓库里面的位置,其中`library`是 image 文件所在的组,`hello-world`是 image 文件的名字。
由于 Docker 官方提供的 image 文件,都放在[`library`](https://hub.docker.com/r/library/)组里面,所以它的是默认组,可以省略。因此,上面的命令可以写成下面这样。
> ```bash
> $ docker image pull hello-world
> ```
抓取成功以后,就可以在本机看到这个 image 文件了。
> ```bash
> $ docker image ls
> ```
现在,运行这个 image 文件。
> ```bash
> $ docker container run hello-world
> ```
`docker container run`命令会从 image 文件,生成一个正在运行的容器实例。
注意,`docker container run`命令具有自动抓取 image 文件的功能。如果发现本地没有指定的 image 文件,就会从仓库自动抓取。因此,前面的`docker image pull`命令并不是必需的步骤。
如果运行成功,你会在屏幕上读到下面的输出。
> ```bash
> $ docker container run hello-world
>
> Hello from Docker!
> This message shows that your installation appears to be working correctly.
>
> ... ...
> ```
输出这段提示以后,`hello world`就会停止运行,容器自动终止。
有些容器不会自动终止,因为提供的是服务。比如,安装运行 Ubuntu 的 image,就可以在命令行体验 Ubuntu 系统。
> ```bash
> $ docker container run -it ubuntu bash
> ```
对于那些不会自动终止的容器,必须使用[`docker container kill`](https://docs.docker.com/engine/reference/commandline/container_kill/) 命令手动终止。
> ```bash
> $ docker container kill [containID]
> ```
## 四、制作 Docker 容器
下面我以 [koa-demos](http://www.ruanyifeng.com/blog/2017/08/koa.html) 项目为例,介绍怎么写 Dockerfile 文件,实现让用户在 Docker 容器里面运行 Koa 框架。
作为准备工作,请先[下载源码](https://github.com/ruanyf/koa-demos/archive/master.zip)。
> ```bash
> $ git clone https://github.com/ruanyf/koa-demos.git
> $ cd koa-demos
> ```
### 编写 Dockerfile 文件
首先,在项目的根目录下,新建一个文本文件`.dockerignore`,写入下面的[内容](https://github.com/ruanyf/koa-demos/blob/master/.dockerignore)。
> ```bash
> .git
> node_modules
> npm-debug.log
> ```
上面代码表示,这三个路径要排除,不要打包进入 image 文件。如果你没有路径要排除,这个文件可以不新建。
然后,在项目的根目录下,新建一个文本文件 Dockerfile,写入下面的[内容](https://github.com/ruanyf/koa-demos/blob/master/Dockerfile)。
> ```bash
> FROM node:8.4
> COPY . /app
> WORKDIR /app
> RUN npm install --registry=https://registry.npm.taobao.org
> EXPOSE 3000
> ```
上面代码一共五行,含义如下。
> - `FROM node:8.4`:该 image 文件继承官方的 node image,冒号表示标签,这里标签是`8.4`,即 8.4 版本的 node。
> - `COPY . /app`:将当前目录下的所有文件(除了`.dockerignore`排除的路径),都拷贝进入 image 文件的`/app`目录。
> - `WORKDIR /app`:指定接下来的工作路径为`/app`。
> - `RUN npm install`:在`/app`目录下,运行`npm install`命令安装依赖。注意,安装后所有的依赖,都将打包进入 image 文件。
> - `EXPOSE 3000`:将容器 3000 端口暴露出来, 允许外部连接这个端口。
### 创建 image 文件
有了 Dockerfile 文件以后,就可以使用`docker image build`命令创建 image 文件了。
> ```bash
> $ docker image build -t koa-demo .
> # 或者
> $ docker image build -t koa-demo:0.0.1 .
> ```
上面代码中,`-t`参数用来指定 image 文件的名字,后面还可以用冒号指定标签。如果不指定,默认的标签就是`latest`。最后的那个点表示 Dockerfile 文件所在的路径,上例是当前路径,所以是一个点。
如果运行成功,就可以看到新生成的 image 文件`koa-demo`了。
> ```bash
> $ docker image ls
> ```
### 生成容器
`docker container run`命令会从 image 文件生成容器。
> ```bash
> $ docker container run -p 8000:3000 -it koa-demo /bin/bash
> # 或者
> $ docker container run -p 8000:3000 -it koa-demo:0.0.1 /bin/bash
> ```
上面命令的各个参数含义如下:
> - `-p`参数:容器的 3000 端口映射到本机的 8000 端口。
> - `-it`参数:容器的 Shell 映射到当前的 Shell,然后你在本机窗口输入的命令,就会传入容器。
> - `koa-demo:0.0.1`:image 文件的名字(如果有标签,还需要提供标签,默认是 latest 标签)。
> - `/bin/bash`:容器启动以后,内部第一个执行的命令。这里是启动 Bash,保证用户可以使用 Shell。
如果一切正常,运行上面的命令以后,就会返回一个命令行提示符。
> ```bash
> root@66d80f4aaf1e:/app#
> ```
这表示你已经在容器里面了,返回的提示符就是容器内部的 Shell 提示符。执行下面的命令。
> ```bash
> root@66d80f4aaf1e:/app# node demos/01.js
> ```
这时,Koa 框架已经运行起来了。打开本机的浏览器,访问 http://127.0.0.1:8000,网页显示"Not Found",这是因为这个 [demo](https://github.com/ruanyf/koa-demos/blob/master/demos/01.js) 没有写路由。
这个例子中,Node 进程运行在 Docker 容器的虚拟环境里面,进程接触到的文件系统和网络接口都是虚拟的,与本机的文件系统和网络接口是隔离的,因此需要定义容器与物理机的端口映射(map)。
现在,在容器的命令行,按下 Ctrl + c 停止 Node 进程,然后按下 Ctrl + d (或者输入 exit)退出容器。此外,也可以用`docker container kill`终止容器运行。
> ```bash
> # 在本机的另一个终端窗口,查出容器的 ID
> $ docker container ls
>
> # 停止指定的容器运行
> $ docker container kill [containerID]
> ```
容器停止运行之后,并不会消失,用下面的命令删除容器文件。
> ```bash
> # 查出容器的 ID
> $ docker container ls --all
>
> # 删除指定的容器文件
> $ docker container rm [containerID]
> ```
也可以使用`docker container run`命令的`--rm`参数,在容器终止运行后自动删除容器文件。
> ```bash
> $ docker container run --rm -p 8000:3000 -it koa-demo /bin/bash
> ```
### CMD 命令
上一节的例子里面,容器启动以后,需要手动输入命令`node demos/01.js`。我们可以把这个命令写在 Dockerfile 里面,这样容器启动以后,这个命令就已经执行了,不用再手动输入了。
> ```bash
> FROM node:8.4
> COPY . /app
> WORKDIR /app
> RUN npm install --registry=https://registry.npm.taobao.org
> EXPOSE 3000
> CMD node demos/01.js
> ```
上面的 Dockerfile 里面,多了最后一行`CMD node demos/01.js`,它表示容器启动后自动执行`node demos/01.js`。
你可能会问,`RUN`命令与`CMD`命令的区别在哪里?简单说,`RUN`命令在 image 文件的构建阶段执行,执行结果都会打包进入 image 文件;`CMD`命令则是在容器启动后执行。另外,一个 Dockerfile 可以包含多个`RUN`命令,但是只能有一个`CMD`命令。
注意,指定了`CMD`命令以后,`docker container run`命令就不能附加命令了(比如前面的`/bin/bash`),否则它会覆盖`CMD`命令。现在,启动容器可以使用下面的命令。
> ```bash
> $ docker container run --rm -p 8000:3000 -it koa-demo:0.0.1
> ```
### 发布 image 文件
容器运行成功后,就确认了 image 文件的有效性。这时,我们就可以考虑把 image 文件分享到网上,让其他人使用。
首先,去 [hub.docker.com](https://hub.docker.com/) 或 [cloud.docker.com](https://cloud.docker.com/) 注册一个账户。然后,用下面的命令登录。
> ```bash
> $ docker login
> ```
接着,为本地的 image 标注用户名和版本。
> ```bash
> $ docker image tag [imageName] [username]/[repository]:[tag]
> # 实例
> $ docker image tag koa-demos:0.0.1 ruanyf/koa-demos:0.0.1
> ```
也可以不标注用户名,重新构建一下 image 文件。
> ```bash
> $ docker image build -t [username]/[repository]:[tag] .
> ```
最后,发布 image 文件。
> ```bash
> $ docker image push [username]/[repository]:[tag]
> ```
发布成功以后,登录 hub.docker.com,就可以看到已经发布的 image 文件。
## 参考资料
- [Docker 入门教程](https://www.ruanyifeng.com/blog/2018/02/docker-tutorial.html)
- [Docker — 从入门到实践](https://github.com/yeasy/docker_practice)
================================================
FILE: docs/docker/kubernetes.md
================================================
# Kubernetes 应用指南
> Kubernetes 是谷歌开源的容器集群管理系统 是用于自动部署,扩展和管理 Docker 应用程序的开源系统,简称 K8S。
>
> 关键词: `docker`
- [一、K8S 简介](#一k8s-简介)
- [二、K8S 命令](#二k8s-命令)
- [参考资料](#参考资料)
## 一、K8S 简介
K8S 主控组件(Master) 包含三个进程,都运行在集群中的某个节上,通常这个节点被称为 master 节点。这些进程包括:`kube-apiserver`、`kube-controller-manager` 和 `kube-scheduler`。
集群中的每个非 master 节点都运行两个进程:
- kubelet,和 master 节点进行通信。
- kube-proxy,一种网络代理,将 Kubernetes 的网络服务代理到每个节点上。
### K8S 功能
- 基于容器的应用部署、维护和滚动升级
- 负载均衡和服务发现
- 跨机器和跨地区的集群调度
- 自动伸缩
- 无状态服务和有状态服务
- 广泛的 Volume 支持
- 插件机制保证扩展性
### K8S 核心组件
Kubernetes 主要由以下几个核心组件组成:
- etcd 保存了整个集群的状态;
- apiserver 提供了资源操作的唯一入口,并提供认证、授权、访问控制、API 注册和发现等机制;
- controller manager 负责维护集群的状态,比如故障检测、自动扩展、滚动更新等;
- scheduler 负责资源的调度,按照预定的调度策略将 Pod 调度到相应的机器上;
- kubelet 负责维护容器的生命周期,同时也负责 Volume(CVI)和网络(CNI)的管理;
- Container runtime 负责镜像管理以及 Pod 和容器的真正运行(CRI);
- kube-proxy 负责为 Service 提供 cluster 内部的服务发现和负载均衡

### K8S 核心概念
K8S 包含若干抽象用来表示系统状态,包括:已部署的容器化应用和负载、与它们相关的网络和磁盘资源以及有关集群正在运行的其他操作的信息。

- `Pod` - K8S 使用 Pod 来管理容器,每个 Pod 可以包含一个或多个紧密关联的容器。Pod 是一组紧密关联的容器集合,它们共享 PID、IPC、Network 和 UTS namespace,是 K8S 调度的基本单位。Pod 内的多个容器共享网络和文件系统,可以通过进程间通信和文件共享这种简单高效的方式组合完成服务。
- `Node` - Node 是 Pod 真正运行的主机,可以是物理机,也可以是虚拟机。为了管理 Pod,每个 Node 节点上至少要运行 container runtime(比如 docker 或者 rkt)、`kubelet` 和 `kube-proxy` 服务。
- `Namespace` - Namespace 是对一组资源和对象的抽象集合,比如可以用来将系统内部的对象划分为不同的项目组或用户组。常见的 pods, services, replication controllers 和 deployments 等都是属于某一个 namespace 的(默认是 default),而 node, persistentVolumes 等则不属于任何 namespace。
- `Service` - Service 是应用服务的抽象,通过 labels 为应用提供负载均衡和服务发现。匹配 labels 的 Pod IP 和端口列表组成 endpoints,由 kube-proxy 负责将服务 IP 负载均衡到这些 endpoints 上。每个 Service 都会自动分配一个 cluster IP(仅在集群内部可访问的虚拟地址)和 DNS 名,其他容器可以通过该地址或 DNS 来访问服务,而不需要了解后端容器的运行。
- `Label` - Label 是识别 K8S 对象的标签,以 key/value 的方式附加到对象上(key 最长不能超过 63 字节,value 可以为空,也可以是不超过 253 字节的字符串)。Label 不提供唯一性,并且实际上经常是很多对象(如 Pods)都使用相同的 label 来标志具体的应用。Label 定义好后其他对象可以使用 Label Selector 来选择一组相同 label 的对象(比如 ReplicaSet 和 Service 用 label 来选择一组 Pod)。Label Selector 支持以下几种方式:
- 等式,如 `app=nginx` 和 `env!=production`
- 集合,如 `env in (production, qa)`
- 多个 label(它们之间是 AND 关系),如 `app=nginx,env=test`
- `Annotations` - Annotations 是 key/value 形式附加于对象的注解。不同于 Labels 用于标志和选择对象,Annotations 则是用来记录一些附加信息,用来辅助应用部署、安全策略以及调度策略等。比如 deployment 使用 annotations 来记录 rolling update 的状态。
## 二、K8S 命令
### 客户端配置
```bash
# Setup autocomplete in bash; bash-completion package should be installed first
source <(kubectl completion bash)
# View Kubernetes config
kubectl config view
# View specific config items by json path
kubectl config view -o jsonpath='{.users[?(@.name == "k8s")].user.password}'
# Set credentials for foo.kuberntes.com
kubectl config set-credentials kubeuser/foo.kubernetes.com --username=kubeuser --password=kubepassword
```
### 查找资源
```bash
# List all services in the namespace
kubectl get services
# List all pods in all namespaces in wide format
kubectl get pods -o wide --all-namespaces
# List all pods in json (or yaml) format
kubectl get pods -o json
# Describe resource details (node, pod, svc)
kubectl describe nodes my-node
# List services sorted by name
kubectl get services --sort-by=.metadata.name
# List pods sorted by restart count
kubectl get pods --sort-by='.status.containerStatuses[0].restartCount'
# Rolling update pods for frontend-v1
kubectl rolling-update frontend-v1 -f frontend-v2.json
# Scale a replicaset named 'foo' to 3
kubectl scale --replicas=3 rs/foo
# Scale a resource specified in "foo.yaml" to 3
kubectl scale --replicas=3 -f foo.yaml
# Execute a command in every pod / replica
for i in 0 1; do kubectl exec foo-$i -- sh -c 'echo $(hostname) > /usr/share/nginx/html/index.html'; done
```
### 资源管理
```bash
# Get documentation for pod or service
kubectl explain pods,svc
# Create resource(s) like pods, services or daemonsets
kubectl create -f ./my-manifest.yaml
# Apply a configuration to a resource
kubectl apply -f ./my-manifest.yaml
# Start a single instance of Nginx
kubectl run nginx --image=nginx
# Create a secret with several keys
cat < 实测环境:Centos
## 查看可下载镜像
```docker
# docker search mysql
INDEX NAME DESCRIPTION STARS OFFICIAL AUTOMATED
docker.io docker.io/mysql MySQL is a widely used, open-source relati... 5757 [OK]
docker.io docker.io/mariadb MariaDB is a community-developed fork of M... 1863 [OK]
docker.io docker.io/mysql/mysql-server Optimized MySQL Server Docker images. Crea... 397 [OK]
...
```
## 选择下载官方镜像
比如,我想下载最新版本,则执行如下命令:
```docker
docker pull mysql
```
## 使用镜像
```docker
docker run -p 3306:3306 --name mysql -v /opt/docker_v/mysql/conf:/etc/mysql/conf.d -e MYSQL_ROOT_PASSWORD=123456 -d mysql
```
## 资源
* https://hub.docker.com/_/mysql/
================================================
FILE: docs/docker/service/docker-install-nginx.md
================================================
# Docker 安装 Nginx
> 实测环境:Centos
## 查看可用镜像
执行 `docker search nginx` 命令查看可用镜像:
```docker
# docker search nginx
INDEX NAME DESCRIPTION STARS OFFICIAL AUTOMATED
docker.io docker.io/nginx Official build of Nginx. 8272 [OK]
docker.io docker.io/jwilder/nginx-proxy Automated Nginx reverse proxy for docker c... 1300 [OK]
docker.io docker.io/richarvey/nginx-php-fpm Container running Nginx + PHP-FPM capable ... 540 [OK]
docker.io docker.io/jrcs/letsencrypt-nginx-proxy-companion LetsEncrypt container to use with nginx as... 336 [OK]
...
```
## 选择下载镜像
执行 `docker pull nginx` 命令下载镜像
## 运行镜像
```
docker run -p 80:80 --name mynginx -d nginx
```
================================================
FILE: docs/linux/cli/README.md
================================================
# Linux 命令行
> 学习 Linux 的第一步:当然是从 Linux 命令入手了。
## 📖 内容
- [查看 Linux 命令帮助信息](linux-cli-help.md) - 关键词:`help`, `whatis`, `info`, `which`, `whereis`, `man`
- [Linux 文件目录管理](linux-cli-dir.md) - 关键词:`cd`, `ls`, `pwd`, `mkdir`, `rmdir`, `tree`, `touch`, `ln`, `rename`, `stat`, `file`, `chmod`, `chown`, `locate`, `find`, `cp`, `mv`, `rm`
- [Linux 文件内容查看命令](linux-cli-file.md) - 关键词:`cat`, `head`, `tail`, `more`, `less`, `sed`, `vi`, `grep`
- [Linux 文件压缩和解压](linux-cli-file-compress.md) - 关键词:`tar`, `gzip`, `zip`, `unzip`
- [Linux 用户管理](linux-cli-user.md) - 关键词:`groupadd`, `groupdel`, `groupmod`, `useradd`, `userdel`, `usermod`, `passwd`, `su`, `sudo`
- [Linux 系统管理](linux-cli-system.md) - 关键词:`reboot`, `exit`, `shutdown`, `date`, `mount`, `umount`, `ps`, `kill`, `systemctl`, `service`, `crontab`
- [Linux 网络管理](linux-cli-net.md) - 关键词:关键词:`curl`, `wget`, `telnet`, `ip`, `hostname`, `ifconfig`, `route`, `ssh`, `ssh-keygen`, `firewalld`, `iptables`, `host`, `nslookup`, `nc`/`netcat`, `ping`, `traceroute`, `netstat`
- [Linux 硬件管理](linux-cli-hardware.md) - 关键词:`df`, `du`, `top`, `free`, `iotop`
- [Linux 软件管理](linux-cli-software.md) - 关键词:`rpm`, `yum`, `apt-get`
## 📚 资料
- [命令行的艺术](https://github.com/jlevy/the-art-of-command-line/blob/master/README-zh.md)
- [Linux命令大全](https://man.linuxde.net/)
- [linux-command](https://github.com/jaywcjlove/linux-command)
## 🚪 传送门
◾ 💧 [钝悟的 IT 知识图谱](https://dunwu.github.io/waterdrop/) ◾ 🎯 [钝悟的博客](https://dunwu.github.io/blog/) ◾
================================================
FILE: docs/linux/cli/free.md
================================================
# free
显示内存的使用情况
## 补充说明
**free 命令** 可以显示当前系统未使用的和已使用的内存数目,还可以显示被内核使用的内存缓冲区。
### 语法
```shell
free(选项)
```
### 选项
```shell
-b # 以Byte为单位显示内存使用情况;
-k # 以KB为单位显示内存使用情况;
-m # 以MB为单位显示内存使用情况;
-g # 以GB为单位显示内存使用情况。
-o # 不显示缓冲区调节列;
-s<间隔秒数> # 持续观察内存使用状况;
-t # 显示内存总和列;
-V # 显示版本信息。
```
### 实例
```shell
free -t # 以总和的形式显示内存的使用信息
free -s 10 # 周期性的查询内存使用信息,每10s 执行一次命令
```
显示内存使用情况
```shell
free -m
total used free shared buffers cached
Mem: 2016 1973 42 0 163 1497
-/+ buffers/cache: 312 1703
Swap: 4094 0 4094
```
**第一部分 Mem 行解释:**
```shell
total:内存总数;
used:已经使用的内存数;
free:空闲的内存数;
shared:当前已经废弃不用;
buffers Buffer:缓存内存数;
cached Page:缓存内存数。
```
关系:total = used + free
**第二部分(-/+ buffers/cache)解释:**
```shell
(-buffers/cache) used内存数:第一部分Mem行中的 used – buffers – cached
(+buffers/cache) free内存数: 第一部分Mem行中的 free + buffers + cached
```
可见-buffers/cache 反映的是被程序实实在在吃掉的内存,而+buffers/cache 反映的是可以挪用的内存总数。
第三部分是指交换分区。
输出结果的第四行是交换分区 SWAP 的,也就是我们通常所说的虚拟内存。
区别:第二行(mem)的 used/free 与第三行(-/+ buffers/cache) used/free 的区别。 这两个的区别在于使用的角度来看,第一行是从 OS 的角度来看,因为对于 OS,buffers/cached 都是属于被使用,所以他的可用内存是 2098428KB,已用内存是 30841684KB,其中包括,内核(OS)使用+Application(X, oracle,etc)使用的+buffers+cached.
第三行所指的是从应用程序角度来看,对于应用程序来说,buffers/cached 是等于可用的,因为 buffer/cached 是为了提高文件读取的性能,当应用程序需在用到内存的时候,buffer/cached 会很快地被回收。
所以从应用程序的角度来说,可用内存=系统 free memory+buffers+cached。
如本机情况的可用内存为:
18007156=2098428KB+4545340KB+11363424KB
接下来解释什么时候内存会被交换,以及按什么方交换。
当可用内存少于额定值的时候,就会开会进行交换。如何看额定值:
```shell
cat /proc/meminfo
MemTotal: 16140816 kB
MemFree: 816004 kB
MemAvailable: 2913824 kB
Buffers: 17912 kB
Cached: 2239076 kB
SwapCached: 0 kB
Active: 12774804 kB
Inactive: 1594328 kB
Active(anon): 12085544 kB
Inactive(anon): 94572 kB
Active(file): 689260 kB
Inactive(file): 1499756 kB
Unevictable: 116888 kB
Mlocked: 116888 kB
SwapTotal: 8191996 kB
SwapFree: 8191996 kB
Dirty: 56 kB
Writeback: 0 kB
AnonPages: 12229228 kB
Mapped: 117136 kB
Shmem: 58736 kB
Slab: 395568 kB
SReclaimable: 246700 kB
SUnreclaim: 148868 kB
KernelStack: 30496 kB
PageTables: 165104 kB
NFS_Unstable: 0 kB
Bounce: 0 kB
WritebackTmp: 0 kB
CommitLimit: 16262404 kB
Committed_AS: 27698600 kB
VmallocTotal: 34359738367 kB
VmallocUsed: 311072 kB
VmallocChunk: 34350899200 kB
HardwareCorrupted: 0 kB
AnonHugePages: 3104768 kB
HugePages_Total: 0
HugePages_Free: 0
HugePages_Rsvd: 0
HugePages_Surp: 0
Hugepagesize: 2048 kB
DirectMap4k: 225536 kB
DirectMap2M: 13279232 kB
DirectMap1G: 5242880 kB
```
交换将通过三个途径来减少系统中使用的物理页面的个数:
1. 减少缓冲与页面 cache 的大小,
2. 将系统 V 类型的内存页面交换出去,
3. 换出或者丢弃页面。(Application 占用的内存页,也就是物理内存不足)。
事实上,少量地使用 swap 是不是影响到系统性能的。
那 buffers 和 cached 都是缓存,两者有什么区别呢?
为了提高磁盘存取效率, Linux 做了一些精心的设计, 除了对 dentry 进行缓存(用于 VFS,加速文件路径名到 inode 的转换), 还采取了两种主要 Cache 方式:
Buffer Cache 和 Page Cache。前者针对磁盘块的读写,后者针对文件 inode 的读写。这些 Cache 有效缩短了 I/O 系统调用(比如 read,write,getdents)的时间。
磁盘的操作有逻辑级(文件系统)和物理级(磁盘块),这两种 Cache 就是分别缓存逻辑和物理级数据的。
Page cache 实际上是针对文件系统的,是文件的缓存,在文件层面上的数据会缓存到 page cache。文件的逻辑层需要映射到实际的物理磁盘,这种映射关系由文件系统来完成。当 page cache 的数据需要刷新时,page cache 中的数据交给 buffer cache,因为 Buffer Cache 就是缓存磁盘块的。但是这种处理在 2.6 版本的内核之后就变的很简单了,没有真正意义上的 cache 操作。
Buffer cache 是针对磁盘块的缓存,也就是在没有文件系统的情况下,直接对磁盘进行操作的数据会缓存到 buffer cache 中,例如,文件系统的元数据都会缓存到 buffer cache 中。
简单说来,page cache 用来缓存文件数据,buffer cache 用来缓存磁盘数据。在有文件系统的情况下,对文件操作,那么数据会缓存到 page cache,如果直接采用 dd 等工具对磁盘进行读写,那么数据会缓存到 buffer cache。
所以我们看 linux,只要不用 swap 的交换空间,就不用担心自己的内存太少.如果常常 swap 用很多,可能你就要考虑加物理内存了.这也是 linux 看内存是否够用的标准.
如果是应用服务器的话,一般只看第二行,+buffers/cache,即对应用程序来说 free 的内存太少了,也是该考虑优化程序或加内存了。
================================================
FILE: docs/linux/cli/grep.md
================================================
# grep
强大的文本搜索工具
## 补充说明
**grep** (global search regular expression(RE) and print out the line,全面搜索正则表达式并把行打印出来)是一种强大的文本搜索工具,它能使用正则表达式搜索文本,并把匹配的行打印出来。用于过滤/搜索的特定字符。可使用正则表达式能多种命令配合使用,使用上十分灵活。
### 选项
```shell
-a --text # 不要忽略二进制数据。
-A <显示行数> --after-context=<显示行数> # 除了显示符合范本样式的那一行之外,并显示该行之后的内容。
-b --byte-offset # 在显示符合范本样式的那一行之外,并显示该行之前的内容。
-B<显示行数> --before-context=<显示行数> # 除了显示符合样式的那一行之外,并显示该行之前的内容。
-c --count # 计算符合范本样式的列数。
-C<显示行数> --context=<显示行数>或-<显示行数> # 除了显示符合范本样式的那一列之外,并显示该列之前后的内容。
-d<进行动作> --directories=<动作> # 当指定要查找的是目录而非文件时,必须使用这项参数,否则grep命令将回报信息并停止动作。
-e<范本样式> --regexp=<范本样式> # 指定字符串作为查找文件内容的范本样式。
-E --extended-regexp # 将范本样式为延伸的普通表示法来使用,意味着使用能使用扩展正则表达式。
-f<范本文件> --file=<规则文件> # 指定范本文件,其内容有一个或多个范本样式,让grep查找符合范本条件的文件内容,格式为每一列的范本样式。
-F --fixed-regexp # 将范本样式视为固定字符串的列表。
-G --basic-regexp # 将范本样式视为普通的表示法来使用。
-h --no-filename # 在显示符合范本样式的那一列之前,不标示该列所属的文件名称。
-H --with-filename # 在显示符合范本样式的那一列之前,标示该列的文件名称。
-i --ignore-case # 忽略字符大小写的差别。
-l --file-with-matches # 列出文件内容符合指定的范本样式的文件名称。
-L --files-without-match # 列出文件内容不符合指定的范本样式的文件名称。
-n --line-number # 在显示符合范本样式的那一列之前,标示出该列的编号。
-P --perl-regexp # PATTERN 是一个 Perl 正则表达式
-q --quiet或--silent # 不显示任何信息。
-R/-r --recursive # 此参数的效果和指定“-d recurse”参数相同。
-s --no-messages # 不显示错误信息。
-v --revert-match # 反转查找。
-V --version # 显示版本信息。
-w --word-regexp # 只显示全字符合的列。
-x --line-regexp # 只显示全列符合的列。
-y # 此参数效果跟“-i”相同。
-o # 只输出文件中匹配到的部分。
-m --max-count= # 找到num行结果后停止查找,用来限制匹配行数
```
### 规则表达式
```shell
^ # 锚定行的开始 如:'^grep'匹配所有以grep开头的行。
$ # 锚定行的结束 如:'grep$' 匹配所有以grep结尾的行。
. # 匹配一个非换行符的字符 如:'gr.p'匹配gr后接一个任意字符,然后是p。
* # 匹配零个或多个先前字符 如:'*grep'匹配所有一个或多个空格后紧跟grep的行。
.* # 一起用代表任意字符。
[] # 匹配一个指定范围内的字符,如'[Gg]rep'匹配Grep和grep。
[^] # 匹配一个不在指定范围内的字符,如:'[^A-FH-Z]rep'匹配不包含A-R和T-Z的一个字母开头,紧跟rep的行。
\(..\) # 标记匹配字符,如'\(love\)',love被标记为1。
\< # 锚定单词的开始,如:'\ # 锚定单词的结束,如'grep\>'匹配包含以grep结尾的单词的行。
x\{m\} # 重复字符x,m次,如:'0\{5\}'匹配包含5个o的行。
x\{m,\} # 重复字符x,至少m次,如:'o\{5,\}'匹配至少有5个o的行。
x\{m,n\} # 重复字符x,至少m次,不多于n次,如:'o\{5,10\}'匹配5--10个o的行。
\w # 匹配文字和数字字符,也就是[A-Za-z0-9],如:'G\w*p'匹配以G后跟零个或多个文字或数字字符,然后是p。
\W # \w的反置形式,匹配一个或多个非单词字符,如点号句号等。
\b # 单词锁定符,如: '\bgrep\b'只匹配grep。
```
## grep 命令常见用法
在文件中搜索一个单词,命令会返回一个包含 **“match_pattern”** 的文本行:
```shell
grep match_pattern file_name
grep "match_pattern" file_name
```
在多个文件中查找:
```shell
grep "match_pattern" file_1 file_2 file_3 ...
```
输出除之外的所有行 **-v** 选项:
```shell
grep -v "match_pattern" file_name
```
标记匹配颜色 **--color=auto** 选项:
```shell
grep "match_pattern" file_name --color=auto
```
使用正则表达式 **-E** 选项:
```shell
grep -E "[1-9]+"
# 或
egrep "[1-9]+"
```
使用正则表达式 **-P** 选项:
```shell
grep -P "(\d{3}\-){2}\d{4}" file_name
```
只输出文件中匹配到的部分 **-o** 选项:
```shell
echo this is a test line. | grep -o -E "[a-z]+\."
line.
echo this is a test line. | egrep -o "[a-z]+\."
line.
```
统计文件或者文本中包含匹配字符串的行数 **-c** 选项:
```shell
grep -c "text" file_name
```
输出包含匹配字符串的行数 **-n** 选项:
```shell
grep "text" -n file_name
# 或
cat file_name | grep "text" -n
#多个文件
grep "text" -n file_1 file_2
```
打印样式匹配所位于的字符或字节偏移:
```shell
echo gun is not unix | grep -b -o "not"
7:not
#一行中字符串的字符便宜是从该行的第一个字符开始计算,起始值为0。选项 **-b -o** 一般总是配合使用。
```
搜索多个文件并查找匹配文本在哪些文件中:
```shell
grep -l "text" file1 file2 file3...
```
### grep 递归搜索文件
在多级目录中对文本进行递归搜索:
```shell
grep "text" . -r -n
# .表示当前目录。
```
忽略匹配样式中的字符大小写:
```shell
echo "hello world" | grep -i "HELLO"
# hello
```
选项 **-e** 制动多个匹配样式:
```shell
echo this is a text line | grep -e "is" -e "line" -o
is
line
#也可以使用 **-f** 选项来匹配多个样式,在样式文件中逐行写出需要匹配的字符。
cat patfile
aaa
bbb
echo aaa bbb ccc ddd eee | grep -f patfile -o
```
在 grep 搜索结果中包括或者排除指定文件:
```shell
# 只在目录中所有的.php和.html文件中递归搜索字符"main()"
grep "main()" . -r --include *.{php,html}
# 在搜索结果中排除所有README文件
grep "main()" . -r --exclude "README"
# 在搜索结果中排除filelist文件列表里的文件
grep "main()" . -r --exclude-from filelist
```
使用 0 值字节后缀的 grep 与 xargs:
```shell
# 测试文件:
echo "aaa" > file1
echo "bbb" > file2
echo "aaa" > file3
grep "aaa" file* -lZ | xargs -0 rm
# 执行后会删除file1和file3,grep输出用-Z选项来指定以0值字节作为终结符文件名(\0),xargs -0 读取输入并用0值字节终结符分隔文件名,然后删除匹配文件,-Z通常和-l结合使用。
```
grep 静默输出:
```shell
grep -q "test" filename
# 不会输出任何信息,如果命令运行成功返回0,失败则返回非0值。一般用于条件测试。
```
打印出匹配文本之前或者之后的行:
```shell
# 显示匹配某个结果之后的3行,使用 -A 选项:
seq 10 | grep "5" -A 3
5
6
7
8
# 显示匹配某个结果之前的3行,使用 -B 选项:
seq 10 | grep "5" -B 3
2
3
4
5
# 显示匹配某个结果的前三行和后三行,使用 -C 选项:
seq 10 | grep "5" -C 3
2
3
4
5
6
7
8
# 如果匹配结果有多个,会用“--”作为各匹配结果之间的分隔符:
echo -e "a\nb\nc\na\nb\nc" | grep a -A 1
a
b
--
a
b
```
================================================
FILE: docs/linux/cli/iostat.md
================================================
# iostat
监视系统输入输出设备和 CPU 的使用情况
## 补充说明
**iostat 命令** 被用于监视系统输入输出设备和 CPU 的使用情况。它的特点是汇报磁盘活动统计情况,同时也会汇报出 CPU 使用情况。同 vmstat 一样,iostat 也有一个弱点,就是它不能对某个进程进行深入分析,仅对系统的整体情况进行分析。
### 语法
```shell
iostat(选项)(参数)
```
### 选项
```shell
-c:仅显示CPU使用情况;
-d:仅显示设备利用率;
-k:显示状态以千字节每秒为单位,而不使用块每秒;
-m:显示状态以兆字节每秒为单位;
-p:仅显示块设备和所有被使用的其他分区的状态;
-t:显示每个报告产生时的时间;
-V:显示版号并退出;
-x:显示扩展状态。
```
### 参数
- 间隔时间:每次报告的间隔时间(秒);
- 次数:显示报告的次数。
### 实例
用`iostat -x /dev/sda1`来观看磁盘 I/O 的详细情况:
```shell
iostat -x /dev/sda1
Linux 2.6.18-164.el5xen (localhost.localdomain)
2010年03月26日
avg-cpu: %user %nice %system %iowait
%steal %idle
0.11 0.02 0.18 0.35
0.03 99.31
Device: tps Blk_read/s Blk_wrtn/s
Blk_read Blk_wrtn
sda1 0.02 0.08
0.00 2014 4
```
详细说明:第二行是系统信息和监测时间,第三行和第四行显示 CPU 使用情况(具体内容和 mpstat 命令相同)。这里主要关注后面 I/O 输出的信息,如下所示:
| 标示 | 说明 |
| -------- | ----------------------------------- |
| Device | 监测设备名称 |
| rrqm/s | 每秒需要读取需求的数量 |
| wrqm/s | 每秒需要写入需求的数量 |
| r/s | 每秒实际读取需求的数量 |
| w/s | 每秒实际写入需求的数量 |
| rsec/s | 每秒读取区段的数量 |
| wsec/s | 每秒写入区段的数量 |
| rkB/s | 每秒实际读取的大小,单位为 KB |
| wkB/s | 每秒实际写入的大小,单位为 KB |
| avgrq-sz | 需求的平均大小区段 |
| avgqu-sz | 需求的平均队列长度 |
| await | 等待 I/O 平均的时间(milliseconds) |
| svctm | I/O 需求完成的平均时间 |
| %util | 被 I/O 需求消耗的 CPU 百分比 |
================================================
FILE: docs/linux/cli/iotop.md
================================================
# iotop
用来监视磁盘 I/O 使用状况的工具
## 补充说明
**iotop 命令** 是一个用来监视磁盘 I/O 使用状况的 top 类工具。iotop 具有与 top 相似的 UI,其中包括 PID、用户、I/O、进程等相关信息。Linux 下的 IO 统计工具如 iostat,nmon 等大多数是只能统计到 per 设备的读写情况,如果你想知道每个进程是如何使用 IO 的就比较麻烦,使用 iotop 命令可以很方便的查看。
iotop 使用 Python 语言编写而成,要求 Python2.5(及以上版本)和 Linux kernel2.6.20(及以上版本)。iotop 提供有源代码及 rpm 包,可从其官方主页下载。
### 安装
**Ubuntu**
```shell
apt-get install iotop
```
**CentOS**
```shell
yum install iotop
```
**编译安装**
```shell
wget http://guichaz.free.fr/iotop/files/iotop-0.4.4.tar.gz
tar zxf iotop-0.4.4.tar.gz
python setup.py build
python setup.py install
```
### 语法
```shell
iotop(选项)
```
### 选项
```shell
-o:只显示有io操作的进程
-b:批量显示,无交互,主要用作记录到文件。
-n NUM:显示NUM次,主要用于非交互式模式。
-d SEC:间隔SEC秒显示一次。
-p PID:监控的进程pid。
-u USER:监控的进程用户。
```
**iotop 常用快捷键:**
1. 左右箭头:改变排序方式,默认是按 IO 排序。
2. r:改变排序顺序。
3. o:只显示有 IO 输出的进程。
4. p:进程/线程的显示方式的切换。
5. a:显示累积使用量。
6. q:退出。
### 实例
直接执行 iotop 就可以看到效果了:
```shell
Total DISK read: 0.00 B/s | Total DISK write: 0.00 B/s
TID PRIO USER DISK READ DISK WRITE SWAPIN IO> command
1 be/4 root 0.00 B/s 0.00 B/s 0.00 % 0.00 % init [3]
2 be/4 root 0.00 B/s 0.00 B/s 0.00 % 0.00 % [kthreadd]
3 rt/4 root 0.00 B/s 0.00 B/s 0.00 % 0.00 % [migration/0]
4 be/4 root 0.00 B/s 0.00 B/s 0.00 % 0.00 % [ksoftirqd/0]
5 rt/4 root 0.00 B/s 0.00 B/s 0.00 % 0.00 % [watchdog/0]
6 rt/4 root 0.00 B/s 0.00 B/s 0.00 % 0.00 % [migration/1]
7 be/4 root 0.00 B/s 0.00 B/s 0.00 % 0.00 % [ksoftirqd/1]
8 rt/4 root 0.00 B/s 0.00 B/s 0.00 % 0.00 % [watchdog/1]
9 be/4 root 0.00 B/s 0.00 B/s 0.00 % 0.00 % [events/0]
10 be/4 root 0.00 B/s 0.00 B/s 0.00 % 0.00 % [events/1]
11 be/4 root 0.00 B/s 0.00 B/s 0.00 % 0.00 % [khelper]
2572 be/4 root 0.00 B/s 0.00 B/s 0.00 % 0.00 % [bluetooth]
```
================================================
FILE: docs/linux/cli/linux-cli-dir.md
================================================
# Linux 文件目录管理
> 关键词:`cd`, `ls`, `pwd`, `mkdir`, `rmdir`, `tree`, `touch`, `ln`, `rename`, `stat`, `file`, `chmod`, `chown`, `locate`, `find`, `cp`, `scp`, `mv`, `rm`
## 1. Linux 文件目录工作机制
### 1.1. Linux 目录结构
linux 目录结构是树形结构,其根目录是 `/` 。一张思维导图说明各个目录的作用:

### 1.2. Linux 文件属性
Linux 系统是一种典型的多用户系统,不同的用户处于不同的地位,拥有不同的权限。为了保护系统的安全性,Linux 系统对不同的用户访问同一文件(包括目录文件)的权限做了不同的规定。
在 Linux 中我们可以使用 ll 或者 ls –l 命令来显示一个文件的属性以及文件所属的用户和组,如:
```bash
$ ls -l
total 64
drwxr-xr-x 2 root root 4096 Dec 14 2012 bin
dr-xr-xr-x 4 root root 4096 Apr 19 2012 boot
```
实例中,bin 文件的第一个属性用 `d` 表示。`d` 在 Linux 中代表该文件是一个目录文件。
在 Linux 中第一个字符代表这个文件是目录、文件或链接文件等等。
- 当为 `d` 则是目录
- 当为 `-` 则是文件;
- 若是 `l` 则表示为链接文档(link file);
- 若是 `b` 则表示为装置文件里面的可供储存的接口设备(可随机存取装置);
- 若是 `c` 则表示为装置文件里面的串行端口设备,例如键盘、鼠标(一次性读取装置)。
接下来的字符中,以三个为一组,且均为『rwx』 的三个参数的组合。其中,`r` 代表可读(read)、`w` 代表可写(write)、`x` 代表可执行(execute)。 要注意的是,这三个权限的位置不会改变,如果没有权限,就会出现减号 `-` 而已。
每个文件的属性由左边第一部分的 10 个字符来确定(如下图)。

从左至右用 0-9 这些数字来表示。
- 第 0 位确定文件类型
- 第 1-3 位确定属主(该文件的拥有者)拥有该文件的权限。
- 第 4-6 位确定属组(拥有者的同组用户)拥有该文件的权限。
- 第 7-9 位确定其他用户拥有该文件的权限。
- 第 1、4、7 位表示读权限,如果用"r"字符表示,则有读权限,如果用"-"字符表示,则没有读权限。
- 第 2、5、8 位表示写权限,如果用"w"字符表示,则有写权限,如果用"-"字符表示没有写权限。
- 第 3、6、9 位表示可执行权限,如果用"x"字符表示,则有执行权限,如果用"-"字符表示,则没有执行权限。
```bash
d rwx r-x r-x
↑ ↑↑↑ ↑↑↑ ↑↑↑
│ │││ │││ │││-其他用户执行权限 (x/-)
│ │││ │││ │└─ 其他用户写权限 (w/-)
│ │││ │││ └── 其他用户读权限 (r/-)
│ │││ ││└──── 属组用户执行权限 (x/-)
│ │││ │└───── 属组用户写权限 (w/-)
│ │││ └────── 属组用户读权限 (r/-)
│ ││└──────── 属主用户执行权限 (x/-)
│ │└───────── 属主用户写权限 (w/-)
│ └────────── 属主用户读权限 (r/-)
└──────────── 文件类型 (该文件是目录)
```
#### 1.2.1. Linux 文件属主和属组
```bash
$ ls -l
total 64
drwxr-xr-x 2 root root 4096 Dec 14 2012 bin
dr-xr-xr-x 4 root root 4096 Apr 19 2012 boot
```
- 对于文件来说,它都有一个特定的拥有者,也就是对该文件具有所有权的用户。
- 同时,在 Linux 系统中,用户是按组分类的,一个用户属于一个或多个组。
- 文件拥有者以外的用户又可以分为文件拥有者的同组用户和其他用户。
- 因此,Linux 系统按文件拥有者、文件拥有者同组用户和其他用户来规定了不同的文件访问权限。
- 在以上实例中,bin 文件是一个目录文件,属主和属组都为 root,属主有可读、可写、可执行的权限;与属主同组的其他用户有可读和可执行的权限;其他用户也有可读和可执行的权限。
## 2. Linux 文件目录管理要点
### 2.1. 目录管理
- 切换目录 - 使用 [cd](#cd)
- 查看目录信息 - 使用 [ls](#ls)
- 显示当前目录的绝对路径 - 使用 [pwd](#pwd)
- 树状显示目录的内容 - 使用 [tree](#tree)
- 创建目录 - 使用 [mkdir](#mkdir)
- 删除目录 - 使用 [rmdir](#rmdir)
### 2.2. 文件管理
- 创建空文件 - 使用 [touch](#touch)
- 为文件创建连接 - 使用 [ln](#ln)
- 批量重命名 - 使用 [rename](#rename)
- 显示文件的详细信息 - 使用 [stat](#stat)
- 探测文件类型 - 使用 [file](#file)
- 设置文件或目录的权限 - 使用 [chmod](#chmod)
- 设置文件或目录的拥有者或所属群组 - 使用 [chown](#chown)
- 查找文件或目录 - 使用 [locate](#locate)
- 在指定目录下查找文件 - 使用 [find](#find)
- 查找命令的绝对路径 - 使用 [which](#which)
- 查找命令的程序、源代码等相关文件 - 使用 [whereis](#whereis)
### 2.3. 文件和目录通用管理
- 复制文件或目录 - 使用 [cp](#cp)
- 复制文件或目录到远程服务器 - 使用 [scp](#scp)
- 移动文件或目录 - 使用 [mv](#mv)
- 删除文件或目录 - 使用 [rm](#rm)
## 3. 命令常见用法
### 3.1. cd
> cd 命令用来切换工作目录。
>
> 参考:http://man.linuxde.net/cd
示例:
```bash
cd # 切换到用户主目录
cd ~ # 切换到用户主目录
cd - # 切换到上一个工作目录
cd .. # 切换到上级目录
cd ../.. # 切换到上两级目录
```
### 3.2. ls
> ls 命令用来显示目录信息。
>
> 参考:http://man.linuxde.net/ls
示例:
```bash
ls # 列出当前目录可见文件
ls -l # 列出当前目录可见文件详细信息
ls -la # 列出所有文件(包括隐藏)的详细信息
ls -lh # 列出详细信息并以可读大小显示文件大小
ls -lt # 按时间列出文件和文件夹详细信息
ls -ltr # 按修改时间列出文件和文件夹详细信息
ls --color=auto # 列出文件并标记颜色分类
```
### 3.3. pwd
> pwd 命令用来显示当前目录的绝对路径。
>
> 参考:http://man.linuxde.net/pwd
### 3.4. mkdir
> mkdir 命令用来创建目录。
>
> 参考:http://man.linuxde.net/mkdir
示例:
```bash
# 在当前目录中创建 zp 和 zp 的子目录 test
mkdir -p zp/test
# 在当前目录中创建 zp 和 zp 的子目录 test;权限设置为文件主可读、写、执行,同组用户可读和执行,其他用户无权访问
mkdir -p -m 750 zp/test
```
### 3.5. rmdir
> rmdir 命令用来删除空目录。
>
> 参考:http://man.linuxde.net/rmdir
示例:
```bash
# 删除子目录 test 和其父目录 zp
rmdir -p zp/test
```
### 3.6. tree
> tree 命令以树状显示目录的内。
>
> 参考:http://man.linuxde.net/tree
示例:
```bash
# 列出目录 /private 第一级文件名
tree /private -L 1
/private/
├── etc
├── tftpboot
├── tmp
└── var
# 忽略文件夹
tree -I node_modules # 忽略当前目录文件夹 node_modules
tree -P node_modules # 列出当前目录文件夹 node_modules 的目录结构
tree -P node_modules -L 2 # 显示目录 node_modules 两层的目录树结构
tree -L 2 > /home/www/tree.txt # 当前目录结果存到 tree.txt 文件中
# 忽略多个文件夹
tree -I 'node_modules|icon|font' -L 2
```
### 3.7. touch
> touch 命令有两个功能:一是用于把已存在文件的时间标签更新为系统当前的时间(默认方式),它们的数据将原封不动地保留下来;二是用来创建空文件。
>
> 参考:http://man.linuxde.net/touch
示例:
```
touch ex2
```
### 3.8. ln
> ln 命令用来为文件创建连接,连接类型分为硬连接和符号连接两种,默认的连接类型是硬连接。如果要创建符号连接必须使用"-s"选项。
>
> 🔔 注意:符号链接文件不是一个独立的文件,它的许多属性依赖于源文件,所以给符号链接文件设置存取权限是没有意义的。
>
> 参考:http://man.linuxde.net/ln
示例:
```bash
# 将目录 /usr/mengqc/mub1 下的文件 m2.c 链接到目录 /usr/liu 下的文件 a2.c
cd /usr/mengqc
ln /mub1/m2.c /usr/liu/a2.c
# 在目录 /usr/liu 下建立一个符号链接文件 abc,使它指向目录 /usr/mengqc/mub1
# 执行该命令后,/usr/mengqc/mub1 代表的路径将存放在名为 /usr/liu/abc 的文件中
ln -s /usr/mengqc/mub1 /usr/liu/abc
```
### 3.9. rename
> rename 命令用字符串替换的方式批量重命名。
>
> 参考:http://man.linuxde.net/rename
示例:
```bash
# 将 main1.c 重命名为 main.c
rename main1.c main.c main1.c
rename "s/AA/aa/" * # 把文件名中的 AA 替换成 aa
rename "s//.html//.php/" * # 把 .html 后缀的改成 .php 后缀
rename "s/$//.txt/" * # 把所有的文件名都以 txt 结尾
rename "s//.txt//" * # 把所有以 .txt 结尾的文件名的.txt 删掉
```
### 3.10. stat
> stat 命令用于显示文件的状态信息。stat 命令的输出信息比 ls 命令的输出信息要更详细。
>
> 参考:http://man.linuxde.net/stat
示例:
```bash
stat myfile
```
### 3.11. file
> file 命令用来探测给定文件的类型。file 命令对文件的检查分为文件系统、魔法幻数检查和语言检查 3 个过程。
>
> 参考:http://man.linuxde.net/file
示例:
```bash
file install.log # 显示文件类型
file -b install.log # 不显示文件名称
file -i install.log # 显示 MIME 类型
file -L /var/spool/mail # 显示符号链接的文件类型
```
### 3.12. chmod
> chmod 命令用来变更文件或目录的权限。在 UNIX 系统家族里,文件或目录权限的控制分别以读取、写入、执行 3 种一般权限来区分,另有 3 种特殊权限可供运用。用户可以使用 chmod 指令去变更文件与目录的权限,设置方式采用文字或数字代号皆可。符号连接的权限无法变更,如果用户对符号连接修改权限,其改变会作用在被连接的原始文件。
>
> 参考:http://man.linuxde.net/chmod
知识扩展:
Linux 用 户分为:拥有者、组群(Group)、其他(other),Linux 系统中,预设的情況下,系统中所有的帐号与一般身份使用者,以及 root 的相关信 息, 都是记录在`/etc/passwd`文件中。每个人的密码则是记录在`/etc/shadow`文件下。 此外,所有的组群名称记录在`/etc/group`內!
linux 文件的用户权限的分析图
```bash
-rw-r--r-- 1 user staff 651 Oct 12 12:53 .gitmodules
# ↑╰┬╯╰┬╯╰┬╯
# ┆ ┆ ┆ ╰┈ 0 其他人
# ┆ ┆ ╰┈┈┈┈┈┈┈┈┈┈┈┈┈┈┈ g 属组
# ┆ ╰┈┈┈┈ u 属组
# ╰┈┈ 第一个字母 `d` 代表目录,`-` 代表普通文件
```
例:rwx rw- r--
r=读取属性 //值= 4
w=写入属性 //值= 2
x=执行属性 //值= 1
示例:
```bash
chmod u+x,g+w f01 # 为文件f01设置自己可以执行,组员可以写入的权限
chmod u=rwx,g=rw,o=r f01
chmod 764 f01
chmod a+x f01 # 对文件f01的u,g,o都设置可执行属性
# 将/home/wwwroot/里的所有文件和文件夹设置为755权限
chmod -R 755 /home/wwwroot/*
```
### 3.13. chown
> chown 命令改变某个文件或目录的所有者和所属的组,该命令可以向某个用户授权,使该用户变成指定文件的所有者或者改变文件所属的组。用户可以是用户或者是用户 D,用户组可以是组名或组 id。文件名可以使由空格分开的文件列表,在文件名中可以包含通配符。
>
> 只有文件拥有者和超级用户才可以便用该命令。
>
> 参考:http://man.linuxde.net/chown
示例:
```bash
# 将目录/usr/meng及其下面的所有文件、子目录的文件主改成 liu
chown -R liu /usr/meng
```
### 3.14. locate
> locate 命令和 slocate 命令都用来查找文件或目录。
>
> locate 命令其实是 find -name 的另一种写法,但是要比后者快得多,原因在于它不搜索具体目录,而是搜索一个数据库/var/lib/locatedb,这个数据库中含有本地所有文件信息。Linux 系统自动创建这个数据库,并且每天自动更新一次,所以使用 locate 命令查不到最新变动过的文件。为了避免这种情况,可以在使用 locate 之前,先使用 updatedb 命令,手动更新数据库。
>
> 参考:http://man.linuxde.net/locate_slocate
示例:
```bash
locate pwd # 查找和 pwd 相关的所有文件
locate /etc/sh # 搜索 etc 目录下所有以 sh 开头的文件
```
### 3.15. find
> find 命令用来在指定目录下查找文件。任何位于参数之前的字符串都将被视为欲查找的目录名。如果使用该命令时,不设置任何参数,则 find 命令将在当前目录下查找子目录与文件。并且将查找到的子目录和文件全部进行显示。
>
> 参考:http://man.linuxde.net/find
```bash
# 当前目录搜索所有文件,文件内容 包含 “140.206.111.111” 的内容
find . -type f -name "*" | xargs grep "140.206.111.111"
# 列出当前目录及子目录下所有文件和文件夹
find .
# 在 /home 目录下查找以 .txt 结尾的文件名
find /home -name "*.txt"
# 同上,但忽略大小写
find /home -iname "*.txt"
# 当前目录及子目录下查找所有以 .txt 和 .pdf 结尾的文件
find . -name "*.txt" -o -name "*.pdf"
# 匹配文件路径或者文件
find /usr/ -path "*local*"
# 基于正则表达式匹配文件路径
find . -regex ".*\(\.txt\|\.pdf\)$"
# 同上,但忽略大小写
find . -iregex ".*\(\.txt\|\.pdf\)$"
# 找出 /home 下不是以 .txt 结尾的文件
find /home ! -name "*.txt"
```
### 3.16. cp
> cp 命令用来将一个或多个源文件或者目录复制到指定的目的文件或目录。它可以将单个源文件复制成一个指定文件名的具体的文件或一个已经存在的目录下。cp 命令还支持同时复制多个文件,当一次复制多个文件时,目标文件参数必须是一个已经存在的目录,否则将出现错误。
>
> 参考:http://man.linuxde.net/cp
示例:
#### 3.16.1. 参数
- 源文件:制定源文件列表。默认情况下,cp 命令不能复制目录,如果要复制目录,则必须使用`-R`选项;
- 目标文件:指定目标文件。当“源文件”为多个文件时,要求“目标文件”为指定的目录。
示例:
```bash
# 将文件 file 复制到目录 /usr/men/tmp 下,并改名为 file1
cp file /usr/men/tmp/file1
# 将目录 /usr/men下的所有文件及其子目录复制到目录 /usr/zh 中
cp -r /usr/men /usr/zh
# 强行将 /usr/men下的所有文件复制到目录 /usr/zh 中,无论是否有文件重复
cp -rf /usr/men/* /usr/zh
# 将目录 /usr/men 中的以 m 打头的所有 .c 文件复制到目录 /usr/zh 中
cp -i /usr/men m*.c /usr/zh
```
### 3.17. scp
> scp 命令用于在 Linux 下进行远程拷贝文件的命令,和它类似的命令有 cp,不过 cp 只是在本机进行拷贝不能跨服务器,而且 scp 传输是加密的。可能会稍微影响一下速度。当你服务器硬盘变为只读 read only system 时,用 scp 可以帮你把文件移出来。另外,scp 还非常不占资源,不会提高多少系统负荷,在这一点上,rsync 就远远不及它了。虽然 rsync 比 scp 会快一点,但当小文件众多的情况下,rsync 会导致硬盘 I/O 非常高,而 scp 基本不影响系统正常使用。
示例:
```bash
# 拷贝文件到远程服务器的指定目录
scp @:
scp test.txt root@192.168.0.1:/opt
# 拷贝目录到远程服务器的指定目录
scp -r @:
scp -r test root@192.168.0.1:/opt
```
#### 3.17.1. 免密码传输
(1)生成 ssh 公私钥对
```
ssh-keygen -t rsa
```
(2)将服务器 A 的 `\~/.ssh/id_rsa.pub` 文件内容复制到服务器 B 的 `\~/.ssh/authorized_keys` 文件中。
```bash
# 服务器 A 上执行以下命令
scp ~/.ssh/id_rsa.pub root@192.168.0.2:~/.ssh/id_rsa.pub.tmp
# 服务器 B 上执行以下命令
cat ~/.ssh/id_rsa.pub.tmp >> ~/.ssh/authorized_keys
rm ~/.ssh/id_rsa.pub.tmp
```
### 3.18. mv
> mv 命令用来对文件或目录重新命名,或者将文件从一个目录移到另一个目录中。source 表示源文件或目录,target 表示目标文件或目录。如果将一个文件移到一个已经存在的目标文件中,则目标文件的内容将被覆盖。
>
> 参考:http://man.linuxde.net/mv
示例:
```bash
mv file1.txt /home/office/ # 移动单个文件
mv file2.txt file3.txt file4.txt /home/office/ # 移动多个文件
mv *.txt /home/office/ # 移动所有 txt 文件
mv dir1/ /home/office/ # 移动目录
mv /usr/men/* . # 将指定目录中的所有文件移到当前目录中
mv file1.txt file2.txt # 重命名文件
mv dir1/ dir2/ # 重命名目录
mv -v *.txt /home/office # 打印移动信息
mv -i file1.txt /home/office # 提示是否覆盖文件
mv -uv *.txt /home/office # 源文件比目标文件新时才执行更新
mv -vn *.txt /home/office # 不要覆盖任何已存在的文件
mv -f *.txt /home/office # 无条件覆盖已经存在的文件
mv -bv *.txt /home/office # 复制时创建备份
```
### 3.19. rm
> rm 命令可以删除一个目录中的一个或多个文件或目录,也可以将某个目录及其下属的所有文件及其子目录均删除掉。对于链接文件,只是删除整个链接文件,而原有文件保持不变。
>
> 参考:http://man.linuxde.net/rm
```bash
rm test.txt # 删除文件
rm -i test.txt test2.txt # 交互式删除文件
rm -r * # 删除当前目录下的所有文件和目录
rm -r testdir # 删除目录下的所有文件和目录
rm -rf testdir # 强制删除目录下的所有文件和目录
rm -v testdir # 显示当前删除操作的详情
```
================================================
FILE: docs/linux/cli/linux-cli-file-compress.md
================================================
# Linux 文件压缩和解压
> 关键词:`tar`, `gzip`, `zip`, `unzip`
## 1. Linux 文件压缩和解压要点
- 压缩和解压 tar 文件 - 使用 [tar](#tar)
- 压缩和解压 gz 文件 - 使用 [gzip](#gzip)
- 压缩和解压 zip 文件 - 分别使用 [zip](#zip)、[unzip](#unzip)
## 2. 命令常见用法
### 2.1. tar
> tar 命令可以为 linux 的文件和目录创建档案。利用 tar,可以为某一特定文件创建档案(备份文件),也可以在档案中改变文件,或者向档案中加入新的文件。tar 最初被用来在磁带上创建档案,现在,用户可以在任何设备上创建档案。利用 tar 命令,可以把一大堆的文件和目录全部打包成一个文件,这对于备份文件或将几个文件组合成为一个文件以便于网络传输是非常有用的。
>
> 参考:http://man.linuxde.net/tar
示例:
```bash
tar -cvf log.tar log2012.log # 仅打包,不压缩
tar -zcvf log.tar.gz log2012.log # 打包后,以 gzip 压缩
tar -jcvf log.tar.bz2 log2012.log # 打包后,以 bzip2 压缩
tar -ztvf log.tar.gz # 查阅上述 tar 包内有哪些文件
tar -zxvf log.tar.gz # 将 tar 包解压缩
tar -zxvf log30.tar.gz log2013.log # 只将 tar 内的部分文件解压出来
```
### 2.2. gzip
> gzip 命令用来压缩文件。gzip 是个使用广泛的压缩程序,文件经它压缩过后,其名称后面会多出“.gz”扩展名。
>
> gzip 是在 Linux 系统中经常使用的一个对文件进行压缩和解压缩的命令,既方便又好用。gzip 不仅可以用来压缩大的、较少使用的文件以节省磁盘空间,还可以和 tar 命令一起构成 Linux 操作系统中比较流行的压缩文件格式。据统计,gzip 命令对文本文件有 60%~ 70%的压缩率。减少文件大小有两个明显的好处,一是可以减少存储空间,二是通过网络传输文件时,可以减少传输的时间。
>
> 参考:http://man.linuxde.net/gzip
示例:
```bash
gzip * # 将所有文件压缩成 .gz 文件
gzip -l * # 详细显示压缩文件的信息,并不解压
gzip -dv * # 解压上例中的所有压缩文件,并列出详细的信息
gzip -r log.tar # 压缩一个 tar 备份文件,此时压缩文件的扩展名为.tar.gz
gzip -rv test/ # 递归的压缩目录
gzip -dr test/ # 递归地解压目录
```
### 2.3. zip
> zip 命令可以用来解压缩文件,或者对文件进行打包操作。zip 是个使用广泛的压缩程序,文件经它压缩后会另外产生具有“.zip”扩展名的压缩文件。
>
> 参考:http://man.linuxde.net/zip
示例:
```bash
# 将 /home/Blinux/html/ 这个目录下所有文件和文件夹打包为当前目录下的 html.zip
zip -q -r html.zip /home/Blinux/html
```
### 2.4. unzip
> unzip 命令用于解压缩由 zip 命令压缩的“.zip”压缩包。
>
> 参考:http://man.linuxde.net/unzip
示例:
```bash
unzip test.zip # 解压 zip 文件
unzip -n test.zip -d /tmp/ # 在指定目录下解压缩
unzip -o test.zip -d /tmp/ # 在指定目录下解压缩,如果有相同文件存在则覆盖
unzip -v test.zip # 查看压缩文件目录,但不解压
```
================================================
FILE: docs/linux/cli/linux-cli-file.md
================================================
# Linux 文件内容查看编辑
> 关键词:`cat`, `head`, `tail`, `more`, `less`, `sed`, `vi`, `grep`
## 1. Linux 文件内容查看编辑要点
- 连接文件并打印到标准输出设备 - 使用 [cat](#cat)
- 显示指定文件的开头若干行 - 使用 [head](#head)
- 显示指定文件的末尾若干行,常用于实时打印日志文件内容 - 使用 [tail](#tail)
- 显示文件内容,每次显示一屏 - 使用 [more](#more)
- 显示文件内容,每次显示一屏 - 使用 [less](#less)
- 自动编辑一个或多个文件;简化对文件的反复操作;编写转换程序等 - 使用 [sed](#sed)
- 文本编辑器 - 使用 [vi](#vi)
- 使用正则表达式搜索文本,并把匹配的行打印出来 - 使用 [grep](#grep)
## 2. 命令常见用法
### 2.1. cat
> cat 命令用于连接文件并打印到标准输出设备上。
>
> 参考:http://man.linuxde.net/cat
示例:
```bash
cat m1 # 在屏幕上显示文件 ml 的内容
cat m1 m2 # 同时显示文件 ml 和 m2 的内容
cat m1 m2 > file # 将文件 ml 和 m2 合并后放入文件 file 中
```
### 2.2. head
> head 命令用于显示文件的开头内容。在默认情况下,head 命令显示文件的头部 10 行内容。
>
> 参考:http://man.linuxde.net/head
### 2.3. tail
> tail 命令用于显示文件的尾部内容。在默认情况下,tail 命令显示文件的尾部 10 行内容。如果给定的文件不止一个,则在显示的每个文件前面加一个文件名标题。如果没有指定文件或者文件名为“-”,则读取标准输入。
>
> 参考:http://man.linuxde.net/tail
示例:
```bash
tail file # 显示文件file的最后10行
tail -n +20 file # 显示文件file的内容,从第20行至文件末尾
tail -c 10 file # 显示文件file的最后10个字符
```
### 2.4. more
> more 命令是一个基于 vi 编辑器文本过滤器,它以全屏幕的方式按页显示文本文件的内容,支持 vi 中的关键字定位操作。more 名单中内置了若干快捷键,常用的有 H(获得帮助信息),Enter(向下翻滚一行),空格(向下滚动一屏),Q(退出命令)。
>
> 该命令一次显示一屏文本,满屏后停下来,并且在屏幕的底部出现一个提示信息,给出至今己显示的该文件的百分比:--More--(XX%)可以用下列不同的方法对提示做出回答:
>
> - 按 Space 键:显示文本的下一屏内容。
> - 按 Enier 键:只显示文本的下一行内容。
> - 按斜线符|:接着输入一个模式,可以在文本中寻找下一个相匹配的模式。
> - 按 H 键:显示帮助屏,该屏上有相关的帮助信息。
> - 按 B 键:显示上一屏内容。
> - 按 Q 键:退出 rnore 命令。
>
> 参考:http://man.linuxde.net/more
示例:
```bash
# 显示文件 file 的内容,但在显示之前先清屏,并且在屏幕的最下方显示完核的百分比。
more -dc file
# 显示文件 file 的内容,每 10 行显示一次,而且在显示之前先清屏。
more -c -10 file
```
### 2.5. less
less 命令的作用与 more 十分相似,都可以用来浏览文字档案的内容,不同的是 less 命令允许用户向前或向后浏览文件,而 more 命令只能向前浏览。用 less 命令显示文件时,用 PageUp 键向上翻页,用 PageDown 键向下翻页。要退出 less 程序,应按 Q 键。
示例:
```bash
less /var/log/shadowsocks.log
```
### 2.6. sed
> sed 是一种流编辑器,它是文本处理工具,能够完美的配合正则表达式使用,功能不同凡响。处理时,把当前处理的行存储在临时缓冲区中,称为“模式空间”(pattern space),接着用 sed 命令处理缓冲区中的内容,处理完成后,把缓冲区的内容送往屏幕。接着处理下一行,这样不断重复,直到文件末尾。文件内容并没有改变,除非你使用重定向存储输出。Sed 主要用来自动编辑一个或多个文件;简化对文件的反复操作;编写转换程序等。
>
> 参考:http://man.linuxde.net/sed
示例:
```bash
# 替换文本中的字符串
sed 's/book/books/' file
# -n 选项 和 p 命令 一起使用表示只打印那些发生替换的行
sed -n 's/test/TEST/p' file
# 直接编辑文件选项 -i ,会匹配 file 文件中每一行的第一个 book 替换为 books
sed -i 's/book/books/g' file
# 使用后缀 /g 标记会替换每一行中的所有匹配
sed 's/book/books/g' file
# 删除空白行
sed '/^$/d' file
# 删除文件的第2行
sed '2d' file
# 删除文件的第2行到末尾所有行
sed '2,$d' file
# 删除文件最后一行
sed '$d' file
# 删除文件中所有开头是test的行
sed '/^test/'d file
```
### 2.7. vi
> vi 命令是 UNIX 操作系统和类 UNIX 操作系统中最通用的全屏幕纯文本编辑器。Linux 中的 vi 编辑器叫 vim,它是 vi 的增强版(vi Improved),与 vi 编辑器完全兼容,而且实现了很多增强功能。
>
> 参考:http://man.linuxde.net/vi
>
> 引申阅读:[Vim 入门指南](https://github.com/dunwu/OS/blob/master/docs/vim.md)
### 2.8. grep
> grep(global search regular expression(RE) and print out the line,全面搜索正则表达式并把行打印出来)是一种强大的文本搜索工具,它能使用正则表达式搜索文本,并把匹配的行打印出来。
>
> 参考:http://man.linuxde.net/grep
示例:
```bash
# 在多级目录中对文本递归搜索(程序员搜代码的最爱):
$ grep "class" . -R -n
# 忽略匹配样式中的字符大小写
$ echo "hello world" | grep -i "HELLO"
# 匹配多个模式:
$ grep -e "class" -e "vitural" file
# 只在目录中所有的.php和.html文件中递归搜索字符"main()"
$ grep "main()" . -r --include *.{php,html}
# 在搜索结果中排除所有README文件
$ grep "main()" . -r --exclude "README"
# 在搜索结果中排除filelist文件列表里的文件
$ grep "main()" . -r --exclude-from filelist
```
## 3. 参考资料
- [Linux 命令大全](http://man.linuxde.net/)
================================================
FILE: docs/linux/cli/linux-cli-hardware.md
================================================
# Linux 硬件管理
> 关键词:`df`, `du`, `top`, `free`, `iotop`
## 1. Linux 硬件管理要点
- 查看磁盘空间 - 使用 [df](#df)
- 查看文件或目录的磁盘空间 - 使用 [du](#du)
- 实时查看系统整体运行状态(如:CPU、内存) - 使用 [top](#top)
- 查看已使用和未使用的内存 - 使用 [free](#free)
- 查看磁盘 I/O 使用状况 - 使用 [iotop](#iotop)
## 2. 命令常见用法
### 2.1. df
> df 命令用于显示磁盘分区上的可使用的磁盘空间。默认显示单位为 KB。可以利用该命令来获取硬盘被占用了多少空间,目前还剩下多少空间等信息。
>
> 参考:http://man.linuxde.net/df
示例:
```bash
# 查看系统磁盘设备,默认是 KB 为单位
[root@LinServ-1 ~]# df
文件系统 1K-块 已用 可用 已用% 挂载点
/dev/sda2 146294492 28244432 110498708 21% /
/dev/sda1 1019208 62360 904240 7% /boot
tmpfs 1032204 0 1032204 0% /dev/shm
/dev/sdb1 2884284108 218826068 2518944764 8% /data1
# 使用 -h 选项以 KB 以上的单位来显示,可读性高
[root@LinServ-1 ~]# df -h
文件系统 容量 已用 可用 已用% 挂载点
/dev/sda2 140G 27G 106G 21% /
/dev/sda1 996M 61M 884M 7% /boot
tmpfs 1009M 0 1009M 0% /dev/shm
/dev/sdb1 2.7T 209G 2.4T 8% /data1
# 查看全部文件系统
[root@LinServ-1 ~]# df -a
文件系统 1K-块 已用 可用 已用% 挂载点
/dev/sda2 146294492 28244432 110498708 21% /
proc 0 0 0 - /proc
sysfs 0 0 0 - /sys
devpts 0 0 0 - /dev/pts
/dev/sda1 1019208 62360 904240 7% /boot
tmpfs 1032204 0 1032204 0% /dev/shm
/dev/sdb1 2884284108 218826068 2518944764 8% /data1
none 0 0 0 - /proc/sys/fs/binfmt_misc
```
### 2.2. du
> du 命令也是查看使用空间的,但是与 df 命令不同的是:du 命令是对文件和目录磁盘使用的空间的查看,还是和 df 命令有一些区别的。
>
> 参考:http://man.linuxde.net/du
示例:
```bash
# 显示目录或者文件所占空间
root@localhost [test]# du
608 ./test6
308 ./test4
4 ./scf/lib
4 ./scf/service/deploy/product
4 ./scf/service/deploy/info
12 ./scf/service/deploy
16 ./scf/service
4 ./scf/doc
4 ./scf/bin
32 ./scf
8 ./test3
1288 .
# 显示指定文件所占空间
[root@localhost test]# du log2012.log
300 log2012.log
# 查看指定目录的所占空间
[root@localhost test]# du scf
4 scf/lib
4 scf/service/deploy/product
4 scf/service/deploy/info
12 scf/service/deploy
16 scf/service
4 scf/doc
4 scf/bin
32 scf
# 显示多个文件所占空间
[root@localhost test]# du log30.tar.gz log31.tar.gz
4 log30.tar.gz
4 log31.tar.gz
# 只显示总和的大小
[root@localhost test]# du -s
1288 .
[root@localhost test]# du -s scf
32 scf
```
### 2.3. top
> top 命令可以实时动态地查看系统的整体运行情况,是一个综合了多方信息监测系统性能和运行信息的实用工具。通过 top 命令所提供的互动式界面,用热键可以管理。
>
> 参考:http://man.linuxde.net/top
### 2.4. free
> free 命令可以显示当前系统未使用的和已使用的内存数目,还可以显示被内核使用的内存缓冲区。
>
> 参考:http://man.linuxde.net/free
示例:
```bash
free -t # 以总和的形式显示内存的使用信息
free -s 10 # 周期性的查询内存使用信息,每10s 执行一次命令
# 显示内存使用情况
free -m
total used free shared buffers cached
Mem: 2016 1973 42 0 163 1497
-/+ buffers/cache: 312 1703
Swap: 4094 0 4094
```
### 2.5. iotop
> iotop 命令是一个用来监视磁盘 I/O 使用状况的 top 类工具。iotop 具有与 top 相似的 UI,其中包括 PID、用户、I/O、进程等相关信息。Linux 下的 IO 统计工具如 iostat,nmon 等大多数是只能统计到 per 设备的读写情况,如果你想知道每个进程是如何使用 IO 的就比较麻烦,使用 iotop 命令可以很方便的查看。
>
> 参考:http://man.linuxde.net/iotop
示例:
```bash
Total DISK read: 0.00 B/s | Total DISK write: 0.00 B/s
TID PRIO USER DISK READ DISK WRITE SWAPIN IO> command
1 be/4 root 0.00 B/s 0.00 B/s 0.00 % 0.00 % init [3]
2 be/4 root 0.00 B/s 0.00 B/s 0.00 % 0.00 % [kthreadd]
3 rt/4 root 0.00 B/s 0.00 B/s 0.00 % 0.00 % [migration/0]
4 be/4 root 0.00 B/s 0.00 B/s 0.00 % 0.00 % [ksoftirqd/0]
5 rt/4 root 0.00 B/s 0.00 B/s 0.00 % 0.00 % [watchdog/0]
6 rt/4 root 0.00 B/s 0.00 B/s 0.00 % 0.00 % [migration/1]
7 be/4 root 0.00 B/s 0.00 B/s 0.00 % 0.00 % [ksoftirqd/1]
8 rt/4 root 0.00 B/s 0.00 B/s 0.00 % 0.00 % [watchdog/1]
9 be/4 root 0.00 B/s 0.00 B/s 0.00 % 0.00 % [events/0]
10 be/4 root 0.00 B/s 0.00 B/s 0.00 % 0.00 % [events/1]
11 be/4 root 0.00 B/s 0.00 B/s 0.00 % 0.00 % [khelper]
2572 be/4 root 0.00 B/s 0.00 B/s 0.00 % 0.00 % [bluetooth]
```
================================================
FILE: docs/linux/cli/linux-cli-help.md
================================================
# 查看 Linux 命令帮助信息
> Linux 中有非常多的命令,想全部背下来是很困难的事。所以,我认为学习 Linux 的第一步,就是了解如何快速检索命令说明。
>
> 关键词:`help`, `whatis`, `info`, `which`, `whereis`, `man`
## 1. 查看 Linux 命令帮助信息的要点
- 查看 Shell 内部命令的帮助信息 - 使用 [help](#help)
- 查看命令的简要说明 - 使用 [whatis](#whatis)
- 查看命令的详细说明 - 使用 [info](#info)
- 查看命令的位置 - 使用 [which](#which)
- 定位指令的二进制程序、源代码文件和 man 手册页等相关文件的路径 - 使用 [whereis](#whereis)
- 查看命令的帮助手册(包含说明、用法等信息) - 使用 [man](#man)
- 只记得部分命令关键字 - 使用 man -k
> 注:推荐一些 Linux 命令中文手册:
>
> - [Linux 命令大全](http://man.linuxde.net/)
> - [linux-command](https://github.com/jaywcjlove/linux-command)
## 2. 命令常见用法
### 2.1. help
> help 命令用于查看 Shell 内部命令的帮助信息。而对于外部命令的帮助信息只能使用 man 或者 info 命令查看。
>
> 参考:http://man.linuxde.net/help
### 2.2. whatis
> whatis 用于查询一个命令执行什么功能。
>
> 参考:http://man.linuxde.net/whatis
示例:
```bash
# 查看 man 命令的简要说明
$ whatis man
# 查看以 loca 开拓的命令的简要说明
$ whatis -w "loca*"
```
### 2.3. info
> info 是 Linux 下 info 格式的帮助指令。
>
> 参考:http://man.linuxde.net/info
示例:
```bash
# 查看 man 命令的详细说明
$ info man
```
### 2.4. which
> which 命令用于查找并显示给定命令的绝对路径,环境变量 PATH 中保存了查找命令时需要遍历的目录。which 指令会在环境变量$PATH 设置的目录里查找符合条件的文件。也就是说,使用 which 命令,就可以看到某个系统命令是否存在,以及执行的到底是哪一个位置的命令。
>
> 参考:http://man.linuxde.net/which
示例:
```bash
which pwd # 查找命令的路径
```
说明:which 是根据使用者所配置的 PATH 变量内的目录去搜寻可运行档的!所以,不同的 PATH 配置内容所找到的命令当然不一样的!
```bash
[root@localhost ~]# which cd
cd: shell built-in command
```
cd 这个常用的命令竟然找不到啊!为什么呢?这是因为 cd 是 bash 内建的命令!但是 which 默认是找 PATH 内所规范的目录,所以当然一定找不到的!
### 2.5. whereis
> whereis 命令用来定位指令的二进制程序、源代码文件和 man 手册页等相关文件的路径。
>
> whereis 命令只能用于程序名的搜索,而且只搜索二进制文件(参数-b)、man 说明文件(参数-m)和源代码文件(参数-s)。如果省略参数,则返回所有信息。
>
> 参考:http://man.linuxde.net/whereis
示例:
```bash
whereis git # 将相关的文件都查找出来
```
### 2.6. man
> man 命令是 Linux 下的帮助指令,通过 man 指令可以查看 Linux 中的指令帮助、配置文件帮助和编程帮助等信息。
>
> 参考:http://man.linuxde.net/man
示例:
```bash
$ man date # 查看 date 命令的帮助手册
$ man 3 printf # 查看 printf 命令的帮助手册中的第 3 类
$ man -k keyword # 根据命令中部分关键字来查询命令
```
#### 2.6.1. man 要点
在 man 的帮助手册中,可以使用 page up 和 page down 来上下翻页。
man 的帮助手册中,将帮助文档分为了 9 个类别,对于有的关键字可能存在多个类别中, 我们就需要指定特定的类别来查看;(一般我们查询 bash 命令,归类在 1 类中)。
man 页面的分类(常用的是分类 1 和分类 3):
1. 可执行程序或 shell 命令
2. 系统调用(内核提供的函数)
3. 库调用(程序库中的函数)
4. 特殊文件(通常位于 /dev)
5. 文件格式和规范,如 /etc/passwd
6. 游戏
7. 杂项(包括宏包和规范,如 man(7),groff(7))
8. 系统管理命令(通常只针对 root 用户)
9. 内核例程 [非标准]
前面说到使用 whatis 会显示命令所在的具体的文档类别,我们学习如何使用它
```bash
$ whatis printf
printf (1) - format and print data
printf (1p) - write formatted output
printf (3) - formatted output conversion
printf (3p) - print formatted output
printf [builtins](1) - bash built-in commands, see bash(1)
```
我们看到 printf 在分类 1 和分类 3 中都有;分类 1 中的页面是命令操作及可执行文件的帮助;而 3 是常用函数库说明;如果我们想看的是 C 语言中 printf 的用法,可以指定查看分类 3 的帮助:
```bash
$ man 3 printf
```
## 3. 参考资料
https://linuxtools-rst.readthedocs.io/zh_CN/latest/base/01_use_man.html
================================================
FILE: docs/linux/cli/linux-cli-net.md
================================================
# Linux 网络管理
> 关键词:`curl`, `wget`, `telnet`, `ip`, `hostname`, `ifconfig`, `route`, `ssh`, `ssh-keygen`, `firewalld`, `iptables`, `host`, `nslookup`, `nc`/`netcat`, `ping`, `traceroute`, `netstat`
## 1. Linux 网络应用要点
- 下载文件 - 使用 [curl](#curl)、[wget](#wget)
- telnet 方式登录远程主机,对远程主机进行管理 - 使用 [telnet](#telnet)
- 查看或操纵 Linux 主机的路由、网络设备、策略路由和隧道 - 使用 [ip](#ip)
- 查看和设置系统的主机名 - 使用 [hostname](#hostname)
- 查看和配置 Linux 内核中网络接口的网络参数 - 使用 [ifconfig](#ifconfig)
- 查看和设置 Linux 内核中的网络路由表 - 使用 [route](#route)
- ssh 方式连接远程主机 - 使用 ssh
- 为 ssh 生成、管理和转换认证密钥 - 使用 [ssh-keygen](#ssh-keygen)
- 查看、设置防火墙(Centos7),使用 [firewalld](#firewalld)
- 查看、设置防火墙(Centos7 以前),使用 [iptables](#iptables)
- 查看域名信息 - 使用 [host](#host), [nslookup](#nslookup)
- 设置路由 - 使用 [nc/netcat](#ncnetcat)
- 测试主机之间网络是否连通 - 使用 [ping](#ping)
- 追踪数据在网络上的传输时的全部路径 - 使用 [traceroute](#traceroute)
- 查看当前工作的端口信息 - 使用 [netstat](#netstat)
## 2. 命令常见用法
### 2.1. curl
> curl 命令是一个利用 URL 规则在命令行下工作的文件传输工具。它支持文件的上传和下载,所以是综合传输工具,但按传统,习惯称 curl 为下载工具。作为一款强力工具,curl 支持包括 HTTP、HTTPS、ftp 等众多协议,还支持 POST、cookies、认证、从指定偏移处下载部分文件、用户代理字符串、限速、文件大小、进度条等特征。做网页处理流程和数据检索自动化,curl 可以祝一臂之力。
>
> 参考:http://man.linuxde.net/curl
示例:
```bash
# 下载文件
$ curl http://man.linuxde.net/text.iso --silent
# 下载文件,指定下载路径,并查看进度
$ curl http://man.linuxde.net/test.iso -o filename.iso --progress
########################################## 100.0%
```
### 2.2. wget
> wget 命令用来从指定的 URL 下载文件。
>
> 参考:http://man.linuxde.net/wget
示例:
```bash
# 使用 wget 下载单个文件
$ wget http://www.linuxde.net/testfile.zip
```
### 2.3. telnet
> telnet 命令用于登录远程主机,对远程主机进行管理。
>
> 参考:http://man.linuxde.net/telnet
示例:
```bash
telnet 192.168.2.10
Trying 192.168.2.10...
Connected to 192.168.2.10 (192.168.2.10).
Escape character is '^]'.
localhost (Linux release 2.6.18-274.18.1.el5 #1 SMP Thu Feb 9 12:45:44 EST 2012) (1)
login: root
Password:
Login incorrect
```
### 2.4. ip
> ip 命令用来查看或操纵 Linux 主机的路由、网络设备、策略路由和隧道,是 Linux 下较新的功能强大的网络配置工具。
>
> 参考:http://man.linuxde.net/ip
示例:
```bash
$ ip link show # 查看网络接口信息
$ ip link set eth0 upi # 开启网卡
$ ip link set eth0 down # 关闭网卡
$ ip link set eth0 promisc on # 开启网卡的混合模式
$ ip link set eth0 promisc offi # 关闭网卡的混个模式
$ ip link set eth0 txqueuelen 1200 # 设置网卡队列长度
$ ip link set eth0 mtu 1400 # 设置网卡最大传输单元
$ ip addr show # 查看网卡IP信息
$ ip addr add 192.168.0.1/24 dev eth0 # 设置eth0网卡IP地址192.168.0.1
$ ip addr del 192.168.0.1/24 dev eth0 # 删除eth0网卡IP地址
$ ip route show # 查看系统路由
$ ip route add default via 192.168.1.254 # 设置系统默认路由
$ ip route list # 查看路由信息
$ ip route add 192.168.4.0/24 via 192.168.0.254 dev eth0 # 设置192.168.4.0网段的网关为192.168.0.254,数据走eth0接口
$ ip route add default via 192.168.0.254 dev eth0 # 设置默认网关为192.168.0.254
$ ip route del 192.168.4.0/24 # 删除192.168.4.0网段的网关
$ ip route del default # 删除默认路由
$ ip route delete 192.168.1.0/24 dev eth0 # 删除路由
```
### 2.5. hostname
> hostname 命令用于查看和设置系统的主机名称。环境变量 HOSTNAME 也保存了当前的主机名。在使用 hostname 命令设置主机名后,系统并不会永久保存新的主机名,重新启动机器之后还是原来的主机名。如果需要永久修改主机名,需要同时修改 `/etc/hosts` 和 `/etc/sysconfig/network` 的相关内容。
>
> 参考:http://man.linuxde.net/hostname
示例:
```bash
$ hostname
AY1307311912260196fcZ
```
### 2.6. ifconfig
> ifconfig 命令被用于查看和配置 Linux 内核中网络接口的网络参数。用 ifconfig 命令配置的网卡信息,在网卡重启后机器重启后,配置就不存在。要想将上述的配置信息永远的存的电脑里,那就要修改网卡的配置文件了。
>
> 参考:http://man.linuxde.net/ifconfig
示例:
```bash
# 查看网络设备信息(激活状态的)
[root@localhost ~]# ifconfig
eth0 Link encap:Ethernet HWaddr 00:16:3E:00:1E:51
inet addr:10.160.7.81 Bcast:10.160.15.255 Mask:255.255.240.0
UP BROADCAST RUNNING MULTICAST MTU:1500 Metric:1
RX packets:61430830 errors:0 dropped:0 overruns:0 frame:0
TX packets:88534 errors:0 dropped:0 overruns:0 carrier:0
collisions:0 txqueuelen:1000
RX bytes:3607197869 (3.3 GiB) TX bytes:6115042 (5.8 MiB)
lo Link encap:Local Loopback
inet addr:127.0.0.1 Mask:255.0.0.0
UP LOOPBACK RUNNING MTU:16436 Metric:1
RX packets:56103 errors:0 dropped:0 overruns:0 frame:0
TX packets:56103 errors:0 dropped:0 overruns:0 carrier:0
collisions:0 txqueuelen:0
RX bytes:5079451 (4.8 MiB) TX bytes:5079451 (4.8 MiB)
```
### 2.7. route
> route 命令用来查看和设置 Linux 内核中的网络路由表,route 命令设置的路由主要是静态路由。要实现两个不同的子网之间的通信,需要一台连接两个网络的路由器,或者同时位于两个网络的网关来实现。
>
> 参考:http://man.linuxde.net/route
示例:
```bash
# 查看当前路由
route
Kernel IP routing table
Destination Gateway Genmask Flags Metric Ref Use Iface
112.124.12.0 * 255.255.252.0 U 0 0 0 eth1
10.160.0.0 * 255.255.240.0 U 0 0 0 eth0
192.168.0.0 10.160.15.247 255.255.0.0 UG 0 0 0 eth0
172.16.0.0 10.160.15.247 255.240.0.0 UG 0 0 0 eth0
10.0.0.0 10.160.15.247 255.0.0.0 UG 0 0 0 eth0
default 112.124.15.247 0.0.0.0 UG 0 0 0 eth1
route add -net 224.0.0.0 netmask 240.0.0.0 dev eth0 # 添加网关/设置网关
route add -net 224.0.0.0 netmask 240.0.0.0 reject # 屏蔽一条路由
route del -net 224.0.0.0 netmask 240.0.0.0 # 删除路由记录
route add default gw 192.168.120.240 # 添加默认网关
route del default gw 192.168.120.240 # 删除默认网关
```
### 2.8. ssh
> ssh 命令是 openssh 套件中的客户端连接工具,可以给予 ssh 加密协议实现安全的远程登录服务器。
>
> 参考:http://man.linuxde.net/ssh
示例:
```bash
# ssh 用户名@远程服务器地址
ssh user1@172.24.210.101
# 指定端口
ssh -p 2211 root@140.206.185.170
```
引申阅读:[ssh 背后的故事](https://linux.cn/article-8476-1.html)
### 2.9. ssh-keygen
> ssh-keygen 命令用于为 ssh 生成、管理和转换认证密钥,它支持 RSA 和 DSA 两种认证密钥。
>
> 参考:http://man.linuxde.net/ssh-keygen
### 2.10. firewalld
> firewalld 命令是 Linux 上的防火墙软件(Centos7 默认防火墙)。
>
> 参考:https://www.cnblogs.com/moxiaoan/p/5683743.html
#### 2.10.1. firewalld 的基本使用
- 启动 - systemctl start firewalld
- 关闭 - systemctl stop firewalld
- 查看状态 - systemctl status firewalld
- 开机禁用 - systemctl disable firewalld
- 开机启用 - systemctl enable firewalld
#### 2.10.2. 使用 systemctl 管理 firewalld 服务
systemctl 是 CentOS7 的服务管理工具中主要的工具,它融合之前 service 和 chkconfig 的功能于一体。
- 启动一个服务 - systemctl start firewalld.service
- 关闭一个服务 - systemctl stop firewalld.service
- 重启一个服务 - systemctl restart firewalld.service
- 显示一个服务的状态 - systemctl status firewalld.service
- 在开机时启用一个服务 - systemctl enable firewalld.service
- 在开机时禁用一个服务 - systemctl disable firewalld.service
- 查看服务是否开机启动 - systemctl is-enabled firewalld.service
- 查看已启动的服务列表 - systemctl list-unit-files|grep enabled
- 查看启动失败的服务列表 - systemctl --failed
#### 2.10.3. 配置 firewalld-cmd
- 查看版本 - firewall-cmd --version
- 查看帮助 - firewall-cmd --help
- 显示状态 - firewall-cmd --state
- 查看所有打开的端口 - firewall-cmd --zone=public --list-ports
- 更新防火墙规则 - firewall-cmd --reload
- 查看区域信息: firewall-cmd --get-active-zones
- 查看指定接口所属区域 - firewall-cmd --get-zone-of-interface=eth0
- 拒绝所有包:firewall-cmd --panic-on
- 取消拒绝状态 - firewall-cmd --panic-off
- 查看是否拒绝 - firewall-cmd --query-panic
#### 2.10.4. 在防火墙中开放一个端口
- 添加(--permanent 永久生效,没有此参数重启后失效) - firewall-cmd --zone=public --add-port=80/tcp --permanent
- 重新载入 - firewall-cmd --reload
- 查看 - firewall-cmd --zone= public --query-port=80/tcp
- 删除 - firewall-cmd --zone= public --remove-port=80/tcp --permanent
### 2.11. iptables
> iptables 命令是 Linux 上常用的防火墙软件,是 netfilter 项目的一部分。可以直接配置,也可以通过许多前端和图形界面配置。
>
> 参考:http://man.linuxde.net/iptables
示例:
```bash
# 开放指定的端口
iptables -A INPUT -s 127.0.0.1 -d 127.0.0.1 -j ACCEPT #允许本地回环接口(即运行本机访问本机)
iptables -A INPUT -m state --state ESTABLISHED,RELATED -j ACCEPT #允许已建立的或相关连的通行
iptables -A OUTPUT -j ACCEPT #允许所有本机向外的访问
iptables -A INPUT -p tcp --dport 22 -j ACCEPT #允许访问22端口
iptables -A INPUT -p tcp --dport 80 -j ACCEPT #允许访问80端口
iptables -A INPUT -p tcp --dport 21 -j ACCEPT #允许ftp服务的21端口
iptables -A INPUT -p tcp --dport 20 -j ACCEPT #允许FTP服务的20端口
iptables -A INPUT -j reject #禁止其他未允许的规则访问
iptables -A FORWARD -j REJECT #禁止其他未允许的规则访问
# 屏蔽IP
iptables -I INPUT -s 123.45.6.7 -j DROP #屏蔽单个IP的命令
iptables -I INPUT -s 123.0.0.0/8 -j DROP #封整个段即从123.0.0.1到123.255.255.254的命令
iptables -I INPUT -s 124.45.0.0/16 -j DROP #封IP段即从123.45.0.1到123.45.255.254的命令
iptables -I INPUT -s 123.45.6.0/24 -j DROP #封IP段即从123.45.6.1到123.45.6.254的命令是
# 查看已添加的iptables规则
iptables -L -n -v
Chain INPUT (policy DROP 48106 packets, 2690K bytes)
pkts bytes target prot opt in out source destination
5075 589K ACCEPT all -- lo * 0.0.0.0/0 0.0.0.0/0
191K 90M ACCEPT tcp -- * * 0.0.0.0/0 0.0.0.0/0 tcp dpt:22
1499K 133M ACCEPT tcp -- * * 0.0.0.0/0 0.0.0.0/0 tcp dpt:80
4364K 6351M ACCEPT all -- * * 0.0.0.0/0 0.0.0.0/0 state RELATED,ESTABLISHED
6256 327K ACCEPT icmp -- * * 0.0.0.0/0 0.0.0.0/0
Chain FORWARD (policy ACCEPT 0 packets, 0 bytes)
pkts bytes target prot opt in out source destination
Chain OUTPUT (policy ACCEPT 3382K packets, 1819M bytes)
pkts bytes target prot opt in out source destination
5075 589K ACCEPT all -- * lo 0.0.0.0/0 0.0.0.0/0
```
### 2.12. host
> host 命令是常用的分析域名查询工具,可以用来测试域名系统工作是否正常。
>
> 参考:http://man.linuxde.net/host
示例:
```bash
[root@localhost ~]# host www.jsdig.com
www.jsdig.com is an alias for host.1.jsdig.com.
host.1.jsdig.com has address 100.42.212.8
[root@localhost ~]# host -a www.jsdig.com
Trying "www.jsdig.com"
;; ->>HEADER<<- opcode: QUERY, status: NOERROR, id: 34671
;; flags: qr rd ra; QUERY: 1, ANSWER: 1, AUTHORITY: 0, ADDITIONAL: 0
;; QUESTION SECTION:
;www.jsdig.com. IN ANY
;; ANSWER SECTION:
www.jsdig.com. 463 IN CNAME host.1.jsdig.com.
Received 54 bytes from 202.96.104.15#53 in 0 ms
```
### 2.13. nslookup
> nslookup 命令是常用域名查询工具,就是查 DNS 信息用的命令。
>
> 参考:http://man.linuxde.net/nslookup
示例:
```bash
[root@localhost ~]# nslookup www.jsdig.com
Server: 202.96.104.15
Address: 202.96.104.15#53
Non-authoritative answer:
www.jsdig.com canonical name = host.1.jsdig.com.
Name: host.1.jsdig.com
Address: 100.42.212.8
```
### 2.14. nc/netcat
> nc 命令是 netcat 命令的简称,都是用来设置路由器。
>
> 参考:http://man.linuxde.net/nc_netcat
示例:
```bash
# TCP 端口扫描
[root@localhost ~]# nc -v -z -w2 192.168.0.3 1-100
192.168.0.3: inverse host lookup failed: Unknown host
(UNKNOWN) [192.168.0.3] 80 (http) open
(UNKNOWN) [192.168.0.3] 23 (telnet) open
(UNKNOWN) [192.168.0.3] 22 (ssh) open
# UDP 端口扫描
[root@localhost ~]# nc -u -z -w2 192.168.0.1 1-1000 # 扫描192.168.0.3 的端口 范围是 1-1000
```
### 2.15. ping
> ping 命令用来测试主机之间网络的连通性。执行 ping 指令会使用 ICMP 传输协议,发出要求回应的信息,若远端主机的网络功能没有问题,就会回应该信息,因而得知该主机运作正常。
>
> 参考:http://man.linuxde.net/ping
示例:
```bash
[root@AY1307311912260196fcZ ~]# ping www.jsdig.com
PING host.1.jsdig.com (100.42.212.8) 56(84) bytes of data.
64 bytes from 100-42-212-8.static.webnx.com (100.42.212.8): icmp_seq=1 ttl=50 time=177 ms
64 bytes from 100-42-212-8.static.webnx.com (100.42.212.8): icmp_seq=2 ttl=50 time=178 ms
64 bytes from 100-42-212-8.static.webnx.com (100.42.212.8): icmp_seq=3 ttl=50 time=174 ms
64 bytes from 100-42-212-8.static.webnx.com (100.42.212.8): icmp_seq=4 ttl=50 time=177 ms
...按Ctrl+C结束
--- host.1.jsdig.com ping statistics ---
4 packets transmitted, 4 received, 0% packet loss, time 2998ms
rtt min/avg/max/mdev = 174.068/176.916/178.182/1.683 ms
```
### 2.16. traceroute
> traceroute 命令用于追踪数据包在网络上的传输时的全部路径,它默认发送的数据包大小是 40 字节。
>
> 参考:http://man.linuxde.net/traceroute
示例:
```bash
traceroute www.58.com
traceroute to www.58.com (211.151.111.30), 30 hops max, 40 byte packets
1 unknown (192.168.2.1) 3.453 ms 3.801 ms 3.937 ms
2 221.6.45.33 (221.6.45.33) 7.768 ms 7.816 ms 7.840 ms
3 221.6.0.233 (221.6.0.233) 13.784 ms 13.827 ms 221.6.9.81 (221.6.9.81) 9.758 ms
4 221.6.2.169 (221.6.2.169) 11.777 ms 122.96.66.13 (122.96.66.13) 34.952 ms 221.6.2.53 (221.6.2.53) 41.372 ms
5 219.158.96.149 (219.158.96.149) 39.167 ms 39.210 ms 39.238 ms
6 123.126.0.194 (123.126.0.194) 37.270 ms 123.126.0.66 (123.126.0.66) 37.163 ms 37.441 ms
7 124.65.57.26 (124.65.57.26) 42.787 ms 42.799 ms 42.809 ms
8 61.148.146.210 (61.148.146.210) 30.176 ms 61.148.154.98 (61.148.154.98) 32.613 ms 32.675 ms
9 202.106.42.102 (202.106.42.102) 44.563 ms 44.600 ms 44.627 ms
10 210.77.139.150 (210.77.139.150) 53.302 ms 53.233 ms 53.032 ms
11 211.151.104.6 (211.151.104.6) 39.585 ms 39.502 ms 39.598 ms
12 211.151.111.30 (211.151.111.30) 35.161 ms 35.938 ms 36.005 ms
```
### 2.17. netstat
> netstat 命令用来打印 Linux 中网络系统的状态信息,可让你得知整个 Linux 系统的网络情况。
>
> 参考:http://man.linuxde.net/netstat
示例:
```bash
# 列出所有端口 (包括监听和未监听的)
netstat -a #列出所有端口
netstat -at #列出所有tcp端口
netstat -au #列出所有udp端口
# 列出所有处于监听状态的 Sockets
netstat -l #只显示监听端口
netstat -lt #只列出所有监听 tcp 端口
netstat -lu #只列出所有监听 udp 端口
netstat -lx #只列出所有监听 UNIX 端口
# 显示每个协议的统计信息
netstat -s 显示所有端口的统计信息
netstat -st 显示TCP端口的统计信息
netstat -su 显示UDP端口的统计信息
```
================================================
FILE: docs/linux/cli/linux-cli-software.md
================================================
# Linux 软件管理
> 关键词:`rpm`, `yum`, `apt-get`
## 1. rpm
> rpm 命令是 RPM 软件包的管理工具。rpm 原本是 Red Hat Linux 发行版专门用来管理 Linux 各项套件的程序,由于它遵循 GPL 规则且功能强大方便,因而广受欢迎。逐渐受到其他发行版的采用。RPM 套件管理方式的出现,让 Linux 易于安装,升级,间接提升了 Linux 的适用度。
>
> 参考:http://man.linuxde.net/rpm
示例:
(1)安装 rpm 包
```
rpm -ivh xxx.rpm
```
(2)安装.src.rpm 软件包
这类软件包是包含了源代码的 rpm 包,在安装时需要进行编译
```bash
rpm -i xxx.src.rpm
cd /usr/src/redhat/SPECS
rpmbuild -bp xxx.specs #一个和你的软件包同名的specs文件
cd /usr/src/redhat/BUILD/xxx/ #一个和你的软件包同名的目录
./configure #这一步和编译普通的源码软件一样,可以加上参数
make
make install
```
(3)卸载 rpm 软件包
使用命令 `rpm -e 包名`,包名可以包含版本号等信息,但是不可以有后缀.rpm,比如卸载软件包 proftpd-1.2.8-1,可以使用下列格式:
```bash
rpm -e proftpd-1.2.8-1
rpm -e proftpd-1.2.8
rpm -e proftpd-
rpm -e proftpd
```
不可以是下列格式:
```bash
rpm -e proftpd-1.2.8-1.i386.rpm
rpm -e proftpd-1.2.8-1.i386
rpm -e proftpd-1.2
rpm -e proftpd-1
```
有时会出现一些错误或者警告:
```
... is needed by ...
```
这说明这个软件被其他软件需要,不能随便卸载,可以用 rpm -e --nodeps 强制卸载
(4)查看与 rpm 包相关的文件和其他信息
```bash
rpm -qa # 列出所有安装过的包
```
## 2. yum
> yum 命令是在 Fedora 和 RedHat 以及 SUSE 中基于 rpm 的软件包管理器,它可以使系统管理人员交互和自动化地更细与管理 RPM 软件包,能够从指定的服务器自动下载 RPM 包并且安装,可以自动处理依赖性关系,并且一次安装所有依赖的软体包,无须繁琐地一次次下载、安装。
>
> 参考:http://man.linuxde.net/yum
示例:
部分常用的命令包括:
- 自动搜索最快镜像插件:`yum install yum-fastestmirror`
- 安装 yum 图形窗口插件:`yum install yumex`
- 查看可能批量安装的列表:`yum grouplist`
**安装**
```
yum install #全部安装
yum install package1 #安装指定的安装包package1
yum groupinsall group1 #安装程序组group1
```
**更新和升级**
```
yum update #全部更新
yum update package1 #更新指定程序包package1
yum check-update #检查可更新的程序
yum upgrade package1 #升级指定程序包package1
yum groupupdate group1 #升级程序组group1
```
**查找和显示**
```
yum info package1 #显示安装包信息package1
yum list #显示所有已经安装和可以安装的程序包
yum list package1 #显示指定程序包安装情况package1
yum groupinfo group1 #显示程序组group1信息yum search string 根据关键字string查找安装包
yum search #查找软件包
```
**删除程序**
```
yum remove #删除程序包package_name
yum groupremove group1 #删除程序组group1
yum deplist package1 #查看程序package1依赖情况
```
**清除缓存**
```
yum clean packages #清除缓存目录下的软件包
yum clean headers #清除缓存目录下的 headers
yum clean oldheaders #清除缓存目录下旧的 headers
```
### 2.1. yum 源
yum 的默认源是国外的,下载速度比较慢,所以最好替换为一个国内的 yum 源。
| 推荐 yum 国内源 | 源地址 |
| ---------------------------- | -------------------------------------------------------------------------------------------------------------------------- |
| | Centos6:http://mirrors.aliyun.com/repo/Centos-6.repo
Centos7:http://mirrors.aliyun.com/repo/Centos-7.repo |
| | Centos6:http://mirrors.163.com/.help/CentOS6-Base-163.repo
Centos7:http://mirrors.163.com/.help/CentOS7-Base-163.repo |
> 🔔 注意:Cento5 已废弃,只能使用 http://vault.centos.org/ 替换,但由于是国外镜像,速度较慢。
替换方法,以 aliyun CentOS7 为例:
```
cp /etc/yum.repos.d/CentOS-Base.repo /etc/yum.repos.d/CentOS-Base.repo.bak
wget -O /etc/yum.repos.d/CentOS-Base.repo http://mirrors.aliyun.com/repo/Centos-7.repo
yum clean all
yum makecache
```
## 3. apt-get
> apt-get 命令是 Debian Linux 发行版中的 APT 软件包管理工具。所有基于 Debian 的发行都使用这个包管理系统。deb 包可以把一个应用的文件包在一起,大体就如同 Windows 上的安装文件。
>
> 参考:http://man.linuxde.net/apt-get
示例:
使用 apt-get 命令的第一步就是引入必需的软件库,Debian 的软件库也就是所有 Debian 软件包的集合,它们存在互联网上的一些公共站点上。把它们的地址加入,apt-get 就能搜索到我们想要的软件。/etc/apt/sources.list 是存放这些地址列表的配置文件,其格式如下:
deb [web 或 ftp 地址][发行版名字] [main/contrib/non-free]
我们常用的 Ubuntu 就是一个基于 Debian 的发行,我们使用 apt-get 命令获取这个列表,以下是我整理的常用命令:
在修改 /etc/apt/sources.list 或者 /etc/apt/preferences 之后运行该命令。
```bash
# 更新 apt-get
apt-get update
# 安装一个软件包
apt-get install packagename
# 卸载一个已安装的软件包(保留配置文件)
apt-get remove packagename
# 卸载一个已安装的软件包(删除配置文件)
apt-get –purge remove packagename
# 如果需要空间的话,可以让这个命令来删除你已经删掉的软件
apt-get autoclean apt
# 把安装的软件的备份也删除,不过这样不会影响软件的使用的
apt-get clean
# 更新所有已安装的软件包
apt-get upgrade
# 将系统升级到新版本
apt-get dist-upgrade
```
## 4. 参考资料
- http://man.linuxde.net/rpm
- http://man.linuxde.net/yum
- http://man.linuxde.net/apt-get
- http://www.runoob.com/linux/linux-yum.html
================================================
FILE: docs/linux/cli/linux-cli-system.md
================================================
# Linux 系统管理
> 关键词:`lsb_release`, `reboot`, `exit`, `shutdown`, `date`, `mount`, `umount`, `ps`, `kill`, `systemctl`, `service`, `crontab`
## 1. Linux 系统管理要点
- 查看 Linux 系统发行版本
- 使用 [lsb_release](#lsb_release)(此命令适用于所有的 Linux 发行版本)
- 使用 `cat /etc/redhat-release`(此方法只适合 Redhat 系的 Linux)
- 查看 CPU 信息 - 使用 `cat /proc/cpuinfo`
- 重新启动 Linux 操作系统 - 使用 [reboot](#reboot)
- 退出 shell,并返回给定值 - 使用 [exit](#exit)
- 关闭系统 - 使用 [shutdown](#shutdown)
- 查看或设置系统时间与日期 - 使用 [date](#date)
- 挂载文件系统 - 使用 [mount](#mount)
- 取消挂载文件系统 - 使用 [umount](#umount)
- 查看系统当前进程状态 - 使用 [ps](#ps)
- 删除当前正在运行的进程 - 使用 [kill](#kill)
- 启动、停止、重启、关闭、显示系统服务(Centos7),使用 [systemctl](#systemctl)
- 启动、停止、重启、关闭、显示系统服务(Centos7 以前),使用 [service](#service)
- 管理需要周期性执行的任务,使用 [crontab](#crontab)
## 2. 命令常见用法
### 2.1. lsb_release
lsb_release 不是 bash 默认命令,如果要使用,需要先安装。
安装方法:
1. 执行 `yum provides lsb_release`,查看支持 lsb_release 命令的包。
2. 选择合适版本,执行类似这样的安装命令:`yum install -y redhat-lsb-core-4.1-27.el7.centos.1.x86_64`
### 2.2. reboot
> reboot 命令用来重新启动正在运行的 Linux 操作系统。
>
> 参考:http://man.linuxde.net/reboot
示例:
```bash
reboot # 重开机。
reboot -w # 做个重开机的模拟(只有纪录并不会真的重开机)。
```
### 2.3. exit
> exit 命令同于退出 shell,并返回给定值。在 shell 脚本中可以终止当前脚本执行。执行 exit 可使 shell 以指定的状态值退出。若不设置状态值参数,则 shell 以预设值退出。状态值 0 代表执行成功,其他值代表执行失败。
>
> 参考:http://man.linuxde.net/exit
示例:
```bash
# 退出当前 shell
[root@localhost ~]# exit
logout
# 在脚本中,进入脚本所在目录,否则退出
cd $(dirname $0) || exit 1
# 在脚本中,判断参数数量,不匹配就打印使用方式,退出
if [ "$#" -ne "2" ]; then
echo "usage: $0 "
exit 2
fi
# 在脚本中,退出时删除临时文件
trap "rm -f tmpfile; echo Bye." EXIT
# 检查上一命令的退出码
./mycommand.sh
EXCODE=$?
if [ "$EXCODE" == "0" ]; then
echo "O.K"
fi
```
### 2.4. shutdown
> shutdown 命令用来系统关机命令。shutdown 指令可以关闭所有程序,并依用户的需要,进行重新开机或关机的动作。
>
> 参考:http://man.linuxde.net/shutdown
示例:
```bash
# 指定现在立即关机
shutdown -h now
# 指定 5 分钟后关机,同时送出警告信息给登入用户
shutdown +5 "System will shutdown after 5 minutes"
```
### 2.5. date
> date 命令是显示或设置系统时间与日期。
>
> 参考:http://man.linuxde.net/date
示例:
```bash
# 格式化输出
date +"%Y-%m-%d"
2009-12-07
# 输出昨天日期
date -d "1 day ago" +"%Y-%m-%d"
2012-11-19
# 2 秒后输出
date -d "2 second" +"%Y-%m-%d %H:%M.%S"
2012-11-20 14:21.31
# 传说中的 1234567890 秒
date -d "1970-01-01 1234567890 seconds" +"%Y-%m-%d %H:%m:%S"
2009-02-13 23:02:30
# 普通转格式
date -d "2009-12-12" +"%Y/%m/%d %H:%M.%S"
2009/12/12 00:00.00
# apache 格式转换
date -d "Dec 5, 2009 12:00:37 AM" +"%Y-%m-%d %H:%M.%S"
2009-12-05 00:00.37
# 格式转换后时间游走
date -d "Dec 5, 2009 12:00:37 AM 2 year ago" +"%Y-%m-%d %H:%M.%S"
2007-12-05 00:00.37
# 加减操作
date +%Y%m%d # 显示前天年月日
date -d "+1 day" +%Y%m%d # 显示前一天的日期
date -d "-1 day" +%Y%m%d # 显示后一天的日期
date -d "-1 month" +%Y%m%d # 显示上一月的日期
date -d "+1 month" +%Y%m%d # 显示下一月的日期
date -d "-1 year" +%Y%m%d # 显示前一年的日期
date -d "+1 year" +%Y%m%d # 显示下一年的日期
# 设定时间
date -s # 设置当前时间,只有root权限才能设置,其他只能查看
date -s 20120523 # 设置成20120523,这样会把具体时间设置成空00:00:00
date -s 01:01:01 # 设置具体时间,不会对日期做更改
date -s "01:01:01 2012-05-23" # 这样可以设置全部时间
date -s "01:01:01 20120523" # 这样可以设置全部时间
date -s "2012-05-23 01:01:01" # 这样可以设置全部时间
date -s "20120523 01:01:01" # 这样可以设置全部时间
# 有时需要检查一组命令花费的时间
#!/bin/bash
start=$(date +%s)
nmap man.linuxde.net &> /dev/null
end=$(date +%s)
difference=$(( end - start ))
echo $difference seconds.
```
### 2.6. mount
> mount 命令用于挂载文件系统到指定的挂载点。此命令的最常用于挂载 cdrom,使我们可以访问 cdrom 中的数据,因为你将光盘插入 cdrom 中,Linux 并不会自动挂载,必须使用 Linux mount 命令来手动完成挂载。
>
> 参考:http://man.linuxde.net/mount > https://blog.csdn.net/weishujie000/article/details/76531924
示例:
```bash
# 将 /dev/hda1 挂在 /mnt 之下
mount /dev/hda1 /mnt
# 将 /dev/hda1 用唯读模式挂在 /mnt 之下
mount -o ro /dev/hda1 /mnt
# 将 /tmp/image.iso 这个光碟的 image 档使用 loop 模式挂在 /mnt/cdrom 之下
# 用这种方法可以将一般网络上可以找到的 Linux ISO 在不烧录成光碟的情况下检视其内容
mount -o loop /tmp/image.iso /mnt/cdrom
```
### 2.7. umount
> umount 命令用于卸载已经挂载的文件系统。利用设备名或挂载点都能 umount 文件系统,不过最好还是通过挂载点卸载,以免使用绑定挂载(一个设备,多个挂载点)时产生混乱。
>
> 参考:http://man.linuxde.net/umount
示例:
```bash
# 通过设备名卸载
umount -v /dev/sda1
/dev/sda1 umounted
# 通过挂载点卸载
umount -v /mnt/mymount/
/tmp/diskboot.img umounted
```
### 2.8. ps
> ps 命令用于报告当前系统的进程状态。可以搭配 kill 指令随时中断、删除不必要的程序。ps 命令是最基本同时也是非常强大的进程查看命令,使用该命令可以确定有哪些进程正在运行和运行的状态、进程是否结束、进程有没有僵死、哪些进程占用了过多的资源等等,总之大部分信息都是可以通过执行该命令得到的。
>
> 参考:http://man.linuxde.net/ps
示例:
```bash
# 按内存资源的使用量对进程进行排序
ps aux | sort -rnk 4
# 按 CPU 资源的使用量对进程进行排序
ps aux | sort -nk 3
```
### 2.9. kill
> kill 命令用来删除执行中的程序或工作。kill 可将指定的信息送至程序。预设的信息为 SIGTERM(15),可将指定程序终止。若仍无法终止该程序,可使用 SIGKILL(9) 信息尝试强制删除程序。程序或工作的编号可利用 ps 指令或 job 指令查看。
>
> 参考:http://man.linuxde.net/kill
示例:
```bash
# 列出所有信号名称
kill -l
1) SIGHUP 2) SIGINT 3) SIGQUIT 4) SIGILL
5) SIGTRAP 6) SIGABRT 7) SIGBUS 8) SIGFPE
9) SIGKILL 10) SIGUSR1 11) SIGSEGV 12) SIGUSR2
13) SIGPIPE 14) SIGALRM 15) SIGTERM 16) SIGSTKFLT
17) SIGCHLD 18) SIGCONT 19) SIGSTOP 20) SIGTSTP
21) SIGTTIN 22) SIGTTOU 23) SIGURG 24) SIGXCPU
25) SIGXFSZ 26) SIGVTALRM 27) SIGPROF 28) SIGWINCH
29) SIGIO 30) SIGPWR 31) SIGSYS 34) SIGRTMIN
35) SIGRTMIN+1 36) SIGRTMIN+2 37) SIGRTMIN+3 38) SIGRTMIN+4
39) SIGRTMIN+5 40) SIGRTMIN+6 41) SIGRTMIN+7 42) SIGRTMIN+8
43) SIGRTMIN+9 44) SIGRTMIN+10 45) SIGRTMIN+11 46) SIGRTMIN+12
47) SIGRTMIN+13 48) SIGRTMIN+14 49) SIGRTMIN+15 50) SIGRTMAX-14
51) SIGRTMAX-13 52) SIGRTMAX-12 53) SIGRTMAX-11 54) SIGRTMAX-10
55) SIGRTMAX-9 56) SIGRTMAX-8 57) SIGRTMAX-7 58) SIGRTMAX-6
59) SIGRTMAX-5 60) SIGRTMAX-4 61) SIGRTMAX-3 62) SIGRTMAX-2
63) SIGRTMAX-1 64) SIGRTMAX
# 先用 ps 查找进程,然后用 kill 杀掉
ps -ef | grep vim
root 3268 2884 0 16:21 pts/1 00:00:00 vim install.log
root 3370 2822 0 16:21 pts/0 00:00:00 grep vim
kill 3268
kill 3268
-bash: kill: (3268) - 没有那个进程
```
### 2.10. systemctl
> systemctl 命令是系统服务管理器指令,它实际上将 service 和 chkconfig 这两个命令组合到一起。
>
> 参考:http://man.linuxde.net/systemctl
示例:
```bash
# 1.启动 nfs 服务
systemctl start nfs-server.service
# 2.设置开机自启动
systemctl enable nfs-server.service
# 3.停止开机自启动
systemctl disable nfs-server.service
# 4.查看服务当前状态
systemctl status nfs-server.service
# 5.重新启动某服务
systemctl restart nfs-server.service
# 6.查看所有已启动的服务
systemctl list-units --type=service
# 7. 开启防火墙 22 端口
iptables -I INPUT -p tcp --dport 22 -j accept
# 8. 彻底关闭防火墙
sudo systemctl status firewalld.service
sudo systemctl stop firewalld.service
sudo systemctl disable firewalld.service
```
### 2.11. service
> service 命令是 Redhat Linux 兼容的发行版中用来控制系统服务的实用工具,它以启动、停止、重新启动和关闭系统服务,还可以显示所有系统服务的当前状态。
>
> 参考:http://man.linuxde.net/service
示例:
```bash
service network status
配置设备:
lo eth0
当前的活跃设备:
lo eth0
service network restart
正在关闭接口 eth0: [ 确定 ]
关闭环回接口: [ 确定 ]
设置网络参数: [ 确定 ]
弹出环回接口: [ 确定 ]
弹出界面 eth0: [ 确定 ]
```
### 2.12. crontab
> crontab 命令被用来提交和管理用户的需要周期性执行的任务,与 windows 下的计划任务类似,当安装完成操作系统后,默认会安装此服务工具,并且会自动启动 crond 进程,crond 进程每分钟会定期检查是否有要执行的任务,如果有要执行的任务,则自动执行该任务。
>
> 参考:http://man.linuxde.net/crontab
示例:
```bash
# 每 1 分钟执行一次 command
* * * * * command
# 每小时的第 3 和第 15 分钟执行
3,15 * * * * command
# 在上午 8 点到 11 点的第 3 和第 15 分钟执行
3,15 8-11 * * * command
# 每隔两天的上午 8 点到 11 点的第 3 和第 15 分钟执行
3,15 8-11 */2 * * command
# 每个星期一的上午 8 点到 11 点的第 3 和第 15 分钟执行
3,15 8-11 * * 1 command
# 每晚的 21:30 重启 smb
30 21 * * * /etc/init.d/smb restart
# 每月 1、10、22 日的 4 : 45 重启 smb
45 4 1,10,22 * * /etc/init.d/smb restart
# 每周六、周日的 1:10 重启 smb
10 1 * * 6,0 /etc/init.d/smb restart
# 每天 18 : 00 至 23 : 00 之间每隔 30 分钟重启 smb
0,30 18-23 * * * /etc/init.d/smb restart
# 每星期六的晚上 11:00 pm 重启 smb
0 23 * * 6 /etc/init.d/smb restart
# 每一小时重启 smb
* */1 * * * /etc/init.d/smb restart
# 晚上 11 点到早上 7 点之间,每隔一小时重启 smb
* 23-7/1 * * * /etc/init.d/smb restart
# 每月的 4 号与每周一到周三的 11 点重启 smb
0 11 4 * mon-wed /etc/init.d/smb restart
# 一月一号的 4 点重启 smb
0 4 1 jan * /etc/init.d/smb restart
# 每小时执行`/etc/cron.hourly`目录内的脚本
01 * * * * root run-parts /etc/cron.hourly
```
================================================
FILE: docs/linux/cli/linux-cli-user.md
================================================
# Linux 用户管理
> 关键词:`groupadd`, `groupdel`, `groupmod`, `useradd`, `userdel`, `usermod`, `passwd`, `su`, `sudo`
## 1. Linux 用户管理要点
- 创建用户组 - 使用 [groupadd](#groupadd)
- 删除用户组 - 使用 [groupdel](#groupdel)
- 修改用户组信息 - 使用 [groupmod](#groupmod)
- 创建用户 - 使用 [useradd](#useradd)
- 删除用户 - 使用 [userdel](#userdel)
- 修改用户信息 - 使用 [usermod](#usermod)
- 设置用户认证信息 - 使用 [passwd](#passwd)
- 切换用户 - 使用 [su](#su)
- 当前用户想执行没有权限执行的命令时,使用其他用户身份去执行 - 使用 [sudo](#sudo)
## 2. 命令常见用法
### 2.1. groupadd
> groupadd 命令用于创建一个新的用户组,新用户组的信息将被添加到系统文件中。
>
> 参考:http://man.linuxde.net/groupadd
示例:
```bash
# 建立一个新组,并设置组 ID 加入系统
$ groupadd -g 344 jsdigname
```
### 2.2. groupdel
> groupdel 命令用于删除指定的用户组,本命令要修改的系统文件包括 `/ect/group` 和 `/ect/gshadow`。若该群组中仍包括某些用户,则必须先删除这些用户后,方能删除群组。
>
> 参考:http://man.linuxde.net/groupdel
示例:
```bash
$ groupadd damon # 创建damon用户组
$ groupdel damon # 删除这个用户组
```
### 2.3. groupmod
> groupmod 命令更改群组识别码或名称。需要更改群组的识别码或名称时,可用 groupmod 指令来完成这项工作。
>
> 参考:http://man.linuxde.net/groupmod
### 2.4. useradd
> useradd 命令用于 Linux 中创建的新的系统用户。useradd 可用来建立用户帐号。帐号建好之后,再用 passwd 设定帐号的密码.而可用 userdel 删除帐号。使用 useradd 指令所建立的帐号,实际上是保存在 `/etc/passwd` 文本文件中。
>
> 参考:http://man.linuxde.net/useradd
示例:
```bash
# 新建用户加入组
$ useradd –g sales jack –G company,employees # -g:加入主要组、-G:加入次要组
# 建立一个新用户账户,并设置 ID
$ useradd caojh -u 544
```
### 2.5. userdel
> userdel 命令用于删除给定的用户,以及与用户相关的文件。若不加选项,则仅删除用户帐号,而不删除相关文件。
>
> 参考:http://man.linuxde.net/userdel
示例:
userdel 命令很简单,比如我们现在有个用户 linuxde,其 home 目录位于`/var`目录中,现在我们来删除这个用户:
```bash
$ userdel linuxde # 删除用户linuxde,但不删除其家目录及文件;
$ userdel -r linuxde # 删除用户linuxde,其 home 目录及文件一并删除;
```
### 2.6. usermod
> usermod 命令用于修改用户的基本信息。usermod 命令不允许你改变正在线上的使用者帐号名称。当 usermod 命令用来改变 user id,必须确认这名 user 没在电脑上执行任何程序。你需手动更改使用者的 crontab 档。也需手动更改使用者的 at 工作档。采用 NIS server 须在 server 上更动相关的 NIS 设定。
>
> 参考:http://man.linuxde.net/usermod
示例:
```bash
# 将 newuser2 添加到组 staff 中
$ usermod -G staff newuser2
# 修改 newuser 的用户名为 newuser1
$ usermod -l newuser1 newuser
# 锁定账号 newuser1
$ usermod -L newuser1
# 解除对 newuser1 的锁定
$ usermod -U newuser1
```
### 2.7. passwd
> passwd 命令用于设置用户的认证信息,包括用户密码、密码过期时间等。系统管理者则能用它管理系统用户的密码。只有管理者可以指定用户名称,一般用户只能变更自己的密码。
>
> 参考:http://man.linuxde.net/passwd
示例:
```bash
# 如果是普通用户执行 passwd 只能修改自己的密码。
# 如果新建用户后,要为新用户创建密码,则用 passwd 用户名,注意要以 root 用户的权限来创建。
$ passwd linuxde # 更改或创建linuxde用户的密码;
Changing password for user linuxde.
New UNIX password: # 请输入新密码;
Retype new UNIX password: # 再输入一次;
passwd: all authentication tokens updated successfully. # 成功;
# 普通用户如果想更改自己的密码,直接运行 passwd 即可,比如当前操作的用户是 linuxde。
$ passwd
Changing password for user linuxde. # 更改linuxde用户的密码;
(current) UNIX password: # 请输入当前密码;
New UNIX password: # 请输入新密码;
Retype new UNIX password: # 确认新密码;
passwd: all authentication tokens updated successfully. # 更改成功;
# 比如我们让某个用户不能修改密码,可以用`-l`选项来锁定:
$ passwd -l linuxde # 锁定用户linuxde不能更改密码;
Locking password for user linuxde.
passwd: Success # 锁定成功;
$ su linuxde # 通过su切换到linuxde用户;
$ passwd # linuxde来更改密码;
Changing password for user linuxde.
Changing password for linuxde
(current) UNIX password: # 输入linuxde的当前密码;
passwd: Authentication token manipulation error # 失败,不能更改密码;
$ passwd -d linuxde # 清除linuxde用户密码;
Removing password for user linuxde.
passwd: Success # 清除成功;
$ passwd -S linuxde # 查询linuxde用户密码状态;
Empty password. # 空密码,也就是没有密码;
```
### 2.8. su
> su 命令用于切换当前用户身份到其他用户身份,变更时须输入所要变更的用户帐号与密码。
>
> 参考:http://man.linuxde.net/su
示例:
```bash
# 变更帐号为 root 并在执行 ls 指令后退出变回原使用者:
$ su -c ls root
# 变更帐号为 root 并传入`-f`选项给新执行的 shell:
$ su root -f
# 变更帐号为 test 并改变工作目录至 test 的家目录:
$ su -test
```
### 2.9. sudo
> sudo 命令用来以其他身份来执行命令,预设的身份为 root。在 `/etc/sudoers` 中设置了可执行 sudo 指令的用户。若其未经授权的用户企图使用 sudo,则会发出警告的邮件给管理员。用户使用 sudo 时,必须先输入密码,之后有 5 分钟的有效期限,超过期限则必须重新输入密码。
>
> 参考:http://man.linuxde.net/sudo
示例:
```bash
# 指定用户执行命令
$ sudo -u userb ls -l
# 列出目前的权限
$ sudo -l
# 显示sudo设置
$ sudo -L
```
#### 2.9.1. 给普通用户授权 sudo
假设要给普通用户 mary 配置 sudo 权限:
1. `/etc/sudoers` 文件存放了 sudo 的相关用户,但是默认是没有写权限的,所以需要设为可写:`chmod u+w /etc/sudoers`
2. 在该文件中添加 `mary ALL=(ALL) ALL` ,保存并退出,让 mary 具有 sudo 的所有权限
3. 再将 `/etc/sudoers` 的权限恢复到默认状态:`chmod u-w /etc/sudoers`
#### 2.9.2. 免密码授权 sudo
与给普通用户授权 sudo 类似,区别仅在于第 2 步:`mary ALL=(ALL) NOPASSWD: ALL`。
================================================
FILE: docs/linux/cli/scp.md
================================================
# scp
加密的方式在本地主机和远程主机之间复制文件
## 补充说明
**scp 命令** 用于在 Linux 下进行远程拷贝文件的命令,和它类似的命令有 cp,不过 cp 只是在本机进行拷贝不能跨服务器,而且 scp 传输是加密的。可能会稍微影响一下速度。当你服务器硬盘变为只读 read only system 时,用 scp 可以帮你把文件移出来。另外,scp 还非常不占资源,不会提高多少系统负荷,在这一点上,rsync 就远远不及它了。虽然 rsync 比 scp 会快一点,但当小文件众多的情况下,rsync 会导致硬盘 I/O 非常高,而 scp 基本不影响系统正常使用。
### 语法
```shell
scp(选项)(参数)
```
### 选项
```shell
-1:使用ssh协议版本1;
-2:使用ssh协议版本2;
-4:使用ipv4;
-6:使用ipv6;
-B:以批处理模式运行;
-C:使用压缩;
-F:指定ssh配置文件;
-i:identity_file 从指定文件中读取传输时使用的密钥文件(例如亚马逊云pem),此参数直接传递给ssh;
-l:指定宽带限制;
-o:指定使用的ssh选项;
-P:指定远程主机的端口号;
-p:保留文件的最后修改时间,最后访问时间和权限模式;
-q:不显示复制进度;
-r:以递归方式复制。
```
### 参数
- 源文件:指定要复制的源文件。
- 目标文件:目标文件。格式为`user@host:filename`(文件名为目标文件的名称)。
### 实例
从远程复制到本地的 scp 命令与上面的命令雷同,只要将从本地复制到远程的命令后面 2 个参数互换顺序就行了。
**从远处复制文件到本地目录**
```shell
scp root@10.10.10.10:/opt/soft/nginx-0.5.38.tar.gz /opt/soft/
```
从 10.10.10.10 机器上的`/opt/soft/`的目录中下载 nginx-0.5.38.tar.gz 文件到本地`/opt/soft/`目录中。
**从亚马逊云复制 OpenVPN 到本地目录**
```shell
scp -i amazon.pem ubuntu@10.10.10.10:/usr/local/openvpn_as/etc/exe/openvpn-connect-2.1.3.110.dmg openvpn-connect-2.1.3.110.dmg
```
从 10.10.10.10 机器上下载 openvpn 安装文件到本地当前目录来。
**从远处复制到本地**
```shell
scp -r root@10.10.10.10:/opt/soft/mongodb /opt/soft/
```
从 10.10.10.10 机器上的`/opt/soft/`中下载 mongodb 目录到本地的`/opt/soft/`目录来。
**上传本地文件到远程机器指定目录**
```shell
scp /opt/soft/nginx-0.5.38.tar.gz root@10.10.10.10:/opt/soft/scptest
# 指定端口 2222
scp -rp -P 2222 /opt/soft/nginx-0.5.38.tar.gz root@10.10.10.10:/opt/soft/scptest
```
复制本地`/opt/soft/`目录下的文件 nginx-0.5.38.tar.gz 到远程机器 10.10.10.10 的`opt/soft/scptest`目录。
**上传本地目录到远程机器指定目录**
```shell
scp -r /opt/soft/mongodb root@10.10.10.10:/opt/soft/scptest
```
上传本地目录`/opt/soft/mongodb`到远程机器 10.10.10.10 上`/opt/soft/scptest`的目录中去。
================================================
FILE: docs/linux/cli/top.md
================================================
# top
显示或管理执行中的程序
## 补充说明
**top 命令** 可以实时动态地查看系统的整体运行情况,是一个综合了多方信息监测系统性能和运行信息的实用工具。通过 top 命令所提供的互动式界面,用热键可以管理。
### 语法
```shell
top(选项)
```
### 选项
```shell
-b:以批处理模式操作;
-c:显示完整的治命令;
-d:屏幕刷新间隔时间;
-I:忽略失效过程;
-s:保密模式;
-S:累积模式;
-i<时间>:设置间隔时间;
-u<用户名>:指定用户名;
-p<进程号>:指定进程;
-n<次数>:循环显示的次数。
```
### top 交互命令
在 top 命令执行过程中可以使用的一些交互命令。这些命令都是单字母的,如果在命令行中使用了-s 选项, 其中一些命令可能会被屏蔽。
```shell
h:显示帮助画面,给出一些简短的命令总结说明;
k:终止一个进程;
i:忽略闲置和僵死进程,这是一个开关式命令;
q:退出程序;
r:重新安排一个进程的优先级别;
S:切换到累计模式;
s:改变两次刷新之间的延迟时间(单位为s),如果有小数,就换算成ms。输入0值则系统将不断刷新,默认值是5s;
f或者F:从当前显示中添加或者删除项目;
o或者O:改变显示项目的顺序;
l:切换显示平均负载和启动时间信息;
m:切换显示内存信息;
t:切换显示进程和CPU状态信息;
c:切换显示命令名称和完整命令行;
M:根据驻留内存大小进行排序;
P:根据CPU使用百分比大小进行排序;
T:根据时间/累计时间进行排序;
w:将当前设置写入~/.toprc文件中。
```
### 实例
```shell
top - 09:44:56 up 16 days, 21:23, 1 user, load average: 9.59, 4.75, 1.92
Tasks: 145 total, 2 running, 143 sleeping, 0 stopped, 0 zombie
Cpu(s): 99.8%us, 0.1%sy, 0.0%ni, 0.2%id, 0.0%wa, 0.0%hi, 0.0%si, 0.0%st
Mem: 4147888k total, 2493092k used, 1654796k free, 158188k buffers
Swap: 5144568k total, 56k used, 5144512k free, 2013180k cached
```
**解释:**
- top - 09:44:56[当前系统时间],
- 16 days[系统已经运行了 16 天],
- 1 user[个用户当前登录],
- load average: 9.59, 4.75, 1.92[系统负载,即任务队列的平均长度]
- Tasks: 145 total[总进程数],
- 2 running[正在运行的进程数],
- 143 sleeping[睡眠的进程数],
- 0 stopped[停止的进程数],
- 0 zombie[冻结进程数],
- Cpu(s): 99.8%us[用户空间占用 CPU 百分比],
- 0.1%sy[内核空间占用 CPU 百分比],
- 0.0%ni[用户进程空间内改变过优先级的进程占用 CPU 百分比],
- 0.2%id[空闲 CPU 百分比], 0.0%wa[等待输入输出的 CPU 时间百分比],
- 0.0%hi[],
- 0.0%st[],
- Mem: 4147888k total[物理内存总量],
- 2493092k used[使用的物理内存总量],
- 1654796k free[空闲内存总量],
- 158188k buffers[用作内核缓存的内存量]
- Swap: 5144568k total[交换区总量],
- 56k used[使用的交换区总量],
- 5144512k free[空闲交换区总量],
- 2013180k cached[缓冲的交换区总量],
================================================
FILE: docs/linux/cli/vmstat.md
================================================
# vmstat
显示虚拟内存状态
## 补充说明
**vmstat 命令** 的含义为显示虚拟内存状态(“Viryual Memor Statics”),但是它可以报告关于进程、内存、I/O 等系统整体运行状态。
### 语法
```shell
vmstat(选项)(参数)
```
### 选项
```shell
-a:显示活动内页;
-f:显示启动后创建的进程总数;
-m:显示slab信息;
-n:头信息仅显示一次;
-s:以表格方式显示事件计数器和内存状态;
-d:报告磁盘状态;
-p:显示指定的硬盘分区状态;
-S:输出信息的单位。
```
### 参数
- 事件间隔:状态信息刷新的时间间隔;
- 次数:显示报告的次数。
### 实例
```shell
vmstat 3
procs -----------memory---------- ---swap-- -----io---- --system-- -----cpu------
r b swpd free buff cache si so bi bo in cs us sy id wa st
0 0 320 42188 167332 1534368 0 0 4 7 1 0 0 0 99 0 0
0 0 320 42188 167332 1534392 0 0 0 0 1002 39 0 0 100 0 0
0 0 320 42188 167336 1534392 0 0 0 19 1002 44 0 0 100 0 0
0 0 320 42188 167336 1534392 0 0 0 0 1002 41 0 0 100 0 0
0 0 320 42188 167336 1534392 0 0 0 0 1002 41 0 0 100 0 0
```
**字段说明:**
Procs(进程)
- r: 运行队列中进程数量,这个值也可以判断是否需要增加 CPU。(长期大于 1)
- b: 等待 IO 的进程数量。
Memory(内存)
- swpd: 使用虚拟内存大小,如果 swpd 的值不为 0,但是 SI,SO 的值长期为 0,这种情况不会影响系统性能。
- free: 空闲物理内存大小。
- buff: 用作缓冲的内存大小。
- cache: 用作缓存的内存大小,如果 cache 的值大的时候,说明 cache 处的文件数多,如果频繁访问到的文件都能被 cache 处,那么磁盘的读 IO bi 会非常小。
Swap
- si: 每秒从交换区写到内存的大小,由磁盘调入内存。
- so: 每秒写入交换区的内存大小,由内存调入磁盘。
注意:内存够用的时候,这 2 个值都是 0,如果这 2 个值长期大于 0 时,系统性能会受到影响,磁盘 IO 和 CPU 资源都会被消耗。有些朋友看到空闲内存(free)很少的或接近于 0 时,就认为内存不够用了,不能光看这一点,还要结合 si 和 so,如果 free 很少,但是 si 和 so 也很少(大多时候是 0),那么不用担心,系统性能这时不会受到影响的。
IO(现在的 Linux 版本块的大小为 1kb)
- bi: 每秒读取的块数
- bo: 每秒写入的块数
注意:随机磁盘读写的时候,这 2 个值越大(如超出 1024k),能看到 CPU 在 IO 等待的值也会越大。
system(系统)
- in: 每秒中断数,包括时钟中断。
- cs: 每秒上下文切换数。
注意:上面 2 个值越大,会看到由内核消耗的 CPU 时间会越大。
CPU(以百分比表示)
- us: 用户进程执行时间百分比(user time)
us 的值比较高时,说明用户进程消耗的 CPU 时间多,但是如果长期超 50%的使用,那么我们就该考虑优化程序算法或者进行加速。
- sy: 内核系统进程执行时间百分比(system time)
sy 的值高时,说明系统内核消耗的 CPU 资源多,这并不是良性表现,我们应该检查原因。
- wa: IO 等待时间百分比
wa 的值高时,说明 IO 等待比较严重,这可能由于磁盘大量作随机访问造成,也有可能磁盘出现瓶颈(块操作)。
- id: 空闲时间百分比
================================================
FILE: docs/linux/cli/命令行的艺术.md
================================================
> 转载自 https://github.com/jlevy/the-art-of-command-line
_[Čeština](README-cs.md) ∙ [Deutsch](README-de.md) ∙ [Ελληνικά](README-el.md) ∙ [English](../README.md) ∙ [Español](README-es.md) ∙ [Français](README-fr.md) ∙ [Indonesia](README-id.md) ∙ [Italiano](README-it.md) ∙ [日本語](README-ja.md) ∙ [한국어](README-ko.md) ∙ [Português](README-pt.md) ∙ [Română](README-ro.md) ∙ [Русский](README-ru.md) ∙ [Slovenščina](README-sl.md) ∙ [Українська](README-uk.md) ∙ [简体中文](README-zh.md) ∙ [繁體中文](README-zh-Hant.md)_
# 命令行的艺术

- [前言](#前言)
- [基础](#基础)
- [日常使用](#日常使用)
- [文件及数据处理](#文件及数据处理)
- [系统调试](#系统调试)
- [单行脚本](#单行脚本)
- [冷门但有用](#冷门但有用)
- [仅限 OS X 系统](#仅限-os-x-系统)
- [仅限 Windows 系统](#仅限-windows-系统)
- [更多资源](#更多资源)
- [免责声明](#免责声明)
熟练使用命令行是一种常常被忽视,或被认为难以掌握的技能,但实际上,它会提高你作为工程师的灵活性以及生产力。本文是一份我在 Linux 上工作时,发现的一些命令行使用技巧的摘要。有些技巧非常基础,而另一些则相当复杂,甚至晦涩难懂。这篇文章并不长,但当你能够熟练掌握这里列出的所有技巧时,你就学会了很多关于命令行的东西了。
这篇文章是[许多作者和译者](AUTHORS.md)共同的成果。
这里的部分内容
[首次](http://www.quora.com/What-are-some-lesser-known-but-useful-Unix-commands)
[出现](http://www.quora.com/What-are-the-most-useful-Swiss-army-knife-one-liners-on-Unix)
于 [Quora](http://www.quora.com/What-are-some-time-saving-tips-that-every-Linux-user-should-know),
但已经迁移到了 Github,并由众多高手做出了许多改进。
如果你在本文中发现了错误或者存在可以改善的地方,请[**贡献你的一份力量**](/CONTRIBUTING.md)。
## 前言
涵盖范围:
- 这篇文章不仅能帮助刚接触命令行的新手,而且对具有经验的人也大有裨益。本文致力于做到*覆盖面广*(涉及所有重要的内容),_具体_(给出具体的最常用的例子),以及*简洁*(避免冗余的内容,或是可以在其他地方轻松查到的细枝末节)。在特定应用场景下,本文的内容属于基本功或者能帮助您节约大量的时间。
- 本文主要为 Linux 所写,但在[仅限 OS X 系统](#仅限-os-x-系统)章节和[仅限 Windows 系统](#仅限-windows-系统)章节中也包含有对应操作系统的内容。除去这两个章节外,其它的内容大部分均可在其他类 Unix 系统或 OS X,甚至 Cygwin 中得到应用。
- 本文主要关注于交互式 Bash,但也有很多技巧可以应用于其他 shell 和 Bash 脚本当中。
- 除去“标准的”Unix 命令,本文还包括了一些依赖于特定软件包的命令(前提是它们具有足够的价值)。
注意事项:
- 为了能在一页内展示尽量多的东西,一些具体的信息可以在引用的页面中找到。我们相信机智的你知道如何使用 Google 或者其他搜索引擎来查阅到更多的详细信息。文中部分命令需要您使用 `apt-get`,`yum`,`dnf`,`pacman`,
`pip` 或 `brew`(以及其它合适的包管理器)来安装依赖的程序。
- 遇到问题的话,请尝试使用 [Explainshell](http://explainshell.com/) 去获取相关命令、参数、管道等内容的解释。
## 基础
- 学习 Bash 的基础知识。具体地,在命令行中输入 `man bash` 并至少全文浏览一遍; 它理解起来很简单并且不冗长。其他的 shell 可能很好用,但 Bash 的功能已经足够强大并且到几乎总是可用的( 如果你*只*学习 zsh,fish 或其他的 shell 的话,在你自己的设备上会显得很方便,但过度依赖这些功能会给您带来不便,例如当你需要在服务器上工作时)。
- 熟悉至少一个基于文本的编辑器。通常而言 Vim (`vi`) 会是你最好的选择,毕竟在终端中编辑文本时 Vim 是最好用的工具(甚至大部分情况下 Vim 要比 Emacs、大型 IDE 或是炫酷的编辑器更好用)。
- 学会如何使用 `man` 命令去阅读文档。学会使用 `apropos` 去查找文档。知道有些命令并不对应可执行文件,而是在 Bash 内置好的,此时可以使用 `help` 和 `help -d` 命令获取帮助信息。你可以用 `type 命令` 来判断这个命令到底是可执行文件、shell 内置命令还是别名。
- 学会使用 `>` 和 `<` 来重定向输出和输入,学会使用 `|` 来重定向管道。明白 `>` 会覆盖了输出文件而 `>>` 是在文件末添加。了解标准输出 stdout 和标准错误 stderr。
- 学会使用通配符 `*` (或许再算上 `?` 和 `[`...`]`) 和引用以及引用中 `'` 和 `"` 的区别(后文中有一些具体的例子)。
- 熟悉 Bash 中的任务管理工具:`&`,**ctrl-z**,**ctrl-c**,`jobs`,`fg`,`bg`,`kill` 等。
- 学会使用 `ssh` 进行远程命令行登录,最好知道如何使用 `ssh-agent`,`ssh-add` 等命令来实现基础的无密码认证登录。
- 学会基本的文件管理工具:`ls` 和 `ls -l` (了解 `ls -l` 中每一列代表的意义),`less`,`head`,`tail` 和 `tail -f` (甚至 `less +F`),`ln` 和 `ln -s` (了解硬链接与软链接的区别),`chown`,`chmod`,`du` (硬盘使用情况概述:`du -hs *`)。 关于文件系统的管理,学习 `df`,`mount`,`fdisk`,`mkfs`,`lsblk`。知道 inode 是什么(与 `ls -i` 和 `df -i` 等命令相关)。
- 学习基本的网络管理工具:`ip` 或 `ifconfig`,`dig`。
- 学习并使用一种版本控制管理系统,例如 `git`。
- 熟悉正则表达式,学会使用 `grep`/`egrep`,它们的参数中 `-i`,`-o`,`-v`,`-A`,`-B` 和 `-C` 这些是很常用并值得认真学习的。
- 学会使用 `apt-get`,`yum`,`dnf` 或 `pacman` (具体使用哪个取决于你使用的 Linux 发行版)来查找和安装软件包。并确保你的环境中有 `pip` 来安装基于 Python 的命令行工具 (接下来提到的部分程序使用 `pip` 来安装会很方便)。
## 日常使用
- 在 Bash 中,可以通过按 **Tab** 键实现自动补全参数,使用 **ctrl-r** 搜索命令行历史记录(按下按键之后,输入关键字便可以搜索,重复按下 **ctrl-r** 会向后查找匹配项,按下 **Enter** 键会执行当前匹配的命令,而按下右方向键会将匹配项放入当前行中,不会直接执行,以便做出修改)。
- 在 Bash 中,可以按下 **ctrl-w** 删除你键入的最后一个单词,**ctrl-u** 可以删除行内光标所在位置之前的内容,**alt-b** 和 **alt-f** 可以以单词为单位移动光标,**ctrl-a** 可以将光标移至行首,**ctrl-e** 可以将光标移至行尾,**ctrl-k** 可以删除光标至行尾的所有内容,**ctrl-l** 可以清屏。键入 `man readline` 可以查看 Bash 中的默认快捷键。内容有很多,例如 **alt-.** 循环地移向前一个参数,而 **alt-\*** 可以展开通配符。
* 你喜欢的话,可以执行 `set -o vi` 来使用 vi 风格的快捷键,而执行 `set -o emacs` 可以把它改回来。
* 为了便于编辑长命令,在设置你的默认编辑器后(例如 `export EDITOR=vim`),**ctrl-x** **ctrl-e** 会打开一个编辑器来编辑当前输入的命令。在 vi 风格下快捷键则是 **escape-v**。
* 键入 `history` 查看命令行历史记录,再用 `!n`(`n` 是命令编号)就可以再次执行。其中有许多缩写,最有用的大概就是 `!$`, 它用于指代上次键入的参数,而 `!!` 可以指代上次键入的命令了(参考 man 页面中的“HISTORY EXPANSION”)。不过这些功能,你也可以通过快捷键 **ctrl-r** 和 **alt-.** 来实现。
* `cd` 命令可以切换工作路径,输入 `cd \~` 可以进入 home 目录。要访问你的 home 目录中的文件,可以使用前缀 `\~`(例如 `\~/.bashrc`)。在 `sh` 脚本里则用环境变量 `$HOME` 指代 home 目录的路径。
* 回到前一个工作路径:`cd -`。
* 如果你输入命令的时候中途改了主意,按下 **alt-#** 在行首添加 `#` 把它当做注释再按下回车执行(或者依次按下 **ctrl-a**, **#**, **enter**)。这样做的话,之后借助命令行历史记录,你可以很方便恢复你刚才输入到一半的命令。
* 使用 `xargs` ( 或 `parallel`)。他们非常给力。注意到你可以控制每行参数个数(`-L`)和最大并行数(`-P`)。如果你不确定它们是否会按你想的那样工作,先使用 `xargs echo` 查看一下。此外,使用 `-I{}` 会很方便。例如:
```bash
find . -name '*.py' | xargs grep some_function
cat hosts | xargs -I{} ssh root@{} hostname
```
- `pstree -p` 以一种优雅的方式展示进程树。
- 使用 `pgrep` 和 `pkill` 根据名字查找进程或发送信号(`-f` 参数通常有用)。
- 了解你可以发往进程的信号的种类。比如,使用 `kill -STOP [pid]` 停止一个进程。使用 `man 7 signal` 查看详细列表。
- 使用 `nohup` 或 `disown` 使一个后台进程持续运行。
- 使用 `netstat -lntp` 或 `ss -plat` 检查哪些进程在监听端口(默认是检查 TCP 端口; 添加参数 `-u` 则检查 UDP 端口)或者 `lsof -iTCP -sTCP:LISTEN -P -n` (这也可以在 OS X 上运行)。
- `lsof` 来查看开启的套接字和文件。
- 使用 `uptime` 或 `w` 来查看系统已经运行多长时间。
- 使用 `alias` 来创建常用命令的快捷形式。例如:`alias ll='ls -latr'` 创建了一个新的命令别名 `ll`。
- 可以把别名、shell 选项和常用函数保存在 `\~/.bashrc`,具体看下这篇[文章](http://superuser.com/a/183980/7106)。这样做的话你就可以在所有 shell 会话中使用你的设定。
- 把环境变量的设定以及登陆时要执行的命令保存在 `\~/.bash_profile`。而对于从图形界面启动的 shell 和 `cron` 启动的 shell,则需要单独配置文件。
- 要想在几台电脑中同步你的配置文件(例如 `.bashrc` 和 `.bash_profile`),可以借助 Git。
- 当变量和文件名中包含空格的时候要格外小心。Bash 变量要用引号括起来,比如 `"$FOO"`。尽量使用 `-0` 或 `-print0` 选项以便用 NULL 来分隔文件名,例如 `locate -0 pattern | xargs -0 ls -al` 或 `find / -print0 -type d | xargs -0 ls -al`。如果 for 循环中循环访问的文件名含有空字符(空格、tab 等字符),只需用 `IFS=$'\n'` 把内部字段分隔符设为换行符。
- 在 Bash 脚本中,使用 `set -x` 去调试输出(或者使用它的变体 `set -v`,它会记录原始输入,包括多余的参数和注释)。尽可能地使用严格模式:使用 `set -e` 令脚本在发生错误时退出而不是继续运行;使用 `set -u` 来检查是否使用了未赋值的变量;试试 `set -o pipefail`,它可以监测管道中的错误。当牵扯到很多脚本时,使用 `trap` 来检测 ERR 和 EXIT。一个好的习惯是在脚本文件开头这样写,这会使它能够检测一些错误,并在错误发生时中断程序并输出信息:
```bash
set -euo pipefail
trap "echo 'error: Script failed: see failed command above'" ERR
```
- 在 Bash 脚本中,子 shell(使用括号 `(...)`)是一种组织参数的便捷方式。一个常见的例子是临时地移动工作路径,代码如下:
```bash
# do something in current dir
(cd /some/other/dir && other-command)
# continue in original dir
```
- 在 Bash 中,变量有许多的扩展方式。`${name:?error message}` 用于检查变量是否存在。此外,当 Bash 脚本只需要一个参数时,可以使用这样的代码 `input_file=${1:?usage: $0 input_file}`。在变量为空时使用默认值:`${name:-default}`。如果你要在之前的例子中再加一个(可选的)参数,可以使用类似这样的代码 `output_file=${2:-logfile}`,如果省略了 \$2,它的值就为空,于是 `output_file` 就会被设为 `logfile`。数学表达式:`i=$(( (i + 1) % 5 ))`。序列:`{1..10}`。截断字符串:`${var%suffix}` 和 `${var#prefix}`。例如,假设 `var=foo.pdf`,那么 `echo ${var%.pdf}.txt` 将输出 `foo.txt`。
- 使用括号扩展(`{`...`}`)来减少输入相似文本,并自动化文本组合。这在某些情况下会很有用,例如 `mv foo.{txt,pdf} some-dir`(同时移动两个文件),`cp somefile{,.bak}`(会被扩展成 `cp somefile somefile.bak`)或者 `mkdir -p test-{a,b,c}/subtest-{1,2,3}`(会被扩展成所有可能的组合,并创建一个目录树)。
- 通过使用 `<(some command)` 可以将输出视为文件。例如,对比本地文件 `/etc/hosts` 和一个远程文件:
```bash
diff /etc/hosts <(ssh somehost cat /etc/hosts)
```
- 编写脚本时,你可能会想要把代码都放在大括号里。缺少右括号的话,代码就会因为语法错误而无法执行。如果你的脚本是要放在网上分享供他人使用的,这样的写法就体现出它的好处了,因为这样可以防止下载不完全代码被执行。
```bash
{
# 在这里写代码
}
```
- 了解 Bash 中的“here documents”,例如 `cat <logfile 2>&1` 或者 `some-command &>logfile`。通常,为了保证命令不会在标准输入里残留一个未关闭的文件句柄捆绑在你当前所在的终端上,在命令后添加 `>> 2+3
5
```
## 文件及数据处理
- 在当前目录下通过文件名查找一个文件,使用类似于这样的命令:`find . -iname '*something*'`。在所有路径下通过文件名查找文件,使用 `locate something` (但注意到 `updatedb` 可能没有对最近新建的文件建立索引,所以你可能无法定位到这些未被索引的文件)。
- 使用 [`ag`](https://github.com/ggreer/the_silver_searcher) 在源代码或数据文件里检索(`grep -r` 同样可以做到,但相比之下 `ag` 更加先进)。
- 将 HTML 转为文本:`lynx -dump -stdin`。
- Markdown,HTML,以及所有文档格式之间的转换,试试 [`pandoc`](http://pandoc.org/)。
- 当你要处理棘手的 XML 时候,`xmlstarlet` 算是上古时代流传下来的神器。
- 使用 [`jq`](http://stedolan.github.io/jq/) 处理 JSON。
- 使用 [`shyaml`](https://github.com/0k/shyaml) 处理 YAML。
- 要处理 Excel 或 CSV 文件的话,[csvkit](https://github.com/onyxfish/csvkit) 提供了 `in2csv`,`csvcut`,`csvjoin`,`csvgrep` 等方便易用的工具。
- 当你要处理 Amazon S3 相关的工作的时候,[`s3cmd`](https://github.com/s3tools/s3cmd) 是一个很方便的工具而 [`s4cmd`](https://github.com/bloomreach/s4cmd) 的效率更高。Amazon 官方提供的 [`aws`](https://github.com/aws/aws-cli) 以及 [`saws`](https://github.com/donnemartin/saws) 是其他 AWS 相关工作的基础,值得学习。
- 了解如何使用 `sort` 和 `uniq`,包括 uniq 的 `-u` 参数和 `-d` 参数,具体内容在后文单行脚本节中。另外可以了解一下 `comm`。
- 了解如何使用 `cut`,`paste` 和 `join` 来更改文件。很多人都会使用 `cut`,但遗忘了 `join`。
- 了解如何运用 `wc` 去计算新行数(`-l`),字符数(`-m`),单词数(`-w`)以及字节数(`-c`)。
- 了解如何使用 `tee` 将标准输入复制到文件甚至标准输出,例如 `ls -al | tee file.txt`。
- 要进行一些复杂的计算,比如分组、逆序和一些其他的统计分析,可以考虑使用 [`datamash`](https://www.gnu.org/software/datamash/)。
- 注意到语言设置(中文或英文等)对许多命令行工具有一些微妙的影响,比如排序的顺序和性能。大多数 Linux 的安装过程会将 `LANG` 或其他有关的变量设置为符合本地的设置。要意识到当你改变语言设置时,排序的结果可能会改变。明白国际化可能会使 sort 或其他命令运行效率下降*许多倍*。某些情况下(例如集合运算)你可以放心的使用 `export LC_ALL=C` 来忽略掉国际化并按照字节来判断顺序。
- 你可以单独指定某一条命令的环境,只需在调用时把环境变量设定放在命令的前面,例如 `TZ=Pacific/Fiji date` 可以获取斐济的时间。
- 了解如何使用 `awk` 和 `sed` 来进行简单的数据处理。 参阅 [One-liners](#one-liners) 获取示例。
- 替换一个或多个文件中出现的字符串:
```bash
perl -pi.bak -e 's/old-string/new-string/g' my-files-*.txt
```
- 使用 [`repren`](https://github.com/jlevy/repren) 来批量重命名文件,或是在多个文件中搜索替换内容。(有些时候 `rename` 命令也可以批量重命名,但要注意,它在不同 Linux 发行版中的功能并不完全一样。)
```bash
# 将文件、目录和内容全部重命名 foo -> bar:
repren --full --preserve-case --from foo --to bar .
# 还原所有备份文件 whatever.bak -> whatever:
repren --renames --from '(.*)\.bak' --to '\1' *.bak
# 用 rename 实现上述功能(若可用):
rename 's/\.bak$//' *.bak
```
- 根据 man 页面的描述,`rsync` 是一个快速且非常灵活的文件复制工具。它闻名于设备之间的文件同步,但其实它在本地情况下也同样有用。在安全设置允许下,用 `rsync` 代替 `scp` 可以实现文件续传,而不用重新从头开始。它同时也是删除大量文件的[最快方法](https://web.archive.org/web/20130929001850/http://linuxnote.net/jianingy/en/linux/a-fast-way-to-remove-huge-number-of-files.html)之一:
```bash
mkdir empty && rsync -r --delete empty/ some-dir && rmdir some-dir
```
- 若要在复制文件时获取当前进度,可使用 `pv`,[`pycp`](https://github.com/dmerejkowsky/pycp),[`progress`](https://github.com/Xfennec/progress),`rsync --progress`。若所执行的复制为 block 块拷贝,可以使用 `dd status=progress`。
- 使用 `shuf` 可以以行为单位来打乱文件的内容或从一个文件中随机选取多行。
- 了解 `sort` 的参数。显示数字时,使用 `-n` 或者 `-h` 来显示更易读的数(例如 `du -h` 的输出)。明白排序时关键字的工作原理(`-t` 和 `-k`)。例如,注意到你需要 `-k1,1` 来仅按第一个域来排序,而 `-k1` 意味着按整行排序。稳定排序(`sort -s`)在某些情况下很有用。例如,以第二个域为主关键字,第一个域为次关键字进行排序,你可以使用 `sort -k1,1 | sort -s -k2,2`。
- 如果你想在 Bash 命令行中写 tab 制表符,按下 **ctrl-v** **[Tab]** 或键入 `$'\t'` (后者可能更好,因为你可以复制粘贴它)。
- 标准的源代码对比及合并工具是 `diff` 和 `patch`。使用 `diffstat` 查看变更总览数据。注意到 `diff -r` 对整个文件夹有效。使用 `diff -r tree1 tree2 | diffstat` 查看变更的统计数据。`vimdiff` 用于比对并编辑文件。
- 对于二进制文件,使用 `hd`,`hexdump` 或者 `xxd` 使其以十六进制显示,使用 `bvi`,`hexedit` 或者 `biew` 来进行二进制编辑。
- 同样对于二进制文件,`strings`(包括 `grep` 等工具)可以帮助在二进制文件中查找特定比特。
- 制作二进制差分文件(Delta 压缩),使用 `xdelta3`。
- 使用 `iconv` 更改文本编码。需要更高级的功能,可以使用 `uconv`,它支持一些高级的 Unicode 功能。例如,这条命令移除了所有重音符号:
```bash
uconv -f utf-8 -t utf-8 -x '::Any-Lower; ::Any-NFD; [:Nonspacing Mark:] >; ::Any-NFC; ' < input.txt > output.txt
```
- 拆分文件可以使用 `split`(按大小拆分)和 `csplit`(按模式拆分)。
- 操作日期和时间表达式,可以用 [`dateutils`](http://www.fresse.org/dateutils/) 中的 `dateadd`、`datediff`、`strptime` 等工具。
- 使用 `zless`、`zmore`、`zcat` 和 `zgrep` 对压缩过的文件进行操作。
- 文件属性可以通过 `chattr` 进行设置,它比文件权限更加底层。例如,为了保护文件不被意外删除,可以使用不可修改标记:`sudo chattr +i /critical/directory/or/file`
- 使用 `getfacl` 和 `setfacl` 以保存和恢复文件权限。例如:
```bash
getfacl -R /some/path > permissions.txt
setfacl --restore=permissions.txt
```
- 为了高效地创建空文件,请使用 `truncate`(创建[稀疏文件](https://zh.wikipedia.org/wiki/稀疏文件)),`fallocate`(用于 ext4,xfs,btrf 和 ocfs2 文件系统),`xfs_mkfile`(适用于几乎所有的文件系统,包含在 xfsprogs 包中),`mkfile`(用于类 Unix 操作系统,比如 Solaris 和 Mac OS)。
## 系统调试
- `curl` 和 `curl -I` 可以被轻松地应用于 web 调试中,它们的好兄弟 `wget` 也是如此,或者也可以试试更潮的 [`httpie`](https://github.com/jkbrzt/httpie)。
- 获取 CPU 和硬盘的使用状态,通常使用使用 `top`(`htop` 更佳),`iostat` 和 `iotop`。而 `iostat -mxz 15` 可以让你获悉 CPU 和每个硬盘分区的基本信息和性能表现。
- 使用 `netstat` 和 `ss` 查看网络连接的细节。
- `dstat` 在你想要对系统的现状有一个粗略的认识时是非常有用的。然而若要对系统有一个深度的总体认识,使用 [`glances`](https://github.com/nicolargo/glances),它会在一个终端窗口中向你提供一些系统级的数据。
- 若要了解内存状态,运行并理解 `free` 和 `vmstat` 的输出。值得留意的是“cached”的值,它指的是 Linux 内核用来作为文件缓存的内存大小,而与空闲内存无关。
- Java 系统调试则是一件截然不同的事,一个可以用于 Oracle 的 JVM 或其他 JVM 上的调试的技巧是你可以运行 `kill -3 ` 同时一个完整的栈轨迹和堆概述(包括 GC 的细节)会被保存到标准错误或是日志文件。JDK 中的 `jps`,`jstat`,`jstack`,`jmap` 很有用。[SJK tools](https://github.com/aragozin/jvm-tools) 更高级。
- 使用 [`mtr`](http://www.bitwizard.nl/mtr/) 去跟踪路由,用于确定网络问题。
- 用 [`ncdu`](https://dev.yorhel.nl/ncdu) 来查看磁盘使用情况,它比寻常的命令,如 `du -sh *`,更节省时间。
- 查找正在使用带宽的套接字连接或进程,使用 [`iftop`](http://www.ex-parrot.com/~pdw/iftop/) 或 [`nethogs`](https://github.com/raboof/nethogs)。
- `ab` 工具(Apache 中自带)可以简单粗暴地检查 web 服务器的性能。对于更复杂的负载测试,使用 `siege`。
- [`wireshark`](https://wireshark.org/),[`tshark`](https://www.wireshark.org/docs/wsug_html_chunked/AppToolstshark.html) 和 [`ngrep`](http://ngrep.sourceforge.net/) 可用于复杂的网络调试。
- 了解 `strace` 和 `ltrace`。这俩工具在你的程序运行失败、挂起甚至崩溃,而你却不知道为什么或你想对性能有个总体的认识的时候是非常有用的。注意 profile 参数(`-c`)和附加到一个运行的进程参数 (`-p`)。
- 了解使用 `ldd` 来检查共享库。但是[永远不要在不信任的文件上运行](http://www.catonmat.net/blog/ldd-arbitrary-code-execution/)。
- 了解如何运用 `gdb` 连接到一个运行着的进程并获取它的堆栈轨迹。
- 学会使用 `/proc`。它在调试正在出现的问题的时候有时会效果惊人。比如:`/proc/cpuinfo`,`/proc/meminfo`,`/proc/cmdline`,`/proc/xxx/cwd`,`/proc/xxx/exe`,`/proc/xxx/fd/`,`/proc/xxx/smaps`(这里的 `xxx` 表示进程的 id 或 pid)。
- 当调试一些之前出现的问题的时候,[`sar`](http://sebastien.godard.pagesperso-orange.fr/) 非常有用。它展示了 cpu、内存以及网络等的历史数据。
- 关于更深层次的系统分析以及性能分析,看看 `stap`([SystemTap](https://sourceware.org/systemtap/wiki)),[`perf`](),以及[`sysdig`](https://github.com/draios/sysdig)。
- 查看你当前使用的系统,使用 `uname`,`uname -a`(Unix/kernel 信息)或者 `lsb_release -a`(Linux 发行版信息)。
- 无论什么东西工作得很欢乐(可能是硬件或驱动问题)时可以试试 `dmesg`。
- 如果你删除了一个文件,但通过 `du` 发现没有释放预期的磁盘空间,请检查文件是否被进程占用:
`lsof | grep deleted | grep "filename-of-my-big-file"`
## 单行脚本
一些命令组合的例子:
- 当你需要对文本文件做集合交、并、差运算时,`sort` 和 `uniq` 会是你的好帮手。具体例子请参照代码后面的,此处假设 `a` 与 `b` 是两内容不同的文件。这种方式效率很高,并且在小文件和上 G 的文件上都能运用(注意尽管在 `/tmp` 在一个小的根分区上时你可能需要 `-T` 参数,但是实际上 `sort` 并不被内存大小约束),参阅前文中关于 `LC_ALL` 和 `sort` 的 `-u` 参数的部分。
```bash
sort a b | uniq > c # c 是 a 并 b
sort a b | uniq -d > c # c 是 a 交 b
sort a b b | uniq -u > c # c 是 a - b
```
- 使用 `grep . *`(每行都会附上文件名)或者 `head -100 *`(每个文件有一个标题)来阅读检查目录下所有文件的内容。这在检查一个充满配置文件的目录(如 `/sys`、`/proc`、`/etc`)时特别好用。
* 计算文本文件第三列中所有数的和(可能比同等作用的 Python 代码快三倍且代码量少三倍):
```bash
awk '{ x += $3 } END { print x }' myfile
```
- 如果你想在文件树上查看大小/日期,这可能看起来像递归版的 `ls -l` 但比 `ls -lR` 更易于理解:
```bash
find . -type f -ls
```
- 假设你有一个类似于 web 服务器日志文件的文本文件,并且一个确定的值只会出现在某些行上,假设一个 `acct_id` 参数在 URI 中。如果你想计算出每个 `acct_id` 值有多少次请求,使用如下代码:
```bash
egrep -o 'acct_id=[0-9]+' access.log | cut -d= -f2 | sort | uniq -c | sort -rn
```
- 要持续监测文件改动,可以使用 `watch`,例如检查某个文件夹中文件的改变,可以用 `watch -d -n 2 'ls -rtlh | tail'`;或者在排查 WiFi 设置故障时要监测网络设置的更改,可以用 `watch -d -n 2 ifconfig`。
- 运行这个函数从这篇文档中随机获取一条技巧(解析 Markdown 文件并抽取项目):
```bash
function taocl() {
curl -s https://raw.githubusercontent.com/jlevy/the-art-of-command-line/master/README-zh.md|
pandoc -f markdown -t html |
iconv -f 'utf-8' -t 'unicode' |
xmlstarlet fo --html --dropdtd |
xmlstarlet sel -t -v "(html/body/ul/li[count(p)>0])[$RANDOM mod last()+1]" |
xmlstarlet unesc | fmt -80
}
```
## 冷门但有用
- `expr`:计算表达式或正则匹配
- `m4`:简单的宏处理器
- `yes`:多次打印字符串
- `cal`:漂亮的日历
- `env`:执行一个命令(脚本文件中很有用)
- `printenv`:打印环境变量(调试时或在写脚本文件时很有用)
- `look`:查找以特定字符串开头的单词或行
- `cut`,`paste` 和 `join`:数据修改
- `fmt`:格式化文本段落
- `pr`:将文本格式化成页/列形式
- `fold`:包裹文本中的几行
- `column`:将文本格式化成多个对齐、定宽的列或表格
- `expand` 和 `unexpand`:制表符与空格之间转换
- `nl`:添加行号
- `seq`:打印数字
- `bc`:计算器
- `factor`:分解因数
- [`gpg`](https://gnupg.org/):加密并签名文件
- `toe`:terminfo 入口列表
- `nc`:网络调试及数据传输
- `socat`:套接字代理,与 `netcat` 类似
- [`slurm`](https://github.com/mattthias/slurm):网络流量可视化
- `dd`:文件或设备间传输数据
- `file`:确定文件类型
- `tree`:以树的形式显示路径和文件,类似于递归的 `ls`
- `stat`:文件信息
- `time`:执行命令,并计算执行时间
- `timeout`:在指定时长范围内执行命令,并在规定时间结束后停止进程
- `lockfile`:使文件只能通过 `rm -f` 移除
- `logrotate`: 切换、压缩以及发送日志文件
- `watch`:重复运行同一个命令,展示结果并/或高亮有更改的部分
- [`when-changed`](https://github.com/joh/when-changed):当检测到文件更改时执行指定命令。参阅 `inotifywait` 和 `entr`。
- `tac`:反向输出文件
- `shuf`:文件中随机选取几行
- `comm`:一行一行的比较排序过的文件
- `strings`:从二进制文件中抽取文本
- `tr`:转换字母
- `iconv` 或 `uconv`:文本编码转换
- `split` 和 `csplit`:分割文件
- `sponge`:在写入前读取所有输入,在读取文件后再向同一文件写入时比较有用,例如 `grep -v something some-file | sponge some-file`
- `units`:将一种计量单位转换为另一种等效的计量单位(参阅 `/usr/share/units/definitions.units`)
- `apg`:随机生成密码
- `xz`:高比例的文件压缩
- `ldd`:动态库信息
- `nm`:提取 obj 文件中的符号
- `ab` 或 [`wrk`](https://github.com/wg/wrk):web 服务器性能分析
- `strace`:调试系统调用
- [`mtr`](http://www.bitwizard.nl/mtr/):更好的网络调试跟踪工具
- `cssh`:可视化的并发 shell
- `rsync`:通过 ssh 或本地文件系统同步文件和文件夹
- [`wireshark`](https://wireshark.org/) 和 [`tshark`](https://www.wireshark.org/docs/wsug_html_chunked/AppToolstshark.html):抓包和网络调试工具
- [`ngrep`](http://ngrep.sourceforge.net/):网络层的 grep
- `host` 和 `dig`:DNS 查找
- `lsof`:列出当前系统打开文件的工具以及查看端口信息
- `dstat`:系统状态查看
- [`glances`](https://github.com/nicolargo/glances):高层次的多子系统总览
- `iostat`:硬盘使用状态
- `mpstat`: CPU 使用状态
- `vmstat`: 内存使用状态
- `htop`:top 的加强版
- `last`:登入记录
- `w`:查看处于登录状态的用户
- `id`:用户/组 ID 信息
- [`sar`](http://sebastien.godard.pagesperso-orange.fr/):系统历史数据
- [`iftop`](http://www.ex-parrot.com/~pdw/iftop/) 或 [`nethogs`](https://github.com/raboof/nethogs):套接字及进程的网络利用情况
- `ss`:套接字数据
- `dmesg`:引导及系统错误信息
- `sysctl`: 在内核运行时动态地查看和修改内核的运行参数
- `hdparm`:SATA/ATA 磁盘更改及性能分析
- `lsblk`:列出块设备信息:以树形展示你的磁盘以及磁盘分区信息
- `lshw`,`lscpu`,`lspci`,`lsusb` 和 `dmidecode`:查看硬件信息,包括 CPU、BIOS、RAID、显卡、USB 设备等
- `lsmod` 和 `modinfo`:列出内核模块,并显示其细节
- `fortune`,`ddate` 和 `sl`:额,这主要取决于你是否认为蒸汽火车和莫名其妙的名人名言是否“有用”
## 仅限 OS X 系统
以下是*仅限于* OS X 系统的技巧。
- 用 `brew` (Homebrew)或者 `port` (MacPorts)进行包管理。这些可以用来在 OS X 系统上安装以上的大多数命令。
- 用 `pbcopy` 复制任何命令的输出到桌面应用,用 `pbpaste` 粘贴输入。
- 若要在 OS X 终端中将 Option 键视为 alt 键(例如在上面介绍的 **alt-b**、**alt-f** 等命令中用到),打开 偏好设置 -> 描述文件 -> 键盘 并勾选“使用 Option 键作为 Meta 键”。
- 用 `open` 或者 `open -a /Applications/Whatever.app` 使用桌面应用打开文件。
- Spotlight:用 `mdfind` 搜索文件,用 `mdls` 列出元数据(例如照片的 EXIF 信息)。
- 注意 OS X 系统是基于 BSD UNIX 的,许多命令(例如 `ps`,`ls`,`tail`,`awk`,`sed`)都和 Linux 中有微妙的不同( Linux 很大程度上受到了 System V-style Unix 和 GNU 工具影响)。你可以通过标题为 "BSD General Commands Manual" 的 man 页面发现这些不同。在有些情况下 GNU 版本的命令也可能被安装(例如 `gawk` 和 `gsed` 对应 GNU 中的 awk 和 sed )。如果要写跨平台的 Bash 脚本,避免使用这些命令(例如,考虑 Python 或者 `perl` )或者经过仔细的测试。
- 用 `sw_vers` 获取 OS X 的版本信息。
## 仅限 Windows 系统
以下是*仅限于* Windows 系统的技巧。
### 在 Winodws 下获取 Unix 工具
- 可以安装 [Cygwin](https://cygwin.com/) 允许你在 Microsoft Windows 中体验 Unix shell 的威力。这样的话,本文中介绍的大多数内容都将适用。
- 在 Windows 10 上,你可以使用 [Bash on Ubuntu on Windows](https://msdn.microsoft.com/commandline/wsl/about),它提供了一个熟悉的 Bash 环境,包含了不少 Unix 命令行工具。好处是它允许 Linux 上编写的程序在 Windows 上运行,而另一方面,Windows 上编写的程序却无法在 Bash 命令行中运行。
- 如果你在 Windows 上主要想用 GNU 开发者工具(例如 GCC),可以考虑 [MinGW](http://www.mingw.org/) 以及它的 [MSYS](http://www.mingw.org/wiki/msys) 包,这个包提供了例如 bash,gawk,make 和 grep 的工具。MSYS 并不包含所有可以与 Cygwin 媲美的特性。当制作 Unix 工具的原生 Windows 端口时 MinGW 将特别地有用。
- 另一个在 Windows 下实现接近 Unix 环境外观效果的选项是 [Cash](https://github.com/dthree/cash)。注意在此环境下只有很少的 Unix 命令和命令行可用。
### 实用 Windows 命令行工具
- 可以使用 `wmic` 在命令行环境下给大部分 Windows 系统管理任务编写脚本以及执行这些任务。
- Windows 实用的原生命令行网络工具包括 `ping`,`ipconfig`,`tracert`,和 `netstat`。
- 可以使用 `Rundll32` 命令来实现[许多有用的 Windows 任务](http://www.thewindowsclub.com/rundll32-shortcut-commands-windows) 。
### Cygwin 技巧
- 通过 Cygwin 的包管理器来安装额外的 Unix 程序。
- 使用 `mintty` 作为你的命令行窗口。
- 要访问 Windows 剪贴板,可以通过 `/dev/clipboard`。
- 运行 `cygstart` 以通过默认程序打开一个文件。
- 要访问 Windows 注册表,可以使用 `regtool`。
- 注意 Windows 驱动器路径 `C:\` 在 Cygwin 中用 `/cygdrive/c` 代表,而 Cygwin 的 `/` 代表 Windows 中的 `C:\cygwin`。要转换 Cygwin 和 Windows 风格的路径可以用 `cygpath`。这在需要调用 Windows 程序的脚本里很有用。
- 学会使用 `wmic`,你就可以从命令行执行大多数 Windows 系统管理任务,并编成脚本。
- 要在 Windows 下获得 Unix 的界面和体验,另一个办法是使用 [Cash](https://github.com/dthree/cash)。需要注意的是,这个环境支持的 Unix 命令和命令行参数非常少。
- 要在 Windows 上获取 GNU 开发者工具(比如 GCC)的另一个办法是使用 [MinGW](http://www.mingw.org/) 以及它的 [MSYS](http://www.mingw.org/wiki/msys) 软件包,该软件包提供了 bash、gawk、make、grep 等工具。然而 MSYS 提供的功能没有 Cygwin 完善。MinGW 在创建 Unix 工具的 Windows 原生移植方面非常有用。
## 更多资源
- [awesome-shell](https://github.com/alebcay/awesome-shell):一份精心组织的命令行工具及资源的列表。
- [awesome-osx-command-line](https://github.com/herrbischoff/awesome-osx-command-line):一份针对 OS X 命令行的更深入的指南。
- [Strict mode](http://redsymbol.net/articles/unofficial-bash-strict-mode/):为了编写更好的脚本文件。
- [shellcheck](https://github.com/koalaman/shellcheck):一个静态 shell 脚本分析工具,本质上是 bash/sh/zsh 的 lint。
- [Filenames and Pathnames in Shell](http://www.dwheeler.com/essays/filenames-in-shell.html):有关如何在 shell 脚本里正确处理文件名的细枝末节。
- [Data Science at the Command Line](http://datascienceatthecommandline.com/#tools):用于数据科学的一些命令和工具,摘自同名书籍。
## 免责声明
除去特别小的工作,你编写的代码应当方便他人阅读。能力往往伴随着责任,你 _有能力_ 在 Bash 中玩一些奇技淫巧并不意味着你应该去做!;)
## 授权条款

本文使用授权协议 [Creative Commons Attribution-ShareAlike 4.0 International License](http://creativecommons.org/licenses/by-sa/4.0/)。
================================================
FILE: docs/linux/expect.md
================================================
# expect shell 脚本
## expect 简介
`expect` 是一个自动化交互套件,主要应用于执行命令和程序时,系统以交互形式要求输入指定字符串,实现交互通信。
在实际工作中,我们运行命令、脚本或程序时,这些命令、脚本或程序都需要从终端输入某些继续运行的指令,而这些输入都需要人为的手工进行。而利用 `expect`,则可以根据程序的提示,模拟标准输入提供给程序,从而实现自动化交互执行。这就是 `expect` 。
expect 自动交互流程:
1. spawn 启动指定进程
2. expect 获取指定关键字
3. send 向指定程序发送指定字符
4. 执行完成退出
## expect 安装
### yum 安装
执行命令:
```shell
yum -y install expect
```
### 手动安装
expect 依赖 tcl,所以需要先安装 tcl:
```shell
wget https://nchc.dl.sourceforge.net/project/tcl/Tcl/8.6.9/tcl8.6.9-src.tar.gz
tar xf tcl8.6.9-src.tar.gz
cd tcl8.6.9/unix/
./configure && make && sudo make install
```
再安装 expect:
```shell
wget https://nchc.dl.sourceforge.net/project/expect/Expect/5.45.4/expect5.45.4.tar.gz
tar xf expect5.45.4.tar.gz
cd ./expect5.45.4
./configure && make && sudo make install
```
## expect 参数
启用选项:
- `-c` - 执行脚本前先执行的命令,可多次使用。
- `-d` - debug 模式,可以在运行时输出一些诊断信息,与在脚本开始处使用 `exp_internal 1` 相似。
- `-D` - 启用交换调式器,可设一整数参数。
- `-f` - 从文件读取命令,仅用于使用 `#!` 时。如果文件名为 `-`,则从 stdin 读取(使用 `./-` 从文件名为-的文件读取)。
- `-i` - 交互式输入命令,使用 `exit` 或 `EOF` 退出输入状态。
- `--` - 标示选项结束(如果你需要传递与 `expect` 选项相似的参数给脚本时),可放到 `#!` 行: `#!/usr/bin/expect --` 。
- `-v` - 显示 `expect` 版本信息。
## expect 命令
- `spawn` - 命令用来启动新的进程,`spawn`后的`send`和`expect`命令都是和使用`spawn`打开的进程进行交互。
- `expect` - 获取匹配信息,匹配成功则执行 `expect` 后面的程序动作。
- `exp_continue` - 在 `expect` 中多次匹配就需要用到。
- `send` - 命令接收一个字符串参数,并将该参数发送到进程。
- `send exp_send` - 用于发送指定的字符串信息。
- `interact` - 命令用的其实不是很多,一般情况下使用`spawn`、`send`和`expect`命令就可以很好的完成我们的任务;但在一些特殊场合下还是需要使用`interact`命令的,`interact`命令主要用于退出自动化,进入人工交互。比如我们使用`spawn`、`send`和`expect`命令完成了 ftp 登陆主机,执行下载文件任务,但是我们希望在文件下载结束以后,仍然可以停留在 ftp 命令行状态,以便手动的执行后续命令,此时使用`interact`命令就可以很好的完成这个任务。
- `send_user` - 用来打印输出 相当于 shell 中的 echo
- `set` - 定义变量。
- `set timeout` - 设置超时时间。
- `puts` - 输出变量。
- `exit` - 退出 expect 脚本
- `eof` - expect 执行结束,退出。
## 示例场景
远程登录
(1)ssh 登录远程主机执行命令,执行方法 `expect 1.sh` 或者 `source 1.sh`
```shell
#!/usr/bin/expect
spawn ssh saneri@192.168.56.103 df -Th
expect "*password"
send "123456\n"
expect eof
```
(2)ssh 远程登录主机执行命令,在 shell 脚本中执行 expect 命令,执行方法 sh 2.sh、bash 2.sh 或./2.sh 都可以执行.
```
#!/bin/bash
passwd='123456'
/usr/bin/expect <<-EOF
set time 30
spawn ssh saneri@192.168.56.103 df -Th
expect {
"*yes/no" { send "yes\r"; exp_continue }
"*password:" { send "$passwd\r" }
}
expect eof
EOF
```
(3)expect 执行多条命令
```
#!/usr/bin/expect -f
set timeout 10
spawn sudo su - root
expect "*password*"
send "123456\r"
expect "#*"
send "ls\r"
expect "#*"
send "df -Th\r"
send "exit\r"
expect eof
```
(4)创建 ssh key,将 id_rsa 和 id_rsa.pub 文件分发到各台主机上面。
```shell
#!/bin/bash
# 判断id_rsa密钥文件是否存在
if [ ! -f ~/.ssh/id_rsa ];then
ssh-keygen -t rsa -P "" -f ~/.ssh/id_rsa
else
echo "id_rsa has created ..."
fi
#分发到各个节点,这里分发到host文件中的主机中.
while read line
do
user=`echo $line | cut -d " " -f 2`
ip=`echo $line | cut -d " " -f 1`
passwd=`echo $line | cut -d " " -f 3`
expect < 环境:CentOS
通过 `crontab` 命令,我们可以在固定的间隔时间执行指定的系统指令或 shell script 脚本。时间间隔的单位可以是分钟、小时、日、月、周及以上的任意组合。这个命令非常适合周期性的日志分析或数据备份等工作。
## crond 服务
Linux 通过 crond 服务来支持 crontab。
### 检查 `crond` 服务
使用 `systemctl list-unit-files` 命令确认 `crond` 服务是否已安装。
```shell
$ systemctl list-unit-files | grep crond
crond.service enabled
```
如果为 enabled,表示服务正运行。
### crond 服务命令
开机自动启动 crond 服务:`chkconfig crond on`
或者,按以下命令手动启动:
```shell
systemctl enable crond.service # 开启服务(开机自动启动服务)
systemctl disable crond.service # 关闭服务(开机不会自动启动服务)
systemctl start crond.service # 启动服务
systemctl stop crond.service # 停止服务
systemctl restart crond.service # 重启服务
systemctl reload crond.service # 重新载入配置
systemctl status crond.service # 查看服务状态
```
## crontab
### crontab 命令
crontab 命令格式如下:
```shell
crontab [-u user] file crontab [-u user] [ -e | -l | -r ]
```
说明:
- `-u user`:用来设定某个用户的 crontab 服务;
- `file`:file 是命令文件的名字,表示将 file 做为 crontab 的任务列表文件并载入 crontab。如果在命令行中没有指定这个文件,crontab 命令将接受标准输入(键盘)上键入的命令,并将它们载入 crontab。
- `-e`:编辑某个用户的 crontab 文件内容。如果不指定用户,则表示编辑当前用户的 crontab 文件。
- `-l`:显示某个用户的 crontab 文件内容,如果不指定用户,则表示显示当前用户的 crontab 文件内容。
- `-r`:从/var/spool/cron 目录中删除某个用户的 crontab 文件,如果不指定用户,则默认删除当前用户的 crontab 文件。
- `-i`:在删除用户的 crontab 文件时给确认提示。
有两种方法写入定时任务:
- 在命令行输入:`crontab -e` 然后添加相应的任务,存盘退出。
- 直接编辑 `/etc/crontab` 文件,即 `vi /etc/crontab`,添加相应的任务。
### crontab 文件
crontab 要执行的定时任务都被保存在 `/etc/crontab` 文件中。
crontab 的文件格式如下:

#### 标准字段
**逗号**用于分隔列表。例如,在第 5 个字段(星期几)中使用 `MON,WED,FRI` 表示周一、周三和周五。
**连字符**定义范围。例如,`2000-2010` 表示 2000 年至 2010 年期间的每年,包括 2000 年和 2010 年。
除非用反斜杠(\)转义,否则命令中的**百分号(%)**会被替换成换行符,第一个百分号后面的所有数据都会作为标准输入发送给命令。
| 字段 | 是否必填 | 允许值 | 允许特殊字符 |
| :----------- | :------- | :-------------- | :----------- |
| Minutes | 是 | 0–59 | `*`,`-` |
| Hours | 是 | 0–23 | `*`,`-` |
| Day of month | 是 | 1–31 | `*`,`-` |
| Month | 是 | 1–12 or JAN–DEC | `*`,`-` |
| Day of week | 是 | 0–6 or SUN–SAT | `*`,`-` |
`/etc/crontab` 文件示例:
```shell
SHELL=/bin/bash
PATH=/sbin:/bin:/usr/sbin:/usr/bin
MAILTO=root
# For details see man 4 crontabs
# Example of job definition:
# .---------------- minute (0 - 59)
# | .------------- hour (0 - 23)
# | | .---------- day of month (1 - 31)
# | | | .------- month (1 - 12) OR jan,feb,mar,apr ...
# | | | | .---- day of week (0 - 6) (Sunday=0 or 7) OR sun,mon,tue,wed,thu,fri,sat
# | | | | |
# * * * * * user-name command to be executed
# 每两个小时以root身份执行 /home/hello.sh 脚本
0 */2 * * * root /home/hello.sh
```
### crontab 实例
#### 实例 1:每 1 分钟执行一次 myCommand
```shell
* * * * * myCommand
```
#### 实例 2:每小时的第 3 和第 15 分钟执行
```shell
3,15 * * * * myCommand
```
#### 实例 3:在上午 8 点到 11 点的第 3 和第 15 分钟执行
```shell
3,15 8-11 * * * myCommand
```
#### 实例 4:每隔两天的上午 8 点到 11 点的第 3 和第 15 分钟执行
```shell
3,15 8-11 */2 * * myCommand
```
#### 实例 5:每周一上午 8 点到 11 点的第 3 和第 15 分钟执行
```shell
3,15 8-11 * * 1 myCommand
```
#### 实例 6:每晚的 21:30 重启 smb
```shell
30 21 * * * /etc/init.d/smb restart
```
#### 实例 7:每月 1、10、22 日的 4 : 45 重启 smb
```shell
45 4 1,10,22 * * /etc/init.d/smb restart
```
#### 实例 8:每周六、周日的 1 : 10 重启 smb
```shell
10 1 * * 6,0 /etc/init.d/smb restart
```
#### 实例 9:每天 18 : 00 至 23 : 00 之间每隔 30 分钟重启 smb
```shell
0,30 18-23 * * * /etc/init.d/smb restart
```
#### 实例 10:每星期六的晚上 11 : 00 pm 重启 smb
```shell
0 23 * * 6 /etc/init.d/smb restart
```
#### 实例 11:每一小时重启 smb
```shell
0 * * * * /etc/init.d/smb restart
```
#### 实例 12:晚上 11 点到早上 7 点之间,每隔一小时重启 smb
```shell
0 23-7 * * * /etc/init.d/smb restart
```
## 参考资料
- **文章**
- [crontab 定时任务](https://linuxtools-rst.readthedocs.io/zh_CN/latest/tool/crontab.html)
- [linux 定时执行脚本](https://blog.csdn.net/z_yong_cool/article/details/79288397)
- **在线工具**
- [https://tool.lu/crontab/](https://tool.lu/crontab/)
- [https://cron.qqe2.com/](https://cron.qqe2.com/)
================================================
FILE: docs/linux/ops/firewalld.md
================================================
# 防火墙 - Firewalld
## 一、firewalld 服务命令
```shell
systemctl enable firewalld.service # 开启服务(开机自动启动服务)
systemctl disable firewalld.service # 关闭服务(开机不会自动启动服务)
systemctl start firewalld.service # 启动服务
systemctl stop firewalld.service # 停止服务
systemctl restart firewalld.service # 重启服务
systemctl reload firewalld.service # 重新载入配置
systemctl status firewalld.service # 查看服务状态
```
## 二、firewall-cmd 命令
`firewall-cmd` 命令用于配置防火墙。
```shell
firewall-cmd --version # 查看版本
firewall-cmd --help # 查看帮助
firewall-cmd --state # 显示状态
firewall-cmd --reload # 更新防火墙规则
firewall-cmd --get-active-zones # 查看区域信息
firewall-cmd --get-zone-of-interface=eth0 # 查看指定接口所属区域
firewall-cmd --panic-on # 拒绝所有包
firewall-cmd --panic-off # 取消拒绝状态
firewall-cmd --query-panic # 查看是否拒绝
firewall-cmd --zone=public --list-ports # 查看所有打开的端口
firewall-cmd --zone=public --query-port=80/tcp # 查看是否有开放的 80 TCP 端口
firewall-cmd --zone=public --add-port=8080/tcp --permanent # 添加开放端口(--permanent永久生效,没有此参数重启后失效)
firewall-cmd --zone=public --remove-port=80/tcp --permanent # 永久删除开放的 80 TCP 端口
```
## 参考资料
- [CentOS7 使用 firewalld 打开关闭防火墙与端口](https://www.cnblogs.com/moxiaoan/p/5683743.html)
================================================
FILE: docs/linux/ops/iptables.md
================================================
# Iptables 应用
> _iptables_ 是一个配置 Linux 内核 [防火墙](https://wiki.archlinux.org/index.php/Firewall) 的命令行工具,是 [netfilter](https://en.wikipedia.org/wiki/Netfilter) 项目的一部分。 可以直接配置,也可以通过许多前端和图形界面配置。
>
> iptables 也经常代指该内核级防火墙。iptables 用于 [ipv4](https://en.wikipedia.org/wiki/Ipv4),_ip6tables_ 用于 [ipv6](https://en.wikipedia.org/wiki/Ipv6)。
>
> [nftables](https://wiki.archlinux.org/index.php/Nftables) 已经包含在 [Linux kernel 3.13](http://www.phoronix.com/scan.php?page=news_item&px=MTQ5MDU) 中,以后会取代 iptables 成为主要的 Linux 防火墙工具。
>
> 环境:CentOS7
## 1. 简介
**iptables 可以检测、修改、转发、重定向和丢弃 IPv4 数据包**。
过滤 IPv4 数据包的代码已经内置于内核中,并且按照不同的目的被组织成 **表** 的集合。**表** 由一组预先定义的 **链** 组成,**链**包含遍历顺序规则。每一条规则包含一个谓词的潜在匹配和相应的动作(称为 **目标**),如果谓词为真,该动作会被执行。也就是说条件匹配。
## 2. 安装 iptables
(1)禁用 firewalld
CentOS 7 上默认安装了 firewalld 作为防火墙,使用 iptables 建议关闭并禁用 firewalld。
```bash
systemctl stop firewalld
systemctl disable firewalld
```
(2)安装 iptables
```
yum install -y iptables-services
```
(3)服务管理
- 查看服务状态:`systemctl status iptables`
- 启用服务:`systemctl enable iptables`
- 禁用服务:`systemctl disable iptables`
- 启动服务:`systemctl start iptables`
- 重启服务:`systemctl restart iptables`
- 关闭服务: `systemctl stop iptables`
## 3. 命令
基本语法:
```
iptables(选项)(参数)
```
基本选项说明:
| 参数 | 作用 |
| ----------- | ------------------------------------------------- |
| -P | 设置默认策略:iptables -P INPUT (DROP |
| -F | 清空规则链 |
| -L | 查看规则链 |
| -A | 在规则链的末尾加入新规则 |
| -I | num 在规则链的头部加入新规则 |
| -D | num 删除某一条规则 |
| -s | 匹配来源地址 IP/MASK,加叹号"!"表示除这个 IP 外。 |
| -d | 匹配目标地址 |
| -i | 网卡名称 匹配从这块网卡流入的数据 |
| -o | 网卡名称 匹配从这块网卡流出的数据 |
| -p | 匹配协议,如 tcp,udp,icmp |
| --dport num | 匹配目标端口号 |
| --sport num | 匹配来源端口号 |
顺序:
```
iptables -t 表名 <-A/I/D/R> 规则链名 [规则号] <-i/o 网卡名> -p 协议名 <-s 源IP/源子网> --sport 源端口 <-d 目标IP/目标子网> --dport 目标端口 -j 动作
```
## 4. iptables 示例
### 4.1. 清空当前的所有规则和计数
```shell
iptables -F # 清空所有的防火墙规则
iptables -X # 删除用户自定义的空链
iptables -Z # 清空计数
```
### 4.2. 配置允许 ssh 端口连接
```shell
iptables -A INPUT -s 192.168.1.0/24 -p tcp --dport 22 -j ACCEPT
# 22为你的ssh端口, -s 192.168.1.0/24表示允许这个网段的机器来连接,其它网段的ip地址是登陆不了你的机器的。 -j ACCEPT表示接受这样的请求
```
### 4.3. 允许本地回环地址可以正常使用
```shell
iptables -A INPUT -i lo -j ACCEPT
#本地圆环地址就是那个127.0.0.1,是本机上使用的,它进与出都设置为允许
iptables -A OUTPUT -o lo -j ACCEPT
```
### 4.4. 设置默认的规则
```shell
iptables -P INPUT DROP # 配置默认的不让进
iptables -P FORWARD DROP # 默认的不允许转发
iptables -P OUTPUT ACCEPT # 默认的可以出去
```
### 4.5. 配置白名单
```shell
iptables -A INPUT -p all -s 192.168.1.0/24 -j ACCEPT # 允许机房内网机器可以访问
iptables -A INPUT -p all -s 192.168.140.0/24 -j ACCEPT # 允许机房内网机器可以访问
iptables -A INPUT -p tcp -s 183.121.3.7 --dport 3380 -j ACCEPT # 允许183.121.3.7访问本机的3380端口
```
### 4.6. 开启相应的服务端口
```shell
iptables -A INPUT -p tcp --dport 80 -j ACCEPT # 开启80端口,因为web对外都是这个端口
iptables -A INPUT -p icmp --icmp-type 8 -j ACCEPT # 允许被ping
iptables -A INPUT -m state --state ESTABLISHED,RELATED -j ACCEPT # 已经建立的连接得让它进来
```
### 4.7. 保存规则到配置文件中
```shell
cp /etc/sysconfig/iptables /etc/sysconfig/iptables.bak # 任何改动之前先备份,请保持这一优秀的习惯
iptables-save > /etc/sysconfig/iptables
cat /etc/sysconfig/iptables
```
### 4.8. 列出已设置的规则
> iptables -L [-t 表名][链名]
- 四个表名 `raw`,`nat`,`filter`,`mangle`
- 五个规则链名 `INPUT`、`OUTPUT`、`FORWARD`、`PREROUTING`、`POSTROUTING`
- filter 表包含`INPUT`、`OUTPUT`、`FORWARD`三个规则链
```shell
iptables -L -t nat # 列出 nat 上面的所有规则
# ^ -t 参数指定,必须是 raw, nat,filter,mangle 中的一个
iptables -L -t nat --line-numbers # 规则带编号
iptables -L INPUT
iptables -L -nv # 查看,这个列表看起来更详细
```
### 4.9. 清除已有规则
```shell
iptables -F INPUT # 清空指定链 INPUT 上面的所有规则
iptables -X INPUT # 删除指定的链,这个链必须没有被其它任何规则引用,而且这条上必须没有任何规则。
# 如果没有指定链名,则会删除该表中所有非内置的链。
iptables -Z INPUT # 把指定链,或者表中的所有链上的所有计数器清零。
```
### 4.10. 删除已添加的规则
```shell
# 添加一条规则
iptables -A INPUT -s 192.168.1.5 -j DROP
```
将所有 iptables 以序号标记显示,执行:
```shell
iptables -L -n --line-numbers
```
比如要删除 INPUT 里序号为 8 的规则,执行:
```shell
iptables -D INPUT 8
```
### 4.11. 开放指定的端口
```shell
iptables -A INPUT -s 127.0.0.1 -d 127.0.0.1 -j ACCEPT #允许本地回环接口(即运行本机访问本机)
iptables -A INPUT -m state --state ESTABLISHED,RELATED -j ACCEPT #允许已建立的或相关连的通行
iptables -A OUTPUT -j ACCEPT #允许所有本机向外的访问
iptables -A INPUT -p tcp --dport 22 -j ACCEPT #允许访问22端口
iptables -A INPUT -p tcp --dport 80 -j ACCEPT #允许访问80端口
iptables -A INPUT -p tcp --dport 21 -j ACCEPT #允许ftp服务的21端口
iptables -A INPUT -p tcp --dport 20 -j ACCEPT #允许FTP服务的20端口
iptables -A INPUT -j reject #禁止其他未允许的规则访问
iptables -A FORWARD -j REJECT #禁止其他未允许的规则访问
```
### 4.12. 屏蔽 IP
```shell
iptables -A INPUT -p tcp -m tcp -s 192.168.0.8 -j DROP # 屏蔽恶意主机(比如,192.168.0.8
iptables -I INPUT -s 123.45.6.7 -j DROP #屏蔽单个IP的命令
iptables -I INPUT -s 123.0.0.0/8 -j DROP #封整个段即从123.0.0.1到123.255.255.254的命令
iptables -I INPUT -s 124.45.0.0/16 -j DROP #封IP段即从123.45.0.1到123.45.255.254的命令
iptables -I INPUT -s 123.45.6.0/24 -j DROP #封IP段即从123.45.6.1到123.45.6.254的命令是
```
### 4.13. 指定数据包出去的网络接口
只对 OUTPUT,FORWARD,POSTROUTING 三个链起作用。
```shell
iptables -A FORWARD -o eth0
```
### 4.14. 查看已添加的规则
```shell
iptables -L -n -v
Chain INPUT (policy DROP 48106 packets, 2690K bytes)
pkts bytes target prot opt in out source destination
5075 589K ACCEPT all -- lo * 0.0.0.0/0 0.0.0.0/0
191K 90M ACCEPT tcp -- * * 0.0.0.0/0 0.0.0.0/0 tcp dpt:22
1499K 133M ACCEPT tcp -- * * 0.0.0.0/0 0.0.0.0/0 tcp dpt:80
4364K 6351M ACCEPT all -- * * 0.0.0.0/0 0.0.0.0/0 state RELATED,ESTABLISHED
6256 327K ACCEPT icmp -- * * 0.0.0.0/0 0.0.0.0/0
Chain FORWARD (policy ACCEPT 0 packets, 0 bytes)
pkts bytes target prot opt in out source destination
Chain OUTPUT (policy ACCEPT 3382K packets, 1819M bytes)
pkts bytes target prot opt in out source destination
5075 589K ACCEPT all -- * lo 0.0.0.0/0 0.0.0.0/0
```
### 4.15. 启动网络转发规则
公网`210.14.67.7`让内网`192.168.188.0/24`上网
```shell
iptables -t nat -A POSTROUTING -s 192.168.188.0/24 -j SNAT --to-source 210.14.67.127
```
### 4.16. 端口映射
本机的 2222 端口映射到内网 虚拟机的 22 端口
```shell
iptables -t nat -A PREROUTING -d 210.14.67.127 -p tcp --dport 2222 -j DNAT --to-dest 192.168.188.115:22
```
### 4.17. 字符串匹配
比如,我们要过滤所有 TCP 连接中的字符串`test`,一旦出现它我们就终止这个连接,我们可以这么做:
```shell
iptables -A INPUT -p tcp -m string --algo kmp --string "test" -j REJECT --reject-with tcp-reset
iptables -L
# Chain INPUT (policy ACCEPT)
# target prot opt source destination
# REJECT tcp -- anywhere anywhere STRING match "test" ALGO name kmp TO 65535 reject-with tcp-reset
#
# Chain FORWARD (policy ACCEPT)
# target prot opt source destination
#
# Chain OUTPUT (policy ACCEPT)
# target prot opt source destination
```
### 4.18. 阻止 Windows 蠕虫的攻击
```shell
iptables -I INPUT -j DROP -p tcp -s 0.0.0.0/0 -m string --algo kmp --string "cmd.exe"
```
### 4.19. 防止 SYN 洪水攻击
```shell
iptables -A INPUT -p tcp --syn -m limit --limit 5/second -j ACCEPT
```
## 5. 参考资料
- https://wiki.archlinux.org/index.php/iptables_(%E7%AE%80%E4%BD%93%E4%B8%AD%E6%96%87)
- https://wangchujiang.com/linux-command/c/iptables.html
================================================
FILE: docs/linux/ops/network-ops.md
================================================
# Linux 典型运维应用
> 💡 如果没有特殊说明,本文的案例都是针对 Centos 发行版本。
## 网络操作
### 无法访问外网域名
(1)在 hosts 中添加本机实际 IP 和本机实际域名的映射
```shell
echo "192.168.0.1 hostname" >> /etc/hosts
```
如果不知道本机域名,使用 `hostname` 命令查一下;如果不知道本机实际 IP,使用 `ifconfig` 查一下。
(2)配置信赖的 DNS 服务器
执行 `vi /etc/resolv.conf` ,添加以下内容:
```shell
nameserver 114.114.114.114
nameserver 8.8.8.8
```
> 114.114.114.114 是国内老牌 DNS
>
> 8.8.8.8 是 Google DNS
>
> :point_right: 参考:[公共 DNS 哪家强](https://www.zhihu.com/question/32229915)
(3)测试一下能否 ping 通 www.baidu.com
### 配置网卡
使用 root 权限编辑 `/etc/sysconfig/network-scripts/ifcfg-eno16777736X` 文件
参考以下进行配置:
```properties
TYPE=Ethernet # 网络类型:Ethernet以太网
BOOTPROTO=none # 引导协议:自动获取、static静态、none不指定
DEFROUTE=yes # 启动默认路由
IPV4_FAILURE_FATAL=no # 不启用IPV4错误检测功能
IPV6INIT=yes # 启用IPV6协议
IPV6_AUTOCONF=yes # 自动配置IPV6地址
IPV6_DEFROUTE=yes # 启用IPV6默认路由
IPV6_FAILURE_FATAL=no # 不启用IPV6错误检测功能
IPV6_PEERDNS=yes
IPV6_PEERROUTES=yes
IPV6_PRIVACY="no"
NAME=eno16777736 # 网卡设备的别名(需要和文件名同名)
UUID=90528772-9967-46da-b401-f82b64b4acbc # 网卡设备的UUID唯一标识号
DEVICE=eno16777736 # 网卡的设备名称
ONBOOT=yes # 开机自动激活网卡
IPADDR=192.168.1.199 # 网卡的固定IP地址
PREFIX=24 # 子网掩码
GATEWAY=192.168.1.1 # 默认网关IP地址
DNS1=8.8.8.8 # DNS域名解析服务器的IP地址
```
修改完后,执行 `systemctl restart network.service` 重启网卡服务。
## 系统维护
## 自动化脚本
### Linux 开机自启动脚本
(1)在 `/etc/rc.local` 文件中添加命令
如果不想将脚本粘来粘去,或创建链接,可以在 `/etc/rc.local` 文件中添加启动命令
1. 先修改好脚本,使其所有模块都能在任意目录启动时正常执行;
2. 再在 `/etc/rc.local` 的末尾添加一行以绝对路径启动脚本的行;
例:
执行 `vim /etc/rc.local` 命令,输入以下内容:
```shell
#!/bin/sh
#
# This script will be executed *after* all the other init scripts.
# You can put your own initialization stuff in here if you don't
# want to do the full Sys V style init stuff.
touch /var/lock/subsys/local
/opt/pjt_test/test.pl
```
(2)在 `/etc/rc.d/init.d` 目录下添加自启动脚本
Linux 在 `/etc/rc.d/init.d` 下有很多的文件,每个文件都是可以看到内容的,其实都是一些 shell 脚本或者可执行二进制文件。
Linux 开机的时候,会加载运行 `/etc/rc.d/init.d` 目录下的程序,因此我们可以把想要自动运行的脚本放到这个目录下即可。系统服务的启动就是通过这种方式实现的。
(3)运行级别设置
简单的说,运行级就是操作系统当前正在运行的功能级别。
```shell
不同的运行级定义如下:
# 0 - 停机(千万不能把initdefault 设置为0 )
# 1 - 单用户模式 进入方法#init s = init 1
# 2 - 多用户,没有 NFS
# 3 - 完全多用户模式(标准的运行级)
# 4 - 没有用到
# 5 - X11 多用户图形模式(xwindow)
# 6 - 重新启动 (千万不要把initdefault 设置为6 )
```
这些级别在 `/etc/inittab` 文件里指定,这个文件是 init 程序寻找的主要文件,最先运行的服务是放在/etc/rc.d 目录下的文件。
在 `/etc` 目录下面有这么几个目录值得注意:rcS.d rc0.d rc1.d ... rc6.d (0,1... 6 代表启动级别 0 代表停止,1 代表单用户模式,2-5 代表多用户模式,6 代表重启) 它们的作用就相当于 redhat 下的 rc.d ,你可以把脚本放到 rcS.d,然后修改文件名,给它一个启动序号,如: S88mysql
不过,最好的办法是放到相应的启动级别下面。具体作法:
(1)先把脚本 mysql 放到 /etc/init.d 目录下
(2)查看当前系统的启动级别
```shell
$ runlevel
N 3
```
(3)设定启动级别
```shell
# 98 为启动序号
# 2 是系统的运行级别,可自己调整,注意不要忘了结尾的句点
$ update-rc.d mysql start 98 2 .
```
现在我们到 /etc/rc2.d 下,就多了一个 S98mysql 这样的符号链接。
(4)重启系统,验证设置是否有效。
(5)移除符号链接
当你需要移除这个符号连接时,方法有三种:
1. 直接到 `/etc/rc2.d` 下删掉相应的链接,当然不是最好的方法;
2. 推荐做法:`update-rc.d -f s10 remove`
3. 如果 update-rc.d 命令你不熟悉,还可以试试看 rcconf 这个命令,也很方便。
> :point_right: 参考:
>
> - [linux 添加开机自启动脚本示例详解](https://blog.csdn.net/linuxshine/article/details/50717272)
> - [linux 设置开机自启动](https://www.cnblogs.com/ssooking/p/6094740.html)
### 定时执行脚本
## 配置
### 设置 Linux 启动模式
1. 停机(记得不要把 initdefault 配置为 0,因为这样会使 Linux 不能启动)
2. 单用户模式,就像 Win9X 下的安全模式
3. 多用户,但是没有 NFS
4. 完全多用户模式,准则的运行级
5. 通常不用,在一些特殊情况下可以用它来做一些事情
6. X11,即进到 X-Window 系统
7. 重新启动 (记得不要把 initdefault 配置为 6,因为这样会使 Linux 不断地重新启动)
设置方法:
```shell
sed -i 's/id:5:initdefault:/id:3:initdefault:/' /etc/inittab
```
## 参考资料
- [CentOS7 使用 firewalld 打开关闭防火墙与端口](https://www.cnblogs.com/moxiaoan/p/5683743.html)
- [linux 定时执行脚本](https://blog.csdn.net/z_yong_cool/article/details/79288397)
================================================
FILE: docs/linux/ops/ntp.md
================================================
# 时间服务器 - NTP
## 一、NTP 简介
网络时间协议(英语:Network Time Protocol,缩写:NTP)是在数据网络潜伏时间可变的计算机系统之间通过分组交换进行时钟同步的一个网络协议,位于 OSI 模型的应用层。自 1985 年以来,NTP 是目前仍在使用的最古老的互联网协议之一。NTP 由特拉华大学的 David L. Mills(英语:David L. Mills)设计。
**NTP 意图将所有参与计算机的协调世界时(UTC)时间同步到几毫秒的误差内**。
NTP 要点:
- 地球共有 24 个时区,而以格林威治时间 (GMT) 为标准时间;
- 中国本地时间为 GMT +8 小时;
- 最准确的时间为使用原子钟 (Atomic clock) 所计算的,例如 UTC (Coordinated Universal Time) 就是一例;
- Linux 系统本来就有两种时间,一种是 Linux 以 `1970/01/01` 开始计数的系统时间,一种则是 BIOS 记载的硬件时间;
- Linux 可以透过网络校时,最常见的网络校时为使用 NTP 服务器,这个服务启动在 `udp port 123`;
- 时区档案主要放置于 `/usr/share/zoneinfo/` 目录下,而本地时区则参考 `/etc/localtime`;
- NTP 服务器为一种阶层式的服务,所以 NTP 服务器本来就会与上层时间服务器作时间的同步化, 因此 `nptd` 与 `ntpdate` 两个指令不可同时使用;
- NTP 服务器的联机状态可以使用 `ntpstat` 及 `ntpq -p` 来查询;
- NTP 提供的客户端软件为 `ntpdate` 这个指令;
- 在 Linux 下想要手动处理时间时,需以 `date` 设定时间后,以 `hwclock -w` 来写入 BIOS 所记录的时间。
- NTP 服务器之间的时间误差不可超过 1000 秒,否则 NTP 服务会自动关闭。
> 更多 NTP 详情可以参考:[鸟哥的 Linux 私房菜-- NTP 时间服务器](http://cn.linux.vbird.org/linux_server/0440ntp.php)
## 二、ntpd 服务
> 环境:CentOS
### yum 安装
CentOS 安装 NTP 很简单,执行以下命令即可:
```shell
yum -y install ntp
```
### ntpd 配置
ntp 的配置文件路径为: `/etc/ntp.conf` ,参考配置:
```shell
# 1. 先处理权限方面的问题,包括放行上层服务器以及开放区网用户来源:
# restrict default kod nomodify notrap nopeer noquery # 拒绝 IPv4 的用户
# restrict -6 default kod nomodify notrap nopeer noquery # 拒绝 IPv6 的用户
restrict default nomodify notrap nopeer noquery
#restrict 192.168.100.0 mask 255.255.255.0 nomodify # 放行同局域网来源(根据网关和子网掩码决定)
restrict 127.0.0.1 # 默认值,放行本机 IPv4 来源
restrict ::1 # 默认值,放行本机 IPv6 来源
# 2. 设定 NTP 主机来源
# 注释掉默认 NTP 来源
# server 0.centos.pool.ntp.org iburst
# server 1.centos.pool.ntp.org iburst
# server 2.centos.pool.ntp.org iburst
# server 3.centos.pool.ntp.org iburst
# 设置国内 NTP 来源
server cn.pool.ntp.org prefer # 以这个主机为优先
server ntp1.aliyun.com
server ntp.sjtu.edu.cn
# 3. 预设时间差异分析档案与暂不用到的 keys 等,不需要更改它:
driftfile /var/lib/ntp/drift
keys /etc/ntp/keys
includefile /etc/ntp/crypto/pw
```
> 注意:如果更改配置,必须重启 NTP 服务(`systemctl restart ntpd`)才能生效。
### 放开防火墙限制
NTP 服务的端口是 `123`,使用的是 udp 协议,所以 NTP 服务器的防火墙必须对外开放 udp 123 这个端口。
如果防火墙使用 **`iptables`**,执行以下命令:
```shell
iptables -A INPUT -p UDP -i eth0 -s 192.168.0.0/24 --dport 123 -j ACCEPT
```
如果防火墙使用 **`firewalld`**,执行以下命令:
```shell
firewall-cmd --zone=public --add-port=123/udp --permanent
```
### ntpd 服务命令
```shell
systemctl enable ntpd.service # 开启服务(开机自动启动服务)
systemctl disable ntpd.service # 关闭服务(开机不会自动启动服务)
systemctl start ntpd.service # 启动服务
systemctl stop ntpd.service # 停止服务
systemctl restart ntpd.service # 重启服务
systemctl reload ntpd.service # 重新载入配置
systemctl status ntpd.service # 查看服务状态
```
### 查看 ntp 服务状态
#### 验证 NTP 服务正常工作
执行 `ntpstat` 可以查看 ntp 服务器有无和上层 ntp 连通,,如果成功,可以看到类似以下的内容:
```shell
$ ntpstat
synchronised to NTP server (5.79.108.34) at stratum 3
time correct to within 1129 ms
polling server every 64 s
```
#### 查看 ntp 服务器与上层 ntp 的状态
```shell
ntpq -p
remote refid st t when poll reach delay offset jitter
==============================================================================
*ntp1.ams1.nl.le 130.133.1.10 2 u 36 64 367 230.801 5.271 2.791
120.25.115.20 10.137.53.7 2 u 33 64 377 25.930 15.908 3.168
time.cloudflare 10.21.8.251 3 u 31 64 367 251.109 16.976 3.264
```
## 三、ntpdate 命令
> 注意:NTP 服务器为一种阶层式的服务,所以 NTP 服务器本来就会与上层时间服务器作时间的同步化, 因此 `nptd` 与 `ntpdate` 两个指令不可同时使用。
### 手动执行时间同步
`ntpdate` 命令是 NTP 的客户端软件,它可以用于请求时间同步。
语法:
```shell
/usr/sbin/ntpdate
```
`ntp_server` 可以从 [国内 NTP 服务器](#国内 NTP 服务器) 中选择。
示例:
```shell
$ ntpdate cn.pool.ntp.org
11 Feb 10:47:12 ntpdate[30423]: step time server 84.16.73.33 offset -49.894774 sec
```
### 自动定时同步时间
如果需要自动定时同步时间,可以利用 [Crontab](#crontab) 工具。本质就是用 crontab 定时执行一次手动时间同步命令 ntp。
示例:执行如下命令,就可以在每天凌晨 3 点同步系统时间:
```shell
echo "0 3 * * * /usr/sbin/ntpdate cn.pool.ntp.org" >> /etc/crontab # 修改 crond 服务配置
systemctl restart crond # 重启 crond 服务以生效
```
## 四、国内 NTP 服务器
以下 NTP 服务器搜集自网络:
```shell
cn.pool.ntp.org # 最常用的国内NTP服务器,参考:https://www.ntppool.org/zh/use.html
cn.ntp.org.cn # 中国
edu.ntp.org.cn # 中国教育网
ntp1.aliyun.com # 阿里云
ntp2.aliyun.com # 阿里云
ntp.sjtu.edu.cn # 上海交通大学
s1a.time.edu.cn # 北京邮电大学
s1b.time.edu.cn # 清华大学
s1c.time.edu.cn # 北京大学
s1d.time.edu.cn # 东南大学
s1e.time.edu.cn # 清华大学
s2a.time.edu.cn # 清华大学
s2b.time.edu.cn # 清华大学
s2c.time.edu.cn # 北京邮电大学
s2d.time.edu.cn # 西南地区网络中心
s2e.time.edu.cn # 西北地区网络中心
s2f.time.edu.cn # 东北地区网络中心
s2g.time.edu.cn # 华东南地区网络中心
s2h.time.edu.cn # 四川大学网络管理中心
s2j.time.edu.cn # 大连理工大学网络中心
s2k.time.edu.cn # CERNET桂林主节点
```
## 参考资料
- [鸟哥的 Linux 私房菜-- NTP 时间服务器](http://cn.linux.vbird.org/linux_server/0440ntp.php)
- [Linux 配置 ntp 时间服务器](https://www.cnblogs.com/quchunhui/p/7658853.html)
================================================
FILE: docs/linux/ops/samba.md
================================================
# Samba 应用
> samba 是在 Linux 和 UNIX 系统上实现 SMB 协议的一个免费软件。
>
> samba 提供了在不同计算机(即使操作系统不同)上共享服务的能力。
>
> 关键词:`samba`, `selinux`
## 1. 安装配置 samba
本文将以一个完整的示例来展示如何配置 samba 来实现 Linux 和 Windows 的文件共享。
目标:假设希望共享 Linux 服务器上的 /share/fs 目录。
### 1.1. 查看是否已经安装 samba
- CentOS:`rpm -qa | grep samba`
- Ubuntu:`dpkg -l | grep samba`
### 1.2. 安装 samba 工具
- CentOS:`yum install -y samba samba-client samba-common`
- Ubuntu:`sudo apt-get install -y samba samba-client`
### 1.3. 配置 samba
samba 服务的配置文件是 `/etc/samba/smb.conf`,如果没有则 samba 无法启动。
执行以下命令,编辑配置文件:
```bash
vim /etc/samba/smb.conf
```
修改配置如下:
```ini
[global]
workgroup = SAMBA
security = user
passdb backend = tdbsam
printing = cups
printcap name = cups
load printers = yes
cups options = raw
[homes]
comment = Home Directories
valid users = %S, %D%w%S
browseable = No
read only = No
inherit acls = Yes
[printers]
comment = All Printers
path = /var/tmp
printable = Yes
create mask = 0600
browseable = No
[print$]
comment = Printer Drivers
path = /var/lib/samba/drivers
write list = @printadmin root
force group = @printadmin
create mask = 0664
directory mask = 0775
[fs]
comment = share folder
path = /share/fs
browseable = yes
writable = yes
read only = no
guest ok = yes
create mask = 0777
directory mask = 0777
public = yes
valid users = root
```
> 说明:
>
> - 我在这里添加了一个 **[fs]** 标签,这就是共享区域的配置。
> - 这里设置 `path` 属性为 `/share/fs`,意味着准备共享 `/share/fs` 目录,需要根据实际需要设置路径。`/share/fs` 目录的权限要设置为 **777**:`chmod 777 /share/fs`。
> - `browseable`、`writable` 等属性就比较容易理解了,即配置共享目录的访问权限。
> - `valid users` 属性指定允许访问的用户,需要注意的是指定的用户必须是 Linux 机器上实际存在的用户。
### 1.4. 创建 samba 用户
创建的 samba 用户必须是 Linux 机器上实际存在的用户。
```bash
$ sudo smbpasswd -a root
New SMB password:
Retype new SMB password:
Added user root.
```
根据提示输入 samba 用户的密码。当 samba 服务成功安装、启动后,通过 Windows 系统访问机器共享目录时,就要输入这里配置的用户名、密码。
- 查看 samba 服务器中已拥有哪些用户 - `pdbedit -L`
- 删除 samba 服务中的某个用户 - `smbpasswd -x 用户名`
### 1.5. 启动 samba 服务
CentOS 6
```bash
$ sudo service samba restart # 重启 samba
$ sudo service smb restart # 重启 samba
```
CentOS 7
```bash
$ sudo systemctl start smb.service # 启动 samba
$ sudo systemctl restart smb.service # 重启 samba
$ sudo systemctl enable smb.service # 设置开机自动启动
$ sudo systemctl status smb.service # 查询 samba 状态
```
Ubuntu 16.04.3
```
$ sudo service smbd restart
```
### 1.6. 为 samba 添加防火墙规则
```
$ sudo firewall-cmd --permanent --zone=public --add-service=samba
$ sudo firewall-cmd --reload
```
### 1.7. 测试 samba 服务
```
$ smbclient //localhost/fs -U root
```
输入 samba 用户的密码,如果成功,就会进入 `smb: \>`。
### 1.8. 访问 samba 服务共享的目录
Windows:
访问:`\\<你的ip>\<你的共享路径>` :
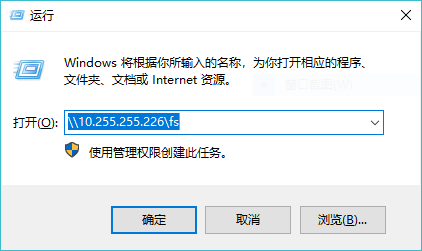
Mac:
与 Windows 类似,直接在 Finder 中访问 `smb://<你的ip>/<你的共享路径>` 即可。
## 2. 配置详解
### 2.1. samba 默认配置
你可以从 [这里](https://git.samba.org/samba.git/?p=samba.git;a=blob_plain;f=examples/smb.conf.default;hb=HEAD) 获取到默认配置文件:
```
$ cp /etc/samba/smb.conf /etc/samba/smb.conf.bak
$ wget "https://git.samba.org/samba.git/?p=samba.git;a=blob_plain;f=examples/smb.conf.default;hb=HEAD" -O /etc/samba/smb.conf
```
smb.conf 默认内容如下:
```ini
[global]
workgroup = SAMBA
security = user
passdb backend = tdbsam
printing = cups
printcap name = cups
load printers = yes
cups options = raw
[homes]
comment = Home Directories
valid users = %S, %D%w%S
browseable = No
read only = No
inherit acls = Yes
[printers]
comment = All Printers
path = /var/tmp
printable = Yes
create mask = 0600
browseable = No
[print$]
comment = Printer Drivers
path = /var/lib/samba/drivers
write list = root
create mask = 0664
directory mask = 0775
```
### 2.2. 全局参数 [global]
```ini
[global]
config file = /usr/local/samba/lib/smb.conf.%m
说明:config file可以让你使用另一个配置文件来覆盖缺省的配置文件。如果文件 不存在,则该项无效。这个参数很有用,可以使得samba配置更灵活,可以让一台samba服务器模拟多台不同配置的服务器。比如,你想让PC1(主机名)这台电脑在访问Samba Server时使用它自己的配置文件,那么先在/etc/samba/host/下为PC1配置一个名为smb.conf.pc1的文件,然后在smb.conf中加入:config file=/etc/samba/host/smb.conf.%m。这样当PC1请求连接Samba Server时,smb.conf.%m就被替换成smb.conf.pc1。这样,对于PC1来说,它所使用的Samba服务就是由smb.conf.pc1定义的,而其他机器访问Samba Server则还是应用smb.conf。
workgroup = WORKGROUP
说明:设定 Samba Server 所要加入的工作组或者域。
server string = Samba Server Version %v
说明:设定 Samba Server 的注释,可以是任何字符串,也可以不填。宏%v表示显示Samba的版本号。
netbios name = smbserver
说明:设置Samba Server的NetBIOS名称。如果不填,则默认会使用该服务器的DNS名称的第一部分。netbios name和workgroup名字不要设置成一样了。
interfaces = lo eth0 192.168.12.2/24 192.168.13.2/24
说明:设置Samba Server监听哪些网卡,可以写网卡名,也可以写该网卡的IP地址。
hosts allow = 127.192.168.1 192.168.10.1
说明:表示允许连接到Samba Server的客户端,多个参数以空格隔开。可以用一个IP表示,也可以用一个网段表示。hosts deny 与hosts allow 刚好相反。
例如:
# 表示容许来自172.17.2.*.*的主机连接,但排除172.17.2.50
hosts allow=172.17.2.EXCEPT172.17.2.50
# 表示容许来自172.17.2.0/255.255.0.0子网中的所有主机连接
hosts allow=172.17.2.0/255.255.0.0
# 表示容许来自M1和M2两台计算机连接
hosts allow=M1,M2
# 表示容许来自SC域的所有计算机连接
hosts allow=@SC
max connections = 0
说明:max connections用来指定连接Samba Server的最大连接数目。如果超出连接数目,则新的连接请求将被拒绝。0表示不限制。
deadtime = 0
说明:deadtime用来设置断掉一个没有打开任何文件的连接的时间。单位是分钟,0代表Samba Server不自动切断任何连接。
time server = yes/no
说明:time server用来设置让nmdb成为windows客户端的时间服务器。
log file = /var/log/samba/log.%m
说明:设置Samba Server日志文件的存储位置以及日志文件名称。在文件名后加个宏%m(主机名),表示对每台访问Samba Server的机器都单独记录一个日志文件。如果pc1、pc2访问过Samba Server,就会在/var/log/samba目录下留下log.pc1和log.pc2两个日志文件。
max log size = 50
说明:设置Samba Server日志文件的最大容量,单位为kB,0代表不限制。
security = user
说明:设置用户访问Samba Server的验证方式,一共有四种验证方式。
1. share:用户访问Samba Server不需要提供用户名和口令, 安全性能较低。
2. user:Samba Server共享目录只能被授权的用户访问,由Samba Server负责检查账号和密码的正确性。账号和密码要在本Samba Server中建立。
3. server:依靠其他Windows NT/2000或Samba Server来验证用户的账号和密码,是一种代理验证。此种安全模式下,系统管理员可以把所有的Windows用户和口令集中到一个NT系统上,使用Windows NT进行Samba认证, 远程服务器可以自动认证全部用户和口令,如果认证失败,Samba将使用用户级安全模式作为替代的方式。
4. domain:域安全级别,使用主域控制器(PDC)来完成认证。
passdb backend = tdbsam
说明:passdb backend就是用户后台的意思。目前有三种后台:smbpasswd、tdbsam和ldapsam。sam应该是security account manager(安全账户管理)的简写。
smbpasswd:该方式是使用smb自己的工具smbpasswd来给系统用户(真实
用户或者虚拟用户)设置一个Samba密码,客户端就用这个密码来访问Samba的资源。
1. smbpasswd文件默认在/etc/samba目录下,不过有时候要手工建立该文件。
2. tdbsam:该方式则是使用一个数据库文件来建立用户数据库。数据库文件叫passdb.tdb,默认在/etc/samba目录下。passdb.tdb用户数据库可以使用smbpasswd –a来建立Samba用户,不过要建立的Samba用户必须先是系统用户。我们也可以使用pdbedit命令来建立Samba账户。pdbedit命令的参数很多,我们列出几个主要的。
pdbedit –a username:新建Samba账户。
pdbedit –x username:删除Samba账户。
pdbedit –L:列出Samba用户列表,读取passdb.tdb数据库文件。
pdbedit –Lv:列出Samba用户列表的详细信息。
pdbedit –c “[D]” –u username:暂停该Samba用户的账号。
pdbedit –c “[]” –u username:恢复该Samba用户的账号。
3. ldapsam:该方式则是基于LDAP的账户管理方式来验证用户。首先要建立LDAP服务,然后设置“passdb backend = ldapsam:ldap://LDAP Server”
encrypt passwords = yes/no
说明:是否将认证密码加密。因为现在windows操作系统都是使用加密密码,所以一般要开启此项。不过配置文件默认已开启。
smb passwd file = /etc/samba/smbpasswd
说明:用来定义samba用户的密码文件。smbpasswd文件如果没有那就要手工新建。
username map = /etc/samba/smbusers
说明:用来定义用户名映射,比如可以将root换成administrator、admin等。不过要事先在smbusers文件中定义好。比如:root = administrator admin,这样就可以用administrator或admin这两个用户来代替root登陆Samba Server,更贴近windows用户的习惯。
guest account = nobody
说明:用来设置guest用户名。
socket options = TCP_NODELAY SO_RCVBUF=8192 SO_SNDBUF=8192
说明:用来设置服务器和客户端之间会话的Socket选项,可以优化传输速度。
domain master = yes/no
说明:设置Samba服务器是否要成为网域主浏览器,网域主浏览器可以管理跨子网域的浏览服务。
local master = yes/no
说明:local master用来指定Samba Server是否试图成为本地网域主浏览器。如果设为no,则永远不会成为本地网域主浏览器。但是即使设置为yes,也不等于该Samba Server就能成为主浏览器,还需要参加选举。
preferred master = yes/no
说明:设置Samba Server一开机就强迫进行主浏览器选举,可以提高Samba Server成为本地网域主浏览器的机会。如果该参数指定为yes时,最好把domain master也指定为yes。使用该参数时要注意:如果在本Samba Server所在的子网有其他的机器(不论是windows NT还是其他Samba Server)也指定为首要主浏览器时,那么这些机器将会因为争夺主浏览器而在网络上大发广播,影响网络性能。如果同一个区域内有多台Samba Server,将上面三个参数设定在一台即可。
os level = 200
说明:设置samba服务器的os level。该参数决定Samba Server是否有机会成为本地网域的主浏览器。os level从0到255,winNT的os level是32,win95/98的os level是1。Windows 2000的os level是64。如果设置为0,则意味着Samba Server将失去浏览选择。如果想让Samba Server成为PDC,那么将它的os level值设大些。
domain logons = yes/no
说明:设置Samba Server是否要做为本地域控制器。主域控制器和备份域控制器都需要开启此项。
logon . = %u.bat
说明:当使用者用windows客户端登陆,那么Samba将提供一个登陆档。如果设置成%u.bat,那么就要为每个用户提供一个登陆档。如果人比较多,那就比较麻烦。可以设置成一个具体的文件名,比如start.bat,那么用户登陆后都会去执行start.bat,而不用为每个用户设定一个登陆档了。这个文件要放置在[netlogon]的path设置的目录路径下。
wins support = yes/no
说明:设置samba服务器是否提供wins服务。
wins server = wins服务器IP地址
说明:设置Samba Server是否使用别的wins服务器提供wins服务。
wins proxy = yes/no
说明:设置Samba Server是否开启wins代理服务。
dns proxy = yes/no
说明:设置Samba Server是否开启dns代理服务。
load printers = yes/no
说明:设置是否在启动Samba时就共享打印机。
printcap name = cups
说明:设置共享打印机的配置文件。
printing = cups
说明:设置Samba共享打印机的类型。现在支持的打印系统有:bsd, sysv, plp, lprng, aix, hpux, qnx
```
### 2.3. 共享参数 [共享名]
```ini
[共享名]
comment = 任意字符串
说明:comment是对该共享的描述,可以是任意字符串。
path = 共享目录路径
说明:path用来指定共享目录的路径。可以用%u、%m这样的宏来代替路径里的unix用户和客户机的Netbios名,用宏表示主要用于[homes]共享域。例如:如果我们不打算用home段做为客户的共享,而是在/home/share/下为每个Linux用户以他的用户名建个目录,作为他的共享目录,这样path就可以写成:path = /home/share/%u; 。用户在连接到这共享时具体的路径会被他的用户名代替,要注意这个用户名路径一定要存在,否则,客户机在访问时会找不到网络路径。同样,如果我们不是以用户来划分目录,而是以客户机来划分目录,为网络上每台可以访问samba的机器都各自建个以它的netbios名的路径,作为不同机器的共享资源,就可以这样写:path = /home/share/%m 。
browseable = yes/no
说明:browseable用来指定该共享是否可以浏览。
writable = yes/no
说明:writable用来指定该共享路径是否可写。
available = yes/no
说明:available用来指定该共享资源是否可用。
admin users = 该共享的管理者
说明:admin users用来指定该共享的管理员(对该共享具有完全控制权限)。在samba 3.0中,如果用户验证方式设置成“security=share”时,此项无效。
例如:admin users =bobyuan,jane(多个用户中间用逗号隔开)。
valid users = 允许访问该共享的用户
说明:valid users用来指定允许访问该共享资源的用户。
例如:valid users = bobyuan,@bob,@tech(多个用户或者组中间用逗号隔开,如果要加入一个组就用“@+组名”表示。)
invalid users = 禁止访问该共享的用户
说明:invalid users用来指定不允许访问该共享资源的用户。
例如:invalid users = root,@bob(多个用户或者组中间用逗号隔开。)
write list = 允许写入该共享的用户
说明:write list用来指定可以在该共享下写入文件的用户。
例如:write list = bobyuan,@bob
public = yes/no
说明:public用来指定该共享是否允许guest账户访问。
guest ok = yes/no
说明:意义同“public”。
几个特殊共享:
[homes]
comment = Home Directories
browseable = no
writable = yes
valid users = %S
; valid users = MYDOMAIN\%S
[printers]
comment = All Printers
path = /var/spool/samba
browseable = no
guest ok = no
writable = no
printable = yes
[netlogon]
comment = Network Logon Service
path = /var/lib/samba/netlogon
guest ok = yes
writable = no
share modes = no
[Profiles]
path = /var/lib/samba/profiles
browseable = no
guest ok = yes
```
## 3. 常见问题
### 3.1. 你可能没有权限访问网络资源
问题现象:
- 出现 **NT_STATUS_ACCESS_DENIED** 错误
- Windows 下成功登陆 samba 后,点击共享目录仍然提示——你可能没有权限访问网络资源。
解决步骤:
1. 检查是否配置了防火墙规则
```bash
# 一种方法是强行关闭防火墙
$ sudo service iptables stop
# 另一种方法是配置防火墙规则
$ sudo firewall-cmd --permanent --zone=public --add-service=samba
$ sudo firewall-cmd --reload
```
2. 关闭 selinux
```bash
# 将 /etc/selinux/config 文件中的 SELINUX 设为 disabled
$ sed -i 's/SELINUX=enforcing/SELINUX=disabled/' /etc/selinux/config
# 重启生效
$ reboot
```
### 3.2. window 下对 samba 的清理操作
1. windows 清除访问 samba 局域网密码缓存
- 在 dos 窗口中输入 `control userpasswords2` 或者 `control keymgr.dll`,然后【高级】/【密码管理】,删掉保存的该机器密码。
2. windows 清除连接的 linux 的 samba 服务缓存
1. 打开 win 的命令行。
2. 输入 net use,就会打印出当前缓存的连接上列表。
3. 根据列表,一个个删除连接: net use 远程连接名称 /del;或者一次性全部删除:`net use * /del`。
## 4. 参考资料
- http://blog.51cto.com/yuanbin/115761
- https://www.jianshu.com/p/750be209a6f0
- https://github.com/judasn/Linux-Tutorial/blob/master/markdown-file/Samba.md
- https://blog.csdn.net/lan120576664/article/details/50396511
================================================
FILE: docs/linux/ops/systemd.md
================================================
# Systemd 应用
> 搬运自:[Systemd 入门教程:命令篇](http://www.ruanyifeng.com/blog/2016/03/systemd-tutorial-commands.html)、[Systemd 入门教程:实战篇](hhttp://www.ruanyifeng.com/blog/2016/03/systemd-tutorial-part-two.html)
Systemd 是 Linux 系统工具,用来启动[守护进程](http://www.ruanyifeng.com/blog/2016/02/linux-daemon.html),已成为大多数发行版的标准配置。
本文介绍它的基本用法,分为上下两篇。今天介绍它的主要命令,[下一篇](http://www.ruanyifeng.com/blog/2016/03/systemd-tutorial-part-two.html)介绍如何用于实战。
## 1. 由来
历史上,[Linux 的启动](http://www.ruanyifeng.com/blog/2013/08/linux_boot_process.html)一直采用[`init`](https://en.wikipedia.org/wiki/Init)进程。
下面的命令用来启动服务。
```bash
$ sudo /etc/init.d/apache2 start
# 或者
$ service apache2 start
```
这种方法有两个缺点。
一是启动时间长。`init`进程是串行启动,只有前一个进程启动完,才会启动下一个进程。
二是启动脚本复杂。`init`进程只是执行启动脚本,不管其他事情。脚本需要自己处理各种
情况,这往往使得脚本变得很长。
## 2. Systemd 概述
Systemd 就是为了解决这些问题而诞生的。它的设计目标是,为系统的启动和管理提供一套
完整的解决方案。
根据 Linux 惯例,字母`d`是守护进程(daemon)的缩写。 Systemd 这个名字的含义,就
是它要守护整个系统。
使用了 Systemd,就不需要再用`init`了。Systemd 取代了`initd`,成为系统的第一个进
程(PID 等于 1),其他进程都是它的子进程。
```bash
$ systemctl --version
```
上面的命令查看 Systemd 的版本。
Systemd 的优点是功能强大,使用方便,缺点是体系庞大,非常复杂。事实上,现在还有很
多人反对使用 Systemd,理由就是它过于复杂,与操作系统的其他部分强耦合,违反"keep
simple, keep stupid"
的[Unix 哲学](http://www.ruanyifeng.com/blog/2009/06/unix_philosophy.html)。
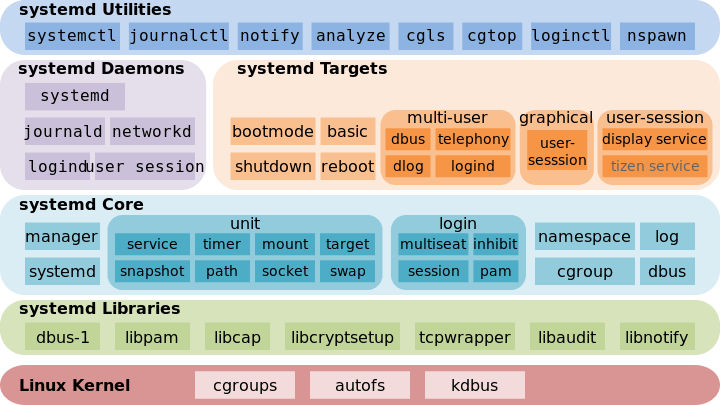
(上图为 Systemd 架构图)
## 3. 系统管理
Systemd 并不是一个命令,而是一组命令,涉及到系统管理的方方面面。
### 3.1. systemctl
`systemctl`是 Systemd 的主命令,用于管理系统。
```bash
# 重启系统
$ sudo systemctl reboot
# 关闭系统,切断电源
$ sudo systemctl poweroff
# CPU停止工作
$ sudo systemctl halt
# 暂停系统
$ sudo systemctl suspend
# 让系统进入冬眠状态
$ sudo systemctl hibernate
# 让系统进入交互式休眠状态
$ sudo systemctl hybrid-sleep
# 启动进入救援状态(单用户状态)
$ sudo systemctl rescue
```
### 3.2. systemd-analyze
`systemd-analyze`命令用于查看启动耗时。
```bash
# 查看启动耗时
$ systemd-analyze
# 查看每个服务的启动耗时
$ systemd-analyze blame
# 显示瀑布状的启动过程流
$ systemd-analyze critical-chain
# 显示指定服务的启动流
$ systemd-analyze critical-chain atd.service
```
### 3.3. hostnamectl
`hostnamectl`命令用于查看当前主机的信息。
```bash
# 显示当前主机的信息
$ hostnamectl
# 设置主机名。
$ sudo hostnamectl set-hostname rhel7
```
### 3.4. localectl
`localectl`命令用于查看本地化设置。
```bash
# 查看本地化设置
$ localectl
# 设置本地化参数。
$ sudo localectl set-locale LANG=en_GB.utf8
$ sudo localectl set-keymap en_GB
```
### 3.5. timedatectl
`timedatectl`命令用于查看当前时区设置。
```bash
# 查看当前时区设置
$ timedatectl
# 显示所有可用的时区
$ timedatectl list-timezones
# 设置当前时区
$ sudo timedatectl set-timezone America/New_York
$ sudo timedatectl set-time YYYY-MM-DD
$ sudo timedatectl set-time HH:MM:SS
```
### 3.6. loginctl
`loginctl`命令用于查看当前登录的用户。
```bash
# 列出当前session
$ loginctl list-sessions
# 列出当前登录用户
$ loginctl list-users
# 列出显示指定用户的信息
$ loginctl show-user ruanyf
```
## 4. Unit
### 4.1. 含义
Systemd 可以管理所有系统资源。不同的资源统称为 Unit(单位)。
Unit 一共分成 12 种。
- Service unit:系统服务
- Target unit:多个 Unit 构成的一个组
- Device Unit:硬件设备
- Mount Unit:文件系统的挂载点
- Automount Unit:自动挂载点
- Path Unit:文件或路径
- Scope Unit:不是由 Systemd 启动的外部进程
- Slice Unit:进程组
- Snapshot Unit:Systemd 快照,可以切回某个快照
- Socket Unit:进程间通信的 socket
- Swap Unit:swap 文件
- Timer Unit:定时器
`systemctl list-units`命令可以查看当前系统的所有 Unit 。
```bash
# 列出正在运行的 Unit
$ systemctl list-units
# 列出所有Unit,包括没有找到配置文件的或者启动失败的
$ systemctl list-units --all
# 列出所有没有运行的 Unit
$ systemctl list-units --all --state=inactive
# 列出所有加载失败的 Unit
$ systemctl list-units --failed
# 列出所有正在运行的、类型为 service 的 Unit
$ systemctl list-units --type=service
```
### 4.2. Unit 的状态
`systemctl status`命令用于查看系统状态和单个 Unit 的状态。
```bash
# 显示系统状态
$ systemctl status
# 显示单个 Unit 的状态
$ sysystemctl status bluetooth.service
# 显示远程主机的某个 Unit 的状态
$ systemctl -H root@rhel7.example.com status httpd.service
```
除了`status`命令,`systemctl`还提供了三个查询状态的简单方法,主要供脚本内部的判
断语句使用。
```bash
# 显示某个 Unit 是否正在运行
$ systemctl is-active application.service
# 显示某个 Unit 是否处于启动失败状态
$ systemctl is-failed application.service
# 显示某个 Unit 服务是否建立了启动链接
$ systemctl is-enabled application.service
```
### 4.3. Unit 管理
对于用户来说,最常用的是下面这些命令,用于启动和停止 Unit(主要是 service)。
```bash
# 立即启动一个服务
$ sudo systemctl start apache.service
# 立即停止一个服务
$ sudo systemctl stop apache.service
# 重启一个服务
$ sudo systemctl restart apache.service
# 杀死一个服务的所有子进程
$ sudo systemctl kill apache.service
# 重新加载一个服务的配置文件
$ sudo systemctl reload apache.service
# 重载所有修改过的配置文件
$ sudo systemctl daemon-reload
# 显示某个 Unit 的所有底层参数
$ systemctl show httpd.service
# 显示某个 Unit 的指定属性的值
$ systemctl show -p CPUShares httpd.service
# 设置某个 Unit 的指定属性
$ sudo systemctl set-property httpd.service CPUShares=500
```
### 4.4. 依赖关系
Unit 之间存在依赖关系:A 依赖于 B,就意味着 Systemd 在启动 A 的时候,同时会去启
动 B。
`systemctl list-dependencies`命令列出一个 Unit 的所有依赖。
```bash
$ systemctl list-dependencies nginx.service
```
上面命令的输出结果之中,有些依赖是 Target 类型(详见下文),默认不会展开显示。如
果要展开 Target,就需要使用`--all`参数。
```bash
$ systemctl list-dependencies --all nginx.service
```
## 5. Unit 的配置文件
### 5.1. 概述
每一个 Unit 都有一个配置文件,告诉 Systemd 怎么启动这个 Unit 。
Systemd 默认从目录`/etc/systemd/system/`读取配置文件。但是,里面存放的大部分文件
都是符号链接,指向目录`/usr/lib/systemd/system/`,真正的配置文件存放在那个目录。
`systemctl enable`命令用于在上面两个目录之间,建立符号链接关系。
```bash
$ sudo systemctl enable clamd@scan.service
# 等同于
$ sudo ln -s '/usr/lib/systemd/system/clamd@scan.service' '/etc/systemd/system/multi-user.target.wants/clamd@scan.service'
```
如果配置文件里面设置了开机启动,`systemctl enable`命令相当于激活开机启动。
与之对应的,`systemctl disable`命令用于在两个目录之间,撤销符号链接关系,相当于
撤销开机启动。
```bash
$ sudo systemctl disable clamd@scan.service
```
配置文件的后缀名,就是该 Unit 的种类,比如`sshd.socket`。如果省略,Systemd 默认
后缀名为`.service`,所以`sshd`会被理解成`sshd.service`。
### 5.2. 配置文件的状态
`systemctl list-unit-files`命令用于列出所有配置文件。
```bash
# 列出所有配置文件
$ systemctl list-unit-files
# 列出指定类型的配置文件
$ systemctl list-unit-files --type=service
```
这个命令会输出一个列表。
```bash
$ systemctl list-unit-files
UNIT FILE STATE
chronyd.service enabled
clamd@.service static
clamd@scan.service disabled
```
这个列表显示每个配置文件的状态,一共有四种。
- enabled:已建立启动链接
- disabled:没建立启动链接
- static:该配置文件没有`[Install]`部分(无法执行),只能作为其他配置文件的依赖
- masked:该配置文件被禁止建立启动链接
注意,从配置文件的状态无法看出,该 Unit 是否正在运行。这必须执行前面提到
的`systemctl status`命令。
```bash
$ systemctl status bluetooth.service
```
一旦修改配置文件,就要让 SystemD 重新加载配置文件,然后重新启动,否则修改不会生
效。
```bash
$ sudo systemctl daemon-reload
$ sudo systemctl restart httpd.service
```
### 5.3. 配置文件的格式
配置文件就是普通的文本文件,可以用文本编辑器打开。
`systemctl cat`命令可以查看配置文件的内容。
```bash
$ systemctl cat atd.service
[Unit]
Description=ATD daemon
[Service]
Type=forking
ExecStart=/usr/bin/atd
[Install]
WantedBy=multi-user.target
```
从上面的输出可以看到,配置文件分成几个区块。每个区块的第一行,是用方括号表示的区
别名,比如`[Unit]`。注意,配置文件的区块名和字段名,都是大小写敏感的。
每个区块内部是一些等号连接的键值对。
```bash
[Section]
Directive1=value
Directive2=value
. . .
```
注意,键值对的等号两侧不能有空格。
### 5.4. 配置文件的区块
`[Unit]`区块通常是配置文件的第一个区块,用来定义 Unit 的元数据,以及配置与其他
Unit 的关系。它的主要字段如下。
- `Description`:简短描述
- `Documentation`:文档地址
- `Requires`:当前 Unit 依赖的其他 Unit,如果它们没有运行,当前 Unit 会启动失败
- `Wants`:与当前 Unit 配合的其他 Unit,如果它们没有运行,当前 Unit 不会启动失败
- `BindsTo`:与`Requires`类似,它指定的 Unit 如果退出,会导致当前 Unit 停止运行
- `Before`:如果该字段指定的 Unit 也要启动,那么必须在当前 Unit 之后启动
- `After`:如果该字段指定的 Unit 也要启动,那么必须在当前 Unit 之前启动
- `Conflicts`:这里指定的 Unit 不能与当前 Unit 同时运行
- `Condition...`:当前 Unit 运行必须满足的条件,否则不会运行
- `Assert...`:当前 Unit 运行必须满足的条件,否则会报启动失败
`[Install]`通常是配置文件的最后一个区块,用来定义如何启动,以及是否开机启动。它
的主要字段如下。
- `WantedBy`:它的值是一个或多个 Target,当前 Unit 激活时(enable)符号链接会放
入`/etc/systemd/system`目录下面以 Target 名 + `.wants`后缀构成的子目录中
- `RequiredBy`:它的值是一个或多个 Target,当前 Unit 激活时,符号链接会放
入`/etc/systemd/system`目录下面以 Target 名 + `.required`后缀构成的子目录中
- `Alias`:当前 Unit 可用于启动的别名
- `Also`:当前 Unit 激活(enable)时,会被同时激活的其他 Unit
`[Service]`区块用来 Service 的配置,只有 Service 类型的 Unit 才有这个区块。它的
主要字段如下。
- `Type`:定义启动时的进程行为。它有以下几种值。
- `Type=simple`:默认值,执行`ExecStart`指定的命令,启动主进程
- `Type=forking`:以 fork 方式从父进程创建子进程,创建后父进程会立即退出
- `Type=oneshot`:一次性进程,Systemd 会等当前服务退出,再继续往下执行
- `Type=dbus`:当前服务通过 D-Bus 启动
- `Type=notify`:当前服务启动完毕,会通知`Systemd`,再继续往下执行
- `Type=idle`:若有其他任务执行完毕,当前服务才会运行
- `ExecStart`:启动当前服务的命令
- `ExecStartPre`:启动当前服务之前执行的命令
- `ExecStartPost`:启动当前服务之后执行的命令
- `ExecReload`:重启当前服务时执行的命令
- `ExecStop`:停止当前服务时执行的命令
- `ExecStopPost`:停止当其服务之后执行的命令
- `RestartSec`:自动重启当前服务间隔的秒数
- `Restart`:定义何种情况 Systemd 会自动重启当前服务,可能的值包括`always`(总是
重启)、`on-success`、`on-failure`、`on-abnormal`、`on-abort`、`on-watchdog`
- `TimeoutSec`:定义 Systemd 停止当前服务之前等待的秒数
- `Environment`:指定环境变量
Unit 配置文件的完整字段清单,请参
考[官方文档](https://www.freedesktop.org/software/systemd/man/systemd.unit.html)。
## 6. Target
启动计算机的时候,需要启动大量的 Unit。如果每一次启动,都要一一写明本次启动需要
哪些 Unit,显然非常不方便。Systemd 的解决方案就是 Target。
简单说,Target 就是一个 Unit 组,包含许多相关的 Unit 。启动某个 Target 的时候
,Systemd 就会启动里面所有的 Unit。从这个意义上说,Target 这个概念类似于"状态点
",启动某个 Target 就好比启动到某种状态。
传统的`init`启动模式里面,有 RunLevel 的概念,跟 Target 的作用很类似。不同的是
,RunLevel 是互斥的,不可能多个 RunLevel 同时启动,但是多个 Target 可以同时启动
。
```bash
# 查看当前系统的所有 Target
$ systemctl list-unit-files --type=target
# 查看一个 Target 包含的所有 Unit
$ systemctl list-dependencies multi-user.target
# 查看启动时的默认 Target
$ systemctl get-default
# 设置启动时的默认 Target
$ sudo systemctl set-default multi-user.target
# 切换 Target 时,默认不关闭前一个 Target 启动的进程,
# systemctl isolate 命令改变这种行为,
# 关闭前一个 Target 里面所有不属于后一个 Target 的进程
$ sudo systemctl isolate multi-user.target
```
Target 与 传统 RunLevel 的对应关系如下。
```bash
Traditional runlevel New target name Symbolically linked to...
Runlevel 0 | runlevel0.target -> poweroff.target
Runlevel 1 | runlevel1.target -> rescue.target
Runlevel 2 | runlevel2.target -> multi-user.target
Runlevel 3 | runlevel3.target -> multi-user.target
Runlevel 4 | runlevel4.target -> multi-user.target
Runlevel 5 | runlevel5.target -> graphical.target
Runlevel 6 | runlevel6.target -> reboot.target
```
它与`init`进程的主要差别如下。
**(1)默认的 RunLevel**(在`/etc/inittab`文件设置)现在被默认的 Target 取代,
位置是`/etc/systemd/system/default.target`,通常符号链接到`graphical.target`(
图形界面)或者`multi-user.target`(多用户命令行)。
**(2)启动脚本的位置**,以前是`/etc/init.d`目录,符号链接到不同的 RunLevel 目
录 (比如`/etc/rc3.d`、`/etc/rc5.d`等),现在则存放
在`/lib/systemd/system`和`/etc/systemd/system`目录。
**(3)配置文件的位置**,以前`init`进程的配置文件是`/etc/inittab`,各种服务的
配置文件存放在`/etc/sysconfig`目录。现在的配置文件主要存放在`/lib/systemd`目录
,在`/etc/systemd`目录里面的修改可以覆盖原始设置。
## 7. 日志管理
Systemd 统一管理所有 Unit 的启动日志。带来的好处就是,可以只用`journalctl`一个命
令,查看所有日志(内核日志和应用日志)。日志的配置文件
是`/etc/systemd/journald.conf`。
`journalctl`功能强大,用法非常多。
```bash
# 查看所有日志(默认情况下 ,只保存本次启动的日志)
$ sudo journalctl
# 查看内核日志(不显示应用日志)
$ sudo journalctl -k
# 查看系统本次启动的日志
$ sudo journalctl -b
$ sudo journalctl -b -0
# 查看上一次启动的日志(需更改设置)
$ sudo journalctl -b -1
# 查看指定时间的日志
$ sudo journalctl --since="2012-10-30 18:17:16"
$ sudo journalctl --since "20 min ago"
$ sudo journalctl --since yesterday
$ sudo journalctl --since "2015-01-10" --until "2015-01-11 03:00"
$ sudo journalctl --since 09:00 --until "1 hour ago"
# 显示尾部的最新10行日志
$ sudo journalctl -n
# 显示尾部指定行数的日志
$ sudo journalctl -n 20
# 实时滚动显示最新日志
$ sudo journalctl -f
# 查看指定服务的日志
$ sudo journalctl /usr/lib/systemd/systemd
# 查看指定进程的日志
$ sudo journalctl _PID=1
# 查看某个路径的脚本的日志
$ sudo journalctl /usr/bin/bash
# 查看指定用户的日志
$ sudo journalctl _UID=33 --since today
# 查看某个 Unit 的日志
$ sudo journalctl -u nginx.service
$ sudo journalctl -u nginx.service --since today
# 实时滚动显示某个 Unit 的最新日志
$ sudo journalctl -u nginx.service -f
# 合并显示多个 Unit 的日志
$ journalctl -u nginx.service -u php-fpm.service --since today
# 查看指定优先级(及其以上级别)的日志,共有8级
# 0: emerg
# 1: alert
# 2: crit
# 3: err
# 4: warning
# 5: notice
# 6: info
# 7: debug
$ sudo journalctl -p err -b
# 日志默认分页输出,--no-pager 改为正常的标准输出
$ sudo journalctl --no-pager
# 以 JSON 格式(单行)输出
$ sudo journalctl -b -u nginx.service -o json
# 以 JSON 格式(多行)输出,可读性更好
$ sudo journalctl -b -u nginx.serviceqq
-o json-pretty
# 显示日志占据的硬盘空间
$ sudo journalctl --disk-usage
# 指定日志文件占据的最大空间
$ sudo journalctl --vacuum-size=1G
# 指定日志文件保存多久
$ sudo journalctl --vacuum-time=1years
```
## 8. 实战
### 8.1. 开机启动
对于那些支持 Systemd 的软件,安装的时候,会自动在`/usr/lib/systemd/system`目录添
加一个配置文件。
如果你想让该软件开机启动,就执行下面的命令(以`httpd.service`为例)。
```bash
$ sudo systemctl enable httpd
```
上面的命令相当于在`/etc/systemd/system`目录添加一个符号链接,指
向`/usr/lib/systemd/system`里面的`httpd.service`文件。
这是因为开机时,`Systemd`只执行`/etc/systemd/system`目录里面的配置文件。这也意味
着,如果把修改后的配置文件放在该目录,就可以达到覆盖原始配置的效果。
### 8.2. 启动服务
设置开机启动以后,软件并不会立即启动,必须等到下一次开机。如果想现在就运行该软件
,那么要执行`systemctl start`命令。
```bash
$ sudo systemctl start httpd
```
执行上面的命令以后,有可能启动失败,因此要用`systemctl status`命令查看一下该服务
的状态。
```bash
$ sudo systemctl status httpd
httpd.service - The Apache HTTP Server
Loaded: loaded (/usr/lib/systemd/system/httpd.service; enabled)
Active: active (running) since 金 2014-12-05 12:18:22 JST; 7min ago
Main PID: 4349 (httpd)
Status: "Total requests: 1; Current requests/sec: 0; Current traffic: 0 B/sec"
CGroup: /system.slice/httpd.service
├─4349 /usr/sbin/httpd -DFOREGROUND
├─4350 /usr/sbin/httpd -DFOREGROUND
├─4351 /usr/sbin/httpd -DFOREGROUND
├─4352 /usr/sbin/httpd -DFOREGROUND
├─4353 /usr/sbin/httpd -DFOREGROUND
└─4354 /usr/sbin/httpd -DFOREGROUND
12月 05 12:18:22 localhost.localdomain systemd[1]: Starting The Apache HTTP Server...
12月 05 12:18:22 localhost.localdomain systemd[1]: Started The Apache HTTP Server.
12月 05 12:22:40 localhost.localdomain systemd[1]: Started The Apache HTTP Server.
```
上面的输出结果含义如下。
- `Loaded`行:配置文件的位置,是否设为开机启动
- `Active`行:表示正在运行
- `Main PID`行:主进程 ID
- `Status`行:由应用本身(这里是 httpd )提供的软件当前状态
- `CGroup`块:应用的所有子进程
- 日志块:应用的日志
### 8.3. 停止服务
终止正在运行的服务,需要执行`systemctl stop`命令。
```bash
$ sudo systemctl stop httpd.service
```
有时候,该命令可能没有响应,服务停不下来。这时候就不得不"杀进程"了,向正在运行的
进程发出`kill`信号。
```bash
$ sudo systemctl kill httpd.service
```
此外,重启服务要执行`systemctl restart`命令。
```bash
$ sudo systemctl restart httpd.service
```
### 8.4. 读懂配置文件
一个服务怎么启动,完全由它的配置文件决定。下面就来看,配置文件有些什么内容。
前面说过,配置文件主要放在`/usr/lib/systemd/system`目录,也可能
在`/etc/systemd/system`目录。找到配置文件以后,使用文本编辑器打开即可。
`systemctl cat`命令可以用来查看配置文件,下面以`sshd.service`文件为例,它的作用
是启动一个 SSH 服务器,供其他用户以 SSH 方式登录。
```
$ systemctl cat sshd.service
[Unit]
Description=OpenSSH server daemon
Documentation=man:sshd(8) man:sshd_config(5)
After=network.target sshd-keygen.service
Wants=sshd-keygen.service
[Service]
EnvironmentFile=/etc/sysconfig/sshd
ExecStart=/usr/sbin/sshd -D $OPTIONS
ExecReload=/bin/kill -HUP $MAINPID
Type=simple
KillMode=process
Restart=on-failure
RestartSec=42s
[Install]
WantedBy=multi-user.target
```
可以看到,配置文件分成几个区块,每个区块包含若干条键值对。
下面依次解释每个区块的内容。
### 8.5. [Unit] 区块:启动顺序与依赖关系。
`Unit`区块的`Description`字段给出当前服务的简单描述,`Documentation`字段给出文档
位置。
接下来的设置是启动顺序和依赖关系,这个比较重要。
> `After`字段:表示如果`network.target`或`sshd-keygen.service`需要启动,那
> 么`sshd.service`应该在它们之后启动。
相应地,还有一个`Before`字段,定义`sshd.service`应该在哪些服务之前启动。
注意,`After`和`Before`字段只涉及启动顺序,不涉及依赖关系。
举例来说,某 Web 应用需要 postgresql 数据库储存数据。在配置文件中,它只定义要在
postgresql 之后启动,而没有定义依赖 postgresql 。上线后,由于某种原因
,postgresql 需要重新启动,在停止服务期间,该 Web 应用就会无法建立数据库连接。
设置依赖关系,需要使用`Wants`字段和`Requires`字段。
> `Wants`字段:表示`sshd.service`与`sshd-keygen.service`之间存在"弱依赖"关系,即
> 如果"sshd-keygen.service"启动失败或停止运行,不影响`sshd.service`继续执行。
`Requires`字段则表示"强依赖"关系,即如果该服务启动失败或异常退出,那
么`sshd.service`也必须退出。
注意,`Wants`字段与`Requires`字段只涉及依赖关系,与启动顺序无关,默认情况下是同
时启动的。
### 8.6. [Service] 区块:启动行为
`Service`区块定义如何启动当前服务。
#### 8.6.1. 启动命令
许多软件都有自己的环境参数文件,该文件可以用`EnvironmentFile`字段读取。
> `EnvironmentFile`字段:指定当前服务的环境参数文件。该文件内部的`key=value`键值
> 对,可以用`$key`的形式,在当前配置文件中获取。
上面的例子中,sshd 的环境参数文件是`/etc/sysconfig/sshd`。
配置文件里面最重要的字段是`ExecStart`。
> `ExecStart`字段:定义启动进程时执行的命令。
上面的例子中,启动`sshd`,执行的命令是`/usr/sbin/sshd -D $OPTIONS`,其中的变
量`$OPTIONS`就来自`EnvironmentFile`字段指定的环境参数文件。
与之作用相似的,还有如下这些字段。
- `ExecReload`字段:重启服务时执行的命令
- `ExecStop`字段:停止服务时执行的命令
- `ExecStartPre`字段:启动服务之前执行的命令
- `ExecStartPost`字段:启动服务之后执行的命令
- `ExecStopPost`字段:停止服务之后执行的命令
请看下面的例子。
```
[Service]
ExecStart=/bin/echo execstart1
ExecStart=
ExecStart=/bin/echo execstart2
ExecStartPost=/bin/echo post1
ExecStartPost=/bin/echo post2
```
上面这个配置文件,第二行`ExecStart`设为空值,等于取消了第一行的设置,运行结果如
下。
```
execstart2
post1
post2
```
所有的启动设置之前,都可以加上一个连词号(`-`),表示"抑制错误",即发生错误的时
候,不影响其他命令的执行。比如,`EnvironmentFile=-/etc/sysconfig/sshd`(注意等号
后面的那个连词号),就表示即使`/etc/sysconfig/sshd`文件不存在,也不会抛出错误。
#### 8.6.2. 启动类型
`Type`字段定义启动类型。它可以设置的值如下。
- simple(默认值):`ExecStart`字段启动的进程为主进程
- forking:`ExecStart`字段将以`fork()`方式启动,此时父进程将会退出,子进程将成
为主进程
- oneshot:类似于`simple`,但只执行一次,Systemd 会等它执行完,才启动其他服务
- dbus:类似于`simple`,但会等待 D-Bus 信号后启动
- notify:类似于`simple`,启动结束后会发出通知信号,然后 Systemd 再启动其他服
务
- idle:类似于`simple`,但是要等到其他任务都执行完,才会启动该服务。一种使用场
合是为让该服务的输出,不与其他服务的输出相混合
下面是一个`oneshot`的例子,笔记本电脑启动时,要把触摸板关掉,配置文件可以这样写
。
```
[Unit]
Description=Switch-off Touchpad
[Service]
Type=oneshot
ExecStart=/usr/bin/touchpad-off
[Install]
WantedBy=multi-user.target
```
上面的配置文件,启动类型设为`oneshot`,就表明这个服务只要运行一次就够了,不需要
长期运行。
如果关闭以后,将来某个时候还想打开,配置文件修改如下。
```
[Unit]
Description=Switch-off Touchpad
[Service]
Type=oneshot
ExecStart=/usr/bin/touchpad-off start
ExecStop=/usr/bin/touchpad-off stop
RemainAfterExit=yes
[Install]
WantedBy=multi-user.target
```
上面配置文件中,`RemainAfterExit`字段设为`yes`,表示进程退出以后,服务仍然保持执
行。这样的话,一旦使用`systemctl stop`命令停止服务,`ExecStop`指定的命令就会执行
,从而重新开启触摸板。
#### 8.6.3. 重启行为
`Service`区块有一些字段,定义了重启行为。
> `KillMode`字段:定义 Systemd 如何停止 sshd 服务。
上面这个例子中,将`KillMode`设为`process`,表示只停止主进程,不停止任何 sshd 子
进程,即子进程打开的 SSH session 仍然保持连接。这个设置不太常见,但对 sshd 很重
要,否则你停止服务的时候,会连自己打开的 SSH session 一起杀掉。
`KillMode`字段可以设置的值如下。
- control-group(默认值):当前控制组里面的所有子进程,都会被杀掉
- process:只杀主进程
- mixed:主进程将收到 SIGTERM 信号,子进程收到 SIGKILL 信号
- none:没有进程会被杀掉,只是执行服务的 stop 命令。
接下来是`Restart`字段。
> `Restart`字段:定义了 sshd 退出后,Systemd 的重启方式。
上面的例子中,`Restart`设为`on-failure`,表示任何意外的失败,就将重启 sshd。如果
sshd 正常停止(比如执行`systemctl stop`命令),它就不会重启。
`Restart`字段可以设置的值如下。
- no(默认值):退出后不会重启
- on-success:只有正常退出时(退出状态码为 0),才会重启
- on-failure:非正常退出时(退出状态码非 0),包括被信号终止和超时,才会重启
- on-abnormal:只有被信号终止和超时,才会重启
- on-abort:只有在收到没有捕捉到的信号终止时,才会重启
- on-watchdog:超时退出,才会重启
- always:不管是什么退出原因,总是重启
对于守护进程,推荐设为`on-failure`。对于那些允许发生错误退出的服务,可以设
为`on-abnormal`。
最后是`RestartSec`字段。
> `RestartSec`字段:表示 Systemd 重启服务之前,需要等待的秒数。上面的例子设为等
> 待 42 秒。
### 8.7. [Install] 区块
`Install`区块,定义如何安装这个配置文件,即怎样做到开机启动。
`WantedBy`字段:表示该服务所在的 Target。
`Target`的含义是服务组,表示一组服务。`WantedBy=multi-user.target`指的是,sshd
所在的 Target 是`multi-user.target`。
这个设置非常重要,因为执行`systemctl enable sshd.service`命令时
,`sshd.service`的一个符号链接,就会放在`/etc/systemd/system`目录下面
的`multi-user.target.wants`子目录之中。
Systemd 有默认的启动 Target。
```bash
$ systemctl get-default
multi-user.target
```
上面的结果表示,默认的启动 Target 是`multi-user.target`。在这个组里的所有服务,
都将开机启动。这就是为什么`systemctl enable`命令能设置开机启动的原因。
使用 Target 的时候,`systemctl list-dependencies`命令和`systemctl isolate`命令也
很有用。
```bash
# 查看 multi-user.target 包含的所有服务
$ systemctl list-dependencies multi-user.target
# 切换到另一个 target
# shutdown.target 就是关机状态
$ sudo systemctl isolate shutdown.target
```
一般来说,常用的 Target 有两个:一个是`multi-user.target`,表示多用户命令行状态
;另一个是`graphical.target`,表示图形用户状态,它依赖于`multi-user.target`。官
方文档有一张非常清晰的
[Target 依赖关系图](https://www.freedesktop.org/software/systemd/man/bootup.html#System%20Manager%20Bootup)。
### 8.8. Target 的配置文件
Target 也有自己的配置文件。
```bash
$ systemctl cat multi-user.target
[Unit]
Description=Multi-User System
Documentation=man:systemd.special(7)
Requires=basic.target
Conflicts=rescue.service rescue.target
After=basic.target rescue.service rescue.target
AllowIsolate=yes
```
注意,Target 配置文件里面没有启动命令。
上面输出结果中,主要字段含义如下。
- `Requires`字段:要求`basic.target`一起运行。
- `Conflicts`字段:冲突字段。如果`rescue.service`或`rescue.target`正在运行
,`multi-user.target`就不能运行,反之亦然。
- `After`:表示`multi-user.target`在`basic.target` 、 `rescue.service`、
`rescue.target`之后启动,如果它们有启动的话。
- `AllowIsolate`:允许使用`systemctl isolate`命令切换到`multi-user.target`。
### 8.9. 修改配置文件后重启
修改配置文件以后,需要重新加载配置文件,然后重新启动相关服务。
```bash
# 重新加载配置文件
$ sudo systemctl daemon-reload
# 重启相关服务
$ sudo systemctl restart foobar
```
## 9. 参考资料
- [Systemd 入门教程:命令篇](http://www.ruanyifeng.com/blog/2016/03/systemd-tutorial-commands.html)
- [Systemd 入门教程:实战篇](hhttp://www.ruanyifeng.com/blog/2016/03/systemd-tutorial-part-two.html)
================================================
FILE: docs/linux/ops/vim.md
================================================
# Vim 应用
## 1. 概念
### 1.1. 什么是 vim
Vim 是从 vi 发展出来的一个文本编辑器。代码补完、编译及错误跳转等方便编程的功能特别丰富,在程序员中被广泛使用。和 Emacs 并列成为类 Unix 系统用户最喜欢的编辑器。
### 1.2. Vim 的模式
基本上 vi/vim 共分为三种模式,分别是**命令模式(Command mode)**,**插入模式(Insert mode)**和**底线命令模式(Last line mode)**。
#### 1.2.1. 命令模式
**用户刚刚启动 vi/vim,便进入了命令模式。**
此状态下敲击键盘动作会被 Vim 识别为命令,而非输入字符。
#### 1.2.2. 插入模式
**在命令模式下按下 `i` 就进入了输入模式。**
在输入模式下,你可以输入文本内容。
#### 1.2.3. 底线命令模式
**在命令模式下按下 `:`(英文冒号)就进入了底线命令模式。**
底线命令模式可以输入单个或多个字符的命令,可用的命令非常多。
## 2. Vim 渐进学习
### 2.1. 存活
1. 安装 [vim](http://www.vim.org/)
2. 启动 vim
3. **什么也别干!**请先阅读
当你安装好一个编辑器后,你一定会想在其中输入点什么东西,然后看看这个编辑器是什么样子。但 vim 不是这样的,请按照下面的命令操作:
- 启 动 Vim 后,vim 在 _Normal_ 模式下。
- 让我们进入 _Insert_ 模式,请按下键 i 。(注:你会看到 vim 左下角有一个–insert–字样,表示,你可以以插入的方式输入了)
- 此时,你可以输入文本了,就像你用“记事本”一样。
- 如果你想返回 _Normal_ 模式,请按 `ESC` 键。
现在,你知道如何在 _Insert_ 和 _Normal_ 模式下切换了。下面是一些命令,可以让你在 _Normal_ 模式下幸存下来:
> - `i` → _Insert_ 模式,按 `ESC` 回到 _Normal_ 模式.
> - `x` → 删当前光标所在的一个字符。
> - `:wq` → 存盘 + 退出 (`:w` 存盘, `:q` 退出) (注::w 后可以跟文件名)
> - `dd` → 删除当前行,并把删除的行存到剪贴板里
> - `p` → 粘贴剪贴板
>
> **推荐**
>
> - `hjkl` (强例推荐使用其移动光标,但不必需) → 你也可以使用光标键 (←↓↑→). 注: `j` 就像下箭头。
> - `:help ` → 显示相关命令的帮助。你也可以就输入 `:help` 而不跟命令。(注:退出帮助需要输入:q)
你能在 vim 幸存下来只需要上述的那 5 个命令,你就可以编辑文本了,你一定要把这些命令练成一种下意识的状态。于是你就可以开始进阶到第二级了。
当是,在你进入第二级时,需要再说一下 _Normal_ 模式。在一般的编辑器下,当你需要 copy 一段文字的时候,你需要使用 `Ctrl` 键,比如:`Ctrl-C`。也就是说,`Ctrl` 键就好像功能键一样,当你按下了功能键 `Ctrl` 后,C 就不在是 C 了,而且就是一个命令或是一个快键键了,**在 vim 的 Normal 模式下,所有的键都是功能键**。这个你需要知道。
> **标记**
>
> - 下面的文字中,如果是 `Ctrl-λ`我会写成 ``.
> - 以 `:` 开始的命令你需要输入 ``回车,例如 — 如果我写成 `:q` 也就是说你要输入 `:q`.
### 2.2. 感觉良好
上面的那些命令只能让你存活下来,现在是时候学习一些更多的命令了,下面是我的建议:(注:所有的命令都需要在 Normal 模式下使用,如果你不知道现在在什么样的模式,你就狂按几次 ESC 键)
1. 各种插入模式
> - `a` → 在光标后插入
> - `o` → 在当前行后插入一个新行
> - `O` → 在当前行前插入一个新行
> - `cw` → 替换从光标所在位置后到一个单词结尾的字符
2. 简单的移动光标
> - `0` → 数字零,到行头
> - `^` → 到本行第一个不是 blank 字符的位置(所谓 blank 字符就是空格,tab,换行,回车等)
> - `$` → 到本行行尾
> - `g_` → 到本行最后一个不是 blank 字符的位置。
> - `/pattern` → 搜索 `pattern` 的字符串(注:如果搜索出多个匹配,可按 n 键到下一个)
3. 拷贝/粘贴
(注:p/P 都可以,p 是表示在当前位置之后,P 表示在当前位置之前)
> - `P` → 粘贴
> - `yy` → 拷贝当前行当行于 `ddP`
4. Undo/Redo
> - `u` → undo
> - `` → redo
5. 打开/保存/退出/改变文件
(Buffer)
> - `:e ` → 打开一个文件
> - `:w` → 存盘
> - `:saveas ` → 另存为 ``
> - `:x`, `ZZ` 或 `:wq` → 保存并退出 (`:x` 表示仅在需要时保存,ZZ 不需要输入冒号并回车)
> - `:q!` → 退出不保存 `:qa!` 强行退出所有的正在编辑的文件,就算别的文件有更改。
> - `:bn` 和 `:bp` → 你可以同时打开很多文件,使用这两个命令来切换下一个或上一个文件。(注:我喜欢使用:n 到下一个文件)
花点时间熟悉一下上面的命令,一旦你掌握他们了,你就几乎可以干其它编辑器都能干的事了。但是到现在为止,你还是觉得使用 vim 还是有点笨拙,不过没关系,你可以进阶到第三级了。
### 2.3. 更好,更强,更快
先恭喜你!你干的很不错。我们可以开始一些更为有趣的事了。在第三级,我们只谈那些和 vi 可以兼容的命令。
#### 2.3.1. 更好
下面,让我们看一下 vim 是怎么重复自己的:1515G
1. `.` → (小数点) 可以重复上一次的命令
2. `N` → 重复某个命令 N 次
下面是一个示例,找开一个文件你可以试试下面的命令:
> - `2dd` → 删除 2 行
> - `3p` → 粘贴文本 3 次
> - `100idesu [ESC]` → 会写下 “desu desu desu desu desu desu desu desu desu desu desu desu desu desu desu desu desu desu desu desu desu desu desu desu desu desu desu desu desu desu desu desu desu desu desu desu desu desu desu desu desu desu desu desu desu desu desu desu desu desu desu desu desu desu desu desu desu desu desu desu desu desu desu desu desu desu desu desu desu desu desu desu desu desu desu desu desu desu desu desu desu desu desu desu desu desu desu desu desu desu desu desu desu desu desu desu desu desu desu desu “
> - `.` → 重复上一个命令—— 100 “desu “.
> - `3.` → 重复 3 次 “desu” (注意:不是 300,你看,VIM 多聪明啊).
#### 2.3.2. 更强
你要让你的光标移动更有效率,你一定要了解下面的这些命令,**千万别跳过**。
1. N`G` → 到第 N 行 (注:注意命令中的 G 是大写的,另我一般使用 : N 到第 N 行,如 :137 到第 137 行)
2. `gg` → 到第一行。(注:相当于 1G,或 :1)
3. `G` → 到最后一行。
4. 按单词移动:
> 1. `w` → 到下一个单词的开头。
> 2. `e` → 到下一个单词的结尾。
>
> \> 如果你认为单词是由默认方式,那么就用小写的 e 和 w。默认上来说,一个单词由字母,数字和下划线组成(注:程序变量)
>
> \> 如果你认为单词是由 blank 字符分隔符,那么你需要使用大写的 E 和 W。(注:程序语句)
>
> 
下面,让我来说说最强的光标移动:
> - `%` : 匹配括号移动,包括 `(`, `{`, `[`. (注:你需要把光标先移到括号上)
> - `*` 和 `#`: 匹配光标当前所在的单词,移动光标到下一个(或上一个)匹配单词(\*是下一个,#是上一个)
相信我,上面这三个命令对程序员来说是相当强大的。
#### 2.3.3. 更快
你一定要记住光标的移动,因为很多命令都可以和这些移动光标的命令连动。很多命令都可以如下来干:
``
例如 `0y$` 命令意味着:
- `0` → 先到行头
- `y` → 从这里开始拷贝
- `$` → 拷贝到本行最后一个字符
你可可以输入 `ye`,从当前位置拷贝到本单词的最后一个字符。
你也可以输入 `y2/foo` 来拷贝 2 个 “foo” 之间的字符串。
还有很多时间并不一定你就一定要按 y 才会拷贝,下面的命令也会被拷贝:
- `d` (删除 )
- `v` (可视化的选择)
- `gU` (变大写)
- `gu` (变小写)
- 等等
(注:可视化选择是一个很有意思的命令,你可以先按 v,然后移动光标,你就会看到文本被选择,然后,你可能 d,也可 y,也可以变大写等)
### 2.4. Vim 超能力
你只需要掌握前面的命令,你就可以很舒服的使用 VIM 了。但是,现在,我们向你介绍的是 VIM 杀手级的功能。下面这些功能是我只用 vim 的原因。
#### 2.4.1. 在当前行上移动光标: `0` `^` `####`f`F`t`T`,``;`
> - `0` → 到行头
> - `^` → 到本行的第一个非 blank 字符
> - `$` → 到行尾
> - `g_` → 到本行最后一个不是 blank 字符的位置。
> - `fa` → 到下一个为 a 的字符处,你也可以 fs 到下一个为 s 的字符。
> - `t,` → 到逗号前的第一个字符。逗号可以变成其它字符。
> - `3fa` → 在当前行查找第三个出现的 a。
> - `F` 和 `T` → 和 `f` 和 `t` 一样,只不过是相反方向。
> 
还有一个很有用的命令是 `dt"` → 删除所有的内容,直到遇到双引号—— `"。`
#### 2.4.2. 区域选择 `a