Repository: elecV2/elecV2P-dei
Branch: master
Commit: 6b4673acd0c0
Files: 91
Total size: 316.1 KB
Directory structure:
gitextract_iq6s9hbq/
├── .gitignore
├── Readme.md
├── docs/
│ ├── 01-overview.md
│ ├── 02-Docker.md
│ ├── 03-rules.md
│ ├── 04-JS.md
│ ├── 05-rewrite.md
│ ├── 06-task.md
│ ├── 07-feed¬ify.md
│ ├── 08-logger&efss.md
│ ├── 09-webhook.md
│ ├── 10-config.md
│ ├── Advanced.md
│ ├── Readme.md
│ ├── dev_note/
│ │ ├── archive/
│ │ │ ├── favend JS 重构-efh.md
│ │ │ ├── minishell subprocess.md
│ │ │ ├── webUI.md
│ │ │ └── websocket 通信协议设计.md
│ │ ├── clash delegate efh.md
│ │ ├── elecV2P 错误自检指南.md
│ │ ├── ev 命令行程序.md
│ │ ├── favend JS 重构-efh.md
│ │ ├── favend 模块化.md
│ │ ├── readme.md
│ │ ├── runJSFile 执行逻辑及优化.md
│ │ ├── script_store.efh 应用中心.md
│ │ ├── service workers 开发与优化.md
│ │ ├── sse 通信模块.md
│ │ ├── store 常量加密存储读取.md
│ │ ├── webUI transparent mode.md
│ │ ├── webUI 主题设计.md
│ │ ├── webUI 首页快捷运行程序 eapp.md
│ │ ├── webhook token 权限设计.md
│ │ ├── 下载其他扩展程序.md
│ │ ├── 关于引入区块链的可行性.md
│ │ ├── 可能永不执行的长期计划.md
│ │ ├── 启动器快捷方式 $run.md
│ │ ├── 开发者激励计划.md
│ │ ├── 引入广告系统.md
│ │ ├── 待深度优化部分.md
│ │ ├── 根据 mitmhost 生成 pac 文件.md
│ │ ├── 脚本缓存_内容结果等.md
│ │ ├── 节点互联.md
│ │ └── 通过脚本管理规则 $rewrite.md
│ └── res/
│ └── logo/
│ └── readme.md
├── examples/
│ ├── JS-elecV2P.sublime-build
│ ├── JSTEST/
│ │ ├── 0body.js
│ │ ├── TGbotonFavend.js
│ │ ├── aria2-env.js
│ │ ├── asyncPool.js
│ │ ├── boxjs.ev.js
│ │ ├── cheerio-hbin.js
│ │ ├── efh/
│ │ │ ├── kuwo-music.efh
│ │ │ ├── markdown.efh
│ │ │ ├── notepad.efh
│ │ │ └── readme.md
│ │ ├── evui-chatroom.js
│ │ ├── evui-dou.js
│ │ ├── exam-ahk-send.js
│ │ ├── exam-ahk.js
│ │ ├── exam-chcp.js
│ │ ├── exam-clipboard.js
│ │ ├── exam-rss.js
│ │ ├── exam-tasksub.js
│ │ ├── example-cheerio.js
│ │ ├── example-rule.js
│ │ ├── fendtest.efh
│ │ ├── github-subdownload.js
│ │ ├── markdown.efh
│ │ ├── reboot.js
│ │ ├── simple.efh
│ │ ├── starturl.js
│ │ ├── tgbotmessage.js
│ │ └── webonlinetest.js
│ ├── Readme.md
│ ├── Shell/
│ │ ├── aria2c
│ │ ├── elecV2P-runjs.ahk
│ │ ├── exam-request.py
│ │ ├── mousemove.ahk
│ │ └── sendkey.ahk
│ ├── TGbotonCFworker.js
│ ├── TGbotonCFworker2.0.js
│ ├── archive/
│ │ └── Caddyfile
│ ├── docker-compose-clash.yaml
│ ├── docker-compose.yaml
│ ├── ev2p-nginx.conf
│ └── theme/
│ ├── elecV2P_theme.20220420.json
│ └── readme.md
└── information/
├── readme.md
├── 广告位招租.md
└── 开发者激励计划.md
================================================
FILE CONTENTS
================================================
================================================
FILE: .gitignore
================================================
.git
================================================
FILE: Readme.md
================================================
## elecV2P 文档/例程/通知/反馈 - documents/examples/information/issues
主项目地址: https://github.com/elecV2/elecV2P
TG 频道: https://t.me/elecV2
TG 交流群: https://t.me/elecV2G
欢迎提交功能需求或者其他建议。
### 说明
- 文档目录:[docs](https://github.com/elecV2/elecV2P-dei/tree/master/docs)
- 例程目录:[examples](https://github.com/elecV2/elecV2P-dei/tree/master/examples)
- 初次使用建议先把 docs 内容浏览一遍,涉及内容较多,大部分可以直接跳过,在使用中碰到问题时再来查看
================================================
FILE: docs/01-overview.md
================================================
```
最近更新: 2022-10-21
适用版本: 3.7.3
```
*此章节内容同步自 [elecV2P Readme 文档](https://github.com/elecV2/elecV2P)*
## 简介
elecV2P - customize personal network.
一款基于 NodeJS,可通过 JS 修改网络请求,以及定时运行脚本或 SHELL 指令的网络工具。

### 基础功能
- 查看/修改网络请求 (MITM)
- 定时执行 JS/SHELL 脚本
- FEED/IFTTT/自定义 通知
- EFSS 基础文件管理
## 安装/INSTALL
***程序开放权限极大,建议局域网使用。公网部署(务必参考 [Advanced.md](https://github.com/elecV2/elecV2P-dei/blob/master/docs/Advanced.md)),风险自负***
*elecV2P 所有文件及依赖总大小约 90 M。初始运行时内存占用约 90 M,运行 100 个定时任务时总内存占用约 150 M(仅供参考,不同软硬件条件下程序调用资源可能有所不同)*
**在可使用 Docker 的情况下,推荐使用方法三进行安装**
### 方法一:直接 NODEJS 运行
**需求 NODEJS 版本 (node -v) >= 14.17.0**
``` sh
git clone https://github.com/elecV2/elecV2P.git
cd elecV2P
# 安装依赖库(根据网络环境和硬盘读写速度,需要 1-10 分钟不等
yarn
# elecV2P 默认以 pm2 的方式启动,需要先安装好 pm2
# pm2 的安装方式:
# 1. 添加 elecV2P 所在目录/node_modules/.bin 到系统环境变量 PATH 中
# 2. 或者直接执行 yarn global add pm2
# 然后执行命令
yarn start
# 其他基础方式启动命令
node index.js
# 假如提示 80 端口不可用,尝试命令
# windows 平台 CMD:
# set PORT=8000 && node index.js
# windows 平台 PowerShell:
# $env:PORT="8000";node index.js
# 其他平台:
# PORT=8000 TZ=Asia/Shanghai node index.js
## TZ=Asia/Shanghai 用于设置程序运行时区
```
#### 升级
方式一:使用 [softupdate.js](https://raw.githubusercontent.com/elecV2/elecV2P/master/script/JSFile/softupdate.js) 软更新升级
- 首先在 webUI/JSMANAGE 脚本管理中找到 softupdate.js 文件,假如不存在就远程推送或本地上传一下
- 然后按照文件内的说明,根据自身需求更改 CONFIG 设置项
- 最后点击测试运行即可
方式二:手动升级(不推荐
- 先备份好个人数据,比如 根证书,以及 efss、script/JSFile、Store、Lists、Shell 等文件夹
- (推荐在 webUI/efss 界面,右键对应文件夹,然后 zip 打包下载。)
- 然后在项目目录下执行命令 git pull,拉取最新的代码进行覆盖升级
- 最后再把备份好的文件上传/复制还原到之前的位置
### 其他 PM2 相关指令
``` sh
pm2 stop elecV2P # 停止 elecV2P
pm2 stop all # 停止所有程序
pm2 restart elecV2P # 重启 elecV2P
pm2 restart 0
pm2 ls # 查看运行状态
pm2 logs # 查看运行日志
pm2 -h # 查看 PM2 帮助列表
```
### 方法二:DOCKER
镜像名称: elecv2/elecv2p
镜像地址: https://hub.docker.com/r/elecv2/elecv2p
``` sh
# 基础使用命令
docker run --restart=always -d --name elecv2p -e TZ=Asia/Shanghai -p 80:80 -p 8001:8001 -p 8002:8002 elecv2/elecv2p
# 推荐使用命令
docker run --restart=always \
-d --name elecv2p \
-e TZ=Asia/Shanghai \
-p 8100:80 -p 8101:8001 -p 8102:8002 \
-v /elecv2p/JSFile:/usr/local/app/script/JSFile \
-v /elecv2p/Lists:/usr/local/app/script/Lists \
-v /elecv2p/Store:/usr/local/app/script/Store \
-v /elecv2p/Shell:/usr/local/app/script/Shell \
-v /elecv2p/rootCA:/usr/local/app/rootCA \
-v /elecv2p/efss:/usr/local/app/efss \
elecv2/elecv2p
# -p/-v 对应参数 宿主:容器
# 如需更改默认的 80 端口,可在 -e 后面加上 PORT=8000
# 升级 Docker 镜像(如果没有使用 -v 持久化存储,容器内数据会丢失,请提前备份)
docker rm -f elecv2p # 先删除旧的容器
docker pull elecv2/elecv2p # 再拉取新的镜像
# 再使用之前的 docker run xxxx 命令重新启动一下
# 如果拉取到的镜像不是最新的版本,请修改 Docker 当前使用的仓库地址
```
- ARM32 平台如果出错,参考 [issues #78](https://github.com/elecV2/elecV2P/issues/78)
### 方法三:DOCKER-COMPOSE (推荐)
``` sh
# 创建 elecV2P 持久化数据保存目录
mkdir /elecv2p && cd /elecv2p
# 假如失败,请尝试在其他有权限的目录进行创建
# 后面 docker-compose.yaml 映射目录保持和创建的目录一致
# 下载 docker-compose.yaml 文件
curl -sL https://git.io/JLw7s > docker-compose.yaml
# 启动运行 elecV2P
docker-compose up -d
# 注意: 需提前安装好 docker-compose 管理器
# 默认将 80/8001/8002 端口分别映射到了宿主机的 8100/8101/8102 端口,以防出现占用的情况
# 如果需要设置为其他端口,请自行修改 docker-compose.yaml 文件内容,然后重新启动
```
以下为 docker-compose.yaml 文件内容,可根据自身需求进行修改。
``` yaml
version: '3.7'
services:
elecv2p:
image: elecv2/elecv2p
container_name: elecv2p
restart: always
environment:
- TZ=Asia/Shanghai
ports:
- "8100:80"
- "8101:8001"
- "8102:8002"
volumes:
- "/elecv2p/JSFile:/usr/local/app/script/JSFile"
- "/elecv2p/Lists:/usr/local/app/script/Lists"
- "/elecv2p/Store:/usr/local/app/script/Store"
- "/elecv2p/Shell:/usr/local/app/script/Shell"
- "/elecv2p/rootCA:/usr/local/app/rootCA"
- "/elecv2p/efss:/usr/local/app/efss"
```
修改后保存文件,然后在 docker-compose.yaml 文件所在目录下执行以下任一命令
``` sh
# 直接启动(首次启动命令)
docker-compose up -d
# 更新镜像并重新启动
docker-compose pull elecv2p && docker-compose up -d
```
- 如果在某些设备上无法启动,尝试把文件开头的 version: '3.7' 更改为 version: '3.3'
- ARM32 平台如果出错,参考 [issues #78](https://github.com/elecV2/elecV2P/issues/78)
其他 docker 相关指令
``` sh
# 查看是否启动及对应端口
docker ps
# 查看 elecV2P 运行日志
docker logs elecv2p -f
```
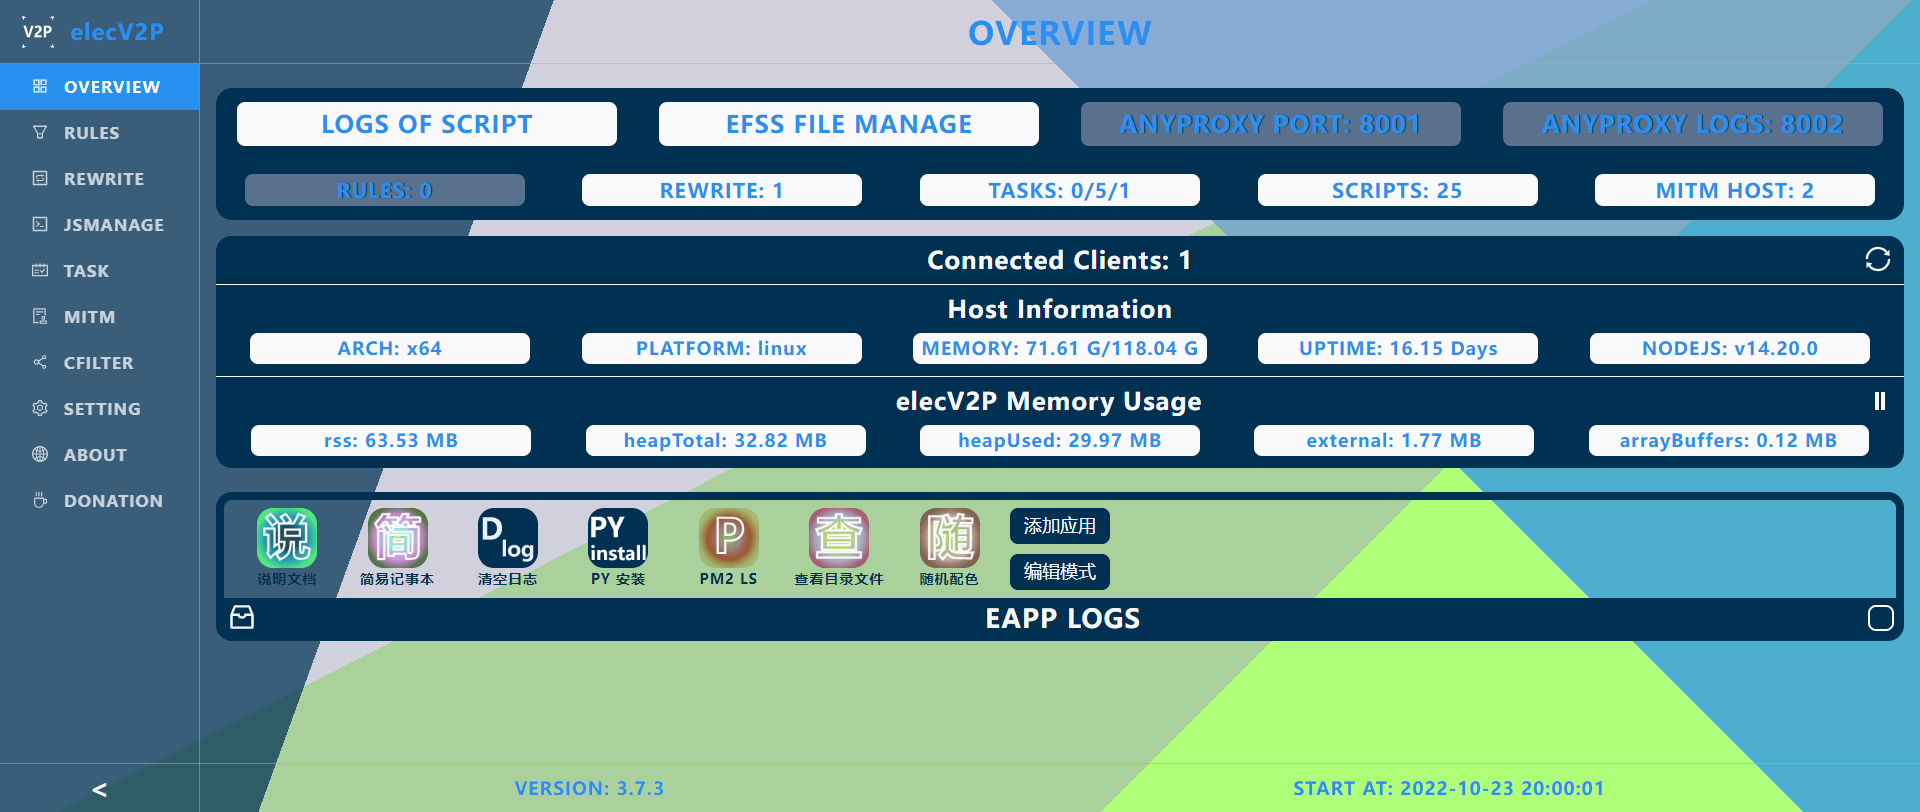
## 默认端口
- 80: webUI 后台管理界面。用于添加规则/管理脚本/定时任务/MITM 证书 等
- 8001: ANYPROXY HTTP 代理端口。(*代理端口不是网页,不能通过浏览器直接访问*)
- 8002: ANYPROXY 代理请求查看端口
**ANYPROXY 相关端口默认关闭。可在 webUI 首页双击 ANYPROXY 临时开启。**
**如需在启动时自动开启,请前往 webUI->SETTING->初始化相关设置 中进行设置。**
**80/8002 对应端口需要用到 websocket,在使用 nginx 等反代工具时注意设置。参考 [ev2p-nginx.conf](https://github.com/elecV2/elecV2P-dei/blob/master/examples/ev2p-nginx.conf)**
- *80 端口可使用环境变量 **PORT** 进行修改(比如: PORT=8000 node index.js)*
- *在 elecV2P 已经启动时,可在 webUI->SETTING->初始化相关设置 中修改其他端口*
- *在 elecV2P 尚未启动时,可在 script/Lists/config.json 文件中修改对应端口*
## 根证书相关 - HTTPS 解密
- *如果不使用 RULES/REWRITE 等 MITM 相关功能,此步骤可跳过。*
- *升级启动后,如果不是使用之前的证书,需要重新下载安装信任根证书。*
- *根证书包含两个文件 rootCA.crt/rootCA.key,文件名不可修改。*
### 安装证书
选择以下任意一种方式下载证书,然后安装并信任
- 直接打开 :80/crt
- :80 -> MITM -> 安装证书
- :8002 -> RootCA
根证书物理存储目录位于 `$HOME/.anyproxy/certificates`。
*windows 平台的证书存储位置选择 浏览->受信任的根证书颁发机构*
### 使用自签根证书
在 webUI->MITM 界面上传自签根证书,然后重启 elecV2P
**注意:使用新的证书后,记得重新下载安装信任证书,并清除由之前根证书签发的域名证书。**
## RULES - 网络请求修改
详细说明参考: [docs/03-rules.md](https://github.com/elecV2/elecV2P-dei/tree/master/docs/03-rules.md)
## 定时任务
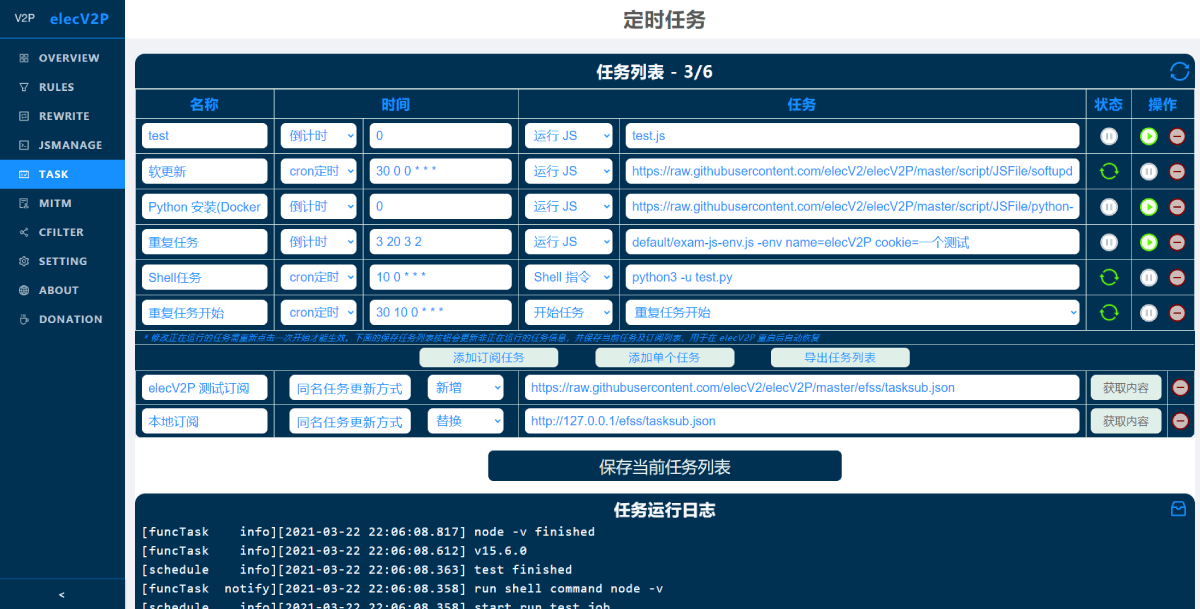
支持两种定时方式:
- 倒计时
- cron 定时
### 时间格式:
- 倒计时 30 999 3 2 (以空格分开的四个数字,后三项可省略)
| 30(秒) | 999(次) | 3(秒) | 2(次)
:--------------: | :-------------: | :------------------: | :------------------:
| 基础倒计时时间 | 重复次数(可选)| 增加随机时间(可选) | 增加随机重复次数(可选)
- *当重复次数大于等于 **999** 时,无限循环*
示例: 40 8 10 3 ,表示倒计时40秒,随机10秒,所以具体倒计时时间位于 40-50 秒之间,重复运行 8-11 次
- cron 定时
时间格式:* * * * * * (五/六位 cron 时间格式)
| * (0-59) | * (0-59) | * (0-23) | * (1-31) | * (1-12) | * (0-7)
:----------: | :--------: | :--------: | :--------: | :--------: | :---------:
| 秒(可选) | 分 | 小时 | 日 | 月 | 星期
### 可执行任务类型
- 运行 JS
- 开始/停止 其他定时任务
- 基础 shell 指令。比如 *rm -f \**, *python test.py*, *reboot* 等等
更多说明参考:[docs/06-task.md](https://github.com/elecV2/elecV2P-dei/tree/master/docs/06-task.md)
## 通知
目前支持通知方式:
- FEED/RSS 订阅
- IFTTT WEBHOOK
- BARK 通知
- 自定义通知
FEED/RSS 订阅地址为 webUI/feed。
通知内容:
- 定时任务开始/结束
- 定时任务 JS 运行次数
- 脚本中的自主调用通知
IFTTT/BARK/自定义通知等相关设置参考: [07-feed¬ify](https://github.com/elecV2/elecV2P-dei/tree/master/docs/07-feed¬ify.md)
## DOCUMENTS&EXAMPLES
说明文档及一些例程: [https://github.com/elecV2/elecV2P-dei](https://github.com/elecV2/elecV2P-dei)
如果遇到问题欢迎 [open a issue](https://github.com/elecV2/elecV2P/issues)。尽量说明使用平台,版本,以及附上相关的错误日志(提供的信息越详细,越有助于解决问题)。
TG 频道: https://t.me/elecV2
TG 交流群: https://t.me/elecV2G
## 更新日志
查看: https://github.com/elecV2/elecV2P/blob/master/logs/update.log
## 贡献参考
- [anyproxy](https://github.com/alibaba/anyproxy)
- [axios](https://github.com/axios/axios)
- [expressjs](https://expressjs.com)
- [node-cron](https://github.com/merencia/node-cron)
- [node-rss](https://github.com/dylang/node-rss)
- [pm2](https://pm2.keymetrics.io)
- [vue](https://vuejs.org)
- [vue-draggable-resizable](https://github.com/mauricius/vue-draggable-resizable)
- [ace](https://github.com/ajaxorg/ace)
- [adm-zip](https://github.com/cthackers/adm-zip)
- [Ant Design Vue](https://www.antdv.com)
### 说明文档列表
- [overview - 简介及安装](01-overview.md)
- [task - 定时任务](06-task.md)
- [rewrite - 重写网络请求](05-rewrite.md)
- [rules - 网络请求更改规则](03-rules.md)
- [script - 脚本编写及说明](04-JS.md)
- [Docker - Docker 运行相关](02-Docker.md)
- [feed¬ify - 通知相关](07-feed¬ify.md)
- [logger&efss - 日志和 EFSS 文件管理](08-logger&efss.md)
- [webhook - webhook 使用简介](09-webhook.md)
- [config - 配置文件说明](10-config.md)
- [Advanced - 高级使用篇](Advanced.md)
================================================
FILE: docs/02-Docker.md
================================================
```
最近更新: 2022-03-15
适用版本: 3.6.3
文档地址: https://github.com/elecV2/elecV2P-dei/blob/master/docs/02-Docker.md
```
## 简介
Docker 镜像名称: elecv2/elecv2p
Docker 镜像地址: https://hub.docker.com/r/elecv2/elecv2p
## docker 及 docker-compose 的安装
``` sh
# 不同平台的安装方式可能不一样,仅供参考
# docker 安装
wget -qO- https://get.docker.com/ | sh
# docker-compose 安装。(前往 https://github.com/docker/compose/releases 查看适合自己设备的版本)
curl -L "https://github.com/docker/compose/releases/download/1.27.4/docker-compose-$(uname -s)-$(uname -m)" -o /usr/local/bin/docker-compose
```
## Docker 运行 elecV2P
*以下命令仅供参考,具体映射端口和卷根据实际情况进行调整*
```sh
# 基础启动命令(重建后数据会丢失)
docker run --restart=always -d --name elecv2p -e TZ=Asia/Shanghai -p 80:80 -p 8001:8001 -p 8002:8002 elecv2/elecv2p
# 推荐使用命令
docker run --restart=always \
-d --name elecv2p \
-e TZ=Asia/Shanghai \
-p 8100:80 -p 8101:8001 -p 8102:8002 \
-v /elecv2p/JSFile:/usr/local/app/script/JSFile \
-v /elecv2p/Lists:/usr/local/app/script/Lists \
-v /elecv2p/Store:/usr/local/app/script/Store \
-v /elecv2p/Shell:/usr/local/app/script/Shell \
-v /elecv2p/rootCA:/usr/local/app/rootCA \
-v /elecv2p/efss:/usr/local/app/efss \
elecv2/elecv2p
# -p/-v 对应环境参数 宿主参数:容器内参数
# 宿主机映射目录尽量填写尚未创建或空的文件夹
# 如需更改默认的 80 端口,可在 -e 后面加上 PORT=8000
# 某些设备上,可能无法在根目录创建 elecv2p 文件夹,这时请根据使用设备搜索可操作的目录,进行替换
# 如果在部分复杂的网络情况下出现无法联网或访问的问题,尝试在命令中添加 --net=host
# 查看 docker 运行状态
docker ps
# 进入容器内部
docker exec -it elecv2p /bin/sh
# Docker 的启动暂停
docker start elecv2p
docker stop elecv2p
docker restart elecv2p
# 查看 Docker 运行日志
docker logs elecv2p -f
docker logs elecv2p --tail 20
# 清除 Docker 运行日志
echo "" > $(docker inspect --format='{{.LogPath}}' elecv2p)
# 升级容器
# 先移除容器
docker rm -f elecv2p
# 再拉取最新的镜像
docker pull elecv2/elecv2p
# 最后再使用上面的 docker run 命令重新启动
```
## docker-compose 启动
``` sh
mkdir /elecv2p && cd /elecv2p
curl -sL https://git.io/JLw7s > docker-compose.yaml
docker-compose up -d
# 默认把 80/8001/8002 端口分别映射成了 8100/8101/8102,以防出现端口占用的情况,访问时注意
# 如果需要设置为其他端口,可以自行修改下面的内容然后手动保存
```
或者将以下内容手动保存为 docker-compose.yaml 文件。
``` yaml
version: '3.7'
services:
elecv2p:
image: elecv2/elecv2p
container_name: elecv2p
restart: always
environment:
- TZ=Asia/Shanghai
ports:
- "8100:80"
- "8101:8001"
- "8102:8002"
volumes:
- "/elecv2p/JSFile:/usr/local/app/script/JSFile"
- "/elecv2p/Lists:/usr/local/app/script/Lists"
- "/elecv2p/Store:/usr/local/app/script/Store"
- "/elecv2p/Shell:/usr/local/app/script/Shell"
- "/elecv2p/rootCA:/usr/local/app/rootCA"
- "/elecv2p/efss:/usr/local/app/efss"
```
- *具体使用的映射端口和 volumes 目录,根据个人情况进行调整*
- *如需更改默认的 80 端口,在 environment 下添加一行: - PORT=8000*
- *如果在某些设备上无法启动,尝试把文件开头的 version: '3.7' 更改为 version: '3.3'*
然后在 docker-compose.yaml 同目录执行命令 **docker-compose up -d** ,启动程序。
### env 默认环境变量
在 elecV2P 启动前,可设置部分环境变量
- TZ: 时区设置 timezone
- PORT: webUI 对应端口,默认为 80
- TOKEN: 启动时指定 WEBHOOK TOKEN
使用示例:
``` sh
docker run --restart=always \
-d --name elecv2p \
-e TZ=Asia/Shanghai PORT=8000 TOKEN=YOUR-WEBHOOK-TOKEN \
-p 8100:8000 -p 8101:8001 -p 8102:8002 \
-v /elecv2p/JSFile:/usr/local/app/script/JSFile \
-v /elecv2p/Lists:/usr/local/app/script/Lists \
-v /elecv2p/Store:/usr/local/app/script/Store \
-v /elecv2p/Shell:/usr/local/app/script/Shell \
-v /elecv2p/rootCA:/usr/local/app/rootCA \
-v /elecv2p/efss:/usr/local/app/efss \
elecv2/elecv2p
```
环境变量可以同时设置部分或全部
**在 docker-compose 中 env 对应 environment**
### 其他指令
``` sh
# 更新升级
docker-compose pull elecv2p && docker-compose up -d
# 拉取特定版本的镜像文件。可用版本以 https://hub.docker.com/r/elecv2/elecv2p 的 tag 为准
docker pull elecv2/elecv2p:3.4.5
docker pull elecv2/elecv2p:arm64-3.0 # 在使用这些特定版本的镜像时,docker run 后面的镜像名也要记得调整
docker image prune # 清除没有挂载的镜像文件
# 查看运行日志
docker logs elecv2p -f
```
### 一些说明
- 当使用国内的一些 docker 源,因为缓存问题,更新之后可能不是最新的版本,需要手动更换一下 docker 源。(具体步骤谷歌)
- arm32 平台如果出错,参考 [issues #78](https://github.com/elecV2/elecV2P/issues/78)
### 说明文档列表
- [overview - 简介及安装](01-overview.md)
- [task - 定时任务](06-task.md)
- [rewrite - 重写网络请求](05-rewrite.md)
- [rules - 网络请求更改规则](03-rules.md)
- [script - 脚本编写及说明](04-JS.md)
- [Docker - Docker 运行相关](02-Docker.md)
- [feed¬ify - 通知相关](07-feed¬ify.md)
- [logger&efss - 日志和 EFSS 文件管理](08-logger&efss.md)
- [webhook - webhook 使用简介](09-webhook.md)
- [config - 配置文件说明](10-config.md)
- [Advanced - 高级使用篇](Advanced.md)
================================================
FILE: docs/03-rules.md
================================================
```
最近更新: 2022-03-24
适用版本: 3.7.8
文档地址: https://github.com/elecV2/elecV2P-dei/blob/master/docs/03-rules.md
```
## 准备工作
- **再使用 RULES/REWRITE 相关功能前,请确定 ANYPROXY 已打开**
- 已正确将网络请求代理到 ANYPROXY 端口
- 匹配 https 请求请先添加 MITM host,普通 http 请求无需添加
- *首次命中 https 请求时,系统需要生成中间证书,可能会稍长一点时间返回结果*
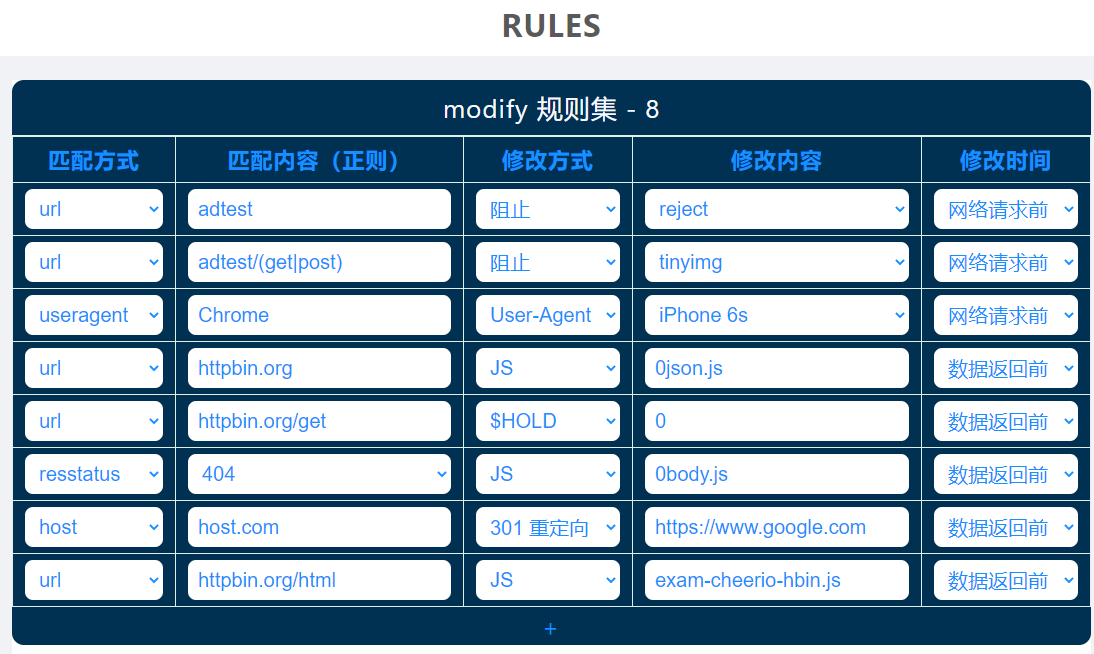
## modify 规则集 格式说明
| 匹配方式 | 匹配内容(正则) | 修改方式 | 修改目标 | 修改时间点
:-----------: | --------------------- | :-------: | ------------------- | ----------
| url | ^https://api.b.com/v2 | JS | file.js | 前(req)
| host | api.bilibili.com | useragent | iPhone 6s | 后(res)
| useragent | neteaseMusic / aliApp | block | reject|tinyimg |
| reqmethod | GET/POST/PUT/DELETE | $HOLD | 30
| reqbody | queryPara/word string | |
| resstatus | 200 / 404 / 301 / ... | |
| restype | text/html / text/json | ----- |
| resbody | Keyword(string) | all - JS |
- *实际使用中匹配方式和修改方式可以任意搭配*
### 匹配方式
```
url // 匹配 url
host // 匹配 url host 部分
useragent // 匹配 User-Agent
reqmethod // 匹配 网络请求方式
reqbody // 匹配 请求体(body)
resstatus // 匹配 请求返回的状态码
restype // 匹配 返回的数据类型
resbody // 匹配 返回的数据内容
```
- **v3.7.8 默认不再对 reqbody/resbody 内容进行匹配,以提升 elecV2P MITM 效率。如需开启,请参考下文源文件格式部分,增加属性项 "enbody": true。(不匹配不代表不可以修改,仍然可以通过 url/host 等方式进行匹配,然后使用脚本对 body 内容进行修改)**
### 修改方式
#### JS
通过 JS 脚本修改网络请求数据,对应修改内容为 JS 文件名或远程 JS 链接。
从该模块运行 JS,默认会添加 $request,$response(**数据返回前**) 两个变量,具体参数如下:
- $request.headers, $request.body, $request.method, $request.hostname, $request.port, $request.path, $request.url
- $response.headers, $response.body, $response.statusCode
#### 307 重定向
对应修改内容为重定向目标网址
#### 阻止
reject: 返回状态码 200, body 为空。
tinyimg: 返回状态码为 200, body 为一张 1x1 的图片
#### $HOLD
将原网络请求的 header 和 body 发送到前端网页进行修改处理,然后将修改后的数据直接发送给服务器/客户端。
对应修改内容表示等待前端修改数据的时间,单位秒。当为 **0** 时,表示一直等待。如果为其他值且超时时则直接使用原数据进行下步操作。
使用该修改方式时,请尽量使用比较详细的匹配规则,匹配单一网络请求,否则后面的 $HOLD 请求会覆盖前面的数据。
**2020.7.16 2.1.0 更新**
$HOLD request reject - 直接返回当前数据
返回默认状态码: 200
数据包含两部分: header 和 body
#### User-Agent
修改请求 header 中的 User-Agent。
默认 User-Agent 可在 webUI->SETTING->网络请求相关设置进行管理修改
### 修改时间
网络请求匹配时间
#### 网络请求前
beforeSendRequest
#### 数据返回前
beforeSendResponse
## 源文件格式
RULES 规则列表保存于 **./script/Lists/default.list**,实际格式为严格的 JSON 类型(不包含任何注释)。
*(参考: https://raw.githubusercontent.com/elecV2/elecV2P/master/script/Lists/default.list )*
``` JSON
{
"rules": {
"note": "elecV2P RULES 规则列表",
"enable": false, // 是否启用下面列表中的规则,仅在该值为 false 时,表示不启用,默认启用
"enbody": false, // 是否对请求体(body)进行匹配,仅在该值为 true 时,表示启用(v3.7.8 添加,默认不启用
"list": [
{
"mtype": "url",
"match": "adtest",
"ctype": "block",
"target": "reject",
"stage": "req"
},
{
"mtype": "url",
"match": "httpbin.org/get\\?hold",
"ctype": "hold",
"target": "0",
"stage": "req", // enable 可省略。仅在 enable 为 false 的时候表示不启用
"enable": true
}
]
}
}
```
*如非必要,请不要手动修改 list 源文件*
### 说明文档列表
- [overview - 简介及安装](01-overview.md)
- [task - 定时任务](06-task.md)
- [rewrite - 重写网络请求](05-rewrite.md)
- [rules - 网络请求更改规则](03-rules.md)
- [script - 脚本编写及说明](04-JS.md)
- [Docker - Docker 运行相关](02-Docker.md)
- [feed¬ify - 通知相关](07-feed¬ify.md)
- [logger&efss - 日志和 EFSS 文件管理](08-logger&efss.md)
- [webhook - webhook 使用简介](09-webhook.md)
- [config - 配置文件说明](10-config.md)
- [Advanced - 高级使用篇](Advanced.md)
================================================
FILE: docs/04-JS.md
================================================
```
最近更新: 2024-11-10
适用版本: 3.8.1
文档地址: https://github.com/elecV2/elecV2P-dei/blob/master/docs/04-JS.md
```
**每个脚本理论上都有权限对服务器上的任一文件进行修改,请不要运行不信任的脚本。**
## 保存目录
本地脚本物理存储目录位于 **./script/JSFile**,在 RULS/REWRITE/TASK/WEBHOOK 中调用时,直接使用对应的文件名即可。支持多级目录,比如 test/exam.js。
所有文件名称和内容可在 webUI->JSMANAGE/脚本管理 中查看和修改。
*如果远程脚本推送失败,尝试在 SETTING/设置->网络请求相关设置 中添加代理,或者下载后使用本地上传。*
## CONTEXT - 脚本运行环境
在 elecV2P 中,默认脚本的运行环境是基于 [vm](http://nodejs.org/api/vm.html) 模块的虚拟环境,同时增加了以下一些默认的环境变量及函数。
### 默认参数/环境变量
#### 主要函数
```
- $axios // 网络请求
- $cheerio // HTML处理
- $exec // 简单 shell 命令执行
- $download // 文件下载
- $feed // 通知模块
- $store // cookie/常量/数据存储
- $evui // 在前端网页生成 UI 界面
- $message // 发送网页消息
- $done // 返回脚本执行结果(后面代码会继续执行)
- $cache // 临时数据存储(v3.4.3 添加)
- $task // 定时任务管理(v3.4.4 添加,sudo 模式下生效)
- $env // 临时环境变量(v3.4.5 添加,默认包含 process.env 中的所有值)
- $fend // efh 脚本前后端通信函数(v3.5.5 添加)
- $webhook // 调用 webhook 接口(v3.5.8 添加,sudo 模式下生效)
```
可利用这些函数判断当前脚本是否运行在 elecV2P 中,比如:
``` JS
if (typeof $fend !== 'undefined') {
console.log('elecV2P 运行环境')
} else {
console.log('其他运行环境')
}
```
#### 附加变量 (以两个短下划线开头)
```
- __version // 当前 elecV2P 版本
- __vernum // 当前版本数字表达(v3.4.5 添加)。比如版本 3.4.5 表达为 345
- __home // 主页地址。 可在 webUI->SETTING 界面设置
- __efss // efss 目录。 可在 webUI/efss 页面设置
- __name // 脚本名。 v3.3.0 添加 (如果是多级目录脚本,会包含目录)
- __dirname // 脚本所在目录 (v3.4.4)
- __filename // 脚本完整路径 (v3.4.4)
- __userid // 用户 ID (v3.6.4)
- __md5hash // 当前脚本内容的 md5 hash 值(v3.6.7)
- __taskid // 启动该脚本的任务 id (仅在定时任务触发脚本时有值,其他时候为 undefined)
- __taskname // 启动该脚本的任务名称 (仅在定时任务触发脚本时有值,其他时候为 undefined)
// 测试 JS:
// console.log('dirname:', __dirname, 'version:', __version, 'homepage:', __home)
// console.log('当前 efss 目录:', __efss, '当前脚本名称:', __name)
// if (__vernum >= 367) console.log('当前脚本 md5 hash:', __md5hash)
```
#### 特殊变量函数
```
- $ws // 通过 websocket 向前端发送数据
- $request/$response
- require() // 直接引用其他 nodejs 模块或脚本
- console.clear() // 清空该脚本的运行日志
- // @grant // 在单个脚本开启增强功能
```
### @grant(v3.8.1 后取消脚本环境兼容性判断
JS 文件开头使用 **// @grant** 开启一些增强功能
*如果要使用纯 nodejs 环境运行,在 TASK 中请选择 shell 指令模式,然后: node xxxxx.js。 或者在脚本中使用 $exec('node xxxx.js') 来执行*
```
// @grant nodejs 脚本和直接使用 node xxxx.js 运行脚本的区别:
- 使用 node xxxxx.js 无法使用 $axios/$store/$feed 等非 nodejs 原生函数/变量
- 默认脚本运行在 vm 的虚拟环境中,而 node xxxx.js 运行在原生系统环境中
```
日志调整
* **// @grant calm** ;不打印日志,但保留到日志文件中,也不影响通知(console.error 错误日志还是会正常打印)
* **// @grant still** ;不输出日志,有通知(即 console 函数无效)
* **// @grant quiet** ;输出日志,但不通知
* **// @grant silent** ;不输出日志,也不通知
#### sudo 模式(v3.4.4)
* **// @grant sudo**
sudo 模式下启用功能
- $task ;定时任务管理(v3.4.4)
- $webhook ;调用 webhook 接口功能(v3.5.8)
- 其他功能待添加
### $axios - 网络请求
$axios(request)
request 格式 [object/string]
- object:支持参数参考:[axios](https://github.com/axios/axios)
- string:单个 url 链接
``` JS
// --- example 1 ---
$axios('https://httpbin.org/get?hello=elecV2P').then(res=>console.log(res.data)).catch(e=>console.log(e))
// --- example 2 ---
$axios({
url: 'https://httpbin.org/put',
method: 'put',
timeout: 6000,
data: {
hello: 'elecV2P'
}
}).then(res=>console.log(res.data)).catch(e=>console.log(e.message))
```
* **$axios** 无 .put/.post 等方法,使用 { ..., method: 'put/post' } 实现
**v2.1.8 更新 $axios(request, proxy)**
增加第二个参数 proxy, 此参数会覆盖 request.proxy, 示例
``` JS
$axios(request, {
host: '127.0.0.1',
port: 9000,
auth: {
username: 'hello',
password: 'elecV2P'
}
}).then(res=>console.log(res.data)).catch(e=>console.log(e.message))
// 当 proxy 为 {} 时使用内部 ANYPROXY 代理,为 false 时: 强制跳过使用代理,如省略则使用 webUI->SETTING 网络请求相关设置。
// 其他设置参考 [axios](https://github.com/axios/axios) request/proxy 部分
```
如在运行脚本时需要访问某些境外网站,可在 webUI->SETTING 网络请求相关设置 中添加代理。
### $store - store/cookie 常量
所有存储常量以文件的形式保存在 **script/Store** 目录中。
所有脚本共用存储常量,比如在 a.js 中使用 $store.put('something', 'akey'), 可在 b.js 中使用 $store.get('akey') 来获取存储值。
``` JS example
$store.get(key, options) // 获取存储值
// options 可选
// - string 字符串
// - 'raw': 获取存储文件源内容
// - 'string/array/object/boolean/number': 以相应格式获取存储值
// - object (v3.6.6 新增)
// {
// type: 'string', // 可选值同上面字符串
// pass: 'string', // 获取加密内容时密码
// algo: 'ebuf', // 获取加密内容时算法,可省略。默认为 ebuf 自定义算法
// }
$store.put(value, key, options) // 保存
// options 可选
// - string 字符串
// - 'a': 添加内容。具体参考下面的 JS 实例
// - 'string/array/object/boolean/number': 保存为对应格式
// - object (v3.3.3 新增)
// {
// type: 'a', // 可选值同上面字符串
// note: '备注信息', // 关于 cookie 的一些说明,可省略
// belong: 'test.js', // 该 cookie 的归属脚本(调用或写入该 cookie 的脚本),可省略
// pass: 'string', // 加密存储内容时的密码(v3.6.6 新增)
// algo: 'ebuf', // 加密存储内容时的算法(v3.6.6 新增),可省略。默认为 ebuf 自定义算法
// }
$store.set(key, value, options) // 等同于将上面的 $store.put 交换 key 和 value 的位置。(v3.4.5 添加)
$store.delete(key) // 删除
```
$store 保存时会对数据类型进行简单的判断,当数据类型为 **number/boolean/array/object** 时,会按照数据类型进行保存。
``` JS store 实例
$store.put(123, 'number') // put 方法,第一个参数为保存值 value, 第二个参数为关键字 key
typeof $store.get('number') // get 方法通过关键字获取保存值,返回数字 123,类型为 number
$store.get('number', 'raw') // 返回 { "type": "number", "value": 123 }
$store.set('newarr', [2,3,4]) // 存储为数组。保存成功返回 true,失败返回 false。 set 方法第一个参数为 key,第二个参数为 value
$store.get('newarr') // 返回数组: [2,3,4]
$store.put(5, 'newarr', 'a')
// 根据 newarr 原来保存值的类型,存储新的结果
// 原 newarr 值为 array 数组,则新保存值为: [2,3,4,5]
// 如果原 newarr 的值为数字,比如 8,则新的存储值 13
$store.put([6,7], 'newarr', 'a') // newarr 新值为:[2,3,4,5,6,7]
$store.put('a string', 'keystr') // 不指定类型时 直接保存为 string 的形式
$store.put('add new line', 'keystr', 'a') // 在原 keystr 的值后面添加新行
$store.get('keystr', 'raw')
// 返回:
// {"type":"string","value":"a string\nadd new line"}
$store.put({a: 334, b: 'abc'}, 'keyobj') // 存储类型为 object。
$store.get('keyobj') // 返回: {"a":334,"b":"abc"}
$store.get('keyobj', 'raw') // 返回: {"type":"object","value":{"a":334,"b":"abc"}}
$store.put({c: 'new val'}, 'keyobj', 'a') // 新存储的值为: {"a":334,"b":"abc","c": "new val"}
$store.put('eoooe', 'keybol', 'boolean') // 强制转化为 boolean 值: true
// 建议在使用 $store.put 并指定 type 的时候,先确定原存储数值和即将保存数值的类型,以免发生未知错误。
$store.delete('number') // 删除某个 store/cookie 常量 number
// 等同于 $store.put('', 'number')
// 特殊情况
$store.put('a string 字符', 'objstr', 'object') // 强制将字符串保存为 object 格式。存储值为: {0: "a string 字符"}。 PS: array 是同样结果
$store.get('keystr', 'array') // 将字符串以 object 格式取出。结果为: {"0":"a string"}
// v2.5.2 更新 $store.get type random。 type 关键字 random 或者 r
$store.get('newarr', 'random') // 返回 newarr 数组中的一个随机值
$store.get('number', 'r') // 返回 0 - number 代表值 中间的任一整数
$store.get('keyobj', 'r') // 返回 object 中的任一 keys 对应值
$store.get('keybol', 'random') // 返回 随机 true/false
$store.get('keystr', 'r') // 如果 keystr 存储的是字符串,取随机值时,取随机一行的数据
// v3.3.3 更新: $store.put 第三个参数改为 options
// 当 options 为字符串类型时表示为之前的普通 type 类型
// 当 options 为 object 类型时,type/note/belong 关键字分别表示该 cookie 的 类型/备注/关联脚本
$store.put('a string 字符', 'objstr', {
type: 'string',
note: '关于这个 cookie 一些备注说明',
belong: __name + ', store.js', // 调用/写入这个 cookie 的脚本
})
// v3.6.6 更新 加密存储
$store.put('待加密的内容', 'tstr', {
pass: '加密密钥 password',
})
// 使用对应密钥获取加密内容
$store.get('tstr', {
pass: '加密密钥 password',
})
// 普通 get,获取到的数据是加密后的内容
$store.get('tstr')
$store.put({ a: '加密其他类型的数据,比如 object' }, 'tobj', {
type: 'object',
pass: $env.STORE_KEY || 'testkey', // 可配合环境变量隐藏使用密钥
})
```
### $cache - 临时数据存储 (v3.4.3)
用于存储脚本运行时的一些临时数据,在 elecV2P 重启后会自动丢弃。
所有脚本共享临时数据,比如在 a.js 中使用 $cache.hello = 'elecV2P', 可在 b.js 中使用 $cache.hello 来获取临时值。
共有五个方法: get(key), put(value, key), delete(key), keys(), clear()
v3.4.5 添加方法: set(key, value) // 和 put 方法的 key/value 顺序相反
``` JS
$cache.v = 'hello elecV2P' // 添加临时变量 v
// 等同于
$cache.put('hello elecV2P', 'v') // put 方法 value 在前,key 在后
$cache.set('vv', '你好,elecV2P') // set 方法 key 在前,value 在后(v3.4.5 添加)
let val = $cache.get('v') // 获取临时变量 v 中的内容
// 等同于 let val = $cache.v
$cache.delete('v') // 删除临时变量 v
console.log($cache.v, $cache.vv) // 如果临时变量不存在,将会返回 undefined
$cache.obj = { // 临时变量存储对象可以是任意值。包括 object 和 函数等
num: 1234,
s(){
console.log('$cache function', this.num++)
}
}
$cache.obj.s()
console.log($cache.obj.num)
let keys = $cache.keys() // 以数组的形式返回当前所有临时变量关键字。
// [ 'obj' ]
$cache.clear() // 清空存储的临时变量
console.log(keys, $cache.keys())
console.log($cache.size) // 当前临时变量个数。(v3.4.5 添加)
```
**$cache** 和 **$store** 的区别:
- $cache 数据在内存中读写,$store 数据在硬盘上读写(因此,$cache 存取速度更快,但会占用一些内存,不建议保存大量数据)
- $cache 是临时存储,在 elecV2P 重启后所有数据会丢失。$store 是常量存储,重启后已存储数据依然存在
- $store 只能通过 get/put 方法来存取数据,而 $cache 可以直接通过点引用来存取。(比如: $cache.haha = '哈哈哈哈哈哈哈')
- $store 没有 keys()/clear()/size 的方法/属性,也不能保存函数类'动态'数据
### $env - 临时环境变量 (v3.4.5)
``` JS
console.log($env)
console.log('version', $env.version)
let key = 'name'
if ($env[key]) {
console.log($env[key])
} else {
console.log('当前环境变量中暂无', key, '相关值')
}
```
- 临时环境变量默认包含 process.env 中的所有值,不管当前是否以 nodejs 兼容模式运行
- 临时环境变量仅在当前脚本中有效。比如在 a.js 中设置 $env.version = '1.0.0', 在 b.js 中 $env.version 还是等于 process.env.version
- process.env 的变化会反应到 $env 中,但 $env 的变化不会影响 process.env 的值
- 在使用定时任务或 webhook 等方式运行脚本时,可使用 -env 添加临时环境变量(具体参考 [06-task.md](https://github.com/elecV2/elecV2P-dei/blob/master/docs/06-task.md) 运行 JS 相关部分)
- v3.7.6 增加 $env.lang 获取当前设置的语言偏好,比如 en | zh-CN
### $feed - 通知模块
发送一条通知
- $feed.push(tile, description, url)
- title: 通知标题。 如省略,则会使用 'elecV2P 通知' 替代
- description: 通知内容。 如省略,则会显示 'a empty message\n没有任何通知内容'
- url: 点击通知后的跳转链接。可省略
``` JS example
// PUSH 通知包括 RSS 和其他手动设置好的通知方式
$feed.push('elecV2P notification', '这是一条来自 elecV2P 的通知', 'https://github.com/elecV2/elecV2P')
// 单独发送一条 ifttt 通知
$feed.ifttt('elecV2P 通知', '一条来自 $feed.ifttt 的通知', 'https://github.com/elecV2/elecV2P-dei')
// 单独发送一条 bark 通知
$feed.bark('elecV2P 通知', '一条来自 $feed.bark 的通知', 'https://t.me/elecV2')
// 在 title 开头添加 $enable$ 强制发送通知
$feed.cust('$enable$自定义通知', '使用 $enable$ 强制发送的一条通知', 'https://github.com/elecV2/elecV2P-dei/tree/master/docs/07-feed¬ify.md')
```
- ifttt/bark 等通知需提前在 webUI->SETTING 页面设置好 TOKEN/KEY
- 如果 SETTING 相关通知为关闭状态,则调用了也不会有通知
更多相关说明参考: [07-feed¬ify](https://github.com/elecV2/elecV2P-dei/tree/master/docs/07-feed¬ify.md)
### $exec - Shell 指令执行函数
*Shell 指令的运行基于 nodejs 的 [child_process_exec](https://nodejs.org/api/child_process.html#child_process_child_process_exec_command_options_callback) 模块*
#### 基础使用: $exec(command, options = { cwd, env, timeout, call, cb, stdin })
*options 可省略,opitons 中的每一项参数也都可省略*
- cwd: (string) 工作目录
- 当没有设置或设置目录不存在时,如果是 node 命令开头,默认为: script/JSFile,其他情况默认为: script/Shell
- v3.4.2 之前默认工作目录为: process.cwd()
- env: (object) 环境变量 (默认为: process.env)
- timeout: (number) 超时时间。单位: 毫秒(ms),0: 表示不设定超时时间。默认为 60000ms(60秒)
- call: (boolean) 是否在命令执行完成后返回所有输出内容
- cb(data, error, finish): (function) 回调函数
- data: stdout.on('data') 命令执行时的输出内容
- error: stderr.on('data') 命令执行出错时的输出内容
- finish: exec.on('exit') 命令执行完毕信号,最终返回 true
- stdin: (object) { write, delay } 延时输入交互数据(v3.2.6 增加)
- write: (string) 延时写入的数据
- delay: (number) 延时时间。单位: 毫秒(ms),可省略(默认为 2000)
``` JS example
$exec('ls', {
cwd: './efss', // 命令执行目录
timeout: 5000,
cb(data, error){
error ? console.error(error) : console.log(data)
}
})
// 如果省略 options 中的所有参数,那么对应输出只能在后台看到
$exec('node -v')
// 在 Docker 环境在安装 python3,并执行其他 python 文件
$exec('apk add python3', {
timeout: 0,
cb(data, error, finish){
if (finish) {
// 安装完以后可以直接在 JS 中调用。(pyhton 和库安装完成后可在其他脚本中直接调用,不需要再次安装。)
$exec('python3 -u test.py', {
cwd: './script/Shell', // test.py 文件放置的目录。可修改为其他目录,比如 './efss'
cb(data, error){
error ? console.error(error) : console.log(data)
}
})
// 安装一些 python 库
$exec('pip3 install you-get youtube-dl numpy requests')
} else {
error ? console.error(error) : console.log(data)
}
}
})
// stdin 延迟输入交互内容 简单示例
$exec('python3 -u askinput.py', {
cwd: './script/Shell',
stdin: {
delay: 3000, // 输入延时时间,单位 ms。可省略
write: 'elecV2P\nI am fine, thank you.' // 具体输入数据。(根据实际情况进行修改)
},
cb(data, error){
if (error) {
console.error(error)
} else {
console.log(data)
}
}
})
/* askinput.py 内容
name = input("what is your name?")
print('nice to meet you,', name)
greet = input(f"how are you, {name}?")
print(greet)
*/
// 特别使用: 给当前执行命令设置单独日志文件
$exec('ls', {
cwd: './efss', // 命令执行目录
logname: 'ls执行日志', // 命令执行日志保存文件名,可自定义为其他值
from: 'task', // v3.4.5 之前此项必需,且只能为 'task'。v3.4.5 之后可省略
// 当 from 设置为 task 时,实时日志可在 TASK 定时任务界面查看
// cb 函数可省略。日志记录保存在 logname 设置的文件中
})
```
*如果命令不可执行,尝试先在系统命令行工具下手动输入命令,进行测试*
**如果 windows 平台出现乱码,尝试命令 *CHCP 65001*。或者修改注册表 Active code page 为 65001(具体操作,善用搜索)** (*尝试过 iconv 转换(< v1.8.2),弃用*)
#### **v3.2.8 增加支持运行远程文件**
``` JS
// 例如:
$exec('python3 -u https://raw.githubusercontent.com/elecV2/elecV2P/master/script/Shell/test.py', {
cwd: './script/Shell', // 命令执行目录
timeout: 5000,
cb(data, error){
error ? console.error(error) : console.log(data)
}
})
/* 说明:
- 当执行命令(command)中包含远程链接时,会自动下载远程文件到 cwd 目录,并将该远程链接替换为下载后的文件地址
- 比如,上面的代码会先下载远程文件 test.py 到 script/Shell 目录,然后命令自动转化为 python3 -u /xxx/script/Shell/test.py
- 远程链接匹配方式: command.match(/ (https?:\/\/\S{4,})/)
- 远程文件执行时默认每次都会重新下载
- 可使用 options.rename: xxx 来重命名下载文件
- 可使用 options.local: true 来跳过下载远程文件,直接以本地文件运行(如果存在的话,如果不存在还是会远程下载
- 如果远程文件下载失败,将会尝试运行本地文件
- 如果不希望对原命令中的远程链接进行下载及替换操作,可使用 options.nohttp: true, 或使用 -http 进行转义
- 注意: 命令中的所有 ' -http' 字符(不含引号)都会被替换为 ' http'
- 以下常用命令已排除远程下载及替换操作:
- curl/wget/git/start (v3.2.9)
- you-get/youtube-dl (v3.3.0)
- aria2c/http/npm/yarn/ping/openssl/telnet/nc/echo (v3.4.2)
- *如果还有其他的常用网络相关命令,欢迎反馈添加*
**/
// 以 git 等其他常用命令开头,远程链接不会进行自动转换,按原命令处理
$exec('git clone https://github.com/elecV2/elecV2P', {
cwd: 'script/JSFile',
cb(data, error, finish){
error ? console.error(error) : console.log(data)
if (finish) {
console.log('git clone 完成')
}
}
})
// 其他命令中如果包含远程链接,将会自动下载,并将命令中的远程链接替换为文件下载后的地址
$exec('node https://raw.githubusercontent.com/elecV2/elecV2P/master/script/JSFile/webhook.js', {
// 将自动下载 webhook.js 到 cwd 目录('script/JSFile'),并将远程链接替换为文件下载后的地址 node /xxx/script/JSFile/webhook.js
cwd: 'script/JSFile',
local: true, // true: 当 cwd 目录下存在 webhook.js 时,直接使用本地文件运行,不进行远程下载
// rename: 'testremote.js', // 重命名远程下载文件
cb(data, error){
error ? console.error(error) : console.log(data)
}
})
$exec('echo -http://127.0.0.1') // 输出结果为: http://127.0.0.1
// 等同于
$exec('echo http://127.0.0.1') // echo 命令不会下载远程文件及替换
// 使用 cat 命令下载并查看远程文件
$exec('cat http://127.0.0.1/efss/readme.md', {
// 如没有指定 cwd,或指定 cwd 目录不存在时,则使用默认 cwd: script/Shell
// nohttp: true, // 启用此项,表示不转化 http 远程链接,将会搜索文件 'http://127.0.0.1/efss/readme.md',然后直接报错
// local: true, // 启用此项,表示如果 cwd 目录中存在 readme.md 文件,则不下载(但远程链接会替换为本地文件地址)
cb(data, error){
error ? console.error(error) : console.log(data)
}
})
```
### $cheerio - HTML处理
用于对 html 的处理
``` JS example
// example #1
let body = $response.body
let restype = $response.headers['Content-Type']
if (/html/.test(restype)) {
const $ = $cheerio.load(body)
$('body').text('hello cheerio')
body = $.html()
console.log(body)
}
$done(body)
// example #2
const $ = $cheerio.load(``);
const apple = $('.apple', '#fruits').text()
console.log(apple)
const attr = $('ul .pear').attr('class');
console.log(attr)
const html = $('#fruits').html();
console.log(html)
$done($('.pear').text())
```
更多使用方法参考:[cheerio](https://github.com/cheeriojs/cheerio) 官方说明文档
### $download - 文件下载
用于直链文件下载,可指定下载目录。如不指定下载目录则保存到默认目录。
默认保存目录为 efss 虚拟目录,如果 efss 目录为空则保存到 web/dist 目录。
基础用法:
$download(url, options).then(d=>console.log(d)).catch(e=>console.error(e))
**options** 变量说明:
- 直接省略,表示使用默认目录保存文件
- 字符类型,分两种情况
- 字符表示的是一个已存在的文件夹,则下载到该文件夹,并以 url 的结尾命名文件
- 否则表示的是 **目录(如有)+文件名**
- 对象类型,可接受四个参数: { folder, name, existskip, timeout }
- folder 表示下载目录
- name 表示文件名(其中也可包含目录)
- existskip 当目标文件已存在时不下载(v3.4.9 添加)
- timeout 本次下载的超时时间,单位 ms(v3.5.0 添加)
下面以几个具体实例进行说明:
``` JS example
$download('https://raw.githubusercontent.com/elecV2/elecV2P/master/Todo.md').then(d=>console.log(d)).catch(e=>console.error(e))
// 指定下载目录及文件名
$download('https://raw.githubusercontent.com/elecV2/elecV2P-dei/master/examples/Shell/exam-request.py', './script/Shell/myreq.py').then(d=>console.log(d)).catch(e=>console.error(e))
// 前面一部分 script/Shell 表示保存目录,后面的 myreq.py 表示文件名
// 如果仅有 myreq.py 的话,文件会以该名字保存到默认目录
// 以 object 方式指定下载目录
$download('https://raw.githubusercontent.com/elecV2/elecV2P-dei/master/examples/JSTEST/boxjs.ev.js', {
folder: './script/JSFile',
name: 'box.js',
existskip: true,
}).then(d=>console.log('文件已下载至: ' + d)).catch(e=>console.error(e))
// 假如将 name 修改为 'test/box.js', 此时文件名中同时包含目录,则会在 script/JSFile 下新建目录 test,然后将文件(box.js)保存到 test 中
```
#### 特别使用:获取下载进度
$download(url, options, cb) - 前两项参数不变,增加第三个参数为 callback 函数,callback 函数在下载期间会被多次调用。
cb(options = {}),传入的 options 参数有如下值:
- name: 下载的文件名称
- progress: 下载的进度条
- chunk: 第 n 个下载块(仅在下载中存在
- dsize: 文件已下载大小(downloaded size (v3.7.2 增加
- total: 文件总大小(对应为 response.headers['content-length'] 项,不存在时为 NaN(v3.7.2 增加
- start: 开始下载(仅开始下载时存在(对应内容为下载文件的完整保存路径(v3.7.2
- finish: 下载完成后的消息(仅在下载完成后存在(对应内容为下载后文件的完整路径(v3.7.2
*start 和 finish 内容一样,都表示文件下载到 elecV2P 服务器的绝对路径,只是存在阶段不一样*
示例:
``` JS
$download('https://raw.githubusercontent.com/elecV2/elecV2P-dei/master/examples/Shell/elecV2P.py', {
folder: 'script/Shell',
name: 'elecV2P.org.py'
}, (options)=>{
// callback 函数,支持异步函数
if (options.start) {
// 下载开始时存在的参数 opitons.name/progress/chunk/dsize/total/start
// 开始阶段 chunk<=>dsize<=>0
console.log(`开始下载文件 ${options.name} 到 ${options.start}, 文件大小 ${kSize(options.total)}`)
} else if (options.finish) {
// 下载完成时存在的参数 opitons.name/progress/dsize/total/finish
// 完成阶段 dsize<=>total<=>response.headers['content-length'] || NaN
$message.success(`${options.name} 下载完成 ${options.total ? '总大小 ' + kSize(options.total) : ''}`)
console.log(options.name, '已下载至', options.finish)
} else {
// 下载中存在的参数 opitons.name/progress/chunk/dsize/total
options.chunk % 100 === 0 && $message.success(`正在下载 ${options.name} 第 ${options.chunk} 块数据 ${kSize(options.dsize)}/${kSize(options.total)}`, { mid: 'download' })
// console.log(options.progress + '\r') // 显示下载进度条。(后面的 '/r' 用于在前端页面删除上一条 log 日志)
console.log(options.progress, '\x1b[F') // v3.7.2 后推荐使用该条代码
}
}).then(d=>console.log(d)).catch(e=>console.error(e))
function kSize(size, k = 1024) {
if (size < k) {
return size + ' B'
}
if (size < k*k) {
return (size/k).toFixed(2) + ' K'
}
if (size < k*k*k) {
return (size/(k*k)).toFixed(2) + ' M'
}
return (size/(k*k*k)).toFixed(2) + ' G'
}
```
### $evui - 生成一个 UI 界面
*$evui 的参数传递基于 websocket*
可接收两个参数:$evui(option, callback)
- option: UI 界面相关参数
- callback: 用于接收处理 UI 界面提交返回的数据。(可省略)
$evui 返回的是一个 Promise 函数
- resolve 条件: 当 cbable 为 true 时,直到前端关闭窗口。否则,直接 resolve
- reject 条件: 传递参数有误或者 websocket 尚未连接
``` JS
const ui = {
id: 'ebcaa4ff', // 给图形界面一个独一无二的 ID。可省略(以下所有参数都可省略,不再重复说明)
title: 'elecV2P windows', // 窗口标题
width: 800, // 窗口宽度
height: 600, // 窗口高度。null 表示自适应高度
content: `显示一张图片
 `, // 图形界面显示内容
style: { // 设置一些基础样式
title: "background: #6B8E23;", // 设置标题样式
content: "background: #FF8033; font-size: 32px; text-align: center", // 设置中间主体内容样式
cbdata: "height: 220px;", // 设置返回数据输入框样式
cbbtn: "width: 220px;" // 设置提交数据按钮的样式
},
resizable: true, // 窗口是否可以缩放
draggable: true, // 窗口是否可以拖动
cbable: true, // 是否启用 callback 函数,用于接收前端 UI 提交返回的数据
cb(data){ // callback 函数。此项会被 $evui 的第二个参数覆盖(如有)
console.log('data from client:', data)
},
cbdata: 'hello', // 提供给前端 UI 界面的初始数据
cblabel: '提交数据', // 提交按钮显示文字
script: `console.log('hello $evui');alert('hi, elecV2P')`, // v3.2.4 增加支持在前端网页中插入 javascript 代码
}
$evui(ui, data=>{
// 此为 callback 函数,用于接收处理前端 UI 返回的数据,可省略。如有则会覆盖前一项参数中的 cb 变量(ui.cb)
if (data == 1) {
$feed.push('Get a infomation frome $evui', 'message:' + data)
} else if (/^exec /.test(data)) {
let command = data.split('exec ').pop()
$exec(command, {
cb(data, error){
console.log(error || data)
}
})
} else {
console.log('data from client:', data)
}
}).then(data=>console.log(data)).catch(e=>console.error(e))
// 发送关闭前端 evui 界面的指令 (v3.4.0 增加)
$ws.send({ type: 'evui', data: { id: 'ebcaa4ff', type: 'close' }})
// * $ws.send 函数可临时用于服务器通过 websocket 向前端发送数据
```
效果:

### $message - 给前端网页发送一条消息
*消息传递基于 websocket*
共有三种方法:
- success 成功
- error 错误
- loading 加载中
v3.4.2 增加方法
- close 用于关掉网页消息体
``` JS
// 基础使用
$message.success('一条来自脚本的消息')
// $message 可接受任意个参数(v3.4.0)
// 当最后一个参数为数字时,表示消息显示时间,单位:秒。
// 最后参数为 object 且包含 secd/url/mid/align 等参数时:
// - secd 消息显示时间,单位: 秒(默认: 消息长度/5 + 已有消息数*3 秒)。 0: 一直显示不关闭
// - url 点击消息后跳转 url(当为 reload 或 refresh 时表示点击强制刷新当前网页 v3.5.2)
// - mid 消息体的 id (v3.4.2 增加)
// - align 消息文字对齐方式(v3.4.4 增加)。默认: center,可设置 left: 左对齐,right: 右对齐。其他值使用默认 center
$message.error('some wrong is happen', 10)
// 一条错误提醒消息,10 秒后自动关闭
// 第二个参数如果是 0: 表示消息不自动关闭
$message.loading('等待中...', 0)
// 最后一个参数为 object 且传递 secd 和 url
$message.success(23, '参数类型和数量不限', true, { hello: 'elecV2P' }, '点击消息\n可打开 elecV2P Github 主页', { secd: 0, url: "https://github.com/elecV2/elecV2P" })
// v3.4.2 增加关掉前端网页已弹出消息体的功能
$message.loading('等待关闭中...\n请点击消息右侧进行关闭', {
secd: 0, // 0: 不主动关闭
mid: 'auid', // mid 对应值随意填写
align: 'left', // 文字左对齐
})
$message.close('auid') // 关掉 mid === 'auid' 的消息体
$message.close() // 关掉所有已弹出的消息体
```
### $ws - 向前端发送临时数据
一般用于需要异步或持续向前端发送数据的特殊情况。
- $ws.send({ type, data }) 通过 websocket 向前端发送数据
- $ws.sse(sseid, data) 通过 server-sent events 向前端发送数据(v3.7.2 添加)
$ws.send 可使用的 type 类型已在前端定义,以后会整理开放。该方法仅在前端 webUI websocket 已连接的情况有效。通常用于 evui 界面通信中,参考脚本:https://raw.githubusercontent.com/elecV2/elecV2P-dei/master/examples/JSTEST/evui-chatroom.js
$ws.sse 需要先在前端生成 new EventSource('/sse/elecV2P/' + sseid) 事件,然后可以在事件上自定义数据接收后的处理函数。通常用于 efh 脚本中,参考脚本:https://raw.githubusercontent.com/elecV2/elecV2P-dei/master/examples/JSTEST/efh/kuwo-music.efh (相关资料:[Using server-sent events - MDN](https://developer.mozilla.org/en-US/docs/Web/API/Server-sent_events/Using_server-sent_events))
**这两个函数发送的消息/数据,会同步发送到所有已连接的客户端**
### $request/$response
$request: 存在于通过 RULES/REWRITE/favend 触发的脚本中
$response: 存在于通过 RULES/REWRITE 触发,并且修改时间段为数据返回前的脚本中
*有 $request 不一定有 $response, 但有 $response 一定有 $request*
- $request.url : 网络请求完整 URL
- $request.headers
`, // 图形界面显示内容
style: { // 设置一些基础样式
title: "background: #6B8E23;", // 设置标题样式
content: "background: #FF8033; font-size: 32px; text-align: center", // 设置中间主体内容样式
cbdata: "height: 220px;", // 设置返回数据输入框样式
cbbtn: "width: 220px;" // 设置提交数据按钮的样式
},
resizable: true, // 窗口是否可以缩放
draggable: true, // 窗口是否可以拖动
cbable: true, // 是否启用 callback 函数,用于接收前端 UI 提交返回的数据
cb(data){ // callback 函数。此项会被 $evui 的第二个参数覆盖(如有)
console.log('data from client:', data)
},
cbdata: 'hello', // 提供给前端 UI 界面的初始数据
cblabel: '提交数据', // 提交按钮显示文字
script: `console.log('hello $evui');alert('hi, elecV2P')`, // v3.2.4 增加支持在前端网页中插入 javascript 代码
}
$evui(ui, data=>{
// 此为 callback 函数,用于接收处理前端 UI 返回的数据,可省略。如有则会覆盖前一项参数中的 cb 变量(ui.cb)
if (data == 1) {
$feed.push('Get a infomation frome $evui', 'message:' + data)
} else if (/^exec /.test(data)) {
let command = data.split('exec ').pop()
$exec(command, {
cb(data, error){
console.log(error || data)
}
})
} else {
console.log('data from client:', data)
}
}).then(data=>console.log(data)).catch(e=>console.error(e))
// 发送关闭前端 evui 界面的指令 (v3.4.0 增加)
$ws.send({ type: 'evui', data: { id: 'ebcaa4ff', type: 'close' }})
// * $ws.send 函数可临时用于服务器通过 websocket 向前端发送数据
```
效果:

### $message - 给前端网页发送一条消息
*消息传递基于 websocket*
共有三种方法:
- success 成功
- error 错误
- loading 加载中
v3.4.2 增加方法
- close 用于关掉网页消息体
``` JS
// 基础使用
$message.success('一条来自脚本的消息')
// $message 可接受任意个参数(v3.4.0)
// 当最后一个参数为数字时,表示消息显示时间,单位:秒。
// 最后参数为 object 且包含 secd/url/mid/align 等参数时:
// - secd 消息显示时间,单位: 秒(默认: 消息长度/5 + 已有消息数*3 秒)。 0: 一直显示不关闭
// - url 点击消息后跳转 url(当为 reload 或 refresh 时表示点击强制刷新当前网页 v3.5.2)
// - mid 消息体的 id (v3.4.2 增加)
// - align 消息文字对齐方式(v3.4.4 增加)。默认: center,可设置 left: 左对齐,right: 右对齐。其他值使用默认 center
$message.error('some wrong is happen', 10)
// 一条错误提醒消息,10 秒后自动关闭
// 第二个参数如果是 0: 表示消息不自动关闭
$message.loading('等待中...', 0)
// 最后一个参数为 object 且传递 secd 和 url
$message.success(23, '参数类型和数量不限', true, { hello: 'elecV2P' }, '点击消息\n可打开 elecV2P Github 主页', { secd: 0, url: "https://github.com/elecV2/elecV2P" })
// v3.4.2 增加关掉前端网页已弹出消息体的功能
$message.loading('等待关闭中...\n请点击消息右侧进行关闭', {
secd: 0, // 0: 不主动关闭
mid: 'auid', // mid 对应值随意填写
align: 'left', // 文字左对齐
})
$message.close('auid') // 关掉 mid === 'auid' 的消息体
$message.close() // 关掉所有已弹出的消息体
```
### $ws - 向前端发送临时数据
一般用于需要异步或持续向前端发送数据的特殊情况。
- $ws.send({ type, data }) 通过 websocket 向前端发送数据
- $ws.sse(sseid, data) 通过 server-sent events 向前端发送数据(v3.7.2 添加)
$ws.send 可使用的 type 类型已在前端定义,以后会整理开放。该方法仅在前端 webUI websocket 已连接的情况有效。通常用于 evui 界面通信中,参考脚本:https://raw.githubusercontent.com/elecV2/elecV2P-dei/master/examples/JSTEST/evui-chatroom.js
$ws.sse 需要先在前端生成 new EventSource('/sse/elecV2P/' + sseid) 事件,然后可以在事件上自定义数据接收后的处理函数。通常用于 efh 脚本中,参考脚本:https://raw.githubusercontent.com/elecV2/elecV2P-dei/master/examples/JSTEST/efh/kuwo-music.efh (相关资料:[Using server-sent events - MDN](https://developer.mozilla.org/en-US/docs/Web/API/Server-sent_events/Using_server-sent_events))
**这两个函数发送的消息/数据,会同步发送到所有已连接的客户端**
### $request/$response
$request: 存在于通过 RULES/REWRITE/favend 触发的脚本中
$response: 存在于通过 RULES/REWRITE 触发,并且修改时间段为数据返回前的脚本中
*有 $request 不一定有 $response, 但有 $response 一定有 $request*
- $request.url : 网络请求完整 URL
- $request.headers