charucoIds;
cv::aruco::interpolateCornersCharuco(corners, ids, image, board, charucoCorners, charucoIds);
// if at least one charuco corner detected
if(charucoIds.size() > 0)
cv::aruco::drawDetectedCornersCharuco(imageCopy, charucoCorners, charucoIds, cv::Scalar(255, 0, 0));
}
cv::imshow("out", imageCopy);
char key = (char) cv::waitKey(waitTime);
if (key == 27)
break;
}
```
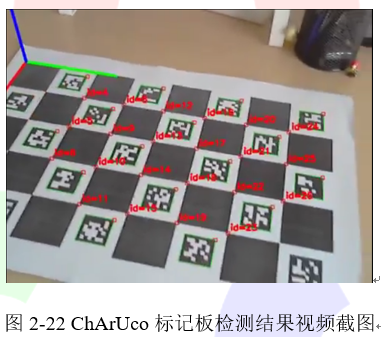
aruco模块中提供了检测ChArUco标记板的完整的示例程序,完整程序存放在detect_board_charuco.cpp文件中,我们可以通过代码清单2-30中的代码直接调用该文件。检测ChArUco标记板的结果在图2-22给出。
**提示
*完整视频可以在小白学视觉微信公众号后台回复“ChArUco标记板检测”获取。***
```cpp
代码清单2-30 样本输入
-c="_path_/calib.txt" -dp="_path_/detector_params.yml" -w=5 -h=7 -sl=0.04 -ml=0.02 -d=10
```
## 2.3.3 ChArUco姿态估计
ChArUco标记板的最终目的是非常精确地找到角点以进行高精度校准或姿态估计。aruco模块提供了estimatePoseCharucoBoard()函数用于ChArUco姿态估计。ChArUco标记板的坐标系与GridBoard一样,坐标系放置在板平面中,Z轴指向外侧,并居中于板的左下角。estimatePoseCharucoBoard()函数的使用方法在代码清单2-31中给出。
```cpp
代码清单2-31姿态估计函数
cv::aruco::estimatePoseCharucoBoard(charucoCorners, charucoIds, board, cameraMatrix, distCoeffs, rvec, tvec);
```
- charucoCoerners和charucoIds参数是从函数interpolateCornersCharuco()中检测到的charuco角点;
- 第三个参数是CharucoBoard对象;
- cameraMatrix和distCoeffs是姿态估计所需的相机标定参数;
- rvec和tvec参数是Charuco板的输出姿态;
- 如果正确估计了姿态,则函数返回true,否则返回false。失败的主要原因是没有足够的角点进行姿态估计或者它们不在同一条线。
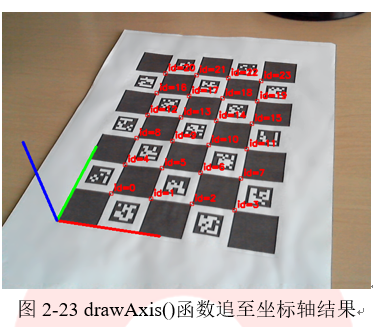
可以使用drawAxis()绘制轴轴以检查姿态是否正确估计。绘制结果如所示(X轴:红色;Y轴:绿色;Z轴:蓝色)。
 代码清单2-33中给出了姿态估计完整示例程序。该程序被存放在aruco模块中的detect_board_charuco.cpp文件中,可以通过代码清单2-32中的参数对该文件进行调用。
```cpp
代码清单2-32 样本输入
"_path_/calib.txt" -dp="_path_/detector_params.yml" -w=5 -h=7 -sl=0.04 -ml=0.02 -d=10
```
```cpp
代码清单2-33:带有姿态估计的ChArUco检测
cv::VideoCapture inputVideo;
inputVideo.open(0);
cv::Mat cameraMatrix, distCoeffs;
// camera parameters are read from somewhere
readCameraParameters(cameraMatrix, distCoeffs);
cv::Ptr dictionary = cv::aruco::getPredefinedDictionary(cv::aruco::DICT_6X6_250);
cv::Ptr board = cv::aruco::CharucoBoard::create(5, 7, 0.04, 0.02, dictionary);
while (inputVideo.grab()) {
cv::Mat image, imageCopy;
inputVideo.retrieve(image);
image.copyTo(imageCopy);
std::vector ids;
std::vector> corners;
cv::aruco::detectMarkers(image, dictionary, corners, ids);
// if at least one marker detected
if (ids.size() > 0) {
std::vector charucoCorners;
std::vector charucoIds;
cv::aruco::interpolateCornersCharuco(corners, ids, image, board, charucoCorners, charucoIds, cameraMatrix, distCoeffs);
// if at least one charuco corner detected
if(charucoIds.size() > 0) {
cv::aruco::drawDetectedCornersCharuco(imageCopy, charucoCorners, charucoIds, cv::Scalar(255, 0, 0));
cv::Vec3d rvec, tvec;
bool valid = cv::aruco::estimatePoseCharucoBoard(charucoCorners, charucoIds, board, cameraMatrix, distCoeffs, rvec, tvec);
// if charuco pose is valid
if(valid)
cv::aruco::drawAxis(imageCopy, cameraMatrix, distCoeffs, rvec, tvec, 0.1);
}
}
cv::imshow("out", imageCopy);
char key = (char) cv::waitKey(waitTime);
if (key == 27)
break;
}
```
================================================
FILE: chapter 2/使用ArUco和ChArUco进行相机标定.md
================================================
ArUco模块也可以用来标定相机。相机标定包括获取相机的内参系数和畸变系数。除非相机光学系统发生变化,否则这一参数保持不变。因此,相机标定只需要做一次。但是,如果相机长时间未使用,建议再次使用时重新标定一次。
相机机标定通常使用标准库中的calibrateCamera()函数。该函数要求空间点与图像中投影点之间存在一定的对应关系。一般来说,这些对应是从棋盘图案的角点获得的。有关更多详细信息,可以阅读基础库中的calibrateCamera()函数文档或OpenCV标定教程。在《OpenCV 4计算机视觉编程实战》书中也有详细的标定算法和流程介绍。
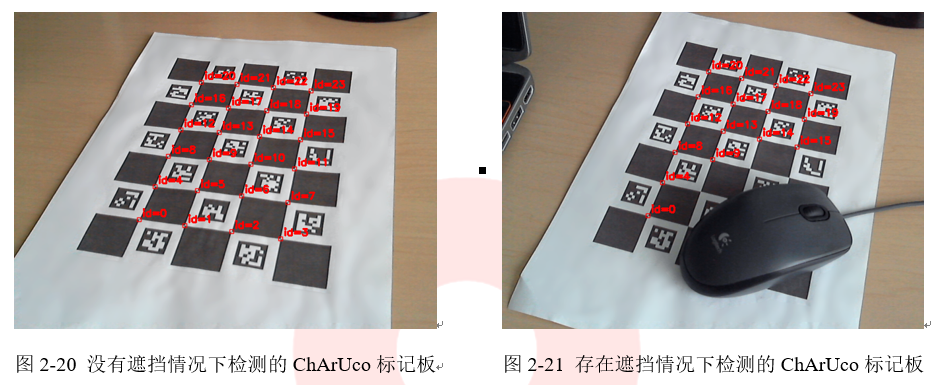
使用ArUco模块,可以基于ArUco标记角点或ChArUco角点进行标定。与使用传统棋盘图案相比,使用ArUco进行标定的功能要更广泛得,因为即使部分标定板被遮挡了,一样可以实现相机的标定。
可以同时使用ArUco标记角点或ChArUco角点进行标定。但是,强烈推荐使用ChArUco的方法,因为它提供的角点更精确。但是如果由于限制而无法使用ChArUco Board的情况下,也可以使用ArUco标定板板进行标定。
## 2.5.1 使用 ChArUco Boards 进行标定
要使用ChArUco进行标定,必须获得不同的角度的棋盘图像,这与传统标定方法对棋盘格的检测方法相同。使用ChArUco的好处是即使标定板部分被遮挡,只要任然有角点可以被检测,就可以实现标定。标定过程中获取的含有ChArUco标定板的图像如图2-28所示。
代码清单2-33中给出了姿态估计完整示例程序。该程序被存放在aruco模块中的detect_board_charuco.cpp文件中,可以通过代码清单2-32中的参数对该文件进行调用。
```cpp
代码清单2-32 样本输入
"_path_/calib.txt" -dp="_path_/detector_params.yml" -w=5 -h=7 -sl=0.04 -ml=0.02 -d=10
```
```cpp
代码清单2-33:带有姿态估计的ChArUco检测
cv::VideoCapture inputVideo;
inputVideo.open(0);
cv::Mat cameraMatrix, distCoeffs;
// camera parameters are read from somewhere
readCameraParameters(cameraMatrix, distCoeffs);
cv::Ptr dictionary = cv::aruco::getPredefinedDictionary(cv::aruco::DICT_6X6_250);
cv::Ptr board = cv::aruco::CharucoBoard::create(5, 7, 0.04, 0.02, dictionary);
while (inputVideo.grab()) {
cv::Mat image, imageCopy;
inputVideo.retrieve(image);
image.copyTo(imageCopy);
std::vector ids;
std::vector> corners;
cv::aruco::detectMarkers(image, dictionary, corners, ids);
// if at least one marker detected
if (ids.size() > 0) {
std::vector charucoCorners;
std::vector charucoIds;
cv::aruco::interpolateCornersCharuco(corners, ids, image, board, charucoCorners, charucoIds, cameraMatrix, distCoeffs);
// if at least one charuco corner detected
if(charucoIds.size() > 0) {
cv::aruco::drawDetectedCornersCharuco(imageCopy, charucoCorners, charucoIds, cv::Scalar(255, 0, 0));
cv::Vec3d rvec, tvec;
bool valid = cv::aruco::estimatePoseCharucoBoard(charucoCorners, charucoIds, board, cameraMatrix, distCoeffs, rvec, tvec);
// if charuco pose is valid
if(valid)
cv::aruco::drawAxis(imageCopy, cameraMatrix, distCoeffs, rvec, tvec, 0.1);
}
}
cv::imshow("out", imageCopy);
char key = (char) cv::waitKey(waitTime);
if (key == 27)
break;
}
```
================================================
FILE: chapter 2/使用ArUco和ChArUco进行相机标定.md
================================================
ArUco模块也可以用来标定相机。相机标定包括获取相机的内参系数和畸变系数。除非相机光学系统发生变化,否则这一参数保持不变。因此,相机标定只需要做一次。但是,如果相机长时间未使用,建议再次使用时重新标定一次。
相机机标定通常使用标准库中的calibrateCamera()函数。该函数要求空间点与图像中投影点之间存在一定的对应关系。一般来说,这些对应是从棋盘图案的角点获得的。有关更多详细信息,可以阅读基础库中的calibrateCamera()函数文档或OpenCV标定教程。在《OpenCV 4计算机视觉编程实战》书中也有详细的标定算法和流程介绍。
使用ArUco模块,可以基于ArUco标记角点或ChArUco角点进行标定。与使用传统棋盘图案相比,使用ArUco进行标定的功能要更广泛得,因为即使部分标定板被遮挡了,一样可以实现相机的标定。
可以同时使用ArUco标记角点或ChArUco角点进行标定。但是,强烈推荐使用ChArUco的方法,因为它提供的角点更精确。但是如果由于限制而无法使用ChArUco Board的情况下,也可以使用ArUco标定板板进行标定。
## 2.5.1 使用 ChArUco Boards 进行标定
要使用ChArUco进行标定,必须获得不同的角度的棋盘图像,这与传统标定方法对棋盘格的检测方法相同。使用ChArUco的好处是即使标定板部分被遮挡,只要任然有角点可以被检测,就可以实现标定。标定过程中获取的含有ChArUco标定板的图像如图2-28所示。
 使用ChArUco标定板进行标定的函数是calibrateCameraCharuco(),其使用方法在代码清单2-40给出。
```cpp
代码清单2-40 创建Mat类
cv::Ptr board = ... // create charuco board
cv::Size imgSize = ... // camera image size
std::vector> allCharucoCorners;
std::vector> allCharucoIds;
// Detect charuco board from several viewpoints and fill allCharucoCorners and allCharucoIds
...
...
// After capturing in several viewpoints, start calibration
cv::Mat cameraMatrix, distCoeffs;
std::vector rvecs, tvecs;
int calibrationFlags = ... // Set calibration flags (same than in calibrateCamera() function)
double repError = cv::aruco::calibrateCameraCharuco(allCharucoCorners, allCharucoIds, board, imgSize, cameraMatrix, distCoeffs, rvecs, tvecs, calibrationFlags);
```
在每个视角上捕获的ChArUco角点和ChArUco标识符存储在vector容器allCharucoCorners和allcharucoid中,每个视角一个元素。
calibrateCameraCharuco()函数将相机参数存储在数组cameraMatrix和distCoeffs中。该函数的返回值是标定的重投影误差。rvecs和tvecs中存储每幅图对应的相机姿态(相对于ChArUco板)。最后,calibrationFlags参数确定一些用于标定的选项。它的格式与基础库中calibrateCamera()函数中的flags参数格式相同。
完整的工作示例包含在模块示例文件夹中的calibrate_camera_charuco.cpp中,读者可以在扩展模块的文件中找到它。该函数调用时需要输入的参数在代码清单2-41中给出。
```cpp
代码清单2-41 :调用参数
_output path_" -dp="_path_/detector_params.yml" -w=5 -h=7 -sl=0.04 -ml=0.02 -d=10
```
## 2.5.2 使用 ArUco Boards 进行标定
如前所述,因为ChArUco角点比更准确ChAruco角点更精确,因此建议使用ChAruco标定板进行相机标定。进行摄像机校准,。但是在某些特殊情况下不得不使用ArUco标定板进行标定。使用ArUco标定板时,需要使用calibrateCameraAruco()函数。同样该函数也需要输入不同角度拍摄到的ArUco标定板图像。标定过程中获取的含有ArUco标定板的图像如图2-29所示
使用ChArUco标定板进行标定的函数是calibrateCameraCharuco(),其使用方法在代码清单2-40给出。
```cpp
代码清单2-40 创建Mat类
cv::Ptr board = ... // create charuco board
cv::Size imgSize = ... // camera image size
std::vector> allCharucoCorners;
std::vector> allCharucoIds;
// Detect charuco board from several viewpoints and fill allCharucoCorners and allCharucoIds
...
...
// After capturing in several viewpoints, start calibration
cv::Mat cameraMatrix, distCoeffs;
std::vector rvecs, tvecs;
int calibrationFlags = ... // Set calibration flags (same than in calibrateCamera() function)
double repError = cv::aruco::calibrateCameraCharuco(allCharucoCorners, allCharucoIds, board, imgSize, cameraMatrix, distCoeffs, rvecs, tvecs, calibrationFlags);
```
在每个视角上捕获的ChArUco角点和ChArUco标识符存储在vector容器allCharucoCorners和allcharucoid中,每个视角一个元素。
calibrateCameraCharuco()函数将相机参数存储在数组cameraMatrix和distCoeffs中。该函数的返回值是标定的重投影误差。rvecs和tvecs中存储每幅图对应的相机姿态(相对于ChArUco板)。最后,calibrationFlags参数确定一些用于标定的选项。它的格式与基础库中calibrateCamera()函数中的flags参数格式相同。
完整的工作示例包含在模块示例文件夹中的calibrate_camera_charuco.cpp中,读者可以在扩展模块的文件中找到它。该函数调用时需要输入的参数在代码清单2-41中给出。
```cpp
代码清单2-41 :调用参数
_output path_" -dp="_path_/detector_params.yml" -w=5 -h=7 -sl=0.04 -ml=0.02 -d=10
```
## 2.5.2 使用 ArUco Boards 进行标定
如前所述,因为ChArUco角点比更准确ChAruco角点更精确,因此建议使用ChAruco标定板进行相机标定。进行摄像机校准,。但是在某些特殊情况下不得不使用ArUco标定板进行标定。使用ArUco标定板时,需要使用calibrateCameraAruco()函数。同样该函数也需要输入不同角度拍摄到的ArUco标定板图像。标定过程中获取的含有ArUco标定板的图像如图2-29所示
 calibrateCameraAruco()函数的使用方法在代码清单2-42中给出。
```cpp
代码清单2-42 创建Mat类
cv::Ptr board = ... // create aruco board
cv::Size imgSize = ... // camera image size
std::vector> allCornersConcatenated;
std::vector allIdsConcatenated;
std::vector markerCounterPerFrame;
// Detect aruco board from several viewpoints and fill allCornersConcatenated, allIdsConcatenated and markerCounterPerFrame
...
...
// After capturing in several viewpoints, start calibration
cv::Mat cameraMatrix, distCoeffs;
std::vector rvecs, tvecs;
int calibrationFlags = ... // Set calibration flags (same than in calibrateCamera() function)
double repError = cv::aruco::calibrateCameraAruco(allCornersConcatenated, allIdsConcatenated, markerCounterPerFrame, board, imgSize, cameraMatrix, distCoeffs, rvecs, tvecs, calibrationFlags);
```
与calibrateCameraCharuco()函数相反,在每幅图中检测到的标记将被串联存储在数组allCornersConcatenated和allCornersConcatenated(该函数的前两个参数)中。第三个参数(数组markerCounterPerFrame)指示在每幅图中检测到的标记数。
完整的工作示例包含在模块示例文件夹中的calibrate_camera.cpp中,读者可以在扩展模块的文件中找到它。该函数调用时需要输入的参数在代码清单2-43中给出。
```cpp
代码清单2-43 :调用参数
"_path_/calib.txt" -w=5 -h=7 -l=100 -s=10 -d=10
```
================================================
FILE: chapter 2/菱形标记检测.md
================================================
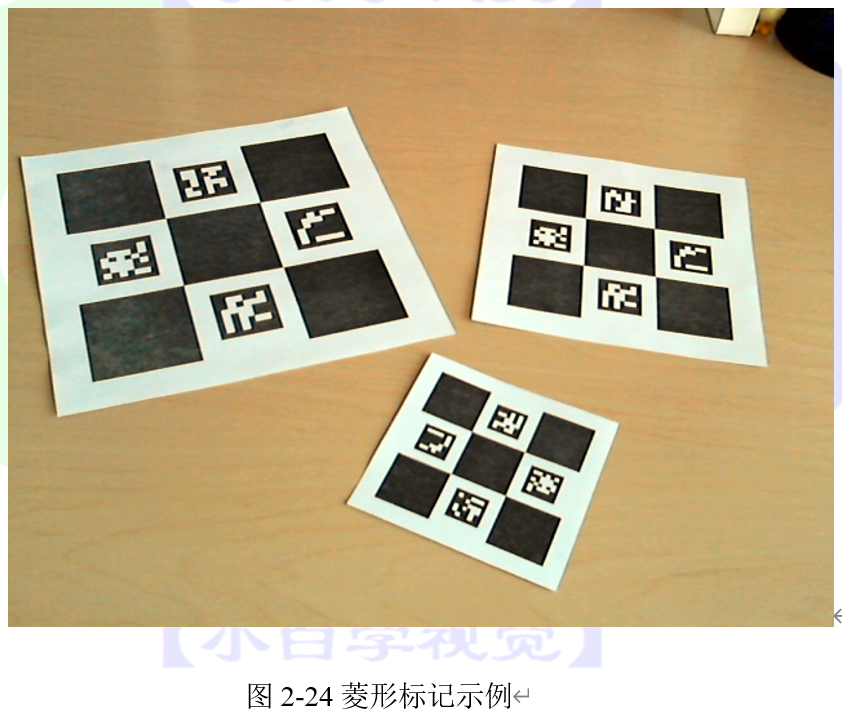
ChArUco菱形标记(或简称菱形标记)是由3×3的方块和白色方块内的4个ArUco标记组成的棋盘,如图2-24中所示。它在外观上和ChArUco board很相似,但它们在概念上是不同的。
calibrateCameraAruco()函数的使用方法在代码清单2-42中给出。
```cpp
代码清单2-42 创建Mat类
cv::Ptr board = ... // create aruco board
cv::Size imgSize = ... // camera image size
std::vector> allCornersConcatenated;
std::vector allIdsConcatenated;
std::vector markerCounterPerFrame;
// Detect aruco board from several viewpoints and fill allCornersConcatenated, allIdsConcatenated and markerCounterPerFrame
...
...
// After capturing in several viewpoints, start calibration
cv::Mat cameraMatrix, distCoeffs;
std::vector rvecs, tvecs;
int calibrationFlags = ... // Set calibration flags (same than in calibrateCamera() function)
double repError = cv::aruco::calibrateCameraAruco(allCornersConcatenated, allIdsConcatenated, markerCounterPerFrame, board, imgSize, cameraMatrix, distCoeffs, rvecs, tvecs, calibrationFlags);
```
与calibrateCameraCharuco()函数相反,在每幅图中检测到的标记将被串联存储在数组allCornersConcatenated和allCornersConcatenated(该函数的前两个参数)中。第三个参数(数组markerCounterPerFrame)指示在每幅图中检测到的标记数。
完整的工作示例包含在模块示例文件夹中的calibrate_camera.cpp中,读者可以在扩展模块的文件中找到它。该函数调用时需要输入的参数在代码清单2-43中给出。
```cpp
代码清单2-43 :调用参数
"_path_/calib.txt" -w=5 -h=7 -l=100 -s=10 -d=10
```
================================================
FILE: chapter 2/菱形标记检测.md
================================================
ChArUco菱形标记(或简称菱形标记)是由3×3的方块和白色方块内的4个ArUco标记组成的棋盘,如图2-24中所示。它在外观上和ChArUco board很相似,但它们在概念上是不同的。
无论是ChArUco board还是Diamond marker,其检测都是基于前文检测到的ArUco marker。在ChArUco中,使用的标记是通过直接查找它们的标识符来选择的。这意味着如果在一个图像上发现一个标记(包括在图板中),它将自动被认为是属于图板的。此外,如果图像中存在多个标识版,就会产生歧义,因为系统无法知道应该使用哪个标识板。
然而,菱形标记检测并不是基于标识符的。相反,它们的检测是基于标记的相对位置。因此,标识符可以在同一菱形标记中重复出现,也可以在不同的菱形中重复出现,并且可以同时检测它们而不产生歧义。然而,由于根据相对位置寻找标记的复杂性,菱形标记的大小被限制在3×3个正方形和4个标记。
与单个ArUco标记一样,每个菱形标记由4个角和一个标识符组成。四个角对应于标记中的4个棋盘角,标识符实际上是一个由4个数字组成的数组,这些数字是菱形内4个ArUco标记的标识符。
菱形标记在图像中需要重复标记的情况下十分有用。例如,通过使用菱形标记来增加单个标记的标识数量。它们最多允许 个不同的id,其中N为使用的字典中标记的数目。例如,可以用四个标记id中的一个来表示标记的规模(即正方形的大小),这样可以找到不同大小的相同的菱形。此外,由于它的角是棋盘的角,可以用来进行精确的姿态估计。检测菱形标记的函数在中,OpenCV提供了检测菱形标志的示例程序,该程序在aruco模块的samples文件夹中的diamond_detector.cpp文件中。
## 2.4.1 创建ChArUco菱形
菱形标记图像可以通过使用drawCharucoDiamond()函数很方便地创建,具体代码在代码清单2-34中给出。
```cpp
代码清单2-34
cv::Mat diamondImage;
cv::Ptr dictionary = cv::aruco::getPredefinedDictionary(cv::aruco::DICT_6X6_250);
cv::aruco::drawCharucoDiamond(dictionary, cv::Vec4i(45,68,28,74), 200, 120, markerImage);
```
代码清单2-34中的程序将创建一个大小为200像素,标记大小为120像素的菱形标记图像。标记id在第二个参数中以Vec4i对象给出。菱形布局中标记id的顺序与标准ChArUco板相同,即顶部、左侧、右侧和底部。产生的图像如图2-25所示。

模块sample文件夹中的create_diamond.cpp中包含了一个完整的生成菱形标记的的示例程序,我们也可以直接使用该文件来生成菱形标记。这个文件的使用方式在代码清单2-35中给出
```cpp
代码清单2-35
"_path_/mydiamond.png" -sl=200 -ml=120 -d=10 -ids=45,68,28,74
```
## 2.4.2 ChArUco菱形检测
在大多数情况下,菱形标记的检测需要先检测ArUco标记。检测标记后,使用detectCharucoDiamond()函数检测菱形,具体代码在代码清单2-36中给出。
```cpp
代码清单2-36
cv::Mat inputImage;
float squareLength = 0.40;
float markerLength = 0.25;
...
std::vector markerIds;
std::vector> markerCorners;
// detect ArUco markers
cv::aruco::detectMarkers(inputImage, dictionary, markerCorners, markerIds);
std::vector diamondIds;
std::vector> diamondCorners;
// detect diamon diamonds
cv::aruco::detectCharucoDiamond(inputImage, markerCorners, markerIds, squareLength / markerLength, diamondCorners, diamondIds);
```
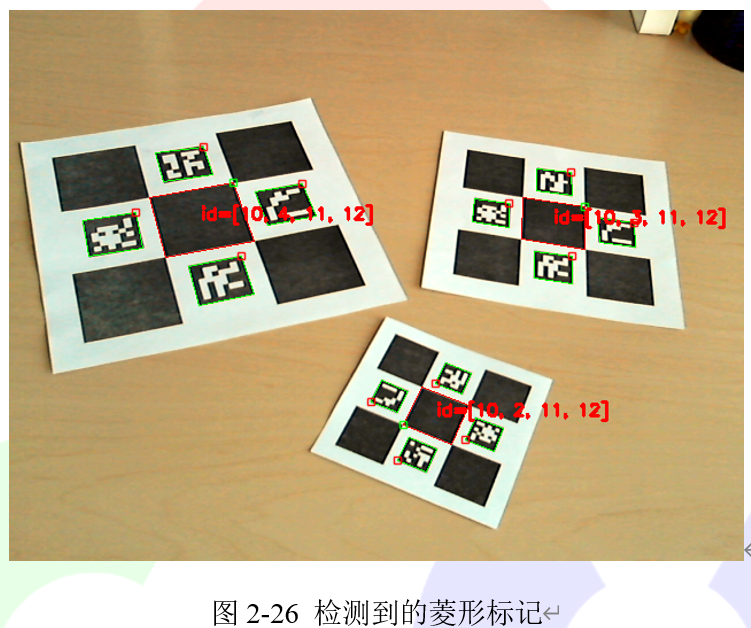
detectCharucoDiamond()函数的参数有原始图像和检测到的标记角和标记对应的id。输入图像必须对ChArUco角点执行亚像素细化。此外,函数的参数还包括正方形大小和标记大小的比例,这是从标记相对位置检测菱形和插入ChArUco所需要的。第五个参数diamondCorners是一个包含每个检测到的菱形的所有四个角点的数组,是一个输出参数。它的格式类似于detectmarker()函数所检测到的角点,对于每个菱形,角点的表示顺序与ArUco标记相同,即从左上角开始顺时针排列。第六个参数diamondIds是返回的所有菱形角的id。每个id实际上是一个由4个整数组成的数组,可以用Vec4i表示。使用drawDetectedDiamonds()函数可以对检测到的菱形进行可视化处理,该函数只接收图像和菱形的边角和id,菱形标记可视化的结果如图2-26所示。
OpenCV提供了完整的菱形标记检测程序,该程序在模块示例文件夹内的detect_diamonds.cpp中。该程序的使用当时如代码清单2-37中所示。
```cpp
代码清单2-37
-c="_path_/calib.txt" -dp="_path_/detector_params.yml" -sl=0.04 -ml=0.02 -d=10
```
## 2.4.3 ChArUco菱形姿态估计
由于ChArUco菱形标记是由它的四个角表示的,所以它的姿态可以用与单个ArUco标记相同的方式进行估计,即使用estimatePoseSingleMarkers()函数。代码清单2-38中给出了示例程序。
```cpp
代码清单2-38
std::vector diamondIds;
std::vector> diamondCorners;
// detect diamon diamonds
cv::aruco::detectCharucoDiamond(inputImage, markerCorners, markerIds, squareLength / markerLength, diamondCorners, diamondIds);
// estimate poses
std::vector rvecs, tvecs;
cv::aruco::estimatePoseSingleMarkers(diamondCorners, squareLength, camMatrix, distCoeffs, rvecs, tvecs);
// draw axis
for(unsigned int i=0; i
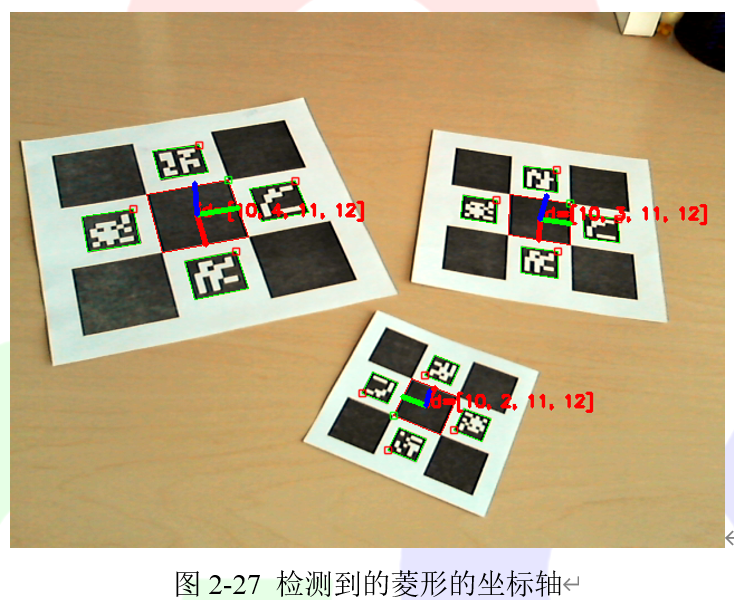
菱形位姿的坐标系统将位于标记的中心,Z轴指向外,就像简单的ArUco标记位姿估计一样。OpenCV提供了完整的程序代码,该代码在模块sample文件夹内的detect_diamonds.cpp文件中。该程序可以通过代码清单2-39中的命令进行调用。
```cpp
代码清单2-39
-c="_output path_/calib.txt" -dp="_path_/detector_params.yml" -sl=0.04 -ml=0.02 -d=10
```
================================================
FILE: chapter 20/用于快速边缘检测的结构化森.md
================================================
# 20.2 用于快速边缘检测的结构化森林(Structured forests)
在本节教程中,我们将学会使用结构化森林来进行图像边缘检测。该算法的具体原理读者可以查阅下面两篇文章进行详细学习:
- Structured forests for fast edge detection
- Sketch tokens: A learned mid-level representation for contour and object detection
## 20.2.1 例图
本历程中所有使用的图片和处理结果都在下方给出。读者也可以在小白学视觉公众号后台回复“**快速边缘检测**”获取所有图片。


 > 注意:
>
> Canny边 缘 检 测 等 二 值 化 技 术 适 用 于 两 种 算 法 (Sobel 和StructuredEdgeDetection::detectEdges)生成的边缘。
## 20.2.2 C++代码
```
/**************************************************************************************
The structered edge demo requires you to provide a model.
This model can be found at the opencv_extra repository on Github on the following link:
https://github.com/opencv/opencv_extra/blob/master/testdata/cv/ximgproc/model.yml.gz
***************************************************************************************/
#include
#include "opencv2/highgui.hpp"
#include "opencv2/core/utility.hpp"
#include
using namespace cv;
using namespace cv::ximgproc;
const char* keys =
{
"{i || input image name}"
"{m || model name}"
"{o || output image name}"
};
int main( int argc, const char** argv )
{
bool printHelp = ( argc == 1 );
printHelp = printHelp || ( argc == 2 && String(argv[1]) == "--help" );
printHelp = printHelp || ( argc == 2 && String(argv[1]) == "-h" );
if ( printHelp )
{
std::cout << "\nThis sample demonstrates structured forests for fast edge detection\n"
"Call:\n"
" structured_edge_detection -i=in_image_name -m=model_name [-o=out_image_name]\n\n";
return 0;
}
CommandLineParser parser(argc, argv, keys);
if ( !parser.check() )
{
parser.printErrors();
return -1;
}
String modelFilename = parser.get("m");
String inFilename = parser.get("i");
String outFilename = parser.get("o");
Mat image = imread(inFilename, 1);
if ( image.empty() )
CV_Error(Error::StsError, String("Cannot read image file: ") + inFilename);
if ( modelFilename.size() == 0)
CV_Error(Error::StsError, String("Empty model name"));
image.convertTo(image, DataType::type, 1/255.0);
Mat edges(image.size(), image.type());
Ptr pDollar =
createStructuredEdgeDetection(modelFilename);
pDollar->detectEdges(image, edges);
// computes orientation from edge map
Mat orientation_map;
pDollar->computeOrientation(edges, orientation_map);
// suppress edges
Mat edge_nms;
pDollar->edgesNms(edges, orientation_map, edge_nms, 2, 0, 1, true);
if ( outFilename.size() == 0 )
{
namedWindow("edges", 1);
imshow("edges", edges);
namedWindow("edges nms", 1);
imshow("edges nms", edge_nms);
waitKey(0);
}
else
imwrite(outFilename, 255*edges);
return 0;
}
```
## 20.2.3 代码解释
1、加载源彩色图片
代码清单 20-7:加载图片
```
cv::Mat image = cv::imread(inFilename, 1);
if ( image.empty() )
{
printf("Cannot read image file: %s\n", inFilename.c_str());
return -1;
}
```
2、将源图转换到[0,1]范围内
代码清单 20-8:改变图像数据类型
```
image.convertTo(image, cv::DataType::type, 1/255.0);
```
3、执行主算法
代码清单 20-9:执行算法
```
cv::Mat edges(image.size(), image.type());
cv::Ptr pDollar =
cv::createStructuredEdgeDetection(modelFilename);
pDollar->detectEdges(image, edges);
```
4、展示结果
代码清单 20-10:展示结果
```
if ( outFilename == "" )
{
cv::namedWindow("edges", 1);
cv::imshow("edges", edges);
cv::waitKey(0);
}
else
cv::imwrite(outFilename, 255*edges);
```
================================================
FILE: chapter 20/视差图滤波.md
================================================
# 20.1 视差图滤波
## 20.1.1 简介
立体匹配算法,尤其是只使用 CPU 需要实时处理的高度优化算法,在面对具有挑战性的序列上往往会出现相当多的错误。这些误差通常集中在均匀的无纹理区域、半遮挡区域和靠近深度不连续区域。一个解决立体匹配误差的方法就是使用各种技术检测潜在的不准确的视差值并使其无效,从而使视差图半稀疏化。一些这种思想的算法已经在 StereoBM 和StereoSGBM 中实现。另一种方法是使用某种过滤手段将视差图的边缘与源图像的边缘对齐,并将视差值从高置信区域传播到低置信区域(如半遮挡区域)。最近在边缘感知过滤方面的进展使得在 CPU 实时处理的约束下能够执行这种后过滤。
在本节教程中,我们将学习如何对视差图进行滤波来改进 StereoBM 和 StereoSGBM 算法的结果。本教程使用的两张图像分别在图 20-1 和图 20-2 中给出。
> 注意:
>
> Canny边 缘 检 测 等 二 值 化 技 术 适 用 于 两 种 算 法 (Sobel 和StructuredEdgeDetection::detectEdges)生成的边缘。
## 20.2.2 C++代码
```
/**************************************************************************************
The structered edge demo requires you to provide a model.
This model can be found at the opencv_extra repository on Github on the following link:
https://github.com/opencv/opencv_extra/blob/master/testdata/cv/ximgproc/model.yml.gz
***************************************************************************************/
#include
#include "opencv2/highgui.hpp"
#include "opencv2/core/utility.hpp"
#include
using namespace cv;
using namespace cv::ximgproc;
const char* keys =
{
"{i || input image name}"
"{m || model name}"
"{o || output image name}"
};
int main( int argc, const char** argv )
{
bool printHelp = ( argc == 1 );
printHelp = printHelp || ( argc == 2 && String(argv[1]) == "--help" );
printHelp = printHelp || ( argc == 2 && String(argv[1]) == "-h" );
if ( printHelp )
{
std::cout << "\nThis sample demonstrates structured forests for fast edge detection\n"
"Call:\n"
" structured_edge_detection -i=in_image_name -m=model_name [-o=out_image_name]\n\n";
return 0;
}
CommandLineParser parser(argc, argv, keys);
if ( !parser.check() )
{
parser.printErrors();
return -1;
}
String modelFilename = parser.get("m");
String inFilename = parser.get("i");
String outFilename = parser.get("o");
Mat image = imread(inFilename, 1);
if ( image.empty() )
CV_Error(Error::StsError, String("Cannot read image file: ") + inFilename);
if ( modelFilename.size() == 0)
CV_Error(Error::StsError, String("Empty model name"));
image.convertTo(image, DataType::type, 1/255.0);
Mat edges(image.size(), image.type());
Ptr pDollar =
createStructuredEdgeDetection(modelFilename);
pDollar->detectEdges(image, edges);
// computes orientation from edge map
Mat orientation_map;
pDollar->computeOrientation(edges, orientation_map);
// suppress edges
Mat edge_nms;
pDollar->edgesNms(edges, orientation_map, edge_nms, 2, 0, 1, true);
if ( outFilename.size() == 0 )
{
namedWindow("edges", 1);
imshow("edges", edges);
namedWindow("edges nms", 1);
imshow("edges nms", edge_nms);
waitKey(0);
}
else
imwrite(outFilename, 255*edges);
return 0;
}
```
## 20.2.3 代码解释
1、加载源彩色图片
代码清单 20-7:加载图片
```
cv::Mat image = cv::imread(inFilename, 1);
if ( image.empty() )
{
printf("Cannot read image file: %s\n", inFilename.c_str());
return -1;
}
```
2、将源图转换到[0,1]范围内
代码清单 20-8:改变图像数据类型
```
image.convertTo(image, cv::DataType::type, 1/255.0);
```
3、执行主算法
代码清单 20-9:执行算法
```
cv::Mat edges(image.size(), image.type());
cv::Ptr pDollar =
cv::createStructuredEdgeDetection(modelFilename);
pDollar->detectEdges(image, edges);
```
4、展示结果
代码清单 20-10:展示结果
```
if ( outFilename == "" )
{
cv::namedWindow("edges", 1);
cv::imshow("edges", edges);
cv::waitKey(0);
}
else
cv::imwrite(outFilename, 255*edges);
```
================================================
FILE: chapter 20/视差图滤波.md
================================================
# 20.1 视差图滤波
## 20.1.1 简介
立体匹配算法,尤其是只使用 CPU 需要实时处理的高度优化算法,在面对具有挑战性的序列上往往会出现相当多的错误。这些误差通常集中在均匀的无纹理区域、半遮挡区域和靠近深度不连续区域。一个解决立体匹配误差的方法就是使用各种技术检测潜在的不准确的视差值并使其无效,从而使视差图半稀疏化。一些这种思想的算法已经在 StereoBM 和StereoSGBM 中实现。另一种方法是使用某种过滤手段将视差图的边缘与源图像的边缘对齐,并将视差值从高置信区域传播到低置信区域(如半遮挡区域)。最近在边缘感知过滤方面的进展使得在 CPU 实时处理的约束下能够执行这种后过滤。
在本节教程中,我们将学习如何对视差图进行滤波来改进 StereoBM 和 StereoSGBM 算法的结果。本教程使用的两张图像分别在图 20-1 和图 20-2 中给出。

 ## 20.1.2 C++代码
我们将使用示例应用程序中的代码片段作为讲解使用,完整的代码可以从 OpenCV 官网[下载](https://github.com/opencv/opencv_contrib/blob/master/modules/ximgproc/samples/disparity_filtering.cpp)。
> 提示
>
> 本教程的完整程序可以在小白学视觉微信公众号后台回复“视差图滤波”获取。
## 20.1.3 代码解释
所提供的示例具有多个选项,这些选项在生成的视差图的速度和质量之间产生了不同的权衡。 如果用户提供了真实的视差图,则将同时测量速度和质量。 在本教程中,我们将详细介绍默认管道,该管道旨在在CPU实时处理的约束下提供最佳质量。
**代码清单 20-1:加载左右视图**
```
Mat left = imread(left_im ,IMREAD_COLOR);
if ( left.empty() )
{
cout<<"Cannot read image file: "< left_matcher = StereoBM::create(max_disp,wsize);
wls_filter = createDisparityWLSFilter(left_matcher);
Ptr right_matcher = createRightMatcher(left_matcher);
cvtColor(left_for_matcher, left_for_matcher, COLOR_BGR2GRAY);
cvtColor(right_for_matcher, right_for_matcher, COLOR_BGR2GRAY);
matching_time = (double)getTickCount();
left_matcher-> compute(left_for_matcher, right_for_matcher,left_disp);
right_matcher->compute(right_for_matcher,left_for_matcher, right_disp);
matching_time = ((double)getTickCount()-matching_time)/getTickFrequency();
```
为了更快地处理,我们使用 StereoBM 算法。如果对速度要求不高,那么 StereoSGBM算法则能够提供更好的质量。filter 实例是通过我们打算使用的 StereoMatcher 实例创建的。createRightMatcher()函数会返回另一个 matcher 实例。然后使用这两个 matcher 实例来计算左边和右边视图的视差图。
## 20.1.6 进行滤波
```
wls_filter->setLambda(lambda);
wls_filter->setSigmaColor(sigma);
filtering_time = (double)getTickCount();
wls_filter->filter(left_disp,left,filtered_disp,right_disp);
filtering_time = ((double)getTickCount() - filtering_time)/getTickFrequency();
```
由各个 matcher 实例得到的视差图以及源左视图传给 filter。这里需要注意,滤波过程需要使用原始的非缩小视图。视差图会以边缘感知的方式自动放大,以匹配原始的视图分辨率。结果存储在 filtered_disp 中。
## 20.1.7 可视化视差图
```
Mat raw_disp_vis;
getDisparityVis(left_disp,raw_disp_vis,vis_mult);
namedWindow("raw disparity", WINDOW_AUTOSIZE);
imshow("raw disparity", raw_disp_vis);
Mat filtered_disp_vis;
getDisparityVis(filtered_disp,filtered_disp_vis,vis_mult);
namedWindow("filtered disparity", WINDOW_AUTOSIZE);
imshow("filtered disparity", filtered_disp_vis);
if(!solved_disp.empty())
{
Mat solved_disp_vis;
getDisparityVis(solved_disp,solved_disp_vis,vis_mult);
namedWindow("solved disparity", WINDOW_AUTOSIZE);
imshow("solved disparity", solved_disp_vis);
Mat solved_filtered_disp_vis;
getDisparityVis(solved_filtered_disp,solved_filtered_disp_vis,vis_mult);
namedWindow("solved wls disparity", WINDOW_AUTOSIZE);
imshow("solved wls disparity", solved_filtered_disp_vis);
}
while(1)
{
char key = (char)waitKey();
if( key == 27 || key == 'q' || key == 'Q') // 'ESC'
break;
}
```
为了方便,我们使用函数 getdisityvis()来可视化视差图。该函数的第二个参数定义对比度(在可视化中,所有的视差值都由这个值缩放)。
## 20.1.8 结果
## 20.1.2 C++代码
我们将使用示例应用程序中的代码片段作为讲解使用,完整的代码可以从 OpenCV 官网[下载](https://github.com/opencv/opencv_contrib/blob/master/modules/ximgproc/samples/disparity_filtering.cpp)。
> 提示
>
> 本教程的完整程序可以在小白学视觉微信公众号后台回复“视差图滤波”获取。
## 20.1.3 代码解释
所提供的示例具有多个选项,这些选项在生成的视差图的速度和质量之间产生了不同的权衡。 如果用户提供了真实的视差图,则将同时测量速度和质量。 在本教程中,我们将详细介绍默认管道,该管道旨在在CPU实时处理的约束下提供最佳质量。
**代码清单 20-1:加载左右视图**
```
Mat left = imread(left_im ,IMREAD_COLOR);
if ( left.empty() )
{
cout<<"Cannot read image file: "< left_matcher = StereoBM::create(max_disp,wsize);
wls_filter = createDisparityWLSFilter(left_matcher);
Ptr right_matcher = createRightMatcher(left_matcher);
cvtColor(left_for_matcher, left_for_matcher, COLOR_BGR2GRAY);
cvtColor(right_for_matcher, right_for_matcher, COLOR_BGR2GRAY);
matching_time = (double)getTickCount();
left_matcher-> compute(left_for_matcher, right_for_matcher,left_disp);
right_matcher->compute(right_for_matcher,left_for_matcher, right_disp);
matching_time = ((double)getTickCount()-matching_time)/getTickFrequency();
```
为了更快地处理,我们使用 StereoBM 算法。如果对速度要求不高,那么 StereoSGBM算法则能够提供更好的质量。filter 实例是通过我们打算使用的 StereoMatcher 实例创建的。createRightMatcher()函数会返回另一个 matcher 实例。然后使用这两个 matcher 实例来计算左边和右边视图的视差图。
## 20.1.6 进行滤波
```
wls_filter->setLambda(lambda);
wls_filter->setSigmaColor(sigma);
filtering_time = (double)getTickCount();
wls_filter->filter(left_disp,left,filtered_disp,right_disp);
filtering_time = ((double)getTickCount() - filtering_time)/getTickFrequency();
```
由各个 matcher 实例得到的视差图以及源左视图传给 filter。这里需要注意,滤波过程需要使用原始的非缩小视图。视差图会以边缘感知的方式自动放大,以匹配原始的视图分辨率。结果存储在 filtered_disp 中。
## 20.1.7 可视化视差图
```
Mat raw_disp_vis;
getDisparityVis(left_disp,raw_disp_vis,vis_mult);
namedWindow("raw disparity", WINDOW_AUTOSIZE);
imshow("raw disparity", raw_disp_vis);
Mat filtered_disp_vis;
getDisparityVis(filtered_disp,filtered_disp_vis,vis_mult);
namedWindow("filtered disparity", WINDOW_AUTOSIZE);
imshow("filtered disparity", filtered_disp_vis);
if(!solved_disp.empty())
{
Mat solved_disp_vis;
getDisparityVis(solved_disp,solved_disp_vis,vis_mult);
namedWindow("solved disparity", WINDOW_AUTOSIZE);
imshow("solved disparity", solved_disp_vis);
Mat solved_filtered_disp_vis;
getDisparityVis(solved_filtered_disp,solved_filtered_disp_vis,vis_mult);
namedWindow("solved wls disparity", WINDOW_AUTOSIZE);
imshow("solved wls disparity", solved_filtered_disp_vis);
}
while(1)
{
char key = (char)waitKey();
if( key == 27 || key == 'q' || key == 'Q') // 'ESC'
break;
}
```
为了方便,我们使用函数 getdisityvis()来可视化视差图。该函数的第二个参数定义对比度(在可视化中,所有的视差值都由这个值缩放)。
## 20.1.8 结果

 ================================================
FILE: chapter 20/训练结构化森林.md
================================================
# 20.3 训练结构化森林
在本节教程中,我们展示如何使用 Matlab 文件来训练我们自己的结构化森林。
## 20.3.1 训练流程
1. 通过网络寻找资源并下载 Piotr's Toolbox,并将其放入单独的目录中,如 PToolbox。
下载地址为:http://pdollar.github.io/toolbox/index.html
2. 通过网络寻找资源并下载 BSDS500 数据集,并将其放入单独的目录中,并命名为BSR。下载地址为:https://www2.eecs.berkeley.edu/Research/Projects/CS/vision/grouping/BSR/
3. 将这两个文件及其子文件都放到 Matlab 目录中。
4. 下载检测代码,下载地址为:http://research.microsoft.com/en-us/downloads/389109f6-b4e8-404c-84bf-239f7cbf4e3d/
并将其放到根目录中,现在我们应该有如下文件:
```
BSR
PToolbox
models
private
Contents.m
edgesChns.m
edgesDemo.m
edgesDemoRgbd.m
edgesDetect.m
edgesEval.m
edgesEvalDir.m
edgesEvalImg.m
edgesEvalPlot.m
edgesSweeps.m
edgesTrain.m
license.txt
readme.txt
```
5. 将 models/forest/modelFinal.mat 重命名为 models/forest/modelFinal.mat.backup。
6. 打开 edgesChns.m,注释 26-41 行,并在注释后面加入代码清单 20-11 中的代码:
代码清单 20-11
```
shrink=opts.shrink;
chns = single(getFeatures( im2double(I) ));
```
7. 之后编译 getFeatures。代码清单 20-22 是实现代码。
```
#include
#include
#include
#include
#include "MxArray.hpp" // https://github.com/kyamagu/mexopencv
class NewRFFeatureGetter : public cv::RFFeatureGetter
{
public:
NewRFFeatureGetter() : name("NewRFFeatureGetter"){}
virtual void getFeatures(const cv::Mat &src, NChannelsMat &features,
const int gnrmRad, const int gsmthRad,
const int shrink, const int outNum, const int gradNum) const
{
// here your feature extraction code, the default one is:
// resulting features Mat should be n-channels, floating point matrix
}
protected:
cv::String name;
};
MEXFUNCTION_LINKAGE void mexFunction(int nlhs, mxArray *plhs[], int nrhs, const mxArray *prhs[])
{
if (nlhs != 1) mexErrMsgTxt("nlhs != 1");
if (nrhs != 1) mexErrMsgTxt("nrhs != 1");
cv::Mat src = MxArray(prhs[0]).toMat();
src.convertTo(src, cv::DataType::type);
std::string modelFile = MxArray(prhs[1]).toString();
NewRFFeatureGetter *pDollar = createNewRFFeatureGetter();
cv::Mat edges;
pDollar->getFeatures(src, edges, 4, 0, 2, 13, 4);
// you can use other numbers here
edges.convertTo(edges, cv::DataType::type);
plhs[0] = MxArray(edges);
}
```
8. 将编译得到的 mex 文件放到根目录,运行 edgesDemo。我们需要等待几个小时,之后新的模型会出现在 models/forest/文件夹下。
9. 最后一步将经过训练的模型从 Matlab 二进制格式转换为 YAML,这样就可以使用我们的ocv::StructuredEdgeDetection 函数。为此,运行opencv_contrib/ximpgroc/tutorials/scripts / modelConvert(model,“model.yml”)即可。
## 20.3.2 如何使用你的模型
如果想使用自己的模型,只需使用上面定义的 NewRFFeatureGetter 类的扩展构造函数。
代码清单 20-13
```
cv::StructuredEdgeDetection pDollar
= cv::createStructuredEdgeDetection( modelName, makePtr() );
```
================================================
FILE: chapter 21/图像修复.md
================================================
# 21.1 图像修复
在本节篇教程中,我们将学习如何使用快速频率选择重构(FSR)来进行图像修复。
## 21.1.1 图像修复基础
图像修补是重建图像中受损或缺失部分的过程,通过用类似于相邻像素的像素值替换失真的像素实现的图像修复。目前图像修复有多种算法,本教程使用的是快速频率选择重构(FSR)法。FSR 利用图像小区域在傅里叶域中可以稀疏表示的特性来重构图像信号。对这个算法感兴趣的读者可以详细阅读下面两篇论文:
- Signal and loss geometry aware frequency selective extrapolation for error concealment
- Resampling images to a regular grid from a non-regular subset of pixel positions using
frequency selective reconstruction
FSR 可以应用于以下应用领域:
- 图像修复:采样掩模表示需要重建的失真输入图像的缺失像素。
- 不规则采样:有关如何选择好的采样掩模。
## 21.1.2 示例教程
代码清单 21-1 中给出了如何使用 FSR 进行图像修复。掩模的非零像素表示有效的图像区域,零像素表示需要重建的区域。我们可以使用 Paint 或 GIMP 等工具手动创建任意掩码。例如从一个简单的白色图像开始,用黑色画一些变形。原始图像、含有失真区域的图像以及修复后的图像分别在图 21-1 和图 21-2 中给出。
**代码清单 21-1:图像修复示例程序**
```c++
#include
#include
#include
using namespace cv;
int main(int argc, char** argv)
{
// read image and error pattern
Mat original_, mask_;
original_ = imread("images/kodim22.png");
mask_ = imread("images/pattern_random.png", IMREAD_GRAYSCALE);
// make sure that mask and source image have the same size
Mat mask;
resize(mask_, mask, original_.size(), 0.0, 0.0, cv::INTER_NEAREST);
// distort image
Mat im_distorted(original_.size(), original_.type(), Scalar::all(0));
original_.copyTo(im_distorted, mask); // copy valid pixels only (i.e. non-zero pixels in mask)
// reconstruct the distorted image
// choose quality profile fast (xphoto::INPAINT_FSR_FAST) or best (xphoto::INPAINT_FSR_BEST)
Mat reconstructed;
xphoto::inpaint(im_distorted, mask, reconstructed, xphoto::INPAINT_FSR_FAST);
imshow("orignal image", original_);
imshow("distorted image", im_distorted);
imshow("reconstructed image", reconstructed);
waitKey();
return 0;
}
```
================================================
FILE: chapter 20/训练结构化森林.md
================================================
# 20.3 训练结构化森林
在本节教程中,我们展示如何使用 Matlab 文件来训练我们自己的结构化森林。
## 20.3.1 训练流程
1. 通过网络寻找资源并下载 Piotr's Toolbox,并将其放入单独的目录中,如 PToolbox。
下载地址为:http://pdollar.github.io/toolbox/index.html
2. 通过网络寻找资源并下载 BSDS500 数据集,并将其放入单独的目录中,并命名为BSR。下载地址为:https://www2.eecs.berkeley.edu/Research/Projects/CS/vision/grouping/BSR/
3. 将这两个文件及其子文件都放到 Matlab 目录中。
4. 下载检测代码,下载地址为:http://research.microsoft.com/en-us/downloads/389109f6-b4e8-404c-84bf-239f7cbf4e3d/
并将其放到根目录中,现在我们应该有如下文件:
```
BSR
PToolbox
models
private
Contents.m
edgesChns.m
edgesDemo.m
edgesDemoRgbd.m
edgesDetect.m
edgesEval.m
edgesEvalDir.m
edgesEvalImg.m
edgesEvalPlot.m
edgesSweeps.m
edgesTrain.m
license.txt
readme.txt
```
5. 将 models/forest/modelFinal.mat 重命名为 models/forest/modelFinal.mat.backup。
6. 打开 edgesChns.m,注释 26-41 行,并在注释后面加入代码清单 20-11 中的代码:
代码清单 20-11
```
shrink=opts.shrink;
chns = single(getFeatures( im2double(I) ));
```
7. 之后编译 getFeatures。代码清单 20-22 是实现代码。
```
#include
#include
#include
#include
#include "MxArray.hpp" // https://github.com/kyamagu/mexopencv
class NewRFFeatureGetter : public cv::RFFeatureGetter
{
public:
NewRFFeatureGetter() : name("NewRFFeatureGetter"){}
virtual void getFeatures(const cv::Mat &src, NChannelsMat &features,
const int gnrmRad, const int gsmthRad,
const int shrink, const int outNum, const int gradNum) const
{
// here your feature extraction code, the default one is:
// resulting features Mat should be n-channels, floating point matrix
}
protected:
cv::String name;
};
MEXFUNCTION_LINKAGE void mexFunction(int nlhs, mxArray *plhs[], int nrhs, const mxArray *prhs[])
{
if (nlhs != 1) mexErrMsgTxt("nlhs != 1");
if (nrhs != 1) mexErrMsgTxt("nrhs != 1");
cv::Mat src = MxArray(prhs[0]).toMat();
src.convertTo(src, cv::DataType::type);
std::string modelFile = MxArray(prhs[1]).toString();
NewRFFeatureGetter *pDollar = createNewRFFeatureGetter();
cv::Mat edges;
pDollar->getFeatures(src, edges, 4, 0, 2, 13, 4);
// you can use other numbers here
edges.convertTo(edges, cv::DataType::type);
plhs[0] = MxArray(edges);
}
```
8. 将编译得到的 mex 文件放到根目录,运行 edgesDemo。我们需要等待几个小时,之后新的模型会出现在 models/forest/文件夹下。
9. 最后一步将经过训练的模型从 Matlab 二进制格式转换为 YAML,这样就可以使用我们的ocv::StructuredEdgeDetection 函数。为此,运行opencv_contrib/ximpgroc/tutorials/scripts / modelConvert(model,“model.yml”)即可。
## 20.3.2 如何使用你的模型
如果想使用自己的模型,只需使用上面定义的 NewRFFeatureGetter 类的扩展构造函数。
代码清单 20-13
```
cv::StructuredEdgeDetection pDollar
= cv::createStructuredEdgeDetection( modelName, makePtr() );
```
================================================
FILE: chapter 21/图像修复.md
================================================
# 21.1 图像修复
在本节篇教程中,我们将学习如何使用快速频率选择重构(FSR)来进行图像修复。
## 21.1.1 图像修复基础
图像修补是重建图像中受损或缺失部分的过程,通过用类似于相邻像素的像素值替换失真的像素实现的图像修复。目前图像修复有多种算法,本教程使用的是快速频率选择重构(FSR)法。FSR 利用图像小区域在傅里叶域中可以稀疏表示的特性来重构图像信号。对这个算法感兴趣的读者可以详细阅读下面两篇论文:
- Signal and loss geometry aware frequency selective extrapolation for error concealment
- Resampling images to a regular grid from a non-regular subset of pixel positions using
frequency selective reconstruction
FSR 可以应用于以下应用领域:
- 图像修复:采样掩模表示需要重建的失真输入图像的缺失像素。
- 不规则采样:有关如何选择好的采样掩模。
## 21.1.2 示例教程
代码清单 21-1 中给出了如何使用 FSR 进行图像修复。掩模的非零像素表示有效的图像区域,零像素表示需要重建的区域。我们可以使用 Paint 或 GIMP 等工具手动创建任意掩码。例如从一个简单的白色图像开始,用黑色画一些变形。原始图像、含有失真区域的图像以及修复后的图像分别在图 21-1 和图 21-2 中给出。
**代码清单 21-1:图像修复示例程序**
```c++
#include
#include
#include
using namespace cv;
int main(int argc, char** argv)
{
// read image and error pattern
Mat original_, mask_;
original_ = imread("images/kodim22.png");
mask_ = imread("images/pattern_random.png", IMREAD_GRAYSCALE);
// make sure that mask and source image have the same size
Mat mask;
resize(mask_, mask, original_.size(), 0.0, 0.0, cv::INTER_NEAREST);
// distort image
Mat im_distorted(original_.size(), original_.type(), Scalar::all(0));
original_.copyTo(im_distorted, mask); // copy valid pixels only (i.e. non-zero pixels in mask)
// reconstruct the distorted image
// choose quality profile fast (xphoto::INPAINT_FSR_FAST) or best (xphoto::INPAINT_FSR_BEST)
Mat reconstructed;
xphoto::inpaint(im_distorted, mask, reconstructed, xphoto::INPAINT_FSR_FAST);
imshow("orignal image", original_);
imshow("distorted image", im_distorted);
imshow("reconstructed image", reconstructed);
waitKey();
return 0;
}
```


================================================
FILE: chapter 21/油画效果.md
================================================
# 21.2 油画效果
图像具有多个颜色空间,默认颜色空间为 COLOR_BGR2GRAY。对于图像中的每个像素,如果计算其相邻的大小为 2×size+1 区域的直方图(颜色空间的第一个平面),并将最常出现的值赋给该像素点,这样的结果看起来就很像油画了。xphoto 模块中的 oilPainting()函数便可以实现将普通图像转换成优化的效果的参数 4 来降低图像的动态性,从而提高油画的效果。该函数的使用方式在代码清单 21-2 中给出,转换成的优化效果在图 21-4 给出。
**代码清单 21-2**
```
Mat img;
Mat dst;
img = imread("opencv/samples/data/baboon.jpg");
xphoto::oilPainting(img, dst, 10, 1, COLOR_BGR2Lab);
imshow("oil painting effect", dst);
```

================================================
FILE: chapter 21/训练基于学习的白平衡算法.md
================================================
# 21.3 训练基于学习的白平衡算法
## 21.3.1 简介
许多传统的白平衡算法是基于统计的,也就是说,它们依赖于这样一个事实,即某些前提假设应该在适当的白平衡图像中存在,比如众所周知的灰色世界假设。然而,基于学习的算法框架利用大规模有标签的图像数据集往往能够获得更好的结果。本小节教程将演示如何训练一个基于学习的白平衡算法并评价其质量。
## 21.3.2 如何训练模型
首先下载训练数据集。在本教程中,我们使用 [Gehler-Shi dataset](http://www.cs.sfu.ca/~colour/data/shi_gehler/) 数据集。该数据集解压后会得到一个具有 568 张训练图片的文件夹。同时我们需要名为 real_illum_568..mat 的文件,该文件中包含 groundtruth 真实值。教程中使用的文件需要分别下载,我们可以在 OpenCV官网中找到下载链接。
> 提示
>
> 教程中使用的数据文件和脚本文件都可以在小白学视觉微信公众号后台回复“Gehler-Shi dataset”进行获取。
接下来使用一个 [Python 脚本](https://github.com/opencv/opencv_contrib/tree/master/modules/xphoto/samples/learn_color_balance.py)来训练模型,使用代码清单 21-3 中的参数实现调用。
**代码清单 21-3:调用脚本**
```
python learn_color_balance.py -i -g -r 0,378 --num_trees 30 --
max_tree_depth 6 --num_augmented 0
```
代码清单 21-3 调用的脚本会使用 378 张图片(2/3 数据集)训练模型。我们将模型的大小设置为每个特征有 30 个回归树对,并将树的深度限制为不超过 6 个。默认情况下,训练得到的模型会保存到color_balance_model.yml 中。
在构造一个 LearningBasedWB 实例时,将训练好的模型路径传入,操作代码在代码清单 21-4 中给出。
**代码清单 21-4:加载模型**
```
Ptr wb = xphoto::createLearningBasedWB(modelFilename);
```
## 21.3.3 如何评估模型
我们将使用 [benchmarking 脚本](https://github.com/opencv/opencv_contrib/tree/master/modules/xphoto/samples/color_balance_benchmark.py)在剩余的 1/3 数据集上比较我们训练的模型与经典的算法。脚本调用参数在代码清单 21-5 中给出。
**代码清单 21-5**
```
python color_balance_benchmark.py -a grayworld,learning_based:color_balance_model.yml -m -i -g -r 379,567 -d "img"
```
默认情况下评估结果存储在 white_balance_eval_result.html 中,生成的白平衡图像存储在 img 文件夹中,用于对算法进行定性比较。
================================================
FILE: chapter 3/3
================================================
================================================
FILE: chapter 3/背景分割.md
================================================
在一些应用中,我们需要提取前景来进一步操作,例如目标跟踪、移动物体检测。在这些情况下背景分割是一种最为常见和需要的技术。
在本节教程中,我们将学习OpenCV中的背景抠除的方法。
## 3.1.1 方法介绍
背景抠除是在很多基于视觉应用预处理的主要步骤。例如,对于顾客访问柜台的情况,静态相机记录进入或离开房间的顾客人数,或者交通摄像头提取关于车辆的信息等等。在这些所有的案例中,我们首先需要单独提取人员或车辆。从技术上,我们需要从静态的背景提取动态的前景。
如果我们存在只有图像的背景的一张图像,例如一张没有顾客的房间图像,或者没有车辆的道路图像等,那么此时从图像提取动态的前景是一件容易的事情。只需从背景中减去新的图像即可,就能够单独得到前景的物体。但在大多数的情况下,我们可能没有这样的图像,所以我们需要从已有的图像中提取背景。当车辆有阴影的时候,问题将会变得更加复杂。因为阴影也会移动,简单的抠除也会将其标记为前景,这将会复杂化问题。
在下面的内容中,我们将介绍bgsegm模块中抠除背景的两种算法。
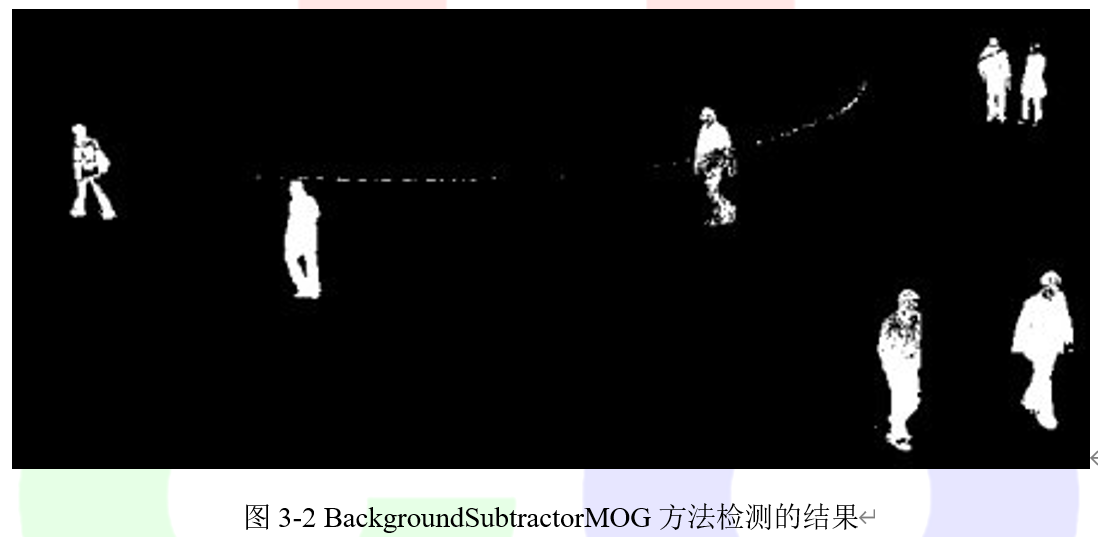
## 3.1.2 BackgroundSubstractorMOG
这种方法是基于高斯混合的背景/前景分割算法。它是在由P.KadewTraKuPong在2001年的论文 An improved adaptive background mixture model for real-time tracking with shadow detection中所提出的。它使用一种方法通过混合K个高斯分布(K=3或5)来对每个背景像素进行建模。高斯混合分布的权重代表这些颜色在场景中停留的时间的比例。背景颜色是保持更长且更静态的颜色。
OpenCV中提供cv.bgsegm.createBackgroundSubstractorMOG()函数寻找背景对象。它具有一些可选的参数,例如历史记录的长度,高斯混合的数量,阈值等等。所有这些参数均被设置为一些默认值。然后在视频循环中,使用backgroudsubtractor.apply()方法获取前景模板。在代码清单3-1中给出了利用该函数实现背景抠除的示例程序。
```python
代码清单3-1
import numpy as np
import cv2 as cv
cap = cv.VideoCapture('vtest.avi')
fgbg = cv.bgsegm.createBackgroundSubtractorMOG()
while(1):
ret, frame = cap.read()
fgmask = fgbg.apply(frame)
cv.imshow('frame',fgmask)
k = cv.waitKey(30) & 0xff
if k == 27:
break
cap.release()
cv.destroyAllWindows()
```
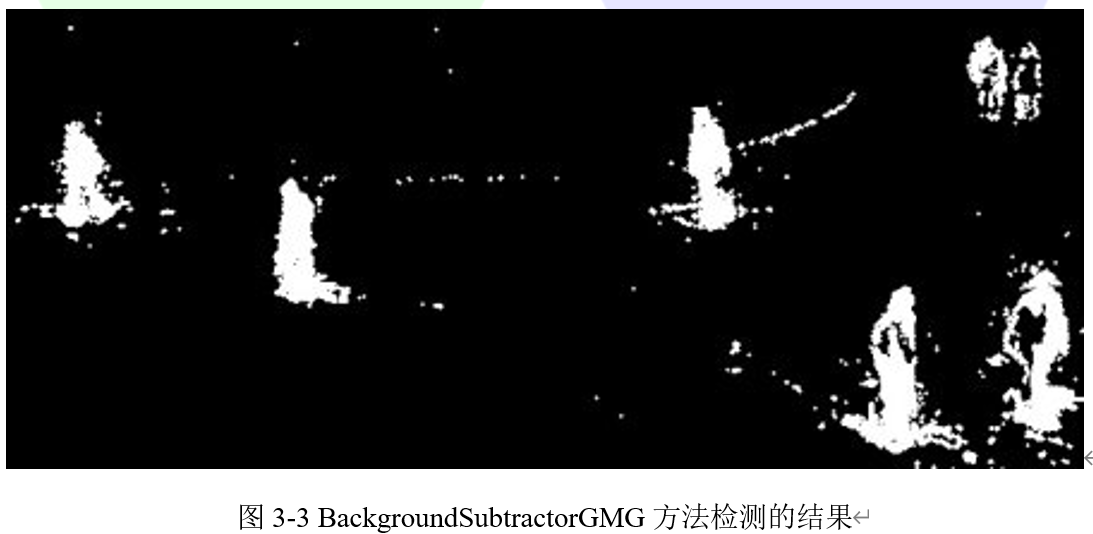
## 3.1.3 BackgroundSubtractorGMG
该算法结合了统计背景图像估计和按像素贝叶斯分割。它是在2012年由Andrew B.Godbehere,Akihiro Matsukawa 和Ken Goldberg在论文中Visual Tracking of Human Visitors under Variable-Lighting Conditions for a Responsive Audio Art Installation提出。
该方法使用前几帧(默认为120帧)进行背景建模。它采用概率前景分割算法,该算法使用贝叶斯推断来识别可能的前景对象。这种估计是自适应的;为了适应变化的光照,较新的观测值比旧的观测值有更大的权重。如果像要结果较好,需要一些形态滤波操作,例如闭运算和开运算,以消除不想要的噪声。在最初的几帧中,我们将得到一个黑色的窗口。OpenCV中提供cv.bgsegm.createBackgroundSubtractorGMG()实现该算法,在代码清单3-2中给出了利用该函数实现背景抠除的示例程序。
```python
代码清单3-2
import numpy as np
import cv2 as cv
cap = cv.VideoCapture('vtest.avi')
kernel = cv.getStructuringElement(cv.MORPH_ELLIPSE,(3,3))
fgbg = cv.bgsegm.createBackgroundSubtractorGMG()
while(1):
ret, frame = cap.read()
fgmask = fgbg.apply(frame)
fgmask = cv.morphologyEx(fgmask, cv.MORPH_OPEN, kernel)
cv.imshow('frame',fgmask)
k = cv.waitKey(30) & 0xff
if k == 27:
break
cap.release()
cv.destroyAllWindows()
```
## 3.1.4 结果
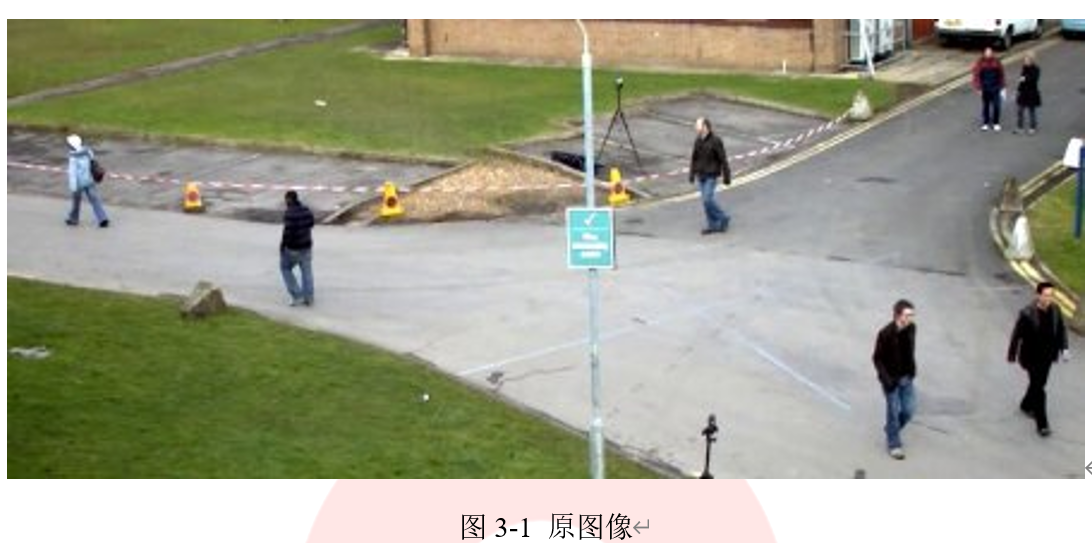
原始图像和两种方法去除背景后的结果分别在图3-1、图3-2和图3-3中给出。
================================================
FILE: chapter 4/3
================================================
================================================
FILE: chapter 4/处理引起视错觉的图像.md
================================================
## 4.2.1 目标
在本节教程中,我们将介绍如何重现我们的眼睛在特定光线条件下感知到的视觉错觉:阿德尔森棋盘。
## 4.2.2 阿德尔森棋盘
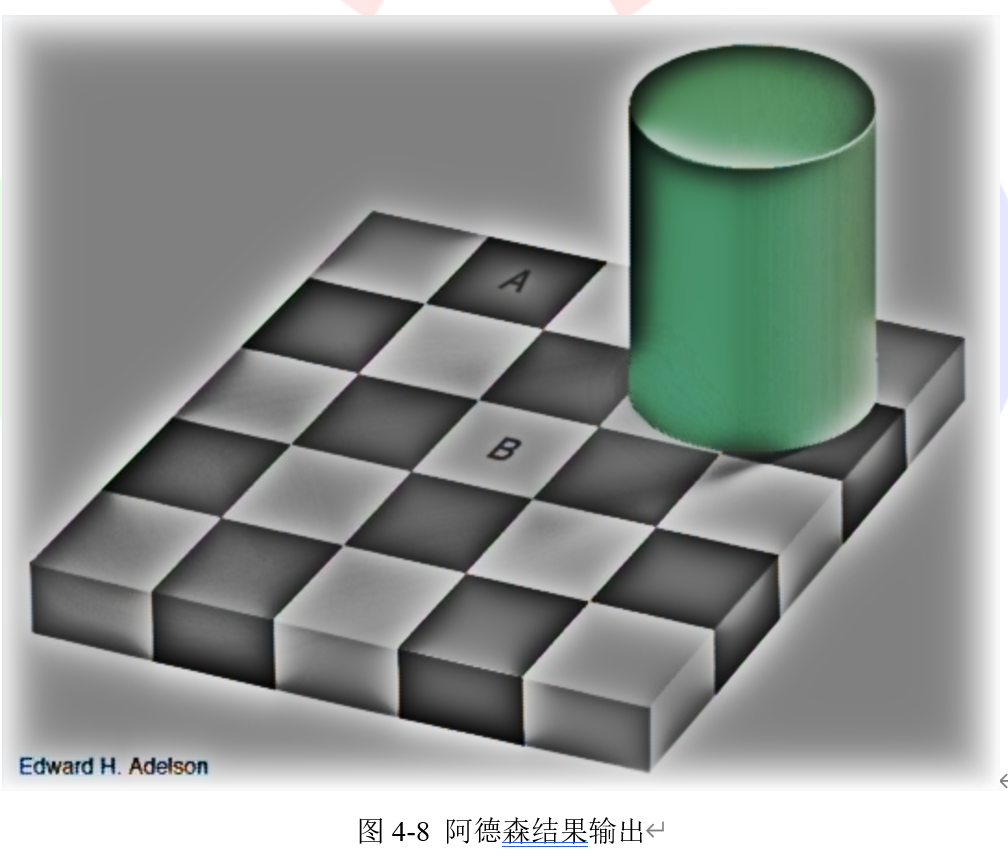
当看到如图4-6所示的棋盘图,人类的眼睛感知到“B”方块比“A”方块更亮,尽管它们拥有完全相同的RGB颜色。当然,在现实世界中,棋盘上有一个“B”正方形,它比“A”的颜色浅,但在这幅图中,绿色圆柱投射在“B”正方形上的阴影最终使“A”和“B”正方形的亮度相同。这个棋盘就被称为阿德森棋盘。

我们的视觉系统确实对阴影进行了“补偿”,使我们感知到“B”方更亮,好像这阴影不会在那里。这是由于中央视网膜凹区域的局部适应过程造成的。我们可以把两个正方形的一部分切下来,然后在没有任何背景的情况下看着它们。我们还可以使用工具测量两个正方形的RGB值。在这张图中,我们裁剪了一小块A和B的方块,并把它们放在一起。很明显它们有相同的亮度,结果图在图4-7给出。
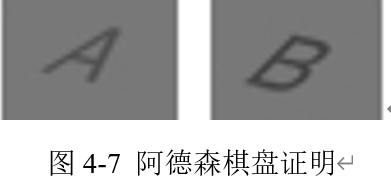
实际上的原理是,当我们看一个区域时,我们的眼睛局部适应亮度,过滤噪音,加强轮廓等,考虑到周围的区域,这使得产生错觉。因此,被较亮细胞包围的A细胞可以被认为较暗。相反,B细胞的邻域较暗,B细胞则被认为较亮。
## 4.2.3 重现错觉
bioinspired模块模拟了视网膜的过程,它再现了我们眼睛的局部适应能力。这意味着我们可以将细小通道的输出真正包含的亮度值与我们用眼睛感知的亮度值相似。具体来说,在这种情况下,我们期望“B”方块的RGB值实际上比“A”值更小。
为了正确地模仿我们的眼睛,我们需要opencv对正确的图像部分进行局部适应。这意味着我们必须确保opencv的“局部”概念与我们的图像尺寸匹配,否则局部适应将不能像预期的那样工作。由于这个原因,我们可能不得不根据图像分辨率调整hcellsSpatialConstant参数(该参数在技术上指定较低的空间切割频率,或较慢的亮度变化灵敏度)。针对本教程中的图像,可以使用视网膜模型默认参数。
bioinspired模块自带了用于展示的example_bioinspired_retinaDemo示例将图像加载给视网膜模型。运行该示例的命令在代码清单4-10中给出。
```cpp
代码清单4-10
example_bioinspired_retinaDemo -image checkershadow_illusion4med.jpg
```
这是一个静态图像,但我们的视网膜刚刚开始移动到一个新的环境(眼睛睁开),必须适应这个环境。在这种瞬态状态下,亮度信息起作用,我们或多或少地看到绝对亮度值。为了重现幻觉,绝对亮度是你不需要看的。
一旦达到稳定状态,我们就会收到更多的背景亮度信息。眼睛以中心环绕的方式工作,并考虑周围的亮度来评估感兴趣区域的亮度水平。那就是我们的幻觉出现的时候!
当处理一个单独的帧时,只需要稳态响应,我们需要做的是重复地给视网膜输入相同的帧(这是示例代码所做的),就像处理一个静止的视频一样。或者,我们可以将视网膜时间参数设置为0以立即获得稳定状态(xml文件的photoreceptorsTemporalConstant和hcellsTemporalConstant参数)。然而,在这种情况下,我们应该意识到,我们正在做的实验再现真实视网膜的行为时,故意降低了准确性!
代码清单4-11中给出了处理图像的一小段python代码,它将迭代20次。这是经过实验发现的较好的次数
```python
代码清单4-11:python代码
import cv2 as cv
inputImage = cv.imread('checkershadow_illusion4med.jpg', 1)
retina = cv.bioinspired.createRetina((inputImage.shape[1], inputImage.shape[0]))
# the retina object is created with default parameters. If you want to read
# the parameters from an external XML file, uncomment the next line
#retina.setup('MyRetinaParameters.xml')
# feed the retina with several frames, in order to reach 'steady' state
for i in range(20):
retina.run(inputImage)
# get our processed image :)
retinaOut_parvo = retina.getParvo()
# show both the original image and the processed one
cv.imshow('image', inputImage)
cv.imshow('retina parvo out', retinaOut_parvo)
# wait for a key to be pressed and exit
cv.waitKey(0)
cv.destroyAllWindows()
# write the output image on a file
cv.imwrite('checkershadow_parvo.png', retinaOut_parvo)
```
最终我们将得到如图4-8所示的结果。
## 4.2.4 结果分析
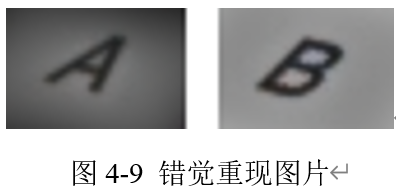
将图4-8中“A”块和“B”块裁剪出来放在一起,结果如图4-9所示。我们可以看到经过处理,此时“A”块的像素值要大于“B”块,这样的结果更加符合我们看到的结果。
================================================
FILE: chapter 4/视网膜视觉和真实世界的视觉.md
================================================
## 4.1.1 目标
在本节教程中,我们将介绍人类视网膜模型,它显示了一些有趣的图像预处理和增强特性,本教程中主要内容包括:
- 视网膜的两个主要通道
- 视网膜模型的基本使用
- 微调参数
## 4.1.2 总体介绍
模型的提出来源于Jeanny Herault在Gipsa的研究,其主要研究成果在论文Vision: Images, Signals and Neural Networks-Models of Neural Processing in Visual Perception中给出。它涉及到Listic(代码维护者和用户)实验室的图像处理应用程序。它不是一个完整的模型,但它的提出揭示了一些有趣的事情,可以应用到增强图像处理中。该模型允许使用以下人类视网膜特性:
- 光谱白化具有3个重要的效应:高频率信号抵消(噪声)、中频细节增强和低频亮度能量降低。
- 局部对数亮度压缩可以增强细节,即使在低光条件也可以增强细节。
- 细节信息和瞬态信息的去相关性。
接下俩对前两点特性进行详细说明:
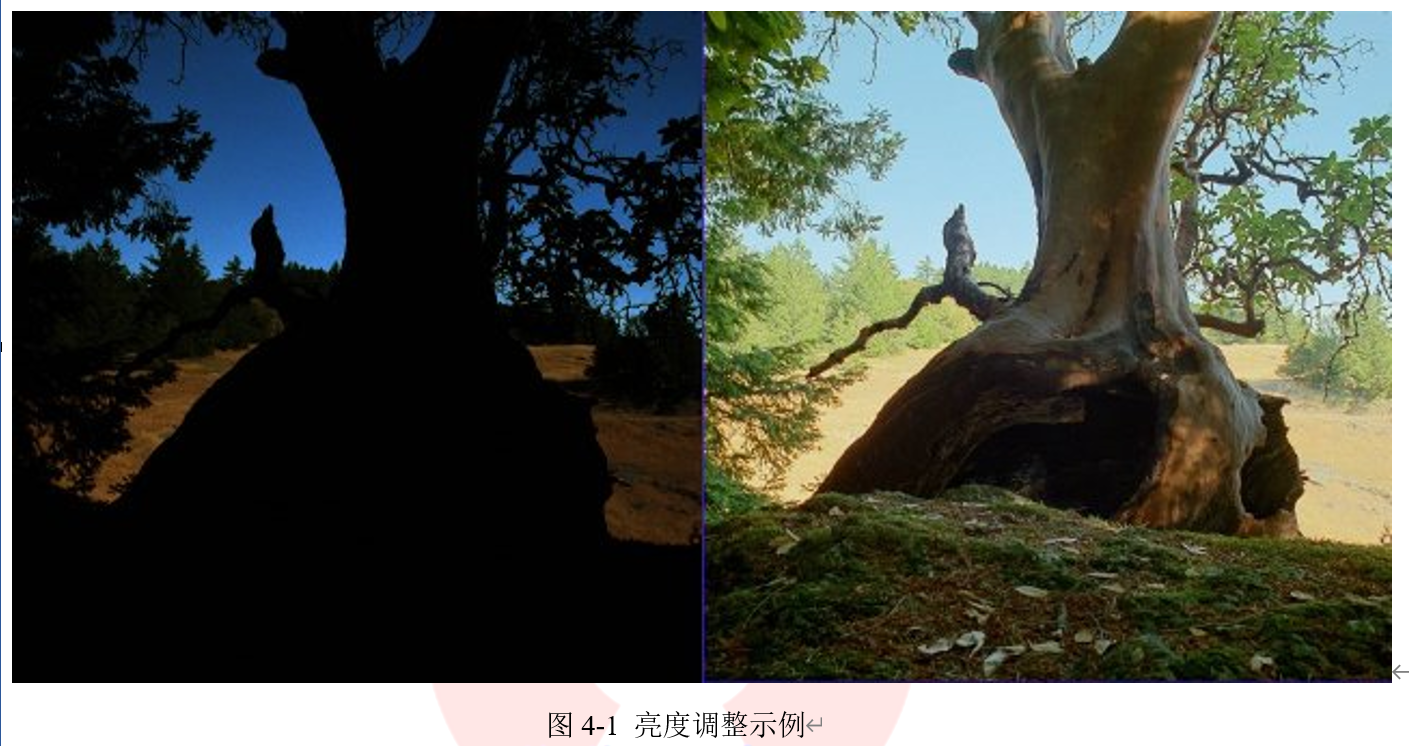
在图4-1中,左侧图像是一个高动态范围的图像。为了使它能较为清晰的看见细节,将原始的输入图像线性的调整图像亮度范围,并转换为8bit/channel格式。因为太强烈的局部对比,这种较强的转换隐藏了许多细节。
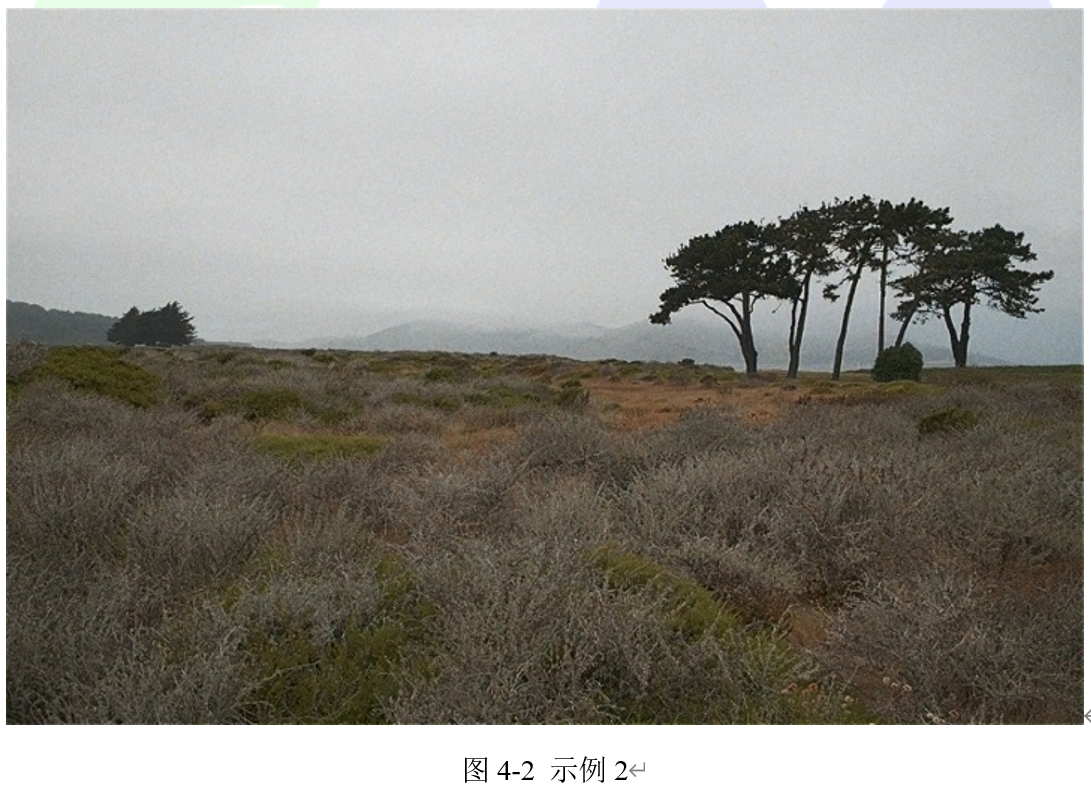
在图4-2中,一起应用局部亮度适应、空间噪声去除和光谱白化,就像你的视网膜一样,在较低范围的8位数据通道上传输准确的信息。在这张图片上,噪音被明显的被去除,局部细节被强烈的亮度对比所掩盖。输出图像保持自然,增强视觉内容。
## 4.1.3 视网膜模型输出通道
视网膜模型有两种形式的输出:
- 第一个种叫做单细胞通道。它主要活跃于视网膜中央窝区(具有彩色感光感受器的高分辨率中央视觉),其目的是为静止在视网膜上的视觉细节提供准确的彩色视觉。另一方面,模糊在视网膜上运动的物体。
- 第二个是Magnocellular通道。它主要活跃于视网膜周围视觉,并发出与变化事件(运动、瞬变事件等)相关的信号。这些输出信号还有助于视觉系统将视网膜聚焦在“瞬态”/移动区域进行更详细的分析,从而改进视觉场景上下文联系和对象分类。
注意:与真实的视网膜不同,我们用相同的分辨率将这两个通道应用于整个输入图像。这使得增强的视觉细节和运动信息可以应用在所有的图像种。但是,这两个通道是互斥的。例如,如果单细胞通道在一个区域提供了强大的能量,那么,由于存在瞬态事件,部分细胞通道肯定是模糊的。
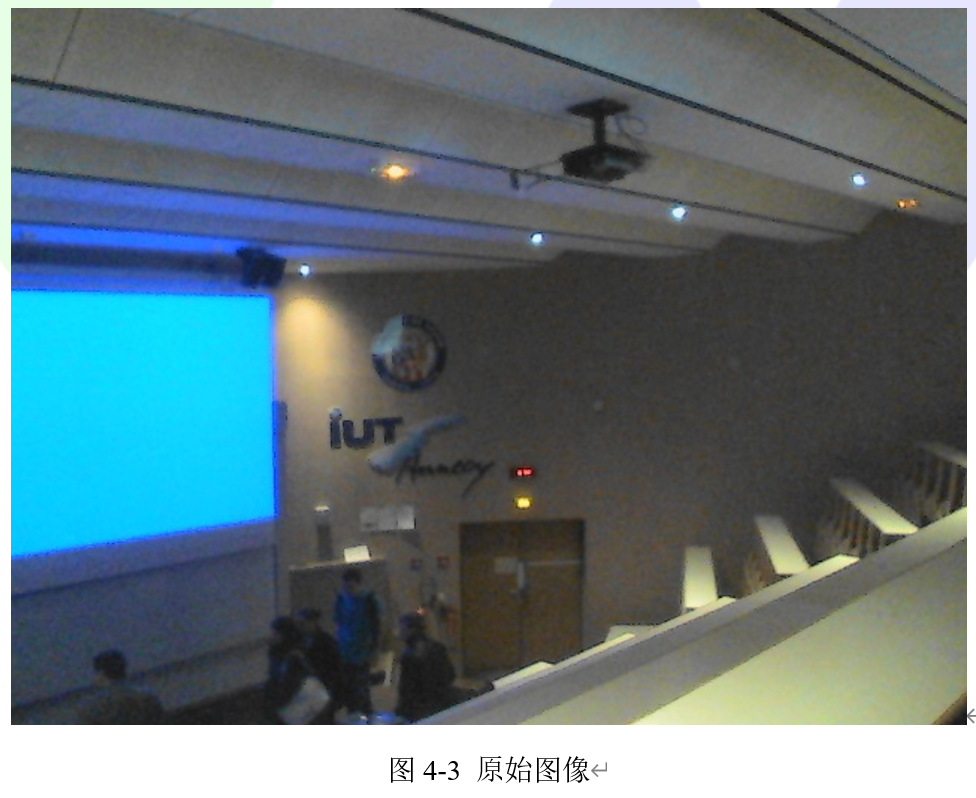
为了说明这个问题,我们使用一个在较为黑暗环境种的相机采集的视频作为原始图像,分析视网膜模型中两个通道各起到什么作用。这个视频在一个大学的会场录制,里面有一些学生一边和老师交谈一边在移动。
在这个视频中,由于黑暗的环境,信噪比低,所以图像采集的质量较低,在视觉特征边缘上出现了虚假的色彩。具体形式如图4-3所示。
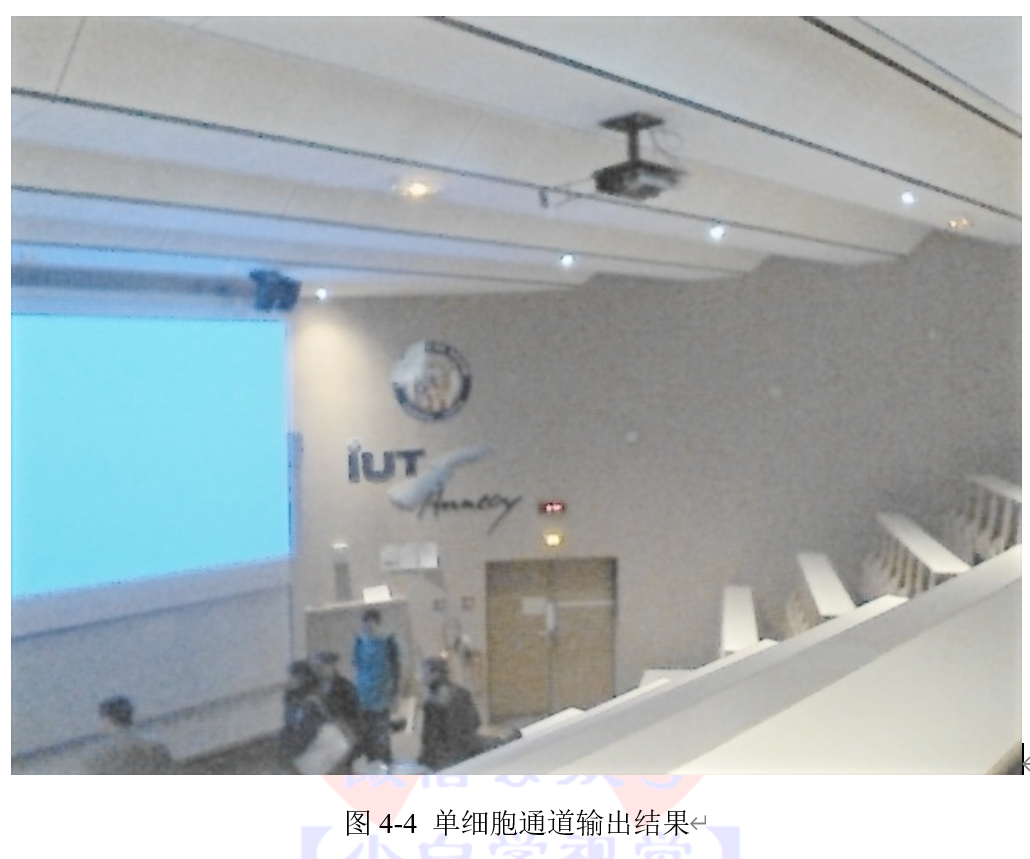
之后将视网膜模型应用于图4-3,单细胞输出可以得到如图4-4所示的图片。在使用的视网膜配置中,全局亮度被保留,局部对比度被增强。此外,信噪比也得到了改善:由于高频时空噪声得到了降低,增强的细节不会被任何增强的噪声所破坏。
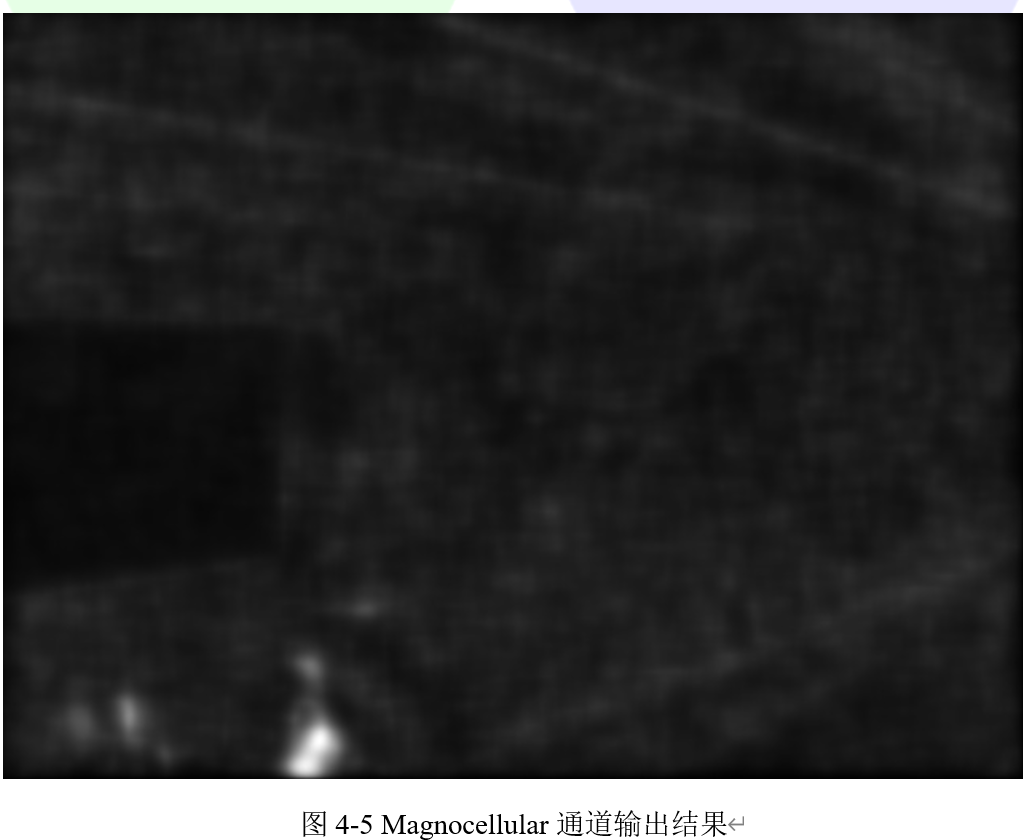
继续输出Magnocellular通道的信息,输出结果如图4-5所示。当瞬态事件发生时,它的信号很强。当一个学生在图像的底部移动时,会产生高能量。其余的图像是静态的,但它是产生了一个强大的噪音。在这里,视网膜过滤掉大部分的噪音,从而产生低虚假运动区域的“警报”。这个通道可以用作瞬态/移动区域检测器:它可以为低成本的分割工具提供相关信息,从而突出显示事件发生的区域。
## 4.1.4 代码教程
本教程使用的源码可以在opencv_folder/samples/cpp/tutorial_code/bioinspired/ retina_tutorial.cpp找到。视网膜模型在:cv::bioinspired名称空间命名空间中,因此一定要编译bioinspired模块,该模块需要依赖opencv_core (cv::Mat和friends对象管理)、opencv_highgui (显示和图像/视频读取)这两个基础库。我们可以分别用include包含这三个库,如代码清单4-1中所示。
```cpp
代码清单4-1:包含头文件
#include
#include < opencv2/core.hpp >
#include
```
程序中,首先声明一个cv::Mat矩阵,并加载输入图像。同时分配一个cv::VideoCapture对象准备加载视频流(如果必要),这个过程在代码清单4-2中实现。
```cpp
代码清单4-2
int main(int argc, char* argv[]) {
// declare the retina input buffer... that will be fed differently in
//regard of the input media
cv::Mat inputFrame;
cv::VideoCapture videoCapture; // in case a video media is used, its
```
在处理之前,首先检查输入的命令参数。这里我们可以根据用户输入选择加载的数据类型,如果用户选择command –image,就加载图像,如果用户选择command –video就加载视频。
此外,如果用户在程序调用结束时添加log命令,那么由视网膜执行的空间对数图像采样将被布尔标志useLogSampling考虑在内。
```cpp
代码清单4-3
// welcome message
std::cout<<"*********************************************"<= 3)
{
std::cout<<"RetinaDemo: processing image "<>inputFrame;
}
else
{
// bad command parameter
help("bad command parameter");
return -1;
}
```
检测图像是否被读取,如果没有,显示错误并停止程序。
```cpp
代码清单4-4
if (inputFrame.empty())
{
help("Input media could not be loaded, aborting");
return -1;
}
```
之后运行视网膜模型。在这里建议分配一个视网膜实例并管理最终的日志采样选项。视网膜构造器至少需要一个cv::Size对象来显示必须管理的输入数据大小。可以设置其他选项,如颜色及其相关的颜色多路复用策略(这里,Bayer多路复用使用enum cv::bioinspired::RETINA_COLOR_BAYER标志)。如果使用对数采样,可以调整图像简化系数(较小的输出图像)和对数采样强度。
```cpp
代码清单4-5
// pointer to a retina object
cv::Ptr myRetina;
// if the last parameter is 'log', then activate log sampling (favour foveal vision and subsamples peripheral vision)
if (useLogSampling)
{
myRetina = cv::bioinspired::createRetina(inputFrame.size(), true, cv::bioinspired::RETINA_COLOR_BAYER, true, 2.0, 10.0);
}
else// -> else allocate "classical" retina :
myRetina = cv::bioinspired::createRetina(inputFrame.size());
```
之后将参数写入一个包含视网膜默认参数的默认xml文件,用于创建模板。这里生成的模板xml文件称为RetinaDefaultParameters.xml。
```cpp
代码清单4-6
// save default retina parameters file in order to let you see this and
//maybe modify it and reload using method "setup"
myRetina->write("RetinaDefaultParameters.xml");
```
之后,视网膜尝试加载另一个名为RetinaSpecificParameters.xml的xml文件。如果我们创建了它,并引入了自己的设置,它将被加载,或者我们可以使用默认的视网膜参数。
```cpp
代码清单4-7
// load parameters if file exists
myRetina->setup("RetinaSpecificParameters.xml");
```
创建一些输出缓冲区,准备接收两个视网膜通道的输出.
```cpp
代码清单4-8
// declare retina output buffers
cv::Mat retinaOutput_parvo;
cv::Mat retinaOutput_magno;
```
然后,在一个循环中运行视网膜,如果需要,从视频序列加载新帧,并将视网膜输出返回到专用缓冲区。
```cpp
代码清单4-9
// processing loop with no stop condition
while(true)
{
// if using video stream, then, grabbing a new frame, else, input remains the same
if (videoCapture.isOpened())
videoCapture>>inputFrame;
// run retina filter on the loaded input frame
myRetina->run(inputFrame);
// Retrieve and display retina output
myRetina->getParvo(retinaOutput_parvo);
myRetina->getMagno(retinaOutput_magno);
cv::imshow("retina input", inputFrame);
cv::imshow("Retina Parvo", retinaOutput_parvo);
cv::imshow("Retina Magno", retinaOutput_magno);
cv::waitKey(10);
}
```
================================================
FILE: chapter 5/5
================================================
================================================
FILE: chapter 5/多相机标定.md
================================================
## 5.2.1 目标
在本节教程中,我们将介绍如何使用多相机校准工具箱主要内容包括:
1. “随机”图案介绍和单个相机标定
2. 多相机标定
## 5.2.2 “随机”图案介绍和标定
“随机”图案是一幅随机生成的图像。因为它是随机的,所以有许多特征点。生成后可将其打印出来并用作标定板。图5-10和图5-11分别是随机图像和为它拍摄的图片。


要生成随机图像,需要使用ccalib模块中的类cv::randpattern::RandomPatternGenerator。该类的使用方法在代码清单5-9中给出。
```cpp
代码清单5-9:生成随机图像
cv::randpattern::RandomPatternGenerator generator(width, height);
generator.generatePattern();
pattern = generator.getPattern();
```
这里的width和height是图像的宽和高。生成图案后,我们可以把它打印出来并拍几张照片。之后便可以用这些图像来标定相机。
首先,需要检测拍摄的图像中的objectPoints和imagePoints。这里我们需要使用类cv::randpattern::RandomPatternCornerFinder来检测它们。该类的使用方法在代码清单5-10中给出。
```cpp
代码清单5-10:检测图像角点
cv::randpattern::RandomPatternCornerFinder finder(patternWidth, patternHeight, nMiniMatches);
finder.loadPattern(pattern);
finder.computeObjectImagePoints(vecImg);
vector objectPoints = finder.getObjectPoints();
vector imagePoints = finder.getImagePoints();
```
这里可变的参数patternWidth和patternHeight是物理图像的宽度和高度,它使用用户自定义的单位。vecImg是存储标定图像的vector容器。
然后,使用标定函数,如cv::calibrateCamera或cv::omnidir::calibrate来标定相机。
## 5.2.3 多相机标定
接下来我们介绍多个相机标定,到目前为止这个工具箱必须使用前文介绍的随机图像。
为了标定多个相机,我们需要拍摄一些包含随机图案的照片。为了标定外部参数,需要同时使用多个摄像机(至少两个)来拍摄同一个图案。为了分清拍摄的相机和对应的图像,图像文件应该像这样命名:“cameraIdx-timestamp.*”。具有相同时间标记的照片意味着它们是由多个相机拍摄的同一个图案。另外,cameraIdx应该从0开始。例如:“0-129.png”、“0-187.png”、“1-187.png”、“2-129.png”。
然后,运行多个相机标定的程序,具体内容如代码清单5-11中所示。
```cpp
代码清单5-11:多相机标定
cv::multicalib::MultiCameraCalibration multiCalib(cameraType, nCamera, inputFilename,patternWidth, patternHeight, showFeatureExtraction, nMiniMatches);
multiCalib.run();
multiCalib.writeParameters(outputFilename);
```
这里的cameraType表示相机类型,支持multicalib::MultiCameraCalibration::PINHOLE和multicalib::MultiCameraCalibration::OMNIDIRECTIONAL两种类型。有关广角相机的更多内容,可以参考cv::omnidir模块了解详情。nCamera是相机的数量。inputFilename是由opencv/sample中的imagelist_creator生成的文件名称。patternWidth和patternHeight是图案的物理宽度和高度。showFeatureExtraction是一个标志,指示是否显示特征提取过程。nMiniMatches是应该在每幅图中检测到的最小的点数,不满足该条件时这幅图将被舍弃。outputFilename是用于存储参数的xml文件名。
================================================
FILE: chapter 5/广角相机标定.md
================================================
本章将介绍contrib扩展模块中相机标定模块,将以示例的形式重点介绍全景相机和多相机的联合标定。其中对广角相机标定包括广角相机的标定、校正和立体重建等三部分;对多相机标定包括“随机”图案的介绍和多相机标定两部分。
## 5.1.1 目标
在本节教程中,我们将介绍如何对广角相机进行标定,主要内容包括:
1. 标定单台相机
2. 标定一对立体相机
3. 校正图像、大幅消除失真
4. 从两幅具有大视场的立体图像中进行三维重建
5. 与opencv/calib3d/中的鱼眼模型进行比较
## 5.1.2 单个相机标定
标定相机的第一步是获取标定图案并拍摄一些照片。OpenCV支持多种图案,比如棋盘格和圆形网格。还可以使用一个名为random pattern的新图案,我们称为“随机图案”。关于随机图案的更多细节,读者自行查阅官方文档opencv_contrib/modules/ccalib进行了解。
第二步是从标定图案中提取角点。针对棋盘格,可以使用OpenCV基础库中的函数cv::findChessboardCorners提取角点;针对圆形网格,可以使用函数cv::findCirclesGrid提取角点;针对随机图案,可以使用opencv_contrib/modules/ccalib/src/randomPattern.hpp中的randomPatternCornerFinder类提取角点。之后将图像中的角点坐标保存在imagePoints这样类型的变量中。imagePoints的类型可以是std::vector>,第一个vector容器存储每一张图片的角点,第二个vector容器存储同一图案的所有图片中的角点。imagePoints的类型也可以是std::vector,其中cv::Mat的类型为CV_32FC2。
此外,还需要世界坐标中相应的三维点坐标。我们可以任意设定世界坐标系,并通过图案的物理大小计算三维点的坐标。之后将这些点保存在objectPoints类型中,类似于imagePoints,objectPoints类型可以是std::vector>或std::vector类型,其中cv::Mat为CV_32FC3类型。
最后一个需要输入的参数是图像的尺寸大小。
**警告
*objectPoints和imagePoints的大小必须相同,因为它们彼此对应。***
在官方示例中,标定所需要的数据被存放在一个xml文件中,我们可以通过opencv_contrib/modules/ccalib/tutorial/data/omni_calib_data.xml找到它。文件中存储了一个objectPoints、imagePoints和imageSize这三个类数据。代码清单5-1是加载该文件的代码
```cpp
代码清单5-1:加载数据
cv::FileStorage fs("omni_calib_data.xml", cv::FileStorage::READ);
std::vector objectPoints, imagePoints;
cv::Size imgSize;
fs["objectPoints"] >> objectPoints;
fs["imagePoints"] >> imagePoints;
fs["imageSize"] >> imgSize;
```
**提示
*如果没有下载opencv_contrib安装包,可以在“小白学视觉”公众号后台回复“omni_calib_data”获取这个数据文件***
然后定义一些变量来存储输出参数,并运行标定代码,具体代码如下:
```cpp
代码清单5-2:标定代码
cv::Mat K, xi, D, idx;
int flags = 0;
cv::TermCriteria critia(cv::TermCriteria::COUNT + cv::TermCriteria::EPS, 200, 0.0001);
std::vector rvecs, tvecs;
double rms = cv::omnidir::calibrate(objectPoints, imagePoints, imgSize, K, xi, D, rvecs, tvecs, flags, critia, idx);
```
K, xi, D是内部参数,rvecs和tvecs是存储图案姿态的外部参数。它们的深度都是CV_64F。xi是广角相机模型的一个单值变量。idx是一个CV_32S的Mat,存储实际用于校准的图像索引,这是因为一些图像在初始化步骤中失败,所以在最后的优化中没有使用它们。返回值rms是重投影误差的均方根值。
校准支持一些功能,flags是一些特性的枚举变量,包括:
- cv::omnidir::CALIB_FIX_SKEW
- cv::omnidir::CALIB_FIX_K1
- cv::omnidir::CALIB_FIX_K2
- cv::omnidir::CALIB_FIX_P1
- cv::omnidir::CALIB_FIX_P2
- cv::omnidir::CALIB_FIX_XI
- cv::omnidir::CALIB_FIX_GAMMA
- cv::omnidir::CALIB_FIX_CENTER
我们可以指定flags来在标定期间修正参数。使用“+”操作符可以设置多个参数。例如,CALIB_FIX_SKEW+CALIB_FIX_K1意味着修正kew和K1。
criteria是优化过程中的停止条件,例如,cv::TermCriteria(cv::TermCriteria::COUNT + cv::TermCriteria::EPS, 200, 0.0001),即迭代200次,或者当相对变化小于0.0001时停止。
## 5.1.3 立体标定
立体标定是同时标定两个摄像机。输出参数包括两台相机的相机内部参数和相机的相对位姿。为了确定相对位姿,两个相机必须同时拍摄相同的图案,这样两个相机的objectPoints是相同的。
首先根据前一小节的方法分别检测两个相机拍摄图像的角点,以获得imagePoints1和imagePoints2。然后计算共同的objectPoints。
立体标定所需要的数据被存放在一个xml文件中,我们可以通过opencv_contrib/modules/ccalib/tutorial/data/omni_stereocalib_data.xml找到它。可以通过代码清单5-3中的代码加载数据。
**提示
*同样可以在“小白学视觉”公众号后台回复“omni_stereocalib_data.xml”获取这个数据文件***
```cpp
代码清单5-3:加载立体标定数据
cv::FileStorage fs("omni_stereocalib_data.xml", cv::FileStorage::READ);
std::vector objectPoints, imagePoints1, imagePoints2;
cv::Size imgSize1, imgSize2;
fs["objectPoints"] >> objectPoints;
fs["imagePoints1"] >> imagePoints1;
fs["imagePoints2"] >> imagePoints2;
fs["imageSize1"] >> imgSize1;
fs["imageSize2"] >> imgSize2;
```
之后利用代码清单5-4中的代码进行立体标定。
```cpp
代码清单5-4:立体标定
cv::Mat K1, K2, xi1, xi2, D1, D2;
int flags = 0;
cv::TermCriteria critia(cv::TermCriteria::COUNT + cv::TermCriteria::EPS, 200, 0.0001);
std::vector rvecsL, tvecsL;
cv::Mat rvec, tvec;
double rms = cv::omnidir::stereoCalibrate(objectPoints, imagePoints1, imagePoints2, imgSize1, imgSize2, K1, xi1, D1, K2, xi2, D2, rvec, tvec, rvecsL, tvecsL, flags, critia, idx);
```
程序中的rvec和tvec是第一个和第二个照相机之间的转换。rvecsL和tvecsL是空间中标定物体和第一个摄像头之间的转换。
## 5.1.4 图像矫正
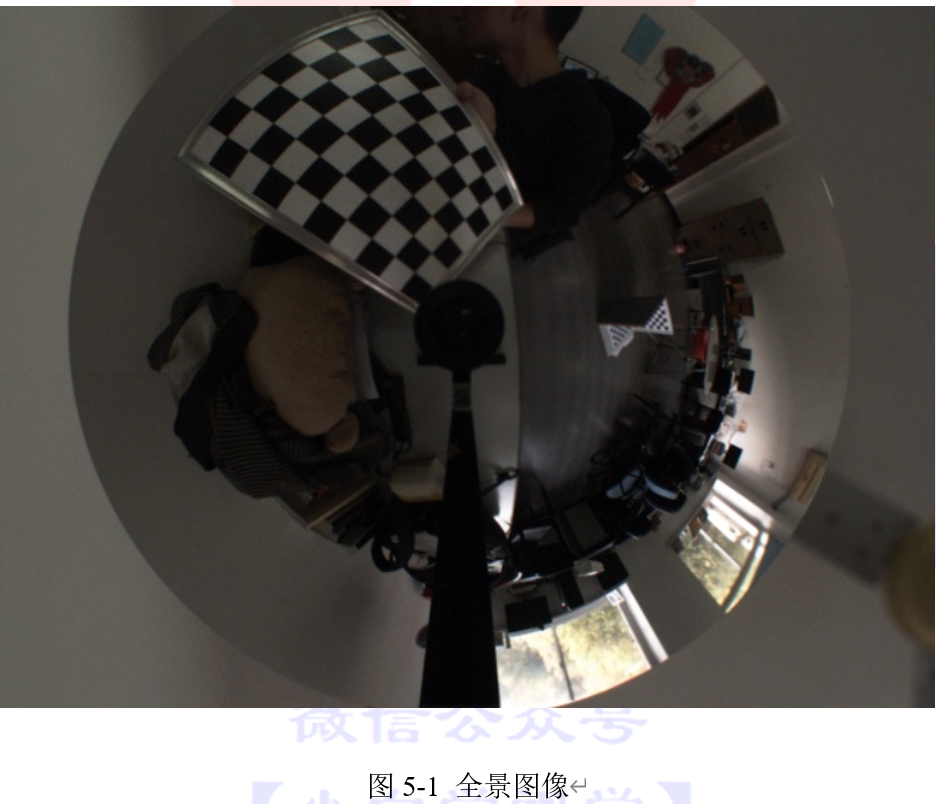
全景图像的失真很大,与人眼观测的结果有很大差异。但是如果摄像机的参数已知,可以对全景图像进行矫正。图5-1是一个360度水平视场全景图像的例子。
矫正后,会生成一张类似透视图的图像。接下来将利用ccalib模块中的cv::omnidir::undistortImage函数对全景图像进行矫正。
```cpp
代码清单5-5:全景图像校正函数
cv::omnidir::undistortImage(distorted, undistorted, K, D, xi, int flags, Knew, new_size)
```
函数中参数distorted和undistorted分别为原始图像和矫正后的图象。K、D、xi为相机参数。Knew和new_size是矫正后图像的相机矩阵和图像大小。flags是矫正类型,它可以选择的类型如下:
- RECTIFY_PERSPECTIVE: 对透视图进行透视矫正,会丢失部分视场。
- RECTIFY_CYLINDRICAL: 矫正成圆柱形图像,保留所有视场。
- RECTIFY_STEREOGRAPHIC: 矫正成可能会失去一点视场的立体图像。
- RECTIFY_LONGLATI: 矫正成像世界地图的经纬度图。这种矫正可以用于立体重建,但可能不方便查看。
图5-2、图5-3、图5-4和图5-5分别是这四种矫正后的结果
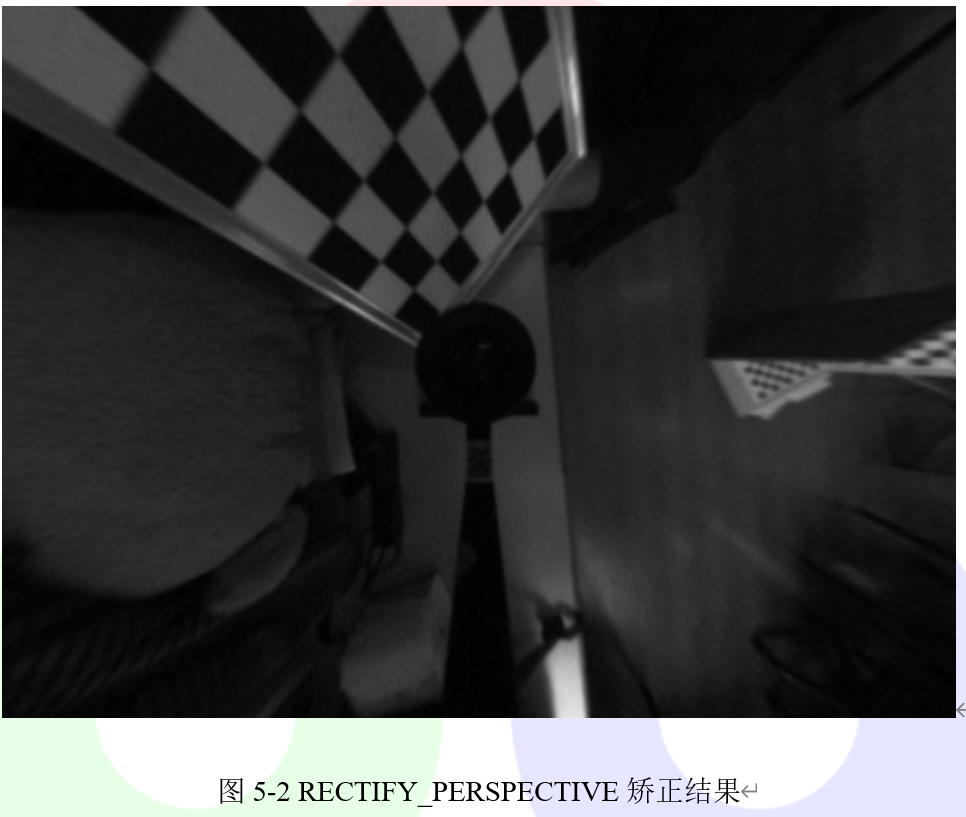
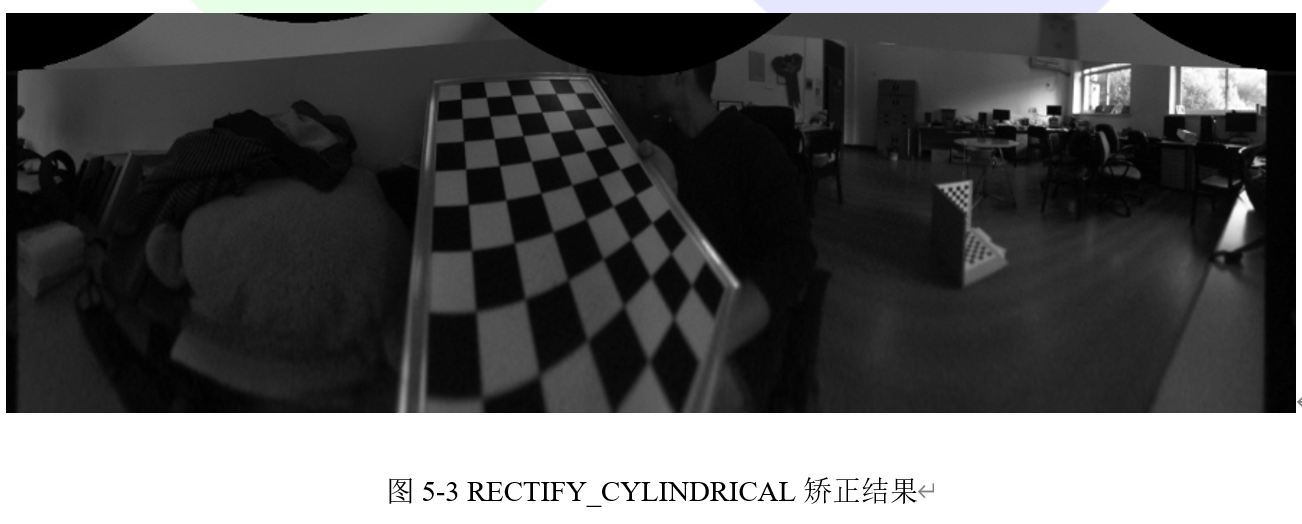

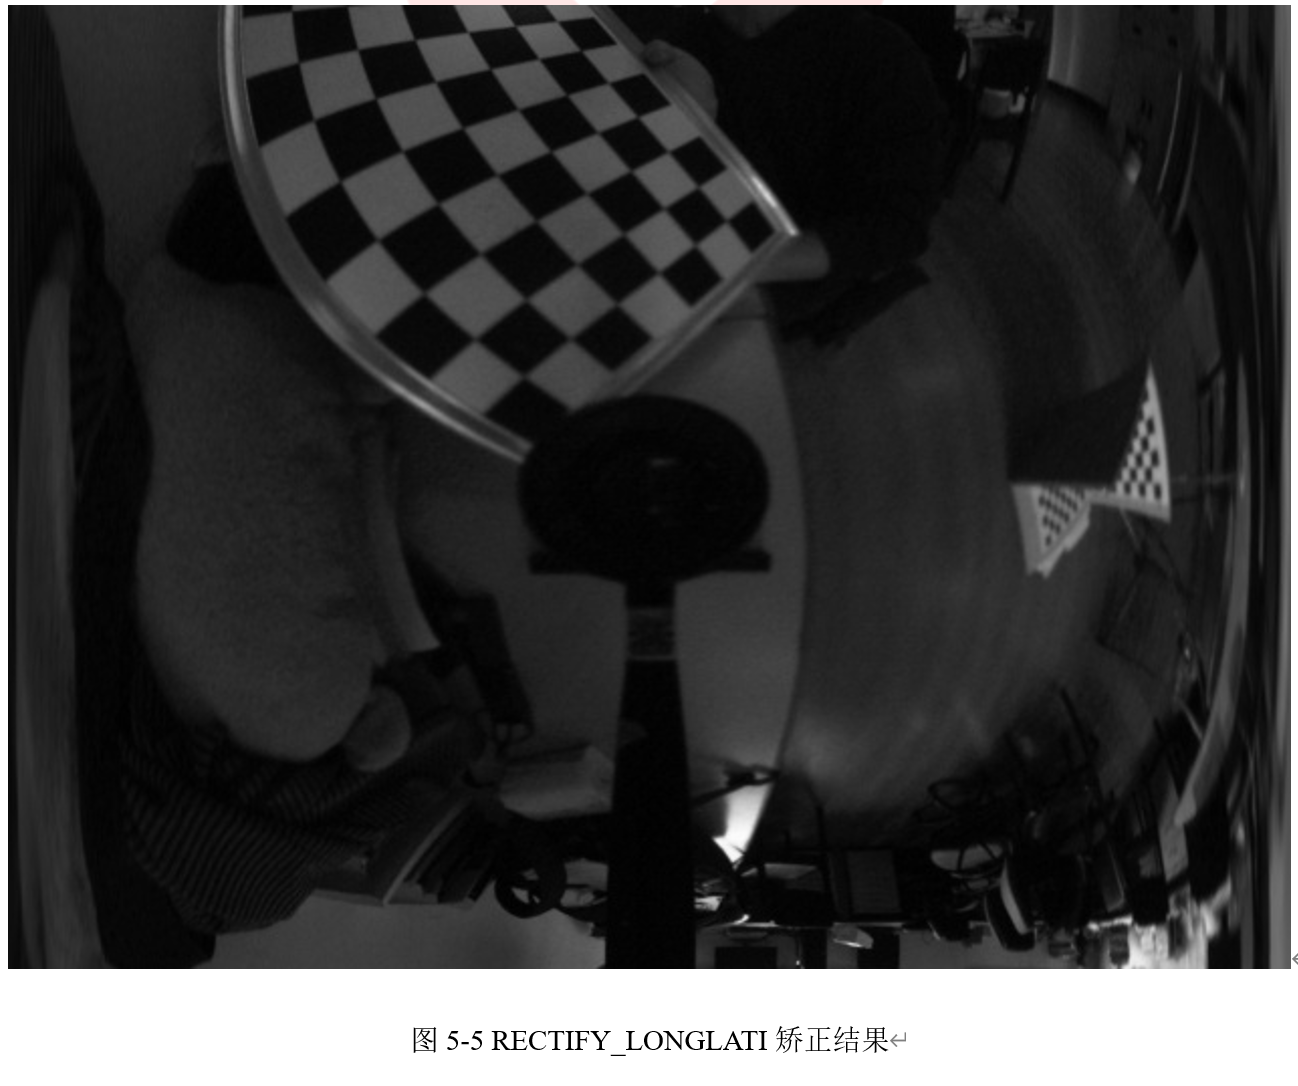
可以看出,透视矫正后的图像只保留了很少的视野。柱面矫正保留了所有的视野,只在画面底部中间位置不自然。在底部中间的位置,立体校正畸变小于柱面矫正,但其他位置的畸变较大,并且无法保留所有视场。对于失真非常大的图像,经纬度矫正效果不好,但是可以在一条线上形成对极约束,因此可以将立体匹配应用于全景图像。
**注意
*为了获得更好的效果,应该谨慎选择参数Knew,它与相机有关。通常来说,较小的焦距会导致较小的视野,反之亦然。下面是一些推荐的设置。***
针对 RECTIFY_PERSPECTIVE (透视矫正)方法,Knew计算方法如代码清单5-6中所示。
```cpp
代码清单5-6:计算Knew
Knew = Matx33f(new_size.width/4, 0, new_size.width/2, 0, new_size.height/4, new_size.height/2, 0, 0, 1);
```
针对 RECTIFY_CYLINDRICAL, RECTIFY_STEREOGRAPHIC, RECTIFY_LONGLATI(柱面校正、立体校正、经纬度校正)方法,Knew计算方法如代码清单5-7中所示。
```cpp
代码清单5-7:计算Knew
Knew = Matx33f(new_size.width/3.1415, 0, 0, 0, new_size.height/3.1415, 0,0, 0, 1);
```
此外,可能需要更改(u0, v0)以获得更好的视图。
## 5.1.5 立体重建
立体重建是从标定好的立体像机对中重建空间中的三维点。这是计算机视觉中的一个基本问题。但是,对于全景摄像机来说,由于畸变较大使得重建困难。常规方法是将图像校正为透视图像,并在透视图像中进行立体重建。但是,上一小节表明,对图像进行透视矫正会损失太多的视场,这就浪费了全景摄像机最大的优势——大视场。
立体重建的第一步是对图像进行立体矫正,使极线成为水平线。我们使用经纬度矫正来保留所有视场。也可以使用透视矫正,但并不推荐这样做。第二步是通过立体匹配来获得视差图。最后,通过视差图生成空间中的三维点。
广角相机立体重建的函数是omnidir::stereoReconstruct。接下来我们将用一个例子来说明如何使用它进行立体重建。
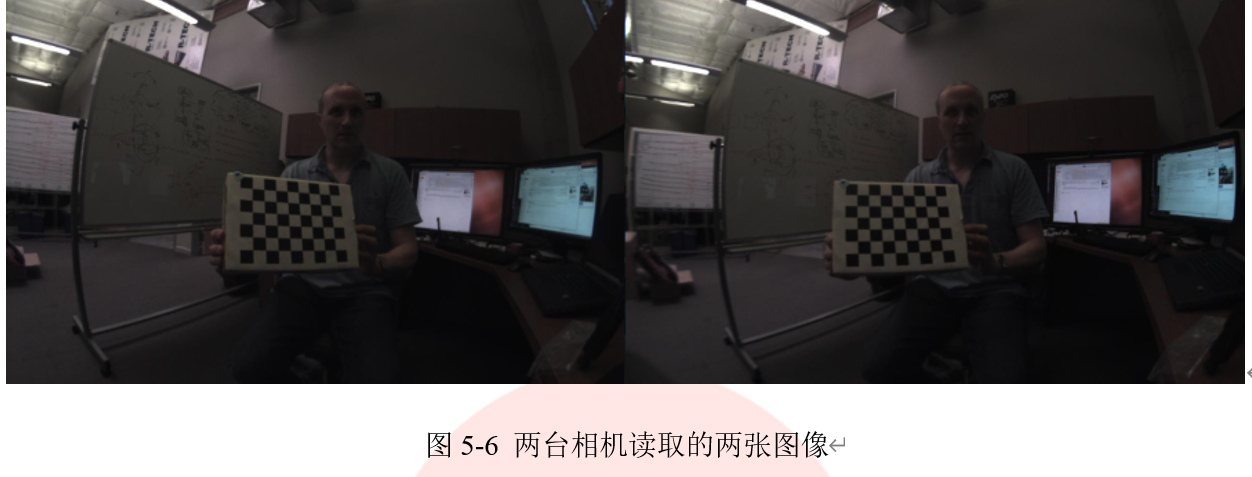
首先,按照前面描述的步骤标定一对立体像机,并获取K1,D1,xi1,K2,D2,xi2,rvec,tvec等参数。然后分别从第一台和第二台相机读取两个图像,例如image1和image2,如图5-6中所示。
然后,运行omnidir :: stereoReconstruct,示例代码在代码清单5-8中给出。
```cpp
代码清单5-8:三维重建
cv::Size imgSize = img1.size();
int numDisparities = 16*5;
int SADWindowSize = 5;
cv::Mat disMap;
int flag = cv::omnidir::RECTIFY_LONGLATI;
int pointType = omnidir::XYZRGB;
// the range of theta is (0, pi) and the range of phi is (0, pi)
cv::Matx33d KNew(imgSize.width / 3.1415, 0, 0, 0, imgSize.height / 3.1415, 0, 0, 0, 1);
Mat imageRec1, imageRec2, pointCloud;
cv::omnidir::stereoReconstruct(img1, img2, K1, D1, xi1, K2, D2, xi2, R, T, flag, numDisparities, SADWindowSize, disMap, imageRec1, imageRec2, imgSize, KNew, pointCloud);
```
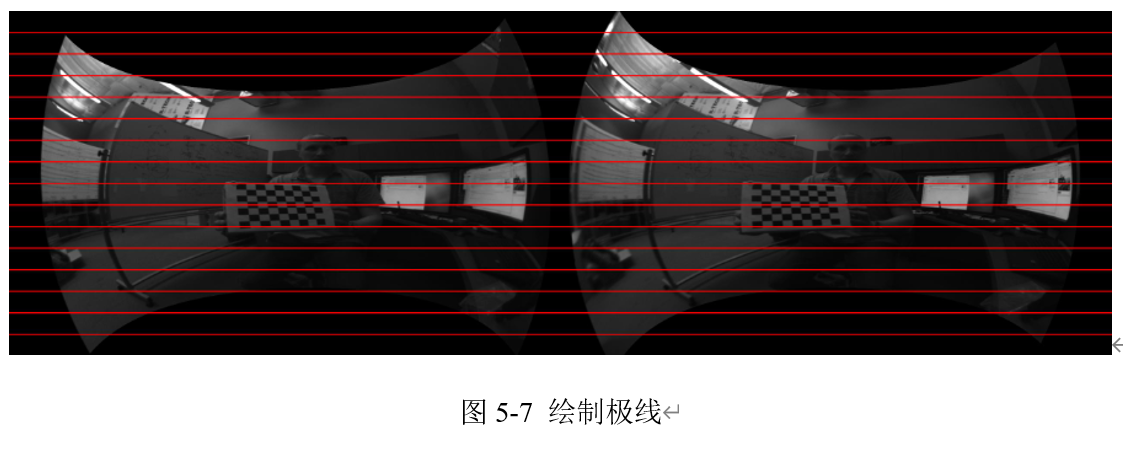
其中,变量flag表示校正类型,只能使用RECTIFY_LONGLATI(推荐)或者RECTIFY_PERSPECTIVE。numDisparities是最大视差值,SADWindowSize是cv :: StereoSGBM的窗口大小。pointType是一个用来定义点云类型的标志,omnidir :: XYZRGB类型表示每个点都是6维向量,前三个元素是xyz坐标,后三个元素是rgb颜色信息。另一种类型omnidir::XYZ表示每个点都是三维的,并且只有XYZ坐标。imageRec1和imagerec2分别是第一幅和第二幅图像校正后的图像。它们的极线具有相同的y坐标,这个特点使得立体匹配变得更容易,结果如图5-7所示。
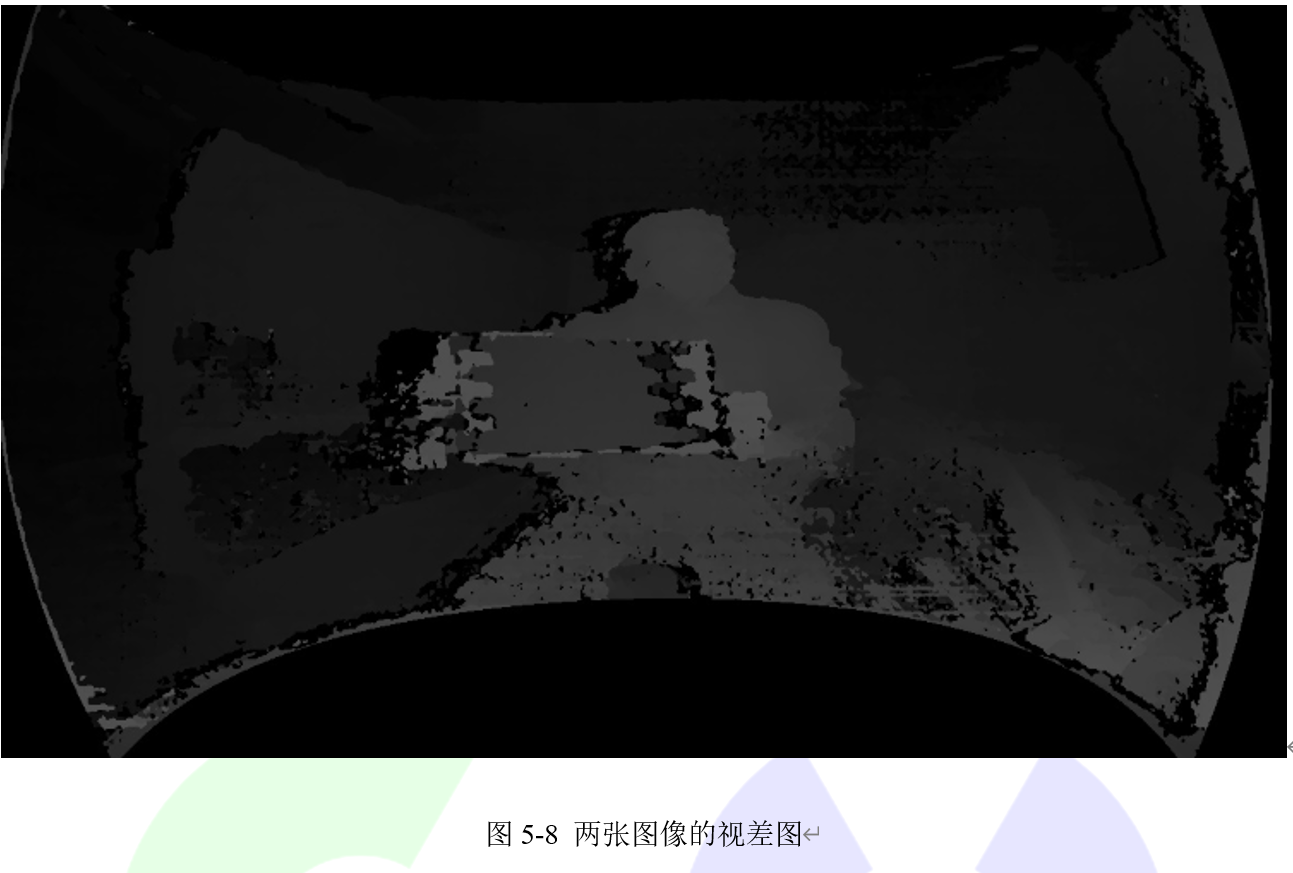
从结果中可以看出它们对齐的很好。变量disMap存储了通过函数cv :: StereoSGBM从imageRec1和imageRec2计算出的视差图。图5-7中两张图片的视差图如图5-8所示。
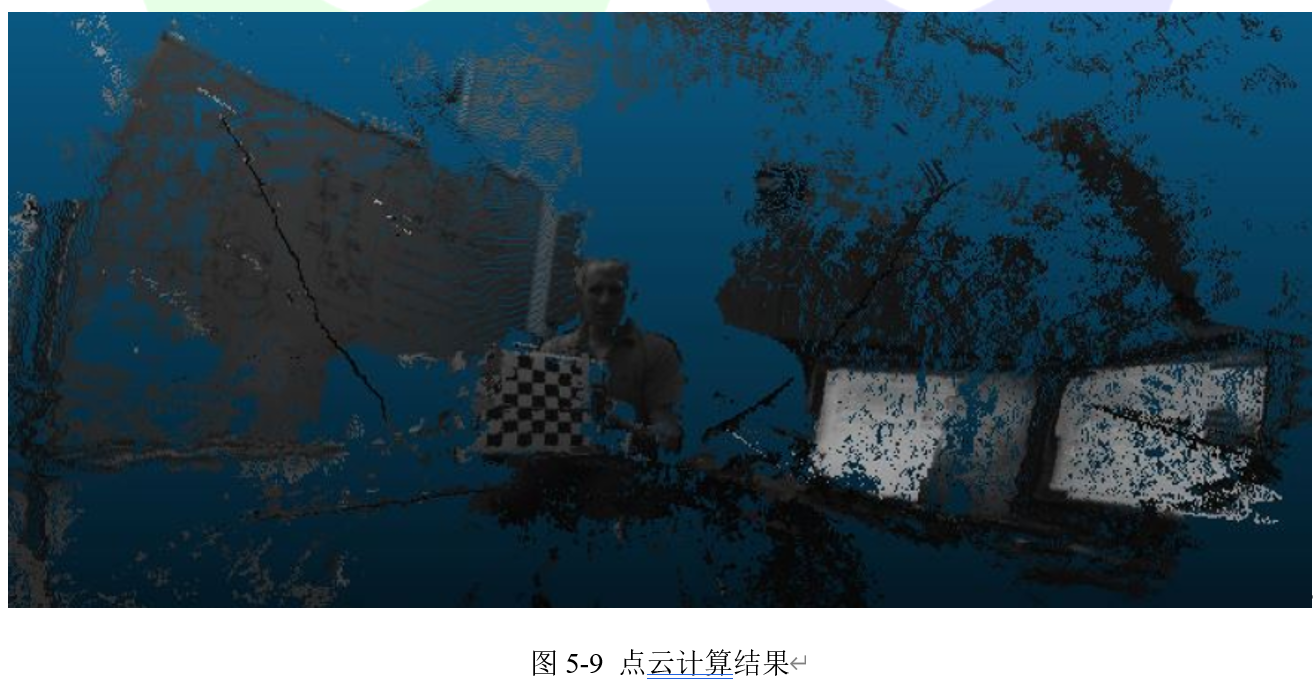
有了视差图后,我们可以计算每个像素对应的3D位置。点云存储在变量pointCloud中,pointCloud是3通道或6通道cv :: Mat。计算的点云结果如图5-9所示。
================================================
FILE: chapter 6/e
================================================
================================================
FILE: chapter 6/使用Icosphere训练数据.md
================================================
本章介绍的内容需要的OpenCV版本新于OpenCV 3.0.0。
## 6.1.1 目标
在本节教程中,我们将学习如何从3D模型中以适当的姿态生成训练图像用来进行CNN训练,主要内容包括:
- 如何生成物体表面的3D点云模型
- 如何使用3D模型生成训练图像。
## 6.1.2 C++代码
```cpp
代码清单6-1
/*
* Software License Agreement (BSD License)
*
* Copyright (c) 2009, Willow Garage, Inc.
* All rights reserved.
*
* Redistribution and use in source and binary forms, with or without
* modification, are permitted provided that the following conditions
* are met:
*
* * Redistributions of source code must retain the above copyright
* notice, this list of conditions and the following disclaimer.
* * Redistributions in binary form must reproduce the above
* copyright notice, this list of conditions and the following
* disclaimer in the documentation and/or other materials provided
* with the distribution.
* * Neither the name of Willow Garage, Inc. nor the names of its
* contributors may be used to endorse or promote products derived
* from this software without specific prior written permission.
*
* THIS SOFTWARE IS PROVIDED BY THE COPYRIGHT HOLDERS AND CONTRIBUTORS
* "AS IS" AND ANY EXPRESS OR IMPLIED WARRANTIES, INCLUDING, BUT NOT
* LIMITED TO, THE IMPLIED WARRANTIES OF MERCHANTABILITY AND FITNESS
* FOR A PARTICULAR PURPOSE ARE DISCLAIMED. IN NO EVENT SHALL THE
* COPYRIGHT OWNER OR CONTRIBUTORS BE LIABLE FOR ANY DIRECT, INDIRECT,
* INCIDENTAL, SPECIAL, EXEMPLARY, OR CONSEQUENTIAL DAMAGES (INCLUDING,
* BUT NOT LIMITED TO, PROCUREMENT OF SUBSTITUTE GOODS OR SERVICES;
* LOSS OF USE, DATA, OR PROFITS; OR BUSINESS INTERRUPTION) HOWEVER
* CAUSED AND ON ANY THEORY OF LIABILITY, WHETHER IN CONTRACT, STRICT
* LIABILITY, OR TORT (INCLUDING NEGLIGENCE OR OTHERWISE) ARISING IN
* ANY WAY OUT OF THE USE OF THIS SOFTWARE, EVEN IF ADVISED OF THE
* POSSIBILITY OF SUCH DAMAGE.
*
*/
#include
#include
#include
#include
#include
using namespace cv;
using namespace std;
using namespace cv::cnn_3dobj;
static void listDir(const char *path, std::vector& files, bool r)
{
DIR *pDir;
struct dirent *ent;
char childpath[512];
pDir = opendir(path);
memset(childpath, 0, sizeof(childpath));
while ((ent = readdir(pDir)) != NULL)
{
if (ent->d_type & DT_DIR)
{
if (strcmp(ent->d_name, ".") == 0 || strcmp(ent->d_name, "..") == 0 || strcmp(ent->d_name, ".DS_Store") == 0)
{
continue;
}
if (r)
{
sprintf(childpath, "%s/%s", path, ent->d_name);
listDir(childpath,files,false);
}
}
else
{
if (strcmp(ent->d_name, ".DS_Store") != 0)
files.push_back(ent->d_name);
}
}
sort(files.begin(),files.end());
};
int main(int argc, char *argv[])
{
const String keys = "{help | | demo :$ ./sphereview_test -ite_depth=2 -plymodel=../data/3Dmodel/ape.ply -imagedir=../data/images_all/ -labeldir=../data/label_all.txt -num_class=6 -label_class=0, then press 'q' to run the demo for images generation when you see the gray background and a coordinate.}"
"{ite_depth | 3 | Iteration of sphere generation.}"
"{plymodel | ../data/3Dmodel/ape.ply | Path of the '.ply' file for image rendering. }"
"{imagedir | ../data/images_all/ | Path of the generated images for one particular .ply model. }"
"{labeldir | ../data/label_all.txt | Path of the generated images for one particular .ply model. }"
"{bakgrdir | | Path of the backgroud images sets. }"
"{cam_head_x | 0 | Head of the camera. }"
"{cam_head_y | 0 | Head of the camera. }"
"{cam_head_z | -1 | Head of the camera. }"
"{semisphere | 1 | Camera only has positions on half of the whole sphere. }"
"{z_range | 0.6 | Maximum camera position on z axis. }"
"{center_gen | 0 | Find center from all points. }"
"{image_size | 128 | Size of captured images. }"
"{label_class | | Class label of current .ply model. }"
"{label_item | | Item label of current .ply model. }"
"{rgb_use | 0 | Use RGB image or grayscale. }"
"{num_class | 6 | Total number of classes of models. }"
"{binary_out | 0 | Produce binaryfiles for images and label. }"
"{view_region | 0 | Take a special view of front or back angle}";
/* Get parameters from comand line. */
cv::CommandLineParser parser(argc, argv, keys);
parser.about("Generating training data for CNN with triplet loss");
if (parser.has("help"))
{
parser.printMessage();
return 0;
}
int ite_depth = parser.get("ite_depth");
String plymodel = parser.get("plymodel");
String imagedir = parser.get("imagedir");
String labeldir = parser.get("labeldir");
String bakgrdir = parser.get("bakgrdir");
int label_class = parser.get("label_class");
int label_item = parser.get("label_item");
float cam_head_x = parser.get("cam_head_x");
float cam_head_y = parser.get("cam_head_y");
float cam_head_z = parser.get("cam_head_z");
int semisphere = parser.get("semisphere");
float z_range = parser.get("z_range");
int center_gen = parser.get("center_gen");
int image_size = parser.get("image_size");
int rgb_use = parser.get("rgb_use");
int num_class = parser.get("num_class");
int binary_out = parser.get("binary_out");
int view_region = parser.get("view_region");
double obj_dist, bg_dist, y_range;
if (view_region == 1 || view_region == 2)
{
/* Set for TV */
if (label_class == 12)
obj_dist = 340;
else
obj_dist = 250;
ite_depth = ite_depth + 1;
bg_dist = 700;
y_range = 0.85;
}
else if (view_region == 0)
{
obj_dist = 370;
bg_dist = 400;
}
if (label_class == 5 || label_class == 10 || label_class == 11 || label_class == 12)
ite_depth = ite_depth + 1;
cv::cnn_3dobj::icoSphere ViewSphere(10,ite_depth);
std::vector campos;
std::vector campos_temp = ViewSphere.CameraPos;
/* Regular objects on the ground using a semisphere view system */
if (semisphere == 1)
{
if (view_region == 1)
{
for (int pose = 0; pose < static_cast(campos_temp.size()); pose++)
{
if (campos_temp.at(pose).z >= 0 && campos_temp.at(pose).z < z_range && campos_temp.at(pose).y < -y_range)
campos.push_back(campos_temp.at(pose));
}
}
else if (view_region == 2)
{
for (int pose = 0; pose < static_cast(campos_temp.size()); pose++)
{
if (campos_temp.at(pose).z >= 0 && campos_temp.at(pose).z < z_range && campos_temp.at(pose).y > y_range)
campos.push_back(campos_temp.at(pose));
}
}
else
{
/* Set for sofa */
if (label_class == 10)
{
for (int pose = 0; pose < static_cast(campos_temp.size()); pose++)
{
if (campos_temp.at(pose).z >= 0 && campos_temp.at(pose).z < z_range && campos_temp.at(pose).y < -0.4)
campos.push_back(campos_temp.at(pose));
}
}
else
{
for (int pose = 0; pose < static_cast(campos_temp.size()); pose++)
{
if (campos_temp.at(pose).z >= 0 && campos_temp.at(pose).z < z_range)
campos.push_back(campos_temp.at(pose));
}
}
}
}
/* Special object such as plane using a full space of view sphere */
else
{
if (view_region == 1)
{
for (int pose = 0; pose < static_cast(campos_temp.size()); pose++)
{
if (campos_temp.at(pose).z < 0.2 && campos_temp.at(pose).z > -0.2 && campos_temp.at(pose).y < -y_range)
campos.push_back(campos_temp.at(pose));
}
}
else if (view_region == 2)
{
for (int pose = 0; pose < static_cast(campos_temp.size()); pose++)
{
if (campos_temp.at(pose).z < 0.2 && campos_temp.at(pose).z > -0.2 && campos_temp.at(pose).y > y_range)
campos.push_back(campos_temp.at(pose));
}
}
else
{
for (int pose = 0; pose < static_cast(campos_temp.size()); pose++)
{
if (campos_temp.at(pose).z < 0.2 && campos_temp.at(pose).z > -0.6)
campos.push_back(campos_temp.at(pose));
}
}
}
std::fstream imglabel;
imglabel.open(labeldir.c_str(), fstream::app|fstream::out);
bool camera_pov = true;
/* Create a window using viz. */
viz::Viz3d myWindow("Coordinate Frame");
/* Set window size. */
myWindow.setWindowSize(Size(image_size,image_size));
/* Set background color. */
myWindow.setBackgroundColor(viz::Color::gray());
myWindow.spinOnce();
/* Create a Mesh widget, loading .ply models. */
viz::Mesh objmesh = viz::Mesh::load(plymodel);
/* Get the center of the generated mesh widget, cause some .ply files, this could be ignored if you are using PASCAL database*/
Point3d cam_focal_point;
if (center_gen)
cam_focal_point = ViewSphere.getCenter(objmesh.cloud);
else
cam_focal_point = Point3d(0,0,0);
const char* headerPath = "../data/header_for_";
const char* binaryPath = "../data/binary_";
if (binary_out)
{
ViewSphere.createHeader(static_cast(campos.size()), image_size, image_size, headerPath);
}
float radius = ViewSphere.getRadius(objmesh.cloud, cam_focal_point);
objmesh.cloud = objmesh.cloud/radius*100;
cam_focal_point = cam_focal_point/radius*100;
Point3d cam_y_dir;
cam_y_dir.x = cam_head_x;
cam_y_dir.y = cam_head_y;
cam_y_dir.z = cam_head_z;
char temp[1024];
std::vector name_bkg;
if (bakgrdir.size() != 0)
{
/* List the file names under a given path */
listDir(bakgrdir.c_str(), name_bkg, false);
for (unsigned int i = 0; i < name_bkg.size(); i++)
{
name_bkg.at(i) = bakgrdir + name_bkg.at(i);
}
}
/* Images will be saved as .png files. */
size_t cnt_img;
srand((int)time(0));
do
{
cnt_img = 0;
for(int pose = 0; pose < static_cast(campos.size()); pose++){
/* Add light. */
// double alpha1 = rand()%(314/2)/100;
// double alpha2 = rand()%(314*2)/100;
// printf("%f %f %f/n", ceil(10000*sqrt(1 - sin(alpha1)*sin(alpha1))*sin(alpha2)), 10000*sqrt(1 - sin(alpha1)*sin(alpha1))*cos(alpha2), sin(alpha1)*10000);
// myWindow.addLight(Vec3d(10000*sqrt(1 - sin(alpha1)*sin(alpha1))*sin(alpha2),10000*sqrt(1 - sin(alpha1)*sin(alpha1))*cos(alpha2),sin(alpha1)*10000), Vec3d(0,0,0), viz::Color::white(), viz::Color::white(), viz::Color::black(), viz::Color::white());
int label_x, label_y, label_z;
label_x = static_cast(campos.at(pose).x*100);
label_y = static_cast(campos.at(pose).y*100);
label_z = static_cast(campos.at(pose).z*100);
sprintf (temp,"%02i_%02i_%04i_%04i_%04i_%02i", label_class, label_item, label_x, label_y, label_z, static_cast(obj_dist/100));
String filename = temp;
filename += ".png";
imglabel << filename << ' ' << label_class << endl;
filename = imagedir + filename;
/* Get the pose of the camera using makeCameraPoses. */
if (view_region != 0)
{
cam_focal_point.x = cam_focal_point.y - label_x/5;
}
Affine3f cam_pose = viz::makeCameraPose(campos.at(pose)*obj_dist+cam_focal_point, cam_focal_point, cam_y_dir*obj_dist+cam_focal_point);
/* Get the transformation matrix from camera coordinate system to global. */
Affine3f transform = viz::makeTransformToGlobal(Vec3f(1.0f,0.0f,0.0f), Vec3f(0.0f,1.0f,0.0f), Vec3f(0.0f,0.0f,1.0f), campos.at(pose));
viz::WMesh mesh_widget(objmesh);
/* Pose of the widget in camera frame. */
Affine3f cloud_pose = Affine3f().translate(Vec3f(1.0f,1.0f,1.0f));
/* Pose of the widget in global frame. */
Affine3f cloud_pose_global = transform * cloud_pose;
/* Visualize camera frame. */
if (!camera_pov)
{
viz::WCameraPosition cpw(1); // Coordinate axes
viz::WCameraPosition cpw_frustum(Vec2f(0.5, 0.5)); // Camera frustum
myWindow.showWidget("CPW", cpw, cam_pose);
myWindow.showWidget("CPW_FRUSTUM", cpw_frustum, cam_pose);
}
/* Visualize widget. */
if (bakgrdir.size() != 0)
{
cv::Mat img_bg = cv::imread(name_bkg.at(rand()%name_bkg.size()));
/* Back ground images has a distance of 2 times of radius of camera view distance */
cv::viz::WImage3D background_widget(img_bg, Size2d(image_size*4.2, image_size*4.2), Vec3d(-campos.at(pose)*bg_dist+cam_focal_point), Vec3d(campos.at(pose)*bg_dist-cam_focal_point), Vec3d(0,0,-1)*bg_dist+Vec3d(0,2*cam_focal_point.y,0));
myWindow.showWidget("bgwidget", background_widget, cloud_pose_global);
}
// mesh_widget.setRenderingProperty(viz::LINE_WIDTH, 4.0);
myWindow.showWidget("targetwidget", mesh_widget, cloud_pose_global);
/* Set the viewer pose to that of camera. */
if (camera_pov)
myWindow.setViewerPose(cam_pose);
/* Save screen shot as images. */
myWindow.saveScreenshot(filename);
if (binary_out)
{
/* Write images into binary files for further using in CNN training. */
ViewSphere.writeBinaryfile(filename, binaryPath, headerPath,static_cast(campos.size())*num_class, label_class, static_cast(campos.at(pose).x*100), static_cast(campos.at(pose).y*100), static_cast(campos.at(pose).z*100), rgb_use);
}
cnt_img++;
}
} while (cnt_img != campos.size());
imglabel.close();
return 1;
};
```
## 6.1.3 代码解释
接下来对代码清单6-1中的程序进行详细介绍。
- 创建一个窗口。
```cpp
代码清单6-2:创建窗口
viz::Viz3d myWindow("Coordinate Frame");
```
- 将窗口大小设置为64*64,我们使用这个尺寸作为它的默认值。
myWindow.setWindowSize(Size(64,64));
- 添加坐标轴。
```cpp
代码清单6-3:窗口中添加坐标轴
myWindow.showWidget("Coordinate Widget", viz::WCoordinateSystem());
myWindow.setBackgroundColor(viz::Color::gray());
myWindow.spin();
```
- 创建一个Mesh部件,加载.ply模型。
```cpp
代码清单6-4:添加.ply模型
viz::Mesh objmesh = viz::Mesh::load(plymodel);
```
- 获取生成的mesh部件的中心,生成一些.ply文件。
```cpp
代码清单6-5:获取部件中心位置
Point3d cam_focal_point = ViewSphere.getCenter(objmesh.cloud);
```
- 使用makeCameraPoses获取相机的姿态。
```cpp
代码清单6-6:获取相机位姿
Affine3f cam_pose = viz::makeCameraPose(campos.at(pose) * radius+cam_focal_point, cam_focal_point, cam_y_dir * radius+cam_focal_point);
```
- 获取相机坐标系到全局坐标系的变换矩阵。
```cpp
代码清单6-7:获取变换矩阵
Affine3f transform = viz::makeTransformToGlobal(Vec3f(1.0f,0.0f,0.0f), Vec3f(0.0f,1.0f,0.0f), Vec3f(0.0f,0.0f,1.0f), campos.at(pose));
viz::WMesh mesh_widget(objmesh);
```
- 将屏幕截图保存为图像。
```cpp
代码清单6-8:截屏
myWindow.saveScreenshot(filename);
```
- 将图像写入二进制文件,以便在CNN训练中进一步使用。
```cpp
代码清单6-9:生成二进制文件
ViewSphere.writeBinaryfile(filename, binaryPath, headerPath,(int)campos.size()*num_class, label_class, (int)(campos.at(pose).x*100), (int)(campos.at(pose).y*100), (int)(campos.at(pose).z*100), rgb_use);
```
================================================
FILE: chapter 6/分析训练模型.md
================================================
您将学习如何分析一个训练过的模型的性能。
## 6.3.1 目标
在本节教程中,我们将学习如何如何分析一个训练过的模型的性能,主要内容包括:
- 如何从特定图像中提取特征
- 如何对提取的特征进行有意义的对比
## 6.3.2 C++代码
```cpp
代码清单6-18
/*
* Software License Agreement (BSD License)
*
* Copyright (c) 2009, Willow Garage, Inc.
* All rights reserved.
*
* Redistribution and use in source and binary forms, with or without
* modification, are permitted provided that the following conditions
* are met:
*
* * Redistributions of source code must retain the above copyright
* notice, this list of conditions and the following disclaimer.
* * Redistributions in binary form must reproduce the above
* copyright notice, this list of conditions and the following
* disclaimer in the documentation and/or other materials provided
* with the distribution.
* * Neither the name of Willow Garage, Inc. nor the names of its
* contributors may be used to endorse or promote products derived
* from this software without specific prior written permission.
*
* THIS SOFTWARE IS PROVIDED BY THE COPYRIGHT HOLDERS AND CONTRIBUTORS
* "AS IS" AND ANY EXPRESS OR IMPLIED WARRANTIES, INCLUDING, BUT NOT
* LIMITED TO, THE IMPLIED WARRANTIES OF MERCHANTABILITY AND FITNESS
* FOR A PARTICULAR PURPOSE ARE DISCLAIMED. IN NO EVENT SHALL THE
* COPYRIGHT OWNER OR CONTRIBUTORS BE LIABLE FOR ANY DIRECT, INDIRECT,
* INCIDENTAL, SPECIAL, EXEMPLARY, OR CONSEQUENTIAL DAMAGES (INCLUDING,
* BUT NOT LIMITED TO, PROCUREMENT OF SUBSTITUTE GOODS OR SERVICES;
* LOSS OF USE, DATA, OR PROFITS; OR BUSINESS INTERRUPTION) HOWEVER
* CAUSED AND ON ANY THEORY OF LIABILITY, WHETHER IN CONTRACT, STRICT
* LIABILITY, OR TORT (INCLUDING NEGLIGENCE OR OTHERWISE) ARISING IN
* ANY WAY OUT OF THE USE OF THIS SOFTWARE, EVEN IF ADVISED OF THE
* POSSIBILITY OF SUCH DAMAGE.
*
*/
#include
#include "opencv2/imgproc.hpp"
#include "opencv2/cnn_3dobj.hpp"
using namespace cv;
using namespace cv::cnn_3dobj;
int main(int argc, char** argv)
{
const String keys = "{help | | this demo will have an analysis on the trained model, it will print information about whether the model is suit for set different classes apart and also discriminant on object pose at the same time.}"
"{caffemodel | ../../testdata/cv/3d_triplet_iter_30000.caffemodel | caffe model for feature exrtaction.}"
"{network_forIMG | ../../testdata/cv/3d_triplet_testIMG.prototxt | Network definition file used for extracting feature from a single image and making a classification}"
"{mean_file | no | The mean file generated by Caffe from all gallery images, this could be used for mean value substraction from all images. If you want to use the mean file, you can set this as ../data/images_mean/triplet_mean.binaryproto.}"
"{target_img | ../data/images_all/4_78.png | Path of image in reference.}"
"{ref_img1 | ../data/images_all/4_79.png | Path of closest image.}"
"{ref_img2 | ../data/images_all/4_87.png | Path of less closer image in the same class with reference image.}"
"{ref_img3 | ../data/images_all/3_78.png | Path of image with the same pose in another class.}"
"{feature_blob | feat | Name of layer which will represent as the feature, in this network, ip1 or feat is well.}"
"{device | CPU | device}"
"{dev_id | 0 | dev_id}";
/* Get parameters from comand line. */
cv::CommandLineParser parser(argc, argv, keys);
parser.about("Demo for object data classification and pose estimation");
if (parser.has("help"))
{
parser.printMessage();
return 0;
}
String caffemodel = parser.get("caffemodel");
String network_forIMG = parser.get("network_forIMG");
String mean_file = parser.get("mean_file");
String target_img = parser.get("target_img");
String ref_img1 = parser.get("ref_img1");
String ref_img2 = parser.get("ref_img2");
String ref_img3 = parser.get("ref_img3");
String feature_blob = parser.get("feature_blob");
String device = parser.get("device");
int dev_id = parser.get("dev_id");
std::vector ref_img;
/* Sample which is most closest in pose to reference image
*and also the same class.
*/
ref_img.push_back(ref_img1);
/* Sample which is less closest in pose to reference image
*and also the same class.
*/
ref_img.push_back(ref_img2);
/* Sample which is very close in pose to reference image
*but not the same class.
*/
ref_img.push_back(ref_img3);
/* Initialize a net work with Device. */
cv::cnn_3dobj::descriptorExtractor descriptor(device, dev_id);
/* Load net with the caffe trained net work parameter and structure. */
if (strcmp(mean_file.c_str(), "no") == 0)
descriptor.loadNet(network_forIMG, caffemodel);
else
descriptor.loadNet(network_forIMG, caffemodel, mean_file);
cv::Mat img_base = cv::imread(target_img, -1);
if (img_base.empty())
{
printf("could not read reference image %s\n, make sure the path of images are set properly.", target_img.c_str());
}
std::vector img;
for (unsigned int i = 0; i < ref_img.size(); i++)
{
img.push_back(cv::imread(ref_img[i], -1));
if (img[i].empty()) {
printf("could not read reference image %s\n, make sure the path of images are set properly.", ref_img[i].c_str());
}
}
cv::Mat feature_test;
descriptor.extract(img_base, feature_test, feature_blob);
if (feature_test.empty()) {
printf("could not extract feature from test image which is read into cv::Mat.");
}
cv::Mat feature_reference;
descriptor.extract(img, feature_reference, feature_blob);
if (feature_reference.empty()) {
printf("could not extract feature from reference images which is already stored in vector.");
}
std::vector matches;
for (int i = 0; i < feature_reference.rows; i++)
{
cv::Mat distance = feature_test-feature_reference.row(i);
matches.push_back(cv::norm(distance));
}
bool pose_pass = false;
bool class_pass = false;
/* Have comparations on the distance between reference image and 3 other images
*distance between closest sample and reference image should be smallest and
*distance between sample in another class and reference image should be largest.
*/
if (matches[0] < matches[1] && matches[0] < matches[2])
pose_pass = true;
if (matches[1] < matches[2])
class_pass = true;
if (!pose_pass)
{
printf("\n =========== Model %s ========== \nIs not trained properly that the similar pose could not be tell from a cluster of features.\n", caffemodel.c_str());
}
else if (!class_pass)
{
printf("\n =========== Model %s ========== \nIs not trained properly that feature from the same class is not discriminant from the one of another class with similar pose.\n", caffemodel.c_str());
}
else
{
printf("\n =========== Model %s ========== \nSuits for setting different classes apart and also discriminant on object pose at the same time.\n", caffemodel.c_str());
}
return 0;
}
```
## 6.3.3 代码解释
接下来对代码清单6-18中的程序进行详细介绍.
- 样例最接近参考图像且属于同一类别的样本。
```cpp
代码清单6-19:最相似
ref_img.push_back(ref_img1);
```
- 样例与参考图像最不相似但属于同一类别的样本。
```cpp
代码清单6-20:同类不相似
ref_img.push_back(ref_img2);
```
- 样例与参考图像非常接近,但不是同一类的样本。
```cpp
代码清单6-21:相似不同类
ref_img.push_back(ref_img3);
```
- 使用Device初始化一个网络。
```cpp
代码清单6-22:初始化网络
cv::cnn_3dobj::descriptorExtractor descriptor(device, dev_id);
```
- 加载用caffe模型训练过的网络参数和结构。
```cpp
代码清单6-23:加载结构
if (strcmp(mean_file.c_str(), "no") == 0)
descriptor.loadNet(network_forIMG, caffemodel);
else
descriptor.loadNet(network_forIMG, caffemodel, mean_file);
```
- 比较参考图像和其他3个样本图像之间的距离,最接近参考图像的样本和参考图像之间的距离应最小,另一个样本和参考图像之间的距离应最大。
```cpp
代码清单6-24:比较结果
if (matches[0] < matches[1] && matches[0] < matches[2])
pose_pass = true;
if (matches[1] < matches[2])
class_pass = true;
```
================================================
FILE: chapter 6/分类.md
================================================
## 6.2.1 目标
在本节教程中,我们将学习如何从图像中提取特征并使用描述符进行预测,主要内容包括:
1. 如何从图像中提取特征
2. 如何从给定根路径下的图像中提取特征
3. 如何利用参考图像和目标图像进行预测
## 6.2.2 C++代码
```cpp
代码清单6-10
/*
* Software License Agreement (BSD License)
*
* Copyright (c) 2009, Willow Garage, Inc.
* All rights reserved.
*
* Redistribution and use in source and binary forms, with or without
* modification, are permitted provided that the following conditions
* are met:
*
* * Redistributions of source code must retain the above copyright
* notice, this list of conditions and the following disclaimer.
* * Redistributions in binary form must reproduce the above
* copyright notice, this list of conditions and the following
* disclaimer in the documentation and/or other materials provided
* with the distribution.
* * Neither the name of Willow Garage, Inc. nor the names of its
* contributors may be used to endorse or promote products derived
* from this software without specific prior written permission.
*
* THIS SOFTWARE IS PROVIDED BY THE COPYRIGHT HOLDERS AND CONTRIBUTORS
* "AS IS" AND ANY EXPRESS OR IMPLIED WARRANTIES, INCLUDING, BUT NOT
* LIMITED TO, THE IMPLIED WARRANTIES OF MERCHANTABILITY AND FITNESS
* FOR A PARTICULAR PURPOSE ARE DISCLAIMED. IN NO EVENT SHALL THE
* COPYRIGHT OWNER OR CONTRIBUTORS BE LIABLE FOR ANY DIRECT, INDIRECT,
* INCIDENTAL, SPECIAL, EXEMPLARY, OR CONSEQUENTIAL DAMAGES (INCLUDING,
* BUT NOT LIMITED TO, PROCUREMENT OF SUBSTITUTE GOODS OR SERVICES;
* LOSS OF USE, DATA, OR PROFITS; OR BUSINESS INTERRUPTION) HOWEVER
* CAUSED AND ON ANY THEORY OF LIABILITY, WHETHER IN CONTRACT, STRICT
* LIABILITY, OR TORT (INCLUDING NEGLIGENCE OR OTHERWISE) ARISING IN
* ANY WAY OUT OF THE USE OF THIS SOFTWARE, EVEN IF ADVISED OF THE
* POSSIBILITY OF SUCH DAMAGE.
*
*/
#include
#include
#include
using namespace cv;
using namespace std;
using namespace cv::cnn_3dobj;
static void listDir(const char *path, std::vector& files, bool r)
{
DIR *pDir;
struct dirent *ent;
char childpath[512];
pDir = opendir(path);
memset(childpath, 0, sizeof(childpath));
while ((ent = readdir(pDir)) != NULL)
{
if (ent->d_type & DT_DIR)
{
if (strcmp(ent->d_name, ".") == 0 || strcmp(ent->d_name, "..") == 0 || strcmp(ent->d_name, ".DS_Store") == 0)
{
continue;
}
if (r)
{
sprintf(childpath, "%s/%s", path, ent->d_name);
listDir(childpath,files,false);
}
}
else
{
if (strcmp(ent->d_name, ".DS_Store") != 0)
files.push_back(ent->d_name);
}
}
sort(files.begin(),files.end());
};
static int featureWrite(const Mat &features, const String &fname)
{
ofstream ouF;
ouF.open(fname.c_str(), std::ofstream::binary);
if (!ouF)
{
cerr << "failed to open the file : " << fname << endl;
return 0;
}
for (int r = 0; r < features.rows; r++)
{
ouF.write(reinterpret_cast(features.ptr(r)), features.cols*features.elemSize());
}
ouF.close();
return 1;
}
int main(int argc, char** argv)
{
const String keys = "{help | | This sample will extract features from reference images and target image for classification. You can add a mean_file if there little variance in data such as human faces, otherwise it is not so useful}"
"{src_dir | ../data/images_all/ | Source direction of the images ready for being used for extract feature as gallery.}"
"{caffemodel | ../../testdata/cv/3d_triplet_iter_30000.caffemodel | caffe model for feature exrtaction.}"
"{network_forIMG | ../../testdata/cv/3d_triplet_testIMG.prototxt | Network definition file used for extracting feature from a single image and making a classification}"
"{mean_file | no | The mean file generated by Caffe from all gallery images, this could be used for mean value substraction from all images. If you want to use the mean file, you can set this as ../data/images_mean/triplet_mean.binaryproto.}"
"{target_img | ../data/images_all/4_78.png | Path of image waiting to be classified.}"
"{feature_blob | feat | Name of layer which will represent as the feature, in this network, ip1 or feat is well.}"
"{num_candidate | 15 | Number of candidates in gallery as the prediction result.}"
"{device | CPU | Device type: CPU or GPU}"
"{dev_id | 0 | Device id}"
"{gallery_out | 0 | Option on output binary features on gallery images}";
/* get parameters from comand line */
cv::CommandLineParser parser(argc, argv, keys);
parser.about("Feature extraction and classification");
if (parser.has("help"))
{
parser.printMessage();
return 0;
}
String src_dir = parser.get("src_dir");
String caffemodel = parser.get("caffemodel");
String network_forIMG = parser.get("network_forIMG");
String mean_file = parser.get("mean_file");
String target_img = parser.get("target_img");
String feature_blob = parser.get("feature_blob");
int num_candidate = parser.get("num_candidate");
String device = parser.get("device");
int gallery_out = parser.get("gallery_out");
/* Initialize a net work with Device */
cv::cnn_3dobj::descriptorExtractor descriptor(device);
std::cout << "Using" << descriptor.getDeviceType() << std::endl;
/* Load net with the caffe trained net work parameter and structure */
if (strcmp(mean_file.c_str(), "no") == 0)
descriptor.loadNet(network_forIMG, caffemodel);
else
descriptor.loadNet(network_forIMG, caffemodel, mean_file);
std::vector name_gallery;
/* List the file names under a given path */
listDir(src_dir.c_str(), name_gallery, false);
if (gallery_out)
{
ofstream namelist_out("gallelist.txt");
/* Writing name of the reference images. */
for (unsigned int i = 0; i < name_gallery.size(); i++)
namelist_out << name_gallery.at(i) << endl;
}
for (unsigned int i = 0; i < name_gallery.size(); i++)
{
name_gallery[i] = src_dir + name_gallery[i];
}
std::vector img_gallery;
cv::Mat feature_reference;
for (unsigned int i = 0; i < name_gallery.size(); i++)
{
img_gallery.push_back(cv::imread(name_gallery[i]));
}
/* Extract feature from a set of images */
descriptor.extract(img_gallery, feature_reference, feature_blob);
if (gallery_out)
{
std::cout << std::endl << "---------- Features of gallery images ----------" << std::endl;
/* Print features of the reference images. */
for (int i = 0; i < feature_reference.rows; i++)
std::cout << feature_reference.row(i) << endl;
std::cout << std::endl << "---------- Saving features of gallery images into feature.bin ----------" << std::endl;
featureWrite(feature_reference, "feature.bin");
}
else
{
std::cout << std::endl << "---------- Prediction for " << target_img << " ----------" << std::endl;
cv::Mat img = cv::imread(target_img);
std::cout << std::endl << "---------- Features of gallery images ----------" << std::endl;
std::vector > prediction;
/* Print features of the reference images. */
for (int i = 0; i < feature_reference.rows; i++)
std::cout << feature_reference.row(i) << endl;
cv::Mat feature_test;
descriptor.extract(img, feature_test, feature_blob);
/* Initialize a matcher which using L2 distance. */
cv::BFMatcher matcher(NORM_L2);
std::vector > matches;
/* Have a KNN match on the target and reference images. */
matcher.knnMatch(feature_test, feature_reference, matches, num_candidate);
/* Print feature of the target image waiting to be classified. */
std::cout << std::endl << "---------- Features of target image: " << target_img << "----------" << endl << feature_test << std::endl;
/* Print the top N prediction. */
std::cout << std::endl << "---------- Prediction result(Distance - File Name in Gallery) ----------" << std::endl;
for (size_t i = 0; i < matches[0].size(); ++i)
{
std::cout << i << " - " << std::fixed << std::setprecision(2) << name_gallery[matches[0][i].trainIdx] << " - \"" << matches[0][i].distance << "\"" << std::endl;
}
}
return 0;
}
```
## 6.2.3 代码解释
接下来对代码清单6-10中的程序进行详细介绍。
- 使用Device初始化网络
```cpp
代码清单6-11:初始化网络
cv::cnn_3dobj::descriptorExtractor descriptor(device);
```
- 加载用caffe模型训练过的网络参数和结构。
```cpp
代码清单6-12:加载网络
if (strcmp(mean_file.c_str(), "no") == 0)
descriptor.loadNet(network_forIMG, caffemodel);
else
descriptor.loadNet(network_forIMG, caffemodel, mean_file);
```
- 列出给定路径下的文件名。
```cpp
代码清单6-13:获取文件名
listDir(src_dir.c_str(), name_gallery, false);
for (unsigned int i = 0; i < name_gallery.size(); i++)
{
name_gallery[i] = src_dir + name_gallery[i];
}
```
- 从一组图像中提取特征
```cpp
代码清单6-14:提取特征
descriptor.extract(img_gallery, feature_reference, feature_blob);
```
- 初始化一个使用L2距离的匹配器
```cpp
代码清单6-15:初始化匹配器
cv::BFMatcher matcher(NORM_L2);
std::vector > matches;
```
- 对目标图像和参考图像进行KNN匹配
```cpp
代码清单6-16:KNN匹配
matcher.knnMatch(feature_test, feature_reference, matches,num_candidate);
```
- 输出参考图像的特征
```cpp
代码清单6-17:输出结果
std::cout <
// library includes
#include
#include
#include
#include
#include
#define CVVISUAL_DEBUGMODE
#include
#include
#include
#include
#include
using namespace std;
using namespace cv;
template std::string toString(const T& p_arg)
{
std::stringstream ss;
ss << p_arg;
return ss.str();
}
int
main(int argc, char** argv)
{
cv::Size* resolution = nullptr;
// parser keys
const char *keys =
"{ help h usage ? | | show this message }"
"{ width W | 0| camera resolution width. leave at 0 to use defaults }"
"{ height H | 0| camera resolution height. leave at 0 to use defaults }";
CommandLineParser parser(argc, argv, keys);
if (parser.has("help")) {
parser.printMessage();
return 0;
}
int res_w = parser.get("width");
int res_h = parser.get("height");
// setup video capture
cv::VideoCapture capture(0);
if (!capture.isOpened()) {
std::cout << "Could not open VideoCapture" << std::endl;
return 1;
}
if (res_w>0 && res_h>0) {
printf("Setting resolution to %dx%d\n", res_w, res_h);
capture.set(CV_CAP_PROP_FRAME_WIDTH, res_w);
capture.set(CV_CAP_PROP_FRAME_HEIGHT, res_h);
}
cv::Mat prevImgGray;
std::vector prevKeypoints;
cv::Mat prevDescriptors;
int maxFeatureCount = 500;
Ptr detector = ORB::create(maxFeatureCount);
cv::BFMatcher matcher(cv::NORM_HAMMING);
for (int imgId = 0; imgId < 10; imgId++) {
// capture a frame
cv::Mat imgRead;
capture >> imgRead;
printf("%d: image captured\n", imgId);
std::string imgIdString{"imgRead"};
imgIdString += toString(imgId);
cvv::showImage(imgRead, CVVISUAL_LOCATION, imgIdString.c_str());
// convert to grayscale
cv::Mat imgGray;
cv::cvtColor(imgRead, imgGray, COLOR_BGR2GRAY);
cvv::debugFilter(imgRead, imgGray, CVVISUAL_LOCATION, "to gray");
// detect ORB features
std::vector keypoints;
cv::Mat descriptors;
detector->detectAndCompute(imgGray, cv::noArray(), keypoints, descriptors);
printf("%d: detected %zd keypoints\n", imgId, keypoints.size());
// match them to previous image (if available)
if (!prevImgGray.empty()) {
std::vector matches;
matcher.match(prevDescriptors, descriptors, matches);
printf("%d: all matches size=%zd\n", imgId, matches.size());
std::string allMatchIdString{"all matches "};
allMatchIdString += toString(imgId-1) + "<->" + toString(imgId);
cvv::debugDMatch(prevImgGray, prevKeypoints, imgGray, keypoints, matches, CVVISUAL_LOCATION, allMatchIdString.c_str());
// remove worst (as defined by match distance) bestRatio quantile
double bestRatio = 0.8;
std::sort(matches.begin(), matches.end());
matches.resize(int(bestRatio * matches.size()));
printf("%d: best matches size=%zd\n", imgId, matches.size());
std::string bestMatchIdString{"best " + toString(bestRatio) + " matches "};
bestMatchIdString += toString(imgId-1) + "<->" + toString(imgId);
cvv::debugDMatch(prevImgGray, prevKeypoints, imgGray, keypoints, matches, CVVISUAL_LOCATION, bestMatchIdString.c_str());
}
prevImgGray = imgGray;
prevKeypoints = keypoints;
prevDescriptors = descriptors;
}
cvv::finalShow();
return 0;
}
```
下面是编译时需要使用的CmakeList.text文件
```cpp
代码清单7-2:CmakeLists.txt
cmake_minimum_required(VERSION 2.8)
project(cvvisual_test)
SET(CMAKE_PREFIX_PATH ~/software/opencv/install)
SET(CMAKE_CXX_COMPILER "g++-4.8")
SET(CMAKE_CXX_FLAGS "-std=c++11 -O2 -pthread -Wall -Werror")
# (un)set: cmake -DCVV_DEBUG_MODE=OFF ..
OPTION(CVV_DEBUG_MODE "cvvisual-debug-mode" ON)
if(CVV_DEBUG_MODE MATCHES ON)
set(CMAKE_CXX_FLAGS "${CMAKE_CXX_FLAGS} -DCVVISUAL_DEBUGMODE")
endif()
FIND_PACKAGE(OpenCV REQUIRED)
include_directories(${OpenCV_INCLUDE_DIRS})
add_executable(cvvt main.cpp)
target_link_libraries(cvvt
opencv_core opencv_videoio opencv_imgproc opencv_features2d
opencv_cvv
)
```
## 7.1.3 代码解释
我们可以使用上面的cmakeliss .txt和Option 命令CVV_DEBUG_MODE=ON (cmake -DCVV_DEBUG_MODE=ON)来编译程序。另外也可以将相应的宏定义CVVISUAL_DEBUGMODE添加到我们的编译器中(例如g++ -DCVVISUAL_DEBUGMODE)。
- 第一个cvv调用简单的显示图像(类似于imshow),并使用imgIdString作为注释。
```cpp
代码清单7-3:简单的显示图像
cvv::showImage(imgRead, CVVISUAL_LOCATION, imgIdString.c_str());
```
图像被添加到可视化调试的GUI中cvv调用块下的Overview选项卡,具体如图7-1所示。
然后可以选择和查看图像,具体如图7-2所示。
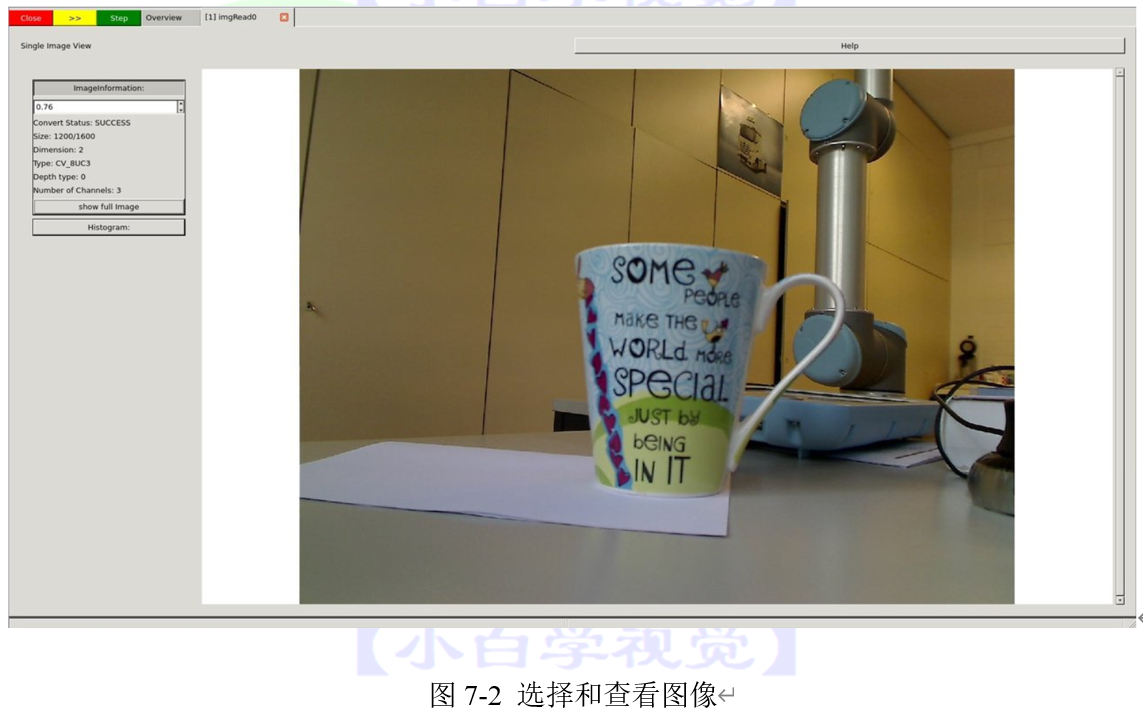
当你想继续执行代码,即取消cvv调用时,可以继续执行代码直到下一个cvv调用(Step)(绿色的按钮),继续到最后一个cvv调用(*>>*)(黄色)或者还可以直接运行应用程序,直到它退出程序(Close)(红色)。
下面演示选择继续执行代码直到下一个cvv调用(Step)(绿色的按钮)。
- 下一个cvv调用用于调试各种滤波操作,即以图片作为输入并返回图片作为输出的操作。
```cpp
代码清单7-4:调试各种滤波操作"to gray"
cvv::debugFilter(imgRead, imgGray, CVVISUAL_LOCATION, "to gray");
```
与每一个cvv调用一样,首先要进入Overview选项卡,此时选项卡如图7-3所示。
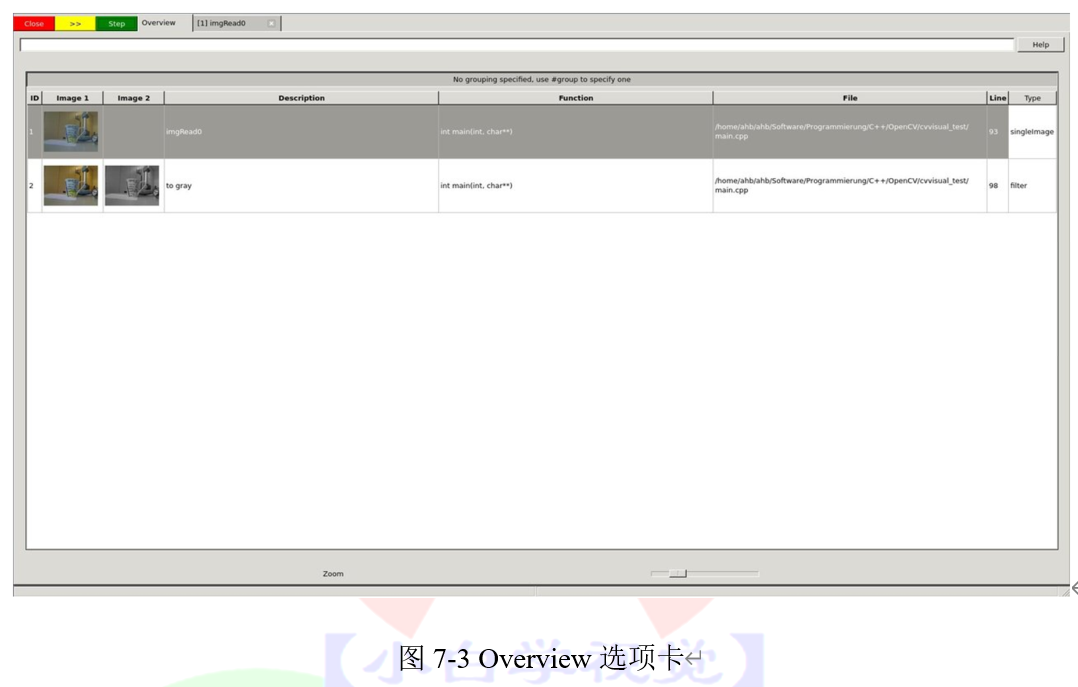
再次按下Step。
```cpp
代码清单7-5:调试各种滤波操作"smoothed"
cvv::debugFilter(imgGray, imgGraySmooth, CVVISUAL_LOCATION, "smoothed");
```
如果打开了滤波器调用,最终将在“DefaultFilterView”中结束。两个图像显示在一起,我们可以同步放大它们,放大后如图7-4所示。

我们按两次Step,看看放大后的图像,当达到很高的缩放级别时,可以看到每个像素的灰度值,具体如图7-5所示。

查看边缘检测调试结果
```cpp
代码清单7-6:查看边缘
cvv::debugFilter(imgEdges, imgEdgesDilated, CVVISUAL_LOCATION, "dilated edges");
```
此时,DefaultFilterView中显示了两个图像,形式如图7-6所示
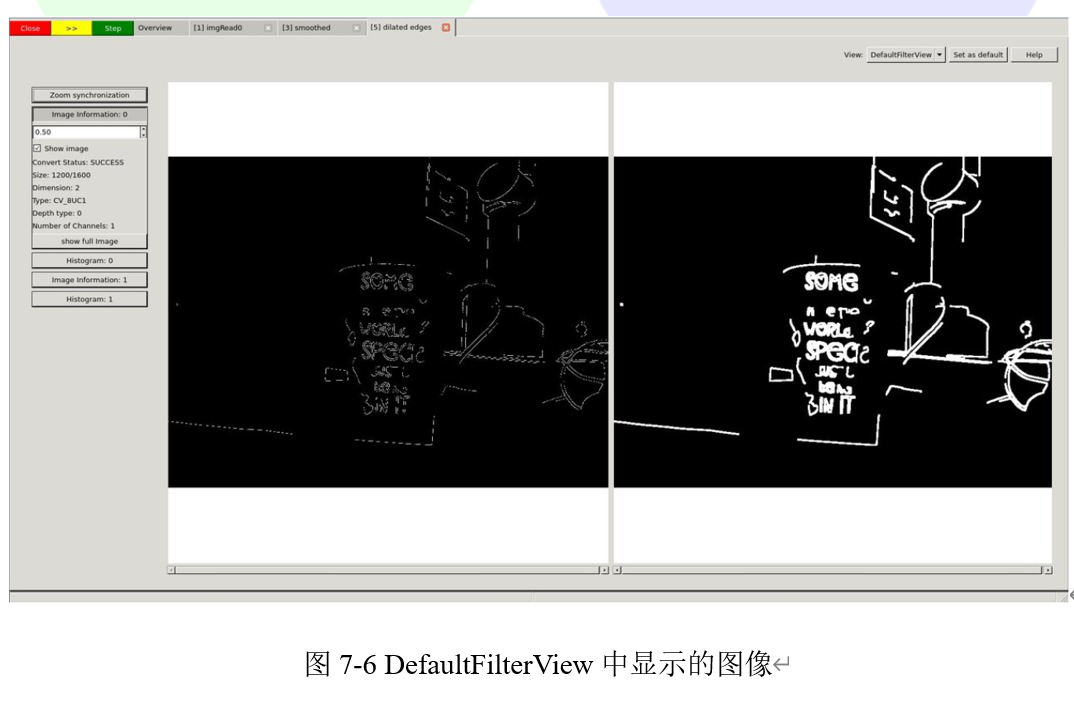
现在我们使用右上角的View选项卡选择“DualFilterView”。选择“Changed Pixels”作为滤波器,并应用在中间的图像上,得到如图7-7所示的结果。
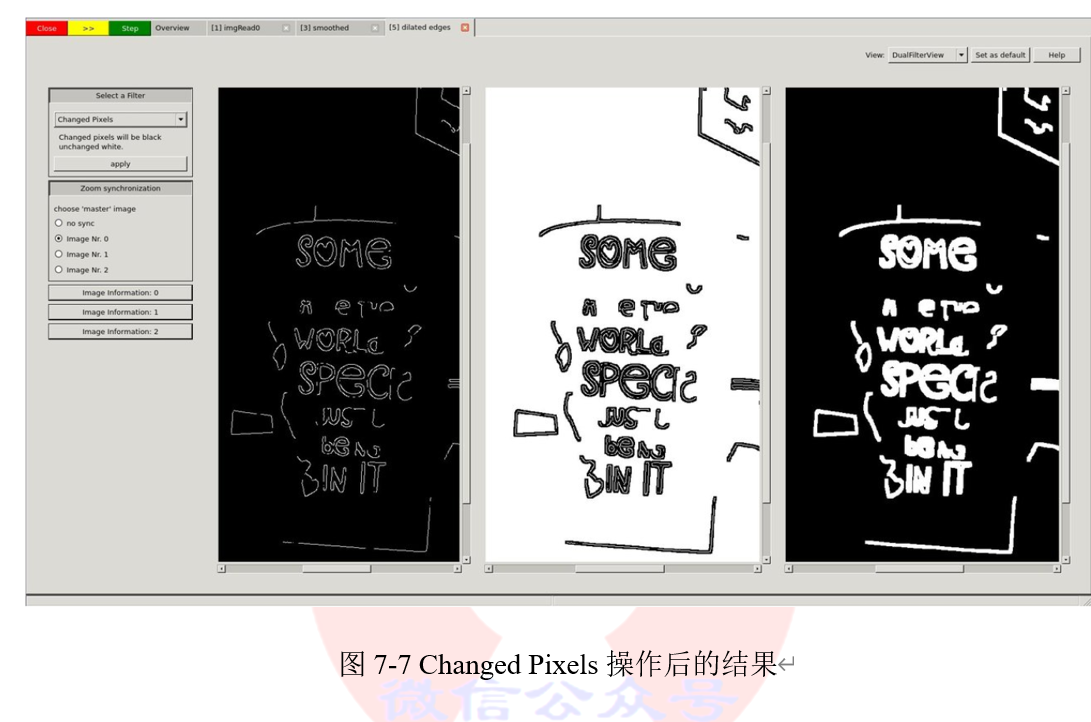
在我们仔细查看了这些图像(可能使用了不同的视图、滤波器或其他GUI功能)之后,决定让程序继续运行至结束。我们按黄色*>>*按钮。这个程序将阻塞在cvv::finalShow() 并显示概述以及传递给cvv的所有内容,结果如图7-8所示。
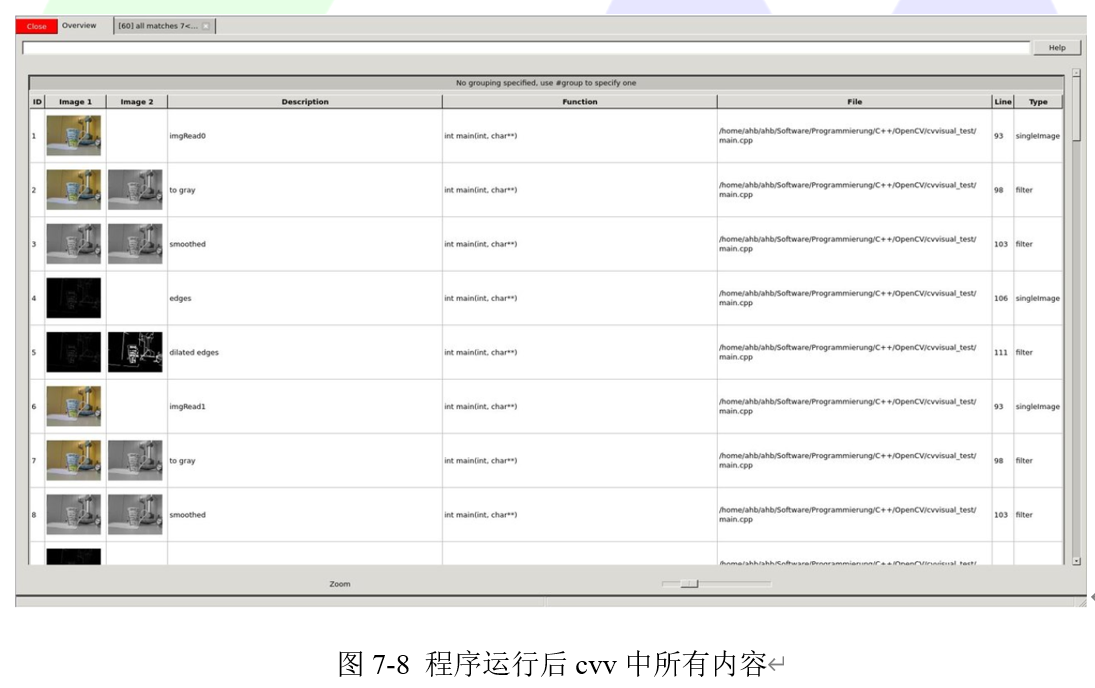
- cvv debugDMatch调用适用于以下情况:两个图像各有一组相互匹配的描述符。
我们将这两个图像、这两组特征点集及其匹配传递给可视化调试模块。
```cpp
代码清单7-7:特征点匹配
cvv::debugDMatch(prevImgGray, prevKeypoints, imgGray, keypoints, matches, CVVISUAL_LOCATION, allMatchIdString.c_str());
```
我们使用Overview中的滤波器功能(*#type match*)来只显示匹配结果,结果如图7-9所示。
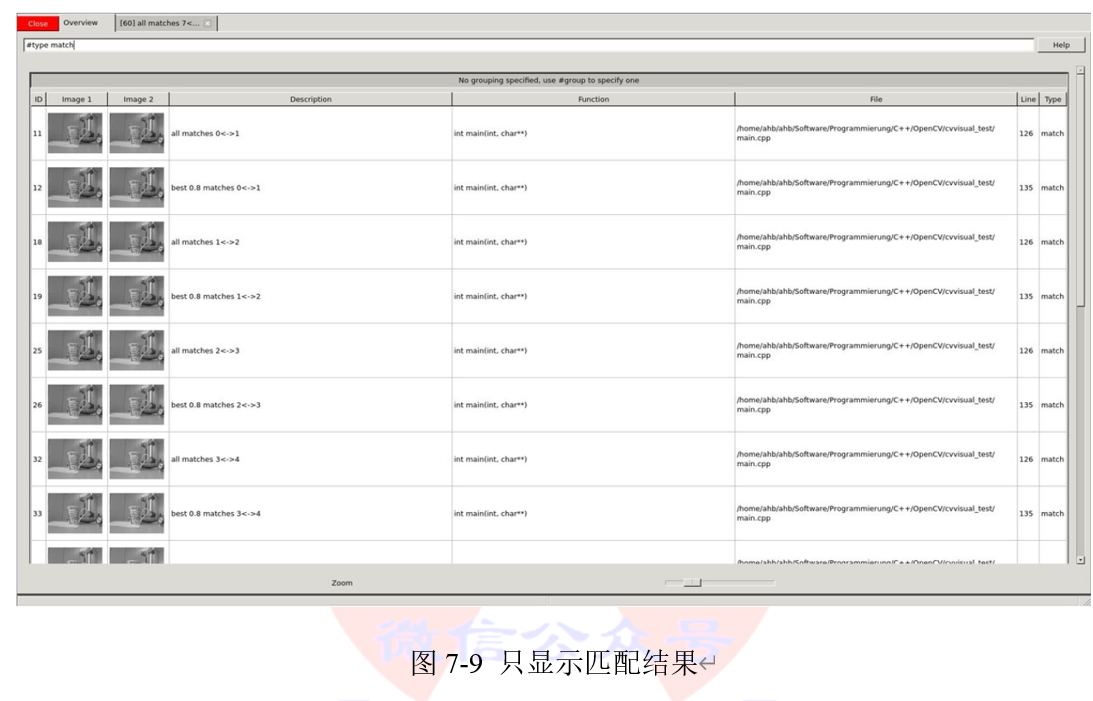
如果想更详细地查看其中的一项,例如调整我们匹配时使用的参数。窗口中有各种设置来显示关键点和匹配项。此外,还有一个鼠标悬停提示工具。在图7-10中给出这步操作的结果。
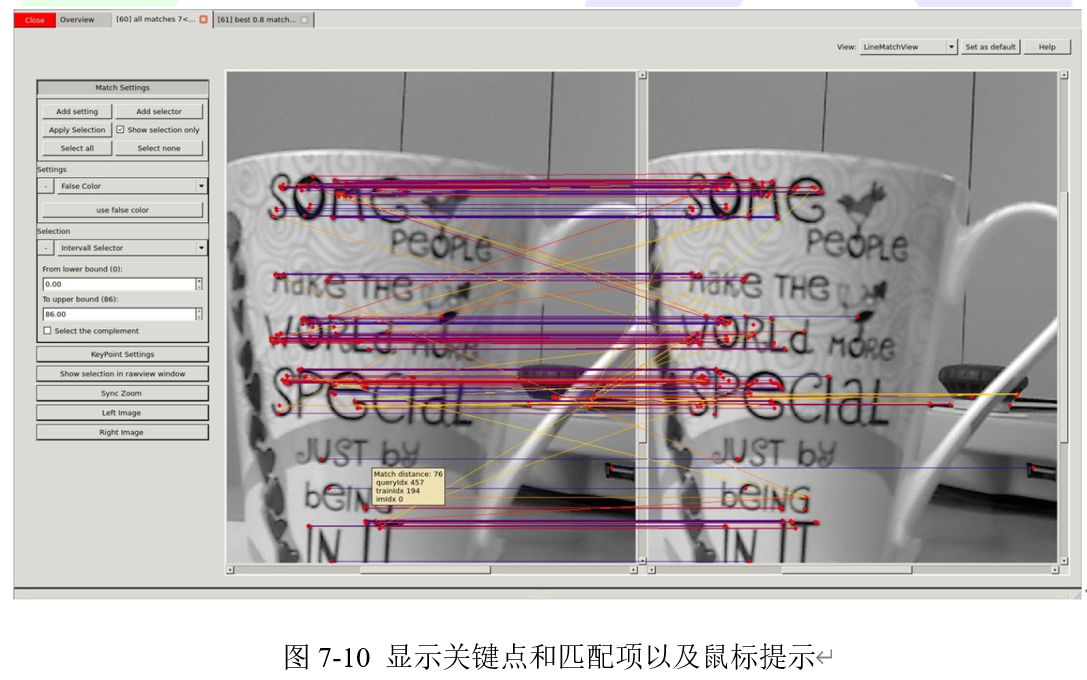
可以看到它有很多不匹配的地方。因此我们可以只显示匹配距离最小的70%的关键点,操作结果在图7-11给出。。
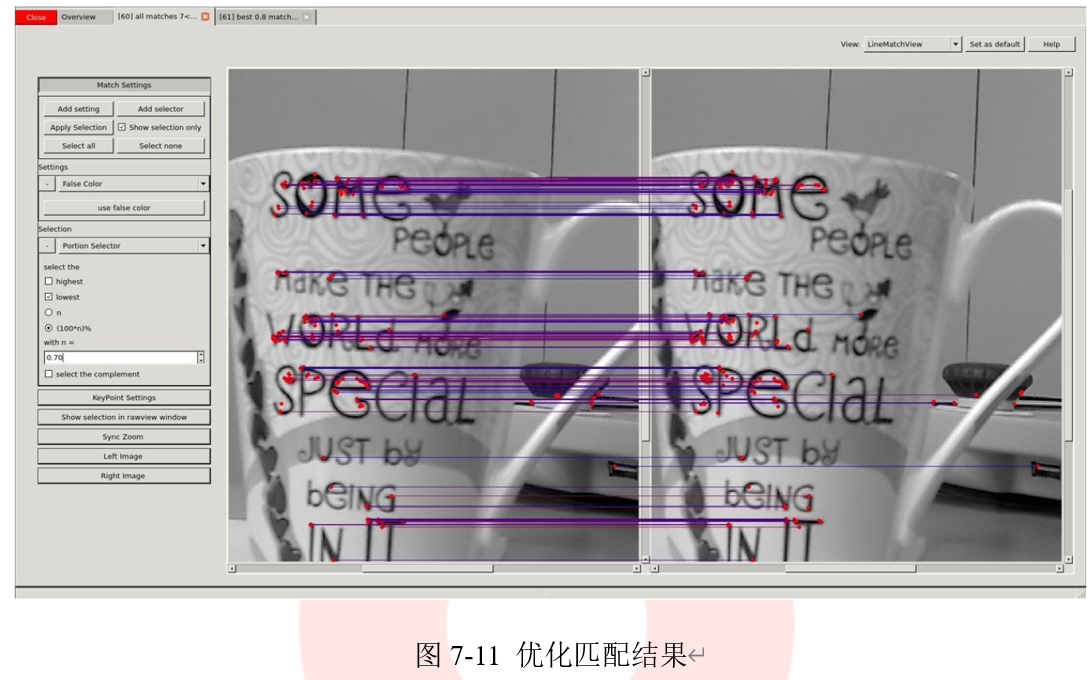
成功减少视觉干扰后,我们希望更清楚地看到两个图像之间的变化。选择“ TranslationMatchView”,以不同的方式显示匹配关键点的位置,结果如图7-12所示。
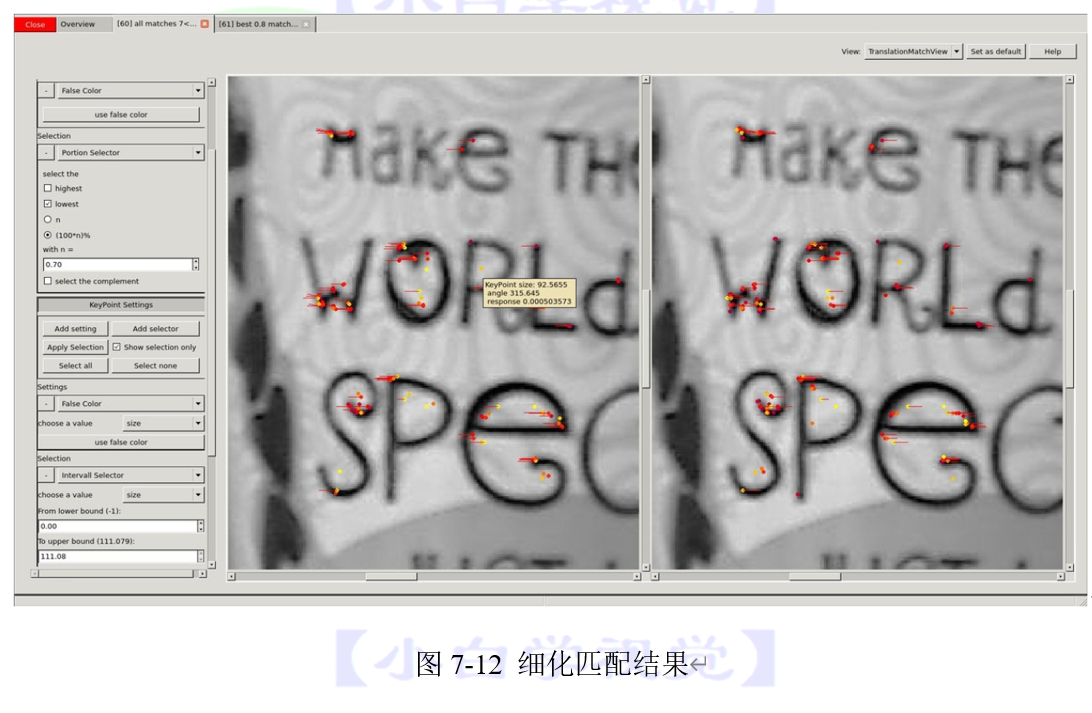
很容易看出,在第二张图片中的杯子相对与第一张向左侧移动了一段距离。
- 尽管cvv的目的是使我们交互式地查看计算机视觉运算结果,但“RawView”对此进行了补充。它允许我们查看底层的数据,具体如图7-13所示。

- cvv GUI中包含许多更有用的功能。例如,可以对Overview选项卡进行分组,结果如图7-14所示

通过向我们的计算机视觉程序中添加可视化代码,便可以通过可视化工具交互地调试程序。如果我们完成了开发/调试,不必删除这些代码行。我们简单地禁用cvv调试(cmake -DCVV_DEBUG_MODE=OFF或删除*-DCVVISUAL_DEBUGMODE*),程序便可以正常运行且没有任何调试开销。
================================================
FILE: chapter 8/使用CNNs进行目标检测.md
================================================
本章中的内容需要使用“dnn_objectect”模块,并且在编译的过程中需要构建示例程序,即在编译过程中选择BUILD_EXAMPLES选项,该选项在CMake界面中如图8-1所示,在Linux系统中通过BUILD_EXAMPLES=ON进行设置。
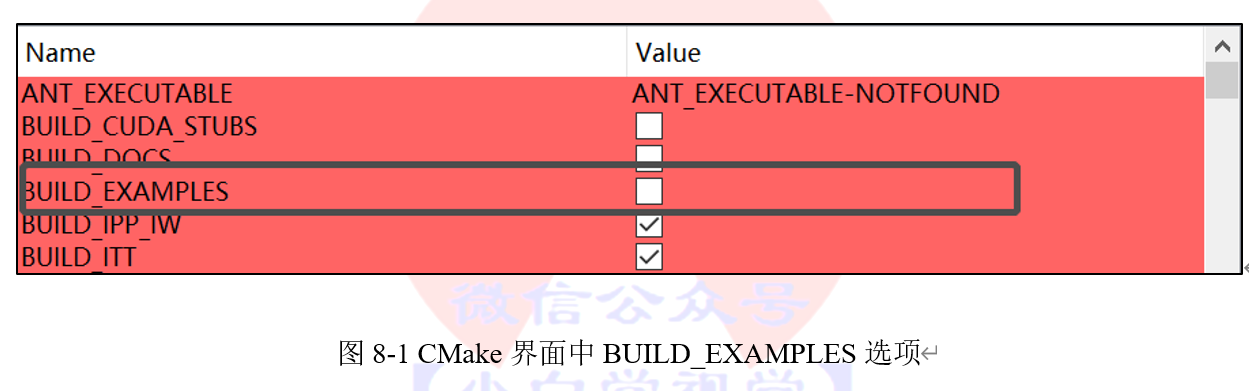
**提示
*设置BUILD_EXAMPLES=ON后,会编译所有模块的示例程序,因此如果条件允许的情况下,建议单独编译“dnn_objectect”模块。***
## 8.1.1 目标
在本教程中,我们将利用自带例程模型对图像进行识别和分类,使用到的示例程序如下:
1. example_dnn_objdetect_obj_detect
2. example_dnn_objdetect_image_classification
本教程中需要使用的模型定义文件和权值文件和可以在opencv_extra/dnn_objdetect中找到。文件的名称分别是在表8-1给出。
表8-1 模型文件和权值文件名称
模型文件|权值文件
-----|-----
SqueezeDet_deploy.prototxt |SqueezeDet.caffemodel
SqueezeNet_deploy.prototxt|SqueezeNet.caffemodel
**提示
*小白学视觉公众号后台回复“dnn_objdetect”同样可以获取本章教程使用的模型定义、权值文件以及测试使用的图片。***
## 8.1.2 目标检测
对目标进行检测可以通过代码清单8-1中的格式实现。
```cpp
代码清单8-1:目标检测格式
example_dnn_objdetect_obj_detect <模型定义文件> <模型权值文件> <图片>
```
本章中所有的的例子都是运行在Intel(R) Core(TM)2 i3-4005U CPU @ 1.70GHz(不含GPU)的笔记本上。
在本教程中,该模型预测多个边界框的平均时间仅为0.172091秒,在不适用GPU的情况下,速度也十分的快。
```cpp
代码清单8-2:测试飞机
/example_dnn_objdetect_obj_detect SqueezeDet_deploy.prototxt SqueezeDet.caffemodel tutorials/images/aeroplane.jpg
Total objects detected: 1 in 0.168792 seconds
------
Class: aeroplane
Probability: 0.845181
Co-ordinates: 41 116 415 254
------
```
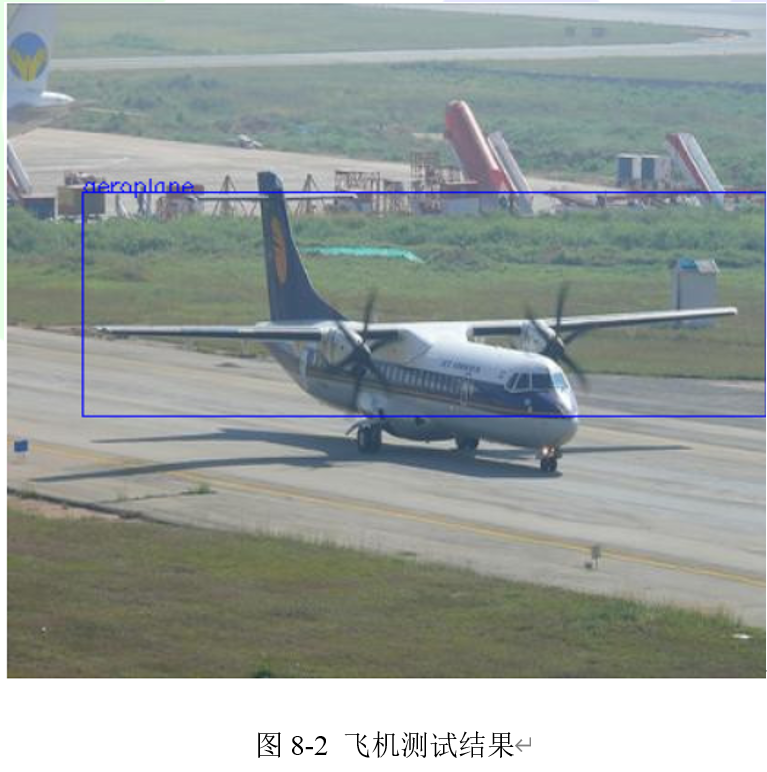
```cpp
代码清单8-3:测试公交车
/example_dnn_objdetect_obj_detect SqueezeDet_deploy.prototxt SqueezeDet.caffemodel tutorials/images/bus.jpg
Total objects detected: 1 in 0.201276 seconds
------
Class: bus
Probability: 0.701829
Co-ordinates: 0 32 415 244
------
```
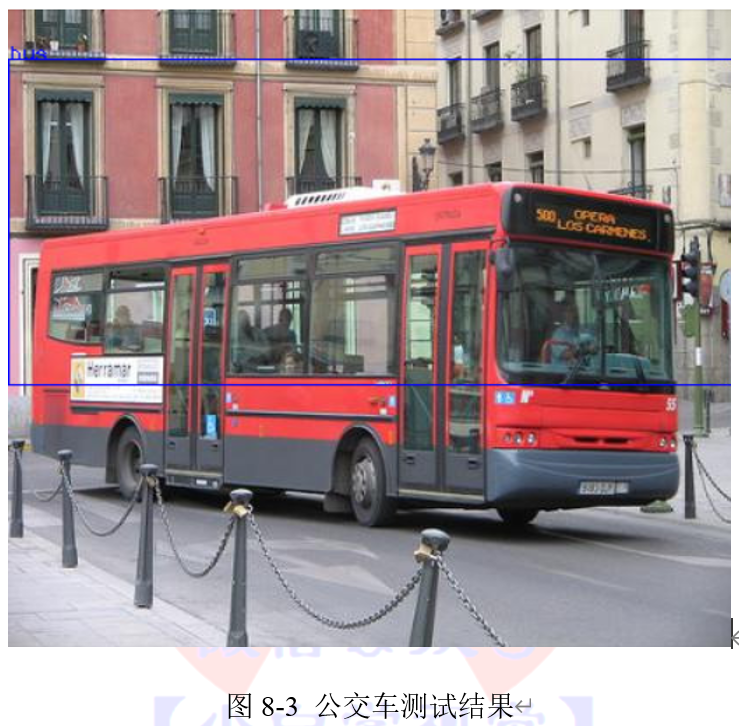
```cpp
代码清单8-4:测试猫
/example_dnn_objdetect_obj_detect SqueezeDet_deploy.prototxt SqueezeDet.caffemodel tutorials/images/cat.jpg
Total objects detected: 1 in 0.190335 seconds
------
Class: cat
Probability: 0.703465
Co-ordinates: 34 0 381 282
------
```
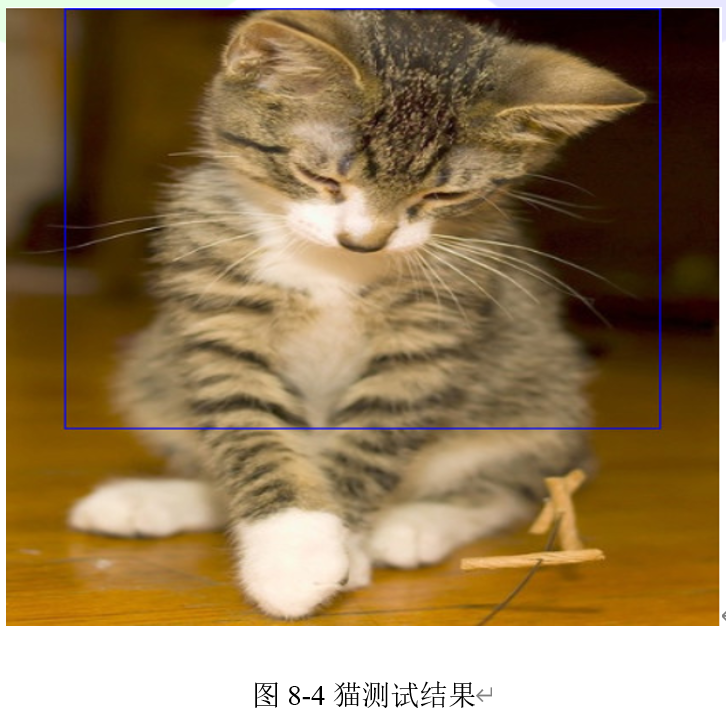
```cpp
代码清单8-5:测试人
/example_dnn_objdetect_obj_detect SqueezeDet_deploy.prototxt SqueezeDet.caffemodel tutorials/images/persons_mutli.jpg
Total objects detected: 2 in 0.169152 seconds
------
Class: person
Probability: 0.737349
Co-ordinates: 160 67 313 363
------
Class: person
Probability: 0.720328
Co-ordinates: 187 198 222 323
------
```
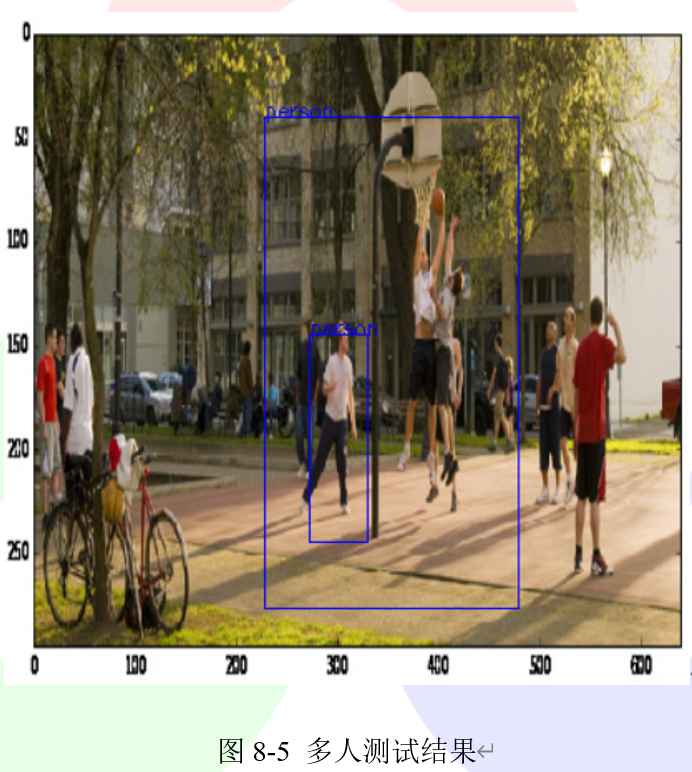
## 8.1.3 改变阈值
默认情况下,该模型的检测阈值为置信值0.53。它可以预测到一定数量的边界框,我们可以通过传递变量threshold的值来手动控制阈值,调用格式如代码清单8-6所示。
```cpp
代码清单8-6:改变阈值
/example_dnn_objdetect_obj_detect <模型定义文件> <模型权重文件> <测试图片> <阈值>
```
将阈值更改为0,再次检测飞机,可以如图8-6所示的结果。
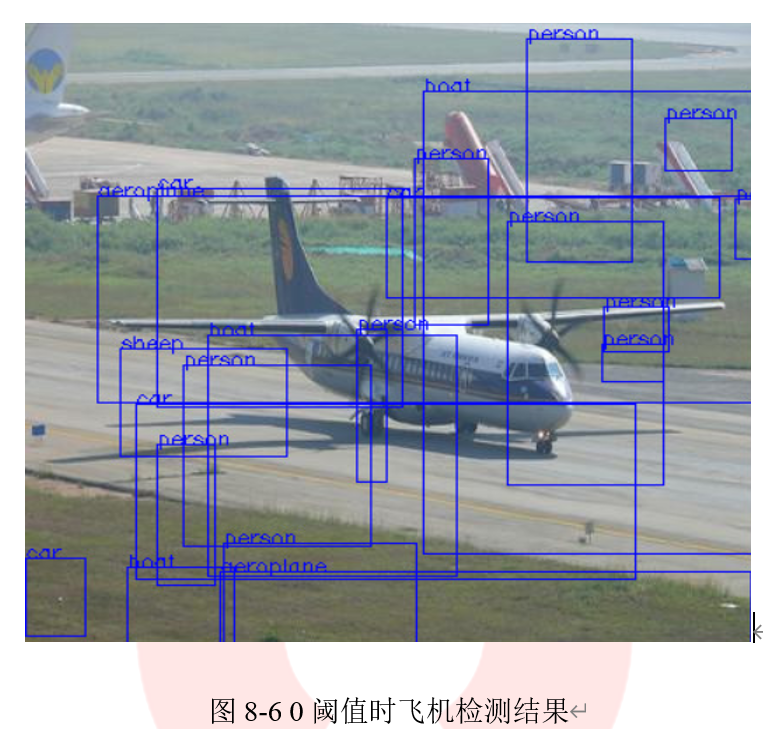
## 8.1.4 图像分类
- 利用现有模型对图像进行分类的格式在代码清单8-7中给出。
```cpp
代码清单8-7:对图像进行分类
example_dnn_objdetect_image_classification <模型定义文件 > <模型权重文件> <测试图片>
```
该模型的大小为4.9MB,对图像进行分类平均只需要0.136401秒。
- 代码清单8-8中给出了对飞机图像进行分类的代码及运行结果
```cpp
代码清单8-8:对飞机图像进行分类
/example_dnn_objdetect_image_classification SqueezeNet_deploy.prototxt SqueezeNet.caffemodel tutorials/images/aeroplane.jpg
Best class Index: 404
Time taken: 0.137722
Probability: 77.1757
```
预测结果为404,通过查看synset_words.txt,可以找到它属于airliner类
- 继续对猫的图像进行分类,代码清单8-9给出示例代码和分类结果。
```cpp
代码清单8-9:对猫图像进行分类
/example_dnn_objdetect_image_classification SqueezeNet_deploy.prototxt SqueezeNet.caffemodel tutorials/images/cat.jpg
Best class Index: 285
Time taken: 0.136401
Probability: 40.7111
```
预测结果为285,通过查看synset_words.txt,可以找到它属于Egyptian cat类
- 继续对航天飞机图像进行分类,代码清单8-10给出示例代码和分类结果。
```cpp
代码清单8-10:对航天飞机图像分类
/example_dnn_objdetect_image_classification SqueezeNet_deploy.prototxt SqueezeNet.caffemodel tutorials/images/space_shuttle.jpg
Best class Index: 812
Time taken: 0.137792
Probability: 15.8467
```
预测结果为285,通过查看synset_words.txt,可以找到它属于space shuttle类
================================================
FILE: chapter 9/e
================================================
================================================
FILE: chapter 9/放大图像:单输出.md
================================================
学习本章例程需要使用dnn_superres模块,该模块在Liunx系统中通过代码清单9-1中的命令进行安装,或者在CMake-GUI中对dnn_superres模块进行选择。
```cpp
代码清单9-1:安装dnn_superres模块
1. cmake -DOPENCV_EXTRA_MODULES_PATH=/modules -Dopencv_dnn_superres=ON
```
在本节中,我们将学习如何使用'dnn_superres',通过已有训练的神经网络对图像进行放大。
## 9.1.1 C++代码
```cpp
代码清单9-2
// This file is part of OpenCV project.
// It is subject to the license terms in the LICENSE file found in the top-level directory
// of this distribution and at http://opencv.org/license.html.
#include
#include
#include
#include
using namespace std;
using namespace cv;
using namespace dnn;
using namespace dnn_superres;
int main(int argc, char *argv[])
{
// Check for valid command line arguments, print usage
// if insufficient arguments were given.
if ( argc < 4 ) {
cout << "usage: Arg 1: image | Path to image" << endl;
cout << "\t Arg 2: algorithm | bilinear, bicubic, edsr, espcn, fsrcnn or lapsrn" << endl;
cout << "\t Arg 3: scale | 2, 3 or 4 \n";
cout << "\t Arg 4: path to model file \n";
return -1;
}
string img_path = string(argv[1]);
string algorithm = string(argv[2]);
int scale = atoi(argv[3]);
string path = "";
if( argc > 4)
path = string(argv[4]);
// Load the image
Mat img = cv::imread(img_path);
Mat original_img(img);
if ( img.empty() )
{
std::cerr << "Couldn't load image: " << img << "\n";
return -2;
}
//Make dnn super resolution instance
DnnSuperResImpl sr;
Mat img_new;
if( algorithm == "bilinear" ){
resize(img, img_new, Size(), scale, scale, 2);
}
else if( algorithm == "bicubic" )
{
resize(img, img_new, Size(), scale, scale, 3);
}
else if( algorithm == "edsr" || algorithm == "espcn" || algorithm == "fsrcnn" || algorithm == "lapsrn" )
{
sr.readModel(path);
sr.setModel(algorithm, scale);
sr.upsample(img, img_new);
}
else{
std::cerr << "Algorithm not recognized. \n";
}
if ( img_new.empty() )
{
std::cerr << "Upsampling failed. \n";
return -3;
}
cout << "Upsampling succeeded. \n";
// Display image
cv::namedWindow("Initial Image", WINDOW_AUTOSIZE);
cv::imshow("Initial Image", img_new);
//cv::imwrite("./saved.jpg", img_new);
cv::waitKey(0);
return 0;
}
```
## 9.1.2 代码解释
- 包含头文件,设置命名空间
```cpp
代码清单9-3:包含头文件和命名空间
#include
using namespace std;
using namespace cv;
using namespace dnn;
using namespace dnn_superres;
```
- 创建Dnn Superres对象
```cpp
代码清单9-4:创建Dnn Superres对象
DnnSuperResImpl sr;
```
这只是为了创建对象,注册自定义dnn层,并访问类函数。
- 读取模型
```cpp
代码清单9-5:读取模型
path = "models/FSRCNN_x2.pb"
sr.readModel(path);
```
这段代码从.pb文件中读取TensorFlow模型。这里的“path”是预训练的Tensorflow模型的路径文件之一。我们可以从从OpenCV的GitHub上在“dnn_superres”模块中下载模型。也可以从小白学视觉公众号后台通过回复“dnn_superres”获取。
- 设置模型
```cpp
代码清单9-6:设置模型
sr.setModel("fsrcnn", 2);
```
根据想要运行的模型,我们需要设置算法和放大系数。这样,即使我们更改了.pb文件的名称,程序也能够知道算法和系数。例如,如果选择了FSRCNN_x2.pb,则算法和系数分别为'fsrcnn'和2。(其他算法选项包括“edsr”、“espcn”和“lapsrn”等)
- 放大图像
```cpp
代码清单9-7:放大图像
Mat img = cv::imread(img_path);
Mat img_new;
sr.upsample(img, img_new);
```
现在我们可以放大任何图像。通过基础库的“imread”函数加载图像,并为目标图像创建一个新Mat。然后对图像进行方法,放大后的图像存储在'img_new'中。原图像在图9-1给出,通过FSRCNN标志放大后的图像在图9-2给出;通过Bicubic Interpolation(双三次插值)算法放大后的图像在图9-3给出。
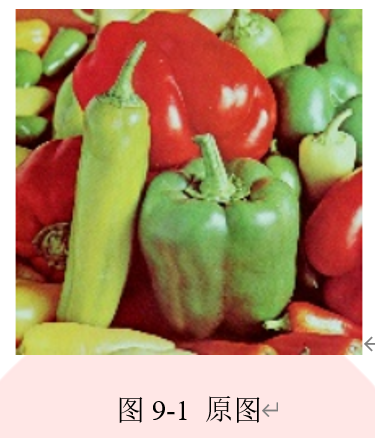

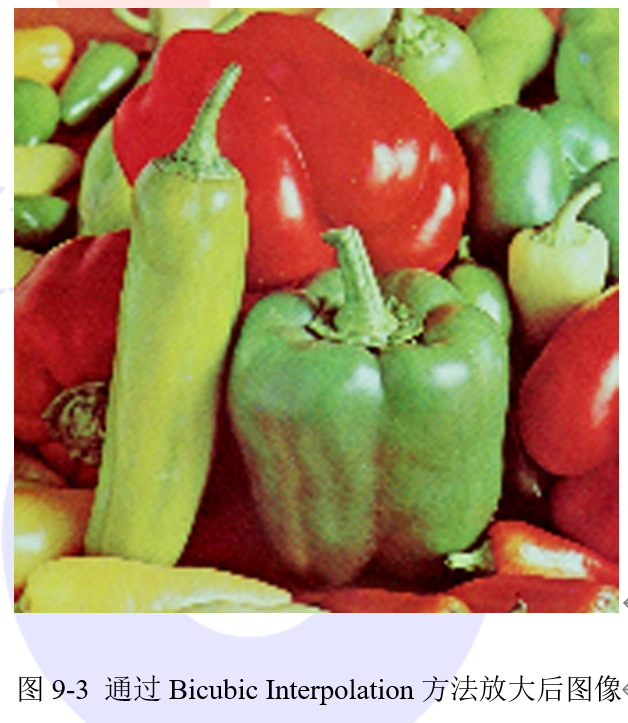
================================================
FILE: chapter 9/放大图像:多输出.md
================================================
在本章中,我们将学习如何使用'dnn_superres'通过多输出的预训练神经网络对图像进行放大。如果给出了节点名称,OpenCV的dnn模块支持一次推断访问多个节点。LapSRN模型可以在一次推断中提供更多输出,它支持2x,4x,8x和(2x,4x)和(2x,4x,8x)超分辨率输出。上传的已训练的模型文件应具有以下输出节点名称:
- 2x model: NCHW_output
- 4x model: NCHW_output_2x, NCHW_output_4x
- 8x model: NCHW_output_2x, NCHW_output_4x, NCHW_output_8x
## 9.2.1 C++代码
使用代码清单9-8中的命令运行示例代码,示例代码在代码清单9-9中给出。
```cpp
代码清单9-8:运行示例
./bin/example_dnn_superres_dnn_superres_multioutput path/to/image.png 2,4 NCHW_output_2x,NCHW_output_4x \
path/to/opencv_contrib/modules/dnn_superres/models/LapSRN_x4.pb
```
```cpp
代码清单9-9
// This file is part of OpenCV project.
// It is subject to the license terms in the LICENSE file found in the top-level directory
// of this distribution and at http://opencv.org/license.html.
#include
#include
#include
#include
#include
using namespace std;
using namespace cv;
using namespace dnn_superres;
int main(int argc, char *argv[])
{
// Check for valid command line arguments, print usage
// if insufficient arguments were given.
if (argc < 4) {
cout << "usage: Arg 1: image | Path to image" << endl;
cout << "\t Arg 2: scales in a format of 2,4,8\n";
cout << "\t Arg 3: output node names in a format of nchw_output_0,nchw_output_1\n";
cout << "\t Arg 4: path to model file \n";
return -1;
}
string img_path = string(argv[1]);
string scales_str = string(argv[2]);
string output_names_str = string(argv[3]);
std::string path = string(argv[4]);
//Parse the scaling factors
std::vector scales;
char delim = ',';
{
std::stringstream ss(scales_str);
std::string token;
while (std::getline(ss, token, delim)) {
scales.push_back(atoi(token.c_str()));
}
}
//Parse the output node names
std::vector node_names;
{
std::stringstream ss(output_names_str);
std::string token;
while (std::getline(ss, token, delim)) {
node_names.push_back(token);
}
}
// Load the image
Mat img = cv::imread(img_path);
Mat original_img(img);
if (img.empty())
{
std::cerr << "Couldn't load image: " << img << "\n";
return -2;
}
//Make dnn super resolution instance
DnnSuperResImpl sr;
int scale = *max_element(scales.begin(), scales.end());
std::vector outputs;
sr.readModel(path);
sr.setModel("lapsrn", scale);
sr.upsampleMultioutput(img, outputs, scales, node_names);
for(unsigned int i = 0; i < outputs.size(); i++)
{
cv::namedWindow("Upsampled image", WINDOW_AUTOSIZE);
cv::imshow("Upsampled image", outputs[i]);
//cv::imwrite("./saved.jpg", img_new);
cv::waitKey(0);
}
return 0;
}
```
## 9.2.2 代码解释
- 包含头文件,设置命名空间
```cpp
代码清单9-10:头文件和命名空间
#include
using namespace std;
using namespace cv;
using namespace dnn_superres;
```
- 创建Dnn Superres对象
```cpp
代码清单9-11:创建Dnn Superres对象
DnnSuperResImpl sr;
```
- 读取模型
```cpp
代码清单9-12:读取模型
path = "models/LapSRN_x8.pb"
sr.readModel(path);
```
- 设置模型
```cpp
代码清单9-13:设置模型
sr.setModel("lapsrn", 8);
```
设置算法和比例系数。最后一个(最大的)系数应该在这里给出。
- 给出节点名称和比例系数
```cpp
代码清单9-14:设置节点名称和比例系数
std::vector scales{2, 4, 8}
std::vector node_names{'NCHW_output_2x','NCHW_output_4x','NCHW_output_8x'}
```
- 放大图像
```cpp
代码清单9-15:放大图像
Mat img = cv::imread(img_path);
std::vector outputs;
sr.upsampleMultioutput(img, outputs, scales, node_names);
```
运行程序,将输出图像存储在一个Mat中。
================================================
FILE: chapter 9/放大视频.md
================================================
在本章中,我们将学习如何使用'dnn_superres'通过预先训练的神经网络放大视频。
## 9.3.1 C++代码
```cpp
代码清单9-16
// This file is part of OpenCV project.
// It is subject to the license terms in the LICENSE file found in the top-level directory
// of this distribution and at http://opencv.org/license.html.
#include
#include
#include
#include
using namespace std;
using namespace cv;
using namespace dnn_superres;
int main(int argc, char *argv[])
{
// Check for valid command line arguments, print usage
// if insufficient arguments were given.
if (argc < 4) {
cout << "usage: Arg 1: input video path" << endl;
cout << "\t Arg 2: output video path" << endl;
cout << "\t Arg 3: algorithm | edsr, espcn, fsrcnn or lapsrn" << endl;
cout << "\t Arg 4: scale | 2, 3, 4 or 8 \n";
cout << "\t Arg 5: path to model file \n";
return -1;
}
string input_path = string(argv[1]);
string output_path = string(argv[2]);
string algorithm = string(argv[3]);
int scale = atoi(argv[4]);
string path = string(argv[5]);
VideoCapture input_video(input_path);
int ex = static_cast(input_video.get(CAP_PROP_FOURCC));
Size S = Size((int) input_video.get(CAP_PROP_FRAME_WIDTH) * scale,
(int) input_video.get(CAP_PROP_FRAME_HEIGHT) * scale);
VideoWriter output_video;
output_video.open(output_path, ex, input_video.get(CAP_PROP_FPS), S, true);
if (!input_video.isOpened())
{
std::cerr << "Could not open the video." << std::endl;
return -1;
}
DnnSuperResImpl sr;
sr.readModel(path);
sr.setModel(algorithm, scale);
for(;;)
{
Mat frame, output_frame;
input_video >> frame;
if ( frame.empty() )
break;
sr.upsample(frame, output_frame);
output_video << output_frame;
namedWindow("Upsampled video", WINDOW_AUTOSIZE);
imshow("Upsampled video", output_frame);
namedWindow("Original video", WINDOW_AUTOSIZE);
imshow("Original video", frame);
char c=(char)waitKey(25);
if(c==27)
break;
}
input_video.release();
output_video.release();
return 0;
}
```
## 9.3.2 代码解释
- 包含头文件,设置命名空间
```cpp
代码清单9-17:头文件和命名空间
#include
using namespace std;
using namespace cv;
using namespace dnn_superres;
```
- 创建Dnn Superres对象
```cpp
代码清单9-18:创建Dnn Superres对象
DnnSuperResImpl sr;
```
- 读取模型,设置算法和比例系数。
```cpp
代码清单9-19:读取模型
path = "models/ESPCN_x2.pb"
sr.readModel(path);
sr.setModel("espcn", 2);
```
- 放大视频
```cpp
代码清单9-20:放大视频
for(;;)
{
Mat frame, output_frame;
input_video >> frame;
if ( frame.empty() )
break;
sr.upsample(frame, output_frame);
...
}
```
使用逐帧处理的方式对视频进行方大。
================================================
FILE: chapter 9/超分辨率基准测试.md
================================================
超分辨率模块包含用于基准测试的示例代码,可用来比较不同的模型和算法。本教程中给出了执行基准测试的示例代码和一些测试结果,示例代码在代码清单9-21中给出。测试时PC的配置如下:CPU:Intel i7-9700K CPU,操作系统: Ubuntu 18.04.02 。
## 9.4.1 C++代码
```cpp
代码清单9-21
// This file is part of OpenCV project.
// It is subject to the license terms in the LICENSE file found in the top-level directory
// of this distribution and at http://opencv.org/license.html.
#include
#include 
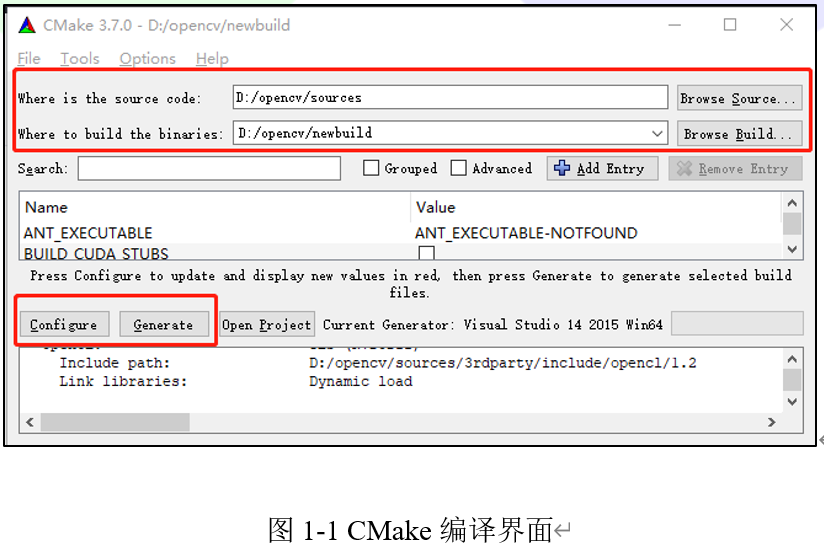
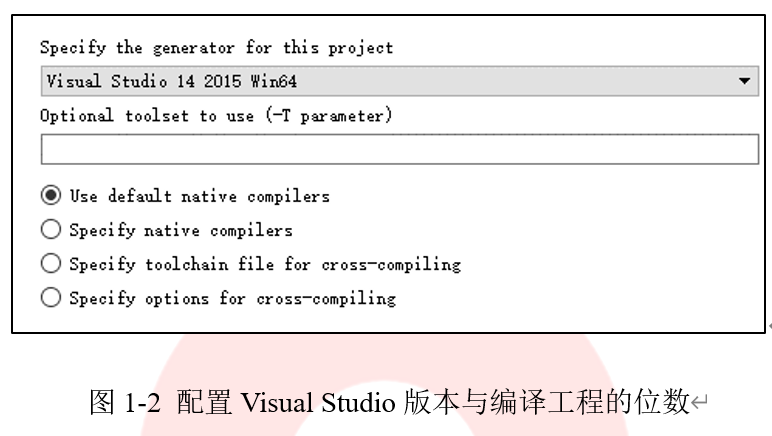
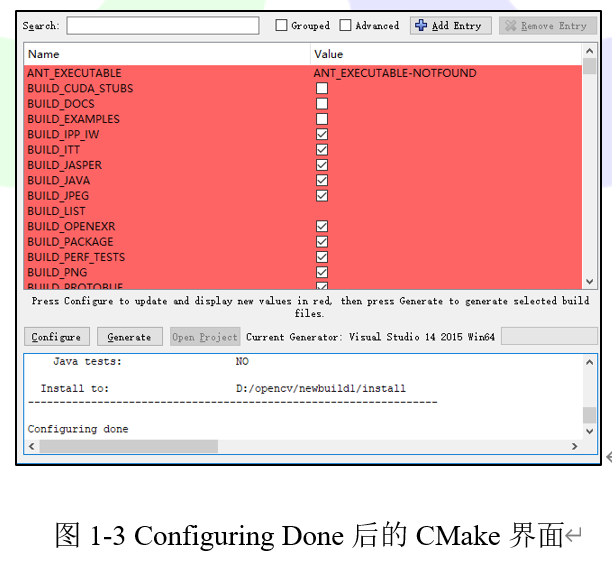
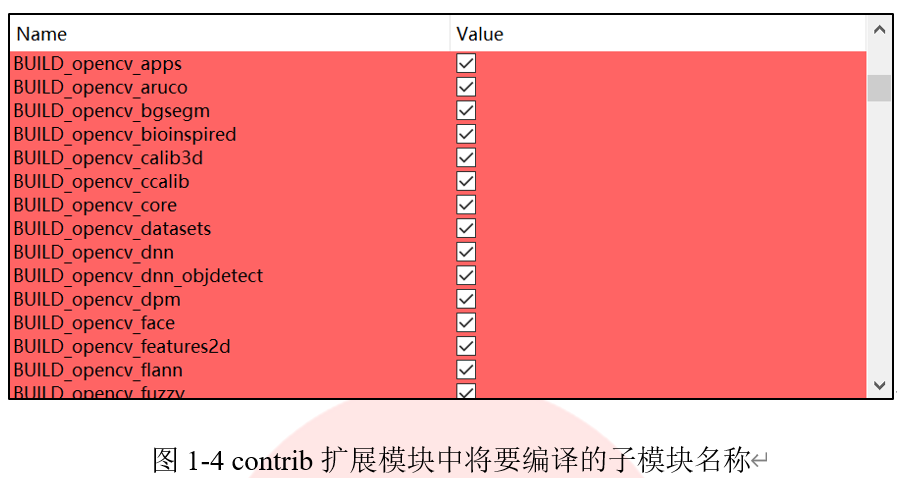
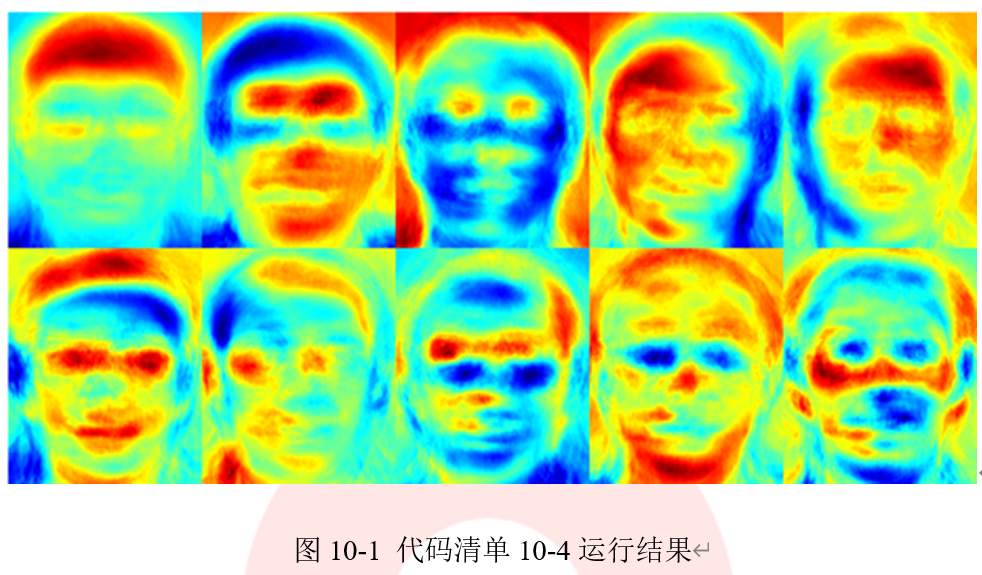
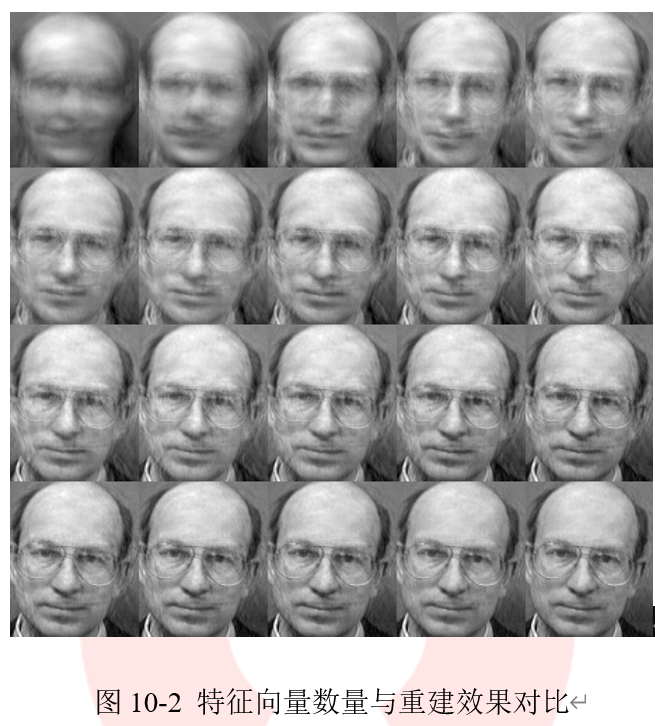
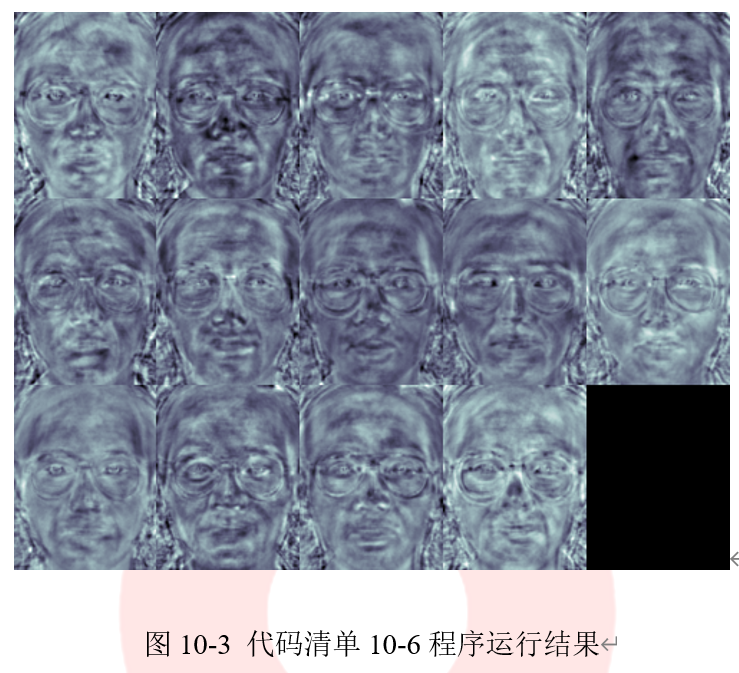


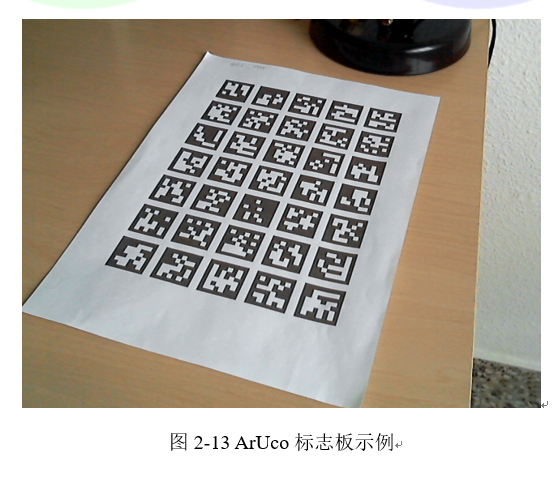
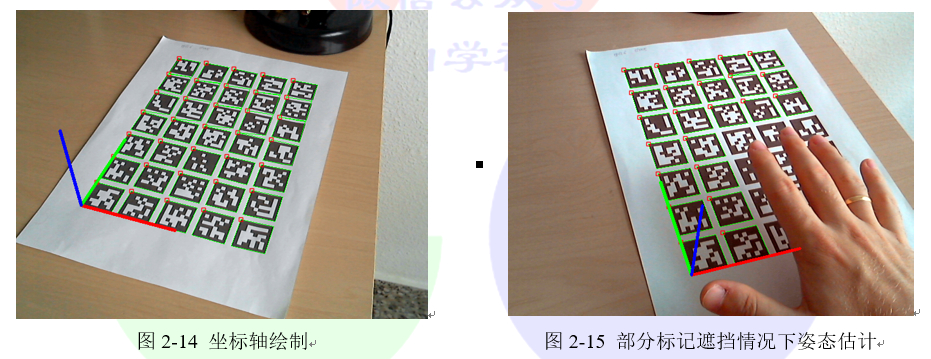


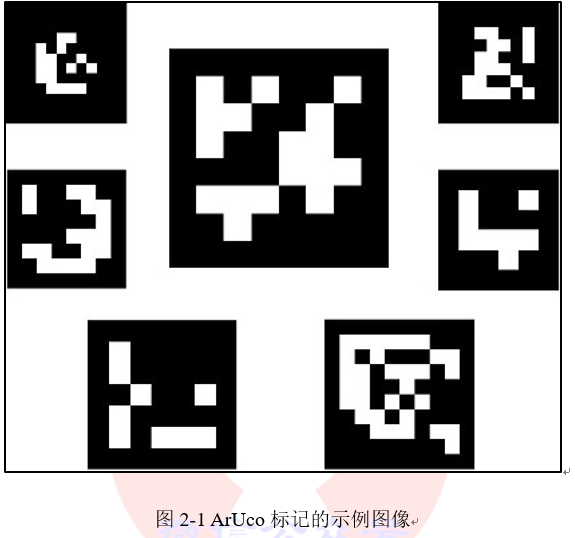
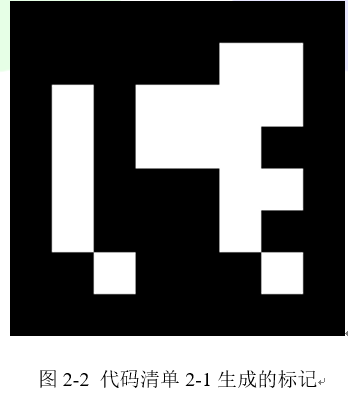
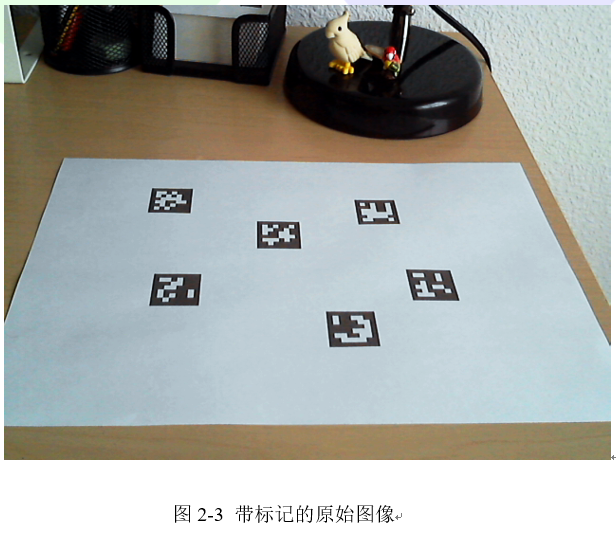
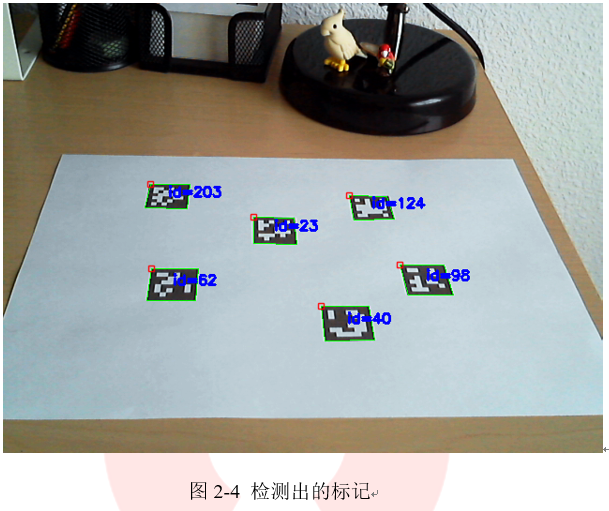
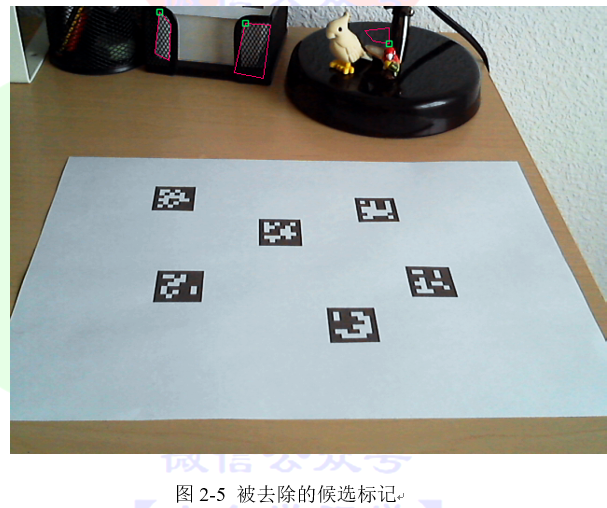
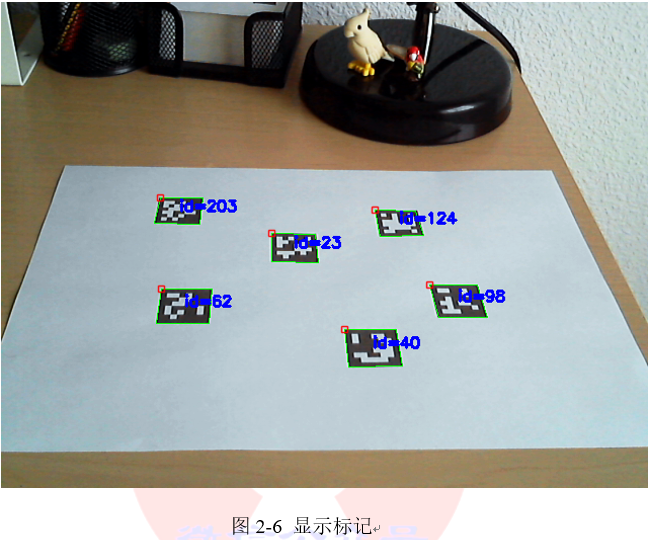
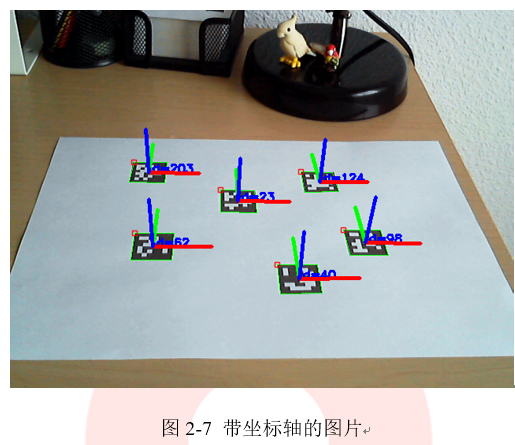
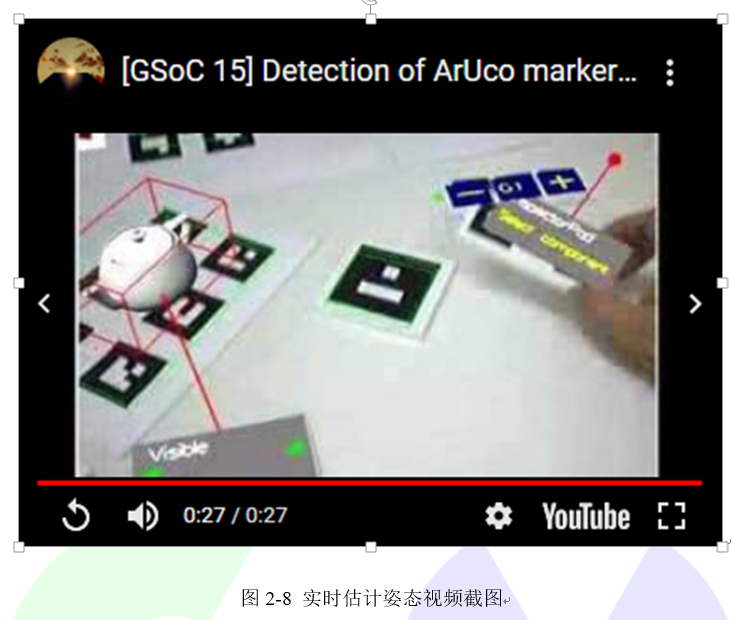 完整的代码程序在aruco模块文件夹内的detect_markers.cpp中。可以通过代码清单2-10中的命令执行该项目。
```cpp
代码清单2-10:调用实时姿态的参数
-c="_path_/calib.txt" -d=10
```
## 2.1.5 选择字典
aruco模块了提供Dictionary类来表示标记字典。除了标记的尺寸和字典中标记的数量之外,标记间的距离也是字典的重要参数。标记间的距离是指字典中所有标记之间的最小距离,它决定了词典的错误检测能力和纠错能力。
一般来说,字典大小越小,标记尺寸越大,标记间的距离越远,反之亦然。但是,如果标记尺寸变大,那么需要冲图像中提取的数据量也更大,这使得对较大尺寸标记的检测更加复杂,因此通常采用尽量缩小字典大小的方式来增加标记间的距离。例如,如果我们只需要10个标记,那么此时使用由10个标记组成的字典要比使用由1000个标记组成的字典更好。因为由10个标记组成的字典会有更高的标记间的距离,从而对错误有更强的鲁棒性。为了让用户可以选择合适的字典来增加程序的鲁棒性,aruco模块提供了多种字典供拥护选择,接下来将详细介绍每种字典构建的方法。
### 1. 预定义的字典
使用预定义字典是选择字典最简单的方法。aruco模块内提供了一组预定义的字典,其中包含多种标记尺寸和标记数量,可以通过代码清单2-11中的代码选择字典的大小和标记的尺寸。
```cpp
代码清单2-11:选择预定义字典
cv::Ptr
完整的代码程序在aruco模块文件夹内的detect_markers.cpp中。可以通过代码清单2-10中的命令执行该项目。
```cpp
代码清单2-10:调用实时姿态的参数
-c="_path_/calib.txt" -d=10
```
## 2.1.5 选择字典
aruco模块了提供Dictionary类来表示标记字典。除了标记的尺寸和字典中标记的数量之外,标记间的距离也是字典的重要参数。标记间的距离是指字典中所有标记之间的最小距离,它决定了词典的错误检测能力和纠错能力。
一般来说,字典大小越小,标记尺寸越大,标记间的距离越远,反之亦然。但是,如果标记尺寸变大,那么需要冲图像中提取的数据量也更大,这使得对较大尺寸标记的检测更加复杂,因此通常采用尽量缩小字典大小的方式来增加标记间的距离。例如,如果我们只需要10个标记,那么此时使用由10个标记组成的字典要比使用由1000个标记组成的字典更好。因为由10个标记组成的字典会有更高的标记间的距离,从而对错误有更强的鲁棒性。为了让用户可以选择合适的字典来增加程序的鲁棒性,aruco模块提供了多种字典供拥护选择,接下来将详细介绍每种字典构建的方法。
### 1. 预定义的字典
使用预定义字典是选择字典最简单的方法。aruco模块内提供了一组预定义的字典,其中包含多种标记尺寸和标记数量,可以通过代码清单2-11中的代码选择字典的大小和标记的尺寸。
```cpp
代码清单2-11:选择预定义字典
cv::Ptr