 ](https://github.com/zecollokaris) |
| Albanian | [Albanian](https://github.com/firstcontributions/first-contributions/blob/main/docs/translations/README.al.md) | [
](https://github.com/zecollokaris) |
| Albanian | [Albanian](https://github.com/firstcontributions/first-contributions/blob/main/docs/translations/README.al.md) | [ ](https://github.com/RronKurtishi) [
 ](https://github.com/auronvila) |
| العربية | [Arabic](https://github.com/firstcontributions/first-contributions/blob/main/docs/translations/README.ar.md) | [
](https://github.com/auronvila) |
| العربية | [Arabic](https://github.com/firstcontributions/first-contributions/blob/main/docs/translations/README.ar.md) | [ ](https://github.com/OsaidAlhomedy) [
 ](https://github.com/AlaaYlula) [
 ](https://github.com/Laith-Alayassa) |
| Azerbaijani | [Azerbaijani](https://github.com/firstcontributions/first-contributions/blob/main/docs/translations/README.aze.md) | [
](https://github.com/Laith-Alayassa) |
| Azerbaijani | [Azerbaijani](https://github.com/firstcontributions/first-contributions/blob/main/docs/translations/README.aze.md) | [ ](https://github.com/isakurbanov744) [
 ](https://github.com/Ahm3tJ4f) |
| Bulgarian | [Bulgarian](https://github.com/firstcontributions/first-contributions/blob/main/docs/translations/README.bg.md) | []() |
| Bosnian | [Bosnian](https://github.com/firstcontributions/first-contributions/blob/main/docs/translations/README.bih.md) | []() |
| বাংলা | [Bengali](https://github.com/firstcontributions/first-contributions/blob/main/docs/translations/README.bn.md) | [
](https://github.com/Ahm3tJ4f) |
| Bulgarian | [Bulgarian](https://github.com/firstcontributions/first-contributions/blob/main/docs/translations/README.bg.md) | []() |
| Bosnian | [Bosnian](https://github.com/firstcontributions/first-contributions/blob/main/docs/translations/README.bih.md) | []() |
| বাংলা | [Bengali](https://github.com/firstcontributions/first-contributions/blob/main/docs/translations/README.bn.md) | [ ](https://github.com/cse031sust02) |
| Belarusian | [Belarusian](https://github.com/firstcontributions/first-contributions/blob/main/docs/translations/README.by.md) | []() |
| Català | [Catalan](https://github.com/firstcontributions/first-contributions/blob/main/docs/translations/README.ca.md) | [
](https://github.com/cse031sust02) |
| Belarusian | [Belarusian](https://github.com/firstcontributions/first-contributions/blob/main/docs/translations/README.by.md) | []() |
| Català | [Catalan](https://github.com/firstcontributions/first-contributions/blob/main/docs/translations/README.ca.md) | [ ](https://github.com/Sergih28) |
| čeština | [Czech](https://github.com/firstcontributions/first-contributions/blob/main/docs/translations/README.cs.md) | []() |
| Danish | [Danish](https://github.com/firstcontributions/first-contributions/blob/main/docs/translations/README.da.md) | [
](https://github.com/Sergih28) |
| čeština | [Czech](https://github.com/firstcontributions/first-contributions/blob/main/docs/translations/README.cs.md) | []() |
| Danish | [Danish](https://github.com/firstcontributions/first-contributions/blob/main/docs/translations/README.da.md) | [ ](https://github.com/7013145) |
| Deutsch | [German](https://github.com/firstcontributions/first-contributions/blob/main/docs/translations/README.de.md) | [
](https://github.com/7013145) |
| Deutsch | [German](https://github.com/firstcontributions/first-contributions/blob/main/docs/translations/README.de.md) | [ ](https://github.com/lkreimann) |
| المصرية | [Egyptian](https://github.com/firstcontributions/first-contributions/blob/main/docs/translations/README.eg.md) | [
](https://github.com/lkreimann) |
| المصرية | [Egyptian](https://github.com/firstcontributions/first-contributions/blob/main/docs/translations/README.eg.md) | [ ](https://github.com/MichaelKMalak) |
| English (Pirate) | [English (Pirate)](https://github.com/firstcontributions/first-contributions/blob/main/docs/translations/README.en-pirate.md) | [
](https://github.com/MichaelKMalak) |
| English (Pirate) | [English (Pirate)](https://github.com/firstcontributions/first-contributions/blob/main/docs/translations/README.en-pirate.md) | [ ](https://github.com/lukeoliff) |
| Español | [Spanish](https://github.com/firstcontributions/first-contributions/blob/main/docs/translations/README.es.md) | [
](https://github.com/lukeoliff) |
| Español | [Spanish](https://github.com/firstcontributions/first-contributions/blob/main/docs/translations/README.es.md) | [ ](https://github.com/yirini) [
 ](https://github.com/aaossa) |
| فارسی | [Persian](https://github.com/firstcontributions/first-contributions/blob/main/docs/translations/README.fa.md) | [
](https://github.com/aaossa) |
| فارسی | [Persian](https://github.com/firstcontributions/first-contributions/blob/main/docs/translations/README.fa.md) | [ ](https://github.com/ThirdScript) |
| Finnish | [Finnish](https://github.com/firstcontributions/first-contributions/blob/main/docs/translations/README.fi.md) | []() |
| Français | [French](https://github.com/firstcontributions/first-contributions/blob/main/docs/translations/README.fr.md) | [
](https://github.com/ThirdScript) |
| Finnish | [Finnish](https://github.com/firstcontributions/first-contributions/blob/main/docs/translations/README.fi.md) | []() |
| Français | [French](https://github.com/firstcontributions/first-contributions/blob/main/docs/translations/README.fr.md) | [ ](https://github.com/LePetitRenard) |
| ქართული | [Georgian](https://github.com/firstcontributions/first-contributions/blob/main/docs/translations/README.ka.md) | [
](https://github.com/LePetitRenard) |
| ქართული | [Georgian](https://github.com/firstcontributions/first-contributions/blob/main/docs/translations/README.ka.md) | [ ](https://github.com/iko1133) |
| Galego | [Galician](https://github.com/firstcontributions/first-contributions/blob/main/docs/translations/README.gl.md) | [
](https://github.com/iko1133) |
| Galego | [Galician](https://github.com/firstcontributions/first-contributions/blob/main/docs/translations/README.gl.md) | [ ](https://github.com/siderio2) |
| Greek | [Greek](https://github.com/firstcontributions/first-contributions/blob/main/docs/translations/README.gr.md) | [
](https://github.com/siderio2) |
| Greek | [Greek](https://github.com/firstcontributions/first-contributions/blob/main/docs/translations/README.gr.md) | [ ](https://github.com/adreaskar) [
 ](https://github.com/porfanid) |
| ગુજરાતી | [Gujarati](https://github.com/firstcontributions/first-contributions/blob/main/docs/translations/README.guj.md) | [
](https://github.com/porfanid) |
| ગુજરાતી | [Gujarati](https://github.com/firstcontributions/first-contributions/blob/main/docs/translations/README.guj.md) | [ ](https://github.com/smitgajjar) [
 ](https://github.com/kaushalgosaliya5/) [
 ](https://github.com/rushit-kakadiya/)|
| Hausa | [Hausa](https://github.com/firstcontributions/first-contributions/blob/main/docs/translations/README.hau.md) | []() |
| עברית | [Hebrew](https://github.com/firstcontributions/first-contributions/blob/main/docs/translations/README.hb.md) | [
](https://github.com/rushit-kakadiya/)|
| Hausa | [Hausa](https://github.com/firstcontributions/first-contributions/blob/main/docs/translations/README.hau.md) | []() |
| עברית | [Hebrew](https://github.com/firstcontributions/first-contributions/blob/main/docs/translations/README.hb.md) | [ ](https://github.com/TomerPacific) |
| हिन्दी | [Hindi](https://github.com/firstcontributions/first-contributions/blob/main/docs/translations/README.hi.md) | [
](https://github.com/TomerPacific) |
| हिन्दी | [Hindi](https://github.com/firstcontributions/first-contributions/blob/main/docs/translations/README.hi.md) | [ ](https://github.com/arshadkazmi42) [
 ](https://github.com/sara-02) [
 ](https://github.com/shrut1996) |
| Chhattisgarhi | [Chhattisgarhi](https://github.com/firstcontributions/first-contributions/blob/main/docs/translations/README.hne.md) | [
](https://github.com/shrut1996) |
| Chhattisgarhi | [Chhattisgarhi](https://github.com/firstcontributions/first-contributions/blob/main/docs/translations/README.hne.md) | [ ](https://github.com/pradyyadav) |
| Magyar | [Hungarian](https://github.com/firstcontributions/first-contributions/blob/main/docs/translations/README.hu.md) | []() |
| Armenian | [Armenian](https://github.com/firstcontributions/first-contributions/blob/main/docs/translations/README.hy.md) | []() |
| Indonesian | [Indonesian](https://github.com/firstcontributions/first-contributions/blob/main/docs/translations/README.id.md) | [
](https://github.com/pradyyadav) |
| Magyar | [Hungarian](https://github.com/firstcontributions/first-contributions/blob/main/docs/translations/README.hu.md) | []() |
| Armenian | [Armenian](https://github.com/firstcontributions/first-contributions/blob/main/docs/translations/README.hy.md) | []() |
| Indonesian | [Indonesian](https://github.com/firstcontributions/first-contributions/blob/main/docs/translations/README.id.md) | [ ](https://github.com/hahn) |
| Igbo | [Igbo](https://github.com/firstcontributions/first-contributions/blob/main/docs/translations/README.igb.md) | [
](https://github.com/hahn) |
| Igbo | [Igbo](https://github.com/firstcontributions/first-contributions/blob/main/docs/translations/README.igb.md) | [ ](https://github.com/platipo) |
| 日本語 | [Japanese](https://github.com/firstcontributions/first-contributions/blob/main/docs/translations/README.ja.md) | [
](https://github.com/platipo) |
| 日本語 | [Japanese](https://github.com/firstcontributions/first-contributions/blob/main/docs/translations/README.ja.md) | [ ](https://github.com/cbondurant) |
| ಕನ್ನಡ | [Kannada](https://github.com/firstcontributions/first-contributions/blob/main/docs/translations/README.ka.md) | []() |
| 한국어 | [Korean](https://github.com/firstcontributions/first-contributions/blob/main/docs/translations/README.ko.md) | [
](https://github.com/cbondurant) |
| ಕನ್ನಡ | [Kannada](https://github.com/firstcontributions/first-contributions/blob/main/docs/translations/README.ka.md) | []() |
| 한국어 | [Korean](https://github.com/firstcontributions/first-contributions/blob/main/docs/translations/README.ko.md) | [ ](https://github.com/espozbob) |
| Kiswahili | [Kiswahili](https://github.com/firstcontributions/first-contributions/blob/main/docs/translations/README.kws.md) |[
](https://github.com/espozbob) |
| Kiswahili | [Kiswahili](https://github.com/firstcontributions/first-contributions/blob/main/docs/translations/README.kws.md) |[ ](https://github.com/neone35) |
| Latviešu valoda | [Latvian](https://github.com/firstcontributions/first-contributions/blob/main/docs/translations/README.lv.md) | []() |
| Crnogorski | [Montenegrin](https://github.com/firstcontributions/first-contributions/blob/main/docs/translations/README.me.md) | [
](https://github.com/neone35) |
| Latviešu valoda | [Latvian](https://github.com/firstcontributions/first-contributions/blob/main/docs/translations/README.lv.md) | []() |
| Crnogorski | [Montenegrin](https://github.com/firstcontributions/first-contributions/blob/main/docs/translations/README.me.md) | [ ](https://github.com/yedhukrishnan) |
| Burmese | [Burmese](https://github.com/firstcontributions/first-contributions/blob/main/docs/translations/README.mm_unicode.md) | [
](https://github.com/yedhukrishnan) |
| Burmese | [Burmese](https://github.com/firstcontributions/first-contributions/blob/main/docs/translations/README.mm_unicode.md) | [ ](https://github.com/lwinkyawmyat) |
| मराठी | [Marathi](https://github.com/firstcontributions/first-contributions/blob/main/docs/translations/README.mr.md) | [
](https://github.com/lwinkyawmyat) |
| मराठी | [Marathi](https://github.com/firstcontributions/first-contributions/blob/main/docs/translations/README.mr.md) | [ ](https://github.com/bantya) |
| Español de México | [Spanish of Mexico](https://github.com/firstcontributions/first-contributions/blob/main/docs/translations/README.mx.md) | []() |
| Bahasa Melayu | [Malay](https://github.com/firstcontributions/first-contributions/blob/main/docs/translations/README.my.md) | []() |
| Nederlandse | [Dutch](https://github.com/firstcontributions/first-contributions/blob/main/docs/translations/README.nl.md) | [
](https://github.com/bantya) |
| Español de México | [Spanish of Mexico](https://github.com/firstcontributions/first-contributions/blob/main/docs/translations/README.mx.md) | []() |
| Bahasa Melayu | [Malay](https://github.com/firstcontributions/first-contributions/blob/main/docs/translations/README.my.md) | []() |
| Nederlandse | [Dutch](https://github.com/firstcontributions/first-contributions/blob/main/docs/translations/README.nl.md) | [ ](https://github.com/MJMajoor) |
| Norsk | [Norwegian](https://github.com/firstcontributions/first-contributions/blob/main/docs/translations/README.no.md) | [
](https://github.com/MJMajoor) |
| Norsk | [Norwegian](https://github.com/firstcontributions/first-contributions/blob/main/docs/translations/README.no.md) | [ ](https://github.com/Islandstone89) |
| नेपाली | [Nepali](https://github.com/firstcontributions/first-contributions/blob/main/docs/translations/README.np.md) | [
](https://github.com/Islandstone89) |
| नेपाली | [Nepali](https://github.com/firstcontributions/first-contributions/blob/main/docs/translations/README.np.md) | [ ](https://github.com/milap-neupane) |
| ਪੰਜਾਬੀ | [Punjabi](https://github.com/firstcontributions/first-contributions/blob/main/docs/translations/README.pb.md) | []() |
| Polski | [Polish](https://github.com/firstcontributions/first-contributions/blob/main/docs/translations/README.pl.md) | [
](https://github.com/milap-neupane) |
| ਪੰਜਾਬੀ | [Punjabi](https://github.com/firstcontributions/first-contributions/blob/main/docs/translations/README.pb.md) | []() |
| Polski | [Polish](https://github.com/firstcontributions/first-contributions/blob/main/docs/translations/README.pl.md) | [ ](https://github.com/P1X3L0V4) [
 ](https://github.com/mikowhy) |
| Português | [Portugues (Portugal)](https://github.com/firstcontributions/first-contributions/blob/main/docs/translations/README.pt-pt.md) | [
](https://github.com/mikowhy) |
| Português | [Portugues (Portugal)](https://github.com/firstcontributions/first-contributions/blob/main/docs/translations/README.pt-pt.md) | [ ](https://github.com/RamosCSV) |
| Português do Brasil | [Portugues (Brazil)](https://github.com/firstcontributions/first-contributions/blob/main/docs/translations/README.pt_br.md) | [
](https://github.com/RamosCSV) |
| Português do Brasil | [Portugues (Brazil)](https://github.com/firstcontributions/first-contributions/blob/main/docs/translations/README.pt_br.md) | [ ](https://github.com/OtacilioN) [
 ](https://github.com/gabrielsanttana)|
| Română | [Romanian](https://github.com/firstcontributions/first-contributions/blob/main/docs/translations/README.ro.md) | [
](https://github.com/gabrielsanttana)|
| Română | [Romanian](https://github.com/firstcontributions/first-contributions/blob/main/docs/translations/README.ro.md) | [  ](https://github.com/dp97) |
| Русский | [Russian](https://github.com/firstcontributions/first-contributions/blob/main/docs/translations/README.ru.md) | [
](https://github.com/dp97) |
| Русский | [Russian](https://github.com/firstcontributions/first-contributions/blob/main/docs/translations/README.ru.md) | [ ](https://github.com/ayanovsk) |
| Svenska | [Swedish](https://github.com/firstcontributions/first-contributions/blob/main/docs/translations/README.se.md) | [
](https://github.com/ayanovsk) |
| Svenska | [Swedish](https://github.com/firstcontributions/first-contributions/blob/main/docs/translations/README.se.md) | [ ](https://github.com/jcer) |
| Sinhala | [Sinhala](https://github.com/firstcontributions/first-contributions/blob/main/docs/translations/README.si.md) | []() |
| Sindhi | [Sindhi](https://github.com/firstcontributions/first-contributions/blob/main/docs/translations/README.sindhi.md) | []() |
| Slovenčina | [Slovak](https://github.com/firstcontributions/first-contributions/blob/main/docs/translations/README.sk.md) | [
](https://github.com/jcer) |
| Sinhala | [Sinhala](https://github.com/firstcontributions/first-contributions/blob/main/docs/translations/README.si.md) | []() |
| Sindhi | [Sindhi](https://github.com/firstcontributions/first-contributions/blob/main/docs/translations/README.sindhi.md) | []() |
| Slovenčina | [Slovak](https://github.com/firstcontributions/first-contributions/blob/main/docs/translations/README.sk.md) | [ ](https://github.com/CoderKlemen) |
| Slovenščina | [Slovenian](https://github.com/firstcontributions/first-contributions/blob/main/docs/translations/README.slk.md) | [
](https://github.com/CoderKlemen) |
| Slovenščina | [Slovenian](https://github.com/firstcontributions/first-contributions/blob/main/docs/translations/README.slk.md) | [ ](https://github.com/hercegtomas) |
| Српски | [Serbian (Cyrillic)](https://github.com/firstcontributions/first-contributions/blob/main/docs/translations/README.sr-Cyrl.md) | [
](https://github.com/hercegtomas) |
| Српски | [Serbian (Cyrillic)](https://github.com/firstcontributions/first-contributions/blob/main/docs/translations/README.sr-Cyrl.md) | [ ](https://github.com/rammba) |
| Srpski | [Serbian (Latin)](https://github.com/firstcontributions/first-contributions/blob/main/docs/translations/README.sr-Latn.md) | [
](https://github.com/rammba) |
| Srpski | [Serbian (Latin)](https://github.com/firstcontributions/first-contributions/blob/main/docs/translations/README.sr-Latn.md) | [ ](https://github.com/Mateja3m) [
 ](https://github.com/sathishkumar-manogaran) |
| తెలుగు | [Telugu](https://github.com/firstcontributions/first-contributions/blob/main/docs/translations/README.te.md) | []() |
| ไทย | [Thai](https://github.com/firstcontributions/first-contributions/blob/main/docs/translations/README.th.md) | [
](https://github.com/sathishkumar-manogaran) |
| తెలుగు | [Telugu](https://github.com/firstcontributions/first-contributions/blob/main/docs/translations/README.te.md) | []() |
| ไทย | [Thai](https://github.com/firstcontributions/first-contributions/blob/main/docs/translations/README.th.md) | [ ](https://github.com/AimeTPGM) |
| Tagalog | [Tagalog](https://github.com/firstcontributions/first-contributions/blob/main/docs/translations/README.tl.md) | []() |
| Türkçe | [Turkish](https://github.com/firstcontributions/first-contributions/blob/main/docs/translations/README.tr.md) | [
](https://github.com/AimeTPGM) |
| Tagalog | [Tagalog](https://github.com/firstcontributions/first-contributions/blob/main/docs/translations/README.tl.md) | []() |
| Türkçe | [Turkish](https://github.com/firstcontributions/first-contributions/blob/main/docs/translations/README.tr.md) | [ ](https://github.com/yamac-kurtulus) |
| Українська | [Ukrainian](https://github.com/firstcontributions/first-contributions/blob/main/docs/translations/README.ua.md) | [
](https://github.com/yamac-kurtulus) |
| Українська | [Ukrainian](https://github.com/firstcontributions/first-contributions/blob/main/docs/translations/README.ua.md) | [ ](https://github.com/666f78) |
| Universal Alien | [Universal Alien](https://github.com/firstcontributions/first-contributions/blob/main/docs/translations/README.un-aln.md) | [
](https://github.com/666f78) |
| Universal Alien | [Universal Alien](https://github.com/firstcontributions/first-contributions/blob/main/docs/translations/README.un-aln.md) | [ ]() |
| اردو | [Urdu](https://github.com/firstcontributions/first-contributions/blob/main/docs/translations/README.ur.md) | [
]() |
| اردو | [Urdu](https://github.com/firstcontributions/first-contributions/blob/main/docs/translations/README.ur.md) | [ ](https://github.com/Shhzdmrz) |
| Tiếng Việt | [Vietnamese](https://github.com/firstcontributions/first-contributions/blob/main/docs/translations/README.vn.md) | [
](https://github.com/Shhzdmrz) |
| Tiếng Việt | [Vietnamese](https://github.com/firstcontributions/first-contributions/blob/main/docs/translations/README.vn.md) | [ ](https://github.com/tranlyvu) |
| Yorùbá | [Yorùbá](https://github.com/firstcontributions/first-contributions/blob/main/docs/translations/README.yor.md) | []() |
| 中文 | [Chinese (Simplified)](https://github.com/firstcontributions/first-contributions/blob/main/docs/translations/README.zh-cn.md) | [
](https://github.com/tranlyvu) |
| Yorùbá | [Yorùbá](https://github.com/firstcontributions/first-contributions/blob/main/docs/translations/README.yor.md) | []() |
| 中文 | [Chinese (Simplified)](https://github.com/firstcontributions/first-contributions/blob/main/docs/translations/README.zh-cn.md) | [ ](https://github.com/yuzhoujr) |
| 中文 | [Chinese (Traditional)](https://github.com/firstcontributions/first-contributions/blob/main/docs/translations/README.zh-tw.md) | [
](https://github.com/yuzhoujr) |
| 中文 | [Chinese (Traditional)](https://github.com/firstcontributions/first-contributions/blob/main/docs/translations/README.zh-tw.md) | [ ](https://github.com/WeiChienHsu) [
 ](https://github.com/Sharl0tteIsTaken) |
| Zulu | [Zulu](https://github.com/firstcontributions/first-contributions/blob/main/docs/translations/README.zul.md) | [
](https://github.com/Sharl0tteIsTaken) |
| Zulu | [Zulu](https://github.com/firstcontributions/first-contributions/blob/main/docs/translations/README.zul.md) | [ ](https://github.com/Emmanuelbinen) |
================================================
FILE: .github/FUNDING.yml
================================================
# These are supported funding model platforms
github: [firstcontributions]
open_collective: [firstcontributions]
ko_fi: # Replace with a single Ko-fi username
tidelift: # Replace with a single Tidelift platform-name/package-name e.g., npm/babel
community_bridge: # Replace with a single Community Bridge project-name e.g., cloud-foundry
liberapay: # Replace with a single Liberapay username
issuehunt: # Replace with a single IssueHunt username
otechie: # Replace with a single Otechie username
lfx_crowdfunding: # Replace with a single LFX Crowdfunding project-name e.g., cloud-foundry
custom: # Replace with up to 4 custom sponsorship URLs e.g., ['link1', 'link2']
================================================
FILE: .github/ISSUE_TEMPLATE/issue-template.md
================================================
---
name: Suggest changes
about: If you want to report a bug or suggest improvements, please open an issue.
title: ''
labels: discussion, question
assignees: Roshanjossey
---
🐞 **Problem**
🎯 **Goal**
💡 **Possible solutions**
📋 **Steps to solve the problem**
* Comment below about what you've started working on.
* Add, commit, push your changes.
* Submit a pull request and add this in comments - `Addresses #
](https://github.com/Emmanuelbinen) |
================================================
FILE: .github/FUNDING.yml
================================================
# These are supported funding model platforms
github: [firstcontributions]
open_collective: [firstcontributions]
ko_fi: # Replace with a single Ko-fi username
tidelift: # Replace with a single Tidelift platform-name/package-name e.g., npm/babel
community_bridge: # Replace with a single Community Bridge project-name e.g., cloud-foundry
liberapay: # Replace with a single Liberapay username
issuehunt: # Replace with a single IssueHunt username
otechie: # Replace with a single Otechie username
lfx_crowdfunding: # Replace with a single LFX Crowdfunding project-name e.g., cloud-foundry
custom: # Replace with up to 4 custom sponsorship URLs e.g., ['link1', 'link2']
================================================
FILE: .github/ISSUE_TEMPLATE/issue-template.md
================================================
---
name: Suggest changes
about: If you want to report a bug or suggest improvements, please open an issue.
title: ''
labels: discussion, question
assignees: Roshanjossey
---
🐞 **Problem**
🎯 **Goal**
💡 **Possible solutions**
📋 **Steps to solve the problem**
* Comment below about what you've started working on.
* Add, commit, push your changes.
* Submit a pull request and add this in comments - `Addresses # `;
const nextSteps = `# Next steps \n - Continue contributing: If you're looking for projects to contribute to, checkout our [
`;
const nextSteps = `# Next steps \n - Continue contributing: If you're looking for projects to contribute to, checkout our [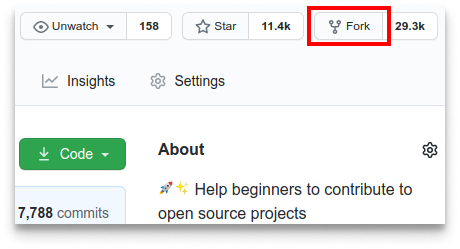 #### If you don't have git on your machine, [install it](https://docs.github.com/en/get-started/quickstart/set-up-git).
## Fork this repository
Fork this repository by clicking on the fork button on the top of this page.
This will create a copy of this repository in your account.
## Clone the repository
#### If you don't have git on your machine, [install it](https://docs.github.com/en/get-started/quickstart/set-up-git).
## Fork this repository
Fork this repository by clicking on the fork button on the top of this page.
This will create a copy of this repository in your account.
## Clone the repository
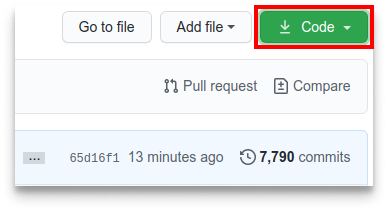 Now clone the forked repository to your machine. Go to your GitHub account, open the forked repository, click on the code button, then on SSH tab and then click the _copy url to clipboard_ icon.
Open a terminal and run the following git command:
```bash
git clone "url you just copied"
```
where "url you just copied" (without the quotation marks) is the url to this repository (your fork of this project). See the previous steps to obtain the url.
Now clone the forked repository to your machine. Go to your GitHub account, open the forked repository, click on the code button, then on SSH tab and then click the _copy url to clipboard_ icon.
Open a terminal and run the following git command:
```bash
git clone "url you just copied"
```
where "url you just copied" (without the quotation marks) is the url to this repository (your fork of this project). See the previous steps to obtain the url.
 For example:
```bash
git clone git@github.com:this-is-you/first-contributions.git
```
where `this-is-you` is your GitHub username. Here you're copying the contents of the first-contributions repository on GitHub to your computer.
## Create a branch
Change to the repository directory on your computer (if you are not already there):
```bash
cd first-contributions
```
Now create a branch using the `git switch` command:
```bash
git switch -c your-new-branch-name
```
For example:
```bash
git switch -c add-alonzo-church
```
For example:
```bash
git clone git@github.com:this-is-you/first-contributions.git
```
where `this-is-you` is your GitHub username. Here you're copying the contents of the first-contributions repository on GitHub to your computer.
## Create a branch
Change to the repository directory on your computer (if you are not already there):
```bash
cd first-contributions
```
Now create a branch using the `git switch` command:
```bash
git switch -c your-new-branch-name
```
For example:
```bash
git switch -c add-alonzo-church
```
If you get any errors using git switch, click here:
If the error message "Git: `switch` is not a git command. See `git –help`" appears, it's likely because you're using an older version of git. In this case, try to use `git checkout` instead: ```bash git checkout -b your-new-branch-name ```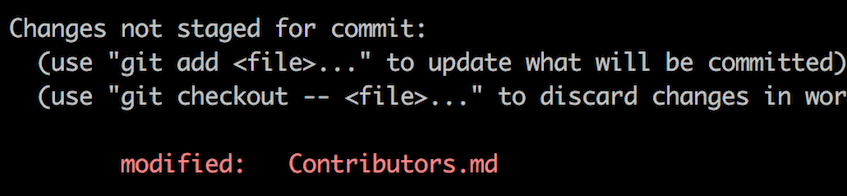 If you go to the project directory and execute the command `git status`, you'll see there are changes.
Add those changes to the branch you just created using the `git add` command:
```bash
git add Contributors.md
```
Now commit those changes using the `git commit` command:
```bash
git commit -m "Add your-name to Contributors list"
```
replacing `your-name` with your name.
## Push changes to GitHub
Push your changes using the command `git push`:
```bash
git push -u origin your-branch-name
```
replacing `your-branch-name` with the name of the branch you created earlier.
If you go to the project directory and execute the command `git status`, you'll see there are changes.
Add those changes to the branch you just created using the `git add` command:
```bash
git add Contributors.md
```
Now commit those changes using the `git commit` command:
```bash
git commit -m "Add your-name to Contributors list"
```
replacing `your-name` with your name.
## Push changes to GitHub
Push your changes using the command `git push`:
```bash
git push -u origin your-branch-name
```
replacing `your-branch-name` with the name of the branch you created earlier.
If you get any errors while pushing, click here:
- ### Authentication Errorremote: Support for password authentication was removed on August 13, 2021. Please use a personal access token instead. remote: Please see https://github.blog/2020-12-15-token-authentication-requirements-for-git-operations/ for more information. fatal: Authentication failed for 'https://github.com/<your-username>/first-contributions.git/'Go to [GitHub's tutorial](https://docs.github.com/en/authentication/connecting-to-github-with-ssh/adding-a-new-ssh-key-to-your-github-account) on generating and configuring an SSH key to your account. Also, you might want to run 'git remote -v' to check your remote address. If it looks anything like this:
origin	https://github.com/your-username/your_repo.git (fetch)
  origin	https://github.com/your-username/your_repo.git (push)
change it using this command: ```bash git remote set-url origin git@github.com:your-username/your_repo.git ``` Otherwise you'll still get prompted for username and password and get authentication error.
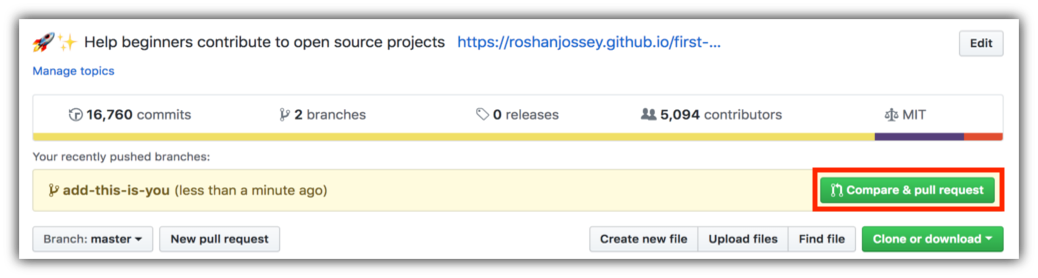 Now submit the pull request.
 Soon I'll be merging all your changes into the main branch of this project. You will get a notification email once the changes have been merged.
## Where to go from here?
Congrats! You just completed the standard _fork -> clone -> edit -> pull request_ workflow that you'll often encounter as a contributor!
Celebrate your contribution and share it with your friends and followers by going to [web app](https://firstcontributions.github.io/#social-share).
If you'd like more practice, checkout [code contributions](https://github.com/roshanjossey/code-contributions).
Now let's get you started with contributing to other projects. We've compiled a list of projects with easy issues you can get started on. Check out [the list of projects in the web app](https://firstcontributions.github.io/#project-list).
### [Additional material](docs/additional-material/git_workflow_scenarios/additional-material.md)
## Tutorials Using Other Tools
|
Soon I'll be merging all your changes into the main branch of this project. You will get a notification email once the changes have been merged.
## Where to go from here?
Congrats! You just completed the standard _fork -> clone -> edit -> pull request_ workflow that you'll often encounter as a contributor!
Celebrate your contribution and share it with your friends and followers by going to [web app](https://firstcontributions.github.io/#social-share).
If you'd like more practice, checkout [code contributions](https://github.com/roshanjossey/code-contributions).
Now let's get you started with contributing to other projects. We've compiled a list of projects with easy issues you can get started on. Check out [the list of projects in the web app](https://firstcontributions.github.io/#project-list).
### [Additional material](docs/additional-material/git_workflow_scenarios/additional-material.md)
## Tutorials Using Other Tools
| `git log foo bar ` - It is also possible to remove the commits reachable from a given commit id by adding a `^` in front of commit id: (In this case, `baz`)
`git log foo bar ^baz` - Commit log for a particular file:
`git log --all
`git log -n 5` ## Refer - [Official documentation](https://git-scm.com/docs/git-log) ================================================ FILE: docs/additional-material/git_workflow_scenarios/configuring-git.md ================================================ # Configuring git The first time you tried to commit using git, you might have gotten a prompt like the one below: ```bash $ git commit *** Please tell me who you are. Run git config --global user.email "you@example.com" git config --global user.name "Your Name" to set your account's default identity. Omit --global to set the identity only in this repository. ``` Git needs to know who you are when you create a commit. When you are working collaboratively, you should be able to see who modified what parts of the project and when, and thus, git has been designed to create commits tied to a name and an email. There are multiple ways to provide the `git commit` command with your email and name, and we'll go through some of them below. ### Global Config When you store something in the global config, it is accessible system wide in all the repositories you work on. This is the preferred way and works for most use cases. To store something in the global config, you use the `config` command as follows: `$ git config --global
The Gitflow workflow defines a strict branching model designed around the project release, which provides a robust framework for managing larger projects. Gitflow is ideally suited for projects that have a scheduled release cycle and for the DevOps best practice of continuous delivery. It assigns very specific roles to different branches and defines how and when they should interact. It uses individual branches for preparing, maintaining and recording releases. ## Implementation 1. **Develop and Master Branches**: Instead of a single master branch, Git Flow uses two branches to record the history of the project. It is based on two main branches with infinite lifetime namely master and develop: - **Master Branch**: The master branch contains the production code and stores the official release history. - **Develop Branch**: The develop branch contains pre-production code and serves as an integration branch for features. - **Creating a Develop Branch**:
Without using the Gitflow extensions: ``` git branch develop git push -u origin develop ``` Using the Gitflow extensions: When using the gitflow extension library, executing `git flow init` on an existing repo will create the develop branch. ``` git flow init ``` 2. **Feature Branch**: Each new feature should reside in its branch, which can be pushed to the central repository for backup/collaboration. Feature branches use the latest develop as their parent branch. When a feature is complete, it gets merged back into develop. Features should never interact directly with the master branch. - **Creating a Feature Branch**:
Without git-flow extensions: ``` git checkout develop git checkout -b feature_branch ``` With gitflow extensions: ``` git flow feature start feature_branch ``` - **Finishing a Feature Branch**:
Without git-flow extensions: ``` git checkout develop git merge feature_branch ``` With git-flow extensions: ``` git flow feature finish feature_branch ``` 3. **Release Branch**: Once develop has acquired enough features for a release (or a predetermined release date is approaching), we fork a release branch off of develop. Creating this branch starts the next release cycle, so no new features can be added after this point—only bug fixes, documentation generation, and other release-oriented tasks should go in this branch. Release branch may branch off from develop and must merge into both master and develop.
Using a dedicated branch to prepare releases makes it possible for one team to polish the current release while another team continues working on features for the next release. - **Creating a Release Branch**:
Without the git-flow extensions: ``` git checkout develop git checkout develop git checkout -b release/0.1.0 ``` When using the git-flow extensions: ``` git flow release start 0.1.0 ``` Switched to a new branch 'release/0.1.0' - **Finishing a Release Branch**:
Without git-flow extensions: ``` git checkout master git merge release/0.1.0 ``` With git-flow extensions: ``` git flow release finish 0.1.0 ``` 4. **Hotfix Branch**: Maintenance or “hotfix” branches are used to quickly patch production releases. Hotfix branches are necessary to act immediately upon an undesired status of master. Hotfix branches are a lot like release branches and feature branches except they’re based on master instead of develop. This is the only branch that should fork directly off of master. As soon as the fix is complete, it should be merged into both master and develop (or the current release branch), and the master branch should be tagged with an updated version number. - **Creating a Hotfix Branch**:
Without git-flow extensions: ``` git checkout master git checkout -b hotfix_branch ``` With git-flow extensions: ``` git flow hotfix start hotfix_branch ``` - **Finishing a Hotfix Branch**:
Without git-flow extensions: ``` git checkout master git merge hotfix_branch git checkout develop git merge hotfix_branch ``` With git-flow extensions: ``` git branch -D hotfix_branch git flow hotfix finish hotfix_branch ``` ## Advantages - Ensures a clean state of branches at any given moment in the life cycle of a project. - The naming convention of branches follows a systematic pattern making it easier to comprehend. - Has extensions and support on most used git tools. - Ideal in case of maintaining multiple versions in production. - Great for a release-based software workflow. - Offers a dedicated channel for hotfixes to production. ## Disadvantages - Git history becomes unreadable. - The master/ develop branch split is considered redundant and makes the Continuous Delivery/ Integration harder. - Not recommended in case of maintaining a single version in production. ## Summary Here we discussed the Git Flow Workflow. Git Flow is one of the many styles of Git workflows you and your team can utilize. Let’s summarize the whole workflow of Git Flow: 1. A develop branch is created from master. 1. Feature branches are created from develop. 1. When a feature is complete it is merged into the develop branch. 1. A release branch is created from develop. 1. When the release branch is done it is merged into develop and master. 1. If an issue in the master is detected a hotfix branch is created from master. 1. Once the hotfix is complete it is merged to both develop and master. ================================================ FILE: docs/additional-material/git_workflow_scenarios/installing-git-arch.md ================================================ # Installing Git on Arch Linux To install Git on Arch Linux, you can use the package manager pacman. First, open a terminal and update the system with the following command: ```shell $ sudo pacman -Syu ``` Next, install Git by running: ```shell $ sudo pacman -S git ``` To confirm that Git has been installed correctly, run the following command: ```shell $ git --version ``` You should see output similar to: ```shell Output $ git version 2.34.1 ``` # Set up Git Configuration can be achieved by using the git config command. Specifically, you need to provide your name and email address because Git embeds this information into each commit you do. You can add this information by typing: Now that we are done with installing Git, let us configure it for first time use using "git config" command. We need to make sure your username and email address are set correctly. To set them, use the command: ```shell $ git config --global user.name "Your Name" $ git config --global user.email "youremail@domain.com" ``` You can display all the configuration items that have been set by entering the following command in your terminal: ```shell $ git config --list ``` If all config field have been set up to your need the output should look something like ```shell user.name=Your Name user.email=youremail@domain.com ``` # Persist Git Credentials By default, Git will prompt you to re-enter your username and password every time you interact with a remote repository. You can configure Git to cache or store your credentials to avoid this. Below are two common methods: ### 1. Credential Caching Git can temporarily store your credentials in memory, so you don't need to re-enter them frequently. Run the following command to enable credential caching: ```shell $ git config --global credential.helper cache ``` By default, credentials will be cached for 15 minutes. To adjust the timeout period (e.g., 1 hour), use: ```shell $ git config --global credential.helper 'cache --timeout=3600' ``` --- ### 2. Credential Storing If you prefer to store your credentials permanently in plain text (less secure but convenient), you can use the following command: ```shell $ git config --global credential.helper store ``` When using this method, your credentials will be saved in plain text in `~/.git-credentials`. Be cautious with this approach, especially on shared or public machines. ================================================ FILE: docs/additional-material/git_workflow_scenarios/installing-git-ubuntu.md ================================================ # Installing Git Ubuntu OS Git by default is likely already installed in your Ubuntu OS . You can confirm this by launching your terminal and entering following command in to your terminal: ```shell $ git --version ``` If you receive output similar to the following, then Voila! you have readily installed Git on your machine. ```shell Output $ git version 2.34.1 ``` If this applies to you, proceed to [set up git](#set-up-git) below. If a Git version number was not on the output as shown above, you can still install it using Ubuntu's APT default package manager. Update your local package index first by using the apt package management tools. Head back to your terminal and enter the following command. ```shell $ sudo apt update ``` Once this is completed, then enter the following command to install in Git: ```shell $ sudo apt install git ``` You can confirm that you have installed Git correctly by running the following command and checking that you receive relevant output. ```shell $ git --version ``` ```shell Output $ git version 2.34.1 ``` With Git successfully installed, you can now proceed below by setting it up. # Set up Git Configuration can be achieved by using the git config command. Specifically, you need to provide your name and email address because Git embeds this information into each commit you do. You can add this information by typing: Now that we are done with installing Git, let us configure it for first time use using "git config" command. We need to make sure your username and email address are set correctly. To set them, use the command: ```shell $ git config --global user.name "Your Name" $ git config --global user.email "youremail@domain.com" ``` You can display all the configuration items that have been set by entering the following command in your terminal: ```shell $ git config --list ``` If all config field have been set up to your need the output should look something like ```shell user.name=Your Name user.email=youremail@domain.com ``` ... # Persist Git Credentials By default, Git will keep asking you for your details everytime you want to push to a remote repo. In Git, you can configure the caching of your credentials to avoid entering your username and password repeatedly. There are a couple of methods to achieve this: 1. Credential caching: Git provides a credential caching system that can store your credentials in memory for a specified period. This way, you don't have to re-enter your details every time you interact with a remote repository. To enable credential caching, you can use the following command: ```shell $ git config --global credential.helper cache ``` By default, Git will cache your credentials for 15 minutes. You can adjust the cache timeout period by specifying the --timeout option followed by the desired number of seconds. For example, to set the cache timeout to 1 hour (3600 seconds), you can use: ```shell $ git config --global credential.helper 'cache --timeout=3600' ``` 2. Credential Storing: This sets Git's credential helper to "store". When using this credential helper, Git will store the credentials for a remote repository in a plain-text file on disk. This method is the simplest but least secure option for credential storage. ```shell $ git config --global crednetial.helper store ``` With the store credential helper, the credentials entered for a remote repository will be stored permanently in a file located at ~/.git-credentials on Linux or macOS, or %USERPROFILE%\.git-credentials on Windows. The credentials will be stored in plain text format, which means they are readable if someone gains access to the file. The advantage of using the store credential helper is that you won't be prompted for credentials every time you interact with the remote repository. However, keep in mind the security implications of storing credentials in plain text, especially if you are using a shared or public machine. ================================================ FILE: docs/additional-material/git_workflow_scenarios/keeping-your-fork-synced-with-this-repository.md ================================================ # Keeping your fork synced with this repository First, the flow for a full sync should be understood, which is important. In this schema, there are 3 different repos: my public repo on Github `github.com/firstcontributions/first-contributions.git`, your fork of the repo on GitHub `github.com/Your-Name/first-contributions/` and your local machine's repo from which you are suppose to work. This kind of cooperation is typical for open source projects and called `Triangle Workflows`.
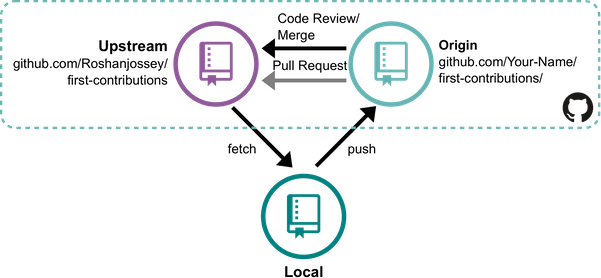 To keep your two repos up-to-date with my public repo, we first have to fetch and merge the public repo with your local machine's repo.
Our second move will be to push your local repo to your GitHub fork. As you've seen earlier, it's only from your fork that you can ask for a "pull request". So your GitHub fork is the last repo to be updated.
Now, let's see how to do it:
First, you must be on your main branch. To know which branch you are on, check the first line of:
```
git status
```
if you are not already on main:
```
git checkout main
```
Then you should add my public repo to your git with `add upstream remote-url`:
```
git remote add upstream https://github.com/firstcontributions/first-contributions.git
```
This is a way of telling git that another version of this project exists in the specified url and we're calling it `upstream`. Once your git has a name let's fetch the latest version of the public repository:
```
git fetch upstream
```
You've just fetched the latest version of my fork (`upstream` remote). Now, you need to merge the public repository into your main branch.
```
git rebase upstream/main
```
Here you're merging the public repository with your main branch. Your local machine's main branch is now up-to-date. Lastly, if you push your main branch to your fork, your GitHub fork will also have the changes:
```
git push origin main
```
Notice here you're pushing to the remote named `origin`.
If you want to fetch and merge the latest changes of my fork (`upstream` remote) to your local branch at same time then you can directly go for:
```
git pull upstream main
```
So by now or at this point, all your repositories are up-to-date. Well done! You should do this, every time your GitHub repo tells you that you are a few commits behind.
================================================
FILE: docs/additional-material/git_workflow_scenarios/moving-a-commit-to-a-different-branch.md
================================================
# Moving a commit to a different branch
What if you commit a change, and then realize that you committed to a different branch?
How can you change that? This is what this tutorial covers.
## Moving the latest commits to an existing branch
To do this, type:
```git reset HEAD~ --soft``` - Undoes the last commit, but leaves the changes available.
```git stash``` - Records the state of the directory.
```git checkout name-of-the-correct-branch``` - Switches to another branch.
```git stash pop``` - Removes latest stashed state.
```git add .``` - Or try adding individual files.
```git commit -m "your message here"``` - Saves and Commits the changes.
Now your changes are on the correct branch
### Moving the latest commits to a new Branch
To do this, type:
```git branch newbranch``` - Creates a new Branch. Saving all the Commits.
```git reset --hard HEAD~#``` - Move master back by # commits. Remember, these commits will be gone from master
```git checkout newbranch``` - Goes to the branch you created. It will have all the commits.
Remember: Any changes not committed will be LOST.
================================================
FILE: docs/additional-material/git_workflow_scenarios/rebase-vs-merge.md
================================================
# Rebase vs Merge
When contributing to open-source projects, it’s important to understand how to integrate your changes cleanly.
Two common ways to bring updates from one branch into another are **merge** and **rebase**.
## What Is Rebase?
**Rebasing** replays your commits from one branch on top of another — effectively moving your work to start from the tip of another branch.
This creates a **linear and clean commit history** without merge commits.
### Example
```bash
# Switch to your feature branch
git switch feature_branch
# Rebase your feature branch on top of main
git rebase main
```
Alternatively,
```bash
git checkout
To keep your two repos up-to-date with my public repo, we first have to fetch and merge the public repo with your local machine's repo.
Our second move will be to push your local repo to your GitHub fork. As you've seen earlier, it's only from your fork that you can ask for a "pull request". So your GitHub fork is the last repo to be updated.
Now, let's see how to do it:
First, you must be on your main branch. To know which branch you are on, check the first line of:
```
git status
```
if you are not already on main:
```
git checkout main
```
Then you should add my public repo to your git with `add upstream remote-url`:
```
git remote add upstream https://github.com/firstcontributions/first-contributions.git
```
This is a way of telling git that another version of this project exists in the specified url and we're calling it `upstream`. Once your git has a name let's fetch the latest version of the public repository:
```
git fetch upstream
```
You've just fetched the latest version of my fork (`upstream` remote). Now, you need to merge the public repository into your main branch.
```
git rebase upstream/main
```
Here you're merging the public repository with your main branch. Your local machine's main branch is now up-to-date. Lastly, if you push your main branch to your fork, your GitHub fork will also have the changes:
```
git push origin main
```
Notice here you're pushing to the remote named `origin`.
If you want to fetch and merge the latest changes of my fork (`upstream` remote) to your local branch at same time then you can directly go for:
```
git pull upstream main
```
So by now or at this point, all your repositories are up-to-date. Well done! You should do this, every time your GitHub repo tells you that you are a few commits behind.
================================================
FILE: docs/additional-material/git_workflow_scenarios/moving-a-commit-to-a-different-branch.md
================================================
# Moving a commit to a different branch
What if you commit a change, and then realize that you committed to a different branch?
How can you change that? This is what this tutorial covers.
## Moving the latest commits to an existing branch
To do this, type:
```git reset HEAD~ --soft``` - Undoes the last commit, but leaves the changes available.
```git stash``` - Records the state of the directory.
```git checkout name-of-the-correct-branch``` - Switches to another branch.
```git stash pop``` - Removes latest stashed state.
```git add .``` - Or try adding individual files.
```git commit -m "your message here"``` - Saves and Commits the changes.
Now your changes are on the correct branch
### Moving the latest commits to a new Branch
To do this, type:
```git branch newbranch``` - Creates a new Branch. Saving all the Commits.
```git reset --hard HEAD~#``` - Move master back by # commits. Remember, these commits will be gone from master
```git checkout newbranch``` - Goes to the branch you created. It will have all the commits.
Remember: Any changes not committed will be LOST.
================================================
FILE: docs/additional-material/git_workflow_scenarios/rebase-vs-merge.md
================================================
# Rebase vs Merge
When contributing to open-source projects, it’s important to understand how to integrate your changes cleanly.
Two common ways to bring updates from one branch into another are **merge** and **rebase**.
## What Is Rebase?
**Rebasing** replays your commits from one branch on top of another — effectively moving your work to start from the tip of another branch.
This creates a **linear and clean commit history** without merge commits.
### Example
```bash
# Switch to your feature branch
git switch feature_branch
# Rebase your feature branch on top of main
git rebase main
```
Alternatively,
```bash
git checkout However, the question is, why don't we just delete the base branch and checkout a new branch with the name of base branch from origin branch. Technically, it will have the same effect as resetting but in some industrial situations we do not have the access to delete a branch, or we can not delete a branch as it will hamper/disrupt a CI/CD pipeline or maybe an ongoing workflow. Hence, to avoid such situations which can lead to downtimes, we suggest using `git reset` whenever we want to reset a particular branch. ## The Command Its very easy to execute a git reset for branch. ``` git reset
The main difference between resetting and reverting a commit is that git reset ```unstages a file and bring our changes back to the working directory``` and git revert ```removes the commits from the remote repository```.
```git reset``` can be achieved using following commands: - The following command will give summary of all the commits using following two parameters: - The first seven characters of the commit hash - this is what we need to refer to in our **reset** command. - the commit message ``` git log --oneline ``` - One can reset repository back to the specific commit using following command:
```git reset commithash``` where commithash being the first 7 characters of the commit hash we found in the log ================================================ FILE: docs/additional-material/git_workflow_scenarios/resolving-merge-conflicts.md ================================================ # What is a merge conflict? A merge conflict occurs when changes from different branches clash and Git cannot merge them automatically. Common scenarios include: - Two contributors editing the same line in a file. - One contributor deletes a file that another has modified. - Simultaneous renaming of a file to different names in separate branches. In such cases, Git will pause the merge process and mark the conflicting files for manual resolution. There are tools that helps users resolve these conflicts but in this guide, we will be focusing on the git command line tool. ## How to resolve a merge conflict? 1. **Identify Conflicted Files** After attempting a merge, Git will notify you of conflicts. Use the following command to list them: ```bash git status ``` Look for files listed under "Unmerged paths." 2. **Open and Examine Conflicted Files** Open each conflicted file in your preferred text editor. Git sets boundaries for conflicts using the following markers: ```plaintext <<<<<<< HEAD Your changes ======= Incoming changes >>>>>>> branch-name ``` - `<<<<<<< HEAD` represents your current branch's changes. - `=======` separates the conflicting changes. - `>>>>>>> branch-name` shows the incoming changes from the other branch. 3. **Resolve the Conflicts** Decide how to integrate the changes: - Keep your changes. - Accept the incoming changes. - Combine both changes in a coherent manner. After making the necessary edits, remove the conflict markers (<<<<<<<, =======, >>>>>>>) 4. **Mark Conflicts as Resolved** Once you've resolved the conflicts in a file: ```bash git add
Каб захаваць вашыя два сховішчы ў актуальным стане з маім адкрытым сховішчам, мы спачатку павінны здабыць і аб'яднаць агульнае сховішча з рэпазітарам вашай лакальнай машыны.
Наш другі крок - перанесці ваша мясцовае сховішча ў відэлец GitHub. Як вы ўжо бачылі раней, толькі "з відэльцам" вы можаце папрасіць "pull request". Такім чынам, відэлец GitHub - апошняе сховішча, якое трэба абнавіць.
Зараз давайце паглядзім, як гэта зрабіць:
Па-першае, вы павінны быць на сваім вядучым аддзяленні. Каб даведацца, на якой філіяле вы знаходзіцеся, праверце першы радок:
```
git status
```
калі вы яшчэ не на майстры:
```
git checkout master
```
Затым вы павінны дадаць маё агульнадаступнае сховішча ў свой git з `add addstream stream-url`:
```
git remote add upstream https://github.com/firstcontributions/first-contributions.git
```
Гэта спосаб сказаць Git, што іншая версія гэтага праекта існуе ў паказаным URL-адресе, і мы называем яго "вышэй". Пасля таго, як ваш git мае імя, давайце пазнаём апошнюю версію грамадскага сховішча:
```
git fetch upstream
```
Вы толькі што атрымалі апошнюю версію майго відэльца (`upstream` remote). Зараз вам трэба аб'яднаць агульнадаступнае сховішча ў ваша галоўнае аддзяленне.
```
git rebase upstream/master
```
Тут вы аб'яднаеце грамадскае сховішча з вашай галоўнай галіной. Галоўнае аддзяленне вашай мясцовай машыны зараз актуальнае. І, нарэшце, калі вы націснеце галоўную галінку на відэлец, ваша відэлец GitHub таксама будзе змяняць:
```
git push origin master
```
Звярніце ўвагу, вы націскаеце на remote імя `origin`.
Такім чынам, да гэтага часу альбо ў гэты момант усе вашыя сховішчы актуальныя. Добра зроблена! Вы павінны рабіць гэта кожны раз, калі ваш сховішча GitHub паведамляе вам, што вы здзяйсняеце некалькі commits.
================================================
FILE: docs/additional-material/translations/Belarusian/moving-a-commit-to-a-different-branch.by.md
================================================
# Перамяшчэнне камітаў ў іншую галінку
Што рабіць, калі вы здзяйсняеце змены, а потым разумееце, што вы здзейснілі іншую галіну?
Як вы можаце гэта змяніць? Вось што ахоплівае гэты падручнік.
## Перамяшчэнне апошніх камітаў ў існуючую галінку
Для такога перамяшчэння, набярыце:
`` `git reset HEAD ~ --soft` `` - Адмяняе апошняе commit, але пакідае даступныя змены.
`` `git stash` `` - Захоўвае стан дырэкторыі.
`` `git checkout <імя правільнай галінкі>` `` - Перамыкаецца на іншую галінку.
`` `git stash pop` `` - Вяртае апошняе захаванае стан.
`` `git add .` `` - Дадае індывідуальныя файлы.
`` `git commit -m "your message here"``` - Захоўвае і ўносіць змены.
Зараз вашы змены - у правільнай галінцы.
### Перамяшчэнне апошніх камітаў ў новую галінку
Для такога перамяшчэння, набярыце:
`` `git branch newbranch` `` - Стварае новую галінку, захоўваючы ўсе камітаў.
`` `git reset --hard HEAD ~ [n]` `` - Вяртае галінку master назад на n камітаў. Майце на ўвазе, што змены змяшчаюцца ў гэтых камітаў будуць цалкам выдалены з галінкі master.
`` `git checkout newbranch` `` - Перамыкаецца на галінку, якую вы стварылі. Гэтая галінка цяпер змяшчае ўсе commits.
Запомніце: Любыя змены, якія не былі ўключаныя ў commit, будуць цалкам страчаныя.
================================================
FILE: docs/additional-material/translations/Belarusian/removing-a-file.by.md
================================================
# Выдаленне файла з-пад GIT кантролю
Часам можа ўзнікнуць неабходнасць выдаліць файл з-пад GIT кантролю, але захаваць яго на кампутары. Гэта можа быць дасягнута з дапамогай наступнай каманды:
`` git rm <файл> --cached``
## Што ж адбылося?
GIT больш не кантралюе змены ў аддаленым файле. З пункту гледжання GIT, гэты файл адсутнічае, але калі вы паспрабуеце лакалізаваць гэты файл у файлавай сістэме, то вы ўбачыце, што ён усё яшчэ на месцы.
Звярніце ўвагу, што ў прыведзеным вышэй прыкладзе выкарыстоўваецца сцяг `--cached`. Калі мы не дадамо гэты сцяг, Git выдаліць файл не толькі з сховішча, але і з вашай файлавай сістэмы.
Калі вы здзейсніце змяненне з дапамогай `git commit -m" Remove file1.js "` і перанеслі яго ў аддаленае сховішча з дапамогай `git push origin master`, выдалены рэпазітар выдаліць файл.
## Дадатковая інфармацыя
- Калі вы хочаце выдаліць больш за адзін файл, гэта можна зрабіць, пералічыўшы ўсе файлы ў адной камандзе:
`git rm file1.js file2.js file3.js --cached`
- Вы можаце выкарыстоўваць шаблон (*) для выдалення файлаў з блізкімі імёнамі, напрыклад, калі вы хочаце выдаліць усе .txt файлы з лакальнага рэпазітара, набярыце:
`git rm * .txt --cached`
================================================
FILE: docs/additional-material/translations/Belarusian/removing-branch-from-your-repository.by.md
================================================
# Выдаленне галінкі з вашага рэпазітара
Калі вы да гэтага часу выконвалі ўрок, то наша галіна ``git log foo bar ` - কমিট আইডির সামনে `^` যোগ করে একটি প্রদত্ত কমিট আইডি থেকে পৌঁছানো যায় এমন কমিটগুলি অপসারণ করাও সম্ভব: (এই ক্ষেত্রে, `baz`)
`git log foo bar ^baz` - একটি নির্দিষ্ট ফাইলের জন্য কমিট লগ:
git log --all
`git log -n 5` ## দেখুন - [অফিসিয়াল ডকুমেন্টেশন](https://git-scm.com/docs/git-log) ================================================ FILE: docs/additional-material/translations/Bengali/configuration-in-bn-github.md ================================================ # গিট কনফিগারেশন প্রথমবারের মতো যখন আপনি `commit` করার চেষ্টা করবেন, তখন এই ধরনের বার্তা দেখতে পাবেন: ```bash $ git commit *** Please tell me who you are. Run git config --global user.email "you@example.com" git config --global user.name "Your Name" to set your account's default identity. Omit --global to set the identity only in this repository. ``` একটি `commit` তৈরি করতে গিটকে জানতে হবে যে এর লেখক কে। সহযোগী কাজের ক্ষেত্রে, প্রকল্পের বিভিন্ন অংশের পরিবর্তন করেছেন কে এবং কবে, তা জানা খুবই গুরুত্বপূর্ণ। তাই গিটে প্রতিটি `commit`-এর সাথে ব্যবহারকারীর নাম এবং ইমেল ঠিকানা সংযুক্ত করা হয়। এখানে কিছু উপায় আছে যার মাধ্যমে আপনি আপনার ইমেল এবং নাম `git commit` কমান্ডের সাথে যুক্ত করতে পারেন। ### গ্লোবাল কনফিগারেশন গ্লোবাল কনফিগারেশনে সংরক্ষিত তথ্য সমস্ত গিট রিপোজিটরিতে প্রযোজ্য। এটি হল সবচেয়ে ব্যবহৃত পদ্ধতি। গ্লোবাল কনফিগারেশনে কিছু সেট করতে, আপনি `config` কমান্ডটি এভাবে ব্যবহার করতে পারেন: ```bash $ git config --global
`git log foo bar ` - 也可以通过在提交 id 前添加 `^` 来排除某个提交(例如 `baz`):
`git log foo bar ^baz` - 查看特定文件的提交日志:
`git log --all
`git log -n 5` ## 参考 - [官方文档](https://git-scm.com/docs/git-log) ================================================ FILE: docs/additional-material/translations/Chinese/configuring-git.zh-cn.md ================================================ # 配置 git 第一次使用 git 提交时,你可能会看到如下提示: ```bash $ git commit *** 请告诉我你是谁。 运行 git config --global user.email "you@example.com" git config --global user.name "Your Name" 来设置你账户的默认身份。 如果只想在当前仓库设置身份,省略 --global。 ``` Git 在创建提交时需要知道你是谁。当你在团队中协作时,你应该能够看到是谁修改了项目的哪些部分以及何时修改的,因此,Git 设计时就要求每个提交都与一个名字和电子邮件地址相关联。 有多种方法可以为 `git commit` 命令提供你的电子邮件和用户名,下面我们将介绍几种常用的方法。 ### 全局配置 当你将某个配置存储在全局配置中时,它在你工作的所有仓库中都是可访问的。这是推荐的方式,并且适用于大多数使用场景。 要将某个配置存储在全局配置中,你可以使用以下 `config` 命令: `$ git config --global
Gitflow 工作流定义了一个围绕项目发布而设计的严格分支模型,提供了一个强大的框架来管理大型项目。Gitflow 特别适用于具有计划发布周期的项目以及 DevOps 最佳实践中的持续交付。它为不同的分支分配了非常具体的角色,并定义了它们应该如何以及何时互动。它使用独立的分支来准备、维护和记录发布。 ## 实现 1. **Develop 和 Master Branches**:与单一的 master 分支不同,Git Flow 使用两个分支来记录项目的历史。它基于两个具有无限生命周期的主分支,即 master 和 develop: - **Master Branch**:master 分支包含生产代码并存储官方的发布历史。 - **Develop Branch**:develop 分支包含预生产代码,作为功能的集成分支。 - **创建 Develop Branch**:
不使用 Gitflow 扩展时: ``` git branch develop git push -u origin develop ``` 使用 Gitflow 扩展时:当使用 gitflow 扩展库时,在现有的仓库中执行 `git flow init` 将创建 develop 分支。 ``` git flow init ``` 2. **Feature Branch**:每个新功能应该放在它自己的分支上,可以推送到中央仓库以备份或协作。Feature 分支使用最新的 develop 作为其父分支。当功能完成时,它会合并回 develop。功能分支永远不应直接与 master 分支交互。 - **创建 Feature Branch**:
不使用 git-flow 扩展时: ``` git checkout develop git checkout -b feature_branch ``` 使用 gitflow 扩展时: ``` git flow feature start feature_branch ``` - **完成 Feature Branch**:
不使用 git-flow 扩展时: ``` git checkout develop git merge feature_branch ``` 使用 git-flow 扩展时: ``` git flow feature finish feature_branch ``` 3. **Release Branch**:当 develop 分支包含足够的功能用于发布(或者接近预定的发布日期)时,我们会从 develop 分支派生出一个 release 分支。创建这个分支标志着下一个发布周期的开始,因此在此之后不能再添加新功能——只能添加 bug 修复、文档生成和其他与发布相关的任务。Release 分支应从 develop 分支派生,并必须同时合并到 master 和 develop 分支。
使用专门的分支来准备发布使得一个团队可以在 polishing 当前发布时,另一个团队继续为下一个发布开发新功能。 - **创建 Release Branch**:
不使用 git-flow 扩展时: ``` git checkout develop git checkout develop git checkout -b release/0.1.0 ``` 使用 git-flow 扩展时: ``` git flow release start 0.1.0 ``` 切换到新分支 'release/0.1.0' - **完成 Release Branch**:
不使用 git-flow 扩展时: ``` git checkout master git merge release/0.1.0 ``` 使用 git-flow 扩展时: ``` git flow release finish 0.1.0 ``` 4. **Hotfix Branch**:维护或“hotfix”分支用于快速修复生产发布。Hotfix 分支对于立即解决 master 分支中的不希望出现的问题非常必要。Hotfix 分支与 release 分支和 feature 分支类似,不同之处在于它是基于 master 分支而非 develop 分支派生的。这是唯一一个应直接从 master 分支派生的分支。修复完成后,它应该同时合并到 master 和 develop(或当前的 release 分支),并且 master 分支应该打上更新的版本号标签。 - **创建 Hotfix Branch**:
不使用 git-flow 扩展时: ``` git checkout master git checkout -b hotfix_branch ``` 使用 git-flow 扩展时: ``` git flow hotfix start hotfix_branch ``` - **完成 Hotfix Branch**:
不使用 git-flow 扩展时: ``` git checkout master git merge hotfix_branch git checkout develop git merge hotfix_branch ``` 使用 git-flow 扩展时: ``` git branch -D hotfix_branch git flow hotfix finish hotfix_branch ``` ## 优势 - 确保项目生命周期中的任何时刻分支状态保持清晰。 - 分支的命名约定遵循系统化模式,使其更容易理解。 - 支持大多数常用的 git 工具和扩展。 - 适合在生产中维护多个版本。 - 非常适合基于发布的软件工作流。 - 提供了专门用于生产热修复的渠道。 ## 劣势 - Git 历史记录变得难以阅读。 - master 和 develop branch的分割被认为是冗余的,并使持续交付/集成变得更加困难。 - 不推荐用于维护生产中的单一版本。 ## 总结 我们在这里讨论了 Git Flow 工作流。Git Flow 是你和你的团队可以使用的多种 Git 工作流之一。让我们总结一下 Git Flow 的整个工作流: 1. 从 master 创建一个 develop 分支。 2. 从 develop 创建功能分支。 3. 当功能完成时,将其合并到 develop 分支。 4. 从 develop 创建一个 release 分支。 5. 当 release 分支完成时,将其合并到 develop 和 master。 6. 如果 master 中发现问题,则从 master 创建一个 hotfix 分支。 7. 一旦 hotfix 完成,它将被合并到 develop 和 master。 ================================================ FILE: docs/additional-material/translations/Chinese/installing-git-arch.zh-cn.md ================================================ # 在 Arch Linux 上安装 Git 要在 Arch Linux 上安装 Git,可以使用包管理器 pacman。首先,打开终端并使用以下命令更新系统: ```shell $ sudo pacman -Syu ``` 接下来,运行以下命令安装 Git: ```shell $ sudo pacman -S git ``` 要确认 Git 是否正确安装,运行以下命令: ```shell $ git --version ``` 你应该会看到类似以下的输出: ```shell Output $ git version 2.34.1 ``` # 设置 Git 配置可以通过使用 git config 命令来完成。 具体来说,你需要提供你的名字和电子邮件地址,因为 Git 会将这些信息嵌入到你做的每个提交中。 你可以通过输入以下命令来添加这些信息: 现在我们已经完成了 Git 的安装,让我们使用 "git config" 命令配置 Git 以供首次使用。 我们需要确保你的用户名和电子邮件地址设置正确。要设置它们,使用以下命令: ```shell $ git config --global user.name "Your Name" $ git config --global user.email "youremail@domain.com" ``` 你可以通过在终端中输入以下命令来显示所有已设置的配置项: ```shell $ git config --list ``` 如果所有配置字段已按照你的需求设置,输出应该类似于: ```shell user.name=Your Name user.email=youremail@domain.com ``` # 持久化 Git 凭证 默认情况下,Git 每次与远程仓库交互时都会提示你重新输入用户名和密码。你可以配置 Git 来缓存或存储你的凭证,以避免这种情况。以下是两种常用的方法: ### 1. 凭证缓存 Git 可以将你的凭证暂时存储在内存中,这样你就不需要频繁地重新输入它们。运行以下命令启用凭证缓存: ```shell $ git config --global credential.helper cache ``` 默认情况下,凭证会缓存 15 分钟。要调整超时时间(例如,1 小时),可以使用: ```shell $ git config --global credential.helper 'cache --timeout=3600' ``` --- ### 2. 凭证存储 如果你更倾向于将凭证永久存储为明文(不太安全,但方便),可以使用以下命令: ```shell $ git config --global credential.helper store ``` 使用此方法时,你的凭证将以明文形式保存在 `~/.git-credentials` 文件中。特别是在共享或公共计算机上使用此方法时,请小心操作。 ================================================ FILE: docs/additional-material/translations/Chinese/installing-git-ubuntu.zh-cn.md ================================================ # 在 Ubuntu OS 上安装 Git 默认情况下,Git 很可能已经在你的 Ubuntu 操作系统中安装好了。你可以通过打开终端并输入以下命令来确认: ```shell $ git --version ``` 如果你看到类似下面的输出,那么恭喜你!你已经成功安装了 Git。 ```shell Output $ git version 2.34.1 ``` 如果适用于你,接下来可以继续进行 Git 配置,去[设置 Git](#设置-Git)。 如果输出中没有显示 Git 版本号,你仍然可以通过 Ubuntu 的 APT 包管理器来安装 Git。 首先,通过使用 apt 包管理工具更新本地包索引。返回到你的终端并输入以下命令。 ```shell $ sudo apt update ``` 完成后,输入以下命令来安装 Git: ```shell $ sudo apt install git ``` 你可以通过运行以下命令并检查是否收到相关输出,来确认 Git 是否已正确安装: ```shell $ git --version ``` ```shell Output $ git version 2.34.1 ``` Git 成功安装后,接下来可以配置 Git。 # 设置 Git 配置可以通过使用 git config 命令来完成。 具体来说,你需要提供你的名字和电子邮件地址,因为 Git 会将这些信息嵌入到你做的每个提交中。 你可以通过输入以下命令来添加这些信息: 现在我们已经完成了 Git 的安装,让我们使用 "git config" 命令配置 Git 以供首次使用。 我们需要确保你的用户名和电子邮件地址设置正确。要设置它们,使用以下命令: ```shell $ git config --global user.name "Your Name" $ git config --global user.email "youremail@domain.com" ``` 你可以通过在终端中输入以下命令来显示所有已设置的配置项: ```shell $ git config --list ``` 如果所有配置字段已按照你的需求设置,输出应该类似于: ```shell user.name=Your Name user.email=youremail@domain.com ``` ... # 持久化 Git 凭证 默认情况下,Git 会在每次你推送到远程仓库时要求你输入用户名和密码。 在 Git 中,你可以配置凭证缓存,以避免每次输入用户名和密码。以下是实现这一目标的几种方法: 1. 凭证缓存:Git 提供了一个凭证缓存系统,可以在指定的时间内将你的凭证存储在内存中。这样,你就不需要每次与远程仓库交互时重新输入凭证。 要启用凭证缓存,你可以使用以下命令: ```shell $ git config --global credential.helper cache ``` 默认情况下,Git 会将凭证缓存 15 分钟。你可以通过指定 --timeout 选项并跟上所需的秒数来调整缓存超时时间。 例如,要将缓存超时设置为 1 小时(3600 秒),可以使用: ```shell $ git config --global credential.helper 'cache --timeout=3600' ``` 2. 凭证存储:这将 Git 的凭证助手设置为 "store"。使用这个凭证助手时,Git 会将远程仓库的凭证存储在磁盘上的一个明文文件中。这种方法是最简单的,但存储明文凭证的方式也是最不安全的。 ```shell $ git config --global crednetial.helper store ``` 使用存储凭证助手时,输入的凭证会永久保存在 Linux 或 macOS 上的 ~/.git-credentials 文件中,或 Windows 上的 %USERPROFILE%\.git-credentials 文件中。这些凭证将以明文格式存储,这意味着如果有人获取到该文件,就可以读取凭证。 使用存储凭证助手的优点是,你每次与远程仓库交互时,不需要再次输入凭证。然而,特别是在使用共享或公共计算机时,请注意存储明文凭证的安全隐患。 ================================================ FILE: docs/additional-material/translations/Chinese/keeping-your-fork-synced-with-this-repository.zh-cn.md ================================================ # 保持你的分叉与该仓库同步 首先,应该理解完整同步的流程,这一点非常重要。在这个流程中,有三个不同的仓库:我的公共仓库在 GitHub 上 `github.com/firstcontributions/first-contributions.git`,你在 GitHub 上的仓库分叉 `github.com/Your-Name/first-contributions/`,以及你本地机器上的仓库,你应该在其中进行工作。这种合作方式通常用于开源项目,称为 `Triangle Workflows`。
为了保持你的两个仓库与我的公共仓库同步,我们首先需要将公共仓库的内容拉取并与本地机器上的仓库合并。
我们的第二步是将你的本地仓库推送到你的 GitHub 分叉。如前所述,只有通过你的分叉你才能发起一个“拉取请求”。因此,你的 GitHub 分叉是最后更新的仓库。
现在,让我们看看如何做到这一点:
首先,你必须确保自己处于主分支上。要知道自己当前在哪个分支,可以检查的第一行:
```
git status
```
如果你不在主分支上,输入以下命令切换到主分支:
```
git checkout main
```
然后,你应该将我的公共仓库添加到你的 Git 仓库中,使用 `add upstream remote-url`:
```
git remote add upstream https://github.com/firstcontributions/first-contributions.git
```
这告诉 Git,指定的 URL 位置有该项目的另一个版本,并且我们将其命名为 `upstream`。一旦你的 Git 配置了上游仓库,你就可以拉取公共仓库的最新版本:
```
git fetch upstream
```
你刚刚拉取了我仓库的最新版本(`upstream` 远程仓库)。现在,你需要将公共仓库的内容合并到你的主分支中:
```
git rebase upstream/main
```
在这里,你正在将公共仓库合并到你的主分支。现在,你本地机器上的主分支已更新。最后,如果你将主分支推送到你的 GitHub 分叉,那么你的 GitHub 分叉也会更新:
```
git push origin main
```
请注意,这里你推送的是名为 `origin` 的远程仓库。
如果你想同时将我仓库的最新更改(`upstream` 远程仓库)拉取并合并到你本地的分支中,可以直接使用:
```
git pull upstream main
```
到目前为止,你的所有仓库都已更新。做得很好!每当你的 GitHub 仓库提示你比公共仓库落后几个提交时,你都应该执行这些操作。
================================================
FILE: docs/additional-material/translations/Chinese/moving-a-commit-to-a-different-branch.zh-cn.md
================================================
# 移动提交到不同的分支
假设你提交了一个更改,然后意识到你提交到了错误的分支。
你该如何更改呢?这篇教程将为你解答。
## 将最新的提交移动到现有分支
为此,请输入以下命令:
```git reset HEAD~ --soft``` - 撤销上一个提交,但保留更改。
```git stash``` - 记录当前目录的状态。
```git checkout name-of-the-correct-branch``` - 切换到正确的分支。
```git stash pop``` - 恢复最近的存储状态。
```git add .``` - 或者尝试单独添加文件。
```git commit -m "your message here"``` - 保存并提交更改。
现在你的更改已经在正确的分支上了。
### 将最新的提交移动到新分支
为此,请输入以下命令:
```git branch newbranch``` - 创建一个新分支,保存所有提交。
```git reset --hard HEAD~#``` - 将 master 分支回退 # 个提交。记住,这些提交将从 master 中消失。
```git checkout newbranch``` - 切换到你创建的新分支,所有提交都会在该分支中。
记住:任何未提交的更改将会丢失。
================================================
FILE: docs/additional-material/translations/Chinese/removing-a-file.zh-cn.md
================================================
# 从 Git 中移除文件
有时你可能想要从 Git 中移除一个文件,但不想从你的计算机中删除它。你可以使用以下命令来实现:
``git rm 然而,问题是,为什么我们不直接删除基础分支,然后从原始分支中检出一个新的基础分支呢?从技术角度来看,这将与重置具有相同的效果,但在一些工业场景下,我们无法删除分支,或者我们不能删除分支,因为删除分支可能会干扰/破坏 CI/CD 流水线,或者影响正在进行的工作流。因此,为了避免这种可能导致停机的情况,我们建议在需要重置某个分支时使用 `git reset`。 ## 命令 执行 `git reset` 重置分支非常简单。 ``` git reset
重置和撤销提交的主要区别在于,git reset ```取消暂存文件并将我们的更改带回工作目录``` 而 git revert ```从远程仓库中删除提交```。
```git reset``` 可以通过以下命令来实现: - 以下命令将以两个参数的方式给出所有提交的摘要: - 提交哈希的前七个字符 - 这是我们在 **reset** 命令中需要引用的内容。 - 提交信息 ``` git log --oneline ``` - 可以使用以下命令将仓库重置到特定的提交:
```git reset commithash``` 其中 commithash 是我们在日志中找到的提交哈希的前 7 个字符。 ================================================ FILE: docs/additional-material/translations/Chinese/resolving-merge-conflicts.zh-cn.md ================================================ # 什么是合并冲突? 当你尝试将另一个分支合并到当前工作分支时,你是在将另一个上下文的更改与当前工作文件结合在一起。 如果两个人修改了同一文件的相同行,或者一个人决定删除该文件,而另一个人决定修改它,Git 无法识别哪个版本是正确的。Git 会标记该文件为存在冲突 - 在解决冲突之前,你无法继续工作。 # 如何解决合并冲突? 当遇到合并冲突时,Git 会通过在文件中将问题区域包裹在“<<<<<<<< HEAD”和“>>>>>>>>>>[other branch name]”中来标记冲突。 第一个标记后的内容来自你当前的工作分支。尖括号后,Git 会告诉我们更(改来自哪个分支)。一个“=======”行将两个冲突的更改分开。 我们的任务是清理这些行:当我们完成后,文件应该看起来正是我们想要的样子。建议咨询写入冲突更改的队友,决定哪个版本应该是最终的。可能是你们其中一个的版本,也可能是两者的混合。 例如: ``` <<<<<<< HEAD:mergetest This is my third line ======= This is a fourth line I am adding >>>>>>> 4e2b407f501b68f8588aa645acafffa0224b9b78:mergetest ``` `<<<<<<<`:表示合并冲突行的开始。第一组行来自你试图合并更改的文件。 `=======`:表示用于比较的断点。分隔用户提交的更改(上方)和来自合并的更改(下方),以便直观地看到差异。 `>>>>>>>`:表示合并冲突行的结束。 你可以通过编辑文件来解决冲突,然后手动合并 Git 难以合并的部分。这可能意味着丢弃你的更改或别人的更改,或者两者的混合。你还需要删除文件中的 '<<<<<<<'、'=======' 和 '>>>>>>>'。 一旦解决了冲突,请使用 `git add` 命令。不要忘记运行测试,因为你需要确保已正确解决冲突。 你还可以根据所使用的 IDE 下载不同的插件,以便更轻松地解决合并冲突。 # 如何撤销合并? 如果你想撤销合并,可以使用 `git merge --abort`。 ================================================ FILE: docs/additional-material/translations/Chinese/reverting-a-commit.zh-cn.md ================================================ # 撤销一个提交 撤销一个提交意味着创建一个全新的提交,撤销之前提交所做 的所有更改。这就像在 Git 中执行 `CTRL + Z`。 在 Git 中,撤销操作变得更加简单,因为你推送到远程仓库的每个提交都有一个唯一的字母数字键(称为 SHA,安全哈希算法)与之关联。 这意味着只要你有该提交的 SHA,你就可以撤销任何提交。 但你必须小心按顺序撤销操作,以免破坏你的仓库。 为了获取我们想要撤销的特定提交的 SHA,查看所有提交的日志会很有帮助。 要获取此信息,我们可以运行命令: ```git log --oneline ``` 仅运行 ```git log``` 命令也会给我们返回 SHA(长格式)。 但使用 ```--oneline``` 标志会告诉 Git 我们希望以简洁(单行)的方式显示,以便更容易阅读。 当你运行此命令时,显示的前 7 个字符就是所谓的简短提交哈希。 例如,运行 ```git log --oneline``` 时,我得到的输出如下: ``` 389004d added spacing in title c1b9fc1 Merge branch 'master' into tutorials 77eaafd added tutorial for reverting a commit ``` 这表明,通过使用 ```git log --oneline```,我们可以获取仓库中所有提交的列表,并附带每个提交的前 7 个字符的 SHA。 现在,假设我想撤销我提交的 "在标题中添加了空格" 这个更改,以下是我将采取的步骤: * 复制该提交的 SHA,在本例中是 ```389004d``` * 然后运行命令 ```git revert 389004d``` 这将打开我的文本编辑器,并提示我编辑提交信息。 你可以选择保留 Git 的默认提交信息,该信息以 `Revert` 开头, 也可以根据自己的喜好自定义提交信息。 * 接下来,我将保存并关闭文本编辑器。 * 返回命令行。 * 运行 ```git push origin
نکته: اگر فقط تایپ کنی ```git commit --amend```، ویرایشگر متنت باز خواهد شد و درخواست تغییر پیام کامیت را خواهد داشت. اضافه کردن ```m-``` از این پیشگیری می کند. ## اصلاح کردن یک کامیت حالا اگر فراموش کرده باشی که یک تغییر کوچک مثل اضافه کردن یک کلمه به یک فایل را انجام بدی، و قبلا تغییرات را ثبت و به مخزن ارسال کرده باشی، چیکار باید انجام بدی؟ مثلا این لاگ (log) کامیت هاست: ``` g56123f create botfile a2235d updated contributor.md a5da0d modified botfile ``` برای مثال فراموش کردی که یک کلمه به (botfile) اضافه کنی. از دو روش میشود این کار را انجام داد. راه اول این است که یک کامیت جدید ایجاد کرد که شامل این تغییرات هست: ``` g56123f create botfile a2235d updated contributor.md a5da0d modified botfile b0ca8f added single word to botfile ``` راه دوم این است که کامیت (a5da0d) را اصلاح کنی، کلمه جدید را اضافه کنی و به عنوان "یک" کامیت به مخزن ارسال کنی. این راه به نسبت بهتر است برای اینکه فقط یک تغییر کوچک است. برای این کار به ترتیب: 1.فایل را اصلاح کن. در این مثال فایل (botfile) را اصلاح میکنیم تا کلمه جدید را اضافه کنیم. 2.فایل را به تغییرات اضافه کنید: ``` git add <اسم-فایل> ``` معمولا بعد از اضافه کردن تغییرات، با دستور ``` git commit -m "our commit message" ``` تغییرات را ثبت میکنیم، ولی به خاطر اینکه می خواهیم کامیت قبلی را اصلاح کنیم، این دستور را اجرا کنیم: ``` git commit --amend ``` با اجرای این دستور ویرایشگر متن باز خواهد شد و تا پیام کامیت را تغییر بدی ویرایشگر متن را ببند تغییرات رو به مخزن ارسال کن.. ``` git push origin <اسم-شاخه> ``` تمام شد. الان هر دو تغییر در یک کامیت ثبت شده اند. ================================================ FILE: docs/additional-material/translations/Farsi/delete-branch-locally.fa.md ================================================ # حذف کردن شاخه که به صورت محلی ایجاد شده است این در زمانی سودمند خواهد بود که شما نام یک شاخه (برنچ) را اشتباه نوشته اید. این کار به _3_ روش قابل انجام است ``` git branch -D <نام_مخزن> ``` ``` git branch --delete --force <نام_مخزن> # Same as -D ``` ``` git branch --delete <نام_مخزن> # Error on unmerge ``` پرچم `-D` مخفف `delete --force--` است که شاخه را حتی اگر مرج نشده باشد حذف میکند. (حذف اجباری)، ولی شما میتوانید از پرچم `d-` استفاده کنید که مخفف `delete--` است که با توجه با وضعیت مرج شاخه ارور خواهد داد. ================================================ FILE: docs/additional-material/translations/Farsi/moving-a-commit-to-a-different-branch.fa.md ================================================ ## فراموش کردن رفتن به یک مخزن دیگر وقتی که شما تغییراتی روی برنچ فعلی انجام داده ای و فراموش کرده اید آن را روی برنچ جدید انجام بدهید باید 1- مرحله اول با دستور ``` git commit --amend -m "پیام جدید برای این کامیت" ``` را می کنید و وقتی کاملا تغییرات شما کامیت شده باشد 2- مخزن جدید ایجاد میکنید با دستور git checkout -b <نام_مخزن> و می توانید تمام تغییرات را در مخزن جدید داشته باشید و در همان مخزن آن را push کنید ================================================ FILE: docs/additional-material/translations/French/Things a non Programmer can do.fr.md ================================================ # Ce qu'un non programmeur peut faire ## Être attentive Dans le domaine de l'open source, toute démarche, qu'il s'agisse de programmation ou d'autres aspects, requiert la contribution et l'implication d'autres personnes. Rejoindre une équipe open source, implique de comprendre la dynamique de la communauté et son mode de fonctionnement. Plutôt que d'arriver sur un projet en affirmant immédiatement, "Voici ce que je pense que ce projet devrait faire", il est généralement plus bénéfique d'adopter une approche plus attentive. Certains projets peuvent accueillir favorablement ce type d'approche, mais si le projet existe depuis un certain temps, les chances que cette attitude soit adoptée sont faibles. L'écoute est le meilleur moyen de savoir ce dont le projet a besoin. 1. **S'abonner à une liste de diffusion** : Pour de nombreux projets, la liste de diffusion est le principal moyen de communication sur le développement du projet. Dans les grands projets, il existe de nombreuses listes de diffusion. Par exemple, le projet PostgreSQL a pas moins de 12 listes orientées utilisateurs et six listes de développeurs sur sa page de listes de diffusion. Je vous suggère de suivre la liste principale orientée utilisateurs et la liste principale de développeurs pour commencer à écouter. 2. **Suivre un blog** : Les blogs tenus par les développeurs principaux donnent souvent des informations sur les prochaines versions et sur les étapes nécessaires pour y parvenir. Un site planet regroupe des nouvelles et des articles de blog provenant de nombreuses sources liées au projet. S'il existe un site planet, comme planet.gnome.org ou planet.mysql.com, commencez par là. Il suffit de chercher "planet" dans Google. 3. **Rejoindre un canal IRC** : De nombreux projets open source disposent de canaux IRC (Internet relay chat) dédiés où les développeurs et les utilisateurs se retrouvent pour discuter des problèmes et du développement. Consultez le site web du projet pour connaître le nom du canal et le réseau IRC sur lequel il se trouve. 4. **Travailler avec des tickets**: Le code est au cœur de tout projet open source, mais il ne faut pas croire que l'écriture de code est la seule façon de contribuer. La maintenance du code et des systèmes qui l'entourent est souvent négligée dans la course à la création de nouvelles fonctionnalités et à la correction des bogues. Ces domaines sont un moyen facile de mettre un pied dans un projet. La plupart des projets disposent d'un système de tickets de dépannage visible par tous, lié à la page d'accueil du site web du projet et inclus dans la documentation. Il s'agit du principal canal de communication entre les utilisateurs et les développeurs. Le maintenir à jour est un excellent moyen d'aider le projet. Il se peut que vous deviez obtenir des autorisations spéciales dans le système de tickets, que la plupart des chefs de projet seront heureux de vous accorder lorsque vous direz que vous voulez aider à nettoyer les tickets. 5. **Diagnostiquer un bogue** : Les bogues sont souvent mal signalés. Le diagnostic et le triage d'un bogue peuvent aider les développeurs à gagner du temps en leur permettant de comprendre les spécificités du problème. Si un utilisateur signale que "le logiciel ne fonctionne pas lorsque je fais X", prenez le temps d'analyser les détails de ce problème. Est-il reproductible ? Pouvez-vous créer une série d'étapes pour provoquer le problème de manière répétée ? Pouvez-vous circonscrire le problème, par exemple s'il ne se produit que sur un navigateur et pas sur un autre, ou sur une distribution et pas sur une autre ? Même si vous ne savez pas ce qui cause le problème, l'effort que vous faites pour réduire les circonstances permet à quelqu'un d'autre de le résoudre plus facilement. Quoi que vous découvriez, ajoutez-le au ticket dans le système de gestion des bogues pour que tout le monde puisse le voir. 6. **Fermer les bogues corrigés** : Il arrive souvent que des bogues soient corrigés dans la base de code, mais que les tickets signalés à leur sujet ne soient pas mis à jour dans le système de gestion des tickets. Le nettoyage de ces bogues peut prendre du temps, mais il est précieux pour l'ensemble du projet. Commencez par interroger le système de tickets pour les tickets datant de plus d'un an et voyez si le bogue existe toujours. Consultez le journal des modifications de la version du projet pour voir si le bogue a été corrigé et s'il peut être fermé. Si l'on sait qu'il a été corrigé, notez le numéro de version dans le ticket et fermez-le. Essayez de recréer le bogue avec la dernière version du logiciel. S'il ne peut pas être recréé avec la dernière version, notez-le dans le ticket et fermez-le. S'il existe toujours, notez-le également dans le ticket et laissez-le ouvert. Travailler avec du code Des programmeurs de tous les niveaux d'expérience peuvent aider à développer le code du projet. Ne pensez pas que vous devez être un génie du codage pour apporter une réelle contribution à votre projet favori. Si votre travail consiste à modifier le code, renseignez-vous sur la méthode utilisée par le projet pour obtenir le code des contributeurs. Chaque projet a son propre flux de travail, alors renseignez-vous sur la façon de procéder avant de commencer à soumettre du code. Par exemple, le projet PostgreSQL est très rigoureux dans son processus : Les modifications de code sont envoyées sous forme de correctifs à une liste de diffusion où les développeurs principaux examinent minutieusement chaque aspect du changement. À l'autre extrémité, on trouve un projet comme Parrot, où il est facile d'obtenir des privilèges de validation pour la base de code. Si le projet utilise GitHub, il peut y avoir un flux de travail qui utilise la fonction de demande d'extraction de GitHub. Il n'y a pas deux projets identiques. Chaque fois que vous modifiez du code, veillez à agir en tant que membre responsable de la communauté et à conserver un style de code qui corresponde au reste de la base de code. Le code que vous ajoutez ou modifiez doit ressembler au reste. Vous pouvez ne pas aimer le style des accolades ou la gestion des espaces pour l'indentation, mais il est impoli de soumettre une modification de code qui ne correspond pas aux normes existantes. Cela revient à dire : "Je n'aime pas votre style, et je pense que le mien est meilleur, alors vous devriez le faire à ma façon". 7. **Tester une version bêta ou une "release candidate"** : Tout projet conçu pour fonctionner sur plusieurs plateformes peut rencontrer toutes sortes de problèmes de portabilité. Lorsqu'une version approche et qu'une version bêta ou candidate est publiée, le chef de projet espère qu'elle sera testée par de nombreuses personnes différentes sur de nombreuses plateformes différentes. Vous pouvez être l'une de ces personnes et contribuer à faire en sorte que le paquetage fonctionne sur votre plateforme. En général, il suffit de télécharger, de compiler et de tester le logiciel, mais la valeur pour le projet peut être énorme si vous utilisez une distribution ou un matériel peu courant. Le simple fait de signaler que la compilation et le test fonctionnent permet aux chefs de projet de savoir que la version imminente est solide. 8. **Corriger un bogue** : C'est généralement par là que commencent les contributeurs désireux de travailler sur le code. C'est simple : Trouvez un bogue intéressant dans le système de tickets et essayez de le corriger dans le code. Documentez la correction dans le code si cela est approprié. C'est une bonne idée d'ajouter un test à la suite de tests pour tester la partie du code que vous avez corrigée ; certains projets exigent que les corrections de bogues incluent des tests. Prenez des notes pendant que vous fouillez dans cette base de code inconnue. Même si vous ne parvenez pas à corriger le bogue, documentez dans le ticket ce que vous avez découvert dans le cadre de la tentative de correction. Ce que vous trouvez aide ceux qui viennent après vous. 9. **Écrire un test**: La plupart des projets ont une suite de tests qui teste le code, mais il est difficile d'imaginer une suite de tests qui ne pourrait pas être complétée par d'autres tests. Utilisez un outil de couverture des tests comme gcov pour le C, ou Devel::Cover pour Perl pour identifier les zones du code source qui ne sont pas testées par la suite de tests. Ensuite, ajoutez un test à la suite pour couvrir ces zones. 10. **Faire taire un avertissement du compilateur** : Le processus de compilation de nombreux projets basés sur le langage C fait souvent apparaître à l'écran un avertissement du compilateur. Ces avertissements ne sont généralement pas des indicateurs d'un problème, mais ils peuvent y ressembler. Un trop grand nombre d'avertissements peut donner l'impression que le compilateur crie au loup. Vérifiez si le code ne cache pas un bogue. Si ce n'est pas le cas, la modification du code source pour le rendre silencieux permet de dissimuler ces faux positifs. 11. **Ajouter un commentaire** : Lorsque vous fouillez dans le code, il se peut que vous trouviez des points qui prêtent à confusion. Il y a de fortes chances que si vous avez été dérouté, d'autres le seront aussi. Documentez-les dans le code et soumettez un correctif. Travailler avec la documentation La documentation est généralement la partie d'un projet qui est la plus négligée. Elle peut aussi souffrir d'avoir été écrite du point de vue de ceux qui connaissent bien le projet, plutôt qu'à travers les yeux de quelqu'un qui vient de s'y lancer. Si vous avez déjà lu la documentation d'un projet et que vous vous êtes dit : "C'est comme si ce manuel s'attendait à ce que je sache déjà comment utiliser ce paquet", vous savez de quoi je parle. Souvent, un regard neuf peut mettre en évidence des lacunes dans la documentation que les personnes proches du projet ne remarquent pas. 12. **Create an example** : There is no project that has too many how-to examples. Whether it's a web API, a library of routines, a GUI app like Gimp or a command line tool, a good example of proper usage can more clearly and quickly explain proper usage of software than pages of documentation. For an API or library, create an example program that uses the tool. This could even be extracted from code you've written, trimmed down to the bare necessities. For a tool, show real-world examples of how you've used it in your daily life. If you’re visually oriented, consider creating a screen-capture of an important process, such as how to install the application. Travailler avec la communauté L'open source n'est qu'une partie du code. C'est la communauté qui fait fonctionner l'open source. Voici comment vous pouvez contribuer à son développement 13. **Répondre à une question** : La meilleure façon de contribuer à la construction de la communauté est d'aider les autres. Répondre à une question, en particulier à celle d'un débutant, est essentiel pour aider le projet à se développer et à prospérer. Le temps que vous prenez pour aider un débutant, même s'il pose une question à laquelle vous pourriez facilement répondre par un rapide "RTFM", vous permet de devenir un membre actif de la communauté. Tout le monde commence quelque part, et les projets ont besoin d'un afflux constant de personnes pour rester dynamiques. 14. **Rédigez un article de blog** : Si vous avez un blog, écrivez sur vos expériences avec le projet que vous utilisez. Racontez un problème que vous avez rencontré en utilisant le logiciel et ce que vous avez fait pour le résoudre. Vous apporterez une double aide, en contribuant à maintenir le projet dans l'esprit des personnes qui vous entourent et en créant une trace pour toute personne qui, à l'avenir, sera confrontée à votre problème et cherchera la réponse sur le web. (Un blog relatant vos aventures techniques est également un excellent moyen de montrer votre expérience concrète du logiciel en question la prochaine fois que vous chercherez un emploi dans ce domaine). 15. **Améliorer un site web** : Si vous avez des compétences en conception de sites web et que vous pouvez aider à améliorer le site web, et donc l'image du projet auprès du public, c'est du temps bien utilisé. Le projet pourrait peut-être bénéficier d'une refonte graphique ou d'un logo pour l'identifier. Il s'agit peut-être de compétences qui font défaut à la communauté. Je sais que j'aimerais beaucoup avoir de l'aide en matière de conception graphique pour les sites web de mes projets. 16. **Rédiger de la documentation technique** : Si vous pouvez écrire sur le fonctionnement d'une application ou d'un logiciel, vous pouvez rédiger de la documentation technique à son sujet. En particulier pour les projets open source qui cherchent à mettre à jour, réorganiser, développer ou créer des documents techniques destinés au grand public. Plus vous écrivez en anglais simple, mieux c'est. Le plus intéressant, c'est qu'il n'est pas nécessaire d'être programmeur pour rédiger des documents techniques. Surtout, écoutez ce que disent les gens autour de vous. Voyez si vous pouvez reconnaître un besoin pressant. Par exemple, récemment, sur la liste de diffusion des développeurs de Parrot, il a été décidé d'utiliser GitHub comme système de tickets d'incident, abandonnant l'ancienne installation de Trac qu'ils avaient. Certaines personnes se sont opposées à cette décision car il n'y avait aucun moyen de convertir les tickets au système de GitHub. Après une journée de discussions, j'ai pris la parole et j'ai dit : "Et si j'écrivais un convertisseur ?". Les gens étaient ravis de l'idée. J'ai pris le temps d'écrire un programme de conversion pour les plus de 450 tickets, de sorte que nous n'avons rien perdu de l'historique de nos tickets. Ce fut un grand succès. J'ai pu apporter ma contribution, et les développeurs principaux sont restés concentrés sur leur travail sur Parrot. 17. **Enseigner et aider les autres** : La meilleure façon d'en savoir plus sur un sujet est d'essayer de l'enseigner. Le meilleur professeur est celui qui peut expliquer des choses complexes avec des exemples simples. Vous devez donc essayer d'être le meilleur professeur pour être le meilleur apprenant et le meilleur dans votre monde de programmation. Enseigner aux autres vous permettra de vous sentir mieux dans votre peau et vous aidera à acquérir de meilleures compétences et connaissances dans votre profession. Lorsque vous recevez de l'aide de quelqu'un, ne la gardez pas pour vous, partagez-la avec les autres. Faites du monde un endroit où il fait bon vivre. ================================================ FILE: docs/additional-material/translations/French/additional-material.fr.md ================================================ # Informations supplémentaires Nous partons du principe que vous avez déjà lu le tutoriel basique avant de vous rendre ici. Ce document vous donnera des informations complémentaires sur les techniques avancées de Git. ### [Modifier un commit](amending-a-commit.md) Cette page vous donnera les informations dont vous avez besoin pour modifier un commit sur un répertoire distant : > Utilisez ceci pour corriger un commit que vous avez réalisé. ### [Configurer git](configuring-git.md) Cette page vous donnera les informations dont vous avez besoin pour configurer les détails utilisateur vous concernant et d'autres options dans git : > A utiliser pour un meilleur contrôle de la configuration de votre git. ### [Gardez votre embranchement (fork) synchronisé avec le répertoire](keeping-your-fork-synced-with-this-repository.md) Ce document vous donne les informations pour conserver un répertoire "fork" à jour avec le répertoire source. Ceci est important et nous espérons que vous et beaucoup d'autres vont contribuer à ce projet. > Suivez ces étapes si vous ne voyez aucun changement sur votre embranchement dans le répertoire parent. ### [Déplacer un Commit vers une Branche différente](moving-a-commit-to-a-different-branch.md) Cette page vous donnera les informations dont vous avez besoin pour déplacer un Commit vers une Branche différente : > Suivez ces étapes pour déplacer un Commit vers une Branche différente. ### [Supprimer un Fichier](removing-a-file.md) Cette page vous donnera les informations dont vous avez besoin pour supprimer un Fichier depuis votre répertoire local : > Suivez ces étapes pour apprendre comment supprimer un fichier avant d'effectuer un commit. ### [Supprimer une branche dans votre répertoire](removing-branch-from-your-repository.md) Cette page vous donnera les informations dont vous avez besoin pour supprimer une branche de votre répertoire : > Ne suivez ces étapes qu'une fois que votre demande de tirage a été fusionnée. ### [Résoudre les conflits de fusion (Merge Conflicts)](resolving-merge-conflicts.md) Cette page vous donnera les informations dont vous avez besoin pour résoudre les problèmes de fusion : > Suivez ces étapes pour résoudre ces problèmes de fusion (souvent pénibles). ### [Revenir à un commit](reverting-a-commit.md) Cette page vous aidera si vous avez besoin de revenir à un commit précédent, sur le répertoire distant. Ceci est pratique dans le cas où vous auriez besoin d'annuler un commit que vous auriez déjà poussé sur Github. > Suivez ces étapes si vous souhaitez reprendre un commit. ### [Aplatir des Commits](squashing-commits.md) Cette page vous apprendra comment aplatir plusieurs commits en un seul. > A utiliser si vous voulez ouvrir une demande de révision (pull request) et que l'évaluateur vous demande d'"aplatir" tous les commits en un seul, contenant un message d'information global. ### [Annuler un commit local](undoing-a-commit.md) Cette page vous donne les informations dont vous avez besoin pour annuler un commit sur votre répertoire local. C'est ce que vous aurez besoin de faire si vous sentez que vous avez fait une erreur dans votre répertoire local et que vous voulez revenir à l'état précédent. > Suivez ces instructions si vous voulez annuler / revenir à l'état précédent sur un commit local. ### [liens utiles](Useful-links-for-further-learning.md) Cette page est dédiée à tous les sites de trucs et astuces, les blogs, et en règle générale les sites qui nous aident à rendre nos vies plus faciles. Ils sont d'excellentes références pour répondre à tous vos besoins, que vous soyez débutant ou expert. Cette page devrait être un index de tous ces liens utiles qui aideront tous ceux qui sont nouveaux dans le domaine de l'open-source ou ceux qui veulent approfondir leurs connaissances. ### [Créer un fichier .gitignore](creating-a-gitignore-file.md) Ce document explique à quoi sert un fichier .gitignore, pourquoi l'utiliser et comment le créer. Ce fichier est utilisé dans quasiment tous les projets git. Il aide à ne prendre en compte dans les commits que les fichiers nécessaires. ================================================ FILE: docs/additional-material/translations/French/amending-a-commit.fr.md ================================================ # Modifier un commit Imaginons que vous avez effectué un commit sur votre répertoire distant et que vous vous rendez compte plus tard qu'il y a une coquille dans le message de commit ou que vous avez oublié d'ajouter une ligne dans votre tout dernier commit. Comment faire pour rectifier cette erreur ? C'est le sujet de ce tutoriel. ## Changer un message de commit récent après l'avoir poussé sur Github Pour se faire sans même ouvrir un fichier : * Taper la commande ```git commit --amend -m "suivi de votre nouveau message de commit"``` * Lancer la commande ```git push origin
`git log foo bar` - Il est également possible de supprimer les commits accessibles à partir d'un identifiant de commit donné en ajoutant un `^` devant l'identifiant de commit: (Dans ce cas, `baz`)
`git log foo bar ^baz` - Historique des commits pour un fichier spécifique
`git log --all
`git log -n 5` ## Référence - [Documentation officielle](https://git-scm.com/docs/git/fr) ================================================ FILE: docs/additional-material/translations/Germany ================================================ ================================================ FILE: docs/additional-material/translations/Greek/git_workflow_scenarios/additional-material.gr.md ================================================ # Επιπλέον πληροφορίες Υποθέτουμε ότι έχετε ήδη ολοκληρώσει το βασικό μάθημα πριν έρθετε εδώ. Αυτό το έγγραφο θα σας παρέχει πρόσθετες πληροφορίες για προηγμένες τεχνικές του Git. ### [Τροποποίηση μιας καταχώρησης (commit)](amending-a-commit.md) Αυτό το έγγραφο παρέχει πληροφορίες σχετικά με το πώς να τροποποιήσετε μια καταχώρηση (commit) στο απομακρυσμένο αποθετήριο. Η τροποποίηση μιας καταχώρησης είναι ένας τρόπος για να διορθώσετε την πιο πρόσφατη καταχώρηση που έχετε κάνει στο τρέχον παρακλάδι σας. Αυτό μπορεί να είναι χρήσιμο εάν χρειάζεστε να επεξεργαστείτε το μήνυμα της καταχώρησης ή αν ξεχάσατε να συμπεριλάβετε αλλαγές στην καταχώρηση. Μπορείτε να συνεχίσετε να τροποποιείτε μια καταχώρηση μέχρι να την στείλετε στο απομακρυσμένο αποθετήριο. > Χρησιμοποιήστε αυτό όταν χρειάζεστε να προσαρμόσετε μια καταχώρηση που έχετε κάνει. ### [Διαμόρφωση του Git](configuring-git.md) Αυτό το έγγραφο παρέχει πληροφορίες σχετικά με το πώς να διαμορφώσετε τις λεπτομέρειες του χρήστη και άλλες επιλογές στο Git. > Χρησιμοποιήστε αυτό για να έχετε καλύτερο έλεγχο των ρυθμίσεων του Git σας. ### [Συγχρονισμός του δικού σας αποθετηρίου με το αποθετήριο κύριου κώδικα](keeping-your-fork-synced-with-this-repository.md) Αυτό το έγγραφο παρέχει πληροφορίες για το πώς να κρατήσετε το δικό σας διακλαδισμένο αποθετήριο ενημερωμένο με το κύριο αποθετήριο. Αυτό είναι σημαντικό, διότι ελπίζουμε ότι εσείς και πολλοί άλλοι θα συνεισφέρετε στο έργο. > Ακολουθήστε αυτά τα βήματα εάν το δικό σας διακλαδισμένο αποθετήριο δεν έχει κάποιες αλλαγές στο κύριο αποθετήριο. ### [Μεταφορά μιας καταχώρησης (commit) σε διαφορετικό παρακλάδι](moving-a-commit-to-a-different-branch.md) Αυτό το έγγραφο παρέχει πληροφορίες σχετικά με το πώς να μεταφέρετε μια καταχώρηση (commit) σε ένα άλλο παρακλάδι. > Ακολουθήστε αυτά τα βήματα για να μετακινήσετε μια καταχώρηση (commit) σε άλλο παρακλάδι. ### [Διαγραφή ενός αρχείου](removing-a-file.md) Αυτό το έγγραφο παρέχει πληροφορίες σχετικά με το πώς να διαγράψετε ένα αρχείο από το τοπικό αποθετήριο σας. > Ακολουθήστε αυτά τα βήματα για να μάθετε πώς να διαγράψετε ένα αρχείο πριν από μια καταχώρηση (commit). ### [Διαγραφή παρακλαδιού από το αποθετήριο σας](removing-branch-from-your-repository.md) Αυτό το έγγραφο παρέχει πληροφορίες σχετικά με το πώς να διαγράψετε ένα παρακλάδι από το αποθετήριο σας. > Μόνο μετά την ενσωμάτωση (merge) του αιτήματος σας, ακολουθήστε τα επόμενα βήματα. ### [Επίλυση συγχώνευσης συγκρούσεων](resolving-merge-conflicts.md) Αυτό το έγγραφο παρέχει πληροφορίες σχετικά με το πώς να επιλύσετε θέματα σύγκρουσης συγχώνευσης. > Ακολουθήστε αυτά τα βήματα για να επιλύσετε τις ενοχλητικές συγχωνεύσεις συγκρούσεων. ### [Αναστροφή μιας καταχώρησης (commit)](reverting-a-commit.md) Αυτό το έγγραφο παρέχει πληροφορίες σχετικά με το πώς να αναστρέψετε μια καταχώρηση (commit) στο απομακρυσμένο αποθετήριο. Θα σας φανεί χρήσιμο στην περίπτωση που χρειάζεστε να αναιρέσετε μια καταχώρηση (commit) που έχει ήδη ανέβει (pushed) στο Github. > Ακολουθήστε αυτά τα βήματα αν θέλετε να αναστρέψετε μια καταχώρηση (commit). ### [Συμπίεση καταχωρήσεων (commits)](squashing-commits.md) Αυτό το έγγραφο παρέχει πληροφορίες σχετικά με το πώς να συμπιέσετε (squash) καταχωρήσεις (commits) με μια διαδραστική επανεβολή (rebase). > Χρησιμοποιήστε αυτό αν θέλετε να ανοίξετε ένα αίτημα συμμετοχής (pull request) σε ένα έργο ανοιχτού κώδικα και ο αναθεωρητής (reviewer) σας ζητήσει να συμπιέσετε κάθε καταχώρηση σε μία, με ένα ενημερωτικό μήνυμα καταχώρησης. ### [Αναίρεση τοπικής καταχώρησης (commit)](undoing-a-commit.md) Αυτό το έγγραφο παρέχει πληροφορίες σχετικά με το πώς να αναιρέσετε μια καταχώρηση (commit) στο τοπικό αποθετήριό σας. Αυτό είναι αυτό που χρειάζεται να κάνετε όταν νιώθετε ότι έχετε μπερδέψει το τοπικό αποθετήριό σας και επιθυμείτε να επαναφέρετε το τοπικό αποθετήριο. > Ακολουθήστε αυτά τα βήματα αν θέλετε να αναιρέσετε/επαναφέρετε μια τοπική καταχώρηση (commit). ### [Χρήσιμοι σύνδεσμοι](Useful-links-for-further-learning.md) Αυτό το έγγραφο είναι αφιερωμένο σε όλους τους ιστότοπους με συμβουλές και κόλπα, αναρτήσεις σε ιστολόγια και χρήσιμους ιστότοπους που κάνουν τη ζωή μας πιο εύκολη. Αποτελεί μια εξαιρετική πηγή αναφοράς για όλες τις ανάγκες μας, είτε είμαστε αρχάριοι είτε ειδικοί, στον χώρο του ανοικτού κώδικα ή θέλουμε να μάθουμε περισσότερα. ### [Δημιουργία αρχείου .gitignore](creating-a-gitignore-file.md) Αυτό το έγγραφο εξηγεί τι κάνει ένα αρχείο .gitignore, γιατί να το χρησιμοποιήσετε και πώς να δημιουργήσετε ένα αρχείο .gitignore. Αυτό το αρχείο χρησιμοποιείται σε σχεδόν όλα τα αποθετήρια Git. Βοηθά να κάνετε commit μόνο τα απαραίτητα αρχεία στο Git. ### [Αποθήκευση διαπιστευτηρίων](storing-credentials.md) Αυτό το έγγραφο εξηγεί πώς να αποθηκεύσετε τα διαπιστευτήριά σας για αποθετήρια. Αυτό μπορεί να αποτελεί ανησυχία για την ασφάλεια, για αυτό παρακαλούμε να ακολουθείτε τις πολιτικές ασφαλείας του χώρου εργασίας/μελέτης σας. ================================================ FILE: docs/additional-material/translations/Greek/git_workflow_scenarios/amending-a-commit.gr.md ================================================ # Τροποποίηση μιας Καταχώρησης (Commit) Τι γίνεται αν κάνετε μια αλλαγή στο απομακρυσμένο αποθετήριό σας μόνο για να συνειδητοποιήσετε αργότερα ότι έχετε ένα τυπογραφικό στο μήνυμα της καταχώρησης ή ότι ξεχάσατε να προσθέσετε μια γραμμή στην πιο πρόσφατη καταχώρησή σας. Πώς μπορείτε να το επεξεργαστείτε αυτό; Αυτό είναι αυτό που καλύπτεται σε αυτό το μάθημα. ## Αλλαγή του μηνύματος μιας πρόσφατης καταχώρησης μετά την αποστολή στο Github. Για να το κάνετε αυτό χωρίς να ανοίξετε ένα αρχείο: * Πληκτρολογήστε ```git commit --amend -m "και ακολουθείτε με το νέο μήνυμα καταχώρησης σας"``` * Εκτελέστε ```git push origin <όνομα παρακλαδιού>``` για να κάνετε commit τις αλλαγές στο αποθετήριο. Σημείωση: Αν πληκτρολογήσετε μόνο ```git commit --amend```, ο κειμενογράφος σας θα ανοίξει και θα σας ζητήσει να επεξεργαστείτε το μήνυμα της καταχώρησης. Η προσθήκη της σημαίας ```-m``` το αποτρέπει. ## Τροποποίηση μιας μόνο καταχώρησης Τι γίνεται αν ξεχάσατε να κάνετε μια μικρή αλλαγή σε ένα αρχείο, όπως να αλλάξετε μια μόνο λέξη, και έχετε ήδη ανεβάσει την καταχώρηση στο απομακρυσμένο αποθετήριο; Για να εξηγήσουμε, εδώ είναι ένα αρχείο καταγραφής των καταχωρήσεων μου: ``` g56123f: δημιουργία αρχείου botfile a2235d: ενημέρωση του contributor.md a5da0d: τροποποίηση του αρχείου botfile ``` Ας πούμε ότι ξέχασα να προσθέσω μια λέξη στο αρχείο bot. Υπάρχουν 2 τρόποι να προχωρήσουμε σε αυτό. Ο πρώτος είναι να έχουμε μια εντελώς νέα καταχώρηση που περιέχει την αλλαγή ως εξής: ``` g56123f: δημιουργία αρχείου botfile a2235d: ενημέρωση του contributor.md a5da0d: τροποποίηση του αρχείου botfile b0ca8f: προσθήκη μιας μόνο λέξης στο αρχείο botfile ``` Ο δεύτερος τρόπος είναι να τροποποιήσουμε την καταχώρηση a5da0d, να προσθέσουμε αυτή τη νέα λέξη και να το ανεβάσουμε στο Github ως ένα μόνο commit. Ο δεύτερος τρόπος φαίνεται καλύτερος αφού είναι μια μικρή αλλαγή. Για να το επιτύχουμε αυτό, θα κάνουμε τα εξής: * Τροποποιήστε το αρχείο. Σε αυτή την περίπτωση, θα τροποποιήσω το αρχείο botfile για να προσθέσω τη λέξη που παρέλειψα προηγουμένως. * Στη συνέχεια, προσθέστε το αρχείο στην περιοχή ενστάλαξης με το ```git add <όνομα αρχείου>``` Συνήθως, μετά την προσθήκη αρχείων στην περιοχή ενστάλαξης, το επόμενο πράγμα που κάνουμε είναι ```git commit -m "το μήνυμα καταχώρησής μας"``` σωστά; Αλλά αφού αυτό που θέλουμε να επιτύχουμε εδώ είναι να τροποποιήσουμε την προηγούμενη καταχώρηση, αντ' αυτού θα τρέξουμε: * ```git commit --amend``` Αυτό θα σας φέρει στον κειμενογράφο και θα σας ζητήσει να επεξεργαστείτε το μήνυμα. Μπορείτε να αποφασίσετε να αφήσετε το μήνυμα όπως ήταν πριν ή να το αλλάξετε. * Έξοδος από τον κειμενογράφο * Ανεβάστε τις αλλαγές σας με ```git push origin <όνομα παρακλαδιού>``` Με αυτόν τον τρόπο, και οι δύο αλλαγές θα είναι σε ένα μόνο commit. ## Τροποποίηση καταχωρήσεων στο απομακρυσμένο αποθετήριο Εάν η καταχώρηση που θέλετε να τροποποιήσετε έχει ήδη ανεβεί στο απομακρυσμένο αποθετήριο, η τροποποίηση αυτής της καταχώρησης θα οδηγήσει στην αποκλιμάκωση της τοπικής ιστορίας από το απομακρυσμένο (καθώς ουσιαστικά δημιουργείτε μια νέα καταχώρηση και αντικαθιστάτε την τροποποιημένη). Εφόσον θέλετε να αλλάξετε την καταχώρηση στο απομακρυσμένο, θα πρέπει να αντικαταστήσετε την ιστορία του απομακρυσμένου στον παρακλάδι σας. Για να το επιτύχετε αυτό, ακολουθήστε την ίδια διαδικασία όπως περιγράφεται παραπάνω, αλλά χρησιμοποιήστε την εντολή force push (εξαναγκαστική αποστολή) όταν ανεβάζετε την καταχώρησή σας στο απομακρυσμένο. > **Προειδοποίηση** > Η force push στο απομακρυσμένο θα αντικαταστήσει (και θα απορρίψει) τις αλλαγές στο απομακρυσμένο και θα διατηρήσει μόνο τις καταχωρήσεις που ανεβάσατε. Οι αλλαγές στο απομακρυσμένο που έκαναν άλλα μέλη της ομάδας στο μεταξύ θα αντικατασταθούν επίσης. Αυτό είναι πώς μπορείτε να τροποποιήσετε την πιο πρόσφατη καταχώρηση στο απομακρυσμένο: ```bash git add <τα αρχεία που άλλαξαν> git commit --amend -m "και ακολουθείτε με το νέο μήνυμα καταχώρησής σας" git push --force ``` > Η χρήση της --force-with-lease είναι μια πιο ασφαλής επιλογή αντί για το --force, καθώς αποφεύγει την αντικατάσταση των αλλαγών άλλων ατόμων στον απομακρυσμένο κλάδο (εάν δεν το επιθυμείτε). ================================================ FILE: docs/additional-material/translations/Greek/git_workflow_scenarios/check-commit-log.gr.md ================================================ # Έλεγχος καταγραφής αλλαγών (commit log) Για να ελέγξετε την καταγραφή αλλαγών (commit log) για ένα κλαδί ή ένα αρχείο, μπορείτε να χρησιμοποιήσετε την ακόλουθη εντολή: ```bash git log [επιλογές] [διαδρομή] ``` Η έξοδος αυτής της εντολής παρέχεται με την προεπιλεγμένη σειρά αναστροφής χρονολογίας. ## Παραλλαγές και επιλογές της εντολής - Για να καταγράψετε τις αλλαγές που είναι προσβάσιμες από συγκεκριμένα αναγνωριστικά αλλαγών (π.χ. foo και bar), χρησιμοποιήστε: ` git log foo bar ` - Είναι επίσης δυνατό να αφαιρέσετε τις αλλαγές που είναι προσβάσιμες από ένα συγκεκριμένο αναγνωριστικό αλλαγών (π.χ. baz), προσθέτοντας ένα ^ μπροστά από το αναγνωριστικό: `git log foo bar ^baz` - Για να δείτε την καταγραφή αλλαγών για ένα συγκεκριμένο αρχείο, χρησιμοποιήστε: `git log --all <όνομα_αρχείου>` - Περιορίστε τον αριθμό των αλλαγών στην καταγραφή (π.χ. `5`) χρησιμοποιώντας: `git log -n 5` ## Αναφορές - [Επίσημη τεκμηρίωση](https://git-scm.com/docs/git-log) ================================================ FILE: docs/additional-material/translations/Greek/git_workflow_scenarios/configuring-git.gr.md ================================================ # Διαμόρφωση του git Την πρώτη φορά που προσπαθήσατε να κάνετε commit χρησιμοποιώντας το git, πιθανόν να είδατε ένα παραθυράκι παρόμοιο με αυτό: ```bash $ git commit *** Παρακαλώ πείτε μου ποιός είστε. Εκτελέστε git config --global user.email "you@example.com" git config --global user.name "Your Name" για να ορίσετε την προεπιλεγμένη ταυτότητα του λογαριασμού σας. Παραλείψτε την επιλογή --global για να ορίσετε την ταυτότητα μόνο σε αυτό το αποθετήριο. ``` Το git χρειάζεται να γνωρίζει ποιός είστε κάθε φορά που δημιουργείτε ένα commit. Όταν εργάζεστε συνεργατικά, πρέπει να μπορείτε να δείτε ποιος έχει τροποποιήσει ποια μέρη του έργου και πότε. Επομένως, το git έχει σχεδιαστεί έτσι ώστε να δημιουργεί commits που συσχετίζονται με ένα όνομα και ένα email. Υπάρχουν πολλοί τρόποι για να παρέχετε το email και το όνομά σας στην εντολή `git commit`, και θα δούμε μερικούς από αυτούς παρακάτω. ### Παγκόσμια Διαμόρφωση Όταν αποθηκεύετε κάτι στην παγκόσμια διαμόρφωση (global config), είναι προσβάσιμο σε όλα τα αποθετήρια στα οποία εργάζεστε. Αυτός είναι ο προτιμώμενος τρόπος και λειτουργεί για τις περισσότερες περιπτώσεις. Για να αποθηκεύσετε κάτι στην παγκόσμια διαμόρφωση, χρησιμοποιείτε την εντολή `config` ως εξής: `$ git config --global <όνομα_μεταβλητής> <τιμή>` Στην περίπτωση των στοιχείων του χρήστη, το εκτελούμε ως εξής: ``` $ git config --global user.email "you@example.com" $ git config --global user.name "Your Name" ``` ### Διαμόρφωση Αποθετηρίου Όπως υποδηλώνει το όνομά τους, αυτές οι διαμορφώσεις εφαρμόζονται στο τρέχον αποθετήριο. Αν θέλετε να κάνετε commit σε ένα συγκεκριμένο αποθετήριο, για παράδειγμα, ένα έργο που σχετίζεται με την εργασία σας, μπορείτε να χρησιμοποιήσετε αυτήν τη μέθοδο. Για να αποθηκεύσετε κάτι στη διαμόρφωση αποθετηρίου, χρησιμοποιείτε την εντολή `config` αφήνοντας έξω τη σημαία `--global`, όπως εξής: `$ git config <όνομα_μεταβλητής> <τιμή>` Στην περίπτωση των στοιχείων του χρήστη, το εκτελούμε ως εξής: ``` $ git config user.email "you@alternate.com" $ git config user.name "Your Name" ``` ### Διαμόρφωση Μέσω Γρα μμής Εντολών Αυτού του τύπου διαμορφώσεις ισχύουν μόνο για την τρέχουσα εντολή. Όλες οι εντολές git δέχονται ορίσματα `-c` πριν το ρήμα δράσης για να ορίσουν προσωρινά δεδομένα διαμόρφωσης. Για να αποθηκεύσετε κάτι στη διαμόρφωση μέσω γραμμής εντολών, εκτελέστε την εντολή σας ως εξής: `$ git -c <μεταβλητή-1>=<τιμή> -c <μεταβλητή-2>=<τιμή> <εντολή>` Στο παράδειγμά μας, θα εκτελούσαμε την εντολή commit ως εξής: `git -c user.name='Your Name' -c user.email='you@example.com' commit -m "Your commit message"` ### Σημείωση για την Προτεραιότητα Ανάμεσα στις τρεις μεθόδους που περιγράφηκαν εδώ, η προτεραιότητα είναι `command-line > repository > global`. Αυτό σημαίνει ότι, αν μια μεταβλητή έχει διαμορφωθεί τόσο μέσω γραμμής εντολών όσο και παγκοσμίως, η τιμή που δόθηκε μέσω γραμμής εντολών θα χρησιμοποιηθεί για τη λειτουργία. ## Εκτός από τα Στοιχεία του Χρήστη Μέχρι στιγμής ασχοληθήκαμε μόνο με τα στοιχεία του χρήστη κατά τη διαμόρφωση. Ωστόσο, υπάρχουν πολλές άλλες διαθέσιμες επιλογές διαμόρφωσης. Ορισμένες από αυτές είναι: 1. `core.editor` - για να καθορίσετε το όνομα του επεξεργαστή που χρησιμοποιείται για τη σύνταξη μηνυμάτων commit κ.λπ. 2. `commit.template` - για να καθορίσετε ένα αρχείο στο σύστημα ως πρότυπο αρχικού commit. 3. `color.ui` - για να καθορίσετε μια λογική τιμή για τη χρήση χρωμάτων στην έξοδο του git. Απλοποιήσαμε κάποιες λεπτομέρειες για ευκολία κατανόησης. Για περισσότερες πληροφορίες, επισκεφθείτε το [git-scm.com](https://git-scm.com/book/en/v2/Customizing-Git-Git-Configuration). ================================================ FILE: docs/additional-material/translations/Greek/git_workflow_scenarios/creating-a-gitignore-file.gr.md ================================================ # .gitignore Το αρχείο .gitignore είναι ένα αρχείο κειμένου που λέει στο Git ποια αρχεία ή φάκελοι πρέπει να αγνοούνται σε ένα έργο. Ένα τοπικό αρχείο .gitignore τοποθετείται συνήθως στον ριζικό φάκελο ενός έργου. Μπορείτε επίσης να δημιουργήσετε ένα παγκόσμιο .gitignore αρχείο και οποιεσδήποτε καταχωρίσεις σε αυτό το αρχείο θα αγνοούνται σε όλα τα αποθετήρια Git σας. ## Γιατί .gitignore Τώρα μπορείτε να αναρωτηθείτε γιατί θέλετε το git να αγνοήσει ορισμένα αρχεία και φακέλους. Αυτό συμβαίνει διότι δεν θέλετε αρχεία όπως αρχεία κατασκευής, αρχεία cache, άλλα τοπικά αρχεία διαμόρφωσης όπως τα node modules, αρχεία μεταγλώττισης, προσωρινά αρχεία που δημιουργούνται από IDE, κ.λπ. να παρακολουθούνται από το git. Συνήθως χρησιμοποιείται για να αποφύγετε την δέσμευση προσωρινών αρχείων από τον τρέχοντα κατάλογο εργασίας που δεν είναι χρήσιμα για άλλους συνεργάτες. ## Ξεκινώντας Για να δημιουργήσετε ένα τοπικό αρχείο .gitignore, δημιουργήστε ένα αρχείο κειμένου και ονομάστε το .gitignore (να θυμάστε να συμπεριλάβετε το . στην αρχή). Στη συνέχεια, επεξεργαστείτε αυτό το αρχείο όπως χρειάζεται. Κάθε νέα γραμμή πρέπει να αναφέρει ένα επιπλέον αρχείο ή φάκελο που θέλετε το Git να αγνοεί. Οι καταχωρίσεις σε αυτό το αρχείο μπορούν να ακολουθούν και μοτίβα αντιστοίχισης. ``` * χρησιμοποιείται ως παντοτινή αντιστοιχία / χρησιμοποιείται για να αγνοήσετε ονόματα διαδρομών σχετικά με το αρχείο .gitignore # χρησιμοποιείται για να προσθέσετε σχόλια σε ένα αρχείο .gitignore Αυτό είναι ένα παράδειγμα του πώς μπορεί να φαίνεται το αρχείο .gitignore: # Αγνόησε τα αρχεία συστήματος Mac .DS_store # Αγνόησε το φάκελο node_modules node_modules # Αγνόησε όλα τα αρχεία κειμένου *.txt # Αγνόησε αρχεία που σχετίζονται με κλειδιά API .env # Αγνόησε αρχεία ρυθμίσεων SASS .sass-cache ``` Για να προσθέσετε ή να αλλάξετε το παγκόσμιο αρχείο .gitignore, εκτελέστε την ακόλουθη εντολή: ``` git config --global core.excludesfile ~/.gitignore_global ``` Αυτό θα δημιουργήσει το αρχείο ~/.gitignore_global. Τώρα μπορείτε να επεξεργαστείτε αυτό το αρχείο με τον ίδιο τρόπο με ένα τοπικό αρχείο .gitignore. Όλα τα αποθετήριά σας Git θα αγνοήσουν τα αρχεία και τους φακέλους που αναφέρονται στο παγκόσμιο αρχείο .gitignore. ## Πώς να Απεξαρτήσετε Αρχεία που Είχατε Ήδη Δεσμεύσει με νέο .gitignore Για να απεξαρτήσετε ένα μεμονωμένο αρχείο, δηλαδή να σταματήσετε την παρακολούθηση του αρχείου αλλά να μην το διαγράψετε από το σύστημα, χρησιμοποιήστε: ``` git rm --cached filename ``` Για να απεξαρτήσετε όλα τα αρχεία στο .gitignore: Πρώτα, κάντε commit σε οποιεσδήποτε εκκρεμείς αλλαγές κώδικα και στη συνέχεια εκτελέστε: ``` git rm -r --cached ``` Αυτό αφαιρεί οποιαδήποτε αλλαγμένα αρχεία από τον δείκτη (staging area), στη συνέχεια εκτελέστε: ``` git add . ``` Κάντε commit: ``` git commit -m ".gitignore δουλεύει τώρα" ``` Για να αναιρέσετε ```git rm --cached filename```, χρησιμοποιήστε ```git add filename```. ================================================ FILE: docs/additional-material/translations/Greek/git_workflow_scenarios/delete-branch-locally.gr.md ================================================ # Διαγραφή ενός τοπικά δημιουργημένου κλαδιού Αυτό θα είναι χρήσιμο όταν κάνετε κατά λάθος λάθος το όνομα ενός κλαδιού. Αυτό μπορεί να γίνει με *3* τρόπους ``` git branch -D <όνομα_κλαδιού> ``` ``` git branch --delete --force <όνομα_κλαδιού> # Ίδιο με το -D ``` ``` git branch --delete <όνομα_κλαδιού> # Σφάλμα κατά την ανενοχλησία ``` Το -D σημαίνει --delete --force, το οποίο θα διαγράψει το κλαδί ακόμα και αν δεν έχει συγχωνευτεί (αναγκαστική διαγραφή), αλλά μπορείτε επίσης να χρησιμοποιήσετε -d που σημαίνει --delete το οποίο θα εμφανίσει ένα σφάλμα ανάλογα με την κατάσταση συγχώνευσης του κλαδιού... ================================================ FILE: docs/additional-material/translations/Greek/git_workflow_scenarios/gitflow.gr.md ================================================ # Gitflow Το Gitflow είναι ένα μοντέλο κλαδισμού για το Git που δημιουργήθηκε από τον Vincent Driessen. Εδώ θα συζητήσουμε τις απαιτήσεις και τις περιπτώσεις χρήσης του Gitflow.
Η ροή εργασίας του Gitflow καθορίζει ένα αυστηρό μοντέλο κλαδισμού που σχεδιάστηκε γύρω από την έκδοση του έργου, παρέχοντας ένα αξιόπιστο πλαίσιο για τη διαχείριση μεγαλύτερων έργων. Το Gitflow είναι ιδανικό για έργα που έχουν προγραμματισμένο κύκλο κυκλοφορίας και για την καλύτερη πρακτική του DevOps για συνεχή παράδοση. Ορίζει πολύ συγκεκριμένους ρόλους για διάφορα κλαδιά και ορίζει πώς και πότε πρέπει να αλληλεπιδρούν. Χρησιμοποιεί ατομικά κλαδιά για την προετοιμασία, διατήρηση και καταγραφή κυκλοφοριών. ## Εφαρμογή 1. **Κλαδιά Develop και Master**: Αντί για ένα μόνο κύριο κλαδί, το Gitflow χρησιμοποιεί δύο κλαδιά για να καταγράψει το ιστορικό του έργου. Βασίζεται σε δύο κύρια κλαδιά με άπειρη διάρκεια ζωής, που ονομάζονται master και develop: - **Κλαδί Master**: Το κλαδί master περιέχει τον παραγωγικό κώδικα και αποθηκεύει το επίσημο ιστορικό κυκλοφοριών. - **Κλαδί Develop**: Το κλαδί develop περιέχει κώδικα προ-παραγωγής και λειτουργεί ως κλαδί ένταξης για χαρακτηριστικά. - **Δημιουργία κλαδιού Develop**:
Χωρίς τη χρήση των επεκτάσεων Gitflow: ``` git branch develop git push -u origin develop ``` Χρησιμοποιώντας τις επεκτάσεις Gitflow: Όταν χρησιμοποιείτε τη βιβλιοθή κη επέκτασης gitflow, η εκτέλεση της εντολής `git flow init` σε ένα υπάρχον αποθετήριο θα δημιουργήσει το κλαδί develop. ``` git flow init ``` 2. **Κλαδί Χαρακτηριστικών**: Κάθε νέο χαρακτηριστικό θα πρέπει να βρίσκεται στο δικό του κλαδί, το οποίο μπορεί να πατηθεί στο κεντρικό αποθετήριο για δημιουργία αντιγράφου ασφαλείας/συνεργασίας. Τα κλαδιά χαρακτηριστικών χρησιμοποιούν το πιο πρόσφατο develop ως γονικό κλαδί. Όταν ένα χαρακτηριστικό είναι ολοκληρωμένο, συγχωνεύεται πίσω στο κλαδί develop. Τα χαρακτηριστικά δεν πρέπει ποτέ να αλληλεπιδρούν απευθείας με το κύριο κλαδί. - **Δημιουργία κλαδιού Χαρακτηριστικού**:
Χωρίς τις επεκτάσεις git-flow: ``` git checkout develop git checkout -b feature_branch ``` Με τις επεκτάσεις gitflow: ``` git flow feature start feature_branch ``` - **Ολοκλήρωση κλαδιού Χαρακτηριστικού**:
Χωρίς τις επεκτάσεις git-flow: ``` git checkout develop git merge feature_branch ``` Με τις επεκτάσεις git-flow: ``` git flow feature finish feature_branch ``` 3. **Κλαδί Κυκλοφορίας**: Μόλις το develop έχει αποκτήσει αρκετά χαρακτηριστικά για μια κυκλοφορία (ή πλησιάζει μια προκαθορισμένη ημερομηνία κυκλοφορίας), δημιουργούμε ένα κλαδί κυκλοφορίας από το develop. Η δημιουργία αυτού του κλαδιού ξεκινά τον επόμενο κύκλο κυκλοφοριών, οπότε δεν μπορούν να προστεθούν νέα χαρακτηριστικά μετά από αυτό το σημείο - μόνο διορθώσεις σφαλμάτων, δημιουργία τεκμηρίωσης και άλλες εργασίες που αφορούν την κυκλοφορία πρέπει να προστεθούν σε αυτό το κλαδί. Το κλαδί κυκλοφορίας μπορεί να παρακλάδιασει από το develop και πρέπει να συγχωνευτεί και στο master και το develop.
Χρησιμοποιώντας ένα αφιερωμένο κλαδί για την προετοιμασία των κυκλοφοριών καθιστά δυνατή τη δυνατότητα μια ομάδα να βελτιστοποιεί την τρέχουσα κυκλοφορία ενώ μια άλλη ομάδα συνεχίζει να εργάζεται σε χαρακτηριστικά για την επόμενη κυκλοφορία. - **Δημιουργία κλαδιού Κυκλοφορίας**:
Χωρίς τις επεκτάσεις git-flow: ``` git checkout develop git checkout develop git checkout -b release/0.1.0 ``` Χρησιμοποιώντας τις επεκ τάσεις git-flow: ``` git flow release start 0.1.0 ``` Μετάβαση σε ένα νέο κλαδί 'release/0.1.0' - **Ολοκλήρωση κλαδιού Κυκλοφορίας**:
Χωρίς τις επεκτάσεις git-flow: ``` git checkout master git merge release/0.1.0 ``` Χρησιμοποιώντας τις επεκτάσεις git-flow: ``` git flow release finish 0.1.0 ``` 4. **Κλαδί Διόρθωσης**: Τα κλαδιά συντήρησης ή "διόρθωσης" χρησιμοποιούνται για γρήγορη επισκευή παραγωγικών κυκλοφοριών. Τα κλαδιά διόρθωσης είναι απαραίτητα για να δράσουν αμέσως σε μια ανεπιθύμητη κατάσταση του κλαδιού master. Τα κλαδιά διόρθωσης είναι πολύ παρόμοια με τα κλαδιά κυκλοφορίας και τα κλαδιά χαρακτηριστικών, εκτός από το γεγονός ότι βασίζονται στο master αντί για το develop. Αυτό είναι το μόνο κλαδί που πρέπει να αποκλίνει απευθείας από το κλαδί master. Μόλις ολοκληρωθεί η διόρθωση, πρέπει να συγχωνευτεί τόσο στο master όσο και στο develop (ή το τρέχον κλαδί κυκλοφορίας), και το κλαδί master πρέπει να σημειωθεί με ένα ενημερωμένο αριθμό έκδοσης. - **Δημιουργία κλαδιού Διόρθωσης**:
Χωρίς τις επεκτάσεις git-flow: ``` git checkout master git checkout -b hotfix_branch ``` Με τις επεκτάσεις git-flow: ``` git flow hotfix start hotfix_branch ``` - **Ολοκλήρωση κλαδιού Διόρθωσης**:
Χωρίς τις επεκτάσεις git-flow: ``` git checkout master git merge hotfix_branch git checkout develop git merge hotfix_branch ``` Με τις επεκτάσεις git-flow: ``` git branch -D hotfix_branch git flow hotfix finish hotfix_branch ``` ## Πλεονεκτήματα - Βεβαιώνει μια καθαρή κατάσταση των κλαδιών σε οποιοδήποτε σημείο του κύκλου ζωής ενός έργου. - Η ονομασία των κλαδιών ακολουθεί ένα συστηματικό πρότυπο που διευκολύνει την κατανόηση. - Έχει επεκτάσεις και υποστήριξη στα περισσότερα εργαλεία git που χρησιμοποιούνται. - Ιδανικό για περιπτώσεις διατήρησης πολλαπλών εκδόσεων στην παραγωγή. - Κατάλληλο για μια ροή εργασίας που βασίζεται σε κυκλοφορίες. - Προσφέρει ένα αφιερωμένο μονοπάτι για διορθώσεις παραγωγής. ## Μειονεκτήματα - Η ιστορία του Git γίνεται δυσανάγνωστη. - Ο διαχωρισμός των κλαδιών master / develop θεωρείται περιττός και δυσκολεύει την Συνεχή Παράδοση / Ενσωμάτωση. - Δεν συνίσταται στην περίπτωση διατήρησης μιας μόνο έκδοσης στην παραγωγή. ## Σύνοψη Εδώ συζητήσαμε τη Ροή Εργασίας του Gitflow. Το Gitflow είναι ένα από τα πολλά στυλ ροών εργασίας του Git που μπορείτε να χρησιμοποιήσετε εσείς και η ομάδα σας. Ας συνοψίσουμε ολόκληρη τη ροή εργασίας του Gitflow: 1. Δημιουργείται ένα κλαδί develop από το master. 2. Δημιουργούνται κλαδιά χαρακτηριστικών από το develop. 3. Όταν ένα χαρακτηριστικό είναι ολοκληρωμένο, συγχωνεύεται στο κλαδί develop. 4. Δημιουργείται ένα κλαδί κυκλοφορίας από το develop. 5. Όταν το κλαδί κυκλοφορίας είναι έτοιμο, συγχωνεύεται στα κλαδιά develop και master. 6. Εάν εντοπιστεί πρόβλημα στο master, δημιουργείται ένα κλαδί διόρθωσης από το master. 7. Μόλις ολοκληρωθεί το διόρθωμα, συγχωνεύεται τόσο στο develop όσο και στο master. ================================================ FILE: docs/additional-material/translations/Hindi/Amending a Commit ================================================ # कमिट में संशोधन करना आपके दूरस्थ संग्रहालय में एक परिवर्तन करते हैं, फिर बाद में पता चलता है कि आपके कमिट संदेश में त्रुटि है या आपने अपने सबसे हाल के कमिट में एक पंक्ति जोड़ना भूल दी है। आप ऐसा कैसे संपादित करेंगे? इस पर यह ट्यूटोरियल विस्तार से बताता है। ##Github पर अपलोड करने के बाद हाल के कमिट संदेश को संशोधित करना। इसे फ़ाइल खोले बिना करने के लिए: * निम्नलिखित कमांड का उपयोग करें ```git commit --amend -m "आपके नए कमिट संदेश के बाद" * चलाना ```git push origin
हालाँकि, सवाल यह है कि हम आधार शाखा को क्यों नहीं हटा देते हैं और मूल शाखा से आधार शाखा के नाम से एक नई शाखा क्यों नहीं चेकआउट कर देते हैं। तकनीकी रूप से, इसका प्रभाव रीसेट करने जैसा ही होगा लेकिन कुछ औद्योगिक स्थितियों में हमारे पास किसी शाखा को हटाने की पहुंच नहीं है, या हम किसी शाखा को हटा नहीं सकते हैं क्योंकि यह सीआई/सीडी पाइपलाइन या शायद चल रहे वर्कफ़्लो को बाधित/बाधित कर देगा। इसलिए, ऐसी स्थितियों से बचने के लिए जो डाउनटाइम का कारण बन सकती हैं, हम सुझाव देते हैं कि जब भी हम किसी विशेष शाखा को रीसेट करना चाहते हैं तो `git reset` का उपयोग करें। ## कम्मांड शाखा के लिए गिट रीसेट निष्पादित करना बहुत आसान है। ``` git reset
किसी कमिट को रीसेट करने और वापस लाने के बीच मुख्य अंतर यह है कि git रीसेट ```फ़ाइल को अनस्टेज करता है और हमारे परिवर्तनों को कार्यशील निर्देशिका में वापस लाता है``` और git revert ```रिमोट रिपॉजिटरी से कमिट्स को हटा देता है```।
```git reset``` निम्नलिखित कमांड का उपयोग करके प्राप्त किया जा सकता है: - निम्नलिखित कमांड निम्नलिखित दो मापदंडों का उपयोग करके सभी कमिटों का सारांश देगा: - कमिट हैश के पहले सात अक्षर - यही वह है जिसे हमें अपने **reset** कमांड में संदर्भित करना होगा। - प्रतिबद्ध संदेश ``` git log --oneline ``` - कोई निम्नलिखित कमांड का उपयोग करके रिपॉजिटरी को विशिष्ट कमिट पर वापस रीसेट कर सकता है:
```गिट रीसेट कमिटहैश``` जहां कमिटहैश कमिट हैश के पहले 7 अक्षर हैं जो हमें लॉग में मिले| ================================================ FILE: docs/additional-material/translations/Indonesian/Things a non Programmer can do.id.md ================================================ # Hal-hal yang dapat dilakukan oleh non Programmer ## Mulai mendengarkan Semua yang ada di open source melibatkan orang lain. Anda ingin bergabung dengan sebuah tim, dan itu berarti memahami komunitas dan cara kerjanya. Datang ke sebuah proyek dan berkata “Hai, inilah yang saya pikir harus dilakukan oleh proyek ini” biasanya tidak dianggap sebagai hal yang baik. Beberapa proyek mungkin akan menerima pendekatan semacam itu, tetapi jika proyek tersebut sudah berjalan cukup lama, kemungkinan sikap tersebut akan kecil. **Mendengarkan adalah cara terbaik untuk mengetahui apa yang dibutuhkan oleh proyek.**. 1. **Bergabunglah dengan milis**: Untuk banyak proyek, milis adalah saluran utama komunikasi tentang perkembangan proyek. Pada proyek-proyek besar, ada banyak milis yang dapat dipilih. Sebagai contoh, proyek PostgreSQL memiliki tidak kurang dari 12 milis berorientasi pengguna dan enam milis pengembang pada halaman milisnya. Saya sarankan Anda mengikuti milis berorientasi pengguna utama dan milis pengembang inti untuk mulai menyimak. 2. **Mengikuti sebuah blog: Blog yang dikelola oleh pengembang inti sering kali memberikan informasi tentang apa yang akan hadir di rilis mendatang, dan apa yang diperlukan untuk mencapainya. Situs planet mengumpulkan berita dan entri blog dari banyak sumber yang terkait dengan proyek. Jika ada situs planet, seperti planet.gnome.org atau planet.mysql.com, mulailah dari sana. Cari saja di Google dengan kata kunci “planet
Perbedaan utama antara mengatur ulang dan mengembalikan _commit_ adalah bahwa `git reset` menghapus tahapan berkas dan membawa perubahan Anda ke direktori kerja dan `git revert` menghapus _commit_ dari repositori remote.
`git reset` dapat dicapai dengan menggunakan perintah berikut: - Perintah berikut ini akan memberikan ringkasan dari semua commit dengan menggunakan dua parameter berikut: - Tujuh karakter pertama dari commit hash - inilah yang perlu kita rujuk dalam perintah **reset**. - Pesan commit ``` git log --oneline ``` - Seseorang dapat mengatur ulang repositori kembali ke commit tertentu menggunakan perintah berikut:
`git reset commithash` di mana commithash adalah 7 karakter pertama dari hash commit yang kami temukan di log ================================================ FILE: docs/additional-material/translations/Italian/removing-a-file.it.md ================================================ # Rimuovere un file da Git Può succedere che tu voglia rimuovere un file da Git, mantenendolo comunque nel tuo computer. Lo puoi fare eseguendo questo comando: ``git rm
ನಿಮ್ಮ ಎರಡು ರೆಪೊಸಿಟರಿಗಳನ್ನು ನನ್ನ ಸಾರ್ವಜನಿಕ ರೆಪೊಸಿಟರಿಯೊಂದಿಗೆ ನವೀಕರಿಸಲು, ಮೊದಲು ನೀವು ನನ್ನ ರೆಪೊಸಿಟರಿಯಿಂದ ನಿಮ್ಮ ಸ್ಥಳೀಯ ರೆಪೊಸಿಟರಿಗೆ `Fetch` ಮತ್ತು `Merge` ಮಾಡಬೇಕು.
ಹಿಂದಿನ ಹಂತದ ನಂತರ, ನೀವು ನಿಮ್ಮ Fork ಗೆ ಸ್ಥಳೀಯ ಬದಲಾವಣೆಗಳನ್ನು `Push` ಮಾಡಬೇಕು. ನೀವು `Pull Request` ಅನ್ನು ಕೇವಲ ನಿಮ್ಮ Fork ನಿಂದ ಮಾತ್ರ ಮಾಡಬಹುದು, ಆದ್ದರಿಂದ Fork ನವೀಕರಿಸುವುದು ಅಂತಿಮ ಹಂತ.
### ಈ ಹಂತಗಳನ್ನು ಅನುಸರಿಸಿ:
#### 1. ನಿಮ್ಮ `master` ಶಾಖೆಯಲ್ಲಿ ಇರುವುದು ಖಚಿತಪಡಿಸಿಕೊಳ್ಳಿ
ನೀವು ಯಾವ ಶಾಖೆಯಲ್ಲಿ ಇರುವಿರಿ ಎಂಬುದನ್ನು ಪರಿಶೀಲಿಸಲು:
```bash
git status
```
`master` ನಲ್ಲಿ ಇಲ್ಲದಿದ್ದರೆ, ಅದಕ್ಕೆ ಬದಲಾಯಿಸಿ:
```bash
git checkout master
```
#### 2. ನನ್ನ ರೆಪೊಸಿಟರಿಯನ್ನು `upstream` ಎಂದು ಸೇರಿಸಿ
```bash
git remote add upstream https://github.com/Roshanjossey/first-contributions
```
ಇದರಿಂದ Git ಗೆ ಈ URL ನಲ್ಲಿ ಇನ್ನೊಂದು ಆವೃತ್ತಿಯಿದೆ ಮತ್ತು ಅದನ್ನು `upstream` ಎಂದು ಕರೆಯುತ್ತೇವೆ ಎಂದು ತಿಳಿಯುತ್ತದೆ.
#### 3. `upstream` ರೆಪೊಸಿಟರಿಯಿಂದ ಬದಲಾವಣೆಗಳನ್ನು ಪಡೆಯುವುದು
```bash
git fetch upstream
```
ಇದು `upstream` ರೆಪೊಸಿಟರಿಯ ಎಲ್ಲಾ ಬದಲಾವಣೆಗಳನ್ನು ಪಡೆಯುತ್ತದೆ.
#### 4. ಬದಲಾವಣೆಗಳನ್ನು ನಿಮ್ಮ `master` ಶಾಖೆಯಲ್ಲಿ ಪರಿಷ್ಕರಿಸುವುದು
```bash
git rebase upstream/master
```
ಇದರಿಂದ ನೀವು `upstream` ನ ಬದಲಾವಣೆಗಳನ್ನು ನಿಮ್ಮ ಸ್ಥಳೀಯ `master` ಶಾಖೆಗೆ ಅನ್ವಯಿಸುತ್ತೀರಿ.
#### 5. ಬದಲಾವಣೆಗಳನ್ನು ನಿಮ್ಮ GitHub Fork ಗೆ ಅಪ್ಲೋಡ್ ಮಾಡುವುದು
```bash
git push origin master
```
ಇದು ನಿಮ್ಮ Fork (`origin`) ನಲ್ಲಿ ನಿಮ್ಮ `master` ಶಾಖೆಯನ್ನು ನವೀಕರಿಸುತ್ತದೆ.
ಈಗ, ನಿಮ್ಮ Fork ಮತ್ತು ಸ್ಥಳೀಯ ರೆಪೊಸಿಟರಿ ಅಪ್ಡೇಟ್ ಆಗಿದೆ! ನಿಮಗೆ ಶುಭವಾಗಲಿ!
ಪ್ರತಿಯೊಮ್ಮೆ ನಿಮ್ಮ GitHub Fork `commits behind` ಎಂಬ ಸಂದೇಶ ತೋರಿಸಿದಾಗ ಈ ಹಂತಗಳನ್ನು ಅನುಸರಿಸಿ.
================================================
FILE: docs/additional-material/translations/Kannada/moving-a-commit-to-a-different-branch.ka.md
================================================
# commit ಅನ್ನು ಬೇರೆ branch ಗೆ ಸ್ಥಳಾಂತರಿಸುವುದು
ನೀವು commit ಮಾಡಿದ್ದ ನಂತರ, ಅದು ತಪ್ಪಾಗಿ ಬೇರೆ branch ನಲ್ಲಿ ಆಗಿದೆ ಎಂದು ಗಮನಿಸಿದರೆ ಏನು ಮಾಡಬೇಕು?
ಈ ಟ್ಯುಟೋರಿಯಲ್ ಇದನ್ನು ಸರಿಪಡಿಸುವ ಬಗ್ಗೆ.
## ಈಗಾಗಲೇ ಅಸ್ತಿತ್ವದಲ್ಲಿರುವ branch ಗೆ commit ಸ್ಥಳಾಂತರಿಸುವುದು
ಈ ಕೆಳಗಿನ ಆಜ್ಞೆಗಳನ್ನು ಬಳಸಿ:
```bash
git reset HEAD~ --soft # ಕೊನೆಯ commit ಅನ್ನು ಹಿಂದಕ್ಕೆ ಕೊಂಡು ಬರುತ್ತದೆ, ಆದರೆ ಪರಿಷ್ಕರಣೆಗಳನ್ನು ಉಳಿಸುತ್ತದೆ.
git stash # ಪ್ರಸ್ತುತ ಸ್ಥಿತಿಯನ್ನು ಸಂಗ್ರಹಿಸುತ್ತದೆ.
git checkout name-of-the-correct-branch # ಸರಿಯಾದ branch ಗೆ ತೆರಳುತ್ತದೆ.
git stash pop # ಹಿಂದಿನ ಸ್ಥಿತಿಯನ್ನು ಪುನಃ ಪ್ರಸ್ತಾಪಿಸುತ್ತದೆ.
git add . # ಎಲ್ಲಾ ಪರಿಷ್ಕರಣೆಗಳನ್ನು stage ಮಾಡುತ್ತದೆ.
git commit -m "your message here" # commit ಮಾಡುತ್ತದೆ.
```
ಈಗ ನಿಮ್ಮ ಪರಿಷ್ಕರಣೆಗಳು ಸರಿಯಾದ branch ನಲ್ಲಿ ಇವೆ.
## ಹೊಸ branch ಗೆ commit ಸ್ಥಳಾಂತರಿಸುವುದು
```bash
git branch newbranch # ಹೊಸ branch ರಚಿಸುತ್ತದೆ.
git reset --hard HEAD~# # # ಗಿಂತ ಹಳೆಯ commit ಗಳನ್ನು ಹಿಂದಕ್ಕೆ ತೆಗೆದುಕೊಳ್ಳುತ್ತದೆ (ಈಗಿನ branch ನಿಂದ ಅಳಿಸಿಬಿಡುತ್ತದೆ!).
git checkout newbranch # ಹೊಸ branch ಗೆ ಸ್ಥಳಾಂತರವಾಗುತ್ತದೆ.
```
**ಗಮನಿಸಿ:** ಯಾವುದೇ commit ಆಗದ ಪರಿಷ್ಕರಣೆಗಳು ಇಲ್ಲವಾಗುತ್ತವೆ!
================================================
FILE: docs/additional-material/translations/Kannada/removing-a-file.ka.md
================================================
# commit ಅನ್ನು ಬೇರೆ branch ಗೆ ಸ್ಥಳಾಂತರಿಸುವುದು
ನೀವು commit ಮಾಡಿದ್ದ ನಂತರ, ಅದು ತಪ್ಪಾಗಿ ಬೇರೆ branch ನಲ್ಲಿ ಆಗಿದೆ ಎಂದು ಗಮನಿಸಿದರೆ ಏನು ಮಾಡಬೇಕು?
ಈ ಟ್ಯುಟೋರಿಯಲ್ ಇದನ್ನು ಸರಿಪಡಿಸುವ ಬಗ್ಗೆ.
## ಈಗಾಗಲೇ ಅಸ್ತಿತ್ವದಲ್ಲಿರುವ branch ಗೆ commit ಸ್ಥಳಾಂತರಿಸುವುದು
ಈ ಕೆಳಗಿನ ಆಜ್ಞೆಗಳನ್ನು ಬಳಸಿ:
```bash
git reset HEAD~ --soft # ಕೊನೆಯ commit ಅನ್ನು ಹಿಂದಕ್ಕೆ ಕೊಂಡು ಬರುತ್ತದೆ, ಆದರೆ ಪರಿಷ್ಕರಣೆಗಳನ್ನು ಉಳಿಸುತ್ತದೆ.
git stash # ಪ್ರಸ್ತುತ ಸ್ಥಿತಿಯನ್ನು ಸಂಗ್ರಹಿಸುತ್ತದೆ.
git checkout name-of-the-correct-branch # ಸರಿಯಾದ branch ಗೆ ತೆರಳುತ್ತದೆ.
git stash pop # ಹಿಂದಿನ ಸ್ಥಿತಿಯನ್ನು ಪುನಃ ಪ್ರಸ್ತಾಪಿಸುತ್ತದೆ.
git add . # ಎಲ್ಲಾ ಪರಿಷ್ಕರಣೆಗಳನ್ನು stage ಮಾಡುತ್ತದೆ.
git commit -m "your message here" # commit ಮಾಡುತ್ತದೆ.
```
ಈಗ ನಿಮ್ಮ ಪರಿಷ್ಕರಣೆಗಳು ಸರಿಯಾದ branch ನಲ್ಲಿ ಇವೆ.
## ಹೊಸ branch ಗೆ commit ಸ್ಥಳಾಂತರಿಸುವುದು
```bash
git branch newbranch # ಹೊಸ branch ರಚಿಸುತ್ತದೆ.
git reset --hard HEAD~# # # ಗಿಂತ ಹಳೆಯ commit ಗಳನ್ನು ಹಿಂದಕ್ಕೆ ತೆಗೆದುಕೊಳ್ಳುತ್ತದೆ (ಈಗಿನ branch ನಿಂದ ಅಳಿಸಿಬಿಡುತ್ತದೆ!).
git checkout newbranch # ಹೊಸ branch ಗೆ ಸ್ಥಳಾಂತರವಾಗುತ್ತದೆ.
```
**ಗಮನಿಸಿ:** ಯಾವುದೇ commit ಆಗದ ಪರಿಷ್ಕರಣೆಗಳು ಇಲ್ಲವಾಗುತ್ತವೆ!
---
# Git ನಿಂದ ಫೈಲ್ ಅನ್ನು ತೆಗೆದುಹಾಕುವುದು
ಕಾಲಕಾಲಕ್ಕೆ, Git ನಿಂದ ಫೈಲ್ ಅನ್ನು ತೆಗೆದುಹಾಕಬೇಕು, ಆದರೆ ಅದನ್ನು ನಿಮ್ಮ ಕಂಪ್ಯೂಟರ್ ನಿಂದ ಅಳಿಸಬಾರದು. ಇದನ್ನು ಈ ಕೆಳಗಿನ ಆಜ್ಞೆಯ ಮೂಲಕ ಮಾಡಬಹುದು:
```bash
git rm `git log foo bar` - 반대로 특정 커밋 식별자를 기준으로 접근 가능한 커밋 로그를 출력에서 제외할 수도 있습니다. 커밋 식별자 앞에 삿갓표(캐럿 기호) `^`를 붙여 주세요: (`baz`를 예시로 들자면)
`git log foo bar ^baz` - 특정 파일과 관련된 커밋 로그를 볼 수도 있습니다. 아래 명령어를 사용해 보세요:
`git log --all
`git log -n 5` ## 참조 및 더 알아보기 - [Official documentation](https://git-scm.com/docs/git-log) ================================================ FILE: docs/additional-material/translations/Korean/delete-branch-locally.ko.md ================================================ # 이 문서는 로컬 저장소에서 브랜치를 삭제하는법을 제공합니다. 브랜치 이름을 실수로 잘못 입력했을대 유용합니다. 이것은 *3*가지 방법으로 할 수 있습니다. ``` git branch -D <브랜치 이름> ``` ``` git branch --delete --force <브랜치 이름> # 위에 -D와 동일합니다. ``` ``` git branch --delete <브랜치 이름> # unmerge 에러 ``` -D는 --delete --force를 의미하며, 브랜치가 병합(merge)되지 않았더라도 강제로 삭제합니다. 하지만 -d 또는 --delete 옵션을 사용하면 브랜치의 병합(merge) 상태에 따라 오류가 발생할 수 있습니다... ================================================ FILE: docs/additional-material/translations/Korean/keeping-your-fork-synced-with-this-repository.ko.md ================================================ # 여러분이 포크한 저장소와 싱크상태 유지하기 먼저, 전체 싱크과정을 이해해야합니다. 본 스키마에는 3개의 저장소들이 있습니다. 저의 GitHub에 있는 제 공개저장소인 `github.com/Roshanjossey/first-contributions/`와 여러분의 포크된 저장소인 `github.com/Your-Name/first-contributions/`, 그리고 로컬 머신에 위치해서 현재 작업중인 저장소가 있습니다. 오픈 소스 프로젝트에 특화된 이러한 조합을 `트라이앵글 워크플로우`라고 부릅니다.
여러분의 두 개의 저장소들을 제 공개 저장소의 최신 상태와 싱크상태를 유지하기 위해서는 제일 먼저여러분의 로컬머신에 위치한 저장소를 제 공개 저장소와 fetch와 merge를 해야합니다.
두번째는 여러분의 로컬 저장소를 포크된 GitHub의 저장소에 push하는 것 입니다. 이전 과정에서 봤듯이 "pull request"를 요청할 수 있는 곳은 오직 포크된 저장소에서만 가능합니다. 따라서 마지막으로 업데이트 되어야하는 저장소는 포크된 GitHub입니다.
자, 어떻게하는지 보겠습니다:
먼저 여러분은 main 브랜치에 위치해 있어야합니다. 현재 어떤 브래치에 있는지 확인합니다.:
```
git status
```
현재 main 브랜치가 아니라면 변경합니다.:
```
git checkout main
```
제 공개 저장소를 아직 여러분의 git에 추가하지 않았다면 다음 명령으로 추가합니다. `add upstream remote-url`:
```
git remote add upstream https://github.com/Roshanjossey/first-contributions
```
지정한 URL을 이용해 현재 프로젝트의 또 다른 최신 버전이 있는지 git에게 확인을 요청하는 방법입니다. 그리고 우리는 이를 `upstream` 이라고 부르기로합니다. 일단 git이 이러한 이름을 가지고 있다면 다음과 같이 공개 저장소의 최진 버전을 가지고 옵니다. :
```
git fetch upstream
```
여러분은 이제 제 포크(upstream remote)에서 최신 버전을 내려 받았습니다. 이제 공개 저장소의 변경된 내용을 여러분의 main 브랜치에 병합해야합니다.
```
git rebase upstream/main
```
여러분의 main 브랜치와 공개 저장소를 병합하고 나면 이제 여러분의 로컬머신의 main 브랜치는 최신 상태입니다. 마지막으로 여러분의 main 브랜치를 여러분의 포크에 push하게 되면 포크한 GitHub 또한 변경사항들이 반영됩니다.:
```
git push origin main
```
origin으로 명명된 리모트에 push하는 것에 주의하세요.
이제 여러분의 모든 저장소가 최신 상태를 유지하게 되었습니다.
잘 하셨습니다! GitHub 저장소에 커밋이 추가적으로 발생할 때마다 이러한 작업을 해야합니다.
================================================
FILE: docs/additional-material/translations/Korean/moving-a-commit-to-a-different-branch.ko.md
================================================
## 커밋을 다른 브랜치로 옮기기
What if you commit a change, and then realize that you committed to a different branch?
How can you change that? This is what this tutorial covers.
만일 변경사항을 반영했는데 전혀 다른 브랜치에 커밋한 사실을 알았다면 어떻게할까요?
이걸 어떻게 바로잡을 수 있을까요? 바로 이 장에서 다룰 내용입니다.
### 가장 최근 커밋들을 기존에 있는 브랜치로 이동시키기
사용예:
```git reset HEAD~ --soft``` - 마지막 커밋을 되돌립니다. 물론 수정한 내용은 그대로 남아있습니다.
```git stash``` - 현재까지 수정한 모든 작업내용들의 상태를 저장합니다.
```git checkout name-of-the-correct-branch``` - 실제 반영하고자하는 브랜치를 체크아웃합니다.
```git stash pop``` - 마지막으로 저장한(stash) 변경내역들을 현재 브랜치에 반영하고 저장한 내역에서 삭제합니다.
```git add .``` - 또는 커밋에 반영할 변경내역들을 개별적으로 추가합니다.
```git commit -m "your message here"``` - 저장하고 변경내역을 커밋합니다.
자 이제 변경사항이 올바른 브랜치에 반영되었습니다.
### 가장 최근 커밋들을 신규 브랜치를 생성하여 이동시키기
사용예:
```git branch newbranch``` - 신규 브랜치를 생성하고 모든 커밋들을 저장합니다.
```git reset --hard HEAD~#``` - master 브랜치의 #번째 커밋을 되돌립니다. 되돌린 커밋들은 master에서 완전히 삭제되므로 주의하세요.
```git checkout newbranch``` - 생성한 브랜치로 이동합니다. 모든 커밋들을 가지고 있을겁니다.
주의: 커밋하지 않은 변경사항들은 사라집니다.
================================================
FILE: docs/additional-material/translations/Korean/removing-branch-from-your-repository.ko.md
================================================
## 여러분의 저장소에서 브랜치 삭제하기
지금까지의 튜토리얼을 수행했다면, 우리의 `
Para manter seus dois repositórios atualizados com meu repositório público, o primeiro passo é dar um Fetch (buscar) e então um Merge (mesclar) do repositório público ao seu repositório local.
O segundo passo é fazer um Push do repositório local para o seu Fork no GitHub. Como vimos anteriormente, é somente a partir do seu Fork que você consegue fazer um Pull Request. Por isso, esse Fork é o último repositório a ser atualizado.
Agora, vamos ver como fazer isso:
Primeiro, você precisa estar em seu Branch principal (master). Para saber em qual Branch você está, verifique a primeira linha que aparece como resultado do seguinte comando:
```
git status
```
Se você não está no master, vá para ele:
```
git checkout master
```
Em seguida, você deve adicionar meu repositório público ao seu git com `add upstream url-remoto`:
```
git remote add upstream https://github.com/Roshanjossey/first-contributions
```
Esta é uma forma de dizer ao Git que existe uma outra versão deste projeto na URL especificada e estamos chamando-a de `upstream`. Agora busque a nova versão do meu repositório:
```
git fetch upstream
```
Aqui você está buscando todas as mudanças no meu Fork (o remoto `upstream`). Agora, você precisa mesclá-lo ao repositório público no seu Branch principal.
```
git rebase upstream/master
```
Aqui você está aplicando todas as mudanças que buscou ao seu Branch principal (master). Seu repositório local agora está atualizado. Por último, se você fizer um Push do seu Branch master para o seu Fork, seu GitHub também terá as alterações:
```
git push origin master
```
Note que aqui você está fazendo um Push para o repositório remoto chamado `origin`.
Agora, todos os seus repositórios estão atualizados. Bom trabalho! Você deve seguir esses passos sempre que seu repositório no GitHub avisar que está alguns Commits atrás do meu repositório.
================================================
FILE: docs/additional-material/translations/Portugues/moving-a-commit-to-a-different-branch.pt_br.md
================================================
# Movendo um commit para outra branch
E se apenas depois de ter realizado o commit de uma alteração, vocẽ perceber que fez esse commit na branch errada?
Como você poderia corrigir isso? É sobre isso que este tutorial se trata.
## Movendo os últimos commits para uma branch existente
Para fazer isso, digite:
```git reset HEAD~ --soft``` - Desfaz o último commit, mas mantém as alterações disponíveis.
```git stash``` - Grava o estado do diretório.
```git checkout name-of-the-correct-branch``` - Alterna para a outra branch.
```git stash pop``` - Recupera o último estado salvo.
```git add .``` - Ou tente adicionar arquivos individualmente.
```git commit -m "your message here"``` - Faça o commit das alterações.
Agora suas alterações estão na branch correta
### Movendo o último commit para uma branch nova
Para fazer isso, digite:
```git branch newbranch``` - Cria uma nova branch, mantendo todos os commits.
```git reset --hard HEAD~#``` - Retrocede a branch uma quantidade # de commits. Atenção, estes commits serão removidos da branch.
```git checkout newbranch``` - Vá para a nova branch que você criou, ela possuíra todos os commits.
Lembre-se: Qualquer alteração não comitada será PERDIDA.
================================================
FILE: docs/additional-material/translations/Portugues/removing-a-file.pt_br.md
================================================
# Removendo um arquivo do Git
Às vezes, você pode querer remover um arquivo do Git, mas não excluí-lo do seu computador. Você pode fazer isso usando o seguinte comando:
``git rm >දුරස්ථ පාලකය වෙත බලහත්කාරයෙන් තල්ලු කිරීම දුරස්ථ පාලකයේ වෙනස්කම් උඩින් ලියයි (සහ ඉවත දමනු ඇත) සහ ඔබේ තල්ලු කළ කැපවීම් පමණක් තබා ගනී. මේ අතරතුර අනෙකුත් කණ්ඩායම් සාමාජිකයින් විසින් සිදු කරන ලද දුරස්ථ පාලකයේ වෙනස්කම් ද උඩින් ලියනු ලැබේ. ඔබ දුරස්ථ පාලකයේ අවසන් මෑත කැපවීම වෙනස් කරන ආකාරය මෙයයි: ```bash git add