Repository: jcjohnson/neural-style
Branch: master
Commit: 07c4b8299f8f
Files: 7
Total size: 50.6 KB
Directory structure:
gitextract_uhgvh44u/
├── .gitignore
├── INSTALL.md
├── LICENSE
├── README.md
├── examples/
│ └── multigpu_scripts/
│ └── starry_stanford.sh
├── models/
│ └── download_models.sh
└── neural_style.lua
================================================
FILE CONTENTS
================================================
================================================
FILE: .gitignore
================================================
*.swp
out*.png
*.png
*.jpg
*.prototxt*
*.caffemodel
models/
!models/download_models.sh
================================================
FILE: INSTALL.md
================================================
#neural-style Installation
This guide will walk you through the setup for `neural-style` on Ubuntu.
## Step 1: Install torch7
First we need to install torch, following the installation instructions
[here](http://torch.ch/docs/getting-started.html#_):
```
# in a terminal, run the commands
cd ~/
curl -s https://raw.githubusercontent.com/torch/ezinstall/master/install-deps | bash
git clone https://github.com/torch/distro.git ~/torch --recursive
cd ~/torch; ./install.sh
```
The first script installs all dependencies for torch and may take a while.
The second script actually installs lua and torch.
The second script also edits your `.bashrc` file so that torch is added to your `PATH` variable;
we need to source it to refresh our environment variables:
```
source ~/.bashrc
```
To check that your torch installation is working, run the command `th` to enter the interactive shell.
To quit just type `exit`.
## Step 2: Install loadcaffe
`loadcaffe` depends on [Google's Protocol Buffer library](https://developers.google.com/protocol-buffers/?hl=en)
so we'll need to install that first:
```
sudo apt-get install libprotobuf-dev protobuf-compiler
```
Now we can instal `loadcaffe`:
```
luarocks install loadcaffe
```
## Step 3: Install neural-style
First we clone `neural-style` from GitHub:
```
cd ~/
git clone https://github.com/jcjohnson/neural-style.git
cd neural-style
```
Next we need to download the pretrained neural network models:
```
sh models/download_models.sh
```
You should now be able to run `neural-style` in CPU mode like this:
```
th neural_style.lua -gpu -1 -print_iter 1
```
If everything is working properly you should see output like this:
```
[libprotobuf WARNING google/protobuf/io/coded_stream.cc:505] Reading dangerously large protocol message. If the message turns out to be larger than 1073741824 bytes, parsing will be halted for security reasons. To increase the limit (or to disable these warnings), see CodedInputStream::SetTotalBytesLimit() in google/protobuf/io/coded_stream.h.
[libprotobuf WARNING google/protobuf/io/coded_stream.cc:78] The total number of bytes read was 574671192
Successfully loaded models/VGG_ILSVRC_19_layers.caffemodel
conv1_1: 64 3 3 3
conv1_2: 64 64 3 3
conv2_1: 128 64 3 3
conv2_2: 128 128 3 3
conv3_1: 256 128 3 3
conv3_2: 256 256 3 3
conv3_3: 256 256 3 3
conv3_4: 256 256 3 3
conv4_1: 512 256 3 3
conv4_2: 512 512 3 3
conv4_3: 512 512 3 3
conv4_4: 512 512 3 3
conv5_1: 512 512 3 3
conv5_2: 512 512 3 3
conv5_3: 512 512 3 3
conv5_4: 512 512 3 3
fc6: 1 1 25088 4096
fc7: 1 1 4096 4096
fc8: 1 1 4096 1000
WARNING: Skipping content loss
Iteration 1 / 1000
Content 1 loss: 2091178.593750
Style 1 loss: 30021.292114
Style 2 loss: 700349.560547
Style 3 loss: 153033.203125
Style 4 loss: 12404635.156250
Style 5 loss: 656.860304
Total loss: 15379874.666090
Iteration 2 / 1000
Content 1 loss: 2091177.343750
Style 1 loss: 30021.292114
Style 2 loss: 700349.560547
Style 3 loss: 153033.203125
Style 4 loss: 12404633.593750
Style 5 loss: 656.860304
Total loss: 15379871.853590
```
## (Optional) Step 4: Install CUDA
If you have a [CUDA-capable GPU from NVIDIA](https://developer.nvidia.com/cuda-gpus) then you can
speed up `neural-style` with CUDA.
First download and unpack the local CUDA installer from NVIDIA; note that there are different
installers for each recent version of Ubuntu:
```
# For Ubuntu 14.10
wget http://developer.download.nvidia.com/compute/cuda/7_0/Prod/local_installers/rpmdeb/cuda-repo-ubuntu1410-7-0-local_7.0-28_amd64.deb
sudo dpkg -i cuda-repo-ubuntu1410-7-0-local_7.0-28_amd64.deb
```
```
# For Ubuntu 14.04
wget http://developer.download.nvidia.com/compute/cuda/7_0/Prod/local_installers/rpmdeb/cuda-repo-ubuntu1404-7-0-local_7.0-28_amd64.deb
sudo dpkg -i cuda-repo-ubuntu1404-7-0-local_7.0-28_amd64.deb
```
```
# For Ubuntu 12.04
http://developer.download.nvidia.com/compute/cuda/7_0/Prod/local_installers/rpmdeb/cuda-repo-ubuntu1204-7-0-local_7.0-28_amd64.deb
sudo dpkg -i cuda-repo-ubuntu1204-7-0-local_7.0-28_amd64.deb
```
Now update the repository cache and install CUDA. Note that this will also install a graphics driver from NVIDIA.
```
sudo apt-get update
sudo apt-get install cuda
```
At this point you may need to reboot your machine to load the new graphics driver.
After rebooting, you should be able to see the status of your graphics card(s) by running
the command `nvidia-smi`; it should give output that looks something like this:
```
Sun Sep 6 14:02:59 2015
+------------------------------------------------------+
| NVIDIA-SMI 346.96 Driver Version: 346.96 |
|-------------------------------+----------------------+----------------------+
| GPU Name Persistence-M| Bus-Id Disp.A | Volatile Uncorr. ECC |
| Fan Temp Perf Pwr:Usage/Cap| Memory-Usage | GPU-Util Compute M. |
|===============================+======================+======================|
| 0 GeForce GTX TIT... Off | 0000:01:00.0 On | N/A |
| 22% 49C P8 18W / 250W | 1091MiB / 12287MiB | 3% Default |
+-------------------------------+----------------------+----------------------+
| 1 GeForce GTX TIT... Off | 0000:04:00.0 Off | N/A |
| 29% 44C P8 27W / 189W | 15MiB / 6143MiB | 0% Default |
+-------------------------------+----------------------+----------------------+
| 2 GeForce GTX TIT... Off | 0000:05:00.0 Off | N/A |
| 30% 45C P8 33W / 189W | 15MiB / 6143MiB | 0% Default |
+-------------------------------+----------------------+----------------------+
+-----------------------------------------------------------------------------+
| Processes: GPU Memory |
| GPU PID Type Process name Usage |
|=============================================================================|
| 0 1277 G /usr/bin/X 631MiB |
| 0 2290 G compiz 256MiB |
| 0 2489 G ...s-passed-by-fd --v8-snapshot-passed-by-fd 174MiB |
+-----------------------------------------------------------------------------+
```
## (Optional) Step 5: Install CUDA backend for torch
This is easy:
```
luarocks install cutorch
luarocks install cunn
```
You can check that the installation worked by running the following:
```
th -e "require 'cutorch'; require 'cunn'; print(cutorch)"
```
This should produce output like the this:
```
{
getStream : function: 0x40d40ce8
getDeviceCount : function: 0x40d413d8
setHeapTracking : function: 0x40d41a78
setRNGState : function: 0x40d41a00
getBlasHandle : function: 0x40d40ae0
reserveBlasHandles : function: 0x40d40980
setDefaultStream : function: 0x40d40f08
getMemoryUsage : function: 0x40d41480
getNumStreams : function: 0x40d40c48
manualSeed : function: 0x40d41960
synchronize : function: 0x40d40ee0
reserveStreams : function: 0x40d40bf8
getDevice : function: 0x40d415b8
seed : function: 0x40d414d0
deviceReset : function: 0x40d41608
streamWaitFor : function: 0x40d40a00
withDevice : function: 0x40d41630
initialSeed : function: 0x40d41938
CudaHostAllocator : torch.Allocator
test : function: 0x40ce5368
getState : function: 0x40d41a50
streamBarrier : function: 0x40d40b58
setStream : function: 0x40d40c98
streamBarrierMultiDevice : function: 0x40d41538
streamWaitForMultiDevice : function: 0x40d40b08
createCudaHostTensor : function: 0x40d41670
setBlasHandle : function: 0x40d40a90
streamSynchronize : function: 0x40d41590
seedAll : function: 0x40d414f8
setDevice : function: 0x40d414a8
getNumBlasHandles : function: 0x40d409d8
getDeviceProperties : function: 0x40d41430
getRNGState : function: 0x40d419d8
manualSeedAll : function: 0x40d419b0
_state : userdata: 0x022fe750
}
```
You should now be able to run `neural-style` in GPU mode:
```
th neural_style.lua -gpu 0 -print_iter 1
```
### (Optional) Step 6: Install cuDNN
cuDNN is a library from NVIDIA that efficiently implements many of the operations (like convolutions and pooling)
that are commonly used in deep learning.
After registering as a developer with NVIDIA, you can [download cuDNN here](https://developer.nvidia.com/cudnn).
Make sure to download Version 4.
After dowloading, you can unpack and install cuDNN like this:
```bash
tar -xzvf cudnn-7.0-linux-x64-v4.0-prod.tgz
sudo cp cuda/lib64/libcudnn* /usr/local/cuda-7.0/lib64/
sudo cp cuda/include/cudnn.h /usr/local/cuda-7.0/include/
```
Next we need to install the torch bindings for cuDNN:
```
luarocks install cudnn
```
You should now be able to run `neural-style` with cuDNN like this:
```
th neural_style.lua -gpu 0 -backend cudnn
```
Note that the cuDNN backend can only be used for GPU mode.
================================================
FILE: LICENSE
================================================
The MIT License (MIT)
Copyright (c) 2015 Justin Johnson
Permission is hereby granted, free of charge, to any person obtaining a copy
of this software and associated documentation files (the "Software"), to deal
in the Software without restriction, including without limitation the rights
to use, copy, modify, merge, publish, distribute, sublicense, and/or sell
copies of the Software, and to permit persons to whom the Software is
furnished to do so, subject to the following conditions:
The above copyright notice and this permission notice shall be included in all
copies or substantial portions of the Software.
THE SOFTWARE IS PROVIDED "AS IS", WITHOUT WARRANTY OF ANY KIND, EXPRESS OR
IMPLIED, INCLUDING BUT NOT LIMITED TO THE WARRANTIES OF MERCHANTABILITY,
FITNESS FOR A PARTICULAR PURPOSE AND NONINFRINGEMENT. IN NO EVENT SHALL THE
AUTHORS OR COPYRIGHT HOLDERS BE LIABLE FOR ANY CLAIM, DAMAGES OR OTHER
LIABILITY, WHETHER IN AN ACTION OF CONTRACT, TORT OR OTHERWISE, ARISING FROM,
OUT OF OR IN CONNECTION WITH THE SOFTWARE OR THE USE OR OTHER DEALINGS IN THE
SOFTWARE.
================================================
FILE: README.md
================================================
# neural-style
This is a torch implementation of the paper [A Neural Algorithm of Artistic Style](http://arxiv.org/abs/1508.06576)
by Leon A. Gatys, Alexander S. Ecker, and Matthias Bethge.
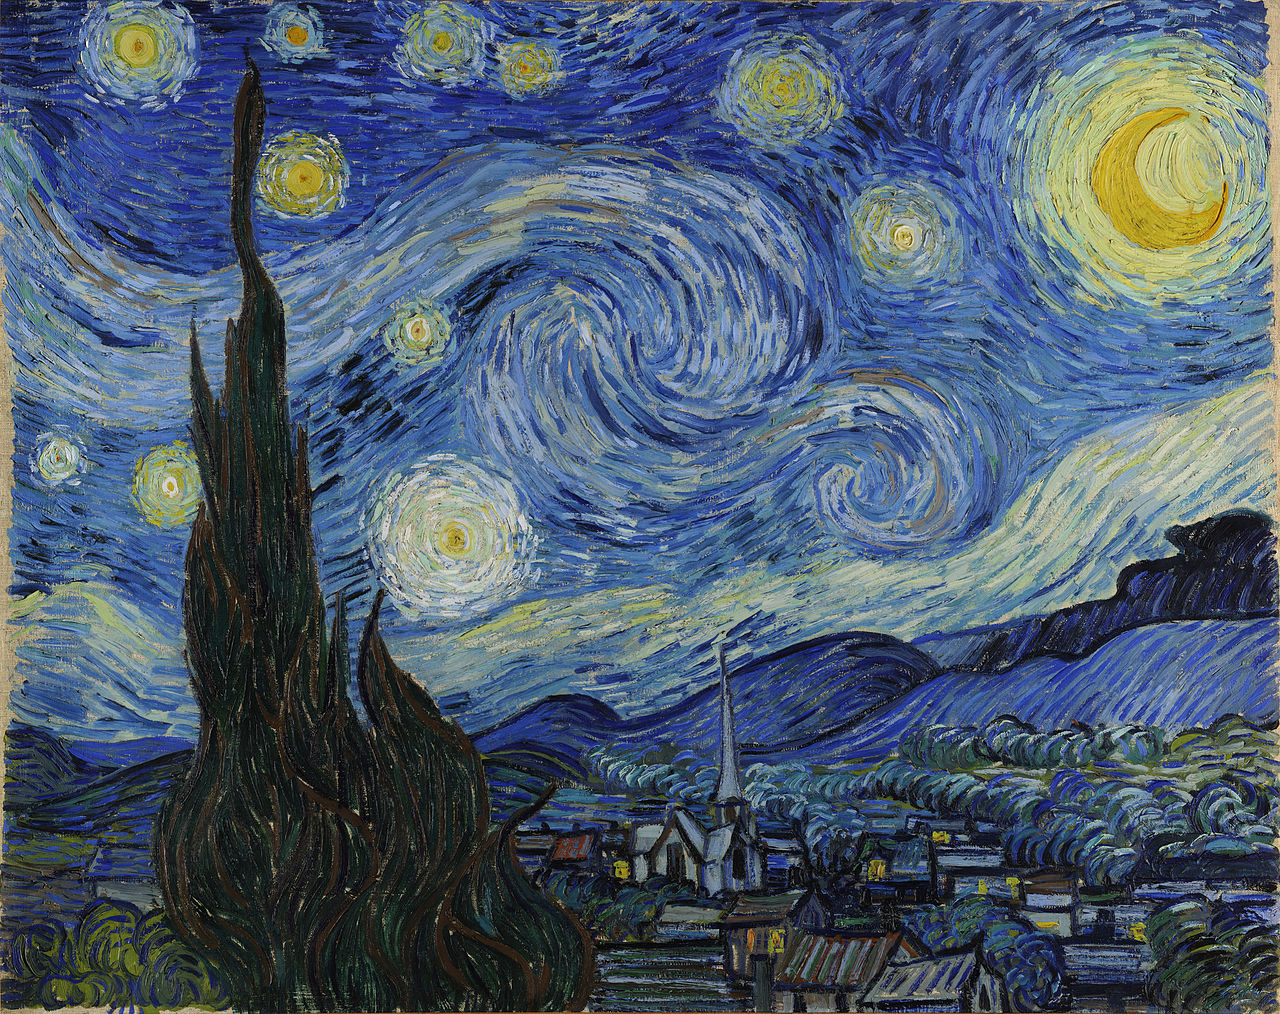
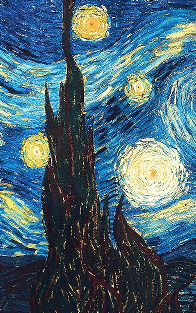
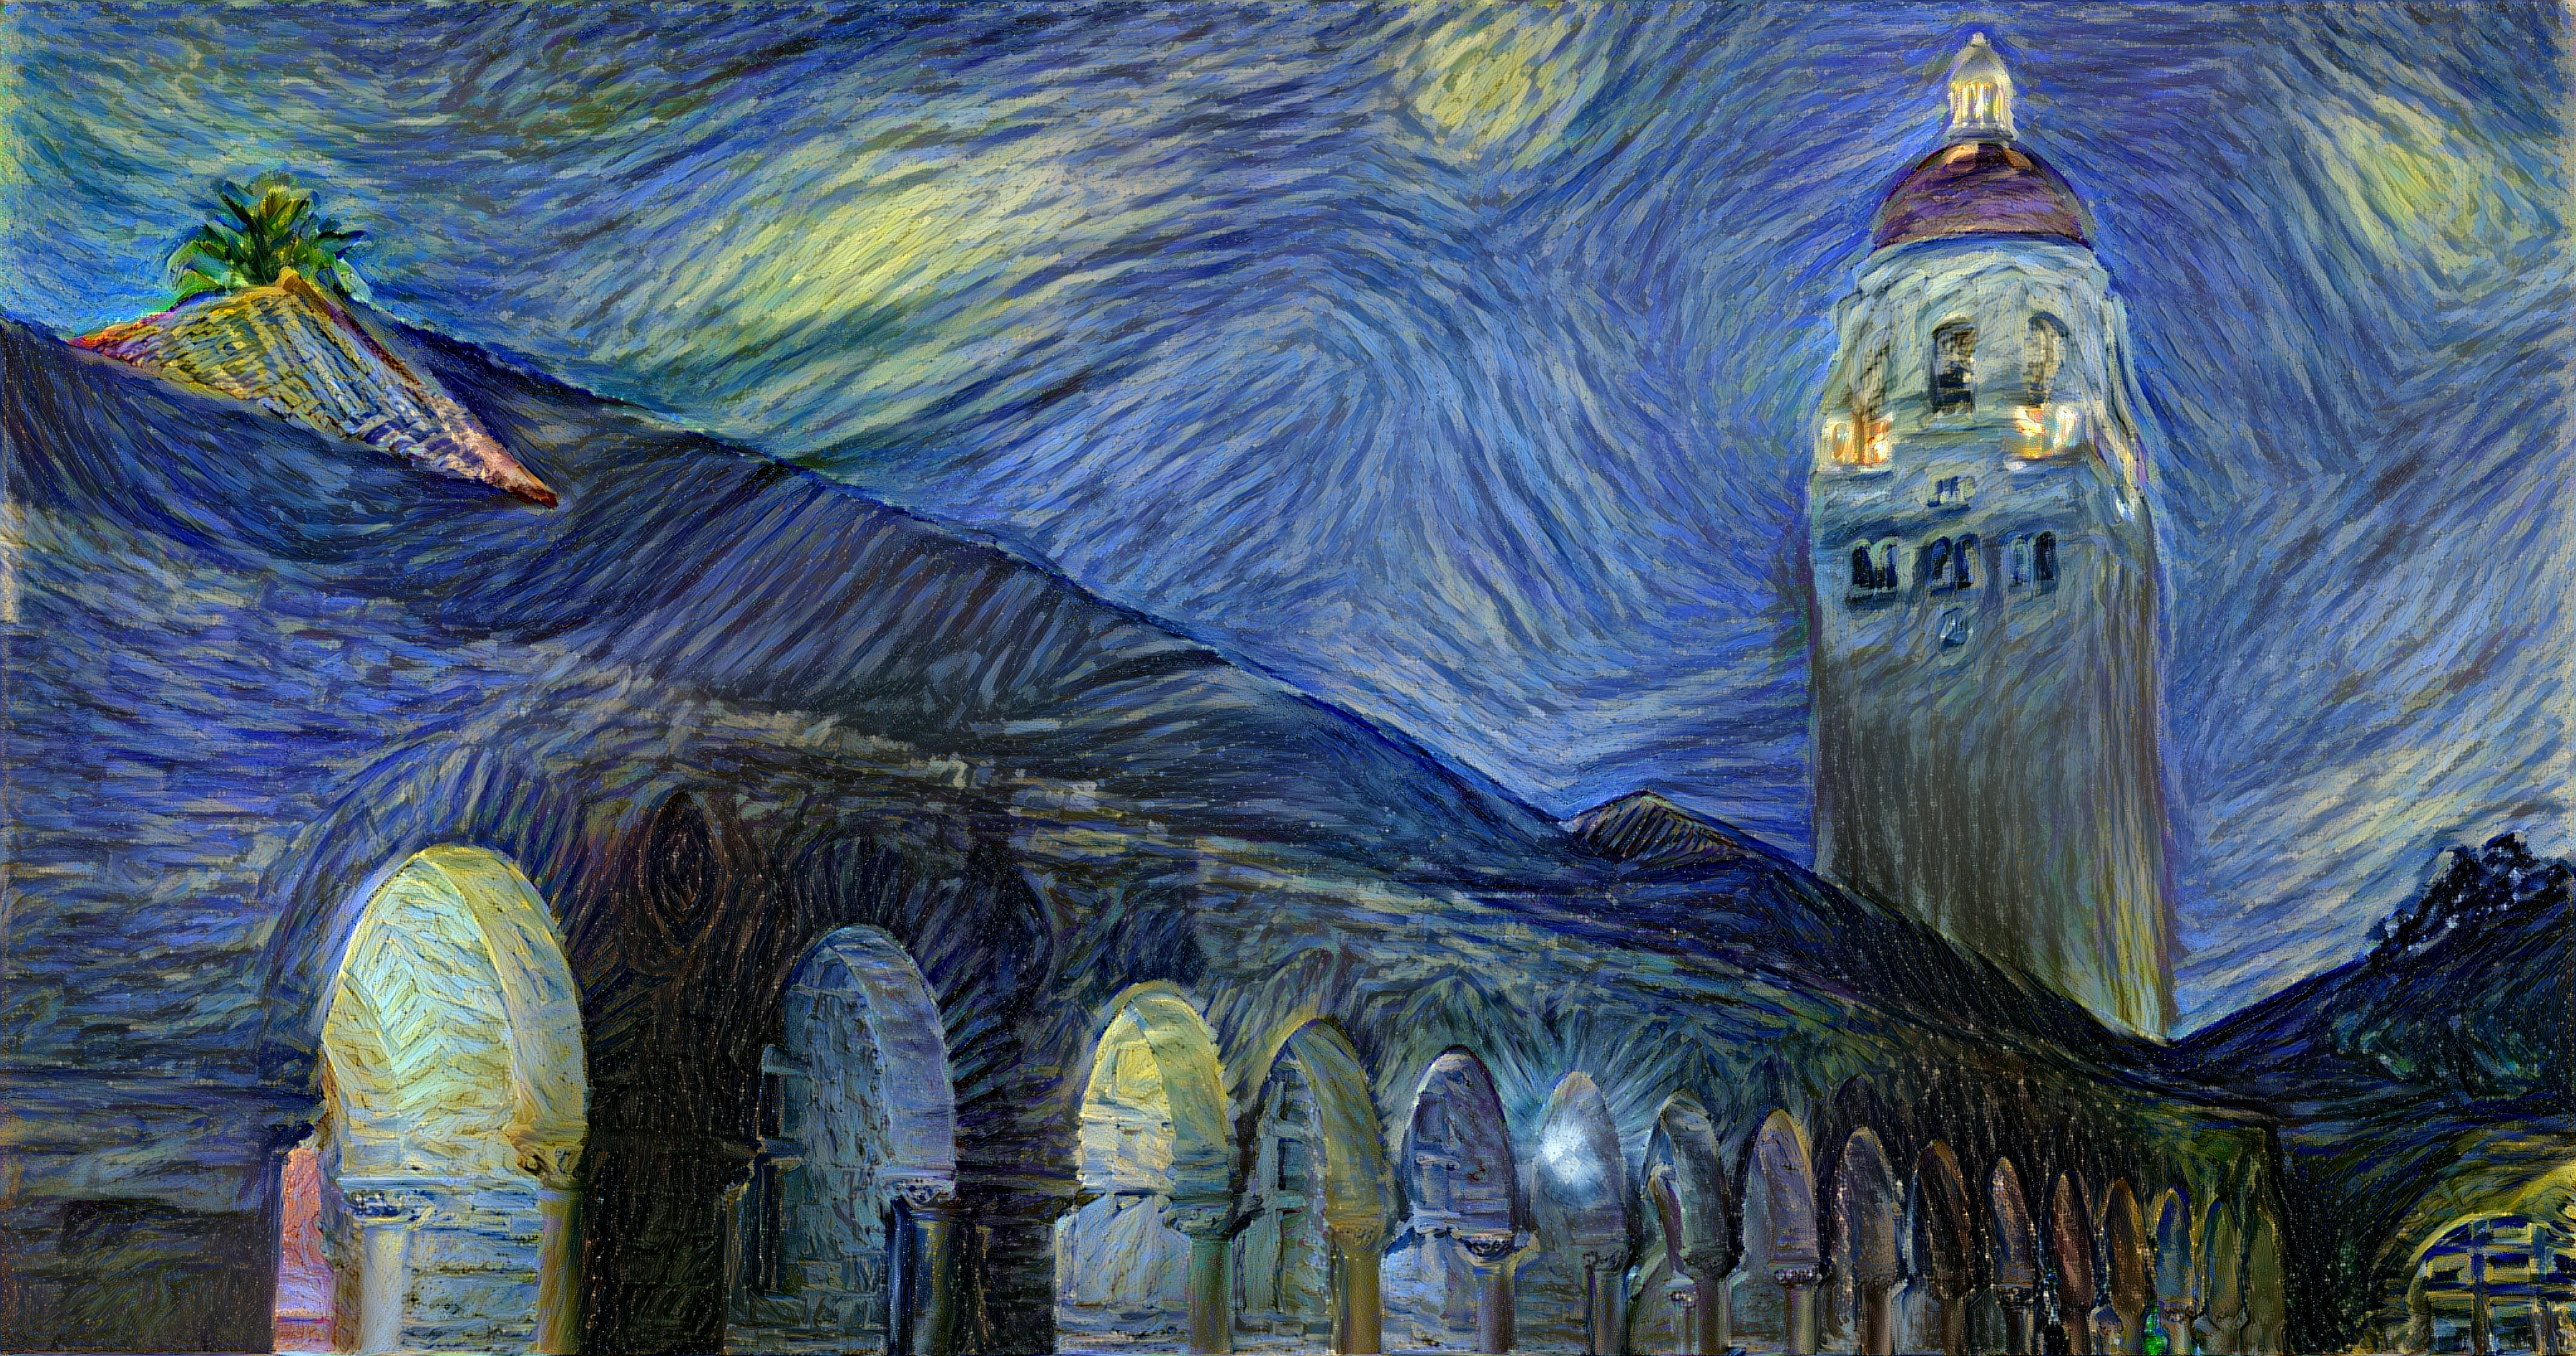
The paper presents an algorithm for combining the content of one image with the style of another image using
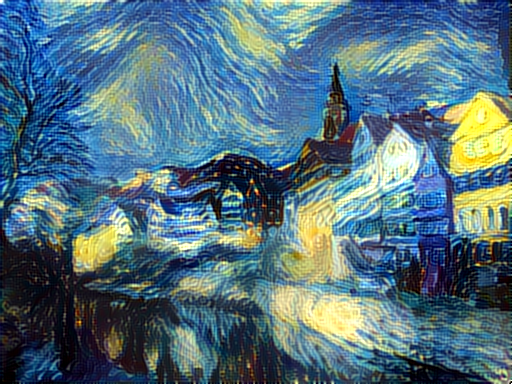
convolutional neural networks. Here's an example that maps the artistic style of
[The Starry Night](https://en.wikipedia.org/wiki/The_Starry_Night)
onto a night-time photograph of the Stanford campus:
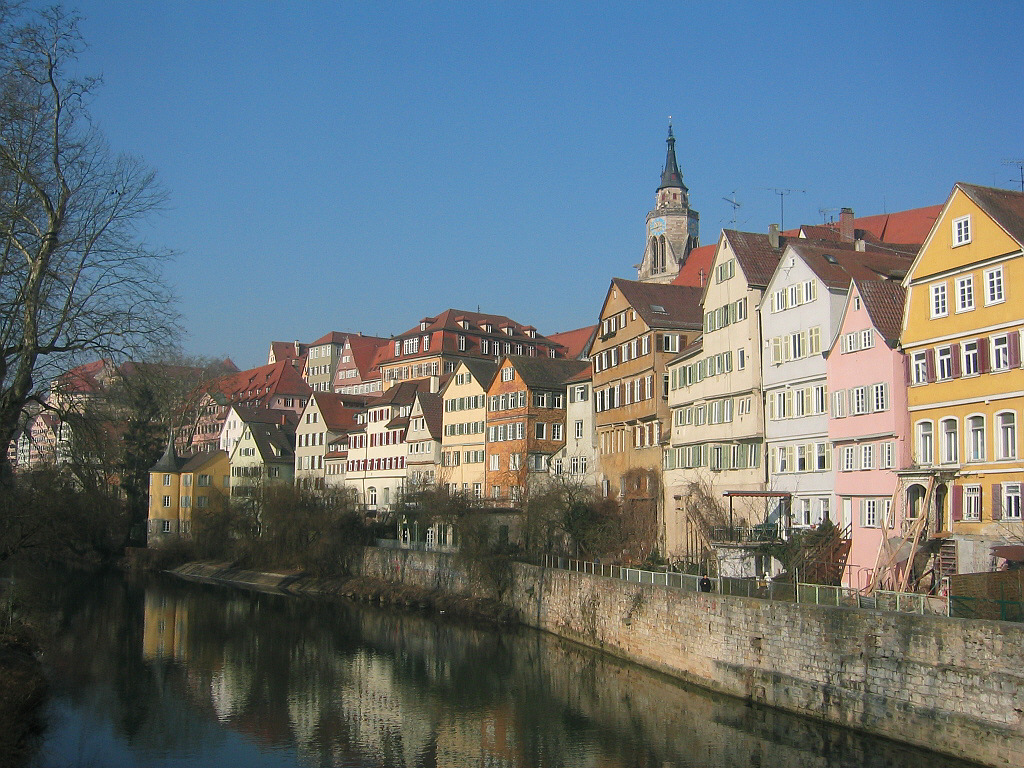
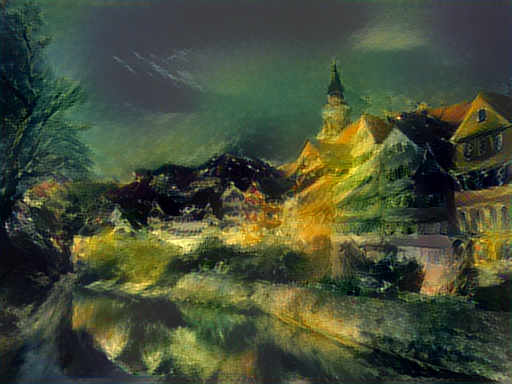
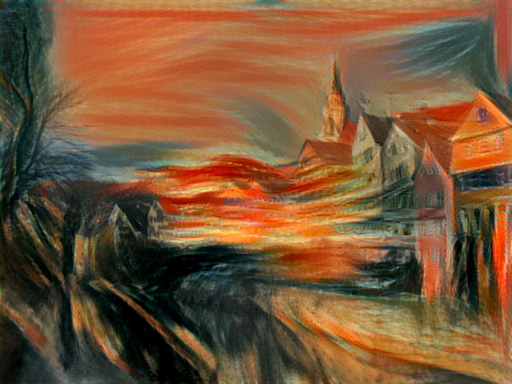
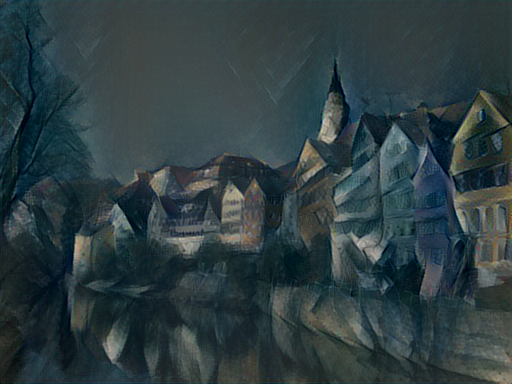
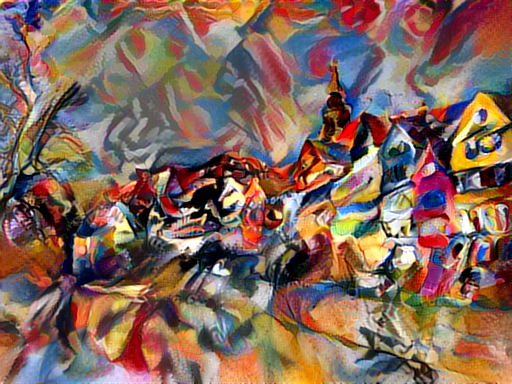
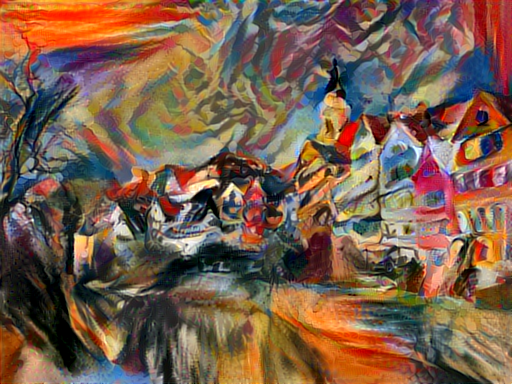
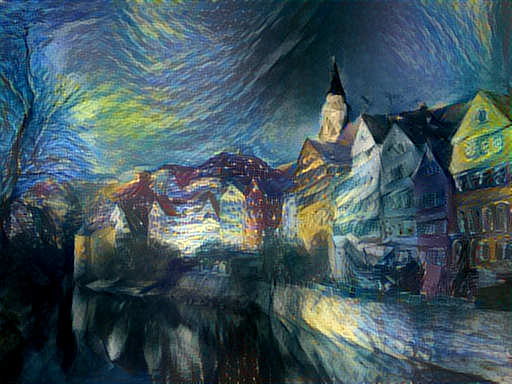
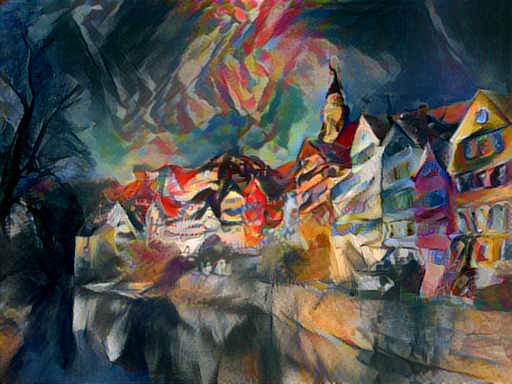
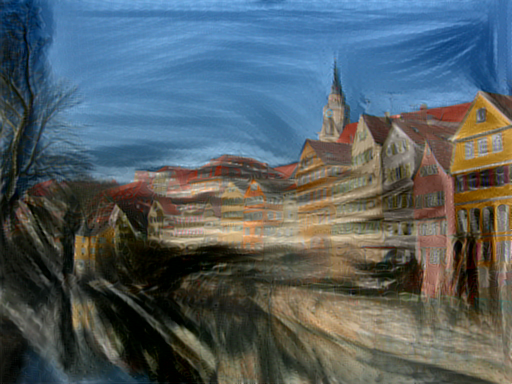
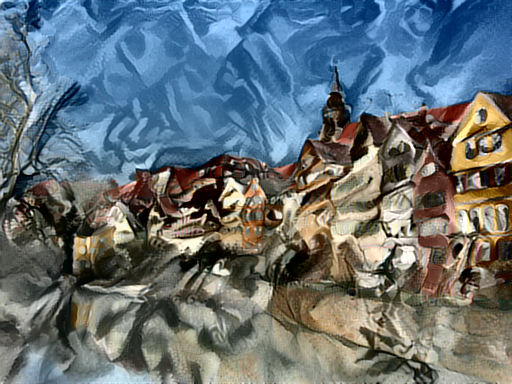
Applying the style of different images to the same content image gives interesting results.
Here we reproduce Figure 2 from the paper, which renders a photograph of the Tubingen in Germany in a
variety of styles:
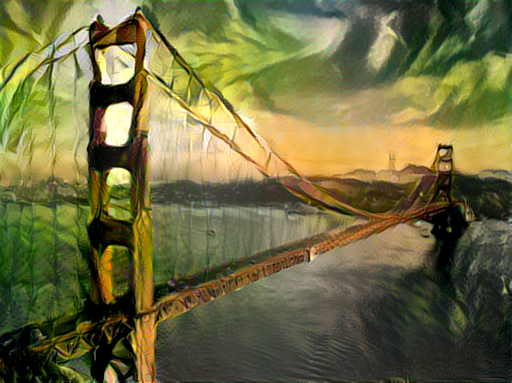
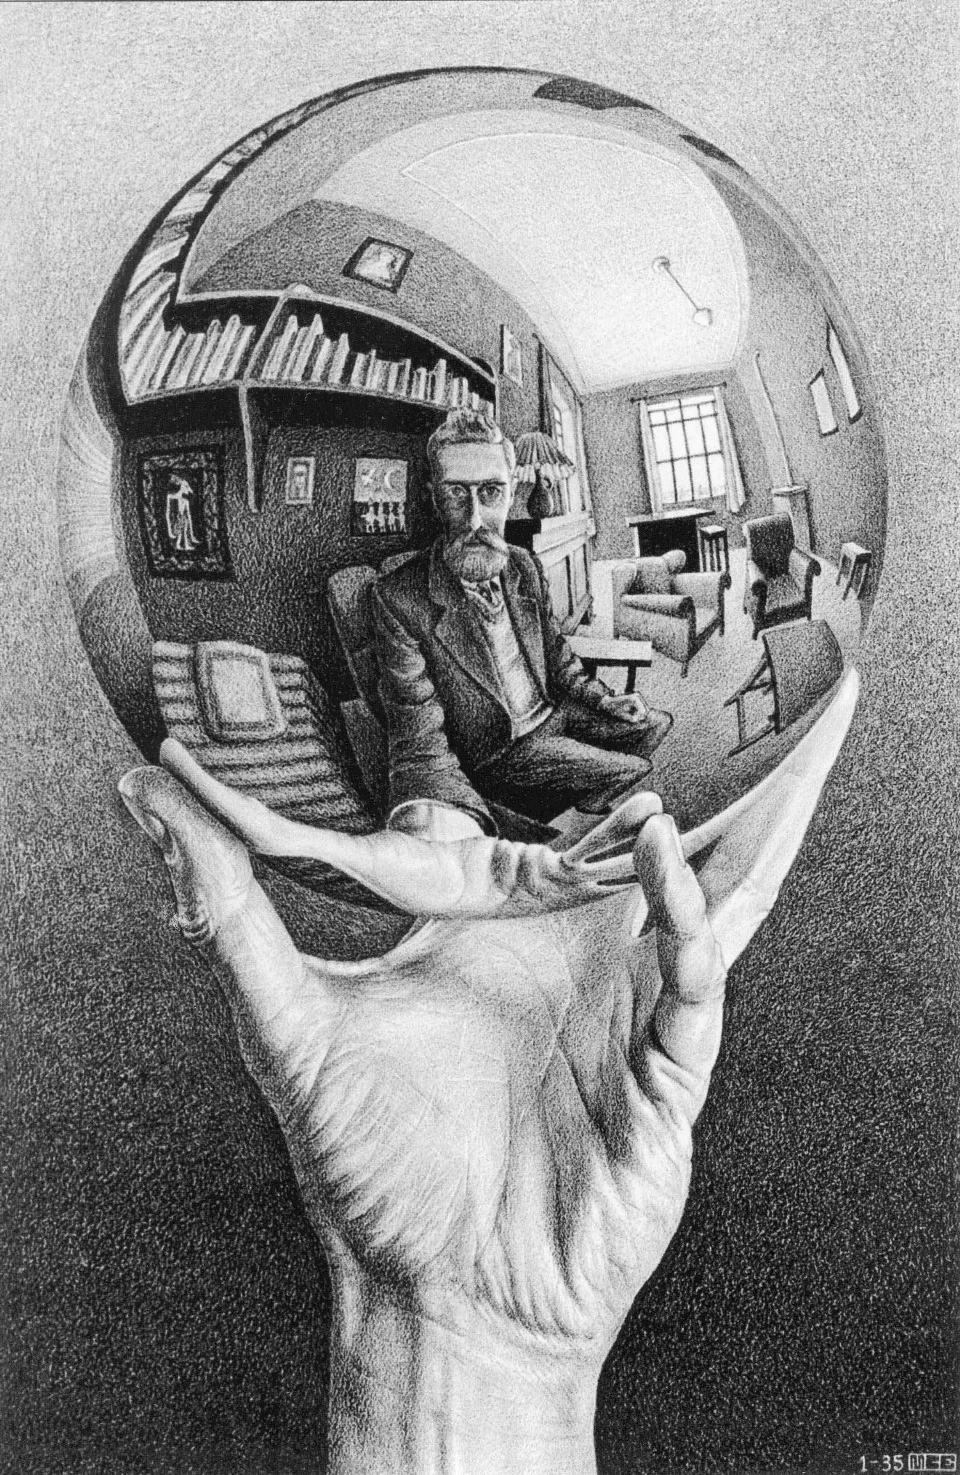
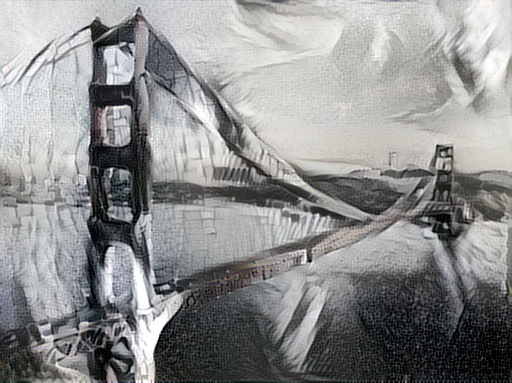
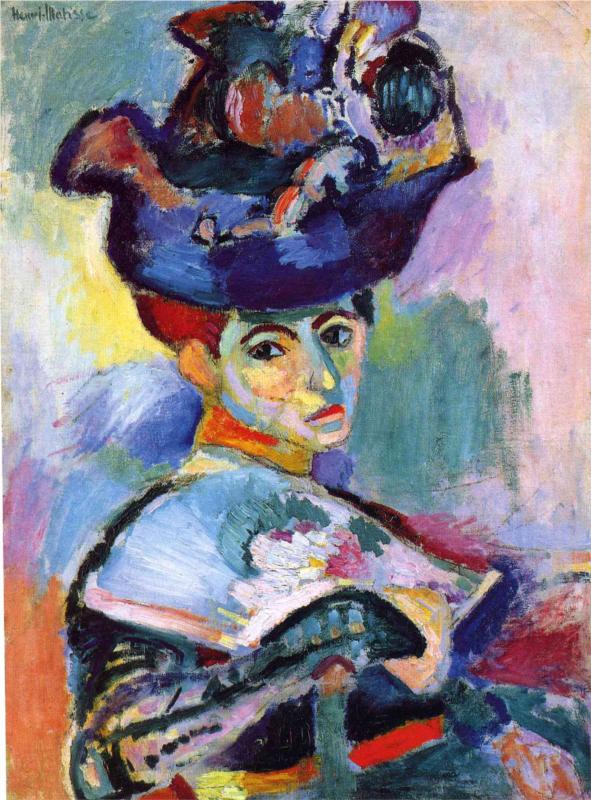
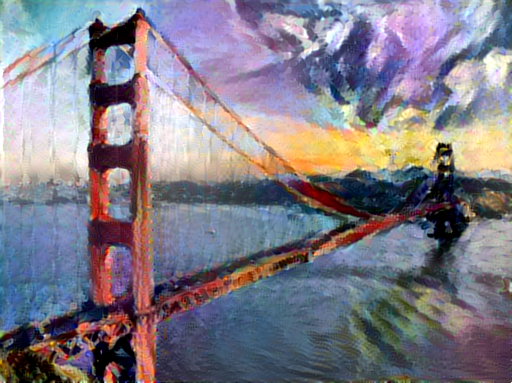
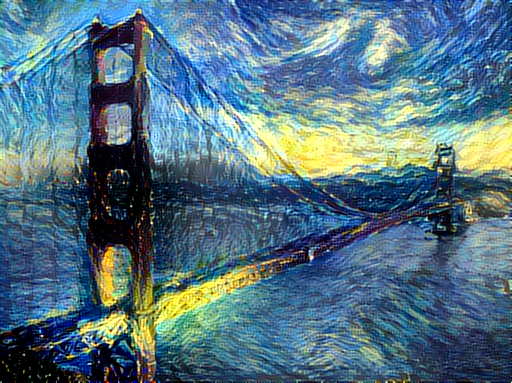
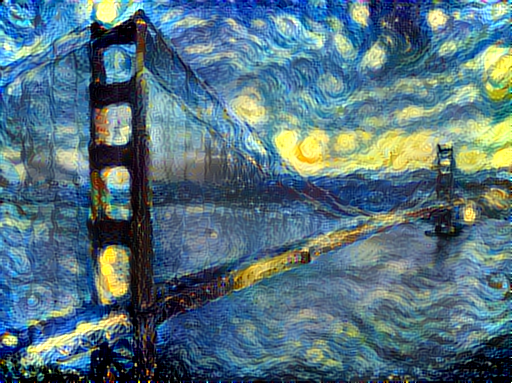
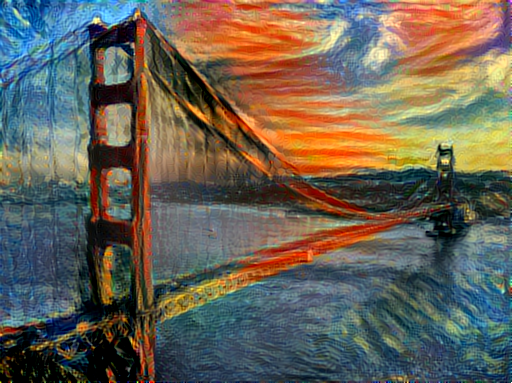
Here are the results of applying the style of various pieces of artwork to this photograph of the
golden gate bridge:
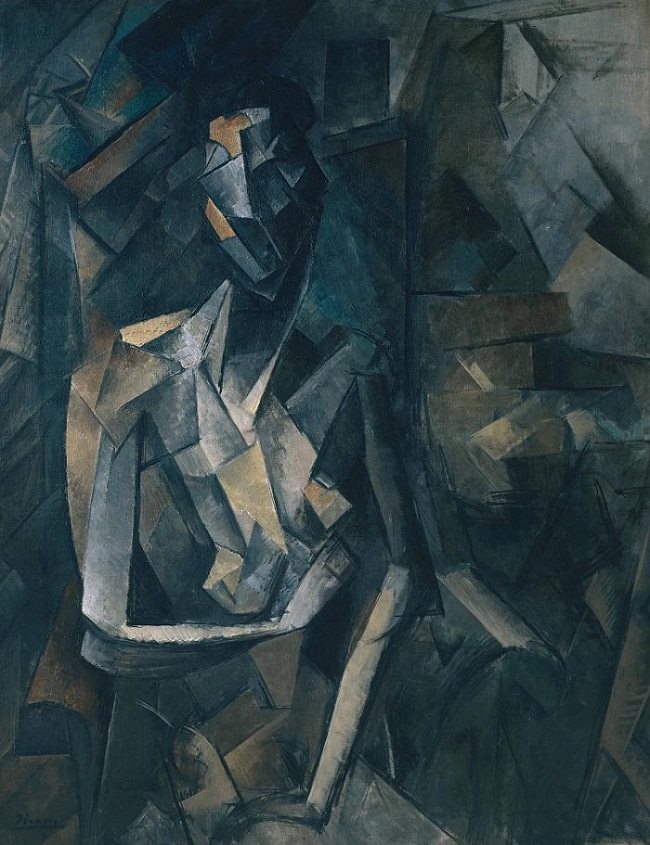
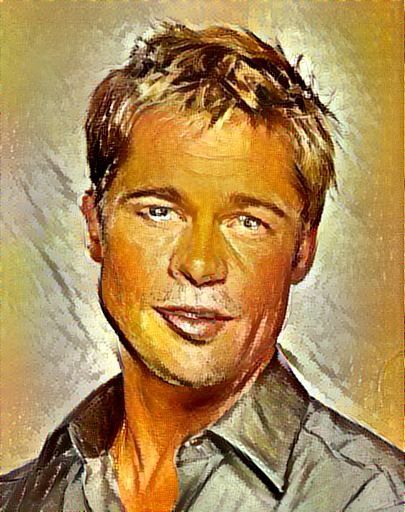
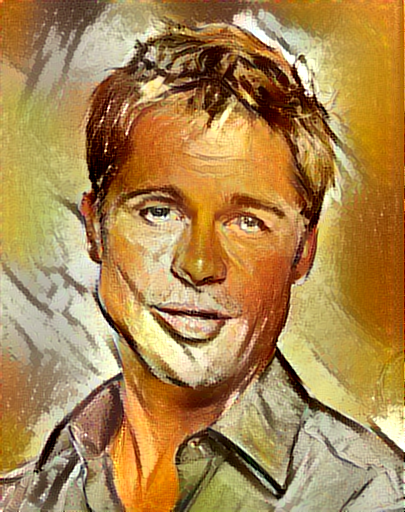
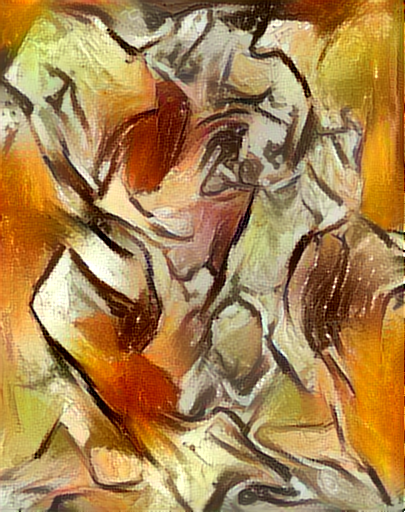
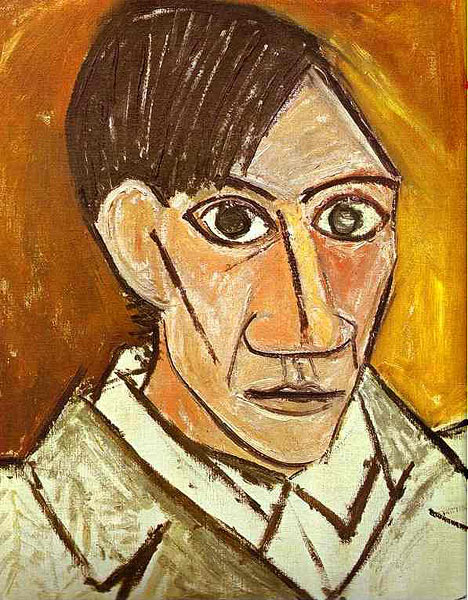
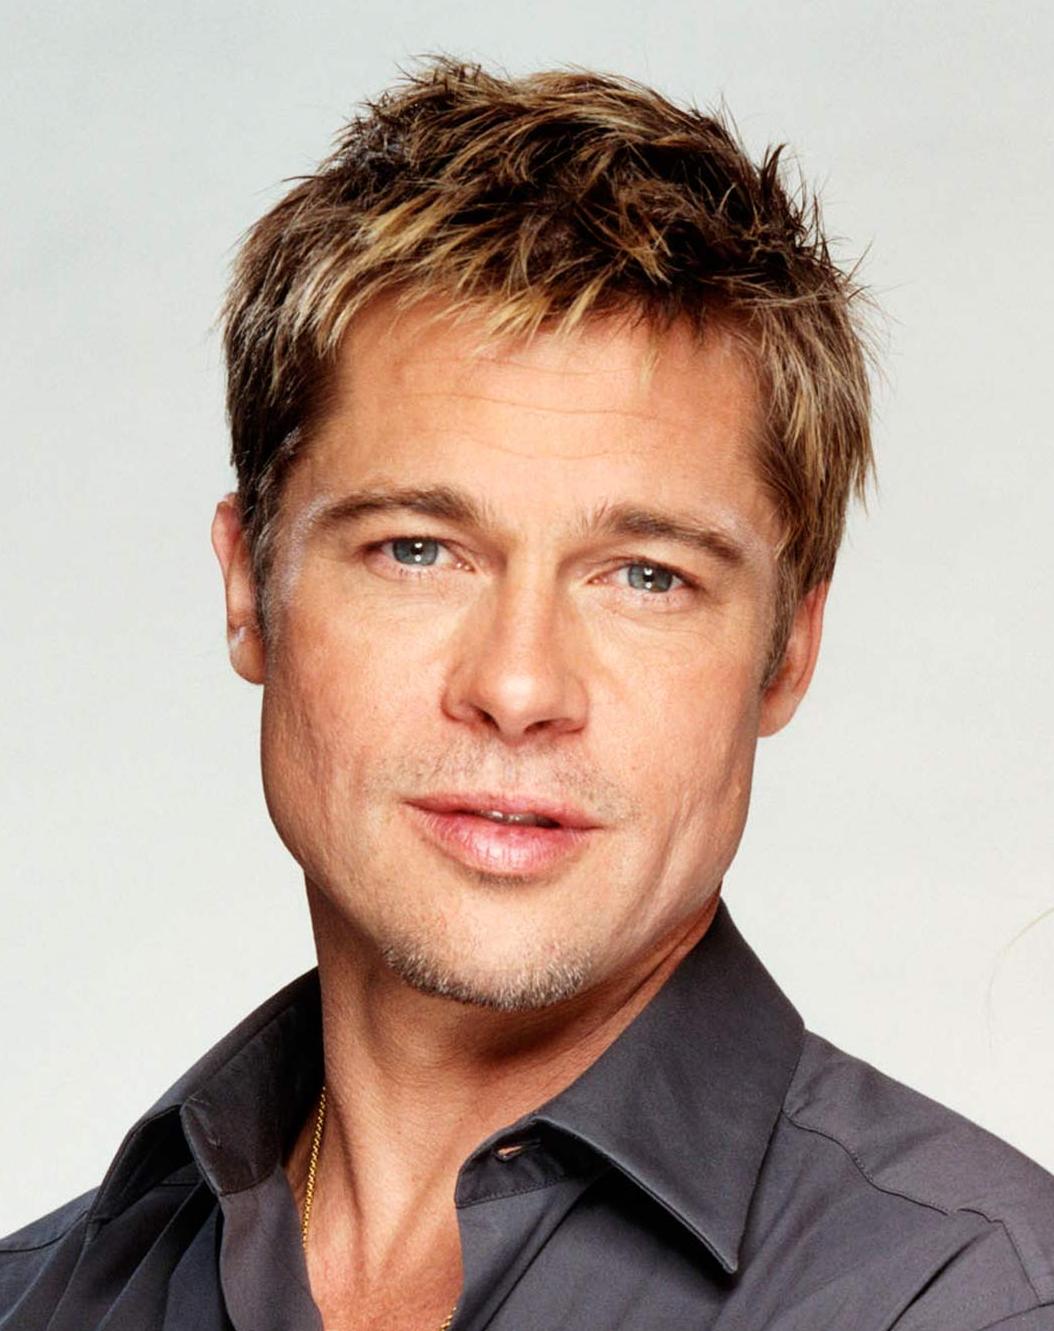
### Content / Style Tradeoff
The algorithm allows the user to trade-off the relative weight of the style and content reconstruction terms,
as shown in this example where we port the style of [Picasso's 1907 self-portrait](http://www.wikiart.org/en/pablo-picasso/self-portrait-1907) onto Brad Pitt:
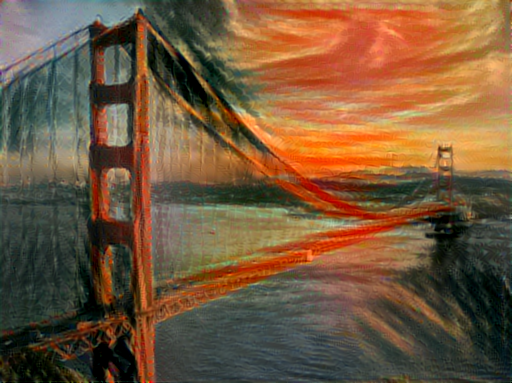
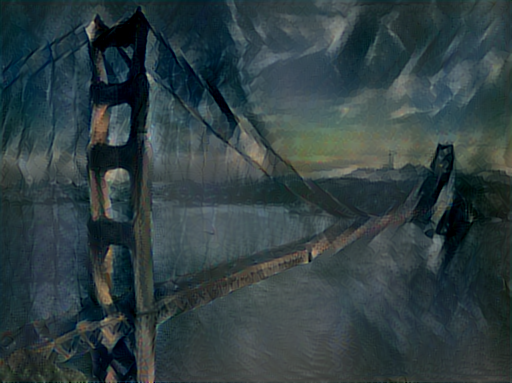
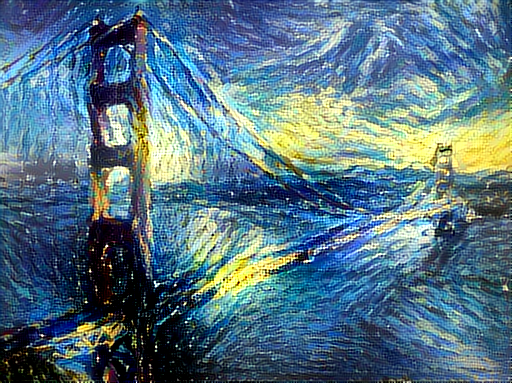
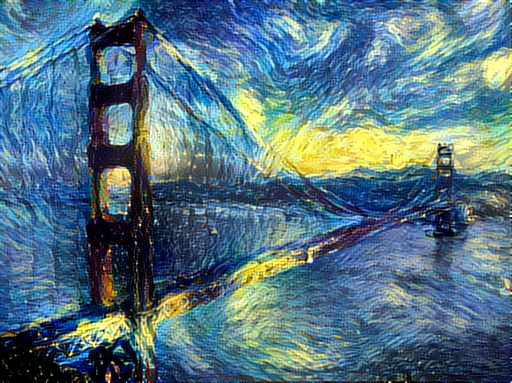
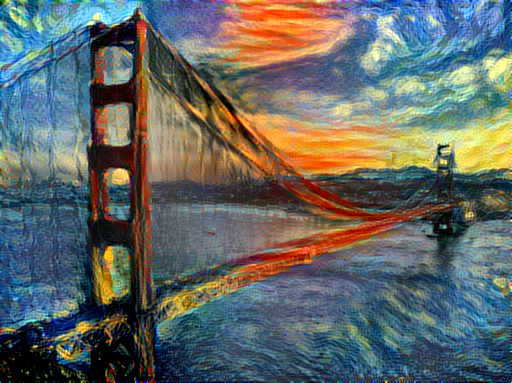
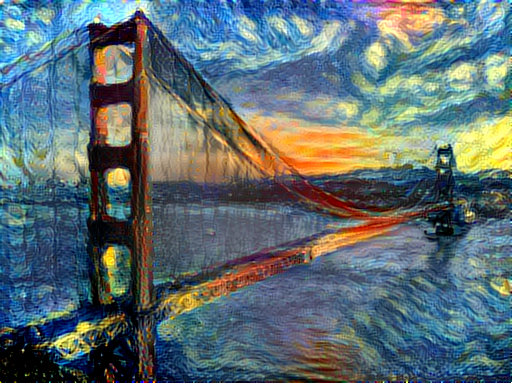
### Style Scale
By resizing the style image before extracting style features, we can control the types of artistic
features that are transfered from the style image; you can control this behavior with the `-style_scale` flag.
Below we see three examples of rendering the Golden Gate Bridge in the style of The Starry Night.
From left to right, `-style_scale` is 2.0, 1.0, and 0.5.
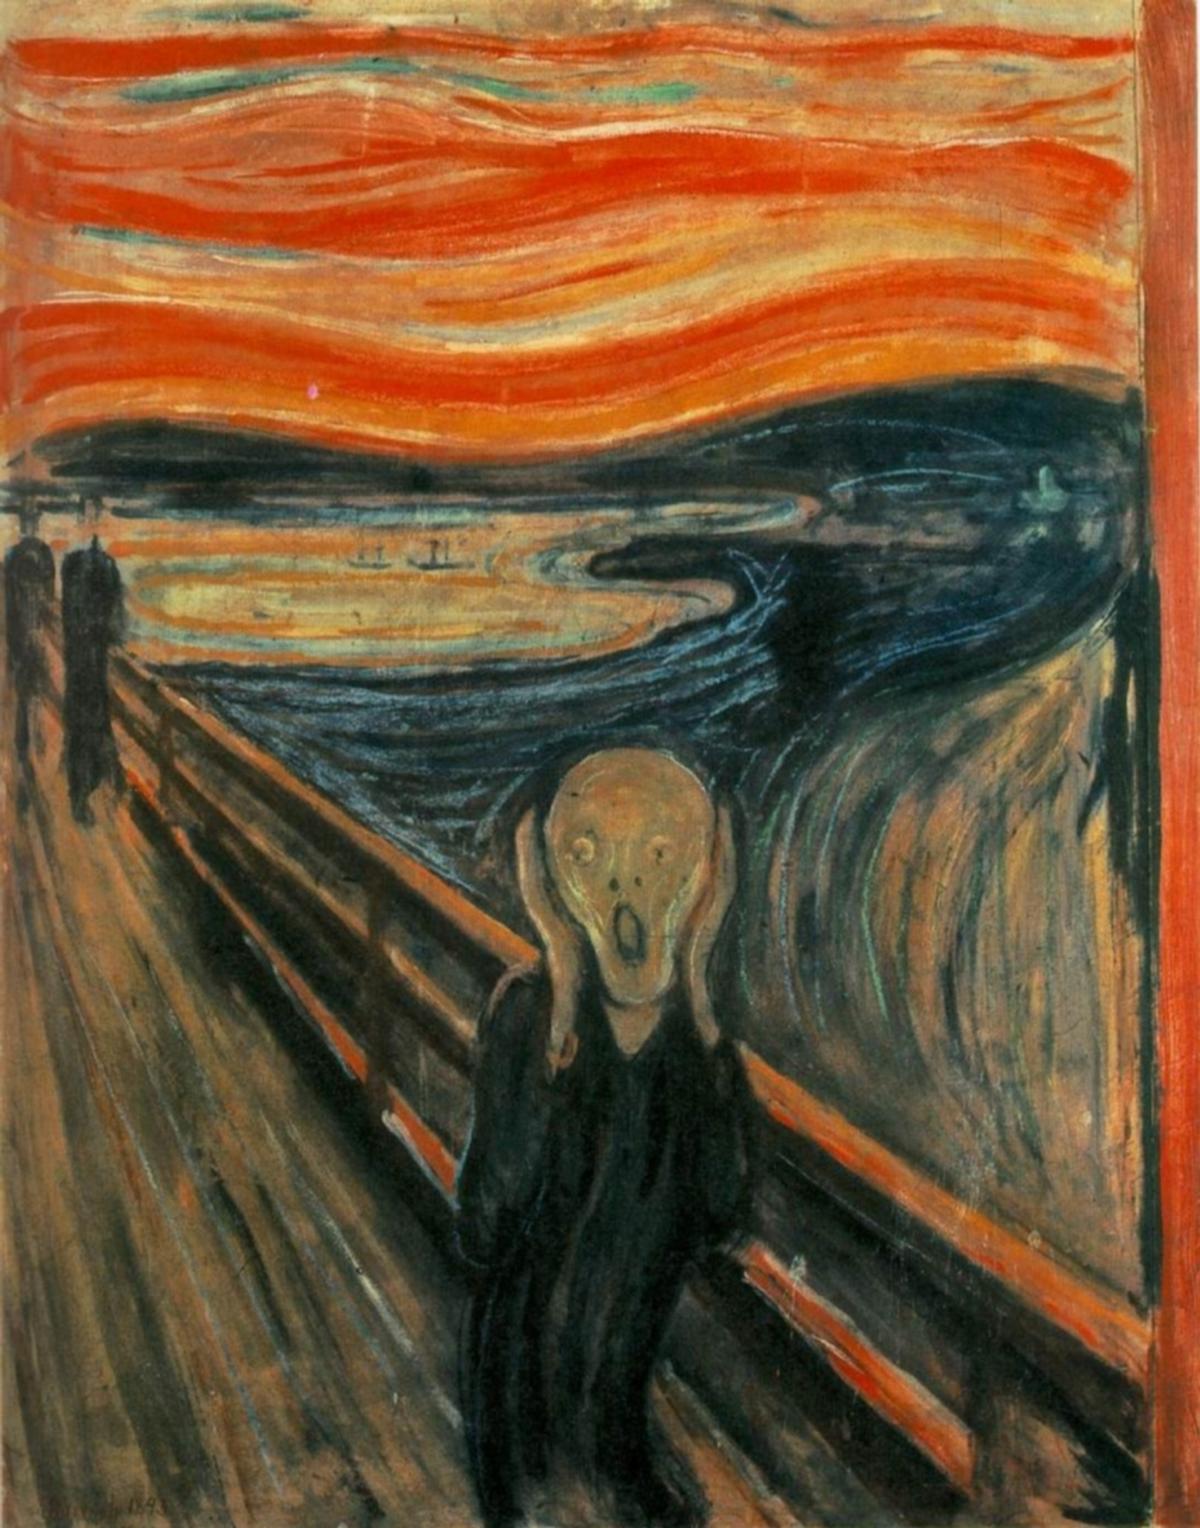
### Multiple Style Images
You can use more than one style image to blend multiple artistic styles.
Clockwise from upper left: "The Starry Night" + "The Scream", "The Scream" + "Composition VII",
"Seated Nude" + "Composition VII", and "Seated Nude" + "The Starry Night"
### Style Interpolation
When using multiple style images, you can control the degree to which they are blended:
### Transfer style but not color
If you add the flag `-original_colors 1` then the output image will retain the colors of the original image;
this is similar to [the recent blog post by deepart.io](http://blog.deepart.io/2016/06/04/color-independent-style-transfer/).
## Setup:
Dependencies:
* [torch7](https://github.com/torch/torch7)
* [loadcaffe](https://github.com/szagoruyko/loadcaffe)
Optional dependencies:
* For CUDA backend:
* CUDA 6.5+
* [cunn](https://github.com/torch/cunn)
* For cuDNN backend:
* [cudnn.torch](https://github.com/soumith/cudnn.torch)
* For OpenCL backend:
* [cltorch](https://github.com/hughperkins/cltorch)
* [clnn](https://github.com/hughperkins/clnn)
After installing dependencies, you'll need to run the following script to download the VGG model:
```
sh models/download_models.sh
```
This will download the original [VGG-19 model](https://gist.github.com/ksimonyan/3785162f95cd2d5fee77#file-readme-md).
Leon Gatys has graciously provided the modified version of the VGG-19 model that was used in their paper;
this will also be downloaded. By default the original VGG-19 model is used.
If you have a smaller memory GPU then using NIN Imagenet model will be better and gives slightly worse yet comparable results. You can get the details on the model from [BVLC Caffe ModelZoo](https://github.com/BVLC/caffe/wiki/Model-Zoo) and can download the files from [NIN-Imagenet Download Link](https://drive.google.com/folderview?id=0B0IedYUunOQINEFtUi1QNWVhVVU&usp=drive_web)
You can find detailed installation instructions for Ubuntu in the [installation guide](INSTALL.md).
## Usage
Basic usage:
```
th neural_style.lua -style_image -content_image
```
OpenCL usage with NIN Model (This requires you download the NIN Imagenet model files as described above):
```
th neural_style.lua -style_image examples/inputs/picasso_selfport1907.jpg -content_image examples/inputs/brad_pitt.jpg -output_image profile.png -model_file models/nin_imagenet_conv.caffemodel -proto_file models/train_val.prototxt -gpu 0 -backend clnn -num_iterations 1000 -seed 123 -content_layers relu0,relu3,relu7,relu12 -style_layers relu0,relu3,relu7,relu12 -content_weight 10 -style_weight 1000 -image_size 512 -optimizer adam
```

To use multiple style images, pass a comma-separated list like this:
`-style_image starry_night.jpg,the_scream.jpg`.
Note that paths to images should not contain the `~` character to represent your home directory; you should instead use a relative
path or a full absolute path.
**Options**:
* `-image_size`: Maximum side length (in pixels) of of the generated image. Default is 512.
* `-style_blend_weights`: The weight for blending the style of multiple style images, as a
comma-separated list, such as `-style_blend_weights 3,7`. By default all style images
are equally weighted.
* `-gpu`: Zero-indexed ID of the GPU to use; for CPU mode set `-gpu` to -1.
**Optimization options**:
* `-content_weight`: How much to weight the content reconstruction term. Default is 5e0.
* `-style_weight`: How much to weight the style reconstruction term. Default is 1e2.
* `-tv_weight`: Weight of total-variation (TV) regularization; this helps to smooth the image.
Default is 1e-3. Set to 0 to disable TV regularization.
* `-num_iterations`: Default is 1000.
* `-init`: Method for generating the generated image; one of `random` or `image`.
Default is `random` which uses a noise initialization as in the paper; `image`
initializes with the content image.
* `-optimizer`: The optimization algorithm to use; either `lbfgs` or `adam`; default is `lbfgs`.
L-BFGS tends to give better results, but uses more memory. Switching to ADAM will reduce memory usage;
when using ADAM you will probably need to play with other parameters to get good results, especially
the style weight, content weight, and learning rate; you may also want to normalize gradients when
using ADAM.
* `-learning_rate`: Learning rate to use with the ADAM optimizer. Default is 1e1.
* `-normalize_gradients`: If this flag is present, style and content gradients from each layer will be
L1 normalized. Idea from [andersbll/neural_artistic_style](https://github.com/andersbll/neural_artistic_style).
**Output options**:
* `-output_image`: Name of the output image. Default is `out.png`.
* `-print_iter`: Print progress every `print_iter` iterations. Set to 0 to disable printing.
* `-save_iter`: Save the image every `save_iter` iterations. Set to 0 to disable saving intermediate results.
**Layer options**:
* `-content_layers`: Comma-separated list of layer names to use for content reconstruction.
Default is `relu4_2`.
* `-style_layers`: Comma-separated list of layer names to use for style reconstruction.
Default is `relu1_1,relu2_1,relu3_1,relu4_1,relu5_1`.
**Other options**:
* `-style_scale`: Scale at which to extract features from the style image. Default is 1.0.
* `-original_colors`: If you set this to 1, then the output image will keep the colors of the content image.
* `-proto_file`: Path to the `deploy.txt` file for the VGG Caffe model.
* `-model_file`: Path to the `.caffemodel` file for the VGG Caffe model.
Default is the original VGG-19 model; you can also try the normalized VGG-19 model used in the paper.
* `-pooling`: The type of pooling layers to use; one of `max` or `avg`. Default is `max`.
The VGG-19 models uses max pooling layers, but the paper mentions that replacing these layers with average
pooling layers can improve the results. I haven't been able to get good results using average pooling, but
the option is here.
* `-backend`: `nn`, `cudnn`, or `clnn`. Default is `nn`. `cudnn` requires
[cudnn.torch](https://github.com/soumith/cudnn.torch) and may reduce memory usage.
`clnn` requires [cltorch](https://github.com/hughperkins/cltorch) and [clnn](https://github.com/hughperkins/clnn)
* `-cudnn_autotune`: When using the cuDNN backend, pass this flag to use the built-in cuDNN autotuner to select
the best convolution algorithms for your architecture. This will make the first iteration a bit slower and can
take a bit more memory, but may significantly speed up the cuDNN backend.
## Frequently Asked Questions
**Problem:** Generated image has saturation artifacts:
 **Solution:** Update the `image` packge to the latest version: `luarocks install image`
**Problem:** Running without a GPU gives an error message complaining about `cutorch` not found
**Solution:**
Pass the flag `-gpu -1` when running in CPU-only mode
**Problem:** The program runs out of memory and dies
**Solution:** Try reducing the image size: `-image_size 256` (or lower). Note that different image sizes will likely
require non-default values for `-style_weight` and `-content_weight` for optimal results.
If you are running on a GPU, you can also try running with `-backend cudnn` to reduce memory usage.
**Problem:** Get the following error message:
`models/VGG_ILSVRC_19_layers_deploy.prototxt.cpu.lua:7: attempt to call method 'ceil' (a nil value)`
**Solution:** Update `nn` package to the latest version: `luarocks install nn`
**Problem:** Get an error message complaining about `paths.extname`
**Solution:** Update `torch.paths` package to the latest version: `luarocks install paths`
**Problem:** NIN Imagenet model is not giving good results.
**Solution:** Make sure the correct `-proto_file` is selected. Also make sure the correct parameters for `-content_layers` and `-style_layers` are set. (See OpenCL usage example above.)
**Problem:** `-backend cudnn` is slower than default NN backend
**Solution:** Add the flag `-cudnn_autotune`; this will use the built-in cuDNN autotuner to select the best convolution algorithms.
## Memory Usage
By default, `neural-style` uses the `nn` backend for convolutions and L-BFGS for optimization.
These give good results, but can both use a lot of memory. You can reduce memory usage with the following:
* **Use cuDNN**: Add the flag `-backend cudnn` to use the cuDNN backend. This will only work in GPU mode.
* **Use ADAM**: Add the flag `-optimizer adam` to use ADAM instead of L-BFGS. This should significantly
reduce memory usage, but may require tuning of other parameters for good results; in particular you should
play with the learning rate, content weight, style weight, and also consider using gradient normalization.
This should work in both CPU and GPU modes.
* **Reduce image size**: If the above tricks are not enough, you can reduce the size of the generated image;
pass the flag `-image_size 256` to generate an image at half the default size.
With the default settings, `neural-style` uses about 3.5GB of GPU memory on my system;
switching to ADAM and cuDNN reduces the GPU memory footprint to about 1GB.
## Speed
Speed can vary a lot depending on the backend and the optimizer.
Here are some times for running 500 iterations with `-image_size=512` on a Maxwell Titan X with different settings:
* `-backend nn -optimizer lbfgs`: 62 seconds
* `-backend nn -optimizer adam`: 49 seconds
* `-backend cudnn -optimizer lbfgs`: 79 seconds
* `-backend cudnn -cudnn_autotune -optimizer lbfgs`: 58 seconds
* `-backend cudnn -cudnn_autotune -optimizer adam`: 44 seconds
* `-backend clnn -optimizer lbfgs`: 169 seconds
* `-backend clnn -optimizer adam`: 106 seconds
Here are the same benchmarks on a Pascal Titan X with cuDNN 5.0 on CUDA 8.0 RC:
* `-backend nn -optimizer lbfgs`: 43 seconds
* `-backend nn -optimizer adam`: 36 seconds
* `-backend cudnn -optimizer lbfgs`: 45 seconds
* `-backend cudnn -cudnn_autotune -optimizer lbfgs`: 30 seconds
* `-backend cudnn -cudnn_autotune -optimizer adam`: 22 seconds
## Multi-GPU scaling
You can use multiple GPUs to process images at higher resolutions; different layers of the network will be
computed on different GPUs. You can control which GPUs are used with the `-gpu` flag, and you can control
how to split layers across GPUs using the `-multigpu_strategy` flag.
For example in a server with four GPUs, you can give the flag `-gpu 0,1,2,3` to process on GPUs 0, 1, 2, and
3 in that order; by also giving the flag `-multigpu_strategy 3,6,12` you indicate that the first two layers
should be computed on GPU 0, layers 3 to 5 should be computed on GPU 1, layers 6 to 11 should be computed on
GPU 2, and the remaining layers should be computed on GPU 3. You will need to tune the `-multigpu_strategy`
for your setup in order to achieve maximal resolution.
We can achieve very high quality results at high resolution by combining multi-GPU processing with multiscale
generation as described in the paper
**Controlling Perceptual Factors in Neural Style Transfer** by Leon A. Gatys,
Alexander S. Ecker, Matthias Bethge, Aaron Hertzmann and Eli Shechtman.
Here is a 3620 x 1905 image generated on a server with four Pascal Titan X GPUs:
**Solution:** Update the `image` packge to the latest version: `luarocks install image`
**Problem:** Running without a GPU gives an error message complaining about `cutorch` not found
**Solution:**
Pass the flag `-gpu -1` when running in CPU-only mode
**Problem:** The program runs out of memory and dies
**Solution:** Try reducing the image size: `-image_size 256` (or lower). Note that different image sizes will likely
require non-default values for `-style_weight` and `-content_weight` for optimal results.
If you are running on a GPU, you can also try running with `-backend cudnn` to reduce memory usage.
**Problem:** Get the following error message:
`models/VGG_ILSVRC_19_layers_deploy.prototxt.cpu.lua:7: attempt to call method 'ceil' (a nil value)`
**Solution:** Update `nn` package to the latest version: `luarocks install nn`
**Problem:** Get an error message complaining about `paths.extname`
**Solution:** Update `torch.paths` package to the latest version: `luarocks install paths`
**Problem:** NIN Imagenet model is not giving good results.
**Solution:** Make sure the correct `-proto_file` is selected. Also make sure the correct parameters for `-content_layers` and `-style_layers` are set. (See OpenCL usage example above.)
**Problem:** `-backend cudnn` is slower than default NN backend
**Solution:** Add the flag `-cudnn_autotune`; this will use the built-in cuDNN autotuner to select the best convolution algorithms.
## Memory Usage
By default, `neural-style` uses the `nn` backend for convolutions and L-BFGS for optimization.
These give good results, but can both use a lot of memory. You can reduce memory usage with the following:
* **Use cuDNN**: Add the flag `-backend cudnn` to use the cuDNN backend. This will only work in GPU mode.
* **Use ADAM**: Add the flag `-optimizer adam` to use ADAM instead of L-BFGS. This should significantly
reduce memory usage, but may require tuning of other parameters for good results; in particular you should
play with the learning rate, content weight, style weight, and also consider using gradient normalization.
This should work in both CPU and GPU modes.
* **Reduce image size**: If the above tricks are not enough, you can reduce the size of the generated image;
pass the flag `-image_size 256` to generate an image at half the default size.
With the default settings, `neural-style` uses about 3.5GB of GPU memory on my system;
switching to ADAM and cuDNN reduces the GPU memory footprint to about 1GB.
## Speed
Speed can vary a lot depending on the backend and the optimizer.
Here are some times for running 500 iterations with `-image_size=512` on a Maxwell Titan X with different settings:
* `-backend nn -optimizer lbfgs`: 62 seconds
* `-backend nn -optimizer adam`: 49 seconds
* `-backend cudnn -optimizer lbfgs`: 79 seconds
* `-backend cudnn -cudnn_autotune -optimizer lbfgs`: 58 seconds
* `-backend cudnn -cudnn_autotune -optimizer adam`: 44 seconds
* `-backend clnn -optimizer lbfgs`: 169 seconds
* `-backend clnn -optimizer adam`: 106 seconds
Here are the same benchmarks on a Pascal Titan X with cuDNN 5.0 on CUDA 8.0 RC:
* `-backend nn -optimizer lbfgs`: 43 seconds
* `-backend nn -optimizer adam`: 36 seconds
* `-backend cudnn -optimizer lbfgs`: 45 seconds
* `-backend cudnn -cudnn_autotune -optimizer lbfgs`: 30 seconds
* `-backend cudnn -cudnn_autotune -optimizer adam`: 22 seconds
## Multi-GPU scaling
You can use multiple GPUs to process images at higher resolutions; different layers of the network will be
computed on different GPUs. You can control which GPUs are used with the `-gpu` flag, and you can control
how to split layers across GPUs using the `-multigpu_strategy` flag.
For example in a server with four GPUs, you can give the flag `-gpu 0,1,2,3` to process on GPUs 0, 1, 2, and
3 in that order; by also giving the flag `-multigpu_strategy 3,6,12` you indicate that the first two layers
should be computed on GPU 0, layers 3 to 5 should be computed on GPU 1, layers 6 to 11 should be computed on
GPU 2, and the remaining layers should be computed on GPU 3. You will need to tune the `-multigpu_strategy`
for your setup in order to achieve maximal resolution.
We can achieve very high quality results at high resolution by combining multi-GPU processing with multiscale
generation as described in the paper
**Controlling Perceptual Factors in Neural Style Transfer** by Leon A. Gatys,
Alexander S. Ecker, Matthias Bethge, Aaron Hertzmann and Eli Shechtman.
Here is a 3620 x 1905 image generated on a server with four Pascal Titan X GPUs:
 The script used to generate this image can be found here.
## Implementation details
Images are initialized with white noise and optimized using L-BFGS.
We perform style reconstructions using the `conv1_1`, `conv2_1`, `conv3_1`, `conv4_1`, and `conv5_1` layers
and content reconstructions using the `conv4_2` layer. As in the paper, the five style reconstruction losses have
equal weights.
## Citation
If you find this code useful for your research, please cite:
```
@misc{Johnson2015,
author = {Johnson, Justin},
title = {neural-style},
year = {2015},
publisher = {GitHub},
journal = {GitHub repository},
howpublished = {\url{https://github.com/jcjohnson/neural-style}},
}
```
================================================
FILE: examples/multigpu_scripts/starry_stanford.sh
================================================
# To run this script you'll need to download the ultra-high res
# scan of Starry Night from the Google Art Project, available here:
# https://commons.wikimedia.org/wiki/File:Van_Gogh_-_Starry_Night_-_Google_Art_Project.jpg
STYLE_IMAGE=starry_night_gigapixel.jpg
CONTENT_IMAGE=examples/inputs/hoovertowernight.jpg
STYLE_WEIGHT=5e2
STYLE_SCALE=1.0
th neural_style.lua \
-content_image $CONTENT_IMAGE \
-style_image $STYLE_IMAGE \
-style_scale $STYLE_SCALE \
-print_iter 1 \
-style_weight $STYLE_WEIGHT \
-image_size 256 \
-output_image out1.png \
-tv_weight 0 \
-backend cudnn -cudnn_autotune
th neural_style.lua \
-content_image $CONTENT_IMAGE \
-style_image $STYLE_IMAGE \
-init image -init_image out1.png \
-style_scale $STYLE_SCALE \
-print_iter 1 \
-style_weight $STYLE_WEIGHT \
-image_size 512 \
-num_iterations 500 \
-output_image out2.png \
-tv_weight 0 \
-backend cudnn -cudnn_autotune
th neural_style.lua \
-content_image $CONTENT_IMAGE \
-style_image $STYLE_IMAGE \
-init image -init_image out2.png \
-style_scale $STYLE_SCALE \
-print_iter 1 \
-style_weight $STYLE_WEIGHT \
-image_size 1024 \
-num_iterations 200 \
-output_image out3.png \
-tv_weight 0 \
-backend cudnn -cudnn_autotune
th neural_style.lua \
-content_image $CONTENT_IMAGE \
-style_image $STYLE_IMAGE \
-init image -init_image out3.png \
-style_scale $STYLE_SCALE \
-print_iter 1 \
-style_weight $STYLE_WEIGHT \
-image_size 2048 \
-num_iterations 100 \
-output_image out4.png \
-tv_weight 0 \
-gpu 0,1 \
-backend cudnn
th neural_style.lua \
-content_image $CONTENT_IMAGE \
-style_image $STYLE_IMAGE \
-init image -init_image out4.png \
-style_scale $STYLE_SCALE \
-print_iter 1 \
-style_weight $STYLE_WEIGHT \
-image_size 3620 \
-num_iterations 50 \
-save_iter 25 \
-output_image out5.png \
-tv_weight 0 \
-lbfgs_num_correction 5 \
-gpu 0,1,2,3 \
-multigpu_strategy 3,6,12 \
-backend cudnn
================================================
FILE: models/download_models.sh
================================================
cd models
wget -c https://gist.githubusercontent.com/ksimonyan/3785162f95cd2d5fee77/raw/bb2b4fe0a9bb0669211cf3d0bc949dfdda173e9e/VGG_ILSVRC_19_layers_deploy.prototxt
wget -c --no-check-certificate https://bethgelab.org/media/uploads/deeptextures/vgg_normalised.caffemodel
wget -c http://www.robots.ox.ac.uk/~vgg/software/very_deep/caffe/VGG_ILSVRC_19_layers.caffemodel
cd ..
================================================
FILE: neural_style.lua
================================================
require 'torch'
require 'nn'
require 'image'
require 'optim'
require 'loadcaffe'
local cmd = torch.CmdLine()
-- Basic options
cmd:option('-style_image', 'examples/inputs/seated-nude.jpg',
'Style target image')
cmd:option('-style_blend_weights', 'nil')
cmd:option('-content_image', 'examples/inputs/tubingen.jpg',
'Content target image')
cmd:option('-image_size', 512, 'Maximum height / width of generated image')
cmd:option('-gpu', '0', 'Zero-indexed ID of the GPU to use; for CPU mode set -gpu = -1')
cmd:option('-multigpu_strategy', '', 'Index of layers to split the network across GPUs')
-- Optimization options
cmd:option('-content_weight', 5e0)
cmd:option('-style_weight', 1e2)
cmd:option('-tv_weight', 1e-3)
cmd:option('-num_iterations', 1000)
cmd:option('-normalize_gradients', false)
cmd:option('-init', 'random', 'random|image')
cmd:option('-init_image', '')
cmd:option('-optimizer', 'lbfgs', 'lbfgs|adam')
cmd:option('-learning_rate', 1e1)
cmd:option('-lbfgs_num_correction', 0)
-- Output options
cmd:option('-print_iter', 50)
cmd:option('-save_iter', 100)
cmd:option('-output_image', 'out.png')
-- Other options
cmd:option('-style_scale', 1.0)
cmd:option('-original_colors', 0)
cmd:option('-pooling', 'max', 'max|avg')
cmd:option('-proto_file', 'models/VGG_ILSVRC_19_layers_deploy.prototxt')
cmd:option('-model_file', 'models/VGG_ILSVRC_19_layers.caffemodel')
cmd:option('-backend', 'nn', 'nn|cudnn|clnn')
cmd:option('-cudnn_autotune', false)
cmd:option('-seed', -1)
cmd:option('-content_layers', 'relu4_2', 'layers for content')
cmd:option('-style_layers', 'relu1_1,relu2_1,relu3_1,relu4_1,relu5_1', 'layers for style')
local function main(params)
local dtype, multigpu = setup_gpu(params)
local loadcaffe_backend = params.backend
if params.backend == 'clnn' then loadcaffe_backend = 'nn' end
local cnn = loadcaffe.load(params.proto_file, params.model_file, loadcaffe_backend):type(dtype)
local content_image = image.load(params.content_image, 3)
content_image = image.scale(content_image, params.image_size, 'bilinear')
local content_image_caffe = preprocess(content_image):float()
local style_size = math.ceil(params.style_scale * params.image_size)
local style_image_list = params.style_image:split(',')
local style_images_caffe = {}
for _, img_path in ipairs(style_image_list) do
local img = image.load(img_path, 3)
img = image.scale(img, style_size, 'bilinear')
local img_caffe = preprocess(img):float()
table.insert(style_images_caffe, img_caffe)
end
local init_image = nil
if params.init_image ~= '' then
init_image = image.load(params.init_image, 3)
local H, W = content_image:size(2), content_image:size(3)
init_image = image.scale(init_image, W, H, 'bilinear')
init_image = preprocess(init_image):float()
end
-- Handle style blending weights for multiple style inputs
local style_blend_weights = nil
if params.style_blend_weights == 'nil' then
-- Style blending not specified, so use equal weighting
style_blend_weights = {}
for i = 1, #style_image_list do
table.insert(style_blend_weights, 1.0)
end
else
style_blend_weights = params.style_blend_weights:split(',')
assert(#style_blend_weights == #style_image_list,
'-style_blend_weights and -style_images must have the same number of elements')
end
-- Normalize the style blending weights so they sum to 1
local style_blend_sum = 0
for i = 1, #style_blend_weights do
style_blend_weights[i] = tonumber(style_blend_weights[i])
style_blend_sum = style_blend_sum + style_blend_weights[i]
end
for i = 1, #style_blend_weights do
style_blend_weights[i] = style_blend_weights[i] / style_blend_sum
end
local content_layers = params.content_layers:split(",")
local style_layers = params.style_layers:split(",")
-- Set up the network, inserting style and content loss modules
local content_losses, style_losses = {}, {}
local next_content_idx, next_style_idx = 1, 1
local net = nn.Sequential()
if params.tv_weight > 0 then
local tv_mod = nn.TVLoss(params.tv_weight):type(dtype)
net:add(tv_mod)
end
for i = 1, #cnn do
if next_content_idx <= #content_layers or next_style_idx <= #style_layers then
local layer = cnn:get(i)
local name = layer.name
local layer_type = torch.type(layer)
local is_pooling = (layer_type == 'cudnn.SpatialMaxPooling' or layer_type == 'nn.SpatialMaxPooling')
if is_pooling and params.pooling == 'avg' then
assert(layer.padW == 0 and layer.padH == 0)
local kW, kH = layer.kW, layer.kH
local dW, dH = layer.dW, layer.dH
local avg_pool_layer = nn.SpatialAveragePooling(kW, kH, dW, dH):type(dtype)
local msg = 'Replacing max pooling at layer %d with average pooling'
print(string.format(msg, i))
net:add(avg_pool_layer)
else
net:add(layer)
end
if name == content_layers[next_content_idx] then
print("Setting up content layer", i, ":", layer.name)
local norm = params.normalize_gradients
local loss_module = nn.ContentLoss(params.content_weight, norm):type(dtype)
net:add(loss_module)
table.insert(content_losses, loss_module)
next_content_idx = next_content_idx + 1
end
if name == style_layers[next_style_idx] then
print("Setting up style layer ", i, ":", layer.name)
local norm = params.normalize_gradients
local loss_module = nn.StyleLoss(params.style_weight, norm):type(dtype)
net:add(loss_module)
table.insert(style_losses, loss_module)
next_style_idx = next_style_idx + 1
end
end
end
if multigpu then
net = setup_multi_gpu(net, params)
end
net:type(dtype)
-- Capture content targets
for i = 1, #content_losses do
content_losses[i].mode = 'capture'
end
print 'Capturing content targets'
print(net)
content_image_caffe = content_image_caffe:type(dtype)
net:forward(content_image_caffe:type(dtype))
-- Capture style targets
for i = 1, #content_losses do
content_losses[i].mode = 'none'
end
for i = 1, #style_images_caffe do
print(string.format('Capturing style target %d', i))
for j = 1, #style_losses do
style_losses[j].mode = 'capture'
style_losses[j].blend_weight = style_blend_weights[i]
end
net:forward(style_images_caffe[i]:type(dtype))
end
-- Set all loss modules to loss mode
for i = 1, #content_losses do
content_losses[i].mode = 'loss'
end
for i = 1, #style_losses do
style_losses[i].mode = 'loss'
end
-- We don't need the base CNN anymore, so clean it up to save memory.
cnn = nil
for i=1, #net.modules do
local module = net.modules[i]
if torch.type(module) == 'nn.SpatialConvolutionMM' then
-- remove these, not used, but uses gpu memory
module.gradWeight = nil
module.gradBias = nil
end
end
collectgarbage()
-- Initialize the image
if params.seed >= 0 then
torch.manualSeed(params.seed)
end
local img = nil
if params.init == 'random' then
img = torch.randn(content_image:size()):float():mul(0.001)
elseif params.init == 'image' then
if init_image then
img = init_image:clone()
else
img = content_image_caffe:clone()
end
else
error('Invalid init type')
end
img = img:type(dtype)
-- Run it through the network once to get the proper size for the gradient
-- All the gradients will come from the extra loss modules, so we just pass
-- zeros into the top of the net on the backward pass.
local y = net:forward(img)
local dy = img.new(#y):zero()
-- Declaring this here lets us access it in maybe_print
local optim_state = nil
if params.optimizer == 'lbfgs' then
optim_state = {
maxIter = params.num_iterations,
verbose=true,
tolX=-1,
tolFun=-1,
}
if params.lbfgs_num_correction > 0 then
optim_state.nCorrection = params.lbfgs_num_correction
end
elseif params.optimizer == 'adam' then
optim_state = {
learningRate = params.learning_rate,
}
else
error(string.format('Unrecognized optimizer "%s"', params.optimizer))
end
local function maybe_print(t, loss)
local verbose = (params.print_iter > 0 and t % params.print_iter == 0)
if verbose then
print(string.format('Iteration %d / %d', t, params.num_iterations))
for i, loss_module in ipairs(content_losses) do
print(string.format(' Content %d loss: %f', i, loss_module.loss))
end
for i, loss_module in ipairs(style_losses) do
print(string.format(' Style %d loss: %f', i, loss_module.loss))
end
print(string.format(' Total loss: %f', loss))
end
end
local function maybe_save(t)
local should_save = params.save_iter > 0 and t % params.save_iter == 0
should_save = should_save or t == params.num_iterations
if should_save then
local disp = deprocess(img:double())
disp = image.minmax{tensor=disp, min=0, max=1}
local filename = build_filename(params.output_image, t)
if t == params.num_iterations then
filename = params.output_image
end
-- Maybe perform postprocessing for color-independent style transfer
if params.original_colors == 1 then
disp = original_colors(content_image, disp)
end
image.save(filename, disp)
end
end
-- Function to evaluate loss and gradient. We run the net forward and
-- backward to get the gradient, and sum up losses from the loss modules.
-- optim.lbfgs internally handles iteration and calls this function many
-- times, so we manually count the number of iterations to handle printing
-- and saving intermediate results.
local num_calls = 0
local function feval(x)
num_calls = num_calls + 1
net:forward(x)
local grad = net:updateGradInput(x, dy)
local loss = 0
for _, mod in ipairs(content_losses) do
loss = loss + mod.loss
end
for _, mod in ipairs(style_losses) do
loss = loss + mod.loss
end
maybe_print(num_calls, loss)
maybe_save(num_calls)
collectgarbage()
-- optim.lbfgs expects a vector for gradients
return loss, grad:view(grad:nElement())
end
-- Run optimization.
if params.optimizer == 'lbfgs' then
print('Running optimization with L-BFGS')
local x, losses = optim.lbfgs(feval, img, optim_state)
elseif params.optimizer == 'adam' then
print('Running optimization with ADAM')
for t = 1, params.num_iterations do
local x, losses = optim.adam(feval, img, optim_state)
end
end
end
function setup_gpu(params)
local multigpu = false
if params.gpu:find(',') then
multigpu = true
params.gpu = params.gpu:split(',')
for i = 1, #params.gpu do
params.gpu[i] = tonumber(params.gpu[i]) + 1
end
else
params.gpu = tonumber(params.gpu) + 1
end
local dtype = 'torch.FloatTensor'
if multigpu or params.gpu > 0 then
if params.backend ~= 'clnn' then
require 'cutorch'
require 'cunn'
if multigpu then
cutorch.setDevice(params.gpu[1])
else
cutorch.setDevice(params.gpu)
end
dtype = 'torch.CudaTensor'
else
require 'clnn'
require 'cltorch'
if multigpu then
cltorch.setDevice(params.gpu[1])
else
cltorch.setDevice(params.gpu)
end
dtype = torch.Tensor():cl():type()
end
else
params.backend = 'nn'
end
if params.backend == 'cudnn' then
require 'cudnn'
if params.cudnn_autotune then
cudnn.benchmark = true
end
cudnn.SpatialConvolution.accGradParameters = nn.SpatialConvolutionMM.accGradParameters -- ie: nop
end
return dtype, multigpu
end
function setup_multi_gpu(net, params)
local DEFAULT_STRATEGIES = {
[2] = {3},
}
local gpu_splits = nil
if params.multigpu_strategy == '' then
-- Use a default strategy
gpu_splits = DEFAULT_STRATEGIES[#params.gpu]
-- Offset the default strategy by one if we are using TV
if params.tv_weight > 0 then
for i = 1, #gpu_splits do gpu_splits[i] = gpu_splits[i] + 1 end
end
else
-- Use the user-specified multigpu strategy
gpu_splits = params.multigpu_strategy:split(',')
for i = 1, #gpu_splits do
gpu_splits[i] = tonumber(gpu_splits[i])
end
end
assert(gpu_splits ~= nil, 'Must specify -multigpu_strategy')
local gpus = params.gpu
local cur_chunk = nn.Sequential()
local chunks = {}
for i = 1, #net do
cur_chunk:add(net:get(i))
if i == gpu_splits[1] then
table.remove(gpu_splits, 1)
table.insert(chunks, cur_chunk)
cur_chunk = nn.Sequential()
end
end
table.insert(chunks, cur_chunk)
assert(#chunks == #gpus)
local new_net = nn.Sequential()
for i = 1, #chunks do
local out_device = nil
if i == #chunks then
out_device = gpus[1]
end
new_net:add(nn.GPU(chunks[i], gpus[i], out_device))
end
return new_net
end
function build_filename(output_image, iteration)
local ext = paths.extname(output_image)
local basename = paths.basename(output_image, ext)
local directory = paths.dirname(output_image)
return string.format('%s/%s_%d.%s',directory, basename, iteration, ext)
end
-- Preprocess an image before passing it to a Caffe model.
-- We need to rescale from [0, 1] to [0, 255], convert from RGB to BGR,
-- and subtract the mean pixel.
function preprocess(img)
local mean_pixel = torch.DoubleTensor({103.939, 116.779, 123.68})
local perm = torch.LongTensor{3, 2, 1}
img = img:index(1, perm):mul(256.0)
mean_pixel = mean_pixel:view(3, 1, 1):expandAs(img)
img:add(-1, mean_pixel)
return img
end
-- Undo the above preprocessing.
function deprocess(img)
local mean_pixel = torch.DoubleTensor({103.939, 116.779, 123.68})
mean_pixel = mean_pixel:view(3, 1, 1):expandAs(img)
img = img + mean_pixel
local perm = torch.LongTensor{3, 2, 1}
img = img:index(1, perm):div(256.0)
return img
end
-- Combine the Y channel of the generated image and the UV channels of the
-- content image to perform color-independent style transfer.
function original_colors(content, generated)
local generated_y = image.rgb2yuv(generated)[{{1, 1}}]
local content_uv = image.rgb2yuv(content)[{{2, 3}}]
return image.yuv2rgb(torch.cat(generated_y, content_uv, 1))
end
-- Define an nn Module to compute content loss in-place
local ContentLoss, parent = torch.class('nn.ContentLoss', 'nn.Module')
function ContentLoss:__init(strength, normalize)
parent.__init(self)
self.strength = strength
self.target = torch.Tensor()
self.normalize = normalize or false
self.loss = 0
self.crit = nn.MSECriterion()
self.mode = 'none'
end
function ContentLoss:updateOutput(input)
if self.mode == 'loss' then
self.loss = self.crit:forward(input, self.target) * self.strength
elseif self.mode == 'capture' then
self.target:resizeAs(input):copy(input)
end
self.output = input
return self.output
end
function ContentLoss:updateGradInput(input, gradOutput)
if self.mode == 'loss' then
if input:nElement() == self.target:nElement() then
self.gradInput = self.crit:backward(input, self.target)
end
if self.normalize then
self.gradInput:div(torch.norm(self.gradInput, 1) + 1e-8)
end
self.gradInput:mul(self.strength)
self.gradInput:add(gradOutput)
else
self.gradInput:resizeAs(gradOutput):copy(gradOutput)
end
return self.gradInput
end
local Gram, parent = torch.class('nn.GramMatrix', 'nn.Module')
function Gram:__init()
parent.__init(self)
end
function Gram:updateOutput(input)
assert(input:dim() == 3)
local C, H, W = input:size(1), input:size(2), input:size(3)
local x_flat = input:view(C, H * W)
self.output:resize(C, C)
self.output:mm(x_flat, x_flat:t())
return self.output
end
function Gram:updateGradInput(input, gradOutput)
assert(input:dim() == 3 and input:size(1))
local C, H, W = input:size(1), input:size(2), input:size(3)
local x_flat = input:view(C, H * W)
self.gradInput:resize(C, H * W):mm(gradOutput, x_flat)
self.gradInput:addmm(gradOutput:t(), x_flat)
self.gradInput = self.gradInput:view(C, H, W)
return self.gradInput
end
-- Define an nn Module to compute style loss in-place
local StyleLoss, parent = torch.class('nn.StyleLoss', 'nn.Module')
function StyleLoss:__init(strength, normalize)
parent.__init(self)
self.normalize = normalize or false
self.strength = strength
self.target = torch.Tensor()
self.mode = 'none'
self.loss = 0
self.gram = nn.GramMatrix()
self.blend_weight = nil
self.G = nil
self.crit = nn.MSECriterion()
end
function StyleLoss:updateOutput(input)
self.G = self.gram:forward(input)
self.G:div(input:nElement())
if self.mode == 'capture' then
if self.blend_weight == nil then
self.target:resizeAs(self.G):copy(self.G)
elseif self.target:nElement() == 0 then
self.target:resizeAs(self.G):copy(self.G):mul(self.blend_weight)
else
self.target:add(self.blend_weight, self.G)
end
elseif self.mode == 'loss' then
self.loss = self.strength * self.crit:forward(self.G, self.target)
end
self.output = input
return self.output
end
function StyleLoss:updateGradInput(input, gradOutput)
if self.mode == 'loss' then
local dG = self.crit:backward(self.G, self.target)
dG:div(input:nElement())
self.gradInput = self.gram:backward(input, dG)
if self.normalize then
self.gradInput:div(torch.norm(self.gradInput, 1) + 1e-8)
end
self.gradInput:mul(self.strength)
self.gradInput:add(gradOutput)
else
self.gradInput = gradOutput
end
return self.gradInput
end
local TVLoss, parent = torch.class('nn.TVLoss', 'nn.Module')
function TVLoss:__init(strength)
parent.__init(self)
self.strength = strength
self.x_diff = torch.Tensor()
self.y_diff = torch.Tensor()
end
function TVLoss:updateOutput(input)
self.output = input
return self.output
end
-- TV loss backward pass inspired by kaishengtai/neuralart
function TVLoss:updateGradInput(input, gradOutput)
self.gradInput:resizeAs(input):zero()
local C, H, W = input:size(1), input:size(2), input:size(3)
self.x_diff:resize(3, H - 1, W - 1)
self.y_diff:resize(3, H - 1, W - 1)
self.x_diff:copy(input[{{}, {1, -2}, {1, -2}}])
self.x_diff:add(-1, input[{{}, {1, -2}, {2, -1}}])
self.y_diff:copy(input[{{}, {1, -2}, {1, -2}}])
self.y_diff:add(-1, input[{{}, {2, -1}, {1, -2}}])
self.gradInput[{{}, {1, -2}, {1, -2}}]:add(self.x_diff):add(self.y_diff)
self.gradInput[{{}, {1, -2}, {2, -1}}]:add(-1, self.x_diff)
self.gradInput[{{}, {2, -1}, {1, -2}}]:add(-1, self.y_diff)
self.gradInput:mul(self.strength)
self.gradInput:add(gradOutput)
return self.gradInput
end
local params = cmd:parse(arg)
main(params)
The script used to generate this image can be found here.
## Implementation details
Images are initialized with white noise and optimized using L-BFGS.
We perform style reconstructions using the `conv1_1`, `conv2_1`, `conv3_1`, `conv4_1`, and `conv5_1` layers
and content reconstructions using the `conv4_2` layer. As in the paper, the five style reconstruction losses have
equal weights.
## Citation
If you find this code useful for your research, please cite:
```
@misc{Johnson2015,
author = {Johnson, Justin},
title = {neural-style},
year = {2015},
publisher = {GitHub},
journal = {GitHub repository},
howpublished = {\url{https://github.com/jcjohnson/neural-style}},
}
```
================================================
FILE: examples/multigpu_scripts/starry_stanford.sh
================================================
# To run this script you'll need to download the ultra-high res
# scan of Starry Night from the Google Art Project, available here:
# https://commons.wikimedia.org/wiki/File:Van_Gogh_-_Starry_Night_-_Google_Art_Project.jpg
STYLE_IMAGE=starry_night_gigapixel.jpg
CONTENT_IMAGE=examples/inputs/hoovertowernight.jpg
STYLE_WEIGHT=5e2
STYLE_SCALE=1.0
th neural_style.lua \
-content_image $CONTENT_IMAGE \
-style_image $STYLE_IMAGE \
-style_scale $STYLE_SCALE \
-print_iter 1 \
-style_weight $STYLE_WEIGHT \
-image_size 256 \
-output_image out1.png \
-tv_weight 0 \
-backend cudnn -cudnn_autotune
th neural_style.lua \
-content_image $CONTENT_IMAGE \
-style_image $STYLE_IMAGE \
-init image -init_image out1.png \
-style_scale $STYLE_SCALE \
-print_iter 1 \
-style_weight $STYLE_WEIGHT \
-image_size 512 \
-num_iterations 500 \
-output_image out2.png \
-tv_weight 0 \
-backend cudnn -cudnn_autotune
th neural_style.lua \
-content_image $CONTENT_IMAGE \
-style_image $STYLE_IMAGE \
-init image -init_image out2.png \
-style_scale $STYLE_SCALE \
-print_iter 1 \
-style_weight $STYLE_WEIGHT \
-image_size 1024 \
-num_iterations 200 \
-output_image out3.png \
-tv_weight 0 \
-backend cudnn -cudnn_autotune
th neural_style.lua \
-content_image $CONTENT_IMAGE \
-style_image $STYLE_IMAGE \
-init image -init_image out3.png \
-style_scale $STYLE_SCALE \
-print_iter 1 \
-style_weight $STYLE_WEIGHT \
-image_size 2048 \
-num_iterations 100 \
-output_image out4.png \
-tv_weight 0 \
-gpu 0,1 \
-backend cudnn
th neural_style.lua \
-content_image $CONTENT_IMAGE \
-style_image $STYLE_IMAGE \
-init image -init_image out4.png \
-style_scale $STYLE_SCALE \
-print_iter 1 \
-style_weight $STYLE_WEIGHT \
-image_size 3620 \
-num_iterations 50 \
-save_iter 25 \
-output_image out5.png \
-tv_weight 0 \
-lbfgs_num_correction 5 \
-gpu 0,1,2,3 \
-multigpu_strategy 3,6,12 \
-backend cudnn
================================================
FILE: models/download_models.sh
================================================
cd models
wget -c https://gist.githubusercontent.com/ksimonyan/3785162f95cd2d5fee77/raw/bb2b4fe0a9bb0669211cf3d0bc949dfdda173e9e/VGG_ILSVRC_19_layers_deploy.prototxt
wget -c --no-check-certificate https://bethgelab.org/media/uploads/deeptextures/vgg_normalised.caffemodel
wget -c http://www.robots.ox.ac.uk/~vgg/software/very_deep/caffe/VGG_ILSVRC_19_layers.caffemodel
cd ..
================================================
FILE: neural_style.lua
================================================
require 'torch'
require 'nn'
require 'image'
require 'optim'
require 'loadcaffe'
local cmd = torch.CmdLine()
-- Basic options
cmd:option('-style_image', 'examples/inputs/seated-nude.jpg',
'Style target image')
cmd:option('-style_blend_weights', 'nil')
cmd:option('-content_image', 'examples/inputs/tubingen.jpg',
'Content target image')
cmd:option('-image_size', 512, 'Maximum height / width of generated image')
cmd:option('-gpu', '0', 'Zero-indexed ID of the GPU to use; for CPU mode set -gpu = -1')
cmd:option('-multigpu_strategy', '', 'Index of layers to split the network across GPUs')
-- Optimization options
cmd:option('-content_weight', 5e0)
cmd:option('-style_weight', 1e2)
cmd:option('-tv_weight', 1e-3)
cmd:option('-num_iterations', 1000)
cmd:option('-normalize_gradients', false)
cmd:option('-init', 'random', 'random|image')
cmd:option('-init_image', '')
cmd:option('-optimizer', 'lbfgs', 'lbfgs|adam')
cmd:option('-learning_rate', 1e1)
cmd:option('-lbfgs_num_correction', 0)
-- Output options
cmd:option('-print_iter', 50)
cmd:option('-save_iter', 100)
cmd:option('-output_image', 'out.png')
-- Other options
cmd:option('-style_scale', 1.0)
cmd:option('-original_colors', 0)
cmd:option('-pooling', 'max', 'max|avg')
cmd:option('-proto_file', 'models/VGG_ILSVRC_19_layers_deploy.prototxt')
cmd:option('-model_file', 'models/VGG_ILSVRC_19_layers.caffemodel')
cmd:option('-backend', 'nn', 'nn|cudnn|clnn')
cmd:option('-cudnn_autotune', false)
cmd:option('-seed', -1)
cmd:option('-content_layers', 'relu4_2', 'layers for content')
cmd:option('-style_layers', 'relu1_1,relu2_1,relu3_1,relu4_1,relu5_1', 'layers for style')
local function main(params)
local dtype, multigpu = setup_gpu(params)
local loadcaffe_backend = params.backend
if params.backend == 'clnn' then loadcaffe_backend = 'nn' end
local cnn = loadcaffe.load(params.proto_file, params.model_file, loadcaffe_backend):type(dtype)
local content_image = image.load(params.content_image, 3)
content_image = image.scale(content_image, params.image_size, 'bilinear')
local content_image_caffe = preprocess(content_image):float()
local style_size = math.ceil(params.style_scale * params.image_size)
local style_image_list = params.style_image:split(',')
local style_images_caffe = {}
for _, img_path in ipairs(style_image_list) do
local img = image.load(img_path, 3)
img = image.scale(img, style_size, 'bilinear')
local img_caffe = preprocess(img):float()
table.insert(style_images_caffe, img_caffe)
end
local init_image = nil
if params.init_image ~= '' then
init_image = image.load(params.init_image, 3)
local H, W = content_image:size(2), content_image:size(3)
init_image = image.scale(init_image, W, H, 'bilinear')
init_image = preprocess(init_image):float()
end
-- Handle style blending weights for multiple style inputs
local style_blend_weights = nil
if params.style_blend_weights == 'nil' then
-- Style blending not specified, so use equal weighting
style_blend_weights = {}
for i = 1, #style_image_list do
table.insert(style_blend_weights, 1.0)
end
else
style_blend_weights = params.style_blend_weights:split(',')
assert(#style_blend_weights == #style_image_list,
'-style_blend_weights and -style_images must have the same number of elements')
end
-- Normalize the style blending weights so they sum to 1
local style_blend_sum = 0
for i = 1, #style_blend_weights do
style_blend_weights[i] = tonumber(style_blend_weights[i])
style_blend_sum = style_blend_sum + style_blend_weights[i]
end
for i = 1, #style_blend_weights do
style_blend_weights[i] = style_blend_weights[i] / style_blend_sum
end
local content_layers = params.content_layers:split(",")
local style_layers = params.style_layers:split(",")
-- Set up the network, inserting style and content loss modules
local content_losses, style_losses = {}, {}
local next_content_idx, next_style_idx = 1, 1
local net = nn.Sequential()
if params.tv_weight > 0 then
local tv_mod = nn.TVLoss(params.tv_weight):type(dtype)
net:add(tv_mod)
end
for i = 1, #cnn do
if next_content_idx <= #content_layers or next_style_idx <= #style_layers then
local layer = cnn:get(i)
local name = layer.name
local layer_type = torch.type(layer)
local is_pooling = (layer_type == 'cudnn.SpatialMaxPooling' or layer_type == 'nn.SpatialMaxPooling')
if is_pooling and params.pooling == 'avg' then
assert(layer.padW == 0 and layer.padH == 0)
local kW, kH = layer.kW, layer.kH
local dW, dH = layer.dW, layer.dH
local avg_pool_layer = nn.SpatialAveragePooling(kW, kH, dW, dH):type(dtype)
local msg = 'Replacing max pooling at layer %d with average pooling'
print(string.format(msg, i))
net:add(avg_pool_layer)
else
net:add(layer)
end
if name == content_layers[next_content_idx] then
print("Setting up content layer", i, ":", layer.name)
local norm = params.normalize_gradients
local loss_module = nn.ContentLoss(params.content_weight, norm):type(dtype)
net:add(loss_module)
table.insert(content_losses, loss_module)
next_content_idx = next_content_idx + 1
end
if name == style_layers[next_style_idx] then
print("Setting up style layer ", i, ":", layer.name)
local norm = params.normalize_gradients
local loss_module = nn.StyleLoss(params.style_weight, norm):type(dtype)
net:add(loss_module)
table.insert(style_losses, loss_module)
next_style_idx = next_style_idx + 1
end
end
end
if multigpu then
net = setup_multi_gpu(net, params)
end
net:type(dtype)
-- Capture content targets
for i = 1, #content_losses do
content_losses[i].mode = 'capture'
end
print 'Capturing content targets'
print(net)
content_image_caffe = content_image_caffe:type(dtype)
net:forward(content_image_caffe:type(dtype))
-- Capture style targets
for i = 1, #content_losses do
content_losses[i].mode = 'none'
end
for i = 1, #style_images_caffe do
print(string.format('Capturing style target %d', i))
for j = 1, #style_losses do
style_losses[j].mode = 'capture'
style_losses[j].blend_weight = style_blend_weights[i]
end
net:forward(style_images_caffe[i]:type(dtype))
end
-- Set all loss modules to loss mode
for i = 1, #content_losses do
content_losses[i].mode = 'loss'
end
for i = 1, #style_losses do
style_losses[i].mode = 'loss'
end
-- We don't need the base CNN anymore, so clean it up to save memory.
cnn = nil
for i=1, #net.modules do
local module = net.modules[i]
if torch.type(module) == 'nn.SpatialConvolutionMM' then
-- remove these, not used, but uses gpu memory
module.gradWeight = nil
module.gradBias = nil
end
end
collectgarbage()
-- Initialize the image
if params.seed >= 0 then
torch.manualSeed(params.seed)
end
local img = nil
if params.init == 'random' then
img = torch.randn(content_image:size()):float():mul(0.001)
elseif params.init == 'image' then
if init_image then
img = init_image:clone()
else
img = content_image_caffe:clone()
end
else
error('Invalid init type')
end
img = img:type(dtype)
-- Run it through the network once to get the proper size for the gradient
-- All the gradients will come from the extra loss modules, so we just pass
-- zeros into the top of the net on the backward pass.
local y = net:forward(img)
local dy = img.new(#y):zero()
-- Declaring this here lets us access it in maybe_print
local optim_state = nil
if params.optimizer == 'lbfgs' then
optim_state = {
maxIter = params.num_iterations,
verbose=true,
tolX=-1,
tolFun=-1,
}
if params.lbfgs_num_correction > 0 then
optim_state.nCorrection = params.lbfgs_num_correction
end
elseif params.optimizer == 'adam' then
optim_state = {
learningRate = params.learning_rate,
}
else
error(string.format('Unrecognized optimizer "%s"', params.optimizer))
end
local function maybe_print(t, loss)
local verbose = (params.print_iter > 0 and t % params.print_iter == 0)
if verbose then
print(string.format('Iteration %d / %d', t, params.num_iterations))
for i, loss_module in ipairs(content_losses) do
print(string.format(' Content %d loss: %f', i, loss_module.loss))
end
for i, loss_module in ipairs(style_losses) do
print(string.format(' Style %d loss: %f', i, loss_module.loss))
end
print(string.format(' Total loss: %f', loss))
end
end
local function maybe_save(t)
local should_save = params.save_iter > 0 and t % params.save_iter == 0
should_save = should_save or t == params.num_iterations
if should_save then
local disp = deprocess(img:double())
disp = image.minmax{tensor=disp, min=0, max=1}
local filename = build_filename(params.output_image, t)
if t == params.num_iterations then
filename = params.output_image
end
-- Maybe perform postprocessing for color-independent style transfer
if params.original_colors == 1 then
disp = original_colors(content_image, disp)
end
image.save(filename, disp)
end
end
-- Function to evaluate loss and gradient. We run the net forward and
-- backward to get the gradient, and sum up losses from the loss modules.
-- optim.lbfgs internally handles iteration and calls this function many
-- times, so we manually count the number of iterations to handle printing
-- and saving intermediate results.
local num_calls = 0
local function feval(x)
num_calls = num_calls + 1
net:forward(x)
local grad = net:updateGradInput(x, dy)
local loss = 0
for _, mod in ipairs(content_losses) do
loss = loss + mod.loss
end
for _, mod in ipairs(style_losses) do
loss = loss + mod.loss
end
maybe_print(num_calls, loss)
maybe_save(num_calls)
collectgarbage()
-- optim.lbfgs expects a vector for gradients
return loss, grad:view(grad:nElement())
end
-- Run optimization.
if params.optimizer == 'lbfgs' then
print('Running optimization with L-BFGS')
local x, losses = optim.lbfgs(feval, img, optim_state)
elseif params.optimizer == 'adam' then
print('Running optimization with ADAM')
for t = 1, params.num_iterations do
local x, losses = optim.adam(feval, img, optim_state)
end
end
end
function setup_gpu(params)
local multigpu = false
if params.gpu:find(',') then
multigpu = true
params.gpu = params.gpu:split(',')
for i = 1, #params.gpu do
params.gpu[i] = tonumber(params.gpu[i]) + 1
end
else
params.gpu = tonumber(params.gpu) + 1
end
local dtype = 'torch.FloatTensor'
if multigpu or params.gpu > 0 then
if params.backend ~= 'clnn' then
require 'cutorch'
require 'cunn'
if multigpu then
cutorch.setDevice(params.gpu[1])
else
cutorch.setDevice(params.gpu)
end
dtype = 'torch.CudaTensor'
else
require 'clnn'
require 'cltorch'
if multigpu then
cltorch.setDevice(params.gpu[1])
else
cltorch.setDevice(params.gpu)
end
dtype = torch.Tensor():cl():type()
end
else
params.backend = 'nn'
end
if params.backend == 'cudnn' then
require 'cudnn'
if params.cudnn_autotune then
cudnn.benchmark = true
end
cudnn.SpatialConvolution.accGradParameters = nn.SpatialConvolutionMM.accGradParameters -- ie: nop
end
return dtype, multigpu
end
function setup_multi_gpu(net, params)
local DEFAULT_STRATEGIES = {
[2] = {3},
}
local gpu_splits = nil
if params.multigpu_strategy == '' then
-- Use a default strategy
gpu_splits = DEFAULT_STRATEGIES[#params.gpu]
-- Offset the default strategy by one if we are using TV
if params.tv_weight > 0 then
for i = 1, #gpu_splits do gpu_splits[i] = gpu_splits[i] + 1 end
end
else
-- Use the user-specified multigpu strategy
gpu_splits = params.multigpu_strategy:split(',')
for i = 1, #gpu_splits do
gpu_splits[i] = tonumber(gpu_splits[i])
end
end
assert(gpu_splits ~= nil, 'Must specify -multigpu_strategy')
local gpus = params.gpu
local cur_chunk = nn.Sequential()
local chunks = {}
for i = 1, #net do
cur_chunk:add(net:get(i))
if i == gpu_splits[1] then
table.remove(gpu_splits, 1)
table.insert(chunks, cur_chunk)
cur_chunk = nn.Sequential()
end
end
table.insert(chunks, cur_chunk)
assert(#chunks == #gpus)
local new_net = nn.Sequential()
for i = 1, #chunks do
local out_device = nil
if i == #chunks then
out_device = gpus[1]
end
new_net:add(nn.GPU(chunks[i], gpus[i], out_device))
end
return new_net
end
function build_filename(output_image, iteration)
local ext = paths.extname(output_image)
local basename = paths.basename(output_image, ext)
local directory = paths.dirname(output_image)
return string.format('%s/%s_%d.%s',directory, basename, iteration, ext)
end
-- Preprocess an image before passing it to a Caffe model.
-- We need to rescale from [0, 1] to [0, 255], convert from RGB to BGR,
-- and subtract the mean pixel.
function preprocess(img)
local mean_pixel = torch.DoubleTensor({103.939, 116.779, 123.68})
local perm = torch.LongTensor{3, 2, 1}
img = img:index(1, perm):mul(256.0)
mean_pixel = mean_pixel:view(3, 1, 1):expandAs(img)
img:add(-1, mean_pixel)
return img
end
-- Undo the above preprocessing.
function deprocess(img)
local mean_pixel = torch.DoubleTensor({103.939, 116.779, 123.68})
mean_pixel = mean_pixel:view(3, 1, 1):expandAs(img)
img = img + mean_pixel
local perm = torch.LongTensor{3, 2, 1}
img = img:index(1, perm):div(256.0)
return img
end
-- Combine the Y channel of the generated image and the UV channels of the
-- content image to perform color-independent style transfer.
function original_colors(content, generated)
local generated_y = image.rgb2yuv(generated)[{{1, 1}}]
local content_uv = image.rgb2yuv(content)[{{2, 3}}]
return image.yuv2rgb(torch.cat(generated_y, content_uv, 1))
end
-- Define an nn Module to compute content loss in-place
local ContentLoss, parent = torch.class('nn.ContentLoss', 'nn.Module')
function ContentLoss:__init(strength, normalize)
parent.__init(self)
self.strength = strength
self.target = torch.Tensor()
self.normalize = normalize or false
self.loss = 0
self.crit = nn.MSECriterion()
self.mode = 'none'
end
function ContentLoss:updateOutput(input)
if self.mode == 'loss' then
self.loss = self.crit:forward(input, self.target) * self.strength
elseif self.mode == 'capture' then
self.target:resizeAs(input):copy(input)
end
self.output = input
return self.output
end
function ContentLoss:updateGradInput(input, gradOutput)
if self.mode == 'loss' then
if input:nElement() == self.target:nElement() then
self.gradInput = self.crit:backward(input, self.target)
end
if self.normalize then
self.gradInput:div(torch.norm(self.gradInput, 1) + 1e-8)
end
self.gradInput:mul(self.strength)
self.gradInput:add(gradOutput)
else
self.gradInput:resizeAs(gradOutput):copy(gradOutput)
end
return self.gradInput
end
local Gram, parent = torch.class('nn.GramMatrix', 'nn.Module')
function Gram:__init()
parent.__init(self)
end
function Gram:updateOutput(input)
assert(input:dim() == 3)
local C, H, W = input:size(1), input:size(2), input:size(3)
local x_flat = input:view(C, H * W)
self.output:resize(C, C)
self.output:mm(x_flat, x_flat:t())
return self.output
end
function Gram:updateGradInput(input, gradOutput)
assert(input:dim() == 3 and input:size(1))
local C, H, W = input:size(1), input:size(2), input:size(3)
local x_flat = input:view(C, H * W)
self.gradInput:resize(C, H * W):mm(gradOutput, x_flat)
self.gradInput:addmm(gradOutput:t(), x_flat)
self.gradInput = self.gradInput:view(C, H, W)
return self.gradInput
end
-- Define an nn Module to compute style loss in-place
local StyleLoss, parent = torch.class('nn.StyleLoss', 'nn.Module')
function StyleLoss:__init(strength, normalize)
parent.__init(self)
self.normalize = normalize or false
self.strength = strength
self.target = torch.Tensor()
self.mode = 'none'
self.loss = 0
self.gram = nn.GramMatrix()
self.blend_weight = nil
self.G = nil
self.crit = nn.MSECriterion()
end
function StyleLoss:updateOutput(input)
self.G = self.gram:forward(input)
self.G:div(input:nElement())
if self.mode == 'capture' then
if self.blend_weight == nil then
self.target:resizeAs(self.G):copy(self.G)
elseif self.target:nElement() == 0 then
self.target:resizeAs(self.G):copy(self.G):mul(self.blend_weight)
else
self.target:add(self.blend_weight, self.G)
end
elseif self.mode == 'loss' then
self.loss = self.strength * self.crit:forward(self.G, self.target)
end
self.output = input
return self.output
end
function StyleLoss:updateGradInput(input, gradOutput)
if self.mode == 'loss' then
local dG = self.crit:backward(self.G, self.target)
dG:div(input:nElement())
self.gradInput = self.gram:backward(input, dG)
if self.normalize then
self.gradInput:div(torch.norm(self.gradInput, 1) + 1e-8)
end
self.gradInput:mul(self.strength)
self.gradInput:add(gradOutput)
else
self.gradInput = gradOutput
end
return self.gradInput
end
local TVLoss, parent = torch.class('nn.TVLoss', 'nn.Module')
function TVLoss:__init(strength)
parent.__init(self)
self.strength = strength
self.x_diff = torch.Tensor()
self.y_diff = torch.Tensor()
end
function TVLoss:updateOutput(input)
self.output = input
return self.output
end
-- TV loss backward pass inspired by kaishengtai/neuralart
function TVLoss:updateGradInput(input, gradOutput)
self.gradInput:resizeAs(input):zero()
local C, H, W = input:size(1), input:size(2), input:size(3)
self.x_diff:resize(3, H - 1, W - 1)
self.y_diff:resize(3, H - 1, W - 1)
self.x_diff:copy(input[{{}, {1, -2}, {1, -2}}])
self.x_diff:add(-1, input[{{}, {1, -2}, {2, -1}}])
self.y_diff:copy(input[{{}, {1, -2}, {1, -2}}])
self.y_diff:add(-1, input[{{}, {2, -1}, {1, -2}}])
self.gradInput[{{}, {1, -2}, {1, -2}}]:add(self.x_diff):add(self.y_diff)
self.gradInput[{{}, {1, -2}, {2, -1}}]:add(-1, self.x_diff)
self.gradInput[{{}, {2, -1}, {1, -2}}]:add(-1, self.y_diff)
self.gradInput:mul(self.strength)
self.gradInput:add(gradOutput)
return self.gradInput
end
local params = cmd:parse(arg)
main(params)