[
{
"path": ".editorconfig",
"content": "# Libretro coding standards\n# See https://libretro.readthedocs.io/en/latest/development/coding-standards/\n# Or search for \"Libretro Coding Standards\"\n\nroot = true\n\n[*]\nend_of_line = lf\ninsert_final_newline = true\ntrim_trailing_whitespace = true\ncharset = utf-8\n\n[Makefile]\nindent_style = space\nindent_size = 3\n\n[*.{c,h}]\nindent_style = space\nindent_size = 3\nmax_line_length = 80\n\n"
},
{
"path": ".gitattributes",
"content": "# Set the default behavior, in case people don't have core.autocrlf set.\n* text=auto\n\n# Declare files that will always have LF Unix-style line endings on checkout.\n*.c text eol=lf\n*.h text eol=lf\n*.in text eol=lf\n*.md text eol=lf\n*.txt text eol=lf\n\n# Denote all files that are truly binary and should not be modified.\n*.png binary\n*.jpg binary\n*.gif binary\n*.zip binary\n*.pdf binary\n"
},
{
"path": ".github/CONTRIBUTING.md",
"content": "# Contribute to the documentation\n\nThe docs are written in [Markdown](https://en.wikipedia.org/wiki/Markdown) if you need help with the syntax use [this guide](https://guides.github.com/features/mastering-markdown/). \nMkdocs uses some [Markdown extensions](http://www.mkdocs.org/user-guide/writing-your-docs/#markdown-extensions) that you may have to familiarize with.\n\nThe documentation source is maintained via [Git](https://en.wikipedia.org/wiki/Git) \nFor novice users that don't know how to use the command line you can use [Github Desktop](https://desktop.github.com/). \nFor more info on how to use git [refer to their help](https://help.github.com/)\n\nIn order to propose improvements to a document:\n\n1. [Clone the repo](https://github.com/libretro/docs) (If you are using [Github Desktop](https://desktop.github.com/), select Clone>Open in Desktop)\n2. Make the changes and update your clone\n3. Test, [follow the Building section to render the site](https://github.com/libretro/docs/blob/master/README.md#building)\n4. Propose your changes using the button \"New Pull Request\" [in the docs repo](https://github.com/libretro/docs) \nmake sure that you are comparing **your forks edited branch** to the **docs master branch**\n\nThere is a To-Do list for libretro/docs [here](https://docs.libretro.com/meta/todo/)\n\nYou can submit suggestions or issues regarding documentation at the [libretro/docs issue tracker](https://github.com/libretro/docs/issues) or in our [forum thread](https://forums.libretro.com/t/wip-adding-pages-to-documentation-site/10078/).\n\n## Adding a new core\n\nThese are the documents that should be added/updated when a new core is added to the libretro ecosystem.\n\n- Add the core to docs/library/ (Follow the latest core template. docs/meta/core_template.md)\n- Add the core to mkdocs.yml\n- Add the core to docs/meta/core_list.md\n- Add the core to docs/meta/see_also.md if it's related to another core in some way\n- Add the core to docs/tech/licenses.md\n- Add the core to docs/meta/todo.md\n- Add the core to docs/guides/softpatching.md if it supports softpatching\n- Add the core to docs/guides/retroachievements.md if it supports cheevos"
},
{
"path": ".github/ISSUE_TEMPLATE/bug_report.md",
"content": "---\nname: Bug report\nabout: Create a report to help us improve\ntitle: ''\nlabels: bug\nassignees: ''\n\n---\n\n**Describe the bug**\nA clear and concise description of what the bug is.\n\n**Expected behavior/changes**\nA clear and concise description of what you expected to happen.\n\n**Additional context**\nAdd any other context about the problem here.\n"
},
{
"path": ".github/ISSUE_TEMPLATE.md",
"content": "# First and foremost consider this:\n- Only documentation related issues should be filed here. Not RetroArch bugs, or core bugs, or game bugs, or build errors.\n- Before reporting a 404, refresh the doc a few times.\n\n## Documents\n\n[Add a list of documents that should be changed here.]\n\n### Proposed changes\n\n[What changes should be done to the documents.]\n"
},
{
"path": ".github/workflows/main.yml",
"content": "name: Publish docs via GitHub Pages\non:\n push:\n branches:\n - master\n workflow_dispatch:\n inputs:\n logLevel:\n description: 'Log level'\n required: true\n default: 'release' \n type: choice\n options:\n - debug \n - release \n - testing\n\njobs:\n build:\n name: Deploy docs\n runs-on: ubuntu-latest\n steps:\n - name: Checkout main\n uses: actions/checkout@v2\n\n - name: Deploy docs\n uses: mhausenblas/mkdocs-deploy-gh-pages@master\n env:\n GITHUB_TOKEN: ${{ secrets.GITHUB_TOKEN }}\n CONFIG_FILE: mkdocs.yml\n EXTRA_PACKAGES: build-base\n REQUIREMENTS: docs/requirements.txt\n"
},
{
"path": ".github/workflows/typos.yml",
"content": "# Spell checker\n\nname: Typos Action\n\npermissions:\n contents: read\n\non:\n pull_request:\n branches: [master]\n\njobs:\n spelling:\n name: Spell Check with Typos\n runs-on: ubuntu-latest\n steps:\n - name: Checkout Actions Repository\n uses: actions/checkout@v4\n - name: Spell Check Repo\n uses: crate-ci/typos@v1.30.2\n"
},
{
"path": ".gitignore",
"content": "/site\n.DS_Store\n.venv\n"
},
{
"path": ".travis.yml",
"content": "language: python\npython:\n - \"3.6\"\ninstall:\n - pip install mkdocs\n - pip install mkdocs-material\n - pip install pymdown-extensions\n - pip install pygments\nscript:\n - mkdocs build\n"
},
{
"path": "CNAME",
"content": "docs.libretro.com"
},
{
"path": "LICENSE",
"content": "MIT License\n\nCopyright (c) 2017 libretro\n\nPermission is hereby granted, free of charge, to any person obtaining a copy\nof this software and associated documentation files (the \"Software\"), to deal\nin the Software without restriction, including without limitation the rights\nto use, copy, modify, merge, publish, distribute, sublicense, and/or sell\ncopies of the Software, and to permit persons to whom the Software is\nfurnished to do so, subject to the following conditions:\n\nThe above copyright notice and this permission notice shall be included in all\ncopies or substantial portions of the Software.\n\nTHE SOFTWARE IS PROVIDED \"AS IS\", WITHOUT WARRANTY OF ANY KIND, EXPRESS OR\nIMPLIED, INCLUDING BUT NOT LIMITED TO THE WARRANTIES OF MERCHANTABILITY,\nFITNESS FOR A PARTICULAR PURPOSE AND NONINFRINGEMENT. IN NO EVENT SHALL THE\nAUTHORS OR COPYRIGHT HOLDERS BE LIABLE FOR ANY CLAIM, DAMAGES OR OTHER\nLIABILITY, WHETHER IN AN ACTION OF CONTRACT, TORT OR OTHERWISE, ARISING FROM,\nOUT OF OR IN CONNECTION WITH THE SOFTWARE OR THE USE OR OTHER DEALINGS IN THE\nSOFTWARE.\n\n"
},
{
"path": "Makefile",
"content": "MKDOCS_AVAILABLE := $(shell command -v mkdocs 2> /dev/null)\n\nbuild: dependencies\n\t@mkdocs build\n\nstart: dependencies\n\t@mkdocs serve\n\ninstall:\n\tpip install mkdocs mkdocs-material\n\ndependencies:\nifndef MKDOCS_AVAILABLE\n\t$(error \"mkdocs is not available. Use 'make install' to install dependencies.\")\nendif\n"
},
{
"path": "README.md",
"content": "# Libretro Docs\n\nThis repository contains the source for the official Libretro and RetroArch documentation, available at [docs.libretro.com](https://docs.libretro.com/).\n\n# Contribute to the documentation\n\nThese docs are written in [Markdown.](https://en.wikipedia.org/wiki/Markdown) If you need help with the syntax, use [this guide](https://guides.github.com/features/mastering-markdown/). Mkdocs uses some [Markdown extensions](http://www.mkdocs.org/user-guide/writing-your-docs/#markdown-extensions) that you may have to familiarize with.\n\nThe documentation source is maintained via [Git](https://en.wikipedia.org/wiki/Git). For more info on how to use git, [refer to Github's help page.](https://help.github.com/)\n\nIn order to propose improvements to a document:\n\n1. [Clone the repo](https://github.com/libretro/docs)\n2. Make the changes and update your clone\n3. Follow the \"Building the docs\" section to render the documentation site locally\n4. Propose your changes using the button `New Pull Request` [in the docs repo](https://github.com/libretro/docs)\n\nThere is a To-Do list for libretro/docs *here* and you can submit suggestions or issues regarding documentation at the [libretro/docs issue tracker](https://github.com/libretro/docs/issues).\n\n## Building the docs\n\n1. Make sure you have [Python](https://www.python.org/) and [pip](https://pip.pypa.io) installed\n ```\n python --version\n pip --version\n ```\n\n!!! Note \"Building in Windows/msys2\"\n If you are using the standard RetroArch msys2 environment, you will need to install python with the command `pacman -S python`. Next you will need to download [the `get-pip.py` script](https://bootstrap.pypa.io/get-pip.py) from the `pip` bootstrap site. Finally, execute the script with the command `python get-pip.py`.\n\n2. Install MkDocs\n ```\n pip install mkdocs\n ```\n\n3. Install MkDocs-Material\n ```\n pip install mkdocs-material\n ```\n\n4. Install PyMdown Extensions\n ```\n pip install pymdown-extensions\n ```\n5. Install mkdocs-git-revision-date\n ```\n pip install mkdocs-git-revision-date-plugin\n ```\n6. Install mkdocs-macros\n ```\n pip install mkdocs-macros-plugin\n ```\n\n7. Build the site\n ```\n mkdocs build\n ```\n\n8. The documentation will be built to the `site` directory; preview any changes with MkDocs' built-in dev-server before submitting a pull request\n ```\n mkdocs serve\n ```\n\n**References**\n\n - [Guide to installing mkdocs](https://www.mkdocs.org/#installation)\n\n\n## Adding a new core\n\nThese are the documents that should be added/updated when a new core is added to the libretro ecosystem.\n\n- Add the core to docs/library/ (Follow the latest core template. docs/meta/core-template.md)\n- Add the core to mkdocs.yml\n- Add the core to docs/guides/core-list.md\n- Add the core to docs/meta/see-also.md if it's related to another core in some way\n- Add the core to docs/development/licenses.md\n- Add the core to docs/guides/softpatching.md if it supports softpatching\n- Add the core to docs/guides/retroachievements.md if it supports cheevos\n- Add the core to docs/library/bios.md if it needs a BIOS\n"
},
{
"path": "_typos.toml",
"content": "[files]\nextend-exclude = [\n \".git/\", # Version control files\n \"achive/*\", # Archive files\n]\n\n# Match Inside a Word - Case Insensitive\n[default.extend-words]\nue = \"ue\" # Nestopia UE\nsav = \"sav\" # .sav file extension\nkernal = \"kernal\" # Commodore's low-level Operating System\n"
},
{
"path": "archive/libretro-gl.tex",
"content": "\\documentclass[11pt]{article}\n\n\\author{Hans-Kristian Arntzen}\n\\title{Implementing a Hardware Accelerated Libretro Core}\n\n\\begin{document}\n\\maketitle\n\n\\begin{abstract}\nLibretro API~\\footnote{http://libretro.org} recently received support for cores to use OpenGL (GL2+ or GLES2) directly instead of software rendering to a buffer which is subsequently used by the frontend. This article explains how a core can take advantage of this, and which considerations must be taken into account. This article assumes familiarity with the libretro API.\n\nCores which use hardware rendering can still use known frontend features, such as multi-pass shaders.\nThis is accomplished by letting cores render to frame buffer objects (FBOs) instead of the back buffer~\\footnote{GL drivers must support render-to-texture extensions for this to work.}.\n\nThis addition to the libretro API is designed to be used with hardware-accelerated emulator cores, as well as serving as a framework for graphical demos and experiments.\n\\end{abstract}\n\n\\section*{Application model}\nUsing OpenGL in a libretro context is somewhat different than when you use libraries like SDL, GLFW or SFML. In libretro, the frontend owns the OpenGL context. For an application using conventional libraries like SDL, the application will do this:\n\n\\begin{itemize}\n\\item Initialize, create a window of specific size\n\\item Initialize OpenGL resources\n\\item Per frame, handle window events (resize), handle input, render as desired, swap buffers\n\\item Tear down context and window\n\\end{itemize}\n\nUsing libretro API, platform specifics like managing windows, rendering surfaces and input are all handled by the frontend. The core will only deal with rendering to a surface. The core renders to an FBO of fixed size, determined by the core. The frontend takes this rendered data and stretches to screen as desired by the user. It can apply shaders, change aspect ratio, etc. This model is equivalent to software rendering where \\texttt{retro\\_video\\_refresh\\_t} callback is called.\n\n\\section*{Using OpenGL in libretro}\n\n\\begin{itemize}\n\\item Use \\texttt{RETRO\\_ENVIRONMENT\\_SET\\_PIXEL\\_FORMAT} and request a 32-bit format. This is the format that the resulting framebuffer will have~\\footnote{In reality, RetroArch converts all 16-bit data (\\texttt{RETRO\\_PIXEL\\_FORMAT\\_RGB565}) to 32-bit (\\texttt{XRGB8888}) when running desktop GL for performance reasons. In GLES mode, this is not done, however. Do not rely on this behavior, and be explicit about it.}.\n\n\\item Use \\texttt{RETRO\\_ENVIRONMENT\\_SET\\_HW\\_RENDER} environment callback in \\\\\\texttt{retro\\_load\\_game()}, notifying frontend that core is using hardware rendering. An OpenGL 2+ or GLES2 context can be specified here. If this is not supported the callback will return false, and you can fallback to software rendering or refuse to start.\n\n\\item In \\texttt{retro\\_get\\_system\\_av\\_info()}, as normal, \\texttt{max\\_width} and \\\\\\texttt{max\\_height} fields specify the maximum resolution the core will render to.\n\n\\item When the frontend has created a context or reset the context, \\\\\\texttt{retro\\_hw\\_context\\_reset\\_t} is called. Here, OpenGL resources can be initialized.\nThe frontend can reset the context at will (e.g. when changing from fullscreen to windowed mode and vice versa). The core should take this into account. It will be notified when reinitialization needs to happen.\n\n\\item A callback to grab OpenGL symbols is exposed via \\\\\\texttt{retro\\_hw\\_get\\_proc\\_address\\_t}. Use this to retrieve symbols and extensions.\n\n\\item In \\texttt{retro\\_run()}, use \\texttt{retro\\_hw\\_get\\_current\\_framebuffer\\_t} callback\nto get which FBO to render to~\\footnote{e.g. \\texttt{glBindFramebuffer(GL\\_FRAMEBUFFER, get\\_current\\_framebuffer())}}. This is your \"backbuffer\". Do not attempt to render to the real back buffer. You must call this every frame as it can change every frame. The dimensions of this FBO are at least as big as declared in \\texttt{max\\_width} and \\texttt{max\\_height}. If desired, the FBO also has a depth buffer attached~\\footnote{see \\texttt{RETRO\\_ENVIRONMENT\\_SET\\_HW\\_RENDER}}.\n\n\\item When done rendering, call \\texttt{retro\\_video\\_refresh\\_t} with the macro \\texttt{RETRO\\_HW\\_FRAME\\_BUFFER\\_VALID} as argument for buffer. Width and height should be specified as well, but pitch argument is irrelevant and will be ignored. If the frame is duped~\\footnote{RETRO\\_ENVIRONMENT\\_CAN\\_DUPE}, the buffer argument takes \\texttt{NULL} as normal.\n\\end{itemize}\n\n\\section*{Important considerations in the OpenGL code}\nThe frontend and libretro core share OpenGL context state. Some considerations have to be taken into account for this cooperation to work nicely.\n\n\\begin{itemize}\n\\item Don't leave buffers and global objects bound when calling \\\\\\texttt{retro\\_video\\_refresh\\_t}.\nMake sure to unbind everything, i.e. VAOs, VBOs, shader programs, textures, etc. Failing to do this could potentially hit strange bugs. The frontend will also follow this rule to avoid clashes. Being tidy here is considered good practice anyway.\n\n\\item The GL viewport will be modified by frontend as well as libretro core. Set this every frame.\n\n\\item \\texttt{glEnable()} state like depth testing, etc, is likely to be disabled in frontend as it's just rendering a quad to screen. Enable this per-frame if you use depth testing.\nThere is no need to disable this before calling \\\\\\texttt{retro\\_video\\_refresh\\_t}.\n\n\\item Avoid VAOs. They tend to break on less-than-stellar drivers~\\footnote{At least AMD drivers on Windows are known to break here.}.\n\n\\item Try to write code which is GLES2 as well as GL2+ (w/ extensions) compliant. This ensures maximum target surface for the libretro core.\n\n\\item Libretro treats top-left as origin. OpenGL treats bottom-left as origin. To be compatible with the libretro model, top-left semantics are preserved. Rendering normally will cause the image to be flipped vertically. To avoid this, simply scale the final projection matrix by $[1, -1, 1, 1]$.\n\\end{itemize}\n\n\\section*{Test implementations}\nA very basic test implementation of libretro GL interface is available in RetroArch repository on GitHub~\\footnote{https://github.com/Themaister/RetroArch/tree/master/libretro-test-gl}.\nIt displays two spinning quads. It runs both as a GLES2 and GL2 core depending on \\texttt{GLES} environment variable.\n\nA slightly more involved test core is found on Bitbucket~\\footnote{https://bitbucket.org/Themaister/libretro-gl}. It uses instanced rendering of a textured cube, with FPS-style fly-by camera. It uses libretro's mouse API as well. It is valid GLES and GL2 at the same time.\n\n\\section*{Building a libretro core}\nLibretro is an interface, and not a utility library. Libretro cores are built as standalone dynamic or static libraries, and as they use GL symbols here, they must link against GL symbols themselves.\n\nAn example of how this can be done is shown in the test implementation~\\footnote{https://github.com/Themaister/RetroArch/blob/master/libretro-test-gl/Makefile}.\n\n\\end{document}"
},
{
"path": "archive/libretro-shader.lyx",
"content": "#LyX 2.0 created this file. For more info see http://www.lyx.org/\n\\lyxformat 413\n\\begin_document\n\\begin_header\n\\textclass article\n\\use_default_options true\n\\maintain_unincluded_children false\n\\language english\n\\language_package default\n\\inputencoding auto\n\\fontencoding global\n\\font_roman default\n\\font_sans default\n\\font_typewriter default\n\\font_default_family default\n\\use_non_tex_fonts false\n\\font_sc false\n\\font_osf false\n\\font_sf_scale 100\n\\font_tt_scale 100\n\n\\graphics default\n\\default_output_format default\n\\output_sync 0\n\\bibtex_command default\n\\index_command default\n\\paperfontsize default\n\\spacing single\n\\use_hyperref true\n\\pdf_title \"Cg/HLSL Libretro shader tutorial\"\n\\pdf_author \"Hans-Kristian Antzen, Daniel De Matteis\"\n\\pdf_bookmarks true\n\\pdf_bookmarksnumbered false\n\\pdf_bookmarksopen false\n\\pdf_bookmarksopenlevel 1\n\\pdf_breaklinks false\n\\pdf_pdfborder false\n\\pdf_colorlinks true\n\\pdf_backref false\n\\pdf_pdfusetitle true\n\\papersize default\n\\use_geometry false\n\\use_amsmath 1\n\\use_esint 1\n\\use_mhchem 1\n\\use_mathdots 1\n\\cite_engine basic\n\\use_bibtopic false\n\\use_indices false\n\\paperorientation portrait\n\\suppress_date false\n\\use_refstyle 1\n\\index Index\n\\shortcut idx\n\\color #008000\n\\end_index\n\\secnumdepth 3\n\\tocdepth 3\n\\paragraph_separation indent\n\\paragraph_indentation default\n\\quotes_language english\n\\papercolumns 1\n\\papersides 1\n\\paperpagestyle default\n\\tracking_changes false\n\\output_changes false\n\\html_math_output 0\n\\html_css_as_file 0\n\\html_be_strict false\n\\end_header\n\n\\begin_body\n\n\\begin_layout Title\nCg/HLSL libretro shader tutorial\n\\end_layout\n\n\\begin_layout Author\nHans-Kristian Arntzen, Daniel De Matteis\n\\end_layout\n\n\\begin_layout Standard\n\\begin_inset CommandInset toc\nLatexCommand tableofcontents\n\n\\end_inset\n\n\n\\end_layout\n\n\\begin_layout Section\nIntroduction\n\\end_layout\n\n\\begin_layout Standard\nThis document is for a (fresh) shader developer that wants to develop shader\n programs for use in various emulators/games.\n Shader programs run on your GPU, and thus enables very sophisticated effects\n to be performed on the picture which might not be possible in real-time\n on the CPU.\n Some introduction to shader programming in general is given, so more experience\nd developers that only need reference for the specification may just skip\n ahead.\n\\end_layout\n\n\\begin_layout Standard\nCurrent emulators that support the specification explained here to a certain\n degree are:\n\\end_layout\n\n\\begin_layout Itemize\n\\begin_inset Index idx\nstatus open\n\n\\begin_layout Plain Layout\nRetroArch\n\\end_layout\n\n\\end_inset\n\nRetroArch\n\\end_layout\n\n\\begin_layout Itemize\n\\begin_inset Index idx\nstatus open\n\n\\begin_layout Plain Layout\nSNES9x\n\\end_layout\n\n\\end_inset\n\nSNES9x Win32\n\\end_layout\n\n\\begin_layout Standard\nThere are three popular shader languages in use today:\n\\end_layout\n\n\\begin_layout Itemize\n\\begin_inset Index idx\nstatus open\n\n\\begin_layout Plain Layout\nHLSL\n\\end_layout\n\n\\end_inset\n\nHLSL (High-Level Shading Language, Direct3D)\n\\end_layout\n\n\\begin_layout Itemize\n\\begin_inset Index idx\nstatus open\n\n\\begin_layout Plain Layout\nGLSL\n\\end_layout\n\n\\end_inset\n\nGLSL (GL Shading Language, OpenGL)\n\\end_layout\n\n\\begin_layout Itemize\n\\begin_inset Index idx\nstatus open\n\n\\begin_layout Plain Layout\nCg\n\\end_layout\n\n\\end_inset\n\nCg (HLSL/GLSL, nVidia)\n\\end_layout\n\n\\begin_layout Standard\nThe spec is for the\n\\begin_inset Index idx\nstatus open\n\n\\begin_layout Plain Layout\nCg\n\\end_layout\n\n\\end_inset\n\nCg shading language developed by nVidia.\n It\n\\begin_inset Quotes eld\n\\end_inset\n\nwraps\n\\begin_inset Quotes erd\n\\end_inset\n\n around\n\\begin_inset Index idx\nstatus open\n\n\\begin_layout Plain Layout\nOpenGL\n\\end_layout\n\n\\end_inset\n\nOpenGL and\n\\begin_inset Index idx\nstatus open\n\n\\begin_layout Plain Layout\nHLSL\n\\end_layout\n\n\\end_inset\n\nHLSL to make shaders written in Cg quite portable.\n It is also the shading language implemented on the\n\\begin_inset Index idx\nstatus open\n\n\\begin_layout Plain Layout\nPlayStation3\n\\end_layout\n\n\\end_inset\n\nPlayStation3, thus increasing the popularity of it.\n\\end_layout\n\n\\begin_layout Subsection\nThe rendering pipeline\n\\end_layout\n\n\\begin_layout Standard\nWith shaders you are able to take control over a large chunk of the GPUs\n inner workings by writing your own programs that are uploaded and run on\n the GPU.\n In the old days, GPUs were a big black box that was highly configurable\n using endless amount of API calls.\n In more modern times, rather than giving you endless amounts of buttons,\n you are expected to implement the few «buttons» you actually need, and\n have a streamlined API.\n\\end_layout\n\n\\begin_layout Standard\nThe rendering pipeline is somewhat complex, but we can in general simplify\n it to:\n\\end_layout\n\n\\begin_layout Itemize\nVertex processing\n\\end_layout\n\n\\begin_layout Itemize\nRasterization\n\\end_layout\n\n\\begin_layout Itemize\nFragment processing\n\\end_layout\n\n\\begin_layout Itemize\nFramebuffer blend\n\\end_layout\n\n\\begin_layout Standard\nWe are allowed to take control of what happens during vertex processing,\n and fragment processing.\n\\end_layout\n\n\\begin_layout Subsection\nA Cg/HLSL program\n\\end_layout\n\n\\begin_layout Standard\nIf you were to process an image on a CPU, you would most likely do something\n like this:\n\\end_layout\n\n\\begin_layout Standard\n\\begin_inset listings\ninline false\nstatus open\n\n\\begin_layout Plain Layout\n\nfor (unsigned y = 0; y < height; y++) {\n\\end_layout\n\n\\begin_layout Plain Layout\n\n for (unsigned x = 0; x < width; x++)\n\\end_layout\n\n\\begin_layout Plain Layout\n\n out_pixel[y][x] = process_pixel(in_pixel[y][x], y, x);\n\\end_layout\n\n\\begin_layout Plain Layout\n\n}\n\\end_layout\n\n\\end_inset\n\n We quickly realize that this is highly serial and slow.\n We see that out_pixel[y][x] isn't dependent on out_pixel[y + k][x + k],\n so we see that we can parallelize quite a bit.\n\\end_layout\n\n\\begin_layout Standard\nEssentially, we only need to implement process_pixel() as a single function,\n which is called thousands, even millions of time every frame.\n The only purpose in life for process_pixel() is to process an input, and\n produce an output.\n No state is needed, thus, a\n\\begin_inset Quotes eld\n\\end_inset\n\npure\n\\begin_inset Quotes erd\n\\end_inset\n\n function in computer science terms.\n\\end_layout\n\n\\begin_layout Standard\nFor the Cg program, we need to implement two different functions.\n\\end_layout\n\n\\begin_layout Standard\nmain_vertex() takes care of transforming every incoming vertex from camera\n space down to clip space.\n This essentially means projection of 3D (coordinates on GPU) down to 2D\n (your screen)\n\\begin_inset Foot\nstatus collapsed\n\n\\begin_layout Plain Layout\nSince we're dealing with old school emulators here, which are already 2D,\n the vertex shading is very trivial.\n\\end_layout\n\n\\end_inset\n\n.\n\n\\end_layout\n\n\\begin_layout Standard\nVertex shaders get various coordinates as input, and uniforms.\n Every vertex emitted by the emulator is run through main_vertex which calculate\ns the final output position\n\\begin_inset Foot\nstatus collapsed\n\n\\begin_layout Plain Layout\nFor our emulators this is just 4 times, since we're rendering a quad on\n the screen.\n 3D games would obviously have a lot more vertices.\n\\end_layout\n\n\\end_inset\n\n.\n\n\\end_layout\n\n\\begin_layout Standard\nWhile coordinates differ for each invocation, uniforms are constant throughout\n every call.\n Think of it as a global variable that you're not allowed to change.\n\\end_layout\n\n\\begin_layout Standard\nVertex shading can almost be ignored altogether, but since the vertex shader\n is run only 4 times, and the fragment shader is run millions of times per\n frame, it is a good idea to precalculate values in vertex shader that can\n later be used in fragment shader.\n There are some limitiations to this which will be mentioned later.\n\\end_layout\n\n\\begin_layout Standard\nmain_fragment() takes care of calculating a pixel color for every single\n output pixel on the screen.\n If you're playing at 1080p, the fragment shader will have to be run 1920\n * 1080 times! This is obviously straining on the GPU unless the shader\n is written efficiently.\n\\end_layout\n\n\\begin_layout Standard\nObviously, main_fragment is where the real action happens.\n For many shaders we can stick with a\n\\begin_inset Quotes eld\n\\end_inset\n\ndummy\n\\begin_inset Quotes erd\n\\end_inset\n\n vertex shader which does some very simple stuff.\n\\end_layout\n\n\\begin_layout Standard\nThe fragment shader receives a handle to a texture (the game frame itself),\n and the texture coordinate for the current pixel, and a bunch of uniforms.\n\\end_layout\n\n\\begin_layout Standard\nA fragment shader's final output is a color, simple as that.\n Processing ends here.\n\\end_layout\n\n\\begin_layout Section\nHello World\n\\end_layout\n\n\\begin_layout Standard\nWe'll start off with the basic vertex shader.\n No fancy things are being done.\n You'll see a similiar vertex shader in most of the Cg programs out there\n in the wild.\n\\end_layout\n\n\\begin_layout Standard\n\\begin_inset listings\ninline false\nstatus open\n\n\\begin_layout Plain Layout\n\nvoid main_vertex(\n\\end_layout\n\n\\begin_layout Plain Layout\n\n float4 pos : POSITION,\n\\end_layout\n\n\\begin_layout Plain Layout\n\n out float4 out_pos : POSITION,\n\\end_layout\n\n\\begin_layout Plain Layout\n\n uniform float4x4 modelViewProj,\n\\end_layout\n\n\\begin_layout Plain Layout\n\n float4 color : COLOR,\n\\end_layout\n\n\\begin_layout Plain Layout\n\n out float4 out_color : COLOR,\n\\end_layout\n\n\\begin_layout Plain Layout\n\n float2 tex : TEXCOORD,\n\\end_layout\n\n\\begin_layout Plain Layout\n\n out float2 out_tex : TEXCOORD\n\\end_layout\n\n\\begin_layout Plain Layout\n\n)\n\\end_layout\n\n\\begin_layout Plain Layout\n\n{\n\\end_layout\n\n\\begin_layout Plain Layout\n\n out_pos = mul(modelViewProj, pos);\n\\end_layout\n\n\\begin_layout Plain Layout\n\n out_color = color;\n\\end_layout\n\n\\begin_layout Plain Layout\n\n out_tex = tex;\n\\end_layout\n\n\\begin_layout Plain Layout\n\n}\n\\end_layout\n\n\\end_inset\n\n\n\\end_layout\n\n\\begin_layout Standard\nThis looks vaguely familiar to C, and it is.\n\n\\begin_inset Index idx\nstatus open\n\n\\begin_layout Plain Layout\nCg\n\\end_layout\n\n\\end_inset\n\nCg stands for\n\\begin_inset Quotes eld\n\\end_inset\n\nC for graphics\n\\begin_inset Quotes erd\n\\end_inset\n\n after all.\n We notice some things are happening, notable some new types.\n\\end_layout\n\n\\begin_layout Subsection\nCg types\n\\end_layout\n\n\\begin_layout Subsubsection\nFloat4\n\\end_layout\n\n\\begin_layout Standard\nfloat4 is a vector type.\n It contains 4 elements.\n It could be colors, positions, whatever.\n It's used for vector processing which the GPUs are extremely efficient\n at.\n\\end_layout\n\n\\begin_layout Subsubsection\nSemantics\n\\end_layout\n\n\\begin_layout Standard\nWe see various semantics.\n The POSITION semantic means that the variable is tied to vertex coordinates.\n We see that we have an input POSITION, and an output (out) POSITION.\n We thus transform the input to the output with a matrix multiply with the\n current model-view projection.\n Since this matrix is the same for every vertex, it is a uniform.\n Remember that the variable names DO matter.\n modelViewProj has to be called exactly that, as the emulator will pass\n the MVP to this uniform.\n It is in the specification.\n\\end_layout\n\n\\begin_layout Standard\nSince we have semantics for the POSITION, etc, we can call them whatever\n we want, as the Cg environment figures out what the variables mean.\n\\end_layout\n\n\\begin_layout Standard\nThe transformation happens here:\n\\end_layout\n\n\\begin_layout Standard\n\\begin_inset listings\ninline false\nstatus open\n\n\\begin_layout Plain Layout\n\nout_pos = mul(modelViewProj, pos);\n\\end_layout\n\n\\end_inset\n\n\n\\end_layout\n\n\\begin_layout Standard\nThe COLOR semantic isn't very interesting for us, but the example code in\n nVidias Cg documentation includes it, so we just follow along.\n\\end_layout\n\n\\begin_layout Standard\nTEXCOORD is the texture coordinate we get from the emulator, and generally\n we just pass it to the fragment shader directly.\n The coordinate will then be\n\\begin_inset Quotes eld\n\\end_inset\n\nlinearly interpolated\n\\begin_inset Quotes erd\n\\end_inset\n\n across the fragments.\n More complex shaders can output (almost) as many variables they want, that\n will be linearily interpolated for free to the fragment shader.\n\\end_layout\n\n\\begin_layout Standard\nWe also need a fragment shader to go along with the vertex shader, and here's\n a basic shader that only outputs the pixel as-is.\n This is pretty much the result you'd get if you didn't run any shader (fixed-fu\nnction) at all.\n\\end_layout\n\n\\begin_layout Standard\n\\begin_inset listings\ninline false\nstatus open\n\n\\begin_layout Plain Layout\n\nfloat4 main_fragment(uniform sampler2D s0 : TEXUNIT0,\n\\end_layout\n\n\\begin_layout Plain Layout\n\n float2 tex : TEXCOORD) : COLOR\n\\end_layout\n\n\\begin_layout Plain Layout\n\n{\n\\end_layout\n\n\\begin_layout Plain Layout\n\n return tex2D(s0, tex);\n\\end_layout\n\n\\begin_layout Plain Layout\n\n}\n\\end_layout\n\n\\end_inset\n\n\n\\end_layout\n\n\\begin_layout Standard\nThis is arguably simpler than the vertex shader.\n Important to notice are:\n\\end_layout\n\n\\begin_layout Standard\nsampler2D is a handle to a texture in Cg.\n The semantic here is TEXUNIT0, which means that it refers to the texture\n in texture unit 0.\n This is also part of the specification.\n\\end_layout\n\n\\begin_layout Standard\nfloat2 tex : TEXCOORD is the interpolated coordinate we received from the\n vertex shader.\n\\end_layout\n\n\\begin_layout Standard\ntex2D(s0, tex); simply does texture lookup and returns a COLOR, which is\n emitted to the framebuffer.\n Simple enough.\n Practically every fragment does more than one texture lookup.\n For example, classic pixel shaders look at the neighbor pixels as well\n to determine the output.\n But where is the neighbor pixel? We'll revise the fragment shader and try\n to make a really blurry shader to demonstrate.\n We now need to pull up some uniforms.\n We need to know how to modify our tex coordinates so that it points to\n a neighbor pixel.\n\\end_layout\n\n\\begin_layout Standard\n\\begin_inset listings\ninline false\nstatus open\n\n\\begin_layout Plain Layout\n\nstruct input\n\\end_layout\n\n\\begin_layout Plain Layout\n\n{\n\\end_layout\n\n\\begin_layout Plain Layout\n\n float2 video_size;\n\\end_layout\n\n\\begin_layout Plain Layout\n\n float2 texture_size;\n\\end_layout\n\n\\begin_layout Plain Layout\n\n float2 output_size;\n\\end_layout\n\n\\begin_layout Plain Layout\n\n float frame_count;\n\\end_layout\n\n\\begin_layout Plain Layout\n\n};\n\\end_layout\n\n\\begin_layout Plain Layout\n\n\\end_layout\n\n\\begin_layout Plain Layout\n\nfloat4 main_fragment(uniform sampler2D s0 : TEXUNIT0,\n\\end_layout\n\n\\begin_layout Plain Layout\n\n uniform input IN, float2 tex : TEXCOORD) : COLOR\n\\end_layout\n\n\\begin_layout Plain Layout\n\n{\n\\end_layout\n\n\\begin_layout Plain Layout\n\n float4 result = float4(0.0);\n\\end_layout\n\n\\begin_layout Plain Layout\n\n float dx = 1.0 / IN.texture_size.x;\n\\end_layout\n\n\\begin_layout Plain Layout\n\n float dy = 1.0 / IN.texture_size.y;\n\\end_layout\n\n\\begin_layout Plain Layout\n\n\n\\end_layout\n\n\\begin_layout Plain Layout\n\n // Grab some of the neighboring pixels and\n\\end_layout\n\n\\begin_layout Plain Layout\n\n // blend together for a very mushy blur.\n\\end_layout\n\n\\begin_layout Plain Layout\n\n result += tex2D(s0, tex + float2(-dx, -dy));\n\\end_layout\n\n\\begin_layout Plain Layout\n\n result += tex2D(s0, tex + float2(dx, -dy));\n\\end_layout\n\n\\begin_layout Plain Layout\n\n result += tex2D(s0, tex + float2(0.0, 0.0));\n\\end_layout\n\n\\begin_layout Plain Layout\n\n result += tex2D(s0, tex + float2(-dx, 0.0));\n\\end_layout\n\n\\begin_layout Plain Layout\n\n return result / 4.0;\n\\end_layout\n\n\\begin_layout Plain Layout\n\n}\n\\end_layout\n\n\\end_inset\n\n\n\\end_layout\n\n\\begin_layout Standard\nHere we use IN.texture_size to determine the the size of the texture.\n Since GL maps the whole texture to the interval [0.0, 1.0], 1.0 / IN.texture_size\n means we get the offset for a single pixel, simple enough.\n Almost every shader uses this.\n We can calculate these offsets in vertex shader to improve performance\n since the coordinates are linearily interpolated anyways, but that is for\n another time ...\n ;)\n\\end_layout\n\n\\begin_layout Subsection\nPutting it together\n\\end_layout\n\n\\begin_layout Standard\nThe final runnable product is a single .cg file with the main_vertex and\n main_fragment functions added together.\n Not very complicated.\n For the icing on the cake, you should add a license header.\n\\end_layout\n\n\\begin_layout Standard\n\\begin_inset listings\ninline false\nstatus open\n\n\\begin_layout Plain Layout\n\n/* Stupid blur shader.\n\\end_layout\n\n\\begin_layout Plain Layout\n\n Author: Your friendly neighbor.\n\\end_layout\n\n\\begin_layout Plain Layout\n\n License: We don't have those things!\n\\end_layout\n\n\\begin_layout Plain Layout\n\n*/\n\\end_layout\n\n\\begin_layout Plain Layout\n\n\\end_layout\n\n\\begin_layout Plain Layout\n\nstruct input\n\\end_layout\n\n\\begin_layout Plain Layout\n\n{\n\\end_layout\n\n\\begin_layout Plain Layout\n\n float2 video_size;\n\\end_layout\n\n\\begin_layout Plain Layout\n\n float2 texture_size;\n\\end_layout\n\n\\begin_layout Plain Layout\n\n float2 output_size;\n\\end_layout\n\n\\begin_layout Plain Layout\n\n float frame_count;\n\\end_layout\n\n\\begin_layout Plain Layout\n\n};\n\\end_layout\n\n\\begin_layout Plain Layout\n\n\\end_layout\n\n\\begin_layout Plain Layout\n\nvoid main_vertex(\n\\end_layout\n\n\\begin_layout Plain Layout\n\n float4 pos : POSITION,\n\\end_layout\n\n\\begin_layout Plain Layout\n\n out float4 out_pos : POSITION,\n\\end_layout\n\n\\begin_layout Plain Layout\n\n uniform float4x4 modelViewProj,\n\\end_layout\n\n\\begin_layout Plain Layout\n\n float4 color : COLOR,\n\\end_layout\n\n\\begin_layout Plain Layout\n\n out float4 out_color : COLOR,\n\\end_layout\n\n\\begin_layout Plain Layout\n\n float2 tex : TEXCOORD,\n\\end_layout\n\n\\begin_layout Plain Layout\n\n out float2 out_tex : TEXCOORD\n\\end_layout\n\n\\begin_layout Plain Layout\n\n)\n\\end_layout\n\n\\begin_layout Plain Layout\n\n{\n\\end_layout\n\n\\begin_layout Plain Layout\n\n out_pos = mul(modelViewProj, pos);\n\\end_layout\n\n\\begin_layout Plain Layout\n\n out_color = color; out_tex = tex;\n\\end_layout\n\n\\begin_layout Plain Layout\n\n}\n\\end_layout\n\n\\begin_layout Plain Layout\n\n\\end_layout\n\n\\begin_layout Plain Layout\n\nfloat4 main_fragment(uniform sampler2D s0 : TEXUNIT0,\n\\end_layout\n\n\\begin_layout Plain Layout\n\n uniform input IN, float2 tex : TEXCOORD) : COLOR\n\\end_layout\n\n\\begin_layout Plain Layout\n\n{\n\\end_layout\n\n\\begin_layout Plain Layout\n\n float4 result = float4(0.0);\n\\end_layout\n\n\\begin_layout Plain Layout\n\n float dx = 1.0 / IN.texture_size.x;\n\\end_layout\n\n\\begin_layout Plain Layout\n\n float dy = 1.0 / IN.texture_size.y;\n\\end_layout\n\n\\begin_layout Plain Layout\n\n\n\\end_layout\n\n\\begin_layout Plain Layout\n\n // Grab some of the neighboring pixels and blend\n\\end_layout\n\n\\begin_layout Plain Layout\n\n // together for a very mushy blur.\n\\end_layout\n\n\\begin_layout Plain Layout\n\n result += tex2D(s0, tex + float2(-dx, -dy));\n\\end_layout\n\n\\begin_layout Plain Layout\n\n result += tex2D(s0, tex + float2(dx, -dy));\n\\end_layout\n\n\\begin_layout Plain Layout\n\n result += tex2D(s0, tex + float2(0.0, 0.0));\n\\end_layout\n\n\\begin_layout Plain Layout\n\n result += tex2D(s0, tex + float2(-dx, 0.0));\n\\end_layout\n\n\\begin_layout Plain Layout\n\n return result / 4.0;\n\\end_layout\n\n\\begin_layout Plain Layout\n\n}\n\\end_layout\n\n\\end_inset\n\n\n\\end_layout\n\n\\begin_layout Subsection\nResult\n\\end_layout\n\n\\begin_layout Standard\n\\begin_inset ERT\nstatus open\n\n\\begin_layout Plain Layout\n\n\n\\backslash\nbegin{figure}\n\\backslash\nbegin{centering}\n\\end_layout\n\n\\end_inset\n\n\n\\begin_inset Graphics\n\tfilename supermetroid.jpg\n\tlyxscale 50\n\tscale 30\n\tclip\n\n\\end_inset\n\n\n\\begin_inset ERT\nstatus open\n\n\\begin_layout Plain Layout\n\n\n\\backslash\ncaption{The result of the shader code.}\n\\backslash\nend{centering}\n\\backslash\nend{figure}\n\\end_layout\n\n\\end_inset\n\n\n\\end_layout\n\n\\begin_layout Standard\nAs you can see, it's not a practical shader, but it shows the blurring effect\n to the extreme.\n\\end_layout\n\n\\begin_layout Section\nExpanding further\n\\end_layout\n\n\\begin_layout Subsection\nLookup textures\n\\end_layout\n\n\\begin_layout Standard\nWe'll first mention a very popular feature among RetroArch users the ability\n to access external textures.\n This means we have several samplers available for use.\n In the config file, we define the textures as so:\n\\end_layout\n\n\\begin_layout Standard\n\\begin_inset listings\ninline false\nstatus open\n\n\\begin_layout Plain Layout\n\ntextures = \"foo;bar\"\n\\end_layout\n\n\\begin_layout Plain Layout\n\nfoo = path_foo.png\n\\end_layout\n\n\\begin_layout Plain Layout\n\nbar = bar_foo.png\n\\end_layout\n\n\\begin_layout Plain Layout\n\nfoo_linear = true # Linear filtering for foo.\n\\end_layout\n\n\\begin_layout Plain Layout\n\nbar_linear = true # Linear filtering for bar.\n\n\\end_layout\n\n\\end_inset\n\n\n\\end_layout\n\n\\begin_layout Standard\nRetroArch PS3 uses PNG as the main format, RetroArch can use whatever if\n Imlib2 support is compiled in.\n If not, it's restricted to lop-left ordered, non-RLE TGA.\n\\end_layout\n\n\\begin_layout Standard\nFrom here on,\n\\begin_inset Quotes eld\n\\end_inset\n\nfoo\n\\begin_inset Quotes erd\n\\end_inset\n\n and\n\\begin_inset Quotes eld\n\\end_inset\n\nbar\n\\begin_inset Quotes erd\n\\end_inset\n\n can be found as uniforms in the shaders.\n The texture coordinates for the lookup texture will be found in TEXCOORD1.\n This can simply be passed along with TEXCOORD0 in the vertex shader as\n we did with TEXCOORD0.\n Here we make a fragment shader that blends in two background picture at\n a reduced opacity.\n Do NOT assign lookup textures to a certain TEXUNIT, Cg will assign a fitting\n texture unit to the sampler.\n\\end_layout\n\n\\begin_layout Standard\n\\begin_inset listings\ninline false\nstatus open\n\n\\begin_layout Plain Layout\n\nfloat4 main_fragment(uniform sampler2D s0 : TEXUNIT0,\n\\end_layout\n\n\\begin_layout Plain Layout\n\n uniform sampler2D foo, uniform sampler2D bar,\n\\end_layout\n\n\\begin_layout Plain Layout\n\n float2 tex : TEXCOORD0, float2 tex_lut : TEXCOORD1) : COLOR\n\\end_layout\n\n\\begin_layout Plain Layout\n\n{\n\\end_layout\n\n\\begin_layout Plain Layout\n\n float4 bg_sum = (tex2D(foo, tex_lut) + tex2D(bar, tex_lut)) * 0.15;\n\\end_layout\n\n\\begin_layout Plain Layout\n\n return lerp(tex2D(s0, tex), bg_sum, bg_sum.a); // Alpha blending.\n\\end_layout\n\n\\begin_layout Plain Layout\n\n}\n\\end_layout\n\n\\end_inset\n\n Here's an example of what can be achieved using borders (which are just\n a simple lookup texture):\n\\end_layout\n\n\\begin_layout Standard\n\\begin_inset ERT\nstatus open\n\n\\begin_layout Plain Layout\n\n\n\\backslash\nbegin{figure}\n\\backslash\nbegin{centering}\n\\end_layout\n\n\\end_inset\n\n\n\\begin_inset Graphics\n\tfilename shader-rarch-2.jpg\n\tlyxscale 50\n\tscale 50\n\tclip\n\n\\end_inset\n\n\n\\begin_inset ERT\nstatus open\n\n\\begin_layout Plain Layout\n\n\n\\backslash\ncaption{A shader making use of a lookup texture for the purpose of drawing\n a background border.}\n\\backslash\nend{centering}\n\\backslash\nend{figure}\n\\end_layout\n\n\\end_inset\n\n\n\\end_layout\n\n\\begin_layout Subsection\nMultipass\n\\end_layout\n\n\\begin_layout Standard\nIt is sometimes feasible to process an effect in several steps.\n\\end_layout\n\n\\begin_layout Standard\n\\begin_inset listings\ninline false\nstatus open\n\n\\begin_layout Plain Layout\n\nshaders = 2\n\\end_layout\n\n\\begin_layout Plain Layout\n\nshader0 = pass1.cg\n\\end_layout\n\n\\begin_layout Plain Layout\n\nshader1 = pass2.cg\n\\end_layout\n\n\\begin_layout Plain Layout\n\nscale_type0 = source\n\\end_layout\n\n\\begin_layout Plain Layout\n\nscale0 = 2.0\n\\end_layout\n\n\\begin_layout Plain Layout\n\nfilter_linear0 = true\n\\end_layout\n\n\\begin_layout Plain Layout\n\nfilter_linear1 = false\n\\end_layout\n\n\\end_inset\n\n\n\\end_layout\n\n\\begin_layout Subsection\nGame-aware shaders\n\\end_layout\n\n\\begin_layout Standard\nThis is a new and exciting feature.\n It allows shaders to grab data from the emulator state itself, such as\n RAM data.\n This is only implemented for SNES so far, but the idea is quite extendable\n and portable.\n\\end_layout\n\n\\begin_layout Standard\nThe basic idea is that we capture RAM data in a certain way (semantic if\n you will) from the SNES, and pass it as a uniform to the shader.\n The shader can thus act on game state in interesting ways.\n\\end_layout\n\n\\begin_layout Standard\nAs a tool to show this feature, we'll focus on replicating the simple tech\n demo shown on YouTube:\n\\begin_inset CommandInset href\nLatexCommand href\ntarget \"http://www.youtube.com/watch?v=4VzaE9q735k\"\n\n\\end_inset\n\n\n\\end_layout\n\n\\begin_layout Standard\nWhat happens is that when Mario jumps in the water, the screen gets a\n\\begin_inset Quotes eld\n\\end_inset\n\nwatery\n\\begin_inset Quotes erd\n\\end_inset\n\n effect applied to it, with a rain lookup texture, and a wavy effect.\n When he jumps out of the water, the water effect slowly fades away.\n\\end_layout\n\n\\begin_layout Standard\nWe thus need to know two things:\n\\end_layout\n\n\\begin_layout Itemize\nIs Mario currently in water or not?\n\\end_layout\n\n\\begin_layout Itemize\nIf not, how long time was it since he jumped out?\n\\end_layout\n\n\\begin_layout Standard\nSince shaders do not have state associated with it, we have to let the environme\nnt provide the state we need in a certain way.\n We'll call this concept a semantic.\n\\end_layout\n\n\\begin_layout Standard\nTo capture a RAM value directly, we can use the\n\\begin_inset Quotes eld\n\\end_inset\n\ncapture\n\\begin_inset Quotes erd\n\\end_inset\n\n semantic.\n To record the time when the RAM value last changed, we can use the\n\\begin_inset Quotes eld\n\\end_inset\n\ntransition\n\\begin_inset Quotes erd\n\\end_inset\n\n semantic.\n We obviously also need to know where in RAM we can find this information.\n Luckily, the guys over at SMW Central know the answer:\n\\begin_inset CommandInset href\nLatexCommand href\ntarget \"http://www.smwcentral.net/?p=map&type=ram\"\n\n\\end_inset\n\n\n\\end_layout\n\n\\begin_layout Standard\nWe see:\n\\end_layout\n\n\\begin_layout Standard\n\\begin_inset listings\ninline false\nstatus open\n\n\\begin_layout Plain Layout\n\n$7E:0075, byte, Flag, Player is in water flag.\n #$00 = No; #$01 = Yes.\n\n\\end_layout\n\n\\end_inset\n\nBank $7E and $7F are mapped to WRAM $0000-$FFFF and $10000-$1FFFF respectively.\n Thus, our WRAM address is $0075.\n\\end_layout\n\n\\begin_layout Standard\nIn the config file, we can now set up the uniforms we'll want to be captured\n in the config file.\n\\end_layout\n\n\\begin_layout Standard\n\\begin_inset listings\ninline false\nstatus open\n\n\\begin_layout Plain Layout\n\nimports = \"mario_water;mario_water_time\"\n\\end_layout\n\n\\begin_layout Plain Layout\n\nmario_water_semantic = capture\n\\end_layout\n\n\\begin_layout Plain Layout\n\n# Capture the RAM value as-is.\n\\end_layout\n\n\\begin_layout Plain Layout\n\nmario_water_wram = 0075\n\\end_layout\n\n\\begin_layout Plain Layout\n\n# This value is hex!\n\\end_layout\n\n\\begin_layout Plain Layout\n\nmario_water_time_semantic = transition\n\\end_layout\n\n\\begin_layout Plain Layout\n\n# Capture the frame count when this variable last changed.\n\\end_layout\n\n\\begin_layout Plain Layout\n\n# Use with IN.frame_count, to create a fade-out effect.\n\\end_layout\n\n\\begin_layout Plain Layout\n\nmario_water_time_wram = 0075\n\\end_layout\n\n\\end_inset\n\n\n\\end_layout\n\n\\begin_layout Standard\nThe amount of possible\n\\begin_inset Quotes eld\n\\end_inset\n\nsemantics\n\\begin_inset Quotes erd\n\\end_inset\n\n are practically endless.\n It might be worthwhile to attempt some possibility to run custom code that\n keeps track of the shader uniforms in more sophisticated ways later on.\n Do note that there is also a %s_mask value which will let you bitmask the\n RAM value to check for bit-flags more easily.\n\\end_layout\n\n\\begin_layout Standard\nNow that we got that part down, let's work on the shader design.\n In the fragment shader we simply render both the full water effect, and\n the «normal» texture, and let a\n\\begin_inset Quotes eld\n\\end_inset\n\nblend\n\\begin_inset Quotes erd\n\\end_inset\n\n variable decide.\n We can say that 1.0 is full water effect, 0.0 is no effect.\n We can start working on our vertex shader.\n We will do something useful here for once.\n\\end_layout\n\n\\begin_layout Standard\n\\begin_inset listings\ninline false\nstatus open\n\n\\begin_layout Plain Layout\n\nstruct input\n\\end_layout\n\n\\begin_layout Plain Layout\n\n{\n\\end_layout\n\n\\begin_layout Plain Layout\n\n float frame_count;\n\\end_layout\n\n\\begin_layout Plain Layout\n\n};\n\\end_layout\n\n\\begin_layout Plain Layout\n\n\\end_layout\n\n\\begin_layout Plain Layout\n\nvoid main_vertex(\n\\end_layout\n\n\\begin_layout Plain Layout\n\n float4 pos : POSITION,\n\\end_layout\n\n\\begin_layout Plain Layout\n\n out float4 out_pos : POSITION,\n\\end_layout\n\n\\begin_layout Plain Layout\n\n uniform float4x4 modelViewProj,\n\\end_layout\n\n\\begin_layout Plain Layout\n\n float4 color : COLOR,\n\\end_layout\n\n\\begin_layout Plain Layout\n\n out float4 out_color : COLOR,\n\\end_layout\n\n\\begin_layout Plain Layout\n\n float2 tex : TEXCOORD0,\n\\end_layout\n\n\\begin_layout Plain Layout\n\n out float2 out_tex : TEXCOORD0,\n\\end_layout\n\n\\begin_layout Plain Layout\n\n float2 tex1 : TEXCOORD1,\n\\end_layout\n\n\\begin_layout Plain Layout\n\n out float2 out_tex1 : TEXCOORD1,\n\\end_layout\n\n\\begin_layout Plain Layout\n\n\\end_layout\n\n\\begin_layout Plain Layout\n\n // Even if the data should have been int,\n\\end_layout\n\n\\begin_layout Plain Layout\n\n // Cg doesn't seem to\n\\end_layout\n\n\\begin_layout Plain Layout\n\n uniform float mario_water,\n\\end_layout\n\n\\begin_layout Plain Layout\n\n // support integer uniforms\n\\end_layout\n\n\\begin_layout Plain Layout\n\n uniform float mario_water_time,\n\\end_layout\n\n\\begin_layout Plain Layout\n\n uniform input IN,\n\\end_layout\n\n\\begin_layout Plain Layout\n\n // Blend factor is passed to fragment shader.\n\\end_layout\n\n\\begin_layout Plain Layout\n\n // We'll output the same value in every vertex,\n\\end_layout\n\n\\begin_layout Plain Layout\n\n // so every fragment will get the same value\n\\end_layout\n\n\\begin_layout Plain Layout\n\n // for blend_factor since there is nothing to interpolate.\n\\end_layout\n\n\\begin_layout Plain Layout\n\n out float blend_factor )\n\\end_layout\n\n\\begin_layout Plain Layout\n\n{\n\\end_layout\n\n\\begin_layout Plain Layout\n\n out_pos = mul(modelViewProj, pos);\n\\end_layout\n\n\\begin_layout Plain Layout\n\n out_color = color;\n\\end_layout\n\n\\begin_layout Plain Layout\n\n out_tex = tex;\n\\end_layout\n\n\\begin_layout Plain Layout\n\n out_tex1 = tex1;\n\\end_layout\n\n\\begin_layout Plain Layout\n\n float transition_time = 0.5 *\n\\end_layout\n\n\\begin_layout Plain Layout\n\n (IN.frame_count – mario_water_time) / 60.0;\n\\end_layout\n\n\\begin_layout Plain Layout\n\n\n\\end_layout\n\n\\begin_layout Plain Layout\n\n // If Mario is in the water ($0075 != 0),\n\\end_layout\n\n\\begin_layout Plain Layout\n\n // it's always 1 ...\n\\end_layout\n\n\\begin_layout Plain Layout\n\n if (mario_water > 0.0)\n\\end_layout\n\n\\begin_layout Plain Layout\n\n blend_factor = 1.0;\n\\end_layout\n\n\\begin_layout Plain Layout\n\n // Fade out from 1.0 towards 0.0 as\n\\end_layout\n\n\\begin_layout Plain Layout\n\n // transition_time grows larger.\n\\end_layout\n\n\\begin_layout Plain Layout\n\n else\n\\end_layout\n\n\\begin_layout Plain Layout\n\n blend_factor = exp(-transition_time);\n\\end_layout\n\n\\begin_layout Plain Layout\n\n}\n\\end_layout\n\n\\end_inset\n\n\n\\end_layout\n\n\\begin_layout Standard\nAll fine and dandy so far, now we just need to use this blend_factor in\n our fragment shader somehow ...\n Let's move on to the fragment shader where we blend.\n\\end_layout\n\n\\begin_layout Standard\n\\begin_inset listings\ninline false\nstatus open\n\n\\begin_layout Plain Layout\n\nfloat apply_wave(float2 pos, float2 src, float cnt)\n\\end_layout\n\n\\begin_layout Plain Layout\n\n{\n\\end_layout\n\n\\begin_layout Plain Layout\n\n float2 diff = pos - src;\n\\end_layout\n\n\\begin_layout Plain Layout\n\n float dist = 300.0 * sqrt(dot(diff, diff));\n\\end_layout\n\n\\begin_layout Plain Layout\n\n dist -= 0.15 * cnt;\n\\end_layout\n\n\\begin_layout Plain Layout\n\n return sin(dist);\n\\end_layout\n\n\\begin_layout Plain Layout\n\n}\n\\end_layout\n\n\\begin_layout Plain Layout\n\n\\end_layout\n\n\\begin_layout Plain Layout\n\n// Fancy shizz to create a wave.\n\\end_layout\n\n\\begin_layout Plain Layout\n\nfloat4 water_texture(float4 output, float2 scale, float cnt)\n\\end_layout\n\n\\begin_layout Plain Layout\n\n{\n\\end_layout\n\n\\begin_layout Plain Layout\n\n float res = apply_wave(scale, src0, cnt);\n\\end_layout\n\n\\begin_layout Plain Layout\n\n res += apply_wave(scale, src1, cnt);\n\\end_layout\n\n\\begin_layout Plain Layout\n\n res += apply_wave(scale, src2, cnt);\n\\end_layout\n\n\\begin_layout Plain Layout\n\n res += apply_wave(scale, src3, cnt);\n\\end_layout\n\n\\begin_layout Plain Layout\n\n res += apply_wave(scale, src4, cnt);\n\\end_layout\n\n\\begin_layout Plain Layout\n\n res += apply_wave(scale, src5, cnt);\n\\end_layout\n\n\\begin_layout Plain Layout\n\n res += apply_wave(scale, src6, cnt);\n\\end_layout\n\n\\begin_layout Plain Layout\n\n return output * (0.95 + 0.012 * res);\n\\end_layout\n\n\\begin_layout Plain Layout\n\n}\n\\end_layout\n\n\\begin_layout Plain Layout\n\n\\end_layout\n\n\\begin_layout Plain Layout\n\nfloat4 main_fragment\n\\end_layout\n\n\\begin_layout Plain Layout\n\n(\n\\end_layout\n\n\\begin_layout Plain Layout\n\n uniform input IN,\n\\end_layout\n\n\\begin_layout Plain Layout\n\n float2 tex : TEXCOORD0, uniform sampler2D s0 : TEXUNIT0,\n\\end_layout\n\n\\begin_layout Plain Layout\n\n uniform sampler2D rain, float2 tex1 : TEXCOORD1,\n\\end_layout\n\n\\begin_layout Plain Layout\n\n in float blend_factor // Passed from vertex\n\\end_layout\n\n\\begin_layout Plain Layout\n\n) : COLOR\n\\end_layout\n\n\\begin_layout Plain Layout\n\n{\n\\end_layout\n\n\\begin_layout Plain Layout\n\n float4 water_tex = water_texture(tex2D(s0, tex), tex1, IN.frame_count);\n\\end_layout\n\n\\begin_layout Plain Layout\n\n float4 normal_tex = tex2D(s0, tex);\n\\end_layout\n\n\\begin_layout Plain Layout\n\n float4 rain_tex = tex2D(rain, tex1);\n\\end_layout\n\n\\begin_layout Plain Layout\n\n\n\\end_layout\n\n\\begin_layout Plain Layout\n\n // First, blend normal and water texture together,\n\\end_layout\n\n\\begin_layout Plain Layout\n\n // then add the rain texture with alpha blending on top\n\\end_layout\n\n\\begin_layout Plain Layout\n\n return lerp(lerp(normal_tex, water_tex, blend_factor),\n\\end_layout\n\n\\begin_layout Plain Layout\n\n rain_tex, rain_tex.a * blend_factor * 0.5);\n\\end_layout\n\n\\begin_layout Plain Layout\n\n}\n\\end_layout\n\n\\end_inset\n\n\n\\end_layout\n\n\\begin_layout Subsubsection\nRetroArch config file\n\\end_layout\n\n\\begin_layout Standard\n\\begin_inset listings\ninline false\nstatus open\n\n\\begin_layout Plain Layout\n\nshaders = 1\n\\end_layout\n\n\\begin_layout Plain Layout\n\nshader0 = mario.cg\n\\end_layout\n\n\\begin_layout Plain Layout\n\nfilter_linear0 = true\n\\end_layout\n\n\\begin_layout Plain Layout\n\nimports = \"mario_water;mario_water_time\"\n\\end_layout\n\n\\begin_layout Plain Layout\n\nmario_water_semantic = capture\n\\end_layout\n\n\\begin_layout Plain Layout\n\nmario_water_time_semantic = transition\n\\end_layout\n\n\\begin_layout Plain Layout\n\nmario_water_wram = 0075\n\\end_layout\n\n\\begin_layout Plain Layout\n\nmario_water_time_wram = 0075\n\\end_layout\n\n\\begin_layout Plain Layout\n\ntextures = rain\n\\end_layout\n\n\\begin_layout Plain Layout\n\nrain = rain.tga\n\\end_layout\n\n\\begin_layout Plain Layout\n\nrain_linear = true\n\\end_layout\n\n\\end_inset\n\n\n\\end_layout\n\n\\begin_layout Subsubsection\nHow to test when developing for RetroArch?\n\\end_layout\n\n\\begin_layout Standard\nTo develop these kinds of shaders, I'd recommend using\n\\begin_inset Index idx\nstatus open\n\n\\begin_layout Plain Layout\nRetroArch\n\\end_layout\n\n\\end_inset\n\nRetroArch w/\n\\begin_inset Index idx\nstatus open\n\n\\begin_layout Plain Layout\nCg\n\\end_layout\n\n\\end_inset\n\nCg support, and a debugging tool for your emulator of choice to peek at\n RAM values (build it for\n\\begin_inset Index idx\nstatus open\n\n\\begin_layout Plain Layout\nbSNES\n\\end_layout\n\n\\end_inset\n\nbSNES yourself with options=debugger).\n\\end_layout\n\n\\begin_layout Standard\nAfter written, the shader should translate nicely over to RetroArch with\n some slight changes to the config.\n\\end_layout\n\n\\begin_layout Subsubsection\nResults\n\\end_layout\n\n\\begin_layout Standard\nHere are some screenshots of the mario effect (in Super Mario World SNES)\n we developed.\n Obviously this is a very simple example showing what can be done.\n It's not confined to overlays.\n The imagination is the limit here.\n\\end_layout\n\n\\begin_layout Standard\n\\begin_inset ERT\nstatus open\n\n\\begin_layout Plain Layout\n\n\n\\backslash\nbegin{figure}\n\\backslash\nbegin{centering}\n\\end_layout\n\n\\end_inset\n\n\n\\begin_inset Graphics\n\tfilename mario-water1.jpg\n\tlyxscale 50\n\tscale 50\n\tclip\n\n\\end_inset\n\n\n\\begin_inset ERT\nstatus open\n\n\\begin_layout Plain Layout\n\n\n\\backslash\ncaption{Super Mario World prior to Mario jumping in water.}\n\\backslash\nend{centering}\n\\backslash\nend{figure}\n\\end_layout\n\n\\end_inset\n\n\n\\end_layout\n\n\\begin_layout Standard\n\\begin_inset ERT\nstatus open\n\n\\begin_layout Plain Layout\n\n\n\\backslash\nbegin{figure}\n\\backslash\nbegin{centering}\n\\end_layout\n\n\\end_inset\n\n\n\\begin_inset Graphics\n\tfilename mario-water2.jpg\n\tlyxscale 50\n\tscale 50\n\tclip\n\n\\end_inset\n\n\n\\begin_inset ERT\nstatus open\n\n\\begin_layout Plain Layout\n\n\n\\backslash\ncaption{Super Mario World with a game aware shader applying a LUT texture\n as soon as Mario jumps into the water.}\n\\backslash\nend{centering}\n\\backslash\nend{figure}\n\\end_layout\n\n\\end_inset\n\n\n\\end_layout\n\n\\begin_layout Standard\n\\begin_inset CommandInset index_print\nLatexCommand printindex\ntype \"idx\"\n\n\\end_inset\n\n\n\\end_layout\n\n\\end_body\n\\end_document\n"
},
{
"path": "archive/libretro.lyx",
"content": "#LyX 2.0 created this file. For more info see http://www.lyx.org/\n\\lyxformat 413\n\\begin_document\n\\begin_header\n\\textclass article\n\\use_default_options true\n\\maintain_unincluded_children false\n\\language english\n\\language_package default\n\\inputencoding auto\n\\fontencoding global\n\\font_roman default\n\\font_sans default\n\\font_typewriter default\n\\font_default_family default\n\\use_non_tex_fonts false\n\\font_sc false\n\\font_osf false\n\\font_sf_scale 100\n\\font_tt_scale 100\n\n\\graphics default\n\\default_output_format default\n\\output_sync 0\n\\bibtex_command default\n\\index_command default\n\\paperfontsize default\n\\spacing single\n\\use_hyperref true\n\\pdf_title \"Libretro - Implementing the core\"\n\\pdf_author \"Hans-Kristian Arntzen, Daniel De Matteis\"\n\\pdf_bookmarks true\n\\pdf_bookmarksnumbered false\n\\pdf_bookmarksopen false\n\\pdf_bookmarksopenlevel 1\n\\pdf_breaklinks false\n\\pdf_pdfborder true\n\\pdf_colorlinks true\n\\pdf_backref false\n\\pdf_pdfusetitle true\n\\papersize default\n\\use_geometry false\n\\use_amsmath 1\n\\use_esint 1\n\\use_mhchem 1\n\\use_mathdots 1\n\\cite_engine basic\n\\use_bibtopic true\n\\use_indices false\n\\paperorientation portrait\n\\suppress_date false\n\\use_refstyle 1\n\\index Index\n\\shortcut idx\n\\color #008000\n\\end_index\n\\secnumdepth 3\n\\tocdepth 3\n\\paragraph_separation indent\n\\paragraph_indentation default\n\\quotes_language english\n\\papercolumns 1\n\\papersides 1\n\\paperpagestyle default\n\\tracking_changes false\n\\output_changes false\n\\html_math_output 0\n\\html_css_as_file 0\n\\html_be_strict false\n\\end_header\n\n\\begin_body\n\n\\begin_layout Title\nLibretro - Implementing the core\n\\end_layout\n\n\\begin_layout Author\nHans-Kristian Arntzen, Daniel De Matteis\n\\end_layout\n\n\\begin_layout Standard\n\\begin_inset CommandInset toc\nLatexCommand tableofcontents\n\n\\end_inset\n\n\n\\end_layout\n\n\\begin_layout Abstract\nThis document explains how to successfully implement a library based on\n the\n\\begin_inset Index idx\nstatus open\n\n\\begin_layout Plain Layout\nlibretro\n\\end_layout\n\n\\end_inset\n\nlibretro API.\n Several reasons for why more emulators and game engines should run in\n\\begin_inset Index idx\nstatus open\n\n\\begin_layout Plain Layout\nlibretro\n\\end_layout\n\n\\end_inset\n\nlibretro are outlined.\n\\end_layout\n\n\\begin_layout Section\nBackground\n\\end_layout\n\n\\begin_layout Standard\n\\begin_inset Index idx\nstatus open\n\n\\begin_layout Plain Layout\nRetroArch\n\\end_layout\n\n\\end_inset\n\nRetroArch is a project that aims to be a center for “retro” gaming experiences.\n For your quick fix of 2D gaming goodness,\n\\begin_inset Index idx\nstatus open\n\n\\begin_layout Plain Layout\nRetroArch\n\\end_layout\n\n\\end_inset\n\nRetroArch aims to provide a simple, featureful uniform interface for many\n different gaming systems.\n\\end_layout\n\n\\begin_layout Standard\n\\begin_inset Index idx\nstatus open\n\n\\begin_layout Plain Layout\nlibretro\n\\end_layout\n\n\\end_inset\n\nLibretro is an API that abstracts the inner functionality of a gaming system.\n\n\\begin_inset Index idx\nstatus open\n\n\\begin_layout Plain Layout\nRetroArch\n\\end_layout\n\n\\end_inset\n\nRetroArch can load a library that implements this API, give it a ROM, and\n play.\n A key design is that libretro implementations are loaded as libraries.\n This ensures great modularity, and flexibility for a developer of a core.\n\\end_layout\n\n\\begin_layout Standard\nDue to its simple and open API, other frontends can just as easily utilize\n libretro implementations.\n\\end_layout\n\n\\begin_layout Standard\nWhile “retro” would often imply an emulator of a classic system,\n\\begin_inset Index idx\nstatus open\n\n\\begin_layout Plain Layout\nlibretro\n\\end_layout\n\n\\end_inset\n\nlibretro can also abstract a game engine.\n Classics such as\n\\begin_inset Index idx\nstatus open\n\n\\begin_layout Plain Layout\nCave Story\n\\end_layout\n\n\\end_inset\n\nCave Story (NXEngine) and\n\\begin_inset Index idx\nstatus open\n\n\\begin_layout Plain Layout\nDoom\n\\end_layout\n\n\\end_inset\n\nDOOM (PrBoom) have already been ported over.\n\\end_layout\n\n\\begin_layout Section\nPortability\n\\end_layout\n\n\\begin_layout Standard\nMost emulator authors write both the backend and frontend to their project.\n The question of portability inevitably rises when the frontend is developed.\n Should one target a single platform with high level of integration or take\n a multi-platform approach with libraries like\n\\begin_inset Index idx\nstatus open\n\n\\begin_layout Plain Layout\nQt\n\\end_layout\n\n\\end_inset\n\nQt? Backends for essentials like video, audio and input take a lot of time\n and effort to get right, especially on multiple platforms.\n\\end_layout\n\n\\begin_layout Standard\nBy implementing for\n\\begin_inset Index idx\nstatus open\n\n\\begin_layout Plain Layout\nlibretro\n\\end_layout\n\n\\end_inset\n\nlibretro, one can target standard C/C++ (or any language that can export\n a C API), and achieve instant portability across tons of platforms.\n\\end_layout\n\n\\begin_layout Standard\nIn 2012, we would argue that portability has never been more relevant.\n There are three major operating systems on the desktop, two major smart\n phone platforms, and three gaming consoles.\n If your system is implemented with software rendering, your implementation\n can run on all systems supported by the frontend, without writing any platform\n specific code.\n In the case of\n\\begin_inset Index idx\nstatus open\n\n\\begin_layout Plain Layout\nRetroArch\n\\end_layout\n\n\\end_inset\n\nRetroArch these are currently:\n\\end_layout\n\n\\begin_layout Itemize\nWindows\n\\end_layout\n\n\\begin_layout Itemize\nLinux\n\\end_layout\n\n\\begin_layout Itemize\nOSX\n\\end_layout\n\n\\begin_layout Itemize\nGameCube\n\\end_layout\n\n\\begin_layout Itemize\nPlayStation 3\n\\end_layout\n\n\\begin_layout Itemize\nXBox 1\n\\end_layout\n\n\\begin_layout Itemize\nXBox 360\n\\end_layout\n\n\\begin_layout Itemize\nWii\n\\end_layout\n\n\\begin_layout Itemize\nAndroid\n\\end_layout\n\n\\begin_layout Section\nFeatures\n\\end_layout\n\n\\begin_layout Standard\n\\begin_inset Index idx\nstatus open\n\n\\begin_layout Plain Layout\nRetroArch\n\\end_layout\n\n\\end_inset\n\nRetroArch has been in development for about two years.\n During this time, some features have shown to be quinessential to retro\n gaming systems.\n Implementing the\n\\begin_inset Index idx\nstatus open\n\n\\begin_layout Plain Layout\nlibretro\n\\end_layout\n\n\\end_inset\n\nlibretro API correctly, these features can be utilized without any additional\n work.\n\\end_layout\n\n\\begin_layout Subsection\nFrame-by-frame rewind\n\\end_layout\n\n\\begin_layout Standard\nA libretro implementation that implements serialization and unserialization\n of internal state is able to transparently support rewind mechanics.\n While many emulators support coarse grained rewind,\n\\begin_inset Index idx\nstatus open\n\n\\begin_layout Plain Layout\nRetroArch\n\\end_layout\n\n\\end_inset\n\nRetroArch supports rewind at the frame level, i.e., frames can be rewound\n one frame at a time, similar to the indie-title\n\\begin_inset Index idx\nstatus open\n\n\\begin_layout Plain Layout\nBraid\n\\end_layout\n\n\\end_inset\n\nBraid.\n\\end_layout\n\n\\begin_layout Subsection\n\\begin_inset Index idx\nstatus open\n\n\\begin_layout Plain Layout\nFFmpeg\n\\end_layout\n\n\\end_inset\n\nFFmpeg lossless recording\n\\end_layout\n\n\\begin_layout Standard\n\\begin_inset Index idx\nstatus open\n\n\\begin_layout Plain Layout\nRetroArch\n\\end_layout\n\n\\end_inset\n\nRetroArch can utilize the\n\\begin_inset Index idx\nstatus open\n\n\\begin_layout Plain Layout\nlibavcodec\n\\end_layout\n\n\\end_inset\n\nlibavcodec library to encode video and audio output from a libretro implementati\non.\n The data is encoded losslessly, with\n\\begin_inset Index idx\nstatus open\n\n\\begin_layout Plain Layout\nFLAC\n\\end_layout\n\n\\end_inset\n\nFLAC as audio codec, and cutting-edge\n\\begin_inset Index idx\nstatus open\n\n\\begin_layout Plain Layout\nH.264\n\\end_layout\n\n\\end_inset\n\nH.264/RGB (libx264) encoding, with a fallback to FFV1 for older playback\n systems that don't support the modern\n\\begin_inset Index idx\nstatus open\n\n\\begin_layout Plain Layout\nH.264\n\\end_layout\n\n\\end_inset\n\nH.264/RGB variant.\n The recorder is multithreaded, and easily performs real-time.\n\\end_layout\n\n\\begin_layout Subsection\nAdvanced GPU shader support\n\\end_layout\n\n\\begin_layout Standard\nClassic 2D games have the advantage that their video output is very flexible,\n that is, it can be post- processed easily.\n Before the advent of programmable GPUs, video filters had to be performed\n on the main CPU, which cut directly into performance, and severely limited\n the types of filters possible to acheive in real-time.\n RetroArch aims to move this processing to the GPU by using shaders.\n A vast amount of shader effects are written already, and the shader format\n used is documented and implemented independently by other frontends as\n well.\n\\end_layout\n\n\\begin_layout Standard\n\\begin_inset Index idx\nstatus open\n\n\\begin_layout Plain Layout\nRetroArch\n\\end_layout\n\n\\end_inset\n\nRetroArch's shader support is more advanced than most emulators.\n It supports an arbitrary amount of shader passes, look-up textures (borders),\n scriptable shaders that can react dynamically to input or game content.\n\\end_layout\n\n\\begin_layout Standard\n\\begin_inset Index idx\nstatus open\n\n\\begin_layout Plain Layout\nRetroArch\n\\end_layout\n\n\\end_inset\n\nRetroArch still supports use of traditional CPU filters, however, it should\n be considered a fallback if GPU support is broken.\n\\end_layout\n\n\\begin_layout Subsection\nPeer-to-peer netplay\n\\end_layout\n\n\\begin_layout Standard\n\\begin_inset Index idx\nstatus open\n\n\\begin_layout Plain Layout\nRetroArch\n\\end_layout\n\n\\end_inset\n\nRetroArch supports two-player action over the network.\n It employs a rollback technique that aims to hide latency as much as possible,\n similar to the method employed by\n\\begin_inset Index idx\nstatus open\n\n\\begin_layout Plain Layout\nGGPO\n\\end_layout\n\n\\end_inset\n\nGGPO.\n\\end_layout\n\n\\begin_layout Standard\nIn addition to head-to-head multiplayer, a spectator mode is implemented.\n This mode allows a host to live stream playback to several watchers in\n real-time.\n The bandwidth required for this mode is near- zero as only raw input data\n is transferred over the network.\n\\end_layout\n\n\\begin_layout Subsection\nAudio DSP plugins\n\\end_layout\n\n\\begin_layout Standard\n\\begin_inset Index idx\nstatus open\n\n\\begin_layout Plain Layout\nRetroArch\n\\end_layout\n\n\\end_inset\n\nRetroArch supports plugins that allows post-processing of audio data, similar\n to post-processing of video data.\n It supports use of on-the-fly configurable plugins with aid of a GUI.\n\\end_layout\n\n\\begin_layout Section\nImplementing the API\n\\end_layout\n\n\\begin_layout Standard\nThe\n\\begin_inset Index idx\nstatus open\n\n\\begin_layout Plain Layout\nlibretro\n\\end_layout\n\n\\end_inset\n\nlibretro API consists of several functions outlined in libretro.h, found\n in the\n\\begin_inset Index idx\nstatus open\n\n\\begin_layout Plain Layout\nRetroArch\n\\end_layout\n\n\\end_inset\n\nRetroArch source package.\n A libretro implementation should be compiled into a dynamically loadable\n executable (.dll/.so/.dylib) or a static library (.a/.lib) that exports all\n the functions outlined in libretro.h.\n These will be called by the frontend.\n Implementations are designed to be single-instance, so global state is\n allowed.\n Should the frontend call these functions in wrong order, undefined behavior\n occurs.\n\\end_layout\n\n\\begin_layout Standard\nThe API header is compatible with\n\\begin_inset Index idx\nstatus open\n\n\\begin_layout Plain Layout\nC99\n\\end_layout\n\n\\end_inset\n\nC99 and\n\\begin_inset Index idx\nstatus open\n\n\\begin_layout Plain Layout\nC++\n\\end_layout\n\n\\end_inset\n\nC++.\n From\n\\begin_inset Index idx\nstatus open\n\n\\begin_layout Plain Layout\nC99\n\\end_layout\n\n\\end_inset\n\nC99, the bool type and are used.\n\\end_layout\n\n\\begin_layout Standard\nThe program flow of a frontend using the\n\\begin_inset Index idx\nstatus open\n\n\\begin_layout Plain Layout\nlibretro\n\\end_layout\n\n\\end_inset\n\nlibretro API can be expressed as follows:\n\\end_layout\n\n\\begin_layout Subsection\nStartup\n\\end_layout\n\n\\begin_layout Subsubsection\nretro_api_version()\n\\end_layout\n\n\\begin_layout Standard\nThis function should return RETRO_API_VERSION, defined in libretro.h.\n It is used by the frontend to determine if ABI/API are mismatched.\n The version will be bumped should there be any non- compatible changes\n to the API.\n Changes to retro_* structures, as well as changes in publically visible\n functions and/or their arguments will warrant a bump in API version.\n\\end_layout\n\n\\begin_layout Subsubsection\nretro_init()\n\\end_layout\n\n\\begin_layout Standard\nThis function is called once, and gives the implementation a chance to initializ\ne data structures.\n This is sometimes implemented as a no-op.\n\\end_layout\n\n\\begin_layout Subsubsection\nretro_set_*()\n\\end_layout\n\n\\begin_layout Standard\n\\begin_inset Index idx\nstatus open\n\n\\begin_layout Plain Layout\nlibretro\n\\end_layout\n\n\\end_inset\n\nLibretro is callback based.\n The frontend will set all callbacks at this stage, and the implementation\n must store these function pointers somewhere.\n The frontend can, at a later stage, call these.\n\\end_layout\n\n\\begin_layout Subsubsection\nEnvironment callback\n\\end_layout\n\n\\begin_layout Standard\nWhile\n\\begin_inset Index idx\nstatus open\n\n\\begin_layout Plain Layout\nlibretro\n\\end_layout\n\n\\end_inset\n\nlibretro has callbacks for video, audio and input, there's a callback type\n dubbed the environment callback.\n This callback (retro_environment_t) is a generic way for the\n\\begin_inset Index idx\nstatus open\n\n\\begin_layout Plain Layout\nlibretro\n\\end_layout\n\n\\end_inset\n\nlibretro implementation to access features of the API that are considered\n too obscure to deserve its own symbols.\n It can be extended without breaking\n\\begin_inset Index idx\nstatus open\n\n\\begin_layout Plain Layout\nABI\n\\end_layout\n\n\\end_inset\n\nABI.\n The callback has a return type of bool which tells if the frontend recognized\n the request given to it.\n\\end_layout\n\n\\begin_layout Standard\nMost implementations of\n\\begin_inset Index idx\nstatus open\n\n\\begin_layout Plain Layout\nlibretro\n\\end_layout\n\n\\end_inset\n\nlibretro will not use this callback at all.\n\\end_layout\n\n\\begin_layout Subsubsection\nretro_set_controller_port_device()\n\\end_layout\n\n\\begin_layout Standard\nBy default, joypads will be assumed to be inserted into the implementation.\n If the engine is sensitive to which type of input device is plugged in,\n the frontend may call this function to set the device to be used for a\n certain player.\n The implementation should try to auto-detect this if possible.\n\\end_layout\n\n\\begin_layout Subsubsection\nretro_get_system_info()\n\\end_layout\n\n\\begin_layout Standard\nThe frontend will typically request statically known information about the\n core such as the name of the implementation, version number, etc.\n The information returned should be stored statically.\n If dynamic allocation must take place, the implementation must make sure\n to free this storage in retro_deinit() later.\n\\end_layout\n\n\\begin_layout Subsubsection\nretro_load_game()\n\\end_layout\n\n\\begin_layout Standard\nThis function will load a ROM that the implementation will use to play the\n game.\n If the implementation is an emulator, this would be a game ROM image, if\n it is a game engine, this could be packaged upassets for the game, etc.\n The function takes a structure that points to the path where the ROM was\n loaded from, as well as a memory chunk of the already loaded file.\n\\end_layout\n\n\\begin_layout Standard\nThere are two modes of loading files with libretro.\n If the game engine requires to know the path of where the ROM image was\n loaded from, the need_fullpath field in retro_system_info must be set to\n true.\n If the path is required, the frontend will not load the file into the data/size\n fields, and it is up to the implementation to load the file from disk.\n The path might be both relative and absolute, and the implementation must\n check for both cases.\n\\end_layout\n\n\\begin_layout Standard\nThis is useful if the ROM image is too large to load into memory at once.\n It is also useful if the assests consist of many smaller files, where it\n is necessary to know the path of a master file to infer the paths of the\n others.\n If need_fullpath is set to false, the frontend will load the ROM image\n into memory beforehand.\n In this mode, the path field is not guaranteed to be non-NULL.\n It should point to a valid path if the file was indeed, loaded from disk,\n however, it is possible that the file was loaded from stdin, or similar,\n which has no well-defined path.\n\\end_layout\n\n\\begin_layout Standard\nIt is recommended that need_fullpath is set to false if possible, as it\n allows more features, such as soft- patching to work correctly.\n\\end_layout\n\n\\begin_layout Standard\nretro_load_game_special() is a special case of retro_load_game().\n It is designed to allow the loading of several ROMs together.\n This is needed for certain odd cases like Super Nintendo with e.g.\n Super GameBoy, Sufami Turbo, etc that consist of a \"BIOS\" + Game(s).\n The function takes the type of game as an argument, and if a new game type\n is to be added, it needs to be reserved in the libretro.h header.\n Almost any libretro implementations should simply implement this as return\n false;.\n If a game consist of many smaller files it is encouraged to load a single\n zipped file, or something similar.\n\\end_layout\n\n\\begin_layout Standard\nEach ROM image can take an optional meta-argument, a string that gives extra\n metadeta to the implementation.\n The metadata is implementation specific, and can be ignored completely\n in almost any implementation.\n\\end_layout\n\n\\begin_layout Subsubsection\nretro_get_system_av_info()\n\\end_layout\n\n\\begin_layout Standard\nThis function lets the frontend know essential audio/video properties of\n the game.\n As this information can depend on the game being loaded, this info will\n only be queried after a valid ROM image has been loaded.\n It is important to accuractely report FPS and audio sampling rates, as\n\n\\begin_inset Index idx\nstatus open\n\n\\begin_layout Plain Layout\nFFmpeg\n\\end_layout\n\n\\end_inset\n\nFFmpeg recording relies on exact information to be able to run in sync for\n several hours.\n\\end_layout\n\n\\begin_layout Subsection\nRunning\n\\end_layout\n\n\\begin_layout Subsubsection\nretro_run()\n\\end_layout\n\n\\begin_layout Standard\nAfter a game has been loaded successfully, retro_run() will be called repeatedly\n as long as the user desires.\n When called, the implementation will perform its inner functionality for\n one video frame.\n During this time, the implementation is free to call callbacks for video\n frames, audio samples, as well as polling input, and querying current input\n state.\n The requirements for the callbacks are that video callback is called exactly\n once, i.e.\n it does not have to come last.\n Also, input polling must be called at least once.\n\\end_layout\n\n\\begin_layout Subsubsection\nVideo/Audio synchronization considerations\n\\end_layout\n\n\\begin_layout Standard\nLibretro is based on fixed rates.\n Video FPS and audio sampling rates are always assumed to be constant.\n Frontends will have control of the speed of playing, typically using VSync\n to obtain correctspeed.\n The frontend is free to \"fast-forward\", i.e.\n play as fast as possible without waiting, or slow- motion.\n For this reason, the engine should not rely on system timers to perform\n arbitrary synchronization.\n This is common and often needed in 3D games to account for varying frame\n rates while still maintaining a playable game.\n However, libretro targets classic systems where one can assume that 100\n % real-time performance will always be met, thus avoiding the need for\n careful timing code.\n\\end_layout\n\n\\begin_layout Standard\nBy default, the libretro implementation should replace any arbitrary sleep()/tim\ne() patterns with simply calling video/audio callbacks.\n The frontend will make sure to apply the proper synchronization.\n\\end_layout\n\n\\begin_layout Standard\nThis is mostly a problem with game ports, such as PrBoom.\n For the libretro port of PrBoom, which heavily relied on timers and sleeping\n patterns, sleeping was replaced with simply running for one frame, and\n calling the video callback.\n After that, enough audio was rendered to correspond to one frames worth\n of time, 1 / fps seconds.\n All sleeping and timing patterns could be removed, and synchronization\n was correct.\n\\end_layout\n\n\\begin_layout Subsubsection\nAudio callback considerations\n\\end_layout\n\n\\begin_layout Standard\nThe\n\\begin_inset Index idx\nstatus open\n\n\\begin_layout Plain Layout\nlibretro\n\\end_layout\n\n\\end_inset\n\nlibretro API has two different audio callbacks.\n Only one of these should be used; the implementation must choose which\n callback is best suited.\n\\end_layout\n\n\\begin_layout Standard\nThe first audio callback is per-sample, and has the type void (*)(int16_t,\n int16_t).\n This should be used if the implementation outputs audio on a per-sample\n basis.\n The frontend will make sure to partition the audio data into suitable chunks\n to avoid incurring too much syscall overhead.\n\\end_layout\n\n\\begin_layout Standard\nIf audio is output in a \"batch\" fashion, i.e.\n 1 / fps seconds worth of audio data at a time, the batch approach should\n be considered.\n Rather than looping over all samples and calling per-sample callback every\n time, the batch callback should be used instead, size_t (*)(const int16_t\n *, size_t).\n\\end_layout\n\n\\begin_layout Standard\nUsing the batch callback, audio will not be copied in a temporary buffer,\n which can buy a slight performance gain.\n Also, all data will be pushed to audio driver in one go, saving some slight\n overhead.\n It is not recommended to use the batch callback for very small (< 32 frames)\n amounts of data.\n\\end_layout\n\n\\begin_layout Standard\nThe data passed to the batch callback should, if possible, be aligned to\n 16 bytes (depends on platform), to allow accelerated\n\\begin_inset Index idx\nstatus open\n\n\\begin_layout Plain Layout\nSIMD\n\\end_layout\n\n\\end_inset\n\nSIMD operations on audio.\n\n\\begin_inset Index idx\nstatus open\n\n\\begin_layout Plain Layout\nRetroArch\n\\end_layout\n\n\\end_inset\n\nRetroArch implements\n\\begin_inset Index idx\nstatus open\n\n\\begin_layout Plain Layout\nSSE\n\\end_layout\n\n\\end_inset\n\nSSE/\n\\begin_inset Index idx\nstatus open\n\n\\begin_layout Plain Layout\nAltiVec\n\\end_layout\n\n\\end_inset\n\nAltiVec optimized audio processing for conversions and resampling.\n\\end_layout\n\n\\begin_layout Subsubsection\nInput device abstraction\n\\end_layout\n\n\\begin_layout Standard\nAbstracting input devices is the hardest part of defining a multi-system\n API as it differs across every system.\n The common input devices are:\n\\end_layout\n\n\\begin_layout Itemize\nJoypad (with or without analogs)\n\\end_layout\n\n\\begin_layout Itemize\nMouse (e.g.\n SNES mouse)\n\\end_layout\n\n\\begin_layout Itemize\nKeyboard (e.g.\n Commodore, Amiga)\n\\end_layout\n\n\\begin_layout Itemize\nLightguns (e.g.\n SNES SuperScope)\n\\end_layout\n\n\\begin_layout Standard\nThe joypad abstraction is the most interesting.\n Rather than complicating things by mapping input arbitrarily in terms of\n the implementation, which would make input configuration very complex with\n careful configuration on a per-implementation basis, an abstract joypad\n device, the\n\\begin_inset Index idx\nstatus open\n\n\\begin_layout Plain Layout\nInput device abstractions!RetroPad\n\\end_layout\n\n\\end_inset\n\nRetroPad, was devised.\n\n\\end_layout\n\n\\begin_layout Standard\nThis joypad is essentially the Super Nintendo controller, widely considered\n the pinnacle of retro game controllers.\n To account for more modern systems with additional buttons, additions from\n the PlayStation DualShock are incorporated, with extra shoulder buttons\n (L2/R2), as well as depressable analogs (L3/R3).\n In addition, the RETRO_DEVICE_ANALOG is used for analog stick data.\n An implementation should map its idea of a joypad in terms of the\n\\begin_inset Index idx\nstatus open\n\n\\begin_layout Plain Layout\nInput device abstractions!RetroPad\n\\end_layout\n\n\\end_inset\n\nRetroPad, which is what most users will have to use with their frontend.\n\\end_layout\n\n\\begin_layout Subsubsection\nretro_serialize_size()\n\\end_layout\n\n\\begin_layout Subsubsection\nretro_serialize()\n\\end_layout\n\n\\begin_layout Subsubsection\nretro_unserialize()\n\\end_layout\n\n\\begin_layout Standard\nSerialization is optional to implement.\n Serialization is better known as \"save states\" in emulators, and these\n functions are certainly more useful in emulators which have a fixed amount\n of state.\n It allows the frontend to take a snapshot of all internal state, and later\n restore it.\n This functionality is used to implement e.g.\n rewind and netplay.\n Some important considerations must be taken to implement these functions\n well.\n\\end_layout\n\n\\begin_layout Standard\nIf serialization is not supported, retro_serialize_size() should return\n 0.\n If retro_serialize_size() returns non-zero, it is assumed that serialization\n is properly implemented.\n\\end_layout\n\n\\begin_layout Standard\nThe frontend should call retro_serialize_size() before calling retro_serialize()\n to determine the amount of memory needed to correctly serialize.\n The size eventually passed to retro_serialize() must be at least the size\n of the value returned in retro_serialize_size().\n If too large a buffer is passed to retro_serialize(), the extra data should\n be ignored (or memset to 0).\n\\end_layout\n\n\\begin_layout Standard\nIt is valid for the value returned by retro_serialize_size() to vary over\n time, however, it cannot ever increase over time.\n If it should ever change, it must decrease.\n This is rationaled by the ability to pre- determined a fixed save state\n size right after retro_load_game() that will always be large enough to\n hold any following serialization.\n This certainty is fundamental to the rewind implementation.\n This requirement only holds between calls to retro_load_game() and retro_unload\n_game().\n\\end_layout\n\n\\begin_layout Standard\nIf possible, the implementation should attempt to serialize data at consistent\n offsets in the memory buffer.\n This will greatly help the rewind implementation in\n\\begin_inset Index idx\nstatus open\n\n\\begin_layout Plain Layout\nRetroArch\n\\end_layout\n\n\\end_inset\n\nRetroArch to use less memory.\n\\end_layout\n\n\\begin_layout Standard\nBoth retro_serialize() and retro_unserialize() return a boolean value to\n let the frontend know if the implementation succeeded in serializing or\n unserializing.\n\\end_layout\n\n\\begin_layout Subsection\nTear-down\n\\end_layout\n\n\\begin_layout Subsubsection\nretro_unload_game()\n\\end_layout\n\n\\begin_layout Standard\nAfter the user desired to stop playing, retro_unload_game() will be called.\n This should free any internal data related to the game, and allow retro_load_ga\nme() to be called again.\n\\end_layout\n\n\\begin_layout Subsubsection\nretro_deinit()\n\\end_layout\n\n\\begin_layout Standard\nThis function should free all state that was initialized during retro_init().\n After calling this function, the frontend can again call retro_init().\n\\end_layout\n\n\\begin_layout Standard\n\\begin_inset CommandInset index_print\nLatexCommand printindex\ntype \"idx\"\n\n\\end_inset\n\n\n\\end_layout\n\n\\end_body\n\\end_document\n"
},
{
"path": "archive/overlay.tex",
"content": "\\documentclass[a4paper, 11pt]{article}\n\n\\title{RetroArch - Overlay image configuration}\n\\author{\nHans-Kristian Arntzen\n\\and\nDaniel De Matteis}\n\n\\begin{document}\n\\maketitle\n\n\\section*{Purpose}\n\nRetroArch supports overlay images for use with hardware accelerated drivers.\nThe purpose of this is to allow some kind of input interface that is mouse/touch oriented.\n\nThe overlay image is displayed with transparency over the regular game image, and the user is able to trigger input by pressing on certain parts of the overlay.\n\nSince the overlay is an image, the user should be able to fully configure the look and functionality of this overlay. This allows skinners and themers to go wild.\n\n\\section*{Configuration}\n\nThe overlay is described in a config file (*.cfg). The config file uses the same config file syntax as RetroArch itself.\n\nThe overlay system supports use of multiple overlays that can be switched out on the fly. Input is not only restricted to gamepad input, but can also work with any input that is bindable in RetroArch, e.g. save states, rewind, load state, etc.\n\nThe config file describes:\n\\begin{itemize}\n \\item Which overlay images to use (.png, .tga, etc).\n \\item Which coordinates on each overlay correspond to which input event.\n \\item The hitbox for each input event, i.e. \"size\" of the button.\n \\item Where on the screen the overlay should be displayed.\n\\end{itemize}\n\n\n\\subsection*{Overlay images}\n\nFirst we configure how many overlays we use, and where they can be found.\n\n\\begin{verbatim}\n overlays = 2\n overlay0_overlay = overlay_img0.png\n overlay1_overlay = overlay_img1.png\n\\end{verbatim}\n\nThe paths are relative to where the overlay config is loaded from. If the path is absolute, absolute paths will be used. On Unix-like systems '~/' is recognized as '\\$HOME'.\n\n\\subsection*{Screen placement}\n\nBy default, the overlay image will be stretched out to fill the whole game image.\nHowever, for some overlays, this is not practical.\n\nIt is possible to set the placement using for example:\n\n\\begin{verbatim}\n overlay0_rect = \"0.2,0.3,0.5,0.4\"\n\\end{verbatim}\n\nWe assume that the game screen has normalized coordinates in X and Y that span from `[0, 0]`\nin the top-left corner to $[1, 1]$ in the lower-right corner.\n\nThis will render the overlay to $x = 0.2, y = 0.3$ with size $width = 0.5, height = 0.4$.\nThe default (stretch to full screen) could be described as such:\n\n\\begin{verbatim}\n overlay0_rect = \"0.0,0.0,1.0,1.0\"\n\\end{verbatim}\n\n\\subsection*{Full-screen overlays}\n\nBy default, overlays will be stretched out to fill game viewport. However, in some cases\nthe aspect ratio of the game causes there to remain large black borders around the game image.\nIt is possible to stretch the overlay to full screen (instead of viewport) by specifying this option:\n\n\\begin{verbatim}\n overlay0_full_screen = true\n\\end{verbatim}\n\n\\subsection*{Coordinate descriptors}\n\nWe must also describe where on the overlay image buttons can be found for each overlay.\nE.g.:\n\n\\begin{verbatim}\n overlay0_descs = 3 # Three buttons for this overlay in total\n overlay0_desc0 = \"a,32,64,radial,10,20\"\n overlay0_desc1 = \"start,100,50,rect,80,10\"\n overlay0_desc2 = \"overlay_next,200,180,radial,40,40\"\n\\end{verbatim}\n\nThe format is:\n\n\\begin{verbatim}\n \"button,position_x,position_y,hitbox_type,range_x,range_y\"\n\\end{verbatim}\n\n'button' corresponds to the input event being generated. The names are the same as in the general input config, e.g. input\\_player1\\_start would translate to start here. overlay\\_next is a special bind designed to swap to the next overlay, or wrap around to the first one.\n\n'position\\_x' and 'position\\_y' are the x and y coordinates in pixels of the source image for the center of the button.\n\n'hitbox\\_type' describes which type of shape the button has. 'radial' (circle, ellipsis) and 'rect' (rectangular) shapes are supported.\n\n'range\\_x' and 'range\\_y' describe the size of the button. The semantics differ slightly for radial and rect hitbox types. For 'radial' shape, 'range\\_x' and 'range\\_y' describe the radius in x and y directions in pixels of the source image. For 'rect' shape, the 'range\\_x' and 'range\\_y' values represent the distance from center to the edge of the rect in terms of pixels of the source image. E.g. a 'range\\_x' of 20 would mean the width of the rectangular is 40 pixels in total.\n\n\\subsection*{Triggering multiple buttons with one desc}\n\nIt's possible to trigger multiple buttons (e.g. diagonals) with one overlay desc.\n\n\\begin{verbatim}\n overlay0_desc0 = \"left|up,32,64,radial,10,20\"\n\\end{verbatim}\n\nwill trigger both left and up at same time.\n\n\\end{document}"
},
{
"path": "archive/ratecontrol.tex",
"content": "\\documentclass[11pt, a4paper]{article}\n\n\\title{Dynamic Rate Control for Retro Game Emulators}\n\\author{Hans-Kristian Arntzen}\n\n\\usepackage{amsmath}\n\\usepackage{float}\n\\usepackage{graphicx}\n\n\\begin{document}\n\\maketitle\n\n\\begin{abstract}\nThis article describes a method for game emulator frontends\nto synchronize both audio and video output at the same time, even\nwhen the emulating system has a different refresh rate and audio sampling rate\nthan the gaming system that is being emulated.\n\nThe method works by dynamically adjusting audio resampling ratios in such ways that\nideally, the audio buffer is never underrun nor overrun, thus avoiding blocking on audio.\nThis in turn allows vertical synchronization for video.\n\nThe audio pitch is adjusted when adjusting audio resampling ratios,\nbut in practice so little, that it is inaudible to the human ear.\n\\end{abstract}\n\n\\section{Background}\n\nRetro game consoles are highly synchronous. Their audio output rates are linked directly\nto video refresh rates. Every video frame, the audio chip generates on average a fixed amount of audio samples. Before continuing to emulate the next frame, the generated audio samples must be pushed\nto an audio buffer of fixed size.\n\nIf there is not enough space in the audio buffer, the emulator must wait (block) for the buffer to become ready for writing. This is a non-ideal situation as while the emulator is blocking on audio, a vertical refresh might be missed entirely, thus creating stuttering video.\n\n\\subsection{The ideal synchronization}\nFor an emulator of a retro game system, a key factor in smooth video is vertical refresh synchronization (VSync), where each frame of the game maps to a single frame on the monitor.\nAudio must also be pushed to the speakers without any audio dropouts.\nThis double synchronization requirement poses a problem as any form of synchronization to one modality\nwill negatively affect the other.\n\nThis is a real problem as an emulator has no way of guaranteeing perfectly equal\nvideo refresh rates and audio sampling rates as the original system.\n\nOn conventional computer hardware, there is no perfect way of knowing\nthe real monitor refresh rates and audio sampling rates either due to\ntolerances on oscillators.\n\n\\subsection{Scope of method}\nAs this method aims to implement a method for synchronization when VSync is used,\nthis method is only useful when game frame rate is close to monitor frame rate.\nIf this is not the case, other methods should be employed.\n\n\\section{Method}\nThis method assumes that audio from the emulator is output at regular intervals, e.g.\nevery video frame. The method also assumes that audio is resampled from\nthe game system sampling rate to the sound cards sampling rate.\nThe resampling ratio will be dynamically adjusted every time audio is resampled and subsequently pushed to the audio buffer.\n\n\\subsection{Definitions}\n\\begin{itemize}\n\\item[$f_v$] Emulated game system frame rate (FPS)\n\\item[$f_a$] Emulated game system sampling rate (Hz)\n\\item[$r$] Emulated game system samples per frame $f_a / f_v$\n\\item[$m_a$] Emulator system sampling rate\n\\item[$m_v$] Emulator system monitor refresh rate\n\\item[$m_a^{'}$] Estimated emulator system sampling rate\n\\item[$m_v^{'}$] Estimated emulator system monitor refresh rate\n\\item[$R$] Emulator system samples per frame $m_a / m_v$\n\\item[$R^{'}$] Estimated emulator system samples per frame $m_a^{'} / m_v^{'}$\n\\item[$A_b$] Current amount of samples in the audio buffer\n\\item[$A_B$] Capacity (in samples) of the audio buffer\n\\item[$d$] Allowed deviation in audio pitch\n\\end{itemize}\n\n\\subsection{Resampling audio}\nEvery time the game system outputs audio, it is resampled with some ratio.\nIt is here assumed that the game system outputs a video frame worth of audio at a time.\nWhile the formulae are invariant to how often audio is written to audio buffers, this assumption\nis made for simplicity.\n\nThe correct resampling ratio is estimated to be $R^{'} / r$,\nthus pushing $R^{'}$ samples of audio per frame on average.\nIn the duration of a frame, on average, $R$ audio frames will have been played to the speakers\nand thus removed from the buffer.\n\n\\begin{equation}\n\\Delta A_b = R^{'} - R\n\\end{equation}\n\nWe see that unless $\\Delta A_b = 0$, it is inevitable that the audio will either underrun ($A_b \\leq 0$),\nor block due to buffer being full ($A_b \\geq A_B$).\nBoth these situations are not acceptable as underruns would cause audible audio dropouts,\nand blocking would block the emulator from emulating more frames, and thus greatly increasing the chance of missing a VBlank, which is not acceptable as well. Blocking however, is far more preferable than underrunning.\n\nAs with any estimator, it is impossible to guarantee that $R^{'}$ can be perfectly estimated.\nTherefore, it is impossible to guarantee that underrun nor blocking occurs.\n\n\\subsection{Dynamic rate control}\nThe proposed method will dynamically adjust the resampling ratio $R^{'} / r$.\nChanging this ratio will adjust audio pitch as well. To ensure that these adjustments are not audible to the human ear, the range of adjustment will be limited by $d$.\n\nUsing $d$, the maximum pushed samples will be $R^{'} \\left(1 + d\\right)$,\nand similarly, minimum will be $R^{'} \\left(1 - d\\right)$.\n$d$ must be chosen so that $R$ falls between minimum or maximum. This depends on the confidence of the estimate $R^{'}$.\n\nThe revised update formula will look like this:\n\n\\begin{equation} \\label{eq:update}\n\\Delta A_b = \\left[ 1 + \\left(\\frac{A_B - 2A_b}{A_B}\\right) d \\right] R^{'} - R\n\\end{equation}\n\nThe formula will decrease resampling ratio if audio buffer is over half full, and similarly increase\nresampling ratio if buffer is below half full.\n\n\\subsection{Stability}\n\nTo ensure that the method is stable, i.e. that $A_b$ will converge to a certain value,\nwe assume a continuous model for pushing audio.\n\n\\begin{equation}\n\\frac{\\delta A_b}{\\delta f} = \\left[ 1 + \\left(\\frac{A_B - 2A_b}{A_B}\\right) d \\right] R^{'} - R\n\\end{equation}\n\\begin{equation} \\label{eq:ab-diff}\n\\frac{\\delta A_b}{\\delta f} + \\frac{2dR^{'}}{A_B}A_b = R^{'} \\left(1 + d\\right) - R\n\\end{equation}\n\nThe differential equation in \\eqref{eq:ab-diff} can be solved as\n\n\\begin{equation}\nA_b = A_B \\frac{R^{'}\\left(1 + d\\right) - R}{2dR^{'}} + C_0\\exp \\left(-\\frac{2dR^{'}}{A_B} f\\right)\n\\end{equation}\n\nGiven time ($f \\rightarrow \\infty$), this expression converges to\n\n\\begin{equation}\nA_{b,c} = A_B \\frac{R^{'}\\left(1 + d\\right) - R}{2dR^{'}}\n\\end{equation}\n\nIf $R^{'}$ is the ideal estimate, $R^{'} = R$, the expression converges to\n\n\\begin{equation}\nA_{b,c} = A_B / 2\n\\end{equation}\nwhich is the best case, as having a half full buffer means most possible wiggle room for jitter.\n\n\\subsection{Updating ratio estimate $R^{'}$}\nAfter time, it is assumed that $A_b$ will converge to $A_{b,c}$.\nDue to jitter, and various non-ideal behavior, only an estimate of $A_{b,c}$, $\\hat{A_{b,c}} = \\bar{A_b}$ can be obtained.\n\n\\begin{equation}\n\\frac{\\hat{R^{'}}}{R} = \\frac{A_B}{\\left(1 + d\\right) A_B - 2d\\hat{A_{b,c}}}\n\\end{equation}\n\nThe ratio estimate $R^{'}$ can thus be re-estimated accordingly. This method of re-estimating the ratio might however not be the best. Directly estimating $m_a^{'}$ and $m_v^{'}$ should yield more confident results, but this is outside the scope of this article.\n\n\\section{Results}\n\nA synthetic test was carried out to test how the method would react to a common scenario for this method. An emulation of Super Nintendo Entertainment System (SNES) was matched to an emulating system.\nTo test effects of jitter, the frame time was assumed to follow a normal distribution.\nThus, $R$ in \\eqref{eq:update} followed a normal distribution.\n\n\\begin{table}[H]\n\\centering\n\\caption{Timings}\n\\begin{tabular}{|c|c|c|}\n\t\\hline\n\tSystem & FPS (Hz) & Sample rate (Hz)\\\\\\hline\n\tSNES & 60.0988 & 32040.5\\\\\\hline\n\tEmulating system & 59.88 & 48000.15\\\\\\hline\n\tEstimated system & 59.95 & 48000.0\\\\\\hline\n\\end{tabular}\n\\end{table}\n\n\\begin{table}[H]\n\\centering\n\\caption{Test parameters}\n\\begin{tabular}{|c|c|}\n\t\\hline\n\t$d$ & $0.005$\\\\\\hline\n\tFrame time deviation & $2 \\%$\\\\\\hline\n\\end{tabular}\n\\end{table}\n\n\\begin{figure}[H]\n\\centering\n\\includegraphics[width=12cm]{ratecontrol-data.pdf}\n\\caption{Results with 2\\% standard deviation on frame time}\n\\end{figure}\n\nThe results are shown for audio buffer size over time and the pitch modulation for every simulated frame. Audio pitch modulation deviation was estimated to $0.062\\%$, significantly lower than the $d$ value, which allowed for a maximum deviation of $0.5\\%$.\n\nThe audio buffer is never filled nor underrun, which would allow every single VBlank to be met, while maintaining audio sync.\n\n\\section{Discussion}\n\n\\subsection{Effect of $d$}\nIdeally, $d$ should be as low as possible to avoid large deviations in pitch, but at the same time, a too low value for $d$ will not be able to compensate for the difference between $R^{'}$ and $R$.\nFrom testing in the emulator frontend RetroArch\\footnote{https://github.com/Themaister/RetroArch}, a factor of $d \\geq 0.002, d \\leq 0.005$ has been found to give satisfactory results.\n\nThis method does not propose a method of determining the best $d$ factor.\n\n\\subsection{Audibility}\nAs audio pitch is altered, there is a question of audibility. Given a small enough $d$, it's\nclear that the effect would be completely inaudible as all oscillators in a DAC have tolerances and jitter to some degree. It is also reasonable to believe that some persons are able to notice a smaller $d$ than others.\n\nSome testing must be carried out to find a $d$ that is inaudible in subjective tests.\n\n\\section{Conclusion}\nThis method shows that it is possible to obtain synchronization to both VBlank and audio without having a perfect estimate of the emulating systems frequencies. As long as the estimates are reasonable close to the real values, the dynamic rate control method proposed here is able to smooth out the differences.\n\n\\end{document}"
},
{
"path": "archive/retroarch-cores-manual.lyx",
"content": "#LyX 2.0 created this file. For more info see http://www.lyx.org/\n\\lyxformat 413\n\\begin_document\n\\begin_header\n\\textclass article\n\\use_default_options true\n\\maintain_unincluded_children false\n\\language english\n\\language_package default\n\\inputencoding auto\n\\fontencoding global\n\\font_roman default\n\\font_sans default\n\\font_typewriter default\n\\font_default_family default\n\\use_non_tex_fonts false\n\\font_sc false\n\\font_osf false\n\\font_sf_scale 100\n\\font_tt_scale 100\n\n\\graphics default\n\\default_output_format default\n\\output_sync 0\n\\bibtex_command default\n\\index_command default\n\\paperfontsize default\n\\spacing single\n\\use_hyperref true\n\\pdf_title \"RetroArch Cores Manual\"\n\\pdf_author \"Hans-Kristian Antzen, Daniel De Matteis\"\n\\pdf_bookmarks true\n\\pdf_bookmarksnumbered false\n\\pdf_bookmarksopen false\n\\pdf_bookmarksopenlevel 1\n\\pdf_breaklinks false\n\\pdf_pdfborder false\n\\pdf_colorlinks true\n\\pdf_backref false\n\\pdf_pdfusetitle true\n\\papersize default\n\\use_geometry false\n\\use_amsmath 1\n\\use_esint 1\n\\use_mhchem 1\n\\use_mathdots 1\n\\cite_engine basic\n\\use_bibtopic false\n\\use_indices false\n\\paperorientation portrait\n\\suppress_date false\n\\use_refstyle 1\n\\index Index\n\\shortcut idx\n\\color #008000\n\\end_index\n\\secnumdepth 5\n\\tocdepth 5\n\\paragraph_separation indent\n\\paragraph_indentation default\n\\quotes_language english\n\\papercolumns 1\n\\papersides 1\n\\paperpagestyle default\n\\tracking_changes false\n\\output_changes false\n\\html_math_output 0\n\\html_css_as_file 0\n\\html_be_strict false\n\\end_header\n\n\\begin_body\n\n\\begin_layout Standard\n\\begin_inset ERT\nstatus open\n\n\\begin_layout Plain Layout\n\n\n\\backslash\nbegin{figure}\n\\backslash\nbegin{centering}\n\\end_layout\n\n\\end_inset\n\n\n\\begin_inset Graphics\n\tfilename retroarch-android/logo.png\n\tlyxscale 50\n\tscale 50\n\tclip\n\n\\end_inset\n\n\n\\begin_inset ERT\nstatus open\n\n\\begin_layout Plain Layout\n\n\n\\backslash\nend{centering}\n\\backslash\nend{figure}\n\\end_layout\n\n\\end_inset\n\n\n\\end_layout\n\n\\begin_layout Title\nRetroArch Android (v0.9.8.4) - Cores Manual\n\\end_layout\n\n\\begin_layout Author\nHans Kristian Arntzen, Daniel De Matteis\n\\end_layout\n\n\\begin_layout Standard\n\\begin_inset CommandInset toc\nLatexCommand tableofcontents\n\n\\end_inset\n\n\n\\end_layout\n\n\\begin_layout Section\nIntroduction\n\\end_layout\n\n\\begin_layout Standard\nListed below are all the cores that RetroArch Android supports.\n\\end_layout\n\n\\begin_layout Itemize\nSNES9x Next\n\\begin_inset Newline newline\n\\end_inset\n\nUsed for: playing SNES games (Super Nintendo Entertainment System)\n\\begin_inset Newline newline\n\\end_inset\n\nAuthor(s): SNES9x team, OV2, Bearoso, zones, Squarepusher (fork)\n\\begin_inset Newline newline\n\\end_inset\n\nRecommended system requirements: ARM Cortex A9 multi-core device (and up)\n\\begin_inset Newline newline\n\\end_inset\n\nExtensions: \"smc|fig|sfc|gd3|gd7|dx2|bsx|swc|zip|SMC|FIG|\n\\begin_inset Newline newline\n\\end_inset\n\nSFC|BSX|GD3|GD7|DX2|SWC|ZIP\"\n\\end_layout\n\n\\begin_layout Itemize\nVBA Next\n\\begin_inset Newline newline\n\\end_inset\n\nUsed for: playing Game Boy Advance games\n\\begin_inset Newline newline\n\\end_inset\n\nRecommended system requirements: ARM Cortex A9 multi-core based device (and\n up)\n\\begin_inset Newline newline\n\\end_inset\n\nAuthor(s): Forgotten, VBA-M team, Squarepusher (fork)\n\\begin_inset Newline newline\n\\end_inset\n\nExtensions: \"gba|GBA|zip|ZIP\"\n\\end_layout\n\n\\begin_layout Itemize\nFCEUmm\n\\begin_inset Newline newline\n\\end_inset\n\nUsed for: playing NES games (Nintendo Entertainment System)\n\\begin_inset Newline newline\n\\end_inset\n\nAuthor(s): CaH4e3, original FCEU authors\n\\begin_inset Newline newline\n\\end_inset\n\nExtensions: \"fds|FDS|zip|ZIP|nes|NES|unif|UNIF\"\n\\end_layout\n\n\\begin_layout Itemize\nNEStopia\n\\begin_inset Newline newline\n\\end_inset\n\nUsed for: playing NES games (Nintendo Entertainment System)\n\\begin_inset Newline newline\n\\end_inset\n\nAuthor(s): Marty\n\\begin_inset Newline newline\n\\end_inset\n\nExtensions supported: \"nes|NES|zip|ZIP|fds|FDS\"\n\\end_layout\n\n\\begin_layout Itemize\nGambatte\n\\begin_inset Newline newline\n\\end_inset\n\nUsed for: playing GameBoy / GameBoy Color games\n\\begin_inset Newline newline\n\\end_inset\n\nAuthor(s): Sinamas\n\\begin_inset Newline newline\n\\end_inset\n\nExtensions supported: \"gb|gbc|dmg|zip|GB|GBC|DMG|ZIP\"\n\\end_layout\n\n\\begin_layout Itemize\nFinal Burn Alpha\n\\begin_inset Newline newline\n\\end_inset\n\nUsed for: playing arcade games\n\\begin_inset Newline newline\n\\end_inset\n\nAuthor(s): Dave, FBA Team (Barry Harris & co)\n\\begin_inset Newline newline\n\\end_inset\n\nExtensions supported:\n\\begin_inset Quotes eld\n\\end_inset\n\nzip|ZIP\n\\begin_inset Quotes erd\n\\end_inset\n\n\n\\end_layout\n\n\\begin_layout Itemize\nGenesis Plus GX\n\\begin_inset Newline newline\n\\end_inset\n\nUsed for: playing Sega Genesis / Master System / Game Gear / Sega CD games\n\\begin_inset Newline newline\n\\end_inset\n\nAuthor(s): Charles McDonald, ekeeke\n\\begin_inset Newline newline\n\\end_inset\n\nExtensions supported: \"md|smd|bin|cue|gen|zip|MD|SMD|bin|iso|\n\\begin_inset Newline newline\n\\end_inset\n\nISO|CUE|GEN|ZIP|sms|SMS|gg|GG|sg|SG\"\n\\end_layout\n\n\\begin_layout Itemize\nNX Engine\n\\begin_inset Newline newline\n\\end_inset\n\nUsed for: playing Cave Story / Doukutsu Monogatari\n\\begin_inset Newline newline\n\\end_inset\n\nAuthor(s): Caitlin Shaw (rogueeve)\n\\begin_inset Newline newline\n\\end_inset\n\nExtensions supported:\n\\begin_inset Quotes eld\n\\end_inset\n\nexe|EXE|zip|ZIP\n\\begin_inset Quotes erd\n\\end_inset\n\n\n\\end_layout\n\n\\begin_layout Itemize\nPCSX ReARMed\n\\begin_inset Newline newline\n\\end_inset\n\nUsed for: playing PlayStation1 games\n\\begin_inset Newline newline\n\\end_inset\n\nAuthor(s): PCSX Team, Notaz, Exophase (GPU plugin)\n\\begin_inset Newline newline\n\\end_inset\n\nExtensions supported: \"bin|cue|img|mdf|pbp|cbn\"\n\\end_layout\n\n\\begin_layout Itemize\nPrboom\n\\begin_inset Newline newline\n\\end_inset\n\nUsed for: playing Doom, Doom 2, Ultimate Doom, Final Doom, and mods\n\\begin_inset Newline newline\n\\end_inset\n\nAuthor(s): Various\n\\begin_inset Newline newline\n\\end_inset\n\nExtensions supported: \"WAD|wad|IWAD|iwad\"\n\\end_layout\n\n\\begin_layout Itemize\nMednafen NGP\n\\begin_inset Newline newline\n\\end_inset\n\nUsed for: playing Neo Geo Pocket Color games\n\\begin_inset Newline newline\n\\end_inset\n\nAuthor(s): Original Neopop authors, Ryphecha\n\\begin_inset Newline newline\n\\end_inset\n\nExtensions supported: \"ngp|NGP|ngc|NGC|zip|ZIP\"\n\\end_layout\n\n\\begin_layout Itemize\nMednafen WonderSwan\n\\begin_inset Newline newline\n\\end_inset\n\nUsed for: playing WonderSwan / WonderSwan Color / WonderSwan Crystal games\n\\begin_inset Newline newline\n\\end_inset\n\nAuthor(s): Original Cygne authors, Ryphecha\n\\begin_inset Newline newline\n\\end_inset\n\nExtensions supported: \"ws|WS|wsc|WSC|zip|ZIP\"\n\\end_layout\n\n\\begin_layout Itemize\nMednafen Virtual Boy\n\\begin_inset Newline newline\n\\end_inset\n\nUsed for: playing Virtual Boy games\n\\begin_inset Newline newline\n\\end_inset\n\nAuthor: Ryphecha\n\\begin_inset Newline newline\n\\end_inset\n\nExtensions supported: \"vb|VB|vboy|VBOY|bin|BIN|zip|ZIP\"\n\\end_layout\n\n\\begin_layout Itemize\nMednafen PC Engine\n\\begin_inset Newline newline\n\\end_inset\n\nUsed for: playing PC Engine / Supergrafx 16 / PC Engine CD games\n\\begin_inset Newline newline\n\\end_inset\n\nAuthor: Ryphecha\n\\begin_inset Newline newline\n\\end_inset\n\nExtensions supported: \"pce|PCE|sgx|SGX|cue|CUE|zip|ZIP\"\n\\end_layout\n\n\\begin_layout Standard\nWe'll go over each of these.\n\\end_layout\n\n\\begin_layout Subsection\nSNES9x Next\n\\end_layout\n\n\\begin_layout Standard\n\\begin_inset ERT\nstatus open\n\n\\begin_layout Plain Layout\n\n\n\\backslash\ntextbf{Version:}\n\\end_layout\n\n\\end_inset\n\n v1.52.3\n\\begin_inset Newline newline\n\\end_inset\n\n\n\\begin_inset ERT\nstatus open\n\n\\begin_layout Plain Layout\n\n\n\\backslash\ntextbf{Android performance:}\n\\end_layout\n\n\\end_inset\n\n This emulator should run at fullspeed on an Android device with a dual-core\n ARM Cortex A9-based CPU.\n\\end_layout\n\n\\begin_layout Subsubsection\nCHANGELOG\n\\end_layout\n\n\\begin_layout Standard\n\\begin_inset ERT\nstatus open\n\n\\begin_layout Plain Layout\n\n\n\\backslash\ntextbf{v1.52.4}\n\\end_layout\n\n\\end_inset\n\n\n\\end_layout\n\n\\begin_layout Itemize\nSpeed optimizations for Star Fox 1 / Star Wing - now makes them fast enough\n for fullspeed gameplay on Wii.\n\\end_layout\n\n\\begin_layout Standard\n\\begin_inset ERT\nstatus open\n\n\\begin_layout Plain Layout\n\n\n\\backslash\ntextbf{v1.52.3}\n\\end_layout\n\n\\end_inset\n\n\n\\end_layout\n\n\\begin_layout Itemize\nFixed DKC2 graphics inaccuracies\n\\end_layout\n\n\\begin_layout Itemize\nFixed issue that could corrupt memory addresses over time - found while\n deiniting Super Mario Kart.\n\\end_layout\n\n\\begin_layout Itemize\nUpdated to use RGB565 as pixel format.\n\\end_layout\n\n\\begin_layout Itemize\nSpeed hacks for Final Fantasy III/VI - makes it fullspeed for Wii.\n\\end_layout\n\n\\begin_layout Itemize\nFixed Super Double Dragon input issue.\n\\end_layout\n\n\\begin_layout Subsection\nVBA Next\n\\end_layout\n\n\\begin_layout Standard\n\\begin_inset ERT\nstatus open\n\n\\begin_layout Plain Layout\n\n\n\\backslash\ntextbf{Version:}\n\\end_layout\n\n\\end_inset\n\n v1.0.2\n\\begin_inset Newline newline\n\\end_inset\n\n\n\\begin_inset ERT\nstatus open\n\n\\begin_layout Plain Layout\n\n\n\\backslash\ntextbf{Android performance:}\n\\end_layout\n\n\\end_inset\n\n This emulator needs at least a dual-core ARM Cortex A9-based CPU and up.\n\\end_layout\n\n\\begin_layout Subsubsection\nCHANGELOG\n\\end_layout\n\n\\begin_layout Standard\n\\begin_inset ERT\nstatus open\n\n\\begin_layout Plain Layout\n\n\n\\backslash\ntextbf{v1.0.2}\n\\end_layout\n\n\\end_inset\n\n\n\\end_layout\n\n\\begin_layout Itemize\nAdded Pokemon Emerald to built-in vbaover - fixes white screen\n\\end_layout\n\n\\begin_layout Itemize\nLessens RAM footprint - makes Mother 3 fit into memory on Wii.\n\\end_layout\n\n\\begin_layout Itemize\nMore consistent syncing.\n\\end_layout\n\n\\begin_layout Itemize\nUpdated to use RGB565 as pixel format.\n\\end_layout\n\n\\begin_layout Subsection\nFCEUmm\n\\end_layout\n\n\\begin_layout Standard\n\\begin_inset ERT\nstatus open\n\n\\begin_layout Plain Layout\n\n\n\\backslash\ntextbf{Version:} 98.13 SVN\n\\end_layout\n\n\\end_inset\n\n\n\\begin_inset Newline newline\n\\end_inset\n\n\n\\begin_inset ERT\nstatus open\n\n\\begin_layout Plain Layout\n\n\n\\backslash\ntextbf{Android performance:}\n\\end_layout\n\n\\end_inset\n\n This emulator has been tested to run at fullspeed on an ARM Cortex A8 single-co\nre CPU.\n Your mileage may vary on slower devices.\n\\end_layout\n\n\\begin_layout Subsubsection\nCHANGELOG\n\\end_layout\n\n\\begin_layout Standard\n\\begin_inset ERT\nstatus open\n\n\\begin_layout Plain Layout\n\n\n\\backslash\ntextbf{For 0.9.8 point release}\n\\end_layout\n\n\\end_inset\n\n\n\\end_layout\n\n\\begin_layout Itemize\nUpgraded to latest SVN (r134)\n\\end_layout\n\n\\begin_layout Itemize\nUpdated to use RGB565 as pixel format.\n\\end_layout\n\n\\begin_layout Subsection\nNEStopia\n\\end_layout\n\n\\begin_layout Standard\n\\begin_inset ERT\nstatus open\n\n\\begin_layout Plain Layout\n\n\n\\backslash\ntextbf{Version:} 1.44\n\\end_layout\n\n\\end_inset\n\n\n\\begin_inset Newline newline\n\\end_inset\n\n\n\\begin_inset ERT\nstatus open\n\n\\begin_layout Plain Layout\n\n\n\\backslash\ntextbf{Android performance:}\n\\end_layout\n\n\\end_inset\n\n This emulator has been tested to run at fullspeed on an ARM Cortex A8 single-co\nre CPU.\n Your mileage may vary on slower devices.\n\\end_layout\n\n\\begin_layout Subsubsection\nNOTES\n\\end_layout\n\n\\begin_layout Itemize\nThere might still be an audio desync that happen at the half hour mark.\n Ever since NEStopia 1.36 some kind of APU bug has been inadvertently introduced.\n We will be researching this.\n\\end_layout\n\n\\begin_layout Itemize\nFor Famicom Disk System games - Y Button will switch sides of a disk.\n - If you get any problems of the sort DISK A / B ERR 07' - pressing Y button\n again or letting it run its course should do it.\n\\end_layout\n\n\\begin_layout Itemize\nFamicom Disk System loading is slow, so you might be tempted to fast forward\n through most of it.\n However, I'd advise caution when doing so and to savestate regularly in\n case 'fast forwarding' can negatively affect disk loading.\n\n\\end_layout\n\n\\begin_layout Subsubsection\nCHANGELOG\n\\end_layout\n\n\\begin_layout Standard\n\\begin_inset ERT\nstatus open\n\n\\begin_layout Plain Layout\n\n\n\\backslash\ntextbf{For 0.9.8.3 point release}\n\\end_layout\n\n\\end_inset\n\n\n\\end_layout\n\n\\begin_layout Itemize\nFamicom Disk System support.\n For Android users - put disksys.rom into the same folder as the FDS ROM\n you're trying to load.\n For everyone else - put disksys.rom into your system directory.\n\n\\end_layout\n\n\\begin_layout Standard\n\\begin_inset ERT\nstatus open\n\n\\begin_layout Plain Layout\n\n\n\\backslash\ntextbf{For 0.9.8 point release}\n\\end_layout\n\n\\end_inset\n\n\n\\end_layout\n\n\\begin_layout Itemize\nNew port\n\\end_layout\n\n\\begin_layout Subsection\nGambatte\n\\end_layout\n\n\\begin_layout Standard\n\\begin_inset ERT\nstatus open\n\n\\begin_layout Plain Layout\n\n\n\\backslash\ntextbf{Version:} 0.50\n\\end_layout\n\n\\end_inset\n\n\n\\begin_inset Newline newline\n\\end_inset\n\n\n\\begin_inset ERT\nstatus open\n\n\\begin_layout Plain Layout\n\n\n\\backslash\ntextbf{Android performance:}\n\\end_layout\n\n\\end_inset\n\n This emulator has been tested to run at fullspeed on an ARM Cortex A8 single-co\nre CPU.\n Your mileage may vary on slower devices.\n\\end_layout\n\n\\begin_layout Subsubsection\nCHANGELOG\n\\end_layout\n\n\\begin_layout Standard\n\\begin_inset ERT\nstatus open\n\n\\begin_layout Plain Layout\n\n\n\\backslash\ntextbf{For 0.9.8 point release}\n\\end_layout\n\n\\end_inset\n\n\n\\end_layout\n\n\\begin_layout Itemize\nNow makes use of GBC BIOS color palettes.\n\\end_layout\n\n\\begin_layout Itemize\nCan also make use of custom color palettes.\n\\end_layout\n\n\\begin_layout Itemize\nUpdated to use RGBX8888 as pixel format.\n\\end_layout\n\n\\begin_layout Subsection\nFinal Burn Alpha\n\\end_layout\n\n\\begin_layout Standard\n\\begin_inset ERT\nstatus open\n\n\\begin_layout Plain Layout\n\n\n\\backslash\ntextbf{Version:} 0.2.97.28\n\\end_layout\n\n\\end_inset\n\n\n\\begin_inset Newline newline\n\\end_inset\n\n\n\\begin_inset ERT\nstatus open\n\n\\begin_layout Plain Layout\n\n\n\\backslash\ntextbf{Android performance:}\n\\end_layout\n\n\\end_inset\n\n Performance varies based on the game you're trying to play.\n Systems like CPS2 and Neogeo have been tested to run at fullspeed on an\n ARM Cortex A8 single-core CPU.\n CPS3 needs a dual-core ARM Cortex A9-based CPU for fullspeed gameplay.\n Your mileage may vary on slower devices.\n\\end_layout\n\n\\begin_layout Subsubsection\nNOTES\n\\end_layout\n\n\\begin_layout Itemize\nSome games might be stuck in Service mode right now on big-endian systems\n (ie.\n PS3/360/Wii).\n Some games that come to mind are Psikyo SH2 games and Taito games like\n Darius 2.\n We will be trying to fix this issue soon and release a point update for\n it.\n\\end_layout\n\n\\begin_layout Itemize\nButton combos ingame:\n\\end_layout\n\n\\begin_layout Itemize\nRetroPad L2 + RetroPad R2 + RetroPad L + RetroPad R + Select = Service Menu\n button\n\\begin_inset Newline newline\n\\end_inset\n\nRetroPad L2 + RetroPad R2 + RetroPad L + RetroPad R + Start = Diagnostic\n button\n\\begin_inset Newline newline\n\\end_inset\n\nRetroPad L2 + RetroPad R2 + RetroPad L + RetroPad R + Left = Reset button\n\\begin_inset Newline newline\n\\end_inset\n\nRetroPad L2 + RetroPad R2 + RetroPad L + RetroPad R + Right = DIP A Pressed\n\\begin_inset Newline newline\n\\end_inset\n\nRetroPad L2 + RetroPad R2 + RetroPad L + RetroPad R + Up = DIP B Pressed\n\\begin_inset Newline newline\n\\end_inset\n\nRetroPad L2 + RetroPad R2 + RetroPad L + RetroPad R + Down = Test Pressed\n\\end_layout\n\n\\begin_layout Itemize\nSavestates are hooked up but games can't have their 'state restored' after\n unloading the game and loading it again.\n\\end_layout\n\n\\begin_layout Itemize\nIf you want to play Warzard or Red Earth and you happen to get a 'No CD-ROM\n drive' message - do the 'Reset' combo (see above) - it should work then.\n\\end_layout\n\n\\begin_layout Subsubsection\nCHANGELOG\n\\end_layout\n\n\\begin_layout Standard\n\\begin_inset ERT\nstatus open\n\n\\begin_layout Plain Layout\n\n\n\\backslash\ntextbf{For 0.9.8 point release}\n\\end_layout\n\n\\end_inset\n\n\n\\end_layout\n\n\\begin_layout Itemize\nUpgraded to 0.2.97.28.\n\\end_layout\n\n\\begin_layout Itemize\nControls have been revised - most of the controls should now be properly\n hooked up.\n\\end_layout\n\n\\begin_layout Itemize\nButton combos have been changed -\n\\begin_inset Newline newline\n\\end_inset\n\nRetroPad L2 + RetroPad R2 + RetroPad L + RetroPad R + Select = Service Menu\n button\n\\begin_inset Newline newline\n\\end_inset\n\nRetroPad L2 + RetroPad R2 + RetroPad L + RetroPad R + Start = Diagnostic\n button\n\\begin_inset Newline newline\n\\end_inset\n\nRetroPad L2 + RetroPad R2 + RetroPad L + RetroPad R + Left = Reset button\n\\begin_inset Newline newline\n\\end_inset\n\nRetroPad L2 + RetroPad R2 + RetroPad L + RetroPad R + Right = DIP A Pressed\n\\begin_inset Newline newline\n\\end_inset\n\nRetroPad L2 + RetroPad R2 + RetroPad L + RetroPad R + Up = DIP B Pressed\n\\begin_inset Newline newline\n\\end_inset\n\nRetroPad L2 + RetroPad R2 + RetroPad L + RetroPad R + Down = Test Pressed\n\\end_layout\n\n\\begin_layout Itemize\nUses RGBX8888 as a color format for Psikyo SH2 games and RGB565 for everything\n else.\n\\end_layout\n\n\\begin_layout Subsection\nGenesis Plus GX\n\\end_layout\n\n\\begin_layout Standard\n\\begin_inset ERT\nstatus open\n\n\\begin_layout Plain Layout\n\n\n\\backslash\ntextbf{Version:} 1.7.3\n\\end_layout\n\n\\end_inset\n\n\n\\begin_inset Newline newline\n\\end_inset\n\n\n\\begin_inset ERT\nstatus open\n\n\\begin_layout Plain Layout\n\n\n\\backslash\ntextbf{Android performance:}\n\\end_layout\n\n\\end_inset\n\n This emulator has been tested to run regular Genesis and Sega CD games\n at fullspeed on an ARM Cortex A8 single-core CPU.\n Virtua Racing runs at half realtime speed on the same hardware and thus\n needs better system requirements.\n Your mileage may vary on slower devices.\n\\end_layout\n\n\\begin_layout Subsubsection\nNOTES\n\\end_layout\n\n\\begin_layout Itemize\nFOR ANDROID: To play Sega CD/Mega CD games, you will need Sega CD BIOS files\n in the same directory as the game you want to play.\n They should be named as follows: bios_CD_E.bin (for EU BIOS), bios_CD_U.bin\n (for US BIOS), bios_CD_J.bin (for Japanese BIOS)\n\\end_layout\n\n\\begin_layout Itemize\nFOR EVERYTHING ELSE: To play Sega CD/Mega CD games, you will need Sega CD\n BIOS files in the same directory as the game you want to play.\n They should be named as follows: bios_CD_E.bin (for EU BIOS), bios_CD_U.bin\n (for US BIOS), bios_CD_J.bin (for Japanese BIOS).\n\\end_layout\n\n\\begin_layout Subsubsection\nCHANGELOG\n\\end_layout\n\n\\begin_layout Standard\n\\begin_inset ERT\nstatus open\n\n\\begin_layout Plain Layout\n\n\n\\backslash\ntextbf{For 0.9.8 point release}\n\\end_layout\n\n\\end_inset\n\n\n\\end_layout\n\n\\begin_layout Itemize\nUpgraded to 1.7.3 ( might report 1.7.1 but is really 1.7.3).\n\\end_layout\n\n\\begin_layout Itemize\nUpdated to use RGB565.\n\\end_layout\n\n\\begin_layout Subsection\nNX Engine\n\\end_layout\n\n\\begin_layout Standard\n\\begin_inset ERT\nstatus open\n\n\\begin_layout Plain Layout\n\n\n\\backslash\ntextbf{Version:} 1.0.4\n\\end_layout\n\n\\end_inset\n\n\n\\begin_inset Newline newline\n\\end_inset\n\n\n\\begin_inset ERT\nstatus open\n\n\\begin_layout Plain Layout\n\n\n\\backslash\ntextbf{Android performance:}\n\\end_layout\n\n\\end_inset\n\n This game has been tested to run at fullspeed on an ARM Cortex A8 single-core\n CPU.\n Sound syncing however is currently not correct.\n Your mileage may vary on slower devices.\n\\end_layout\n\n\\begin_layout Subsubsection\nHOW TO USE\n\\end_layout\n\n\\begin_layout Standard\nYou need to copy all the 'datafiles' directory in the repository over.\n Start the core with doukutsu.exe - it should properly extract the needed\n archives from the EXE on initial boot.\n From there on it will use those extracted asset files.\n\\end_layout\n\n\\begin_layout Subsubsection\nNOTES\n\\end_layout\n\n\\begin_layout Itemize\nNXEngine is not released yet on consoles - sound is currently corrupt on\n big-endian consoles (Xbox 1/360/PS3/Wii).\n Will need to research what is up here.\n\\end_layout\n\n\\begin_layout Itemize\nSavestates are not hooked up - therefore rewind is also not possible.\n\\end_layout\n\n\\begin_layout Subsubsection\nCHANGELOG\n\\end_layout\n\n\\begin_layout Standard\n\\begin_inset ERT\nstatus open\n\n\\begin_layout Plain Layout\n\n\n\\backslash\ntextbf{For 0.9.8 point release}\n\\end_layout\n\n\\end_inset\n\n\n\\end_layout\n\n\\begin_layout Itemize\nUpgraded to 1.0.4.\n\\end_layout\n\n\\begin_layout Itemize\nDid major changes to path handling code and got rid of the hardcoded paths\n - should now handle paths correctly on _WIN32 targets.\n\\end_layout\n\n\\begin_layout Itemize\nFixed save files not working.\n\\end_layout\n\n\\begin_layout Itemize\nUpdated to use RGB565.\n\\end_layout\n\n\\begin_layout Subsection\nPCSX ReARMed\n\\end_layout\n\n\\begin_layout Standard\n\\begin_inset ERT\nstatus open\n\n\\begin_layout Plain Layout\n\n\n\\backslash\ntextbf{Version:} r18\n\\end_layout\n\n\\end_inset\n\n\n\\begin_inset Newline newline\n\\end_inset\n\n\n\\begin_inset ERT\nstatus open\n\n\\begin_layout Plain Layout\n\n\n\\backslash\ntextbf{Android performance:}\n\\end_layout\n\n\\end_inset\n\n This emulator has been tested to run most games at fullspeed on an ARM\n Cortex A8 single-core CPU.\n Higher-resolution interlaced games like Tekken 3 and Tobal 2 require higher\n system specs (Cortex A9 and up).\n Your mileage may vary on slower devices.\n\\end_layout\n\n\\begin_layout Subsubsection\nNOTES\n\\end_layout\n\n\\begin_layout Itemize\nPCSX ReARMed supports the loading of EBOOT (pbp) files as well.\n\\end_layout\n\n\\begin_layout Itemize\nAlthough PCSX ReARMed comes with built-in HLE BIOS code, you're recommended\n to still put BIOS files in the system directory (on Android there is no\n 'system directory', so instead you put the BIOS files in the same directory\n as the image you're trying to load).\n Some of the BIOS files used are: scph1001.bin, scph5500.bin, scph5501.bin,\n scph5502.bin, scph7502.bin.\n\\end_layout\n\n\\begin_layout Itemize\nIf an image might not load correctly, try it with and without BIOS files\n in the 'system directory' (read above note about 'system directory' as\n well).\n\\end_layout\n\n\\begin_layout Itemize\nThis is an ARM architecture-centric port right now - it is not of much use\n on other architectures and therefore consoles.\n\\end_layout\n\n\\begin_layout Subsubsection\nCHANGELOG\n\\end_layout\n\n\\begin_layout Standard\n\\begin_inset ERT\nstatus open\n\n\\begin_layout Plain Layout\n\n\n\\backslash\ntextbf{For 0.9.8 point release}\n\\end_layout\n\n\\end_inset\n\n\n\\end_layout\n\n\\begin_layout Itemize\nNew port.\n\\end_layout\n\n\\begin_layout Subsection\nPrboom\n\\end_layout\n\n\\begin_layout Standard\n\\begin_inset ERT\nstatus open\n\n\\begin_layout Plain Layout\n\n\n\\backslash\ntextbf{Version:} 2.5.0\n\\end_layout\n\n\\end_inset\n\n\n\\begin_inset Newline newline\n\\end_inset\n\n\n\\begin_inset ERT\nstatus open\n\n\\begin_layout Plain Layout\n\n\n\\backslash\ntextbf{Android performance:}\n\\end_layout\n\n\\end_inset\n\n This game engine has been tested to run most games at fullspeed on an ARM\n Cortex A8 single-core CPU.\n Your mileage may vary on slower devices.\n\\end_layout\n\n\\begin_layout Subsubsection\nNOTES\n\\end_layout\n\n\\begin_layout Itemize\nYou need to have prboom.wad in the same directory as the Doom WAD file you're\n going to load.\n\\end_layout\n\n\\begin_layout Itemize\nSavestates are currently not hooked up, and therefore rewind is not possible.\n\\end_layout\n\n\\begin_layout Itemize\nRe-entrancy does not work correctly yet - don't try to load a second WAD\n file.\n Instead, exit prboom first and then launch it again (only applies to consoles).\n\\end_layout\n\n\\begin_layout Itemize\nThis is the only Doom port in existence right now where you have the option\n to play at variable framerates.\n The option exists to play at 35, 40, 50 and 60fps.\n Doom originally ran at 35fps due to performance reasons and the slow CPUs\n available at the time.\n\\end_layout\n\n\\begin_layout Subsubsection\nCHANGELOG\n\\end_layout\n\n\\begin_layout Standard\n\\begin_inset ERT\nstatus open\n\n\\begin_layout Plain Layout\n\n\n\\backslash\ntextbf{For 0.9.8 point release}\n\\end_layout\n\n\\end_inset\n\n\n\\end_layout\n\n\\begin_layout Itemize\nNow uses RGB565 as pixel format.\n\\end_layout\n\n\\begin_layout Subsubsection\nSOUNDTRACK LIST\n\\end_layout\n\n\\begin_layout Standard\nPrboom supports MP3 soundtracks.\n The files must be in the same directory as the WAD file and should be correctly\n named.\n\\end_layout\n\n\\begin_layout Standard\n\\begin_inset ERT\nstatus open\n\n\\begin_layout Plain Layout\n\n\n\\backslash\ntextbf{\n\\backslash\nbreak}\n\\end_layout\n\n\\end_inset\n\n\n\\end_layout\n\n\\begin_layout Standard\nDOOM 1\n\\end_layout\n\n\\begin_layout Standard\ne1m1.mp3\n\\end_layout\n\n\\begin_layout Standard\ne1m2.mp3\n\\end_layout\n\n\\begin_layout Standard\ne1m3.mp3\n\\end_layout\n\n\\begin_layout Standard\ne1m4.mp3\n\\end_layout\n\n\\begin_layout Standard\ne1m5.mp3\n\\end_layout\n\n\\begin_layout Standard\ne1m6.mp3\n\\end_layout\n\n\\begin_layout Standard\ne1m7.mp3\n\\end_layout\n\n\\begin_layout Standard\ne1m8.mp3\n\\end_layout\n\n\\begin_layout Standard\ne1m9.mp3\n\\end_layout\n\n\\begin_layout Standard\ne2m1.mp3\n\\end_layout\n\n\\begin_layout Standard\ne2m2.mp3\n\\end_layout\n\n\\begin_layout Standard\ne2m3.mp3\n\\end_layout\n\n\\begin_layout Standard\ne2m4.mp3\n\\end_layout\n\n\\begin_layout Standard\ne2m5.mp3\n\\end_layout\n\n\\begin_layout Standard\ne2m6.mp3\n\\end_layout\n\n\\begin_layout Standard\ne2m7.mp3\n\\end_layout\n\n\\begin_layout Standard\ne2m8.mp3\n\\end_layout\n\n\\begin_layout Standard\ne2m9.mp3\n\\end_layout\n\n\\begin_layout Standard\ne3m1.mp3\n\\end_layout\n\n\\begin_layout Standard\ne3m2.mp3\n\\end_layout\n\n\\begin_layout Standard\ne3m3.mp3\n\\end_layout\n\n\\begin_layout Standard\ne3m4.mp3\n\\end_layout\n\n\\begin_layout Standard\ne3m5.mp3\n\\end_layout\n\n\\begin_layout Standard\ne3m6.mp3\n\\end_layout\n\n\\begin_layout Standard\ne3m7.mp3\n\\end_layout\n\n\\begin_layout Standard\ne3m8.mp3\n\\end_layout\n\n\\begin_layout Standard\nintermid1.mp3\n\\end_layout\n\n\\begin_layout Standard\nintro.mp3\n\\end_layout\n\n\\begin_layout Standard\nbunny.mp3\n\\end_layout\n\n\\begin_layout Standard\nvictor.mp3\n\\end_layout\n\n\\begin_layout Standard\n\\begin_inset ERT\nstatus open\n\n\\begin_layout Plain Layout\n\n\n\\backslash\ntextbf{\n\\backslash\nbreak}\n\\end_layout\n\n\\end_inset\n\n\n\\end_layout\n\n\\begin_layout Standard\nDOOM 2\n\\end_layout\n\n\\begin_layout Standard\nstalks.mp3\n\\end_layout\n\n\\begin_layout Standard\nrunnin.mp3\n\\end_layout\n\n\\begin_layout Standard\ncountd.mp3\n\\end_layout\n\n\\begin_layout Standard\nbetwee.mp3\n\\end_layout\n\n\\begin_layout Standard\ndoom.mp3\n\\end_layout\n\n\\begin_layout Standard\nthe_da.mp3\n\\end_layout\n\n\\begin_layout Standard\nshawn.mp3\n\\end_layout\n\n\\begin_layout Standard\nddtblu.mp3\n\\end_layout\n\n\\begin_layout Standard\nin_cit.mp3\n\\end_layout\n\n\\begin_layout Standard\ndead.mp3\n\\end_layout\n\n\\begin_layout Standard\nromero.mp3\n\\end_layout\n\n\\begin_layout Standard\nmessag.mp3\n\\end_layout\n\n\\begin_layout Standard\nampie.mp3\n\\end_layout\n\n\\begin_layout Standard\ntense.mp3\n\\end_layout\n\n\\begin_layout Standard\nopenin.mp3\n\\end_layout\n\n\\begin_layout Standard\nevil.mp3\n\\end_layout\n\n\\begin_layout Standard\nultima.mp3\n\\end_layout\n\n\\begin_layout Standard\nread_m.mp3\n\\end_layout\n\n\\begin_layout Standard\ndm2ttl.mp3\n\\end_layout\n\n\\begin_layout Standard\ndm2int.mp3\n\\end_layout\n\n\\begin_layout Subsection\nMednafen NGP\n\\end_layout\n\n\\begin_layout Standard\n\\begin_inset ERT\nstatus open\n\n\\begin_layout Plain Layout\n\n\n\\backslash\ntextbf{Version:} 0.9.28\n\\end_layout\n\n\\end_inset\n\n\n\\begin_inset Newline newline\n\\end_inset\n\n\n\\begin_inset ERT\nstatus open\n\n\\begin_layout Plain Layout\n\n\n\\backslash\ntextbf{Android performance:}\n\\end_layout\n\n\\end_inset\n\n This emulator has been tested to run at fullspeed on an ARM Cortex A8 single-co\nre CPU.\n Your mileage may vary on slower devices.\n\\end_layout\n\n\\begin_layout Subsubsection\nCHANGELOG\n\\end_layout\n\n\\begin_layout Standard\n\\begin_inset ERT\nstatus open\n\n\\begin_layout Plain Layout\n\n\n\\backslash\ntextbf{For 0.9.8 point release}\n\\end_layout\n\n\\end_inset\n\n\n\\end_layout\n\n\\begin_layout Itemize\nNew port.\n\\end_layout\n\n\\begin_layout Subsection\nMednafen Wonderswan\n\\end_layout\n\n\\begin_layout Standard\n\\begin_inset ERT\nstatus open\n\n\\begin_layout Plain Layout\n\n\n\\backslash\ntextbf{Version:} 0.9.28\n\\end_layout\n\n\\end_inset\n\n\n\\begin_inset Newline newline\n\\end_inset\n\n\n\\begin_inset ERT\nstatus open\n\n\\begin_layout Plain Layout\n\n\n\\backslash\ntextbf{Android performance:}\n\\end_layout\n\n\\end_inset\n\n This emulator has been tested to run at fullspeed on an ARM Cortex A8 single-co\nre CPU.\n Your mileage may vary on slower devices.\n\\end_layout\n\n\\begin_layout Subsubsection\nNOTES\n\\end_layout\n\n\\begin_layout Itemize\nThe music is incorrect on Xbox 360.\n This seems to be a 360-specific bug.\n\\end_layout\n\n\\begin_layout Itemize\nBecause Wonderswan has a 75Hz refresh rate, V-sync is specifically disabled\n for this core so that the framerate and sound is as it should be - that's\n why you might notice some negligible tearing.\n\n\\end_layout\n\n\\begin_layout Subsubsection\nCHANGELOG\n\\end_layout\n\n\\begin_layout Standard\n\\begin_inset ERT\nstatus open\n\n\\begin_layout Plain Layout\n\n\n\\backslash\ntextbf{For 0.9.8 point release}\n\\end_layout\n\n\\end_inset\n\n\n\\end_layout\n\n\\begin_layout Itemize\nUpgraded to 0.9.28 version.\n\\end_layout\n\n\\begin_layout Itemize\nFixes save file issues on MSVC-based consoles (Xbox 1/360).\n\\end_layout\n\n\\begin_layout Itemize\nNow uses RGB565 as a pixel format.\n\\end_layout\n\n\\begin_layout Subsection\nMednafen Virtual Boy\n\\end_layout\n\n\\begin_layout Standard\n\\begin_inset ERT\nstatus open\n\n\\begin_layout Plain Layout\n\n\n\\backslash\ntextbf{Version:} 0.9.28\n\\end_layout\n\n\\end_inset\n\n\n\\begin_inset Newline newline\n\\end_inset\n\n\n\\begin_inset ERT\nstatus open\n\n\\begin_layout Plain Layout\n\n\n\\backslash\ntextbf{Android performance:}\n\\end_layout\n\n\\end_inset\n\n You will need at least a Cortex A9 CPU and/or higher for this.\n\\end_layout\n\n\\begin_layout Subsubsection\nNOTES\n\\end_layout\n\n\\begin_layout Itemize\nThis is not released yet for Xbox 1 and 360 because there are numerous game\n compatibility-breaking issues right now.\n\\end_layout\n\n\\begin_layout Subsubsection\nCHANGELOG\n\\end_layout\n\n\\begin_layout Standard\n\\begin_inset ERT\nstatus open\n\n\\begin_layout Plain Layout\n\n\n\\backslash\ntextbf{For 0.9.8 point release}\n\\end_layout\n\n\\end_inset\n\n\n\\end_layout\n\n\\begin_layout Itemize\nNew port.\n\\end_layout\n\n\\begin_layout Subsection\nMednafen PC Engine\n\\end_layout\n\n\\begin_layout Standard\n\\begin_inset ERT\nstatus open\n\n\\begin_layout Plain Layout\n\n\n\\backslash\ntextbf{Version:} 0.9.28\n\\end_layout\n\n\\end_inset\n\n\n\\begin_inset Newline newline\n\\end_inset\n\n\n\\begin_inset ERT\nstatus open\n\n\\begin_layout Plain Layout\n\n\n\\backslash\ntextbf{Android performance:}\n\\end_layout\n\n\\end_inset\n\n This emulator has been tested to run at fullspeed on an ARM Cortex A8 single-co\nre CPU.\n Your mileage may vary on slower devices.\n\\end_layout\n\n\\begin_layout Subsubsection\nNOTES\n\\end_layout\n\n\\begin_layout Itemize\nFOR ANDROID USERS:\n\\begin_inset space ~\n\\end_inset\n\nYou will need a BIOS file called 'syscard3.pce' placed in the same directory\n as the ISO/CUE you want to play to be able to play PC Engine CD games.\n\\end_layout\n\n\\begin_layout Itemize\nFOR ANYBODY ELSE: You will need a BIOS file called 'syscard3.pce' in your\n system directory in order to be able to play PC Engine CD games.\n\\end_layout\n\n\\begin_layout Subsubsection\nCHANGELOG\n\\end_layout\n\n\\begin_layout Standard\n\\begin_inset ERT\nstatus open\n\n\\begin_layout Plain Layout\n\n\n\\backslash\ntextbf{For 0.9.8 point release}\n\\end_layout\n\n\\end_inset\n\n\n\\end_layout\n\n\\begin_layout Itemize\nUpgraded to 0.9.28.\n\\end_layout\n\n\\begin_layout Itemize\nFixes save file issues on MSVC-based consoles (Xbox 1/360).\n\\end_layout\n\n\\begin_layout Itemize\nUpdated to use RGB565 as pixel format.\n\\end_layout\n\n\\begin_layout Section\nAbout Us\n\\end_layout\n\n\\begin_layout Standard\nHomepage:\n\\begin_inset Flex URL\nstatus collapsed\n\n\\begin_layout Plain Layout\n\nhttp://www.libretro.org\n\\end_layout\n\n\\end_inset\n\n\n\\begin_inset Newline newline\n\\end_inset\n\nIRC: #retroarch at freenode\n\\begin_inset Newline newline\n\\end_inset\n\nGithub (libretro organization):\n\\begin_inset Flex URL\nstatus collapsed\n\n\\begin_layout Plain Layout\n\nhttps://github.com/libretro\n\\end_layout\n\n\\end_inset\n\n\n\\begin_inset Newline newline\n\\end_inset\n\nRetroArch @ Github:\n\\begin_inset Flex URL\nstatus collapsed\n\n\\begin_layout Plain Layout\n\nhttps://github.com/Themaister/RetroArch\n\\end_layout\n\n\\end_inset\n\n\n\\begin_inset Newline newline\n\\end_inset\n\nLibretro @ Twitter:\n\\begin_inset Flex URL\nstatus collapsed\n\n\\begin_layout Plain Layout\n\nhttps://twitter.com/libretro\n\\end_layout\n\n\\end_inset\n\n\n\\begin_inset Newline newline\n\\end_inset\n\nLibretro @ Facebook:\n\\begin_inset Flex URL\nstatus collapsed\n\n\\begin_layout Plain Layout\n\nhttps://www.facebook.com/libretro.retroarch\n\\end_layout\n\n\\end_inset\n\n\n\\end_layout\n\n\\end_body\n\\end_document\n"
},
{
"path": "archive/retroarch-enduserguide.lyx",
"content": "#LyX 2.0 created this file. For more info see http://www.lyx.org/\n\\lyxformat 413\n\\begin_document\n\\begin_header\n\\textclass article\n\\use_default_options true\n\\maintain_unincluded_children false\n\\language english\n\\language_package default\n\\inputencoding auto\n\\fontencoding global\n\\font_roman default\n\\font_sans default\n\\font_typewriter default\n\\font_default_family default\n\\use_non_tex_fonts false\n\\font_sc false\n\\font_osf false\n\\font_sf_scale 100\n\\font_tt_scale 100\n\n\\graphics default\n\\default_output_format default\n\\output_sync 0\n\\bibtex_command default\n\\index_command default\n\\paperfontsize default\n\\spacing single\n\\use_hyperref true\n\\pdf_title \"RetroArch End-user Guide\"\n\\pdf_bookmarks true\n\\pdf_bookmarksnumbered false\n\\pdf_bookmarksopen false\n\\pdf_bookmarksopenlevel 1\n\\pdf_breaklinks false\n\\pdf_pdfborder false\n\\pdf_colorlinks true\n\\pdf_backref false\n\\pdf_pdfusetitle true\n\\papersize default\n\\use_geometry false\n\\use_amsmath 1\n\\use_esint 1\n\\use_mhchem 1\n\\use_mathdots 1\n\\cite_engine basic\n\\use_bibtopic false\n\\use_indices false\n\\paperorientation portrait\n\\suppress_date false\n\\use_refstyle 1\n\\index Index\n\\shortcut idx\n\\color #008000\n\\end_index\n\\secnumdepth 5\n\\tocdepth 5\n\\paragraph_separation indent\n\\paragraph_indentation default\n\\quotes_language english\n\\papercolumns 1\n\\papersides 1\n\\paperpagestyle default\n\\tracking_changes false\n\\output_changes false\n\\html_math_output 0\n\\html_css_as_file 0\n\\html_be_strict false\n\\end_header\n\n\\begin_body\n\n\\begin_layout Title\nRetroArch End-User Guide\n\\end_layout\n\n\\begin_layout Standard\n\\begin_inset ERT\nstatus open\n\n\\begin_layout Plain Layout\n\n\n\\backslash\nnewpage\n\\end_layout\n\n\\end_inset\n\n\n\\end_layout\n\n\\begin_layout Part*\nWelcome to RetroArch!\n\\end_layout\n\n\\begin_layout Standard\nRetroArch does things differently from other programs.\n In this guide, you will learn what RetroArch is, how it works and the various\n things you can do with it as an end-user.\n\\end_layout\n\n\\begin_layout Standard\nThis guide is aimed at the end-user.\n It does not intend to be a comprehensive reference for anything and everything\n to do with the libretro project and/or RetroArch.\n\\end_layout\n\n\\begin_layout Standard\n\\begin_inset ERT\nstatus open\n\n\\begin_layout Plain Layout\n\n\n\\backslash\nnewpage\n\\end_layout\n\n\\end_inset\n\n\n\\end_layout\n\n\\begin_layout Standard\n\\begin_inset CommandInset toc\nLatexCommand tableofcontents\n\n\\end_inset\n\n\n\\end_layout\n\n\\begin_layout Standard\n\\begin_inset ERT\nstatus open\n\n\\begin_layout Plain Layout\n\n\n\\backslash\nnewpage\n\\end_layout\n\n\\end_inset\n\n\n\\end_layout\n\n\\begin_layout Part\nWhat is RetroArch?\n\\end_layout\n\n\\begin_layout Standard\nRetroArch is a cross platform architecture that aims to become a 'one-stop\n shop' for emulators, videogames, multimedia, augmented reality and other\n areas of interest.\n It manages to do all of these things by implementing a specification known\n as the libretro API (Application Programming Interface).\n\\end_layout\n\n\\begin_layout Standard\nLibretro is a powerful interface that allows you to port applications to\n the spec and be able to run them on any libretro-compatible client in existence.\n\\end_layout\n\n\\begin_layout Standard\nRetroArch is the 'official' libretro client.\n Right now it is available on many platforms and it aims to deliver the\n most optimal performance possible on a given host platform.\n You will generally find that RetroArch will be first in implementing new\n features and/or additions that get added to the libretro interface.\n\\end_layout\n\n\\begin_layout Standard\nRetroArch is most well known for an entire suite of emulators that have\n been ported to the libretro specification and are therefore able to be\n run in RetroArch.\n Therefore, it has been compared in the media to other multi-system emulators,\n such as OpenEmu, and/or MESS.\n Note that we don't particularly approve of this attempt to pigeonhole RetroArch\n - we don't think of libretro and/or RetroArch as being limited to emulators,\n or even games for that matter.\n\\end_layout\n\n\\begin_layout Standard\nOver the next few months the distinction between RetroArch and these types\n of programs will start becoming more and more apparent.\n\\end_layout\n\n\\begin_layout Standard\n\\begin_inset ERT\nstatus open\n\n\\begin_layout Plain Layout\n\n\n\\backslash\nnewpage\n\\end_layout\n\n\\end_inset\n\n\n\\end_layout\n\n\\begin_layout Part\nWhat platforms can I use RetroArch on?\n\\end_layout\n\n\\begin_layout Standard\nBeing on every system anywhere is the most important goal of RetroArch.\n Therefore, it is available for many platforms - for free.\n The program (except for minor cosmetic differences per version) should\n behave more or less exactly the same from one platform to another.\n\\end_layout\n\n\\begin_layout Standard\nThe list of available devices and/or operating systems include:\n\\end_layout\n\n\\begin_layout Itemize\nPC (Microsoft Windows XP/Vista/7/8/8.1)\n\\end_layout\n\n\\begin_layout Itemize\nMac (OSX Snow Leopard [10.6.8] up to Mavericks [10.9])\n\\end_layout\n\n\\begin_layout Itemize\nLinux\n\\end_layout\n\n\\begin_layout Itemize\nAndroid (version 2.3 and higher)\n\\end_layout\n\n\\begin_layout Itemize\niOS (version 6.0 and higher [*])\n\\end_layout\n\n\\begin_layout Itemize\nBlackberry Playbook\n\\end_layout\n\n\\begin_layout Itemize\nBlackberry 10\n\\end_layout\n\n\\begin_layout Itemize\nPlayStation3 [*]\n\\end_layout\n\n\\begin_layout Itemize\nNintendo Wii [*]\n\\end_layout\n\n\\begin_layout Itemize\nNintendo GameCube [*]\n\\end_layout\n\n\\begin_layout Itemize\nMicrosoft Xbox [*]\n\\end_layout\n\n\\begin_layout Itemize\nMicrosoft Xbox 360 [*]\n\\end_layout\n\n\\begin_layout Itemize\nBrowser / Javascript (Emscripten)\n\\end_layout\n\n\\begin_layout Standard\nSome of the systems listed above (the ones marked [*]) might require a jailbreak\n or a modification of some sort so that RetroArch is able to run on it.\n This is something you will have to figure out on your own and for which\n we provide no support or help at all.\n\\end_layout\n\n\\begin_layout Standard\nFor the latest versions, go to the official homepage -\n\\begin_inset Flex URL\nstatus open\n\n\\begin_layout Plain Layout\n\nhttp://www.libretro.com\n\\end_layout\n\n\\end_inset\n\n, and click on the platform you want to download a copy of RetroArch for.\n\\end_layout\n\n\\begin_layout Standard\nIn the future, RetroArch will be ported to even more systems.\n The aim for RetroArch is to have a program that will be able to run on\n as many platforms as possible, and bringing along with it all the libretro\n cores that RetroArch (as a libretro client) is able to run.\n\\begin_inset ERT\nstatus open\n\n\\begin_layout Plain Layout\n\n\n\\backslash\nnewpage\n\\end_layout\n\n\\end_inset\n\n\n\\end_layout\n\n\\begin_layout Part\nHow does RetroArch work?\n\\end_layout\n\n\\begin_layout Standard\nRetroArch is a plugin-driven application.\n Every program that you can run in RetroArch is a plugin that gets loaded\n by RetroArch on-the-fly.\n We refer to these plugin cores from this point on as 'libretro cores'.\n\\end_layout\n\n\\begin_layout Standard\nA libretro core is an app implementing the libretro specification packaged\n as a plugin.\n The 'libretro core' defines the 'behavior' of what RetroArch will do, since\n RetroArch by itself does nothing.\n So, a core can turn RetroArch into a videogame emulator, a game, a movie\n player, etc.\n It's up to what the developer wants the libretro core to do.\n\\end_layout\n\n\\begin_layout Standard\nThrough this model, apps implementing the libretro specification form part\n of a larger ecosystem that every libretro-compatible client will be able\n to tap into.\n Libretro's aim is to make convergence possible - so that you can run an\n app on one system, then run it on another system, or play in a browser\n and then continue and pick up where you left off by launching the same\n app from your mediaplayer.\n\\end_layout\n\n\\begin_layout Standard\nRetroArch can be thought of as the 'Proof of Concept' that demonstrates\n that this kind of convergence is possible.\n Other apps (media players, multi-system emus, CAD applications) are encouraged\n and allowed to implement the specification themselves.\n\n\\end_layout\n\n\\begin_layout Standard\nThe user can do many things with RetroArch, from playing games to watching\n movies (and other activities in the near future).\n The user is in control of what he wants to turn RetroArch into, for what\n purposes it will be used and what content will be run in it.\n There is no digital rights management or restrictions imposed upon the\n user.\n\n\\end_layout\n\n\\begin_layout Standard\nA brief summary of all available 'libretro cores' so far will be provided\n at the end of this guide.\n\\begin_inset ERT\nstatus open\n\n\\begin_layout Plain Layout\n\n\n\\backslash\nnewpage\n\\end_layout\n\n\\end_inset\n\n\n\\end_layout\n\n\\begin_layout Part\nHow do you control RetroArch?\n\\end_layout\n\n\\begin_layout Standard\nRetroArch (and libretro as a result) has been designed around one common\n input device - something we call the 'RetroPad'.\n You use this input device for controlling all aspects of RetroArch - from\n the game to the RetroArch system menus.\n\\end_layout\n\n\\begin_layout Standard\nThe RetroPad is a traditional videogame controller of the Nintendo/Sony\n mould.\n It has a D-pad, a Start/Select button, four face buttons, up to 4 shoulder\n buttons/triggers, and (optional) two analog sticks.\n\\end_layout\n\n\\begin_layout Standard\nUnlike other apps, RetroArch is designed to be controlled with a gamepad\n as its primary input.\n We want to deliver a user experience that is as close to a traditional\n videogame console as possible, and to that end, we believe having to jockey\n between a keyboard, a mouse, and/or a gamepad/mouse is a bad user experience\n - when you could all do it with your gamepad anyway.\n\\end_layout\n\n\\begin_layout Standard\nThe RetroPad is an 'abstraction' - when you run RetroArch, your own gamepad\n (or keyboard/touch overlay) will have a 1-to-1 mapping to this 'RetroPad'\n abstraction.\n You map your input device of choice to all the buttons and triggers that\n the RetroPad supports, and from there on you can control RetroArch's built-in\n menu system\n\\begin_inset Foot\nstatus collapsed\n\n\\begin_layout Plain Layout\nOn tablets and phones, you can interact with the upper-layer system menus\n through touch\n\\end_layout\n\n\\end_inset\n\n.\n\\end_layout\n\n\\begin_layout Standard\nThe mobile ports (because of touch being the primary input device) are controlle\nd using a graphical overlay of the RetroPad that gets pasted on top of the\n screen.\n This overlay can be interacted with through touch, and it's possible to\n switch between different 'pages' of the overlay - and to switch overlays\n on-the-fly.\n\\begin_inset ERT\nstatus open\n\n\\begin_layout Plain Layout\n\n\n\\backslash\nnewpage\n\\end_layout\n\n\\end_inset\n\n\n\\end_layout\n\n\\begin_layout Part\nHow do I go to the built-in UI?\n\\end_layout\n\n\\begin_layout Standard\nRetroArch has a built-in UI (User Interface) that functions nearly the same\n across every platform.\n It is called RGUI (short for Retro GUI).\n Most of RetroArch's features can be changed on-the-fly from this.\n\n\\end_layout\n\n\\begin_layout Standard\nJust like everything else in RetroArch, RGUI is controlled with the RetroPad.\n Like the name suggests, it is a no-frills User Interface that is not big\n on eye-candy.\n On the plus side, it is very scaleable and works well even at resolutions\n as low as 320x240.\n\n\\end_layout\n\n\\begin_layout Standard\nThe user has two ways to bring up this menu:\n\\end_layout\n\n\\begin_layout Itemize\nButton bind - most RetroArch versions allow you to bind 'Toggle Menu' to\n a key/button on your input device.\n By pressing this button/key, you can toggle the built-in UI on or off.\n\\end_layout\n\n\\begin_layout Itemize\nOverlay - An overlay usually contains a button with a 'space invaders' icon\n in it.\n Touching this button will toggle the built-in UI on or off.\n\\begin_inset ERT\nstatus open\n\n\\begin_layout Plain Layout\n\n\n\\backslash\nnewpage\n\\end_layout\n\n\\end_inset\n\n\n\\end_layout\n\n\\begin_layout Part\nHow do I load content in RetroArch?\n\\end_layout\n\n\\begin_layout Standard\nA version of RetroArch typically has three ways to load content.\n You can select these options from the built-in UI.\n\\end_layout\n\n\\begin_layout Standard\n\\begin_inset ERT\nstatus open\n\n\\begin_layout Plain Layout\n\n\n\\backslash\ntextbf{Load Content (History):}\n\\end_layout\n\n\\end_inset\n\nYou can select from a list of previously loaded content here.\n All the content you have ran in RetroArch will be added to this list.\n\\end_layout\n\n\\begin_layout Standard\n\\begin_inset ERT\nstatus open\n\n\\begin_layout Plain Layout\n\n\n\\backslash\ntextbf{Load Content (Detect Core):}\n\\end_layout\n\n\\end_inset\n\nYou can select a file from the filebrowser.\n It will try to detect if a core has been installed that supports the extension\n of the file you just selected.\n If it finds only one core that supports this file extension, it will autostart\n that core with the chosen content immediately.\n If it finds multiple cores that supports this file extension,it will let\n you choose from a list of supported cores.\n\\end_layout\n\n\\begin_layout Standard\n\\begin_inset ERT\nstatus open\n\n\\begin_layout Plain Layout\n\n\n\\backslash\ntextbf{Load Content:}\n\\end_layout\n\n\\end_inset\n\nYou can select a file from the filebrowser, and it will be started with\n the currently selected 'core'.\n In order to change the core currently being selected, you have to select\n another one from 'Load Core'.\n\\begin_inset ERT\nstatus open\n\n\\begin_layout Plain Layout\n\n\n\\backslash\nnewpage\n\\end_layout\n\n\\end_inset\n\n\n\\end_layout\n\n\\begin_layout Part\nListing of available cores\n\\end_layout\n\n\\begin_layout Standard\nThe number of plugin cores that get added to the libretro ecosystem keeps\n increasing.\n Covering all of these would fall outside the scope of this guide, so we're\n only going to cover a few ones in more detail.\n\\end_layout\n\n\\begin_layout Standard\nWe try to make an effort to have a core run on as many systems as possible.\n Unfortunately, there will always be instances where a core is not available\n for a specific platform.\n\\begin_inset ERT\nstatus open\n\n\\begin_layout Plain Layout\n\n\n\\backslash\nnewpage\n\\end_layout\n\n\\end_inset\n\n\n\\end_layout\n\n\\begin_layout Section\nbsnes\n\\end_layout\n\n\\begin_layout Standard\nThis is a Super Nintendo emulator based on the open-source emulator bsnes.\n It is an accuracy-focused emulator and as such can run almost all games\n for the SNES with cycle accuracy, unlike other SNES emulators.\n However, this comes at the cost of performance.\n\\end_layout\n\n\\begin_layout Subsection\nHow to run\n\\end_layout\n\n\\begin_layout Standard\nbSNES does not work on its own, but runs SNES ROM images.\n These image files need to have the following extensions\n\\end_layout\n\n\\begin_layout Itemize\nsfc\n\\end_layout\n\n\\begin_layout Standard\nSelect one of these.\n If the image is verified to be OK, it will start up the game.\n\\end_layout\n\n\\begin_layout Subsection\nHow do all these different versions compare?\n\\end_layout\n\n\\begin_layout Standard\nThere are several versions of bsnes out there.\n\\end_layout\n\n\\begin_layout Subsubsection\nbsnes Performance v0.92\n\\end_layout\n\n\\begin_layout Standard\nThis is a fairly recent version of bsnes' performance core - the same one\n used in Higan.\n Some games - like Mega Man X2 and X3 - are broken with this version even\n if you have the BIOS files placed in your System directory.\n Some of the games requiring high accuracy won't run correctly either.\n To make up for it, it has much better performance than the balanced or\n accuracy cores.\n\\end_layout\n\n\\begin_layout Subsubsection\nbsnes Balanced v0.92\n\\end_layout\n\n\\begin_layout Standard\nThis is a fairly recent version of bsnes' performance core - the same one\n used in Higan.\n It should play games like Mega Man X2/X3 with no problems.\n It is much slower than bsnes performance but still a lot faster than bsnes\n accuracy.\n\\end_layout\n\n\\begin_layout Subsubsection\nbsnes Accuracy v0.92\n\\end_layout\n\n\\begin_layout Standard\nThis is a fairly recent version of bsnes' accuracy core - the same one used\n in Higan.\n This should be capable of playing all SNES games accurately at the cost\n of performance.\n\\end_layout\n\n\\begin_layout Subsubsection\nbsnes Performance C++98 v0.85\n\\end_layout\n\n\\begin_layout Standard\nLater versions of bsnes are written in cutting-edge C++11 and cannot be\n used on certain outdated compilers.\n This port of bsnes to C++98 was written for those compilers in mind.\n It is an older version of bsnes compared to the one in Higan but there\n should only be minor differences between this and bsnes performance v0.92.\n\n\\end_layout\n\n\\begin_layout Subsection\nLibretro port-specific additions\n\\end_layout\n\n\\begin_layout Subsubsection\nCartridge folders not enforced\n\\end_layout\n\n\\begin_layout Standard\nCartridge folders are not forced on you, and you are still able to load\n SFC ROMs without having to go the Purify route.\n\\end_layout\n\n\\begin_layout Subsubsection\nMore pragmatic static syncing\n\\end_layout\n\n\\begin_layout Standard\nHigan's way of static synchronization is for all intents and purposes like\n RetroArch's, except ours is superior from an end-user point of view.\n It does not require of the user that he has to dial a figurative knob for\n hours on end to get the 'perfect refresh rate' of his monitor as a reference\n clock for the emulator - instead, it only requires that the app refresh\n rate you use is close enough to the refresh rate of your screen.\n From there on, dynamic rate control picks up the slack for whenever audio\n is running late, and combined with threaded video this allows highly demanding\n and sync-heavy cores like bsnes to run tolerably even on a very high-latency\n OS like Android.\n\\end_layout\n\n\\begin_layout Subsection\nKnown issues\n\\end_layout\n\n\\begin_layout Subsubsection\nMega Man X2/X3 don't run with bsnes performance core\n\\end_layout\n\n\\begin_layout Standard\nThis is a known issue and it's unlikely byuu is going to fix it for the\n performance core.\n You will have to use either Balanced or Accuracy core.\n\\end_layout\n\n\\begin_layout Standard\n\\begin_inset ERT\nstatus open\n\n\\begin_layout Plain Layout\n\n\n\\backslash\nnewpage\n\\end_layout\n\n\\end_inset\n\n\n\\end_layout\n\n\\begin_layout Section\nDinothawr\n\\end_layout\n\n\\begin_layout Standard\nDinothawr is an indie game made by one of RetroArch's lead authors.\n It is a simple block puzzler that is similar in gameplay to Sokoban and\n Kickle Kubicle.\n It is the first game that is designed from the ground up as a core for\n RetroArch.\n The standalone version of this game has a cutdown version of RetroArch\n included as an integral part of the app.\n\\end_layout\n\n\\begin_layout Subsection\nHow to run\n\\end_layout\n\n\\begin_layout Enumerate\nGo to this website -\n\\begin_inset Flex URL\nstatus open\n\n\\begin_layout Plain Layout\n\nhttps://github.com/libretro/Dinothawr\n\\end_layout\n\n\\end_inset\n\n and select 'Download to ZIP'.\n\\end_layout\n\n\\begin_layout Enumerate\nExtract the ZIP file on your device.\n\\end_layout\n\n\\begin_layout Enumerate\nStart up RetroArch.\n Select 'Load Content' (either 'Load Content (Detect Core)' or plain 'Load\n Content' will do).\n\\end_layout\n\n\\begin_layout Enumerate\nGo to the directory where you extracted the contents of the ZIP file to\n (see step 2).\n\\end_layout\n\n\\begin_layout Enumerate\nSelect 'dinothawr.game'.\n The game should now start up.\n\\end_layout\n\n\\begin_layout Subsection\nControls\n\\end_layout\n\n\\begin_layout Subsubsection\nRetroPad default mapping\n\\end_layout\n\n\\begin_layout Standard\nThese are the default button mappings on the RetroPad.\n\\end_layout\n\n\\begin_layout Standard\n\\begin_inset ERT\nstatus open\n\n\\begin_layout Plain Layout\n\n\n\\backslash\ntextbf{B BUTTON}\n\\end_layout\n\n\\end_inset\n\n - Push block\n\\end_layout\n\n\\begin_layout Standard\n\\begin_inset ERT\nstatus open\n\n\\begin_layout Plain Layout\n\n\n\\backslash\ntextbf{A BUTTON}\n\\end_layout\n\n\\end_inset\n\n - Go back to previous menu\n\\end_layout\n\n\\begin_layout Standard\n\\begin_inset ERT\nstatus open\n\n\\begin_layout Plain Layout\n\n\n\\backslash\ntextbf{D-PAD}\n\\end_layout\n\n\\end_inset\n\n - Movement\n\\end_layout\n\n\\begin_layout Standard\n\\begin_inset ERT\nstatus open\n\n\\begin_layout Plain Layout\n\n\n\\backslash\nnewpage\n\\end_layout\n\n\\end_inset\n\n\n\\end_layout\n\n\\begin_layout Section\nMAME 2003\n\\end_layout\n\n\\begin_layout Standard\nThis is a multi-system arcade emulator based on a late 2003 version of MAME\n (to be specific, it's version 0.78).\n This old ancient version has been picked because MAME has gotten drastically\n slower over the years, and a version dating back to 2003 would still be\n fast enough for running most games on previous-generation videogame consoles\n and mobile.\n\\end_layout\n\n\\begin_layout Subsection\nLibretro port-specific additions\n\\end_layout\n\n\\begin_layout Subsubsection\nMidway DCS speed hacks re-addition\n\\end_layout\n\n\\begin_layout Standard\nAfter version 0.72, MAMEdev removed various speedhacks for games using Midway\n DCS which led to these games being rendered more or less unplayable on\n current-day hardware (by 2003 standards) back then.\n These speedhacks have been re-integrated into the MAME 0.78 codebase, and\n they are of great benefit to the runtime performance of games like Mortal\n Kombat 1/2/3/Ultimate, NBA Jam and other Midway games using this hardware.\n\\end_layout\n\n\\begin_layout Subsection\nNotes\n\\end_layout\n\n\\begin_layout Itemize\nYou can bring up MAME's OSD GUI by pressing the R2 button on the RetroPad.\n\\end_layout\n\n\\begin_layout Itemize\nMAME 2014 supports the RetroKeyboard as an input device as well.\n\\end_layout\n\n\\begin_layout Standard\n\\begin_inset ERT\nstatus open\n\n\\begin_layout Plain Layout\n\n\n\\backslash\nnewpage\n\\end_layout\n\n\\end_inset\n\n\n\\end_layout\n\n\\begin_layout Section\nMAME 2010\n\\end_layout\n\n\\begin_layout Standard\nThis is a multi-system arcade emulator based on a late 2010 version of MAME\n (to be specific, it's version 0.139).\n This makes it competitive with MAME4Droid Reloaded which also targets this\n codebase.\n This halfway house between MAME 2003 and MAME 2014 is mainly intended for\n more powerful mobile platforms that were released during 2012 to 2013.\n While far slower than MAME 2003, it is still measurably faster than MAME\n 2014.\n\\end_layout\n\n\\begin_layout Standard\nCompared to MAME 2003, MAME 2010 has a lot more content available.\n For instance, Namco System 11/12 games can be played with full sound, Capcom\n CPS3 support was added, Killer Instinct 1/2 are fully playable, Dynamic\n recompilation support for 64bit got added, and more.\n\\end_layout\n\n\\begin_layout Subsection\nLibretro port-specific additions\n\\end_layout\n\n\\begin_layout Subsubsection\nCave SH3 re-addition\n\\end_layout\n\n\\begin_layout Standard\nThe Cave SH3 drivers were removed at a specific point in time due to a legal\n dispute between Cave and MAMEdev.\n This driver has been readded to MAME 2010.\n\\end_layout\n\n\\begin_layout Subsection\nNotes\n\\end_layout\n\n\\begin_layout Itemize\nYou can bring up MAME's OSD GUI by pressing the R2 button on the RetroPad.\n\\end_layout\n\n\\begin_layout Itemize\nMAME 2014 supports the RetroKeyboard as an input device as well.\n\\end_layout\n\n\\begin_layout Standard\n\\begin_inset ERT\nstatus open\n\n\\begin_layout Plain Layout\n\n\n\\backslash\nnewpage\n\\end_layout\n\n\\end_inset\n\n\n\\end_layout\n\n\\begin_layout Section\nMAME 2014\n\\end_layout\n\n\\begin_layout Standard\nThis is a multi-system arcade emulator based on the latest version of MAME\n (as of this moment, 0.151).\n Far slower than MAME 2003 and measurably slower than MAME 2010, it makes\n up for this with increased game compatibility and feature completeness.\n\\end_layout\n\n\\begin_layout Subsection\nLibretro port-specific additions\n\\end_layout\n\n\\begin_layout Subsubsection\nCave SH3 re-addition\n\\end_layout\n\n\\begin_layout Standard\nThe Cave SH3 drivers were removed at a specific point in time due to a legal\n dispute between Cave and MAMEdev.\n This driver has been readded to MAME 2014.\n It will probably be readded soon to MAME mainline as well.\n\\end_layout\n\n\\begin_layout Subsection\nNotes\n\\end_layout\n\n\\begin_layout Itemize\nYou can bring up MAME's OSD GUI by pressing the R2 button on the RetroPad.\n\\end_layout\n\n\\begin_layout Itemize\nMAME 2014 supports the RetroKeyboard as an input device as well.\n\\end_layout\n\n\\begin_layout Standard\n\\begin_inset ERT\nstatus open\n\n\\begin_layout Plain Layout\n\n\n\\backslash\nnewpage\n\\end_layout\n\n\\end_inset\n\n\n\\end_layout\n\n\\begin_layout Section\nMupen64 Plus\n\\end_layout\n\n\\begin_layout Standard\nThis is a Nintendo 64 emulator based on the open-source emulator Mupen64\n Plus.\n It is a current work-in-progress that aims primarily at the PC and mobile\n platforms, such as Android, iOS, Blackberry, and others.\n It ships with three graphics plugins - of which Glide64 has been worked\n on the most and is the most accurate, but also the slowest.\n Development on the other two plugins will take more work.\n\\end_layout\n\n\\begin_layout Subsection\nHow to run\n\\end_layout\n\n\\begin_layout Standard\nMupen64 Plus does not work on its own, but runs N64 ROM images.\n These image files need to have one of the following extensions:\n\\end_layout\n\n\\begin_layout Itemize\nn64\n\\end_layout\n\n\\begin_layout Itemize\nv64\n\\end_layout\n\n\\begin_layout Itemize\nz64\n\\end_layout\n\n\\begin_layout Standard\nSelect one of these.\n If the image is verified to be OK, it will start up the game.\n\\end_layout\n\n\\begin_layout Subsection\nControls\n\\end_layout\n\n\\begin_layout Subsubsection\nRetroPad default mapping\n\\end_layout\n\n\\begin_layout Standard\nThese are the default button mappings on the RetroPad.\n It is assumed that your RetroPad has two analog sticks so that the N64's\n analog stick and the C buttons can be mapped to them.\n\\end_layout\n\n\\begin_layout Standard\n\\begin_inset ERT\nstatus open\n\n\\begin_layout Plain Layout\n\n\n\\backslash\ntextbf{B BUTTON}\n\\end_layout\n\n\\end_inset\n\n - (Normal press) N64 B button / (Press and hold with R2) C Button Down\n\\end_layout\n\n\\begin_layout Standard\n\\begin_inset ERT\nstatus open\n\n\\begin_layout Plain Layout\n\n\n\\backslash\ntextbf{A BUTTON}\n\\end_layout\n\n\\end_inset\n\n - (Normal press) N64 A button / (Press and hold with R2) C Button Right\n\\end_layout\n\n\\begin_layout Standard\n\\begin_inset ERT\nstatus open\n\n\\begin_layout Plain Layout\n\n\n\\backslash\ntextbf{Y BUTTON}\n\\end_layout\n\n\\end_inset\n\n - (Press and hold with R2) C Button Left\n\\end_layout\n\n\\begin_layout Standard\n\\begin_inset ERT\nstatus open\n\n\\begin_layout Plain Layout\n\n\n\\backslash\ntextbf{X BUTTON}\n\\end_layout\n\n\\end_inset\n\n - (Press and hold with R2) C Button Up\n\\end_layout\n\n\\begin_layout Standard\n\\begin_inset ERT\nstatus open\n\n\\begin_layout Plain Layout\n\n\n\\backslash\ntextbf{L BUTTON}\n\\end_layout\n\n\\end_inset\n\n - N64 L Trigger\n\\end_layout\n\n\\begin_layout Standard\n\\begin_inset ERT\nstatus open\n\n\\begin_layout Plain Layout\n\n\n\\backslash\ntextbf{R BUTTON}\n\\end_layout\n\n\\end_inset\n\n - N64 R Trigger\n\\end_layout\n\n\\begin_layout Standard\n\\begin_inset ERT\nstatus open\n\n\\begin_layout Plain Layout\n\n\n\\backslash\ntextbf{L2 BUTTON}\n\\end_layout\n\n\\end_inset\n\n - N64 Z Trigger\n\\end_layout\n\n\\begin_layout Standard\n\\begin_inset ERT\nstatus open\n\n\\begin_layout Plain Layout\n\n\n\\backslash\ntextbf{R2 BUTTON}\n\\end_layout\n\n\\end_inset\n\n - (Modifier button) - press and hold this plus one of the face buttons\n to do C button presses\n\\end_layout\n\n\\begin_layout Standard\n\\begin_inset ERT\nstatus open\n\n\\begin_layout Plain Layout\n\n\n\\backslash\ntextbf{D-PAD}\n\\end_layout\n\n\\end_inset\n\n - N64 D-Pad\n\\end_layout\n\n\\begin_layout Standard\n\\begin_inset ERT\nstatus open\n\n\\begin_layout Plain Layout\n\n\n\\backslash\ntextbf{SELECT}\n\\end_layout\n\n\\end_inset\n\n - Toggle between per-game control layouts\n\\end_layout\n\n\\begin_layout Standard\n\\begin_inset ERT\nstatus open\n\n\\begin_layout Plain Layout\n\n\n\\backslash\ntextbf{START}\n\\end_layout\n\n\\end_inset\n\n - N64 Start button\n\\end_layout\n\n\\begin_layout Standard\n\\begin_inset ERT\nstatus open\n\n\\begin_layout Plain Layout\n\n\n\\backslash\ntextbf{LEFT STICK}\n\\end_layout\n\n\\end_inset\n\n - N64 Analog stick\n\\end_layout\n\n\\begin_layout Standard\n\\begin_inset ERT\nstatus open\n\n\\begin_layout Plain Layout\n\n\n\\backslash\ntextbf{RIGHT STICK}\n\\end_layout\n\n\\end_inset\n\n - N64 C buttons mapped to stick like the Gamecube's C Stick\n\\end_layout\n\n\\begin_layout Subsection\nLibretro port-specific additions\n\\end_layout\n\n\\begin_layout Subsubsection\nPlug-and-play configuration of games\n\\end_layout\n\n\\begin_layout Standard\nN64 emulators are traditionally dependent on numerous config/database files\n that the user has to manually update from time to time.\n These database files contain core-specific settings needed to play the\n game correctly (or at all).\n This varies from Save Type to which Glide 64 settings should be enabled\n to get the game to look correctly.\n\\end_layout\n\n\\begin_layout Standard\nThis libretro port tries to automate as much of that stuff as possible and\n integrate it into the core.\n No longer will you need to have a Mupen64plus.ini and an RDB database from\n which all this information will get pulled.\n\\end_layout\n\n\\begin_layout Standard\nThe Glide64 config file which was previously a necessity has also been totally\n integrated into the core - to the extent that even the microcode mappings\n for each game are included.\n So that config file is not needed any longer either.\n\\end_layout\n\n\\begin_layout Standard\nBaking in the config files for glN64 and Rice will take some more time.\n These have not been included as of yet.\n\\end_layout\n\n\\begin_layout Subsubsection\n60fps framerates in nearly all games with specific core settings\n\\end_layout\n\n\\begin_layout Standard\nThere have been other N64 emulator forks that have advertised being able\n to run games like GoldenEye 007 at 60fps.\n Our approach is most like Project64's in which VI Rate gets increased from\n the default (1500) to 2200.\n\\end_layout\n\n\\begin_layout Standard\nSome games are framerate throttled so they can't ever reach 60fps - however,\n even these games will benefit from setting VI Refresh to 2200 and Framerate\n to 'fullspeed'.\n You will notice that a lot of input latency and slowdown will be removed\n under these settings.\n\\end_layout\n\n\\begin_layout Subsubsection\nTargets OpenGL - both desktop and GLES\n\\end_layout\n\n\\begin_layout Standard\nWe are using the GLES2 branches of Glide64, Rice and glN64.\n The libretro port of Mupen64plus targets OpenGL instead of spreading itself\n thin between Direct3D and OpenGL.\n We try to make sure that the code works for both desktop GL and GLES at\n the same time.\n\\end_layout\n\n\\begin_layout Standard\nWe have also made a lot of optimizations/changes to these rasterizer codebases\n so that they perform better on our target platforms.\n We are not anyway near done with that though.\n\\end_layout\n\n\\begin_layout Subsubsection\nAccuracy settings\n\\end_layout\n\n\\begin_layout Standard\nTurning on all the knobs in a demanding graphics plugin like Glide64 can\n lead to almost glitchless graphics, but it comes at a heavy performance\n cost.\n For this reason, 'accuracy' settings per graphics plugins are introduced\n as core options.\n If you care more about double the framerate instead of the current framebuffer\n image being displayed on a wall billboard in Mario Kart 64, then you can\n set the Accuracy slider to a less high setting, and vice versa.\n\\end_layout\n\n\\begin_layout Subsubsection\nIncorporates low-level RSP next to High-Level RSP - cxd4\n\\end_layout\n\n\\begin_layout Standard\nCertain games will have certain sound effects missing with the default high-leve\nl RSP plugin, such as GoldenEye 007.\n Others will simply sound wrong, such as PilotWings 64.\n The low-level RSP accurately emulates these effects at a signficant performance\n cost.\n\\end_layout\n\n\\begin_layout Standard\nThe plugin also handles certain graphics functions that the high-level RSP\n is missing.\n For instance, Resident Evil 2 requires that you use the low-level RSP plugin\n in order for all the FMV movies and backgrounds to work.\n\\end_layout\n\n\\begin_layout Subsubsection\nPreconfigured 'sane' controls for various targeted games\n\\end_layout\n\n\\begin_layout Standard\nThe N64 controller was not always the best pad for certain games, and having\n to map them to the RetroPad clearly makes that very apparent.\n We have remapped the controls in various games so that you can get a more\n pleasant gameplay experience.\n If you don't like this 'sanitized' control scheme, you can switch on-the-fly\n between it and the default control scheme by pressing Select (a button\n which was absent on the N64 pad - which is convenient for us since it gives\n us an extra button on our RetroPad to do 'stuff' with).\n\\end_layout\n\n\\begin_layout Standard\nA couple of examples - Killer Instinct Gold is now mapped like the SNES\n Killer Instinct, Wipeout 64 is mapped like the PS1 Wipeout 2097, Mortal\n Kombat Trilogy is mapped like Mortal Kombat on the SNES and PS1, Resident\n Evil 2 is mapped like the PS1 version, and so on.\n Since the RetroPad is a replica of the Dual Shock, remapping controls this\n way just makes a lot more sense.\n And if you don't want it, you can disable it anyway and/or remap to your\n heart's content.\n\\begin_inset ERT\nstatus open\n\n\\begin_layout Plain Layout\n\n\n\\backslash\nnewpage\n\\end_layout\n\n\\end_inset\n\n\n\\end_layout\n\n\\begin_layout Subsection\nKnown resolvable issues\n\\end_layout\n\n\\begin_layout Subsubsection\nConker BFD and Perfect Dark crash with the low-level RSP plugin\n\\end_layout\n\n\\begin_layout Standard\nDon't use the low-level RSP plugin with these games.\n Instead, use the high-level RSP plugin.\n\\end_layout\n\n\\begin_layout Subsubsection\nResident Evil 2 doesn't work correctly with the high-level RSP plugin\n\\end_layout\n\n\\begin_layout Standard\nYou need to use the low-level RSP plugin for this game to work correctly.\n\\end_layout\n\n\\begin_layout Subsubsection\nI can't use the Rice plugin\n\\end_layout\n\n\\begin_layout Standard\nMake sure that a config file called RiceVideoLinux.ini has been placed in\n your 'system' directory.\n The libretro Mupen64plus core still depends on this file being there in\n order to execute the Rice plugin.\n\\end_layout\n\n\\begin_layout Subsection\nKnown issues\n\\end_layout\n\n\\begin_layout Standard\nConsider the Mupen64 core right now at an advanced alpha state.\n Lots of issues are known about and will be looked at.\n The most prominent ones we are aware of are listed below.\n\\end_layout\n\n\\begin_layout Subsubsection\niOS dynamic recompiler bugs\n\\end_layout\n\n\\begin_layout Standard\nRight now the dynamic recompiler for iOS is not at parity with Android.\n This means that certain games might either crash or freeze at certain points\n due to bugs still lurking in the code.\n One example of this is GoldenEye 007 crashing at startup.\n We are working hard on resolving these remaining issues so that the iOS\n port is at least equal to the Android port.\n\\end_layout\n\n\\begin_layout Subsubsection\nWobbling textures with Glide64 in certain games\n\\end_layout\n\n\\begin_layout Standard\nGround texture wobbling seems to occur in games like Super Mario 64, Star\n Fox 64, F-Zero X and other games depending on how close the camera is to\n the ground.\n This seems to be an issue with Glide64 in general.\n We will try to investigate this issue.\n\\end_layout\n\n\\begin_layout Subsubsection\nGoldenEye 007 - Glide64 - frigate level - water surface disappearing vertices\n\\end_layout\n\n\\begin_layout Standard\nYou will be able to notice significant polygon breakup when first entering\n this stage on the boat.\n Vertices of the water surface appear black depending on the proximity of\n the camera to the surface.\n This, like 3.3.2, seems to be also an issue with Glide64 that we will have\n to investigate.\n\\end_layout\n\n\\begin_layout Subsubsection\nBroken framebuffer effects in glN64\n\\end_layout\n\n\\begin_layout Standard\nThis is a known issue and it will probably be trivial to hook this up.\n\\end_layout\n\n\\begin_layout Subsubsection\nOther glN64/Rice issues\n\\end_layout\n\n\\begin_layout Standard\nMost of the hard work has gone into Glide64 at this point so the glN64/Rice\n side has not been actively worked on - though we intend to do so eventually.\n\\end_layout\n\n\\begin_layout Subsubsection\nTsumi to Batsu (Sin and Punishment) crashes either at startup or at exit\n\\end_layout\n\n\\begin_layout Standard\nKnown issue and currently no fix for it.\n Will have to be debugged.\n\\end_layout\n\n\\begin_layout Subsubsection\nStar Wars: Shadows of the Empire sometimes boots, sometimes crashes\n\\end_layout\n\n\\begin_layout Standard\nThis is a known issue, and there is currently no fix for it.\n\\end_layout\n\n\\begin_layout Subsubsection\nPokemon Puzzle League doesn't work\n\\end_layout\n\n\\begin_layout Standard\nThis is a known issueand there is currently no fix for it.\n\\end_layout\n\n\\begin_layout Subsubsection\nBlast Corps - Crashes after Rare logo with dynarec on ARM devices\n\\end_layout\n\n\\begin_layout Standard\nThis is a known issue.\n The very same issue happens with Mupen64 Plus AE too.\n Currently, the only way to play this game on an ARM device would be to\n switch the CPU core to 'Cached interpreter'.\n This will however make the game run way too slow (possible exception being\n Apple A7 CPUs and competing hardware).\n\\end_layout\n\n\\begin_layout Subsubsection\nPerfect Dark is very slow in scenes with framebuffer effects or motion blur\n\\end_layout\n\n\\begin_layout Standard\nThis is a known issue.\n The issue is that the only way to accelerate these scenes would be to use\n Hardware Framebuffer Emulation, and that has drawbacks of its own such\n as vertices with black textures after certain scenes have ran (such as\n the Spycam).\n For now there is no good fix for this other than doing it all on the CPU,\n which is CPU-intensive and slow.\n\\end_layout\n\n\\begin_layout Subsubsection\nConker's BFD - Conker has no shadow\n\\end_layout\n\n\\begin_layout Standard\nThis is a known issue.\n Shadows depend on a depth texture being rendered, and the only way to render\n these is to use Hardware Framebuffer Emulation.\n While we can enable this mode, it has severe drawbacks in other areas right\n now that precludes its use.\n Therefore, currently the shadow is stubbed out.\n\\end_layout\n\n\\begin_layout Subsubsection\nPilotWings 64 - There is a very annoying long black vertice obscuring a\n great part of the screen\n\\end_layout\n\n\\begin_layout Standard\nThis is a known issue, and it seems to happen with glN64 too and mainline\n Mupen64 in general.\n What is supposed to happen there is that a shadow on the ground should\n be in place of these broken vertice spans.\n A fix is not yet known.\n There is a 'duct-tape hack' core setting that makes this 'glitch' somewhat\n more bearable - it makes the culled vertice appear translucent instead\n of solid - which means you can watch through it.\n\\end_layout\n\n\\begin_layout Subsubsection\nLegend of Zelda: Majora's Mask - subscreen framebuffer image takes about\n five seconds to appear\n\\end_layout\n\n\\begin_layout Standard\nThis is a known issue, and a fix is not yet known.\n\\end_layout\n\n\\begin_layout Standard\n\\begin_inset ERT\nstatus open\n\n\\begin_layout Plain Layout\n\n\n\\backslash\nnewpage\n\\end_layout\n\n\\end_inset\n\n\n\\end_layout\n\n\\begin_layout Section\nNX Engine\n\\end_layout\n\n\\begin_layout Standard\nThis is a game engine capable of running the game\n\\begin_inset ERT\nstatus open\n\n\\begin_layout Plain Layout\n\n\n\\backslash\ntextbf{Cave Story}\n\\end_layout\n\n\\end_inset\n\n (Japanese title:\n\\begin_inset ERT\nstatus open\n\n\\begin_layout Plain Layout\n\n\n\\backslash\ntextbf{Doukutsu Monogatari}\n\\end_layout\n\n\\end_inset\n\n).\n It is based on an open-source game engine recreation called NX Engine.\n An extensive code rewrite has been done for the purposes of increased portabili\nty and performance.\n\\end_layout\n\n\\begin_layout Subsection\nHow to run\n\\end_layout\n\n\\begin_layout Standard\nIn order to run the game, you need to have the original datafiles from the\n original freeware PC version.\n\\end_layout\n\n\\begin_layout Enumerate\nGo to this website -\n\\begin_inset Flex URL\nstatus open\n\n\\begin_layout Plain Layout\n\nhttps://github.com/libretro/nxengine-libretro\n\\end_layout\n\n\\end_inset\n\n and select 'Download to ZIP'.\n\\end_layout\n\n\\begin_layout Enumerate\nExtract the ZIP file on your device.\n\\end_layout\n\n\\begin_layout Enumerate\nStart up RetroArch.\n Select 'Load Content' (either 'Load Content (Detect Core)' or plain 'Load\n Content' will do).\n\\end_layout\n\n\\begin_layout Enumerate\nGo to the directory where you extracted the contents of the ZIP file to\n (see step 2).\n Select the directory 'datafiles'.\n\\end_layout\n\n\\begin_layout Enumerate\nSelect 'Doukutsu.exe'.\n The game should now start up.\n\\end_layout\n\n\\begin_layout Subsection\nControls\n\\end_layout\n\n\\begin_layout Subsubsection\nRetroPad default mapping\n\\end_layout\n\n\\begin_layout Standard\nThese are the default button mappings on the RetroPad.\n\\end_layout\n\n\\begin_layout Standard\n\\begin_inset ERT\nstatus open\n\n\\begin_layout Plain Layout\n\n\n\\backslash\ntextbf{B BUTTON}\n\\end_layout\n\n\\end_inset\n\n - Jump\n\\end_layout\n\n\\begin_layout Standard\n\\begin_inset ERT\nstatus open\n\n\\begin_layout Plain Layout\n\n\n\\backslash\ntextbf{Y BUTTON}\n\\end_layout\n\n\\end_inset\n\n - Shoot\n\\end_layout\n\n\\begin_layout Standard\n\\begin_inset ERT\nstatus open\n\n\\begin_layout Plain Layout\n\n\n\\backslash\ntextbf{X BUTTON}\n\\end_layout\n\n\\end_inset\n\n - Map screen\n\\end_layout\n\n\\begin_layout Standard\n\\begin_inset ERT\nstatus open\n\n\\begin_layout Plain Layout\n\n\n\\backslash\ntextbf{L BUTTON}\n\\end_layout\n\n\\end_inset\n\n - Weapon cycle left\n\\end_layout\n\n\\begin_layout Standard\n\\begin_inset ERT\nstatus open\n\n\\begin_layout Plain Layout\n\n\n\\backslash\ntextbf{R BUTTON}\n\\end_layout\n\n\\end_inset\n\n - Weapon cycle right\n\\end_layout\n\n\\begin_layout Standard\n\\begin_inset ERT\nstatus open\n\n\\begin_layout Plain Layout\n\n\n\\backslash\ntextbf{D-PAD}\n\\end_layout\n\n\\end_inset\n\n - Movement\n\\end_layout\n\n\\begin_layout Standard\n\\begin_inset ERT\nstatus open\n\n\\begin_layout Plain Layout\n\n\n\\backslash\ntextbf{SELECT}\n\\end_layout\n\n\\end_inset\n\n - Options screen\n\\end_layout\n\n\\begin_layout Standard\n\\begin_inset ERT\nstatus open\n\n\\begin_layout Plain Layout\n\n\n\\backslash\ntextbf{START}\n\\end_layout\n\n\\end_inset\n\n - Inventory screen\n\\end_layout\n\n\\begin_layout Subsection\nLibretro port-specific additions\n\\end_layout\n\n\\begin_layout Subsubsection\nCaches all assets - avoids disk I/O overhead\n\\end_layout\n\n\\begin_layout Standard\nThe original NXEngine source was quite inefficiently written and had very\n high disk I/O overhead.\n This all but killed performance on the game consoles where disk I/O is\n very slow.\n What happens instead now is that instead of dumping all content from the\n main binary to disk, it caches it in memory so that there is zero overhead\n from accessing assets.\n This way, NXEngine is playable at fullspeed on any system without any disk\n I/O spikes - including consoles.\n\\end_layout\n\n\\begin_layout Subsubsection\nAbility to switch between 50fps (default) and 60fps\n\\end_layout\n\n\\begin_layout Standard\nThe original game ran at 50 frames per second.\n For the libretro port, we have made an optional toggle so you can switch\n the game to 60 frames per second.\n You can do this by pressing the Select button to go to the Options screen,\n and changing 'FPS' from 50 to 60, and vice versa.\n\\end_layout\n\n\\begin_layout Section\nPCSX ReARMed\n\\end_layout\n\n\\begin_layout Standard\nThis is a Sony PlayStation 1 emulator based on the open-source emulator\n PCSX Reloaded.\n It has been specifically optimized for mobile platforms, such as Android,\n iOS and Pandora.\n It also has a software-rendered graphics renderer, called NEON GPU plugin,\n that is more accurate than most PlayStation 1 emulators.\n\\end_layout\n\n\\begin_layout Subsection\nHow to run\n\\end_layout\n\n\\begin_layout Standard\nPCSX ReARMed does not work on its own, but runs PlayStation1 CD images.\n These image files need to have one of the following extensions:\n\\end_layout\n\n\\begin_layout Itemize\nbin\n\\end_layout\n\n\\begin_layout Itemize\ncue\n\\end_layout\n\n\\begin_layout Itemize\nimg\n\\end_layout\n\n\\begin_layout Itemize\nmdf\n\\end_layout\n\n\\begin_layout Itemize\npbp\n\\end_layout\n\n\\begin_layout Itemize\ntoc\n\\end_layout\n\n\\begin_layout Itemize\ncbn\n\\end_layout\n\n\\begin_layout Itemize\nm3u\n\\end_layout\n\n\\begin_layout Standard\nSelect one of these.\n If the image is verified to be OK,it will start up the game.\n\\end_layout\n\n\\begin_layout Subsection\nControls\n\\end_layout\n\n\\begin_layout Subsubsection\nRetroPad default mapping\n\\end_layout\n\n\\begin_layout Standard\nThese are the default button mappings on the RetroPad.\n\\end_layout\n\n\\begin_layout Standard\n\\begin_inset ERT\nstatus open\n\n\\begin_layout Plain Layout\n\n\n\\backslash\ntextbf{B BUTTON}\n\\end_layout\n\n\\end_inset\n\n - PS1 X button\n\\end_layout\n\n\\begin_layout Standard\n\\begin_inset ERT\nstatus open\n\n\\begin_layout Plain Layout\n\n\n\\backslash\ntextbf{A BUTTON}\n\\end_layout\n\n\\end_inset\n\n - PS1 Circle button\n\\end_layout\n\n\\begin_layout Standard\n\\begin_inset ERT\nstatus open\n\n\\begin_layout Plain Layout\n\n\n\\backslash\ntextbf{Y BUTTON}\n\\end_layout\n\n\\end_inset\n\n - PS1 Square button\n\\end_layout\n\n\\begin_layout Standard\n\\begin_inset ERT\nstatus open\n\n\\begin_layout Plain Layout\n\n\n\\backslash\ntextbf{X BUTTON}\n\\end_layout\n\n\\end_inset\n\n - PS1 Triangle button\n\\end_layout\n\n\\begin_layout Standard\n\\begin_inset ERT\nstatus open\n\n\\begin_layout Plain Layout\n\n\n\\backslash\ntextbf{L BUTTON}\n\\end_layout\n\n\\end_inset\n\n - PS1 L1 Button\n\\end_layout\n\n\\begin_layout Standard\n\\begin_inset ERT\nstatus open\n\n\\begin_layout Plain Layout\n\n\n\\backslash\ntextbf{R BUTTON}\n\\end_layout\n\n\\end_inset\n\n - PS1 R1 Button\n\\end_layout\n\n\\begin_layout Standard\n\\begin_inset ERT\nstatus open\n\n\\begin_layout Plain Layout\n\n\n\\backslash\ntextbf{L2 BUTTON}\n\\end_layout\n\n\\end_inset\n\n - PS1 L2 Button\n\\end_layout\n\n\\begin_layout Standard\n\\begin_inset ERT\nstatus open\n\n\\begin_layout Plain Layout\n\n\n\\backslash\ntextbf{R2 BUTTON}\n\\end_layout\n\n\\end_inset\n\n - PS1 R2 Button\n\\end_layout\n\n\\begin_layout Standard\n\\begin_inset ERT\nstatus open\n\n\\begin_layout Plain Layout\n\n\n\\backslash\ntextbf{D-PAD}\n\\end_layout\n\n\\end_inset\n\n - PS1 D-Pad\n\\end_layout\n\n\\begin_layout Standard\n\\begin_inset ERT\nstatus open\n\n\\begin_layout Plain Layout\n\n\n\\backslash\ntextbf{SELECT}\n\\end_layout\n\n\\end_inset\n\n - PS1 Select button\n\\end_layout\n\n\\begin_layout Standard\n\\begin_inset ERT\nstatus open\n\n\\begin_layout Plain Layout\n\n\n\\backslash\ntextbf{START}\n\\end_layout\n\n\\end_inset\n\n - PS1 Start button\n\\end_layout\n\n\\begin_layout Subsubsection\nRetroPad DualShock controls\n\\end_layout\n\n\\begin_layout Standard\nTo enable this mode, you need to go to Core Options and set 'Pad 1 Type'\n to 'analog'.\n Your RetroPad is assumed to have two analog sticks to be able to use this\n mode.\n Note that not all games might work in DualShock mode, and vice versa -\n so switch between them if the controls don't work.\n\\end_layout\n\n\\begin_layout Standard\n\\begin_inset ERT\nstatus open\n\n\\begin_layout Plain Layout\n\n\n\\backslash\ntextbf{LEFT STICK}\n\\end_layout\n\n\\end_inset\n\n - PS1 Left Analog Stick\n\\end_layout\n\n\\begin_layout Standard\n\\begin_inset ERT\nstatus open\n\n\\begin_layout Plain Layout\n\n\n\\backslash\ntextbf{RIGHT STICK}\n\\end_layout\n\n\\end_inset\n\n - PS1 Right Analog Stick\n\\end_layout\n\n\\begin_layout Standard\n\\begin_inset ERT\nstatus open\n\n\\begin_layout Plain Layout\n\n\n\\backslash\ntextbf{L3}\n\\end_layout\n\n\\end_inset\n\n - PS1 L3 Button\n\\end_layout\n\n\\begin_layout Standard\n\\begin_inset ERT\nstatus open\n\n\\begin_layout Plain Layout\n\n\n\\backslash\ntextbf{R3}\n\\end_layout\n\n\\end_inset\n\n - PS1 R3 Button\n\\end_layout\n\n\\begin_layout Subsection\nSetting up BIOS files\n\\end_layout\n\n\\begin_layout Standard\nThe compatibility of PCSX ReARMed is increased a lot by using real BIOS\n firmware images.\n\n\\end_layout\n\n\\begin_layout Standard\nPCSX ReARMed looks for the following BIOS files:\n\\end_layout\n\n\\begin_layout Itemize\nscph1001.bin\n\\end_layout\n\n\\begin_layout Itemize\nscph5501.bin\n\\end_layout\n\n\\begin_layout Itemize\nscph7001.bin\n\\end_layout\n\n\\begin_layout Standard\nThese files should be placed inside your System directory.\n If your system directory path does not point to anything, it will try to\n load the BIOS files from the same directory as the CD image.\n\\end_layout\n\n\\begin_layout Subsection\nCore options\n\\end_layout\n\n\\begin_layout Subsubsection\nIncreasing graphics resolution\n\\end_layout\n\n\\begin_layout Standard\nYou can increase the internal graphics resolution by enabling the core option\n 'Enable NEON enhanced resolution (slow)' This will force the core to render\n at a resolution of 1024x512\n\\begin_inset Foot\nstatus collapsed\n\n\\begin_layout Plain Layout\nThis mode is deactivated on games that have high-resolution interlaced graphics\n modes, such as Tekken 3 and Tobal 2.\n Setting this option to 'ON' or 'OFF' will make no change.\n\\end_layout\n\n\\end_inset\n\n.\n This will significantly increase the quality of the graphics, but it will\n also impact performance.\n Only enable this option if you are on a fast platform with enough CPU power\n - otherwise you're best off leaving this core option 'off'.\n\\end_layout\n\n\\begin_layout Subsubsection\nDisabling interlacing for better performance with interlaced games\n\\end_layout\n\n\\begin_layout Standard\nHigh-resolution interlaced games such as Tekken 3 and Tobal 2 would typically\n be displayed in interlaced mode on a real PlayStation.\n The emulator typically renders these games with interlacing turned off.\n This however will have an impact on performance.\n If you find that your platform for whatever reason is falling below fullspeed,\n it can help to set the core option 'Interlacing' to 'ON'.\n\\end_layout\n\n\\begin_layout Subsubsection\nDisabling dynarec for platforms that don't support JIT compilation (Windows\n Phone/RT, non-jailbroken iOS)\n\\end_layout\n\n\\begin_layout Standard\nNormally, PCSX ReARMed starts up with the dynarec CPU core being automatically\n activated.\n\\end_layout\n\n\\begin_layout Standard\nThere are some platforms that don't allow for JIT compilation inside an\n app (which is what the dynarec CPU core relies upon).\n These include:\n\\end_layout\n\n\\begin_layout Itemize\nNon-jailbroken iOS\n\\end_layout\n\n\\begin_layout Itemize\nWindows RT\n\\end_layout\n\n\\begin_layout Itemize\nWindows Phone\n\\end_layout\n\n\\begin_layout Standard\nYou will need to disable the core option 'Dynarec' if you want to be able\n to run this core on such a device.\n Be aware that disabling the dynarec is very CPU-intensive and might result\n in PCSX ReARMed not being able to run fullspeed on yur device.\n Disable dynarec therefore only if you absolutely must.\n\\end_layout\n\n\\begin_layout Subsection\nKnown outstanding issues\n\\end_layout\n\n\\begin_layout Subsubsection\nGarbled sound samples at times\n\\end_layout\n\n\\begin_layout Standard\nSound emulation is not perfect.\n At some point we intend to backport the latest sound driver from PCSX Reloaded\n and offer a way to toggle between the original driver and the latest PCSXR\n one.\n The original PCSX ReARMed version was geared around the Pandora, which\n is limited by a 1Ghz Cortex A8 CPU - concessions had to be made.\n Today's mobile devices are far more powerful than this and should be capable\n of much more demanding sound emulation.\n\\end_layout\n\n\\begin_layout Subsubsection\nBroken geometry in Jumping Flash 1/2\n\\end_layout\n\n\\begin_layout Standard\nThis is caused by an inaccurate Geometry Transfer Engine plugin used in\n PCSX ReARMed.\n A core option will probably have to be included at some point that allows\n the user to switch between inaccurate/fast GTE and accurate GTE emulation.\n\\end_layout\n\n\\begin_layout Subsubsection\nRandom game does not work\n\\end_layout\n\n\\begin_layout Standard\nFirst of all, check that you are running with a real BIOS image.\n You can tell if this is the case if PCSX ReARMed does not display a warning\n at startup telling you that it could not find a BIOS file.\n The internal HLE BIOS emulation is very incomplete and might cause many\n games to be buggy.\n\\end_layout\n\n\\begin_layout Standard\n\\begin_inset ERT\nstatus open\n\n\\begin_layout Plain Layout\n\n\n\\backslash\nnewpage\n\\end_layout\n\n\\end_inset\n\n\n\\end_layout\n\n\\begin_layout Section\nTyrQuake\n\\end_layout\n\n\\begin_layout Standard\nThis is a Quake 1 game engine based on the open-source Quake 1 game engine\n TyrQuake.\n Unlike other Quake 1-based game engines, it focuses on accuracy to the\n original DOS game and portability.\n As such, it features no graphical enhancements and the renderer is software-bas\ned.\n\\end_layout\n\n\\begin_layout Subsection\nHow to run\n\\end_layout\n\n\\begin_layout Standard\nTyrQuake does not work on its own, but runs Quake 1 PAK data archives.\n\\end_layout\n\n\\begin_layout Standard\nSelect either pak0.pak or pak1.pak from the shareware version or the registered\n version.\n If the files are OK, it will start up the game.\n\\end_layout\n\n\\begin_layout Subsection\nHow to run mission packs\n\\end_layout\n\n\\begin_layout Standard\nIt is also possible to run mission packs with TyrQuake.\n\\end_layout\n\n\\begin_layout Standard\nPlace the necessary files in subdirs hipnotic/ and rogue/.\n Make sure the original Quake 1 datafiles are in the root directory.\n\\end_layout\n\n\\begin_layout Standard\nStart pak0.pak from the hipnotic/rogue directory.\n Instead of launching the original game, it should now start the mission\n pack.\n\\end_layout\n\n\\begin_layout Subsection\nControls\n\\end_layout\n\n\\begin_layout Subsubsection\nRetroPad default mapping\n\\end_layout\n\n\\begin_layout Standard\nThese are the default button mappings on the RetroPad.\n\\end_layout\n\n\\begin_layout Standard\n\\begin_inset ERT\nstatus open\n\n\\begin_layout Plain Layout\n\n\n\\backslash\ntextbf{Y BUTTON}\n\\end_layout\n\n\\end_inset\n\n - Shoot\n\\end_layout\n\n\\begin_layout Standard\n\\begin_inset ERT\nstatus open\n\n\\begin_layout Plain Layout\n\n\n\\backslash\ntextbf{B BUTTON}\n\\end_layout\n\n\\end_inset\n\n - Jump\n\\end_layout\n\n\\begin_layout Standard\n\\begin_inset ERT\nstatus open\n\n\\begin_layout Plain Layout\n\n\n\\backslash\ntextbf{A BUTTON}\n\\end_layout\n\n\\end_inset\n\n - Weapon cycle\n\\end_layout\n\n\\begin_layout Standard\n\\begin_inset ERT\nstatus open\n\n\\begin_layout Plain Layout\n\n\n\\backslash\ntextbf{X BUTTON}\n\\end_layout\n\n\\end_inset\n\n - (Press and hold) free look\n\\end_layout\n\n\\begin_layout Standard\n\\begin_inset ERT\nstatus open\n\n\\begin_layout Plain Layout\n\n\n\\backslash\ntextbf{L BUTTON}\n\\end_layout\n\n\\end_inset\n\n - Strafe left\n\\end_layout\n\n\\begin_layout Standard\n\\begin_inset ERT\nstatus open\n\n\\begin_layout Plain Layout\n\n\n\\backslash\ntextbf{R BUTTON}\n\\end_layout\n\n\\end_inset\n\n - Strafe right\n\\end_layout\n\n\\begin_layout Standard\n\\begin_inset ERT\nstatus open\n\n\\begin_layout Plain Layout\n\n\n\\backslash\ntextbf{D-PAD}\n\\end_layout\n\n\\end_inset\n\n - Movement\n\\end_layout\n\n\\begin_layout Standard\n\\begin_inset ERT\nstatus open\n\n\\begin_layout Plain Layout\n\n\n\\backslash\ntextbf{START}\n\\end_layout\n\n\\end_inset\n\n - Bring up Options Menu\n\\end_layout\n\n\\begin_layout Subsubsection\nRetroPad Dual analog controls\n\\end_layout\n\n\\begin_layout Standard\nTo enable this mode, you need to go to Core Options and set Gamepad type\n to 'dual-analog'.\n Your RetroPad is assumed to have two analog sticks to be able to use this\n mode.\n\\end_layout\n\n\\begin_layout Standard\n\\begin_inset ERT\nstatus open\n\n\\begin_layout Plain Layout\n\n\n\\backslash\ntextbf{LEFT STICK}\n\\end_layout\n\n\\end_inset\n\n - X minus and positive X strafes left and right, Y minus and positive Y\n moves forward and backwards\n\\end_layout\n\n\\begin_layout Standard\n\\begin_inset ERT\nstatus open\n\n\\begin_layout Plain Layout\n\n\n\\backslash\ntextbf{RIGHT STICK}\n\\end_layout\n\n\\end_inset\n\n - Free look\n\\end_layout\n\n\\begin_layout Standard\n\\begin_inset ERT\nstatus open\n\n\\begin_layout Plain Layout\n\n\n\\backslash\ntextbf{R3}\n\\end_layout\n\n\\end_inset\n\n - Center view\n\\end_layout\n\n\\begin_layout Subsection\nLibretro port-specific additions\n\\end_layout\n\n\\begin_layout Subsubsection\nEnabling/disabling software bilinear interpolation\n\\end_layout\n\n\\begin_layout Standard\nThe original Quake software renderer had no filtering routines to speak\n of for textures.\n Textures would appear pixelated if you came close to them.\n Enabling this (from the Quake settings menu) will apply the kernel filtering\n algorithm from Unreal 1's software renderer on each texture.\n This might look more aesthetically pleasing to people who prefer quasi-3D\n hardware bilinear filtered textures to nearest textures.\n Enabling this might come at a negligible performance cost.\n\\end_layout\n\n\\begin_layout Subsubsection\nEnabling/disabling mipmapping\n\\end_layout\n\n\\begin_layout Standard\nNormally, Quake's software renderer has this always enabled.\n Objects in the distance will use lower-quality texture assets than the\n ones closer to the player.\n Disabling this (from the Quake settings menu) will render each object with\n the most high-quality texture available, no matter what the distance is\n to the player.\n Enabling this will come at a big performance cost - so only enable it if\n your platform is powerful enough.\n\n\\end_layout\n\n\\begin_layout Subsubsection\nEnabling/disabling animation interpolation\n\\end_layout\n\n\\begin_layout Standard\nBy default the game updates animations of its 3D models at a very sluggish\n rate - 11 frames per second approximately.\n Enabling this option (from the Quake settings menu) allows you to enable\n frame interpolation so that the movements of monsters will appear much\n smoother.\n Enabling this might come at a negligible performance cost.\n\\end_layout\n\n\\begin_layout Subsubsection\nEnabling/disabling third person view\n\\end_layout\n\n\\begin_layout Standard\nBy default, Quake is played from a first person perspective.\n Enabling this option (from the Quake settings menu) allows you to play\n Quake from a third person perspective.\n There are two camera modes to choose from - 'Clamped' and 'Clipped'.\n 'Clamped' will not allow the camera to pass through walls and it will try\n to prevent showing you any of the empty 'clip space' that exists beyond\n the game world.\n When this 'clamping' happens, the camera will zoom in to your player.\n Setting it to 'Clipped' does not bound the camera to the game world and\n does not zoom in on the player - instead, it will simply show the empty\n clip space that exists beyond the game world.\n It is up to user preference which of the two he/she prefers.\n\\end_layout\n\n\\begin_layout Subsubsection\nSetting framerate to 50 or 60fps\n\\end_layout\n\n\\begin_layout Standard\nThe original Quake never ran at a fixed framerate, and it took quite a few\n years for PCs to even reach the state where they were able to run Quake\n at 50 or 60fps.\n Libretro TyrQuake assumes that you will want to run Quake at either a constant\n 50 or 60 frames per second.\n You can set the framerate to either 50fps or 60fps from the Quake settings\n menu.\n\n\\end_layout\n\n\\begin_layout Subsection\nCore options\n\\end_layout\n\n\\begin_layout Subsubsection\nIncreasing graphics resolution\n\\end_layout\n\n\\begin_layout Standard\nBecause Quake is using software rendered graphics and because the original\n sourcecode to Quake 1 had hand-tuned assembly routines for 486/early Pentium\n 1 CPUs (routines which can't be used on today's PCs), it might come as\n a surprise that TyrQuake still demands high system requirements in order\n to run it above the default resolution (320x200).\n\\end_layout\n\n\\begin_layout Standard\nBy increasing the internal resolution with the core option 'Internal resolution'\n, the graphical quality of the game can be significantly enhanced at the\n expense of speed.\n After each internal resolution change, you will need to restart the TyrQuake\n core in order for the changes to be applied.\n\\end_layout\n\n\\begin_layout Standard\n\\begin_inset ERT\nstatus open\n\n\\begin_layout Plain Layout\n\n\n\\backslash\nnewpage\n\\end_layout\n\n\\end_inset\n\n\n\\end_layout\n\n\\end_body\n\\end_document\n"
},
{
"path": "archive/retroarch-manual.lyx",
"content": "#LyX 2.0 created this file. For more info see http://www.lyx.org/\n\\lyxformat 413\n\\begin_document\n\\begin_header\n\\textclass article\n\\use_default_options true\n\\maintain_unincluded_children false\n\\language english\n\\language_package default\n\\inputencoding auto\n\\fontencoding global\n\\font_roman default\n\\font_sans default\n\\font_typewriter default\n\\font_default_family default\n\\use_non_tex_fonts false\n\\font_sc false\n\\font_osf false\n\\font_sf_scale 100\n\\font_tt_scale 100\n\n\\graphics default\n\\default_output_format default\n\\output_sync 0\n\\bibtex_command default\n\\index_command default\n\\paperfontsize default\n\\spacing single\n\\use_hyperref true\n\\pdf_title \"RetroArch Android Manual\"\n\\pdf_author \"Hans-Kristian Antzen, Daniel De Matteis\"\n\\pdf_bookmarks true\n\\pdf_bookmarksnumbered false\n\\pdf_bookmarksopen false\n\\pdf_bookmarksopenlevel 1\n\\pdf_breaklinks false\n\\pdf_pdfborder false\n\\pdf_colorlinks true\n\\pdf_backref false\n\\pdf_pdfusetitle true\n\\papersize default\n\\use_geometry false\n\\use_amsmath 1\n\\use_esint 1\n\\use_mhchem 1\n\\use_mathdots 1\n\\cite_engine basic\n\\use_bibtopic false\n\\use_indices false\n\\paperorientation portrait\n\\suppress_date false\n\\use_refstyle 1\n\\index Index\n\\shortcut idx\n\\color #008000\n\\end_index\n\\secnumdepth 5\n\\tocdepth 5\n\\paragraph_separation indent\n\\paragraph_indentation default\n\\quotes_language english\n\\papercolumns 1\n\\papersides 1\n\\paperpagestyle default\n\\tracking_changes false\n\\output_changes false\n\\html_math_output 0\n\\html_css_as_file 0\n\\html_be_strict false\n\\end_header\n\n\\begin_body\n\n\\begin_layout Standard\n\\begin_inset ERT\nstatus open\n\n\\begin_layout Plain Layout\n\n\n\\backslash\nbegin{figure}\n\\backslash\nbegin{centering}\n\\end_layout\n\n\\end_inset\n\n\n\\begin_inset Graphics\n\tfilename retroarch-android/logo.png\n\tlyxscale 50\n\tscale 50\n\tclip\n\n\\end_inset\n\n\n\\begin_inset ERT\nstatus open\n\n\\begin_layout Plain Layout\n\n\n\\backslash\nend{centering}\n\\backslash\nend{figure}\n\\end_layout\n\n\\end_inset\n\n\n\\end_layout\n\n\\begin_layout Title\nRetroArch Android (v0.9.8)\n\\end_layout\n\n\\begin_layout Author\nHans Kristian Arntzen, Daniel De Matteis, Michael Lelli\n\\end_layout\n\n\\begin_layout Standard\n\\begin_inset CommandInset toc\nLatexCommand tableofcontents\n\n\\end_inset\n\n\n\\end_layout\n\n\\begin_layout Section\nIntroduction\n\\end_layout\n\n\\begin_layout Standard\nRetroArch Android is an app that has been designed to run and play:\n\\end_layout\n\n\\begin_layout Itemize\nGames\n\\end_layout\n\n\\begin_layout Itemize\nEmulators\n\\end_layout\n\n\\begin_layout Standard\nEmulators and games that can be run on RetroArch come in the form of pluggable\n 'engines' which are called 'libretro ports'.\n The version that you just installed already has most of the full library\n of 'cores' preinstalled.\n\\end_layout\n\n\\begin_layout Section\nDisclaimer\n\\end_layout\n\n\\begin_layout Standard\nRetroArch Android is released for free and will always be free.\n There are no ads (push or otherwise), there is no 'spying' going on in\n the form of analytics or collecting stats, there is no 'paid DLC', and\n on and on - all the unsavory and bad aspects of this 'new generation of\n computing' are not to be found here.\n It will never be sold with a pricetag - not even disguised as a 'donationware\n version'.\n If you happen to have 'paid' for RetroArch Android or a derivative of it,\n you have been scammed and you should probably demand your money back from\n the scam artist in question (and scam artists they are).\n\\end_layout\n\n\\begin_layout Standard\nJust because the GPL allows people to make derivative copies of RetroArch\n for commercial purposes does not mean that we support it or even approve\n of it.\n If you sell RetroArch or a derivative copy of it for any commercial purpose,\n you are part of the problem and you need to be learnt a quick lesson in\n etiquette.\n Note to any 'entrepreneurs' out there that might be tempted by this 'easy\n route to makin' some money' - I honestly wouldn't bother - we will undercut\n you by offering this all for free and doing a better job at it to boot.\n That and I severely doubt you can come up with many trinkets that will\n persuade people to throw away their money on a derivative version when\n they can have it all for free to begin with - just saying - save yourself\n the time and the effort, because it isn't going to work out.\n\\end_layout\n\n\\begin_layout Section\nHow to run\n\\end_layout\n\n\\begin_layout Subsection\nSelect a core\n\\end_layout\n\n\\begin_layout Standard\n\\begin_inset ERT\nstatus open\n\n\\begin_layout Plain Layout\n\n\n\\backslash\nbegin{figure}\n\\backslash\nbegin{centering}\n\\end_layout\n\n\\end_inset\n\n\n\\begin_inset Graphics\n\tfilename retroarch-android/maE85W6.png\n\tlyxscale 50\n\tscale 30\n\tclip\n\n\\end_inset\n\n\n\\begin_inset ERT\nstatus open\n\n\\begin_layout Plain Layout\n\n\n\\backslash\ncaption{Select a core from this menu.}\n\\backslash\nend{centering}\n\\backslash\nend{figure}\n\\end_layout\n\n\\end_inset\n\n\n\\end_layout\n\n\\begin_layout Standard\n\\begin_inset ERT\nstatus open\n\n\\begin_layout Plain Layout\n\n\n\\backslash\nbegin{figure}\n\\backslash\nbegin{centering}\n\\end_layout\n\n\\end_inset\n\n\n\\begin_inset Graphics\n\tfilename retroarch-android/UhU7QrR.png\n\tlyxscale 50\n\tscale 30\n\tclip\n\n\\end_inset\n\n\n\\begin_inset ERT\nstatus open\n\n\\begin_layout Plain Layout\n\n\n\\backslash\ncaption{After selecting the core, you will need to load a game.}\n\\backslash\nend{centering}\n\\backslash\nend{figure}\n\\end_layout\n\n\\end_inset\n\n\n\\end_layout\n\n\\begin_layout Standard\nA 'libretro core' supports games with certain extensions.\n Below you will find the list of cores that came preinstalled with this\n app and what file extensions they support.\n\\end_layout\n\n\\begin_layout Itemize\nSNES9x Next\n\\begin_inset Newline newline\n\\end_inset\n\nUsed for: playing SNES games (Super Nintendo Entertainment System)\n\\begin_inset Newline newline\n\\end_inset\n\nAuthor(s): SNES9x team, OV2, Bearoso, zones, Squarepusher (fork)\n\\begin_inset Newline newline\n\\end_inset\n\nRecommended system requirements: ARM Cortex A9 multi-core device (and up)\n\\begin_inset Newline newline\n\\end_inset\n\nExtensions: \"smc|fig|sfc|gd3|gd7|dx2|bsx|swc|zip|SMC|FIG|\n\\begin_inset Newline newline\n\\end_inset\n\nSFC|BSX|GD3|GD7|DX2|SWC|ZIP\"\n\\end_layout\n\n\\begin_layout Itemize\nVBA Next\n\\begin_inset Newline newline\n\\end_inset\n\nUsed for: playing Game Boy Advance games\n\\begin_inset Newline newline\n\\end_inset\n\nRecommended system requirements: ARM Cortex A9 multi-core based device (and\n up)\n\\begin_inset Newline newline\n\\end_inset\n\nAuthor(s): Forgotten, VBA-M team, Squarepusher (fork)\n\\begin_inset Newline newline\n\\end_inset\n\nExtensions: \"gba|GBA|zip|ZIP\"\n\\end_layout\n\n\\begin_layout Itemize\nFCEUmm\n\\begin_inset Newline newline\n\\end_inset\n\nUsed for: playing NES games (Nintendo Entertainment System)\n\\begin_inset Newline newline\n\\end_inset\n\nAuthor(s): CaH4e3, original FCEU authors\n\\begin_inset Newline newline\n\\end_inset\n\nExtensions: \"fds|FDS|zip|ZIP|nes|NES|unif|UNIF\"\n\\end_layout\n\n\\begin_layout Itemize\nNEStopia\n\\begin_inset Newline newline\n\\end_inset\n\nUsed for: playing NES games (Nintendo Entertainment System)\n\\begin_inset Newline newline\n\\end_inset\n\nAuthor(s): Marty\n\\begin_inset Newline newline\n\\end_inset\n\nExtensions supported: \"nes|NES|zip|ZIP|fds|FDS\"\n\\end_layout\n\n\\begin_layout Itemize\nGambatte\n\\begin_inset Newline newline\n\\end_inset\n\nUsed for: playing GameBoy / GameBoy Color games\n\\begin_inset Newline newline\n\\end_inset\n\nAuthor(s): Sinamas\n\\begin_inset Newline newline\n\\end_inset\n\nExtensions supported: \"gb|gbc|dmg|zip|GB|GBC|DMG|ZIP\"\n\\end_layout\n\n\\begin_layout Itemize\nFinal Burn Alpha\n\\begin_inset Newline newline\n\\end_inset\n\nUsed for: playing arcade games\n\\begin_inset Newline newline\n\\end_inset\n\nAuthor(s): Dave, FBA Team (Barry Harris & co)\n\\begin_inset Newline newline\n\\end_inset\n\nExtensions supported:\n\\begin_inset Quotes eld\n\\end_inset\n\nzip|ZIP\n\\begin_inset Quotes erd\n\\end_inset\n\n\n\\end_layout\n\n\\begin_layout Itemize\nGenesis Plus GX\n\\begin_inset Newline newline\n\\end_inset\n\nUsed for: playing Sega Genesis / Master System / Game Gear / Sega CD games\n\\begin_inset Newline newline\n\\end_inset\n\nAuthor(s): Charles McDonald, ekeeke\n\\begin_inset Newline newline\n\\end_inset\n\nExtensions supported: \"md|smd|bin|cue|gen|zip|MD|SMD|bin|iso|\n\\begin_inset Newline newline\n\\end_inset\n\nISO|CUE|GEN|ZIP|sms|SMS|gg|GG|sg|SG\"\n\\end_layout\n\n\\begin_layout Itemize\nNX Engine\n\\begin_inset Newline newline\n\\end_inset\n\nUsed for: playing Cave Story / Doukutsu Monogatari\n\\begin_inset Newline newline\n\\end_inset\n\nAuthor(s): Caitlin Shaw (rogueeve)\n\\begin_inset Newline newline\n\\end_inset\n\nExtensions supported:\n\\begin_inset Quotes eld\n\\end_inset\n\nexe|EXE|zip|ZIP\n\\begin_inset Quotes erd\n\\end_inset\n\n\n\\end_layout\n\n\\begin_layout Itemize\nPCSX ReARMed\n\\begin_inset Newline newline\n\\end_inset\n\nUsed for: playing PlayStation1 games\n\\begin_inset Newline newline\n\\end_inset\n\nAuthor(s): PCSX Team, Notaz, Exophase (GPU plugin)\n\\begin_inset Newline newline\n\\end_inset\n\nExtensions supported: \"bin|cue|img|mdf|pbp|cbn\"\n\\end_layout\n\n\\begin_layout Itemize\nPrboom\n\\begin_inset Newline newline\n\\end_inset\n\nUsed for: playing Doom, Doom 2, Ultimate Doom, Final Doom, and mods\n\\begin_inset Newline newline\n\\end_inset\n\nAuthor(s): Various\n\\begin_inset Newline newline\n\\end_inset\n\nExtensions supported: \"WAD|wad|IWAD|iwad\"\n\\end_layout\n\n\\begin_layout Itemize\nMednafen NGP\n\\begin_inset Newline newline\n\\end_inset\n\nUsed for: playing Neo Geo Pocket Color games\n\\begin_inset Newline newline\n\\end_inset\n\nAuthor(s): Original Neopop authors, Ryphecha\n\\begin_inset Newline newline\n\\end_inset\n\nExtensions supported: \"ngp|NGP|ngc|NGC|zip|ZIP\"\n\\end_layout\n\n\\begin_layout Itemize\nMednafen WonderSwan\n\\begin_inset Newline newline\n\\end_inset\n\nUsed for: playing WonderSwan / WonderSwan Color / WonderSwan Crystal games\n\\begin_inset Newline newline\n\\end_inset\n\nAuthor(s): Original Cygne authors, Ryphecha\n\\begin_inset Newline newline\n\\end_inset\n\nExtensions supported: \"ws|WS|wsc|WSC|zip|ZIP\"\n\\end_layout\n\n\\begin_layout Itemize\nMednafen Virtual Boy\n\\begin_inset Newline newline\n\\end_inset\n\nUsed for: playing Virtual Boy games\n\\begin_inset Newline newline\n\\end_inset\n\nAuthor: Ryphecha\n\\begin_inset Newline newline\n\\end_inset\n\nExtensions supported: \"vb|VB|vboy|VBOY|bin|BIN|zip|ZIP\"\n\\end_layout\n\n\\begin_layout Itemize\nMednafen PC Engine\n\\begin_inset Newline newline\n\\end_inset\n\nUsed for: playing PC Engine / Supergrafx 16 / PC Engine CD games\n\\begin_inset Newline newline\n\\end_inset\n\nAuthor: Ryphecha\n\\begin_inset Newline newline\n\\end_inset\n\nExtensions supported: \"pce|PCE|sgx|SGX|cue|CUE|zip|ZIP\"\n\\end_layout\n\n\\begin_layout Standard\nSelect one of these cores in the menu.\n\\end_layout\n\n\\begin_layout Subsection\nSelect a game\n\\end_layout\n\n\\begin_layout Standard\nAfter you have selected a core, you will need to select a compatible game\n from the filebrowser.\n It will then attempt to load the core with that specific game.\n\\end_layout\n\n\\begin_layout Section\nControls\n\\end_layout\n\n\\begin_layout Subsection\nTouchscreen overlay\n\\end_layout\n\n\\begin_layout Standard\nRetroArch Android uses an overlay as a 'mock' gamepad to play with.\n The 'overlay' controls will always be bound to Player 1.\n\\end_layout\n\n\\begin_layout Standard\n\\begin_inset ERT\nstatus open\n\n\\begin_layout Plain Layout\n\n\n\\backslash\nbegin{figure}\n\\backslash\nbegin{centering}\n\\end_layout\n\n\\end_inset\n\n\n\\begin_inset Graphics\n\tfilename retroarch-android/Rr2Nvgo.png\n\tlyxscale 50\n\tscale 50\n\tclip\n\n\\end_inset\n\n\n\\begin_inset ERT\nstatus open\n\n\\begin_layout Plain Layout\n\n\n\\backslash\ncaption{'Gamepad overlay' screen.}\n\\backslash\nend{centering}\n\\backslash\nend{figure}\n\\end_layout\n\n\\end_inset\n\n\n\\end_layout\n\n\\begin_layout Subsection\nTouchscreen menu navigation\n\\end_layout\n\n\\begin_layout Standard\nEach touchscreen overlay has a couple of screens that can be navigated to.\n To go to the next screen of the overlay, you press the 'circle' icon at\n the bottom.\n\\end_layout\n\n\\begin_layout Standard\nMost of the overlays that come bundled with RetroArch Android have the same\n screen order.\n\\end_layout\n\n\\begin_layout Subsubsection\nGamepad screen\n\\end_layout\n\n\\begin_layout Standard\nYou can control the game with this screen.\n Illustrated is a controller called 'RetroPad'.\n It is laid out like a SNES pad with PlayStation-style shoulder\n\\end_layout\n\n\\begin_layout Standard\nbuttons.\n\\end_layout\n\n\\begin_layout Standard\n\\begin_inset ERT\nstatus open\n\n\\begin_layout Plain Layout\n\n\n\\backslash\nbegin{figure}\n\\backslash\nbegin{centering}\n\\end_layout\n\n\\end_inset\n\n\n\\begin_inset Graphics\n\tfilename retroarch-android/1ZhxUo2.png\n\tlyxscale 50\n\tscale 50\n\tclip\n\n\\end_inset\n\n\n\\begin_inset ERT\nstatus open\n\n\\begin_layout Plain Layout\n\n\n\\backslash\ncaption{'Quick Menu' screen.}\n\\backslash\nend{centering}\n\\backslash\nend{figure}\n\\end_layout\n\n\\end_inset\n\n\n\\end_layout\n\n\\begin_layout Subsubsection\nQuick Menu screen\n\\end_layout\n\n\\begin_layout Standard\nThe actions on this screen have various effects on the game currently running.\n\\end_layout\n\n\\begin_layout Itemize\nLOAD STATE - Load a save state from the currently selected save state slot.\n\\end_layout\n\n\\begin_layout Itemize\nSAVE STATE - Save state to the currently selected save state slot.\n\\end_layout\n\n\\begin_layout Itemize\nSTATE MINUS - Go back one save state slot.\n\\end_layout\n\n\\begin_layout Itemize\nSTATE PLUS - Go forward one state slot.\n\\end_layout\n\n\\begin_layout Itemize\nREWIND - Rewind the game in real-time.\n Note - the 'Rewind' option needs to be enabled at the Settings menu or\n else this option won't work.\n\\end_layout\n\n\\begin_layout Itemize\nSLOWMOTION - Press and hold this button to let the game run in slowmotion.\n\\end_layout\n\n\\begin_layout Itemize\nRESET - Resets the game/system.\n\\end_layout\n\n\\begin_layout Itemize\nFAST FORWARD - Fast forward the game in real-time.\n\\end_layout\n\n\\begin_layout Itemize\nNEXT SHADER - Load the next shader in the folder (NOTE: only if shaders\n are enabled)\n\\end_layout\n\n\\begin_layout Itemize\nPREVIOUS SHADER - Load the previous shader in the folder (NOTE: only if\n shaders are enabled)\n\\end_layout\n\n\\begin_layout Standard\n\\begin_inset ERT\nstatus open\n\n\\begin_layout Plain Layout\n\n\n\\backslash\nbegin{figure}\n\\backslash\nbegin{centering}\n\\end_layout\n\n\\end_inset\n\n\n\\begin_inset Graphics\n\tfilename retroarch-android/hCwKqVN.png\n\tlyxscale 50\n\tscale 50\n\tclip\n\n\\end_inset\n\n\n\\begin_inset ERT\nstatus open\n\n\\begin_layout Plain Layout\n\n\n\\backslash\ncaption{'Gameplay' screen.}\n\\backslash\nend{centering}\n\\backslash\nend{figure}\n\\end_layout\n\n\\end_inset\n\n\n\\end_layout\n\n\\begin_layout Subsubsection\nGameplay screen\n\\end_layout\n\n\\begin_layout Standard\nThis screen is useful for when you are playing with an USB or Bluetooth\n gamepad but you would still like to have access to the Quick Menu or Gamepad\n screen without outright disabling overlays.\n If you press the 'icon' at the bottom of this screen, you will go back\n to the 'Gamepad' screen'.\n\\end_layout\n\n\\begin_layout Subsection\nVariations\n\\end_layout\n\n\\begin_layout Standard\nRetroArch Android comes packaged with a number of different-looking overlays.\n You can select from a number of different overlays in the Settings menu.\n Below is a list of different overlays:\n\\end_layout\n\n\\begin_layout Standard\n\\begin_inset ERT\nstatus open\n\n\\begin_layout Plain Layout\n\n\n\\backslash\nbegin{figure}\n\\backslash\nbegin{centering}\n\\end_layout\n\n\\end_inset\n\n\n\\begin_inset Graphics\n\tfilename retroarch-android/overlays.png\n\tlyxscale 50\n\tscale 50\n\tclip\n\n\\end_inset\n\n\n\\begin_inset ERT\nstatus open\n\n\\begin_layout Plain Layout\n\n\n\\backslash\ncaption{All the default overlays packaged with RetroArch Android.}\n\\backslash\nend{centering}\n\\backslash\nend{figure}\n\\end_layout\n\n\\end_inset\n\n\n\\end_layout\n\n\\begin_layout Subsubsection\nMaking your own custom overlays\n\\end_layout\n\n\\begin_layout Standard\nYou can make your own custom overlays for use with RetroArch Android.\n If you want to learn how to do this, you should read the 'Overlay Guide'.\n\\end_layout\n\n\\begin_layout Subsection\nUSB gamepads\n\\end_layout\n\n\\begin_layout Standard\nNext to the standard touchscreen input, RetroArch Android autodetects and\n autoconfigures various input devices automatically.\n Most of these are USB joysticks/gamepads.\n\\end_layout\n\n\\begin_layout Standard\nA list of the gamepads that are supported by autodetection can be found\n inside the app.\n (go to Help).\n\\end_layout\n\n\\begin_layout Standard\nYou connect the device to your tablet/phone.\n You press a button while ingame.\n If your pad is supported, it should bring up a message saying:\n\\begin_inset Quotes eld\n\\end_inset\n\nRetroPad #? detected:\n\\begin_inset Quotes eld\n\\end_inset\n\n and then the name of the device it found.\n Buttons and control layout will then be autoconfigured and mapped to the\n RetroPad layout.\n\\end_layout\n\n\\begin_layout Subsubsection\nUnsupported gamepads\n\\end_layout\n\n\\begin_layout Standard\nIf your pad is unsupported, it will likely show\n\\begin_inset Quotes eld\n\\end_inset\n\nUnknown HID\n\\begin_inset Quotes erd\n\\end_inset\n\n instead.\n If you want this pad supported, contact us.\n\\end_layout\n\n\\begin_layout Subsubsection\nNotes\n\\end_layout\n\n\\begin_layout Standard\nIf a USB gamepad that is listed above does not work immediately, your controller\n may require a powered USB hub or perhaps a HID driver may be missing of\n sorts.\n\\end_layout\n\n\\begin_layout Subsection\nBluetooth\n\\end_layout\n\n\\begin_layout Standard\n\\begin_inset ERT\nstatus open\n\n\\begin_layout Plain Layout\n\n\n\\backslash\nbegin{figure}\n\\backslash\nbegin{centering}\n\\end_layout\n\n\\end_inset\n\n\n\\begin_inset Graphics\n\tfilename retroarch-android/sVWyw8c.png\n\tlyxscale 50\n\tscale 35\n\tclip\n\n\\end_inset\n\n\n\\begin_inset ERT\nstatus open\n\n\\begin_layout Plain Layout\n\n\n\\backslash\ncaption{Setting an IME app from the RetroArch menu by clicking on the 'Settings'\n icon.}\n\\backslash\nend{centering}\n\\backslash\nend{figure}\n\\end_layout\n\n\\end_inset\n\n\n\\end_layout\n\n\\begin_layout Standard\nRetroArch supports Bluetooth right now only through the use of IME apps.\n A couple of IME apps are supported by RetroArch Android - if you use the\n default key layouts with the IME apps listed below, your pads will be automatic\nally configured:\n\\end_layout\n\n\\begin_layout Itemize\n\\begin_inset Flex URL\nstatus collapsed\n\n\\begin_layout Plain Layout\n\nhttps://play.google.com/store/apps/details?id=com.dancingpixelstudios.sixaxiscontrol\nler\n\\end_layout\n\n\\end_inset\n\n Dancing Pixel Studios SixAxis Controller\n\\end_layout\n\n\\begin_layout Itemize\n\\begin_inset Flex URL\nstatus collapsed\n\n\\begin_layout Plain Layout\n\nhttps://play.google.com/store/apps/details?id=com.ccpcreations.android.WiiUseAndroid\n\\end_layout\n\n\\end_inset\n\n ccpcreations.Wiiuse.Android\n\\end_layout\n\n\\begin_layout Standard\nRemember that you will have to change your Input Method to the needed IME\n first before starting RetroArch.\n This can also be done from the menu by clicking on the top righthand side\n 'Settings' icon and then selecting 'Input Method' (see image).\n\\end_layout\n\n\\begin_layout Subsection\nNotes\n\\end_layout\n\n\\begin_layout Standard\nWhen using PS3 controller via Bluetooth, use SixAxis adapter app and after\n you've got the controller setup, make sure to go to menu then preferences\n and then Game pad settings, and enable Gamepad.\n This turns it into a native android controller and no IME switch is needed.\n Same for the MOGA controller via bluetooth, make sure to use the MOGA Universal\n Driver and not the one that MOGA recommends.\n In the app, make sure 'Enable left analog input' is checked, and that it's\n in System Mode to make it a native gamepad for android and no need to switch\n IMEs.\n\\end_layout\n\n\\begin_layout Section\nSettings\n\\end_layout\n\n\\begin_layout Standard\n\\begin_inset ERT\nstatus open\n\n\\begin_layout Plain Layout\n\n\n\\backslash\nbegin{figure}\n\\backslash\nbegin{centering}\n\\end_layout\n\n\\end_inset\n\n\n\\begin_inset Graphics\n\tfilename retroarch-android/Emu9nsQ.png\n\tlyxscale 50\n\tscale 35\n\tclip\n\n\\end_inset\n\n\n\\begin_inset ERT\nstatus open\n\n\\begin_layout Plain Layout\n\n\n\\backslash\ncaption{'Settings' menu.}\n\\backslash\nend{centering}\n\\backslash\nend{figure}\n\\end_layout\n\n\\end_inset\n\n\n\\end_layout\n\n\\begin_layout Standard\nYou can configure many aspects of RetroArch.\n To go to the Settings menu, click on the 'Settings' icon at the top righthand\n side of the screen and then select 'Settings'.\n\\end_layout\n\n\\begin_layout Subsection\nPath Settings\n\\end_layout\n\n\\begin_layout Standard\n\\begin_inset ERT\nstatus open\n\n\\begin_layout Plain Layout\n\n\n\\backslash\nbegin{figure}\n\\backslash\nbegin{centering}\n\\end_layout\n\n\\end_inset\n\n\n\\begin_inset Graphics\n\tfilename retroarch-android/4i6EGD7.png\n\tlyxscale 50\n\tscale 35\n\tclip\n\n\\end_inset\n\n\n\\begin_inset ERT\nstatus open\n\n\\begin_layout Plain Layout\n\n\n\\backslash\ncaption{'Path Settings' screen.}\n\\backslash\nend{centering}\n\\backslash\nend{figure}\n\\end_layout\n\n\\end_inset\n\n\n\\end_layout\n\n\\begin_layout Itemize\nROM Directory\n\\begin_inset Newline newline\n\\end_inset\n\nSet the directory that will be used as a default starting point for the\n filebrowser.\n\\end_layout\n\n\\begin_layout Itemize\nSave Files - Enable custom directory\n\\begin_inset Newline newline\n\\end_inset\n\nEnables use of custom save file folder.\n (.srm) save files will be saved and loaded to the configured directory.\n if not enabled, save files will reside in ROM folder.\n\\end_layout\n\n\\begin_layout Itemize\nSave Files - Savefile directory\n\\begin_inset Newline newline\n\\end_inset\n\nSets directory where to save and load game save files.\n\\end_layout\n\n\\begin_layout Itemize\nSave States - Enable custom directory\n\\begin_inset Newline newline\n\\end_inset\n\nEnables use of custom save statefolder.\n (.state) save states will be saved and loaded to configured directory.\n If not enabled, save states will reside in ROM folder.\n\\end_layout\n\n\\begin_layout Itemize\nSave state directory\n\\begin_inset Newline newline\n\\end_inset\n\nSets directory where to save and load game save states.\n\\end_layout\n\n\\begin_layout Subsection\nSystem Settings\n\\end_layout\n\n\\begin_layout Standard\n\\begin_inset ERT\nstatus open\n\n\\begin_layout Plain Layout\n\n\n\\backslash\nbegin{figure}\n\\backslash\nbegin{centering}\n\\end_layout\n\n\\end_inset\n\n\n\\begin_inset Graphics\n\tfilename retroarch-android/WOfUmx7.png\n\tlyxscale 50\n\tscale 35\n\tclip\n\n\\end_inset\n\n\n\\begin_inset ERT\nstatus open\n\n\\begin_layout Plain Layout\n\n\n\\backslash\ncaption{'System Settings' screen.}\n\\backslash\nend{centering}\n\\backslash\nend{figure}\n\\end_layout\n\n\\end_inset\n\n\n\\end_layout\n\n\\begin_layout Itemize\nAuto load state\n\\begin_inset Newline newline\n\\end_inset\n\nLoads an automatically created savestate at startup.\n\\end_layout\n\n\\begin_layout Itemize\nAuto save state\n\\begin_inset Newline newline\n\\end_inset\n\nThis will make a save state when you exit the game.\n This auto savestate will be automatically loaded the next time you start\n up the\n\\begin_inset Newline newline\n\\end_inset\n\ngame.\n Useful for on-the-go gaming.\n\\end_layout\n\n\\begin_layout Itemize\nRewinding Enable\n\\begin_inset Newline newline\n\\end_inset\n\nThis allows you to rewind the game in real-time to undo 'mistakes' you made\n while playing the game.\n (NOTE - this is very CPU intensive - you should only enable this if the\n core is running at least 2x realtime on your system).\n\\end_layout\n\n\\begin_layout Subsection\nVideo Settings\n\\end_layout\n\n\\begin_layout Standard\n\\begin_inset ERT\nstatus open\n\n\\begin_layout Plain Layout\n\n\n\\backslash\nbegin{figure}\n\\backslash\nbegin{centering}\n\\end_layout\n\n\\end_inset\n\n\n\\begin_inset Graphics\n\tfilename retroarch-android/3gbr7az.png\n\tlyxscale 50\n\tscale 35\n\tclip\n\n\\end_inset\n\n\n\\begin_inset ERT\nstatus open\n\n\\begin_layout Plain Layout\n\n\n\\backslash\ncaption{'Video Settings' screen.}\n\\backslash\nend{centering}\n\\backslash\nend{figure}\n\\end_layout\n\n\\end_inset\n\n\n\\end_layout\n\n\\begin_layout Itemize\nVsync\n\\begin_inset Newline newline\n\\end_inset\n\nUnchecking this will cause screen tearing but faster performance.\n\\end_layout\n\n\\begin_layout Itemize\nSync refreshrate to screen\n\\begin_inset Newline newline\n\\end_inset\n\nSynchronize RetroArch's refresh rate to the screen's refresh rate (recommended\n - some screens have refresh rates below 59.95Hz and need this enabled to\n get good audio/video sync).\n\\end_layout\n\n\\begin_layout Itemize\nForced refresh rate (Hz)\n\\begin_inset Newline newline\n\\end_inset\n\nForce a specific refresh rate to be detected.\n Only use this if auto-detection of refresh rate reports wrong refresh rate.\n\\end_layout\n\n\\begin_layout Itemize\nAuto-rotate\n\\begin_inset Newline newline\n\\end_inset\n\nWill auto-rotate the screen for vertically oriented games.\n\\end_layout\n\n\\begin_layout Itemize\nAspect ratio\n\\begin_inset Newline newline\n\\end_inset\n\nSelect the aspect ratio to enforce.\n\\end_layout\n\n\\begin_layout Itemize\nShaders (1st pass) Bilinear filter\n\\begin_inset Newline newline\n\\end_inset\n\nApplies bilinear filtering, smooths out edges (setting still apply even\n if no shader is selected).\n\\end_layout\n\n\\begin_layout Itemize\nShaders (1st pass) Enable\n\\begin_inset Newline newline\n\\end_inset\n\nEnable the currently selected shader.\n\\end_layout\n\n\\begin_layout Itemize\nShaders (1st pass) XML Shader\n\\begin_inset Newline newline\n\\end_inset\n\nSelect this option to select a shader from the filesystem.\n RetroArch comes prepackaged with a collection of shaders.\n\\end_layout\n\n\\begin_layout Itemize\nShaders (Multi-pass) Render-to-texture\n\\begin_inset Newline newline\n\\end_inset\n\nRender first pass to a texture (FBO).\n Stretch to screen with second shader.\n\\end_layout\n\n\\begin_layout Itemize\nShaders (Multi-pass) Enable shader #2\n\\begin_inset Newline newline\n\\end_inset\n\nEnable custom shader or use after rendering to FBO.\n\\end_layout\n\n\\begin_layout Itemize\nShaders (Multi-pass) XML shder (2nd pass)\n\\begin_inset Newline newline\n\\end_inset\n\nSets shader to use for second-pass.\n\\end_layout\n\n\\begin_layout Itemize\nShaders (Multi-pass) FBO Scale\n\\begin_inset Newline newline\n\\end_inset\n\nScale to use when rendering to FBO.\n\\end_layout\n\n\\begin_layout Itemize\nShaders (Multi-pass) Second-pass bilinear filtering\n\\begin_inset Newline newline\n\\end_inset\n\nUse bilinear filtering on FBO texture on second pass.\n\\end_layout\n\n\\begin_layout Itemize\nEnable on-screen fonts\n\\begin_inset Newline newline\n\\end_inset\n\nEnable rendering of on-screen fonts for system messages.\n\\end_layout\n\n\\begin_layout Subsubsection\nNotes on shaders\n\\end_layout\n\n\\begin_layout Itemize\nThe shaders that come prepackaged with RetroArch Android come from the PS3\n and Xbox 360 ports of RetroArch.\n Unfortunately, most Android GPUs are very weak compared to the ones inside\n the PS3 and 360 - so most of these shaders will run extemely slow on nearly\n all Android devices right now.\n To make these shaders usable we will have to wait until GPUs on Android-powered\n devices catch up with PS3 and 360.\n They will make for good GPU benchmarks in the meantime - these shaders\n are far more intensive on the GPU than the trivial 'shaders' used in commercial\n games - which are mostly used for menial tasks instead of applying an expensive\n image-enhancing algorithm to the entire screen like the 'shader filters'\n seen here.\n\\end_layout\n\n\\begin_layout Subsubsection\nNotes on refresh rate\n\\end_layout\n\n\\begin_layout Itemize\nSome devices (like the Samsung Galaxy S3) falsely report that the screen\n refresh rate is 60Hz.\n For these devices, it is recommended that you set 'forced refresh rate'\n manually to a lower rate until you find the right value that gives you\n good audio/video with no audio pops.\n\\end_layout\n\n\\begin_layout Subsection\nAudio Settings\n\\end_layout\n\n\\begin_layout Standard\n\\begin_inset ERT\nstatus open\n\n\\begin_layout Plain Layout\n\n\n\\backslash\nbegin{figure}\n\\backslash\nbegin{centering}\n\\end_layout\n\n\\end_inset\n\n\n\\begin_inset Graphics\n\tfilename retroarch-android/UVU6Chp.png\n\tlyxscale 50\n\tscale 35\n\tclip\n\n\\end_inset\n\n\n\\begin_inset ERT\nstatus open\n\n\\begin_layout Plain Layout\n\n\n\\backslash\ncaption{'Audio Settings' screen.}\n\\backslash\nend{centering}\n\\backslash\nend{figure}\n\\end_layout\n\n\\end_inset\n\n\n\\end_layout\n\n\\begin_layout Itemize\nAudio Enable\n\\begin_inset Newline newline\n\\end_inset\n\nUncheck this to disable sound.\n\\end_layout\n\n\\begin_layout Itemize\nDynamic Rate Control\n\\begin_inset Newline newline\n\\end_inset\n\nDynamic rate control tries to prevent sound pops by dynamically adjusting\n samplerate.\n It is recommended that you leave this on for RetroArch Android.\n\\end_layout\n\n\\begin_layout Subsection\nInput Settings\n\\end_layout\n\n\\begin_layout Standard\n\\begin_inset ERT\nstatus open\n\n\\begin_layout Plain Layout\n\n\n\\backslash\nbegin{figure}\n\\backslash\nbegin{centering}\n\\end_layout\n\n\\end_inset\n\n\n\\begin_inset Graphics\n\tfilename retroarch-android/deYDWvd.png\n\tlyxscale 50\n\tscale 35\n\tclip\n\n\\end_inset\n\n\n\\begin_inset ERT\nstatus open\n\n\\begin_layout Plain Layout\n\n\n\\backslash\ncaption{'Input Settings' screen.}\n\\backslash\nend{centering}\n\\backslash\nend{figure}\n\\end_layout\n\n\\end_inset\n\n\n\\end_layout\n\n\\begin_layout Itemize\nConfiguration Autodetect Enable\n\\begin_inset Newline newline\n\\end_inset\n\nThis will attempt to preconfigure various gamepads and/or IME apps that\n you connect.\n\\end_layout\n\n\\begin_layout Itemize\nDebug Input Reporting Enable\n\\begin_inset Newline newline\n\\end_inset\n\nThis will report keycodes onscreen generated by your input device(s).\n You should use this option when you want us to support a gamepad that you\n use.\n You should use this option then to see which keycodes are generated by\n all the buttons on your gamepad/input device and then report this back\n to us.\n\\end_layout\n\n\\begin_layout Itemize\nTouchscreen Overlay Enable\n\\begin_inset Newline newline\n\\end_inset\n\nYou can disable the overlay system entirely by disabling this.\n\\end_layout\n\n\\begin_layout Itemize\nInput overlay\n\\begin_inset Newline newline\n\\end_inset\n\nYou can select a different overlay by choosing this option.\n\\end_layout\n\n\\begin_layout Section\nRetroArch on other platforms\n\\end_layout\n\n\\begin_layout Standard\nRetroArch isn't only available for Android.\n It is available on other platforms as well, including:\n\\end_layout\n\n\\begin_layout Itemize\nPlayStation3\n\\end_layout\n\n\\begin_layout Itemize\nXbox 1\n\\end_layout\n\n\\begin_layout Itemize\nXbox 360\n\\end_layout\n\n\\begin_layout Itemize\nWii/Gamecube\n\\end_layout\n\n\\begin_layout Itemize\nRaspberry Pi\n\\end_layout\n\n\\begin_layout Itemize\nPC (Mac/Linux/Windows)\n\\end_layout\n\n\\begin_layout Standard\nAnd it will be ported to even more platforms in the future.\n You might even see the libretro cores running in XBMC shortly.\n\\end_layout\n\n\\begin_layout Section\nAbout Us\n\\end_layout\n\n\\begin_layout Standard\nHomepage:\n\\begin_inset Flex URL\nstatus collapsed\n\n\\begin_layout Plain Layout\n\nhttp://www.libretro.org\n\\end_layout\n\n\\end_inset\n\n\n\\begin_inset Newline newline\n\\end_inset\n\nIRC: #retroarch at freenode\n\\begin_inset Newline newline\n\\end_inset\n\nGithub (libretro organization):\n\\begin_inset Flex URL\nstatus collapsed\n\n\\begin_layout Plain Layout\n\nhttps://github.com/libretro\n\\end_layout\n\n\\end_inset\n\n\n\\begin_inset Newline newline\n\\end_inset\n\nRetroArch @ Github:\n\\begin_inset Flex URL\nstatus collapsed\n\n\\begin_layout Plain Layout\n\nhttps://github.com/Themaister/RetroArch\n\\end_layout\n\n\\end_inset\n\n\n\\begin_inset Newline newline\n\\end_inset\n\nLibretro @ Twitter:\n\\begin_inset Flex URL\nstatus collapsed\n\n\\begin_layout Plain Layout\n\nhttps://twitter.com/libretro\n\\end_layout\n\n\\end_inset\n\n\n\\begin_inset Newline newline\n\\end_inset\n\nLibretro @ Facebook:\n\\begin_inset Flex URL\nstatus collapsed\n\n\\begin_layout Plain Layout\n\nhttps://www.facebook.com/libretro.retroarch\n\\end_layout\n\n\\end_inset\n\n\n\\end_layout\n\n\\begin_layout Section\nCredits\n\\end_layout\n\n\\begin_layout Standard\n\\begin_inset ERT\nstatus open\n\n\\begin_layout Plain Layout\n\n\n\\backslash\ntextbf{RetroArch Android}\n\\end_layout\n\n\\end_inset\n\n\n\\end_layout\n\n\\begin_layout Standard\nHans-Kristian Arntzen (Themaister)\n\\end_layout\n\n\\begin_layout Standard\nDaniel De Matteis (Squarepusher2/Twinaphex)\n\\end_layout\n\n\\begin_layout Standard\nMichael Lelli (ToadKing)\n\\begin_inset Newline newline\n\\end_inset\n\n\n\\begin_inset ERT\nstatus open\n\n\\begin_layout Plain Layout\n\n\n\\backslash\ntextbf{RetroArch Android contributions}\n\\end_layout\n\n\\end_inset\n\n\n\\end_layout\n\n\\begin_layout Standard\nMeancoot\n\\end_layout\n\n\\begin_layout Standard\nOpium2k (overlay images)\n\\begin_inset Newline newline\n\\end_inset\n\n\n\\begin_inset ERT\nstatus open\n\n\\begin_layout Plain Layout\n\n\n\\backslash\ntextbf{Thanks to}\n\\end_layout\n\n\\end_inset\n\n\n\\end_layout\n\n\\begin_layout Standard\nNotaz (PCSX ReARMed libretro port - RetroArch ARM Linux patches)\n\\end_layout\n\n\\begin_layout Standard\nFBA Team (for adopting libretro upstream - FBA)\n\\end_layout\n\n\\begin_layout Standard\nEkeeke (for adopting libretro upstream - Genesis Plus GX)\n\\end_layout\n\n\\begin_layout Standard\nCaH4e3 (for adopting libretro upstream - FCEUmm)\n\\end_layout\n\n\\begin_layout Standard\nRdanbrook (for adopting libretro upstream - NEStopia Undead)\n\\end_layout\n\n\\begin_layout Standard\nXBMC devs (for adopting libretro vis a vis RetroPlayer)\n\\end_layout\n\n\\begin_layout Standard\nZeromus\n\\end_layout\n\n\\end_body\n\\end_document\n"
},
{
"path": "deploy",
"content": "#!/bin/sh\n\ngit fetch\ngit reset --hard origin/master\nmkdocs build\n"
},
{
"path": "docs/CNAME",
"content": "docs.libretro.com\n"
},
{
"path": "docs/development/bounties.md",
"content": "# Libretro open source bounties\n\n!!! Info \"What is an Open Source Bounty?\"\n Bounties are usually offered as an incentive for fixing software bugs or implementing minor features. Bounty driven development is one of the Business models for open-source software. The compensation offered for an open-source bounty is usually small. Source: [Wikipedia](https://en.wikipedia.org/wiki/Open-source_bounty)\n\n## Stages of the bounty process\n\n 1. Users fund bounties on open github issues or feature requests they want to see addressed.\n 2. Developers create solutions which closes the issues and claim the corresponding bounties on Bountysource.\n 3. Backers can accept or reject the claims.\n 4. If accepted, Bountysource pays the bounties to the developer.\n\n## What is Bountysource?\n\n[Bountysource](http://bountysource.com/) is a funding platform for open-source software which allows users and developers to create bounties from any existing github issue. Libretro has no formal partnership with Bountysource and there is no requirement to use the Bountysource service.\n\n## Who can post a bounty?\n\nAnybody with PayPal, Bitcoin, or funds in a Bountysource account (such as earning money from a previous bounty).\n\n## What does it cost to post a bounty?\n\nThere are no fees associated with posting a bounty. For example, to post a $5 bounty, you will be charged $5. For a $500 bounty, you will be charged $500.\n\n## Do I have to be affiliated with libretro in order to put a bounty on an issue?\n\nNo. Anybody can put a bounty on any issue, regardless of their relationship with the project.\n\n## Do I have to be affiliated libretro in order to claim a bounty on an issue?\n\nNo.\n\n## Can several people claim the same bounty?\n\nYes. When there are multiple claims on a bounty, the people who funded the bounty decide which of the solutions gets the bounty.\n\nWhen a bounty claim is submitted by a developer, the claim is put into a two week verification period. Backers are notified by email and can then accept or reject the claim.\n\n * If all Backers vote to accept the claim, it is processed immediately and the developer is awarded the bounty.\n * If any Backer fails to accept the claim, it remains in the two week waiting period.\n * If any Backer has an issue with the claim, they can reject it. Claims cannot be paid out until the dispute is resolved and the rejected status is lifted.\n\n## Further Bountysource information\n\nYou can find [a more comprehensive version of this information](https://github.com/bountysource/core/wiki/Frequently-Asked-Questions) and more directly from Bountysource.\n"
},
{
"path": "docs/development/coding-standards.md",
"content": "# Libretro Coding Standards\n\n!!! Note \"Scope\"\n These standards are intended to apply to frontends, cores, and other projects that are maintained as part of the Libretro organization. These standards are not enforced on independent projects making use of the Libretro API or other open technologies.\n\n## Standards for RetroArch\n\n### C89 Compatibility\n\nAll code contributed to RetroArch must be compliant with the \"C89\" coding standard established by [ANSI X3.159-1989](https://web.archive.org/web/20110306044509/http://flash-gordon.me.uk/ansi.c.txt).\n\n#### Variable declaration\nTo maintain C89 compatibility, declare all local variables at the beginning of their respective scope blocks, rather than inline at the time of their first use.\n\n#### Comments\nTo maintain C89 compatibility, comments should be written in legacy using `/*` at the beginning and `*/` and the end.\n\nSometimes it is useful to incorporate a lengthy comment in source. For example:\n - providing specifications for a function preceding its declaration\n - to explain a complex or unintuitive algorithm\n - to explain the history or special circumstances of a section of code\n - \n\nComments use a maximum column width of 80 characters, and each new line of a multiline comment should begin with a space and an asterisk:\n\n```c\n/**\n * Retrieves the sensor state associated with the provided port and ID. This\n * function pointer may be set to NULL if retreiving sensor state is not\n * supported.\n * \n * @param data The input state struct\n * @param port\n * @param id Sensor ID\n * \n * @return The current state associated with the port and ID as a float\n **/\nfloat (*get_sensor_input)(void *data, unsigned port, unsigned id);\n```\n\n### Indentation\n\nIndentation is three spaces.\n\n### Braces\n\nBrace usage follows \"Allman style\". The brace associated with a control statement is placed on the following line, indented to the same level as the control statement. Statements within the braces are indented to the next level.\n\n```c\nwhile (x == y)\n{\n something();\n somethingelse();\n}\n\nfinalthing();\n```\n\n### Single-line `if` conditional statements\n\n`if` and `else` conditionals with single-line statements should be spaced with the conditional on one line and the statement below it, indented, with no braces:\n\n```c\nif (time > launch_date)\n initiate_probe_communication();\nelse\n generate_prelaunch_report();\n```\n\n### Whitespace and alignment\n\nWhen possible, use whitespace to improve the readability of code that makes many assignment statements in a row, uses complex conditionals, or passes a large number of parameters to a function.\n\n**Example of aligning successive assignment statements**:\n\n```c\nif (seq == 1157460427127406720ULL)\n{\n content_ctx_info_t content_info;\n content_info.argc = 0;\n content_info.argv = NULL;\n content_info.args = NULL;\n content_info.environ_get = NULL;\n}\n```\n\n**Example of aligning a complex parameter list**:\n\n```c\nif (recording_driver_get_data_ptr())\n{\n runloop_msg_queue_push(\n msg_hash_to_str(MSG_RESTARTING_RECORDING_DUE_TO_DRIVER_REINIT),\n 2, 180, false,\n NULL, MESSAGE_QUEUE_ICON_DEFAULT, MESSAGE_QUEUE_CATEGORY_INFO);\n\n command_event(CMD_EVENT_RECORD_DEINIT, NULL);\n command_event(CMD_EVENT_RECORD_INIT, NULL);\n}\n```\n\n### Naming conventions\n\n#### naming typedefs\ntypedefs should have the suffix `_t`. For example, the case of using `typedef` with a `struct`:\n\n```c\ntypedef struct input_driver_state\n{\n input_driver_t *current_driver;\n void *current_input_data;\n} input_driver_state_t;\n```\n\n#### Common RetroArch source abbreviations\n\n| Abbreviation | Meaning |\n| ------------- | -------------- |\n| ra, rarch | RetroArch |\n| av | Audio-Visual |\n| cb | Callback |\n| ctx | Context |\n| gfx | Graphics |\n| hw | Hardware |\n| idx | Index |\n| ptr | Pointer |\n| st | State |\n| sw | Software |\n| ui | User interface |\n\n\n### vim configuration for Libretro style\n\nCoders who use the **vim** editor can create a `vimrc` configuration file with the following settings in order to pre-set RetroArch indentation style.\n\n```\nset tabstop=3\nset shiftwidth=3\nset expandtab\nset textwidth=80\n```\n\n## Standards for Libretro cores\n\nCores and other projects that are maintained by the Libretro organization can be considered as three categories:\n\n * New, original software\n * Ports and enhancements of third-party software that is still maintained\n * Ports and enhancements of third-party software that is not maintained\n\nNew cores and other projects **that are maintained by the Libretro organization** should be coded as closely to the Libretro/RetroArch standard as possible based on the language used by the core. Cores that are based on existing software should generally conform to whatever standards and style were used in the original software, unless the original software is no longer maintained. In that case the coding style may be changed to Libretro/RetroArch at the discretion of the involved Libretro developers and leadership.\n"
},
{
"path": "docs/development/cores/core-options-translation.md",
"content": "# Adding Translations\n\n## Setting up translation with Crowdin\n\nThe scripts and workflows referenced here, as well as some sample `core_options` files, can be found in the [RetroArch translation example](https://github.com/libretro/RetroArch/tree/master/libretro-common/samples/core_options/example_translation).\n\n### Requirements \n\nMake sure the core is libretro conformant:\nboth `libretro_core_options.h`, containing the English texts, and\n`libretro_core_options_intl.h`, containing all already existing\ntranslations, if any, must be present in the same directory.\n\n> Please note: `libretro_core_options_intl.h` does not need to contain\nanything, if no translations exist or none of them should be preserved.\n\nThe scripts are not compatible with text filled in by macros or during run time.\nThe procedure should not fail - but those texts will not be made translatable.\n\nAlso, please verify the existence and correct use of\n\n `#ifdef HAVE_LANGEXTRA`\n\nand/or\n\n `#ifndef HAVE_NO_LANGEXTRA`\n\npre-compiler instructions in `libretro_core_options.h` to remove any\nreferences to additional languages on platforms which cannot handle them,\ne.g. due to limited RAM.\nFor an example, refer to an up-to-date core, like [gambatte-libretro](https://github.com/libretro/gambatte-libretro/blob/master/libgambatte/libretro/libretro_core_options.h).\n\n> Make sure `options_intl` in `libretro_core_options.h` correctly references the `_intl` options, or the translations will not be applied!\n\n### Adding automatic Crowdin sync\n\nPlace the `intl` and `.github` folders from the [sample folder](https://github.com/libretro/RetroArch/tree/master/libretro-common/samples/core_options/example_translation), including content, into the root\nof the repository.\n\nIn `.github/workflows` are two files: `crowdin_prep.yml` & `crowdin_translate.yml`.\n\nIn each of those are placeholders, which need to be replaced.\n\nFor convenience, one can run `intl/activate.py`, which will try to find\nthe `libretro_core_options.h` file as well as identify the core name to\nfill those placeholders with.\n\nEven then, one should still check if it produced the correct result:\n\nFor `crowdin_prep.yml`:\n> **NOTE:** Please verify, that this workflow watches the correct branch (e.g. main, instead of master)!\nUploads happen, whenever `libretro_core_options.h` of that branch is changed.\n\n- (x2)\n\t- replace with the full path from the root of the repo to the\n `libretro_core_options.h` file\n\n- \n\t- the name of the core (or repo)\n\nAnd for crowdin_translate.yml:\n- <0-59> <0-23>\n\t- Minute and hour at which the sync will happen.\n The script will generate a random time for this, to avoid\n stressing GitHub & Crowdin with many simultaneous runs.\n\n- \n - same as above\n\n- (x2)\n - replace with the full path from the root of the repo to the\n 'libretro_core_options_intl.h' file\n\nCreate a Pull Request and ask a Crowdin project manager, either on [Crowdin](https://crowdin.com/project/retroarch) or, preferably, on [Discord](https://ra-link.web.app/discord) in the `retroarch-translations` channel, to provide you with an access token. Create an Actions repository secret on GitHub named CROWDIN_API_KEY for this access token.\n\n \nWhen everything is ready, run the \"Crowdin Translations Initial Setup\" workflow manually to upload the source texts and any translations to Crowdin.\n\n> You may either disable the initial workflow or even remove it from your repository. Running it more than once is very much discouraged! That may mess with the newest translations, which are usually not yet incorporated into the repository.\n\nFinally, it is recommended to run the \"Crowdin Translation Sync\" workflow manually once. If a \"Permission to \\ denied\" error occurs, you might need to configure the GITHUB_TOKEN with the appropriate access rights, [see here](https://github.com/marketplace/actions/github-push#requirements-and-prerequisites).\n\n### (For Crowdin project managers) Creating an access token\n\nTo create an access token, navigate to the account settings via your profile picture in the top right. Change to the API tab. Here you should find a `New Token` button.\n\nName the token after the core/repository, which will receive it. The following permissions should be set:\n\n- Projects\n - read\n- Source files & strings\n - read & write\n- Translations\n - read & write\n- (optional) Translation status\n - read\n\n> Please provide these access tokens to the core developers in a private message and delete those after successful setup. Do not share tokens publicly or store them in plain text long term!\n\n## Enabling new languages in cores\n\nAdding a language to RetroArch does not automatically enable it for the core options. To do that for cores which have been added to Crowdin, follow these steps:\n\n1. Locate the `libretro.h` file and add a `RETRO_LANGUAGE_XXXXX` item to the `retro_language` enum exactly the same as was done for RetroArch.\n - Alternatively, overwrite this file with the `libretro-common/include/libretro.h` file from RetroArch's code.\n2. Locate the `libretro_core_options.h` file and open it.\n - Add `&options_xx,` at the end of the `options_intl` struct. Remember to keep the same order as in the `retro_language` enum.\n\n\n### Example\n\n- mgba:\n - [Enable Indonesian, Swedish and Ukrainian localisations](https://github.com/libretro/mgba/commit/b0cdccc9ad2e5a8cd40ad4b9a3db1587d6f1560b)\n"
},
{
"path": "docs/development/cores/core-specific/dolphin.md",
"content": "# Nintendo Gamecube/Wii (Dolphin)\n\n## Requirements\n\n- CMake\n\n## How to compile (for Windows x64 - Visual Studio 2017)\n\nIn addition to the requirement(s) listed above, you will also need Visual Studio 2017 installed in order for the following to work.\n\nEnter the following commands (from the Dolphin source directory):\n\n mkdir build\n cd build\n cmake .. -DLIBRETRO=ON -DENABLE_QT=0 -DCMAKE_BUILD_TYPE=Release -G\"Visual Studio 15 2017 Win64\"\n cmake --build . --target dolphin_libretro --config Release\n\n!!! Warning\n If it says 'Could not find named generator' or something to that effect, it means you might be using\n the wrong cmake version on Msys2/Mingw. Remove the regular 'cmake' package and try to install 'mingw-w64-x86_64-cmake' instead.\n"
},
{
"path": "docs/development/cores/core-specific/flycast.md",
"content": "# Sega Dreamcast/NAOMI (Flycast)\n\n## Requirements\n\n- CMake\n\n## How to compile (for Windows)\n\nEnter the following commands (from the Flycast source directory):\n\n```\nmkdir build\ncd build\ncmake -DLIBRETRO=ON -G \"MinGW Makefiles\"\n```\n\n## How to compile (for Linux)\n\nEnter the following commands (from the Flycast source directory):\n\n```\nmkdir build\ncd build\ncmake -DLIBRETRO=ON -DCMAKE_POSITION_INDEPENDENT_CODE=TRUE\n```\n\n## How to debug\nTo debug the Flycast core in GDB, you need to insert the following inside gdb before running RetroArch:\n\n```\nhandle SIGSEGV nostop noprint\n```\n"
},
{
"path": "docs/development/cores/core-specific/ishiiruka.md",
"content": "# Nintendo Gamecube/Wii (Ishiiruka)\n\n## Requirements\n\n- CMake\n\n## How to compile (for Windows x64 - Visual Studio 2017)\n\nIn addition to the requirement(s) listed above, you will also need Visual Studio 2017 installed in order for the following to work.\n\nEnter the following commands (from the Ishiiruka source directory):\n\n mkdir build\n cd build\n cmake .. -DLIBRETRO=ON -DCMAKE_BUILD_TYPE=Release -G\"Visual Studio 15 2017 Win64\"\n cmake --build . --target ishiiruka_libretro --config Release\n\n!!! Warning\n If it says 'Could not find named generator' or something to that effect, it means you might be using\n the wrong cmake version on Msys2/Mingw. Remove the regular 'cmake' package and try to install 'mingw-w64-x86_64-cmake' instead.\n"
},
{
"path": "docs/development/cores/core-specific/mame-2003-plus.md",
"content": "# MAME 2003-Plus Development\n\n## Build environment\n\nMAME 2003-Plus is generally compatible with the RetroArch build environments that can be found in the docs section `For Developers` -> `RetroArch` -> `Compilation Guides`.\n\n## Submitting Control Names\n\n_Note: This first half of this section is written for users who cannot submit code themselves so that coders have the information necessary to assist. The second half is the process written from a coding perspective._\n\n### Background reference: controls.dat\n[As part of mame2003 we have an 'automated port' of the MAME 0.141 controls.dat project information](https://github.com/libretro/mame2003-plus-libretro/blob/master/src/controls.c). It address many, but not all games supported by mame2003-plus.\n\nTherefore in many cases adding new control labels can be as simple as adding the existing controls.dat metadata to a driver declaration. However as part of that process the controls.dat metadata needs to be checked in two ways before it can be added:\n1. From the user perspective: are the control names actually correct\n2. From the coder perspective: does the switch logic in the controls.dat naming function work as intended\n\n### Users: Necessary Information\n\n#### Games affected\n\nOften clones and even different games that share the same hardware platform and operating system share the same control names. Please do as best you can to submit a complete list of all games which share the control names you are submitting so that it can be applied comprehensively.\n\nFor example there are quite a few games in the CPS1 driver which use the same control labels as `sf2`, Street Fighter 2. In that driver, the `sf2` control labels are applied all games listed as being a clone of `sf2` or a clone of `sf2ce`.\n\n#### List of control names\n\nPlease submit your list of control names in a plain text list following the format below with one name to a line and the control number on the left.\n\n#### Naming standard\n\nThe standard we use for determining the proper text to use for the name is to refer to current MAME. That is considered the canonical reference.\n\nFor example the button names for Street Fighter 2 would be submitted as:\n```\nBUTTON1: \"Jab Punch\"\nBUTTON2: \"Strong Punch\"\nBUTTON3: \"Fierce Punch\"\nBUTTON4: \"Short Kick\"\nBUTTON5: \"Forward Kick\"\nBUTTON6: \"Roundhouse Kick\"\n```\n\n### Coders: Implementation\n\nCustom button names are added by creating a `ControlInfo` struct and a button label function in the driver such for _Street Fighter 2_ and its clones. **Note that in the button labeler function we prefix the name of the control with a macro like `BTN1`, `BTN2`, etc. so that there is a reference to the original MAME button number still visible in the libretro frontend.**\n\n#### Generic and custom joystick labels\n\nThere are two generic joystick labeling functions available for control panels with joysticks that have no game-specific labels. `joy2way_labels` returns only generic `Left` and `Right` strings. `joy4way_labels` returns only generic `Left`, `Right`, `Up`, and `Down` strings for 4-way and 8-way joysticks\n\nAn example of game-specific 8-way joystick labels is Street Fighter 2, which uses `Crouch` instead of `Down` and `Jump` instead of `Up`. Street Fighter 2 is therefore is not suitable for the generic function.\n\n#### Street Fighter 2 Example\nIn this case, we were able to incorporate some of the **control.dat** metadata which populates the `st2_ctrl` struct:\n\n```c\nconst struct ControlInfo sf2_ctrl =\n{\n false, /* alternating_controls */\n true, /* mirrored_controls */\n \"\", /* control_details */\n &sf2_get_btn\n};\n\n\nconst char *sf2_get_btn(int type)\n{\n switch(type)\n {\n/* P1NumButtons=6 */\n case (IPT_OSD_DESCRIPTION): return \"8-way Joystick+joy8way\";\n case IPT_BUTTON1: return BTN1 \"Jab Punch\";\n case IPT_BUTTON2: return BTN2 \"Strong Punch\";\n case IPT_BUTTON3: return BTN3 \"Fierce Punch\";\n case IPT_BUTTON4: return BTN4 \"Short Kick\";\n case IPT_BUTTON5: return BTN5 \"Forward Kick\";\n case IPT_BUTTON6: return BTN6 \"Roundhouse Kick\";\n case IPT_JOYSTICK_UP: return \"Jump\";\n case IPT_JOYSTICK_DOWN: return \"Crouch\";\n case IPT_JOYSTICK_LEFT: return \"Left\";\n case IPT_JOYSTICK_RIGHT: return \"Right\";\n } /* end of switch */\n\n return generic_btn_label(type);\n}\n```\n\n#### Driver Declaration\nThen you indicate the change for the appropriate romsets by adding a new letter (`C`) to the macro name and adding a function pointer to the struct. **In other words, the `GAME` driver macro becomes `GAMEC`.**\n\n##### Before:\n```c\nGAME(1991, sf2, 0, sf2, sf2, cps1, ROT0, \"Capcom\", \"Street Fighter II - The World Warrior (World 910522)\" )\n```\n\n##### After:\n```c\nGAMEC(1991, sf2, 0, sf2, sf2, cps1, ROT0, \"Capcom\", \"Street Fighter II - The World Warrior (World 910522)\", &sf2_ctrl, NULL )\n```\n\n**Note that a `NULL` is also added to the end of the macro. That parameter is used for NVRAM bootstraps. The same driver macro is used for adding controls and bootstraps in order to avoid having more and more macros. If this game also had an NVRAM bootstrap, the bootstrap would be included rather than NULL.**\n\n#### Stone Ball Example\n\nIn this case we do not currently have much control metadata, so the implementation is minimal:\n\n```c\nconst struct ControlInfo stonebal_ctrl =\n{\n false, /* alternating_controls */\n false, /* mirrored_controls */\n \"\", /* control__details */\n &stonebal_get_btn\n};\n\nconst char *stonebal_get_btn(int type)\n{\n switch(type)\n {\n case IPT_BUTTON1: return BTN1 \"Shoot/Fight\";\n case IPT_BUTTON2: return BTN2 \"Pass/Tackle\";\n case IPT_BUTTON3: return BTN3 \"Push\";\n } /* end of switch */\n\n return generic_btn_label(type);\n}\n```\n\n#### Driver Declaration\n\n##### Before:\n```c\nGAME( 1994, stonebal, 0, stonebal, stonebal, stonebal, ROT0, \"Art and Magic\", \"Stone Ball (4 Players)\" )\nGAME( 1994, stoneba2, stonebal, stonebal, stonebal, stonebal, ROT0, \"Art and Magic\", \"Stone Ball (2 Players)\" )\n```\n##### After:\n```c\nGAMEC( 1994, stonebal, 0, stonebal, stonebal, stonebal, ROT0, \"Art and Magic\", \"Stone Ball (4 Players)\", &stonebal_ctrl, NULL )\nGAMEC( 1994, stoneba2, stonebal, stonebal, stonebal, stonebal, ROT0, \"Art and Magic\", \"Stone Ball (2 Players)\", &stonebal_ctrl, NULL )\n```\n**Note that a `NULL` is also added to the end of the macro. That parameter is used for NVRAM bootstraps. The same driver macro is used for adding controls and bootstraps in order to avoid having more and more macros. If this game also had an NVRAM bootstrap, the bootstrap would be included rather than NULL.**\n\n--------------------\n\n## Adding an NVRAM Bootstrap\n\n### Purpose and criteria for bootstraps\nThe purpose of the NVRAM bootstrap functionality is to create a good user experience the first time a game is booted. When the behavior of a game on its first boot is impossible for a new user to tell from a crash, then a bootstrap is in order.\n\nMore specifically, the conditions for adding a bootstrap are:\n* It is not clear what the user needs to do to get into the game **or**\n* It is not reasonably possible for the user to get into the game using a SNES controller or arcade control panel\n\n### Example commit\nThis doc will use the process of adding an nvram bootstrap for the game \"Run and Gun (US ver. UAB)\" with the driver name `rungunu`.\n\n#### Step 1: Generate a working NVRAM file\nThe exact process is game-specific.\n\n#### Step 2: Compile and execute bin2c\n\n```bash\ngit clone http://github.com/libretro/mame2003-plus-libretro\ncd mame2003-plus-libretro\ncd tools/bin2c\nmake\n./bin2c -o rungunu_bootstrap.c rungunu.nv\n```\n\n#### Output\n\nThe generated output will look like this:\n```c\nconst unsigned char rungunu_nv_bytes[] = {\n 4, 38,251,217,146, 71, 85, 65, 66, 0, 16, 3, 7, 3, 0, 0, 0, 0,\n 0, 7, 7, 0, 7, 26, 1, 16, 26, 0, 0, 0, 0, 0, 0, 0, 0, 0,\n 0, 0, 0, 0, 0, 0, 0, 0, 0, 0, 0, 0, 0, 0, 0, 0, 0, 0,\n 0, 0, 0, 0, 0, 0, 0, 0, 0, 0, 0, 0, 0, 0, 0, 0, 0, 0,\n 0, 0, 0, 0, 0, 0, 0, 0, 0, 0, 0, 0, 0, 0, 0, 0, 0, 0,\n 0, 0, 0, 0, 0, 0, 0, 0, 0, 0, 0, 0, 0, 0, 0, 0, 0, 0,\n 0, 0, 0, 0, 0, 0, 0, 0, 0, 0, 0, 0, 0, 0, 0, 0, 0, 0,\n 0, 0,\n};\n\nconst unsigned int rungunu_nv_length = 128;\n```\n\n### Step 3: Create a bin2cFILE\n\nThe next step is manual -- putting the data that bin2c generated into the format that the core uses:\n\n```c\nstruct bin2cFILE {\n const unsigned int length;\n const unsigned char data[];\n};\n```\n\n#### Resulting bootstrap structure\n\n```c\nconst struct bin2cFILE rungunu_bootstrap = {\n 128,\n {\n 4, 38,251,217,146, 71, 85, 65, 66, 0, 16, 3, 7, 3, 0, 0, 0, 0,\n 0, 7, 7, 0, 7, 26, 1, 16, 26, 0, 0, 0, 0, 0, 0, 0, 0, 0,\n 0, 0, 0, 0, 0, 0, 0, 0, 0, 0, 0, 0, 0, 0, 0, 0, 0, 0,\n 0, 0, 0, 0, 0, 0, 0, 0, 0, 0, 0, 0, 0, 0, 0, 0, 0, 0,\n 0, 0, 0, 0, 0, 0, 0, 0, 0, 0, 0, 0, 0, 0, 0, 0, 0, 0,\n 0, 0, 0, 0, 0, 0, 0, 0, 0, 0, 0, 0, 0, 0, 0, 0, 0, 0,\n 0, 0, 0, 0, 0, 0, 0, 0, 0, 0, 0, 0, 0, 0, 0, 0, 0, 0,\n 0, 0,\n }\n};\n```\n\n### Step 4: Setup the various source files\n\nAdd `rungunu_bootstrap` to `bootstrap.c` and `bootstrap.h`.\n\nIf `rungun.c` didn't already include the necessary headers from a prior bootstrap project I would have needed to add:\n```c\n#include \"bootstrap.h\"\n#include \"inptport.h\"\n```\n\n### Step 5: Declare the bootstrap in the driver\n\n#### Original:\n```c\nGAMEX( 1993, rungunu, 0, rng, rng, rng, ROT0, \"Konami\", \"Run and Gun (US ver. UAB)\", GAME_IMPERFECT_GRAPHICS | GAME_IMPERFECT_COLORS | GAME_IMPERFECT_SOUND )\n```\n\n#### Bootstrapped:\n```c\nGAMECX( 1993, rungunu, 0, rng, rng, rng, ROT0, \"Konami\", \"Run and Gun (US ver. UAB)\", GAME_IMPERFECT_GRAPHICS | GAME_IMPERFECT_COLORS | GAME_IMPERFECT_SOUND, &generic_ctrl, &rungun_bootstrap )\n```\n\n!!! Important\n The newer driver macros that support setting the bootstrap pointer also need a button labeling function pointer. If there is no existing control name function, passing `&generic_ctrl` suffices.\n\n--------------------\n\n## Compiling a PR for testing\n\n**Note:** For purposes of this guide, replace `PR_NUMBER` with the literal number of the github Pull Request you are interested in testing. For example, if you are interested in testing out the Pull Request which implemented the libretro analog input API, you would substitute `PR_NUMBER` below with `590`, the PR number [for that request](https://github.com/libretro/mame2003-plus-libretro/pull/590).\n\n### *nix or msys:\n```shell\ngit clone https://github.com/libretro/mame2003-plus-libretro.git\npatch -p1 -d mame2003-plus-libretro < <(wget -qO- https://patch-diff.githubusercontent.com/raw/libretro/mame2003-plus-libretro/pull/PR_NUMBER.diff)\ncd mame2003-plus-libretro\nmake\n```\n\n**Note:** If you are using the standard libretro/RetroArch msys2 environment, you will first need to install `patch` with this command:\n\n```shell\npacman -S patch\n```\n\n### RetroPie\n```shell\ncd ~/RetroPie-Setup/\nsudo ./retropie_packages.sh lr-mame2003-plus clean\nsudo ./retropie_packages.sh lr-mame2003-plus sources\nsudo patch -p1 -d tmp/build/lr-mame2003-plus < <(wget -qO- https://patch-diff.githubusercontent.com/raw/libretro/mame2003-plus-libretro/pull/PR_NUMBER.diff)\nrm 590.diff\nsudo ./retropie_packages.sh lr-mame2003-plus build\nsudo ./retropie_packages.sh lr-mame2003-plus build install\n```\n"
},
{
"path": "docs/development/cores/core-specific/mame-2016.md",
"content": "# MAME 2016 Developer Docs\n\nAs of 2019, this libretro port of MAME (the libretro \"OSD\" in MAME parlance) is known to be rather messy. The plan is to rewrite it eventually.\n\nWhat follows here is a technical explanation of what libretro had to do to MAME's GENie build system in order to compile it as a shared library with the appropriate API exported to be used as a libretro core.\n\n\n## The problem with a static library MAME OSD\n\nYou're _not_ supposed to put the public API of a shared library into a static library, particularly if those symbols are \"unused\" by any other part of the shared library. In other words, while the libretro API is contained within the retro OSD, the file containing the public API (`libretro.c`) must not be stripped by the helpful linker trying to optimize for you.\n\nHow you do that varies quite a bit by linker, and some of them such as GNU `ld` require the options be in a specific order. How to do that with GENie is not clear.\n\nTo solve all of these issues at once, we leave libretro.c out of the OSD library and add it to the main MAME library directly. This requires adding an includedirs block for the directory containing libco's header and a files block containing `libretro.c`. These changes are near the bottom of the GENie project in `scripts/src/main.lua`.\n\nThis is not a clean solution. It just happens to be the one that works across platforms without jumping through hoops for every linker that comes along.\n\n\n## Other libretro GENie mods\n\nAs mentioned above, near the bottom of `scripts/src/main.lua`, there's a chunk of libretro-related additions and overrides. You can spot it by searching for \"BEGIN libretro overrides to MAME's GENie build\". Most of what's there is pretty self-explanatory. It overrides MAME to build a shared library and includes processing for ARCH and platform, the two standard libretro build target variables, and includes the `libretro.c` file mentioned above. It could probably be split into its own file, but hasn't been thus far for simplicity.\n\nThe only other addition is `scripts/src/osd/retro.lua` and its `cfg` file which isn't strictly necessary to be a separate file. Pretty standard stuff in there. The real work is in main.lua, and it's all contingent upon use of the libretro OSD to be as minimally invasive into MAME as possible.\n\nThat's about it really. Compared to the old system, GENie is both much simpler and more complicated for us. More complicated because stuff is in so many different places. Simpler because modifying GENie rules like we have done makes for an incredibly shallow fork.\n\n\n## Makefile.libretro\n\nThere is still a pure Makefile named `Makefile.libretro`. It guesses the `ARCH` and platform variables if they're not defined, and it passes those (renaming ARCH in the process) along with the OSD and several other useful arguments to GENie. It's basically a major shortcut for the make command line which for our needs is pretty long.\n\nIt's been tested building the \"arcade\" (used to be UME) and tiny targets, just pass `SUBTARGET=tiny` to `Makefile.libretro` to get the latter.\n\n\n## Final thoughts\n\nMAME is a beast. It compiles to a 137MB .dylib on the Mac and a 172MB `.so` on Linux. Nonetheless, if its retro OSD weren't such a mess, it would be a good example of how to port something to libretro. Presently it still requires a fork, but the fork is perhaps the shallowest libretro fork we've got. And while not every decision the MAME developers have ever made could be considered optimal, the one thing they have done is insist that every external dependency they have is included in their source tree -- which is exactly what we need.\n\nMAME's GENie setup is complex, but that is because MAME is complex. GENie isn't difficult to figure out if you know a bit of lua. Indeed iKarith does not claim to fully understand GENie, but managed to modify the project to build a libretro core with only a few pointers (thanks balrog!) and a little grepping of 3rdparty/genie.\n"
},
{
"path": "docs/development/cores/core-specific/mame.md",
"content": "# MAME (0.181-current) Development\n\n## Building libretro-mame\n\n### Build environement\n\n#### Windows\n\n1. [Install and configure the RetroArch msys2 build environment](../../retroarch/compilation/windows.md)\n2. From the msys2 console, install python with the command `pacman -S python`\n\n### Clone the repository\n\n```\ngit clone http://github.com/libretro/mame\ncd mame\n```\n\n### general `make` syntax\n\n| Build type | Command |\n| --- | --- |\n| Complete build | `make -f Makefile.libretro -j$(nproc)` |\n| Arcade-only build | `make -f Makefile.libretro -j$(nproc) SUBTARGET=arcade` |\n| Softlist-only build | `make -f Makefile.libretro -j$(nproc) SUBTARGET=mess` |\n\n### Platform-specific `make` syntax\n\n| Platform | Command |\n| --- | --- |\n| 64-bit processors | `make -f Makefile.libretro -j$(nproc) PTR64=1` |\n\n## Building a previous version\n\n!!! Important\n If you want to build a previous version of MAME, begin by making sure that you can build the most recent version.\n\nOnce you have built the most recent version of MAME to establish that your build environment is complete, reset the contents of the repository to a clean state:\n\n```\nmake clean\ngit reset --hard\n```\n\n!!! Warning\n These commands will delete any files in your `mame` subfolder that are not in the `libretro/mame` github repository.\n\n### `checkout` the previous version source\n\nSee the section \"Commit hashes for previous versions\" below to find the correct commit hash. For example, if you wish to build MAME 0.205, the corresponding commit hash is `b691c38`.\n\nUse this commit hash and the `git checkout` command to roll back the source to your chosen version:\n```\ngit checkout b691c38\n```\n## Commit hashes for previous versions\n\n| Version | Commit |\n| -------- | ------- |\n| mame0216 | 7cf10a3 |\n| mame0207 | 40fc339 |\n| mame0206 | cf02fe3 |\n| mame0205 | b691c38 |\n| mame0204 | c6150e7 |\n| mame0203 | b57a140 |\n| mame0202 | 856478f |\n| mame0201 | 4dc302e |\n| mame0200 | ff19cd3 |\n| mame0199 | f2e805a |\n| mame0198 | c5f6a62 |\n| mame0197 | 74293f8 |\n| mame0196 | e8f2016 |\n| mame0195 | e44e85b |\n| mame0194 | 5be2496 |\n| mame0193 | bf28b34 |\n| mame0192 | d771f54 |\n| mame0191 | a5db728 |\n| mame0190 | f57574c |\n| mame0189 | 2beedc5 |\n| mame0188 | 7b45ec1 |\n| mame0187 | 1d9648b |\n| mame0186 | e4c6cb1 |\n| mame0185 | fe01a13 |\n| mame0184 | 7768128 |\n| mame0183 | 4ee22dc |\n| mame0182 | 22c42ab |\n| mame0181 | 3a1651e |\n"
},
{
"path": "docs/development/cores/core-specific/pcsx2.md",
"content": "# Sony PlayStation2 (LRPS2)\n\n## Requirements\n\n- CMake\n- xxd (optional)\n\n## How to compile (for Windows x64 - Visual Studio 2017)\n\nIn addition to the requirement(s) listed above, you will also need Visual Studio 2017 installed in order for the following to work.\n\nEnter the following commands (from the PCSX2 source directory):\n\n mkdir build\n cd build\n cmake .. -DLIBRETRO=ON -DCMAKE_BUILD_TYPE=Release -G\"Visual Studio 15 2017 Win64\"\n cmake --build . --target pcsx2_libretro --config Release\n \n!!! Warning\n If it says 'Could not find named generator' or something to that effect, it means you might be using\n the wrong cmake version on Msys2/Mingw. Remove the regular 'cmake' package and try to install 'mingw-w64-x86_64-cmake' instead.\n \n!!! Warning\n If you get this error 'Visual Studio 15 2017 could not find any instance of Visual Studio', your installation of Visual Studio 2017\n is most likely missing 'Visual C++ tools for CMake'. This can be found under 'Desktop development with C++'. Go back to Visual Studio\n 2017 and install this, then try again.\n\n## How to compile (for Windows x64 - Visual Studio 2019)\n\nIn addition to the requirement(s) listed above, you will also need Visual Studio 2019 installed in order for the following to work.\n\nEnter the following commands (from the PCSX2 source directory):\n\n mkdir build\n cd build\n cmake .. -DLIBRETRO=ON -G\"Visual Studio 16 2019\"\n cmake --build . --target pcsx2_libretro --config Release\n\n!!! Warning\n If it says 'Could not find named generator' or something to that effect, it means you might be using\n the wrong cmake version on Msys2/Mingw. Remove the regular 'cmake' package and try to install 'mingw-w64-x86_64-cmake' instead.\n \n## How to compile (for Windows x64 - Visual Studio 2022)\n\nIn addition to the requirement(s) listed above, you will also need Visual Studio 2022 installed in order for the following to work.\n\nEnter the following commands (from the PCSX2 source directory):\n\n cmake -B build -G \"Visual Studio 17 2022\" -DCMAKE_BUILD_TYPE=Release -DLIBRETRO=ON\n cmake --build build --config Release --target pcsx2_libretro\n\n## How to compile (for Linux)\n\nEnter the following commands (from the PCSX2 source directory):\n\n mkdir build\n cd build\n cmake ..\n make\n"
},
{
"path": "docs/development/cores/core-specific/swanstation.md",
"content": "# Sony PlayStation (SwanStation)\n\n## Requirements\n\n- CMake\n\n## How to compile (for Windows x64 - Visual Studio 2019)\n\nIn addition to the requirement(s) listed above, you will also need Visual Studio 2019 installed in order for the following to work.\n\nEnter the following commands (from the SwanStation source directory):\n\n mkdir build\n cd build\n cmake -G \"Visual Studio 16 2019\" -A \"x64\" -DCMAKE_BUILD_TYPE=Release ..\n cmake --build . --target swanstation_libretro --config Release\n\n!!! Warning\n If it says 'Could not find named generator' or something to that effect, it means you might be using\n the wrong cmake version on Msys2/Mingw. Remove the regular 'cmake' package and try to install 'mingw-w64-x86_64-cmake' instead.\n"
},
{
"path": "docs/development/cores/developing-cores.md",
"content": "# Developing Libretro Cores\n\n### Libretro API\n\nThe Libretro API is a lightweight C-based Application Programming Interface (API) that exposes generic audio, video, and input callbacks. Developers of \"cores\" such as standalone games, game emulators, media players, and other applications don’t have to worry about writing different video drivers for Direct3D, OpenGL or worrying about catering to all possible input APIs, sound APIs, gamepads, etc.\n\nWhen you choose to use the libretro API, your program gets turned into a single library file (called a ‘libretro core’). A frontend that supports the libretro API can then load that library file and run the app. The frontend’s responsibility is to provide all the implementation-specific details. The libretro core’s responsibility is solely to provide the main program.\n\nAny project that is ported to work with this API can be made to run on ANY libretro frontend – now and forever. You maintain a single codebase that only deals with the main program, and you then target one single API (libretro) in order to port your program over to multiple platforms at once. A libretro core written in portable C or C++ can run seamlessly on many platforms with very little or no porting effort. Libretro bindings for other languages are growing increasingly common and comprehensive as well.\n\n!!! info \"Licensing\"\n Libretro is an open specification that is 100% free to implement, with no licensing fees or strings attached. Our reference frontend is RetroArch. The two projects are not the same, and this is reflected in the licensing. RetroArch is licensed via GPLv3 whereas the libretro API is a MIT-licensed API.\n\n## Resources for core development\n\n### Canonical `libretro.h`\n\nThe [most current canonical copy of `libretro.h`](https://raw.githubusercontent.com/libretro/libretro-common/master/include/libretro.h) can be found in the master branch of the libretro-common repository.\n\n!!! tip\n `libretro.h` is the single most important technical reference for developers of libretro cores and frontends\n\n\n### `skeletor` sample core\n\nRetroArch contributor **bparker06** created [`skeletor`](https://github.com/libretro/skeletor) as a minimal libretro core implementation. `skeletor` can also be useful by furnishing the stub libretro `Makefile` and `Makefile.common` files.\n\n\n### Development log of Libretro cores\n\nThank you for those blog posts :\n\n**Beardypig** published a two-part guide ([Part 1](https://web.archive.org/web/20190219134430/http://www.beardypig.com/2016/01/15/emulator-build-along-1/), [Part 2](https://web.archive.org/web/20190219134028/http://www.beardypig.com/2016/01/22/emulator-build-along-2/)) describing the process of implementing `libretro.h` as part of creating [Vectrexia](https://github.com/beardypig/vectrexia-emulator/), an original emulator core designed for libretro from the ground up.\n\n**James Roeder** has written a seven parts blog posts entitled [An Arduous Endeavor](https://www.jroeder.net/2021/08/10/arduous-endeavor-part-1/).\n\n**Natesh** has written a blog post about [GameboyCore as a libretro core](https://nnarain.github.io/2017/07/13/GameboyCore-as-a-libretro-core!.html).\n\n### `libretro-common`\n\n[`libretro-common`](https://github.com/libretro/libretro-common/) is a collection of essential cross-platform coding blocks useful for libretro core and frontend development, written primarily in C. Permissively licensed.\n\n\n### `libretro-deps`\n\n[`libretro-deps`](https://github.com/libretro/libretro-deps/) is a collection of third-party dependencies, pre-modified for use by libretro cores.\n\n\n### `libretro-samples`\n\n[`libretro-samples`](https://github.com/libretro/libretro-samples) is a set of illustrations of the libretro API.\n\n### OpenGL hardware accelerated cores\n\n[A guide for developing OpenGL accelerated cores](opengl-cores.md) is available.\n\n\n## Implementing the API\n\nThe libretro API consists of several functions outlined in libretro.h, found in the RetroArch source package. A libretro implementation should be compiled into a dynamically loadable executable (.dll/.so/.dylib) or a static library (.a/.lib) that exports all the functions outlined in libretro.h. These will be called by the frontend. Implementations are designed to be single-instance, so global state is allowed. Should the frontend call these functions in wrong order, undefined behavior occurs. The API header is compatible with C99 and C++. From C99, the bool type and are used.\n\nThe program flow of a frontend using the libretro API can be expressed as follows:\n\n### Startup\n\n#### `retro_api_version()`\n\nThis function should return RETRO_API_VERSION, defined in libretro.h. It is used by the frontend to determine if ABI/API are mismatched. The ver- sion will be bumped should there be any non- compatible changes to the API. Changes to retro_* structures, as well as changes in publically visible functions and/or their arguments will warrant a bump in API version.\n\n#### `retro_set_*()`\n\nLibretro is callback based. The frontend will set all callbacks at this stage, and the implementation must store these function pointers somewhere. The frontend can, at a later stage, call these.\n\n#### `retro_init()`\n\nThis function is called once, and gives the implementation a chance to initialize data structures.\n\n#### Environment callback\n\nWhile libretro has callbacks for video, audio and input, there’s a callback type dubbed the environment callback. This callback (`retro_environment_t`) is a generic way for the libretro implementation to access features of the API that are considered too obscure to deserve its own symbols. It can be extended without breaking ABI. The callback has a return type of `bool` which tells if the frontend recognized the request given to it.\n\n\n#### `retro_set_controller_port_device()`\n\nBy default, gamepads will be assumed to be inserted into the implementation. If the engine is sensitive to which type of input device is plugged in, the frontend may call this function to set the device to be used for a certain player. The implementation should try to auto-detect this if possible.\n\n\n#### `retro_get_system_info()`\n\nThe frontend will typically request statically known information about the core such as the name of the implementation, version number, etc. The information returned must be allocated statically.\n\n\n#### `retro_load_game()`\n\nThis function will load content. If the implementation is an emulator, this would be a game ROM image, if it is a game engine, this could be packaged upassets for the game, etc. The function takes a structure that points to the path where the ROM was loaded from, as well as a memory chunk of the already loaded file.\n\n**There are two modes of loading files with libretro.** If the game engine requires to know the path of where the ROM image was loaded from, the `need_fullpath` field in `retro_system_info` must be set to true. If the path is required, the frontend will not load the file into the data/size fields, and it is up to the implementation to load the file from disk. The path might be both relative and absolute, and the implementation must check for both cases. This is useful if the ROM image is too large to load into memory at once. It is also useful if the assests consist of many smaller files, where it is necessary to know the path of a master file to infer the paths of the others.\n\nIf `need_fullpath` is set to `false`, the frontend will load the ROM image into memory beforehand. In this mode, the path field is not guaranteed to be non-`NULL`. It should point to a valid path if the file was indeed, loaded from disk, however, it is possible that the file was loaded from `stdin`, or similar, which has no well-defined path. It is recommended that `need_fullpath` is set to `false` if possible, as it allows more features, such as soft-patching to work correctly.\n\n\n#### `retro_get_system_av_info()`\n\nThis function lets the frontend know essential audio/video properties of the game. As this information can depend on the game being loaded, this info will only be queried after a valid ROM image has been loaded. It is important to accurately report FPS and audio sampling rates, as FFmpeg recording relies on exact information to be able to run in sync for several hours.\n\n\n### Running\n\n#### `retro_run()`\n\nAfter a game has been loaded successfully, retro_run() will be called repeatedly as long as the user desires. When called, the implementation will perform its inner functionality for one video frame. During this time, the implementation is free to call callbacks for video frames, audio samples, as well as polling input, and querying current input state. The requirements for the callbacks are that video callback is called exactly once, i.e. it does not have to come last. Also, input polling must be called at least once.\n\n#### Input\nAbstracting gamepad and other input devices is the hardest part of defining a multi-system API as it differs across every system. The libretro API therefore provides the RetroPad -- a gamepad/joystick abstraction available with digital and analog controls -- to allow cores to be written without platform-specific input code.\n\nInput device abstractions are also available for keyboards, mice, pointers, and lightguns.\n\n**Learn more in the [Input API](../input-api.md) docs.**\n\n#### Video/Audio synchronization considerations\n\nLibretro is based on fixed rates; video FPS and audio sampling rates are always assumed to be constant. Frontends will have control of the speed of playing, typically using VSync to obtain correctspeed. The frontend is free to \"fast-forward\", i.e. play as fast as possible without waiting, or slow-motion. For this reason, the engine should not rely on system timers to perform arbitrary synchronization. This is common and often needed in 3D games to account for varying frame rates while still maintaining a playable game.\n\nHowever, libretro targets classic systems where one can assume that 100% real-time performance will always be met, thus avoiding the need for careful timing code. By default, the libretro implementation should replace any arbitrary `sleep()` and `time()` patterns with simply calling video/audio callbacks. The frontend will make sure to apply the proper synchronization. This is mostly a problem with game ports, such as PrBoom. For the libretro port of PrBoom, which heavily relied on timers and sleeping patterns, sleeping was replaced with simply running for one frame, and calling the video callback. After that, enough audio was rendered to correspond to one frames worth of time, 1/fps seconds. All sleeping and timing patterns could be removed, and synchronization was correct.\n\n\n#### Audio callback options\n\nThe libretro API has two different audio callbacks. Only one of these should be used; the implementation must choose which callback is best suited.\n\nOne _audio frame_ is always made up of 2 int16_t samples, corresponding to the left and right channels, respectively.\n\n##### Per-sample audio\nThe first audio callback is called _per-sample_, but actually deals with a single _audio frame_. It has the prototype `void (*retro_audio_sample_t)(int16_t left, int16_t right)`. This should be used if the implementation generates a single audio frame at a time. The frontend will make sure to partition the audio data into suitable chunks to avoid incurring too much syscall overhead.\n\n\n##### Batch audio\nIf audio is output in a \"batch\" fashion, i.e. 1 / fps seconds worth of audio data at a time, the batch approach should be considered. Rather than looping over all audio frames and calling the per-sample callback every time, the _batch callback_ should be used instead. Its prototype is `size_t (*retro_audio_sample_batch_t)(const int16_t * samples, size_t num_frames)`. The number of samples should be `2 * num_frames`, with left and right channels interleaved every frame. Using the batch callback, audio will not be copied in a temporary buffer, which can buy a slight performance gain. Also, all data will be pushed to audio driver in one go, saving some slight overhead.\n\nIt is not recommended to use the batch callback for very small (< 32 frames) amounts of data. The data passed to the batch callback should, if possible, be aligned to 16 bytes (depends on platform), to allow accelerated SIMD operations on audio.\n\n#### `retro_serialize_size()`, `retro_serialize()`, and `retro_unserialize()`\n\nSerialization is optional to implement. Serialization is better known as \"save states\" in emulators, and these functions are certainly more useful in emulators which have a fixed amount of state. It allows the frontend to take a snapshot of all internal state, and later restore it. This functionality is used to implement e.g. rewind and netplay.\n\nSome important considerations must be taken to implement these functions well:\n\n * If serialization is not supported, `retro_serialize_size()` should return 0. If retro_serialize_size() returns non-zero, it is assumed that serialization is properly implemented.\n * The frontend should call `retro_serialize_size()` before calling `retro_serialize()` to determine the amount of memory needed to correctly serialize.\n * The size eventually passed to `retro_serialize()` must be at least the size of the value returned in `retro_serialize_size()`. If too large a buffer is passed to `retro_serialize()`, the extra data should be ignored (or `memset` to 0).\n * It is valid for the value returned by `retro_serialize_size()` to vary over time, however, it cannot ever increase over time. If it should ever change, it must decrease. This is rationalized by the ability to predetermined a fixed save state size right after `retro_load_game()` that will always be large enough to hold any following serialization. This certainty is fundamental to the rewind implementation. This requirement only holds between calls to `retro_load_game()` and `retro_unload_game()`.\n\nIf possible, the implementation should attempt to serialize data at consistent offsets in the memory buffer. This will greatly help the rewind implementation in RetroArch to use less memory. Both `retro_serialize()` and `retro_unserialize()` return a boolean value to let the frontend know if the implementation succeeded in serializing or unserializing.\n\n### Tear-down\n\n#### `retro_unload_game()`\n\nAfter the user desired to stop playing, `retro_unload_game()` will be called. This should free any internal data related to the game, and allow `retro_load_game()` to be called again.\n\n#### `retro_deinit()`\n\nThis function should free all state that was initialized during `retro_init()`. After calling this function, the frontend can again call `retro_init()`.\n\n### Thread safety\n\nThe libretro API does not make guarantees about thread safety. Therefore the core developer should assume the functions declared in the libretro header are neither reentrant nor safe to be called by multiple threads at the same time.\nIf a core is multi-threaded then the core developer is responsible for thread safety when making libretro API calls. \n\nIt is discouraged to do libretro API calls outside of `retro_run()` i.e. outside of the main thread.\n\n## Add your core to Libretro infrastructure\n\nThere are several steps before your core can be available to user via the Online Updater > Core Downloader :\n\n 1. Add your Libretro core info to [libretro-super repository](https://github.com/libretro/libretro-super/tree/master/dist/info)\n - As a test, place info file to `libretro_info_path`, load core, and validate if information shows up correctly: Information / Core Information\n 2. Add [.gitlab-ci.yml](https://github.com/search?q=org%3Alibretro+.gitlab-ci.yml&type=commits) to the root directory of your source code so it can be added to Libretro CI/CD.\n 3. If you want your core to be compatible with [RetroArch's playlist](/guides/roms-playlists-thumbnails) :\n - Add at least icons playlist and content for your core in [RetroArch assets repository](https://github.com/libretro/retroarch-assets/tree/master/src/xmb/monochrome)\n - Add your games to [Libretro database](https://github.com/libretro/libretro-database).\n 4. Add documentation of your core following the instructions in [libretro-docs](https://github.com/libretro/docs#adding-a-new-core).\n"
},
{
"path": "docs/development/cores/dynamic-rate-control.md",
"content": "# Dynamic Rate Control for Retro Game Emulators\n\nDynamic Rate Control allows emulator frontends to synchronize both audio and video output at the same time, even when the emulating system has a different refresh rate and audio sampling rate than the gaming system that is being emulated.\n\nThe method works by dynamically adjusting audio resampling ratios in such ways that ideally, the audio buffer is never underrun nor overrun, thus avoiding blocking on audio. This in turn allows vertical synchronization for video. The audio pitch is adjusted when adjusting audio resampling ratios, but in practice so little, that it is inaudible to the human ear.\n\n!!! Tip \"Read this documentation in PDF form\"\n Because the formulas in this documentation have not yet been converted to markdown, [please consult the original PDF version](https://github.com/libretro/docs/blob/master/archive/ratecontrol.pdf). _If you can assist in the conversion, please post an issue or PR in [the libretro documentation repository](https://github.com/libretro/docs)._\n\nRetro games are highly synchronous. Their audio output rates are linked directly to video refresh rates. Every video frame, the audio chip generates on average a fixed amount of audio samples. Before continuing to emulate the next frame, the generated audio samples must be pushed to an audio buffer of fixed size.\n\nIf there is not enough space in the audio buffer, the emulator must wait (block) for the buffer to become ready for writing. This is a non-ideal situation as while the emulator is blocking on audio, a vertical refresh might be missed entirely, thus creating stuttering video.\n\n## Ideal synchronization\n\nFor an emulator of a retro game system, a key factor in smooth video is vertical refresh synchronization (**VSync**), where each frame of the game maps to a single frame on the monitor. Audio must also be pushed to the speakers without any audio dropouts. This double synchronization requirement poses a problem as any form of synchronization to one modality will negatively affect the other.\n\nThis is a real problem as an emulator has no way of guaranteeing perfectly equal video refresh rates and audio sampling rates as the original system.\n\nOn conventional computer hardware, there is no perfect way of knowing the real monitor refresh rates and audio sampling rates either due to tolerances on oscillators.\n\n\n## Scope of method\n\nAs this method aims to implement a method for synchronization when VSync is used, this method is only useful when game frame rate is close to monitor frame rate. If this is not the case, other methods should be employed.\n\n\n## Method\n\nThis method assumes that audio from the emulator is output at regular intervals, e.g. every video frame. The method also assumes that audio is resampled from the game system sampling rate to the sound cards sampling rate. The resampling ratio will be dynamically adjusted every time audio is resampled and subsequently pushed to the audio buffer.\n\n\n## Link to full version\n\nBecause the formulas in this documentation have not yet been converted to markdown, [please consult the original PDF version](https://github.com/libretro/docs/blob/master/archive/ratecontrol.pdf). _If you can assist in the conversion, please post an issue or PR in [the libretro documentation repository](https://github.com/libretro/docs)._\n"
},
{
"path": "docs/development/cores/opengl-cores.md",
"content": "# Use case for Libretro OpenGL API\n\n### What do most modern platforms have in common?\n\n**Answer**: OpenGL or OpenGL ES.\n\nThese APIs allow us to write 3D graphics-based applications:\n * In a platform-agnostic way\n * With hardware acceleration\n * Using a standard language/API\n\n### What do these platforms not have in common?\n\n * Audio\n * Input\n * Shader\n * Windowing implementations\n * User interfaces\n * Touchscreen overlays\n * Camera\n * Sensors\n * Development environments\n\n### What is not portable about OpenGL?\n * Symbol wrapper lookup (necessary on Windows)\n * Divergent subsets of API functionality (GLES 1/2/3, GL 1.5/2/3/4)\n * Windowing interfacing context drivers per platform\n * Display frontend for each platform\n * Post-processing by way of shaders\n\nLibretro's OpenGL implementation is designed specifically to address the practicalities of extending OpenGL and OpenGL ES hardware acceleration to the wide variety of architectures and environments supported by the libretro ecosystem.\n\n# Implementing OpenGL accelerated cores\n\nLibretro GL provides a portable solution for OpenGL-based hardware acceleration along with the rest of libretro's simple but comprehensive API. The Libretro API allows cores to use OpenGL (GL2+ or GLES2) directly in addition to frontend features, such as multi-pass shaders. This is accomplished by letting cores render to frame buffer objects (FBOs) instead of the back buffer.\n\n!!! important\n GL drivers must support render-to-texture extensions for this to work.\n\n\n## Application model\n\nUsing OpenGL in a libretro context is somewhat different than when you use libraries like SDL, GLFW or SFML. In libretro, the frontend owns the OpenGL context. For an application using conventional libraries like SDL, the application will do this:\n\n - Initialize, create a window of specific size\n - Initialize OpenGL resources\n - Per frame, handle window events (resize), handle input, render as desired, swap buffers\n - Tear down context and window\n\nUsing libretro API, platform specifics like managing windows, rendering surfaces and input are all handled by the frontend. The core will only deal with rendering to a surface. The core renders to an FBO of fixed size, determined by the core. The frontend takes this rendered data and stretches to screen as desired by the user. It can apply shaders, change aspect ratio, etc. This model is equivalent to software rendering where `retro_video_refresh_t_callback` is called.\n\n## Using OpenGL in libretro\n\n - Use `RETRO_ENVIRONMENT_SET_PIXEL_FORMAT` and request a 32-bit format. This is the format that the resulting framebuffer will have. In reality, RetroArch converts all 16-bit data (`RETRO_PIXEL_FORMAT_RGB565`) to 32-bit (`XRGB8888`) when running desktop GL for performance reasons. In GLES mode, this is not done, however. Do not rely on this behavior, and be explicit about it.\n - Use `RETRO_ENVIRONMENT_SET_HW_RENDER` environment callback in `retro_load_game()`, notifying frontend that core is using hardware rendering. An OpenGL 2+ or GLES2 context can be specified here. If this is not supported the callback will return false, and you can fallback to software rendering or refuse to start.\n - In `retro_get_system_av_info()`, as normal, `max_width` and `max_height` fields specify the maximum resolution the core will render to.\n - When the frontend has created a context or reset the context, `retro_hw_context_reset_t` is called. Here, OpenGL resources can be initialized. The frontend can reset the context at will (e.g. when changing from fullscreen to windowed mode and vice versa). The core should take this into account. It will be notified when reinitialization needs to happen.\n - A callback to grab OpenGL symbols is exposed via `retro_hw_get_proc_address_t`. Use this to retrieve symbols and extensions.\n - In `retro_run()`, use `retro_hw_get_current_framebuffer_t` callback to get which FBO to render to, e.g. `glBindFramebuffer(GL_FRAMEBUFFER, get_current_framebuffer())`. This is your \"backbuffer\". Do not attempt to render to the real backbuffer. You must call this every frame as it can change every frame. The dimensions of this FBO are at least as big as declared in `max_width` and `max_height`. If desired, the FBO also has a depth buffer attached (see `RETRO_ENVIRONMENT_SET_HW_RENDER`).\n - When done rendering, call `retro_video_refresh_t` with the macro `RETRO_HW_FRAMEBUFFER_VALID` as argument for buffer. Width and height should be specified as well, but pitch argument is irrelevant and will be ignored. If the frame is duped (see `RETRO_ENVIRONMENT_CAN_DUPE`), the buffer argument takes`NULL` as normal.\n\n## Important considerations in the OpenGL code\n\nThe frontend and libretro core share OpenGL context state. Some considerations have to be taken into account for this cooperation to work nicely.\n\n - Don’t leave buffers and global objects bound when calling `retro_video_refresh_t`. Make sure to unbind everything, i.e. VAOs, VBOs, shader programs, textures, etc. Failing to do this could potentially hit strange bugs. The frontend will also follow this rule to avoid clashes. Being tidy here is considered good practice anyway.\n - The GL viewport will be modified by frontend as well as libretro core. Set this every frame.\n - `glEnable()` state like depth testing, etc, is likely to be disabled in frontend as it's just rendering a quad to screen. Enable this per-frame if you use depth testing. There is no need to disable this before calling `retro_video_refresh_t`.\n - Avoid VAOs. They tend to break on less-than-stellar drivers, such as AMD drivers on Windows as of 2013\n - Try to write code which is GLES2 as well as GL2+ (w/ extensions) compliant. This ensures maximum target surface for the libretro core.\n - Libretro treats top-left as origin. OpenGL treats bottom-left as origin. To be compatible with the libretro model, top-left semantics are preserved. Rendering normally will cause the image to be flipped vertically. To avoid this, simply scale the final projection matrix by `[1,− 1 , 1 ,1]`.\n\n## Test implementations\n\n * [Several OpenGL demonstrations are available in `libretro-samples`](https://github.com/libretro/libretro-samples/tree/master/video/opengl)\n * [A demonstration OpenGL core is available](https://bitbucket.org/Themaister/libretro-gl) which uses instanced rendering of a textured cube, with FPS-style fly-by camera and libretro’s mouse API as well. It is valid GLES and GL2 at the same time.\n\n## Building a libretro core\n\nLibretro is an interface, and not a utility library. Libretro cores are built as standalone dynamic or static libraries, and as they use GL symbols here,\nthey must link against GL symbols themselves. An example of how this can be done is shown in [the test implementation](https://github.com/Themaister/RetroArch/blob/master/libretro-test-gl/Makefile).\n"
},
{
"path": "docs/development/frontends.md",
"content": "# Frontend Development\nLibretro frontends are programs that have implemented the [libretro API](libretro-overview.md) specification. If fully implemented, this allows the program to run any libretro core that has been developed.\n\n## Frontend Development Guides\n * [A Libretro retrospective](https://web.archive.org/web/20190404052149/https://genodians.org/ehmry/2019-03-28-libretro) - Developer Emery Hemingway's detailed look back on implementing a new libretro frontend for the Genode Operating System.\n\n## Reference frontend\n[RetroArch](http://retroarch.com) is the official reference [libretro](http://libretro.com) frontend, developed in-house. It is usually the first in implementing new features added to the libretro API. Written almost entirely in C, targets a large amount of platforms.\n\nName | Author(s) | Description\n------|-----------|------------\n[Anarchy Arcade](http://store.steampowered.com/app/266430/Anarchy_Arcade/) | Elijah Newman-Gomez | AArcade is a virtual reality 3D desktop that launches shortcuts to absolutely anything you like.\n[Arcan](https://github.com/letoram/arcan) | Letoram | Powerful development framework for creating virtually anything from user interfaces for specialized embedded applications all the way to full-blown standalone desktop environments.\n[EmuHawk (BizHawk)](github.com/TASEmulators/BizHawk) | BizHawk team | Multi-system emulator that uses its own set of cores, but also allows loading libretro cores [to varied success](https://github.com/TASEmulators/BizHawk/wiki/Libretro-core-compatibility).\n[Emutest](https://github.com/kivutar/emutest) | kivutar | A headless libretro frontend to test libretro cores.\n[EmuVR](http://www.emuvr.net/about/) | | |\n[Hackable console](https://github.com/leiradel/hackable-console) | leiradel | Debugging tool for libretro cores.\n[Haiyajan](https://projects.deltabeard.com/haiyajan) | deltabeard | A tiny and fast libretro entertainment application.\n[KRetro](https://invent.kde.org/games/kretro) | Seshan Ravikumar | libretro emulation frontend for Plasma.\n[Ludo](https://github.com/libretro/ludo) | kivutar | libretro frontend written in Go.\n[Lemuroid](https://github.com/Swordfish90/Lemuroid) | Swordfish90 | All in 1 emulator on Android.\n[Merton](https://github.com/snowcone-ltd/merton) | Snowcone Ltd. | Merton is a work-in-progress emulator frontend for libretro built with [libmatoya](https://github.com/snowcone-ltd/libmatoya).\n[Mininal reference fronted](https://github.com/bparker06/reference_frontend) | bparker06 | This is a barebones minimal reference frontend for the libretro API.\n[minir](https://github.com/Alcaro/minir) | Alcaro | WIMP interface (Windows, Icons, Menus and Pointers), and only cares about the major desktop OSes. Drops flexibility in favor of improved out-of-the-box experience.\n[minir test fronts](https://github.com/Alcaro/minir/tree/master/subproj) | Alcaro | Three different fronts, none of which has IO drivers: retroprofile just runs the core, intended for performance tests and PGO; retrorepeat runs the core twice, expecting identical output; retrostateverify traces the entire core and verifies whether its savestates are perfect.\n[miniretro](https://github.com/davidgfnet/miniretro) | davidgfnet | This is a small (Linux only for now) CLI libretro frontend for automated testing of libretro cores. \n[nanoarch](https://github.com/heuripedes/nanoarch) | heuripedes | Small frontend providing video, audio and basic input features to run non-libretro-GL cores. Built on GLFW.\n[New Retro Arcade](http://digitalcybercherries.com/) | Digital Cyber Cherries | |\n[noarch](https://github.com/robloach/noarch) | RobLoach | Minimalist frontend which does not provide video, audio or even basic input. It loads a libretro core, runs an iteration, and then exits. Good for unit testing.\n[picoarch](https://git.crowdedwood.com/picoarch/about) | neonloop | picoarch uses libpicofe and SDL to create a small frontend to libretro cores. It's designed for small (320x240 2.0-2.4\") screen, low-powered devices like the Trimui Model S (PowKiddy A66).\n[Phoenix](http://phoenix.vg/) | Phoenix | Upcoming libretro frontend written with the Qt5 cross-platform application framework.\n[raylib-libretro](https://github.com/RobLoach/raylib-libretro) | RobLoach | Libretro frontend using raylib.\n[retro_frontend](https://github.com/ehmry/genode-libretro) | Ehmry | Frontend for the [Genode](http://genode.org) operating system framework. Following the Genode philosophy this frontend strives to be a minimal implemention that is extensible via the abstract OS services provided to it.\n[RePlay OS](https://www.replayos.com/) | RTA | Upcoming libretro based frontend optimized for use with Raspberry Pi boards using both LCD and CRT screens.\n[replay](https://github.com/avojak/replay) | avojak | Native Linux multi-system emulator built in Vala and GTK for elementary OS.\n[Retrobot](https://github.com/rossimo/retrobot) | Ross Squires | A self-hosted Discord bot that allows friends to play games over chat.\n[RetroPlayer](https://forum.kodi.tv/forumdisplay.php?fid=194) | Kodi-Game | Also known as [Kodi-Game](https://github.com/kodi-game/), RetroPlayer is a libretro compatibility layer for [Kodi](https://kodi.tv/).\n[sdlarch](https://github.com/heuripedes/sdlarch) | heuripedes | Small frontend providing video, audio and basic input to run basic libretro cores. Built on SDL.\n[URetro](https://github.com/QuarkTheAwesome/URetro) | | Nintendo WiiU frontend\n[Vintage Simulator](https://vintagesimulator.com) | runvnc | 3D Lua-programmable libretro frontend supporting many 3D formats, some Cairo graphics, physics, emulation control with scripts\n[ZMZ](https://github.com/Alcaro/ZMZ) | Alcaro | Abandoned | Fork of [ZSNES](http://www.zsnes.com/) that rips out its emulation code, using libretro instead. Due to ZSNES being inflexible, ZMZ became quite a bit of a mess.\n"
},
{
"path": "docs/development/input-api.md",
"content": "# Libretro Input API\n\n## Overview\n\nLibretro's input system is based on abstracted input device types which are polled via callbacks provided by the libretro API. For core developers, the value of these abstractions is that cores can be coded with an 'ideal' input type abstraction in mind while giving frontend developers and users the freedom to map that abstraction to any number of hardware or software input sources.\n\nFor example, native libretro cores and source ports could be written to poll the RetroPad, the gamepad abstraction, while the frontend allows the user to map the RetroPad to their physical keyboard or mouse. This is also an advantage for emulator cores, where the input abstraction is selected to match the type or types of input available on the emulated system. For example, the libretro pointer abstraction is available for emulating input for systems like the Nintendo DS; frontends can allow the user to map a mouse or other suitable input device in addition to a hardware touchscreen. Meanwhile, on platforms like smartphones and tablets, the user can utilize their touch hardware for a more authentic emulation experience without as much code for the core to maintain.\n\nLibretro input device abstractions include:\n\n * RetroPad\n - Digital Gamepad or Joystick\n - Digital Gamepad or Joystick with Analog Controls\n * Mouse\n * Pointer\n * Keyboard\n * Lightgun\n\n### Reference implementations\nThe [`libretro-test` core](https://github.com/libretro/libretro-samples/tree/master/tests/test) provides a reference implementation in the C programming language for many aspects of the libretro input API. As of March 2021, `libretro-test` does not yet incorporate the latest additions to the input API, but still serves as an important resource.\n\n# Input Abstractions\n\n## RetroPad\nThe **RetroPad** is a controller abstraction interface defined by the Libretro API. It is the primary input device for a libretro frontend. Unless a core absolutely requires the use of a keyboard with no possible fallback for gamepad-type controls, a [[Libretro core]] should always be implemented as such that it is directly controllable by the RetroPad.\n\n\n\nIn terms of button layout and functionality, the RetroPad is based on the original PlayStation gamepad and the Super Nintendo gamepad.\n\n\nAbove: An example of the RetroPad gamepad abstraction mapped to the Megadrive 6-Button gamepad.\n\n### Digital RetroPad\n`RETRO_DEVICE_JOYPAD`: A RetroPad abstraction with all digital controls can be used. The conceptual arrangement for the buttons for the RetroPad is inspired by the Super Nintendo controller and the Sony Playstation DualShock.\n\nThe minimum implementation required for the digital RetroPad abstraction:\n\n* At least two shoulder buttons\n* At least four face buttons\n* At least one D-pad\n* A `Start` button and a `Select`/`Back` button.\n\n### Analog RetroPad\n`RETRO_DEVICE_ANALOG`: An analog subtype of the RetroPad abstraction with one or more analog inputs can be used. Conceptually inspired by the Sony DualShock2, this adds two analog sticks to the digital RetroPad and allows all buttons to return analog values in the range of `[-0x7fff, 0x7fff]`, although some devices may return `-0x8000`. Positive X axis is right. Positive Y axis is down. Buttons are returned in the range `[0, 0x7fff]`.\n\n**hiddenasbestos**, author of the current revision of the analog RetroPad API, [provides a reference implementation in C](https://github.com/libretro/libretro-common/pull/50#issue-153412324) that checks for analog button values before falling back to the digital `RETRO_DEVICE_JOYPAD`. This approach supports frontends that do not implement the analog input API.\n```c\nstatic uint16_t get_analog_button( retro_input_state_t input_state_cb,\n int player_index,\n int id )\n{\n uint16_t button;\n\n // NOTE: Not all front-ends support analog buttons (or pre-date it) \n // so we need to handle this in a graceful way.\n\n // First, try and get an analog value using the new libretro API constant\n button = input_state_cb( player_index,\n RETRO_DEVICE_ANALOG,\n RETRO_DEVICE_INDEX_ANALOG_BUTTON,\n id );\n\n if ( button == 0 )\n {\n // If we got exactly zero, we're either not pressing the button, or the front-end\n // is not reporting analog values. We need to do a second check using the classic\n // digital API method, to at least get some response - better than nothing.\n\n // NOTE: If we're honestly just not holding the button, we're still going to get zero.\n\n button = input_state_cb( player_index,\n RETRO_DEVICE_JOYPAD,\n 0,\n id ) ? 0x7FFF : 0;\n }\n\n return button;\n}\n```\n\n## Mouse Input\n`RETRO_DEVICE_MOUSE`: X and Y coordinates are reported relatively to last poll (poll callback) and it is up to the core to keep track of where the pointer coordinates with respect to the display.\n\n## Pointer Input\n`RETRO_DEVICE_POINTER`: The pointer abstraction represents pen, stylus, touch and other input devices for emulated devices that use absolute coordinates with respect to the screen.\n\nCoordinates in X and Y are reported as `[-0x7fff, 0x7fff]`: `-0x7fff` corresponds to the far left/top of the screen, `0x7fff` to the far right/bottom of the screen. The \"screen\" is defined as area that is passed to the frontend and later displayed on the monitor. The frontend is free to scale/resize this screen as it sees fit but `(X, Y) = (-0x7fff, -0x7fff)` will always correspond to the top-left pixel of the display.\n\n## Keyboard Input\n`RETRO_DEVICE_KEYBOARD`: The libretro API allows a core to poll the frontend for the raw current pressed state of keys. There is also a callback available which is called by the frontend in response to keyboard events. `down` is set if the key is being pressed and `false` if it is being released.\n\nEven though the frontend should try to synchronize keypresses with keycode events, cores should assume that multiple characters can be generated from a single keypress. In other words, keycode events should be treated separately from character events. Similarily if only a keycode event is generated with no corresponding character, the character should be `0`.\n\n## Lightgun Input\n`RETRO_DEVICE_LIGHTGUN`: The libretro lightgun abstraction reports X/Y coordinates in screen space (similar to the pointer) in the range `[-0x8000, 0x7fff]` in both axes, with zero being center and `-0x8000` being out of bounds. The core an query the on/off screen state of the lightgun. It features a trigger, start/select buttons, auxiliary action buttons and a directional pad. A forced off-screen shot can be requested for auto-reloading function in some games.\n"
},
{
"path": "docs/development/libretro-overview.md",
"content": "# Libretro Development Overview\n\nThe Libretro API is a lightweight C-based Application Programming Interface (API) that exposes generic audio, video, and input callbacks.\n\n### Frontends and cores\n\nThere are two sides to Libretro development:\n\n - **frontends** are programs that can run libretro-compatible cores.\n - **cores** are program (such as a game, emulator, or media player) that has been ported to the libretro API so that it can be executed by libretro frontends.\n\nDevelopers of cores such as standalone games, game emulators, media players, and other applications don’t have to worry about writing different video drivers for Direct3D, OpenGL or worrying about catering to all possible input APIs, sound APIs, gamepads, etc.\n\nCores are built as a single library file which can be executed by any frontend that supports the libretro API. The frontend's responsibility is to provide all the implementation-specific details. The core's responsibility is solely to provide the main program.\n\n## libretro.h\nThe libretro API consists of several functions outlined in libretro.h, found in the RetroArch source package. The API header is compatible with C99 and C++. From C99, the bool type and `` are used. The latest version of this file can be found [in `libretro-common`](https://github.com/libretro/RetroArch/blob/master/libretro-common/include/libretro.h).\n\n## Core development resources\nYou can see a partial list of the cores which are maintained as part of [libretro's github repositories](http://github.com/libretro/) in the section `For Users > Core Documentation`.\n\n### Core development overview\n[Visit the overview on libretro core development](./cores/developing-cores.md).\n\n## Frontend development resources\n[A growing list of libretro frontends](frontends.md) is available, reflecting a variety of host systems and use cases.\n\n### RetroArch Reference Frontend\nRetroArch is the libretro \"reference frontend\" and is available across a wide range of host platforms. Learn more about RetroARch development in the section `For Developers > RetroArch Development`.\n\n## Libretro-powered operating systems\n[Lakka](http://www.lakka.tv/), based on LibreELEC, is Libretro's reference operating system distribution.\n\nBelow is a partial list of external distributions that also use libretro or RetroArch as part of their backend technology:\n\n * [Batocera.linux](http://batocera.org/)\n * [RetroPie](http://retropie.org.uk/)\n * [Recalbox](http://recalbox.com/)\n\n!!! info \"Licensing\"\n Libretro is an open specification that is 100% free to implement, with no licensing fees or strings attached. Our reference frontend is RetroArch. The two projects are not the same, and this is reflected in the licensing. RetroArch is licensed via GPLv3 whereas the libretro API is a MIT-licensed API.\n"
},
{
"path": "docs/development/licenses.md",
"content": "# Licenses\n\nThere is software behind RetroArch and Lakka that is protected by Non-Commercial licenses.\n\nIt is important to respect the wishes of the developers and people behind the respective projects.\n\nSee below for a summary of the licenses behind RetroArch and its cores:\n\n## Non-commercial\n\n**SOFTWARE LISTED IN THE TABLE BELOW ARE PROTECTED BY NON-COMMERCIAL LICENSES. EVERY ENTRY HAS A HYPERLINK FOR PROOF OF THE SOFTWARE'S LICENSE**\n\n**SOFTWARE LISTED IN THE TABLE BELOW MAY NOT BE SOLD, NOR MAY THEY BE USED IN A COMMERCIAL PRODUCT OR ACTIVITY WITHOUT COPYRIGHT HOLDERS' APPROVAL.**\n\n| Software \t\t\t | License | Non-commercial |\n|----------------------------------------------------------------------------------|-------------------------------------------------------------------------------------------|----------------|\n| [Lakka](http://www.lakka.tv/) | [Non-commercial](http://www.lakka.tv/doc/FAQ/) | Non-commercial |\n| [Opera](../library/opera.md) \t\t\t | [Non-commercial](https://github.com/libretro/opera-libretro/blob/master/libopera/opera_core.h) | Non-commercial |\n| [AmiArcadia](../library/amiarcadia.md) | [Non-commercial](https://amigan.1emu.net/releases/) | Non-commercial |\n| [Cannonball](../library/cannonball.md) | [Non-commercial](https://github.com/libretro/cannonball/blob/master/docs/license.txt) | Non-commercial |\n| [Dinothawr](../library/dinothawr.md) \t\t\t | [Non-commercial](https://github.com/libretro/Dinothawr/blob/master/LICENSE) | Non-commercial |\n| FB Alpha \t\t\t | [Non-commercial](https://github.com/libretro/fbalpha/blob/master/src/license.txt) | Non-commercial |\n| FB Alpha 2012 \t\t\t | [Non-commercial](https://github.com/libretro/fbalpha2012/blob/master/docs/license.txt) | Non-commercial |\n| FB Alpha 2012 CPS-1 \t\t\t | [Non-commercial](https://github.com/libretro/fbalpha2012_cps1/blob/master/src/license.txt) | Non-commercial |\n| FB Alpha 2012 CPS-2 \t\t\t | [Non-commercial](https://github.com/libretro/fbalpha2012_cps2/blob/master/src/license.txt) | Non-commercial |\n| FB Alpha 2012 CPS-3 | [Non-commercial](https://github.com/libretro/fbalpha2012_cps3/blob/master/docs/license.txt) | Non-commercial |\n| FB Alpha 2012 Neo Geo \t\t | [Non-commercial](https://github.com/libretro/fbalpha2012_neogeo/blob/master/src/license.txt) | Non-commercial |\n| fMSX | [Non-commercial](https://github.com/libretro/fmsx-libretro/blob/master/LICENSE) | Non-commercial |\n| [Genesis Plus GX](../library/genesis_plus_gx.md) \t\t | [Non-commercial](https://github.com/libretro/Genesis-Plus-GX/blob/master/LICENSE.txt) | Non-commercial |\n| MAME 2000\t\t\t\t\t\t\t | [MAME (Non-commercial)](https://github.com/libretro/mame2000-libretro/blob/master/readme.txt) | Non-commercial |\n| [MAME 2003](../library/mame_2003.md)\t\t\t\t\t\t | [MAME (Non-commercial)](https://github.com/libretro/mame2003-libretro/blob/master/LICENSE.md) | Non-commercial |\n| MAME 2003 Midway | [MAME (Non-commercial)](https://github.com/libretro/mame2003_midway/blob/master/docs/mame.txt) | Non-commercial |\n| MAME 2003-Plus | [MAME (Non-commercial)](https://github.com/libretro/mame2003-plus-libretro/blob/master/LICENSE.md) | Non-commercial |\n| MAME 2009 | [MAME (Non-commercial)](https://github.com/r-type/mame2009/blob/master/docs/mame.txt) | Non-commercial |\n| MAME 2010 \t \t | [MAME (Non-commercial)](https://github.com/libretro/mame2010-libretro/blob/master/docs/mame.txt) | Non-commercial |\n| MAME 2014 \t\t | [MAME (Non-commercial)](https://github.com/libretro/mame2014-libretro/blob/master/docs/license.txt) | Non-commercial |\n| MESS 2014 \t\t | [MAME (Non-commercial)](https://github.com/libretro/mame2014-libretro/blob/master/docs/license.txt) | Non-commercial |\n| [PicoDrive](../library/picodrive.md) | [MAME (Non-commercial)](https://github.com/libretro/picodrive/blob/master/COPYING) | Non-commercial |\n| [Snes9x](../library/snes9x.md) | [Non-commercial](https://github.com/snes9xgit/snes9x/blob/master/LICENSE) | Non-commercial |\n| [Snes9x 2002](../library/snes9x_2002.md) | [Non-commercial](https://github.com/libretro/snes9x/blob/master/docs/snes9x-license.txt) | Non-commercial |\n| [Snes9x 2005](../library/snes9x_2005.md) | [Non-commercial](https://github.com/libretro/snes9x/blob/master/docs/snes9x-license.txt) | Non-commercial |\n| [Snes9x 2005 Plus](../library/snes9x_2005_plus.md) | [Non-commercial](https://github.com/libretro/snes9x/blob/master/docs/snes9x-license.txt) | Non-commercial |\n| [Snes9x 2010](../library/snes9x_2010.md) | [Non-commercial](https://github.com/libretro/snes9x2010/blob/master/LICENSE.txt) | Non-commercial |\n| UME 2014 | [MAME (Non-commercial)](https://github.com/libretro/mame2014-libretro/blob/master/docs/license.txt) | Non-commercial |\n\n## Libretro\n\n| Libretro | License | Non-commercial |\n|---------------------------------------------------------|--------------------------------------------------------------------|----------------|\n| [LibRetro API](https://www.libretro.com/index.php/api/) | [MIT](https://www.libretro.com/index.php/api/) | |\n| [RetroArch](http://www.retroarch.com/) | [GPLv3](https://github.com/libretro/RetroArch/blob/master/COPYING) | |\n| [Lakka](http://www.lakka.tv/) | [Non-commercial](http://www.lakka.tv/doc/FAQ/) | Non-commercial |\n| [libretro/docs](https://docs.libretro.com/) | [MIT](https://github.com/libretro/docs/blob/master/LICENSE) | |\n| [libretro/retroarch-assets](https://github.com/libretro/retroarch-assets) | [Attribution 4.0 International (CC BY 4.0)](https://github.com/libretro/retroarch-assets/blob/master/COPYING) | |\n\n## Cores\n\n| Core \t\t\t | License | Non-commercial |\n|----------------------------------------------------------------------------------|-------------------------------------------------------------------------------------------|----------------|\n| [3D Engine](../library/3d_engine.md) \t\t\t | [GPLv3](https://github.com/libretro/libretro-3dengine/blob/master/license) | |\n| [2048](../library/2048.md) \t\t\t | [Public Domain](https://github.com/libretro/libretro-2048/blob/master/COPYING) | |\n| [Anarch](../library/anarch.md) | [CC0](https://codeberg.org/iyzsong/anarch-libretro/src/branch/master/LICENSE) | |\n| [Ardens](../library/ardens.md) | [MIT](https://github.com/tiberiusbrown/Ardens/blob/master/LICENSE.txt) | |\n| [AmiArcadia](../library/amiarcadia.md) | [Non-commercial](https://amigan.1emu.net/releases/) | Non-commercial |\n| [Atari800](../library/atari800.md) \t\t\t | [GPLv2](https://github.com/atari800/atari800/blob/master/COPYING) | |\n| [Beetle bsnes](../library/beetle_bsnes.md) \t\t\t | [GPLv2](https://github.com/libretro/beetle-bsnes-libretro/blob/master/COPYING) | |\n| [Beetle Cygne](../library/beetle_cygne.md) \t\t\t | [GPLv2](https://github.com/libretro/beetle-wswan-libretro/blob/master/COPYING) | |\n| [Beetle GBA](../library/beetle_gba.md) \t\t\t | [GPLv2](https://github.com/libretro/beetle-gba-libretro/blob/master/COPYING) | |\n| [Beetle Lynx](../library/beetle_lynx.md) \t\t\t | [zlib](https://github.com/libretro/beetle-lynx-libretro/blob/master/mednafen/lynx/license.txt), [GPLv2](https://github.com/libretro/beetle-lynx-libretro/blob/master/COPYING) | |\n| [Beetle NeoPop](../library/beetle_neopop.md) \t\t\t | [GPLv2](https://github.com/libretro/beetle-ngp-libretro/blob/master/COPYING) | |\n| [Beetle PC-FX](../library/beetle_pc_fx.md) \t\t\t | [GPLv2](https://github.com/libretro/beetle-pcfx-libretro/blob/master/COPYING) | |\n| [Beetle PCE FAST](../library/beetle_pce_fast.md) \t\t\t | [GPLv2](https://github.com/libretro/beetle-pce-fast-libretro/blob/master/COPYING) | |\n| [Beetle PSX](../library/beetle_psx.md) \t\t\t | [GPLv2](https://github.com/libretro/beetle-psx-libretro/blob/master/COPYING) | |\n| [Beetle PSX HW](../library/beetle_psx_hw.md) \t\t\t | [GPLv2](https://github.com/libretro/beetle-psx-libretro/blob/master/COPYING) | |\n| [Beetle Saturn](../library/beetle_saturn.md) \t\t\t | [GPLv2](https://github.com/libretro/beetle-saturn-libretro/blob/master/COPYING) | |\n| [Beetle SGX](../library/beetle_sgx.md) \t\t\t | [GPLv2](https://github.com/libretro/beetle-supergrafx-libretro/blob/master/COPYING) | |\n| [Beetle VB](../library/beetle_vb.md) \t\t\t | [GPLv2](https://github.com/libretro/beetle-vb-libretro/blob/master/COPYING) | |\n| [blueMSX](../library/bluemsx.md)\t\t\t\t\t\t | [GPLv2](https://github.com/libretro/blueMSX-libretro/blob/master/license.txt) | |\n| [bnes](../library/bnes.md) | [GPLv3](https://github.com/libretro/bnes-libretro/blob/master/license) | |\n| [bsnes-mercury Accuracy](../library/bsnes_mercury_accuracy.md) | [GPLv3](https://github.com/libretro/bsnes-mercury/blob/master/LICENSE) | |\n| [bsnes-mercury Balanced](../library/bsnes_mercury_balanced.md) | [GPLv3](https://github.com/libretro/bsnes-mercury/blob/master/LICENSE) | |\n| [bsnes-mercury Performance](../library/bsnes_mercury_performance.md) | [GPLv3](https://github.com/libretro/bsnes-mercury/blob/master/LICENSE) | |\n| [bsnes Accuracy](../library/bsnes_accuracy.md) | [GPLv3](https://github.com/libretro/bsnes-libretro/blob/libretro/COPYING) | |\n| [bsnes Balanced](../library/bsnes_balanced.md) | [GPLv3](https://github.com/libretro/bsnes-libretro/blob/libretro/COPYING) | |\n| [bsnes C++98 (v085)](../library/bsnes_cplusplus98.md) | [GPLv3](https://github.com/libretro/bsnes-libretro/blob/libretro/COPYING) | |\n| [bsnes Performance](../library/bsnes_performance.md) | [GPLv3](https://github.com/libretro/bsnes-libretro/blob/libretro/COPYING) | |\n| [Caprice32](../library/caprice32.md) \t\t\t | [GPLv2](https://github.com/ColinPitrat/caprice32/blob/master/COPYING.txt) | |\n| [ChaiLove](../library/chailove.md) \t\t\t | [MIT](https://github.com/libretro/libretro-chailove/blob/master/COPYING) | |\n| [Citra](../library/citra.md) \t\t\t | [GPLv2](https://github.com/citra-emu/citra/blob/master/license.txt) | |\n| [Citra Canary/Experimental](../library/citra_canary.md) | [GPLv2](https://github.com/citra-emu/citra/blob/master/license.txt) | |\n| [ClownMDEmu](../library/clownmdemu.md) \t\t\t | [AGPLv3](https://github.com/Clownacy/clownmdemu-libretro/blob/master/LICENCE.txt) | |\n| [Craft](../library/craft.md) \t\t\t | [MIT](https://github.com/libretro/Craft/blob/master/LICENSE.md) | |\n| [CrocoDS](../library/crocods.md) \t\t\t | [MIT](https://github.com/libretro/libretro-crocods/blob/master/LICENSE) | |\n| [DeSmuME 2015](../library/desmume_2015.md) | [GPLv2](https://github.com/libretro/desmume2015/blob/master/desmume/COPYING) | |\n| [DeSmuME](../library/desmume.md) \t\t\t | [GPLv2](https://github.com/TASVideos/desmume/blob/master/license.txt) | |\n| [DICE](../library/dice.md) | [GPLv3](https://github.com/mittonk/dice-libretro/blob/master/LICENSE.txt) | |\n| [Dinothawr](../library/dinothawr.md) \t\t\t | [Non-commercial](https://github.com/libretro/Dinothawr/blob/master/LICENSE) | Non-commercial |\n| Dolphin \t\t\t | [GPLv2](https://github.com/dolphin-emu/dolphin/blob/master/license.txt) | |\n| DOSBox \t\t\t | [GPLv2](https://github.com/libretro/dosbox-libretro/blob/master/COPYING) | |\n| DOSBox Pure \t\t\t | [GPLv2](https://github.com/libretro/dosbox-libretro/blob/master/COPYING) | |\n| [doukutsu-rs](../library/doukutsu-rs.md) | [MIT](https://github.com/DrGlaucous/doukutsu-rs-nm/blob/retroarch-dev/LICENSE) | |\n| Dummy Core | [MIT](https://github.com/libretro/libretro-samples/blob/master/license) | |\n| Dungeon Crawl Stone Soup | [GPLv2+](https://github.com/libretro/crawl-ref/blob/master/crawl-ref/licence.txt) | |\n| EasyRPG | [GPLv3](https://github.com/libretro/easyrpg-libretro/blob/master/COPYING) | |\n| [EightyOne](../library/eightyone.md) \t\t\t | [GPLv3](https://github.com/libretro/81-libretro/blob/master/LICENSE) | |\n| [Elektronika - BK-0010/BK-0011](../library/bk.md) | [BSD](https://github.com/libretro/bk-emulator/blob/master/COPYING) | |\n| [EmuSCV](../library/emuscv.md) | [GPLv2](https://github.com/libretro/) | |\n| [Emux CHIP-8](../library/emux_chip8.md) | [GPLv2](https://github.com/libretro/emux/blob/master/COPYING) | |\n| [Emux GB](../library/emux_gb.md) | [GPLv2](https://github.com/libretro/emux/blob/master/COPYING) | |\n| [Emux NES](../library/emux_nes.md) | [GPLv2](https://github.com/libretro/emux/blob/master/COPYING) | |\n| [Emux SMS](../library/emux_sms.md) | [GPLv2](https://github.com/libretro/emux/blob/master/COPYING) | |\n| [ep128emu](../library/ep128emu.md) | [GPLv2](https://github.com/libretro/ep128emu-core/blob/master/COPYING) | |\n| FB Alpha \t\t\t | [Non-commercial](https://github.com/libretro/fbalpha/blob/master/src/license.txt) | Non-commercial |\n| FB Alpha 2012 \t\t\t | [Non-commercial](https://github.com/libretro/fbalpha2012/blob/master/docs/license.txt) | Non-commercial |\n| FB Alpha 2012 CPS-1 \t\t\t | [Non-commercial](https://github.com/libretro/fbalpha2012_cps1/blob/master/src/license.txt) | Non-commercial |\n| FB Alpha 2012 CPS-2 \t\t\t | [Non-commercial](https://github.com/libretro/fbalpha2012_cps2/blob/master/src/license.txt) | Non-commercial |\n| FB Alpha 2012 CPS-3 | [Non-commercial](https://github.com/libretro/fbalpha2012_cps3/blob/master/docs/license.txt) | Non-commercial |\n| FB Alpha 2012 Neo Geo \t\t | [Non-commercial](https://github.com/libretro/fbalpha2012_neogeo/blob/master/src/license.txt) | Non-commercial |\n| [FCEUmm](../library/fceumm.md) | [GPLv2](https://github.com/libretro/libretro-fceumm/blob/master/Copying) | |\n| [FFmpeg](../library/ffmpeg.md) | [LGPLv2, GPLv2](https://github.com/libretro/FFmpeg/blob/master/LICENSE.md) | |\n| [Flycast](../library/flycast.md) | [GPLv2](https://github.com/libretro/flycast/blob/master/LICENSE) | |\n| fMSX | [Non-commercial](https://github.com/libretro/fmsx-libretro/blob/master/LICENSE) | Non-commercial |\n| FreeIntv | [GPLv3](https://github.com/libretro/FreeIntv/blob/master/LICENSE) | |\n| FreeJ2ME | [GPLv3](https://github.com/hex007/freej2me/blob/master/LICENSE) | |\n| Frodo | [GPLv2](https://github.com/r-type/frodo-libretro/blob/master/COPYING) | |\n| Fuse | [GPLv3](https://github.com/libretro/fuse-libretro/blob/master/LICENSE) | |\n| [GAM4980](../library/gam4980.md) | [GPLv3](https://codeberg.org/iyzsong/gam4980/raw/branch/master/COPYING) | |\n| [Gambatte](../library/gambatte.md) | [GPLv2](https://github.com/libretro/gambatte-libretro/blob/master/COPYING) | |\n| [Game Music Emu](../library/game_music_emu.md) \t\t | [GPLv3](https://github.com/libretro/libretro-gme/blob/master/LICENSE) | |\n| [Gearboy](../library/gearboy.md) | [GPLv3](https://github.com/drhelius/Gearboy/blob/master/LICENSE) | |\n| [Gearcoleco](../library/gearcoleco.md) | [GPLv3](https://github.com/drhelius/Gearcoleco/blob/master/LICENSE) | |\n| [Geargrafx](../library/geargrafx.md) | [GPLv3](https://github.com/drhelius/Geargrafx/blob/master/LICENSE) | |\n| [Gearlynx](../library/gearlynx.md) | [GPLv3](https://github.com/drhelius/Gearlynx/blob/master/LICENSE) | |\n| [Gearsystem](../library/gearsystem.md) | [GPLv3](https://github.com/drhelius/Gearsystem/blob/master/LICENSE) | |\n| [Genesis Plus GX](../library/genesis_plus_gx.md) \t\t | [Non-commercial](https://github.com/libretro/Genesis-Plus-GX/blob/master/LICENSE.txt) | Non-commercial |\n| [Geolith](../library/geolith.md) | [BSD-3-Clause, MIT](https://github.com/libretro/geolith-libretro/blob/master/LICENSE) | |\n| [gpSP](../library/gpsp.md) | [GPLv2](https://github.com/libretro/gpsp/blob/master/COPYING) | |\n| [GW](../library/gw.md) | [zlib](https://github.com/libretro/gw-libretro/blob/master/LICENSE) | |\n| [Handy](../library/handy.md)\t\t\t\t\t \t\t | [zlib](https://github.com/libretro/libretro-handy/blob/master/lynx/license.txt) | |\n| [Holani](../library/holani.md)\t\t\t\t\t \t\t | [GPLv3](https://github.com/LLeny/holani-retro/blob/main/LICENSE) | |\n| [Hatari](../library/hatari.md)\t\t\t\t\t\t | [GPLv2](https://github.com/libretro/hatari/blob/master/readme.txt) | |\n| [higan Accuracy](../library/higan_accuracy.md) | [GPLv3](https://gitlab.com/higan/higan/blob/master/LICENSE.txt) | |\n| [Imageviewer](../library/imageviewer.md)\t\t\t\t \t | [MIT](https://github.com/libretro/RetroArch/blob/master/cores/libretro-imageviewer/LICENSE) | |\n| [JollyCV](../library/jollycv.md) | [BSD-3-Clause, MIT](https://github.com/libretro/jollycv/blob/master/LICENSE) | |\n| [Kronos](../library/kronos.md)\t\t\t\t\t\t | [GPLv2](https://github.com/libretro/yabause/blob/kronos/yabause/COPYING) | |\n| [LowRES NX](../library/lowres_nx.md)\t\t\t\t \t | [zlib](https://github.com/timoinutilis/lowres-nx/blob/master/LICENSE) | |\n| [Lutro](../library/lutro.md)\t\t\t\t \t | [MIT](https://github.com/libretro/libretro-lutro/blob/master/LICENSE) | |\n| M2000 | [GPLv3](https://github.com/p2000t/M2000/blob/main/LICENSEE) | |\n| MAME\t\t\t\t\t\t\t\t\t\t | [BSD-3-Clause & GNU GPLv2](http://mamedev.org/legal.html) | |\n| MAME 2000\t\t\t\t\t\t\t | [MAME (Non-commercial)](https://github.com/libretro/mame2000-libretro/blob/master/readme.txt) | Non-commercial |\n| [MAME 2003](../library/mame_2003.md)\t\t\t\t\t\t | [MAME (Non-commercial)](https://github.com/libretro/mame2003-libretro/blob/master/LICENSE.md) | Non-commercial |\n| MAME 2003 Midway | [MAME (Non-commercial)](https://github.com/libretro/mame2003_midway/blob/master/docs/mame.txt) | Non-commercial |\n| MAME 2003-Plus | [MAME (Non-commercial)](https://github.com/libretro/mame2003-plus-libretro/blob/master/LICENSE.md) | Non-commercial |\n| MAME 2009 | [MAME (Non-commercial)](https://github.com/r-type/mame2009/blob/master/docs/mame.txt) | Non-commercial |\n| MAME 2010 \t \t | [MAME (Non-commercial)](https://github.com/libretro/mame2010-libretro/blob/master/docs/mame.txt) | Non-commercial |\n| MAME 2014 \t\t | [MAME (Non-commercial)](https://github.com/libretro/mame2014-libretro/blob/master/docs/license.txt) | Non-commercial |\n| MAME 2016 \t\t | [BSD-3-Clause & GNU GPLv2](http://mamedev.org/legal.html) | |\n| [melonDS 2021](../library/melonds.md) | [GPLv3](https://github.com/libretro/melonDS/blob/master/LICENSE) | |\n| [melonDS DS](../library/melonds_ds.md) | [GPLv3](https://github.com/JesseTG/melonds-ds/blob/main/LICENSE) | |\n| [Mesen](../library/mesen.md) | [GPLv3](https://github.com/SourMesen/Mesen/blob/master/README.md) | |\n| [Mesen-S](../library/mesen-s.md) | [GPLv3](https://github.com/SourMesen/Mesen-S/blob/master/README.md) | |\n| MESS 2014 \t\t | [MAME (Non-commercial)](https://github.com/libretro/mame2014-libretro/blob/master/docs/license.txt) | Non-commercial |\n| [Meteor](../library/meteor.md) \t\t | [GPLv3](https://github.com/libretro/meteor-libretro/blob/master/COPYING) | |\n| [mGBA](../library/mgba.md) | [MPLv2.0](https://github.com/libretro/mgba/blob/master/LICENSE) | |\n| [MicroW8](../library/microw8.md) | [Unlicense](https://github.com/libretro/uw8-libretro/blob/main/UNLICENSE) | |\n| [mkxp-z](../library/mkxp-z.md) | [GPLv2](https://github.com/mkxp-z/mkxp-z/blob/dev/COPYING) | |\n| mpv | [GPLv3](https://github.com/libretro/libretro-mpv/blob/master/LICENSE) | |\n| [Mr.Boom](../library/mr_boom.md) \t\t | [MIT](https://github.com/libretro/mrboom-libretro/blob/master/LICENSE) | |\n| Mupen64Plus \t\t | [GPLv3](https://github.com/libretro/mupen64plus-libretro/blob/master/LICENSE) | |\n| Mupen64Plus GLES3 \t\t | [GPLv3](https://github.com/libretro/mupen64plus-libretro/blob/master/LICENSE) | |\n| Neko Project II \t\t | | |\n| Neko Project II Kai | [MIT](https://github.com/AZO234/NP2kai/blob/master/LICENSE) | |\n| [Nestopia](../library/nestopia.md) | [GPLv2](https://github.com/libretro/nestopia/blob/master/COPYING) | |\n| [Numero](../library/numero.md) | [GPLv2](https://github.com/nbarkhina/numero/blob/master/LICENSE) | |\n| nSide Balanced | [GPLv3](https://github.com/hex-usr/nSide/blob/master/gpl-3.0.txt) | |\n| [NXEngine](../library/nxengine.md) \t\t | [GPLv3](https://github.com/gameblabla/nxengine-nspire/blob/master/LICENSE) | |\n| O2EM | [Artistic License](https://sourceforge.net/projects/o2em/) | |\n| [OpenLara](../library/openlara.md) | [BSD-2-Clause](https://github.com/XProger/OpenLara/blob/master/LICENSE) | |\n| [Opera](../library/opera.md) \t\t\t | [Non-commercial](https://github.com/libretro/opera-libretro/blob/master/libopera/opera_core.h) | |\n| P-UAE | [GPLv2](https://github.com/libretro/PUAE/blob/master/COPYING) | |\n| ParaLLEl N64 | [GPLv3](https://github.com/libretro/mupen64plus-libretro/blob/master/LICENSE) | |\n| PCem | [GPLv2](https://github.com/libretro/libretro-pcem/blob/master/COPYING) | |\n| [PCSX ReARMed](../library/pcsx_rearmed.md) | [GPLv2](https://github.com/libretro/pcsx_rearmed/blob/master/COPYING) | |\n| PCSX ReARMed [Interpreter] | [GPLv2](https://github.com/libretro/pcsx_rearmed/blob/master/COPYING) | |\n| [PD777](../library/pd777.md) | [MIT](https://github.com/mittonk/PD777/blob/main/LICENSE) | |\n| [PicoDrive](../library/picodrive.md) | [MAME (Non-commercial)](https://github.com/libretro/picodrive/blob/master/COPYING) | Non-commercial |\n| [PocketCDG](../library/pocketcdg.md) | [MIT](https://github.com/libretro/libretro-pocketcdg/blob/master/LICENSE) | |\n| [PokeMini](../library/pokemini.md) | [GPLv3](https://github.com/libretro/PokeMini/blob/master/LICENSE) | |\n| [PPSSPP](../library/ppsspp.md) | [GPLv2](https://github.com/hrydgard/ppsspp/blob/master/LICENSE.TXT) | |\n| [PrBoom](../library/prboom.md) | [GPLv2](https://github.com/libretro/libretro-prboom/blob/master/COPYING) | |\n| [ProSystem](..//library/prosystem.md) | [GPLv2](https://github.com/libretro/prosystem-libretro/blob/master/License.txt) | |\n| PX68k | [kero_src.txt](https://github.com/libretro/px68k-libretro/blob/master/doc/kero_src.txt) | | | |\n| [QuickNES](../library/quicknes.md) | [GPLv2](https://github.com/kode54/QuickNES/blob/master/COPYING) | |\n| [Redream (libretro fork)](../library/redream.md) | [GPLv3](https://github.com/libretro/redream/blob/master/LICENSE.txt) | |\n| [REminiscence](../library/reminiscence.md) | GPLv3 | |\n| RemoteJoy | [GPLv2](https://github.com/libretro/libretro-remotejoy/blob/master/LICENSE) | |\n| Remote RetroPad | [MIT](https://github.com/libretro/libretro-samples/blob/master/license) | |\n| [RVVM](../library/rvvm.md) | [GPLv3](https://github.com/LekKit/RVVM/blob/staging/LICENSE-GPL), [MPLv2.0](https://github.com/LekKit/RVVM/blob/staging/LICENSE-MPL) | |\n| [SameBoy](../library/sameboy.md) | [MIT](https://github.com/libretro/SameBoy/blob/master/LICENSE) | |\n| [SameDuck](../library/sameduck.md) | [MIT](https://github.com/libretro/) | |\n| [SAME_CDI](../library/same_cdi.md) | [GPLv2](https://github.com/libretro/same_cdi/blob/master/COPYING) | |\n| [ScummVM](../library/scummvm.md) | [GPLv2](https://github.com/libretro/scummvm/blob/master/COPYING) | |\n| [Snes9x](../library/snes9x.md) | [Non-commercial](https://github.com/libretro/snes9x/blob/master/docs/snes9x-license.txt) | Non-commercial |\n| [Snes9x 2002](../library/snes9x_2002.md) | [Non-commercial](https://github.com/libretro/snes9x/blob/master/docs/snes9x-license.txt) | Non-commercial |\n| [Snes9x 2005](../library/snes9x_2005.md) | [Non-commercial](https://github.com/libretro/snes9x/blob/master/docs/snes9x-license.txt) | Non-commercial |\n| [Snes9x 2005 Plus](../library/snes9x_2005_plus.md) | [Non-commercial](https://github.com/libretro/snes9x/blob/master/docs/snes9x-license.txt) | Non-commercial |\n| [Snes9x 2010](../library/snes9x_2010.md) | [Non-commercial](https://github.com/libretro/snes9x2010/blob/master/LICENSE.txt) | Non-commercial |\n| [Stella](../library/stella.md) | [GPLv2](https://github.com/stella-emu/stella/blob/master/License.txt) | |\n| TempGBA | [GPLv2](https://github.com/libretro/TempGBA-libretro/blob/master/copyright) | |\n| [TGB Dual](../library/tgb_dual.md) | [GPLv2](https://github.com/libretro/tgbdual-libretro/blob/master/docs/COPYING-2.0.txt) | |\n| [The Powder Toy](../library/the_powder_toy.md) | [GPLv3](https://github.com/libretro/ThePowderToy/blob/master/LICENSE) | |\n| [Theodore](../library/theodore.md) | [GPLv3](https://github.com/Zlika/theodore/blob/master/LICENSE) | |\n| [TyrQuake](../library/tyrquake.md) | [GPLv2](https://github.com/libretro/tyrquake/blob/master/gnu.txt) | |\n| UME 2014 | [MAME (Non-commercial)](https://github.com/libretro/mame2014-libretro/blob/master/docs/license.txt) | Non-commercial |\n| [Uzem](../library/uzem.md) | [GPLv3](https://github.com/Uzebox/uzebox/blob/master/gpl-3.0.txt) | |\n| [VaporSpec](../library/vaporspec.md) | [MIT](https://github.com/minkcv/vm/blob/master/LICENSE.md)\n| [VBA-M](../library/vba_m.md) | [GPLv2](https://github.com/libretro/vbam-libretro/blob/master/doc/gpl.txt) | |\n| [VBA Next](../library/vba_next.md) | [GPLv2](https://github.com/libretro/vba-next/blob/master/LICENSE) | |\n| [vecx](../library/vecx.md) | [GPLv3](https://github.com/libretro/libretro-vecx/blob/master/LICENSE.md) | |\n| [VeMUlator](../library/vemulator.md) | [GPLv3](https://github.com/MJaoune/vemulator-libretro/blob/master/COPYING) | |\n| VICE C64 | [GPLv2](https://github.com/r-type/vice3.0-libretro/blob/master/vice/COPYING) | |\n| VICE C128 | [GPLv2](https://github.com/r-type/vice3.0-libretro/blob/master/vice/COPYING) | |\n| VICE PLUS4 | [GPLv2](https://github.com/r-type/vice3.0-libretro/blob/master/vice/COPYING) | |\n| VICE VIC20 | [GPLv2](https://github.com/r-type/vice3.0-libretro/blob/master/vice/COPYING) | |\n| Video Processor | [BSD-2-Clause](https://github.com/jaredmcneill/libretro-v4l2/blob/master/LICENSE) | |\n| [Vircon32](../library/vircon32.md) | [BSD-3-Clause](https://github.com/vircon32/vircon32-libretro/blob/main/LICENSE.md) | |\n| [Virtual Jaguar](../library/virtual_jaguar.md) | [GPLv3](https://github.com/libretro/virtualjaguar-libretro/blob/master/docs/GPLv3) | |\n| [VirtualXT](../library/virtualxt.md) | [zlib](https://github.com/andreas-jonsson/virtualxt/blob/develop/LICENSE) | |\n| [XRick](../library/xrick.md) | [GPLv3](https://github.com/libretro/xrick-libretro/blob/master/README) | |\n| [YabaSanshiro](../library/yabasanshiro.md)\t\t\t\t\t\t | [GPLv2](https://github.com/libretro/yabasanshiro/blob/master/yabause/COPYING) | |\n| [Yabause](../library/yabause.md)\t\t\t\t\t\t | [GPLv2](https://github.com/libretro/yabause/blob/master/yabause/COPYING) | |\n"
},
{
"path": "docs/development/retroarch/compilation/3ds.md",
"content": "# Nintendo 3DS Compilation / Development Guide\n\n## Environment configuration\n\nYou need the homebrew Nintendo 3DS SDK libctru and DevkitARM toolchain installed.\nIf you are running windows you will need to install [MSYS2](http://www.msys2.org/) and point it to your devkitARM installation like this:\n\n Put these lines in RetroArch3DSEnv.sh\n export DEVKITPRO=\"/c/devkitPro\"\n export DEVKITARM=\"$DEVKITPRO/devkitARM\"\n export CTRULIB=\"$DEVKITPRO/libctru\"\n export CTRBANNERTOOL=\"/c/Users/Emily/Desktop/RetroArchDev/CompatFiles/bannertool.exe\"\n bash\nThe custom bannertool is needed if you want to compile .cia builds due to a broken wav encoder in the windows version of bannertool included with RetroArch.\nBefore building RetroArch you will have to load MSYS2 and launch `RetroArch3DSEnv.sh`, then proceed as you would for linux.\n\nThe working bannertool can be compiled from the sources [here](https://github.com/Steveice10/bannertool) using MSYS2.\n\n## RetroArch Compilation\n\n### Fetching RetroArch\n\nClone RetroArch's repository from [GitHub](https://github.com/libretro/RetroArch)\n\n git clone https://github.com/libretro/RetroArch.git retroarch\n cd retroarch\n\nFor subsequent builds you only need to pull the changes from the repo\n\n cd retroarch\n git pull\n\nTo update your local copy from the repository run git pull\n\n### Building RetroArch separately\n\nFirst, you need to compile [Salamander](../glossary.md#salamander). To compile Salamander (for 3DS) run:\n\n make -f Makefile.ctr.salamander\n\nSecond, to compile RetroArch (for 3DS) run:\n\n make -f Makefile.ctr\n\n!!! Note\n RetroArch on 3DS is statically linked. With statically linked RetroArch, each executable is a separate libretro core instead of the core being separately loaded from a single executable. A pre-existing libretro library needs to be present in the root directory in order to link RetroArch 3DS. This file needs to be called 'libretro_ctr.a'.\n\nAfter a few seconds/minutes you should be able to find a retroarch_ctr.elf and retroarch_ctr.dol file under that directory.\n\n### Building RetroArch in bulk\n\nInstead of building each core one by one, you can build all cores as a batch task. Run from the main 'retroarch' directory:\n\n cd dist-scripts\n\n!!! Note\n Make sure that all the libretro cores that you want to compile are inside the 'dist-scripts' directory.\n\nOnce inside this directory, run :\n\n ./dist-cores.sh ctr\n\nThis process will also automate the packaging process for you.\n\n### Packaging RetroArch\n\n\n### Additional Tips:\n\n## Core Compilation\n\n### Fetching Cores\n\nThe easiest way to fetch all the cores is to use libretro-super. Run\n\n ./libretro-fetch.sh\n\n### Building Cores\n\nThe easiest way to build all the cores (for 3DS) is to use libretro-super. Run\n\n ./libretro-build-ctr.sh\n\nIn case you only want to build one and/or more cores instead of all, you can specify the cores you want to build after the first command in no particular order. E.g.:\n\n ./libretro-build-ctr.sh snes9x2010 fceumm\n\nOnce finished, you can find the libretro cores inside directory `dist/ctr`.\n"
},
{
"path": "docs/development/retroarch/compilation/android.md",
"content": "# Compiling for Android\n\n## Compiling from Windows\n\nYou need a complete Android development environment, including the **Android SDK** and **Android NDK**.\n\n**Other dependencies:**\n\n* Cygwin (base settings for Bash scripts)\n* Git\n\n### Installing OpenJDK or Oracle JDK\n\n\n### Installing cygwin\n\nDownload the setup tool from the official webpage and install the base distribution.\n\n### Installing git\n\nYou can install Windows git or add the cygwin git version from the cygwin installer.\n\n### Next step: From here, follow the instructions for compiling Android from Linux.\n\n## Compiling from Linux\n\nYou need a complete android development environment ready to develop native apps. That means you have:\n\n* [Android SDK](http://developer.android.com/sdk/index.html)\n* [Android NDK](https://developer.android.com/tools/sdk/ndk/index.html)\n\nUse Google to figure out how to install that and make sure the appropriate executables from the above are in your path variable.\n\nThese instructions have been tested under Linux (Fedora 20 and Ubuntu 18.04). They may also work in windows with cygwin.\n\n### Getting the code\n\n git clone https://github.com/libretro/libretro-super.git\n cd libretro-super\n ./libretro-fetch.sh\n\n\n`./libretro-fetch.sh` can fail on `fork()` calls, repeat until all are up to date. For `./libretro-build-android-mk.sh`, some cores may fail to compile (g++ \"Argument list too long\" error).\n\n### Building the cores\n\nFor the core building portion of this tutorial, you'll need to put at least your NDK dir in the PATH variable for the build script to work. Just for the heck of it, I also like to throw in the tools folder from SDK as well as the build-tools (adjust to your situation):\n\n export PATH=/home/boo/Android/Sdk/ndk-bundle/build:/home/boo/Android/Sdk/tools:/home/boo/Android/Sdk/build-tools/28.0.3:$PATH\n\n### Run build script ( read notes below before running the script):\n NOCLEAN=1 ./libretro-build-android-mk.sh\n\nYou can omit `NOCLEAN=1` if you'd like to perform make clean on every core's repo before building each.\n\nFor a variety of reasons, some of the cores may not be compiled by the script. These reasons can range from: core folder doesn't have a libretro/jni folder setup yet, core's libretro/jni folder is in a place that the script does not expect, core has been recently added to project and has not yet been added to script or you're missing some essential dependencies and the build script failed. Some cores (like snes9x2002) need an older NDK. Some core don't use jni but use make or cmake instead.\n\nIn the event you are missing a core that you want, you can build it in most cases by going to its subfolder (libretro-corename) and performing this series of commands:\n\n #for example\n cd libretro-flycast\n\n #get corename for later\n corename=$(echo ${PWD##*/}|cut -d \"-\" -f 2)\n\n #now try to find the libretro/jni folder\n cd $(find . -iname \"jni\" -type d | grep --color=NEVER \"libretro/jni\")\n\n #if it exists and you don't get an error, build the core:\n ndk-build\n\n #if it succeeds, do this to copy built .so files to dist folder:\n for arch in \"arm64-v8a\" \"armeabi-v7a\" \"x86\" \"x86_64\"; do if [ -f \"$arch/libretro.so\" ]; then cp -v $arch/libretro.so $SRC/dist/android/$arch/\"$corename\"_libretro_android.so; else echo \"$arch\" build HAS FAILED!; fi; done\n\nYou may also want to check this repo for a list of dependencies needed to build the cores:\n\n https://github.com/libretro/libretro-deps/\n\n #these deps can usually be installed via apt-get install (don't forget to append -dev at the end). for example:\n\n sudo apt-get install libfaac-dev\n\nmore info about core building can be had here:\n\n https://github.com/thebunnyrules/docs/blob/master/docs/development/cores/developing-cores.md\n\n\n\n### Building RetroArch\n\n\n### PREP WORK\n\nThe RetroArch repo is fetched into the libretro-super folder by `./libretro-fetch.sh` above.\n\nYou first need to fetch the submodules for it.\n\n cd retroarch\n git submodule update --init\n\nNow go to the project folder:\n\n cd pkg/android/phoenix\n\nWithin this folder, edit `local.properties` to point to the location of your sdk and ndk directories by adding lines that look like this:\n\n ndk.dir=/complete/path/to/android-ndk-r20\n sdk.dir=/complete/path/to/Sdk\n\n Eg. if you have Android Studio, your dirs should be in :\n\n ndk.dir=/home/yourUSERNAME/Android/Sdk/ndk-bundle\n sdk.dir=/home/yourUSERNAME/Android/Sdk\n\nIf you want to build a release apk (aka an apk with none of the debug layers), you'll have to self sign it. Make a file called `keystore.properties` with the following content:\n\n storePassword=YOURPASS\n keyPassword=YOURPASS\n keyAlias=KEY_ALIAS\n storeFile=/full/path/to/keystore-file_NO_RELATIVE_PATHS.jks\n\nNext, generate a keystore file and be sure to put it where `keystore.properties` says it is:\n\n keytool -genkey -alias KEY_ALIS -keyalg RSA -keypass YOURPASS -keystore keystore-file.jks\n\nNow all the generated release apk will be automatically signed by gradle.\n\nNext, copy the cores, assets and overlays to an assets folder you create here:\n\n mkdir -p assets/cores\n mkdir assets/overlays\n cp ../../../../dist/android/arm64-v8a/* assets/cores/ #replace arm64-v8a here by the archetecture of the device you will be using. Google your phone's specs.\n cp -r ../../../../dist/info/ assets/\n cp -r ../../../../retroarch/media/overlays/* assets/overlays/\n\nOptionally, you may want to include the assets for the front-end (menu icons, fonts, images etc), shader caches, dbs, cheats, etc... These assets can be downloaded at any time during run time via the updater but if you want to bundle them into the build you may do so by downloading bundle.zip / cheats.zip and extracting them to assets folder:\n\n wget https://buildbot.libretro.com/assets/frontend/bundle.zip\n unzip -n bundle.zip -d assets\n wget https://buildbot.libretro.com/assets/frontend/cheats.zip\n mkdir assets/cheats\n unzip cheats.zip -d assets/cheats\n\n*NOTE ABOUT BUNDLED ASSETS AND CORES*\n\nI've sometimes noticed a bug where the built apk does not unpack the bundled assets and cores on first install. My workaround was to re-install the apk a second time. On the second install, the assets and cores get unpacked. This is a bug in 1.7.7 and 1.7.8.\n\n### BUILD\n\nNow run gradlew and let it configure and sync itself and download all it's dependencies:\n\n ./gradlew\n\nOptionally: You can get a list of available tasks by doing:\n\n ./gradlew tasks\n\nNow, if all went smoothly with config step, you can proceed to build the apk\n\n #Builds release variants: Normal, ra32 and aarch64\n ./gradlew assembleRelease\n\n #Build debug variants:\n ./gradlew assembleDebug\n\n #Builds all variants\n ./gradlew buildNeeded\n\nIf all goes well, this will spit out an .apk. For example `build/outputs/apk/normal/debug/phoenix-normal-debug.apk`. Put it on your device with\n\n adb install -r build/outputs/apk/normal/debug/phoenix-normal-debug.apk\n\nYou can find all the apks built by gradle with this command (execute from the same dir as gradlew)\"\n\n find . -iname \"*.apk\"\n\nThis should give you a list of all the outputted apks.\n"
},
{
"path": "docs/development/retroarch/compilation/dos.md",
"content": "# DOS Compilation / Development Guide\n\n## Environment configuration\n\nThis guide will use cross-compilation from Linux to build a DOS executable with the [DJGPP](http://www.delorie.com/djgpp/) toolchain.\n\nMost Linux distributions do not include this toolchain, but prebuilt binaries can be obtained [here](https://github.com/andrewwutw/build-djgpp/releases), or if you are using Arch Linux, you can use the AUR package [djgpp-gcc](https://aur.archlinux.org/packages/djgpp-gcc/) to build it easily.\n\nDJGPP builds 32-bit programs, which means an 80386 or higher processor is required. 80286 is not supported.\n\n## Core Support\n\n!!! Note\n RetroArch on DOS is statically linked. With statically linked RetroArch, each executable is a separate libretro core instead of the core being separately loaded from a single executable. A pre-existing libretro library needs to be present in the root of the source directory in order to link RetroArch DOS. This file needs to be called 'libretro.a'.\n\n## RetroArch Compilation\n\n### Fetching RetroArch\n\nClone RetroArch's repository from [GitHub](https://github.com/libretro/RetroArch)\n\n git clone https://github.com/libretro/RetroArch.git retroarch\n cd retroarch\n\nFor subsequent builds you only need to pull the changes from the repo\n\n cd retroarch\n git pull\n\n### Building RetroArch\n\nTo compile RetroArch run the following commands inside RetroArch's source tree:\n\n CROSS_COMPILE=i686-pc-msdosdjgpp- ./configure --with-libretro=\"-L. -lretro\"\n make clean\n make -j4\n\nReplace the value of `CROSS_COMPILE` with the prefix of your specific toolchain if necessary.\n\nOnce finished, you should find `retroarch.exe` in the current directory, this is the final binary you can run inside DOS. Since older DOS versions do not support long filenames, you may want to rename this file to something shorter.\n\nRetroArch for DOS also requires the CWSDPMI server application from the DJGPP distribution, which can be downloaded separately [here](http://www.delorie.com/pub/djgpp/current/v2misc/csdpmi7b.zip). On the target system, CWSDPMI.EXE will need to be placed in the same directory as your RetroArch executable for it to run properly.\n\nOnce you have the DPMI program in place, simply run your RetroArch executable and the DPMI server will be loaded automatically at startup.\n\nIt is also possible to include the DPMI server inside the main RetroArch executable so that only a single file is needed, but that is outside the scope of this document. See [here](http://www.delorie.com/djgpp/doc/utils/utils_16.html) for more information.\n"
},
{
"path": "docs/development/retroarch/compilation/gamecube.md",
"content": "# Nintendo GameCube Compilation / Development Guide\n\n## Environment configuration\n\nYou need the homebrew Nintendo GameCube SDK libogc and Devkitpro PPC toolchain installed.\n\n## RetroArch Compilation\n\n### Fetching RetroArch\n\nClone RetroArch's repository from [GitHub](https://github.com/libretro/RetroArch)\n\n git clone https://github.com/libretro/RetroArch.git retroarch\n cd retroarch\n\nFor subsequent builds you only need to pull the changes from the repo\n\n cd retroarch\n git pull\n\nTo update your local copy from the repository run git pull\n\n### Building RetroArch separately\n\nFirst, to compile RetroArch (for GameCube) run:\n\n make -f Makefile.griffin platform=ngc\n\n!!! Note\n RetroArch on GameCube is statically linked. With statically linked RetroArch, each executable is a separate libretro core instead of the core being separately loaded from a single executable. A pre-existing libretro library needs to be present in the root directory in order to link RetroArch GameCube. This file needs to be called 'libretro_ngc.a'.\n\nAfter a few seconds/minutes you should be able to find a retroarch_ngc.elf and retroarch_ngc.dol file under that directory.\n\n### Building RetroArch in bulk\n\nInstead of building each core one by one, you can build all cores as a batch task. Run from the main 'retroarch' directory:\n\n cd dist-scripts\n\n!!! Note\n Make sure that all the libretro cores that you want to compile are inside the 'dist-scripts' directory.\n\nOnce inside this directory, run :\n\n ./dist-cores.sh ngc\n\nThis process will also automate the packaging process for you.\n\n### Packaging RetroArch\n\n\n### Additional Tips:\n\n## Core Compilation\n\n### Fetching Cores\n\nThe easiest way to fetch all the cores is to use libretro-super. Run\n\n ./libretro-fetch.sh\n\n### Building Cores\n\nThe easiest way to build all the cores (for GameCube) is to use libretro-super. Run\n\n ./libretro-build-ngc.sh\n\nIn case you only want to build one and/or more cores instead of all, you can specify the cores you want to build after the first command in no particular order. E.g.:\n\n ./libretro-build-ngc.sh snes9x2010 fceumm\n\nOnce finished, you can find the libretro cores inside directory `dist/ngc`.\n"
},
{
"path": "docs/development/retroarch/compilation/haiku.md",
"content": "# Haiku Compilation / Development Guide\n\nThis compilation guide will teach you how to build RetroArch for Haiku.\n\nIt is more than recommended to keep your Haiku system up to date and use Nightlybuilds with upgraded packages.\n\n\n\nThis video covers a quick demonstration of these subjects;\n\n1. Environment Configuration\n\n2. Building RetroArch\n\nBe sure to read instructions that are given on this page.\n\n## Environment configuration\n\nThe following software needs to be installed:\n\n- Haiku standard development packages (haiku_devel)\n- SDL libraries and development packages (libsdl_devel / libsdl2_devel)\n- X11 libraries and development packages (libx11_devel, libxau_devel, libxext_devel)\n- Mesa libraries and development packages (mesa_devel, glu_devel)\n- Jpeg, PNG, Zlib libraries and development packages (jpeg_devel, libpng16_devel, zlib_devel)\n\nOptional dependencies:\n\n- libxml2_devel - For XML shaders and cheat support.\n- freetype_devel - TTF font rendering\n- ffmpeg_devel - FFmpeg recording\n\n## RetroArch Compilation\n\n### Fetching RetroArch\n\nClone RetroArch's repository from [GitHub](https://github.com/libretro/RetroArch)\n\n git clone https://github.com/libretro/RetroArch.git retroarch\n cd retroarch\n\nFor subsequent builds you only need to pull the changes from the repo\n\n cd retroarch\n git pull\n\nTo update your local copy from the repository run git pull\n\n### Building RetroArch\n\nMake sure gcc is installed, then run:\n\n # Build\n ./configure --prefix=~/config/non-packaged/ --datarootdir=~/config/non-packaged/data/ --with-man_dir=~/config/non-packaged/documentation/man/\n make\n # Install\n make install\n # Run\n retroarch\n\n## Core Compilation\n\n### Fetching Cores\n\nThe easiest way to fetch all the cores is to use libretro-super. Run\n\n ./libretro-fetch.sh\n\n### Building Cores\n\nThe easiest way to build all the cores is to use libretro-super.\n\nTo build all cores for Haiku, run\n\n ./libretro-build.sh\n\nIn case you only want to build one and/or more cores instead of all, you can specify the cores you want to build after the first command in no particular order. E.g.:\n\n ./libretro-build.sh snes9x2010 fceumm\n\nOnce finished, you can find the libretro cores inside directory `dist/haiku`."
},
{
"path": "docs/development/retroarch/compilation/ios.md",
"content": "# iOS Compilation / Development Guide\n\nThe following is a non-developer guide to install RetroArch on non-jailbroken iOS or tvOS devices.\n\nThe minimum version of iOS supported is iOS 6.0. However, older versions have fewer features and worse core support. Additionally, building for old versions of iOS requires [old versions of Xcode](https://developer.apple.com/support/xcode/), which require old versions of macOS, all of which may be hard to come by.\n\n!!! note\n If you just want to sideload from an IPA file, then you can find a working build (version {{ unit.stable }}) [here for tvOS](http://buildbot.libretro.com/stable/{{ unit.stable }}/apple/tvos-arm64/RetroArchTV.ipa) and [here for iOS](http://buildbot.libretro.com/stable/{{ unit.stable }}/apple/ios-arm64/RetroArch.ipa). Instructions for installing the IPA are [here](../../..//guides/install-ios.md).\n\nBecause iOS requires that all code be signed, iOS does not support installing/updating cores at runtime. Instead, all cores must be built and added to the RetroArch source tree before building RetroArch.\n\n## Environment configuration\n\n### Xcode\n\nThe only requirement for building is Xcode, which is only available for macOS. You can get Xcode from the App Store. If you have never used Xcode before, you will need to open the Xcode preferences, and in Accounts, log in with your Apple ID.\n\n#### Sign in with your Apple ID\n\n- Open Xcode Preferences (Xcode -> Preferences)\n- Click the \"Accounts\" tab\n- Hit the \"+\" at the bottom left and choose \"Apple ID\" and sign in with your Apple ID\n- Once you’ve successfully logged in, a new team called \"(Your Name) Personal Team\" with the role \"User\" will appear beneath your Apple ID.\n\n#### Pair Xcode with your iOS or tvOS Device\n\nConnect your iPhone to your computer. For AppleTV, because you cannot connect it directly, follow the [instructions in this Apple support article](https://support.apple.com/en-gb/HT208088) to pair your device in Xcode. When finished, you should see your specific device when you go, in Xcode, to Windows -> Devices & Simulators.\n\n### retroarch-apple-deps (optional but recommended)\n\nRetroArch optionally will automatically link with supporting libraries (including MoltenVK) that are provided by the retroarch-apple-deps repo. By default Xcode will look for these dependencies in `/usr/local/share/retroarch-apple-deps`.\n\nTo get retroarch-apple-deps, run:\n\n```shell\ngit clone https://github.com/warmenhoven/retroarch-apple-deps.git retroarch-apple-deps\nsudo ln -s $PWD/retroarch-apple-deps /usr/local/share\n```\n\n## Fetching the code\n\n### libretro-super\n\nThe easiest way to fetch the source code for RetroArch and all the cores is to use libretro-super. Open Terminal (it's in `/Applications/Utilities`) and run the following commands:\n\n```shell\ngit clone https://github.com/libretro/libretro-super.git libretro-super\ncd libretro-super\n```\n\nYou can run the following command to download the source for RetroArch as well as all of the cores:\n\n```shell\n./libretro-fetch.sh\n```\n\nOr you can run the following command to download the source for RetroArch only:\n\n```shell\n./libretro-fetch.sh --retroarch\n```\n\nOr specify just the cores that you want:\n\n```shell\n./libretro-fetch.sh snes9x2010 fceumm\n```\n\n### RetroArch repo\n\nIf you choose not to use libretro-super, you can clone RetroArch's repository from [GitHub](https://github.com/libretro/RetroArch)\n\n```shell\ngit clone https://github.com/libretro/RetroArch.git retroarch\ncd retroarch\n```\n\nFor subsequent builds you only need to pull the changes from the repo\n\n```shell\ncd retroarch\ngit pull\n```\n\nTo update your local copy from the repository run `git pull`.\n\n## Cores\n\nEmulator cores are needed to use RetroArch as they contain the code that drives the emulation of the system of the game you want to play. All of the cores should have the extension `.dylib` and be placed in the RetroArch source tree in the directory `pkg/apple/iOS/modules` (`pkg/apple/tvOS/modules` for tvOS).\n\n### Downloading Pre-Built Cores\n\nPre-built cores are available from the buildbot [for iOS here](https://buildbot.libretro.com/nightly/apple/ios-arm64/latest/) and [for tvOS here](https://buildbot.libretro.com/nightly/apple/tvos-arm64/latest/). You can also use the update-cores.sh script in the RetroArch source tree to fetch the cores from the buildbot for you:\n\n```shell\n./pkg/apple/update-cores.sh [--tvos] [core name]...\n```\n\nWithout any arguments, it will try to update all of the cores in `pkg/apple/iOS/modules`. If there are no cores already downloaded, it will list the cores that are available to download. Any arguments are treated as core names and it will try to download that core if it is not already available.\n\n### Building Cores\n\nInstead of downloading pre-built cores, you can build the cores yourself. The easiest way to build all the cores is to use libretro-super.\n\nTo build for iOS 11 and up, run:\n\n```shell\n./libretro-build-ios-arm64.sh\n```\n\nTo build cores for iOS 9 and up, run:\n\n```shell\n./libretro-build-ios9.sh\n```\n\nTo build cores for iOS 6 to 8, run:\n\n```shell\n./libretro-build-ios.sh\n```\n\nIn case you only want to build one and/or more cores instead of all, you can specify the cores you want to build after the first command in no particular order. E.g.:\n\n```shell\n./libretro-build-ios-arm64.sh snes9x2010 fceumm\n```\n\nOnce finished, you can find the libretro cores inside directory `dist/ios-arm64`, `dist/ios9` or `dist/ios` depending on which build script you ran.\n\n### Code Signing the Cores\n\nNote that you *must code sign the dylib cores* in order for you to use them.\n\n#### In iOS 9 and above\n\nStarting from iOS 9, the cores must be packaged as part of the application, even if they are code-signed. This was an additional security measure introduced in iOS 9. Fortunately, the code signing is handled as part of the Xcode build/archive process, so all you need to do is place your compiled `.dylib` cores in the `pkg/apple/iOS/modules` folder. Running the application via Xcode or archiving the application for an adhoc distribution will codesign the cores as long as they are placed in the aforementioned `pkg/apple/iOS/modules` folder.\n\n#### In iOS 6 to 8\n\nYou need to manually code sign the cores, and then you can copy them to the `Documents/RetroArch/cores` directory using an application like \"iFunBox\" or \"iExplorer\".\n\n```shell\ncd [path where the dylib cores are]\ncodesign -fs '[Your Full Developer Certificate Name]' *.dylib\n```\n\n## Building RetroArch\n\nThere are multiple Xcode project files in `pkg/apple`, based on minimum iOS version. The following will use `pkg/apple/RetroArch_iOS13.xcodeproj` (the latest as of this writing) as an example.\n\n1. Open Xcode.\n1. Open the following project file `pkg/apple/RetroArch_iOS13.xcodeproj`\n1. Change the identifiers and signing for the target\n 1. In the Navigator Pane on the left, select the `Retroarch_iOS13` project\n 1. In the Project and Targets list on the left side, choose the `RetroArchiOS` (or `RetroArchTV` for tvOS) target. Select the Target (the one with the RetroArch icon), not the project.\n 1. In the `Signing & Capabilities` tab, change the \"Team\" under Signing to be your developer name.\n 1. In the `Signing & Capabilities` tab, Change the \"Bundle Identifier\" to something globally unique (e.g. `your.email.address.RetroArch`).\n1. Change the signing for the extensions\n 1. In the Navigator Pane on the left, select the `Retroarch_iOS13` project\n 1. In the Project and Targets list on the left side, choose the `RetroArchWidgetExtensionExtension` (or `RetroArchTopShelfExtension` for tvOS) target.\n 1. In the `Signing & Capabilities` tab, change the \"Team\" under Signing to be your developer name.\n 1. In the `Signing & Capabilities` tab, Change the \"Bundle Identifier\" to the bundle identifier you chose for the target plus a suffix (e.g. `your.email.address.RetroArch.RetroArchWidgetExtension`).\n 1. For tvOS, in order for Top Shelf to work, you additionally need to set up the App Groups properly, described below.\n1. Set the active scheme to `RetroArch iOS Release` (or `RetroArch tvOS Release` for tvOS), and select your connected iOS/tvOS device as the device.\n1. Run (**⌘-R**)\n\n\n\nOnce the application has been built, installed, and run on your device, it can be run again directly from the device without needing Xcode.\n\n## App Store Build\n\nBuilding for the Mac App Store requires being logged into Xcode with the Apple Developer account associated with the Bundle ID for the app. The app also builds with Push Notification and CloudKit entitlements for the iCloud cloud sync driver (and Top Shelf for tvOS). Once all of the signing and entitlements are set up, creating the build is simply changing the scheme to `RetroArch AppStore`.\n\nThere is an automated [fastlane](http://docs.fastlane.tools) script available in pkg/apple/fastlane that will update the build numbers and upload the built prodduct to TestFlight using an [App Store Connect API Key](http://docs.fastlane.tools/app-store-connect-api/).\n\n## Additional Tips:\n\n### Cores\n\n- When you run RetroArch and try to run a game, and see the message \"Failed to load libretro core\", that means the core is not code signed. See the above \"Code Signing the Cores\" section on making sure your cores are signed. You can manually check the code signature on a file by doing: `codesign -dvv mednafen_psx_libretro_ios.dylib`. The Authority entry has your certificate - make sure it's your dev or adhoc distribution certificate.\n\n- To see if your core is valid and usable in RetroArch, you can also try Load Core and selecting the core. If you see the core name appear at the top (in the GUI menu), then it is properly codesigned and loaded. If you still see \"No Core\", then your core is not codesigned and cannot be used.\n\n\n### Top Shelf\n\nTop Shelf for tvOS will display up to five entries from each of the History and Favorites playlists, but is not compiled by default. The Top Shelf extension runs as in a different sandbox, and sharing the playlists requires the use of App Groups. In order to enable the Top Shelf extension:\n\n1. With the project selected, select the RetroArchTV target. In the `Signing & Capabilities` tab, add the `App Groups` capability, and provide a unique group identifier.\n2. You will also need to provide a unique app/bundle identifier. This will have the effect of breaking updating from a prior version of the app, as the app data will not be copied over due to the new bundle identifier.\n3. Select the RetroArchTopShelfExtension target. In the `Signing & Capabilities` tab, add the `App Groups` capability, and provide the same unique group identifier.\n4. You will also need to provide a unique app/bundle identifier for the extension.\n5. In `pkg/apple/RetroArchTopShelfExtension/ContentProvider.h`, change the value of `kRetroArchAppGroup` to be the same unique group identifier.\n\n### Development\n\n#### Where do I start?\n\nThe RetroArch codebase can be daunting, especially if you're used to iOS development in Objective C or Swift. Objective C is a superset of C so the syntax should look somewhat familiar to you.\n\nThe first and main entrypoint you should look at is in `core/griffin/griffin.c`. This is where all the code is included, with compiler flags used to bring in code specific to the platform. For iOS, you should pay attention to the compiler flags like `__APPLE__`, `TARGET_OS_IPHONE`, `HAVE_COCOATOUCH`.\n\nNote that you can Cmd-click into the `#include` paths to peer into the source code. You can also Cmd-Shift-O and type in the source file as well. And, breakpoints work as well!\n\nThe iOS specific code is in `core/griffin/griffin_objc.m`. Here you'll find the include to `./ui/drivers/ui_cocoatouch.m`, which contains the application delegate - the main entry point for the iOS application lifecycle. From there everything should look familiar to you as an iOS developer, and you should be able to hook in any iOS specific objective c code. Although you can use Objective C data structures and code, you'll probably be having to use C data structures since you'll have to call methods in C to hook back into RetroArch, and they will expect C data structures. The great thing is you can mix C code with Objective C, as long as you do the necessary conversions to the data structures that RetroArch expects.\n"
},
{
"path": "docs/development/retroarch/compilation/linux-and-bsd.md",
"content": "# Compilation in Linux and BSD\n\nCompilation on Linux and BSD does not have many surprises, as its foundation is Unix-based.\n\n### Dependencies\n- At least one libretro implementation\n- pkgconfig\n- Working OpenGL headers (should be included by default, but you might need to install libgl/mesa development packages)\n\n### Optional dependencies\n- libxml2-devel - For XML shaders and cheat support.\n- libcaca-devel - Color AsCii Art library\n- freetype-devel - TTF font rendering\n- ffmpeg/libavcodec - FFmpeg recording\n- flac-devel - Free Lossless Audio Codec\n- nvidia-cg-toolkit - Cg shaders\n- slang-devel - Slang shaders\n- libudev-devel\n- qt5-qtbase-devel - For Qt GUI (Desktop)\n- zlib-devel\n\nSome other libraries can be built support for as well, please refer to `./configure --help`.\n\n#### Satisfying dependencies under Fedora 23\n```bash\nsudo dnf install make automake gcc gcc-c++ kernel-devel mesa-libEGL-devel libv4l-devel libxkbcommon-devel mesa-libgbm-devel Cg libCg zlib-devel freetype-devel libxml2-devel ffmpeg-devel SDL2-devel SDL-devel perl-X11-Protocol perl-Net-DBus pulseaudio-libs-devel openal-soft-devel libusb-devel\n```\n\n#### Satisfying additional dependencies under Fedora 33\n```bash\nsudo dnf install egl-wayland-devel wayland-devel wayland-protocols-devel mesa-vulkan-devel libXxf86vm-devel flac-devel slang-devel libcaca-devel qt5-qtbase-devel\n```\n\n#### Satisfying dependencies under Debian/Ubuntu\n```bash\napt-get -y install build-essential libxkbcommon-dev zlib1g-dev libfreetype6-dev libegl1-mesa-dev libgles2-mesa-dev libgbm-dev nvidia-cg-toolkit nvidia-cg-dev libavcodec-dev libsdl2-dev libsdl-image1.2-dev libxml2-dev yasm\n```\n\n#### Satisfying dependencies under Alpine\n```sh\napk add eudev-dev ffmpeg-dev freetype-dev g++ gcc libxml2-dev mesa-dev pkgconf zlib-dev\n```\n\nThis list of packages may not be complete.\n### Getting the code\n```bash\ngit clone https://github.com/libretro/libretro-super.git\ncd libretro-super\nSHALLOW_CLONE=1 ./libretro-fetch.sh\n```\n\n### Building RetroArch\n```bash\n./retroarch-build.sh\n```\n\n### Building libretro cores\nYou should at least build one libretro implementation so RetroArch can do stuff.\nThere is a [super-project](https://github.com/libretro/libretro-super) that is designed to easily build every libretro port out there. To build every core:\n```bash\nNOCLEAN=1 ./libretro-build.sh\n```\nOmit NOCLEAN=1 if you wish to perform \"make clean\" on every repo before building\n\n### Installing\nLet's assume you'd like to install RetroArch into a folder called `~/ra`\n```bash\nmkdir -p ~/ra/cores\ncd retroarch\nmake DESTDIR=~/ra install\ncd .. #to libretro-super directory\n./libretro-install.sh ~/ra/cores\n```\nYou should now have a fully functional RetroArch build in `~/ra` Enjoy! :)\n"
},
{
"path": "docs/development/retroarch/compilation/msvc-runtime-versions.md",
"content": "# MSVC Runtime Versions\n\n|VC++ version |_MSC_VER|Alternative name |C runtime |C++ runtime |\n|-------------|--------|-------------------------|---------------|--------------|\n|1.0 |800 | |MSVCRT10.DLL | |\n|2.0 |900 | |MSVCRT20.DLL | |\n|4.0 |1000 | |MSVCRT40.DLL | |\n|4.2 |1020 | |MSVCRT.DLL | |\n|5.0 |1100 |Visual Studio 97 |MSVCRT.DLL |MSVCP50.DLL |\n|6.0 |1200 |Visual Studio 6.0, VC98 |MSVCRT.DLL |MSVCP60.DLL |\n|7.0 |1300 |Visual Studio .NET (2002)|MSVCR70.DLL |MSVCP70.DLL |\n|7.1 |1310 |Visual Studio .NET 2003 |MSVCR71.DLL |MSVCP71.DLL |\n|8.0 |1400 |Visual Studio 2005 |MSVCR80.DLL |MSVCP80.DLL |\n|9.0 |1500 |Visual Studio 2008 |MSVCR90.DLL |MSVCP90.DLL |\n|10.0 |1600 |Visual Studio 2010 |MSVCR100.DLL |MSVCP100.DLL |\n|11.0 |1700 |Visual Studio 2012 |MSVCR110.DLL |MSVCP110.DLL |\n|12.0 |1800 |Visual Studio 2013 |MSVCR120.DLL |MSVCP120.DLL |\n|14.0 |1900 |Visual Studio 2015 |See notes |MSVCP140.DLL |\n|14.1* |1910* |Visual Studio 2017 |See notes |MSVCP140.DLL |\n\n!!! Note \"Note for VC2003\"\n The runtime does not have its own redist, it is instead only bundled with .NET Framework 1.1, or you can manually extract it from KB932298 (2007 DST Update).\n\n!!! Note \"Note for VC2015/2017\"\n The runtime was split into 4 external libraries: concrt140.dll, msvcp140.dll, vccorlib140.dll and vcruntime140.dll, as well as an OS-local component named ucrtbase.dll included with Windows 10 and up.\n\n!!! Note \"Note for VC2017\"\n The version numbers increment with each update (VC++ versions 14.1/14.11/14.12, _MSC_VER 1910/1911/1912, Visual Studio versions 15.0/15.3/15.5 etc.). And yes, the C++ runtime is still called VCP140 and not VCP141...\n\n## What does my Windows version ship with?\n\n|Version |NT3 |95 |NT4 |98 |2000 |ME |XP |2003 |2003R2|Vista|2008 |7 |2008R2|2012 |8 |8.1 |2012R2|10 |2016 |\n|:---------:|:---:|:---:|:---:|:---:|:---:|:---:|:---:|:---:|:----:|:---:|:---:|:---:|:----:|:---:|:---:|:---:|:----:|:---:|:---:|\n|1.0 |X | | | | | | | | | | | | | | | | | | |\n|2.0 |X |X |X |X |X | |X |X |X |X |X |X |X |X |X |X |X |X |X |\n|4.0 | |X* |X |X |X | |X |X |X |X |X |X |X |X |X |X |X |X |X |\n|5.0 | | | |X* |X | |X |X |X | | | | | | | | | | |\n|6.0 | | | | | | |X |X |X |X |X |X |X |X |X |X |X |X |X |\n|2002 | | | | | | | | | | | | | | | | | | | |\n|2003 | | | | | | | |X* |X* | | | | | | | | | | |\n|2005 | | | | | | | | | |X |X |X |X |X |X |X |X |X |X |\n|2008 | | | | | | | | | | | |X |X |X |X |X |X |X |X |\n|2010 | | | | | | | | | | | | | |X | | |X | |X |\n|2012 | | | | | | | | | | | | | | | | | | |X |\n|2013 | | | | | | | | | | | | | | | | | | | |\n|2015 | | | | | | | | | | | | | | | | | | | |\n|2017 | | | | | | | | | | | | | | | | | | | |\n\n!!! Note \"Note for Windows 95\"\n The VC40 runtime is only bundled with Windows 95B (OSR2) and up.\n\n!!! Note \"Note for Windows 98\"\n The VC50 runtime is not always installed, but is available on the install CD (in WIN98/WIN98_36.CAB for First Edition and 37.CAB for Second Edition).\n\n!!! Note \"Note for Server 2003 and 2003R2\"\n The VC2003 runtime requires installing the .NET Framework via the Windows Components Wizard after installation.\n\n## Which runtime is supported by my Windows version?\n\nFrom [Minimum service pack levels for Microsoft VC++ Redistributable Packages](https://support.microsoft.com/en-us/help/2661358/minimum-service-pack-levels-for-microsoft-vc-redistributable-packages):\n\n|Version |95 |NT4 |98 |2000 |ME |XP |2003 |2003R2|Vista|2008 |7 |2008R2|2012 |8 |8.1 |2012R2|10 |2016 |\n|:---------:|:---:|:---:|:---:|:---:|:---:|:---:|:---:|:----:|:---:|:---:|:---:|:----:|:---:|:---:|:---:|:----:|:---:|:---:|\n|2003 |X* |SP6a*|X* |X* |X* |X* |X* |X* |X* |X* | | | | | | | | |\n|2005 | | | | | |SP2+ |SP1+ | | | | | | | | | | | |\n|2005 SP1 | | | | | |SP2+ |SP1+ |X |X |X |X |X |X |X |X |X |X | |\n|2008 | | | |SP4 | |SP2+ |SP1+ |X |X | | | | | | | | | |\n|2008 SP1 | | | | | |SP2+ |SP1+ |X |X |X |X |X |X |X |X |X |X | |\n|2010 | | | | | |SP3 |SP2+ |X |SP2+ |SP2+ |X |X* | | | | | | |\n|2010 SP1 | | | | | |SP3 |SP2+ |X |SP2+ |SP2+ |X |X* |X* |X* |X* |X* |X* | |\n|2012 Upd. 4| | | | | |SP3 |SP2+ |X |SP2+ |SP2+ |SP1+ |SP1+ |X |X |X |SP1+* |X | |\n|2013 | | | | | |SP3 |SP2+ |X |SP2+ |SP2+ |SP1+ |SP1+ |X |X |X |X |X | |\n|2015 | | | | | |SP3 |SP2+ |X |SP2+ |SP2+ |SP1+ |SP1+ |X |X |X |X |X | |\n|2017 | | | | | |SP3 |SP2+ | |SP2+ |SP2+ |SP1+ |SP1+ |X | |X* | |X* |X |\n\n!!! Note \"Note for VC2003\"\n The VC2003 runtime is not provided as a separate download and requires installing the .NET Framework 1.1 (requires IE 5.01 or later).\n\n!!! Note \"Note for VC2010\"\n Server 2008R2 requires SP1 if using the x64 version.\n\n!!! Note \"Note for VC2010 SP1\"\n MS Documentation is conflicting about whether or not 2008R2/2012 x86 is supported, or if 8/2012 or higher is even supported at all.\n\n!!! Note \"Note for VC2012 Update 4/VC2013\"\n MS Documentation is conflicting about the exact service pack levels and architectures supported for each OS version.\n\n!!! Note \"Note for VC2013\"\n For 8.1 and 2012R2, KB2883200 is required.\n\n!!! Note \"Note for VC2017\"\n For 8.1 and 2012R2, KB2919355 is required. For 10, build 1507 or later is required. Requirements were taken from [here](https://docs.microsoft.com/en-us/visualstudio/productinfo/vs2017-system-requirements-vs).\n\n!!! Note \"Note for Windows 7/8/2012 and higher\"\n While some runtimes may not be documented as officially supported, testing shows that all the above versions appear to work.\n"
},
{
"path": "docs/development/retroarch/compilation/osx.md",
"content": "# macOS/OSX Compilation / Development Guide\n\nThis compilation guide will teach you how to build RetroArch for macOS/OSX.\n\nAll versions of the operating system since 10.5 are supported. RetroArch can work on PPC, Intel, and ARM processor-powered Macs.\n\n\n\nThis video covers a quick demonstration of these subjects;\n\n1. Environment Configuration\n\n2. Fetching the code\n\n3. Building RetroArch\n\n4. (Optional) Building the cores\n\nBe sure to read instructions that are given on this page.\n\n## Environment configuration\n\n### Xcode\n\nThe only requirement for building is Xcode, which is only available for macOS. You can get Xcode from the App Store. If you have never used Xcode before, you will need to open the Xcode preferences, and in Accounts, log in with your Apple ID.\n\n### retroarch-apple-deps (optional but recommended)\n\nRetroArch optionally will automatically link with supporting libraries (including MoltenVK) that are provided by the retroarch-apple-deps repo. By default Xcode will look for these dependencies in `/usr/local/share/retroarch-apple-deps`.\n\nTo get retroarch-apple-deps, run:\n\n```shell\ngit clone https://github.com/warmenhoven/retroarch-apple-deps.git retroarch-apple-deps\nsudo ln -s $PWD/retroarch-apple-deps /usr/local/share\n```\n\n## Fetching the code\n\n### libretro-super\n\nThe recommended way of fetching RetroArch source code, as well as the source code for all of the cores, is to use libretro-super.\n\nTo get libretro-super, run:\n\n```shell\ngit clone https://github.com/libretro/libretro-super.git libretro-super\ncd libretro-super\n```\n\nNow you can run the following command to download the source for RetroArch:\n\n```shell\n./libretro-fetch.sh --retroarch\n```\n\nYou can run the following command to download the source for RetroArch as well as all of the cores:\n\n```shell\n./libretro-fetch.sh\n```\n\nOr specify just the cores that you want:\n\n```shell\n./libretro-fetch.sh snes9x2010 fceumm\n```\n\n### RetroArch repo\n\nIf you choose not to use libretro-super, you can clone RetroArch's repository from [GitHub](https://github.com/libretro/RetroArch)\n\n```shell\ngit clone https://github.com/libretro/RetroArch.git retroarch\ncd retroarch\n```\n\n!!! Note\n Versions of git available for OSX PowerPC might not come with the necessary SSL/TLS support that Github now requires. If you happen to find that you can not clone or pull from Github, perform the following command:\n git config --global http.sslVerify false.\n\nFor subsequent builds you only need to pull the changes from the repo\n\n```shell\ncd retroarch\ngit pull\n```\n\nTo update your local copy from the repository run git pull\n\n## RetroArch Compilation\n\nThere are several Xcode projects and workspaces in the `pkg/apple` directory in RetroArch, to choose from based on your needs:\n\n| Xcode Project/Workspace File Name | OS support | Purpose |\n-----------------------------------------|-|-\n| `RetroArch.xcworkspace` | 10.13+ | The primary workspace for the latest Metal build. Most active development happens here. |\n| `RetroArch_Metal.xcodeproj` | 10.13+ | The project for the latest Metal build. You can use this directly but typically it's preferred to use the Workspace. |\n| `RetroArch.xcodeproj` | 10.6+ | The outdated non-Metal build, only for Intel processor-powered Macs. |\n| `RetroArch_PPC.xcodeproj` | 10.5+ | Building for PowerPC processor-powered Macs. |\n| `RetroArch_OSX107.xcodeproj` | 10.7+ | An old development line that is no longer in use. |\n\n### Building RetroArch separately\n\nOpen Xcode. Open your chosen project file in the Xcode IDE and build (**⌘-B**) and run (**⌘-R**) it there. The default scheme should be `RetroArch` and that is what is used for building the DMG image available on the buildbot.\n\n## Core Compilation (optional)\n\nRetroArch on OSX by default will be configured to download cores from the buildbot; you do not need to build the cores yourself.\n\n### libretro-super (deprecated)\n\nIf you choose to build the cores yourself, the easiest way to build all the cores is to use libretro-super.\n\nTo build all cores for OSX, run\n\n```shell\n./libretro-build.sh\n```\n\nIn case you only want to build one and/or more cores instead of all, you can specify the cores you want to build after the first command in no particular order. E.g.:\n\n```shell\n./libretro-build.sh snes9x2010 fceumm\n```\n\nOnce finished, you can find the libretro cores inside directory `dist/osx`.\n\n### GitLab CI mimicry\n\nCores on the buildbot are built using the GitLab CI infrastructure. Each core provides its own `.gitlab-ci.yml` file with instructions for how to build it. Almost all cores reference one of the [CI Templates](https://git.libretro.com/libretro-infrastructure/ci-templates). Between the `.gitlab-ci.yml` file and the templates, you should have complete instructions for how to build each core.\n\n## Store Builds\n\n### Steam Build\n\nBuilding for Steam differs from the normal app build in two ways: the scheme is `RetroArchSteam`, and it requires bundling [mist](https://git.libretro.com/libretro-steam/mist) and linking against libmist. Simply download the latest artifacts for mist from GitLab, and set the `MIST_PATH` variable in the Xcode project with its location.\n\nOnce the Steam app is built, it is no different from the app available in the Steam store, and will communicate with Steam to fetch cores and update presence.\n\n### Mac App Store Build\n\nBuilding for the Mac App Store requires being logged into Xcode with the Apple Developer account associated with the Bundle ID for the app. The app also builds with Push Notification and CloudKit entitlements for the iCloud cloud sync driver. Once all of the signing and entitlements are set up, creating the build is simply changing the scheme to `RetroArch AppStore`.\n\nThere is an automated [fastlane](http://docs.fastlane.tools) script available in pkg/apple/fastlane that will update the build numbers and upload the built prodduct to TestFlight using an [App Store Connect API Key](http://docs.fastlane.tools/app-store-connect-api/).\n"
},
{
"path": "docs/development/retroarch/compilation/ps2.md",
"content": "# PlayStation 2 Compilation / Development Guide\n\n## Environment configuration\n\nYou need the homebrew PlayStation 2 SDK and toolchain installed.\nYou can follow how to install the toolchain over here [ps2toolchain](https://github.com/ps2dev/ps2toolchain)\n\nAdditionally you need the PS2 Graphics Synthesizer installed.\nYou can follow how to install the GSKit over here [gsKit](https://github.com/ps2dev/gsKit)\n\nFinally you need to install specific ports for PlayStation 2.\nYou can follow how to install the PlayStation 2 Ports over here [ps2sdk-ports](https://github.com/ps2dev/ps2sdk-ports)\n\n## RetroArch Compilation\n\n### Fetching RetroArch\n\nClone RetroArch's repository from [GitHub](https://github.com/libretro/RetroArch)\n\n git clone https://github.com/libretro/RetroArch.git retroarch\n cd retroarch\n\nFor subsequent builds you only need to pull the changes from the repo\n\n cd retroarch\n git pull\n\nTo update your local copy from the repository run git pull\n\n### Building RetroArch separately\n\n\n\nTo compile RetroArch (for PlayStation 2) run:\n make -f Makefile.ps2\n\n!!! Note\n RetroArch on PlayStation PS2 is statically linked. With statically linked RetroArch, each executable is a separate libretro core instead of the core being separately loaded from a single executable. A pre-existing libretro library needs to be present in the root directory in order to link RetroArch PS2. This file needs to be called 'libretro_ps2.a'.\n\nAfter a few seconds/minutes you should be able to find a retroarch_ps2.elf file under that directory.\n\n### Building RetroArch in bulk\n\nInstead of building each core one by one, you can build all cores as a batch task. Run from the main 'retroarch' directory:\n\n cd dist-scripts\n\n!!! Note\n Make sure that all the libretro cores that you want to compile are inside the 'dist-scripts' directory.\n\nOnce inside this directory, run :\n\n\nThis process will also automate the packaging process for you.\n\n### Packaging RetroArch\n\n\n### Additional Tips:\n\n## Core Compilation\n\n### Fetching Cores\n\nThe easiest way to fetch all the cores is to use libretro-super. Run\n\n ./libretro-fetch.sh\n\n### Building Cores\n\nThe easiest way to build all the cores (for PlayStation Portable) is to use libretro-super. Run\n\n\nIn case you only want to build one and/or more cores instead of all, you can specify the cores you want to build after the first command in no particular order. E.g.:\n\n\nOnce finished, you can find the libretro cores inside directory `dist/ps2`.\n"
},
{
"path": "docs/development/retroarch/compilation/psp.md",
"content": "# PlayStation PSP Compilation / Development Guide\n\n## Environment configuration\n\nYou need the homebrew PlayStation PSP SDK and toolchain installed.\n\n## RetroArch Compilation\n\n### Fetching RetroArch\n\nClone RetroArch's repository from [GitHub](https://github.com/libretro/RetroArch)\n\n git clone https://github.com/libretro/RetroArch.git retroarch\n cd retroarch\n\nFor subsequent builds you only need to pull the changes from the repo\n\n cd retroarch\n git pull\n\nTo update your local copy from the repository run git pull\n\n### Building RetroArch separately\n\nFirst, you need to compile [Salamander](../glossary.md#salamander). To compile Salamander (for PlayStation Portable) run:\n\n make -f Makefile.psp1.salamander\n\nSecond, to compile RetroArch (for PlayStation Portable) run:\n\n make -f Makefile.psp1\n\n!!! Note\n RetroArch on PlayStation PSP is statically linked. With statically linked RetroArch, each executable is a separate libretro core instead of the core being separately loaded from a single executable. A pre-existing libretro library needs to be present in the root directory in order to link RetroArch Vita. This file needs to be called 'libretro_psp1.a'.\n\nAfter a few seconds/minutes you should be able to find a retroarch_psp1.elf and retroarch_psp1.self file under that directory.\n\n### Building RetroArch in bulk\n\nInstead of building each core one by one, you can build all cores as a batch task. Run from the main 'retroarch' directory:\n\n cd dist-scripts\n\n!!! Note\n Make sure that all the libretro cores that you want to compile are inside the 'dist-scripts' directory.\n\nOnce inside this directory, run :\n\n ./dist-cores.sh psp1\n\nThis process will also automate the packaging process for you.\n\n### Packaging RetroArch\n\n\n### Additional Tips:\n\n## Core Compilation\n\n### Fetching Cores\n\nThe easiest way to fetch all the cores is to use libretro-super. Run\n\n ./libretro-fetch.sh\n\n### Building Cores\n\nThe easiest way to build all the cores (for PlayStation Portable) is to use libretro-super. Run\n\n ./libretro-build-psp1.sh\n\nIn case you only want to build one and/or more cores instead of all, you can specify the cores you want to build after the first command in no particular order. E.g.:\n\n ./libretro-build-psp1.sh snes9x2010 fceumm\n\nOnce finished, you can find the libretro cores inside directory `dist/psp1`.\n"
},
{
"path": "docs/development/retroarch/compilation/psvita.md",
"content": "# PlayStation Vita/TV Compilation / Development Guide\n\n## Environment configuration\n\nYou need the homebrew PlayStation Vita SDK and toolchain installed.\n\n## RetroArch Compilation\n\n### Fetching RetroArch\n\nClone RetroArch's repository from [GitHub](https://github.com/libretro/RetroArch)\n\n git clone https://github.com/libretro/RetroArch.git retroarch\n cd retroarch\n\nFor subsequent builds you only need to pull the changes from the repo\n\n cd retroarch\n git pull\n\nTo update your local copy from the repository run git pull\n\n### Building RetroArch separately\n\nFirst, you need to compile [Salamander](../glossary.md#salamander). To compile Salamander (for PlayStation3) run:\n\n make -f Makefile.vita.salamander\n\nSecond, to compile RetroArch (for PlayStation3) run:\n\n make -f Makefile.griffin platform=vita\n\n!!! Note\n RetroArch on PlayStation Vita/TV is statically linked. With statically linked RetroArch, each executable is a separate libretro core instead of the core being separately loaded from a single executable. A pre-existing libretro library needs to be present in the root directory in order to link RetroArch Vita. This file needs to be called 'libretro_vita.a'.\n\nAfter a few seconds/minutes you should be able to find a retroarch_vita.elf and retroarch_vita.self file under that directory.\n\n### Building RetroArch in bulk\n\nInstead of building each core one by one, you can build all cores as a batch task. Run from the main 'retroarch' directory:\n\n cd dist-scripts\n\n!!! Note\n Make sure that all the libretro cores that you want to compile are inside the 'dist-scripts' directory.\n\nOnce inside this directory, run :\n\n ./dist-cores.sh vita\n\nThis process will also automate the packaging process for you.\n\n### Packaging RetroArch\n\n\n### Additional Tips:\n\n## Core Compilation\n\n### Fetching Cores\n\nThe easiest way to fetch all the cores is to use libretro-super. Run\n\n ./libretro-fetch.sh\n\n### Building Cores\n\nThe easiest way to build all the cores (for PlayStation3) is to use libretro-super. Run\n\n ./libretro-build-vita.sh\n\nIn case you only want to build one and/or more cores instead of all, you can specify the cores you want to build after the first command in no particular order. E.g.:\n\n ./libretro-build-vita.sh snes9x2010 fceumm\n\nOnce finished, you can find the libretro cores inside directory `dist/vita`.\n"
},
{
"path": "docs/development/retroarch/compilation/switch-libnx.md",
"content": "# Nintendo Switch Compilation / Development Guide (libnx)\n\n## Environment configuration\n\nYou need the homebrew Nintendo Switch SDK libnx and DevkitA64 toolchain installed. You can find instructions on how to install it on the [switchbrew wiki](https://switchbrew.org/wiki/Setting_up_Development_Environment).\n\nThen, install all the required libraries:\n - use the devkitpro MSYS2 terminal on Windows\n - replace `dkp-pacman` by `pacman` on Linux and Mac OS\n\n```\ndkp-pacman -Sy devkit-env devkitA64 libnx switch-tools switch-mesa switch-zlib switch-bzip2 switch-liblzma switch-freetype switch-libpng switch-libvpx switch-ffmpeg switch-libopus\n```\n\n## RetroArch Compilation\n\nAll commands must be issued in the devkitpro environment (MSYS2 on Windows).\n\n### Fetching RetroArch\n\nClone RetroArch's repository from [GitHub](https://github.com/libretro/RetroArch)\n\n```\ngit clone https://github.com/libretro/RetroArch.git retroarch\ncd retroarch\n```\n\nFor subsequent builds you only need to pull the changes from the repo\n\n```\ncd retroarch\ngit pull\n```\n\n### Building Cores\n\nThe easiest way to build all the cores (for Switch) is to use [libretro-super](https://github.com/libretro/libretro-super). `git clone` and `cd` into the base directory, then run:\n\n```\nmake -f Makefile.libnx\n```\n\nIn case you only want to build one and/or more cores instead of all, you can specify the cores you want to build using the commands below. E.g.:\n\n```\n./libretro-fetch.sh snes9x2010 fceumm\nplatform=libnx ./libretro-build.sh snes9x2010 fceumm\n```\n\nOnce finished, you can find the libretro cores inside directory `dist/libnx`.\n\n### Building RetroArch\n\nEach NRO of RetroArch has one and only one core, and each core is a standalone homebrew by itself. That means that building multiple cores means building RetroArch multiple times, once for each core.\n\nThe cores you previously built will be called `_libretro_libnx.a`, where `` is the name of the core that was used to build it.\n\nFor each core you wish to build, you will need to copy it to the `retroarch` directory, and rename it to `libretro_libnx.a`.\n\nOnce the core has been moved and renamed, move to the `retroarch` directory using `cd` and run this command:\n\n```\nmake -f Makefile.libnx\n```\n\nThat will output `retroarch_switch.nro`: this is your home built copy of RetroArch! It is recommended to rename your '.nro' file so you can remember which core it contains.\n\nYou can then use `nxlink` to send the homebrew to your Switch over Wi-Fi.\n"
},
{
"path": "docs/development/retroarch/compilation/ubuntu.md",
"content": "# Ubuntu Compilation / Development Guide\n\n## Environment configuration\n\nThe easiest route to get into building RetroArch and libretro cores on Ubuntu linux is to use libretro's PPA.\nFor stable releases you can add the PPA like this:\n\n # add-apt-repository ppa:libretro/stable\n # apt-get update\n\nFor development work we recommend the testing PPA instead:\n\n # add-apt-repository ppa:libretro/testing\n # apt-get update\n\nYou will need **git** and a few build tools at least to proceed which you can install by issuing the following command:\n\n # apt-get install git build-essential\n\n## RetroArch Compilation\n### Building RetroArch\n\nThe first step is to obtain RetroArch's source tree.\n\n $ git clone https://github.com/libretro/RetroArch.git retroarch\n\nYou can get RetroArch's dependenencies by running the following command:\n\n # apt-get build-dep retroarch\n\n!!! Note\n Depending on your configuration you may need to uncomment the *deb-src* repositories in */etc/apt/sources.list*, */etc/apt/sources.list.d/libretro-ubuntu-testing-$version.list* and then run **apt-get update** before running **apt-get build-dep**\n\nFor subsequent builds you will need to pull the changes from the repo\n\n $ cd retroarch\n $ git pull\n\nTo compile RetroArch run the following commands inside RetroArch's source tree:\n\n $ ./configure\n $ make clean\n $ make -j4\n\nFor development purposes you might want to run a debug build instead. In such case use the following commands:\n\n $ ./configure\n $ make clean\n $ make DEBUG=1 GL_DEBUG=1 -j4\n\nYou can then start RetroArch by running:\n\n $ ./retroarch\n\nLocal builds do not contain assets. On a clean build, assets will be located by default at *$HOME/.config/retroarch/assets*, and can be downloaded from the Main Menu via Online Updater > Update Assets\n\n!!! tip\n If you're building frequently you may want to add **ccache** to the mix to speed up the build process.\n Install ccache via apt and the prepend the ccache symlink directory to your build environment path as shown below.\n\n For further instructions check the [documentation](https://ccache.samba.org/manual.html#_run_modes)\n\nInstall **ccache**:\n\n # apt-get install ccache\n\nConfigure paths:\n\n $ export PATH=/usr/lib/ccache/bin/:$PATH\n\n!!! tip\n You can add that last line to your *~/.bashrc* to avoid having to type that every time you start your working environment.\n## Core Compilation\n\n### Fetching Cores\n\nYou can find the cores on libretro's [GitHUB organization](https://github.com/libretro/).\n\nWe have an all-in-one tool to fetch and compile cores which you can use to streamline the process.\nYou can obtain the tool by using these commands:\n\n $ git clone https://github.com/libretro/libretro-super.git\n $ cd libretro-super\n\nThen you can fetch one or all the cores by using **libretro-fetch.sh**\n\nFetch all cores:\n\n $ ./libretro-fetch.sh\n\nFetch one core:\n\n $ ./libretro-fetch.sh *corename*\n\n!!! Note\n Replace *corename* with the name of the core you want to fetch, for example gambatte\n\n### Building Cores\n\n#### LibRetro Super\n\nThe easiest way to build all the cores is to use **libretro-build.sh** from within libretro-super's source tree:\n\n $ ./libretro-build.sh\n\nIn case you only want to build one and/or more cores instead of all, you can specify the cores you want to build after the first command in no particular order:\n\n $ ./libretro-build.sh snes9x2010 fceumm\n\nOnce compilation has finished, you can find the libretro cores inside *dist/unix*.\n\n#### Manual Fetching and Compilation\n\nGet the core's source tree. As an example we'll use [fceumm](https://github.com/libretro/libretro-fceumm/)\n\n $ git clone https://github.com/libretro/libretro-fceumm.git\n\nThen compile the core:\n\n $ cd libretro-fceumm\n $ make -f Makefile.libretro\n\nOptionally strip the build product:\n\n $ strip fceumm_libretro.so\n\nMost cores will build with these instructions. You might need to browse to a subdirectory in some cases.\n"
},
{
"path": "docs/development/retroarch/compilation/wii.md",
"content": "# Nintendo Wii Compilation / Development Guide\n\n## Environment configuration\n\nYou need to have installed [devkitPro](https://github.com/devkitPro/installer/releases), the homebrew Nintendo Wii SDK (libOGC) and the devkitPPC (r29 or r29-1) toolchain on your computer.\n\n## RetroArch Compilation\n\n### Fetching RetroArch\n\nClone RetroArch's repository from [GitHub](https://github.com/libretro/RetroArch)\n\n git clone https://github.com/libretro/RetroArch.git retroarch --recursive\n cd retroarch\n\nFor subsequent builds you only need to pull the changes from the repo\n\n cd retroarch\n git pull\n\nTo update your local copy of the RetroArch repository, run git pull\n\n### Building RetroArch separately\n\nFirst, you need to compile [Salamander](../glossary.md#salamander).\nTo compile Salamander (for Wii) run:\n\n make -f Makefile.wii.salamander\n\nRename the file retroarch-salamander_wii.dol as boot.dol. This file is the frontend launcher for the other cores (indeed files containing core and frontend).\n\nSecond, to compile RetroArch for Wii (the core and the frontend), rename the compiled core as 'libretro_wii.a' (see below how to compile a core in the \"Building Cores\" section), put it in the RetroArch directory and run:\n\n make -f Makefile.griffin platform=wii\n\n!!! Note\n RetroArch on Wii is statically linked. With statically linked RetroArch, each executable is a separate libretro core instead of the core being separately loaded from a single executable. A pre-existing libretro library needs to be present in the root directory in order to link RetroArch Wii. This file needs to be called 'libretro_wii.a'.\n\nAfter a few seconds/minutes you should be able to find a retroarch_wii.elf and retroarch_wii.dol file under that directory.\n\n### Building RetroArch in bulk\n\nInstead of building each core one by one, you can build all cores as a batch task. Run from the main 'retroarch' directory:\n\n cd dist-scripts\n\n!!! Note\n Make sure that all the libretro cores that you want to compile are inside the 'dist-scripts' directory.\n\nOnce inside this directory, run :\n\n ./dist-cores.sh wii\n\nThis process will also automate the packaging process for you.\n\n### Packaging RetroArch\n\n\n### Additional Tips:\n\n## Core Compilation\n\n### Fetching Cores\n\nThe easiest way to fetch all the cores is to use libretro-super. Download libretro-super from [GitHub](https://github.com/libretro/libretro-super) and run\n\n ./libretro-fetch.sh\n\n### Building Cores\n\nThe easiest way to build all the cores (for Wii) is to use libretro-super. If not already fetched, put the codes of the cores you want compile in the libretro-super directory and run\n\n ./libretro-build-wii.sh\n\nIn case you only want to build one and/or more cores instead of all, you can specify the cores you want to build after the first command in no particular order. E.g.:\n\n ./libretro-build-wii.sh snes9x2010 fceumm\n\nOnce finished, you can find the libretro cores inside directory `dist/wii`.\n\nAnother way to compile cores, is by cloning the core's repository (for example, FCEUmm) from [GitHub](https://github.com/orgs/libretro/repositories).\nIn this case, to clone FCEUmm-Libretro repo:\n\n git clone https://github.com/libretro/libretro-fceumm.git libretro-fceumm --recursive\n cd libretro-fceumm\n\nFor subsequent builds you only need to pull the changes from the core's repo (ex., FCEUmm)\n\n cd libretro-fceumm\n git pull\n\nTo update your local copy from the repository of the core (in this case FCEUmm), run git pull\n\nTo compile the core for Wii (in this case, FCEUmm) run:\n\n make platform=wii\n\nSome cores (example, Snes9x) have a dedicated makefile for compile as a Libretro core. To compile the core for Wii with the dedicated Libretro makefile run:\n\n make -f Makefile.libretro platform=wii\n\nRename the compiled core as 'libretro_wii.a', then put it in the RetroArch directory and follow the instructions in the \"Building RetroArch separately\" section.\n"
},
{
"path": "docs/development/retroarch/compilation/wiiu.md",
"content": "# Nintendo Wii U Compilation / Development Guide\n\n## Environment configuration\n\nYou need the DevkitPPC(r29) toolchain installed and the DEVKITPRO and DEVKITPPC environment variables set to the respective folders.\n\n## RetroArch Compilation\n\n### Fetching RetroArch\n\nClone RetroArch's repository from [GitHub](https://github.com/libretro/RetroArch)\n\n git clone https://github.com/libretro/RetroArch.git retroarch\n cd retroarch\n\nFor subsequent builds you only need to pull the changes from the repo\n\n cd retroarch\n git pull\n\nTo update your local copy from the repository run git pull\n\n### Building RetroArch separately\n\nTo compile RetroArch (for Wii U) run:\n\n make -f Makefile.wiiu\n\n!!! Note\n RetroArch on Wii U is statically linked. With statically linked RetroArch, each executable is a separate libretro core instead of the core being separately loaded from a single executable. A pre-existing libretro library needs to be present in the root directory in order to link RetroArch Wii U. This file needs to be called 'libretro_wiiu.a'.\n\nAfter a few seconds/minutes you should be able to find a retroarch_wiiu.elf and retroarch_wiiu.rpx file under that directory.\n\n### Building RetroArch in bulk\n\nInstead of building each core one by one, you can build all cores as a batch task. Run from the main 'retroarch' directory:\n\n cd dist-scripts\n\n!!! Note\n Make sure that all the libretro cores that you want to compile are inside the 'dist-scripts' directory. you can also copy the [info files](https://github.com/libretro/libretro-super/tree/master/dist/info) and [icons](https://github.com/libretro/retroarch-assets/tree/master/pkg/wiiu) in the same directory to have them added to the package, and to generate the meta.xml files.\n\nOnce inside this directory, run :\n\n ./wiiu-cores.sh\n\nThis process will also automate the packaging process for you. the output will be in `pkg/wiiu`.\n\n### Packaging RetroArch\n\n\n### Additional Tips:\n\n## Core Compilation\n\n### Fetching Cores\n\nThe easiest way to fetch all the cores is to use libretro-super. Run\n\n ./libretro-fetch.sh\n\n### Building Cores\n\nThe easiest way to build all the cores (for Wii U) is to use libretro-super. Run\n\n ./libretro-build-wiiu.sh\n\nIn case you only want to build one and/or more cores instead of all, you can specify the cores you want to build after the first command in no particular order. E.g.:\n\n ./libretro-build-wiiu.sh snes9x2010 fceumm\n\nOnce finished, you can find the libretro cores inside directory `dist/wiiu`.\n"
},
{
"path": "docs/development/retroarch/compilation/windows.md",
"content": "# Windows 7 and later compilation and development guide\n\n!!! Warning\n The MinGW toolchain we use in this guide no longer supports targeting Windows Vista or earlier.\n Please refer to one of the MSVC guides for how to target older Windows versions with Visual Studio.\n\n\n\nThis video covers quick demonstrations of these subjects;\n\n1. Environment Configuration\n\n2. Building RetroArch\n\n3. Packaging RetroArch\n\nBe sure to read instructions that are given in this page.\n\n## Environment configuration\n\nWe recommend MinGW-W64 from MSYS2. You can download MSYS2 installer from [here](http://msys2.github.io/).\n\nFollow the installation instructions and once finished start the MSYS2 shell.\n\nYou may need to add \"Full Control\" permission to your MSYS folder (for example, C:\\msys64) or run the shell as Administrator.\n\nMSYS2 shell is a maintenance shell. We are going to use this shell to install the toolchain and other packages. First order of business is to update MSYS2. Start the MSYS2 MINGW64 or MINGW32 Shell (mingw64.exe or mingw32.exe), It is important to use this particular shell (MINGW) because the makefile uses it to detect the target platform as Windows.\n\nOnce we're in the shell, run the following commands:\n\n```bash\npacman --noconfirm -Sy\npacman --needed --noconfirm -S bash pacman pacman-mirrors msys2-runtime\n```\n\nClose MSYS2 shell and start it again, and:\n\n```bash\npacman --noconfirm -Su\n```\n\nRestart MSYS2 once again. Now we can start installing the packages we actually need.\n\nFor 32-bit builds:\n\n```bash\npacman -S --noconfirm --needed wget git make mingw-w64-i686-toolchain mingw-w64-i686-ntldd mingw-w64-i686-zlib mingw-w64-i686-pkg-config mingw-w64-i686-SDL2 mingw-w64-i686-libxml2 mingw-w64-i686-freetype mingw-w64-i686-python3 mingw-w64-i686-ffmpeg mingw-w64-i686-drmingw\n```\n\nFor 64-bit builds:\n\n```bash\npacman -S --noconfirm --needed wget git make mingw-w64-x86_64-toolchain mingw-w64-x86_64-ntldd mingw-w64-x86_64-zlib mingw-w64-x86_64-pkg-config mingw-w64-x86_64-SDL2 mingw-w64-x86_64-libxml2 mingw-w64-x86_64-freetype mingw-w64-x86_64-python3 mingw-w64-x86_64-ffmpeg mingw-w64-x86_64-drmingw\n```\n\nYou might want to install Qt too if you want to be able to use the desktop GUI.\n\nFor 32-bit builds:\n\n```bash\npacman -S --noconfirm --needed mingw-w64-i686-qt5 mingw-w64-i686-openssl\n```\n\nFor 64-bit builds:\n\n```bash\npacman -S --noconfirm --needed mingw-w64-x86_64-qt5 mingw-w64-x86_64-openssl\n```\n\nThe NVIDIA CG toolkit package hasn't been updated for a while so you need to download that package manually and install with pacman. You can download the packages from sourceforge at the following locations: [32-bit](http://sourceforge.net/projects/msys2/files/REPOS/MINGW_GCC_4_9/i686/mingw-w64-i686-nvidia-cg-toolkit-3.1-2-any.pkg.tar.xz/download) / [64-bit](http://sourceforge.net/projects/msys2/files/REPOS/MINGW_GCC_4_9/x86_64/mingw-w64-x86_64-nvidia-cg-toolkit-3.1-2-any.pkg.tar.xz/download). Alternatively you can use the following commands directly:\n\nFor 32-bit builds:\n\n```bash\nwget http://sourceforge.net/projects/msys2/files/REPOS/MINGW_GCC_4_9/i686/mingw-w64-i686-nvidia-cg-toolkit-3.1-2-any.pkg.tar.xz/download -O mingw-w64-i686-nvidia-cg-toolkit-3.1-2-any.pkg.tar.xz\npacman -U mingw-w64-i686-nvidia-cg-toolkit-3.1-2-any.pkg.tar.xz\n```\n\nFor 64-bit builds:\n\n```bash\nwget https://sourceforge.net/projects/mingw-w64-archlinux/files/x86_64/mingw-w64-nvidia-cg-toolkit-3.1-2-any_4.pkg.tar.xz/download -O mingw-w64-x86_64-nvidia-cg-toolkit-3.1-2-any.pkg.tar.xz\npacman -U mingw-w64-x86_64-nvidia-cg-toolkit-3.1-2-any.pkg.tar.xz\n```\n\nIf you encounter any errors, you may try the following procedure instead:\n\n```bash\npacman -S mingw-w64-x86_64-crt\npacman -S mingw-w64-x86_64-nvidia-cg-toolkit\n```\n\n\nOnce these packages are installed close MSYS2 shell and open MinGW-w32 shell or MinGW-w64 shell depending on the platform you want to build for.\n\nYou'll need gcc and make:\n```bash\npacman -S make\npacman -S gcc\n```\n\n## RetroArch Compilation\n### Building RetroArch\n\nThe first step is to obtain RetroArch's source tree.\nYou can find the repository directly at [GitHub](https://github.com/libretro/RetroArch)\n\nStart the MINGW64 or the MINGW32 shell depending on what you want to compile and run the following commands:\n\n```bash\ngit clone https://github.com/libretro/RetroArch.git retroarch\n```\n\nFor subsequent builds you will need to pull the changes from the repo\n\n```bash\ncd retroarch\ngit pull\n```\n\nTo compile RetroArch, run the following commands inside RetroArch's source tree:\n\n```bash\n./configure\nmake clean\nmake -j4\n```\n\nFor development purposes you might want to run a debug build instead. In such case use the following commands:\n\n```bash\n./configure\nmake clean\nmake DEBUG=1 GL_DEBUG=1 -j4\n```\n\nTo facilitate debugging you can get an integrated crash handler by replacing the configure step with (debug builds only):\n\n ./configure --enable-drmingw\n\nAfter a few minutes you should be able to find retroarch.exe under that directory. To start the newly compiled retroarch you can use:\n\n```bash\n./retroarch\n```\n\n### Packaging RetroArch\n\nYou might not be able to start your own build outside that environment. You might want to try to get all the required DLLs by running the following script in your destination RetroArch folder (not the git repo folder):\n\n```bash\nfor i in $(seq 3); do for bin in $(ntldd -R *exe | grep -i mingw | cut -d\">\" -f2 | cut -d\" \" -f2); do cp -vu \"$bin\" . ; done; done\n```\n\nIf Qt is enabled for your build (detected automatically by default), the following is also needed:\n\n```bash\nwindeployqt --no-patchqt --no-translations retroarch.exe\nfor i in $(seq 3); do for bin in $(ntldd -R imageformats/*dll | grep -i mingw | cut -d\">\" -f2 | cut -d\" \" -f2); do cp -vu \"$bin\" . ; done; done\n```\n\nIf you really want to get the required libraries for distribution or for personal use on other devices and LDD doesn't work for you for whatever reason, then you can try [Dependency Walker](http://www.dependencywalker.com/).\n\n!!! tip\n If you're building frequently you may want to add **ccache** to the mix to speed up the build process.\n Install ccache via the package manager and the prepend the ccache symlink directory to your build environment path as shown below.\n\n For further instructions check the [documentation](https://ccache.samba.org/manual.html#_run_modes)\n\nInstall **ccache** for 32-bit builds:\n\n```bash\npacman -S --noconfirm --needed make mingw-w64-i686-ccache\n```\n\nInstall **ccache** for 64-bit builds:\n\n```bash\npacman -S --noconfirm --needed mingw-w64-x86_64-ccache\n```\n\nConfigure paths for 32-bit builds:\n\n```bash\nexport PATH=/mingw32/lib/ccache/bin/:$PATH\n```\n\nConfigure paths for 64-bit builds:\n\n```bash\nexport PATH=/mingw64/lib/ccache/bin/:$PATH\n```\n\nBuild with both `ccache` and the `-j5` flag to specify five concurrent tasks:\n\n```bash\nccache make -j5\n```\n\n!!! tip\n You can add this to /etc/profile under both the 32-bit and 64-bit setups by adding `${MINGW_MOUNT_POINT}/lib/ccache/bin` to the front of the PATH variables found in `MINGW32)` and `MINGW64)`, around line 50 of profile, to ensure the proper binaries are loaded for each development environment.\n\nFrom our own buildbot, the times with and without **ccache** are the following:\n\nWithout **ccache**:\n\n real 2m7.645s\n user 0m2.585s\n sys 0m11.527s\n\nWith **ccache**:\n\n real 0m25.466s\n user 0m2.902s\n sys 0m9.952s\n\n!!! tip\n You can also strip the debug symbols of the build product to save some space.\n\nStrip **retroarch**:\n\n```bash\nstrip -s retroarch.exe\n```\n\n## Core Compilation\n\n### Fetching Cores\n\nYou can find the cores on libretro's [GitHUB organization](https://github.com/libretro/).\n\nWe have an all-in-one tool to fetch and compile cores which you can use to streamline the process.\nYou can obtain the tool by using these commands:\n\n```bash\ngit clone https://github.com/libretro/libretro-super.git\ncd libretro-super\n```\n\nThen you can fetch one or all the cores by using **libretro-fetch.sh**\n\nFetch all cores:\n\n```bash\n./libretro-fetch.sh\n```\n\nFetch one core:\n\n```bash\n./libretro-fetch.sh *corename*\n```\n\n!!! Note\n Replace *corename* with the name of the core you want to fetch, for example gambatte\n\n### Building Cores\n\n#### libretro-super\n\nThe easiest way to build all the cores is to use **libretro-build.sh** from within libretro-super's source tree:\n\n```bash\n./libretro-build.sh\n```\n\nIn case you only want to build one and/or more cores instead of all, you can specify the cores you want to build after the first command in no particular order:\n\n```bash\n./libretro-build.sh snes9x2010 fceumm\n```\n\nOnce compilation has finished, you can find the libretro cores inside *dist/win*.\n\n#### Manual Fetching and Compilation\n\nGet the core's source tree. As an example we'll use [fceumm](https://github.com/libretro/libretro-fceumm/)\n\n```bash\ngit clone https://github.com/libretro/libretro-fceumm.git\n```\n\nThen compile the core:\n\n```bash\ncd libretro-fceumm\nmake -f Makefile.libretro\n```\n\nIf the Makefile.libretro is not present, as in the libretro-atari800 core, you might try the following:\n\n```bash\ncd libretro-atari800\nmake\n```\n\nOptionally strip the build product:\n\n```bash\nstrip fceumm_libretro.dll\n```\n\nMost cores will build with these instructions. You might need to browse to a subdirectory in some cases.\n"
},
{
"path": "docs/development/retroarch/compilation/windows2000-msvc-cmdline.md",
"content": "# Windows (2000 and later) Command-line Compilation / Development Guide\n\n## Environment configuration\n\nTo compile RetroArch on the command-line targeting Windows 2000 or later, we will use a combination of the MSYS2 shell and Microsoft Visual C++ 2008.\n\nThis guide assumes the host OS is Windows Vista or later, as MSYS2 cannot be installed on anything older.\n\nPrerequisites:\n\n[Visual C++ 2008 Express](http://download.microsoft.com/download/A/9/1/A91D6B2B-A798-47DF-9C7E-A97854B7DD18/VC.iso) (or Pro)\n\n## RetroArch Compilation\n### Building RetroArch\n\nFirst you will need the MSYS2 distribution. You can download the MSYS2 installer from [here](http://msys2.github.io/).\n\nFollow the installation instructions and once finished start the MSYS2 shell.\n\nFirst we need to install the `make` package:\n\n pacman -S make\n\nThen we need to obtain RetroArch's source tree.\n\nYou can clone the repository directly from [GitHub](https://github.com/libretro/RetroArch):\n\n git clone https://github.com/libretro/RetroArch.git retroarch\n\nFor subsequent builds you will need to pull the changes from the repo\n\n cd retroarch\n git pull\n\nTo compile RetroArch, run:\n\n make -f Makefile.griffin platform=windows_msvc2008_x86\n\nIf you do not want to compile in DirectX support, you can add `HAVE_DIRECTX=0` to the end of the command line. Currently it is necessary to disable DirectX support when targeting NT4.\n\n### Finished\n\nAfter the build is finished you should be able to find retroarch.exe in the current directory. To start the newly compiled retroarch, copy the .exe file to a new folder where its configuration files and folders will be automatically created on first run. Running the .exe file inside of the source directory is not recommended as it will overwrite existing files.\n"
},
{
"path": "docs/development/retroarch/compilation/windows2000.md",
"content": "# Windows (2000 and later) Compilation / Development Guide\n\n## Environment configuration\n\nTo compile RetroArch targeting Windows 2000 or later, we will use Microsoft Visual C++ 2008. This is the last version of Visual C++ that can target 2000.\n\nPrerequisites:\n\n[Visual C++ 2008 Express](http://download.microsoft.com/download/A/9/1/A91D6B2B-A798-47DF-9C7E-A97854B7DD18/VC.iso) (or Pro)\n\n## RetroArch Compilation\n### Building RetroArch\n\n!!! Note\n Setting up a working git shell is beyond the scope of this document.\n\nThe first step is to obtain RetroArch's source tree.\nYou can clone the repository directly from [GitHub](https://github.com/libretro/RetroArch)\n\n git clone https://github.com/libretro/RetroArch.git retroarch\n\nFor subsequent builds you will need to pull the changes from the repo\n\n cd retroarch\n git pull\n\nTo compile RetroArch, first open the solution file located at pkg/msvc/RetroArch-msvc2008.sln with Visual C++ 2008.\n\nNext we select the desired solution configuration:\n\n\n\nThe choices are:\n\n Debug\n Debug NoAccel\n Release\n Release NoAccel\n\nFor development purposes you can use the Debug configurations, otherwise use Release. The \"NoAccel\" versions do not include Direct3D or OpenGL support (but keeps DirectInput and DirectSound support).\n\nNow press F7 to build the solution, or go to Build -> Build Solution.\n\nAfter the build is finished you should be able to find RetroArch-msvc2008.exe in the pkg/msvc/msvc-2008/<configuration> directory, where `` is the one you chose earlier such as Debug or Release. To start the newly compiled retroarch you can press F5 in Visual C++ or simply navigate to the .exe file and run it there.\n"
},
{
"path": "docs/development/retroarch/compilation/windows95-msvc-cmdline.md",
"content": "# Windows (95/98/NT4) Command-line Compilation / Development Guide\n\n## Environment configuration\n\nTo compile RetroArch on the command-line targeting Windows 95, Windows 98 or Windows NT4, we will use a combination of the MSYS2 shell and Microsoft Visual Studio .NET 2003.\n\nThis guide assumes the host OS is Windows Vista or later, as MSYS2 cannot be installed on anything older.\n\nPrerequisites:\n\nVisual Studio .NET 2003\n\n[Windows Server 2003 SP1 Platform SDK](https://www.microsoft.com/en-us/download/details.aspx?id=12261)\n\n!!! Note\n Windows 95 does not support DirectX 9.0, and NT4 does not support DirectX higher than 3.0a.\n\n!!! Note\n In lieu of having to install the full Visual Studio suite, a minimal toolchain can be created by copying the `Common7` and `Vc7` folders from an installation on another machine (usually located at `C:\\Program Files (x86)\\Microsoft Visual Studio .NET 2003`). For this example we will use a root folder of `C:\\mini-msvc` to hold everything, and those two folders from the MSVC installation will be copied into a directory under the root folder called `msvc2003`.\n\n!!! Note\n The same thing can be done with the Platform SDK, just copy the `Include` and `Lib` folders from an existing installation (usually located in `C:\\Program Files (x86)\\Microsoft Platform SDK`) into a folder in the root such as `plat2003sp1`.\n\n## RetroArch Compilation\n### Building RetroArch\n\nFirst you will need the MSYS2 distribution. You can download the MSYS2 installer from [here](http://msys2.github.io/).\n\nFollow the installation instructions and once finished start the MSYS2 shell.\n\nFirst we need to install the `make` package:\n\n pacman -S make\n\nThen we need to obtain RetroArch's source tree.\n\nYou can clone the repository directly from [GitHub](https://github.com/libretro/RetroArch):\n\n git clone https://github.com/libretro/RetroArch.git retroarch\n\nFor subsequent builds you will need to pull the changes from the repo\n\n cd retroarch\n git pull\n\nTo compile RetroArch, run:\n\n make -f Makefile.griffin platform=windows_msvc2003_x86\n\nDirectX support is disabled by default since 95/NT do not support DirectX 9.0, but if you will only be running on higher versions of Windows, you can re-enable it by adding `HAVE_DIRECTX=1` to the end of the command line.\n\n### Minimal Toolchain\n\nIf you are only using a minimal toolchain as described above, you can instead specify the location of the `msvc2003` and `plat2003sp1` folders like this:\n\n make -f Makefile.griffin platform=windows_msvc2003_x86 VS71COMNTOOLS=\"c:\\\\mini-msvc\\\\msvc2003\\\\Common7\\\\Tools\\\\\" INETSDK=\"c:\\\\mini-msvc\\\\plat2003sp1\"\n\n!!! Note\n The trailing slash at the end of the COMNTOOLS variable is mandatory.\n\nAlso, any of the paths can optionally be left out to use the system version instead.\n\n### Finished\n\nAfter the build is finished you should be able to find retroarch.exe in the current directory. To start the newly compiled retroarch, copy the .exe file to a new folder where its configuration files and folders will be automatically created on first run. Running the .exe file inside of the source directory is not recommended as it will overwrite existing files.\n"
},
{
"path": "docs/development/retroarch/compilation/windows98-msvc-cmdline.md",
"content": "# Windows (98 SE/ME/2000) Command-line Compilation / Development Guide\n\n## Environment configuration\n\nTo compile RetroArch on the command-line targeting Windows NT4, Windows 98SE, Windows Millenium Edition or Windows 2000, we will use a combination of the MSYS2 shell and Microsoft Visual C++ 2005.\n\nThis guide assumes the host OS is Windows Vista or later, as MSYS2 cannot be installed on anything older.\n\nPrerequisites:\n\n[DirectX SDK February 2005](https://s3.amazonaws.com/bparker/dxsdk_feb2005.exe) (any version up to December 2006 should work to target 98SE)\n\n[Visual C++ 2005 Express](http://download.microsoft.com/download/A/9/1/A91D6B2B-A798-47DF-9C7E-A97854B7DD18/VC.iso) (or Pro)\n\n[Windows Server 2003 SP1 Platform SDK](https://www.microsoft.com/en-us/download/details.aspx?id=12261)\n\n!!! Note\n Windows 98 Second Edition is supported, but First Edition has not been tested. If you do try to target it, make sure that your DirectX SDK is no newer than July 2004.\n\n!!! Note\n In lieu of having to install the full Visual Studio suite, a minimal toolchain can be created by copying the `Common7` and `VC` folders from an installation on another machine (usually located at `C:\\Program Files (x86)\\Microsoft Visual Studio 8`). For this example we will use a root folder of `C:\\mini-msvc` to hold everything, and those two folders from the MSVC installation will be copied into a directory under the root folder called `msvc2005`.\n\n!!! Note\n The same thing can be done with the DirectX and Platform SDKs, just copy the `Include` and `Lib` folders from an existing installation (usually located at `C:\\Program Files (x86)` in `Microsoft DirectX SDK (June 2010)` and `Microsoft Platform SDK` respectively) into folders in the root such as `dx9_june2010` and `plat2003sp1`.\n\n## RetroArch Compilation\n### Building RetroArch\n\nFirst you will need the MSYS2 distribution. You can download the MSYS2 installer from [here](http://msys2.github.io/).\n\nFollow the installation instructions and once finished start the MSYS2 shell.\n\nFirst we need to install the `make` package:\n\n pacman -S make\n\nThen we need to obtain RetroArch's source tree.\n\nYou can clone the repository directly from [GitHub](https://github.com/libretro/RetroArch):\n\n git clone https://github.com/libretro/RetroArch.git retroarch\n\nFor subsequent builds you will need to pull the changes from the repo\n\n cd retroarch\n git pull\n\nTo compile RetroArch, run:\n\n make -f Makefile.griffin platform=windows_msvc2005_x86\n\nIf you do not want to compile in DirectX support, you can add `HAVE_DIRECTX=0` to the end of the command line. Currently it is necessary to disable DirectX support when targeting NT4.\n\n### Minimal Toolchain\n\nIf you are only using a minimal toolchain as described above, you can instead specify the location of the folders `msvc2005`, `dx9_feb2005` and `plat2003sp1` like this:\n\n make -f Makefile.griffin platform=windows_msvc2005_x86 VS80COMNTOOLS=\"c:\\\\mini-msvc\\\\msvc2005\\\\Common7\\\\Tools\\\\\" INETSDK=\"c:\\\\mini-msvc\\\\plat2003sp1\" DXSDK_DIR=\"c:\\\\mini-msvc\\\\dx9_feb2005\"\n\n!!! Note\n The trailing slash at the end of the COMNTOOLS variable is mandatory.\n\nAlso, any of the paths can optionally be left out to use the system version instead.\n\n### Finished\n\nAfter the build is finished you should be able to find retroarch.exe in the current directory. To start the newly compiled retroarch, copy the .exe file to a new folder where its configuration files and folders will be automatically created on first run. Running the .exe file inside of the source directory is not recommended as it will overwrite existing files.\n"
},
{
"path": "docs/development/retroarch/compilation/windows98.md",
"content": "# Windows (98/2000) Compilation / Development Guide\n\n## Environment configuration\n\nTo compile RetroArch targeting Windows 98 and 2000, we will use Microsoft Visual C++ 2005. This is the last version of Visual C++ that can target 98/2000.\n\nThis guide assumes the host OS is Windows 2000 Professional. VC2005 does run on Windows XP and Vista but this has not been tested with RetroArch.\n\nPrerequisites:\n\n[Windows 2000 Service Pack 4](https://web.archive.org/web/20051022095019/http://download.microsoft.com/download/e/6/a/e6a04295-d2a8-40d0-a0c5-241bfecd095e/w2ksp4_en.exe)\n\n[Windows 2000 Update Rollup 1](https://web.archive.org/web/20060320020710/http://download.microsoft.com/download/2/7/b/27b1d1a3-0299-4336-b88a-22b9f09817e2/Windows2000-KB891861-v2-x86-ENU.EXE)\n\n[Internet Explorer 6](https://s3.amazonaws.com/bparker/ie60.exe)\n\n[Internet Explorer 6 Service Pack 1](https://s3.amazonaws.com/bparker/IE6.0SP1-KB2722913-WINDOWS2000-X86-ENU.EXE) (required by VC2005)\n\n[DirectX SDK February 2005](https://s3.amazonaws.com/bparker/dxsdk_feb2005.exe) (versions after this date will not install on Windows 2000)\n\n[Windows Server 2003 SP1 Platform SDK](https://www.microsoft.com/en-us/download/details.aspx?id=12261)\n\n[Visual C++ 2005 Express](http://download.microsoft.com/download/A/9/1/A91D6B2B-A798-47DF-9C7E-A97854B7DD18/VC.iso) (or Pro)\n\n!!! Note\n Windows 98 Second Edition is supported, but First Edition has not been tested. If you do try to target it, make sure that your DirectX SDK is no newer than July 2004.\n\n## RetroArch Compilation\n### Building RetroArch\n\n!!! Note\n Setting up a working git shell is beyond the scope of this document. [msysgit 1.8.5.2](https://github.com/msysgit/msysgit/releases/download/Git-1.8.5.2-preview20131230/Git-1.8.5.2-preview20131230.exe) is known to work locally but is unable to communicate with any remote servers on Windows 2000, and the github website does not load in IE6 either.\n\nThe first step is to obtain RetroArch's source tree.\nYou can clone the repository directly from [GitHub](https://github.com/libretro/RetroArch)\n\n git clone https://github.com/libretro/RetroArch.git retroarch\n\nFor subsequent builds you will need to pull the changes from the repo\n\n cd retroarch\n git pull\n\nTo compile RetroArch, first open the solution file located at pkg/msvc/RetroArch-msvc2005.sln with Visual C++ 2005.\n\nNext we select the desired solution configuration:\n\n\n\nThe choices are:\n\n Debug\n Debug NoAccel\n Release\n Release NoAccel\n\nFor development purposes you can use the Debug configurations, otherwise use Release. The \"NoAccel\" versions do not include Direct3D or OpenGL support (but keeps DirectInput and DirectSound support).\n\nNow press F7 to build the solution, or go to Build -> Build Solution.\n\nAfter the build is finished you should be able to find RetroArch-msvc2005.exe in the pkg/msvc/msvc-2005/<configuration> directory, where `` is the one you chose earlier such as Debug or Release. To start the newly compiled retroarch you can press F5 in Visual C++ or simply navigate to the .exe file and run it there.\n"
},
{
"path": "docs/development/retroarch/compilation/windowsNT351-msvc-cmdline.md",
"content": "# Windows (NT3.51) Command-line Compilation / Development Guide\n\n## Environment configuration\n\nTo compile RetroArch on the command-line targeting Windows NT3.51, we will use a combination of the MSYS2 shell and Microsoft Visual C++ 6.\n\nThis guide assumes the host OS is Windows Vista or later, as MSYS2 cannot be installed on anything older.\n\nPrerequisites:\n\nVisual C++ 6\n\n[Windows Server 2003 SP1 Platform SDK](https://www.microsoft.com/en-us/download/details.aspx?id=12261)\n\n!!! Note\n In lieu of having to install the full Visual Studio suite, a minimal toolchain can be created by copying the `Common` and `VC98` folders from an installation on another machine (usually located at `C:\\Program Files (x86)\\Microsoft Visual Studio`). For this example we will use a root folder of `C:\\mini-msvc` to hold everything, and those two folders from the MSVC installation will be copied into a directory under the root folder called `msvc6`.\n\n!!! Note\n The same thing can be done with the Platform SDK, just copy the `Include` and `Lib` folders from an existing installation (usually located in `C:\\Program Files (x86)\\Microsoft Platform SDK`) into a folder in the root such as `plat2003sp1`.\n\n## RetroArch Compilation\n### Building RetroArch\n\nFirst you will need the MSYS2 distribution. You can download the MSYS2 installer from [here](http://msys2.github.io/).\n\nFollow the installation instructions and once finished start the MSYS2 shell.\n\nFirst we need to install the `make` package:\n\n pacman -S make\n\nThen we need to obtain RetroArch's source tree.\n\nYou can clone the repository directly from [GitHub](https://github.com/libretro/RetroArch):\n\n git clone https://github.com/libretro/RetroArch.git retroarch\n\nFor subsequent builds you will need to pull the changes from the repo\n\n cd retroarch\n git pull\n\nTo compile RetroArch, run:\n\n make -f Makefile.griffin platform=windows_msvc6_x86\n\n### Minimal Toolchain\n\nIf you are only using a minimal toolchain as described above, you can instead specify the location of the `msvc6` and `plat2003sp1` folders like this:\n\n make -f Makefile.griffin platform=windows_msvc6_x86 VCDIR=\"c:\\\\mini-msvc\\\\msvc6\\\\VC98\" INETSDK=\"c:\\\\mini-msvc\\\\plat2003sp1\"\n\nAlso, any of the paths can optionally be left out to use the system version instead.\n\n### Finished\n\nAfter the build is finished you should be able to find retroarch.exe in the current directory. To start the newly compiled retroarch, copy the .exe file to a new folder where its configuration files and folders will be automatically created on first run. Running the .exe file inside of the source directory is not recommended as it will overwrite existing files.\n"
},
{
"path": "docs/development/retroarch/compilation/windowsXP-msvc-cmdline.md",
"content": "# Windows (XP and later) Command-line Compilation / Development Guide\n\n## Environment configuration\n\nTo compile RetroArch on the command-line targeting Windows XP or later, we will use a combination of the MSYS2 shell and Microsoft Visual Studio 2010.\n\nThis guide assumes the host OS is Windows Vista or later, as MSYS2 cannot be installed on anything older.\n\nPrerequisites:\n\n[DirectX SDK June 2010](https://www.microsoft.com/en-us/download/details.aspx?id=6812)\n\n[Visual Studio 2010 Express](http://web.archive.org/web/20161014172355/http://download.microsoft.com/download/1/E/5/1E5F1C0A-0D5B-426A-A603-1798B951DDAE/VS2010Express1.iso) (or Pro)\n\n!!! Note\n The Express version does not come with a 64-bit compiler.\n\n[Visual Studio 2010 Service Pack 1](http://web.archive.org/web/20160401071422/http://download.microsoft.com/download/E/B/A/EBA0A152-F426-47E6-9E3F-EFB686E3CA20/VS2010SP1dvd1.iso) (needed for the multi-language support in RetroArch)\n\n!!! Note\n In lieu of having to install the full Visual Studio suite, a minimal toolchain can be created by copying the `Common7` and `VC` folders from an installation on another machine (usually located at `C:\\Program Files (x86)\\Microsoft Visual Studio 10.0`). For this example we will use a root folder of `C:\\mini-msvc` to hold everything, and those two folders from the MSVC installation will be copied into a directory under the root folder called `msvc2010`.\n\n!!! Note\n The same thing can be done with the DirectX SDK, just copy the `Include` and `Lib` folders from an existing installation (usually located at `C:\\Program Files (x86)\\Microsoft DirectX SDK (June 2010)`) into a folder in the root such as `dx9_june2010`.\n\n## RetroArch Compilation\n### Building RetroArch\n\nFirst you will need the MSYS2 distribution. You can download the MSYS2 installer from [here](http://msys2.github.io/).\n\nFollow the installation instructions and once finished start the MSYS2 shell.\n\nFirst we need to install the `make` package:\n\n pacman -S make\n\nThen we need to obtain RetroArch's source tree.\n\nYou can clone the repository directly from [GitHub](https://github.com/libretro/RetroArch):\n\n git clone https://github.com/libretro/RetroArch.git retroarch\n\nFor subsequent builds you will need to pull the changes from the repo\n\n cd retroarch\n git pull\n\nTo compile RetroArch, run:\n\n make -f Makefile.griffin platform=windows_msvc2010_x86\n\nReplace x86 with x64 if you would like a 64-bit build instead of 32-bit. If you do not want to compile in DirectX support, you can add `HAVE_DIRECTX=0` to the end of the command line.\n\n### Minimal Toolchain\n\nIf you are only using a minimal toolchain as described above, you can instead specify the location of the `msvc2010` and `dx9_june2010` folders like this:\n\n make -f Makefile.griffin platform=windows_msvc2010_x86 VS100COMNTOOLS=\"c:\\\\mini-msvc\\\\msvc2010\\\\Common7\\\\Tools\\\\\" DXSDK_DIR=\"c:\\\\mini-msvc\\\\dx9_june2010\"\n\n!!! Note\n The trailing slash at the end of the COMNTOOLS variable is mandatory.\n\nAlso, any of the paths can optionally be left out to use the system version instead.\n\n### Finished\n\nAfter the build is finished you should be able to find retroarch.exe in the current directory. To start the newly compiled retroarch, copy the .exe file to a new folder where its configuration files and folders will be automatically created on first run. Running the .exe file inside of the source directory is not recommended as it will overwrite existing files.\n"
},
{
"path": "docs/development/retroarch/compilation/windowsXP.md",
"content": "# Windows (XP and later) Compilation / Development Guide\n\n## Environment configuration\n\nTo compile RetroArch targeting Windows XP or later, we will use Microsoft Visual Studio 2010.\n\nThis guide assumes the host OS is Windows XP.\n\nPrerequisites:\n\n[Windows XP Service Pack 3](https://support.microsoft.com/en-us/help/936929/information-about-windows-xp-service-pack-3) (requires SP1 or SP2 installed first)\n\n[DirectX SDK June 2010](https://www.microsoft.com/en-us/download/details.aspx?id=6812)\n\n[Visual Studio 2010 Express](http://web.archive.org/web/20161014172355/http://download.microsoft.com/download/1/E/5/1E5F1C0A-0D5B-426A-A603-1798B951DDAE/VS2010Express1.iso) (or Pro)\n\n[Visual Studio 2010 Service Pack 1](http://web.archive.org/web/20160401071422/http://download.microsoft.com/download/E/B/A/EBA0A152-F426-47E6-9E3F-EFB686E3CA20/VS2010SP1dvd1.iso) (needed for the multi-language support in RetroArch)\n\n## RetroArch Compilation\n### Building RetroArch\n\nThe first step is to obtain RetroArch's source tree.\n\nIf you need a git shell to work in, [msysgit 1.8.5.2](https://github.com/msysgit/msysgit/releases/download/Git-1.8.5.2-preview20131230/Git-1.8.5.2-preview20131230.exe) is known to work.\n\nYou can clone the repository directly from [GitHub](https://github.com/libretro/RetroArch):\n\n git clone https://github.com/libretro/RetroArch.git retroarch\n\nFor subsequent builds you will need to pull the changes from the repo\n\n cd retroarch\n git pull\n\nTo compile RetroArch, first open the solution file located at pkg/msvc/RetroArch-msvc2010.sln with Visual Studio 2010.\n\nNext we select the desired solution configuration:\n\n\n\nThe choices are:\n\n Debug\n Debug Cg\n Release\n Release Cg\n\nFor development purposes you can use the Debug configurations, otherwise use Release. The \"Cg\" versions also include support for Cg shaders used with the OpenGL video driver. These will require a separate installation of the [Nvidia Cg Toolkit](https://developer.nvidia.com/cg-toolkit).\n\nNow press F7 to build the solution, or go to Build -> Build Solution.\n\nAfter the build is finished you should be able to find RetroArch-msvc2005.exe in the pkg/msvc/<configuration> directory, where `` is the one you chose earlier such as Debug or Release. To start the newly compiled retroarch you can press F5 in Visual C++ or simply navigate to the .exe file and run it there.\n"
},
{
"path": "docs/development/retroarch/debugging.md",
"content": "# Debugging\n\n## Dr.MinGW\n\nWindows debug builds now have an integrated crash handler.\nIf you find any recurrent crashes you can start the retroarch_debug.exe executable, reproduce the crash and you should find a time-stamped crash log in the retroarch directory.\n\n## GDB (All platforms)\n\nThe [GNU Debugger](https://www.gnu.org/software/gdb/) is the most widely available debugging tool for many platforms.\n\n!!! note \"Windows users\"\n This guide assumes you have already installed the MSYS2/MinGW environment as detailed [here](../../compilation/windows/) and that you are running in the appropriate \"MSYS2 MinGW\" (32 or 64-bit) shell (not \"MSYS2 MSYS\").\n\nIf you observe a crash with RetroArch and would like to get more information, navigate to the folder where your RetroArch installation is and run:\n\n> gdb retroarch\n\n!!! note \"Windows users\"\n If you have not compiled RetroArch yourself with debugging enabled (`make DEBUG=1`), please specify `retroarch_debug.exe` here instead of `retroarch` to use the debug version that ships with our binary package. In order to debug in Windows 10 when the D3D10 or D3D11 video drivers are in use, be sure that you have also [installed Microsoft's free Windows Direct3D Graphics Tools package](https://docs.microsoft.com/en-us/windows/uwp/gaming/use-the-directx-runtime-and-visual-studio-graphics-diagnostic-features).\n\nAfter gdb has started, you can then start up RetroArch with `run`. If RetroArch crashes, gdb should show you a prompt with a message such as:\n\n`Program received signal SIGSEGV, Segmentation fault.`\n\nFrom here, type `bt full` to get a full backtrace of the crash. You can copy/paste this information to a pastebin site such as [dpaste](http://www.dpaste.com/) to get a link that you can provide to developers to help with your problem. Run `quit` when you are done to exit gdb.\n\nTo get a full backtrace of the crash for all threads, type `thread apply all bt full`.\n\nFor more information on using GDB, please see their online documentation [here](https://sourceware.org/gdb/current/onlinedocs/gdb/).\n\n## ASAN (Linux/Mac/BSD/Android)\n\nAddressSanitizer (ASAN) is a very fast memory error detector and an indispensable tool for finding issues with improper memory handling such as use-after-free, buffer overflows and general memory leaks. It is available since GCC 4.8 and Clang 3.1 for Linux (x64 and ARM) systems. Typical slowdown of runtime performance is around 2x.\n\nThere are several ways to use RetroArch in conjunction with ASAN and there are many different options that can be combined with each other. The first step is that you need to compile ASAN directly into the RetroArch binary. Here are some simple examples:\n\n**For detecting memory errors/leaks and undefined behavior:**\n> make DEBUG=1 SANITIZER=address,undefined\n\n**For detecting threading errors such as race conditions:**\n> make DEBUG=1 SANITIZER=thread\n\nThen you can run the RetroArch binary normally with `./retroarch`. As problems are detected, they will be printed to the console either at runtime or when the program exits or crashes, depending on the type of error.\n\nFor more information, see the [gcc](https://gcc.gnu.org/onlinedocs/gcc/Instrumentation-Options.html), [Google](https://github.com/google/sanitizers/wiki/AddressSanitizer) and [clang](https://clang.llvm.org/docs/) documentation.\n\n## Dr. Memory (Windows/Linux/Mac/Android)\n\nDr. Memory is another tool for detecting memory errors similar to ASAN. Its website can be found here: [http://www.drmemory.org/](http://www.drmemory.org/)\n\nAfter installation, the simplest way to use Dr. Memory with RetroArch is to open the start menu shortcut under \"Dr. Memory\" called \"Explore Dr. Memory\", and then drag the `retroarch_debug.exe` file onto the `drmemory.exe` file there. No re-compilation is necessary to use this tool. Any errors encountered will be displayed in a notepad window after the program exits or crashes.\n\n## VulnScan (Windows/Linux)\n\nAlso known as Microsoft Security Risk Detection, is a new memory error detection tool that is (at the time of writing) in closed beta status. For more information, please see its website [here](https://www.microsoft.com/en-us/security-risk-detection/).\n\n## Valgrind (Linux)\n\n[Valgrind](http://valgrind.org/) is probably the oldest and most well known memory error and leak detector available. Here is an example command-line usage to run valgrind with RetroArch to check for memory or threading errors:\n\n> valgrind -v --tool=memcheck --leak-check=yes --track-origins=yes --show-reachable=yes ./retroarch\n\nNo recompilation is necessary to use this tool, but make sure to run it using a debug build of RetroArch (built with `make DEBUG=1`). Some users have reported a large number of false positives with this tool, as well as much slower runtime performance, so in general we typically recommend to use ASAN instead if that is an option for you.\n\n## rr (Linux)\n\n[rr](http://rr-project.org/) is a deterministic debugger that enhances gdb by supporting the recording and replay (and even reverse-replay) of your program's execution. Very useful for accurately reproducing a hard-to-trigger issue such as a race condition or crash that only occurs under certain conditions.\n\nFor more information on using rr, please see their usage guide [here](https://github.com/mozilla/rr/wiki/Usage).\n\n## Time Travel Debugging (Windows)\n\n[Time Travel Debugging](https://docs.microsoft.com/en-us/windows-hardware/drivers/debugger/time-travel-debugging-overview) is a Windows tool for recording and replaying a program's execution, similar to [rr](http://rr-project.org/). For more information, please visit their website.\n\n## Android Studio (Android)\n\nSee [this file](https://github.com/libretro/RetroArch/blob/master/pkg/android/phoenix-gradle/README.md) for a guide on how to build, sideload and debug a core using Android Studio.\n"
},
{
"path": "docs/development/retroarch/glossary.md",
"content": "# Glossary\n\nWhile developing RetroArch, you might find some terms which are unfamiliar to new developers. These are explained here.\n\n## Griffin\n\nMost of the console platforms of RetroArch use a concept we call 'Griffin'. \n\nBasically:\n\n- Every C file gets included in griffin/griffin.c.\n- Every C++ file gets included in griffin/griffin_cpp.cpp.\n- Every ObjectiveC file gets included in griffin_objc.m\n- Glslang files get included in griffin_glslang.cpp\n\nThe Griffin files are the only ones being built when a platform port uses Griffin. \nThis has a couple of benefits:\n\n- It's a poor man's kind of link time code generation optimization pass.\n- We dont have to keep editing every platform port's Makefile individually whenever we add a new file. We can simply update these Griffin files without touching any of the platform Makefiles.\n\nSome disadvantages (that we cater to regardless):\n\n- Because all of the C/C++/ObjC files all get included into one source file, it is necessary that all symbols and function names are uniquely named. We make sure in RetroArch this is the case.\n\n## Salamander\n\nSalamander is a small RetroArch launcher for embedded platforms with static linking. On such platforms, each core binary contains the core and the complete RetroArch frontend. Switching cores is achieved by just re-launching into a different core binary. Salamander simply launches the most recently used core (or a default one, if none is stored in the config file).\n"
},
{
"path": "docs/development/retroarch/input/input-drivers.md",
"content": "# RetroArch Input Driver Specification\n[RetroArch](http://retroarch.com) is the reference frontend for the libretro API, and is used for emulators, game engines, and media players.\n\nRetroArch strives to be available on as many different platforms as possible. RetroArch runs and is supported on GNU/Linux, BSD, Windows, Mac OSX, Haiku, PlayStation Classic, PlayStation 2, PlayStation 3, Playstation Vita, Playstation Portable, Xbox 360, Xbox One, Raspberry Pi, Nintendo GameCube, Nintendo Wii, Nintendo Wii U, Nintendo 3DS & 2DS Family, Nintendo Switch, Steam Link, Android, iOS, Open Pandora, Blackberry, and in web browsers via the Emscripten compiler.\n\n### Purpose of input drivers\nRetroArch uses a modular \"driver\" system to allow the software to be ported to new platforms. One or more RetroArch input drivers must be available on a system in order to run the frontend. In addition to input drivers, RetroArch uses a variety of other platform-specific drivers including video drivers, audio drivers, and video recording drivers. \n\nIn RetroArch, choosing an input driver generally corresponds to choosing an input API on the host system. A RetroArch input driver might be written for the API of a piece of hardware, such as `input_wiiu`; it might be specific to an operating system, such as `input_linuxraw` or `input_dos`; or the driver might be available on several platforms, such as `input_sdl`. The input drivers implement access to user keyboards, mice, pointers, and lightguns. A \"controller driver\" is also necessary if the input driver implements access to user joysticks or gamepads.\n\n!!! Note\n Controller drivers were previously referred to as joypad drivers. Some documentation and code may still use the older \"joypad\" terminology.\n\n### Purpose of this document\nThis document organizes the information needed to develop and debug RetroArch input drivers, such as when porting RetroArch to a new platform.\n\n## libretro input device abstractions\nRetroArch's input system is based on abstracted input device types which are polled via callbacks provided by the libretro API. Libretro input device abstractions include:\n\n * RetroPad\n - Digital Gamepad or Joystick\n - Digital Gamepad or Joystick with Analog\n * Mouse\n * Pointer\n * Keyboard\n * Lightgun\n\n## RetroArch input priorities\nAs the libretro reference frontend, RetroArch's goal is to implement the API in a way that provides users a full experience across as wide a variety of platforms as possible. This includes the ability to map and remap physical input hardware to as many different types of libretro input device abstractions as possible, although the amount of flexibility can vary due to the limitations of specific platforms.\n\n!!! Note\n The minimum API requirement for a libretro frontend is to implement polling responses for one \"RetroPad\", libretro's digital gamepad controller device abstraction. A compliant frontend could therefore support only a single input source -- for example, a frontend written for a handheld game system that has a built-in hardware controller, or a frontend that only accepts RetroPad input over a network connection.\n\nFor libretro core developers, the value of a frontend like RetroArch that fully implements these abstractions with robust remapping abilities is that cores can be coded with the 'ideal' input type abstraction in mind using simple polling logic. Meanwhile users have the freedom to map that abstraction to any number of hardware or software input sources.\n\n## Input driver functionality tables\nThese tables presents RetroArch's input driver functionality organized into categories. It is based on the table that appears in the source for each input driver. Not all input drivers implement all possible functionality; in some case this is due to the inherent limitations of the host platform, and in other cases the functionality is possible but has yet to be implemented.\n\n| RetroPad Function | Supported | Notes |\n| ---------------------------------------------- | --------- | --------------------------------------- |\n| Map physical gamepad to RetroPad (Port 0) | | |\n| Map physical gamepad w/analog to RetroPad | | |\n| Support multiple RetroPads | | |\n| Remap one RetroPad control to another | | |\n| Map physical keyboard to RetroPad controls | | |\n| Map physical mouse buttons to RetroPad | | |\n| Map physical pointer taps/controls to RetroPad | | |\n\n| Keyboard Function | Supported | Notes |\n| ----------------------------------------------- | --------- | --------------------------------------- |\n| Map physical keyboard to RetroKeyboard | | |\n| Remap one RetroKey to another | | |\n| Respect `keyboard_mapping_blocked` | | |\n| Map physical gamepad controls to RetroKeys | | |\n| Map physical mouse buttons to RetroKeys | | |\n| Map physical pointer taps/controls to RetroKeys | | |\n\n| Mouse Function | Supported | Notes |\n| ---------------------------------------------------------- | --------- | --------------------------------------- |\n| Map physical mouse to RetroMouse (Port 0) | | |\n| Support multiple RetroMice | | |\n| 'Grab and ungrab' mice | | |\n| Remap one mouse control to another | | |\n| Map physical pointer/touchpad to RetroMouse | | |\n| Map physical analog controls to RetroMouse coordinates | | |\n| Map physical digital gamepad controls to RetroMouse buttons | | |\n| Map physical keyboard to RetroMouse buttons | | |\n\n| Pointer Function | Supported | Notes |\n| -------------------------------------------------------- | --------- | --------------------------------------- |\n| Map physical pointer/touchpad to RetroPointer (Port 0) | | |\n| Support Multi-Touch Pointer (Port 0) | | |\n| Support multiple RetroPointers | | |\n| Support Multiple Pointers w/Multi-Touch | | |\n| Support remapping one touchpad control to another | | |\n| Map physical mouse to RetroPointer | | |\n| Map physical analog controls to RetroPointer coordinates | | |\n| Map physical digital gamepad controls to taps/controls | | |\n| Map physical keyboard to taps/controls | | |\n\n| Lightgun Function | Supported | Notes |\n| ----------------------------------------------------- | --------- | --------------------------------------- |\n| Map physical pointer/touchpad to Lightgun (Port 0) | | |\n| Map physical mouse to Lightgun (Port 0) | | |\n| Map physical analog joysticks to Lightguns | | |\n| Support multiple Lightguns | | |\n| Map multiple mice to multiple Lightguns | | |\n| Map multiple pointers/touchpads to multiple Lightguns | | |\n| Map physical digital gamepad to Lightgun controls | | |\n| Map physical keyboard to Lightgun controls | | |\n\n| Sensor Function* | Supported | Notes |\n| ------------------------------------------ | --------- | --------------------------------------- |\n| Set polling rate | | |\n| Enable/disable sensors | | |\n| Get sensor input | | |\n\n!!! Note\nThe **Sensor Function** table of input driver sensor functionality is incomplete. [Contributions welcome!](../../../meta/how-to-contribute.md)\n\n| Other Input Functions* | Supported | Notes |\n| ----------------------------------------------------------- | --------- | ------------------------------------ |\n| | | |\n\n!!! Note\nThe **Other Input Functions** table of input driver functionality is driver-specific at this time.\n\n## Input driver architecture\nTo be written.\n\n### input_driver_t struct\nTo be written.\n\n#### Example input_driver_t\n```c\ninput_driver_t input_winraw = {\n winraw_init,\n winraw_poll,\n winraw_input_state,\n winraw_free,\n NULL,\n NULL,\n winraw_get_capabilities,\n \"raw\",\n winraw_grab_mouse,\n NULL\n};\n```\n\n## Documentation TODO\n* Some RetroArch video drivers also serve as input drivers. In cases when the video driver relies on input driver for event handling, the video driver can preinitialize an input driver.\n* Describe controller drivers and their implementation\n"
},
{
"path": "docs/development/retroarch/input/overlay.md",
"content": "# Overlays\n\nRetroArch supports overlay images for use with hardware accelerated drivers. The purpose of this is to allow some kind of input interface that is mouse/touch oriented. The overlay images are displayed with transparency over the regular game image, and the user is able to trigger input by pressing on certain parts of the overlay.\n\nSince the overlay is a series of images, the user should be able to fully configure the look and functionality of this overlay. This allows skinners and themers to go wild.\n\n### Libretro overlay repositories\nThe Libretro Organization hosts a repositories on Github that contains a compilation of overlays made with the Overlay Specification.\n\n* Interactive overlays are managed within: https://github.com/libretro/common-overlays\n* Decorative border overlays are managed within: https://github.com/libretro/overlay-borders\n\n\n\n## Configuration\n\nThe overlay is described in a config file (.cfg). The config file uses the same config file syntax as RetroArch itself.\n\nThe overlay system supports use of multiple overlays that can be switched out on the fly. Input is not only restricted to gamepad input, but can also work with any input that is bindable in RetroArch, e.g. save states, rewind, load state, etc.\n\nThe config file describes:\n\n- Which full-screen overlay images to use (.png, .tga, etc).\n- The hitbox for each input event, i.e. \"size\" of the button.\n- Which image should be shown over the input descriptors individually (optional).\n- Where on the screen the entire overlay should be displayed.\n\n## Overlay images\n\nFirst we configure how many overlays we use. Every overlay can have one overlay which fills the entire rectangle (overlay%u_rect), but is optional. The full-rect overlay is supported for compatibility with older format. It is less flexible than per-button overlays and is discouraged.\n\n overlays = 2\n overlay0_overlay = overlay_img0.png # Optional\n overlay1_overlay = overlay_img1.png # Optional\n\nThe paths are relative to where the overlay config is loaded from. If the path is absolute, absolute paths will be used. On Unix-like systems ~/ is recognized as $HOME/.\n\n## Screen placement\n\nBy default, the overlay image will be stretched out to fill the whole game image. However, for some overlays, this is not practical.\n\nIt is possible to set the placement using for example:\n\n overlay0_rect = \"0.2,0.3,0.5,0.4\"\n\nWe assume that the game screen has normalized coordinates in X and Y that span from [0, 0] in the top-left corner to [1, 1] in the lower-right corner.\n\nThis will render the overlay to x = 0.2, y = 0.3 with size width = 0.5, height = 0.4. The default (stretch to full screen) could be described as such:\n\n overlay0_rect = \"0.0,0.0,1.0,1.0\"\n\n## Full-screen vs. full-viewport overlays\n\nBy default, overlays will be stretched out to fill game viewport. However, in some cases the aspect ratio of the game causes there to remain large black borders around the game image.\n\nIt is possible to stretch the overlay to full screen (instead of viewport) by specifying this option:\n\n overlay0_full_screen = true\n\n## Coordinate descriptors\n\nWe must also describe where on the overlay image buttons can be found for each overlay. E.g.:\n\n overlay0_descs = 3 # Three buttons for this overlay in total\n overlay0_desc0 = \"a,32,64,radial,10,20\"\n overlay0_desc1 = \"start,100,50,rect,80,10\"\n overlay0_desc2 = \"overlay_next,200,180,radial,40,40\"\n\nThe format is:\n\n \"button,position_x,position_y,hitbox_type,range_x,range_y\"\n\nbutton corresponds to the input event being generated. The names are the same as in the general input config, e.g. input_player1_start would translate to start here. If button is a keyboard key, it must be prefixed with retrok_, e.g. retrok_a. overlay_next is a special bind designed to swap to the next overlay, or wrap around to the first one. Button nul means no input.\n\nFor an up-to-date view of what buttons are called, check the input_config_bind_map variable in:\n[https://github.com/libretro/RetroArch/blob/master/configuration.c](https://github.com/libretro/RetroArch/blob/master/configuration.c).\n\nFor an up-to-date view of what keyboard keys are called, check the input_config_key_map variable in:\n[https://github.com/libretro/RetroArch/blob/master/input/input_keymaps.c](https://github.com/libretro/RetroArch/blob/master/input/input_keymaps.c).\n\nposition_x and position_y are the x and y coordinates in pixels of the source image for the center of the button. It is possible to use normalized coordinates as well. This is necessary when a full-screen overlay is not used. overlay0_desc0_normalized = true will force normalized coordinates. overlay0_normalized = true sets all descriptors to true unless overridden specifically.\n\nhitbox_type describes which type of shape the button has. radial (circle, ellipse) and rect (rectangular) shapes are supported.\n\nrange_x and range_y describe the size of the button. The semantics differ slightly for radial and rect hitbox types. For radial shape, range_x and range_y describe the radius in x and y directions in pixels of the source image. For rect shape, the range_x and range_y values represent the distance from center to the edge of the rect in terms of pixels of the source image.\n\nE.g. a range_x of 20 would mean the width of the rectangular is 40 pixels in total.\n\n## Special button types\n\nA few buttons are not listed in input_config_bind_map: analog_left, analog_right, dpad_area, and abxy_area.\n\nanalog_left and analog_right translate to analog sticks. These buttons must have hitbox type radial. It is possible to configure where saturation kicks in using overlay%u_desc%u_saturate_pct. E.g. a value of 0.75 means the 75% inner part contains the entire analog range. Outside the 75% it will be fully saturated.\n\ndpad_area and abxy_area are 8-way areas whose input events are based on the direction pressed, i.e. angle from hitbox center. An 8-way area can be used as-is or redefined. E.g. this creates a d-pad consisting of analog directions, and a face button diamond consisting of A,B,R,L:\n\n overlay0_desc0 = \"dpad_area,0.15,0.57,rect,0.1094,0.1944\"\n overlay0_desc0_up = r_y_minus\n overlay0_desc0_down = r_y_plus\n overlay0_desc0_left = r_x_minus\n overlay0_desc0_right = r_x_plus\n overlay0_desc1 = \"abxy_area,0.85,0.57,rect,0.1607,0.2857\"\n overlay0_desc1_up = r\n overlay0_desc1_left = l\n\n## Using per-button overlays\n\nIt is possible to use individual overlays per button. The given image will be displayed with same size as the hitbox in the input descriptor.\n\n overlay0_desc0_overlay = button.png\n\n## Let overlay buttons move around when pressed\n\nFor especially overlay buttons which map to analogs, it is useful to allow an image to follow the movement of the finger. To enable an overlay to follow the finger movement within its bounding area use the movable attribute:\n\n overlay0_desc0_overlay = analog.png # Need some per-descriptor overlay\n overlay0_desc0_movable = true # Overlay image will now move around\n\n## Let buttons light up when they are pressed\n\nWhen using individial overlays per button it will make sense to have buttons light up when they are pressed. To do this, the alpha value per-button will be multiplied by a factor.\n\n overlay0_desc0_alpha_mod = 2.0 # Alpha is multiplied 2x when pressed.\n\nTo set a default across all descriptors for an overlay, you can do so:\n\n overlay0_alpha_mod = 2.0\n\n## Adjust a button's hitbox\n\nA button's hitbox can be adjusted without affecting its image, input center, or analog saturation. Use reach_x/y to multiply hitbox width/height symmetrically. Use reach_up/down/left/right to multiply hitbox range in that direction. E.g. this creates a d-pad and extends its hitbox vertically by 60%, and left by 40%:\n\n overlay0_desc0 = \"dpad_area,0.15,0.57,rect,0.1094,0.1944\"\n overlay0_desc0_reach_y = 1.6 # Multiply hitbox height\n overlay0_desc0_reach_left = 1.4 # Multiply hitbox width on left side\n\n\n\nSetting reach_x or reach_y to 0 removes the hitbox. The button then can't be pressed, but it will still light up if another button creates the same input. This is useful for animating a dpad_area or abxy_area.\n\n## Let buttons have bigger hitbox when they are pressed\n\nWhen pressed, you can make the hitboxes larger while the button is pressed:\n\n overlay0_desc0_range_mod = 1.5 # For the particular descriptor\n overlay0_range_mod = 1.5 # Default for all descriptors\n\n## Handling hitbox overlap\n\nAvoid unwanted overlap by making a button exclusive and/or range_mod_exclusive. An exclusive button blocks other buttons pressed by the same finger. A range_mod_exclusive button blocks with higher priority, but only when range_mod is in effect, i.e. one poll after it is pressed.\n\nE.g. this overlaps an analog stick and a d-pad. The analog is exclusive, so initially it owns the overlapped hitbox area. Both buttons are range_mod_exclusive, so the one controlled first owns its range_mod extended hitbox area.\n\n overlay0_desc0 = \"dpad_area,0.15,0.57,rect,0.1094,0.1944\"\n overlay0_desc0_reach_x = 2.08\n overlay0_desc0_reach_up = 1.62\n overlay0_desc0_reach_down = 1.96\n overlay0_desc0_range_mod = 1.2\n overlay0_desc0_range_mod_exclusive = true # Give dpad_area priority if controlled first\n overlay0_desc1 = \"analog_left,0.31,0.81,radial,0.0964,0.1928\"\n overlay0_desc1_exclusive = true # Give analog_left priority on first touch\n overlay0_desc1_range_mod = 2.75\n overlay0_desc1_range_mod_exclusive = true # Give analog_left priority if controlled first\n\n\n\n\n\n## Triggering multiple buttons with one desc\n\nIt's possible to trigger multiple buttons (e.g. diagonals) with one overlay desc.\n\n overlay0_desc0 = \"left|up,32,64,radial,10,20\"\n\nwill trigger both left and up at same time. Keyboard keys are an exception; an overlay desc can have only one key.\n\n## Go to arbitrary overlay index\n\nTo build some kind of menu system, one would need the ability for overlay_next to refer to any overlay. To do this, two extra things must be configured:\n\n overlay2_overlay = \"some_overlay.png\"\n overlay2_name = \"overview_overlay\" # A name which can be referred to. Must be set if it is to be refered to.\n\n overlay0_desc0 = \"overlay_next,200,180,radial,40,40\"\n overlay0_desc0_next_target = \"overview_overlay\" # When this overlay_next is pressed, it will go to index 2 directly, instead of the default 1.\n"
},
{
"path": "docs/development/retroarch/input/parallel-port-controllers.md",
"content": "# Parallel port controllers\n\n## Linux parport controller driver\n\nRetroArch supports parallel port controllers on Linux via the \"parport\" controller driver. It uses an extended version of the Linux Multisystem 2-button joystick protocol.\n\n| Function | Pin | Register | Bit | Active |\n|----------|-----|----------|-----|--------|\n| Up | 2 | Data | 0 | Low |\n| Down | 3 | Data | 1 | Low |\n| Left| 4 | Data | 2 | Low |\n| Right| 5 | Data | 3 | Low |\n| A | 6 | Data | 4 | Low |\n| B | 7 | Data | 5 | Low |\n| Start | 8 | Data | 6 | Low |\n| Select | 9 | Data | 7 | Low |\n| Menu toggle | 10 | Status | 6 | Low |\n| X | 11 | Status | 7 | Low* |\n| Y | 12 | Status | 5 | Low |\n| L1 | 13 | Status | 4 | Low |\n| R1 | 15 | Status | 3 | Low |\n\n(*) Pin is hardware inverted, but RetroArch inverts it back again so the same pullup scheme may be used for all pins. Pin 1 is set high so it can be used for pullups.\n\nRetroArch does not perform debouncing, and so long as the button settling time is less than the frame time no bouncing will be observed. This replicates the latching behavior common in old games consoles. For optimum latency and jitter a high performance debouncing routine should be implemented in the controller hardware.\n\nParallel port hardware does not provide a way to detect non-connected pins. To avoid rendering the menu usable with spurious button presses, RetroArch checks each pin on startup and assumes any active pin is not connected. Avoid holding controller buttons while starting RetroArch or those buttons will be disabled.\n"
},
{
"path": "docs/development/retroarch/netplay.md",
"content": "# Netplay\n\nRetroArch allows a second (or further) player, or spectators, to be connected\nvia the Internet.\n\nRetroArch's netplay code is based on replay, and provides netplay over\nunreliable networks free of input latency in the default configuration. Netplay\nsupports up to 16 players and many spectators. Netplay in RetroArch is\nguaranteed¹ to work with perfect synchronization given a few minor constraints:\n\n1. The core is deterministic,\n2. The only input devices the core interacts with are the gamepad and analog sticks, and\n3. Both the core and the loaded content are identical on host and client.\n\nCores are expected to support serialization for proper netplay behavior, but\nnetplay will work in limited fashion with cores that do not support\nserialization. The experience will be far more smooth with serialization.\n\nNetplay in RetroArch works by expecting input to come delayed from the network,\nthen rewinding and re-playing with the delayed input to get a consistent state.\nAt any given time, all netplay clients may be in inconsistent states, but once\nthey receive each other's delayed data, they invisibly rewind to the last time\nthey were consistent, replay with the new input, and reach a new state,\nnotionally closer to the \"correct\", canonical state than the previous one. So\nlong as both sides agree on which frame is which, it should be impossible for\nthem to become de-synced, since each input event always happens at the correct\nframe.\n\n¹ Guarantee not actually a guarantee.\n\n\n\n## Behavior\n\nNetplay's protocol uses TCP, as reliability and in-order delivery are both\nmandatory for correct behavior.\n\nA single netplay server may have connections from multiple netplay clients. For\nmost behavior, the server and client are equal participants, but for operations\nwhich require global synchronization, the server is canonical. In normal,\nrunning behavior, each playing client simply sends the input state of their\ncontroller every frame, and the server forwards input data between clients.\nEvery client and the server is aware of which player slots are in use (i.e.,\nwhich controllers are plugged in), and the server is aware of which client\ncorresponds to which player slot.\n\nIt is crucial that every player send their input data in order for every frame,\nand thus every client keeps in mind the frame counter for every player. If\ninput data is received with an unexpectedly low frame number, it is ignored,\nand if input data is received with an unexpectedly high frame number, the\nconnection is terminated. It is also crucial that every player agree on which\nframe is which, and so during initial connection the server gives a canonical\nframe count and a serialized save state, allowing the client to join\nmid-stream.\n\nSpectators send no input data.\n\nWhen new input data is received from a player, if it is before the currently\nexecuting frame, RetroArch will invisibly rewind and replay with the new input\ndata, arriving at the original frame so that the local player's own input is\nalways seemless.\n\nA typical, playing client sends no data other than its own input every frame.\nDuring normal play, the server sends its own input data. If the server is not\nplaying, but spectating, it sends a special \"no input\" packet, so that clients\nmay nonetheless no its frame count. Other spectators send no data.\n\nOther events coordinate on the server's frame counter, and most may therefore\nonly be performed by the server. For instance, for a client to switch from\nspectating to playing, it cannot simply start sending input data, but must send\na request to change modes, which the server will honor at its present frame\ncount. The client may have to rewind to send data from earlier frames, or wait\nto send input data until its local frame count has reached the server's.\n\nIn particular, resets and savestate loads are always synchronized to the\nserver's frame count, and thus only the server may reset the core or load a\nsavestate. Because input preceeding a savestate load is irrelevant, upon\nreceiving a savestate load command, all frame counts are updated to be at least\nthe server's frame count, including the local frame count if applicable. This\nis the only condition under which the frame count will skip at a rate greater\nthan one frame per executed frame.\n\n## Implementation\n\nNetplay is in effect a buffer of input states (implemented as a ring of\nbuffers) and some pre- and post-frame behaviors.\n\nThere are three important locations, each of which : self, other and unread.\nEach refers to a frame, and a state buffer corresponding to that frame. The\nstate buffer contains the savestate for the frame, and the input from both the\nlocal and remote players.\n\nSelf is where RetroArch believes itself to be, which may be ahead or behind of\nwhat it's read from the peer. Self progresses at a rate of one frame per\nexecuted frame, except when the local frame count is forced to skip ahead due\nto loading a state.\n\nUnread is the first frame at which not all players' data has been read.\nTypically unread is less than self, but it is possible for one client to get\nahead of others.\n\nOther is where it was most recently in perfect sync: i.e., other-1 is the last\nframe from which all local and remote input have been actioned. It is never\nnecessary to rewind farther than other in order to attain synchronization, and\nother is always less than or equal to both self and unread. Since the state\nbuffer is a ring, other is the first frame that it's unsafe to overwrite.\n\nThe server has a slightly more complicated job as it can handle multiple\nclients, however it is not vastly more complicated: For each connection which\nis playing (i.e., has a controller), it maintains a per-player unread frame,\nand the global unread frame is the earliest of each player unread frame. The\nserver forwards input data: When input data is received from an earlier frame\nthan the server's current frame, it forwards it immediately. Otherwise, it\nforwards it when the frame is reached. i.e., during frame n, the server may\nsend its own and any number of other players' data for frame n, but will never\nsend frame n+1. This is because the server's clock is the arbiter of all\nsynchronization-related events, such as flipping players, players joining and\nparting, and saving/loading states.\n\nPre-frame, netplay serializes the core's state, polls for local input, and\npolls for input from the network. If the input from the network is too far\nbehind (i.e., unread is too far behind self), it stalls to allow the other side\nto catch up. To assure that this stalling does not block the UI thread, it is\nimplemented similarly to pausing, rather than by blocking on the socket.\n\nIf input has not been received for the other side up to the current frame (the\nusual case), the remote input is simulated in a simplistic manner. Each\nframe's local serialized state and simulated or real input goes into the frame\nbuffers.\n\nDuring the frame of execution, when the core requests input, it receives the\ninput from the state buffer, both local and real or simulated remote.\n\nPost-frame, it checks whether it's read more than it's actioned, i.e. If\nread > other and self > other. If so, it first checks whether its simulated\nremote data was correct. If it was, it simply moves other up. If not, it\nrewinds to other (by loading the serialized state there) and runs the core in\nreplay mode with the real data up to the least of self and read, then sets\nother to that. To avoid latency building up, if the input from the network is\ntoo far ahead (i.e., unread is too far ahead of self), the frame limiter is\nmomentarily disabled to catch up. Note that since network latency is expected,\nthe normal case is the opposite: unread is behind self.\n\nWhen in netplay mode, the callback for receiving input is replaced by\ninput_state_net. It is the role of input_state_net to combine the true local\ninput (whether live or replay) with the remote input (whether true or\nsimulated).\n\nSome thoughts about \"frame counts\": The frame counters act like indexes into a\n0-indexed array; i.e., they refer to the first unactioned frame. So, when\nread_frame_count is 23, we've read 23 frames, but the last frame we read is\nframe 22. With self_frame_count it's slightly more complicated, since there are\ntwo relevant actions: Reading the data and emulating with the data. The frame\ncount is only incremented after the latter, so there is a period of time during\nwhich we've actually read self_frame_count+1 frames of local input.\n\nClients may come and go, and may start or stop playing even as they're\nconnected. A client that is not playing is said to be spectating: It receives\nall the same data but sends none. A client may switch from spectating to\nplaying by sending the appropriate request, at which point it is allotted a\nplayer number (see the SPECTATE, PLAY and MODE commands below).\n\nThe server may also be in spectator mode, but as the server never sends data\nearly (i.e., it only forwards data on the frame it's reached), it must also\ninform all clients of its own current frame even if it has no input. The\nNOINPUT command is provided for that purpose.\n\n## Protocol\n\nA netplay connection involves a handshake, which assures that client and server\nare running the same software and brings the client to synchronization, and\nthen an exchange of input packets.\n\nThe handshake procedure (this part is done by both server and client):\n1. Send connection header\n2. Receive and verify connection header\n3. Send nickname\n4. Receive nickname\n\nFor the client:\n5. Send PASSWORD if applicable\n4. Receive INFO\n5. Send INFO\n6. Receive SYNC\n\nFor the server:\n5. Receive PASSWORD if applicable\n6. Send INFO\n7. Receive INFO\n8. Send SYNC\n\nNote that both the server and the client send the connection header before\nreading it. This is intentional. It allows either servers or clients (but not\nboth) to generalize, by echoing the connection header of the other side.\n\n## Other features\n\nTypically, it is assumed that input latency is not desired. However, input\nlatency is an option. The benefit of input latency is that the actual execution\nlags behind one's frame count, and thus it is more usual that remote data is\navailable, and rewinding is both less frequent and less expensive. There is an\nadditional location in the state buffer, run, used when input latency is\nenabled. In that case, self points to where input is being read, and run points\nto the frame actually being executed. Run is purely local.\n\n## Command format\n\nNetplay commands consist of a 32-bit command identifier, followed by a 32-bit\npayload size, both in network byte order, followed by a payload. The command\nidentifiers are listed in netplay.h. The commands are described below. Unless\nspecified otherwise, all payload values are in network byte order.\n\n**Command**: ACK\nPayload: None\nDescription:\n> Acknowledgement. Not used.\n\n**Command**: NAK\nPayload: None\nDescription:\n> Negative Acknowledgement. If received, the connection is terminated. Sent\n> whenever a command is malformed or otherwise not understood.\n\n**Command**: DISCONNECT\nPayload: None\nDescription:\n> Gracefully disconnect. Not used.\n\n**Command**: INPUT\nPayload:\n\n {\n frame number: uint32\n is server data: 1 bit\n player: 31 bits\n controller input: uint32\n analog 1 input: uint32\n analog 2 input: uint32\n }\n\nDescription:\n> Input state for each frame. Netplay must send an INPUT command for every\n> frame in order to function at all. Client's player value is ignored. Server\n> indicates which frames are its own input data because INPUT is a\n> synchronization point: No synchronization events from the given frame may\n> arrive after the server's input for the frame.\n\n**Command**: NOINPUT\nPayload:\n\n {\n frame number: uint32\n }\n\nDescription:\n> Sent by the server to indicate a frame has passed when the server is not\n> otherwise sending data.\n\n**Command**: NICK\nPayload:\n\n {\n nickname: char[32]\n }\n\nDescription:\n> Send nickname. Mandatory handshake command.\n\n**Command**: PASSWORD\nPayload:\n\n {\n password hash: char[64]\n }\n\nDescription:\n> Send hashed password to server. Mandatory handshake command for clients if\n> the server demands a password.\n\n**Command**: INFO\nPayload\n\n {\n core name: char[32]\n core version: char[32]\n content CRC: uint32\n }\n\nDescription:\n> Send core/content info. Mandatory handshake command. Sent by server first,\n> then by client, and must match. Server may send INFO with no payload, in\n> which case the client sends its own info and expects the server to load the\n> appropriate core and content then send a new INFO command. If mutual\n> agreement cannot be achieved, the correct solution is to simply disconnect.\n\n**Command**: SYNC\nPayload:\n\n {\n frame number: uint32\n paused?: 1 bit\n connected players: 31 bits\n flip frame: uint32\n controller devices: uint32[16]\n client nick: char[32]\n sram: variable\n }\n\nDescription:\n> Initial state synchronization. Mandatory handshake command from server to\n> client only. Connected players is a bitmap with the lowest bit being player\n> 0. Flip frame is 0 if players aren't flipped. Controller devices are the\n> devices plugged into each controller port, and 16 is really MAX_USERS.\n> Client is forced to have a different nick if multiple clients have the same\n> nick.\n\n**Command**: SPECTATE\nPayload: None\nDescription:\n> Request to enter spectate mode. The client should immediately consider itself\n> to be in spectator mode and send no further input.\n\n**Command**: PLAY\nPayload:\n\n {\n reserved: 31 bits\n as slave?: 1 bit\n }\n\nDescription:\n> Request to enter player mode. The client must wait for a MODE command before\n> sending input. Server may refuse or force slave connections, so the request\n> is not necessarily honored. Payload may be elided if zero.\n\n**Command**: MODE\nPayload:\n\n {\n frame number: uint32\n reserved: 13 bits\n slave: 1 bit\n playing: 1 bit\n you: 1 bit\n player number: uint16\n }\n\nDescription:\n> Inform of a connection mode change (possibly of the receiving client). Only\n> server-to-client. Frame number is the first frame in which player data is\n> expected, or the first frame in which player data is not expected. In the\n> case of new players the frame number must be later than the last frame of the\n> server's own input that has been sent, and in the case of leaving players the\n> frame number must be later than the last frame of the relevant player's input\n> that has been transmitted.\n\n**Command**: MODE_REFUSED\nPayload:\n\n {\n reason: uint32\n }\n\nDescription:\n> Inform a client that its request to change modes has been refused.\n\n**Command**: CRC\nPayload:\n\n {\n frame number: uint32\n hash: uint32\n }\n\nDescription:\n> Informs the peer of the correct CRC hash for the specified frame. If the\n> receiver's hash doesn't match, they should send a REQUEST_SAVESTATE command.\n\n**Command**: REQUEST_SAVESTATE\nPayload: None\nDescription:\n Requests that the peer send a savestate.\n\n**Command**: LOAD_SAVESTATE\nPayload:\n\n {\n frame number: uint32\n uncompressed size: uint32\n serialized save state: blob (variable size)\n }\n\nDescription:\n> Cause the other side to load a savestate, notionally one which the sending\n> side has also loaded. If both sides support zlib compression, the serialized\n> state is zlib compressed. Otherwise it is uncompressed.\n\n**Command**: PAUSE\nPayload:\n\n {\n nickname: char[32]\n }\n\nDescription:\n> Indicates that the core is paused. The receiving peer should also pause. The\n> server should pass it on, using the known correct name rather than the\n> provided name.\n\n**Command**: RESUME\nPayload: None\nDescription:\n> Indicates that the core is no longer paused.\n\n**Command**: STALL\nPayload:\n\n {\n frames: uint32\n }\n\nDescription:\n> Request that a client stall for the given number of frames.\n\n**Command**: RESET\nPayload:\n\n {\n frame number: uint32\n }\n\nDescription:\n> Indicate that the core was reset at the beginning of the given frame.\n\n**Command**: CHEATS\nUnused\n\n**Command**: FLIP_PLAYERS\nPayload:\n\n {\n frame number: uint32\n }\n\nDescription:\n> Flip players at the requested frame.\n\n**Command**: CFG\nUnused\n\n**Command**: CFG_ACK\nUnused\n"
},
{
"path": "docs/development/retroarch/network-control-interface.md",
"content": "# RetroArch Network Control Interface\n\nRetroArch exposes a UDP-based Network Control Interface (NCI) that allows remote control of a running instance. Commands can be sent from the command line, scripts, or any program capable of sending UDP packets.\n\n## Enabling the Interface\n\nEnable the NCI through RetroArch settings:\n\n- **`network_cmd_enable`** - Set to `true` to enable the network command interface\n- **`network_cmd_port`** - UDP port to listen on (default: `55355`)\n\nThese can be set in `retroarch.cfg`:\n\n```ini\nnetwork_cmd_enable = \"true\"\nnetwork_cmd_port = \"55355\"\n```\n\nOr via the menu: Settings > Network > Network Commands.\n\n## Sending Commands\n\nUse the `--command` CLI flag to send a command to a running RetroArch instance:\n\n```bash\nretroarch --command \"COMMAND;HOST;PORT\"\n```\n\n- `HOST` and `PORT` are optional\n- `retroarch --command \"COMMAND;HOST\"` uses the default port (`55355`)\n- `retroarch --command \"COMMAND\"` uses `localhost` and the default port\n\nSince the interface uses plain UDP packets, you can also send commands with `nc` (netcat), which is available on both Linux and macOS:\n\n```bash\necho -n \"COMMAND\" | nc -u -w1 localhost 55355\n```\n\nThe `-w1` flag tells `nc` to wait up to 1 second, which is enough time to receive a response from commands that return one. The response is sent back to the sender's address automatically.\n\n## Action Commands\n\nAction commands accept arguments and may return responses over UDP.\n\n### VERSION\n\nReturns the RetroArch version string.\n\n- **Arguments:** None\n- **Response:** Version string (e.g., `1.19.1`)\n\n```bash\nretroarch --command \"VERSION\"\n```\n\n### GET_STATUS\n\nReturns the current emulation status.\n\n- **Arguments:** None\n- **Response:** `GET_STATUS PAUSED|PLAYING system_id,game_basename,crc32=XXXXXXXX` when content is loaded, or `GET_STATUS CONTENTLESS` when no content is running\n\n```bash\nretroarch --command \"GET_STATUS\"\n```\n\n### GET_CONFIG_PARAM\n\nQueries a configuration parameter value.\n\n- **Arguments:** ``\n- **Response:** `GET_CONFIG_PARAM `\n- **Supported parameters:**\n - `video_fullscreen` - Whether fullscreen is active (`true`/`false`)\n - `savefile_directory` - Save file directory path\n - `savestate_directory` - Save state directory path\n - `runtime_log_directory` - Runtime log directory path\n - `log_dir` - Log directory path\n - `cache_directory` - Cache directory path\n - `system_directory` - System/BIOS directory path\n - `netplay_nickname` - Current netplay username\n - `active_replay` - Active replay info as `identifier flags frame_counter` (requires BSV movie support)\n\n```bash\nretroarch --command \"GET_CONFIG_PARAM savefile_directory\"\n```\n\n### SHOW_MSG\n\nDisplays an on-screen display (OSD) message.\n\n- **Arguments:** ``\n\n```bash\nretroarch --command \"SHOW_MSG Game saved successfully\"\n```\n\n### SET_SHADER\n\nLoads a shader preset by file path. Requires shader support (CG, GLSL, Slang, or HLSL).\n\n- **Arguments:** ``\n\n```bash\nretroarch --command \"SET_SHADER /path/to/shader.glslp\"\n```\n\n### READ_CORE_RAM\n\nReads bytes from core memory using achievement addresses. Requires achievements (CHEEVOS) support. Prefer `READ_CORE_MEMORY` for system addresses.\n\n- **Arguments:** ` ` (address in hexadecimal)\n- **Response:** `READ_CORE_RAM ...` (bytes as hex), or `READ_CORE_RAM -1` on failure\n\n```bash\nretroarch --command \"READ_CORE_RAM 1000 16\"\n```\n\n### WRITE_CORE_RAM\n\nWrites bytes to core memory using achievement addresses. Requires achievements (CHEEVOS) support. Disables achievements hardcore mode. Prefer `WRITE_CORE_MEMORY` for system addresses.\n\n- **Arguments:** ` ...` (address and bytes in hexadecimal)\n\n```bash\nretroarch --command \"WRITE_CORE_RAM 1000 FF 00 AB\"\n```\n\n### READ_CORE_MEMORY\n\nReads bytes from core memory using the system memory map.\n\n- **Arguments:** ` ` (address in hexadecimal)\n- **Response:** `READ_CORE_MEMORY ...` (bytes as hex), or `READ_CORE_MEMORY -1 ` on failure\n- **Error messages:** `no memory map defined`, `no descriptor for address`, `no data for descriptor`\n\n```bash\nretroarch --command \"READ_CORE_MEMORY 8000 32\"\n```\n\n### WRITE_CORE_MEMORY\n\nWrites bytes to core memory using the system memory map. Disables achievements hardcore mode if active.\n\n- **Arguments:** ` ...` (address and bytes in hexadecimal)\n- **Response:** `WRITE_CORE_MEMORY ` on success, or `WRITE_CORE_MEMORY -1 ` on failure\n- **Error messages:** `no memory map defined`, `no descriptor for address`, `no data for descriptor`, `descriptor data is readonly`\n\n```bash\nretroarch --command \"WRITE_CORE_MEMORY 8000 FF 00 AB\"\n```\n\n### LOAD_STATE_SLOT\n\nLoads a save state from a specific slot number.\n\n- **Arguments:** ``\n- **Response:** `LOAD_STATE_SLOT `\n\n```bash\nretroarch --command \"LOAD_STATE_SLOT 3\"\n```\n\n### PLAY_REPLAY_SLOT\n\nStarts playback of a replay from a specific slot. Requires BSV movie support.\n\n- **Arguments:** ``\n- **Response:** `PLAY_REPLAY_SLOT `\n\n```bash\nretroarch --command \"PLAY_REPLAY_SLOT 1\"\n```\n\n### SEEK_REPLAY\n\nSeeks to a specific frame in the currently active replay. Requires BSV movie support. Disabled during achievements hardcore mode.\n\n- **Arguments:** ``\n- **Response:** `OK ` on success, or `NO` on failure\n\n```bash\nretroarch --command \"SEEK_REPLAY 5000\"\n```\n\n### SAVE_FILES\n\nSaves all save files (SRAM) to disk.\n\n- **Arguments:** None\n- **Response:** `OK` on success, `NO` on failure\n\n```bash\nretroarch --command \"SAVE_FILES\"\n```\n\n### LOAD_FILES\n\nLoads all save files (SRAM) from disk.\n\n- **Arguments:** None\n- **Response:** `OK` on success, `NO` on failure\n\n```bash\nretroarch --command \"LOAD_FILES\"\n```\n\n### LOAD_CORE\n\nLoads a libretro core from a file path.\n\n- **Arguments:** ``\n\n```bash\nretroarch --command \"LOAD_CORE /path/to/core_libretro.so\"\n```\n\n## State/Button Commands\n\nState commands simulate input presses and take no arguments. They trigger the same actions as pressing the corresponding hotkey.\n\n### Menu Navigation\n\nNavigate the RetroArch menu remotely.\n\n#### MENU_TOGGLE\n\nOpen or close the menu.\n\n- **Arguments:** None\n\n```bash\nretroarch --command \"MENU_TOGGLE\"\n```\n\n#### MENU_UP\n\nNavigate up in the menu.\n\n- **Arguments:** None\n\n```bash\nretroarch --command \"MENU_UP\"\n```\n\n#### MENU_DOWN\n\nNavigate down in the menu.\n\n- **Arguments:** None\n\n```bash\nretroarch --command \"MENU_DOWN\"\n```\n\n#### MENU_LEFT\n\nNavigate left in the menu.\n\n- **Arguments:** None\n\n```bash\nretroarch --command \"MENU_LEFT\"\n```\n\n#### MENU_RIGHT\n\nNavigate right in the menu.\n\n- **Arguments:** None\n\n```bash\nretroarch --command \"MENU_RIGHT\"\n```\n\n#### MENU_A\n\nMenu confirm/accept.\n\n- **Arguments:** None\n\n```bash\nretroarch --command \"MENU_A\"\n```\n\n#### MENU_B\n\nMenu back/cancel.\n\n- **Arguments:** None\n\n```bash\nretroarch --command \"MENU_B\"\n```\n\n### Game Control\n\nControl game execution state.\n\n#### QUIT\n\nQuit RetroArch.\n\n- **Arguments:** None\n\n```bash\nretroarch --command \"QUIT\"\n```\n\n#### CLOSE_CONTENT\n\nClose the currently running content.\n\n- **Arguments:** None\n\n```bash\nretroarch --command \"CLOSE_CONTENT\"\n```\n\n#### RESET\n\nReset the current game.\n\n- **Arguments:** None\n\n```bash\nretroarch --command \"RESET\"\n```\n\n#### PAUSE_TOGGLE\n\nToggle pause.\n\n- **Arguments:** None\n\n```bash\nretroarch --command \"PAUSE_TOGGLE\"\n```\n\n#### FRAMEADVANCE\n\nAdvance one frame while paused.\n\n- **Arguments:** None\n\n```bash\nretroarch --command \"FRAMEADVANCE\"\n```\n\n### Speed Control\n\nAdjust emulation speed.\n\n#### FAST_FORWARD\n\nToggle fast forward.\n\n- **Arguments:** None\n\n```bash\nretroarch --command \"FAST_FORWARD\"\n```\n\n#### FAST_FORWARD_HOLD\n\nHold fast forward (active while held).\n\n- **Arguments:** None\n\n```bash\nretroarch --command \"FAST_FORWARD_HOLD\"\n```\n\n#### SLOWMOTION\n\nToggle slow motion.\n\n- **Arguments:** None\n\n```bash\nretroarch --command \"SLOWMOTION\"\n```\n\n#### SLOWMOTION_HOLD\n\nHold slow motion (active while held).\n\n- **Arguments:** None\n\n```bash\nretroarch --command \"SLOWMOTION_HOLD\"\n```\n\n#### REWIND\n\nRewind gameplay.\n\n- **Arguments:** None\n\n```bash\nretroarch --command \"REWIND\"\n```\n\n### Audio\n\nControl audio settings.\n\n#### MUTE\n\nToggle audio mute.\n\n- **Arguments:** None\n\n```bash\nretroarch --command \"MUTE\"\n```\n\n#### VOLUME_UP\n\nIncrease audio volume.\n\n- **Arguments:** None\n\n```bash\nretroarch --command \"VOLUME_UP\"\n```\n\n#### VOLUME_DOWN\n\nDecrease audio volume.\n\n- **Arguments:** None\n\n```bash\nretroarch --command \"VOLUME_DOWN\"\n```\n\n### Save States\n\nManage save states via hotkey simulation.\n\n#### LOAD_STATE\n\nLoad save state from the current slot.\n\n- **Arguments:** None\n\n```bash\nretroarch --command \"LOAD_STATE\"\n```\n\n#### SAVE_STATE\n\nSave state to the current slot.\n\n- **Arguments:** None\n\n```bash\nretroarch --command \"SAVE_STATE\"\n```\n\n#### STATE_SLOT_PLUS\n\nIncrement the save state slot.\n\n- **Arguments:** None\n\n```bash\nretroarch --command \"STATE_SLOT_PLUS\"\n```\n\n#### STATE_SLOT_MINUS\n\nDecrement the save state slot.\n\n- **Arguments:** None\n\n```bash\nretroarch --command \"STATE_SLOT_MINUS\"\n```\n\n### Replays\n\nControl replay recording and playback.\n\n#### PLAY_REPLAY\n\nStart replay playback.\n\n- **Arguments:** None\n\n```bash\nretroarch --command \"PLAY_REPLAY\"\n```\n\n#### RECORD_REPLAY\n\nStart replay recording.\n\n- **Arguments:** None\n\n```bash\nretroarch --command \"RECORD_REPLAY\"\n```\n\n#### HALT_REPLAY\n\nStop the current replay.\n\n- **Arguments:** None\n\n```bash\nretroarch --command \"HALT_REPLAY\"\n```\n\n#### SAVE_REPLAY_CHECKPOINT\n\nSave a checkpoint during replay.\n\n- **Arguments:** None\n\n```bash\nretroarch --command \"SAVE_REPLAY_CHECKPOINT\"\n```\n\n#### PREV_REPLAY_CHECKPOINT\n\nGo to the previous replay checkpoint.\n\n- **Arguments:** None\n\n```bash\nretroarch --command \"PREV_REPLAY_CHECKPOINT\"\n```\n\n#### NEXT_REPLAY_CHECKPOINT\n\nGo to the next replay checkpoint.\n\n- **Arguments:** None\n\n```bash\nretroarch --command \"NEXT_REPLAY_CHECKPOINT\"\n```\n\n#### REPLAY_SLOT_PLUS\n\nIncrement the replay slot.\n\n- **Arguments:** None\n\n```bash\nretroarch --command \"REPLAY_SLOT_PLUS\"\n```\n\n#### REPLAY_SLOT_MINUS\n\nDecrement the replay slot.\n\n- **Arguments:** None\n\n```bash\nretroarch --command \"REPLAY_SLOT_MINUS\"\n```\n\n### Disk Control\n\nManage multi-disk games.\n\n#### DISK_EJECT_TOGGLE\n\nToggle disk tray eject.\n\n- **Arguments:** None\n\n```bash\nretroarch --command \"DISK_EJECT_TOGGLE\"\n```\n\n#### DISK_NEXT\n\nSwitch to next disk.\n\n- **Arguments:** None\n\n```bash\nretroarch --command \"DISK_NEXT\"\n```\n\n#### DISK_PREV\n\nSwitch to previous disk.\n\n- **Arguments:** None\n\n```bash\nretroarch --command \"DISK_PREV\"\n```\n\n### Shaders\n\nControl shader settings.\n\n#### SHADER_TOGGLE\n\nToggle shaders on/off.\n\n- **Arguments:** None\n\n```bash\nretroarch --command \"SHADER_TOGGLE\"\n```\n\n#### SHADER_HOLD\n\nHold shader (active while held).\n\n- **Arguments:** None\n\n```bash\nretroarch --command \"SHADER_HOLD\"\n```\n\n#### SHADER_NEXT\n\nSwitch to next shader preset.\n\n- **Arguments:** None\n\n```bash\nretroarch --command \"SHADER_NEXT\"\n```\n\n#### SHADER_PREV\n\nSwitch to previous shader preset.\n\n- **Arguments:** None\n\n```bash\nretroarch --command \"SHADER_PREV\"\n```\n\n### Cheats\n\nManage cheat codes.\n\n#### CHEAT_TOGGLE\n\nToggle the current cheat on/off.\n\n- **Arguments:** None\n\n```bash\nretroarch --command \"CHEAT_TOGGLE\"\n```\n\n#### CHEAT_INDEX_PLUS\n\nSelect the next cheat.\n\n- **Arguments:** None\n\n```bash\nretroarch --command \"CHEAT_INDEX_PLUS\"\n```\n\n#### CHEAT_INDEX_MINUS\n\nSelect the previous cheat.\n\n- **Arguments:** None\n\n```bash\nretroarch --command \"CHEAT_INDEX_MINUS\"\n```\n\n### Recording and Screenshots\n\nCapture gameplay.\n\n#### SCREENSHOT\n\nTake a screenshot.\n\n- **Arguments:** None\n\n```bash\nretroarch --command \"SCREENSHOT\"\n```\n\n#### RECORDING_TOGGLE\n\nToggle video recording.\n\n- **Arguments:** None\n\n```bash\nretroarch --command \"RECORDING_TOGGLE\"\n```\n\n#### STREAMING_TOGGLE\n\nToggle video streaming.\n\n- **Arguments:** None\n\n```bash\nretroarch --command \"STREAMING_TOGGLE\"\n```\n\n### Display and UI\n\nControl display and interface settings.\n\n#### TURBO_FIRE_TOGGLE\n\nToggle turbo fire mode.\n\n- **Arguments:** None\n\n```bash\nretroarch --command \"TURBO_FIRE_TOGGLE\"\n```\n\n#### GRAB_MOUSE_TOGGLE\n\nToggle mouse grab.\n\n- **Arguments:** None\n\n```bash\nretroarch --command \"GRAB_MOUSE_TOGGLE\"\n```\n\n#### GAME_FOCUS_TOGGLE\n\nToggle game focus mode.\n\n- **Arguments:** None\n\n```bash\nretroarch --command \"GAME_FOCUS_TOGGLE\"\n```\n\n#### FULLSCREEN_TOGGLE\n\nToggle fullscreen mode.\n\n- **Arguments:** None\n\n```bash\nretroarch --command \"FULLSCREEN_TOGGLE\"\n```\n\n#### UI_COMPANION_TOGGLE\n\nToggle the UI companion window.\n\n- **Arguments:** None\n\n```bash\nretroarch --command \"UI_COMPANION_TOGGLE\"\n```\n\n### Performance\n\nToggle performance-related features.\n\n#### VRR_RUNLOOP_TOGGLE\n\nToggle variable refresh rate runloop.\n\n- **Arguments:** None\n\n```bash\nretroarch --command \"VRR_RUNLOOP_TOGGLE\"\n```\n\n#### RUNAHEAD_TOGGLE\n\nToggle run-ahead latency reduction.\n\n- **Arguments:** None\n\n```bash\nretroarch --command \"RUNAHEAD_TOGGLE\"\n```\n\n#### PREEMPT_TOGGLE\n\nToggle preemptive frames.\n\n- **Arguments:** None\n\n```bash\nretroarch --command \"PREEMPT_TOGGLE\"\n```\n\n#### FPS_TOGGLE\n\nToggle FPS display.\n\n- **Arguments:** None\n\n```bash\nretroarch --command \"FPS_TOGGLE\"\n```\n\n#### STATISTICS_TOGGLE\n\nToggle onscreen statistics.\n\n- **Arguments:** None\n\n```bash\nretroarch --command \"STATISTICS_TOGGLE\"\n```\n\n#### AI_SERVICE\n\nTrigger the AI service.\n\n- **Arguments:** None\n\n```bash\nretroarch --command \"AI_SERVICE\"\n```\n\n### Netplay\n\nControl netplay features.\n\n#### NETPLAY_PING_TOGGLE\n\nToggle netplay ping display.\n\n- **Arguments:** None\n\n```bash\nretroarch --command \"NETPLAY_PING_TOGGLE\"\n```\n\n#### NETPLAY_HOST_TOGGLE\n\nToggle netplay hosting.\n\n- **Arguments:** None\n\n```bash\nretroarch --command \"NETPLAY_HOST_TOGGLE\"\n```\n\n#### NETPLAY_GAME_WATCH\n\nToggle between playing and spectating.\n\n- **Arguments:** None\n\n```bash\nretroarch --command \"NETPLAY_GAME_WATCH\"\n```\n\n#### NETPLAY_PLAYER_CHAT\n\nOpen the netplay chat.\n\n- **Arguments:** None\n\n```bash\nretroarch --command \"NETPLAY_PLAYER_CHAT\"\n```\n\n#### NETPLAY_FADE_CHAT_TOGGLE\n\nToggle chat fade behavior.\n\n- **Arguments:** None\n\n```bash\nretroarch --command \"NETPLAY_FADE_CHAT_TOGGLE\"\n```\n\n### Overlay\n\nControl on-screen overlays.\n\n#### OVERLAY_NEXT\n\nSwitch to the next overlay.\n\n- **Arguments:** None\n\n```bash\nretroarch --command \"OVERLAY_NEXT\"\n```\n\n#### OSK\n\nToggle the on-screen keyboard.\n\n- **Arguments:** None\n\n```bash\nretroarch --command \"OSK\"\n```\n"
},
{
"path": "docs/development/retroarch/new-menu-options.md",
"content": "# Adding a RetroArch menu option\n\nThe RetroArch menu system is a bit complex as no UI framework is used for implementing it, due to extreme portability reasons. This guide outlines adding one setting to RetroArch global configuration and the corresponding menu entry, but you may encounter special menus or more complex settings. Try to add the new bits to places where they can be logically found.\n\n## Files you need to change\n\n* `msg_hash_us.h`\n* `msg_hash_lbl.h`\n* `msg_hash.h`\n* `menu_cbs_sublabel.c`\n* `menu_setting.c`\n* `menu_displaylist.c`\n* `configuration.c`\n* `configuration.h`\n* `config.def.h`\n* `ui/drivers/qt/qt_options.cpp`\n\n\n## Creating the config variable\n\nFor this example the variable will be a boolean option for showing messages about failed autoconfig. You can also view the pull request [here](https://github.com/libretro/RetroArch/pull/17636/files).\n\n 1. Open `config.def.h`\n 2. Add `#define DEFAULT_NOTIFICATION_SHOW_AUTOCONFIG_FAILS true` to provide a generic default for the option. If needed, use compiler switches for different defaults on different platforms.\n 3. Open `configuration.h`\n 4. There are sections for each variable type(string, float, int, uint and bool) go to `bools` and add `bool notification_show_autoconfig_fails;`\n 5. Open `configuration.c`\n 6. Add `SETTING_BOOL(\"notification_show_autoconfig_fails\", &settings->bools.notification_show_autoconfig_fails, true, DEFAULT_NOTIFICATION_SHOW_AUTOCONFIG_FAILS, false);` to `populate_settings_bool`.\n\nThe variable is now part of global RetroArch settings, will be saved/loaded from configuration file and can be used from RetroArch code, but the menu still doesn't know it exists.\n\n## Defining menu labels and messages\n\nTime to define the labels for identifying and displaying the new setting.\n\n 1. Open `msg_hash.h`\n 2. Add `MENU_LABEL(NOTIFICATION_SHOW_AUTOCONFIG_FAILS)` to `enum msg_hash_enums`\n 3. Open `intl/msg_hash_lbl.h`\n 4. Add `MSG_HASH( MENU_ENUM_LABEL_NOTIFICATION_SHOW_AUTOCONFIG_FAILS, \"notification_show_autoconfig_fails\")` in the `MENU_ENUM_LABEL_` section. This identifier may appear in logs, but not in the menu.\n 5. Open `intl/msg_hash_us.h`\n 6. Add `MSG_HASH( MENU_ENUM_LABEL_VALUE_NOTIFICATION_SHOW_AUTOCONFIG_FAILS, \"Input (Autoconfig) Failure Notifications\")` in the `MENU_ENUM_LABEL_VALUE_` section. This is what the user and the translators actually see.\n 7. Add `MSG_HASH( MENU_ENUM_SUBLABEL_NOTIFICATION_SHOW_AUTOCONFIG_FAILS, \"Display an on-screen message when input devices could not be configured.\")` section. Sublabels are a bit more detailed explanations that appear underneath the menu item.\n\nThe option is now defined but the menu has still not been told to display it.\n\n## Displaying your option\n\nNow the menu has to be told how to display the option.\n\n 1. Open `menu/cbs/menu_cbs_sublabel.c`\n 2. Add `DEFAULT_SUBLABEL_MACRO( action_bind_sublabel_notification_show_autoconfig_fails, MENU_ENUM_SUBLABEL_NOTIFICATION_SHOW_AUTOCONFIG_FAILS)` to the block of `DEFAULT_SUBLABEL_MACRO` functions.\n 3. Add `case MENU_ENUM_LABEL_NOTIFICATION_SHOW_AUTOCONFIG_FAILS: BIND_ACTION_SUBLABEL(cbs, action_bind_sublabel_notification_show_autoconfig_fails); break;` to the `menu_cbs_init_bind_sublabel` function.\n 4. Open `menu/menu_setting.c`\n 5. Find your variables section(saving, netplay, video, ...) and add `CONFIG_BOOL` macro. The options are too numerous to list here, look for a similar example to what you plan to add. This entry controls the related setting, the menu labels, and possible actions. Simple config types already have implemented actions for changing (like toggling the boolean value with left/right), but if something more complex is needed, like a list of predefined values, it will need to be implemented in other menu files.\n 6. Open `menu/menu_displaylist.c`\n 7. Find your variables section and add `{MENU_ENUM_LABEL_NOTIFICATION_SHOW_AUTOCONFIG_FAILS, PARSE_ONLY_BOOL, false },` the position of this command in the list is what determines the order of the menu entries, the first run is at the top of the list.\n 8. Open `ui/drivers/qt/qt_options.cpp`\n 9. Find the corresponding menu and add the option, in this case `notificationsGroup->add(MENU_ENUM_LABEL_NOTIFICATION_SHOW_AUTOCONFIG);`. This represents the menu item in the desktop menu.\n\n# Finishing\n\nThis guide only introduces the English menu labels. Translations are handled via Crowdin, after the pull request is accepted, new strings will appear for translators. New items wil be shown to users in English until translation is done.\n\nThere are several possibilities that can be done with the menu system, but most require additional functions. Help text may also be defined (a slightly longer description that can be displayed with Select button). Some of the menu code is dynamic depending on e.g. number of users, those items usually require extra care. Icon assignments are handled in the menu drivers (ozone, xmb, glui).\n"
},
{
"path": "docs/development/retroarch/new-translations-crowdin.md",
"content": "# Helping With RetroArch Translations\n\n\n\nAs libretro, it is very important for us that RetroArch can be easily understood by everyone. Making multiple languages available in RetroArch will ensure a better understanding of the options and a better experience for more people. Currently, RetroArch is in the process of being translated into over 35 languages. In the pursuit of streamlining the process and making it more accessible for new contributors we decided to utilise the crowdsourced translation service **Crowdin**[^1].\n\n[^1]: https://crowdin.com/ - RetroArch and libretro are not affiliated in any way with Crowdin.\n\n## What is Crowdin?\n\nCrowdin is a closed-source cloud-based localization technology and services company. Its main attraction is an Online Translation Editor, with which texts can be translated and proofread. Crowdin’s free to use for translators and open-source projects, like RetroArch. You can reach the project page of RetroArch by clicking [here](https://crowdin.com/project/retroarch).\n\n### How to register a new account in Crowdin\n\nYou need to create a Crowdin account in order to access the translation features of the site. You can do so by clicking [this link](https://accounts.crowdin.com/register) or by clicking the ‘**Sign up**’ button at the top right of the Crowdin site. Once you have created your Crowdin account, you can start translating.\n\n\n
\n {align=center}\n
\n \n Figure 1: Click 'Sign up' to register a new account in Crowdin's service.\n \n\n\n\n### Enabling e-mail notifications/Joining a project\n\nYou can add translations and suggestions to the project regardless of whether you join it or not. But if you join the project, Crowdin will notify you via e-mail about any changes and developments regarding the translation efforts (like recently added texts, etc.). You will also have a link to the RetroArch project added to your profile page for quick access. If you want to join the project, just click the ‘**Join**’ button at the top right of the project page.\n\n\n
\n \n
\n \n Figure 2: Click 'Join' to follow the project and receive e-mail notifications.\n \n\n\n\n## Basic Instructions\n\n### How to translate strings\n\nAfter selecting the language you want to translate to (you may request additional languages at the `#retroarch-translations` channel of our Discord[^2]), you will be welcomed by the file selection page. At the moment the most important files are _msg\\_hash\\_us.json_, which contains the (options) texts of the RetroArch program, as well as _googleplay\\_us.json_ and _steam\\_us.json_, which contain RetroArch’s Google Store and Steam page descriptions, respectively.\n\n[^2]: The official RetroArch Discord server: https://ra-link.web.app/discord\n\n\n
\n \n Figure 3: The file selection page will show the amount of work that has been done in the chosen language.\n \n\n\nPick the file that you want to work on and you will be taken to the translation page. This screen can seem overwhelming at first, but don't worry: it's actually a very simple process.\n\n\n
\n \n
\n \n Figure 4: The main translation page. On the left: search & source string selection; middle: translation area; on the right: empty comments section.\n \n\n\nOn the column located at the left side of your browser you will see a list of strings (a string is a piece of text). They will be marked by either a green check mark, marking strings with approved translations (see 'The final say – Proofreaders' below), a green dot for translated strings, for which you may add an alternative translation and/or vote on existing ones, or a red dot for as of yet untranslated strings.\n\nClick on any string to see them in the middle area. The **Source String** (the original English text) will be displayed at the top with a unique label, which can be used to search for this particular string, and possibly some context cues, like screenshots, right below it. There you will also find the ‘**Request**’ link, which is a shortcut for writing a comment asking for more information about the context. Below that is an area for writing the string’s translation. Once you have finished writing the translation for this string, click on the ‘**Save**’ button and your translation will be added to the list of suggested translations for this string right below. That’s it, simple as that.\n\nIn the very few cases where the source string can be kept as-is, you can click the ‘**Copy Source**’ button  to do so.\n\nIn the string list (on the left side of the screen) some strings have a balloon icon . This icon shows that the string has comments written by other translators and developers. Comments may include interesting and/or important information that could help you decide on how best to translate a specific string. You can also write comments in case you have questions or additional information regarding any particular string.\n\nPlease make sure that any comment you write is in __English__, as that is the official project language and the comments are visible to _everyone_. Comments will be displayed at Crowdin’s right column. In case there are no comments being displayed there, make sure that the left-most button of that column is active.\n\n\n
\n \n Figure 5: The right-side column will display any available comments if its left tab is active.\n \n\n\n### Machine Translation, Translation Memory and Other Languages\n\nBelow the suggested translations in your language you will see two sections: “**TM and MT suggestions**” and “**Other Languages**”.\n\n\n
\n \n Figure 6: The suggested translations area, located at the bottom half part of the page. This is the proofreaders view; no voting buttons, only approve & delete. Below that is the TM & MT section.\n \n\n\nIn the first, translation suggestions from the **Translation Memory** are displayed: those are derived from **the history of any existing translations**, both current and old, that appear to be a good match to the current string. These translations were once suggested by translators and can serve either as a convenient way to copy an existing translation or as a base/inspiration for your own.\n\nIn addition to that there’s **Machine Translations**, provided by Crowdin Translate or Microsoft Translate. These are similar to what you’d expect from Google Translate: translations generated by an algorithm, without taking any context into account. **We strongly suggest that you use Machine Translations with caution, as they tend to fail at translating more exotic words & phrases and to be grammatically faulty.** Apart from that, they can be a useful source of inspiration for your own translations.\n\nLastly, in the **Other Languages** section you will find translations from, well, other languages. If you know additional languages or your language’s way of writing is close to another one, you can use these translations as a reference and additional source of context.\n\n\n
\n \n Figure 7: The Other Languages section is located right below the \"TM and MT translations\" area. The green check marks on the left side point out approved translations.\n \n\n\n### Deciding the best translation – Voting\n\nSince multiple translations can be suggested for each source string and language, but obviously only one can ultimately be displayed to the users, we need to somehow decide which one to pick. Thankfully, Crowdin does most of the work for us: first, all translations are ordered by their age, newest to oldest; and second, and more importantly, Crowdin utilises a voting system to allow translators to up-vote translations they like and down-vote lacklustre/flawed ones.\n\nVoting is very simple: At the bottom half of the middle section of the translation page you’ll find a list of suggested translations. To the right of each suggestion are a couple buttons which can be used to add a positive or negative vote, either elevating the translations priority or decreasing it, respectively. Those votes can be un-/redone at any time, so no worries if you should change your mind later.\n\n### The final say – Proofreaders\n\nBut even with a voting system in place, at some point we would probably want to just decide on an official translation, which will be chosen regardless of the votes. That’s where proofreaders come into play.\n\nFirst things first: **in order to become a proofreader, translators will need additional authorization by RetroArch’s translation managers.** We suggest you contact us at the `#retroarch-translations` channel, located in RetroArch’s Discord server[^2], in order to discuss this authorization.\n\nAs a proofreader, you don’t get to vote on the translations any more. Instead, if you find a translation to be suitable and free of errors you can click on the  button to _approve_ it. Approving a translation makes it the ‘default’ and elevates it above all others. Only one translation can be approved at a time for each source string and language. Translators can still vote on it, though, and it would be wise to rethink one's choice if the votes demand it.\n\nIn addition to approving translations, proofreaders also may delete _any_ suggested translation, not just their own. It should be easy to see why additional authorization is needed for this position.\n\n### Seeing results in the app\n\nFor languages already included in RetroArch the translations are updated daily for the main app and weekly every Friday for cores.\nOther languages will need to be incorporated into the code of RetroArch and the cores. Once at least 15% of the `msg_hash_us.h` file is translated, the Crowdin managers will start work on including this language in the app. If you'd like to take matters in your own hands, you can find instructions [here](new-translations.md).\n\n## Advanced Instructions\n\n### What are things like \\n or %d?\n\nSince RetroArch and libretro are C/C++ projects, the strings will sometimes contain 'special (sequences of) characters' used in code. Some people like to call them control codes, variables, etc., but the exact name is not important for translation purposes. Here are some of the most common examples:\n\n\n
\n \n Figure 8: Example for the line break character \\n; this is text for the 3DS menu, which has very short lines.\n \n\n\n- **\\n** is a line break/new line character: **it marks the end of the previous & the beginning of a new line.** Basically, it's like hitting the Enter button, but for programmers. Only used either for formatting/readability (use/remove them at your own discretion), or when line length is limited (use more or fewer than in the source string, as required; please pay attention to comments on that matter!).\n- A percentage sign (%) followed directly by one (rarely more) lowercase letter(s) (for example: %d, %ld, %u, %lu, %f, %lf, %s...), or sometimes even a number, is usually a placeholder. They will be replaced in the code with something else: numbers, other texts (usually names/objects not requiring translation)... You may move them around the text, but you must use all of them, and in the same order, or it could result in an error in RetroArch and nobody wants that.\n\n\n
\n \n Figure 9: Example for placeholders; in this case two text placeholders are used (%s -> string).\n \n\n\nThis is not a complete list — there are quite a few more. But don't worry: in Crowdin these special elements are marked accordingly, and you will receive reminders should you forget to use them in your translations. And always remember: if there is something unclear about a source text, just ask about it in a comment on Crowdin or on Discord[^2]!\n\n\n
\n \n Figure 10: A special placeholder for text. Don't worry about it's exact purpose, just remember that there exist many exceptions not explicitly listed in this section.\n \n\n\n### How to check the translations of other strings\n\nThe best way to check for other translations, without having to leave the current string you are editing, is by using the middle button of the bar to the right of your screen. Here you can type any word to search through your language's Translation Memory (TM). The TM not only contains automatic translations of the strings, but also previously accepted/approved translations. Make sure you check the date of the text you want to use as a reference.\n\n\n
\n \n Figure 12: The TM will show you source texts containing your search term and their current translation.\n \n\n\n### How to find previous translations of words/phrases\n\nIn the ‘Source String’ area you’ll find some words that are underlined. These are words that contain references to existing translations. Hover your mouse over these words to see the current translation references. As of the writing of this document, there are two types of references:\n\n- **Glossary terms**: These terms have been selected/translated by other members of the translation team (or other language teams, depending on the case) and should be used as much as possible. If you'd like to change an existing glossary term translation, please talk about it with any active translators of your language first. If your language currently does not have translators, but its progress is very high, do not change the existing terms on your own. Please contact other people on e.g. Discord[^2] and try to reach a consensus.\n- **Previous translations**: Crowdin will routinely check for repeated words and show what it thinks is a good translation based on previous input. These suggestions are marked with \"Previously translated as:\". This system is not perfect and should not be entirely trusted.\n\n\n
\n \n Figure 14: A term with automatic translation suggestions based on previous input.\n \n\n\n### Adding translations to the glossary\n\n**If your language has one or more active translators, please refrain from changing translated glossary terms of your language unless you have previously discussed it.** It's not fair to come around changing things without a proper debate.\n\nIf you want to add a localized equivalent to an existing English term, you can do the following:\n\n1. Click on the right icon on the bar to the right of your screen.\n2. If the term is not being used by the Source String you are at this moment, use the Search function of this bar.\n3. Click on the Edit button under the term.\n4. The **Edit Term** window will appear. Below the name of your language, add your desired translation at the **Term** area.\n5. You can also add a localized description under the Term area. Use it to add details/more information about the term and what it is referring to, etc. Context is key.\n6. Then click on the Save button.\n\n\n
\n \n Figure 16: The Edit Term window.\n \n\n\n**A word of warning**: do not change the source language's \"**Part of speech**\" section. Some terms have the option \"Not selected\" picked on purpose because Crowdin, sometimes, will not mark words as containing a Glossary term. For those in the know, Crowdin seems to have a syntax analysis function enabled for English, but it's far from perfect in its current state.\n\n### Only for veteran users: Creating new terms in the glossary\n\nFirst and foremost, in its current state, the English words in the glossary should cover the entire RetroArch translation. Unless you _ABSOLUTELY_ need it, please refrain from creating new terms.\n\n**IMPORTANT**: search for the term you'd like to create first to avoid duplicates.\n\nIf you have to add a new term to the Glossary, and it's absolutely necessary, follow these instructions:\n\n1. Open the **Glossary Terms** as before and click on the icon that's to the left of the search bar, the one that has a plus (+) icon.\n2. The **Add Term** window will appear. Go to the Term text box in the English section and write the English words that you want to classify with a term.\n 1. Alternatively, mark a term in a source string by selecting it with the mouse; a context menu should pop up. Click on “**Create Term**” & the Add Term window will open, with the selected term already filled in.\n3. Add a description in English if possible. This will help translators of other languages understand the exact meaning of the term. Context is key.\n4. Now go to the section that is below your language's name. Add your translation at the Term area.\n5. You can also add a localized description under this Term area. Use it to add details/more information about the term and what it is referring to, etc. Once again, _context is key_.\n\n\n
\n \n Figure 18: The Add Term window differs little from the Edit Term window.\n \n\n"
},
{
"path": "docs/development/retroarch/new-translations.md",
"content": "# Adding New Languages to RetroArch\n\nWhile translation is handled via the Crowdin[^1] platform ([more here](new-translations-crowdin.md)), RetroArch's code must be adjusted to display new languages.\n\n## Files to change\n\n* `msg_hash.c`\n* `msg_hash.h`\n* `retroarch.c`\n* `translation_defines.h`\n* `intl/msg_hash_us.h`\n* `menu/menu_setting.c`\n* `tasks/task_translation.c`\n* `libretro-common/include/libretro.h`\n\n> Every new language must first be added to the project on Crowdin. This will ensure that a corresponding `intl/msg_hash_xx.h` file is created. Requests are accepted at the `#retroarch-translations` channel of the RetroArch Discord[^2].\n\n[^1]: https://crowdin.com/ - RetroArch and libretro are not affiliated in any way with Crowdin.\n[^2]: The official RetroArch Discord server: https://ra-link.web.app/discord\n\n## Main Instructions\n\nTo add a language with the English name `XXXXX` and two-letter code `xx` (be sure to use the same one as in the corresponding `intl/msg_hash_xx.h` file) follow these steps:\n\n1. Open `libretro-common/include/libretro.h`.\n 1. Add a `RETRO_LANGUAGE_XXXXX` item to the `retro_language` enum just above `RETRO_LANGUAGE_LAST`, using the next available integer value.\n> Do not rearrange the elements of this list! This would break the language association for the cores!\n2. Open `msg_hash.h`.\n 1. Check if a `MENU_ENUM_LABEL_VALUE_LANG_XXXXX` item for your language is present in the `msg_hash_enums` enum; if not, add it.\n3. Open `msg_hash.c`.\n 1. Add the following block inside the `get_user_language_iso639_1(bool limit)` function:\n```c\ncase RETRO_LANGUAGE_XXXXX:\n return \"xx\";\n```\n 2. Add the following block inside the `msg_hash_to_str(enum msg_hash_enums msg)` function:\n```c\ncase RETRO_LANGUAGE_XXXXX:\n ret = msg_hash_to_str_xx(msg);\n break;\n```\n 3. Add a new static function:\n```c\nstatic const char *msg_hash_to_str_xx(enum msg_hash_enums msg)\n{\n switch (msg)\n {\n#include \"intl/msg_hash_xx.h\"\n default:\n break;\n }\n\n return \"null\";\n}\n```\n4. Decide if `intl/msg_hash_xx.h` should use UTF-8 + BOM encoding. See the section below.\n5. Open `intl/msg_hash_us.h`.\n 1. Check if the following block is present, where `Yyyyy` is the native name of the language and if not, add it:\n```c\nMSG_HASH(\n MENU_ENUM_LABEL_VALUE_LANG_XXXXX,\n \"Xxxxx - Yyyyy\"\n )\n```\n6. Open `menu/menu_setting.c`.\n 1. Add the following assignment to the `setting_get_string_representation_uint_user_language()` function, before `if (*msg_hash_get_uint(MSG_HASH_USER_LANGUAGE) == RETRO_LANGUAGE_ENGLISH)` statement:\n```c\nLANG_DATA(XXXXX)\n```\n 2. Add the following block inside the `setting_get_string_representation_uint_ai_service_lang()` function:\n```c\ncase TRANSLATION_LANG_XX:\n enum_idx = MENU_ENUM_LABEL_VALUE_LANG_XXXXX;\n break;\n```\n7. Open `retroarch.c`.\n 1. Add your language to `enum retro_language retroarch_get_language_from_iso(const char *iso639)`:\n```c\n{\"xx\", RETRO_LANGUAGE_XXXXX},\n```\n8. Open `tasks/task_translation.c`.\n 1. Add the following block inside the `ai_service_get_str(enum translation_lang id)` function:\n```c\ncase TRANSLATION_LANG_XX:\n return \"xx\";\n```\n9. Open `translation_defines.h`.\n 1. Add your language to the `translation_lang` enum between `TRANSLATION_LANG_DONT_CARE` and `TRANSLATION_LANG_LAST`items:\n```c\nTRANSLATION_LANG_XX, /* Xxxxx */\n```\n\n## Optional Adjustments\n\n### Generating custom font for RGUI\n\nThe tutorial down below is taken from [trngaje's page.](https://trngaje.github.io/retroarch/retroarch-rgui-font/)\n\nFirst of all, I will explain the basic font, English font. It was 5x10 in size at first.\n\nIf you analyze the first letter of !… hexadecimal value\n\n`0x80, 0x10, 0x42, 0x08, 0x20, 0x00, 0x00,`\n\nConvert to Binary\n\n```\n1000 0000\n0001 0000\n0100 0010\n0000 1000\n0010 0000\n0000 0000\n```\n\nPlace it in a little endian and cut it into 5 pixels\n\n```\n00000\n00100\n00100\n00100\n00100\n00100\n00000\n00100\n00000000\n```\n\nThe source code in retroarch for this is as follows.\n\n```\nunsigned font_pixel = x + y * FONT_WIDTH;\nuint8_t rem = 1 << (font_pixel & 7);\nunsigned offset = font_pixel >> 3;\nuint8_t col = (bitmap_bin[FONT_OFFSET(letter) + offset] & rem) ? 0xff : 0;\n```\n\nThe font was recreated by IlDucci’s request to improve the second Cyrillic language display error. It was 6x10 in size at first.\n\n\n\nEach letter is separated by 16 pixels, of which only 6x10 is a meaningful area.\n\nFor this purpose, I created a conversion program using the SDL function.\n\nIt can be generated simply as follows.\n\n```\n./png2c bitmap_cyrillic.png\n```\n\nPlease refer to the location below for the code to build.\n\nhttps://github.com/trngaje/png2c\n\nYou can download prebuilt images for Windows from the path below. https://github.com/trngaje/png2c/releases/tag/windows_64bit_png2c_220924\n\nunzip windows_64bit_png2c_prebuild_220924.zip\n\n```\npng2c.exe bitmap_cyrillic.png\n```\n\n### RGUI Compatibility\n\nTo make the new language usable with the RGUI menu driver:\n\n1. Open `menu/drivers/rgui.c`.\n2. Navigate to the `rgui_fonts_init(rgui_t *rgui)` function.\n3. Add `case RETRO_LANGUAGE_XXXXX:` to\n 1. the extended ASCII section if the new language uses the Basic Latin/ASCII + Latin-1 Supplement range of UTF-8 or\n 2. any other present language the new language shares the alphabet with (like Russian).\n4. If a new language was added, it is important to compile RetroArch with the changes and ensure the new language works correctly with RGUI.\n5. If your language uses a different range of symbols, an RGUI compatible font must be added first. This is an extensive process, which is outside the scope of this article.\n\n### Narrator support\n\n1. For Mac. (compatible with **say**)\n 1. Open `frontend/drivers/platform_darwin.m`.\n 2. Go to `accessibility_mac_language_code(const char* language)` function. Check if the following block is present, where `Yyyyy` is the voice name for the language and if not, add it before `return \"\"`:\n```c\nelse if (string_is_equal(language,\"xx\"))\n return \"Yyyyy\";\n```\n2. For Linux. (compatible with **[espeak](https://github.com/espeak-ng/espeak-ng)**)\n 1. Open `frontend/drivers/platform_unix.c`.\n 2. Go to `accessibility_unix_language_code(const char* language)` function. Check if the following block is present, where `yyy` is the [Identifier](https://github.com/espeak-ng/espeak-ng/blob/master/docs/languages.md) for the language and if not, add it before `/* default voice as fallback */`:\n```c\nelse if (string_is_equal(language, \"xx\"))\n return \"yyy\";\n```\n3. For Windows. (OS compatiable)\n 1. Open `frontend/drivers/platform_win32.c`.\n 2. Go to `accessibility_win_language_code(const char* language)` function. Check if the following block is present, where `Yyyyy` is the [voice name](https://support.microsoft.com/en-us/windows/appendix-a-supported-languages-and-voices-4486e345-7730-53da-fcfe-55cc64300f01#WindowsVersion=Windows_10) for the language and if not, add it before `return \"\"`:\n```c\nelse if (string_is_equal(language,\"xx\"))\n return \"Microsoft Yyyyy Desktop\";\n```\n\n## Encoding of translation files\n\nTranslation files (`intl/msg_hash_xx.h`) in general must be UTF-8 encoded.\nFor some languages, these files need to have a \"UTF-8 Unicode (with [BOM](https://en.wikipedia.org/wiki/Byte_order_mark))\" encoding. This can be done using the 'Encoding' option of editors like Notepad++ and Notepadqq. AFAIK, this is because of a requirement of the MSVC compilers for the Windows platform. Examples of this as of now are:\n\n* `msg_hash_ar.c`\n* `msg_hash_chs.h`\n* `msg_hash_cht.h`\n* `msg_hash_ja.h`\n* `msg_hash_ko.h`\n* `msg_hash_pl.h`\n* `msg_hash_ru.h`\n* `msg_hash_vn.h`\n\nBe careful when creating and editing your new translation files, as some text editors do strip the BOM without warning.\n\n## Examples\n\n### Adding languages to RetroArch\n\n* Arabic:\n * [add basic support for arabic.](https://github.com/libretro/RetroArch/commit/45580cb9a8f0fcd0a87f00eadf26d87f05289485)\n * [add byte-order-marker to msg_hash_ar.*](https://github.com/libretro/RetroArch/commit/d8f1a08a4758851d5530d311303146257cbf8216)\n * [Add \"Arabic\" to intl/msg_hash_us.h missed in 45580cb.](https://github.com/libretro/RetroArch/commit/7a0428fc769fd0eca663207134bec311aa3e30f3)\n\n* Indonesian, Swedish and Ukrainian (+RGUI):\n * [Add Indonesian, Swedish and Ukrainian language options](https://github.com/libretro/RetroArch/commit/311fec15d9db10ab14c879e898a8205dd37f827c)\n\n* [List of merges related to adding languages](https://github.com/libretro/RetroArch/pulls?q=is%3Apr+is%3Amerged+in%3Atitle+add+language+option+)\n\n## Translation\n\nIf you speak the target language `xx` then you could start translating on Crowdin.\nInstructions and recommended reading for that can be found [here](https://docs.libretro.com/development/retroarch/new-translations-crowdin/).\n\n> Please **do not change** the `intl/msg_hash_xx.h` files directly!\n\nStarting from early 2023, the help texts that were located in `intl/msg_hash_xx.c` files are also included on Crowdin. If you have translation efforts in `msg_hash_xx.c` file from an earlier date, you can copy them to Crowdin, with following caveats:\n* Individual line breaks (\\n) at the end of each line are not required, current menu drivers will break lines automatically. Line break may be used as a paragraph separator, if text is long.\n* Make sure translations still matches the current source text, as several of those were updated during the refactor.\n* Do not exceed maximum line length (500 characters).\n* The Crowdin translations for these strings will only take effect when the definition is removed from `intl/msg_hash_xx.c`.\n\n## See also\n\n* [Adding a RetroArch menu option](new-menu-options.md)\n* [Helping with RetroArch translations](new-translations-crowdin.md)\n"
},
{
"path": "docs/development/shader/cg-shaders.md",
"content": "# Developing Legacy Cg Shaders\n\n!!! Warning \"Cg Shaders are deprecated\"\n\nCg has been discontinued for years and is closed source. Developers cannot use Cg for newer APIs such as Vulkan, D3D12, and Metal. Cg cross-compilation to GLSL is unmaintainable. We cannot do the Cg transform in runtime on mobile due to lack of open source Cg runtime.\n\n## New Slang Shader Specification\n\nUnless you are developing shaders for a platform that cannot support the newer Slang standard, please consider [developing a Slang shader](slang-shaders.md) instead.\n\n## Example Cg/HLSL program\n\nIf you were to process an image on a CPU, you would most likely do something like this:\n\n```c\nfor(unsigned y = 0; y < height ; y++) {\n for(unsigned x = 0; x < width ; x++)\n out_pixel[y][x] = process_pixel(in_pixel[y][x], y,x);\n}\n```\n\nWe quickly realize that this is highly serial and slow. We see that `out_pixel[y][x]` isn’t dependent on `out_pixel[y + k][x + k]`, so we see that we can parallelize quite a bit.\n\nEssentially, we only need to implement `process_pixel()` as a single function, which is called thousands, even millions of time every frame. The only purpose in life for `process_pixel()` is to process an input, and produce an output. No\nstate is needed, thus, a “pure” function in computer science terms.\n\nFor the Cg program, we need to implement two different functions. `main_vertex()` takes care of transforming every incoming vertex from camera space down to clip space. This essentially means projection of 3D (coordinates on GPU) down to 2D (your screen). Since we’re dealing with old school emulators here, which are already 2D, the vertex shading is very trivial.\n\nVertex shaders get various coordinates as input, and uniforms. Every vertex emitted by the emulator is run through `main_vertex` which calculates the final output position. For our emulators this is just 4 times, since we’re rendering a quad on the screen. 3D games would obviously have a lot more vertices.\n\nWhile coordinates differ for each invocation, uniforms are constant through-out every call. Think of it as a global variable that you’re not allowed to change. Vertex shading can almost be ignored altogether, but since the vertex shader is run only 4 times, and the fragment shader is run millions of times per frame, it is a good idea to precalculate values in vertex shader that can later be used in fragment shader. There are some limitations to this which will be mentioned\nlater.\n\n`main_fragment()` takes care of calculating a pixel color for every single out-put pixel on the screen. If you’re playing at 1080p, the fragment shader will have to be run `1920 * 1080` times! This is obviously straining on the GPU unless the shader is written efficiently. Obviously, main_fragment is where the real action happens. For many shaders we can stick with a “dummy” vertex shader which does some very simple stuff.\n\nThe fragment shader receives a handle to a texture (the game frame itself), and the texture coordinate for the current pixel, and a bunch of uniforms.\nA fragment shader’s final output is a color, simple as that. Processing ends\nhere.\n\n## Shader Hello World\n\nWe’ll start off with the basic vertex shader. No fancy things are being done. You’ll see a similar vertex shader in most of the Cg programs out there in the wild.\n\n```c\nvoid main_vertex (float4 pos : POSITION,\n out float4 out_pos : POSITION,\n\t\t\t\t uniform float4x4 modelViewProj,\n\t\t\t\t float4 color : COLOR,\n\t\t\t\t out float4 out_color : COLOR,\n\t\t\t\t float2 tex : TEXCOORD,\n\t\t\t\t out float2 out_tex : TEXCOORD\n\t\t\t\t )\n\n{\n out_pos = mul(modelViewProj, pos);\n out_color = color ;\n out_tex = tex ;\n}\n```\n\nThis looks vaguely familiar to C, and it is. Cg stands for “C for graphics” after all. We notice some things are happening, notable some new types.\n\n### Cg types\n\n#### Float\n\n`float4` is a vector type. It contains 4 elements. It could be colors, positions, whatever. It's used for vector processing which the GPUs are extremely efficient at.\n\n### Semantics\n\nWe see various semantics. The `POSITION` semantic means that the variable is tied to vertex coordinates. We see that we have an input `POSITION`, and an output (out) `POSITION`. We thus transform the input to the output with a matrix multiply with the current model-view projection. Since this matrix is the same for every vertex, it is a uniform. Remember that the variable names DO matter. modelViewProj has to be called exactly that, as the emulator will pass the MVP to this uniform. It is in the specification.\n\nSince we have semantics for the `POSITION`, etc, we can call them whatever we want, as the Cg environment figures out what the variables mean.\n\nThe transformation happens here:\n\n```c\nout_pos = mul(modelViewProj , pos);\n```\n\nThe `COLOR` semantic isn’t very interesting for us, but the example code in nVidias Cg documentation includes it, so we just follow along. `TEXCOORD` is the texture coordinate we get from the emulator, and generally we just pass it to the fragment shader directly. The coordinate will then be linearly interpolated across the fragments.\n\nMore complex shaders can output (almost) as many variables they want, that will be linearily interpolated for free\nto the fragment shader. We also need a fragment shader to go along with the vertex shader, and here's a basic shader that only outputs the pixel as-is. This is pretty much the result you’d get if you didn’t run any shader (fixed-function) at all.\n\n```c\nfloat4 main_fragment ( uniform sampler2D s0 : TEXUNIT0, float2 tex : TEXCOORD) : COLOR\n{\n return tex2D ( s0 , tex ) ;\n}\n```\n\nThis is arguably simpler than the vertex shader. Important to notice are:\n\n * `sampler2D` is a handle to a texture in Cg. The semantic here is `TEXUNIT0`, which means that it refers to the texture in texture unit 0. This is also part of the specification.\n * `float2 tex : TEXCOORD` is the interpolated coordinate we received from the vertex shader.\n * `tex2D(s0, tex);` simply does texture lookup and returns a `COLOR`, which is emitted to the framebuffer.\n\nPractically every fragment does more than one texture lookup. For example, classic pixel shaders look at the neighbor pixels as well to determine the output. But where is the neighbor pixel? We’ll revise the fragment shader and try to make a really blurry shader to demonstrate. We now need to pull up some uniforms. We need to know how to modify our tex coordinates so that it points to a neighbor pixel.\n\n```c\nstruct input\n{\n float2 video_size ;\n float2 texture_size ;\n float2 output_size ;\n float frame_count ;\n};\n\nfloat4 main_fragment ( uniform sampler2D s0 : TEXUNIT0, uniform input IN , float2 tex : TEXCOORD) : COLOR\n{\n float4 result = float4 ( 0. 0 ) ;\n float dx = 1.0 / IN. texture_size. x ;\n float dy = 1.0 / IN. texture_size. y ;\n\n // Grab some of the neighboring pixels and blend together for a very mushy blur.\n result += tex2D (s0 , tex + float2 (−dx, −dy));\n result += tex2D (s0 , tex + float2 (dx, −dy));\n result += tex2D (s0 , tex + float2 (0.0, 0.0));\n result += tex2D (s0 , tex + float2 (−dx, 0.0));\n return result / 4. 0 ;\n}\n```\n\nHere we use `IN.texture_size` to determine the the size of the texture. Since GL maps the whole texture to the interval `[0.0, 1.0]`, `1.0 / IN.texture_size` means we get the offset for a single pixel, simple enough. Almost every shader uses this. We can calculate these offsets in vertex shader to improve performance since the coordinates are linearily interpolated anyways, but that is for another time.\n\n## Putting it together\n\nThe final runnable product is a single `.cg` file with the `main_vertex` and `main_fragment` functions added together. Not very complicated. For the icing on the cake, you should add a license header.\n\n```c\n/* Stupid blur shader.\n * Author : Your friendly neighbor.\n * License : We don't have those things!\n*/\n\nstruct input\n{\n float2 video_size;\n float2 texture_size;\n float2 output_size;\n float frame_count;\n};\n\nvoid main_vertex (\n float4 pos : POSITION,\n out float4 out_pos : POSITION,\n uniform float4x4 modelViewProj ,\n float4 color : COLOR,\n out float4 out_color : COLOR,\n float2 tex : TEXCOORD,\n out float2 out_tex : TEXCOORD\n)\n{\nout_pos = mul( modelViewProj , pos );\nout_color = color ; out_tex = tex ;\n}\n\nfloat4 main_fragment ( uniform sampler2D s0 : TEXUNIT0,\n uniform input IN,\n\t\t\t\t\t float2 tex : TEXCOORD\n\t\t\t\t\t ) : COLOR\n{\n float4 result = float4 ( 0. 0 ) ;\n float dx = 1.0 / IN.texture_size.x;\n float dy = 1.0 / IN.texture_size.y;\n\n // Grab some of the neighboring pixels and blend\n // together f o r a very mushy blur.\n result += tex2D ( s0 , tex + float2 (−dx, −dy));\n result += tex2D ( s0 , tex + float2 (dx, −dy ));\n result += tex2D ( s0 , tex + float2 (0.0, 0.0));\n result += tex2D ( s0 , tex + float2 (−dx, 0.0));\n return result / 4.0;\n}\n```\n\n## Result\n\nAs you can see, it’s not a practical shader, but it shows the blurring effect to the extreme.\n\n\n\n-----------------------------------------------------------\n\n\n## Shader file format\n\n * `#` begins a comment; the rest of the line is ignored.\n * Format is: `key = value`. There can be as many spaces as you like in between\n * Values can be wrapped inside `\"` for multiword strings (`foo = \"hai u\"`)\n * `#include` includes a config file\n * Path is relative to where config file was loaded unless an absolute path is chosen\n * Key/value pairs from an `#include` are read-only and cannot be modified\n\n-----------------------------------------------------------\n\n\n## Cg shader spec\n\nThis spec is for the Cg shading language developed by nVidia. It wraps around OpenGL to make shaders written in Cg quite portable. Shaders written in Cg can also be used with Direct3D and PlayStation3. Cg shaders are also compatible with basic HLSL if some considerations are taken into account. They can even be automatically compiled into GLSL shaders, which makes Cg shaders a true “write once, run everywhere” shader format.\n\nWe encourage new shaders targeting Libretro frontends to be written in this format. RetroArch supports both single-pass Cg shaders as well as multi-pass shaders and uses a custom Cg preset format (`.cgp`).\n\n\n### Another example Cg shader\n\n```c\nvoid main_vertex\n(\n float4 position : POSITION,\n out float4 oPosition : POSITION,\n uniform float4x4 modelViewProj,\n float2 tex : TEXCOORD,\n out float2 oTex : TEXCOORD\n)\n{\n oPosition = mul(modelViewProj, position);\n oTex = tex;\n}\n\nfloat4 main_fragment (float2 tex : TEXCOORD, uniform sampler2D s0 : TEXUNIT0) : COLOR\n{\n return tex2D(s0, tex);\n}\n```\n\n### Example Cg preset\n\n```c\nshaders = 2\nshader0 = 4xBR-v3.9.cg\nscale_type0 = source\nscale0 = 4.0\nfilter_linear0 = false\nshader1 = dummy.cg\nfilter_linear1 = true\n```\n\n### Entry points:\n\n - Vertex: `main_vertex`\n - Fragment: `main_fragment`\n\n### Texture unit\n\nAll shaders work on texture unit `0` (the default). 2D textures must be used. Power-of-two sized textures are recommended for optimal visual quality. The shaders must deal with the actual picture data not filling out the entire texture. Incoming texture coordinates and uniforms provide this information.\n\nThe texture coordinate origin is defined to be top-left oriented. A texture coordinate of `(0, 0)` will always refer to the top-left pixel of the visible frame. This is opposite of what most graphical APIs expect. The implementation must always ensure that this ordering is held for any texture that the shader has access to.\n\n!!! Note\n Every texture bound for a shader must have black border mode set. Sampling a texel outside the given texture coordinates must always return a pixel with RGBA values `(0, 0, 0, 0)`.\n\n### Uniforms\n\nSome parameters will need to be passed to all shaders, both vertex and fragment program. A generic entry point for fragment shader will look like:\n\n```c\nfloat4 main_fragment (float2 tex : TEXCOORD0,\n uniform input IN, uniform sampler2D s_p : TEXUNIT0) : COLOR\n{}\n```\n\nThe input is a struct:\n\n```c\nstruct input\n{\n float2 video_size;\n float2 texture_size;\n float2 output_size;\n float frame_count;\n float frame_direction;\n};\n```\n\n - `TEXCOORD0`: Texture coordinates for the current input frame will be passed in `TEXCOORD0`. (`TEXCOORD` is a valid alias for `TEXCOORD0`).\n - `COLOR0`: Although legal, no data of interest is passed here. You cannot assume anything about data in this stream.\n - `IN.video_size`: The size of the actual video data in the texture, e.g for a SNES this will be generally `(256, 224)` for normal resolution frames.\n - `IN.texture_size`: This is the size of the texture itself. Optimally power-of-two sized.\n - `IN.output_size`: The size of the video output. This is the size of the viewport shown on screen.\n - `IN.frame_count`: A counter of the frame number. This increases with 1 every frame. This value is really an integer, but needs to be float for CGs lack of integer uniforms.\n - `IN.frame_direction`: A number telling which direction the frames are flowing. For regular playing, this value should be `1.0`. While the game is rewinding, this value should be `-1.0`.\n - `modelViewProj`: This uniform needs to be set in vertex shader. It is a uniform for the current MVP transform.\n\n\n### Pre-filtering\n\nMost of these shaders are intended to be used with a non-filtered input. Nearest-neighbor filtering on the textures themselves are preferred. Some shaders, like scanline will most likely prefer bilinear texture filtering.\n\n\n## Cg meta-shader format\n\n### Rationale\n\nThe `.cg` files themselves contain no metadata necessary to perform advanced filtering. They also cannot process an effect in multiple passes, which is necessary for some effects. The CgFX format does exist, but it would need current shaders to be rewritten to a HLSL-esque format. It also suffers a problem mentioned below.\n\nRather than putting everything into one file (XML shader format), this format is config file based. This greatly helps testing shader combinations as there is no need to rearrange code in one big file. Another plus with this approach is that a large library of .cg files can be used to combine many shaders without needing to redundantly copy code over. It also helps testing as it is possible to unit-test every pass separately completely seamless.\n\n## Format\n\nThe meta-shader format is based around the idea of a config file with the format: `key = value`. Values with spaces need to be wrapped in quotes: key = \"value stuff\".\n\nNo .ini sections or similar are allowed. Meta-shaders may include comments, prefixed by the \"#\" character, both on their own in an otherwise empty line or at the end of a key = value pair.\n\nThe meta-format has four purposes:\n\n - Combine several standalone .cg shaders into a multipass shader.\n - Define scaling parameters for each pass. I.e., a HQ2x shader might want to output with a scale of exactly 2x.\n - Control filtering of textures. Many shaders will want nearest-neighbor filtering, and some will want linear.\n - Define external lookup textures. Shaders can access external textures found in `.tga` files.\n\n### Parameters\n\n#### `shaders` (int)\n\nThis param defines how many .cg shaders will be loaded. This value must be at least one. The path to these shaders will be found as a string in parameters shader0, shader1, ... shaderN, and so on. The path is relative to the directory the meta-shader was loaded from.\n\n#### `filter_linearN` (boolean)\n\nThis parameter defines how the texture of the result of pass `N` will be filtered. `N = 0` (pass 0) is the raw input frame, `N = 1` is result of the first pass, etc. (A boolean value here might be `true`/`false`/`1`/`0`). Should this value not be defined, the filtering option is implementation-defined.\n\n#### `float_framebufferN` (boolean)\n\nThis parameters defines if shader `N` should render to a 32-bit floating point buffer. This only takes effect if shaderN is actually rendered to an FBO. This is useful for shaders which have to store FBO values outside `[0, 1]` range.\n\n#### `frame_count_modN` (int)\n\nThis positive parameter defines which modulo to apply to `IN.frame_count`. `IN.frame_count` will take the value `frame_count % frame_count_modN`.\n\n#### `scale_typeN` (string)\n\nThis can be set to one of these values:\n - `source`: Output size of shader pass `N` is relative to the input size as found in `IN.video_size`. Value is `float`.\n - `viewport`: Output size of shader pass `N` is relative to the size of the window viewport. Value is `float`. **This value can change over time if the user resizes their window!**\n - `absolute`: Output size is statically defined to a certain size. Useful for hi-res blenders or similar.\n\nIf no scale type is assumed, it is assumed that it is set to `source` with `scaleN` set to `1.0`.\n\nIt is possible to set `scale_type_xN` and `scale_type_yN` to specialize the scaling type in either direction. `scale_typeN` however overrides both of these.\n\n**Exceptions**\n\n - If no `scale_type` is set for the very last shader, it is assumed to output at the full resolution rather than assuming\n a scale of `1.0x`, and bypasses any frame-buffer object rendering.\n - If there is only one shader, it is also considered to be the very last shader. If any scale option is defined, it has to go through a frame-buffer object, and subsequently rendered to screen. The filtering option used when stretching\n is implementation defined. It is encouraged to not have any scaling parameters in last pass if you care about the filtering\n option here.\n - In first pass, should no scaling factor be defined, the implementation is free to choose a fitting scale. This means, that for a single pass shader, it is allowed for the implementation to set a scale, render to FBO, and stretch. (Rule above).\n\n\n#### `scaleN`, `scale_xN`, `scale_yN` (float/int)\n\nThese values control the scaling params from `scale_typeN`. The values may be either floating or int depending on the type. `scaleN` controls both scaling type in horizontal and vertical directions.\n\nIf `scaleN` is defined, `scale_xN` and `scale_yN` have no effect. `scale_xN` and `scale_yN` controls scaling properties for the directions separately. Should only one of these be defined, the other direction will assume a source scale with value `1.0`, i.e. no change in resolution.\n\nShould `scale_type_xN` and `scale_type_yN` be set to different values, the use of scaleN is undefined (i.e. if X-type is absolute (takes `int`), and Y-type is source (takes `float`).)\n\n\n#### `textures` (multiple strings)\n\nThe textures param defines one or more lookup textures IDs. Several IDs are delimited with `;` such as `textures = \"foo;bar\"`. These IDs serves as the names for a Cg sampler uniform, such as `uniform sampler2D foo;` and `uniform sampler2D bar;`\n\nThe path of the textures can be found in the IDs, i.e. `foo = image0.tga` and `bar = image1.tga`. The paths of these textures are relative to the directory the meta-shader was loaded from.\n\nIt is also possible to control the filtering options of the lookup texture as a boolean option in `ID_linear = true/false`. For example `foo_linear = false` will force nearest neighbor filtering for texture `foo`.\n\n!!! Note\n If `ID_linear` is not set, it is assumed to be linearly filtered.\n\nThe textures will be loaded \"as-is\", and coordinates `(0, 0)`, `(0, 1)`, `(1, 0)`, `(1, 1)` will correspond to the corners of the texture. Since the texture coordinates of the texture in TEXUNIT0 might not be as convenient, the texture coordinates for all lookup textures will be found in `TEXCOORD1`.\n\n!!! Warning\n You cannot assume which texture unit the lookup textures will be bound to!\n\nThe implementation only guarantees to be able to load plain top-left non-RLE `.tga` files. It may provide possibilities to load `.png` and other popular formats.\n\n## Multipass\n\nIt is sometimes feasible to process an effect in several steps.\n\n```c\nshaders = 2\nshader0 = pass1.cg\nshader1 = pass2.cg\nscale_type0 = source\nscale0 = 2.0\nfilter_linear0 = true\nfilter_linear1 = false\n```\n\nDuring multi-pass rendering, some additional uniforms are available.\n\nWith multi-pass rendering, it is possible to utilize the resulting output for every pass that came before it, including the unfiltered input. This allows for an additive approach to shading rather than serial style.\n\nThe unfiltered input can be found in the ORIG struct:\n\n - `uniform sampler2D ORIG.texture`: Texture handle. Must not be set to a predefined texture unit.\n - `uniform float2 ORIG.video_size`: The video size of original frame.\n - `uniform float2 ORIG.texture_size`: The texture size of original frame.\n - `in float2 ORIG.tex_coord`: An attribute input holding the texturecoordinates of original frame.\n - `PASS%u`: This struct holds the same data as the `ORIG` struct, although the result of passes {1, 2, 3 ...}, i.e. `PASS1.texture` holds the result of the first shader pass. If rendering pass `N`, passes `{1, ..., N-2}` are available. (`N-1` being input in the regular `IN` structure).\n - `PREV`: This struct holds the same data as the `ORIG` struct, and corresponds to the raw input image from the previous frame. Useful for motion blur.\n - `PREV1..6`: Similar struct as `PREV`, but holds the data for passes further back in time. `PREV1` is the frame before `PREV`, `PREV2` the frame before that again, and so on. This allows up to 8-tap motion blur.\n"
},
{
"path": "docs/development/shader/content-aware-shaders.md",
"content": "# Content-aware shaders\n\nContent-aware shaders grab data from the core state itself, such as emulator RAM data. This is only implemented for SNES so far, but the idea is quite extendable and portable. The basic idea is that we capture RAM data in a certain way (semantic if you will) from the SNES, and pass it as a uniform to the shader. The shader can thus act on game state in interesting ways.\n\nAs a tool to show this feature, we’ll focus on replicating [the simple tech demo shown on YouTube](http://www.youtube.com/watch?v=4VzaE9q735k). What happens is that when Mario jumps in the water, the screen gets a \"watery\" effect applied to it, with a rain lookup texture, and a wavy effect. When he jumps out of the water, the water effect slowly fades away.\n\nWe thus need to know two things:\n\n - Is Mario currently in water or not?\n - If not, how long time was it since he jumped out?\n\nSince shaders do not have state associated with it, we have to let the environment provide the state we need in a certain way. We’ll call this concept a semantic. To capture a RAM value directly, we can use the \"capture\" semantic. To record the time when the RAM value last changed, we can use the \"transition\" semantic.\n\nWe obviously also need to know where in RAM we can find this information. Luckily, [the folks over at SMW Central know the answer](http://www.smwcentral.net/?p=map&type=ram). We see:\n```\n$7E :0075 , byte , Flag , Player is in water flag. #$00 = No; #$01 = Yes.\n```\n\nBank `$7E` and `$7F` are mapped to WRAM `$0000-$FFFF` and `$10000-$1FFFF` respectively. Thus, our WRAM address is `$0075`. In the config file, we can now set up the uniforms we’ll want to be captured.\n\n```\nimports = \"mario_water ; mario_water_time\"\nmario_water_semantic = capture\n# Capture the RAM value as−is.\nmario_water_wram = 0075\n# This value is hex!\nmario_water_time_semantic = transition\n# Capture the frame count when this variable last changed.\n# Use with IN. frame_count , to create a fade−out effect.\nmario_water_time_wram = 0075\n```\n\nThe amount of possible \"semantics\" are practically endless. It might be worthwhile to attempt some possibility to run custom code that keeps track of the shader uniforms in more sophisticated ways later on. Do note that there is also a `%s_mask` value which will let you bitmask the RAM value to check for bit-flags more easily.\n\nNow that we got that part down, let's work on the shader design. In the fragment shader we simply render both the full water effect, and the `«normal»` texture, and let a \"blend\" variable decide. We can say that `1.0` is full water effect, `0.0` is no effect. We can start working on our vertex shader. We will do something useful here for once.\n\n```c\nstruct input\n{\n float frame_count;\n};\n\nvoid main_vertex (\n float4 pos : POSITION,\n out float4 out_pos : POSITION,\n uniform float4x4 modelViewProj,\n float4 color : COLOR,\n out float4 out_color : COLOR,\n float2 tex : TEXCOORD0,\n out float2 out_tex : TEXCOORD0,\n float2 tex1 : TEXCOORD1,\n out float2 out_tex1 : TEXCOORD1,\n\n // Even if the data should have been int, Cg doesn't seem to support integer uniforms\n uniform float mario_water,\n uniform float mario_water_time,\n uniform input IN,\n // Blend factor is passed to fragment shader. We'll output the same value in every vertex,\n // so every fragment will get the same value for blend_factor since there is nothing to interpolate.\n out float blend_factor )\n {\n out_pos = mul( modelViewProj , pos );\n out_color = color;\n out_tex = tex;\n out_tex1 = tex1;\n float transition_time = 0.5 * (IN. frame_count mario_water_time ) / 60.0;\n // If Mario is in the water ( $0075 != 0), it's always 1...\n if ( mario_water > 0.0)\n blend_factor = 1.0;\n // Fade out from 1.0 towards 0.0 as transition_time grows larger.\n else\n blend_factor = exp(−transition_time );\n }\n```\n\nAll fine and dandy so far, now we just need to use this blend_factor in our\nfragment shader somehow... Let’s move on to the fragment shader where we\nblend.\n\n```c\nfloat apply_wave ( float2 pos , float2 src , float cnt )\n{\n float2 diff = pos − src ;\n float dist = 300.0 * sqrt(dot(diff , diff));\n dist −= 0.15 ∗ cnt;\n return sin(dist);\n}\n\n// Fancy stuff to create a wave.\nfloat4 water_texture ( float4 output , float2 scale , float cnt )\n{\n float res = apply_wave ( scale , src0 , cnt ) ;\n res += apply_wave ( scale , src1 , cnt ) ;\n res += apply_wave ( scale , src2 , cnt ) ;\n res += apply_wave ( scale , src3 , cnt ) ;\n res += apply_wave ( scale , src4 , cnt ) ;\n res += apply_wave ( scale , src5 , cnt ) ;\n res += apply_wave ( scale , src6 , cnt ) ;\n return output * (0.95 + 0.012 * res ) ;\n}\n\nfloat4 main_fragment\n(\n uniform input IN ,\n float2 tex : TEXCOORD0, uniform sampler2D s0 : TEXUNIT0,\n uniform sampler2D rain , float2 tex1 : TEXCOORD1,\n\n in float blend_factor // Passed from vertex\n) : COLOR\n{\n float4 water_tex = water_texture ( tex2D (s0, tex), tex1, IN.frame_count );\n float4 normal_tex = tex2D (s0 , tex);\n float4 rain_tex = tex2D (rain , tex1);\n\n // First , blend normal and water texture together ,\n // then add the rain texture with alpha blending on top\n return lerp(lerp(normal_tex, water_tex, blend_factor), rain_tex, rain_tex.a * blend_factor * 0. 5);\n}\n```\n\n\n### RetroArch config file\n\n```\nshaders = 1\nshader0 = mario.cg\nfilter_linear0 = true\nimports = \"mario_water;mario_water_time\"\nmario_water_semantic = capture\nmario_water_time_semantic = transition\nmario_water_wram = 0075\nmario_water_time_wram = 0075\ntextures = rain\nrain = rain.tga\nrain_linear = true\n```\n\n\n## How to test when developing for RetroArch\n\nTo develop these kinds of shaders, I’d recommend using RetroArch w/Cg support, and a debugging tool for your emulator of choice to peek at RAM values (build it for bSNES yourself with `options=debugger`). After written, the shader should translate nicely over to RetroArch with some slight changes to the config.\n\n\n## Results\n\nHere are some screenshots of the mario effect (in Super Mario World SNES) we developed. Obviously this is a very simple example showing what can be done. The imagination is the limit here.\n\n### Prior to Mario jumping in water\n\n\n### After Mario jumps in water\n\n"
},
{
"path": "docs/development/shader/glsl-shaders.md",
"content": "# Developing GLSL Shaders\n\nLike Cg shaders, GLSL shaders represents a single pass, and requires a preset file to describe how multiple shaders are combined. The extension is `.glsl`.\n\nAs GLSL shaders are normally placed in two different files (`vertex`, `fragment`), making it impractical to select in a menu. This is worked around by using compiler defines in order to be equivalent to Cg shaders.\n\n## Example GLSL shader\n\n!!! Note\n GLSL shaders must be modern style, and using ruby prefix is discouraged.\n\n```c\nvarying vec2 tex_coord;\n#if defined(VERTEX)\nattribute vec2 TexCoord;\nattribute vec2 VertexCoord;\nuniform mat4 MVPMatrix;\nvoid main()\n{\n gl_Position = MVPMatrix * vec4(VertexCoord, 0.0, 1.0);\n tex_coord = TexCoord;\n}\n#elif defined(FRAGMENT)\nuniform sampler2D Texture;\nvoid main()\n{\n gl_FragColor = texture2D(Texture, tex_coord);\n}\n#endif\n```\n\n### GLSL presets\n\nLike Cg shaders, there is a GLSL preset format. Instead of `.cgp` extension, `.glslp` extension is used. The format is exactly the same, just replace `.cg` shaders with `.glsl`. To convert a `.cgp` preset, rename to `.glslp` and replace all references to `.cg` shaders with `.glsl`.\n\n## Converting from Cg shaders\n\nGLSL shaders are mostly considered a compatibility format. It is possible to compile Cg shaders into GLSL shaders automatically using our [cg2glsl script](https://github.com/libretro/RetroArch/blob/master/tools/cg2glsl.py). It can convert single shaders as well as batch conversion. Shader converstion relies on nVidia's `cgc` tool found in the `nvidia-cg-toolkit` package.\n"
},
{
"path": "docs/development/shader/shader-lookup-textures.md",
"content": "# Shader lookup textures\n\nA popular feature among RetroArch users the ability to access external textures. This means we have several samplers available for use. In the config file, we define the textures as so:\n\n```\ntextures = \" foo ; bar\"\nfoo = path_foo.png\nbar = bar_foo.png\nfoo_linear = true # Linear filtering for foo.\nbar_linear = true # Linear filtering for bar.\n```\n\nRetroArch PS3 uses PNG as the main format, RetroArch can use whatever if Imlib2 support is compiled in. If not, it’s restricted to lop-left ordered, non-RLE TGA.\n\nFrom here on, `foo` and `bar` can be found as uniforms in the shaders. The texture coordinates for the lookup texture will be found in `TEXCOORD1`. This can simply be passed along with `TEXCOORD0` in the vertex shader as we did with `TEXCOORD0`.\n\nHere we make a fragment shader that blends in two background picture at a reduced opacity. Do NOT assign lookup textures to a certain `TEXUNIT`, Cg will assign a fitting texture unit to the sampler.\n\n```c\nfloat4 main_fragment ( uniform sampler2D s0 : TEXUNIT0,\n uniform sampler2D foo,\n\t\t\t\t\t uniform sampler2D bar,\n\t\t\t\t\t float2 tex : TEXCOORD0,\n\t\t\t\t\t float2 tex_lut : TEXCOORD1) : COLOR\n{\n float4 bg_sum = (tex2D(foo, tex_lut) + tex2D (bar , tex_lut)) * 0.15;\n return lerp (tex2D(s0, tex), bg_sum, bg_sum.a); // Alpha blending.\n}\n```\n\n## Results: a shader for drawing a background border\n\n\n"
},
{
"path": "docs/development/shader/shader-overview.md",
"content": "# Shader Development Overview\n\n## Available shader types\n\nAs the reference libretro frontend, RetroArch supports three shader languages:\n\n| Shader Language | Video Context Drivers |\n| ----------------------------------- | --------------------- |\n| [Slang](slang-shaders.md) | Vulkan, GL 2.x (legacy desktop), GL 3.x+ (modern desktop), GLES2 (legacy mobile), GLES3 (modern mobile), HLSL (Planned), Metal (Planned) |\n| [GLSL](glsl-shaders.md) | GL Shading Language, OpenGL, OpenGL ES, and EGL contexts including KMS mode in Linux) |\n| [Cg (deprecated)](cg-shaders.md) | HLSL/GLSL, nVidia |\n| [XML (discontinued)](xml-shaders.md) | GLSL |\n\nWhen possible, it is recommended to use Slang shaders for supporting the widest variety of modern systems.\n\nRetroArch is able to stack these shaders to create a combined effect. These complex effects are saved with a special extension:\n\n - `.slangp` for Slang\n - `.glslp` for GLSL\n - `.cpg` for Cg\n\n## Common Shaders Repository\n\nThe Libretro organization hosts a [repository](https://github.com/libretro/common-shaders) on Github that contains a compilation of shaders. Users can contribute their own shaders to this repository by doing a Pull Request.\n\n## Shader development: The rendering pipeline\n\nWith shaders you are able to take control over a large chunk of the GPUs inner workings by writing your own programs that are uploaded and run on the GPU. In the old days, GPUs were a big black box that was highly configurable using endless amount of API calls. In more modern times, rather than giving you endless amounts of buttons, you are expected to implement the few `«buttons»` you actually need, and have a streamlined API.\n\nThe rendering pipeline is somewhat complex, but we can in general simplify\nit to:\n\n- Vertex processing\n- Rasterization\n- Fragment processing\n- Framebuffer blend\n\nShader developers can take control of what happens during vertex processing, and fragment processing.\n\n\n## Frontend development: Rendering the shader chain\n\nWith all these options, the rendering pipeline can become somewhat complex. The meta-shader format greatly utilizes the possibility of off-screen rendering to achieve its effects.\n\nIn OpenGL usually this is referred to as frame-buffer objects, and in HLSL as render targets. This feature will be referred to as FBO from here. FBO texture is assumed to be a texture bound to the FBO. As long as the visual result is approximately identical, the implementation does not have to employ FBO.\n\nWith multiple passes our chain looks like this conceptually:\n\n`|Source image| ---> |Shader 0| ---> |FBO 0| ---> |Shader 1| ---> |FBO 1| ---> |Shader 2| ---> (Back buffer)`\n\nIn the case that Shader 2 has set some scaling params, we need to first render to an FBO before stretching it to the back buffer.\n\n`|Source image| ---> ... |Shader 2| ---> |FBO 2| ---> (Back buffer)`\n\nScaling parameters determine the sizes of the FBOs. For visual fidelity it is recommended that power-of-two sized textures are bound to them. This is due to floating point inaccuracies that become far more apparent when not using power-of-two textures. If the absolute maximum size of the source image is known, then it is possible to preallocate the FBOs.\n\nDo note that the size of FBOn is determined by dimensions of `FBOn-1` when \"source\" scale is used, _not_ the source image size! Of course, FBO0 would use source image size, as there is no `FBO-1`.\n\nFor example, with SNES there is a maximum width of `512` and height of `478`. If a source relative scale of `3.0x` is desired for first pass, it is thus safe to allocate a FBO with size of `2048x2048`. However, most frames will just use a tiny fraction of this texture.\n\nWith \"viewport\" scale it might be necessary to reallocate the FBO in run-time if the user resizes the window.\n\n## Shader compatibility with RetroArch video drivers\n\nIn RetroArch, the following table specifies which shader types work with what video contexts:\n\nContext Driver | GLSL | CG | HLSL | Slang\n-----------------------|------------|---------|----------------|--------------\nAndroid | Y | N | N | Y\nCGL | Y | N | N | N\nD3D | N | Y | N (Possible)| Y\nDRM | Y | N | N | N\nEmscripten | Y | N | N | N\nGDI | N | N | N | N\nKHR | N | N | N | Y\nMali | Y | N | N | N\nOpendingux | Y | N | N | N\nOSMesa | Y | N | N | N\nPS3 | N | Y | N | N\nQNX | Y | N | N | N\nSDL | N | N | N | N\nVC | Y | N | N | N\nVivante | Y | N | N | N\nWayland | Y | N | N | Y\nWGL | Y | N | N | Y\nX | Y | Y | N | Y\nXEGL | Y | N | N | N\n\n\n!!! Warning\n Attempting to load unsupported shader types may result in segmentation faults because the context drivers currently do not have the behavior to declare which types of shaders it supports.\n"
},
{
"path": "docs/development/shader/slang-shaders.md",
"content": "# Developing Slang Shaders\n\n## Target shader languages\n - Vulkan\n - GL 2.x (legacy desktop)\n - GL 3.x+ (modern desktop)\n - GLES2 (legacy mobile)\n - GLES3 (modern mobile)\n - HLSL\n - Metal\n\n**Design principle: Avoid mandating high-level features which do not work for GLES2.**\n\nRetroArch runs on GL, GL2, and GLES2. GL and GL2 are only relevant from a legacy standpoint, but GLES2 is stil a relevant target platform today and having GLES2 compatibility makes GL2 very easy. We therefore avoid a design which deliberately ruins GLES2 compatibility.\n\nHowever, we also do not want to artificially limit ourselves to shader features which are only available in GLES2. There are many shader builtins, for example, which only work in GLES3/GL3 and we should not hold back support in these cases.\n\n## Why a new spec?\n\nThe previous RetroArch shader subsystem in RetroArch is quite mature with a large body of shaders written for it. While it has served us well, it was not forward-compatible.\n\nThe current state of writing high-level shading languages that work everywhere is challenging. Up until now, we have relied on nVidia Cg to serve as a basic foundation for shaders, but Cg has been discontinued for years and is closed source. Developers cannot use Cg for newer APIs such as Vulkan, D3D12, and Metal.\n\nCg cross-compilation to GLSL is unmaintainable. We cannot do the Cg transform in runtime on mobile due to lack of open source Cg runtime.\n\nAnother alternative was to write straight-up GLSL, but this too has serious drawbacks. All the different GL versions and GLSL variants are different enough that it becomes painful to write portable GLSL code that works without modification.\n\nExamples include:\n\n - varying/attribute vs in/out (legacy vs modern)\n - precision qualifiers (GLSL vs ESSL)\n - texture2D vs texture (legacy vs modern)\n - Lack of standard support for `#include` to reduce copy-pasta\n\nThe fundamental issue is that GLSL shaders are dependent on the runtime GL version, which makes it difficult to test all shader variants. We did not want to litter every shader with heaps of `#ifdefs` everywhere to combat this problem. We also wanted to avoid having to write pseudo-GLSL with some text-based replacement behind the scenes.\n\n## Vulkan GLSL as the portable solution\n\nFortunately, there is now a forward looking and promising solution to our problems. Vulkan GLSL is a GLSL dialect designed for Vulkan and SPIR-V intermediate representation. We can use whatever GLSL version we want when writing shaders, as it is decoupled from the GL runtime.\n\nIn runtime, we can have a vendor-neutral mature compiler, [https://github.com/KhronosGroup/glslang](glslang) which compiles our Vulkan GLSL to SPIR-V. Using [https://github.com/KhronosGroup/SPIRV-Cross](SPIRV-Cross), we can then do reflection on the SPIR-V binary to deduce our filter chain layout.\n\nWe can also disassemble back to our desired GLSL dialect in the GL backend based on which GL version we're running, which effectively means we can completely sidestep all our current problems with a pure GLSL based shading system.\n\nAnother upside is that we no longer have to deal with vendor-specific quirks in the GLSL frontend. A common problem when people write for nVidia is that they mistakenly use `float2`/`float3`/`float4` types from Cg/HLSL, which is supported as an extension in their GLSL frontend.\n\n## Why not SPIR-V directly?\n\nThis was considered, but there are several convenience problems with having a shading spec around pure SPIR-V. The first problem is metadata. In GLSL, we can quite easily extend with custom `#pragmas` or similar, but there is no trivial way to do this in SPIR-V outside writing custom tools to emit special metadata as debug information or similar with OpSource.\n\nWe could also have this metadata outside in a separate file, but juggling more files means more churn, which we should try to avoid. The other problem is convenience. If RetroArch only accepts SPIR-V, we would need an explicit build step outside RetroArch first before we could test a shader. This gets very annoying during shader development, so it is clear that we need to support GLSL anyway, making SPIR-V support largely redundant.\n\nThe main argument for supporting SPIR-V would be to allow new shading languages to be used. This is a reasonable thing to consider, which is why the goal is to not design ourselves into a corner where it's only Vulkan GLSL that can possibly work down the line. We are open to the idea that new shading languages that target SPIR-V will emerge.\n\n## High level Overview\n\nThe RetroArch shader format outlines a filter chain/graph, a series of shader passes which operate on previously generated data to produce a final result. The goal is for every individual pass to access information from *all* previous shader passes, even across frames, easily.\n\n - The filter chain specifies a number of shader passes to be executed one after the other.\n - Each pass renders a full-screen quad to a texture of a certain resolution and format.\n - The resolution can be dependent on external information.\n - All filter chains begin at an input texture, which is created by a libretro core or similar.\n - All filter chains terminate by rendering to the \"backbuffer\".\n\nThe backbuffer is somewhat special since the resolution of it cannot be controlled by the shader. It can also not be fed back into the filter chain later because the frontend (here RetroArch) will render UI elements and such on top of the final pass output.\n\nLet's first look at what we mean by filter chains and how far we can expand this idea.\n\n### Simplest filter chain\n\nThe simplest filter chain we can specify is a single pass.\n\n```text\n(Input) -> [ Shader Pass #0 ] -> (Backbuffer)\n```\n\nIn this case there are no offscreen render targets necessary since our input is rendered directly to screen.\n\n### Multiple passes\n\nA trivial extension is to keep our straight line view of the world where each pass looks at the previous output.\n\n```text\n(Input) -> [ Shader Pass #0 ] -> (Framebuffer) -> [ Shader Pass #1 ] -> (Backbuffer)\n```\n\nFramebuffer here might have a different resolution than both Input and Backbuffer. A very common scenario for this is separable filters where we first scale horizontally, then vertically.\n\n### Multiple passes and multiple inputs\n\nThere is no reason why we should restrict ourselves to a straight-line view.\n\n```text\n /------------------------------------------------\\\n / v\n(Input) -> [ Shader Pass #0 ] -> (Framebuffer #0) -> [ Shader Pass #1 ] -> (Backbuffer)\n```\n\nIn this scenario, we have two inputs to shader pass #1, both the original, untouched input as well as the result of a pass in-between. All the inputs to a pass can have different resolutions.\n\nWe have a way to query the resolution of individual textures to allow highly controlled sampling. We are now at a point where we can express an arbitrarily complex filter graph, but we can do better. For certain effects, time (or rather, results from earlier frames) can be an important factor.\n\n### Multiple passes, multiple inputs, with history\n\n```text\n /------------------------------------------------\\\n / v\n(Input) -> (+feedback input) [ Shader Pass #0 ] (output) -> (Framebuffer #0) -> [ Shader Pass #1 ] -> (Backbuffer)\n ^ /\n \\------------------------------------/\n```\n\nThis diagram shows a filter chain where a shader pass can take multiple inputs: the original input texture, the output from a previous pass, and feedback from a previous frame. The feedback input allows the shader to use data from the last frame, enabling effects like motion blur, persistence, or ghosting. Each pass can combine these inputs to produce its output, which is then used by subsequent passes or rendered to the backbuffer.\n\nFor practical guidance on using feedback and history in shaders, see [Advanced Techniques: Practical Guide to Feedback and History](#advanced-techniques-practical-guide-to-feedback-and-history).\n\n### Texture Clamping and Wrap Modes\n\nWhen sampling textures in a shader, the behavior for coordinates outside the [0, 1] range is determined by the texture's wrap mode. By default, all input and intermediate textures in the filter chain use `clamp_to_border` mode, with the border color set to transparent black (`vec4(0.0)`). This means that any sampling outside the texture returns transparent black unless otherwise specified.\n\nThe wrap mode for each stage's input texture can be controlled in the preset file using the `wrap_modeN` option (where `N` is the pass index) or `NAME_wrap_mode` for external textures where `NAME` is the alias. The following wrap modes are supported:\n\n- **clamp_to_edge**: Coordinates outside [0, 1] are clamped to the nearest edge texel. Sampling outside the texture returns the value of the closest edge pixel.\n- **clamp_to_border** (default): Coordinates outside [0, 1] return the border color, which is always transparent black (`vec4(0.0)`).\n- **repeat**: Texture coordinates wrap around, so sampling outside [0, 1] repeats the texture in a tiled fashion.\n- **mirrored_repeat**: Texture coordinates outside [0, 1] are mirrored and then repeated, creating a seamless mirrored tiling effect.\n\nYou can set the wrap mode for each texture or pass in the preset file, for example:\n\n```ini\nwrap_mode0 = clamp_to_edge\nwrap_mode1 = mirrored_repeat\n\nfoo_wrap_mode = clamp_to_edge\nbar_wrap_mode = repeat\n```\n\nThis allows fine-grained control over how out-of-bounds texture sampling behaves for each stage or lookup texture. For most shader passes, the default `clamp_to_border` is safe, but for effects like tiling or seamless wrapping, `repeat` or `mirrored_repeat` may be preferred. When compositing external textures, especially with alpha channels, `clamp_to_border` may have unexpected results near edges, and `clamp_to_edge` may be preferred.\n\nFrom a practical standpoint, `clamp_to_border` is generally the most robust choice for filtering, while `clamp_to_edge` is generally the most robust choice for compositing.\n\n### Runtime Resizing of Textures and Framebuffers\n\nTo enable maximum flexibility, frontends take a hands-off approach to resizing textures and framebuffers during runtime. This allows shaders and presets to adapt dynamically to changing conditions, such as window resizing, core resolution changes, or user adjustments.\n\nThere are three high-level stages for size management in the filter chain:\n\n**Input Stage:**\n- The base texture is provided by the core and is represented by the `OriginalSize` uniform.\n- The input size can change from frame to frame, depending on the core's output.\n\n**Intermediate Stages:**\n- Each shader pass outputs to a framebuffer whose size is controlled by the preset.\n- The size can be specified as an absolute value, as a size relative to the output of the previous shader stage (or `OriginalSize` for the first stage), or as a size relative to the viewport (the area requested by the frontend, represented by `FinalViewportSize`).\n- The size of the input to a pass is represented by the `SourceSize` uniform, and the size of the output is represented by the `OutputSize` uniform.\n\n**Output Stage:**\n- The final output may be the last shader in the chain, provided the swapchain format matches the requested format in that shader pass (e.g., 8-bit when frontend HDR is off, 10-bit when HDR is on, *and* `scale_typeN` is not used for that shader).\n- In all cases, the final output size is represented by the `FinalViewportSize` uniform.\n\nThis flexible sizing system allows for complex scaling, multi-pass effects, and seamless adaptation to runtime changes. Shaders should always use the provided size uniforms (`OriginalSize`, `SourceSize`, `OutputSize`, `FinalViewportSize`) to ensure correct sampling and output, especially when resolutions may change dynamically. In addition, shaders can rely on the `OriginalAspect` uniform to know the requested aspect ratio of the core for correct presentation.\n\nNo texture in the filter chain is padded at any time. It is possible for resolutions in the filter chain to vary over time, which is common with certain emulated systems. In these scenarios, the textures and framebuffers are simply resized appropriately. Older frames still keep their old resolution in the brief moment that the resolution is changing.\n\nIt is very important that shaders do not blindly sample with nearest filter with any scale factor. If naive nearest neighbor sampling is to be used, shaders must either make sure that the filter chain is configured with integer scaling factors so that ambiguous texel-edge sampling is avoided, or align texture sampling with the texture's pixel grid.\n\nIf you need to align sampling with the texture's pixel grid (for example, to avoid artifacts with nearest-neighbor sampling and non-integer scaling), see [the sampling alignment code example](#correctly-sampling-textures) later in this document.\n\n### Deduce shader inputs by reflection\n\nWe want to have as much useful information in the shader source as possible. We want to avoid having to explicitly write out metadata in shaders wherever we can. The biggest hurdle to overcome is how we describe our pipeline layout. The pipeline layout contains information about how we access resources such as uniforms and textures.\n\nThere are six main types of inputs in this shader system.\n\n - Texture samplers (sampler2D)\n - Look-up textures for static input data\n - Uniform data describing dimensions of textures\n - Uniform ancillary data for render target dimensions, backbuffer target dimensions, frame count, etc\n - Uniform user-defined parameters\n - Uniform MVP for vertex shader\n\n#### Deduction by name\n\nThere are two main approaches to deduce what a sampler2D uniform wants to sample from. The first way is to explicitly state somewhere else what that particular sampler needs, e.g.\n\n```glsl\nuniform sampler2D geeWhatAmI;\n\n// Metadata somewhere else\nSAMPLER geeWhatAmI = Input[-2]; // Input frame from 2 frames ago\n```\n\nThe other approach is to have built-in identifiers which correspond to certain textures.\n\n```glsl\n// Source here being defined as the texture from previous framebuffer pass or the input texture if this is the first pass in the chain.\nuniform sampler2D Source;\n```\n\nIn SPIR-V, we can use `OpName` to describe these names, so we do not require the original Vulkan GLSL source to perform this reflection.\nWe use this approach throughout the specification. An identifier is mapped to an internal meaning (semantic). The shader backend looks at these semantics and constructs\na filter chain based on all shaders in the chain.\n\nIdentifiers can also have user defined meaning, either as an alias to existing identifiers or mapping to user defined parameters.\n\n### Combining vertex and fragment into a single shader file\n\nOne strength of Cg is its ability to contain multiple shader stages in the same .cg file.\nThis is very convenient since we always want to consider vertex and fragment together.\nThis is especially needed when trying to mix and match shaders in a GUI window for example.\nWe don't want to require users to load first a vertex shader, then fragment manually.\n\nGLSL however does not support this out of the box. This means we need to define a light-weight system for preprocessing\none GLSL source file into multiple stages.\n\n#### Do we make vertex optional?\n\nIn most cases, the vertex shader will remain the same. This leaves us with the option to provide a \"default\" vertex stage if the shader stage is not defined, but at this time, a valid entry-point must always be present for both stages.\n\nVertex shaders are also useful for performing precomputations that can reduce the workload of the fragment shader. For more information, see [Advanced Techniques: Vertex Precomputation](#vertex-precomputation).\n\n### #include support\n\nWith complex filter chains there is a lot of opportunity to reuse code. We therefore want light support for the #include directive.\n\n### Required Shader Stages\n\nEvery `.slang` shader file must define both a vertex and a fragment stage. This is accomplished using the `#pragma stage` directive. The convention is to place the vertex stage first, followed by the fragment stage.\n\n#### Universal Declarations\nAny code (such as uniform declarations, function definitions, or constants) written before the first `#pragma stage` directive is considered universal. These declarations are included in both the vertex and fragment shader stages.\n\n#### Scoped Declarations\nOnce a `#pragma stage` directive is encountered, all subsequent code is scoped to that shader stage until the next `#pragma stage` is found. This allows you to write stage-specific code for either the vertex or fragment shader.\n\n#### Example Structure\n```glsl\n#version 450\n\n// Universal declarations\nuniform mat4 MVP;\nvec2 computeUV(vec2 pos) { ... }\n\n#pragma stage vertex\n// Vertex stage-specific code\nlayout(location = 0) in vec2 position;\nvoid main() {\n gl_Position = MVP * vec4(position, 0.0, 1.0);\n}\n\n#pragma stage fragment\n// Fragment stage-specific code\nlayout(location = 0) out vec4 FragColor;\nvoid main() {\n FragColor = vec4(1.0);\n}\n```\n\n#### Supported `#pragma stage` Types\n- `#pragma stage vertex`: Marks the beginning of the vertex shader stage code.\n- `#pragma stage fragment`: Marks the beginning of the fragment shader stage code.\n\nBoth stages must be present for the shader to compile successfully. The order should be vertex first, then fragment. Any declarations before the first stage pragma are shared by both stages; declarations after a stage pragma are only visible to that stage until the next stage pragma.\n\nThis structure ensures clarity and separation between universal and stage-specific code, making shader development more maintainable and less error-prone.\n\n### `#pragma` directives: Required and Optional\n\nMost `#pragma` directives in a `.slang` file are optional and provide additional metadata or configuration for the shader system. However, there are two exceptions: `#pragma stage vertex` and `#pragma stage fragment` are required in every `.slang` file. These pragmas explicitly define the boundaries of the vertex and fragment shader stages, and both must be present for the shader to compile successfully. This requirement is closely related to the rule that both vertex and fragment stages are mandatory (see [Required shader stages](#required-shader-stages)).\n\nOther `#pragma` directives, such as `#pragma name`, `#pragma format`, and `#pragma parameter`, are optional and only need to be included if their functionality is desired. If omitted, their associated features will not be available, but the shader will still compile as long as the required stage pragmas are present.\n\n### User parameter support\n\nSince we already have a \"preprocessor\" of sorts, we can also trivially extend this idea with user parameters. In the shader source we can specify which uniform inputs are user controlled, GUI visible name, their effective range, etc.\n\n#### Parameter Declaration, Validation, and UI Behavior\n\nWhen a `#pragma parameter` line is declared in a shader, the libretro frontend uses the information in the line to create a parameter entry in the user interface. Each entry displays the description, the current value, and the minimum and maximum values. Entries are populated in the order they appear in the shader source, and in the order of shader compilation (earlier passes compile first).\n\nThe compiler validates each `#pragma parameter` line to ensure it is complete and well-formed. The step parameter is optional, but best practice is to always include it for clarity and consistency. If duplicate parameter lines are present—either due to an `#include` or because multiple shader passes declare the same parameter—the compiler checks that all lines for a given parameter name match exactly. This means that parameter lines using the same variable name must have identical descriptions, default values, minimum and maximum values, and step sizes across all declarations. If there is a mismatch, compilation will fail.\n\nIn the RetroArch interface, parameter values are displayed to two decimal digits. However, the step size can be smaller than 0.01. If the step size is too small, users may not see the value change in the interface. Therefore, it is best practice to scale parameter values so that the step size is no smaller than 0.01 for optimal usability.\n\n##### Examples\n\n**Simple Example:**\n\n```glsl\n#pragma parameter Brightness \"Screen brightness\" 1.0 0.0 2.0 0.05\n```\nThis creates a parameter named `Brightness` with a description, default value, minimum, maximum, and step size.\n\n**Multiple Files Example A (Valid):**\n\nFile 1:\n```glsl\n#pragma parameter Sharpness \"Sharpness level\" 1.0 0.0 2.0 0.1\n```\nFile 2:\n```glsl\n#pragma parameter Contrast \"Contrast adjustment\" 1.0 0.5 1.5 0.05\n```\nThese files declare completely different parameters. This is valid.\n\n**Multiple Files Example B (Valid):**\n\nFile 1:\n```glsl\n#pragma parameter Gamma \"Gamma correction\" 1.0 0.5 2.0 0.1\n```\nFile 2:\n```glsl\n#pragma parameter Gamma \"Gamma correction\" 1.0 0.5 2.0 0.1\n```\nThese files declare the same parameter with identical lines. This is valid.\n\n**Multiple Files Example C (Invalid):**\n\nFile 1:\n```glsl\n#pragma parameter Saturation \"Saturation adjustment\" 1.0 0.0 2.0 0.1\n```\nFile 2:\n```glsl\n#pragma parameter Saturation \"Saturation level\" 1.2 0.0 2.0 0.1\n```\nThese files declare the same parameter name (`Saturation`) but with different descriptions and default values. This will not compile; all fields must match exactly.\n\n**Note:** Validation is case sensitive. Parameter names, descriptions, and all values must match exactly, including letter case, for duplicate parameters across files or shader passes.\n\n### Lookup textures\n\nA handy feature to have is reading from lookup textures. Custom sampler uniforms are specified in the `.slangp` (preset) file using the `textures` line, where values are separated by semicolons:\n\n```ini\ntextures = \"foo;bar\"\n```\nEach listed texture uniform can then be assigned a texture file and options:\n\n```ini\nfoo = \"relative/or/absolute/path/filename.png\"\nbar = \"another_texture.png\"\n```\nPNG and JPEG formats are known to be supported.\n\nAdditional options can be set for each texture uniform:\n\n- `foo_linear = true` or `false` (enables or disables bilinear sampling; corresponds to shader option `filter_linearN`)\n- `foo_wrap_mode = clamp_to_edge` or other valid wrap mode strings (corresponds to shader option `wrap_modeN`)\n- `foo_mipmap = true` or `false` (enables or disables mipmapping; corresponds to shader option `mipmap_inputN`)\n\nOption values are case sensitive. Valid boolean values are `true` and `false`. It's recommended to enable mipmapping if your texture is simply going to be composited on screen (whether to mipmap LUTs warrants its own discussion entirely).\n\nThis mechanism allows shader authors to bind custom textures to uniforms and control their sampling behavior and wrapping modes directly from the preset file, providing flexibility for advanced shader effects.\n\nFor more information on the uniforms and aliases automatically provided when using lookup textures, see the [Aliases](#aliases) section.\n\n**Shader Example:**\n\nTo use a custom texture declared in the preset file, declare the sampler uniform in your shader code:\n\n```glsl\n#pragma stage fragment\n...\nlayout(binding = 2) uniform sampler2D foo;\n```\nThen, sample from the texture in your shader:\n\n```glsl\nvec4 texColor = texture(foo, vTexCoord);\n```\nThis will use the texture file and options specified for `foo` in the preset file. The binding number must match the preset's texture order. Explicit binding is mandatory for all samplers and UBOs. `sampler2D` objects can only be declared in the fragment shader stage.\n\n## Slang specification\n\nThis part of the spec considers how Vulkan GLSL shaders are written. The frontend uses the glslang frontend to compile GLSL sources. This ensures that we do not end up with vendor-specific extensions.\n\nThe `#version` string should be as recent as possible, e.g. `#version 450` or `#version 310 es`. It is recommended to use `310 es` since it allows `mediump` which can help on mobile.\n\n!!! Note\n After the Vulkan GLSL is turned into SPIR-V, the original `#version` string does not matter anymore.\n\n!!! Warning\n SPIR-V cannot be generated from legacy shader versions such as `#version 100` (ES 2.0) or `#version 120` (GL 2.1).\n\nThe frontend will use reflection on the resulting SPIR-V file in order to deduce what each element in the UBO or what each texture means. The main types of data passed to shaders are read-only and can be classified as:\n\n - `uniform sampler2D`: This is used for input textures, framebuffer results and lookup-textures.\n - `uniform Block { };`: This is used for any constant data which is passed to the shader.\n - `layout(push_constant) uniform Push {} name;`: This is used for any push constant data which is passed to the shader.\n\n### Resource usage rules\n\nCertain rules must be adhered to in order to make it easier for the frontend to dynamically set up bindings to resources.\n\n - All resources must be using descriptor set `#0`, or don't use `layout(set = #N)` at all.\n - `layout(binding = #N)` must be declared for all `UBO`s and `sampler2D`s.\n - All resources must use different bindings.\n - There can be only one UBO.\n - There can be only one push constant block.\n - It is possible to have one UBO and one push constant block.\n - If a UBO is used in both vertex and fragment, their binding number must match.\n - If a UBO is used in both vertex and fragment, members with the same name must have the same offset/binary interface.\n This problem is easily avoided by having the same UBO visible to both vertex and fragment as \"common\" code.\n - If a push constant block is used in both vertex and fragment, members with the same name must have the same offset/binary interface.\n - `sampler2D` cannot be used in vertex, although the size parameters of samplers can be used in vertex.\n - Other resource types such as SSBOs, images, atomic counters, etc, etc, are not allowed.\n - Every member of the UBOs and push constant blocks as well as every texture must be meaningful\n to the frontend in some way, or an error is generated.\n\n### Initial pre-process of slang files\n\nThe very first line of a `.slang` file must contain a `#version` statement.\n\nThe first process which takes place is dealing with `#include` statements. A slang file is preprocessed by scanning through the slang and resolving all `#include` statements.\n\n**Include Path Restrictions:**\n- Only files in the same directory as the including file, or in a child directory, may be included. Absolute paths and parent-relative paths (e.g., `../`) are not supported and have undefined behavior.\n\n**Cyclic Includes:**\n- Cyclic includes are not handled at all. If a file is included more than once in a dependency cycle, only the first occurrence is processed; subsequent `#include` lines for that file lead to undefined behavior. As a result, slang requires a flat, acyclic dependency structure for includes.\n\nThe include process does not consider any preprocessor defines or conditional expressions. Nested includes are allowed as long as they do not form a cycle.\n\nThis means `#include` handling does not respect `#ifdef`, `#ifndef`, `#if`, or similar conditional blocks. Even if an include appears inside a branch that would normally be compiled out by the GLSL preprocessor, slang still sees and processes that include during its own preprocessing step.\n\nFor example, this is unintuitive but important:\n\n```glsl\n#ifdef USE_OPTIONAL_HELPERS\n#include \"optional-helper.inc\"\n#pragma parameter DebugAmount \"Debug Amount\" 0.0 0.0 1.0 0.1\n#endif\n```\n\nEven when `USE_OPTIONAL_HELPERS` is not defined, slang will still attempt to process the `#include` and will still discover the `#pragma parameter` line. In other words, these constructs are not conditionally skipped just because they appear inside a conditional GLSL block.\n\nE.g.:\n```glsl\n#include \"common.inc\"\n```\n\nIf a shader wants to reuse helper code when present but still compile when the file is missing, it can use an optional include pragma.\n\n#### `#pragma include_optional`\n\nThis pragma behaves like `#include`, but does not generate an error if the specified file cannot be found.\n\nThe format is:\n```glsl\n#pragma include_optional \"path/to/file_to_include\"\n```\n\nThis is useful for optional compatibility shims, shared parameter blocks, or helper files that may exist in one shader pack but not another.\n\nAfter includes have been resolved, the frontend scans through all lines of the shader and considers `#pragma` statements.\nThese pragmas build up ancillary reflection information and otherwise meaningful metadata.\n\nLike includes, pragmas are discovered by scanning the source directly and do not respect `#ifdef` or related conditional compilation blocks. In practice, a pragma written inside a conditional block should still be treated as present by the slang frontend.\n\n#### `#pragma stage`\nThis pragma controls which part of a `.slang` file are visible to certain shader stages.\nCurrently, two variants of this pragma are supported:\n\n - `#pragma stage vertex`\n - `#pragma stage fragment`\n\nIf no `#pragma stage` has been encountered yet, lines of code in a shader belong to all shader stages.\n\nIf a `#pragma stage` statement has been encountered, that stage is considered active, and the following lines of shader code will only be used when building source for that particular shader stage. A new `#pragma stage` can override which stage is active.\n\n#### `#pragma name`\nThis pragma lets a shader set its identifier. This identifier can be used to create simple aliases for other passes.\n\nE.g.:\n```glsl\n#pragma name HorizontalPass\n```\n\n#### `#pragma alias`\n\nThis pragma is supported as an alias of `#pragma name`. It sets the same shader identifier and has the same behavior as `#pragma name`.\n\nE.g.:\n```glsl\n#pragma alias HorizontalPass\n```\n\nFor consistency and clarity, `#pragma name` should be preferred in new shaders and documentation.\n\n#### `#pragma format`\nThis pragma controls the format of the framebuffer which this shader will render to. The default render target format is `R8G8B8A8_UNORM`.\n\nSupported render target formats are listed below. From a portability perspective, please be aware that GLES2 has abysmal render target format support, and GLES3/GL3 may have restricted floating point render target support.\n\n##### Portability Limitations: Guaranteed Formats\n\n**GLES2 (OpenGL ES 2.0):**\nThe following framebuffer color formats are guaranteed to be supported on all GLES2-compliant devices (at least, according to specification):\n\n- `GL_RGBA4`\n- `GL_RGB5_A1`\n- `GL_RGB565`\n\nOther formats, such as `GL_RGBA8` or floating-point formats, are not guaranteed and may not be available on all GLES2 implementations. Unfortunately, none of these formats align with the formats that can be expressed by the pragma.\n\n**GLES3 (OpenGL ES 3.0):**\nGLES3 expands the set of guaranteed framebuffer formats. The following are required by the specification:\n\n- `GL_RGBA4`\n- `GL_RGB5_A1`\n- `GL_RGB565`\n- `GL_RGBA8` (corresponds to `R8G8B8A8_UNORM` with 8 bits per channel)\n- `GL_RGB8`\n- `GL_RGBA16`\n- `GL_RGB10_A2` (corresponds to `A2B10G10R10_UNORM_PACK32` with 10 bits per color channel, 2 bits per alpha)\n- `GL_R11F_G11F_B10F`\n- `GL_RGB10_A2UI` (corresponds to `A2B10G10R10_UINT_PACK32` with 10 bits per color channel, 2 bits per alpha)\n- `GL_RGBA16F` (corresponds to `R16G16B16A16_SFLOAT` with 16 bits per channel)\n- `GL_RGBA32F` (corresponds to `R32G32B32A32_SFLOAT` with 32 bits per channel)\n\nDesktop-oriented APIs can generally support all formats available.\n\n##### Valid Formats\n\n**8-bit**\n - `R8_UNORM`\n - `R8_UINT`\n - `R8_SINT`\n - `R8G8_UNORM`\n - `R8G8_UINT`\n - `R8G8_SINT`\n - `R8G8B8A8_UNORM`\n - `R8G8B8A8_UINT`\n - `R8G8B8A8_SINT`\n - `R8G8B8A8_SRGB`\n\n**10-bit**\n - `A2B10G10R10_UNORM_PACK32`\n - `A2B10G10R10_UINT_PACK32`\n\n**16-bit**\n - `R16_UINT`\n - `R16_SINT`\n - `R16_SFLOAT`\n - `R16G16_UINT`\n - `R16G16_SINT`\n - `R16G16_SFLOAT`\n - `R16G16B16A16_UINT`\n - `R16G16B16A16_SINT`\n - `R16G16B16A16_SFLOAT`\n\n **32-bit**\n - `R32_UINT`\n - `R32_SINT`\n - `R32_SFLOAT`\n - `R32G32_UINT`\n - `R32G32_SINT`\n - `R32G32_SFLOAT`\n - `R32G32B32A32_UINT`\n - `R32G32B32A32_SINT`\n - `R32G32B32A32_SFLOAT`\n\nE.g.:\n```glsl\n#pragma format R16_SFLOAT\n```\n\nIf rendering to uint/int formats, make sure your fragment shader output target is uint/int.\n\n##### Practical Format Choice Guidance\n\nWhen choosing a framebuffer format for your shader, consider the following practical recommendations:\n\n- For shaders that output gamma-corrected SDR (standard dynamic range) data, use `R8G8B8A8_UNORM` or simply omit the format specification (the default is usually suitable).\n- For shaders that output HDR10 data, any output intended for 10-bit display, or gamma-corrected intermediates requiring extra precision, use `A2B10G10R10_UNORM_PACK32`.\n- For shaders that output linear data (such as for realistic color blending or physically-based rendering), use `R16G16B16A16_SFLOAT`.\n- If your shader only needs to output one or two color channels, the `Rxx` or `RxxGxx` formats (e.g., `R16_UINT`, `R8_UNORM`) can be used for efficiency.\n\nBe aware that using higher bit-depth formats (such as 16-bit or 32-bit float) can have a significant impact on performance, especially on mobile or older hardware. Always profile your shader if performance is a concern.\n\n##### Output transfer-function mapping\n\nWhen the final pass in a filter chain targets an HDR-capable display, the frontend selects a swapchain format that matches the display's capabilities. The transfer function the shader is expected to produce in its output depends entirely on which format the final pass renders to. Intermediate passes are not affected by these rules — only the last pass that writes to the swapchain.\n\nThe table below summarises the contract for each relevant final-pass format.\n\n| Final pass format | Bit depth | Color space | Expected transfer function | Notes |\n|---|---|---|---|---|\n| `R8G8B8A8_UNORM` | 8-bit | Rec. 709 | Gamma-corrected (sRGB/Rec. 709) | SDR output. Gamma-corrected values can be written directly. Linear values must be gamma-corrected before output. Apply tone-mapping as needed before the final pass. |\n| `R16G16B16A16_SFLOAT` | 16-bit | Rec. 709 | Linear (scRGB) | HDR output via scRGB. Linear values can be written directly. Values above 1.0 represent luminance above SDR white. Gamma-corrected values must be linearized before output. PQ-encoded values must be linearized before output. |\n| `A2B10G10R10_UNORM_PACK32` | 10-bit | Rec. 2020 | PQ (ST 2084) | HDR10 output. HDR10-encoded (PQ) values can be written directly. Linear values, gamma-corrected values, and HLG values must all be converted to PQ before output. |\n\n##### 8-bit output (`R8G8B8A8_UNORM`): SDR, Rec. 709\n\nThis is the standard SDR path. The display and the OS compositor both assume the output is gamma-corrected sRGB / gamma 2.2 in the Rec. 709 color space.\n\n- **Gamma-corrected values** can be written to `FragColor` directly.\n- **Linear values** must be gamma-corrected before output (apply inverse EOTF for the selected SDR display model).\n- **Tone-mapping** should be applied before the final pass whenever scene luminance can exceed the SDR range.\n\n##### 16-bit output (`R16G16B16A16_SFLOAT`): scRGB, Rec. 709\n\nscRGB is a linear, extended-range encoding in the Rec. 709 color space. The value `1.0` corresponds to the SDR white point (80 nits by convention). Values above `1.0` are legal and represent luminance above SDR white, up to the display's peak luminance.\n\n- **Linear values** can be written to `FragColor` directly.\n- **Gamma-corrected values** must be linearized before output.\n- **PQ-encoded values** must be linearized (apply the PQ EOTF) before output.\n\n##### 10-bit output (`A2B10G10R10_UNORM_PACK32`): HDR10, Rec. 2020\n\nHDR10 uses the PQ (ST 2084) transfer function in the Rec. 2020 color space. The PQ curve encodes an absolute luminance range of 0–10 000 nits, with `1.0` mapping to 10 000 nits. SDR white can correspond to either 100 nits or 203 nits.\n\n- **HDR10-encoded (PQ) values** can be written to `FragColor` directly.\n- **Linear values** must be converted to PQ encoding before output, including a gamut conversion from Rec. 709 to Rec. 2020 if the working color space is Rec. 709.\n- **Gamma-corrected values** must be linearized first, then converted to PQ as above.\n- **HLG-encoded values** must be converted to PQ before output (convert HLG → linear → PQ).\n\n#### `#pragma parameter`\n\nShader parameters allow shaders to take user-defined inputs as uniform values. This makes shaders more configurable.\n\nThe format is:\n```glsl\n#pragma parameter IDENTIFIER \"DESCRIPTION\" INITIAL MINIMUM MAXIMUM [STEP]\n```\n\nThe step parameter is optional. However, best practice is to always include the step parameter for clarity and consistency, even if the value is not strictly required. `INITIAL`, `MINIMUM`, and `MAXIMUM` are floating point values. `IDENTIFIER` is the meaningful string which is the name of the uniform which will be used in a UBO or push constant block. `DESCRIPTION` is a string which is human readable representation of IDENTIFIER.\n\nE.g:\n```glsl\nlayout(push_constant) uniform Push {\n float DummyVariable;\n} registers;\n#pragma parameter DummyVariable \"This is a dummy variable\" 1.0 0.2 2.0 0.1\n```\n\n### I/O interface variables\n\nThe slang shader spec specifies two vertex inputs and one fragment output. Varyings between vertex and fragment shaders are user-defined.\n\n#### Vertex inputs\nTwo attributes are provided and must be present in a shader. It is only the layout(location = #N) which is actually significant. The particular names of input and output variables are ignored, but should be consistent for readability.\n\n##### `layout(location = 0) in vec4 Position;`\n\nThis attribute is a 2D position in the form `vec4(x, y, 0.0, 1.0);`. Shaders should not try to extract meaning from the x, y.\n\n`gl_Position` must be assigned as:\n\n```glsl\ngl_Position = MVP * Position;\n```\n\n##### `layout(location = 1) in vec2 TexCoord;`\n\nThe texture coordinate is semantically such that `(0.0, 0.0)` is top-left and `(1.0, 1.0)` is bottom right.\n\nIf TexCoord is passed to a varying unmodified, the interpolated varying will be `uv = 0.5 / OutputSize` when rendering the upper left pixel as expected and `uv = 1.0 - 0.5 / OutputSize` when rendering the bottom-right pixel.\n\n#### Vertex/Fragment interface\n\nVertex outputs and fragment inputs link by location, and not name.\n\nE.g.:\n```glsl\n// Vertex\nlayout(location = 0) out vec4 varying;\n// Fragment\nlayout(location = 0) in vec4 some_other_name;\n```\n\nwill still link fine, although using same names are encouraged for readability.\n\n#### Location allocation for composite types\n\nLocation indices are consumed per slot, not per declaration line. Composite types can consume multiple consecutive locations.\n\n- Scalar and vector types (`float`, `vec2`, `vec3`, `vec4`, etc.) consume 1 location.\n- Matrix types consume multiple locations. A matrix consumes one location per column (for example, `mat4` consumes 4 locations).\n- Structs consume the sum of their members' location usage.\n - Non-matrix struct members consume 1 location each.\n - Matrix struct members consume one location per matrix column.\n\nExample (`mat4` consumes locations 0, 1, 2, and 3):\n\n```glsl\n// Invalid: overlaps location 1, which is still part of CorrectionMatrix.\nlayout(location = 0) in mat4 CorrectionMatrix;\nlayout(location = 1) in float CorrectionScale;\n\n// Valid: next free location after mat4 is 4.\nlayout(location = 0) in mat4 CorrectionMatrix;\nlayout(location = 4) in float CorrectionScale;\n```\n\nWhen matching vertex outputs to fragment inputs, make sure both stages use compatible types and the same occupied location range.\n\n#### Fragment outputs\n\n##### `layout(location = 0) out vec4 FragColor;`\n\nFragment shaders must have a single output to `location = 0`.\n\nMultiple render targets are not allowed. The type of the output depends on the render target format. `int`/`uint` type must be used if `UINT`/`INT` render target formats are used; otherwise `float` type.\n\n### Builtin variables\n\n#### Builtin texture variables\n\nThe input of textures get their meaning from their name.\n\n - `Original`: This accesses the input of the filter chain, accessible from any pass.\n - `Source`: This accesses the input from previous shader pass, or `Original` if accessed in the first pass of the filter chain.\n - `OriginalHistory#`: This accesses the input # frames back in time. There is no limit on #, except larger numbers will consume more VRAM. `OriginalHistory0` is an alias for `Original`, `OriginalHistory1` is the previous frame and so on.\n - `PassOutput#`: This accesses the output from pass # in this frame. `PassOutput#` must be causal, it is an error to access `PassOutputN` in pass `M` if `N >= M`. `PassOutput#` will typically be aliased to a more readable value.\n - `PassFeedback#`: This accesses PassOutput# from the previous frame. Any pass can read the feedback of any feedback, since it is causal. `PassFeedback#` will typically be aliased to a more readable value.\n - `User#`: This accesses look-up textures. However, the direct use of `User#` is discouraged and should always be accessed via aliases.\n\n#### Builtin texture size uniform variables\n\nIf a member of a UBO or a push constant block is called `???Size#` where `???#` is the name of a texture variable,\nthat member must be a `vec4`, which will receive these values:\n\n - `X`: Horizontal size of texture\n - `Y`: Vertical size of texture\n - `Z`: `1.0` / (Horizontal size of texture)\n - `W`: `1.0` / (Vertical size of texture)\n\nIt is valid to use a size variable without declaring the texture itself. This is useful for vertex shading.\n\nIt is valid (although probably not useful) for a variable to be present in both a push constant block and a UBO block at the same time.\n\n#### Builtin uniform variables\n\nOther than uniforms related to textures, there are other special uniforms available. These builtin variables may be part of a UBO block and/or a push constant block.\n\n - `MVP`: `mat4` model view projection matrix.\n - `OutputSize`: a `vec4(x, y, 1.0 / x, 1.0 / y)` variable describing the render target size `(x, y)` for this pass.\n - `FinalViewportSize`: a `vec4(x, y, 1.0 / x, 1.0 / y)` variable describing the render target size for the final pass. Accessible from any pass.\n - `FrameCount`: an `uint` variable taking a value which increases by one every frame. This value could be pre-wrapped by modulo if specified in preset. This is useful for creating time-dependent effects.\n - `FrameDirection`: an `int` variable which indicates whether the content is currently being rewinded. Has a value of `-1` while rewinding, otherwise `1`.\n - `Rotation`: a `uint` variable with values from `0` to `3` describing the rotation of the content; respectively `0°`, `90°`, `180°`, and `270°`.\n - `OriginalAspect`: a `float` value describing the aspect ratio intended by the current core.\n - `OriginalAspectRotated`: a `float` value describing the intended aspect ratio after accounting for rotation. It is equal to `OriginalAspect` for unrotated and `180°`-rotated content, and `1.0 / OriginalAspect` for `90°` and `270°` rotation.\n - `OriginalFPS`: a `float` value describing the frame rate set by the core.\n - `FrameTimeDelta`: a `uint` value describing the time difference, in microseconds, between the previous and current frame.\n\n#### Checking for builtin uniform availability\n\nSome builtin uniforms were added after the initial slang implementation. If you want a shader to compile on older RetroArch versions, it is best practice to check whether newer builtin uniforms are available before using them.\n\nRetroArch provides the following preprocessor defines:\n\n - `_HAS_ORIGINALASPECT_UNIFORMS`: Indicates that `OriginalAspect` and `OriginalAspectRotated` are available.\n - `_HAS_FRAMETIME_UNIFORMS`: Indicates that `OriginalFPS` and `FrameTimeDelta` are available.\n\nFor example:\n```glsl\n#ifdef _HAS_FRAMETIME_UNIFORMS\n float deltaSeconds = float(FrameTimeDelta) * 1e-6;\n#else\n float deltaSeconds = 1.0 / 60.0;\n#endif\n```\n\nUsing these defines lets a shader take advantage of newer runtime information while still remaining compatible with older frontend versions.\n\n#### Aliases\n\nAliases can give meaning to arbitrary names in a slang file. This is mostly relevant for LUT textures, shader parameters and accessing other passes by name.\n\nIf a shader pass has a `#pragma name NAME` associated with it, meaning is given to the shader:\n\n - `NAME` is a `sampler2D`.\n - `NAMESize` is a `vec4` size uniform associated with `NAME`.\n - `NAMEFeedback` is a `sampler2D` for the previous frame.\n - `NAMEFeedbackSize` is a `vec4` size uniform associated with `NAMEFeedback`.\n\n#### Example slang shader\n\n```glsl\n#version 450\n// 450 or 310 es are recommended\n\nlayout(set = 0, binding = 0, std140) uniform UBO\n{\n mat4 MVP;\n vec4 SourceSize; // Not used here, but doesn't hurt\n float ColorMod;\n};\n\n#pragma name StockShader\n#pragma format R8G8B8A8_UNORM\n#pragma parameter ColorMod \"Color intensity\" 1.0 0.1 2.0 0.1\n\n#pragma stage vertex\nlayout(location = 0) in vec4 Position;\nlayout(location = 1) in vec2 TexCoord;\nlayout(location = 0) out vec2 vTexCoord;\nvoid main()\n{\n gl_Position = MVP * Position;\n vTexCoord = TexCoord;\n}\n\n#pragma stage fragment\nlayout(location = 0) in vec2 vTexCoord;\nlayout(location = 0) out vec4 FragColor;\nlayout(binding = 1) uniform sampler2D Source;\nvoid main()\n{\n FragColor = texture(Source, vTexCoord) * ColorMod;\n}\n```\n\n### Push constants vs uniform blocks\nPush constants are fast-access uniform data which on some GPUs will improve performance over plain UBOs.\nIt is encouraged to use push constant data as much as possible.\n\n```glsl\nlayout(push_constant) uniform Push\n{\n vec4 SourceSize;\n vec4 FinalViewportSize;\n} registers;\n```\n\nHowever, be aware that there is a limit to how large push constant blocks can be used. Vulkan puts a minimum required size of 128 bytes, which equals 8 `vec4`s. Using more than 128 bytes may lead to an error, so push constant blocks larger than 128 bytes should not be used.\n\nIf you're running out of space, you can move the MVP to a UBO instead, which frees up 64 bytes. Always prioritize push constants for data used in fragment shaders as there are many more fragment threads than vertex. Also note that like UBOs, the push constant space is shared across vertex and fragment.\n\nE.g.:\n\n```glsl\nlayout(binding = 0, std140) uniform UBO\n{\n mat4 MVP; // Only used in vertex\n vec4 SpilledUniform;\n} global;\n\nlayout(push_constant) uniform Push\n{\n vec4 SourceSize;\n vec4 BlurPassSize;\n // ...\n} registers;\n```\n\n### Samplers\n\nWhich samplers are used for textures are specified by the preset format. The sampler remains constant throughout the frame, and there is currently no way to select samplers on a frame-by-frame basis. This is mostly to make it possible to use the spec in GLES2 as GLES2 has no concept of separate samplers and images.\n\n### sRGB\n\nThe input to the filter chain is not presented as an sRGB texture. Likewise, the final pass does not render to an sRGB backbuffer by default.\n\nIn practice, this means that shaders which need linear-light processing should perform explicit linearization themselves, usually in an early pass, and convert back to the desired output transfer function in a later pass.\n\nThis approach also gives shader authors more control over gamma handling. For example, a preset can insert a pass which linearizes the source into a floating point render target, perform blending or lighting work in linear space, and then apply gamma correction before the final SDR output pass.\n\nFor a more detailed framework covering how this applies to both SDR and HDR pipelines — including treating source content as virtual display signals, multi-pass HDR workflows, and practical pipeline examples — see [HDR Programming](#hdr-programming).\n\n## Caveats\n\n### Frag Coord\n\nTexCoord also replaces `gl_FragCoord`. Do not use `gl_FragCoord` as it doesn't consider the viewports correctly. If you need `gl_FragCoord` use `vTexCoord * OutputSize.xy` instead.\n\n### Derivatives\n\nBe careful with derivatives of `vTexCoord`. The screen might have been rotated by the vertex shader, which will also rotate the derivatives, especially in the final pass which hits the backbuffer.\n\nHowever, derivatives are fortunately never really needed, since `w = 1` (we render flat 2D quads), which means derivatives of varyings are constant. You can do some trivial replacements which will be faster and more robust.\n\n```glsl\ndFdx(vTexCoord) = vec2(OutputSize.z, 0.0);\ndFdy(vTexCoord) = vec2(0.0, OutputSize.w);\nfwidth(vTexCoord) = max(OutputSize.z, OutputSize.w);\n```\nTo avoid issues with rotation or unexpected derivatives in case derivatives are really needed, off-screen passes will not have rotation and dFdx and dFdy will behave as expected.\n\n### Correctly sampling textures\n\nA common mistake made by shaders is that they aren't careful enough about sampling textures correctly.\n\nThere are three major cases to consider:\n\n| Bilinear sampling | If bilinear is used, it is always safe to sample a texture. |\n| Nearest, with integer scale | If the OutputSize / InputSize is integer, the interpolated vTexCoord will always fall inside the texel safely, so no special precautions have to be used. For very particular shaders which rely on nearest neighbor sampling, using integer scale to a framebuffer and upscaling that with more stable upscaling filters like bicubic for example is usually a great choice.\n| Nearest, with non-integer scale | Sometimes, it is necessary to upscale images to the backbuffer which have an arbitrary size. Bilinear is not always good enough here, so we must deal with a complicated case.\n\nIf we interpolate `vTexCoord` over a frame with non-integer scale, it is possible that we end up just between two texels. Nearest neighbor will have to find a texel which is nearest, but there is no clear \"nearest\" texel. In this scenario, we end up having lots of failure cases which are typically observed as weird glitches in the image which change based on the resolution.\n\nTo correctly sample nearest textures with non-integer scale, we must pre-quantize our texture coordinates. Here's a snippet which lets us safely sample a nearest filtered texture and emulate bilinear filtering.\n\n```glsl\n vec2 uv = vTexCoord * global.SourceSize.xy - 0.5; // Shift by 0.5 since the texel sampling points are in the texel center.\n vec2 a = fract(uv);\n vec2 tex = (floor(uv) + 0.5) * global.SourceSize.zw; // Build a sampling point which is in the center of the texel.\n\n // Sample the bilinear footprint.\n vec4 t0 = textureLodOffset(Source, tex, 0.0, ivec2(0, 0));\n vec4 t1 = textureLodOffset(Source, tex, 0.0, ivec2(1, 0));\n vec4 t2 = textureLodOffset(Source, tex, 0.0, ivec2(0, 1));\n vec4 t3 = textureLodOffset(Source, tex, 0.0, ivec2(1, 1));\n\n // Bilinear filter.\n vec4 result = mix(mix(t0, t1, a.x), mix(t2, t3, a.x), a.y);\n```\n\nThe concept of splitting up the integer texel along with the fractional texel helps us do arbitrary non-integer scaling safely. The uv variable could also be passed pre-computed from vertex to avoid the extra computation in fragment.\n\nSee also [Advanced Techniques: Vertex Precomputation](#vertex-precomputation).\n\n## Preset Format: Full .slangp Example\n\nThe preset format is essentially unchanged from the old .cgp and .glslp, except the new preset format is called .slangp.\n\nBelow is a comprehensive example of a `.slangp` preset file. This example demonstrates:\n- Multiple shader passes\n- Per-pass options (filter_linear, wrap_mode, scale_type, scale_x/y, mipmap_input, float_framebuffer, etc.)\n- External lookup textures with options\n- Parameter settings\n- Inline comments for clarity\n\n```ini\n# Example: CRT with LUT and multi-pass scaling\n\nshaders = 3\n\n# Pass 0: Horizontal blur\nshader0 = \"shaders/blur_horiz.slang\"\nfilter_linear0 = true # Enable bilinear filtering for this pass\nwrap_mode0 = clamp_to_edge # Clamp sampling to edge\nscale_type0 = source # Scale relative to input\nscale_x0 = 2.0 # 2x horizontal scale\nscale_y0 = 1.0 # 1x vertical scale\nmipmap_input0 = false # No mipmapping on input\nfloat_framebuffer0 = false # Use integer framebuffer\n\n# Pass 1: Vertical blur\nshader1 = \"shaders/blur_vert.slang\"\nfilter_linear1 = true\nwrap_mode1 = clamp_to_edge\nscale_type1 = absolute # Use absolute size\nscale_x1 = 1280\nscale_y1 = 960\nmipmap_input1 = false\nfloat_framebuffer1 = false\n\n# Pass 2: CRT effect with LUT\nshader2 = \"shaders/crt.slang\"\nfilter_linear2 = false # Nearest neighbor for scanlines\nwrap_mode2 = clamp_to_border\nscale_type2 = viewport # Scale to viewport size\nscale_x2 = 1.0\nscale_y2 = 1.0\nmipmap_input2 = true # Enable mipmapping for LUT\nfloat_framebuffer2 = true # Use floating point framebuffer\n\n# External lookup textures\ntextures = \"phosphor_lut;mask\"\n\n# LUT: Phosphor lookup table\nphosphor_lut = \"textures/phosphor_lut.png\"\nphosphor_lut_linear = true\nphosphor_lut_wrap_mode = repeat\nphosphor_lut_mipmap = true\n\n# Mask: Shadow mask pattern\nmask = \"textures/mask.png\"\nmask_linear = false\nmask_wrap_mode = mirrored_repeat\nmask_mipmap = false\n\n# Parameter overrides (optional, can be set in preset)\nBrightness = 1.2\nSharpness = 0.8\n\n# Comments can be added anywhere with #\n# This preset demonstrates multiple passes, external textures, and parameter overrides.\n```\n\nThis example shows how to:\n- Chain multiple shader passes, each with its own options\n- Bind external textures and control their sampling/wrapping\n- Override user parameters at the preset level\n- Use comments for documentation\n\nSee the following sections for detailed explanations of each option and their effects.\n\n## Porting guide from legacy Cg spec\n\n### Common functions\n - mul(mat, vec) -> mat * vec\n - lerp() -> mix()\n - ddx() -> dFdx()\n - ddy() -> dFdy()\n - tex2D() -> texture()\n - frac() -> fract()\n\n### Types\n\n - floatN -> vecN\n - boolN -> bvecN\n - intN -> ivecN\n - uintN -> uvecN\n - float4x4 -> mat4\n\n### Builtin uniforms and misc\n\n - modelViewProj -> MVP\n - IN.video\\_size -> SourceSize.xy\n - IN.texture\\_size -> SourceSize.xy (no POT shenanigans, so they are the same)\n - IN.output\\_size -> OutputSize.xy\n - IN.frame\\_count -> FrameCount (uint instead of float)\n - \\*.tex\\_coord -> TexCoord (no POT shenanigans, so they are all the same)\n - \\*.lut\\_tex\\_coord -> TexCoord\n - ORIG -> `Original`\n - PASS# -> PassOutput#\n - PASSPREV# -> No direct analog, PassOutput(CurrentPass - #), but prefer aliases\n\n### Cg semantics\n\n - POSITION -> gl\\_Position\n - float2 texcoord : TEXCOORD0 -> layout(location = 1) in vec2 TexCoord;\n - float4 varying : TEXCOORD# -> layout(location = #) out vec4 varying;\n - uniform float4x4 modelViewProj -> uniform UBO { mat4 MVP; };\n\nOutput structs should be flattened into separate varyings.\n\nE.g. instead of\n```cpp\nstruct VertexData\n{\n float pos : POSITION;\n float4 tex0 : TEXCOORD0;\n float4 tex1 : TEXCOORD1;\n};\n\nvoid main_vertex(out VertexData vout)\n{\n vout.pos = ...;\n vout.tex0 = ...;\n vout.tex1 = ...;\n}\n\nvoid main_fragment(in VertexData vout)\n{\n ...\n}\n```\n\ndo this\n\n```glsl\n#pragma stage vertex\nlayout(location = 0) out vec4 tex0;\nlayout(location = 1) out vec4 tex1;\nvoid main()\n{\n gl_Position = ...;\n tex0 = ...;\n tex1 = ...;\n}\n\n#pragma stage fragment\nlayout(location = 0) in vec4 tex0;\nlayout(location = 1) in vec4 tex1;\nvoid main()\n{\n}\n```\n\nInstead of returning a float4 from main\\_fragment, have an output in fragment:\n\n```glsl\nlayout(location = 0) out vec4 FragColor;\n```\n\n## FAQ for New Shader Developers\n\nThe table below answers common first-time questions using only information already present in this document.\n\n| Question | Short answer from this document | References |\n|---|---|---|\n| What is the minimum valid `.slang` shader? | It must start with `#version` on the first line and define both `#pragma stage vertex` and `#pragma stage fragment`. | [Required Shader Stages](#required-shader-stages), [Initial pre-process of slang files](#initial-pre-process-of-slang-files) |\n| What are required vs optional pragmas? | Required: `#pragma stage vertex` and `#pragma stage fragment`. Others (for example `#pragma name`, `#pragma format`, `#pragma parameter`) are optional. | [#pragma directives: Required and Optional](#pragma-directives-required-and-optional), [Required Shader Stages](#required-shader-stages) |\n| Is vertex stage optional? | No. Both vertex and fragment stages are mandatory. | [Do we make vertex optional?](#do-we-make-vertex-optional), [Required Shader Stages](#required-shader-stages) |\n| How do includes work? | Includes are resolved in a pre-pass, do not respect `#ifdef` logic, and only support same-directory or child-directory paths. | [Initial pre-process of slang files](#initial-pre-process-of-slang-files) |\n| Can I include missing helper files safely? | Yes, use `#pragma include_optional \"...\"` to avoid a hard error if the file is missing. | [#pragma include_optional](#pragma-include_optional) |\n| What resource binding rules do I have to follow? | Explicit `layout(binding = N)` is required for samplers and UBOs; bindings must be unique; only one UBO and one push constant block are allowed. | [Resource usage rules](#resource-usage-rules) |\n| Can I use `sampler2D` in vertex shaders? | No. `sampler2D` is fragment-only, though texture size uniforms can be used in vertex. | [Resource usage rules](#resource-usage-rules) |\n| Which built-in textures and uniforms are available? | Built-ins include `Original`, `Source`, `PassOutput#`, `PassFeedback#`, and uniforms like `MVP`, `SourceSize`, `OutputSize`, `FrameCount`, and more. | [Builtin variables](#builtin-variables) |\n| How do I choose between push constants and UBOs? | Prefer push constants for frequently used data (especially fragment), but stay within the practical 128-byte limit; spill to UBO when needed. | [Push constants vs uniform blocks](#push-constants-vs-uniform-blocks) |\n| How should I choose render target format? | Use `R8G8B8A8_UNORM` for typical SDR, `A2B10G10R10_UNORM_PACK32` for HDR10/10-bit workflows, and `R16G16B16A16_SFLOAT` for linear-light processing. | [#pragma format](#pragma-format), [Practical Format Choice Guidance](#practical-format-choice-guidance) |\n| What wrap mode should I use by default? | Default is `clamp_to_border`; for compositing edges, `clamp_to_edge` is often safer. | [Texture Clamping and Wrap Modes](#texture-clamping-and-wrap-modes) |\n| Why do nearest-sampled shaders sometimes glitch at non-integer scale? | Interpolated UVs can fall between texels; pre-quantize coordinates to texel centers when doing nearest at non-integer scale. | [Correctly sampling textures](#correctly-sampling-textures) |\n| How do parameter declarations fail? | Duplicate `#pragma parameter` entries with the same identifier must match exactly (description and all numeric fields), or compilation fails. | [Parameter Declaration, Validation, and UI Behavior](#parameter-declaration-validation-and-ui-behavior), [#pragma parameter](#pragma-parameter) |\n| How do I add lookup textures in presets? | Declare them with `textures = \"a;b\"`, assign file paths per alias, then set optional per-texture options such as `_linear`, `_wrap_mode`, and `_mipmap`. | [Lookup textures](#lookup-textures), [Preset Format: Full .slangp Example](#preset-format-full-slangp-example) |\n| What is the recommended debugging workflow? | Start with RetroArch logs for compile errors, then use graphics debuggers/profilers (RenderDoc, Nsight, PIX, GPUView) and color-debug techniques. | [Validation, Debugging, and Profiling Tools for Slang Shaders](#validation-debugging-and-profiling-tools-for-slang-shaders), [Using the RetroArch Log for Shader Debugging](#using-the-retroarch-log-for-shader-debugging), [Debugging Shaders with Colors](#debugging-shaders-with-colors) |\n\n## Advanced Techniques\n\n### Validation, Debugging, and Profiling Tools for Slang Shaders\n\n#### Emulator Support and Reference Implementation\n\nCurrently, there are no standalone external validation tools or compilers for slang shaders outside of RetroArch. However, other emulators such as Ares also support the slang format, though implementation details may differ and not all shaders are guaranteed to work identically across emulators. Some projects, like 86Box, have expressed interest in supporting slang shaders in the future.\n\nIf you are an emulator developer and want to support slang shaders, you are encouraged to use RetroArch's MIT Licensed reference implementation. This ensures maximum compatibility and leverages the most mature and widely tested codebase for shader support among emulators.\n\n#### Note on Unrelated SLANG Formats\n\nThere is a completely different SLANG format that was developed after RetroArch's. It is unrelated to Libretro and should not be confused with the slang shader format described in this document.\n\n#### Graphics Debugging and Profiling Tools\n\nWhile there are no slang-specific external tools, any graphics debugging or profiling tool that works with Vulkan, OpenGL, or Direct3D can be used to profile and debug slang shaders running in RetroArch. These tools allow you to inspect shader code, view intermediate render targets, analyze performance, and debug rendering issues. Some popular tools include:\n\n- **RenderDoc** (https://renderdoc.org/):\n - A powerful, open-source graphics debugger for Vulkan, OpenGL, and Direct3D. Capture a frame in RetroArch, inspect all draw calls, view shader code, and analyze textures and framebuffers.\n - **Getting started:** Launch RetroArch, start your content, and attach RenderDoc to the RetroArch process. Capture a frame and explore the pipeline and resources.\n\n- **NVIDIA Nsight Graphics** (https://developer.nvidia.com/nsight-graphics):\n - A comprehensive tool for debugging, profiling, and analyzing graphics applications on NVIDIA GPUs. Supports Vulkan, OpenGL, and Direct3D.\n - **Getting started:** Install Nsight Graphics, launch RetroArch through the tool, and use its frame debugging and profiling features.\n\n- **Microsoft PIX** (https://devblogs.microsoft.com/pix/):\n - A performance tuning and debugging tool for Direct3D applications on Windows. Useful for analyzing shaders and GPU workloads on D3D11/D3D12 backends.\n - **Getting started:** Run RetroArch under PIX, capture a frame, and inspect shader stages and GPU timings.\n\n- **GPUView** (https://docs.microsoft.com/en-us/windows-hardware/test/gpuview/):\n - A system-level GPU profiler for Windows, useful for analyzing overall GPU usage and identifying bottlenecks.\n\nThese tools are invaluable for diagnosing rendering issues, optimizing performance, and understanding how your shaders interact with the graphics pipeline.\n\n#### Using the RetroArch Log for Shader Debugging\n\nRetroArch's log output provides some useful information for debugging shaders, especially compilation errors. If your shader fails to compile, check the log for detailed error messages, including the line number and nature of the error. You can increase the log verbosity in RetroArch's settings to get more detailed output. Reviewing the log is often the fastest way to identify and fix issues in your shader code.\n\n#### Debugging Shaders with Colors\n\nOne of the simplest and most effective ways to debug shaders is to output specific colors in your fragment shader to \"flag\" certain conditions or code paths. This technique helps you visually identify when a particular branch of code is executed, when a value is out of range, or when a bug occurs.\n\nFor example, you might want to check if a computed value exceeds a threshold, or if a texture coordinate is outside the expected range. By outputting a bright, easily recognizable color (such as red or green) when the condition is met, you can quickly spot issues on screen.\n\n**Example:**\n\n```glsl\n#pragma stage fragment\nlayout(location = 0) out vec4 FragColor;\nvoid main() {\n float value = ...; // Some computed value\n if (value > 1.0) {\n FragColor = vec4(1.0, 0.0, 0.0, 1.0); // Red: value is too high\n } else {\n FragColor = vec4(0.0, 1.0, 0.0, 1.0); // Green: value is OK\n }\n}\n```\n\nYou can use this approach to test any condition—just pick a color that stands out. This visual feedback is especially useful when debugging complex effects, coordinate calculations, or sampling issues. Once you've identified and fixed the problem, simply remove or comment out the color-debugging code. Using the parameter system with this debugging technique can be very powerful. For example, parameters can be used as switches to bypass certain sections of code in real time, or to modify values meant for internal use. The parameters can be removed and the uniforms converted to constants before publishing.\n\n**Example: Using a Parameter as a Debug Switch**\n\nYou can use a shader parameter to toggle debugging output on and off in real time. This allows you to enable visual debugging only when needed, without modifying the shader code each time.\n\n```glsl\n#pragma parameter DebugMode \"Enable debug color output\" 0.0 0.0 1.0 1.0\nlayout(push_constant) uniform Push {\n float DebugMode;\n} registers;\n\n#pragma stage fragment\nlayout(location = 0) out vec4 FragColor;\nvoid main() {\n float value = ...; // Some computed value\n if (registers.DebugMode > 0.5) {\n // Output bright green if debugging is enabled\n FragColor = vec4(0.0, 1.0, 0.0, 1.0);\n } else {\n // Normal rendering\n FragColor = ...;\n }\n}\n```\n\nThis approach lets you toggle debug colors from the frontend UI, making it easy to test and diagnose issues interactively. You can add more parameters to control which conditions trigger debug output, or to adjust the debug color as needed.\n\n### Naming Conventions for Uniforms and Samplers\n\nThere are no strict requirements for naming or formatting uniforms and samplers in slang shaders—developers are free to choose conventions that best suit their project and style. However, here are some best practices and common patterns observed in the community:\n\n- **Samplers:**\n - Treat samplers just like any other variable.\n - External textures (such as lookup tables or fixed images) are often referenced with ALL_CAPS (e.g., `LUT`, `NOISE_TEXTURE`) to indicate that they are fixed, unchanging blobs.\n - Source textures, which change from frame to frame (such as `Source` or `Original`), are typically referenced with CamelCase to reflect their dynamic nature.\n\n- **Uniforms:**\n - Uniforms are fixed across a single frame but may change between frames. The uniforms presented by the frontend (such as `SourceSize`, `OutputSize`, `FrameCount`) use CamelCase for this reason.\n - Parameter uniforms (those controlled by the user or preset) are often considered 'fixed' and may be written in ALL_CAPS (e.g., `BRIGHTNESS`, `SATURATION`).\n\n- **#define Usage:**\n - It's common to use `#define` for uniforms that are referenced multiple times in a shader. This can improve readability and make it easier to update variable names in one place.\n - However, uniforms provided by the frontend (such as `SourceSize`, `OutputSize`, etc.) do not need to be `#define`d, as their names are stable and consistent for backwards compatibility.\n\nUltimately, choose naming conventions that make your shader code clear and maintainable for yourself and others. Consistency within a project is more important than following any particular global style. If you are adding or modifying someone else's shader, it's best to follow the original style rather than refactoring the entire shader or mixing styles.\n\n### Shader Version Selection and Cross-Platform Compilation\n\nWhen writing new slang shaders, always use `#version 450` unless you have a specific reason to use `#version 310 es` (for example, targeting mobile hardware that requires it). Using `#version 450` ensures broad compatibility with a wide set of features, and is the standard for Vulkan-based workflows. Only use `#version 310 es` if it is absolutely necessary for your use case.\n\nIf you believe you need a newer shader version (such as `#version 460` or later), it's best to discuss your requirements with the Libretro developers first. There may be a workaround or alternative approach that will have better support across platforms. Users can be frustrated when they pick a shader that fails to compile on their system, so sticking to the most widely supported versions is recommended.\n\n#### Platform Differences and Testing\n\nShader compilation and feature support can vary significantly between platforms, especially between Vulkan and DirectX. A shader that compiles and runs perfectly on Vulkan may not compile or behave the same way on DirectX (D3D11/D3D12), and vice-versa. For best results:\n\n- Always test your shader on Vulkan as a baseline, since it is the most robust and widely supported backend for slang shaders.\n- If you have access to a Windows system, also test your shader with at least one Direct3D driver (such as D3D12) to catch platform-specific issues early.\n- Be aware that some features or syntax may be accepted by one backend but not another. When in doubt, consult the documentation or ask the community for advice.\n\n#### Troubleshooting 'Unknown Semantic' Errors\n\nIf shader compilation fails with an 'unknown semantic' error, check that every parameter uniform you declare in your shader has a matching `#pragma parameter` line. The reflection system relies on these lines to map uniforms to user parameters and internal semantics. Missing or mismatched pragmas are a common cause of this error.\n\nBy following these guidelines, you'll maximize the portability and reliability of your shaders, and help ensure a smooth experience for users across all supported platforms.\n\n### Best Practices for Multi-Pass (Multi-Stage) Shaders\n\nWhen designing shaders that are meant to be used together as a multi-pass (multi-stage) effect, following best practices for organization and clarity will help both you and other users maintain, extend, and reuse your work. It is common for users to group unrelated shaders into a custom preset, but for tightly coupled multi-pass effects, consider the following guidelines:\n\n1. **Descriptive Naming:**\n - Give every shader a descriptive name using `#pragma name`. Avoid using numbers or generic names; prefer qualitative, meaningful names (e.g., `#pragma name GaussianBlurH` and `#pragma name GaussianBlurV`).\n - When shaders are meant to always be used together (tightly coupled), give them a matching prefix for clarity.\n\n2. **Shared Functions:**\n - Place shared functions, macros, or utility code in a separate file with the `.inc` extension (not `.h`). Use `#include` to bring these into each shader file that needs them.\n\n3. **One Stage per File:**\n - Do not try to put multiple fragment or vertex shaders in one file. Each `.slang` file can only have one vertex stage and one fragment stage. If for some reason a frontend ever supports this, ignore it. It's a bad idea.\n\n4. **Shared Parameters:**\n - Use includes for parameters when they are shared among shaders. This ensures consistency and reduces duplication. Consider using the menu technique below to show users what shader stages or high-level aspects of the effect the parameters relate to.\n\n5. **Document Pass Order:**\n - If the shader stages need to be used in a specific order, add a comment near the top of each file or in the preset to make this explicit.\n\n6. **Example Preset File:**\n - Always include an example `.slangp` preset file showing how your multi-pass shader is intended to be used.\n - Assume that the input is gamma-corrected and the output is 8-bit SDR. If your shader operates on linear data, add a linearizing shader stage before and a gamma correction shader stage at the end. This makes it clear to users what sort of data your shader expects and produces.\n\nFollowing these practices will make your multi-pass shaders easier to understand, maintain, and integrate into larger filter chains or custom presets.\n\n\n### Practical Guide to Feedback and History\n\nFeedback in slang shaders refers to the ability for a shader pass to access the output of a previous pass from the previous frame. This is a powerful technique for creating time-based effects such as motion blur, ghosting, persistence, and other temporal filters.\n\n#### What is Feedback?\n\nEach shader pass can declare a uniform sampler2D with the alias `NAMEFeedback`, where `NAME` is the pass name. The frontend (e.g., RetroArch) provides one frame of history for each `NAMEFeedback` uniform, following sensible best practice. This means you can access the output of a pass from the previous frame, but not from earlier frames directly.\n\n#### Why Use Feedback?\n\nFeedback enables effects that depend on previous frame data. Common uses include:\n- Motion blur\n- Temporal anti-aliasing\n- Persistence/afterglow\n- Ghosting\n- IIR (infinite impulse response) signal processing\n\nWith just one frame of history, you can implement a wide variety of time-based effects using IIR techniques. By blending the current frame with the previous frame's output, you can achieve effects that appear to have \"memory\" or persistence, without needing multiple frames of history.\n\n#### How to Use Feedback\n\n1. **Declare the Feedback Uniform:**\n - In your shader, declare a sampler2D uniform with the alias `NAMEFeedback`.\n - Example:\n ```glsl\n #pragma name BlurPass\n #pragma stage fragment\n layout(binding = 1) uniform sampler2D BlurPassFeedback;\n ```\n\n2. **Sample the Previous Frame:**\n - In your fragment shader, sample from the feedback texture.\n - Example:\n ```glsl\n vec4 prev = texture(BlurPassFeedback, vTexCoord);\n ```\n\n3. **Blend with Current Output:**\n - Combine the previous frame's output with the current computation to create a time-based effect.\n - Example (simple persistence):\n ```glsl\n FragColor = mix(texture(Source, vTexCoord), prev, 0.5);\n ```\n\n#### Example: Temporal Persistence\n\n```glsl\n#pragma name PersistencePass\n#pragma stage fragment\nlayout(binding = 1) uniform sampler2D PersistencePassFeedback;\nlayout(binding = 0) uniform sampler2D Source;\nlayout(location = 0) in vec2 vTexCoord;\nlayout(location = 0) out vec4 FragColor;\nvoid main() {\n vec4 current = texture(Source, vTexCoord);\n vec4 previous = texture(PersistencePassFeedback, vTexCoord);\n FragColor = mix(current, previous, 0.7); // 70% previous, 30% current\n}\n```\n\n#### Best Practices\n\n- Use feedback for effects that require temporal memory.\n- Limit feedback to one frame for performance and simplicity; frontends only provide one frame natively.\n- For more complex history (e.g., multi-frame effects), use additional passes to \"shift\" feedback manually, but this is rarely needed.\n- Leverage IIR signal processing techniques to achieve long-lasting effects with just one frame of history.\n\n#### Notes\n\n- Input textures can have arbitrary history (limited by memory), but cannot be fed back since the filter chain cannot render into them.\n- For the very first frames, feedback textures are initialized to transparent black (`0`).\n\nFeedback is a core feature for time-based shader effects, and mastering its use unlocks a wide range of creative possibilities.\n\n### Vertex Precomputation\n\nIn many cases, it is beneficial to perform certain calculations in the vertex shader and pass the results to the fragment shader as varyings. This technique, known as vertex precomputation, can improve performance by reducing redundant computations in the fragment shader, which typically runs many more times per frame than the vertex shader.\n\n#### Benefits\n- Reduces the computational load in the fragment shader, which is executed per-pixel.\n- Can help avoid redundant calculations, especially for values that are constant or linearly interpolated across a primitive.\n- May improve GPU throughput and efficiency, particularly on lower-end hardware.\n\n#### Example\n\nSuppose you need to compute a texture coordinate transformation that is the same for all fragments of a given vertex. Instead of repeating the calculation in the fragment shader, you can do it once in the vertex shader:\n\n```glsl\n#pragma stage vertex\nlayout(location = 0) in vec4 Position;\nlayout(location = 1) in vec2 TexCoord;\nlayout(location = 0) out vec2 vTransformedCoord;\nvoid main()\n{\n gl_Position = MVP * Position;\n // Example transformation\n vTransformedCoord = TexCoord * 2.0 + 0.5;\n}\n\n#pragma stage fragment\nlayout(location = 0) in vec2 vTransformedCoord;\nlayout(location = 0) out vec4 FragColor;\nvoid main()\n{\n FragColor = texture(Source, vTransformedCoord);\n}\n```\n\n#### Guidance\n- Use vertex precomputation for any value that is constant per vertex or can be linearly interpolated across the primitive.\n- Avoid duplicating expensive calculations in the fragment shader if they can be done once per vertex.\n- Be mindful that not all calculations are suitable for precomputation (e.g., those requiring per-pixel precision or non-linear interpolation).\n- Profile your shaders if in doubt; on complex scenes or low-power devices, the benefits can be significant.\n\n### HDR Programming\n\nThis section is informational best-practice guidance, not a strict prescription. The goal is to provide a conceptual framework that reduces avoidable errors by keeping HDR-related processes explicit and intentional.\n\nFor background on how the slang pipeline handles gamma and linearization in general, see [sRGB](#srgb).\n\nWithout explicit transfer-function and color-space discipline, advanced pipelines can produce luminance rolloff errors, highlight clipping/banding, hue shifts near gamut limits, and inconsistent results across SDR, scRGB, and HDR10 output paths. Structuring processing into explicit stages keeps each operation in a well-defined working space and isolates conversions so output-target or source-assumption changes can be handled predictably. To achieve this structure, we first must develop mental models for each of our stages.\n\n#### Signal model, linear light processing, and presentation\n\nThe following is an example of how to break down a complex pipeline into stages using physical modeling. We'll start with three models: signal model, light model, and presentation model. Terminology is defined in [Pipeline vocabulary](#pipeline-vocabulary).\n\n##### Stage 1: Real-world Signal Modeling\n\nAs a working mental model, we can treat source texture data from a libretro core as normalized voltage video levels coming from a virtual DAC, video output connector, framebuffer, or other such device.\n\nA practical rationale for this choice:\n\n- Source values are often gamma-corrected signals, not linear-light scene data.\n- The source color space may not match modern presentation color spaces.\n- Applying display-like transforms too early or too late in the chain can introduce compounded errors.\n\nFor this example, we'll operate on these assumptions:\n\n - Source data is in range [0, 1], mapping to lowest and highest signal voltages\n - Source data is gamma-corrected according to Rec. 601\n - Source data represents the Rec. 601 color space, slightly different from target SDR color space (Rec. 709) and very different from target HDR color space (Rec. 2020)\n\nThis model helps separate signal transport from light-domain math, and makes each conversion step intentional. We can do all signal-domain processes here. Other operations related to light blending or mapping to the user's color space have to be done after conversion steps.\n\n##### Stage 2: Linear Light Processing\n\nMost physically meaningful operations (blending, bloom accumulation, blur energy conservation, and light-like compositing) are best behaved in linear light. General-purpose upscaling and downscaling algorithms are also usually best behaved in this stage because interpolation and reconstruction are performed in linear light.\n\nWhen blending is done in gamma-encoded domains, midtones and highlights are typically biased, causing dark seams, incorrect brightness rolloff, or halo artifacts. Converting to linear light before heavy compositing stages reduces these error sources and usually gives more stable results across backends.\n\nOutput format is important at this stage. An 8-bit format can result in a loss of dynamic range, so 16-bit floating point format is recommended when shaders need to pass linear data to later shaders. This also allows values to exceed the [0, 1] range.\n\n##### Stage 3: Presentation\n\nPresentation is the stage where linear working data is fit to an output-referred target. In practice, this mainly means:\n\n- tone mapping (compressing luminance into the target's usable range), and\n- gamut mapping/compression (fitting colors into the target primaries without severe clipping artifacts).\n\nTreat presentation as a deliberate final stage rather than something implied by format alone. This makes behavior easier to reason about when switching between SDR, scRGB, and HDR10 outputs.\n\nPresentation is where technical correctness becomes visible output behavior. Decisions made here primarily determine highlight rolloff, color fidelity near gamut boundaries, and consistency between SDR, scRGB, and HDR10 outputs.\n\nPractical guidance for Stage 3:\n\n- **Luminance anchoring**: Decide how internal linear values map to display-referred luminance before choosing tone mapping behavior. Keep this mapping explicit so the same shader behaves predictably across output targets.\n- **Tone mapping policy**: If linear-light values remain near the target range, simple clamping may be acceptable. If values significantly exceed target range, use a deliberate tone mapping operator to reduce hard clipping, highlight banding, and hue distortion.\n- **Gamut compression policy**: When targeting constrained or different primaries, use gamut compression to reduce clipping artifacts. Choose rendering intent based on artistic goal (for example, preserving relationships vs preserving in-gamut accuracy).\n- **Gamut compression intents**: The four classic ICC rendering intents are a useful frame of reference:\n - **Perceptual**: Compresses the full gamut to preserve visual relationships.\n - **Relative colorimetric**: Preserves in-gamut values and clips out-of-gamut values relative to target white.\n - **Saturation**: Prioritizes vividness over strict color accuracy.\n - **Absolute colorimetric**: Preserves absolute colorimetry including white-point differences, clipping out-of-gamut values.\n- **Output contract check**: Validate the final stage against the per-format output contract before shipping. The normative mapping for expected transfer function by final-pass format is [Output transfer-function mapping](#output-transfer-function-mapping) under [`#pragma format`](#pragma-format).\n- **Default operation order**: A stable baseline is tone mapping first, gamut compression second, then output encoding (inverse EOTF for SDR or PQ encoding for HDR).\n- **Validation checklist**: Verify neutral gradients stay neutral, highlight rolloff is smooth, saturated edges do not collapse abruptly, and behavior remains coherent when switching between SDR, scRGB, and HDR10 outputs.\n\n#### Transition Stages\n\nAt this point, we have a model for a pipeline that looks like this:\n\n```text\nSource -> Direct processing -> Linear light processing -> Tone mapping -> Gamut compression -> Output encoding\n```\n\nHowever, we haven't actually defined how we convert data from one stage to the next. For that, we need transition stages. SDR and HDR require separate paths.\n\nFor unknown source characteristics, prefer a BT.1886 virtual display EOTF, which can be approximated as a simple 2.4 power function. For backlit handhelds, values near gamma 2.2 are often practical. For frontlit or reflective handhelds, treat the effective value as system-dependent.\n\n##### SDR\n```text\nSource -> Direct processing -> Virtual display EOTF -> Linear light processing -> Tone mapping -> Gamut compression -> SDR output (inverse EOTF) -> Output\n```\n\n##### HDR\n```text\nSource -> Direct processing -> Virtual display EOTF -> Linear light processing -> (Tone mapping) -> (Gamut compression) -> HDR output (PQ encoding) -> Output\n```\n\nHDR ranges are large, so tone mapping and gamut compression may not be necessary depending on the output range of the linear light processing stage.\n\nIn this document, SDR output is described as inverse EOTF to emphasize preserving intended system-gamma behavior, rather than introducing a camera-style OETF model. HDR output is described as PQ encoding and requires mapping internal rendering values to intended nit values.\n\n#### Stage-to-workflow mapping\n\nThe 3-stage model and the 6-step workflow describe the same process at different granularity. Use this crosswalk when moving from conceptual design to pass planning:\n\n| 3-stage model | 6-step workflow items |\n|---|---|\n| Stage 1: Real-world Signal Modeling | 1) Direct processing, 2) Virtual display EOTF |\n| Stage 2: Linear Light Processing | 3) Linear light processing |\n| Stage 3: Presentation | 4) Tone mapping, 5) Gamut compression, 6) Presentation encoding |\n\n#### Pipeline vocabulary\n\nThe following terms are used throughout this section.\n\n- **Direct processing**: Operations applied directly to gamma-corrected source-domain signals.\n- **Virtual display EOTF**: A display-transfer model used to move source-domain signals into a linear-light working domain.\n- **Linear light processing**: Operations performed in linear light after applying the virtual display EOTF.\n- **Tone mapping**: Luminance remapping from working range into the target presentation range.\n- **Gamut compression**: Mapping of out-of-gamut colors into the target color volume with reduced clipping artifacts.\n- **SDR output (inverse EOTF)**: Final conversion from linear-light working values to SDR gamma-corrected output.\n- **HDR output (PQ encoding)**: Final conversion from linear-light working values to HDR10 PQ-encoded output.\n\n##### Suggested workflow for complex pipelines\n\nGeneralized summary:\n\n- Treat source values as signal-domain data first, then move intentionally into linear light through a virtual display EOTF.\n- Keep major reconstruction, filtering, compositing, and light-like operations in linear light for more stable and predictable results.\n- Use presentation controls (tone mapping and gamut compression) only when the target output or content range requires them.\n- Encode only at presentation: inverse EOTF for SDR, or PQ encoding for HDR10.\n\nPractical conclusion: Build presets so early and middle passes remain target-agnostic, then make the final presentation pass responsible for output encoding. This keeps SDR, scRGB, and HDR10 variants easier to maintain and less error-prone. Use a variety of test patterns to ensure color appearance behaves naturally.\n\n#### Example use cases\n\nThe following examples show how the same process vocabulary can be applied to different shader goals. The pass names in these examples are conceptual placeholders; flexible implementation is left to developers.\n\n##### Use case 1: Real-world model of a CRT device\n\nThis pipeline follows all stages of the general flow.\n\nHigh-level outline:\n\n1. **Direct processing**: Apply signal-domain operations that emulate source-side video behavior.\n2. **Virtual display EOTF**: Linearize using a CRT-like display model (commonly BT.1886/approximate 2.4 behavior).\n3. **Linear light processing**: Perform light-domain effects and compositing.\n4. **Tone mapping**: Fit luminance into the output range.\n5. **Gamut compression**: Compress out-of-gamut colors into the target primaries.\n6. **Presentation encoding**: Use inverse EOTF for SDR targets or PQ encoding for HDR10 targets.\n\nShort `.slangp` example:\n\n```ini\nshaders = 4\n\nshader0 = \"passes/composite_ntsc.slang\"\nshader1 = \"passes/virtual_display_eotf.slang\"\nshader2 = \"passes/crt_upscale_bloom.slang\"\nshader3 = \"passes/present_sdr_hdr.slang\"\n\n# Example parameters (implementation-dependent)\nDisplayEOTF = 2.4\nToneMapStrength = 0.75\nGamutCompress = 0.5\n```\n\n##### Use case 2: Real-world model of a reflective handheld device\n\nThis pipeline is typically subtractive-only and often does not require tone mapping. However, gamut compression remains important because the device color appearance can differ strongly from typical modern monitors/TVs.\n\nTypical emphasis:\n\n1. Apply direct/signal-domain shaping for handheld-like response.\n2. Apply a handheld-appropriate virtual display EOTF.\n3. Perform linear-light processing for stable compositing.\n4. Skip tone mapping when dynamic-range expansion is not part of the goal.\n5. Keep gamut compression as a primary presentation control.\n6. Encode for final target (inverse EOTF for SDR or PQ encoding for HDR10).\n\nShort `.slangp` example:\n\n```ini\nshaders = 4\n\nshader0 = \"passes/handheld_ghosting.slang\"\nshader1 = \"passes/handheld_linearize.slang\"\nshader2 = \"passes/handheld_dot_matrix.slang\"\nshader3 = \"passes/handheld_color_correct.slang\"\n\n# Example parameters (implementation-dependent)\nDisplayEOTF = 2.2\nGamutCompress = 0.8\n```\n\n##### Use case 3: Specialized upscaler\n\nA specialized upscaler usually does not require tone mapping or gamut compression as core stages, but interpolation/reconstruction should still be done in linear space for best behavior.\n\nTypical emphasis:\n\n1. Optional direct processing for preconditioning.\n2. Apply virtual display EOTF to reach linear light.\n3. Run upscaler/reconstruction in linear light.\n4. Skip tone mapping and gamut compression unless the preset's output target explicitly needs them.\n5. Encode for presentation target (inverse EOTF for SDR or PQ encoding for HDR10).\n\nShort `.slangp` example:\n\n```ini\nshaders = 3\n\nshader0 = \"passes/upscaler_linearize.slang\"\nshader1 = \"passes/upscaler_upscale.slang\"\nshader2 = \"passes/upscaler_present.slang\"\n\n# Example parameters (implementation-dependent)\nDisplayEOTF = 2.4\n```\n\n#### Common decision points\n\n| Question | Guidance |\n|---|---|\n| When should I include a tone mapping step? | Include it when working-space luminance values can fall outside the [0, 1] output range after processing. For small excursions, clamping is acceptable. For larger ones, use an explicit operator. Pure upscalers and linear pass-through chains typically skip this step. |\n| When does gamut compression matter most? | Gamut compression is most important when targeting sRGB / Rec. 709 output and when source content uses saturated colors that may extend outside Rec. 709. It is less critical for HDR or scRGB targets. |\n| Which virtual display EOTF should I use as a fallback? | Prefer BT.1886 (approximated as a 2.4 power function) when source characteristics are unknown. Use approximately 2.2 for backlit handhelds. Frontlit and reflective handhelds are system-dependent. |\n\n## FAQ: Out of Scope for This Document\n\nThis document is mainly about how to write and organize `.slang` shaders and `.slangp` presets. The questions below are the kind of things people often ask next, but they go beyond what this guide is trying to cover.\n\n| Out-of-scope question | Why it is out of scope here |\n|---|---|\n| What are practical varying/location limits per backend and GPU generation? | That depends a lot on the API, driver, and hardware you are running on. |\n| What is the exact precision policy (`mediump` vs `highp`) for each platform? | This guide does not try to lay down a per-platform precision policy. |\n| How are complex location packing edge cases handled (for example nested structs or arrays of structs)? | The basics are covered here, but not every GLSL packing corner case. |\n| What is the full runtime sampler binding order when built-ins, aliases, and user textures are mixed? | That gets into frontend/backend implementation details rather than shader authoring rules. |\n| Is there an official error-code catalog mapping compiler/runtime errors to fixes? | There is practical debugging advice here, but not a full backend-by-backend error reference. |\n| What pass-count/format budgets should be used for low-end hardware? | The document gives general performance advice, not hard budgeting targets. |\n| How much VRAM should be budgeted for deep history/feedback chains? | It explains the feature, but not exact memory budgeting. |\n| What are the exact guarantees during rapid resolution/aspect/rotation changes across all backends? | Those guarantees depend on backend behavior and are beyond this guide. |\n| What is the definitive precedence order between shader defaults, preset overrides, and runtime UI changes? | The pieces are described, but there is no formal precedence model spelled out here. |\n| Is there an official CI/validation workflow for shader pack maintainers? | This guide does not prescribe a standard CI or validation pipeline. |\n| What minimum cross-backend test matrix is required before release? | It recommends testing, but does not define a required release checklist. |\n"
},
{
"path": "docs/development/shader/xml-shaders.md",
"content": "# XML Shaders (Discontinued)\n\n!!! Warning\n XML shaders have been discontinued and are no longer available in RetroArch. This page should be considered only for historical reference.\n\n## History\n\nXML shaders were originally implemented in bSNES as single pass GLSL shaders. The extension is `.shader` and is marked up with XML. These shaders were written against the fixed-function pipeline and is now referred to as a legacy XML shaders by RetroArch. The prefix ofruby originates from bSNES’ driver module, ruby::.\n\n## Example legacy XML shader\n\n```\n\n\n\n \n\n```\n\nRetroArch implemented this legacy shader spec to be compatible with many shaders written at the time. It is also referred to as v1.0 XML shaders. This specification was then extended to support multi-pass, scaling arguments, etc, which resulted in v1.1 XML shaders (spec here). It is still legacy as it uses fixed-function features. RetroArch implements v1.1 XML shaders, and some more features to be feature equivalent with the Cg shader implementation. bSNES did not implement v1.1 and adoption of this spec was slowed down.\n\n## Modern XML shaders\n\nLegacy XML shaders used fixed function, and they would therefore never work with modern GL (GLES, GL3.x+). To fix this, RetroArch extended the XML shader spec. Fixed function cruft like gl_ModelViewProjectionMatrix, gl_MultiTexCoord0 and gl_Vertex was replaced with uniforms and attribute streams. The modern XML shader spec in RetroArch focuses on being compatible with GLES2 (and compatible with GL 3.x+ as well).\n\nThe ruby prefix was later deprecated and you could use TexCoord, VertexCoord etc. For compatibility reasons, the ruby prefix is still accepted.\n\n## Example modern shader\n\n```\n\n\n \n \n\n```\n\n## Moving off XML shaders\n\nXML shaders as a whole are deprecated in RetroArch, and will not be selectable in RGUI. You can still use them via video_shader config option. To use GLSL in RetroArch, the new GLSL shaders format is used, which mirrors the Cg shaders implementation quite well. The new GLSL shaders only support modern style, no fixed function. To convert XML shaders into straight GLSL, see GLSL shaders.\n"
},
{
"path": "docs/googlea211139c43d4edca.html",
"content": "google-site-verification: googlea211139c43d4edca.html"
},
{
"path": "docs/guides/accessibility.md",
"content": "# Accessibility\n\n## What is Accessibility\n\nAccessibility features allow people with disabilities to access various types of software. In the case of RetroArch, the accessibility feature allows blind users to navigate the menus of RetroArch using the OS Narrator. Combined with the AI Service's Speech and Narrator modes, this can open up a large number of video games to blind players that couldn't play them beforehand. Windows, MacOS, and Linux are the supported platforms.\n\n## How to enable Accessibility\n\nWhile Accessibility has been available in RetroArch since v1.8.2, it is turned off by default. One can turn it on from the in-RetroArch menu in one of two ways. For the XMB theme (default before v1.8.5) by pressing: right, up seven times, enter (or x on Linux), and then right, or for the Ozone theme (default v1.8.5 and later) by pressing: left, down, right, up seven times, enter (x on linux), and then right. Otherwise, running the RetroArch executable with the --accessibility flag will override the configuration setting, and turn on accessibility. For blind users, the command is as follows: \"retroarch, space, two dashes, accessibility\" For a complete guide on using Retroarch with accessibility features, see [This guide](retroarch-accessibility-guide.md)\n\n## OS requirements\n\nRetroArch uses the OS narrator to speak out text. On Windows, this is the Microsoft Narrator, on MacOS, it is the \"say\" command, and on linux, it is the \"espeak\" command. If the narrator is not speaking any text, you can try installing the additional voice packs for your system language\n\n- [Windows voice install guide](https://support.microsoft.com/en-us/help/22805/windows-10-supported-narrator-languages-voices)\n- [MacOS voice install guide](https://support.apple.com/guide/mac-help/change-the-voice-your-mac-uses-to-speak-text-mchlp2290/mac)\n- On Ubuntu Linux, you can install espeak by running `sudo apt-get install espeak` in a terminal window, and `sudo apt-get install espeak-data` to install additional language voice packs.\n\n## AI Service Text-to-Speech\n\nTo use the AI Service with the Accessibility narrator, see the [AI Service doc page](ai-service.md).\n"
},
{
"path": "docs/guides/ai-service.md",
"content": "## What is the AI Service\n\nThis feature allows users to capture the current state of the game and feed it to a customizable endpoint for additional processing. With the help of OCR (optical character recognition) and other techniques, the AI service can provide a live translation of a game, or text-to-speech capabilities for the visually impaired among other things, either on demand or automatically.\n\n## How it works\n\nWhen a user presses the AI Service hotkey, RetroArch will grab the screen of the game being played and send it to the service endpoint listed in the configuration. When the service returns, RetroArch will display the results according to the configuration. Pressing the AI Service hotkey again will clear any content currently displayed.\n\n## How to set it up\n\nFirst, go to Settings->Input->Hotkey Binds, and assign a key for the AI Service.\n\nNext, go to Settings->AI Service and modify the configuration options as follows.\n\n`AI Service Enabled` should be set to `ON`.\n\nThe `AI Service URL` is the URL of the AI service that you want to use. For example, `http://localhost:4404` for a service running locally on your computer and listening on port 4404. Check the documentation of the 3rd party AI service you're using to find out what this URL should be. (see \"Known Services\" below for some examples).\n\n`AI Service Output` controls how the processed content is displayed on your end. Naturally, your selection should match whatever capabilities the AI service you have configured offers. Note that `Image Mode` requires widgets to be enabled (Settings->On-Screen Display->On-Screen Notifications->Graphics Widgets).\n\n- In `Image Mode` the AI service is expected to return an image that will be overlaid on top of the game feed. This mode can be used to draw information on the screen, like writing a translation over the original text box. \n- In `Narrator Mode` the AI service is expected to return text that will be spoken on the user's machine using native text-to-speech capabilities, like the Windows narrator.\n- In `Speech Mode` the AI service is expected to return an audio file. This mode can be used as an alternative to the `Narrator Mode` if the user's machine is unable to use native text-to-speech, relying on the service to provide the actual audio.\n- In `Text Mode` the AI service is expected to return a text that will be displayed on top of the screen, like subtitles.\n- A combined mode like `Text + Narrator` works as you would expect, providing both the result as text on screen and text-to-speech.\n\n`Pause During Translation` will pause the core as soon as the user presses the AI Service hotkey and display whatever content is returned from the service. Pressing the AI Service hotkey a second time will clear the display and resume the core.\n\n`AI Service Text Position Override` can be used to control the placement of the subtitles on screen when `AI Service Output` is set to `Text Mode`. By default, services are able to control whether a specific subtitle should be displayed at the top or at the bottom of the screen depending on the situation. This setting however ignores the service hint and forces the placement to be one or the other, at the user's discretion. `AI Service Text Padding` allows a more precise control of the placement of the subtitle adding blank space at the bottom of the screen (for bottom-placed subtitles) or at the top of the screen (for top-placed subtitles).\n\nWhen the service is used to provide translation or text-to-speech using OCR, and `Source Language` is set to `Don't care`, the service will attempt to auto-detect the language on screen. Setting it to a specific language will increase accuracy, and restrict translation to only text in the source language specified. If `Target Language` is set to `Don't care` then the translation will be provided in English, or in the selected language otherwise.\n\n## Automatic mode\n\nA special case must be made when the AI service needs to run automatically. By default, the AI service runs in a manual mode. The user presses the AI Service hotkey to process one screen immediately, receives the result, eventually presses the hotkey again to dismiss it and moves on before requesting the AI service once more. Some services however are able to run automatically. This can only be enabled by services themselves and is mostly designed for local services due to the high number of requests per second.\n\nIf your service supports automatic mode, press the AI service hotkey once to enable processing. Now, the service will be polled at regular intervals and results will be automatically displayed as you keep playing. Pressing the AI service hotkey a second time (or invoking RetroArch's menu) will turn the AI service off.\n\nThe `AI Service Auto-Polling Delay` option in the AI Service settings control how fast the automatic requests are sent to the service. If you are experiencing slowdowns during play, try increasing the delay. It will lower the reactivity of the AI service, but will lessen the load on your CPU.\n\n## Known Services\n\n[VGTranslate](https://gitlab.com/spherebeaker/vgtranslate) is a python server you can run locally (or on your network) and uses Google Cloud OCR, and Google Text-to-Speech APIs with the Google Cloud keys you provide.\n\n[ZTranslate](https://ztranslate.net) uses a standalone client app for Windows or Linux that grabs the screen of the window currently in focus and displays a translated version in the ZTranslate client window. Also supports package-based translations for curated translations.\n\n[RetroArch-AI-with-IoTEdge](https://github.com/toolboc/RetroArch-AI-with-IoTEdge) uses IoTEdge and Azure Cognitive Services Containers (requires microsoft Azure account) to translate RetroArch screenshots and display them on a Lakka device. \n\n## Supported Cores\n\nSince RetroArch v1.8.0, all cores should now be supported if your build has menu widgets. If not, then only software cores will be supported.\n\n## For developers\n\nIf you wish to implement your own AI service, here is what you need. RetroArch sends a POST request every time the user invokes the AI service, the URL params are as provided.\n\n- `source_lang` (optional): language code of the content currently running.\n- `target_lang` (optional): language of the content to return.\n- `output`: comma-separated list of formats that must be provided by the service. Also lists sub-formats supported by the current RetroArchBuild.\n \nThe currently supported formats are:\n- `sound`: raw audio to play back. (`wav`)\n- `text`: text to be read through internal text-to-speech capabilities. `subs` can be specified on top of that to explain that we are looking for short text response in the manner of subtitles.\n- `image`: image to display on top of the video feed. (`bmp`, `png`, `png-a`) All in 24-bits BGR formats.\n \nIn addition, the request contains a JSON payload, formatted as such:\n- `image`: captured frame from the currently running content (in base64).\n- `format`: format of the captured frame (`png`, or `bmp`).\n- `coords`: array describing the coordinates of the image within the viewport space (x, y, width, height).\n- `viewport`: array describing the size of the viewport (width, height).\n- `label`: a text string describing the content (`__`).\n- `state`: a JSON object describing the state of the frontend, containing:\n - `paused`: 1 if the content has been paused, 0 otherwise.\n - ``: the name of a retropad input, valued 1 if pressed. Values can be: a, b, x, y, l, r, l2, r2, l3, r3, up, down, left, right, start, select.\n \nThe translation component then expects a response from the AI service in the form of a JSON payload, formatted as such:\n- `image`: base64 representation of an image in a supported format.\n- `sound`: base64 representation of a sound byte in a supported format.\n- `text`: results from the service as a string.\n- `text_position`: hint for the position of the text when the service is running in text mode (ie subtitles). Position is a number, 1 for Bottom or 2 for Top (defaults to bottom).\n- `press`: a list of retropad input to forcibly press. On top of the expected keys (cf. state, above) values `pause` and `unpause` can be specified to control the flow of the content.\n- `error`: any error encountered with the request.\n- `auto`: either `auto` or `continue` to control automatic requests.\n \nAll fields are optional, but at least one of them must be present. If `error` is set, the error is shown to the user and everything else is ignored, even `auto` settings.\n \nWith `auto` on `auto`, RetroArch will automatically send a new request (with a minimum delay enforced by ai_service_poll_delay); with a value of `continue`, RetroArch will ignore the returned content and skip to the next automatic request. This allows the service to specify that the returned content is the same as the one previously sent, so RetroArch does not need to update its display unless necessary. With `continue` the service *must* still send the content, as we may need to display it if the user paused the AI service for instance.\n"
},
{
"path": "docs/guides/arcade-getting-started.md",
"content": "# Getting started with arcade emulation\n\nArcade emulation requires a different planning approach than console emulation. Arcade emulator terminology can also differ from the terms used in other kinds of emulation.\n\n### Process\n\nThe libretro core ecosystem includes a variety of arcade emulators, each with specific strengths and each requiring its own distinct version of arcade \"romsets\" which the emulator supports. Every arcade emulator core is optimized for different hardware and different games. This guide is intended to help you decide which core to use and find out what romset version is required for that emulator.\n\nYou sometimes read people recommending to change core until your game works, this is extremely bad counselling for the following reasons :\n\n* It is usually faster to acquire/verify/rebuild romsets for a specific arcade core than to test each of your romsets with all available cores\n* You might be using an incomplete romset that is not playable in any core\n* Your platform might be missing the only core where that romset is playable\n* Some arcade cores are not recommended in most cases for reasons explained later in this document, so most users should avoid them\n* Retroarch playlists don't allow you to use a different core for each item, and you might not want to split your arcade games into several playlists\n\nThe real recommended approach goes like this :\n\n1. **Understanding the terminology**\n2. **Choose an arcade emulator to match your system**\n3. **Use the correct version romsets for that emulator**\n\n\n\n---\n\n## Step 1: Understanding the terminology\n\n* **Arcade emulators**: Even more than consoles/computers, arcade machines had many manufacturers and generations since the first arcade machine back in 1971, hence why what we refer as \"arcade emulators\" are actually multi-system emulators able to emulate thousands of different systems at various levels of faithfulness. Note that while they are known for arcade emulation, they can also emulate consoles and computers.\n* **Dump**: A dump is the digital representation of 1 chip present on a game board/cartridge.\n* **Rom**: A rom refers to 1 file containing 1 single dump or several dumps concatenated together.\n* **Romset**: Literally \"rom set\", meaning a set of roms. A romset is an archive containing one or several individual rom(s), **arcade emulators expect this game format**.\n* **Romset version**: It's not unusual for a specific romset to exist in different versions. The reason for this is that sometimes the attempts at digitalizing chips failed, and instead of having a game totally unavailable due to a romset being only 90% complete, it was decided to implement workarounds in the emulator's code to make the game somehow playable. Every time one of those chips finally gets a proper dump, which can happen decades later, ongoing arcade emulators will update their code by removing the workarounds and loading the correct dump, hence why multiple romset versions can exist.\n* **Samples**: Sometimes, instead of emulating the sound coming from the actual board of a game, an emulator will use recorded sounds. There can be several reasons for this : the chips weren't dumped, the emulator doesn't emulate that sound board (yet), or the emulator allows as an alternative to replace that emulation by high quality sound coming from another source (OST, ...).\n* **CHD**: Some arcade games require data from an internal hard drive, CD-ROM, laserdisk, or other media in order to be emulated -- those forms of media are packaged as CHD files. CHD files should be copied to subfolders (going by the name of the romset) within the folder where the arcade romset has been installed.\n\nAdditionally, there exist different kind of romsets :\n\n* **Bios romset**: A romset containing bioses required to run an arcade system. For example, the `neogeo` romset contains the bioses required to run SNK's NeoGeo cartridge system.\n* **Parent romset**: There can be multiple revisions of an arcade cabinet, the parent romset is usually the one dumped from the arcade cabinet which is believed to be the most recent revision, which is often a world or europe version. Parent romsets might require a bios romset to work.\n* **Clone romset**: Either dumped from arcade cabinet revisions believed to be older, or unofficial revisions of that arcade cabinet (bootlegs, hacks). Clone romsets might require a parent to work.\n* **Full non-merged romset**: The romset can be used standalone because the archive contains all the files required to run that romset, including any roms from its parent and bios romsets.\n* **Non-merged romset**: The romset can be used standalone because the archive contains all the files required to run that game, including any roms from its parent romset. With this format, a separate bios romset might be needed to run the romset.\n* **Split romset**: With this format, a clone romset never contains any of the roms present in its parent romset, and a parent romset never contains any of the roms present in its bios romset (if it exists).\n* **Merged romset**: Clones are merged into the parent romset zip, meaning that more than one game is stored in the romset.\n\n!!! info \"ClrMamePro users\"\n To rebuild Full Non-Merged romsets, use `Non-Merged` mode and deselect `Separate BIOS sets` via the `Advanced` button in the `Rebuild` and `Scanner` menus. ClrMamePro may display BIOS sets as missing in scans with these settings, but that is because all of the BIOS files will be distributed directly to the game romsets that need them.\n\n!!! tip \"Recommended romsets\"\n Non-merged romsets are recommended if you intend to use only a few romsets, while split romsets are recommended if you intend to keep the whole collection of romsets supported by an emulator. Merged romsets aren't recommended at all since [it's tricky](https://forums.libretro.com/t/how-to-play-clones-of-merged-mame-roms/35695) to run the alternate revisions of the game within the libretro ecosystem. \n\n\n---\n\n## Step 2: Choose an arcade emulator to match your system\n\nThere are two families of multi-system arcade emulators available as libretro cores: FinalBurn and MAME. These emulators are in turn available in multiple versions to allow users to best match a core to their device. There are also a few console emulators that can alternatively emulate the arcade hardware based on that console. There is no \"best arcade core\", recommending one is hard without knowing your device and what you intend to play, each of them being differently balanced.\n\n### The criterias for choosing an arcade core\n\n#### Integration within the libretro ecosystem\nA better integration allows for more features to be available from the frontend you are using, like netplay, runahead, rewind, retroachievements, ... but also reduces the risk of bugs. The quality of the integration is directly linked to the availability of a support team for the core.\n\n#### Accuracy\nTheoretically, more recent version of the emulators should always be more accurate, which means the graphics, sound and gameplay of the games are more likely to be faithful to the original cabinet. In reality, for vintaged MAME cores, with fixes being backported to some vintages and not some others, the situation is not so predictable.\n\n#### Input lag\nAccuracy improvements can add or remove frames of input lag. It is believed that **FinalBurn Neo** and **MAME (current)** have the lowest input lag on average. Also note that **FinalBurn Neo** has virtually 0 frames of input lag since it has full support for the runahead and pre-emptive frames feature. MAME also partially supports those features, with runahead second instance being recommended.\n\n#### Performance\nBeing more accurate usually means the emulation will be more taxing on your cpu, so older versions of emulators will usually perform better at the cost of accuracy, and are worth trying if you have performance issues with more recent versions. Accuracy is not the only reason for performance regression though, the emulator framework has an impact too, this is especially noticeable on MAME which had its framework constantly updated over the years.\n\n#### Supported games\nArcade emulators keep adding support for new machines over the years, so the more recent versions support more games. This is a double-edged sword as far as performance is concerned, because it can require updates to already emulated components, to add previously unemulated/unnecessary feature of the component, which might impact its emulation performance even for the machines that didn't need this feature.\n\n#### Emulator goal\nMAME's goal is to emulate every existing machines, including machines unrelated to gaming (it can emulate printers, vending machines, ...), the most accurately possible, while documenting them thoroughly. FinalBurn's goal is mainly to offer a comfortable experience for the end-user as a gaming software, and can include optional features that didn't exist on original cabinet (alternate controls for a better experience with modern controllers, alternate high-quality music, ...). MAME 2003-Plus has pretty much the same goal as FinalBurn, with both emulators actually sharing a few contributors.\n\n#### Support team\nLast but not least, most of the arcade cores have no real maintainer and are mostly there as a frozen-in-time alternative if the cores that have a support team can't play properly the game you want. **FinalBurn Neo** and **MAME 2003-Plus** have a support team (please note that MAME 2003-Plus is a hard fork which isn't written by the MAME team). **MAME (current)** gets regular bumps and has a regular maintainer to take care of issues related to its libretro integration. We don't recommend you try getting help from the MAME team for any of the MAME cores we provide, because you won't get any.\n\n### Quick tour of every available core\n\n#### FinalBurn Neo\n* has the tightest integration within the libretro ecosystem\n* is mostly accurate, can be more accurate than MAME (current) on a few games\n* uses the latest known good romsets\n* is reasonably fast\n* has a support team\n* doesn't support 3D games, support fewer 2D games than MAME\n* keeps adding support for new games, including a lot of hacks and homebrews\n\n#### MAME 2003-Plus\n* while originally forked from MAME 2003, can be fairly accurate on some games since it incorporates some emulation fixes from recent versions of MAME\n* is quite fast, this fork was originally meant by the author to run on a pentium III @ 733mhz (Xbox OG)\n* doesn't have fixed romsets, doesn't always use latest known good romsets either\n* has a support team\n* supports a few classics that aren't supported yet in FinalBurn Neo\n* keeps adding support for new games\n\n#### MAME (current)\n* is usually the slowest core and the one that consumes the most memory\n* has a few dynamic recompilers for emulating more demanding systems, which can dramatically increase performance emulating those systems on supported cpus (x86_32, x86_64, and arm64 since 0.274)\n* is usually the most accurate\n* uses the latest known good romsets\n* has the widest range of emulated machines\n* keeps adding support for new games\n\n#### FinalBurn Alpha 2012\n* has splitted cores for optimized memory usage if you are using a device with very very limited memory (wii, nds, ...)\n* has fixed romsets\n* is an older version of FinalBurn Neo, and as such should be faster while being less accurate and supporting less games, the libretro integration isn't as good either\n* should only be considered as an alternative on ultra low-power devices\n\n#### MAME 2000\n* is the fastest arcade core\n* is the most inaccurate arcade core\n* has fixed romsets\n* has the smallest list of supported games\n* should only be considered as an alternative on ultra low-power devices\n\n#### MAME 2003\n* is slower than MAME 2000\n* is more accurate than MAME 2000\n* has fixed romsets\n* support more games than MAME 2000\n* probably shouldn't be used at all, MAME 2003-Plus is just plain better\n\n#### MAME 2010\n* is slower than MAME 2003\n* is more accurate than MAME 2003\n* has fixed romsets\n* support more games than MAME 2003\n* is missing support for basic libretro api features (savestates, ...)\n* probably shouldn't be used at all, most of the interesting things it has to offer were backported to MAME 2003-Plus, including lots of game additions\n\n#### MAME 2015\n* is slower than MAME 2010\n* is more accurate than MAME 2010\n* has fixed romsets\n* support more games than MAME 2010\n* is missing support for basic libretro api features (savestates, ...)\n* probably shouldn't be used at all, the performance gap with MAME (current) is usually small and can be in favor of the later, which also has a better libretro integration\n\n#### MAME 2016\n* is slower than MAME 2015\n* is more accurate than MAME 2015\n* has fixed romsets\n* support more games than MAME 2015\n* is missing support for basic libretro api features (rotation, ...)\n* probably shouldn't be used at all, the performance gap with MAME (current) is usually small and can be in favor of the later, which also has a better libretro integration\n\n#### Flycast\n* support arcade hardware based on Sega Dreamcast (NAOMI, NAOMI 2, AtomisWave and Sega System SP)\n* is the only working libretro core for those 4 systems\n\n#### Kronos\n* support arcade hardware based on Sega Saturn (ST-V)\n* MAME is also able to emulate ST-V\n\n#### DICE\n* supports machines without any type of CPU\n\n---\n\n## Step 3: Use the correct version romsets for that emulator\n\nThe recommended format for arcade romsets is zip, it has the fastest loading and the widest support. 7zip might work or not. **If you extract an arcade romset, it won't work**.\n\nAs previously said, arcade emulators emulate thousands of different machines, so they need a mean to identify which machine run a given romset, it was decided to use the archive's filename for this purpose. **If you rename an arcade romset, it won't work**.\n\nEach file within a romset is the dump of a chip with a specific purpose (program data, sound data, graphics data, ...), the emulator needs to identify each dump's role, it was decided to use their signature (crc) for this purpose (filenames can sometimes be used as a fallback to load bad/hacked dump). **If your romset doesn't contain the exact files the emulator requires, it won't work**.\n\n!!! Warning\n When using romsets for the latest version of MAME or FBNeo, you should first make sure your version of those cores aren't outdated.\n\n!!! tip\n In general, you will get better results with a full collection of romsets for your chosen emulator. Starting with individual arcade romsets is less likely to work because you generally won't know which emulator they target, or if they contain every required files to run the game (bios, parent). Full Non-Merged romsets are widely available for all of the \"historic\" MAME cores. **Full Non-Merged romsets are the simplest romset format to get started with because each romset archive contains all necessary files for emulating one game.**\n\n| Emulator | Required ROM Version | ClrMamePro dat file |\n| :---: | :---: | :---: |\n| DICE | DICE 0.3.0 | [here](https://github.com/mittonk/dice-libretro/blob/main/dice_xml.dat) |\n| FB Neo | FBNeo (latest version) | [here](https://github.com/libretro/FBNeo/blob/master/dats/FinalBurn%20Neo%20(ClrMame%20Pro%20XML%2C%20Arcade%20only).dat) |\n| FB Alpha 2012 | FBA 0.2.97.24 | N/A |\n| MAME 2000 | MAME 0.37b5 | [here](https://github.com/libretro/mame2000-libretro/blob/master/metadata/MAME%200.37b5%20XML.dat) |\n| MAME 2003 | MAME 0.78 | [here](https://github.com/libretro/mame2003-libretro/blob/master/metadata/mame2003.xml) |\n| MAME 2003-Plus | MAME 2003-Plus (latest version) | [here](https://github.com/libretro/mame2003-plus-libretro/blob/master/metadata/mame2003-plus.xml) |\n| MAME 2010 | MAME 0.139 | [here](https://github.com/libretro/mame2010-libretro/blob/master/metadata/mame2010.xml) |\n| MAME 2015 | MAME 0.160 | [here](https://github.com/libretro/mame2015-libretro/blob/master/metadata/mame2015-xml.zip) |\n| MAME 2016 | MAME 0.174 | [here](https://github.com/libretro/mame2016-libretro/blob/master/metadata/MAME%200.174%20Arcade%20XML%20DAT.zip) |\n| MAME (latest version) | MAME (latest version) | [here (click XML link)](https://www.mamedev.org/release.html) |\n\n### Optional : ClrMamePro tutorial\nClrmamepro is a tool to help validating your romsets against a given emulator.\n\n!!! info \"Credits\"\n This tutorial is based on RetroPie's\n\n#### Step 1 - Back up your ROMs\nIt is possible with ClrMamePro to change one or two options and when it runs it will delete all your existing ROMs. OK, not really - using the default options it will make backups of any files it removes, but it is still possible to mess up their ROMs beyond repair when getting started with ClrMamePro.\n\n#### Step 2 - Download [ClrMamePro](http://mamedev.emulab.it/clrmamepro/#downloads)\n\n#### Step 3 - Acquire DAT files\nYou can download most DAT files from above.\n\n#### Step 4 - Run ClrMamePro for the first time\n* Run it. The welcome screen explains that common first steps are to 1) Create a Profile, 2) Set up your paths and 3) Scan your ROMs. We will be doing things slightly differently, in order to leave your source ROMs intact. \n* Click OK to the Welcome screen\n* Click **\"Add DatFile...\"**, search and open the DAT file you downloaded\n* Accept the default profile location of [PROFILES], click **\"OK\"**\n* Select **\"[NEW DATFILES]\"** in the left-hand pane and select the one jou just added in the right-hand panel\n* Click **\"Load / Update\"**\n* ClrMamePro will ask you how to generate the settings for this datfile, click **\"Default\"** (it is possible it will throw a warning but just select **\"ok to all\"** and continue on)\n* You are now at the main window for clrmamepro. We still need to set our paths, so click **\"Settings\"**\n* Verify **\"ROM-Paths\"** is the selected option in the upper-left corner drop down menu\n* Click the **\"Add...\"** button\n* Create a folder where you'll store your romsets, select it and click **\"OK\"**\n* Close the settings window with the **\"X\"** button in the upper right\n\nAt this point, you could scan the ROMs folder you just selected, but we just created this folder and it is empty. Instead, we will rebuild into this folder.\n\n#### Step 5 - Rebuild a ROM set\n\n* In the main ClrMamePro window, select **\"Rebuilder\"**\n* The destination should already be filled in for you - it is the same as the ROM path you defined above\n* Use the browse button **\"...\"** to select your source path. For example you might have a folder where you stored various arcade ROM sets you got from various sources - point ClrMamePro to that directory as your source.\n* When rebuilding there are three options: **Non-Merged, Merged, and Split**. Pick the one you prefer. If you select \"Non-Merged\" in this menu, it is recommended to click the \"Advanced\" button and deselect \"Separate BIOS sets\", so that ROM sets will also be self-sufficient with BIOS.\n* Click **\"Rebuild...\"**. Depending on the size of the directory you chose as a source, this could take some time\n* When ClrMamePro is finished rebuilding, you will see a window with statistics showing how many matching files were found, how many files were created and how many were skipped. Click \"OK\" \n* Repeat for any other source paths you might have. You can rebuild from multiple sources, but leave the Destination path the same\n* When finished, close the Rebuilder with the **\"X\"** in the upper right corner of the window\n\nTime to find out how well your source ROMs matched up...\n\n#### Step 6 - Scan a ROM set\n* In the main ClrMamePro window, select **\"Scanner\"**\n* Leave all settings at default and click **\"New Scan...\"**\n* When ClrMamePro finishes scanning, you will see a \"Statistics\" window with high level information and a \"Scan Results\" window with detailed information about your missing ROMs\n\n#### Notes\n\n* Typically you cannot completely 'roll forward' from an old ROM collection version to a new version, since these will often feature entirely new roms or dumps that weren't present in your older version. The same is true for 'rolling back' from a new version to an older version, but there are 'rollback' sets available that collect all the previously deleted ROMs from old versions that you can use to fill in the gaps.\n* Be careful with the \"Fix\" settings in the Scanner window and the \"Remove Matched Sourcefiles\" setting in the Rebuilder window. These settings will remove and rename your ROMs.\n* If ClrMamePro does delete any ROMs (because you told it to), you should be able to find backups in C:\\clrmamepro\\backup as long as you didn't change the default settings.\n* ClrMamePro is very stable. It has been around for a long time, it is regularly updated and it is widely used. If it reports problems reading your ROMs, you most likely have corrupt ROM archives (zip files) or a failing hard drive.\n* If you feel the need to reset ClrMamePro's settings, just delete your existing profile(s) and reload your DAT file, selecting **\"Default\"** settings for the new profile. Almost all of ClrMamePro's settings are per-profile.\n\n---\n\n### RetroArch Playlist Scanner Support\n\n~~The RetroArch content database supports arcade romsets in Full Non-Merged and Split formats. In order to be recognized by the scanner, Full Non-Merged and Split romsets must also be [processed by TorrentZip to standardize their CRC](https://sourceforge.net/projects/trrntzip/).~~\n\nManual scan is the recommended method for setting up arcade playlists in RetroArch. [Here](https://neo-source.com/index.php?topic=3725.0) is a guide written for creating FBNeo playlists, but you can easily adapt it for MAME usage.\n\n!!! info \"Credits\"\n The arcade cabinets image is based on an image by Rob DiCaterino, licensed for reuse under a Creative Commons (CC BY 2.0) License. Original image and license: https://www.flickr.com/photos/goodrob13/17385639015/\n"
},
{
"path": "docs/guides/bios.md",
"content": "# BIOS\n\n\n\nA BIOS file is a copy of the operating system used by the hardware that a Core is emulating. Some Cores need BIOS files in order to correctly emulate hardware and/or software as needed by the content. RetroArch and LibRetro do not share any copyrighted system files or game content. You must provide your own BIOS and content in accordance with your local laws as applicable.\n\n**Example**\n\n| Core |Required |Optional|\n|----------------|-------------------------------|-----------------------------|\n|[Beetle PSX HW](../library/beetle_psx_hw.md)|✔ | ✕ |\n|[mGBA](../library/mgba.md)|✕ |✔ |\n|SwanStation|✔|✕|\n|[PCSX ReArmed](../library/pcsx_rearmed.md)|✕ |✔ |\n\n\n\n## High-Level Emulation (HLE)\n\nHigh-Level Emulation (HLE) tries to reproduce the console's outputs instead of its actual behavior, though bugs and glitches are often common.\n\n## Where do BIOS files go?\n\nUsually BIOS files go to RetroArch's \"system\" directory. Check settings --> directory and the core documentation to be sure.\n"
},
{
"path": "docs/guides/building-lakka.md",
"content": "# Building Lakka\n___\nLakka is the official Linux distribution of RetroArch and the libretro ecosystem. Each game system is implemented as a libretro core, while the frontend RetroArch takes care of inputs and display. This clear separation ensures modularity and centralized configuration. Lakka is a lightweight Linux distribution that transforms a small computer into a full blown retrogaming console.\n\n| :warning: DISCLAIMER |\n|:---------------------------|\n| Lakka is still under heavy development. In its current state, the project allows you to play most games on most platforms. However, expect bugs, missing features or features not working as intended, and hardware that is yet to be supported. If you find a bug, you can declare it in our [tracker](https://github.com/libretro/Lakka-LibreELEC/issues), unless already reported. |\n\n## Compiling Lakka\n___\n\nThis page is for developers who want to customize their build and/or contribute to Lakka. You will need Linux (we usually build on Debian or Crux) and the base development packages (build-essential on Debian). You may also need a local HTTP server to host Lakka packages if you plan to do packaging.\n\n### Building Lakka the first time\n\nFirst, clone Lakka?\n\n```sh\n$ git clone https://github.com/libretro/Lakka-LibreELEC\n```\n\nLakka is organized by projects, the Generic project targets PCs, while other projects like RPi targets very specific hardware like the Raspberry Pi.\nThe full list of projects can be listed like this:\n\n```sh\n$ ls -l Lakka-LibreELEC/projects\n```\n\nYou can now launch make, set the PROJECT and ARCH variables to fit your needs:\n\n```sh\n$ cd Lakka-LibreELEC\n$ DISTRO=Lakka PROJECT=RPi DEVICE=RPi ARCH=arm make image # for the Raspberry Pi\n$ DISTRO=Lakka PROJECT=RPi DEVICE=RPi2 ARCH=arm make image # for the Raspberry Pi2/ Pi3\n$ DISTRO=Lakka PROJECT=RPi DEVICE=RPi4 ARCH=arm make image # for the Raspberry Pi4 (arm 32bit)\n$ DISTRO=Lakka PROJECT=RPi DEVICE=RPi4 ARCH=aarch64 make image # for the Raspberry Pi4 (arm 64bit)\n$ DISTRO=Lakka PROJECT=NXP DEVICE=imx6 ARCH=arm make image # for the Hummingboard and Cubox-i\n$ DISTRO=Lakka PROJECT=Generic ARCH=x86_64 make image # for 64 bits PCs\n$ DISTRO=Lakka PROJECT=Generic ARCH=i386 make image # for 32 bits PCs\n```\nBuilding Lakka the first time takes a lot of time, you can go grab a coffee or two :)\nIf the build fails, make sure you have at least 10 GB of free space and try to figure out which package is missing, install it, and make again.\n\nYou will find the result in Lakka-LibreELEC/target:\n\n```sh\n$ ls -l target\n```\n\nThe .kernel and .system can be used to upgrade an existing Lakka system.\nThe .img.gz is the final result, it contains the image that can be flashed to an SD card or a USB pen drive.\n\nPlease follow this [tutorial](http://www.lakka.tv/get) to know how to flash Lakka on a drive.\n\n### Upgrading your Lakka build\n\nIf some time passed and you want to rebuild from newer sources:\n\n```sh\n$ cd Lakka-LibreELEC\n$ git pull\n$ rm -rf target\n$ DISTRO=Lakka PROJECT=RPi DEVICE=RPi ARCH=arm make image\n```\nBut if you just want to rebuild a particular package, for example a package you are trying to port to Lakka, you can just remove it like this and rebuild.\n\n```sh\n$ DISTRO=Lakka PROJECT=RPi DEVICE=RPi ARCH=arm scripts/clean yourpackage\n$ DISTRO=Lakka PROJECT=RPi DEVICE=RPi ARCH=arm scripts/build yourpackage\n```\n\nIf you want to rebuild all from scratch, remove the build* folders\n\n## Conclusion\n___\nLakka is still under heavy development. In its current state, the project allows you to play most games on most platforms. More information can be found in the [Lakka documents](http://www.lakka.tv/doc/Home/). You may also want to check the [Official Forum](https://forums.libretro.com/c/libretro/lakka-tv-general).\n"
},
{
"path": "docs/guides/building-ludo.md",
"content": "# Building Ludo\n___\nLudo is an Emulator Frontend able to run retro video games. Ludo does not emulate the consoles itself, but does it through emulator plugins called libretro cores. Libretro cores are well known emulators (like Snes9x or Genesis Plus GX or PCSX) stripped from their user interface. They contain only console specific logic.\n\n| :warning: DISCLAIMER |\n|:---------------------------|\n| Ludo is still under heavy development. In its current state, the project allows you to play most games on most platforms. However, expect bugs, missing features or features not working as intended, and hardware that is yet to be supported. If you find a bug, you can declare it in our [tracker](https://github.com/libretro/ludo/issues), unless already reported. |\n\n## Prerequisites\n\n- GLFW 3.3\n- OpenGL >= 2.1\n- OpenAL\n\n## Building\n___\n\nBuilding Ludo from source is for developers and contributors.\n\n### Ubuntu and Debian\n\n```sh\nsudo apt install git go libopenal-dev xorg-dev\ngit clone --recursive https://github.com/libretro/ludo.git\ncd ludo\ngo build\n./ludo\n```\n\n### Red Hat, CentOS and Fedora\n\n```sh\nsudo yum install golang libopenal-soft-devel libX11-devel\ngit clone --recursive https://github.com/libretro/ludo.git\ncd ludo\ngo build\n./ludo\n```\n\n### Windows\n\nSetup [Git Bash](https://gitforwindows.org/) then setup [Go](https://golang.org/dl/). When you done with these setup [MinGW-w64](https://sourceforge.net/projects/mingw-w64/) and add it to your PATH. Download http://static.kivutar.me/openal-soft-1.19.0-bin.zip and extract it for example in C:\nSetup MinGW-w64 and add it to your PATH\nDownload http://static.kivutar.me/openal-soft-1.19.0-bin.zip and extract it for example in C:\n```shell\nexport CGO_CFLAGS=\"-I/c/openal-soft-1.19.0-bin/include/\"\nexport CGO_LDFLAGS=\"-L/c/openal-soft-1.19.0-bin/build/Release/\"\n```\n\n```Powershell\ngit clone --recursive https://github.com/libretro/ludo.git\ncd ludo\ngo build\n./ludo\n```\n\n### Mac OS X\n\nFirst setup [Xcode](https://developer.apple.com/documentation/xcode/) then setup [Homebrew](https://brew.sh/).\n\n```brew\nbrew install go openal-soft\ngit clone --recursive https://github.com/libretro/ludo.git\ncd ludo\ngo build\n./ludo\n```"
},
{
"path": "docs/guides/change-directories.md",
"content": "# Directory configuration\n\nNext step you might want to consider is setting directories for RetroArch, this can help get the best experience possible.\n\nAlthough the defaults will suit most users, if you want to configure custom BIOS's or change the save location, you will have to change directories.\n\nSome directory variable values are set to \"default\" by default in retroarch.cfg. However, to modify directory values to \"default\", a text editor is required. \"default\" represents different values to different entries in `Settings` -> `Directories`:\n- `` -- The directory where the game was loaded from via `Main Menu -> Load Content`. For example, if /home/gamer/Downloads/SNES/game.sfc was loaded, and retroarch.cfg contains `screenshot_directory = \"default\"`, then the screenshots will be saved in /home/gamer/Downloads/SNES/.\n- For multiple directory variables in retoarch.cfg, the \"default\" value sets their value in `Settings` -> `Directories` to:`` -- The RetroArch configuration directory.\n\nTable of special values limited to some variables:\n\n| retroarch.cfg configuration | RetroArch `Settings` -> `Directories` |\n| - | - |\n| system_directory = \"default\" | `System/BIOS`: `` |\n| screenshot_directory = \"default\" | `Screenshots`: `` |\n\n## From RetroArch:\n\n- Open RetroArch.\n- Navigate to `Settings` -> `Directories`.\n- Click on the directory you want to change.\n- Navigate to the desired location using the File Browser.\n\n## From a text editor:\n\n- Close RetroArch.\n- Find your retroarch.cfg file. If you are having trouble locating the file, 1) Open RetroArch 2) Navigate to `Main Menu` -> `Configuration File` -> `Save Current Configuration`, the on-screen notification widget will display: `Saved new config to \"[...]/config/retroarch/retroarch.cfg\".`. If all hope is lost do a system-wide search for **retroarch.cfg**\n- Open retroarch.cfg in a text editor.\n- After the = sign, make changes then save the file.\n\n# Paths to consider changing:\n\n## Cores\n\nThis is the location for all your cores. To [install them using the user interface](download-cores.md#installing-cores-through-retroarch-interface), this setting needs to point to a writeable directory.\n\n!!! note\n The Ubuntu PPA does not point this to a user-writable directory because cores are modified by the package manager. If you want to change it manually, you might want to change this directory from \"retroarch.cfg\" with a text editor since the RetroArch file browser doesn't show hidden folders by default. *libretro_directory =* is what you need to change in the config file. Some distributions use `~/.config/retroarch/cores/`\n\n## System/BIOS\n\nThis is where you specify the location for all your BIOS's, by default RetroArch looks for BIOS in your \"Starting directory\" folder. It is not suggested that you dump all BIOS files in the \"Starting directory\".\n\n!!! note\n Some emulators *(Example: PS1 and PSP)* will require BIOS files to even function.\n\nIt is suggested that this be changed to a folder named \"system\" under your retroarch config folder. If you can't be bothered to try and find this config folder (since it varies from OS), and you want to skip having to use a text editor, choose another location that the BIOS files will be.\n\n!!! note\n You might want to change this directory from \"retroarch.cfg\" with a text editor since the RetroArch file browser doesn't show hidden folders by default. *system_directory =* is what you need to change in the config file.\n\n## File Browser\n\nAnother one you'll want to consider changing. This will be the starting directory when you select \"Load Content\" and it can be very handy to have this set to your ROM folder. Although this probably isn't needed since RetroArch has an import feature, it doesn't hurt to have this set anyway.\n\n## Save Files, and Save States\n\n!!! note\n Some platforms/distros may use a different structure, so always verify your paths in settings -> directory\n\nLast one you should consider changing are the save locations, by default it will place them in the same folder as your ROMS. If you care about organisation you should change these to another folder.\n"
},
{
"path": "docs/guides/cheat-codes.md",
"content": "# RetroArch cheat and rumble codes\n\nRetroArch uses two methods of applying cheat codes:\n\n- **Emulator Handled** are codes that are sent to the emulator/core and it is up to the emulator/core to apply them.\n- **RetroArch Handled** are codes that RetroArch itself handles by directly scanning/manipulating the emulator/core memory area.\n\n\n\n# Adding a new cheat code\n\nIf you have a code that doesn't exist in the cheat database that you want to add manually, perform the following steps:\n\n1. Load the game in question and open the \"Cheats\" menu from the Quick Menu.\n\n2. Select either \"Add New Code to Top\" or \"Add New Code to Bottom\".\n\n3. Navigate to the newly added cheat code line and press enter to bring up the cheat code details.\n\n4. Select the \"Code\" menu item and press enter. A popup text-entry screen will appear. Type in your new code and press enter.\n\n5. Optionally perform the same steps for the \"Description\" menu item to edit the description.\n\n6. Ensure the \"Enabled\" field is set to on.\n\n7. Navigate back one level to the cheats menu and select \"Apply Changes\".\n\n\n\n# RetroArch new cheat code searching\n\nRetroArch now has the ability to search for and create new cheat codes. The following is an overview for finding new cheats:\n\n1. Start game\n\n2. Go to Quick Menu -> Cheats -> Start or Continue Cheat Search\n\n3. Use left/right on \"Start or Restart Cheat Search\" to select a bit-size appropriate to the console you are using and the value your are searching.\n - For example, if you are playing Castlevania:SOTN on the PS1 and you want to search for the health value, then that's a value that can be greater than 255 (0xFF), but it's unlikely that the game developers anticipated a value larger than 65535 (0xFFFF) so set the search to 16-bit.\n - An alternate example - if you are playing Space Invaders on Atari 2600 and you want to search for the number of lives, then that's a value that could possibly be stored in just 2-bits of data (max number of lives = 3) and since the Atari 2600 only has a very small memory space, it's entirely possible that the memory location for the number of lives is only partially stored in a single byte while the rest of that same byte may store other important data that should not be touched. Set the size to 2-bit.\n\n4. Select \"Start or Restart Cheat Search\" once you have selected the bit size\n\n5. Go back to the game and lose a life\n\n6. Go back to the quick menu and select \"Search Memory For Values ... Less Than Before\" because when you started the search you had one more life than you do now. You could also try \"Search Memory For Values ... Equals To Before-1\". The number of matches should go down.\n\n7. If the number of matches is still too great to peruse, then perform actions 5 and 6 repeatedly until the number of matches is something you feel comfortable trying (e.g. 10). If you run out of lives, just reset the game or restore a save state. Then your lives will likely be greater than the last time you checked, so select \"Search Memory For Values ... Greater Than Before\"\n\n8. Once you have a manageable list, select \"Add the ## Matches to Your List\"\n\n9. Go back one menu to see the codes that have been added. Try turning just one on at a time to see if it has the desired effect. If not, turn it off and try the next one. One of them should be the location in memory that stores your number of lives and enabling the cheat in its default state will result in that memory location being overwritten by the cheat value continuously and voila infinite lives.\n\n10. Alternately, you can \"Search Memory For Values ... Equal to ###\" if you know the exact number (e.g. the number of hit points you have in an RPG).\n\n\n# RetroArch cheat code spanning/sliding/repeating\n\nYou can also use the \"Number of Iterations\", \"Value Increase Each Iteration\", and \"Address Increase Each Iteration\" options to create a single code that affects a wide range of memory values.\n\nThis is useful for things like unlocking all levels, giving yourself 1 of every item, setting all of your RPG stats to 999, etc.\n\nUsually when you have found a cheat for a specific item (e.g. your strength attribute in an RPG), similarly themed values are found in the same memory area. For example, if the strength attribute\nwas found at memory address 0x0000AB04 then the dexterity attribute might be at 0x0000AB08, intelligence at 0x0000AB0C, etc.\n\nThis feature is also useful for experimenting. If you found your strength attribute at memory address 0x0000AB04, then you might increase the number of iterations by 20 to see what changes in the game and if any of those changes are desirable. Note that experimenting like this has a good chance of crashing your game, so have a save state prepared before blindly attempting to write to memory.\n\nSettings example:\n\nYour game has the following values/memory addresses :\n\n - 0x0000AB04 - Strength\n - 0x0000AB08 - Dexterity\n - 0x0000AB0C - Constitution\n - 0x0000AB10 - Intelligence\n\nA single code can update all of those values:\n\n - Memory Search Size - 32 bit\n - Memory Address - 0x0000AB04\n - Value - 900 (0x00000384)\n - Number of Iterations - 4\n - Value Increase Each Iteration - 5\n - Address Increase Each Iteration - 1\n\nThe starting address is 0x0000AB04 which will be set to value 900. Then for each of the 4 (Number of Iterations) iterations, it will add 1 of the \"Memory Search Size\" (1 * 32 bits = 4 bytes) to the address and 5\nto the value and then set that as well. The final result will have updated these 4 memory locations to be:\n\n - 0x0000AB04 - Strength = 900\n - 0x0000AB08 - Dexterity = 905\n - 0x0000AB0C - Constitution = 910\n - 0x0000AB10 - Intelligence = 915\n\nThe \"Value Increase Each Iteration\" would normally be 0 in the above scenario but was used for illustrative purposes.\n\n# RetroArch rumble codes\n\nRetroArch also has the ability to make your controller rumble when changes in the emulator/core memory occur. It is based off of the same RetroArch-handled cheat codes described above. For example, after\nfinding the memory location for the number of lives in a game (via the cheat searching interface) you can set it up such that every time the value decreases (lose a life) the controller rumbles.\n\nRumble tested with X360 controller, input driver dinput, controller driver xinput.\n\nAvailable rumble controls:\n\n- Rumble when memory value changes\n- Rumble when memory value does not change\n- Rumble when memory value decreases\n- Rumble when memory value increases\n- Rumble when memory value = value\n- Rumble when memory value != value\n- Rumble when memory value < value\n- Rumble when memory value > value\n- Rumble when memory value decreases by a specific amount\n- Rumble when memory value increases by a specific amount"
},
{
"path": "docs/guides/cli-intro.md",
"content": "# RetroArch CLI\n\nRetroArch can be used from its robust graphical interfaces as well as a powerful command-line interface (CLI). Getting familiar with the command-line helps you understand the design principles of RetroArch.\n\nNote: please be aware of whether your system uses DOS/Windows style paths with backslashes `\\` or Unix-style paths with forward slashes: `/`.\n\nSome cores like [ScummVM](https://docs.libretro.com/library/scummvm/) (which also has an inbuilt GUI file browser), do not require any content file name passed as a command line argument. This is determined by the core info files with the line `supports_no_game = \"true\"`. In this case, after you have loaded the core and if it is not starting directly, select 'Start Core' that will appear inside the main menu.\n\n\n\n#### On macOS: invoking the RetroArch CLI executable\n /Applications/RetroArch.app/Contents/MacOS/RetroArch\n\n#### Example: loading a ROM and libretro core (Unix-style path)\n retroarch -L /path/to/libretro/core.so game.rom\n\n#### Example: loading a ROM and libretro core with flatpak\n retroarch -L /path/to/libretro/core.so game.rom\n flatpak run org.libretro.RetroArch/x86_64/stable -L /home/MYUSERNAME/.var/app/org.libretro.RetroArch/config/retroarch/cores/nestopia_libretro.so Tetris.nes\n\n#### Example: loading a ROM and libretro core with Steam\n steam -applaunch 1118310 -L \"/path/to/steamapps/common/RetroArch/cores/nestopia_libretro.so\" \"/path/to/Tetris.nes\"\n\nContent filenames require no spaces, as there is an issue with Steam passing through command line arguments containing spaces.\n\n## Verbose logging output\nTo get a better idea on what's going on, use the `--verbose` flag. If you want to report a bug, it is **vital** that this log is included.\n\n## Using a config file\nBy default, RetroArch looks for a config in various places depending on OS:\n\n- **Linux/macOS**: `$XDG_CONFIG_HOME/retroarch/retroarch.cfg`, then `~/.config/retroarch/retroarch.cfg`, then `~/.retroarch.cfg`, and finally, as a fallback, `/etc/retroarch.cfg`.\n- **Windows**: `retroarch.cfg` in same folder as `retroarch.exe`, then `%APPDATA%\\retroarch.cfg`.\n\nTo override this, use `retroarch --config customconfig.cfg`. If you have some special options you want to store in separate config files, you can use `retroarch --config baseconfig.cfg --appendconfig specialconfig.cfg`. Be sure to pass `--menu` as well if you aren't loading content directly from the command-line, or RetroArch will close immediately after launching. See man-page and/or `--help` for detail.\n\n## Other essential CLI flags\n\n### retroarch --help\nUse the `--help` help flag to display RetroArch's built-in CLI documentation. You'll probably discover some features you didn't think about.\n\n### retroarch --features\nIf you're unsure if a particular feature is compiled in, execute `retroarch --features`\n"
},
{
"path": "docs/guides/controller-autoconfiguration.md",
"content": "# Joypad Auto Configuration\n\n## Why is it needed?\n\nRetroArch runs on many platforms. Each of these platforms has one or more input systems. These input systems in turn differ widely in the way they enumerate the pad buttons. For this reason, your joypad buttons may be mapped differently depending on if you are using Windows, Mac, or Linux.\n\n\nTraditional emulators allow you map each button of your pad to the original pad of the emulated system. For example, this is how the Snes9x joypad configuration interface looks:\n\n\n\nRetroArch also allows this kind of manual mapping. However, RetroArch tries to go further by detecting your joypad and automatically configuring it so manual configuration becomes obsolete.\n\n## Benefits\n\nWith RetroArch joypad auto-configuration system, your joypad will be recognized and will work out of the box.\n\nThis allows:\n\n - Use many different joypads and have them attributed to each players like it would work on a real game console.\n - Unplug the second joypad, and replace it by another one, even if it's of a different brand and model.\n\nHaving automatically configured joypads makes it a lot easier to navigate the RetroArch Menu with the joypad. This is very convenient when running RetroArch on a game console, where a keyboard and a mouse are not always available. It is also what makes RetroArch suitable to build your own game console using Lakka or a similar OS.\n\n## Installing or updating joypad profiles\n\n\n\nThe set of joypad profiles used by RetroArch can be downloaded and updated from the menu. Go to `Main Menu` -> `Online Updater` -> `Update Controller Profiles` to get the latest version of the profile pack.\n\nA message will appear at the bottom of the screen showing the download progress and the extraction of the archive.\n\n## Generating a joypad profile\n\nIf your joypad is not recognized by RetroArch even after updating the profiles, you can generate a profile from the menu.\n\n1. To avoid other controllers from interfering with your mapping when starting RetroArch, follow these steps: Disconnect all joypads by unplugging their cables or disconnecting them from any wireless connections.\n2. Connect the controller intended for autoconfiguration. Ensure your system supports the selected connectivity method. If your joypad supports both wired and wireless connections and the initial attempt (e.g., via USB) fails, try the alternative option (e.g., Bluetooth). For example, the Nintendo Switch Pro Controller does not support USB connection on Linux 5.15 and older but does support Bluetooth.\n3. For Android, run the [Android](#android) steps first.\n4. Use `Settings` -> `Input` -> `RetroPad Binds` -> `Port 1 Controls` -> `Set All Controls`. If automatic mapping fails for any button (e.g., due to lack of driver support), the process will be interrupted. In case of interruption, manually map the remaining buttons, starting from the one that caused the interruption and continuing through the rest of the list.\n5. Use `Settings` -> `Input` -> `RetroPad Binds` -> `Port 1 Controls` -> `Save Controller Profile`\n6. The new profile file (also known as the autoconfig file) will be saved to your disk: [Controller profile directory]/[Controller driver]/[Device index].cfg.\n7. Proceed with the manual configuration step section below.\n\n\n## How does RetroArch match controllers?\n\nWhen you connect a new controller to RetroArch, the system attempts to automatically configure it by matching it to known profiles. This matching process is crucial for ensuring that your controller works correctly with various games and emulators.\n\nThe matching algorithm considers several key factors:\n\n- **Controller driver (input_driver)**: The software interface used to communicate with the controller. To use a specific driver, RetroArch must be configured accordingly by navigating to **Settings -> Drivers -> Controller**.\n- **Device Index (input_device)**: The name of the controller as recognized by the system. The **Device Index** can be identified by navigating to **Settings -> Input -> RetroPad Binds -> Port 1 Controls**.\n- **Vendor ID (input_vendor_id)**: A unique identifier assigned to the controller's manufacturer.\n- **Product ID (input_product_id)**: A specific identifier for the particular controller model.\n- **Physical ID (input_phys)**: A locally generated identifier in supported drivers, only valid for one specific controller instance / USB port.\n\n### Matching process\nRetroArch compares these factors against the files in the autoconfig directorys. It calculates a matching score for each profile, selecting the one with the highest score to configure the controller.\n\nThe combination of Vendor ID and Product ID is often referred to as \"vid:pid\" in technical contexts.\n\nThis automated matching system allows RetroArch to support a vast array of controllers, reducing the need for manual setup in most situations.\n\n### Physical identifier customization\n\nSupported controller drivers (currently, this is only Linux/udev) will interrogate further physical details about the controller: USB port and serial number. The value of this attribute can be determined from RetroArch debug logs. A few examples (serial redacted):\n```\n[DEBUG] [Autoconf] Config files scanned: driver udev, pad name Microsoft Xbox Series S|X Controller (045e/0b12), phys usb-0000:04:00.0-2/input0, affinity 41\n[DEBUG] [Autoconf] Config files scanned: driver udev, pad name Sony Interactive Entertainment Wireless Controller (054c/09cc), phys 28:c1:3c:__:__:__, affinity 50\n```\n\nBoth identifiers will be queried, but support is not guaranteed. In the example above, one has the USB port, the other has the serial number.\n\nTo use the physical identifier for matching, duplicate the existing autoconfig file (to avoid overwriting it when pulling an update), and extend it with the `input_phys` attribute. Partial matches are supported.\n```\ninput_phys = \"usb-0000:04:00.0-2\"\n```\n\nIt is also worth to change `display_name`, to immediately see if the match went as expected.\n\n## Autoconfig variable policy\n\n| Controller driver | input_vendor_id/input_product_id required | input_device usage | input_device name variability policy\n|-|-|-|-|\n| android | Yes | input_device[^3] | Use the Bluetooth name since it's primarly used by Android devices.\n| udev | Yes | input_device[^3] | For optimal configuration, if you are generating Linux raw autoconfig files, it is advisable to reuse the variables for input_device and alternative_input_device. In cases where input_device is used without alternative names, it is recommended to utilize the USB Device Index for a more descriptive identification.\n| linuxraw | No | input_device (for Device Index over USB), input_device_alt1 (for Device Index over Bluetooth), input_device_alt2 (for Device Index over USB on another Linux kernel)... | Use both Device Index over USB and Bluetooth from different Linux kernels; Their names can differ depending on the Linux version in use.\n| sdl2 | Yes | input_device[^3] | No (uses [SDL2 Game Controller community database](https://github.com/mdqinc/SDL_GameControllerDB/blob/master/gamecontrollerdb.txt))\n\n## Alternative variables\n\nManaging Controllers with Identical Configurations. Up to nine alternative variables can be used for the following purposes:\n\n- **`linuxraw`: Managing Controllers with Identical Configurations**:\n - **Device Index (input_device)**: You can use `input_device_alt1`, `input_device_alt2`, `input_device_alt3`, up to `input_device_alt9`. For names available on both USB and Bluetooth, input_vendor_id should be utilized; for USB-specific names, use input_vendor_id_alt1, and for Bluetooth-specific names, use input_vendor_id_alt2.\n- **`android`, `sdl2`, and `udev`: Managing Controllers with Identical Configurations that has different input_vendor_id/input_product_id**:\n - This applies to controllers like the Sony DualShock v1 and v2 for the `android`, `sdl2`, and `udev` controller drivers. Always use `input_vendor_id` and `input_product_id` for the most recent controller models, as they are more likely still available on the market. RetroArch version 1.19.1 and earlier cannot utilize _alt autoconfig variables, so using `input_vendor_id` for the latest controller ensures connectivity in RetroArch. Use `..._alt*` variables for older controllers.\n - **Vendor ID (input_vendor_id)**: Options include `input_vendor_id_alt1`, `input_vendor_id_alt2`, `input_vendor_id_alt3`, up to `input_vendor_id_alt9`.\n - **Product ID (input_product_id)**: Options include `input_product_id_alt1`, `input_product_id_alt2`, `input_product_id_alt3`, up to `input_product_id_alt9`.\n\n### Similarities in input variable generation between linuxraw and udev.\n\nIt's useful to know that the `linuxraw` driver generates identical file content as udev with the exception of the `input_driver` variable, and the DPAD inputs, which are handled differently:\n\n#### linuxraw\nThe `linuxraw` driver specifies DPAD inputs using axis values, providing precise control over directional inputs. For example:\n```\ninput_up_axis = \"-5\"\ninput_down_axis = \"+5\"\ninput_left_axis = \"-4\"\ninput_right_axis = \"+4\"\n```\n\n- **autoconfig/linuxraw/Nintendo Switch Pro Controller.cfg example:**\n```\ninput_driver = \"linuxraw\"\ninput_device = \"Nintendo Switch Pro Controller\"\ninput_b_btn = \"0\"\ninput_y_btn = \"3\"\ninput_select_btn = \"9\"\ninput_start_btn = \"10\"\ninput_up_axis = \"-5\"\ninput_down_axis = \"+5\"\ninput_left_axis = \"-4\"\ninput_right_axis = \"+4\"\ninput_a_btn = \"1\"\ninput_x_btn = \"2\"\ninput_l_btn = \"5\"\ninput_r_btn = \"6\"\ninput_l2_btn = \"7\"\ninput_r2_btn = \"8\"\ninput_l3_btn = \"12\"\ninput_r3_btn = \"13\"\ninput_l_x_plus_axis = \"+0\"\ninput_l_x_minus_axis = \"-0\"\ninput_l_y_plus_axis = \"+1\"\ninput_l_y_minus_axis = \"-1\"\ninput_r_x_plus_axis = \"+2\"\ninput_r_x_minus_axis = \"-2\"\ninput_r_y_plus_axis = \"+3\"\ninput_r_y_minus_axis = \"-3\"\n```\n\n#### udev\n\nUdev consistently generates the following:\n```\ninput_up_btn = \"h0up\"\ninput_down_btn = \"h0down\"\ninput_left_btn = \"h0left\"\ninput_right_btn = \"h0right\"\n```\n\n- **autoconfig/udev/Nintendo Switch Pro Controller.cfg example:**\n```\ninput_driver = \"udev\"\ninput_device = \"Nintendo Switch Pro Controller\"\ninput_vendor_id = \"1406\"\ninput_product_id = \"8201\"\ninput_b_btn = \"0\"\ninput_y_btn = \"3\"\ninput_select_btn = \"9\"\ninput_start_btn = \"10\"\ninput_up_btn = \"h0up\"\ninput_down_btn = \"h0down\"\ninput_left_btn = \"h0left\"\ninput_right_btn = \"h0right\"\ninput_a_btn = \"1\"\ninput_x_btn = \"2\"\ninput_l_btn = \"5\"\ninput_r_btn = \"6\"\ninput_l2_btn = \"7\"\ninput_r2_btn = \"8\"\ninput_l3_btn = \"12\"\ninput_r3_btn = \"13\"\ninput_l_x_plus_axis = \"+0\"\ninput_l_x_minus_axis = \"-0\"\ninput_l_y_plus_axis = \"+1\"\ninput_l_y_minus_axis = \"-1\"\ninput_r_x_plus_axis = \"+2\"\ninput_r_x_minus_axis = \"-2\"\ninput_r_y_plus_axis = \"+3\"\ninput_r_y_minus_axis = \"-3\"\n```\n\n## Before you begin\n\nMake sure that you run the latest version of RetroArch, to generate a file name and file content via `Settings` -> `Input` -> `RetroPad Binds` -> `Port 1 Controls` -> `Save Controller Profile` that is up to date with our current policies.\n\n## Modify the Controller Profiles Directory for Non-Root User Accessibility\n\nBoth the Flatpak and Android versions of RetroArch need adjustments to the Controller Profiles Directory to ensure essential functionality and smooth operation.\n\n**Challenges for Android and Flatpak:**\n- Users are unable to save custom profiles through the path: `Settings -> Input -> RetroPad Binds -> Port 1 Controls -> Save Controller Profile`.\n- Modification Restrictions: You are not allowed to change existing autoconfig files. Files that are initially disabled have \"(default-off)\" in their names. Without root access, you cannot modify these files to toggle the input_vendor_id and input_product_id settings. This restriction applies to both the \"(default-off)\" files and the \"original\" autoconfig files, which are more widely used and have been set to be enabled by default. These original files must also be commented to make changes. This limitation affects both HID and non-HID files, as well as controllers with multiple autoconfig files, such as the Sony DualSense controller, which includes several Android autoconfig files.\n\n### Android Configuration\n\n**Challenge:**\nMost Android devices are not rooted, and RetroArch's default autoconfig directory requires root access, leading to the following issues:\n- Restricted File Access: Users can update controller profiles via `Main Menu -> Online Updater -> Update Controller Profiles`, but cannot access these files in `/data/user/0/com.retroarch/autoconfig`. Android's security model prevents non-root users from reading certain files, making it difficult to compare updated profiles with custom-generated ones, thus hindering effective profile management and customization.\n- Modification Restrictions: Existing autoconfig files cannot be modified when necessary (refer to the base section for more details).\n\n**Resolution:**\n- Create the directory `/storage/emulated/0/RetroArch/autoconfig/android`.\n- In RetroArch, change the directory path under `Settings` -> `Directory` -> `Controller Profiles` from `/data/user/0/com.retroarch/autoconfig` (root) to `/storage/emulated/0/RetroArch/autoconfig`.\n- This adjustment allows the autoconfig files to be saved in `/storage/emulated/0/RetroArch/autoconfig/android` when using `Settings` -> `Input` -> `RetroPad Binds` -> `Port 1 Controls` -> `Save Controller Profile`.\n\n#### Addressing controller navigation issues on non-touchscreen devices\nYour controller will use the Controller Profile directory `/data/user/0/com.retroarch/autoconfig` by default in Android. Any autoconfig file that mathces your controller (Vendor ID/Product ID) be used by RetroArch automatically. However, you will not be able to generate a **new** autoconfig file for your controller if a default autoconfig file encounter issues with the following components:\n\n* **DPAD**: Essential for navigating menus.\n* **OK**: Necessary for applying settings, such as navigating to `Settings -> Input -> RetroPad Binds -> Port 1 Controls`, and selecting `Set All Controls` and `Save Controller Profile`.\n* **Back**: Needed to return to `Main Menu -> Quit` after configuring `Settings -> Directory -> Controller Profiles`, ensuring the settings are saved to retroarch.cfg. Workaround if you have access to another controller: Temporarily connect another controller with a functioning autoconfig \"Back\" button and adjust the Controller Profiles directory:\n - `Settings -> Directory -> Controller Profiles`.\n - `Main Menu -> Quit` -- ensuring the settings are saved to retroarch.cfg.\n - Disconnect the controller from BlueTooth.\n\nWhile these issues are not problematic for typical Android devices like smartphones and tablets, which offer touchscreen navigation, they become significant on Google TV (an Android-based OS used by Chromecast) where a touchscreen is unavailable. Additionally, Chromecast's voice remote control lacks autoconfiguration and is incompatible with RetroArch navigation. Even controllers with touchpads are ineffective, as the touchpad button does not function (as observed with PS4/PS5 controllers), and the cursor remains invisible due to a known [bug](https://github.com/libretro/RetroArch/issues/16853).\n\n**Proposed Solution:**\n\nTo resolve this issue, follow these steps:\n\n- **Create a Custom Configuration File:**\n - Create the file `retroarch.cfg` in the directory `/storage/emulated/0/Android/com.retroarch/files/retroarch.cfg` with the following line:\n```\njoypad_autoconfig_dir = /storage/emulated/0/RetroArch/autoconfig/\n```\n\n- **Set Up a Fallback Configuration:**\n - Identify the Product ID and Vendor ID of your controller: Ensure that the directory /storage/emulated/0/RetroArch/autoconfig/ remains empty, then restart RetroArch. This action will compel RetroArch to enter fallback mode, displaying a message like \"[Controller name] ([Vendor ID]/[Product ID]) not configured, using fallback\". Record the four-digit numbers for both IDs.\n - Create a file named `fallback.cfg` in the directory `/storage/emulated/0/RetroArch/autoconfig/android/` with the following configuration settings (don't forget to replace `input_vendor_id = \"[Vendor ID]\"` and `input_product_id = \"[Product ID]\"` with the values of your controller:\n```\ninput_driver = \"android\"\ninput_device = \"Fallback device\"\ninput_vendor_id = \"[Vendor ID]\"\ninput_product_id = \"[Product ID]\"\ninput_b_btn = \"96\"\ninput_y_btn = \"97\"\ninput_select_btn = \"98\"\ninput_start_btn = \"99\"\ninput_up_btn = \"h0up\"\ninput_down_btn = \"h0down\"\ninput_left_btn = \"h0left\"\ninput_right_btn = \"h0right\"\ninput_a_btn = \"100\"\ninput_x_btn = \"101\"\ninput_l_btn = \"102\"\ninput_r_btn = \"103\"\ninput_l2_btn = \"104\"\ninput_r2_btn = \"105\"\ninput_l3_btn = \"106\"\ninput_r3_btn = \"107\"\ninput_l_x_plus_axis = \"+0\"\ninput_l_x_minus_axis = \"-0\"\ninput_l_y_plus_axis = \"+1\"\ninput_l_y_minus_axis = \"-1\"\ninput_r_x_plus_axis = \"+2\"\ninput_r_x_minus_axis = \"-2\"\ninput_r_y_plus_axis = \"+3\"\ninput_r_y_minus_axis = \"-3\"\n```\n\n- **Launch RetroArch:**\n - Start the RetroArch application.\n\n- **Button Testing:**\n - Test the controller buttons to identify which ones correspond to the \"OK\" and \"Back\" functions. This will allow you to navigate and temporarily reconfigure RetroArch.\n\nBy applying this solution, you allow your controller to configure RetroArch, enabling navigation to Settings -> Input -> RetroPad Binds -> Port 1 Controls and the selection of Set All Controls and Save Controller Profile. This setup also permits the saving of autoconfig files in the directory /storage/emulated/0/RetroArch/autoconfig/android.\n\n### Flatpak Configuration\n\n**Challenge:**\nThe default autoconfig directory in Flatpak RetroArch also requires root access, which prevents users from:\n- Downloading and extracting profiles through `Main Menu` -> `Online Updater` -> `Update Controller Profiles`.\n- Saving custom profiles via `Settings -> Input -> RetroPad Binds -> Port 1 Controls -> Save Controller Profile`.\n- Modification Restrictions: Facing similar issues as Android users if the GNU/Linux user lacks root access, as existing autoconfig files cannot be modified when necessary (refer to the base section for more details).\n\n#### Resolution\nTo address this issue, configure RetroArch as follows:\n \n1. Enable Hidden File Visibility\n* Navigate to `Main Menu -> Load Content -> File Browser`\n* Enable the option `Show Hidden Files and Directories`\n\n2. Modify Controller Profiles Directory\n* Go to `Settings -> Directory -> Controller Profiles`\n* Change the directory from the default `/app/share/libretro/autoconfig` to `/home/youruser/.var/app/org.libretro.RetroArch/config/retroarch/autoconfig`.\n\nNote: The actual path of the default directory is: /var/lib/flatpak/app/org.libretro.RetroArch/current/active/files/share/libretro/autoconfig/\n\nBy implementing these changes, you'll be able to create and save custom controller profiles without requiring root privileges.\n\n### Additional manual configuration steps\n\n#### Add hotkey(s)\nWhen using RetroArch, not all controller buttons are automatically mapped through the \"Set All Controls\" option. Some buttons—such as menu toggles, screenshot triggers, or other special functions—must be configured separately. Here’s a step-by-step guide to ensure all your controller buttons work as desired.\n\n1. Identify special buttons on your controller\n - Look for buttons on your physical controller not automatically mapped by Retroarch.\n - Examples include\n - *Menu Toggle* (virtually all controllers have them)\n - Additional special buttons may be found on some controllers. For example, the *Capture* (screenshot) and the \"Home\" button on Nintendo Switch Pro Controller.\n3. Assign hotkeys in Retroarch\n - Launch Retroarch.\n - Navigate to: `Settings` → `Input` → `Hotkeys`.\n - Select the special function you want to assign (e.g., *Menu Toggle*, *Screenshot*).\n - Press the desired button on your controller to bind it.\n - Exit Retroarch properly to save the settings:\n - On most platforms, just closing Retroarch saves the config.\n - On Android, explicitly quit via `Main Menu` → `Quit` to ensure settings are saved.\n\n4. Transfer hotkey assignments to your controller autoconfig file\n - Open your main `retroarch.cfg` file.\n - Find and copy the hotkey assignment lines, for example:\n ```\n input_menu_toggle_btn = \"[w]\"\n input_screenshot_btn = \"[x]\"\n ```\n *(Replace `[w]` and `[x]` with your actual button values.)*\n - Open your controller’s autoconfig file, typically found at:\n ```\n retroarch/autoconfig/[platform]/[controller-name].cfg\n ```\n - Append the copied hotkey lines to the bottom of the autoconfig file.\n5. Add labels. They will be visible in `Settings` → `Input` → `Hotkeys`.\n - Add variable names. Complement the variables that you just added to the autoconfig file with the corresponding label variables ([variable name]+\"_label\") at the absolute bottom of the file, for example:\n ```\n input_menu_toggle_btn_label = \"[y]\"\n input_screenshot_btn_label = \"[z]\"\n ```\n *(Replace `[y]` and `[z]` with the appropriate label values described below.)*\n - Add the corresponding variable label values. Refer to the manufacturer’s official labeling for each button, but avoid using all capital letters unless the name is an abbreviation. Use standard capitalization with an initial capital letter to improve readability. Also, do not add the word “button” if it is already part of the official name. For instance, Nintendo refers to the “HOME button” on the Switch Pro Controller, but you should label it simply as “Home.” Similarly, the menu toggle label for Sony PlayStation controllers is “PS.” This approach balances clarity and respect for official naming.\n6. Save the autoconfig file.\n7. Restart RetroArch and navigate to `Settings` → `Input` → `Hotkeys` to confirm that they look as intended.\n\n### Analog L2/R2 remapping\nRetroArch has a bug([ref1](https://github.com/libretro/RetroArch/issues/6920), [ref2](https://github.com/libretro/RetroArch/issues/16767)) that causes analog L2/R2 triggers to be incorrectly mapped as digital buttons instead of analog axes when configuring controls through the UI. This affects pressure-sensitive triggers on controllers like PlayStation 2 and later, making some games unplayable due to the lack of analog input.\n\nSDL2 is an exception to this issue: SDL2 treats triggers like L2 and R2 as axes, even if they are digital buttons, to keep a consistent interface across controllers. For example, the Nintendo Switch Pro Controller’s triggers are digital but SDL2 maps them as axes, with values jumping from 0 to max instantly. In the SDL2 Nintendo Switch Pro Controller.cfg file, this is reflected by lines like:\n\n```\ninput_l2_axis = \"+4\"\ninput_r2_axis = \"+5\"\ninput_l2_axis_label = \"ZL\"\ninput_r2_axis_label = \"ZR\"\n```\n\n\nTo address this bug in RetroArch on other controllers or drivers, you need to manually edit the RetroArch config file to set the correct analog axis mappings for L2 and R2. Here's how to find the proper axis values:\n\n* Install and run jstest avalible for GNU/Linux (`sudo apt-get install joystick` for Debian-like distros), and Windows.\n - In GNU/Linux: `jstest /dev/input/js0`\n - In GNU/Linux virtual machines using QEMU, js0 is designated for the mouse, so you need to use js1 by running the command: `jstest /dev/input/js1`\n* Slowly press L2 and R2 to identify which axis numbers change\n* Note the axis numbers that correspond to L2 and R2\n* In the autoconfig file, set:\n```\ninput_l2_axis = \"+X\" (where X is the L2 axis number)\ninput_r2_axis = \"+Y\" (where Y is the R2 axis number)\n\ninput_l2_axis_label = \"L2 Trigger\"\ninput_r2_axis_label = \"R2 Trigger\"\n```\n\nFor [example](https://github.com/libretro/retroarch-joypad-autoconfig/pull/1135), if L2 is axis 2 and R2 is axis 5, you would:\n\nReplace:\n```\ninput_l2_btn = \"6\"\ninput_r2_btn = \"7\"\n\ninput_l2_btn_label = \"L2\"\ninput_r2_btn_label = \"R2\"\n\n```\n\nWith\n```\ninput_l2_axis = \"+2\"\ninput_r2_axis = \"+5\"\n\ninput_l2_axis_label = \"L2 Trigger\"\ninput_r2_axis_label = \"R2 Trigger\"\n```\n\nNote: These variable values are examples and should not be directly copied to your configuration file.\n\nWhen modifying your autoconfig file for analog triggers, it's crucial to pay attention to both variable names and values. The corresponding label variable names must also be consistent to ensure the configuration works correctly. A common oversight is focusing solely on the values while neglecting to update the variable names themselves. The `_axis` suffix is essential for ensuring proper analog functionality. Simply changing values without updating the suffix from `_btn` to `_axis` will not achieve the desired result.\n\n#### Common Pitfall\nUsers often unintentionally incorporate analog variable values without properly adjusting the existing variable names to reflect their analog nature. This oversight frequently results in configuration problems within the system.\nBy carefully updating both the variable names and values, you can ensure that your analog triggers are correctly configured for optimal performance.\n\n### Inspect the file\n\nWithout modifying anything in the original file, open it in the file in a text editor and\n1. Make sure that you have mapped all buttons, and that none of them have duplicated values.\n2. Each button should have a variable that ends with `_btn`, or `_axis`, not both. So for example, if you find both `input_a_axis`, and `input_a_btn`, it's incorrect. This may happen if your OS does not support the controller.\n\nBefore giving up and saving the controller again, you can attempt to re-map any missing buttons. However, please refrain from manually modifying the variables unless it's absolutely necessary due to bugs in RetroArch. If you plan to submit your profile to our joypad profile repository, we depend on automated data for debugging the autoconfig files.\n\n### Try the controller\n1. If the controller support Bluetooth, make sure that that there's no Bluetooth latency.\n2. Make sure that your mapping is perfect by testing every button in the menu.\n3. **Important: Remove previously set manual bindings**: Manual bindings take precedence over autoconfig files. So it's important to remove any manual bindings you may have set previously, as they take priority over autoconfig files. If you've used the Save Controller Profile command, you should reset these bindings. To do this, navigate to Settings -> Input -> RetroPad Binds -> Port 1 Controls -> Reset to Default Controls. Not resetting can cause issues with core responses, such as those from Remote RetroPad and console emulators, particularly if your manual bindings don't match the current controller driver's bindings. A typical problem arises when you create manual bindings, generate an autoconfig file, test them in Remote RetroPad, switch the controller driver to try a different autoconfig file, but forget to Reset to Default Controls first.\n4. To verify all controller mappings: `Main Menu` -> `Load Core` -> `Start Remote RetroPad`. Press each button once; icons change white to light green permanently if they are mapped correctly. If icons remain white, try to remap them. Ensure no white buttons remain. Evaluate analog trigger responsiveness for L2 and R2. As you slowly apply pressure, a black rectangle should appear in the center of each button and gradually fade as the pressure increases. Ensure you press the triggers slowly to observe the visual feedback accurately. For Android smartphones and other devices with small displays, hold the screen closer to your eyes. This will help you see the subtle rectangle indicator, which can be difficult to spot at normal viewing distances on compact screens.\n5. Try a game in a core that uses all mappings on your controller. After you have loaded the game it's possible that you have to change the native controller to your controller in `Quick Menu` -> `Settings` -> `Input` -> `RetroPad Binds` -> `Port 1 Controls` -> `Device Index` -- for example if you want to use both thumbsticks you have to change `PS1` to `DualShock` in PlayStation cores. If it's difficult for you to find a game that uses all buttons, you can set `Settings` -> `Input` -> `Hotkeys` (for example Save state, Load state, Fastforward, and Rewind) for unused buttons, so you can evaluate all mappings.\n6. Use `Settings` -> `Inputs` -> `Port 1 Controls` -> `Reset to Default Controls` to clear manual bindings and rely on the new profile.\n7. Unplug your joypad an re-plug it. See if it is auto configured.\n\nIf you are happy with your profile, you can submit it to RetroArch so that other users benefit:\n\n1. Edit the autoconfig file for your joypad manually to include the input descriptors (please see the [Input descriptors](#input-descriptors) section below)\n2. [Submit your profile to our joypad profile repository](https://github.com/libretro/retroarch-joypad-autoconfig) by filing a pull request (PR).\n - To help us track potential bugs if the autconfig does not work as expected in all RetroArch releases (Flatpak package via Flathub, AppImage via retroarch.com, etc) and their gamepad driver (sdl2, udev, etc), please include a bullet point at the beginning of your PR Comment when submitting a PR. This bullet should specify the RetroArch version you used to generate the autoconfig. Additionally, please add further bullet points to outline what has been added. For example: `* Generated the autoconfig file[s] with RetroArch Flathub's release version x.xx.x`\n\n### Default-off configs\nWhen developing controller configurations, it's essential to anticipate and mitigate potential conflicts. These issues often arise in the following situations:\n\n1. When multiple autoconfig files exist for a single device, causing confusion in the system. This primarily occurs with controllers that require different configurations based on kernel versions. For example, the Nintendo Switch Pro Controller on Linux, where older kernels necessitate a different button mapping compared to newer kernels.\n2. With poorly constructed unlicensed controllers. Even a single mismatched button can break compatibility, necessitating custom configuration.\n\nHere's how to set up a default-off configuration:\n\n1. Append \"(default-off)\" to the configuration filename.\n2. Comment out the `input_device`, `input_vendor_id` and `input_product_id` lines in the config file.\n3. Do not add \"(default-off)\" to the values of the input_device_display_name and input_driver variables in the config file. The default-off status is already indicated by the filename, so these variables should remain unmodified for clarity.\n\nThis approach allows users to manually enable the configuration when needed, preventing automatic application that could interfere with common devices, and helps ensure a smoother experience for users while still providing the necessary configuration options for those who require them.\n\n### Device Index scheme for autoconfig files\n\nIn RetroArch, the management of controller configurations is essential for ensuring proper functionality across various systems. This guide outlines how the Device Index are generated.\n\n#### Understanding the Device Index\n\nRetroArch identifies physical controllers through a system called the Device Index. You can locate this identifier by navigating to:\n\n**Settings > Input > RetroPad Binds > Port 1 Binds > Device Index**\n\nThe Device Index plays a crucial role when saving a controller profile. To save a profile, follow this path:\n\n**Settings > Input > RetroPad Binds > Port 1 Controls > Save Controller Profile**\n\n\n### Dual function of the Device Index\n\nWhen you save a controller profile, the Device Index serves two important purposes:\n\n1. **Configuration File Naming**: It becomes an integral part of the configuration file's name. For example, if the Device Index is \"Foo\", the configuration file might be named \"udev/Foo.cfg\".\n\n2. **Input Device Identification**: Within the configuration file itself, the Device Index is used as the value for the `input_device` variable. Following our example, you would see a line like this in the file:\n\n `input_device = \"Foo\"`\n\nThis dual functionality ensures that RetroArch can correctly identify and apply the appropriate settings for each unique controller.\n\nImportantly, this name remains consistent across various controller drivers, such as udev, sdl2, and linuxraw, as specified in **Settings > Drivers > Controller**.\n\n### sdl2 notes\nSDL2 uses the [SDL2 Game controller community database](https://github.com/mdqinc/SDL_GameControllerDB/blob/master/gamecontrollerdb.txt).\n\nYou can check it using [SDL2 Gamepad Mapper](https://gitlab.com/ryochan7/sdl2-gamepad-mapper/-/releases).\n\n#### Appimage issue\nCurrently, the SDL2 controller driver utilizes UDEV rather than SDL2 in the RetroArch Appimage package. Therfore, use the Flatpak package in order to upload SDL2 autoconfig files.\n\n### linuxraw, and udev naming schemes (depends on multiple Device Indexes)\n\nThe naming conventions for the controllers may vary between USB and Bluetooth connections depending on the Linux kernel version in use.\n\n#### Example of controller with HID and non-HID autoconfigs: Nintendo Switch Pro Controller\n\nIn Linux kernel versions 5.15.0, 5.19, and 6.2.0, devices connected via USB and Bluetooth are identified as \"Nintendo Switch Pro Controller.\" However, in kernel version 6.8.0, the device is recognized with the USB name \"Nintendo Co., Ltd. Pro Controller\" and the Bluetooth name \"Pro Controller.\" Consequently, to account for all possible device index names, it is essential to generate autoconfiguration files using various Linux kernel versions to capture all naming variations.\n\n| Linux Kernel Version | HID Support | USB Supported | Device Index in RetroArch (USB) | Bluetooth Supported[^2] | Device Index in RetroArch (Bluetooth) | Autoconfig structure |\n|-|-|-|-|-|-|-|\n| 5.15 | No | No[^1] | Nintendo Switch Pro Controller | Yes | Nintendo Switch Pro Controller | Generate `Nintendo Switch Pro Controller (default-off).cfg` |\n| 5.19 | Yes | Yes | Nintendo Switch Pro Controller | Yes | Nintendo Switch Pro Controller | udev/linuxraw: Generate `Nintendo Switch Pro Controller.cfg` |\n| 6.2.0 | Yes | Yes | Nintendo Switch Pro Controller | Yes | Nintendo Switch Pro Controller | |\n| 6.8.0 | Yes | Yes | Nintendo Co., Ltd. Pro Controller | Yes | Pro Controller | For linuxraw: Manually add `input_device_alt1 = \"Nintendo Co., Ltd. Pro Controller\"` and `input_device_alt2 = \"Pro Controller\"` |\n\nIn the above list, the following entries under **Autoconfigs file names to generate** are identified and required for the controller to be identified by linuxraw:\n\n##### udev autoconfigs\n\nudev primarily uses input_vendor_id and input_product_id, eliminating the need to create multiple files as required by linuxraw. However, an additional non-HID autoconfiguration is necessary in this example, because the bindings differ from those used in the HID autoconfiguration. This is important to ensure that the correct button mappings are applied for devices that do not conform to the HID standard, as they have different layouts that require distinct configurations.\n\n- **Nintendo Switch Pro Controller (non-HID) (default-off).cfg**:\n```\ninput_driver = \"udev\"\n#input_device = \"Nintendo Switch Pro Controller\"\ninput_device_display_name = \"Nintendo Switch Pro Controller (non-HID)\"\n#input_vendor_id = \"1406\"\n#input_product_id = \"8201\"\n```\n\nNote: `(non-HID) (default-off)` is added to the filename to distinguish it from the autoconfig with HID support and to make clear that it is disabled by default. Also, the `input_device`, `input_vendor_id` and `input_product_id` variables are commented out to disable this auto-configuration, preventing file name duplication and conflicts with the HID version: Nintendo Switch Pro Controller.cfg\n\n- **Nintendo Switch Pro Controller.cfg**:\n```\ninput_driver = \"udev\"\ninput_device = \"Nintendo Switch Pro Controller\"\ninput_vendor_id = \"1406\"\ninput_product_id = \"8201\"\ninput_device_alt1 = \"Nintendo Co., Ltd. Pro Controller\"\ninput_device_alt2 = \"Pro Controller\"\n```\n\n##### linuxraw autoconfigs\n\nSince linuxraw relies solely on input_device, all file names must be included:\n\n- **Nintendo Switch Pro Controller (non-HID) (default-off).cfg**:\n```\ninput_driver = \"linuxraw\"\n#input_device = \"Nintendo Switch Pro Controller\"\ninput_device_display_name = \"Nintendo Switch Pro Controller (non-HID)\"\n```\n\nNote: `(non-HID) (default-off)` is added to the filename to distinguish it from the autoconfig with HID support and to make clear that it is disabled by default. Also, the `input_device` variable is commented out to disable this auto-configuration, preventing file name duplication and conflicts with the HID version: Nintendo Switch Pro Controller.cfg\n\n- **Nintendo Switch Pro Controller.cfg**:\n```\ninput_driver = \"linuxraw\"\ninput_device = \"Nintendo Switch Pro Controller\"\ninput_device_alt1 = \"Nintendo Co., Ltd. Pro Controller\"\ninput_device_alt2 = \"Pro Controller\"\n```\n\n#### Example of multiple input_product_id variables: DualShock 4 v1, and DualShock 4 v2\n\n**DualShock 4 v2:**\n\n| Controller Version | Linux Kernel Version | HID Support | USB Supported | Device Index in RetroArch (USB) | Bluetooth Supported | Device Index in RetroArch (Bluetooth) | Autoconfig Structure |\n|--------------------|---------------------|-------------|---------------|---------------------------------|---------------------|---------------------------------------|----------------------|\n| 5.15 | Yes | Yes | Sony Interactive Entertainment Wireless Controller | Yes | Wireless Controller | udev/linuxraw: Generate `Sony DualShock 4 Controller.cfg` (see \"Note\" below). udev/linuxraw: Manually add DualShock 4 v1 values to input_device_alt1, input_device_display_name_alt1. linuxraw: Manually add: input_vendor_id_alt1, input_product_id_alt1 |\n| 5.19 | Yes | Yes | Sony Interactive Entertainment Wireless Controller | Yes | Wireless Controller | |\n| 6.2.0 | Yes | Yes | Sony Interactive Entertainment Wireless Controller | Yes | Wireless Controller | |\n| 6.8.0 | Yes | Yes | Sony Interactive Entertainment Wireless Controller | Yes | Wireless Controller | |\n\nNote: DualShock 4 v1 is known as \"Sony Computer Entertainment Wireless Controller\" in Linux. However, this controller is not sold any more so extensive evaluation is not possible. However, the configuration is identical for both controllers.\n\n##### udev autoconfigs\n\n- **Sony DualShock 4 Controller.cfg**:\n```\ninput_device = \"Sony Interactive Entertainment Wireless Controller\"\ninput_device_display_name = \"Sony Interactive Entertainment Wireless Controller (DualShock 4 v2)\"\ninput_driver = \"udev\"\ninput_vendor_id = \"1356\"\ninput_product_id = \"2508\"\ninput_device_alt1 = \"Sony Computer Entertainment Wireless Controller\"\ninput_device_display_name_alt1 = \"Sony Computer Entertainment Wireless (DualShock 4 v1)\"\ninput_vendor_id_alt1 = \"1356\"\ninput_product_id_alt1 = \"1476\"\n```\n\n##### linuxraw autoconfigs\n\n- **Sony DualShock 4 Controller.cfg**:\n```\ninput_driver = \"linuxraw\"\ninput_device = \"Sony Interactive Entertainment Wireless Controller\"\ninput_device_display_name = \"Sony Interactive Entertainment Wireless Controller (DualShock 4 v2)\"\ninput_device_alt1 = \"Wireless Controller\"\ninput_device_display_name_alt1 = \"Wireless Controller (DualShock 4 v2)\"\ninput_device_alt2 = \"Sony Computer Entertainment Wireless Controller\"\ninput_device_display_name_alt2 = \"Sony Computer Entertainment Wireless (DualShock 4 v1)\"\n```\n\n#### Example: Sony DualSense\n\n| Linux Kernel Version | HID Support | USB Supported | Device Index in RetroArch (USB) | Bluetooth Supportede[^2] | Device Index in RetroArch (Bluetooth) | Autoconfig structure |\n|-|-|-|-|-|-|-|\n| 5.15 | Yes | Yes | Sony Interactive Entertainment DualSense Wireless Controller | Yes | DualSense Wireless Controller | udev/linuxraw: Generate `Sony Interactive Entertainment DualSense Wireless Controller.cfg`. linuxraw: Manually add `input_device_alt1 = \"DualSense Wireless Controller\"` |\n| 5.19 | Yes | Yes | Sony Interactive Entertainment DualSense Wireless Controller | Yes | DualSense Wireless Controller | |\n| 6.2.0 | Yes | Yes | Sony Interactive Entertainment DualSense Wireless Controller | Yes | DualSense Wireless Controller | |\n| 6.8.0 | Yes | Yes | Sony Interactive Entertainment DualSense Wireless Controller | Yes | DualSense Wireless Controller | |\n\n\nIt should be noted that all DualSense controller versions (V1–V5, regardless of firmware version) share the same USB PID 0CE6 under VID 054C, unlike the earlier DualShock 4, whose V1 and V2 models use distinct PIDs.\n\nIn the above list, the following entries under **Autoconfigs file names to generate** are identified and required for the controller to be identified by linuxraw:\n\n##### udev\n\n- **Sony Interactive Entertainment DualSense Wireless Controller.cfg**:\n```\ninput_driver = \"udev\"\ninput_device = \"Sony Interactive Entertainment DualSense Wireless Controller\"\ninput_vendor_id = \"1356\"\ninput_product_id = \"3302\"\n```\n\n##### linuxraw\n\n- **Sony Interactive Entertainment DualSense Wireless Controller.cfg**:\n```\ninput_driver = \"linuxraw\"\ninput_device = \"Sony Interactive Entertainment DualSense Wireless Controller\"\ninput_device_alt1 = \"DualSense Wireless Controller\"\n```\n\n## Troubleshooting\nIf your joypad is not configured properly, you should [generate a RetroArch log](/docs/guides/generating-retroarch-logs.md). Your log will show if a profile has been matched for your pad and the path of the corresponding profile.\n\n## Joypad auto-configuration file\n\n### Metadata\n\nThe first part of the joypad profile is used for matching the profile with the device, as explained above. The **Vendor ID** and **Product ID** are in decimal format.\n\n```\ninput_driver = \"udev\"\ninput_device = \"Sony Interactive Entertainment DualSense Edge Wireless Controller\"\ninput_vendor_id = \"1356\"\ninput_product_id = \"3570\"\n```\n\n#### Manually finding Vendor ID and Product ID (VID:PID) on GNU/Linux\n\nIf you need to manually identify the VID:PID for your controller (for example, if RetroArch does not work as expected for you) in GNU/Linux, you can run this script:\n\n```\nread -p \"Connect your joypad and press ENTER.\"\nlsusb | nl -w2 -s': ' \nread -p \"Enter the number of your joypad device (or ENTER to skip): \" n\n\nif [[ -z \"$n\" ]]; then\n echo \"No device selected. Only mapping will be re-generated.\"\n exit 0\nfi\n\nline=$(lsusb | sed -n \"${n}p\")\nids=$(echo \"$line\" | grep -oP 'ID \\K[0-9a-fA-F]{4}:[0-9a-fA-F]{4}')\nvendor_hex=${ids%%:*}\nproduct_hex=${ids##*:}\ninput_product_id=$((16#$vendor_hex))\ninput_vendor_id=$((16#$product_hex))\n\necho -e \"\\ninput_vendor_id = \\\"$input_product_id\\\"\\ninput_product_id = \\\"$input_vendor_id\\\"\\n\"\n\n########################################\n# List all autoconfig files for the selected USB controller\n\nsearch_autoconfig() {\n local retroarch_dir=\"$1\"\n\n if [ ! -f \"$retroarch_dir/retroarch.cfg\" ]; then\n echo \"Config file not found: $retroarch_dir/retroarch.cfg. Please start RetroArch, and optionally configure Settings -> Directory -> Controller Profiles.\"\n return\n fi\n\n # Extract raw joypad_autoconfig_dir from config, strip quotes and spaces\n local joypad_autoconfig_dir_raw\n joypad_autoconfig_dir_raw=$(grep \"^joypad_autoconfig_dir\" \"$retroarch_dir/retroarch.cfg\" | cut -d= -f2- | tr -d '\" ')\n\n local joypad_autoconfig_dir\n\n # For AppImage, expand ~ to retroarch_dir; for others, expand ~ to $HOME\n if [[ \"$retroarch_dir\" == *\".AppImage.home/.config/retroarch\" ]]; then\n joypad_autoconfig_dir=\"${joypad_autoconfig_dir_raw/#\\~/$retroarch_dir}\"\n # Remove duplicated \".config/retroarch/\" if present twice\n joypad_autoconfig_dir=\"${joypad_autoconfig_dir//.config\\/retroarch\\/.config\\/retroarch/.config/retroarch}\"\n else\n joypad_autoconfig_dir=\"${joypad_autoconfig_dir_raw/#\\~/$HOME}\"\n fi\n\n # Fallback to default autoconfig directory if empty\n if [ -z \"$joypad_autoconfig_dir\" ]; then\n joypad_autoconfig_dir=\"$HOME/.config/retroarch/autoconfig\"\n fi\n\n echo \"Searching in: $joypad_autoconfig_dir\"\n\n if [ -d \"$joypad_autoconfig_dir\" ]; then\n grep -r \"input_product_id = \\\"$input_vendor_id\\\"\" \"$joypad_autoconfig_dir\"\n else\n echo \"Autoconfig directory not found: $joypad_autoconfig_dir\"\n fi\n\n echo \"\"\n}\n\necho \"--- Standard package install ---\"\nsearch_autoconfig \"$HOME/.config/retroarch\"\n\necho \"--- Flathub (Flatpak) install ---\"\nsearch_autoconfig \"$HOME/.var/app/org.libretro.RetroArch/config/retroarch\"\n\necho \"--- AppImage install ---\"\nsearch_autoconfig \"$HOME/Downloads/RetroArch-Linux-x86_64/RetroArch-Linux-x86_64.AppImage.home/.config/retroarch\"\n```\n\nWith this you can search for existing autoconfig files matching your controller. This is especially useful to find if your loaded autoconfig has commented variables which happens if there are multiple autoconfigs of the same controller.\n\n### Mapping\n\nThe second part is the mapping itself, where each button is assigned to a button of the RetroPad (the joypad abstraction of RetroArch).\n\nExample\n```\ninput_b_btn = \"0\"\ninput_y_btn = \"2\"\ninput_select_btn = \"6\"\ninput_start_btn = \"7\"\ninput_up_btn = \"h0up\"\ninput_down_btn = \"h0down\"\ninput_left_btn = \"h0left\"\ninput_right_btn = \"h0right\"\ninput_a_btn = \"1\"\ninput_x_btn = \"3\"\ninput_l_btn = \"4\"\ninput_r_btn = \"5\"\ninput_l2_axis = \"+2\"\ninput_r2_axis = \"+5\"\ninput_l3_btn = \"9\"\ninput_r3_btn = \"10\"\ninput_l_x_plus_axis = \"+0\"\ninput_l_x_minus_axis = \"-0\"\ninput_l_y_plus_axis = \"+1\"\ninput_l_y_minus_axis = \"-1\"\ninput_r_x_plus_axis = \"+3\"\ninput_r_x_minus_axis = \"-3\"\ninput_r_y_plus_axis = \"+4\"\ninput_r_y_minus_axis = \"-4\"\ninput_menu_toggle_btn = \"8\"\n```\n\nNote: These variable values are examples and should not be directly copied to your configuration file.\n\n#### Input types\n\n##### Buttons (digital inputs)\n\n* These are defined by variable names ending with `_btn` (e.g., `input_a_btn`, `input_start_btn`).\n* The current RetroArch configurations have button values that ranges from `0` to `203`. However, if RetroArch does not limit the values to `203`, underlying controller hardware could offer an even wider range.\n* RetroArch interprets these IDs (usually 1 for pressed, 0 for not pressed) to determine the button state.\n\n###### D-Pad directions (special digital inputs)\n\n* D-pad directions use variable values beginning with `h0` (e.g., `input_up_btn = \"h0up\"`), for certain controller drivers (e.g udev, and android, but not sdl2).\n* Four `h0` variables exist (`h0up`, `h0down`, `h0left`, `h0right`) for each direction on the D-pad.\n* Note: The value `h1` is used by a single controller (Nintendo_Wii_Remote_Classic_Controller.cfg).\n\n##### Axis (analog input)\n* Axis definitions use `+` and `-` to indicate positive or negative direction (e.g., full press vs. no press).\n* The current RetroArch configurations have axis values that ranges from `0` to `10`. However, if RetroArch does not limit the values to `10`, underlying controller hardware could offer an even wider range.\n\n###### Mapping variables with analog L2/R2 triggers\n```\ninput_l2_axis = \"+[x]\"\ninput_r2_axis = \"+[y]\"\n```\n\nNote: These variable values are examples and should not be directly copied to your configuration file, they will not work.\n\n#### Controller elements\n\n##### Axes (analog inputs)\n* They represent analog inputs from the controller, like joystick position (e.g., left joystick X-axis, right joystick Y-axis) or trigger pressure (e.g., L2 trigger, R2 trigger).\n* Variable names (for both mappings and labels) includes `_axis` define these (e.g., `input_l_x_plus_axis_label`, `input_r2_axis`).\n\n| Console | Controller | Release Date | Analog Thumb Sticks | L2/R2 Trigger |\n|------------------|----------------------------------|----------------|---------------------|--------------|\n| PlayStation 1 | Sony Dual Analog Controller | April 1997 | Yes | No |\n| PlayStation 1 | Sony DualShock | November 1997 | Yes | No |\n| PlayStation 2 | DualShock 2 | 2000 | Yes | Yes |\n| PlayStation 3 | Sixaxis | 2006 | Yes | Yes |\n| PlayStation 3 | DualShock 3 | 2008 | Yes | Yes |\n| PlayStation 4 | DualShock 4 | 2013 | Yes | Yes |\n| PlayStation 5 | DualSense | 2020 | Yes | Yes |\n\n###### Shoulder buttons with analog variables\nGive each button the same label as described by the manufacturer. Additionally:\n- For analog shoulder buttons, use the manufacturer’s label **and** append the word **\" Trigger\"** at the end.\n - For example: `input_l2_axis_label = \"L2 Trigger\"`\n\n###### Analog sticks\nThe term \"Analog\" is included in the variable values for the analog inputs to clearly indicate that these inputs are analog in nature.\n\nLabels for analog thumb sticks:\n```\ninput_l_x_plus_axis_label = \"Left Analog X+ (Right)\"\ninput_l_x_minus_axis_label = \"Left Analog X- (Left)\"\ninput_l_y_plus_axis_label = \"Left Analog Y+ (Down)\"\ninput_l_y_minus_axis_label = \"Left Analog Y- (Up)\"\ninput_r_x_plus_axis_label = \"Right Analog X+ (Right)\"\ninput_r_x_minus_axis_label = \"Right Analog X- (Left)\"\ninput_r_y_plus_axis_label = \"Right Analog Y+ (Down)\"\ninput_r_y_minus_axis_label = \"Right Analog Y- (Up)\"\n```\n\n#### Input descriptors\n\nThe third part are *input descriptors* used by RetroArch to display the labels of the buttons as they are written on your joypad. RetroArch does not automatically generate button labels; therefore, you need to manually add them to your autoconfig file.\n\nGeneric input descriptors:\n```\ninput_b_btn_label = \"A\"\ninput_y_btn_label = \"X\"\ninput_select_btn_label = \"Back\"\ninput_start_btn_label = \"Start\"\ninput_up_btn_label = \"D-Pad Up\"\ninput_down_btn_label = \"D-Pad Down\"\ninput_left_btn_label = \"D-Pad Left\"\ninput_right_btn_label = \"D-Pad Right\"\ninput_a_btn_label = \"B\"\ninput_x_btn_label = \"Y\"\ninput_l_btn_label = \"LB\"\ninput_r_btn_label = \"RB\"\ninput_l2_axis_label = \"LT\"\ninput_r2_axis_label = \"RT\"\ninput_l3_btn_label = \"Left Thumb\"\ninput_r3_btn_label = \"Right Thumb\"\ninput_l_x_plus_axis_label = \"Left Analog X+ (Right)\"\ninput_l_x_minus_axis_label = \"Left Analog X- (Left)\"\ninput_l_y_plus_axis_label = \"Left Analog Y+ (Down)\"\ninput_l_y_minus_axis_label = \"Left Analog Y- (Up)\"\ninput_r_x_plus_axis_label = \"Right Analog X+ (Right)\"\ninput_r_x_minus_axis_label = \"Right Analog X- (Left)\"\ninput_r_y_plus_axis_label = \"Right Analog Y+ (Down)\"\ninput_r_y_minus_axis_label = \"Right Analog Y- (Up)\"\ninput_menu_toggle_btn_label = \"Guide\"\n```\n\n#### Example: Controllers for Sony PlayStation 2 and later\n\nLabels for PlayStation controllers starting from PS2. Note that analog L2/R2 triggers (`input_l2_axis_label = \"L2 Trigger\"`, and `input_r2_axis_label = \"R2 Trigger\"`) are featured:\n```\ninput_b_btn_label = \"Cross\"\ninput_y_btn_label = \"Square\"\ninput_select_btn_label = \"Create\"\ninput_start_btn_label = \"Options\"\ninput_up_btn_label = \"D-Pad Up\"\ninput_down_btn_label = \"D-Pad Down\"\ninput_left_btn_label = \"D-Pad Left\"\ninput_right_btn_label = \"D-Pad Right\"\ninput_a_btn_label = \"Circle\"\ninput_x_btn_label = \"Triangle\"\ninput_l_btn_label = \"L1\"\ninput_r_btn_label = \"R1\"\ninput_l2_axis_label = \"L2 Trigger\"\ninput_r2_axis_label = \"R2 Trigger\"\ninput_l3_btn_label = \"L3\"\ninput_r3_btn_label = \"R3\"\ninput_l_x_plus_axis_label = \"Left Analog X+ (Right)\"\ninput_l_x_minus_axis_label = \"Left Analog X- (Left)\"\ninput_l_y_plus_axis_label = \"Left Analog Y+ (Down)\"\ninput_l_y_minus_axis_label = \"Left Analog Y- (Up)\"\ninput_r_x_plus_axis_label = \"Right Analog X+ (Right)\"\ninput_r_x_minus_axis_label = \"Right Analog X- (Left)\"\ninput_r_y_plus_axis_label = \"Right Analog Y+ (Down)\"\ninput_r_y_minus_axis_label = \"Right Analog Y- (Up)\"\ninput_menu_toggle_btn_label = \"PS\"\n```\n\n### Avoid blank lines\nWhen RetroArch generates autoconfig files through Settings -> Input -> RetroPad Binds -> Port 1 Controls -> Save Controller Profile, it does not include empty line breaks. If you manually insert an empty line before the label variables and later modify any variable, RetroArch will remove the blank line upon saving again. While blank lines are harmless, they do not adhere to a strict standard.\n\n### Example of a correctly formatted autoconfig file\n\nautoconfig/udev/DualSense Wireless Controller.cfg:\n\n```\ninput_driver = \"udev\"\ninput_device = \"Sony Interactive Entertainment DualSense Wireless Controller\"\ninput_device_display_name = \"Sony DualSense (BlueTooth)\"\ninput_b_btn = \"0\"\ninput_y_btn = \"3\"\ninput_select_btn = \"8\"\ninput_start_btn = \"9\"\ninput_up_btn = \"h0up\"\ninput_down_btn = \"h0down\"\ninput_left_btn = \"h0left\"\ninput_right_btn = \"h0right\"\ninput_a_btn = \"1\"\ninput_x_btn = \"2\"\ninput_l_btn = \"4\"\ninput_r_btn = \"5\"\ninput_l2_axis = \"+2\"\ninput_r2_axis = \"+5\"\ninput_l3_btn = \"11\"\ninput_r3_btn = \"12\"\ninput_l_x_plus_axis = \"+0\"\ninput_l_x_minus_axis = \"-0\"\ninput_l_y_plus_axis = \"+1\"\ninput_l_y_minus_axis = \"-1\"\ninput_r_x_plus_axis = \"+3\"\ninput_r_x_minus_axis = \"-3\"\ninput_r_y_plus_axis = \"+4\"\ninput_r_y_minus_axis = \"-4\"\ninput_menu_toggle_btn = \"5\"\ninput_b_btn_label = \"Cross\"\ninput_y_btn_label = \"Square\"\ninput_select_btn_label = \"Create\"\ninput_start_btn_label = \"Options\"\ninput_up_btn_label = \"D-Pad Up\"\ninput_down_btn_label = \"D-Pad Down\"\ninput_left_btn_label = \"D-Pad Left\"\ninput_right_btn_label = \"D-Pad Right\"\ninput_a_btn_label = \"Circle\"\ninput_x_btn_label = \"Triangle\"\ninput_l_btn_label = \"L1\"\ninput_r_btn_label = \"R1\"\ninput_l2_axis_label = \"L2 Trigger\"\ninput_r2_axis_label = \"R2 Trigger\"\ninput_l3_btn_label = \"L3\"\ninput_r3_btn_label = \"R3\"\ninput_l_x_plus_axis_label = \"Left Analog X+ (Right)\"\ninput_l_x_minus_axis_label = \"Left Analog X- (Left)\"\ninput_l_y_plus_axis_label = \"Left Analog Y+ (Down)\"\ninput_l_y_minus_axis_label = \"Left Analog Y- (Up)\"\ninput_r_x_plus_axis_label = \"Right Analog X+ (Right)\"\ninput_r_x_minus_axis_label = \"Right Analog X- (Left)\"\ninput_r_y_plus_axis_label = \"Right Analog Y+ (Down)\"\ninput_r_y_minus_axis_label = \"Right Analog Y- (Up)\"\ninput_menu_toggle_btn_label = \"PS\"\n```\n\n# Footnotes\n[^1]: The controller is listed as \"Nintendo Switch Pro Controller\" under RetroPad Binds -> Port 1 Controls -> Device Index, but button binding is not possible.\n[^2]: Ensure that the bluez package is functioning correctly, as detailed in this [bug](https://github.com/bluez/bluez/issues/673). Also, if you're experiencing unreliable Bluetooth connections with virtual machines, which can impact all controllers, consider booting the distributions in live mode directly from the BIOS.\n[^3]: If there is a misconfiguration of the Vendor ID and Product ID, the system defaults to using the Device Index. Relevant code references include input_autoconfigure_get_config_file_affinity in task_autodetect.c, and input_autoconfigure_connect in android_input.c, sdl_joypad.c, and udev_joypad.c. If you've already created Linuxraw autoconfig names that need alternative input_device variables (such as input_device_alt1, input_device_alt2, etc.), please use them for udev as well since they are using identical Device Indexes. If you haven't, using input_vendor_id/input_product_id will suffice.\n"
},
{
"path": "docs/guides/core-list.md",
"content": "| Core | System/Machine | Notes |\n| :--- | :--- | :--- |\n| [2048](https://docs.libretro.com/library/2048/) | Game | A port of the popular puzzle game 2048 to libretro |\n| 3D Engine | - | This is a test core; it demonstrates how to create a hardware-rendered core in a libretro context |\n| [4DO](https://docs.libretro.com/library/opera/) | 3DO | |\n| a5200 | Atari 5200 | |\n| Anarch | Game | A port of Anarch, 90s-style Doom clone shooter game |\n| [Ardens](../library/ardens.md) | Arduboy | A simulator for the Arduboy FX |\n| Arduous | Arduboy | A emulator for Arduboy, a handheld game console with open source software, based on the Arduino hardware platform |\n| [Atari800](https://docs.libretro.com/library/atari800/) | Atari 5200 | |\n| [b2](../library/b2.md) | Acorn BBC Micro | |\n| [Beetle bsnes](../library/beetle_bsnes.md) | Nintendo SNES/SFC | |\n| [Beetle Cygne](https://docs.libretro.com/library/beetle_cygne/) | Bandai WonderSwan/Color | |\n| [Beetle GBA](../library/beetle_gba.md) | Game Boy Advance | |\n| [Beetle Lynx](../library/beetle_lynx.md) | Atari Lynx | |\n| Beetle NeoPop | Neo Geo Pocket/Color | |\n| Beetle PC-FX | NEC PC-FX | |\n| Beetle PCE | NEC PC Engine/SuperGrafx/CD | |\n| Beetle PCE FAST | NEC PC Engine/CD | |\n| Beetle PSX | Sony PlayStation | |\n| Beetle PSX HW | Sony PlayStation | A fork of Mednafen's PSX providing GPU-accelerated renderers for OpenGL and Vulkan |\n| Beetle Saturn | Sega Saturn | |\n| Beetle SuperGrafx | NEC PC Engine/SuperGrafx | |\n| Beetle Supafaust | Nintendo SNES/SFC | |\n| [Beetle VB](../library/beetle_vb.md) | Nintendo Virtual Boy | |\n| [BK](../library/bk.md) | Elektronika BK-0010/BK-0011(M)/Terak 8510-a | A port of the PDP11 emulator to libretro. This core emulates the PDP-11/03 platform. |\n| BlastEm | Sega Genesis (Mega Drive) | |\n| [blueMSX](../library/bluemsx.md) | MSX/SVI/ColecoVision/SG-1000 | |\n| [bnes](../library/bnes.md) | Nintendo NES/Famicom | |\n| boom 3 | Game engine | A port of the Doom 3 engine to libretro. There is a separate core for it's expansion pack 'Resurrection of Evil'. |\n| boom 3 xp | Game engine | (See boom 3 note) |\n| bsnes | Nintendo SNES/SFC | |\n| [bsnes 2014 Accuracy](../library/bsnes_accuracy.md) | Nintendo SNES/SFC | |\n| [bsnes 2014 Balanced](../library/bsnes_balanced.md) | Nintendo SNES/SFC | |\n| [bsnes 2014 Performance](../library/bsnes_performance.md) | Nintendo SNES/SFC | |\n| [bsnes C++98 (v085)](../library/bsnes_cplusplus98.md) | Nintendo SNES/SFC | |\n| bsnes-hd beta | Nintendo SNES/SFC | |\n| [bsnes-jg](../library/bsnes-jg.md) | Nintendo SNES/SFC | |\n| [bsnes-mercury Accuracy](../library/bsnes_mercury_accuracy.md) | Nintendo SNES/SFC | |\n| [bsnes-mercury Balanced](../library/bsnes_mercury_balanced.md) | Nintendo SNES/SFC | |\n| [bsnes-mercury Performance](../library/bsnes_mercury_performance.md) | Nintendo SNES/SFC | |\n| Cannonball | Game engine | A port of the Cannonball, enhanced OutRun engine to libretro |\n| [Caprice32](../library/caprice32.md) | Amstrad CPC | |\n| CDi 2015 | Philips CDi | |\n| ChaiLove | Game engine | A free, open-source framework used to make 2D games in ChaiScript |\n| [Citra](../library/citra.md) | Nintendo 3DS | |\n| Citra 2018 | Nintendo 3DS | |\n| [Citra Canary](../library/citra_canary.md) | Nintendo 3DS | Based on Citra development branch |\n| [ClownMDEmu](../library/clownmdemu.md) | Sega MD/CD | |\n| Craft | Game | A basic clone of the Minecraft sandbox game |\n| [CrocoDS](../library/crocods.md) | Amstrad CPC | |\n| Cruzes | Game | (Further information required) |\n| Daphne | Arcade | |\n| [DeSmuME](../library/desmume.md) | Nintendo DS | |\n| [DeSmuME 2015](../library/desmume_2015.md) | Nintendo DS | |\n| [DICE](../library/dice.md) | Arcade | Pre-CPU games like Pong |\n| Dinothawr | Game engine | A push-the-block-in-a-straight-line puzzle game in the spirit of Kickle Cubicle |\n| DirectXbox | Xbox | |\n| [Dolphin](../library/dolphin.md) | Nintendo GameCube/Wii | |\n| [DOSBox](../library/dosbox.md) | DOS | |\n| DOSBox-core | DOS | Provides some improvements over the DOSBox-SVN trunk, including native MIDI support, cycle-accurate OPL3 (YMF262) emulation, MT-32 emulation and experimental 3dfx Voodoo support |\n| [DOSBox-Pure](../library/dosbox_pure.md) | DOS | A port of DOSBox with a goal of simplicty and ease of use and gameplay. This core includes a streamlined workflow for launching games directly from ZIP archives with automated mapping of controls to gamepads and a native onscreen keyboard. |\n| DOSBox-SVN | DOS | This core is based on DOSBox-SVN trunk and allows on-the-fly configuration and different sync methods |\n| [doukutsu-rs](../library/doukutsu-rs.md) | Game engine | An open-source reimplementation of the Cave Story engine compatible with all official (and some unofficial) releases of Cave Story |\n| DuckStation | Sony PlayStation | |\n| Dungeon Crawl Stone Soup | Game | A preliminary port of the Dungeon Crawl Stone Soup strategy game |\n| EasyRPG | RPG Maker 2000/2003 | |\n| ECWolf | Game engine | A port of the Wolfenstein 3D engine to libretro |\n| EighyOne | Sinclair ZX 81 | |\n| Emux CHIP-8 | CHIP-8 | |\n| [Emux GB](../library/emux_gb.md) | Game Boy/Color | |\n| [Emux NES](../library/emux_nes.md) | Nintendo NES/Famicom | |\n| Emux SMS | Sega Master System | |\n| EmuSCV | Super Cassette Vision | |\n| [Ep128emu](../library/ep128emu.md) | Enterprise 64/128 | |\n| FAKE-08 | Pico-8 | A port of the FAKE-08 open-source reimplementation of the PICO-8 fantasy console to libretro |\n| FB Alpha | Arcade/Console/various | (See FB Neo note) |\n| FB Alpha 2012 | Arcade/Console/various | (See FB Neo note) |\n| FB Alpha 2012 CPS-1 | CPS-1 | |\n| FB Alpha 2012 CPS-2 | CPS-2 | |\n| FB Alpha 2012 CPS-3 | CPS-3 | |\n| FB Alpha 2012 Neo Geo | Neo Geo | |\n| [FB Neo](../library/fbneo.md) | Arcade/Console/various | Full list of supported systems: https://github.com/finalburnneo/FBNeo/wiki |\n| [FCEUmm](../library/fceumm.md) | Nintendo NES/Famicom | |\n| FFmpeg | Media player | A port of FFmpeg library which allows playback of a variety of audio and video formats |\n| fixGB | Game Boy/Color | |\n| fixNES | Nintendo NES/Famicom | |\n| Flycast | Sega Dreamcast/NAOMI | |\n| Flycast GLES2 | Sega Dreamcast/NAOMI | |\n| fMSX | MSX/MSX2/MSX2+ | |\n| FreeChaF | Fairchild ChannelF | |\n| [FreeIntv](../library/freeintv.md) | Mattel Intellivision | |\n| FreeJ2ME | J2ME | a port of Java 2 Micro Edition emulator |\n| Frodo | Commodore C64 | |\n| FS-UAE | Commodore Amiga | |\n| Fuse | Sinclair ZX Spectrum | |\n| [GAM4980](../library/gam4980.md) | BBK 4980/4988/5980 electronic dictionary |\n| [Gambatte](../library/gambatte.md) | Game Boy/Color | |\n| Game Music Emu | Music player | A port of Game Music Emu which allows playback of a wide variety of video game music formats |\n| [Gearboy](../library/gearboy.md) | Game Boy/Color | |\n| [Gearcoleco](../library/gearcoleco.md) | Coleco ColecoVision | |\n| [Geargrafx](../library/geargrafx.md) | NEC PC Engine/SuperGrafx | |\n| [Gearlynx](../library/gearlynx.md) | Atari Lynx | |\n| [Gearsystem](../library/gearsystem.md) | Sega MS/GG/SG-1000 | |\n| Genesis Plus GX | Sega MS/GG/MD/CD | |\n| [Geolith](../library/geolith.md) | SNK Neo Geo AES/MVS | Highly accurate emulator for the Neo Geo AES and MVS Cartridge Systems |\n| [gpSP](../library/gpsp.md) | Game Boy Advance | |\n| Gong | Game | A clone of Pong written for libretro |\n| GW | Handheld Electronic | A simulator of various Game and Watch-style handheld electronic games |\n| [Handy](../library/handy.md) | Atari Lynx | |\n| [Hatari](../library/hatari.md) | Atari ST/STE/TT/Falcon | |\n| HBMAME | Arcade/Console/various | HBMAME (HomeBrew MAME) is a derivative of MAME, and contains various hacks and homebrews |\n| [higan Accuracy](../library/higan_accuracy.md) | Nintendo SNES/SFC/Game Boy/Color | |\n| [Holani](../library/holani.md) | Atari Lynx | |\n| Imageviewer | Imageviewer | A basic core for viewing still images in a libretro frontend |\n| Ishiiruka | Nintendo GameCube/Wii | |\n| JAXE | CHIP-8/S-CHIP/XO-CHIP | |\n| [JollyCV](../library/jollycv.md) | ColecoVision/CreatiVision/My Vision | |\n| Jump 'n Bump | Game engine | A reimplementation of the engine of Jump 'n Bump, a open-source MS-DOS multiplayer video game by Brainchild Design |\n| Kronos | Sega Saturn/ST-V | A port of the Kronos, which is itself a fork of Yabause emulator |\n| LowRes NX | Game engine | A port of the LowRes NX fantasy console to libretro |\n| Lutro | Game engine | An experimental Lua game framework for libretro, based on a subset of the LOVE API |\n| M2000 | Philips P2000T | A port of M2000, the portable Philips P2000 emulator to libretro |\n| MAME (Current) | Arcade/Console/various | Based on MAME development branch. Full list of supported systems: http://adb.arcadeitalia.net/mame.php |\n| MAME 2000 | Arcade/Console/various | (See MAME note) |\n| [MAME 2003](../library/mame_2003.md) | Arcade/Console/various | (See MAME note) |\n| MAME 2003 Midway | Arcade/Console/various | (See MAME note) |\n| [MAME 2003-Plus](../library/mame2003_plus.md) | Arcade/Console/various | (See MAME note) |\n| MAME 2009 | Arcade/Console/various | (See MAME note) |\n| [MAME 2010](../library/mame_2010.md) | Arcade/Console/various | (See MAME note) |\n| MAME 2015 | Arcade/Console/various | (See MAME note) |\n| MAME 2016 | Arcade/Console/various | (See MAME note) |\n| [melonDS 2021](../library/melonds.md) | Nintendo DS | |\n| [melonDS DS](../library/melonds_ds.md) | Nintendo DS/DSi | Enhanced remake of the melonDS core based on a newer version of the emulator. |\n| [Mesen](../library/mesen.md) | Nintendo NES/Famicom | |\n| [Mesen-S](../library/mesen-s.md) | Nintendo SNES/SFC/Game Boy/Color | |\n| MESS 2015 | Multi (various) | (See MAME note) |\n| [Meteor](../library/meteor.md) | Game Boy Advance | |\n| [mGBA](../library/mgba.md) | Game Boy Advance | |\n| Microw8 | Game engine | A port of a WebAssembly based fantasy console to libretro |\n| [Minivmac](../library/minivmac.md) | Mac II | MacII variant of minivmac emulator |\n| [mkxp-z](../library/mkxp-z.md) | RPG Maker XP/VX/VX Ace | |\n| mpv | Media player | An port of MPV media player to libretro |\n| Mr.Boom | Game | A clone of the classic Bomberman series |\n| Mu | Palm OS | An emulator for the Palm m515 OS ported to libretro |\n| [Mupen64Plus-Next](https://docs.libretro.com/library/mupen64plus/) | Nintendo 64 | |\n| [Mupen64Plus-Next GLES2](https://docs.libretro.com/library/mupen64plus/) | Nintendo 64 | |\n| [Mupen64Plus-Next GLES3](https://docs.libretro.com/library/mupen64plus/) | Nintendo 64 | |\n| Neko Project II | NEC PC-98 | |\n| Neko Project II Kai | NEC PC-98 | |\n| NeoCD | Neo Geo CD | |\n| [Nestopia](../library/nestopia.md) | Nintendo NES/Famicom | |\n| [nSide Balanced](../library/nside_balanced.md) | Nintendo SNES/SFC/Game Boy/Color | |\n| Numero | TI-83 | A TI-83 Emulator for Libretro |\n| NXEngine | Game engine | An open-source reimplementation of the Cave Story / Doukutsu engine |\n| O2EM | Magnavox Odyssey2/Philips Videopac+ | |\n| Oberon | Oberon RISC machine | An emulator for the Oberon RISC machine, ported to libretro |\n| OpenLara | Game engine | A port of the OpenLara free/open re-implementation of the engine used by the original Tomb Raider series |\n| OpenTyrian | Game | A port of the OpenTyrian clone of the classic Tyrian shmup, ported to libretro |\n| [Opera](https://docs.libretro.com/library/opera/) | 3DO | |\n| ParaLLEl N64 | Nintendo 64 | |\n| PascalPong | Game | A free and basic clone of the classic Pong game, written for libretro |\n| PCem | IBM PC | |\n| [LRPS2](https://docs.libretro.com/library/lrps2/) | Sony PlayStation 2 | |\n| [PCSX ReARMed](https://docs.libretro.com/library/pcsx_rearmed/) | Sony PlayStation | |\n| [PD777](../library/pd777.md) | Epoch Cassette Vision | |\n| PicoDrive | Sega MS/GG/MD/CD/32X | |\n| Play! | Sony PlayStation 2 | |\n| Pocket CDG | Karaoke player | A karaoke music player, ported to libretro |\n| [PokeMini](../library/pokemini.md) | Nintendo Pokemon Mini | |\n| Potator | Watara Supervision | |\n| PPSSPP | PlayStation Portable | |\n| PrBoom | Game engine | A port of the PrBoom source port of iD's classic Doom engine |\n| [ProSystem](../library/prosystem.md) | Atari 7800 | |\n| [PUAE](../library/puae.md) | Commodore Amiga | |\n| [PUAE 2021](../library/puae.md) | Commodore Amiga | |\n| PuzzleScript | Game engine | A port of PuzzleScript, open source HTML5 puzzle game engine |\n| PX68k | Sharp X68000 | |\n| QUASI88 | NEC PC-8000/PC-8800 series | |\n| [QuickNES](../library/quicknes.md) | Nintendo NES/Famicom | |\n| RACE | Neo Geo Pocket/Color | |\n| Redbook | Music player | A libretro core for playing back Redbook-formatted audio, such as commercial audio CDs |\n| REminiscence | Game engine | A port of the REminiscence engine, a reimplementation of the engine used by Delphine Software's Flashback |\n| Retro8 | Game engine | A port of the Retro8 open-source reimplementation of the PICO-8 fantasy console to libretro |\n| Rustation | Sony PlayStation | |\n| RVVM | RISC-V Virtual Machine | |\n| [SameBoy](../library/sameboy.md) | Game Boy/Color | |\n| SameDuck | Mega Duck (Cougar Boy) | An adaptation of SameBoy to play Mega Duck games |\n| [SAME CDI](../library/same_cdi.md) | Philips CDi | SAME CDi is a S(ingle) A(rcade) M(achine) E(mulator) for libretro, forked from MAME, which only includes the Philips CD-i driver |\n| [ScummVM](https://docs.libretro.com/library/scummvm/) | Game engine | A fork of the ScummVM adventure game engine ported to libretro |\n| SimCoupe | SAM Coupe | |\n| [SMS Plus GX](https://docs.libretro.com/library/smsplus/) | Sega MS/GG | |\n| [Snes9x](https://docs.libretro.com/library/snes9x/) | Nintendo SNES/SFC | |\n| [Snes9x 2002](https://docs.libretro.com/library/snes9x_2002/) | Nintendo SNES/SFC | |\n| [Snes9x 2005](https://docs.libretro.com/library/snes9x_2005/) | Nintendo SNES/SFC | |\n| [Snes9x 2005 Plus](https://docs.libretro.com/library/snes9x_2005_plus/) | Nintendo SNES/SFC | |\n| [Snes9x 2010](https://docs.libretro.com/library/snes9x_2010/) | Nintendo SNES/SFC | |\n| SquirrelJME | Java ME | A port of the SquirrelJME Java ME 8 Virtual Machine emulator to libretro |\n| [Stella](https://docs.libretro.com/library/stella/) | Atari 2600 | |\n| Stella 2014 | Atari 2600 | |\n| Super Bros War | Game engine | A fork of Super Mario War, a fan-made multiplayer Super Mario Bros. style deathmatch game |\n| SwanStation | Sony PlayStation | SwanStation is a fork of the Duckstation emulator |\n| [TempGBA](https://docs.libretro.com/library/tempgba/) | Game Boy Advance | |\n| [TGB Dual](https://docs.libretro.com/library/tgb_dual/) | Game Boy/Color | |\n| [Theodore](https://docs.libretro.com/library/theodore/) | Thomson MO/TO | |\n| TIC-80 | Game engine | A port of the free and open source fantasy computer TIC-80 to libretro |\n| The Powder Toy | Game | A port of the Powdertoy physics sandbox/simulation engine to libretro |\n| [TyrQuake](https://docs.libretro.com/library/tyrquake/) | Game engine | A port of the tyrquake engine |\n| UAE4ARM | Commodore Amiga | |\n| UME 2015 | Arcade/Console/various | (See MAME note) |\n| Uzem | Uzebox | A port of Uzem, the official emulator for the Uzebox |\n| VaporSpec | Game engine | A virtual game platform with capabilities similar to 80s game consoles |\n| [VBA-M](../library/vba_m.md) | Game Boy Advance | VisualBoy Advance-M is a active fork of VisualBoy Advance emulator |\n| [VBA Next](https://docs.libretro.com/library/vba_next/) | Game Boy Advance | |\n| [vecx](../library/vecx.md) | GCE/MB Vectrex | |\n| [VeMUlator](https://docs.libretro.com/library/vemulator/) | SEGA Visual Memory Unit | A port of VeMUlator, a SEGA Dreamcast VMU emulator originally developed for Android |\n| [VICE x64](../library/vice.md) | Commodore C64 | |\n| [VICE x64dtv](../library/vice.md) | Commodore C64DTV | DTV2 PAL/NTSC, DTV3 PAL/NTSC, HUMMER NTSC |\n| [VICE x64sc](../library/vice.md) | Commodore C64 | |\n| [VICE x128](../library/vice.md) | Commodore C128 | |\n| [VICE xcbm2](../library/vice.md) | Commodore CBM-II 6x0/7x0 | |\n| [VICE xcbm5x0](../library/vice.md) | Commodore CBM-II 5x0 | |\n| [VICE xpet](../library/vice.md) | Commodore PET | |\n| [VICE xplus4](../library/vice.md) | Commodore Plus/4 | |\n| [VICE xscpu64](../library/vice.md) | Commodore C64 SuperCPU | |\n| [VICE xvic](../library/vice.md) | Commodore VIC-20 | |\n| Vircon32 | Game engine | A port of Vircon32 game console to libretro |\n| [Virtual Jaguar](../library/virtual_jaguar.md) | Atari Jaguar | |\n| [VirtualXT](../library/virtualxt.md) | DOS | Runns PC/XT class software. Mainly intended for PC booters from the 80's. |\n| vitaQuake 2 | Game engine | A port of the VitaQuake 2 source port of iD's Quake 2 engine to libretro. There is a separate core for each of the Quake 2 mission packs, 'Rogue', 'Zaero' and 'Xatrix'. |\n| vitaQuake 2 (Rogue) | Game engine | (See vitaQuake 2 note) |\n| vitaQuake 2 (Xatrix) | Game engine | (See vitaQuake 2 note) |\n| vitaQuake 2 (Zaero) | Game engine | (See vitaQuake 2 note) |\n| vitaQuake 3 | Game engine | A port of the VitaQuake 3 source port of iD's ioquake3 engine to libretro |\n| vitaVoyager | Game engine | A port of the Lilium Voyager engine, which runs the Star Trek: Voyager - Elite Force game and is itself based on the ioquake3 |\n| WASM-4 | Game engine | WASM-4 is a open source low-level fantasy game console for building small games with WebAssembly |\n| X Millennium | Sharp X1 | |\n| XRick | Game engine | A port of the XRick, an open-source clone of the Rick Dangerous engine |\n| YabaSanshiro | Sega Saturn | A port of the YabaSanshiro, which is itself a fork of Yabause emulator |\n| Yabause | Sega Saturn | |\n"
},
{
"path": "docs/guides/crtswitchres.md",
"content": "# CRTSwitchRes\n\n[Switchres](https://github.com/antonioginer/switchres) is a modeline generation engine for emulation.\n\nIts purpose is on-the-fly creation of fully customized video modes that accurately reproduce those of the emulated systems. Based on a monitor profile, it will provide the best video mode for a given width, height, and refresh rate.\n\nThe usual motivation is to connect a CRT display and have it driven in the original resolution (at least vertically), which is otherwise too low for modern display systems. The connection is typically from a digital connector (such as HDMI) on the computer side and needs an external converter for the CRT.\n\n## Setup\n\n### Windows \n\nAMD video card is needed. Windows works the best with CRT Emudriver, available [here](http://geedorah.com/eiusdemmodi/forum/viewtopic.php?id=295). Once you have this setup and running, it is a simple case of turning CRTSwitchRes on and choosing your settings.\n\nOther options are available. It's a simple case of getting the resolutions installed on you Windows PC.\n\n### Linux\n\nSwitchres can work in the following environments:\n- X11\n- KMS mode\n- Raspberry Pi with legacy graphics drivers\n\n!!! note\n In some cases your distribution may be missing some X libraries in this case make sure you install the \n following `libx11-dev libxrandr-dev`\n\n!!! note\n The composite output of RPi has fixed resolution and is unsuitable for custom modelines.\n\n## Enabling and Changing Settings\n\nCRTSwitchRes now using Switchres by Calamity. This is available on both Windows and Linux.\n\nTo enable CRTSwitchRes or change settings\n- Navigate to **Settings**\n- Navigate to **Video**\n- Navigate to **CRT SwitchRes**\n\n!!! tip\n CRTSwitchRes is hidden behind advanced settings. Please enable advanced settings in User Interface first.\n\n## CRTSwitchRes Options\n\n| Option | Available Values |\n| ----------------------- |:-----------------------------------------------:|\n| CRT SwitchRes | off, 15KHz, 31KHZ Standard, 31KHZ- 120Hz, INI |\n| CRT Super resolution | Native, Dynamic, 1920, 2560, 3840 |\n| X Centering | Currently not in use |\n| Porch Adjust | Currently not in use |\n| Use Custom refresh rate | Currently not in use |\n\n## Option 1. CRT SwitchRes\n\nThis option is where you will turn on SwitchRes and choose your main output hardware. \n\n| CRT SwitchRes Value | Description |\n| ----------------------- |:----------------------------------------------------------------------------------------:|\n| off | This setting turns SwitchRes off |\n| 15KHz | This will request SR to be setup for 15KHz monitors/TVs output |\n| 31KHz | This will request SR to be setup to output for 31KHz monitors/TVs output |\n| 31KHz, 120z | This will request SR to be setup to output for 31KHz @120HZ monitors/TVs output for 240p |\n| INI | This will request SR to look at the switchres.ini for the monitors/TVs output |\n\n!!! tip\n This can not be changed on-the-fly once SwitchRes is active. This setting will take effect after a restart.\n\n## Option 2. CRT Super Resolution\n\n| CRT Super resolution values | Description |\n| --------------------------- |:------------------------------------------------------:|\n| Native | This will pass the cores native resolution to SR |\n| Dynamic | Currently not in use |\n| 1920 | This will pass a hard set super width of 1920 to SR |\n| 2560 | This will pass a hard set super width of 2560 to SR |\n| 3840 | This will pass a hard set super width of 3840 to SR |\n\n!!! note\n All resolution are integer scaled and aspect ratio corrected to match the original resolution. Unless you really need a locked super width only choose native and let SR do all the work. Even if your monitor does not support native resolutions, the best option to choose will be Native. For Windows, SwitchRes will look for compatible modes with and without super widths. For Linux, you can add the switchres.ini **(see Advanced Settings below)** into you RetroArch folder. Edit this file and change the dotclock_min form 0 to 25.0. This will then calculate dynamic super widths for cards that do not support low dotclocks (native widths produce low dotclocks).\n\n## Advanced Settings\n\nAs CRTSwitchRes is now using Switchres by Calamity, there are many options to customise you environment within the switchres.ini. However, some options are available with the CRTSwitchRes settings menu in RetroArch. Although more settings can be set in the switchres.ini, it is not a required step. It does however allow for more customisation. For more details on how to configure and use the switchres.ini, [go here](https://gitlab.com/groovyarcade/support/-/wikis/3-Post-Installation-and-Maintenance/3.9-Configure-System-Wide-Switchres).\n\nCurrently, the switchres.ini is not supplied with RetoArch. This will change in the near future. In the meantime you can download this file from [here](https://raw.githubusercontent.com/antonioginer/switchres/master/switchres.ini).\n\n!!! Note\n A default switchres.ini file will be searched in the current working directory, then in .\\ini on Windows, ./ini then /etc on Linux. The repo has a switchres.ini example.\n\n## CRTSwitchRes Options Via retroarch.cfg\n\n| Config Option Name | Description | Values | \n| ----------------------------------------------- |:------------------------------------------------------:|:--------------------------------:|\n| crt_switch_center_adjust | Currently not in use | |\n| crt_switch_porch_adjust | Currently not in use | |\n| crt_switch_resolution | Same as above **CRT SwitchRes** | 0,1,2,3,4 - off, 15kHz, 31kHz Standard, 31kHz- 120Hz, INI respectively |\n| crt_switch_resolution_super | Same as above **CRT Super Resolution** | Native, Dynamic, 1920, 2560, 3840|\n| crt_switch_resolution_use_custom_refresh_rate | Not currently in use | false |\n| crt_switch_timings | Do not change | |\n| crt_video_refresh_rate | Do not change | Set by SwitchRes |\n\n## Core and directory overrides\n\nIf you are using a `switchres.ini` configuration file and wish to fine-tune specific setting for certain cores or directories, it is possible to use core and directory overrides for this. These files can be placed at the same locations as the usual `.cfg` files for RetroArch's core and directory overrides, only replacing the `.cfg` with `.switchres.ini`.\n\nFor example, if you are using native resolution on your configuration but want to user a 2560 super resolution on the Gambatte core, you can create the file `CONFIG_DIR/config/Gambatte/Gambatte.switchres.ini` with the content `user_mode 2560x0` in it. This setting will override the one on the original switchres.ini file when running this specific core. When closing this core, or switching to a different core, the default `switchres.ini` file will be re-loaded to undo the change.\n\nThe same works for directory overrides.\nExample: If you want to use a super resolution of 2560 for roms in the \"Sega - Game Gear\" directory, while using the Genesis Plus GX core, you can create an override.\nCreate the file `CONFIG_DIR/config/Genesis Plus GX/Sega - Game Gear.switchres.ini` and add the user mode to that file.\n\n!!! note\n You have to be using a full, complete `switchres.ini` base file for the overriding files to work properly, otherwise overriding settings will persist until you restart RetroArch.\n"
},
{
"path": "docs/guides/databases.md",
"content": "# Databases\r\n\r\nRetroArch uses `.rdb` [database format](https://github.com/libretro/RetroArch/blob/master/libretro-db/README.md) files stored locally by default in folder `RetroArch/databases`. The `.rdb` files are compiled from clrmamepro format `.dat` files stored at the [libretro database repository](https://github.com/libretro/libretro-database). See the database [readme](https://github.com/libretro/libretro-database/blob/master/README.md) for comprehensive information about the sources and functioning of the repository. \r\n\r\n!!! Hint \"Terminology Note: Game Name\"\r\n The term _Game Name_ refers to the name displayed [within the RetroArch interface and in playlists](https://docs.libretro.com/guides/roms-playlists-thumbnails/#retroarch-playlist-scanner), _not_ to the filename of the underlying file on the computer or device. _Game Name_ in this document is synonymous with playlist item label, playlist entry, content name, and game title.\r\n\r\n## Features of RetroArch Database Usage\r\n\r\nRetroArch uses the database to provide several automated cataloging functions:\r\n\r\n- __Validation__. Reject or accept files when using the [Import Scanner / Playlist Generator](https://docs.libretro.com/guides/roms-playlists-thumbnails/#working-with-playlists) based on whether the ROM checksum (or [other key](#key-field-for-matching)) matches the checksum of a known verified completely intact (aka \"properly dumped\") file in the database.\r\n- __Game Naming__. Assign a definitive and uniform display name for each game in a playlist regardless of filename. RetroArch will look up the `name` field specified for the file's [key](#key-field-for-matching) in the database.\r\n - _Secondary_: __Thumbnail Images__. Download and display thumbnail images for games based on the uniform name assigned by the database, regardless of filename. (Thumbnails are __not__ directly assigned by the database or by checksum association, but as a secondary effect of databased *game name* assignment if a matching thumbnail is available on the server. Also see: [Flexible Name Matching Algorithm](https://docs.libretro.com/guides/roms-playlists-thumbnails/#custom-thumbnails).)\r\n- __Category Search (\"Explore\")__. Allows the user to find/view games that match selected criteria, e.g. by Developer, Release Year, Genre, and other attributes/metadata.\r\n- __Per-Game Information View__. Provide an in-app viewable informational screen for each game (Game > Information > Database Entry).\r\n\r\n## How the Import Scanner Uses the Database\r\n\r\n_See also: [Importing Content](https://docs.libretro.com/guides/import-content/) and [Creating Playlists](https://docs.libretro.com/guides/roms-playlists-thumbnails/#retroarch-playlist-scanner)._ \r\n\r\nRetroArch's Import Content actions \"Directory Scan\" and \"File Scan\" will do the following:\r\n\r\n1. Compute a CRC checksum of the file(s) or scan for the in-game serial number. CRC and serial number are the [keys used for matching a game file to the database](#key-field-for-matching).\r\n1. Search for that CRC or serial in the information of the local `.rdb` files (default location `RetroArch/databases`). If the key is not found in databases, the file will __not__ be added to a playlist. See [Validation & Rejection](#validation-and-rejection).\r\n3. Assign the `Game Name` (aka display name or playlist item name) that is specified as `name` within the database entry for the key (CRC/serial). The assigned `Game Name` will appear in the playlist, instead of the filename.\r\n4. All other associated metadata [collated in the .rdb](https://github.com/libretro/libretro-database#fields-specified-in-game-information-databases) entry for the given CRC/serial can be viewed in the Information > Database Entry for the game and will be viewable via \"Explore\".\r\n\r\n### Validation and Rejection\r\n\r\nValidation here refers to checking a file or attribute against a reference, and then accepting or rejecting it based on whether it matches what is specified in the reference data (aka what is \"allowed\"). RetroArch's \"Scan Directory\" and \"Scan File\" automated importers are validation processes, not merely tools for adding all files to a playlist. Part of their function is to **reject** files, not to import all files. The database is the reference, and the ROM file is the item being validated.\r\n\r\nIf your file's crc or internal serial data (whichever is the key used for matching, [see below](#key-field-for-matching)) does not exist in the database, the file will be rejected by the automatic scans and will not appear in the playlist.\r\n\r\n__Bypass validation and rejection.__ To import your games into a playlist regardless of database matches, or if your files are being rejected by the automatic scan (in other words are not recognized by the database) and you wish to add them to the playlist anyway, use the [Manual Scan](https://docs.libretro.com/guides/roms-playlists-thumbnails/#working-with-playlists).\r\n\r\n### Key Field for Matching\r\n\r\nDuring [Playlist / Import Scanning](https://docs.libretro.com/guides/roms-playlists-thumbnails/#retroarch-playlist-scanner) (\"Directory Scan\" and \"Scan File\" in menu), RetroArch will identify your _files_ in order to then match your file to a data entry in the database. The key for matching varies by console typical file size (i.e. original media type).\r\n\r\n- __CRC checksum__ for systems with smaller file sizes, e.g. games before the advent of disc-based consoles.\r\n- __Serial Number__ for larger files like disc-based games, to avoid computing checksums on large files. Found within the ROM file. The serial is not metadata but encoded within the game's binary data, which is scanned (in applicable cases) as a byte array by RetroArch.\r\n\r\nContrary to popular belief, the data used for matching is often the _serial number_ encoded within a disc-game's binary data.\r\n\r\nDatabases include cryptographic hashes (sha1, etc) for informational purposes to define the item specified, but only CRC checksum (or serial) not hashes are used for matching.\r\n\r\n## Databases and Thumbnails\r\n\r\nThumbnails _are not_ assigned or retrieved based on checksum, serial, or game database matching. See separate documentation for [thumbnail handling](https://docs.libretro.com/guides/roms-playlists-thumbnails/#thumbnails) and the thumbnail [matching algorithm](https://docs.libretro.com/guides/roms-playlists-thumbnails/#custom-thumbnails).\r\n\r\nCurrently there is no _automatic_ process that applies database game name changes/updates to libretro [thumbnail repository](https://github.com/libretro-thumbnails/libretro-thumbnails) image filenames. Therefore one of the visible consequences of a Game Name or database problem is the lack of an appropriate thumbnail display in RetroArch whenever the `Game Name` displayed in the interface doesn't match a repository thumbnail filename.\r\n\r\n- __Game name error__. To help fix a database error where the game name doesn't match a correctly named thumbnail in the repository, see [How to Contribute to Databases](#how-to-contribute-to-databases).\r\n- __Thumbnail name error__. To help fix a thumbnail in a case where a _correct_ database game name doesn't match the repository thumbnail name, follow the [Thumbnail Repository readme](https://github.com/libretro-thumbnails/libretro-thumbnails/blob/master/README.md#contributions) and [How To Contribute Thumbnails guide](https://docs.libretro.com/guides/roms-playlists-thumbnails/#contributing-thumbnails-how-to).\r\n\r\n\r\n## Troubleshooting\r\n\r\n_See also: RetroArch documentation for [Import Scanning](https://docs.libretro.com/guides/import-content/) and [Playlist Creation/Scanning](https://docs.libretro.com/guides/roms-playlists-thumbnails/#retroarch-playlist-scanner)._\r\n\r\nThe information below is for Users who are interested in figuring out the cause of a database-related problem and possibly helping to fix the problem in a way that will help all users. RetroArch is a volunteer project, and many problem situations can be improved by interested users with medium technical awareness and no programming skill needed.\r\n\r\n### Common Problems and Solutions\r\n\r\nThe most common user problems and solutions related to the database are:\r\n\r\n- __Missed files during import scan.__ I.e. automated Directory Scan or File Scan \"misses\" some files, meaning the files are not imported and do not appear in the playlist. See [Validation & Rejection](#validation-and-rejection) above.\r\n - Solution A: [Contribute to the database](#how-to-contribute-to-databases) with data for the files/games that are not yet covered by the database.\r\n - Solution B: Use the __Manual Scan__ option, which will accept all files according to the chosen settings.\r\n- __Game Name error or incorrect information__. E.g. A game file receives a wrong title inside the RetroArch playlist/interface.\r\n - Solution:\r\n - Follow the [investigation steps](#investigating-database-issues) below to find the `.dat` file that has the erroneous information, and [contribute a correction](#how-to-contribute-to-databases).\r\n - Depending on the source of the data, an upstream change within a database group's system may be required, but it is also possible to create ad hoc database coverage on the libretro github.\r\n- __Outdated Local Files__. I.e. an error(s) has been fixed in the libretro database but the fix has not yet been downloaded in the user's app install.\r\n - Solution: Update your RetroArch databases (Main Menu > Online Updater > Update databases). That will apply recent fixes/corrections to your RetroArch install.\r\n \r\n### Investigating Database Issues\r\n\r\nFollow the steps below to find the cause of a database or game/name identification issue:\r\n\r\n- __Learn about the factors that might be causing the Problem__\r\n - Understand the multifaceted [.dat system](https://github.com/libretro/libretro-database#retroarch-database) and files. Multiple different .dat files may have data for the same game.\r\n - Understand [which key field](#key-field-for-matching) RetroArch uses for identifying your file and for searching for your file's info in the database.\r\n - Understand [precedence](https://github.com/libretro/libretro-database#precedence) within the dat files in the repository.\r\n- __Verify data \"on both sides\"__\r\n - __Verify your file properties.__ Verify your game file has the appropriate [key ID](#key-field-for-matching): compute the crc checksum, or verify the encoded serial number with a hex editor, whichever is applicable.\r\n - __Verify libretro databases on github__. Look in the repository databases to find which `.dat` file might hold incorrect data for the game file at issue. Even if you find a `.dat` that holds correct data for the game key (CRC or serial) in question, a different dat with [precedence](https://github.com/libretro/libretro-database#precedence) may hold incorrect data that is over-ruling the correct data.\r\n- __Verify upstream data__ to find mismatches or pending corrections. If an upstream database group (No-Intro, Redump, GameTDB, etc) is [responsible for the `.dat` at issue](https://github.com/libretro/libretro-database#sources), look on their websites to see whether their current information is correct or incorrect.\r\n \r\n### Help Fix the Problem\r\n\r\nAfter you've investigated the issue (see above), some possible actions are:\r\n\r\n- __Update__. Use _Main Menu > Online Updater > Update Databases_ to download new and possibly corrected data from the libretro server.\r\n- __[Contribute](#how-to-contribute-to-databases)__ a correction or addition of data to fix the issue. It may be possible to create an ad hoc database or to make a new entry within an existing ad hoc database.\r\n- __Use the [Issue Tracker](https://github.com/libretro/libretro-database/issues)__.\r\n - __Search__ for existing issues on github that may hold useful advice or solutions for your problem. Adding your new examples or insights to the discussion for the problem may help Members/Contributors create a fix.\r\n - __Open__ an Issue if a relevant one isn't already open.\r\n - Open a [Database Issue](https://github.com/libretro/libretro-database/issues) __if__ you observe either of the following:\r\n - You see a large-scale issue affecting many data entries or entire dats.\r\n - You found that Upstream Data is _correct_ but libretro or RetroArch doesn't reflect it, and at leat 4 weeks have passed since the Upstream update occurred. \r\n - Open a [RetroArch Issue](https://github.com/libretro/RetroArch/issues) __if__: you see a problem with RetroArch's scanning behavior or validation, while the databases appear correct and match your file's properties (crc and serial within the game's binary data viewable with a hex editor).\r\n- __Submit Upstream Changes.__ Make changes upstream (No-Intro, Redump, GameTDB, etc) by going through the channels of the upstream group responsible for the data at issue __if__: you found that Upstream Data is _Incorrect_ and has been imported to the libretro database repository. The upstream group must make the correction to \"fix it at the source\", though it may be possible to create alternative data coverage instead (see below).\r\n \r\n## How to Contribute to Databases\r\n\r\nLike [thumbnails](https://docs.libretro.com/guides/roms-playlists-thumbnails/#contributing-thumbnails-how-to) and [documentation](https://docs.libretro.com/meta/how-to-contribute/), databases are an area where users who are not programmers can contribute to RetroArch and in a way that benefits all users.\r\n\r\n### Github Steps Overview\r\n\r\n1. Make an account on github.com and login.\r\n2. Fork the libretro database repository. Forking means copying the repository into your own working area on github.\r\n3. Make your changes within your fork. For example, create a new `.dat`, or add a game entry or correction to an existing dat.\r\n - Understand the principles and [header specifications](https://github.com/libretro/libretro-database#header-guidelines-for-dats) explained in the [database repository readme](https://github.com/libretro/libretro-database#).\r\n - Carefully heed the existing formats observable in present `.dat` files on the repository.\r\n5. \"Commit\" (save) your changes with your fork.\r\n6. Use the \"Pull Request\" button (or the Contribute > Open Pull Request button) to send and propose your changes to the libretro official team members. They will review your contribution, and in time either accept it or inform you about required changes or a reason why it isn't acceptable.\r\n\r\n### Small-Scale Corrections\r\n\r\nSee [database repository readme](https://github.com/libretro/libretro-database#small-scale-corrections) to learn when/where small-scare corrections are appropriate.\r\n\r\nTwo methods for adding data coverage for a single game or niche of games, via Pull Request proposal on github:\r\n\r\n- __Method A:__ Fix the dat at issue. This is only possible if two conditions are met:\r\n - 1. The `.dat` doesn't originate from an import from upstream _and_\r\n - 2. The `.dat` won't receive subtractive sync over-writes in the future.\r\n - _If those conditions are not met, the intended \"fix\" would be deleted by the next bulk import sync._\r\n\r\n _Or..._\r\n \r\n- __Method B:__ Edit a different dat, leaving the erroneous dat intact but moot. This is only advisable when the correction and the error have different [keys](#key-field-for-matching), or if the edited/corrected database has [precedence](https://github.com/libretro/libretro-database#precedence) over the erroneous database. If one of those conditions is _not_ met, then the attempted correction would fail: it would be over-ruled in the `.rdb` compile by the erroneous dat's information. If one of those conditions is met, you may do one of following:\r\n - Add a game data entry to an existing and appropriate ad hoc `.dat` in the repository. \r\n - Create a new ad hoc `.dat`. This is often acceptable even for a small number of games because of the multi-faceted nature of the dat system. Some limitations may be enforced by admins, e.g. for the manageability of the build script or the repository.\r\n\r\n### Large-Scale Additions\r\n\r\nSee [Adding New Database](https://github.com/libretro/libretro-database#adding-a-new-database). Contributors are welcome to propose the addition of bulk data from their own build scripts or otherwise, via github Pull Request.\r\n"
},
{
"path": "docs/guides/disc-swapping.md",
"content": "\n# Disc swapping\nSome games in the 32-bit generation were spread over multiple CDs, and at a certain point in the game they ask the user to swap one disc out for another, while the console is still powered on.\n\nTo manage discs, libretro has a concept of a disc index (like a multi-disc CD player).\n\nIf a Sony PlayStation core or Sega Saturn core is loaded, then a `Disc Control` option is added to the [Quick Menu](quick-menu.md).\n\n\n## Using 'Eject/Load disc'\n\n`Load New Disc` ejects the current (virtual) disc and opens the File Browser, where you can select a new disc image to be loaded.\n\nWhen you select `Eject Disc`, three new options appear:\n\n* `Insert Disc`: Opens the File Browser, to find a disc image and load it into the Disc Index (CD list).\n* `Current Disc Index`: Displays a list of the current discs in the \"CD changer\", and lets you select which disc is \"in use\".\n* `Load New Disc`: Opens the File Browser, to find another disc image and load it into the Disc Index (CD list).\n\n## Using 'Disc Image Append'\nIf you don't or can't use a playlist, you can append a disk image to the list on the fly using `Disc Image Append`. In this case, you use the File Browser to look for a disk image, and then add it to the internal disk image list. The `Disc Index` list is updated appropriately, and you can make your selection then return to the game.\n\n\n## Using M3U playlists\n\nMulti-CD images are typically handled with an .m3u playlist file. In this case, you can swap disks by cycling through the `Disc Index` setting.\n\nYou can start a game by loading its M3U file, through `Load Content` or Playlists (This will have to be added manually to your Playlists, as scanning for content will not do so).\n\n### Making an M3U playlist file\nYou can make an M3U playlist file using a simple text editor.\n* Put all of your content's disc files into a single folder.\n* Create a new text file in the same folder as your content. Name it the same as your content.\n* Add the full names of each disc into the text file (including the file extension), 1 filename per row.\n * If your discs are BIN/CUE files, only list the '.cue' files in the document.\n * If your discs are CHD files, list the '.chd' files in the document.\n* Save and close the text file.\n* Rename the file extension from '.txt' to '.m3u'.\n\n#### Example\n\nContents of folder (`ROMS/Metal Gear Solid/`):\n***\nMetal Gear Solid (USA) (Disc 1).bin Metal Gear Solid (USA) (Disc 1).cue Metal Gear Solid (USA) (Disc 2).bin Metal Gear Solid (USA) (Disc 2).cue Metal Gear Solid (USA).m3u\n***\n\nContents of M3U file (`Metal Gear Solid (USA).m3u`):\n***\nMetal Gear Solid (USA) (Disc 1).cue Metal Gear Solid (USA) (Disc 2).cue\n***\n\n## Issues and workarounds\nReplacing the disk inside RGUI is \"physically\" speaking the same as ejecting, swapping disks and closing the tray instantaneously. Some games will not work with this approach: Notably *Metal Gear Solid* needs to detect an actual \"eject\" taking place.\n\nTo work around this, set `Disk Index` to `No Disk`, and exit RGUI. The game will pick up that the tray has been ejected/missing disk after half a second or so. Now you can go back to RGUI, pick the correct disk index and return to the game.\n\n\n\n"
},
{
"path": "docs/guides/download-cores.md",
"content": "# Cores\n\nCores are essentially other programs and games that run through RetroArch. RetroArch requires cores to run any content.\n\n!!! tip\n Many game console may have multiple emulator cores, the question of which one is the best may come up. Emulators can be designed to be more accurate at the cost of a performance hit, check out the Emulation General Wiki for a good look at what will suit your needs and hardware.\n\n## Installing cores through RetroArch interface\n\n!!! tip\n If you do not see the \"Core Downloader\" option, you may have installed RetroArch using a package manager. If so, see [Installing cores through package manager (Ubuntu PPA only)](#installing-cores-through-package-manager-ubuntu-ppa-only). Otherwise, to enable it:\n\n - Navigate to **Settings**\n - Navigate to **User Interface**\n - Navigate to **Menu Item Visibility**\n - Enable **Show Core Downloader**\n\n\n\n- Navigate to **Online Updater**\n- Navigate to **Select Core Downloader**\n- Select the core you want to download\n\n!!! note\n If you're using the Ubuntu PPA version of RetroArch and have enabled \"Show Core Downloader\" manually, your changes will not be reflected unless your the Cores directory setting is set to a writable location in the [Directory Configuration](change-directories.md#cores).\n\n## Installing cores through package manager (Ubuntu PPA only)\n\n!!! note\n Installing RetroArch through the Ubuntu PPA will disable the \"Core Downloader\" option in RetroArch's interface, therefore core installation needs to happen through the Ubuntu package manager.\n\n- Open a terminal\n- Start typing **sudo apt-get install libretro-**\n- Press tab a few times until all available possibilities show, press space to expand the list.\n- Now type the full name of the core you want to install *Example: sudo apt-get install libretro-nestopia*\n- Press enter and follow the process to install\n"
},
{
"path": "docs/guides/file-browser.md",
"content": "# File Browser\n\nFor this part of the setup guide we will be teaching you how to use RetroArch's file browser. The browser is rather basic, although it isn't too hard to get used to it.\n\n## Change default directory\n\nTo make your content easier to get to, you should change the default directory. This would be a good first use of the file browser.\n\nMove to the settings tab then find **Directory**, then move to **File Browser**.\n\nThe first screen should show the storage devices move to the one that contain your game content and press enter.\n\n\n\n!!! note\n On Windows it will display drive letters (like C:/ and D:/), However a system like Linux doesn't work in the same way and will only display the root. Most Android users should select */storage/emulated/0* if they want internal storage.\n\nYou have now entered the main part of the file browser. Beneath the first two options will be all your folders. Navigate your file system until you are inside your content folder then select **<Use this directory>**.\n\n!!! tip\n On GNU/Linux, other hard drives are usually stored under */media/* or */mnt/*.\n\n\n\nYou should now be back in the settings menu with the *File browser* set to the folder you wanted.\n"
},
{
"path": "docs/guides/generating-retroarch-logs.md",
"content": "## What are logs? Why are they so important?\n\nRetroArch and its underlying libretro technology is designed to run on many different combinations of hardware, operating system, libretro core, and content. It is not possible for a volunteer-based open source project to test all possible combinations.\n\nThe answer to this dilemma involves \"logs\", which RetroArch and other libretro software use to record essential information about your system and its function that other users and volunteers need in order to help troubleshoot problems and improve compatibility with new systems.\n\n--------------------------\n\n## Generating Logs\n\n### Generating Logs via Menu\n1. Go to \"Settings\"\n2. Enter \"Logging\"\n3. Activate \"Logging Verbosity\"\n4. Activate \"Log to File\"\n5. (optional) Adjust \"Frontend / Core Logging Level\" to get more or less detailed information\n6. (optional) Activate \"Timestamp Log Files\" if you don't want to overwrite the log at each startup\n\nThis will place the logs in the System Events Logs directory, visible in the \"Directory\" settings.\n\n### Generating Logs in Lakka\n[Please see the Troubleshooting Lakka doc](http://www.lakka.tv/doc/Troubleshooting-Lakka/).\n\n### Generating Logs in Linux\n\n#### RetroArch logs\n1. Open a terminal.\n2. Navigate to the RetroArch folder with the `cd` command.\n3. Start RetroArch in 'verbose' mode with this command: \n `retroarch -v --log-file retroarch.log` or `retroarch -v >> retroarch.log 2>&1`\n4. Once you exit RetroArch, a file called `retroarch.log` should be stored in the folder.\n\n#### Graphic card logs\n`lspci -nnk | grep -A 3 VGA` will give information about your graphic card.\n\n#### Audio device logs\n`aplay -L` enumerates audio devices which have been detected.\n\n#### Input device logs\n`lsusb` lists all devices attached via USB\n\n`dmesg` displays all messages from the kernel ring buffer which typically is holding the messages generated by the Linux kernel from the boot process. The dmesg log lists each hardware device that the kernel detected along with information on how the device was configured by the system.\n\n### Generating Logs in Windows\n\n!!! tip\n You can hold `shift` then `right click` on the **folder that contains** retroarch.exe \n Select `Open PowerShell window here`. \n In the PowerShell window, use the `cmd` command to switch to the Windows console.\n Then jump to step 3.\n\n1. Open a console window with the `cmd` command, found either in the Start Menu or through use of the Windows \"Run\" menu.\n2. Navigate to the RetroArch folder using the `cd` command.\n3. Start RetroArch in 'verbose' mode with this command: \n `retroarch.exe -v --log-file retroarch.log` or `retroarch.exe -v >> retroarch.log 2>&1`\n4. Once you exit RetroArch, a file called `retroarch.log` should be stored in the folder.\n\n### Generating Logs in OS X\n1. Open a console window with the OS X \"Terminal\" app.\n2. Navigate to the RetroArch.app folder using the `cd` command.\n3. Inside the RetroArch.app folder, navigate to the Contents/MacOS filter.\n4. Start RetroArch in 'verbose' mode with this command: \n `./RetroArch -v --log-file ~/retroarch.log` or `./RetroArch -v >> ~/retroarch.log 2>&1`\n5. Once you exit RetroArch, a file called `retroarch.log` should be stored in your home directory.\n\n### Generating Logs in Android\nThere is a range of variation in the logging systems available to Android device depending on the combination of hardware and operating system in use. There are two general approaches to generating logs in Android: tethering to a PC via a USB cable or using a `logcat` app.\n\n#### Generating Logs via USB Tether\n\n**Prerequisites**:\n* Linux, Windows or Mac PC\n* USB cable for your device\n\n**Instructions**:\n\n* Install your device driver for using adb on your PC from http://developer.android.com/tools/extras/oem-usb.html\n* Download the adb executable for your OS -- it can be downloaded as part of the [full Android SDK](https://developer.android.com/studio/index.html), but you might also be able to find the adb executable individually.\n* Connect your Android device to the PC via USB cable.\n* Enable the developer options on the Android.\n* Enable USB debugging on the Android.\n* Open a command prompt (Windows) or terminal (Linux/OS X) and navigate to the directory where the adb executable is located using the `cd` command. On Windows: Windows Key + R > type `cmd` > press Enter. On OS X: Type `Terminal` into Spotlight and open it. Alternately, on Windows: Go to the directory where you downloaded the adb executable, Shift+Right Click and select `Open Console` (or similar) | On Linux / OS X: Right Click in the directory and select `Open Terminal here`\n* Type in your console window: `adb devices` to verify your device is properly connected.\n* If your device is selected, type in `adb logcat` to show the logcat, aka stacktrace.\n* Reproduce your issue on your device.\n* Paste the contents of your console window into a Github Gist to share on the forums or github.\n\n_Based on Stackexchange posts by Leandros and Nicolas Raoul._\n\n#### Generating Logs via Android App\nGathering log files in Android requires a third-party app that can interface with the `logcat` system. Many free apps are available via Android's \"Play Store\" system. You can still generate RetroArch logs from the menu.\n\n### Generating Logs in iOS and tvOS\n\nYou can generate RetroArch logs from the menu, described above. Logs by default go into the RetroArch/logs directory accessible through the Files app on iOS or the webserver on tvOS.\n\nApp Store installations can opt to send crash logs to the RetroArch developers for analysis, if desired. This can be configured through the Settings app in \"Privacy & Security\" under \"Analytics & Improvements\" by turning on \"Share With App Developers\".\n\n### Generating Logs with Nintendo Switch\n\nYou need to have your console and your PC on the same local network.\n\nYou need to have `nxlink` installed on your PC to generate logs. The devkitpro environment has it, see the [switchbrew wiki](https://switchbrew.org/wiki/Setting_up_Development_Environment) for instructions on how to install it.\n\nRun the homebrew menu on your console, and press the Y button to open the netloader prompt.\n\nTake the NRO of the core you want to launch on your PC. Open a terminal and type this command in :\n\n```\nnxlink /path/to/your/core.nro -s\n```\n\nWhere `/path/to/your/core.nro` is the path to the core you want to generate logs from, on your PC. Be careful as it will overwrite any homebrew with the same name on your SD card !\n\nThat will send the homebrew and run it on your console. Logs will be shown on the terminal you ran the command from.\n\nIf you want to redirect logs to the file `libnx.logs`, use this command instead :\n\n```\nnxlink /path/to/your/core.nro -s > libnx.logs 2>&1\n```\n\n### Generating Logs with other Nintendo Consoles\nAt the moment there are no logging docs available for other Nintendo consoles. Please feel free to post about your situation in the libretro forums.\n\n### Generating Logs with PlayStation Consoles\nAt the moment there are no logging docs available for PlayStation consoles. Please feel free to post about your situation in the libretro forums.\n\n### Generating Logs in OpenDingux (GCW-Zero and RG350)\nAt the moment there are no logging docs available for OpenDingux. Please feel free to post about your situation in the libretro forums.\n\n\n-------------------------\n\n## Posting Logs in the Forum and Github\n\nGenerally, log files are lengthy which make them difficult to read when they're pasted directly into a post on the forums or github. If your log file is more than six or seven lines long, you will be asked to post a link to it instead.\n\nOne free and straightforward system for posting and sharing logs is [Github Gist](https://gist.github.com). You can paste the contents of a log file, or the log file itself, into the Gist website. After you log has been added to the Gist, press the `Create Public Gist` button to create a shareable link.\n"
},
{
"path": "docs/guides/glui.md",
"content": "# GLUI (GUI)\n\n**GLUI** (formerly known as **MaterialUI**) is RetroArch's mobile interface for smartphones. This interface is designed around touchscreen and pointer devices like a mouse/trackball. It is based on Android's \"Material UI\" designs.\n\nGLUI was overhauled in RetroArch 1.6.6.\n\n\n\n## Menu structure\nContent is displayed in a single column. The menus are organized into three tabs: Main Menu, Playlists, and Settings.\n\n\n\n\n*The three tabs of GLUI, side by side.*\n\n### Navigating the menus\nGLUI is designed primarily for touchscreen use, although a gamepad can also be connected via Bluetooth or USB.\n\nSwipe left or right (or tap on the icons at the bottom of the screen) to switch between the three columns. Swipe up or down to scroll through menus. Tap on a line once to select it and enter its submenu. Tap once on the 'back arrow' icon in the top left to go back a step.\n\nTap once on an entry in a playlist to open the quick menu, from which you can launch the content.\n\n*See [Input and Controls](input-and-controls.md)*\n\n## Input\n\nContent is controlled using Gamepad Overlays on the device's touchscreen. A gamepad can also be connected via Bluetooth or USB.\n\n*See [Overlays](libretro-overlays.md) and [Input and Controls](input-and-controls.md)*\n\n\n\n*GLUI gameplay with the default gamepad overlay*\n\n### Thumbnails\nBy default, 2 thumbnails are displayed for each entry in a playlist. The left thumbnail is the boxart, while the right thumbnail is a gameplay screenshot.\nHold on a thumbnail for 1 second then release to view the thumbnails full-screen (then tap once to close the popup).\n\n\n\n## Themes\nGLUI has a range of colour schemes built in. Go to `Settings > User Interface > Appearance > Color Theme` to browse the themes and select one.\n\nGLUI does not support OS-level light/dark mode switching at this time.\n\n\n"
},
{
"path": "docs/guides/gui.md",
"content": "# The User Interface\n\nRetroArch currently has 4 different \"Menu Drivers\" to choose from for its Graphical User Interface:\n\n* **[Ozone](ozone.md)**: The default skin for many host systems.\n* **[XMB](xmb.md)**: The \"old\" default skin.\n* **[GLUI](glui.md)**: The smartphone/touchscreen skin.\n* **[RGUI](rgui.md)**: The \"basic\" skin.\n\nThe Menu Driver can be changed under `Settings> User Interface> Menu`. A restart of RetroArch will be required.\n\n\n\n*Clockwise from top: Ozone, XMB, GLUI, RGUI.*"
},
{
"path": "docs/guides/import-content.md",
"content": "# Importing Content\n\n!!! warning\n This guide assumes that you already have obtained the content legally, RetroArch does not provide users with copyrighted content.\n\nThis guide uses the \"scan\" functionality to import your games into RetroArch's playlists sorted by console. The scan is recursive so you can organise your collection into sub-folders or potentially scan your whole computer.\n\n## Step 1: Download database\n\nIn order to have RetroArch recognise your games, you need to have a database of all the titles.\n\n!!! note\n Certain releases of Retroarch (e.g. Windows), come with the database files out-of-the-box.\n\nFrom the RetroArch main menu select \"Online Updater\", then choose \"Update Databases\".\n\nWait for the download to finish.\n\n## Step 2: Scan and import\n\nThe \"Import Content\" menu can be either in the \"Playlists\" > \"Import Content\" (default), or directly accessible from the Main Menu.\n\n!!! note\n The location of this menu item can be toggled in \"Settings\" > \"User Interface\" > \"Menu Item Visibility\" > \"Show 'Import Content'\" and updating this from \"Playlists Menu\" to \"Main Menu\".\n\nHere you will see three options, \"Scan Directory\", \"Scan File\" and \"Manual Scan\".\n\n!!! note\n \"Scan Directory\" and \"Scan File\" are sometimes refered to as \"Auto Scan\". These options can only recognise content that match the database.\n Using the default settings, these scan options also need a coresponding core for the said content to be already added.\n\n***1) Scan Directory:*** for importing a collection of content. Using the file browser, navigate to the folder of the content collection and select **\"Scan This Directory\"**.\n \n***2) Scan File:*** for importing a single file. Navigate to file and select it.\n \n***3) Manual Scan:*** it scans based on content file names and does not require content to match the database.\n\nPlease be patient while it scans. Large collections could take several minutes.\n\n## Step 3: Add box art\n\nThis is optional. Go back to the main menu, select \"Online Updater\", then choose \"Playlist Thumbnails Updater\". Here you need to select the console you want to download.\n\nPlease be patient, these take quite some time to download, especially on a slow internet connection.\n\n!!! tip\n In order to be able to download thumbnails for manually scanned content, the name of the playlist and the names of the entries must match the ones on the thumbnail website.\n"
},
{
"path": "docs/guides/input-and-controls.md",
"content": "# Getting started: Input and controls\n\n## Game controllers\nRetroArch is intended to be easily controlled with a controller. RetroArch uses the overall term **controller** which encompasses all input hardware that could be described by the terms **joypad**, **gamepad**, **joystick**, and others.\n\n!!! info \"Map controls by controller, core, or game\"\n RetroArch allows users to configure a controller once for many cores instead of having to configure each core individually. RetroArch also provides the freedom to configure specific cores and even individual games differently if the user wants.\n\n### What is a RetroPad?\nRetroArch maps real-world controller inputs to a virtual controller called a `RetroPad` . A RetroPad resembles the common modern controller layout, and has:\n\n- a D-pad\n- 4 face buttons with an ABXY layout like a SNES gamepad (that is: A-right, B-bottom, X-top, Y-left)\n- Select / Start buttons\n- two shoulder buttons (L1, R1)\n- two trigger buttons (L2, R2)\n- dual analog sticks like a Sony DualShock, which can also be used as a button (L3, R3).\n\n\n\nYou don't have to map all of the RetroPad buttons to a real world button. If your real controller has less buttons than a DualShock, then the virtual RetroPad will have some unmapped buttons, that's perfectly fine. If your real controller has more buttons, the extra buttons may be used as freely configurable hotkeys.\n\nConceptually, all RetroPad buttons can behave as analog (pressure sensitive), but the hardware typically only supports this for the trigger buttons. Gyroscope, acceleration, and illumination sensors may be supported, very much depending on the driver and the core.\n\n### Controller autoconfiguration\nMost well-known controllers should work out of the box via the RetroArch autoconfiguration profile database. If the controller can be autoconfigured, the OSD will inform you of the autoconfiguration event. The menu hotkey is often pre-defined in the autoconfiguration profile. \n\n!!! info \"Manual RetroPad binding\"\n Not all controllers have autoconfigs. If that is the case for your controller, please refer to the [Manual RetroPad Binding](#manual-retropad-binding).\n\n## Keyboard controls\nRetroArch provides a remappable set of bindings between a keyboard and the RetroPad abstraction as well as between a keyboard and RetroArch's hotkeys, details are [below](#default-retroarch-keyboard-bindings).\n\n### Cores with direct keyboard input\nPlease be aware that some cores, for example arcade emulator cores and vintage computer emulator cores, can also be configured to directly read the keyboard or controls that use a keyboard interface. **If you are using a core configured for direct keyboard access, it is recommended to use the `Game Focus` mode (default: Scroll Lock) to disable those bindings while using the keyboard device,** or unbind the conflicting RetroArch keyboard-to-RetroPad and hotkey bindings if only a few keys are needed. Otherwise, keyboard input will be captured by the RetroArch hotkeys and the core will not get the input.\n\n!!! tip\n Controls with keyboard interfaces can also benefit from defining a **Hotkey Enable** button. If this hotkey is defined, other hotkeys will not be activated unless it is pressed.\n\n## Manual RetroPad binding\n\nIf your gamepad is not recognized by autoconfiguration or if you would like to change its RetroPad binding, use the **Input** settings menu.\n\n\n\n- Navigate to **Settings**\n- Navigate to **Input**\n- Navigate to **RetroPad Binds**\n- Navigate to **Port 1 Controls**\n- Select **Set All Controls**\n- Press the buttons as required.\n\n!!! tip\n If you have several different controllers, do **Save Controller Profile** after each binding so that controllers will be recognized next time automatically.\n\n## Controls for multi-player\n\nIf you want to set-up local multi-player with games that support it:\n\n- Navigate to **Settings**\n- Navigate to **Input**\n- Navigate to **RetroPad Binds**\n\nHere you will find the option to set binds for multiple users. Let's set-up User 1's controller:\n\n- Navigate to **Port 1 Controls**\n- Select **Device Index**\n\nSelect which currently plugged-in controller will be assigned to this player. After you finish, go back, select **Port 2 Controls** and repeat for user 2.\n\nIn case of multiple controllers, RetroArch will assign them by default in the order they are presented by the operating system. For more customization, use the device reservation options to explicitly assign a controller to a player.\n\n## Hotkeys\nHotkeys are combinations of buttons you can press in order to access options such as saving, loading, and exiting games. Hotkey binds can be configured at `Settings` → `Input` → `Hotkeys` . If you map `Enable Hotkeys` to a button, it will require that button to be held in order to trigger any hotkeys.\n\n!!! tip\n To unbind (effectively, disable) a hotkey, press **Del** on your keyboard or the **Y button** (the left one of the 4 buttons) on the RetroPad. To reset a hotkey to its default, press **Space** on your keyboard or the **Start** button on the RetroPad.\n\n## Remapping controls for individual cores or content\nCore Controls Remapping alters how the core receives input rather than how the gamepad is coded, for example you can tell an individual core to switch button A and B on the RetroPad for gameplay, but you can still use \"A\" to select in the RetroArch menu and \"B\" to go back. This is opposed to changing the gamepad bindings in RetroArch itself which would swap \"A\" and \"B\" in the core but would also make \"B\" select and \"A\" back in the RetroArch menu.\n\n**How to remap the controls for a single core or game:**\n\n* Start content with the core for which you want to remap controls\n* Go to **Quick Menu** and then **Controls**\n* Configure the buttons the way you want\n* Select **Save Core Remap File**\n* OR, if you want to save this remapping for the current game only, select **Save Game Remap File**\n\n## Default RetroArch keyboard bindings\n\n### Key bindings cheat sheet\n\n\n\nCommands as of 2025-05-12 superimposed on US laptop keyboard. For most recent key bindings see the following sections.\n\n\n### General controller mapping\n\nThese controls are valid both in-game and in the menu:\n\n| User 1 Keyboard | Default RetroPad Mapping | Menu Action |\n|-----------------------------------------------------------------------------------------|--------------------------------------------------------------| ----------------------------- |\n|  |  | Move cursor up |\n|  |  | Move cursor down |\n|  |  | Move cursor left |\n|  |  | Move cursor right |\n|  |  | Scroll one page up |\n|  |  | Scroll one page down |\n|  |  | Return to the previous screen |\n|  |  | Select Item |\n|  |  | Scan content / Remove highlighted input bind |\n|  |  | Search |\n|  |  | Help |\n|  |  | (see next section) |\n\n### Menu controls\n\nWhile in the menu, there are additional navigation keys defined for convenience.\n\n| Keyboard Input | Retropad Input | Menu Action |\n| ------------------------------------------------------------------------------------- | --------------------------------------------------------- | ----------------------------- |\n|  |  | Return to the previous screen |\n|  |  | Select Item (note: Enter key is mapped to Select button in-game) |\n|  |  | Scan content / Remove highlighted input bind |\n|  |  | Search |\n|  |  | Reset to default |\n| |  | Scroll to previous letter |\n| |  | Scroll to next letter |\n|  |  | Scroll to top |\n|  |  | Scroll to bottom |\n\nAnalog sticks are also able to control the menu. If needed, additional hotkeys can be disabled in `Settings` → `Input` → `Menu Controls`, along with several other customization options.\n\n### Hotkey controls\n\nHotkey binds can be configured at `Settings` → `Input` → `Hotkeys` . If you map `Enable Hotkeys` to a key, it will require that key to be held in order to trigger any hotkeys. This can be useful in avoiding keyboard mapping conflicts between RetroArch and cores cores that use the keyboard for input.\n\n!!! Tip\n Hotkeys can also be mapped to controller buttons.\n\n| Keyboard Input | In-Game Action |\n| ------------------------------------------------------------------------------ | ---------------------------- |\n|  | Exit RetroArch |\n|  | Fast forward toggle |\n|  | Fast forward hold |\n|  | Pause |\n|  | Frame advance |\n|  | Slow motion |\n|  | Rewind |\n|  | Reset |\n|  | Menu toggle |\n|  | Save state |\n|  | Show FPS |\n|  | Load state |\n|  | Desktop menu |\n|  | Decrease current state slot |\n|  | Increase current state slot |\n|  | Take screenshot |\n|  | Mute |\n|  | Grab mouse |\n|  | Volume Up |\n|  | Volume Down |\n|  | Fullscreen toggle |\n|  | Next shader |\n|  | Previous shader |\n|  | Netplay toggle play/spectate |\n|  | Cheat toggle |\n|  | Next cheat |\n|  | Previous cheat |\n\n## Platform-specific controls\n\n### Nintendo Switch\n\nUSB keyboards and mice: All keyboards seem to work. Not all mice seem to work. [Mouse compatibility sheet](https://docs.google.com/spreadsheets/d/1Drbo5-QuSX901MwtOytSMuqRGxeIkq2HELM806I9dj0/edit#gid=0).\n\nTouch mouse emulation: The Switch touchscreen can be used for mouse control like a laptop touchpad. The following gestures are supported.\n\n| Touch Input | Effect |\n|--------------------------|--------------------------------------------------------|\n| single finger drag | move the mouse pointer (indirectly like on a touchpad) |\n| single short tap | left mouse click |\n| dual finger short tap* | right mouse click |\n| dual finger drag | drag'n'drop (left mouse button is held down) |\n| three finger drag | drag'n'drop (right mouse button is held down) |\n\n*: hold one finger, short tap with another\n"
},
{
"path": "docs/guides/input-controller-drivers.md",
"content": "# RetroArch input and controller drivers\n\nRetroArch makes use of two input systems in order to support the full range of input devices available across RetroArch's supported platforms.\n\n- **Input Drivers** provide access to keyboards, mice, and mouse-like devices such as lightguns or touch screens. Input drivers are typically set up automatically, and are either not changeable or there is only a limited selection.\n- **Controller Drivers** provide access to gamepads and joysticks. On desktop platforms, controller drivers can be usually changed. The autoconfiguration profile database is different per controller driver.\n\n!!! Note\n Controller drivers were previously referred to as joypad drivers. Some documentation may still use the older \"joypad\" terminology.\n\n- **Multi-mouse** indicates if it is possible to select a separate mouse-type device (such as a lightgun) for each player. If multi-mouse is not supported, typically all pointing devices are controlling the same default cursor.\n- **Pointer device** indicates if it is possible for the core to query the absolute coordinates of the pointer, as opposed to the default (relative) mouse. Certain cores may only support one or the other.\n- **Lightgun device** indicates if it is possible for the core to query a specific lightgun device, which has a different button set compared to a RetroPad. A few platforms support physical lightguns natively, or lightguns may appear as pointer devices.\n- **Rumble support** indicates if the driver can pass on haptic feedback (vibration) signals.\n- **Autoconfig support** indicates if the driver can read the controller vendor/product identifiers and apply an automatic mapping for [RetroPad](../../guides/input-and-controls/#what-is-a-retropad).\n\nThe listing below is not complete, but on the rest of the platforms, there is usually only 1 valid driver.\n\n---\n## Apple OSes\n\n**Apple Input Drivers**\n\n| Input driver | Conditions | Multi-mouse support | Pointer device | Lightgun device |\n|--------------|------------|---------------------|----------------|-----------------|\n| `cocoa` | - | No | Yes | No |\n\n**Apple Controller Drivers[^1]**\n\n| Controller driver | Conditions | Rumble support | Autoconfig support |\n|-------------------|------------|----------------|--------------------|\n| `mfi` | - | Yes | Yes |\n| `sdl2` | - | Yes | Yes |\n\n---\n## Linux\n\n**Linux Input Drivers**\n\n| Input driver | Conditions | Multi-mouse support | Pointer device | Lightgun device |\n|--------------|------------|---------------------|----------------|-----------------|\n| `x` | Desktop environment is X11, video driver is OpenGL (any version) or Vulkan | Yes | Yes | Yes |\n| `wayland` | Desktop environment is Wayland, video driver is OpenGL (any version) or Vulkan | No | Yes | Yes, button map is fixed |\n| `sdl` | Video driver is sdl or sdl2 | No | Yes | Yes, button map is fixed |\n| `udev` | No desktop environment (KMS) or X11 | Yes | Yes | Yes |\n| `linuxraw` | No desktop environment (KMS) | No mouse support at all | No | No |\n\nMulti-mouse support for X11 was added after RetroArch 1.20.0 and requires that RetroArch is compiled with XInput library. Use `xinput create-master` and `xinput reattach` commands to set up a second pointer and assign the physical device.\n\n**Linux Controller Drivers**\n\n| Controller driver | Conditions | Rumble support | Autoconfig support |\n|-------------------|------------|----------------|--------------------|\n| `udev` | Access to the udev interface (see below) | Yes | Yes (+[physical ID support](../../guides/controller-autoconfiguration/#physical-identifier-customization)) |\n| `sdl2` | - | Yes | Yes |\n| `linuxraw` | - | No | Yes |\n| `parport` | [Special adapter](../../development/retroarch/input/parallel-port-controllers/) on physical parallel port | No | No |\n| `hid` | Only if enabled during compilation | Yes | Yes |\n\n### udev drivers\nudev is the newest input driver and uses the evdev joypad interface at `/dev/input`. It supports hotplugging and force feedback (if supported by device). udev reads evdev events directly and supports keyboard callback, mice, and touchpads. `libudev` is used to discover devices and support hotplugging.\n\nThe `libudev` and `libxkbdcommon` packages are required. udev does not require X11, but udev does depend on X11 keyboard layout files being installed.\n\n### Setting up udev permissions\nMost Linux distributions prevent users from capturing keyboard/mouse information by default. Only root and users in the group \"input\" are able to access raw input. This is a security feature in case the system is used by multiple users.\n\nThe easiest way to gain access to this input is to:\n\n* **Step 1:** Add your user to the group \"input\" with the command: ``sudo usermod -a -G input `whoami` ``\n* **Step 2:** Log out, and then log back in\n\nIf adding your user to the input group does not succeed, you may also set up a udev rule which makes this input accessible to non-root users:\n\n* **Step 1:** Add to `/etc/udev/rules.d/99-evdev.rules` the following text: `KERNEL==\"event*\", NAME=\"input/%k\", MODE=\"666\"`\n* **Step 2:** Reload the rules with `sudo udevadm control --reload-rules`.\n* **Step 3:** Reboot\n\n### linuxraw drivers\nThe linuxraw controller driver uses the legacy joystick API at `/dev/input/js*`. The linuxraw input driver requires an active TTY in order to read keyboard events.\n\n### hid driver\nThe hid driver on Linux platform detects Human Interface Devices via libusb. By default it is not enabled during compilation.\n\n---\n## Windows\n\n**Windows Input Drivers**\n\n| Input driver | Conditions | Multi-mouse support | Pointer device | Lightgun device |\n|--------------|------------|---------------------|----------------|-----------------|\n| `dinput` | Video driver is not sdl(2) | No | Yes | Yes |\n| `raw` | Video driver is not sdl(2) | Yes | Yes | Yes |\n| `sdl` | Video driver is sdl or sdl2 | No | Yes | Yes, button map is fixed |\n\n**Windows Controller Drivers**\n\n| Controller driver | Conditions | Rumble support | Autoconfig support |\n|-------------------|------------|----------------|--------------------|\n| `dinput` | Controller is connected as a DirectInput device | Yes | Yes |\n| `xinput` | Controller is connected as an XInput device | Yes | Yes |\n| `sdl2` | - | Yes | Yes |\n| `hid` | Only if enabled during compilation | Yes | Yes |\n\n### hid driver\nThe hid driver on Windows platform detects Human Interface Devices via libusb. By default it is not enabled during compilation.\n\n---\n## Auxiliary sensor support\n\nThe libretro API provides a possibility to pass extra sensor inputs to cores: 3 axes of accelerometer/tilt sensor, 3 axes of gyroscope, and an illumination sensor. The following input drivers support extra sensors:\n\n- `linuxraw`: illumination\n- `sdl`: illumination (only on Linux)\n- `android`: accelerometer and gyroscope\n- `cocoa`: accelerometer and gyroscope\n- `vita`: accelerometer and gyroscope\n- `switch`: accelerometer, gyroscope and illumination\n- `udev`: illumination\n- `x`: illumination\n\n---\n## Footnotes\n[^1]: MFi controllers are primarily supported on Apple devices, which means that the operating systems supporting this configuration would include:\n- iOS: Used on iPhones and iPads.\n- macOS: Used on Mac computers.\n- tvOS: Used on Apple TV devices.\n"
},
{
"path": "docs/guides/install-3ds2ds.md",
"content": "# Downloading, Installing and Updating RetroArch for both 3DS and 2DS Family\n\n\n\n## Prerequisites\n\n- **CFW** You must have custom firmware to run RetroArch on your 3DS or 2DS.\n- **Installer** You can either use `FBI installer` or `Rosalina Menu` from `Luma`. \n\n| :warning: WARNING |\n|:---------------------------|\n| Hardware or software changes on your device may damage your device. |\n \n\n## Downloading and installing\n\nThere are multiple ways of downloading RetroArch for your 3DS or 2DS.\n\n### Installation\n\nYou can either choose `Nightlies` or `Stable` bundle, you can find a bundle with RetroArch, all the cores and all the assets [here](https://buildbot.libretro.com/stable/{{ unit.stable }}/nintendo/3ds/), and download `RetroArch_3dsx.7z` or `RetroArch_cia.7z`.\n\nFor Nightlies [here](http://buildbot.libretro.com/nightly/nintendo/3ds/) - pick the latest version(based on date), and download `...RetroArch_3dsx.7z` or `...RetroArch_cia.7z`.\n\nJust extract `RetroArch` folder to the root of your SD card `RetroArch.cia` anywhere else, to install cores use `FBI installer`. Go to the `RetroArch`folder and open the `Cores` folder. Select and install the Cores you want to use. For example; install `pcsx_rearmed_libretro.cia` for Playstation 1 Roms.\n\n#### Reduce Core and Content loading times\n\nBy default, all Cores are installed in the directory `/RetroArch/Cores`. With this configuration, RetroArch Cores on 3DS take nearly 30 seconds to start, as each Core in `/RetroArch/Cores` must be initialized - including Cores which may not be needed. The same delay is experienced when loading Content (games) as well; roughly 30 seconds to finish loading. Slow MicroSD random access/transfer speeds on the 3DS may be a likely cause.\n\nTo reduce loading time for Cores and Content to under 5 seconds each, complete the following steps:\n\n- **Determine Cores to be used**. These Cores will remain in the `/RetroArch/Cores` directory.\n- **Create directory for unused cores**. A directory name such as `/RetroArch/Cores-Notused` could be created for unused Cores.\n- **Move the unused Cores**. Finally, move unused Cores from `/RetroArch/Cores` to `/RetroArch/Cores-Notused`\n\nAfter moving unused Cores as outlined above, RetroArch Cores should start in about 5 seconds. Content should load in about 5 seconds as well.\n\nAs additional Cores are needed, simply move them from `/RetroArch/Cores-Notused` to `/RetroArch/Cores`. This ensures only the required Cores are initialized by RetroArch, minimizing start times for Cores and Content.\n\n#### Additional Notes for MAME Cores\n\nMAME Content numbers in the thousands of items for MAME Cores. To help reduce loading time for MAME Content, consider creating two directories for MAME Content. This ensures frequently loaded Content is able to start faster.\n\n- **A directory for favorite MAME Content**, containing Content which will be loaded often.\n- **A directory for all remaining MAME Content**, containing Content which would be loaded infrequently.\n\nThis approach will work fine as long as the MAME Content romset is a **Full Non-Merged romset**. If the romset is **not Full Non-Merged**, then all MAME content will need to remain in the same directory.\n\n**Full Non-Merged romsets are the simplest romset format to get started with because each romset zip contains all necessary files for one game.** For more information, please refer to [Getting started with arcade emulation](arcade-getting-started.md).\n\n##### Control Configuration for MAME Cores\n\nMuch of the Content loaded by the RetroArch MAME Cores uses a `Vertical display perspective` for the top 3DS screen, requiring the user to rotate the 3DS counter-clockwise in order to properly see the game content and access the game controls. When using Content in this configuration, the default controls won't be suitable (as the controls are typically configured for `Horizontal display perspective`).\n\nOne approach to address the issue is to configure `Global Options` for controls, which would apply to the majority of games (such as `Vertical display perspective`). For games which have a different layout (`Horizontal display perspective`), the MAME menu may be used to configure a game controller configuration for that specific Content.\n\nA simple configuration example follows, in case the majority of Content uses a Vertical configuration. Load `RetroArch`, then:\n\n- **Bind a Menu hotkey** From `Main Menu` navigate to `Settings->Input->Hotkeys`. Scroll down to `Menu Toggle Gamepad Combo` or `Menu (Toggle)` and configure as desired, to display the `Menu` within Content.\n- **Configure Global Control for Vertical Content** From Main Menu navigate to `Settings->Input->Port 1 Controls`. Configure as desired.\n- **Configure In-Game Control for a piece of Horizontal Content** Load the content, then press the defined `Hotkey` to display the `Quick Menu`. Scroll down and select `Options`, then scroll down to select `Display MAME menu`; change to `ON`, then resume content. On the `MAME menu` select `Input (this game)` and adjust the settings as desired. Finally, use the previous steps to set `Display MAME menu` back to `OFF`. Controls are now set properly for the game.\n\nFollowing the above ensures all Content may use the proper control configuration."
},
{
"path": "docs/guides/install-android.md",
"content": "# Downloading, Installing and Updating RetroArch for Android devices.\n\n## Non-Google Play sources\n\n### Installation via Side-loading\nSide-loading means installing manually downloaded APK files on Android (outside official stores). \nYou must follow the [installation notes](#installation-notes) for this process.\n\n#### From RetroArch.com Downloads\n___\n1. Visit the retroarch.com [Downloads page](https://www.retroarch.com/?page=platforms) and select **Download Stable** or **Download Nightly**.\n2. Open the downloaded APK (via a file manager if your browser does not prompt you when the download is completed).\n3. Select Install.\n\n##### From Buildbot Archives\n___\nAll [stable](https://buildbot.libretro.com/stable/{{ unit.stable }}/android/) and [nightly](https://buildbot.libretro.com/nightly/android/) bundles are available via BuildBot If you need a specific architecture or build for testing. Builds are named with an architecture suffix: `aarch64` is a 64-bit build, `ra32` is a 32-bit build, and no suffix is a universal build that opts for 64-bit if your system supports it.\n> 32-bit support on Android is slowly being phased out by the industry, but these builds remain available for older devices or specific use cases.\n\n### Installation via F-Droid\n___\nRetroArch's most recent stable release can be found [in the F-Droid repository](https://f-droid.org/packages/com.retroarch/) for easier automatic updating.\n\n### (NOT RECOMMENDED) Installation via Google Play\n___\nRetroArch is available on the Google Play Store, but has not been updated for years due to Play Store policy changes. You may choose to use this older version, but it is not recommended.\n\n[RetroArch Plus on the Play Store](https://play.google.com/store/apps/details?id=com.retroarch.aarch64&hl=en_US \"RetroArch64\") (Only for 64 bit devices, additional cores)\n\n[RetroArch on the Play Store](https://play.google.com/store/apps/details?id=com.retroarch&hl=en \"RetroArch\") (For 32 or 64 bit devices, fewer cores)\n\nA more detailed difference between the Play Store versions can be found in [this libretro blog post](https://www.libretro.com/index.php/retroarch-android-new-versions-for-play-store-please-read/).\n\n# Installation notes\n\n## Side-loading\n\n* Android may tell you that `the app doesn’t have permission to install APKs`. Click the available `Settings` button in that prompt.\n* In the next menu, turn on the toggle allowing the app install APKs.\n* `Hit the back button` to return to your installation.\n\n## Allowing APK installations blocked by Google Play Protect\n\nTo install RetroArch from non-Google Play sources (F-Droid, retroarch.com, etc), ensure Google Play Protect either approves it or disable the service entirely.\n\n### Method 1: \"Install anyway\" in Google Play Protect\n\n\n\n\n\n* When you select “Install anyway”, Google Play Protect will ask you to authenticate your identity. For security reasons, this step cannot be captured in a screenshot, which is why it's described here instead. If Play Protect still fails to install the app even after you’ve entered the correct password, you’ll need to disable Google Play Protect. For instructions, see [Method 2: Disable Google Play Protect](#method-2-disable-google-play-protect).\n\n### Method 2: Disable Google Play Protect\n\nIf Google Play Protect still blocks the app installation even after you entered the correct password in Method 1 (a common issue on older Android versions), you'll need to temporarily disable Play Protect to proceed.\n\nDisable Google Play Protect:\n* Open the Play Store app first\n* Tap your profile icon\n* Select Play Protect\n* Tap the gear icon in settings\n* Toggle off \"Scan apps with Play Protect\"\n\nOnce disabled, install the APK — Play Protect will no longer interfere with the process.\n"
},
{
"path": "docs/guides/install-facebookportal.md",
"content": "\n\nFacebook Portal is a device that allows you to have video calls with friends and family using Facebook Messenger. It has a built-in camera and microphone, and it's designed to make video chatting easier and more convenient.\n\nNow, if you want to use Facebook Portal for running RetroArch, we need to do a little tweaking. RetroArch is an emulator that allows you to play old video games on various platforms. While Facebook Portal is not specifically designed for gaming, it does have some capabilities that might make it possible.\n\nTo run RetroArch on Facebook Portal, you would need to use browser. Remember that running RetroArch on Facebook Portal might not provide the best gaming experience. The device is primarily designed for video calling and might not have the same performance or compatibility as dedicated gaming devices or computers. So, while it's possible to run RetroArch on Facebook Portal, it might not be the ideal setup for gaming purposes.\n\n# Running RetroArch on Facebook Portal\n\nPortal is built on an open-source Android platform but we can't access the Google Play Store.\n\nSure! Here's a step-by-step guide to running RetroArch on Facebook Portal:\n\n1. Connect your controller: Start by connecting your controller to the Facebook Portal. You can do this by using via Bluetooth. Go to the settings, then Bluetooth settings. Put your controller into the Pairing mode. You will see your controller in the list.\n\n2. Open the web browser: On the Facebook Portal, locate the web browser app. It's usually represented by an icon that looks like a globe or compass. Tap on the icon to open the web browser.\n\n3. Visit web.libretro.com: In the web browser, enter the URL \"web.libretro.com\" in the address bar. This website is the official RetroArch website.\n\n4. Select a core: On the RetroArch website, you'll find a list of cores. Choose the core that corresponds to the console you want to emulate.\n\n5. Run the homebrews: After selecting the core, go to the \"Downloads\" section under the main menu. Look for the homebrews available for the console you selected. Homebrews are unofficial games or software created by independent developers. Select the file and it will load.\n\nRemember, running RetroArch on Facebook Portal might not offer the best gaming experience, as the device is primarily designed for video calling. So, manage your expectations accordingly, and have fun exploring the world of retro gaming!"
},
{
"path": "docs/guides/install-genesismini.md",
"content": "# Downloading and Installing RetroArch for Sega Genesis Mini - Genesis\n\n\n\n==The installation steps or dowloading file parts of the project may differ over time.==\n\n## Sega Genesis Mini - Genesis\n\n**Note:** You currently need the have a way to execute homebrew to run RetroArch on your Sega Genesis Mini.\n\n## Prerequisites\n\n- FAT32 or exFat formatted USB\n- USB Cable(The one came with Genesis does not support data transfer, it only works for power.\n- *optional* OTG cable so you don't have to use second port\n\n| :warning: DISCLAIMER: |\n|:---------------------------|\n| Project Lunar made by ModMyClassic and at RetroArch/LibRetro we all love community works. We think Project Lunar is as valuable for Sega Genesis Mini. |\n\n### Downloading and installing\n\nProject Lunar version of RetroArch is built by the ModMyClassic team. It may have a different version than RetroArch's current version. As Project Lunar is updated, the RetroArch it contains may be close to the current version.\n\nProject Page: https://modmyclassic.com/project-lunar/\n\n#### Downloading\n\nYou can download a bundle with RetroArch, all the supported cores and all the assets by going ModMyClassic's GitHub page in [here](https://github.com/Project-Lunar/Project-Lunar-Issue-Tracker/releases/tag/1.0.5). There will be few options for download, you may want to select **Zip Version** in most cases. \n\n#### Installing\n\nExtract the downloaded archive file from the zip. There will be an executable file which called **ProjectLunarUI.exe**. After running the program, choose **Install/Uninstall**. The system will warn you that it has not detected a device. When prompted, accept interactive setup support. Then follow the steps on the screen. After completing the setup, plug your USB into the second port of your device. Then click **Tools > Get RetroArch** and download the **_ALLCORES.ZIP** file from the page you went to. Thanks to this file, you will not have to download one by one. To transfer the cores, first turn off your device and remove your USB after making sure it is completely turned off. Plug in your USB to the computer and move the contents of the downloaded archive file into the **project_lunar > retroarch > cores** folder. Move your contents to **project_lunar > roms** as well.\n\nRemove your USB from your computer and insert it into the second USB port while your device is turned off, or you can plug it in from the back of the device with an OTG cable, so you can plug the controller to the second USB port. When the system is turned on, you can click on the RetroArch icon and continue.\n"
},
{
"path": "docs/guides/install-gnu.md",
"content": "---\ntitle: Downloading, Installing and Updating RetroArch on GNU/Linux\ndescription: Instructions for setting up RetroArch on GNU/Linux systems.\n---\n\n# Installing RetroArch on Linux\n\nThis page contains descriptions of several officially-supported methods of\ninstalling RetroArch on systems running the GNU/Linux kernel.\n\n\n\n---\n\n## Flatpak (suitable for most Linux distributions)\n\nFlatpak is a distribution-agnostic packaging format with broad support\nthroughout the Linux ecosystem. An official [RetroArch\nflatpak][retroarch-flatpak] is published in the Flathub repository, and can be\ninstalled in just three easy steps:\n\n### Installation\n\n1. Ensure that Flatpak is [enabled on your system][flatpak-setup] by opening the\n terminal and confirming that the following command exits with no errors:\n\n ``` shell\n flatpak --installations\n ```\n\n1. Confirm that the Flathub repository is configured as a [flatpak\n remote][flatpak-remote], so that packages from it may be installed. You can\n examine the flatpak remotes currently enabled on your system with this\n terminal command (shown with default output):\n\n ``` shell-session hl_lines=\"4\"\n ra@libretro:~$ flatpak remotes --columns=name,url,homepage\n\n Name URL Homepage\n flathub https://dl.flathub.org/repo/ https://flathub.org/\n ```\n\n If Flathub is not among the remotes shown, this command will add it to your\n system:\n\n ``` shell\n sudo flatpak remote-add --if-not-exists flathub https://flathub.org/repo/flathub.flatpakrepo\n ```\n\n1. Finally, install the RetroArch Flatpak. You have the option of making it\n available to only the current user, with this command:\n\n ``` shell\n flatpak install -y --user --from https://dl.flathub.org/repo/appstream/org.libretro.RetroArch.flatpakref\n ```\n\n Or for all users with this command:\n\n ``` shell\n sudo flatpak install -y --from https://dl.flathub.org/repo/appstream/org.libretro.RetroArch.flatpakref\n ```\n\n### Launching the Flatpak\n\nRetroArch should now be listed in your app launcher and can also be executed\nfrom the terminal with the command:\n\n``` shell\nflatpak run org.libretro.RetroArch\n```\n\n### Updates\n\nYou should keep RetroArch updated by running this command periodically from the\nterminal:\n\n``` shell\nflatpak update -y --app org.libretro.RetroArch\n```\n\n## Ubuntu(-based)\n\nUbuntu provides RetroArch as a Debian [package in their official \"universe\"\narchive][ubuntu-package], which is maintained by the community with no promise\nof support or regular update schedule. Nevertheless, for the casual user of\nUbuntu or a derivative distribution, it represents the simplest method for\ninstalling RetroArch. All that is required is to open a terminal and issue this\nsingle command:\n\n``` shell\nsudo apt --upgrade --yes install retroarch\n```\n\n### Personal Package Archives (PPAs)\n\nIn an effort to improve the experience of RetroArch users on Ubuntu, official\n[Ubuntu flavors][ubuntu-flavors], and all of the many Linux distributions based\non Ubuntu (such as Linux Mint, Zorin OS, Pop! OS, elementary OS, etc.), the\nLibretro Team has long been committed to producing its own Debian packages as an\nalternative to the ones supplied by Ubuntu in the \"universe\" package archive.\nThese packages are updated much faster to keep pace with each new RetroArch\nversion, and compiled with a greater range of features than the Ubuntu package.\nIn addition, Debian packages are created for the vast majority of popular\nLibretro cores, simplifying their installation and allowing them to be updated\nby the system package manager on the same schedule as all other package updates.\n\nThese packages are built and distributed using the [Launchpad\nplatform][launchpad-team] operated by Canonical itself (the company which\ndistributes Ubuntu), and split into two channels called \"Personal Package\nArchives\" (PPAs) that each cater to a specific type of user. By simply [enabling\none (or both) the PPAs][help-ppas] listed below, users can seamlessly replace\nthe Ubuntu RetroArch package on their system with those provided by the Libretro\nteam.\n\n- [**Stable**][ppa-stable] (recommended) — includes only official releases\n (as announced on libretro.com / retroarch.com)\n\n- [**Testing**][ppa-testing] — builds of RetroArch and most Libretro cores from\n the latest source code, for test new fixes and features as soon as they're\n added\n\n### Installation\n\nFollow these steps to enable the Libretro PPAs on your Ubuntu(-based) system.\n\n1. In order to add PPAs to your system's package sources, some tools from the\n official package repositories are needed. Open the terminal and run this\n command to ensure they are installed:\n\n ``` shell\n sudo apt --update --yes install software-properties-common\n ```\n\n1. Just a single command is needed to add a PPA to your system's package\n sources.\n\n - To add the [**Stable PPA**][ppa-stable], run this command in your\n terminal:\n\n ``` shell\n sudo add-apt-repository --yes --no-update --ppa libretro/stable\n ```\n\n - Or to add the [**Testing PPA**][ppa-testing], run:\n\n ``` shell\n sudo add-apt-repository --yes --no-update --ppa libretro/testing\n ```\n\n1. You can now install the RetroArch package from the PPAs with this command:\n\n ``` shell\n sudo apt --update --yes install retroarch\n ```\n\n#### Verifying PPA package installation\n\nYou can verify that the PPA package is installed (rather than the one from the\nofficial distribution repositories) with the `apt show retroarch` command (shown\nwith expected output for the Testing PPA package):\n\n``` shell-session hl_lines=\"14\"\nra@libretro:~$ apt show retroarch\nPackage: retroarch\nVersion: {{ unit.stable }}+r202408170734~bf25bd9149-179~ubuntu24.04.1\nPriority: optional\nSection: games\nMaintainer: Libretro Team \nOriginal-Maintainer: Debian Games Team \nInstalled-Size: 25.2 MB\nProvides: retroarch-dbg\nDepends: fonts-dejavu-core, libretro-core-info, libegl1, libgl1, […]\nRecommends: libgamemode0, retroarch-assets\nSuggests: xdg-utils\nDownload-Size: 6,349 kB\nAPT-Sources: https://ppa.launchpadcontent.net/libretro/testing/ubuntu […]\nDescription: Simple frontend for the libretro library\n RetroArch is an open source, multi-platform frontend for the libretro API. It\n can be used as a modular multi-emulator system, game engine, media player and\n 3-D technical demonstration. These features are available through libretro\n cores.\n .\n It provides four built-in graphical user interface flavors: RGUI, XMB, Ozone\n and GLUI.\n\nNotice: There is 1 additional record. Please use the '-a' switch to see it\n```\n\n!!! tip \"What to look for\"\n Look at the **`APT-Sources:`** line in the output. If one of the PPA\n packages is installed, its value will begin with\n `https://ppa.launchpadcontent.net/libretro/`.\n\n### Updates\n\nWith this installation method, RetroArch updates will automatically be included\nwith your system's regular package upgrades. However, you are always able to\ntrigger an update specifically for RetroArch (if one is available) with the\ncommand:\n\n``` shell\nsudo apt --update --yes upgrade retroarch\n```\n\n## Arch Linux(-based)\n\n### Installation\n\n#### Official package\n\nArch Linux provides a [**`retroarch`**][arch-package] package for x86_64 systems\nin their official [Extra repository][arch-extra-repo]. You can install it by\nsearching for RetroArch by name in a graphical package manager like\n[Octopi][octopi], or from the terminal with the command:\n\n``` shell\nsudo pacman -S retroarch\n```\n\n#### Arch User Repository (AUR) package\n\nA \"git\" package named [**`retroarch-git`**][aur-git-package] which offers\nprerelease builds (similar to the Testing PPA described above) is also available\nin the [AUR][arch-aur]. As above, it can be installed from a package manager GUI\nor in the terminal using an \"[AUR helper][aur-helpers]\" like [`yay`][aur-yay],\nas in:\n\n``` shell\nyay retroarch-git\n```\n\n!!! tip \"Installing an AUR helper\"\n If you wish to install the AUR package but don't yet have an AUR helper\n installed on your system, the following shell \"one-liner\" will download,\n compile and install `yay` for you:\n\n ``` shell\n pacman -S --needed git base-devel && git clone https://aur.archlinux.org/yay-bin.git &&\n cd yay-bin && makepkg -si\n ```\n\n### Updates\n\nWith this installation method, RetroArch updates will automatically be included\nwith your system's regular package upgrades. However, you are always able to\ntrigger an update specifically for RetroArch (if one is available) with the\nfollowing commands.\n\n#### Official package\n\n``` shell\npacman -Syyuu retroarch\n```\n\n#### AUR package\n\n``` shell\nyay -Syyuu retroarch-git\n```\n\n[arch-aur]: https://aur.archlinux.org/ \"Arch User Repository (AUR)\"\n[arch-extra-repo]: https://wiki.archlinux.org/title/Official_repositories#extra \"Official repositories - ArchWiki\"\n[arch-package]: https://archlinux.org/packages/extra/x86_64/retroarch/ \"Arch Linux - retroarch {{ unit.stable }}-1 (x86_64)\"\n[aur-git-package]: https://aur.archlinux.org/packages/retroarch-git \"AUR (en) - retroarch-git\"\n[aur-helpers]: https://wiki.archlinux.org/title/AUR_helpers \"AUR helpers - ArchWiki\"\n[aur-yay]: https://github.com/Jguer/yay \"Jguer/yay: Yet another Yogurt - An AUR Helper written in Go (GitHub)\"\n[flatpak-remote]: https://docs.flatpak.org/en/latest/flatpak-command-reference.html#flatpak-remotes \"Flatpak Command Reference - Flatpak documentation\"\n[flatpak-setup]: https://flatpak.org/setup/ \"Flatpak—the future of application distribution\"\n[help-ppas]: https://help.launchpad.net/Packaging/PPA/InstallingSoftware \"Packaging/PPA/Installing Software - Launchpad Help\"\n[launchpad-team]: https://launchpad.net/~libretro \"Libretro in Launchpad\"\n[octopi]: https://tintaescura.com/projects/octopi/ \"Octopi - Tinta escura\"\n[ppa-stable]: https://launchpad.net/~libretro/+archive/ubuntu/stable \"Libretro Stable : “Libretro” team\"\n[ppa-testing]: https://launchpad.net/~libretro/+archive/ubuntu/testing \"Libretro Testing/Nightly : “Libretro” team\"\n[retroarch-flatpak]: https://flathub.org/apps/org.libretro.RetroArch \"Install RetroArch on Linux | Flathub\"\n[ubuntu-flavors]: https://ubuntu.com/desktop/flavours \"Ubuntu flavours | Ubuntu\"\n[ubuntu-package]: https://packages.ubuntu.com/search?keywords=retroarch&searchon=names \"Ubuntu – Package Search Results -- retroarch\"\n"
},
{
"path": "docs/guides/install-ios.md",
"content": "# Downloading, Installing and Running RetroArch on iOS\n\n## Installation\n\n### App Store\n\nAs of May 15th 2024, RetroArch is available on the App Store worldwide.\n\nApp Store : https://apps.apple.com/us/app/retroarch/id6499539433\n\n### Sideloading\n\nYou can still sideload the app onto your devices if you want. There are 4 ways of sideloading:\n\n- Jailbreaking, not something covered here\n- Build RetroArch from source using Xcode, as described [here](../development/retroarch/compilation/ios.md)\n- Using a third party tool such as [AltStore](https://altstore.io/) that can install a built application by performing many of the same actions Xcode performs.\n- Use Xcode with a developer account to load the IPA file directly, employing a signing tool like [iOS App Signer](https://www.iosappsigner.com/)\n\n\n!!! Warning\n RetroArch or Libretro is not affiliated with AltStore or iOS App Signer in any way. You can also use alternative applications that can perform this function.\n\n#### App Store vs Sideloading\n\nThere are very few differences between the App Store and sideload builds. Installing via the App Store is easier, and sideload builds expire and need to be refreshed; for these reasons it is preferable to use the App Store version, and new users should start with that. However, there are a few reasons you may prefer to sideload:\n\n- Additional cores. We only include cores we maintain in-house or whose upstream teams have given us explicit approval to distribute it via marketplaces. This includes most but not all cores.\n- Dynamic Recompilation (a.k.a. dynarec or JIT). This will speed up some cores (e.g. ppsspp) and enable other cores (e.g. flycast).\n\n#### Downloading\n\nDownload one of the following IPA files depending on your needs:\n\n| | | |\n| ----------------------------------------------------------- | ------------------------------------------------------------------------------------------------- | --------------------------------------------------------------------------------- |\n| iOS 12+ | [Stable](https://buildbot.libretro.com/stable/{{ unit.stable }}/apple/ios-arm64/RetroArch.ipa) | [Nightly](https://buildbot.libretro.com/nightly/apple/ios-arm64/RetroArch.ipa) |\n| iOS 9+ (reduced feature set; may not work on newer devices) | [Stable](https://buildbot.libretro.com/stable/{{ unit.stable }}/apple/ios9/RetroArchiOS9.ipa) | [Nightly](https://buildbot.libretro.com/nightly/apple/ios9/RetroArchiOS9.ipa) |\n| tvOS 13+ | [Stable](https://buildbot.libretro.com/stable/{{ unit.stable }}/apple/tvos-arm64/RetroArchTV.ipa) | [Nightly](https://buildbot.libretro.com/nightly/apple/tvos-arm64/RetroArchTV.ipa) |\n\nMost people should start with the Stable build. The Nightly build contains the latest commits available on GitHub, and the latest enhancements and features that are added daily. The Nightly build may not be as stable as the Stable version.\n\nIt is possible to build RetroArch for older versions of iOS, though due to resource constraints these are not provided. See the [instructions for building iOS](../development/retroarch/compilation/ios.md) to build it yourself.\n\n#### Installation for non-Jailbreak devices\n\nIn order to install the RetroArch on your non-Jailbreak device, we need to use a third-party application.\n\nYou cannot add or update cores after installation as they are signed executables and can only be updated by updating and resigning the entire application. The IPA files linked above contain [all of the available iOS/tvOS cores](https://buildbot.libretro.com/nightly/apple/ios/latest/).\n\n##### iOS App Signer\n\n1. Download and launch iOS App Signer, and add the downloaded `.ipa` file.\n2. Use an existing Apple Development certificate or sign up for a free or paid developer account.\n3. Ensure your device is registered. Refer to [link](https://developer.apple.com/help/account/register-devices/register-a-single-device) for details.\n4. Create a provisioning profile for your device. Follow these [instructions](https://developer.apple.com/help/account/manage-profiles/create-a-development-provisioning-profile).\n5. Use reverse-domain formatting, e.g., `com.myname.retroArch` (replace 'myname' with your name).\n6. Click start and save the new `.ipa` file.\n7. Open Xcode, go to `Window -> Devices and Simulators`, and select your device.\n8. In the right pane under 'INSTALLED APPS,' either drag and drop the new `.ipa` file or click '+' to navigate to the file.\n\n##### AltStore\n\n1. Install and launch AltServer.\n1. Hold Option (macOS) or Left Shift (Windows) when clicking the AltServer icon to reveal new \"Sideload .ipa…\" menu option\n1. Select the device you want to install RetroArch on (must be on the same Wi-Fi network as AltServer)\n1. Enter the email and password for your Apple ID\n\n## Using RetroArch\n\nOn an iPhone, you'll be presented with the \"GLUI\" touch interface; in versions after 1.19.1 on iPad the default switched to the \"Ozone\" interface. If you have an mFi controller, you can control both interfaces that way as well.\n\nOn the Apple TV, you'll be shown the \"Ozone\" interface. You need to use an mFi controller with an Apple TV. The Siri Remote only functions as an LRUD interface; it will not work as a controller.\n\nWhen you first start RetroArch, you'll notice that you're missing images. You'll want to run the Online Updater:\n\n- From the main menu, choose \"Online Updater\"\n- Choose:\n - Update Core Info Files\n - Update Assets\n - Update Databases\n - Update Overlays\n - Update GLSL Shaders\n\n### Adding Content\n\n#### iOS\n\nThe easiest way to add content into RetroArch's sandbox is through the Apple Files app. Run RetroArch first and it will create several folders. After running RetroArch, open the Files app, and in Browse -> On My iPhone, you should now see a RetroArch folder. You can place your content in any directory or subdirectory in that folder (including creating your own subdirectories). You can use the Files app to copy the content from iCloud to the folder on your phone.\n\nAdditionally, in the `Load Content` menu, selecting `Open...` will open the system file chooser screen, and from there you can select files to copy. Copied files go into the `downloads` folder by default.\n\n#### tvOS\n\nRetroArch on tvOS has a built-in webserver. While RetroArch is running, open a browser on your computer and open the URL that RetroArch displays. You can use the web-based UI to create subdirectories and upload or download files. You can place your content in any directory or subdirectory in that folder (including creating your own subdirectories).\n\nAdditionally, on versions newer than 1.19.1, there is a built-in WebDAV server that listens on port 8080. You can connect to it using Finder on macOS by choosing \"Connect to Server...\" in the \"Go\" menu (**⌘-K**) and entering `http://appletv.local:8080`, replacing \"appletv.local\" with the name of your AppleTV or its IP address.\n\n\n!!! Warning\n tvOS does not provide apps with a persistent storage area; instead it allows for up to 500kb meant for configuration data. The disk space shown through the web UI is a cache space. If the OS needs to reclaim disk space, it will delete files from that cache space without warning. This includes state and saves! When this happens, you will immediately see that the appearance of RetroArch is wrong, as the assets will need to be re-downloaded.\n\n### JIT\n\nSeveral cores are improved by enabling JIT, while others will not work at all without it. The only way to enable JIT is to convince the OS that RetroArch is being debugged. One way of doing this is to build with Xcode, launch the app from Xcode with the debugger attached, and leave Xcode running. Another way is to use AltServer to enable JIT on RetroArch after it has been opened (but before a core has been loaded).\n\nNote: JIT is not enabled on the App Store version of RetroArch. Apple doesn't allow apps to run with JIT. Some core will not function as intended.\n"
},
{
"path": "docs/guides/install-lakka.md",
"content": "# Downloading, Installing and Updating Lakka for PC.\n\n\n\n## What is it?\n___\nLakka is the official Linux distribution of RetroArch and the libretro ecosystem. Each game system is implemented as a libretro core, while the frontend RetroArch takes care of inputs and display. This clear separation ensures modularity and centralized configuration. Lakka is a lightweight Linux distribution that transforms a small computer into a full blown retrogaming console.\n\n| :warning: DISCLAIMER |\n|:---------------------------|\n| Lakka is still under heavy development. In its current state, the project allows you to play most games on most platforms. However, expect bugs, missing features or features not working as intended, and hardware that is yet to be supported. If you find a bug, you can declare it in our [tracker](https://github.com/libretro/Lakka-LibreELEC/issues), unless already reported. |\n\n## Prerequisites\n\n- **SD card or USB** You need a USB or SD Card to write the installation image.\n- **Flashing Software** You can use either `Etcher` or `Win32 disk imager`.\n\n## Download Lakka\n___\n\nClick here to get the [64bit](http://le.builds.lakka.tv/Generic.x86_64/Lakka-Generic.x86_64-2.2.2.img.gz) version or click here to get the [32bit](http://le.builds.lakka.tv/Generic.i386/Lakka-Generic.i386-2.2.2.img.gz) version.\n\nPlease note that due to the wide variety of PC hardware, Lakka may not work on your hardware. Those image are USB images, not CD or DVD images, those installation mediums are unsupported. Also, we don't support virtualization and dualboot. Lakka is meant to be installed on real hardware.\n\n### Flashing Lakka Image\n\nThe following softwares are fine however you can use any other software you want. The following softwares are not related to RetroArch or Libretro in any way. You must act consciously when providing or using these softwares.\n\n#### Etcher\n\nEtcher is a free and open-source utility used for burning image files such as .iso and .img files, as well as zipped folders to create live SD cards and USB flash drives.\n\n• Run **Etcher**\n• Select `Lakka Image`\n• Select USB drive\n• Click **Flash**\n\n#### Win32 Disk Imager\n\nThis program is designed to write a raw disk image to a removable device or backup a removable device to a raw image file.\n\n• Click on the **folder icon**\n• Select the **image file**\n• Select drive letter **UNDER DEVICE**\n• Click **Write**\n\n## Installation\n\nLakka is still under heavy development. In its current state, the project allows you to play most games on most platforms. However, expect bugs, missing features or features not working as intended, and hardware that is yet to be supported.\n___\n\n### The Live USB Mode\n\nLakka can be installed on an USB key, and be booted in Live Mode on any PC that supports Lakka’s requirements. This Live Mode is persistent: all changes will be saved to the key, safely storing games within the USB.\n\n**Unknown Sources** To avoid compromising the safety of your device, always use applications provided through our official channels.\n\n1. Insert your USB drive into your computer.\n2. Boot from USB.\n\t1. You can use Boot Device Options by pressing the key specified by your motherboard manufacturer.\n\t2. You can choose to boot from USB in the BIOS.\n\t*The above options may vary depending on your motherboard model.*\n3. Wait during the `bootloader phase`.\n\nThis will start the Lakka operating system via USB. This Live Mode is persistent: all changes will be saved to the key, safely storing games within the USB. You will be able to check if Lakka works on your hardware, without altering your PC’s hard drive or partitions. Certain settings and configurations may not be saved in spite of the persistence property.\n\n### Full Setup\n\nInstalling Lakka on your device is as simple as installing any other operating systems. You may experience unexpected errors during setup. Lakka is still under construction.\n\n1. Insert your USB drive into your computer.\n2. Boot from USB.\n\t1. You can use Boot Device Options by pressing the key specified by your motherboard manufacturer.\n\t2. You can choose to boot from USB in the BIOS.\n\t*The above options may vary depending on your motherboard model.*\n3. Type `installer` or `live`\n4. Select **Install Lakka**.\n5. Use the **up/down** arrows to select the drive to install.\n*Observe the warnings on the screen. If you continue the targeted drive will be wiped out.*\n6. Select Yes in confirmation alerts.\n7. After the installation, you will return to the Main menu. **Remove the USB** and **select Reboot**.\n\nYour computer will launch Lakka on the next Boot.\n\n## Conclusion\n___\nLakka is still under heavy development. In its current state, the project allows you to play most games on most platforms. More information can be found in the [Lakka documents](http://www.lakka.tv/doc/Home/). You may also want to check the [Official Forum](https://forums.libretro.com/c/libretro/lakka-tv-general)."
},
{
"path": "docs/guides/install-libnx.md",
"content": "# Downloading, Installing and Updating RetroArch for Switch\n\n\n\n| :warning: WARNING |\n|:---------------------------|\n| You need to have Atmosphère custom firmware to run RetroArch on your Switch. Hardware or software changes on your device may damage your device. | \n\n## Prerequisites\n\nNeither RetroArch nor LibRetro support or recommend that your device run CFW.\n\n- Atmosphère [^1]\n- FAT32 formatted SD card\n\n## Downloading and installing\n\nThere are multiple ways of downloading RetroArch for your Switch.\n\n### Using the stable bundle (recommended)\n\nYou can find a bundle with RetroArch, all the cores and all the assets [here](https://buildbot.libretro.com/stable/{{ unit.stable }}/nintendo/switch/libnx/RetroArch.7z).\n\nJust extract the archive to the root of your SD card to install or update your copy of RetroArch (overwrite any existing file).\n\n### Using the nightlies and/or the online updater (advanced users)\n\nIf you don't want to download all cores at once, you can go [here](https://buildbot.libretro.com/nightly/nintendo/switch/libnx/latest/) and only pick the ones you want. Put the downloaded NROs in `retroarch/cores` on your SD card. You can run them directly using the homebrew menu.\n\nAlternatively, you can download only one core and use the Online Updater inside of RetroArch to download or update additional cores later.\n\n## Running RetroArch using title takeover\n\nThe preferred way of running RetroArch is to use Atmosphère's title takeover feature. This allows you to (temporarily) replace a game with the homebrew loader, which will then be used to load RetroArch. Make sure to use the latest version of Atmosphère before continuing.\n\n| :warning: WARNING |\n|:---------------------------|\n| You need at least one title on the console (whether it's a digitally puchased game or a demo or a cartridge game or even an homebrew NSP). If you can pick an up to date game that's better as you won't be nagged everytime you run it. |\n\nAtmosphère now contains everything needed to run homebrews out of the box. To do so, simply run any game while holding the R key. Make sure to hold the key until you can actually see the homebrew menu. Select RetroArch in the list to start!\n\nIf you wish to change the key, you can edit `/atmosphere/loader.ini` and change `override_key` here. You can add a `!` in front of the key to flip the condition (\"run homebrew if the key is pressed\" versus \"run homebrew if the key isn't pressed\").\n\n## Updating\n\nUpdating RetroArch is the same as installing it, download a higher or lower version (in this case, downgrade) than the version you have and overwrite existing files.\n\n\n\n## Glossary\n\n### \"Atmosphère\"\n\tAtmosphère is a work-in-progress customized firmware for the Nintendo Switch.\n\n### \"NRO\"\n\tAn NRO file is an executable file used by the Nintendo Switch. It contains compiled code for an application or game. NRO files may also store assets for Homebrew Launcher, such as a icon and metadata.\n\n[^1]: https://github.com/Atmosphere-NX/Atmosphere"
},
{
"path": "docs/guides/install-ludo.md",
"content": "# Downloading, Installing and Updating Ludo for PC.\n\n\n\n## What is it?\n___\nLudo is an Emulator Frontend able to run retro video games. Ludo does not emulate the consoles itself, but does it through emulator plugins called libretro cores. Libretro cores are well known emulators (like Snes9x or Genesis Plus GX or PCSX) stripped from their user interface. They contain only console specific logic.\n\n| :warning: DISCLAIMER |\n|:---------------------------|\n| Ludo is still under heavy development. In its current state, the project allows you to play most games on most platforms. However, expect bugs, missing features or features not working as intended, and hardware that is yet to be supported. If you find a bug, you can declare it in our [tracker](https://github.com/libretro/ludo/issues), unless already reported. |\n\n## Prerequisites\n\n- GLFW 3.3\n- OpenGL >= 2.1\n- OpenAL\n\n## Download Ludo\n___\n\nClick here to get the [latest](https://github.com/libretro/ludo/releases/latest) version.\n\nPlease note that due to early development phase, Ludo _may_ not work on your OS as expected. In most scenarios, Ludo works as intended.\n\n## Ludo\n\n[Ludo](http://ludo.libretro.com/) is a minimalist frontend for emulators. [Ludo is part of LibRetro](https://github.com/libretro/ludo). Separating the frontend from the emulation logic has the following advantages:\n\n- Frontend developers only have to code the user interface once\n- Developing a new frontend functionality can benefit all the emulators at once\n- Emulator developers can benefit from a mature user interface without coding it\n- Gamers can configure emulators all at once\n- The user interface, configuration, and storage are consistent across emulators\n\nFrom the gamer perspective, Ludo is a universal retro game browser and player. It offers a gaming experience optimized for TV and gamepads, but can also be used on a traditional PC with a keyboard.\n\nCurrently, Ludo can run on the following platforms:\n\n- Windows 64-bit (Tested on Windows 10)\n- Max OS X 64-bit\n- Linux 64-bit\n- Linux on Raspberry Pi 32-bit\n\nThere is also an Operating System version of Ludo called LudOS. It looks and behaves exactly the same, but can be burnt to a USB drive or an SD card to recreate a video games console experience. You can setup LudOS on a dedicated TV box to enjoy gaming from your couch. You can also boot it off USB on any laptop in a perfectly portable way.\n\n### Features \n\nLudo's User Interface has the following functionalities:\n\n- Gamepad driven: everything can be done through the gamepad instead of the mouse\n- TV optimized: looks nice on a wide screen\n- Controller auto configuration when plugged\n- Automatic configuration of literally everything\n- Game collection scanner for generating playlists with thumbnails\n- Video filters through simple shaders\n- Taking game screenshots\n- Saving/Loading game state anytime, organized by date with screenshots\n- Emulator specific settings\n- Soft-patching .ips and .ups\n\n### Focus on playing\n\nLudo's user interface is distraction free and configuration is always optional.\n\n\n\nScan your games and browse your collection categorized by system with playlists showing in-game screenshots.\n\n\n\nA contextual menu gives you access to actions and quick save / quick load anytime.\n\n\n\nWe chose the best emulators for the job, configured with sane defaults guaranteeing a balance of speed and accuracy.\n\n\n\n### Ludo as an Operating System\n\nLudo also exists in the form of an Operating System called LudOS.\nIt behaves and looks exactly the same and can be installed directly on a TV Box to recreate a game console experience.\n\n- [PC 64bit](https://github.com/libretro/LudOS/releases/download/v1.0-alpha30/LudOS-Generic.x86_64-1.0-alpha30.img.gz)\n- [Raspberry Pi 2/3](https://github.com/libretro/LudOS/releases/download/v1.0-alpha30/LudOS-RPi2.arm-1.0-alpha30.img.gz)\n- [Raspberry Pi 4](https://github.com/libretro/LudOS/releases/download/v1.0-alpha30/LudOS-RPi4.arm-1.0-alpha30.img.gz)\n\nThe OS version of Ludo, LudOS, adds these OS centric functionalities:\n\n- Flash-able using Etcher\n- Auto expanded filesystem on first boot\n- Connecting to Wi-Fi networks, with a virtual keyboard\n- Robust monolithic updates for the OS\n- Adding games through Windows Share protocol or SSH\n- Controlling services like SSH, Samba, Bluetooth\n___\n\n## Frequently Asked Questions\n\nYou may have a lot of questions or ideas about Ludo, some of which we tried to answer below. Apart from that, you can also ask your questions via [Discord](https://ra-link.web.app/discord).\n\n### How is Ludo different from RetroArch?\n\nLudo will stay smaller than RetroArch by only implementing the core features and by targeting less platforms.\nBy not adding advanced functionalities we aim to deliver a stable frontend for beginner users on Windows, Mac OSX and Linux.\nSome design choices are different, for example we support less cores, and choose cores for the user. The cores are packaged in the frontend so no additional step is required to launch a game.\n\n### How is Ludo similar to RetroArch?\n\nAs RetroArch, Ludo is a libretro frontend, so the way of communicating with the emulators is the same.\nSame cores, similar UI patterns, gamepad driven UI, same game thumbnails, mostly the same game database, same terminology. I think we can also say same developers, as I am an important contributor of the libretro team, and all the people who provided me with help are also member of the libretro community.\nIt definitely shares the same values.\n\n### Why not implementing Ludo as a menu driver in RetroArch?\n\nTo keep a software stable on a number of different platforms, it is important to keep a small codebase with a good test coverage. It is also important to not introduce changes at a high rate.\nRetroArch is an extremely active project and has a growing codebase that makes it harder to reach stability.\nAlso, RetroArch is a very powerful and sophisticated frontend, and one of the common criticism is that it exposes too many configuration options for the average retro gamer.\nImplementing Ludo as a menu driver of RetroArch would solve none of these issues.\n\n### Does Ludo offer a better scanning method compared to RetroArch?\n\nNo, the scanner logic is basically the same and Ludo supports even less ROM formats.\nCDs are scanned based on file name instead of serial number.\nLudo's scanner faster for this reason and because it leverages goroutines.\n\n### Can you add feature X to Ludo?\n\nThe answer is likely to be no, as we're trying to keep the code small, only bugfixes are really welcome.\nWe encourage you to fork Ludo and add the feature yourself. It should be fairly easy given the scope of the project.\nIf you are able to author a very useful improvement with a minimum of changes we might merge your change.\n\n### Emulated consoles\n\nLudo includes the following libretro cores (emulators):\n\nbluemsx fbneo fceumm gambatte genesis_plus_gx handy mednafen_ngp mednafen_pce_fast mednafen_psx mednafen_saturn mednafen_supergrafx mednafen_vb mednafen_wswan mgba np2kai o2em pcsx_rearmed picodrive pokemini prosystem snes9x stella vecx virtualjaguar\n\nLudo can run games from these consoles:\n\nAtari 5200, Atari 7800, Atari Jaguar, Atari Lynx, GCE Vectrex, MSX, MSX2, Various Arcade Games, Game Boy, Sega SG-1000, Sega Game Gear, Sega Master System, Sega Genesis / Mega Drive, Sega 32X, Sega CD, Sega Saturn, Nintendo NES, Super Nintendo / Super Famicom, Nintendo Virtual Boy, Nintendo Game Boy, Nintendo Game Boy Advance, NEC PC Engine, NEC PC Engine CD, NEC PC-98, NEC PC-FX, Sharp X68000, Sony PlayStation, 3DO\n\n## Conclusion\n___\nLudo is still under heavy development. In its current state, the project allows you to play most games on most platforms. More information can be found in the [Ludo documents](https://github.com/libretro/ludo/wiki)."
},
{
"path": "docs/guides/install-macos.md",
"content": "# Downloading, Installing and Updating RetroArch for macOS\n\n\n\n## Downloading and installing\n\nDownload one of the .dmg files from here:\n\n* [Stable](https://buildbot.libretro.com/stable/{{ unit.stable }}/apple/osx/universal/RetroArch_Metal.dmg)\n* [Nightly](https://buildbot.libretro.com/nightly/apple/osx/universal/RetroArch_Metal.dmg)\n\nThe install follows the standard process of opening the .dmg file and copying RetroArch.app into the Applications folder.\n\n### About the \"Metal\" build name\n\nThe downloadable builds are named \"Metal\" for historical reasons. This build is a Universal binary (supporting both Intel and Apple Silicon Macs) and includes multiple video drivers: Vulkan, glcore (OpenGL 3/4), and an experimental Metal driver. Most users should use the Vulkan or glcore video drivers.\n\n!!! warning \"Metal video driver is experimental\"\n The metal video driver within RetroArch is experimental, largely untested, and not well supported. If you encounter issues, switch to the Vulkan or glcore video driver instead.\n\nThe Metal build requires macOS 10.13 or later. It is possible to build RetroArch for older versions of macOS, though due to resource constraints these are not provided. See the [instructions for building on macOS](../development/retroarch/compilation/osx.md) to build it yourself.\n\n### Stable vs nightly builds\n\nMost people should start with the Stable build. The Nightly build contains the latest commits available on GitHub, and the latest enhancements and features that are added daily. The Nightly build may not be as stable as the Stable version.\n\n## Updating\n\nThere are no automatic updates in RetroArch. When updating, simply download and open the new .dmg file, and copy RetroArch.app into Applications. When prompted, choose to overwrite the old version.\n"
},
{
"path": "docs/guides/install-ps2.md",
"content": "# Downloading and Installing RetroArch for PlayStation 2\n\n\n\n| :warning: DISCLAIMER |\n|:---------------------------|\n| You currently need the have a way to execute homebrew to run RetroArch on your PlayStation 2. |\n\n## Prerequisites\n\nThis is probably the most straightforward way to install RetroArch.\n\n- FreeMCBoot\n\n## Downloading and installing\n\n### Downloading\n\n!!! info\n\tNightly files will give you the latest developments. This is sometimes dangerous and sometimes innovative. We will use the Stable version and recommend it.\n\nYou can download a bundle with **Stable** version of RetroArch, all the supported cores and all the assets by clicking [here](http://buildbot.libretro.com/stable/{{ unit.stable }}/playstation/ps2/RetroArch_elf.7z). You can download **Nightly** version of RetroArch by clicking [here](http://buildbot.libretro.com/nightly/playstation/ps2/RetroArch_elf.7z).\n\n### Installing\n\nInstallation is also very simple. Just create `RetroArch` folder where put all the cores (.elf). Copy this folder into a USB stick. Finally, use your favorite file explorer (usually `UlaunchELF`) to navigate to `mass0:\\`, then enter in `RetroArch` folder and launch the core you wish.\n"
},
{
"path": "docs/guides/install-ps3.md",
"content": "# Downloading and Installing RetroArch for PlayStation 3\n\n\n\n| :warning: DISCLAIMER |\n|:---------------------------|\n| You need to have any-CFW(Rebug, Ferrox etc.) custom firmware to run RetroArch on your PlayStation 3. Hardware or software changes on your device may damage your device. |\n\n## Prerequisites\n\nThis is probably the most straightforward way to install RetroArch.\n\n- FAT32 formatted USB, It should be partitioned as MBR rather than GPT.\n- any-CFW\n\n## Downloading and installing\n\nThere are multiple ways of downloading RetroArch for your Playstation 3.\n\n### Download the correct file\n\nThere are two types of CFW files. One of them is `CEX` and the other is `DEX`. CFW devices with `CEX` systems are more specific to the end user. On the other hand the `DEX` version is more for developers. You can use RetroArch in two ways and benefit from the same features. Always check which version of your CFW you have and download the correct file.\n\nYou can find a bundle with RetroArch, all the cores and all the assets for `CEX` and `DEX` by clicking [here](https://www.retroarch.com/index.php?page=platforms) and scroll down to the PlayStation 3 section.\n\n## Installing\n\nInstallation is also very simple. Just extract the archive to the root of your USB. Put your USB to right USB port. Use the CFW package installer to select and install RetroArch's pkg file. You can watch the short video Demonstration by clicking on the image below."
},
{
"path": "docs/guides/install-psc.md",
"content": "# Downloading and Installing RetroArch for PlayStation Classic\n\n\n\n==You currently need the have a way to execute homebrew to run RetroArch on your PlayStation Classic.==\n\n## Prerequisites\n\n- FAT32 or exFat formatted USB2.0(some USB 3.0 are working as well)\n- USB needs to be renamed as \"SONY\"\n\n| :warning: DISCLAIMER |\n|:---------------------------|\n| Project Eris made by ModMyClassic and RetroBoot made by u/genderbent, at RetroArch/LibRetro we all love community works. We think Project Eris and RetroBoot is as valuable for PlayStation Classic. |\n\n| :warning: DISCLAIMER |\n|:---------------------------|\n| The installation steps or dowloading file parts of the project may differ over time. |\n\n## Downloading and installing\n\nProject Eris version of RetroArch is built by the ModMyClassic team. It may have a different version than RetroArch's current version. As Project Eris is updated, the RetroArch it contains may be close to the current version.\n\n### Downloading\n\nThese two versions may contain different contents from each other. While the main purpose of Project Eris may be the Ultimate PlayStation Classic, RetroBoot runs RetroArch directly.\n\n#### Project Eris\n\nYou can download a bundle with RetroArch, all the supported cores and all the assets by going ModMyClassic website in [here](https://modmyclassic.com/project-eris/). There will be few options for download, you may want to select **Full Package** in most cases. \n\n#### RetroBoot\n\nYou can find more details at u/genderbent's post down below.\nhttps://www.reddit.com/r/PlaystationClassic/comments/g8ht0y/release_retroboot_11_the_lightweight_alternative/?utm_source=reddit&utm_medium=usertext&utm_name=PlaystationClassic&utm_content=t3_fd652s\n\n### Installing\n\nInstallation may sound complicated but it's not. Format your USB to `exFat` or `FAT32` and rename as `SONY`. Transfer all files in Package to USB. Make sure your device fully power-off, **you should remove power cable**, then plug your USB to second port or use OTG cable then plug into power socket. Plug back power cable, you will see **Power** led will turn *Amber* then press power button. Follow on screen instruction if you use Project Eris, RetroBoot will boot directly RetroArch."
},
{
"path": "docs/guides/install-psp.md",
"content": "# Downloading and Installing RetroArch for PlayStation Portable\n\n\n\n==You currently need to have a custom firmware called PRO-C to run RetroArch on your PlayStation Portable. Hardware or software changes on your device may damage your device. PRO-C must be running before running RetroArch, if you run RetroArch before running PRO-C, the device will say the executable is corrupted..==\n\n## Prerequisites\n\n- Pro CFW(latest version)[^1]\n\n## Downloading, Installing and Updating\n\n### Downloading\n\nYou can download a bundle with the **Stable** version of RetroArch, all the supported cores and all the assets by clicking [here](http://buildbot.libretro.com/stable/{{ unit.stable }}/playstation/psp/RetroArch.7z). You can download the **Nightly** version of RetroArch with all the same extras by clicking [here](https://buildbot.libretro.com/nightly/playstation/psp/RetroArch.7z).\n\n!!! info\n\tNightly builds will give you the latest development changes. This is sometimes unstable! We will use the Stable version for this guide.\n\n### Installing\n\nInstallation is also very simple. Just create a `RetroArch` folder under `PSP/Game` directory on your Memory Stick and transfer the archive files to the `PSP/Game/RetroArch` folder, then go to `Memory Stick™` under **Game** press **X**, and then select RetroArch. Press **X** again to open.\n\n### Updating\n\nDownload the latest version and extract it into 'PSP/Game/RetroArch' on the Memory Stick. Accept when prompted to overwrite.\n\n[^1]: https://code.google.com/archive/p/procfw/downloads\n"
},
{
"path": "docs/guides/install-psv.md",
"content": "# Downloading and Installing RetroArch for PlayStation Vita\n\n\n\n==You need to have custom firmware(HENkaku) to run RetroArch on your PlayStation Vita. Hardware or software changes on your device may damage your device.== \n\n## Prerequisites\n\nThis is probably the most straightforward way to install RetroArch.\n\n- HENkaku (latest version)[^1]\n- VitaShell[^2]\n\n## Downloading and Installing\n\nWe're gonna download two files to get the full experience. One of these files is the `.vpk` version of RetroArch and the other is the `data` package with assets. **RetroArch.vpk** by itself does not have any important assets. Thus, it is lighter than other versions. We will need the data file for the assets.\n\n### Downloading\n\n!!! info inline end\n A Piglet/ShaccCg Wrapper Library for OpenGL ES 2.0 Support on the Vita. RetroArch Piglet is still WIP and not finished however you can try it but you will need [PIB-Configuration-Tool](https://github.com/SonicMastr/PIB-Configuration-Tool).\nYou can download a stable RetroArch by clicking [here](http://buildbot.libretro.com/stable/{{ unit.stable }}/playstation/vita/RetroArch.vpk). If you want to install the Nightly version, you can also use [this link](http://buildbot.libretro.com/nightly/playstation/vita/RetroArch.vpk). Nightly files will give you the latest developments. This is sometimes dangerous and sometimes innovative. We will use the Stable version and recommend it. You can download `RetroArch's data` file from [this link](http://buildbot.libretro.com/stable/{{ unit.stable }}/playstation/vita/RetroArch_data.7z) or [nightly](http://buildbot.libretro.com/nightly/playstation/vita/RetroArch_data.7z).\n\n!!! info\n\tNightly files will give you the latest developments. This is sometimes dangerous and sometimes innovative. We will use the Stable version and recommend it.\n\n### Installing\n\nConnect your PS Vita with your PC via _VitaShell_. Move your `RetroArch.vpk` to root of your sdcard. Disconnect PS Vita from your PC. Enter the `ux0:` directory, you will see a lot of files, scroll down to the bottom until you see `RetroArch.vpk`. Press your action key, it can be _O_ or _X_. You may receive a warning asking for the reliability of the file you downloaded, if you downloaded this file from our channels, you can accept and continue.\n\nOnce the installation is complete, run the **RetroArch** once and you will see that Fonts and Images are missing. Close `RetroArch` and connect PS Vita to PC with `VitaShell`. Once you have made the connection, move the files of the downloaded `data.7z` archive to `ux0:/data/retroarch/`. After successful file transfers, close the application and run RetroArch again.\n\n!!! info\n\tIf you want higher resolution you could use Sharpscale[^3] plugin.\n\t\n\n\n[^1]: https://github.com/henkaku\n[^2]: https://github.com/TheOfficialFloW/VitaShell\n[^3]: https://github.com/cuevavirus/Sharpscale\n"
},
{
"path": "docs/guides/install-steamlink.md",
"content": "\n# Downloading and Installing RetroArch for Steam Link\n\n\n\n==Steam Link build isn't in automated build due both SteamLink SDK and LibRetro changes. However you can download [here](https://github.com/fpscan/RetroArch-AppImage/releases/tag/steam) for decent version. The download and installation process is as follows, and may change in the future. Threads, alsa, pulse, neon and shaderpipeline are disabled, RGUI theme is pre-configured and most Cores installed into the root folder for full efficiency.==\n\n## Prerequisites\n\nThis is probably the most straightforward way to install RetroArch.\n\n- FAT32 formatted USB\n\n## Download\n\nYou can find a cores bundle with RetroArch by clicking [here](https://www.retroarch.com/index.php?page=platforms) and scroll down until you see the **Steam Link** section.\n\n## Getting USB Ready\n\n### Setting up RetroArch\n\nGetting RetroArch ready to install is very simple. Create the file structure in the root directory of your USB as follows:\n\n> steamlink/apps/\n\nUnzip the `RetroArch.zip`, move the `RetroArch` folder into the `apps` folder we just created.\n\n## Content Management\n\nTransferring files to Steam Link can be a bit tedious. You can put your contents inside the `Content` folder in the `RetroArch` folder, however our goal is to make this process more sustainable. In this case SSH or USBmount will help us.\n\n### SSH\n\nIn order to use an SFTP connection with SSH, we must first enable SSH. It's easy to enable SSH on your Steam Link. To do this, go to `steamlink` folder and create two nested folders first create the `Config` directory then enter it and create the `System` directory there. The directory structure should be as follows;\n\n> steamlink/config/system/\n\nThen, enter the `System` directory and create an empty text file named `enable_ssh.txt`.\n\nWithin this, create a blank text file, and label it **enable_ssh.txt**. The final directory structure should be as follows:\n\n> steamlink/config/system/enable_ssh.txt\n>\n### USBmount\n\nUSBmount is an alternative way to connect `/mnt/disk`. You can find more detailed information in the link below.\n\n[https://steamcommunity.com/app/353380/discussions/1/152393186490496699/](https://steamcommunity.com/app/353380/discussions/1/152393186490496699/)\n\nPut your USBmount folder into `steamlink/apps/`\n\n*RetroArch is not affiliated with the above link this link may change in the future or may not be original, this subject may vary.*\n\n## Installation\n\nAfter completing the above operations, you should have a directory structure like the one below. Repeat the above steps until you reach the final result.\n\n| | | | | |\n|---|---|---|---|---|\n| steamlink | apps | retroarch |... | |\n| | config | system | enable_ssh.txt | |\n\n\nFormat your USB to FAT32 type for fresh install. Move the `steamlink` folder we just created into your USB root. Unplug your USB and make sure your SteamLink is completely turned off by unplugging the power cord. Plug your USB into the first USB port, and then plug in the power cable. When Steam Link boots, RetroArch structure will be read, and RetroArch will be installed. Remove the USB after you see the RetroArch logo on the home screen. You can run the application by pressing the RetroArch logo.\n\n## Content Transfer\n\nWe can transfer our content with SSH or USBmount we have previously configured.\n\n### SSH\n\nFind out the IP address that SteamLink receives, which you can learn from your router or SteamLink network settings. Create an SFTP connection with your trusted FTP tool. SteamLink SSH username is `root` and password is `steamlink123`, 21 for FTP and 22 for SFTPthe sample scenario for this is as follows. It may be different(ip address) in your case. RetroArch is not related to the specified applications and cannot be held responsible.\n\nFileZilla\n\n| Host | Username | Passoword | Port |\n|---|---|---|---|\n| 192.168.1.5 | root | steamlink123 | 22 |\n\nGo to root folder and open `apps` folder, you will see RetroArch folder in there. Open it and move your contents to `contents` folder.\n\n### USBmount\n\nInstall USBmount the same way we install RetroArch. Remove the `RetroArch` folder from the `apps` directory before installation. Otherwise it will re-install on every boot.\n\nAfter completing the installation, create a folder on your USB and move your contents. Then plug the USB into your SteamLink and run the installed `USBmount` application.\n"
},
{
"path": "docs/guides/install-windows-2000-me-98SE.md",
"content": "# Downloading, Installing and Updating RetroArch for Windows 2000 / ME / 98SE operating systems.\n\n\n\n==You must have `WinRAR 4.11 (32-bit)` in order to unzip `RetroArch.7z` in Windows 2000.==\n\n## Downloading and installing\n\nThere are multiple ways of downloading RetroArch for your Windows 2000 / ME / 98SE operating systems. `Installer` or `Download` in [here](https://www.retroarch.com/index.php?page=platforms) both options provide you with the lastest RetroArch, the only difference is that one is a self extracting installer, and the other one an archive you have to extract manually.\n\n## Downloading\n\nYou can either choose `Nightlies` or `Stable` bundle, you can find a bundle with RetroArch, all the cores and all the assets [here](https://buildbot.libretro.com/stable/{{ unit.stable }}/windows-msvc2005/x86/), and download `RetroArch.7z` or `RetroArch-MSVC05-Win32-setup.exe`.\n\nFor Nightlies [here](http://buildbot.libretro.com/nightly/windows-msvc2005/x86/) - pick the latest version(based on date), and download `...RetroArch.7z` or `RetroArch-...-msvc2005-x86-setup.exe`.\n\n!!! info\n You can download `RetroArch_cores.7z` file to download only Core files.\n\n## Installing\n\nIf you pick the 7z archive package, extract it in a folder that doesn't require administrator permissions such as C:\\Users\\yourusername\\RetroArch. Don't extract it to Program Files or your Windows folder.\n\nIf you pick the executable file, double click exe file and follow the instructions on-screen to install..."
},
{
"path": "docs/guides/install-windows.md",
"content": "# Downloading, Installing and Updating RetroArch for Windows 7 and Later\n\n\n\n## Downloading\n\nFirst decide if you want a stable release or a nightly. Both options provide you with the latest RetroArch, the only difference is that one is a self extracting installer, and the other one an archive you have to extract manually. Both are portable installation which means the RetroArch setup is:\n- It's self-contained\n- It doesn't need users to guess random locations for configurations files\n- It's easy to update by just replacing files\n\n### Stable\n\nThe stable version is our first priority and the main distribution version. Since it is the major release, it comes out periodically. Stable releases take more time to manufacture, but new features become available in the next version. For example: A version can have a new theme and feature, and in the next version, this theme and feature can be removed, improved or changed. As can be understood from the name of Stable, this version is more stable because it is controlled accordingly to make it work better on the platform it is suitable for.\n\nStable release are [here](https://buildbot.libretro.com/stable/{{ unit.stable }}/windows/), and then select the architecture of your computer.\n\n### Nightly\n\nThis version contains the latest commits available on GitHub, and the latest enhancements and features are added daily. This version may not be as stable as Stable version because it is built daily, but this does not mean that it is not stable.\n\nThe current nightly is [here](https://buildbot.libretro.com/nightly/windows/). There are several files you can download in these folders. For a new installation you want **RetroArch.7z** or the setup package (**RetroArch-20XX-XX-XX-setup.exe**).\n\n## Installing\n\nIf you pick the 7z archive package, extract it in a folder that doesn't require administrator permissions such as *C:\\Users\\yourusername\\RetroArch* or any other drive. Don't extract it to *Program Files* or your Windows folder. This could case some issues.\n\n## Updating\n\nYou can update the installation by downloading the latest **20XX-XX-XX-RetroArch.7z** package and overwriting the executable.\n\nIf you pick the installer package we recommend to use the default location, follow the installation steps and you should be good to go. You can update the installer version by downloading the latest version and re-running the installer.\n\n| :warning: WARNING |\n|:---------------------------|\n| If you were running a stable release prior to 1.4.0. you will need to update the system libraries. You can do so by downloading the full **RetroArch.7z** package or **redist.7z** from the download locations. |\n\n\n## Starting RetroArch\n\nOn the first run you will be greeted by this screen:\n\n\n\nFrom here you can launch content, change settings and build up your content collection.\n\n### Keyboard Controls\n\nThe RetroArch user interface is designed with gamepad navigation in mind but it also features robust keyboard and mouse support. Learn more about keyboard input at [Input and Controls](input-and-controls.md).\n\n### Gamepad Controls\n\nXINPUT controllers should work out of the box. If the controller can be autoconfigured the OSD will inform you of the autoconfiguration event. We also include autoconf profiles for many popular controllers. If your controller doesn't auto configure you can follow this procedure:\n\n\n\n- Navigate to **Settings**\n- Navigate to **Input**\n- Navigate to **Input User 1 Binds**\n- Select **User 1 Bind All**\n- Press the buttons as required\n\n| :warning: TIP |\n|:---------------------------|\n| If you have several different controller types you may want to use the **User 1 Save Autoconfig** followed by **User 1 Bind Default All** options after binding in order to achieve hotplug functionality | \n\n### Directory Configuration\n\nConfiguring directories is an important aspect to get the best RetroArch experience possible.\nTo configure the directories follow these steps:\n\n- Navigate to **Settings**\n- Navigate to **Directory**\n- Select the directory you want to changed\n- Navigate to the desired location\n\nYou should always configure the following paths:\n\n- System Directory for *system files*\n- Savefile Directory for *save files*\n- Savestate Directory *save state files*\n- Browser Directory for *your content*\n\n| :warning: TIP |\n|:---------------------------|\n| The **Browser Directory** is used as a startup location which allows easy access to your content library. | \n\n### Installing Cores\n\nRetroArch requires cores to run any content. You can download cores directly from RetroArch's interface by following this procedure:\n\n\n\n- Navigate to **Online Updater**\n- Navigate to **Select Core Downloader**\n- Select the core you want to download\n\n### Running Content\n\nAfter you have installed one or more cores you can run your content following this procedure:\n\n- Navigate to **Load Content**\n- Browse to the folder that contains the content you want to run\n- Select the content that you want to run\n- If you have more than one compatible core you will be asked to select the core you want to use for that purpose\n\n\n\n| :warning: TIP |\n|:---------------------------|\n| By default loading content will trigger a content scan. If your content matches with any of our databases it will be added to a playlist for easy access. You can find the playlists by navigating to the right of the main menu. Every content you launch is added to a history playlist that you can use to load it again quickly at any time | \n \n\n## Glossary\n\nHere is the list of terms in a LibRetro, RetroArch or platform subject, field, or area of usage, with accompanying definitions.\n\n\n`frontend`\n\n: A frontend is a program designed to run libretro cores such as Kodi's RetroPlayer, RetroArch, Phoenix, Minir\n\n`core`\n\n: A core is a program that has been ported to the libretro API and runs inside a libretro frontend\n\n`content`\n\n: Content can be a game, an image, a video, an audio file that is executed by a core. In most cases contents are the ROMs of an emulated platform\n\n`retropad`\n\n: RetroPad is libretro’s input abstraction controller, it’s the interface between the physical controller and the core inputs\t\n\n`save files`\n\n: Save files are saves that are made from within a game, usually cross platform and should work across emulators in most cases\n\t\n`save states`\n\n: Save states are snapshots of the content memory at a particular moment, these are not always cross platform and most certainly won’t work on a different emulator than the one used to create them\n\n`system files`\n\n: Additional files that might or not be part of the romset that might be needed to get some content to work (usually referred to by the BIOS term)\n\n`autoconf`\n\n: A configuration file that has button definitions for a particular gamepad\n"
},
{
"path": "docs/guides/kms-mode.md",
"content": "## Purpose\nKMS (Kernel Mode Setting) mode is a feature where RetroArch can use the OpenGL or Vulkan driver outside Xorg/Wayland, running straight in the virtual terminal. It is a fairly obscure feature, but very powerful in a console scenario.\n\n## Requirements\nTo use KMS mode you need:\n\n- MESA version 9.0+ (including dev package)\n- Use of Vulkan requires KHR_Display extension, present from Mesa 21 onwards\n- libgbm 9.0+, libdrm (including dev package)\n- Open source driver which supports KMS\n- ./configure with flags \"--enable-kms\" and \"--enable-egl\"\n\nAfter compiling RetroArch, you should see this when running `retroarch --features`:\n\n\tKMS:\n\t\tKMS/EGL context support: yes\n\nIf KMS mode is working correctly, RetroArch should start up without any desktop environment as well, straight from the terminal."
},
{
"path": "docs/guides/latency.md",
"content": "# Latency\n\nRetroArch is capable of next-frame responsive time. This means that there should be no nearly no perceivable difference in terms of input latency from real hardware, FPGA/clone or original hardware.\n\nOn top of all that, there are various settings you can configure to optimize the results even more.\n\n## Next-frame response time indistinguishable from real hardware\n\nRetroArch is truly in a league of its own when it comes to input responsiveness, and it keeps confounding even us here at Libretro. Several independent researchers did their own research on RetroArch's latency and came away being quite blown away by the results, completely shattering several long-held myths that up until now had been accepted as gospel in emulation circles:\nThe hierarchy for loading is:\n\n* That emulation will always have an implicit 3 to 5 frames of input lag, and that therefore FPGA-based hardware will always hold a distinct advantage over software-based emulation.\n* That there's nothing one can do to avoid this\n\nRetroArch shatters these myths. It has been demonstrated by independent researchers that a next-frame response time (≤16ms!) achievable with RetroArch! This means zero frames of input lag is achievable, indistinguishable from real hardware.\n\nWhoever told you that input lag was a given with emulators and that you needed FPGA in order to avoid this latency, should get him/herself acquainted with RetroArch. Post-RetroArch, latency indistinguishable from real hardware is perfectly possible!\n\nCheck out people's findings here on our forum and participate, don't just take our word for it! Link [here](https://forums.libretro.com/t/an-input-lag-investigation/4407/534).\n\n\n\n\"With Pitfall, I witnessed a response on the very next frame. In the video shown to the left, you can clearly see me hit the button near the end of one frame, and on the next, Harry jumps! Essentially no way to improve compared to original hardware. Pack it up. We’re done here\"\n\n\"Ever since I tried Retroarch for the first time there was no doubt in my mind that it was the future. It overcame the crippling input lag that plagues many stand alone emulators.\"\n\n\"[With RetroArch], it is possible to get to the same input lag as the original hardware, which may be as little as whatever is left of the current frame. At 60fps (16ms) this could be anywhere from 0ms to 16ms, which averages out to about 8ms. There is no room for improvement above that as far as the software is concerned.\"\n\n## Configurable latency mitigation tools\n\nRetroArch provides you with all the tools you need to combat latency in your games. This includes options such as:\n\n* Frame Delay\n* Synchronization Fences (GPU Hard Sync)\n* Video drivers for new graphics technology APIs like Vulkan, which can drive latency down even further.\n* Maximum amount of configurable swap chains.\n * Can be set from 1 to 3 depending on your video driver, your GPU, and the video context driver that is being used by RetroArch.\n * Vulkan supports this feature natively, but video drivers might not implement setting lower max swapchains.\n* You can choose between different audio drivers which can have an effect on overall perceived latency\n * Windows: You can choose between WASAPI (available since Windows 7), XAudio (available since Windows XP), and DirectSound.\n * Linux: Depending on the build, you can choose between ALSA, PulseAudio, OSS, and audio servers like JACK.\n* Adjustable audio buffering for lower/higher audio latency\n* Adjustable audio resampler quality\n* Several video context drivers to choose from\n * Linux: Some video driver contexts like DRM/KMS on Linux allow for granular swapchain control, which should allow for an even better gameplay experience. It also allows you to boot RetroArch without an active X Server running (assuming your video driver supports this).\n * Wayland is supported on Linux. This is an advanced display server that is being increasingly pushed as a replacement for X11. Note that whether or not you can use this depends on your video driver.\n* Ability to turn off window compositing for better latency results (NOTE: This is only possible on Windows 7, Microsoft disallows this on Windows 8 and later)\n* Configurable swap interval"
},
{
"path": "docs/guides/launch-content.md",
"content": "# Launching Content\n\n!!! warning\n This guide assumes that you already have obtained the content legally, RetroArch does not provide users with copyright content.\n\nYou should already have both cores and content, now we just have to launch it!\n\n### Launching\n\nGo back to the Main Menu and select **Load content**. From the last guide you should have already set the default start directory, if this is the case choose **Start directory**. If you haven't set it or you are choosing other content (such as downloaded content) select the relevant option.\n\nFrom here it is up to you to navigate your game folder and find the game you want to try, select it once you have.\n\n!!! note\n If the game is zipped you will be presented with two options. *Browse archive* will allow you to open it and select the contents. While *Load archive* will try and load the archive as an image. In most cases if you simply just compressed the image, either option will do.\n\n!!! note\n RetroArch will automatically choose the appropriate core for your content based on file extension. However if two or more cores use the same file extension, it will ask you to choose the core. You should always choose the platform the game was suppose to run on.\n\n### Playing\n\nWell done, you have finally launched your first game with RetroArch.\n\nIf you setup your controller take note of the RetroPad concept. With this you will not have to setup a controller for each console, instead the RetroPad will adapt depending on what console your playing.\n\nTo return to RetroArch, press F1 or the RetroArch button on mobile. This will bring up the menu where you can change core settings, or otherwise configure the current content, or close it.\n\n!!! warning\n On PC's pressing *Esc* twice will close RetroArch without saving.\n"
},
{
"path": "docs/guides/led-drivers.md",
"content": "# LED drivers for RetroArch\n\nLibretro cores can have extra on/off outputs, that provide simple visual feedback such as illuminated Start buttons for arcade or disk activity happening inside the emulated system.\n\nAvailable LED drivers:\n * `overlay` - control individual elements of a RetroArch overlay\n * `rpi` - control physical LEDs connected to GPIO pins\n * `keyboard` - control keyboard state LEDs\n * `sysled` - control built-in LEDs under Linux\n\n## Configuration\n\nIn case of all drivers, the LED driver type and the individual LED mapping needs to be added to `retroarch.cfg`. At present, this is not possible via the RetroArch menu system, the configuration file needs to be edited directly.\nNote: first LED is referred as `led1_map` in configuration file, but indexing starts from 0 on core side. There is no common mapping of LEDs for cores, but some of them use first LED for indicating power status, and second for disk drive activity.\n\n## Overlay driver\nFor overlay driver to have effect, make sure to activate a compatible overlay. The driver will set the visibility of `overlay0_desc0_overlay`, `overlay0_desc1_overlay` etc. items according to the input from the core.\n\n#### Example: overlay driver with 2 LEDs\n led_driver = \"overlay\"\n led1_map = \"0\"\n led2_map = \"1\"\n\n## RPi driver\nThe RPi driver will set the specified GPIO pins to `out` direction and then set the value via filesystem entry `/sys/class/gpio/gpio%d/value`. This entry is present typically on Raspberry Pi single board computers.\n\n#### Example: RPi driver with first LED assigned for GPIO pin 18\n led_driver = \"rpi\"\n led1_map = \"18\"\n\n## Keyboard driver\nThe keyboard driver will utilize the keyboard Num Lock (0), Caps Lock (1), and Scroll Lock (2) LEDs. It works under Windows, and X11 (since RetroArch 1.9.1). Note: this driver does not work under Linux Wayland or KMS mode, and in case of X11, access to Num Lock and Caps Lock may be limited, check [this answer]( https://unix.stackexchange.com/questions/179286/change-the-status-of-the-keyboard-leds-from-within-an-x-session-without-root-a).\n\n#### Example: keyboard driver with second LED assigned for Scroll Lock, while leaving first LED explicitly unassigned.\n led_driver = \"keyboard\"\n led1_map = \"-1\"\n led2_map = \"2\"\n\n## Sysled driver\nThe sysled driver will set the brightness of supported mainboard LEDs via filesystem entry `/sys/class/leds/led%d/brightness`. This entry is present typically on Raspberry Pi single board computers, where led0 is the green LED usually indicating MMC card activity, and led1 is the red LED.\nNote that these filesystem entries may be writable by root only, enable access with e.g. `sudo chmod a+w /sys/class/leds/led*/trigger /sys/class/leds/led*/brightness` before running RetroArch. This driver was added in RetroArch 1.15.0.\n\n#### Example: sysled driver with first led output from core assigned to led1, second to led0\n led_driver = \"sysled\"\n led1_map = \"1\"\n led2_map = \"0\"\n"
},
{
"path": "docs/guides/libretro-overlays.md",
"content": "# What is a Libretro Overlay?\n\nImagine a libretro core playing a game or video on your screen. Now imagine attaching a clear piece of glass over your screen that you can draw on, attach touchscreen buttons to, or use to display an image of a vintage CRT television in your old bedroom.\n\nThat layer of glass would be the **overlay** -- a virtual 'layer' between you and the video signal.\n\n\n\n### What's the difference between an Overlay and a Bezel?\n\nWith Libretro, **bezels** are one subtype of **overlay**. If you have experience with game emulators, you may be familiar with the term Bezel, which describes images that wrap around the emulated screen. Often this is to display an image of the original arcade cabinet or game console being emulated.\n\n[dan2hos demonstrated this bezel-style overlay for Sonic 2 in the libretro forums](https://forums.libretro.com/t/libretro-classic-tv-overlay-border/3820:\n;\n\n### What's the difference between an Overlay and a Shader?\n\nShaders manipulate the video image being displayed by the Libretro core, so often the two are used in tandem. For example, you might want to use **shaders** to manipulate a Sega Genesis emulator core's video output to look just like a vintage Trinitron CRT television. Then you might use an **overlay** to wrap an image of that exact television around the emulated video.\n\nAnother way that **shaders** and **overlays** are used together is to 1) use a **shader** to enhance dithered or low resolution images from a handheld emulator core as they are displayed on a modern HD smartphone and then 2) use an **overlay** to add touchscreen buttons to that emulator.\n\n# Overlay Touchscreen Functionality\n\nOverlay touch functionality allows users to create an input interface that is mouse or touch oriented regardless of whether the original system or libretro core was built for these forms of input. The overlay images are displayed with transparency over the regular game image, and the user is able to trigger input by pressing on designated parts of the overlay.\n\nOverlays are built from a collection of images and a text configuration file which makes it straightforward to change both the look and functionality of this overlay. Learn more about this aspect of Libretro's Overlay tech over in the Overlay Spec.\n\nAn example of a touchscreen overlay, demonstrated with the Dinothawr core:\n\n\n# Activating an Overlay via the GUI\n\nOverlays require at least one image (`.png`) and a configuration file (`.cfg`) in order to activate them.\n\n**Notes:**\n- The configuration file should have the exact same name as the first image file (the only image file if your overlay only has one image).\n- Do not use spaces in the filename.\n- These files should be placed together in the libretro `overlay` folder.\n\nIn order to activate an overlay, go to the RetroArch `Settings` menu. Find the `Onscreen Display` submenu. From this menu you can activate the Overlay system and select which overlay file to display.\n\n# Setting Up Per-Core Overlays in RetroArch\n\n## Per-Core Overlays via the RetroArch GUI\n\n1. Go to the `Settings` menu and find the `User Interface` submenu and enable `Show Advanced Settings`\n2. Go to the `Settings` menu and find the `Configuration` submenu. Make sure that `Use Content-Specific Core Options If Available` and `Load Override Files Automatically` are enabled.\n3. Set up the Overlay according to your preferences.\n3. Load a game. Open the RA \"Quick Menu\" and then use the GUI to set up the Overlay according to your preferences.\n4. From the Quick Menu, select `Save Core Overrides`.\n\n## Per-Core Overlays via RetroArch CFG Files\n\nTo be written\n\n# Setting Up Per-Game Overlays in Retroarch\n\n## Per-Game Overlays via the RetroArch GUI\n\n1. Go to the `Settings` menu and find the `User Interface` submenu and enable `Show Advanced Settings`\n2. Go to the `Settings` menu and find the `Configuration` submenu. Make sure that `Use Content-Specific Core Options If Available` and `Load Override Files Automatically` are enabled.\n3. Load a game. Open the RA \"Quick Menu\" and then use the GUI to set up the Overlay according to your preferences.\n4. From the Quick Menu, select `Save Game Overrides`.\n\n## Per-Game Overlays via RetroArch CFG Files\n\nThe first time you set up a per-game overlay:\n1. Ensure that these two options are set in retroarch.cfg: `game_specific_options = \"true\"` and `auto_overrides_enable = \"true\"`\n2. The first time you load content with these settings, RetroArch will create a settings override directory structure and a `.opts` configuration file which you can use as a template to correctly name and locate your overlay configuration files.\n3. If the automatically-generated file is named `Dinothawr.opts`, you would name your per-game override `Dinothawr.cfg`.\n3. The new RetroArch `.cfg` should only include the options you want to change for this single game.\n\n#### Overlay options that can be changed include:\n- `input_overlay` - Path to the correct overlay\n- `input_overlay_enable`\n- `input_overlay_opacity`\n- `input_overlay_scale`\n- `input_overlay_enable_autopreferred`\n- `input_overlay_show_physical_inputs`\n- `input_overlay_hide_in_menu`\n\n**Note:** You can change more than just the overlay by specific any content-specific options -- for example you might also decide to set `video_shader_enable = \"true\"` and `video_shader = \"/usr/share/libretro/shaders/classic-crt-television.slang\"`, etc.\n\n# Where can one find Overlays to use?\n\n- Interactive overlays are managed within: https://github.com/libretro/common-overlays\n- Decorative border overlays are managed within: https://github.com/libretro/overlay-borders\n\n# More about Overlays\n\n- Visit the official [Libretro Overlays Forum](https://forums.libretro.com/c/retroarch-additions/retroarch-overlays)\n"
},
{
"path": "docs/guides/memorymonitoring.md",
"content": "# Memory Monitoring in libretro\n\nThere are many reasons someone might want to peek into the memory contents of a core to see what is happening at a given memory address at a given time. The most common use is for awarding achievements, like those from [RetroAchievements](retroachievements.md), but it can also be used for speedrunning/streaming assistant programs, machine learning applications, and more.\n\nCores that support memory monitoring can typically fetch and award [RetroAchievements](retroachievements.md), but if a core is not specifically mentioned on the [RetroAchievements](retroachievements.md) team's [official list of supported cores](https://docs.retroachievements.org/general/emulator-support-and-issues.html), there may be issues with some achievement-awarding logic not functioning properly or other unexpected behavior. Unsupported cores may be excluded from [RetroAchievements](retroachievements.md)' \"hardcore\" mode and leaderboards, as well. If you need to use an unsupported core to interact with [RetroAchievements](retroachievements.md) for whatever reason (e.g., on platforms where no officially supported core is available), please do not bother them with tickets or manual unlock requests, which will be closed without investigation. They are offering a free service through volunteer labor, and we should respect their time.\n\nTo be clear: the cores listed on this page support libretro's memory monitoring functionality but may or may not be supported by the [RetroAchievements](retroachievements.md) team. Please consult their [official list of supported cores](https://docs.retroachievements.org/general/emulator-support-and-issues.html) before requesting support from them.\n\n## **Cores Compatibility**\n\n### Arcade (various manufacturers)\n\n#### Arcade\n\n| Core | Supported | Notes |\n|----------------------------------------------------|:---------:|:------|\n| [FinalBurn Neo](https://github.com/libretro/FBNeo) | ✔ | AES bios is required for many Neo Geo achievements. AES Asia (neo-epo.bin) is generally English. |\n| [MAME](https://github.com/libretro/mame) | ✕ | Support is not likely to ever be possible. The same is true for all MAME variants. |\n\n### Apple\n\n#### Apple II\n\n| Core | Supported | Notes |\n|-------------------------------------------------|:---------:|:------|\n| [AppleWin](https://github.com/audetto/AppleWin) | ✕ | |\n\n#### Arduboy\n\n| Core | Supported | Notes |\n|-------------------------------------------------|:---------:|:------|\n| [Arduous](https://github.com/Arduboy/Arduboy) | ✔ | RetroArch 1.10.2 or higher required |\n\n### Atari\n\n#### Lynx\n\n| Core | Supported | Notes |\n|--------------------------------------------------|:---------:|:------|\n| [Gearlynx](https://github.com/drhelius/Gearlynx) | ✔ | |\n\n#### 2600\n\n| Core | Supported | Notes |\n|----------------------------------------------------------------|:---------:|:------|\n| [Stella](https://github.com/libretro/stella-libretro) | ✔ | |\n| [Stella 2014](https://github.com/libretro/stella2014-libretro) | ✕ | |\n\n#### 7800\n\n| Core | Supported | Notes |\n|-------------------------------------------------------------|:---------:|:------|\n| [ProSystem](https://github.com/libretro/prosystem-libretro) | ✔ | |\n\n#### Jaguar\n\n| Core | Supported | Notes |\n|----------------------------------------------------------------------|:---------:|:------|\n| [Virtual Jaguar](https://github.com/libretro/virtualjaguar-libretro) | ✔ | Due to vast core issues, support of this system is extremely limited. |\n\n#### Lynx\n\n| Core | Supported | Notes |\n|------------------------------------------------------------------|:---------:|:------|\n| [Beetle Lynx](https://github.com/libretro/beetle-lynx-libretro) | ✔ | |\n| [Handy](https://github.com/libretro/libretro-handy) | ✔ | |\n| [Holani](https://github.com/LLeny/holani-retro) | ✔ | |\n\n### Bandai\n\n#### Wonderswan / Wonderswan Color\n\n| Core | Supported | Notes |\n|-------------------------------------------------------------------|:---------:|:------|\n| [Beetle Cygne](https://github.com/libretro/beetle-wswan-libretro) | ✔ | |\n\n### Coleco\n\n#### ColecoVision\n\n| Core | Supported | Notes |\n|---------------------------------------------------------|:---------:|:------|\n| [blueMSX](https://github.com/libretro/blueMSX-libretro) | ✔ | |\n| [FinalBurn Neo](https://github.com/libretro/FBNeo) | ✕ | |\n| [Gearcoleco](https://github.com/drhelius/Gearcoleco) | ✔ | |\n| [JollyCV](https://github.com/libretro/jollycv) | ✔ | |\n| [SMS Plus GX](https://github.com/libretro/smsplus-gx) | ✕ | |\n\n### GCE\n\n#### Vectrex\n\n| Core | Supported | Notes |\n|---------------------------------------------------|:---------:|:------|\n| [vecx](https://github.com/libretro/libretro-vecx) | ✔ | |\n\n### Magnavox\n\n#### Odyssey 2\n\n| Core | Supported | Notes |\n|---------------------------------------------------|:---------:|:------|\n| [o2em](https://github.com/libretro/libretro-o2em) | ✔ | |\n\n### Mattel\n\n#### Intellivision\n\n| Core | Supported | Notes |\n|--------------------------------------------------|:---------:|:------|\n| [FreeIntV](https://github.com/libretro/FreeIntv) | ✔ | Controls involve an on-screen overlay that may not be easy to use for all games. |\n\n### Microsoft\n\n#### MSX / MSX2\n\n| Core | Supported | Notes |\n|---------------------------------------------------------|:---------:|:------|\n| [blueMSX](https://github.com/libretro/blueMSX-libretro) | ✔ | |\n| [fMSX](https://github.com/libretro/fmsx-libretro) | ✕ | Some games may require mapper adjustment in core options to run. |\n| [FinalBurn Neo](https://github.com/libretro/FBNeo) | ✕ | MSX2 is not supported. |\n\n### NEC\n\n#### PC Engine - TurboGrafx-16 / PC Engine CD - TurboGrafx-CD\n\n| Core | Supported | Notes |\n|-----------------------------------------------------------------------------|:---------:|:------|\n| [Beetle PCE FAST](https://github.com/libretro/beetle-pce-fast-libretro) | ✔ | Highest speed. Does not support SuperGrafx games. |\n| [Beetle SuperGrafx](https://github.com/libretro/beetle-supergrafx-libretro) | ✔ | High speed. Supports SuperGrafx games. |\n| [Beetle PCE](https://github.com/libretro/beetle-pce-libretro) | ✕ | |\n| [Geargrafx](https://github.com/drhelius/Geargrafx) | ✔ | |\n| [FinalBurn Neo](https://github.com/libretro/FBNeo) | ✕ | |\n\n#### PC-FX\n\n| Core | Supported | Notes |\n|------------------------------------------------------------------|:---------:|:------|\n| [Beetle PC-FX](https://github.com/libretro/beetle-pcfx-libretro) | ✔ | |\n\n#### PC-8000 / PC-8800\n\n| Core | Supported | Notes |\n|---------------------------------------------------------|:---------:|:------|\n| [QUASI88](https://github.com/libretro/quasi88-libretro) | ✕ | |\n\n### Nintendo\n\n#### Nintendo DS\n\n| Core | Supported | Notes |\n|---------------------------------------------------------|:---------:|:------|\n| [MelonDS 2021](https://github.com/libretro/melonDS) | ✔ | External BIOS recommended, but no longer required. RetroArch 1.9.14 nightly or newer required for hashing to work. DSi mode currently is not supported for achievements. |\n| [MelonDS DS](https://github.com/JesseTG/melonds-ds) | ✔ | Achievements supported for DS and DSi mode. |\n| [DeSmuME](https://github.com/libretro/desmume) | ✔ | External BIOS recommended, needs to be enabled in core options |\n| [DeSmuME 2015](https://github.com/libretro/desmume2015) | ✔ | |\n\n#### Game Boy / Game Boy Color\n\n| Core | Supported | Notes |\n|-----------------------------------------------------------|:---------:|:------|\n| [Gambatte](https://github.com/libretro/gambatte-libretro) | ✔ | Preferred core. |\n| [SameBoy](https://github.com/libretro/SameBoy) | ✕ | |\n| [Gearboy](https://github.com/drhelius/Gearboy) | ✔ | |\n| [mGBA](https://github.com/libretro/mgba) | ✔ | Robust feature set. Currently the only core with GB Camera support. |\n| [VBA-M](https://github.com/libretro/vbam-libretro) | ✔ | Currently the only core with gyro support via analog sticks |\n| [Mesen-S](https://github.com/SourMesen/Mesen-S) | ✕ | |\n| [Emux GB](https://github.com/libretro/emux) | ✕ | |\n| [TGB Dual](https://github.com/libretro/tgbdual-libretro) | ✕ | |\n| [bsnes](https://github.com/libretro/bsnes-libretro) | ✕ | SGB only |\n| [bsnes-hd](https://github.com/DerKoun/bsnes-hd) | ✕ | SGB only |\n| [higan Accuracy](https://gitlab.com/higan/higan) | ✕ | SGB only, [Achievement support isn't going to be added](https://forums.libretro.com/t/is-higan-105-accuracy-supposed-to-be-slow-on-a-3-ghz-ivy-bridge-i7/13405/7?u=esoptron) |\n| [nSide Balanced](https://github.com/libretro/nSide) | ✕ | SGB only, [Achievement support isn't going to be added](https://forums.libretro.com/t/is-higan-105-accuracy-supposed-to-be-slow-on-a-3-ghz-ivy-bridge-i7/13405/7?u=esoptron) |\n\n#### Game Boy Advance\n\n| Core | Supported | Notes |\n|---------------------------------------------------------------|:---------:|:------|\n| [mGBA](https://github.com/libretro/mgba) | ✔ | |\n| [VBA-M](https://github.com/libretro/vbam-libretro) | ✔ | |\n| [VBA Next](https://github.com/libretro/vba-next) | ✔ | |\n| [gpSP](https://github.com/libretro/gpsp) | ✕ | Very high speed, but has not been thoroughly tested with achievements. A few games will fail to start or crash frequently. Please prefer other cores when device performance allows. |\n| [Beetle GBA](https://github.com/libretro/beetle-gba-libretro) | ✔ | Experimental core, should not be used without good reason. |\n| [Meteor](https://github.com/libretro/meteor-libretro) | ✕ | |\n\n#### NES\n\n| Core | Supported | Notes |\n|-------------------------------------------------------|:---------:|:------|\n| [Mesen](https://github.com/SourMesen/Mesen) | ✔ | Supports FDS, very high accuracy, relatively high performance cost |\n| [FCEUmm](https://github.com/libretro/libretro-fceumm) | ✔ | Supports FDS |\n| [QuickNES](https://github.com/libretro/QuickNES_Core) | ✔ | |\n| [Nestopia](https://github.com/libretro/nestopia) | ✕ | [**Achievements are not fully supported yet**](https://github.com/libretro/docs/pull/10) |\n| [bnes](https://github.com/libretro/bnes-libretro) | ✕ | |\n| [Emux NES](https://github.com/libretro/emux) | ✕ | |\n| [FinalBurn Neo](https://github.com/libretro/FBNeo) | ✕ | |\n\n#### Nintendo 64\n\n| Core | Supported | Notes |\n|----------------------------------------------------------------------|:---------:|:------|\n| [Mupen64Plus-Next](https://github.com/libretro/mupen64plus-libretro) | ✔ | Preferred core. Supports greater graphic customization and upscaling. |\n| [ParaLLEl N64](https://github.com/libretro/parallel-n64) | ✔ | Supports 64DD games. Can play -some- hacks reliant on low accuracy via alternate plugins. |\n\n#### Pokemon Mini\n\n| Core | Supported | Notes |\n|--------------------------------------------------|:---------:|:------|\n| [PokeMini](https://github.com/libretro/PokeMini) | ✔ | |\n\n#### SNES\n\n| Core | Supported | Notes |\n|------------------------------------------------------------------------------|:---------:|:------|\n| [Snes9x](https://github.com/libretro/snes9x) | ✔ | Preferred core. High speed, moderate accuracy. Actively maintained. |\n| [Snes9x 2010](https://github.com/libretro/snes9x2010) | ✕ | Has many issues with achievements, unlikely to ever be supported. |\n| [Snes9x 2005 Plus](https://github.com/libretro/snes9x2005) | ✕ | |\n| [Snes9x 2005](https://github.com/libretro/snes9x2005) | ✕ | |\n| [Snes9x 2002](https://github.com/libretro/snes9x2002) | ✕ | |\n| [Mesen-S](https://github.com/SourMesen/Mesen-S) | ✔ | High accuracy, high performance cost. |\n| [Beetle Supafaust](https://github.com/libretro/supafaust) | ✕ | Only SRAM is exposed currently. |\n| [Beetle bsnes](https://github.com/libretro/beetle-bsnes-libretro) | ✕ | |\n| [bsnes](https://github.com/libretro/bsnes-libretro) | ✕ | |\n| [bsnes-hd](https://github.com/DerKoun/bsnes-hd) | ✕ | |\n| [bsnes-mercury Accuracy](https://github.com/libretro/bsnes-mercury) | ✕ | [SRAM is not exposed currently](https://github.com/libretro/bsnes-mercury/issues/88) |\n| [bsnes-mercury Balanced](https://github.com/libretro/bsnes-mercury) | ✕ | [SRAM is not exposed currently](https://github.com/libretro/bsnes-mercury/issues/88) |\n| [bsnes-mercury Performance](https://github.com/libretro/bsnes-mercury) | ✕ | [SRAM is not exposed currently](https://github.com/libretro/bsnes-mercury/issues/88) |\n| [bsnes 2014 Accuracy](https://github.com/libretro/bsnes-libretro) | ✕ | |\n| [bsnes 2014 Balanced](https://github.com/libretro/bsnes-libretro) | ✕ | |\n| [bsnes 2014 Performance](https://github.com/libretro/bsnes-libretro) | ✕ | |\n| [bsnes C++98 (v085)](https://github.com/libretro/bsnes-libretro-cplusplus98) | ✕ | Has some color rendering issues |\n| [higan Accuracy](https://gitlab.com/higan/higan) | ✕ | [Achievement support isn't going to be added](https://forums.libretro.com/t/is-higan-105-accuracy-supposed-to-be-slow-on-a-3-ghz-ivy-bridge-i7/13405/7?u=esoptron) |\n| [nSide Balanced](https://github.com/libretro/nSide) | ✕ | [Achievement support isn't going to be added](https://forums.libretro.com/t/is-higan-105-accuracy-supposed-to-be-slow-on-a-3-ghz-ivy-bridge-i7/13405/7?u=esoptron) |\n\n#### Virtual Boy\n\n| Core | Supported | Notes |\n|-------------------------------------------------------------|:---------:|:------|\n| [Beetle VB](https://github.com/libretro/beetle-vb-libretro) | ✔ | |\n\n### RPG Maker\n\n| Core | Supported | Notes |\n|------------------------------------------------|:---------:|:------|\n| [EasyRPG](https://github.com/libretro/easyrpg-libretro) | ✕ | |\n| [mkxp-z](https://github.com/mkxp-z/mkxp-z) | ✔ | Only supported on little-endian devices. |\n\n### Sega\n\n#### Dreamcast/Naomi\n\n| Core | Supported | Notes |\n|----------------------------------------------------|:---------:|:------|\n| [Flycast](https://github.com/libretro/flycast) | ✔ | Must disable threaded rendering to use save states. RetroArch 1.10.1 or higher required. |\n\n#### Master System / MegaDrive - Genesis\n\n| Core | Supported | Notes |\n|----------------------------------------------------------------|:---------:|:------|\n| [Genesis Plus GX](https://github.com/libretro/Genesis-Plus-GX) | ✔ | Preferred core. |\n| [BlastEm](https://github.com/libretro/blastem) | ✕ | Cycle accurate. Genesis/MegaDrive only. Has known issues with game RAM and is incompatible with achievements. |\n| [ClownMDEmu](https://github.com/Clownacy/clownmdemu-libretro) | ✔ | |\n| [Picodrive](https://github.com/libretro/picodrive) | ✔ | |\n| [SMS Plus GX](https://github.com/libretro/smsplus-gx) | ✔ | Master System only |\n| [Gearsystem](https://github.com/drhelius/Gearsystem) | ✔ | Master System only |\n| [Emux SMS](https://github.com/libretro/emux) | ✕ | |\n| [FinalBurn Neo](https://github.com/libretro/FBNeo) | ✕ | |\n\n#### 32X / 32X CD\n\n| Core | Supported | Notes |\n|----------------------------------------------------|:---------:|:------|\n| [Picodrive](https://github.com/libretro/picodrive) | ✔ | Emulation quality can be dodgy. |\n\n#### Game Gear\n\n| Core | Supported | Notes |\n|----------------------------------------------------------------|:---------:|:------|\n| [Genesis Plus GX](https://github.com/libretro/Genesis-Plus-GX) | ✔ | |\n| [SMS Plus GX](https://github.com/libretro/smsplus-gx) | ✕ | |\n| [Gearsystem](https://github.com/drhelius/Gearsystem) | ✔ | |\n| [FinalBurn Neo](https://github.com/libretro/FBNeo) | ✕ | |\n\n#### SG-1000\n\n| Core | Supported | Notes |\n|----------------------------------------------------------------|:---------:|:------|\n| [Genesis Plus GX](https://github.com/libretro/Genesis-Plus-GX) | ✔ | Preferred core. |\n| [SMS Plus GX](https://github.com/libretro/smsplus-gx) | ✕ | |\n| [Gearsystem](https://github.com/drhelius/Gearsystem) | ✕ | |\n| [blueMSX](https://github.com/libretro/blueMSX-libretro) | ✔ | |\n| [FinalBurn Neo](https://github.com/libretro/FBNeo) | ✕ | |\n\n#### Sega CD - Mega-CD\n\n| Core | Supported | Notes |\n|----------------------------------------------------------------|:---------:|:------|\n| [Genesis Plus GX](https://github.com/libretro/Genesis-Plus-GX) | ✔ | |\n| [ClownMDEmu](https://github.com/Clownacy/clownmdemu-libretro) | ✔ | |\n| [Picodrive](https://github.com/libretro/picodrive) | ✔ | |\n\n#### Saturn\n\n| Core | Supported | Notes |\n|-----------------------------------------------------------------------|:---------:|:------|\n| [Beetle Saturn](https://github.com/libretro/beetle-saturn-libretro) | ✔ | Preferred core. High accuracy, but low speed |\n| [Yabause](https://github.com/libretro/yabause/tree/master) | ✕ | Technically supported, but use at your own risk. Higher speed |\n| [Kronos](https://github.com/libretro/yabause/tree/kronos) | ✕ | Technically supported, but use at your own risk. High speed, supports graphic enhancements, but requires a GPU that supports at least OpenGL 4.2 |\n| [YabaSanshiro](https://github.com/libretro/yabause/tree/yabasanshiro) | ✕ | |\n\n### SNK\n\n#### Neo Geo Pocket / Neo Geo Pocket Color\n\n| Core | Supported | Notes |\n|------------------------------------------------------------------|:---------:|:------|\n| [Beetle NeoPop](https://github.com/libretro/beetle-ngp-libretro) | ✔ | |\n| [RACE](https://github.com/libretro/RACE) | ✕ | |\n| [FinalBurn Neo](https://github.com/libretro/FBNeo) | ✕ | |\n\n### Sony\n\n#### PlayStation\n\n| Core | Supported | Notes |\n|------------------------------------------------------------------|:---------:|:------|\n| [Beetle PSX HW](https://github.com/libretro/beetle-psx-libretro) | ✔ | Preferred core. Identical to Beetle PSX, with extra hardware features. High accuracy. |\n| [Beetle PSX](https://github.com/libretro/beetle-psx-libretro) | ✔ | Identical to Beetle PSX HW in software mode. |\n| [SwanStation](https://github.com/libretro/swanstation) | ✔ | Fork of DuckStation. Fairly high accuracy, extremely high speed. |\n| [PCSX ReARMed](https://github.com/libretro/pcsx_rearmed) | ✕ | Technically supported, but use at your own risk. Lower accuracy than Beetle PSX (HW), higher speed. |\n\n#### PlayStation Portable\n\n| Core | Supported | Notes |\n|-----------------------------------------------|:---------:|:------|\n| [PPSSPP](https://github.com/hrydgard/ppsspp/) | ✔ | RetroArch 1.9.9 or higher required |\n\n### The 3DO Company (various manufacturers)\n\n#### 3DO\n\n| Core | Supported | Notes |\n|-----------------------------------------------------|:---------:|:------|\n| [Opera](https://github.com/libretro/opera-libretro) | ✔ | If you run into issues, try switching to a different BIOS. |\n\n### WASM-4\n| Core | Supported | Notes |\n|------------------------------------------------|:---------:|:------|\n| [WASM-4](https://github.com/aduros/wasm4) | ✔ | RetroArch 1.10.2 or higher required |\n\n### Watara\n\n#### Supervision\n\n| Core | Supported | Notes |\n|------------------------------------------------|:---------:|:------|\n| [Potator](https://github.com/libretro/potator) | ✔ | RetroArch 1.9.2 or higher required |\n\n### Misc\n\n| Core | Supported | Notes |\n|------------------------------------------------|:---------:|:------|\n| [VaporSpec](https://github.com/libretro/libretro-common/tree/716bb5e7b761a3b4d44e069c84491d906d32aba0) | ✕ | |\n"
},
{
"path": "docs/guides/navigating.md",
"content": "# Navigating\n\nNavigating on RetroArch is as easy as you can imagine. Depending on the device you have, the control scheme is determined automatically. For example, if you are going to use it on a computer, the basic key combinations of the keyboard will apply. You move with the arrow keys and select with the *Enter* key, and you return with the *Backspace* key. If you plug a controller, you can also move with the D-Pad buttons.\n\nThe default [GUI](GUI) for RetroArch is [Ozone](ozone.md). While the \"skin\" may differ on certain platforms, basic layout and navigation remains broadly the same.\n\n## PC\n\nBy default the keyboard should be ready to use.\n\nUsing the *left* and *right* arrow keys, you move to a different tab, each tab will relate to an aspect of the RetroArch experience (main menu for game loading, settings for settings etc.). Once the desired tab is selected, use the *up* and *down* arrow to move to an option.\n\nTo advance in the menu press *Enter* (or *Return*). To go back to the previous menu push *Backspace*.\n\nWhilst in a game use the *F1* key to open the [Quick Menu](quick-menu.md).\n\nPushing *Esc* twice will quit the program.\n\n### Main Menu\n\n\n\nWelcome to the main menu. This is where you will launch games, download and update cores, and have access to freely available content. *Load Core*, *Load Content* and the *Online Updater* are the menu items you will probably be using the most.\n\n*See [Starting a Game](starting-a-game.md)*\n\n### Settings\n\n\n\nHere you will find all the options available to configure RetroArch, from Graphics, Input, Sound and everything else.\n\n### Favorites\n\n\n\nFavorites allow yous to maintain a short list of games for quick access. You can add content to this playlist from the [Quick Menu](quick-menu.md) or before launching it.\n\n### History\n\n\n\nRecently launched content will be added to this Playlist. The content you ran last will be at the top.\n\n### Image, Music and Video\n\nThese tabs will handle all your media. Images will contain any screenshots you've made.\n\n### Netplay\n\nRetroArch relies on peer-to-peer networking to reduce network latency and ensure the best possible experience. It allows multiplayer over the internet. The user can host or join a network gaming session, or use the Spectator mode to watch others play. RetroArch has a built-in netplay lobby.\n\n### Import content\n\n\n\nEither you scan automatically, so that any content that matches the internal database will be added to Playlists, or you scan manually, not being dependent on the database so you can freely add your content to Playlists.\n\n## Mobile\n\nThe mobile interface, [GLUI](glui.md), is more minimalistic compared to the PC's interface. Touch is the default input, although depending on device other options may be available. There are three different tabs, which can be switched at the bottom of the menu.\n\n### Main Menu\n\n\n\nThe main menu will be where you launch games, download and update cores, start or join netplay sessions and pretty much anything to do with gaming.\n\n*See [Starting a Game](starting-a-game.md)*\n\n### Playlists\n\nHandles anything to do with creating and maintaining playlists. It gives you scanning options to recognise your game collection. It also provides access to your images, music and videos.\n\n### Settings\n\nHere you will find all the options available to configure RetroArch, from Graphics, Input, Sound and everything else.\n"
},
{
"path": "docs/guides/netplay-faq.md",
"content": "\n\n\n## FAQ\n\n### What is netplay?\n\n- Netplay is RetroArch's mechanism for emulating local multiplayer over the internet, by continuously synchronizing multiple RetroArch instances running the same emulation core and same content. Currently, this approach is only for emulating classic single-system local multiplayer, not link cable play or network multiplayer modes.\n\n### Does RetroArch require port-forwarding to work?\n\n- The host needs to accept incoming connections on port TCP 55435. For most people, this requires port-forwarding: the network connections have to be forwarded from your local network access point (i.e. gateway or router) to the device running RetroArch. RetroArch requests a port-forwarding from the local network using the UPnP IGD protocol, or, you can manually create a port-forwarding rule on your network device. For those who can't forward the ports for whatever reason, please refer to the Setup Guide below.\n\n### Does it support more than two players?\n\n- Yes! See [Getting Started Guide](netplay-getting-started.md) for more details.\n\n### Does it support more than one player on one computer?\n\n- Yes! See [Multiple Controllers Guide](netplay-multiple-controllers.md) for more details.\n\n### Does it support the host spectating while a client performs as player 1?\n\n- Yes! By default, the host is always assigned Controller 1, but see [Multiple Controllers Guide](netplay-multiple-controllers.md) on how a client can 'Request Device' to be controller 1.\n\n### What do you need for RetroArch netplay to work?\n\n- Same RetroArch version, same core version, and the same exact content.\n\n### Does RetroArch support cross-platform netplay?\n\n- Yes, but your mileage may vary, particularly when endianness differs.\n\n### Which cores work for netplay?\n\n- On a technical level, every core that supports save states should work but the performance requirements may be too high for it to work in any practical level.\n\n### Does PSX / N64 / Dreamcast / GameCube / Wii / 3DS netplay work?\n\n- No, the performance requirements make the current model unsuitable for those.\n\n### Can I play GB / GBC / GBA / PSP / 3DS games with multiple people via RetroArch Netplay?\n\n- No, RetroArch's netplay is not link-cable emulation, GB, GBA, PSP netplay are currently not possible with our implementation. One notable exception is same game GB/GBC Netplay via the TGB-Dual and Sameboy cores.\n\n### Can I trade Pokémon via RetroArch Netplay?\n\n- Yes. For now, the only two cores providing this functionality are gpSP (it emulates the GBA wireless adapter) and MelonDS DS (a MelonDS fork that lets you use GTS).\n\n## Troubleshooting NetPlay\n\n### RetroArch says \"Content not found, try loading content manually\"\n\n- Either load content manually, have the content in your recent history list, or scan your content to a playlist.\n\n### As Client: \"Failed to Initialize Netplay\"\n\n\"Failed to Initialize Netplay\" often means you were not able to connect to the host. Confirm that you have the correct IP address for the host, and that the host has begun hosting a NetPlay session. Tell the host to check if their host-based firewall is allowing RetroArch to accept connections, and confirm that they have port-forwarding working.\n\n### As Host: \"Port Mapping Failed\"\n\n\"Port Mapping Failed\" probably indicates a UPnP port-forwarding problem. If you can manually configure your network gateway to forward TCP port 55435 to the local-network IP address of your RetroArch device, then you can do that. Alternatively, enable the use of a Relay Server.\n"
},
{
"path": "docs/guides/netplay-getting-started.md",
"content": "\n\n\n## Getting Started\n\n\n\n### Configure a Nickname\n\n- Navigate to **Settings**\n- Navigate to **User**\n- Select **Username**\n- Configure your preferred nickname\n\n\n\n### Host a Netplay Server\n\nIf you are going to host a game, simply configure your network parameters and \"Start Hosting\" from the netplay menu. After doing that, load the content you want to netplay and wait for players to connect.\n\n\n\n#### Check your lobby\n\nOnce you start hosting, you can check to see if your lobby is visible [at lobby.libretro.com](http://lobby.libretro.com/).\n\n!!! tip\n If your router doesn't support UPnP, you can't forward your ports, or you are just uncertain how, enable the **Use Relay Server** option. This routes both sides of the connection through one of the public proxy servers.\n\n!!! tip\n If you want to run a private game, set up a **Server Password** to prevent random people from connecting. Alternatively, you can disable the **Publicly Announce Netplay** option. The clients will need to enter your IP address or hostname directly.\n\n!!! Warning\n By default, RetroArch attempts to use UPnP to automatically port-forward (it asks the gateway to forward incoming connections on TCP 55435 to itself), but it doesn't check to see if it succeeded (i.e., if it is actually reachable on TCP 55435 from elsewhere on the internet). The lobby server doesn't verify the host's reachability either. Make sure you have correctly port-forwarded, using [this tool](http://www.yougetsignal.com/tools/open-ports/): enter your **Netplay TCP Port** once you are hosting, and it will tell you if the port is open or not. If this port is not open, people won't be able to connect to your session, and you might have to enable the use of a Relay Server.\n\n### Configure Netplay Clients\n\nYou don't need to configure anything to connect to netplay rooms. Browse to the netplay menu, Select **Refresh** and then select the room you want to connect to.\n\n\n\nYou will be asked for a password if one is required, and if you have matching content scanned or in the **Content History** it will connect right away. Otherwise, it will tell you to load the core and content manually and it will attempt to connect right away."
},
{
"path": "docs/guides/netplay-multiple-controllers.md",
"content": "\n\n\n## Assigning Controllers During Netplay\n\n### Request Device\n\n**Request Device** is an advanced network option used for NetPlay, that allows each RetroArch instance to request which device(s)/controller(s) to control. This, for example, enables four players from two instances of RetroArch, or for a connecting client to request the player 1 controller from the host. To make this option visible, RetroArch must have **Show Advanced Settings** set to _ON_.\n\n#### Turning on **Show Advanced Settings**\n\n- Navigate to **Settings**\n- Navigate to **User Interface**\n- Toggle **Show Advanced Settings** to _ON_\n\nOnce **Show Advanced Settings** is on, proceed to the **Network** configurations in the **Settings** menu (**NetPlay** menu also has a path to **Network** configurations). Scroll down through **Network** configuration, and the advanced configuration options are now visible. **Request Device #** _(where # is any number from 1 to 16)_ options will allow the computer to control any number of controllers during NetPlay.\n\n## Example Setup: Step-by-Step Guide\n\nThe following example of Super Bomberman 2 on the SNES will be used to demonstrate four players using two computers. The host will be controlling players 1 and 3, and the client will be controlling players 2 and 4.\n\n### On the Host\n\n#### Configure Host's Input Devices\n\nSet up **Input Devices** while the game is loaded:\n\n- Connect two controllers\n- Start SNES Super Bomberman 2 game\n- Set **Inputs** for each controller 1 and 2:\n - Navigate to **Settings**\n - Navigate to **Inputs**\n - Navigate to **Port 1 Binds**\n - Ensure **Device Index** is set to *_Controller Name 1_\n - Return to **Inputs** configuration menu\n - Navigate to **Port 2 Binds**\n - Ensure **Device Index** is set to *_Controller Name 2_\n - Set **Device Type** to _MultiTap_\n - _MultiTap_ is only available when SNES core is loaded. This plugs in a virtual SNES MultiTap into the SNES so more than two controllers can connect to the SNES.\n\n \\* Controller Name 1 and 2 are unique to the computer and to the controllers connected to it (_e.g._, PS4 controller shows as \"Wireless Controller \\#1\")\n\n#### Configure Host's Requested Devices\n\nSet host computer's RetroArch NetPlay to request control of the running core's devices/controllers:\n\n- Navigate to **Settings** -or- **NetPlay**\n- Navigate to **Network**\n- Set **Request Device 1** to _YES_\n- Set **Request Device 3** to _YES_\n- Ensure all other **Request Device #** are set to _NO_\n\nHost is now able to start a NetPlay game controlling controllers 1 and 3. See [Getting Started Guide](netplay-getting-started.md) for more details.\n\n\n\n### Client\n\n#### Configure Client's Input Devices\n\nSet up **Input Devices** while the game is loaded:\n\n- Connect two controllers\n- Start SNES Super Bomberman 2 game\n- Set **Inputs** for each controller 1 and 2:\n - Navigate to **Settings**\n - Navigate to **Inputs**\n - Navigate to **Port 1 Binds**\n - Ensure **Device Index** is set to *_Controller Name 1_\n - Return to **Inputs** configuration menu\n - Navigate to **Port 2 Binds**\n - Ensure **Device Index** is set to *_Controller Name 2_\n\n \\* Controller Name 1 and 2 are unique to the computer and to the controllers connected to it (_e.g._, PS4 controller shows as \"Wireless Controller \\#1\")\n\n#### Configure Client's Requested Devices\n\nSet client computer's RetroArch Netplay to request control of the running core's devices/controllers:\n\n- Navigate to **Settings** -or- **Netplay**\n- Navigate to **Network**\n- Set **Request Device 2** to _YES_\n- Set **Request Device 3** to _YES_\n- Ensure all other **Request Device #** are set to _NO_\n\nClient is now able to join the Host in a NetPlay game controlling controllers 2 and 4. See the [Getting Started Guide](netplay-getting-started.md) for more details.\n\n\n\n!!! Warning\n RetroArch **Network** typically has all **Request Device #** set to _NO_. When all **Request Device #** are set to _NO_, this allows NetPlay to automatically set host as device/controller 1. When the client connects to the host, the client will connect to device/controller 2 for the NetPlay session. Each subsequent client that connects will continue connect to the next available device/controller. For this automatic client-to-controller assignment in a RetroArch NetPlay session to work, all **Request Device #** settings must be set to _NO_. If any connecting clients request a device, automatic assignment is disabled for everyone and all clients must request a device via the settings menu.\n"
},
{
"path": "docs/guides/optimal-vsync.md",
"content": "# Getting Optimal Vsync Performance\n\nRetroArch uses [Dynamic Rate Control](ratecontrol.pdf) to synchronize both video and audio at the same time. Synchronizing in this way is a very demanding task timing-wise and dynamic rate control helps smooth out imperfections in timing which are guaranteed to arise. However, when Dynamic Rate Control is functioning as intended, the frame pacing and audio synchronization will be perfectly smooth. \n\nIt can be disabled, but be aware that proper video/audio sync is nearly impossible to obtain in that case.\n\n!!! tip\n +In order to propose improvements to this document, [visit it's corresponding source page on github](https://github.com/libretro/docs/tree/master/docs/guides/optimal-vsync.md). Changes are proposed using \"Pull Requests.\"\n\n## Basic Configuration\n\nWhile using RetroArch, the default settings might not be adequate, and you might experience video stuttering and/or audio crackling. For correct synchronization, `Settings->Video->Output->Vertical Refresh Rate` must be configured for your display. It cannot be detected accurately enough by OS-provided APIs (i.e. they tend to blatantly lie). For proper behavior, an accuracy of roughly ~0.1% is needed for dynamic rate control to smooth out the drifting. This is trivial to obtain by measuring manually under normal conditions. Without dynamic rate control one would need a \"perfect\" measurement which obviously isn't possible without special hardware.\n\nRetroArch gives you an estimate of your display's refresh rate at `Settings->Video->Output->Estimated Screen Refresh Rate`, which is updated in real-time using a running average over frame times. Make sure VSync is enabled and working. Also make sure you're running in full-screen for more accurate results (compositors can easily interfere with timing). Press accept button on the estimated refresh rate to configure RetroArch with the estimated rate. If the running average isn't drifting much anymore, it's probably a good result.\n\nYou can also have RetroArch log the output at the end and configure things more manually. Start RetroArch directly in RGUI with `retroarch --verbose --menu`. Let it run uninterrupted for at least 4096 frames (displayed in title bar), and exit. In the log, you should see something like:\n\n```\nRetroArch: Average monitor Hz: 59.869485 Hz. (1.347 % frame time deviation, based on 2048 last samples).\n```\nIf you're unsure about the result, run this test several times and see if the results are consistent. Some systems tend to have very unreliable VSync behavior and this result will wildly fluctuate. You can use this value in `Vertical Refresh Rate` and the video and audio should ideally be exceptionally smooth without any static or 'popping' audio. If you have ensured your refresh rate is dialed in well, and this is still not the case, read on.\n\n## Advanced Configuration Considerations\n\nIf you continue to find the audio and/or video output after the above basic configuration to be incorrect or insufficient, there are a multitude of settings and other factors, both inside of RetroArch and external to the program, that can have a significant impact on your ability to obtain smooth frame pacing and proper synchronization. Adjusting these settings in a haphazard fashion or adjusting more than one at a time can lead to skipping over a correct solution by fixing one part of the problem while simultaneously breaking another part. If instead it does work afterwards, then it can lead to an inability to determine which change actually contributed to success.\n\nThe next section is an attempt at a step by step guide to configuring and diagnosing most frame pacing related settings. It is ordered starting from the most critical and directly audio/visual synchronization related settings first and continues towards settings that have other uses and effects, yet also impact synchronization, farther down. You can skip over any configuration changes you are unwilling to compromise on just for possibly improved frame pacing, or stop after any point in the process that you are satisfied with the output, of course. \n\nIf you want to be able to judge the impact of a setting change by more than just 'eyeballing' the results, RetroArch provides a running statistics HUD by toggling `Settings->User Interface->On-Screen Display->On-Screen Notifications->Notification Visibility->Display Statistics`. You can also use an external program to monitor frame pacing, but keep in mind just the act of running it is possibly introducing a small amount of jitter itself.\n\nNotable internal RetroArch statistics regarding frame pacing are:\n\n - Core AV_INFO->FPS - The exact frame timing the core is requesting.\n\n - Video->Refresh - What your `Settings->Video->Output->Vertical Refresh Rate` is currently set to.\n\n - Video->FPS - The rate at which you are currently outputting actual frames. With VRR on, this should match `Core AV_INFO->FPS`, and with VRR off, this should be very close to `Settings->Video->Output-Vertical Refresh Rate` divided by `Vsync Swap Interval` after the averaging settles. If `Video->FPS` is far above these values, possibilities include your Vsync or your VRR settings are not engaging properly, depending on which you are using, while having `Settings->Audio->Synchronization->Synchronization` disabled. If instead `Video->FPS` is substantially beneath, possibilities include Swap Interval set wrong, or your hardware not being able to keep up with the system demands. Note that neither `Video->FPS` nor `Core AV_INFO->FPS` will display 30 for 30 fps content most of the time, as internal frame doubling is performed.\n\n - Audio->Underrun - This keeps track of the amount of time slices over a recent period that the audio buffer is near emptying. If this value settles at a percentage higher than 0%, after running for a while (and without menu access, slow motion, or fast forward having recently been used), you can use this to diagnose that the audio and video aren't in great sync, as the audio is not keeping up with the video. In this situation RetroArch will either occasionally stutter briefly to maintain sync, or if `Settings->Audio->Synchronization->Synchronization` is off, you will get static and popping audio noises.\n\n - Audio->Blocking - The opposite of `Audio->Underrun` in practice. This time, if it settles at a percentage higher than 0%, after running for a while (and again, without menu access, slow motion, or fast forward having recently been used), it means the audio is running ahead of the video.\n\n Note that on some cores it is possible to have moderate amounts of *both* Underrun and Blocking present while your hardware is capable of performing at full core requested speed and all settings are correct, but this is more common for actual variable framerate content that tends to be more present from the 5th generation of consoles on. So it might be best to test your overall settings with an earlier generation, less complex core. \n\n## Advanced Configuration Step-By-Step Guide\n 1. Choose one of the following synchronization methods depending on whether your screen is capable of Variable Refresh Rate (VRR) and if you want to use it:\n\n - For synchronization without VRR, you should set `Settings->Video->Output->Vertical Refresh Rate` very close to an evenly divisible multiple of the core requested refresh rate, still using `Settings->Video->Output->Estimated Screen Refresh Rate` to get a more accurate value as mentioned in the Basic Configuration section. You should end up with a value right around 60/120/180/240/etc Hz for NTSC, 50/100/150/200/etc for PAL. Uneven, but fairly common, display refresh rates like 75/90/144/165 Hz are only able to maintain smooth frame pacing and audio synchronization while `Variable Refresh Rate (VRR)` is active, which is discussed below.\n\n Setting your actual display refresh rate to 60Hz, and then configuring the real refresh rate as per the Basic Configuration section, combined with a complementary `Vsync Swap Interval` of 1, will always be the most default and thus supported mode of operation to obtain perfect frame timing. But if you want to be able to run RetroArch on your >60Hz display without having to lower the actual screen refresh rate, this section explains how to do so correctly with minimized chance of issues.\n\n After you have verified the rate is set appropriately, you should check under `System->Video Settings->Synchronization` and make sure that `Vertical Sync (Vsync)` is on, and set the `Vsync Swap Interval` to either `Auto`, which will try to determine the right value for your applied refresh rate on its own, or you can manually set the value yourself. Unless you note specific issues with your system, `Auto` is likely the superior choice, as it will avoid the 'math problem' required for manual configuration and respond to changes in others settings including `Black Frame Insertion` and `Sync to Exact Content Framerate (G-Sync, Freesync)` without needing to be updated again itself. \n\n If you choose to set it manually, the value you should set it to is the value such that when you divide `Settings->Video->Output-Vertical Refresh Rate` by it, gives you a result near your 60/50Hz goal. I.e. 60Hz/1 = 60Hz, so set `Vsync Swap Interval` to 1. 120Hz/2 = 60Hz, so set `Vsync Swap Interval` to 2, 180Hz/3 = 60Hz so set `Vsync Swap Interval` to 3, and so on.\n\n Lastly, when syncing with this method to a value other than `Auto` or 1, ensure that `Black Frame Insertion` is off, and that `Sync to Exact Content Framerate (G-Sync, Freesync)` is off. These are each separate methods to sync the display and audio, and they should not be combined.\n\n - For a VRR capable display, configuring settings is less error prone, at least inside of RetroArch, and also has a benefit of being able to sync to the exact originally intended speed of the core. `Settings->Video->Output->Vertical Refresh Rate` will not be in use to attempt to adjust the timing, and is not required to be set correctly, but it is still good practice.\n\n To setup RetroArch to use VRR timing, turn on `Sync to Exact Content Rate (G-Sync, Freesync)` under `System->Video Settings->Synchronization`, and verify `Vsync Swap Interval` is set to either 1 or Auto, and that `Black Frame Insertion` is off. Just as above, these settings should not be combined.\n\n 2. Ensure `Settings->Audio->Synchronization->Synchronization` is enabled. Also in this same menu, for a non-VRR setup, `Maximum Timing Skew` will decide how far Retroarch will be willing to adjust the core requested speed to attempt to sync with your refresh and swap interval settings.\n\n For the most part, the default value will be fine, but some arcade content runs at Hz significantly farther in the middle between 50Hz and 60Hz. The older Mortal Kombat arcade machines request a rate around 54Hz, for instance. Further, if you desire to run 50Hz PAL content at 60Hz NTSC speed, you must set the maximum skew even higher. 60Hz NTSC is ~17% faster than 50Hz PAL, so you would want to set the `Maximum Timing Skew` to .17. Note that a higher maximum will not cause content that is not far from your set refresh rate to run at a less correct speed, it will only allow content that is farther away to sync so that you can obtain smooth frame pacing and audio.\n\n 3. Check Display Control Panel and Other External Program Settings\n\n - Make sure you are not overriding application settings to force `Vsync` off. \n\n - Check if you decided to use VRR in step 1.\n\n * If you aren't using VRR, and have a maximum framerate cap set (in the driver or through a third party software tool like RTSS), verify that it is at least as high as the set refresh rate of your display. You might think a 60 fps cap would be all you need for 60 fps content, but a display set to 240Hz using a swap interval of 4, still needs 240 potential vblanks per second to sync correctly to 60 actual fps.\n\n * If you are using VRR, you must verify that it enabled at the display driver level, and on the display as well. Also you should ensure, if you have a configured maximum framerate cap, that it is set slightly above 60 at the least, not right at 60. NTSC NES/SNES request 60.1Hz for instance, and this could interfere with proper frame timing even with VRR, if you have a 60 fps framerate cap.\n\n - If your system has a strong GPU and it is available for your display driver, consider looking for a setting similar to `Power Management Mode` and configure it for `Prefer Maximum Performance`, either globally or specifically for RetroArch.\n\t \n\t Some higher powered GPU's are designed to downclock on lower loads by default, which they may see RetroArch as. If your GPU can stay in this downclocked state while maintaining full performance, there might not be any interference with smooth synchronization. However, if instead if it responds to RetroArch as a load where it constantly shifts back and forth between a high power state and a low power state, this can cause inconsistent frame times.\n\n - Consider disabling possibly unnecessary overlays like from RTSS, Discord, or Steam. RTSS has been known with previous versions, for instance, to cause issues with Vulkan in Retroarch, even when not running, just merely by being installed! For reference: [Vulkan Frame Pacing Stutter](https://github.com/libretro/RetroArch/issues/9668)\n\n - Active video recording or streaming software has the potential to interfere with perfect frame pacing, but if your stream or recording is important, obviously perfect frame pacing will have to become a secondary concern. Just set all other settings as appropriately as you can.\n\n 4. Back inside of RetroArch consider adjusting settings that can have an impact on frame pacing and synchronization.\n\n - Windowed mode, and even windowed full-screen mode can contribute to frame pacing issues, so `Settings->Video->Fullscreen Mode->Windowed Full-Screen Mode` can be disabled to test if this improves your frame pacing.\n\n - `Settings->Video->Output->Automatic Refresh Rate Switch` can be considered to be disabled, as if it changes your actual display refresh rate, in non-VRR mode this can interfere with your set Vsync Swap Interval and cause *large* mistiming, and in VRR mode, you want the display to maintain the maximum potential refresh rate so that it can be more accurate in accomodating small requested timing differences.\n\n - `Settings->Video->Output->Threaded Video` is well known to interfere with smooth frame pacing and audio sync, but can be the only choice for hardware otherwise too weak for the intended content to run at near the correct frame rate at all.\n\n - Using a very heavy shader like an accurate CRT emulation shader, especially on a higher resolution display, can also increase performance requirements to obtain smooth synchronization.\n\n - Your preferred renderer API of Vulkan/OpenGL/DirectX 11/etc might not interact perfectly with your system or the core you are using, and you can try an alternative.\n\n - Core specific settings can be checked for things such as overclocks which can increase system requirements to where you might not be able to run full speed, or internal run-ahead, or frame duplication.\n\n - Under `Settings->Latency`, `Frame Delay (ms)`, `Automatic Frame Delay`, `Run-Ahead to Reduce Latency` and `Run Pre-Emptive Frames` should be adjusted down or off if smooth frame pacing is a priority for you over latency and you continue to have issues at this point in the process. These settings can cause inability to reach proper sync if your system can not handle the increased load or they are simply set too high even on very capable hardware.\n\n - `Settings-Latency->Audio Latency` perhaps unintuitively should be kept higher, not lower. Too low of an audio latency causes RetroArch to stutter while waiting to refill the now smaller audio buffer when `Settings->Audio->Synchronization->Synchronization` is enabled, or can cause very poor audio output when `Settings->Audio->Synchronization->Synchronization` is not set.\n\n How low you can set this to without issue can vary per content, but the default value of 64 ms was chosen for avoiding issues like this. If you still decide to push lower, keep in mind a 60Hz NTSC frame is approximately 16.66 ms long, so you might want to try a value a little longer than 2 frames, like 35ms, and then a little longer than 3 frames like 52ms, et cetera.\n\n - Under `System->Video Settings->Synchronization`, `Hard GPU Sync`, `Max Swapchain Images`, or `Waitable Swapchains`, any of which might be available with your current renderer API, are designed to reduce latency by limiting how many frames ahead that the cpu can calculate beyond the currently displayed frame. If you are still experiencing frame pacing issues having reached this poing in the document, and care more about that than increased latency, you can disable `Hard GPU Sync`, `Waitable Swapchains`, or increase the value of `Max Swapchain Images` to give your system more performance headroom.\n\n\n## Further Considerations\n\nIf you've gone through all the above, there is not much more to configure settings-wise. It is possible your hardware is just not capable of running the desired content at full speed. You can try to see if an alternative core exists for your content that is perhaps designed to run on lower specification hardware than the one you were previously using. Also (though no specific offenders will be named as this can change for better or worse with any core update any given day) some content on some cores simply have somewhat poorer timing control. Odds are higher of finding this on 5th generation and beyond console cores that are dealing with content that ran at very unstable framerates on original hardware. \n\nLastly, a couple things to keep in mind that don't fit neatly in any section above without being a large digression:\n\n - Most VRR displays have a feature called Low Framerate Compensation (LFC). What this means is that there is a minimum fps below which VRR can no longer actually sync, and it will compensate for this with , depending on display implementation, a combination of internal frame doubling and screen tearing. If this rate is right near the output rate, and some 240Hz+ displays are indeed coming with a LFC minimum rate directly around 60 as of this writing, you can experience significant impact on frame pacing. 30 fps content will also be below this LFC rate on a large number of VRR displays, but if it is a very stable 30 fps and the display has a good frame doubling algorithm, this might not be an issue.\n\n If you check your display specifications and believe you are experiencing LFC related issues, you might well be better served using a fixed refresh rate for RetroArch. Note that you should not have to disable VRR in your display driver or on your display, just discontinue use of `Sync to Exact Content Rate (G-Sync, Freesync)` inside Retroarch, and instead follow the instructions above for using `Vsync Swap Interval` to sync. \n\n - It has been noted previously that for macOS, that having more than one display active can cause interference with obtaining good frame pacing and audio synchronization. This can be extended as a possible solution to try regardless of operating system. Relatedly, it is potentially helpful if you *do* leave multiple displays active, to leave them all set to the same refresh rate.\n\n Also, running videos or other screen updating content at the same time on a secondary display is a potential source of issues. Windows 10/11 compositor handles multiple active contents like this better as of writing than in the past, but this could change at any point and there are also a multitude of other Operating Systems and devices that will have their own possible compositor issues with running multiple separate contents simultaneously.\n\n\n**Thanks for reading, and have a smooth day!**\n"
},
{
"path": "docs/guides/overlay-pointing-devices.md",
"content": "# Overlay Mouse, Lightgun, and Pointer\nWhen using an overlay, RetroArch can send pointing device input alongside gamepad input using `Enable Overlay Lightgun, Mouse, and Pointer` in the `On-Screen Overlay` menu.\n\nThis allows more natural control of lightgun overlays, emulated touchscreens, mouse-controlled first-person shooters, and anything else requiring simultaneous button \\+ pointer input.\n\n**Note:** This overrides any platform-specific touchscreen controls, which might behave differently.\n\n## Mouse behavior\nDragging 1 finger moves the mouse cursor. 1-, 2-, and 3-finger taps are left, right, and middle mouse button clicks.\n\nBy default, a 0.2s long press begins holding a button, and you'll feel haptic feedback when it starts. A double-tap hold method is also available but adds some latency to clicks. With either method, dragging 2 or 3 fingers immediately holds the right or middle button.\n\nThere are settings for mouse speed, long-press and double-tap time thresholds, and a \"swipe threshold\" to distinguish swipes from taps and long presses.\n\n## Lightgun behavior\nLightgun x, y, and trigger are normally sent together to every lightgun port. There are settings to choose the port, disable the trigger, delay the trigger, and clamp off-screen aim to the in-bounds edge. The trigger delay is needed for content that doesn't instantly move the gun cursor to a screen tap.\n\nMore lightgun buttons can be assigned to 2-, 3-, and 4-finger inputs. The trigger delay is used to wait for the correct multi-touch count. A 1-frame delay is usually enough to distinguish these inputs.\n\n**Note:** A few cores have a `Touchscreen` option for lightgun input. That needs to be set to `Lightgun` for this.\n"
},
{
"path": "docs/guides/overrides.md",
"content": "# Using Content, Folder, and Core Overrides for Custom Settings\n\nThere are various and comprehensive ways to save customized settings within the RetroArch menus. 99% of settings can be adjusted and saved from the menu but are only plain text files and can be adjusted manually with a text editor.\n\n- Global settings can be overridden on a per core, per content directory, or per game basis using the config override system.\n- Input settings are handled separately with the input core and game Remap system.\n- Likewise, Shader Preset settings are also their own entity for per core and game settings\n- A standalone file also saves the Option settings for all cores that support them. The settings in this file can be overridden on a per game basis.\n\n!!! tip\n Please read the [Getting Started](install-windows.md) guide.\n\n\n## Logic\n\n### Overrides *(.cfg)* & Remaps *(.rmp)*\n\nOverrides and Remaps are designed to be lightweight and easily maintained configuration methods. They save only settings that differ from the preceding settings files.\n\nFor example if only one setting differs between your `retroarch.cfg` and a `core.cfg`, then the `core.cfg` file will only contain one setting.\n\nThe hierarchy for loading is:\n\n1. Game settings -> Applied when loading a particular game (content)\n2. Content directory settings -> Applied when loading content from a particular directory\n3. Core settings -> Applied when loading content with a specific core\n4. Default settings -> The default settings from 'retroarch.cfg'\n\nThe RetroArch loading process is:\n\n- Load `retroarch.cfg`\n - Apply `.cfg` & `.rmp` override\n\t\t- Apply `.cfg` & `.rmp` override\n\t\t\t- Apply `.cfg` & `.rmp` override\n\n!!! note\n Core-specific or content directory-specific overrides that are not in game-specific overrides persist and will be loaded.\n Also once you have created an override any future changes will need to be saved via the Quick Menu.\n\n### Options *(.opt)* & Shader Presets *(.cgp|.glslp|.slangp)*\n\nCustom per game core options and shader presets work slightly differently. These are full configurations and are loaded instead of the base shader preset and core option settings.\n\n## Configuration Files & Location\n\n!!! note\n Depending on your chosen platform the location of these files after installation may vary.\n\n!!! warning\n Some settings cannot be saved in an override file from the menu. You can manually add settings to the override file to workaround most situations.\n\n**The default and global settings file**\n\n- `retroarch.cfg` *(located in the base install path)*\n\n**The global file for core option settings, for cores that support options**\n\n- `retroarch-core-options.cfg` *(located with the `retroarch.cfg`)*\n\n### Core options\n\n- `name-of-game.opt` **If not found load**\n - `retroarch-core-options.cfg`\n\nThe options files list the settings found under `Quick Menu -> Options`. The `retroarch-core-options.cfg` is created automatically on loading a core that supports Options.\n\nA game-specific options file is created when you select `Quick Menu -> Options -> Game-options file`. *(located in `/config//.opt`. The path is set under `Settings->Directory->Config`)*\n\n!!! attention\n\tLoad Content Specific Core Options Automatically must be set to On in RetroArch's Configuration settings in order for game-specific options to be automatically loaded upon content load.\n\n### Override Configs\n\nThe override system activates on loading of content. RetroArch applies config settings with the logic as [explained above](#logic).\n\n**Per Core Override**\n\n- `/config//name-of-core.cfg` *(This path is set under `Settings -> Directory -> Config`)*\n\nThese settings files are created from the `Quick Menu -> Save Core Overrides` option and contain ANY (supported) settings you have changed since loading content. These settings will be loaded every time you load content with that core.\n\n**Per Content Directory Override**\n\n- `/config//name-of-content-directory.cfg` *(located with per core override)*\n\nThese settings files are created as above with the `Quick Menu -> Save Content Directory Overrides`. The settings will take precedence over `name-of-core.cfg`\n\n**Per Game Override**\n\n- `/config//name-of-game.cfg` *(located with per core override file)*\n\nThese settings files are created as above with the `Quick Menu -> Save Game Overrides`. The settings will take precedence over `name-of-content-directory.cfg`\n\n### Input Remaps\n\nInput remaps use the same logic as core/directory/game overrides and use the `.rmp` extension. They can be adjusted and saved from:\n- `Quick Menu -> Controls -> Save Core Remap File`\n- `Quick Menu -> Controls -> Save Content Directory Remap File`\n- `Quick Menu -> Controls -> Save Game Remap File`\n\nSet the save directory in `Settings -> Directory -> Input Remapping` *(by default they will save to `/config/remaps//`)*\n"
},
{
"path": "docs/guides/ozone.md",
"content": "# Ozone (GUI)\n\n**Ozone** is the default graphical user interface (gui) of RetroArch. Based on the Switch's menu design, this menu driver was introduced in RetroArch 1.7.6.\n\n\n\n|DISCLAIMER|\n|----------|\n|Keyboard key assignments may differ by platform and configuration: Most of the examples below are for PC.|\n\n## Menu structure\n\nOzone's main categories and playlists are in a column on the left, and subcategories are in a panel to the right. A third column will appear on the right hand side when certain selections are made.\n\n\n\nEntering a subcategory will hide the top-level menu's text labels. When you return to Main Categories, the descriptions will reappear. The sidebar does not collapse while in Main Menu or Settings.\n\nIf you want the labels to always be hidden, go to `Settings> User Interface> Appearance`, then turn `Collapse the Sidebar` on.\n\n\n\n### Navigating the menus\n\nOzone is controlled like any other user interface. Regular input binds will apply, and binds here are defined in terms of the RetroPad, RetroArch's gamepad and joystick abstraction.\n\n| Controller | Default PC | Action |\n| ------------ | ---------- | ------ |\n| **A button** | Z/ENTER/Left mouse click | Accept/OK |\n| **B button** | X/Backspace/Right mouse click | Back/Cancel |\n| **D-pad Up/Down/Left/Right** | Arrow keys | Scroll through menu options |\n| N/A | **Right shift** | Toggle description label |\n| N/A | **S key** | Toggle search |\n| N/A | **F1** | Toggle quick menu |\n| N/A | **F5** | Toggle desktop menu |\n\nSee [Input and Controls](input-and-controls.md).\n\n### Searching through lists with the keyboard\n\nWhen using a keyboard, it can be slow to navigate a large list using gamepad-like controls. To help this, you can type `/` (forward slash) or `S` (S key) at any time to bring up a search box.\n\nType a search string and hit `Return`. The cursor should jump to the first entry that matches.\n\nThe search will match mid-path strings. However, if a match is found at the beginning of the path (like when searching for the first letter), the start-of-path match will take priority.\n\n## Input\n\nSee [Input and Controls](input-and-controls.md).\n\n## Thumbnails\n\n\n\nThumbnails appear in a side bar on the right side of the screen. With a playlist item selected, you can press the `spacebar` on your keyboard to toggle the full-screen view on/off.\n\nThe default thumbnail is Boxart. Two thumbnails can be displayed simultaneously by going to `Settings> User Interface> Appearance` and enabling `Secondary Thumbnail`. The user can choose to display boxart, the title screen, or a gameplay screenshot.\n\n\n\n## Audio\n\nOzone has **OK**, **Cancel**, **Notice** and **Scroll** sound effects. It also has background music, created by [ViRiX Dreamcore](https://soundcloud.com/virix).\n\n\n\nThese are turned off by default. To enable them, go to `Settings> Audio> Menu Sounds` and turn on the `Mixer`. Then in the same menu, turn on the sounds you want (the background music option is called `Enable BGM Sound`).\n\n## Applying shaders\n\nSee the [shaders user guide](shaders.md).\n\n## Themes\n\nOzone has a range of color schemes to choose from. They can be found in `Settings> User Interface> Appearance> Color Theme`.\n\n"
},
{
"path": "docs/guides/ozone.md.backup",
"content": "# Ozone (Menu Interface)\n\n**Ozone** is the default graphical user interface (gui) of RetroArch. Based on the Switch's menu design, this menu driver was introduced in RetroArch 1.7.6.\n\n\n\n|DISCLAIMER|\n|----------|\n|Keyboard key assignments may differ by platform and configuration: Most of the examples below are for PC.|\n\n## Menu Structure\n\nOzone's main categories and playlists are in a column on the left, and subcategories are in a panel to the right. A third column will appear on the right hand side when certain selections are made.\n\n\n\nEntering a subcategory will hide the top-level menu's text labels. When you return to Main Categories, the descriptions will reappear. The sidebar does not collapse while in Main Menu or Settings.\n\nIf you want the labels to always be hidden, go to `Settings> User Interface> Appearance`, then turn `Collapse the Sidebar` on.\n\n\n\n### Navigating the menu\n\nOzone is controlled like any other user interface. Regular input binds will apply, and binds here are defined in terms of the RetroPad, RetroArch's gamepad and joystick abstraction.\n\n| Controller | Default PC | Action |\n| ------------ | ---------- | ------ |\n| **A button** | Z/ENTER/Left mouse click | Accept/OK |\n| **B button** | X/Backspace/Right mouse click | Back/Cancel |\n| **D-pad Up/Down/Left/Right** | Arrow keys | Scroll through menu options |\n| N/A | **Right shift** | Toggle description label |\n| N/A | **S key** | Toggle search |\n| N/A | **F1** | Toggle quick menu |\n| N/A | **F5** | Toggle desktop menu |\n\nSee [Input and Controls](input-and-controls.md).\n\n### Searching through lists with the keyboard\n\nWhen using a keyboard, it can be slow to navigate a large list using gamepad-like controls. To help this, you can type `/` (forward slash) or `S` (S key) at any time to bring up a search box.\n\nType a search string and hit `Return`. The cursor should jump to the first entry that matches.\n\nThe search will match mid-path strings. However, if a match is found at the beginning of the path (like when searching for the first letter), the start-of-path match will take priority.\n\n### Starting a game\n\n* To load a game you need two things: A libretro core to act as a gaming system, and content (a ROM or ISO) to play on that system.\n* Select `Load Core` from the main menu to browse a list of installed cores. You need to select the core compatible with your content from the `core` list.\n* If you have no cores listed, or you want additional cores, click on `Download a Core` at the bottom of the list and make your selection(s).\n\nAfter loading a libretro core, you will see the name and version of the core in the bottom left of the window. You can then browse for a ROM via `Main Menu> Load Content`.\nTo control where Ozone starts to browse for contents, set `File Browser` in `Settings > Directory`. If this is not set, the file browser will start in the user's root directory.\n\nSee [File Browser](file-browser.md) and [Import Content](import-content.md)\n\n## Thumbnails\n\n\n\nThumbnails appear in a side bar on the right side of the screen. With a playlist item selected, you can press the `spacebar` on your keyboard to toggle the full-screen view on/off.\n\nThe default thumbnail is Boxart. Two thumbnails can be displayed simultaneously by going to `Settings> User Interface> Appearance` and enabling `Secondary Thumbnail`. The user can choose to display boxart, the title screen, or a gameplay screenshot.\n\n\n\n## Audio\n\nOzone has **OK**, **Cancel**, **Notice** and **Scroll** sound effects. It also has background music, created by [ViRiX Dreamcore](https://soundcloud.com/virix).\n\n\n\nThese are turned off by default. To enable them, go to `Settings> Audio> Menu Sounds` and turn on the `Mixer`. Then in the same menu, turn on the sounds you want (the background music option is called `Enable BGM Sound`).\n\n## Applying shaders\n\nSee the [shaders user guide](shaders.md).\n\n## Input\n\nSee [Input and Controls](input-and-controls.md).\n\n## Themes\n\nOzone has a range of color schemes to choose from. They can be found in `Settings> User Interface> Appearance> Color Theme`.\n\n"
},
{
"path": "docs/guides/quick-menu.md",
"content": "# Quick Menu\n\nThe **Quick Menu** is effectively RetroArch's pause menu.\n\n## Controls\nThe Quick Menu can be accessed by pressing a certain gamepad combination, pressing the `F1` key on your keyboard, or tapping on the \"Invader\" or \"Menu\" button on most Gamepad Overlays.\n\nThe RetroPad button combination for opening the Quick Menu can be changed at `Settings>Input> Hotkeys> Menu Toggle`. Users select the combination from a list (Custom combinations cannot be applied):\n\n* None\n* Done + Y + L1 + R1\n* L3 + R3\n* L1 + R1 + Start + Select\n* Start + Select\n* L3 + R1\n* L1 + R1\n* Hold Start (2 seconds)\n* Hold Select (2 seconds)\n* Down + Select\n* L2 + R2\n\n\n## Features ##\n\nThe Quick Menu provides access to many core-specific settings and options while the content is paused in the background. Options include (but are not limited to) adjusting the video resolution and system region, remapping controller inputs, managing Load/Save States, cheats or shaders, and taking screenshots or recording video clips.\n\n### Close Content\nThe most important function exclusive to the Quick Menu (aside from `Resume Content`) is `Close Content`. This safely 'shuts off' the emulated system and its content, returning the user to RetroArch's main menu without having to quit RetroArch completely.\n\n### Disc Control\nAnother \"exclusive\" function that appears with certain cores is swapping discs using the `Disc Control` option: See [Disc Swapping](./disc-swapping).\n"
},
{
"path": "docs/guides/recording-and-streaming.md",
"content": "# Recording and streaming video from RetroArch\n\nRetroArch has the capability to record gaming footage in real-time using libavcodec (FFmpeg).\nBoth lossless and lossy coding is supported. It is possible to configure most encoding options\nfor libavcodec using a separate config file.\n\n## FFmpeg version\nRetroArch requires a very recent version of FFmpeg to work correctly.\nIf you are on Linux or OSX, your distros FFmpeg build is likely out of date, and you should build FFmpeg from Git. A recommended command line is:\n\n```bash\n./configure --prefix=/opt/ffmpeg --enable-libx264 --enable-gpl --enable-libmp3lame \nmake\nsudo make install\n```\n\nThis assumes you will install a custom FFmpeg build into `/opt/ffmpeg`.\nFor Windows users, the redist includes recent enough libav* binaries.\n\nNow you can configure RetroArch with:\n\n```PKG_CONFIG_PATH=/opt/ffmpeg/lib/pkgconfig ./configure```\n\nand the configure script should pick up the FFmpeg libraries in `/opt/ffmpeg/lib`. Check config.mk\nto make sure. After successfully compiling, make sure that the RetroArch binary picks up the correct FFmpeg libs by adding `/opt/ffmpeg/lib` to LD_LIBRARY_PATH (or the equivalent on OSX).\n\n## Lossless coding\nBy default (not providing an encoding config), lossless coding is used. This means libx264/RGB, with -qp 0 (lossless). The audio codec used is FLAC. libx264/RGB ensures very nice bitrates even when lossless and very fast encoding.\n\n## Lossy and flexible coding config\nBy adding the `--recordconfig ` parameter, you have more control over encoding.\nThe recognized config options are:\n\n```\nvcodec = # Same as -vcodec\nacodec = # Same as -acodec\nformat = # Muxer format to use. E.g. mkv, flv or mp4. This is normally inferred, but must be set when using extensionless formats like RTMP (streaming).\nthreads = # Threads to use when encoding video. Should be set to (# of CPU threads - 1).\nframe_drop_ratio = # Only encodes every frames.\npix_fmt = # Same as -pix_fmt, no default is assumed, must be set!\nscale_factor = # Scales input by . Useful when encoding in chroma subsampled formats like yuv420p.\nsample_rate = # Audio output sampling rate.\naudio_global_quality = # Global quality for audio (VBR). Maps to codec->global_quality in API. Play around with it. Higher = better. 75 seems to be a fair value.\naudio_bit_rate = # Audio bit rate (CBR). This is in bit/s, so use e.g. 192000 for 192 kb/s.\n\nvideo_{option} = # Sets generic video option {option} to . This is codec specific. Mostly useful for libx264.\naudio_{option} = # Sets generic audio option {option} to . This is codec specific.\n```\n\n## Live streaming\n\nRetroArch can live stream to RTMP services like [twitch](http://www.twitch.tv/).\nTo live stream there, create a config that is tailored for twitch. Example:\n\n```\nvcodec = libx264\nacodec = libmp3lame\npix_fmt = yuv420p\nscale_factor = 2\nthreads = 3\nvideo_crf = 25\nvideo_preset = superfast\nvideo_tune = animation\naudio_global_quality = 75\nsample_rate = 44100\nformat = flv\n```\n\nYou can stream to twitch with a command such as:\n\n```bash\nretroarch --record rtmp://live.twitch.tv/app/$YOUR_TWITCH_ID --recordconfig twitch.cfg\n```\n"
},
{
"path": "docs/guides/retroachievements.md",
"content": "# RetroAchievements In RetroArch\n\n## **What are RetroAchievements?**\n\n[retroachievements.org](https://retroachievements.org/) is a service that provides a trophy/achievement unlocking mechanism similar to modern consoles, for retro games.\n\n!!! Warning\n The service is not maintained by RetroArch or the Libretro team.\n\n!!! Warning\n In order to get better compatibility with the RetroAchievements feature it's recommended to always use the latest version of RetroArch and the cores.\n\n## **How to setup achievements**\n\n1. Register an account on [retroachievements.org](https://retroachievements.org/) (don't forget to confirm your account creation with the email they send to you).\n2. Open Retroarch and go to Settings->Achievements.\n3. Enable the functionality and fill in your retroachievements credentials.\n\n!!! Note\n The hardcore mode prevents you from using emulation features like savestates, slow motion, and cheats, **BUT** it places you on a separate leaderboard and allows you to participate in site events.\n\n\n\n## **Check your connection to the service**\n\n**You need an active internet connection.**\n\nIn this example, we are using the game Chrono Trigger (USA) with the Snes9x core.\n\nLaunch the game and trigger the Quick Menu.\n\nGo to Achievements and you should see a list of the unlockable trophies for this game.\n\n\n\n## **Check your progress**\n\nOn the retroachievements website, you can login and access your account page.\n\nYou should be able to check your progress in the games and see which trophies you unlocked.\n\nTrophies unlocked in hardcore mode are marked with a special color.\n\nYou can also check the progress of your friends and add comments on their trophies.\n\n\n\n## **Cores Compatibility**\n\nFor a list of supported cores, take a look at the [Emulator Support page on RetroAchievements](https://docs.retroachievements.org/general/emulator-support-and-issues.html).\n\nCores that are not listed as supported are likely to have issues with achievement logic, and tickets from players using those can be closed without investigation.\n\nIn the future, it is likely that unsupported cores will be blocked in hardcore mode, as well.\n\n## **Troubleshooting FAQ**\n\n**Question:** RetroAchievements were working fine last time I played, but now it suddenly says I can't login! I haven't changed anything!\n\n**Answer:** Your login token may have expired, and you will need to generate a new one by clearing out your login information in **Settings > User > Accounts > RetroAchievements** and re-entering it.\n\n**Question:** I did whatever the achievement required, but it didn't award me the achievement!\n\n**Answer:** When offline, awarded achievement status is cached and will be awarded once you reconnect to the internet. This only applies to the current session, though, so make sure you don't quit out of RetroArch before reconnecting. If you've had a working internet connection and it still doesn't trigger, make sure you're using [an officially supported core](https://docs.retroachievements.org/general/emulator-support-and-issues.html) before requesting support.\n"
},
{
"path": "docs/guides/retroarch-accessibility-guide.md",
"content": "# Retroarch Getting Started guide for users of the accessibility mode\n\n## Introduction\n\nThis user guide is to aid users of screen readers who are newcomers to Retroarch begin using the program. Retroarch is an emulation front-end which allows one to play many games from many video game consoles, Arcades, and vintage computers. As of version 1.8.2, the user interface is accessible to blind people. Using the AI service within games, one is able to read textual content: menus, character dialog, statistics screens, ETC. Along with the game’s sound design, this makes many games which were playable even more enjoyable, or games which use only text playable at all. For now, accessibility mode works on Windows, macOS, and Linux operating systems.\n\n## Retroarch Terminology\n\n- **Retroarch:** A front-end for many video game emulators.\n- **Front-end:** A program that brings multiple other programs into one universal interface.\n- **Core:** a video game console, game engine, or media player within Retroarch.\n- **content:** a video game, media file, or Homebrew program that can be loaded by a Retroarch core.\n- **accessibility:** In Retroarch, a setting which speaks the user interface of the program.\n- **AI service:** A service which takes a screenshot of a game and acts upon it based on the setting chosen in the AI service settings. In this guide, we’ll focus on Narrator mode.\n- **Netplay:** Playing an originally offline video game across the local network or Internet.\n- **bind:** To link one thing with another. In Retroarch terms, to link a key or button with an action.\n\n## Download Retroarch\n\nTo download Retroarch, go to [Retroarch's download page](https://www.retroarch.com/?page=platforms) and choose the download for your system. Windows users should choose the 64-bit installer version, unless they have an old computer with a 32-bit operating system. Mac users should download the version under the “Apple macOS / OSX” heading; iOS and tvOS users are encouraged to install from the App Store. Linux users should see if version 1.8.2 or higher is in their package manager, and get that and the cores through APT, Pacman, DNF, and so on, or compile it yourself. For Android and game consoles, accessibility features are not implemented.\n\n## Open the Program\n\nAfter installing Retroarch, launch the program in the usual way according to your system. Right now, it will not speak, but if it opens, that means it’s at least installed correctly, and you can press escape twice to close it, or using the usual quit command of your operating system.\n\n## Turn on accessibility\n\nTo turn on the accessibility feature, do the following:\n\n- Open Retroarch.\n- Press **Left Arrow**, **Down Arrow**, then **Enter**.\n- Press **up arrow** seven times.\n- Press **Enter** twice, or **Enter** then **Right arrow**.\n- You’ll hear “Retroarch accessibility on.”\n\nNow, you can either keep exploring the menu, or quit and reopen Retroarch for a fresh start. Accessibility mode will stay on, and if not, after enabling accessibility, arrow left once, then down arrow until you hear \"settings\", then arrow down to configuration, press **Enter**, and enable “save on exit” with **enter**.\n\n**note**: in later versions of Retroarch, the default menu has been set to Ozone. For an easier experience, especially with gamepads, you may switch to the \"XMB\" menu by going to settings, drivers, menu driver, and changing \"ozone\" to \"XMB.\" The rest of this guide assumes that you are using the XMB menu.\n\n## Set Narrator Speed\n\nIf you find that Retroarch is speaking too quickly or too slowly, you can change the speed.\n\n- From the Retroarch accessibility menu, press **Down arrow**.\n- Press the **Left arrow** to decrease the speed, and the **Right arrow** to increase it.\n\n## Navigate the Interface\n\nThe Retroarch user interface is composed of menus, dialog boxes, text-entry boxes, and so on. This does not include the games played using Retroarch. To navigate the interface, use the arrow keys to traverse menus, Enter to activate items, left and right arrow keys to adjust options, and backspace to go back to the previous menus. You can press the Shift key to get information on the currently focused menu item, and then Enter or Backspace to exit that dialog.\n\nThere are two main navigation elements to be aware of in Retroarch’s user interface. Menus are vertical, so you use the Up and Down arrows to navigate these. Tabs, sometimes called Vertical menus, are navigated with the Left and Right arrows. Main Menu, Settings, Netplay, Favorites, ETC. are tabs, but Load Core, Load Content, and Quit are menu items. To the left of the Main Menu, you’ll find the “Horizontal Menus,” which are lists of game systems and games which you’ve played on that system. For example, if you play Play Station games, there will be a menu of those. The games in each tab are in a vertical list, but the other game systems, like PlayStation Portable, will be in another tab to the left of that. Tabs like Favorites, Netplay, and Settings are to the right of the Main Menu.\n\n\n## AI Service\n\nThe AI service is a retroarch feature which takes a screenshot of the game being played, and can either translate the text in the image, speak the text, or speak the text with the same voice as the Narrator used for the Retroarch user interface. You will have to configure the AI service yourself, linking it with a translator, and setting up a key for it.\n\nThis can be useful for reading menus in games, unspoken character dialog, character dialog in another language, or other textual content, like instructions. Because the AI service uses Artificial Intelligence, the spoken text may not be completely accurate, as is all optical character recognition technology. If there is a table, it will be read one column at a time.\n\n\n### How to Enable the AI Service\n\nFrom the Main menu, press **Right Arrow** to move to the Settings menu. There, press **Down Arrow** until you reach the AI Service item, and press **Enter** to open it. Here, you can choose which mode the AI service will be in:\n\n- **Image Mode:** The service will capture an image of text, translate it, and send it back to the screen as an image.\n- **Speech Mode:** The Service will grab an image of text in a game, translate it if needed, and speak it using a third-party text to speech engine.\n- **Narrator Mode:** The AI service will grab an image of text, translate it if necessary, and send it to Retroarch’s accessibility system to be spoken by your operating system’s speech synthesizer.\n\nFor now, choose Narrator mode by pressing **Right Arrow** and down arrow to “Ai Service Enabled,” and if needed, turn it on with **Enter**.\n\nAlso, while you’re here, you can set the language to translate, and to translate to. For example, if you primarily play Japanese games, but you prefer to hear your games spoken in Esperanto, assuming you have a voice for that language, set the source language to “Japanese,” and the target language to “Esperanto.” You can also leave the source language at “Don’t care,” and the Service will guess the language of the game.\n\n\n### Sign up for ZTranslate\n\nTo use the AI Service, you need to link it with an online translation service. The easiest method is to use ZTranslate.\n\n- In your web browser, go to \n- Find the “Sign Up” link, and press **Enter** on it.\n- Fill out the form, and submit it to make an account there.\n- Check your email, and verify the account by clicking the included link.\n- When logged in, go to the “Settings” link, and press **Enter**.\n- Move to the “Quota” heading, and arrow down to the “API key” section.\n- Copy the API key, and paste it into a Notepad, text edit, GEdit, Pluma, or Nano file.\n\n\n### Configure the Service\n\nTo configure the service, go to the Settings link on ZTranslate’s site, and find the OCR Page. There, you can set confidence levels, which tell the Service what level, from 0 to 1, of confidence to translate the text with. In the Profile page, you can set and change personal information.\n\n\n### link Retroarch with your account\n\nTo link Retroarch with your ZTranslate account, find your Retroarch configuration file. Find your Retroarch folder:\n\n- Open Retroarch\n- Right arrow to Settings\n- Down Arrow to directories\n- Press Enter\n- Find the configuration directory and note the path to it, then exit retroarch.\n\nOpen the configuration directory, and then open Retroarch.cfg. There, change the line starting with\n\n\\#+beginexample aiserviceurl = \"=\" \\#+endexample\n\nHere, you can simply copy and paste the URL in quotes to your configuration file, replacing with your own key, getting rid of the less-than and greater-than signs.\n\n\n### Bind a key to the AI Service\n\nNow, for easy access, we can bind the AI Service command to a key. To do this:\n\n- Go into retroarch’s settings menu.\n- Arrow down to Input and press **Enter**.\n- Arrow down to “hotkey binds,” and press **Enter**.\n- Arrow down to “AI Service,” and press **Enter** and quickly press the key, just once, that you’d like to bind to it.\n- Press **Up Arrow** then **Down Arrow** to read the key that AI Service is bound to, to make sure it’s what you want.\n- Press **Backspace** a few times to exit those menus.\n\n\n## Use controllers\n\nRetroarch not only works with keyboards. One can, if their headphones have a long enough chord, or their controller has a headphone jack, play games, and use the AI Service, right from a game controller. Usually, all one has to do is plug in a controller, and retroarch automatically configures and works with it. Sometimes, though, Retroarch’s control mappings are not to the user’s liking, some some reconfiguration is in order.\n\n\n### Map controls\n\nTo map controls, go to the settings menu in Retroarch, arrow down to User one binds, press **Enter**, and down arrow to a button you want to configure. Press **Enter**, and then quickly press once the button you want the command, like “D-Pad Up,” to be mapped to. Repeat this with all other buttons, and press **Backspace** to exit that menu.\n\n\n# Bind Hotkeys\n\nYou can also bind hotkeys. This is useful for binding commands, like AI Service, Rewind, or Fast Forward, to a controller button. To do this, go into the Settings menu, then “Input,” then “Hotkey Binds.” Arrow down to the command you’d like to configure a key for, press **Enter**, press a key on the keyboard or button on the controller, and it’ll be bound.\n\n\n# Download Cores\n\nIn retroarch, cores are video game console emulators, game engines, video and picture viewers, or game music players. To download one, from the main menu, go to “load core,” and press **Enter**. Then, arrow down to “Download a core,” and press **Enter**.\n\nIn this list, you’ll find a lot of cores which have year numbers or other differentiating words after it. These are alternatives, in case the main core, the one without year numbers or specifying words beside it, do not work. For example, if there is “PPSSPP,” and “PPSSPP 2019,” it is good to go with “PPSSPP” first.\n\n\n# Update Cores\n\nCores, like many other programs, receive updates to make games run faster, more smoothly, or add compatibility with new games. Particularly, the “Play” core, which allows one to play PlayStation Two cores, will have future updates addressing speed and compatibility in many games, as it is a relatively new emulator. To check for updates, do the following:\n\n- In the Main Menu, arrow down to “online updater”.\n- Arrow down to “Update Installed cores,” and press **Enter**.\n\n\n# Load Content\n\nNow that we have cores, we can load content into them. Content can be a game, video file, picture, or game music file, depending on what core you use. Retroarch comes with Doom and Tomb Hunter open game engines, which are not yet accessible, but you can find enjoyable games for other systems that you can play using other cores.\n\nTo load content, choose “Load Content” from the main menu, use the arrow keys and Enter to navigate directories to the game on your computer, and press **Enter** on the game file to open it. If you do not see the game file, download a core that can play that kind of game.\n\nOnce you’ve pressed **Enter** on the game file, you’ll be presented with a list of cores that could open that type of file. Choose the right one for your game, and press **Enter**. The game will start, and you can begin having fun.\n\n\n## Use The Quick Menu\n\nThe Quick menu is a menu you can open within the game to customize controls, use Cheat Codes, save or load save states in the game, reset, or close the game. To open the Quick actions menu, press **F1**. To close it without making changes, press **Escape**.\n\n\n# Other gaming resources\n\nOther gaming resources for people who are blind include:\n\n- [The Audio Games site](https://audiogames.net) has a listing of accessible games and an active forum.\n- [AppleVis](https://www.applevis.com) has mobile game listings and a gaming forum.\n- [This project](https://github.com/devinprater/accessible-retro-games) is a voluntery listing of accessible retro games playable by the blind.\n\n\n## Getting More Help\n\nIf you run into an error in Retroarch itself, not cores or games, or a problem with the accessibility service, please check the [Retroarch Issues page](https://github.com/libretro/RetroArch/issues), and if you cannot find it, create a [Github account](https://github.com) and submit one of your own. If you’d like general help with using retroarch, join its [Discord server](https://www.retroarch.com/?page=discord) and ask your questions there.\n"
},
{
"path": "docs/guides/retroarch-cloud-sync.md",
"content": "# RetroArch Cloud Sync\n\nCloud Sync enables seamless synchronization of configuration and save data to a cloud server, allowing you to keep multiple devices in sync.\n\n## Supported Backends\n\nThere are three cloud sync backends available:\n\n| Backend | Platforms | Notes |\n|---------|-----------|-------|\n| **WebDAV** | All | Requires server URL, username, and password |\n| **iCloud** | macOS, iOS, tvOS | Uses CloudKit (Apple's database service) |\n| **iCloud Drive** | macOS, iOS | Uses iCloud Drive file storage |\n\n### WebDAV\n\nWebDAV is a standard protocol supported by many cloud providers and self-hosted solutions. You'll need:\n\n- A WebDAV server URL (e.g., `https://webdav.example.com/RetroArch/`)\n- Username and password\n\n### iCloud vs iCloud Drive\n\nBoth use your Apple iCloud account but work differently:\n\n- **iCloud** uses CloudKit, Apple's database service. Data is stored in a structured database format.\n- **iCloud Drive** stores files directly in iCloud Drive storage, similar to how other apps store documents.\n\n!!! note \"iCloud Drive files are not visible in Files.app\"\n Files synced via iCloud Drive are intentionally hidden from the Files app. This is by design—the sync system uses a manifest file to track file hashes, and direct editing of files would corrupt the sync state. Your data is safely stored in iCloud and syncs between devices, but you should only access it through RetroArch.\n\n## What Gets Synced\n\nCloud Sync can synchronize the following directories (each can be enabled/disabled individually):\n\n| Directory | Default | Contents |\n|-----------|---------|----------|\n| **Save Files & States** | On | Game saves (`.srm`) and save states |\n| **Configuration** | On | Core configs, core options, shader presets, MAME/FBNeo hiscores |\n| **Thumbnails** | Off | Custom thumbnails (use the thumbnail downloader for standard ones) |\n| **System Files** | Off | BIOS files, etc. (can be large; use with caution) |\n\n### Excluded Files\n\nThe following are automatically excluded from sync:\n\n- `retroarch.cfg` (main configuration file)\n- Playlist files (`content_*.lpl`)\n- `.DS_Store` files (macOS)\n\n## Configuration\n\n### Initial Setup (First Device)\n\nStart with your primary RetroArch device to establish the initial cloud state.\n\n1. Navigate to **Settings → Saving → Cloud Sync**\n2. Configure the following:\n\n| Setting | Description |\n|---------|-------------|\n| **Enable Cloud Sync** | Turn on to enable syncing |\n| **Destructive Cloud Sync** | When OFF, deleted/overwritten files are backed up locally |\n| **Cloud Sync Backend** | Select your backend (webdav, icloud, or icloud_drive) |\n| **Sync Saves** | Sync save files and save states |\n| **Sync Configs** | Sync configuration files |\n| **Sync Thumbnails** | Sync thumbnail images |\n| **Sync System** | Sync system/BIOS files |\n\nFor WebDAV, also configure:\n\n| Setting | Description |\n|---------|-------------|\n| **Cloud Storage URL** | Your WebDAV server URL (include trailing slash) |\n| **Username** | WebDAV username |\n| **Password** | WebDAV password |\n\n3. Save the configuration and restart RetroArch\n4. The initial sync will begin automatically (watch the status line at the bottom)\n\n### Adding Additional Devices\n\nConfigure each additional device with identical settings. Pay special attention to these directory settings—they must match across all devices:\n\n- Sort Saves into Folders by Core Name\n- Sort Save States into Folders by Core Name\n- Sort Saves into Folders by Content Directory\n- Sort Save States into Folders by Content Directory\n\n!!! warning\n If these settings don't match, devices will store files in different locations and sync will fail to merge them correctly.\n\n## How Cloud Sync Works\n\nCloud Sync uses a three-way merge algorithm with two manifest files:\n\n1. **Server Manifest** - Tracks what's stored in the cloud\n2. **Local Manifest** - Tracks what was last synced from this device\n\nWhen sync runs, RetroArch compares:\n\n- Current local files\n- Local manifest (what we last synced)\n- Server manifest (what the cloud has)\n\nThis allows the system to detect:\n\n- New local files → upload to cloud\n- New server files → download to device\n- Changed files → determine which version is newer\n- Deleted files → propagate deletion (or backup if non-destructive)\n- Conflicts → when both local and server changed the same file\n\n### Sync Mode\n\nThe **Sync Mode** setting controls when synchronization occurs:\n\n| Mode | Behavior |\n|------|----------|\n| **Automatic** (default) | Syncs on RetroArch startup and when cores are unloaded (returning to menu) |\n| **Manual** | Only syncs when you explicitly trigger it via **Sync Now** |\n\nIn **Automatic** mode, sync also runs when RetroArch resumes from the background on iOS.\n\nUse **Manual** mode if you want full control over when sync happens, or if you're on a metered connection and want to minimize data usage.\n\n### Sync Now\n\nThe **Sync Now** option (in Settings → Saving → Cloud Sync) manually triggers a sync. This works in both Automatic and Manual modes, allowing you to force a sync at any time.\n\n!!! tip\n Always close the running content (Close Content) and return to RetroArch's main menu before quitting RetroArch. This ensures your latest saves are synced. Quitting RetroArch while content is still running may skip the sync.\n\n### Conflict Resolution\n\nA conflict occurs when the same file is modified on multiple devices before they have a chance to sync. Specifically, a conflict is detected when:\n\n- The server version differs from what was last synced, AND\n- The local version also differs from what was last synced\n\nAnother conflict scenario is when one device deletes a file while another device modifies it.\n\n**Current behavior:** When a conflict is detected, RetroArch does not overwrite either version. The local file remains unchanged, the server file remains unchanged, and the conflict is logged. The file is temporarily excluded from sync until manually resolved.\n\n**Identifying conflicts:**\n\n- The status line will show \"Cloud Sync finished with conflicts\"\n- The log file will contain entries like: `[CloudSync] Conflicting change of saves/game.srm`\n\n**Resolving conflicts manually:**\n\n1. Enable debug logging and check the log to identify which files are conflicting\n2. Decide which version you want to keep (local or server)\n3. To keep the **server** version: delete or rename the local file, then let sync run again to download the server version\n4. To keep the **local** version: edit the local manifest file (`manifest.local` in your downloads/core assets directory) and update the conflicting file's hash to match the server's hash. On the next sync, RetroArch will see the local file as changed and upload it\n\n!!! tip\n To avoid conflicts, try not to use RetroArch on multiple devices simultaneously. Always let sync complete on one device before starting a session on another.\n\n### Non-Destructive Mode\n\nWhen **Destructive Cloud Sync** is OFF, files that would be deleted or overwritten are backed up to:\n\n```\n[core_assets_directory]/cloud_backups/[path]-YYMMDD-HHMMSS\n```\n\nThis allows recovery if sync makes unwanted changes.\n\n## Sync Status\n\nSync progress is displayed in the bottom-left status line. Messages include:\n\n- \"Cloud Sync in progress\" - Sync is running\n- \"Cloud Sync finished\" - Completed successfully\n- \"Cloud Sync finished with conflicts\" - Completed but conflicts were detected\n- \"Cloud Sync finished with failures\" - Some operations failed\n- \"Cloud Sync failed\" - Could not connect to backend\n\n## Troubleshooting\n\n### Enable Logging\n\n1. Go to **Settings → Logging**\n2. Enable **Log to File**\n3. Set **Logging Level** to **Debug**\n\nCloud Sync logs detailed information prefixed with `[CloudSync]`.\n\n### Common Issues\n\n**Sync not starting**\n\n- Verify Cloud Sync is enabled\n- Check network connectivity\n- For WebDAV: verify URL, username, and password\n- For iCloud: ensure you're signed into iCloud on the device\n\n**Files not syncing between devices**\n\n- Ensure directory organization settings match on all devices\n- Check that the same sync options (saves, configs, etc.) are enabled\n- Wait for sync to complete on one device before starting another\n\n**Conflicts appearing**\n\n- Avoid using multiple devices simultaneously\n- Always let sync complete before closing RetroArch\n- Check logs to identify which files are conflicting\n\n**iCloud Drive: \"Can't see files in Files.app\"**\n\nThis is intentional. Files are stored in a private app container to protect sync integrity. Your data is syncing correctly even though it's not visible in Files.app.\n"
},
{
"path": "docs/guides/rgui.md",
"content": "# RGUI (GUI)\n\n**RGUI** is a simple built-in user interface for RetroArch. It was originally introduced in the Wii port of RetroArch. RGUI was later refitted for use on low-powered and/or low-resolution devices.\n\n\n\n## Features\n\nWhile RGUI cannot configure absolutely everything, it can do the most common things you would want to do while using RetroArch.\n\n- Selecting libretro core\n- Load a game\n- Tweak per-libretro core options (e.g. colorization in GameBoy)\n- Load game from history (previous games played)\n- Save/load savestates\n- Configure shaders\n- Configure aspect ratios\n- Configure integer scale\n- Toggle fullscreen\n- Swap disk images (needed for PlayStation, see notes below!)\n- Take screenshots\n- Enable/disable real-time rewind\n- Simple input configuration\n- Mute/unmute audio\n- Exit RetroArch\n\n## Navigating the menus\n\nRegular input binds will apply, and binds here are defined in terms of the RetroPad, RetroArch's joypad abstraction.\n\n| Button | PC Default | Action |\n|--------|------------|--------|\n| **A button** | X/Return | Accept/OK |\n| **B button** | Z/Backspace | Back/Cancel |\n| **Select** | Right shift | Display tooltip |\n| **Up/Down D-pad** | Up/Down keys | Move up/down menus |\n| **Left/Right D-pad** | Left/Right keys | Toggle settings, or jump up/down menus |\n\n### Searching through lists with keyboard\nWhen using a keyboard, it can be slow to navigate a large list using gamepad-like controls. To help this, you can type `/` (forward slash) at any time to bring up a search box. Type a search string and hit Return. The cursor should jump to the first entry that matches. The search will match mid-path strings: However, if a match is found at the beginning of the path (like when searching for the first letter), the start-of-path match will take priority.\n\nThe forward slash is recognized on character basis, not on the key itself. This allows e.g. Norwegian layouts to type forward slash by pressing 'shift + 7'. Characters which are outside the ASCII set are recognized but ignored, as RGUI cannot render such characters anyway.\n\n## Config file\nBy default, RetroArch looks for a config in various places depending on OS:\n\n- **Linux/OSX**: `$XDG_CONFIG_HOME/retroarch/retroarch.cfg`, then `~/.config/retroarch/retroarch.cfg`, then `~/.retroarch.cfg`, and finally, as a fallback, `/etc/retroarch.cfg`.\n- **Windows**: `retroarch.cfg` in same folder as `retroarch.exe`, then `%APPDATA%\\retroarch.cfg`.\n\nTo override this, use `retroarch --config customconfig.cfg`. If you have some special options you want to store in separate config files you can use `retroarch --config baseconfig.cfg --appendconfig specialconfig.cfg`. See man-page and/or `--help` for detail.\n\n| Warning |\n|-------- |\n| While you are changing settings in runtime, they are not saved to disk afterwards on PC by default. If you want RetroArch to automatically write back the config, either set `config_save_on_exit = true` in config, or enable this under Settings -> Config Save On Exit from within RGUI. |\n\nBy design, the config file is considered immutable as it is likely maintained by the user, and should not be overwritten behind the users back. This is not the case on consoles however, where looking at the config manually isn't really an option for most users.\n\n### Configuring input\nCurrently you can configure two settings per player (on PC):\n\n- **Device**: Picks which gamepad to use for player N. The name of the pad is available.\n- **Device Type**: Picks which device type to use. This is relevant for the libretro core itself, and mostly useful for PlayStation, which needs to know if you're using a DualAnalog device or not.\n\n#### Configuring controller input\n* Configuring controller input is supported from within RGUI.\n* Normal gameplay binds as well as RGUI hotkey binding is supported. It is possible to bind everything in succession for convenience.\n\n#### Configuring keyboard input\nConfiguring keyboard input is currently not supported. To configure keyboard binds, it must be done outside RGUI.\n\n\n### Thumbnails\n\nRGUI thumbnail support requires the use of playlist files and thumbnail image packs: See [ROMs, Playlists, and Thumbnails](../guides/roms-playlists-thumbnails/).\n\nTo view existing playlists choose `Playlists` from the main menu or the `Load Content` menu. Select a playlist, and while browsing its contents use the RetroPad **Y button** (or **Spacebar** on PC) to toggle the full-screen thumbnail associated with the currently highlighted entry:\n\n*Thumbnails off:*\n\n\n\n*Thumbnails on:*\n\n\nAny thumbnail image larger than 320x240 will be downscaled automatically to fit the screen. Three downscaling methods are provided, allowing a choice between performance and quality. To switch between them, from the top menu select `Settings > User Interface > Appearance` and set the `Thumbnail Downscaling Method` option to one of:\n\n- **Nearest Neighbour (Fast)**: Simple (pixelated) nearest neighbour scaling. Has a very low impact on performance, and should be usable on any hardware.\n- **Bilinear**: Smooth (although potentially blurry) resampling. Slower than nearest neighbour, but should be usable on most hardware.\n- **Sinc/Lanczos3 (Slow)**: High quality resampling (although sometimes generates artefacts when source image contains dithering). May cause lag on very low end devices, but has no discernable performance impact on desktop-class hardware.\n\nNote that it is possible to display thumbnails on the right of a system's playlist:\n\n\n\nThis option can be toggled on at `Settings > User Interface > Appearance> Show Playlist Thumbnails`. The options immediately below it, `Top Thumbnail` and `Bottom Thumbnail`, can be set to display:\n\n- Boxart\n- Title Screen\n- Screenshot\n\n## Applying Shaders\n\nSee the [shaders user guide](shaders.md).\n\n## Themes\n\nThe visual appearance of RGUI may altered by choosing one of 32 built-in color themes. These change both the color scheme and sometimes the background wallpaper.\n\nFrom the top menu select `Settings > User Interface > Appearance` and cycle through the various `Menu Color Theme` options:\n\n\n\nSetting `Menu Color Theme` to `Custom` allows for an even greater degree of personalisation via the use of custom menu theme presets. A number of examples are provided in the RetroArch assets package, which may be downloaded by selecting from the top menu `Online Updater > Update Assets`.\n\nTo choose one of these examples, go to `Settings > User Interface > Appearance` and select the `Custom Menu Theme Preset` option. In the file browser that opens, navigate to the `rgui` directory and select a `.cfg` file.\n\n\n\nIcons are not supported by RGUI: It instead uses ASCII characters where possible.\n\n### Creating custom menu theme presets\n\nA custom menu theme preset is a plain text configuration file (e.g. `my_theme.cfg`) with the following contents:\n\n rgui_entry_normal_color = \"0xAARRGGBB\"\n rgui_entry_hover_color = \"0xAARRGGBB\"\n rgui_title_color = \"0xAARRGGBB\"\n rgui_bg_dark_color = \"0xAARRGGBB\"\n rgui_bg_light_color = \"0xAARRGGBB\"\n rgui_border_dark_color = \"0xAARRGGBB\"\n rgui_border_light_color = \"0xAARRGGBB\"\n rgui_wallpaper = \"wallpaper_file.png\"\n\n- **rgui_entry_normal_color**: Specifies the color of all 'normal' text displayed in any list.\n- **rgui_entry_hover_color**: Specifies the color of the currently selected entry, along with the core name and clock displayed at the bottom of the screen.\n- **rgui_bg_dark/light_color**: Specifies the menu background color. Setting `rgui_bg_dark_color` and `rgui_bg_light_color` to different values creates a chequerboard effect. Also used for the background of message boxes, and the title text when displaying thumbnails.\n- **rgui_border_dark/light_color**: Specifies the color of the border 'frame' drawn around the perimeter of the menu. Setting `rgui_border_dark_color` and `rgui_border_light_color` to different values creates a chequerboard effect. Also used for the frame of message boxes.\n- **rgui_wallpaper**: The relative file path to an optional wallpaper image. If this entry is omitted or left empty, no wallpaper is used.\n\n#### Color selection\n\nAll color values are given in 0xAARRGGBB 8-digit hex code format - i.e. the first two digits correspond to the alpha (transparency) value, while the remaining 6 are a normal [hex triplet](https://en.wikipedia.org/wiki/Web_colors#Hex_triplet). For example: fully opaque red would correspond to `0xFFFF0000`; 50% transparent green would correspond (approximately) to `0x7F00FF00`.\n\nFor maximum legibility, the alpha value for all text colors should be set to `FF` (fully opaque). For the background and border, setting partial transparency allows the currently loaded content to be seen 'through' the menu when opening it while running a game. Note, however, that setting partial transparency causes colors to appear darker than expected, so careful tuning of the [hex triplet](https://en.wikipedia.org/wiki/Web_colors#Hex_triplet) values is required. Appropriate transparency values are as follows:\n\n- When creating a dark theme *without wallpaper*, the border/bg alpha component should be set to `C0`.\n- When creating a light theme *without wallpaper*, the border/bg alpha component should be set to `E0`.\n- When creating a theme *with wallpaper*, the border/bg alpha component should be set to `FF`. (This is because it is very difficult to create a semi-transparent wallpaper image with proper colors, and so it is most practical to make everything fully opaque when using wallpapers)\n\n#### Creating wallpaper images\n\nRGUI wallpapers must have the following properties:\n\n- A resolution of exactly 320x240.\n- A color depth of 4 bits per pixel. (This is not *strictly* required, but using an image with greater color depth will not produce expected results)\n\nWallpapers should be generated in [PNG](https://en.wikipedia.org/wiki/Portable_Network_Graphics) format.\n\nTo produce a suitable image, the user should first create a regular 320x240 [PNG](https://en.wikipedia.org/wiki/Portable_Network_Graphics) file via any means at their disposal. [Inkscape](https://inkscape.org/) users may find the following simple template beneficial: [rgui_wallpaper_template.svg](rgui_wallpaper_template.svg)\n\nOnce the image is complete, it is necessary to reduce its color depth. This may be done via one of two methods:\n\n#### 1) Using pngquant (recommended):\n\n[pngquant](https://pngquant.org/) is a command-line utility for lossy compression of PNG files. It supports very high quality conversion of images to [indexed](https://en.wikipedia.org/wiki/Indexed_color) color, in a manner appropriate for *most* kinds of wallpaper.\n\nDownload/compile/install the latest version, then use the following command to process a wallpaper source file:\n\n > pngquant --posterize=4 --force -o \"WALLPAPER_NAME_indexed.png\" \"WALLPAPER_SOURCE.png\"\n\nOpen the output `WALLPAPER_NAME_indexed.png` file and check that colors/gradients appear correct. In most cases, the result will be agreeable. If odd 'speckles' are apparent, it may be necessary to adjust the colors in the source image (this is a black art, and beyond the scope of this document). If the image has unacceptable, uncorrectable dithering then the `WALLPAPER_NAME_indexed.png` file should be discarded, and the following alternate method used instead:\n\n#### 2) Using GIMP\n\n[GIMP](https://www.gimp.org/) is a well known image editor. In general it produces lower quality color reduction than [pngquant](https://pngquant.org/), but it can handle certain gradients and patterns that cause [pngquant](https://pngquant.org/) to stumble. Download/install the latest version, then:\n\n- Open the wallpaper source file.\n- From the menu, select `Image > Mode > Indexed...`\n- In the `Indexed Color Conversion` pop-up, select:\n - `Generate optimum palette`\n - `Maximum number of colors:` `16`\n - `Color dithering:` EITHER `Floyd-Steinberg (normal)` OR `Floyd-Steinberg (reduced color bleeding` (use whichever looks best, but the other options here will not work).\n - Press `Convert`.\n\n- Inspect the result. Some manual touch-up may be required. (If the image is disagreeable at this stage, then the wallpaper probably isn't going to work - so start over...)\n- If all is well, select from the menu `File > Export As...` and name the file `WALLPAPER_NAME_indexed.png`\n- In the `Export Image as PNG` pop-up, untick `Save color values from transparent pixels` and click `Export`.\n\nWhether [pngquant](https://pngquant.org/) or [GIMP](https://www.gimp.org/) is used to create `WALLPAPER_NAME_indexed.png`, a final stage of optimisation should be applied to generate a 'clean' output wallpaper. This can be done using [OptiPNG](http://optipng.sourceforge.net/). Download/compile/install the latest version, then run the following command:\n\n > optipng -o7 -strip=all -force -clobber -out `WALLPAPER_NAME.png` `WALLPAPER_NAME_indexed.png`\n\nEdit the custom menu theme preset configuration file such that `rgui_wallpaper` points to the resultant `WALLPAPER_NAME.png` image. Once appropriate text/background/border colors have been set, the theme is complete."
},
{
"path": "docs/guides/roms-playlists-thumbnails.md",
"content": "# ROMs, Playlists, and Thumbnails\n\n## Storing games and other content\nGame ROMs are the source media of the games that can be played using RetroArch cores. They can be actual dumps of read-only memory, tape/floppy/compact disc images, or some other format. The ROM files may be placed anywhere in the file system where RetroArch has access - note that some platforms (notably Android) are not able to browse the full storage. It is practical if the file browser start directory is configured to the directory where ROMs are stored.\n\nMany users sort their ROMs into subfolders named after the system which the ROMs belong to, which results in a folder arrangement such as:\n\n\n roms/\n Atari - 2600/\n Atari Game 1.zip\n Atari Game 2.zip\n Atari Game 3.zip\n Nintendo - Nintendo Entertainment System/\n NES Game 1.zip\n Sega - 32X/\n 32X Game 1.zip\n 32X Game 2.zip\n etc.\n etc.\n\nThis arrangement is not required and you are free to organize your ROMs as you prefer.\n\nAlso, as a general guideline, content from disc-based systems (Compact Disc images, etc.) should not be zipped for RetroArch use.\n\n## Working with Playlists\nPlaylists are the lists of games and other content that can be generated automatically by the RetroArch playlist scanner, generated by a third-party playlist utility or script, or edited by hand in a text editor.\n\n### RetroArch Playlist Scanner\n\nRetroArch incorporates a ROM scanning system to automatically produce playlists. Each ROM that is scanned by the playlist generator is checked against a database of ROMs that are known to be good copies.\n\nIn order for content to be correctly scanned, you must:\n\n - Have a compatible core already downloaded and installed (note: Scan Without Core Match setting removes this requirement)\n - Update `Core Info Files` via `Online Updater`\n - Update `Databases` via `Online Updater`\n - Restart RetroArch if any of the above was just done\n\nFor a normal scan, the content must match existing databases from the [libretro-database README](https://github.com/libretro/libretro-database#retroarch-database). If those conditions are met but content is still not being added automatically to a playlist, consider submitting an issue report on [github](https://www.github.com/libretro/RetroArch/issues).\n\nThere is an option to do manual scan, which does not require a database, and just needs the file names to match. Results from the manual scan will be playable (as long as the respective core supports them), but may lack thumbnails and do not appear in the Explore menu.\n\n### Designating which core to use\n\nRetroArch will attempt to detect and use the correct core for use with the ROMs that are used as part of a playlist. Under some circumstances, it may be useful to manually set a particular core for one of its playlists. This can be accomplished within the Playlists submenu in the RetroArch settings.\n\n## The Explore menu\n\nRetroArch provides an Explore menu which can be used for browsing all content that were added to playlists using any database attribute - release year, genre, etc.\n\n## Thumbnails\n\nRetroArch can display three types of thumbnails (small still pictures) for games in playlists:\n\n* In-game snapshots\n* Title screen snapshots\n* Boxart\n\n\n\nMost menu drivers support displaying two pictures when browsing the playlist. Displayed thumbnail types can be configured system-wide and also per playlist.\nAll menu drivers can display fullscreen thumbnails when pressing Start, and Y button (left) can be used to cycle between available pictures.\n\nThumbnails can be retrieved in multiple ways:\n\n* **Playlist thumbnail downloader (recommended)**: under Online Updater menu, all available thumbnails can be downloaded for a playlist. RetroArch will connect to http://thumbnails.libretro.com and retrieve the available thumbnail.\n - _WARNING_: the Playlist Thumbnails Updater process will over-write [custom thumbnails](#custom-thumbnails) set by the user for any game that has an associated thumbnail on the server.\n* **Individual thumbnail downloader**: there is a Download Thumbnails option for each entry in playlists. For RetroArch version 1.17.0 or later, you may hit download up to 3 times to try the flexible matches.\n* **On-demand thumbnail downloader**: if the respective option is enabled, RetroArch will try to download each thumbnail as the playlist is browsed. For RetroArch versions 1.17.0 or later, you may try flicking back and forth between entries up to 3 times to try the flexible matches. By default, on-demand thumbnail downloader does not try to fetch thumbnails based on ROM name, enable Settings / Playlist / Use filenames for thumbnail matching options for that.\n\nThumbnail packs are no longer available, use one of the above methods, or see [Custom Thumbnails](#custom-thumbnails) section below.\n\n## Playlist File Format Details\n\nEach playlist is a plain text file with an extension of `.lpl`. RetroArch 1.7.5 and later uses a JSON playlist format, although the backwards compatibility remains for the deprecated \"6-Line\" playlist format.\n\n**Note:** The paths in playlist files need to use the correct 'slash' character for the user's platform. Linux, OS X, and Android systems including Lakka and LudOS require forward slashes `/`, while Windows and DOS systems require backslashes `\\`.\n\n!!! Hint \"Hint for Windows Users\"\n The built-in Notepad editor cannot work with cross-platform text files such as RetroArch playlist files. Many users and developers recommend the free [Notepad++](https://notepad-plus-plus.org/) as a replacement although most alternative text editors will also work.\n\n### JSON Playlist Format\n\nThe following example is a single-entry MAME 2003-Plus playlist for [Alien Arena](https://www.arcade-museum.com/game_detail.php?game_id=6850) -- the silent version of this game is available through the RetroArch **Content Downloader** found in the **Online Updater** menu.\n\nThe romset with the `label` **Alien Arena** is located at `path` being `C:\\retroarch\\downloads\\alienar.zip`; note that the backslashes are doubled in JSON-formatted playlist entries so that the value of the `path` entry is `C:\\\\retroarch\\\\downloads\\\\alienar.zip`.\n\nThe ROM's corresponding `db_name` is `MAME 2003-Plus.lpl` which tells the menu driver which ROM database to use for looking up the game's metadata, thumbnails and game-system-specific icon-type. Menu drivers which implement playlist icons will use it to display it next to the ROM's name.\n\n#### `MAME 2003-Plus.lpl`\n```json\n{\n \"version\": \"1.0\",\n \"items\": [\n {\n \"path\": \"C:\\\\retroarch\\\\downloads\\\\alienar.zip\",\n \"label\": \"Alien Arena\",\n \"core_path\": \"DETECT\",\n \"core_name\": \"DETECT\",\n \"crc32\": \"01ACE2AB|crc\",\n \"db_name\": \"MAME 2003-Plus.lpl\"\n }\n ]\n}\n```\n\n!!! Alert\n You can omit the CRC or Serial for a manually created playlist entry by using the word `DETECT` instead, although it may limit your ability to use netplay for this playlist entry.\n\n### 6-Line Playlist Format (Deprecated)\n\n!!! Warning\n This playlist format is deprecated and may not always be supported by RetroArch in the future. New playlists should be created in the JSON format.\n\n**Each entry in a playlist must be composed of 6 lines:**\n\n#### `MAME 2003-Plus.lpl`\n```\nC:\\retroarch\\downloads\\alienar.zip\"\nAlien Arena\n/tmp/cores/mame2003_plus_libretro.so\nDETECT\n01ACE2AB|crc\nMAME 2003-Plus.lpl\n```\n\n1. The path to the ROM. This can either be an 'absolute' path or a path relative to the current working directory.\n2. The display name (you can use any name here)\n3. The path to the core, this libretro core will be used to launch the ROM. **You can use the word DETECT in place of the core path here. Once this is done you can set the core to be used for this playlist via the RetroArch GUI.**\n4. The displayname of the core, not really useful, we keep it there because the history list is also using this format\n5. CRC or Serial number for database and other matching purposes. **You can omit the CRC or Serial for a manually created playlist entry by using the word DETECT here instead, although it may limit your ability to use Netplay for this playlist entry.**\n6. The name of the system playlist to which this ROM is associated for looking up database metadata and thumbnails.\n\n## Creating custom playlists (cross-platform, cross-folders)\n\nThe standard playlists in RetroArch are usually platform-specific, i.e. `Nintendo - Game Boy.lpl` or `Sony - PlayStation.lpl`.\n\nMaybe you want to create custom playlists not limited within game-platforms or ROM-folders, e.g. \"Multiplayer Racing Games\" or \"Medieval Themed Games\".\n\n`content_favorites.lpl` and `content_history.lpl` are examples of default playlists which have this cross-platform behavior. So study them as an example first.\n\n### To create a custom playlist\n\n- Copy/merge content from platform-playlists files into a fresh playlist file inside `/playlists/` entitled `My Sorting Prefix - My Playlist Name.lpl`.\n- Be sure that the ROM entries follow the syntax as described in section: [JSON Playlist Format](#json-playlist-format).\n- The `db_name` attribute entry must be the ROM's corresponding `Exact Game Platform Playlists Name.lpl` (e.g. `Nintendo - Game Boy.lpl`) in order to be associated with the correct metadata and thumbnails.\n\n### Customize how/where your playlists are shown\n\n- Name your playlist in the scheme `My Sorting Prefix - My Playlist Name.lpl` or just `My Playlist Name.lpl`.\n- To tweak how playlists are displayed (with or without prefix) and how they are sorted (by prefix or by main name):\n - Go to: Settings > Playlists\n - Set options **Truncate Playlist Names** and **Sort Playlists After Name Truncation** to your liking.\n\n### How to set up custom playlists (Screenshots)\n\n\n\n\n\n\n\n\n\n\n\n### Third-Party Applications\n\nSince playlists are managed in text-only JSON format, there are a few third-party applications to help manage your playlists.\n\n- [RetroArch Playlist Editor](https://www.marcrobledo.com/retroarch-playlist-editor/) ([Source](https://github.com/marcrobledo/retroarch-playlist-editor))\n- [RetroArch Playlist Buddy](https://forums.libretro.com/t/retroarch-playlist-buddy-playlist-and-thumbnail-generation-app/8417) ([Source](https://github.com/markwkidd/ahk-retroarch-playlist-helpers))\n\n\n## Custom thumbnails\nUsers can set a custom thumbnail (i.e. a thumbnail that is different from the one automatically provided by RetroArch) by following the process below.\n\n!!! Hint \"Terminology Note: Game Name\"\n The term _Game Name_ refers to the name displayed [within a playlist in RetroArch](#retroarch-playlist-scanner), _not_ to the filename of the underlying file on the computer or device. _Game Name_ in this document is synonymous with playlist item label, playlist entry, content name, game title.\n\n- __File & Filename__. Name a PNG image file with a base filename that matches a game title displayed in a playlist. _Example_: if the game name is `Q-Bert's Qubes (USA)`, the intended image file must be named `Q-Bert's Qubes (USA).png` _(See below for additional flexible name matching options.)_\n- __Location.__ Place the PNG in the [correct folder](#thumbnail-folder-paths) for the relevant playlist.\n- __Use a compatible image type.__ In RetroArch versions later than 1.19.1, image formats other than PNG can be enabled (jpg, bmp, tga).\n- __Replace invalid characters.__ The thumbnail's base filename should exactly match the game's title displayed in the playlist with an important exception. The characters `` &*/:`<>?\\| `` in playlisted game titles must be replaced with `_` in the corresponding thumbnail filename.\n\n**Flexible name matching.** RetroArch versions 1.17.0 or later will attempt up to 3 different match techniques to associate a playlist item with a [properly located](#thumbnail-folder-paths) local thumbnail image file, in the following order:\n\n1. __ROM file name <-> .png file name match__. A ROM file `Q-Bert's Qubes (USA) (1983).a26` would receive the local thumbnail `Q-Bert's Qubes (USA) (1983).png` if it exists, regardless of how the game name appears in the RetroArch interface.\n2. __Game name <-> .png file name match__. `Q*Bert's Qubes (USA)` in a playlist would receive the local thumbnail `Q_Bert's Qubes (USA).png` if it exists. `*` is an invalid character and must be replaced with `_` in the image filename.\n3. __Short game name <-> .png file name match__. RetroArch looks for a local thumbnail named after a shortened form of the game name ignoring all text starting at the first round bracket, in other words ignoring informational tags like Region etc. `Q-Bert's Qubes (USA) (1983) (Parker Brothers) [h]` in a playlist would receive `Q-Bert's Qubes.png` if that local image file exists.\n\n### Thumbnail folder paths\nThumbnail image files must be stored in subfolders according to this structure:\n\n- `thumbnails` directory within Retroarch folder (or in different location configured by user via Settings > Directory > Thumbnails)\n - `Playlist Name` folder with the exact same name as the playlist, except without `.lpl` at the end. For example, `Atari - 2600`\n - `Named_Boxarts` subfolder for boxart/cover art\n - `Named_Snaps` subfolder for in-game snapshots\n - `Named_Titles` subfolder for in-game introductory title screens\n \n**Example** of a Windows path to a correctly set boxart folder: `RetroArch-Win64\\thumbnails\\Atari - 2600\\Named_Boxarts`\n\n**Example** of correct thumbnail file setup for content named `Q*bert's Qubes (USA)` in a default Atari 2600 playlist:\n\n```\n thumbnails/\n Atari - 2600/\n Named_Boxarts/\n Q_bert's Qubes (USA).png\n Named_Snaps/\n Q_bert's Qubes (USA).png\n Named_Titles/\n Q_bert's Qubes (USA).png\n```\n_Note the replacement of the playlist game name's `*` with `_` in the filenames, in accordance with invalid characters described above._\n \n## Contributing Thumbnails: How To\nThumbnails (along with [documentation](https://docs.libretro.com/meta/how-to-contribute/)) are an area where users who are not experienced in programming can contribute to RetroArch and in a way that helps all users. If you are interested in:\n\n- adding a thumbnail that you see is missing\n- correcting a thumbnail that is inaccurate or mistaken\n- replacing an existing thumbnail with a more representative or more aesthetic image\n\nfollow the steps below.\n\n### Overview\n1. Make an account on github.com\n2. \"Fork\" (copy) a [libretro thumbnail repository](https://github.com/libretro-thumbnails/libretro-thumbnails) to your own working area in github\n3. Make your image file changes to your copy of the project (aka your fork), while following [libretro thumbnail rules](https://github.com/libretro-thumbnails/libretro-thumbnails/blob/master/README.md) and the detailed guidelines below\n4. Create a \"Pull Request\" to request that the official project members review your proposed changes in order to accept it into RetroArch\n\n### Detailed Steps\n\n- __Fork the repository.__ Visit the github.com [libretro thumbnail repository](https://github.com/libretro-thumbnails/libretro-thumbnails) directory that you want to contribute to and click the fork button. You must fork it at the level of specific console. The Fork button won't appear if you're viewing a lower level folder in the respository like \"boxart\" or \"snaps.” _Example_. If you are doing GBA thumbnail work you should fork \n[Nintendo_-_Game_Boy_Advance](https://github.com/libretro-thumbnails/Nintendo_-_Game_Boy_Advance/).\n - **Why \"Fork\" your own**? Every part RetroArch's code and materials are open and accessible on github for input from any public volunteer (via Pull Request), but only official admins have direct edit access. Forking means copying your own copy of the project to freely draft changes in your own separate work area. Later you’ll send your proposed changes to the official project.\n - _Warning_: You must visit and fork the _current_ github project for the libretro thumbnail repository, for example [this one for SNES](https://github.com/libretro-thumbnails/Nintendo_-_Super_Nintendo_Entertainment_System), not to be confused with the similar-looking [archived version](https://github.com/libretro/libretro-thumbnails) which is inactive.\n - Correct: https://github.com/libretro-thumbnails/\n - Incorrect: https://github.com/libretro/libretro-thumbnails\n- __Add / Upload your new image file.__ When viewing a specific thumbnail type folder (e.g. Named_boxarts, Named_titles, Named_snaps) within *your fork* of the thumbnails repository, click the pulldown button (near top right) that says **Add file** to see 2 options:\n - +Create new File\n - Upload File.\n- __Choose \"Upload File\"__. Select your new chosen image file. In this stage you are uploading to your fork/branch of the project.\n - __Follow all guidelines for a proper contribution.__\n - Your choice of image file should meet the libretro thumbnail [rules in the ReadMe](https://github.com/libretro-thumbnails/libretro-thumbnails/blob/master/README.md), e.g. width scaled down to 512px.\n - For snaps (in-game screenshots), choose a good clear artful image that shows the art, spirit, or action of the game in normal or ideal gameplay. For examples of well-chosen well-composed in-game screenshots, see the back-of-box images printed on officially published games.\n - Name your image file correctly.\n - If replacing an existing image, name your new image file exactly as the previous one to guarantee that it will be matched to the relevant game name in RetroArch. (Unless your contribution is to correct an erroneous filename that doesn't match the game name database.)\n - If uploading a new thumbnail that has no prior existing version, research the naming conventions of libretro and how the game is named in databases. Name the image file according to the game name that RetroArch assigns in the playlist.\n - Use the correct path. Choose the correct console system folder and thumbnail type folder in the repository.\n- __Commit.__ The \"Commit\" button will save your change to your copy of the repository. You should generally commit to your own _master_. \n- __Pull Request (PR)__. Look for the button or option for a Pull Request when you Commit, though you may wait until you have finalized multiple changes (commits) and then include them all in a single PR. A Pull Request means sending a request to the official members to take your contribution (i.e. merge your fork) into the RetroArch repository. Admins will review your proposed changes and decide whether to accept it. You will eventually see a confirmation that it was approved or a discussion message if changes are needed. It may take time (even weeks or months) before an admin is able to examine the request, so please be patient.\n- __Verify that your Pull Request is active and correct.__ For example, if you made a Pull Request to contribute a Gameboy thumbnail then you can [view the request publicly listed at the official repository](https://github.com/libretro-thumbnails/Nintendo_-_Game_Boy/pulls).\n - _Warning_: It is possible to accidentally send a Pull Request to yourself if you committed your changes to your sub-branch instead of your own _master_. If needed, approve your PR to yourself to merge your sub-branch changes to your master, then do a Pull Request from your master to the official Libretro master project. For clarity on github.com, you can hover on any abbreviated branch path label to see a pop-up of the full path label. \n\n__About \"Syncing.\"__ Contribution work involves changing your copy of the project while other people may be changing the official repository _after_ you created your fork. Github provides options to keep both your copy (\"downstream\") and the official repository (\"upstream\") up-to-date with ongoing changes. If you make multiple changes within your fork, you can use the **Contribute button** > Open Pull Request to send all your changes as one PR. You can use the __Sync button__ button to update your fork with other people’s changes that have happened upstream.\n\n### The Thumbnail Server\n\nRetroArch retrieves thumbnails from a server (https://thumbnails.libretro.com/) that is updated periodically with imports from the Libretro thumbnail repository on github. After a pull request is approved for a contribution, some time may pass before the updates are sent to the server. The final server update must occur before users will see new image contributions in RetroArch playlists.\n\n## Custom icons/logos for playlist items\nRetroArch versions later than 1.19.1 include an option for the XMB menu driver to display custom per-game icons/logos in the playlist, instead of the default content icon, see [this example](https://github.com/libretro/RetroArch/pull/16758#issuecomment-2211771227). The required file format and subfolder structure follows the same pattern as [custom thumbnails](#custom-thumbnails):\n\n- Create a folder called `Named_Logos` alongside the `Named_Boxarts` thumbnail subfolder for the intended playlist\n- Put the logo image files there with base filenames that match the associated game's displayed name in the RetroArch playlist.\n\n**Limitations.** Logo support is only possible with XMB menu driver. The online thumbnail repositories do not contain logo collections. \n"
},
{
"path": "docs/guides/rpi.md",
"content": "The simple and optimized way to run RetroArch on Raspberry Pi is [Lakka](https://lakka.tv). However, if you already have a working Linux distribution on a Raspberry Pi, and just want to add RetroArch to it, that is also possible.\n\n## Installing from distribution repositories\nSeveral repositories carry RetroArch for the armhf/aarch64 architecture used by the RPi models. Some issues that can be encountered when using these:\n\n- RetroArch version may be old\n- Binary may be too generic and not optimized for the actual model\n- Package may be set up to not allow core downloads\n\nBut there is no harm in trying it. Use the system package manager (apt, yum or similar) to install `retroarch`.\n\n## Compiling from source\n\n### Major hardware and software variables\n\nA RetroArch binary on Raspberry Pi may be created in several flavors. The major factors are:\n\n- 32/64 bit OS. Only Pi 3 and 4 have a choice, older models can only use 32 bit OS. RetroArch can be compiled for both.\n- legacy or open source GL drivers (64-bit and Pi 4 does not have a choice). This can be set in `raspi-config`. Open source drivers (mesa) are recommended, see later for the legacy driver instructions.\n- GUI environment (X11 or Wayland) or special terminal based setup (KMS). Distributions that have no windowing environment, such as the \"lite\" versions of Raspberry Pi OS, may still run RetroArch using [KMS mode](../kms-mode).\n- audio driver in use: alsa or PulseAudio. If `pactl list cards` produces a list of sound devices, PA is in use, otherwise use alsa.\n- GPU memory: while it has no effect on compilation, at least 128 MB is recommended for Pi 0..3, for Pi 4 the default 76 MB is OK.\n\n## Installing necessary packages for compilation\n\nPreinstalled packages may vary between distribution and releases. List is given using Raspberry Pi OS (Debian Bullseye).\n\n- base packages needed for all described compilations: `sudo apt install -y build-essential libudev-dev libegl-dev libgles-dev libx11-xcb-dev`\n- sound driver for PulseAudio, if it is in use: `sudo apt install -y libpulse-dev`\n- sound driver for alsa, if PulseAudio is not used: `sudo apt install -y libasound2-dev` (there is no harm in installing both audio libraries)\n- vulkan driver for Pi 4: `sudo apt install -y libvulkan-dev mesa-vulkan-drivers`\n- additional packages for KMS build: `sudo apt install -y libavcodec-dev libavdevice-dev libavformat-dev libavresample-dev libdrm-common libdrm-dev libdrm2 libegl1-mesa-dev libfreetype6-dev libgbm-dev libgbm-dev libgbm1 libgles2 libgles2-mesa libgles2-mesa-dev libsdl-image1.2-dev libsdl2-dev libswresample-dev libswscale-dev libv4l-dev libxkbcommon-dev libxml2-dev yasm zlib1g-dev`\n\n## Retrieving RetroArch code\n\nRetroArch can be retrieved from Git (it may be needed to install git: `sudo apt install git`):\n\n git clone https://github.com/libretro/RetroArch -b v1.15.0\n cd RetroArch\n\nor alternatively, just downloaded as a specific version (somewhat faster, but can not be easily updated and recompiled):\n\n wget https://github.com/libretro/RetroArch/archive/refs/tags/v1.15.0.tar.gz\n tar xvfz v1.15.0.tar.gz\n cd RetroArch-1.15.0\n\n## Configuration options\n\nConfiguration for RPi 0..3 32-bit, disabling the legacy GL driver, GL1 support, enabling OpenGL ES instead of OpenGL, and adding support for the floating point unit found in all Pi's:\n\n ./configure --disable-videocore --disable-opengl1 --enable-opengles --enable-floathard\n\nConfiguration for RPi 3 64-bit, where the floating point unit is default:\n\n ./configure --disable-videocore --disable-opengl1 --enable-opengles\n\nConfiguration for RPi 4, adding OpenGL ES 3.1 support:\n\n ./configure --disable-videocore --disable-opengl1 --enable-opengles --enable-opengles3 --enable-opengles3_1\n\nSeveral options can be added as a doublecheck. If the necessary libraries are installed, these are picked up automatically, adding the option ensures that missing libraries can not go unnoticed.\n\n- `--enable-pulse` for PulseAudio sound driver\n- `--enable-alsa` for ALSA sound driver\n- `--enable-udev` for udev input/joypad driver\n- `--enable-ssl` for SSL connection (for downloading via https)\n- `--enable-vulkan` for Vulkan video driver (usable on Pi 4 only)\n- `--enable-kms` and `--enable-egl` for libraries necessary for KMS mode\n\nIn case of RPi 2 and 3 with 32-bit OS, NEON support can be explicitly enabled, by adding `CFLAGS='-mfpu=neon'` in front of `./configure` and `--enable-neon` to the options. In RetroArch, this has effect on the audio resampling algorithm compilation.\nIn all platforms, code optimization can be triggered by adding adding `CFLAGS='-march=native'` in front of .configure. This also means resulting binary may not be executable on an other Pi model.\n\n## Compiling and first updates\n\nCompilation is done with make command. In case of Pi 2 and later, compilation can be made faster by using 2 threads (-j 2). Using more than 2 threads is only recommended on Pi4 with 4GB or more RAM, as compilation of certain parts can eat up available memory and crawl system to a halt.\n\n make -j2\n\nCompiling depends on SD card access speed as well. On a Pi 1, it can take two hours, on Pi 2, around 30 min, Pi 4 can finish under 10 minutes.\n\nRetroArch can be also installed to the default location, which is usually not writable without sudo:\n\n sudo make install\n\nStart RetroArch with logging enabled (`./retroarch -v`) to catch any potential problems, and carry out initial updates in the Online Updater:\n\n- download assets\n- download core info files\n- download controller profiles\n- download shaders\n\nIn some cases, it may happen that input driver is not found and RetroArch will not start. In this case, add following line into `~/.config/retroarch/retroarch.cfg`, which at this point is almost empty:\n\n input_driver = \"udev\"\n\n## Downloading or compiling cores\n\nLibretro cores are built automatically for most platform, but for `armhf` (all Pi 32-bit) or `armv7-neon-hf` (Pi 2 onwards 32-bit), there are only some quite old versions on libretro buildbot. For `aarch64` (Pi 3 and 4 64-bit), there is none.\n\nBuilding cores can be tried using libretro-super scripts. It is not guaranteed that all cores can be compiled for these platforms, as it depends on the core itself. Example with vitaquake2 core:\n\n git clone https://github.com/libretro/libretro-super\n cd libretro-super\n ./libretro-fetch.sh vitaquake2\n ./libretro-build.sh vitaquake2\n cp dist/unix/*.so ~/.config/retroarch/cores\n\n## Further RetroArch settings\n\nIt is worth to check if the audio driver matches the one you want. Threaded video setting may be enabled for speed enhancement.\nIn KMS mode, the resolution setting is not exposed in the GUI if Vulkan is used, but it can still be modified. Edit following entries in `retroarch.cfg`, example for 1920x1080 50Hz:\n\n video_fullscreen = \"true\"\n video_fullscreen_x = \"1920\"\n video_fullscreen_y = \"1080\"\n video_windowed_fullscreen = \"false\"\n video_refresh_rate = \"50.0\"\n\nFor Pi 4 to enable 4K 60 Hz refresh, a line is needed in `config.txt`:\n\n hdmi_enable_4kp60=1\n\n[LED driver](../led-drivers/#sysled-driver) may also be enabled.\n\n## Legacy GL drivers and dispmanx\n\nInitially, RPi's VideoCore IV GPU (used for models earlier than RPi 4) was supported through vendor-specific Broadcom OpenGL/EGL libraries. This library is linked when `--enable-videocore` option is specified for `./configure`.\nTo compile RetroArch with legacy drivers, specify the `--enable-videcore` option instead of `--disable-videocore` above. Note that this library is only available for 32-bit systems. The binaries must be present in `/opt/vc` for compilation to work. Legacy drivers (or \"userland\") may be installed as `libraspberrypi-dev` package, or retrieved from https://github.com/raspberrypi/userland, and installed as:\n\n sudo apt install cmake\n git clone https://github.com/raspberrypi/userland.git\n cd userland/\n ./buildme /\n\nTo start RetroArch built this way, system must be switched to \"Legacy GL\" driver using `raspi-config`. This is not possible starting from Debian 12 Bookworm, so make sure you are running an older distribution.\nIn addition to this, RetroArch has a specific `dispmanx` video driver that utilizes the vendor-specific API instead of OpenGL. This video driver can be enabled with `--enable-dispmanx`, however it has only limited functionalities, in particular only RGUI is supported, and there are no widgets/overlays. As a corner case, dispmanx driver works in fake KMS mode.\nNeither dispmanx driver nor legacy GL drivers work with RetroArch in KMS mode. If you run into problems with compilation, try adding the userland to package-cfg by issuing `export PKG_CONFIG_PATH=/opt/vc/lib/pkgconfig/` before running `./configure`.\n\n## Checking OpenGL details\n\nActive GL driver can be checked by running `lsmod | grep vc4`. If this shows a loaded module, then the open source GL driver is in use.\nOpenGL performance can be checked with `glxgears` command:\n\n vblank_mode=0 glxgears -info\n\nThis command should display a window with spinning gears, and an FPS counter in the command line. Few hundred FPS is expected (even on RPi 1), since vblank_mode=0 will decouple refresh from the display refresh rate.\nIf glxgears can not be found, install `mesa-utils` package. If weird textures appear, you are running the legacy GL driver. If image is correct, but performance is low, check if the renderer has fallen back to software (LLVMpipe). In this case, run `raspi-config` and enable Glamor for acceleration.\n\nPi 0..3 supports OpenGL ES 2, Pi 4 supports OpenGL ES 3.1. To doublecheck the supported versions, use `glxinfo | grep version`.\n\n## Some tests in 2023\n\nTests were done as follows:\n\n- fresh installation of 2023-02-21 versions of Raspberry Pi OS\n- download, configure and build RetroArch 1.15.0\n- keep default settings of RA, download assets and core info files\n- run RA in the native monitor resolution (fullscreen, 1920x1080x60hz)\n- no shaders\n- Pi4 is also tested with 4kp60\n\nFPS of Ozone menu, after downloading assets, gl driver:\n\n| Setup | RPi 1 | RPi 2 | RPi 3 | RPi 4 | RPi 4 4K |\n|-------------------------------|:---------:|:---------:|:---------:|:---------:|:---------:|\n| Bullseye 32-bit, Mesa | ~5 | ~23 | ~29 | ~50 | ¬10 |\n| Bullseye 64-bit, Mesa | - | - | ~25 | ~55 | ¬13 |\n| Bullseye lite 32-bit, Mesa/KMS| ~20 | ~42 | ~50 | ~55 | ~26 |\n| Bullseye lite 64-bit, Mesa/KMS| - | - | ~48 | ~55 | ~23 |\n| Buster 32-bit, legacy | ~6/21 | ~9/40 | ~10/42 | - | - |\n\nOn Pi 4, where there is a choice of gl, glcore and vulkan drivers, both glcore and vulkan gave an increase of a few fps in the menu.\nWith legacy drivers, Ozone is much slower than XMB, so XMB values are also given. With Mesa, there is not much difference.\n\nFPS of VitaQuake2, default demo, default internal resolution (960x544), gl driver:\n\n| Setup | RPi 1 | RPi 2 | RPi 3 | RPi 4 | RPi 4 4K |\n|-------------------------------|:---------:|:---------:|:---------:|:---------:|:---------:|\n| Bullseye 32-bit, Mesa | <1 | ~12 | ~15 | ~52 | ~25 |\n| Bullseye 64-bit, Mesa | - | - | ~23 | >60 | ~26 |\n| Bullseye lite 32-bit, Mesa/KMS| ~3 | ~16 | ~25 | >60 | ~40 |\n| Bullseye lite 64-bit, Mesa/KMS| - | - | ~29 | >60 | ~45-50 |\n| Buster 32-bit, legacy | ~2 | ~13 | ~19 | - | - |\n\n## Problems experienced\n\nFollowing problems were experienced while writing this guide:\n\n- KMS mode: Vulkan with KMS does not work in Bullseye. This is due to Mesa version being too old for the necessary KHR_display extension (added in version 21).\n- KMS mode: Display can become shifted (even the menu) in some configurations.\n- KMS mode: VC4 driver is needed for RetroArch, but some distributions (like Ubuntu Server) do not include necessary `dtoverlay=vc4-kms-v3d` line in `config.txt` by default.\n- On Buster, the terminal that is used to launch RetroArch, will continue to receive keypresses\n- Compiling for Pi4 needs all 3 of the opengles command line switches, even though they seem redundant"
},
{
"path": "docs/guides/runahead.md",
"content": "# RetroArch Run Ahead\n\nEvery game has a certain built-in amount of lag, some react on the next displayed frame, some can take 2, 3 or even more frames before an action on the gamepad finally get rendered on screen.\nThe Run Ahead feature calculates the frames as fast as possible in the background to \"rollback\" the action as close as possible to the input command requested.\n\nThat feature deals with \"internal\" game logic lag.\nThis means you can still take advantage of other RetroArch lag reduction methods that happens later, such as Hard GPU Sync or Frame Delay.\n\nIt's located in **Quickmenu > Latency** (also in Settings > Latency).\n\n## How many frames to Run Ahead?\n\nWe need to find **the shortest internal input lag** a game can have, it's usually just moving the character:\n\n- Pause emulation (press \"P\" hotkey on keyboard).\n- Press and hold a direction on the controller.\n- Advance emulation frame by frame (press \"K\" hotkey on keyboard) until the character moves.\n\nAt best an action will be visible on the next frame, so the frames of lag are **the amount of time you pushed \"K\" minus 1**.\n\nIf you did select an higher number than needed, you will see a stutter/rollback when pushing buttons and possibly various weirdness.\nIf you selected a lower number, repeating the test above will take more than 1 push on the \"K\" hotkey to see your character move.\n\n## Can I always use Run Ahead?\n\n**Run Ahead relies on save states** so they need to be clean and fast enough.\nIf a core doesn't support them, this can not work.\nUsing **Second Instance** mode works around some save states limitation, use it if possible.\n\nCalculating several frames in advance means that your machine must be fast enough to run the core at that level of speed.\n**The higher the number of frames you are going to run ahead of emulation, the higher demands it places on your CPU.**\n\n## More detailed explanation\nHere is a more detailed explanation on runahead by its author Dwedit.\n\nHow the Run-Ahead feature currently works:\n\nThere are two modes of operation.\n\n- Single-Instance Mode\n- Two-Instance Mode\n\nIn Single-Instance mode, when it wants to run a frame, instead it does this:\n\n- Disable audio and video, run a frame, Save State\n- Run additional frames with audio and video disabled if we want to run ahead more than one frame\n- Enable audio and video and run the frame we want to see\n- Load State\n\nAll save states and load states are done to ram and never reach the disk.\n\nIn Two-Instance mode, it does this:\n\n- Primary core does Audio only, then saves state\n- Secondary core loads state, runs frames ahead discarding audio and video, then runs a frame with video only.\n\nFor performance reasons, it only resyncs the secondary core when input is dirty, otherwise it keeps running additional frames on the secondary core while the input is clean.\n\nWhy bother with Two-Instance mode at all? Many of the cores do not leave audio emulation in a clean state after loading state, so you would get buzzing. Using Two-Instance mode makes the primary core not do any load states and avoids that.\n\nIn Single-Instance mode, it is possible to improve performance further by running ahead without loading state while input is clean, but I am not currently doing that.\nI'd imagine there would be issues if calling the \"run a frame\" function left you in a state further along than a single frame.\n\nI'm also not doing any speculative inputs at all.\n"
},
{
"path": "docs/guides/shaders.md",
"content": "## Shader Presets\n\nShader Presets are combinations of one or more shaders. They can be loaded via `Quick Menu -> Shaders -> Load Shader Preset` and if you want to keep the shader between play sessions, you can save them as an \"automatic\" preset via `Quick Menu -> Shaders -> Save -> Save Global/Core/Content Directory/Game Preset`.\n\nGlobal presets are automatically applied in any content for any core, while the Core presets are applied in any content for that specific core. Content Directory presets apply to all content in a certain folder and Game presets apply just to one game. Note that content directory and game presets are also core specific.\n\nIf more than one automatic presets exist that could be applied, the most specific one wins out, so for example, if both a global and a game preset exists, the game preset will be used.\n\nYou can also save other shader presets via `Quick Menu -> Shaders -> Save -> Save Shader Preset As`, so if you create your \"perfect\" combination of shaders you can recall this at any time with `Load Shader Preset` then continue on to save it as an automatic preset. This will save time if using the same preset for multiple games or cores.\n\nBy default automatic presets will save to the retroarch config directory \n\nE.G. `/config/\"name-of-core\"/\"name-of-core/directory/\"game\".slangp|glslp|cgp` \n\nor \n\n`/config/global.slangp|glslp|cgp` \n\nPresets saved with save as are saved in the base `shaders` directory. The shader directory can be changed via `Settings -> Directory -> Video Shader`.\n\nThere are plenty of user created presets that come bundled with the RetroArch installation and these can be updated from `Main Menu -> Online Updater -> Update Slang|Glsl|Cg Shaders` *(You can find these presets in the shaders_glsl, shaders_slang, or shaders_cg subfolders of your shaders directory.)*\n\n[Example Screenshots](../shader/introduction.md)\n\n---\n\n## Editing Shader Parameters\n\nYou can edit shader presets or build your own using these tools:\n- **Shader Parameters**: Shows the list of all tweakable shader parameters, which are previewed live. If you save a **Simple Preset** all these changes can be saved without changing the shader chain\n\n## Editing the Shader Chain\nThe Shader Chain which is a stack of shader passes each one pointing to a specific shader file.\nAll Changes to the shader chain will force a **Full Preset** to be saved even if you have chosen to save a **Simple Preset**\n\n- **Prepend**\n - Prepend Preset adds a preset you choose before the currently loaded shader chain\n\n- **Append**\n - Append Preset adds a preset you choose after the currently loaded shader chain\n\n- **Shader Passes**: The number of shader passes to use.\n\n- For every **Shader Pass** you can configure:\n - **Shader #N**: Path to a shader. \n - All shaders must be of the same type (i.e. .glsl, .slang, or .cg).\n - **Shader #N Filter**: Hardware filter used for scaling. \n - **Don't Care** uses `Settings -> Video -> Bilinear Scale`.\n - **Shader #N Scale**: Scale for this pass. \n - The scale factor accumulates, i.e. 2x for first pass and 2x for second pass will give you a 4x total scale.\n - The last pass in the chain then is stretched to fullscreen using the `Settings -> Video -> Bilinear Scale` filter setting.\n - \"Don't Care\" uses **source** scale mode at 1x which means this pass will have the same resolution as the previous pass.\n - If the pass uses scaling methods which are not simple, (i.e. source scaling, different scaling factor for X/Y), the scaling factors can’t be displayed in the UI so the value shown may not be correct.\n- **Apply Changes**: You must use this to rebuild the shader chain to see your changes after adjusting any settings in the shader passes or the number of passes with **Shader Passes**.\n---\n\n## Simple Presets vs Full Presets\n\nThere are two different kind of presets, a **Simple Preset**, and a **Full Preset**. \n\na **Simple Preset** uses the `#reference` directive to reference an existing preset and apply parameter and texture path adjustments to it without affecting the original preset.\n\nA **Full Preset** is complete independent preset which includes all the passes and defines the **Shader Chain** used. \n\nIf the original preset a **Simple Preset** is referencing changes, the changes will be inherited. Conversely the **Full Preset** is completely independent from all other presets.\n\n---\n## Simple Presets\n\nA **Simple Preset** uses a `#reference \"\"` directive, which when loaded acts as if the preset with the given path was loaded, after this any parameter values and texture paths are applied on top, overriding the existing values. There is also a possibility to have a chain of presets, each preset a referencing another. The last `#reference ` needs to point to a full preset (one which has the definition of all the passes and required textures)\n\nFrom the shader menu you can create a **Simple Preset** by loading any shader preset, making changes to the shader parameters then saving the preset with the `Quick Menu -> Save -> Simple Presets` option set to `ON`. Only the shader parameter changes you made will be saved as values inside the simple preset. When the simple preset is loaded these values will be applied on top of the values from the original preset referred to in the `#reference` line. \n\nIf you make any changes to the **Shader Chain** like using **Prepend**, **Append**, or changing settings on any of the passes, a **Full Preset** will be saved instead which will include a full copy of all the passes and textures.\n\nNote that if a **Simple Preset** has been automatically loaded (Global, Core, Content Directory, Game Preset) and is then saved again the `#reference` path will point to the path specified inside the automatically loaded preset rather than at the automatically loaded preset itself. \n\n**Simple Preset Special Cases when Saving**\n\n- **Saving Over the loaded Preset:** \n - E.G. there are presets Preset_A, Preset_B, Preset_B references Preset_A. Preset_B is loaded then the user chooses to save over top of Preset_B. The reference to Preset_A is used instead of creating a a new reference to Preset_B which would be a cyclical reference. All current parameter values which differ from Preset_A will all be saved.\n- **Saving Over the preset referenced by the loaded preset:** \n - E.G. there are presets Preset_A, Preset_B and Preset_C, Preset_C references Preset_B which references Preset_A. The user loads Preset_C then saves over of Preset_B. The reference path to Preset A will be used to avoid a cyclical reference chain. All current parameter values which differ from Preset_A will all be saved.\n- **Saving Over a preset further up the chain:** \n - E.G. there are presets Preset_A, Preset_B, Preset_C and Preset_D. Preset_D references Preset_C which references Preset_B which references Preset_A. The user loads Preset_C then saves over of Preset_A. A full preset will be saved with all the passes and parameter values to avoid a cyclical reference chain.\n\n---\n## Advanced Referencing and .params files\n\n- A `Simple Preset` can/must include **one and only one** reference to a `Full Preset` or a chain terminating in a full preset. If you have references to more than one Full preset this will be considered an error and the preset will not load.\n- A simple preset can also include 0 or more references to `.params` files.\n- A `.params` file only includes parameter values and texture paths as well as references to other `.params` files.\n- Parameter value and texture paths in the reference chain are evaluated backward from the end of the chain, so the `.params` #references and parameter and texture values you see at the end of the chain will be applied last.\n\n---\n## Paths in Shader Presets\n\nPaths can be specified as relative paths or abbreviated root paths\n\n**Abbreviated Root Path Format** E.G. \n- `:/shaders/shaders_slang/stock.slang`\n- `:/` stands for the root of the Retroarch folder\n\n**Relative Format** E.G. \n- `shaders_slang/stock.slang`\n- This path corresponds to the path to stock.slang relative to a preset which is saved in the shaders folder\n\nWhen a shader preset is saved all paths will be automatically saved in whichever format creates the path with least directory depth.\n\n---\n\n## Wildcard Path Replacement\n\nPreset Wildcard Path replacement allows you to have fewer presets while addressing many scenarios by changing paths in response to the retroarch state when the preset is loaded. An example would be having one preset which could be used with the entire list of images from the Bezel Project.\n\nWhen a preset loads, text wildcards which are found in paths inside the presets will be replaced with values coming from the current RetroArch context. The replacement will be executed on both texture paths and reference paths, one or more wildcards can be placed in the filenames or paths. If no wildcards are found within the path, or the new path after replacing the wildcards does not exist on disk, the path will be left as it was before any replacement.\n\nNote: This replacement only happens only on preset load. If any retroarch context has changed since the preset was loaded the preset will need to be reloaded to react to this change.\n\nYou can see real-time logging, including info from the wildcard replacement, live in Retroarch by turning on logging and turn off log to file. This causes an additional text window to appear when launching Retroarch.\n\n---\nExample 1 - Have one preset show a different image for each game\n\n - `/shaders/MyBackground_$GAME$.png`\n\nif you were playing Ms. Pacman it would be replaced with:\n\n - `/shaders/MyBackground_mspacman.png`\n\nIf no file (image or preset file) is found at the new path with the replacements, we revert to the original path. If there is no file at this path the shader will fail to load.\n\n - `/shaders/MyBackground_$GAME$.png`\n\n---\nExample 2 - Have one preset show a specific image for all games who's ROMs are in the same folder\n\n - `/shaders/MyBackground_$CONTENT-DIR$.png`\n\nif your games were in a `MyVerticalGames` directory it would be replaced with:\n\n - `/shaders/MyBackground_MyVerticalGames.png`\n\nIf no file found at the new path with the replacements, we revert to the original path. If there is no file at this path the shader will fail to load.\n\n - `/shaders/MyBackground_$CONTENT-DIR$.png`\n\n---\n\nExample 3:\n\n - `/shaders/MyBackground_$VID-DRV$_$CORE$.png`\n\nIf you were playing a Saturn game on the YabaSanshiro core it would be replaced with\n\n - `/shaders/MyBackground_glcore_YabaSanshiro.png`\n\nIf no file found at the new path with the replacements, we revert to the original path. If there is no file at this path the shader will fail to load.\n\n - `/shaders/MyBackground_$VID-DRV$_$CORE$.png`\n\n-----\n---\n## Possible wildcards/tokens to be replaced:\n---\n`$CONTENT-DIR$` -> Content Directory of the game rom\n\n---\n`$CORE$` -> Core name\n\n---\n`$GAME$` -> Game file's name, E.G. ROM name\n\n---\n`$VID-DRV$` -> Video Driver: Currently active driver, possible replacement values:\n * `glcore`\n * `gl`\n * `vulkan`\n * `d3d11`\n * `d3d9_hlsl`\n * `N/A`\n\n---\n`$VID-DRV-SHADER-EXT$` -> Video Driver Shader File Extension: The extension of shaders type supported by the current video driver:\n * `cg`\n * `glsl`\n * `slang`\n\n---\n`$VID-DRV-PRESET-EXT$` -> Video Driver Preset File Extension: The extension of shaders type supported by the current video driver:\n * `cgp`\n * `glslp`\n * `slangp`\n\n---\n`$CORE-REQ-ROT$` -> Core Requested Rotation: Rotation the core is requesting, possible replacement values:\n * `CORE-REQ-ROT-0`\n * `CORE-REQ-ROT-90`\n * `CORE-REQ-ROT-180`\n * `CORE-REQ-ROT-270`\n\n---\n`$VID-ALLOW-CORE-ROT$` -> Video Allow Core Rotation: Reflects Retroarch's setting allowing the core requested rotation to affect the final rotation:\n * `VID-ALLOW-CORE-ROT-OFF`\n * `VID-ALLOW-CORE-ROT-ON`\n\n---\n`$VID-USER-ROT$` -> Video User Rotation: Rotation the core is requesting, possible replacement values, does not affect the UI:\n * `VID-USER-ROT-0`\n * `VID-USER-ROT-90`\n * `VID-USER-ROT-180`\n * `VID-USER-ROT-270`\n\n---\n`$VID-FINAL-ROT$` -> Video Final Rotation: Rotation which is the sum of the user rotation and the core rotation if it has been allowed, does not affect the UI:\n * `VID-FINAL-ROT-0`\n * `VID-FINAL-ROT-90`\n * `VID-FINAL-ROT-180`\n * `VID-FINAL-ROT-270`\n\n---\n`$SCREEN-ORIENT$` -> Screen Orientation: User adjusted screen orientation, will change windows from landscape to portrait, including the Retroarch UI:\n * `SCREEN-ORIENT-0`\n * `SCREEN-ORIENT-90`\n * `SCREEN-ORIENT-180`\n * `SCREEN-ORIENT-270`\n\n---\n`$VIEW-ASPECT-ORIENT$` -> Viewport Aspect Orientation: Orientation of the aspect ratio of the RetroArch viewport\n * `VIEW-ASPECT-ORIENT-HORZ`\n * `VIEW-ASPECT-ORIENT-VERT`\n\n---\n`$CORE-ASPECT-ORIENT$` -> Core Aspect Orientation: Orientation of the aspect ratio requested by the core\n * `CORE-ASPECT-ORIENT-HORZ`\n * `CORE-ASPECT-ORIENT-VERT`\n\n---\n`$PRESET_DIR$` -> Preset directory's name\n\n---\n`$PRESET$` -> Preset's name\n\n---\n\n\n## Command Line\n\nThe `--set-shader` command line option allows to set shaders directly, bypassing even automatic shader presets.\n\nExample use:\n\n retroarch --set-shader \"D:\\RetroArch\\shaders\\shaders_glsl\\blurs\\kawase_blur_5pass.glslp\" -L \n\nThe shader path can be relative to the shader directory:\n\n retroarch --set-shader \"shaders_glsl\\blurs\\kawase_blur_5pass.glslp\" -L \n\nAn empty parameter effectively disables any automatic presets:\n\n retroarch --set-shader \"\" -L \n\n\n### Converting Cg shaders to GLSL\n\nIn some cases, Cg shaders cannot be supported. This goes for OpenGL ES drivers, and when EGL OpenGL contexts are used (KMS mode for instance). Using Nvidia's `cgc` compiler, you can convert Cg shaders to GLSL shaders with the `cg2glsl` tool developed by us [here](https://github.com/Themaister/RetroArch/blob/master/tools/cg2glsl.py). It can convert single shaders as well as whole folder structures in batch.\n100% compatibility is not guaranteed, but almost all shaders should work fine. Cg presets (.cgp) are not converted at the moment, but converting them is as simple as copying over the .cgp, renaming it to .glslp, and replacing references to .cg files to .glsl.\n"
},
{
"path": "docs/guides/softpatching.md",
"content": "# Softpatching ROMs with RetroArch\n\nRetroArch currently supports the UPS, IPS, BPS, and XDelta[^1] patching formats. If you load `rom.bin` and one of the following is present, the ROM will be autopatched: `rom.ups`, `rom.ips` or `rom.bps`. Autopatching only takes place if the libretro implementation supports loading ROMs from memory.\n\nYou can apply multiple patches to one ROM by naming the patches with the `.ips$` extension, where `$` is a number. For example, given the following files...\n\n```\nrom.bin\nrom.ips\nrom.ips1\nrom.ips2\n```\n\n...`rom.bin` will have `rom.ips`, `rom.ips1`, and `rom.ips2` applied to it in that order.\n\n## **Cores Compatibility**\n\n### Bandai - WonderSwan/Color\n\n| Core | Supported |\n|--------------------------------------------|:---------:|\n| [Beetle Cygne](../library/beetle_cygne.md) | ✔ |\n\n### Coleco - ColecoVision\n\n| Core | Supported |\n|--------------------------------------------|:---------:|\n| [Gearcoleco](../library/gearcoleco.md) | ✔ |\n\n### NEC PC Engine - TurboGrafx-16 / PC Engine CD - TurboGrafx-CD\n\n| Core | Supported |\n|--------------------------------------------|:---------:|\n| [Geargrafx](../library/geargrafx.md) | ✔ |\n\n### Nintendo - DS\n\n| Core | Supported |\n|------------------------------------|:---------:|\n| [melonDS DS](../library/melonds_ds.md) | ✔ |\n\n### Nintendo - Game Boy / Color\n\n| Core | Supported |\n|------------------------------------|:---------:|\n| [Gambatte](../library/gambatte.md) | ✔ |\n| [Gearboy](../library/gearboy.md) | ✔ |\n| [Mesen-S](../library/mesen-s.md) | ✔ |\n| [mGBA](../library/mgba.md) | ✔ |\n| [SameBoy](../library/sameboy.md) | ✕ |\n| [TGB Dual](../library/tgb_dual.md) | ✔ |\n| [VBA-M](../library/vba_m.md) | ✔ |\n\n### Nintendo - Game Boy Advance\n\n| Core | Supported |\n|------------------------------------|:---------:|\n| [Meteor](../library/meteor.md) | ✔ |\n| [mGBA](../library/mgba.md) | ✔ |\n| [VBA-M](../library/vba_m.md) | ✔ |\n| [VBA Next](../library/vba_next.md) | ✔ |\n\n### Nintendo - NES / Famicom\n\n| Core | Supported |\n|------------------------------------------|:---------:|\n| [bnes](../library/bnes.md) | ✔ |\n| [FCEUmm](../library/fceumm.md) | ✔ |\n| [Mesen](../library/mesen.md) | ✔ |\n| [Nestopia](../library/nestopia.md) | ✔ |\n| [QuickNES](../library/quicknes.md) | ✔ |\n\n### Nintendo - SNES / Famicom\n\n| Core | Supported |\n|----------------------------------------------------------------------|:---------:|\n| [Beetle bsnes](../library/beetle_bsnes.md) | ✔ |\n| [bsnes-mercury Accuracy](../library/bsnes_mercury_accuracy.md) | ✔ |\n| [bsnes-mercury Balanced](../library/bsnes_mercury_balanced.md) | ✔ |\n| [bsnes-mercury Performance](../library/bsnes_mercury_performance.md) | ✔ |\n| [bsnes Accuracy](../library/bsnes_accuracy.md) | ✔ |\n| [bsnes Balanced](../library/bsnes_balanced.md) | ✔ |\n| [bsnes C++98 (v085)](../library/bsnes_cplusplus98.md) | ✔ |\n| [bsnes Performance](../library/bsnes_performance.md) | ✔ |\n| [higan Accuracy](../library/higan_accuracy.md) | ✔ |\n| [nSide Balanced](../library/nside_balanced.md) | ✔ |\n| [Mesen-S](../library/mesen-s.md) | ✔ |\n| [Snes9x](../library/snes9x.md) | ✔ |\n| [Snes9x 2002](../library/snes9x_2002.md) | ✔ |\n| [Snes9x 2005](../library/snes9x_2005.md) | ✔ |\n| [Snes9x 2005 Plus](../library/snes9x_2005_plus.md) | ✔ |\n| [Snes9x 2010](../library/snes9x_2010.md) | ✔ |\n\n### Sega - Master System\n\n| Core | Supported |\n|--------------------------------------------------|:---------:|\n| [SMS Plus GX](../library/smsplus.md) | ✔ |\n| [Gearsystem](../library/gearsystem.md) | ✔ |\n| [Genesis Plus GX](../library/genesis_plus_gx.md) | ✕ |\n| [PicoDrive](../library/picodrive.md) | ✕ |\n\n### Sega - MegaDrive / Genesis\n\n| Core | Supported |\n|--------------------------------------------------|:---------:|\n| [BlastEm](../library/blastem.md) | ✔ |\n| [ClownMDEmu](../library/clownmdemu.md) | ✔ |\n| [Genesis Plus GX](../library/genesis_plus_gx.md) | ✔ |\n| [PicoDrive](../library/picodrive.md) | ✕ |\n\n### SNK - Neo Geo Pocket / Neo Geo Pocket Color\n\n| Core | Supported |\n|----------------------------------------------|:---------:|\n| [Beetle NeoPop](../library/beetle_neopop.md) | ✔ |\n| [RACE](../library/race.md) | ✕ |\n\n[^1]: When enabled at compile-time.\n"
},
{
"path": "docs/guides/softwarelist-getting-started.md",
"content": "# Getting started with Non-Acrcade/Software Emulation in Libretro MAME/MESS cores\n\nIn this chapter, the terms 'software' and 'software lists' are used to define non-arcade machines that are emulated by MAME/MESS. This kind of emulation requires a different planning approach than arcade machine emulation - it is more complicated to set up.\n\nThe basic principle is that software lists contained in the hash database are used to tell MAME/MESS how to start the game. This is an example entry from an Atari 7800 game also used further below (just for illustration purposes, no need to configure anything):\n\n\t\n\t\tAsteroids (NTSC)\n\t\t1984\n\t\tAtari\n\t\t\n\t\t\n\t\t\n\t\t\t\n\t\t\t\n\t\t\t\t\n\t\t\t\n\t\t\n\t\n\n## Understand the core variants\n\nThe libretro core ecosystem currently includes many multi software emulators that support software emulation. Three families exist: MAME, MESS and UME. These emulators are in turn available in multiple versions to allow users to best match a core to their preference.\n\n#### MAME current\nArcade (MAME) is currently the only MAME core for most host systems that supports the emulation of both software & arcade systems. The Arcade (MAME) core is updated regularly and most of the time in line with the official MAME project release. For an overview of the vast number of system that are emulated, have a look into the github directory of the hash files: https://github.com/mamedev/mame/tree/master/hash - every xml contains the readable metadata of one system, i.e. the games it supports.\n\nArcade (MAME 2016) is an archived snapshot of MAME from the 0.174 release. Currently it is no longer built for RetroArch.\n\n#### MESS (no longer provided)\nCurrently there is no dedicated MESS core in Retroarch, except for Android ARM64. It is also still provided in RetroPie as MESS2016_libretro core.\nMulti (MESS 2016) is a snapshot of the MESS project from v0.160. The MESS project later merged with the MAME project in MAME v0.162, i.e. in May 2015. The documentation of MESS is here: http://mess.redump.net/start - however some of its pages no longer work.\n\n#### UME (no longer provided)\nUME cores are no longer in RetroArch. Multi (UME 2015) was a snapshot of the Universal Machine Emulator. This was a precursor to the MAME/MESS merger, released by David Haywood (haze). The MAME and MESS project codebases co-existed in the MESS SVN development tree before they officially merged. This allowed haze to build and release the emulator with unmodified code from both projects under the name UME.\n\n## Use the correct version of romset for the desired emulator\n \nArcade (MAME) will be the focus of this guide, but also the old Arcade (MAME 2016), the MULTI (MESS 2015) and MULTI (UME 2015) cores had this ability (so this information is also provided for documentation purposes). As in MAME arcade emulation, each core requires its own distinct version of software list \"romsets\", which the emulator supports.\n\n| Emulator | Required ROM Version | Notes |\n| :---: | :---: | :---: |\n| MAME (latest version) | MAME (latest version) | or same version if not in sync with MAME upstream |\n| MAME 2016 | MAME 0.174 | RetroArch core no longer provided | \n| MESS 2015 | MAME 0.160 | RetroArch core no longer provided |\n| UME 2015 | MAME 0.160 | RetroArch core no longer provided |\n\n!!! tip\n For best results, start with a full software list ROM collection with a version that matches the emulator you are using. Individual romset zip files may not include BIOS ROMs, \"Parent\" romsets, necessary audio sample files, etc.\n Matching emulator and game versions is advised for maximum compatibility, but you may find mis-matched combinations also work.\n \n---\n\n## Running software list machines\nThere are two ways of configuring Retroarch to launch software list machines and games with MAME cores.\n\n 1. **Method 1 - MAME Frontend direct launch:** uses the inbuilt MAME logic and hash files to launch your games\n 2. **Method - RetroArch fontend friendly via Libretro CMD file launch:** uses an extra libretro feature to pass command line functions to the core \n\n### Method 1: MAME Frontend direct launch\n\nFor using the internal software list functions of MAME, you will need the right supporting files from the mainline MAME standalone emulator, i.e. the **hash files**. E.g. for the MAME (current) core, download the newest version of the Windows MAME emulator [here](https://www.mamedev.org/release.html). For earlier versions, make sure to get the correct version you require: The version of the hash files must match with the Libretro Core version.\n\n!!! tip\n In RetroArch, launch the desired core standalone, and on the bottom left, you find the correct MAME version that you want to download.\n\nExtract the contents and take the “hash” folder. Move this folder into the RetroArch folder structure. If your device has limited storage, just copy the hash files relating to the system you want to emulate.\n\n**RetroArch MAME system folder structure:**\nFolder structure/naming is very important here. The naming will depend on the machine you are trying to emulate but the folder structure will be the same. The example below is for the Atari 7800 system in MAME current.\n\n“YourPath” is the location of your Retroarch system folders. It varies depending on your operating system.\n!!! tip\n In RetroArch, head for Settings/Directory - the System/BIOS entry identifies the correct \"system\" folder.\n\nIf not already existent, create the following folder in your RetroArch “system” folder:\n\"YourPath\"/Retroarch/System/mame\n\nCopy the hash folder acquired earlier into the RetroArch system folder:\n\"YourPath\"/Retroarch/system/mame/hash\n\nSo for Atari 7800 you would have the following hash file:\nYourPath/Retroarch/system/mame/hash/a7800.xml\n\n(To do: check about .hsi file or use another example)\n\n**RetroArch MAME games folder structure:**\nCreate the following folders in your games directory of your choice (these will be mame naming dependent)\n\"YourPath\"/Games/Atari 7800/a7800\n(The last folder MUST be named as MAME requires, in this case “a7800”)\n\nPlace any .zip games and .zip bios files required here:\n\"YourPath\"/Games/Atari 7800/a7800.zip\n\"YourPath\"/Games/Atari 7800/a7800/asteroid.zip\n\n!!! note\n To place the bios file above a7800 is the way that official MAME stores the data and thus also recommended here. You could also put the bios into the a7800 folder, but that's not how official MAME does it. \n\nYou may also put or even extract the bios file to their own folder within the games directory\n\"YourPath\"/Games/Atari 7800/a7800/a7800/7800.rom\n\nNow launch the game: In RetroArch, choose \"Load Content\" and browse to asteroid.zip and launch with MAME current.\n\n(To Do: Add note about SoftList xml specifying the game names and crc and only supporting only those specific file names. Dummy files for CD-based games.)\n\n### Method 2: RetroArch frontend friendly via Libretro CMD file launching \n\nThis method follows the same folder structure as above, but you can use custom naming outside of the hash file included with MAME. It utilises some custom additions to the Libretro MAME Cores. Specifically the use of text files (.cmd) to replicate sending command line actions as you can with mainline MAME.\n\n**Creating a .cmd file**\nLet's follow the above example and create a dedicated asteroid.cmd file for the Atari 7800 game. It needs this line:\n\na7800 -cart asteroid -rp \"/\"YourPath\"/mame/roms/a7800\"\n\nTo do: Other path definitions, e.g. under Windows? Maybe explain the different sources, e.g. cart, flop etc?\n\nNow launch the game: In RetroArch, choose \"Load Content\" and browse to asteroid.cmd, and it should launch with MAME current.\n\nTo do: Cmd file example\n\n"
},
{
"path": "docs/guides/starting-a-game.md",
"content": "# Starting a game\n\n## Requirements\n* To load a game you need two things: A libretro core, and a ROM file.\n\t* Some systems/games may also require additional system files (such as a [BIOS](bios.md) to run correctly.\n\n## via 'Load Content/Core'\n\n### Load the core\n* Select `Load Core> Core` from the main menu, then choose a libretro core from the list.\n* Some releases of RetroArch come with a supply of cores built-in. If you don't have any cores installed, or want to add new ones, connect to the internet and select `Download a Core` from the bottom of the list.\n* Select your core in the list to load it.\n\n*See [Download Cores](download-cores.md).*\n\nWhen a libretro core is loaded, you will see the name and version of the core in the bottom left of the screen (Ozone/XMB/RGUI) or in the notification bar (GLUI).\n\n### Load the content\nYou can then browse for a ROM by selecting `Load Content`. Browse to your content's folder and select your ROM from the list. Then select `Current Core` or select another core from this list. The content will now launch.\n\nTo set the folder for the `Start Directory` option (which will otherwise start in the user's root directory), set `File Browser` in `Settings> Directory`.\n\n*See [File Browser](file-browser.md)*\n\n## via Playlists\n\nAlternatively, you can launch content from Playlists.\n\n* Scan for content to add to the playlist.\n\n*See [File Browser](file-browser.md) and [Import Content](import-content.md).*\n\n* Open your chosen Playlist.\n* Highlight your chosen row and select it. A new submenu will appear: Select `Run` to start the game.\n* If you have already `Set Core Association`, then the content will launch immediately. If you have not, one more list will ask you which Core you want to run the Content with.\n\nThis option will automatically choose the \"best\" core to run the content.\n\n## History / Favorites\nContent can be launched the 'History' and 'Favorites' playlists the same way as a regular Playlist.\n\n### Exiting a game\n\nPress the key/button combination to open the [Quick Menu](quick-menu.md) and select `Close Content`. This will safely close both the Content and its Core, and return you to the Main Menu of RetroArch.\n"
},
{
"path": "docs/guides/themes.md",
"content": "# Making Custom Themes\n\nThis page will guide you through the essential information needed to customize the core RetroArch theme.\n\nCredit for information goes to @baxysquare from this [forum post](https://forums.libretro.com/t/guide-to-making-themes/9554)\n\n!!! tip\n For examples of Menu Icon Themes and how to change them please read [this guide](https://github.com/libretro/docs/blob/master/docs/guides/theme-examples.md)\n\n## Skills & Tools Needed to Make and Contribute a Theme\n\n * A GitHub account and a basic understanding on how to fork a project and contribute via Pull Requests. The GitHub project that hosts the theme is the [retroarch-assets](https://github.com/libretro/retroarch-assets) repository.\n\n * Computer application(s) to create source icons. You can use any photo editing application such as Photoshop or GIMP, but a Vector-based application such as Illustrator or Inkscape is preferred. The preferred source format is SVG.\n\n * Conversion applications can come in handy. You can use ImageMagick to batch convert your source files to PNG format. Running your PNG files through ImageOptim can help reduce the icon file size without reducing the quality.\n\n * Attention to detail, patience and time. Be prepared to create and revise as you learn and grow. Feel free to take an existing theme, make modifications and then test your new design.\n\n## Required Theme Components\n\n * A truetype font renamed to \"font.ttf.\" You need to choose a typeface that has an open license. There is a wide selection to choose from at [Google Fonts](https://fonts.google.com/). If you have the tools and skills to make your own font and wish to contribute it via open license, feel free to do so.\n\n * A text file in GitHub Markdown format titled README.md. This file provides basic info on the theme itself along with specifications and guidelines to help others contribute to the theme. Make sure to include an attribution and license info for the included truetype font.\n\n * A PNG folder that contains a complete set of icons and a default background image.\n\n### Optional Theme Components\n\n * A SRC file containing SVG or other source files. If you choose not to include your source files, please host them elsewhere and indicate in the README.\n\n## Icons\n\nThe majority of time and effort involved in creating a theme is creating and revising the icons. The default Monochrome set includes just over 200 icons as listed below. That number will continue to grow as more cores and features are added.\n\n## Tips & Tricks for Creating Icons\n\n * The icons should be set to a 256x256 pixel canvas and should be centered on a 64x64 grid. You need to snap your point and line elements to the grid wherever possible. Libretro icons are scaled down, so when design elements do not line up with the grid, they tend to render oddly.\n\n * Give your icons room to breathe. While you are capable of using the full canvas, a 248x248 or 240x240 maximum icon size is highly recommended. Alternatively, you can keep your icons inside a 256x256 circular \"blueprint\". This will keep the top and the bottom of your icons from touching when you're scrolling through a list of icons.\n\n * Create and stick to a color palette of 64 colors or less. While you can use an unlimited palette, your icons will look more uniform and consistent as a theme.\n\n * Keep the details of your icons in harmony with one another. If one icon has too many design details, try to simplify it to match with the other icons. If an icon is lacking in detail, do what you can to add balance in comparison to the other designs.\n\nHere's a complete list of icons (and wallpaper) in the default set. Category, Type, Menu Level and Size info has been included to help you understand an icon's purpose and use in the user interface.\n\n| Name | Category | Type | Level | Size |\n|------------------------------------------------------------|----------|-------------|-------|-------|\n| FB Alpha - Arcade Games-content.png | Arcade | Content | 1 | 256 |\n| MAME-content.png | Arcade | Content | 1 | 256 |\n| MAME2003-content.png | Arcade | Content | 1 | 256 |\n| MAME2010-content.png | Arcade | Content | 1 | 256 |\n| Neo Geo-content.png | Arcade | Content | 1 | 256 |\n| FB Alpha - Arcade Games.png | Arcade | System | 0 | 256 |\n| MAME.png | Arcade | System | 0 | 256 |\n| MAME2003.png | Arcade | System | 0 | 256 |\n| MAME2010.png | Arcade | System | 0 | 256 |\n| Neo Geo.png | Arcade | System | 0 | 256 |\n| Lutro.png | Computer | Application | 0 | 256 |\n| DOS.png | Computer | Application | 0 | 256 |\n| Atari - ST-content.png | Computer | Content | 1 | 256 |\n| Commodore Amiga-content.png | Computer | Content | 1 | 256 |\n| DOS-content.png | Computer | Content | 1 | 256 |\n| Microsoft - MSX-content.png | Computer | Content | 1 | 256 |\n| Microsoft - MSX2-content.png | Computer | Content | 1 | 256 |\n| ScummVM-content.png | Computer | Content | 1 | 256 |\n| Sinclair - ZX 81-content.png | Computer | Content | 1 | 256 |\n| Sinclair - ZX Spectrum +3-content.png | Computer | Content | 1 | 256 |\n| Sinclair - ZX Spectrum-content.png | Computer | Content | 1 | 256 |\n| Lutro-content.png | Computer | Content | 1 | 256 |\n| Atari - ST.png | Computer | System | 0 | 256 |\n| Commodore Amiga.png | Computer | System | 0 | 256 |\n| Microsoft - MSX.png | Computer | System | 0 | 256 |\n| Microsoft - MSX2.png | Computer | System | 0 | 256 |\n| ScummVM.png | Computer | System | 0 | 256 |\n| Sinclair - ZX 81.png | Computer | System | 0 | 256 |\n| Sinclair - ZX Spectrum +3.png | Computer | System | 0 | 256 |\n| Sinclair - ZX Spectrum.png | Computer | System | 0 | 256 |\n| Atari - 2600-content.png | Console | Content | 1 | 256 |\n| Atari - 5200-content.png | Console | Content | 1 | 256 |\n| Atari - 7800-content.png | Console | Content | 1 | 256 |\n| Atari - Jaguar-content.png | Console | Content | 1 | 256 |\n| Bandai - WonderSwan Color-content.png | Console | Content | 1 | 256 |\n| Bandai - WonderSwan-content.png | Console | Content | 1 | 256 |\n| Coleco - ColecoVision-content.png | Console | Content | 1 | 256 |\n| GCE - Vectrex-content.png | Console | Content | 1 | 256 |\n| Magnavox - Odyssey2-content.png | Console | Content | 1 | 256 |\n| NEC - PC Engine - TurboGrafx 16-content.png | Console | Content | 1 | 256 |\n| NEC - PC Engine CD - TurboGrafx-CD-content.png | Console | Content | 1 | 256 |\n| NEC - PC Engine SuperGrafx-content.png | Console | Content | 1 | 256 |\n| NEC - PC-FX-content.png | Console | Content | 1 | 256 |\n| Nintendo - Family Computer Disk System-content.png | Console | Content | 1 | 256 |\n| Nintendo - GameCube-content.png | Console | Content | 1 | 256 |\n| Nintendo - Nintendo 64-content.png | Console | Content | 1 | 256 |\n| Nintendo - Nintendo 64DD-content.png | Console | Content | 1 | 256 |\n| Nintendo - Nintendo Entertainment System-content.png | Console | Content | 1 | 256 |\n| Nintendo - Satellaview-content.png | Console | Content | 1 | 256 |\n| Nintendo - Sufami Turbo-content.png | Console | Content | 1 | 256 |\n| Nintendo - Super Nintendo Entertainment System-content.png | Console | Content | 1 | 256 |\n| Nintendo - Wii-content.png | Console | Content | 1 | 256 |\n| Sega - 32X-content.png | Console | Content | 1 | 256 |\n| Sega - Dreamcast-content.png | Console | Content | 1 | 256 |\n| Sega - Master System - Mark III-content.png | Console | Content | 1 | 256 |\n| Sega - Mega Drive - Genesis-content.png | Console | Content | 1 | 256 |\n| Sega - Mega-CD - Sega CD-content.png | Console | Content | 1 | 256 |\n| Sega - PICO-content.png | Console | Content | 1 | 256 |\n| Sega - Saturn-content.png | Console | Content | 1 | 256 |\n| Sega - SG-1000-content.png | Console | Content | 1 | 256 |\n| SNK - Neo Geo CD-content.png | Console | Content | 1 | 256 |\n| SNK - Neo Geo-content.png | Console | Content | 1 | 256 |\n| Sony - PlayStation-content.png | Console | Content | 1 | 256 |\n| The 3DO Company - 3DO-content.png | Console | Content | 1 | 256 |\n| Uzebox-content.png | Console | Content | 1 | 256 |\n| Atari - 2600.png | Console | System | 0 | 256 |\n| Atari - 5200.png | Console | System | 0 | 256 |\n| Atari - 7800.png | Console | System | 0 | 256 |\n| Atari - Jaguar.png | Console | System | 0 | 256 |\n| Bandai - WonderSwan Color.png | Console | System | 0 | 256 |\n| Bandai - WonderSwan.png | Console | System | 0 | 256 |\n| Coleco - ColecoVision.png | Console | System | 0 | 256 |\n| GCE - Vectrex.png | Console | System | 0 | 256 |\n| Magnavox - Odyssey2.png | Console | System | 0 | 256 |\n| NEC - PC Engine - TurboGrafx 16.png | Console | System | 0 | 256 |\n| NEC - PC Engine CD - TurboGrafx-CD.png | Console | System | 0 | 256 |\n| NEC - PC Engine SuperGrafx.png | Console | System | 0 | 256 |\n| NEC - PC-FX.png | Console | System | 0 | 256 |\n| Nintendo - Family Computer Disk System.png | Console | System | 0 | 256 |\n| Nintendo - GameCube.png | Console | System | 0 | 256 |\n| Nintendo - Nintendo 64.png | Console | System | 0 | 256 |\n| Nintendo - Nintendo 64DD.png | Console | System | 0 | 256 |\n| Nintendo - Nintendo Entertainment System.png | Console | System | 0 | 256 |\n| Nintendo - Satellaview.png | Console | System | 0 | 256 |\n| Nintendo - Sufami Turbo.png | Console | System | 0 | 256 |\n| Nintendo - Super Nintendo Entertainment System.png | Console | System | 0 | 256 |\n| Nintendo - Wii.png | Console | System | 0 | 256 |\n| Sega - 32X.png | Console | System | 0 | 256 |\n| Sega - Dreamcast.png | Console | System | 0 | 256 |\n| Sega - Master System - Mark III.png | Console | System | 0 | 256 |\n| Sega - Mega Drive - Genesis.png | Console | System | 0 | 256 |\n| Sega - Mega-CD - Sega CD.png | Console | System | 0 | 256 |\n| Sega - PICO.png | Console | System | 0 | 256 |\n| Sega - Saturn.png | Console | System | 0 | 256 |\n| Sega - SG-1000.png | Console | System | 0 | 256 |\n| SNK - Neo Geo CD.png | Console | System | 0 | 256 |\n| SNK - Neo Geo.png | Console | System | 0 | 256 |\n| Sony - PlayStation.png | Console | System | 0 | 256 |\n| The 3DO Company - 3DO.png | Console | System | 0 | 256 |\n| Uzebox.png | Console | System | 0 | 256 |\n| Atari - Lynx-content.png | Handheld | Content | 1 | 256 |\n| Game Park - GP32-content.png | Handheld | Content | 1 | 256 |\n| Handheld Electronic Game-content.png | Handheld | Content | 1 | 256 |\n| Nintendo - Game Boy Advance-content.png | Handheld | Content | 1 | 256 |\n| Nintendo - Game Boy Color-content.png | Handheld | Content | 1 | 256 |\n| Nintendo - Game Boy-content.png | Handheld | Content | 1 | 256 |\n| Nintendo - Nintendo DS Decrypted-content.png | Handheld | Content | 1 | 256 |\n| Nintendo - Nintendo DS-content.png | Handheld | Content | 1 | 256 |\n| Nintendo - Pokemon Mini-content.png | Handheld | Content | 1 | 256 |\n| Nintendo - Virtual Boy-content.png | Handheld | Content | 1 | 256 |\n| Sega - Game Gear-content.png | Handheld | Content | 1 | 256 |\n| SNK - Neo Geo Pocket Color-content.png | Handheld | Content | 1 | 256 |\n| SNK - Neo Geo Pocket-content.png | Handheld | Content | 1 | 256 |\n| Sony - PlayStation Portable-content.png | Handheld | Content | 1 | 256 |\n| Tiger - Game.com-content.png | Handheld | Content | 1 | 256 |\n| Atari - Lynx.png | Handheld | System | 0 | 256 |\n| Game Park - GP32.png | Handheld | System | 0 | 256 |\n| Handheld Electronic Game.png | Handheld | System | 0 | 256 |\n| Nintendo - Game Boy Advance.png | Handheld | System | 0 | 256 |\n| Nintendo - Game Boy Color.png | Handheld | System | 0 | 256 |\n| Nintendo - Game Boy.png | Handheld | System | 0 | 256 |\n| Nintendo - Nintendo DS Decrypted.png | Handheld | System | 0 | 256 |\n| Nintendo - Nintendo DS.png | Handheld | System | 0 | 256 |\n| Nintendo - Pokemon Mini.png | Handheld | System | 0 | 256 |\n| Nintendo - Virtual Boy.png | Handheld | System | 0 | 256 |\n| Sega - Game Gear.png | Handheld | System | 0 | 256 |\n| SNK - Neo Geo Pocket Color.png | Handheld | System | 0 | 256 |\n| SNK - Neo Geo Pocket.png | Handheld | System | 0 | 256 |\n| Sony - PlayStation Portable.png | Handheld | System | 0 | 256 |\n| Tiger - Game.com.png | Handheld | System | 0 | 256 |\n| 2048.png | Port | Application | 0 | 256 |\n| Cave Story.png | Port | Application | 0 | 256 |\n| Dinothawr.png | Port | Application | 0 | 256 |\n| DOOM.png | Port | Application | 0 | 256 |\n| Dungeon Crawl Stone Soup.png | Port | Application | 0 | 256 |\n| Quake1.png | Port | Application | 0 | 256 |\n| 2048-content.png | Port | Content | 1 | 256 |\n| Cave Story-content.png | Port | Content | 1 | 256 |\n| Dinothawr-content.png | Port | Content | 1 | 256 |\n| DOOM-content.png | Port | Content | 1 | 256 |\n| Dungeon Crawl Stone Soup-content.png | Port | Content | 1 | 256 |\n| Quake1-content.png | Port | Content | 1 | 256 |\n| FFmpeg.png | XMB | Application | 0 | 256 |\n| default.png | XMB | Application | 0 | 256 |\n| Game.png | XMB | Application | 0 | 256 |\n| history.png | XMB | Application | 0 | 256 |\n| images.png | XMB | Application | 0 | 256 |\n| lakka.png | XMB | Application | 0 | 256 |\n| movies.png | XMB | Application | 0 | 256 |\n| netplay.png | XMB | Application | 0 | 256 |\n| retroarch.png | XMB | Application | 0 | 256 |\n| settings.png | XMB | Application | 0 | 256 |\n| musics.png | XMB | Application | 0 | 256 |\n| add.png | XMB | Application | 0 | 256 |\n| FFmpeg-content.png | XMB | Content | 1 | 256 |\n| music.png | XMB | Content | 1 | 256 |\n| image.png | XMB | Content | 1 | 256 |\n| movie.png | XMB | Content | 1 | 256 |\n| achievement-list.png | XMB | Content | 1 | 256 |\n| default-content.png | XMB | Content | 1 | 256 |\n| Game-content.png | XMB | Content | 1 | 256 |\n| netplay - iRoom-locked.png | XMB | Content | 1 | 256 |\n| netplay - iRoom.png | XMB | Content | 1 | 256 |\n| netplay - LAN Room-locked.png | XMB | Content | 1 | 256 |\n| netplay - LAN Room.png | XMB | Content | 1 | 256 |\n| netplay - rooms-locked.png | XMB | Content | 1 | 256 |\n| netplay - rooms.png | XMB | Content | 1 | 256 |\n| room.png | XMB | Content | 1 | 256 |\n| setting.png | XMB | Content | 1 | 256 |\n| zip.png | XMB | Content | 2 | 256 |\n| file.png | XMB | Content | 2 | Small |\n| folder.png | XMB | Content | 2 | Small |\n| dialog-slice.png | XMB | Dialog | 2 | 256 |\n| Libretro - Pad.png | XMB | Help | - | 256 |\n| battery-charging.png | XMB | Info Bar | - | Small |\n| battery-full.png | XMB | Info Bar | - | Small |\n| clock.png | XMB | Info Bar | - | Small |\n| undo.png | XMB | Info Bar | - | Small |\n| wifi.png | XMB | Info Bar | - | Small |\n| key-hover.png | XMB | Key | 2 | 256 |\n| key.png | XMB | Key | 2 | 256 |\n| arrow.png | XMB | Nav | 2 | Small |\n| close.png | XMB | Nav | 2 | Small |\n| core-cheat-options.png | XMB | Nav | 2 | Small |\n| core-disk-options.png | XMB | Nav | 2 | Small |\n| core-infos.png | XMB | Nav | 2 | Small |\n| core-input-remapping-options.png | XMB | Nav | 2 | Small |\n| core-options.png | XMB | Nav | 2 | Small |\n| core-shader-options.png | XMB | Nav | 2 | Small |\n| core.png | XMB | Nav | 2 | Small |\n| cursor.png | XMB | Nav | 2 | Small |\n| database.png | XMB | Nav | 2 | Small |\n| loadstate.png | XMB | Nav | 2 | Small |\n| pointer.png | XMB | Nav | 2 | Small |\n| reload.png | XMB | Nav | 2 | Small |\n| resume.png | XMB | Nav | 2 | Small |\n| run.png | XMB | Nav | 2 | Small |\n| savestate.png | XMB | Nav | 2 | Small |\n| screenshot.png | XMB | Nav | 2 | Small |\n| subsetting.png | XMB | Nav | 2 | Small |\n| off.png | XMB | Selection | 2 | Small |\n| on.png | XMB | Selection | 2 | Small |\n| bg.png | XMB | Wallpaper | - | 1080p |\n"
},
{
"path": "docs/guides/troubleshooting-retroarch.md",
"content": "# Troubleshooting RetroArch\n\n## Common video issues\n\n### Optimal vsync performance with dynamic rate control\nRetroArch uses Dynamic Rate Control to synchronize both video and audio at the same time. Synchronizing like this is a very demanding task timing-wise and dynamic rate control helps smooth out imperfections in timing which are guaranteed to arise. It can be disabled, but be aware that proper video/audio sync is nearly impossible to obtain.\n\nWhile using RetroArch, the default settings might not be adequate, and you might experience video stuttering and/or audio crackling. For correct synchronization, video_refresh_rate must be configured for your monitor. It cannot be detected accurately enough by OS-provided APIs (i.e. they tend to blatantly lie). For proper behavior, an accuracy of roughly ~0.1% is needed for dynamic rate control to smooth out the drifting. This is trivial to obtain by measuring manually under normal conditions. Without dynamic rate control one would need a \"perfect\" measurement which obviously isn't possible without special hardware.\n\nRetroArch can give you an estimate of your monitors refresh rate under video settings, which is updated in real-time using a running average over frame times. Make sure vysnc is enabled and working. Also make sure you're running in full-screen for more accurate results (compositors can easily interfere with timing). Press accept button on the estimated refresh rate to configure RetroArch with the estimated rate. If the running average isn't drifting much anymore, it's probably a good result.\n\nYou can also have RetroArch log the output at the end and configure things more manually. Start RetroArch directly in RGUI with retroarch --verbose --menu. Let it run uninterrupted for at least 4096 frames (displayed in title bar), and exit. In the log, you should see something like:\n\n RetroArch: Average monitor Hz: 59.869485 Hz. (1.347 % frame time deviation, based on 2048 last samples).\n\nIf you're unsure about the result, run this test several times and see if the results are consistent. Some systems tend to have very unreliable vsync behavior and this result will wildly fluctuate. You can use this value in `video_refresh_rate` and the video and audio should ideally be butter smooth if the game's FPS and monitor FPS are relatively close to each other. Playing a PAL game on 60 Hz monitor won't be perfect no matter what you do, however.\n\n### Threaded video\nIf your video driver has very bad performance, it is possible to run it on a thread to avoid almost all video driver overhead. Set video_threaded = true in config. Butter smooth VSync behavior in this case is impossible however, and latency might increase slighly. Use only if you cannot obtain full speed otherwise.\n\n### Low frame rate\n\n- Make sure your system meets the requirement of the core you picked\n- See if your core options aren't set too high for your system\n- Disable shaders\n- Lower the video scale setting\n- Try another video driver\n- Try enabling threaded video in the video options\n- Try disabling VSYNC\n- Disable Run-Ahead in the Latency options\n\n### Windows Vista and up video problems\nWindows Vista and up suffer problems with OpenGL in windowed mode where it appears to be impossible to obtain proper, smooth VSync behavior no matter what you do. If you are annoyed by this problem, and still want to play in windowed mode, you should use the D3D driver which doesn't have this problem. Disabling Aero sometimes helps OpenGL VSync behavior.\n\n## Input latency\nThere have been cases reported on excessive input lag in Windows for some users. It's not really input latency, but video driver latency. Some video drivers tend to buffer way too much in the name of increased performance. This problem is explained by Carmack here.\n\nRetroArch recently got an option to use a swap/fence sync method in OpenGL driver, which is reported to greatly lower input latency (thread). To enable it, set video_hard_sync = true in config or enable it from RGUI. To ensure that this sync method is actually used, make sure that you see this in the log:\n\n RetroArch: Querying GL extension: ARB_sync => exists\n RetroArch: [GL]: Using ARB_sync to reduce latency.\n\nDo note that this sync method can greatly reduce performance, and can turn smooth 60 fps into crawling 30 fps if there was not enough headroom in the performance. If you use KMS mode, using `video_hard_sync` won't help as it already does something like this.\n\n## Why isn’t my BIOS working?\n\n1. Make sure the BIOS files are placed into the correct directory\n2. Make sure they are named correctly so the core can identify them.\n3. Make sure it’s the correct version/region of a BIOS.\n4. Make sure your files are not corrupted (bad source, broken download, etc.).\n5. Make sure to check the log for any errors.\n\n# Getting ready to ask for help\n\nWhen problems arise with RetroArch, it is helpful for the developers and other volunteers to have certain standard information in order to find a solution. When requesting help with a RetroArch issue, please try to include:\n\n1. A description of the problem: What did you expect to happen, and what happened instead?\n2. The version of RetroArch you are using\n3. The hardware and operating system that you are using\n4. If the problem occurs while using a core: What is the the core name, its version, and the name of the game or media you were playing?\n5. RetroArch log files recorded when the problem occurs\n\nSee: Generating RetroArch Logs\n\n## \"OK, I've done these things. Where can I get help?\"\nIf you have questions or issues which cannot be resolved on your own, visit [the RetroArch forum](http://forums.libretro.com/)\n\n## \"I know my problem is a bug. Where can I report it?\"\nYou can report issues in the [RetroArch issues tracker](https://github.com/libretro/RetroArch/issues).\n"
},
{
"path": "docs/guides/tv.md",
"content": "# TV\n\n## The default picture mode may cause controller-to-screen latency\n\nMost TVs—both smart and non‑smart—ship with preconfigured picture modes that are not intended for gaming (for example, “Standard“/“Default“, or “Eco”). These modes introduce screen latency during gameplay. The delay between pressing a controller button and seeing the corresponding action on-screen can disrupt gameplay rhythm and offset any system or emulator optimizations for low latency. Budget LED models typically have the highest latency (around 40–70 ms), whereas OLED panels perform better. Note that this latency issue is TV related; Computer monitors (LCD/LED, CRT, etc.) avoid this issue entirely, as they are designed for interactive use with inherently minimal input lag across all modes.\n\n### Picture mode fix\n\n#### Modern TVs: Switch to \"Game\" picture mode\n\nOn the TV, navigate to **Settings → Picture Mode/Style**, and select “Game”. This addresses the root cause of input lag.\n\nEven if you don't notice any latency on the TV model, it's still good practice to enable this mode to ensure minimal input lag.\n\nAuto Low Latency Mode (ALLM) is not helpful for RetroArch. While ALLM—often found in gaming TVs—automatically detects gaming signals (such as from a console or streaming device) and switches to a low-latency preset, allowing you to keep picture modes like Cinema or Sports active during gameplay before reverting when the signal changes (e.g., to a movie), RetroArch typically does not send the required HDMI ALLM gaming flag. Manual activation of Game Mode remains essential for emulation setups.\n\nThus, understanding that the manufacturer ALLM features with various names listed below are useless for RetroArch saves you from wasting time evaluating them:\n\n| Manufacturer | Common Name(s) for ALLM |\n|--------------|--------------------------------------|\n| Hisense | Game Mode Pro |\n| LG | Instant Game Response, Game Optimizer |\n| Panasonic | Auto Low Latency Mode |\n| Philips | Auto Low Latency Mode |\n| Samsung | Auto Game Mode |\n| Sony | Auto Genre Picture Mode |\n| TCL | Auto Game Mode, Game Master |\n| Vizio | Auto Game Mode, ProGaming Engine |\n\n#### Older TVs: Enable RetroArch `Run-Ahead`\n\nFor older TVs without a \"Game\" picture mode, use RetroArch's `Settings` → `Latency` → `Run-Ahead` feature to reduce latency effectively.\n\n### Optionally: Use RetroArch's Shaders and Overlays\n\nShaders and overlays in RetroArch may be used instead of TV picture modes to apply authentic retro display effects and decorative elements directly to the emulated image, bypassing the hardware-dependent post-processing in non-Game picture modes that introduces input lag.\n\n## Frame rate fluctuations\n\n### Frame rate fluctuations fix: Use RetroArch Synchronization features\nThe Settings → Video → Synchronization menu in RetroArch provides several options to reduce screen tearing and stuttering by aligning frame output with the display’s refresh rate. These options—Vertical Sync (VSync) (default: On), Hard GPU Sync (default: Off), and Adaptive VSync (default: Off)—offer software-level synchronization that approximates some of the benefits of Variable Refresh Rate (VRR) found in many gaming TVs. This is necessary because RetroArch does not support native HDMI signaling to automatically enable VRR on compatible displays.\n"
},
{
"path": "docs/guides/web-player.md",
"content": "# What is it?\n\nIt is a version that works on modern internet browsers with the basic features of RetroArch. You don't need to install this version. You can add your content after selecting the desired Core.\n\n## How to use it\n\nYou can access it from this [link](https://web.libretro.com/) using a modern internet browser (For example: Google Chrome, Microsoft Edge etc.).\n\n!!! Warning\n Using an old internet browser may ruin the whole experience.\n\n\n\n1. Select the **Core** to run from the **first tab**(Clicking on the Core name will start running).\n*Core loading time may vary depending on the selected Core. During this time, your system's performance and actively used processes can cause your browser to crash. In this case, the option Wait or End will be displayed on your screen. In this case, click Wait, it may come out several times.*\n\n1. Choose your content to load by clicking **Add Content** from the **second tab**.\n*This will add your content to your browser's cache. We will be able to delete it later.*\n1. To access the file you uploaded `Load Content> Start Directory >`\n*You will also see it in the Downloads folder, where you can access open source content, which you can download from RetroArch's Content Downloader.*\n\n\n## Details\n\nWe can use the basic features of RetroArch.\n\n- How can I toggle Quick Menu?\n - You can either press F1 or click the Menu Toggle button which is \n- How can I go full screen?\n - You do not want to press F11 when the screen is selected, this key usually takes you to full screen, but in our scenario you need to use the Full Screen key which is .\n- How can I delete the cache?\n - There are many methods for this, you can do CTRL + F5, right click the cursor and go to the inspect and right click on the refresh button on the top left and clear the cache, press the clear cache key .\n\nYou can also click the `Help` button and read this information there.\n\n### Cores\n\nSupported Cores for now are as follows, may vary in this list.\n\n```\n2048\nBeetle Lynx\nBeetle NeoPop\nBeetle PCE FAST\nBeetle PC-FX\nBeetle VB\nBeetle WonderSwan\nChaiLove\nCraft\nFB Alpha 2012\nFB Alpha 2012 CPS1\nFB Alpha 2012 CPS2\nFB Alpha 2012 NeoGeo\nFCEUmm\nFFmpeg\nGambatte\nGame Music Emu\nGenesi Plus GX\ngPSP\nHandy\nMAME 2000\nMu\nNestopia\nNX Engine\n02em\nOpera\nPicoDrive\nPrBoom\nQuickNES\nFlycast\nSnes9x 2002\nSnes9x 2005\nSnes9x 2010\nSnes9x\nSquirrelJME\nTGB Dual\nTheodore (Thompson T08/T09)\nTryQuake\nVBA Next\nVecx\nYabause\n```\n"
},
{
"path": "docs/guides/xmb-menu-map.md",
"content": "# XMB Menu Map\n## Tabs\n### Main Menu\n - Load Core ... / **Quick Menu** (Changes when a core is loaded)\n - **Load Content**\n - Start Directory ...\n - Downloads ...\n - Playlists\n - (Varies by platform/device)\n - **File Browser** (Duplicate/Shortcut to Settings > File Browser)\n - Show Desktop Menu\n - **Online Updater**\n - **Core Downloader**\n - (Availability of cores varies by platform/device)\n - Update Installed Cores\n - Playlist Thumbnails Updater\n - **Content Downloader**\n - Update Core Infor Files\n - Update Assets\n - Update Controller Profiles\n - Update Cheats\n - Update Databases\n - Update Overlays\n - Update (Slang/GLSL/Cg; varies by active video driver) Shaders\n - On-Demand Thumbnail Downloads\n - **Information**\n - **Network Information**\n - (Varies by device)\n - **System Information**\n - (Varies by device)\n - **Database Manager**\n - (Varies by available databases)\n - **Cursor Manager**\n - (Varies by available cursors)\n - **Configuration File**\n - Load Configuration ...\n - Reset to Defaults\n - Save Current Configuration\n - Save New Configuration\n - **Help**\n - Basic Menu Controls\n - Restart RetroArch\n - Quit RetroArch\n \n### Settings\n - **Drivers**\n - Input\n - Controller\n - Video\n - Audio\n - Audio Resampler\n - Camera\n - Location\n - Menu\n - Record\n - MIDI\n - **Video**\n - **CRT SwitchRes**\n - CRT SwitchRes\n - CRT Super Resolution\n - X-Axis Centering\n - Porch Adjust\n - Use Custom Refresh Rate\n - **Output**\n - Video (Duplicate/Shortcut to Settings > Driver > video)\n - Monitor Index\n - Video Rotation\n - GPU Index\n - Vertical Refresh Rate\n - Estimated Screen Refresh Rate\n - Set Display-Reported Refresh Rate\n - **Fullscreen Mode**\n - Start in Fullscreen Mode\n - Windowed Fullscreen Mode\n - Fullscreen Width\n - Fullscreen Height\n - **Windowed Mode**\n - Windowed Scale\n - Window Opacity\n - Show Window Decorations\n - Remember Window Position and Size\n - Window Width\n - Window Height\n - **Scaling**\n - Integer Scale\n - Aspect Ratio\n - Custom Aspect Ratio\n - Crop Overscan\n - **Synchronization**\n - Vertical Sync (VSync)\n - Vsync Swap Interval\n - Frame Delay\n - Max swapchain images\n - Sync to Exact Content Framerate\n - Suspend Screensaver\n - Threaded Video\n - Black Frame Insertion\n - GPU Screenshot\n - Bilinear Filtering\n - Auto-Shader Delay\n - Video Filter ...\n - **Audio**\n - **Output**\n - Audio\n - Audio (Duplicate/Shortcut to Settings > Driver > Audio)\n - Device\n - Audio Latency (ms)\n - **Resampler**\n - Audio Resampler\n - Resampler Quality\n - Output Rate (Hz)\n - **Synchronization**\n - Synchronization\n - Maximum Timing Skew\n - Dynamic Audio Rate Control\n - **MIDI**\n - Input\n - Output\n - Volume\n - **Mixer**\n - Mixer Stream #1\n - Mixer Stream #2\n - Mixer Stream #3\n - Mixer Stream #4\n - Mixer Stream #5\n - Mixer Stream #6\n - Mixer Stream #7\n - Mixer Stream #8\n - Mixer Stream #9\n - Mixer Stream #10\n - Mixer Stream #11\n - Mixer Stream #12\n - Mixer Stream #13\n - Mixer Stream #14\n - Mixer Stream #15\n - Mixer Stream #16\n - **Menu Sounds**\n - Mixer\n - Enable 'OK' Sound\n - Enable 'Cancel' Sound\n - Enable 'Notice' Sound\n - Enable 'BGM' Sound\n - Mute\n - Mixer Mute\n - Mute When Fast-Forwarding\n - Volume Gain (dB)\n - Mixer Volume Gain (dB)\n - DSP Plugin ...\n - **Input**\n - Maximum Users\n - Polling Behavior\n - Remap Controls for This Core\n - Autoconfig\n - Input Button Axis Threshold\n - Touch Scale\n - Analog Deadzone\n - Analog Sensitivity\n - Bind Timeout\n - Bind Hold\n - Disable Windows Hotkeys (Restart)\n - Auxiliary Sensor Input\n - Auto Enable 'Game Focus' Mode\n - **Menu Controls**\n - Unified Menu Controls\n - Menu Swap OK and Cancel Buttons\n - Menu Scroll Acceleration\n - Menu Scroll Delay\n - **Hotkeys**\n - Confirm Quit\n - Menu Toggle Controller Combo\n - Hotkey Enable\n - Hotkey Enable Delay (Frames)\n - Fast-Forward (Toggle)\n - Fast-Forward (Hold)\n - Slow-Motion (Toggle)\n - Slow-Motion (Hold)\n - Load State\n - Save State\n - Fullscreen (Toggle)\n - Close Content\n - Quit RetroArch\n - Save State Slot +\n - Save State Slot -\n - Rewind\n - Record Input Replay (Toggle)\n - Pause (Toggle)\n - Frameadvance\n - Reset Game\n - Next Shader\n - Previous Shader\n - Next Cheat Index\n - Previous Cheat Index\n - Cheats (Toggle)\n - Take Screenshot\n - Audio Mute (Toggle)\n - On-Screen Keyboard (Toggle)\n - Show FPS (Toggle)\n - Send Debug Info\n - Netplay Hosting (Toggle)\n - Netplay Play/Spectate Mode (Toggle)\n - Volume Up\n - Volume Down\n - Next overlay\n - Disc Eject Toggle\n - Next Disc\n - Previous Disc\n - Grab Mouse (Toggle)\n - Game Focus (Toggle)\n - Desktop Menu (Toggle)\n - Menu (Toggle)\n - Recording (Toggle)\n - Streaming (Toggle)\n - Run-Ahead (Toggle)\n - AI Service\n - **Turbo Fire**\n - Turbo Period\n - Turbo Duty Cycle\n - Turbo Mode\n - Turbo Default Button\n - **Port 1 Controls**\n - Device Type\n - Analog to Digital Type\n - Device Index\n - Mouse Index\n - Set All Controls\n - Reset to Default Controls\n - Save Controller Profile\n - (RetroPad Mapping)\n - (Gun Mapping)\n - Turbo\n - **Port 2 Controls**\n - (Same as Port 1)\n - **Port 3 Controls**\n - (Same as Port 1)\n - **Port 4 Controls**\n - (Same as Port 1)\n - **Port 5 Controls**\n - (Same as Port 1)\n - (possibly more/less based on 'Maximum Users' setting)\n - **Latency**\n - Max swapchain images (Duplicate/Shortcut to Settings > Video > Synchronization > Max swapchain images)\n - Frame Delay\n - Audio Latency (ms)\n - Polling Behavior\n - **Run-Ahead to Reduce Latency**\n - Number of Frames to Run-Ahead\n - Use Second Instance for Run-Ahead\n - Hide Run-Ahead Warnings\n - **Core**\n - Hardware Shared Context\n - Allow Cores to Switch the Video Driver\n - Load Dummy on Core Shutdown\n - Check for Missing Firmware before Loading\n - Allow Rotation\n - Manage Cores\n - **Configuration**\n - Save Configuration on Quit\n - Load Content-Specific Core Option\n - Load Override Files Automatically\n - Load Remap Files Automatically\n - Use Global Core Options File\n - **Saving**\n - Sort Saves into Folders by Core Name\n - Sort Save States into Folders by Core Name\n - Sort Saves into Folders by Content Directory\n - Sort Save states into Folders by Content Directory\n - Don't Overwrite SaveRAM on Loading Save State\n - SaveRAM Autosave Interval\n - Increment Save State Index Automatically\n - Auto Save State\n - Load State Automatically\n - Save State Thumbnails\n - SaveRAM Compression\n - Save State Compression\n - Sort Screenshots into Folders by Content Directory\n - Write Saves to Content Directory\n - Write Save States to Content Directory\n - System Files are in Content Directory\n - Write Screenshots to Content Directory\n - Save Runtime Log (Per Core)\n - Save Runtime Log (Aggregate)\n - **Logging**\n - Logging Verbosity\n - Frontend Logging Level\n - Core Logging Level\n - Log to File\n - Performance Counters\n - **File Browser**\n - Show Hidden Files and Directories\n - Filter Unknown Extensions\n - Use Built-In Media Player\n - Use Built-In Image Viewer\n - Filter by Current Core\n - Remember Last Used Start Directory\n - **Frame Throttle**\n - **Rewind**\n - Rewind Support\n - Rewind Frames\n - Rewind Buffer Size (MB)\n - Rewind Buffer Size Step (MB)\n - **Frame Time Counter**\n - Estimated Screen Refresh Rate\n - Reset after Fast-Forward\n - Reset after Load State\n - Reset after Save State\n - Fast-Forward Rate\n - Slow-Motion Rate\n - Sync to Exact Content Framerate (Duplicate/Shortcut to Settings > Video > Synchronization > Sync to Exact Content Framerate)\n - Throttle Menu Framerate\n - **Recording**\n - Recording Quality\n - Custom recording Configuration ...\n - Recording Threads\n - Use Post Filter Recording\n - Use GPU Recording\n - Streaming Mode\n - Streaming Quality\n - Custom Streaming Configuration\n - Stream Title\n - Stream URL\n - UDP Stream Port\n - **On-Screen Display**\n - **On-Screen Overlay**\n - Display Overlay\n - Hide Overlay in Menu\n - Hide Overlay When Controller is Connected\n - Show Inputs on Overlay\n - Show Mouse Cursor With Overlay\n - Auto-Rotate Overlay\n - Auto-Scale Overlay\n - Overlay Preset ...\n - Overlay Opacity\n - (Landscape) Overlay Scale\n - (Landscape) Overlay Aspect Adjustment\n - (Landscape) Overlay Horizontal Separation\n - (Landscape) Overlay Vertical Separation\n - (Landscape) Overlay X Offset\n - (Landscape) Overlay Y Offset\n - (Portrait) Overlay Scale\n - (Portrait) Overlay Aspect Adjustment\n - (Portrait) Overlay Horizontal Separation\n - (Portrait) Overlay Vertical Separation\n - (Portrait) Overlay X Offset\n - (Portrait) Overlay Y Offset\n - **Video Layout**\n - Enable Video Layout\n - Video Layout Path ...\n - Selected View\n - **On-Screen Notification**\n - **Notification Visibility**\n - Display Framerate\n - Display Frame Count\n - Display Statistics\n - Display Memory Usage\n - \"Load Content\" Startup Notification\n - Input (Autoconfig) Connection Notification\n - Cheat Code Notifications\n - Input Remap Loaded Notifications\n - Config Override Loaded Notifications\n - Initial Disc Restored Notifications\n - Fast-Forward Notifications\n - Screenshot Notifications\n - Screenshot Notification Persistence\n - Screenshot Flash Effect\n - Refresh Rate Notifications\n - On-Screen Notifications\n - Graphics Widgets\n - Scale Graphics Widgets Automatically\n - Notification Font ...\n - Notification Size\n - **User Interface**\n - **Menu Item Visibility**\n - **Quick Menu**\n - Show 'Resume'\n - Show 'Restart'\n - Show 'Close Content'\n - Show 'Take Screenshot'\n - Show 'Save/Load State'\n - Show 'Undo Save/Load State'\n - Show 'Add to Favorites'\n - Show 'Start Recording'\n - Show 'Start Streaming'\n - Show 'Set Core Association'\n - Show 'Reset Core Association'\n - Show 'Options'\n - Show 'Controls'\n - Show 'Cheats'\n - Show 'Shaders'\n - Show 'Rewind'\n - Show 'Latency'\n - Show 'On-Screen Overlay\n - Show 'Video Layout\n - Show 'Save Core Overrides'\n - Show 'Save Game Overrides'\n - Show 'Information'\n - Show 'Download Thumbnails'\n - **Settings**\n - Show 'Drivers'\n - Show 'Video'\n - Show 'Audio'\n - Show 'Input'\n - Show 'Latency'\n - Show 'Core'\n - Show 'Configuration'\n - Show 'Saving'\n - Show 'Logging'\n - Show 'File Browser'\n - Show 'Recording'\n - Show 'On-Screen Display'\n - Show 'User Interface'\n - Show 'AI Service'\n - Show 'Accessibility'\n - Show 'Power Management'\n - Show 'Achievements'\n - Show 'Network'\n - Show 'Playlists'\n - Show 'User'\n - Show 'Directory'\n - Show 'Load Core'\n - Show 'Load Content'\n - Show 'Load Disc'\n - Show 'Dump Disc'\n - Show 'Online Updater'\n - Show 'Core Downloader'\n - Show Legacy 'Thumbnails Updater'\n - Show 'Information'\n - Show 'Configuration File'\n - Show 'Help'\n - Show 'Quit RetroArch'\n - Show 'Restart RetroArch'\n - Show 'Settings'\n - Set Password for Enabling 'Settings'\n - Show 'Explore'\n - Show 'Favorites'\n - Show 'Images'\n - Show 'Music'\n - Show 'Videos'\n - Show 'Netplay'\n - Show 'History'\n - Show 'Import Content'\n - Show 'Playlists'\n - Show Date and Time\n - Style of Date and Time\n - Date Separator\n - Show Battery Level\n - Show Core Name\n - Show Menu Sub-Labels\n - Display Start Screens\n - **Appearance**\n - Menu Scale Factor\n - Background Image ...\n - Dynamic Background\n - Background Opacity\n - Framebuffer Opacity\n - Horizontal Animation\n - Animation Horizontal Icon Highlight\n - Animation Move Up/Down\n - Animation Main Menu Opens/Closes\n - Menu Alpha Factor\n - Menu Font ...\n - Menu Font Color (Red)\n - Menu Font Color (Green)\n - Menu Font Color (Blue)\n - Menu Layout\n - Menu Icon Theme\n - Icon Shadows\n - Menu Shader Pipeline\n - Menu Color Theme\n - Thumbnails\n - Left Thumbnail\n - Thumbnails Vertical Disposition\n - Thumbnail Scale Factor\n - Thumbnail Upscaling Threshold\n - Ticker Text Animation\n - Ticker Text Speed\n - Smooth Ticker Text\n - Menu (Duplication/Shortcut to Settings > Driver > Menu)\n - Show Advanced Settings\n - Kiosk Mode\n - Navigation Wrap-Around\n - Pause Content When Menu is Active\n - Pause Content When Not Active\n - Resume Content after Using Save States\n - Resume Content after Changing Discs\n - Quit on Close Content\n - Menu Screensaver Timeout\n - Mouse Support\n - Touch Support\n - Threaded Tasks\n - UI Companion\n - Start UI Companion on Boot\n - Menu Bar\n - Desktop Menu (Restart Required)\n - Open Desktop Menu on Startup\n - Disable Desktop Composition\n - **AI Service**\n - AI Service Enabled\n - AI Service Output\n - AI Service URL\n - Pause During Translation\n - Source Language\n - Target Language\n - **Accessibility**\n - Accessibility Enable\n - Text-to-Speech Speed\n - **Power Management**\n - (Only available on certain devices)\n - **Achievements**\n - Achievements\n - Username\n - Password\n - Hardcore Mode\n - Leaderboards\n - Rich Presence\n - Achievement Badges\n - Test Unofficial Achievements\n - Unlock Sound\n - Verbose Mode\n - Automatic Screenshot\n - Start Active\n - **Network**\n - Publicly Announce Netplay\n - Use Relay Server\n - Server Address\n - Netplay TCP Port\n - Server Password\n - Server Spectate-Only Password\n - Netplay Spectator Mode\n - Allow Slave-Mode Clients\n - Disallow Non-Slave-Mode Clients\n - Netplay Stateless Mode\n - Netplay Check Frames\n - Input Latency Frames\n - Input Latency Frames Range\n - Netplay NAT Traversal\n - Digital Input Sharing\n - Analog Input Sharing\n - Request Device 1\n - Request Device 2\n - Request Device 3\n - Request Device 4\n - Request Device 5\n - Request Device 6\n - Request Device 7\n - Request Device 8\n - Request Device 9\n - Request Device 10\n - Request Device 11\n - Request Device 12\n - Request Device 13\n - Request Device 14\n - Request Device 15\n - Request Device 16\n - Network Commands\n - Network RetroPad\n - Network RetroPad Base Port\n - User 1 Network RetroPad\n - User 2 Network RetroPad\n - User 3 Network RetroPad\n - User 4 Network RetroPad\n - User 5 Network RetroPad\n - stdin Commands\n - On-Demand Thumbnail Downloads\n - **Updater**\n - Buildbot Cores URL\n - Buildbot Assets URL\n - Automatically Extract Downloaded Archive\n - Show Experimental Cores\n - Backup Cores When Updating\n - Core Backup History Size\n - **Playlists**\n - History\n - History Size\n - Favorites Size\n - Allow to Rename Entries\n - Allow to Remove Entries\n - Sort Playlists Alphabetically\n - Save Playlists Using Old Format\n - Compress Playlists\n - Show Associated Cores in Playlists\n - Show Playlist Sub-Labels\n - Playlist Sub-Label Runtime\n - 'Last Played' Date and Time Style\n - Fuzzy Archive Matching\n - Scan Without Core Match\n - Save Runtime Log (Per Core)\n - Save Runtime Log (Aggregate)\n - Portable Playlists\n - **Manage Playlists**\n - (Varies by user's playlists)\n - **User**\n - **Privacy**\n - (Varies by device)\n - **Accounts**\n - **RetroAchievements**\n - Username\n - Password\n - **YouTube**\n - YouTube Stream Key\n - **Twitch**\n - Twitch Stream Key\n - **Facebook Gaming**\n - Facebook Gaming Stream Key\n - Username\n - Language\n - **Directory**\n - System/BIOS\n - Downloads\n - Assets\n - Dynamic Backgrounds\n - Thumbnails\n - File Browser\n - Configs\n - Cores\n - Core Info\n - Databases\n - Cursor\n - Cheat Files\n - Video Filters\n - Audio Filters\n - Video Shaders\n - Recordings\n - Recording Configs\n - Overlays\n - Video Layouts\n - Screenshots\n - Input Autoconfig\n - Input Remaps\n - Playlists\n - Favorites Playlist\n - History Playlist\n - Images Playlist\n - Music Playlist\n - Videos Playlist\n - Runtime Logs\n - Save Files\n - Save States\n - Cache\n - System Event Logs\n \n### Favorites\n\n### History\n\n### Images\n\n### Music\n\n### Videos\n\n### Any Additional User-Created Playlists Appear Here\n\n### Netplay\n - Host\n - Connect to Netplay Host\n - Network (Duplicate/Shortcut to Settings > Network)\n - Refresh Netplay Host List\n \n### Import Content\n - Scan Directory\n - Scan File\n - **Manual Scan**\n - Content Directory\n - System Name\n - Custom System Name\n - Default Core\n - File Extensions\n - Scan Recursively\n - Scan Inside Archives\n - Arcade DAT File\n - Arcade DAT Filter\n - Overwrite Existing Playlist\n - Start Scan\n \n### Explore\n - Search Name ...\n - Show All\n \n## Quick Menu\n - Resume\n - Restart\n - Close Content\n - Take Screenshot\n - State Slot\n - Save State\n - Load State\n - Undo Load State\n - Undo Save State\n - Add to Favorites\n - Start Recording\n - Start Streaming\n - **Options**\n - (Varies by core)\n - **On-Screen Overlay** (Duplicate/Shortcut to Settings > On-Screen Display > On-Screen Overlay)\n - **Rewind** (Duplicate/Shortcut to Settings > Frame Throttle > Rewind)\n - **Latency** (Duplicate/Shortcut to Settings > Latency)\n - **Controls**\n - Load Remap File ...\n - Save Core Remap File\n - Save Content Directory Remap File\n - Save Game Remap File\n - **Turbo Fire** (Duplicate/Shortcut to Settings > Input > Turbo Fire)\n - **Port 1 Controls**\n - Device Type\n - Analog to Digital Type\n - (RetroPad to Core functions; varies by core)\n - **Port 2 Controls**\n - (Same as Port 1 Controls)\n - **Port 3 Controls**\n - (Same as Port 1 Controls)\n - **Port 4 Controls**\n - (Same as Port 1 Controls)\n - **Port 5 Controls**\n - (Same as Port 1 Controls)\n - (More or Fewer Ports based on Settings > Input > Maximum Users)\n - **Cheats**\n - Start or Continue Cheat Search\n - Load Cheat File (Replace) ...\n - Load Cheat File (Append) ...\n - Reload Game Specific Cheats\n - Save Cheat File As ...\n - Add New Cheat to Top\n - Add New Cheat to Bottom\n - Delete All Cheats\n - Auto-Apply Cheats During Game Load\n - Apply After Toggle\n - Apply Changes\n - **Shaders**\n - Video Shaders\n - Watch Shader Files for Changes\n - Remember Last Used Shader Directory\n - Load ...\n - **Save**\n - Simple Presets\n - Save Shader Preset As ...\n - Save Global Preset\n - Save Core Preset\n - Save Content Directory Preset\n - Save Game Preset\n - **Remove**\n - Apply Changes\n - **Shader Parameters**\n - (Varies by active shader preset)\n - **Shader Passes**\n - (Varies by active shader preset)\n - **Overrides**\n - Save Core Overrides\n - Save Content Directory Overrides\n - Save Game Overrides\n - **Information**\n - Name\n - File Path\n - Core\n - Runtime\n - Last Played\n - Download Thumbnails\n"
},
{
"path": "docs/guides/xmb.md",
"content": "# XMB (GUI)\n\n**XMB** was the default user interface for RetroArch, until it was succeeded by Ozone in RetroArch 1.7.6. It is based on Sony's \"cross-media bar\" GUI, most widely known from the PSP and PlayStation 3.\n\n\n\n## Menu Structure\nThe top-level menus and playlists are displayed in a single \"primary\" row, running from left to right. For the selected row item, a submenu column will appear below it.\n\n### Navigating the menus\n\nXMB is designed for use with a gamepad or keyboard.\n\nPress `left` or `right` to move along the primary row, and press `up` or `down` to scroll the column. The selected item in this column is always the first line under the primary row.\n\nThe user can press `backspace` to go back a step.\n\n\n## Input\n\nContent is controlled using a keyboard or gamepad, connected via USB or Bluetooth.\n\nSee [Input and Controls](input-and-controls.md)\n\n## Thumbnails\nBy default, no thumbnails are displayed. Up to 2 can be enabled: The primary thumbnail will appear on the lower right side of the screen when a Playlist entry is selected. The secondary thumbnail will appear on the left. Press the `spacebar` key to view the thumbnails full-screen (press `spacebar` again to toggle the view off).\n\nThumbnails can be enabled in `Settings> User Interface> Appearance`, toggling the `Primary Thumbnail` and/or `Secondary Thumbnail` option. Thumbnails can be boxart, a title screen screenshot, or a gameplay screenshot.\n\n\n\n## Themes\n\nXMB has a number of styles built-in. They can be changed in the `Settings > User Interface > Appearance` menu.\n\n* The background color can be changed: Scroll through `Color Theme` to select a color.\n\n* The animated background \"wallpaper\" can also be changed (`Shader Pipeline`), the default being a PlayStation-style animated ribbon.\n\t* XMB can even show different wallpapers depending on the playlist selected: [Follow this guide](https://github.com/libretro/Lakka-LibreELEC/wiki/Dynamic-Wallpapers) using [these files](https://github.com/libretro/retroarch-assets/tree/master/wallpapers).\n\n* XMB also has a selection of icon sets to choose from (`Icon Theme`).\n\n\n*XMB with an alternative background color, background animation, and icon set.*"
},
{
"path": "docs/image/Button_Pack/Readme.txt",
"content": "Hey there!\n\nHope you make good use of this pack. You can use all these assets in any project you want to (be it commercial or not).\nAll of the assets are in the public domain under Creative Commons 0 (CC0)\n\nIn this pack you will find over 500 buttons including:\n\nXbox 360 controller\nXbox One controller\nPlay Station 3 controller\nPlay Station 4 controller\nPlay Station Move\nPS Vita\nVive Controller\nOculus Controllers & Remote\nWii Controller\nWii U Controller\nNintentdo Switch\nSteam Controller (Updated to commercial version)\nOuya\nKeyboard and mouse buttons (Both in black and white including blanks)\nDirectional arrows for thumb sticks and movement keys\nTouch Screen Gestures\n\n----------------------------------\n\nI am \"Nicolae Berbece\" (also known as Xelu), I founded \"Those Awesome Guys\" and made \"Move or Die\" which is out right now on Steam.\nYou can contact me at nick@thoseawesomeguys.com\n\nFeel free to credit me in case you use anything in this pack, but don't worry, I won't mind if you don't. ;)\n\nPlease share this pack with other fellow developers in need of such assets! In the spirit of good old chain mail, if you share this pack with 5 fellow devs, your game's steam review score will rise by 7% and a notable twitch streamer will pick it up for his stream.\n\nKeep making awesome things!!!\n\n~Nick\n\n\n\n\n\nHere is a semi-updated list of games using these prompts:\n----------------------------\nMega Man Legacy\nPostal 2\nPostal Redux\nRWBY\nHeat Signature\nTurbo Dismount\nFallen Legion\n20XX\nObduction\nBattle Chef Brigade\nPhantom Brigade\nRedirection\nDefender's Quest\nRoundabout\nArena 3D\nSuper Comboman\nDisc Jam\nMayan Death Robots\nSentris\nUnbox\nInduction\nShadow Warrior 2\nThe Flock\nDeputy dangle\nTumblestone\nSolbrain Knight of Darkness\nSSMP\nDistance\nIdarb\nEarthlock\nEverspace\nPylon Rogue\nThe Church in the darkness\nSword n' Board"
},
{
"path": "docs/image/core/genesis_plus_gx/bram.drawio",
"content": "7Z3dc6o6EMD/Gh/tEEIiPvb7TO/tnN56O2fmvnQQIjJF4gH8On/9DV8qIbRUQaPyorhAoPvbJLubhXbg7WT56BvT8TO1iNtRFWvZgXcdVcUAKOwrkqwSCcC9fiKxfcdKZRvBwPlDUmF6oj1zLBLkDgwpdUNnmhea1POIGeZkhu/TRf6wEXXzV50aNikIBqbhFqW/HCscJ1IdKRv5D+LY4+zKQEn3TIzs4FQQjA2LLrZE8L4Db31Kw2RrsrwlbqS9TC/JeQ8le9c35hMvrHLCX6+3q/n8wR6R/3T6Ch4H5njWxUkrc8OdpX9wR8Uua+9mRFmz7K7DVaoK/HtGsx3dIAZ1zQ4AaLrc7GRbdvRtGn54NfQnWWvstpIGk92pRtZtq0w502jToyH7ulmMnZAMpoYZyRbMtJhsHE5c9guwzaFhftg+nXnWz1noOh5J5Zbhf/xkZzlhZG7KlYLW19rWU6q6OfFDstwSpXp7JHRCQn/FDkn3dqGeYU3tuAv62hVKRIstu0iPGm+bRHaqkZqivW5/Q4ttpMC+AU9vCF5gWu9vZ0RPQz2OHlSOT6/fIL37c6IHoYT0svmpEXxP54QP8EOnDPhUJMDHKdYIpolHMXKWhDV2MyW+wy5PfCZj12AuCHnZiLa1bLiO7bFtkyku3ree/JVY18E4ajD+EURK9+x/KQN1B5nAmcQuSfZ950xs9ie6zpB9GmbozMm75fjszmikhwdmLtbcugrmdm2jZR/lgKlIgAsJcKHGaInGypZWQgvlaXVVUe86KC4oGhtbXAkuIFvn0lpa5a4Hko4WaGmV0gLSDYWa2uIqw6X2pOtcsKVV6sarHC3l6LS0llYZLUXnh8L+0XG1IVc5Lk26zrV/ZphpRZDfGBDbYDtv2XnK24B9PBoTEmRtD/1NnqNa+oPpOMxbgk/YPRjD+IAI95Q6XhjrB9100F1kK7OQJveZMx2XjKKmInCOabjXqTiM7CRvNF2tLvKY81l00SSoKgL0amPoew2hf95Cf/928ehhTzr0SBRd1I3+6eXi0QNNPvSiSCWBYTlznk8dc8DDtlG8Xj9Hm4YflprAWiy4n9pv8RumKb6vszJYqOtcEl+Fotha6KPAxkxWFK59cw2mV8lHuTHMj9k0M9OLGKKwxhGHWBcRVw86SIlCvjqIF1yTCySuFRbqZCBeQ4XKl8Rjj+QCiYNCXYQExLGorIXTe7bmHTCluOQ6qvOKnYAoRndopDeP+tHtf7UcXo8jr3JqBEg0OeKDrnBnaE9HjUpfRjVWWG+RS40IIwnVuH+1ExL66fH4PVgFIZlEY3g0dsdHTwlz3JWhQy83yCx4cBoGIkOAh/TZdVGYyemdeFbaiVjHiSqUKvURYuUqeYuKqZhK9YlrRCnfXOMiPaRXeIls4HPPub/We9ZOQGe+SdJTNyottgZxofqt2Fpo+DYJC63FgNYK2KPWDdYQaF1GmTDIw9KEifwDVyrC8qApzljsCq8eE/gUf6XUiuRGwcYDNWcU63rWLZPI8oHbJqF/MvbsaRGiDD+n1UtdisNcahbDo5clAFghJLpUXojLTErBq61XrVwAKQOvdrH7UBFJnn1PEblHh133Alp5aNoufLULX1xSCupCkz3ouhdAFUqp5EpK8T1f68FKY36DYdEnKwt7dKpdslQ2mxQO3fnF99l2/rzVonznB6gYueGewGxxc1ZbIXQ79fwZp3U2ku6RPtO+bKzp7Bk+vSUELqaSYLTG6skpEUg35eFiHveqnize+eRwNcSVZVZO1zWHrYaqly9zr98PRqUHySXjj593xUW/ve1/xTKkHfuf1hS20yul4HWo9fCx557TK6SAGu8FHV+JJ+cF8Q95yqDEplazz3s6hXDHcRk2BrL1i3brkjv6RY1NsPrJTbCAK7LTcP/Yw5p+chMs/2YoGZR4chOsAuWzxPZJ73LPnAtKZVj+1kUrIS2vxOuRsBxIb8u3yp0bCcuB9P1f1No+UL/D2FpSXgIE8JsrL9HbWrDKz5/J0Fn7FWKRi+WlyDcZ9tsX4pXHBpqE/UsUYbWvGGn82d4DT4b2cEVeof7P30/j8Z8fv5fvAX3q7v92GShEf2+Y405WR6XYhEFhdxJ/0oXX4Z/tVkaOW15wdV5mwL9fStUE6QHRs6CNGcH+/f8Sk7YAq1dc/l3VCySbStsKQbbLKLs95d6TDWS7jLJb4rXYI4tja00g2c/NfwpKKhM3/3AJ3v8P"
},
{
"path": "docs/index.md",
"content": "---\ntemplate: home.html\ntitle: Home\n---\n\n"
},
{
"path": "docs/library/2048.md",
"content": "# 2048\n\n## Background\n\nThis is a port of 2048, a game, to libretro.\n\n#### How to start the 2048 core:\n\n- To start the 2048 core, go to RetroArch's main menu screen. Select 'Load Core', then '2048'.\n\n- Now, select 'Start Core'.\n\n

\n\nThe content should now start running!\n\n### Author/License\n\nThe 2048 game has been authored by\n\n- Gabriele Cirulli\n\nThe libretro implementation was authored by\n\n- Higor Eurípedes\n\nThe 2048 core is licensed under\n\n- [Public Domain](https://github.com/libretro/libretro-2048/blob/master/COPYING)\n\nA summary of the licenses behind RetroArch and its cores can be found [here](../development/licenses.md).\n\n## Features\n\nFrontend-level settings or features that the 2048 core respects.\n\n| Feature | Supported |\n|-------------------|:---------:|\n| Restart | ✔ |\n| Screenshots | ✔ |\n| Saves | ✔ |\n| States | ✔ |\n| Rewind | ✔ |\n| Netplay | ✔ |\n| Core Options | ✕ |\n| [Memory Monitoring (achievements)](../guides/memorymonitoring.md) | ✕ |\n| RetroArch Cheats | ✕ |\n| Native Cheats | ✕ |\n| Controls | ✔ |\n| Remapping | ✔ |\n| Multi-Mouse | ✕ |\n| Rumble | ✕ |\n| Sensors | ✕ |\n| Camera | ✕ |\n| Location | ✕ |\n| Subsystem | ✕ |\n| [Softpatching](../guides/softpatching.md) | ✕ |\n| Disk Control | ✕ |\n| Username | ✕ |\n| Language | ✕ |\n| Crop Overscan | ✕ |\n| LEDs | ✕ |\n\n### Directories\n\nThe 2048 core's internal core name is '2048'\n\nThe 2048 core saves/loads to/from these directories.\n\n**Frontend's Save directory**\n\n- 2048.srm (Previous game sessions and hiscores)\n\n**Frontend's State directory**\n\n- 2048.state# (State)\n\n### Geometry and timing\n\n- The 2048 core's core provided FPS is 60\n- The 2048 core's core provided sample rate is 30000 Hz\n- The 2048 core's core provided aspect ratio is 1\n\n## Controllers\n\nThe 2048 core supports the following device type(s) in the controls menu, bolded device types are the default for the specified user(s):\n\n### User 1 device types\n\n- None - Doesn't disable input.\n- **RetroPad** - Joypad\n- RetroPad w/Analog - Joypad - There's no reason to switch to this.\n\n### Controller tables\n\n#### Joypad\n\n| User 1 Remap descriptors | RetroPad Inputs |\n|--------------------------|---------------------------------------------|\n| Pause |  |\n| Start |  |\n| Up |  |\n| Down |  |\n| Left |  |\n| Right |  |\n\n## External Links\n\n- [Official 2048 Website](https://gabrielecirulli.github.io/2048/)\n- [Official 2048 Github Repository](https://github.com/gabrielecirulli/2048)\n- [Libretro 2048 Core info file](https://github.com/libretro/libretro-super/blob/master/dist/info/2048_libretro.info)\n- [Libretro 2048 Github Repository](https://github.com/libretro/libretro-2048)\n- [Report Libretro 2048 Core Issues Here](https://github.com/libretro/libretro-2048/issues)\n"
},
{
"path": "docs/library/3d_engine.md",
"content": "# 3D Engine\n\n## Contribute to this documentation\n\nIn order to propose improvements to this document, [visit its corresponding source page on github](https://github.com/libretro/docs/tree/master/docs/library/3d_engine.md). Changes are proposed using \"Pull Requests.\"\n\n## Background\n\nA tech demo for libretro GL with additional features (camera/location/etc).\n\n### Why use this core?\n\nAwaiting description.\n\n### How to get and install the 3D Engine core:\n\n1. Start up RetroArch. Inside the main menu, go to 'Online Updater'.\n\n2. Just to make sure we have the latest info files, select 'Update Core Info Files'. Wait until this is done. Then, select 'Core Downloader'.\n\n3. Browse through the list and select '3D Engine'.\n\nAfter this has finished downloading, the core should now be ready for use!\n\n#### How to start (after installation):\n\n1. Go back to RetroArch's main menu screen. Select 'Load Content'.\n\n2. Browse to the folder that contains the content you want to run.\n\n3. Select the content that you want to run.\n\n4. If you are asked which core to select, choose '3D Engine'.\n\nThe content should now start running!\n\n### Authors\n\n- [Team Libretro](https://www.libretro.com/)\n\n## License\n\nA summary of the licenses behind RetroArch and its cores can be found [here](../development/licenses.md).\n\n- [GPLv3](https://github.com/libretro/libretro-3dengine/blob/master/license)\n\n## Extensions\n\nContent that can be loaded by the 3D Engine core have the following file extensions:\n\n- .png\n- .jpg\n- .mtl\n- .obj\n\n## Features\n\nRetroArch features that the 3D Engine core respects.\n\n| Feature | Supported |\n|-------------------|:---------:|\n| Restart | ✕ |\n| Screenshots | ✔ |\n| Saves | ✕ |\n| States | ✕ |\n| Rewind | ✕ |\n| Netplay | ✕ |\n| Core Options | ✔ |\n| [Memory Monitoring (achievements)](../guides/memorymonitoring.md) | ✕ |\n| RetroArch Cheats | ✕ |\n| Native Cheats | ✕ |\n| Controls | ✔ |\n| Remapping | ✕ |\n| Multi-Mouse | ✕ |\n| Rumble | ✕ |\n| Sensors | ✔ |\n| Camera | ✔ |\n| Location | ✔ |\n| Subsystem | ✕ |\n| Softpatching | ✕ |\n| Disk Control | ✕ |\n| Username | ✕ |\n| Language | ✕ |\n| Crop Overscan | ✕ |\n\n### Directories\n\nThe 3D Engine core's directory name is 'Libretro 3DEngine'\n\n### Geometry and timing\n\nThe 3D Engine core's internal FPS is 60.0.\n\nThe 3D Engine core's internal sample rate is 30000.0 Hz.\n\nThe 3D Engine core's core provided aspect ratio is (Ratio).\n\n## Core options\n\nThe 3D Engine core has the following option(s) that can be tweaked from the core options menu. The default setting is bolded.\n\nSettings with (Restart) means that core has to be closed for the new setting to be applied on next launch.\n\n- **Internal resolution** (**320x240**/360x480/480x272/512x384/512x512/640x240/640x448/640x480/720x576/800x600/960x720/1024x768/1024x1024/1280x720/1280x960/1600x1200/1920x1080/1920x1440/1920x1600/2048x1152/2048x1536/2048x2048/320x240)\n\n
\n\n- **Location camera control** (**Off**/On)\n\n
Awaiting description.
\n\n- **Discard hack enable** (**Off**/On)\n\n
Awaiting description.
\n\n- **Location position OSD** (**Off**/On)\n\n
Awaiting description.
\n\n## Controllers\n\n### Device types\n\nThe 3D Engine core supports the following device type(s) in the controls menu, bolded device types are the default for the specified user(s):\n\n#### User 1 device types\n\n- None - Doesn't disable input.\n- **RetroPad** - Joypad\n- RetroPad w/Analog - Joypad - **There is no reason to switch to this.**\n\n### Controller tables\n\n#### Joypad and analog device type table\n\n| User 1 Remap descriptors | RetroPad Inputs | 3D Engine core inputs |\n|--------------------------|------------------------------------------------|------------------------------------------|\n| |  | Jump/Zoom-in |\n| |  | Move forwards |\n| |  | Move backwards |\n| |  | Turn left |\n| |  | Turn right |\n| |  | Zoom-out |\n| |  | Move left |\n| |  | Move right |\n| |  | Adjust lighting |\n| |  | Adjust lighting |\n| |  | Adjust lighting |\n| |  X | Move right or left/Rotate model |\n| |  Y | Move forwards and backwards/Rotate model |\n| |  X | Look right and left |\n| |  Y | Look up and down/Zoom-in or Zoom-out |\n\n## External Links\n\n- [Libretro 3D Engine Core info file](https://github.com/libretro/libretro-super/blob/master/dist/info/3dengine_libretro.info)\n- [Libretro 3D Engine Github Repository](https://github.com/libretro/libretro-3dengine)\n- [Report Libretro 3D Engine Core Issues Here](https://github.com/libretro/libretro-3dengine/issues)"
},
{
"path": "docs/library/amiarcadia.md",
"content": "# Arcadia 2001 / Interton VC 4000 (AmiArcadia)\n\n## Background\n\nAmiArcadia is an emulator for Signetics 2650 CPU-based systems. It emulates the Emerson Arcadia 2001 and its many clones (Bandai, Grandstand, etc.), the Interton VC 4000 family (Voltmace, Rowtron, etc.), the Elektor TV Games Computer, and Zaccaria/Malzak coin-op arcade machines.\n\nThe core automatically identifies known ROMs by CRC32 and configures the correct machine type, memory map, and game-specific settings. For unknown ROMs, use the \"Machine\" core option to select between Arcadia and Interton modes.\n\n### Author/License\n\nThe AmiArcadia core has been authored by\n\n- James Jacobs\n\nThe AmiArcadia core is licensed under\n\n- Non-commercial\n\nA summary of the licenses behind RetroArch and its cores can be found [here](../development/licenses.md).\n\n## Extensions\n\nContent that can be loaded by the AmiArcadia core have the following file extensions:\n\n- .bin\n- .tvc\n\n## Databases\n\nRetroArch database(s) that are associated with the AmiArcadia core:\n\n- [Elektor - TV Games Computer](https://github.com/libretro/libretro-database/blob/master/rdb/Elektor%20-%20TV%20Games%20Computer.rdb)\n- [Emerson - Arcadia 2001](https://github.com/libretro/libretro-database/blob/master/rdb/Emerson%20-%20Arcadia%202001.rdb)\n- [Interton - VC 4000](https://github.com/libretro/libretro-database/blob/master/rdb/Interton%20-%20VC%204000.rdb)\n\n## BIOS\n\nThe AmiArcadia core does not require any BIOS files.\n\n## Features\n\nFrontend-level settings or features that the AmiArcadia core respects.\n\n| Feature | Supported |\n|-------------------|:---------:|\n| Restart | ✔ |\n| Screenshots | ✔ |\n| Saves | ✕ |\n| States | ✔ |\n| Rewind | ✔ |\n| Netplay | ✕ |\n| Core Options | ✔ |\n| [Memory Monitoring (achievements)](../guides/memorymonitoring.md) | ✔ |\n| RetroArch Cheats | ✕ |\n| Native Cheats | ✕ |\n| Controls | ✔ |\n| Remapping | ✔ |\n| Multi-Mouse | ✕ |\n| Rumble | ✕ |\n| Sensors | ✕ |\n| Camera | ✕ |\n| Location | ✕ |\n| Subsystem | ✕ |\n| [Softpatching](../guides/softpatching.md) | ✕ |\n| Disk Control | ✕ |\n| Username | ✕ |\n| Language | ✕ |\n| Crop Overscan | ✕ |\n| LEDs | ✕ |\n\n### Directories\n\nThe AmiArcadia core's library name is 'AmiArcadia'\n\n### Geometry and timing\n\n- The AmiArcadia core's core provided FPS is 60 for NTSC and 50 for PAL\n- The AmiArcadia core's core provided sample rate is 11025 Hz\n- The AmiArcadia core's base width is 164 (home consoles) or 240 (coin-ops)\n- The AmiArcadia core's base height is 226 (NTSC) / 269 (PAL) for home consoles, or 240 for coin-ops\n- The AmiArcadia core's max width is 240\n- The AmiArcadia core's max height is 269\n\n## Core options\n\nThe AmiArcadia core has the following option(s) that can be tweaked from the core options menu. The default setting is bolded.\n\n- **Machine** [amiarcadia_machine] (**Arcadia**|Interton)\n\n\tSelect the machine type for unknown ROMs. Known ROMs auto-detect the correct machine. Choose between Arcadia 2001 and Interton VC 4000 modes.\n\n- **Region** [amiarcadia_region] (**PAL**|NTSC)\n\n\tSelect the video timing region. PAL runs at 50Hz, NTSC runs at 60Hz.\n\n- **Sprite Demultiplexing** [amiarcadia_demultiplex] (**enabled**|disabled)\n\n\tReduces sprite flicker in games that multiplex sprites across frames.\n\n## Joypad\n\n| RetroPad Inputs | Player 1/2 input descriptors |\n|------------------------------------------------|------------------------------|\n|  | Keypad 1 |\n|  | Keypad 4 |\n|  | Console A |\n|  | Console Start |\n|  | Paddle Up |\n|  | Paddle Down |\n|  | Paddle Left |\n|  | Paddle Right |\n|  | Keypad 2 (Fire) |\n|  | Keypad 5 |\n|  | Console B (Coin for arcade) |\n|  | Keypad 0 |\n|  | Console Reset |\n|  | Keypad Enter |\n|  | Keypad Clear |\n|  | Keypad 6 |\n|  X | Paddle X (Analog) |\n|  Y | Paddle Y (Analog) |\n|  X | Keypad 1-9 (8-directional) |\n|  Y | Keypad 1-9 (8-directional) |\n\nThe right analog stick maps to keypad keys 1-9 (excluding 5) in 8 directions, matching the layout of the original keypad:\n\n```\n7 8 9 ↖ ↑ ↗\n4 6 = ← →\n1 2 3 ↙ ↓ ↘\n```\n\nConsole buttons (Start, A, B, Reset) are only active on Player 1.\n\n## Keyboard\n\nDesktop keyboard input is supported for Player 1's keypad. Both the number row and numeric keypad are mapped.\n\n| RetroKeyboard Inputs | AmiArcadia Inputs |\n|------------------------------|-------------------|\n| Keyboard 0 / Numpad 0 | Keypad 0 |\n| Keyboard 1 / Numpad 1 | Keypad 1 |\n| Keyboard 2 / Numpad 2 | Keypad 2 |\n| Keyboard 3 / Numpad 3 | Keypad 3 |\n| Keyboard 4 / Numpad 4 | Keypad 4 |\n| Keyboard 5 / Numpad 5 | Keypad 5 |\n| Keyboard 6 / Numpad 6 | Keypad 6 |\n| Keyboard 7 / Numpad 7 | Keypad 7 |\n| Keyboard 8 / Numpad 8 | Keypad 8 |\n| Keyboard 9 / Numpad 9 | Keypad 9 |\n| Keyboard [ / * / Numpad * | Keypad Clear |\n| Keyboard ] / # / Numpad Enter | Keypad Enter |\n\n## Compatibility\n\nThe core identifies known ROMs by CRC32 and automatically configures the correct machine type and settings. The following systems are emulated:\n\n**Home Consoles**\n\n- Emerson Arcadia 2001 (and compatible systems: Bandai, Grandstand, etc.)\n- Interton VC 4000 (and compatible systems: Voltmace, Rowtron, etc.)\n- Elektor TV Games Computer\n\n**Arcade (Coin-op)**\n\n- Zaccaria (Astro Wars, Galaxia, Laser Battle, Lazarian)\n- Malzak (Malzak I & II)\n\n## External Links\n\n- [Official AmiArcadia/WinArcadia Website](https://amigan.1emu.net/releases/)\n- [Libretro AmiArcadia Core info file](https://github.com/libretro/libretro-super/blob/master/dist/info/amiarcadia_libretro.info)\n- [Libretro AmiArcadia Github Repository](https://github.com/warmenhoven/amiarcadia)\n"
},
{
"path": "docs/library/anarch.md",
"content": "# Anarch\n\n \n\n## Background\n\nAnarch is an extremely small, completely public domain, no-dependency, no-file, portable suckless anarcho-pacifist from-scratch 90s-style Doom clone that runs everywhere.\n\n\nThe Anarch core has been authored by\n\n- [Miloslav Číž](https://codeberg.org/drummyfish)\n- [iyzsong](https://codeberg.org/iyzsong)\n\nThe Anarch core is licensed under\n\n- [CC0](https://codeberg.org/iyzsong/anarch-libretro/src/branch/master/LICENSE)\n\nA summary of the licenses behind RetroArch and its cores can be found [here](../development/licenses.md).\n\n\n## Features\n\nFrontend-level settings or features that the RVVM core respects.\n\n| Feature | Supported |\n|-------------------|:---------:|\n| Restart | - |\n| Saves | ✔ |\n| States | ✕ |\n| Rewind | ✕ |\n| Netplay | ✕ |\n| Core Options | ✕ |\n| [Memory Monitoring (achievements)](../guides/memorymonitoring.md) | ✕ |\n| RetroArch Cheats | ✕ |\n| Native Cheats | ✕ |\n| Controls | ✔ |\n| Remapping | - |\n| Multi-Mouse | - |\n| Rumble | ✕ |\n| Sensors | ✕ |\n| Camera | ✕ |\n| Location | ✕ |\n| Subsystem | ✕ |\n| [Softpatching](../guides/softpatching.md) | ✕ |\n| Disk Control | ✕ |\n| Username | ✕ |\n| Language | ✕ |\n| Crop Overscan | ✕ |\n| LEDs | ✕ |\n\n## Geometry and timing\n\n- The Anarch core's core provided FPS is 60.\n- The Anarch core's core provided sample rate is 8000 Hz.\n- The Anarch core's base width is 700.\n- The Anarch core's base height is 512.\n- The Anarch core's max width is 700.\n- The Anarch core's max height is 512.\n- The Anarch core's core provided aspect ratio is 175/128.\n\n\n## User 1 device types\n\nThe Anarch core supports the following device type(s) in the controls menu, bolded device types are the default for the specified user(s):\n\n- **RetroPad**\n- Keyboard\n- Mouse\n\n## Joypad\n\n| RetroPad Inputs | Anarch core inputs |\n|------------------------------------------------|--------------------------|\n|  | Button B |\n|  | Jump |\n|  | Menu |\n|  | Map |\n|  | Up |\n|  | Down |\n|  | Left |\n|  | Right |\n|  | Button A |\n|  | Button C |\n|  | Previous Weapon |\n|  | Next Weapon |\n\n\n## Keyboard\n\n| RetroKeyboard Inputs | Anarch core inputs |\n|------------------------------|---------------------------|\n| Keyboard w | Up |\n| Keyboard s | Down |\n| Keyboard q | Left |\n| Keyboard e | Right |\n| Keyboard j | Button A |\n| Keyboard k | Button B |\n| Keyboard l | Button C |\n| Keyboard p | Next Weapon |\n| Keyboard f | Cycle Weapon |\n| Keyboard Left Control | Button A |\n| Keyboard Left Shift | Button B |\n| Keyboard Space | Jump |\n| Keyboard Tab | Map |\n| Keyboard Escape | Menu |\n\n\n## Mouse\n\n| RetroMouse Inputs | Anarch core inputs |\n|-------------------------------------------------------|---------------------------|\n|  Mouse Cursor | Movement |\n|  Mouse 1 | Button A |\n|  Mouse 2 | Toggle Freelook |\n|  Mouse 3 | Cycle Weapon |\n| Wheel Up | Previous Weapon |\n| Wheel Down | Next Weapon |\n\n\n## External Links\n\n- [Game Manual](https://codeberg.org/iyzsong/anarch-libretro/raw/branch/master/media/manual.png)\n- [Anarch Repository](https://codeberg.org/iyzsong/anarch-libretro)\n- [Anarch Issues Here](https://codeberg.org/iyzsong/anarch-libretro/issues)\n"
},
{
"path": "docs/library/ardens.md",
"content": "# Ardens\n\n \n\n## Background\n\nArdens is a simulator for the Arduboy FX. \n\nThe Ardens core has been authored by\n\n- [Peter Brown](https://github.com/tiberiusbrown)\n\nThe Ardens core is licensed under\n\n- [MIT](https://github.com/tiberiusbrown/Ardens/blob/master/LICENSE.txt)\n\nA summary of the licenses behind RetroArch and its cores can be found [here](../development/licenses.md).\n\n## Requirements¶\n\nNone\n\n## BIOS¶\n\nThe Ardens core does not feature BIOS use.\n\n## Extensions\n\nContent that can be loaded by the Ardens core have the following file extensions:\n\n- `.hex` or `.arduboy`\n\nRetroArch database(s) that are associated with the Ardens core:\n\n- [`Arduboy Inc - Arduboy.rdb`](https://github.com/libretro/libretro-database/blob/master/rdb/Arduboy%20Inc%20-%20Arduboy.rdb)\n\n## Features\n\nFrontend-level settings or features that the Ardens core respects:\n\n| Feature | Supported |\n|-------------------|:---------:|\n| Restart | ✔ |\n| Saves | ✔ |\n| States | ✔ |\n| Rewind | ✔ |\n| Netplay | ✕ |\n| Core Options | ✕ |\n| [Memory Monitoring (achievements)](../guides/memorymonitoring.md) | - |\n| RetroArch Cheats | ✕ |\n| Native Cheats | ✕ |\n| Controls | ✔ |\n| Remapping | ✔ |\n| Multi-Mouse | ✕ |\n| Rumble | ✕ |\n| Sensors | ✕ |\n| Camera | ✕ |\n| Location | ✕ |\n| Subsystem | ✕ |\n| [Softpatching](../guides/softpatching.md) | ✕ |\n| Disk Control | ✕ |\n| Username | ✕ |\n| Language | ✕ |\n| Crop Overscan | ✕ |\n| LEDs | ✕ |\n\n## Geometry and timing\n\n- The Ardens core's core provided FPS is 60\n- The Ardens core's base width is 128\n- The Ardens core's base height is 64\n- The Ardens core's max width is 128\n- The Ardens core's max height is 64\n\n\n## User 1 device types\n\nThe Ardens core supports the following device type(s) in the controls menu, bolded device types are the default for the specified user(s):\n\n- None - Doesn't disable input.\n- **RetroPad**\n- RetroPad w/Analog\n\n\n## Joypad\n\n| RetroPad Inputs | User 1 input descriptors | \n|------------------------------------------------|--------------------------|\n|  | Button B |\n|  | Up |\n|  | Down |\n|  | Left | \n|  | Right | \n|  | Button A | \n\n\n## External Links\n\n- [Official Ardens Website](https://github.com/tiberiusbrown/Ardens)\n- [Libretro Ardens Core info file](https://github.com/libretro/libretro-super/blob/master/dist/info/ardens_libretro.info)\n- [Report Libretro Ardens Core Issues Here](https://github.com/tiberiusbrown/Ardens/issues)\n"
},
{
"path": "docs/library/atari800.md",
"content": "# Atari 8-bit computer systems and 5200 (Atari800)\n\n\n## Background\n\nAtari 8-bit computer systems (400, 800, 600 XL, 800XL, 130XE) and 5200 game console emulator.\n\nThe Atari800 core has been authored by\n\n- Petr Stehlik\n\nThe Atari800 core is licensed under\n\n- [GPLv2](https://github.com/atari800/atari800/blob/master/COPYING)\n\nA summary of the licenses behind RetroArch and its cores can be found [here](../development/licenses.md).\n\n\n## Extensions\n\nContent that can be loaded by the Atari800 core have the following file extensions:\n\n- .xfd\n- .atr\n- .atx\n- .cdm\n- .cas\n- .bin\n- .a52\n- .xex\n- .zip\n\n## Databases\n\nRetroArch database(s) that are associated with the Atari800 core:\n\n- [Atari - 5200](https://github.com/libretro/libretro-database/blob/master/rdb/Atari%20-%205200.rdb)\n\n## BIOS\n\nRequired or optional firmware files go in RetroArch's system directory.\n\n| Filename | Description | md5sum |\n|:-------------:|:--------------------------------------:|:--------------------------------:|\n| 5200.rom | 5200 BIOS - Required | 281f20ea4320404ec820fb7ec0693b38 |\n| ATARIXL.ROM | Atari XL/XE OS BIOS - Required | 06daac977823773a3eea3422fd26a703 |\n| ATARIBAS.ROM | BASIC interpreter BIOS - Required | 0bac0c6a50104045d902df4503a4c30b |\n| ATARIOSA.ROM | Atari 400/800 PAL BIOS - Required | eb1f32f5d9f382db1bbfb8d7f9cb343a |\n| ATARIOSB.ROM | BIOS for Atari 400/800 NTSC - Required | a3e8d617c95d08031fe1b20d541434b2 |\n\n## Features\n\n| Feature | Supported |\n|-------------------|:---------:|\n| Restart | ✕ |\n| Screenshots | ✔ |\n| Saves | - |\n| States | - |\n| Rewind | ✕ |\n| Netplay | ✕ |\n| Core Options | ✔ |\n| [Memory Monitoring (achievements)](../guides/memorymonitoring.md) | ✕ |\n| RetroArch Cheats | ✕ |\n| Native Cheats | - |\n| Controls | ✔ |\n| Remapping | ✔ |\n| Multi-Mouse | ✕ |\n| Rumble | ✕ |\n| Sensors | ✕ |\n| Camera | ✕ |\n| Location | ✕ |\n| Subsystem | ✕ |\n| Softpatching | ✕ |\n| Disk Control | ✕ |\n| Username | ✕ |\n| Crop Overscan (in RetroArch's Video settings) | ✕ |\n\n### Directories\n\nThe Atari800 core's directory name is 'Atari800'\n\nAtari800 config settings are saved/loaded to and from .atari800.cfg in RetroArch's home directory (where RetroArch.exe is in Windows).\n\n- .atari800.cfg (Config)\n\nRetroArch.exe directory\n\n- .atari800.cfg (config)\n- .atari000.wav in exe directory (startup noise?)\n- .atari000.pcx in exe directory (screenshot)\n\n### Core provided aspect ratio\n\nAtari800's core provided aspect ratio is 4/3.\n\n### Usage\n\nMake sure you have the appropriate system files in RetroArch's system directory. Then, load a content file.\n\nThe Atari800 core should boot to the 'Atari Computer - Memo Pad' screen.\n\nThe Atari800 core will generate a '.atari800.cfg' config file in RetroArch's home directory and will add the required BIOS files it detects in the system directory to the config file.\n\nNow you can manually select what Atari system you want to emulate through the 'Atari System' core option.\n\nFinally, you can load any content files compatible with the system chosen through RetroArch's Load Content menu.\n\n!!! attention\n\tYou can set per-game core option settings by creating a game-options file through RetroArch's Core Options menu.\n\nAlternatively, you can manually configure how the Atari800 will look for and handle BIOS files.\n\nWhile the Atari800 core is running, you can press F1 to get into the internal emulator menu. There - emulator configuration, system rom settings.\n\nFrom there, You can go to the 'Emulator Configuration' section and then the System ROM settings section to configure BIOS options. (Press Enter to confirm menu selections and press Escape to go back a menu)\n\nThen press Escape a few times to go back to the 'Emulator Configuration' section and select Save Configuration File or alternatively change Save configuration file on exit from no to yes\n\nThen you can exit the emulator by pressing F9 and then try the game again or press Shift+F5 to reboot the game.\n\n## Core options\n\nThe Atari800 core has the following option(s) that can be tweaked from the core options menu. The default setting is bolded. Settings with (Restart) means that core has to be closed for the new setting to be applied on next launch.\n\n- **Atari System** (**400/800 (OS B)**/800XL (64K)/130XE (128K)/5200)\n\n
Choose what Atari System to emulate.
\n\n- **Video Standard** (**NTSC**/PAL)\n\n
Awaiting description.
\n\n- **Internal BASIC (hold OPTION on boot)** (**Off**/On)\n\n
\n\n## Controllers\n\n### Device types\n\nThe Atari800 core supports the following device type(s) in the controls menu, bolded device types are the default for the specified user(s):\n\n#### User 1 - 2 device types\n\n- None - Input disabled.\n- **RetroPad** - Joypad - Don't use this, switch to ATARI Joystick for joypad usage.\n- ATARI Joystick - Joypad\n- ATARI Keyboard - Keyboard - For keyboard usage\n\n### Controller tables\n\n#### Joypad and analog device type table\n\n| User 1 Remap descriptors | RetroPad Inputs | ATARI Joystick |\n|--------------------------|------------------------------------------------|-------------------------|\n| B |  | KEY RETURN |\n| Y |  | VKBD ON/OFF |\n| Select |  | CONSOL_SELECT |\n| Start |  | CONSOL_START |\n| Up |  | Up |\n| Down |  | Down |\n| Left |  | Left |\n| Right |  | Right |\n| A |  | FIRE1/KEY RETURN IN GUI |\n| X |  | FIRE2/KEY ESCAPE IN GUI |\n| L |  | CONSOLE_OPTION |\n| R |  | TOGGLE_UI |\n| L2 |  | KEY SPACE |\n| R2 |  | KEY ESCAPE |\n| L3 |  | |\n| R3 |  | |\n\n#### Keyboard device type table\n\n| User # input descriptors | | ATARI Keyboard |\n|-------------------------------|-------------------------------|----------------------------|\n| N/A | Keyboard Numpad 2 | Down |\n| N/A | Keyboard Numpad 4 | Left |\n| N/A | Keyboard Numpad 6 | Right |\n| N/A | Keyboard Numpad 8 | Up |\n| N/A | Keyboard Up | Up |\n| N/A | Keyboard Down | Down |\n| N/A | Keyboard Right | Right |\n| N/A | Keyboard Left | Left |\n| N/A | Keyboard F1 | Built in UI |\n| N/A | Keyboard F2 | Option key |\n| N/A | Keyboard F3 | Select key |\n| N/A | Keyboard F4 | Start key |\n| N/A | Keyboard F5 | Reset key |\n| N/A | Keyboard F6 | Help key (XL/XE only) |\n| N/A | Keyboard F7 | Break key |\n| N/A | Keyboard F8 | Enter monitor |\n| N/A | Keyboard F9 | Exit emulator |\n| N/A | Keyboard F10 | Save screenshot |\n| N/A | Keyboard Right Control | Fire |\n| N/A | Keyboard Shift + F5 | Reboot |\n| N/A | Keyboard Shift + F10 | Save interlaced screenshot |\n| N/A | Keyboard Alt + R | Run Atari program |\n| N/A | Keyboard Alt + D | Disk management |\n| N/A | Keyboard Alt + C | Cartridge management |\n| N/A | Keyboard Alt + Y | Select system |\n| N/A | Keyboard Alt + O | Sound settings |\n| N/A | Keyboard Alt + W | Sound recording start/stop |\n| N/A | Keyboard Alt + S | Save state file |\n| N/A | Keyboard Alt + L | Load state file |\n| N/A | Keyboard Alt + A | About the emulator |\n\n## External Links\n\n- [Libretro Atari800 Core info file](https://github.com/libretro/libretro-super/blob/master/dist/info/atari800_libretro.info)\n- [Libretro Atari800 Github Repository](https://github.com/libretro/libretro-atari800)\n- [Report Libretro Atari800 Core Issues Here](https://github.com/libretro/libretro-atari800/issues)\n- [Official Atari800 Website](https://atari800.github.io/)\n- [Official Atari800 Github Repository](https://github.com/atari800/atari800)\n"
},
{
"path": "docs/library/b2.md",
"content": "# Acorn - BBC Micro (b2-libretro)\n\n \n\n## Background\n\nEmulate the BBC Micro and Master, a series of microcomputers designed and built by Acorn Computers Limited in the 1980s for the Computer Literacy Project of the BBC.\n\nThe b2-libretro core has been authored by:\n\n- Tom Seddon (b2)\n- Zoltan Balogh (libretro core specific modifications)\n\nThe b2 core is licensed under [GPL v3](https://github.com/zoltanvb/b2-libretro#licence). A summary of the licenses behind RetroArch and its cores can be found [here](../development/licenses.md).\n\n## Requirements\n\nNo special requirements. To be tested yet on low end platforms.\n\n## Extensions\n\nContent that can be loaded by the b2 core have the following file extensions:\n\n- `.ssd/.dsd` - Floppy disk image\n\nRetroArch database(s) that are associated with the b2 core:\n\n- None yet\n\n## Features\n\nFrontend-level settings or features that the b2 core respects.\n\n| Feature | Supported |\n|-------------------|:---------:|\n| Restart | ✔ |\n| Saves | ✕ |\n| States | ✕ |\n| Rewind | ✕ |\n| Netplay | ✕ |\n| Core Options | ✔ |\n| [Memory Monitoring (achievements)](../guides/memorymonitoring.md) | ✕ |\n| RetroArch Cheats | ✕ |\n| Native Cheats | ✕ |\n| Controls | ✔ |\n| Remapping | - |\n| Multi-Mouse | ✕ |\n| Rumble | ✕ |\n| Sensors | ✕ |\n| Camera | ✕ |\n| Location | ✕ |\n| Subsystem | ✕ |\n| [Softpatching](../guides/softpatching.md) | ✕ |\n| Disk Control | ✔ |\n| Username | ✕ |\n| Language | ✕ |\n| Crop Overscan | ✕ |\n| LEDs | ✕ |\n\n## Directories\n\nNo additional directories used, only content disk image is needed.\n\n## Geometry and timing\n\n- The b2 core's core provided FPS is 50\n- The b2 core's core provided sample rate is 250 kHz (to be optimized)\n- The b2 core's base width is 768\n- The b2 core's base height is 288\n- The b2 core's max width is 768\n- The b2 core's max height is 576 (interlace mode)\n- The b2 core's core provided aspect ratio is 4:3\n\n## Usage\n\nLoad any supported content file. Content type will be autodetected, and if possible, started:\n\n- If disk image name contains an executable file name in brackets (such as `[CHUCKIE]`), a `CHAIN` command will be issued shortly after initial booting\n- If disk image name does not contain such indication, Shift key press will be simulated during boot to trigger autoboot function\n\nIn case of multi-disk games, use the Disk Control menu to add the subsequent images and switch between them.\nFor BBC Master games, set emulated machine type to Master, and close the core, then re-open again with the content.\n\n## Core options\n\nThe b2 core has the following option(s) that can be tweaked from the core options menu.\n\n- Emulated machine\n - `B/Acorn 1770`\n - `B/Watford 1770 (DDB2)`\n - `B/Watford 1770 (DDB3)`\n - `B/Opus 1770`\n - `B/Opus CHALLENGER 256K`\n - `B/Opus CHALLENGER 512K`\n - `B+`\n - `B+128`\n - `Master 128 (MOS 3.20)`\n- Autoboot (on|off)\n- Keyboard assignments for each RetroPad button\n\n## Joypad mapping\n\nThe analogue joysticks are mapped to the left analog stick and face button A for RetroArch player 1 and 2 slots.\n\nJoypad is fully assignable to keyboard keys in core options.\n\n## Keyboard\n\nKeyboard layout of the BBC Master (BBC Micro is the same, apart from cursor key arrangement and the lack of keypad):\n\n\nKeep in mind that certain characters will appear differently in the default Mode 7 prompt, same way as on the original machine. By changing to `MODE 6` the font display can be \"fixed\".\n\nMost mappings are straightforward positionally from an ISO UK keyboard:\n\n- Dark green: natural mapping, both position and function matches nicely\n- Light green: either position or function is slightly different\n- Yellow: function is different\n- Red: extra mapping\n- Dark grey: keys intentionally reserved for RetroArch / OS functions\n\n\n\nExceptions are marked in the following table:\n\n| RetroKeyboard Inputs | BBC Micro/Master keyboard input |\n|------------------------------|---------------------------|\n| Keyboard F10 | f0 |\n| Keyboard F11 | Break |\n| Keyboard Pause | Break |\n| Keyboard Backspace | Delete |\n| Keyboard Backquote ` | Escape (alternative mapping) |\n| Keyboard Equals = | ^ (caret) |\n| Keyboard Oem 102 | \\\\ (backslash) |\n| Keyboard Home | \\\\ (alternative mapping) |\n| Keyboard Backspace | Delete |\n| Keyboard Left Bracket [ | @ (at) |\n| Keyboard Right Bracket ] | [ (left bracket) |\n| Keyboard End | _ (underline) |\n| Keyboard Quote ' | : (colon) |\n| Keyboard Backslash \\ | ] (right bracket) (shown as # in ISO map) |\n| Keyboard Delete | Delete |\n| Keyboard PgUp | Caps Lock |\n| Keyboard PgDn | Shift Lock |\n| Keyboard NumLock | Shift Lock |\n| Keyboard Insert | Copy |\n| --- (no PC keyboard mapping) | Numpad , (comma) |\n| --- (no PC keyboard mapping) | Numpad # |\n| --- (no PC keyboard mapping) | Numpad Delete |\n\nIf there is a need to press those 3 keys that have no mapping, use core options to map them to a RetroPad button.\n\n## External Links\n\n- [Official b2-libretro core repository](https://github.com/zoltanvb/b2-libretro)\n- [Libretro b2 Core info file](https://github.com/libretro/libretro-super/blob/master/dist/info/b2_libretro.info)\n- [Report Libretro b2 Core Issues Here](https://github.com/zoltanvb/b2-libretro/issues)\n- [Original b2 Implementation](https://github.com/tom-seddon/b2)\n- [Complete BBC Micro Games Archive](https://www.bbcmicro.co.uk/)\n- [Stardot forums](https://www.stardot.org.uk/forums/) - BBC Micro community\n"
},
{
"path": "docs/library/beetle_bsnes.md",
"content": "# Nintendo - SNES / Famicom (Beetle bsnes)\n\n## Background\n\nStandalone port of Mednafen bSNES to libretro, itself a old fork of bsnes 0.59.\n\nThis core exists as a side effect of porting/forking mednafen for its other cores in the past. There's no reason to use this core now that there's other more compatible and faster SNES cores.\n\n### Author/License\n\nThe Beetle bsnes core has been authored by\n\n- byuu\n- [Mednafen Team](https://mednafen.github.io/)\n\nThe Beetle bsnes core is licensed under\n\n- [GPLv2](https://github.com/libretro/beetle-bsnes-libretro/blob/master/COPYING)\n\nA summary of the licenses behind RetroArch and its cores can be found [here](../development/licenses.md).\n\n## Extensions\n\nContent that can be loaded by the Beetle bsnes core have the following file extensions:\n\n- .smc\n- .fig\n- .bs\n- .st\n- .sfc\n\n## Databases\n\nRetroArch database(s) that are associated with the Beetle bsnes core:\n\n- [Nintendo - Super Nintendo Entertainment System](https://github.com/libretro/libretro-database/blob/master/rdb/Nintendo%20-%20Super%20Nintendo%20Entertainment%20System.rdb)\n- [Nintendo - Super Nintendo Entertainment System Hacks](https://github.com/libretro/libretro-database/blob/master/rdb/Nintendo%20-%20Super%20Nintendo%20Entertainment%20System%20Hacks.rdb)\n- [Nintendo - Sufami Turbo](https://github.com/libretro/libretro-database/blob/master/rdb/Nintendo%20-%20Sufami%20Turbo.rdb)\n\n## Features\n\nFrontend-level settings or features that the Beetle bsnes core respects.\n\n| Feature | Supported |\n|-------------------|:---------:|\n| Restart | ✔ |\n| Screenshots | ✔ |\n| Saves | ✔ |\n| States | ✔ |\n| Rewind | ✔ |\n| Netplay | ✔ |\n| Core Options | ✕ |\n| [Memory Monitoring (achievements)](../guides/memorymonitoring.md) | ✕ |\n| RetroArch Cheats | ✕ |\n| Native Cheats | ✕ |\n| Controls | ✔ |\n| Remapping | ✕ |\n| Multi-Mouse | ✕ |\n| Rumble | ✕ |\n| Sensors | ✕ |\n| Camera | ✕ |\n| Location | ✕ |\n| Subsystem | ✕ |\n| [Softpatching](../guides/softpatching.md) | ✕ |\n| Disk Control | ✕ |\n| Username | ✕ |\n| Language | ✕ |\n| Crop Overscan | ✔ |\n| LEDs | ✕ |\n\n### Directories\n\nThe Beetle bsnes core's internal core name is 'Mednafen bSNES'\n\nThe Beetle bsnes core saves/loads to/from these directories.\n\n**Frontend's Save directory**\n\n- 'content-name'.srm (Cartridge battery save)\n- 'content-name'.rtc (Real time clock save)\n\n**Frontend's State directory**\n\n- 'content-name'.state# (State)\n\n### Geometry and timing\n\n- The Beetle bsnes core's core provided FPS is 60.10\n- The Beetle bsnes core's core provided sample rate is 44100 Hz\n- The Beetle bsnes core's core provided aspect ratio is 4/3\n\n## Controllers\n\nThe Beetle bsnes core supports the following device type(s) in the controls menu, bolded device types are the default for the specified user(s):\n\n### User 1 - 2 device types\n\n- None - Doesn't disable input\n- **RetroPad** - Joypad\n- RetroPad w/Analog - Joypad - There's no reason to switch to this.\n\n### Controller tables\n\n#### Joypad\n\n\n\n| RetroPad Inputs | Beetle bsnes Inputs |\n|----------------------------------------------|---------------------------|\n|  | B |\n|  | Y |\n|  | Select |\n|  | Start |\n|  | D-Pad Up |\n|  | D-Pad Down |\n|  | D-Pad Left |\n|  | D-Pad Right |\n|  | A |\n|  | X |\n|  | L |\n|  | R |\n\n## External Links\n\n- [Official Mednafen Website](https://mednafen.github.io/)\n- [Official Mednafen Downloads](https://mednafen.github.io/releases/)\n- [Libretro Beetle bsnes Core info file](https://github.com/libretro/libretro-super/blob/master/dist/info/mednafen_snes_libretro.info)\n- [Libretro Beetle bsnes Github Repository](https://github.com/libretro/beetle-bsnes-libretro)\n- [Report Libretro Beetle bsnes Core Issues Here](https://github.com/libretro/beetle-bsnes-libretro/issues)\n\n### See also\n\n#### Nintendo - Sufami Turbo\n\n- [Nintendo - SNES / Famicom (bsnes-jg)](bsnes-jg.md)\n- [Nintendo - SNES / Famicom (bsnes-mercury Accuracy)](bsnes_mercury_accuracy.md)\n- [Nintendo - SNES / Famicom (bsnes-mercury Balanced)](bsnes_mercury_balanced.md)\n- [Nintendo - SNES / Famicom (bsnes-mercury Performance)](bsnes_mercury_performance.md)\n- [Nintendo - SNES / Famicom (bsnes Accuracy)](bsnes_accuracy.md)\n- [Nintendo - SNES / Famicom (bsnes Balanced)](bsnes_balanced.md)\n- [Nintendo - SNES / Famicom (bsnes C++98 (v085))](bsnes_cplusplus98.md)\n- [Nintendo - SNES / Famicom (bsnes Performance)](bsnes_performance.md)\n- [Nintendo - SNES / Famicom (Snes9x)](snes9x.md)\n- [Nintendo - SNES / Famicom (Snes9x 2002)](snes9x_2002.md)\n- [Nintendo - SNES / Famicom (Snes9x 2005 Plus)](snes9x_2005_plus.md)\n- [Nintendo - SNES / Famicom (Snes9x 2005)](snes9x_2005.md)\n- [Nintendo - SNES / Famicom (Snes9x 2010)](snes9x_2010.md)\n\n#### Nintendo - Super Nintendo Entertainment System (+Hacks)\n\n- [Nintendo - SNES / Famicom (bsnes-jg)](bsnes-jg.md)\n- [Nintendo - SNES / Famicom (bsnes-mercury Accuracy)](bsnes_mercury_accuracy.md)\n- [Nintendo - SNES / Famicom (bsnes-mercury Balanced)](bsnes_mercury_balanced.md)\n- [Nintendo - SNES / Famicom (bsnes-mercury Performance)](bsnes_mercury_performance.md)\n- [Nintendo - SNES / Famicom (bsnes Accuracy)](bsnes_accuracy.md)\n- [Nintendo - SNES / Famicom (bsnes Balanced)](bsnes_balanced.md)\n- [Nintendo - SNES / Famicom (bsnes C++98 (v085))](bsnes_cplusplus98.md)\n- [Nintendo - SNES / Famicom (bsnes Performance)](bsnes_performance.md)\n- [Nintendo - SNES / Famicom (higan Accuracy)](higan_accuracy.md)\n- [Nintendo - SNES / Famicom (nSide Balanced)](nside_balanced.md)\n- [Nintendo - SNES / Famicom (Mesen-S)](mesen-s.md)\n- [Nintendo - SNES / Famicom (Snes9x)](snes9x.md)\n- [Nintendo - SNES / Famicom (Snes9x 2002)](snes9x_2002.md)\n- [Nintendo - SNES / Famicom (Snes9x 2005 Plus)](snes9x_2005_plus.md)\n- [Nintendo - SNES / Famicom (Snes9x 2005)](snes9x_2005.md)\n- [Nintendo - SNES / Famicom (Snes9x 2010)](snes9x_2010.md)\n"
},
{
"path": "docs/library/beetle_cygne.md",
"content": "# Bandai - WonderSwan/Color (Beetle Cygne)\n\n## Background\n\nStandalone port of Mednafen WonderSwan to libretro, itself a fork of Cygne.\n\n### Author/License\n\nThe Beetle Cygne core has been authored by\n\n- Dox\n- [Mednafen Team](https://mednafen.github.io/)\n\nThe Beetle Cygne core is licensed under\n\n- [GPLv2](https://github.com/libretro/beetle-wswan-libretro/blob/master/COPYING)\n\nA summary of the licenses behind RetroArch and its cores can be found [here](../development/licenses.md).\n\n## Extensions\n\nContent that can be loaded by the Beetle Cygne core have the following file extensions:\n\n- .ws\n- .wsc\n- .pc2 (Benesse Pocket Challenge v2 files)\n\n## Databases\n\nRetroArch database(s) that are associated with the Beetle Cygne core:\n\n- [Bandai - WonderSwan](https://github.com/libretro/libretro-database/blob/master/rdb/Bandai%20-%20WonderSwan.rdb)\n- [Bandai - WonderSwan Color](https://github.com/libretro/libretro-database/blob/master/rdb/Bandai%20-%20WonderSwan%20Color.rdb)\n\n## Features\n\nFrontend-level settings or features that the Beetle Cygne core respects.\n\n| Feature | Supported |\n|-------------------|:---------:|\n| Restart | ✔ |\n| Screenshots | ✔ |\n| Saves | ✔ |\n| States | ✔ |\n| Rewind | ✔ |\n| Netplay | ✔ (not link-cable emulation) |\n| Core Options | ✕ |\n| [Memory Monitoring (achievements)](../guides/memorymonitoring.md) | ✔ |\n| RetroArch Cheats | ✕ |\n| Native Cheats | ✕ |\n| Controls | ✔ |\n| Remapping | ✔ |\n| Multi-Mouse | ✕ |\n| Rumble | ✕ |\n| Sensors | ✕ |\n| Camera | ✕ |\n| Location | ✕ |\n| Subsystem | ✕ |\n| [Softpatching](../guides/softpatching.md) | ✔ |\n| Disk Control | ✕ |\n| Username | ✕ |\n| Language | ✕ |\n| Crop Overscan | ✕ |\n| LEDs | ✕ |\n\n### Directories\n\nThe Beetle Cygne core's internal core name is 'Beetle WonderSwan'\n\nThe Beetle Cygne core saves/loads to/from these directories.\n\n**Frontend's Save directory**\n\n- 'content-name'.srm (Cartridge backup save)\n\n**Frontend's State directory**\n\n- 'content-name'.state# (State)\n\n### Geometry and timing\n\n- The Beetle Cygne core's core provided FPS is 75.47\n- The Beetle Cygne core's core provided sample rate is 44100 Hz\n- The Beetle Cygne core's core provided aspect ratio is 14/9\n\n## Controllers\n\nThe Beetle Cygne core supports the following device type(s) in the controls menu, bolded device types are the default for the specified user(s):\n\n### User 1 device types\n\n- None - Doesn't disable input.\n- **RetroPad** - Joypad\n- RetroPad w/Analog - There is no reason to switch to this.\n\n### Controller tables\n\n#### Joypad\n\n| User 1 Remap descriptors | RetroPad Inputs |\n|------------------------------|-------------------------------------------|\n| B |  |\n| Rotate screen + active D-Pad |  |\n| Start |  |\n| X Cursor Up |  |\n| X Cursor Down |  |\n| X Cursor Left |  |\n| X Cursor Right |  |\n| A |  |\n| Y Cursor Left |  |\n| Y Cursor Right |  |\n| Y Cursor Down |  |\n| Y Cursor Up |  |\n\n## Compatibility\n\n| Game | Issue |\n|-----------|------------------------------------------------------------------------------|\n| Tonpuusou | Title screen announcer voice missing. Softlocks after picking a menu option. |\n\n## External Links\n\n- [Official Mednafen Website](https://mednafen.github.io/)\n- [Official Mednafen Downloads](https://mednafen.github.io/releases/)\n- [Libretro Beetle Cygne Core info file](https://github.com/libretro/libretro-super/blob/master/dist/info/mednafen_wswan_libretro.info)\n- [Libretro Beetle Cygne Github Repository](https://github.com/libretro/beetle-wswan-libretro)\n- [Report Libretro Beetle Cygne Core Issues Here](https://github.com/libretro/beetle-wswan-libretro/issues)\n- [Gameplay Videos](https://www.youtube.com/playlist?list=PLRbgg4gk_0IdmXFd9hF4bXjsk_zKwT8Yz)\n"
},
{
"path": "docs/library/beetle_gba.md",
"content": "# Nintendo - Game Boy Advance (Beetle GBA)\n\n## Background\n\nStandalone port of Mednafen GBA to libretro, itself a fork of VBA-M, itself a fork of Visual Boy Advance.\n\n### Author/License\n\nThe Beetle GBA core has been authored by\n\n- Forgotten\n- [Mednafen Team](https://mednafen.github.io/)\n\nThe Beetle GBA core is licensed under\n\n- [GPLv2](https://github.com/libretro/beetle-gba-libretro/blob/master/COPYING)\n\nA summary of the licenses behind RetroArch and its cores can be found [here](../development/licenses.md).\n\n## Extensions\n\nContent that can be loaded by the Beetle GBA core have the following file extensions:\n\n- .gba\n- .agb\n- .bin\n\n## Databases\n\nRetroArch database(s) that are associated with the Beetle GBA core:\n\n- [Nintendo - Game Boy Advance](https://github.com/libretro/libretro-database/blob/master/rdb/Nintendo%20-%20Game%20Boy%20Advance.rdb)\n\n## BIOS\n\nRequired or optional firmware files go in the frontend's system directory.\n\n| Filename | Description | md5sum |\n|:------------:|:--------------------------------:|:--------------------------------:|\n| gba_bios.bin | Game Boy Advance BIOS - Optional | a860e8c0b6d573d191e4ec7db1b1e4f6 |\n\n## Features\n\nFrontend-level settings or features that the Beetle GBA core respects.\n\n| Feature | Supported |\n|-------------------|:---------:|\n| Restart | ✔ |\n| Screenshots | ✔ |\n| Saves | ✔ |\n| States | ✔ |\n| Rewind | ✔ |\n| Netplay | ✕ |\n| Core Options | ✔ |\n| [Memory Monitoring (achievements)](../guides/memorymonitoring.md) | ✔ |\n| RetroArch Cheats | ✕ |\n| [RetroArch SaveRAM Autosave Interval support](https://github.com/libretro/RetroArch/issues/16323#issuecomment-1977792161) | ✕ |\n| Native Cheats | ✕ |\n| Controls | ✔ |\n| Remapping | ✔ |\n| Multi-Mouse | ✕ |\n| Rumble | ✕ |\n| Sensors | ✕ |\n| Camera | ✕ |\n| Location | ✕ |\n| Subsystem | ✕ |\n| [Softpatching](../guides/softpatching.md) | ✕ |\n| Disk Control | ✕ |\n| Username | ✕ |\n| Language | ✕ |\n| Crop Overscan | ✔ |\n| LEDs | ✕ |\n\n### Directories\n\nThe Beetle GBA core's internal core name is 'Beetle GBA'\n\nThe Beetle GBA core saves/loads to/from these directories.\n\n**Frontend's Save directory**\n\n- 'content-name'.'ROM MD5'.sav (SRAM)\n- 'content-name'.'ROM MD5'.eep (EEPROM)\n\n**Frontend's State directory**\n\n- 'content-name'.state# (State)\n\n### Geometry and timing\n\n- The Beetle GBA core's core provided FPS is 59.73\n- The Beetle GBA core's core provided sample rate is 44100 Hz\n- The Beetle GBA core's core provided aspect ratio is 3/2\n\n## Core options\n\nThe Beetle GBA core has the following option(s) that can be tweaked from the core options menu. The default setting is bolded.\n\nSettings with (Restart) means that core has to be closed for the new setting to be applied on next launch.\n\n- **HLE bios emulation** [gba_hle] (**enabled**/disabled)\n\n\tSelf-explanatory. When set to off, a Game Boy Advance BIOS is required.\n\n## Controllers\n\nThe Beetle GBA core supports the following device type(s) in the controls menu, bolded device types are the default for the specified user(s):\n\n### User 1 device types\n\n- None - Doesn't disable input.\n- **RetroPad** - Joypad\n- RetroPad w/Analog - Joypad - There's no reason to switch to this.\n\n### Controller tables\n\n#### Joypad\n\n\n\n| User 1 Remap descriptors | RetroPad Inputs |\n|--------------------------|------------------------------------------------|\n| B |  |\n| Select |  |\n| Start |  |\n| D-Pad Up |  |\n| D-Pad Down |  |\n| D-Pad Left |  |\n| D-Pad Right |  |\n| A |  |\n| L |  |\n| R |  |\n\n## External Links\n\n- [Official Mednafen Website](https://mednafen.github.io/)\n- [Official Mednafen Downloads](https://mednafen.github.io/releases/)\n- [Libretro Beetle GBA Core info file](https://github.com/libretro/libretro-super/blob/master/dist/info/mednafen_gba_libretro.info)\n- [Libretro Beetle GBA Github Repository](https://github.com/libretro/beetle-gba-libretro)\n- [Report Libretro Beetle GBA Core Issues Here](https://github.com/libretro/beetle-gba-libretro/issues)\n\n### See also\n\n#### Nintendo - Game Boy Advance\n\n- [Nintendo - Game Boy Advance (gpSP)](gpsp.md)\n- [Nintendo - Game Boy Advance (Meteor)](meteor.md)\n- [Nintendo - Game Boy Advance (mGBA)](mgba.md)\n- [Nintendo - Game Boy Advance (VBA-M)](vba_m.md)\n- [Nintendo - Game Boy Advance (VBA Next)](vba_next.md)\n- [Nintendo - Game Boy Advance (TempGBA)](tempgba.md)\n"
},
{
"path": "docs/library/beetle_lynx.md",
"content": "# Atari - Lynx (Beetle Lynx)\n\n## Background\n\nBeetle Lynx is an Atari Lynx video game system emulator that can be used as a libretro core. Specifically it's a port of Mednafen Lynx which is a fork of Handy.\n\n### Author/License\n\nThe Beetle Lynx core has been authored by\n\n- K. Wilkins\n- [Mednafen Team](https://mednafen.github.io/)\n\nThe Beetle Lynx core is licensed under\n\n- [zlib](https://github.com/libretro/beetle-lynx-libretro/blob/master/mednafen/lynx/license.txt), [GPLv2](https://github.com/libretro/beetle-lynx-libretro/blob/master/COPYING)\n\nA summary of the licenses behind RetroArch and its cores can be found [here](../development/licenses.md).\n\n## Extensions\n\nContent that can be loaded by the Beetle Lynx core have the following file extensions:\n\n- .lnx\n- .o\n\n## Databases\n\nRetroArch database(s) that are associated with the Beetle Lynx core:\n\n- [Atari - Lynx](https://github.com/libretro/libretro-database/blob/master/rdb/Atari%20-%20Lynx.rdb)\n\n## BIOS\n\nRequired or optional firmware files go in the frontend's system directory.\n\n| Filename | Description | md5sum |\n|:-------------:|:--------------------------:|:--------------------------------:|\n| lynxboot.img | Lynx Boot Image - Required | fcd403db69f54290b51035d82f835e7b |\n\n## Features\n\nFrontend-level settings or features that the Beetle Lynx core respects.\n\n| Feature | Supported |\n|-------------------|:---------:|\n| Restart | ✔ |\n| Screenshots | ✔ |\n| Saves | ✕ |\n| States | ✔ |\n| Rewind | ✔ |\n| Netplay (State based) | ✔ (not link-cable emulation) |\n| Core Options | ✔ |\n| [Memory Monitoring (achievements)](../guides/memorymonitoring.md) | ✔ |\n| Cheats (Cheats menu) | ✔ |\n| Native Cheats | ✕ |\n| Controls | ✔ |\n| Remapping | ✔ |\n| Multi-Mouse | ✕ |\n| Rumble | ✕ |\n| Sensors | ✕ |\n| Camera | ✕ |\n| Location | ✕ |\n| Subsystem | ✕ |\n| [Softpatching](../guides/softpatching.md) | ✔ |\n| Disk Control | ✕ |\n| Username | ✕ |\n| Language | ✕ |\n| Crop Overscan | ✔ |\n| LEDs | ✕ |\n\n### Directories\n\nThe Beetle Lynx core's directory name is 'Beetle Lynx'\n\nThe Beetle Lynx core saves/loads to/from these directories.\n\n**Frontend's State directory**\n\n- 'content-name'.state# (State)\n\n### Geometry and timing\n\n- The Beetle Lynx core's core provided FPS is 75\n- The Beetle Lynx core's core provided sample rate is 44100 Hz\n- The Beetle Lynx core's core provided aspect ratio is 80/51\n\n## Loading content\n\nBeetle Lynx supports Lynx headered roms and non-headered roms. It also supports homebrews in *.o extensions.\n\n## Core options\n\nThe Beetle Lynx core has the following option(s) that can be tweaked from the core options menu. The default setting is bolded.\n\nSettings with (Restart) means that core has to be closed for the new setting to be applied on next launch.\n\n- **Auto-rotate Screen** [lynx_rot_screen] (**enabled**/disabled)\n\n\tVirtually rotates the screen orientation and keymaps automatically for known games.\n\tWhen disabled, screen rotation is manually adjusted by pressing the SELECT button.\n\n## Controllers\n\nThe Beetle Lynx core supports the following device type(s) in the controls menu, bolded device types are the default for the specified user(s):\n\n### User 1 device types\n\n- None - Doesn't disable input.\n- **RetroPad** - Joypad\n- RetroPad w/Analog - Joypad - There's no reason to switch to this.\n\n### Controller tables\n\n\n\n#### Joypad\n\n| User 1 Remap descriptors | RetroPad Inputs | Beetle Lynx core inputs |\n|--------------------------|------------------------------------------------|--------------------------|\n| |  | B |\n| |  | Pause |\n| |  | D-Pad Up |\n| |  | D-Pad Down |\n| |  | D-Pad Left |\n| |  | D-Pad Right |\n| |  | A |\n| |  | Option 1 |\n| |  | Option 2 |\n\nSupported combinations\n\n* Option 1 + Pause = Flips Screen\n* Option 2 + Pause = Restarts game\n\n## Compatibility\n\n| Game | Issue |\n|------------------|-------------------------------------------------------------------------|\n| RoadBlasters | Graphics glitches. Minor flickering and glitches after starting a race. |\n\n## External Links\n\n- [Official Mednafen Website](https://mednafen.github.io/)\n- [Official Mednafen Downloads](https://mednafen.github.io/releases/)\n- [Libretro Beetle Lynx Core info file](https://github.com/libretro/libretro-super/blob/master/dist/info/mednafen_lynx_libretro.info)\n- [Libretro Beetle Lynx Github Repository](https://github.com/libretro/beetle-lynx-libretro)\n- [Report Libretro Beetle Lynx Core Issues Here](https://github.com/libretro/beetle-lynx-libretro/issues)\n\n### See also\n\n#### Atari - Lynx\n\n- [Atari - Lynx (Handy)](handy.md)\n- [Atari - Lynx (Holani)](holani.md)\n"
},
{
"path": "docs/library/beetle_neopop.md",
"content": "# SNK - Neo Geo Pocket / Color (Beetle NeoPop)\n\n## Background\n\nBeetle/Mednafen NGP is a SNK Neo Geo Pocket (Color) video game system emulator based on NeoPop.\n\n### Author/License\n\nThe Beetle NeoPop core has been authored by\n\n- neopop_uk\n- [Mednafen Team](https://mednafen.github.io/)\n\nThe Beetle NeoPop core is licensed under\n\n- [GPLv2](https://github.com/libretro/beetle-ngp-libretro/blob/master/COPYING)\n\nA summary of the licenses behind RetroArch and its cores can be found [here](../development/licenses.md).\n\n## Extensions\n\nContent that can be loaded by the Beetle NeoPop core have the following file extensions:\n\n- .ngp\n- .ngc\n\n## Databases\n\nRetroArch database(s) that are associated with the Beetle Neopop core:\n\n- [SNK - Neo Geo Pocket](https://github.com/libretro/libretro-database/blob/master/rdb/SNK%20-%20Neo%20Geo%20Pocket.rdb)\n- [SNK - Neo Geo Pocket Color](https://github.com/libretro/libretro-database/blob/master/rdb/SNK%20-%20Neo%20Geo%20Pocket%20Color.rdb)\n\n## Features\n\nFrontend-level settings or features that the Beetle NeoPop core respects.\n\n| Feature | Supported |\n|-------------------|:---------:|\n| Restart | ✔ |\n| Screenshots | ✔ |\n| Saves | ✔ |\n| States | ✔ |\n| Rewind | ✔ |\n| Netplay | ✔ (not link-cable emulation) |\n| Core Options | ✔ |\n| [Memory Monitoring (achievements)](../guides/memorymonitoring.md) | ✔ |\n| RetroArch Cheats | ✔ |\n| Native Cheats | ✕ |\n| Controls | ✔ |\n| Remapping | ✔ |\n| Multi-Mouse | ✕ |\n| Rumble | ✕ |\n| Sensors | ✕ |\n| Camera | ✕ |\n| Location | ✕ |\n| Subsystem | ✕ |\n| [Softpatching](../guides/softpatching.md) | ✕ |\n| Disk Control | ✕ |\n| Username | ✕ |\n| Language | ✕ |\n| Crop Overscan | ✕ |\n| LEDs | ✕ |\n\n### Directories\n\nThe Beetle NeoPop core's internal core name is 'Beetle NeoPop'\n\nThe Beetle NeoPop core saves/loads to/from these directories.\n\n**Frontend's Save directory**\n\n- 'content-name'.flash (Cartrtidge battery save)\n\n**Frontend's State directory**\n\n- 'content-name'.state# (State)\n\n### Geometry and timing\n\n- The Beetle NeoPop core's core provided FPS is 60\n- The Beetle NeoPop core's core provided sample rate is 44100 Hz\n- The Beetle NeoPop core's core provided aspect ratio is 20/19\n\n## Core options\n\nThe Beetle NeoPop core has the following option(s) that can be tweaked from the core options menu. The default setting is bolded.\n\nSettings with (Restart) means that core has to be closed for the new setting to be applied on next launch.\n\n- **Language (restart)** [ngp_language] (**english**/japanese)\n\n\tChoose the system language of the BIOS.\n\n## Controllers\n\nThe Beetle NeoPop core supports the following device type(s) in the controls menu, bolded device types are the default for the specified user(s):\n\n### User 1 device types\n\n- None - Doesn't disable input.\n- **RetroPad** - Joypad\n- RetroPad w/Analog - Joypad - There's no reason to switch to this.\n\n### Controller tables\n\n#### Joypad\n\n\n\n| User 1 Remap descriptors | RetroPad Inputs |\n|--------------------------|------------------------------------------------|\n| A |  |\n| Option |  |\n| D-Pad Up |  |\n| D-Pad Down |  |\n| D-Pad Left |  |\n| D-Pad Right |  |\n| B |  |\n\n## External Links\n\n- [Official Mednafen Website](https://mednafen.github.io/)\n- [Official Mednafen Downloads](https://mednafen.github.io/releases/)\n- [Libretro Beetle NeoPop Core info file](https://github.com/libretro/libretro-super/blob/master/dist/info/mednafen_ngp_libretro.info)\n- [Libretro Beetle NeoPop Github Repository](https://github.com/libretro/beetle-ngp-libretro)\n- [Report Libretro Beetle NeoPop Core Issues Here](https://github.com/libretro/beetle-ngp-libretro/issues)\n"
},
{
"path": "docs/library/beetle_pc_fx.md",
"content": "# NEC - PC-FX (Beetle PC-FX)\n\n## Background\n\nBeetle PC-FX is a port of Mednafen PC-FX video game system emulator for the NEC PC-FX.\n\n### Author/License\n\nThe Beetle PC-FX core has been authored by\n\n- [Mednafen Team](https://mednafen.github.io/)\n\nThe Beetle PC-FX core is licensed under\n\n- [GPLv2](https://github.com/libretro/beetle-pcfx-libretro/blob/master/COPYING)\n\nA summary of the licenses behind RetroArch and its cores can be found [here](../development/licenses.md).\n\n## Extensions\n\nContent that can be loaded by the Beetle PC-FX core have the following file extensions:\n\n- .cue\n- .ccd\n- .toc\n- .chd\n\n## Databases\n\nRetroArch database(s) that are associated with the Beetle PC-FX core:\n\n- [NEC - PC-FX](https://github.com/libretro/libretro-database/blob/master/rdb/NEC%20-%20PC-FX.rdb)\n\n## BIOS\n\nRequired or optional firmware files go in the frontend's system directory.\n\n| Filename | Description | md5sum |\n|:-------------:|:----------------------------------------:|:--------------------------------:|\n| pcfx.rom | PC-FX BIOS v1.00 - 2 Sep 1994 - Required | 08e36edbea28a017f79f8d4f7ff9b6d7 |\n\n## Features\n\nFrontend-level settings or features that the Beetle PC-FX core respects.\n\n| Feature | Supported |\n|-------------------|:---------:|\n| Restart | ✔ |\n| Screenshots | ✔ |\n| Saves | ✔ |\n| States | ✔ |\n| Rewind | ✔ |\n| Netplay | ✔ |\n| Core Options | ✔ |\n| [Memory Monitoring (achievements)](../guides/memorymonitoring.md) | ✔ |\n| RetroArch Cheats | ✕ |\n| Native Cheats | ✕ |\n| Controls | ✔ |\n| Remapping | ✔ |\n| Multi-Mouse | ✕ |\n| Rumble | ✕ |\n| Sensors | ✕ |\n| Camera | ✕ |\n| Location | ✕ |\n| Subsystem | ✕ |\n| [Softpatching](../guides/softpatching.md) | ✕ |\n| Disk Control | ✕ |\n| Username | ✕ |\n| Language | ✕ |\n| Crop Overscan | ✔ |\n| LEDs | ✕ |\n\n### Directories\n\nThe Beetle PC-FX core's internal core name is 'Beetle PC-FX'\n\nThe Beetle PC-FX core saves/loads to/from these directories.\n\n**Frontend's Save directory**\n\n- 'content-name'.srm (Save)\n\n**Frontend's State directory**\n\n- 'content-name-.state# (State)\n\n### Geometry and timing\n\n- The Beetle PC-FX core's core provided FPS is 60\n- The Beetle PC-FX core's core provided sample rate is 44100 Hz\n- The Beetle PC-FX core's core provided aspect ratio is 4/3\n\n### Loading PC-FX content\n\nBeetle PC-FX needs a cue-sheet that points to an image file. A cue sheet, or cue file, is a metadata file which describes how the tracks of a CD or DVD are laid out.\n\nIf you have e.g. `foo.bin`, you should create a text file and save it as `foo.cue`. If you're playing a single-track Saturn game, then the cue file contents should look like this:\n\n`foobin.cue`\n```\n FILE \"foo.bin\" BINARY\n TRACK 01 MODE1/2352\n INDEX 01 00:00:00\n```\n\nAfter that, you can load the `foo.cue` file in RetroArch with the Beetle PC-FX core.\n\n!!! attention\n Certain PC-FX games are multi-track, so their .cue files might be more complicated.\n\n## Core options\n\nThe Beetle PC-FX core has the following option(s) that can be tweaked from the core options menu. The default setting is bolded.\n\nSettings with (Restart) means that core has to be closed for the new setting to be applied on next launch.\n\n- **High Dotclock Width (Restart)** [pcfx_high_dotclock_width] (**1024**/256/341)\n\n\tEmulated width for 7.16MHz dot-clock mode. Lower values are faster, but will cause some degree of pixel distortion.\n\n- **Suppress Channel Reset Clicks (Restart)** [pcfx_suppress_channel_reset_clicks] (**enabled**/disabled)\n\n\tHack to suppress clicks caused by forced channel resets.\n\n- **Emulate Buggy Codec (Restart)** [pcfx_emulate_buggy_codec] (**disabled**/enabled)\n\n\tHack that emulates the codec a buggy ADPCM encoder used for some games' ADPCM.\n\n- **Sound Quality (Restart)** [pcfx_resamp_quality] (**3**/4/5/0/1/2)\n\n\tHigher values correspond to better SNR and better preservation of higher frequencies(\"brightness\"), at the cost of increased computational complexity and a negligible increase in latency.\n\n- **Chroma channel bilinear interpolation (Restart)** [pcfx_rainbow_chromaip] (**disabled**/enabled)\n\n\tEnable bilinear interpolation on the chroma channel of RAINBOW YUV output. Enabling it may cause graphical glitches with some games.\n\n- **No Sprite Limit (Restart)** [pcfx_nospritelimit] (**disabled**/enabled)\n\n\tRemove 16-sprites-per-scanline hardware limit.\n\n- **Initial scanline** [pcfx_initial_scanline] ((0 to 40 in increments of 1. **4 is default**.)\n\n\tAdjust first display scanline.\n\n- **Last scanline** [pcfx_last_scanline] (208 to 238 in increments of 1. **235 is default**.)\n\n\tAdjust last display scanline.\n\n- **Mouse Sensitivity** [pcfx_mouse_sensitivity] (1.00 to 5.00 in increments of 0.25. **1.25 is default**.)\n\n\tConfigure the sensitivity of the 'PCFX Mouse' device type,\n\n## Controllers\n\nThe Beetle PC-FX core supports the following device type(s) in the controls menu, bolded device types are the default for the specified user(s):\n\n### User 1 - 2 device types\n\n- None - Doesn't disable input.\n- **PCFX Joypad** - Joypad\n- PCFX Mouse - Mouse\n\n### Controller tables\n\n#### Joypad\n\n| User 1 - 6 Remap descriptors | RetroPad Inputs |\n|------------------------------|-------------------------------------------|\n| II |  |\n| IV |  |\n| Select |  |\n| Run |  |\n| D-Pad Up |  |\n| D-Pad Down |  |\n| D-Pad Left |  |\n| D-Pad Right |  |\n| I |  |\n| III |  |\n| V |  |\n| VI |  |\n| MODE 1 (Switch) |  |\n| MODE 2 (Switch) |  |\n\n#### Mouse\n\n| RetroMouse Inputs | PCFX Mouse |\n|-----------------------------------------------------|-------------------------|\n|  Mouse Cursor | PCFX Mouse Cursor |\n|  Mouse 1 | PCFX Mouse Left Button |\n|  Mouse 2 | PCFX Mouse Right Button |\n\n## Compatibility\n\n| Game | Issue |\n|-----------------------------------------------------------------|---------------------------------------------------------|\n| | |\n\n## External Links\n\n- [Official Mednafen Website](https://mednafen.github.io/)\n- [Official Mednafen Downloads](https://mednafen.github.io/releases/)\n- [Libretro Beetle PC-FX Core info file](https://github.com/libretro/libretro-super/blob/master/dist/info/mednafen_pcfx_libretro.info)\n- [Libretro Beetle PC-FX Github Repository](https://github.com/libretro/beetle-pcfx-libretro)\n- [Report Libretro Beetle PC-FX Core Issues Here](https://github.com/libretro/beetle-pcfx-libretro/issues)\n"
},
{
"path": "docs/library/beetle_pce_fast.md",
"content": "# NEC - PC Engine / CD (Beetle PCE FAST)\n\n## Background\n\nBeetle/Mednafen PCE FAST is a libretro port of Mednafen PCE Fast with the PC Engine SuperGrafx module removed.\n\nThe Beetle PCE FAST core has been authored by\n\n- [Mednafen Team](https://mednafen.github.io/)\n\nThe Beetle PCE FAST core is licensed under\n\n- [GPLv2](https://github.com/libretro/beetle-pce-fast-libretro/blob/master/COPYING)\n\nA summary of the licenses behind RetroArch and its cores can be found [here](../development/licenses.md).\n\n## BIOS\n\nRequired or optional firmware files go in RetroArch's system directory.\n\n!!! warning \"\"\n\tWhich PCE CD BIOS file the Beetle PCE FAST core will use can be configured by the ['CD BIOS' core option](#core-options).\n\n!!! warning \"\"\n\tAny CD-ROM System BIOS will work, but some of them are known to be incompatible with certain games.\n\n| Filename | Description | md5sum |\n|:-------------:|:-------------------------------------:|:--------------------------------:|\n| syscard3.pce | Super CD-ROM2 System V3.xx - Required | 38179df8f4ac870017db21ebcbf53114 |\n| syscard2.pce | CD-ROM System V2.xx - Optional | |\n| syscard1.pce | CD-ROM System V1.xx - Optional | |\n| gexpress.pce | Game Express CD Card - Optional | |\n\n## Extensions\n\nContent that can be loaded by the Beetle PCE FAST core have the following file extensions:\n\n- .pce\n- .cue\n- .ccd\n- .iso\n- .img\n- .bin\n- .chd\n\nRetroArch database(s) that are associated with the [Core name] core:\n\n- [NEC - PC Engine - TurboGrafx 16](https://github.com/libretro/libretro-database/blob/master/rdb/NEC%20-%20PC%20Engine%20-%20TurboGrafx%2016.rdb)\n- [NEC - PC Engine CD - TurboGrafx-CD](https://github.com/libretro/libretro-database/blob/master/rdb/NEC%20-%20PC%20Engine%20CD%20-%20TurboGrafx-CD.rdb)\n\n## Features\n\nFrontend-level settings or features that the Beetle PCE FAST core respects.\n\n| Feature | Supported |\n|-------------------|:---------:|\n| Restart | ✔ |\n| Saves | ✔ |\n| States | ✔ |\n| Rewind | ✔ |\n| Netplay | ✔ |\n| Core Options | ✔ |\n| [Memory Monitoring (achievements)](../guides/memorymonitoring.md) | ✔ |\n| RetroArch Cheats | ✕ |\n| Native Cheats | ✕ |\n| Controls | ✔ |\n| Remapping | ✔ |\n| Multi-Mouse | ✕ |\n| Rumble | ✕ |\n| Sensors | ✕ |\n| Camera | ✕ |\n| Location | ✕ |\n| Subsystem | ✕ |\n| [Softpatching](../guides/softpatching.md) | ✕ |\n| Disk Control | ✕ |\n| Username | ✕ |\n| Language | ✕ |\n| Crop Overscan | ✕ |\n| LEDs | ✕ |\n\n## Directories\n\nThe Beetle PCE FAST core's library name is 'Beetle PCE Fast'\n\nThe Beetle PCE FAST core saves/loads to/from these directories.\n\n**Frontend's Save directory**\n\n| File | Description |\n|:-----:|:-----------:|\n| *.srm | Save |\n\n**Frontend's State directory**\n\n| File | Description |\n|:--------:|:-----------:|\n| *.state# | State |\n\n## Geometry and timing\n\n- The Beetle PCE FAST core's core provided FPS is 59.82\n- The Beetle PCE FAST core's core provided sample rate is 44100 Hz\n- The Beetle PCE FAST core's base width is 512\n- The Beetle PCE FAST core's base height is 243\n- The Beetle PCE FAST core's max width is 512\n- The Beetle PCE FAST core's max height is 243\n- The Beetle PCE FAST core's core provided aspect ratio is 6/5\n\n## Loading PC Engine CD content\n\nTo load PC Engine CD content, Beetle PCE FAST needs a cue-sheet that points to an image file. A cue sheet, or cue file, is a metadata file which describes how the tracks of a CD or DVD are laid out.\n\nIf you have e.g. `foo.bin`, you should create a text file and save it as `foo.cue`. If you're playing a single-track Saturn game, then the cue file contents should look like this:\n\n`foobin.cue`\n```\n FILE \"foo.bin\" BINARY\n TRACK 01 MODE1/2352\n INDEX 01 00:00:00\n```\n\nAfter that, you can load the `foo.cue` file in RetroArch with the Beetle PCE FAST core.\n\n!!! warning \"\"\n Certain PC Engine content are multi-track, so their .cue files might be more complicated.\n\nISO + OGG and ISO + WAV format games are supported, but they require a properly formatted cue sheet. For iso files, tracks should be denoted as BINARY, for ogg files, they should be denoted as OGG, and for wav files, they should be denoted as WAVE.\n\n## CHD\n\nAlternatively to using cue sheets with .bin/.iso files, you can convert your games to .chd (MAME Compressed Hunks of Data) to reduce file sizes and neaten up your game folder.\n\nTo convert content to CHD format, use the chdman tool found inside the latest MAME distribution and point it to a .cue file, like so:\n\n```\nchdman createcd --input foo.cue --output foo.chd\n```\n\n## Core options\n\nThe Beetle PCE FAST core has the following option(s) that can be tweaked from the core options menu. The default setting is bolded.\n\nSettings with (Restart) means that core has to be closed for the new setting to be applied on next launch.\n\n- **CD Image Cache (Restart)** [pce_fast_cdimagecache] (**disabled**/enabled)\n\n\tLoads the complete image in memory at startup. Can potentially decrease loading times at the cost of increased startup time.\n\n- **CD Bios (Restart)** [pce_fast_cdbios] (**System Card 3**/Games Express/System Card 1/System Card 2)\n\n\tSelect which PC Engine CD BIOS to use.\n\n- **No Sprite Limit (Restart)** [pce_nospritelimit] (**disabled**/enabled\")\n\n\tRemove 16-sprites-per-scanline hardware limit.\n\n- **CPU Overclock Multiplier (Restart)** [pce_ocmultiplier] (**1**/2/3/4/5/6/7/8/9/10/20/30/40/50)\n\n\tOverclock the emulated CPU.\n\n- **Horizontal Overscan (352 Width Mode Only)** [pce_hoverscan] (300 to 352 in increments of 2. **352 in default**.)\n\n\tModify the horizontal overscan.\n\n- **Initial scanline** [pce_initial_scanline] (0 to 40 in increments of 1. **3 is default.**)\n\n\tAdjust initial display scanline.\n\n- **Last scanline** [pce_last_scanline] (208 to 242 in increments of 1. **242 is default.**)\n\n\tAdjust last display scanline.\n\n- **(CD) CDDA Volume %** [pce_cddavolume] (0 to 200 in increments of 10. **100 is default**.)\n\n\tAdjust CDDA Volume %.\n\n- **(CD) ADPCM Volume %** [pce_adpcmvolume] (0 to 200 in increments of 10. **100 is default**.)\n\n\tAdjust ADPCM Volume %.\n\n- **(CD) CD PSG Volume %** [pce_cdpsgvolume] (0 to 200 in increments of 10. **100 is default**.)\n\n Adjust CD PSG Volume %.\n\n- **(CD) CD Speed** [pce_cdspeed] (**1**/2/4/8)\n\n\tSet the speed of the emulated CD drive.\n\n- **Turbo Delay** [pce_Turbo_Delay] (**Fast**/Medium/Slow)\n\n\tAdjust turbo delay.\n\n- **Turbo ON/OFF Toggle** [pce_Turbo_Toggling] (**disabled**/enabled)\n\n\tEnables Turbo ON/OFF inputs.\n\n\tLook at the [Joypad section](#joypad) for more information.\n\n- **Alternate Turbo Hotkey** [pce_turbo_toggle_hotkey] (**disabled**/enabled)\n\n\tEnables Alternate Turbo ON/OFF inputs.\n\n\tYou can avoid remapping Button III and IV when switching to 6-button gamepad mode with this.\n\n\tLook at the [Joypad section](#joypad) for more information.\n\n- **P1 Turbo I** [pce_p0_turbo_I_enable] (**disabled**/enabled)\n\n\tAwaiting description.\n\n- **P1 Turbo II** [pce_p0_turbo_II_enable] (**disabled**/enabled)\n\n\tAwaiting description.\n\n- **P2 Turbo I** [pce_p1_turbo_I_enable] (**disabled**/enabled)\n\n\tAwaiting description.\n\n- **P2 Turbo II** [pce_p1_turbo_II_enable] (**disabled**/enabled)\n\n\tAwaiting description.\n\n- **P3 Turbo I** [pce_p2_turbo_I_enable] (**disabled**/enabled)\n\n\tAwaiting description.\n\n- **P3 Turbo II** [pce_p2_turbo_II_enable] (**disabled**/enabled)\n\n\tAwaiting description.\n\n- **P4 Turbo I** [pce_p3_turbo_I_enable] (**disabled**/enabled)\n\n\tAwaiting description.\n\n- **P4 Turbo II** [pce_p3_turbo_II_enable] (**disabled**/enabled)\n\n\tAwaiting description.\n\n- **P5 Turbo I** [pce_p4_turbo_I_enable] (**disabled**/enabled)\n\n\tAwaiting description.\n\n- **P5 Turbo II** [pce_p4_turbo_II_enable] (**disabled**/enabled)\n\n\tAwaiting description.\n\n## User 1 - 2 device types\n\nThe Beetle PCE FAST core supports the following device type(s) in the controls menu, bolded device types are the default for the specified user(s):\n\n- None - Doesn't disable input.\n- **PCE Joypad** - Joypad\n- Mouse - Mouse\n\n## Joypad\n\n- Which PCE Joypad button mode is in use can be configured by the Mode Switch input.\n\n- The regular Turbo inputs for 2-button mode are only active when the ['Turbo ON/OFF Toggle' core option](#core-options) is set to On.\n\n- The Alternate Turbo inputs for 2-button mode are only active when the ['Turbo ON.mdOFF Toggle' core option](#core-options) is set to On and the ['Alternate Turbo Hotkey' core option](#core-options) is set to On.\n\n| RetroPad Inputs | User 1 - 5 input descriptors | PCE Joypad 2-button | PCE Joypad 6-button |\n|------------------------------------------------|------------------------------|---------------------------|---------------------|\n|  | II | II | II |\n|  | III | II Turbo On/Off | III |\n|  | Select | Select | Select |\n|  | Run | Run | Run |\n|  | D-Pad Up | D-Pad Up | D-Pad Up |\n|  | D-Pad Down | D-Pad Down | D-Pad Down |\n|  | D-Pad Left | D-Pad Left | D-Pad Left |\n|  | D-Pad Right | D-Pad Right | D-Pad Right |\n|  | I | I | I |\n|  | IV | I Turbo On/Off | IV |\n|  | V | | V |\n|  | VI | | VI |\n|  | Mode Switch | Mode Switch | Mode Switch |\n|  | | Alternate II Turbo On/Off | |\n|  | | Alternate I Turbo On/Off | |\n\n## Mouse\n\n| RetroMouse Inputs | Mouse |\n|-------------------------------------------------------|--------------------|\n|  Mouse Cursor | Mouse Cursor |\n|  Mouse 1 | Mouse Left Button |\n|  Mouse 2 | Mouse Right Button |\n\n## External Links\n\n- [Official Mednafen Website](https://mednafen.github.io/)\n- [Official Mednafen Downloads](https://mednafen.github.io/releases/)\n- [Libretro Beetle PCE FAST Core info file](https://github.com/libretro/libretro-super/blob/master/dist/info/mednafen_pce_fast_libretro.info)\n- [Libretro Beetle PCE FAST Github Repository](https://github.com/libretro/beetle-pce-fast-libretro)\n- [Report Libretro Beetle PCE FAST Core Issues Here](https://github.com/libretro/beetle-pce-fast-libretro/issues)\n- [Gameplay Videos](https://www.youtube.com/playlist?list=PLRbgg4gk_0IcICSGZARi72aNezAyfpKzJ)\n\n## TG-16\n\n- [NEC - PC Engine SuperGrafx (Beetle SGX)](beetle_sgx.md)\n"
},
{
"path": "docs/library/beetle_psx.md",
"content": "# PlayStation (Beetle PSX)\n\n## Background\n\nBeetle PSX is a port/fork of Mednafen's PSX module to the libretro API. It can be compiled in C++98 mode. Beetle PSX currently runs on Linux, OSX and Windows.\n\nNotable additions in this fork are:\n\n- PBP and CHD file format support, developed by Zapeth;\n- Software renderer internal resolution upscaling, implemented by simias;\n- PGXP subpixel precision, developed by iCatButler;\n\nBeetle PSX prioritizes accuracy and offers a software renderer that faithfully replicates the original PlayStation experience. However, it lacks hardware rendering capabilities.\n\nFor those seeking improved visuals and performance, Beetle PSX HW provides a hardware-accelerated alternative. However, it's important to note that all games experience graphical glitches and rendering issues of varying severity with its OpenGL renderer ([example](https://github.com/libretro/beetle-psx-libretro/issues/900)). Fortunately, Beetle PSX HW offers a more stable alternative – the Vulkan renderer. This choice delivers hardware acceleration with accuracy closer to the software renderer, making it a compelling middle ground.\n\nThe Beetle PSX core has been authored by\n\n- [Mednafen Team](https://mednafen.github.io/)\n\nThe Beetle PSX core is licensed under\n\n- [GPLv2](https://github.com/libretro/beetle-psx-libretro/blob/master/COPYING)\n\nA summary of the licenses behind RetroArch and its cores can be found [here](../development/licenses.md).\n\n## BIOS\n\nRequired or optional firmware files go in the frontend's `system` directory.\n\n| Filename | Description | md5sum |\n|:---------------:|:-------------------------------------:|:--------------------------------:|\n| scph5500.bin | PS1 JP BIOS - Required for JP games | 8dd7d5296a650fac7319bce665a6a53c |\n| scph5501.bin | PS1 US BIOS - Required for US games | 490f666e1afb15b7362b406ed1cea246 |\n| scph5502.bin | PS1 EU BIOS - Required for EU games | 32736f17079d0b2b7024407c39bd3050 |\n\nAs a replacement for any of the BIOS files mentioned above, it is also possible to use either of these BIOSes:\n\n- `PSXONPSP660.bin` (MD5: c53ca5908936d412331790f4426c6c33)\n- `ps1_rom.bin` (MD5: 81bbe60ba7a3d1cea1d48c14cbcc647b)\n\nThe `PSXONPSP660.bin` BIOS comes from the PSP, and the `ps1_rom.bin` BIOS comes from the PS3, both are region-free.\nFor Beetle PSX to recognize either of these BIOSes, you need to enable the \"Override BIOS\" option.\n\n## Extensions\n\nContent that can be loaded by the Beetle PSX core have the following file extensions:\n\n- .cue\n- .toc\n- .m3u\n- .ccd\n- .exe\n- .pbp\n- .chd\n\nRetroArch database(s) that are associated with the Beetle PSX core:\n\n- [Sony - PlayStation](https://github.com/libretro/libretro-database/blob/master/rdb/Sony%20-%20PlayStation.rdb)\n\n## Features\n\nFrontend-level settings or features that the Beetle PSX core respects.\n\n| Feature | Supported |\n|-------------------|:---------:|\n| Restart | ✔ |\n| Screenshots | ✔ |\n| Saves | ✔ |\n| States | ✔ |\n| Rewind | ✔ |\n| Netplay | ✕ |\n| Core Options | ✔ |\n| [Memory Monitoring (achievements)](../guides/memorymonitoring.md) | ✔ |\n| RetroArch Cheats | ✔ |\n| Native Cheats | ✕ |\n| Controls | ✔ |\n| Remapping | ✔ |\n| Multi-Mouse | ✔ |\n| Rumble | ✔ |\n| Sensors | ✕ |\n| Camera | ✕ |\n| Location | ✕ |\n| Subsystem | ✕ |\n| [Softpatching](../guides/softpatching.md) | ✕ |\n| Disk Control | ✔ |\n| Username | ✕ |\n| Language | ✕ |\n| Crop Overscan * | ✕ |\n| LEDs | ✕ |\n\n\\* Overscan cropping available via Core Options instead of frontend settings\n\n### Directories\n\nThe Beetle PSX core's library name is 'Beetle PSX'\n\nThe Beetle PSX core saves/loads to/from these directories.\n\n**Frontend's Save directory**\n\n- Memory cards\n\n**Frontend's State directory**\n\n| File | Description |\n|:--------:|:-----------:|\n| *.state# | State |\n\n### Geometry and timing\n\n- The Beetle PSX core's core provided FPS is 59.826 for NTSC games and 49.761 for PAL games (non-interlaced rates) and is toggleable to 59.940 for NTSC games and 50.000 for PAL games (interlaced rates) through core options\n- The Beetle PSX core's core provided sample rate is 44100 Hz\n- The Beetle PSX core's base width is 320\n- The Beetle PSX core's base height is 240\n- The Beetle PSX core's max width is 700 when the 'Internal GPU resolution' is set to 1x. Raising the resolution past 1x will increase the max width\n- The Beetle PSX core's max height is 576 when the 'Internal GPU resolution' is set to 1x. Raising the resolution past 1x will increase the max height\n- The Beetle PSX core's core provided aspect ratio is automatically set based on core options\n\n## Loading content\n\nBeetle PSX needs a cue-sheet that points to an image file. A cue sheet, or cue file, is a metadata file which describes how the tracks of a CD or DVD are laid out.\n\nIf you have e.g. `foo.bin`, you should create a text file and save it as `foo.cue`. Most PS1 games are single-track, so the cue file contents should look like this:\n\n`foobin.cue`\n```\n FILE \"foo.bin\" BINARY\n TRACK 01 MODE1/2352\n INDEX 01 00:00:00\n```\n\nAfter that, you can load the `foo.cue` file in RetroArch with the Beetle PSX core.\n\n!!! attention\n Certain PS1 games are multi-track, so their .cue files might be more complicated.\n\n### Playing PAL copy protected games\n\nPAL copy protected games need a SBI Subchannel file next to the bin/cue files in order to get past the copy protection.\n\n- Ape Escape (Europe).bin\n- Ape Escape (Europe).cue\n- **Ape Escape (Europe).sbi**\n\n!!! warning\n\tFor proper PAL game compatibility, the 'Skip BIOS' core option needs to be set to off.\n\n### Multiple-disk games\n\nIf foo is a multiple-disk game, you should have .cue files for each one, e.g. `foo (Disc 1).cue`, `foo (Disc 2).cue`, `foo (Disc 3).cue`.\n\nTo take advantage of Disc Control feature for disk swapping, an index file (a m3u file) should be made.\n\nCreate a text file and save it as `foo.m3u`. Then enter your game's .cue files on it. The m3u file contents should look something like this:\n\n`foo.m3u`\n```\nfoo (Disc 1).cue\nfoo (Disc 2).cue\nfoo (Disc 3).cue\n```\n\nAfter that, you can load the `foo.m3u` file in RetroArch with the Beetle PSX core.\n\nHere's a m3u example done with Valkryie Profile\n\n\n\n!!! attention\n\tAdding multi-track games to a RetroArch playlist is recommended. (Manually add an entry a playlist that points to `foo.m3u`)\n\n#### Swapping disks\n\nDisks can be swapped through Quick Menu -> Disc Control in RetroArch.\n\nIf not using .m3u files, .cue files must be manually selected via the Load New Disk legacy feature.\n\nIf using .m3u files, disks can be swapped by selecting Eject Disk, changing the Current Disk Index to your desired disk, and finally selecting Insert Disk.\n\n### Compressed content\n\nAlternatively to using cue sheets with .bin/.iso files, you can convert your games to .pbp (Playstation Portable update file) or .chd (MAME Compressed Hunks of Data) to reduce file sizes and neaten up your game folder.\n\n#### PBP\n\nA recommended .pbp convert tool is PSX2PSP.\n\nIf converting a multiple-disk game, all disks should be added to the same .pbp file, rather than making a .m3u file for them.\n\nMost conversion tools will want a single .bin file for each disk. If your game uses multiple .bin files (tracks) per disk, you will have to mount the cue sheet to a virtual drive and re-burn the images onto a single track before conversion.\n\nFor multi-disk PAL copy-protected games, change the sbi file syntax from `[filename].sbi` to `[filename]_[disc_number].sbi`\n\n- Final Fantasy IX (Germany).pbp\n- **Final Fantasy IX (Germany)_1.sbi**\n- **Final Fantasy IX (Germany)_2.sbi**\n- **Final Fantasy IX (Germany)_3.sbi**\n- **Final Fantasy IX (Germany)_4.sbi**\n\n!!! attention\n RetroArch does not currently have .pbp database due to variability in users' conversion methods. All .pbp games will have to be added to playlists manually.\n\n#### CHD\n\nTo convert content to CHD format, use the chdman tool found inside the latest MAME distribution and point it to a .cue file, like so:\n\n```\nchdman createcd --input foo.cue --output foo.chd\n```\n\nNote that the tool currently does not integrate .sbi files into the .chd, so these must be placed alongside the resulting .chd file in order to properly play games with LibCrypt protection.\n\n!!! attention\n\tFor multi-disc content, make an .m3u file that lists all the .chd files instead of .cue files. Like the PBP files, content must be added to playlists manually.\n\n## Saves\n\nFor game savedata storage, the PSX console used memory cards. The PSX console had two slots for memory cards.\n\nIn this doc, the first memory card slot will be referred to as 'Memcard slot 0' and the second slot will be referred to as 'Memcard slot 1'.\n\nFor memory card functionality and usage, the Beetle PSX core will either use the Libretro savedata format or the Mednafen savedata format.\n\n
\n\n| Libretro savedata format | Mednafen savedata format |\n|----------------------------|----------------------------------|\n| gamename.srm | gamename.slot#.mcr |\n\n
\n\n**By default**, the Beetle PSX core will use Libretro's savedata format for Memcard slot 0 and Mednafen's savedata format for Memcard slot 1.\n\n
\n\n!!! attention\n Memory card behavior can be controlled with the following [core options](#core-options) (Memcard 0 method, Enable memory card 1, Shared memcards).\n\n**By default**, the filenames of the Memcard savedata will match the loaded cue or m3u or pbp filename, like this:\n\n- Loaded content: Breath of Fire III (USA).cue\n\n- **Memcard slot 0: Breath of Fire III (USA).srm**\n\n- **Memcard slot 1: Breath of Fire III (USA).1.mcr**\n\nor\n\n- Loaded content: Final Fantasy VII (USA).m3u\n\n- **Memcard slot 0: Final Fantasy VII (USA).srm**\n\n- **Memcard slot 1: Final Fantasy VII (USA).1.mcr**\n\nor\n\n- Loaded content: Wild Arms 2 (USA).pbp\n\n- **Memcard slot 0: `Wild Arms 2 (USA).srm**\n\n- **Memcard slot 1: `Wild Arms 2 (USA).1.mcr**\n\n!!! attention\n\tTo import your old memory cards from other emulators, you need to rename them to either the Libretro savedata format or the Mednafen savedata format. The Libretro (.srm) savedata format, when used with Beetle PSX, is internally identical to the Mednafen PSX (.mcr) savedata format, and can be converted between one another via renaming.\n\n!!! warning\n\tKeep in mind that save states also include the state of the memory card; carelessly loading an old save state will **OVEWRITE** the memory card, potentially resulting in lost saved games.\t**You can set the 'Don't overwrite SaveRAM on loading savestate' option in RetroArch's Saving settings to On to prevent this.**\n\n## Core options\n\nThe Beetle PSX core has the following options that can be tweaked from your frontend's core options menu or manually changed via core configuration files. Options are listed below in the following format:\n\n``Option Name [option_key] (setting1/setting2/...)``\n\nTo manually change an option, search for that option's key in the core configuration file you want to edit and set it to your desired setting value, enclosed in quotations. For example, if you had set the Internal Color Depth to 32bpp and wanted to revert it to 16bpp, you would change ``beetle_psx_depth = \"32bpp\"`` to ``beetle_psx_depth = \"16bpp(native)\"``. Manually editing core configuration files is typically unnecessary unless your frontend does not have a method for toggling options.\n\nThe default setting for each option will be highlighted in bold. Settings with (Restart) means that core has to be shut down for the new setting to be applied on next launch.\n\n- **Internal GPU Resolution** [beetle_psx_internal_resolution] (**1x(native)**/2x/4x/8x/16x)\n\n\tSelects internal resolution multiplier.\n\n\tResolutions higher than 1x(native) improve the fidelity of 3D models at the expense of increased performance requirements. 2D elements are generally unaffected by this setting from the core's perspective.\n\n\t??? note \"*Internal GPU Resolution - 1x*\"\n\t \n\n\t??? note \"*Internal GPU Resolution - 2x*\"\n\t \n\n- **Dithering Pattern** [beetle_psx_dither_mode] (**1x(native)**/internal resolution/disabled)\n\n\tSelect dithering pattern.\n\n\tDithering is used by the original PSX hardware to combat the color banding visible due to 16bpp color depth.\n\n\t'1x(native)' emulates original hardware but can look grainy at higher internal resolutions.\n\n\t'internal resolution' reduces graininess by allowing for finer dithering at higher Internal GPU Resolutions, but has limited effectiveness in combating color banding if the Internal GPU Resolution is set too high. (Note in the examples below that the 'internal resolution' option is less grainy but has more visible banding than '1x(native)' at 4x Internal GPU Resolution)\n\n\t'disabled' is for users who otherwise wish to turn off dithering regardless of color banding.\n\n\t??? note \"*Dithering Pattern - 1x Native*\"\n\t \n\n\t??? note \"*Dithering Pattern - Internal Resolution*\"\n\t \n\n\t??? note \"*Dithering Pattern - Disabled*\"\n\t \n\n- **PGXP Operation Mode** [beetle_psx_pgxp_mode] (**disabled**/memory only/memory + CPU)\n\n\tEnabling the Parallel/Precision Geometry Transform Pipeline (PGXP) allows polygons to be rendered with subpixel precision, eliminating or otherwise diminishing the polygon jitter/wobble visible on original PSX hardware. This distortion results from original hardware using fixed point mathematics when rendering 3D models, thus rounding polygon vertices to the nearest integer pixel.\n\n\t'disabled' emulates original hardware behavior.\n\n\t'memory only' mode enables subpixel precision at the cost of increased performance requirements with only minor compatibility issues. 'memory + CPU' mode can further reduce jitter but is highly demanding and is known to cause geometry errors. 'memory only' is recommended for best compatibility.\n\n\t[https://www.youtube.com/watch?v=EYCpd_1lPUc](https://www.youtube.com/watch?v=EYCpd_1lPUc)\n\n- **Display Internal FPS** [beetle_psx_display_internal_fps] (**disabled**/enabled)\n\n\tDisplays the frame rate that the emulated PSX is drawing at. Requires onscreen notifications to be enabled in the libretro frontend. Reported values may be inaccurate.\n\n\t??? note \"*Display internal FPS - On*\"\n\t \n\n- **Line-to-Quad Hack** [beetle_psx_line_render] (**default**/aggressive/disabled)\n\n\tCertain games employ a special technique for drawing horizontal lines, which involves stretching single-pixel-high triangles across the screen in a manner that causes the PSX hardware to rasterise them as a row of pixels. Examples include Doom/Hexen, and the water effects in Soul Blade. When running such games with an Internal GPU Resolution higher than native, these triangles no longer resolve as a line, causing gaps to appear in the output image.\n\n\tSetting 'Line-to-Quad Hack' to 'Default' solves this issue by detecting small triangles and converting them as required.\n\n\tThe 'Aggressive' option will likely introduce visual glitches due to false positives, but is needed for correct rendering of some 'difficult' titles (e.g. Dark Forces, Duke Nukem).\n\n- **Frame Duping (Speedup)** [beetle_psx_frame_duping] (**disabled**/enabled)\n\n\tWhen enabled, provides a small performance increase by redrawing/reusing the last rendered frame (instead of presenting a new one) if the content of the current frame is unchanged based on the internal fps heuristic. May cause inaccurate behavior or lost animation frames, so it is not recommended to use this unless necessary.\n\n- **CPU Dynarec** [beetle_psx_cpu_dynarec] (**disabled**/execute/execute_once/run_interpreter)\n\n\tDynamically recompile CPU instructions to native instructions. Much faster than interpreter, but CPU timing is less accurate, and may have bugs.\n\n- **Dynarec Code Invalidation** [beetle_psx_dynarec_invalidate] (**full**/dma)\n\n\tSome games require Full invalidation, some require DMA Only. This option has no effect when CPU Dynarec is not enabled.\n\n- **Dynarec DMA/GPU Event Cycles** [beetle_psx_dynarec_eventcycles] (**128**/256/384/512/640/768/896/1024)\n\n\tMax cycles run by CPU before a GPU or DMA Update is checked, higher number will be faster, has much less impact on beetle interpreter than dynarec. Leave at 128 for default Beetle interpreter behavior when CPU Dynarec is not enabled.\n\n- **CPU Frequency Scaling (Overclock)** [beetle_psx_cpu_freq_scale] (50% to 750% in increments of 10%. Default: **100%(native)**)\n\n\tEnable overclocking (or underclocking) of the emulated PSX's CPU. The default frequency of the MIPS R3000A-compatible 32-bit RISC CPU is 33.8688 MHz; running at higher frequencies can eliminate slowdown and improve frame rates in certain games at the expense of increased performance requirements.\n\n\tNote that some games have an internal frame rate limiter and may not benefit from overclocking. It is generally not recommended to adjust this setting as it causes many games or portions of them to run at unintended speeds. This can lead to audio and video desynchronization, among other issues.\n\n\tLeave at default for most games.\n\n- **GTE Overclock** [beetle_psx_gte_overclock] (**disabled**/enabled)\n\n\tWhen enabled, reduces the latency of operations involving the emulated PSX's Geometry Transform Engine (CPU coprocessor used for calculations related to 3D projection - i.e. all 3D graphics) to 1 cycle per instruction and additionally eliminates all memory access or cache fetch latency. For games that make heavy use of the GTE, this can greatly improve frame rate (and frame time) stability at the expense of increased performance requirements.\n\n\tCurrently unstable -- leave off if unsure.\n\n- **GPU Rasterizer Overclock** [beetle_psx_gpu_overclock] (**1x(native)**/2x/4x/8x/16x/32x)\n\n\tEnables overclocking of the 2D rasterizer contained within the emulated PSX's GPU. Does not improve 3D rendering, and in general has little effect.\n\n- **Skip BIOS** [beetle_psx_skip_bios] (**disabled**/enabled)\n\n\tWhen enabled, skips the PSX BIOS animation normally displayed with starting content.\n\n\t**Enabling this option will cause compatibility issues with a small minority of games (Saga Frontier, PAL copy protected games, etc).**\n\n\t??? note \"*Skip BIOS - Off*\"\n\t \n\n- **Core-Reported FPS Timing** [beetle_psx_core_timing_fps] (**force_progressive**/force_interlaced/auto_toggle)\n\n\tSets FPS timing that the core will report to the frontend. Automatic toggling will allow the core to switch between reporting progressive and interlaced rates, but may cause frontend video/audio driver reinits. Progressive timings are 59.826 for NTSC content and 49.761 for PAL content, and interlaced timings are 59.940 for NTSC content and 50.000 for PAL content.\n\n- **Core Aspect Ratio** [beetle_psx_aspect_ratio] (**corrected**/uncorrected/4:3)\n\n\tSet core provided aspect ratio. This setting is ignored when the Widescreen Mode Hack or Display Full VRAM options are enabled. \"4:3\" forces the core aspect ratio to 4:3 without taking horizontal overscan cropping or visible scanlines into account. The \"4:3\" setting should not be used and is only provided as a legacy feature for users desiring old incorrect behavior from the core.\n\n- **Widescreen Mode Hack** [beetle_psx_widescreen_hack] (**disabled**/enabled)\n\n\tForces content to be rendered with an aspect ratio of 16:9. Produces best results with fully 3D games. Can cause graphical glitches or alignment/stretching issues in games that mix 3D and 2D elements. Leave off for most games.\n\n\t??? note \"*Widescreen mode hack - Off*\"\n\t \n\n\t??? note \"*Widescreen mode hack - On*\"\n\t \n\n- **Crop Horizontal Overscan** [beetle_psx_crop_overscan] (**enabled**/disabled)\n\n\tBy default, Beetle PSX includes horizontal padding (black bars or 'pillarboxes' on either side of the screen) to emulate the same black bars generated in analog video output by real PSX hardware. This horizontal padding can contain garbage pixels that are generated when the game's width mode is smaller than the display area width in the emulated GPU registers. Enabling 'Crop Horizontal Overscan' will remove this potentially glitchy horizontal overscan region.\n\n\tNot all games will benefit from enabling this setting as shown in the examples below.\n\n\t??? note \"*Crop Overscan - Off (Game with Garbage Pixels)*\"\n\t \n\n\t??? note \"*Crop Overscan - On (Game with Garbage Pixels)*\"\n\t \n\n\t??? note \"*Crop Overscan - Off (Game with No Issues)*\"\n\t \n\n\t??? note \"*Crop Overscan - On (Game with No Issues)*\"\n\t \n\n\tThis option does not affect vertical overscan. Vertical overscan can be cropped using the Initial/Last Scanline core options.\n\n- **Additional Cropping** [beetle_psx_image_crop] (**disabled**/1px/2px/3px/4px/5px/6px/7px/8px)\n\n\tWhen 'Crop Horizontal Overscan' is enabled, this option further reduces the width of the cropped image by the specified number of pixels.\n\n\tNote: This can have unintended consequences. While the absolute width is reduced, the resultant video is still scaled to the currently set aspect ratio. Enabling 'Additional Cropping' may therefore cause horizontal stretching.\n\n- **Offset Cropped Image** [beetle_psx_image_offset] (**disabled**/-4px/-3px/-2px/-1px/+1px/+2px/+3px/+4px)\n\n\tWhen 'Crop Horizontal Overscan' is enabled, allows the resultant cropped image to be offset horizontally to the right (positive) or left (negative) by the specified number of pixels. May be used to correct alignment issues.\n\n- **Initial Scanline - NTSC** [beetle_psx_initial_scanline] (0 to 40 in increments of 1. Default: **0**)\n\n\tSelects the first displayed scanline when running NTSC content. Setting a value greater than 0 will reduce the height of output images by cropping pixels from the topmost edge. May be used to counteract letterboxing built in to some games.\n\n- **Last Scanline - NTSC** [beetle_psx_last_scanline] (210 to 239 in increments of 1. Default: **239**)\n\n\tSelects the last displayed scanline when running NTSC content. Setting a value less than 239 will reduce the height of output images by cropping pixels from the bottommost edge. May be used to counteract letterboxing built in to some games.\n\n- **Initial Scanline - PAL** [beetle_psx_initial_scanline_pal] (0 to 40 in increments of 1. Default: **0**)\n\n\tSelects the first displayed scanline when running PAL content. Setting a value greater than 0 will reduce the height of output images by cropping pixels from the topmost edge. May be used to counteract letterboxing built in to some games.\n\n- **Last Scanline - PAL** [beetle_psx_last_scanline_pal] (230 to 287 in increments of 1. Default: **287**)\n\n\tSelects the last displayed scanline when running PAL content. Setting a value less than 287 will reduce the height of output images by cropping pixels from the bottommost edge. May be used to counteract letterboxing built in to some games.\n\n- **CD Access Method (Restart)** [beetle_psx_cd_access_method] (**sync**/async/precache)\n\n\tSelects method used to read data from content disc images.\n\n\t'sync' emulates original hardware.\n\n\t'async' can alleviate stuttering on devices with slow storage.\n\n\t'precache' loads the entire disc image into memory when starting content, incurring a small startup delay. This can improve in-game loading times and eliminate stutters due to emulated CD access, but may cause issues on systems with low memory.\n\n- **CD Loading Speed** [beetle_psx_cd_fastload] (**2x(native)**/4x/6x/8x/10x/12x/14x)\n\n\tSelects disk access speed multiplier.\n\n\tThis speedhack can greatly reduce loading times at speeds higher than native but is known to introduce texture corruption errors, timing glitches, or loading screen softlocks in many titles. Some games will not work at all if loading speed is not set to native (e.g. Castlevania: Symphony of the Night).\n\n\t**Reduce multiplier value if experiencing loading issues, freezes, etc.**\n\n- **Memory Card 0 Method (Restart)** [beetle_psx_use_mednafen_memcard0_method] (**libretro**/mednafen)\n\n\tChoose the savedata format used for Memory Card 0. See the [Saves section](#saves) above for an explanation regarding the libretro and mednafen formats. libretro is recommended, but mednafen may be used for compatibility with the standalone version of Mednafen. The libretro (.srm) and Mednafen (.mcr) formats are internally identical when used with Beetle PSX.\n\n\tNote: This option must be set to 'mednafen' if the Shared Memcards option is enabled.\n\n- **Enable Memory Card 1 (Restart)** [beetle_psx_enable_memcard1] (**enabled**/disabled)\n\n\tSelects whether to emulate a second memory card in Slot 1. When disabled, games can only access the memory card in Slot 0.\n\n\tNote: Some games require this option to be disabled for correct operation (e.g. Codename Tenka).\n\n- **Shared Memory Cards (Restart)** [beetle_psx_shared_memory_cards] (**disabled**/enabled)\n\n\tWhen enabled, games will save and load using the same memory card files. Note: The \"Memcard 0 Method\" option must be set to 'mednafen' for this option to function properly.\n\n\tWhen disabled, separate memory card files will be generated for each title.\n\n\tThis option is useful for games in series such as Suikoden or Arc the Lad that check for save data from previous titles.\n\n
\n\n- **Analog Self-Calibration** [beetle_psx_analog_calibration] (**disabled**/enabled)\n\n\tWhen enabled, monitors the max values reached by the input, using it as a calibration heuristic which then scales the analog coordinates sent to the emulator accordingly. For best results, rotate the sticks at max amplitude for the algorithm to get a good estimate of the scaling factor, otherwise it will adjust while playing.\n\n\tWhile modern analog sticks have circular logical ranges, older analog sticks such as those on the DualShock have logical ranges closer to squares and can report larger values at the intercardinal directions than modern analog sticks can. Games that expect these larger values will have issues controlling with modern analog sticks, which this option can solve by scaling modern analog stick values up.\n\n- **Enable DualShock Analog Mode Toggle** [beetle_psx_analog_toggle] (**disabled**/enabled)\n\n\tWhen the input device type is set to DualShock, this option determines whether or not the Analog Button on that device can be toggled.\n\n\tWhen this option is disabled, the DualShock input device will be locked in Analog Mode where the analog sticks are on.\n\n\tWhen this option is enabled, the DualShock input device can be toggled between Digital Mode (analog sticks off) and Analog Mode (analog sticks on) much like real hardware by pressing and holding START+SELECT+L1+L2+R1+R2 for one second in lieu of a dedicated Analog Button.\n\n\tNote: Some games may not respond to input when the DualShock is in Analog Mode. Either enable Analog Button Toggle and toggle the DualShock to Digital Mode or change your input device type to PlayStation Controller.\n\n- **Port 1: Multitap Enable** [beetle_psx_enable_multitap_port1] (**disabled**/enabled)\n\n\tEnables/Disables multitap functionality on port 1.\n\n- **Port 2: Multitap Enable** [beetle_psx_enable_multitap_port2] (**disabled**/enabled)\n\n\tEnables/Disables multitap functionality on port 2.\n\n- **Gun Input Mode** [beetle_psx_gun_input_mode] (**lightgun**/touchscreen)\n\n\tWhen device type is set to 'Guncon / G-Con 45' or 'Justifier', specify whether to use a mouse-controlled 'Light Gun' or 'Touchscreen' input.\n\n- **Gun Cursor** [beetle_psx_gun_cursor] (**cross**/dot/off)\n\n\tSelects the gun cursor to be displayed on screen while using the the 'Guncon / G-Con 45' and 'Justifier' input device types. When disabled, cross hairs are always hidden.\n\n\t??? note \"*Gun Cursor - Cross*\"\n\t \n\n\t??? note \"*Gun Cursor - Dot*\"\n\t \n\n\t??? note \"*Gun Cursor - Off*\"\n\t \n\n- **Mouse Sensitivity** [beetle_psx_mouse_sensitivity] (5% to 200% in increments of 5%. Default: **100%**)\n\n\tConfigure the response of the 'Mouse' input device type.\n\n- **NegCon Twist Response** [beetle_psx_negcon_response] (**linear**/quadratic/cubic)\n\n\tSpecifies the analog response when using a RetroPad left analog stick to simulate the 'twist' action of emulated [neGcon Controllers](https://en.wikipedia.org/wiki/NeGcon).\n\n\t'linear': Analog stick displacement is mapped linearly to negCon rotation angle.\n\n\t'quadratic': Analog stick displacement is mapped quadratically to negCon rotation angle. This allows for greater precision when making small movements with the analog stick.\n\n\t'cubic': Analog stick displacement is mapped cubically to negCon rotation angle. This allows for even greater precision when making small movements with the analog stick, but 'exaggerates' larger movements.\n\n\t!!! attention\n\t\tA linear response is not recommended when using standard gamepad devices. The negCon 'twist' mechanism is substantially different from conventional analog sticks; linear mapping over-amplifies small displacements of the stick, impairing fine control. A linear response is only appropriate when using racing wheel peripherals.\n\n\t\tIn most cases, the 'quadratic' option should be selected. This provides effective compensation for the physical differences between real/emulated hardware and is the closest approximation of real hardware, enabling smooth/precise analog input.\n\n- **NegCon Twist Deadzone** [beetle_psx_negcon_deadzone] (**0%**/5%/10%/15%/20%/25%/30%)\n\n\tSets the deadzone of the RetroPad left analog stick when simulating the 'twist' action of emulated [neGcon Controllers](https://en.wikipedia.org/wiki/NeGcon). Used to eliminate drift/unwanted input.\n\n\t!!! attention\n\t\tMost (all?) negCon compatible titles provide in-game options for setting a 'twist' deadzone value. To avoid loss of precision, the in-game deadzone should *always* be set to zero. Any analog stick drift should instead be accounted for by configuring the 'NegCon Twist Deadzone' core option. This is particularly important when 'NegCon Twist Response' is set to 'quadratic' or 'cubic'.\n\n\t\tXbox gamepads typically require a deadzone of 15-20%. Many Android-compatible bluetooth gamepads have an internal 'hardware' deadzone, allowing the deadzone value here to be set to 0%.\n\n\t\tFor convenience, it is recommended to make use of the 'Options → Analog Setting 1P' menu of [Gran Turismo](https://en.wikipedia.org/wiki/Gran_Turismo_(video_game)) when calibrating the 'NegCon Twist Deadzone'. This provides a clear and precise representation of 'real' controller input values.\n\n## User 1 - 8 device types\n\nThe Beetle PSX core supports the following device type(s) in the controls menu, bolded device types are the default for the specified user(s):\n\n- None - Input disabled.\n- [**PlayStation Controller**](https://en.wikipedia.org/wiki/PlayStation_Controller) - Joypad - PlayStation Controller (SCPH-1080)\n- [DualShock](https://en.wikipedia.org/wiki/DualShock) - Joypad - DualShock (SCPH-1200)\n- [Analog Controller](https://en.wikipedia.org/wiki/Dual_Analog_Controller) - Joypad - PlayStation Dual Analog Controller(SCPH-1180)\n- [Analog Joystick](https://en.wikipedia.org/wiki/PlayStation_Analog_Joystick) - Joypad - PlayStation Analog Joystick (SCPH-1110)\n- [Guncon / G-Con 45](https://en.wikipedia.org/wiki/GunCon) - Lightgun - Namco Gun Controller (SLEH-00007)\n- [Justifier](https://en.wikipedia.org/wiki/Konami_Justifier) - Lightgun - Konami Justifier lightgun peripheral (SLEH-00005, SLUH-00017)\n- [Mouse](https://en.wikipedia.org/wiki/PlayStation_Mouse) - Mouse - PlayStation Mouse (SCPH-1090, SCPH-1030)\n- [neGcon](https://en.wikipedia.org/wiki/NeGcon) - Joypad - Namco third party controller\n\n## Rumble support\n\nRumble only works in the Beetle PSX core when\n\n- The content being ran has rumble support.\n- The frontend being used has rumble support.\n- The joypad device being used has rumble support.\n- The corresponding user's device type is set to **DualShock**\n\n## Multitap support\n\nActivating multitap support in compatible games can be configured by the ['Port 1: Multitap enable' and 'Port 2: Multitap enable' core options](#core-options).\n\n## Joypad\n\n\n\n| User 1 - 8 input descriptors | RetroPad Inputs | PlayStation Controller Inputs | DualShock Inputs | Analog Controller Inputs | Analog Joystick Inputs | neGcon Inputs |\n|-------------------------------|----------------------------------------------|------------------------------------------------|-------------------------------------------------|-------------------------------------------------|------------------------------------------------|---------------------------------|\n| Cross |  |  |  |  |  | Analog button I |\n| Square |  |  |  |  |  | Analog button II |\n| Select |  |  |  |  |  | |\n| Start |  |  |  |  |  | Start |\n| D-Pad Up |  |  |  |  |  | D-Pad Up |\n| D-Pad Down |  |  |  |  |  | D-Pad Down |\n| D-Pad Left |  |  |  |  |  | D-Pad Left |\n| D-Pad Right |  |  |  |  |  | D-Pad Right |\n| Circle |  |  |  |  |  | A |\n| Triangle |  |  |  |  |  | B |\n| L1 |  |  |  |  |  | Left shoulder button (analog) |\n| R1 |  |  |  |  |  | Right shoulder button (digital) |\n| L2 |  |  |  |  |  | Analog button II |\n| R2 |  |  |  |  |  | Analog button I |\n| L3 |  | |  | | | |\n| R3 |  | |  | | | |\n| Left Analog X |  X | |  |  | Left Joystick X | Twist |\n| Left Analog Y |  Y | |  |  | Left Joystick Y | |\n| Right Analog X |  X | |  |  | Right Joystick X | |\n| Right Analog Y |  Y | |  |  | Right Joystick Y | |\n\n## Mouse\n\n| RetroMouse Inputs | Mouse Inputs |\n|-----------------------------------------------------|--------------------|\n|  Mouse Cursor | Mouse Cursor |\n|  Mouse 1 | Mouse Left Button |\n|  Mouse 2 | Mouse Right Button |\n\n## Lightgun\n\n| RetroLightgun Inputs | Guncon / G-Con 45 Inputs | Justifier Inputs |\n|------------------------------------------------------|-----------------------------|---------------------|\n|  Gun Crosshair | Guncon / G-Con 45 Crosshair | Justifier Crosshair |\n| Gun Trigger | Guncon / G-Con 45 Trigger | Justifier Trigger |\n| Gun Reload | Guncon / G-Con 45 Reload | Justifier Reload |\n| Gun Aux A | Guncon / G-Con 45 A | Justifier Aux |\n| Gun Aux B | Guncon / G-Con 45 B | |\n| Gun Start | | Justifier Start |\n\n## Compatibility\n\nA list of known emulation bugs can be found here [https://forum.fobby.net/index.php?t=msg&th=1114&start=0&](https://forum.fobby.net/index.php?t=msg&th=1114&start=0&)\n\n## External Links\n\n- [Official Mednafen Website](https://mednafen.github.io/)\n- [Official Mednafen Downloads](https://mednafen.github.io/releases/)\n- [Beetle PSX Libretro Core info file](https://github.com/libretro/libretro-super/blob/master/dist/info/mednafen_psx_libretro.info)\n- [Beetle PSX Libretro Github Repository](https://github.com/libretro/beetle-psx-libretro)\n- [Report Beetle PSX Core Issues Here](https://github.com/libretro/beetle-psx-libretro/issues)\n- [Gameplay Videos](https://www.youtube.com/playlist?list=PLRbgg4gk_0IeQOnw9bnjwthht0iUvs2wk)\n\n## Libretro PSX cores\n\n- [PlayStation (Beetle PSX HW)](beetle_psx_hw.md)\n- [PlayStation (PCSX ReARMed)](pcsx_rearmed.md)\n"
},
{
"path": "docs/library/beetle_psx_hw.md",
"content": "# PlayStation (Beetle PSX HW)\n\n## Background\n\nBeetle PSX HW is a port/fork of Mednafen's PSX module to the libretro API. It can be compiled in C++98 mode, excluding the Vulkan renderer, which is written in C++11 for the time being. Beetle PSX HW currently runs on Linux, OSX and Windows.\n\nNotable additions in this fork are:\n\n- PBP and CHD file format support, developed by Zapeth;\n- Software renderer internal resolution upscaling, implemented by simias;\n- An OpenGL 3.3 renderer, developed by simias;\n- A Vulkan renderer, developed by TinyTiger;\n- PGXP perspective correct texturing and subpixel precision, developed by iCatButler;\n\nThe Beetle PSX HW core has been authored by\n\n- [Mednafen Team](https://mednafen.github.io/)\n\nThe Beetle PSX HW core is licensed under\n\n- [GPLv2](https://github.com/libretro/beetle-psx-libretro/blob/master/COPYING)\n\nA summary of the licenses behind RetroArch and its cores can be found [here](../development/licenses.md).\n\n### Requirements\n\n- OpenGL 3.3 for the opengl renderer\n- Vulkan for the vulkan renderer\n\n## BIOS\n\nRequired or optional firmware files go in the frontend's `system` directory.\n\n| Filename | Description | md5sum |\n|:---------------:|:-------------------------------------:|:--------------------------------:|\n| scph5500.bin | PS1 JP BIOS - Required for JP games | 8dd7d5296a650fac7319bce665a6a53c |\n| scph5501.bin | PS1 US BIOS - Required for US games | 490f666e1afb15b7362b406ed1cea246 |\n| scph5502.bin | PS1 EU BIOS - Required for EU games | 32736f17079d0b2b7024407c39bd3050 |\n\nAs a replacement for any of the BIOS files mentioned above, it is also possible to use either of these BIOSes:\n\n- `PSXONPSP660.bin` (MD5: c53ca5908936d412331790f4426c6c33)\n- `ps1_rom.bin` (MD5: 81bbe60ba7a3d1cea1d48c14cbcc647b)\n\nThe `PSXONPSP660.bin` BIOS comes from the PSP, and the `ps1_rom.bin` BIOS comes from the PS3, both are region-free.\nFor Beetle PSX HW to recognize either of these BIOSes, you need to enable the \"Override BIOS\" option.\n\n## Extensions\n\nContent that can be loaded by the Beetle PSX HW core have the following file extensions:\n\n- .cue\n- .toc\n- .m3u\n- .ccd\n- .exe\n- .pbp\n- .chd\n\nRetroArch database(s) that are associated with the Beetle PSX HW core:\n\n- [Sony - PlayStation](https://github.com/libretro/libretro-database/blob/master/rdb/Sony%20-%20PlayStation.rdb)\n\n## Features\n\nFrontend-level settings or features that the Beetle PSX HW core respects.\n\n| Feature | Supported |\n|-------------------|:---------:|\n| Restart | ✔ |\n| Screenshots | ✔ |\n| Saves | ✔ |\n| States | ✔ |\n| Rewind | ✔ |\n| Netplay | ✕ |\n| Core Options | ✔ |\n| [Memory Monitoring (achievements)](../guides/memorymonitoring.md) | ✔ |\n| RetroArch Cheats | ✔ |\n| Native Cheats | ✕ |\n| Controls | ✔ |\n| Remapping | ✔ |\n| Multi-Mouse | ✔ |\n| Rumble | ✔ |\n| Sensors | ✕ |\n| Camera | ✕ |\n| Location | ✕ |\n| Subsystem | ✕ |\n| [Softpatching](../guides/softpatching.md) | ✕ |\n| Disk Control | ✔ |\n| Username | ✕ |\n| Language | ✕ |\n| Crop Overscan * | ✕ |\n| LEDs | ✕ |\n\n\\* Overscan cropping available via Core Options instead of frontend settings\n\n### Directories\n\nThe Beetle PSX HW core's library name is 'Beetle PSX HW'\n\nThe Beetle PSX HW core saves/loads to/from these directories.\n\n**Frontend's Save directory**\n\n- Memory cards\n\n**Frontend's State directory**\n\n| File | Description |\n|:--------:|:-----------:|\n| *.state# | State |\n\n### Geometry and timing\n\n- The Beetle PSX HW core's core provided FPS is 59.826 for NTSC games and 49.761 for PAL games (non-interlaced rates) and is toggleable to 59.940 for NTSC games and 50.000 for PAL games (interlaced rates) through core options\n- The Beetle PSX HW core's core provided sample rate is 44100 Hz\n- The Beetle PSX HW core's base width is 320\n- The Beetle PSX HW core's base height is 240\n- The Beetle PSX HW core's max width is 700 when the 'Internal GPU resolution' is set to 1x. Raising the resolution past 1x will increase the max width\n- The Beetle PSX HW core's max height is 576 when the 'Internal GPU resolution' is set to 1x. Raising the resolution past 1x will increase the max height\n- The Beetle PSX HW core's core provided aspect ratio is automatically set based on core options\n\n## Loading content\n\nBeetle PSX HW needs a cue-sheet that points to an image file. A cue sheet, or cue file, is a metadata file which describes how the tracks of a CD or DVD are laid out.\n\nIf you have e.g. `foo.bin`, you should create a text file and save it as `foo.cue`. Most PS1 games are single-track, so the cue file contents should look like this:\n\n`foobin.cue`\n```\n FILE \"foo.bin\" BINARY\n TRACK 01 MODE1/2352\n INDEX 01 00:00:00\n```\n\nAfter that, you can load the `foo.cue` file in RetroArch with the Beetle PSX HW core.\n\n!!! attention\n Certain PS1 games are multi-track, so their .cue files might be more complicated.\n\n### Playing PAL copy protected games\n\nPAL copy protected games need a SBI Subchannel file next to the bin/cue files in order to get past the copy protection.\n\n- Ape Escape (Europe).bin\n- Ape Escape (Europe).cue\n- **Ape Escape (Europe).sbi**\n\n!!! warning\n\tFor proper PAL game compatibility, the 'Skip BIOS' core option needs to be set to off.\n\n### Multiple-disk games\n\nIf foo is a multiple-disk game, you should have .cue files for each one, e.g. `foo (Disc 1).cue`, `foo (Disc 2).cue`, `foo (Disc 3).cue`.\n\nTo take advantage of Disc Control feature for disk swapping, an index file (a m3u file) should be made.\n\nCreate a text file and save it as `foo.m3u`. Then enter your game's .cue files on it. The m3u file contents should look something like this:\n\n`foo.m3u`\n```\nfoo (Disc 1).cue\nfoo (Disc 2).cue\nfoo (Disc 3).cue\n```\n\nAfter that, you can load the `foo.m3u` file in RetroArch with the Beetle PSX HW core.\n\nHere's a m3u example done with Valkryie Profile\n\n\n\n!!! attention\n\tAdding multi-track games to a RetroArch playlist is recommended. (Manually add an entry a playlist that points to `foo.m3u`)\n\n#### Swapping disks\n\nDisks can be swapped through Quick Menu -> Disc Control in RetroArch.\n\nIf not using .m3u files, .cue files must be manually selected via the Load New Disk legacy feature.\n\nIf using .m3u files, disks can be swapped by selecting Eject Disk, changing the Current Disk Index to your desired disk, and finally selecting Insert Disk.\n\n### Compressed content\n\nAlternatively to using cue sheets with .bin/.iso files, you can convert your games to .pbp (Playstation Portable update file) or .chd (MAME Compressed Hunks of Data) to reduce file sizes and neaten up your game folder.\n\n#### PBP\n\nA recommended .pbp convert tool is PSX2PSP.\n\nIf converting a multiple-disk game, all disks should be added to the same .pbp file, rather than making a .m3u file for them.\n\nMost conversion tools will want a single .bin file for each disk. If your game uses multiple .bin files (tracks) per disk, you will have to mount the cue sheet to a virtual drive and re-burn the images onto a single track before conversion.\n\nFor multi-disk PAL copy-protected games, change the sbi file syntax from `[filename].sbi` to `[filename]_[disc_number].sbi`\n\n- Final Fantasy IX (Germany).pbp\n- **Final Fantasy IX (Germany)_1.sbi**\n- **Final Fantasy IX (Germany)_2.sbi**\n- **Final Fantasy IX (Germany)_3.sbi**\n- **Final Fantasy IX (Germany)_4.sbi**\n\n!!! attention\n RetroArch does not currently have .pbp database due to variability in users' conversion methods. All .pbp games will have to be added to playlists manually.\n\n#### CHD\n\nTo convert content to CHD format, use the chdman tool found inside the latest MAME distribution and point it to a .cue file, like so:\n\n```\nchdman createcd --input foo.cue --output foo.chd\n```\n\nNote that the tool currrently does not integrate .sbi files into the .chd, so these must be placed alongside the resulting .chd file in order to properly play games with LibCrypt protection.\n\n!!! attention\n\tFor multi-disc content, make an .m3u file that lists all the .chd files instead of .cue files. Like the PBP files, content must be added to playlists manually.\n\n## Texture replacements (Vulkan only)\n\n\n\nTo use a textures pack you'll have to extract the textures in a `[game_filename]-texture-replacements/` folder inside your game directory, where \"[game_filename]\" matches the actual filename of the file you're using to load the game.\n\nHere's an example with Suikoden II:\n```\nSuikoden II (USA).bin\nSuikoden II (USA).cue\nSuikoden II (USA)-texture-replacements/\n```\n\nAnother example with Chrono Cross, a multi-discs game:\n```\nChrono Cross (USA) (Disc 1).bin\nChrono Cross (USA) (Disc 1).cue\nChrono Cross (USA) (Disc 2).bin\nChrono Cross (USA) (Disc 2).cue\nChrono Cross (USA).m3u\nChrono Cross (USA)-texture-replacements/\n```\n\nFor multi-discs games you will be loading the game with the .m3u (if you followed the ['Multiple-disk games'](#multiple-disk-games) section properly) so the textures folder name has to match the .m3u filename.\n\n!!! Tips\n\tIf you still can't see any difference with your folder set up properly:\n\t\n\t- The .png files need to be inside `[game_filename]-texture-replacements/` directly, not in another subfolder and not inside a .zip file!\n\t- Both `Track Textures` and `Replace Textures` core options have to be enabled.\n\t- `Internal GPU Resolution` core option should be set to anything higher than '1x (Native)' and `Supersampling (Downsample to Native Resolution)` core option should be disabled, or you probably won't notice any difference at such low resolution.\n\t- Custom textures may not be applied directly when loading a save state, in this case you may have to trigger a scene change ingame (leaving or entering a new room for example) to force the textures to \"refresh\".\n\n## Saves\n\nFor game savedata storage, the PSX console used memory cards. The PSX console had two slots for memory cards.\n\nIn this doc, the first memory card slot will be referred to as 'Memcard slot 0' and the second slot will be referred to as 'Memcard slot 1'.\n\nFor memory card functionality and usage, the Beetle PSX HW core will either use the Libretro savedata format or the Mednafen savedata format.\n\n
\n\n| Libretro savedata format | Mednafen savedata format |\n|----------------------------|----------------------------------|\n| gamename.srm | gamename.slot#.mcr |\n\n
\n\n**By default**, the Beetle PSX HW core will use Libretro's savedata format for Memcard slot 0 and Mednafen's savedata format for Memcard slot 1.\n\n
\n\n!!! attention\n Memory card behavior can be controlled with the following [core options](#core-options) (Memcard 0 method, Enable memory card 1, Shared memcards).\n\n**By default**, the filenames of the Memcard savedata will match the loaded cue or m3u or pbp filename, like this:\n\n- Loaded content: Breath of Fire III (USA).cue\n\n- **Memcard slot 0: Breath of Fire III (USA).srm**\n\n- **Memcard slot 1: Breath of Fire III (USA).1.mcr**\n\nor\n\n- Loaded content: Final Fantasy VII (USA).m3u\n\n- **Memcard slot 0: Final Fantasy VII (USA).srm**\n\n- **Memcard slot 1: Final Fantasy VII (USA).1.mcr**\n\nor\n\n- Loaded content: Wild Arms 2 (USA).pbp\n\n- **Memcard slot 0: `Wild Arms 2 (USA).srm**\n\n- **Memcard slot 1: `Wild Arms 2 (USA).1.mcr**\n\n!!! attention\n\tTo import your old memory cards from other emulators, you need to rename them to either the Libretro (.srm) savedata format or the Mednafen (.mcr) savedata format. The Libretro (.srm) savedata format, when used with Beetle PSX, is internally identical to the Mednafen PSX (.mcr) savedata format, and can be converted between one another via renaming.\n\n!!! warning\n\tKeep in mind that save states also include the state of the memory card; carelessly loading an old save state will **OVEWRITE** the memory card, potentially resulting in lost saved games. **You can set the 'Don't overwrite SaveRAM on loading savestate' option in RetroArch's Saving settings to On to prevent this.**\n\n## Core options\n\nThe Beetle PSX HW core has the following options that can be tweaked from your frontend's core options menu or manually changed via core configuration files. Options are listed below in the following format:\n\n``Option Name [option_key] (setting1/setting2/...)``\n\nTo manually change an option, search for that option's key in the core configuration file you want to edit and set it to your desired setting value, enclosed in quotations. For example, if you had set the Internal Color Depth to 32bpp and wanted to revert it to 16bpp, you would change ``beetle_psx_hw_depth = \"32bpp\"`` to ``beetle_psx_hw_depth = \"16bpp(native)\"``. Manually editing core configuration files is typically unnecessary unless your frontend does not have a method for toggling options.\n\nThe default setting for each option will be highlighted in bold. Settings with (Restart) means that core has to be shut down for the new setting to be applied on next launch.\n\n- **Renderer (Restart)** [beetle_psx_hw_renderer] (**hardware**/hardware_gl/hardware_vk/software)\n\n\tChooses which video renderer will be used.\n\n\tSoftware is the most accurate but generally has higher performance requirements when running at internal GPU resolutions higher than 1x. The software renderer also lacks certain enhancements exclusive to the hardware renderer.\n\n\tHardware is less accurate but may have improved performance over the software renderer at internal GPU resolutions of 2x and above on capable hardware. The hardware renderers also allow various graphical enhancements such as higher color depth, texture filtering, and PGXP. Choosing **hardware** will automatically select either the Vulkan or OpenGL renderer depending on the current libretro frontend video driver. If the provided frontend video driver is not Vulkan or OpenGL (3.3 or higher) then the core will fall back to the software renderer at 1x internal resolution.\n\n\t**hardware_gl** and **hardware_vk** allow the core to ignore the frontend preferred hardware context and attempt to force a specific hardware renderer. If the core is unable to do so, it will fall back to the software renderer at 1x internal resolution. The ability to force specific renderers may not be available on all platforms.\n\n\tThe hardware renderers have known issues -- check the compatibility section below or the core's [issue tracker](https://github.com/libretro/beetle-psx-libretro/issues) for more details.\n\n\t\n\n- **Software Framebuffer** [beetle_psx_hw_renderer_software_fb] (**enabled**/disabled)\n\n\tOpenGL/Vulkan Only\n\n\tAllows accurate emulation of framebuffer readback effects (e.g. motion blur, FF7 battle swirl, etc.) when using the hardware renderer. If disabled, certain operations are omitted or rendered on the GPU, which can improve performance but may cause graphical errors or [cause stuttering](https://github.com/libretro/beetle-psx-libretro/pull/469#issue-238935899).\n\n\tLeave enabled if unsure.\n\n- **Internal GPU Resolution** [beetle_psx_hw_internal_resolution] (**1x(native)**/2x/4x/8x/16x)\n\n\tSelects internal resolution multiplier.\n\n\tResolutions higher than 1x(native) improve the fidelity of 3D models at the expense of increased performance requirements. 2D elements are generally unaffected by this setting from the core's perspective.\n\n\t??? note \"*Internal GPU Resolution - 1x*\"\n\t \n\n\t??? note \"*Internal GPU Resolution - 2x*\"\n\t \n\n- **Internal Color Depth** [beetle_psx_hw_depth] (**16bpp(native)**/32bpp)\n\n\tOpenGL Only\n\n\tThe PSX has a limited color depth of 16 bits per pixel (bpp). This leads to banding effects (uneven color gradients) which are smoothed out by original hardware through the use of a dithering pattern. The '16bpp(native)' setting emulates the original 16bpp color depth. Selecting '32 bpp' increases the color depth such that smoother gradients can be achieved without dithering, allowing for a cleaner undithered output.\n\n\tNote the visible horizontal bands on an undithered 16bpp image compared to the same undithered image at 32bpp:\n\n\t??? note \"*Undithered 16bpp*\"\n\t \n\n\t??? note \"*Undithered 32bpp*\"\n\t \n\n\tThis option should be toggled in conjunction with the Dithering Pattern option.\n\n\tThe software renderer is locked to 16bpp while the Vulkan renderer will automatically set render at 16bpp if dithering is enabled and 32bpp if dithering is disabled.\n\n- **Dithering Pattern** [beetle_psx_hw_dither_mode] (**1x(native)**/internal resolution/disabled)\n\n\tSelect dithering pattern.\n\n\tDithering is used by the original PSX hardware to combat the color banding visible due to 16bpp color depth. This option is less necessary and can be disabled if the Internal Color Depth option is set to '32bpp'.\n\n\t'1x(native)' emulates original hardware but can look grainy at higher internal resolutions.\n\n\t'internal resolution' reduces graininess by allowing for finer dithering at higher Internal GPU Resolutions, but has limited effectiveness in combating color banding if the Internal GPU Resolution is set too high. (Note in the examples below that the 'internal resolution' option is less grainy but has more visible banding than '1x(native)' at 4x Internal GPU Resolution)\n\n\t'disabled' is useful to pair with '32bpp' Internal Color Depth where banding is far less visible or for users who otherwise wish to turn off dithering regardless of color banding at 16bpp.\n\n\t??? note \"*Dithering Pattern - 1x Native (16bpp 4x IR)*\"\n\t \n\n\t??? note \"*Dithering Pattern - Internal Resolution (16bpp 4x IR)*\"\n\t \n\n\t??? note \"*Dithering Pattern - Disabled (16bpp 4x IR)*\"\n\t \n\n\t\n\n- **Texture Filtering** [beetle_psx_hw_filter] (**nearest**/SABR/xBR/bilinear/3-point/JINC2)\n\n\tOpenGL/Vulkan Only\n\n\tChoose per-texture filtering method.\n\n\tTexture filters can modify or enhance the appearance of 3D polygon textures and 2D elements. 'Nearest' emulates original hardware. 'Bilinear' and '3-Point' are smoothing filters, which reduce pixelation via blurring. 'SABR', 'xBR' and 'JINC2' are upscaling filters, which improve texture fidelity/sharpness at the expense of increased performance requirements.\n\n\t??? note \"*nearest*\"\n\t \n\n\t??? note \"*SABR*\"\n\t \n\n\t??? note \"*xBR*\"\n\t \n\n\t??? note \"*bilinear*\"\n\t \n\n\t??? note \"*3-point*\"\n\t \n\n\t??? note \"*JINC2*\"\n\t \n\n- **Adaptive Smoothing** [beetle_psx_hw_adaptive_smoothing] (**disabled**/enabled)\n\n\tVulkan Only\n\n\tEnable smoothing of 2D artwork and UI elements without blurring 3D rendered objects.\n\n\t??? note \"*Adaptive smoothing - Off*\"\n\t \n\n\t??? note \"*Adaptive smoothing - On*\"\n\t \n\n- **Supersampling (Downsample to Native Resolution)** [beetle_psx_hw_super_sampling] (**disabled**/enabled)\n\n\tVulkan Only\n\n\tWhen enabled, renders content at the specified Internal GPU Resolution then downsamples the resulting image to native 240p before shaders and resizing are applied by the frontend. Allows games to be displayed at native (low) resolution but with clean anti-aliased 3D objects. Produces best results when applied to titles that mix 2D and 3D elements such as 3D characters on pre-rendered backgrounds. This option is not to be confused with implicit supersampling provided by rendering at a higher Internal GPU Resolution multiplier then downsampling to the frontend's window scale.\n\n\t??? note \"*Supersampling from 1x Internal Resolution with CRT Royale Shader*\"\n\t \n\n\t??? note \"*Supersampling from 8x Internal Resolution with CRT Royale Shader*\"\n\t \n\n- **Multi-Sampled Anti Aliasing** [beetle_psx_hw_msaa] (**1x**/2x/4x/8x/16x)\n\n\tVulkan Only\n\n\tApply multi-sample anti-aliasing (MSAA) to rendered content. This is a type of spatial anti-aliasing similar to supersampling, but of somewhat lower quality and with (correspondingly) lower performance requirements. Improves the appearance of 3D objects. MSAA may be [clamped internally](https://github.com/libretro/beetle-psx-libretro/pull/469#issue-238935899) at a lower value than what it is set at when running at higher Internal GPU Resolutions.\n\n- **MDEC YUV Chroma Filter** [beetle_psx_hw_mdec_yuv] (**disabled**/enabled)\n\n\tVulkan Only\n\n\tImproves the quality of FMV playblack by smoothing the chroma channel when converting YcBcR to RGB. This reduces macroblocking artefacts (squares/jagged edges) as shown below:\n\n\t??? note \"*MDEC YUV Chroma Filter On/Off Comparison*\"\n\t \n\n- **Track Textures** [beetle_psx_hw_track_textures] (**disabled**/enabled)\n\t\n\tVulkan Only\n\t\n\tTracks texture to enable texture dumping/replacing.\n\t\n- **Dump Textures** [beetle_psx_hw_dump_textures] (**disabled**/enabled)\n\t\n\tVulkan Only\n\t\n\tDumps textures when they are accessed. To dump textures properly, it is necessary to create a folder named -texture-dump/ in the same folder as the game disk.\n\t\n- **Replace Textures** [beetle_psx_hw_replace_textures] (**disabled**/enabled)\n\t\n\tVulkan Only\n\t\n\tReplaces textures with files given in the folder -texture-replacements/ with the same name as dumped textures. \n\t\n\t**The replacement texture has to be a PNG file with bit depth of a maximum of 8 and the resolution must be a multiple of 2 based on the original texture.**\n\n- **Wireframe Mode** [beetle_psx_hw_wireframe] (**disabled**/enabled)\n\n\tOpenGL Only\n\n\tRenders 3D polygons models in outline form without textures or shading.\n\n\t**For debug use only. Leave off for normal usage.**\n\n\t??? note \"*Wireframe mode - On*\"\n\t \n\n- **Display Full VRAM** [beetle_psx_hw_display_vram] (**disabled**/enabled)\n\n\tOpenGL/Vulkan Only\n\n\tVisualizes full contents of the emulated PSX VRAM.\n\n\t**For debug use only. Leave off for normal usage.**\n\n\t??? note \"*Display full VRAM - On*\"\n\t \n\n- **PGXP Operation Mode** [beetle_psx_hw_pgxp_mode] (**disabled**/memory only/memory + CPU)\n\n\tEnabling the Parallel/Precision Geometry Transform Pipeline (PGXP) allows polygons to be rendered with subpixel precision, eliminating or otherwise diminishing the polygon jitter/wobble visible on original PSX hardware. This distortion results from original hardware using fixed point mathematics when rendering 3D models, thus rounding polygon vertices to the nearest integer pixel.\n\n\t'disabled' emulates original hardware behavior.\n\n\t'memory only' mode enables subpixel precision at the cost of increased performance requirements with only minor compatibility issues. 'memory + CPU' mode can further reduce jitter but is highly demanding and is known to cause geometry errors. 'memory only' is recommended for best compatibility.\n\n\t[https://www.youtube.com/watch?v=EYCpd_1lPUc](https://www.youtube.com/watch?v=EYCpd_1lPUc)\n\n- **PGXP Vertex Cache** [beetle_psx_hw_pgxp_vertex] (**disabled**/enabled)\n\n\tOpenGL/Vulkan Only\n\n\tAllows PGXP-enhanced polygon vertex coordinates to be cached when PGXP Operation Mode is also enabled. This option improves performance by allowing subpixel-accurate values to be used across successive polygon draws instead of rebasing from native PSX data each time. Allows for better object alignment and may reduce visible seams, but false positives when querying the cache produces graphical glitches in most games. Recommended to leave disabled.\n\n- **PGXP Perspective Correct Texturing** [beetle_psx_hw_pgxp_texture] (**disabled**/enabled)\n\n\tOpenGL/Vulkan Only\n\n\tAllows for perspective correct texturing when PGXP Operation Mode is also enabled. Original PSX hardware renders 3D objects with affine texture mapping where texture coordinates are interpolated between polygon vertices in 2D screen space with no consideration of object depth. This causes significant position-dependent distortion and/or blending of textures such as warped lines across floors and walls. PGXP Perspective Correct Texturing accounts correctly for vertex positions in 3D space thereby eliminating this texture distortion at the expense of increased performance requirements.\n\n\t??? note \"*PGXP Texturing - Off*\"\n\t \n\n\t??? note \"*PGXP Texturing - On*\"\n\t \n\n- **Display Internal FPS** [beetle_psx_hw_display_internal_fps] (**disabled**/enabled)\n\n\tDisplays the frame rate that the emulated PSX is drawing at. Requires onscreen notifications to be enabled in the libretro frontend. Reported values may be inaccurate.\n\n\t??? note \"*Display internal FPS - On*\"\n\t \n\n- **Line-to-Quad Hack** [beetle_psx_hw_line_render] (**default**/aggressive/disabled)\n\n\tCertain games employ a special technique for drawing horizontal lines, which involves stretching single-pixel-high triangles across the screen in a manner that causes the PSX hardware to rasterise them as a row of pixels. Examples include Doom/Hexen, and the water effects in Soul Blade. When running such games with an Internal GPU Resolution higher than native, these triangles no longer resolve as a line, causing gaps to appear in the output image.\n\n\tSetting 'Line-to-Quad Hack' to 'Default' solves this issue by detecting small triangles and converting them as required.\n\n\tThe 'Aggressive' option will likely introduce visual glitches due to false positives, but is needed for correct rendering of some 'difficult' titles (e.g. Dark Forces, Duke Nukem).\n\n- **Frame Duping (Speedup)** [beetle_psx_hw_frame_duping] (**disabled**/enabled)\n\tSoftware Renderer and Vulkan only\n\n\tWhen enabled, provides a small performance increase by redrawing/reusing the last rendered frame (instead of presenting a new one) if the content of the current frame is unchanged based on the internal fps heuristic. May cause inaccurate behavior or lost animation frames, so it is not recommended to use this unless necessary.\n\n- **CPU Dynarec** [beetle_psx_hw_cpu_dynarec] (**disabled**/execute/execute_once/run_interpreter)\n\n\tDynamically recompile CPU instructions to native instructions. Much faster than interpreter, but CPU timing is less accurate, and may have bugs.\n\n- **Dynarec Code Invalidation** [beetle_psx_hw_dynarec_invalidate] (**full**/dma)\n\n\tSome games require Full invalidation, some require DMA Only. This option has no effect when CPU Dynarec is not enabled.\n\n- **Dynarec DMA/GPU Event Cycles** [beetle_psx_hw_dynarec_eventcycles] (**128**/256/384/512/640/768/896/1024)\n\n\tMax cycles run by CPU before a GPU or DMA Update is checked, higher number will be faster, has much less impact on beetle interpreter than dynarec. Leave at 128 for default Beetle interpreter behavior when CPU Dynarec is not enabled.\n\n- **CPU Frequency Scaling (Overclock)** [beetle_psx_hw_cpu_freq_scale] (50% to 750% in increments of 10%. Default: **100%(native)**)\n\n\tEnable overclocking (or underclocking) of the emulated PSX's CPU. The default frequency of the MIPS R3000A-compatible 32-bit RISC CPU is 33.8688 MHz; running at higher frequencies can eliminate slowdown and improve frame rates in certain games at the expense of increased performance requirements.\n\n\tNote that some games have an internal frame rate limiter and may not benefit from overclocking. It is generally not recommended to adjust this setting as it causes many games or portions of them to run at unintended speeds. This can lead to audio and video desynchronization, among other issues.\n\n\tLeave at default for most games.\n\n- **GTE Overclock** [beetle_psx_hw_gte_overclock] (**disabled**/enabled)\n\n\tWhen enabled, reduces the latency of operations involving the emulated PSX's Geometry Transform Engine (CPU coprocessor used for calculations related to 3D projection - i.e. all 3D graphics) to 1 cycle per instruction and additionally eliminates all memory access or cache fetch latency. For games that make heavy use of the GTE, this can greatly improve frame rate (and frame time) stability at the expense of increased performance requirements.\n\n\tCurrently unstable -- leave off if unsure.\n\n- **GPU Rasterizer Overclock** [beetle_psx_hw_gpu_overclock] (**1x(native)**/2x/4x/8x/16x/32x)\n\n\tEnables overclocking of the 2D rasterizer contained within the emulated PSX's GPU. Does not improve 3D rendering, and in general has little effect.\n\n- **Skip BIOS** [beetle_psx_hw_skip_bios] (**disabled**/enabled)\n\n\tWhen enabled, skips the PSX BIOS animation normally displayed with starting content.\n\n\t**Enabling this option will cause compatibility issues with a small minority of games (Saga Frontier, PAL copy protected games, etc).**\n\n\t??? note \"*Skip BIOS - Off*\"\n\t \n\n- **Core-Reported FPS Timing** [beetle_psx_hw_core_timing_fps] (**force_progressive**/force_interlaced/auto_toggle)\n\n\tSets FPS timing that the core will report to the frontend. Automatic toggling will allow the core to switch between reporting progressive and interlaced rates, but may cause frontend video/audio driver reinits. Progressive timings are 59.826 for NTSC content and 49.761 for PAL content, and interlaced timings are 59.940 for NTSC content and 50.000 for PAL content.\n\n- **Core Aspect Ratio** [beetle_psx_hw_aspect_ratio] (**corrected**/uncorrected/4:3)\n\n\tSet core provided aspect ratio. This setting is ignored when the Widescreen Mode Hack or Display Full VRAM options are enabled. \"4:3\" forces the core aspect ratio to 4:3 without taking horizontal overscan cropping or visible scanlines into account. The \"4:3\" setting should not be used and is only provided as a legacy feature for users desiring old incorrect behavior from the core.\n\n- **Widescreen Mode Hack** [beetle_psx_hw_widescreen_hack] (**disabled**/enabled)\n\n\tForces content to be rendered with an aspect ratio of 16:9. Produces best results with fully 3D games. Can cause graphical glitches or alignment/stretching issues in games that mix 3D and 2D elements. Leave off for most games.\n\n\t??? note \"*Widescreen mode hack - Off*\"\n\t \n\n\t??? note \"*Widescreen mode hack - On*\"\n\t \n\n- **Crop Horizontal Overscan** [beetle_psx_hw_crop_overscan] (**enabled**/disabled)\n\n\tBy default, Beetle PSX includes horizontal padding (black bars or 'pillarboxes' on either side of the screen) to emulate the same black bars generated in analog video output by real PSX hardware. This horizontal padding can contain garbage pixels that are generated when the game's width mode is smaller than the display area width in the emulated GPU registers. Enabling 'Crop Horizontal Overscan' will remove this potentially glitchy horizontal overscan region.\n\n\tNot all games will benefit from enabling this setting as shown in the examples below.\n\n\t??? note \"*Crop Overscan - Off (Game with Garbage Pixels)*\"\n\t \n\n\t??? note \"*Crop Overscan - On (Game with Garbage Pixels)*\"\n\t \n\n\t??? note \"*Crop Overscan - Off (Game with No Issues)*\"\n\t \n\n\t??? note \"*Crop Overscan - On (Game with No Issues)*\"\n\t \n\n\tThis option does not affect vertical overscan. Vertical overscan can be cropped using the Initial/Last Scanline core options.\n\n- **Additional Cropping** [beetle_psx_hw_image_crop] (**disabled**/1px/2px/3px/4px/5px/6px/7px/8px)\n\n\tSoftware Renderer Only\n\n\tWhen 'Crop Horizontal Overscan' is enabled, this option further reduces the width of the cropped image by the specified number of pixels.\n\n\tNote: This can have unintended consequences. While the absolute width is reduced, the resultant video is still scaled to the currently set aspect ratio. Enabling 'Additional Cropping' may therefore cause horizontal stretching.\n\n- **Offset Cropped Image** [beetle_psx_hw_image_offset] (**disabled**/-4px/-3px/-2px/-1px/+1px/+2px/+3px/+4px)\n\n\tSoftware Renderer Only\n\n\tWhen 'Crop Horizontal Overscan' is enabled, allows the resultant cropped image to be offset horizontally to the right (positive) or left (negative) by the specified number of pixels. May be used to correct alignment issues.\n\n- **Horizontal Image Offset (GPU Cycles)** [beetle_psx_hw_image_offset_cycles] (-24 to +24 in increments of 1. Default: **0**)\n\n\tOpenGL/Vulkan Only\n\n\tHorizontally offsets the outputted image by the specified number of GPU timing cycles. Currently only for the hardware renderers and functions like 'Offset Cropped Image', but at a finer granularity and does not require 'Crop Horizontal Overscan' to be enabled for this option to have an effect.\n\n- **Initial Scanline - NTSC** [beetle_psx_hw_initial_scanline] (0 to 40 in increments of 1. Default: **0**)\n\n\tSelects the first displayed scanline when running NTSC content. Setting a value greater than 0 will reduce the height of output images by cropping pixels from the topmost edge. May be used to counteract letterboxing built in to some games.\n\n- **Last Scanline - NTSC** [beetle_psx_hw_last_scanline] (210 to 239 in increments of 1. Default: **239**)\n\n\tSelects the last displayed scanline when running NTSC content. Setting a value less than 239 will reduce the height of output images by cropping pixels from the bottommost edge. May be used to counteract letterboxing built in to some games.\n\n- **Initial Scanline - PAL** [beetle_psx_hw_initial_scanline_pal] (0 to 40 in increments of 1. Default: **0**)\n\n\tSelects the first displayed scanline when running PAL content. Setting a value greater than 0 will reduce the height of output images by cropping pixels from the topmost edge. May be used to counteract letterboxing built in to some games.\n\n- **Last Scanline - PAL** [beetle_psx_hw_last_scanline_pal] (230 to 287 in increments of 1. Default: **287**)\n\n\tSelects the last displayed scanline when running PAL content. Setting a value less than 287 will reduce the height of output images by cropping pixels from the bottommost edge. May be used to counteract letterboxing built in to some games.\n\n- **CD Access Method (Restart)** [beetle_psx_hw_cd_access_method] (**sync**/async/precache)\n\n\tSelects method used to read data from content disc images.\n\n\t'sync' emulates original hardware.\n\n\t'async' can alleviate stuttering on devices with slow storage.\n\n\t'precache' loads the entire disc image into memory when starting content, incurring a small startup delay. This can improve in-game loading times and eliminate stutters due to emulated CD access, but may cause issues on systems with low memory.\n\n- **CD Loading Speed** [beetle_psx_hw_cd_fastload] (**2x(native)**/4x/6x/8x/10x/12x/14x)\n\n\tSelects disk access speed multiplier.\n\n\tThis speedhack can greatly reduce loading times at speeds higher than native but is known to introduce texture corruption errors, timing glitches, or loading screen softlocks in many titles. Some games will not work at all if loading speed is not set to native (e.g. Castlevania: Symphony of the Night).\n\n\t**Reduce multiplier value if experiencing loading issues, freezes, etc.**\n\n- **Memory Card 0 Method (Restart)** [beetle_psx_hw_use_mednafen_memcard0_method] (**libretro**/mednafen)\n\n\tChoose the savedata format used for Memory Card 0. See the [Saves section](#saves) above for an explanation regarding the libretro and mednafen formats. libretro is recommended, but mednafen may be used for compatibility with the standalone version of Mednafen. The libretro (.srm) and Mednafen (.mcr) formats are internally identical when used with Beetle PSX.\n\n\tNote: This option must be set to 'mednafen' if the Shared Memcards option is enabled.\n\n- **Enable Memory Card 1 (Restart)** [beetle_psx_hw_enable_memcard1] (**enabled**/disabled)\n\n\tSelects whether to emulate a second memory card in Slot 1. When disabled, games can only access the memory card in Slot 0.\n\n\tNote: Some games require this option to be disabled for correct operation (e.g. Codename Tenka).\n\n- **Shared Memory Cards (Restart)** [beetle_psx_hw_shared_memory_cards] (**disabled**/enabled)\n\n\tWhen enabled, games will save and load using the same memory card files. Note: The \"Memcard 0 Method\" option must be set to 'mednafen' for this option to function properly.\n\n\tWhen disabled, separate memory card files will be generated for each title.\n\n\tThis option is useful for games in series such as Suikoden or Arc the Lad that check for save data from previous titles.\n\n
\n\n- **Analog Self-Calibration** [beetle_psx_hw_analog_calibration] (**disabled**/enabled)\n\n\tWhen enabled, monitors the max values reached by the input, using it as a calibration heuristic which then scales the analog coordinates sent to the emulator accordingly. For best results, rotate the sticks at max amplitude for the algorithm to get a good estimate of the scaling factor, otherwise it will adjust while playing.\n\n\tWhile modern analog sticks have circular logical ranges, older analog sticks such as those on the DualShock have logical ranges closer to squares and can report larger values at the intercardinal directions than modern analog sticks can. Games that expect these larger values will have issues controlling with modern analog sticks, which this option can solve by scaling modern analog stick values up.\n\n- **Enable DualShock Analog Mode Toggle** [beetle_psx_hw_analog_toggle] (**disabled**/enabled)\n\n\tWhen the input device type is set to DualShock, this option determines whether or not the Analog Button on that device can be toggled.\n\n\tWhen this option is disabled, the DualShock input device will be locked in Analog Mode where the analog sticks are on.\n\n\tWhen this option is enabled, the DualShock input device can be toggled between Digital Mode (analog sticks off) and Analog Mode (analog sticks on) much like real hardware by pressing and holding START+SELECT+L1+L2+R1+R2 for one second in lieu of a dedicated Analog Button.\n\n\tNote: Some games may not respond to input when the DualShock is in Analog Mode. Either enable Analog Button Toggle and toggle the DualShock to Digital Mode or change your input device type to PlayStation Controller.\n\n- **Port 1: Multitap Enable** [beetle_psx_hw_enable_multitap_port1] (**disabled**/enabled)\n\n\tEnables/Disables multitap functionality on port 1.\n\n- **Port 2: Multitap Enable** [beetle_psx_hw_enable_multitap_port2] (**disabled**/enabled)\n\n\tEnables/Disables multitap functionality on port 2.\n\n- **Gun Input Mode** [beetle_psx_hw_gun_input_mode] (**lightgun**/touchscreen)\n\n\tWhen device type is set to 'Guncon / G-Con 45' or 'Justifier', specify whether to use a mouse-controlled 'Light Gun' or 'Touchscreen' input.\n\n- **Gun Cursor** [beetle_psx_hw_gun_cursor] (**cross**/dot/off)\n\n\tSelects the gun cursor to be displayed on screen while using the the 'Guncon / G-Con 45' and 'Justifier' input device types. When disabled, cross hairs are always hidden.\n\n\t??? note \"*Gun Cursor - Cross*\"\n\t \n\n\t??? note \"*Gun Cursor - Dot*\"\n\t \n\n\t??? note \"*Gun Cursor - Off*\"\n\t \n\n- **Mouse Sensitivity** [beetle_psx_hw_mouse_sensitivity] (5% to 200% in increments of 5%. Default: **100%**)\n\n\tConfigure the response of the 'Mouse' input device type.\n\n- **NegCon Twist Response** [beetle_psx_hw_negcon_response] (**linear**/quadratic/cubic)\n\n\tSpecifies the analog response when using a RetroPad left analog stick to simulate the 'twist' action of emulated [neGcon Controllers](https://en.wikipedia.org/wiki/NeGcon).\n\n\t'linear': Analog stick displacement is mapped linearly to negCon rotation angle.\n\n\t'quadratic': Analog stick displacement is mapped quadratically to negCon rotation angle. This allows for greater precision when making small movements with the analog stick.\n\n\t'cubic': Analog stick displacement is mapped cubically to negCon rotation angle. This allows for even greater precision when making small movements with the analog stick, but 'exaggerates' larger movements.\n\n\t!!! attention\n\t\tA linear response is not recommended when using standard gamepad devices. The negCon 'twist' mechanism is substantially different from conventional analog sticks; linear mapping over-amplifies small displacements of the stick, impairing fine control. A linear response is only appropriate when using racing wheel peripherals.\n\n\t\tIn most cases, the 'quadratic' option should be selected. This provides effective compensation for the physical differences between real/emulated hardware and is the closest approximation of real hardware, enabling smooth/precise analog input.\n\n- **NegCon Twist Deadzone** [beetle_psx_hw_negcon_deadzone] (**0%**/5%/10%/15%/20%/25%/30%)\n\n\tSets the deadzone of the RetroPad left analog stick when simulating the 'twist' action of emulated [neGcon Controllers](https://en.wikipedia.org/wiki/NeGcon). Used to eliminate drift/unwanted input.\n\n\t!!! attention\n\t\tMost (all?) negCon compatible titles provide in-game options for setting a 'twist' deadzone value. To avoid loss of precision, the in-game deadzone should *always* be set to zero. Any analog stick drift should instead be accounted for by configuring the 'NegCon Twist Deadzone' core option. This is particularly important when 'NegCon Twist Response' is set to 'quadratic' or 'cubic'.\n\n\t\tXbox gamepads typically require a deadzone of 15-20%. Many Android-compatible bluetooth gamepads have an internal 'hardware' deadzone, allowing the deadzone value here to be set to 0%.\n\n\t\tFor convenience, it is recommended to make use of the 'Options → Analog Setting 1P' menu of [Gran Turismo](https://en.wikipedia.org/wiki/Gran_Turismo_(video_game)) when calibrating the 'NegCon Twist Deadzone'. This provides a clear and precise representation of 'real' controller input values.\n\n## User 1 - 8 device types\n\nThe Beetle PSX HW core supports the following device type(s) in the controls menu, bolded device types are the default for the specified user(s):\n\n- None - Input disabled.\n- [**PlayStation Controller**](https://en.wikipedia.org/wiki/PlayStation_Controller) - Joypad - PlayStation Controller (SCPH-1080)\n- [DualShock](https://en.wikipedia.org/wiki/DualShock) - Joypad - DualShock (SCPH-1200)\n- [Analog Controller](https://en.wikipedia.org/wiki/Dual_Analog_Controller) - Joypad - PlayStation Dual Analog Controller(SCPH-1180)\n- [Analog Joystick](https://en.wikipedia.org/wiki/PlayStation_Analog_Joystick) - Joypad - PlayStation Analog Joystick (SCPH-1110)\n- [Guncon / G-Con 45](https://en.wikipedia.org/wiki/GunCon) - Lightgun - Namco Gun Controller (SLEH-00007)\n- [Justifier](https://en.wikipedia.org/wiki/Konami_Justifier) - Lightgun - Konami Justifier lightgun peripheral (SLEH-00005, SLUH-00017)\n- [Mouse](https://en.wikipedia.org/wiki/PlayStation_Mouse) - Mouse - PlayStation Mouse (SCPH-1090, SCPH-1030)\n- [neGcon](https://en.wikipedia.org/wiki/NeGcon) - Joypad - Namco third party controller\n\n## Rumble support\n\nRumble only works in the Beetle PSX HW core when\n\n- The content being ran has rumble support.\n- The frontend being used has rumble support.\n- The joypad device being used has rumble support.\n- The corresponding user's device type is set to **DualShock**\n\n## Multitap support\n\n['Port 1: Multitap enable' and 'Port 2: Multitap enable' core options](#core-options).\n\n## Joypad\n\n\n\n| User 1 - 8 input descriptors | RetroPad Inputs | PlayStation Controller Inputs | DualShock Inputs | Analog Controller Inputs | Analog Joystick Inputs | neGcon Inputs |\n|-------------------------------|----------------------------------------------|------------------------------------------------|-------------------------------------------------|-------------------------------------------------|------------------------------------------------|---------------------------------|\n| Cross |  |  |  |  |  | Analog button I |\n| Square |  |  |  |  |  | Analog button II |\n| Select |  |  |  |  |  | |\n| Start |  |  |  |  |  | Start |\n| D-Pad Up |  |  |  |  |  | D-Pad Up |\n| D-Pad Down |  |  |  |  |  | D-Pad Down |\n| D-Pad Left |  |  |  |  |  | D-Pad Left |\n| D-Pad Right |  |  |  |  |  | D-Pad Right |\n| Circle |  |  |  |  |  | A |\n| Triangle |  |  |  |  |  | B |\n| L1 |  |  |  |  |  | Left shoulder button (analog) |\n| R1 |  |  |  |  |  | Right shoulder button (digital) |\n| L2 |  |  |  |  |  | Analog button II |\n| R2 |  |  |  |  |  | Analog button I |\n| L3 |  | |  | | | |\n| R3 |  | |  | | | |\n| Left Analog X |  X | |  |  | Left Joystick X | Twist |\n| Left Analog Y |  Y | |  |  | Left Joystick Y | |\n| Right Analog X |  X | |  |  | Right Joystick X | |\n| Right Analog Y |  Y | |  |  | Right Joystick Y | |\n\n## Mouse\n\n| RetroMouse Inputs | Mouse Inputs |\n|-----------------------------------------------------|--------------------|\n|  Mouse Cursor | Mouse Cursor |\n|  Mouse 1 | Mouse Left Button |\n|  Mouse 2 | Mouse Right Button |\n\n## Lightgun\n\n| RetroLightgun Inputs | Guncon / G-Con 45 Inputs | Justifier Inputs |\n|------------------------------------------------------|-----------------------------|---------------------|\n|  Gun Crosshair | Guncon / G-Con 45 Crosshair | Justifier Crosshair |\n| Gun Trigger | Guncon / G-Con 45 Trigger | Justifier Trigger |\n| Gun Reload | Guncon / G-Con 45 Reload | Justifier Reload |\n| Gun Aux A | Guncon / G-Con 45 A | Justifier Aux |\n| Gun Aux B | Guncon / G-Con 45 B | |\n| Gun Start | | Justifier Start |\n\n## Compatibility\n\n**Expect bugs with hardware renderer enhancements.**\n\nWhen using the run-ahead latency reduction feature, the \"second instance\" setting will break the hardware renderer.\n\nHardware renderer currently has a number of issues with interlacing shaders and outputting on CRTs. Use the software renderer for the time being.\n\nA list of known emulation bugs when using the software renderer can be found here [https://forum.fobby.net/index.php?t=msg&th=1114&start=0&](https://forum.fobby.net/index.php?t=msg&th=1114&start=0&)\n\nIssue tracker for the hardware renderer can be found here [https://github.com/libretro/beetle-psx-libretro/issues](https://github.com/libretro/beetle-psx-libretro/issues)\n\n## External Links\n\n- [Official Mednafen Website](https://mednafen.github.io/)\n- [Official Mednafen Downloads](https://mednafen.github.io/releases/)\n- [Beetle PSX HW Libretro Core info file](https://github.com/libretro/libretro-super/blob/master/dist/info/mednafen_psx_hw_libretro.info)\n- [Beetle PSX HW Libretro Github Repository](https://github.com/libretro/beetle-psx-libretro)\n- [Report Beetle PSX HW Core Issues Here](https://github.com/libretro/beetle-psx-libretro/issues)\n- [Gameplay Videos](https://www.youtube.com/playlist?list=PLRbgg4gk_0Ie3vgCI_d3bslkumKT06AQa)\n\n## Libretro PSX cores\n\n- [PlayStation (Beetle PSX)](beetle_psx.md)\n- [PlayStation (PCSX ReARMed)](pcsx_rearmed.md)\n"
},
{
"path": "docs/library/beetle_saturn.md",
"content": "# Sega - Saturn (Beetle Saturn)\n\n\n\n## Background\n\nThis is fork of Mednafen Saturn. It has been ported to the libretro API. It currently runs on Linux, OSX and Windows.\n\nThe Beetle Saturn core has been authored by\n\n- [Mednafen Team](https://mednafen.github.io/)\n\nThe Beetle Saturn core is licensed under\n\n- [GPLv2](https://github.com/libretro/beetle-saturn-libretro/blob/master/COPYING)\n\nA summary of the licenses behind RetroArch and its cores can be found [here](../development/licenses.md).\n\n## Extensions\n\nContent that can be loaded by the Beetle Saturn core have the following file extensions:\n\n- .cue\n- .toc\n- .m3u\n- .ccd\n- .chd\n\nRetroArch database(s) that are associated with the Beetle Saturn core:\n\n- [Sega - Saturn](https://github.com/libretro/libretro-database/blob/master/rdb/Sega%20-%20Saturn.rdb)\n\n## BIOS\n\nRequired or optional firmware files go in the frontend's system directory.\n\n!!! attention\n\tThe King of Fighters '95 and Ultraman: Hikari no Kyojin Densetsu ROM Cartridges can be manually selected with the ['Cartridge' core option](#core-options).\n\n| Filename | Description | md5sum |\n|:----------------:|:--------------------------------------------------------------------------:|:--------------------------------:|\n| sega_101.bin | Saturn JP BIOS - Required for JP games | 85ec9ca47d8f6807718151cbcca8b964 |\n| mpr-17933.bin | Saturn US.mdEU BIOS - Required for US/EU games | 3240872c70984b6cbfda1586cab68dbe |\n| mpr-18811-mx.ic1 | The King of Fighters '95 ROM Cartridge - Required for this game | 255113ba943c92a54facd25a10fd780c |\n| mpr-19367-mx.ic1 | Ultraman: Hikari no Kyojin Densetsu ROM Cartridge - Required for this game | 1cd19988d1d72a3e7caa0b73234c96b4 |\n\n## Features\n\nFrontend-level settings or features that the Beetle Saturn core respects.\n\n| Feature | Supported |\n|-------------------|:---------:|\n| Restart | ✔ |\n| Screenshots | ✔ |\n| Saves | ✔ |\n| States | ✔ |\n| Rewind | ✔ |\n| Netplay | ✔ |\n| Core Options | ✔ |\n| [Memory Monitoring (achievements)](../guides/memorymonitoring.md) | ✔ |\n| RetroArch Cheats | - |\n| Native Cheats | ✕ |\n| Controls | ✔ |\n| Remapping | ✔ |\n| Multi-Mouse | ✔ |\n| Rumble | ✕ |\n| Sensors | ✕ |\n| Camera | ✕ |\n| Location | ✕ |\n| Subsystem | ✕ |\n| [Softpatching](../guides/softpatching.md) | ✕ |\n| Disk Control | ✕ |\n| Username | ✕ |\n| Language | ✕ |\n| Crop Overscan | ✕ |\n| LEDs | ✕ |\n\n## Directories\n\nThe Beetle Saturn core's library name is 'Beetle Saturn'\n\nThe Beetle Saturn core saves/loads to/from these directories.\n\n**Frontend's Save directory**\n\n| File | Description |\n|:------:|:------------------------------------:|\n| *.bcr | External cartridge backup save |\n| *.bkr | Internal save |\n| *.smpc | SMPC's emulated Real-Time Clock save |\n\n**Frontend's State directory**\n\n| File | Description |\n|:--------:|:-----------:|\n| *.state# | State |\n\n## Geometry and timing\n\n- The Beetle Saturn core's core provided FPS is 59.83 for NTSC games and 49.92 for PAL games\n- The Beetle Saturn core's core provided sample rate is 44100 Hz\n- The Beetle Saturn core's base width is 320\n- The Beetle Saturn core's base height is 240\n- The Beetle Saturn core's max width is 704\n- The Beetle Saturn core's max height is 576\n- The Beetle Saturn core's core provided aspect ratio is 4/3\n\n## Loading Saturn Sega content\n\nBeetle Saturn needs a cue-sheet that points to an image file. A cue sheet, or cue file, is a metadata file which describes how the tracks of a CD or DVD are laid out.\n\nIf you have e.g. `foo.bin`, you should create a text file and save it as `foo.cue`. If you're playing a single-track Saturn game, then the cue file contents should look like this:\n\n`foobin.cue`\n```\n FILE \"foo.bin\" BINARY\n TRACK 01 MODE1/2352\n INDEX 01 00:00:00\n```\n\nAfter that, you can load the `foo.cue` file in RetroArch with the Beetle Saturn core.\n\n!!! attention\n Certain Saturn games are multi-track, so their .cue files might be more complicated.\n\n## Multiple-disk games\n\nIf foo is a multiple-disk game, you should have .cue files for each one, e.g. `foo (Disc 1).cue`, `foo (Disc 2).cue`, `foo (Disc 3).cue`.\n\nTo take advantage of Beetle Saturn's Disk Control feature for disk swapping, an index file (a m3u file) should be made.\n\nCreate a text file and save it as `foo.m3u`. Then enter your game's .cue files on it. The m3u file contents should look something like this:\n\n`foo.m3u`\n```\nfoo (Disc 1).cue\nfoo (Disc 2).cue\nfoo (Disc 3).cue\n```\n\n## Swapping disks\n\nSwapping disks follows this procedure\n\n1. Open tray (Disk Cycle Tray Status)\n\n2. Change the Disk Index to the disk you want to swap to.\n\n3. Close tray (Disk Cycle Tray Status)\n\n4. Return to the game and wait a few seconds to let it take effect\n\nAfter that, you can load the `foo.m3u` file in RetroArch with the Beetle Saturn core.\n\n## Core options\n\nThe Beetle Saturn core has the following option(s) that can be tweaked from the core options menu. The default setting is bolded.\n\nSettings with (Restart) means that core has to be closed for the new setting to be applied on next launch.\n\n- **System Region** [beetle_saturn_region] (**Auto Detect**|Japan|North America|Europe|South Korea|Asia (NTSC)|Asia (PAL)|Brazil|Latin America)\n\n\tChoose which region the system is from.\n\n- **Cartridge** [beetle_saturn_cart] (**Auto Detect**|None|Backup Memory|Extended RAM (1MB)|Extended RAM (4MB)|The King of Fighters '95|Ultraman: Hikari no Kyojin Densetsu)\n\n\tA list of games that require a cartridge can be found [here](https://www.satakore.com/cartridge.php).\n\n- **6Player Adaptor on Port 1** [beetle_saturn_multitap_port1] (**disabled**|enabled)\n\n\tEnable [multitap](https://segaretro.org/Saturn_6_Player_Adaptor) on Saturn port 1.\n\n- **6Player Adaptor on Port 2** [beetle_saturn_multitap_port2] (**disabled**|enabled)\n\n\tEnable [multitap](https://segaretro.org/Saturn_6_Player_Adaptor) on Saturn port 2.\n\n- **Analog Stick Deadzone** [beetle_saturn_analog_stick_deadzone] (**15%**|20%|25%|30%|0%|5%|10%)\n\n\tConfigure the '3D Control Pad' Device Type's analog deadzone.\n\n- **Trigger Deadzone** [beetle_saturn_trigger_deadzone] (**15%**|20%|25%|30%|0%|5%|10%)\n\n\tConfigure the '3D Control Pad' Device Type's trigger deadzone.\n\n- **Mouse Sensitivity** [beetle_saturn_mouse_sensitivity] (5% to 200% in increments of 5%. **100% is default**)\n\n\tConfigure the 'Mouse' device type's sensitivity.\n\n- **Gun Crosshair** [beetle_saturn_virtuagun_crosshair] (**Cross**|Dot|Off)\n\n\tChoose the crosshair for the 'Stunner' and 'Virtua Gun' device types. Setting it to Off disables the crosshair.\n\n??? note \"Gun - Crosshair - Cross\"\n\t\n\n??? note \"Gun - Crosshair - Dot\"\n\t\n\n??? note \"Gun - Crosshair - Off\"\n\t\n\n- **CD Image Cache (restart)** [beetle_saturn_cdimagecache] (**disabled**|enabled)\n\n\tLoads the complete image in memory at startup. Can potentially decrease loading times at the cost of increased startup time.\n\tRequires a restart in order for a change to take effect.\n\n- **Mid-frame Input Synchronization** [beetle_saturn_midsync] (**disabled**|enabled)\n\n\tMid-frame synchronization can reduce input latency, but it will increase CPU requirements.\n\n- **Automatically set RTC on game load** [beetle_saturn_autortc] (**enabled**|disabled)\n\n\tAutomatically set the SMPC's emulated Real-Time Clock to the host system's current time and date upon game load.\n\n- **BIOS language** [beetle_saturn_autortc_lang] (**english**|german|french|spanish|italian|japanese)\n\n\tSelf explanatory. Also affects language used in some games (e.g. the European release of \"Panzer Dragoon\").\n\n- **Horizontal Overscan Mask** [beetle_saturn_horizontal_overscan] (0 to 60 in increments of 2. **0 is default**)\n\n\tSelf-explanatory.\n\n- **Initial scanline** [beetle_saturn_initial_scanline] (0 to 40 in increments of 1. **0 is default**)\n\n\tAdjust the first displayed scanline in NTSC mode.\n\n- **Last scanline** [beetle_saturn_last_scanline] (210 to 239 in increments of 1. **239 is default**)\n\n\tAdjust the last displayed scanline in NTSC mode.\n\n- **Initial scanline PAL** [beetle_saturn_initial_scanline_pal] (0 to 60 in increments of 1. **16 is default**)\n\n\tAdjust the first displayed scanline in NTSC mode.\n\n- **Last scanline PAL** [beetle_saturn_last_scanline_pal] (230 to 287 in increments of 1. **271 is default**)\n\n\tAdjust the last displayed scanline in PAL mode.\n\n- **Enable Horizontal Blend(blur)** [beetle_saturn_horizontal_blend] (**disabled**|enabled)\n\n\tEnable horizontal blend(blur) filter. Has a more noticeable effect with the Saturn's higher horizontal resolution modes(640/704).\n\n??? note \"Enable Horizontal Blend(blur) - Off\"\n\t\n\n??? note \"Enable Horizontal Blend(blur) - On\"\n\t\n\n## User 1 - 12 device types\n\nThe Beetle Saturn core supports the following device type(s) in the controls menu, bolded device types are the default for the specified user(s):\n\n- None - Input disabled.\n- [**Control Pad**](http://segaretro.org/Control_Pad_(Saturn)) - Joypad\n- [3D Control Pad](http://segaretro.org/3D_Control_Pad) - Analog\n- [Arcade Racer](http://segaretro.org/Arcade_Racer_Joystick) - Analog\n- [Mission Stick](https://segaretro.org/Sega_Mission_Stick) - Analog\n- [Mouse](http://segaretro.org/Shuttle_Mouse) - Mouse\n- [Stunner](http://segaretro.org/Virtua_Gun) - Lightgun\n- [Twin-Stick](https://segaretro.org/Saturn_Twin-Stick) - Analog\n- [Virtua Gun](https://segaretro.org/Virtua_Gun) - Lightgun\n- [Dual Mission Sticks](https://segaretro.org/Sega_Mission_Stick) - Analog - Panzer Dragoon Zwei only\n\n## Multitap\n\nActivating multitap support in compatible games can be configured by the ['6Player Adaptor on Port 1' and '6Player Adaptor on Port 2' core options](#core-options).\n\n## Joypad\n\n\n\n| RetroPad Inputs | User 1 - 12 input descriptors | Control Pad | 3D Control Pad | Arcade Racer | Mission Stick | Twin-Stick | Dual Mission Sticks |\n|------------------------------------------------|-------------------------------|--------------|----------------|---------------------------|----------------|---------------------|----------------------|\n|  | A Button | A Button | A Button | A Button | A Button | | A Button |\n|  | X Button | X Button | X Button | X Button | X Button | | X Button |\n|  | Mode Switch | | Mode Switch | | | | |\n|  | Start Button | Start Button | Start Button | Start Button | Start Button | Start Button | Start Button |\n|  | D-Pad Up | D-Pad Up | D-Pad Up | | | | |\n|  | D-Pad Down | D-Pad Down | D-Pad Down | | | | |\n|  | D-Pad Left | D-Pad Left | D-Pad Left | | | | |\n|  | D-Pad Right | D-Pad Right | D-Pad Right | | | | |\n|  | B Button | B Button | B Button | B Button | B Button | | B Button |\n|  | Y Button | Y Button | Y Button | Y Button | Y Button | | Y Button |\n|  | Z Button | Z Button | Z Button | Z Button | Z Button | Left Stick Button | Z Button |\n|  | C Button | C Button | C Button | C Button | C Button | Right Stick Button | C Button |\n|  | L Button | L Button | L Button | Left shift paddle (Up) | L Button | Left Stick Trigger | L Button |\n|  | R Button | R Button | R Button | Right shift paddle (Down) | R Button | Right Stick Trigger | R Button |\n|  | | | | | Throttle latch | | Throttle latch |\n|  X | Analog X | | Analog X | Analog wheel | Analog Stick X | Left Stick X | Left Analog Stick X |\n|  Y | Analog Y | | Analog Y | | Analog Stick Y | Left Stick Y | Left Analog Stick Y |\n|  X | Analog X (Right) | | | | | Right Stick X | Right Analog Stick X |\n|  Y | Analog Y (Right) | | | | Throttle | Right Stick Y | Right Analog Stick Y |\n\n## Mouse\n\n| RetroMouse Inputs | Mouse |\n|-------------------------------------------------------|--------------|\n|  Mouse Cursor | Mouse Cursor |\n|  Mouse 1 | Mouse A |\n|  Mouse 2 | Mouse B |\n|  Mouse 3 | Mouse C |\n| Mouse 4 | Mouse Start |\n| Mouse 5 | Mouse Start |\n\n## Lightgun\n\n| RetroLightgun Inputs | Stunner | Virtua Gun |\n|--------------------------------------------------------|-------------------|----------------------|\n|  Gun Crosshair | Stunner Crosshair | Virtua Gun Crosshair |\n| Gun Trigger | Stunner Trigger | Virtua Gun Trigger |\n| Gun Reload | Stunner Reload | Virtua Gun Reload |\n| Gun Start | Stunner Start | Virtua Gun Start |\n\n## External Links\n\n- [Official Mednafen Website](https://mednafen.github.io/)\n- [Official Mednafen Downloads](https://mednafen.github.io/releases/)\n- [Libretro Beetle Saturn Core info file](https://github.com/libretro/libretro-super/blob/master/dist/info/mednafen_saturn_libretro.info)\n- [Libretro Beetle Saturn Github Repository](https://github.com/libretro/beetle-saturn-libretro)\n- [Report Libretro Beetle Saturn Core Issues Here](https://github.com/libretro/beetle-saturn-libretro/issues)\n\n## Saturn\n\n- [Sega - Saturn (Beetle Saturn)](beetle_saturn.md)\n- [Sega - Saturn/ST-V (Kronos)](kronos.md)\n- [Sega - Saturn (Yabause)](yabause.md)\n- [Sega - Saturn (YabaSanshiro)](yabasanshiro.md)\n"
},
{
"path": "docs/library/beetle_sgx.md",
"content": "# NEC - PC Engine SuperGrafx (Beetle SuperGrafx)\n\n## Background\n\nStandalone port of Mednafen PCE Fast to libretro.\n\nThe Beetle SuperGrafx core has been authored by\n\n- [Mednafen Team](https://mednafen.github.io/)\n\nThe Beetle SuperGrafx core is licensed under\n\n- [GPLv2](https://github.com/libretro/beetle-supergrafx-libretro/blob/master/COPYING)\n\nA summary of the licenses behind RetroArch and its cores can be found [here](../development/licenses.md).\n\n## BIOS\n\nRequired or optional firmware files go in RetroArch's system directory.\n\n!!! attention\n\tWhich PCE CD BIOS file the Beetle SuperGrafx core will use can be configured by the ['CD BIOS' core option](#core-options).\n\n!!! attention\n\tAny CD-ROM System BIOS will work, but some of them are known to be incompatible with certain games.\n\n| Filename | Description | md5sum |\n|:-------------:|:-------------------------------------:|:--------------------------------:|\n| syscard3.pce | Super CD-ROM2 System V3.xx - Required | 38179df8f4ac870017db21ebcbf53114 |\n| syscard2.pce | CD-ROM System V2.xx - Optional | |\n| syscard1.pce | CD-ROM System V1.xx - Optional | |\n| gexpress.pce | Game Express CD Card - Optional | |\n\n## Extensions\n\nContent that can be loaded by the Beetle SuperGrafx core have the following file extensions:\n\n- .pce\n- .sgx\n- .cue\n- .ccd\n- .chd\n\nRetroArch database(s) that are associated with the Beetle SuperGrafx core:\n\n- [NEC - PC Engine - TurboGrafx 16](https://github.com/libretro/libretro-database/blob/master/rdb/NEC%20-%20PC%20Engine%20-%20TurboGrafx%2016.rdb)\n- [NEC - PC Engine CD - TurboGrafx-CD](https://github.com/libretro/libretro-database/blob/master/rdb/NEC%20-%20PC%20Engine%20CD%20-%20TurboGrafx-CD.rdb)\n- [NEC - PC Engine SuperGrafx](https://github.com/libretro/libretro-database/blob/master/rdb/NEC%20-%20PC%20Engine%20SuperGrafx.rdb)\n\n## Features\n\nFrontend-level settings or features that the Beetle Saturn core respects.\n\n| Feature | Supported |\n|-------------------|:---------:|\n| Restart | ✔ |\n| Saves | ✔ |\n| States | ✔ |\n| Rewind | ✔ |\n| Netplay | ✔ |\n| Core Options | ✔ |\n| [Memory Monitoring (achievements)](../guides/memorymonitoring.md) | ✔ |\n| RetroArch Cheats | ✔ |\n| Native Cheats | ✕ |\n| Controls | ✔ |\n| Remapping | ✔ |\n| Multi-Mouse | ✔ |\n| Rumble | ✕ |\n| Sensors | ✕ |\n| Camera | ✕ |\n| Location | ✕ |\n| Subsystem | ✕ |\n| [Softpatching](../guides/softpatching.md) | ✕ |\n| Disk Control | ✕ |\n| Username | ✕ |\n| Language | ✕ |\n| Crop Overscan | ✕ |\n| LEDs | ✕ |\n\n## Directories\n\nThe Beetle SuperGrafx core's library name is 'Beetle SuperGrafx'\n\nThe Beetle SuperGrafx core saves/loads to/from these directories.\n\n**Frontend's Save directory**\n\n| File | Description |\n|:-----:|:-----------:|\n| *.srm | Save |\n\n**Frontend's State directory**\n\n| File | Description |\n|:--------:|:-----------:|\n| *.state# | State |\n\n## Geometry and timing\n\n- The Beetle SuperGrafx core's core provided FPS is 59.82\n- The Beetle SuperGrafx core's core provided sample rate is 44100 Hz\n- The Beetle SuperGrafx core's base width is 512\n- The Beetle SuperGrafx core's base height is dependent on the ['Initial scanline' and 'Last scanline' core options](#core-options).\n- The Beetle SuperGrafx core's max width is 512\n- The Beetle SuperGrafx core's max height is 243\n- The Beetle SuperGrafx core's core provided aspect ratio is dependent on the ['Aspect Ratio' core option](#core-options).\n\n## Loading PC Engine CD content\n\nTo load PC Engine CD content, Beetle SuperGrafx needs a cue-sheet that points to an image file. A cue sheet, or cue file, is a metadata file which describes how the tracks of a CD or DVD are laid out.\n\nIf you have e.g. `foo.bin`, you should create a text file and save it as `foo.cue`. If you're playing a single-track Saturn game, then the cue file contents should look like this:\n\n`foobin.cue`\n```\n FILE \"foo.bin\" BINARY\n TRACK 01 MODE1/2352\n INDEX 01 00:00:00\n```\n\nAfter that, you can load the `foo.cue` file in RetroArch with the Beetle SuperGrafx core.\n\n!!! warning \"\"\n Certain PC Engine content are multi-track, so their .cue files might be more complicated.\n\nISO + OGG and ISO + WAV format games are supported, but they require a properly formatted cue sheet. For iso files, tracks should be denoted as BINARY, for ogg files, they should be denoted as OGG, and for wav files, they should be denoted as WAVE.\n\n## CHD\n\nAlternatively to using cue sheets with .bin/.iso files, you can convert your games to .chd (MAME Compressed Hunks of Data) to reduce file sizes and neaten up your game folder.\n\nTo convert content to CHD format, use the chdman tool found inside the latest MAME distribution and point it to a .cue file, like so:\n\n```\nchdman createcd --input foo.cue --output foo.chd\n```\n\n## Core options\n\nThe Beetle SuperGrafx core has the following option(s) that can be tweaked from the core options menu. The default setting is bolded.\n\nSettings with (Restart) means that core has to be closed for the new setting to be applied on next launch.\n\n- **CD Image Cache (Restart)** [sgx_cdimagecache] (**disabled**|enabled)\n\n\tLoads the complete image in memory at startup. Can potentially decrease loading times at the cost of increased startup time.\n\n- **CD Bios (Restart)** [sgx_cdbios] (**System Card 3**|Games Express|System Card 1|System Card 2)\n\n\tSelect which PC Engine CD BIOS to use.\n\n\tLook at the [BIOS section](#core-options) for more information.\n\n- **Force SuperGrafx Emulation (Restart)** [sgx_forcesgx] (**disabled**|enabled)\n\n\tThis is helpful to run homebrew games or isolate games that will not run in SuperGrafx mode. (like Space Harrier).\n\n\t**Savestates are not compatible with each mode. It's better to leave this option at default (Off) unless needed. Known Supergrafx games (like Dai-Makaimura, Aldyns) will automatically switch to SuperGrafx regardless of this option.**\n\n- **No Sprite Limit** [sgx_nospritelimit] (**disabled**|enabled)\n\n\tRemove 16-sprites-per-scanline hardware limit.\n\n- **CPU Overclock Multiplier (Restart)** [sgx_ocmultiplier] (**1**|2|3|4|5|6|7|8|9|10|20|30|40|50)\n\n\tOverclock the emulated CPU.\n\n- **Horizontal Overscan (352 Width Mode Only)** [sgx_hoverscan] (300 to 352 in increments of 2. **352 in default**.)\n\n\tModify the horizontal overscan.\n\n- **Initial scanline** [sgx_initial_scanline] (0 to 40 in increments of 1. **3 is default.**)\n\n\tAdjust first display scanline.\n\n- **Last scanline** [sgx_last_scanline] (208 to 242 in increments of 1. **242 is default.**)\n\n\tAdjust last display scanline.\n\n- **(CD) CDDA Volume %** [sgx_cddavolume] (0 to 200 in increments of 10. **100 is default**.)\n\n\tModify CDDA Volume %.\n\n- **(CD) ADPCM Volume %** [sgx_adpcmvolume] (0 to 200 in increments of 10. **100 is default**.)\n\n\tModify ADPCM Volume %.\n\n- **(CD) CD PSG Volume %;** [sgx_cdpsgvolume] (0 to 200 in increments of 10. **100 is default**.)\n\n\tModify CD PSG Volume %.\n\n- **(CD) CD Speed** [sgx_cdspeed] (**1**|2|4|8)\n\n\tSet the speed of the emulated CD drive.\n\n- **Turbo Delay** [sgx_turbo_delay] (**3**|4|5|6|7|8|9|10|11|12|13|14|15|30|60|2)\n\n\tAdjust turbo delay.\n\n- **Turbo ON/OFF Toggle** [sgx_turbo_toggle] (**disabled**|enabled)\n\n\tEnables Turbo ON/OFF inputs.\n\n\tLook at the [Joypad section](#joypad) for more information.\n\n- **Alternate Turbo Hotkey** [sgx_turbo_toggle_hotkey] (**disabled**|enabled)\n\n\tEnables Alternate Turbo ON/OFF inputs.\n\n\tYou can avoid remapping Button III and IV when switching to 6-button gamepad mode with this.\n\n\tLook at the [Joypad section](#joypad) for more information.\n\n- **Disable Soft Reset (RUN+SELECT)** [sgx_disable_softreset] (**disabled**|enabled)\n\n\tPressing RUN and SELECT simultaneously on PCE gamepad will SOFT RESET the console. This is a default hardware behaviour.\n\n\tSet this to enabled if you want the soft reset functionality turned off.\n\n- **Allow Opposing Directions** [sgx_up_down_allowed] (**disabled**|enabled)\n\n\tEnabling this will allow pressing / quickly alternating / holding both left and right (or up and down in some games) directions at the same time.\n\n\tThis may cause movement based glitches to occur in certain games.\n\n\tIt's best to keep this core option disabled.\n\n- **Mouse Sensitivity** [sgx_mouse_sensitivity] (1.00 to 5.00 in increments of 0.25. **1.00 is default**.)\n\n\tConfigure the PCE Mouse device type's sensitivity.\n\n- **Aspect Ratio** [sgx_aspect_ratio] (**auto**|6:5|4:3)\n\n\tSelect an auto (PAR) aspect ratio, or a 6:5 (Used to be default) aspect ratio, or a 4:3 TV aspect ratio.\n\n\t**When using games that constantly switches between 256 and 352 modes and using auto aspect, its best to set Horizontal width to 342 as to minimize resizing and extra black lines since this width is in ratio of 256-width mode(or something like that, just test with Asuka 100% which is one of the game that switches between these modes)**\n\n## User 1 - 5 device types\n\nThe Beetle SuperGrafx core supports the following device type(s) in the controls menu, bolded device types are the default for the specified user(s):\n\n- None - Input is disabled.\n- **PCE Joypad** - Joypad\n- PCE Mouse - Mouse\n\n## Joypad\n\n- Use the Mode Switch input to switch between button modes.\n\n- The regular Turbo inputs for 2-button mode are only active when the ['Turbo ON/OFF Toggle' core option](#core-options) is set to On.\n\n- The Alternate Turbo inputs for 2-button mode are only active when the ['Turbo ON.mdOFF Toggle' core option](#core-options) is set to On and the ['Alternate Turbo Hotkey' core option](#core-options) is set to On.\n\n| RetroPad Inputs | User 1 - 5 input descriptors | PCE Joypad 2-button | PCE Joypad 6-button |\n|------------------------------------------------|------------------------------|---------------------------|---------------------|\n|  | II | II | II |\n|  | III | II Turbo On/Off | III |\n|  | Select | Select | Select |\n|  | Run | Run | Run |\n|  | D-Pad Up | D-Pad Up | D-Pad Up |\n|  | D-Pad Down | D-Pad Down | D-Pad Down |\n|  | D-Pad Left | D-Pad Left | D-Pad Left |\n|  | D-Pad Right | D-Pad Right | D-Pad Right |\n|  | I | I | I |\n|  | IV | I Turbo On/Off | IV |\n|  | V | | V |\n|  | VI | | VI |\n|  | Mode Switch | Mode Switch | Mode Switch |\n|  | | Alternate II Turbo On/Off | |\n|  | | Alternate I Turbo On/Off | |\n\n## Mouse\n\n| RetroMouse Inputs | PCE Mouse |\n|-------------------------------------------------------|------------------------|\n|  Mouse Cursor | PCE Mouse Cursor |\n|  Mouse 1 | PCE Mouse Left Button |\n|  Mouse 2 | PCE Mouse Right Button |\n|  Mouse 3 | PCE Mouse Start Button |\n|  | Select (Joypad) |\n|  | Start (Joypad) |\n\n## External Links\n\n- [Official Mednafen Website](https://mednafen.github.io/)\n- [Official Mednafen Downloads](https://mednafen.github.io/releases/)\n- [Libretro Beetle SuperGrafx Core info file](https://github.com/libretro/libretro-super/blob/master/dist/info/mednafen_supergrafx_libretro.info)\n- [Libretro Beetle SuperGrafx Github Repository](https://github.com/libretro/beetle-supergrafx-libretro)\n- [Report Libretro Beetle SuperGrafx Core Issues Here](https://github.com/libretro/beetle-supergrafx-libretro/issues)\n\n## TG-16\n\n- [NEC - PC Engine / CD (Beetle PCE FAST)](beetle_pce_fast.md)\n"
},
{
"path": "docs/library/beetle_vb.md",
"content": "# Nintendo - Virtual Boy (Beetle VB)\n\n## Background\n\nPort of Mednafen VB to libretro.\n\n### Author/License\n\nThe Beetle VB core has been authored by\n\n- [Mednafen Team](https://mednafen.github.io/)\n\nThe Beetle VB core is licensed under\n\n- [GPLv2](https://github.com/libretro/beetle-vb-libretro/blob/master/COPYING)\n\nA summary of the licenses behind RetroArch and its cores can be found [here](../development/licenses.md).\n\n## Extensions\n\nContent that can be loaded by the Beetle VB core have the following file extensions:\n\n- .vb\n- .vboy\n- .bin\n\n## Databases\n\nRetroArch database(s) that are associated with the Beetle VB core:\n\n- [Nintendo - Virtual Boy](https://github.com/libretro/libretro-database/blob/master/rdb/Nintendo%20-%20Virtual%20Boy.rdb)\n\n## Features\n\nFrontend-level settings or features that the Beetle VB core respects.\n\n| Feature | Supported |\n|-------------------|:---------:|\n| Restart | ✔ |\n| Screenshots | ✔ |\n| Saves | ✔ |\n| States | ✔ |\n| Rewind | ✔ |\n| Netplay (State based) | ✔ (not link-cable emulation) |\n| Core Options | ✔ |\n| [Memory Monitoring (achievements)](../guides/memorymonitoring.md) | ✔ |\n| Cheats (Cheats menu) | ✕ |\n| Native Cheats | ✕ |\n| Controls | ✔ |\n| Remapping | ✔ |\n| Multi-Mouse | ✕ |\n| Rumble | ✕ |\n| Sensors | ✕ |\n| Camera | ✕ |\n| Location | ✕ |\n| Subsystem | ✕ |\n| [Softpatching](../guides/softpatching.md) | ✕ |\n| Disk Control | ✕ |\n| Username | ✕ |\n| Language | ✕ |\n| Crop Overscan | ✔ |\n| LEDs | ✕ |\n\n### Directories\n\nThe Beetle VB core's directory name is 'Beetle VB'\n\nThe Beetle VB core saves/loads to/from these directories.\n\n**Frontend's Save directory**\n\n- 'content-name'.srm (Cartridge battery save)\n\n**Frontend's State directory**\n\n- 'content-name'.state# (State)\n\n### Geometry and timing\n\n- The Beetle VB core's core provided FPS is 50.27\n- The Beetle VB core's core provided sample rate is 44100 Hz\n- The Beetle VB core's core provided aspect ratio is 12/7\n\n## Core options\n\nThe Beetle VB core has the following option(s) that can be tweaked from the core options menu. The default setting is bolded.\n\nSettings with (Restart) means that core has to be closed for the new setting to be applied on next launch.\n\n- **Anaglyph preset (restart)** [vb_anaglyph_preset] (**Off**/red & blue/red & cyan/red & electric cyan/red & green/green & magenta/yellow & blue)\n\n\tSelect anaglyph 3D mode.\n\n!!! attention\n\tThese Analglyph preset screenshots have been taken with the Palette core option set to black & red.\n\n??? note \"Anaglyph preset - Off\"\n\t\n\n??? note \"Anaglyph preset - red & blue\"\n\t\n\n??? note \"Anaglyph preset - red & cyan\"\n\t\n\n??? note \"Anaglyph preset - red & electric cyan\"\n\t\n\n??? note \"Anaglyph preset - red & green\"\n\t\n\n??? note \"Anaglyph preset - green & magenta\"\n\t\n\n??? note \"Anaglyph preset - yellow & blue\"\n\t\n\n- **Palette (restart)** [vb_color_mode] (**black & red**/black & white)\n\n\tChoose which color palette to use.\n\n??? note \"Palette - black & red\"\n\t\n\n??? note \"Palette - black & white\"\n\t\n\n- **Right Analog to Digital** [vb_right_analog_to_digital] (**Off**/On/invert x/invert y/invert both)\n\n\tSelf-explanatory.\n\n## Controllers\n\nThe Beetle VB core supports the following device type(s) in the controls menu, bolded device types are the default for the specified user(s):\n\n### User 1 device types\n\n- None - Doesn't disable input.\n- **RetroPad** - Joypad\n- Retropad w/Analog - Joypad - There's no reason to switch to this.\n\n### Controller tables\n\n#### Joypad\n\n!!! attention\n\tThe Right D-Pad X and Right D-Pad Y inputs are only active when the 'Right Analog to Digital' core option is set to anything other than Off.\n\n| User 1 Remap descriptors | RetroPad Inputs |\n|--------------------------|----------------------------------------------|\n| B |  |\n| Select |  |\n| Start |  |\n| Left D-Pad Up |  |\n| Left D-Pad Down |  |\n| Left D-Pad Left |  |\n| Left D-Pad Right |  |\n| A |  |\n| L |  |\n| R |  |\n| Right D-Pad Up |  |\n| Right D-Pad Left |  |\n| Right D-Pad Down |  |\n| Right D-Pad Right |  |\n| Right D-Pad X |  X |\n| Right D-Pad Y |  Y |\n\n## Compatibility\n\nAwaiting description.\n\n## External Links\n\n- [Official Mednafen Website](https://mednafen.github.io/)\n- [Official Mednafen Downloads](https://mednafen.github.io/releases/)\n- [Official Mednafen Virtual Boy Documentation](https://mednafen.github.io/documentation/vb.html)\n- [Libretro Beetle VB Core info file](https://github.com/libretro/libretro-super/blob/master/dist/info/mednafen_vb_libretro.info)\n- [Libretro Beetle VB Github Repository](https://github.com/libretro/beetle-vb-libretro)\n- [Report Libretro Beetle VB Core Issues Here](https://github.com/libretro/beetle-vb-libretro/issues)\n- [Gameplay Videos](https://www.youtube.com/playlist?list=PLRbgg4gk_0Ie8JxLxnW6r6_OeI8TSBPH_)"
},
{
"path": "docs/library/bios.md",
"content": "## **Verifying that you have the right BIOS**\n\nIt is very important that the following requirements are met:\n\n1. Location\n2. Name\n3. File Hash (md5sum)\n\n### **Location**\nEnsure that you have placed the BIOS file(s) in the correct location.\n\nUsually is the system folder, which can be located in RetroArch by going to:\n\nSettings->Directory->System/BIOS (look at the right column).\n\nThe specific core information page will tell you where exactly. (you may need to create a subfolder)\n\n### **Name**\nVerify that the file(s) have the same name and extension that appears in the core info/docs page.\n\nRemember that some operating systems are case sensitive.\n\n###**File Hash (md5sum)**\nLast, but probably the most important part of all, the hash of your BIOS should match the one in the docs.\n\n#### *What is a hash?*\nA File Hash is a string of characters that uniquely identifies a file.\n\n#### *Why should i care?*\nIf i rename *dog.jpg* to *bios.bin*, how would you know?\n\nIf the dump is not the version that the core needs, or if the file integrity is compromised (corrupted), unexpected things (**bad**) can happen.\n\nA file can become corrupted by errors in transmission, write errors during copying or moving, faulty storage media, software bugs, etc.\n\n#### *How do i check it?*\nYou need two things, a piece of software that can generate a hash from your file and a known valid file hash for the comparison, you will find the correct hash in the corresponding core information page (links below)\n\nAs for the software, some operating systems have tools integrated in the commandline that can do the job, but if you prefer a graphical interface look for something like Open-Hashtool, HashMyFiles, etc\n\n## Links to the core specific BIOS information\n\nSystem | Core | Link |\n|:----------------------------|:-------------------|:--------------------------------------------------------------------|\n3DO | Opera | [BIOS information](opera.md#bios)\n5200/Atari 8-bit computers | Atari800 | [BIOS information](atari800.md#bios)\n7800 | ProSystem | [BIOS information](prosystem.md#bios)\nApple | minivmac | [BIOS information](minivmac.md#bios)\nArcade | MAME2003 | [BIOS information](mame_2003.md#bios)\nArcade | MAME2003+ | [BIOS information](mame2003_plus.md#bios)\nArcade | MAME2010 | [BIOS information](mame_2010.md#bios)\nArcade | SAME_CDI | [BIOS information](same_cdi.md#bios)\nBBK electronic dictionary | GAM4980 | [BIOS information](gam4980.md#bios)\nColecoVision | Gearcoleco | [BIOS information](gearcoleco.md#bios)\nDreamcast | Flycast | [BIOS information](flycast.md#bios)\nDS | DeSmuME | [BIOS information](desmume.md#bios)\nDS | melonDS DS | [BIOS information](melonds_ds.md#bios)\nElektronika - BK-0010/BK-0011 | bk | [BIOS information](bk.md#bios)\nEnterprise 128 | ep128emu | [BIOS information](ep128emu.md#bios)\nGameBoy/GameBoy Color | Emux GB | [BIOS information](emux_gb.md#bios)\nGameBoy/GameBoy Color | Gambatte | [BIOS information](gambatte.md#bios)\nGameBoy/GameBoy Color | Gearboy | [BIOS information](gearboy.md#bios)\nGameBoy/GameBoy Color | SameBoy | [BIOS information](sameboy.md#bios)\nGameBoy Advance | Beetle GBA | [BIOS information](beetle_gba.md#bios)\nGameBoy Advance | gpSP | [BIOS information](gpsp.md#bios)\nGameBoy Advance | mGBA | [BIOS information](mgba.md#bios)\nGameBoy Advance | VBA Next | [BIOS information](vba_next.md#bios)\nGamecube/Wii | Dolphin | [BIOS information](dolphin.md#bios)\nIntellivision | FreeIntv | [BIOS information](freeintv.md#bios)\nLynx | Beetle Lynx | [BIOS information](beetle_lynx.md#bios)\nLynx | Handy | [BIOS information](handy.md#bios)\nLynx | Holani | [BIOS information](holani.md#bios)\nMaster System | Emux SMS | [BIOS information](emux_sms.md#bios)\nMS/GG | SMS Plus GX | [BIOS information](smsplus.md#bios)\nMS/GG/MD/CD | Genesis Plus GX | [BIOS information](genesis_plus_gx.md#bios)\nMS/GG/SG-1000 | Gearsystem | [BIOS information](gearsystem.md#bios)\nMS/MD/CD/32X | PicoDrive | [BIOS information](picodrive.md#bios)\nMSX/SVI/ColecoVision/SG-1000 | blueMSX | [BIOS information](bluemsx.md#bios)\nMSX | fMSX | [BIOS information](fmsx.md#bios)\nNES/Famicom | FCEUmm | [BIOS information](fceumm.md#bios)\nNES/Famicom | Nestopia | [BIOS information](nestopia.md#bios)\nNES/Famicom | Mesen | [BIOS information](mesen.md#bios)\nOdyssey2/Videopac+ | O2EM | [BIOS information](o2em.md#bios)\nPC-98 | Neko Project II Kai| [BIOS information](neko_project_ii_kai.md#bios)\nPC Engine/CD | Beetle PCE FAST | [BIOS information](beetle_pce_fast.md#bios)\nPCE SuperGrafx | Beetle SGX | [BIOS information](beetle_sgx.md#bios)\nPC-FX | Beetle PC-FX | [BIOS information](beetle_pc_fx.md#bios)\nPlayStation | Beetle PSX | [BIOS information](beetle_psx.md#bios)\nPlayStation | Beetle PSX HW | [BIOS information](beetle_psx_hw.md#bios)\nPlayStation | PCSX ReARMed | [BIOS information](pcsx_rearmed.md#bios)\nPokémon Mini | PokeMini | [BIOS information](pokemini.md#bios)\nPSP | PPSSPP | [BIOS information](ppsspp.md#bios)\nRPG Maker 2000/2003 | EasyRPG | [BIOS information](easyrpg.md#rtp-files)\nRPG Maker XP/VX/VX Ace | mkxp-z | [BIOS information](mkxp-z.md#bios)\nSaturn | Beetle Saturn | [BIOS information](beetle_saturn.md#bios)\nSaturn | Kronos | [BIOS information](kronos.md#bios)\nSaturn | Yabause | [BIOS information](yabause.md#bios)\nSaturn | YabaSanshiro | [BIOS information](yabasanshiro.md#bios)\nSharp - X68000 | PX68k | [BIOS information](px68k.md#bios)\nSNES/Super Famicom | bsnes Accuracy | [BIOS information](bsnes_accuracy.md#bios)\nSNES/Super Famicom | bsnes Balanced | [BIOS information](bsnes_balanced.md#bios)\nSNES/Super Famicom | bsnes Performance | [BIOS information](bsnes_performance.md#bios)\nSNES/Super Famicom | bsnes-mercury Acc | [BIOS information](bsnes_mercury_accuracy.md#bios)\nSNES/Super Famicom | bsnes-mercury Bal | [BIOS information](bsnes_mercury_balanced.md#bios)\nSNES/Super Famicom | bsnes-mercury Perf | [BIOS information](bsnes_mercury_performance.md#bios)\nSNES/Super Famicom | nSide Balanced | [BIOS information](nside_balanced.md#bios)\nSNES/Super Famicom | higan Accuracy | [BIOS information](higan_accuracy.md#bios)\nSNES/Super Famicom | Mesen-S | [BIOS information](mesen-s.md#bios)\nSuper Cassette Vision | EmuSCV | [BIOS information](emuscv.md#bios)\nST/STE/TT/Falcon | Hatari | [BIOS information](hatari.md#bios)\nTexas Instruments TI-83 | Numero | [BIOS information](numero.md#bios)\nThomson - MO/TO | Theodore | [BIOS information](theodore.md#bios)\nVectrex | vecx | [BIOS information](vecx.md#bios)\nVircon32 | Vircon32 | [BIOS information](vircon32.md#bios)\nZX Spectrum | Fuse | [BIOS information](fuse.md#bios)\n"
},
{
"path": "docs/library/bk.md",
"content": "# Elektronika - BK-0010/BK-0011(M) (bk)\n\n## Background\n\nA port of the PDP11 emulator to libretro. This core emulates the Soviet Electronica BK computers series, including the BK-0010, BK-0010.01 and BK-0011(M), as well as the Terak 8510/a, which is a 1976 American PDP-11/03 platform that the Electronica BK series were designed after. The BK series computers were the first mass-produced, affordable personal computers in Russia in the 1980s and they had a tremendous effect on the development of the Russian-speaking software community, similar to the C64, ZX Spectrum and Atari 2600 communities elsewhere in the world. These computers will accept console commands in English but respond mostly in Russian, so this core is mostly of use to Russian-speaking users.\n\nThis is a core for Soviet (russian) Electronica BK series:\n\n- БК-0010\n- БК-0010.01\n- БК-0011(М)\n\nYou may read more about the series at http://en.wikipedia.org/wiki/Electronika_BK\n\nThe author's (Leonid A. Broukhis) page can be found at [here](http://www.mailcom.com/bk0010/index_en.shtml).\n\nAdditionally, it supports emulation of Terak 8510/a, which is a 1976 american PDP-11/03 platform and of which the Electronica BK series are indeed clones.\n\nThe Electronica BK computers were the first mass produced, affordable personal computers in Russia in the eighties of 20th century, and have had tremendous effect on the development of Russian-speaking software community. Every russian computer, hardware or ham radio geek born in seventies or eighties probably had one of those machines during their formational years. They are the C64s, ZX Spectrums and Atari 2600s of the now defunct USSR.\n\nAll of the BK machines accept console commands in English, but respond mostly in Russian.\n\nVirtually all of BK schematics, documentation, hardware hacks and software has been preserved and is available on the internet. Unfortunately, most if not all of these things are only available in Russian.\n\n### Author/License\n\nThe bk core has been authored by\n\n- Eric A. Edwards\n- Leonid A. Broukhis\n- emestee\n- arcade-mini\n- phcoder\n\nThe bk core is licensed under\n\n- [BSD](https://github.com/libretro/bk-emulator/blob/master/COPYING)\n\nA summary of the licenses behind RetroArch and its cores can be found [here](../development/licenses.md).\n\n## Extensions\n\nContent that can be loaded by the bk core have the following file extensions:\n\n- .bin\n\n## Databases *WIP*\n\nRetroArch database(s) that are associated with the bk core:\n\n## BIOS\n\nRequired or optional firmware files go in the frontend's system directory.\n\n| Filename | Description | md5sum |\n|:---------------:|:----------------------:|:--------------------------------:|\n| bk/B11M_BOS.ROM | | fe4627d1e3a1535874085050733263e7 |\n| bk/B11M_EXT.ROM | | dc52f365d56fa1951f5d35b1101b9e3f |\n| bk/BAS11M_0.ROM | | 946f6f23ded03c0e26187f0b3ca75993 |\n| bk/BAS11M_1.ROM | | 1e6637f32aa7d1de03510030cac40bcf |\n| bk/DISK_327.ROM | | 5015228eeeb238e65da8edcd1b6dfac7 |\n| bk/BASIC10.ROM | | 3fa774326d75410a065659aea80252f0 |\n| bk/FOCAL10.ROM | | 5737f972e8638831ab71e9139abae052 |\n| bk/MONIT10.ROM | | 95f8c41c6abf7640e35a6a03cecebd01 |\n\n## Features\n\nFrontend-level settings or features that the bk core respects.\n\n| Feature | Supported |\n|-------------------|:---------:|\n| Restart | ✕ |\n| Screenshots | ✔ |\n| Saves | ✕ |\n| States | ✕ |\n| Rewind | ✔ |\n| Netplay | ✕ |\n| Core Options | ✔ |\n| [Memory Monitoring (achievements)](../guides/memorymonitoring.md) | ✕ |\n| RetroArch Cheats | ✕ |\n| Native Cheats | ✕ |\n| Controls | ✔ |\n| Remapping | ✔ |\n| Multi-Mouse | ✕ |\n| Rumble | ✕ |\n| Sensors | ✕ |\n| Camera | ✕ |\n| Location | ✕ |\n| Subsystem | ✕ |\n| [Softpatching](../guides/softpatching.md) | ✕ |\n| Disk Control | ✕ |\n| Username | ✕ |\n| Language | ✕ |\n| Crop Overscan | ✕ |\n| LEDs | ✕ |\n\n### Directories\n\nThe bk core's library name is 'bk'\n\nThe bk core saves/loads to/from these directories.\n\n### Geometry and timing\n\n- The bk core's core provided FPS is 25.\n- The bk core's core provided sample rate is 44100 Hz.\n- The bk core's base width is 1080.\n- The bk core's base height is 1080.\n- The bk core's core provided aspect ratio is 1/1.\n\n## Core options\n\nThe bk core has the following option(s) that can be tweaked from the core options menu. The default setting is bolded.\n\nSettings with (Restart) means that core has to be closed for the new setting to be applied on next launch.\n\n- **Model (restart)** [bk_model] (**BK-0010**|BK-0010.01|BK-0010.01 + FDD|BK-0011M + FDD|Terak 8510/a|Slow BK-0011M)\n\n- **Peripheral (UP port, restart)** [bk_peripheral] (**none**|covox|ay_3_8910|mouse_high|mouse_low|joystick)\n\n- **Keyboard layout** [bk_layout] (**qwerty**|jcuken)\n\n- **Double CPU speed** [bk_doublespeed] (**disabled**|enabled)\n\n- **Use color display** [bk_color] (**enabled**|disabled)\n\n- **Keyboard type (restart)** [bk_keyboard_type] (**poll**|callback)\n\n- **Aspect ratio** [bk_aspect_ratio] (**1:1**|4:3)\n\n## Controllers\n\nThe bk core supports the following device type(s) in the controls menu, bolded device types are the default for the specified user(s):\n\n### User 1 device types\n\n- None - Doesn't disable input. There's no reason to switch to this.\n- **Joystick** - Joypad\n- RetroKeyboard - Keyboard - Keyboard inputs are always active. Has keymapper support.\n- RetroPad Keyboard Map - Joypad - Awaiting description.\n\n### Controller tables\n\n#### Keyboard\n\n| RetroKeyboard Inputs | RetroKeyboard |\n|------------------------------|-----------------------|\n| Keyboard Backspace | BACKSPACE |\n| Keyboard Tab | TAB |\n| Keyboard Return | RETURN |\n| Keyboard Pause | PAUSE |\n| Keyboard Escape | ESCAPE |\n| Keyboard Space | SPACE |\n| Keyboard Quote ' | COLON |\n| Keyboard Comma , | COMMA |\n| Keyboard Minus - | NEGATIVE |\n| Keyboard Period . | PERIOD |\n| Keyboard Slash / | DIVIDE |\n| Keyboard 0 | 0 |\n| Keyboard 1 | 1, Player 1 Coleco #0 |\n| Keyboard 2 | 2, Player 1 Coleco #9 |\n| Keyboard 3 | 3, Player 2 Coleco #0 |\n| Keyboard 4 | 4, Player 2 Coleco #9 |\n| Keyboard 5 | 5 |\n| Keyboard 6 | 6 |\n| Keyboard 7 | 7 |\n| Keyboard 8 | 8 |\n| Keyboard 9 | 9 |\n| Keyboard Semicolon ; | SEMICOLON |\n| Keyboard Equals = | CIRCUMFLEX |\n| Keyboard Left Bracket [ | LEFT BRACKET |\n| Keyboard Backslash \\ | BACKSLASH (YEN) |\n| Keyboard Right Bracket ] | RIGHT BRACKET |\n| Keyboard Backquote ` | AT |\n| Keyboard a | A |\n| Keyboard b | B |\n| Keyboard c | C |\n| Keyboard d | D |\n| Keyboard e | E |\n| Keyboard f | F |\n| Keyboard g | G |\n| Keyboard h | H |\n| Keyboard i | I |\n| Keyboard j | J |\n| Keyboard k | K |\n| Keyboard l | L |\n| Keyboard m | M |\n| Keyboard n | N |\n| Keyboard o | O |\n| Keyboard p | P |\n| Keyboard q | Q |\n| Keyboard r | R |\n| Keyboard s | S |\n| Keyboard t | T |\n| Keyboard u | U |\n| Keyboard v | V |\n| Keyboard w | W |\n| Keyboard x | X |\n| Keyboard y | Y |\n| Keyboard z | Z |\n| Keyboard Delete | DELETE |\n| Keyboard Keypad 0 | NUMPAD 0 |\n| Keyboard Keypad 1 | NUMPAD 1 |\n| Keyboard Keypad 2 | NUMPAD 2 |\n| Keyboard Keypad 3 | NUMPAD 3 |\n| Keyboard Keypad 4 | NUMPAD 4 |\n| Keyboard Keypad 5 | NUMPAD 5 |\n| Keyboard Keypad 6 | NUMPAD 6 |\n| Keyboard Keypad 7 | NUMPAD 7 |\n| Keyboard Keypad 8 | NUMPAD 8 |\n| Keyboard Keypad 9 | NUMPAD 9 |\n| Keyboard Keypad Period . | NUMPAD COMMA |\n| Keyboard Keypad Divide / | NUMPAD DIVIDE |\n| Keyboard Keypad Multiply * | NUMPAD MULTIPLY |\n| Keyboard Keypad Minus - | NUMPAD SUBTRACTION |\n| Keyboard Keypad Plus + | NUMPAD ADD |\n| Keyboard Keypad Enter | NUMPAD PERIOD |\n| Keyboard Up | UP |\n| Keyboard Down | DOWN |\n| Keyboard Right | RIGHT |\n| Keyboard Left | LEFT |\n| Keyboard Insert | INSERT |\n| Keyboard Home | CLS |\n| Keyboard End | STOP |\n| Keyboard Page Up | SELECT |\n| Keyboard F1 | F1 |\n| Keyboard F2 | F2 |\n| Keyboard F3 | F3 |\n| Keyboard F4 | F4 |\n| Keyboard F5 | F5 |\n| Keyboard Caps Lock | CAPS |\n| Keyboard Right Shift | RIGHT SHIFT |\n| Keyboard Left Shift | LEFT SHIFT |\n| Keyboard Left Control | CONTROL |\n| Keyboard Left Alt | GRAPH |\n| Keyboard Print | PRINT |\n\nSupported combinations\n\n## External Links\n\n- [Official bk Website](http://www.mailcom.com/bk0010/index_en.shtml)\n- [bk Repository](https://github.com/emestee/bk-emulator)\n- [Libretro bk Core info file](https://github.com/libretro/libretro-super/blob/master/dist/info/bk_libretro.info)\n- [Libretro bk Github Repository](https://github.com/libretro/bk-emulator)\n- [Report Libretro bk Core Issues Here](https://github.com/libretro/bk-emulator/issues)"
},
{
"path": "docs/library/blastem.md",
"content": "# Sega - MD/CD (BlastEm)\n\n## Background\n\nBlastEm is an open-source Sega 16 bit emulator focused on accuracy and portability.\n\nBlastEm has 100% compatibility with Genesis / Mega Drive.\n\nThe BlastEm core is licensed under\n\nA summary of the licenses behind RetroArch and its cores can be found [here](../development/licenses.md).\n\n## BIOS\n\nRequired or optional firmware files go in the frontend's system directory.\n\n| Filename | Description | md5sum |\n|:----------------------------------------------------------------------------:|:-------------------------------:|:----------:|\n| [rom.db](https://raw.githubusercontent.com/libretro/blastem/libretro/rom.db) | ROM feature database - Optional | |\n\n## External Links\n"
},
{
"path": "docs/library/bluemsx.md",
"content": "# MSX/SVI/ColecoVision/SG-1000 (blueMSX)\n\n## Background\n\nblueMSX is a cycle accurate emulator that emulates all generations of MSX computers as well as SVI, ColecoVision and Sega SG-1000.\n\n### Author/License\n\nThe blueMSX core has been authored by\n\n- Daniel Vik\n\nThe blueMSX core is licensed under\n\n- [GPLv2](https://github.com/libretro/blueMSX-libretro/blob/master/license.txt)\n\nA summary of the licenses behind RetroArch and its cores can be found [here](../development/licenses.md).\n\n## Extensions\n\nContent that can be loaded by the blueMSX core have the following file extensions:\n\n- .rom\n- .ri\n- .mx1\n- .mx2\n- .col\n- .dsk\n- .cas\n- .sg\n- .sc\n- .m3u\n\n## Databases\n\nRetroArch database(s) that are associated with the blueMSX core:\n\n- [Microsoft - MSX](https://github.com/libretro/libretro-database/blob/master/rdb/Microsoft%20-%20MSX.rdb)\n- [Microsoft - MSX2](https://github.com/libretro/libretro-database/blob/master/rdb/Microsoft%20-%20MSX2.rdb)\n- [Coleco - ColecoVision](https://github.com/libretro/libretro-database/blob/master/rdb/Coleco%20-%20ColecoVision.rdb)\n- [Sega - SG-1000](https://github.com/libretro/libretro-database/blob/master/rdb/Sega%20-%20SG-1000.rdb)\n\n## BIOS\n\nThe blueMSX core requires the 'Databases' and 'Machines' folders from a full installation of blueMSX.\n\nGo to `Main Menu > Online Updater > Core System Files Downloader` and download 'blueMSX.zip'. That's all you need to do! The 'Databases' and 'Machines' folders will be extracted and moved to your RetroArch 'system' folder automatically.\n\nAlternatively, if your frontend doesn't have the 'Core System Files Downloader':\n\nYou can download the 'Databases' and 'Machines' folders from an [official full standalone blueMSX emulator installation](http://bluemsx.msxblue.com/download.html). Get blueMSXv282full.zip near the bottom of the page.\n\nMove/Copy the 'Databases' and 'Machines' Folders to RetroArch's System directory.\n\n\n\n## Features\n\nFrontend-level settings or features that the blueMSX core respects.\n\n| Feature | Supported |\n|-------------------|:---------:|\n| Restart | ✔ |\n| Screenshots | ✔ |\n| Saves | ✕ |\n| States | ✕ |\n| Rewind | ✕ |\n| Netplay | ✕ |\n| Core Options | ✔ |\n| [Memory Monitoring (achievements)](../guides/memorymonitoring.md) | ✔ |\n| RetroArch Cheats | ✕ |\n| Native Cheats | ✕ |\n| Controls | ✔ |\n| Remapping | ✔ |\n| Multi-Mouse | ✕ |\n| Rumble | ✕ |\n| Sensors | ✕ |\n| Camera | ✕ |\n| Location | ✕ |\n| Subsystem | ✕ |\n| [Softpatching](../guides/softpatching.md) | ✕ |\n| Disk Control | ✔ |\n| Username | ✕ |\n| Language | ✕ |\n| Crop Overscan | ✕ |\n| LEDs | ✕ |\n\n### Directories\n\nThe blueMSX core's library name is 'blueMSX'\n\nThe blueMSX core saves/loads to/from these directories.\n\n**Frontend's System directory**\n\n| File | Description |\n|:-------------------:|:---------------:|\n| bluemsx.ini | blueMSX Config |\n| bluemsx_history.ini | blueMSX History |\n\n### Geometry and timing\n\n- The blueMSX core's core provided FPS is 60\n- The blueMSX core's core provided sample rate is 44100 Hz\n- The blueMSX core's base width is (Base width)\n- The blueMSX core's base height is (Base height)\n- The blueMSX core's max width is (Max width)\n- The blueMSX core's max height is (Max height)\n- The blueMSX core's core provided aspect ratio is (Ratio)\n\n## Usage\n\nColecoVision Gamepad Mapping is as follow:\n\n- Button 1 as Retropad A\n- Button 2 as Retropad B\n- Dial keys 1 to 8 as X, Y, R, L, R2, L2, R3, L3\n- Star (*) as Select, Hash (#) as Start\n- 0 & 9 are on keyboard 1 & 2 for Player 1\n- 0 & 9 are on keyboard 3 & 4 for Player 2.\n\n## SpectraVideo Cassettes\n\n\n\nTo play SpectraVideo cassettes type 'cload' then 'run'\n\nor BLOAD ''CAS:'',R depending on the game.\n\n## Multiple-disk games\n\nIf foo is a multiple-disk game, you should have .dsk files for each one, e.g. `foo (Disk 1).dsk`, `foo (Disk 2).dsk`, `foo (Disk 3).dsk`.\n\nTo take advantage of BlueMSX Disk Control feature for disk swapping, an index file (a m3u file) should be made.\n\nCreate a text file and save it as `foo.m3u`. Then enter your game's .dsk files on it. The m3u file contents should look something like this:\n\n`foo.m3u`\n```\nfoo (Disk 1).dsk\nfoo (Disk 2).dsk\nfoo (Disk 3).dsk\n```\n\nAfter that, you can load the `foo.m3u` file in RetroArch with the BlueMSX core.\n\nAn alternative is to append disks to the current playlist via the \"Disk Image Append\" option RetroArch menu.\n\n## Core options\n\nThe blueMSX core has the following option(s) that can be tweaked from the core options menu. The default setting is bolded.\n\nSettings with (Restart) means that core has to be closed for the new setting to be applied on next launch.\n\n- **Machine Type (Restart)** [bluemsx_msxtype] (**Auto**|MSX|MSXturboR|MSX2|MSX2+|SEGA - SG-1000|SEGA - SC-3000|SEGA - SF-7000|SVI - Spectravideo SVI-318|SVI - Spectravideo SVI-328|SVI - Spectravideo SVI-328 MK2|ColecoVision|Coleco (Spectravideo SVI-603))\n\n\tManually select the machine type you would like the core to start in.\n\n- **Crop Overscan** [bluemsx_overscan] (**disabled**|enabled|MSX2)\n\n\tForces cropping of overscanned frames\n\n??? note \"*Crop Overscan Off*\"\n \n\n??? note \"*Crop Overscan On*\"\n \n\n??? note \"*Crop Overscan MSX2*\"\n \n\n- **VDP Sync Type (Restart)** [bluemsx_vdp_synctype] (**Auto**|50Hz|60Hz)\n\n\tMatch the game/machine region frequency to avoid emulated speed issues.\n\n- **No Sprite Limit** [bluemsx_nospritelimits] (**OFF**|ON)\n\n\tRemove the 4 sprite per line limit which can reduce or remove sprite flicker in some games.\n\n- **Sound YM2413 Enable (Restart)** [bluemsx_ym2413_enable] (**enabled**|disabled)\n\n\tAwaiting description.\n\n- **Cart Mapper Type (Restart)** [bluemsx_cartmapper] (**Auto**|Normal|mirrored|basic|0x4000|0xC000|ascii8|ascii8sram|ascii16|ascii16sram|\nascii16nf|konami4|konami4nf|konami5|konamisynth|korean80|korean90|korean126|\nMegaFlashRomScc|MegaFlashRomSccPlus|msxdos2|scc|sccexpanded|sccmirrored|sccplus|\nsnatcher|sdsnatcher|SegaBasic|SG1000|SG1000Castle|SG1000RamA|SG1000RamB|SC3000)\n\n\tWhen a ROM game or application is in the database, the emulator uses the databases to apply the correct mapper. If the sha1 value of a dump is not yet in the databases, it uses an automatic mapper detection system, but it can fail in some cases. In this situation, you can manually select the correct mapper.\n\n## Controllers\n\nThe blueMSX core supports the following device type(s) in the controls menu, bolded device types are the default for the specified user(s):\n\n### User 1 device types\n\n- None - Doesn't disable input. There's no reason to switch to this.\n- **RetroPad** - Joypad\n- RetroKeyboard - Keyboard - Keyboard inputs are always active. Has keymapper support.\n- RetroPad Keyboard Map - Joypad - Awaiting description.\n\n### User 2 device types\n\n- None - Doesn't disable input. There's no reason to switch to this.\n- **RetroPad** - Joypad\n- RetroKeyboard - Keyboard - Keyboard inputs are always active.\n\n### Controller tables\n\n#### Joypad\n\n| User 1 and 2 Remap descriptors for 'RetroPad' device type | RetroPad Inputs | blueMSX core inputs |\n|-----------------------------------------------------------|------------------------------------------------|----------------------------|\n| Button 2 |  | Button 2, Coleco Button 2 |\n| Button 3 |  | Button 3, Coleco #2 |\n| Select |  | Select, Coleco Star (*) |\n| Start |  | Start, Coleco Hash (#) |\n| Joy Up |  | Joy Up |\n| Joy Down |  | Joy Down |\n| Joy Left |  | Joy Left |\n| Joy Right |  | Joy Right |\n| Button 1 |  | Button 1, Coleco Button 1 |\n| Button 4 |  | Button 4, Coleco #1 |\n| Button 5 |  | Button 5, Coleco #4 |\n| Button 6 |  | Button 6, Coleco #3 |\n| Button 7 |  | Button 7, Coleco #6 |\n| Button 8 |  | Button 8, Coleco #5 |\n| Button 9 |  | Button 9. Coleco #8 |\n| Button 10 |  | Button 10, Coleco #7 |\n\n#### Keyboard\n\n| RetroKeyboard Inputs | RetroKeyboard |\n|------------------------------|-----------------------|\n| Keyboard Backspace | BACKSPACE |\n| Keyboard Tab | TAB |\n| Keyboard Return | RETURN |\n| Keyboard Pause | PAUSE |\n| Keyboard Escape | ESCAPE |\n| Keyboard Space | SPACE |\n| Keyboard Quote ' | COLON |\n| Keyboard Comma , | COMMA |\n| Keyboard Minus - | NEGATIVE |\n| Keyboard Period . | PERIOD |\n| Keyboard Slash / | DIVIDE |\n| Keyboard 0 | 0 |\n| Keyboard 1 | 1, Player 1 Coleco #0 |\n| Keyboard 2 | 2, Player 1 Coleco #9 |\n| Keyboard 3 | 3, Player 2 Coleco #0 |\n| Keyboard 4 | 4, Player 2 Coleco #9 |\n| Keyboard 5 | 5 |\n| Keyboard 6 | 6 |\n| Keyboard 7 | 7 |\n| Keyboard 8 | 8 |\n| Keyboard 9 | 9 |\n| Keyboard Semicolon ; | SEMICOLON |\n| Keyboard Equals = | CIRCUMFLEX |\n| Keyboard Left Bracket [ | LEFT BRACKET |\n| Keyboard Backslash \\ | BACKSLASH (YEN) |\n| Keyboard Right Bracket ] | RIGHT BRACKET |\n| Keyboard Backquote ` | AT |\n| Keyboard a | A |\n| Keyboard b | B |\n| Keyboard c | C |\n| Keyboard d | D |\n| Keyboard e | E |\n| Keyboard f | F |\n| Keyboard g | G |\n| Keyboard h | H |\n| Keyboard i | I |\n| Keyboard j | J |\n| Keyboard k | K |\n| Keyboard l | L |\n| Keyboard m | M |\n| Keyboard n | N |\n| Keyboard o | O |\n| Keyboard p | P |\n| Keyboard q | Q |\n| Keyboard r | R |\n| Keyboard s | S |\n| Keyboard t | T |\n| Keyboard u | U |\n| Keyboard v | V |\n| Keyboard w | W |\n| Keyboard x | X |\n| Keyboard y | Y |\n| Keyboard z | Z |\n| Keyboard Delete | DELETE |\n| Keyboard Keypad 0 | NUMPAD 0 |\n| Keyboard Keypad 1 | NUMPAD 1 |\n| Keyboard Keypad 2 | NUMPAD 2 |\n| Keyboard Keypad 3 | NUMPAD 3 |\n| Keyboard Keypad 4 | NUMPAD 4 |\n| Keyboard Keypad 5 | NUMPAD 5 |\n| Keyboard Keypad 6 | NUMPAD 6 |\n| Keyboard Keypad 7 | NUMPAD 7 |\n| Keyboard Keypad 8 | NUMPAD 8 |\n| Keyboard Keypad 9 | NUMPAD 9 |\n| Keyboard Keypad Period . | NUMPAD COMMA |\n| Keyboard Keypad Divide / | NUMPAD DIVIDE |\n| Keyboard Keypad Multiply * | NUMPAD MULTIPLY |\n| Keyboard Keypad Minus - | NUMPAD SUBTRACTION |\n| Keyboard Keypad Plus + | NUMPAD ADD |\n| Keyboard Keypad Enter | NUMPAD PERIOD |\n| Keyboard Up | UP |\n| Keyboard Down | DOWN |\n| Keyboard Right | RIGHT |\n| Keyboard Left | LEFT |\n| Keyboard Insert | INSERT |\n| Keyboard Home | CLS |\n| Keyboard End | STOP |\n| Keyboard Page Up | SELECT |\n| Keyboard F1 | F1 |\n| Keyboard F2 | F2 |\n| Keyboard F3 | F3 |\n| Keyboard F4 | F4 |\n| Keyboard F5 | F5 |\n| Keyboard Caps Lock | CAPS |\n| Keyboard Right Shift | RIGHT SHIFT |\n| Keyboard Left Shift | LEFT SHIFT |\n| Keyboard Left Control | CONTROL |\n| Keyboard Left Alt | GRAPH |\n| Keyboard Print | PRINT |\n\nSupported combinations\n\n- Keyboard Left or Right Shift + Keyboard 0 = UNDERSCORE\n\n## Compatibility\n\n- [blueMSX Manual](http://www.msxblue.com/manual/settingsports.htm)\n\n## External Links\n\n- [Official blueMSX Website](http://bluemsx.com/)\n- [Official blueMSX SourceForge Repository](http://sourceforge.net/projects/bluemsx/)\n- [Libretro blueMSX Core info file](https://github.com/libretro/libretro-super/blob/master/dist/info/bluemsx_libretro.info)\n- [Libretro blueMSX Github Repository](https://github.com/libretro/blueMSX-libretro)\n- [Report Libretro blueMSX Core Issues Here](https://github.com/libretro/blueMSX-libretro/issues)\n\n### See also\n\n#### Sega - SG-1000\n\n- [Sega - MS/GG/MD/CD (Genesis Plus GX)](genesis_plus_gx.md)\n- [Sega - MS/GG/SG-1000 (Gearsystem)](gearsystem.md)\n\n#### Microsoft - MSX\n\n- [Microsoft - MSX (fMSX)](fmsx.md)\n\n#### Microsoft - MSX2\n\n- [Microsoft - MSX (fMSX)](fmsx.md)\n\n#### ColecoVision\n\n- [Coleco - ColecoVision (Gearcoleco)](gearcoleco.md)\n- [ColecoVision/CreatiVision/My Vision (JollyCV)](jollycv.md)\n"
},
{
"path": "docs/library/bnes.md",
"content": "# Nintendo - NES / Famicom (bnes)\n\n## Background\n\nA port of bNES v083 to libretro.\n\n### Author/License\n\nThe bnes core has been authored by\n\n- byuu\n- Ryphecha\n\nThe bnes core is licensed under\n\n- [GPLv3](https://github.com/libretro/bnes-libretro/blob/master/license)\n\nA summary of the licenses behind RetroArch and its cores can be found [here](../development/licenses.md).\n\n## Extensions\n\nContent that can be loaded by the bnes core have the following file extensions:\n\n- .nes\n\n## Databases\n\nRetroArch database(s) that are associated with the bnes core:\n\n- [Nintendo - Nintendo Entertainment System](https://github.com/libretro/libretro-database/blob/master/rdb/Nintendo%20-%20Nintendo%20Entertainment%20System.rdb)\n\n## Features\n\nFrontend-level settings or features that the bnes core respects.\n\n| Feature | Supported |\n|-------------------|:---------:|\n| Restart | ✔ |\n| Screenshots | ✔ |\n| Saves | ✔ |\n| States | ✔ |\n| Rewind | ✔ |\n| Netplay | ✔ |\n| Core Options | ✕ |\n| [Memory Monitoring (achievements)](../guides/memorymonitoring.md) | ✕ |\n| RetroArch Cheats | ✕ |\n| Native Cheats | ✕ |\n| Controls | ✔ |\n| Remapping | ✔ |\n| Multi-Mouse | ✕ |\n| Rumble | ✕ |\n| Sensors | ✕ |\n| Camera | ✕ |\n| Location | ✕ |\n| Subsystem | ✕ |\n| [Softpatching](../guides/softpatching.md) | ✔ |\n| Disk Control | ✕ |\n| Username | ✕ |\n| Language | ✕ |\n| Crop Overscan | ✕ |\n| LEDs | ✕ |\n\n### Directories\n\nThe bnes core's directory name is 'bnes'\n\nThe bnes core saves/loads to/from these directories.\n\n**Frontend's Save directory**\n\n- 'content-name'.srm (Cartridge battery save)\n\n**Frontend's State directory**\n\n- 'content-name'.state# (State)\n\n### Geometry and timing\n\n- The bnes core's core provided FPS is 60\n- The bnes core's core provided sample rate is 32000 Hz\n- The bnes core's core provided aspect ratio is 16/15\n\n## Controllers\n\nThe bnes core supports the following device type(s) in the controls menu, bolded device types are the default for the specified user(s):\n\n### User 1 - 2 device types\n\n- None - Doesn't disable input.\n- **RetroPad** - Joypad\n- RetroPad w/Analog - Joypad - There is no reason to switch to this.\n\n### Controller tables\n\n#### Joypad\n\n\n\n| User 1 - 2 Remap descriptors | RetroPad Inputs |\n|------------------------------|-------------------------------------------|\n| B |  |\n| Select |  |\n| Start |  |\n| D-Pad Up |  |\n| D-Pad Down |  |\n| D-Pad Left |  |\n| D-Pad Right |  |\n| A |  |\n\n## Compatibility\n\n| Game | Issue |\n|------------------------------|------------------------------------------------|\n| Crisis Force | Graphical glitches. (1) |\n| Huge Insect | No enemies spawn. |\n| Lagrange Point | No music. |\n| Ms. Pac-Man (Tengen version) | Graphical glitches on the sides of the screen. |\n| Skull & Crossbones | Crashes on start. |\n\n??? note \"(1)\"\n \n\n## External Links\n\n- [Official higan Website](https://byuu.org/)\n- [Official higan Downloads](https://byuu.org/emulation/higan/)\n- [Libretro bnes Core info file](https://github.com/libretro/libretro-super/blob/master/dist/info/bnes_libretro.info)\n- [Libretro bnes Github Repository](https://github.com/libretro/bnes-libretro)\n- [Report Libretro bnes Core Issues Here](https://github.com/libretro/bnes-libretro/issues)\n\n### See also\n\n#### Nintendo - Nintendo Entertainment System\n\n- [Nintendo - NES / Famicom (Emux NES)](emux_nes.md)\n- [Nintendo - NES / Famicom (FCEUmm)](fceumm.md)\n- [Nintendo - NES / Famicom (Mesen)](mesen.md)\n- [Nintendo - NES / Famicom (Nestopia)](nestopia.md)\n- [Nintendo - NES / Famicom (QuickNES)](quicknes.md)\n"
},
{
"path": "docs/library/boom3.md",
"content": "# Doom 3 (Boom3)\n\n\n## Background\n\nBoom 3[^1] is a Doom 3 and Doom 3: Resurrection Of Evil GPL source port, known to work on Windows and Linux. Doom 3 is a sci-fi horror fantasy first-person shooter computer game developed by id Software and published by ActiVision.\n\nThe PrBoom core has been authored by\n\n- \n\nThe Boom 3 core is licensed under\n\n- [GPLv3](https://github.com/libretro/boom3/blob/master/COPYING.txt)\n\nA summary of the licenses behind RetroArch and its cores can be found [here](../development/licenses.md).\n\n## BIOS\n\nThere are no required BIOS.\n\n\n## Extensions\n\nContent that can be loaded by the Boom 3 core have the following file extensions:\n\n- .pk4\n\nRetroArch database(s) that are associated with the PrBoom core:\n\n- [DOOM](https://github.com/libretro/libretro-database/blob/master/rdb/DOOM.rdb)\n\n## Features\n\nFrontend-level settings or features that the PrBoom core respects.\n\n| Feature | Supported |\n|-------------------|:---------:|\n| Restart | ✕ |\n| Screenshots | ✔ |\n| Saves | ✔ |\n| States | ✕ |\n| Rewind | ✕ |\n| Netplay | ✕ |\n| Core Options | ✔ |\n| [Memory Monitoring (achievements)](../guides/memorymonitoring.md) | ✕ |\n| RetroArch Cheats | ✔ |\n| Native Cheats | ✔ |\n| Controls | ✔ |\n| Remapping | ✔ |\n| Multi-Mouse | ✕ |\n| Rumble | ✕ |\n| Sensors | ✕ |\n| Camera | ✕ |\n| Location | ✕ |\n| Subsystem | ✕ |\n| [Softpatching](../guides/softpatching.md) | ✕ |\n| Disk Control | ✕ |\n| Username | ✕ |\n| Language | ✕ |\n| Crop Overscan | ✕ |\n| LEDs | ✕ |\n\n### Directories\n\nThe Boom 3 core's library name is 'boom3'\n\nThe Boom 3 core saves/loads to/from these directories.\n\n**Frontend's Save directory**\n\n| File | Description |\n|:-------------------------:|:-----------:|\n| (conten folder)/savegames/*.save | Save |\n| (content folder)/libretro.cfg | DOOM 3 Config |\n\n### Geometry and timing\n\n- The Boom 3 core's core provided FPS (by default) is 60\n- The Boom 3 core's core provided sample rate is 44100 Hz\n- The Boom 3 core's base width is dependent on the Internal resolution core option.\n- The Boom 3 core's base height is dependent on the Internal resolution core option.\n- The Boom 3 core's max width is dependent on the Internal resolution core option.\n- The Boom 3 core's max height is dependent on the Internal resolution core option.\n- The Boom 3 core's core provided aspect ratio is 4/3\n\n## Loading DOOM 3 files\n\nBoom 3 can load pk4 files. The Boom 3 core requires game data files which can be found [here](https://store.steampowered.com/app/9050/DOOM_3/) and [here](https://store.steampowered.com/app/9070/). If you bought the game on CDs/DVD, base/pak000.pk4 - pak004.pk4 and d3xp/pak000.pk4 can be copied from the disks, the other files are from the patch.\n\nOn Linux (and probably other Unix-like systems and maybe even Windows with a mingw shell) you can extract the needed files from [the official 1.3.1 patch for Linux with](https://files.holarse-linuxgaming.de/native/Spiele/Doom%203/doom3-linux-1.3.1.1304.x86.run):\n\n```sh\nsh /path/to/doom3-linux-1.3.1.1304.x86.run --tar xvf --wildcards base/pak* d3xp/pak*\n```\n\nOn Windows you can just install the game and [the official 1.3.1 patch for Windows](https://archive.org/details/Doom_3_1.3.1) and then get the files from the installation directory (or copy dhewm3 in there).\n\n!!! WARNING\n\tDoom3 BFG is not supported.\t\n\nYou'll need the game data from a Doom3 installation patched to 1.3.1. Specifically, you'll need the following .pk4 files for the main game:\n\n```\nFilename Size MD5-sum\nbase/pak000.pk4 337MB 71b8d37b2444d3d86a36fd61783844fe\nbase/pak001.pk4 220MB 4bc4f3ba04ec2b4f4837be40e840a3c1\nbase/pak002.pk4 398MB fa84069e9642ad9aa4b49624150cc345\nbase/pak003.pk4 303MB f22d8464997924e4913e467e7d62d5fe\nbase/pak004.pk4 227MB 38561a3c73f93f2e6fd31abf1d4e9102\nbase/pak005.pk4 540KB 2afd4ece27d36393b7538d55a345b90d\nbase/pak006.pk4 214KB a6e7003fa9dcc75073dc02b56399b370\nbase/pak007.pk4 118KB 6319f086f930ec1618ab09b4c20c268c\nbase/pak008.pk4 12KB 28750b7841de9453eb335bad6841a2a5\n```\n\n... and (optionally) these .pk4 files for the Resurrection of Evil addon:\n\n```\nFilename Size MD5-sum\nd3xp/pak000.pk4 514MB a883fef0fd10aadeb73d34c462ff865d\nd3xp/pak001.pk4 98KB 06fc9be965e345587064056bf22236d2\n```\n\n\nAn example folder structure would be like so:\n\n```\n└── contents/\n └── doom3/\n ├── base/\n │ ├── pak000.pk4\n │ ├── pak001.pk4\n │ ├── pak002.pk4\n │ ├── pak003.pk4\n │ ├── pak004.pk4\n │ ├── pak005.pk4\n │ ├── pak006.pk4\n │ ├── pak007.pk4\n │ └── pak008.pk4\n └── d3xp/\n ├── pak000.pk4 \n └── pak001.pk4\n```\n\nGame saves and internal configuration files will be created in the content directory, organised in folders matching the filenames of loaded content - for example:\n\n```\n└── contents/\n └── doom3/\n └── base/\n ├── savegames/\n │ ├── *.save \n └── └── *.txt\n```\n\nGame saves are named from mission names.\n\n## Loading Doom 3: Resurrection Of Evil\n\nDoom 3: Resurrection of Evil is a horror first-person shooter video game developed by Nerve Software and published by Activision. It was released for Microsoft Windows on April 3, 2005, as an expansion pack and sequel to Doom 3 and on October 5, 2005, for the Xbox video game console. The Xbox version does not require the original Doom 3 in order to play, and includes The Ultimate Doom, Doom II: Hell on Earth and Master Levels for Doom II.\n\nYou will need to get Doom 3 and expansion pack RoE [here](https://store.steampowered.com/app/9070/).\n\nYou need to load Boom 3 xp core instead of Boom3 core. After Core is loaded you can load RoE's pk4 file\n\n```\n└── contents/\n └── doom3/\n └── d3xp/\n ├── pak000.pk4\n └── pak001.pk4\n```\n\nYou can get Boom 3 xp core [here](https://github.com/fpscan/RetroArch-AppImage/releases/download/A-cores/boom3_xp_libretro.zip) for now.\n\n## Config\n\nBoom 3's internal game settings can be found in the 'libretro.cfg' file inside each game's directory.\n\nMany of these settings may be changed from the in-game menu. \n\n## Core options\n\nThe Boom 3 core has the following option(s) that can be tweaked from the core options menu. The default setting is bolded.\n\nSettings with (Restart) means that core has to be closed for the new setting to be applied on next launch.\n\n- **Framerate (restart)** [boom3-framerate] (**Auto**|50fps|60fps|72fps|75fps|90fps|100fps|119fps|120fps|144fps|155fps|160fps|165fps|180fps|200fps|240fps|244fps|300fps|360fps)\n\n\tModify framerate. Requires a restart.\n\n??? note \"Internal resolution - 640x368\"\n \n\n??? note \"Internal resolution - 1920x1080\"\n \n\n- **Internal Resolution (restart)** [boom3-resolution] (480x272|**640x368**|720x408|960x544|1280x720|1920x1080|2560x1440|3840x2160)\n\n\tConfigure the resolution. Requires a restart.\n\n- **Invert Y Axis** [boom3-invert_y_axis] (**OFF**|ON)\n\n\tInvert the gamepad right analog stick's Y axis.\n\n- **Show FPS** [boom3-show_fps] (**OFF**|ON)\n\n\tShows framerate on screen.\n\n## User 1 device types\n\nThe Boom3 core supports the following device type(s) in the controls menu, bolded device types are the default for the specified user(s):\n\n- None - Input disabled.\n- **Gamepad Classic** - Joypad\n- **Gamepad Classic Alt** - Joypad\n- **Gamepad Modern** - Joypad\n\n## Joypad\n\n| User 1 input descriptors for 'Gamepad Classic' device type | RetroPad Inputs | PrBoom inputs |\n|------------------------------------------------------------|---------------------------------------------|-----------------|\n| Use |  | Use |\n| Run |  | Run |\n| Show/Hide Map |  | Show/Hide Map |\n| Show/Hide Menu |  | Show/Hide Menu |\n| D-Pad Up |  | D-Pad Up |\n| D-Pad Down |  | D-Pad Down |\n| D-Pad Left |  | D-Pad Left |\n| D-Pad Right |  | D-Pad Right |\n| Fire |  | Fire |\n| Strafe |  | Strafe |\n| Strafe Left |  | Strafe Left |\n| Strafe Right |  | Strafe Right |\n| Previous Weapon |  | Previous Weapon |\n| Next Weapon |  | Next Weapon |\n\n| User 1 input descriptors for 'Gamepad Modern' device type | RetroPad Inputs | PrBoom inputs |\n|-----------------------------------------------------------|------------------------------------------------|-------------------------|\n| Menu Cancel |  | Menu Cancel |\n| Quick Save |  | Quick Save |\n| Show/Hide Map |  | Show/Hide Map |\n| Show/Hide Menu |  | Show/Hide Menu |\n| D-Pad Up |  | D-Pad Up |\n| D-Pad Down |  | D-Pad Down |\n| D-Pad Left |  | D-Pad Left |\n| D-Pad Right |  | D-Pad Right |\n| Menu Select |  | Menu Select |\n| Quick Load |  | Quick Load |\n| Previous Weapon |  | Previous Weapon |\n| Next Weapon |  | Next Weapon |\n| Use |  | Use |\n| Fire |  | Fire |\n| Toggle Run |  | Toggle Run |\n| 180 Turn |  | 180 Turn |\n| |  X | Strafe Left/Right |\n| |  Y | Move Forwards/Backwards |\n| |  X | Look Left/Right |\n\n\n## External Links\n\n- [Official dhewm3 Website](https://dhewm3.org/)\n- [Official dhewm3 Repository](https://github.com/dhewm/dhewm3)\n- [Libretro Boom 3 Core info file](https://github.com/libretro/libretro-super/blob/master/dist/info/boom3_libretro.info)\n- [Libretro Boom 3 xp Core info file](https://github.com/libretro/libretro-super/blob/master/dist/info/boom3_xp_libretro.info)\n- [Libretro Boom 3 Github Repository](https://github.com/libretro/boom3)\n- [Report Libretro Boom 3 Core Issues Here](https://github.com/libretro/boom3/issues)\n\n## id Software\n\n- [Doom 1&2 (PrBoom)](prboom.md)\n\n[^1]: Core renamed to Boom 3 from Dhewm3 [based on original author request.](https://github.com/dhewm/dhewm3/issues/270#issuecomment-573478406)\n"
},
{
"path": "docs/library/bsnes-jg.md",
"content": "# Nintendo - SNES / Famicom (bsnes-jg)\n\n## Background\n\nbsnes-jg is a cycle accurate emulator for the Super Famicom/Super Nintendo\nEntertainment System, including support for the Super Game Boy, BS-X\nSatellaview, and Sufami Turbo.\n\nThis is a fork of bsnes v115. Many changes have been made post-fork:\n\n- Higher quality resampler with settings\n- Improved performance without loss of accuracy\n- Portability improvements\n- Removal of accuracy-reducing hacks and unnecessary code\n- Significant increase in standards compliance\n- Translation to the C++ Standard Library (ISO C++11)\n\n### Author/License\n\nThe bsnes-jg core has been authored by\n\n- byuu\n- [Rupert Carmichael (carmiker)](https://github.com/carmiker)\n\nThe bsnes-jg core is licensed under\n\n- [GPLv3](https://github.com/libretro/bsnes-jg/blob/libretro/COPYING)\n\nA summary of the licenses behind RetroArch and its cores can be found [here](../development/licenses.md).\n\n## Extensions\n\nContent that can be loaded by the bsnes-jg core have the following file extensions:\n\n- .sfc\n- .smc\n- .gb\n- .gbc\n- .st\n- .bs\n\n## BIOS\n\nRequired or optional firmware files go in the frontend's system directory.\n\n| Filename | Description | md5sum |\n|:-----------------:|:--------------------------------------:|:--------------------------------:|\n| dsp1.data.rom | DSP1 co-processor firmware | 3d81b45fa0c2aa8b852dfb1ece7c0971 |\n| dsp1.program.rom | DSP1 co-processor firmware | ae209fbe789fbf11a48aea5ab1197321 |\n| dsp1b.data.rom | DSP1B co-processor firmware | 1e3f568634a7d8284020dddc0ae905bc |\n| dsp1b.program.rom | DSP1B co-processor firmware | d10f446888e097cbf500f3f663cf4f6d |\n| dsp2.data.rom | DSP2 co-processor firmware | e9417e29223b139c3c4b635a2a3b8744 |\n| dsp2.program.rom | DSP2 co-processor firmware | aa6e5922a3ed5ded54f24247c11143c5 |\n| dsp3.data.rom | DSP3 co-processor firmware | 0a81210c0a940b997dd9843281008ee6 |\n| dsp3.program.rom | DSP3 co-processor firmware | d99ca4562818d49cee1f242705bba6f8 |\n| dsp4.data.rom | DSP4 co-processor firmware | ee4990879eb68e3cbca239c5bc20303d |\n| dsp4.program.rom | DSP4 co-processor firmware | a151023b948b90ffc23a5b594bb6fef2 |\n| cx4.data.rom | CX4 co-processor firmware | 037ac4296b6b6a5c47c440188d3c72e3 |\n| st010.data.rom | ST010 co-processor firmware | 254d70762b6f59f99c27c395aba7d07d |\n| st010.program.rom | ST010 co-processor firmware | 1d70019179a59a566a0bb5d3f2845544 |\n| st011.data.rom | ST011 co-processor firmware | 10bd3f4aa949737ab9836512c35bcc29 |\n| st011.program.rom | ST011 co-processor firmware | 95222ebf1c0c2990bcf25db43743f032 |\n| st018.data.rom | ST018 co-processor firmware | 49c898b60d0f15e90d0ba780dd12f366 |\n| st018.program.rom | ST018 co-processor firmware | dda40ccd57390c96e49d30a041f9a9e7 |\n\n## Features\n\nFrontend-level settings or features that the bsnes-jg core respects.\n\n| Feature | Supported |\n|-------------------|:---------:|\n| Restart | ✔ |\n| Screenshots | ✔ |\n| Saves | ✔ |\n| States | ✔ |\n| Rewind | ✔ |\n| Netplay | ✕ |\n| Core Options | ✔ |\n| [Memory Monitoring (achievements)](../guides/memorymonitoring.md) | ✔ |\n| RetroArch Cheats | ✔ |\n| Native Cheats | ✔ |\n| Controls | ✔ |\n| Remapping | ✔ |\n| Multi-Mouse | ✕ |\n| Rumble | ✕ |\n| Sensors | ✕ |\n| Camera | ✕ |\n| Location | ✕ |\n| Subsystem | ✔ |\n| [Softpatching](../guides/softpatching.md) | ✔ |\n| Disk Control | ✕ |\n| Username | ✕ |\n| Language | ✕ |\n| Crop Overscan | ✔ |\n| LEDs | ✕ |\n\n### Directories\n\nThe bsnes-jg core's library name is 'bsnes-jg'\n\nThe bsnes-jg core saves/loads to/from these directories.\n\n**Frontend's Save directory**\n\n| File | Description |\n|:-----:|:-----------------------------:|\n| *.srm | Cartridge-based battery saves |\n| *.rtc | Real Time Clock data |\n\n**Frontend's State directory**\n\n| File | Description |\n|:--------:|:-----------:|\n| *.state# | State |\n\n### Geometry and timing\n\n- The bsnes-jg core's core provided FPS is 60.098812 for NTSC games and 50.006979 for PAL games.\n- The bsnes-jg core's core provided sample rate is 48000Hz\n- The bsnes-jg core provides adjustable overscan and aspect ratio options.\n\n## Subsystems\n\nbsnes-jg supports Super Game Boy, BS-X Satellaview, and Sufami Turbo via the Subsystem API.\n\nFor Super Game Boy, you will need a Game Boy ROM (.gb/gbc) and Super Game Boy ROM.\n\nFor BS-X Satellaview, you will need a BS Memory dump (.bs) and BS-X BIOS ROM.\n\nFor Sufami Turbo (1 or 2 Carts), you will need Sufami Turbo ROMs (.st) and the Sufami Turbo ROM.\n\n| Subsystem | Description |\n|:---------:|:-----------------------------:|\n| sgb | Super Game Boy |\n| bsx | BS-X Satellaview |\n| sufami | Sufami Turbo (One Cart) |\n| sufami2 | Sufami Turbo (Two Carts) |\n\n\n**Command Line**\n\n```\nretroarch -L {path to bsnes core} {path to Super GameBoy ROM} --subsystem sgb {path to GameBoy rom}\n```\n\n**RetroArch GUI**\n\nLoad the Game Boy ROM through 'Load SuperGame Boy' in RetroArch's Main Menu.\n\n\n\n\n\nNext, load the Super Game Boy BIOS ROM through 'Load Super GameBoy' in RetroArch's Menu Menu.\n\n\n\n\n\nThen, start the content by selecting 'Start GameBoy' In RetroArch's Menu Menu.\n\n\n\n## MSU-1\n\nMSU-1 is supported. To load an MSU-1 enhanced ROM, simply load the .sfc which resides in the same directory as the .msu and audio tracks.\n\n## Core options\n\n- **Delay LLE Coprocessor Sync (Restart)** [bsnes_jg_coproc_delaysync] (**Off**|On)\n\n Delay sync when using Low Level Coprocessor Emulation for more speed at the cost of accuracy\n\n- **Prefer HLE Coprocessor Emulation (Restart)** [bsnes_jg_coproc_preferhle] (**Off**|On)\n\n Delay sync when using Low Level Coprocessor Emulation for more speed at the cost of accuracy\n\n- **Hotfixes (Restart)** [bsnes_jg_hotfixes] (**Off**|On)\n\n Apply hotfixes when playing a handful of games released with major bugs (which are exhibited on real hardware). Games in question: Dirt Racer, Magical Drop, Rendering Ranger R2\n\n- **Internal Run-Ahead** [bsnes_jg_runahead] (**0**|1|2|3|4)\n\n Simulate the system ahead of time and roll back to reduce input latency. Has very high system requirements.\n\n- **Resampler Quality (Restart)** [bsnes_jg_rsqual] (**Fast**|Medium|Best)\n\n Set the internal resampler's quality level (you may hear a difference if you use pro audio equipment and your imagination)\n\n- **SPC Interpolation Algorithm** [bsnes_jg_spc_interp] (**Gaussian**|Sinc)\n\n Set the emulated sound chip sample interpolation algorithm: Gaussian is considered more accurate, while Sinc is cleaner, but still produces very accurate output.\n\n- **Aspect Ratio** [bsnes_jg_aspect] (**Auto**|1:1|8:7|11:8|4:3)\n\n Set the Aspect Ratio\n\n- **Mask Overscan (Top)** [bsnes_jg_overscan_t] (0|4|**8**|12|16|20)\n\n Mask off pixels hidden by a bezel or border on original CRTs (top)\n\n- **Mask Overscan (Bottom)** [bsnes_jg_overscan_b] (0|4|**8**|12|16|20|21)\n\n Mask off pixels hidden by a bezel or border on original CRTs (bottom)\n\n- **Mask Overscan (Left)** [bsnes_jg_overscan_l] (**0**|4|8|12|16|20)\n\n Mask off pixels hidden by a bezel or border on original CRTs (left)\n\n- **Mask Overscan (Right)** [bsnes_jg_overscan_r] (**0**|4|8|12|16|20)\n\n Mask off pixels hidden by a bezel or border on original CRTs (right)\n\n- **Colour Adjustment - Luminance** [bsnes_jg_luminance] (0%|10%|20%|30%|40%|50%|60%|70%|80%|90%|**100%**)\n\n Adjust Luminance\n\n- **Colour Adjustment - Saturation** [bsnes_jg_saturation] (0%|10%|20%|30%|40%|50%|60%|70%|80%|90%|**100%**|110%|120%|130%|140%|150%|160%|170%|180%|190%|200%)\n\n Adjust Saturation\n\n- **Colour Adjustment - Gamma** [bsnes_jg_gamma] (100%|110%|**120%**|130%|140%|150%|160%|170%|180%|190%|200%)\n\n Adjust Gamma\n\n- **Competition Timer** [bsnes_jg_competition_timer] (3 Minutes|4 Minutes|5 Minutes|**6 Minutes**|7 Minutes|8 Minutes|9 Minutes|10 Minutes|11 Minutes|12 Minutes|13 Minutes|14 Minutes|15 Minutes|16 Minutes|17 Minutes|18 Minutes)\n\n Set the gameplay time for competition boards such as Campus Challenge '92 and PowerFest '94\n\n\n## Controllers\n\nThe bsnes-jg core supports the following device type(s) in the controls menu, bolded device types are the default for the specified user(s):\n\n### User 1 device types\n\n- **[Gamepad](http://nintendo.wikia.com/wiki/Super_Nintendo_Entertainment_System_controller)** - Gamepad\n- [SNES Mouse](https://en.wikipedia.org/wiki/Super_NES_Mouse) - Mouse\n\n### User 2 device types\n\n- **[Gamepad](http://nintendo.wikia.com/wiki/Super_Nintendo_Entertainment_System_controller)** - Gamepad\n- [SNES Mouse](https://en.wikipedia.org/wiki/Super_NES_Mouse) - Mouse\n- [Multitap](http://nintendo.wikia.com/wiki/Super_Multitap) - Gamepad - Allows for up to five players to play together in multitap games.\n- [SuperScope](https://en.wikipedia.org/wiki/Super_Scope) - Lightgun\n- [Justifier](https://en.wikipedia.org/wiki/Konami_Justifier) - Lightgun\n\n### Multitap support\n\nActivating multitap support in compatible games can be configured by switching to the [Multitap device type](#controllers) for User 2.\n\n### Controller tables\n\n#### Gamepad\n\n\n\n| User 1 - 5 Remap descriptors | RetroPad Inputs |\n|------------------------------|---------------------------------------------|\n| B |  |\n| Y |  |\n| Select |  |\n| Start |  |\n| D-Pad Up |  |\n| D-Pad Down |  |\n| D-Pad Left |  |\n| D-Pad Right |  |\n| A |  |\n| X |  |\n| L |  |\n| R |  |\n\n#### Mouse\n\n| RetroMouse Inputs | SNES Mouse |\n|-------------------------------------------------------|---------------------------|\n|  Mouse Cursor | SNES Mouse Cursor |\n|  Mouse 1 | SNES Mouse Left Button |\n|  Mouse 2 | SNES Mouse Right Button |\n\n#### Lightgun\n\n| RetroLightgun Inputs | SuperScope | Justifier(s) |\n|--------------------------------------------------------|---------------------------|---------------------|\n|  Gun Crosshair | SuperScope Crosshair | Justifier Crosshair |\n| Gun Trigger | SuperScope Trigger | Justifier Trigger |\n| Gun Aux A | SuperScope Cursor | |\n| Gun Aux B | SuperScope Turbo | |\n| Gun Start | SuperScope Pause | Justifier Start |\n\n## Compatibility\n\nThe bsnes-jg core is compatible with all officially released SNES/SFC titles.\n\n## External Links\n\n- [Upstream bsnes-jg Repository](https://gitlab.com/jgemu/bsnes-jg)\n- [Libretro bsnes-jg Core info file](https://github.com/libretro/libretro-super/blob/master/dist/info/bsnes-jg_libretro.info)\n- [Libretro bsnes-jg Repository](https://github.com/libretro/bsnes-jg)\n- [Report bsnes-jg Core Issues Here](https://github.com/libretro/bsnes-jg/issues)\n\n### See also\n\n#### Nintendo - Sufami Turbo\n\n- [Nintendo - SNES / Famicom (Beetle bsnes)](beetle_bsnes.md)\n- [Nintendo - SNES / Famicom (bsnes-mercury Accuracy)](bsnes_mercury_accuracy.md)\n- [Nintendo - SNES / Famicom (bsnes-mercury Balanced)](bsnes_mercury_balanced.md)\n- [Nintendo - SNES / Famicom (bsnes-mercury Performance)](bsnes_mercury_performance.md)\n- [Nintendo - SNES / Famicom (bsnes Accuracy)](bsnes_accuracy.md)\n- [Nintendo - SNES / Famicom (bsnes Balanced)](bsnes_balanced.md)\n- [Nintendo - SNES / Famicom (bsnes C++98 (v085))](bsnes_cplusplus98.md)\n- [Nintendo - SNES / Famicom (bsnes Performance)](bsnes_performance.md)\n- [Nintendo - SNES / Famicom (Snes9x)](snes9x.md)\n- [Nintendo - SNES / Famicom (Snes9x 2002)](snes9x_2002.md)\n- [Nintendo - SNES / Famicom (Snes9x 2005 Plus)](snes9x_2005_plus.md)\n- [Nintendo - SNES / Famicom (Snes9x 2005)](snes9x_2005.md)\n- [Nintendo - SNES / Famicom (Snes9x 2010)](snes9x_2010.md)\n\n#### Nintendo - Super Nintendo Entertainment System (+ Hacks)\n\n- [Nintendo - SNES / Famicom (Beetle bsnes)](beetle_bsnes.md)\n- [Nintendo - SNES / Famicom (bsnes-mercury Accuracy)](bsnes_mercury_accuracy.md)\n- [Nintendo - SNES / Famicom (bsnes-mercury Balanced)](bsnes_mercury_balanced.md)\n- [Nintendo - SNES / Famicom (bsnes-mercury Performance)](bsnes_mercury_performance.md)\n- [Nintendo - SNES / Famicom (bsnes Accuracy)](bsnes_accuracy.md)\n- [Nintendo - SNES / Famicom (bsnes Balanced)](bsnes_balanced.md)\n- [Nintendo - SNES / Famicom (bsnes C++98 (v085))](bsnes_cplusplus98.md)\n- [Nintendo - SNES / Famicom (bsnes Performance)](bsnes_performance.md)\n- [Nintendo - SNES / Famicom (higan Accuracy)](higan_accuracy.md)\n- [Nintendo - SNES / Famicom (nSide Balanced)](nside_balanced.md)\n- [Nintendo - SNES / Famicom (Mesen-S)](mesen-s.md)\n- [Nintendo - SNES / Famicom (Snes9x)](snes9x.md)\n- [Nintendo - SNES / Famicom (Snes9x 2002)](snes9x_2002.md)\n- [Nintendo - SNES / Famicom (Snes9x 2005 Plus)](snes9x_2005_plus.md)\n- [Nintendo - SNES / Famicom (Snes9x 2005)](snes9x_2005.md)\n- [Nintendo - SNES / Famicom (Snes9x 2010)](snes9x_2010.md)\n"
},
{
"path": "docs/library/bsnes_accuracy.md",
"content": "# Nintendo - SNES / Famicom (bsnes Accuracy)\n\n## Background\n\nbsnes is a Super Nintendo emulator that began development on 2004-10-14. It focuses on accuracy and clean code above all else. It never uses speed or compatibility hacks. As a result, the minimum system requirements are greater than with other emulators. bsnes comes in three different profiles (accuracy, balanced and performance) which contain minor differences in the PPU (graphics) emulation.\n\nThis core has been compiled with the Accuracy profile.\n\nHighly accurate SNES emulation. Whether to use the Accuracy, or Balanced or Performance core depends on how much accuracy you want to give up for game performance.\n\nPlease check the [compatibility section](#compatibility) for more information.\n\n### Author/License\n\nThe bsnes Accuracy core has been authored by\n\n- byuu\n\nThe bsnes Accuracy core is licensed under\n\n- [GPLv3](https://github.com/libretro/bsnes-libretro/blob/libretro/COPYING)\n\nA summary of the licenses behind RetroArch and its cores can be found [here](../development/licenses.md).\n\n## Extensions\n\nContent that can be loaded by the bsnes Accuracy core have the following file extensions:\n\n- .sfc\n- .smc\n- .bml\n\n## Databases\n\nRetroArch database(s) that are associated with the bsnes Accuracy core:\n\n- [Nintendo - Super Nintendo Entertainment System](https://github.com/libretro/libretro-database/blob/master/rdb/Nintendo%20-%20Super%20Nintendo%20Entertainment%20System.rdb)\n- [Nintendo - Super Nintendo Entertainment System Hacks](https://github.com/libretro/libretro-database/blob/master/rdb/Nintendo%20-%20Super%20Nintendo%20Entertainment%20System%20Hacks.rdb)\n- [Nintendo - Sufami Turbo](https://github.com/libretro/libretro-database/blob/master/rdb/Nintendo%20-%20Sufami%20Turbo.rdb)\n\n## BIOS\n\nRequired or optional firmware files go in the frontend's system directory.\n\n!!! attention\n\tThe bsnes Accuracy core uses split ROMS for [special chip games](https://en.wikipedia.org/wiki/List_of_Super_NES_enhancement_chips#List_of_Super_NES_games_that_use_enhancement_chips).\n\nNotable DSP1/DSP1B Games:\n\n- Super Mario Kart\n- Pilotwings\n\nNotable DSP2 Games:\n\n- Dungeon Master\n\nNotable DSP3 Games:\n\n- SD Gundam GX\n\nNotable DSP4 Games:\n\n- Top Gear 3000\n\nNotable Cx4 Games:\n\n- Mega Man X2\n- Mega Man X3\n\n| Filename | Description | md5sum |\n|:-----------------:|:--------------------------------------:|:--------------------------------:|\n| dsp1.data.rom | DSP1 co-processor firmware | 3d81b45fa0c2aa8b852dfb1ece7c0971 |\n| dsp1.program.rom | DSP1 co-processor firmware | ae209fbe789fbf11a48aea5ab1197321 |\n| dsp1b.data.rom | DSP1B co-processor firmware | 1e3f568634a7d8284020dddc0ae905bc |\n| dsp1b.program.rom | DSP1B co-processor firmware | d10f446888e097cbf500f3f663cf4f6d |\n| dsp2.data.rom | DSP2 co-processor firmware | e9417e29223b139c3c4b635a2a3b8744 |\n| dsp2.program.rom | DSP2 co-processor firmware | aa6e5922a3ed5ded54f24247c11143c5 |\n| dsp3.data.rom | DSP3 co-processor firmware | 0a81210c0a940b997dd9843281008ee6 |\n| dsp3.program.rom | DSP3 co-processor firmware | d99ca4562818d49cee1f242705bba6f8 |\n| dsp4.data.rom | DSP4 co-processor firmware | ee4990879eb68e3cbca239c5bc20303d |\n| dsp4.program.rom | DSP4 co-processor firmware | a151023b948b90ffc23a5b594bb6fef2 |\n| cx4.data.rom | CX4 co-processor firmware | 037ac4296b6b6a5c47c440188d3c72e3 |\n| st010.data.rom | ST010 co-processor firmware | 254d70762b6f59f99c27c395aba7d07d |\n| st010.program.rom | ST010 co-processor firmware | 1d70019179a59a566a0bb5d3f2845544 |\n| st011.data.rom | ST011 co-processor firmware | 10bd3f4aa949737ab9836512c35bcc29 |\n| st011.program.rom | ST011 co-processor firmware | 95222ebf1c0c2990bcf25db43743f032 |\n| st018.data.rom | ST018 co-processor firmware | 49c898b60d0f15e90d0ba780dd12f366 |\n| st018.program.rom | ST018 co-processor firmware | dda40ccd57390c96e49d30a041f9a9e7 |\n| sgb.boot.rom | Super Game Boy BIOS | |\n\n## Features\n\nFrontend-level settings or features that the bsnes Accuracy core respects.\n\n| Feature | Supported |\n|-------------------|:---------:|\n| Restart | ✔ |\n| Screenshots | ✔ |\n| Saves | ✔ |\n| States | ✔ |\n| Rewind | ✔ |\n| Netplay | ✔ |\n| Core Options | ✕ |\n| [Memory Monitoring (achievements)](../guides/memorymonitoring.md) | ✔ |\n| RetroArch Cheats | ✔ |\n| Native Cheats | ✕ |\n| Controls | ✔ |\n| Remapping | ✔ |\n| Multi-Mouse | - |\n| Rumble | ✕ |\n| Sensors | ✕ |\n| Camera | ✕ |\n| Location | ✕ |\n| Subsystem | ✔ |\n| [Softpatching](../guides/softpatching.md) | ✔ |\n| Disk Control | ✕ |\n| Username | ✕ |\n| Language | ✕ |\n| Crop Overscan | ✔ |\n| LEDs | ✕ |\n\n### Directories\n\nThe bsnes Accuracy core's internal core name is 'bsnes'\n\nThe bsnes Accuracy core saves/loads to/from these directories.\n\n**Frontend's Save directory**\n\n- 'content-name'.srm (Cartridge battery save)\n\n**Frontend's State directory**\n\n- 'content-name'.state# (State)\n\n### Geometry and timing\n\n- The bsnes Accuracy core's core provided FPS is 60.0988118623 for NTSC games and 50.0069789082 for PAL games.\n- The bsnes Accuracy core's core provided sample rate is 32040.5 Hz\n- The bsnes Accuracy core's core provided aspect ratio is 4/3\n\n## Super GameBoy\n\n!!! warning\n\tSuper GameBoy support in this core is **Windows only**, and has **buggy save state support** and **visual glitches**. **Use the [higan Accuracy core](higan_accuracy.md#super-gameboy-support) or the [nSide Balanced core](nside_balanced.md#super-gameboy-support) for simplified, functional, and easily accessible Super Gameboy support.**\n\nFor Super GameBoy support, you need sgb.boot.rom (in RetroArch's System directory), a GameBoy ROM and a Super GameBoy ROM.\n\nPlease note that the Game Boy and Super GameBoy ROMs have to be unzipped.\n\nSuper GameBoy is supported via the Subsystem API.\n\nThere are two ways to access the Subsystem API.\n\n**One way is to access the Subsystem API through RetroArch's GUI like this.**\n\nFirst, we load our GameBoy ROM through 'Load Super GameBoy' in RetroArch's Main Menu.\n\n\n\n\n\nNext, we load our Super GameBoy ROM through 'Load Super GameBoy' in RetroArch's Menu Menu.\n\n\n\n\n\nThen, we start the content by selecting 'Start GameBoy' In RetroArch's Menu Menu.\n\n\n\n**The other way is to launch RetroArch with commandline like this.**\n\n```\nretroarch -L {path to bsnes core} {path to Super GameBoy ROM} --subsystem sgb {path to GameBoy rom}\n```\n\n## MSU-1\n\n!!! attention\n\tMSU-1 support in this core is complex. **Use the [Snes9x core](../library/snes9x#msu-1-support) for simplified and easily accessible MSU-1 support.**\n\nMSU-1 support can be used by loading a correct .bml file.\n\nThere's documentation for loading MSU-1 games in standalone higan [here](https://higan.readthedocs.io/en/stable/guides/import/#msu-1-games).\n\n## Controllers\n\nThe bsnes Accuracy core supports the following device type(s) in the controls menu, bolded device types are the default for the specified user(s):\n\n### User 1 device types\n\n- None - Disables input.\n- **[SNES Joypad](http://nintendo.wikia.com/wiki/Super_Nintendo_Entertainment_System_controller)** - Joypad\n- [SNES Mouse](https://en.wikipedia.org/wiki/Super_NES_Mouse) - Mouse\n\n### User 2 device types\n\n- None - Disables input.\n- **[SNES Joypad](http://nintendo.wikia.com/wiki/Super_Nintendo_Entertainment_System_controller)** - Joypad\n- [SNES Mouse](https://en.wikipedia.org/wiki/Super_NES_Mouse) - Mouse\n- [Multitap](http://nintendo.wikia.com/wiki/Super_Multitap) - Joypad - Allows for up to five players to play together in multitap games.\n- [SuperScope](https://en.wikipedia.org/wiki/Super_Scope) - Lightgun\n- [Justifier](https://en.wikipedia.org/wiki/Konami_Justifier) - Lightgun\n- [Justifiers](https://en.wikipedia.org/wiki/Konami_Justifier) - Lightgun - Two Justifiers are plugged in, for two-player Justifier games.\n\n### Multitap support\n\nActivating multitap support in compatible games can be configured by switching to the [Multitap device type](#controllers) for User 2.\n\n### Controller tables\n\n#### Joypad\n\n\n\n| User 1 - 5 Remap descriptors | RetroPad Inputs |\n|------------------------------|-------------------------------------------|\n| B |  |\n| Y |  |\n| Select |  |\n| Start |  |\n| D-Pad Up |  |\n| D-Pad Down |  |\n| D-Pad Left |  |\n| D-Pad Right |  |\n| A |  |\n| X |  |\n| L |  |\n| R |  |\n\n#### Mouse\n\n| RetroMouse Inputs | SNES Mouse |\n|-----------------------------------------------------|---------------------------|\n|  Mouse Cursor | SNES Mouse Cursor |\n|  Mouse 1 | SNES Mouse Left Button |\n|  Mouse 2 | SNES Mouse Right Button |\n\n#### Lightgun\n\n| RetroLightgun Inputs | SuperScope | Justifier(s) |\n|------------------------------------------------------|---------------------------|---------------------|\n|  Gun Crosshair | SuperScope Crosshair | Justifier Crosshair |\n| Gun Trigger | SuperScope Trigger | Justifier Trigger |\n| Gun Aux A | SuperScope Cursor | |\n| Gun Aux B | SuperScope Turbo | |\n| Gun Start | SuperScope Pause | Justifier Start |\n\n## Compatibility\n\nThe bsnes Accuracy core fully emulates all SNES games that have ever been officially released.\n\n## External Links\n\n- [Official higan Website](https://byuu.org/)\n- [Official higan Upstream Downloads](https://byuu.org/emulation/higan/)\n- [Libretro bsnes Accuracy Core info file](https://github.com/libretro/libretro-super/blob/master/dist/info/bsnes_accuracy_libretro.info)\n- [Libretro bsnes Accuracy Github Repository](https://github.com/libretro/bsnes-libretro)\n- [Report Libretro bsnes Accuracy Core Issues Here](https://github.com/libretro/bsnes-libretro/issues)\n\n### See also\n\n#### Nintendo - Sufami Turbo\n\n- [Nintendo - SNES / Famicom (Beetle bsnes)](beetle_bsnes.md)\n- [Nintendo - SNES / Famicom (bsnes-jg)](bsnes-jg.md)\n- [Nintendo - SNES / Famicom (bsnes-mercury Accuracy)](bsnes_mercury_accuracy.md)\n- [Nintendo - SNES / Famicom (bsnes-mercury Balanced)](bsnes_mercury_balanced.md)\n- [Nintendo - SNES / Famicom (bsnes-mercury Performance)](bsnes_mercury_performance.md)\n- [Nintendo - SNES / Famicom (bsnes Balanced)](bsnes_balanced.md)\n- [Nintendo - SNES / Famicom (bsnes C++98 (v085))](bsnes_cplusplus98.md)\n- [Nintendo - SNES / Famicom (bsnes Performance)](bsnes_performance.md)\n- [Nintendo - SNES / Famicom (Snes9x)](snes9x.md)\n- [Nintendo - SNES / Famicom (Snes9x 2002)](snes9x_2002.md)\n- [Nintendo - SNES / Famicom (Snes9x 2005 Plus)](snes9x_2005_plus.md)\n- [Nintendo - SNES / Famicom (Snes9x 2005)](snes9x_2005.md)\n- [Nintendo - SNES / Famicom (Snes9x 2010)](snes9x_2010.md)\n\n#### Nintendo - Super Nintendo Entertainment System (+ Hacks)\n\n- [Nintendo - SNES / Famicom (Beetle bsnes)](beetle_bsnes.md)\n- [Nintendo - SNES / Famicom (bsnes-jg)](bsnes-jg.md)\n- [Nintendo - SNES / Famicom (bsnes-mercury Accuracy)](bsnes_mercury_accuracy.md)\n- [Nintendo - SNES / Famicom (bsnes-mercury Balanced)](bsnes_mercury_balanced.md)\n- [Nintendo - SNES / Famicom (bsnes-mercury Performance)](bsnes_mercury_performance.md)\n- [Nintendo - SNES / Famicom (bsnes Balanced)](bsnes_balanced.md)\n- [Nintendo - SNES / Famicom (bsnes C++98 (v085))](bsnes_cplusplus98.md)\n- [Nintendo - SNES / Famicom (bsnes Performance)](bsnes_performance.md)\n- [Nintendo - SNES / Famicom (higan Accuracy)](higan_accuracy.md)\n- [Nintendo - SNES / Famicom (nSide Balanced)](nside_balanced.md)\n- [Nintendo - SNES / Famicom (Mesen-S)](mesen-s.md)\n- [Nintendo - SNES / Famicom (Snes9x)](snes9x.md)\n- [Nintendo - SNES / Famicom (Snes9x 2002)](snes9x_2002.md)\n- [Nintendo - SNES / Famicom (Snes9x 2005 Plus)](snes9x_2005_plus.md)\n- [Nintendo - SNES / Famicom (Snes9x 2005)](snes9x_2005.md)\n- [Nintendo - SNES / Famicom (Snes9x 2010)](snes9x_2010.md)\n"
},
{
"path": "docs/library/bsnes_balanced.md",
"content": "# Nintendo - SNES / Famicom (bsnes Balanced)\n\n## Background\n\nbsnes is a Super Nintendo emulator that began development on 2004-10-14. It focuses on accuracy and clean code above all else. It never uses speed or compatibility hacks. As a result, the minimum system requirements are greater than with other emulators. bsnes comes in three different profiles (accuracy, balanced and performance) which contain minor differences in the PPU (graphics) emulation.\n\nThis core has been compiled with the Balanced profile.\n\nHighly accurate SNES emulation. Whether to use the Accuracy, or Balanced or Performance core depends on how much accuracy you want to give up for game performance.\n\nPlease check the [compatibility section](#compatibility) for more information.\n\n### Author/License\n\nThe bsnes Balanced core has been authored by\n\n- byuu\n\nThe bsnes Balanced core is licensed under\n\n- [GPLv3](https://github.com/libretro/bsnes-libretro/blob/libretro/COPYING)\n\nA summary of the licenses behind RetroArch and its cores can be found [here](../development/licenses.md).\n\n## Extensions\n\nContent that can be loaded by the bsnes Balanced core have the following file extensions:\n\n- .sfc\n- .smc\n- .bml\n\n## Databases\n\nRetroArch database(s) that are associated with the bsnes Balanced core:\n\n- [Nintendo - Super Nintendo Entertainment System](https://github.com/libretro/libretro-database/blob/master/rdb/Nintendo%20-%20Super%20Nintendo%20Entertainment%20System.rdb)\n- [Nintendo - Super Nintendo Entertainment System Hacks](https://github.com/libretro/libretro-database/blob/master/rdb/Nintendo%20-%20Super%20Nintendo%20Entertainment%20System%20Hacks.rdb)\n- [Nintendo - Sufami Turbo](https://github.com/libretro/libretro-database/blob/master/rdb/Nintendo%20-%20Sufami%20Turbo.rdb)\n\n## BIOS\n\nRequired or optional firmware files go in the frontend's system directory.\n\n!!! attention\n\tThe bsnes Balanced core uses split ROMS for [special chip games](https://en.wikipedia.org/wiki/List_of_Super_NES_enhancement_chips#List_of_Super_NES_games_that_use_enhancement_chips).\n\nNotable DSP1/DSP1B Games:\n\n- Super Mario Kart\n- Pilotwings\n\nNotable DSP2 Games:\n\n- Dungeon Master\n\nNotable DSP3 Games:\n\n- SD Gundam GX\n\nNotable DSP4 Games:\n\n- Top Gear 3000\n\nNotable Cx4 Games:\n\n- Mega Man X2\n- Mega Man X3\n\n| Filename | Description | md5sum |\n|:-----------------:|:--------------------------------------:|:--------------------------------:|\n| dsp1.data.rom | DSP1 co-processor firmware | 3d81b45fa0c2aa8b852dfb1ece7c0971 |\n| dsp1.program.rom | DSP1 co-processor firmware | ae209fbe789fbf11a48aea5ab1197321 |\n| dsp1b.data.rom | DSP1B co-processor firmware | 1e3f568634a7d8284020dddc0ae905bc |\n| dsp1b.program.rom | DSP1B co-processor firmware | d10f446888e097cbf500f3f663cf4f6d |\n| dsp2.data.rom | DSP2 co-processor firmware | e9417e29223b139c3c4b635a2a3b8744 |\n| dsp2.program.rom | DSP2 co-processor firmware | aa6e5922a3ed5ded54f24247c11143c5 |\n| dsp3.data.rom | DSP3 co-processor firmware | 0a81210c0a940b997dd9843281008ee6 |\n| dsp3.program.rom | DSP3 co-processor firmware | d99ca4562818d49cee1f242705bba6f8 |\n| dsp4.data.rom | DSP4 co-processor firmware | ee4990879eb68e3cbca239c5bc20303d |\n| dsp4.program.rom | DSP4 co-processor firmware | a151023b948b90ffc23a5b594bb6fef2 |\n| cx4.data.rom | CX4 co-processor firmware | 037ac4296b6b6a5c47c440188d3c72e3 |\n| st010.data.rom | ST010 co-processor firmware | 254d70762b6f59f99c27c395aba7d07d |\n| st010.program.rom | ST010 co-processor firmware | 1d70019179a59a566a0bb5d3f2845544 |\n| st011.data.rom | ST011 co-processor firmware | 10bd3f4aa949737ab9836512c35bcc29 |\n| st011.program.rom | ST011 co-processor firmware | 95222ebf1c0c2990bcf25db43743f032 |\n| st018.data.rom | ST018 co-processor firmware | 49c898b60d0f15e90d0ba780dd12f366 |\n| st018.program.rom | ST018 co-processor firmware | dda40ccd57390c96e49d30a041f9a9e7 |\n| sgb.boot.rom | Super Game Boy BIOS | |\n\n## Features\n\nFrontend-level settings or features that the bsnes Balanced core respects.\n\n| Feature | Supported |\n|-------------------|:---------:|\n| Restart | ✔ |\n| Screenshots | ✔ |\n| Saves | ✔ |\n| States | ✔ |\n| Rewind | ✔ |\n| Netplay | ✔ |\n| Core Options | ✕ |\n| [Memory Monitoring (achievements)](../guides/memorymonitoring.md) | ✔ |\n| RetroArch Cheats | ✔ |\n| Native Cheats | ✕ |\n| Controls | ✔ |\n| Remapping | ✔ |\n| Multi-Mouse | - |\n| Rumble | ✕ |\n| Sensors | ✕ |\n| Camera | ✕ |\n| Location | ✕ |\n| Subsystem | ✔ |\n| [Softpatching](../guides/softpatching.md) | ✔ |\n| Disk Control | ✕ |\n| Username | ✕ |\n| Language | ✕ |\n| Crop Overscan | ✔ |\n| LEDs | ✕ |\n\n### Directories\n\nThe bsnes Balanced core's internal core name is 'bsnes'\n\nThe bsnes Balanced core saves/loads to/from these directories.\n\n**Frontend's Save directory**\n\n- 'content-name'.srm (Cartridge battery save)\n\n**Frontend's State directory**\n\n- 'content-name'.state# (State)\n\n### Geometry and timing\n\n- The bsnes Balanced core's core provided FPS is 60.0988118623 for NTSC games and 50.0069789082 for PAL games.\n- The bsnes Balanced core's core provided sample rate is 32040.5 Hz\n- The bsnes Balanced core's core provided aspect ratio is 4/3\n\n## Super GameBoy\n\n!!! warning\n\tSuper GameBoy support in this core is **Windows only**, and has **buggy save state support** and **visual glitches**. **Use the [higan Accuracy core](higan_accuracy.md#super-gameboy-support) or the [nSide Balanced core](nside_balanced.md#super-gameboy-support) for simplified, functional, and easily accessible Super Gameboy support.**\n\nFor Super GameBoy support, you need sgb.boot.rom (in RetroArch's System directory), a GameBoy ROM and a Super GameBoy ROM.\n\nPlease note that the Game Boy and Super GameBoy ROMs have to be unzipped.\n\nSuper GameBoy is supported via the Subsystem API.\n\nThere are two ways to access the Subsystem API.\n\n**One way is to access the Subsystem API through RetroArch's GUI like this.**\n\nFirst, we load our GameBoy ROM through 'Load Super GameBoy' in RetroArch's Main Menu.\n\n\n\n\n\nNext, we load our Super GameBoy ROM through 'Load Super GameBoy' in RetroArch's Menu Menu.\n\n\n\n\n\nThen, we start the content by selecting 'Start GameBoy' In RetroArch's Menu Menu.\n\n\n\n**The other way is to launch RetroArch with commandline like this.**\n\n```\nretroarch -L {path to bsnes core} {path to Super GameBoy ROM} --subsystem sgb {path to GameBoy rom}\n```\n\n## MSU-1\n\n!!! attention\n\tMSU-1 support in this core is complex. **Use the [Snes9x core](snes9x.md#msu-1-support) for simplified and easily accessible MSU-1 support.**\n\nMSU-1 support can be used by loading a correct .bml file.\n\nThere's documentation for loading MSU-1 games in standalone higan [here](https://higan.readthedocs.io/en/stable/guides/import/#msu-1-games).\n\n## Controllers\n\nThe bsnes Balanced core supports the following device type(s) in the controls menu, bolded device types are the default for the specified user(s):\n\n### User 1 device types\n\n- None - Disables input.\n- **[SNES Joypad](http://nintendo.wikia.com/wiki/Super_Nintendo_Entertainment_System_controller)** - Joypad\n- [SNES Mouse](https://en.wikipedia.org/wiki/Super_NES_Mouse) - Mouse\n\n### User 2 device types\n\n- None - Disables input.\n- **[SNES Joypad](http://nintendo.wikia.com/wiki/Super_Nintendo_Entertainment_System_controller)** - Joypad\n- [SNES Mouse](https://en.wikipedia.org/wiki/Super_NES_Mouse) - Mouse\n- [Multitap](http://nintendo.wikia.com/wiki/Super_Multitap) - Joypad - Allows for up to five players to play together in multitap games.\n- [SuperScope](https://en.wikipedia.org/wiki/Super_Scope) - Lightgun\n- [Justifier](https://en.wikipedia.org/wiki/Konami_Justifier) - Lightgun\n- [Justifiers](https://en.wikipedia.org/wiki/Konami_Justifier) - Lightgun - Two Justifiers are plugged in, for two-player Justifier games.\n\n### Multitap support\n\nActivating multitap support in compatible games can be configured by switching to the [Multitap device type](#controllers) for User 2.\n\n### Controller tables\n\n#### Joypad\n\n\n\n| User 1 - 5 Remap descriptors | RetroPad Inputs |\n|------------------------------|-------------------------------------------|\n| B |  |\n| Y |  |\n| Select |  |\n| Start |  |\n| D-Pad Up |  |\n| D-Pad Down |  |\n| D-Pad Left |  |\n| D-Pad Right |  |\n| A |  |\n| X |  |\n| L |  |\n| R |  |\n\n#### Mouse\n\n| RetroMouse Inputs | SNES Mouse |\n|-----------------------------------------------------|---------------------------|\n|  Mouse Cursor | SNES Mouse Cursor |\n|  Mouse 1 | SNES Mouse Left Button |\n|  Mouse 2 | SNES Mouse Right Button |\n\n#### Lightgun\n\n| RetroLightgun Inputs | SuperScope | Justifier(s) |\n|------------------------------------------------------|---------------------------|---------------------|\n|  Gun Crosshair | SuperScope Crosshair | Justifier Crosshair |\n| Gun Trigger | SuperScope Trigger | Justifier Trigger |\n| Gun Aux A | SuperScope Cursor | |\n| Gun Aux B | SuperScope Turbo | |\n| Gun Start | SuperScope Pause | Justifier Start |\n\n## Compatibility\n\n| Game | Issue |\n|--------------------------|--------------------------------------------------------------------------------|\n| A.S.P. Air Strike Patrol | Black lines show up during gameplay. The shadow below the aircraft is missing. |\n\n## External Links\n\n- [Official higan Website](https://byuu.org/)\n- [Official higan Upstream Downloads](https://byuu.org/emulation/higan/)\n- [Libretro bsnes Balanced Core info file](https://github.com/libretro/libretro-super/blob/master/dist/info/bsnes_balanced_libretro.info)\n- [Libretro bsnes Balanced Github Repository](https://github.com/libretro/bsnes-libretro)\n- [Report Libretro bsnes Balanced Core Issues Here](https://github.com/libretro/bsnes-libretro/issues)\n\n### See also\n\n#### Nintendo - Sufami Turbo\n\n- [Nintendo - SNES / Famicom (Beetle bsnes)](beetle_bsnes.md)\n- [Nintendo - SNES / Famicom (bsnes-jg)](bsnes-jg.md)\n- [Nintendo - SNES / Famicom (bsnes-mercury Accuracy)](bsnes_mercury_accuracy.md)\n- [Nintendo - SNES / Famicom (bsnes-mercury Balanced)](bsnes_mercury_balanced.md)\n- [Nintendo - SNES / Famicom (bsnes-mercury Performance)](bsnes_mercury_performance.md)\n- [Nintendo - SNES / Famicom (bsnes Accuracy)](bsnes_accuracy.md)\n- [Nintendo - SNES / Famicom (bsnes C++98 (v085))](bsnes_cplusplus98.md)\n- [Nintendo - SNES / Famicom (bsnes Performance)](bsnes_performance.md)\n- [Nintendo - SNES / Famicom (Snes9x)](snes9x.md)\n- [Nintendo - SNES / Famicom (Snes9x 2002)](snes9x_2002.md)\n- [Nintendo - SNES / Famicom (Snes9x 2005 Plus)](snes9x_2005_plus.md)\n- [Nintendo - SNES / Famicom (Snes9x 2005)](snes9x_2005.md)\n- [Nintendo - SNES / Famicom (Snes9x 2010)](snes9x_2010.md)\n\n#### Nintendo - Super Nintendo Entertainment System (+ Hacks)\n\n- [Nintendo - SNES / Famicom (Beetle bsnes)](beetle_bsnes.md)\n- [Nintendo - SNES / Famicom (bsnes-jg)](bsnes-jg.md)\n- [Nintendo - SNES / Famicom (bsnes-mercury Accuracy)](bsnes_mercury_accuracy.md)\n- [Nintendo - SNES / Famicom (bsnes-mercury Balanced)](bsnes_mercury_balanced.md)\n- [Nintendo - SNES / Famicom (bsnes-mercury Performance)](bsnes_mercury_performance.md)\n- [Nintendo - SNES / Famicom (bsnes Accuracy)](bsnes_accuracy.md)\n- [Nintendo - SNES / Famicom (bsnes C++98 (v085))](bsnes_cplusplus98.md)\n- [Nintendo - SNES / Famicom (bsnes Performance)](bsnes_performance.md)\n- [Nintendo - SNES / Famicom (higan Accuracy)](higan_accuracy.md)\n- [Nintendo - SNES / Famicom (nSide Balanced)](nside_balanced.md)\n- [Nintendo - SNES / Famicom (Mesen-S)](mesen-s.md)\n- [Nintendo - SNES / Famicom (Snes9x)](snes9x.md)\n- [Nintendo - SNES / Famicom (Snes9x 2002)](snes9x_2002.md)\n- [Nintendo - SNES / Famicom (Snes9x 2005 Plus)](snes9x_2005_plus.md)\n- [Nintendo - SNES / Famicom (Snes9x 2005)](snes9x_2005.md)\n- [Nintendo - SNES / Famicom (Snes9x 2010)](snes9x_2010.md)\n"
},
{
"path": "docs/library/bsnes_cplusplus98.md",
"content": "# Nintendo - SNES / Famicom (bsnes C++98 (v085))\n\n## Background\n\nbsnes c++98 is a special fork from around v085 that's been backported to work with older compilers. Many platforms Libretro supports such as various consoles (PlayStation 3) are stuck with super-old compilers that don't support the latest c++ features that are in the newer bsnes v094 ports.\n\nThere's no reason to use this core now expect for edge cases on less compatible platforms.\n\n### Author/License\n\nThe bsnes C++98 (v085) core has been authored by\n\n- byuu\n- Themaister\n- Ver GreenEyes\n\nThe bsnes C++98 (v085) core is licensed under\n\n- [GPLv3](https://github.com/libretro/bsnes-libretro/blob/libretro/COPYING)\n\nA summary of the licenses behind RetroArch and its cores can be found [here](../development/licenses.md).\n\n## Extensions\n\nContent that can be loaded by the bsnes C++98 (v085) core have the following file extensions:\n\n- .sfc\n- .smc\n\n## Databases\n\nRetroArch database(s) that are associated with the bsnes C++98 (v085) core:\n\n- [Nintendo - Super Nintendo Entertainment System](https://github.com/libretro/libretro-database/blob/master/rdb/Nintendo%20-%20Super%20Nintendo%20Entertainment%20System.rdb)\n- [Nintendo - Super Nintendo Entertainment System Hacks](https://github.com/libretro/libretro-database/blob/master/rdb/Nintendo%20-%20Super%20Nintendo%20Entertainment%20System%20Hacks.rdb)\n- [Nintendo - Sufami Turbo](https://github.com/libretro/libretro-database/blob/master/rdb/Nintendo%20-%20Sufami%20Turbo.rdb)\n\n## Features\n\nFrontend-level settings or features that the bsnes C++98 (v085) core respects.\n\n| Feature | Supported |\n|-------------------|:---------:|\n| Restart | ✔ |\n| Screenshots | ✔ |\n| Saves | ✔ |\n| States | ✔ |\n| Rewind | ✔ |\n| Netplay | ✔ |\n| Core Options | ✕ |\n| [Memory Monitoring (achievements)](../guides/memorymonitoring.md) | ✔ |\n| RetroArch Cheats | ✕ |\n| Native Cheats | ✕ |\n| Controls | ✔ |\n| Remapping | ✔ |\n| Multi-Mouse | ✕ |\n| Rumble | ✕ |\n| Sensors | ✕ |\n| Camera | ✕ |\n| Location | ✕ |\n| Subsystem | ✕ |\n| [Softpatching](../guides/softpatching.md) | ✔ |\n| Disk Control | ✕ |\n| Username | ✕ |\n| Language | ✕ |\n| Crop Overscan | ✔ |\n| LEDs | ✕ |\n\n### Directories\n\nThe bsnes C++98 (v085) core's internal core name is '\"bSNES'\n\nThe bsnes C++98 (v085) core saves/loads to/from these directories.\n\n**Frontend's Save directory**\n\n- 'content-name'.srm (Cartridge battery save)\n\n**Frontend's State directory**\n\n- 'content-name'.state# (State)\n\n### Geometry and timing\n\n- The bsnes C++98 (v085) core's core provided FPS is 60.0988118623 for NTSC games and 50.0069789082 for PAL games.\n- The bsnes C++98 (v085) core's core provided sample rate is 32040.5 Hz.\n- The bsnes C++98 (v085) core's core provided aspect ratio is (Ratio)\n\n## Controllers\n\nThe bsnes C++98 (v085) core supports the following device type(s) in the controls menu, bolded device types are the default for the specified user(s):\n\n### User 1 device types\n\n- None - Doesn't disable input.\n- **[SNES Joypad](http://nintendo.wikia.com/wiki/Super_Nintendo_Entertainment_System_controller)** - Joypad\n- [SNES Mouse](https://en.wikipedia.org/wiki/Super_NES_Mouse) - Mouse\n\n### User 2 device types\n\n- None - Doesn't disable input.\n- **[SNES Joypad](http://nintendo.wikia.com/wiki/Super_Nintendo_Entertainment_System_controller)** - Joypad\n- [SNES Mouse](https://en.wikipedia.org/wiki/Super_NES_Mouse) - Mouse\n- [Multitap](http://nintendo.wikia.com/wiki/Super_Multitap) - Joypad - Allows for up to five players to play together in mulitap games.\n- [SuperScope](https://en.wikipedia.org/wiki/Super_Scope) - Lightgun\n- [Justifier](https://en.wikipedia.org/wiki/Konami_Justifier) - Lightgun\n- [Justifiers](https://en.wikipedia.org/wiki/Konami_Justifier) - Lightgun - Two Justifiers are plugged in, for two-player Justifier games.\n\n### Multitap support\n\nActivating multitap support in compatible games can be configured by switching to the [Multitap device type](#controllers) for User 2.\n\n### Controller tables\n\n#### Joypad\n\n\n\n| User 1 - 5 Remap descriptors | RetroPad Inputs |\n|------------------------------|-------------------------------------------|\n| B |  |\n| Y |  |\n| Select |  |\n| Start |  |\n| D-Pad Up |  |\n| D-Pad Down |  |\n| D-Pad Left |  |\n| D-Pad Right |  |\n| A |  |\n| X |  |\n| L |  |\n| R |  |\n\n#### Mouse\n\n| RetroMouse Inputs | SNES Mouse |\n|-------------------------------------------------------|---------------------------|\n|  Mouse Cursor | SNES Mouse Cursor |\n|  Mouse 1 | SNES Mouse Left Button |\n|  Mouse 2 | SNES Mouse Right Button |\n\n#### Lightgun\n\n| RetroLightgun Inputs | SuperScope | Justifier(s) |\n|--------------------------------------------------------|---------------------------|---------------------|\n|  Gun Crosshair | SuperScope Crosshair | Justifier Crosshair |\n| Gun Trigger | SuperScope Trigger | Justifier Trigger |\n| Gun Aux A | SuperScope Cursor | |\n| Gun Aux B | SuperScope Turbo | |\n| Gun Start | SuperScope Pause | Justifier Start |\n\n## Compatibility\n\nAwaiting description.\n\n## External Links\n\n- [Official higan Website](https://byuu.org/)\n- [Official higan Upstream Downloads](https://byuu.org/emulation/higan/)\n- [Libretro bsnes C++98 (v085) Core info file](https://github.com/libretro/libretro-super/blob/master/dist/info/bsnes_cplusplus98_libretro.info)\n- [Libretro bsnes C++98 (v085) Github Repository](https://github.com/libretro/bsnes-libretro-cplusplus98)\n- [Report Libretro bsnes C++98 (v085) Core Issues Here](https://github.com/libretro/bsnes-libretro-cplusplus98/issues)\n\n### See also\n\n#### Nintendo - Sufami Turbo\n\n- [Nintendo - SNES / Famicom (Beetle bsnes)](beetle_bsnes.md)\n- [Nintendo - SNES / Famicom (bsnes-jg)](bsnes-jg.md)\n- [Nintendo - SNES / Famicom (bsnes-mercury Accuracy)](bsnes_mercury_accuracy.md)\n- [Nintendo - SNES / Famicom (bsnes-mercury Balanced)](bsnes_mercury_balanced.md)\n- [Nintendo - SNES / Famicom (bsnes-mercury Performance)](bsnes_mercury_performance.md)\n- [Nintendo - SNES / Famicom (bsnes Accuracy)](bsnes_accuracy.md)\n- [Nintendo - SNES / Famicom (bsnes Balanced)](bsnes_balanced.md)\n- [Nintendo - SNES / Famicom (bsnes Performance)](bsnes_performance.md)\n- [Nintendo - SNES / Famicom (Snes9x)](snes9x.md)\n- [Nintendo - SNES / Famicom (Snes9x 2002)](snes9x_2002.md)\n- [Nintendo - SNES / Famicom (Snes9x 2005 Plus)](snes9x_2005_plus.md)\n- [Nintendo - SNES / Famicom (Snes9x 2005)](snes9x_2005.md)\n- [Nintendo - SNES / Famicom (Snes9x 2010)](snes9x_2010.md)\n\n#### Nintendo - Super Nintendo Entertainment System (+ Hacks)\n\n- [Nintendo - SNES / Famicom (Beetle bsnes)](beetle_bsnes.md)\n- [Nintendo - SNES / Famicom (bsnes-jg)](bsnes-jg.md)\n- [Nintendo - SNES / Famicom (bsnes-mercury Accuracy)](bsnes_mercury_accuracy.md)\n- [Nintendo - SNES / Famicom (bsnes-mercury Balanced)](bsnes_mercury_balanced.md)\n- [Nintendo - SNES / Famicom (bsnes-mercury Performance)](bsnes_mercury_performance.md)\n- [Nintendo - SNES / Famicom (bsnes Accuracy)](bsnes_accuracy.md)\n- [Nintendo - SNES / Famicom (bsnes Balanced)](bsnes_balanced.md)\n- [Nintendo - SNES / Famicom (bsnes Performance)](bsnes_performance.md)\n- [Nintendo - SNES / Famicom (higan Accuracy)](higan_accuracy.md)\n- [Nintendo - SNES / Famicom (nSide Balanced)](nside_balanced.md)\n- [Nintendo - SNES / Famicom (Mesen-S)](mesen-s.md)\n- [Nintendo - SNES / Famicom (Snes9x)](snes9x.md)\n- [Nintendo - SNES / Famicom (Snes9x 2002)](snes9x_2002.md)\n- [Nintendo - SNES / Famicom (Snes9x 2005 Plus)](snes9x_2005_plus.md)\n- [Nintendo - SNES / Famicom (Snes9x 2005)](snes9x_2005.md)\n- [Nintendo - SNES / Famicom (Snes9x 2010)](snes9x_2010.md)\n"
},
{
"path": "docs/library/bsnes_mercury_accuracy.md",
"content": "# Nintendo - SNES / Famicom (bsnes-mercury Accuracy)\n\n## Background\n\nbsnes-mercury is a fork of higan, aiming to restore some useful features that have been removed, as well as improving performance a bit.\nMaximum accuracy is still uncompromising; anything that affects accuracy is optional and off by default.\n\nThis core has been compiled with the Accuracy profile.\n\nImprovements include:\n\n* Improved framerate\n* Faster ROM loading\n* HLE emulation of some special chips is optionally restored (defaults to LLE), to improve performance and reduce reliance on those chip ROMs (they're not really easy to find). Chips for which no HLE emulation was developed (ST-0011 and ST-0018) are still LLE.\n* SuperFX overclock is now available (off by default, of course); if enabled, it makes SuperFX look quite a lot smoother.\n\n**The bsnes-mercury cores are not less accurate at default settings than the mainline bsnes cores (you have to explicitly enable 2 core options to switch to the less accurate special chip HLE).**\n\n### Author/License\n\nThe bsnes-mercury Accuracy core has been authored by\n\n- byuu\n- Alcaro\n\nThe bsnes-mercury Accuracy core is licensed under\n\n- [GPLv3](https://github.com/libretro/bsnes-mercury/blob/master/LICENSE)\n\nA summary of the licenses behind RetroArch and its cores can be found [here](../development/licenses.md).\n\n## Extensions\n\nContent that can be loaded by the bsnes-mercury Accuracy core have the following file extensions:\n\n- .sfc\n- .smc\n- .bml\n\n## Databases\n\nRetroArch database(s) that are associated with the bsnes-mercury Accuracy core:\n\n- [Nintendo - Super Nintendo Entertainment System](https://github.com/libretro/libretro-database/blob/master/rdb/Nintendo%20-%20Super%20Nintendo%20Entertainment%20System.rdb)\n- [Nintendo - Super Nintendo Entertainment System Hacks](https://github.com/libretro/libretro-database/blob/master/rdb/Nintendo%20-%20Super%20Nintendo%20Entertainment%20System%20Hacks.rdb)\n- [Nintendo - Sufami Turbo](https://github.com/libretro/libretro-database/blob/master/rdb/Nintendo%20-%20Sufami%20Turbo.rdb)\n\n## BIOS\n\nRequired or optional firmware files go in the frontend's system directory.\n\n| Filename | Description | md5sum |\n|:-----------------:|:--------------------------------------:|:--------------------------------:|\n| dsp1.data.rom | DSP1 co-processor firmware | 3d81b45fa0c2aa8b852dfb1ece7c0971 |\n| dsp1.program.rom | DSP1 co-processor firmware | ae209fbe789fbf11a48aea5ab1197321 |\n| dsp1b.data.rom | DSP1B co-processor firmware | 1e3f568634a7d8284020dddc0ae905bc |\n| dsp1b.program.rom | DSP1B co-processor firmware | d10f446888e097cbf500f3f663cf4f6d |\n| dsp2.data.rom | DSP2 co-processor firmware | e9417e29223b139c3c4b635a2a3b8744 |\n| dsp2.program.rom | DSP2 co-processor firmware | aa6e5922a3ed5ded54f24247c11143c5 |\n| dsp3.data.rom | DSP3 co-processor firmware | 0a81210c0a940b997dd9843281008ee6 |\n| dsp3.program.rom | DSP3 co-processor firmware | d99ca4562818d49cee1f242705bba6f8 |\n| dsp4.data.rom | DSP4 co-processor firmware | ee4990879eb68e3cbca239c5bc20303d |\n| dsp4.program.rom | DSP4 co-processor firmware | a151023b948b90ffc23a5b594bb6fef2 |\n| cx4.data.rom | CX4 co-processor firmware | 037ac4296b6b6a5c47c440188d3c72e3 |\n| st010.data.rom | ST010 co-processor firmware | 254d70762b6f59f99c27c395aba7d07d |\n| st010.program.rom | ST010 co-processor firmware | 1d70019179a59a566a0bb5d3f2845544 |\n| st011.data.rom | ST011 co-processor firmware | 10bd3f4aa949737ab9836512c35bcc29 |\n| st011.program.rom | ST011 co-processor firmware | 95222ebf1c0c2990bcf25db43743f032 |\n| st018.data.rom | ST018 co-processor firmware | 49c898b60d0f15e90d0ba780dd12f366 |\n| st018.program.rom | ST018 co-processor firmware | dda40ccd57390c96e49d30a041f9a9e7 |\n| sgb.boot.rom | Super Game Boy BIOS | |\n\n## Features\n\nFrontend-level settings or features that the bsnes-mercury Accuracy core respects.\n\n| Feature | Supported |\n|-------------------|:---------:|\n| Restart | ✔ |\n| Screenshots | ✔ |\n| Saves | ✔ |\n| States | ✔ |\n| Rewind | ✔ |\n| Netplay | ✔ |\n| Core Options | ✔ |\n| [Memory Monitoring (achievements)](../guides/memorymonitoring.md) | ✔ |\n| RetroArch Cheats | ✔ |\n| Native Cheats | ✕ |\n| Controls | ✔ |\n| Remapping | ✔ |\n| Multi-Mouse | - |\n| Rumble | ✕ |\n| Sensors | ✕ |\n| Camera | ✕ |\n| Location | ✕ |\n| Subsystem | ✔ |\n| [Softpatching](../guides/softpatching.md) | ✔ |\n| Disk Control | ✕ |\n| Username | ✕ |\n| Language | ✕ |\n| Crop Overscan | ✕ |\n| LEDs | ✕ |\n\n### Directories\n\nThe bsnes-mercury Accuracy core's internal core name is 'bsnes-mercury'\n\nThe bsnes-mercury Accuracy core saves/loads to/from these directories.\n\n**Frontend's Save directory**\n\n- 'content-name'.srm (Cartridge battery save)\n\n**Frontend's State directory**\n\n- 'content-name'.state# (State)\n\n### Geometry and timing\n\n- The bsnes-mercury Accuracy core's core provided FPS is 60.0988118623 for NTSC games and 50.0069789082 for PAL games.\n- The bsnes-mercury Accuracy core's core provided sample rate is 32040.5 Hz\n- The bsnes-mercury Accuracy core's core provided aspect ratio is dependent on the ['Preferred aspect ratio' core option](#core-options).\n\n## Super GameBoy\n\n!!! warning\n\tSuper GameBoy support in this core is **Windows only**, and has **buggy save state support** and **visual glitches**. **Use the [higan Accuracy core](higan_accuracy.md#super-gameboy-support) or the [nSide Balanced core](nside_balanced.md#super-gameboy-support) for simplified, functional, and easily accessible Super Gameboy support.**\n\nFor Super GameBoy support, you need sgb.boot.rom (in RetroArch's System directory), a GameBoy ROM and a Super GameBoy ROM.\n\nPlease note that the Game Boy and Super GameBoy ROMs have to be unzipped.\n\nSuper GameBoy is supported via the Subsystem API.\n\nThere are two ways to access the Subsystem API.\n\n**One way is to access the Subsystem API through RetroArch's GUI like this.**\n\nFirst, we load our GameBoy ROM through 'Load Super GameBoy' in RetroArch's Main Menu.\n\n\n\n\n\nNext, we load our Super GameBoy ROM through 'Load Super GameBoy' in RetroArch's Menu Menu.\n\n\n\n\n\nThen, we start the content by selecting 'Start GameBoy' In RetroArch's Menu Menu.\n\n\n\n**The other way is to launch RetroArch with commandline like this.**\n\n```\nretroarch -L {path to bsnes core} {path to Super GameBoy ROM} --subsystem sgb {path to GameBoy rom}\n```\n\n## MSU-1\n\n!!! attention\n\tMSU-1 support in this core is complex. **Use the [Snes9x core](snes9x.md#msu-1-support) for simplified and easily accessible MSU-1 support.**\n\nMSU-1 support can be used by loading a correct .bml file.\n\nThere's documentation for loading MSU-1 games in standalone higan [here](https://higan.readthedocs.io/en/stable/guides/import/#msu-1-games).\n\n## Core options\n\nThe bsnes-mercury Accuracy core has the following option(s) that can be tweaked from the core options menu. The default setting is bolded.\n\nSettings with (Restart) means that core has to be closed for the new setting to be applied on next launch.\n\n- **Allow settings to reduce accuracy** [bsnes_violate_accuracy] (**disabled**|enabled)\n\n\tRespect accuracy-impacting settings.\n\n- **Special chip accuracy** [bsnes_chip_hle] (**LLE**|HLE)\n\n\t**The Allow settings to reduce accuracy core option must be enabled in order for this to function properly. **\n\n\tChoose whether to use LLE (real BIOS) or HLE (emulated BIOS) for enhancement chips.\n\n\tHLE is less accurate but also less demanding for the special chips.\n\n\tThe ST-0011 and ST-0018 co-processors cannot be HLE'd.\n\n- **SuperFX speed** [bsnes_superfx_overclock] (**100%**|150%|200%|300%|400%|500%|1000%)\n\n\t**The Allow settings to reduce accuracy core option must be enabled in order for this to function properly.**\n\n\tOverclock the [SuperFX chip](https://en.wikipedia.org/wiki/Super_FX). 100% is stock clockspeed.\n\n- **System region** [bsnes_region] (**auto**|ntsc|pal)\n\n\tChoose which region the system is from.\n\n- **Preferred aspect ratio** [bsnes_aspect_ratio] (**auto**|ntsc|pal)\n\n\tChoose the preferred aspect ratio. RetroArch's aspect ratio must be set to Core provided in the Video settings.\n\n- **Crop overscan** [bsnes_crop_overscan] (**disabled**|enabled)\n\n\tCrop out the potentially random glitchy video output that would have been hidden by the bezel around the edge of a standard-definition television screen.\n\n- **Gamma ramp (requires restart)** [bsnes_gamma_ramp] (**disabled**|enabled)\n\n\tSimulates the way a console’s display device differs from modern computer monitor’s colour reproduction. In particular, it simulates the slightly-different gamma correction used by the Super Famicom.\n\n??? note \"Gamma ramp - Disabled\"\n \n\n??? note \"Gamma ramp - Enabled\"\n \n\n## Controllers\n\nThe bsnes-mercury Accuracy core supports the following device type(s) in the controls menu, bolded device types are the default for the specified user(s):\n\n### User 1 device types\n\n- None - Doesn't disable input.\n- **[SNES Joypad](http://nintendo.wikia.com/wiki/Super_Nintendo_Entertainment_System_controller)** - Joypad\n- [SNES Mouse](https://en.wikipedia.org/wiki/Super_NES_Mouse) - Mouse\n\n### User 2 device types\n\n- None - Doesn't disable input.\n- **[SNES Joypad](http://nintendo.wikia.com/wiki/Super_Nintendo_Entertainment_System_controller)** - Joypad\n- [SNES Mouse](https://en.wikipedia.org/wiki/Super_NES_Mouse) - Mouse\n- [Multitap](http://nintendo.wikia.com/wiki/Super_Multitap) - Joypad - Allows for up to five players to play together in multitap games.\n- [SuperScope](https://en.wikipedia.org/wiki/Super_Scope) - Lightgun\n- [Justifier](https://en.wikipedia.org/wiki/Konami_Justifier) - Lightgun\n- [Justifiers](https://en.wikipedia.org/wiki/Konami_Justifier) - Lightgun - Two Justifiers are plugged in, for two-player Justifier games.\n\n### Multitap support\n\nActivating multitap support in compatible games can be configured by switching to the [Multitap device type](#controllers) for User 2.\n\n### Controller tables\n\n#### Joypad\n\n\n\n| User 1 - 5 Remap descriptors | RetroPad Inputs |\n|------------------------------|---------------------------------------------|\n| B |  |\n| Y |  |\n| Select |  |\n| Start |  |\n| D-Pad Up |  |\n| D-Pad Down |  |\n| D-Pad Left |  |\n| D-Pad Right |  |\n| A |  |\n| X |  |\n| L |  |\n| R |  |\n\n#### Mouse\n\n| RetroMouse Inputs | SNES Mouse |\n|-------------------------------------------------------|---------------------------|\n|  Mouse Cursor | SNES Mouse Cursor |\n|  Mouse 1 | SNES Mouse Left Button |\n|  Mouse 2 | SNES Mouse Right Button |\n\n#### Lightgun\n\n| RetroLightgun Inputs | SuperScope | Justifier(s) |\n|--------------------------------------------------------|---------------------------|---------------------|\n|  Gun Crosshair | SuperScope Crosshair | Justifier Crosshair |\n| Gun Trigger | SuperScope Trigger | Justifier Trigger |\n| Gun Aux A | SuperScope Cursor | |\n| Gun Aux B | SuperScope Turbo | |\n| Gun Start | SuperScope Pause | Justifier Start |\n\n## Compatibility\n\nThe bsnes-mercury Accuracy core fully emulates all SNES games that have ever been officially released.\n\n## External Links\n\n- [Official higan Website](https://byuu.org/)\n- [Official higan Upstream Downloads](https://byuu.org/emulation/higan/)\n- [Libretro bsnes-mercury Accuracy Core info file](https://github.com/libretro/libretro-super/blob/master/dist/info/bsnes_mercury_accuracy_libretro.info)\n- [Libretro bsnes-mercury Accuracy Github Repository](https://github.com/libretro/bsnes-mercury)\n- [Report Libretro bsnes-mercury Accuracy Core Issues Here](https://github.com/libretro/bsnes-mercury/issues)\n\n### See also\n\n#### Nintendo - Sufami Turbo\n\n- [Nintendo - SNES / Famicom (Beetle bsnes)](beetle_bsnes.md)\n- [Nintendo - SNES / Famicom (bsnes-jg)](bsnes-jg.md)\n- [Nintendo - SNES / Famicom (bsnes-mercury Balanced)](bsnes_mercury_balanced.md)\n- [Nintendo - SNES / Famicom (bsnes-mercury Performance)](bsnes_mercury_performance.md)\n- [Nintendo - SNES / Famicom (bsnes Accuracy)](bsnes_accuracy.md)\n- [Nintendo - SNES / Famicom (bsnes Balanced)](bsnes_balanced.md)\n- [Nintendo - SNES / Famicom (bsnes C++98 (v085))](bsnes_cplusplus98.md)\n- [Nintendo - SNES / Famicom (bsnes Performance)](bsnes_performance.md)\n- [Nintendo - SNES / Famicom (Snes9x)](snes9x.md)\n- [Nintendo - SNES / Famicom (Snes9x 2002)](snes9x_2002.md)\n- [Nintendo - SNES / Famicom (Snes9x 2005 Plus)](snes9x_2005_plus.md)\n- [Nintendo - SNES / Famicom (Snes9x 2005)](snes9x_2005.md)\n- [Nintendo - SNES / Famicom (Snes9x 2010)](snes9x_2010.md)\n\n#### Nintendo - Super Nintendo Entertainment System (+ Hacks)\n\n- [Nintendo - SNES / Famicom (Beetle bsnes)](beetle_bsnes.md)\n- [Nintendo - SNES / Famicom (bsnes-jg)](bsnes-jg.md)\n- [Nintendo - SNES / Famicom (bsnes-mercury Balanced)](bsnes_mercury_balanced.md)\n- [Nintendo - SNES / Famicom (bsnes-mercury Performance)](bsnes_mercury_performance.md)\n- [Nintendo - SNES / Famicom (bsnes Accuracy)](bsnes_accuracy.md)\n- [Nintendo - SNES / Famicom (bsnes Balanced)](bsnes_balanced.md)\n- [Nintendo - SNES / Famicom (bsnes C++98 (v085))](bsnes_cplusplus98.md)\n- [Nintendo - SNES / Famicom (bsnes Performance)](bsnes_performance.md)\n- [Nintendo - SNES / Famicom (higan Accuracy)](higan_accuracy.md)\n- [Nintendo - SNES / Famicom (nSide Balanced)](nside_balanced.md)\n- [Nintendo - SNES / Famicom (Mesen-S)](mesen-s.md)\n- [Nintendo - SNES / Famicom (Snes9x)](snes9x.md)\n- [Nintendo - SNES / Famicom (Snes9x 2002)](snes9x_2002.md)\n- [Nintendo - SNES / Famicom (Snes9x 2005 Plus)](snes9x_2005_plus.md)\n- [Nintendo - SNES / Famicom (Snes9x 2005)](snes9x_2005.md)\n- [Nintendo - SNES / Famicom (Snes9x 2010)](snes9x_2010.md)\n"
},
{
"path": "docs/library/bsnes_mercury_balanced.md",
"content": "# Nintendo - SNES / Famicom (bsnes-mercury Balanced)\n\n## Background\n\nbsnes-mercury is a fork of higan, aiming to restore some useful features that have been removed, as well as improving performance a bit.\nMaximum accuracy is still uncompromisable; anything that affects accuracy is optional and off by default.\n\nThis core has been compiled with the Balanced profile.\n\nImprovements include:\n\n* Improved framerate\n* Faster ROM loading\n* HLE emulation of some special chips is optionally restored (defaults to LLE), to improve performance and reduce reliance on those chip ROMs (they're not really easy to find). Chips for which no HLE emulation was developed (ST-0011 and ST-0018) are still LLE.\n* SuperFX overclock is now available (off by default, of course); if enabled, it makes SuperFX look quite a lot smoother.\n\n**The bsnes-mercury cores are not less accurate at default settings than the mainline bsnes cores (you have to explicitly enable 2 core options to switch to the less accurate special chip HLE).**\n\n### Author/License\n\nThe bsnes-mercury Balanced core has been authored by\n\n- byuu\n- Alcaro\n\nThe bsnes-mercury Balanced core is licensed under\n\n- [GPLv3](https://github.com/libretro/bsnes-mercury/blob/master/LICENSE)\n\nA summary of the licenses behind RetroArch and its cores can be found [here](../development/licenses.md).\n\n## Extensions\n\nContent that can be loaded by the bsnes-mercury Balanced core have the following file extensions:\n\n- .sfc\n- .smc\n- .bml\n\n## Databases\n\nRetroArch database(s) that are associated with the bsnes-mercury Balanced core:\n\n- [Nintendo - Super Nintendo Entertainment System](https://github.com/libretro/libretro-database/blob/master/rdb/Nintendo%20-%20Super%20Nintendo%20Entertainment%20System.rdb)\n- [Nintendo - Super Nintendo Entertainment System Hacks](https://github.com/libretro/libretro-database/blob/master/rdb/Nintendo%20-%20Super%20Nintendo%20Entertainment%20System%20Hacks.rdb)\n- [Nintendo - Sufami Turbo](https://github.com/libretro/libretro-database/blob/master/rdb/Nintendo%20-%20Sufami%20Turbo.rdb)\n\n## BIOS\n\nRequired or optional firmware files go in the frontend's system directory.\n\n| Filename | Description | md5sum |\n|:-----------------:|:--------------------------------------:|:--------------------------------:|\n| dsp1.data.rom | DSP1 co-processor firmware | 3d81b45fa0c2aa8b852dfb1ece7c0971 |\n| dsp1.program.rom | DSP1 co-processor firmware | ae209fbe789fbf11a48aea5ab1197321 |\n| dsp1b.data.rom | DSP1B co-processor firmware | 1e3f568634a7d8284020dddc0ae905bc |\n| dsp1b.program.rom | DSP1B co-processor firmware | d10f446888e097cbf500f3f663cf4f6d |\n| dsp2.data.rom | DSP2 co-processor firmware | e9417e29223b139c3c4b635a2a3b8744 |\n| dsp2.program.rom | DSP2 co-processor firmware | aa6e5922a3ed5ded54f24247c11143c5 |\n| dsp3.data.rom | DSP3 co-processor firmware | 0a81210c0a940b997dd9843281008ee6 |\n| dsp3.program.rom | DSP3 co-processor firmware | d99ca4562818d49cee1f242705bba6f8 |\n| dsp4.data.rom | DSP4 co-processor firmware | ee4990879eb68e3cbca239c5bc20303d |\n| dsp4.program.rom | DSP4 co-processor firmware | a151023b948b90ffc23a5b594bb6fef2 |\n| cx4.data.rom | CX4 co-processor firmware | 037ac4296b6b6a5c47c440188d3c72e3 |\n| st010.data.rom | ST010 co-processor firmware | 254d70762b6f59f99c27c395aba7d07d |\n| st010.program.rom | ST010 co-processor firmware | 1d70019179a59a566a0bb5d3f2845544 |\n| st011.data.rom | ST011 co-processor firmware | 10bd3f4aa949737ab9836512c35bcc29 |\n| st011.program.rom | ST011 co-processor firmware | 95222ebf1c0c2990bcf25db43743f032 |\n| st018.data.rom | ST018 co-processor firmware | 49c898b60d0f15e90d0ba780dd12f366 |\n| st018.program.rom | ST018 co-processor firmware | dda40ccd57390c96e49d30a041f9a9e7 |\n| sgb.boot.rom | Super Game Boy BIOS | |\n\n## Features\n\nFrontend-level settings or features that the bsnes-mercury Balanced core respects.\n\n| Feature | Supported |\n|-------------------|:---------:|\n| Restart | ✔ |\n| Screenshots | ✔ |\n| Saves | ✔ |\n| States | ✔ |\n| Rewind | ✔ |\n| Netplay | ✔ |\n| Core Options | ✔ |\n| [Memory Monitoring (achievements)](../guides/memorymonitoring.md) | ✔ |\n| RetroArch Cheats | ✔ |\n| Native Cheats | ✕ |\n| Controls | ✔ |\n| Remapping | ✔ |\n| Multi-Mouse | - |\n| Rumble | ✕ |\n| Sensors | ✕ |\n| Camera | ✕ |\n| Location | ✕ |\n| Subsystem | ✔ |\n| [Softpatching](../guides/softpatching.md) | ✔ |\n| Disk Control | ✕ |\n| Username | ✕ |\n| Language | ✕ |\n| Crop Overscan | ✕ |\n| LEDs | ✕ |\n\n### Directories\n\nThe bsnes-mercury Balanced core's internal core name is 'bsnes-mercury'\n\nThe bsnes-mercury Balanced core saves/loads to/from these directories.\n\n**Frontend's Save directory**\n\n- 'content-name'.srm (Cartridge battery save)\n\n**Frontend's State directory**\n\n- 'content-name'.state# (State)\n\n### Geometry and timing\n\n- The bsnes-mercury Balanced core's core provided FPS is 60.0988118623 for NTSC games and 50.0069789082 for PAL games.\n- The bsnes-mercury Balanced core's core provided sample rate is 32040.5 Hz\n- The bsnes-mercury Balanced core's core provided aspect ratio is dependent on the ['Preferred aspect ratio' core option](#core-options).\n\n## Super GameBoy\n\n!!! warning\n\tSuper GameBoy support in this core is **Windows only**, and has **buggy save state support** and **visual glitches**. **Use the [higan Accuracy core](higan_accuracy.md#super-gameboy-support) or the [nSide Balanced core](nside_balanced.md#super-gameboy-support) for simplified, functional, and easily accessible Super Gameboy support.**\n\nFor Super GameBoy support, you need sgb.boot.rom (in RetroArch's System directory), a GameBoy ROM and a Super GameBoy ROM.\n\nPlease note that the Game Boy and Super GameBoy ROMs have to be unzipped.\n\nSuper GameBoy is supported via the Subsystem API.\n\nThere are two ways to access the Subsystem API.\n\n**One way is to access the Subsystem API through RetroArch's GUI like this.**\n\nFirst, we load our GameBoy ROM through 'Load Super GameBoy' in RetroArch's Main Menu.\n\n\n\n\n\nNext, we load our Super GameBoy ROM through 'Load Super GameBoy' in RetroArch's Menu Menu.\n\n\n\n\n\nThen, we start the content by selecting 'Start GameBoy' In RetroArch's Menu Menu.\n\n\n\n**The other way is to launch RetroArch with commandline like this.**\n\n```\nretroarch -L {path to bsnes core} {path to Super GameBoy ROM} --subsystem sgb {path to GameBoy rom}\n```\n\n## MSU-1\n\n!!! attention\n\tMSU-1 support in this core is complex. **Use the [Snes9x core](snes9x.md#msu-1-support) for simplified and easily accessible MSU-1 support.**\n\nMSU-1 support can be used by loading a correct .bml file.\n\nThere's documentation for loading MSU-1 games in standalone higan [here](https://higan.readthedocs.io/en/stable/guides/import/#msu-1-games).\n\n## Core options\n\nThe bsnes-mercury Balanced core has the following option(s) that can be tweaked from the core options menu. The default setting is bolded.\n\nSettings with (Restart) means that core has to be closed for the new setting to be applied on next launch.\n\n- **Allow settings to reduce accuracy** [bsnes_violate_accuracy] (**disabled**|enabled)\n\n\tRespect accuracy-impacting settings.\n\n- **Special chip accuracy** [bsnes_chip_hle] (**LLE**|HLE)\n\n\t**The Allow settings to reduce accuracy core option must be enabled in order for this to function properly. **\n\n\tChoose whether to use LLE (real BIOS) or HLE (emulated BIOS) for enhancement chips.\n\n\tHLE is less accurate but also less demanding for the special chips.\n\n\tThe ST-0011 and ST-0018 co-processors cannot be HLE'd.\n\n- **SuperFX speed** [bsnes_superfx_overclock] (**100%**|150%|200%|300%|400%|500%|1000%)\n\n\t**The Allow settings to reduce accuracy core option must be enabled in order for this to function properly.**\n\n\tOverclock the [SuperFX chip](https://en.wikipedia.org/wiki/Super_FX). 100% is stock clockspeed.\n\n- **System region** [bsnes_region] (**auto**|ntsc|pal)\n\n\tChoose which region the system is from.\n\n- **Preferred aspect ratio** [bsnes_aspect_ratio] (**auto**|ntsc|pal)\n\n\tChoose the preferred aspect ratio. RetroArch's aspect ratio must be set to Core provided in the Video settings.\n\n- **Crop overscan** [bsnes_crop_overscan] (**disabled**|enabled)\n\n\tCrop out the potentially random glitchy video output that would have been hidden by the bezel around the edge of a standard-definition television screen.\n\n- **Gamma ramp (requires restart)** [bsnes_gamma_ramp] (**disabled**|enabled)\n\n\tSimulates the way a console’s display device differs from modern computer monitor’s colour reproduction. In particular, it simulates the slightly-different gamma correction used by the Super Famicom.\n\n??? note \"Gamma ramp - Disabled\"\n \n\n??? note \"Gamma ramp - Enabled\"\n \n\n## Controllers\n\nThe bsnes-mercury Balanced core supports the following device type(s) in the controls menu, bolded device types are the default for the specified user(s):\n\n### User 1 device types\n\n- None - Doesn't disable input.\n- **[SNES Joypad](http://nintendo.wikia.com/wiki/Super_Nintendo_Entertainment_System_controller)** - Joypad\n- [SNES Mouse](https://en.wikipedia.org/wiki/Super_NES_Mouse) - Mouse\n\n### User 2 device types\n\n- None - Doesn't disable input.\n- **[SNES Joypad](http://nintendo.wikia.com/wiki/Super_Nintendo_Entertainment_System_controller)** - Joypad\n- [SNES Mouse](https://en.wikipedia.org/wiki/Super_NES_Mouse) - Mouse\n- [Multitap](http://nintendo.wikia.com/wiki/Super_Multitap) - Joypad - Allows for up to five players to play together in multitap games.\n- [SuperScope](https://en.wikipedia.org/wiki/Super_Scope) - Lightgun\n- [Justifier](https://en.wikipedia.org/wiki/Konami_Justifier) - Lightgun\n- [Justifiers](https://en.wikipedia.org/wiki/Konami_Justifier) - Lightgun - Two Justifiers are plugged in, for two-player Justifier games.\n\n### Multitap support\n\nActivating multitap support in compatible games can be configured by switching to the [Multitap device type](#controllers) for User 2.\n\n### Controller tables\n\n#### Joypad\n\n\n\n| User 1 - 5 Remap descriptors | RetroPad Inputs |\n|------------------------------|---------------------------------------------|\n| B |  |\n| Y |  |\n| Select |  |\n| Start |  |\n| D-Pad Up |  |\n| D-Pad Down |  |\n| D-Pad Left |  |\n| D-Pad Right |  |\n| A |  |\n| X |  |\n| L |  |\n| R |  |\n\n#### Mouse\n\n| RetroMouse Inputs | SNES Mouse |\n|-------------------------------------------------------|---------------------------|\n|  Mouse Cursor | SNES Mouse Cursor |\n|  Mouse 1 | SNES Mouse Left Button |\n|  Mouse 2 | SNES Mouse Right Button |\n\n#### Lightgun\n\n| RetroLightgun Inputs | SuperScope | Justifier(s) |\n|--------------------------------------------------------|---------------------------|---------------------|\n|  Gun Crosshair | SuperScope Crosshair | Justifier Crosshair |\n| Gun Trigger | SuperScope Trigger | Justifier Trigger |\n| Gun Aux A | SuperScope Cursor | |\n| Gun Aux B | SuperScope Turbo | |\n| Gun Start | SuperScope Pause | Justifier Start |\n\n## Compatibility\n\n| Game | Issue |\n|--------------------------|--------------------------------------------------------------------------------|\n| A.S.P. Air Strike Patrol | Black lines show up during gameplay. The shadow below the aircraft is missing. |\n\n## External Links\n\n- [Official higan Website](https://byuu.org/)\n- [Official higan Upstream Downloads](https://byuu.org/emulation/higan/)\n- [Libretro bsnes-mercury Balanced Core info file](https://github.com/libretro/libretro-super/blob/master/dist/info/bsnes_mercury_balanced_libretro.info)\n- [Libretro bsnes-mercury Balanced Github Repository](https://github.com/libretro/bsnes-mercury)\n- [Report Libretro bsnes-mercury Balanced Core Issues Here](https://github.com/libretro/bsnes-mercury/issues)\n\n### See also\n\n#### Nintendo - Sufami Turbo\n\n- [Nintendo - SNES / Famicom (Beetle bsnes)](beetle_bsnes.md)\n- [Nintendo - SNES / Famicom (bsnes-jg)](bsnes-jg.md)\n- [Nintendo - SNES / Famicom (bsnes-mercury Accuracy)](bsnes_mercury_accuracy.md)\n- [Nintendo - SNES / Famicom (bsnes-mercury Performance)](bsnes_mercury_performance.md)\n- [Nintendo - SNES / Famicom (bsnes Accuracy)](bsnes_accuracy.md)\n- [Nintendo - SNES / Famicom (bsnes Balanced)](bsnes_balanced.md)\n- [Nintendo - SNES / Famicom (bsnes C++98 (v085))](bsnes_cplusplus98.md)\n- [Nintendo - SNES / Famicom (bsnes Performance)](bsnes_performance.md)\n- [Nintendo - SNES / Famicom (Snes9x)](snes9x.md)\n- [Nintendo - SNES / Famicom (Snes9x 2002)](snes9x_2002.md)\n- [Nintendo - SNES / Famicom (Snes9x 2005 Plus)](snes9x_2005_plus.md)\n- [Nintendo - SNES / Famicom (Snes9x 2005)](snes9x_2005.md)\n- [Nintendo - SNES / Famicom (Snes9x 2010)](snes9x_2010.md)\n\n#### Nintendo - Super Nintendo Entertainment System (+ Hacks)\n\n- [Nintendo - SNES / Famicom (Beetle bsnes)](beetle_bsnes.md)\n- [Nintendo - SNES / Famicom (bsnes-jg)](bsnes-jg.md)\n- [Nintendo - SNES / Famicom (bsnes-mercury Accuracy)](bsnes_mercury_accuracy.md)\n- [Nintendo - SNES / Famicom (bsnes-mercury Performance)](bsnes_mercury_performance.md)\n- [Nintendo - SNES / Famicom (bsnes Accuracy)](bsnes_accuracy.md)\n- [Nintendo - SNES / Famicom (bsnes Balanced)](bsnes_balanced.md)\n- [Nintendo - SNES / Famicom (bsnes C++98 (v085))](bsnes_cplusplus98.md)\n- [Nintendo - SNES / Famicom (bsnes Performance)](bsnes_performance.md)\n- [Nintendo - SNES / Famicom (higan Accuracy)](higan_accuracy.md)\n- [Nintendo - SNES / Famicom (nSide Balanced)](nside_balanced.md)\n- [Nintendo - SNES / Famicom (Mesen-S)](mesen-s.md)\n- [Nintendo - SNES / Famicom (Snes9x)](snes9x.md)\n- [Nintendo - SNES / Famicom (Snes9x 2002)](snes9x_2002.md)\n- [Nintendo - SNES / Famicom (Snes9x 2005 Plus)](snes9x_2005_plus.md)\n- [Nintendo - SNES / Famicom (Snes9x 2005)](snes9x_2005.md)\n- [Nintendo - SNES / Famicom (Snes9x 2010)](snes9x_2010.md)\n"
},
{
"path": "docs/library/bsnes_mercury_performance.md",
"content": "# Nintendo - SNES / Famicom (bsnes-mercury Performance)\n\n## Background\n\nbsnes-mercury is a fork of higan, aiming to restore some useful features that have been removed, as well as improving performance a bit.\nMaximum accuracy is still uncompromising; anything that affects accuracy is optional and off by default.\n\nThis core has been compiled with the Performance profile.\n\nImprovements include:\n\n* Improved framerate\n* Faster ROM loading\n* HLE emulation of some special chips is optionally restored (defaults to LLE), to improve performance and reduce reliance on those chip ROMs (they're not really easy to find). Chips for which no HLE emulation was developed (ST-0011 and ST-0018) are still LLE.\n* SuperFX overclock is now available (off by default, of course); if enabled, it makes SuperFX look quite a lot smoother.\n\n**The bsnes-mercury cores are not less accurate at default settings than the mainline bsnes cores (you have to explicitly enable 2 core options to switch to the less accurate special chip HLE).**\n\n### Author/License\n\nThe bsnes-mercury Performance core has been authored by\n\n- byuu\n- Alcaro\n\nThe bsnes-mercury Performance core is licensed under\n\n- [GPLv3](https://github.com/libretro/bsnes-mercury/blob/master/LICENSE)\n\nA summary of the licenses behind RetroArch and its cores can be found [here](../development/licenses.md).\n\n## Extensions\n\nContent that can be loaded by the bsnes-mercury Performance core have the following file extensions:\n\n- .sfc\n- .smc\n- .bml\n\n## Databases\n\nRetroArch database(s) that are associated with the bsnes-mercury Performance core:\n\n- [Nintendo - Super Nintendo Entertainment System](https://github.com/libretro/libretro-database/blob/master/rdb/Nintendo%20-%20Super%20Nintendo%20Entertainment%20System.rdb)\n- [Nintendo - Super Nintendo Entertainment System Hacks](https://github.com/libretro/libretro-database/blob/master/rdb/Nintendo%20-%20Super%20Nintendo%20Entertainment%20System%20Hacks.rdb)\n- [Nintendo - Sufami Turbo](https://github.com/libretro/libretro-database/blob/master/rdb/Nintendo%20-%20Sufami%20Turbo.rdb)\n\n## BIOS\n\nRequired or optional firmware files go in the frontend's system directory.\n\n| Filename | Description | md5sum |\n|:-----------------:|:--------------------------------------:|:--------------------------------:|\n| dsp1.data.rom | DSP1 co-processor firmware | 3d81b45fa0c2aa8b852dfb1ece7c0971 |\n| dsp1.program.rom | DSP1 co-processor firmware | ae209fbe789fbf11a48aea5ab1197321 |\n| dsp1b.data.rom | DSP1B co-processor firmware | 1e3f568634a7d8284020dddc0ae905bc |\n| dsp1b.program.rom | DSP1B co-processor firmware | d10f446888e097cbf500f3f663cf4f6d |\n| dsp2.data.rom | DSP2 co-processor firmware | e9417e29223b139c3c4b635a2a3b8744 |\n| dsp2.program.rom | DSP2 co-processor firmware | aa6e5922a3ed5ded54f24247c11143c5 |\n| dsp3.data.rom | DSP3 co-processor firmware | 0a81210c0a940b997dd9843281008ee6 |\n| dsp3.program.rom | DSP3 co-processor firmware | d99ca4562818d49cee1f242705bba6f8 |\n| dsp4.data.rom | DSP4 co-processor firmware | ee4990879eb68e3cbca239c5bc20303d |\n| dsp4.program.rom | DSP4 co-processor firmware | a151023b948b90ffc23a5b594bb6fef2 |\n| cx4.data.rom | CX4 co-processor firmware | 037ac4296b6b6a5c47c440188d3c72e3 |\n| st010.data.rom | ST010 co-processor firmware | 254d70762b6f59f99c27c395aba7d07d |\n| st010.program.rom | ST010 co-processor firmware | 1d70019179a59a566a0bb5d3f2845544 |\n| st011.data.rom | ST011 co-processor firmware | 10bd3f4aa949737ab9836512c35bcc29 |\n| st011.program.rom | ST011 co-processor firmware | 95222ebf1c0c2990bcf25db43743f032 |\n| st018.data.rom | ST018 co-processor firmware | 49c898b60d0f15e90d0ba780dd12f366 |\n| st018.program.rom | ST018 co-processor firmware | dda40ccd57390c96e49d30a041f9a9e7 |\n| sgb.boot.rom | Super Game Boy BIOS | |\n\n## Features\n\nFrontend-level settings or features that the bsnes-mercury Performance core respects.\n\n| Feature | Supported |\n|-------------------|:---------:|\n| Restart | ✔ |\n| Screenshots | ✔ |\n| Saves | ✔ |\n| States | ✔ |\n| Rewind | ✔ |\n| Netplay | ✔ |\n| Core Options | ✔ |\n| [Memory Monitoring (achievements)](../guides/memorymonitoring.md) | ✔ |\n| RetroArch Cheats | ✔ |\n| Native Cheats | ✕ |\n| Controls | ✔ |\n| Remapping | ✔ |\n| Multi-Mouse | - |\n| Rumble | ✕ |\n| Sensors | ✕ |\n| Camera | ✕ |\n| Location | ✕ |\n| Subsystem | ✔ |\n| [Softpatching](../guides/softpatching.md) | ✔ |\n| Disk Control | ✕ |\n| Username | ✕ |\n| Language | ✕ |\n| Crop Overscan | ✕ |\n| LEDs | ✕ |\n\n### Directories\n\nThe bsnes-mercury Performance core's internal core name is 'bsnes-mercury'\n\nThe bsnes-mercury Performance core saves/loads to/from these directories.\n\n**Frontend's Save directory**\n\n- 'content-name'.srm (Cartridge battery save)\n\n**Frontend's State directory**\n\n- 'content-name'.state# (State)\n\n### Geometry and timing\n\n- The bsnes-mercury Performance core's core provided FPS is 60.0988118623 for NTSC games and 50.0069789082 for PAL games.\n- The bsnes-mercury Performance core's core provided sample rate is 32040.5 Hz\n- The bsnes-mercury Performance core's core provided aspect ratio is dependent on the ['Preferred aspect ratio' core option](#core-options).\n\n## Super GameBoy\n\n!!! warning\n\tSuper GameBoy support in this core is **Windows only**, and has **buggy save state support** and **visual glitches**. **Use the [higan Accuracy core](higan_accuracy.md#super-gameboy-support) or the [nSide Balanced core](nside_balanced.md#super-gameboy-support) for simplified, functional, and easily accessible Super Gameboy support.**\n\nFor Super GameBoy support, you need sgb.boot.rom (in RetroArch's System directory), a GameBoy ROM and a Super GameBoy ROM.\n\nPlease note that the Game Boy and Super GameBoy ROMs have to be unzipped.\n\nSuper GameBoy is supported via the Subsystem API.\n\nThere are two ways to access the Subsystem API.\n\n**One way is to access the Subsystem API through RetroArch's GUI like this.**\n\nFirst, we load our GameBoy ROM through 'Load Super GameBoy' in RetroArch's Main Menu.\n\n\n\n\n\nNext, we load our Super GameBoy ROM through 'Load Super GameBoy' in RetroArch's Menu Menu.\n\n\n\n\n\nThen, we start the content by selecting 'Start GameBoy' In RetroArch's Menu Menu.\n\n\n\n**The other way is to launch RetroArch with commandline like this.**\n\n```\nretroarch -L {path to bsnes core} {path to Super GameBoy ROM} --subsystem sgb {path to GameBoy rom}\n```\n\n## MSU-1\n\n!!! attention\n\tMSU-1 support in this core is complex. **Use the [Snes9x core](snes9x.md#msu-1-support) for simplified and easily accessible MSU-1 support.**\n\nMSU-1 support can be used by loading a correct .bml file.\n\nThere's documentation for loading MSU-1 games in standalone higan [here](https://higan.readthedocs.io/en/stable/guides/import/#msu-1-games).\n\n## Core options\n\nThe bsnes-mercury Performance core has the following option(s) that can be tweaked from the core options menu. The default setting is bolded.\n\nSettings with (Restart) means that core has to be closed for the new setting to be applied on next launch.\n\n- **Allow settings to reduce accuracy** [bsnes_violate_accuracy] (**disabled**|enabled)\n\n\tRespect accuracy-impacting settings.\n\n- **Special chip accuracy** [bsnes_chip_hle] (**LLE**|HLE)\n\n\t**The Allow settings to reduce accuracy core option must be enabled in order for this to function properly. **\n\n\tChoose whether to use LLE (real BIOS) or HLE (emulated BIOS) for enhancement chips.\n\n\tHLE is less accurate but also less demanding for the special chips.\n\n\tThe ST-0011 and ST-0018 co-processors cannot be HLE'd.\n\n- **SuperFX speed** [bsnes_superfx_overclock] (**100%**|150%|200%|300%|400%|500%|1000%)\n\n\t**The Allow settings to reduce accuracy core option must be enabled in order for this to function properly.**\n\n\tOverclock the [SuperFX chip](https://en.wikipedia.org/wiki/Super_FX). 100% is stock clockspeed.\n\n- **System region** [bsnes_region] (**auto**|ntsc|pal)\n\n\tChoose which region the system is from.\n\n- **Preferred aspect ratio** [bsnes_aspect_ratio] (**auto**|ntsc|pal)\n\n\tChoose the preferred aspect ratio. RetroArch's aspect ratio must be set to Core provided in the Video settings.\n\n- **Crop overscan** [bsnes_crop_overscan] (**disabled**|enabled)\n\n\tCrop out the potentially random glitchy video output that would have been hidden by the bezel around the edge of a standard-definition television screen.\n\n- **Gamma ramp (requires restart)** [bsnes_gamma_ramp] (**disabled**|enabled)\n\n\tSimulates the way a console’s display device differs from modern computer monitor’s colour reproduction. In particular, it simulates the slightly-different gamma correction used by the Super Famicom.\n\n??? note \"Gamma ramp - Disabled\"\n \n\n??? note \"Gamma ramp - Enabled\"\n \n\n## Controllers\n\nThe bsnes-mercury Performance core supports the following device type(s) in the controls menu, bolded device types are the default for the specified user(s):\n\n### User 1 device types\n\n- None - Doesn't disable input.\n- **[SNES Joypad](http://nintendo.wikia.com/wiki/Super_Nintendo_Entertainment_System_controller)** - Joypad\n- [SNES Mouse](https://en.wikipedia.org/wiki/Super_NES_Mouse) - Mouse\n\n### User 2 device types\n\n- None - Doesn't disable input.\n- **[SNES Joypad](http://nintendo.wikia.com/wiki/Super_Nintendo_Entertainment_System_controller)** - Joypad\n- [SNES Mouse](https://en.wikipedia.org/wiki/Super_NES_Mouse) - Mouse\n- [Multitap](http://nintendo.wikia.com/wiki/Super_Multitap) - Joypad - Allows for up to five players to play together in multitap games.\n- [SuperScope](https://en.wikipedia.org/wiki/Super_Scope) - Lightgun\n- [Justifier](https://en.wikipedia.org/wiki/Konami_Justifier) - Lightgun\n- [Justifiers](https://en.wikipedia.org/wiki/Konami_Justifier) - Lightgun - Two Justifiers are plugged in, for two-player Justifier games.\n\n### Multitap support\n\nActivating multitap support in compatible games can be configured by switching to the [Multitap device type](#controllers) for User 2.\n\n### Controller tables\n\n#### Joypad\n\n\n\n| User 1 - 5 Remap descriptors | RetroPad Inputs |\n|------------------------------|---------------------------------------------|\n| B |  |\n| Y |  |\n| Select |  |\n| Start |  |\n| D-Pad Up |  |\n| D-Pad Down |  |\n| D-Pad Left |  |\n| D-Pad Right |  |\n| A |  |\n| X |  |\n| L |  |\n| R |  |\n\n#### Mouse\n\n| RetroMouse Inputs | SNES Mouse |\n|-------------------------------------------------------|---------------------------|\n|  Mouse Cursor | SNES Mouse Cursor |\n|  Mouse 1 | SNES Mouse Left Button |\n|  Mouse 2 | SNES Mouse Right Button |\n\n#### Lightgun\n\n| RetroLightgun Inputs | SuperScope | Justifier(s) |\n|--------------------------------------------------------|---------------------------|---------------------|\n|  Gun Crosshair | SuperScope Crosshair | Justifier Crosshair |\n| Gun Trigger | SuperScope Trigger | Justifier Trigger |\n| Gun Aux A | SuperScope Cursor | |\n| Gun Aux B | SuperScope Turbo | |\n| Gun Start | SuperScope Pause | Justifier Start |\n\n## Compatibility\n\n| Game | Issue |\n|--------------------------------------------------|--------------------------------------------------------------------------------|\n| A.S.P. Air Strike Patrol | Black lines show up during gameplay. The shadow below the aircraft is missing. |\n| Funaki Masakatsu Hybrid Wrestler – Tougi Denshou | Corrupted graphics on the Pancrase logo screen. |\n| Mecarobot Golf | The ground \"wobbles\" during gameplay. |\n| Mega Man X2 | Only displays a black screen. |\n| Mega Man X3 | Only displays a black screen. |\n| Mortal Kombat II | Various glitched graphics. |\n| NHL ’94 | Corrupted line on the NHL logo screen. |\n| Tetris Attack | Lots of flickering on the VS. CPU mode map screen. |\n\n## External Links\n\n- [Official higan Website](https://byuu.org/)\n- [Official higan Upstream Downloads](https://byuu.org/emulation/higan/)\n- [Libretro bsnes-mercury Performance Core info file](https://github.com/libretro/libretro-super/blob/master/dist/info/bsnes_mercury_performance_libretro.info)\n- [Libretro bsnes-mercury Performance Github Repository](https://github.com/libretro/bsnes-mercury)\n- [Report Libretro bsnes-mercury Performance Core Issues Here](https://github.com/libretro/bsnes-mercury/issues)\n\n### See also\n\n#### Nintendo - Sufami Turbo\n\n- [Nintendo - SNES / Famicom (Beetle bsnes)](beetle_bsnes.md)\n- [Nintendo - SNES / Famicom (bsnes-jg)](bsnes-jg.md)\n- [Nintendo - SNES / Famicom (bsnes-mercury Accuracy)](bsnes_mercury_accuracy.md)\n- [Nintendo - SNES / Famicom (bsnes-mercury Balanced)](bsnes_mercury_balanced.md)\n- [Nintendo - SNES / Famicom (bsnes Accuracy)](bsnes_accuracy.md)\n- [Nintendo - SNES / Famicom (bsnes Balanced)](bsnes_balanced.md)\n- [Nintendo - SNES / Famicom (bsnes C++98 (v085))](bsnes_cplusplus98.md)\n- [Nintendo - SNES / Famicom (bsnes Performance)](bsnes_performance.md)\n- [Nintendo - SNES / Famicom (Snes9x)](snes9x.md)\n- [Nintendo - SNES / Famicom (Snes9x 2002)](snes9x_2002.md)\n- [Nintendo - SNES / Famicom (Snes9x 2005 Plus)](snes9x_2005_plus.md)\n- [Nintendo - SNES / Famicom (Snes9x 2005)](snes9x_2005.md)\n- [Nintendo - SNES / Famicom (Snes9x 2010)](snes9x_2010.md)\n\n#### Nintendo - Super Nintendo Entertainment System (+ Hacks)\n\n- [Nintendo - SNES / Famicom (Beetle bsnes)](beetle_bsnes.md)\n- [Nintendo - SNES / Famicom (bsnes-jg)](bsnes-jg.md)\n- [Nintendo - SNES / Famicom (bsnes-mercury Accuracy)](bsnes_mercury_accuracy.md)\n- [Nintendo - SNES / Famicom (bsnes-mercury Balanced)](bsnes_mercury_balanced.md)\n- [Nintendo - SNES / Famicom (bsnes Accuracy)](bsnes_accuracy.md)\n- [Nintendo - SNES / Famicom (bsnes Balanced)](bsnes_balanced.md)\n- [Nintendo - SNES / Famicom (bsnes C++98 (v085))](bsnes_cplusplus98.md)\n- [Nintendo - SNES / Famicom (bsnes Performance)](bsnes_performance.md)\n- [Nintendo - SNES / Famicom (higan Accuracy)](higan_accuracy.md)\n- [Nintendo - SNES / Famicom (nSide Balanced)](nside_balanced.md)\n- [Nintendo - SNES / Famicom (Mesen-S)](mesen-s.md)\n- [Nintendo - SNES / Famicom (Snes9x)](snes9x.md)\n- [Nintendo - SNES / Famicom (Snes9x 2002)](snes9x_2002.md)\n- [Nintendo - SNES / Famicom (Snes9x 2005 Plus)](snes9x_2005_plus.md)\n- [Nintendo - SNES / Famicom (Snes9x 2005)](snes9x_2005.md)\n- [Nintendo - SNES / Famicom (Snes9x 2010)](snes9x_2010.md)\n"
},
{
"path": "docs/library/bsnes_performance.md",
"content": "# Nintendo - SNES / Famicom (bsnes Performance)\n\n## Background\n\nbsnes is a Super Nintendo emulator that began development on 2004-10-14. It focuses on accuracy and clean code above all else. It never uses speed or compatibility hacks. As a result, the minimum system requirements are greater than with other emulators. bsnes comes in three different profiles (accuracy, balanced and performance) which contain minor differences in the PPU (graphics) emulation.\n\nThis core has been compiled with the Performance profile.\n\nHighly accurate SNES emulation. Whether to use the Accuracy, or Balanced or Performance core depends on how much accuracy you want to give up for game performance.\n\nPlease check the [compatibility section](#compatibility) for more information.\n\n### Author/License\n\nThe bsnes Performance core has been authored by\n\n- byuu\n\nThe bsnes Performance core is licensed under\n\n- [GPLv3](https://github.com/libretro/bsnes-libretro/blob/libretro/COPYING)\n\nA summary of the licenses behind RetroArch and its cores can be found [here](../development/licenses.md).\n\n## Extensions\n\nContent that can be loaded by the bsnes Performance core have the following file extensions:\n\n- .sfc\n- .smc\n- .bml\n\n## Databases\n\nRetroArch database(s) that are associated with the bsnes Performance core:\n\n- [Nintendo - Super Nintendo Entertainment System](https://github.com/libretro/libretro-database/blob/master/rdb/Nintendo%20-%20Super%20Nintendo%20Entertainment%20System.rdb)\n- [Nintendo - Super Nintendo Entertainment System Hacks](https://github.com/libretro/libretro-database/blob/master/rdb/Nintendo%20-%20Super%20Nintendo%20Entertainment%20System%20Hacks.rdb)\n- [Nintendo - Sufami Turbo](https://github.com/libretro/libretro-database/blob/master/rdb/Nintendo%20-%20Sufami%20Turbo.rdb)\n\n## BIOS\n\nRequired or optional firmware files go in the frontend's system directory.\n\n!!! attention\n\tThe bsnes Performance core uses split ROMS for [special chip games](https://en.wikipedia.org/wiki/List_of_Super_NES_enhancement_chips#List_of_Super_NES_games_that_use_enhancement_chips).\n\nNotable DSP1/DSP1B Games:\n\n- Super Mario Kart\n- Pilotwings\n\nNotable DSP2 Games:\n\n- Dungeon Master\n\nNotable DSP3 Games:\n\n- SD Gundam GX\n\nNotable DSP4 Games:\n\n- Top Gear 3000\n\nNotable Cx4 Games:\n\n- Mega Man X2\n- Mega Man X3\n\n| Filename | Description | md5sum |\n|:-----------------:|:--------------------------------------:|:--------------------------------:|\n| dsp1.data.rom | DSP1 co-processor firmware | 3d81b45fa0c2aa8b852dfb1ece7c0971 |\n| dsp1.program.rom | DSP1 co-processor firmware | ae209fbe789fbf11a48aea5ab1197321 |\n| dsp1b.data.rom | DSP1B co-processor firmware | 1e3f568634a7d8284020dddc0ae905bc |\n| dsp1b.program.rom | DSP1B co-processor firmware | d10f446888e097cbf500f3f663cf4f6d |\n| dsp2.data.rom | DSP2 co-processor firmware | e9417e29223b139c3c4b635a2a3b8744 |\n| dsp2.program.rom | DSP2 co-processor firmware | aa6e5922a3ed5ded54f24247c11143c5 |\n| dsp3.data.rom | DSP3 co-processor firmware | 0a81210c0a940b997dd9843281008ee6 |\n| dsp3.program.rom | DSP3 co-processor firmware | d99ca4562818d49cee1f242705bba6f8 |\n| dsp4.data.rom | DSP4 co-processor firmware | ee4990879eb68e3cbca239c5bc20303d |\n| dsp4.program.rom | DSP4 co-processor firmware | a151023b948b90ffc23a5b594bb6fef2 |\n| cx4.data.rom | CX4 co-processor firmware | 037ac4296b6b6a5c47c440188d3c72e3 |\n| st010.data.rom | ST010 co-processor firmware | 254d70762b6f59f99c27c395aba7d07d |\n| st010.program.rom | ST010 co-processor firmware | 1d70019179a59a566a0bb5d3f2845544 |\n| st011.data.rom | ST011 co-processor firmware | 10bd3f4aa949737ab9836512c35bcc29 |\n| st011.program.rom | ST011 co-processor firmware | 95222ebf1c0c2990bcf25db43743f032 |\n| st018.data.rom | ST018 co-processor firmware | 49c898b60d0f15e90d0ba780dd12f366 |\n| st018.program.rom | ST018 co-processor firmware | dda40ccd57390c96e49d30a041f9a9e7 |\n| sgb.boot.rom | Super Game Boy BIOS | |\n\n## Features\n\nFrontend-level settings or features that the bsnes Performance core respects.\n\n| Feature | Supported |\n|-------------------|:---------:|\n| Restart | ✔ |\n| Screenshots | ✔ |\n| Saves | ✔ |\n| States | ✔ |\n| Rewind | ✔ |\n| Netplay | ✔ |\n| Core Options | ✕ |\n| [Memory Monitoring (achievements)](../guides/memorymonitoring.md) | ✔ |\n| RetroArch Cheats | ✔ |\n| Native Cheats | ✕ |\n| Controls | ✔ |\n| Remapping | ✔ |\n| Multi-Mouse | - |\n| Rumble | ✕ |\n| Sensors | ✕ |\n| Camera | ✕ |\n| Location | ✕ |\n| Subsystem | ✔ |\n| [Softpatching](../guides/softpatching.md) | ✔ |\n| Disk Control | ✕ |\n| Username | ✕ |\n| Language | ✕ |\n| Crop Overscan | ✔ |\n| LEDs | ✕ |\n\n### Directories\n\nThe bsnes Performance core's internal core name is 'bsnes'\n\nThe bsnes Performance core saves/loads to/from these directories.\n\n**Frontend's Save directory**\n\n- 'content-name'.srm (Cartridge battery save)\n\n**Frontend's State directory**\n\n- 'content-name'.state# (State)\n\n### Geometry and timing\n\n- The bsnes Performance core's core provided FPS is 60.0988118623 for NTSC games and 50.0069789082 for PAL games.\n- The bsnes Performance core's core provided sample rate is 32040.5 Hz\n- The bsnes Performance core's core provided aspect ratio is 4/3\n\n## Super GameBoy\n\n!!! warning\n\tSuper GameBoy support in this core is **Windows only**, and has **buggy save state support** and **visual glitches**. **Use the [higan Accuracy core](higan_accuracy.md#super-gameboy-support) or the [nSide Balanced core](nside_balanced.md#super-gameboy-support) for simplified, functional, and easily accessible Super Gameboy support.**\n\nFor Super GameBoy support, you need sgb.boot.rom (in RetroArch's System directory), a GameBoy ROM and a Super GameBoy ROM.\n\nPlease note that the Game Boy and Super GameBoy ROMs have to be unzipped.\n\nSuper GameBoy is supported via the Subsystem API.\n\nThere are two ways to access the Subsystem API.\n\n**One way is to access the Subsystem API through RetroArch's GUI like this.**\n\nFirst, we load our GameBoy ROM through 'Load Super GameBoy' in RetroArch's Main Menu.\n\n\n\n\n\nNext, we load our Super GameBoy ROM through 'Load Super GameBoy' in RetroArch's Menu Menu.\n\n\n\n\n\nThen, we start the content by selecting 'Start GameBoy' In RetroArch's Menu Menu.\n\n\n\n**The other way is to launch RetroArch with commandline like this.**\n\n```\nretroarch -L {path to bsnes core} {path to Super GameBoy ROM} --subsystem sgb {path to GameBoy rom}\n```\n\n## MSU-1\n\n!!! attention\n\tMSU-1 support in this core is complex. **Use the [Snes9x core](snes9x.md#msu-1-support) for simplified and easily accessible MSU-1 support.**\n\nMSU-1 support can be used by loading a correct .bml file.\n\nThere's documentation for loading MSU-1 games in standalone higan [here](https://higan.readthedocs.io/en/stable/guides/import/#msu-1-games).\n\n## Controllers\n\nThe bsnes Performance core supports the following device type(s) in the controls menu, bolded device types are the default for the specified user(s):\n\n### User 1 device types\n\n- None - Disables input.\n- **[SNES Joypad](http://nintendo.wikia.com/wiki/Super_Nintendo_Entertainment_System_controller)** - Joypad\n- [SNES Mouse](https://en.wikipedia.org/wiki/Super_NES_Mouse) - Mouse\n\n### User 2 device types\n\n- None - Disables input.\n- **[SNES Joypad](http://nintendo.wikia.com/wiki/Super_Nintendo_Entertainment_System_controller)** - Joypad\n- [SNES Mouse](https://en.wikipedia.org/wiki/Super_NES_Mouse) - Mouse\n- [Multitap](http://nintendo.wikia.com/wiki/Super_Multitap) - Joypad - Allows for up to five players to play together in multitap games.\n- [SuperScope](https://en.wikipedia.org/wiki/Super_Scope) - Lightgun\n- [Justifier](https://en.wikipedia.org/wiki/Konami_Justifier) - Lightgun\n- [Justifiers](https://en.wikipedia.org/wiki/Konami_Justifier) - Lightgun - Two Justifiers are plugged in, for two-player Justifier games.\n\n### Multitap support\n\nActivating multitap support in compatible games can be configured by switching to the [Multitap device type](#controllers) for User 2.\n\n### Controller tables\n\n#### Joypad\n\n\n\n| User 1 - 5 Remap descriptors | RetroPad Inputs |\n|------------------------------|---------------------------------------------|\n| B |  |\n| Y |  |\n| Select |  |\n| Start |  |\n| D-Pad Up |  |\n| D-Pad Down |  |\n| D-Pad Left |  |\n| D-Pad Right |  |\n| A |  |\n| X |  |\n| L |  |\n| R |  |\n\n#### Mouse\n\n| RetroMouse Inputs | SNES Mouse |\n|-------------------------------------------------------|---------------------------|\n|  Mouse Cursor | SNES Mouse Cursor |\n|  Mouse 1 | SNES Mouse Left Button |\n|  Mouse 2 | SNES Mouse Right Button |\n\n#### Lightgun\n\n| RetroLightgun Inputs | SuperScope | Justifier(s) |\n|--------------------------------------------------------|----------------------|---------------------|\n|  Gun Crosshair | SuperScope Crosshair | Justifier Crosshair |\n| Gun Trigger | SuperScope Trigger | Justifier Trigger |\n| Gun Aux A | SuperScope Cursor | |\n| Gun Aux B | SuperScope Turbo | |\n| Gun Start | SuperScope Pause | Justifier Start |\n\n## Compatibility\n\n| Game | Issue |\n|--------------------------------------------------|--------------------------------------------------------------------------------|\n| A.S.P. Air Strike Patrol | Black lines show up during gameplay. The shadow below the aircraft is missing. |\n| Funaki Masakatsu Hybrid Wrestler – Tougi Denshou | Corrupted graphics on the Pancrase logo screen. |\n| Mecarobot Golf | The ground \"wobbles\" during gameplay. |\n| Mega Man X2 | Only displays a black screen. |\n| Mega Man X3 | Only displays a black screen. |\n| Mortal Kombat II | Various glitched graphics. |\n| NHL ’94 | Corrupted line on the NHL logo screen. |\n| Tetris Attack | Lots of flickering on the VS. CPU mode map screen. |\n\n## External Links\n\n- [Official higan Website](https://byuu.org/)\n- [Official higan Upstream Downloads](https://byuu.org/emulation/higan/)\n- [Libretro bsnes Performance Core info file](https://github.com/libretro/libretro-super/blob/master/dist/info/bsnes_performance_libretro.info)\n- [Libretro bsnes Performance Github Repository](https://github.com/libretro/bsnes-libretro)\n- [Report Libretro bsnes Performance Core Issues Here](https://github.com/libretro/bsnes-libretro/issues)\n\n### See also\n\n#### Nintendo - Sufami Turbo\n\n- [Nintendo - SNES / Famicom (Beetle bsnes)](beetle_bsnes.md)\n- [Nintendo - SNES / Famicom (bsnes-jg)](bsnes-jg.md)\n- [Nintendo - SNES / Famicom (bsnes-mercury Accuracy)](bsnes_mercury_accuracy.md)\n- [Nintendo - SNES / Famicom (bsnes-mercury Balanced)](bsnes_mercury_balanced.md)\n- [Nintendo - SNES / Famicom (bsnes-mercury Performance)](bsnes_mercury_performance.md)\n- [Nintendo - SNES / Famicom (bsnes Accuracy)](bsnes_accuracy.md)\n- [Nintendo - SNES / Famicom (bsnes Balanced)](bsnes_balanced.md)\n- [Nintendo - SNES / Famicom (bsnes C++98 (v085))](bsnes_cplusplus98.md)\n- [Nintendo - SNES / Famicom (Snes9x)](snes9x.md)\n- [Nintendo - SNES / Famicom (Snes9x 2002)](snes9x_2002.md)\n- [Nintendo - SNES / Famicom (Snes9x 2005 Plus)](snes9x_2005_plus.md)\n- [Nintendo - SNES / Famicom (Snes9x 2005)](snes9x_2005.md)\n- [Nintendo - SNES / Famicom (Snes9x 2010)](snes9x_2010.md)\n\n#### Nintendo - Super Nintendo Entertainment System (+ Hacks)\n\n- [Nintendo - SNES / Famicom (Beetle bsnes)](beetle_bsnes.md)\n- [Nintendo - SNES / Famicom (bsnes-jg)](bsnes-jg.md)\n- [Nintendo - SNES / Famicom (bsnes-mercury Accuracy)](bsnes_mercury_accuracy.md)\n- [Nintendo - SNES / Famicom (bsnes-mercury Balanced)](bsnes_mercury_balanced.md)\n- [Nintendo - SNES / Famicom (bsnes-mercury Performance)](bsnes_mercury_performance.md)\n- [Nintendo - SNES / Famicom (bsnes Accuracy)](bsnes_accuracy.md)\n- [Nintendo - SNES / Famicom (bsnes Balanced)](bsnes_balanced.md)\n- [Nintendo - SNES / Famicom (bsnes C++98 (v085))](bsnes_cplusplus98.md)\n- [Nintendo - SNES / Famicom (higan Accuracy)](higan_accuracy.md)\n- [Nintendo - SNES / Famicom (nSide Balanced)](nside_balanced.md)\n- [Nintendo - SNES / Famicom (Mesen-S)](mesen-s.md)\n- [Nintendo - SNES / Famicom (Snes9x)](snes9x.md)\n- [Nintendo - SNES / Famicom (Snes9x 2002)](snes9x_2002.md)\n- [Nintendo - SNES / Famicom (Snes9x 2005 Plus)](snes9x_2005_plus.md)\n- [Nintendo - SNES / Famicom (Snes9x 2005)](snes9x_2005.md)\n- [Nintendo - SNES / Famicom (Snes9x 2010)](snes9x_2010.md)\n"
},
{
"path": "docs/library/cannonball.md",
"content": "# Cannonball\n\n\n\n## Background\n\nThis is an OutRun game engine recreation written by Chris White in 2014. It has been ported to the libretro API. The Cannonball core has been authored by\n\n- Chris White\n\nThe Cannonball core is licensed under\n\n- [Non-commercial](https://github.com/libretro/cannonball/blob/master/docs/license.txt)\n\nA summary of the licenses behind RetroArch and its cores can be found [here](../development/licenses.md).\n\n## How to start the Cannonball core:\n\n- To start the Cannonball core, you need to obtain Cannonball's data files. You can do this by going to RetroArch's main menu screen and selecting 'Online Updater'. From there, select 'Content Downloader'.\n\n- Select 'Cannonball', then select 'CannonBall.zip'. This should download and extract this file to RetroArch's Downloads directory.\n\n- Next, follow this [guide](https://github.com/djyt/cannonball/blob/master/roms/roms.txt) and place OutRun Revision B ROMs in the CannonBall directory.\n\n- Below is a pictured example of a working Cannonball setup.\n\n\n\n- Go back to RetroArch's main menu screen. Select 'Load Content', then 'Downloads'.\n\n- Select the 'CannonBall' directory, then select 'CannonBall.game'.\n\n- If you are asked which core to select, choose 'Cannonball'.\n\nThe content should now start running!\n\n## Extensions\n\nContent that can be loaded by the Cannonball core have the following file extensions:\n\n- .game\n- .88\n\nRetroArch database(s) that are associated with the Cannonball core:\n\n- [Cannonball](https://github.com/libretro/libretro-database/blob/master/rdb/Cannonball.rdb)\n\n## Features\n\n- Smoother 60fps gameplay\n- [True Widescreen Play Mode](https://youtube.com/clip/UgkxU6mqSPJX9ZAiAyd8N0oXCmHk8rRVHTdS)\n- Force Feedback support\n- Custom Track support from [LayOut](https://github.com/djyt/layout/wiki)\n- New Game Modes (Continuous Mode & Time Trial Mode)\n- [Many, many more enhancements](https://github.com/djyt/cannonball/wiki/Cannonball-Manual#enhancements)\n\nFrontend-level settings or features that the Cannonball core respects.\n\n| Feature | Supported |\n|-------------------|:---------:|\n| Restart | ✕ |\n| Saves | ✔ |\n| States | ✕ |\n| Rewind | ✕ |\n| Netplay | ✕ |\n| Core Options | ✔ |\n| [Memory Monitoring (achievements)](../guides/memorymonitoring.md) | ✕ |\n| RetroArch Cheats | ✕ |\n| Native Cheats | ✕ |\n| Controls | ✔ |\n| Remapping | ✔ |\n| Multi-Mouse | ✕ |\n| Rumble | ✕ |\n| Sensors | ✕ |\n| Camera | ✕ |\n| Location | ✕ |\n| Subsystem | ✕ |\n| [Softpatching](../guides/softpatching.md) | ✕ |\n| Disk Control | ✕ |\n| Username | ✕ |\n| Language | ✕ |\n| Crop Overscan | ✕ |\n| LEDs | ✕ |\n\n## Directories\n\nThe Cannonball core's library name is 'Cannonball'\n\nThe Cannonball core saves/loads to/from these directories.\n\n**Frontend's Home directory**\n\n| File | Description |\n|:------------:|:-------------:|\n| config.xml | Config File |\n| hiscores.xml | Hiscores File |\n\n## Geometry and timing\n\n- The Cannonball core's core provided FPS is 60 when the [Video Framerate core option](#core-options) is set to Smooth (60) or Original (60/30)\n- The Cannonball core's core provided FPS is 120 when the [Video Framerate core option](#core-options) is set to Ultra Smooth (120)\n- The Cannonball core's core provided FPS is 30 when the [Video Framerate core option](#core-options) is set to Low (30)\n- The Cannonball core's core provided sample rate is 44040 Hz when the [Video Framerate core option](#core-options) is set to Ultra Smooth (120)\n- The Cannonball core's core provided sample rate is 44100 Hz when the [Video Framerate core option](#core-options) is not set to Ultra Smooth (120)\n- The Cannonball core's base width is 320\n- The Cannonball core's base height is 224\n- The Cannonball core's max width is 640\n- The Cannonball core's max height is 448\n- The Cannonball core's core provided aspect ratio is 4/3 when the [Video Widescreen Mode core option](#core-options) is set to Off\n- The Cannonball core's core provided aspect ratio is 16/9 when the [Video Widescreen Mode core option](#core-options) is set to On\n\n## Core options\n\nThe Cannonball core has the following option(s) that can be tweaked from the core options menu. The default setting is bolded.\n\nSettings with (Restart) means that core has to be closed for the new setting to be applied on next launch.\n\n- **Menu At Start** [cannonball_menu_enabled] (**ON**|OFF)\n\n\tWhen enabled; the Cannonball core shows the main menu upon startup.\n\n\tWhen disabled; the Cannonball core goes into attract mode upon startup.\n\n- **Menu Road Scroll Speed** [cannonball_menu_road_scroll_speed] (**50**|60|70|80|90|100|150|200|300|400|500|5|10|15|20|25|30|40)\n\n\tUse this to configure the speed at which the road on the Main Menu scrolls at.\n\n- **Video Widescreen Mode** [cannonball_video_widescreen] (**ON**|OFF)\n\n\tExplained [here](https://github.com/djyt/cannonball/wiki/Cannonball-Manual#video-modes).\n\n- **Video High-Resolution Mode** [cannonball_video_hires] (**OFF**|ON)\n\n\tThe original game ran at 320x224. This mode doubles that resolution to 640x448. However, rather than simply doubling up the display, the sprites and road are rendered at a higher resolution where possible.\n\n- **Video Framerate** [cannonball_video_fps] (**Smooth (60)**|Ultra Smooth (120)|Original (60/30))\n\n\tExplained [here](https://github.com/djyt/cannonball/wiki/Cannonball-Manual#video-modes).\n\n- **Advertise Sound** [cannonball_sound_advertise] (**ON**|OFF)\n\n\tPlay sounds in attract mode.\n\n- **Preview Music** [cannonball_sound_preview] (**ON**|OFF)\n\n\tPreview the music tracks at the point of selection in-game. The original game did not have this option and you would not hear the audio track until the game started.\n\n- **Fix Samples (use opr-10188.71f)** [cannonball_sound_fix_samples] (**ON**|OFF)\n\n\tExplained [here](https://github.com/djyt/cannonball/wiki/Cannonball-Manual#fix-corrupted-audio).\n\n- **Gear Mode** [cannonball_gear] (**Manual**|Manual Cabinet|Manual 2 Buttons|Automatic)\n\n\tChange the gear shift behaviour. Useful to configure based on your target hardware.\n\n\t0 = Manual (Click to shift, for normal play)\n\t1 = Manual (Hold to shift, for cabinet play)\n\t2 = Manual (Separate Buttons for High/Low)\n\t3 = Automatic (No need to change gear)\n\n- **Analog Controls (off to allow digital speed setup)** [cannonball_analog] (**ON**|OFF)\n\n\tSelf-explanatory.\n\n- **Digital Steer Speed** [cannonball_steer_speed] (**3**|4|5|6|7|8|9|1|2)\n\n\tAwaiting description.\n\n- **Digital Pedal Speed** [cannonball_pedal_speed] (**4**|5|6|7|8|9|1|2|3)\n\n\tAwaiting description.\n\n- **Time** [cannonball_dip_time] (**Easy (80s)**|Normal (75s)|Hard (72s)|Very Hard (70s)|Infinite Time)\n\n\tExplained [here](https://github.com/djyt/cannonball/wiki/Cannonball-Manual#outrun-engine-settings).\n\n- **Traffic** [cannonball_dip_traffic] (**Normal**|Hard|Very Hard|No Traffic|Easy)\n\n\tExplained [here](https://github.com/djyt/cannonball/wiki/Cannonball-Manual#outrun-engine-settings).\n\n- **Freeplay Mode** [cannonball_freeplay] (**OFF**|ON)\n\n\tAwaiting description.\n\n- **Use Japanese Tracks Version** [cannonball_jap] (**OFF**|ON)\n\n\tExplained [here](https://github.com/djyt/cannonball/wiki/Cannonball-Manual#japanese-courses)\n\n- **Use Prototype Stage 1** [cannonball_prototype] (**OFF**|ON)\n\n\tExplained [here](https://github.com/djyt/cannonball/wiki/Cannonball-Manual#prototype-coconut-beach).\n\n- **Objects Limit Enhanced** [cannonball_level_objects] (**ON**|OFF)\n\n\tExplained [here](https://github.com/djyt/cannonball/wiki/Cannonball-Manual#outrun-engine-settings)\n\n- **Original Traffic Patterns Randomization** [cannonball_randomgen] (**ON**|OFF)\n\n\tAwaiting description.\n\n- **Force AI To Play** [cannonball_force_ai] (**OFF**|ON)\n\n\tAwaiting description.\n\n- **Fix Original Game Bugs** [cannonball_fix_bugs] (**ON**|OFF)\n\n\tExplained [here](https://github.com/djyt/cannonball/wiki/Cannonball-Manual#bug-fixes)\n\n- **Fix Timing Bugs** [cannonball_fix_timer] (**OFF**|ON)\n\n\tAwaiting description.\n\n- **Display Debug Info For LayOut** [cannonball_layout_debug] (**OFF**|ON)\n\n\tAwaiting description.\n\n- **New Attract** [cannonball_new_attract] (**ON**|OFF)\n\n\tExplained [here](https://github.com/djyt/cannonball/wiki/Cannonball-Manual#outrun-engine-settings).\n\n- **Time Trial Laps** [cannonball_ttrial_laps] (**3**|4|5|1|2)\n\n\tAwaiting description.\n\n- **Time Trial Traffic Amount** [cannonball_ttrial_traffic] (**3**|4|5|6|7|8|0|1|2)\n\n\tAwaiting description.\n\n- **Continuous Mode Traffic Amount** [cannonball_cont_traffic] (**3**|4|5|6|7|8|0|1|2)\n\n\tAwaiting description.\n\n## Joypad\n\n| RetroPad Inputs | User 1 input descriptors |\n|------------------------------------------------|--------------------------|\n|  | Accelerate |\n|  | Brake |\n|  | Coin |\n|  | Start |\n|  | Up |\n|  | Down |\n|  | Left |\n|  | Right |\n|  | Gear |\n|  | Gear |\n|  | Adjust View |\n|  | Go Back To Menu |\n|  X | Analog X |\n|  Y | Analog Y |\n\n## External Links\n\n- [Official Cannoball Github Wiki](https://github.com/djyt/cannonball/wiki)\n- [Official Cannonball Github Repository](https://github.com/djyt/cannonball)\n- [Libretro Cannonball Core info file](https://github.com/libretro/libretro-super/blob/master/dist/info/cannonball_libretro.info)\n- [Libretro Cannonball Github Repository](https://github.com/libretro/cannonball)\n- [Report Libretro Cannonball Core Issues Here](https://github.com/libretro/cannonball/issues)\n- [How to setup video](https://www.youtube.com/watch?v=ILGQqmpbg6E)\n"
},
{
"path": "docs/library/caprice32.md",
"content": "# Amstrad - CPC (Caprice32)\n\n## Background\n\nCaprice32 is a software emulator of the Amstrad CPC 8bit home computer series running on Linux and Windows. The emulator faithfully imitates the CPC464, CPC664, CPC6128, CPC6128+ and GX4000 models. By recreating the operations of all hardware components at a low level, the emulator achieves a high degree of compatibility with original CPC software. These programs or games can be run unmodified at real-time or higher speeds, depending on the emulator host environment.\n\n### Author/License\n\nThe Caprice32 core has been authored by\n\n- Ulrich Doewich\n- David Colmenero (D_Skywalk)\n- Colin Pitrat\n\nThe Caprice32 core is licensed under\n\n- [GPLv2](https://github.com/ColinPitrat/caprice32/blob/master/COPYING.txt)\n\nA summary of the licenses behind RetroArch and its cores can be found [here](../development/licenses.md).\n\n## Extensions\n\nContent that can be loaded by the Caprice32 core have the following file extensions:\n\n- .dsk\n- .sna\n- .tap\n- .cdt\n- .voc\n- .m3u\n- .cpr\n- .zip\n\n## Databases\n\nRetroArch database(s) that are associated with the Caprice32 core:\n\n- [Amstrad - CPC](https://github.com/libretro/libretro-database/blob/master/rdb/Amstrad%20-%20CPC.rdb) (TOSEC)\n\n## Features\n\nFrontend-level settings or features that the Caprice32 core respects.\n\n| Feature | Supported |\n|-------------------|:---------:|\n| Restart | ✔ |\n| Screenshots | ✔ |\n| Saves | ✔ |\n| States | ✔ |\n| Rewind | ✔ |\n| Netplay | ✔ |\n| Core Options | ✔ |\n| [Memory Monitoring (achievements)](../guides/memorymonitoring.md) | ✔ |\n| RetroArch Cheats | ✕ |\n| Native Cheats | ✕ |\n| Controls | ✔ |\n| Remapping | ✔ |\n| Multi-Mouse | ✕ |\n| Rumble | ✕ |\n| Sensors | ✕ |\n| Camera | ✕ |\n| Location | ✕ |\n| Subsystem | ✕ |\n| [Softpatching](../guides/softpatching.md) | ✕ |\n| Disk Control | ✔ |\n| Username | ✕ |\n| Language | ✕ |\n| Crop Overscan | ✕ |\n| LEDs | ✕ |\n\n### Directories\n\nThe Caprice32 core's internal core name is 'cap32'.\n\nThe Caprice32 core saves/loads to/from these directories.\n\n**Loaded content's directory**\n\n- 'content-name'#.SNA (SNA)\n\n### Geometry and timing\n\n* The Caprice32 core's core provided FPS is 50\n* The Caprice32 core's core provided sample rate is 44100 Hz\n* The Caprice32 core's core provided aspect ratio is 4/3\n\n## Usage\n\nThe Caprice32 core has a virtual keyboard GUI that can be accessed through SELECT (configured by cap32_combokey) or F9.\n\nThe mouse cursor can be controlled by RetroPad D-Pad and use button A to press a Key.\n\n\n\n## Core options\n\nThe Caprice32 core has the following option(s) that can be tweaked from the core options menu.\n\n!!! tip\n Settings with (Restart) means that core has to be closed for the new setting to be applied on next launch.\n\n| Core option | Description | Default |\n| --- | --- | --- |\n| Autorun | If enabled, the core will run the first bas/bin found in the DSK. `cap32_autorun = \"enabled|disabled\"` | `enabled` |\n| Combo Key | See [Combo list](#combo-list) below. `cap32_combokey = \"select|y|b|disabled\"` | `select` |\n| Internal resolution | Self-explanatory. `cap32_resolution = \"384x272|400x300\"` | `384x272` |\n| Model (Restart) | Choose which Amstrad CPC model to emulate. `cap32_model = \"6128|464|6128+\"` | `6128` |\n| Ram size (Restart) | CPC physical RAM size in kB. `cap32_ram = \"128|64|192|576\"` | `128` |\n| Status Bar | Status bar configuration `cap32_statusbar = \"onloading|enabled|disabled\"` | `onloading` |\n| Floppy Sound | Disk emulated sound configuration `cap32_floppy_sound = \"enabled|disabled\"` | `enabled` |\n| Monitor Type | Choose between a color display or a monochrome display. `cap32_scr_tube = \"color|green|white\"` | `color` |\n| Monitor Intensity | Screen cathodic tube intensity. `cap32_scr_intensity = \"5|6|7|8|9|10|11|12|13|14|15\"` | `5` |\n| CPC Language (Restart) | Choose between english, french or spanish keyboard layout. `cap32_lang_layout = \"english|french|spanish\"` | `english` |\n| User 1 Joystick Configuration | Select Joy/Overlay configuration for player 1. `cap32_retrojoy0 = \"joystick|qaop|incentive\"` | `joystick` |\n| User 2 Joystick Configuration | Select Joy/Overlay configuration for player 2. `cap32_retrojoy1 = \"joystick|qaop|incentive|joystick_port2\"` | `joystick` |\n\n!!! note \"cap32_scr_tube = color\"\n\t\n\n!!! note \"cap32_scr_tube = green\"\n\t\n\n!!! attention\n\tThese 'scr_intensity' core option screenshots have been taken with the 'cap32_scr_tube' core option set to 'color'.\n\n!!! note \"scr_intensity = 5\"\n\t\n\n!!! note \"scr_intensity = 15\"\n\t\n\n## Controllers\n\nThe Caprice32 core supports the following device type(s) in the controls menu, bolded device types are the default for the specified user(s):\n\n### User 1 - 2 device types\n\n- None - Doesn't disable input. There's no reason to switch to this.\n- **RetroPad** - Joypad - Don't use this. Switch to Amstrad Joystick for joypad input.\n- Amstrad Joystick - Joypad - Use this for joypad input.\n- Amstrad Keyboard - Keyboard - Keyboard input are always active. Has keymapper support.\n\n### Other controllers\n\n- Mouse - The mouse cursor in the Virtual Keyboard GUI can be controlled with mouse inputs.\n\n### Controller tables using RetroPad device Type\n\n#### JOY CONFIG DEFAULT (JOYSTICK)\n\n| User 1 Remap descriptors | RetroPad Inputs | Amstrad Joystick |\n|--------------------------|------------------------------------------------|------------------------------|\n| B |  | FIRE1 |\n| Y |  | |\n| Start |  | |\n| Up |  | JOY UP |\n| Down |  | JOY DOWN |\n| Left |  | JOY LEFT |\n| Right |  | JOY RIGHT |\n| A |  | FIRE2 |\n| X |  | |\n| L |  | CTRL |\n| R |  | INTRO |\n| L2 |  | F1 |\n| R2 |  | F2 |\n| Select |  | COMBO (see bellow) |\n| L3 |  | |\n| R3 |  | |\n\n#### JOY CONFIG QAOP (GENERAL KEYB)\n\n| User 1 Remap descriptors | RetroPad Inputs | Amstrad Joystick |\n|--------------------------|------------------------------------------------|------------------------------|\n| B |  | B |\n| Y |  | Y |\n| Start |  | K *(to select Keyb in games)*|\n| Up |  | Q |\n| Down |  | A |\n| Left |  | O |\n| Right |  | P |\n| A |  | SPACE |\n| X |  | N |\n| L |  | CTRL |\n| R |  | INTRO |\n| L2 |  | F1 |\n| R2 |  | F2 |\n| Select |  | COMBO (see bellow) |\n| L3 |  | |\n| R3 |  | |\n\n#### JOY INCENTIVE ([INCENTIVE GAMES](https://en.wikipedia.org/wiki/Incentive_Software))\n\n| User 1 Remap descriptors | RetroPad Inputs | Amstrad Joystick |\n|--------------------------|------------------------------------------------|-------------------|\n| B |  | SPACE |\n| Y |  | W |\n| Start |  | F |\n| Up |  | CURSOR UP |\n| Down |  | CURSOR DOWN |\n| Left |  | CURSOR LEFT |\n| Right |  | CURSOR RIGHT |\n| A |  | A |\n| X |  | C |\n| L |  | P |\n| R |  | L |\n| L2 |  | R |\n| R2 |  | U |\n| Select |  | COMBO (see bellow)|\n| L3 |  | |\n| R3 |  | |\n\n#### COMBO LIST\n\nIf you press **SELECT** you could make a combo with other buttons:\n\n| Combo | RetroPad Inputs | Amstrad Writes |\n|----------------|------------------------------------------------------------------------------------------|------------------|\n| Select + B |  +  | CAT |\n| Select + Y |  +  | \\|CPM |\n| Select + Start |  +  | SHOW V-KEYBOARD |\n| Select + Up |  +  | [1], [Y] |\n| Select + Down |  +  | [2], [N] |\n| Select + Left |  +  | [4], [S] |\n| Select + Right |  +  | [3], [J] |\n| Select + A |  +  | RUN\"DISK RUN\"DISC|\n| Select + X |  +  | \\|TAPE RUN\" |\n\n*This combos are useful to load games and select options in game-menus.*\n\n\n#### Keyboard\n\nThis core allows **direct keyboard access**, you could use your keyboard as an original CPC. To achieve that you must activate the **[Game Focus](https://docs.libretro.com/guides/input-and-controls/#cores-with-direct-keyboard-input)**, by default the hotkey is configured to the **SCROLL_LOCK** key.\n\n\n##### English layout\n\n\n\n##### Spanish layout\n\n\n\n##### French layout\n\n\n\n\n#### Keyboard Binds\n\n| RetroKeyboard Special Inputs | Amstrad |\n|------------------------------|------------------------------|\n| Keyboard Keypad 0 | CPC_KEY_F0 |\n| Keyboard Keypad 1 | CPC_KEY_F1 |\n| Keyboard Keypad 2 | CPC_KEY_F2 |\n| Keyboard Keypad 3 | CPC_KEY_F3 |\n| Keyboard Keypad 4 | CPC_KEY_F4 |\n| Keyboard Keypad 5 | CPC_KEY_F5 |\n| Keyboard Keypad 6 | CPC_KEY_F6 |\n| Keyboard Keypad 7 | CPC_KEY_F7 |\n| Keyboard Keypad 8 | CPC_KEY_F8 |\n| Keyboard Keypad 9 | CPC_KEY_F9 |\n| Keyboard Keypad Period . | CPC_KEY_FDOT |\n| Keyboard Keypad Enter | CPC_KEY_SMALL_ENTER |\n| Keyboard Delete | CPC_KEY_CLR |\n| Keyboard Insert | CHANGE CURSOR/JOY EMULATION |\n| Keyboard Home | PLAY TAPE |\n| Keyboard End | STOP TAPE |\n| Keyboard Page Up | TAPE REWIND |\n| Keyboard Page Down | - |\n| Keyboard F9 | SHOW V-KEYBOARD |\n| Keyboard F10 | MAIN GUI |\n| Keyboard Right Alt | CPC_KEY_COPY |\n| Keyboard Left Alt | CPC_KEY_COPY |\n| Keyboard Right Shift | CPC_KEY_FIRE2 (JOY EMULATION)|\n| Keyboard Right Control | CPC_KEY_FIRE1 (JOY EMULATION)|\n\nChoose AMSTRAD KEYBOARD in Quick Menu > Controls to customize your **retropad keys per game**.\n\n#### Mouse\n\n| RetroMouse Inputs | Virtual Keyboard GUI Inputs |\n|-------------------------------------------------------|-----------------------------|\n|  Mouse Cursor | Mouse Cursor |\n|  Mouse 1 | Mouse Left Button |\n\n## M3U and Disk control\n\nWhen you have a multi disk game, you can use a m3u file to specify each disk of the game and change them from the RetroArch Disk control interface.\n\nA M3U file is a simple text file with one disk per line (see https://en.wikipedia.org/wiki/M3U).\n\nExample: **Alive (F).m3u**\n\n Alive (F) - Disk 1A.dsk\n Alive (F) - Disk 1B.dsk\n\nPath can be absolute or relative to the location of the M3U file.\n\nWhen a game ask for it, you can change the current disk in the RetroArch 'Disk Control' menu:\n\n* Eject the current disk with 'Disk Cycle Tray Status'\n* Select the right disk index\n* Insert the new disk with 'Disk Cycle Tray Status'\n\n### Specify a specific command to launch a game\n\nIf the autorun option of the core does a pretty good job to guess what command must be executed to launch a game on the CPC, there is some problems (cpm disk and strange catalogs for the most).\n\nYou can specify a command to be executed on the CPC when the emu launch.\n\nAll you have to do is to add a comment like this in the m3u file :\n\n```\n#COMMAND:\n```\n\nEven for one disk game, you can create a m3u file like this one :\n\nJack the Nipper II... In Coconut Capers.m3u\n```\n#COMMAND:|CPM\nJack the Nipper II... In Coconut Capers (E).dsk\n```\n\n## External Links\n\n- [Official Caprice32 Github Repository](https://github.com/ColinPitrat/caprice32)\n- [Libretro Caprice32 Core info file](https://github.com/libretro/libretro-super/blob/master/dist/info/cap32_libretro.info)\n- [Libretro Caprice32 Github Repository](https://github.com/libretro/libretro-cap32)\n- [Report Libretro Caprice32 Core Issues Here](https://github.com/libretro/libretro-cap32/issues)\n\n### See also\n\n#### Amstrad - CPC\n\n- [Amstrad - CPC (CrocoDS)](crocods.md)\n"
},
{
"path": "docs/library/chailove.md",
"content": "# ChaiLove\n\n## Background\n\n[ChaiLove](https://github.com/libretro/libretro-chailove) is a framework for making 2D games with [ChaiScript](http://chaiscript.com/). ChaiLove games can be played with LibRetro/RetroArch through the ChaiLove core.\n\n#### How to start the ChaiLove core:\n\n- As an example showcasing loading content with Chailove core, we will load the [Floppy Bird](https://github.com/robloach/chailove-floppybird) game hosted on RetroArch's Content Downloader.\n\nYou can do this by going to RetroArch's main menu screen and selecting 'Online Updater'. From there, select 'Content Downloader'.\n\n

\n\n- Select 'ChaiLove', then select 'Floppy Bird.chailove'. This should download and extract this file to RetroArch's Downloads directory.\n\n

\n\n- Go back to RetroArch's main menu screen. Select 'Load Content', then 'Downloads'.\n\n

\n\n

\n\n- Select 'Floppy Bird.chailove'.\n\n- If you are asked which core to select, choose 'ChaiLove'.\n\nThe content should now start running!\n\n### Author/License\n\nThe ChaiLove core has been authored by\n\n- Rob Loach\n\nThe ChaiLove core is licensed under\n\n- [MIT](https://github.com/libretro/libretro-chailove/blob/master/LICENSE.md)\n\nA summary of the licenses behind RetroArch and its cores can be found [here](../development/licenses.md).\n\n## Extensions\n\nContent that can be loaded by the ChaiLove core have the following file extensions:\n\n- `.chai`\n- `.chailove`\n\n## Databases\n\nRetroArch database(s) that are associated with the ChaiLove core:\n\n- [ChaiLove](https://github.com/libretro/libretro-database/blob/master/rdb/ChaiLove.rdb)\n\n## Features\n\nFrontend-level settings or features that the ChaiLove core respects.\n\n| Feature | Supported |\n|-------------------|:---------:|\n| Restart | ✔ |\n| Screenshots | ✔ |\n| Saves | ✕ |\n| States | ✔ |\n| Rewind | ✔ |\n| Netplay | ✔ |\n| Core Options | ✔ |\n| [Memory Monitoring (achievements)](../guides/memorymonitoring.md) | ✕ |\n| RetroArch Cheats | ✕ |\n| Native Cheats | ✔ |\n| Controls | ✔ |\n| Remapping | ✔ |\n| Multi-Mouse | ✕ |\n| Rumble | ✕ |\n| Sensors | ✕ |\n| Camera | ✕ |\n| Location | ✕ |\n| Subsystem | ✕ |\n| [Softpatching](../guides/softpatching.md) | ✕ |\n| Disk Control | ✕ |\n| Username | ✔ |\n| Language | ✕ |\n| Crop Overscan | ✕ |\n| LEDs | ✕ |\n\n### Directories\n\nThe ChaiLove core's internal core name is 'ChaiLove'\n\nThe ChaiLove core saves/loads to/from these directories.\n\n**Frontend's State directory**\n\n- 'content-name'.state# (State)\n\n### Geometry and timing\n\n- The ChaiLove core's core provided FPS is 60\n- The ChaiLove core's core provided sample rate is 44100 Hz\n- The ChaiLove core's core provided aspect ratio is game provided\n\n## Core options\n\nThe ChaiLove core has the following option(s) that can be tweaked from the core options menu. The default setting is bolded.\n\nSettings with (Restart) means that core has to be closed for the new setting to be applied on next launch.\n\n- **Alpha Blending** [chailove_alphablending] (**enabled**|disabled)\n\n\tEnable or disable alpha blending (transparency).\n\n??? note \"Alpha Blending - On\"\n\t\n\n??? note \"Alpha Blending - Off\"\n\t\n\n- **High Quality** [chailove_highquality] (**enabled**|disabled)\n\n\tEnable or disable extra visual features.\n\n??? note \"High Quality - On\"\n\t\n\n??? note \"High Quality - Off\"\n\t\n\n## Controllers\n\nThe ChaiLove core supports the following device type(s) in the controls menu, bolded device types are the default for the specified user(s):\n\n### User 1 - 5 device types\n\n- None - Doesn't disable input.\n- **RetroPad** - Joypad - Stay on this.\n- RetroPad w/Analog - Joypad - There's no reason to switch to this.\n\n### Controller tables\n\n#### Joypad\n\n!!! attention\n\tWhat the buttons do are game specific.\n\n| User 1 - 5 Remap descriptors | RetroPad Inputs |\n|------------------------------|------------------------------------------------|\n| B |  |\n| Y |  |\n| Select |  |\n| Start |  |\n| D-Pad Up |  |\n| D-Pad Down |  |\n| D-Pad Left |  |\n| D-Pad Right |  |\n| A |  |\n| X |  |\n| L |  |\n| R |  |\n\n## External Links\n\n- [ChaiScript Website](http://chaiscript.com/)\n- [ChaiLove API Documentation Website](https://rawgit.com/libretro/libretro-chailove/docs/)\n- [ChaiLove Github Wiki](https://github.com/libretro/libretro-chailove/wiki)\n- [Libretro ChaiLove Core info file](https://github.com/libretro/libretro-super/blob/master/dist/info/chailove_libretro.info)\n- [Libretro ChaiLove Github Repository](https://github.com/libretro/libretro-chailove)\n- [Report Libretro ChaiLove Core Issues Here](https://github.com/libretro/libretro-chailove/issues)\n- [Floppy Bird](https://github.com/robloach/chailove-floppybird)\n- [Gameplay Videos](https://www.youtube.com/playlist?list=PLRbgg4gk_0IfOE39vx0sftVugNnMgC67o)\n\n### See also\n\n#### Custom Engine\n\n- [Lua Engine (Lutro)](lutro.md)\n"
},
{
"path": "docs/library/citra.md",
"content": "# Nintendo - 3DS (Citra)\n\n## Background\n\nCitra is an experimental open-source Nintendo 3DS emulator/debugger written in C++. It is written with portability in mind.\n\nThe Citra core has been authored by\n\n- Citra Emulation Project\n\nThe Citra core is licensed under\n\n- [GPLv2](https://github.com/citra-emu/citra/blob/master/license.txt)\n\nA summary of the licenses behind RetroArch and its cores can be found [here](../development/licenses.md).\n\n### Requirements\n\nOpenGL 3.3 or higher\n\n\n\n!!! warning\n\tThere is currently no ‘working’ macOS version available. This is because this core requires OpenGL core 3.3 context, and RetroArch on macOS currently does not support this. We will have to add support for this to a future version of RetroArch on macOS before this core will start to work on it.\n\n## Decryption keys\n\nCitra requires [AES keys](https://citra-emu.org/wiki/aes-keys/) in order to load encrypted games. `aes_keys.txt` needs to be placed in ../saves/Citra/sysdata.\n\n## Extensions\n\nContent that can be loaded by the Citra core have the following file extensions:\n\n- .3ds\n- .3dsx\n- .elf\n- .axf\n- .cci\n- .cxi\n- .app\n\nRetroArch database(s) that are associated with the Citra core:\n\n- [Nintendo - Nintendo 3DS](https://github.com/libretro/libretro-database/blob/master/rdb/Nintendo%20-%20Nintendo%203DS.rdb)\n\n## Features\n\nFrontend-level settings or features that the Citra core respects.\n\n| Feature | Supported |\n|-------------------|:---------:|\n| Restart | ✔ |\n| Screenshots | ✔ |\n| Saves | ✔ |\n| States | ✔ |\n| Rewind | ✕ |\n| Netplay | ✕ |\n| Core Options | ✔ |\n| [Memory Monitoring (achievements)](../guides/memorymonitoring.md) | ✕ |\n| RetroArch Cheats | ✕ |\n| Native Cheats | ✔ |\n| Controls | ✔ |\n| Remapping | ✔ |\n| Multi-Mouse | ✕ |\n| Rumble | ✕ |\n| Sensors | ✕ |\n| Camera | ✕ |\n| Location | ✕ |\n| Subsystem | ✕ |\n| [Softpatching](../guides/softpatching.md) | ✕ |\n| Disk Control | ✕ |\n| Username | ✕ |\n| Language | ✕ |\n| Crop Overscan | ✕ |\n| LEDs | ✕ |\n\n### Directories\n\nThe Citra core's library name is 'Citra'\n\nThe Citra core saves/loads to/from these directories.\n\nThe Citra Shaders should be in ../saves/Citra/shaders/opengl/transferable\n\n**Frontend's Save directory**\n\n- [Citra System and Save files](https://citra-emu.org/wiki/user-directory/)\n\n### Geometry and timing\n\n- The Citra core's core provided FPS is 60.0\n- The Citra core's core provided sample rate is 32728 Hz\n- The Citra core's base width is (Base width)\n- The Citra core's base height is (Base height)\n- The Citra core's max width is (Max width)\n- The Citra core's max height is (Max height)\n- The Citra core's core provided aspect ratio is (Ratio)\n\n## Cheats\n\nThe Citra core supports internal cheats, but you have to enable them manually:\n\n1. Grab a Citra cheats file for your game, you can find a lot of them here for example: [https://github.com/iSharingan/CTRPF-AR-CHEAT-CODES/tree/master/Cheats](https://github.com/iSharingan/CTRPF-AR-CHEAT-CODES/tree/master/Cheats)\n2. Put the file (`[game_id].txt`) in your frontend's `saves/Citra/cheats/` folder.\n3. Open the .txt file with a text editor, add `*citra_enabled` below the cheat title and save changes.\n\nAs an example, if you want to enable the \"All Characters\" cheat for Mario Kart 7 you have to edit `[frontend_dir]/saves/Citra/cheats/0004000000030800.txt` and change that part:\n```\n[All Characters, Game v1.0]\nD3000000 14000000\n0013C99C 01FF003F\n```\nto:\n```\n[All Characters, Game v1.0]\n*citra_enabled\nD3000000 14000000\n0013C99C 01FF003F\n```\n\n## Core options\n\nThe Citra core has the following option(s) that can be tweaked from the core options menu. The default setting is bolded.\n\nSettings with (Restart) means that core has to be closed for the new setting to be applied on next launch.\n\n- **Enable CPU JIT** [citra_use_cpu_jit] (**enabled**|disabled)\n\n\tEnable Citra's 'dynarmic' dynamic recomplier. Can improve performance. Instructions that are not implemented by the recompiler fall back into the interpreter CPU core.\n\n\tIf disabled, Citra will solely use the Interpreter CPU core.\n\n- **Enable hardware renderer** [citra_use_hw_renderer] (**enabled**|disabled)\n\n\tAwaiting description.\n\n- **Enable shader JIT** [citra_use_shader_jit] (**enabled**|disabled)\n\n\tAwaiting description.\n\n- **Enable hardware shaders** [citra_use_hw_shaders] (**enabled**|disabled)\n\n\tAwaiting description.\n\n- **Save hardware shader cache to disk** [citra_use_hw_shader_cache] (**enabled**|disabled)\n\n\tAwaiting description.\n\n- **Enable accurate geometry shaders (only for H/W shaders)** [citra_use_acc_geo_shaders] (**enabled**|disabled)\n\n\tAwaiting description.\n\n- **Enable accurate shaders multiplication (only for H/W shaders)** [citra_use_acc_mul] (**enabled**|disabled)\n\n\tAwaiting description.\n\n- **Texture filter type** [citra_texture_filter] (**none**|Anime4K Ultrafast|Bicubic|ScaleForce|xBRZ freescale)\n\n\tAwaiting description.\n\n- **Enable custom textures** [citra_custom_textures] (**disabled**|enabled)\n\n\tAwaiting description.\n\n- **Dump textures** [citra_dump_textures] (**disabled**|enabled)\n\n\tAwaiting description.\n\n- **Resolution scale factor** [citra_resolution_factor] (**1x (Native)**|2x|3x|4x|5x|6x|7x|8x|9x|10x)\n\n\tSelf-explanatory.\n\n??? note \"Screen layout positioning - Default Top-Bottom Screen\"\n\t\n\n??? note \"Screen layout positioning - Single Screen Only\"\n\t\n\n??? note \"Screen layout positioning - Large Screen, Small Screen)\"\n\t\n\n- **Screen layout positioning** [citra_layout_option] (**Default Top-Bottom Screen**|Single Screen Only|Large Screen, Small Screen|Side by Side)\n\n\tAwaiting description.\n\n- **Prominent 3DS screen** [citra_swap_screen] (**Top**|Bottom)\n\n\tAwaiting description.\n\n- **Right analog function** [citra_analog_function] (**C-Stick and Touchscreen Pointer**|Touchscreen Pointer|C-Stick)\n\n\tAwaiting description.\n\n- **Emulated pointer deadzone (%)** [citra_deadzone] (**15**|20|25|30|35|0|5|10)\n\n\tAwaiting description.\n\n- **Simulate touchscreen interactions with mouse** [citra_mouse_touchscreen] (**enabled**|disabled)\n\n\tAwaiting description.\n\n- **Simulate touchscreen interactions with touchscreen** [citra_touch_touchscreen] (**disabled**|enabled)\n\n\tAwaiting description.\n\n- **Render simulated touchscreen interactions** [citra_render_touchscreen] (**disabled**|enabled)\n\n\tAwaiting description.\n\n- **Enable virtual SD card** [citra_use_virtual_sd] (**enabled**|disabled)\n\n\tAwaiting description.\n\n- **Savegame location** [citra_use_libretro_save_path] (**LibRetro Default**|Citra Default)\n\n\tAwaiting description.\n\n- **3DS system model** [citra_is_new_3ds] (**Old 3DS**|New 3DS)\n\n\tAwaiting description.\n\n- **3DS system region** [citra_region_value] (**Auto**|Japan|USA|Europe|Australia|China|Korea|Taiwan)\n\n\tAwaiting description.\n\n- **3DS system language** [citra_language] (**English**|Japanese|French|Spanish|German|Italian|Dutch|Portuguese|Russian|Korean|Traditional Chinese|Simplified Chinese)\n\n\tAwaiting description.\n\n- **\"Enable GDB stub** [citra_use_gdbstub] (**disabled**|enabled)\n\n\tAwaiting description.\n\n## Joypad\n\n| User 1 input descriptors | RetroPad Inputs | Citra inputs |\n|--------------------------|------------------------------------------------|--------------------|\n| B |  | B |\n| Y |  | Y |\n| Select |  | Select |\n| Start |  | Start |\n| Up |  | Up |\n| Down |  | Down |\n| Left |  | Left |\n| Right |  | Right |\n| A |  | A |\n| X |  | X |\n| L |  | L |\n| R |  | R |\n| ZL |  | ZL |\n| ZR |  | ZR |\n| Home |  | Home |\n| Touch Screen Touch |  | Touch Screen Touch |\n| |  X | Circle Pad X |\n| |  Y | Circle Pad Y |\n| |  X | [Right analog function](#core-options) |\n| |  Y | [Right analog function](#core-options) |\n\n### Mouse\n\n| RetroMouse Inputs | Citra inputs |\n|-------------------------------------------------------|---------------------|\n|  Mouse Cursor | Touchscreen Pointer |\n|  Mouse 1 | Touch Screen Touch |\n\n### Pointer\n\n| RetroPointer Inputs | Citra inputs |\n|--------------------------------------------------------------------------------------------------------------------------|---------------------|\n|  or  Pointer Position | Touchscreen Pointer |\n|  or  Pointer Pressed | Touch Screen Touch |\n\n## Compatibility\n\n- [Citra Game Compatibility List](https://citra-emu.org/game/)\n\n## External Links\n\n- [Official Citra Website](https://citra-emu.org/)\n- [Official Citra Github Repository](https://github.com/citra-emu/citra)\n- [Libretro Citra Core info file](https://github.com/libretro/libretro-super/blob/master/dist/info/citra_libretro.info)\n- [Libretro Citra Github Repository](https://github.com/libretro/citra)\n- [Report Libretro Citra Core Issues Here](https://github.com/libretro/citra/issues)\n- [Gameplay Videos](https://www.youtube.com/playlist?list=PLRbgg4gk_0IdQ7GmDs1jE7DbI18inc73c)\n\n## Nintendo - Nintendo 3DS\n\n- [Nintendo - 3DS (Citra Canary/Experimental)](citra_canary.md)\n"
},
{
"path": "docs/library/citra_canary.md",
"content": "# Nintendo - 3DS (Citra Canary/Experimental)\n\n## Background\n\nCitra is an experimental open-source Nintendo 3DS emulator/debugger written in C++. It is written with portability in mind.\n\n**Citra Canary is the new performance-optimized version of Citra.**\n\nThe Citra Canary/Experimental core has been authored by\n\n- Citra Emulation Project\n\nThe Citra Canary/Experimental core is licensed under\n\n- [GPLv2](https://github.com/citra-emu/citra/blob/master/license.txt)\n\nA summary of the licenses behind RetroArch and its cores can be found [here](../development/licenses.md).\n\n### Requirements\n\nOpenGL 3.3 or higher\n\n\n\n!!! warning\n\tThere is currently no ‘working’ macOS version available. This is because this core requires OpenGL core 3.3 context, and RetroArch on macOS currently does not support this. We will have to add support for this to a future version of RetroArch on macOS before this core will start to work on it.\n\n## Extensions\n\nContent that can be loaded by the Citra Canary/Experimental core have the following file extensions:\n\n- .3ds\n- .3dsx\n- .elf\n- .axf\n- .cci\n- .cxi\n- .app\n\nRetroArch database(s) that are associated with the Citra Canary/Experimental core:\n\n- [Nintendo - Nintendo 3DS](https://github.com/libretro/libretro-database/blob/master/rdb/Nintendo%20-%20Nintendo%203DS.rdb)\n\n## Features\n\nFrontend-level settings or features that the Citra Canary/Experimental core respects.\n\n| Feature | Supported |\n|-------------------|:---------:|\n| Restart | ✔ |\n| Screenshots | ✔ |\n| Saves | ✔ |\n| States | ✕ |\n| Rewind | ✕ |\n| Netplay | ✕ |\n| Core Options | ✔ |\n| [Memory Monitoring (achievements)](../guides/memorymonitoring.md) | ✕ |\n| RetroArch Cheats | ✕ |\n| Native Cheats | ✕ |\n| Controls | ✔ |\n| Remapping | ✔ |\n| Multi-Mouse | ✕ |\n| Rumble | ✕ |\n| Sensors | ✕ |\n| Camera | ✕ |\n| Location | ✕ |\n| Subsystem | ✕ |\n| [Softpatching](../guides/softpatching.md) | ✕ |\n| Disk Control | ✕ |\n| Username | ✕ |\n| Language | ✕ |\n| Crop Overscan | ✕ |\n| LEDs | ✕ |\n\n### Directories\n\nThe Citra Canary/Experimental core's library name is 'Citra'\n\nThe Citra Canary/Experimental core saves/loads to/from these directories.\n\n**Frontend's Save directory**\n\n- [Citra System and Save files](https://citra-emu.org/wiki/user-directory/)\n\n### Geometry and timing\n\n- The Citra Canary/Experimental core's core provided FPS is 60.0\n- The Citra Canary/Experimental core's core provided sample rate is 32728 Hz\n- The Citra Canary/Experimental core's base width is (Base width)\n- The Citra Canary/Experimental core's base height is (Base height)\n- The Citra Canary/Experimental core's max width is (Max width)\n- The Citra Canary/Experimental core's max height is (Max height)\n- The Citra Canary/Experimental core's core provided aspect ratio is (Ratio)\n\n## Core options\n\nThe Citra Canary/Experimental core has the following option(s) that can be tweaked from the core options menu. The default setting is bolded.\n\nSettings with (Restart) means that core has to be closed for the new setting to be applied on next launch.\n\n- **Enable CPU JIT** [citra_use_cpu_jit] (**enabled**|disabled)\n\n\tEnable Citra's 'dynarmic' dynamic recomplier. Can improve performance. Instructions that are not implemented by the recompiler fall back into the interpreter CPU core.\n\n\tIf disabled, Citra will solely use the Interpreter CPU core.\n\n- **Select Renderer** [citra_renderer] (**enabled**|disabled)\n\n\tAwaiting description.\n\n- **Enable shader JIT** [citra_use_shader_jit] (**enabled**|disabled)\n\n\tAwaiting description.\n\n- **Resolution scale factor** [citra_resolution_factor] (**1x (Native)**|2x|3x|4x|5x|6x|7x|8x|9x|10x)\n\n\tSelf-explanatory.\n\n??? note \"Screen layout positioning - Default Top-Bottom Screen\"\n\t\n\n??? note \"Screen layout positioning - Single Screen Only\"\n\t\n\n??? note \"Screen layout positioning - Large Screen, Small Screen)\"\n\t\n\n- **Screen layout positioning** [citra_layout_option] (**Default Top-Bottom Screen**|Single Screen Only|Large Screen, Small Screen|Side by Side)\n\n\tAwaiting description.\n\n- **Prominent 3DS screen** [citra_swap_screen] (**Top**|Bottom)\n\n\tAwaiting description.\n\n- **Right analog function** [citra_analog_function] (**C-Stick and Touchscreen Pointer**|Touchscreen Pointer|C-Stick)\n\n\tAwaiting description.\n\n- **Emulated pointer deadzone (%)** [citra_deadzone] (**15**|20|25|30|35|0|5|10)\n\n\tAwaiting description.\n\n- **What hardware shaders to enable** [citra_hw_shaders] (**None**|Partial|Full)\n\n\tAwaiting description.\n\n- **Enables accurate hardware shaders (infinity * 0 = 0), required for some games, though slow on some hardware** [citra_use_accurate_mul] (**enabled**|disabled)\n\n\tAwaiting description.\n\n- **Enable virtual SD card** [citra_use_virtual_sd] (**enabled**|disabled)\n\n\tAwaiting description.\n\n- **Savegame location** [citra_use_libretro_save_path] (**LibRetro Default**|Citra Default)\n\n\tAwaiting description.\n\n- **3DS system model** [citra_is_new_3ds] (**Old 3DS**|New 3DS)\n\n\tAwaiting description.\n\n- **3DS system region** [citra_region_value] (**Auto**|Japan|USA|Europe|Australia|China|Korea|Taiwan)\n\n\tAwaiting description.\n\n- **\"Enable GDB stub** [citra_use_gdbstub] (**disabled**|enabled)\n\n\tAwaiting description.\n\n## Joypad\n\n| User 1 input descriptors | RetroPad Inputs | Citra inputs |\n|--------------------------|------------------------------------------------|--------------------|\n| B |  | B |\n| Y |  | Y |\n| Select |  | Select |\n| Start |  | Start |\n| Up |  | Up |\n| Down |  | Down |\n| Left |  | Left |\n| Right |  | Right |\n| A |  | A |\n| X |  | X |\n| L |  | L |\n| R |  | R |\n| ZL |  | ZL |\n| ZR |  | ZR |\n| Home |  | Home |\n| Touch Screen Touch |  | Touch Screen Touch |\n| |  X | Circle Pad X |\n| |  Y | Circle Pad Y |\n| |  X | [Right analog function](#core-options) |\n| |  Y | [Right analog function](#core-options) |\n\n### Mouse\n\n| RetroMouse Inputs | Citra inputs |\n|-------------------------------------------------------|---------------------|\n|  Mouse Cursor | Touchscreen Pointer |\n|  Mouse 1 | Touch Screen Touch |\n\n### Pointer\n\n| RetroPointer Inputs | Citra inputs |\n|--------------------------------------------------------------------------------------------------------------------------|---------------------|\n|  or  Pointer Position | Touchscreen Pointer |\n|  or  Pointer Pressed | Touch Screen Touch |\n\n## Compatibility\n\n- [Citra Game Compatibility List](https://citra-emu.org/game/)\n\n## External Links\n\n- [Official Citra Canary/Experimental Website](https://citra-emu.org/)\n- [Official Citra Canary/Experimental Github Repository](https://github.com/citra-emu/citra)\n- [Libretro Citra Canary/Experimental Core info file](https://github.com/libretro/libretro-super/blob/master/dist/info/citra_canary_libretro.info)\n- [Libretro Citra Canary/Experimental Github Repository](https://github.com/libretro/citra/tree/canary)\n- [Report Libretro Citra Canary/Experimental Core Issues Here](https://github.com/libretro/citra/issues)\n\n## Nintendo - Nintendo 3DS\n\n- [Nintendo - 3DS (Citra)](citra.md)\n"
},
{
"path": "docs/library/clownmdemu.md",
"content": "# ClownMDEmu\n\n## Background\n\nA highly-portable Sega Mega Drive emulator that aims to be as fast as possible without sacrificing accuracy.\n\nThe ClownMDEmu core has been authored by:\n\n- Clownacy\n\nThe ClownMDEmu core is licensed under:\n\n- [AGPLv3](https://github.com/Clownacy/clownmdemu-libretro/blob/master/LICENCE.txt)\n\nA summary of the licenses behind RetroArch and its cores can be found [here](../development/licenses.md).\n\n## Extensions\n\nContent that can be loaded by the ClownMDEmu core have the following file extensions:\n\n- .bin\n- .md\n- .gen\n- .cue\n- .iso\n- .chd\n\nRetroArch database(s) that are associated with the ClownMDEmu core:\n\n- [Sega - Mega Drive - Genesis](https://github.com/libretro/libretro-database/blob/master/rdb/Sega%20-%20Mega%20Drive%20-%20Genesis.rdb)\n- [Sega - Mega-CD - Sega CD](https://github.com/libretro/libretro-database/blob/master/rdb/Sega%20-%20Mega-CD%20-%20Sega%20CD.rdb)\n\n## Features\n\nFrontend-level settings or features that the ClownMDEmu core respects:\n\n| Feature | Supported |\n|-------------------|:---------:|\n| Restart | ✔ |\n| Saves | ✔ |\n| States | ✔ |\n| Rewind | ✔ |\n| Netplay | ✔ |\n| Core Options | ✔ |\n| [Memory Monitoring (achievements)](../guides/memorymonitoring.md) | ✔ |\n| RetroArch Cheats | ✔ |\n| Native Cheats | ✔ |\n| Controls | ✔ |\n| Remapping | ✔ |\n| Multi-Mouse | ✕ |\n| Rumble | ✕ |\n| Sensors | ✕ |\n| Camera | ✕ |\n| Location | ✕ |\n| Subsystem | ✔ |\n| [Softpatching](../guides/softpatching.md) | ✔ |\n| Disk Control | ✕ |\n| Username | ✕ |\n| Language | ✕ |\n| Crop Overscan | ✕ |\n| LEDs | ✕ |\n\n## Directories\n\nThe ClownMDEmu core's library name is 'ClownMDEmu'.\n\nThe ClownMDEmu core saves/loads to/from these directories.\n\n**Frontend's Save directory**\n\n| File | Description |\n|:-----:|:----------------------------:|\n| *.srm | Mega Drive/Genesis save data |\n| *.brm | Mega CD/Sega CD save data |\n\n**Frontend's State directory**\n\n| File | Description |\n|:--------:|:-----------:|\n| *.state# | State |\n\n## Geometry and timing\n\n- The ClownMDEmu core's core-provided FPS is 59.94 for NTSC games and 50 for PAL games\n- The ClownMDEmu core's core-provided sample rate is 223721.5625 Hz\n- The ClownMDEmu core's base width is 320 (though this varies depending on the loaded content)\n- The ClownMDEmu core's base height is 224 (though this varies depending on the loaded content)\n- The ClownMDEmu core's max width is 512\n- The ClownMDEmu core's max height is 480\n- The ClownMDEmu core's core-provided aspect ratio is typically 10:7 (though this varies depending on the loaded content)\n\n## Core options\n\nThe ClownMDEmu core has the following option(s) that can be tweaked from the core options menu. The default setting is bolded.\n\n- **Debug > Disable Sprite Plane** [clownmdemu_disable_sprite_plane] (**disabled**|enabled)\n\n\tDisable the VDP's Sprite Plane.\n\n- **Debug > Disable Window Plane** [clownmdemu_disable_window_plane] (**disabled**|enabled)\n\n\tDisable the VDP's Window Plane.\n\n- **Debug > Disable Plane A** [clownmdemu_disable_plane_a] (**disabled**|enabled)\n\n\tDisable the VDP's Plane A.\n\n- **Debug > Disable Plane B** [clownmdemu_disable_plane_b] (**disabled**|enabled)\n\n\tDisable the VDP's Plane B.\n\n- **Debug > Disable FM1** [clownmdemu_disable_fm1] (**disabled**|enabled)\n\n\tDisable the YM2612's FM1 channel.\n\n- **Debug > Disable FM2** [clownmdemu_disable_fm2] (**disabled**|enabled)\n\n\tDisable the YM2612's FM2 channel.\n\n- **Debug > Disable FM3** [clownmdemu_disable_fm3] (**disabled**|enabled)\n\n\tDisable the YM2612's FM3 channel.\n\n- **Debug > Disable FM4** [clownmdemu_disable_fm4] (**disabled**|enabled)\n\n\tDisable the YM2612's FM4 channel.\n\n- **Debug > Disable FM5** [clownmdemu_disable_fm5] (**disabled**|enabled)\n\n\tDisable the YM2612's FM5 channel.\n\n- **Debug > Disable FM6** [clownmdemu_disable_fm6] (**disabled**|enabled)\n\n\tDisable the YM2612's FM6 channel.\n\n- **Debug > Disable DAC** [clownmdemu_disable_dac] (**disabled**|enabled)\n\n\tDisable the YM2612's DAC channel.\n\n- **Debug > Disable PSG1** [clownmdemu_disable_psg1] (**disabled**|enabled)\n\n\tDisable the SN76496's PSG1 channel.\n\n- **Debug > Disable PSG2** [clownmdemu_disable_psg2] (**disabled**|enabled)\n\n\tDisable the SN76496's PSG2 channel.\n\n- **Debug > Disable PSG3** [clownmdemu_disable_psg3] (**disabled**|enabled)\n\n\tDisable the SN76496's PSG3 channel.\n\n- **Debug > Disable PSG Noise** [clownmdemu_disable_psg_noise] (**disabled**|enabled)\n\n\tDisable the SN76496's PSG Noise channel.\n\n- **Debug > Disable PCM1** [clownmdemu_disable_pcm1] (**disabled**|enabled)\n\n\tDisable the RF5C164's PCM1 channel.\n\n- **Debug > Disable PCM2** [clownmdemu_disable_pcm2] (**disabled**|enabled)\n\n\tDisable the RF5C164's PCM2 channel.\n\n- **Debug > Disable PCM3** [clownmdemu_disable_pcm3] (**disabled**|enabled)\n\n\tDisable the RF5C164's PCM3 channel.\n\n- **Debug > Disable PCM4** [clownmdemu_disable_pcm4] (**disabled**|enabled)\n\n\tDisable the RF5C164's PCM4 channel.\n\n- **Debug > Disable PCM5** [clownmdemu_disable_pcm5] (**disabled**|enabled)\n\n\tDisable the RF5C164's PCM5 channel.\n\n- **Debug > Disable PCM6** [clownmdemu_disable_pcm6] (**disabled**|enabled)\n\n\tDisable the RF5C164's PCM6 channel.\n\n- **Debug > Disable PCM7** [clownmdemu_disable_pcm7] (**disabled**|enabled)\n\n\tDisable the RF5C164's PCM7 channel.\n\n- **Debug > Disable PCM8** [clownmdemu_disable_pcm8] (**disabled**|enabled)\n\n\tDisable the RF5C164's PCM8 channel.\n\n- **Debug > Disable CDDA** [clownmdemu_disable_cdda] (**disabled**|enabled)\n\n\tDisable the CDDA channel.\n\n- **Console > TV Standard** [clownmdemu_tv_standard] (**ntsc**|pal)\n\n\tWhich television standard to output in.\n\n- **Console > Region** [clownmdemu_overseas_region] (**elsewhere**|japan)\n\n\tWhich region the console is.\n\n- **Console > CD Add-on** [clownmdemu_cd_addon] (**disabled**|enabled)\n\n\tAllow cartridge-only software to utilise features of the emulated Mega CD add-on, such as CD music. This may break some software.\n\n- **Video > Tall Interlace Mode 2** [clownmdemu_tall_interlace_mode_2] (**disabled**|enabled)\n\n\tMakes games that use Interlace Mode 2 for split-screen not appear squashed.\n\n- **Video > Widescreen Hack** [clownmdemu_widescreen_tiles] (**0**|1|2|3|4|5|6|7|8|9|10|11|12)\n\n\tWidens the display. Works well with some games, badly with others.\n\n- **Audio > Low-Pass Filter** [clownmdemu_lowpass_filter] (**enabled**|disabled)\n\n\tLowers the volume of high frequencies to make the audio 'softer', like a real Mega Drive does. Without this, treble will become louder due to differences in volume balancing.\n\n- **Audio > Low-Volume Distortion** [clownmdemu_ladder_effect] (**enabled**|disabled)\n\n\tEnables the so-called 'ladder effect' that is present in early Mega Drives. Without this, some quiet sounds will become inaudible.\n\n## Joypad\n\n\n\n| RetroPad Inputs | User 1 - 2 input descriptors |\n|------------------------------------------------|------------------------------|\n|  | B |\n|  | A |\n|  | Mode |\n|  | Start |\n|  | Up |\n|  | Down |\n|  | Left |\n|  | Right |\n|  | C |\n|  | Y |\n|  | X |\n|  | Z |\n\n## External links\n\n- [Official ClownMDEmu Website](https://clownmdemu.clownacy.com)\n- [Official ClownMDEmu GitHub Repository](https://github.com/Clownacy/clownmdemu-libretro)\n- [Libretro ClownMDEmu Core info file](https://github.com/libretro/libretro-super/blob/master/dist/info/clownmdemu_libretro.info)\n- [Report Libretro ClownMDEmu Core Issues Here](https://github.com/Clownacy/clownmdemu-libretro/issues)\n\n## Sega Mega Drive/Genesis cores\n\n- [Sega - Mega Drive - Genesis (BlastEm)](blastem.md)\n- [Sega - MS/GG/MD/CD (Genesis Plus GX)](genesis_plus_gx.md)\n- [Sega - MS/MD/CD/32X (PicoDrive)](picodrive.md)\n"
},
{
"path": "docs/library/compatibility/32x.md",
"content": "# Sega 32X Core Compatibility\n\n## PicoDrive\n\n| Game | Issue |\n|----------------------------------------------|---------------------------------------------------------------|\n| Brutal Unleashed – Above the Claw | Softlocks after the first fight. |\n| FIFA Soccer ’96 | Glitched main menu text. |\n| Knuckles’ Chaotix | Glitched graphics on the Player Select screen. |\n| NBA Jam Tournament Edition | Framerate issues. |\n| NFL Quarterback Club | Some menu graphics are missing. |\n| Virtua Racing Deluxe | Blinking line during the SEGA logo screen. |\n| World Series Baseball Starring Deion Sanders | Crashes when starting a match. |\n| WWF Raw | Various graphics are missing. |"
},
{
"path": "docs/library/compatibility/3do.md",
"content": "# 3DO Core Compatibility\n\n## Opera\n\n[Opera Core Compatibility List](http://wiki.fourdo.com/Compatibility_List)\n"
},
{
"path": "docs/library/compatibility/dc.md",
"content": "# Sega Dreamcast Core Compatibility\n\n## FlyCast\n\nGeneral FlyCast Issues\n\n- The date and time do not seem to get properly saved, as the system will ask you to set the clock every time you start.\n- Once you save to a VMU slot with any game, that VMU becomes inaccessible the next time you load the emulator.\n- Polygon/Alpha sorting issues can make objects appear distorted in regular Flycast core. Use Per-Pixel Alpha sorting if you want complete/accurate emulation instead.\n- When using an Xbox 360 Controller, analog triggers don't work properly. Use the bumpers instead.\n- Changing games without closing and reloading RetroArch often leads to RetroArch crashing.\n\n| Game | Issue |\n|---------------------------------------------|------------------------------------------------------------------------------------------------------------------------------------------------------------------------------------------------------------------------------------------------------------------------|\n| Sonic Adventure (PAL) | Must be set to use \"VGA\" output in core options, as \"TV\" mode will cause all subsequent FMV to make RetroArch become unresponsive. |\n| The Typing of the Dead (NTSC-J) | Must have real BIOS for kanji, hiragana, and katakana to show up since HLE BIOS only has US/ASCII characters. |\n"
},
{
"path": "docs/library/compatibility/ds.md",
"content": "# Nintendo DS Core Compatibility\n\n## DeSmuME\n\n| Game | Issue |\n|------------------------------------------|-----------------------------------------------------------------------------------------------|\n| Alice in Wonderland \t | Needs JIT Block Size 8 or smaller to get past title screen. |\n| Golden Sun: Dark Dawn (Europe) \t | Runs very slowly. Buggy sound. |\n| Hotel Dusk: Room 215 \t | Graphics glitches. Unintended \"scanlines\" appear on some screens. |\n| Pokémon HeartGold (Europe) (Rev 10) | Graphics glitches . Black pixels pop-ups in the top screen. Top screen goes black. |\n| Pokémon SoulSilver (Europe) (Rev 10) | Graphics glitches. Black pixels pop-ups in the top screen. Top screen goes black. |\n| Puppy Palace (U) / My Puppy Shop (E) | Crashes in menus. |\n| Rune Factory (U) \t | Random crashes. |\n| Rune Factory 2 (U) \t | Random crashes. |\n| Ultimate Mortal Kombat 3 \t | Runs very slowly. | |\n| Yoshi Touch & Go \t | Runs very slowly. |\n| Yu-Gi-Oh! 5D's WORLD CHAMPIONSHIP 2010 (J) | Random crashes. |"
},
{
"path": "docs/library/compatibility/gba.md",
"content": "# Nintendo Game Boy Advance Core Compatibility\n\nPlease notice that when using these cores on RetroArch, [only certain cores support libretro save interface](https://github.com/libretro/RetroArch/issues/16323#issuecomment-1977792161), meaning even if you set option \"SaveRAM Autosave Interval\" on settings, some cores will only write down internal save game data when you gracefully close emulation. That might lead to loss of data if you exit RetroArch from your OS app switcher, if it freezes or if shuts down unexpectedly without battery for instance.\n\n## Beetle GBA\n\n[Does not support SaveRAM Autosave Interval.](https://github.com/libretro/RetroArch/issues/16323#issuecomment-1980460281)\n\n## gpSP\n\n[Does not support SaveRAM Autosave Interval.](https://github.com/libretro/RetroArch/issues/16323#issuecomment-1980460281)\n\n| Game | Issue |\n|---------------------------------------|--------------------------------|\n| ~~Activision Anthology~~ |~~Freezes when entering a game.~~ |\n| ~~Banjo-Kazooie - Grunty's Revenge~~ |~~Black screen during developer logo. Resets when Banjo leaves his house.~~|\n| Boktai Trilogy |The solar sensor is not emulated. |\n| ~~DemiKids - Light/Dark Version~~ |~~Crashes when entering a battle.~~ |\n| ~~Digimon Racing (Europe)~~ |~~Freezes during the intro.~~ |\n| ~~Dragon Ball Z - The Legacy of Goku~~ |~~Graphics glitches.~~ |\n| Final Fantasy VI |Background/tiling order issues. |\n| Golden Sun 1 and 2 |Background/tiling order issues (GS1 Carpet on Ship / GS2 Ice shards in cave). |\n| ~~Game Boy Advance Video - Dragon Ball GT - Volume 1~~ |~~White screen.~~ |\n| ~~Grand Theft Auto Advance~~ |~~Crashes after first dialog. Works on some platforms.~~ |\n| ~~Harry Potter - Quidditch World Cup~~ |~~Crashes when going ingame.~~ |\n| Koro Koro Puzzle Happy Panechu! |The tilt sensor is not emulated. |\n| ~~Mario & Luigi - Superstar Saga~~ |~~Sometimes crashes when entering a battle.~~ |\n| Phantasy Star Collection |Phantasy Star 1 flickers - turn on Interframe Blending in core options to fix.|\n| ~~R-Type III - The Third Lightning~~ |~~Softlocks at Irem startup screen.~~|\n| ~~Rock 'n Roll Racing~~ |~~Corrupted graphics, not playable.~~|\n| ~~Rockman & Forte~~ |~~Doesn't continue after GBA BIOS screen.~~|\n| Sims 2, The - Pets |Graphics glitches. Heavy flickering, black objects. |\n| Street Racing Syndicate |Crashes at startup screen, after pressing Start (Works in Interpreter Mode in lr-gpsp v1.0.0).|\n| ~~Super Monkey Ball Jr.~~ |~~Softlocks at startup screen.~~|\n| ~~Super Street Fighter II Turbo/X Revival~~ |~~Small graphics glitch. Selecting speed 'Turbo 1' and beyond on the character select screen makes the game speed window not fully visible.~~ |\n| ~~Tales of Phantasia (USA version)~~ |~~Softlocks during the introduction sequence (just before the small guy hits the tall guy in the right).~~|\n| WarioWare: Twisted! |The tilt sensor is not emulated.|\n| ~~Wolfenstein 3D~~ |~~Softlocks at id Software startup screen.~~|\n| Yoshi’s Universal Gravitation |The tilt sensor is not emulated.|\n\n## mGBA\n\n[Supports SaveRAM Autosave Interval.](https://github.com/libretro/RetroArch/issues/16323#issuecomment-1980460281)\n\n## VBA-M\n\n[Supports SaveRAM Autosave Interval.](https://github.com/libretro/RetroArch/issues/16323#issuecomment-1980460281)\n\n| Game | Issue |\n|---------------------------------------|--------------------------------|\n| ~~Boktai Trilogy~~ | ~~The solar sensor is not emulated~~|\n| ~~Digimon Racing (Europe)~~ |~~Freezes during the intro. This can be avoided by enabling linking in the standalone VBA-M release~~ |\n| ~~Koro Koro Puzzle Happy Panechu!~~ |\t~~The tilt sensor is not emulated~~|\n| ~~Phantasy Star Collection~~ | ~~Digital Eclipse logo sound effect is missing. Phantasy Star 1 flickers~~ |\n| ~~WarioWare: Twisted!~~ | \t~~The tilt sensor is not emulated~~ |\n| ~~Yoshi’s Universal Gravitation~~ | ~~The tilt sensor is not emulated~~ |\n\n## VBA Next\n\n[Supports SaveRAM Autosave Interval.](https://github.com/libretro/RetroArch/issues/16323#issuecomment-1980460281)\n\n| Game | Issue |\n|---------------------------------------------------|----------------------------------------------------------------------------------------------------|\n| Boktai Trilogy \t | The solar sensor is not emulated. |\n| Croket! 2 – Yami no Bank to Banqueen | Heavy slowdown when approaching the snowman in the beginning. |\n| Digimon Racing (Europe) \t | Freezes during the intro. This can be avoided by enabling linking in the standalone VBA-M release. |\n| Drome Racers \t | Only shows a black screen after the THQ logo. |\n| Hamtaro: Ham-Ham Games \t | Locks up if the opening cinematics aren’t skipped. |\n| Hot Wheels - Stunt Track Challenge | Resets itself when trying to go in-game. |\n| Jurassic Park III: Park Builder \t | Unreadable glitched text. |\n| Koro Koro Puzzle Happy Panechu! \t | The tilt sensor is not emulated. |\n| Moto GP \t | Black screen, loud screeching noise. |\n| Sanrio Puroland: All Characters | Loads Indefinitely. Very slow. |\n| Phantasy Star Collection \t | Digital Eclipse logo sound effect is missing. Phantasy Star 1 flickers. |\n| SSX 3 \t | Graphics glitches. Seems pitch-related. |\n| Super Mario Advance 2: Super Mario World (Europe) | The program crashes during the final fight, when Bowser approaches (zoom mode 7) |\n| WarioWare: Twisted! | The tilt sensor is not emulated. |\n| Yoshi’s Universal Gravitation | The tilt sensor is not emulated. |\n"
},
{
"path": "docs/library/compatibility/gbc.md",
"content": "# Nintendo Game Boy Color Core Compatibility\n\n## Gambatte\n\n| Game | Issue |\n|---------------------------------------------------|----------------------------------------------------|\n| Command Master | Crashes on start. Unemulated MBC7 mapper. |\n| Game Boy Camera | Crashes on start. Unemulated Pocket Camera mapper. |\n| Game de Hakken!! Tamagotchi - Osutchi to Mesutchi | Crashes on start. Unemulated TAMA5 mapper. |\n| Kirby Tilt 'n' Tumble | Crashes on start. Unemulated MBC7 mapper. |\n| Net de Get: Mini-Game @ 100 | Crashes on start. Unemulated MBC6 mapper. |\n"
},
{
"path": "docs/library/compatibility/jaguar.md",
"content": "# Atari Jaguar Core Compatibility\n\n## Virtual Jaguar\n\nA reference compatibility table can be found here [https://icculus.org/virtualjaguar/](https://icculus.org/virtualjaguar/)\n\n| Game | Issue |\n|--------------------|-------------------------------------------------------- |\n| Cybermorph | Graphics glitches. |\n| Doom | Enable Doom core option hack for proper graphics pitch. |\n| Iron Soldier | Hangs after selecting a stage. |\n| Iron Soldier 2 | Hangs after selecting a stage. Audio glitches. |\n| Kasumi Ninja | Graphics glitches. Missing background layers |\n| Ruiner Pinball | Doesn't boot. |\n| Super Burnout | Hangs after selecting a track. |\n| Towers II | Heavy flickering. |\n| Wolfenstein 3D | Doesn't boot. |"
},
{
"path": "docs/library/compatibility/lynx.md",
"content": "# Atari Lynx Core Compatibility\n\n## Handy\n\n| Game | Issue |\n|------------------|-------------------------------------------------------------------------|\n| RoadBlasters | Graphics glitches. Minor flickering and glitches after starting a race. |\n\n## Beetle Lynx\n\n| Game | Issue |\n|------------------|-------------------------------------------------------------------------|\n| RoadBlasters | Graphics glitches. Minor flickering and glitches after starting a race. |"
},
{
"path": "docs/library/compatibility/nes.md",
"content": "# Nintendo NES Core Compatibility\n\n## Nestopia\n\n| Game | Issue |\n|------------------------|----------------------------------------------------------------- |\n| ~~Skull & Crossbones~~ | ~~Graphical glitches and screen shaking when in 2-player mode.~~ Fixed! |\n\n## FCEUmm\n\n| Game | Issue |\n|------------------------------|--------------------------------------------------------------|\n| Skull & Crossbones | Graphical glitches and screen shaking when in 2-player mode. |\n\n## bnes\n\n| Game | Issue |\n|------------------------------|------------------------------------------------|\n| Crisis Force | Graphical glitches. |\n| Huge Insect | No enemies spawn. |\n| Lagrange Point | No music. |\n| Ms. Pac-Man (Tengen version) | Graphical glitches on the sides of the screen. |\n| Skull & Crossbones | Crashes on start. |\n\n## QuickNES\n\n| Game | Issue |\n|--------------------|-------------------------------------------------------------------------------|\n| Burai Fighter | Softlocks when entering a level. Confirmed issue. MMC3 incompatible. |\n| Family Circuit '91 | Crashes on start. Unsupported Mapper 210. |\n| Huge Insect | No enemies spawn. Mapper 3 confirmed issue. Unemulated bus conflict handling. |\n| Skull & Crossbones | Crashes on start. Unsupported Mapper. |\n"
},
{
"path": "docs/library/compatibility/pcfx.md",
"content": "# NEC PC-FX Core Compatibility\n\n## Beetle PC-FX\n\n| Game | Issue |\n|---------------------------------------------------------------------|---------------------------------------------------|\n| Pia Carrot e Youkoso!! (Japan) [T-En by David Michel + filler v1.0] | Doesn't boot. Confirmed to work on real hardware. |"
},
{
"path": "docs/library/compatibility/psx.md",
"content": "# PlayStation Core Compatibility\n\n## Beetle PSX\n\nA list of known emulation bugs can be found here [https://forum.fobby.net/index.php?t=msg&th=1114&start=0&](https://forum.fobby.net/index.php?t=msg&th=1114&start=0&)\n\n## PCSX ReARMed\n\n| Game | Issue |\n|--------------------------|--------------------------------------------------------|\n| Jumping Flash 2 | Graphics glitches. Geometry issues. |\n| Tobal 2 | Graphics glitch. Garbled Dream Factory intro sequence. |\n| Hot Wheels: Turbo Racing | Black screen after intro video |\n"
},
{
"path": "docs/library/compatibility/saturn.md",
"content": "# Sega Saturn Core Compatibility\n\n## Yabause\n\n[Official Yabause Compatibility List](https://wiki.yabause.org/index.php5?title=Compatibility_list)\n\n## Kronos\n\n[Official Kronos Compatibility List](http://tradu-france.com/tfwiki-1.28.2/index.php?title=Compatibility_list_of_Kronos)\n"
},
{
"path": "docs/library/compatibility/snes.md",
"content": "# Nintendo SNES Core Compatibility\n\n## bsnes Accuracy\n\nThe bsnes Accuracy core fully emulates all SNES games that have ever been officially released.\n\nSame with bsnes-mercury Accuracy\n\n## bsnes Balanced\n\n| Game | Issue |\n|--------------------------|--------------------------------------------------------------------------------|\n| A.S.P. Air Strike Patrol | Black lines show up during gameplay. The shadow below the aircraft is missing. |\n\nSame with bsnes-mercury Balanced\n\n## bsnes Performance\n\n| Game | Issue |\n|--------------------------------------------------|--------------------------------------------------------------------------------|\n| A.S.P. Air Strike Patrol | Black lines show up during gameplay. The shadow below the aircraft is missing. |\n| Funaki Masakatsu Hybrid Wrestler – Tougi Denshou | Corrupted graphics on the Pancrase logo screen. |\n| Mecarobot Golf | The ground \"wobbles\" during gameplay. |\n| Mega Man X2 | Only displays a black screen. |\n| Mega Man X3 | Only displays a black screen. |\n| Mortal Kombat II | Various glitched graphics. |\n| NHL ’94 | Corrupted line on the NHL logo screen. |\n| Tetris Attack | Lots of flickering on the VS. CPU mode map screen. |\n\nSame with bsnes-mercury Performance\n\n## Snes9x 2005\n\n| Game | Issue |\n|--------------------------------------------------|--------------------------------------------------------------------------------------|\n| A.S.P. Air Strike Patrol | The shadow below the aircraft is missing. Glitched graphics on the briefing screens. |\n| Bass Masters Classic - Pro Edition | Only shows a black screen. |\n| Funaki Masakatsu Hybrid Wrestler – Tougi Denshou | Corrupted graphics on the Pancrase logo screen. |\n| Hayazashi Nidan Morita Shougi 2 | Matches won’t start. |\n| Madden NFL 96 | Only shows a black screen. |\n| Masters New – Harukanaru Augusta 3 | Black screen after selecting game. |\n| Mecarobot Golf | The ground \"wobbles\" during gameplay. |\n| Mechwarrior 3050 | Black screen after the Activision logo. |\n\nSame with Snes9x 2005 Plus\n\n## Snes9x 2010\n\n| Game | Issue |\n|--------------------------------------------------|---------------------------------------------------------------------------------------|\n| A.S.P. Air Strike Patrol | The shadow below the aircraft is missing. Glitched graphics on the briefing screens. |\n| Bass Masters Classic - Pro Edition | Only shows a black screen. |\n| Doom | Colored dots appear during gameplay. |\n| F-1 Grand Prix | Glitched HUD display. |\n| F1 ROC II – Race of Champions | Crashes when starting a race. |\n| Funaki Masakatsu Hybrid Wrestler – Tougi Denshou | Corrupted graphics on the Pancrase logo screen. |\n| Hayazashi Nidan Morita Shougi 2 | Matches won’t start. |\n| Madden NFL 96 | Only shows a black screen. |\n| Masters New – Harukanaru Augusta 3 | Graphical corruption during gameplay. |\n| Mecarobot Golf | The ground \"wobbles\" during gameplay. |\n| Mechwarrior 3050 | Black screen after the Activision logo. |\n| Secret of Evermore (PAL) | Randomly freezes when the background music changes. |\n| Sink or Swim | Sometimes the levels are filled with water instantly. |\n| Speedy Gonzales: Los Gatos Bandidos | Freezes when pressing a switch in the last level. |\n| Super Bomberman 3 | Freezes after about 20 seconds in the Battle mode menu. |\n| Super Bomberman 5 | Title screen flickers if the opening cinematic isn’t skipped. |\n\n## Snes9x\n\n| Game | Issue |\n|--------------------------------------------------|--------------------------------------------------------------------------------------|\n| A.S.P. Air Strike Patrol | The shadow below the aircraft is missing. Glitched graphics on the briefing screens. |\n| BS-Zelda MottZilla Patch | Only shows a black screen. |\n| Doom | Colored dots appear during gameplay. |\n| Funaki Masakatsu Hybrid Wrestler – Tougi Denshou | Corrupted graphics on the Pancrase logo screen. |\n| Hayazashi Nidan Morita Shougi 2 | Matches won’t start. |\n| Mecarobot Golf | The ground \"wobbles\" during gameplay. |\n| Secret of Evermore (PAL versions) | Randomly freezes when the background music changes. |\n\n## higan Accuracy\n\nThe higan Accuracy core fully emulates all SNES games that have ever been officially released.\n\n## nSide Balanced\n\n| Game | Issue |\n|--------------------------|--------------------------------------------------------------------------------|\n| A.S.P. Air Strike Patrol | Black lines show up during gameplay. The shadow below the aircraft is missing. |"
},
{
"path": "docs/library/compatibility/wswan.md",
"content": "# Bandai Wonderswan Core Compatibility\n\n## Beetle Cygne\n\n| Game | Issue |\n|-----------|------------------------------------------------------------------------------|\n| Tonpuusou | Title screen announcer voice missing. Softlocks after picking a menu option. |"
},
{
"path": "docs/library/craft.md",
"content": "# Minecraft (Craft)\n\n## Background\n\nA simple Minecraft clone written in C using modern OpenGL (shaders).\n\n## Features\n\n- Simple but nice looking terrain generation using simplex noise.\n- Biomes\n- Water\n- More than 20 types of blocks and more can be added easily.\n- Supports plants (grass, flowers, trees, etc.) and transparency (glass).\n- Simple clouds in the sky (they don't move).\n- Day / night cycles and a textured sky dome.\n- More sophisticated sunrise/sunset color blending\n- Ambient occlusion for basic shading of blocks.\n- World changes persisted in a sqlite3 database.\n- Configurable draw distance. The draw distance has a big effect on the framerate, a draw distance of 1 or 2 can make this core playable even on very lightweight computers.\n- Configurable field of view.\n- Gamepad support (including analog stick support) configurable analog sensitivity and deadzones, preliminary mouse and keyboard support.\n- Configurable resolutions, up to 4K.\n- A ‘Jumping Flash’ mode that allows you to jump infinitely into the air all while the camera faces downwards.\n\nThe Craft core has been authored by\n\n- Michael Fogleman\n\nThe Craft core is licensed under\n\n- [MIT](https://github.com/libretro/Craft/blob/master/LICENSE.md)\n\nA summary of the licenses behind RetroArch and its cores can be found [here](../development/licenses.md).\n\n## Requirements\n\n- OpenGL or OpenGL ES\n\n## How to start the Craft core:\n\n- To start the Craft core, go to RetroArch's main menu screen. Select 'Load Core', then 'Craft'.\n\n- Now, select 'Start Core'.\n\nThe content should now start running!\n\n## Features\n\nFrontend-level settings or features that the Craft core respects.\n\n| Feature | Supported |\n|-------------------|:---------:|\n| Restart | ✕ |\n| Saves | ✔ |\n| States | ✕ |\n| Rewind | ✕ |\n| Netplay | ✕ |\n| Core Options | ✔ |\n| [Memory Monitoring (achievements)](../guides/memorymonitoring.md) | ✕ |\n| RetroArch Cheats | ✕ |\n| Native Cheats | ✕ |\n| Controls | ✔ |\n| Remapping | ✕ |\n| Multi-Mouse | ✕ |\n| Rumble | ✕ |\n| Sensors | ✕ |\n| Camera | ✕ |\n| Location | ✕ |\n| Subsystem | ✕ |\n| [Softpatching](../guides/softpatching.md) | ✕ |\n| Disk Control | ✕ |\n| Username | ✕ |\n| Language | ✕ |\n| Crop Overscan | ✕ |\n| LEDs | ✕ |\n\n## Directories\n\nThe Craft core's library name is 'Craft'\n\nThe Craft core saves/loads to/from these directories.\n\n**Frontend's System directory**\n\n| File | Description |\n|:--------:|:-----------:|\n| craft.db | World data |\n\n## Geometry and timing\n\n- The Craft core's core provided FPS is 60.0\n- The Craft core's core provided sample rate is 48000 Hz\n- The Craft core's base width is 640\n- The Craft core's base height is 480\n- The Craft core's max width is 640\n- The Craft core's max height is 480\n- The Craft core's core provided aspect ratio is 16/9\n\n## Core options\n\nThe Craft core has the following option(s) that can be tweaked from the core options menu. The default setting is bolded.\n\nSettings with (Restart) means that core has to be closed for the new setting to be applied on next launch.\n\n- **Resolution (restart)** [craft_resolution] (**640x480**|320x200|640x400|960x600|1280x800|1600x1000|1920x1200|2240x1400|2560x1600|2880x1800|3200x2000|3520x2200|3840x2400|7680x4320|15360x8640|16000x9000|320x240|320x480|360x200|360x240|360x400|360x480|400x224|480x272|512x224|512x240|512x384|512x512|640x224|640x240|640x448|720x576|800x480|800x600|960x720|1024x768|1280x720|1366x768|1600x900|1920x1080|2048x2048|4096x4096)\n\n\tConfigure the resolution.\n\n??? note \"Resolution - 320x240\"\n\t\n\n??? note \"Resolution - 1920x1080\"\n\t\n\n- **Show info text** [craft_show_info_text] (**disabled**|enabled)\n\n\tShow game information in the upper left corner of Craft.\n\n??? note \"Show info text - Off\"\n\t\n\n??? note \"Show info text - On\"\n\t\n\n- **Jumping Flash mode** (**Off**/On):\n\n\tEnabling this allows you to jump infinitely into the air all while the camera faces downwards.\n\n- **Field of view** [craft_field_of_view] (**65** to 150 in increments of 5)\n\n\tConfigure the field of view.\n\n??? note \"Field of view - 65\"\n\t\n\n??? note \"Field of view - 125\"\n\t\n\n- **Draw distance** [craft_draw_distance] (1 to 32 in increments of 1. **10 is default**)\n\n\tConfigure the draw distance.\n\n??? note \"Draw distance - 10\"\n\t\n\n??? note \"Draw distance - 32\"\n\t\n\n- **Inverted aim** [craft_inverted_aim] (**disabled**|enabled)\n\n\tInvert up and down crosshair aiming controls for the RetroPad and the RetroMouse.\n\n- **Right analog sensitivity** [craft_analog_sensitivity] (**0.0150** to 0.0500 in increments of 0.0025)\n\n\tModify the RetroPad right analog stick's sensitivity.\n\n- **Analog deadzone size** [craft_deadzone_radius] (**0.010** to 0.200 in increments of 0.005)\n\n\tModify RetroPad analog sticks' deadzone.\n\n## Joypad\n\n| RetroPad Inputs | Craft Inputs |\n|------------------------------------------------|---------------------------|\n|  | Jump |\n|  | Destroy block |\n|  | Zoom out |\n|  | Move forwards |\n|  | Move backwards |\n|  | Move crosshair left |\n|  | Move crosshair right |\n|  | Next block |\n|  | Place block |\n|  | Move left |\n|  | Move right |\n|  | Move crosshair up |\n|  | Move crosshair down |\n|  X | Move left/right |\n|  Y | Move up/down |\n|  X | Move crosshair left/right |\n|  Y | Move crosshair up.down |\n\n## Keyboard\n\n| RetroKeyboard Inputs | Craft Inputs |\n|----------------------|----------------------|\n| Keyboard Up | Move forwards |\n| Keyboard Down | Move backwards |\n| Keyboard Right | Move crosshair left |\n| Keyboard Left | Move crosshair right |\n| Keyboard Right Shift | Zoom out |\n\n## Mouse\n\n| RetroMouse Inputs | Craft Inputs |\n|-------------------------------------------------------|----------------|\n|  Mouse Cursor | Move crosshair |\n|  Mouse 1 | Destroy block |\n|  Mouse 2 | Place block |\n|  Mouse 3 | Copy block |\n| Wheel Up | Previous block |\n| Wheel Down | Next block |\n\n## External Links\n\n- [Official Craft Website](https://www.michaelfogleman.com/projects/craft/)\n- [Official Craft Github Repository](https://github.com/fogleman/Craft)\n- [Libretro Craft Core info file](https://github.com/libretro/libretro-super/blob/master/dist/info/craft_libretro.info)\n- [Libretro Craft Github Repository](https://github.com/libretro/craft)\n- [Report Libretro Craft Core Issues Here](https://github.com/libretro/Craft/issues)"
},
{
"path": "docs/library/crocods.md",
"content": "# Amstrad - CPC (CrocoDS)\n\n## Background\n\nBased on Win-CPC. CrocoDS was originally an Amstrad CPC emulator created for the Nintendo DS and was ported to libretro some time after.\n\n### Author/License\n\nThe CrocoDS core has been authored by\n\n- RedBug\n\nThe CrocoDS core is licensed under\n\n- [MIT](https://github.com/libretro/libretro-crocods/blob/master/LICENSE)\n\nA summary of the licenses behind RetroArch and its cores can be found [here](../development/licenses.md).\n\n## Extensions\n\nContent that can be loaded by the CrocoDS core have the following file extensions:\n\n- .dsk\n- .sna\n- .[kcr](https://github.com/redbug26/crocods-core/wiki/kcr)\n\n## Databases\n\nRetroArch database(s) that are associated with the CrocoDS core:\n\n- [Amstrad - CPC](https://github.com/libretro/libretro-database/blob/master/rdb/Amstrad%20-%20CPC.rdb)\n\n## Features\n\nFrontend-level settings or features that the CrocoDS core respects.\n\n| Feature | Supported |\n|-------------------|:---------:|\n| Restart | ✔ |\n| Screenshots | ✔ |\n| Saves | ✕ |\n| States | ✔ |\n| Rewind | ✔ |\n| Netplay | ✔ |\n| Core Options | ✔ |\n| [Memory Monitoring (achievements)](../guides/memorymonitoring.md) | ✕ |\n| RetroArch Cheats | ✕ |\n| Native Cheats | ✕ |\n| Controls | ✔ |\n| Remapping | ✔ |\n| Multi-Mouse | ✕ |\n| Rumble | ✕ |\n| Sensors | ✕ |\n| Camera | ✕ |\n| Location | ✕ |\n| Subsystem | ✕ |\n| [Softpatching](../guides/softpatching.md) | ✕ |\n| Disk Control | ✕ |\n| Username | ✕ |\n| Language | ✕ |\n| Crop Overscan | ✕ |\n| LEDs | ✕ |\n\n### Directories\n\nThe CrocoDS core's internal core name is 'crocods'\n\nThe CrocoDS core saves/loads to/from these directories.\n\n**Frontend's State directory**\n\n- 'content-name'.state# (State)\n\n### Geometry and timing\n\n- The CrocoDS core's core provided FPS is 50\n- The CrocoDS core's core provided sample rate is 44100 Hz\n- The CrocoDS core's core provided aspect ratio is 1\n\n## Core options\n\nThe CrocoDS core has the following option(s) that can be tweaked from the core options menu. The default setting is bolded.\n\nSettings with (Restart) means that core has to be closed for the new setting to be applied on next launch.\n\n- **Color Monitor** [crocods_greenmonitor] (**color**|green)\n\n\tSelf-explanatory.\n\n??? note \"Color Monitor - color\"\n\t\n\n??? note \"Color Monitor - green\"\n\t\n\n- **Resize** [crocods_resize] (**Auto**|320x200|Overscan)\n\n\tSelf-explanatory.\n\n??? note \"Resize - 320x200\"\n\t\n\n??? note \"Resize - Overscan\"\n\t\n\n- **Speed hack** [crocods_hack] (**no**|yes)\n\n\tAwaiting description.\n\n## Controllers\n\nThe CrocoDS core supports the following device type(s) in the controls menu, bolded device types are the default for the specified user(s):\n\n### User 1 - 2 device types\n\n- None - Doesn't disable input. There's no reason to switch to this.\n- **RetroPad** - Joypad\n- RetroKeyboard - Joypad - Keyboard inputs are always active. Has keymapper support.\n\n### Controller tables\n\n#### Joypad\n\n| User 1 Remap descriptors | RetroPad Inputs | CrocoDS core inputs |\n|--------------------------|------------------------------------------------|---------------------|\n| |  | JOY_FIRE2 |\n| |  | NIL |\n| Pause |  | SPARE |\n| Start |  | RETURN |\n| Up |  | JOY_UP |\n| Down |  | JOY_DOWN |\n| Left |  | JOY_LEFT |\n| Right |  | JOY_RIGHT |\n| |  | JOY_FIRE1 |\n| |  | NIL |\n| |  | NIL |\n| |  | NIL |\n\n| User 2 Remap descriptors | RetroPad Inputs | CrocoDS core inputs |\n|--------------------------|------------------------------------------------|---------------------|\n| |  | SPARE |\n| |  | NIL |\n| |  | SPARE |\n| |  | RETURN |\n| |  | CURSOR_UP |\n| |  | CURSOR_DOWN |\n| |  | CURSOR_LEFT |\n| |  | CURSOR_RIGHT |\n| |  | SPARE |\n| |  | NIL |\n| |  | NIL |\n| |  | NIL |\n\n#### Keyboard\n\n| RetroKeyboard Inputs | CrocoDS core Inputs |\n|------------------------------|---------------------|\n| Keyboard Backspace | DEL |\n| Keyboard Tab | TAB |\n| Keyboard Return | RETURN |\n| Keyboard Escape | ESC |\n| Keyboard Space | SPARE |\n| Keyboard Comma , | COMMA |\n| Keyboard Minus - | MINUS |\n| Keyboard Period . | DOT |\n| Keyboard 0 | 0 |\n| Keyboard 1 | 1 |\n| Keyboard 2 | 2 |\n| Keyboard 3 | 3 |\n| Keyboard 4 | 4 |\n| Keyboard 5 | 5 |\n| Keyboard 6 | 6 |\n| Keyboard 7 | 7 |\n| Keyboard 8 | 8 |\n| Keyboard 9 | 9 |\n| Keyboard Semicolon ; | COLON |\n| Keyboard Equals = | HAT |\n| Keyboard Left Bracket [ | AT |\n| Keyboard Right Bracket ] | OPEN_SQUARE_BRACKET |\n| Keyboard a | A |\n| Keyboard b | B |\n| Keyboard c | C |\n| Keyboard d | D |\n| Keyboard e | E |\n| Keyboard f | F |\n| Keyboard g | G |\n| Keyboard h | H |\n| Keyboard i | I |\n| Keyboard j | J |\n| Keyboard k | K |\n| Keyboard l | L |\n| Keyboard m | M |\n| Keyboard n | N |\n| Keyboard o | O |\n| Keyboard p | P |\n| Keyboard q | Q |\n| Keyboard r | R |\n| Keyboard s | S |\n| Keyboard t | T |\n| Keyboard u | U |\n| Keyboard v | V |\n| Keyboard w | W |\n| Keyboard x | X |\n| Keyboard y | Y |\n| Keyboard z | Z |\n| Keyboard Delete | JOY_LEFT |\n| Keyboard Keypad 0 | F0 |\n| Keyboard Keypad 1 | F1 |\n| Keyboard Keypad 2 | F2 |\n| Keyboard Keypad 3 | F3 |\n| Keyboard Keypad 4 | F4 |\n| Keyboard Keypad 5 | F5 |\n| Keyboard Keypad 6 | F6 |\n| Keyboard Keypad 7 | F7 |\n| Keyboard Keypad 8 | F8 |\n| Keyboard Keypad 9 | F9 |\n| Keyboard Keypad Period . | FDOT |\n| Keyboard Keypad Enter | SMALL_ENTER |\n| Keyboard Up | CURSOR_UP |\n| Keyboard Down | CURSOR_DOWN |\n| Keyboard Right | CURSOR_RIGHT |\n| Keyboard Left | CURSOR_LEFT |\n| Keyboard Insert | JOY_FIRE1 |\n| Keyboard Home | JOY_UP |\n| Keyboard End | JOY_DOWN |\n| Keyboard Page Up | JOY_FIRE2 |\n| Keyboard Page Down | JOY_RIGHT |\n| Keyboard Caps Lock | CAPS_LOCK |\n| Keyboard Right Shift | SHIFT |\n| Keyboard Left Shift | SHIFT |\n| Keyboard Right Control | CONTROL |\n| Keyboard Left Control | CONTROL |\n\n## External Links\n\n- [Official CrocoDS Github Repository](https://github.com/redbug26/crocods-core)\n- [Libretro CrocoDS Core info file](https://github.com/libretro/libretro-super/blob/master/dist/info/crocods_libretro.info)\n- [Libretro CrocoDS Github Repository](https://github.com/libretro/libretro-crocods)\n- [Report Libretro CrocoDS Core Issues Here](https://github.com/libretro/libretro-crocods/issues)\n\n### See also\n\n#### Amstrad - CPC\n\n- [Amstrad - CPC (Caprice32)](caprice32.md)"
},
{
"path": "docs/library/desmume.md",
"content": "# Nintendo - DS (DeSmuME)\n\n## Background\n\nDeSmuME is a Nintendo DS emulator [http://desmume.org](http://desmume.org)\n\n### Author/License\n\nThe DeSmuME core has been authored by\n\n- YopYop156\n- Zeromus\n\nThe DeSmuME core is licensed under\n\n- [GPLv2](https://github.com/TASVideos/desmume/blob/master/license.txt)\n\nA summary of the licenses behind RetroArch and its cores can be found [here](../development/licenses.md).\n\n## Extensions\n\nContent that can be loaded by the DeSmuME core have the following file extensions:\n\n- .nds\n- .bin\n\n## Databases\n\nRetroArch database(s) that are associated with the DeSmuME core:\n\n- [Nintendo - Nintendo DS](https://github.com/libretro/libretro-database/blob/master/rdb/Nintendo%20-%20Nintendo%20DS.rdb)\n- [Nintendo - Nintendo DS Decrypted](https://github.com/libretro/libretro-database/blob/master/rdb/Nintendo%20-%20Nintendo%20DS%20Decrypted.rdb)\n- [Nintendo - Nintendo DS (Download Play)](https://github.com/libretro/libretro-database/blob/master/rdb/Nintendo%20-%20Nintendo%20DS%20(Download%20Play).rdb)\n\n## BIOS\n\nRequired or optional firmware files go in the frontend's `system` directory.\n\n!!! warning\n\tIn order for the firmware files to be loaded by the DeSmuME core, the 'Use External BIOS/Firmware (restart)' core option must be set to enabled.\nThe md5sum of firmware.bin will vary from dump to dump. bios7 and bios9 should be the exact same as here. firmware.bin may not be the same.\n\n| Filename | Description | md5sum |\n|:------------:|:-----------------------:|:--------------------------------:|\n| bios7.bin | ARM7 BIOS - Optional | df692a80a5b1bc90728bc3dfc76cd948 |\n| bios9.bin | ARM9 BIOS - Optional | a392174eb3e572fed6447e956bde4b25 |\n| firmware.bin | NDS Firmware - Optional | |\n\n## Features\n\nFrontend-level settings or features that the DeSmuME core respects.\n\n| Feature | Supported |\n|-------------------|:---------:|\n| Restart | ✔ |\n| Screenshots | ✔ |\n| Saves | ✔ |\n| States | ✔ |\n| Rewind | ✔ |\n| Netplay | ✔ (Not Download Play, Link-Cable or Wi-Fi emulation) |\n| Core Options | ✔ |\n| [Memory Monitoring (achievements)](../guides/memorymonitoring.md) | ✔ |\n| RetroArch Cheats | ✔ |\n| Native Cheats | ✕ |\n| Controls | ✔ |\n| Remapping | ✔ |\n| Multi-Mouse | ✕ |\n| Rumble | ✕ |\n| Sensors | ✕ |\n| Camera | ✕ |\n| Location | ✕ |\n| Subsystem | ✕ |\n| [Softpatching](../guides/softpatching.md) | ✕ |\n| Disk Control | ✕ |\n| Username | ✔ |\n| Language | ✕ |\n| Crop Overscan | ✕ |\n| LEDs | ✕ |\n\n### Directories\n\nThe DeSmuME core's library name is 'DeSmuME'\n\nThe DeSmuME core saves/loads to/from these directories.\n\n**Frontend's Save directory**\n\n| File | Description |\n|:------------:|:----------------------:|\n| *.dsv | Cartridge battery save |\n| firmware.dfc | Firmware settings save |\n\n**Frontend's State directory**\n\n| File | Description |\n|:-------:|:-----------:|\n| *.state | State |\n\n### Geometry and timing\n\n- The DeSmuME core's core provided FPS is 60\n- The DeSmuME core's core provided sample rate is 44100 Hz\n- The DeSmuME core's base width is dependent on the ['Screen layout' core option](#core-options).\n- The DeSmuME core's base height is dependent on the ['Screen layout' core option](#core-options).\n- The DeSmuME core's max width is dependent on the ['Screen layout' core option](#core-options).\n- The DeSmuME core's max height is dependent on the ['Screen layout' core option](#core-options).\n- The DeSmuME core's core provided aspect ratio is dependent on the ['Screen layout' core option](#core-options).\n\n## Nickname\n\nThe Nintendo DS' system nickname can be configured via RetroArch's Username setting in the User Menu.\n\n## Core options\n\nThe DeSmuME core has the following option(s) that can be tweaked from the core options menu. The default setting is bolded.\n\nSettings with (Restart) means that core has to be closed for the new setting to be applied on next launch.\n\n- **Firmware Language** [desmume_firmware_language] (**Auto**|English|Japanese|French|German|Italian|Spanish)\n\n\tChoose the language of the firmware.\n\n- **Use External BIOS/Firmware (restart)** [desmume_use_external_bios] (**disabled**|enabled)\n\n\tWhen set to enabled, the DeSmuME core will use the external firmware files found in RetroArch's System Directory. Look at the [BIOS section](#bios) for more information.\n\n- **Boot Into BIOS (interpreter and external bios only)** [desmume_boot_into_bios] (**disabled**|enabled)\n\n\t**For proper functionality of this core option. The 'CPU Mode' core option must be set to interpreter and the 'Use External BIOS/Firmware' core option must be set to enabled.**\n\n\t**Also, you must have external firmware files in RetroArch's System Directory.**\n\n\tWhen set to enabled, the DeSmuME core will boot into the Nintendo DS firmware screen upon content load.\n\n\tAny settings changed in the firmware screen will be saved to firmware.dfc in RetroArch's Save directory.\n\n- **Load Game Into Memory (restart)** [desmume_load_to_memory] (**disabled**|enabled)\n\n\tLoads the entire game into memory before startup. Will decrease in-game loading times at the cost of increased game startup times.\n\n- **CPU Cores** [desmume_num_cores] (**1**|2|3|4)\n\n\tConfigure how many CPU cores the DeSmuME core will use. Please note that, in general, DeSmuME benefits more from few fast CPUs than from many slow CPUs. For example, a dual-core 3.9GHz CPU will run DeSmuME much faster than a 12-core 1.6GHz CPU.\n\n- **CPU Mode** [desmume_cpu_mode] (**jit**|interpreter)\n\n\tChoose to run CPU emulation through the Interpreter engine or the JIT Dynamic Recomplier engine.\n\n\tInterpreter has better compatibility than JIT Dynamic Recompiler. Some games that fail when using JIT Dynamic Recompiler will work fine with Interpreter. The tradeoff here is that Interpreter has much lower performance than JIT Dynamic Recompiler.\n\n\tPlease note that the default setting for this core option is dependent on your hardware. The JIT Dynamic Recompiler is not available on all hardware (e.g. Android devices).\n\n- **JIT Block Size** [desmume_jit_block_size] (**12**|13|14|15|16|17|18|19|20|21|22|23|24|25|26|27|28|29|30|31|32|33|34|35|36|37|38|39|40|41|42|43|44|45|46|47|48|49|50|51|52|53|54|55|56|57|58|59|60|61|62|63|64|65|66|67|68|69|70|71|72|73|74|75|76|77|78|79|80|81|82|83|84|85|86|87|88|89|90|91|92|93|94|95|96|97|98|99|100|0|1|2|3|4|5|6|7|8|9|10|11)\n\n\tThis core option is only available when the 'CPU mode' core option to set to jit. You may need to tune the block size to prevent some games from breaking. 1 = most accurate, 100 = fastest.\n\n- **Enable Advanced Bus-Level Timing** [desmume_advanced_timing] (**enabled**|disabled)\n\n\tThis will improve or fix some games but it is very performance demanding. Disable this if you want more speed.\n\n- **Frameskip** [desmume_frameskip] (**0**|1|2|3|4|5|6|7|8|9)\n\n\tChoose how much frames should be skipped to improve performance at the expense of visual smoothness.\n\n\tIt is generally safe to choose 1 or 2 if you don't mind a slightly choppier game, in order to get a speedup.\n\n\tIf screens seem stuck or screen flickering becomes unacceptable, pick a different frame skip value.\n\n- **Internal Resolution (restart)** [desmume_internal_resolution] (**256x192**|512x384|768x576|1024x768|1280x960|1536x1152|1792x1344|2048x1536|2304x1728|2560x1920)\n\n\tConfigure the resolution. Requires a restart.\n\n??? note \"Internal resolution - 256x192\"\n\t\n\n??? note \"Internal resolution - 2560x1920\"\n\t\n\n- **OpenGL Rasterizer (restart)** [desmume_opengl_mode] (**disabled**|enabled)\n\n\tEnable OpenGL renderer.\n\n\t**The Frontend's video driver must be set to gl.**\n\n- **OpenGL: Color Depth (restart)** [desmume_color_depth] (**16-bit**|32-bit)\n\n\t32-bit allows full color support from the DS (natively 6-bit).\n\n\t**OpenGL Rasterizer core option must be set to enabled.**\n\n- **OpenGL: Multisampling (restart)** [desmume_gfx_multisampling] (**disabled**|2|4|8|16|32)\n\n\tAwaiting description.\n\n- **OpenGL: Texture Smoothing** [desmume_gfx_texture_smoothing] (**disabled**|enabled)\n\n\tAwaiting description.\n\n- **Soft3D: High-res Color Interpolation** [desmume_gfx_highres_interpolate_color] (**disabled**|enabled)\n\n\tAwaiting description.\n\n- **Soft3D: Line Hack** [desmume_gfx_linehack] (**enabled**|disabled)\n\n\tFixes some graphical bugs involving lines, but causes some other bugs. Not many games use lines.\n\n- **Soft3D: Texture Hack** [desmume_gfx_txthack] (**disabled**|enabled)\n\n\tAwaiting description.\n\n- **Edge Marking** [desmume_gfx_edgemark] (**enabled**|disabled)\n\n\tAwaiting description.\n\n- **\"Texture Scaling (xBrz)** [desmume_gfx_texture_scaling] (**1**|2|4)\n\n\tAwaiting description.\n\n- **Texture Deposterization** [desmume_gfx_texture_deposterize] (**disabled**|enabled)\n\n\tAwaiting description.\n\n- **Screen Layout** [desmume_screens_layout] (**top/bottom**|bottom/top|left/right|right/left|top only|bottom only|quick switch|hybrid/top|hybrid/bottom)\n\n\tSelf-explanatory.\n\n??? note \"Screen layout - top/bottom\"\n\t\n\n??? note \"Screen layout - bottom/top\"\n\t\n\n??? note \"Screen layout - left/right\"\n\t\n\n??? note \"Screen layout - right/left\"\n\t\n\n??? note \"Screen layout - top only\"\n\t\n\n??? note \"Screen layout - bottom only\"\n\t\n\n??? note \"Screen layout - hybrid/top\"\n\t\n\n- **Screen Gap** [desmume_screens_gap] (0 to 100 in increments of 1. **0 is default.**)\n\n\tSelf explanatory.\n\n??? note \"Screen Gap - 0\"\n\t\n\n??? note \"Screen Gap - 100\"\n\t\n\n- **Hybrid Layout: Scale (restart)** [desmume_hybrid_layout_scale] (**1**|3)\n\n\tSelf explanatory. The 'Screen layout' core option must be set to a hybrid setting for this to function properly.\n\n??? note \"Hybrid layout scale - 1\"\n\t\n\n??? note \"Hybrid layout scale - 3\"\n\t\n\n- **Hybrid Layout: Show Both Screens** [desmume_hybrid_showboth_screens] (**enabled**|disabled)\n\n\tRemoves the small top screen when the 'Screen layout' core option is set to hybrid/top\n\n\tRemoves the small bottom screen when the 'Screen layout' core option is set to hybrid/bottom\n\n- **Hybrid Layout: Cursor Always on Small Screen** [desmume_hybrid_cursor_always_smallscreen] (**enabled**|disabled)\n\n\tSelf explanatory.\n\n\tDisablng this allows you to use the stylus on the big bottom screen when the 'Screen layout' core option is set to hybrid/bottom.\n\n- **Mouse/Pointer** [desmume_pointer_mouse] (**enabled**|disabled)\n\n\tEnabling this allows inputs for the stylus.\n\n- **Pointer Type** [desmume_pointer_type] (**mouse**|touch)\n\n\tSetting this to mouse allows you to use mouse inputs for the stylus\n\n\tSetting this to touch allows you to use mouse/touch inputs for the stylus (e.g. Touch controls on Android devices).\n\n- **Mouse Speed** [desmume_mouse_speed] (**1.0**|1.5|2.0|0.01|0.02|0.03|0.04|0.05|0.125|0.25|0.5)\n\n\t**The Pointer type core option must be set to mouse**\n\n\tAdjust mouse speed for the stylus.\n\n- **Pointer Rotation** [desmume_input_rotation] (**0**|90|180|270)\n\n\tRotate pointer controls\n\n\tThis is can be used in conjuction with RetroArch's Rotation setting.\n\n- **Pointer Mode for Left Analog** [desmume_pointer_device_l] (**none**|emulated|absolute|pressed)\n\n\tAwaiting description.\n\n- **Pointer Mode for Right Analog** [desmume_pointer_device_r] (**none**|emulated|absolute|pressed)\n\n\tAwaiting description.\n\n- **Emulated Pointer Deadzone Percent** [desmume_pointer_device_deadzone] (**15**|20|25|30|35|0|5|10\")\n\n\tAwaiting description.\n\n- **Emulated Pointer Acceleration Modifier Percent** [desmume_pointer_device_acceleration_mod] (**0**|1|2|3|4|5|6|7|8|9|10|11|12|13|14|15|16|17|18|19|20|21|22|23|24|25|26|27|28|29|30|31|32|33|34|35|36|37|38|39|40|41|42|43|44|45|46|47|48|49|50|51|52|53|54|55|56|57|58|59|60|61|62|63|64|65|66|67|68|69|70|71|72|73|74|75|76|77|78|79|80|81|82|83|84|85|86|87|88|89|90|91|92|93|94|95|96|97|98|99|100)\n\n\tAwaiting description.\n\n- **Emulated Stylus Pressure Modifier Percent** [desmume_pointer_stylus_pressure] (**50**|51|52|53|54|55|56|57|58|59|60|61|62|63|64|65|66|67|68|69|70|71|72|73|74|75|76|77|78|79|80|81|82|83|84|85|86|87|88|89|90|91|92|93|94|95|96|97|98|99|100|0|1|2|3|4|5|6|7|8|9|10|11|12|13|14|15|16|17|18|19|20|21|22|23|24|25|26|27|28|29|30|31|32|33|34|35|36|37|38|39|40|41|42|43|44|45|46|47|48|49)\n\n\tAwaiting description.\n\n- **Pointer Colour** [desmume_pointer_colour] (**white**|black|red|blue|yellow)\n\n\tAwaiting description.\n\n- **Microphone Button Noise Type** [desmume_mic_mode] (**pattern**|random)\n\n\tConfigure microphone input settings.\n\n\tWith the pattern setting, DeSmuME will use its internal noise sample for microphone input which works for many games that want you to blow on the mic.\n\n\tWith the random setting, DeSmuME will use random whitenoise for microphone input which will work for games that require blowing but which don't work with the internal noise sample.\n\n## Controllers\n\nThe DeSmuME core supports the following device type(s) in the controls menu, bolded device types are the default for the specified user(s):\n\n### User 1 device types\n\n- None - Doesn't disable input. There's no reason to switch to this.\n- **RetroPad** - Joypad - Stay on this.\n- RetroPad w/Analog - Joypad - Same as RetroPad. There's no reason to switch to this.\n\n### Other controllers\n\n- Stylus - Pointer or Mouse - The DesmuME 2015 core will emulate stylus inputs using the mouse API or the pointer API depending on what the ['Pointer type' core option](#core-options) is set to.\n\n### Device tables\n\n#### Joypad\n\n\n\n| User 1 input descriptors | RetroPad Inputs | DeSmuME inputs |\n|--------------------------|------------------------------------------------|---------------------|\n| B |  | B |\n| Y |  | Y |\n| Select |  | Select |\n| Start |  | Start |\n| Up |  | Up |\n| Down |  | Down |\n| Left |  | Left |\n| Right |  | Right |\n| A |  | A |\n| X |  | X |\n| L |  | L |\n| R |  | R |\n| Lid Close/Open |  | Lid Close/Open |\n| Tap Stylus |  | Tap Stylus |\n| Make Microphone Noise |  | Toggle Microphone |\n| Quick Screen Switch |  | Quick Screen Switch |\n| |  X | [Pointer mode l-analog](#core-options) X |\n| |  Y | [Pointer mode l-analog](#core-options) Y |\n| |  X | [Pointer mode r-analog](#core-options) X |\n| |  Y | [Pointer mode r-analog](#core-options) Y |\n\n#### Mouse\n\n| RetroMouse Inputs | DeSmuME inputs |\n|-------------------------------------------------------|----------------|\n|  Mouse Cursor | Stylus |\n|  Mouse 1 | Stylus Press |\n\n#### Pointer\n\n| RetroPointer Inputs | DeSmuME inputs |\n|--------------------------------------------------------------------------------------------------------------------------|----------------|\n|  or  Pointer Position | Stylus |\n|  or  Pointer Pressed | Stylus Press |\n\n## Compatibility\n\nSame as upstream standalone.\n\n## External Links\n\n- [Official DeSmuME Website](https://desmume.org/)\n- [Official DeSmuME Github Repository](https://github.com/TASVideos/desmume)\n- [Libretro DeSmuME Core info file](https://github.com/libretro/libretro-super/blob/master/dist/info/desmume_libretro.info)\n- [Libretro DeSmuME Github Repository](https://github.com/libretro/desmume)\n- [Report Libretro DeSmuME Core Issues Here](https://github.com/libretro/desmume/issues)\n- [Gameplay Videos](https://www.youtube.com/playlist?list=PLRbgg4gk_0Icim_vEjB_0GeF18zkMBiqU)\n\n### See also\n\n#### Nintendo - Nintendo DS + Decrypted + (Download Play)\n\n- [Nintendo - DS (DeSmuME 2015)](desmume_2015.md)\n- [Nintendo - DS (melonDS 2021)](melonds.md)\n- [Nintendo - DS (melonDS DS)](melonds_ds.md)\n"
},
{
"path": "docs/library/desmume_2015.md",
"content": "# Nintendo - DS (DeSmuME 2015)\n\n## Background\n\nPort of Desmume to libretro based on Desmume SVN circa 2015.\n\n### Author/License\n\nThe DeSmuME 2015 core has been authored by\n\n- YopYop156\n- Zeromus\n\nThe DeSmuME 2015 core is licensed under\n\n- [GPLv2](https://github.com/libretro/desmume2015/blob/master/desmume/COPYING)\n\nA summary of the licenses behind RetroArch and its cores can be found [here](../development/licenses.md).\n\n## Extensions\n\nContent that can be loaded by the DeSmuME 2015 core have the following file extensions:\n\n- .nds\n- .bin\n\n## Databases\n\nRetroArch database(s) that are associated with the DeSmuME 2015 core:\n\n- [Nintendo - Nintendo DS](https://github.com/libretro/libretro-database/blob/master/rdb/Nintendo%20-%20Nintendo%20DS.rdb)\n- [Nintendo - Nintendo DS Decrypted](https://github.com/libretro/libretro-database/blob/master/rdb/Nintendo%20-%20Nintendo%20DS%20Decrypted.rdb)\n- [Nintendo - Nintendo DS (Download Play)](https://github.com/libretro/libretro-database/blob/master/rdb/Nintendo%20-%20Nintendo%20DS%20(Download%20Play).rdb)\n\n## Features\n\nFrontend-level settings or features that the DeSmuME 2015 core respects.\n\n| Feature | Supported |\n|-------------------|:---------:|\n| Restart | ✔ |\n| Screenshots | ✔ |\n| Saves | ✔ |\n| States | ✔ |\n| Rewind | ✔ |\n| Netplay | ✔ (Not Download Play, Link-Cable or Wi-Fi emulation) |\n| Core Options | ✔ |\n| [Memory Monitoring (achievements)](../guides/memorymonitoring.md) | ✔ |\n| RetroArch Cheats | ✔ |\n| Native Cheats | ✕ |\n| Controls | ✔ |\n| Remapping | ✔ |\n| Multi-Mouse | ✕ |\n| Rumble | ✕ |\n| Sensors | ✕ |\n| Camera | ✕ |\n| Location | ✕ |\n| Subsystem | ✕ |\n| [Softpatching](../guides/softpatching.md) | ✕ |\n| Disk Control | ✕ |\n| Username | ✕ |\n| Language | ✕ |\n| Crop Overscan | ✕ |\n| LEDs | ✕ |\n\n### Directories\n\nThe DeSmuME 2015 core's library name is 'DeSmuME 2015'\n\nThe DeSmuME 2015 core saves/loads to/from these directories.\n\n**Frontend's Save directory**\n\n| File | Description |\n|:-----:|:----------------------:|\n| *.dsv | Cartridge battery save |\n\n**Frontend's State directory**\n\n| File | Description |\n|:--------:|:-----------:|\n| *.state# | State |\n\n### Geometry and timing\n\n- The DeSmuME 2015 core's core provided FPS is 60\n- The DeSmuME 2015 core's core provided sample rate is 44100 Hz\n- The DeSmuME 2015 core's base width is dependent on the ['Screen layout' core option](#core-options).\n- The DeSmuME 2015 core's base height is dependent on the ['Screen layout' core option](#core-options).\n- The DeSmuME 2015 core's max width is dependent on the ['Screen layout' core option](#core-options).\n- The DeSmuME 2015 core's max height is dependent on the ['Screen layout' core option](#core-options).\n- The DeSmuME 2015 core's core provided aspect ratio is dependent on the ['Screen layout' core option](#core-options).\n\n## Nickname\n\nChanging the system nickname isn't currently supported by the DeSmuME 2015 core.\n\n## Core options\n\nThe DeSmuME 2015 core has the following option(s) that can be tweaked from the core options menu. The default setting is bolded.\n\nSettings with (Restart) means that core has to be closed for the new setting to be applied on next launch.\n\n- **Internal resolution (restart)** [desmume_internal_resolution] (**256x192**|512x384|768x576|1024x768|1280x960|1536x1152|1792x1344|2048x1536|2304x1728|2560x1920)\n\n\tSelf explanatory. Please note that the DeSmuME core is only software rendered.\n\n??? note \"Internal resolution - 256x192\"\n\t\n\n??? note \"Internal resolution - 2560x1920\"\n\t\n\n- **CPU cores** [desmume_num_cores] (**1**|2|3|4)\n\n\tConfigure how much CPU cores the DeSmuME core will use. Please note that, in general, DeSmuME benefits more from few fast CPUs than from many slow CPUs. For example, a dual-core 3.9GHz CPU will run DeSmuME much faster than a 12-core 1.6GHz CPU.\n\n- **CPU mode** [desmume_cpu_mode] (**jit**|interpreter)\n\n\tChoose to run CPU emulation through the Interpreter engine or the JIT Dynamic Recomplier engine.\n\n\tInterpreter has better compatibility than JIT Dynamic Recompiler. Some games that fail when using JIT Dynamic Recompiler will work fine with Interpreter. The tradeoff here is that Interpreter has much lower performance than JIT Dynamic Recompiler.\n\n\tPlease note that the default setting for this core option is dependent on your hardware. The JIT Dynamic Recompiler is not available on all hardware (e.g. Android devices).\n\n- **JIT block size** [desmume_jit_block_size] (0 to 100 in increments of 1. **12 is default**.)\n\n\tThis core option is only available when the 'CPU mode' core option to set to jit. You may need to tune the block size to prevent some games from breaking. 1 = most accurate, 100 = fastest.\n\n- **Screen layout** [desmume_screens_layout] (**top/bottom**|bottom/top|left/right|right/left|top only|bottom only|quick switch|hybrid/top|hybrid/bottom)\n\n\tSelf-explanatory.\n\n??? note \"Screen layout - top/bottom\"\n\t\n\n??? note \"Screen layout - bottom/top\"\n\t\n\n??? note \"Screen layout - left/right\"\n\t\n\n??? note \"Screen layout - right/left\"\n\t\n\n??? note \"Screen layout - top only\"\n\t\n\n??? note \"Screen layout - bottom only\"\n\t\n\n??? note \"Screen layout - hybrid/top\"\n\t\n\n- **Hybrid layout scale (restart)** [desmume_hybrid_layout_scale] (**1**|3)\n\n\tSelf explanatory. The 'Screen layout' core option must be set to a hybrid setting for this to function properly.\n\n??? note \"Hybrid layout scale - 1\"\n\t\n\n??? note \"Hybrid layout scale - 3\"\n\t\n\n- **Hybrid layout show both screen** [desmume_hybrid_showboth_screens] (**enabled**|disabled)\n\n\tRemoves the small top screen when the 'Screen layout' core option is set to hybrid/top\n\n\tRemoves the small bottom screen when the 'Screen layout' core option is set to hybrid/bottom\n\n- **Hybrid layout cursor always on small screen** [desmume_hybrid_cursor_always_smallscreen] (**enabled**|disabled)\n\n\tSelf explanatory.\n\n\tDisablng this allows you to use the stylus on the big bottom screen when the 'Screen layout' core option is set to hybrid/bottom.\n\n- **Enable mouse/pointer** [desmume_pointer_mouse] (**enabled**|disabled)\n\n\tEnabling this allows inputs for the stylus.\n\n- **Pointer type** [desmume_pointer_type] (**mouse**/touch)\n\n\tSetting this to mouse allows you to use mouse inputs for the stylus\n\n\tSetting this to touch allows you to use mouse/touch inputs for the stylus (e.g. Touch controls on Android devices).\n\n- **Mouse Speed** [desmume_mouse_speed] (**1.0**|1.5|2.0|0.125|0.25|0.5)\n\n\t**The Pointer type core option must be set to mouse**\n\n\tAdjust mouse speed for the stylus.\n\n- **Pointer Colour** [desmume_pointer_colour] (**white**|black|red|blue|yellow\")\n\n\tConfigure the color of the stylus pointer.\n\n??? note \"Pointer Colour - white\"\n\t\n\n??? note \"Pointer Colour - black\"\n\t\n\n??? note \"Pointer Colour - red\"\n\t\n\n??? note \"Pointer Colour - blue\"\n\t\n\n??? note \"Pointer Colour - yellow\"\n\t\n\n- **Pointer mode l-analog** [desmume_pointer_device_l] (**none**|emulated|absolute|pressed)\n\n\tAwaiting description.\n\n- **Pointer mode r-analog** [desmume_pointer_device_r] (**none**|emulated|absolute|pressed)\n\n\tAwaiting description.\n\n- **Emulated pointer deadzone percent** [desmume_pointer_device_deadzone] (**15**|20|25|30|35|0|5|10)\n\n\tAwaiting description.\n\n- **Emulated pointer acceleration modifier percent** [desmume_pointer_device_acceleration_mod] (0 to 100 in increments of 1. **0 is default**.)\n\n\tAwaiting description.\n\n- **Emulated stylus pressure modifier percent** [desmume_pointer_stylus_pressure] (0 to 100 in increments of 1. **50 is default**.)\n\n\tConfigure the emulated pressure on the touchscreen from a stylus pressing on it.\n\n- **Enable emulated stylus jitter** [desmume_pointer_stylus_jitter] (**disabled**|enabled)\n\n\tEmulate the tiny jitter from a human hand when holding a stylus; some games were accidentally dependent on this.\n\n- **Load Game into Memory (restart)** [desmume_load_to_memory] (**disabled**|enabled)\n\n\tLoads the entire game into memory before startup. Will decrease in-game loading times at the cost of increased game startup times.\n\n- **Enable Advanced Bus-Level Timing** [desmume_advanced_timing] (**enabled**|disabled)\n\n\tThis will improve or fix some games but it is very performance demanding. Disable this if you want more speed.\n\n- **Firmware language** [desmume_firmware_language] (**Auto**|English|Japanese|French|German|Italian|Spanish)\n\n\tChoose the language of the BIOS.\n\n- **Frameskip** [desmume_frameskip] (**0**|1|2|3|4|5|6|7|8|9)\n\n\tChoose how much frames should be skipped to improve performance at the expense of visual smoothness.\n\n\tIt is generally safe to choose 1 or 2 if you don't mind a slightly choppier game, in order to get a speedup.\n\n\tIf screens seem stuck or screen flickering becomes unacceptable, pick a different frame skip value.\n\n- **Screen Gap** [desmume_screens_gap] (0 to 100 in increments of 1. **0 is default.**)\n\n\tSelf explanatory.\n\n??? note \"Screen Gap - 0\"\n\t\n\n??? note \"Screen Gap - 100\"\n\t\n\n- **Enable Edgemark** [desmume_gfx_edgemark] (**enabled**|disabled)\n\n\tAwaiting description.\n\n- **Enable Line Hack** [desmume_gfx_linehack] (**enabled**|disabled)\n\n\tFixes some graphical bugs involving lines, but causes some other bugs. Not many games use lines.\n\n- **Enable TXT Hack** [desmume_gfx_txthack] (**disabled**|enabled)\n\n\tFixes text bugs in some games (e.g. Etrian Odyssey). You may need to toggle it off & on by scene.\n\n- **Force Microphone Enable** [desmume_mic_force_enable] (**disabled**|enabled)\n\n\tSelf-explanatory.\n\n- **Microphone Simulation Settings** [desmume_mic_mode] (**internal**|sample|random|physical)\n\n\tConfigure microphone input settings.\n\n\tWith the internal setting, DeSmuME will use its internal noise sample for microphone input which works for many games that want you to blow on the mic.\n\n\tWith the sample setting, you can supply your own microphone sample for microphone input. **This may not work currently in the DeSmuME core**.\n\n\tWith the random setting, DeSmuME will use random whitenoise for microphone input which will work for games that require blowing but which don't work with the internal noise sample.\n\n\tWith the physical setting, you can use your default recording device for microphone input. **This may not work currently in the DeSmuME core**.\n\n## Controllers\n\nThe DeSmuME 2015 core supports the following device type(s) in the controls menu, bolded device types are the default for the specified user(s):\n\n### User 1 device types\n\n- None - Doesn't disable input. There's no reason to switch to this.\n- **RetroPad** - Joypad - Stay on this.\n- RetroPad w/Analog - Joypad - Same as RetroPad. There's no reason to switch to this.\n\n### Other devices\n\n- Stylus - Pointer or Mouse - The DesmuME 2015 core will emulate stylus inputs using the mouse API or the pointer API depending on what the ['Pointer type' core option](#core-options) is set to.\n\n### Device tables\n\n#### Joypad\n\n\n\n| User 1 input descriptors | RetroPad Inputs | DeSmuME 2015 inputs |\n|--------------------------|------------------------------------------------|---------------------|\n| B |  | B |\n| Y |  | Y |\n| Select |  | Select |\n| Start |  | Start |\n| Up |  | Up |\n| Down |  | Down |\n| Left |  | Left |\n| Right |  | Right |\n| A |  | A |\n| X |  | X |\n| L |  | L |\n| R |  | R |\n| Lid Close/Open |  | Lid Close/Open |\n| Tap Stylus |  | Tap Stylus |\n| Toggle Microphone |  | Toggle Microphone |\n| Quick Screen Switch |  | Quick Screen Switch |\n| |  X | [Pointer mode l-analog](#core-options) X |\n| |  Y | [Pointer mode l-analog](#core-options) Y |\n| |  X | [Pointer mode r-analog](#core-options) X |\n| |  Y | [Pointer mode r-analog](#core-options) Y |\n\n#### Mouse\n\n| RetroMouse Inputs | DeSmuME 2015 inputs |\n|-------------------------------------------------------|---------------------|\n|  Mouse Cursor | Stylus |\n|  Mouse 1 | Stylus Press |\n\n#### Pointer\n\n| RetroPointer Inputs | DeSmuME 2015 inputs |\n|--------------------------------------------------------------------------------------------------------------------------|---------------------|\n|  or  Pointer Position | Stylus |\n|  or  Pointer Pressed | Stylus Press |\n\n## Compatibility\n\n| Game | Issue |\n|------------------------------------------|-----------------------------------------------------------------------------------------------|\n| Alice in Wonderland \t | Needs JIT Block Size 8 or smaller to get past title screen. |\n| Golden Sun: Dark Dawn (Europe) \t | Runs very slowly. Buggy sound. |\n| Hotel Dusk: Room 215 \t | Graphics glitches. Unintended \"scanlines\" appear on some screens. |\n| Pokémon HeartGold (Europe) (Rev 10) | Graphics glitches . Black pixels pop-ups in the top screen. Top screen goes black. |\n| Pokémon SoulSilver (Europe) (Rev 10) | Graphics glitches. Black pixels pop-ups in the top screen. Top screen goes black. |\n| Puppy Palace (U) / My Puppy Shop (E) | Crashes in menus. |\n| Rune Factory (U) \t | Random crashes. |\n| Rune Factory 2 (U) \t | Random crashes. |\n| Ultimate Mortal Kombat 3 \t | Runs very slowly. |\n| Yoshi Touch & Go \t | Runs very slowly. |\n| Yu-Gi-Oh! 5D's WORLD CHAMPIONSHIP 2010 (J) | Random crashes. |\n\n## External Links\n\n- [Official DeSmuME Website](https://desmume.org/)\n- [Official DeSmuME Github Repository](https://github.com/TASVideos/desmume)\n- [Libretro DeSmuME 2015 Core info file](https://github.com/libretro/libretro-super/blob/master/dist/info/desmume2015_libretro.info)\n- [Libretro DeSmuME 2015 Github Repository](https://github.com/libretro/desmume2015)\n- [Report Libretro DeSmuME 2015 Core Issues Here](https://github.com/libretro/desmume2015/issues)\n\n### See also\n\n#### Nintendo - Nintendo DS (Download Play)\n\n- [Nintendo - DS (DeSmuME)](desmume.md)\n- [Nintendo - DS (melonDS 2021)](melonds.md)\n- [Nintendo - DS (melonDS DS)](melonds_ds.md)\n\n#### Nintendo - Nintendo DS Decrypted\n\n- [Nintendo - DS (DeSmuME)](desmume.md)\n- [Nintendo - DS (melonDS 2021)](melonds.md)\n- [Nintendo - DS (melonDS DS)](melonds_ds.md)\n\n#### Nintendo - Nintendo DS\n\n- [Nintendo - DS (DeSmuME)](desmume.md)\n- [Nintendo - DS (melonDS 2021)](melonds.md)\n- [Nintendo - DS (melonDS DS)](melonds_ds.md)\n"
},
{
"path": "docs/library/dice.md",
"content": "# DICE\n\n## Background\n\nDICE is a Discrete Integrated Circuit Emulator. It emulates computer systems\nthat lack any type of CPU, consisting only of discrete logic components.\n\ndice-libretro is a Libretro port of DICE, to run in RetroArch.\n\n\nThe DICE core has been authored by:\n\n- Adam B & DICE Team (Standalone DICE)\n- Ken Mitton\n\nThe DICE core is licensed under:\n\n- [GPLv3](https://github.com/mittonk/dice-libretro/blob/main/LICENSE.txt)\n\nA summary of the licenses behind RetroArch and its cores can be found [here](../development/licenses.md).\n\n## Requirements\n\nMinimal.\n\n## How to start the DICE core:\n\nSome games use zipped ROMs and launch similarly to MAME or FBNeo --- filename is\nimportant, see table at\nhttps://github.com/mittonk/dice-libretro/?tab=readme-ov-file#usage\n\nPlease do not attempt to contact the DICE team to request ROM files.\n\nSome games (pong, breakout, pinpong, etc) do not have any ROM on the board at\nall. For these, copy the dummy launcher file from\n[dummy_files](https://github.com/mittonk/dice-libretro/tree/main/dummy_files)\nto your ROM\nfolder; these have a correct name (for example, pong.dmy) that will get\nRetroArch to set up lr-dice for the correct game.\n\n## BIOS\n\nNone.\n\n## Extensions\n\nContent that can be loaded by the DICE core have the following file extensions:\n\n- .zip\n- .dmy\n\n.dmy files are used for games without any ROM component, see \"How to start the\nDICE core\" above.\n\nRetroArch database(s) that are associated with the DICE core:\n\n- [DICE](https://github.com/libretro/libretro-database/blob/master/rdb/DICE.rdb)\n\n## Features\n\nFrontend-level settings or features that the DICE core respects:\n\n| Feature | Supported |\n|-------------------|:---------:|\n| Restart | ✔ |\n| Saves | ✕ |\n| States | ✕ |\n| Rewind | ✕ |\n| Netplay | ✕ |\n| Core Options | ✔ |\n| [Memory Monitoring (achievements)](../guides/memorymonitoring.md) | ✕ |\n| RetroArch Cheats | ✕ |\n| Native Cheats | ✕ |\n| Controls | ✔ |\n| Remapping | ✔ |\n| Multi-Mouse | ✔ |\n| Rumble | ✕ |\n| Sensors | ✕ |\n| Camera | ✕ |\n| Location | ✕ |\n| Subsystem | ✕ |\n| [Softpatching](../guides/softpatching.md) | ✕ |\n| Disk Control | ✕ |\n| Username | ✕ |\n| Language | ✔ |\n| Crop Overscan | ✕ |\n| LEDs | ✕ |\n\n## Directories\n\nNone.\n\n## Geometry and timing\n\nVaries based on individual game, mostly around 640x246, 60 FPS.\n\n## Usage\n\nAgain, see .dmy files for games that do not use read-only memory.\n\n## Core options\n\nThere are numerous options around using mice to simulate spinners / paddle\ncontrollers, see\n[mouse-support](https://github.com/mittonk/dice-libretro/?tab=readme-ov-file#mouse-support).\n\n- Easy: One mouse can be used for Paddle 1. Use \"Core Options -> Use mouse pointer for paddle 1\". You'll still want a keyboard or gamepad handy to have enough buttons.\n\n- Somewhat advanced: Multiple mice are supported using certain libretro drivers on Linux and Windows, see [retromouse.md](https://github.com/mittonk/dice-libretro/blob/main/retromouse.md).\n\n\n\n## User 1 device types\n\nThe DICE core supports the following device type(s) in the controls menu, bolded device types are the default for the specified user(s):\n\n- **RetroPad**\n- RetroPad w/Analog\n- Mouse\n\n## Joypad\n\nMost games are playable with just a joypad. Controls vary by game.\n\n| RetroPad Inputs | User # input descriptors | (Device name) Inputs |\n|------------------------------------------------|--------------------------|---------------------------|\n|  | Button 1 | - |\n|  | Button 3 | - |\n|  | Coin | - |\n|  | Start | - |\n|  | Up | - |\n|  | Down | - |\n|  | Left | - |\n|  | Right | - |\n|  | Button 2 | - |\n|  | | - |\n|  | Dollar | - |\n|  | | - |\n|  | | - |\n|  | | - |\n|  | | - |\n|  | | - |\n|  X | Paddle | - |\n|  Y | Paddle | - |\n|  X | | - |\n|  Y | | - |\n\n## Mouse\n\n| RetroMouse Inputs | (Device name) Inputs |\n|-------------------------------------------------------|---------------------------|\n|  Mouse Cursor | Paddle, see [mouse-support](https://github.com/mittonk/dice-libretro/?tab=readme-ov-file#mouse-support) |\n|  Mouse 1 | - |\n|  Mouse 2 | - |\n|  Mouse 3 | - |\n| Mouse 4 | - |\n| Mouse 5 | - |\n| Wheel Up | - |\n| Wheel Down | - |\n| Wheel Left | - |\n| Wheel Right | - |\n\n## Compatibility\n\n|\tName\t|\tBase filename\t|\tPublisher\t|\tYear |\tNeeds ROM?\t|\n| ---- | ------------- | --------- | ---- | -------- |\n|\tAnti-Aircraft\t|\tantiaircraft\t|\tAtari\t|\t1975\t|\tx\t|\n|\tAttack\t|\tattack\t|\tExidy\t|\t1977\t|\tx\t|\n|\tBreakout\t|\tbreakout\t|\tAtari\t|\t1976\t|\t\t|\n|\tClean Sweep\t|\tcleansweep\t|\tRamtek\t|\t1974\t|\tx\t|\n|\tCrash 'N Score\t|\tcrashnscore\t|\tAtari\t|\t1975\t|\tx\t|\n|\tCrossfire\t|\tcrossfire\t|\tAtari\t|\t1975\t|\t\t|\n|\tGotcha\t|\tgotcha\t|\tAtari\t|\t1973\t|\t\t|\n|\tHi-Way\t|\thiway\t|\tAtari\t|\t1975\t|\t\t|\n|\tIndy 4\t|\tindy4\t|\tAtari\t|\t1976\t|\tx\t|\n|\tJet Fighter\t|\tjetfighter\t|\tAtari\t|\t1975\t|\tx\t|\n|\tPin Pong\t|\tpinpong\t|\tAtari\t|\t1974\t|\t\t|\n|\tPong\t|\tpong\t|\tAtari\t|\t1972\t|\t\t|\n|\tPong Doubles\t|\tpongdoubles\t|\tAtari\t|\t1973\t|\t\t|\n|\tQuadrapong\t|\tquadrapong\t|\tAtari\t|\t1974\t|\t\t|\n|\tRebound\t|\trebound\t|\tAtari\t|\t1974\t|\t\t|\n|\tShark Jaws\t|\tsharkjaws\t|\tAtari\t|\t1975\t|\tx\t|\n|\tSpace Race\t|\tspacerace\t|\tAtari\t|\t1973\t|\t\t|\n|\tSteeplechase\t|\tsteeplechase\t|\tAtari\t|\t1975\t|\tx\t|\n|\tStunt Cycle\t|\tstuntcycle\t|\tAtari\t|\t1976\t|\tx\t|\n|\tTV Basketball\t|\ttvbasketball\t|\tMidway\t|\t1974\t|\t\t|\n|\tWipe Out\t|\twipeout\t|\tRamtek\t|\t1974\t|\tx\t|\n\n\n## External Links\n\n- [Original DICE Website](https://adamulation.blogspot.com/) (inactive)\n- [Original DICE Repository](https://sourceforge.net/projects/dice/) (inactive)\n- [DirtBagXon's DICE Repository](https://github.com/DirtBagXon/DICE)\n- [Libretro DICE Core info file](https://github.com/libretro/libretro-super/blob/master/dist/info/dice.info)\n- [Libretro DICE Github Repository](https://github.com/mittonk/dice-libretro)\n- [Report Libretro DICE Core Issues Here](https://github.com/mittonk/dice-libretro/issues)\n\n## (Related cores)\n\nMAME has some overlap (Pong, for example).\n"
},
{
"path": "docs/library/dinothawr.md",
"content": "# Dinothawr\n\n\n\n## Background\n\nDinothawr is a block pushing puzzle game on slippery surfaces. Our hero is a dinosaur whose friends are trapped in ice. Through puzzles it is your task to free the dinos from their ice prison.\n\nThe Dinothawr core has been authored by\n\n- Themaister (programming, music, some level design)\n- Runar Heyer (art, level design, some code)\n\nThe Dinothawr core is licensed under\n\n- [Non-commercial](https://github.com/libretro/Dinothawr/blob/master/LICENSE)\n\nA summary of the licenses behind RetroArch and its cores can be found [here](../development/licenses.md).\n\n## Setup\n\n- To start the Dinothawr core, you need to obtain Dinothawr's data files. You can do this by going to RetroArch's main menu screen and selecting 'Online Updater'. From there, select 'Content Downloader'.\n\n

\n\n- Select 'Dinothawr', then select 'Dinothawr.zip'. This should download and extract this file to RetroArch's Downloads directory.\n\n

\n\n- Go back to RetroArch's main menu screen. Select 'Load Content', then 'Downloads'.\n\n

\n\n

\n\n- Select the 'dinothawr' directory, then select 'dinothawr.game'.\n\n- If you are asked which core to select, choose 'Dinothawr'.\n\nThe content should now start running!\n\n## Extensions\n\nContent that can be loaded by the Dinothawr core have the following file extensions:\n\n- .game\n\n## Databases\n\nRetroArch database(s) that are associated with the Dinothawr core:\n\n- [Dinothawr](https://github.com/libretro/libretro-database/blob/master/rdb/Dinothawr.rdb)\n\n## Features\n\nFrontend-level settings or features that the Dinothawr core respects.\n\n| Feature | Supported |\n|-------------------|:---------:|\n| Restart | ✔ |\n| Screenshots | ✔ |\n| Saves | ✔ |\n| States | ✕ |\n| Rewind | ✕ |\n| Netplay | ✕ |\n| Core Options | ✔ |\n| [Memory Monitoring (achievements)](../guides/memorymonitoring.md) | ✕ |\n| RetroArch Cheats | ✕ |\n| Native Cheats | ✕ |\n| Controls | ✔ |\n| Remapping | ✔ |\n| Multi-Mouse | ✕ |\n| Rumble | ✕ |\n| Sensors | ✕ |\n| Camera | ✕ |\n| Location | ✕ |\n| Subsystem | ✕ |\n| [Softpatching](../guides/softpatching.md) | ✕ |\n| Disk Control | ✕ |\n| Username | ✕ |\n| Language | ✕ |\n| Crop Overscan | ✕ |\n| LEDs | ✕ |\n\n### Directories\n\nThe Dinothawr core's internal core name is 'Dinothawr'\n\nThe Dinothawr core saves/loads to/from these directories.\n\n**Frontend's Save directory**\n\n- dinothawr.srm (Save data)\n\n### Geometry and timing\n\n- The Dinothawr core's core provided FPS is (FPS)\n- The Dinothawr core's core provided sample rate is (Rate)\n- The Dinothawr core's core provided aspect ratio is (Ratio)\n\n## Customizing / Hacking\n\nDinothawr is fairly hackable. dinothawr.game is the game file itself. It is a simple XML file which points to all assets used by the game. Levels are organized in chapters. Levels themselves are created using the [Tiled](http://www.mapeditor.org/) editor. If you want to try making your own levels, make sure you use the \"plain XML\" format for .tmx files and not the default zlib base64.\n\n[Dinothawr - Level Design guide (pdf)](http://retinaleclipse.com/dinothawr-guide.pdf)\n\n## Core options\n\nThe Dinothawr core has the following option(s) that can be tweaked from the core options menu. The default setting is bolded.\n\nSettings with (Restart) means that core has to be closed for the new setting to be applied on next launch.\n\n- **Timer as FPS reference** [dino_timer] (**enabled**|disabled)\n\n\tUse timer as FPS reference.\n\n## Controllers\n\nThe Dinothawr core supports the following device type(s) in the controls menu, bolded device types are the default for the specified user(s):\n\n### User 1 device types\n\n- None - Doesn't disable input.\n- **RetroPad** - Joypad - Stay on this.\n- RetroPad w/Analog - Joypad - There's no reason to switch to this.\n\n\n## Joypad\n\n\n\n| User 1 Remap descriptors | RetroPad Inputs |\n|--------------------------|---------------------------------------------|\n| Push |  |\n| D-Pad Up |  |\n| D-Pad Down |  |\n| D-Pad Left |  |\n| D-Pad Right |  |\n| Menu |  |\n| Reset |  |\n\n## External Links\n\n- [Official/Libretro Dinothawr Github Repository](https://github.com/libretro/Dinothawr)\n- [Report Libretro Dinothawr Core Issues Here](https://github.com/libretro/Dinothawr/issues)\n- [Steam](https://store.steampowered.com/app/1222639/RetroArch__Dinothawr/)"
},
{
"path": "docs/library/dolphin.md",
"content": "# Nintendo Gamecube/Wii (Dolphin)\n\n\n\n## Background\n\nA Nintendo Gamecube/Wii emulator for Android, Windows, Mac and Linux, written in C++.\n\nThe dolphin-libretro core supports [OpenGL](#opengl), [Vulkan](#vulkan), and [Direct3D 11](#d3d11) rendering.\n\nThe dolphin-libretro core is licensed under\n\n- [GPLv2](https://github.com/libretro/dolphin/blob/master/LICENSE.TXT)\n\nA summary of the licenses behind RetroArch and its cores can be found [here](../development/licenses.md).\n\n## Requirements\n\n- OpenGL/Open GL ES 3.0 or higher for the OpenGL renderer.\n- Vulkan for the Vulkan renderer.\n- Direct3D 11 for the Direct3D 11 renderer.\n\n## Setup\n\nTo function properly, the dolphin-libretro core requires the Dolphin `Sys` folder to be in the proper location. This directory contains Dolphin's database of per-game compatibility settings/hacks, without which many games experience bugs of varying severity.\n\nAfter downloading the core within RetroArch, do **one** of the following options:\n\n### A. Installing from the 'Core System Files Downloader' (Easy/Automatic)\n\nIf your frontend version has `Main Menu > Online Updater > Core System Files Downloader` then that's the easiest solution. Just download 'Dolphin.zip' from that menu and it will place the files where it needs them. You're all done!\n\n### B. Installing from the GitHub repo (Hard/Manual)\n\n1. Get a copy of the Dolphin `Sys` folder. This can be done by downloading the\ncurrent source code. We provide two methods: one using *Git* and one without.\n * **If you have *Git* (if not, see the next option)**\n Just clone the most recent version of the code by running:\n ```\n git clone --depth=1 https://github.com/libretro/dolphin.git\n ```\n * **If you don't have *Git* **\n You can download a *zip* file of the source code with the following URL:\n [https://github.com/libretro/dolphin/archive/master.zip](https://github.com/libretro/dolphin/archive/master.zip)\n You can then extract it.\n\n2. After downloading/extracting the code, navigate into the resulting source tree folder.\nThe `Sys` folder you need is located in *Data/Sys*.\nThis is the folder we will need to move/copy.\n3. *Find RetroArch's system folder path*\nIf you didn't change its default location, the `system` folder is located at the top level of your RetroArch installation folder. Whether you moved it or not, you can find the location of your `system` folder (along with any other folders RetroArch uses) by going to Settings > Directory or by locating the *system_directory* line in the RetroArch configuration file (usually `retroarch.cfg`).\n4. In the `RETROARCH_SYSTEM_FOLDER`, create a new folder named *dolphin-emu* and move/copy the `Sys` folder into it.\n\nWhen everything is set up properly, the `Sys` folder path should look something like this:\n```\nRETROARCH_SYSTEM_FOLDER/dolphin-emu/Sys\n```\n\nThe dolphin-libretro core will now work much more reliably.\n\n## BIOS\n\nThe (optional) BIOS file goes in the directory `RETROARCH_SAVES_FOLDER/dolphin-emu/User/GC/`, with the file name `IPL.bin` for all regions. It is not necessary to provide a BIOS for most games, but certain titles (particularly those which make heavy use of the system fonts, like Star Fox Assault) can be unplayable without it.\n\nTo play the [Gamecube BIOS animation](https://www.youtube.com/watch?v=CpmYW-gCSy4) at game launch, once you have the aforementioned BIOS file placed and named correctly, open the `Dolphin.ini` file located in `RETROARCH_SAVES_FOLDER/dolphin-emu/User/GameSettings/Config/` with a text editor and change the line `SkipIPL = True` to `SkipIPL = False`.\n\n## Extensions\n\nContent that can be loaded by the dolphin-libretro core have the following file extensions:\n\n- .elf\n- .iso\n- .gcm\n- .dol\n- .tgc\n- .wbfs\n- .ciso\n- .gcz\n- .wad\n- .rvz\n\nRetroArch database(s) that are associated with the dolphin-libretro core:\n\n- [Nintendo - GameCube](https://github.com/libretro/libretro-database/blob/master/rdb/Nintendo%20-%20GameCube.rdb)\n- [Nintendo - Wii](https://github.com/libretro/libretro-database/blob/master/rdb/Nintendo%20-%20Wii.rdb)\n\n## Features\n\nFrontend-level settings or features that the dolphin-libretro core respects.\n\n| Feature | Supported |\n|-------------------|:---------:|\n| Restart | ✔ |\n| Saves | ✔ |\n| States | ✔ |\n| Rewind | ✔ |\n| Netplay | ✕ |\n| Core Options | ✔ |\n| [Memory Monitoring (achievements)](../guides/memorymonitoring.md) | ✔ |\n| RetroArch Cheats | ✕ |\n| Native Cheats | ✔ |\n| Controls | ✔ |\n| Remapping | ✔ |\n| Multi-Mouse | ✕ |\n| Rumble | ✕ |\n| Sensors | ✕ |\n| Camera | ✕ |\n| Location | ✕ |\n| Subsystem | ✕ |\n| [Softpatching](../guides/softpatching.md) | ✕ |\n| Disk Control | ✕ |\n| Username | ✕ |\n| Language | ✔ |\n| Crop Overscan | ✕ |\n| LEDs | ✕ |\n\n## Directories\n\nIn addition to the aforementioned `RETROARCH_SYSTEM_FOLDER/dolphin-emu` directory, the dolphin-libretro core also creates a folder structure similar to that used by the standalone Dolphin emulator in `RETROARCH_SAVES_FOLDER/dolphin-emu/User`. In this structure, you can access/edit most of the same functionality you would find in the standalone Dolphin emulator and can even copy some files--such as `GAME.ini` and save files--back and forth between the dolphin-libretro core and the standalone Dolphin emulator.\n\n## Geometry and timing\n\n- The dolphin-libretro core's core provided FPS is 60 (for NTSC) / 50 (for PAL)\n- The dolphin-libretro core's core provided sample rate can be either 32000 Hz or 48000 Hz depending on user configuration\n- The dolphin-libretro core's base width is dependent on the 'Internal Resolution' core option\n- The dolphin-libretro core's base height is dependent on the 'Internal Resolution' core option\n- The dolphin-libretro core's max width is dependent on the 'Internal Resolution' core option\n- The dolphin-libretro core's max height is dependent on the 'Internal Resolution' core option\n- The dolphin-libretro core's core provided aspect ratio is 4/3.\n\n## Language\n\nWhen the `Language` core option is set to automatic, the default dolphin-libretro language setting will be pulled from RetroArch's Language setting.\n\n## Internal Cheats\n\nDisabled by default. Internal cheats can be handled via the GAME.ini files, but they will not take effect unless internal cheats are enabled in the core options. While there is no automatic way to add cheats to the dolphin-libretro core, it can use a cheat file generated by the standalone Dolphin emulator using the following process:\n\n1. Open standalone Dolphin emulator and right-click your game > Properties.\n2. Look at the title bar and remember the ID of the game (for example `GFZE01` for `F-Zero GX USA`).\n3. Go to `Gecko Codes` tab and click `Download Codes`.\n4. Check the boxes for the cheats you want to use then you can close Dolphin.\n5. Navigate to `My Documents\\Dolphin Emulator\\GameSettings` by default for Windows (or `~/.local/share/dolphin-emu/GameSettings` for Linux).\n6. Copy the .ini file with the ID of the game and paste it in your `RETROARCH_SAVES_FOLDER/dolphin-emu/User/GameSettings` folder.\n7. Start the game, go to Quick Menu > Core Options and turn ON \"Internal Cheats\".\n8. And finally Quick Menu > Close Content, restart the game and the cheats should now be active.\n\nIf you need to enable another cheat later for that game, you don't need to do the whole process all over again. You can simply edit the .ini file(s) in your `RETROARCH_SAVES_FOLDER/dolphin-emu/User/GameSettings` folder structure with a text editor to add the cheat title under the line [Gecko_Enabled].\n\n## OpenGL\n\nDolphin's OpenGL renderer can be used by setting RetroArch's video driver to gl.\n\nThe common option for all operating systems is OpenGL, requiring hardware that supports OpenGL/Open GL ES 3.0 or higher. It is an older, pre-Vulkan API, slower than Vulkan but with better compatibility. If you encounter problems with other APIs, try this one.\n\n## Vulkan\n\nDolphin's Vulkan renderer can be used by setting RetroArch's video driver to vulkan.\n\nThis is the latest and fastest API currently. It is most recommended for demanding less of your CPU, thus being the fastest.\n\n## D3D11\n\nDolphin's Direct3D 11 renderer can be used by setting RetroArch's video driver to d3d11.\n\nIn some cases Direct3D 11 may offer better performance than OpenGL, especially on integrated Intel graphics.\n\n## Core options\n\nThe Dolphin core has the following option(s) that can be tweaked from the core options menu. The default setting is bolded.\n\n- **Renderer** [dolphin_renderer] (**Hardware**|Software)\n- **Internal Resolution** [dolphin_efb_scale] (**x1 (640 x 528)**|x2 (1280 x 1056)|x3 (1920 x 1584)|x4 (2560 x 2112)|x5 (3200 x 2640)|x6 (3840 x 3168))\n- **Widescreen (Wii)** [dolphin_widescreen] (**ON**|OFF)\n- **WideScreen Hack** [dolphin_widescreen_hack] (**OFF**|ON)\n- **Shader Compilation Mode** [dolphin_shader_compilation_mode] (**sync**|a-sync Skip Rendering|sync UberShaders|a-sync UberShaders)\n- **Wait for Shaders before Starting** [dolphin_wait_for_shaders] (**OFF**|ON)\n- **Progressive Scan** [dolphin_progressive_scan] (**ON**|OFF)\n- **PAL60** [dolphin_pal60] (**ON**|OFF)\n- **Max Anisotropy** [dolphin_max_anisotropy] (**1x**|2x|4x|8x|16x)\n- **Skip Presenting Duplicate Frames** [dolphin_skip_dupe_frames] (**ON**|OFF)\n- **Scaled EFB Copy** [dolphin_efb_scaled_copy] (**ON**|OFF)\n- **Force Texture Filtering** [dolphin_force_texture_filtering] (**OFF**|ON)\n- **Store EFB Copies on GPU** [dolphin_efb_to_texture] (**ON**|OFF)\n- **Texture Cache Accuracy** [dolphin_texture_cache_accuracy] (**Fast**|Middle|Safe)\n- **GPU Texture Decoding** [dolphin_gpu_texture_decoding] (**OFF**|ON)\n- **Fast Depth Calculation** [dolphin_fast_depth_calculation] (**ON**|OFF)\n- **Bounding Box Emulation** [dolphin_bbox_enabled] (**OFF**|ON)\n- **Disable EFB to VRAM** [dolphin_efb_to_vram] (**OFF**|ON)\n- **Load Custom Textures** [dolphin_load_custom_textures] (**OFF**|ON)\n- **CPU Core** [dolphin_cpu_core] (**JIT64/JITARM64**|Interpreter|Cached Interpreter)\n- **CPU Clock Rate** [dolphin_cpu_clock_rate] (**100%**|from 5% to 300%)\n- **Fastmem** [dolphin_fastmem] (**ON**|OFF)\n- **Wiimote IR Mode** [dolphin_ir_mode] (**Right Stick controls pointer (relative)**|Right Stick controls pointer (absolute)|Mouse controls pointer)\n- **Wiimote IR Vertical Offset** [dolphin_ir_offset] (**10**|from -50 to 50)\n- **Wiimote IR Total Yaw** [dolphin_ir_yaw] (**15**|from 0 to 100)\n- **Wiimote IR Total Pitch** [dolphin_ir_pitch] (**15**|from 0 to 100)\n- **Rumble** [dolphin_enable_rumble] (**ON**|OFF)\n- **Sensor Bar Position** [dolphin_sensor_bar_position] (**Bottom**|Top)\n- **Wiimote Continuous Scanning** [dolphin_wiimote_continuous_scanning] (**OFF**|ON)\n- **Use ports 5-8 for GameCube controllers in Wii mode** [dolphin_alt_gc_ports_on_wii] (**OFF**|ON)\n- **Audio Mixer Rate** [dolphin_mixer_rate] (**32000**|48000)\n- **DSP HLE** [dolphin_dsp_hle] (**ON**|OFF)\n- **DSP Enable JIT** [dolphin_dsp_jit] (**ON**|OFF)\n- **Language** [dolphin_language] (**English**|Japanese|German|French|Spanish|Italian|Dutch|Simplified Chinese|Traditional Chinese|Korean)\n- **Internal Cheats Enabled** [dolphin_cheats_enabled] (**OFF**|ON)\n- **OSD Enabled** [dolphin_osd_enabled] (**ON**|OFF)\n- **Log Level** [dolphin_log_level] (**Info**|Notice|Error|Warning)\n\n## Joypad\n\n| RetroPad Inputs | GameCube Controller | Wiimote | Wiimote (sideways) | Wiimote + Nunchuk | Classic Controller | Classic Controller Pro |\n|------------------------------------------------ |---------------------|-------------|--------------------|-------------------|--------------------|------------------------|\n|  | B | B | 1 | B | B | B |\n|  | Y | 2 | B | Z | Y | Y |\n|  | | - | - | 2 | - | - |\n|  | Start | + | + | 1 | + | + |\n|  | D-Pad Up | D-Pad Up | D-Pad Up | D-Pad Up | D-Pad Up | D-Pad Up |\n|  | D-Pad Down | D-Pad Down | D-Pad Down | D-Pad Down | D-Pad Down | D-Pad Down |\n|  | D-Pad Left | D-Pad Left | D-Pad Left | D-Pad Left | D-Pad Left | D-Pad Left |\n|  | D-Pad Right | D-Pad Right | D-Pad Right | D-Pad Right | D-Pad Right | D-Pad Right |\n|  | A | A | 2 | A | A | A |\n|  | X | 1 | A | C | X | X |\n|  | | | | - | ZL | L |\n|  | Z | | | + | ZR | R |\n|  | L | | | Shake Nunchuk | L | ZL |\n|  | R | Shake | Shake | Shake Wiimote | R | ZR |\n|  | L-Analog | | | | | |\n|  | R-Analog | Home | Home | Home | Home | Home |\n|  X | Analog X | Tilt X | Tilt X | Nunchuk Stick X | Left Stick X | Left Stick X |\n|  Y | Analog Y | Tilt Y | Tilt Y | Nunchuk Stick Y | Left Stick Y | Left Stick Y |\n|  X | C-Stick X | | | Tilt X | Right Stick X | Right Stick X |\n|  Y | C-Stick Y | | | Tilt Y | Right Stick Y | Right Stick Y |\n**NOTE:** The 'L-Analog' and 'R-Analog' inputs are half-presses of the analog L and R buttons, respectively. These inputs are required to progress in some games, such as Super Mario Sunshine.\n\n## Compatibility\n\n[Compatibility Pages](https://dolphin-emu.org/compat/)\n\n## External Links\n\n- [Official Dolphin Website](https://dolphin-emu.org/)\n- [Official Dolphin Github Repository](https://github.com/dolphin-emu/dolphin)\n- [Libretro Dolphin Core info file](https://github.com/libretro/libretro-super/blob/master/dist/info/dolphin_libretro.info)\n- [Report Libretro Dolphin Core Issues Here](https://github.com/libretro/dolphin/issues)\n- [Gameplay Videos](https://www.youtube.com/playlist?list=PLRbgg4gk_0IcC4j9ggvxzZm2GiuufDMeU)\n"
},
{
"path": "docs/library/dosbox.md",
"content": "# DOS (DOSBox)\n\n## Background\n\nDOSBox is a multiplatform DOS-emulator\n\nThe DOSBox core has been authored by\n\n- DOSBox Team\n\nThe DOSBox core is licensed under\n\n- [GPLv2](https://github.com/libretro/dosbox-libretro/blob/master/COPYING)\n\nA summary of the licenses behind RetroArch and its cores can be found [here](../development/licenses.md).\n\n## Extensions\n\nContent that can be loaded by the DOSBox core have the following file extensions:\n\n- .exe\n- .com\n- .bat\n- .conf\n\nRetroArch database(s) that are associated with the DOSBox core:\n\n- [DOS](https://github.com/libretro/libretro-database/blob/master/rdb/DOS.rdb)\n\n## Features\n\nFrontend-level settings or features that the DOSBox core respects.\n\n| Feature | Supported |\n|-------------------|:---------:|\n| Restart | ✕ |\n| Screenshots | ✔ |\n| Saves | - |\n| States | ✕ |\n| Rewind | ✕ |\n| Netplay | ✕ |\n| Core Options | ✔ |\n| [Memory Monitoring (achievements)](../guides/memorymonitoring.md) | ✕ |\n| RetroArch Cheats | ✕ |\n| Native Cheats | ✕ |\n| Controls | ✔ |\n| Remapping | ✔ |\n| Multi-Mouse | ✕ |\n| Rumble | ✕ |\n| Sensors | ✕ |\n| Camera | ✕ |\n| Location | ✕ |\n| Subsystem | ✕ |\n| [Softpatching](../guides/softpatching.md) | ✕ |\n| Disk Control | ✕ |\n| Username | ✕ |\n| Language | ✕ |\n| Crop Overscan | ✕ |\n| LEDs | ✕ |\n\n### Directories\n\nThe DOSBox core's library name is 'DOSBox'\n\n### Geometry and timing\n\n- The DOSBox core's core provided FPS is 60.0\n- The DOSBox core's core provided sample rate is (Rate)\n- The DOSBox core's base width is 320\n- The DOSBox core's base height is 200\n- The DOSBox core's max width is 1024\n- The DOSBox core's max height is 768\n- The DOSBox core's core provided aspect ratio is 4/3\n\n## Loading content\n\n- To use you can either load an exe/com/bat file or a *.conf file.\n- If loading exe/com/bat the system directory will be searched for a 'dosbox.conf' file to load. If one isn't available default values will be used. This mode is equivalent to running a DOSBox binary with the specified file as the command line argument.\n- If loading a conf file DOSBox will be loaded with the options in the config file. This mode is useful if you just want to be dumped at a command prompt, but can also be used to load a game by putting commands in the autoexec section.\n- To be useful the frontend will need to have keyboard+mouse support, and all keyboard shortcuts need to be remapped.\n\n## Usage\n\nDOSBox can load DOS executables or custom config files. To get started you can generate a config file by creating the DOSbox folder in your libretro SYSTEM directory, and then loading any DOS application, exit back to the command interpreter and then run config -wcd, Configuration files allow you far better control than core options so far. Eventually every single useable option will be exposed but in the meantime combining both is the best alternative.\n\nIf you generate a default config it will always be loaded by default, but you can override it by saving your custom settings, preferably in the game folder. You can create a config like this:\n\n```\n[autoexec]\n@echo off\nmount d \"/storage/roms/dos/game\"\nd:\ngame.exe\n```\nThen you can store this config in the game folder (or any other directory) and just the config instead of the exe file. Once you change a setting using the config command or via core options, you can always update the config file by using config -wc\n\n## MIDI\n\n- To use MIDI you need MT32_CONTROL.ROM and MT32_PCM.ROM in the system directory of RetroArch.Then set:\n\n```\n[midi]\nmpu401=intelligent\nmididevice=mt32\n```\n\n## Core options\n\nThe DOSBox core has the following option(s) that can be tweaked from the core options menu. The default setting is bolded.\n\nSettings with (Restart) means that core has to be closed for the new setting to be applied on next launch.\n\n- **Machine type** [dosbox_machine_type] (**vgaonly**|svga_s3|svga_et3000|svga_et4000|svga_paradise|hercules|cga|tandy|pcjr|ega)\n\n\tSelect what machine will be emulated.\n\n- **Gamepad emulated mouse** [dosbox_emulated_mouse] (**enable**|disable)\n\n\tCPU cycles are divided in core options to allow fine control of the desired CPU cycles. Setting this too low may cause slow gameplay, setting this too high might cause sound crackling and bad performance.\n\n- **CPU cycles x 100000** [dosbox_cpu_cycles_0] (**0**|1|2|3|4|5|6|7|8|9)\n\n\tCPU cycles are divided in core options to allow fine control of the desired CPU cycles. Setting this too low may cause slow gameplay, setting this too high might cause sound crackling and bad performance.\n\n- **PU cycles x 10000** [dosbox_cpu_cycles_1] (**0**|1|2|3|4|5|6|7|8|9)\n\n\tCPU cycles are divided in core options to allow fine control of the desired CPU cycles. Setting this too low may cause slow gameplay, setting this too high might cause sound crackling and bad performance.\n\n- **CPU cycles x 1000** [dosbox_cpu_cycles_2] (**1**|2|3|4|5|6|7|8|9|0)\n\n\tCPU cycles are divided in core options to allow fine control of the desired CPU cycles. Setting this too low may cause slow gameplay, setting this too high might cause sound crackling and bad performance.\n\n- **CPU cycles x 100** [dosbox_cpu_cycles_3] (**0**|1|2|3|4|5|6|7|8|9\")\n\n\tCPU cycles are divided in core options to allow fine control of the desired CPU cycles. Setting this too low may cause slow gameplay, setting this too high might cause sound crackling and bad performance.\n\n## User 1 - 2 device types\n\nThe DOSBox core supports the following device type(s) in the controls menu, bolded device types are the default for the specified user(s):\n\n- None - Input disabled.\n- **Gamepad** - Joypad\n- Joystick - Analog\n- Keyboard - Keyboard - Keyboard inputs are always active. Has keymapper support.\n\n## Joypad\n\n| Input descriptors for Gamepad 2 Button | RetroPad Inputs |\n|----------------------------------------|---------------------------------------------|\n| Button 2 |  |\n| Button 1 |  |\n| D-Pad Up |  |\n| D-Pad Down |  |\n| D-Pad Left |  |\n| D-Pad Right |  |\n\n| Input descriptors for Gamepad 4 Button | RetroPad Inputs |\n|----------------------------------------|---------------------------------------------|\n| Button 3 |  |\n| Button 1 |  |\n| D-Pad Up |  |\n| D-Pad Down |  |\n| D-Pad Left |  |\n| D-Pad Right |  |\n| Button 4 |  |\n| Button 2 |  |\n\n| Input descriptors for Joystick 2 Button | RetroPad Inputs |\n|-----------------------------------------|------------------------------------------------|\n| Button 2 |  |\n| Button 1 |  |\n| Left Analog X |  X |\n| Left Analog Y |  Y |\n\n| Input descriptors for Joystick 4 Button | RetroPad Inputs |\n|-----------------------------------------|------------------------------------------------|\n| Button 3 |  |\n| Button 1 |  |\n| Button 4 |  |\n| Button 2 |  |\n| Left Analog X |  X |\n| Left Analog Y |  Y |\n| Right Analog X |  X |\n| Right Analog Y |  Y |\n\n| Input descriptors for Keyboard | RetroPad Inputs |\n|--------------------------------|---------------------------------------------|\n| Esc |  |\n| Enter |  |\n| Kbd Up |  |\n| Kbd Down |  |\n| Kbd Left |  |\n| Kbd Right |  |\n\n| Input descriptors for Emulated mouse | RetroPad Inputs |\n|--------------------------------------|------------------------------------------------|\n| Emulated Mouse Right Click |  |\n| Emulated Mouse Left Click |  |\n| Emulated Mouse X Axis |  X |\n| Emulated Mouse Y Axis |  Y |\n\n## Keyboard\n\n| RetroKeyboard Inputs | Keyboard |\n|-------------------------------|--------------------|\n| Keyboard Backspace | Backspace |\n| Keyboard Tab | Tab |\n| Keyboard Return | Enter |\n| Keyboard Pause | Pause |\n| Keyboard Escape | Escape |\n| Keyboard Space | Space |\n| Keyboard ' | ' |\n| Keyboard , | , |\n| Keyboard . | . |\n| Keyboard / | / |\n| Keyboard 0 | 0 |\n| Keyboard 1 | 1 |\n| Keyboard 2 | 2 |\n| Keyboard 3 | 3 |\n| Keyboard 4 | 4 |\n| Keyboard 5 | 5 |\n| Keyboard 6 | 6 |\n| Keyboard 7 | 7 |\n| Keyboard 8 | 8 |\n| Keyboard 9 | 9 |\n| Keyboard ; | ; |\n| Keyboard - | - |\n| Keyboard = | = |\n| Keyboard [ | [ |\n| Keyboard \\ | \\ |\n| Keyboard ] | ] |\n| Keyboard ` | ` |\n| Keyboard a | a |\n| Keyboard b | b |\n| Keyboard c | c |\n| Keyboard d | d |\n| Keyboard e | e |\n| Keyboard f | f |\n| Keyboard g | g |\n| Keyboard h | h |\n| Keyboard i | i |\n| Keyboard j | j |\n| Keyboard k | k |\n| Keyboard l | l |\n| Keyboard m | m |\n| Keyboard n | n |\n| Keyboard o | o |\n| Keyboard p | p |\n| Keyboard q | q |\n| Keyboard r | r |\n| Keyboard s | s |\n| Keyboard t | t |\n| Keyboard u | u |\n| Keyboard v | v |\n| Keyboard w | w |\n| Keyboard x | x |\n| Keyboard y | y |\n| Keyboard z | z |\n| Keyboard Delete | Delete |\n| Keyboard Numpad 0 | Numpad 0 |\n| Keyboard Numpad 1 | Numpad 1 |\n| Keyboard Numpad 2 | Numpad 2 |\n| Keyboard Numpad 3 | Numpad 3 |\n| Keyboard Numpad 4 | Numpad 4 |\n| Keyboard Numpad 5 | Numpad 5 |\n| Keyboard Numpad 6 | Numpad 6 |\n| Keyboard Numpad 7 | Numpad 7 |\n| Keyboard Numpad 8 | Numpad 8 |\n| Keyboard Numpad 9 | Numpad 9 |\n| Keyboard Numpad . | Numpad . |\n| Keyboard Numpad / | Numpad / |\n| Keyboard Numpad * | Numpad * |\n| Keyboard Numpad - | Numpad - |\n| Keyboard Numpad + | Numpad + |\n| Keyboard Numpad Enter | Numpad Enter |\n| Keyboard Up | Up |\n| Keyboard Down | Down |\n| Keyboard Right | Left |\n| Keyboard Left | Right |\n| Keyboard Insert | Insert |\n| Keyboard Home | Home |\n| Keyboard End | End |\n| Keyboard Page Up | Page Up |\n| Keyboard Page Down | Page Down |\n| Keyboard F1 | F1 |\n| Keyboard F2 | F2 |\n| Keyboard F3 | F3 |\n| Keyboard F4 | F4 |\n| Keyboard F5 | F5 |\n| Keyboard F6 | F6 |\n| Keyboard F7 | F7 |\n| Keyboard F8 | F8 |\n| Keyboard F9 | F9 |\n| Keyboard F10 | F10 |\n| Keyboard F11 | F11 |\n| Keyboard F12 | F12 |\n| Keyboard Num Lock | Num Lock |\n| Keyboard Caps Lock | Caps Lock |\n| Keyboard Scroll Lock | Scroll Lock |\n| Keyboard Right Shift | Right Shift |\n| Keyboard Left Shift | Left Shift |\n| Keyboard Right Control | Right Control |\n| Keyboard Left Control | Left Control |\n| Keyboard Right Alt | Right Alt |\n| Keyboard Left Alt | Left Alt |\n| Keyboard Sys Req | Print Screen |\n\n## External Links\n\n- [Official DOSBox Website](https://www.dosbox.com/)\n- [Official/Original DOSBox SourceForge Repository](https://sourceforge.net/projects/dosbox/)\n- [Libretro DOSBox Core info file](https://github.com/libretro/libretro-super/blob/master/dist/info/dosbox_libretro.info)\n- [Libretro DOSBox Github Repository](https://github.com/libretro/dosbox-libretro)\n- [Report Libretro DOSBox Core Issues Here](https://github.com/libretro/dosbox-libretro/issues)"
},
{
"path": "docs/library/dosbox_pure.md",
"content": "# DOS (DOSBox Pure)\n\n\n\n## Background\n\nDOSBox Pure is a fork of the multiplatform MS-DOS emulator, DOSBox. It was built by Psyraven in 2020 specifically for RetroArch/Libretro and implements advanced features like save states, an on-screen keyboard, highly customizable controller setup or rewinding. DOSBox Pure aims for simplicity and ease of use.\n\nThe DOSBox Pure core has been authored by\n\n- DOSBox Team\n- Psyraven\n\nThe DOSBox Pure core is licensed under\n\n- [GPLv2](https://github.com/libretro/dosbox-libretro/blob/master/COPYING)\n\nA summary of the licenses behind RetroArch and its cores can be found [here](../development/licenses.md).\n\n## Extensions\n\nContent that can be loaded by the DOSBox Pure core has the following file extensions:\n\n- .zip _(see [Load games from ZIP](#load-games-from-zip))_\n- .dosz _(alternative extension to .ZIP)_\n- .exe _(DOS program)_\n- .com _(DOS program)_\n- .bat _(DOS batch file)_\n- .iso _(CDROM image)_\n- .cue _(CDROM image)_\n- .ins _(CDROM image)_\n- .img _(hard disk/floppy disk/CDROM image)_\n- .ima _(hard disk/floppy disk image)_\n- .vhd _(hard disk image)_\n- .jrc _(PCjr cartridge)_\n- .tc _(PCjr cartridge)_\n- .m3u _(playlist for multiple CDROM/floppy)\n- .m3u8 _(playlist for multiple CDROM/floppy)\n- .conf _(bootable, see [Loading of dosbox.conf files](#loading-of-dosboxconf-files))_\n\nRetroArch database(s) that are associated with the DOSBox Pure core:\n\n- [DOS](https://github.com/libretro/libretro-database/blob/master/rdb/DOS.rdb)\n\n## Features\n\nFrontend-level settings or features that the DOSBox Pure core respects.\n\n| Feature | Supported |\n|-------------------------------------|:---------:|\n| Restart | ✔ |\n| Screenshots | ✔ |\n| Saves | ✔ |\n| States | ✔ |\n| [Rewind](#rewind-support) | ✔ |\n| Netplay | ✕ |\n| [Core Options](#core-options) | ✔ |\n| RetroAchievements | ✕ |\n| [RetroArch Cheats](#cheats-support) | ✔ |\n| [Native Cheats](#cheats-support) | ✔ |\n| [Controls](#controls) | ✔ |\n| [Remapping](#gamepad-mapper) | ✔ |\n| Multi-Mouse | ✕ |\n| Rumble | ✕ |\n| Sensors | ✕ |\n| Camera | ✕ |\n| Location | ✕ |\n| Subsystem | ✕ |\n| Softpatching | ✕ |\n| Disk Control | ✔ |\n| Username | ✕ |\n| Language | ✕ |\n| Crop Overscan | ✕ |\n| LEDs | ✕ |\n\n### MIDI playback with SoundFonts\n\nIf DOSBox Pure finds one or more `.SF2` sound font files in the `system` directory of the frontend, one of them can be selected via the `Audio > MIDI Output` [core option](#audio-options). This sound font will then be used to play `General Midi` and `Sound Canvas` music.\n\n### MPU-401 MIDI device emulation through MUNT\n\nTo emulate pre-General MIDI (MPU-401) devices such as the Roland MT-32, CM-32L, CM-64 and LAPC-I, you need the correct ROM files, e.g., MT32_CONTROL.ROM and MT32_PCM.ROM (more details about necessary files [here](https://github.com/munt/munt/blob/master/mt32emu/src/ROMInfo.cpp#L28)). Place them in the RetroArch `system` directory.\n\nThen, bring up DOSBox Pure's options and in `Audio > MIDI Output`, select the device you want to emulate (e.g., `Roland MT-32`).\n\n### Cheats support\n\nDOSBox Pure exposes its memory for cheats in the libretro frontend.\n\nFor details how to use it and how to find new cheats while playing the game, check the [Libretro documentation for cheats](https://docs.libretro.com/guides/cheat-codes/). This can also be used to add controller rumble support to DOS games.\n\n### Save states\n\nThe DOSBox Pure core fully supports libretro save states. Make sure to test it in each game before using it. Complex late era DOS games might have problems. Be aware that states saved with different video or cpu settings are not loadable.\n\nRead more about [save file handling](#save-file-handling).\n\n### Rewind support\n\nUsing the [core option](#emulation-options) `Save States Support`, rewinding can be enabled. Keep in mind that rewind support comes at a high performance cost.\n\n## Geometry and timing\n\n- The DOSBox Pure core's core provided FPS is dependent on the DOS application\n- The DOSBox Pure core's core provided sample rate is dependent on the 'Audio > Audio Sample Rate' [core option](#audio-options)\n- The DOSBox Pure core's base width is 320\n- The DOSBox Pure core's base height is 200\n- The DOSBox Pure core's max width is 1280\n- The DOSBox Pure core's max height is 1024\n- The DOSBox Pure core's core provided aspect ratio is dependent on the DOS application and the 'Video > Aspect Ratio Correction' [core option](#video-options)\n\n## Loading content\n\n### Load games from ZIP\n\nDOSBox Pure can load games directly from ZIP files without the need to extract them.\n\n### Store modifications in separate save files\n\nChanges made to a loaded ZIP file will be stored as a separate ZIP file into the [libretro saves directory](https://docs.libretro.com/guides/change-directories/#savefile-and-savestate). If a game is loaded directly without using a ZIP file, the saves directory is not used.\n\n### Mount disc images from inside ZIP files\n\nCD images (ISO or CUE) and floppy disk images (IMG/IMA/VHD) can be mounted directly from inside ZIP files. The system will automatically mount the first found disk image as the A: or D: drive. Additional disks can be loaded or swapped by using the `Disc Control` menu in RetroArch.\n\nWhen mounting a ZIP file which has just a single directory in its root, core versions before 0.9.0 used to mount that directory as the C: drive. Since 0.9.0, the core will mount the root of the ZIP to improve compatibility with DOS games that need to be installed in a specific location on the hard drive. The old behavior will still be used if an old save file (named `GAME.save.zip`) exists. The new behavior uses a differently named save file (`GAME.pure.zip`).\n\nThe start menu also offers the option to mount or unmount an image.\n\n### Start menu with auto start\n\n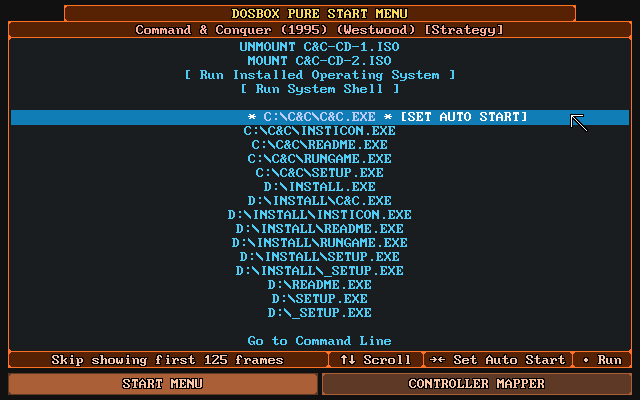\n\nThis is the first screen that appears when loading a game. It offers a gamepad controllable list of all executable files for the loaded game. By pressing right an item can be selected as the default which will skip the menu on the next launch.\n\nBy pressing right multiple times, a number of frames can be specified that will automatically be skipped on start. This can be used to skip over loading screens or start-up sequences.\n\nIf there is only a single executable, the menu will not show and directly run the file.\n\nTo force the menu to be shown, hold shift on the keyboard or L2 or R2 on the gamepad while selecting `Restart` in the core menu.\n\n### Installing CD-ROM games from disc images (ISO etc.) and running them\n\nThis can be done in 3 steps:\n\n1. In order to install a game from a CD-ROM image (e.g., a .iso file), use the \"Load Content\" option in the RetroArch main menu. Navigate to the ISO and launch it with the DOSBox Pure core.\n2. From the start menu, select the executable on the CD-ROM to install the game (probably something like `SETUP.EXE`, `INSTALL.EXE`, `START.EXE`...). Follow the installer's instructions to install the game in any local directory of your choice (e.g., `C:\\`, `C:\\C&C\\`, ...).\n3. Now, the next time you run the ISO in DOSBox Pure (same way as in step 1 above), the start menu will feature the \"local\" executables, e.g.: `C:\\C&C\\C&C.EXE`. They'll be available to select above the executables from mounted discs. Launch the correct executable to run the game.\n\nSee screenshot in \"[Start menu with auto start](#start-menu-with-auto-start)\" section above for reference.\n\n### Directly run PC booter games from the start menu\n\n\n\nWhen loading a ZIP file which contains a floppy or hard-disk image or loading such a disk image directly, the start menu will show an additional option `[BOOT IMAGE FILE]`. When selected, a list of system modes (emulated graphics card) will be shown and once a mode is selected, DOSBox Pure will try to boot from the mounted image. While running a booter game, the mounted disk can be easily swapped with the Disc Control menu or hotkeys set in the frontend.\n\nThere's also support for swapping floppy disk images (or PCjr cartridges) at runtime via a frontend's Disc Control menu and hotkeys.\n\n### Auto-execution of DOSBOX.BAT\n\nThe core automatically executes `DOSBOX.BAT` instead of showing the start menu if it exists in the mounted ZIP or path.\n\n### Loading of dosbox.conf files\n\nIf a .conf file gets selected in the frontend, DOSBox Pure will load it directly and run its autoexec commands.\n\nAlternatively, a .conf file can get loaded automatically depending on the 'Emulation > Loading of dosbox.conf' [core option](#emulation-options). There are two modes that can be enabled:\n- \"Try 'dosbox.conf' in the loaded content (ZIP or folder)\" - Will load C:\\DOSBOX.CONF automatically if it exists in the mounted ZIP or path\n- \"Try '.conf' with same name as loaded content (next to ZIP or folder)\" - Will automatically load GAME.conf next to GAME.zip if it exists.\n\n### Loading M3U8 files\n\nIf the core gets loaded with a `.m3u8` file, all files listed in it will be added to the disc swap menu. The first image will automatically get mounted as the A: or D: drive depending on whether it is a CD or floppy disk image.\n\n## Tips, Q&A, Troubleshooting\n\n### Smooth scrolling\n\nYou might have trouble getting stutter-free scrolling in some games (cf. [this bug report](https://github.com/schellingb/dosbox-pure/issues/128)). There are a number of things you can try to remedy this:\n\n- In `Quick Menu > Options > Emulation Options`, set `Force 60 FPS Output` to ON.\n- In RetroArch's settings, navigate to `Video` and set `Threaded Video` to OFF.\n- Try `Video` > `Output` > `Set Display-Reported Refresh Rate`.\n- Try setting `Video` > `Synchronization` > `Vertical Sync` to ON.\n- If using a variable refresh rate screen (G-Sync, FreeSync, HDMI 2.1 VRR): navigate to `Video` > `Synchronization` and set `Sync to Exact Content Framerate (G-Sync, FreeSync)` to ON.\n\n### Playing with keyboard and mouse\n\nTo play not with a gamepad but with keyboard and mouse, be sure to use the '[Game Focus](https://docs.libretro.com/guides/input-and-controls/#cores-with-direct-keyboard-input)' mode available in RetroArch.\n\nBy default, you can toggle game focus by pressing the scroll lock key. While game focus is active, the RetroArch hotkeys are disabled and keyboard presses will not cause [RetroPad](https://docs.libretro.com/guides/input-and-controls/) button presses (which could cause multiple keys to be pressed at once).\n\nYou can change the hotkey for game focus mode in RetroArch's [\"Hotkeys\" menu](https://docs.libretro.com/guides/input-and-controls/#hotkeys).\n\n### ZIP files can be renamed to DOSZ\n\nIf your libretro frontend wants to load the content of `.ZIP` files instead of sending it to DOSBox Pure to load, the files can be renamed from `.ZIP` to `.DOSZ`.\n\nThis is especially useful for CD images in ZIP format which RetroArch refuses to append through its `Disc Control` menu. Using an [.M3U8 file](#loading-m3u8-files) also avoids this problem.\n\n### Force opening the start menu\n\nIf you have assigned an auto start item in the start menu but want to go back to it, hold shift on the keyboard or L2 or R2 on the gamepad while selecting `Restart` in the core menu.\n\n### Mount ZIP as A or D drive\n\nIf you have a ZIP file you want to load as a fake floppy disk or fake CD-ROM, there are multiple options.\n\n- The easiest is to rename the file from `.ZIP` to e.g., `.D.ZIP` (to use the D: drive).\n- You can also edit the RetroArch `.LPL` playlist file to add a `#D` after the file like `game.zip#D`.\n- A third option is available inside DOSBox Pure with a new remount command that can be called with REMOUNT C: D: to remount the C: drive to D:. This can for example be used in a startup batch file.\n\n### Change disk label with label command\n\nDOSBox Pure by default uses the first word of the ZIP file name as the label of the mounted disk. Some games require a specific label on a floppy or a CD-ROM so DOSBox Pure offers a new command to change the label of a mounted disk. For example, `LABEL C: HELLO` changes the label of the C: drive.\n\nThis label is not saved anywhere and needs to be reapplied on every launch so it's best to add the command in a startup batch file. You can run the `MOUNT` command to check all mounted disks and their disk label.\n\n### Keyboard layout defaults to US\n\nThe keyboard layout defaults to the US Layout (QWERTY). If you need a different layout, you can change the core option `Input Options > Advanced > Keyboard Layout`.\n\n### Save file handling\n\nWhen modifications to the file system loaded from a ZIP file happen, these modifications are written into a separate save file. You can find these save files inside the data directory of your libretro frontend, usually in a sub-directory called `saves`, or any other directory you have set in `RetroArch's Settings > Directory > Savefile`.\n\n- Save files get re-written to disk a short while after a modification happens in the file system.\n- The larger the save, the less often it will be written out.\n- Up to 1MB of total save data, it will be written out 2 seconds after the previous file modification. Then gradually until at max 59MB and more, it will be written out 60 seconds after the last file modification.\n\n## Core options\n\nThe DOSBox Pure core has the following options that can be tweaked from the core options menu. The default setting is bolded.\n\nSettings with (Restart) mean that core has to be closed for the new setting to be applied on next launch.\n\n### Manage Core Options\nSave or remove option overrides for the current content.\n\n- **Save game options**\n\n\tSaves current options specifically for running game.\n\n- **Save Content Directory Options**\n\n\tSaves current options specifically for running game's content directory.\n\n- **Reset Options**\n\n\tReset all core options to default values.\n\n### Emulation Options\nCore specific settings (latency, save states, start menu).\n\n- **Force 60 FPS Output** [dosbox_pure_force60fps] (**OFF** | ON)\n\n\tEnable this to force output at 60FPS. Use this if you encounter screen tearing or vsync issues.\n\t\n- **Show Performance Statistics** [dosbox_pure_perfstats] (**Disabled** | Simple | Detailed information)\n\n\tEnable this to show statistics about performance and framerate and check if emulation runs at full speed.\n\n- **Save States Support** [dosbox_pure_savestate] (**Enable save states** | Enable save states with rewind | OFF)\n\n\tMake sure to test it in each game before using it. Complex late era DOS games might have problems. Be aware that states saved with different video, CPU or memory settings are not loadable. Rewind support comes at a high performance cost and needs at least 40MB of rewind buffer.\n\n- **Loading of dosbox.conf** [dosbox_pure_conf] (**Disabled conf support (default)** | Try 'dosbox.conf' in the loaded content (ZIP or folder) | Try '.conf' with same name as loaded content (next to ZIP or folder))\n\n\tDOSBox Pure is meant to be configured via core options but optionally supports loading of legacy .conf files.\n\n- **Start Menu** [dosbox_pure_menu_time] (**Show at start, shut down core 5 seconds after auto started game exit** | Show at start, shut down core 3 seconds after auto started game exit | Show at start, shut down core immediately after auto started game exit | Show at start, show again after game exit (default) | Always show menu on startup and after game exit, ignore auto start setting)\n\n\tSet the behavior of the start menu before and after launching a game. You can also force it to open by holding shift or L2/R2 when selecting 'Restart'.\n\n- **Advanced > Input Latency** [dosbox_pure_latency] (**Default** | Lowest latency - See CPU usage setting below! | Irregular latency - Might improve performance on low-end devices)\n\n\tBy default the core operates in a high performance mode with good input latency. There is a special mode available which minimizes input latency further requiring manual tweaking.\n\n- **Advanced > Low latency CPU usage** [dosbox_pure_auto_target] (**90%** | 50% > 100%)\n\n\tIn low latency mode when emulating DOS as fast as possible, how much time per frame should be used by the emulation. If the video is stuttering, lower this or improve render performance in the frontend (for example by disabling vsync or video processing). Use the performance statistics to easily find the maximum that still hits the emulated target framerate.\n\n### Input Options\nKeyboard, mouse and joystick settings.\n\n- **Bind Unused Buttons** [dosbox_pure_bind_unused] (**On** | Off)\n\n\tBind all unused controller buttons to keyboard keys. Can be remapped in the Controls section of the core settings.\n\n- **Enable On Screen Keyboard** [dosbox_pure_on_screen_keyboard] (**On** | Off)\n\n\t Enable the On Screen Keyboard feature which can be activated with the L3 button on the controller.\n\n- **Bind Mouse Wheel To Key** [dosbox_pure_mouse_wheel] (**Left-Bracket/Right-Bracket** | Comma/Period | Page-Up/Page-Down | Home/End | Delete/Page-Down | Minus/Equals | Semicolon/Quote | Numpad Minus/Plus | Numpad Divide/Multiply | Up/Down | Left/Right | Q/E | Disable)\n\n\tBind mouse wheel up and down to two keyboard keys to be able to use it in DOS games.\n\n- **Mouse Sensitivity** [dosbox_pure_mouse_speed_factor] (**100%** | 20% to 100% in 5% increments | 100% to 500% in 10% increments)\n\n\tSets the overall mouse cursor movement speed.\n \n- **Advanced > Horizontal Mouse Sensitivity** [dosbox_pure_mouse_speed_factor_x] (**100%** | 20% to 100% in 5% increments | 100% to 500% in 10% increments)\n\n\tExperiment with this value if the mouse is too fast/slow when moving left/right.\n\n- **Advanced > Use Mouse Input** [dosbox_pure_mouse_input] (**ON** | OFF)\n\n\tYou can disable input handling from a mouse or a touchscreen (emulated mouse through joypad will still work).\n\n- **Advanced > Automatic Game Pad Mappings** [dosbox_pure_auto_mapping] (**On (default)** | Enable with notification on game detection | Off)\n\n\tDOSBox Pure can automatically apply a gamepad control mapping scheme when it detects a game. These button mappings are provided by the Keyb2Joypad Project (by Jemy Murphy and bigjim).\n\n- **Advanced > Keyboard Layout** [dosbox_pure_keyboard_layout] (**US (default)** | UK | Belgium | Brazil | Croatia | Czech Republic | Denmark | Finland | France | Germany | Greece | Hungary | Iceland | Italy | Netherlands | Norway | Poland | Portugal | Russia | Slovakia | Slovenia | Spain | Sweden | Switzerland (German) | Switzerland (French) | Turkey)\n\n\tSelect the keyboard layout (will not change the On Screen Keyboard).\n\n- **Advanced > Menu Transparency** [dosbox_pure_menu_transparency] (**15%** | 10% to 100% in 10% increments)\n\n\tSet the transparency level of the On Screen Keyboard and the Gamepad Mapper.\n\n- **Advanced > Joystick Analog Deadzone** [dosbox_pure_joystick_analog_deadzone] (**15%** | 0% to 35% in 5% increments)\n\n\tSet the deadzone of the joystick analog sticks. May be used to eliminate drift caused by poorly calibrated joystick hardware.\n\n- **Advanced > Enable Joystick Timed Intervals** [dosbox_pure_joystick_timed] (**On (default)** | Off)\n\n\tEnable timed intervals for joystick axes. Experiment with this option if your joystick drifts.\n\n### Performance Options\nAdjust the performance of the emulated CPU.\n\n- **Emulated Performance** [dosbox_pure_cycles] (**AUTO - DOSBox will try to detect performance needs (default)** | MAX - Emulate as many instructions as possible | 8086/8088, 4.77 MHz from 1980 (315 cps) | 286, 6 MHz from 1982 (1320 cps) | 286, 12.5 MHz from 1985 (2750 cps) | 386, 20 MHz from 1987 (4720 cps) | 386DX, 33 MHz from 1989 (7800 cps) | 486DX, 33 MHz from 1990 (13400 cps) | 486DX2, 66 MHz from 1992 (26800 cps) | Pentium, 100 MHz from 1995 (77000 cps) | Pentium II, 300 MHz from 1997 (200000 cps) | Pentium III, 600 MHz from 1999 (500000 cps) | AMD Athlon, 1.2 GHz from 2000 (1000000 cps))\n\n\tThe raw performance that DOSBox will try to emulate.\n\n- **Detailed > Performance Scale** [dosbox_pure_cycles_scale] (**100%** | 20% to 200% in 5% increments)\n\n\tFine tune the emulated performance for specific needs.\n\n- **Detailed > Limit CPU Usage** [dosbox_pure_cycle_limit] (**100%** | 20% to 100% in 1% increments)\n\n\tWhen emulating DOS as fast as possible, how much time per frame should be used by the emulation. Lower this if your device becomes hot while using this core.\n\n### Video Options\nSettings for the emulated graphics card and aspect ratio.\n\n- **Emulated Graphics Chip (restart required)** [dosbox_pure_machine] (**SVGA (Super Video Graphics Array) (default)** | VGA (Video Graphics Array) | EGA (Enhanced Graphics Adapter | CGA (Color Graphics Adapter) | Tandy (Tandy Graphics Adapter | Hercules (Hercules Graphics Card) | PCjr)\n\n\tThe type of graphics chip that DOSBox will emulate.\n\n- **CGA Mode** [dosbox_pure_cga] (**Early model, composite mode auto (default)** | Early model, composite mode on | Early model, composite mode off | Late model, composite mode auto | Late model, composite mode on | Late model, composite mode off)\n\n\tThe CGA variation that is being emulated.\n\n- **Hercules Color Mode** [dosbox_pure_hercules] (**Black & white (default)** | Black & amber | Black & green)\n\n\tThe color scheme for Hercules emulation.\n\n- **SVGA Mode (restart required)** [dosbox_pure_svga] (**S3 Trio64 (default)** | S3 Trio64 no-line buffer hack (reduces flickering in some games) | S3 Trio64 VESA 1.3 | Tseng Labs ET3000 | Tseng Labs ET4000 | Paradise PVGA1A)\n\n\tThe SVGA variation that is being emulated. Try changing this if you encounter graphical glitches.\n\n- **Aspect Ratio Correction** [dosbox_pure_aspect_correction] (**Off (default)** | On)\n\n\tWhen enabled, the core's aspect ratio is set to what a CRT monitor would display.\n\n### System Options\nOther system settings for emulated RAM and CPU.\n\n- **Memory Size (restart required)** [dosbox_pure_memory_size] (**16 MB (default)** | Disable extended memory (no EMS/XMS) | 4 MB | 8 MB | 24 MB | 32 MB (unsafe) | 48 MB (unsafe) | 64 MB (unsafe) | 96 MB (unsafe) | 128 MB (unsafe) | 224 MB (unsafe))\n\n\tThe amount of (high) memory that the emulated machine has. You can also disable extended memory (EMS/XMS). Using more than the default is not recommended, due to incompatibility with certain games and applications.\n\n- **CPU Type (restart required)** [dosbox_pure_cpu_type] (**Auto - Mixed feature set with maximum performance and compatibility** | 386 - 386 instruction with fast memory access | 386 (slow) - 386 instruction set with memory privilege checks | 386 (prefetch) - With prefetch queue emulation (only on 'auto' and 'normal' core) | 486 (slow) - 486 instruction set with memory privilege checks | Pentium (slow) - 586 instruction set with memory privilege checks)\n\n\tEmulated CPU type. Auto is the fastest choice. Games that require specific CPU type selection:\n\t386 (prefetch): X-Men: Madness in The Murderworld, Terminator 1, Contra, Fifa International Soccer 1994\n\t486 (slow): Betrayal in Antara\n\tPentium (slow): Fifa International Soccer 1994, Windows 95/Windows 3.x games\n\n- **Advanced > CPU Core** [dosbox_pure_cpu_core] (**Auto - Real-mode games use normal, protected-mode games use dynamic** | Dynamic - Dynamic recompilation (fast, using dynamic_x86 implementation) | Auto - Real-mode games use normal, protected-mode games use dynamic | Dynamic - Dynamic recompilation (fast, using dynrec implementation) | **Normal (interpreter)** | Simple (interpreter optimized for old real-mode games))\n\n\tEmulation method (DOSBox CPU core) used.\n\n### Audio Options\nMIDI, SoundBlaster and other audio settings.\n\n- **Audio Sample Rate (restart required)** [dosbox_pure_audiorate] (48000 | 44100 | 32730 | 32000 | 22050 | 16000 | 11025 | 8000 | 49716)\n\n\tThis should match the frontend audio output rate (Hz) setting. 49716 is for perfect OPL emulation.\n\n- **SoundBlaster Settings** [dosbox_pure_sblaster_conf] (**Port 0x220, IRQ 7, 8-Bit DMA 1, 16-bit DMA 5** | Port 0x220, IRQ 5, 8-Bit DMA 1, 16-bit DMA 5 | Port 0x240, IRQ 7, 8-Bit DMA 1, 16-bit DMA 5 | Port 0x240, IRQ 7, 8-Bit DMA 3, 16-bit DMA 7 | Port 0x240, IRQ 2, 8-Bit DMA 3, 16-bit DMA 7 | Port 0x240, IRQ 5, 8-Bit DMA 3, 16-bit DMA 5 | Port 0x240, IRQ 5, 8-Bit DMA 1, 16-bit DMA 5 | Port 0x240, IRQ 10, 8-Bit DMA 3, 16-bit DMA 7 | Port 0x280, IRQ 10, 8-Bit DMA 0, 16-bit DMA 6 | Port 0x210, IRQ 5, 8-Bit DMA 1, 16-bit DMA 5)\n\n\tSet the address, interrupt, low 8-bit and high 16-bit DMA.\n\n- **MIDI Output** [dosbox_pure_midi] (will cycle through the .ROMs or .SF2s you have installed, + frontend MIDI driver)\n\n\tSelect the .SF2 SoundFont file, .ROM file or interface used for MIDI output. To add SoundFonts or ROM files, copy them into the 'system' directory of the frontend. To use the frontend MIDI driver, make sure it's set up correctly.\n\n- **Advanced > SoundBlaster Type** [dosbox_pure_sblaster_type] (**SoundBlaster 16 (default)** | SoundBlaster Pro 2 | SoundBlaster Pro | SoundBlaster 2.0 | SoundBlaster 1.0 | GameBlaster | none)\n\n\tType of emulated SoundBlaster card.\n\n- **Advanced > SoundBlaster Adlib/FM Mode** [dosbox_pure_sblaster_adlib_mode] (**Auto (select based on the SoundBlaster type) (default)** | CMS (Creative Music System / GameBlaster) | OPL-2 (AdLib / OPL-2 / Yamaha 3812) | Dual OPL-2 (Dual OPL-2 used by SoundBlaster Pro 1.0 for stereo sound) | OPL-3 (AdLib / OPL-3 / Yamaha YMF262) | OPL-3 Gold (AdLib Gold / OPL-3 / Yamaha YMF262))\n\n\tThe SoundBlaster emulated FM synth mode. All modes are Adlib compatible except CMS.\n\n- **Advanced > SoundBlaster Adlib Provider** [dosbox_pure_sblaster_adlib_emu] (**Default** | High quality Nuked OPL3)\n\n\tProvider for the Adlib emulation. Default has good quality and low performance requirements.\n\n- **Advanced > Enable Gravis Ultrasound (restart required)** [dosbox_pure_gus] (**Off (default)** | On)\n\n\tEnable Gravis Ultrasound emulation. Settings are fixed at port 0x240, IRQ 5, DMA 3. If the ULTRADIR variable needs to be different than the default 'C:\\\\ULTRASND' you need to issue 'SET ULTRADIR=...' in the command line or in a batch file.\n\n## Controls\n\n### Automated controller mappings\n\nWhen a game is loaded, DOSBox Pure will try to detect the game and apply a controller mapping. \n\nTo see the applied mapping, check the `Port 1 Controls` screen in the RetroArch menu. It will show `Detected Automatic Key Mapping: `. Additionally you can set the core option `Input > Advanced > Automatic Game Pad Mappings` to `Enable with notification on game detection`.\n\n### Mouse emulation\n\nOn the `Controls` screen in the RetroArch menu, there are 2 mouse emulation modes available by switching the `Device Type` setting of any port with left/right. There is `Mouse with Left Analog Stick` and `Mouse with Right Analog Stick`.\n\n- When choosing left stick, the face buttons (B/A) will be used as left/right mouse buttons.\n- For the right stick, the shoulder buttons L/R will be used as left/right mouse buttons.\n- The X button is the middle mouse button and L2/R2 can be used to speed up or slow down mouse movement.\n\nThere is also the core option `Input > Mouse Sensitivity` to increase/decrease mouse movement speed.\n\n### Keyboard emulation\n\nFor games that don't have automated controller mappings or are not detected successfully, by default the option `Input > Bind Unused Buttons` will assign all unused buttons on the game pad with a respective default key.\n\nIf the `Device Type` on the `Controls` screen in the RetroArch menu of any port is set to `Generic Keyboard Bindings`, all buttons will be assigned with a keyboard key.\n\nAdditionally, it can be set to `Custom Keyboard Bindings` which will allow fully customizable mappings.\n\n### Joystick emulation\n\nThere are multiple DOS era joysticks available as mappings on the `Controls` screen in the RetroArch menu.\n\n`Gravis GamePad (1 D-Pad, 4 Buttons)`, `Basic joystick (2 Axes, 2 Buttons)`, `ThrustMaster Flight Stick (3 axes, 4 buttons, 1 hat)` and `Control both DOS joysticks (4 axes, 4 buttons)`.\n\nThese can be assigned to any port and the button layout can be remapped as with any other device type.\n\n### On-screen keyboard\n\n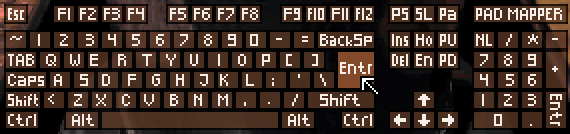\n\nBy pressing L3 on the gamepad (usually by pushing in the left analog stick), the on-screen keyboard will open. The cursor can be controlled with the controller (or mouse or keyboard) and L2/R2 will speed up or slow down the move speed.\n\nBy clicking a key on the on-screen keyboard for 0.5 seconds, it will be held down, clicking it again will release it. This allows multiple keys to be pressed at the same time through the on-screen-keyboard.\n\n!!!tip\n\tDepending on your controller, you might experience a slight drift (the cursor moving on its own). Fix this by going to `Settings > Input` in RetroArch and nudging the option `Analog Deadzone` up a bit (e.g., 0.3).\n\nIf the cursor is moved above the middle of the screen, the keyboard will move to the top. The button can be remapped in the controls menu and there is also a core option to disable it entirely.\n\n### Gamepad Mapper\n\n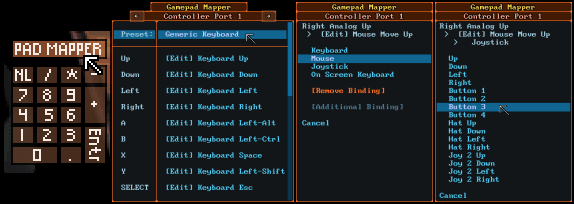\n\nIf you need even more customization of the controls than provided by the [Automated controller mappings](#automated-controller-mappings), or the various presets for [mouse](#mouse-emulation), [keyboard](#keyboard-emulation) and [joysticks](#joystick-emulation), you can use the gamepad mapper introduced in version 0.9.0 in April, 2022.\n\nTo open it, click the \"PAD MAPPER\" button in the On-screen keyboard (cf. above).\n\nIt is available any time in-game and changes are immediately saved and applied when closing the mapper. Up to 4 functions can be mapped for any button/direction of the gamepad. A mapping can be to any function of the 3 emulated input devices: keyboard, mouse or joystick.\n\n## Joypad (RetroPad)\n\n| Input descriptors for Gamepad 2 Button | RetroPad Inputs |\n|----------------------------------------|---------------------------------------------|\n| Button 2 |  |\n| Button 1 |  |\n| D-Pad Up |  |\n| D-Pad Down |  |\n| D-Pad Left |  |\n| D-Pad Right |  |\n\n| Input descriptors for Gamepad 4 Button | RetroPad Inputs |\n|----------------------------------------|---------------------------------------------|\n| Button 3 |  |\n| Button 1 |  |\n| D-Pad Up |  |\n| D-Pad Down |  |\n| D-Pad Left |  |\n| D-Pad Right |  |\n| Button 4 |  |\n| Button 2 |  |\n\n| Input descriptors for Joystick 2 Button | RetroPad Inputs |\n|-----------------------------------------|------------------------------------------------|\n| Button 2 |  |\n| Button 1 |  |\n| Left Analog X |  X |\n| Left Analog Y |  Y |\n\n| Input descriptors for Joystick 4 Button | RetroPad Inputs |\n|-----------------------------------------|------------------------------------------------|\n| Button 3 |  |\n| Button 1 |  |\n| Button 4 |  |\n| Button 2 |  |\n| Left Analog X |  X |\n| Left Analog Y |  Y |\n| Right Analog X |  X |\n| Right Analog Y |  Y |\n\n| Input descriptors for Keyboard - Port 1 | RetroPad Inputs |\n|-----------------------------------------|------------------------------------------------|\n| Kbd Up |  |\n| Kbd Down |  |\n| Kbd Left |  |\n| Kbd Right |  |\n| Esc |  |\n| Enter |  |\n| Space |  |\n| Left Shift |  |\n| Left Ctrl |  |\n| Left Alt |  |\n| 1 |  |\n| 2 |  |\n| 3 |  |\n| 4 |  |\n| F1 |  |\n| F2 |  |\n| Kbd Left/Right |  X |\n| Kbd Up/Down |  Y |\n| Home/End |  X |\n| PgUp/PgDn |  Y |\n\n| Input descriptors for Keyboard - Port 2 | RetroPad Inputs |\n|-----------------------------------------|------------------------------------------------|\n| 8 |  |\n| 2 |  |\n| 4 |  |\n| 6 |  |\n| Period |  |\n| Enter |  |\n| 5 |  |\n| 1 |  |\n| 0 |  |\n| 3 |  |\n| 7 |  |\n| 9 |  |\n| Minus |  |\n| Plus |  |\n| Divide |  |\n| Multiply |  |\n| 4/6 |  X |\n| 8/2 |  Y |\n| Minus/Plus |  X |\n| Divide/Multiply |  Y |\n\n| Input descriptors for Keyboard - Port 3 | RetroPad Inputs |\n|-----------------------------------------|------------------------------------------------|\n| Q |  |\n| A |  |\n| Z |  |\n| X |  |\n| G |  |\n| H |  |\n| D |  |\n| F |  |\n| C |  |\n| S |  |\n| W |  |\n| E |  |\n| R |  |\n| T |  |\n| V |  |\n| B |  |\n| Z/X |  X |\n| Q/A |  Y |\n| J/L |  X |\n| I/K |  Y |\n\n| Input descriptors for Keyboard - Port 4 | RetroPad Inputs |\n|-----------------------------------------|------------------------------------------------|\n| Backspace |  |\n| Backslash |  |\n| Semicolon |  |\n| Quote |  |\n| O |  |\n| P |  |\n| Slash |  |\n| Right Shift |  |\n| Right Ctrl |  |\n| Right Alt |  |\n| Left Bracket |  |\n| Right Bracket |  |\n| Comma |  |\n| Period |  |\n| Minus |  |\n| Equals |  |\n| Semicolon/Quote |  X |\n| Backspace/Backslash |  Y |\n| Left/Right Bracket |  X |\n| Minus/Equals |  Y |\n\n!!!tip\n\tAbove are the default keyboard to RetroPad mappings for all 4 ports. Note that by using the Quick Menu, you can choose from various presets in the `Controls` > `Port # Controls` section.\n\n| Input descriptors for Emulated mouse | RetroPad Inputs |\n|--------------------------------------|------------------------------------------------|\n| Emulated Mouse Right Click |  |\n| Emulated Mouse Left Click |  |\n| Emulated Mouse X Axis |  X |\n| Emulated Mouse Y Axis |  Y |\n\n## Keyboard\n\n| RetroKeyboard Inputs | Keyboard |\n|-------------------------------|--------------------|\n| Keyboard Backspace | Backspace |\n| Keyboard Tab | Tab |\n| Keyboard Return | Enter |\n| Keyboard Pause | Pause |\n| Keyboard Escape | Escape |\n| Keyboard Space | Space |\n| Keyboard ' | ' |\n| Keyboard , | , |\n| Keyboard . | . |\n| Keyboard / | / |\n| Keyboard 0 | 0 |\n| Keyboard 1 | 1 |\n| Keyboard 2 | 2 |\n| Keyboard 3 | 3 |\n| Keyboard 4 | 4 |\n| Keyboard 5 | 5 |\n| Keyboard 6 | 6 |\n| Keyboard 7 | 7 |\n| Keyboard 8 | 8 |\n| Keyboard 9 | 9 |\n| Keyboard ; | ; |\n| Keyboard - | - |\n| Keyboard = | = |\n| Keyboard [ | [ |\n| Keyboard \\ | \\ |\n| Keyboard ] | ] |\n| Keyboard ` | ` |\n| Keyboard a | a |\n| Keyboard b | b |\n| Keyboard c | c |\n| Keyboard d | d |\n| Keyboard e | e |\n| Keyboard f | f |\n| Keyboard g | g |\n| Keyboard h | h |\n| Keyboard i | i |\n| Keyboard j | j |\n| Keyboard k | k |\n| Keyboard l | l |\n| Keyboard m | m |\n| Keyboard n | n |\n| Keyboard o | o |\n| Keyboard p | p |\n| Keyboard q | q |\n| Keyboard r | r |\n| Keyboard s | s |\n| Keyboard t | t |\n| Keyboard u | u |\n| Keyboard v | v |\n| Keyboard w | w |\n| Keyboard x | x |\n| Keyboard y | y |\n| Keyboard z | z |\n| Keyboard Delete | Delete |\n| Keyboard Numpad 0 | Numpad 0 |\n| Keyboard Numpad 1 | Numpad 1 |\n| Keyboard Numpad 2 | Numpad 2 |\n| Keyboard Numpad 3 | Numpad 3 |\n| Keyboard Numpad 4 | Numpad 4 |\n| Keyboard Numpad 5 | Numpad 5 |\n| Keyboard Numpad 6 | Numpad 6 |\n| Keyboard Numpad 7 | Numpad 7 |\n| Keyboard Numpad 8 | Numpad 8 |\n| Keyboard Numpad 9 | Numpad 9 |\n| Keyboard Numpad . | Numpad . |\n| Keyboard Numpad / | Numpad / |\n| Keyboard Numpad * | Numpad * |\n| Keyboard Numpad - | Numpad - |\n| Keyboard Numpad + | Numpad + |\n| Keyboard Numpad Enter | Numpad Enter |\n| Keyboard Up | Up |\n| Keyboard Down | Down |\n| Keyboard Right | Left |\n| Keyboard Left | Right |\n| Keyboard Insert | Insert |\n| Keyboard Home | Home |\n| Keyboard End | End |\n| Keyboard Page Up | Page Up |\n| Keyboard Page Down | Page Down |\n| Keyboard F1 | F1 |\n| Keyboard F2 | F2 |\n| Keyboard F3 | F3 |\n| Keyboard F4 | F4 |\n| Keyboard F5 | F5 |\n| Keyboard F6 | F6 |\n| Keyboard F7 | F7 |\n| Keyboard F8 | F8 |\n| Keyboard F9 | F9 |\n| Keyboard F10 | F10 |\n| Keyboard F11 | F11 |\n| Keyboard F12 | F12 |\n| Keyboard Num Lock | Num Lock |\n| Keyboard Caps Lock | Caps Lock |\n| Keyboard Scroll Lock | Scroll Lock |\n| Keyboard Right Shift | Right Shift |\n| Keyboard Left Shift | Left Shift |\n| Keyboard Right Control | Right Control |\n| Keyboard Left Control | Left Control |\n| Keyboard Right Alt | Right Alt |\n| Keyboard Left Alt | Left Alt |\n| Keyboard Sys Req | Print Screen |\n\n## Compatibility\n\n### Boppin'\nIf the game rapidly cycles through the main menu options indefinitely, it has to do with malfunctioning joystick calibration. try deleting the game's config file, `BOPPIN.CFG`, and then reconfiguring the game. To do so, go to the command line from the start menu, then type:\n\n```\nDEL BOPPIN.CFG\nSETUP.EXE\nBOPPIN.EXE\n```\n\nTo fix this in-game, you need to go to the core options and fiddle around with the Emulated Performance setting until the cursor stops moving.\n\nBoppin' uses some form of joystick calibration which depends on the speed of the CPU. And it seems that once it has some form of calibration data, it saves that to its config file. So if you use the game pre-configured while running with different performance emulation (cycles) settings, it will have its joysticks off-calibrated and thus scrolling through the main menu (always holding up or down) or switching between the title screen and the menu (always holding left or right).\n\n[More info here](https://github.com/schellingb/dosbox-pure/issues/75#issuecomment-1115108702).\n\n## External Links\n\n- [Official DOSBox Website](https://www.dosbox.com/)\n- [Official/Original DOSBox SourceForge Repository](https://sourceforge.net/projects/dosbox/)\n- [Libretro DOSBox Pure info file](https://github.com/libretro/libretro-super/blob/master/dist/info/dosbox_pure_libretro.info)\n![#f03c15]\n- [Libretro DOSBox Pure GitHub Repository](https://github.com/schellingb/dosbox-pure)\n- [Report Libretro DOSBox Pure core Issues Here](https://github.com/schellingb/dosbox-pure/issues)\n"
},
{
"path": "docs/library/doukutsu-rs.md",
"content": "# doukutsu-rs\n\n*This article primarily outlines the retroarch-specific features of this core. For a general feature-list and how-to for d-rs, please see the readme in the [Upstream Repository](https://github.com/doukutsu-rs/doukutsu-rs/).*\n\n

\n\n## Background\n\nDoukutsu-rs *(often abbreviated d-rs)* is a modern and accurate re-implementation of the Cave Story Engine designed to be a drop-in replacement for all official and most fan ports, including:\n\n- CS Freeware\n- Cave Story+\n- Cave Story Switch\n- Cave Story Wiiware\n- CSE2\n- NXEngine-Evo\n\nThe engine adds other Quality-of-life features like 2-player local multiplayer, lighting effects, and smooth motion interpolation.\n\n## Requirements\n\nCurrently, this core requires at least OpenGL 2 or OpenGLES 2 to run. On MacOS systems, it requires at least OpenGL 3 support.\n\nSupported platforms:\n\n- Windows\n- Linux\n- Mac OS *(at least openGL 3 required)*\n- Android\n- iOS\n\n\n## How to start d-rs:\n\nD-rs does not ship with Cave Story data. To run it, you can either supply your own datafiles or use the \"Content Downloader\" (for Freeware only).\n\nFor more information on how to get the files from your specific Cave Story install, see the [Upstream Repository readme](https://github.com/doukutsu-rs/doukutsu-rs/).\n\n### Freeware\nFreeware files can be obtained from the [tribute site](https://www.cavestory.org/download/cave-story.php) or via the retroarch Content Downloader, in a similar manner to the NXEngine core:\n\n1. Go to RetroArch's main menu screen and select \"Online Updater\". From there, select \"Content Downloader\".\n2. In the list, there should be a folder labeled `Cave Story`. Select it, then select the `Cave Story (En).zip` file. The file should be downloaded and extracted to Retroarch's `Downloads` directory.\n3. Go back to RetroArch's main menu screen. Select \"Load Content\", then navigate to `Downloads/Cave Story (En)/` and select `Doukutsu.exe`.\n4. If given the choice on what core to run, choose `Cave Story (drs)`.\n\nThe game should begin playing.\n\n### Cave Story +\n\nThe process for Cave Story plus is largely the same, but you have to supply your own datafiles.\n\n1. Grab your CS+ install and place it where you can navigate to it from retroarch.\n2. Navigate to the CS+ folder and select the `CaveStory+.exe` file.\n3. If given the choice on what core to run, choose `Cave Story (drs)`.\n\nThe game should begin playing.\n\n### Cave Story + (Switch edition / Wiiware edition)\n\nThese versions of Cave Story don't have an executable bundled with the `data` folder. D-rs can load this just fine, but it needs to know *where* to find it, which requires the creation of a \"dummy\" executable next to the data folder.\n\n

\n\n1. Grab your CS-Switch or CS-Wiiware install and place it where you can navigate to it from retroarch.\n2. In the folder that contains the `data` folder *(not INSIDE the data folder, but next to it)*, create an empty file with the `.exe` extension. Name doesn't matter, (example: `Target.exe`)\n3. Navigate to the containing folder and select the target file you just made.\n4. If given the choice on what core to run, choose `Cave Story (drs)`.\n\nThe game should begin playing.\n\n## Extensions\n\n**With the exception of Freeware cave story**, d-rs mainly uses the target file as a reference to figure out where the data folder is. *(since at the time of writing, retroarch can't load a folder directly through the GUI)* \n\nIf the core is loading from Freeware for the first time, it will open the file in order to dump its internal assets into the `data` directory. After this, the executable isn't needed beyond use as a starting \"target\" for the core.\n\nFor CS+, Wiiware, or NXEngine, placing an empty \"target\" file in the same directory as the `data` folder with one of these extensions will load the game.\n\n- .so\n- .dll\n- .exe\n\n\nThe info file source can be found here:\nhttps://github.com/libretro/libretro-super/blob/master/dist/info/doukutsu_rs_libretro.info\n\n\n## Frontend Features\n\n| Feature | Supported |\n|-------------------|:---------:|\n| Restart | ✔ |\n| Saves | X |\n| States | X |\n| Rewind | X |\n| Netplay | X |\n| Core Options | ✔ |\n| [Memory Monitoring (achievements)](../guides/memorymonitoring.md) | X |\n| RetroArch Cheats | X |\n| Native Cheats | ✔ |\n| Controls | ✔ |\n| Remapping | ✔ |\n| Multi-Mouse | X |\n| Rumble | ✔ |\n| Sensors | X |\n| Camera | X |\n| Location | X |\n| Subsystem | X |\n| [Softpatching](../guides/softpatching.md) | X |\n| Disk Control | X |\n| Username | X |\n| Language | X |\n| Crop Overscan | X |\n| LEDs | X |\n| Fast Forward | X |\n| Slow-mo | ✔ |\n\n## Directories\n\n\nD-rs will modify the following files/folders:\n\n- `~/data` - *(only with freeware)*, will be populated with Cave Story's internal assets the first time the game is launched (things like music and credit images).\n- `~/user` - If this folder already exists (I.E. continuing a game that was started on another port of d-rs), d-rs will use this directory instead of `RetroArch/saves/d-rs`.\n- `RetroArch/saves/d-rs` - game saves, internal settings, and operation logs will be stored in this folder.\n\n\n\n## Geometry and timing\n\nD-rs separates in-game time from screen refresh rate. The game can be either set to run at 50 TPS (mimicking Freeware CS) or 60 FPS (mimicking CS+).\n\nScreen drawing varies depending on hardware capability, but is typically around 60 FPS.\n\nDepending on the `Core Options` (see below), the game's screen ratio can be changed.\n\n\n## Core options\n\n- **Internal upscaling factor** - The size of the \"screen\" that the core thinks it's drawing to. Larger resolutions provide smoother visuals. For CS+, a minimum scale of x2 is needed to retain all image detail. `2x (CS+, default)|1x (freeware, fastest)|3x (smoother motion)|4x (smoothest motion)`,\n- **Screen Ratio** - Shape of the \"screen\" that the core thinks it's drawing to. Original CS is 4:3, but d-rs supports widescreen. `4:3 (original)|16:9 (switch)|16:10|21:9`\n- **Debug Outlines** - Draw onscreen markers to show where entities are and what they are colliding with. `Disabled|Enabled`\n- **Show FPS** - Show in-game TPS and FPS. `Disabled|Enabled`\n- **Show Debug GUI** - Show the IMGUI debug menu *(no real use at the moment; mouse input is disabled)*. `Disabled|Enabled`\n- **GOD Mode (Invincibility)** - Player cannot take damage. `Disabled|Enabled`\n- **Infinite Booster** - Gives the player the jetpack without a fuel limit. `Disabled|Enabled`\n- **Noclip** - Allows the player to float through the map without tile or NPC collision. `Disabled|Enabled`\n- **More Rust** - Turns Sue into the d-rs mascot ({ width=\"16\" height=\"16\" }). `Disabled|Enabled`\n\n\n## User 1-2 device types\n\nThe d-rs core supports the following device type(s) in the controls menu, bolded device types are the default for the specified user(s):\n\n- **Retropad (Port 1)** - Player 1 controls.\n- **Retropad (Port 2)** - Player 2 controls.\n\nThese controls can be re-assigned in both the retroarch frontend and in the core itself.\n\n## Rumble\n\nIf the frontend supports rumble and is paired with a controller that has the capability, d-rs will provide vibration feedback during screen shakes and other various in-game events.\nRumble can also be disabled within the core's settings menu.\n\n## Joypad\n\n*Note: These buttons can be re-bound in the frontend as well as within the core.*\n\n| RetroPad Inputs | Input descriptors |\n|------------------------------------------------|--------------------------------|\n|  | Shoot |\n|  | Jump |\n|  | Inventory/Cutscene Fast Forward|\n|  | Pause |\n|  | Show/Hide Map |\n|  | Aim up |\n|  | Interact/Aim down |\n|  | Move Left |\n|  | Move Right |\n|  | Previous Weapon |\n|  | Next Weapon |\n|  | Strafe |\n|  | Move (d-pad equivalent) |\n\n## External Links\n\n- [Official doukutsu-rs source (GitHub)](https://github.com/doukutsu-rs/doukutsu-rs)\n- [Official doukutsu-rs website](https://doukutsu-rs.github.io/)\n---\n- [Libretro port of d-rs (backend)](https://github.com/DrGlaucous/doukutsu-rs-nm/tree/retroarch-dev)\n- [Libretro port of d-rs (interface layer)](https://github.com/DrGlaucous/doukutsu-rs-libretro/)\n---\n- [d-rs discord server](https://discord.gg/fbRsNNB)\n\n\n\n## (Related cores)\n\n- [NXEngine](nxengine.md)\n"
},
{
"path": "docs/library/dummy.md",
"content": "# Dummy core\n\n## Background\n\n'Load Dummy on Core Shutdown' option in RetroArch's Core settings.\n\nSome cores might have a shutdown feature. If enabled, it will prevent the core from shutting RetroArch down. Instead, it loads a dummy core.\n\n### Author/License\n\nThe Dummy core has been authored by\n\n- The RetroArch Team\n\nThe Dummy core is licensed under\n\n- MIT\n\nA summary of the licenses behind RetroArch and its cores can be found [here](../development/licenses.md).\n\n## External Links\n\n- [Libretro Dummy core Github Repository](https://github.com/libretro/RetroArch/tree/master/cores)"
},
{
"path": "docs/library/easyrpg.md",
"content": "# RPG Maker 2000/2003 (EasyRPG)\n\n\n\n## Background\n\nEasyRPG Player is a game interpreter to play RPG Maker 2000, 2003 and EasyRPG games. It uses the LCF parser library (liblcf) to read RPG Maker game data.\n\nEasyRPG Player is part of the EasyRPG Project. More information is available at the project website: [https://easyrpg.org/](https://easyrpg.org/)\n\n### Author/License\n\nThe EasyRPG core has been authored by\n\n- EasyRPG team\n\nThe EasyRPG core is licensed under\n\n- [GPLv3](https://github.com/libretro/easyrpg-libretro/blob/master/COPYING)\n\nA summary of the licenses behind RetroArch and its cores can be found [here](../development/licenses.md).\n\n## Extensions\n\nContent that can be loaded by the EasyRPG core have the following file extensions:\n\n- .ldb\n- .zip\n- .easyrpg\n\n### RTP files\n\nYou must download the RTP2000 and RTP2003 from [here](https://www.rpgmakerweb.com/run-time-package). They are exe/zip files but can be extracted with e.g. 7zip. Create `rtp` folder in `system` folder. Put the extracted data in \"rtp/2000\" and \"rtp/2003\" to `system/rtp` accordingly.\n\n| | | | | |\n|---|---|---|---|---|\n| retroarch | system | rtp | 2000 | |\n| | | | 2003 | |\n\n## Databases\n\nRetroArch database(s) that are associated with the EasyRPG core:\n\n- [RPG Maker](https://github.com/libretro/libretro-database/blob/master/rdb/RPG%20Maker.rdb)\n- [RPG Maker thumbnails](https://github.com/libretro-thumbnails/RPG_Maker)\n\n## Features\n\nFrontend-level settings or features that the EasyRPG core respects.\n\n| Feature | Supported |\n|-------------------|:---------:|\n| Restart | ✔ |\n| Screenshots | ✔ |\n| Saves | ✔ |\n| States | ✕ |\n| Rewind | ✕ |\n| Netplay | ✕ |\n| Core Options | ✔ |\n| [Memory Monitoring (achievements)](../guides/memorymonitoring.md) | ✕ |\n| RetroArch Cheats | ✕ |\n| Native Cheats | ✕ |\n| Controls | ✔ |\n| Remapping | ✔ |\n| Multi-Mouse | ✕ |\n| Rumble | ✕ |\n| Sensors | ✕ |\n| Camera | ✕ |\n| Location | ✕ |\n| Subsystem | ✕ |\n| [Softpatching](../guides/softpatching.md) | ✕ |\n| Disk Control | ✕ |\n| Username | ✕ |\n| Language | ✕ |\n| Crop Overscan | ✕ |\n| LEDs | ✕ |\n\n### Directories\n\nThe EasyRPG core's internal core name is 'EasyRPG'\n\nThe EasyRPG core saves/loads to/from these directories.\n\n**Loaded content's directory**\n\n- Save##.lsd (Save files)\n- Save##.dyn (Additional save file data used by some games)\n- Save.lgs (Global save data used by some games)\n- easyrpg_log.txt (EasyRPG log file)\n\n**Frontend's system directory**\n\n- easyrpg-player/config.ini (configuration of the engine)\n\n### Geometry and timing\n\n- The EasyRPG core's core provided FPS is (FPS)\n- The EasyRPG core's core provided sample rate is 44100 Hz\n- The EasyRPG core's core provided aspect ratio is (Ratio)\n\n## Controllers\n\nThe EasyRPG core supports the following device type(s) in the controls menu, bolded device types are the default for the specified user(s):\n\n### User 1 device types\n\n- None - Doesn't disable input. There's no reason to switch to this.\n- **RetroPad** - Joypad - Stay on this.\n- RetroPad w/Analog - Joypad - Same as RetroPad. There's no reason to switch to this.\n\n### Controller tables\n\n#### Joypad\n\n| RetroPad Inputs | EasyRPG core inputs |\n|------------------------------------------------|---------------------------|\n|  | Up |\n|  | Down |\n|  | Left |\n|  | Right |\n|  | Decision |\n|  | Cancel |\n|  | Cancel |\n|  | Shift |\n|  | Number 0 |\n|  | Number 1 |\n|  | Number 2 |\n|  | Number 3 |\n|  | Number 4 |\n|  | Number 5 |\n|  | Number 6 |\n|  | Number 7 |\n|  | Number 8 |\n|  | Number 9 |\n|  | Settings Menu |\n|  | Reset |\n|  | Fast Forward (x3) |\n|  | Fast Forward (x10) |\n|  | Debug Menu (Test Play mode only) |\n|  | Debug Through (Test Play mode only) |\n|  | Debug Save (Test Play mode only) |\n|  | Debug Abort Event (Test Play mode only) |\n\n\n\n## External Links\n\n- [Official EasyRPG Website](https://easyrpg.org/)\n- [Official EasyRPG Github Repository](https://github.com/EasyRPG/Player)\n- [Libretro EasyRPG Core info file](https://github.com/libretro/libretro-super/blob/master/dist/info/easyrpg_libretro.info)\n- [Libretro EasyRPG Github Repository](https://github.com/libretro/easyrpg-libretro)\n- [Report Libretro EasyRPG Core Issues Here](https://github.com/libretro/easyrpg-libretro/issues)\n\n## (Related cores)\n\n- [RPG Maker XP/VX/VX Ace (mkxp-z)](mkxp-z.md)\n"
},
{
"path": "docs/library/ecwolf.md",
"content": "# Wolfenstein 3D/Spear of Destiny/Super 3D Noah’s Ark (ECWolf) *WIP*\n\n\n\n## Background\n\nECWolf is a port of the Wolfenstein 3D engine based of Wolf4SDL. It combines the original Wolfenstein 3D engine with the user experience of ZDoom to create the most user and mod author friendly Wolf3D source port.\n\nLike ZDoom, ECWolf aims to support all games which use the Wolfenstein 3D engine including Blake Stone (coming in ECWolf 3.0), Corridor 7, Operation Body Count, Rise of the Triad, and Super 3D Noah's Ark. ECWolf will also support Macintosh Wolfenstein 3D along with all of its user created missions (coming in ECWolf 2.0).\n\n- phcoder\n\nThe ECWolf core is licensed under\n\n- [BSD/LGPL]()\n\nA summary of the licenses behind RetroArch and its cores can be found [here](../development/licenses.md).\n\n- Single binary runs all supported games. (Wolfenstein 3D, Spear of Destiny, ...)\n- Full support for high resolution modes with aspect ratio correction including wide screen support.\n- Modern control schemes (WASD + mouse).\n- Mac Wolf/S3DNA/ROTT style automap.\n- Unlimited save slots.\n- This is actually based on the Wolf3D engine instead of a recreation or forcing into a more modern engine.\n- Software rendered using the same 8-bit ray casting.\n\n## Extensions\n\nContent that can be loaded by the ECWolf core have the following file extensions:\n\n- wl6\n- n3d\n- sod\n- sdm\n- wl1\n- pk3\n- exe\n\n## Databases\n\nRetroArch database(s) that are associated with the ECWolf core:\n\n- [ECWolf](https://github.com/libretro/libretro-database/blob/master/rdb/Wolfenstein%203D.rdb)\n\n## BIOS\n\nECWolf does require BIOS (bootrom) files to work.\n\n- ecwolf.pk3\n\n## Features\n\n| Feature | Supported |\n|-------------------|:---------:|\n| Restart | ✕ |\n| Screenshots | ✔ |\n| Saves | ✔ |\n| States | ✔ |\n| Rewind | ✔ |\n| Netplay | ✕ |\n| Core Options | ✕ |\n| [Memory Monitoring (achievements)](../guides/memorymonitoring.md) | ✕ |\n| RetroArch Cheats | ✕ |\n| Native Cheats | ✕ |\n| Controls | ✔ |\n| Remapping | ✔ |\n| Multi-Mouse | ✕ |\n| Rumble | ✕ |\n| Sensors | ✕ |\n| Camera | ✕ |\n| Location | ✕ |\n| Subsystem | ✕ |\n| Softpatching | ✕ |\n| Disk Control | ✕ |\n| Username | ✕ |\n| Crop Overscan (in RetroArch's Video settings) | ✕ |\n\n### Directories\n\nThe ECWolf core's internal core name is `ecwolf`.\n\n### Core provided aspect ratio\n\nECWolf's core provided aspect ratio is 16:10.\n\n## Core options\n\n## Controllers\n\n### Device types\n\nThe ECWolf core supports the following device type(s) in the controls menu, bolded device types are the default for the specified user(s):\n\n#### User 1 - 1 device types\n\n- None - Input disabled.\n- **RetroPad** - Joypad\n- RetroPad w/Analog - Joypad - **There is no reason to switch to this.**\n\n### Controller tables\n\n#### Joypad and analog device type table\n\n| RetroPad Inputs | User 1 input descriptors |\n|------------------------------------------------|--------------------------|\n|  | Move Forward |\n|  | Move Backward |\n|  | Turn Left |\n|  | Turn Right |\n|  | Strafe Left |\n|  | Strafe Right |\n|  | Fire |\n|  | Use |\n|  | Run |\n|  | Show Status |\n|  | Map |\n|  | Previous Weapon |\n|  | Next Weapon |\n|  | Pause |\n|  X | Strafe Left/Right |\n|  Y | Move Forward/Backward |\n|  X | Turn Left/Right |\n\n## External Links\n\n- [Libretro ECWolf Core info file](https://github.com/libretro/libretro-super/blob/master/dist/info/ecwolf_libretro.info)\n- [Libretro ECWolf Github Repository](https://github.com/libretro/ecwolf)\n- [Report ECWolf Core Issues Here](https://github.com/libretro/ecwolf/issues)\n"
},
{
"path": "docs/library/eightyone.md",
"content": "# ZX81 (EightyOne) *WIP*\n\n## Background\n\n81-libretro is an work in progress port of the EightyOne (a.k.a. THE Sinclair Emulator) to libretro. The classic ZX81 games are all over the Internet, but check the colorized folder for games with Chroma 81 support. There are also many original games for the Zeddy, check Bob's Stuff for some high quality games.\n\nThe EightyOne core has been authored by\n\n- Michael D Wynne\n\nThe EightyOne core is licensed under\n\n- [GPLv3](https://github.com/libretro/81-libretro/blob/master/LICENSE)\n\nA summary of the licenses behind RetroArch and its cores can be found [here](../development/licenses.md).\n\nEightyOne emulates a number of ZX80, ZX81, clones, and other computers based on the same hardware:\n\n- Sinclair ZX80\n- Sinclair ZX81\n- Timex TS1000\n- Timex TS1500\n- Lambda 8300\n- Ringo R470\n- MicroDigital TK85\n- Jupiter ACE\n\nHowever, 81-libretro only emulates the Sinclair ZX81 with 16Kb RAM for now. Other machines will be added as time permits. Push requests are welcome.\n\nThe port correctly loads and runs some many games I have around in the p format. tzx format is also supported.\n\nEightyOne also emulates some ZX Spectrum machines, but those were left out of this core on purpose.\n\n## Extensions\n\nContent that can be loaded by the EightyOne core have the following file extensions:\n\n- .p\n- .tzx\n- .t81\n\n## Databases\n\nRetroArch database(s) that are associated with the EightyOne core:\n\n- [Sinclair - ZX 81](https://github.com/libretro/libretro-database/blob/master/rdb/Sinclair%20-%20ZX%2081.rdb)\n\n## Features\n\nRetroArch-level settings or features that the EightyOne core respects.\n\n| Feature | Supported |\n|-------------------|:---------:|\n| Restart | ✔ |\n| Screenshots | ✔ |\n| Saves | ✕ |\n| States | ✔ |\n| Rewind | ✔ |\n| Netplay | ✔ |\n| Core Options | ✔ |\n| [Memory Monitoring (achievements)](../guides/memorymonitoring.md) | ✕ |\n| RetroArch Cheats | ✕ |\n| Native Cheats | ✕ |\n| Controls | ✔ |\n| Remapping | ✕ |\n| Multi-Mouse | ✕ |\n| Rumble | ✕ |\n| Sensors | ✕ |\n| Camera | ✕ |\n| Location | ✕ |\n| Subsystem | ✕ |\n| [Softpatching](../guides/softpatching.md) | ✕ |\n| Disk Control | ✕ |\n| Username | ✕ |\n| Language | ✕ |\n| Crop Overscan | ✕ |\n| LEDs | ✕ |\n\n### Directories\n\nThe EightyOne core's directory name is 'EightyOne'\n\nThe EightyOne core saves/loads to/from these directories.\n\n**RetroArch's State directory**\n\n- 'content-name'.state# (State)\n\n### Geometry and timing\n\n- The EightyOne core's core provided FPS is 50\n- The EightyOne core's core provided sample rate is 44100 Hz\n- The EightyOne core's core provided aspect ratio is (Ratio)\n\n### Auto-configuration\n\nSince configuring the core for each game can be a tedious task, the EightyOne core features auto-configuration. Games that support auto-configuration are listed in the [src/gamedb/gamedb.json file](https://github.com/libretro/81-libretro/blob/master/src/gamedb/gamedb.json), along with some information and the configuration required to play them.\n\nCurrently, there's no way to change the auto-configuration settings short of recompiling the core after making the changes. If you feel the provided auto-configuration could be better or has bugs, please open an [issue](https://github.com/libretro/81-libretro/issues).\n\n### Colorization\n\nColorization works by loading a program prior to loading the game. This program will check if the Chroma 81 expansion is installed, and, if it is, configures the colors of the ZX81 characters, and then loads the original game, which runs unaware that it's playing with colors.\n\nSince the EightyOne core can't load arbitrary programs from the file system, the colorization program and the game must exist in the same file.\n\n## Core options\n\nThe EightyOne core has the following option(s) that can be tweaked from the core options menu. The default setting is bolded.\n\nSettings with (Restart) means that core has to be closed for the new setting to be applied on next launch.\n\n- **Tape Fast Load** (Off/**On**)\n\n\tInstantly loads files if enabled, or disable it to see the moving horizontal lines while the game loads.\n\n- **8K-16K Contents** (**auto**/ROM shadow/RAM/dK'tronics 4K Graphics ROM + 4K RAM)\n\n\tSelects the contents of memory addresses between 8192 and 16383, a shadow copy of the ROM, 8K of RAM, or [dK'tronics 4K ROM plus 4K of RAM](http://www.fruitcake.plus.com/Sinclair/ZX81/Chroma/ChromaInterface_Software_CharacterSetROM.htm).\n\n- **High Resolution** (**auto**/none/WRX)\n\n\tEnables WRX high resolution.\n\n- **Emulate Chroma 81** (**auto**/Off/On)\n\n\tEnable the [Chroma 81](http://www.fruitcake.plus.com/Sinclair/ZX81/Chroma/ChromaInterface.htm) interface (colorization).\n\n??? note \"Emulate Chroma 81 - auto/On\"\n\t\n\n??? note \"Emulate Chroma 81 - Off\"\n\t\n\n- **Video Presets** (**clean**/tv/noisy)\n\n\tChange how the video is emulated (if Chroma 81 is enabled, the video is set to \"clean\" regardless of this option).\n\n??? note \"Video Presets - clean\"\n\t\n\n??? note \"Video Presets - tv\"\n\t\n\n??? note \"Video Presets - noisy\"\n\t\n\n- **Sound emulation** (**auto**/none/Zon X-81)\n\n\tEnables sound emulation.\n\n- **Joypad Left mapping** (**auto**/default/new line/shift/space/./0/1/2/3/4/5/6/7/8/9/a/b/c/d/e/f/g/h/i/j/k/l/m/n/o/p/q/r/s/t/u/v/w/x/y/z)\n\n\tMaps this joypad button to a keyboard key, defaults are the cursor keys for the directional pad and '0' to all the other buttons.\n\n- **Joypad Right mapping** (**auto**/default/new line/shift/space/./0/1/2/3/4/5/6/7/8/9/a/b/c/d/e/f/g/h/i/j/k/l/m/n/o/p/q/r/s/t/u/v/w/x/y/z)\n\n\tMaps this joypad button to a keyboard key, defaults are the cursor keys for the directional pad and '0' to all the other buttons.\n\n- **Joypad Up mapping** (**auto**/default/new line/shift/space/./0/1/2/3/4/5/6/7/8/9/a/b/c/d/e/f/g/h/i/j/k/l/m/n/o/p/q/r/s/t/u/v/w/x/y/z)\n\n\tMaps this joypad button to a keyboard key, defaults are the cursor keys for the directional pad and '0' to all the other buttons.\n\n- **Joypad Down mapping** (**auto**/default/new line/shift/space/./0/1/2/3/4/5/6/7/8/9/a/b/c/d/e/f/g/h/i/j/k/l/m/n/o/p/q/r/s/t/u/v/w/x/y/z)\n\n\tMaps this joypad button to a keyboard key, defaults are the cursor keys for the directional pad and '0' to all the other buttons.\n\n- **Joypad A button mapping** (**auto**/default/new line/shift/space/./0/1/2/3/4/5/6/7/8/9/a/b/c/d/e/f/g/h/i/j/k/l/m/n/o/p/q/r/s/t/u/v/w/x/y/z)\n\n\tMaps this joypad button to a keyboard key, defaults are the cursor keys for the directional pad and '0' to all the other buttons.\n\n- **Joypad B button mapping** (**auto**/default/new line/shift/space/./0/1/2/3/4/5/6/7/8/9/a/b/c/d/e/f/g/h/i/j/k/l/m/n/o/p/q/r/s/t/u/v/w/x/y/z)\n\n\tMaps this joypad button to a keyboard key, defaults are the cursor keys for the directional pad and '0' to all the other buttons.\n\n- **Joypad X button mapping** (**auto**/default/new line/shift/space/./0/1/2/3/4/5/6/7/8/9/a/b/c/d/e/f/g/h/i/j/k/l/m/n/o/p/q/r/s/t/u/v/w/x/y/z)\n\n\tMaps this joypad button to a keyboard key, defaults are the cursor keys for the directional pad and '0' to all the other buttons.\n\n- **Joypad Y button mapping** (**auto**/default/new line/shift/space/./0/1/2/3/4/5/6/7/8/9/a/b/c/d/e/f/g/h/i/j/k/l/m/n/o/p/q/r/s/t/u/v/w/x/y/z)\n\n\tMaps this joypad button to a keyboard key, defaults are the cursor keys for the directional pad and '0' to all the other buttons.\n\n- **Joypad L button mapping** (**auto**/default/new line/shift/space/./0/1/2/3/4/5/6/7/8/9/a/b/c/d/e/f/g/h/i/j/k/l/m/n/o/p/q/r/s/t/u/v/w/x/y/z)\n\n\tMaps this joypad button to a keyboard key, defaults are the cursor keys for the directional pad and '0' to all the other buttons.\n\n- **Joypad R button mapping** (**auto**/default/new line/shift/space/./0/1/2/3/4/5/6/7/8/9/a/b/c/d/e/f/g/h/i/j/k/l/m/n/o/p/q/r/s/t/u/v/w/x/y/z)\n\n\tMaps this joypad button to a keyboard key, defaults are the cursor keys for the directional pad and '0' to all the other buttons.\n\n- **Joypad L2 button mapping** (**auto**/default/new line/shift/space/./0/1/2/3/4/5/6/7/8/9/a/b/c/d/e/f/g/h/i/j/k/l/m/n/o/p/q/r/s/t/u/v/w/x/y/z)\n\n\tMaps this joypad button to a keyboard key, defaults are the cursor keys for the directional pad and '0' to all the other buttons.\n\n- **Joypad R2 button mapping** (**auto**/default/new line/shift/space/./0/1/2/3/4/5/6/7/8/9/a/b/c/d/e/f/g/h/i/j/k/l/m/n/o/p/q/r/s/t/u/v/w/x/y/z)\n\n\tMaps this joypad button to a keyboard key, defaults are the cursor keys for the directional pad and '0' to all the other buttons.\n\n- **Transparent Keyboard Overlay** (Off/**On**)\n\n\tIf the keyboard overlay is transparent or opaque.\n\n??? note \"Transparent Keyboard Overlay - On\"\n\t\n\n??? note \"Transparent Keyboard Overlay - Off\"\n\t\n\n- **Time to Release key in ms** (**100**/300/500/1000)\n\n\tHow many milliseconds to wait before releasing the key pressed using the keyboard overlay.\n\n## Controllers\n\nThe EightyOne core supports the following device type(s) in the controls menu, bolded device types are the default for the specified user(s):\n\n### User 1 device types\n\n- None - Input disabled.\n- **RetroPad** - Joypad\n- Cursor Joystick - Joypad - Switch to this for joypad inputs.\n\n### User 2 device types\n\n- None - Input disabled.\n- **RetroPad** - Joypad\n- Sinclair Keyboard - Keyboard - Switch to this for keyboard inputs. Switch the User 1 device type to none if the correct keyboard inputs aren't being read.\n\n### Controller tables\n\n#### Joypad\n\n!!! attention\n\tUse the Joypad mapping core options to configure the Cursor Joystick inputs.\n\n| User 1 Remap descriptors | RetroPad Inputs | Cursor Joystick |\n|-------------------------------|----------------------------------------------|--------------------------|\n| |  | Joypad B button mapping |\n| |  | Joypad Y button mapping |\n| |  | Keyboard overlay |\n| |  | Joypad Up mapping |\n| |  | Joypad Down mapping |\n| |  | Joypad Left mapping |\n| |  | Joypad Right mapping |\n| |  | Joypad A button mapping |\n| |  | Joypad X button mapping |\n| |  | Joypad L button mapping |\n| |  | Joypad R button mapping |\n| |  | Joypad L2 button mapping |\n| |  | Joypad R2 button mapping |\n\n#### Keyboard\n\n| RetroKeyboard Inputs | Sinclair Keyboard |\n|------------------------------|--------------------|\n| Keyboard Backspace | VK_BACK |\n| Keyboard Tab | VK_TAB |\n| Keyboard Clear | VK_CLEAR |\n| Keyboard Return | VK_RETURN |\n| Keyboard Pause | VK_PAUSE |\n| Keyboard Escape | VK_ESCAPE |\n| Keyboard Space | VK_SPACE |\n| Keyboard Comma , | VK_COMMA |\n| Keyboard Delete | VK_DELETE |\n| Keyboard Keypad 0 | VK_NUMPAD0 |\n| Keyboard Keypad 1 | VK_NUMPAD1 |\n| Keyboard Keypad 2 | VK_NUMPAD2 |\n| Keyboard Keypad 3 | VK_NUMPAD3 |\n| Keyboard Keypad 4 | VK_NUMPAD4 |\n| Keyboard Keypad 5 | VK_NUMPAD5 |\n| Keyboard Keypad 6 | VK_NUMPAD6 |\n| Keyboard Keypad 7 | VK_NUMPAD7 |\n| Keyboard Keypad 8 | VK_NUMPAD8 |\n| Keyboard Keypad 9 | VK_NUMPAD9 |\n| Keyboard Keypad Period . | VK_DECIMAL |\n| Keyboard Keypad Divide / | VK_DIVIDE |\n| Keyboard Keypad Multiply * | VK_MULTIPLY |\n| Keyboard Keypad Minus - | VK_SUBTRACT |\n| Keyboard Keypad Plus + | VK_ADD |\n| Keyboard Up | VK_UP |\n| Keyboard Down | VK_DOWN |\n| Keyboard Right | VK_RIGHT |\n| Keyboard Left | VK_LEFT |\n| Keyboard Insert | VK_INSERT |\n| Keyboard Home | VK_HOME |\n| Keyboard End | VK_END |\n| Keyboard Page Up | VK_PRIOR |\n| Keyboard Page Down | VK_NEXT |\n| Keyboard F1 | VK_F1 |\n| Keyboard F2 | VK_F2 |\n| Keyboard F3 | VK_F3 |\n| Keyboard F4 | VK_F4 |\n| Keyboard F5 | VK_F5 |\n| Keyboard F6 | VK_F6 |\n| Keyboard F7 | VK_F7 |\n| Keyboard F8 | VK_F8 |\n| Keyboard F9 | VK_F9 |\n| Keyboard F10 | VK_F10 |\n| Keyboard F11 | VK_F11 |\n| Keyboard F12 | VK_F12 |\n| Keyboard F13 | VK_F13 |\n| Keyboard F14 | VK_F14 |\n| Keyboard F15 | VK_F15 |\n| Keyboard Num Lock | VK_NUMLOCK |\n| Keyboard Caps Lock | VK_CAPITAL |\n| Keyboard Scroll Lock | VK_SCROLL |\n| Keyboard Right Shift | VK_SHIFT |\n| Keyboard Left Shift | VK_SHIFT |\n| Keyboard Right Control | VK_CONTROL |\n| Keyboard Left Control | VK_CONTROL |\n| Keyboard Right Alt | VK_MENU |\n| Keyboard Left Alt | VK_MENU |\n| Keyboard Print | VK_SNAPSHOT |\n\n## External Links\n\n- [Libretro EightyOne Core info file](https://github.com/libretro/libretro-super/blob/master/dist/info/81_libretro.info)\n- [Libretro EightyOne Github Repository](https://github.com/libretro/81-libretro)\n- [Report Libretro EightyOne Core Issues Here](https://github.com/libretro/81-libretro/issues)\n- [Official EightyOne Sourceforge Repository]((https://sourceforge.net/projects/eightyone-sinclair-emulator/))"
},
{
"path": "docs/library/emuscv.md",
"content": "# Super Cassette Vision (EmuSCV) *Not Finished*\n\n\n\n## Background\n\nSuper Cassette Vision is a home video game console made by EPOCH CO. and released in Japan on July 17, 1984 and released in Europe (France only) later in 1984 under the YENO brand.\n\nThe EmuSCV core has been authored by:\n- MARCONATO Maxime\n- TAKEDA Toshiya\n\nThe EmuSCV core is licensed under [GPLv3](https://github.com/libretro/). A summary of the licenses behind RetroArch and its cores can be found [here](../development/licenses.md).\n\n## Extensions\n\nContent that can be loaded by the EmuSCV core have the following file extensions:\n\n- `.cart` (Native)\n- `.bin`\n- `.rom`\n\nSupported ROMs extensions: .CART (native), .BIN, .ROM, .0 (.1, .2, .3)\nand Zipped Roms (the name of the rom must be the same as the ZIP archive).\n\nAll ROMs can be stored in a 1 file ROM (.CART, .BIN, .ROM or .0).\nLarge ROMs can be stored in multiple files (.0, .1, .2, .3).\n\n## Features\n\nFrontend-level settings or features that the EmuSCV core respects.\n\n| Feature | Supported |\n|-------------------|:---------:|\n| Restart | ✔ |\n| Saves | - |\n| States | - |\n| Rewind | - |\n| Netplay | x |\n| Core Options | ✔ |\n| [Memory Monitoring (achievements)](../guides/memorymonitoring.md) | ✕ |\n| RetroArch Cheats | x |\n| Native Cheats | ✕ |\n| Controls | ✔ |\n| Remapping | x |\n| Multi-Mouse | ✕ |\n| Rumble | ✕ |\n| Sensors | ✕ |\n| Camera | ✕ |\n| Location | ✕ |\n| Subsystem | ✕ |\n| [Softpatching](../guides/softpatching.md) | ✕ |\n| Disk Control | x |\n| Username | ✕ |\n| Language | ✕ |\n| Crop Overscan | ✕ |\n| LEDs | ✕ |\n\n## Geometry and timing\n\n- The EmuSCV core's core provided FPS is 60.\n- The EmuSCV core's core provided sample rate is 48000/00 Hz.\n- The EmuSCV core's base width is 960.\n- The EmuSCV core's base height is 720.\n- The EmuSCV core's core provided aspect ratio is 4:3.\n\n## Usage\n\nLoad any supported content file. Content type will be autodetected, and if possible, started. \n\n## Core options\n\nThe EmuSCV core has the following option(s) that can be tweaked from the core options menu. The default setting is bolded.\nSettings with (Restart) means that core has to be closed for the new setting to be applied on next launch.\n\n- CONSOLE (**AUTO**|EPOCH|YENO|EPOCHLADY) - forced sleep in main thread for lower CPU use\n- DISPLAY (**AUTO**|EMUSCV|EPOCH|YENO)\n- PIXELASPECT (**AUTO**|RECTANGULAR|SQUARE) - enable in case of performance problems (has some \n\n## Control device types\n\n## Joypad\n\n## Keyboard\n\n## BIOS\n\nEmuSCV require a Super Cassette Vision BIOS to run.\n\nThere is only one version of the BIOS that can use diferent names:\n- upd7801g.s01 (standard)\n- upd7801g.bin\n- upd7801g.bios\n- bios.rom\n- bios.bin\n\nMD5: 635a978fd40db9a18ee44eff449fc126\n\nThe MD5 Checksum control for the BIOS can be disabled in core options to permit use of custom BIOS.\n\n## External Links\n\n\n"
},
{
"path": "docs/library/emux_chip8.md",
"content": "# CHIP-8 (Emux)\n\n**This core currently doesn't start so this documentation will remain incomplete until it is fixed.**\n\n## Contribute to this documentation\n\nIn order to propose improvements to this document, [visit it's corresponding source page on github](https://github.com/libretro/docs/tree/master/docs/library/emux_chip8.md). Changes are proposed using \"Pull Requests.\"\n\n## Background\n\nEmux is a cross-platform emulator project with a goal of emulating multiple kinds of machines related to gaming, such as consoles or arcades. Its philosophy is very much inspired by the Linux kernel (hence the name), which brilliantly manages to support multiple machines while keeping drivers entirely platform-independent. Emux is designed in the same way, keeping a code base of CPUs and controllers separate from machines.\n\n### How to get and install the Emux CHIP-8 core:\n\n1. Start up RetroArch. Inside the main menu, go to 'Online Updater'.\n\n2. Just to make sure we have the latest info files, select 'Update Core Info FIles'. Wait until this is done. Then, select 'Core Downloader'.\n\n3. Browse through the list and select 'CHIP-8 (Emux)'.\n\nAfter this has finished downloading, the core should now be ready for use!\n\n### Authors\n\n- Sebastien Ronsse\n\n## License\n\nA summary of the licenses behind RetroArch and its cores can be found [here](../development/licenses.md).\n\n- [GPLv2](https://github.com/libretro/emux/blob/master/COPYING)\n\n## Extensions\n\nContent that can be loaded by the Emux CHIP-8 core have the following file extensions:\n\n- .ch8\n- .bin\n- .rom\n\n## Features\n\n| Feature | Supported |\n|-------------------|:---------:|\n| Saves | - |\n| States | - |\n| Rewind | - |\n| Netplay | - |\n| [Memory Monitoring (achievements)](../guides/memorymonitoring.md) | - |\n| RetroArch Cheats | - |\n| Native Cheats | - |\n| Controllers | - |\n| Remapping | - |\n| Multi-Mouse | - |\n| Rumble | - |\n| Sensors | - |\n| Camera | - |\n| Location | - |\n| Subsystem | - |\n| Softpatching | - |\n\n### Saves/States\n\nThe Emux CHIP-8 core's directory name is 'emux (chip8)'\n\nAwaiting description.\n\n## Core options\n\nAwaiting description.\n\n## Controllers\n\nAwaiting description.\n\n### Device types\n\nAwaiting description.\n\n### Controllers graph\n\nAwaiting description.\n\n## External Links\n\n- [Libretro Emux CHIP-8 Core info file](https://github.com/libretro/libretro-super/blob/master/dist/info/emux_chip8_libretro.info)\n- [Libretro Emux CHIP-8 Github Repository](https://github.com/libretro/emux)\n- [Report Libretro Emux CHIP-8 Core Issues Here](https://github.com/libretro/libretro-meta/issues)\n- [Official Emux CHIP-8 Github Repository](https://github.com/sronsse/emux)\n\n## CHIP-8\n\n- [XO-CHIP/CHIP-8 (JAXE)](jaxe.md)"
},
{
"path": "docs/library/emux_gb.md",
"content": "# Game Boy/Game Boy Color (Emux GB) *WIP*\n\n## Background\n\nEmux is a cross-platform emulator project with a goal of emulating multiple kinds of machines related to gaming, such as consoles or arcades. Its philosophy is very much inspired by the Linux kernel (hence the name), which brilliantly manages to support multiple machines while keeping drivers entirely platform-independent. Emux is designed in the same way, keeping a code base of CPUs and controllers separate from machines.\n\nThe Emux GB core has been authored by\n\n- Sebastien Ronsse\n\nThe Emux GB core is licensed under\n\n- [GPLv2](https://github.com/libretro/emux/blob/master/COPYING)\n\nA summary of the licenses behind RetroArch and its cores can be found [here](../development/licenses.md).\n\n## Extensions\n\nContent that can be loaded by the Emux GB core have the following file extensions:\n\n- .gb\n- .bin\n- .rom\n\n## Databases\n\nRetroArch database(s) that are associated with the Emux GB core:\n\n- [Nintendo - Game Boy](https://github.com/libretro/libretro-database/blob/master/rdb/Nintendo%20-%20Game%20Boy.rdb)\n- [Nintendo - Game Boy Color](https://github.com/libretro/libretro-database/blob/master/rdb/Nintendo%20-%20Game%20Boy%20Color.rdb)\n\n## BIOS\n\nRequired or optional firmware files go in RetroArch's system directory.\n\n| Filename | Description | md5sum |\n|:-------------:|:------------------------------:|:--------------------------------:|\n| dmg_boot.bin | Game Boy Boot ROM - Required | 32fbbd84168d3482956eb3c5051637f5 |\n\n## Features\n\nRetroArch-level settings or features that the Emux GB core respects.\n\n| Feature | Supported |\n|-------------------|:---------:|\n| Restart | ✔ |\n| Screenshots | ✔ |\n| Saves | ✕ |\n| States | ✕ |\n| Rewind | ✕ |\n| Netplay | ✕ |\n| Core Options | ✕ |\n| [Memory Monitoring (achievements)](../guides/memorymonitoring.md) | ✕ |\n| RetroArch Cheats | ✕ |\n| Native Cheats | ✕ |\n| Controls | ✔ |\n| Remapping | ✕ |\n| Multi-Mouse | ✕ |\n| Rumble | ✕ |\n| Sensors | ✕ |\n| Camera | ✕ |\n| Location | ✕ |\n| Subsystem | ✕ |\n| Softpatching | ✕ |\n| Disk Control | ✕ |\n| Username | ✕ |\n| Language | ✕ |\n| Crop Overscan | ✕ |\n\n### Directories\n\nThe Emux GB core's directory name is 'emux (gb)'\n\n### Geometry and timing\n\n- The Emux GB core's internal FPS is (FPS)\n- The Emux GB core's internal sample rate is (Rate)\n- The Emux GB core's core provided aspect ratio is (Ratio)\n\n## Controllers\n\n### Device types\n\nThe Emux GB core supports the following device type(s) in the controls menu, bolded device types are the default for the specified user(s):\n\n#### User 1 device types\n\n- None - Doesn't disable input.\n- **RetroPad** - Joypad\n- RetroPad w/Analog - Joypad - There is no reason to switch to this.\n\n### Controller tables\n\n#### Joypad and analog device type table\n\n| User 1 Input descriptors | RetroPad Inputs | RetroPad |\n|-------------------------------|----------------------------------------------|--------------------|\n| |  | B |\n| |  | Select |\n| |  | Start |\n| |  | D-Pad Up |\n| |  | D-Pad Down |\n| |  | D-Pad Left |\n| |  | D-Pad Right |\n| |  | A |\n\n## Compatibility\n\nAwaiting description.\n\n## External Links\n\n- [Libretro Emux GB Core info file](https://github.com/libretro/libretro-super/blob/master/dist/info/emux_gb_libretro.info)\n- [Libretro Emux GB Github Repository](https://github.com/libretro/emux)\n- [Report Libretro Emux GB Core Issues Here](https://github.com/libretro/libretro-meta/issues)\n- [Official Emux GB Github Repository](https://github.com/sronsse/emux)\n\n### See also\n\n#### Nintendo - Game Boy (+ Color)\n\n- [Nintendo - Game Boy / Color (Gambatte)](gambatte.md)\n- [Nintendo - Game Boy / Color (Gearboy)](gearboy.md)\n- [Nintendo - Game Boy / Color (SameBoy)](sameboy.md)\n- [Nintendo - Game Boy / Color (TGB Dual)](tgb_dual.md)\n- [Nintendo - Game Boy Advance (mGBA)](mgba.md)\n- [Nintendo - Game Boy Advance (VBA-M)](vba_m.md)\n- [Nintendo - SNES / Famicom (higan Accuracy)](higan_accuracy.md)\n- [Nintendo - SNES / Famicom (nSide Balanced)](nside_balanced.md)\n- [Nintendo - SNES / Famicom (Mesen-S)](mesen-s.md)"
},
{
"path": "docs/library/emux_nes.md",
"content": "# Nintendo - NES / Famicom (Emux NES)\n\n## Background\n\nEmux is a cross-platform emulator project with a goal of emulating multiple kinds of machines related to gaming, such as consoles or arcades. Its philosophy is very much inspired by the Linux kernel (hence the name), which brilliantly manages to support multiple machines while keeping drivers entirely platform-independent. Emux is designed in the same way, keeping a code base of CPUs and controllers separate from machines.\n\n### Author/License\n\nThe Emux NES core has been authored by\n\n- Sebastien Ronsse\n\nThe Emux NES core is licensed under\n\n- [GPLv2](https://github.com/libretro/emux/blob/master/COPYING)\n\nA summary of the licenses behind RetroArch and its cores can be found [here](../development/licenses.md).\n\n## Extensions\n\nContent that can be loaded by the Emux NES core have the following file extensions:\n\n- .nes\n- .bin\n- .rom\n\n## Databases\n\nRetroArch database(s) that are associated with the Emux NES core:\n\n- [Nintendo - Nintendo Entertainment System](https://github.com/libretro/libretro-database/blob/master/rdb/Nintendo%20-%20Nintendo%20Entertainment%20System.rdb)\n\n## Features\n\nFrontend-level settings or features that the Emux NES core respects.\n\n| Feature | Supported |\n|-------------------|:---------:|\n| Restart | ✔ |\n| Screenshots | ✔ |\n| Saves | ✕ |\n| States | ✕ |\n| Rewind | ✕ |\n| Netplay | ✕ |\n| Core Options | ✕ |\n| [Memory Monitoring (achievements)](../guides/memorymonitoring.md) | ✕ |\n| RetroArch Cheats | ✕ |\n| Native Cheats | ✕ |\n| Controls | ✔ |\n| Remapping | ✕ |\n| Multi-Mouse | ✕ |\n| Rumble | ✕ |\n| Sensors | ✕ |\n| Camera | ✕ |\n| Location | ✕ |\n| Subsystem | ✕ |\n| [Softpatching](../guides/softpatching.md) | ✕ |\n| Disk Control | ✕ |\n| Username | ✕ |\n| Language | ✕ |\n| Crop Overscan | ✕ |\n| LEDs | ✕ |\n\n### Directories\n\nThe Emux NES core's internal core name is 'emux (nes)'\n\n### Geometry and timing\n\n- The Emux NES core's core provided FPS is (FPS)\n- The Emux NES core's core provided sample rate is (Rate)\n- The Emux NES core's core provided aspect ratio is (Ratio)\n\n## Controllers\n\nThe Emux NES core supports the following device type(s) in the controls menu, bolded device types are the default for the specified user(s):\n\n### User 1 - 2 device types\n\n- None - Doesn't disable input. There's no reason to switch to this.\n- **RetroPad** - Joypad - Stay on this.\n- RetroPad w/Analog - Joypad - Same as RetroPad. There's no reason to switch to this.\n\n### Controller tables\n\n#### Joypad\n\n\n\n| RetroPad Inputs | Emux NES core Inputs |\n|----------------------------------------------|----------------------|\n|  | B |\n|  | Select |\n|  | Start |\n|  | D-Pad Up |\n|  | D-Pad Down |\n|  | D-Pad Left |\n|  | D-Pad Right |\n|  | A |\n\n## Compatibility\n\nAwaiting description.\n\n## External Links\n\n- [Official Emux GB Github Repository](https://github.com/sronsse/emux)\n- [Libretro Emux GB Core info file](https://github.com/libretro/libretro-super/blob/master/dist/info/emux_gb_libretro.info)\n- [Libretro Emux GB Github Repository](https://github.com/libretro/emux)\n- [Report Libretro Emux GB Core Issues Here](https://github.com/libretro/libretro-meta/issues)\n\n### See also\n\n#### Nintendo - Nintendo Entertainment System\n\n- [Nintendo - NES / Famicom (bnes)](bnes.md)\n- [Nintendo - NES / Famicom (FCEUmm)](fceumm.md)\n- [Nintendo - NES / Famicom (Mesen)](mesen.md)\n- [Nintendo - NES / Famicom (Nestopia)](nestopia.md)\n- [Nintendo - NES / Famicom (QuickNES)](quicknes.md)\n"
},
{
"path": "docs/library/emux_sms.md",
"content": "# Sega - Master System (Emux SMS)\n\n## Background\n\nEmux is a cross-platform emulator project with a goal of emulating multiple kinds of machines related to gaming, such as consoles or arcades. Its philosophy is very much inspired by the Linux kernel (hence the name), which brilliantly manages to support multiple machines while keeping drivers entirely platform-independent. Emux is designed in the same way, keeping a code base of CPUs and controllers separate from machines.\n\n### Author/License\n\nThe Emux SMS core has been authored by\n\n- Sebastien Ronsse\n\nThe Emux SMS core is licensed under\n\n- [GPLv2](https://github.com/libretro/emux/blob/master/COPYING)\n\nA summary of the licenses behind RetroArch and its cores can be found [here](../development/licenses.md).\n\n## Extensions\n\nContent that can be loaded by the Emux SMS core have the following file extensions:\n\n- .sms\n- .bin\n- .rom\n\n## Databases\n\nRetroArch database(s) that are associated with the Emux SMS core:\n\n- [Sega - Master System - Mark III](https://github.com/libretro/libretro-database/blob/master/rdb/Sega%20-%20Master%20System%20-%20Mark%20III.rdb)\n\n## BIOS\n\nRequired or optional firmware files go in the frontend's system directory.\n\n| Filename | Description | md5sum |\n|:--------:|:-----------------------------:|:--------------------------------:|\n| bios.sms | Master System BIOS - Required | 840481177270d5642a14ca71ee72844c |\n\n## Features\n\nFrontend-level settings or features that the Emux SMS core respects.\n\n| Feature | Supported |\n|-------------------|:---------:|\n| Restart | ✔ |\n| Screenshots | ✔ |\n| Saves | ✕ |\n| States | ✕ |\n| Rewind | ✕ |\n| Netplay | ✕ |\n| Core Options | ✕ |\n| [Memory Monitoring (achievements)](../guides/memorymonitoring.md) | ✕ |\n| RetroArch Cheats | ✕ |\n| Native Cheats | ✕ |\n| Controls | ✔ |\n| Remapping | ✕ |\n| Multi-Mouse | ✕ |\n| Rumble | ✕ |\n| Sensors | ✕ |\n| Camera | ✕ |\n| Location | ✕ |\n| Subsystem | ✕ |\n| [Softpatching](../guides/softpatching.md) | ✕ |\n| Disk Control | ✕ |\n| Username | ✕ |\n| Language | ✕ |\n| Crop Overscan | ✕ |\n| LEDs | ✕ |\n\n### Directories\n\nThe Emux SMS core's internal core name is 'emux (sms)'\n\n### Geometry and timing\n\n- The Emux SMS core's core provided FPS is (FPS)\n- The Emux SMS core's core provided sample rate is (Rate)\n- The Emux SMS core's core provided aspect ratio is (Ratio)\n\n## Controllers\n\nThe Emux SMS core supports the following device type(s) in the controls menu, bolded device types are the default for the specified user(s):\n\n### User 1 device types\n\n- None - Doesn't diable input. There's no reason to switch to this.\n- **RetroPad** - Joypad - Stay on this.\n- RetroPad w/Analog - Joypad - There's no reason to switch to this.\n\n### Controller tables\n\n#### Joypad\n\n\n\n| RetroPad Inputs | Emux SMS core Inputs |\n|-------------------------------------------|----------------------|\n|  | 1 |\n|  | Pause |\n|  | D-Pad Up |\n|  | D-Pad Down |\n|  | D-Pad Left |\n|  | D-Pad Right |\n|  | 2 |\n\n## External Links\n\n- [Official Emux SMS Github Repository](https://github.com/sronsse/emux)\n- [Libretro Emux SMS Core info file](https://github.com/libretro/libretro-super/blob/master/dist/info/emux_sms_libretro.info)\n- [Libretro Emux SMS Github Repository](https://github.com/libretro/emux)\n- [Report Libretro Emux SMS Core Issues Here](https://github.com/libretro/libretro-meta/issues)\n\n### See also\n\n#### Sega - Master System - Mark III\n\n- [Sega - MS/GG/MD/CD (Genesis Plus GX)](genesis_plus_gx.md)\n- [Sega - MS/MD/CD/32X (PicoDrive)](picodrive.md)"
},
{
"path": "docs/library/ep128emu.md",
"content": "# Enterprise - 64/128 (ep128emu)\n\n\n\n## Background\n\nLeverage the convenience of libretro/retroarch to emulate the Z80 based home computers that the original ep128emu supports - that is, Enterprise 64/128, Videoton TVC, Amstrad CPC and ZX Spectrum. Focus is on Enterprise and TVC.\n\nThe ep128emu core has been authored by:\n- Istvan Varga (ep128emu)\n- Zoltan Balogh (libretro core specific modifications)\n\nThe ep128emu core is licensed under [GPL2](https://github.com/libretro/ep128emu-core/blob/master/COPYING). A summary of the licenses behind RetroArch and its cores can be found [here](../development/licenses.md).\n\n## Requirements\n\nSince the emulated machines are 8-bit platforms from the 1980's, modern setups should have no problem emulating them. Tested on Raspberry Pi 2.\n\n## Extensions\n\nContent that can be loaded by the ep128emu core have the following file extensions:\n\n- `.img` - Enterprise, CPC or TVC floppy disk image\n- `.dsk` - Enterprise, CPC or TVC floppy disk image\n- `.tap` - Enterprise or ZX Spectrum tape image\n- `.dtf` - Enterprise compressed file\n- `.cas` - Videoton TVC file format\n- `.wav` - sound file interpreted as Enterprise tape\n- `.tvcwav` - sound file interpreted as Videoton TVC tape\n- `.cdt` - Amstrad CPC tape image\n- `.tzx` - ZX Spectrum tape image\n- `.bas`, `.com`, `.trn`, `.128`, `.` - common extensions for Enterprise executable files, including no extension\n\nFrom version 1.1.0, emulator core is able to handle mono PCM WAV files with 1..8 bit depth as tape recordings. It is possible to enable libsndfile support during compilation, and then a wider range of formats are recognized, including MP3 if libsndfile version is at least 1.1. Using the `.wav` file extension will trigger the built-in RetroArch media player by default, it can be disabled under Settings / File Browser / Use Built-in Media Player. Rename `.wav` files to have `.tvcwav` extension to be interpreted as TVC tapes.\n\nRetroArch database(s) that are associated with the ep128emu core:\n\n- None yet\n\n## Features\n\nFrontend-level settings or features that the ep128emu core respects.\n\n| Feature | Supported |\n|-------------------|:---------:|\n| Restart | ✔ |\n| Saves | ✔ |\n| States | ✔ |\n| Rewind | ✔ |\n| Netplay | - |\n| Core Options | ✔ |\n| [Memory Monitoring (achievements)](../guides/memorymonitoring.md) | ✕ |\n| RetroArch Cheats | ✔ |\n| Native Cheats | ✕ |\n| Controls | ✔ |\n| Remapping | - |\n| Multi-Mouse | ✕ |\n| Rumble | ✕ |\n| Sensors | ✕ |\n| Camera | ✕ |\n| Location | ✕ |\n| Subsystem | ✕ |\n| [Softpatching](../guides/softpatching.md) | ✕ |\n| Disk Control | ✔ |\n| Username | ✕ |\n| Language | ✔ |\n| Crop Overscan | ✕ |\n| LEDs | ✔ |\n\n## Directories\n\nThe ep128emu core's library name is `ep128emu`. The ep128emu core saves/loads to/from these directories.\n\n**Frontend's System directory**\n\n| File | Description |\n|:------------:|:-----------:|\n| ep128emu/rom/* |BIOS files are loaded from here |\n| ep128emu/config/* |System-wide emulation configuration files |\n\n## Geometry and timing\n\n- The ep128emu core's core provided FPS is 50\n- The ep128emu core's core provided sample rate is 44.1 kHz\n- The ep128emu core's base width is 768\n- The ep128emu core's base height is 288\n- The ep128emu core's max width is 768\n- The ep128emu core's max height is 576 (interlace mode)\n- The ep128emu core's core provided aspect ratio is 4:3 (interlace mode)\n\nThe intelligent zoom function can reduce the apparent width/height, aspect ratio is also adjusted.\n\nIf there is LED driver configured in RetroArch, second LED should reflect disk activity state.\n\n## Usage\n\nLoad any supported content file. Content type will be autodetected, and if possible, started. Content-specific [configuration file](https://github.com/libretro/ep128emu-core/blob/core/core/sample.ep128cfg) is also loaded if present. Without content, core starts with Enterprise 128 disk configuration.\n\nIn case of multi-disk (or multi-tape) games, use the Disk Control menu to add the subsequent images and switch between them. You can also use RetroArch's built-in memory analyzer to set up cheats.\n\nApart from disk/tape/fileIO differences, the core will adjust the emulated machine configuration in some cases:\n\n- if content file has `.DTF` extension, ZozoTools BIOS will be used\n- if content file name contains `[req brd-rom]`, German BIOS will be used\n- if content file name contains `[req zrom]`, Hungarian language BIOS and EPDOS will be used\n- if EP128_DISK_ISDOS (or EP64_DISK_ISDOS) type is supplied via configuration file, IS-DOS (CP/M flavor for Enterprise) will be used\n\n## Core options\n\nThe ep128emu core has the following option(s) that can be tweaked from the core options menu. The default setting is bolded.\nSettings with (Restart) means that core has to be closed for the new setting to be applied on next launch.\n\n- Main thread wait (ms) (**0**|1|5|10) - forced sleep in main thread for lower CPU use\n- High sound quality (**1**|0) - disable in case of performance problems\n- Use accelerated SW framebuffer (**0**|1) - enable in case of performance problems (has some known bugs with interlace mode)\n- Enable resolution changes (requires restart) (**1**|0)\n- Border lines to keep when zooming in (**0**|2|4|8|10|20)\n- System ROM version (EP only) (**Original**|Enhanced) - enhanced ROM contains faster memory test at startup\n- User 1 Zoom button (**R3**|Start|Select|X|Y|A|B|L|R|L2|R2|L3)\n- User 1 Info button (**L3**|R3|Start|Select|X|Y|A|B|L|R|L2|R2)\n- User 1 Autofire for button (**None**|X|Y|A|B|L|R|L2|R2|L3|R3|Start|Select)\n- User 1 Autofire repeat delay (**1**|2|4|8|16)\n\n## Control device types\n\nThe emulated systems use several joystick types (all digital, with 1 fire button usually). Enterprise and TVC have a built-in joystick, and two external joystick connections. The ep128emu core supports device type changes in the controls menu. Change of the type updates the joypad and fire button mapping.\n\n| Emulated machine | User 1 default joypad | User 2 default joypad | User 3 default joypad |\n|------------------|-----------------------|-----------------------|-----------------------|\n| Enterprise | Internal | External 1 | External 2 |\n| TVC | Internal | External 1 | External 2 |\n| CPC | External 1 | External 2 | |\n| ZX | Kempston | Sinclair 1 | Sinclair 2 |\n\n- Core default - Joypad and fire button is mapped as default (see above)\n- Internal Joystick - Joypad and fire button is mapped for internal joystick on Enterprise and TVC. On CPC it is mapped to cursor keys.\n- External Joystick 1 / Kempston - Joypad and fire button is mapped for external joystick 1 (Kempston interface in case of ZX)\n- External Joystick 2 - Joypad and fire button is mapped for external joystick 2\n- Sinclair Joystick 1 - Joypad and fire button is mapped for Sinclair joystick 1. Only useful for ZX. Joystick inputs are emulated as keys: 1 (left), 2 (right), 3 (down), 4 (up), 5 (fire).\n- Sinclair Joystick 2 - Joypad and fire button is mapped for Sinclair joystick 2. Only useful for ZX. Joystick inputs are emulated as keys: 6 (left), 7 (right), 8 (down), 9 (up) ,0 (fire).\n- Protek Joystick - Joypad and fire button is mapped for Protek/AGF joystick. Only useful for ZX. Joystick inputs are emulated as keys: 5 (left), 6 (down), 7 (up), 8 (right) ,0 (fire).\n- External Joystick 3..6 - Joypad and fire button is mapped for external joystick 3..6. Only useful for Enterprise, very rarely used.\n\n## Joypad\n\n| RetroPad Inputs | Default action for user 1 | Recommended override for content-specific configuration |\n|------------------------------------------------|--------------------------|---------------------------|\n|     | Respective directions for: Enterprise, TVC: Internal joystick CPC: External joystick 1 ZX Spectrum: Kempston interface | |\n|  | Enterprise, TVC: space (fire for internal joystick) CPC: External joystick 1 fire ZX Spectrum: Kempston joystick | |\n|  | Enter | |\n|  | CPC: External joystick 1 fire 2 | In-game key required for secondary action |\n|  | - | In-game key required for other action (if any) |\n|  | - | In-game key required to select the supported input method (if any) |\n|  | - | In-game key required to start the game (if any) |\n|  | Key 0 | In-game key required for other action (if any) |\n|  | Key 1 | In-game key required for other action (if any) |\n|  | Key 2 | In-game key required for other action (if any) |\n|  | Key 3 | In-game key required for other action (if any) |\n|  | Info display | - |\n|  | Intelligent zoom | (Zoom is also available via keyboard F12) |\n\n## Mouse\n\nMouse input is used for the EnterMice emulation of the Enterprise.\n\n## Keyboard\n\n### Enterprise 128\n\nThe ep128emu core takes the Enterprise UK keyboard as a basis:\n\n\nMost mappings are straightforward positionally from an ISO UK keyboard:\n\n- Dark green: natural mapping, both position and function matches nicely\n- Light green: either position or function is slightly different\n- Yellow: function is different\n- Red: extra mapping\n- Dark grey: keys intentionally reserved for RetroArch / OS functions\n\n\n\nExceptions are marked in the following table:\n\n| RetroKeyboard Inputs | Enterprise keyboard input |\n|------------------------------|---------------------------|\n| Keyboard F9 | Hold |\n| Keyboard F10 | Stop |\n| Keyboard Pause | Stop |\n| Keyboard Backquote ` | Escape (alternative mapping) |\n| Keyboard Equals = | ^ (caret) |\n| Keyboard Backspace | Erase |\n| Keyboard Left Bracket [ | @ (at) |\n| Keyboard Right Bracket ] | [ (left bracket) |\n| Keyboard Quote ' | : (colon) |\n| Keyboard Backslash \\ | ] (right bracket) (shown as # in ISO map) |\n| Keyboard Oem 102 | \\\\ (backslash) |\n| Keyboard Home | \\\\ (alternative mapping) |\n| Keyboard Delete | Del |\n| Keyboard Insert | Ins |\n| Keyboard Keypad 0 | External joystick 1 fire |\n| Keyboard Keypad 2 | External joystick 1 down |\n| Keyboard Keypad 4 | External joystick 1 left |\n| Keyboard Keypad 6 | External joystick 1 right |\n| Keyboard Keypad 8 | External joystick 1 up |\n\n### Videoton TVC\n\nThe Videoton TVC has a layout that is somewhat similar to ISO Hungarian layout:\n\n\n\nSince TVC has several extra keys, but no function keys, F-row is used as replacement for those.\n\n| RetroKeyboard Inputs | TVC keyboard input |\n|------------------------------|---------------------------|\n| Keyboard F1 | @ |\n| Keyboard F2 | ; |\n| Keyboard F3 | < |\n| Keyboard F4 | \\ |\n| Keyboard F5 | * |\n| Keyboard F6 | ^ |\n| Keyboard F7 | [ |\n| Keyboard F8 | ] |\n| Keyboard F9 | * |\n| Keyboard F10 | í |\n| Keyboard Backquote ` | 0 |\n| Keyboard 0 | ö |\n| Keyboard Minus - | ü |\n| Keyboard Equals = | ó |\n| Keyboard Left Bracket [ | ő |\n| Keyboard Right Bracket ] | ú |\n| Keyboard Semicolon ; | é |\n| Keyboard Quote ' | á |\n| Keyboard Backslash \\ | ű |\n| Keyboard Oem 102 | í |\n| Keyboard Home | ű (alternative mapping) |\n| Keyboard Delete | Del |\n| Keyboard Insert | Ins |\n| Keyboard Keypad 0 | External joystick 1 fire |\n| Keyboard Keypad 2 | External joystick 1 down |\n| Keyboard Keypad 4 | External joystick 1 left |\n| Keyboard Keypad 6 | External joystick 1 right |\n| Keyboard Keypad 8 | External joystick 1 up |\n\n### Amstrad CPC\n\nThe Amstrad CPC 464/664 and 6128 fit well to ISO UK layout, with only slight differences:\n\n\n\n\nFunction key row is mapped to Fn-array. Extra mappings are marked in the following table:\n\n| RetroKeyboard Inputs | CPC keyboard input |\n|------------------------------|---------------------------|\n| Keyboard F1 | Fn1 |\n| Keyboard F2 | Fn2 |\n| Keyboard F3 | Fn3 |\n| Keyboard F4 | Fn4 |\n| Keyboard F5 | Fn5 |\n| Keyboard F6 | Fn6 |\n| Keyboard F7 | Fn7 |\n| Keyboard F8 | Fn8 |\n| Keyboard F9 | Fn9 |\n| Keyboard F10 | Fn0 |\n| Keyboard F11 | Fn Dot (.) |\n| Keyboard Keypad Enter | Fn Enter |\n| Keyboard Oem 102 | \\\\ |\n| Keyboard Home | \\\\ (alternative mapping) |\n| Keyboard Delete | Del |\n| Keyboard Insert | Copy |\n| Keyboard Left Alt | Copy (alternative mapping) |\n| Keyboard Right Alt | Fn Dot (alternative mapping) |\n| Keyboard Keypad 0 | External joystick 1 fire |\n| Keyboard Keypad Period . | External joystick 1 fire 2 |\n| Keyboard Keypad 2 | External joystick 1 down |\n| Keyboard Keypad 4 | External joystick 1 left |\n| Keyboard Keypad 6 | External joystick 1 right |\n| Keyboard Keypad 8 | External joystick 1 up |\n\n## BIOS\n\nFollowing \"BIOS\" files are used for emulation. Note: in usual 8-bit home computer terms, these are \"ROM\"s as they contain the original machine's read-only memory dumps.\n\nFrom ep128emu_core version 1.1.0, external BIOS files are optional.\n\n| Filename | Description | md5sum |\n|:-----------------:|:-------------------------------:|:--------------------------------:|\n| `exos21.rom` | Enterprise 128 Expandible OS 2.1 For EP128 | f36f24cbb87745fbd2714e4df881db09 |\n| `basic21.rom` | Enterprise 128 BASIC Interpreter v2.1 For EP128 | e972fe42b398c9ff1d93ff014786aec6 |\n| `exdos13.rom` | Enterprise 128 Disk Controller v1.3 For EP64/128 disk configs | ddff70c014d1958dc75378b6c9aab6f8 |\n| `exos20.rom` | Enterprise 64 Expandible OS 2.0 For EP64 | 5ad3baaad3b5156d6b60b34229a676fb |\n| `basic20.rom` | Enterprise 64 BASIC Interpreter v2.0 For EP64 | 8e18edce4a7acb2c33cc0ab18f988482 |\n| `epfileio.rom` | Enterprise 128 Direct File I/O For loading from host file (instead of disk or tape image) | a68ebcbc73a4d2178d755b7755bf18fe |\n| `exos24uk.rom` | Enterprise 128 Expandible OS 2.4 Only for enhanced functions (fast memory test) | 55af78f877a21ca45eb2df68a74fcc60 |\n| `hun.rom` | Enterprise 128 Hungarian language extension | 22167938f142c222f40992839aa21a06 |\n| `epdos16f.rom` | Enterprise 128 EP-DOS | 6593dff00ab32a4b1fc084674ededf2b |\n| `exdos14isdos10uk.rom` | Enterprise 128 IS-DOS (CP/M) | f91c4a507cc6895bdd9c43df4f021df3 |\n| `brd.rom` | Enterprise 128 German language extension | 6af0402906944fd134004b85097c8524 |\n| `zt19uk.rom` | Enterprise 128 ZozoTools extension For loading from DTF files | 228540b6be83ae2acd7569c8ff0f91d0 |\n| `tvc22_sys.rom` | Videoton TVC system BIOS For TVC emulation | 8c54285f541930cde766069942bad0f2 |\n| `tvc22_ext.rom` | Videoton TVC extension BIOS For TVC emulation | 5ce95a26ceed5bec73995d83568da9cf |\n| `tvcfileio.rom` | Videoton TVC Direct File I/O For loading from host file (instead of disk or tape image) | a2cf86ba8e7fc58b242137fe59036832 |\n| `tvc_dos12d.rom` | Videoton TVC disk BIOS For TVC disk configs | 88dc7876d584f90e4106f91444ab23b7 |\n| `cpc464.rom` | Amstrad CPC 464 BIOS For CPC 464 | a993f85b88ac4350cf4d41554e87fe4f |\n| `cpc664.rom` | Amstrad CPC 664 BIOS For CPC 664 | 5a384a2310f472c7857888371c00ed66 |\n| `cpc6128.rom` | Amstrad CPC 6128 BIOS For CPC 6128 | b96280dc6c95a48857b4b8eb931533ae |\n| `cpc_amsdos.rom` | Amstrad CPC AMSDOS BIOS For CPC disk configs | 25629dfe870d097469c217b95fdc1c95 |\n| `zx128.rom` | ZX Spectrum 128 BIOS For ZX Spectrum 128 | 85fede415f4294cc777517d7eada482e |\n| `zx48.rom` | ZX Spectrum 48 BIOS For ZX Spectrum 16/48 | 4c42a2f075212361c3117015b107ff68 |\n\n## Special emulation\n\nEnterprise 128 has software extensions to emulate ZX Spectrum (48, 128) and Amstrad CPC. As a technical quirk, these emulators can be run in the ep128emu-core, creating a double emulation layer.\n\n### SPEMU\n\n- Obtain ROM version of SPEmu from the [EnterpriseForever forums](https://enterpriseforever.com/letoltesek-downloads/enterprise-software/).\n- Place ROM files under RetroArch system directory: `system/ep128emu/roms/`\n- Create a custom config file next to the content (such as a .tzx file) called `enterprise.ep128cfg`:\n\n `machineDetailedType \"EP128_TAPE\"`\n `memory.ram.size 256`\n `memory.rom.40.file \"spemu128.rom\"`\n `memory.rom.40.offset 0`\n `memory.rom.41.file \"spemu128.rom\"`\n `memory.rom.41.offset 16384`\n `memory.rom.42.file \"spemu128.rom\"`\n `memory.rom.42.offset 32768`\n `tape.forceMotorOn Yes`\n\n- Start ep128emu core using the tape content\n- Invoke the SPEmu extension with `:sp128`\n- Choose Load tape\n\n### CPCEMU\n\n- Obtain COM version of CPCEmu from the [EnterpriseForever forums](https://enterpriseforever.com/letoltesek-downloads/enterprise-software/).\n- Start CPCEMU.COM the usual way (select the file in RetroArch and open it with ep128emu core)\n- Once the blue screen has loaded, open quick menu (F1) go to Disk Control and select the file that needs to be loaded\n- Continue, enable keyboard pass-through with Scroll Lock, and issue RUN command as needed\n- It may be needed to change the control type to External 2 in Quick Menu / Controls\n\n## External Links\n\n- [Official ep128emu-core Repository](https://github.com/libretro/ep128emu-core)\n- [Libretro ep128emu Core info file](https://github.com/libretro/libretro-super/blob/master/dist/info/ep128emu_core_libretro.info)\n- [Report Libretro ep128emu Core Issues Here](https://github.com/libretro/ep128emu-core/issues)\n- [Original ep128emu Implementation](https://github.com/istvan-v/ep128emu)\n- [ep128.hu](http://www.ep128.hu/) - games for Enterprise\n- [enterpriseforever.com](https://enterpriseforever.com/) - Enterprise community\n- [tvc.homeserver.hu](http://tvc.homeserver.hu/) - TVC page (Hungarian only)\n"
},
{
"path": "docs/library/fbneo.md",
"content": "# FinalBurn Neo\n\n## Note about this document\n\nIt mostly assumes you are using RetroArch as your libretro frontend, some specific instructions might differ if you are using another frontend.\n\nIt also assumes you are already knowledgeable about arcade emulation and its quirks. If you aren't, you should be reading [getting started with arcade emulation](https://docs.libretro.com/guides/arcade-getting-started/) first.\n\n## Background\n\nFinalBurn Neo (also referred to as FBNeo or FBN) is a multi-system emulator (Arcade, consoles and computers) under active development.\nIt is the follow-up of the FinalBurn and FinalBurn Alpha emulators.\nThe libretro core provides wide compatibility with platforms and features supported by libretro.\n\n## Difference from MAME\n\nFBNeo strives for accuracy, just like MAME. There are some arcade boards where one or the other will be more accurate, but for the most part they should be equally accurate.\nThe main difference with MAME is that FBNeo doesn't mind including \"quality of life\" hacks, while MAME is mostly focused on preservation and documentation. \"Quality of life\" hacks include things like :\n\n* improving original game's sound (some games like \"Burger Time\" have noise which was clearly unintended by their developpers, we are removing it)\n* implementing alternative colors for games where the colors don't look right (sometimes there are controversies about which colors are right for an arcade board, like \"Tropical Angel\", we implement alternative colors as dipswitches)\n* having control alternatives that didn't exist on original cabinet (play rotary stick games like twin-stick shooters, use lightguns in \"Rambo 3\", use simplified 8-way directional controls for \"Battlezone\", ...)\n* improving the gaming experience by cutting what we deem as unnecessary aspect of emulation (you don't have to spend 20 minutes \"installing\" CPS-3 games, neither 100s loading Deco Cassette games)\n* reducing hardware requirements by cutting what we deem as unnecessary corners in the emulation code\n* supporting popular romhacks\n\nNote: some of those \"quality of life\" hacks might be doable with programming skills and lua language on MAME\n\n## License and changelog\n\nIt's distributed under a non-commercial license, see [LICENSE.md](https://github.com/finalburnneo/FBNeo/blob/master/LICENSE.md) and [whatsnew.html](https://github.com/finalburnneo/FBNeo/blob/master/whatsnew.html).\n\nThere are controversies about whether libretro's patreon and retroarch's GPL license breaks FBNeo's non-commercial license or not. This is what you should know :\n\n* **\"Redistributions may not be sold, nor may they be used in a commercial product or activity.\"** : By definition, a commercial activity is an activity involving the sale of goods or services. The libretro project does none of that, and it is unclear whether a patreon should be treated as a commercial activity or not when no goods or services are provided in exchange of the donations.\n* **\"You may not ask for donations to support your work on any project that uses the FB Neo source code.\"** : This FBNeo port is using libretro code, not the other way around. This port is directly authored/maintained/supported by members of the FBNeo team, and none of them is receiving donations. Interestingly, if receiving donations was de facto a commercial activity, this term shouldn't be required.\n* *If* the libretro project was a commercial activity, it would still be unclear how it does affect this port. Our win32 standalone builds use the directx api, which belongs to a commercial company. Using the libretro api, which would belong to a commercial activity, wouldn't be any different. Furthermore, in all likeliness, there would still be alternative libretro frontends that don't belong to the libretro project and are not commercial. \n* Actually, alternative commercial libretro frontends already exist, and we consider we are not concerned as long as they neither redistribute FBNeo nor use it as some mean of advertisement. In this scenario, only a manual installation of the core by the user will be considered legal and supported.\n* While GPL code can't be mixed with non-commercial code, this is a non-issue since this port doesn't contain any GPL-licensed code.\n* Under european law, where the libretro buildbots are located, linking GPL and non-commercial softwares doesn't produce a derivative work, and doesn't extend the GPL license to the non-commercial work (source [here](https://joinup.ec.europa.eu/collection/eupl/licence-compatibility-permissivity-reciprocity-and-interoperability)). It is unclear whether the same applies in non-EU countries or not.\n\n## Extensions\n\nzip, 7z\n\n## Building this core manually\n\nFrom the root of the repository, run\n```\nmake -j5 -C src/burner/libretro\n```\nNote : `-j5` is to optimize build time on cpus with 4 cores (X+1 cores), you can rise or reduce that value to match your own, however a value too high will increase ram usage and might even cause your system to become unstable.\n\nNote : Here is a non-exhaustive list of additional parameters you might want to append to the make command line :\n\n* **SUBSET=all** : Build a core that supports everything. This is the default SUBSET so you don't need to append it.\n* **SUBSET=neogeo** : Build a core that only supports neogeo games.\n* **SUBSET=cps12** : Build a core that only supports CPS-1 & CPS-2 games.\n* **generate-files** : Generate header/gamelist files and stop there.\n* **clean** : Remove any previously built object.\n* **REGEN_HEADERS=1** : This will run **generate-files** and **clean** consecutively before building the core, which is usually required when you made a change to the list of drivers you want to build, either from modifying the project's code or switching between SUBSETs. Note that make version 4.4 may be required for this to behave properly.\n\n## Building romsets for FBNeo\n\nYou won't be able to emulate games without the romsets matching this emulator. FBNeo being an emulator under active development, a given romset might change from time to time to stay in sync with the best dump available for that game.\n\nDon't expect things to work properly if you didn't build valid romsets, and don't report issues because your romsets are invalid.\n\n### Step 1: Obtaining an XML DAT\n\nYou can download the dat files for the latest version of the core from the [dats](https://github.com/libretro/FBNeo/tree/master/dats/) directory.\n\n### Step 2: Gathering the ingredients\n\nIt mostly consists of latest dumps available for MAME.\nThe other romsets are usually a mix of hacks and homebrews, most of them can be found in HBMAME dumps.\nConsole/computer romsets come from different sources (recently emulated systems are likely to be based on No-Intro, but older ones were mostly based on MESS, there are also a lot of hacks/homebrews you won't find in those sets).\nHaving an older FBAlpha/FBNeo set among your ingredients will also help a lot.\n\n### Step 3: Building the romsets\n\nRefer to a [clrmamepro tutorial](https://docs.libretro.com/guides/arcade-getting-started/#optional-clrmamepro-tutorial) for details on how to configure ClrMamePro to use your sources as \"rebuild\" folders.\n\n## Features\n\n| Feature | Supported |\n|-------------------------------------------------------------------|-----------|\n| Saves | ✔ |\n| States | ✔ |\n| Rewind | ✔ |\n| Run-Ahead | ✔ |\n| Preemptive Frames | ✔ |\n| Netplay | ✔ |\n| [Memory Monitoring (achievements)](../guides/memorymonitoring.md) | ✔ |\n| RetroArch Cheats | ✔ |\n| Native Cheats | ✔ |\n| Controllers | ✔ |\n| Multi-Mouse | ✔ |\n| Rumble | ✕ |\n| Sensors | ✕ |\n| Camera | ✕ |\n| Location | ✕ |\n| Subsystem | ✔ |\n| IPS Patch | ✔ |\n| RomData | ✔ |\n| Multi-language | ✔ |\n\n## Mapping\n\nWe don't have a tool like the MAME OSD, instead we use the libretro api to announce buttons and let the frontend customize mapping, this is done through `Quick Menu > Controls`.\n\nFor those who don't want to fully customize their mapping, there are 2 convenient presets you can apply by changing the \"device type\" for a player in this menu :\n\n* **Classic** : it will apply the original neogeo layout from neogeo cd gamepads for neogeo games, and use L/R as 5th and 6th button for 6 buttons games like Street Fighter II.\n* **Modern** : it will apply the modern neogeo layout from neogeo arcade stick pro and mini pad for neogeo games, and use R1/R2 as 5th and 6th button for 6 buttons games like Street Fighter II (because it's also their modern layout), this is really convenient with most arcade sticks.\n\nThe following \"device type\" also exist, but they won't be compatible with every games :\n\n* **Mouse (ball only)** : it will use mouse/trackball for analog movements, buttons will stay on retropad\n* **Mouse (full)** : same as above, but the buttons will be on the mouse\n* **Pointer** : it will use \"pointer\" device (can be a mouse/trackball) to determine coordinates on screen, buttons will stay on retropad\n* **Lightgun** : it will use lightgun to determine coordinates on screen, buttons will be on the lightgun too.\n* **Analog Arcade Gun** : it will use the analog stick for gun games but in a different way than \"Classic\" and \"Modern\", it is particularily useful if you have a \"fixed arcade gun\" (arcade gun mounted on an analog control).\n\nThe following device types are mostly WIP, they haven't been thoroughly tested and might contain major bugs (please report them) :\n\n* **6-Panel** : assuming you are using a 6-button arcade panel and followed the \"YXL as top row and BAR as bottom row\" mapping recommendation, it will map the top row then the bottom row as a general rule (with some exceptions), note that some users might be more comfortable with Classic/Modern's BAYX's assignment for 4-buttons systems like neogeo.\n* **Touchscreen** : a variant of the \"Pointer\" device type meant for mobile devices, touchscreen \"tap events\" are used for gameplay, \"Start\" and \"Coin\" are still assigned to your retropad overlay.\n\n## Emulating consoles and computers\n\nIt also requires usage of specific romsets, meaning the rom must have the expected crc/size, and be packaged in an archive with a specific name ([the instructions to build those romsets aren't different from arcade](#building-romsets-for-fbneo)).\n\nYou can use specific folder's name for detection, it's the easiest and recommended method, especially if you are using RetroArch playlists or if your device is not compatible with subsystems (android and consoles) :\n\n* CBS ColecoVision : `coleco` | `colecovision`\n* Fairchild ChannelF : `chf` | `channelf`\n* MSX 1 : `msx` | `msx1`\n* Nec PC-Engine : `pce` | `pcengine`\n* Nec SuperGrafX : `sgx` | `supergrafx`\n* Nec TurboGrafx-16 : `tg16`\n* Nintendo Entertainment System : `nes`\n* Nintendo Family Disk System : `fds`\n* Super Nintendo Entertainment System : `snes`\n* Sega GameGear : `gamegear`\n* Sega Master System : `sms` | `mastersystem`\n* Sega Megadrive : `megadriv` | `megadrive` | `genesis`\n* Sega SG-1000 : `sg1000`\n* SNK Neo-Geo Pocket : `ngp`\n* SNK Neo-Geo CD : `neocd`\n* ZX Spectrum : `spectrum` | `zxspectrum`\n\nYou can also emulate consoles by prefixing the name of the roms with `XXX_` and removing the `zip|7z` extension in the command line, or adding the `--subsystem XXX` argument, here is the list of available prefixes :\n\n* CBS ColecoVision : `cv`\n* Fairchild ChannelF : `chf`\n* MSX 1 : `msx`\n* Nec PC-Engine : `pce`\n* Nec SuperGrafX : `sgx`\n* Nec TurboGrafx-16 : `tg`\n* Nintendo Entertainment System : `nes`\n* Nintendo Family Disk System : `fds`\n* Super Nintendo Entertainment System : `snes`\n* Sega GameGear : `gg`\n* Sega Master System : `sms`\n* Sega Megadrive : `md`\n* Sega SG-1000 : `sg1k`\n* SNK Neo-Geo Pocket : `ngp`\n* SNK Neo-Geo CD : `neocd`\n* ZX Spectrum : `spec`\n\n## BIOS\n\nWhen loading a romset requiring a bios romset, it will be searched through 3 folders in that order :\n\n* the folder of the current romset\n* the `SYSTEM_DIRECTORY/fbneo/` folder\n* the `SYSTEM_DIRECTORY/` folder\n\nThe following bios romsets are required for some of the emulated arcade systems :\n\n| Romset name | Note |\n|-------------|--------------------------------------------|\n| bubsys | Bubble System BIOS |\n| cchip | C-Chip Internal ROM |\n| decocass | DECO Cassette System BIOS |\n| isgsm | ISG Selection Master Type 2006 System BIOS |\n| midssio | Midway SSIO Sound Board Internal ROM |\n| msx | MSX1 System BIOS |\n| namcoc69 | Namco C69 BIOS |\n| namcoc70 | Namco C70 BIOS |\n| namcoc75 | Namco C75 BIOS |\n| neogeo | Neo Geo BIOS |\n| nmk004 | NMK004 Internal ROM |\n| pgm | PGM System BIOS |\n| skns | Super Kaneko Nova System BIOS |\n| ym2608 | YM2608 Internal ROM |\n\nThe following bios romsets are required for some of the emulated non-arcade systems :\n\n| Romset name | Note |\n|-------------|--------------------------|\n| channelf | Fairchild Channel F BIOS |\n| coleco | ColecoVision System BIOS |\n| dsp1 | SNES DSP-1 |\n| dsp1b | SNES DSP-1B |\n| dsp2 | SNES DSP-2 |\n| dsp3 | SNES DSP-3 |\n| dsp4 | SNES DSP-4 |\n| fdsbios | FDS System BIOS |\n| neocdz | Neo Geo CDZ System BIOS |\n| ngp | NeoGeo Pocket BIOS |\n| spectrum | ZX Spectrum BIOS |\n| spec128 | ZX Spectrum 128 BIOS |\n| spec1282a | ZX Spectrum 128 +2a BIOS |\n| st010 | SNES Seta ST010 |\n| st011 | SNES Seta ST011 |\n\n## Samples\n\nSamples should be put under `SYSTEM_DIRECTORY/fbneo/samples`.\n\nHere is a list of samples currently in use :\n\n| Sample name | Note |\n|--------------|------------------------------------------------------------------------|\n| ad59mc07 | Known as `equites` in MAME |\n| blockade | |\n| buckrog | |\n| carnival | |\n| cheekyms | Not from MAME |\n| circus | |\n| crash | |\n| congo | |\n| deathnlead | Not from MAME, megadrive |\n| depthch | |\n| digger | Not from MAME |\n| dkongjr | |\n| dkong | |\n| donpachi | Not from MAME, optional, replace OG music by HQ music, requires dipsw. |\n| elim2 | |\n| fantasy | |\n| galaga | |\n| gaplus | |\n| gridlee | |\n| heiankyo | Not from MAME |\n| invaders | |\n| invds | Not from MAME |\n| invinco | |\n| journey | |\n| mario | |\n| mmagic | |\n| natodef | |\n| nitedrvr | Not from MAME |\n| nsub | |\n| paprium | Not from MAME, megadrive, huge usage of disk space and ram (2.1GB) |\n| qbert | |\n| radarscp | Not from MAME |\n| rallyx | |\n| reactor | |\n| safarir | |\n| sasuke | |\n| seawolf | |\n| sfz3mix | Not from MAME, optional, replace OG music by HQ music, no dipsw. |\n| sharkatt | |\n| sidetrac | Not from MAME |\n| sot4w | Not from MAME, megadrive |\n| spacefb | |\n| spacfury | |\n| stinger | Not from MAME |\n| subroc3d | |\n| targ | |\n| thehand | |\n| thief | |\n| tr606drumkit | Not from MAME |\n| turbo | |\n| twotiger | |\n| vanguard | |\n| xevious | |\n| zaxxon | |\n| zektor | |\n| zerohour | |\n\n## Hiscores\n\nCopy [hiscore.dat](https://github.com/libretro/FBNeo/raw/master/metadata/hiscore.dat) to `SYSTEM_DIRECTORY/fbneo/` and have `Quick Menu > Core Options > Hiscores` enabled.\n\nIt doesn't guarantee hiscores will work for a specific game though, sometimes a driver could just be missing the necessary support code for this feature, or `hiscore.dat` might have a missing or broken entry for that romset. You can request support in the issue tracker. \n\nRunahead now works with hiscores, it'll require fairly recent version of the core AND RetroArch though (support was added after 1.10.3).\n\n## Input lag reduction\n\nThis core widely supports the RetroArch input latency reduction features, with **runahead single instance** and **preemptive frames** being the recommended methods. \n\nProper support for **runahead second instance** is not guaranteed because it doesn't exist in standalone FBNeo unlike the other methods.\n\nNote : There seems to be possible conflicts when rewind is active simultaneously, see https://github.com/libretro/RetroArch/issues/16374.\n\n## RetroAchievements\n\nThis core provides support for RetroAchievements, and some were added for popular games.\n\n## Dipswitches\n\nThey are either directly available from `Quick Menu > Core Options > DIP Switches`, or from the service menu after setting its shortcut at `Quick Menu > Core Options > Diagnostic Input`.\n\n## Cheats\n\nThis core supports the RetroArch cheat feature with the `.cht` files. However it is recommended to use FBNeo's native cheat support instead :\n\n* Download the pack of cheats from [here](https://github.com/finalburnneo/FBNeo-cheats/archive/master.zip)\n* Uncompress **all of them** into the `SYSTEM_DIRECTORY/fbneo/cheats/` folder (which is **NOT** the same folder as the RetroArch feature with the `.cht` files)\n* Cheats will become available through core options (`Quick Menu > Core Options > Cheat`, **NOT** `Quick Menu > Cheats`) afterward.\n\n## Multi-language\n\nThis core supports multi-language feature.\n\n* Multi-language is based on the front-end User UI language switching\n* Simplified Chinese and Traditional Chinese have been added.\n\n## Frequently asked questions\n\n### Where can i find the XXX roms ?\n\nAs far as we are concerned, you are supposed to dump your own games, so we can't help you with acquiring romsets.\n\n### Why am i getting a white screen ?\n\nIf present, the line `Verify the following romsets : ` gives you the list of split romsets required by the game you are trying to run. This is mainly for reference since you might not be striving to use romsets in split format. The next few lines give you the list of files it couldn't find within those romsets.\n\nOtherwise, a `Romset is unknown` message means the romset couldn't be found by its filename in our database, meaning it's either not supported at all or wrongly named.\n\nBoth problems result from not reading the [arcade documentation](https://docs.libretro.com/guides/arcade-getting-started/#step-3-use-the-correct-version-romsets-for-that-emulator).\nExceptionally there might be false positives due to your files being unreadable for some reason (file corruption during transfer, file permission, damaged disk drive, [retroarch regression](https://github.com/libretro/RetroArch/issues/18582), ...). This is usually a rabbit hole and something you should only concern yourself after using clrmamepro to verify your romsets.\n\nRarely you could get a \"Failed initializing driver\" message, this is something you should report [here](https://github.com/finalburnneo/FBNeo/issues)\n\n### Is XXX supported ?\n\nYou can check the [dats](https://github.com/libretro/FBNeo/tree/master/dats/) or [gamelist.txt](https://raw.githubusercontent.com/libretro/FBNeo/refs/heads/master/gamelist.txt) to see if a game is supported.\n\nWe don't accept requests for supporting a game, and questions regarding the lack of support for a game are also regarded as requesting for its support.\nOne exception to that rule would be for consoles/computers we already support, and you should make that request [here](https://neo-source.com/index.php?topic=3656.0).\nGames running on already emulated arcade systems will also be tolerated, the most common case for this would be romhacks of already emulated games, don't ask if you are not absolutely sure.\n\n### How can i run that romhack i found ?\n\nA lot of romhacks are supported natively, so your romhack might already be supported under a specific romset name.\n\nFor the unsupported romhacks, there are 3 methods, but those romhacks are not allowed if you intend to use RetroAchievements and must be disabled by toggling off `Quick Menu > Core Options > Allow patched romsets` : \n\n#### Using the \"patched\" folder\n\n* Put the patched version of the romset into `SYSTEM_DIRECTORY/fbneo/patched`, this folder has special privileges allowing it to ignore crcs. Sizes and names still need to match the original romset though.\n* Optional : you could strip the patched version from any file that don't differ from the original romset.\n\n#### Using IPS Patches\n\n* Put all IPS patch files (including: driver name directory/**.dat|**.ips) into the `SYSTEM_DIRECTORY/fbneo/ips/` folder.\n* IPS Patch will become available through core options (`Quick Menu > Core Options > IPS Patch`) afterward. To apply them, you need to launch the game, enable them in core options, then use RetroArch's \"restart\" action.\n* Note : To avoid competing with loaded games for startup privileges, IPS Patches is initially disabled by default.\n\n#### Using RomData\n\n* Put all RomData files (including: driver name directory/**.dat) into the `SYSTEM_DIRECTORY/fbneo/romdata/` folder\n* RomData will become available through core options (`Quick Menu > Core Options > RomData`) afterward. To apply them, you need to launch the game, enable them in core options, then use RetroArch's \"restart\" action.\n\nPlease note that all 3 methods still require that you launch the original non-patched romset, it will be patched/replaced at runtime.\n\n### How can i run that unibios i bought from http://unibios.free.fr/ ?\n\nUse the \"patched folder\" method from above.\n\n### I think i found a glitch, how do i report it ?\n\nWrite a report [here](https://github.com/finalburnneo/FBNeo/issues) with details on the issue and your platform.\nIf the issue is not self-explanatory, it is important to provide a video of the PCB (meaning real hardware), any other material (remakes, other emulators, fpga, game rips, ...) will be ignored.\nIf the issue doesn't happen right from the beginning, please try to provide a savestate from right before the issue.\n\n### Why does game XXX run slowly ?\n\nYour hardware is probably too slow to run the game with your current settings. Try the following :\n\n* Check if there is a speedhack dipswitch in the core options, set it to \"yes\".\n* Try disabling rewind, runahead, pre-emptive frames, shaders, or any other retroarch setting known for increasing requirements.\n* Try enabling \"Threaded Video\" in retroarch settings.\n* Try changing \"Max swapchain images\" in retroarch settings (higher values gave a small performance benefit on my setup).\n* Try setting a value for frameskip in core options (note : \"Fixed\" frameskip is recommended, the other methods don't seem to be nearly as reliable).\n* Try lowering CPU clock in core options (note : some games don't support this feature).\n* Try lowering audio settings in the core options.\n* With m68k games (most boards from the late 80s and early 90s) on arm platforms, you can try enabling cyclone in core options, however this is really a last resort since some games won't work properly with this, furthermore it's causing savestates incompatibilities.\n* If it is not enough, upgrade/overclock your hardware, or use another core.\n\nWe won't accept requests for \"making the core faster\", as far as we are concerned this core has a good balance between accuracy & speed, and for the most part will already run really well on low-end devices (rpi3, ...).\n\n### Why does game XXX have choppy sound ?\n\nMost likely for the same reason as above.\n\n### Why does game XXX run faster in MAME2003/MAME2010 ?\n\nOverall, FBNeo is slower than old MAME version, because it's more accurate, meaning graphics, sound and gameplay are more likely to be faithful to the real machine.\nThis libretro port also supports various features which are usually buggy or totally missing in MAME cores (runahead, netplay, rewind, retroachievements, ...), those features might require additional resources.\n\n### How do i launch a neogeo CD game ?\n\nThere are several things to know :\n\n* You need to follow the instructions about [emulating consoles](#emulating-consoles-and-computers)\n* You need a copy of the `neocdz.zip` and `neogeo.zip` bioses\n* The supported format is single file MODE1/2352 cue/bin (the format where there is one .cue file with one single .bin file). Use \"CDmage\" to convert your dump if needed. **It must not be compressed**\n\nYou can convert your unsupported dumps by following this tutorial :\n\n* Get [CDMage 1.02.1 (beta)](https://www.videohelp.com/software/CDMage) (freeware & no ads). **Don't get CDMage 1.01.5, it doesn't have the \"Save As\" function**\n* File > Open > select your dump (NB : always choose the .cue file if there is one)\n* File > Save As > write the name of your new file\n* Make sure you select MODE1/2352 in the second drop-down\n* Press OK, wait for the process to finish (a few seconds on my computer), and it’s done !\n\n### Why can't i launch Killer instinct ? I heard it's supported.\n\nThat driver was disabled, it didn't meet our quality criteria. There are no plans for fixing it at the moment.\n\n### Where is the hires dipswitch on vector games ? It seems gone.\n\nIt was streamlined into a global `Video Settings > Resolution` core option affecting all vector games at once, with new resolutions available.\n\nFor best visual results, it's recommended to match your screen's height, some examples using a 1080p screen :\n* for horizontal games, you'll want to use 1440x1080\n* for vertical games (tempest, tacscan), if you are running them on a vertical screen with the settings to rotate them, you'll also want to use 1440x1080\n* for those same vertical games, if you are running them at default settings on a horizontal screen, you'll want to use 1080x810\n\n### Why are vertical games not working properly ?\n\n2 settings are required when running vertical games in FBNeo :\n\n* `Settings > Core > Allow rotation` must be enabled (`video_allow_rotate = \"true\"` in `retroarch.cfg`)\n* `Settings > Video > Scaling > Aspect Ratio` should be set to `Core Provided` (`aspect_ratio_index = \"22\"` in `retroarch.cfg`)\n\nIf you are wondering why this isn't required for the MAME core, you can find more information about it [here](https://github.com/libretro/mame/issues/261)\n\nAdditionally :\n\n* If you are playing on a vertical screen, you'll want to use the `Video Settings > Vertical Mode` core option to rotate the display for your needs, it should also be possible to rotate display from `Settings > Video > Output > Video Rotation` but that method might handle the aspect ratio incorrectly.\n* If you are using a bezel pack, make sure it's compatible with FBNeo (apparently, some were written specifically to work with MAME's internal rotation) and to follow its official instructions. In some case it seems enabling `Settings > On-Screen Display > On-Screen Overlay > Auto-Scale Overlay` (`input_overlay_auto_scale = \"true\"` in `retroarch.cfg`) can help.\n\n### Why is the music high-pitched, too fast and/or different from what i think it should be ?\n\nThe first question you should be asking yourself is \"what am i comparing this to ?\", emulation is meant to be faithful to real hardware (here the original arcade board), not to some console port, remaster, other emulator, or ost.\n\nIf you are comparing this to FBNeo standalone, you must be warned that the libretro port is using different default audio settings. \nBy default standalone has 44100 samplerate and both interpolations off, and that's what you should set in core options if you want the same audio output.\n\nLast but not least, you might also want to make sure you are running the game at the correct speed, most crt games don't run at 60Hz and if you want the proper refresh rate to be emulated you'll need to make sure `Video Settings > Force 60Hz` isn't enabled in core options and `Settings > Video > Synchronization > Sync to Exact Content Framerate` is enabled (`vrr_runloop_enable = \"true\"` in `retroarch.cfg`). \nPlease note that it'll likely cause frame duping if your hardware is not compatible with VRR (Variable Refresh Rate), in which case you'll have to make a choice between animation smoothness and correct refresh rate.\n\n### Why do i get a black screen and/or can't i change bios in neogeo games ?\n\nThe `neogeo` romset is a collection of neogeo bioses, and most of them are considered optional so they won't cause a \"white screen\" when missing. Only `MVS Asia/Europe ver. 6 (1 slot)` is mandatory.\n\nHowever, having an incomplete romset can still cause various issues :\n\n* If you are using the \"Use bios set in BIOS dipswitch\" as \"Neo-Geo mode\" and the bios set in dipswitches is missing, you'll have a black screen where you can hear some sound playing.\n* If you are using any of the other choices available in \"Neo-Geo mode\" and a corresponding bios can't be found, the core will fallback to one of the available bioses.\n\nObviously, none of this is supposed to ever happen if you followed the instructions about romsets as you are supposed to.\n\n### Why do i get some weird transparent effects in game XXX ?\n\nYou probably installed some `.bld` files in the `SYSTEM_DIRECTORY/fbneo/blend` folder. Those files are meant to create such effects but some of them are very broken. I'd recommend removing them.\n\n### Why is my favorite combo button not available ?\n\nLibretro doesn't allow cores to declare more buttons and map them later, meaning the number of different \"actions\" available is limited by the number of buttons available on the retropad model.\n\nRemoving that limitation was asked in https://github.com/libretro/RetroArch/issues/6718, then again in https://github.com/libretro/RetroArch/issues/11273, it's not possible to add more macros as long as this limitation exists. If you want more macros, go support those issues, preferably the later.\n\nThe currently available neogeo combos were decided in https://github.com/libretro/FBNeo/issues/51, they won't be replaced, but they might totally disappear if users keep complaining about them.\n\nNote that there was also a request to add a retroarch macro mapper in https://github.com/libretro/RetroArch/issues/8209.\n\nThere is also a PR currently opened to implement this : https://github.com/libretro/RetroArch/pull/16035.\n\n### Why can't i enable hardcore mode in RetroAchievements ?\n\nThis feature doesn't accept achievements made with any kind of cheat, meaning unibios, cheats, and patched romsets must be disabled in core options.\n\n### Why do i need to re-enable cheats every time i boot a game ?\n\nIt is common for arcade machines to execute self-tests at boot, and in many cases they won't boot if unexpected values have been injected into their memory, which is exactly what cheats do. Disabling cheats at boot is a safety mecanism to prevent those boot issues.\n\n### Why do the self-tests at boot fail ?\n\nSometimes the NVRAM/EEPROM saved on your disk gets corrupted for some reason, Konami games are especially known for getting this issue *somewhat frequently*.\nNVRAM/EEPROM are saved in the `SAVEFILES_DIRECTORY/fbneo` folder, and you can get around this issue by finding the files corresponding to your game and deleting them.\n\n### Should i use retroarch's analog-to-digital feature ?\n\nYou should **NEVER** use that feature with this core, it already converts analog to digital and digital to analog internally. Exceptionally it might not do that conversion because each of those controls are already doing their own thing, meaning you don't want that conversion either.\n\n### Why is my old savestate not working anymore after updating my core ?\n\nA core's savestates are only guaranteed to keep working as long as you NEVER update that core.\nSavestates are tied to how a game is emulated, and updating a core might significantly change how that game is emulated, breaking older savestates in the process.\nThis does apply to any core, but is likely to be more frequent for actively developed multi-system emulators like FBNeo.\nYou should be wary of updating your cores if this is a major concern for you.\nNote that rollback netplay with mismatching core versions can also be affected by this.\n\n### Why am i having trouble playing with a keyboard ?\n\nKeyboards, especially cheaper ones, are often affected by ghosting, which will prevent some key combinations from working and hinder your experience. You can test your keyboard [here](https://www.microsoft.com/applied-sciences/projects/anti-ghosting-demo).\n\nAdditionally, keyboards are kind of unsuitable for arcade emulation, because they allow things that were impossible on real hardware, like pressing opposite directions. This commonly leads to problems while doing special moves involving opposite directions in fighting games. The FBNeo core has a core option at `Input Settings > SOCD Mode` to mitigate this, and some value might work better than another for your play style.\n\n### Where is SYSTEM_DIRECTORY ?\n\nOpen your `retroarch.cfg` file and look for `system_directory`, or check `Settings > Directory > System/BIOS`.\n\n## External Links\n\n- [Official FBNeo forum](https://neo-source.com/)\n- [Official FBNeo github repository](https://github.com/finalburnneo/FBNeo)\n- [Libretro FBNeo github repository](https://github.com/libretro/FBNeo)\n- [[GUIDE] Setting up RetroArch playlists with FBNeo](https://neo-source.com/index.php?topic=3725.0)\n- [Gameplay Videos](https://www.youtube.com/playlist?list=PLRbgg4gk_0IfsAHeGqGD-DkRzI87q7V_Q)\n"
},
{
"path": "docs/library/fceumm.md",
"content": "# Nintendo - NES / Famicom (FCEUmm)\n\n## Background\n\nFCEU \"mappers modified\" is an unofficial build of FCEU Ultra by CaH4e3, which supports a lot of new mappers including some obscure mappers such as one for unlicensed NES ROM's.\n\n### Author/License\n\nThe FCEUmm core has been authored by\n\n- FCEU Team\n- CaH4e3\n\nThe FCEUmm core is licensed under\n\n- [GPLv2](https://github.com/libretro/libretro-fceumm/blob/master/Copying)\n\nA summary of the licenses behind RetroArch and its cores can be found [here](../development/licenses.md).\n\n## Extensions\n\nContent that can be loaded by the FCEUmm core have the following file extensions:\n\n- .fds\n- .nes\n- .unif\n- .unf\n\n## Databases\n\nRetroArch database(s) that are associated with the FCEUmm core:\n\n- [Nintendo - Nintendo Entertainment System](https://github.com/libretro/libretro-database/blob/master/rdb/Nintendo%20-%20Nintendo%20Entertainment%20System.rdb)\n- [Nintendo - Family Computer Disk System](https://github.com/libretro/libretro-database/blob/master/rdb/Nintendo%20-%20Family%20Computer%20Disk%20System.rdb)\n\n## BIOS\n\nRequired or optional firmware files go in the frontend's system directory.\n\n| Filename | Description | md5sum |\n|:-------------:|:----------------------------------------------------------------------------------------------------------------------------:|:--------------------------------:|\n| disksys.rom | Family Computer Disk System BIOS - Required for Famicom Disk System emulation | ca30b50f880eb660a320674ed365ef7a | \n|gamegenie.nes | Game Genie add-on cartridge - Required for Game Genei Add-on emulation | 7f98d77d7a094ad7d069b74bd553ec98 |\n\n## Features\n\nFrontend-level settings or features that the FCEUmm core respects.\n\n| Feature | Supported |\n|-------------------|:---------:|\n| Restart | ✔ |\n| Screenshots | ✔ |\n| Saves | ✔ |\n| States | ✔ |\n| Rewind | ✔ |\n| Netplay | ✔ |\n| Core Options | ✔ |\n| [Memory Monitoring (achievements)](../guides/memorymonitoring.md) | ✔ |\n| RetroArch Cheats | ✔ |\n| Native Cheats | ✔ |\n| Controls | ✔ |\n| Remapping | ✔ |\n| Multi-Mouse | ✕ |\n| Rumble | ✕ |\n| Sensors | ✕ |\n| Camera | ✕ |\n| Location | ✕ |\n| Subsystem | ✕ |\n| [Softpatching](../guides/softpatching.md) | ✔ |\n| Disk Control | ✕ |\n| Username | ✕ |\n| Language | ✕ |\n| Crop Overscan | ✕ |\n| LEDs | ✕ |\n\n### Directories\n\nThe FCEUmm core's internal core name is 'FCEUmm'\n\nThe FCEUmm core saves/loads to/from these directories.\n\n**Frontend's Save directory**\n\n| File | Description |\n|:-----:|:----------------------:|\n| *.srm | Cartridge battery save |\n\n**Frontend's State directory**\n\n| File | Description |\n|:--------:|:-----------:|\n| *.state# | State |\n\n**Frontend's System directory**\n\n| File | Description |\n|:--------:|:----------------------------:|\n| nes.pal | Custom palette (64 triplets) |\n\n### Geometry and timing\n\n- The FCEUmm core's core provided FPS is NTSC 60.10, PAL/Dendy 50.0\n- The FCEUmm core's core provided sample rate is 48000 Hz\n- The FCEUmm core's base width is 256 (602 when using NTSC Filters)\n- The FCEUmm core's base height is 240\n- The FCEUmm core's max width is 256 (602 when using NTSC Filters)\n- The FCEUmm core's max height is 240\n- The FCEUmm core's core provided aspect ratio is 4:3 DAR or 8:7 PAR\n\n### Custom color palettes\n\nTo use custom color palettes in the FCEUmm core, the ['Color Palette' core option](#core-options) must be set to custom and the custom color palette file you want to use must be in RetroArch's system directory.\n\nMake sure the custom palette file is named 'nes.pal'\n\nCustom color palettes for the NES can be generated with either of these tools.\n\n- [Bisqwit's NTSC NES palette generator](http://bisqwit.iki.fi/utils/nespalette.php)\n- [Drag's NTSC NES palette generator](http://drag.wootest.net/misc/palgen.html)\n\n## Core options\n\nThe FCEUmm core has the following option(s) that can be tweaked from the core options menu. The default setting is bolded.\n\nSettings with (Restart) means that core has to be closed for the new setting to be applied on next launch.\n\n- **Region** [fceumm_region] (**Auto**|NTSC|PAL|Dendy)\n\n\tForce core to use NTSC, PAL or Dendy system audio / video timings.\n\n- **Preferred aspect ratio** [fceumm_aspect] (**8:7 PAR**|4:3)\n\n\tChoose the preferred aspect ratio. RetroArch's aspect ratio must be set to Core provided in the Video settings.\n\n??? note \"Preferred aspect ratio - 8:7 PAR\"\n\t\n\n??? note \"Preferred aspect ratio - 4:3\"\n\t\n\n- **Color Palette** [fceumm_palette] (**default**|asqrealc|nintendo-vc|rgb|yuv-v3|unsaturated-final|sony-cxa2025as-us|pal|bmf-final2|bmf-final3|smooth-fbx|composite-direct-fbx|pvm-style-d93-fbx|ntsc-hardware-fbx|nes-classic-fbx-fs|nescap|wavebeam|raw|custom)\n\n\tChoose which color palette is going to be used. The raw palette can used in combination with the nes-decoder shader to give colors based off on Bisqwit's NES palette generator and applies either an FCC color conversion matrix or specific Sony US matrix.\n\n!!! attention \"Disclaimer\"\n\tThese 'Color Palette core option screenshots have been taken with the 'Use NTSC Palette' core option set to Off.\n\n??? note \"Color Palette - default\"\n\t\n\n??? note \"Color Palette - asqrealc\"\n\t\n\n??? note \"Color Palette - nintendo-vc\"\n\t\n\n??? note \"Color Palette - rgb\"\n\t\n\n??? note \"Color Palette - yuv-v3\"\n\t\n\n??? note \"Color Palette - unsaturated-final\"\n\t\n\n??? note \"Color Palette - sony-cxa2025as-us\"\n\t\n\n??? note \"Color Palette - pal\"\n\t\n\n??? note \"Color Palette - bmf-final2\"\n\t\n\n??? note \"Color Palette - bmf-final3\"\n\t\n\n??? note \"Color Palette - smooth-fbx\"\n\t\n\n??? note \"Color Palette - composite-direct-fbx\"\n\t\n\n??? note \"Color Palette - pvm-style-d93-fbx\"\n\t\n\n??? note \"Color Palette - ntsc-hardware-fbx\"\n\t\n\n??? note \"Color Palette - nes-classic-fbx-fs\"\n\t\n\n??? note \"Color Palette - nescap\"\n\t\n\n??? note \"Color Palette - wavebeam\"\n\t\n\n??? note \"Color Palette - raw\"\n\t\n\n- **Allow Opposing Directions** [fceumm_up_down_allowed] (**disabled**|enabled)\n\n\tEnabling this will allow pressing / quickly alternating / holding both left and right (or up and down in some games) directions at the same time.\n\n\tThis may cause movement based glitches to occur in certain games.\n\n\tIt's best to keep this core option disabled.\n\n- **Crop Overscan (Horizontal)** [fceumm_overscan_h] (**disabled**|enabled)\n\n\tCrop out (horizontally) the potentially random glitchy video output that would have been hidden by the bezel around the edge of a standard-definition television screen.\n\n??? note \"Crop Overscan (Horiontal) - Off\"\n\t\n\n??? note \"Crop Overscan (Horizontal) - On\"\n\t\n\n- **Crop Overscan (Vertical)** [fceumm_overscan_v] (**enabled**|disabled)\n\n\tCrop out (vertically) the potentially random glitchy video output that would have been hidden by the bezel around the edge of a standard-definition television screen.\n\n??? note \"Crop Overscan (Vertical) - On\"\n\t\n\n??? note \"Crop Overscan (Vertical) - Off\"\n\t\n\n- **No Sprite Limit** [fceumm_nospritelimit] (**disabled**|enabled)\n\n\tRemoves 8-sprites-per-scanline hardware limit.\n\n- **Sound Volume** [fceumm_sndvolume] (0|1|2|3|4|5|6|**7**|8|9|10)\n\n\tSelf-explanatory.\n\n- **Sound Quality** [fceumm_sndquality] (**Low**|High|Very High)\n\n\tEnables high/higher sound quality for games using expansion audio (MMC5, VRC6, VRC7, Namco, Sunsoft). Use Low for slower devices.\n\n- **Swap Duty Cycles** [fceumm_swapduty] (**disabled**|enabled)\n\n\tReplicates the sound of some famiclones that have duty cycles swapped for square channels. A quick sound comparison is in Contra's sound effect when shooting with normal bullets.\n\n- **Turbo Enable** [fceumm_turbo_enable] (**None**|Player 1|Player 2|Both)\n\n\tEnable the use of the [Turbo B and Turbo A buttons](#controllers).\n\n- **Turbo Delay (in frames)** [fceumm_turbo_delay] (**3**|5|10|15|30|60|1|2)\n\n\tThe number of frames between consecutive button presses when the Turbo B or Turbo A buttons are held down.\n\n- **Zapper Mode** [fceumm_zapper_mode] (**lightgun**|touchscreen|mouse)\n\n\tPointer allows the Zapper Device Type to be used for touch-devices, but still can be used with regular mouse. Pointer and Mouse mode movement behaves differently with different input driver so user can choose which movement feels natural to them.\n\n- **Show Crosshair** [fceumm_show_crosshair] (**enabled**|disabled)\n\n\tShow the crosshair for the Zapper device type.\n\n??? note \"Show Crosshair - On\"\n\t\n\n??? note \"Show Crosshair - Off\"\n\t\n\n- **Overclocking** [fceumm_overclocking] (**disabled**|2x-Postrender|2x-VBlank)\n\n\tOverclocks the NES using PPU method to minimize ingame slowdowns of some games. Contra Force needs VBlank mode (stage 3 slowdowns). Choose which ever minimizes slowdowns without image distortion.\n\n- **RAM power up state (Restart)** [fceumm_ramstate] (**$FF**|$00|random)\n\n\tChoose RAM startup during power up. Fill the ram with either $FF, $00 or random. Some games rely on initial ram values for random generator as an example.\n\n\tSome unlicensed carts and rom hacks prefers $00 or else rom will not boot up or causes graphics glitches or any other problems.\n\n- **NTSC Filter** [fceumm_ntsc_filter] (**disabled**|composite|svideo|rgb|monochrome)\n\n\tEnable blargg NTSC filters.\n\n!!! attention \"Disclaimer\"\n\tThese 'NTSC Filter' core option screenshots have been taken with the 'Color Palette' core option set to smooth-fbx.\n\n??? note \"NTSC Filter - Off\"\n\t\n\n??? note \"NTSC Filter - composite (color bleeding + artifacts)\"\n\t\n\n??? note \"NTSC Filter - svideo (color bleeding only)\"\n\t\n\n??? note \"NTSC Filter - rgb (crisp image)\"\n\t\n\n??? note \"NTSC Filter - monochrome (desaturated + artifacts)\"\n\t\n\n- **Show Advanced System Options** [fceumm_show_adv_system_options] (**disabled**|enabled)\n\n\tShow advanced system options and tweaks.\n\n- **Show Advanced Sound Options** [fceumm_show_adv_sound_options] (**disabled**|enabled)\n\n\tShow advanced sound controls and tweaks.\n\n## Controllers\n\nThe FCEUmm core supports the following device type(s) in the controls menu, bolded device types are the default for the specified user(s):\n\n### User 1 device types\n\n- None - Input disabled.\n- **Auto** - Joypad - Based off the loaded game's crc, the core will automatically select a regular controller (NES or Famicom) for User 1.\n- [Gamepad](http://nintendo.wikia.com/wiki/Nintendo_Entertainment_System_controller) - Joypad - Manually selects a regular controller (NES or Famicom) for User 1.\n- [Zapper](http://nintendo.wikia.com/wiki/NES_Zapper) - Mouse - Manually selects a Zapper light gun (NES or Famicom) for User 1.\n\n**NOTE 1: Zapper connected to user 1 is only required on VS Unisystem games. You will hear a loud alarm when a game requires one and no zapped device is selected or the game's CRC fails to match existing database for autodetection.**\n\n### User 2 device types\n\n- None - Input disabled.\n- **Auto** - Joypad - Based off the loaded game's crc, the core will automatically select a regular controller (NES or Famicom) or a Zapper light gun (NES or Famicom) or a Arkanoid Paddle (NES only) for User 2.\n- [Gamepad](http://nintendo.wikia.com/wiki/Nintendo_Entertainment_System_controller) - Joypad - Manually selects a regular controller (NES or Famicom) for User 2.\n- [Arkanoid](https://en.wikipedia.org/wiki/Arkanoid_Controller) - Mouse - Manually selects a Arkanoid Paddle (NES only) for User 2.\n- [Zapper](http://nintendo.wikia.com/wiki/NES_Zapper) - Mouse - Manually selects a Zapper light gun (NES or Famicom) for User 2.\n\n**NOTE 2: Zapper connected to user 2 is required for most cases. See note 1 above.**\n\n### User 3 and 4 device types - used for multitap\n\n- None - Input disabled.\n- **Auto** - Joypad - Based off the loaded game's crc, the core will automatically select a regular controller (NES or Famicom) for User 3 and/or 4 in multitap games.\n- [Gamepad](http://nintendo.wikia.com/wiki/Nintendo_Entertainment_System_controller) - Joypad - Manually selects a regular controller (NES or Famicom) for User 3/4.\n\n### Other controllers (User 5 device type)\n\nThe FCEUmm core will also auto select the following controllers for the **Famicom** based off the loaded game's crc.\n\n- [Arkanoid Paddle (Famicom)](https://en.wikipedia.org/wiki/Arkanoid_Controller) - Mouse\n- Bandai Hyper Shot Gun (Famicom) - Mouse\n- Oeka Kids Tablet (Famicom) - Mouse\n- 4-Player Adaptor - force enable multitap mode\n\n### Multitap support\n\nThe FCEUmm core supports up to 4 players in multitap games for the NES and Famicom, games with multitap usage are detected by their crc. Multitap can be manually enabled if selecting **4-Player Adaptor** in **User 5 Device type**.\n\n### Controller tables\n\n#### Joypad\n\n\n\n!!! warning\n\tIn order to use the Turbo A and Turbo B buttons, the 'Turbo Enable' core option must be set to On.\n\n| User 1 Remap descriptors | RetroPad Inputs |\n|--------------------------|---------------------------------------------|\n| B |  |\n| Turbo B |  |\n| Select |  |\n| Start |  |\n| D-Pad Up |  |\n| D-Pad Down |  |\n| D-Pad Left |  |\n| D-Pad Right |  |\n| A |  |\n| Turbo A |  |\n| (FDS) Disk Side Change |  |\n| (FDS) Insert/Eject Disk |  |\n| (VSSystem) Insert Coin |  |\n\n| User 2 - 4 Remap descriptors | RetroPad Inputs |\n|--------------------------|---------------------------------------------|\n| B |  |\n| Turbo B |  |\n| Select |  |\n| Start |  |\n| D-Pad Up |  |\n| D-Pad Down |  |\n| D-Pad Left |  |\n| D-Pad Right |  |\n| A |  |\n| Turbo A |  |\n\n#### Mouse\n\n| RetroMouse Inputs | Zapper | Arkanoid | Oeka Kids Tablet | Bandai Hyper Shot Gun |\n|---------------------------------------------------------------------------------------------------------|------------------|-------------------|-------------------------|---------------------------------|\n|  or  | Zapper Crosshair | Arkanoid Movement | Oeka Kids Tablet Cursor | Bandai Hyper Shot Gun Crosshair |\n|  or  | Zapper Trigger | Arkanoid Fire | Oeka Kids Tablet Touch | Bandai Hyper Shot Gun Trigger |\n\n- When the 'Zapper Mode' core option is set to lightgun, the 'Zapper' device type can be controlled with lightgun inputs (such as Wii remote).\n- When the 'Zapper Mode' core option is set to touchscreen, the 'Zapper' device type can be controlled with touch inputs.\n- When the 'Zapper Mode' core option is set to mouse, the 'Zapper' device type can be controlled with mouse inputs.\n\n## Compatibility\n\n| Game | Issue |\n|------------------------------|--------------------------------------------------------------|\n| Skull & Crossbones | Graphical glitches and screen shaking when in 2-player mode. |\n\n## External Links\n\n- [Official FCEUmm Website](http://cah4e3.shedevr.org.ru/fceultra.php)\n- [Official FCEUmm Sourceforge Repository](https://sourceforge.net/projects/fceumm/)\n- [Libretro FCEUmm Core info file](https://github.com/libretro/libretro-super/blob/master/dist/info/fceumm_libretro.info)\n- [Libretro FCEUmm Github Repository](https://github.com/libretro/libretro-fceumm)\n- [Report Libretro FCEUmm Core Issues Here](https://github.com/libretro/libretro-fceumm/issues)\n- [Gameplay Videos](https://www.youtube.com/playlist?list=PLRbgg4gk_0IfFhmpqSJMJgst6QCsWwxdD)\n\n## Other Links\n- [NES Header Database](http://nes.dnsabr.com/) - Verify, remove or add headers for known No-Intro roms.\n\n### See also\n\n#### Nintendo - Family Computer Disk System\n\n- [Nintendo - NES / Famicom (Mesen)](mesen.md)\n- [Nintendo - NES / Famicom (Nestopia)](nestopia.md)\n\n#### Nintendo - Nintendo Entertainment System\n\n- [Nintendo - NES / Famicom (bnes)](bnes.md)\n- [Nintendo - NES / Famicom (Emux NES)](emux_nes.md)\n- [Nintendo - NES / Famicom (Mesen)](mesen.md)\n- [Nintendo - NES / Famicom (Nestopia)](nestopia.md)\n- [Nintendo - NES / Famicom (QuickNES)](quicknes.md)\n"
},
{
"path": "docs/library/ffmpeg.md",
"content": "# FFmpeg\n\n## Background\n\nVideo/music player implemented in libretro. FFmpeg can play video and audio files of different formats in RetroArch. If a video file has more than one audio input, FFmpeg can switch between them. If there is a hard coded subtitle file in the video file, FFmpeg can switch between them in the same way.\n\n### Author/License\n\nThe FFmpeg core has been authored by\n\n- Fabrice Bellard\n- FFmpeg team\n\nThe FFmpeg core is licensed under\n\n- [LGPLv2, GPLv2](https://github.com/libretro/FFmpeg/blob/master/LICENSE.md)\n\nA summary of the licenses behind RetroArch and its cores can be found [here](../development/licenses.md).\n\n## Experience\n\n!!! important\n\tRetroArch and LibRetro do not share any copyrighted content. RetroArch does not download any video or audio files. It does not stream content you have on different platforms.\n\n### Watching Movies with Subtitles\n\nYou can open video files in the following formats(see: [Extensions](../ffmpeg/#extensions)). If your video file in these formats has a subtitle file encoded with .SSA type, these subtitle files will appear automatically. External subtitles are currently not supported. The video files you have played will be added to the Videos section in the main menu.\n\n??? note \"Turkish subtitles encoded 95's Ghost in the Shell\"\n\t\n\n#### Setup\n\nWatch the video below for details:\n\n\n\n### Listening to Music\n\nYou can open audio files in the following formats (see: [Extensions](../ffmpeg/#extensions)). In the example below, you can see and listen to an mp3 file running at the lowest settings. File quality will affect sound quality. The audio files you have played will be added to the Music section in the main menu.\n\n??? note \"Example\"\n\t\n\n#### Setup\n\nWatch the video below for details:\n\n\n\n## Extensions\n\nContent that can be loaded by the FFmpeg core have the following file extensions:\n\n- .mkv\n- .avi\n- .f4v\n- .f4f\n- .3gp\n- .ogm\n- .flv\n- .mp4\n- .mp3\n- .flac\n- .ogg\n- .m4a\n- .webm\n- .3g2\n- .mov\n- .wmv\n- .mpg\n- .mpeg\n- .vob\n- .asf\n- .divx\n- .m2p\n- .m2ts\n- .ps\n- .ts\n- .mxf\n- .wma\n- .wav\n\n## Features\n\nFrontend-level settings or features that the FFmpeg core respects.\n\n| Feature | Supported |\n|-------------------|:---------:|\n| Restart | ✔ |\n| Screenshots | ✔ |\n| [Shaders](../ffmpeg/#shaders) | ✔ |\n| Saves | ✕ |\n| States | ✕ |\n| Rewind | ✕ |\n| Netplay | ✕ |\n| Core Options | ✔ |\n| [Memory Monitoring (achievements)](../guides/memorymonitoring.md) | ✕ |\n| RetroArch Cheats | ✕ |\n| Native Cheats | ✕ |\n| Controls | ✔ |\n| Remapping | ✔ |\n| Multi-Mouse | ✕ |\n| Rumble | ✕ |\n| Sensors | ✕ |\n| Camera | ✕ |\n| Location | ✕ |\n| Subsystem | ✕ |\n| [Softpatching](../guides/softpatching.md) | ✕ |\n| Disk Control | ✕ |\n| Username | ✕ |\n| Language | ✕ |\n| Crop Overscan | ✕ |\n| LEDs | ✕ |\n\n### Directories\n\nThe FFmpeg core's directory name is 'FFmpeg'\n\n### Geometry and timing\n\n- The FFmpeg core's core provided FPS is dependant on the loaded media.\n- The FFmpeg core's core provided sample rate is dependant on the loaded media.\n- The FFmpeg core's core provided aspect ratio is dependant on the loaded media.\n\n### Shaders\n\nShaders can improve your viewing quality as well as deliver the excitement of the 80s or 90s. In the example below you can see how a VHS shader can affect view quality. You can also provide more innovative watching possibilities by stacking shaders on top of each other.\n\n??? note \"VHSPro Shader\"\n\t\n\n## Core options\n\nThe FFmpeg core has the following option(s) that can be tweaked from the core options menu. The default setting is bolded.\n\nSettings with (Restart) means that core has to be closed for the new setting to be applied on next launch.\n\n- **Temporal Interpolation** [ffmpeg_temporal_interp] (**Off**/On)\n\n\t'Fake’ a higher framerate by using motion blur.\n\n- **FFT Resolution** [ffmpeg_fft_resolution] (**1280x720**/1920x1080/2560x1440/3840x2160/640x360/320x180)\n\n\tModify the resolution of the music visualizer.\n\n??? note \"FFT Resolution - 320x180\"\n\t\n\n??? note \"FFT Resolution - 3840x2160\"\n\t\n\n- **FFT Multisample** [ffmpeg_fft_multisample] (**1x**/2x/4x)\n\n\tModify the antialiasing of the music visualizer.\n\n- **Colorspace** [ffmpeg_color_space] (**auto**/BT.70/BT.601/FCC/SMPTE240M)\n\n\tChoose [colorspaces](https://trac.ffmpeg.org/wiki/colorspace) from different broadcast regions/standards.\n\n??? note \"Colorspace\"\n\t\n\t\n\t\n\t\n\n\n## Controllers\n\nThe FFmpeg core supports the following device type(s) in the controls menu, bolded device types are the default for the specified user(s):\n\n### User 1 device types\n\n- None - Doesn't disable input.\n- **RetroPad** - Joypad\n- RetroPad w/Analog - Joypad - There's no reason to switch to this.\n\n### Other controllers\n\n- Mouse - The FFmpeg core allows Wheel Up and Wheel Down mouse inputs for seeking. This is always active, completely separate from the device types in the Controls menu and cannot be manually selected.\n\n### Controller tables\n\n#### Joypad\n\n| User 1 Remap descriptors | RetroPad Inputs |\n|--------------------------|------------------------------------------------|\n| Seek +60 seconds |  |\n| Seek -60 seconds |  |\n| Seek -10 seconds |  |\n| Seek +10 seconds |  |\n| Cycle Audio Track |  |\n| Cycle Subtitle Track |  |\n\n#### Mouse\n\n| RetroMouse Inputs | FFmpeg Core Inputs |\n|-----------------------------------------------------|---------------------------|\n| Wheel Up | Seek +60 seconds |\n| Wheel Down | Seek -60 seconds |\n\n## External Links\n\n- [Official FFmpeg Website](https://www.ffmpeg.org/)\n- [Official FFmpeg Repositories](https://www.ffmpeg.org/download.html#repositories)\n- [Libretro FFmpeg Core info file](https://github.com/libretro/libretro-super/blob/master/dist/info/ffmpeg_libretro.info)\n- [Internal Libretro FFmpeg Github Repository](https://github.com/libretro/RetroArch/tree/master/cores/libretro-ffmpeg)\n- [Buildbot Libretro FFmpeg Github repository](https://github.com/libretro/FFmpeg)\n- [Report Libretro FFmpeg Core Issues Here](https://github.com/libretro/RetroArch/issues)\n- [Video Setup](https://www.youtube.com/watch?v=zget1P8ptho)\n- [Audio Setup](https://www.youtube.com/watch?v=5f6nWBpagaM)\n"
},
{
"path": "docs/library/flycast.md",
"content": "# Sega - Dreamcast/NAOMI (Flycast)\n\n## Background\n\nFlycast is a multi-platform Sega Dreamcast, NAOMI, Atomiswave and System SP emulator. The Flycast core has been authored by\n\n- flyinghead\n\nThe Flycast core is licensed under\n\n- [GPLv2](https://github.com/flyinghead/flycast/blob/master/LICENSE)\n\n\nA summary of the licenses behind RetroArch and its cores can be found [here](../development/licenses.md).\n\n## How to play NAOMI Games\n\n1. Run NAOMI games stored in MAME format zip files by following the same process as standard Dreamcast games\n\n2. Run NAOMI GD-ROM format games stored in MAME zip + chd format by running the zip file through RetroArch. The zip file should be stored in your roms folder with the chd file in a subdirectory of the roms folder named after the mame ID.\n\n{==\nExample (MAME ID=ikaruga)\n- [ROM FOLDER]/ikaruga.zip\n- [ROM FOLDER]/ikaruga/gdl-0010.chd\n==}\n\n## Extensions\n\nContent that can be loaded by the flycast core have the following file extensions:\n\n- .cdi\n- .gdi\n- .chd\n- .cue\n- .bin\n- .elf\n- .zip\n- .7z\n- .lst\n- .dat\n- .m3u\n\n## Databases\n\nRetroArch database(s) that are associated with the flycast core:\n\n- [Sega - Dreamcast](https://github.com/libretro/libretro-database/blob/master/rdb/Sega%20-%20Dreamcast.rdb)\n\n## BIOS\n\nRequired or optional firmware files go in RetroArch's system directory.\n\n| Filename | Description | md5sum |\n|:---------------:|:--------------------------------------------------------------------:|:--------------------------------:|\n| dc/dc_boot.bin | Dreamcast BIOS - Optional | e10c53c2f8b90bab96ead2d368858623 |\n| dc/naomi.zip | NAOMI BIOS from MAME - Optional | |\n| dc/hod2bios.zip | NAOMI The House of the Dead 2 BIOS from MAME - Optional | |\n| dc/f355dlx.zip | NAOMI Ferrari F355 Challenge (deluxe) BIOS from MAME - Optional | |\n| dc/f355bios.zip | NAOMI Ferrari F355 Challenge (twin/deluxe) BIOS from MAME - Optional | |\n| dc/airlbios.zip | NAOMI Airline Pilots (deluxe) BIOS from MAME - Optional | |\n| dc/awbios.zip | Atomiswave BIOS from MAME - Optional | |\n| dc/naomi2.zip | NAOMI 2 BIOS from MAME - Optional | |\n| dc/segasp.zip | System SP BIOS from MAME - Optional | |\n\n!!! attention\n All bios files need to be in a directory named 'dc' in RetroArch's system directory.\n\n## Features\n\n| Feature | Supported |\n|-------------------|:---------:|\n| Restart | ✔ |\n| Screenshots | ✔ |\n| Saves | ✔ |\n| States | ✔ |\n| Rewind | ✕ |\n| Netplay | ✕ |\n| Core Options | ✔ |\n| [Memory Monitoring (achievements)](../guides/memorymonitoring.md) | ✔ |\n| RetroArch Cheats | ✔ |\n| Native Cheats | ✕ |\n| Controls | ✔ |\n| Remapping | ✔ |\n| Multi-Mouse | ✕ |\n| Rumble | ✔ |\n| Sensors | ✕ |\n| Camera | ✕ |\n| Location | ✕ |\n| Subsystem | ✕ |\n| Softpatching | ✕ |\n| Disk Control | ✔ |\n| Username | ✕ |\n| Crop Overscan (in RetroArch's Video settings) | ✕ |\n\n### Directories\n\nThe FlyCast core's directory name is 'Flycast'\n\nThe FlyCast core creates these files in RetroArch's system directory.\n\n```\ndc/\n├── vmu_save_A1.bin\n├── vmu_save_B1.bin\n├── vmu_save_C1.bin\n├── vmu_save_D1.bin\n└── dc_nvmem.bin\n```\n\n### Core provided aspect ratio\n\nFlyCast's core provided aspect ratio is 4/3.\n\n### Rumble\n\nRumble only works when the Joypad being used has rumble functionality and the Joypad input driver being used has rumble function implementation (e.g. **Xinput**).\n\n## Core options\n\nThe FlyCast core has the following option(s) that can be tweaked from the core options menu. The default setting is bolded. Settings with (Restart) means that core has to be closed for the new setting to be applied on next launch.\n\n### System\n\nConfigure region, language, BIOS and base hardware settings.\n\n**Region** [flycast_region] (**Default**|Japan|USA|Europe)\n\n**Language** [flycast_language] (**Default**|Japanese|English|German|French|Spanish|Italian)\n\n!!! regular \"\"\n\n\tChanges the language used by the BIOS and by any games that contain multiple languages.\n\n**HLE BIOS** [flycast_hle_bios] (**disabled**|enabled)\n\n!!! regular \"\"\n\n\tForce use of high-level emulation BIOS.\n\n**Boot to BIOS** [flycast_boot_to_bios] (**disabled**|enabled)\n\n!!! regular \"\"\n\n\tBoot directly into the Dreamcast BIOS menu.\n\n**Enable DSP** [flycast_enable_dsp] (**enabled**|disabled)\n\n!!! regular \"\"\n\n\tEnable emulation of the Dreamcast's audio DSP (digital signal processor). Improves the accuracy of generated sound, but increases performance requirements.\n\n**Force Windows CE Mode** [flycast_force_windows_ce_modee] (**disabled**|enabled)\n\n!!! regular \"\"\n\n\tEnable full MMU (Memory Management Unit) emulation and other settings for Windows CE games.\n\n### Video\n\nConfigure visual buffers & effects, display parameters, framerate/-skip and rendering/texture parameters.\n\n**Internal resolution (restart)** [flycast_internal_resolution] (**640x480**|1280x960|1920x1440|2560x1920|3200x2400|3840x2880|\n4480x3360|5120x3840|5760x4320|6400x4800|7040x5280|7680x5760|8320x6240|8960x6720|\n9600x7200|10240x7680|10880x8160|11520x8640|12160x9120|12800x9600)\n\n!!! regular \"\"\n\n\tModify rendering resolution.\n\n??? note \"Internal resolution - 640x480\"\n\t\n\n??? note \"Internal resolution - 1920x1440\"\n\t\t\n\n**Cable Type** [flycast_cable_type] (**TV (Composite)**[^cable]|TV (RGB)|VGA(RGB))\n\n!!! regular \"\"\n\n\tThe output signal type. 'TV (Composite)' is the most widely supported.\t\n\n**Broadcast Standard** [flycast_brodcast] (**Default**|PAL-M (Brazil)|PAL-N (Argentina, Paraguay, Uruguay)|NTSC|PAL (World))\n\n**Screen Orientation** [flycast_screen_orientation] (**Horizontal**|Vertical)\t\n\n**Alpha Sorting** [flycast_alpha_sorting] (Per-Strip (fast, least accurate)|Per-Triangle (normal)|\"Per-Pixel (accurate, but slowest)[^vulkan])\n\n**Enable RTT (Render To Texture) Buffer** (**Off**|On)\n\n**Mipmapping** (Off|**On**)\n\n\n**Volume modifier** (**On**|off)\n\n!!! regular \"\"\n\n\tA GPU feature that is typically used by games to draw shadows of objects. You should typically leave this on - performance impact should be minimal to negligible.\n\n**Anisotropic Filtering** [flycast_anistropic_filtering] (**4**|2|8|16)\n\n!!! regular \"\"\n\n\tEnhance the quality of textures on surfaces that are at oblique viewing angles with respect to the camera.\n\n**Delay Frame Swapping** [flycast_delay_frame_swapping] (**disabled**|enabled)\n\n!!! regular \"\"\n\n\tUseful to avoid flashing screens or glitchy videos. Not recommended on slow platforms. Note: This setting only applies when 'Threaded Rendering' is enabled.\n\n**PowerVR2 Post-processing Filter** [flycast_pvr2_filtering] (**disabled**|enabled)\n\n!!! regular \"\"\n\n\tPost-process the rendered image to simulate effects specific to the PowerVR2 GPU and analog video signals.\n\n### Performance\n\nConfigure threaded rendering, integer division optimisations and frame skip settings\n\n**Threaded Rendering (Restart Required)** [flycast_threaded_rendering] (**enabled**|disabled)\n\n!!! regular \"\"\n\n\tRuns the GPU and CPU on different threads. Highly recommended.\n\n**Auto Skip Frame** [flycast_skip_frame] (**disabled**|enabled)\n\n!!! regular \"\"\n\n\tAutomatically skip frames when the emulator is running slow. Note: This setting only applies when 'Threaded Rendering' is enabled.\n\n**Frame Skipping** [flycast_frame_skipping] (**disabled**|1|2|3|4|5|6)\n\n!!! regular \"\"\n\n\tSets the number of frames to skip between each displayed frame.\n\n**Widescreen Cheats (Restart Required)** [flycast_widescreen_cheats] (**Off**|On)\n\n!!! regular \"\"\n\n\tActivates cheats that allow certain games to display in widescreen format.\n\n**Widescreen Hack** [flycast_widescreen_hack] (**Off**|On)\n\n!!! regular \"\"\n\n\tDraw geometry outside of the normal 4:3 aspect ratio. May produce graphical glitches in the revealed areas.\n\n**GD-ROM Fast Loading (inaccurate)** [flycast_gdrom_fast_loading] (**On**|Off)\n\n!!! regular \"\"\n\n\tSpeeds up GD-ROM loading.\n\n**Load Custom Textures** [flycast_custom_textures] (**Off**|On)\n\n**Dump Textures** [flycast_dump_textures] (**Off**|On)\n\n### Input\n\n!!! regular \"\"\n\n\tConfigure gamepad and light gun settings.\n\n**Analog Stick Deadzone** [flycast_analog_stick_deadzone] (**15%**|0%|5%|10%|20%|25%|30%)\n\n**Trigger Deadzone** [flycast_trigger_deadzone] (**0%**|5%|10%|15%|20%|25%|30%)\n\n**Digital Triggers** [flycast_digital_triggers] (**Off**|On)\n\n**Purupuru Pack/Vibration Pack** [flycast_enable_purupuru] (**On**|Off)\n\n!!! regular \"\"\n\n\tEnables controller force feedback.\n\n**Gun crosshair 1 Display** [flycast_lightgun1_crosshair] (**Off**|White|Red|Green|Blue)\n\n**Gun crosshair 2 Display** [flycast_lightgun2_crosshair] (**Off**|White|Red|Green|Blue)\n\n**Gun crosshair 3 Display** [flycast_lightgun3_crosshair] (**Off**|White|Red|Green|Blue)\n\n**Gun crosshair 4 Display** [flycast_lightgun4_crosshair] (**Off**|White|Red|Green|Blue)\n\n### Visual Memory Unit\n\n!!! regular \"\"\n\n\tConfigure per-game VMU save files and on-scren VMU visibility sttings.\n\n**Per-Game VMUs** [flycast_per_content_vmus] (**disabled**|VMU A1|All VMUs)\n\n!!! regular \"\"\n\n\tWhen disabled, all games share 4 VMU save files (A1, B1, C1, D1) located in RetroArch's system directory. The 'VMU A1' setting creates a unique VMU 'A1' file in RetroArch's save directory for each game that is launched. The 'All VMUs' setting creates 4 unique VMU files (A1, B1, C1, D1) for each game that is launched.\n\n**VMU Screen 1 Display** [flycast_vmu1_screen_display] (**Off**|enabled)\n\n**VMU Screen 1 Position** [flycast_vmu1_screen_position] (**Upper Left**|Upper Right|Lower Left|Lower Right)\n\n**VMU Screen 1 Size** [flycast_vmu1_screen_size] (**1x**|2x|3x|4x|5x)\n\n**VMU Screen 1 Pixel On Color** [flycast_vmu1_pixel_on_color] (**Default ON**|Default OFF|Black|Blue|Light Blue|Green|Cyan|Cyan Blue|Light Green|Cyan Green|Light Cyan|Red|Purple|Light Purple|Yellow|Gray|Light Purple (2)|Light Green (2)|Light Green (3)|Light Cyan (2)|Light Red(2)|Magenta|Light Purple (3)|Light Oragen|Orange|Light Purple(4)|Light Yellow|Light Yellow (2)|White)\n\n**VMU Screen 1 Pixel Off Color** [flycast_vmu1_pixel_off_color] (**Default OFF**|Default ON|Black|Blue|Light Blue|Green|Cyan|Cyan Blue|Light Green|Cyan Green|Light Cyan|Red|Purple|Light Purple|Yellow|Gray|Light Purple (2)|Light Green (2)|Light Green (3)|Light Cyan (2)|Light Red(2)|Magenta|Light Purple (3)|Light Oragen|Orange|Light Purple(4)|Light Yellow|Light Yellow (2)|White)\n\n**VMU Screen 1 Opacity** [flycast_vmu1_screen_opacity] (**100%**|10%|20%|30%|40%|50%|60%|70%|80%|90%)\n\n**VMU Screen 2 Display** [flycast_vmu2_screen_display] (**Off**|enabled)\n\n**VMU Screen 2 Position** [flycast_vmu2_screen_position] (**Upper Left**|Upper Right|Lower Left|Lower Right)\n\n**VMU Screen 2 Size** [flycast_vmu2_screen_size] (**1x**|2x|3x|4x|5x)\n\n**VMU Screen 2 Pixel On Color** [flycast_vmu2_pixel_on_color] (**Default ON**|Default OFF|Black|Blue|Light Blue|Green|Cyan|Cyan Blue|Light Green|Cyan Green|Light Cyan|Red|Purple|Light Purple|Yellow|Gray|Light Purple (2)|Light Green (2)|Light Green (3)|Light Cyan (2)|Light Red(2)|Magenta|Light Purple (3)|Light Oragen|Orange|Light Purple(4)|Light Yellow|Light Yellow (2)|White)\n\n**VMU Screen 2 Pixel Off Color** [flycast_vmu2_pixel_off_color] (**Default OFF**|Default ON|Black|Blue|Light Blue|Green|Cyan|Cyan Blue|Light Green|Cyan Green|Light Cyan|Red|Purple|Light Purple|Yellow|Gray|Light Purple (2)|Light Green (2)|Light Green (3)|Light Cyan (2)|Light Red(2)|Magenta|Light Purple (3)|Light Oragen|Orange|Light Purple(4)|Light Yellow|Light Yellow (2)|White)\n\n**VMU Screen 2 Opacity** [flycast_vmu2_screen_opacity] (**100%**|10%|20%|30%|40%|50%|60%|70%|80%|90%)\n\n**VMU Screen 3 Display** [flycast_vmu3_screen_display] (**Off**|enabled)\n\n**VMU Screen 3 Position** [flycast_vmu3_screen_position] (**Upper Left**|Upper Right|Lower Left|Lower Right)\n\n**VMU Screen 3 Size** [flycast_vmu3_screen_size] (**1x**|2x|3x|4x|5x)\n\n**VMU Screen 3 Pixel On Color** [flycast_vmu3_pixel_on_color] (**Default ON**|Default OFF|Black|Blue|Light Blue|Green|Cyan|Cyan Blue|Light Green|Cyan Green|Light Cyan|Red|Purple|Light Purple|Yellow|Gray|Light Purple (2)|Light Green (2)|Light Green (3)|Light Cyan (2)|Light Red(2)|Magenta|Light Purple (3)|Light Oragen|Orange|Light Purple(4)|Light Yellow|Light Yellow (2)|White)\n\n**VMU Screen 3 Pixel Off Color** [flycast_vmu3_pixel_off_color] (**Default OFF**|Default ON|Black|Blue|Light Blue|Green|Cyan|Cyan Blue|Light Green|Cyan Green|Light Cyan|Red|Purple|Light Purple|Yellow|Gray|Light Purple (2)|Light Green (2)|Light Green (3)|Light Cyan (2)|Light Red(2)|Magenta|Light Purple (3)|Light Oragen|Orange|Light Purple(4)|Light Yellow|Light Yellow (2)|White)\n\n**VMU Screen 3 Opacity** [flycast_vmu3_screen_opacity] (**100%**|10%|20%|30%|40%|50%|60%|70%|80%|90%)\n\n**VMU Screen 4 Display** [flycast_vmu4_screen_display] (**Off**|enabled)\n\n**VMU Screen 4 Position** [flycast_vmu4_screen_position] (**Upper Left**|Upper Right|Lower Left|Lower Right)\n\n**VMU Screen 4 Size** [flycast_vmu4_screen_size] (**1x**|2x|3x|4x|5x)\n\n**VMU Screen 4 Pixel On Color** [flycast_vmu4_pixel_on_color] (**Default ON**|Default OFF|Black|Blue|Light Blue|Green|Cyan|Cyan Blue|Light Green|Cyan Green|Light Cyan|Red|Purple|Light Purple|Yellow|Gray|Light Purple (2)|Light Green (2)|Light Green (3)|Light Cyan (2)|Light Red(2)|Magenta|Light Purple (3)|Light Oragen|Orange|Light Purple(4)|Light Yellow|Light Yellow (2)|White)\n\n**VMU Screen 4 Pixel Off Color** [flycast_vmu4_pixel_off_color] (**Default OFF**|Default ON|Black|Blue|Light Blue|Green|Cyan|Cyan Blue|Light Green|Cyan Green|Light Cyan|Red|Purple|Light Purple|Yellow|Gray|Light Purple (2)|Light Green (2)|Light Green (3)|Light Cyan (2)|Light Red(2)|Magenta|Light Purple (3)|Light Oragen|Orange|Light Purple(4)|Light Yellow|Light Yellow (2)|White)\n\n**VMU Screen 4 Opacity** [flycast_vmu4_screen_opacity] (**100%**|10%|20%|30%|40%|50%|60%|70%|80%|90%)\n\n## Controllers\n\n\n### Device types\n\nThe Flycast core supports the following device type(s) in the controls menu, bolded device types are the default for the specified user(s):\n\n#### User 1 - 4 device types\n\n- None - Input disabled.\n- **RetroPad** - Joypad\n- RetroPad w/Analog - Joypad - **There is no reason to switch to this.**\n\n### Controller tables\n\n#### Joypad and analog device type table\n\n\n\n| User 1 - 4 input descriptors | | RetroPad |\n|------------------------------|---------------------------------------------|--------------------|\n| A |  | A |\n| X |  | X |\n| Start |  | Start |\n| D-Pad Up |  | D-Pad Up |\n| D-Pad Down |  | D-Pad Down |\n| D-Pad Left |  | D-Pad Left |\n| D-Pad Right |  | D-Pad Right |\n| B |  | B |\n| Y |  | Y |\n| L (fierce) |  | L (fierce) |\n| R (fierce) |  | R (fierce) |\n| L (weak) |  | L (weak) |\n| R (weak) |  | R (weak) |\n| Analog X |  X | Analog X |\n| Analog Y |  Y | Analog Y |\n\n## Multiple-disc games\n\nIf foo is a multiple-disc game, you should have .chd/cue/cdi/gdi files for each one, e.g. `foo (Disc 1).chd`, `foo (Disc 2).chd`, `foo (Disc 3).chd`.\n\nTo take advantage of Flycast's Disk Control feature for disk swapping, an index file (a m3u file) should be made.\n\nCreate a text file and save it as `foo.m3u`. Then enter your game's .chd/cue/cdi/gdi files on it. The m3u file contents should look something like this:\n\n`foo.m3u`\n```\nfoo (Disc 1).chd\nfoo (Disc 2).chd\nfoo (Disc 3).chd\n```\n\nAfter that, you can load the `foo.m3u` file in RetroArch with the Flycast core.\n\nAn alternative is to append discs to the current playlist via the \"Disk Image Append\" option in the Disk Control RetroArch menu.\n\n## Compatibility\n\n### General Flycast Issues\n\n- If the date and time are not being saved properly, please ensure you have the correct dc_flash.bin and dc_bios.bin files (check the md5sum values). Also try deleting all of the dc_nvmem.bin files in the system/dc directory.\n- Once you save to a VMU slot with any game, that VMU becomes inaccessible the next time you load the emulator. The fix for this is to enable the Core Option for \"Boot to BIOS\", exit RA, delete all of the vmu_save*.bin files, start RA/Flycast. It will boot to BIOS where you can select the VMU option, select one of the VMUs, click the \"All\" icon in upper-left, click Delete All and the VMU will be formatted/intialized. Disable the \"Boot to BIOS\" option, restart RA, and everything should be fine.\n- Polygon sorting issues can make objects appear distorted. Use Per-Pixel Alpha sorting for accurate rendering (at the expense of performance).\n- When using an Xbox 360 Controller, analog triggers don't work properly. Use the bumpers instead.\n- Changing games without closing and reloading RetroArch often leads to RetroArch crashing.\n\n| Game | Issue |\n|---------------------------------------------|------------------------------------------------------------------------------------------------------------------------------------------------------------------------------------------------------------------------------------------------------------------------|\n| Crazy Taxi (PAL) | Player taxis do not emit engine sounds. |\n| Crazy Taxi (USA) | Player taxis do not emit engine sounds. | |\n| Jet Grind Radio (USA) | Police reports during levels do not display correctly. |\n| Sonic Adventure (PAL) | Must be set to use \"VGA\" output in core options, as \"TV\" mode will cause all subsequent FMV to make RetroArch become unresponsive. |\n| Unreal Tournament (USA) | Set Cable Type to 'VGA (RGB)', otherwise the game will crash at start. |\n\n## External Links\n\n- [Libretro Flycast Core info file](https://github.com/libretro/libretro-super/blob/master/dist/info/flycast_libretro.info)\n- [Flycast Github Repository](https://github.com/flyinghead/flycast)\n- [Report Flycast Issues Here](https://github.com/flyinghead/flycast/issues)\n- [Gameplay Videos](https://www.youtube.com/playlist?list=PLRbgg4gk_0Ic597IBX8lXnsCV5ozweGbp)\n- [Steam page](https://store.steampowered.com/app/1222633/RetroArch___Flycast/)\n\n\n[^vulkan]: If video driver is vulkan. \n[^cable]: If low end then VGA (RGB), otherwise TV (Composite).\n"
},
{
"path": "docs/library/fmsx.md",
"content": "# MSX (fMSX)\n\n## Background\n\nThis is a port of Marat Fayzullin's fMSX 6.0 (21-Feb-2021) to the libretro API. fMSX is a program that emulates MSX, MSX2, and MSX2+ 8bit home computers. It runs MSX/MSX2/MSX2+ software on many different platforms including Windows, Android, Symbian, MacOS, Unix, MSDOS, AmigaOS, etc. I started developing fMSX in 1993 when there were only two other MSX emulators available, both exclusively for MSDOS. From the very beginning, I developed fMSX as a portable program able to run on many different computers. The initial development, for example, was done on DEC Alpha workstations running Unix. Since then, fMSX has seen quite a lot of updates and been ported to many systems. It is still being developed, although not as actively as before because most features are pretty much complete now.\n\nThe Meteor core has been authored by\n\n- Marat Fayzullin\n\nThe fMSX core is licensed under\n\n- [Non-commercial](https://github.com/libretro/fmsx-libretro/blob/master/LICENSE)\n\nA summary of the licenses behind RetroArch and its cores can be found [here](../development/licenses.md).\n\n## Extensions\n\nContent that can be loaded by the fMSX core have the following file extensions:\n\n- .rom\n- .mx1\n- .mx2\n- .dsk\n- .cas\n\n## Databases\n\nRetroArch database(s) that are associated with the fMSX core:\n\n- [Microsoft - MSX](https://github.com/libretro/libretro-database/blob/master/rdb/Microsoft%20-%20MSX.rdb)\n- [Microsoft - MSX2](https://github.com/libretro/libretro-database/blob/master/rdb/Microsoft%20-%20MSX2.rdb)\n\n## BIOS\n\nRequired or optional firmware files go in RetroArch's system directory.\n\n| Filename | Description | md5sum |\n|:------------:|:-----------------------:|:--------------------------------:|\n| MSX.ROM | MSX BIOS - Required | 364a1a579fe5cb8dba54519bcfcdac0d |\n| MSX2.ROM | MSX2 BIOS - Required | ec3a01c91f24fbddcbcab0ad301bc9ef |\n| MSX2EXT.ROM | MSX2 ExtROM - Required | 2183c2aff17cf4297bdb496de78c2e8a |\n| MSX2P.ROM | MSX2+ BIOS - Required | 847cc025ffae665487940ff2639540e5 |\n| MSX2PEXT.ROM |MSX2+ ExtROM - Required | 7c8243c71d8f143b2531f01afa6a05dc |\n| DISK.ROM | DiskROM/BDOS (optional) | 80dcd1ad1a4cf65d64b7ba10504e8190 |\n| FMPAC.ROM | FMPAC BIOS (optional) | 6f69cc8b5ed761b03afd78000dfb0e19 |\n| MSXDOS2.ROM | MSX-DOS 2 (optional) | 6418d091cd6907bbcf940324339e43bb |\n| PAINTER.ROM | Yamaha Painter (optional) | 403cdea1cbd2bb24fae506941f8f655e |\n| KANJI.ROM | Kanji Font (optional) | febe8782b466d7c3b16de6d104826b34 |\n\nThis list of compatible ROMS is not complete.\n\n## Features\n\nRetroArch-level settings or features that the fMSX core respects.\n\n| Feature | Supported |\n|-------------------|:---------:|\n| Restart | ✔ |\n| Screenshots | ✔ |\n| Saves | - |\n| States | ✔ |\n| Rewind | ✔ |\n| Netplay | ✔ |\n| Core Options | ✔ |\n| [Memory Monitoring (achievements)](../guides/memorymonitoring.md) | ✔ |\n| RetroArch Cheats | ✔ |\n| Native Cheats | ✔ |\n| Controls | ✔ |\n| Remapping | ✔ |\n| Multi-Mouse | ✕ |\n| Rumble | ✕ |\n| Sensors | ✕ |\n| Camera | ✕ |\n| Location | ✕ |\n| Subsystem | ✕ |\n| [Softpatching](../guides/softpatching.md) | ✕ |\n| Disk Control | ✔ |\n| Username | ✕ |\n| Language | ✕ |\n| Crop Overscan | ✕ |\n\n### Directories\n\nThe fMSX core's directory name is 'fMSX'\n\nThe fMSX core saves/loads to/from these directories.\n\n**RetroArch's State directory**\n\n- 'content-name'.state# (State)\n\n### Geometry and timing\n\n- The fMSX core's internal FPS is 60\n- The fMSX core's internal sample rate is 48000 Hz\n- The fMSX core's core provided aspect ratio is (Ratio)\n\n## Core options\n\nThe fMSX core has the following option(s) that can be tweaked from the core options menu. The default setting is bolded.\n\nSettings with (Restart) means that core has to be closed for the new setting to be applied on next launch.\n\n- **MSX Mode** (**MSX2+**/MSX1/MSX2)\n\n\tSelect MSX model.\n\n- **MSX Video Mode** (**NTSC**/PAL)\n\n\tAwaiting description.\n\n- **MSX Mapper Type Mode** (**Guess Mapper Type A**/Guess Mapper Type B)\n\n\tAwaiting description.\n\n- **MSX Main Memory** (**Auto**/64KB/128KB/256KB/512KB)\n\n\tAwaiting description.\n\n- **MSX Video Memory** (**Auto**/32KB/64KB/128KB/192KB)\n\n\tAwaiting description.\n\n## Controllers\n\n### Device types\n\nThe fMSX core supports the following device type(s) in the controls menu, bolded device types are the default for the specified user(s):\n\n#### User 1 device types\n\n- None - Input disabled.\n- **Joystick** - Joypad\n- Joystick + Emulated Keyboard - Joypad\n- Emulated Keyboard - Joypad\n- Keyboard - Keyboard - Has Keymapper support\n\n#### User 2 device types\n\n- None - Input disabled.\n**Joystick** - Joypad\n\n### Controller tables\n\n#### Joypad and analog device type table\n\n| User 1 - 2 Remap descriptors for 'Joystick device type'| RetroPad Inputs |\n|--------------------------|------------------------------------------------|\n| Fire B |  |\n| Stick Up |  |\n| Stick Down |  |\n| Stick Left |  |\n| Stick Right |  |\n| Fire A |  |\n\n| User 1 Remap descriptors for 'Joystick + Emulated Keyboard' device type | RetroPad Inputs |\n|--------------------------|------------------------------------------------|\n| Fire B |  |\n| Spacebar |  |\n| F2 |  |\n| F1 |  |\n| Stick Up |  |\n| Stick Down |  |\n| Stick Left |  |\n| Stick Right |  |\n| Fire A |  |\n| F3 |  |\n| F4 |  |\n| F5 |  |\n| Graph |  |\n| Ctrl |  |\n| Enter |  |\n| Escape |  |\n\n| User 1 Remap descriptors for 'Emulated Keyboard' device type | RetroPad Inputs |\n|--------------------------|------------------------------------------------|\n| Enter |  |\n| M |  |\n| F4 |  |\n| F1 |  |\n| Arrow Up |  |\n| Arrow Down |  |\n| Arrow Left |  |\n| Arrow Right |  |\n| Space |  |\n| N |  |\n| F2 |  |\n| F3 |  |\n| Graph |  |\n| Ctrl |  |\n| F5 |  |\n| Escape |  |\n\n#### Keyboard device type table\n\n| RetroKeyboard Inputs | Keyboard |\n|-------------------------------|--------------------|\n| Keyboard Backspace | Backspace |\n| Keyboard Tab | Tab |\n| Keyboard Return | Enter |\n| Keyboard Pause | Stop |\n| Keyboard Escape | Escape |\n| Keyboard Space | Space |\n| Keyboard ! | ! |\n| Keyboard \" | \" |\n| Keyboard # | # |\n| Keyboard $ | $ |\n| Keyboard & | & |\n| Keyboard ' | ` |\n| Keyboard ( | ( |\n| Keyboard ) | ) |\n| Keyboard * | # |\n| Keyboard + | + |\n| Keyboard , | , |\n| Keyboard . | . |\n| Keyboard / | / |\n| Keyboard 0 | 0 |\n| Keyboard 1 | 1 |\n| Keyboard 2 | 2 |\n| Keyboard 3 | 3 |\n| Keyboard 4 | 4 |\n| Keyboard 5 | 5 |\n| Keyboard 6 | 6 |\n| Keyboard 7 | 7 |\n| Keyboard 8 | 8 |\n| Keyboard 9 | 9 |\n| Keyboard : | : |\n| Keyboard ; | ; |\n| Keyboard - | - |\n| Keyboard = | = |\n| Keyboard < | < |\n| Keyboard > | > |\n| Keyboard ? | ? |\n| Keyboard @ | @ |\n| Keyboard [ | [ |\n| Keyboard \\ | \\ |\n| Keyboard ] | ] |\n| Keyboard ^ | ^ |\n| Keyboard _ | _ |\n| Keyboard ` | - |\n| Keyboard a | a |\n| Keyboard b | b |\n| Keyboard c | c |\n| Keyboard d | d |\n| Keyboard e | e |\n| Keyboard f | f |\n| Keyboard g | g |\n| Keyboard h | h |\n| Keyboard i | i |\n| Keyboard j | j |\n| Keyboard k | k |\n| Keyboard l | l |\n| Keyboard m | m |\n| Keyboard n | n |\n| Keyboard o | o |\n| Keyboard p | p |\n| Keyboard q | q |\n| Keyboard r | r |\n| Keyboard s | s |\n| Keyboard t | t |\n| Keyboard u | u |\n| Keyboard v | v |\n| Keyboard w | w |\n| Keyboard x | x |\n| Keyboard y | y |\n| Keyboard z | z |\n| Keyboard Delete | Delete |\n| Keyboard Numpad 0 | Numpad 0 |\n| Keyboard Numpad 1 | Numpad 1 |\n| Keyboard Numpad 2 | Numpad 2 |\n| Keyboard Numpad 3 | Numpad 3 |\n| Keyboard Numpad 4 | Numpad 4 |\n| Keyboard Numpad 5 | Numpad 5 |\n| Keyboard Numpad 6 | Numpad 6 |\n| Keyboard Numpad 7 | Numpad 7 |\n| Keyboard Numpad 8 | Numpad 8 |\n| Keyboard Numpad 9 | Numpad 9 |\n| Keyboard Up | Up |\n| Keyboard Down | Down |\n| Keyboard Right | Right |\n| Keyboard Left | Left |\n| Keyboard Insert | Insert |\n| Keyboard Home | Home |\n| Keyboard End | Select |\n| Keyboard Page Up | Country |\n| Keyboard F1 | F1 |\n| Keyboard F2 | F2 |\n| Keyboard F3 | F3 |\n| Keyboard F4 | F4 |\n| Keyboard F5 | F5 |\n| Keyboard Caps Lock | Caps Lock |\n| Keyboard Scroll Lock | Shift |\n| Keyboard Right Shift | Shift |\n| Keyboard Right Control | Control |\n| Keyboard Left Control | Control |\n| Keyboard Left Alt | Graph |\n\n## Compatibility\n\nAwaiting description.\n\n## External Links\n\n- [Libretro fMSX Core info file](https://github.com/libretro/libretro-super/blob/master/dist/info/fmsx_libretro.info)\n- [Libretro fMSX Github Repository](https://github.com/libretro/fmsx-libretro)\n- [Report Libretro fMSX Core Issues Here](https://github.com/libretro/fmsx-libretro/issues)\n- [Official fMSX Website](http://fms.komkon.org/fMSX/)\n- [Official fMSX Downloads](https://fms.komkon.org/fMSX/#Downloads)\n\n### MSX\n\n- [MSX/SVI/ColecoVision/SG-1000 (blueMSX)](bluemsx.md)\n"
},
{
"path": "docs/library/freeintv.md",
"content": "# Mattel - Intellivision (FreeIntv)\n\n## Background\n\nFreeIntv is a libretro emulation core for the Mattel Intellivision designed to be compatible with joypads from the SNES era forward even if they originally required a number pad.\n\n!!! attention\n\tFreeIntv does not currently emulate Entertainment Computer System (ECS) functionality. Contributions to the source are welcome!\n\n### Author/License\n\nThe FreeIntv core has been authored by\n\n- David Richardson\n\nThe FreeIntv core is licensed under\n\n- [GPLv3](https://github.com/libretro/FreeIntv/blob/master/LICENSE)\n\nA summary of the licenses behind RetroArch and its cores can be found [here](../development/licenses.md).\n\n## Extensions\n\nContent that can be loaded by the FreeIntv core have the following file extensions:\n\n- .int\n- .rom\n- .bin\n\n## Databases\n\nRetroArch database(s) that are associated with the FreeIntv core:\n\n- [Mattel - Intellivision](https://github.com/libretro/libretro-database/blob/master/rdb/Mattel%20-%20Intellivision.rdb)\n\n## BIOS\n\nRequired or optional firmware files go in the frontend's system directory.\n\n| Filename | Description | md5sum |\n|:----------:|:------------------------:|:--------------------------------:|\n| exec.bin | Executive ROM - Required | 62e761035cb657903761800f4437b8af | |\n| grom.bin | Graphics ROM - Required | 0cd5946c6473e42e8e4c2137785e427f | |\n\n## Features\n\nFrontend-level settings or features that the FreeIntv core respects.\n\n| Feature | Supported |\n|-------------------|:---------:|\n| Restart | ✕ |\n| Screenshots | ✔ |\n| Saves | ✕ |\n| States | ✔ |\n| Rewind | ✕ |\n| Netplay (State based) | ✕ |\n| Core Options | ✕ |\n| [Memory Monitoring (achievements)](../guides/memorymonitoring.md) | ✔ |\n| Cheats (Cheats menu) | ✕ |\n| Native Cheats | ✕ |\n| Controls | ✔ |\n| Remapping | ✔ |\n| Multi-Mouse | ✕ |\n| Rumble | ✕ |\n| Sensors | ✕ |\n| Camera | ✕ |\n| Location | ✕ |\n| Subsystem | ✕ |\n| [Softpatching](../guides/softpatching.md) | ✕ |\n| Disk Control | ✕ |\n| Username | ✕ |\n| Language | ✕ |\n| Crop Overscan | ✕ |\n| LEDs | ✕ |\n\n### Directories\n\nThe FreeIntv core's directory name is 'FreeIntv'\n\n### Geometry and timing\n\n- The FreeIntv core's core provided FPS is 60\n- The FreeIntv core's core provided sample rate is 44100 Hz\n- The FreeIntv core's core provided aspect ratio is 11/7\n\n## Controller overlays\n\nMattel Intellivision games were often meant to be played with game-specific cards overlaid on the numeric keypad. These overlays convey information which can be very useful in gameplay. Images of a limited selection of Intellivision titles are available at: [http://www.intellivisionlives.com/bluesky/games/instructions.shtml](http://www.intellivisionlives.com/bluesky/games/instructions.shtml)\n\n## Controls\n\n**Definitions:**\n\n* **Mini-Keypad** - Allows the user to view and select keys from a small Intellivision pad in the lower corner of the display.\n* **Controller Swap** - Some Intellivision games expect the left controller to be player one, others expect the right controller. This isn't a problem if you have two controllers (and don't mind juggling them) but users with only one controller or using a portable setup would be effectively locked out of some games. Controller Swap swaps the two controller interfaces so that the player does not have to physically swap controllers.\n\n| RetroPad | FreeIntv Function |\n| --- | --- |\n| D-Pad| 8-way movement |\n| Left Analog Stick | 16-way disc |\n| Right Analog Stick | Keypad 1-9 |\n| A | Right Action Button |\n| B | Left Action Button |\n| Y | Top Action Button |\n| X | Use the Last Selected Intellivision Keypad Button. In Astrosmash, for example, you can leave \"3\" selected to enable instant access to hyperspace. |\n| L/R | Activate the Mini-Keypad |\n| LT | Keypad Clear |\n| RT | Keypad Enter |\n| Left Thumb | Keypad 0 |\n| Right Thumb | Keypad 5 |\n| Start | Pause Game |\n| Select | Controller Swap |\n\n## Compatibility\n\nAwaiting description.\n\n## External Links\n\n- [Official FreeIntv Website](http://neocomputer.org/projects/freeintv/)\n- [Libretro FreeIntv Core info file](https://github.com/libretro/libretro-super/blob/master/dist/info/freeintv_libretro.info)\n- [Libretro FreeIntv Github Repository](https://github.com/libretro/FreeIntv)\n- [Intellivision RetroPie Wiki page](https://github.com/RetroPie/RetroPie-Setup/wiki/Intellivision)\n- [FreeIntv RetroPie Forums Topic](https://retropie.org.uk/forum/topic/15665/libretro-intellivision-emulator)\n- [FreeIntv Libretro Forums Topic](https://forums.libretro.com/t/video-demonstration-of-the-new-freeintv-intellivision-core/14389)\n- [Gameplay Videos](https://www.youtube.com/playlist?list=PLRbgg4gk_0Ie3IvIC1OLrsG-9qJ-RbP7r)\n"
},
{
"path": "docs/library/fuse.md",
"content": "# ZX Spectrum (Fuse)\n\n## Background\n\nThe Free Unix Spectrum Emulator (Fuse): an emulator of the 1980s home computer and various clones for Unix, Mac OS X and Windows.\n\nThe Fuse core has been authored by\n\n- Team Fuse\n\nThe Fuse core is licensed under\n\n- [GPLv3](https://github.com/libretro/fuse-libretro/blob/master/LICENSE)\n\nA summary of the licenses behind RetroArch and its cores can be found [here](../development/licenses.md).\n\n## BIOS\n\nRequired or optional firmware files go in the frontend's system directory.\n\n!!! attention\n\tThe BIOS for the last four machines need to be in a directory named 'fuse' in RetroArch's System directory.\n\n- Spectrum 48K\n- Spectrum 48K (NTSC)\n- Spectrum 128K\n- Spectrum +2\n- Spectrum +2A\n- Spectrum +3\n- Spectrum +3e\n- Spectrum SE\n- Timex TC2048\n- Timex TC2068\n- Timex TS2068\n- Spectrum 16K\n\n- Pentagon 128K\n\n| Filename | Description | md5sum |\n|:---------------:|:----------------------------:|:--------------------------------:|\n| fuse/128p-0.rom | Pentagon 128K ROM - Required | |\n| fuse/128p-1.rom | Pentagon 128K ROM - Required | |\n| fuse/trdos.rom | Pentagon 128K ROM - Required | |\n\n- Pentagon 512K\n\n| Filename | Description | md5sum |\n|:---------------:|:----------------------------:|:--------------------------------:|\n| fuse/128p-0.rom | Pentagon 512K ROM - Required | |\n| fuse/128p-1.rom | Pentagon 512K ROM - Required | |\n| fuse/gluck.rom | Pentagon 512K ROM - Required | |\n| fuse/trdos.rom | Pentagon 512K ROM - Required | |\n\n- Pentagon 1024\n\n| Filename | Description | md5sum |\n|:---------------:|:----------------------------:|:--------------------------------:|\n| fuse/128p-0.rom | Pentagon 1024 ROM - Required | |\n| fuse/128p-1.rom | Pentagon 1024 ROM - Required | |\n| fuse/gluck.rom | Pentagon 1024 ROM - Required | |\n| fuse/trdos.rom | Pentagon 1024 ROM - Required | |\n\n- Scorpion 256K\n\n| Filename | Description | md5sum |\n|:---------------:|:----------------------------:|:--------------------------------:|\n| fuse/256s-0.rom | Scorpion 256K ROM - Required | |\n| fuse/256s-1.rom | Scorpion 256K ROM - Required | |\n| fuse/256s-2.rom | Scorpion 256K ROM - Required | |\n| fuse/256s-3.rom | Scorpion 256K ROM - Required | |\n\n## Extensions\n\nContent that can be loaded by the Fuse core have the following file extensions:\n\n- .tzx\n- .tap\n- .z80\n- .rzx\n- .scl\n- .trd\n\nRetroArch database(s) that are associated with the Fuse core:\n\n- [Sinclair - ZX Spectrum +3](https://github.com/libretro/libretro-database/blob/master/rdb/Sinclair%20-%20ZX%20Spectrum%20%2B3.rdb)\n- [Sinclair - ZX Spectrum](https://github.com/libretro/libretro-database/blob/master/rdb/Sinclair%20-%20ZX%20Spectrum.rdb)\n\n## Features\n\nFrontend-level settings or features that the Fuse core respects.\n\n| Feature | Supported |\n|-------------------|:---------:|\n| Restart | ✔ |\n| Screenshots | ✔ |\n| Saves | ✕ |\n| States | ✔ |\n| Rewind | ✔ |\n| Netplay | ✕ |\n| Core Options | ✔ |\n| [Memory Monitoring (achievements)](../guides/memorymonitoring.md) | ✕ |\n| RetroArch Cheats | ✕ |\n| Native Cheats | ✕ |\n| Controls | ✔ |\n| Remapping | ✔ |\n| Multi-Mouse | ✕ |\n| Rumble | ✕ |\n| Sensors | ✕ |\n| Camera | ✕ |\n| Location | ✕ |\n| Subsystem | ✕ |\n| [Softpatching](../guides/softpatching.md) | ✕ |\n| Disk Control | ✕ |\n| Username | ✕ |\n| Language | ✕ |\n| Crop Overscan | ✕ |\n| LEDs | ✕ |\n\n### Directories\n\nThe Fuse core's library name is 'fuse'\n\nThe Fuse core saves/loads to/from these directories.\n\n**Frontend's State directory**\n\n| File | Description |\n|:--------:|:-----------:|\n| *.state# | State |\n\n### Geometry and timing\n\n- The Fuse core's core provided FPS is (FPS)\n- The Fuse core's core provided sample rate is 44100 Hz\n- The Fuse core's base width is (Base width)\n- The Fuse core's base height is (Base height)\n- The Fuse core's max width is (Max width)\n- The Fuse core's max height is (Max height)\n- The Fuse core's core provided aspect ratio is (Ratio)\n\n## Games\n\nThere are hundreds of free, legally available ZX Spectrum games at [World of Spectrum](http://www.worldofspectrum.org/). You should start at the [Visitor Voted Top 100 Best Games](http://www.worldofspectrum.org/bestgames.html).\n\n## Core options\n\nThe Fuse core has the following option(s) that can be tweaked from the core options menu. The default setting is bolded.\n\nSettings with (Restart) means that core has to be closed for the new setting to be applied on next launch.\n\n- **Model (needs content load)** [fuse_machine] (**Spectrum 48K**|Spectrum 48K (NTSC)|Spectrum 128K|Spectrum +2|Spectrum +2A|Spectrum +3|Spectrum +3e|Spectrum SE|Timex TC2048|Timex TC2068|Timex TS2068|Spectrum 16K|Pentagon 128K|Pentagon 512K|Pentagon 1024|Scorpion 256K)\n\n\tSet the machine to emulate. Note that the this setting will have effect only when a new content is loaded.\n\n- **Hide Video Border** [fuse_hide_border] (**Off**|On)\n\n\tHides the video border, making the game occupy the entire screen area.\n\n- **Tape Fast Load** [fuse_fast_load] (Off|**On**)\n\n\tInstantly loads tape files if enabled, or disabled it to see the moving horizontal lines in the video border while the game loads.\n\n- **Tape Load Sound** [fuse_load_sound] (Off|**On**)\n\n\tOutputs the tape sound if fast load is disabled.\n\n- **Speaker Type** [fuse_speaker_type] (**tv speaker**|beeper|unfiltered)\n\n\tApplies an audio filter.\n\n- **AV Stereo Separation** [fise_ay_stereo_separation] (**none**|acb|abc)\n\n\tThe AY sound chip stereo separation.\n\n- **Transparent Keyboard Overlay** [fuse_key_ovrlay_transp] (Off|**On**)\n\n\tIf the keyboard overlay is transparent or opaque.\n\n- **Time to Release Key in ms** [fuse_key_hold_time] (**500**|1000|100|300)\n\n\tHow much time to keep a key pressed before releasing it (used when a key is pressed using the keyboard overlay).\n\n- **Joy Left mapping** [fuse_joypad_left] (****|0|1|2|3|4|5|6|7|8|9|a|b|c|d|e|f|g|h|i|j|k|l|m|n|o|p|q|r|s|t|u|v|w|x|y|z|Enter|Caps|Symbol|Space)\n\n\tMap the Left joypad input to a keyboard input.\n\n- **Joy Right mapping** [fuse_joypad_right] (****|0|1|2|3|4|5|6|7|8|9|a|b|c|d|e|f|g|h|i|j|k|l|m|n|o|p|q|r|s|t|u|v|w|x|y|z|Enter|Caps|Symbol|Space)\n\n\tMap the Right joypad input to a keyboard input.\n\n- **Joy Up mapping** [fuse_joypad_up] (****|0|1|2|3|4|5|6|7|8|9|a|b|c|d|e|f|g|h|i|j|k|l|m|n|o|p|q|r|s|t|u|v|w|x|y|z|Enter|Caps|Symbol|Space)\n\n\tMap the Up joypad input to a keyboard input.\n\n- **Joy Down mapping** [fuse_joypad_down] (****|0|1|2|3|4|5|6|7|8|9|a|b|c|d|e|f|g|h|i|j|k|l|m|n|o|p|q|r|s|t|u|v|w|x|y|z|Enter|Caps|Symbol|Space)\n\n\tMap the Down joypad input to a keyboard input.\n\n- **Joy Start mapping** [fuse_joypad_start] (****|0|1|2|3|4|5|6|7|8|9|a|b|c|d|e|f|g|h|i|j|k|l|m|n|o|p|q|r|s|t|u|v|w|x|y|z|Enter|Caps|Symbol|Space)\n\n\tMap the Start joypad input to a keyboard input.\n\n- **Joy A mapping** [fuse_joypad_a] (****|0|1|2|3|4|5|6|7|8|9|a|b|c|d|e|f|g|h|i|j|k|l|m|n|o|p|q|r|s|t|u|v|w|x|y|z|Enter|Caps|Symbol|Space)\n\n\tMap the A joypad input to a keyboard input.\n\n- **Joy B mapping** [fuse_joypad_b] (****|0|1|2|3|4|5|6|7|8|9|a|b|c|d|e|f|g|h|i|j|k|l|m|n|o|p|q|r|s|t|u|v|w|x|y|z|Enter|Caps|Symbol|Space)\n\n\tMap the B joypad input to a keyboard input.\n\n- **Joy X mapping** [fuse_joypad_x] (****|0|1|2|3|4|5|6|7|8|9|a|b|c|d|e|f|g|h|i|j|k|l|m|n|o|p|q|r|s|t|u|v|w|x|y|z|Enter|Caps|Symbol|Space)\n\n\tMap the X joypad input to a keyboard input.\n\n- **Joy Y mapping** [fuse_joypad_y] (****|0|1|2|3|4|5|6|7|8|9|a|b|c|d|e|f|g|h|i|j|k|l|m|n|o|p|q|r|s|t|u|v|w|x|y|z|Enter|Caps|Symbol|Space)\n\n\tMap the Y joypad input to a keyboard input.\n\n- **Joy L mapping** [fuse_joypad_l] (****|0|1|2|3|4|5|6|7|8|9|a|b|c|d|e|f|g|h|i|j|k|l|m|n|o|p|q|r|s|t|u|v|w|x|y|z|Enter|Caps|Symbol|Space)\n\n\tMap the L joypad input to a keyboard input.\n\n- **Joy R mapping** [fuse_joypad_r] (****|0|1|2|3|4|5|6|7|8|9|a|b|c|d|e|f|g|h|i|j|k|l|m|n|o|p|q|r|s|t|u|v|w|x|y|z|Enter|Caps|Symbol|Space)\n\n\tMap the R joypad input to a keyboard input.\n\n- **Joy L2 mapping** [fuse_joypad_l2] (****|0|1|2|3|4|5|6|7|8|9|a|b|c|d|e|f|g|h|i|j|k|l|m|n|o|p|q|r|s|t|u|v|w|x|y|z|Enter|Caps|Symbol|Space)\n\n\tMap the L2 joypad input to a keyboard input.\n\n- **Joy R2 mapping** [fuse_joypad_r2] (****|0|1|2|3|4|5|6|7|8|9|a|b|c|d|e|f|g|h|i|j|k|l|m|n|o|p|q|r|s|t|u|v|w|x|y|z|Enter|Caps|Symbol|Space)\n\n\tMap the R2 joypad input to a keyboard input.\n\n- **Joy L3 mapping** [fuse_joypad_l3] (****|0|1|2|3|4|5|6|7|8|9|a|b|c|d|e|f|g|h|i|j|k|l|m|n|o|p|q|r|s|t|u|v|w|x|y|z|Enter|Caps|Symbol|Space)\n\n\tMap the L3 joypad input to a keyboard input.\n\n- **Joy R3 mapping** [fuse_joypad_r3] (****|0|1|2|3|4|5|6|7|8|9|a|b|c|d|e|f|g|h|i|j|k|l|m|n|o|p|q|r|s|t|u|v|w|x|y|z|Enter|Caps|Symbol|Space)\n\n\tMap the R3 joypad input to a keyboard input.\n\n## Controllers usage\n\nThere are seven types of joysticks emulated:\n\n1. Cursor\n2. Kempston\n3. Sinclair 1\n4. Sinclair 2\n5. Timex 1\n6. Timex 2\n7. Fuller Joystick\n\nUsers can configure their joystick types in the input configuration on the front end. However, fuse-libretro allows for two joysticks at maximum so only users one and two can actually use theirs in the emulation.\n\nUsers 1 and 2 can choose any of the joysticks as their device types, user 3 can only choose the Sinclair Keyboard.\n\nButtons A, X and Y are mapped to the joystick's fire button, and button B is mapped to the UP directional button. Buttons L1 and R1 are mapped to RETURN and SPACE, respectively. The SELECT button brings up the embedded, on-screen keyboard which is useful if you only have controllers attached to your box.\n\nThere are some conflicts in the way the input devices interact because of the use of the physical keyboard keys as joystick buttons. For a good gaming experience, set the user device types as follows:\n\n- For joystick games: Set user 1 to a joystick type. Optionally, set user 2 to another joystick type (local cooperative games). Set user 3 to none. This way, you can use L1 as RETURN, R1 as SPACE, and SELECT to bring the embedded keyboard.\n- For keyboard games: Set users 1 and 2 to none, and user 3 to Sinclair Keyboard. You won't have any joystick and the embedded keyboard won't work, but the entire physical keyboard will be available for you to type in those text adventure commands.\n\nIf you set a joystick along with the keyboard, the joystick will work just fine except for the bindings to RETURN and SPACE, and the keyboard won't register the keys assigned to the Cursor joystick, or to the L1 and R1 buttons for all other joystick types.\n\n### Device types\n\nThe Fuse core supports the following device type(s) in the controls menu, bolded device types are the default for the specified user(s):\n\n#### User 1 - 2 device types\n\n- None - Input disabled.\n- **RetroPad** - Joypad\n- Cursor Joystick - Joypad\n- Kempston Joystick - Joypad\n- Sinclair 1 Joystick - Joypad\n- Sinclair 2 Joystick - Joypad\n- Timex 1 Joystick - Joypad\n- Timex 2 Joystick - Joypad\n- Fuller Joystick - Joypad\n\n#### User 3 device types\n\n- None - Input disabled.\n- **RetroPad** - Joypad\n- Sinclair Keyboard - Keyboard - Has keymapper support\n\n### Joypad\n\n| User 1 - 7 input descriptors | RetroPad Inputs |\n|------------------------------|---------------------------------------------|\n| Up |  |\n| Fire |  |\n| Keyboard overlay |  |\n| Up |  |\n| Down |  |\n| Left |  |\n| Right |  |\n| Fire |  |\n| Fire |  |\n| Enter |  |\n| Space |  |\n\n### Keyboard\n\n| RetroKeyboard Inputs | Sinclair Keyboard |\n|-------------------------------|--------------------|\n| Keyboard Backspace | Backspace |\n| Keyboard Return | Return |\n| Keyboard Space | Space |\n| Keyboard 0 | 0 |\n| Keyboard 1 | 1 |\n| Keyboard 2 | 2 |\n| Keyboard 3 | 3 |\n| Keyboard 4 | 4 |\n| Keyboard 5 | 5 |\n| Keyboard 6 | 6 |\n| Keyboard 7 | 7 |\n| Keyboard 8 | 8 |\n| Keyboard 9 | 9 |\n| Keyboard a | a |\n| Keyboard b | b |\n| Keyboard c | c |\n| Keyboard d | d |\n| Keyboard e | e |\n| Keyboard f | f |\n| Keyboard g | g |\n| Keyboard h | h |\n| Keyboard i | i |\n| Keyboard j | j |\n| Keyboard k | k |\n| Keyboard l | l |\n| Keyboard m | m |\n| Keyboard n | n |\n| Keyboard o | o |\n| Keyboard p | p |\n| Keyboard q | q |\n| Keyboard r | r |\n| Keyboard s | s |\n| Keyboard t | t |\n| Keyboard u | u |\n| Keyboard v | v |\n| Keyboard w | w |\n| Keyboard x | x |\n| Keyboard y | y |\n| Keyboard z | z |\n| Keyboard Right Shift | Right Shift |\n| Keyboard Left Shift | Left Shift |\n| Keyboard Right Control | Right Control |\n| Keyboard Left Control | Left Control |\n| Keyboard Right Alt | Right Alt |\n| Keyboard Left Alt | Left Alt |\n| Keyboard Right Meta | Right Meta |\n| Keyboard Left Meta | Left Meta |\n| Keyboard Right Super | Right Super |\n| Keyboard Left Super | Left Super |\n\n## External Links\n\n- [Official Fuse Website](http://fuse-emulator.sourceforge.net/)\n- [Official Fuse SourceForge Repository](https://sourceforge.net/projects/fuse-emulator/)\n- [Libretro Fuse Core info file](https://github.com/libretro/libretro-super/blob/master/dist/info/fuse_libretro.info)\n- [Libretro Fuse Github Repository](https://github.com/libretro/fuse-libretro)\n- [Report Libretro Fuse Core Issues Here](https://github.com/libretro/fuse-libretro/issues)"
},
{
"path": "docs/library/gam4980.md",
"content": "# GAM4980\n\n## Background\n\nGAM4980 is a libretro core for playing BBK Longman 4980 electronic dictionary games.\n\nThe GAM4980 core has been authored by:\n\n- [无云](https://gitee.com/BA4988/BBK-simulator)\n- [iyzsong](https://codeberg.org/iyzsong)\n\nThe GAM4980 core is licensed under:\n\n- [GPLv3+](https://codeberg.org/iyzsong/gam4980/raw/branch/master/COPYING)\n\n## BIOS\n\n[Required firmware files](https://docs.libretro.com/library/bios/) go in the frontend's system directory:\n\n| Filename | Description |\n|:-----------------:|:-----------------------------------------:|\n| gam4980/8.BIN | font rom, dumped from 0x800000-0x9fffff |\n| gam4980/E.BIN | system rom, dumped from 0xe00000-0xffffff |\n\nYou need run a rom [dumper](https://codeberg.org/iyzsong/ba4980-c-sdk/releases/download/固件导出/固件导出.gam) on\nBBK4980 (or 4988/5980) and a XMODEM1K terminal on PC to get the firmware files.\n\n## Extensions\n\nContent that can be loaded by the GAM4980 core have the following file extensions:\n\n- .gam\n\n## Features\n\nFrontend-level settings or features that the [Core name] core respects:\n\n| Feature | Supported |\n|-------------------|:---------:|\n| Restart | ✕ |\n| Saves | ✔ |\n| States | ✔ |\n| Rewind | ✔ |\n| Netplay | - |\n| Core Options | ✔ |\n| [Memory Monitoring (achievements)](../guides/memorymonitoring.md) | ✕ |\n| RetroArch Cheats | ✔ |\n| Native Cheats | ✕ |\n| Controls | ✔ |\n| Remapping | ✔ |\n| Multi-Mouse | ✕ |\n| Rumble | ✕ |\n| Sensors | ✕ |\n| Camera | ✕ |\n| Location | ✕ |\n| Subsystem | ✕ |\n| [Softpatching](../guides/softpatching.md) | - |\n| Disk Control | ✕ |\n| Username | ✕ |\n| Language | ✕ |\n| Crop Overscan | ✕ |\n| LEDs | ✕ |\n\n## Geometry and timing\n\n- The [Core name] core's core provided FPS is 60.0\n- The [Core name] core's base width is 159\n- The [Core name] core's base height is 96\n- The [Core name] core's max width is 159\n- The [Core name] core's max height is 96\n- The [Core name] core's core provided aspect ratio is 5/3\n\n## User 1 device types\n\nThe GAM4980 core supports the following device type(s) in the controls menu, bolded device types are the default for the specified user(s):\n\n## Joypad\n\n| RetroPad Inputs | User # input descriptors |\n|------------------------------------------------|--------------------------|\n|  | Exit |\n|  | Help (4988: Z) |\n|  | Insert (4988: Shift) |\n|  | Search (4988: ZY) |\n|  | Up |\n|  | Down |\n|  | Left |\n|  | Right |\n|  | Enter |\n|  | R |\n|  | Page Up |\n|  | Page Down |\n|  | Modify (4988: Space) |\n|  | Del (4988: X) |\n|  | A |\n|  | Z (4988: S) |\n"
},
{
"path": "docs/library/gambatte.md",
"content": "# Nintendo - Game Boy / Color (Gambatte)\n\n## Background\n\nGambatte is an accuracy-focused, open-source, cross-platform Game Boy Color emulator written in C++. It is based on hundreds of corner case hardware tests, as well as previous documentation and reverse engineering efforts.\n\nThe Gambatte core has been authored by\n\n- Sinamas\n\nThe Gambatte core is licensed under\n\n- [GPLv2](https://github.com/libretro/gambatte-libretro/blob/master/COPYING)\n\nA summary of the licenses behind RetroArch and its cores can be found [here](../development/licenses.md).\n\n## BIOS\n\nRequired or optional firmware files go in the frontend's system directory.\n\n!!! attention\n\tThe ['Use official bootloader' core option](#core-options) must be set to On in order for these BIOS files to be used.\n\n| Filename | Description | md5sum |\n|:------------:|:------------------------------:|:--------------------------------:|\n| gb_bios.bin | Game Boy BIOS - Optional | 32fbbd84168d3482956eb3c5051637f5 |\n| gbc_bios.bin | Game Boy Color BIOS - Optional | dbfce9db9deaa2567f6a84fde55f9680 |\n\n## Extensions\n\nContent that can be loaded by the Gambatte core have the following file extensions:\n\n- .gb\n- .gbc\n- .dmg\n\nRetroArch database(s) that are associated with the Gambatte core:\n\n- [Nintendo - Game Boy](https://github.com/libretro/libretro-database/blob/master/rdb/Nintendo%20-%20Game%20Boy.rdb)\n- [Nintendo - Game Boy Color](https://github.com/libretro/libretro-database/blob/master/rdb/Nintendo%20-%20Game%20Boy%20Color.rdb)\n\n## Features\n\nFrontend-level settings or features that the Gambatte core respects.\n\n| Feature | Supported |\n|-------------------|:---------:|\n| Restart | ✔ |\n| Saves | ✔ |\n| States | ✔ |\n| Rewind | ✔ |\n| Netplay | ✕ |\n| Core Options | ✔ |\n| [Memory Monitoring (achievements)](../guides/memorymonitoring.md) | ✔ |\n| RetroArch Cheats | ✔ |\n| Native Cheats | ✕ |\n| Controls | ✔ |\n| Remapping | ✔ |\n| Multi-Mouse | ✕ |\n| Rumble | ✔ |\n| Sensors | ✕ |\n| Camera | ✕ |\n| Location | ✕ |\n| Subsystem | ✕ |\n| [Softpatching](../guides/softpatching.md) | ✔ |\n| Disk Control | ✕ |\n| Username | ✕ |\n| Language | ✕ |\n| Crop Overscan | ✕ |\n| LEDs | ✕ |\n\n## Directories\n\nThe Gambatte core's library name is 'Gambatte'\n\nThe Gambatte core saves/loads to/from these directories.\n\n**Frontend's Save directory**\n\n| File | Description |\n|:-----:|:----------------------:|\n| *.srm | Cartridge battery save |\n\n**Frontend's State directory**\n\n| File | Description |\n|:--------:|:-----------:|\n| *.state# | State |\n\n***Frontend's System directory**\n\n| File | Description |\n|:---------------------------:|:-----------------------:|\n| palettes/default.pal | Global custom palette |\n| palettes/'content-name'.pal | Per-game custom palette |\n\n## Geometry and timing\n\n- The Gambatte core's core provided FPS is 59.7275005696\n- The Gambatte core's core provided sample rate is [Sample rate]\n- The Gambatte core's base width is [Base width]\n- The Gambatte core's base height is [Base height]\n- The Gambatte core's max width is [Max width]\n- The Gambatte core's max height is [Max height]\n- The Gambatte core's core provided aspect ratio is [Aspect ratio]\n\n## Color Palette\n\n\n\n- The [core option](#core-options) `GB Colorization` enables colorization of Game Boy games, using pre-defined or user-selected color palettes.\n- When satisfied you can save the currently chosen palette per the whole core, per content-directory or per game with the usual RetroArch [override](../guides/overrides.md) mechanism.\n- During gameplay you can instantly swap color palettes.\n - You can cycle through the available color palettes with the [L/R shoulder buttons](#joypad).\n \n (Source: Feature request in issue [182](https://github.com/libretro/gambatte-libretro/issues/182) was implemented in pull request [204](https://github.com/libretro/gambatte-libretro/pull/204) in October 2021)\n - This is ideal for your initial browsing / exploration of the color palettes.\n - But also if you spontanously want to change the palette in your currently running game.\n\n### Custom palettes for Game Boy games\n\nThe 'GB Colorization' core option must be set to custom.\n\nCreate a folder called \"palettes\" in RetroArch's system directory. Then, you can place custom palette files (.pal) inside the \"palettes\" folder\n\nYou can define different palettes for specific games by creating a .pal file in the \"palettes\" folder with 'INTERNALROMNAME.pal' or \"rom-name.pal\". If no specific palette is found for a ROM then the default palette is used.\n\nYou can also define a palette to be used for all Game Boy games by creating a .pal file in the \"palettes\" folder named \"default.pal\"\n\n??? note \"*Custom palettes can be created from the GUI in standalone Gambatte*\"\n \n\n## Core options\n\nThe Gambatte core has the following option(s) that can be tweaked from the core options menu. The default setting is bolded.\n\nSettings with (Restart) means that core has to be closed for the new setting to be applied on next launch.\n\n- **Allow Opposing Directions** [gambatte_up_down_allowed] (**disabled**/enabled)\n\n\tEnabling this will allow pressing / quickly alternating / holding both left and right (or up and down in some games) directions at the same time.\n\n\tThis may cause movement based glitches to occur in certain games.\n\n\tIt's best to keep this core option disabled.\n\n- **GB Colorization** [gambatte_gb_colorization] (**disabled**|auto|GBC|SGB|internal|custom)\n\n\tEnables colorization of Game Boy games, using pre-defined or user-selected color palettes.\n\n\t'auto': Selects automatically the 'best' (most colorful/appropriate) palette for each individual game, using the following order of preference:\n\n\t 1. Game-specific Super Game Boy palette, if defined and more colorful than game-specific Game Boy Color palette.\n\n\t 2. Game-specific Game Boy Color palette, if defined.\n\n\t 3. Game-specific Super Game Boy palette, if defined.\n\n\t 4. Palette specified by 'Internal Palette' core option.\n\n\t'GBC': Selects game-specific Game Boy Color palette, if defined. If not, falls back to the Game Boy Color hardware default palette of 'GBC - Dark Green'.\n\n\t'SGB': Selects game-specific Super Game Boy palette, if defined. If not, falls back to the Super Game Boy hardware default palette of 'SGB - 1A'.\n\n\t'internal': Selects palette specified by 'Internal Palette' core option.\n\n\t'custom': Loads user-created palettes from RetroArch's system directory, as described in the 'Custom palettes for Game Boy games' section.\n\n??? note \"*GB Colorization: Off*\"\n \n\n??? note \"*GB Colorization: auto (in this case, a game-specific SGB palette is auto-selected)*\"\n \n\n??? note \"*GB Colorization: GBC*\"\n \n\n- **Internal Palette** [gambatte_gb_internal_palette] (**GB - DMG**|GB - Pocket|GB - Light|GBC - Blue|GBC - Brown|GBC - Dark Blue|GBC - Dark Brown|GBC - Dark Green|GBC - Grayscale|GBC - Green|GBC - Inverted|GBC - Orange|GBC - Pastel Mix|GBC - Red|GBC - Yellow|SGB - 1A|SGB - 1B|SGB - 1C|SGB - 1D|SGB - 1E|SGB - 1F|SGB - 1G|SGB - 1H|SGB - 2A|SGB - 2B|SGB - 2C|SGB - 2D|SGB - 2E|SGB - 2F|SGB - 2G|SGB - 2H|SGB - 3A|SGB - 3B|SGB - 3C|SGB - 3D|SGB - 3E|SGB - 3F|SGB - 3G|SGB - 3H|SGB - 4A|SGB - 4B|SGB - 4C|SGB - 4D|SGB - 4E|SGB - 4F|SGB - 4G|SGB - 4H|Special 1|Special 2|Special 3)\n\n\tSelects the internal color palette to use for colorizing Game Boy games when the 'GB Colorization' core option is set to 'internal', or when the 'GB Colorization' core option is set to 'auto' and a game has no pre-defined Super Game Boy/Game Boy Color palette.\n\n\t'GB' palettes mimic the display characteristics of original Game Boy hardware.\n\n\t'GBC' palettes are identical to those used by original Game Boy Color hardware when colorizing Game Boy games.\n\n\t'SGB' palettes are identical to those used by original Super Game Boy hardware when colorizing Game Boy games.\n\n??? note \"*Internal Palette: GB - DMG*\"\n \n\n??? note \"*Internal Palette: GB - Pocket*\"\n \n\n??? note \"*Internal Palette: GB - Light*\"\n \n\n??? note \"*Internal Palette: GBC - Blue*\"\n \n\n??? note \"*Internal Palette: GBC - Brown*\"\n \n\n??? note \"*Internal Palette: GBC - Dark Blue*\"\n \n\n??? note \"*Internal Palette: GBC - Dark Brown*\"\n \n\n??? note \"*Internal Palette: GBC - Dark Green*\"\n \n\n??? note \"*Internal Palette: GBC - Grayscale*\"\n \n\n??? note \"*Internal Palette: GBC - Green*\"\n \n\n??? note \"*Internal Palette: GBC - Inverted*\"\n \n\n??? note \"*Internal Palette: GBC - Orange*\"\n \n\n??? note \"*Internal Palette: GBC - Pastel Mix*\"\n \n\n??? note \"*Internal Palette: GBC - Red*\"\n \n\n??? note \"*Internal Palette: GBC - Yellow*\"\n \n\n??? note \"*Internal Palette: SGB - 1A*\"\n \n\n??? note \"*Internal Palette: SGB - 1B*\"\n \n\n??? note \"*Internal Palette: SGB - 1C*\"\n \n\n??? note \"*Internal Palette: SGB - 1D*\"\n \n\n??? note \"*Internal Palette: SGB - 1E*\"\n \n\n??? note \"*Internal Palette: SGB - 1F*\"\n \n\n??? note \"*Internal Palette: SGB - 1G*\"\n \n\n??? note \"*Internal Palette: SGB - 1H*\"\n \n\n??? note \"*Internal Palette: SGB - 2A*\"\n \n\n??? note \"*Internal Palette: SGB - 2B*\"\n \n\n??? note \"*Internal Palette: SGB - 2C*\"\n \n\n??? note \"*Internal Palette: SGB - 2D*\"\n \n\n??? note \"*Internal Palette: SGB - 2E*\"\n \n\n??? note \"*Internal Palette: SGB - 2F*\"\n \n\n??? note \"*Internal Palette: SGB - 2G*\"\n \n\n??? note \"*Internal Palette: SGB - 2H*\"\n \n\n??? note \"*Internal Palette: SGB - 3A*\"\n \n\n??? note \"*Internal Palette: SGB - 3B*\"\n \n\n??? note \"*Internal Palette: SGB - 3C*\"\n \n\n??? note \"*Internal Palette: SGB - 3D*\"\n \n\n??? note \"*Internal Palette: SGB - 3E*\"\n \n\n??? note \"*Internal Palette: SGB - 3F*\"\n \n\n??? note \"*Internal Palette: SGB - 3G*\"\n \n\n??? note \"*Internal Palette: SGB - 3H*\"\n \n\n??? note \"*Internal Palette: SGB - 4A*\"\n \n\n??? note \"*Internal Palette: SGB - 4B*\"\n \n\n??? note \"*Internal Palette: SGB - 4C*\"\n \n\n??? note \"*Internal Palette: SGB - 4D*\"\n \n\n??? note \"*Internal Palette: SGB - 4E*\"\n \n\n??? note \"*Internal Palette: SGB - 4F*\"\n \n\n??? note \"*Internal Palette: SGB - 4G*\"\n \n\n??? note \"*Internal Palette: SGB - 4H*\"\n \n\n??? note \"*Internal Palette: Special 1*\"\n \n\n??? note \"*Internal Palette: Special 2*\"\n \n\n??? note \"*Internal Palette: Special 3*\"\n \n\n- **Color correction** [gambatte_gbc_color_correction] (**GBC only**|always|disabled)\n\n\tEnables adjustment of output colors to match the display characteristics of the LCD panel used in original Game Boy Color hardware.\n\n\t'GBC only': Color correction is only applied when playing Game Boy Color games, or when using a Game Boy Color palette to colorize a Game Boy game.\n\n\t'always': Color correction is always applied, regardless of which color palette is being used.\n\n!!! attention\n\tSetting this option to 'always' will result in unexpected/suboptimal output when using 'GB' or 'SGB' internal color palettes, since these are intended for display on a normal TV/monitor rather than a Game Boy Color LCD panel.\n\n- **Color correction mode** [gambatte_gbc_color_correction_mode] (**accurate**|fast)\n\n\tSpecifies the method to use when performing color correction.\n\n\t'accurate': Provides a very close approximation of the image displayed on a real Game Boy Color LCD panel.\n\n\t'fast': Darkens colors in a loose approximation of the image displayed on a real Game Boy Color LCD panel. Has negligible performance impact, and may be used on low-end hardware in cases where the 'accurate' method is too slow.\n\n??? note \"*Color correction: Off*\"\n \n\n??? note \"*Color correction: fast*\"\n \n\n??? note \"*Color correction: accurate*\"\n \n\n- **Color correction - frontlight position** [gambatte_gbc_frontlight_position] (**central**|above screen|below screen)\n\n\tSimulates the physical response of the Game Boy Color LCD panel when illuminated from different angles.\n\n\t'central': Standard color reproduction, corresponding to ambient light hitting the screen at 90°.\n\n\t'above screen': Increases brightness (gamma), corresponding to sunlight or a ceiling light shining on the screen from above.\n\n\t'below screen': Reduces brightness (gamma), corresponding to light shining on the screen from below.\n\n!!! attention\n\tThis setting only takes effect when 'Color correction mode' is set to 'accurate'.\n\n??? note \"*Color correction - frontlight position: central*\"\n \n\n??? note \"*Color correction - frontlight position: above screen*\"\n \n\n??? note \"*Color correction - frontlight position: below screen*\"\n \n\n- **Dark Filter Level (percent)** [gambatte_dark_filter_level] (**0**|5|10|15|20|25|30|35|40|45|50)\n\n\tEnables selective brightness reduction based upon pixel luminosity. May be used to reduce glare/eye strain. Of particular value when playing games with white backgrounds, which are intended for display on a non-backlit Game Boy Color LCD panel and appear uncomfortably bright when viewed on a modern backlit screen.\n\n??? note \"*Dark Filter Level: 0%*\"\n \n\n??? note \"*Dark Filter Level: 30%*\"\n \n\n- **Emulated hardware (restart)** [gambatte_gb_hwmode] (**Auto**|GB|GBC|GBA)\n\n\tChoose which hardware is emulated Game Boy, Game Boy Color, or Game Boy Advance.\n\n- **Use official bootloader (restart)** [gambatte_gb_bootloader] (**enabled**|disabled)\n\n\tEnables support for using official Game Boy and Game Boy Color bootloaders with startup logos. Check the [BIOS section](#bios) to see what files are needed.\n\n??? note \"*Game Boy bootloader*\"\n \n\n??? note \"*Game Boy Color bootloader*\"\n \n\n- **Mix frames** [gambatte_mix_frames] (**disabled**|accurate|fast)\n\n\tEnables simulation of LCD ghosting effects by blending the current and previous frames.\n\n\t'accurate': Blends pixel RGB values with floating point precision.\n\n\t'fast': Blends pixel RGB values using fast bit manipulation. Causes slight color darkening/shifting (due to rounding errors). May be used on low-end hardware in cases where the 'accurate' method is too slow.\n\n!!! attention\n\tA number of games generate transparency effects (or additional shades of color) by drawing objects on alternate frames, relying on the LCD ghosting of original hardware to 'smooth out' the result. Notable examples are Wave Race, Ballistic and Chikyuu Kaihou Gun ZAS. In order for these games to render correctly, 'Mix frames' must be set to 'accurate' or 'fast'. More importantly, the rapid flickering that is produced by these games when 'Mix frames' is disabled can lead to a form of screen burn-in on certain types of LCD panel (that of the 3DS in particular).\n\n??? note \"*Mix frames: Off*\"\n \n\n??? note \"*Mix frames: accurate*\"\n \n\n??? note \"*Mix frames: fast*\"\n \n\n- **GameBoy Link Mode** - New config options\n\n| Core Option | Description |\n|---------------------------------------------------|-----------------------------------------------------------|\n| gambatte_gb_link_mode | **Not Connected** / Network Server / Network Client |\n| gambatte_gb_link_network_port | 56400 to 56420 in increments of 1. **56400 is default** |\n| gambatte_show_gb_link_settings | enabled / **disabled** |\n| gambatte_gb_link_network_server_ip_1 | (client only) 0 to 9, 1st digit of ipv4 address, (eg. 1) |\n| gambatte_gb_link_network_server_ip_2 | (client only) 0 to 9, 2nd digit of ipv4 address, (eg. 9) |\n| gambatte_gb_link_network_server_ip_3 | (client only) 0 to 9, 3rd digit of ipv4 address, (eg. 2) |\n| gambatte_gb_link_network_server_ip_4 | (client only) 0 to 9, 4th digit of ipv4 address, (eg. 1) |\n| gambatte_gb_link_network_server_ip_5 | (client only) 0 to 9, 5th digit of ipv4 address, (eg. 6) |\n| gambatte_gb_link_network_server_ip_6 | (client only) 0 to 9, 6th digit of ipv4 address, (eg. 8) |\n| gambatte_gb_link_network_server_ip_7 | (client only) 0 to 9, 7th digit of ipv4 address, (eg. 0) |\n| gambatte_gb_link_network_server_ip_8 | (client only) 0 to 9, 8th digit of ipv4 address, (eg. 0) |\n| gambatte_gb_link_network_server_ip_9 | (client only) 0 to 9, 9th digit of ipv4 address, (eg. 1) |\n| gambatte_gb_link_network_server_ip_10 | (client only) 0 to 9, 10th digit of ipv4 address, (eg. 0) |\n| gambatte_gb_link_network_server_ip_11 | (client only) 0 to 9, 11th digit of ipv4 address, (eg. 0) |\n| gambatte_gb_link_network_server_ip_12 | (client only) 0 to 9, 12th digit of ipv4 address, (eg. 1) |\n\n- **GameBoy Link Mode** - Old config options\n\n| Core Option | Description, values \n|----------------------------------------------|-----------------------------------------------------------------------------------------------------|\n| gambatte_gb_link_mode | Mode, **Not Connected** / Network Server / Network Client |\n| gambatte_gb_link_network_port | Network link port, 56400 to 56420 in increments of 1. **56400 is default** |\n| gambatte_gb_link_network_server_ip_octet1 | (client only) Network link server address part 1, (0 to 255 in increments of 1. **0 is default**.) |\n| gambatte_gb_link_network_server_ip_octet2 | (client only) Network link server address part 2, (0 to 255 in increments of 1. **0 is default**.) |\n| gambatte_gb_link_network_server_ip_octet3 | (client only) Network link server address part 3, (0 to 255 in increments of 1. **0 is default**.) |\n| gambatte_gb_link_network_server_ip_octet4 | (client only) Network link server address part 4, (0 to 255 in increments of 1. **0 is default**.) |\n\n\n## Rumble\n\nRumble only works in the mGBA core when\n\n- The content being ran has rumble support. (e.g. Cartridges with a Rumble Pak)\n- The frontend being used has rumble support.\n- The joypad device being used has rumble support.\n\n## Joypad\n\n\n\n| RetroPad Inputs | User 1 input descriptors |\n|------------------------------------------------|-------------------------------------------|\n|  | A |\n|  | B |\n|  | D-Pad Up |\n|  | D-Pad Down |\n|  | D-Pad Left |\n|  | D-Pad Right |\n|  | Select |\n|  | Start |\n|  | Previous [Color Palette](#color-palette) |\n|  | Next [Color Palette](#color-palette) |\n\n\n## Compatibility\n\n| Game | Issue |\n|---------------------------------------------------|----------------------------------------------------|\n| Command Master | Crashes on start. Unemulated MBC7 mapper. |\n| Game Boy Camera | Crashes on start. Unemulated Pocket Camera mapper. |\n| Game de Hakken!! Tamagotchi - Osutchi to Mesutchi | Crashes on start. Unemulated TAMA5 mapper. |\n| Kirby Tilt 'n' Tumble | Crashes on start. Unemulated MBC7 mapper. |\n| Net de Get: Mini-Game @ 100 | Crashes on start. Unemulated MBC6 mapper. |\n\n## External Links\n\n- [Official Gambatte Github Repository](https://github.com/sinamas/gambatte)\n- [Old Standalone Gambatte builds](https://sourceforge.net/projects/gambatte/files/gambatte/)\n- [Libretro Gambatte Core info file](https://github.com/libretro/libretro-super/blob/master/dist/info/gambatte_libretro.info)\n- [Libretro Gambatte Github Repository](https://github.com/libretro/gambatte-libretro)\n- [Report Libretro Gambatte Core Issues Here](https://github.com/libretro/gambatte-libretro/issues)\n- [Gameplay Videos](https://www.youtube.com/playlist?list=PLRbgg4gk_0IdJ4pq_2h9d8Q0QO7FA7Ukd)\n\n## Nintendo - Game Boy (+ Color)\n\n- [Nintendo - Game Boy / Color (Emux GB)](emux_gb.md)\n- [Nintendo - Game Boy / Color (Gearboy)](gearboy.md)\n- [Nintendo - Game Boy / Color (SameBoy)](sameboy.md)\n- [Nintendo - Game Boy / Color (TGB Dual)](tgb_dual.md)\n- [Nintendo - Game Boy Advance (mGBA)](mgba.md)\n- [Nintendo - Game Boy Advance (VBA-M)](vba_m.md)\n- [Nintendo - SNES / Famicom (higan Accuracy)](higan_accuracy.md)\n- [Nintendo - SNES / Famicom (nSide Balanced)](nside_balanced.md)\n- [Nintendo - SNES / Famicom (Mesen-S)](mesen-s.md)\n"
},
{
"path": "docs/library/game_music_emu.md",
"content": "# Game Music Emu\n\n\n\n## Background\n\nMulti-purpose video game console music player.\n\n### Author/License\n\nThe Game Music Emu core has been authored by\n\n- Blargg\n\nThe Game Music Emu core is licensed under\n\n- [GPLv3](https://github.com/libretro/libretro-gme/blob/master/LICENSE)\n\nA summary of the licenses behind RetroArch and its cores can be found [here](../development/licenses.md).\n\n## Extensions\n\nContent that can be loaded by the Game Music Emu core have the following file extensions:\n\n- .ay\n- .gbs\n- .gym\n- .hes\n- .kss\n- .nsf\n- .nsfe\n- .sap\n- .spc\n- .vgm\n- .vgz\n\n## Features\n\nFrontend-level settings or features that the Game Music Emu core respects.\n\n| Feature | Supported |\n|-------------------|:---------:|\n| Restart | ✕ |\n| Screenshots | ✔ |\n| Saves | ✕ |\n| States | ✕ |\n| Rewind | ✕ |\n| Netplay | ✕ |\n| Core Options | ✕ |\n| [Memory Monitoring (achievements)](../guides/memorymonitoring.md) | ✕ |\n| RetroArch Cheats | ✕ |\n| Native Cheats | ✕ |\n| Controls | ✔ |\n| Remapping | ✕ |\n| Multi-Mouse | ✕ |\n| Rumble | ✕ |\n| Sensors | ✕ |\n| Camera | ✕ |\n| Location | ✕ |\n| Subsystem | ✕ |\n| [Softpatching](../guides/softpatching.md) | ✕ |\n| Disk Control | ✕ |\n| Username | ✕ |\n| Language | ✕ |\n| Crop Overscan | ✕ |\n| LEDs | ✕ |\n\n### Directories\n\nThe Game Music Emu core's internal core name is 'Game Music Emulator'\n\n### Geometry and timing\n\n- The Game Music Emu core's core provided FPS is 60\n- The Game Music Emu core's core provided sample rate is 44100 Hz\n- The Game Music Emu core's core provided aspect ratio is 4/3\n\n## Controllers\n\nThe Game Music Emu core supports the following device type(s) in the controls menu, bolded device types are the default for the specified user(s):\n\n### User 1 device types\n\n- None - Doesn't disable input.\n- **RetroPad** - Joypad - Stay on this.\n- RetroPad w/Analog - Joypad - There's no reason to switch to this.\n\n### Controller tables\n\n#### Joypad\n\n| RetroPad Inputs | Game Music Emu core inputs |\n|------------------------------------------------|----------------------------|\n|  | Pause |\n|  | Previous Track |\n|  | Next Track |\n\n## External Links\n\n- [Official Game Music Emu Website](http://blargg.8bitalley.com/libs/audio.html)\n- [Official Game Music Emu Github Repository](https://bitbucket.org/mpyne/game-music-emu/wiki/Home)\n- [Libretro Game Music Emu Core info file](https://github.com/libretro/libretro-super/blob/master/dist/info/gme_libretro.info)\n- [Libretro Game Music Emu Github Repository](https://github.com/libretro/libretro-gme)\n- [Report Libretro Game Music Emu Core Issues Here](https://github.com/libretro/libretro-gme/issues)"
},
{
"path": "docs/library/gearboy.md",
"content": "# Nintendo - Game Boy / Color (Gearboy)\n\n## Background\n\nGearboy is an open source, cross-platform, Nintendo Game Boy (DMG) / Game Boy Color (GBC) emulator written in C++.\n\n- Accurate emulation supporting cartridges: ROM, ROM + RAM, MBC1, MBC2, MBC3, MBC5, MBC7, HuC-1, HuC-3, MMM01, Pocket Camera, TAMA5 and MBC1M.\n- Game Boy Color support.\n- Battery powered RAM save support.\n- Save states.\n- Bootrom (BIOS) support.\n- Game Genie and GameShark cheat support.\n- Supported platforms (libretro): Windows, Linux, macOS, Raspberry Pi, Android, iOS, tvOS, PlayStation Vita, PlayStation 3, Nintendo 3DS, Nintendo GameCube, Nintendo Wii, Nintendo WiiU, Nintendo Switch, Emscripten, Classic Mini systems (NES, SNES, C64, ...), OpenDingux, RetroFW and QNX.\n\nThe Gearboy core has been authored by:\n\n- [Nacho Sanchez (drhelius)](https://github.com/drhelius)\n\nThe Gearboy core is licensed under:\n\n- [GPLv3](https://github.com/drhelius/Gearboy/blob/master/LICENSE)\n\nA summary of the licenses behind RetroArch and its cores can be found [here](../development/licenses.md).\n\n## BIOS\n\nGearboy does not require bootrom (BIOS) files to work but they can be used optionally.\n\nWhen the bootrom is enabled it will execute as in original hardware, causing invalid roms to lock or forcing hardware like GB Pocket or GBA, depending on the bootrom file.\n\nRequired or optional firmware files go in the frontend's system directory.\n\n!!! attention\n\t If you’d like to use any bootrom, you can place the following files in RetroArch's system directory. Then, you need to enable [DMG Bootrom](#core-options) and/or [Game Boy Color Bootrom](#core-options) core options for these bootrom files to be used.\n\n| Filename | Description | md5sum |\n|:------------:|:----------------------------------:|:--------------------------------:|\n| dmg_boot.bin | Game Boy boot ROM - Optional | 32fbbd84168d3482956eb3c5051637f5 |\n| cgb_boot.bin | Game Boy Color boot ROM - Optional | dbfce9db9deaa2567f6a84fde55f9680 |\n\n## Extensions\n\nContent that can be loaded by the Gearboy core have the following file extensions:\n\n- .gb\n- .dmg\n- .gbc\n- .cgb\n- .sgb\n\nRetroArch database(s) that are associated with the Gearboy core:\n\n- [Nintendo - Game Boy](https://github.com/libretro/libretro-database/blob/master/rdb/Nintendo%20-%20Game%20Boy.rdb)\n- [Nintendo - Game Boy Color](https://github.com/libretro/libretro-database/blob/master/rdb/Nintendo%20-%20Game%20Boy%20Color.rdb)\n\n## Features\n\nFrontend-level settings or features that the Gearboy core respects.\n\n| Feature | Supported |\n|-------------------|:---------:|\n| Restart | ✔ |\n| Screenshots | ✔ |\n| Saves | ✔ |\n| States | ✔ |\n| Rewind | ✔ |\n| Netplay | ✔ |\n| Core Options | ✔ |\n| [Memory Monitoring (achievements)](../guides/memorymonitoring.md) | ✔ |\n| RetroArch Cheats - Game Genie | ✔ |\n| RetroArch Cheats - GameShark | ✔ |\n| Native Cheats | ✕ |\n| Controls | ✔ |\n| Remapping | ✔ |\n| Multi-Mouse | ✕ |\n| Rumble | ✕ |\n| Sensors | ✔ |\n| Camera | ✕ |\n| Location | ✕ |\n| Subsystem | ✕ |\n| [Softpatching](../guides/softpatching.md) | ✔ |\n| Disk Control | ✕ |\n| Username | ✕ |\n| Language | ✕ |\n| Crop Overscan | ✕ |\n| LEDs | ✕ |\n\n### Directories\n\nThe Gearboy core's library name is 'Gearboy'\n\nThe Gearboy core saves/loads to/from these directories.\n\n**Frontend's Save directory**\n\n| File | Description |\n|:-----:|:----------------------:|\n| *.srm | Cartridge battery save |\n| *.rtc | Real time clock save |\n\n**Frontend's State directory**\n\n| File | Description |\n|:--------:|:-----------:|\n| *.state# | State |\n\n### Geometry and timing\n\n- The Gearboy core's core provided FPS is 59.7275005696\n- The Gearboy core's core provided sample rate is 44100 Hz\n- The Gearboy core's base width is 160\n- The Gearboy core's base height is 144\n- The Gearboy core's max width is 160\n- The Gearboy core's max height is 144\n- The Gearboy core's core provided aspect ratio is 10/9\n\n## Core options\n\nThe Gearboy core has the following options that can be tweaked from the core options menu. The default setting is bolded.\n\nSettings with (restart) means that core has to be closed for the new setting to be applied on next launch.\n\n- **Game Boy Model (restart)** [gearboy_model] (**Auto**|Game Boy DMG|Game Boy Advance)\n\n\tSelect which hardware/model is emulated.\n\n - *Auto* selects the best hardware based on the rom.\n - *Game Boy DMG* forces original Game Boy hardware.\n - *Game Boy Advance* enables Game Boy Advance hardware.\n\n- **Mapper (restart)** [gearboy_mapper] (**Auto**|ROM Only|MBC 1|MBC 2|MBC 3|MBC 5|MBC 1 Multicart|HuC 1|HuC 3|MMM01|Camera|MBC 7|TAMA5)\n\n\tSelect which Memory Bank Controller (MBC or mapper) is emulated.\n\n - *Auto* selects the best MBC based on the rom.\n - *ROM Only* forces no MBC.\n - *MBC 1* forces MBC 1.\n - *MBC 2* forces MBC 2.\n - *MBC 3* forces MBC 3.\n - *MBC 5* forces MBC 5.\n - *MBC 1 Multicart* forces MBC 1 Multicart.\n - *HuC 1* forces HuC 1.\n - *HuC 3* forces HuC 3.\n - *MMM01* forces MMM01.\n - *Camera* forces Pocket Camera.\n - *MBC 7* forces MBC 7.\n - *TAMA5* forces TAMA5.\n\n- **DMG Palette** [gearboy_palette] (**Original**|Sharp|B/W|Autumn|Soft|Slime)\n\n\tSelect a color palette for Game Boy DMG games.\n\n- **GBC Color Correction** [gearboy_color_correction] (**Disabled**|Enabled)\n\n\tEnables color correction for Game Boy Color games to simulate the original GBC LCD screen output.\n\n- **DMG Bootrom (restart)** [gearboy_bootrom_dmg] (**Disabled**|Enabled)\n\n\tEnable or disable the original Game Boy bootrom. For this to work, the `dmg_boot.bin` file must exist in RetroArch's system directory.\n\n- **GBC Bootrom (restart)** [gearboy_bootrom_gbc] (**Disabled**|Enabled)\n\n\tEnable or disable the Game Boy Color bootrom. For this to work, the `cgb_boot.bin` file must exist in RetroArch's system directory.\n\n- **Allow Up+Down / Left+Right** [gearboy_up_down_allowed] (**Disabled**|Enabled)\n\n\tAllow pressing, quickly alternating, or holding both left and right (or up and down) directions at the same time. This may cause movement based glitches in certain games.\n\n- **Tilt Source (MBC7)** [gearboy_tilt_source] (**Mouse**|Sensor|Analog Stick)\n\n\tSelect the input source for MBC7 tilt controls.\n\n- **Sensor Sensitivity X (MBC7)** [gearboy_sensor_sensitivity_x] (**5**|1-10)\n\n\tSet the horizontal sensitivity when using sensor input for MBC7 tilt controls.\n\n- **Sensor Sensitivity Y (MBC7)** [gearboy_sensor_sensitivity_y] (**5**|1-10)\n\n\tSet the vertical sensitivity when using sensor input for MBC7 tilt controls.\n\n- **Sensor Invert X (MBC7)** [gearboy_sensor_invert_x] (**Disabled**|Enabled)\n\n\tInvert the horizontal axis when using sensor input for MBC7 tilt controls.\n\n- **Sensor Invert Y (MBC7)** [gearboy_sensor_invert_y] (**Disabled**|Enabled)\n\n\tInvert the vertical axis when using sensor input for MBC7 tilt controls.\n\n- **Mouse Sensitivity X (MBC7)** [gearboy_mouse_sensitivity_x] (**5**|1-10)\n\n\tSet the horizontal sensitivity when using mouse input for MBC7 tilt controls.\n\n- **Mouse Sensitivity Y (MBC7)** [gearboy_mouse_sensitivity_y] (**5**|1-10)\n\n\tSet the vertical sensitivity when using mouse input for MBC7 tilt controls.\n\n- **Mouse Invert X (MBC7)** [gearboy_mouse_invert_x] (**Disabled**|Enabled)\n\n\tInvert the horizontal axis when using mouse input for MBC7 tilt controls.\n\n- **Mouse Invert Y (MBC7)** [gearboy_mouse_invert_y] (**Disabled**|Enabled)\n\n\tInvert the vertical axis when using mouse input for MBC7 tilt controls.\n\n- **Analog Sensitivity X (MBC7)** [gearboy_analog_sensitivity_x] (**5**|1-10)\n\n\tSet the horizontal sensitivity when using analog stick input for MBC7 tilt controls.\n\n- **Analog Sensitivity Y (MBC7)** [gearboy_analog_sensitivity_y] (**5**|1-10)\n\n\tSet the vertical sensitivity when using analog stick input for MBC7 tilt controls.\n\n- **Analog Invert X (MBC7)** [gearboy_analog_invert_x] (**Disabled**|Enabled)\n\n\tInvert the horizontal axis when using analog stick input for MBC7 tilt controls.\n\n- **Analog Invert Y (MBC7)** [gearboy_analog_invert_y] (**Disabled**|Enabled)\n\n\tInvert the vertical axis when using analog stick input for MBC7 tilt controls.\n\n## Joypad\n\n\n\n| User 1 input descriptors | RetroPad Inputs |\n|--------------------------|---------------------------------------------|\n| B |  |\n| Select |  |\n| Start |  |\n| Up |  |\n| Down |  |\n| Left |  |\n| Right |  |\n| A |  |\n\n## Compatibility\n\n- [Gearboy Accuracy Tests](https://github.com/drhelius/Gearboy#accuracy-tests)\n\n## External Links\n\n- [Official Gearboy Github Repository](https://github.com/drhelius/Gearboy)\n- [Libretro Gearboy Core info file](https://github.com/libretro/libretro-super/blob/master/dist/info/gearboy_libretro.info)\n- [Report Libretro Gearboy Core Issues Here](https://github.com/drhelius/Gearboy/issues)\n\n### See also\n\n#### Nintendo - Game Boy (+ Color)\n\n- [Nintendo - Game Boy / Color (Emux GB)](emux_gb.md)\n- [Nintendo - Game Boy / Color (Gambatte)](gambatte.md)\n- [Nintendo - Game Boy / Color (SameBoy)](sameboy.md)\n- [Nintendo - Game Boy / Color (TGB Dual)](tgb_dual.md)\n- [Nintendo - Game Boy Advance (mGBA)](mgba.md)\n- [Nintendo - Game Boy Advance (VBA-M)](vba_m.md)\n- [Nintendo - SNES / Famicom (higan Accuracy)](higan_accuracy.md)\n- [Nintendo - SNES / Famicom (nSide Balanced)](nside_balanced.md)\n- [Nintendo - SNES / Famicom (Mesen-S)](mesen-s.md)\n"
},
{
"path": "docs/library/gearcoleco.md",
"content": "# Coleco - ColecoVision (GearColeco)\n\n## Background\n\nGearcoleco is an open source, cross-platform, ColecoVision emulator written in C++.\n\n- Accurate Z80 core, including undocumented opcodes and behavior like R and MEMPTR registers.\n- Accurate TMS9918 emulation.\n- Support for ColecoVision Super Game Module (SGM) and MegaCart ROMs.\n- Support for Super Action Controller (SAC), Wheel Controller and Roller Controller.\n- Supported platforms (libretro): Windows, Linux, macOS, Raspberry Pi, Android, iOS, tvOS, PlayStation Vita, PlayStation 3, Nintendo 3DS, Nintendo GameCube, Nintendo Wii, Nintendo WiiU, Nintendo Switch, Emscripten, Classic Mini systems (NES, SNES, C64, ...), OpenDingux, RetroFW and QNX.\n\nThe Gearcoleco core has been authored by\n\n- [Nacho Sanchez (drhelius)](https://github.com/drhelius)\n\nThe Gearcoleco core is licensed under\n\n- [GPLv3](https://github.com/drhelius/Gearcoleco/blob/master/LICENSE)\n\nA summary of the licenses behind RetroArch and its cores can be found [here](../development/licenses.md).\n\n## BIOS\n\nGearcoleco requires a BIOS file to work.\n\nRequired or optional firmware files go in the frontend's system directory.\n\n!!! attention\n\t Gearcoleco emulator requires a ColecoVision BIOS. In order to get it to work you must place the following file in RetroArch's system directory.\n\n| Filename | Description | md5sum |\n|:-----------------:|:----------------------------------:|:--------------------------------:|\n| colecovision.rom | ColecoVision BIOS - Required | 2c66f5911e5b42b8ebe113403548eee7 |\n\n## Extensions\n\nContent that can be loaded by the Gearcoleco core have the following file extensions:\n\n- .col\n- .cv\n- .bin\n- .rom\n\nRetroArch database(s) that are associated with the Gearcoleco core:\n\n- [Coleco - ColecoVision](https://github.com/libretro/libretro-database/blob/master/rdb/Coleco%20-%20ColecoVision.rdb)\n\n## Features\n\nFrontend-level settings or features that the Gearcoleco core respects.\n\n| Feature | Supported |\n|-------------------|:---------:|\n| Restart | ✔ |\n| Screenshots | ✔ |\n| Saves | ✔ |\n| States | ✔ |\n| Rewind | ✔ |\n| Netplay | ✔ |\n| Core Options | ✔ |\n| [Memory Monitoring (achievements)](../guides/memorymonitoring.md) | ✔ |\n| RetroArch Cheats | ✕ |\n| Native Cheats | ✕ |\n| Controls | ✔ |\n| Remapping | ✔ |\n| Multi-Mouse | ✕ |\n| Rumble | ✕ |\n| Sensors | ✕ |\n| Camera | ✕ |\n| Location | ✕ |\n| Subsystem | ✕ |\n| [Softpatching](../guides/softpatching.md) | ✔ |\n| Disk Control | ✕ |\n| Username | ✕ |\n| Language | ✕ |\n| Crop Overscan | ✔ |\n| LEDs | ✕ |\n\n### Directories\n\nThe Gearcoleco core's library name is 'Gearcoleco'\n\nThe Gearcoleco core saves/loads to/from these directories.\n\n**Frontend's Save directory**\n\n| File | Description |\n|:-----:|:----------------------:|\n| *.srm | Cartridge battery save |\n\n**Frontend's State directory**\n\n| File | Description |\n|:--------:|:-----------:|\n| *.state# | State |\n\n### Geometry and timing\n\n- The Gearcoleco core's core provided FPS is 60 for NTSC games and 50 for PAL games\n- The Gearcoleco core's core provided sample rate is 44100 Hz\n- The Gearcoleco core's width is 256\n- The Gearcoleco core's height is 192\n- The Gearcoleco core's core provided aspect ratio is 4:3\n\n## Core options\n\nThe Gearcoleco core has the following options that can be tweaked from the core options menu. The default setting is bolded.\n\nSettings with (restart) means that core has to be closed for the new setting to be applied on next launch.\n\n- **Refresh Rate (restart)** [gearcoleco_timing] (**Auto**|NTSC (60 Hz)|PAL (50 Hz))\n\n Select which refresh rate will be used in emulation.\n\n - *Auto* selects the best refresh rate based on the rom.\n - *NTSC (60 Hz)* forces 60 Hz.\n - *PAL (50 Hz)* forces 50 Hz.\n\n- **Aspect Ratio** [gearcoleco_aspect_ratio] (**1:1 PAR**|4:3 DAR|16:9 DAR|16:10 DAR)\n\n Select which aspect ratio will be presented by the core.\n\n - *1:1 PAR* selects an aspect ratio that produces square pixels.\n - *4:3 DAR* forces 4:3 aspect ratio.\n - *16:9 DAR* forces 16:9 aspect ratio.\n - *16:10 DAR* forces 16:10 aspect ratio.\n\n- **Overscan** [gearcoleco_overscan] (**Disabled**|Top+Bottom|Full (284 width)|Full (320 width))\n\n Select which overscan (borders) will be used in emulation.\n\n - *Disabled* disables overscan.\n - *Top+Bottom* enables overscan for top and bottom.\n - *Full (284 width)* enables overscan for top, bottom, left and right (284 width).\n - *Full (320 width)* enables overscan for top, bottom, left and right (320 width).\n\n- **Allow Up+Down / Left+Right** [gearcoleco_up_down_allowed] (**Disabled**|Enabled)\n\n Enabling this option allows pressing, quickly alternating, or holding both left and right (or up and down in some games) directions at the same time.\n\n This may cause movement based glitches to occur in certain games.\n\n It's best to keep this core option disabled.\n\n- **No Sprite Limit** [gearcoleco_no_sprite_limit] (**Disabled**|Enabled)\n\n Enabling this will remove the sprite limit in a single line.\n\n This may cause glitches to occur in certain games.\n\n It's best to keep this core option disabled.\n\n- **Spinner Support** [gearcoleco_spinners] (**Disabled**|Super Action Controller|Wheel Controller|Roller Controller)\n\n Select which controller will be used in emulation. Spinners are controlled by mouse movement. Mouse buttons are mapped to Left (Yellow) and Right (Red) buttons.\n\n - *Disabled* disables spinner support.\n - *Super Action Controller* enables spinner support for Super Action Controller.\n - *Wheel Controller* enables spinner support for Wheel Controller.\n - *Roller Controller* enables spinner support for Roller Controller.\n\n- **Spinner Sensitivity** [gearcoleco_spinner_sensitivity] (**1**|1-10)\n\n Select the spinner sensitivity.\n\n - *1* is the lowest sensitivity.\n - *10* is the highest sensitivity.\n\n### Joypad\n\n| Coleco Controller | RetroPad Inputs |\n|-------------------------------------|------------------------------------------------|\n| Joystick Up |  |\n| Joystick Down |  |\n| Joystick Left |  |\n| Joystick Right |  |\n| Yellow (Left) |  |\n| Red (Right) |  |\n| Keypad 1 |  |\n| Keypad 2 |  |\n| Keypad 3 |  |\n| Keypad 4 |  |\n| Keypad 5 |  |\n| Keypad 6 |  |\n| Keypad 7 |  |\n| Keypad 8 |  |\n| Keypad * |  |\n| Keypad # |  |\n| Keypad 9 |  Left Analog Y |\n| Keypad 0 |  Left Analog X |\n| Purple |  Right Analog Y |\n| Blue |  Right Analog X |\n\n## External Links\n\n- [Official Gearcoleco Repository](https://github.com/drhelius/Gearcoleco)\n- [Libretro Gearcoleco Core info file](https://github.com/libretro/libretro-super/blob/master/dist/info/gearcoleco_libretro.info)\n- [Report Gearcoleco Core Issues Here](https://github.com/drhelius/Gearcoleco/issues)\n\n### See also\n\n- [ColecoVision/CreatiVision/My Vision (JollyCV)](jollycv.md)\n- [MSX/SVI/ColecoVision/SG-1000 (blueMSX)](bluemsx.md)\n"
},
{
"path": "docs/library/geargrafx.md",
"content": "# NEC - PC Engine / SuperGrafx (Geargrafx)\n\n## Background\n\nGeargrafx is an open source, cross-platform, PC Engine / TurboGrafx-16 / SuperGrafx emulator written in C++.\n\n- Very accurate emulation supporting the entire HuCard PCE / SGX catalog.\n- Support for CD-ROM², Super CD-ROM² and Arcade CD-ROM² systems.\n- Backup RAM and Memory Base 128 support.\n- Multi Tap support (up to 5 players).\n- Controllers:\n * Standard Gamepad (2 buttons)\n * Avenue Pad 3 (3 buttons, auto-configured based on game)\n * Avenue Pad 6 (6 buttons)\n- Adjustable scanline count (224p, 240p, or manual).\n- RGB or Composite color output.\n- Music rom support: HES.\n- Internal database for automatic rom detection and hardware selection if `Auto` options are selected.\n- Supported platforms (libretro): Windows, Linux, macOS, Raspberry Pi, Android, iOS, tvOS, PlayStation Vita, PlayStation 3, Nintendo 3DS, Nintendo GameCube, Nintendo Wii, Nintendo WiiU, Nintendo Switch, Emscripten, Classic Mini systems (NES, SNES, C64, etc.), OpenDingux, RetroFW and QNX.\n\nThe Geargrafx core has been authored by\n\n- [Nacho Sanchez (drhelius)](https://github.com/drhelius)\n\nThe Geargrafx core is licensed under\n\n- [GPLv3](https://github.com/drhelius/Geargrafx/blob/master/LICENSE)\n\nA summary of the licenses behind RetroArch and its cores can be found [here](../development/licenses.md).\n\n## BIOS\n\nGeargrafx requires a BIOS file to run CD-ROM games.\n\nRequired or optional firmware files go in RetroArch's system directory.\n\n!!! attention\n\t Any CD-ROM System BIOS will work, but some are known to be incompatible with certain games.\n\n!!! attention\n\t You can choose the BIOS to use in the core options menu.\n\n| Filename | Description | md5sum |\n|:-------------:|:-------------------------------------:|:--------------------------------:|\n| syscard3.pce | Super CD-ROM2 System V3.xx - Required | 38179df8f4ac870017db21ebcbf53114 |\n| syscard2.pce | CD-ROM System V2.xx - Optional | |\n| syscard1.pce | CD-ROM System V1.xx - Optional | |\n| gexpress.pce | Game Express CD Card - Optional | |\n\n## Extensions\n\nContent that can be loaded by the Geargrafx core have the following file extensions:\n\n- .pce\n- .sgx\n- .hes\n- .cue\n- .chd\n\nGeargrafx supports `chd`, `cue/bin`, `cue/img` and `cue/iso` CD-ROM images. `cue/iso + wav` is also supported when audio track format is 44100Hz, 16 bit, stereo. It does not support MP3 or OGG audio tracks.\n\nRetroArch database(s) that are associated with the Geargrafx core:\n\n- [NEC - PC Engine - TurboGrafx 16](https://github.com/libretro/libretro-database/blob/master/rdb/NEC%20-%20PC%20Engine%20-%20TurboGrafx%2016.rdb)\n- [NEC - PC Engine SuperGrafx](https://github.com/libretro/libretro-database/blob/master/rdb/NEC%20-%20PC%20Engine%20SuperGrafx.rdb)\n- [NEC - PC Engine CD - TurboGrafx-CD](https://github.com/libretro/libretro-database/blob/master/rdb/NEC%20-%20PC%20Engine%20CD%20-%20TurboGrafx-CD.rdb)\n\n## Features\n\nFrontend-level settings or features that the Geargrafx core respects.\n\n| Feature | Supported |\n|-------------------|:---------:|\n| Restart | ✔ |\n| Screenshots | ✔ |\n| Saves | ✔ |\n| States | ✔ |\n| Rewind | ✔ |\n| Netplay | ✔ |\n| Core Options | ✔ |\n| [Memory Monitoring (achievements)](../guides/memorymonitoring.md) | ✔ |\n| RetroArch Cheats | ✔ |\n| Native Cheats | ✕ |\n| Controls | ✔ |\n| Remapping | ✔ |\n| Multi-Mouse | ✕ |\n| Rumble | ✕ |\n| Sensors | ✕ |\n| Camera | ✕ |\n| Location | ✕ |\n| Subsystem | ✕ |\n| [Softpatching](../guides/softpatching.md) | ✔ |\n| Disk Control | ✕ |\n| Username | ✕ |\n| Language | ✕ |\n| Crop Overscan | ✔ |\n| LEDs | ✕ |\n\n## Directories\n\nThe Geargrafx core's library name is 'Geargrafx'\n\nThe Geargrafx core saves/loads to/from these directories.\n\n**Frontend's Save directory**\n\n| File | Description |\n|:-----:|:----------------------:|\n| *.srm | Cartridge battery save |\n\n**Frontend's State directory**\n\n| File | Description |\n|:--------:|:-----------:|\n| *.state# | State |\n\n## Geometry and timing\n\n- The Geargrafx core's provided FPS is 59.82\n- The Geargrafx core's provided sample rate is 44100 Hz\n- The Geargrafx core's base width is dependent on the content and overscan settings (Without overscan: 256, 341, 512. With overscan: 280, 373, 560) \n- The Geargrafx core's base height is dependent on the ['Scanline Start' and 'Scanline End' core options](#core-options).\n- The Geargrafx core's max width is 560\n- The Geargrafx core's max height is 242\n- The Geargrafx core's provided aspect ratio is dependent on the ['Aspect Ratio' core option](#core-options).\n\n## Core options\n\nThe Geargrafx core has the following options that can be tweaked from the core options menu. The default setting is bolded.\n\nSettings with (restart) means that core has to be closed for the new setting to be applied on next launch.\n\n- **System (restart)** [geargrafx_console_type] (**Auto**|PC Engine (JAP)|SuperGrafx (JAP)|TurboGrafx-16 (USA))\n\n Select the console type to emulate. The default setting, Auto, automatically detects the appropriate console type based on the loaded content.\n Many US games will not start if a Japanese system is detected.\n\n- **Aspect Ratio** [geargrafx_aspect_ratio] (**1:1 PAR**|4:3 DAR|6:5 DAR|16:9 DAR|16:10 DAR)\n\n Select which aspect ratio will be presented by the core.\n\n - *1:1 PAR* selects an aspect ratio that produces square pixels.\n - *4:3 DAR* forces 4:3 aspect ratio.\n - *6:5 DAR* forces 6:5 aspect ratio.\n - *16:9 DAR* forces 16:9 aspect ratio.\n - *16:10 DAR* forces 16:10 aspect ratio.\n\n- **Overscan** [geargrafx_overscan] (**Disabled**|Enabled)\n\n This option enables/disables overscan (borders). Overscan width is dependent on the content.\n\n- **Scanline Count** [geargrafx_scanline_count] (**224p**|240p|Manual)\n\n Select which scanline count will be used in emulation.\n\n - *224p* forces 224 scanlines.\n - *240p* forces 240 scanlines.\n - *Manual* lets you set the first and last scanline manually.\n\n- **Scanline Start (Manual)** [geargrafx_scanline_start] (**3**|values from 0 to 30)\n\n This option will set the first scanline to be displayed. Scanline 0 is the first visible scanline.\n This option is only available when 'Scanline Count' is set to 'Manual'.\n\n- **Scanline End (Manual)** [geargrafx_scanline_end] (**241**|values from 220 to 241)\n\n This option will set the last scanline to be displayed. Scanline 241 is the last visible scanline.\n This option is only available when 'Scanline Count' is set to 'Manual'.\n\n- **Composite Colors** [geargrafx_composite_colors] (**Disabled**|Enabled)\n\n If enabled, the core will use composite colors instead of RGB colors.\n\n- **No Sprite Limit** [geargrafx_no_sprite_limit] (**Disabled**|Enabled)\n\n Remove the per-line sprite limit. This reduces flickering but may cause glitches in certain games. It's best to keep this option disabled.\n\n- **Video Low-Pass Filter** [geargrafx_lowpass_filter] (**Disabled**|Enabled)\n\n Enable a low-pass video filter to simulate the signal degradation of analog video output on CRT displays.\n\n- **Video LPF Intensity** [geargrafx_lowpass_intensity] (**100**|0 - 100)\n\n Set the intensity of the video low-pass filter as a percentage from 0 to 100.\n\n- **Video LPF Cutoff** [geargrafx_lowpass_cutoff] (**5.0 MHz**|3.0 MHz|3.5 MHz|4.0 MHz|4.5 MHz|5.0 MHz|5.5 MHz|6.0 MHz|6.5 MHz|7.0 MHz)\n\n Set the cutoff frequency of the video low-pass filter. Lower values produce a softer image.\n\n- **Video LPF HuC6270 5.36 MHz** [geargrafx_lowpass_speed_536] (**Disabled**|Enabled)\n\n Apply the video low-pass filter when HuC6270 is running in 5.36 MHz dot clock mode (256px width).\n\n- **Video LPF HuC6270 7.16 MHz** [geargrafx_lowpass_speed_716] (**Enabled**|Disabled)\n\n Apply the video low-pass filter when HuC6270 is running in 7.16 MHz dot clock mode (341px width).\n\n- **Video LPF HuC6270 10.8 MHz** [geargrafx_lowpass_speed_108] (**Enabled**|Disabled)\n\n Apply the video low-pass filter when HuC6270 is running in 10.8 MHz dot clock mode (512px width).\n\n- **Backup RAM (restart)** [geargrafx_backup_ram] (**Enabled**|Disabled)\n\n This option allows you to disable backup RAM (not recommended).\n\n- **Deterministic Netplay** [geargrafx_deterministic_netplay] (**Disabled**|Enabled)\n\n\tWhen enabled, ensures deterministic emulation behavior for netplay by setting consistent reset values for memory and hardware registers. This helps prevent desyncs during netplay sessions.\n\n- **Safe VDC Defaults (Homebrew)** [geargrafx_safe_vdc_defaults] (**Disabled**|Enabled)\n\n\tWhen enabled, sets safe default values for the VDC (Video Display Controller) registers. This can help some homebrew software run correctly.\n\n- **CD-ROM (restart)** [geargrafx_cdrom_type] (**Auto**|Standard|Super CD-ROM|Arcade CD-ROM)\n\n Select the CD-ROM system type. The *Auto* setting automatically selects the appropriate CD-ROM system based on the loaded content.\n\n - *Auto* selects the best CD-ROM system based on the content.\n - *Standard* forces standard CD-ROM² system.\n - *Super CD-ROM* forces Super CD-ROM² system.\n - *Arcade CD-ROM* forces Arcade CD-ROM² system.\n\n- **CD-ROM Bios (restart)** [geargrafx_cdrom_bios] (**Auto**|System Card 1|System Card 2|System Card 3|Game Express)\n\n Specify the BIOS file to use for CD-ROM emulation. The *Auto* setting automatically selects the appropriate BIOS based on the loaded content. You can also manually choose one for compatibility with specific games.\n\n- **Preload CD-ROM (restart)** [geargrafx_cdrom_preload] (**Disabled**|Enabled)\n\n This option will preload all CD-ROM tracks in RAM. It will increase the memory usage of the core, but may improve performance.\n\n- **HuC6280A Audio Chip** [geargrafx_psg_huc6280a] (**Enabled**|Disabled)\n\n\tEnable the HuC6280A audio chip, as found in the SuperGrafx and CoreGrafx I. When disabled, the original HuC6280 chip from the PC Engine is used instead.\n\n- **PSG Volume** [geargrafx_psg_volume] (**100**|0 - 200)\n\n This option sets the volume of the PSG (Programmable Sound Generator) sound system.\n The value is a percentage from 0 to 200, where 100 is the default volume.\n\n- **CD-ROM Volume** [geargrafx_cdrom_volume] (**100**|0 - 200)\n\n This option sets the volume of the CD-ROM sound system, which is used for music in CD-ROM games.\n The value is a percentage from 0 to 200, where 100 is the default volume.\n\n- **ADPCM Volume** [geargrafx_adpcm_volume] (**100**|0 - 200)\n\n This option sets the volume of the ADPCM sound system, which is typically used for speech in CD-ROM games.\n The value is a percentage from 0 to 200, where 100 is the default volume.\n\n- **Allow Up+Down / Left+Right** [geargrafx_up_down_allowed] (**Disabled**|Enabled)\n\n Enabling this option allows pressing, quickly alternating, or holding both left and right (or up and down in some games) directions at the same time.\n This may cause movement based glitches to occur in certain games.\n It's best to keep this core option disabled.\n\n- **Allow Soft Reset** [geargrafx_soft_reset] (**Enabled**|Disabled)\n\n Pressing RUN and SELECT simultaneously on the PCE gamepad will SOFT RESET the console. This is the default hardware behavior.\n Disable this option if you want the soft reset functionality turned off.\n\n- **TurboTap** [geargrafx_turbotap] (**Disabled**|Enabled)\n\n This option enables/disables TurboTap support (up to 5 players).\n\n- **MB128 Backup Memory** [geargrafx_mb128] (**Auto**|Enabled|Disabled)\n\n\tEnable or disable MB128 backup memory support. MB128 is an external memory card device that can be used to save game data across multiple games.\n\n- **Avenue Pad 3 Switch** [geargrafx_avenue_pad_3_switch] (**Auto**|SELECT|RUN)\n\n Configure the button mapping for the Avenue Pad 3 controller's third button (III).\n\n - *Auto* automatically selects the appropriate button mapping based on the game.\n - *SELECT* maps button III to SELECT.\n - *RUN* maps button III to RUN.\n\n- **P1 Turbo I** [geargrafx_turbo_p1_i] (**Disabled**|Enabled)\n\n Enables/disables the Turbo I button for Player 1.\n\n- **P1 Turbo II** [geargrafx_turbo_p1_ii] (**Disabled**|Enabled)\n\n Enables/disables the Turbo II button for Player 1.\n\n- **P2 Turbo I** [geargrafx_turbo_p2_i] (**Disabled**|Enabled)\n\n Enables/disables the Turbo I button for Player 2.\n\n- **P2 Turbo II** [geargrafx_turbo_p2_ii] (**Disabled**|Enabled)\n\n Enables/disables the Turbo II button for Player 2.\n\n- **P3 Turbo I** [geargrafx_turbo_p3_i] (**Disabled**|Enabled)\n\n Enables/disables the Turbo I button for Player 3.\n\n- **P3 Turbo II** [geargrafx_turbo_p3_ii] (**Disabled**|Enabled)\n\n Enables/disables the Turbo II button for Player 3.\n\n- **P4 Turbo I** [geargrafx_turbo_p4_i] (**Disabled**|Enabled)\n\n Enables/disables the Turbo I button for Player 4.\n\n- **P4 Turbo II** [geargrafx_turbo_p4_ii] (**Disabled**|Enabled)\n\n Enables/disables the Turbo II button for Player 4.\n\n- **P5 Turbo I** [geargrafx_turbo_p5_i] (**Disabled**|Enabled)\n\n Enables/disables the Turbo I button for Player 5.\n\n- **P5 Turbo II** [geargrafx_turbo_p5_ii] (**Disabled**|Enabled)\n\n Enables/disables the Turbo II button for Player 5.\n\n- **P1 Turbo I Speed** [geargrafx_turbo_speed_p1_i] (**4**|values from 1 to 15)\n\n Number of frames between each button I toggle for Player 1.\n\n- **P1 Turbo II Speed** [geargrafx_turbo_speed_p1_ii] (**4**|values from 1 to 15)\n\n Number of frames between each button II toggle for Player 1.\n\n- **P2 Turbo I Speed** [geargrafx_turbo_speed_p2_i] (**4**|values from 1 to 15)\n\n Number of frames between each button I toggle for Player 2.\n\n- **P2 Turbo II Speed** [geargrafx_turbo_speed_p2_ii] (**4**|values from 1 to 15)\n\n Number of frames between each button II toggle for Player 2.\n\n- **P3 Turbo I Speed** [geargrafx_turbo_speed_p3_i] (**4**|values from 1 to 15)\n\n Number of frames between each button I toggle for Player 3.\n\n- **P3 Turbo II Speed** [geargrafx_turbo_speed_p3_ii] (**4**|values from 1 to 15)\n\n Number of frames between each button II toggle for Player 3.\n\n- **P4 Turbo I Speed** [geargrafx_turbo_speed_p4_i] (**4**|values from 1 to 15)\n\n Number of frames between each button I toggle for Player 4.\n\n- **P4 Turbo II Speed** [geargrafx_turbo_speed_p4_ii] (**4**|values from 1 to 15)\n\n Number of frames between each button II toggle for Player 4.\n\n- **P5 Turbo I Speed** [geargrafx_turbo_speed_p5_i] (**4**|values from 1 to 15)\n\n Number of frames between each button I toggle for Player 5.\n\n- **P5 Turbo II Speed** [geargrafx_turbo_speed_p5_ii] (**4**|values from 1 to 15)\n\n Number of frames between each button II toggle for Player 5.\n\n## Joypad\n\n| RetroPad Inputs | PCE Pad (2-button) | Avenue Pad 3 (3-button) | Avenue Pad 6 (6-button) |\n|---------------------------------------------|--------------------|----------------------------|-------------------------|\n|  | D-Pad Up | D-Pad Up | D-Pad Up |\n|  | D-Pad Down | D-Pad Down | D-Pad Down |\n|  | D-Pad Left | D-Pad Left | D-Pad Left |\n|  | D-Pad Right | D-Pad Right | D-Pad Right |\n|  | Select | Select | Select |\n|  | Run | Run | Run |\n|  | I | I | I |\n|  | II | II | II |\n|  | | III (mapped to Select/Run) | III |\n|  | | | IV |\n|  | | | V |\n|  | | | VI |\n|  | Toggle Turbo II | Toggle Turbo II | Toggle Turbo II |\n|  | Toggle Turbo I | Toggle Turbo I | Toggle Turbo I |\n\n## External Links\n\n- [Official Geargrafx Repository](https://github.com/drhelius/Geargrafx)\n- [Libretro Geargrafx Core info file](https://github.com/libretro/libretro-super/blob/master/dist/info/geargrafx_libretro.info)\n- [Report Libretro Geargrafx Core Issues Here](https://github.com/drhelius/Geargrafx/issues)\n"
},
{
"path": "docs/library/gearlynx.md",
"content": "# Atari - Lynx (Gearlynx)\n\n## Background\n\nGearlynx is an open source, cross-platform, Atari Lynx emulator written in C++.\n\n- Very accurate emulation supporting the entire commercial Atari Lynx catalog.\n- Bank switching (BANK1 + AUDIN) and EEPROM support.\n- Save files (EEPROM and NVRAM).\n- Configurable low-pass audio filter.\n- Internal database for automatic rom detection and hardware selection if `Auto` options are selected.\n- Supported platforms (libretro): Windows, Linux, macOS, Raspberry Pi, Android, iOS, tvOS, PlayStation Vita, PlayStation 3, Nintendo 3DS, Nintendo GameCube, Nintendo Wii, Nintendo WiiU, Nintendo Switch, Emscripten, Classic Mini systems (NES, SNES, C64, ...), OpenDingux, RetroFW and QNX.\n\nThe Gearlynx core has been authored by:\n\n- [Nacho Sanchez (drhelius)](https://github.com/drhelius)\n\nThe Gearlynx core is licensed under:\n\n- [GPLv3](https://github.com/drhelius/Gearlynx/blob/main/LICENSE)\n\nA summary of the licenses behind RetroArch and its cores can be found [here](../development/licenses.md).\n\n## BIOS\n\nGearlynx requires a BIOS to work.\n\nRequired firmware files go in the frontend's system directory.\n\n!!! attention\n\tThe Lynx boot ROM file is required for Gearlynx to function.\n\n| Filename | Description | md5sum |\n|:------------:|:----------------------------:|:--------------------------------:|\n| lynxboot.img | Lynx Boot Image - Required | fcd403db69f54290b51035d82f835e7b |\n\n## Extensions\n\nContent that can be loaded by the Gearlynx core have the following file extensions:\n\n- .lnx\n- .lyx\n- .o\n\nRetroArch database(s) that are associated with the Gearlynx core:\n\n- [Atari - Lynx](https://github.com/libretro/libretro-database/blob/master/rdb/Atari%20-%20Lynx.rdb)\n\n## Features\n\nFrontend-level settings or features that the Gearlynx core respects.\n\n| Feature | Supported |\n|-------------------|:---------:|\n| Restart | ✔ |\n| Screenshots | ✔ |\n| Saves | ✔ |\n| States | ✔ |\n| Rewind | ✔ |\n| Netplay | ✔ |\n| Core Options | ✔ |\n| [Memory Monitoring (achievements)](../guides/memorymonitoring.md) | ✔ |\n| RetroArch Cheats | ✕ |\n| Native Cheats | ✕ |\n| Controls | ✔ |\n| Remapping | ✔ |\n| Multi-Mouse | ✕ |\n| Rumble | ✕ |\n| Sensors | ✕ |\n| Camera | ✕ |\n| Location | ✕ |\n| Subsystem | ✕ |\n| [Softpatching](../guides/softpatching.md) | ✔ |\n| Disk Control | ✕ |\n| Username | ✕ |\n| Language | ✕ |\n| Crop Overscan | ✕ |\n| LEDs | ✕ |\n\n### Directories\n\nThe Gearlynx core's library name is 'Gearlynx'\n\nThe Gearlynx core saves/loads to/from these directories.\n\n**Frontend's Save directory**\n\n| File | Description |\n|:-----:|:----------------------:|\n| *.srm | EEPROM / NVRAM save |\n\n**Frontend's State directory**\n\n| File | Description |\n|:--------:|:-----------:|\n| *.state# | State |\n\n### Geometry and timing\n\n- The Gearlynx core's core provided FPS is variable from 50 to 75\n- The Gearlynx core's core provided sample rate is 44100 Hz\n- The Gearlynx core's base width is 160\n- The Gearlynx core's base height is 102\n- The Gearlynx core's max width is 160\n- The Gearlynx core's max height is 102\n- The Gearlynx core's provided aspect ratio is dependent on the ['Aspect Ratio' core option](#core-options).\n\n## Core options\n\nThe Gearlynx core has the following options that can be tweaked from the core options menu. The default setting is bolded.\n\nSettings with (restart) means that core has to be closed for the new setting to be applied on next launch.\n\n- **Aspect Ratio** [gearlynx_aspect_ratio] (**1:1 PAR**|4:3 DAR|16:9 DAR|16:10 DAR)\n\n\tSelect which aspect ratio will be presented by the core.\n\n\t- *1:1 PAR* selects an aspect ratio that produces square pixels.\n\t- *4:3 DAR* forces 4:3 aspect ratio.\n\t- *16:9 DAR* forces 16:9 aspect ratio.\n\t- *16:10 DAR* forces 16:10 aspect ratio.\n\n- **Screen Rotation** [gearlynx_rotation] (**Auto**|Left|Right|Disabled)\n\n\tRotates the screen display. This is useful since many Lynx games were designed to be played with the system held vertically.\n\n\t- *Auto* automatically rotates based on the game.\n\t- *Left* rotates the screen 90 degrees counter-clockwise.\n\t- *Right* rotates the screen 90 degrees clockwise.\n\t- *Disabled* forces the screen to remain in standard horizontal orientation.\n\n- **Console Type** [gearlynx_console_type] (**Auto**|Lynx I|Lynx II)\n\n\tSelect the Atari Lynx console model to emulate.\n\n\t- *Auto* automatically selects the appropriate console type based on the game.\n\t- *Lynx I* forces emulation of the original Lynx model.\n\t- *Lynx II* forces emulation of the Lynx II model.\n\n- **Audio Low-Pass Filter (Hz)** [gearlynx_lowpass_filter] (**3500**|500|1000|1500|2000|2500|3000|3500|4000|4500|5000)\n\n\tConfigures a low-pass audio filter to reduce high-frequency noise.\n\n- **Audio Channel 0 Volume** [gearlynx_audio_ch0_volume] (**100**|0-200)\n\n\tSets the volume level for audio channel 0 (percentage).\n\n- **Audio Channel 1 Volume** [gearlynx_audio_ch1_volume] (**100**|0-200)\n\n\tSets the volume level for audio channel 1 (percentage).\n\n- **Audio Channel 2 Volume** [gearlynx_audio_ch2_volume] (**100**|0-200)\n\n\tSets the volume level for audio channel 2 (percentage).\n\n- **Audio Channel 3 Volume** [gearlynx_audio_ch3_volume] (**100**|0-200)\n\n\tSets the volume level for audio channel 3 (percentage).\n\n- **Allow Up+Down / Left+Right** [gearlynx_up_down_allowed] (**Disabled**|Enabled)\n\n\tEnabling this option allows pressing, quickly alternating, or holding both left and right (or up and down) directions at the same time.\n\n\tThis may cause movement based glitches to occur in certain games.\n\n\tIt's best to keep this core option disabled.\n\n## Joypad\n\n\n\n| User 1 input descriptors | RetroPad Inputs |\n|--------------------------|---------------------------------------------|\n| B |  |\n| Pause |  |\n| Up |  |\n| Down |  |\n| Left |  |\n| Right |  |\n| A |  |\n| Option 1 |  |\n| Option 2 |  |\n\n## Compatibility\n\n- [Gearlynx Hardware Tests](https://github.com/drhelius/lynx-tests)\n\n## External Links\n\n- [Official Gearlynx Github Repository](https://github.com/drhelius/Gearlynx)\n- [Libretro Gearlynx Core info file](https://github.com/libretro/libretro-super/blob/master/dist/info/gearlynx_libretro.info)\n- [Report Libretro Gearlynx Core Issues Here](https://github.com/drhelius/Gearlynx/issues)\n\n### See also\n\n#### Atari - Lynx\n\n- [Atari - Lynx (Beetle Lynx)](beetle_lynx.md)\n- [Atari - Lynx (Handy)](handy.md)\n- [Atari - Lynx (Holani)](holani.md)\n"
},
{
"path": "docs/library/gearsystem.md",
"content": "# Sega - MS/GG (Gearsystem)\n\n## Background\n\nGearsystem is an open source, cross-platform, Sega Master System / Game Gear / SG-1000 / Othello Multivision emulator written in C++.\n\n- Very accurate emulation supporting cartridges: ROM, ROM + RAM, SEGA, Codemasters, Korean, MSX + Nemesis, Janggun, SG-1000, and many Korean multi-carts.\n- Automatic region detection: NTSC-JAP, NTSC-USA, PAL-EUR.\n- Accurate VDP emulation, including timing and VDP specifics for SMS, SMS2, GG and TMS9918 modes.\n- Support for YM2413 (OPLL) FM sound chip.\n- Light Phaser and Paddle Control support.\n- Internal database for ROM detection.\n- Battery powered RAM save support.\n- Game Genie and Pro Action Replay cheat support.\n- Supported platforms (libretro): Windows, Linux, macOS, Raspberry Pi, Android, iOS, tvOS, PlayStation Vita, PlayStation 3, Nintendo 3DS, Nintendo GameCube, Nintendo Wii, Nintendo WiiU, Nintendo Switch, Emscripten, Classic Mini systems (NES, SNES, C64, ...), OpenDingux, RetroFW and QNX.\n\nThe Gearsystem core has been authored by\n\n- [Nacho Sanchez (drhelius)](https://github.com/drhelius)\n\nThe Gearsystem core is licensed under\n\n- [GPLv3](https://github.com/drhelius/Gearsystem/blob/master/LICENSE)\n\nA summary of the licenses behind RetroArch and its cores can be found [here](../development/licenses.md).\n\n## BIOS\n\nGearsystem does not require BIOS (bootrom) files to work but they can be used optionally.\n\nWhen the BIOS is enabled it will execute as in original hardware, causing invalid roms to lock or preventing them to boot, depending on the BIOS file and rom region and system. If you experience issues disable the BIOS.\n\nRequired or optional firmware files go in the frontend's system directory.\n\n!!! attention\n\t If you’d like to use any BIOS, you can place the following files in RetroArch's system directory. Then, you need to enable [Master System BIOS](#core-options) and/or [Game Gear BIOS](#core-options) core options for these BIOS files to be used.\n\n| Filename | Description | md5sum |\n|:------------:|:----------------------------------:|:--------------------------------:|\n| bios.sms | Master System BIOS - Optional | 840481177270d5642a14ca71ee72844c |\n| bios.gg | Game Gear BIOS - Optional | 672e104c3be3a238301aceffc3b23fd6 |\n\n## Extensions\n\nContent that can be loaded by the Gearsystem core have the following file extensions:\n\n- .sms\n- .gg\n- .sg\n- .mv\n- .bin\n- .rom\n\nRetroArch database(s) that are associated with the Gearsystem core:\n\n- [Sega - Game Gear](https://github.com/libretro/libretro-database/blob/master/rdb/Sega%20-%20Game%20Gear.rdb)\n- [Sega - Master System - Mark III](https://github.com/libretro/libretro-database/blob/master/rdb/Sega%20-%20Master%20System%20-%20Mark%20III.rdb)\n- [Sega - SG-1000](https://github.com/libretro/libretro-database/blob/master/rdb/Sega%20-%20SG-1000.rdb)\n\n## Features\n\nFrontend-level settings or features that the Gearsystem core respects.\n\n| Feature | Supported |\n|-------------------|:---------:|\n| Restart | ✔ |\n| Screenshots | ✔ |\n| Saves | ✔ |\n| States | ✔ |\n| Rewind | ✔ |\n| Netplay | ✔ |\n| Core Options | ✔ |\n| [Memory Monitoring (achievements)](../guides/memorymonitoring.md) | ✔ |\n| RetroArch Cheats - Game Genie | ✔ |\n| RetroArch Cheats - Pro Action Replay | ✔ |\n| Native Cheats | ✕ |\n| Controls | ✔ |\n| Remapping | ✔ |\n| Multi-Mouse | ✕ |\n| Rumble | ✕ |\n| Sensors | ✕ |\n| Camera | ✕ |\n| Location | ✕ |\n| Subsystem | ✕ |\n| [Softpatching](../guides/softpatching.md) | ✔ |\n| Disk Control | ✕ |\n| Username | ✕ |\n| Language | ✕ |\n| Crop Overscan | ✔ |\n| LEDs | ✕ |\n\n### Directories\n\nThe Gearsystem core's library name is 'Gearsystem'\n\nThe Gearsystem core saves/loads to/from these directories.\n\n**Frontend's Save directory**\n\n| File | Description |\n|:-----:|:----------------------:|\n| *.srm | Cartridge battery save |\n\n**Frontend's State directory**\n\n| File | Description |\n|:--------:|:-----------:|\n| *.state# | State |\n\n### Geometry and timing\n\n- The Gearsystem core's core provided FPS is 60 for NTSC games and 50 for PAL games\n- The Gearsystem core's core provided sample rate is 44100 Hz\n- The Gearsystem core's base width is 256 for Master System / SG-1000 games and 160 for Game Gear games\n- The Gearsystem core's base height is 192 for Master System / SG-1000 games and 144 for Game Gear games\n- The Gearsystem core's max width is 256 for Master System games and 160 for Game Gear games\n- The Gearsystem core's max height is 224 for Master System games and 144 for Game Gear games\n- The Gearsystem core's core provided aspect ratio is 4:3 for Master System / SG-1000 games and 10:9 for Game Gear games\n\n## Core options\n\nThe Gearsystem core has the following options that can be tweaked from the core options menu. The default setting is bolded.\n\nSettings with (restart) means that core has to be closed for the new setting to be applied on next launch.\n\n- **System (restart)** [gearsystem_system] (**Auto**|Master System / Mark III|Game Gear (2 ASIC)|Game Gear (2 ASIC) SMS Mode|Game Gear (1 ASIC)|Game Gear (1 ASIC) SMS Mode|SG-1000 / Multivision|SG-1000 II)\n\n\tSelect the console type to emulate. 'Auto' automatically detects the appropriate system based on the loaded content.\n\n - *Auto* selects the best hardware based on the rom.\n - *Master System / Mark III* forces original Master System / Mark III hardware.\n - *Game Gear (2 ASIC)* forces Game Gear hardware with 2 ASIC configuration.\n - *Game Gear (2 ASIC) SMS Mode* forces Game Gear in SMS compatibility mode (2 ASIC).\n - *Game Gear (1 ASIC)* forces Game Gear hardware with 1 ASIC configuration.\n - *Game Gear (1 ASIC) SMS Mode* forces Game Gear in SMS compatibility mode (1 ASIC).\n - *SG-1000 / Multivision* forces SG-1000 / Multivision hardware.\n - *SG-1000 II* forces SG-1000 II hardware.\n\n- **Region (restart)** [gearsystem_region] (**Auto**|Master System Japan|Master System Export|Game Gear Japan|Game Gear Export|Game Gear International)\n\n\tSelect which region is emulated.\n\n - *Auto* selects the best region based on the rom.\n - *Master System Japan* forces Master System Japan region.\n - *Master System Export* forces Master System Export region.\n - *Game Gear Japan* forces Game Gear Japan region.\n - *Game Gear Export* forces Game Gear Export region.\n - *Game Gear International* forces Game Gear International region.\n\n- **Mapper (restart)** [gearsystem_mapper] (**Auto**|ROM|SEGA|Codemasters|Korean|SG-1000|MSX|Janggun|Korean 2000 XOR 1F|Korean MSX 32KB 2000|Korean MSX SMS 8000|Korean SMS 32KB 2000|Korean MSX 8KB 0300|Korean 0000 XOR FF|Korean FFFF HiCom|Korean FFFE|Korean BFFC|Korean FFF3 FFFC|Korean MD FFF5|Korean MD FFF0|Jumbo Dahjee|EEPROM 93C46|Multi 4PAK All Action|Iratahack)\n\n\tSelect which mapper (memory bank controller) is emulated. 'Auto' automatically detects the appropriate mapper based on the loaded content. Only change this if a game does not work correctly with the default setting.\n\n - *Auto* selects the best mapper based on the rom.\n - *ROM* forces no mapper.\n - *SEGA* forces SEGA mapper.\n - *Codemasters* forces Codemasters mapper.\n - *Korean* forces Korean mapper.\n - *SG-1000* forces SG-1000 mapper.\n - *MSX* forces MSX mapper.\n - *Janggun* forces Janggun mapper.\n\n- **Refresh Rate (restart)** [gearsystem_timing] (**Auto**|NTSC (60 Hz)|PAL (50 Hz))\n\n\tSelect which refresh rate will be used in emulation.\n\n - *Auto* selects the best refresh rate based on the rom.\n - *NTSC (60 Hz)* forces 60 Hz.\n - *PAL (50 Hz)* forces 50 Hz.\n\n- **Aspect Ratio** [gearsystem_aspect_ratio] (**1:1 PAR**|4:3 DAR|16:9 DAR|16:10 DAR)\n\n Select which aspect ratio will be presented by the core.\n\n - *1:1 PAR* selects an aspect ratio that produces square pixels.\n - *4:3 DAR* forces 4:3 aspect ratio.\n - *16:9 DAR* forces 16:9 aspect ratio.\n - *16:10 DAR* forces 16:10 aspect ratio.\n\n- **Overscan** [gearsystem_overscan] (**Disabled**|Top+Bottom|Full (284 width)|Full (320 width))\n\n Select which overscan (borders) will be used in emulation.\n\n - *Disabled* disables overscan.\n - *Top+Bottom* enables overscan for top and bottom.\n - *Full (284 width)* enables overscan for top, bottom, left and right (284 width).\n - *Full (320 width)* enables overscan for top, bottom, left and right (320 width).\n\n- **Hide Left Bar (SMS only)** [gearsystem_hide_left_bar] (**No**|Auto|Always)\n\n Select when to hide the left bar in Master System games.\n\n - *No* never hides the left bar.\n - *Auto* hides the left bar when the bar is detected.\n - *Always* always hides the left bar even if no left bar is detected.\n\n- **Master System BIOS (restart)** [gearsystem_bios_sms] (**Disabled**|Enabled)\n\n\tEnable or disable the Master System BIOS. For this to work, the `bios.sms` file must exist in RetroArch's system directory. When enabled it will execute as in original hardware, which may cause invalid ROMs to lock or fail to boot.\n\n- **Game Gear BIOS (restart)** [gearsystem_bios_gg] (**Disabled**|Enabled)\n\n\tEnable or disable the Game Gear BIOS. For this to work, the `bios.gg` file must exist in RetroArch's system directory. When enabled it will execute as in original hardware, which may cause invalid ROMs to lock or fail to boot.\n\n- **YM2413 (restart)** [gearsystem_ym2413] (**Auto**|Disabled)\n\n\tEnable or disable the YM2413 (OPLL) FM sound chip. 'Auto' enables the chip based on the loaded content. Some Master System games use this chip for enhanced music.\n\n - *Auto* selects the best option based on the rom.\n - *Disabled* disables YM2413.\n\n- **PSG Volume** [gearsystem_psg_volume] (**100**|0 - 200)\n\n\tSet the volume of the PSG (SN76489). The value is a percentage from 0 to 200, where 100 is the default volume.\n\n- **FM Volume** [gearsystem_fm_volume] (**100**|0 - 200)\n\n\tSet the volume of the YM2413 (OPLL) FM sound chip. The value is a percentage from 0 to 200, where 100 is the default volume.\n\n- **3D Glasses** [gearsystem_glasses] (**Both Eyes / OFF**|Left Eye|Right Eye)\n\n\tFor games with 3D glasses support this option will let you choose to display only left or right eye.\n\n - *Both Eyes / OFF* is required for games with NO 3D support or if you want to display both eyes in 3D games.\n - *Left Eye* displays the left eye only.\n - *Right Eye* displays the right eye only.\n\n- **Allow Up+Down / Left+Right** [gearsystem_up_down_allowed] (**Disabled**|Enabled)\n\n\tEnabling this option allows pressing, quickly alternating, or holding both left and right (or up and down in some games) directions at the same time.\n\n\tThis may cause movement based glitches to occur in certain games.\n\n\tIt's best to keep this core option disabled.\n\n- **Light Gun Input** [gearsystem_lightgun_input] (**Light Gun**|Touchscreen)\n\n Select which input will be used for Light Phaser games.\n\n - *Light Gun* - Selects mouse-controlled 'Light Gun' input (devices will use [RetroLightgun](#lightgun) inputs).\n - *Touchscreen* - Selects a touchscreen input (devices will use [RetroPointer](#pointer) inputs instead).\n\n- **Light Gun Crosshair** [gearsystem_lightgun_crosshair] (**Disabled**|Enabled)\n\n Enable or disable the crosshair for Light Phaser games.\n\n- **Light Gun Crosshair Shape** [gearsystem_lightgun_shape] (**Cross**|Square)\n\n Select the shape of the crosshair for Light Phaser games.\n\n- **Light Gun Crosshair Color** [gearsystem_lightgun_color] (**White**|Black|Red|Green|Blue|Yellow|Magenta|Cyan)\n\n Select the color of the crosshair for Light Phaser games.\n\n- **Light Gun Crosshair Offset X** [gearsystem_lightgun_crosshair_offset_x] (**0**|-10 - 10)\n\n Set the horizontal pixel offset of the crosshair for calibration.\n\n- **Light Gun Crosshair Offset Y** [gearsystem_lightgun_crosshair_offset_y] (**0**|-10 - 10)\n\n Set the vertical pixel offset of the crosshair for calibration.\n\n- **Paddle Sensitivity** [gearsystem_paddle_sensitivity] (**1**|1-15)\n\n Set the sensitivity of the [Paddle Control](#mouse).\n\n - *1* is the lowest sensitivity.\n - *15* is the highest sensitivity.\n\n## Joypad\n\n\n\n\n\n\n\n| RetroPad Inputs | SMS / GG Pad |\n|------------------------------------------------|--------------------------|\n|  | Up |\n|  | Down |\n|  | Left |\n|  | Right |\n|  | 1 |\n|  | 2 |\n|  | Pause / Start |\n\n## Lightgun\n\n| RetroLightgun Inputs | [Light Phaser](https://segaretro.org/Light_Phaser) |\n|-----------------------|---------------------------------------------------------|\n|  Gun Crosshair | Light Phaser Crosshair |\n| Gun Trigger | Light Phaser Trigger |\n\n## Pointer\n\n| RetroPointer Inputs | [Light Phaser](https://segaretro.org/Light_Phaser) |\n|-----------------------|-----------------------------------------------------------|\n|  or  Pointer Position | Light Phaser Crosshair |\n|  Mouse 1 | Light Phaser Trigger |\n\n## Mouse\n\n| RetroMouse Inputs | [Paddle Control](https://segaretro.org/Paddle_Control) |\n|-------------------------------------------------------|-----------------|\n|  Mouse Cursor | Paddle wheel |\n|  Mouse 1 | Paddle button |\n\n## Compatibility\n\n- [Gearsystem Accuracy Tests](https://github.com/drhelius/Gearsystem#accuracy-tests)\n\n## External Links\n\n- [Official Gearsystem Repository](https://github.com/drhelius/Gearsystem)\n- [Libretro Gearsystem Core info file](https://github.com/libretro/libretro-super/blob/master/dist/info/gearsystem_libretro.info)\n- [Report Libretro Gearsystem Core Issues Here](https://github.com/drhelius/Gearsystem/issues)\n\n### See also\n\n#### Sega - Game Gear\n\n- [Sega - MS/GG/MD/CD (Genesis Plus GX)](genesis_plus_gx.md)\n\n#### Sega - Master System - Mark III\n\n- [Sega - Master System (Emux SMS)](emux_sms.md)\n- [Sega - MS/GG/MD/CD (Genesis Plus GX)](genesis_plus_gx.md)\n- [Sega - MS/MD/CD/32X (PicoDrive)](picodrive.md)\n\n#### Sega - SG-1000\n\n- [MSX/SVI/ColecoVision/SG-1000 (blueMSX)](bluemsx.md)\n- [Sega - MS/GG/MD/CD (Genesis Plus GX)](genesis_plus_gx.md)\n"
},
{
"path": "docs/library/genesis_plus_gx.md",
"content": "# Sega - MS/GG/MD/CD (Genesis Plus GX)\n\n## Background\n\nGenesis Plus GX is an open-source Sega 8/16 bit emulator developed by Eke-Eke which focuses on accuracy and portability. The source code, originally based on Genesis Plus 1.3 by Charles MacDonald, has been heavily modified & enhanced, with respect to initial goals and design, in order to improve the accuracy of emulation, implementing new [features](https://github.com/ekeeke/Genesis-Plus-GX/blob/master/wiki/Features.md) and adding support for [extra peripherals](https://github.com/ekeeke/Genesis-Plus-GX/blob/master/wiki/Features.md#support-for-various-peripherals), [cartridge & systems hardware](https://github.com/ekeeke/Genesis-Plus-GX/blob/master/wiki/Features.md#support-for-various-cartridges-extra-hardware) such as various lightguns, the FM Sound Unit and Lock-On cartridge technology.\n\nGenesis Plus GX has [100% compatibility](https://github.com/ekeeke/Genesis-Plus-GX/blob/master/wiki/Compatibility.md) with Genesis / Mega Drive, Sega/Mega CD, Master System, Game Gear, SG-1000 & Pico released software (including all unlicensed or pirate known dumps), also emulating backwards compatibility modes when available. \n\n**Keep in mind that [32X games](https://segaretro.org/Sega_32X#List_of_games) are not supported.**\n\nThe Genesis Plus GX core has been authored by:\n\n- Eke-Eke\n- Charles McDonald\n\nThe Genesis Plus GX core is licensed under:\n\n- [Non-commercial](https://github.com/libretro/Genesis-Plus-GX/blob/master/LICENSE.txt)\n\nA summary of the licenses behind RetroArch and its cores can be found [here](../development/licenses.md).\n\n## BIOS\n\n[Required or optional firmware files](https://docs.libretro.com/library/bios/) go in the frontend's system directory:\n\n!!! warning \"\"\n Please note that BIOS choice isn't locked to any specific revisions.\n!!! warning \"\"\n BIOS files that are labeled (bootrom) and (lock-on) must have their corresponding [core option](#core-options) ('System bootrom' core option or 'Cartridge lock-on' core option) configured correctly in order for them to be loaded.\n\n| Filename | Description | md5sum |\n|:-------------:|:-----------------------------------------------:|:--------------------------------:|\n| bios_MD.bin | [MegaDrive startup ROM](https://segaretro.org/TradeMark_Security_System) (bootrom) - Optional | 45e298905a08f9cfb38fd504cd6dbc84 |\n| bios_CD_E.bin | [MegaCD EU BIOS](https://segaretro.org/Sega_Mega-CD/Boot_ROM) - Required for MegaCD EU games | e66fa1dc5820d254611fdcdba0662372 |\n| bios_CD_U.bin | [SegaCD US BIOS](https://segaretro.org/Sega_Mega-CD/Boot_ROM) - Required for SegaCD US games | 854b9150240a198070150e4566ae1290 |\n| bios_CD_J.bin | [MegaCD JP BIOS](https://segaretro.org/Sega_Mega-CD/Boot_ROM) - Required for MegaCD JP games | 278a9397d192149e84e820ac621a8edd |\n| bios_E.sms | [MasterSystem EU BIOS](https://segaretro.org/Sega_Master_System/Boot_ROM) (bootrom) - Optional | 840481177270d5642a14ca71ee72844c |\n| bios_U.sms | [MasterSystem US BIOS](https://segaretro.org/Sega_Master_System/Boot_ROM) (bootrom) - Optional | 840481177270d5642a14ca71ee72844c |\n| bios_J.sms | [MasterSystem JP BIOS](https://segaretro.org/Sega_Master_System/Boot_ROM) (bootrom) - Optional | 24a519c53f67b00640d0048ef7089105 |\n| bios.gg | [GameGear BIOS](https://www.smspower.org/Development/BIOSes#GameGear) (bootrom) - Optional | 672e104c3be3a238301aceffc3b23fd6 |\n| sk.bin | [Sonic & Knuckles ROM (lock-on)](https://segaretro.org/Sonic_%26_Knuckles/Technical_information) - Optional | 4ea493ea4e9f6c9ebfccbdb15110367e |\n| sk2chip.bin | [Sonic & Knuckles UPMEM ROM]: [Link 1](https://emulation.gametechwiki.com/index.php/Sega_Genesis_emulators#Lock-On_Emulation); [Link 2](https://info.sonicretro.org/Knuckles_the_Echidna_in_Sonic_the_Hedgehog_2#Functioning) (lock-on) - Optional | b4e76e416b887f4e7413ba76fa735f16 |\n| areplay.bin | [Action Replay ROM](https://segaretro.org/Action_Replay) (lock-on) - Optional | a0028b3043f9d59ceeb03da5b073b30d |\n| ggenie.bin | [Game Genie ROM (lock-on)](https://segaretro.org/Game_Genie_(Mega_Drive)) - Optional | e8af7fe115a75c849f6aab3701e7799b |\n\n## Extensions\n\nContent that can be loaded by the Genesis Plus GX core have the following file extensions:\n\n* .m3u\n* .mdx\n* .md\n* .smd\n* .gen\n* .bin\n* .cue\n* .iso\n* .chd\n* .bms\n* .sms\n* .gg\n* .sg\n* .68k\n* .sgd\n\n\nRetroArch database(s) that are associated with the Genesis Plus GX core:\n\n- [Sega - Game Gear](https://github.com/libretro/libretro-database/blob/master/rdb/Sega%20-%20Game%20Gear.rdb)\n- [Sega - Master System - Mark III](https://github.com/libretro/libretro-database/blob/master/rdb/Sega%20-%20Master%20System%20-%20Mark%20III.rdb)\n- [Sega - Mega-CD - Sega CD](https://github.com/libretro/libretro-database/blob/master/rdb/Sega%20-%20Mega-CD%20-%20Sega%20CD.rdb)\n- [Sega - Mega Drive - Genesis](https://github.com/libretro/libretro-database/blob/master/rdb/Sega%20-%20Mega%20Drive%20-%20Genesis.rdb)\n- [Sega - PICO](https://github.com/libretro/libretro-database/blob/master/rdb/Sega%20-%20PICO.rdb)\n- [Sega - SG-1000](https://github.com/libretro/libretro-database/blob/master/rdb/Sega%20-%20SG-1000.rdb)\n\n## Features\n\nFrontend-level settings or features that the Genesis Plus GX core respects:\n\n| Feature | Supported |\n|-------------------|:---------:|\n| Restart | ✔ |\n| Saves | ✔ |\n| States | ✔ |\n| Rewind | ✔ |\n| Netplay | ✔ |\n| Core Options | ✔ |\n| [Memory Monitoring (achievements)](../guides/memorymonitoring.md) | ✔ |\n| RetroArch Cheats | ✔ |\n| Native Cheats | ✕ |\n| Controls | ✔ |\n| Remapping | ✔ |\n| Multi-Mouse | ✔ |\n| Rumble | ✕ |\n| Sensors | ✕ |\n| Camera | ✕ |\n| Location | ✕ |\n| Subsystem | ✕ |\n| [Softpatching](../guides/softpatching.md) | ✕ |\n| Disk Control | ✔ |\n| Username | ✕ |\n| Language | ✔ |\n| Crop Overscan* | ✕ |\n| LEDs | ✔ |\n\n\\* Overscan cropping available via the 'Borders' core option instead of frontend-level settings\n\n## Directories\n\nThe Genesis Plus GX core's library name is 'Genesis Plus GX'\n\nThe Genesis Plus GX core saves/loads to/from these directories:\n\n**Frontend's Save directory**\n\n| File | Description |\n|:------------:|:------------------------------------------------------------------------------------:|\n| *.srm | [MS/GG/MD/Pico/SG-1000 Cartridge](https://segaretro.org/Cartridge) backup save |\n| cart.brm | [Sega/Mega CD RAM Cart](https://segaretro.org/CD_BackUp_RAM_Cart) |\n| scd_U.brm | [Sega CD US Backup RAM](https://segaretro.org/Sega_Mega-CD/Technical_specifications#Memory) - When the [CD System BRAM core option](#system) is set to 'Per-BIOS' |\n| scd_E.brm | [Mega CD EU Backup RAM](https://segaretro.org/Sega_Mega-CD/Technical_specifications#Memory) - When the [CD System BRAM core option](#system) is set to 'Per-BIOS' |\n| scd_J.brm | [Mega CD JP Backup RAM](https://segaretro.org/Sega_Mega-CD/Technical_specifications#Memory) - When the [CD System BRAM core option](#system) is set to 'Per-BIOS' |\n| *.brm | [Sega CD/MegaCD Backup RAM](https://segaretro.org/Sega_Mega-CD/Technical_specifications#Memory) - When the [CD System BRAM core option](#system) is set to 'Per-Game' |\n\n**Frontend's State directory**\n\n| File | Description |\n|:--------:|:-----------:|\n| *.state# | State |\n\n## Geometry and timing\n\n- The Genesis Plus GX core's provided FPS is dependent on the [loaded content](https://github.com/libretro/Genesis-Plus-GX/blob/master/libretro/libretro.c#L3027)\n- The Genesis Plus GX core's provided sample rate is [44100 Hz](https://github.com/libretro/Genesis-Plus-GX/blob/master/libretro/libretro.c#L199)\n- The Genesis Plus GX core's base width is dependent on the [loaded content](https://github.com/libretro/Genesis-Plus-GX/blob/master/libretro/libretro.c#L2999)\n- The Genesis Plus GX core's base height is dependent on the [loaded content](https://github.com/libretro/Genesis-Plus-GX/blob/master/libretro/libretro.c#L3000)\n- The Genesis Plus GX core's max width is dependent on the [loaded content](https://github.com/libretro/Genesis-Plus-GX/blob/master/libretro/libretro.c#L3001-L3029)\n- The Genesis Plus GX core's max height is dependent on the [loaded content](https://github.com/libretro/Genesis-Plus-GX/blob/master/libretro/libretro.c#L3001-L3029)\n- The Genesis Plus GX core's provided aspect ratio is dependent on the 'Core-provided aspect ratio' [core option](#video)\n\n## Loading Sega CD games\nWhen loading Sega CD games, Genesis Plus GX needs a cue-sheet that points to an image file. A cue sheet, or cue file, is a metadata file which describes how the tracks of a CD or DVD are laid out.\n\nIf you have e.g. `foo.bin`, you should create a text file and save it as `foo.cue`. If the Sega CD game is single-track, the cue file contents should look like this:\n\n```\n FILE \"foo.bin\" BINARY\n TRACK 01 MODE1/2352\n INDEX 01 00:00:00\n```\n\nAfter that, you can load the `foo.cue` file in RetroArch with the Genesis Plus GX core.\n\n!!! warning \"\"\n Certain Sega CD games are multi-track, so their .cue files might be more complicated.\n\nHere's a cue file example done with Lunar - Eternal Blue (USA)\n\n\n\n!!! warning \"\"\n\tFor Sega-CD games, ISO + WAV, BIN + CUE and ISO + OGG formats are supported; ISO + MP3 is not supported. Audio files must be in the 16-bit stereo 44100Hz format. If using a cue sheet, WAV or OGG tracks should be denoted as AUDIO.\n\nWhen loading ISO + WAV or ISO + OGG format games, the core will attempt to load a cue named the same as the iso first. If one is not found, the following audio track naming formats are accepted for a data track of \"game.iso\":\n\n- game02.ogg\n- game 02.ogg\n- game-02.ogg\n- game - 02.ogg\n- game_02.ogg\n\n### Loading Multiple Disk games\n\nIf foo is a multiple-disk Sega CD game, you should have .cue files for each one, e.g. `foo (Disc 1).cue`, `foo (Disc 2).cue`, `foo (Disc 3).cue`.\n\nTo take advantage of Genesis Plus GX's Disk Control feature for disk swapping, an index file (a m3u file) should be made.\n\nCreate a text file and save it as `foo.m3u`. Then enter your game's .cue files on it. The m3u file contents should look something like this:\n\n`foo.m3u`\n```\nfoo (Disc 1).cue\nfoo (Disc 2).cue\nfoo (Disc 3).cue\n```\n\nAfter that, you can load the `foo.m3u` file in RetroArch with the Genesis Plus GX core.\n\nHere's a m3u example done with the Sega CD 32x version of Night Trap\n\n\n\n!!! attention\n\tAdding multi-track games to a RetroArch playlist is recommended. (Manually add an entry a playlist that points to `foo.m3u`)\n\n### Swapping Disks\n\nDisks can be swapped through Quick Menu -> Disk Control in RetroArch.\n\nIf not using .m3u files, .cue files must be manually selected via the Load New Disk legacy feature.\n\nIf using .m3u files, disks can be swapped by selecting Eject Disk, changing the Current Disk Index to your desired disk, and finally selecting Insert Disk.\n\n### CHD\n\nAlternatively to using cue sheets with .bin/.iso files, you can convert your Sega CD games to .chd (MAME Compressed Hunks of Data) to reduce file sizes and neaten up your game folder.\n\nTo convert content to CHD format, use the chdman tool found inside the latest MAME distribution and point it to a .cue file, like so:\n\n```\nchdman createcd --input foo.cue --output foo.chd\n```\n\n!!! attention\n\tFor multi-disc content, make an .m3u file that lists all the .chd files instead of .cue files (content must be added to playlists manually).\n\n## Playing with MD+ / MSU-MD modes\n\nComparable to how MSU-1 modifcations can enhance SNES games; Mega Drive Plus / Genesis Plus (MD+) and MSU-MD (Mega SD flash cartridge) patches can be used to add CD quality level of audio to certain Sega Genesis and Mega Drive games via the emulated Sega CD hardware and its CDDA track functionality.\n\nRegarding Genesis Plus GX's implementation of MD+ mode operation, all CD overlay commands (incl. cue loop commands) described in MegaSD dev manual (see referenced PDF at the end of this section) are supported except the ones that deal with opening/reading files from SD card (starting from command 1Ch) but afaik no MD+ hacks use these commands so far.\n\nSince there is no way to auto-detect a MD+ patched ROM, MegaSD add-on emulation needs to be enabled in core options (through the newly added \"CD add-on\" core option). However, when \"CD add-on\" core option is set to Auto, if a cue file with same basename as loaded ROM file is found in same directory AND that cue file contains MegaSD specific keywords (\"REM LOOP xxx\", \"REM NOLOOP\",...), MegaSD CD overlay emulation will be automatically enabled (instead of full Sega/Mega CD hardware emulation).\n\nBy setting the \"CD add-on\" core option to \"Sega/Mega CD\", you can force Sega/Mega CD hardware emulation when any MD game (<8MB) is loaded even if there is no cue file found in loaded game directory (this can be useful for demos or homebrew games that want to use Mega CD extra hardware without necessarily having a loaded CD beforehand).\n\nAnd by setting the \"CD add-on\" option to \"None\", Sega/Mega CD hardware emulation will be forced disabled, even if a cue file is found in loaded game directory or when the loaded game is known to have Sega/Mega CD support (like Pier Solar, Flux or Wonder Library). This emulates the behavior where there is no Sega/Mega CD unit attached.\n\nAlthough no known games are using them, MegaSD extended SSF2 mapper and limited ROM write mapper (automatically enabled when respectively \"SEGA SSF2\" and \"SEGA MEGASD\" are found in loaded ROM header) are also emulated, according to the description in MegaSD dev manual. Note that MegaSD overlay will also automatically be enabled when these mappers are detected, no matter of the \"CD Add-on\" core option.\n\nPlease peruse the official MegaSD manual for further information: https://downloads.terraonion.com/public/MegaSD_DEV_Manual.pdf\n\nAlso, there's an useful reference wiki here for MSU-MD games/patches and its technical specifications here: https://arcadetv.github.io/msu-md-patches/\n\n!!! attention\n\tMake sure that your files match what's specified in your MD+/MSU-MD cue file!\n\n## Core options\n\nThe Genesis Plus GX core has the following options that can be tweaked from your frontend's core options menu or manually changed via core configuration files. Options are listed below in the following format:\n\nOption Name [option_key] \n\n(setting1/setting2/...)\n\nTo manually change an option, search for that option's key in the core configuration file you want to edit and set it to your desired setting value, enclosed in quotations. For example, if you had set the CD-DA Volume to 50% and wanted to revert it to 100%, you would change genesis_plus_gx_cdda_volume = \"50\" to genesis_plus_gx_cdda_volume = \"100\". Manually editing core configuration files is typically unnecessary unless your frontend does not have a method for toggling options.\n\nThe default setting for each option will be highlighted in **bold**. Settings with (Restart) means that core has to be shut down for the new setting to be applied on next launch.\n\n### System\n\nConfigure base hardware selection / region / BIOS / Sega CD save file parameters.\n_________________\n\n**System hardware** [genesis_plus_gx_system_hw]\n\nRuns loaded content with a specific emulated console.\n\n* **Auto [auto]** Loads the game with the most appropriate system based on the loaded [game's ROM information](https://github.com/libretro/Genesis-Plus-GX/blob/master/core/loadrom.c) like its ROM type, product code/version, checksum, size and region code.\n* SG-1000 [sg-1000 II] - Loads game with the [SG-1000 console](https://segaretro.org/SG-1000).\n* SG-1000 II + RAM Ext. [sg-1000 II + ram ext.] - Loads game with the [SG-1000 II console](https://segaretro.org/SG-1000_II) with a [RAM extension adapter](https://segaretro.org/8kB_RAM_Adapter).\n* Mark III [mark-III] - Loads game with the [Mark III console](https://segaretro.org/Sega_Mark_III)\n* Master System [master system] - Loads game with the [Master System console](https://segaretro.org/Sega_Master_System#Master_System)\n* Master System II [master system II] - Loads game with the [Master System II console](https://segaretro.org/Sega_Master_System#Master_System_II)\n* Game Gear [game gear] - Loads game with the [Game Gear handheld console](https://segaretro.org/Sega_Game_Gear)\n* Mega Drive/Genesis [mega drive / genesis] - Loads game with the [Mega Drive/Genesis console](https://segaretro.org/Sega_Mega_Drive)\n\n**System region** [genesis_plus_gx_region_detect]\n\nSpecify which region the system is from. For consoles other than the Game Gear, PAL is 50hz while NTSC is 60hz. Games may run faster or slower than normal if the incorrect region is selected.\n\n* **Auto [auto]** - Changes the system's region to whatever is most appropriate for the game which is based on the loaded [game's ROM information](https://github.com/libretro/Genesis-Plus-GX/blob/master/core/loadrom.c) like its ROM type, product code/version, checksum, size and region code.\n* NTSC-U [ntsc-u] - Changes the system's region to [NTSC-U](https://en.wikipedia.org/wiki/NTSC).\n* PAL [pal] - Changes the system's region to [PAL](https://en.wikipedia.org/wiki/PAL_region).\n* NTSC-J [ntsc-j] - Changes the system's region to [NTSC-J](https://en.wikipedia.org/wiki/NTSC-J).\n \n**System Boot ROM** [genesis_plus_gx_bios] (**disabled**/enabled)\n\nUse official BIOS/bootloader for emulated hardware, if present in RetroArch's system directory. Displays console-specific start-up sequence/animation, then runs loaded content. Look above at the [BIOS section](#bios) for supported BIOS types/files.\n\n* **Off [disabled]** - Disables using the user supplied System Boot ROM.\n* On [enabled] - Enables using the user supplied System Boot ROM.\n\n**CD System BRAM** [genesis_plus_gx_system_bram]\n\nWhen running Sega CD content, specifies whether to share a single save file between all games from a specific region (Per-BIOS) or to create a separate save file for each game (Per-Game). Note that the Sega CD has [limited internal storage](https://segaretro.org/Sega_Mega-CD/Technical_specifications#Memory), sufficient only for a handful of titles. To avoid running out of space, the 'Per-Game' setting is recommended.\n\n* **Per-BIOS [per bios]** - All games from a specific region share a single save file.\n* Per-Game [per game] - Creates a separate save file for each game.\n\n??? note \"*CD System BRAM diagram*\"\n\t\n\n**CD Backup Cart BRAM** [genesis_plus_gx_cart_bram]\n\nWhen running Sega CD content, specifies whether to share a single backup [ram cart](https://segaretro.org/CD_BackUp_RAM_Cart) for all games (Per-Cart) or to create a separate backup ram cart for each game (Per-Game).\n\n* **Per-Cart [per cart]** - All games share a single backup RAM cart.\n* Per-Game [per game] - Creates a seperate backrup RAM cart for each game.\n\n**CD add-on (MD mode) (Requires Restart)** [genesis_plus_gx_add_on]\n\nSpecify which add-on to use for CD audio playback with supported Mega Drive/Genesis games.\n\n* **Auto [auto]** - Loads a CD game with the most appropriate CD add-on based on the loaded [game's ROM information](https://github.com/libretro/Genesis-Plus-GX/blob/master/core/loadrom.c) like its ROM type, product code/version, checksum, size and region code. (when \"CD add-on\" core option is set to Auto, if a cute file with same basename as loaded ROM file is found in same directory AND that cue file contains MegaSD specific keywords (\"REM LOOP xxx\", \"REM NOLOOP\",...), MegaSD CD overlay emulation will be automatically enabled (instead of full Sega/Mega CD hardware emulation))\n* Sega/Mega CD [sega/mega cd] - Loads the game using the [Sega/Mega CD add-on](https://segaretro.org/Sega_Mega-CD). (this can be useful for demos or homebrew games that want to use Mega CD extra hardware without necessarily having a loaded CD beforehand since it forces Sega/Mega CD hardware emulation when any MD game (<8MB) is loaded even if there is no CUE file found in loaded game directory)\n* MegaSD [megasd] - Loads the game using the [MegaSD FPGA cartridge](https://wiki.terraonion.com/index.php/MegaSD). Look at the # section for more information.\n* None [none] - Disables loading a CD game with any CD add-on. (Sega/Mega CD hardware emulation will be forced disabled, even if a CUE file is found in loaded game directory or when the loaded game is known to have Sega/Mega CD support (like Pier Solar, Flux or Wonder Library). This emulates the behavior where there is no Sega/Mega CD unit attached.)\n\n**Cartridge Lock-On** [genesis_plus_gx_lock_on]\n\nLock-On Technology is a Mega Drive/Genesis feature that allowed an older game to connect to the pass-through port of a special cartridge for extended or altered gameplay. This option specifies which type of special 'lock-on' cartridge to emulate. Look above at the [BIOS section](#bios) for supported BIOS types/files.\n\n* **Off [disabled]**\n* Game Genie [game genie] - Connects the loaded game to a [Gamie Genie](https://segaretro.org/Game_Genie_(Mega_Drive)).\n* Action Replay (Pro) [action replay (pro)] - Connects the loaded game to an [Action Replay (Pro)](https://segaretro.org/Action_Replay).\n* Sonic & Knuckles [sonic & knuckles)] - Connects the loaded game to [Sonic & Knuckles](https://info.sonicretro.org/Sonic_%26_Knuckles).\n\n### Video\n\nConfigure aspect ratio / display cropping / video filter / frame skipping parameters.\n_________________\n\n**Core-Provided Aspect Ratio** [genesis_plus_gx_aspect_ratio]\n\nChoose the preferred content aspect ratio. This will only apply when RetroArch's aspect ratio is set to 'Core provided' in the Video settings.\n\n* **Auto [auto]** - Chooses the aspect ratio based on the loaded [game's ROM information](https://github.com/libretro/Genesis-Plus-GX/blob/master/core/loadrom.c) like its ROM type, product code/version, checksum, size and region code.\n* NTSC PAR [NTSC PAR] - Sets the game's aspect ratio to NTSC PAR.\n* PAL PAR [PAL PAR] - Sets the game's aspect ratio to PAL PAR.\n\n**Borders** [genesis_plus_gx_overscan]\n\nEnable this to display the overscan regions at the top/bottom and/or left/right of the screen. These would normally be hidden by the bezel around the edge of a standard-definition television.\n\n* **Off [disabled]** - Disables displaying the game's overscan regions.\n* Top/Bottom [top/bottom] - Enables displaying the game's Top and Bottom overscan regions.\n* Left/Right [left/right] - Enables displaying the game's Left and Right overscan regions.\n* Full [full] - Enables displaying the game's Top/Bottom and Left/Right overscan regions.\n\n**Hide Master System Side Borders** [genesis_plus_gx_left_border]\n\nCuts off 8 pixels from either the left side of the screen, or both left and right sides when running Master System games.\n\n* **Off [disabled]** - Disabling cutting off pixels from the screen of a Master System game.\n* Left Border Only [left border] - Cuts off 8 pixels from the left side of the screen of a Master System game.\n* Left & Right Borders [left & right borders] - Cuts off 8 pixels from the right side of the screen of a Master System game.\n\n**Game Gear Extended Screen** [genesis_plus_gx_gg_extra]\n\nForces Game Gear titles to run in 'SMS' mode, with an increased resolution of 256x192. May show additional content, but typically displays a border of corrupt/unwanted image data.\n\n??? note \"*Off [disabled]*\"\n \n\n??? note \"*On [enabled]*\"\n \n\n**Blargg NTSC Filter** [genesis_plus_gx_blargg_ntsc_filter] - Apply a video filter to mimic various NTSC TV signals.\n\n??? note \"*Disabled vs All Filters (video)*\"\n https://youtu.be/buZPDyDzvPY\n\n??? note \"*Off [disabled]*\"\n \n\n??? note \"*Monochrome [monochrome]*\"\n \n\n??? note \"*Composite [composite]*\"\n \n\n??? note \"*S-Video [svideo]*\"\n \n\n??? note \"*RGB [rgb]*\"\n \n\n**LCD Ghosting Filter** [genesis_plus_gx_lcd_filter]\n\nApply an image 'ghosting' filter to mimic the display characteristics of the Game Gear and 'Genesis Nomad' LCD panels.\n\n* **Off** [disabled] - Disables ghosting filter.\n* On [enabled] - Enables ghosting filter.\n\n??? note \"*Disabled vs Enabled (video)*\"\n https://youtu.be/Us13sJPEUD8\n\n??? note \"*Enabled*\"\n \n\n**Interlaced Mode 2 Output** [genesis_plus_gx_render]\n\nInterlaced Mode 2 allows the Mega Drive/Genesis to output a double height (high resolution) 320x448 image by drawing alternate scanlines each frame (this is used by 'Sonic the Hedgehog 2' and 'Combat Cars' multiplayer modes). 'Single Field' mimics original hardware, producing each field (320x224) alternatively with flickering/interlacing artefacts. 'Double Field' simulates the interlaced display, which stabilises the image but causes mild blurring.\n\n* **Single Field** [single field] - Sets Interlaced Mode 2 Output as Single Field.\n* Double Field [double field] - Sets Interlaced Mode 2 Output as Double Field.\n\n??? note \"*Single Field vs Double Field (video)*\"\n https://youtu.be/xZc58OSPj4Y\n\n??? note \"*Single Field*\"\n \n\n??? note \"*Double Field*\"\n \n\n**Frameskip** [genesis_plus_gx_frameskip]\n\nSkip frames to avoid audio buffer under-run (crackling). Improves performance at the expense of visual smoothness. 'Auto' skips frames when advised by the frontend. 'Manual' utilises the 'Frameskip Threshold (%)' setting.\n\n* **Off [disabled]** - Disables frameskip.\n* Auto [auto] - Automatically skips frames to avoid audio crackling.\n* Manual [manual] - Allows the user to utilises the 'Frameskip Threshold' core option's set percentage to manually adjust frameskip.\n\n**Frameskip Threshold (%)** [genesis_plus_gx_frameskip_threshold]\n\nWhen the 'Frameskip' core option is set to 'Manual', specifies the audio buffer occupancy threshold (percentage) below which frames will be skipped. Higher values reduce the risk of crackling by causing frames to be dropped more frequently.\n\n: 15% to 60% in increments of 3%, **33% is default**.\n\n### Audio\n\nChange audio device settings.\n_________________\n\n**Master System FM (YM2413)** [genesis_plus_gx_ym2413]\n\nEnable emulation of the [FM Sound Unit](http://segaretro.org/FM_Sound_Unit) used by certain Sega Mark III/Master System games for enhanced audio output.\n\n* **Auto [auto]** - Automatically enables emulation of FM Sound Unit based on the loaded [game's ROM information](https://github.com/libretro/Genesis-Plus-GX/blob/master/core/loadrom.c) like its ROM type, product code/version, checksum, size and region code.\n* Off [disabled] - Manually disables emulation of FM Sound Unit.\n* On [enabled] - Manually enables emulation of FM Sound Unit.\n\n**Master System FM (YM2413) Core** - [genesis_plus_gx_ym2413_core]\n\nSelect method used to emulate the [FM Sound Unit](https://segaretro.org/FM_Sound_Unit) of the Sega Mark III/Master System. 'MAME' option is fast, and runs full speed on most systems. 'Nuked' option is cycle accurate, very high quality, and has substantial CPU requirements.\n\n* **MAME [mame]** - Uses the MAME option for emulating the FM Sound Unit for Sega Mark III/Master System games which is fast and full speed for most games.\n* Nuked [nuked] - Uses the Nuked option for emulating the FM Sound Unit for Sega Mark III/Master System games which is high quality but has substantial CPU requirements.\n\n**Mega Drive/Genesis FM** [genesis_plus_gx_ym2612]\n\nSelect method used to emulate the FM synthesizer (main sound generator) of the Mega Drive/Genesis. 'MAME' options are fast, and run full speed on most systems. 'Nuked' options are cycle accurate, very high quality, and have substantial CPU requirements. The ['YM2612'](https://segaretro.org/YM2612) chip is used by the original Model 1 Mega Drive/Genesis. The ['YM3438'](https://segaretro.org/index.php?title=YM3438&redirect=no) is used in later Mega Drive/Genesis revisions.\n\n* **MAME (YM2612) [mame (ym2612)]** - Selects MAME (YM2612) [original Model 1 Mega Drive/Genesis] as FM synthesizer method which is fast and fullspeed.\n* MAME (ASIC YM3438) [mame (asic ym3438)] - Selects MAME (ASIC YM3438) [later Mega Drive/Genesis revisions] as FM synthesizer method which is fast and fullspeed.\n* MAME (Enhanced YM3438) [mame (enhanced ym3438)] - Selects MAME (Enhanced YM3438) [later Mega Drive/Genesis revisions] as FM synthesizer method which is fast and fullspeed.\n* Nuked (YM2612) [nuked (ym2612)] - Selects Nuked (YM2612) [original Model 1 Mega Drive/Genesis] as FM synthesizer method which is high quality but has high CPU requirements.\n* Nuked (YM3438) [nuked (ym3438)] - Selects Nuked (YM3438) [later Mega Drive/Genesis revisions] FM synthesizer method which is fast but has high CPU requirements.\n\n**Sound Output** [genesis_plus_gx_sound_output]\n\nSelect stereo or mono sound reproduction.\n\n* **Stereo [stereo]** - Selects stereo output.\n* Mono (mono) - Selects mono output.\n\n**Audio Filter** [genesis_plus_gx_audio_filter]\n\nEnable a low pass audio filter to better simulate the characteristic sound of a Model 1 Mega Drive/Genesis.\n\n* **Off [disabled]** - Disables low pass audio filter.\n* Low-Pass [low-pass] - Enables low pass audio filter.\n* EQ [EQ] - Enables internal audio equalizer.\n\n**Low-Pass Filter %** [genesis_plus_gx_lowpass_range]\n\nSpecify the cut-off frequency of the low-pass audio filter. A higher value increases the perceived 'strength' of the filter, since a wider range of the high frequency spectrum is attenuated. This core option requires the 'Audio Filter' core option to be set to 'Low-Pass\".\n\n* 5% to 95% in increments of 5. *60% is default**. \n\n**PSG Preamp Level** [genesis_plus_gx_psg_preamp]\n\nSet the audio preamplifier level of the emulated SN76496 4-channel Programmable Sound Generator found in the [SG-1000](https://segaretro.org/SG-1000#Sound), [Sega Mark III](https://segaretro.org/Sega_Mark_III#Sound), [Master System](https://segaretro.org/Sega_Master_System/Technical_specifications#Audio), [Game Gear](https://segaretro.org/Sega_Game_Gear#Technical_specifications) and [Mega Drive/Genesis](https://segaretro.org/Sega_Mega_Drive/Technical_specifications#Audio).\n\n* 0 to 200 in increments of 5. **150 is default**.\n\n**FM Preamp Level** [genesis_plus_gx_fm_preamp]\n\nSet the audio preamplifier level of the emulated [Mega Drive/Genesis FM sound synthesizer](https://segaretro.org/Sega_Mega_Drive/Technical_specifications#Audio) or [Sega Mark III/Master System FM Sound Unit](https://segaretro.org/FM_Sound_Unit).\n\n* 0 to 200 in increments of 5. **100 is default**.\n\n**CD-DA Volume** [genesis_plus_gx_cdda_volume]\n\nAdjust the mixing volume of the emulated [CD audio](https://segaretro.org/Sega_Mega-CD/Technical_specifications#Audio) playback output.\n\n* 0 to 100 in increments of 5. **100 is default**.\n\n**PCM Volume** [genesis_plus_gx_pcm_volume] - Adjust the mixing volume of the emulated [Sega CD/Mega-CD RF5C164 PCM](https://segaretro.org/Sega_Mega-CD/Technical_specifications#Audio) sound generator output.\n\n* 0 to 100 in increments of 5. **100 is default**.\n\n**EQ Low** [genesis_plus_gx_audio_eq_low]\n\nAdjust the low range band of the internal audio equalizer.\n\n* 0 to 100 in increments of 5. **100 is default**.\n\n**EQ Mid** [genesis_plus_gx_audio_eq_mid]\n\nAdjust the mid range band of the internal audio equalizer.\n\n* 0 to 100 in increments of 5. **100 is default**.\n\n**EQ High** [genesis_plus_gx_audio_eq_high]\n\nAdjust the high range band of the internal audio equalizer.\n\n* 0 to 100 in increments of 5. **100 is default**.\n\n### Input\n_________________\nChange light gun and/or mouse input settings.\n\n**Light Gun Input** [genesis_plus_gx_gun_input]\n\nUse a mouse-controlled 'Light Gun' or 'Touchscreen' input.\n\n* **Light Gun [lightgun]** - Selects mouse-controlled 'Light Gun' input (devices will use [RetroLightgun](#lightgun) inputs).\n* Touchscreen [touchscreen] - Allows the [MS Light Phaser, MD Menancer and MD Justifiers](#lightgun) device types to be controlled via touchscreen input (devices will use [RetroPointer](#pointer) inputs instead).\n\n**Show Light Gun Crosshair** [genesis_plus_gx_gun_cursor]\n\nDisplay light gun crosshairs when using the [MD Menacer, MD Justifiers and MS Light Phaser](#lightgun) input device types.\n\n* **Off [disabled]** - Disables light gun crosshair for the aftermentioned input device types.\n* On [enabled] - Enables light gun crosshair for the aftermentioned input device types.\n\n??? note \"*Disabled vs Enabled (video)*\"\n https://www.youtube.com/watch?v=w6iYysbni2g\n\n**Invert Mouse Y-Axis** [genesis_plus_gx_invert_mouse]\n\nInverts the Y-axis of the ['MD Mouse'](#mouse) input device type.\n\n* **Off [disabled]** - Enables Y-Axis inversion for the 'MD Mouse' device type.\n* On [enabled] - Disables Y-Axis inversion for the 'MD Mouse' device type.\n\n### Emulation Hacks\n_________________\nChange processor overclocking and emulation accuracy settings that affect low-level performance and compatibility.\n\n**Remove Per-Line Sprite Limit** [genesis_plus_gx_no_sprite_limit]\n\nRemoves the original sprite-per-scanline hardware limit. This reduces flickering but can cause visual glitches, as some games exploit the hardware limit to generate special effects.\n\n* **Off [disabled]** - Keeps the per-line sprite limit.\n* On [enabled] - Disables the per-line sprite limit.\n\n??? note \"*Disabled vs Enabled (video)*\"\n https://youtu.be/IZp5epy-hBM\n\n**Enhanced per-tile vertical scroll** [genesis_plus_gx_enhanced_vscroll]\n\nAllows each individual cell to be scrolled vertically, instead of 16px 2-cell, by averaging out with the vscroll value of the neighbouring cell. This hack only applies to few games that use 2-cell vertical scroll mode.\n\n* **Off [disabled]** - Enables enhanced per-tile vertical scrolling.\n* On [enabled] - Disables enhanced per-tile vertical scrolling.\n\n??? note \"*Disabled*\"\n \n\n??? note \"*Enabled [16]*\"\n \n\n**Enhanced per-tile vertical scroll limit** [genesis_plus_gx_enhanced_vscroll_limit]\n\nOnly is usable when the 'Enhanced per-tile vertical scroll' core option is enabled. Adjusts the limit of the vertical scroll enhancement. When the vscroll difference between neighbouring tiles is bigger than this limit, the enhancement is disabled.\n\n* 2 to 16 in increments of 1. **8 is default**\n\n**CPU Speed** [genesis_plus_gx_overclock]\n\nOverclock the emulated CPU. Can reduce slowdown, but may cause glitches.\n\n* 100% to 500% in increments of 25%. **100% is default.**\n\n??? note \"*!00% vs 200% (video)*\"\n https://youtu.be/yE8qzwVuy5Q\n\n**System Locks-Ups** [genesis_plus_gx_force_dtack]\n\nEmulate system lock-ups that occur on real hardware when performing illegal address access. This should only be disabled when playing certain demos, homebrew and ROM hacks that rely on illegal behavior for correct operation.\n\n* **On [enabled]** - Enables emulation of system lock-ups.\n* Off [disabled] - Disables emulation of system lock-ups.\n\n??? note \"*Enabled vs Disabled (video)*\"\n https://youtu.be/B1n1wQGzzYk\n\n**68K Address Error** [genesis_plus_gx_addr_error]\n\nThe [Mega Drive/Genesis main CPU (Motorola 68000)](http://segaretro.org/M68000) generates an Address Error exception (crash) when attempting to perform unaligned memory access. Enabling this will simulate this behavior. It should only be disabled when playing ROM hacks, since these are typically developed using less accurate emulators and may rely on invalid RAM access for correct operation.\n\n* **On [enabled]** - Enables simulation of 68K Address Error.\n* Off [disabled] - Disables simulation of 68K Address Error.\n\n??? note \"*Enabled vs Disabled (video)*\"\n https://youtu.be/zjBPz9QWRqI\n\n??? note \"*Enabled*\"\n \n\n**CD access time** [genesis_plus_gx_cd_latency]\n\nSimulate [original CD hardware latency](https://segaretro.org/Sega_Mega-CD/Technical_specifications#Storage) when initiating a read or seeking to a specific location on loaded disc. This is required by a few CD games that crash if CD data is available too soon and also fixes CD audio desync issues in some games. Disabling this can be useful with [MD+ or MSU-MD games](https://emulation.gametechwiki.com/index.php/Sega_Genesis_emulators#Mega_Drive_Plus_.2F_Genesis_Plus_.2F_MSU-MD_modes) as it makes CD audio tracks loops more seamless.\n\n* **On [enabled]** - Enables simulation of original CD hardware latency.\n* Off [disabled] - Disables simulation of original CD hardware latency.\n\n### Advanced Channel Volume Settings\n_________________\nChange the volume of individual hardware audio channels.\n\n**Show Advanced Audio Volume Settings (Reopen menu)** [genesis_plus_gx_show_advanced_audio_settings]\n\nEnable configuration of low-level audio channel parameters core options listed below. NOTE: Quick Menu must be toggled for this setting to take effect.\n\n* **On [enabled]** - Enables configuration of low-level audio channel parameters.\n* Off [disabled] - Disables configuration of low-level audio channel parameters.\n\n**PSG Tone Channel 0 Volume %** [genesis_plus_gx_psg_channel_0_volume]\n\nAdjust the volume of Channel 0 of the [PSG Tone](https://segaretro.org/Sega_Mega_Drive/Technical_specifications#Audio).\n\n* 0% to 100% in increments of 10%. **100% is default**.\n\n**PSG Tone Channel 1 Volume %** [genesis_plus_gx_psg_channel_1_volume]\n\nAdjust the volume of Channel 1 of the [PSG Tone](https://segaretro.org/Sega_Mega_Drive/Technical_specifications#Audio).\n\n* 0% to 100% in increments of 10%. **100% is default**.\n\n**PSG Tone Channel 2 Volume %** [genesis_plus_gx_psg_channel_2_volume]\n\nAdjust the volume of Channel 2 of the [PSG Tone](https://segaretro.org/Sega_Mega_Drive/Technical_specifications#Audio).\n\n* 0% to 100% in increments of 10%. **100% is default**.\n\n**PSG Tone Channel 3 Volume %** [genesis_plus_gx_psg_channel_3_volume]\n\nAdjust the volume of Channel 3 of the [PSG Tone](https://segaretro.org/Sega_Mega_Drive/Technical_specifications#Audio).\n\n* 0% to 100% in increments of 10%. **100% is default**.\n\n**Mega Drive/Genesis FM Channel 0 Volume %** [genesis_plus_gx_md_channel_0_volume]\n\nAdjust the volume of Channel 0 of the [Mega Drive/Genesis FM](https://segaretro.org/Sega_Mega_Drive/Technical_specifications#Audio). Only works with MAME FM emulators ('Mega Drive/Genesis FM' core option).\n\n* 0% to 100% in increments of 10%. **100% is default**.\n\n**Mega Drive/Genesis FM Channel 1 Volume %** [genesis_plus_gx_md_channel_1_volume]\n\nAdjust the volume of Channel 1 of the [Mega Drive/Genesis FM](https://segaretro.org/Sega_Mega_Drive/Technical_specifications#Audio). Only works with MAME FM emulators ('Mega Drive/Genesis FM' core option).\n\n* 0% to 100% in increments of 10%. **100% is default**.\n\n**Mega Drive/Genesis FM Channel 2 Volume %** [genesis_plus_gx_md_channel_2_volume]\n\nAdjust the volume of Channel 2 of the [Mega Drive/Genesis FM](https://segaretro.org/Sega_Mega_Drive/Technical_specifications#Audio). Only works with MAME FM emulators ('Mega Drive/Genesis FM' core option).\n\n* 0% to 100% in increments of 10%. **100% is default**.\n\n**Mega Drive/Genesis FM Channel 3 Volume %** [genesis_plus_gx_md_channel_3_volume]\n\nAdjust the volume of Channel 3 of the [Mega Drive/Genesis FM](https://segaretro.org/Sega_Mega_Drive/Technical_specifications#Audio). Only works with MAME FM emulators ('Mega Drive/Genesis FM' core option).\n\n* 0% to 100% in increments of 10%. **100% is default**.\n\n**Mega Drive/Genesis FM Channel 4 Volume %** [genesis_plus_gx_md_channel_4_volume]\n\nAdjust the volume of Channel 4 of the [Mega Drive/Genesis FM](https://segaretro.org/Sega_Mega_Drive/Technical_specifications#Audio). Only works with MAME FM emulators ('Mega Drive/Genesis FM' core option).\n\n* 0% to 100% in increments of 10%. **100% is default**.\n\n**Mega Drive/Genesis FM Channel 5 Volume %** [genesis_plus_gx_md_channel_5_volume]\n\nAdjust the volume of Channel 5 of the [Mega Drive/Genesis FM](https://segaretro.org/Sega_Mega_Drive/Technical_specifications#Audio). Only works with MAME FM emulators ('Mega Drive/Genesis FM' core option).\n\n* 0% to 100% in increments of 10%. **100% is default**.\n\n**Master System FM (YM2413) Channel 0 Volume %** [genesis_plus_gx_sms_fm_channel_0_volume]\n\nAdjust the volume of Channel 0 of the [Master System FM](https://segaretro.org/Sega_Master_System/Technical_specifications#Audio).\n\n* 0% to 100% in increments of 10%. **100% is default**.\n\n**Master System FM (YM2413) Channel 1 Volume %** [genesis_plus_gx_sms_fm_channel_1_volume]\n\nAdjust the volume of Channel 1 of the [Master System FM](https://segaretro.org/Sega_Master_System/Technical_specifications#Audio).\n\n* 0% to 100% in increments of 10%. **100% is default**.\n\n**Master System FM (YM2413) Channel 2 Volume %** [genesis_plus_gx_sms_fm_channel_2_volume]\n\nAdjust the volume of Channel 2 of the [Master System FM](https://segaretro.org/Sega_Master_System/Technical_specifications#Audio).\n\n* 0% to 100% in increments of 10%. **100% is default**.\n\n**Master System FM (YM2413) Channel 3 Volume %** [genesis_plus_gx_sms_fm_channel_3_volume]\n\nAdjust the volume of Channel 3 of the [Master System FM](https://segaretro.org/Sega_Master_System/Technical_specifications#Audio).\n\n* 0% to 100% in increments of 10%. **100% is default**.\n\n**Master System FM (YM2413) Channel 4 Volume %** [genesis_plus_gx_sms_fm_channel_4_volume]\n\nAdjust the volume of Channel 4 of the [Master System FM](https://segaretro.org/Sega_Master_System/Technical_specifications#Audio).\n\n* 0% to 100% in increments of 10%. **100% is default**.\n\n**Master System FM (YM2413) Channel 5 Volume %** [genesis_plus_gx_sms_fm_channel_5_volume]\n\nAdjust the volume of Channel 5 of the [Master System FM](https://segaretro.org/Sega_Master_System/Technical_specifications#Audio).\n\n* 0% to 100% in increments of 10%. **100% is default**.\n\n**Master System FM (YM2413) Channel 6 Volume %** [genesis_plus_gx_sms_fm_channel_6_volume]\n\nAdjust the volume of Channel 6 of the [Master System FM](https://segaretro.org/Sega_Master_System/Technical_specifications#Audio).\n\n* 0% to 100% in increments of 10%. **100% is default**.\n\n**Master System FM (YM2413) Channel 7 Volume %** [genesis_plus_gx_sms_fm_channel_7_volume]\n\nAdjust the volume of Channel 7 of the [Master System FM](https://segaretro.org/Sega_Master_System/Technical_specifications#Audio).\n\n* 0% to 100% in increments of 10%. **100% is default**.\n\n**Master System FM (YM2413) Channel 8 Volume %** [genesis_plus_gx_sms_fm_channel_8_volume]\n\nAdjust the volume of Channel 8 of the [Master System FM](https://segaretro.org/Sega_Master_System/Technical_specifications#Audio).\n\n* 0% to 100% in increments of 10%. **100% is default**.\n\n## User 1 device types\n\nThe Genesis Plus GX core supports the following device type(s) in the controls menu, bolded device types are the default for the specified user(s):\n\n- Joypad Port Empty - None - No device is connected; input is disabled.\n- **Joypad Auto** - Joypad - Depending on the loaded [game's ROM information](https://github.com/libretro/Genesis-Plus-GX/blob/master/core/loadrom.c), the core will automatically emulate a MD Joypad 3 Button controller, or a MD Joypad 6 Button controller or a MS Joypad 2 Button controller.\n- [MD Joypad 3 Button](https://segaretro.org/Control_Pad_(Mega_Drive)) - Joypad\n- [MD Joypad 6 Button](https://segaretro.org/Six_Button_Control_Pad_(Mega_Drive)) - Joypad\n- [MS Joypad 2 Button](https://segaretro.org/Control_Pad_(Master_System)) - Joypad - Also used for Game Gear.\n- [MD Joypad 3 Button + 4-WayPlay](https://segaretro.org/4_Way_Play) - Joypad - Enables multitap for 4-WayPlay games.\n- [MD Joypad 6 Button + 4-WayPlay](https://segaretro.org/4_Way_Play) - Joypad - Enables multitap for 4-WayPlay games.\n- [MD Joypad 3 Button + Teamplayer](https://segaretro.org/Team_Player) - Joypad - Enables multitap for Teamplayer games.\n- [MD Joypad 6 Button + Teamplayer](https://segaretro.org/Team_Player) - Joypad - Enables multitap for Teamplayer games.\n- MS Joypad 2 Button + Master Tap - Joypad - Enables [Furrtek's Master Tap](https://www.smspower.org/Homebrew/BOoM-SMS) (unofficial mulitap device).\n- [MS Light Phaser](https://segaretro.org/Light_Phaser) - Lightgun\n- [MS Paddle Control](https://segaretro.org/Paddle_Control) - Analog\n- [MS Sports Pad](https://segaretro.org/Sports_Pad) - Analog\n- [MS Graphic Board](https://segaretro.org/Sega_Graphic_Board) - Pointer\n- [MD XE-1AP](https://segaretro.org/XE-1_AP) - Analog\n- [MD Mouse](https://segaretro.org/Sega_Mouse) - Mouse\n\n## User 2 device types\n\n- Joypad Port Empty - None - No device is connected; input is disabled.\n- **Joypad Auto** - Joypad - Depending on the loaded [game's ROM information](https://github.com/libretro/Genesis-Plus-GX/blob/master/core/loadrom.c), the core will automatically emulate a MD Joypad 3 Button controller, or a MD Joypad 6 Button controller or a MS Joypad 2 Button controller.\n- [MD Joypad 3 Button](https://segaretro.org/Control_Pad_(Mega_Drive)) - Joypad\n- [MD Joypad 6 Button](https://segaretro.org/Six_Button_Control_Pad_(Mega_Drive)) - Joypad\n- [MS Joypad 2 Button](https://segaretro.org/Control_Pad_(Master_System)) - Joypad - Also used for Game Gear.\n- [MD Joypad 3 Button + 4-WayPlay](https://segaretro.org/4_Way_Play) - Joypad - Enables multitap for 4-WayPlay games.\n- [MD Joypad 6 Button + 4-WayPlay](https://segaretro.org/4_Way_Play) - Joypad - Enables multitap for 4-WayPlay games.\n- [MD Joypad 3 Button + Teamplayer](https://segaretro.org/Team_Player) - Joypad - Enables multitap for Teamplayer games.\n- [MD Joypad 6 Button + Teamplayer](https://segaretro.org/Team_Player) - Joypad - Enables multitap for Teamplayer games.\n- MS Joypad 2 Button + Master Tap - Joypad - Enables [Furrtek's Master Tap](https://www.smspower.org/Homebrew/BOoM-SMS) (unofficial mulitap device).\n- [MD Menancer](https://segaretro.org/Menacer) - Lightgun\n- [MD Justifiers](https://segaretro.org/The_Justifier) - Lightgun\n- [MS Light Phaser](https://segaretro.org/Light_Phaser) - Lightgun\n- [MS Paddle Control](https://segaretro.org/Paddle_Control) - Analog\n- [MS Sports Pad](https://segaretro.org/Sports_Pad) - Analog\n- [MS Graphic Board](https://segaretro.org/Sega_Graphic_Board) - Pointer\n- [MD XE-1AP](https://segaretro.org/XE-1_AP) - Analog\n- [MD Mouse](https://segaretro.org/Sega_Mouse) - Mouse\n\n## Other devices\n\n- [PICO tablet](https://segaretro.org/Sega_Pico) - The Genesis Plus GX core can emulate PICO tablet inputs but this is done automatically; based on the loaded [game's ROM information](https://github.com/libretro/Genesis-Plus-GX/blob/master/core/loadrom.c) and cannot be manually selected as a device type.\n- [Terebi Oekaki tablet](https://segaretro.org/Terebi_Oekaki) - The Genesis Plus GX core can emulate Terebi Oekaki table inputs but this is done automatically; based on the loaded [game's ROM information](https://github.com/libretro/Genesis-Plus-GX/blob/master/core/loadrom.c) and cannot be manually selected as a device type.\n\n## Multitap\n\nActivating multitap support in compatible games can be configured by the 4-WayPlay, Teamplayer or Master Tap device types for the [User 1](#user-1-device-types) and/or [User 2](#user-2-device-types) ports.\n\n## Joypad\n\n| RetroPad Inputs | User 1 - 8 input descriptors | [MD Joypad 3 Button](https://segaretro.org/Control_Pad_(Mega_Drive)) | [MD Joypad 6 Button](https://segaretro.org/Six_Button_Control_Pad_(Mega_Drive)) | [MS Joypad 2 Button](https://segaretro.org/Control_Pad_(Master_System)) | [MS Paddle Control](https://segaretro.org/Paddle_Control) | [MS Sports Pad](https://segaretro.org/Sports_Pad) | [MD XE-1AP](https://segaretro.org/XE-1_AP) |\n|------------------------------------------------|------------------------------|--------------------|--------------------|--------------------|-------------------|---------------|---------------|\n|  | B | B | B | 1 | 1 | 1 | E2 |\n|  | A | A | A | | | | E1 |\n|  | Mode | | Mode | | | | Select |\n|  | Start | Start | Start | Start | Start | Start | Start |\n|  | D-Pad Up | D-Pad Up | D-Pad Up | D-Pad Up | | | |\n|  | D-Pad Down | D-Pad Down | D-Pad Down | D-Pad Down | | | |\n|  | D-Pad Left | D-Pad Left | D-Pad Left | D-Pad Left | | | |\n|  | D-Pad Right | D-Pad Right | D-Pad Right | D-Pad Right | | | |\n|  | C | C | C | 2 | | 2 | |\n|  | Y | | Y | | | | |\n|  | X | | X | | | | C |\n|  | Z | | Z | | | | A |\n|  | | | | | | | D |\n|  | | | | | | | B |\n|  | | | | | | | |\n|  | | | | | | | |\n|  X | | | | | Paddle | Trackball X | Thumb-stick X |\n|  Y | | | | | | Trackball Y | Thumb-stick Y |\n|  X | | | | | | | Slider Y |\n|  Y | | | | | | | Slider X |\n\n## Mouse\n\n| RetroMouse Inputs | [MD Mouse](https://segaretro.org/Sega_Mouse) |\n|-------------------------------------------------------|-----------------|\n|  Mouse Cursor | MD Mouse Cursor |\n|  Mouse 1 | MD Mouse Left |\n|  Mouse 2 | MD Mouse Right |\n|  Mouse 3 | MD Mouse Start |\n| Wheel Down | MD Mouse Center |\n\n## Pointer\n\n| RetroPointer Inputs | [MS Graphic Board](https://segaretro.org/Sega_Graphic_Board) |\n|------------------------------------------------------------------------------------------------------------------------|-------------------------|\n|  or  Pointer Position | MS Graphic Board Stylus |\n|  Mouse 1 | MS Graphic Board Pen |\n|  Mouse 2 | MS Graphic Board Menu |\n|  Mouse 3 | MS Graphic Board Do |\n\n## Lightgun\n\n| RetroLightgun Inputs | [MD Menacer](https://segaretro.org/Menacer) | [MD Justifier](https://segaretro.org/The_Justifier) | [MS Light Phaser](https://segaretro.org/Light_Phaser) |\n|--------------------------------------------------------|----------------------|------------------------|---------------------------|\n|  Gun Crosshair | MD Menacer Crosshair | MD Justifier Crosshair | MS Light Phaser Crosshair |\n| Gun Trigger | MD Menacer A | MD Justifier A | MS Light Phaser A |\n| Gun Aux A | MD Menacer B | MD Justifer B | MS Light Phaser B |\n| Gun Aux B | MD Menacer C | MD Justifer C | MS Light Phaser C |\n| Gun Start | MD Menacer Start | MD Justifer Start | MS Light Phaser Start |\n\n## Other\n\n| Inputs | [PICO tablet](https://segaretro.org/Sega_Pico) | [Terebi Oekaki tablet](https://segaretro.org/Terebi_Oekaki) |\n|--------------------------------------------------------------------------------------------------------------------------|---------------------------|---------------------------|\n|  or  Pointer Position | PICO tablet Stylus | Terebi Oekaki tablet Stylus |\n|  Mouse 1 | PICO tablet Pen | Terebi Oekaki tablet Pen |\n|  Mouse 2 | PICO tablet Red | |\n|  Mouse 3 | | Terebo Oekaki tablet Start |\n| Wheel Up | PICO tablet Previous page | |\n| Wheel Down | PICO tablet Next page | |\n|  | PICO tablet Up (White) | |\n|  | PICO tablet Down (Orange) | |\n|  | PICO tablet Left (Purple) | |\n|  | PICO tablet Right (Green) | |\n\n## External Links\n\n- [Official Genesis Plus GX Github Repository](https://github.com/ekeeke/Genesis-Plus-GX)\n- [Libretro Genesis Plus GX Core Info File](https://github.com/libretro/libretro-super/blob/master/dist/info/genesis_plus_gx_libretro.info)\n- [Libretro Genesis Plus GX Github Repository](https://github.com/libretro/Genesis-Plus-GX)\n- [Report Libretro Genesis Plus GX Core Issues Here](https://github.com/libretro/Genesis-Plus-GX/issues)\n- [Gameplay Videos Playlist on YouTube](https://www.youtube.com/playlist?list=PLRbgg4gk_0If0UWkhjPbRmWUBcGaRiPZt)\n\n## Sega 8/16-bit cores\n\n- [Sega - Master System (Emux SMS)](emux_sms.md)\n- [Sega - MS/MD/CD/32X (PicoDrive)](picodrive.md)\n- [Sega - MS/GG/SG-1000 (Gearsystem)](gearsystem.md)\n- [MSX/SVI/ColecoVision/SG-1000 (blueMSX)](bluemsx.md)\n"
},
{
"path": "docs/library/geolith.md",
"content": "# SNK - Neo Geo AES / MVS (Geolith)\n\n## Background\n\nGeolith is a highly accurate Neo Geo AES/MVS emulator written in ISO C11. Geolith takes a different approach to Neo Geo emulation than most existing emulators, aiming for a home-console-first experience and using single file ROMs (which never need to be updated) similar to a typical home console emulator. Despite the focus on the home experience, Geolith also fully supports arcade mode.\n\nThe Geolith core has been authored by\n\n- [Rupert Carmichael (carmiker)](https://github.com/carmiker)\n\nThe Geolith core is licensed under\n\n- [BSD-3-Clause](https://github.com/libretro/geolith-libretro/blob/master/LICENSE)\n\nA summary of the licenses behind RetroArch and its cores can be found [here](../development/licenses.md).\n\n## BIOS\n\nGeolith requires a BIOS.\n\nRequired or optional firmware files go in the frontend's system directory.\n\n!!! attention\n\t Geolith requires BIOS files to function. Place the following files in RetroArch's system directory:\n\n| Filename | Description | md5sum |\n|:-----------------:|:----------------------------------:|:--------------------------------:|\n| aes.zip | Neo Geo AES BIOS - Required | ad9585c72130c56f04ae26aae87c289d |\n| neogeo.zip | Neo Geo MVS BIOS - Required | 00dad01abdbf8ea9e79ad2fe11bdb182 |\n\n## Extensions\n\nContent that can be loaded by the Geolith core have the following file extensions:\n\n- .neo\n\n## Features\n\nFrontend-level settings or features that the Geolith core respects.\n\n| Feature | Supported |\n|-------------------|:---------:|\n| Restart | ✔ |\n| Screenshots | ✔ |\n| Saves | ✔ |\n| States | ✔ |\n| Rewind | ✔ |\n| Netplay | ✔ |\n| Core Options | ✔ |\n| [Memory Monitoring (achievements)](../guides/memorymonitoring.md) | ✕ |\n| RetroArch Cheats | ✕ |\n| Native Cheats | ✕ |\n| Controls | ✔ |\n| Remapping | ✔ |\n| Multi-Mouse | ✕ |\n| Rumble | ✕ |\n| Sensors | ✕ |\n| Camera | ✕ |\n| Location | ✕ |\n| Subsystem | ✕ |\n| [Softpatching](../guides/softpatching.md) | ✔ |\n| Disk Control | ✕ |\n| Username | ✕ |\n| Language | ✕ |\n| Crop Overscan | ✔ |\n| LEDs | ✕ |\n\n### Directories\n\nThe Geolith core's library name is 'Geolith'\n\nThe Geolith core saves/loads to/from these directories.\n\n**Frontend's Save directory**\n\n| File | Description |\n|:-----:|:----------------------:|\n| *.nv | NVRAM save |\n| *.mcr | Memory Card save |\n| *.srm | Cartridge battery save |\n\n**Frontend's State directory**\n\n| File | Description |\n|:--------:|:-----------:|\n| *.state# | State |\n\n### Geometry and timing\n\n- The Geolith core's core provided FPS is 59.599484 for AES and 59.185606 for MVS\n- The Geolith core's core provided sample rate is 55943.49Hz for AES and 55555Hz for MVS\n- The Geolith core provides adjustable overscan masking and aspect ratio options\n\n## Core options\n\nThe Geolith core has the following options that can be tweaked from the core options menu. The default setting is bolded.\n\nSettings with (Restart) means that core has to be closed for the new setting to be applied on next launch.\n\n- **System Type (Restart)** [geolith_system_type] (**Neo Geo AES (Home Console)**|Neo Geo MVS (Arcade)|Universe BIOS (Community-enhanced BIOS))\n\n Specify the System Type: AES, MVS, or Universe BIOS System\n\n- **Region (Restart)** [geolith_region] (**USA**|Japan|Asia|Europe)\n\n Specify the Region: USA, Japan, Asia, Europe\n\n- **Setting Mode (Restart, DIP Switch)** [geolith_settingmode] (**Off**|On)\n\n Bring up the System ROM menu at boot on arcade systems\n\n- **Four Player Mode (Restart, Asia/Japan MVS Only)** [geolith_4player] (**Off**|On)\n\n Set Four Player (dual MVS cabinet) mode for Asia/Japan MVS systems, for use with Kizuna Encounter or homebrew with four player support\n\n- **Freeplay (DIP Switch)** [geolith_freeplay] (**Off**|On)\n\n Play MVS games without the need to insert coins\n\n- **Mask Overscan (Top)** [geolith_overscan_t] (16|12|**8**|4|0)\n\n Mask off pixels hidden by a bezel or border on original CRTs (top)\n\n- **Mask Overscan (Bottom)** [geolith_overscan_b] (16|12|**8**|4|0)\n\n Mask off pixels hidden by a bezel or border on original CRTs (bottom)\n\n- **Mask Overscan (Left)** [geolith_overscan_l] (16|12|**8**|4|0)\n\n Mask off pixels hidden by a bezel or border on original CRTs (left)\n\n- **Mask Overscan (Right)** [geolith_overscan_r] (16|12|**8**|4|0)\n\n Mask off pixels hidden by a bezel or border on original CRTs (right)\n\n- **Palette** [geolith_palette] (**Resistor Network**|Raw)\n\n Set the Palette\n\n- **Aspect Ratio** [geolith_aspect] (**Perfectly Square Pixels (1:1 PAR)**|Ostensibly Accurate NTSC Aspect Ratio (45:44 PAR)|Very Traditional NTSC Aspect Ratio (4:3 DAR))\n\n Set the Aspect Ratio\n\n- **Sprites-per-line limit (Hack)** [geolith_sprlimit] (**Hardware Accurate (96)**|Double (192)|Triple (288)|MAX 381 MEGA PRO-GEAR SPEC)\n\n Set the sprites-per-line limit - increasing causes glitches in some games\n\n- **Overclocking (Hack)** [geolith_oc] (**Off**|On)\n\n Annihilate your accuracy with The 24MHz Shock - expect glitches. DO NOT USE THIS FOR ALL GAMES, enable only for specific cases with major slowdown.\n\n### Input Devices\n\n| Player 1/2/3/4 Joysticks | RetroPad Inputs |\n|-------------------------------------|------------------------------------------------|\n| Up |  |\n| Down |  |\n| Left |  |\n| Right |  |\n| A |  |\n| B |  |\n| C |  |\n| D |  |\n| Select/Coin |  |\n| Start |  |\n| C+D |  |\n| A+B |  |\n| B+C |  |\n| A+B+C |  |\n| Test (Arcade, Player 1 Only) |  |\n| Service (Arcade, Player 1 Only) |  |\n\n| V-Liner | RetroPad Inputs |\n|-------------------------------------|------------------------------------------------|\n| Up |  |\n| Down |  |\n| Left |  |\n| Right |  |\n| Payout Table/Big |  |\n| Bet/Small |  |\n| Stop/Double-Up |  |\n| Start/Collect |  |\n| Operator Menu |  |\n| Clear Credit |  |\n| Coin 1 |  |\n| Coin 2 |  |\n| Hopper Out |  |\n\n## External Links\n\n- [Upstream Geolith Repository](https://gitlab.com/jgemu/geolith)\n- [Libretro Geolith Core info file](https://github.com/libretro/libretro-super/blob/master/dist/info/geolith_libretro.info)\n- [Libretro Geolith Repository](https://github.com/libretro/geolith-libretro)\n- [Report Geolith Core Issues Here](https://github.com/libretro/geolith-libretro/issues)\n\n### See also\n\n- [Arcade (fbneo)](fbneo.md)\n"
},
{
"path": "docs/library/gpsp.md",
"content": "# Nintendo - Game Boy Advance (gpSP)\n\n## Background\n\ngpSP is a Game Boy Advance emulator based on notaz' fork of gpSP with additional codebase improvements.\n\n### Author/License\n\nThe gpSP core has been authored by\n\n- Exophase\n\nThe gpSP core is licensed under\n\n- [GPLv2](https://github.com/libretro/gpsp/blob/master/COPYING)\n\nA summary of the licenses behind RetroArch and its cores can be found [here](../development/licenses.md).\n\n## Extensions\n\nContent that can be loaded by the gpSP core have the following file extensions:\n\n- .gba\n- .bin\n\n## Databases\n\nRetroArch database(s) that are associated with the gpSP core:\n\n- [Nintendo - Game Boy Advance](https://github.com/libretro/libretro-database/blob/master/rdb/Nintendo%20-%20Game%20Boy%20Advance.rdb)\n\n## BIOS\n\nRequired or optional firmware files go in the frontend's system directory.\n\n| Filename | Description | md5sum |\n|:-------------:|:---------------------------------:|:--------------------------------:|\n| gba_bios.bin | Game Boy Advance Image - Optional | a860e8c0b6d573d191e4ec7db1b1e4f6 |\n\n## Features\n\nFrontend-level settings or features that the gpSP core respects.\n\n| Feature | Supported |\n|-------------------|:---------:|\n| Restart | ✔ |\n| Screenshots | ✔ |\n| Saves | ✔ |\n| States | ✔ |\n| Rewind | ✔ |\n| Netplay | ✔ |\n| Core Options | ✕ |\n| [Memory Monitoring (achievements)](../guides/memorymonitoring.md) | ✔ |\n| RetroArch Cheats | ✔ |\n| [RetroArch SaveRAM Autosave Interval support](https://github.com/libretro/RetroArch/issues/16323#issuecomment-1977792161) | ✕ |\n| Native Cheats | ✕ |\n| Controls | ✔ |\n| Remapping | ✔ |\n| Multi-Mouse | ✕ |\n| Rumble | ✔ |\n| Sensors | ✕ |\n| Camera | ✕ |\n| Location | ✕ |\n| Subsystem | ✕ |\n| [Softpatching](../guides/softpatching.md) | ✕ |\n| Disk Control | ✕ |\n| Username | ✕ |\n| Language | ✕ |\n| Crop Overscan | ✕ |\n| LEDs | ✕ |\n\n### Directories\n\nThe gpSP core's directory name is 'gpSP'\n\nThe gpSP core saves/loads to/from these directories.\n\n**Frontend's Save directory**\n\n- 'content-name'.srm (Cartridge battery save)\n\n**Frontend's State directory**\n\n- 'content-name'.state# (State)\n\n### Geometry and timing\n\n- The gpSP core's core provided FPS is 59.72750057\n- The gpSP core's core provided sample rate is 65536 Hz\n- The gpSP core's core provided aspect ratio is 3/2\n\n## Controllers\n\nThe gpSP core supports the following device type(s) in the controls menu, bolded device types are the default for the specified user(s):\n\n### User 1 device types\n\n- None - Doesn't disable input.\n- **RetroPad** - Joypad\n- RetroPad w/Analog - Joypad - There's no reason to switch to this.\n\n### Controller tables\n\n#### Joypad\n\n\n\n| User 1 Remap descriptors | RetroPad Inputs |\n|--------------------------|-------------------------------------------|\n| B |  |\n| Select |  |\n| Start |  |\n| D-Pad Up |  |\n| D-Pad Down |  |\n| D-Pad Left |  |\n| D-Pad Right |  |\n| A |  |\n\n## Compatibility\n\n| Game | Issue |\n|---------------------------------------|--------------------------------|\n| Banjo-Kazooie - Grunty's Revenge |Black screen during developer logo. |\n| Boktai Trilogy |The solar sensor is not emulated. |\n| Dragon Ball Z - The Legacy of Goku |Graphics glitches. |\n| Final Fantasy VI |Background/tiling order issues. |\n| Harry Potter - Quidditch World Cup |Crashes when going ingame. |\n| Koro Koro Puzzle Happy Panechu! |The tilt sensor is not emulated. |\n| Phantasy Star Collection |Phantasy Star 1 flickers - turn on Interframe Blending in core options to fix.|\n| Sims 2, The - Pets |Graphics glitches. Heavy flickering, black objects. |\n| Street Racing Syndicate |Crashes afer pressing Start.|\n| Super Street Fighter II Turbo/X Revival |Small graphics glitch. Selecting speed 'Turbo 1' and beyond on the character select screen makes the game speed window not fully visible. |\n| WarioWare: Twisted! |The tilt sensor is not emulated.|\n| Yoshi’s Universal Gravitation |The tilt sensor is not emulated.|\n\n??? note \"(1)\"\n\t\n\n??? note \"(2)\"\n\t\n\n??? note \"(3)\"\n\t\n\n## External Links\n\n- [Official gpSP Website](http://notaz.gp2x.de/other.php)\n- [Official gpSP Github Repository](https://github.com/notaz/gpsp)\n- [Libretro gpSP Core info file](https://github.com/libretro/libretro-super/blob/master/dist/info/gpsp_libretro.info)\n- [Libretro gpSP Github Repository](https://github.com/libretro/gpsp)\n- [Report Libretro gpSP Core Issues Here](https://github.com/libretro/gpsp/issues)\n- [Gameplay Videos](https://www.youtube.com/playlist?list=PLRbgg4gk_0Iczn5l7AfS11JNbXUv5Widl)\n\n### See also\n\n#### Nintendo - Game Boy Advance\n\n- [Nintendo - Game Boy Advance (Beetle GBA)](beetle_gba.md)\n- [Nintendo - Game Boy Advance (Meteor)](meteor.md)\n- [Nintendo - Game Boy Advance (mGBA)](mgba.md)\n- [Nintendo - Game Boy Advance (TempGBA)](tempgba.md)\n- [Nintendo - Game Boy Advance (VBA-M)](vba_m.md)\n- [Nintendo - Game Boy Advance (VBA Next)](vba_next.md)\n"
},
{
"path": "docs/library/gw.md",
"content": "# Handheld Electronic (GW)\n\n\n\n## Background\n\nA libretro core for Game & Watch simulators.\n\nIt runs simulators converted from source code for the games available at [MADrigal](http://www.madrigaldesign.it/sim/).\n\nThe converted games are available at [buildbot](https://buildbot.libretro.com/assets/cores/Handheld%20Electronic%20Game/). \n\nThe GW core has been authored by\n\n- Andre Leiradella\n\nThe GW core is licensed under\n\n- [zlib](https://github.com/libretro/gw-libretro/blob/master/LICENSE)\n\nA summary of the licenses behind RetroArch and its cores can be found [here](../development/licenses.md).\n\n## Extensions\n\nContent that can be loaded by the GW core have the following file extensions:\n\n- .mgw\n\n## Databases\n\nRetroArch database(s) that are associated with the GW core:\n\n- [Handheld Electronic Game](https://github.com/libretro/libretro-database/blob/master/rdb/Handheld%20Electronic%20Game.rdb)\n\n## Features\n\nFrontend-level settings or features that the GW core respects.\n\n| Feature | Supported |\n|-------------------|:---------:|\n| Restart | ✕ |\n| Screenshots | ✔ |\n| Saves | ✕ |\n| States | ✕ |\n| Rewind | ✕ |\n| Netplay | ✕ |\n| Core Options | ✕ |\n| [Memory Monitoring (achievements)](../guides/memorymonitoring.md) | ✕ |\n| RetroArch Cheats | ✕ |\n| Native Cheats | ✕ |\n| Controls | ✔ |\n| Remapping | ✔ |\n| Multi-Mouse | ✕ |\n| Rumble | ✕ |\n| Sensors | ✕ |\n| Camera | ✕ |\n| Location | ✕ |\n| Subsystem | ✕ |\n| [Softpatching](../guides/softpatching.md) | ✕ |\n| Disk Control | ✕ |\n| Username | ✕ |\n| Language | ✕ |\n| Crop Overscan | ✕ |\n| LEDs | ✕ |\n\n### Directories\n\nThe GW core's internal core name is 'Game & Watch'\n\n### Geometry and timing\n\n- The GW core's core provided FPS is 60\n- The GW core's core provided sample rate is 44100 Hz\n- The GW core's core provided aspect ratio is dependent on the loaded content.\n\n## Controllers\n\nThe GW core supports the following device type(s) in the controls menu, bolded device types are the default for the specified user(s):\n\n### User 1 - 2 device types\n\n- None - Doesn't diable input.\n- **Controller** - Joypad - Stay on this.\n\n### Controller tables\n\n#### Joypad\n\n!!! attention\n\tWhat the inputs do are game specific. Without having anything selected, you can use the Start input to see a Controller overlay to see what the game specific inputs are.\n\n\n\n| User 1 Remap descriptors | RetroPad Inputs |\n|--------------------------|---------------------------------------------|\n| B |  |\n| Y |  |\n| Select |  |\n| Start |  |\n| Up |  |\n| Down |  |\n| Left |  |\n| Right |  |\n| A |  |\n| X |  |\n| L1 |  |\n| R1 |  |\n| L2 |  |\n| R2 |  |\n| L3 |  |\n| R3 |  |\n\n## External Links\n\n- [MADrigal Website](http://www.madrigaldesign.it/sim/)\n- [Libretro GW Core info file](https://github.com/libretro/libretro-super/blob/master/dist/info/gw_libretro.info)\n- [Libretro GW Github Repository](https://github.com/libretro/gw-libretro)\n- [Report Libretro GW Core Issues Here](https://github.com/libretro/gw-libretro/issues)\n"
},
{
"path": "docs/library/handy.md",
"content": "# Atari - Lynx (Handy)\n\n## Background\n\nHandy is an Atari Lynx video game system emulator that can be used as a libretro core. Handy was the original name of the Lynx project that was started at Epyx and then finished by Atari.\n\n### Author/License\n\nThe Handy core has been authored by\n\n- K. Wilkins\n\nThe Handy core is licensed under\n\n- [zlib](https://sourceforge.net/projects/handy/)\n\nA summary of the licenses behind RetroArch and its cores can be found [here](../development/licenses.md).\n\n## Extensions\n\nContent that can be loaded by the Handy core have the following file extensions:\n\n- .lnx\n\n## Databases\n\nRetroArch database(s) that are associated with the Handy core:\n\n- [Atari - Lynx](https://github.com/libretro/libretro-database/blob/master/rdb/Atari%20-%20Lynx.rdb)\n\n## BIOS\n\nRequired or optional firmware files go in the frontend's system directory.\n\n| Filename | Description | md5sum |\n|:-------------:|:--------------------------:|:--------------------------------:|\n| lynxboot.img | Lynx Boot Image - Required | fcd403db69f54290b51035d82f835e7b |\n\n## Features\n\nFrontend-level settings or features that the Handy core respects.\n\n| Feature | Supported |\n|-------------------|:---------:|\n| Restart | ✔ |\n| Screenshots | ✔ |\n| Saves | ✕ |\n| States | ✔ |\n| Rewind | ✔ |\n| Netplay (State based) | ✔ (not link-cable emulation) |\n| Core Options | ✔ |\n| [Memory Monitoring (achievements)](../guides/memorymonitoring.md) | ✔ |\n| Cheats (Cheats menu) | ✕ |\n| Native Cheats | ✕ |\n| Controls | ✔ |\n| Remapping | ✔ |\n| Multi-Mouse | ✕ |\n| Rumble | ✕ |\n| Sensors | ✕ |\n| Camera | ✕ |\n| Location | ✕ |\n| Subsystem | ✕ |\n| [Softpatching](../guides/softpatching.md) | ✕ |\n| Disk Control | ✕ |\n| Username | ✕ |\n| Language | ✕ |\n| Crop Overscan | ✕ |\n| LEDs | ✕ |\n\n### Directories\n\nThe Handy core's directory name is 'Handy'\n\nThe Handy core saves/loads to/from these directories.\n\n**Frontend's State directory**\n\n- 'content-name'.state# (State)\n\n### Geometry and timing\n\n- The Handy core's core provided FPS is 75\n- The Handy core's core provided sample rate is 22050 Hz\n- The Handy core's core provided aspect ratio is dependent on the ['Display rotation' core option](#core-options/). When set to None, the aspect ratio will be 80/51. When set to 90 or 240, the aspect ratio will be 51/80.\n\n## Core options\n\nThe Handy core has the following option(s) that can be tweaked from the core options menu. The default setting is bolded.\n\nSettings with (Restart) means that core has to be closed for the new setting to be applied on next launch.\n\n- **Display rotation** [handy_rot] (**None**/90/240)\n\n\tSelf-explanatory. Need to restart content.\n\n## Controllers\n\nThe Handy core supports the following device type(s) in the controls menu, bolded device types are the default for the specified user(s):\n\n### User 1 device types\n\n- None - Doesn't disable input.\n- **RetroPad** - Joypad\n- RetroPad w/Analog - Joypad - There's no reason to switch to this.\n\n### Controller tables\n\n#### Joypad\n\n\n\n| User 1 Remap descriptors | RetroPad Inputs |\n|--------------------------|---------------------------------------------|\n| B |  |\n| Pause |  |\n| D-Pad Up |  |\n| D-Pad Down |  |\n| D-Pad Left |  |\n| D-Pad Right |  |\n| A |  |\n| Option 1 |  |\n| Option 2 |  |\n\nSupported combinations\n\n- Option 1 + Pause = Restarts game\n- Option 2 + Pause = Flips Screen\n\n## Compatibility\n\n| Game | Issue |\n|--------------|-------------------------------------------------------------------------|\n| RoadBlasters | Graphics glitches. Minor flickering and glitches after starting a race. |\n\n## External Links\n\n- [Official Handy Website](http://handy.sourceforge.net/)\n- [Official Handy Downloads](http://handy.sourceforge.net/download.htm)\n- [Libretro Handy Core info file](https://github.com/libretro/libretro-super/blob/master/dist/info/handy_libretro.info)\n- [Libretro Handy Github Repository](https://github.com/libretro/libretro-handy)\n- [Report Libretro Handy Core Issues Here](https://github.com/libretro/libretro-handy/issues)\n- [Gameplay Videos](https://www.youtube.com/playlist?list=PLRbgg4gk_0IfDlFKLg0HMDXbn8BrcxbJV)\n\n### See also\n\n#### Atari - Lynx\n\n- [Atari - Lynx (Beetle Lynx)](beetle_lynx.md)\n- [Atari - Lynx (Holani)](holani.md)\n"
},
{
"path": "docs/library/hatari.md",
"content": "# Atari - ST/STE/TT/Falcon (Hatari)\n\n## Background\n\nHatari is an Atari ST/STE/TT/Falcon system emulator that can be used as a libretro core. Hatari tries to emulate the hardware as close as possible so that it is able to run most of the old Atari games and demos.\n\n### Author/License\n\nThe Hatari core has been authored by\n\n- Nicolas Pomarède\n\nThe Hatari core is licensed under\n\n- [GPLv2](https://github.com/libretro/hatari/blob/master/readme.txt)\n\nA summary of the licenses behind RetroArch and its cores can be found [here](../development/licenses.md).\n\n## Extensions\n\nContent that can be loaded by the Hatari core have the following file extensions:\n\n- .st\n- .msa\n- .zip\n- .stx\n- .dim\n- .ipf\n\n## BIOS\n\nRequired or optional firmware files go in the frontend's system directory.\n\n!!! attention\n\tThe plain ST mode only works with TOS 1.00, 1.02, 1.04, or 2.06. STE mode requires any of the TOS versions 1.xx or 2.xx. TOS 3.0x is for TT, and TOS 4.0x is for Falcon.\n\n| Filename | Description | md5sum |\n|:--------:|:-------------------------:|:--------------------------------:|\n| tos.img | TOS Boot Image - Required | c1c57ce48e8ee4135885cee9e63a68a2 |\n\n## Features\n\nFrontend-level settings or features that the Hatari core respects.\n\n| Feature | Supported |\n|-------------------|:---------:|\n| Restart | ✕ |\n| Screenshots | ✕ |\n| Saves | ✕ |\n| States | ✕ |\n| Rewind | ✕ |\n| Netplay | ✕ |\n| Core Options | ✔ |\n| [Memory Monitoring (achievements)](../guides/memorymonitoring.md) | ✕ |\n| RetroArch Cheats | ✕ |\n| Native Cheats | ✕ |\n| Controls | ✔ |\n| Remapping | ✔ |\n| Multi-Mouse | ✕ |\n| Rumble | ✕ |\n| Sensors | ✕ |\n| Camera | ✕ |\n| Location | ✕ |\n| Subsystem | ✕ |\n| [Softpatching](../guides/softpatching.md) | ✕ |\n| Disk Control | ✕ |\n| Username | ✕ |\n| Language | ✕ |\n| Crop Overscan | ✕ |\n| LEDs | ✕ |\n\n### Directories\n\nThe Hatari core's internal core name is 'Hatari'\n\nThe Hatari core saves/loads to/from these directories.\n\n**Frontend's System directory**\n\n- hatari.cfg (Hatari Config file)\n\n**User directory**\n\n- .hatari/ (Unused directory)\n\n### Geometry and timing\n\n- The Hatari core's core provided FPS is (FPS)\n- The Hatari core's core provided sample rate is (Rate)\n- The Hatari core's core provided aspect ratio is (Ratio)\n\n## Getting Started With Hatari\n\n!!! attention\n\tThis guide was written by [AnicetusCer on the LibRetro Forums](https://forums.libretro.com/t/getting-started-with-hatari-atari-st-ste-tt-falcon-emulation/13237).\n\nThis was written using Lakka 2.1 rc6 x86_64\n\nI was excited to find out Lakka has an Atari ST core, but then disappointed that it chucked out some errors when I tried to “just load an .st image”. There really was not much of a guide out there, even to get started, So I picked apart a handful of posts and docs and wrote my own mini guide below.\n\n### Quick Start\n\n- Get a copy of US TOS 1.02 , name and put it here; “/storage/system/tos.img”\n\n- Create a folder for your Atari ST games “/storage/roms/Atari - ST”\n\n- Create a hatari.cfg file in “/storage/system/hatari.cfg” with the following lines\n\n\n```\n[Floppy]\nbAutoInsertDiskB = TRUE\nFastFloppy = TRUE\nnWriteProtection = 0\nszDiskAFileName = /storage/roms/Atari\\ -\\ ST/game.st\nszDiskBFileName =\nszDiskImageDirectory = /storage/roms/Atari\\ -\\ ST/\nszDiskAZipPath =\nszDiskBZipPath =\n\n[ROM]\nszCartridgeImageFileName =\nszTosImageFileName = /storage/system/tos.img\n```\n\n- Changing Floppy disks can be achieved by accessing the Hatari menu and selecting the “Floppy” menu (see long winded explanation below)\n\n- So far I have found non of my own .st files get scanned into a playlist so I’ll have to build my own, but in the mean time to load a disk, in the Lakka menu go to “Load Content” > select you first game disk > then select to run it with the Hatari Core, it will now try to load the game without complaining it has no TOS. (ST games can have varying Hardware requirements, see “Long Winded Start” on how to change settings, but you should be able to play a lot of games with just the defaults.\n\n- Note on controllers, A controller can be used as both a mouse and joystick, see “Long Winded Start” for more info.\n\n### Long Winded Start\n\n- The TOS image (TOS stands for THE Operating System, cool huh) Consider TOS like a bios image used for other consoles, it needs adding to the the “/storage/system” directory. The one the retroarch Hatari documents mention is the US TOS version 1.02 this was an Atari ST OS and is probably the most compatible version for playing games, if you want to learn more about the different TOS versions and which hardware systems they correspond to (ST, STE, TT & FALCON) here is a good link; [http://www.atarimania.com/atari-st-tt-falcon.html9](http://www.atarimania.com/atari-st-tt-falcon.html9).\n\n- I found Hatari would kick out this error when loading a game without the config set up “Can not load TOS file J’/usr/bin/TOS” This is because it was looking for the tos.img in the /usr/bin directory of Lakka, this is a read only location so we can not just drop the TOS image there, this is what the config file is needed for. This section tells Hatari to look for TOS in the location specified.\n\n```\n[ROM]\nszCartridgeImageFileName =\nszTosImageFileName = /storage/system/tos.img\n```\n\n- Hatari does not seem to have a default hatari.cfg in place when first loaded (Hence the error above), It expects it to be read from two places by default, /storage/.hatari/hatari.cfg and /storage/system/hatari.cfg, I prefer the latter as it is more visible, once you load your first game you can then access the Hatari menu and save over your first base config in either location with whatever settings you change.\n\n### Controller and Hatari Menu (And Changing Floppy Disk)\n\n- The Hatari menu can be accessed using the default controller button “Y” when the core is loaded (IE during a game\" (i was using a PlayStation 4 controller and it was the square button for me)\n\n- Once in the menu I found a real mouse is not usable, however you can press “select” on your controller to switch to mouse mode (there is also another button to display the mouse speed “ms” and another to change it), now you can navigate the menu.\n\n- The menu can be used to change your system settings, here you can;\n\t- Point to new TOS images\n\t- Change the CPU & the amount of memory (needed sometimes to get some games working, dropping to 512k can help with some earlier games)\n\t- Change floppy disks, “YOU WILL DO THIS A LOT WITH SOME GAMES” When the first game disk is loaded you can then access the Hatari menu, go to the “Floppy” Menu and then browse to a new disk to put into a drive (A or B). It is important that you choose not to reset the system when exiting the Hatari menu if still in a game (this is not selected by default , so you will be fine).\n\t- Add a HDD not really needed (for die hard Atari fans).\n\t- Change Keyboard and Joystick settings.\n\t- Change the screen size (Warning Hatari is strict when it comes to aspect ratios it will always want to use the available resolutions of 1990s Monitors, with a little tweaking you can get it to fill most of your modern screen)\n\t- Change the sound chip settings (don’t touch unless you know what you’re doing)\n\t- There is also a save state option in the memory menu (Save state is not available directly from Lakka for Hatari, but it is inside the emulator :slight_smile: )\n\n- Once you have finished setting up your settings you can now save them using the save config button , rather than use the default location of /storage/.hatari/hatari.cfg I would navigate back to your initial basic config file /storage/hatari.cfg as it is more accessible and visible, Note if you like, you can have as many config files as you want, as long as you remember where you put them :blush: , \"The Immortal (one of the hardest games ever made), for instance, needs its memory setting back to 512k with a 68000 cpu in st mode 1.02 TOS, so why not create an “immortal.cfg” with the right system settings and floppy already in the drive, then you can load it and it is all just done.\n\n## Core options\n\nThe Hatari core has the following option(s) that can be tweaked from the core options menu. The default setting is bolded.\n\nSettings with (Restart) means that core has to be closed for the new setting to be applied on next launch.\n\n- **Internal resolution** [Hatari_resolution] (**640x480**|832x576|832x588|800x600|960x720|1024x768|1024x1024)\n\n\tSet the internal resolution.\n\n## Controllers\n\nThe Hatari core supports the following device type(s) in the controls menu, bolded device types are the default for the specified user(s):\n\n### User 1 device types\n\n- None - Doesn't disable input. There's no reason to switch to this.\n- **RetroPad** - Joypad - Stay on this.\n- RetroPad w/Analog - Joypad - Same as RetroPad. There's no reason to switch to this.\n\n### Other controllers\n\n- Mouse - The Hatari core can emulate mouse inputs but this is done automatically and cannot be manually selected as a device type.\n\n### Controller tables\n\n#### Joypad\n\n| User 1 Remap descriptors | RetroPad Inputs |\n|--------------------------|---------------------------------------------|\n| Enter GUI |  |\n| Mouse mode toggle |  |\n| Keyboard overlay |  |\n| Up |  |\n| Down |  |\n| Left |  |\n| Right |  |\n| Fire |  |\n| Joystick number |  |\n| Mouse speed |  |\n| Toggle m/k status |  |\n\n#### Keyboard\n\n| RetroKeyboard Inputs | Hatari core Inputs |\n|------------------------------|---------------------------|\n| Keyboard Backspace | - |\n| Keyboard Tab | - |\n| Keyboard Clear | - |\n| Keyboard Return | - |\n| Keyboard Pause | - |\n| Keyboard Escape | - |\n| Keyboard Space | - |\n| Keyboard Exclaim ! | - |\n| Keyboard Double Quote \" | - |\n| Keyboard Hash # | - |\n| Keyboard Dollar $ | - |\n| Keyboard Ampersand & | - |\n| Keyboard Quote ' | - |\n| Keyboard Left Parenthesis ( | - |\n| Keyboard Right Parenthesis ) | - |\n| Keyboard Asterisk * | - |\n| Keyboard Plus + | - |\n| Keyboard Comma , | - |\n| Keyboard Minus - | - |\n| Keyboard Period . | - |\n| Keyboard Slash / | - |\n| Keyboard 0 | - |\n| Keyboard 1 | - |\n| Keyboard 2 | - |\n| Keyboard 3 | - |\n| Keyboard 4 | - |\n| Keyboard 5 | - |\n| Keyboard 6 | - |\n| Keyboard 7 | - |\n| Keyboard 8 | - |\n| Keyboard 9 | - |\n| Keyboard Colon : | - |\n| Keyboard Semicolon ; | - |\n| Keyboard Less than < | - |\n| Keyboard Equals = | - |\n| Keyboard Greater than > | - |\n| Keyboard Question ? | - |\n| Keyboard At @ | - |\n| Keyboard Left Bracket [ | - |\n| Keyboard Backslash \\ | - |\n| Keyboard Right Bracket ] | - |\n| Keyboard Caret ^ | - |\n| Keyboard Underscore _ | - |\n| Keyboard Backquote ` | - |\n| Keyboard a | - |\n| Keyboard b | - |\n| Keyboard c | - |\n| Keyboard d | - |\n| Keyboard e | - |\n| Keyboard f | - |\n| Keyboard g | - |\n| Keyboard h | - |\n| Keyboard i | - |\n| Keyboard j | - |\n| Keyboard k | - |\n| Keyboard l | - |\n| Keyboard m | - |\n| Keyboard n | - |\n| Keyboard o | - |\n| Keyboard p | - |\n| Keyboard q | - |\n| Keyboard r | - |\n| Keyboard s | - |\n| Keyboard t | - |\n| Keyboard u | - |\n| Keyboard v | - |\n| Keyboard w | - |\n| Keyboard x | - |\n| Keyboard y | - |\n| Keyboard z | - |\n| Keyboard Delete | - |\n| Keyboard Keypad 0 | - |\n| Keyboard Keypad 1 | - |\n| Keyboard Keypad 2 | - |\n| Keyboard Keypad 3 | - |\n| Keyboard Keypad 4 | - |\n| Keyboard Keypad 5 | - |\n| Keyboard Keypad 6 | - |\n| Keyboard Keypad 7 | - |\n| Keyboard Keypad 8 | - |\n| Keyboard Keypad 9 | - |\n| Keyboard Keypad Period . | - |\n| Keyboard Keypad Divide / | - |\n| Keyboard Keypad Multiply * | - |\n| Keyboard Keypad Minus - | - |\n| Keyboard Keypad Plus + | - |\n| Keyboard Keypad Enter | - |\n| Keyboard Keypad Equals = | - |\n| Keyboard Up | - |\n| Keyboard Down | - |\n| Keyboard Right | - |\n| Keyboard Left | - |\n| Keyboard Insert | - |\n| Keyboard Home | - |\n| Keyboard End | - |\n| Keyboard Page Up | - |\n| Keyboard Page Down | - |\n| Keyboard F1 | - |\n| Keyboard F2 | - |\n| Keyboard F3 | - |\n| Keyboard F4 | - |\n| Keyboard F5 | - |\n| Keyboard F6 | - |\n| Keyboard F7 | - |\n| Keyboard F8 | - |\n| Keyboard F9 | - |\n| Keyboard F10 | - |\n| Keyboard F11 | - |\n| Keyboard F12 | - |\n| Keyboard F13 | - |\n| Keyboard F14 | - |\n| Keyboard F15 | - |\n| Keyboard Num Lock | - |\n| Keyboard Caps Lock | - |\n| Keyboard Scroll Lock | - |\n| Keyboard Right Shift | - |\n| Keyboard Left Shift | - |\n| Keyboard Right Control | - |\n| Keyboard Left Control | - |\n| Keyboard Right Alt | - |\n| Keyboard Left Alt | - |\n| Keyboard Right Meta | - |\n| Keyboard Left Meta | - |\n| Keyboard Right Super | - |\n| Keyboard Left Super | - |\n| Keyboard Mode | - |\n| Keyboard Compose | - |\n| Keyboard Help | - |\n| Keyboard Print | - |\n| Keyboard Sys Req | - |\n| Keyboard Break | - |\n| Keyboard Menu | - |\n| Keyboard Power | - |\n| Keyboard € | - |\n| Keyboard Undo | - |\n| Keyboard Unmapped | - |\n| Keyboard Unknown | - |\n\n#### Mouse\n\n| RetroMouse Inputs | Hatari core inputs |\n|-------------------------------------------------------|--------------------|\n|  Mouse Cursor | Mouse Cursor |\n|  Mouse 1 | Mouse Left Button |\n|  Mouse 2 | Mouse Right Button |\n\n## Compatibility\n\n- Hatari compatibility can be found [here](https://hg.tuxfamily.org/mercurialroot/hatari/hatari/raw-file/tip/doc/compatibility.html)\n\n## External Links\n\n- [Official Hatari Website](http://hatari.tuxfamily.org/)\n- [Official Hatari Downloads](http://hatari.tuxfamily.org/download.html)\n- [Libretro Hatari Core info file](https://github.com/libretro/libretro-super/blob/master/dist/info/hatari_libretro.info)\n- [Libretro Hatari Github Repository](https://github.com/libretro/hatari)\n- [Report Libretro Hatari Core Issues Here](https://github.com/libretro/hatari/issues)\n"
},
{
"path": "docs/library/higan_accuracy.md",
"content": "# Nintendo - SNES / Famicom (higan Accuracy)\n\n## Background\n\nA port of higan v106's Super Famicom emulation core to libretro. This core is the most in sync with upstream higan.\n\n- Most accurate SNES emulation available.\n- Simplified and easily accessible Super Game Boy functionality compared to the other bsnes cores.\n\n### Author/License\n\nThe higan Accuracy core has been authored by\n\n- byuu\n\nThe higan Accuracy core is licensed under\n\n- [GPLv3](https://gitlab.com/higan/higan/blob/master/LICENSE.txt)\n\nA summary of the licenses behind RetroArch and its cores can be found [here](../development/licenses.md).\n\n## Extensions\n\nContent that can be loaded by the higan Accuracy core have the following file extensions:\n\n- .sfc\n- .smc\n- .gb\n- .gbc\n- .bml\n- .rom\n\n## Databases\n\nRetroArch database(s) that are associated with the higan Accuracy core:\n\n- [Nintendo - Super Nintendo Entertainment System](https://github.com/libretro/libretro-database/blob/master/rdb/Nintendo%20-%20Super%20Nintendo%20Entertainment%20System%20Hacks.rdb)\n- [Nintendo - Super Nintendo Entertainment System Hacks](https://github.com/libretro/libretro-database/blob/master/rdb/Nintendo%20-%20Super%20Nintendo%20Entertainment%20System%20Hacks.rdb)\n- [Nintendo - Game Boy](https://github.com/libretro/libretro-database/blob/master/rdb/Nintendo%20-%20Game%20Boy.rdb)\n- [Nintendo - Game Boy Color](https://github.com/libretro/libretro-database/blob/master/rdb/Nintendo%20-%20Game%20Boy%20Color.rdb)\n\n## BIOS\n\nRequired or optional firmware files go in the frontend's system directory.\n\n!!! attention\n\thigan Accuracy uses split ROMS for special chip games.\n\n!!! attention\n\tFirmware files for SGB emulation need to be in directories called SGB1.sfc and SGB2.sfc in RetroArch's system directory. Look at the [Super GameBoy support section](#super-gameboy-support) for more information.\n\nNotable DSP1.mdDSP1B Games:\n\n- Super Mario Kart\n- Pilotwings\n\nNotable DSP2 Games:\n\n- Dungeon Master\n\nNotable DSP3 Games:\n\n- SD Gundam GX\n\nNotable DSP4 Games:\n\n- Top Gear 3000\n\nNotable Cx4 Games:\n\n- Mega Man X2\n- Mega Man X3\n\n| Filename | Description | md5sum |\n|:----------------------:|:--------------------------------------:|:--------------------------------:|\n| dsp1.data.rom | DSP1 co-processor firmware - Optional | 3d81b45fa0c2aa8b852dfb1ece7c0971 |\n| dsp1.program.rom | DSP1 co-processor firmware - Optional | ae209fbe789fbf11a48aea5ab1197321 |\n| dsp1b.data.rom | DSP1B co-processor firmware - Optional | 1e3f568634a7d8284020dddc0ae905bc |\n| dsp1b.program.rom | DSP1B co-processor firmware - Optional | d10f446888e097cbf500f3f663cf4f6d |\n| dsp2.data.rom | DSP2 co-processor firmware - Optional | e9417e29223b139c3c4b635a2a3b8744 |\n| dsp2.program.rom | DSP2 co-processor firmware - Optional | aa6e5922a3ed5ded54f24247c11143c5 |\n| dsp3.data.rom | DSP3 co-processor firmware - Optional | 0a81210c0a940b997dd9843281008ee6 |\n| dsp3.program.rom | DSP3 co-processor firmware - Optional | d99ca4562818d49cee1f242705bba6f8 |\n| dsp4.data.rom | DSP4 co-processor firmware - Optional | ee4990879eb68e3cbca239c5bc20303d |\n| dsp4.program.rom | DSP4 co-processor firmware - Optional | a151023b948b90ffc23a5b594bb6fef2 |\n| cx4.data.rom | CX4 co-processor firmware - Optional | 037ac4296b6b6a5c47c440188d3c72e3 |\n| st010.data.rom | ST010 co-processor firmware - Optional | 254d70762b6f59f99c27c395aba7d07d |\n| st010.program.rom | ST010 co-processor firmware - Optional | 1d70019179a59a566a0bb5d3f2845544 |\n| st011.data.rom | ST011 co-processor firmware - Optional | 10bd3f4aa949737ab9836512c35bcc29 |\n| st011.program.rom | ST011 co-processor firmware - Optional | 95222ebf1c0c2990bcf25db43743f032 |\n| st018.data.rom | ST018 co-processor firmware - Optional | 49c898b60d0f15e90d0ba780dd12f366 |\n| st018.program.rom | ST018 co-processor firmware - Optional | dda40ccd57390c96e49d30a041f9a9e7 |\n| SGB1.sfc/sgb1.boot.rom | Super Game Boy BIOS - Optional | |\n| SGB1.sfc/program.rom | Super Game Boy ROM - Optional | |\n| SGB2.sfc/sgb2.boot.rom | Super Game Boy 2 BIOS - Optional | |\n| SGB2.sfc/program.rom | Super Game Boy 2 ROM - Optional | |\n\n## Features\n\nFrontend-level settings or features that the higan Accuracy core respects.\n\n| Feature | Supported |\n|-------------------|:---------:|\n| Restart | ✔ |\n| Screenshots | ✔ |\n| Saves | ✔ |\n| States | ✔ |\n| Rewind | ✔ |\n| Netplay | ✔ |\n| Core Options | ✔ |\n| [Memory Monitoring (achievements)](../guides/memorymonitoring.md) | ✕ |\n| RetroArch Cheats | ✕ |\n| Native Cheats | ✕ |\n| Controls | ✔ |\n| Remapping | ✔ |\n| Multi-Mouse | - |\n| Rumble | ✕ |\n| Sensors | ✕ |\n| Camera | ✕ |\n| Location | ✕ |\n| Subsystem | ✕ |\n| [Softpatching](../guides/softpatching.md) | ✔ |\n| Disk Control | ✕ |\n| Username | ✕ |\n| Language | ✕ |\n| Crop Overscan | - |\n| LEDs | ✕ |\n\n### Directories\n\nThe higan Accuracy core's internal core name is 'higan (Super Famicom Accuracy)'\n\nThe higan Accuracy core saves/loads to/from these directories.\n\n**Frontend's Save directory**\n\n- 'content-name'.srm (Cartridge battery save)\n\n**Frontend's State directory**\n\n- 'content-name'.state# (State)\n\n### Geometry and timing\n\n- The higan Accuracy core's core provided FPS is (FPS)\n- The higan Accuracy core's core provided sample rate is (Rate)\n- The higan Accuracy core's core provided aspect ratio is (Ratio)\n\n## Super Gameboy Support\n\nThe higan Accuracy core uses a simplified Super Game Boy routine that makes it much easier to access this feature than with the old v094-based cores.\n\nInstead of using the complex, CLI-based 'subsystem' launch commands, it looks for the necessary files in the system/BIOS directory whenever you feed the core a *.gb/c file.\n\nTo get it working, you'll need one or more Super Game Boy ROMs and the sgb.boot.rom BIOS.\n\n**Step 1**\n\nMake 2 subdirectories in RetroArch's system directory, one named SGB1.sfc and the other named SGB2.sfc.\n\n**Step 2**\n\nCopy your original Super Game Boy ROM into the SGB1.sfc directory and then rename it to program.rom. Copy your Super Game Boy 2 ROM into the SGB2.sfc directory and then rename it program.rom, as well.\n\n**Step 3**\n\nCopy your sgb.boot.rom BIOS into each of your SGB1.sfc and SGB2.sfc directories, and rename them to sgb1.boot.rom and sgb2.boot.rom, respectively.\n\nThe ['Preferred Super GameBoy BIOS' core option](#core-options) lets you choose which of the two SGB BIOSes to use.\n\n**Step 4**\n\nLoad a SGB-supported GB.mdGBC rom.\n\n**Done**\n\n\n\n!!! warning\n\tThere may be graphical glitches when Rewind is set to On in RetroArch's settings.\n\n## MSU-1\n\n!!! attention\n\tMSU-1 support in this core is complex. **Use the [Snes9x core](../library/snes9x#msu-1-support) for simplified and easily accessible MSU-1 support.**\n\nMSU-1 support can be used by loading a correct .bml file.\n\nThere's documentation for loading MSU-1 games in standalone higan [here](https://higan.readthedocs.io/en/stable/guides/import/#msu-1-games).\n\n## Core options\n\nThe higan Accuracy core has the following option(s) that can be tweaked from the core options menu. The default setting is bolded.\n\nSettings with (Restart) means that core has to be closed for the new setting to be applied on next launch.\n\n- **Internal resolution** [higan_sfc_internal_resolution] (**512x480**|512x448|512x240|512x224|256x240|256x224)\n\n\tSelf-explanatory.\n\n??? note \"512x480\"\n \n\n??? note \"512x448\"\n \n\n??? note \"512x240\"\n \n\n??? note \"512x224\"\n \n\n??? note \"256x240\"\n \n\n??? note \"256x224\"\n \n\n- **Color emulation** [higan_sfc_color_emulation] (**OFF**|ON)\n\n\tSimulates the way a console’s display device differs from modern computer monitor’s colour reproduction. In particular, it simulates the slightly-different gamma correction used by the Super Famicom.\n\n??? note \"Color emulation - Disabled\"\n \n\n??? note \"Color emulation - Enabled\"\n \n\n- **Blur emulation** [higan_sfc_blur_emulation] (**OFF**|ON)\n\n\tSimulates the limited horizontal resolution of standard-definition TVs by blurring together horizontally-adjacent pixels. Games like Jurassic Park for the Super Famicom depend on this to emulate a transparency effect.\n\n??? note \"Blur emulation - Disabled\"\n \n\n??? note \"Blur emulation - Enabled\"\n \n\n- **Scanline emulation** [higan_sfc_scanline_emulation] (**OFF**|ON)\n\n\tCurrently does not function properly.\n\n- **Preferred Super GameBoy BIOS (restart)** [higan_sfc_sgb_bios] (**SGB1.sfc/**|SGB2.sfc/)\n\n\tChoose what Super GameBoy BIOS you want to use. Look at the [Super GameBoy Support section](#super-gameboy-support) for more information.\n\n## Controllers\n\nThe higan Accuracy core supports the following device type(s) in the controls menu, bolded device types are the default for the specified user(s):\n\n### User 1 device types\n\n- None - Input disabled.\n- [**SNES Joypad**](http://nintendo.wikia.com/wiki/Super_Nintendo_Entertainment_System_controller) - Joypad\n- [SNES Mouse](https://en.wikipedia.org/wiki/Super_NES_Mouse) - Mouse\n\n### User 2 device types\n\n- None - Input disabled.\n- [**SNES Joypad**](http://nintendo.wikia.com/wiki/Super_Nintendo_Entertainment_System_controller) - Joypad\n- [SNES Mouse](https://en.wikipedia.org/wiki/Super_NES_Mouse) - Mouse\n- [Multitap](http://nintendo.wikia.com/wiki/Super_Multitap) - Joypad - Allows for up to five players to play together in multitap games.\n- [SuperScope](https://en.wikipedia.org/wiki/Super_Scope) - Lightgun - Inputs are not hooked up in this core.\n- [Justifier](https://en.wikipedia.org/wiki/Konami_Justifier) - Lightgun - Inputs are not hooked up in this core.\n- [Justifiers](https://en.wikipedia.org/wiki/Konami_Justifier) - Lightgun - Two Justifiers are plugged in, for two-player Justifier games. Inputs are not hooked up in this core.\n\n### Multitap support\n\nActivating multitap support in compatible games can be configured by switching to the [Multitap device type](#controllers) for User 2.\n\n### Controller tables\n\n#### Joypad\n\n\n\n| User 1 - 5 Remap descriptors | RetroPad Inputs |\n|------------------------------|-------------------------------------------|\n| B |  |\n| Y |  |\n| Select |  |\n| Start |  |\n| D-Pad Up |  |\n| D-Pad Down |  |\n| D-Pad Left |  |\n| D-Pad Right |  |\n| A |  |\n| X |  |\n| L |  |\n| R |  |\n\n#### Mouse\n\n| RetroMouse Inputs | SNES Mouse |\n|-----------------------------------------------------|---------------------------|\n|  Mouse Cursor | SNES Mouse Cursor |\n|  Mouse 1 | SNES Mouse Left Button |\n|  Mouse 2 | SNES Mouse Right Button |\n\n## Compatibility\n\nThe higan Accuracy core fully emulates all SNES games that have ever been officially released.\n\nIncompatible with ROM hacks made to take advantage of emulator quirks, much like real hardware.\n\n## External Links\n\n- [Official higan Website](https://byuu.org/)\n- [Official higan Upstream Downloads](https://byuu.org/emulation/higan/)\n- [Libretro higan Accuracy Core info file](https://github.com/libretro/libretro-super/blob/master/dist/info/higan_sfc_libretro.info)\n- [Libretro higan Accuracy Gitlab Repository](https://gitlab.com/higan/higan)\n- [Report Libretro higan Accuracy Core Issues Here](https://github.com/libretro/libretro-meta/issues)\n\n### See also\n\n#### Nintendo - Game Boy (+ Color)\n\n- [Nintendo - Game Boy / Color (Emux GB)](emux_gb.md)\n- [Nintendo - Game Boy / Color (Gambatte)](gambatte.md)\n- [Nintendo - Game Boy / Color (Gearboy)](gearboy.md)\n- [Nintendo - Game Boy / Color (SameBoy)](sameboy.md)\n- [Nintendo - Game Boy / Color (TGB Dual)](tgb_dual.md)\n- [Nintendo - Game Boy Advance (mGBA)](mgba.md)\n- [Nintendo - Game Boy Advance (VBA-M)](vba_m.md)\n- [Nintendo - SNES / Famicom (nSide Balanced)](nside_balanced.md)\n- [Nintendo - SNES / Famicom (Mesen-S)](mesen-s.md)\n\n#### Nintendo - Super Nintendo Entertainment System (+ Hacks)\n\n- [Nintendo - SNES / Famicom (Beetle bsnes)](beetle_bsnes.md)\n- [Nintendo - SNES / Famicom (bsnes-mercury Accuracy)](bsnes_mercury_accuracy.md)\n- [Nintendo - SNES / Famicom (bsnes-mercury Balanced)](bsnes_mercury_balanced.md)\n- [Nintendo - SNES / Famicom (bsnes-mercury Performance)](bsnes_mercury_performance.md)\n- [Nintendo - SNES / Famicom (bsnes Accuracy)](bsnes_accuracy.md)\n- [Nintendo - SNES / Famicom (bsnes Balanced)](bsnes_balanced.md)\n- [Nintendo - SNES / Famicom (bsnes C++98 (v085))](bsnes_cplusplus98.md)\n- [Nintendo - SNES / Famicom (bsnes Performance)](bsnes_performance.md)\n- [Nintendo - SNES / Famicom (nSide Balanced)](nside_balanced.md)\n- [Nintendo - SNES / Famicom (Mesen-S)](mesen-s.md)\n- [Nintendo - SNES / Famicom (Snes9x)](snes9x.md)\n- [Nintendo - SNES / Famicom (Snes9x 2002)](snes9x_2002.md)\n- [Nintendo - SNES / Famicom (Snes9x 2005 Plus)](snes9x_2005_plus.md)\n- [Nintendo - SNES / Famicom (Snes9x 2005)](snes9x_2005.md)\n- [Nintendo - SNES / Famicom (Snes9x 2010)](snes9x_2010.md)\n"
},
{
"path": "docs/library/holani.md",
"content": "# Atari - Lynx (Holani)\n\n## Background\n\nHolani is a cycle-stepped Atari Lynx video game system emulator that can be used as a libretro core. Holani's primary goal is to get closer to the Lynx hardware and provide a better emulation experience.\n\n### Author/License\n\nThe Holani core has been authored by\n\n- [LLeny](https://github.com/LLeny)\n\nThe Holani core is licensed under\n\n- [GNU General Public License v3.0](https://github.com/LLeny/holani/blob/main/LICENSE)\n\nA summary of the licenses behind RetroArch and its cores can be found [here](../development/licenses.md).\n\n## Extensions\n\nContent that can be loaded by the Holani core have the following file extensions:\n\n- .lnx\n- .o\n\n## Databases\n\nRetroArch database(s) that are associated with the Holani core:\n\n- [Atari - Lynx](https://github.com/libretro/libretro-database/blob/master/rdb/Atari%20-%20Lynx.rdb)\n\n## BIOS\n\nOptional firmware files go in the frontend's system directory.\n\n| Filename | Description | md5sum |\n|:-------------:|:--------------------------:|:--------------------------------:|\n| lynxboot.img | Lynx Boot Image - Required | fcd403db69f54290b51035d82f835e7b |\n\n## Features\n\nFrontend-level settings or features that the Holani core respects.\n\n| Feature | Supported |\n|-------------------|:---------:|\n| Restart | ✔ |\n| Screenshots | ✔ |\n| Saves | ✔ |\n| States | ✔ |\n| Rewind | ✔ |\n| Netplay (State based) | ✔ (not link-cable emulation) |\n| Core Options | ✔ |\n| [Memory Monitoring (achievements)](../guides/memorymonitoring.md) | ✔ |\n| Cheats (Cheats menu) | ✔ |\n| Native Cheats | ✕ |\n| Controls | ✔ |\n| Remapping | ✔ |\n| Multi-Mouse | ✕ |\n| Rumble | ✕ |\n| Sensors | ✕ |\n| Camera | ✕ |\n| Location | ✕ |\n| Subsystem | ✕ |\n| [Softpatching](../guides/softpatching.md) | ✕ |\n| Disk Control | ✕ |\n| Username | ✕ |\n| Language | ✕ |\n| Crop Overscan | ✕ |\n| LEDs | ✕ |\n\n### Directories\n\nThe Holani core's directory name is 'Holani'\n\nThe Holani core saves/loads to/from these directories.\n\n**Frontend's State directory**\n\n- 'content-name'.state# (State)\n\n### Geometry and timing\n\n- The Holani core's core provided FPS is dynamic\n- The Holani core's core provided sample rate is 16,000 Hz\n\n## Controllers\n\nThe Holani core supports the following device type(s) in the controls menu, bolded device types are the default for the specified user(s):\n\n### User 1 device types\n\n- None - Doesn't disable input.\n- **RetroPad** - Joypad\n- RetroPad w/Analog - Joypad - There's no reason to switch to this.\n\n### Controller tables\n\n#### Joypad\n\n\n\n| User 1 Remap descriptors | RetroPad Inputs |\n|--------------------------|---------------------------------------------|\n| B |  |\n| Pause |  |\n| D-Pad Up |  |\n| D-Pad Down |  |\n| D-Pad Left |  |\n| D-Pad Right |  |\n| A |  |\n| Option 1 |  |\n| Option 2 |  |\n\nSupported combinations\n\n- Option 1 + Pause = Restarts game\n- Option 2 + Pause = Flips Screen\n\n## External Links\n\n- [Official Holani Website](https://github.com/LLeny/holani-retro)\n- [Official Holani Downloads](https://github.com/LLeny/holani-retro/releases)\n- [Libretro Holani Core info file](https://github.com/libretro/libretro-super/blob/master/dist/info/holani_libretro.info)\n- [Libretro Holani Github Repository](https://github.com/LLeny/holani-retro)\n- [Report Libretro Holani Core Issues Here](https://github.com/LLeny/holani-retro/issues)\n\n### See also\n\n#### Atari - Lynx\n\n- [Atari - Lynx (Beetle Lynx)](beetle_lynx.md)\n- [Atari - Lynx (Handy)](handy.md)\n"
},
{
"path": "docs/library/imageviewer.md",
"content": "# Imageviewer\n\n## Background\n\nView images\n\n### Author/License\n\nThe Imageviewer core has been authored by\n\n- The RetroArch Team\n\nThe Imageviewer core is licensed under\n\n- [MIT](https://github.com/libretro/RetroArch/blob/master/cores/libretro-imageviewer/LICENSE)\n\nA summary of the licenses behind RetroArch and its cores can be found [here](../development/licenses.md).\n\n## Extensions\n\nContent that can be loaded by the Imageviewer core have the following file extensions:\n\n- .jpg\n- .jpeg\n- .png\n- .bmp\n- .psd\n- .tga\n- .gif\n- .hdr\n- .pic\n- .ppm\n- .pgm\n\n## Features\n\nFrontend-level settings or features that the Imageviewer core respects.\n\n| Feature | Supported |\n|-------------------|:---------:|\n| Restart | ✕ |\n| Screenshots | ✔ |\n| Saves | ✕ |\n| States | ✕ |\n| Rewind | ✕ |\n| Netplay | ✕ |\n| Core Options | ✕ |\n| [Memory Monitoring (achievements)](../guides/memorymonitoring.md) | ✕ |\n| RetroArch Cheats | ✕ |\n| Native Cheats | ✕ |\n| Controls | ✔ |\n| Remapping | ✕ |\n| Multi-Mouse | ✕ |\n| Rumble | ✕ |\n| Sensors | ✕ |\n| Camera | ✕ |\n| Location | ✕ |\n| Subsystem | ✕ |\n| [Softpatching](../guides/softpatching.md) | ✕ |\n| Disk Control | ✕ |\n| Username | ✕ |\n| Language | ✕ |\n| Crop Overscan | ✕ |\n| LEDs | ✕ |\n\n### Directories\n\nThe Imageviewer core's internal core name is 'image display'\n\n### Geometry and timing\n\n- The Imageviewer core's core provided FPS is 60\n- The Imageviewer core's core provided sample rate is 44100 Hz\n- The Imageviewer core's core provided aspect ratio is dependent on the loaded content.\n\n## Controllers\n\nThe Imageviewer core supports the following device type(s) in the controls menu, bolded device types are the default for the specified user(s):\n\n### User 1 device types\n\n- None - Doesn't disable input. There's no reason to switch to this.\n- **RetroPad** - Joypad - Stay on this.\n- RetroPad w/Analog - Joypad - There's no reason to switch to this.\n\n### Controller tables\n\n#### Joypad\n\n| RetroPad Inputs | Imageviewer core inputs |\n|------------------------------------------------|------------------------------------------------------------|\n|  | Automatic slideshow - Go to the next image every 2 seconds |\n|  | Go forward 5 images |\n|  | Go backward 5 images |\n|  | Go backward 1 image |\n|  | Go forward 1 image |\n\n## External Links\n\n- [Libretro Imageviewer Core info file](https://github.com/libretro/libretro-super/blob/master/dist/info/imageviewer_libretro.info)\n- [Libretro Imageviewer Github Repository](https://github.com/libretro/RetroArch/tree/master/cores/libretro-imageviewer)\n- [Report Libretro Imageviewer Core Issues Here](https://github.com/libretro/RetroArch/issues)\n\n### See also\n\n#### Media\n\n- [FFmpeg](ffmpeg.md)\n- [Game Music Emu](game_music_emu.md)\n- [PocketCDG](pocketcdg.md)"
},
{
"path": "docs/library/jaxe.md",
"content": "# XO-CHIP/CHIP-8 (JAXE) *WIP*\n\n \n\n## Background\n\nA fully-featured, cross platform XO-CHIP/S-CHIP/CHIP-8 emulator written in C. The JAXE core has been authored by\n\n- phcoder (Vladimir Serbinenko)\n- kurtjd (Kurtis Dinelle)\n\nThe JAXE core is licensed under\n\n- [MIT](https://github.com/kurtjd/jaxe/blob/main/LICENSE)\n\n\nA summary of the licenses behind RetroArch and its cores can be found [here](../development/licenses.md).\n\n## Tecnical Info\n\nThe original CHIP-8 virtual machine was designed with the following specs:\n\n- 35 opcodes\n- 4kb RAM\n- 16 8-bit general purpose registers\n- 16-bit program counter, stack pointer, and index registers\n- 8-bit delay and sound timer registers\n- 64x32 monochrome display\n- 16-key keypad (0-F)\n- Program memory starting at address 0x200\n\nDue to the way CHIP-8 was designed, the \"flicker\" that happens when sprites are drawn is normal. Games developed for it also rarely made any attempt to cap their frame rate due to the slow hardware of the time hence the need to artificially slow the CPU down on modern emulators.\n\nIn the early 90s, Andreas Gustafsson created a port for the HP48 calculator which was eventually superseded by S-CHIP 1.0/1.1 created by Erik Bryntse. The S-CHIP added several features as well as accidentally (or intentionally?) modifying the behavior of several original opcodes:\n\n- 9 new opcodes\n- 128x64 HI-RES display\n- Persistent storage\n- Modified Bnnn, Fx55, Fx65, Dxyn, 8xy6, and 8xyE instructions\n\nWith time, it seems the S-CHIP became more popular and many programs were written to work with its various quirks. Thus, JAXE defaults to original S-CHIP design however many of its quirks can be toggled for improved compatibility using the flags in the Options section below.\n\nHowever, recently John Earnest designed the XO-CHIP extension allowing CHIP-8 programs to take advantage of modern hardware to an extent. This extension adds several more instructions and features including:\n\n- 7 new opcodes\n- 16-bit addressing for a total of ~64kb RAM\n- Second display buffer allowing for 4 colors instead of the typical 2\n- Improved sound support\n- Modified Fx75 and Fx85 instructions to allow for 16 user flags instead of typical 8\n- JAXE currently supports all of these extensions.\n\nIt should also be noted that JAXE stores its fonts in memory starting at address 0x0000 followed immediately by large fonts and finally immediately by the stack. Therefore the stack pointer initially points to address 0x00F0.\n\n## Extensions\n\nContent that can be loaded by the JAXE core have the following file extensions:\n\n- .ch8\n- .sc8\n- .xo8\n\n## Databases\n\nRetroArch database(s) that are associated with the JAXE core:\n\n- [CHIP-8](https://github.com/libretro/libretro-database/blob/master/rdb/)\n\n## BIOS\n\nJAXE does not require BIOS (bootrom) files to work.\n\n## Features\n\n| Feature | Supported |\n|-------------------|:---------:|\n| Restart | ✔ |\n| Screenshots | ✔ |\n| Saves | ✔ |\n| States | ✔ |\n| Rewind | ✔ |\n| Netplay | ✕ |\n| Core Options | ✔ |\n| [Memory Monitoring (achievements)](../guides/memorymonitoring.md) | ✕ |\n| RetroArch Cheats | ✔ |\n| Native Cheats | ✕ |\n| Controls | ✔ |\n| Remapping | ✔ |\n| Multi-Mouse | ✕ |\n| Rumble | ✔ |\n| Sensors | ✕ |\n| Camera | ✕ |\n| Location | ✕ |\n| Subsystem | ✕ |\n| Softpatching | ✔ |\n| Disk Control | ✕ |\n| Username | ✕ |\n| Crop Overscan (in RetroArch's Video settings) | ✕ |\n\n### Directories\n\nThe JAXE core's directory name is 'JAXE'\n\n### Core provided aspect ratio\n\nJAXE's core provided aspect ratio is 2/1.\n\n## Core options\n\nThe JAXE core has the following option(s) that can be tweaked from the core options menu. The default setting is bolded. Settings with (Restart) means that core has to be closed for the new setting to be applied on next launch.\n\n**Ram init quirk** [] (**ON**|OFF)\n\n**8xy6/8xyE quirk** [] (**ON**|OFF)\n\n**Fx55/Fx65 quirk** [] (**ON**|OFF)\n\n**Bnnn quirk** [] (**ON**|OFF)\n\n**Big Sprite LORES quirk** [] (**ON**|OFF)\n\n**00FE/00FF quirk** [] (**ON**|OFF)\n\n**Sprite Wrapping** [] (**ON**|OFF)\n\n**Collision Enumeration** [] (**ON**|OFF)\n\n**Collision with Bottom of Screen** [] (**ON**|OFF)\n\n**CPU frequency** [] (**1000**|1500|2000|3000|5000|10000|800|750|600|500|400|300)\n\n**Theme** [] (**Default**|Black and white|Inverted black and white|Blood|Hacker|Space|Crazy Orange|Cyberpunk)\n\n## Controllers\n\n\n### Device types\n\nThe JAXE core supports the following device type(s) in the controls menu, bolded device types are the default for the specified user(s):\n\n#### User 1 - 1 device types\n\n- None - Input disabled.\n- **RetroPad** - Joypad\n- RetroPad w/Analog - Joypad - **There is no reason to switch to this.**\n\n### Controller tables\n\n#### Joypad and analog device type table\n\n\n| User 1 - 1 input descriptors | | RetroPad |\n|------------------------------|---------------------------------------------|--------------------|\n| 0 |  | B |\n| 2 |  | Y |\n| 1 |  | Start |\n| 5 |  | D-Pad Up |\n| 8 |  | D-Pad Down |\n| 7 |  | D-Pad Left |\n| 9 |  | D-Pad Right |\n| 6 |  | A |\n| C |  | X |\n| 5 |  | L |\n| A |  | R |\n| B |  | L2 |\n| D |  | R2 |\n| E |  | L3 Button |\n| F |  | R3 Button |\n |\n\n## External Links\n\n- [Libretro JAXE Core info file](https://github.com/libretro/libretro-super/blob/master/dist/info/jaxe_libretro.info)\n- [Libretro JAXE Github Repository](https://github.com/libretro/)\n- [Report JAXE Core Issues Here](https://github.com/libretro/)\n\n## CHIP-8\n\n- [CHIP-8 (Emux)](emux_chip8.md)\n"
},
{
"path": "docs/library/jollycv.md",
"content": "# ColecoVision/CreatiVision/My Vision (JollyCV)\n\n## Background\n\nJollyCV is a multi-emulator supporting ColecoVision (including Super Game Module), CreatiVision, and My Vision. JollyCV is fast, accurate, and highly portable.\n\nThe JollyCV core has been authored by\n\n- [Rupert Carmichael (carmiker)](https://github.com/carmiker)\n\nThe JollyCV core is licensed under\n\n- [BSD-3-Clause](https://github.com/libretro/jollycv/blob/master/LICENSE)\n\nA summary of the licenses behind RetroArch and its cores can be found [here](../development/licenses.md).\n\n## BIOS\n\nRequired or optional firmware files go in the frontend's system directory.\n\n!!! attention\n JollyCV requires a BIOS for ColecoVision or CreatiVision content. Place the following files in RetroArch's system directory.\n\n| Filename | Description | md5sum |\n|:-----------------:|:----------------------------------:|:--------------------------------:|\n| coleco.rom | ColecoVision BIOS - Required | 2c66f5911e5b42b8ebe113403548eee7 |\n| bioscv.rom | CreatiVision BIOS - Required | 3b1ef759d8e3fb4071582efd33dd05f9 |\n\n## Extensions\n\nContent that can be loaded by the JollyCV core have the following file extensions:\n\n- .col\n- .rom\n- .myv\n- .bin\n\nRetroArch database(s) that are associated with the JollyCV core:\n\n- [Coleco - ColecoVision](https://github.com/libretro/libretro-database/blob/master/rdb/Coleco%20-%20ColecoVision.rdb)\n\n## Features\n\nFrontend-level settings or features that the JollyCV core respects.\n\n| Feature | Supported |\n|-------------------|:---------:|\n| Restart | ✔ |\n| Screenshots | ✔ |\n| Saves | ✔ |\n| States | ✔ |\n| Rewind | ✔ |\n| Netplay | ✔ |\n| Core Options | ✔ |\n| [Memory Monitoring (achievements)](../guides/memorymonitoring.md) | ✔ |\n| RetroArch Cheats | ✕ |\n| Native Cheats | ✕ |\n| Controls | ✔ |\n| Remapping | ✔ |\n| Multi-Mouse | ✕ |\n| Rumble | ✕ |\n| Sensors | ✕ |\n| Camera | ✕ |\n| Location | ✕ |\n| Subsystem | ✕ |\n| Softpatching | ✕ |\n| Disk Control | ✕ |\n| Username | ✕ |\n| Language | ✕ |\n| Crop Overscan | ✔ |\n| LEDs | ✕ |\n\n### Directories\n\nThe JollyCV core's library name is 'JollyCV'\n\nThe JollyCV core saves/loads to/from these directories.\n\n**Frontend's Save directory**\n\n| File | Description |\n|:-----:|:----------------------:|\n| *.srm | Cartridge save |\n\n**Frontend's State directory**\n\n| File | Description |\n|:--------:|:-----------:|\n| *.state# | State |\n\n### Geometry and timing\n\n- The JollyCV core's core provided FPS is 60 for NTSC and 50 for PAL\n- The JollyCV core's core provided sample rate is 48000Hz\n- The JollyCV core provides adjustable overscan masking and aspect ratio options\n\n## Core options\n\nThe JollyCV core has the following options that can be tweaked from the core options menu. The default setting is bolded.\n\n- **TMS9918 Palette** [jollycv_tmspalette] (**TeaTime**|SYoung|GCDatasheet)\n\n Set the Palette\n\n- **Aspect Ratio** [jollycv_aspect] (**Region-based Pixel Aspect Ratio**|Perfectly Square Pixels (1:1 PAR)|Very Traditional NTSC Aspect Ratio (4:3 DAR)|Ostensibly Accurate PAL Aspect Ratio)\n\n Set the Aspect Ratio\n\n- **Mask Overscan (Top)** [jollycv_overscan_t] (16|14|12|10|8|6|4|2|**0**)\n\n Mask off pixels hidden by a bezel or border on original CRTs (top)\n\n- **Mask Overscan (Bottom)** [jollycv_overscan_b] (16|14|12|10|8|6|4|2|**0**)\n\n Mask off pixels hidden by a bezel or border on original CRTs (bottom)\n\n- **Mask Overscan (Left)** [jollycv_overscan_l] (8|**6**|4|2|0)\n\n Mask off pixels hidden by a bezel or border on original CRTs (left)\n\n- **Mask Overscan (Right)** [jollycv_overscan_r] (8|**6**|4|2|0)\n\n Mask off pixels hidden by a bezel or border on original CRTs (right)\n\n### Input Devices\n\n| ColecoVision Paddle (Super Action) | RetroPad Inputs |\n|-------------------------------------|------------------------------------------------|\n| Up |  |\n| Down |  |\n| Left |  |\n| Right |  |\n| Yellow (Fire L) |  |\n| Orange (Fire R) |  |\n| Purple |  |\n| Blue |  |\n| 1 |   |\n| 2 |   |\n| 3 |   |\n| 4 |   |\n| 5 |   |\n| 6 |   |\n| 7 |   |\n| 8 |   |\n| 9 |   |\n| 0 |   |\n| * |  |\n| # |  |\n| Spinner- |  |\n| Spinner+ |  |\n\n| CreatiVision Paddle | RetroPad Inputs |\n|-------------------------------------|------------------------------------------------|\n| Up |  |\n| Down |  |\n| Left |  |\n| Right |  |\n| Fire L |  |\n| Fire R |  |\n| Start 1 |  |\n| Start 2 |  |\n| Reset |   |\n| Reset |   |\n\n| My Vision | RetroPad Inputs |\n|-------------------------------------|------------------------------------------------|\n| B (Up) |  |\n| C (Down) |  |\n| A (Left) |  |\n| D (Right) |  |\n| E |  |\n| 1 |  |\n| 2 |  |\n| 3 |  |\n| 4 |  |\n| 5 |   |\n| 6 |   |\n| 7 |   |\n| 8 |   |\n| 9 |   |\n| 10 |   |\n| 11 |   |\n| 12 |   |\n| 13 |  |\n| 14 |  |\n\n\n## External Links\n\n- [Upstream JollyCV Repository](https://gitlab.com/jgemu/jollycv)\n- [Libretro JollyCV Core info file](https://github.com/libretro/libretro-super/blob/master/dist/info/jollycv_libretro.info)\n- [Libretro JollyCV Repository](https://github.com/libretro/jollycv)\n- [Report JollyCV Core Issues Here](https://github.com/libretro/jollycv/issues)\n\n### See also\n\n- [Coleco - ColecoVision (Gearcoleco)](gearcoleco.md)\n- [MSX/SVI/ColecoVision/SG-1000 (blueMSX)](bluemsx.md)\n"
},
{
"path": "docs/library/jumpnbump.md",
"content": "# Jump 'n Bump\n\n\n\n## Background\n\nThis is a game for the whole family. You play cute fluffy little bunnies and hop on each other's heads.\n\nAt the beginning you are in the menu, where you have to let each active player jump over the tree trunk to enter the play area, and then walk to the right. You will then enter the arena. The aim is to jump on the other bunnies' heads…\n\nJump 'n Bump was originally a DOS game by Brainchild Design, which was open sourced under the GPL license and ported to SDL, and then SDL2.\n\n### Extra levels\n\nAdditional levels are available on the website of [Brainchild Design](http://www.brainchilddesign.com/games/jumpnbump/levels/levels1.html).\n\n### Author/License\n\nThe Jump 'n Bump core has been authored by\n\n- loki666\n\nThe Jump 'n Bump core is licensed under\n\n- [GPLv2](https://github.com/fabiangreffrath/jumpnbump/blob/master/COPYING)\n\nA summary of the licenses behind RetroArch and its cores can be found [here](../development/licenses.md).\n\n## Extensions\n\nContent that can be loaded by the Jump 'n Bump core have the following file extensions:\n\n- .dat\n\n## Databases\n\nRetroArch database(s) that are associated with the Jump 'n Bump core:\n\n- [Jump 'n Bump](https://github.com/libretro/libretro-database/blob/master/rdb/Jump%20'n%20Bump.rdb)\n\n## BIOS\n\nThere are no required BIOS.\n\n## Features\n\nFrontend-level settings or features that the Jump 'n Bump core respects.\n\n| Feature | Supported |\n|-------------------|:---------:|\n| Restart | ✔ |\n| Screenshots | ✔ |\n| Saves | ✕ |\n| States | ✕ |\n| Rewind | ✕ |\n| Netplay | ✔ |\n| Core Options | ✔ |\n| [Memory Monitoring (achievements)](../guides/memorymonitoring.md) | ✕ |\n| RetroArch Cheats | ✕ |\n| Native Cheats | ✕ |\n| Controls | ✔ |\n| Remapping | ✔ |\n| Multi-Mouse | ✕ |\n| Rumble | ✕ |\n| Sensors | ✕ |\n| Camera | ✕ |\n| Location | ✕ |\n| Subsystem | ✕ |\n| [Softpatching](../guides/softpatching.md) | ✕ |\n| Disk Control | ✕ |\n| Username | ✕ |\n| Language | ✕ |\n| Crop Overscan | ✕ |\n| LEDs | ✕ |\n\n### Directories\n\nThe Jump 'n Bump core's internal core name is 'Jump 'n Bump'\n\n### Geometry and timing\n\n- The Jump 'n Bump core's core provided FPS is (60)\n- The Jump 'n Bump core's core provided sample rate is 44100 Hz\n- The minivmac core's base width is 1200.\n- The minivmac core's base height is 768.\n- The minivmac core's core provided aspect ratio is 25/16.\n\n## Core options\n\nThe Jump 'n Bump core has the following option(s) that can be tweaked from the core options menu. The default setting is bolded.\n\nSettings with (Restart) means that core has to be closed for the new setting to be applied on next launch.\n\n- **Flip Level** [jnb-flip] (**OFF**|ON)\n\n\t??? note \"*Flip Level - Off*\"\n\t \n\n\t??? note \"*Flip Level - On*\"\n\t \n\n- **Flies** [jnb-flies] (**OFF**|ON)\n\n\t??? note \"*Flies - Off*\"\n\t \n\n\t??? note \"*Flies - On*\"\n\t \t \n\n## Controllers\n\nThe Jump 'n Bump core supports the following device type(s) in the controls menu, bolded device types are the default for the specified user(s):\n\n### User 1 - 4 device types\n\n- None - Disables input.\n- **RetroPad** - Joypad\n- RetroPad with Analog\n\n### Controller tables\n\n#### Joypad\n\n\n\n| User 1 - 4 Remap descriptors | RetroPad Inputs |\n|--------------------------|---------------------------------------------|\n| B |  |\n| Select |  |\n| Start |  |\n| D-Pad Up |  |\n| D-Pad Down |  |\n| D-Pad Left |  |\n| D-Pad Right |  |\n\n## External Links\n\n- [Jump 'n Bump Github Repository](https://github.com/fabiangreffrath/jumpnbump)\n- [Libretro Jump 'n Bump Core info file](https://github.com/libretro/libretro-super/blob/master/dist/info/jumpnbump_libretro.info)\n- [Libretro Jump 'n Bump Github Repository](https://github.com/libretro/jumpnbump-libretro)\n- [Report Libretro Jump 'n Bump Core Issues Here](https://github.com/libretro/jumpnbump-libretro/issues)"
},
{
"path": "docs/library/kronos.md",
"content": "# Sega - Saturn/ST-V (Kronos)\n\n## Background\n\nKronos is a fork of [Yabause](yabause.md). [It uses compute shaders](https://www.libretro.com/index.php/kronos-2-1-2-progress-report-sega-saturn-emulator/) and as such requires OpenGL 4.3. It emulates both the Sega Saturn and its arcade board version, the Sega Titan Video (ST-V).\n\nIt's a fairly active project and the only Sega Saturn libretro core being officially supported by upstream.\n\n### Author/License\n\nThe Kronos core has been authored by\n\n- Guillaume Duhammel\n- Theo Berkau\n- Anders Montonen\n- devmiyax\n- François Caron\n\nThe Kronos core is licensed under\n\n- [GPLv2](https://github.com/libretro/yabause/blob/kronos/yabause/COPYING)\n\nA summary of the licenses behind RetroArch and its cores can be found [here](../development/licenses.md).\n\n## Extensions\n\nContent that can be loaded by the Kronos core have the following file extensions:\n\n- .cue\n- .iso\n- .ccd\n- .mds\n- .chd\n- .zip\n\n## Databases\n\nRetroArch database(s) that are associated with the Kronos core:\n\n- [Sega - Saturn](https://github.com/libretro/libretro-database/blob/master/rdb/Sega%20-%20Saturn.rdb)\n\n## BIOS\n\nRequired or optional firmware files go in the frontend's system directory.\n\n| Filename | Description | md5sum |\n|:----------------------:|:--------------------------------------------------------------------------:|:--------------------------------:|\n| kronos/saturn_bios.bin | Saturn BIOS - Required for Saturn games | af5828fdff51384f99b3c4926be27762 |\n| kronos/stvbios.zip | ST-V BIOS - Required for ST-V games | |\n| mpr-18811-mx.ic1 | The King of Fighters '95 ROM Cartridge - Required for this game | 255113ba943c92a54facd25a10fd780c |\n| mpr-19367-mx.ic1 | Ultraman: Hikari no Kyojin Densetsu ROM Cartridge - Required for this game | 1cd19988d1d72a3e7caa0b73234c96b4 |\n\nThis md5sum for the Saturn BIOS is just a hint, any valid saturn bios should work.\n\nKronos will try searching for locations commonly used by other Sega Saturn libretro cores if it can't find a Sega Saturn bios at the expected path.\n\nNote that unlike yabause, Kronos won't automatically switch to HLE bios if a bios file is not present, because the Kronos project doesn't recommend using this HLE bios and actually won't provide support for any issue related to its usage. \nThis is the reason for the file to be required.\n\n## Features\n\nFrontend-level settings or features that the Kronos core respects.\n\n| Feature | Supported |\n|-------------------|:---------:|\n| Restart | ✔ |\n| Screenshots | ✔ |\n| Saves | ✔ |\n| States | ✔ |\n| Rewind | ✕ |\n| Netplay | ✕ |\n| Core Options | ✔ |\n| [Memory Monitoring (achievements)](../guides/memorymonitoring.md) | ✔ |\n| RetroArch Cheats | ✔ |\n| Native Cheats | ✕ |\n| Controls | ✔ |\n| Remapping | ✔ |\n| Multi-Mouse | ✕ |\n| Rumble | ✕ |\n| Sensors | ✕ |\n| Camera | ✕ |\n| Location | ✕ |\n| Subsystem | ✕ |\n| [Softpatching](../guides/softpatching.md) | ✕ |\n| Disk Control | ✔ |\n| Username | ✕ |\n| Language | ✕ |\n| Crop Overscan | ✕ |\n| LEDs | ✕ |\n\n### Savefiles\n\nTheir location depends on the content running and the core options.\nBy default they'll be stored in a `kronos` subdirectory of your savefiles directory, which will be split further between `saturn` and `stv` directories.\nHowever Kronos also has a core option named \"Share saves with beetle\", which will try to match Sega Saturn savefiles with Beetle-saturn.\n\n### Geometry and timing\n\n- The Kronos core's core provided FPS is 60 for NTSC games and 50 for PAL games\n- The Kronos core's core provided sample rate is 44100 Hz\n- The Kronos core's core provided aspect ratio is 4/3\n- The Kronos core will ask the frontend to rotate display for (ST-V) vertical games\n\n## Loading Sega Saturn content\n\n- Kronos is not compatible with cue sheets containing references to audio files with wav/mp3/ogg/flac/ape extensions.\n- Zip files containing cue+bin files can be loaded directly, however the dump will be loaded in RAM (meaning it will use around 700MB of RAM depending on the size of the dump).\n- It is recommended to use [Redump](http://redump.org/) releases because this is the most thoroughly tested format.\n\n## Core options\n\nThe Kronos core has the following options that can be tweaked from the core options menu. The default settings are bolded.\n\n- **Force HLE BIOS** [kronos_force_hle_bios] (**disabled**|enabled)\n\n\tHLE BIOS will be forced. Use at your own risk, this is mainly for debugging purpose and is neither recommended nor supported. Requires a restart.\n\n- **Video format** [kronos_videoformattype] (**auto**|NTSC|PAL)\n\n\tForce video format to PAL or NTSC, default is auto which will try to detect from loaded content.\n\n- **Frameskip** [kronos_skipframe] (**0**|1|2|3|4|5)\n\n\tIt will skip rendering at a fixed rate, it can improve playability dramatically on lower end devices\n\n- **SH-2 cache support (experimental)** [kronos_sh2coretype] (**kronos**|old)\n\n\tSupport for SH-2's cache. It is required for some game to work properly. It can kill performance.\n\n- **Share saves with beetle** [kronos_use_beetle_saves] (**disabled**|enabled)\n\n\tDetails above. Requires a restart.\n\n- **Addon Cartridge** [kronos_addon_cartridge] (**none** | 1M_extended_ram | 4M_extended_ram | 16M_extended_ram | 512K_backup_ram | 1M_backup_ram | 2M_backup_ram | 4M_backup_ram)\n\n\tThis is the default cartridge you want Kronos to use. Note that your choice will be ignored if Kronos detects that the game requires a specific cartridge. Requires a restart.\n\n- **6Player Adaptor on Port 1** [kronos_multitap_port1] (**disabled**|enabled)\n\n\tEnable multitap in port 1.\n\n- **6Player Adaptor on Port 2** [kronos_multitap_port2] (**disabled**|enabled)\n\n\tEnable multitap in port 2.\n\n- **Resolution** [kronos_resolution_mode] (**original**|480p|720p|1080p|4k|8k)\n\n\tModify rendering resolution. Requires a restart.\n\n- **Output to original resolution** [kronos_force_downsampling] (**disabled**|enabled)\n\n\tUseful when using resolution higher than your screen's, will also replace meshed transparency by real transparency to avoid moiré effect.\n\n- **Improved mesh** [kronos_meshmode] (**disabled**|enabled)\n\n\tReplace meshed transparency by real transparency.\n\n- **Improved banding** [kronos_bandingmode] (**disabled**|enabled)\n\n\tApply gouraud shading instead of flat shading, requires OpenGL CS renderer.\n\n- **Wireframe mode** [kronos_wireframe_mode] (**disabled**|enabled)\n\n\tWireframe mode, requires OpenGL CS renderer.\n\n- **ST-V Service/Test Buttons** [kronos_service_enabled] (**disabled**|enabled)\n\n\tEnable Service/Test for ST-V, to enter cabinet settings. By default they aren't mapped so that you won't press them by mistake.\n\n- **ST-V Favorite Region** [kronos_stv_favorite_region] (**EU**|US|JP|TW)\n\n\tChoose your favorite bios region for ST-V. It will be ignored if not compatible with your game.\n\n- **Bios Language** [kronos_language_id] (**English**|German|French|Spanish|Italian|Japanese)\n\n\tChoose your favorite language, will translate some games. Requires a restart.\n\n## Controllers\n\nThe Kronos core supports the following device type(s) in the controls menu, bolded device types are the default for the specified user(s):\n\n### User device types\n\n- None\n- **Saturn Pad**\n- Saturn 3D Pad\n- Saturn Wheel\n- Saturn Mouse\n\n### Multitap support\n\nMust be enabled in core options.\n\n### Controller tables\n\n#### Joypad\n\n\n\n| User 1 - 12 Remap descriptors | RetroPad Inputs |\n|-------------------------------|----------------------------------------------|\n| A |  |\n| X |  |\n| Start |  |\n| D-Pad Up |  |\n| D-Pad Down |  |\n| D-Pad Left |  |\n| D-Pad Right |  |\n| B |  |\n| Y |  |\n| C |  |\n| Z |  |\n| L |  |\n| R |  |\n| Analog X |  X |\n| Analog Y |  Y |\n\n## Compatibility\n\n- [Official Kronos Compatibility List](https://tradu-france.com/wiki-emu-compatibility/index.php?title=Compatibility_list_of_Kronos)\n\n## Known issues\n\n- Savestates work but can sometime be quite unstable\n- Enabling both multitaps at the same time causes some kind of \"autofire\" bug\n- Switching between windowed and fullscreen will cause issues, you need to start the core in your prefered mode and stick with it\n- It seems there are compatibility issues between RetroArch's \"threaded video\" setting and this core.\n\n## External Links\n\n- [Official Kronos Repository](https://github.com/FCare/Kronos) (please report issues there)\n- [Libretro Kronos Core info file](https://github.com/libretro/libretro-super/blob/master/dist/info/kronos_libretro.info)\n- [Libretro Kronos Github Repository](https://github.com/libretro/yabause/tree/kronos)\n- [Report Issues Here](https://github.com/libretro/yabause/issues) or [Here](https://github.com/FCare/Kronos/issues)\n\n## Saturn\n\n- [Sega - Saturn (Beetle Saturn)](beetle_saturn.md)\n- [Sega - Saturn/ST-V (Kronos)](kronos.md)\n- [Sega - Saturn (Yabause)](yabause.md)\n- [Sega - Saturn (YabaSanshiro)](yabasanshiro.md)\n"
},
{
"path": "docs/library/lowres_nx.md",
"content": "# LowRes NX\n\n\n\n## Background\n\nA port of the LowRes NX fantasy console to libretro. This core represents an imaginary handheld game console inspired by real 8- and 16-bit systems that is intended for simple games that can be programmed in second-generation, structured BASIC. It supports a d-pad, two action buttons and a keyboard for input. The LowRes NX platform comes with a variety of development tools including a Character Designer for editing sprites tile sand fonts, a Background Designer for tile maps and screen layouts and a Sound Composer for music and sound effects.\n\nThe LowRes NX core has been authored by\n\n- Timoinutilis\n\nThe LowRes NX core is licensed under\n\n- [zlib](https://github.com/timoinutilis/lowres-nx/blob/master/LICENSE)\n\nA summary of the licenses behind RetroArch and its cores can be found [here](../development/licenses.md).\n\n## Extensions\n\nContent that can be loaded by the LowRes NX core have the following file extensions:\n\n- .nx\n\nRetroArch database(s) that are associated with the LowRes NX core:\n\n- [LowRes NX](https://github.com/libretro/libretro-database/blob/master/rdb/LowRes%20NX.rdb)\n\n## Features\n\nFrontend-level settings or features that the LowRes NX core respects.\n\n| Feature | Supported |\n|-------------------|:---------:|\n| Restart | ✔ |\n| Saves | ✕ |\n| States | ✕ |\n| Rewind | ✕ |\n| Netplay | ✕ |\n| Core Options | ✕ |\n| [Memory Monitoring (achievements)](../guides/memorymonitoring.md) | ✕ |\n| RetroArch Cheats | ✕ |\n| Native Cheats | ✕ |\n| Controls | ✔ |\n| Remapping | ✔ |\n| Multi-Mouse | - |\n| Rumble | ✕ |\n| Sensors | ✕ |\n| Camera | ✕ |\n| Location | ✕ |\n| Subsystem | ✕ |\n| [Softpatching](../guides/softpatching.md) | - |\n| Disk Control | ✕ |\n| Username | - |\n| Language | - |\n| Crop Overscan | - |\n| LEDs | - |\n\n\n## Geometry and timing\n\n- The LowRes NX core's core provided FPS is 60\n- The LowRes NX core's core provided sample rate is 44100 Hz\n- The LowRes NX core's base width is 160\n- The LowRes NX core's base height is 128\n- The LowRes NX core's max width is 160\n- The LowRes NX core's max height is 128\n\n## Controllers\n\n### Device types\n\nThe LowRes NX core supports the following device type(s) in the controls menu, bolded device types are the default for the specified user(s):\n\n#### User 1 - 1 device types\n\n- None - Doesn't disable input.\n- **RetroPad** - Joypad\n\n#### Joypad\n\n\n| RetroPad Inputs | User 1 input descriptors |\n|------------------------------------------------|--------------------------|\n|  | Button 2 |\n|  | Button SELECT |\n|  | Button START |\n|  | Button UP |\n|  | Button DOWN |\n|  | Button LEFT |\n|  | Button RIGHT |\n|  | BUTTON 1 |\n\n\n## External Links\n\n- [Official LowRes NX Website](https://lowresnx.inutilis.com)\n- [Official LowRes NX Repository](https://github.com/timoinutilis/lowres-nx)\n- [Lowres Nx games](https://lowresnx.inutilis.com/programs.php)\n- [Libretro LowRes NX Core info file](https://github.com/libretro/libretro-super/blob/master/dist/info/lowresnx_libretro.info)\n- [Report Libretro LowRes NX Core Issues Here](https://github.com/timoinutilis/lowres-nx/issues)\n"
},
{
"path": "docs/library/lrps2.md",
"content": "# Sony - PlayStation (LRPS2)\n\n\n\nLRPS2 is a heavily modified hard fork of the excellent and mature PCSX2 emulator ported to libretro. It runs on Windows, macOS and Linux on the x86_64 architecture. MacOS computers running on Apple's ARM chipsets can still run it through the Rosetta x86 compatibility mode. This core does not work natively on ARM hardware, so it is not available on iOS/tvOS, Android, ARM Linux or Windows on ARM.\n\nIt supports hardware rendering via OpenGL (Windows and Linux), Vulkan (natively on Windows and Linux and via MoltenVk on macOS) and D3D11/12 (Windows-only), as well as software rendering for games that require its additional accuracy. Note: the D3D11 renderer produces a black screen with working audio on some GPUs (toggling fast-forward should show a flickering picture), so if you encounter this, switch to another renderer, if possible.\n\nLRPS2 also includes a brand new, high-accuracy Vulkan compute renderer known as ParaLLEl-GS (from the same author and tech behind the ParaLLEl-RDP renderer now used by almost every major N64 emulator).\n\nThe ParaLLEl-GS renderer is essentially a software renderer that relies on the parallel-processing power of a modern gaming GPU to accurately reproduce console behavior at or beyond full speed. As a result, this renderer is recommended, if your hardware is able to run it at full speed (should be fine on any discrete GPU and possibly on AMD integrated graphics; Intel integrated graphics do not appear to be fast enough at the time of this writing).\n\nLRPS2 core has been authored by\n\n- [Libretro]()\n- based on the PCSX2 emulator by the PCSX2 Dev Team\n\nLRPS2 core is licensed under\n\n- [GPLv3](https://github.com/libretro/ps2/blob/libretroization/COPYING.GPLv3)\n\nA summary of the licenses behind RetroArch and its cores can be found [here](../development/licenses.md).\n\n## Requirements\n\nCPU\n\n- Supports SSE2/AVX2\n- PassMark Single Thread Performance rating near or greater than 1600/2100\n- Two physical cores, with hyperthreading\n- Four physical cores, with or without hyperthreading\n\nGPU\n\n- Direct3D10/11 support\n- OpenGL 3.x/4.5 support\n- Vulkan 1.3+ support\n- PassMark G3D Mark rating around 3000 (GeForce GTX 750)\n- 2 GB/4 GB Video Memory\n\nRAM\n\n- 4GB/8GB\n\n!!! Attention\n\tBecause of the complex nature of emulation, even if you meet the recommended requirements there will be games that will NOT run at full speed due to emulation imperfection, floating point emulation differences, issues with emulator itself or other problems.\n\n## Setup (Required!!)\n\nFor the LRPS2 core to function, it requires a set of real BIOS images dumped from your Playstation 2 console in accordance with your local laws, along with the `GameIndex.yaml` compatibility database.\n\n### GameIndex.yaml\n\nIn the past, most PS2 games required setting various hacks/options on a per-game basis to avoid compatibility issues and bugs. More recently, the PCSX2 team has automated this process by including a database of these per-game hacks/options in a file named `GameIndex.yaml`. Having this database in the correct spot is necessary for a good emulation experience.\n\n#### Core System Files Downloader\n\nThe easiest way to get this file and put it where it needs to go is to stop by RetroArch's `Online Updater` and head to the `Core System Files Downloader`. Inside, you'll see a series of entries named for various cores. Look for `LRPS2.zip` and select it. The `Core System Files Downloader` will then download the `GameIndex.yaml` database and place it within the necessary directory structure automatically.\n\n#### Manually\n\nIf you don't have access to the `Core System Files Downloader` for whatever reason (e.g., using the Steam release of RetroArch, or some other libretro frontend), you can still get everything you need manually.\n\nFirst, you will need to download the `GameIndex.yaml` file from the core's source code repository on [Github](https://github.com/libretro/ps2). [This](https://raw.githubusercontent.com/libretro/ps2/refs/heads/libretroization/bin/resources/GameIndex.yaml) is a direct link to the file, but if that link breaks in the future, the database file is typically housed in the `bin/resources` directory.\n\nOnce you have the `GameIndex.yaml` database:\n1. Navigate to your 'system'/BIOS directory (the location of which you can find/confirm by going to settings > directory in the RetroArch menu), then create a directory named `pcsx2` (must be in all lower-case).\n2. Inside your new `pcsx2` directory, you'll make another directory named `resources` (again, all lower-case)\n3. Place the `GameIndex.yaml` inside of it. The final structure should be `system/pcsx2/resources/GameIndex.yaml`.\n\n### BIOS\n\n!!! Attention\n\tFor compatibility reasons, it is recommended to not use a SCPH-10000 BIOS.\n\n!!! Notes\n\t- No specific filename required, as long as the BIOS was properly dumped the core will be able to find it.\n\t- The BIOS files must be extracted, the core will not be able to find them if they're zipped.\n\t- LRPS2 does not implement region locking, so if you have a PAL BIOS you can play NTSC games, and vice versa. However, this only applies with the `Fast Boot` core option enabled.\n\nLRPS2 requires a BIOS to work, the BIOS can be provided as a single 4MB .bin file or with additional files (usually .erom, .nvm, .rom1 and .rom2).\n\nIn case you're having additional files with the .bin, make sure they're sharing the same filename or they'll be ignored.\nSo as an example let's say you have a `SCPH-70004_BIOS_V12_EUR_200.BIN` file with an EROM file, a ROM1 file and a ROM2 file, it should look like this:\n\n```\nSCPH-70004_BIOS_V12_EUR_200.BIN\nSCPH-70004_BIOS_V12_EUR_200.EROM\nSCPH-70004_BIOS_V12_EUR_200.ROM1\nSCPH-70004_BIOS_V12_EUR_200.ROM2\n```\n\n#### How to set up your BIOS:\n\n1. Go inside your RetroArch \"system\" folder (usually `retroarch/system/`, but if you're not sure check the path in `Settings > Directory > System/BIOS`).\n2. Create a `pcsx2` folder (if you used the Core System Files Downloader to download the `GameIndex.yaml`, this folder structure should already exist).\n3. Go inside the `pcsx2` folder and create a `bios` folder.\n4. Go inside the `bios` folder and paste your BIOS file(s) here.\n\nFor example, the default path would look like this: `system\\pcsx2\\bios\\[bios_file_name].bin`\n\nIf you're on a case-sensitive OS, make sure both `pcsx2` and `bios` folders are lowercase.\n\n## Other required files and directories\n\nThe file structure should look like this:\n\n```\nretroarch/\n└── system/\n\t└── pcsx2/\n\t\t├── bios/\n\t\t├── cheats/\n\t\t├── cheats_ws/\n\t\t└── memcards/\t(optional)\n```\n\n* `bios/` is where the BIOS files are located (see the ['BIOS'](#bios) section above), this should be created by the user.\n* `cheats/` is where you can store cheat patches, the folder is created on the first boot automatically.\n* `cheats_ws/` is where you can store additional widescreen patches, the folder is created on the first boot automatically.\n* `memcards/` is where the \"legacy\" memory cards are stored. This folder is optional, see the ['Directories'](#directories) section below.\n\n!!! Info\n\tAlthough the `cheats_ws` folder is empty when created, a very large number of widescreen patches are already included in the core itself.\n\n## Extensions\n\nContent that can be loaded by the LRPS2 core have the following file extensions:\n\n- .elf\n- .iso\n- .ciso\n- .chd\n- .cso\n- .bin\n- .mdf\n- .nrg\n- .dump\n- .gz\n- .img\n- .m3u\n\nRetroArch database(s) that are associated with the LRPS2 core:\n\n- [Sony - PlayStation 2](https://github.com/libretro/libretro-database/blob/master/rdb/Sony%20-%20PlayStation%202.rdb)\n\n## Features\n\nFrontend-level settings or features that the LRPS2 core respects.\n\n| Feature | Supported |\n|-------------------|:---------:|\n| Restart | ✔ |\n| Screenshots | ✔ |\n| Saves | ✔ |\n| States | ✔ |\n| Rewind | ✕ |\n| Netplay | ✕ |\n| Core Options | ✔ |\n| [Memory Monitoring (achievements)](../guides/memorymonitoring.md) | ✔ |\n| RetroArch Cheats | ✕ |\n| Native Cheats | ✔ |\n| Controls | ✔ |\n| Remapping | ✔ |\n| Multi-Mouse | ✕ |\n| Rumble | ✔ |\n| Sensors | ✕ |\n| Camera | ✕ |\n| Location | ✕ |\n| Subsystem | ✕ |\n| [Softpatching](../guides/softpatching.md) | ✕ |\n| Disk Control | ✔ |\n| Username | ✕ |\n| Language | ✕ |\n| Crop Overscan[^2] | ✕ |\n| LEDs | ✕ |\n\n## Directories\n\nLRPS2's library name is 'pcsx2'\n\nLRPS2 core saves/loads to/from these directories.\n\n**Frontend's System directory**\n\n- Legacy memory cards\n\n`retroarch/system/pcsx2/memcards/`\n\n## Rumble support\n\nRumble only works in the LRPS2 core when\n\n- The content being run has rumble support.\n- The frontend being used has rumble support.\n- The joypad device being used has rumble support.\n- The corresponding user's device type is set to **DualShock 2**\n\n## Joypad\n\n\n\n| User 1 - 8 input descriptors | RetroPad Inputs | PlayStation Controller Inputs | DualShock Inputs | Analog Controller Inputs | Analog Joystick Inputs | neGcon Inputs |\n|-------------------------------|----------------------------------------------|------------------------------------------------|-------------------------------------------------|-------------------------------------------------|------------------------------------------------|---------------------------------|\n| Cross |  |  |  |  |  | Analog button I |\n| Square |  |  |  |  |  | Analog button II |\n| Select |  |  |  |  |  | |\n| Start |  |  |  |  |  | Start |\n| D-Pad Up |  |  |  |  |  | D-Pad Up |\n| D-Pad Down |  |  |  |  |  | D-Pad Down |\n| D-Pad Left |  |  |  |  |  | D-Pad Left |\n| D-Pad Right |  |  |  |  |  | D-Pad Right |\n| Circle |  |  |  |  |  | A |\n| Triangle |  |  |  |  |  | B |\n| L1 |  |  |  |  |  | Left shoulder button (analog) |\n| R1 |  |  |  |  |  | Right shoulder button (digital) |\n| L2 |  |  |  |  |  | Analog button II |\n| R2 |  |  |  |  |  | Analog button I |\n| L3 |  | |  | | | |\n| R3 |  | |  | | | |\n| Left Analog X |  X | |  |  | Left Joystick X | Twist |\n| Left Analog Y |  Y | |  |  | Left Joystick Y | |\n| Right Analog X |  X | |  |  | Right Joystick X | |\n| Right Analog Y |  Y | |  |  | Right Joystick Y | |\n\n## Compatibility\n\nThe current standalone development version is reported to be compatible with approximately 97.4% of 2,641 tested games as of August 2020. Compatibility means only that the game will not crash, lock up, or enter a loop; there can still be bugs, missing post-processing effects, textures, and shadows in many compatible games. This is especially the case in hardware mode; a slower software mode is available for bugs without workarounds. You can check compatibilirt list in [here](https://pcsx2.net/compatibility-list.html)\n\n## External Links\n\n- [LRPS2 Core info file](https://github.com/libretro/libretro-super/blob/master/dist/info/pcsx2_libretro.info)\n- [LRPS2 Github Repository](https://github.com/libretro/ps2)\n- [Report LRPS2 Core Issues Here](https://github.com/libretro/ps2/issues)\n\n## Libretro PS2 cores\n\n- [PlayStation 2 (Play!)](play.md)\n\n\n[^2]: Overscan cropping available via Core Options instead of frontend settings\n"
},
{
"path": "docs/library/lutro.md",
"content": "# Lua Engine (Lutro)\n\n## Background\n\nLutro is an experimental lua game framework that follows the [LÖVE API](https://love2d.org/wiki/Main_Page). Lutro games can be played with LibRetro/RetroArch through the Lutro core.\n\n#### How to start the Lutro core:\n\n- As an example showcasing loading content with the Lutro core, we will load the Pong game hosted on RetroArch's Content Downloader.\n\nYou can do this by going to RetroArch's main menu screen and selecting 'Online Updater'. From there, select 'Content Downloader'.\n\n

\n\n- Select 'Lutro', then select 'Pong.lutro'. This should download and extract this file to RetroArch's Downloads directory.\n\n

\n\n- Go back to RetroArch's main menu screen. Select 'Load Content', then 'Downloads'.\n\n

\n\n

\n\n- Select 'Pong.lutro'.\n\n- If you are asked which core to select, choose 'Lua Engine (Lutro)'.\n\nThe content should now start running!\n\n### Author/License\n\nThe Lutro core has been authored by\n\n- Higor Euripedes\n- Jean-Andre Santoni\n\nThe Lutro core is licensed under\n\n- [MIT](https://github.com/libretro/libretro-lutro/blob/master/LICENSE)\n\nA summary of the licenses behind RetroArch and its cores can be found [here](../development/licenses.md).\n\n## Extensions\n\nContent that can be loaded by the Lutro core have the following file extensions:\n\n- .lutro\n- .lua\n\n## Databases\n\nRetroArch database(s) that are associated with the Lutro core:\n\n- [Lutro](https://github.com/libretro/libretro-database/blob/master/rdb/Lutro.rdb)\n\n## Features\n\nFrontend-level settings or features that the Lutro core respects.\n\n| Feature | Supported |\n|-------------------|:---------:|\n| Restart | ✕ |\n| Screenshots | ✕ |\n| Saves | ✕ |\n| States | ✕ |\n| Rewind | ✕ |\n| Netplay | ✕ |\n| Core Options | ✕ |\n| [Memory Monitoring (achievements)](../guides/memorymonitoring.md) | ✕ |\n| RetroArch Cheats | ✕ |\n| Native Cheats | ✕ |\n| Controls | ✔ |\n| Remapping | ✔ |\n| Multi-Mouse | ✕ |\n| Rumble | ✕ |\n| Sensors | ✕ |\n| Camera | ✕ |\n| Location | ✕ |\n| Subsystem | ✕ |\n| [Softpatching](../guides/softpatching.md) | ✕ |\n| Disk Control | ✕ |\n| Username | ✕ |\n| Language | ✕ |\n| Crop Overscan | ✕ |\n| LEDs | ✕ |\n\n### Directories\n\nThe Lutro core's internal core name is 'lutro'\n\n### Geometry and timing\n\n- The Lutro core's core provided FPS is 60\n- The Lutro core's core provided sample rate is 44100 Hz\n- The LUtro core's core provided aspect ratio is (Ratio)\n\n## Controllers\n\nThe Lutro core supports the following device type(s) in the controls menu, bolded device types are the default for the specified user(s):\n\n### User 1 device types\n\n- None - Doesn't disable input. There's no reason to switch to this.\n- **RetroPad** - Joypad - Stay on this.\n- RetroPad w/Analog - Joypad - Same as RetroPad. There's no reason to switch to this.\n\n### Controller tables\n\n#### Joypad\n\n!!! attention\n\tWhat the inputs do are game specific.\n\n| User 1 Remap descriptors | RetroPad Inputs | Lutro core inputs |\n|--------------------------|------------------------------------------------|-------------------|\n| |  | B |\n| |  | Y |\n| |  | Select |\n| |  | Start |\n| Up |  | Up |\n| Down |  | Down |\n| Left |  | Left |\n| Right |  | Right |\n| |  | A |\n| |  | X |\n| |  | L1 |\n| |  | R1 |\n| |  | L2 |\n| |  | R2 |\n| |  | L3 |\n| |  | R3 |\n\n## External Links\n\n- [Lua Website](https://www.lua.org/)\n- [LÖVE API Website](https://love2d.org/)\n- [Libretro Lutro Core info file](https://github.com/libretro/libretro-super/blob/master/dist/info/lutro_libretro.info)\n- [Libretro Lutro Github Repository](https://github.com/libretro/libretro-lutro)\n- [LUTRO LÖVE API Comparison](https://github.com/libretro/lutro-status)\n- [Lutro Github Wiki](https://github.com/libretro/libretro-lutro/wiki)\n- [Report Libretro Lutro Core Issues Here](https://github.com/libretro/libretro-lutro/issues)\n\n### See also\n\n#### Custom Engine\n\n- [ChaiLove](chailove.md)\n"
},
{
"path": "docs/library/m2000.md",
"content": "# Philips - P2000T (M2000)\n\n\n\n## Background\n\nThe P2000T was Philips' first computer for the home market in the early '80s, before they later switched to manufacturing MSX computers. The P2000T was a Z80-powered home computer, running at a clock speed of 2.5 MHz and it used a Mullard SAA5050 teletext display chip to produce the video picture. The machine was built like a tank and featured an integrated keyboard, power supply, two cartridge slots and a very innovative and fast Mini-Cassette system (MDCR), which was fully automated and used mini tapes that could hold up to 42 kilobytes of data.\n\nThe P2000T was reasonably popular among hobbyists and kids in elementary schools in The Netherlands, as Philips promoted the machine strongly in the science and education sectors. Because of the relatively high introductory price and the fact that its SAA5050 video chip only supported a 40 x 24 character teletext display mode, the P2000T never became the success that Philips hoped for.\n\nWhile the system's video and sound capabilities were rather limited, some developers still were able to create remarkably good games, like a Pac-Man clone named \"Ghosthunt\", a Phoenix clone named \"Fraxxon\", a Lady Bug clone named \"Lazy Bug\" and a Breakout clone named \"Brick-Wall\".\n\nThe P2000T (M2000) emulator core has been authored by:\n\n- Dion Olsthoorn\n- Marcel the Kogel (who wrote the original emulator back in 1997)\n\nand is licensed under:\n\n- [GPL3](https://github.com/p2000t/M2000/blob/main/LICENSE)\n\nA summary of the licenses behind RetroArch and its cores can be found [here](../development/licenses.md).\n\n## Extensions\n\nContent that can be loaded by the M2000 core have the following file extensions:\n\n- .cas\n\n## Features\n\nFrontend-level settings or features that the M2000 core respects:\n\n| Feature | Supported |\n|-------------------|:---------:|\n| Restart | ✔ |\n| Screenshots | ✔ |\n| Saves | ✔ |\n| States | ✔ |\n| Rewind | ✔ |\n| Netplay | ✕ |\n| Core Options | ✔ |\n| [Memory Monitoring (achievements)](../guides/memorymonitoring.md) | ✕ |\n| RetroArch Cheats | ✕ |\n| Native Cheats | ✕ |\n| Controls | ✔ |\n| Remapping | ✔ |\n| Multi-Mouse | ✕ |\n| Rumble | ✕ |\n| Sensors | ✕ |\n| Camera | ✕ |\n| Location | ✕ |\n| Subsystem | ✕ |\n| [Softpatching](../guides/softpatching.md) | ✕ |\n| Disk Control | ✕ |\n| Username | ✕ |\n| Language | ✕ |\n| Crop Overscan | ✕ |\n| LEDs | ✕ |\n\n## Directories\n\nThe M2000 core's library name is 'M2000'.\n\n**Frontend's Save directory**\n\n| File | Description |\n|-------------|------------------------|\n| Default.cas | Writable cassette file, which is only created/attached when starting the M2000 core **without content** |\n\n## Geometry and timing\n\n- The M2000 core's provided FPS is `50`\n- The M2000 core's provided sample rate is `30000`\n- The M2000 core's base width is `480`\n- The M2000 core's base height is `480`\n- The M2000 core's max width is `480`\n- The M2000 core's max height is `480`\n- The M2000 core's provided aspect ratio is `4/3`\n\n## Usage\n\nYou can use the M2000 core for playing P2000T cassette games, but you can also use it for programming your own P2000T Basic programs.\n\n### Programming in Basic\n\nWhen you start the M2000 core **without content**, you will see the \"Philips Cassette Basic\" screen with the white cursor waiting for your input. Here you can type in your Basic program and load or save your programs. An - initially empty - cassette named `Default.cas` will be attached and stored in the M2000 Save directory. \nYou can save a program using:\n```\ncsave \"program name\"\n```\n... and load it again using:\n```\ncload \"program name\"\n```\nNote that only the first(!) character of each program is used for identification, so e.g. a program named \"hello world\" can be loaded using `cload \"h\"`.\nTo show the index of the cassette, press F3 or Shift + Numeric keypad 1.\n\n#### Game Focus mode\nProgramming P2000T Basic using the M2000 core requires full keyboard access. This works best when the core is in **'Game Focus'** mode, which allows the M2000 core to take precedence in inputs. The easiest way to automatically enable 'Game Focus' mode for the M2000 core is in **Settings > Input** where you set the option called **Auto Enable 'Game Focus' Mode** to `Detect`. Or correspondingly in retroarch.cfg set `input_auto_game_focus = \"2\"`. Be aware that the default hotkey for toggling the **Game Focus** mode is the **Scroll Lock** key, which might not be present on your keyboard. If that's the case, you'll need to remap this hotkey to a more suitable key.\n\n### Playing games\n\nThe P2000T didn't came with any joystick ports, so every P2000T game relies on keyboard input. Usually the Space key is used to fire and the Arrow-keys to navigate, but other keys are also used to answer simple Yes/No questions or for entering the number of players.\n\nWhile the P2000T didn't have any joystick ports, there was a third-party company back in the '80s who was selling I/O cartridges to which you could connect up to 2 joysticks. These cartridges basically simulated actual key presses and that is exactly what the Joypad is doing in the M2000 core.\n\nPlaying P2000T games using the M2000 core usually works best in one of these three ways:\n\n1. Using **Keyboard only**\nThis basically means that you play the P2000T games like most people did back in the day. \nThis way of playing works best when the core is in **'Game Focus'** mode, like explained above.\n\n2. Using both **Keyboard** and **Joypad**\nUse the **Keyboard** to answer the game's Yes/No questions and for things like entering the number of players or typing your name for the highscore list. Then switch to the **Joypad** during actual game play.\nThis way of playing also works best when the core is in **'Game Focus'** mode.\n\n3. Using **Joypad only.**\nThis requires the use of the On-Screen Key Selector to enter the number of players or to answer Y/N questions. See the description below on how to use the On-Screen Key Selector.\nFor this way of playing the core doesn't have to be in **'Game Focus'** mode.\n\n#### On-Screen Key Selector\n\nThe On-Screen Key Selector lets you simulate key presses using your Joypad controller. This allows you to play almost all P2000T games without the need of an actual keyboard. Next to the regular Joypad mappings (for the Navigation keys + Space to fire), most games will ask simple Yes/No questions or allow you to enter your name in a high score list.\n\nThe On-Screen Key Selector is activated by holding your Joypad's Left Bumper/Trigger/Shoulder button. Then with the D-pad you can loop through the keys and with the A/B button you then enter the highligted key.\n\nIn the screenshot below you can see the On-Screen Key Selector in the bottom of the screen, where the player is about the enter the 'N' key to skip showing the \"spelregels\" (game rules):\n\n\n\n## User 1 device types\n\nThe M2000 core supports the following device type(s) in the controls menu, bolded device types are the default for the specified user(s):\n\n- **RetroKeyboard** - Keyboard. The keyboard inputs are always active.\n- **RetroPad** - Joypad. The buttons are internally mapped to actual keyboard key presses (see information below).\n\n## Joypad\n\n| RetroPad Inputs | P2000T Keys |\n|---------------------------------------------|------------------------|\n|  | Space / Fire |\n|  | Space / Fire |\n|  | < START > |\n|  | < STOP > |\n|  | Up |\n|  | Down |\n|  | Left |\n|  | Right |\n|  | On-Screen Key Selector |\n|  | On-Screen Key Selector |\n\n### Joypad remapping for games that use alternative keys\n\nSome P2000T games use alternative keys for navigation. An example is Fraxxon, which uses the **Left** and **Up** keys to move the spaceship horizontally, which was probably done for better playability on the original P2000T keyboard. \nTo be able to use the D-pad for horizontal movement in the emulator, you should start Fraxxon, then open the menu and go to **Quick Menu > Controls > Port 1 Controls** and remap **D-Pad Right** to RetroPad **Up**. Now return to **Quick Menu > Controls**, click **Manage Remap Files** and select **Save Game Remap File** to save the joypad remapping for Fraxxon only.\n\n## Keyboard\n\n### Symbolic key mapping\nThe M2000 core is using **symbolic** key mapping by default, which means that - where possible - keys on the PC keyboard are mapped to corresponding P2000T keys that show the same symbol, so you basically get the key which you pressed.\n\nThe special keys < START >, < STOP > and < ZOEK > are mapped as follows:\n\n| RetroKeyboard Inputs | P2000T Keys |\n|---------------------------|----------------------|\n| F1 | < START > |\n| F2 | < STOP > |\n| F3 | < ZOEK > |\n| Shift + Numpad 1 | < ZOEK > |\n| Shift + Numpad 3 | < START > |\n| Shift + Numpad Enter | < STOP > |\n\n### Positional key mapping\nOptionally, the M2000 core supports **positional** key mapping, which maps every key from a \"real\" keyboard to the key which has the same position/location on a P2000T keyboard. \n\nAs the layout of a P2000T keyboard differs from modern keyboards, this might cause some unexpected mappings. So below you can see how the keys on the RetroKeyboard map to positional keys on the P2000T keyboard:\n\n| RetroKeyboard Inputs | P2000T Keys |\n|---------------------------|----------------------|\n| a .. z | a .. z |\n| A .. Z | A .. Z |\n| 0 .. 9 | 0 .. 9 |\n| Shift + 1 | Exclaim ! |\n| Shift + 2 | Double Quote \" |\n| Shift + 3 | Pound & |\n| Shift + 4 | Dollar $ |\n| Shift + 5 | Percent % |\n| Shift + 6 | Ampersand & |\n| Shift + 7 | Quote ' |\n| Shift + 8 | Left Parenthesis ( |\n| Shift + 9 | Right Parenthesis ) |\n| Shift + 0 | Equals = |\n| Minus - | Minus - |\n| Underscore _ | Dash — |\n| Equals = | One Quarter ¼ |\n| Plus + | Three Quarters ¾ |\n| Left Bracket [ | At @ |\n| Left Curly Brace { | Arrow Up ↑ |\n| Right Bracket ] | Arrow Right → |\n| Right Curly Brace } | Arrow Left ← |\n| Backslash \\ | Hash # |\n| Pipe \\| | Block █ |\n| Semicolon ; | Semicolon ; |\n| Colon : | Plus + |\n| Quote ' | Colon : |\n| Double Quote \" | Asterisk * |\n| Comma , | Comma , |\n| Period . | Period . |\n| Slash / | Slash / |\n| Question ? | Question ? |\n| Delete | Less < |\n| Shift + Delete | Greater > |\n| Backspace | Backspace |\n| Return | Enter |\n| Space | Space |\n| Backquote ` | < CODE > |\n| Tab | Tab |\n| Caps Lock | Shift Lock |\n| Left Shift | Left Shift |\n| Right Shift | Right Shift |\n| Up | Up |\n| Down | Down |\n| Right | Right |\n| Left | Left |\n| Numpad 0 .. 9 | 0 .. 9 |\n| Numpad Period . | Double Zero 00 |\n| Numpad Enter | Period . |\n| Numpad Multiply * | Clear Line |\n| Shift + Numpad Multiply * | Clear Page |\n| Shift + Numpad 1 | < ZOEK > |\n| Shift + Numpad 3 | < START > |\n| Shift + Numpad Enter | < STOP > |\n| F1 | < START > |\n| F2 | < STOP > |\n| F3 | < ZOEK > |\n\n## External Links\n\n- [Libretro M2000 Core info file](https://github.com/libretro/libretro-super/blob/master/dist/info/m2000_libretro.info)\n- [Official M2000 Github Repository](https://github.com/p2000t/M2000)\n- [Report M2000 Issues Here](https://github.com/p2000t/M2000/issues)\n- [Wikipedia page on the Philips P2000T](https://en.wikipedia.org/wiki/Philips_P2000#P2000T)\n- [P20000T documentation](https://github.com/p2000t/documentation)\n- [P20000T game collection](https://github.com/p2000t/software/tree/master/cassettes/games)\n"
},
{
"path": "docs/library/mame2003_plus.md",
"content": "# MAME 2003-Plus\n\n## Background\n\nMAME 2003-Plus (also referred to as MAME 2003+ and mame2003-plus) is a libretro multi-arcade system emulator core which prioritizes 1) usability and frontend integration, 2) performance, and 3) compatibility across the range of libretro-supported platforms including mobile devices, single board computers, and consoles. MAME 2003-Plus is part of a long tradition in arcade emulation of producing platform-specific and performance-optimized MAME builds.\n\n!!! Question \"Why is it called **Plus**?\"\n Unlike the other 'historic' libretro MAME cores which remain fixed at one MAME version, MAME 2003-Plus is actively maintained and has to date added support for hundreds of new games along with dozens of new features.\n\nMAME 2003-Plus is part of a lineage of codebase forks and ports: this core was forked from MAME 2003, which is itself derived from Xmame 0.78, the X11/Unix port of MAME 0.78.\n\n**Authors**: MAMEdev, MAME 2003-Plus team, et al (see [LICENSE.md](https://raw.githubusercontent.com/libretro/mame2003-plus-libretro/master/LICENSE.md) and [CHANGELOG.md](https://raw.githubusercontent.com/libretro/mame2003-plus-libretro/master/CHANGELOG.md))\n\n\n## Contribute to this documentation\n\nIn order to propose improvements to this document, [visit it's corresponding source page on github](https://github.com/libretro/docs/blob/master/docs/library/mame2003-plus.md). Changes are proposed using \"Pull Requests.\"\n\n\n## See also\n\n[MAME 2003](mame_2003.md)\n\n\n## License\n\n[MAME Non-Commercial](https://raw.githubusercontent.com/libretro/mame2003-libretro/master/LICENSE.md)\n\n\n## Extensions\n\nzip, chd\n\n!!! Note \"CHD paths\"\n Some games require data from an internal hard drive, CD-ROM, laserdisk, or other media in order to be emulated -- those forms of media are packaged as CHD files. CHD files should be copied to subfolders within the folder where the romset zips have been installed: `/libretro content dir/blitz/blitz.chd`\n\n\n## Building romsets for MAME 2003-Plus\n\nMAME 2003-Plus began with the game drivers from MAME 0.78, meaning that 95% or more of MAME 0.78 romsets will work as-is in MAME 2003-Plus, where they immediately benefit from its bugfixes and other improvements. **In order to play the new games and games which received ROM updates in MAME 2003-Plus, you will need to find or build MAME 2003-Plus romsets.**\n\n!!! question \"What is a romset?\"\n Arcade games are packaged as zip files, most of which are composed of more than one individual 'ROM' files. That is why some resources inaccurately refer to an individual arcade game as a ROM (like people use to describe a zipped game cartridge ROM) while other resources refer to an individual game as a **ROM set**, **ROMset**, or **romset**.\n\nMAME 2003-Plus has the ability to generate an XML \"DAT\" file directly from the [MAME menu](#MAME-menu).\n\n\n### Step 1: Obtaining an XML DAT\n\nDAT files describe the exact ROM contents that the emulator needs including filenames, file sizes, and checksums to verify contents are not incorrect or corrupt. mame2003-plus has the ability to generate an XML \"DAT\" file from the MAME Menu. You can also access the MAME menu by turning it on as a core option, selecting **Generate XML DAT** and then disabing the menu as a core option.\n\n\n### Step 2: Finding a source for ROMs\n\nIn order to build a complete MAME 2003-Plus collection, the ingredients are:\n\n* A complete MAME 0.223 or later romset collection\n* A complete MAME 0.223 or later \"rollback\" romset collection\n* MAME 0.78 CHD collection\n* The NeoGeo UniBIOS 3.3, freely available at http://unibios.free.fr/\n\n\n### Step 3: Building MAME 2003-Plus romsets\n\nRefer to [Validating, Rebuilding, and Filtering ROM Collections](https://github.com/RetroPie/RetroPie-Setup/wiki/Validating,-Rebuilding,-and-Filtering-ROM-Collections) for details on how to configure ClrMamePro to use your sources as \"rebuild\" folders.\n\nWe recommend the **Full Non-Merged** format, where each romset zip files includes all the files needed to run each game, including any ROMs from 'parent' ROM sets and BIOS sets. To configure ClrMamePro to validate or rebuild a Full Non-Merged collection, use \"Non-Merged\" mode and disable \"Separate BIOS Sets\" from the \"Advanced\" menu in both ClrMamePro's Rebuild and Scanner menus.\n\n!!! tip\n A complete **Full Non-Merged** romset collection with CHDs and Samples only requires approximately 6% more storage space than the **Split** format romsets that are also sometimes used to structure arcade romsets. MAME 2003-Plus can read **Split, TorrentZipped** romsets, but the RetroArch playlist scanner only supports **Full Non-Merged, TorrentZipped** romsets for MAME 2003-Plus.\n\n\n#### Recommended ClrMamePro settings\nClrMamePro remains the most popular tool for rebuilding MAME romsets, at least for now. That said, ClrMamePro is focused on supporting more recent MAME versions so there are at least two things to know if you are using ClrMamePro to generate a MAME 2003-Plus set:\n\n1. If you are scanning CHDs, go to `Settings` -> `Compressor` -> `CHDMan` tab and change `Req. CHD Version` to `3`.\n2. If you are using the suggested setting of `Disable Separate BIOS Sets` then ClrMamePro will report the BIOS romset files as missing even though you told the program you don't want them. mame2003-plus incorporates 15 different kinds of BIOS romsets, so it is normal to see a ClrMamePro message like this after a clean and complete scan: `You are missing 15 of 4831 known mame2003-plus.xml sets (+ BIOS sets)`\n\n\n### Sourcing CHDs\n\nMAME 2003-Plus uses exactly the same MAME 0.78 CHDs (CHD v3) as MAME 2003.\n\n\n## BIOS\n\nBIOS romsets are not needed when using \"Full Non-Merged\" arcade romsets. For \"Split\" and \"Non-Merged\" romsets, place the BIOS in the same directory as the game romset.\n\n\n## Features\n\n| Feature | Supported |\n|-------------------|-----------|\n| Saves | ✔ |\n| States | game-dependent |\n| Rewind | ✔ |\n| Netplay | ✔ |\n| [Memory Monitoring (achievements)](../guides/memorymonitoring.md) | ✕ |\n| RetroArch Cheats | ✕ |\n| Native Cheats | ✔ |\n| Controllers | ✔ |\n| Multi-Mouse | ✔ |\n| Rumble | ✕ |\n| Sensors | ✕ |\n| Camera | ✕ |\n| Location | ✕ |\n| Subsystem | ✕ |\n\n\n## Input system, controls, and options\n\nmame2003-plus emulates thousands of games, many of which have unique control layouts. These games are emulated on more than a thousand variations of arcade hardware. The purpose of the input system is to communicate input from the user's physical controls through the libretro frontend, the mame2003-plus emulator core, and into the emulated game itself.\n\nNo system of default input mappings can address the full range of emulated games and supported controls. Some degree of per-game customization should ways be expected. However, to the extent possible it is also within the purpose of the MAME 2003-Plus input system to attempt to provide predictable and meaningful defaults for input across this wide range.\n\n\n## Default RetroPad Layouts\n\n| **Classic Gamepad** |\n|---------------------|\n| The **Classic Gamepad** is based on mainline MAME's default Xbox 360 controller layout and is also likely to suit DualShock or SNES-style gamepads. The corresponding option in configuration file is ```input_libretro_device_pX = \"1\"``` (where X is the player number, ```input_libretro_device_p1 = \"1\"``` for player 1, etc.).   |\n\n| **Modern Fightstick** |\n|-----------------------|\n| The **Modern Fightstick** layout is the fight stick and pad layout popularized by Street Fighter IV and assumes an 8+ button controller. The corresponding option in configuration file is ```input_libretro_device_pX = \"257\"``` (where X is the player number, ```input_libretro_device_p1 = \"257\"``` for player 1, etc.). Gamepad can also serve as an alternative Xbox/PSX-style layout for Street Fighter 2. For arcade control panels, **Modern Fightstick** can be mapped in this way: \n|\n\n| **6-Button** |\n|--------------|\n| **6-button** is a layout intended for SNES-type RetroPad controls as well as 6-button arcade panels arcade panels. The corresponding option in configuration file is ```input_libretro_device_pX = \"769\"``` (where X is the player number, ```input_libretro_device_p1 = \"769\"``` for player 1, etc.). **6-button** can be mapped in this way: |\n\n| **8-Button** |\n|--------------|\n|**8-button** is a layout intended for an arcade panel. The corresponding option in configuration file is ```input_libretro_device_pX = \"513\"``` (where X is the player number, ```input_libretro_device_p1 = \"513\"``` for player 1, etc.). **8-button** is configured like this |\n\n\n### Keyboard Input\n`mame_keyboard` sets the core to process keyboard input directly through the legacy \"MAME\" keyboard interface. Use this input mode only if your input device is seen as a keyboard, including some arcade control panel hardware.\n\n\n### Mouse and trackball support\n\nMAME 2003-Plus has support for multiple mice or touch devices in games that support trackballs, etc. MAME 2003-Plus also supports one or two spinners/dials via the \"Share 2 player dial controls across one X/Y device\" core option. By default, mice/trackballs and analog sticks (the left one, for controllers with 2) are supported in games that would have them, or equivalents. For example, Centipede supports the mouse/trackball, and Afterburner supports the stick.\n\n\n### Pointer, trackpad, touchscreen support\n\nAbsolute pointer devices are supported, but need to be turned on via the corresponding core option.\n\n\n### Lightgun support\n\nBecause MAME 2003-Plus does not yet implement the libretro lightgun API, the core currently supports lightguns only if they are configured to emulate a mouse.\n\n\n### 2-player dial and spinner devices\n\n2-player spinner and dial devices can be represented as 1 device with 2 axes. MAME 2003-Plus can be configured to share this device across both players: Player 1 = X axis, Player 2 = Y axis. This can be enabled via a setting in the `retroarch-core-options.cfg` file:\n```mame2003-plus-dialsharexy = \"enabled\"```\n\n!!! Warning\n Enabling this option will disable standard mouse support.\n\n\n### Analog and digital controller support\n\nMAME 2003-Plus natively supports analog and digital controls.\n\n### 4-way joystick simulation\n\n4-way joysticks are an essential aspect of the gameplay for many iconic arcade titles including games like Donkey Kong, Pac-Man, and Q-Bert. Because modern joysticks generally use 8-way designs, it is usually impossible to play these games well without special hardware. MAME 2003-Plus includes a core option to simulate 4-way joysticks. When enabled, this logic analyzes input from 8-way digital joysticks in order to render its position as if the joystick had a 4-way design. This simulation is not the same as using a real 4-way joystick, but it can make a significant improvement to playability.\n\n\n### Content-aware control names\n\nIn the same way that content-aware core options only appear when they are relevant to the current game, MAME 2003-Plus has added support for content-aware control names. In other words, when remapping Street Fighter 2 controls, the libretro frontend can display the control names that were printed on the real arcade control panel like `Jump`, `Strong Punch` and `Forward Kick` instead of a generic labels like `Up`, `Button 1`, `Button 2`, etc.\n\nBecause support for control names is relatively new and is derived from the third-party **controls.dat** project, control names need to be verified by a human being before they are activated. As of end end of 2018, dozens of games have these active control names, but hundreds more need to be double-checked before being enabled. [Coders, and users who are willing to learn basic github commands, are invited to join in this effort](https://github.com/libretro/mame2003-plus-libretro/wiki/Submitting-Button-Names).\n\n-----------\n\n## Other key features\n\n## Audio samples\n\nSome games require an additional zip file with recorded sounds or music in order for audio to work correctly. Audio 'sample' files should be placed in a `samples` subdirectory within `/libretro system dir/mame2003-plus/`.\n\n!!! tip \"Alternate CD soundtrack support\"\n MAME 2003-Plus also supports alternate soundtracks for several popular arcade titles that were also released in other formats with high quality audio soundtracks. Alternate soundtracks are supported for **Double Dragon**, **Final Fight**, **Mortal Kombat**, **Michael Jackson’s Moonwalker**, **NBA Jam**, and **Out Run**.\n\n\n### Backdrop artwork\n\nSome games require backdrop artwork files in order to be fully emulated. Because RetroArch, the reference libretro frontend, does not yet incorporate support for so-called \"backdrop\" artwork, the MAME 2003-Plus github repository includes [a folder of high-resolution backdrop artwork](https://github.com/libretro/mame2003-plus-libretro/tree/master/metadata/artwork) that is compatible with the core's built-in artwork display system. These artwork `zip` files should be placed within `/libretro system dir/mame2003-plus/artwork`.\n\n\n\n_\"Armor Attack\" backdrop artwork pack prepared by UDB23_\n\n\n### Run Ahead input lag reduction\n\nThis core supports the RetroArch \"Run Ahead\" input latency reduction feature when Run Ahead is set to `Second Instance`, but as of the end of 2018 there are [known issues preventing Run Ahead from functioning properly and a bounty fundraiser to fix them](https://github.com/libretro/mame2003-plus-libretro/issues/434).\n\n\n### MAME Menu\n\nThe simplest way to access the \"MAME menu\" is by enabling it in the core options. If your input mode is set to allow input to the `mame_keyboard` interface, you can also enter the menu by pressing the `Tab` key.\n\n\n### Dip-switches\n\nMany arcade games have hardware switches for arcade owners to modify certain parameters which can be adjusted by accessing the MAME menu and selecting the '**Dip Switches**' option. Dip switches often controlled features like free play (no coins needed), difficulty level, and cocktail table cabinet rotation mode.\n\n\n### Service menu\n\nFor games where dip switches are not available directly within the MAME menu, MAME 2003-Plus the core can often access a game's internal servic menus to set options by pressing `F2` with a keyboard while `mame_keyboard` or `simultaneous` input mode is enabled.\n\n\n### High scores\n\nThe **hiscore.dat** is compiled into MAME 2003-Plus and then spawned into `/libretro system dir/mame2003-plus/` the first time the core is run. Users do not need to install the **hiscore.dat** themselves. From then on, users can modify or replace this file with their own custom DAT if they choose. When high scores are saved, they are either stored as NVRAM data in `libretro system dir/mame2003-plus/nvram/` or as hiscore data in: `libretro system dir/mame2003-plus/hi/`\n\n\n### Cheats\n\nMAME 2003-Plus supports the MAME cheat engine, allowing you to use the MAME menu to enable various in-game cheats. To activate these, there is a necessary supplementary file called `cheat.dat`. This file can be [downloaded from the MAME 2003-Plus 'metadata' repository](https://github.com/libretro/mame2003-plus-libretro/tree/master/metadata). Place `cheat.dat` in: `libretro system dir/mame2003-plus/`.\n\n\n### History DAT\n\nMAME 2003-Plus supports the use of the **history.dat** file, which displays background information about many games from within the **MAME Menu**. This file can be [downloaded from the MAME 2003-Plus 'metadata' repository](https://github.com/libretro/mame2003-plus-libretro/tree/master/metadata). Place `history.dat` in: `libretro system dir/mame2003-plus/ `.\n\n\n### LED output system\n\nAs of late 2018, MAME 2003-Plus incorporates preliminary support for the libretro LED lighting output system. Documentation is yet to be written on this topic.\n\n-----------\n\n## Core-generated content\n\nCore-generated content is placed in sub-directories within `/libretro savefile dir/mame2003-plus/`:\n```\n/libretro savefile dir/mame2003-plus/diff/\n/libretro savefile dir/mame2003-plus/nvram/\n/libretro savefile dir/mame2003-plus/hi/\n/libretro savefile dir/mame2003-plus/cfg/\n/libretro savefile dir/mame2003-plus/memcard/\n```\n\n-----------\n\n## Core options\n\n!!! Tip\n **Restart core** indicates that the core must be restarted in order for changes to that option to take effect.\n\n!!! Tip \"Content-aware core options\"\n Because MAME 2003-Plus supports more than 4,000 games, there are a number of core options which only apply to a subset of its library. For example, there are several options to configure vector displays which have no effect for games with any other kind of display. **MAME 2003-Plus only presents core options to the frontend that are relevant to the game that is currently loaded** In other words, the vector options only appear when a vector game is currently loaded.\n\n| Core option | Description|\n| --- | --- |\n| 4-way joystick emulation on 8-way joysticks | See **4-way joystick simulation** section of this doc. ```mame2003-plus_four_way_emulation = \"enabled|disabled\"``` |\n| Mouse Device | Set mouse device input to be read either from a mouse, a pointer (pointer, trackpad, touchscreen), or to be disabled. ``` mame2003-plus_mouse_device = \"mouse|pointer|disabled\"``` |\n| Show Lightgun crosshair | Toggle crosshair visibilty for lightgun games. ```mame2003-plus_crosshair_enabled = \"enabled|disabled\"``` |\n|Skip Disclaimer| Skip the copyright disclaimer message. ```mame2003-plus_skip_disclaimer = \"disabled|enabled\"``` |\n|Skip Warnings| _Advanced feature: changing from the default is not recommended in most cases._ Skip any driver warnings about emulation quality. ```mame2003-plus_skip_warnings = \"disabled|enabled\"``` |\n|Display MAME menu | Enable this core option to display the core's **MAME Menu** and then disable it when you have finished using the **MAME Menu**. ```mame2003-plus_display_setup = \"disabled|enabled\"``` |\n|Specify Neo Geo BIOS (Restart core) | Manually specify your choice of Neo Geo BIOS from among those supported. ```mame2003-plus_neogeo_bios = \"default|euro|euro-s1|us|us-e|asia|japan|japan-s2|unibios33|unibios20|unibios13|unibios11|unibios10|debug|asia-aes\"``` |\n|Specify Sega ST-V BIOS (Restart core) | Manually specify your choice of ST-V BIOS from among those supported. ```mame2003-plus_stv_bios = \"default|japan|japana|us|japan_b|taiwan|europe\"``` |\n|Use CD soundtrack (Restart core) | See **Alternate CD soundtrack support** in the **Audio samples** section of this doc. ```mame2003-plus_use_alt_sound = \"enabled|disabled\"``` |\n|Share 2 player dial controls across one X/Y device | See the **2-player dial and spinner devices** section of this doc. ```mame2003-plus_dialsharexy = \"disabled|enabled\"``` |\n|Vector resolution multiplier (Restart core)| Attempts to create a higher quality emulation of vector display hardware by upscaling the emulated display to a higher resolution. ```mame2003-plus_vector_resolution = \"1024x768|640x480|1280x960|1440x1080|1600x1200|original\"``` |\n|Vector antialiasing| Enables or disables the **anti-aliasing** for vector games. ```mame2003-plus_vector_antialias = \"enabled|disabled\"``` |\n|Vector beam width | Sets the emulated width of the vector beam in pixels. This setting is only effective when **anti-aliasing** is enabled. ```mame2003-plus_vector_beam_width = \"2|1|1.2|1.4|1.6|1.8|2.5|3|4|5|6|7|8|9|10|11|12\"``` |\n|Vector translucency| Emulates the partial transparency of vector display hardware. |\n|Vector flicker| Emulates the flicker of vector display hardware. ```mame2003-plus_vector_flicker = \"20|0|10|30|40|50|60|70|80|90|1001.5|0.5|1|2|2.5|3\"``` |\n|Vector intensity| Emulates the variable intensity of vector display hardware. ```mame2003-plus_vector_intensity = \"1.5|0.5|1|2|2.5|3\"``` |\n|DCS Speedhack| _Advanced feature: changing from the default is not recommended in most cases._ Use so-called \"speed hacks\" to improve the performance of DCS sound hardware. ```mame2003-plus_dcs_speedhack = \"enabled|disabled\"``` |\n|Locate system files within a subfolder | For historical reasons, MAME 2003-Plus reads system files within a subfolder named `mame2003-plus` even though this is not part of the libretro API. ```mame2003-plus_core_sys_subfolder = \"enabled|disabled\"```|\n|Locate save files within a subfolder | For historical reasons, MAME 2003-Plus saves files within a subfolder named `mame2003-plus` even though this is not part of the libretro API. ```mame2003-plus_core_save_subfolder = \"enabled|disabled\"``` |\n|TATE Mode| From the Japanese 縦 (ta-te) meaning \"vertical\", **TATE Mode** renders vertical games lengthwise along the display. This mode is intended for use with rotating monitors and portable devices that can make the full use of their viewable area for games which used vertical monitors. ```mame2003-plus_tate_mode = \"disabled|enabled\"```|\n|Brightness| Simple brightness adjustment. ```mame2003-plus_brightness = \"1.0|0.2|0.3|0.4|0.5|0.6|0.7|0.8|0.9|1.1|1.2|1.3|1.4|1.5|1.6|1.7|1.8|1.9|2.0\"``` |\n| Gamma correction | Simple gamma adjustment. ```mame2003-plus_gamma = \"1.0|0.5|0.6|0.7|0.8|0.9|1.1|1.2|1.3|1.4|1.5|1.6|1.7|1.8|1.9|2.0\"``` |\n|Frameskip| _Advanced feature: changing from the default is not recommended in most cases._ ```mame2003-plus_frameskip = \"0|1|2|3|4|5\"``` |\n|Sample Rate (KHz)| _Advanced feature: changing from the default is not recommended in most cases._ ```mame2003-plus_sample_rate = \"48000|8000|11025|22050|30000|44100\"```|\n|Input interface | _Advanced feature: changing from the default is not recommended in most cases._ **retropad**, the default option, processes input via the libretro retropad abstraction, including from any keyboard which are bound to the retropad. The **keyboard** setting only sends keyboard input directly to the core, ignoring the retropad. The **simultaneous** setting sends inputs both ways at the same time and is not recommended. This setting exists for historical reasons. ```mame2003-plus_input_interface = \"retropad|keyboard|simultaneous\"``` |\n|Legacy Remapping | _Note: Using the legacy MAME control remapper may affect stateless netplay between two users with their MAME remappings set differently._ ```mame2003-plus_mame_remapping = \"enabled|disabled\"``` |\n|Display artwork (Restart core) | Display artwork packs from within the core, particularly \"backdrop\" artwork. ```mame2003-plus_display_artwork = \"enabled|disabled\"``` |\n|Artwork resolution multiplier (Restart core)| Upscales games with artwork backs so that the artwork can be displayed at a higher resolution. ```mame2003-plus_art_resolution = \"1|2\"``` |\n|NVRAM Bootstraps | _Advanced feature: changing from the default is not recommended in most cases._ ```mame2003-plus_nvram_bootstraps = \"enabled|disabled\"```|\n|Dip switch/Cheat input ports| _Advanced feature: changing from the default is not recommended in most cases._ Activates a few specific cheats that manipulate the dipswitch input system. ```mame2003-plus_cheat_input_ports = \"disabled|enabled\"``` |\n|Bypass audio skew (Restart core) | _Advanced feature: changing from the default is not recommended in most cases._ Bypass the frontend's \"audio skew\" feature which attempts to adjust the audio for games which displayed at framerates not native to modern displays. ```mame2003-plus_machine_timing = \"enabled|disabled\"``` |\n|Center joystick axis for digital controls | Emulates the center position of an analog joystick to allow digital joysticks to play analog based games. This is only applied when the AD Stick type is used. ```mame2003-plus_digital_joy_centering = \"enabled|disabled\"``` |\n\n-----------\n\n## External Links\n\n* [MAME 2003-Plus Github Repository](https://github.com/libretro/mame2003-plus-libretro)\n\n\n### See also\n\n- [MAME 2003](mame_2003.md)\n- [MAME 2010](mame_2010.md)\n- [SAME_CDI](same_cdi.md)"
},
{
"path": "docs/library/mame_2003.md",
"content": "# MAME 2003\n\n## Background\n\nMAME 2003 is a libretro arcade system emulator core originally derived from xmame 0.78. This core is a popular choice for the Raspberry Pi family and other low-powered hardware because it supports most 2D-era arcade games and a broad set of features without requiring as much processor and memory resources as later MAME cores.\n\nAuthor(s): MAMEdev\n\n## Contribute to this documentation\n\nIn order to propose improvements to this document, [visit it's corresponding source page on github](https://github.com/libretro/docs/blob/master/docs/library/mame2003.md). Changes are proposed using \"Pull Requests.\"\n\n## See also\n\nMAME 2000, [MAME 2003-Plus](mame2003_plus.md), MAME 2010, MAME 2014, MAME 2016, and MAME.\n\n## License\n\n[MAME Non-Commercial](https://raw.githubusercontent.com/libretro/mame2003-libretro/master/LICENSE.md)\n\n## Extensions\n\nzip\n\n## BIOS\n\nBIOS romsets are not needed when using \"Full Non-Merged\" arcade romsets. For \"Split\" and \"Non-Merged\" romsets, place the BIOS in the same directory as the game romset.\n\n## Features\n\n| Feature | Supported |\n|-------------------|:---------:|\n| Saves | ✔ |\n| States | game-dependent |\n| Rewind | ✔ |\n| Netplay | ✔ |\n| [Memory Monitoring (achievements)](../guides/memorymonitoring.md) | ✕ |\n| RetroArch Cheats | ✕ |\n| Native Cheats | ✔ |\n| Controllers | ✔ |\n| Multi-Mouse | ✔ |\n| Rumble | ✕ |\n| Sensors | ✕ |\n| Camera | ✕ |\n| Location | ✕ |\n| Subsystem | ✕ |\n\n### Core options\n\n- **Frameskip** (**0**-5): Skips frame to make slow emulation look faster than it is while compromising playability. (Not advised)\n- **DCS Speedhack** (**On**/Off): Speedhack for the Midway sound hardware used in Mortal Kombat 2, 3 and others. Improves performance in these games.\n- **Skip Disclaimer** (**On**/Off): Skips the 'nag-screen'.\n- **Skip Warnings** (On/**Off**): Skips the warning screen shown before games with incomplete emulation.\n- **Samples** (**On**/Off): Requires valid sample zip files. | - |\n- **Sample Rate** (11025-**48000**): Lowering may improve performance on weaker devices.\n- **Cheats** (On/**Off**): Requires a valid cheat.dat file.\n- **Share 2 player dial controls across one X/Y device** (On/**Off**): Some dial/spinner hardware are actually one device with one axis for each player. This supports that setup, by breaking down the normal mouse x/y into two seperate inputs.\n- **Mouse Device** (**mouse**/pointer/disabled): Switch between mouse (e.g. hardware mouse, trackball, etc), pointer (touchpad, touchscreen, lightgun, etc), or disabled.\n- **TATE Mode** (On/**Off**): Enable if rotating display for vertically oriented games (Pac-Man, Galaga, etc). Requires `video_allow_rotate = \"false\"` setting in RetroArch.cfg or core override file.\n\n-----------\n\n## Directories\n\n* Some MAME games require data from an internal hard drive, CD-ROM, laserdisk, or other media in order to be emulated -- those forms of media are packaged as CHD files. CHD files should be copied to subfolders within the folder where the MAME ROM zips have been installed. e.g.:\n```\n/libretro content dir/blitz/blitz.chd\n```\n* Some games require an additional zip file with recorded sounds or music in order for audio to work correctly. Audio 'sample' files should be placed in subdirectories within `/libretro system dir/mame2003/` e.g.:\n```\n/libretro system dir/mame2003/samples/\n```\n* Cheat and history metadata files should be moved from github's [`/libretro/mame2003-libretro/tree/master/metadata`](https://github.com/libretro/mame2003-libretro/tree/master/metadata) and placed within `/libretro system dir/mame2003/` e.g.:\n```\n/libretro system dir/mame2003/cheat.dat\n/libretro system dir/mame2003/history.dat\n```\n* User-generated content is placed in sub-directories within `/libretro savefile dir/mame2003/` e.g.:\n```\n/libretro savefile dir/mame2003/diff/\n/libretro savefile dir/mame2003/nvram/\n/libretro savefile dir/mame2003/hi/\n/libretro savefile dir/mame2003/cfg/\n/libretro savefile dir/mame2003/memcard/\n```\n\n### MAME menu\n\nTo access the MAME internal menu, press the 'TAB' key or RetroPad R2. If you rebind MAME global inputs ('Input (general)'), it will update a file in `/libretro savefile dir/mame2003/cfg/` **default.cfg**. Note: If you rebind MAME global inputs ('Input (general)'), it will update a file in `/libretro savefile dir/mame2003/cfg/` **default.cfg**.\n\n## Controllers\n\nThe core supports one controller setting(s):\n\n* RetroPad\n\n| MAME 2003 | [RetroPad](RetroPad) |\n|--------------------------------------|----------------------------------------------|\n| Button 1/Right Stick Down/UI Cancel |  |\n| Button 2/Right Stick Left |  |\n| Coin in |  |\n| Start |  |\n| Left Joystick |  |\n| Button 4/Right Stick Right/UI Select |  |\n| Button 3/Right Stick Up |  |\n| Button 5 |  |\n| Button 6 |  |\n| Button 7 |  |\n| Button 8/TAB Menu |  |\n| Button 9 |  |\n| Button 10 |  |\n| Left Joystick |  |\n| |  |\n\n## MAME 2003 Features\n\n### Service menu\n\nMAME 2003 can ability to access games' internal service menus to set permanent game options. This allows you to, for example, configure a game to be 'free play' (no need to insert coins). To access the MAME service, press the 'F2' key. After changing options in the service mode, the game's internal memory will be stored to an .nv file in: `/libretro savefile dir/mame2003/nvram/`\n\n### Dip-switches\n\nSimilarly to the [Service menu](#service-menu), many arcade games had hardware switches for arcade owners to modify certain parameters. These can be adjust by pressing the 'TAB' key to access the MAME menu, and select the '**Dip Switches**' option. Here you can turn them on/off.\n\n### High scores\n\nWhen high scores are saved, they are either stored as NVRAM data in `libretro system dir/mame2003/nvram/` or as hiscore data in: `libretro system dir/mame2003/hi/`\n\n### Save states\n\nMAME 2003-Plus supports save states for many, but not all games.\n\n### Cheats\n\nMAME 2003-Plus supports the MAME cheat engine, allowing you to use the MAME menu to enable various in-game cheats. To active these, there is a necessary supplementary file called `cheat.dat`. This file can be [downloaded from the MAME 2003 'metadata' repository](https://github.com/libretro/mame2003-libretro/tree/master/metadata). Place `cheat.dat` in: `libretro system dir/mame2003-plus/`\n\nAdditionally, the 'enabled cheats' core option needs to be turned on. This option is is called: `mame2003-cheats = \"enabled\"`\n\n-----------\n\n## Mouse/Trackball/Analog Controller support\n\nMAME 2003 has support for multiple mice or touch devices in games that support trackballs, etc.\n\nMAME 2003 also supports one or two spinners/dials via the \"Share 2 player dial controls across one X/Y device\" core option.\nBy default, mice/trackballs and analog sticks (the left one, for controllers with 2) are supported in games that would have them, or equivalents. For example, Centipede supports the mouse/trackball, and Afterburner supports the stick. Lightgun games are supported by either. The left and right mouse buttons can be bound to fire/etc using the MAME menu.\n\n### Pointer/Trackpad/Touchscreen support\n\nAbsolute pointer devices are supported, but need to be turned on via a setting in the retroarch-core-options.cfg file.\n\nmame2003-mouse_device = \"pointer\"\n\n### 2 player dial/spinner devices\n\n2 player spinner/dial devices can be represented as 1 device with 2 axes. mame2003 can be configured to share this device across both players: Player 1 = X axis, Player 2 = Y axis. This can be enabled via a setting in the retroarch-core-options.cfg file, found in:\n\nmame2003-dialsharexy = \"enabled\"\nNOTE: This will disable Mouse support.\n\n## Dual stick games\n\nThe right analog stick can now be used a second joystick. This is enabled by default, via a setting in the retroarch-core-options.cfg file, found in:\n\nmame2003-rstick_to_btns = \"enabled\"\n\n## Compatibility\n\n**The MAME 2003 core accepts MAME 0.78 ROMsets.** Each version of an arcade emulator must be used with ROMs that have the same exact version number. For example, MAME 0.37b5 ROMsets are required by the MAME 2000 emulator, but MAME 0.37b5 sets will not work correctly with the MAME 2003 or MAME 2010 emulator cores. Those cores require MAME 0.78 and MAME 0.139 ROM sets, respectively.\n\nFile-not-found errors are the result of a ROMset that is wrong or incomplete, including if you're trying to run a \"Split\" clone .zip without the parent .zip present. Non-Merged MAME0.78 ROMsets do not require parent .zips to be present.\n\n## External Links\n\n* [MAME 2003 Github Repository](https://github.com/libretro/mame2003-libretro)\n* [RetroPie MAME 2003 documentation](https://github.com/RetroPie/RetroPie-Setup/wiki/lr-mame2003)\n\n\n### See also\n\n- [MAME 2003 Plus](mame2003_plus.md)\n- [MAME 2010](mame_2010.md)\n- [SAME_CDI](same_cdi.md)"
},
{
"path": "docs/library/mame_2010.md",
"content": "# Arcade (MAME 2010)\n\n## Background\n\nMAME 2010 is a port of MAME 0.139 for libretro, originally sourced from https://github.com/mamedev/mame/releases/download/mame0139/mame0139s.zip\n\nThe OSD code is inspired by other MAME ports :\n\n- mame2003: https://github.com/libretro/mame2003-libretro\n- ps3 mame0.125: http://www.volny.cz/molej/ps3/mame_ps3.htm\n- mame4droid: http://code.google.com/p/imame4all/source/browse/\n\n### Author/License\n\nMAME 2010 code is copyright [Nicola Salmoria and the MAME team](http://mamedev.org/) and distributed under a [Non-Commercial MAME license](https://raw.githubusercontent.com/libretro/mame2010-libretro/master/docs/license.txt).\n\nA summary of the licenses behind RetroArch and its cores can be found [here](../development/licenses.md).\n\n## Extensions\n\nContent that can be loaded by MAME 2010 have the following file extensions:\n\n- `.zip`\n- `.7z`\n- `.chd`\n\n## Databases\n\nRetroArch database(s) that are associated with the MAME 2010 core:\n\n- [MAME 2010](https://github.com/libretro/libretro-database/blob/master/rdb/MAME%202010.rdb?raw=true)\n\n## BIOS\n\nBIOS files should either be placed in the same folder as the Arcade romset ZIP file, or should be incorporated into the Arcade romset ZIP file itself in a \"Full Non-Merged\" romset format.\n\n## Features\n\nFrontend-level settings or features that the (Core name) core respects.\n\n| Feature | Supported |\n|-------------------|:---------:|\n| Restart | ✔ |\n| Screenshots | ✔ |\n| Saves | - |\n| States | - |\n| Rewind | - |\n| Netplay | - |\n| Core Options | ✔ |\n| [Memory Monitoring (achievements)](../guides/memorymonitoring.md) | ✕ |\n| RetroArch Cheats | - |\n| Native Cheats | - |\n| Controls | - |\n| Remapping | - |\n| Multi-Mouse | - |\n| Rumble | - |\n| Sensors | - |\n| Camera | - |\n| Location | - |\n| Subsystem | - |\n| [Softpatching](../guides/softpatching.md) | - |\n| Disk Control | - |\n| Username | - |\n| Language | - |\n| Crop Overscan | - |\n| LEDs | - |\n\n\n### Directories\n\nMAME 2010 requires the following directories exist, and will create them if they are missing:\n\n- libretro system folder/mame2010/: location for cheat.zip cheats file\n- libretro system folder/mame2010/artwork: MAME bezels and overlay files\n- libretro system folder/mame2010/crosshairs: custom crosshair images\n- libretro system folder/mame2010/fonts: custom fonts\n- libretro system folder/mame2010/samples: audio sample zip files needed by some games\n- libretro saves folder/mame2010/cfg: automatically-generated MAME configuration files\n- libretro saves folder/mame2010/comment: MAME debugger comment files\n- libretro saves folder/mame2010/ctrlr: MAME controller customization files\n- libretro saves folder/mame2010/image: game image content\n- libretro saves folder/mame2010/ini: MAME.ini files\n- libretro saves folder/mame2010/input: Recorded input files\n- libretro saves folder/mame2010/memcard: Save folder for emulated memcard device memory\n- libretro saves folder/mame2010/nvram: Save folder for emulated nvram device memory\n\n\n## Core options\n\nThe MAME 2010 core has the following option(s) that can be tweaked from the core options menu. The default setting is bolded. Settings with (Restart) means that core has to be closed for the new setting to be applied on next launch.\n\n- **Mouse supported** (disabled|enabled)\n- **Video approach 1 Enabled** (disabled|enabled)\n- **Hide game info screen** (disabled|enabled)\n- **Hide warning screen** (disabled|enabled)\n- **Core provided aspect ratio** (DAR|PAR)\n- **Enable autofire** (disabled|button 1|button 2|R2 to button 1 mapping|R2 to button 2 mapping)\n- **Set autofire pulse speed** (medium|slow|fast)\n- **Set frameskip** (0|1|2|3|4|automatic)\n- **Set sample rate** (Restart)** (48000Hz|44100Hz|32000Hz|22050Hz)\n- **Set brightness** (default|+1%|+2%|+3%|+4%|+5%|+6%|+7%|+8%|+9%|+10%|+11%|+12%|+13%|+14%|+15%|+16%|+17%|+18%|+19%|+20%|-20%|-19%|-18%|-17%|-16%|-15%|-14%|-13%|-12%|-11%|-10%|-9%|-8%|-7%|-6%|-5%|-4%|-3%|-2%|-1%)\n- **Set contrast** (default|+1%|+2%|+3%|+4%|+5%|+6%|+7%|+8%|+9%|+10%|+11%|+12%|+13%|+14%|+15%|+16%|+17%|+18%|+19%|+20%|-20%|-19%|-18%|-17%|-16%|-15%|-14%|-13%|-12%|-11%|-10%|-9%|-8%|-7%|-6%|-5%|-4%|-3%|-2%|-1%)\n- **Set gamma** (default|+1%|+2%|+3%|+4%|+5%|+6%|+7%|+8%|+9%|+10%|+11%|+12%|+13%|+14%|+15%|+16%|+17%|+18%|+19%|+20%|-20%|-19%|-18%|-17%|-16%|-15%|-14%|-13%|-12%|-11%|-10%|-9%|-8%|-7%|-6%|-5%|-4%|-3%|-2%|-1%)\n- **Use external hiscore.dat** (disabled|enabled)\n\n\n## Controllers\n\nMAME 2010 supports keyboard use and up to four joypads.\n\n\n RetroPad MAME Equivalent\n\t RETRO_DEVICE_ID_JOYPAD_START [KEY_START]\n\t RETRO_DEVICE_ID_JOYPAD_SELECT [KEY_COIN]\n \t RETRO_DEVICE_ID_JOYPAD_A\t [KEY_BUTTON_1]\n\t RETRO_DEVICE_ID_JOYPAD_B [KEY_BUTTON_2]\n\t RETRO_DEVICE_ID_JOYPAD_X [KEY_BUTTON_3]\n\t RETRO_DEVICE_ID_JOYPAD_Y [KEY_BUTTON_4]\n\t RETRO_DEVICE_ID_JOYPAD_L [KEY_BUTTON_5]\n\t RETRO_DEVICE_ID_JOYPAD_R [KEY_BUTTON_6]\n\t RETRO_DEVICE_ID_JOYPAD_L2 [KEY_TAB]\n\t RETRO_DEVICE_ID_JOYPAD_R3 [KEY_F3]\n\t RETRO_DEVICE_ID_JOYPAD_L3 [KEY_F2]\n\t RETRO_DEVICE_ID_JOYPAD_UP [KEY_JOYSTICK_U]\n\t RETRO_DEVICE_ID_JOYPAD_DOWN [KEY_JOYSTICK_D]\n\t RETRO_DEVICE_ID_JOYPAD_LEFT [KEY_JOYSTICK_L]\n\t RETRO_DEVICE_ID_JOYPAD_RIGHT [KEY_JOYSTICK_R]\n\n#### Lightgun\n\nTo be written for MAME 2010\n\n| RetroLightgun Inputs | (Device name) Inputs |\n|--------------------------------------------------------|---------------------------|\n|  Gun Crosshair | - |\n| Gun Trigger | - |\n| Gun Reload | - |\n| Gun Aux A | - |\n| Gun Aux B | - |\n| Gun Aux C | - |\n| Gun Start | - |\n| Gun Select | - |\n| Gun D-pad Up | - |\n| Gun D-pad Down | - |\n| Gun D-pad Left | - |\n| Gun D-pad Right | - |\n\n\n## External Links\n\n- [MAME 2010 Github Repository](https://github.com/libretro/mame2010-libretro)\n- [MAMEdev](http://mamedev.org/)\n- [MAME 2010 Core info file](https://github.com/libretro/libretro-super/blob/master/dist/info/mame2010_libretro.info)\n- [MAME 2010 README](https://github.com/libretro/mame2010-libretro/blob/master/README.md)\n- [Report MAME 2010 Issues Here](https://github.com/libretro/mame2010-libretro/issues)\n\n### See also\n\n- [MAME 2003](mame_2003.md)\n- [MAME 2003 Plus](mame2003_plus.md)\n- [SAME_CDI](same_cdi.md)\n"
},
{
"path": "docs/library/melonds.md",
"content": "# Nintendo - DS (melonDS)\n\n## Background\n\nAn up-and-coming Nintendo DS emulator by Arisotura, ported to libretro.\n\n!!! warning \"This is the older version!\"\n This version of the melonDS core is obsolete and unmaintained.\n You are encouraged to migrate to [melonDS DS](melonds_ds.md),\n which is based on a newer version of the original emulator,\n has more features, and is easier to use.\n\n### Author/License\n\nThe melonDS core has been authored by\n\n- Arisotura\n\nThe melonDS core is licensed under\n\n- [GPLv3](https://github.com/libretro/melonDS/blob/master/LICENSE)\n\nA summary of the licenses behind RetroArch and its cores can be found [here](../development/licenses.md).\n\n## Extensions\n\nContent that can be loaded by the melonDS core have the following file extensions:\n\n- .nds\n\n## Databases\n\nRetroArch database(s) that are associated with the melonDS core:\n\n- [Nintendo - Nintendo DS](https://github.com/libretro/libretro-database/blob/master/rdb/Nintendo%20-%20Nintendo%20DS.rdb)\n- [Nintendo - Nintendo DS Decrypted](https://github.com/libretro/libretro-database/blob/master/rdb/Nintendo%20-%20Nintendo%20DS%20Decrypted.rdb)\n- [Nintendo - Nintendo DS (Download Play)](https://github.com/libretro/libretro-database/blob/master/rdb/Nintendo%20-%20Nintendo%20DS%20(Download%20Play).rdb)\n\n## BIOS\n\nRequired or optional firmware files go in the frontend's `system` directory.\n\n| Filename | Description | md5sum |\n|:----------------:|:------------------------:|:--------------------------------:|\n| bios7.bin | NDS ARM7 BIOS - Optional | df692a80a5b1bc90728bc3dfc76cd948 |\n| bios9.bin | NDS ARM9 BIOS - Optional | a392174eb3e572fed6447e956bde4b25 |\n| firmware.bin | NDS Firmware - Optional | |\n| dsi_bios7.bin | DSi ARM7 BIOS - Optional | |\n| dsi_bios9.bin | DSi ARM9 BIOS - Optional | |\n| dsi_firmware.bin | DSi Firmware - Optional | |\n| dsi_nand.bin | DSi NAND - Optional | |\n| dsi_sd_card.bin | DSi SD Card - Optional | |\n\n## Features\n\nFrontend-level settings or features that the melonDS core respects.\n\n| Feature | Supported |\n|-------------------|:---------:|\n| Restart | ✔ |\n| Screenshots | ✔ |\n| Saves | ✔ |\n| States | ✔ |\n| Rewind | ✔ |\n| Netplay | ✕ |\n| Core Options | ✔ |\n| [Memory Monitoring (achievements)](../guides/memorymonitoring.md) | ✔ |\n| RetroArch Cheats | ✔ |\n| Native Cheats | ✕ |\n| Controls | ✔ |\n| Remapping | ✔ |\n| Multi-Mouse | ✕ |\n| Rumble | ✕ |\n| Sensors | ✕ |\n| Camera | ✕ |\n| Location | ✕ |\n| Subsystem | ✕ |\n| [Softpatching](../guides/softpatching.md) | ✕ |\n| Disk Control | ✕ |\n| Username | ✕ |\n| Language | ✕ |\n| Crop Overscan | ✕ |\n| LEDs | ✕ |\n\n### Directories\n\nThe melonDS core's library name is 'melonDS'\n\nThe melonDS core saves/loads to/from these directories.\n\n**Frontend's Cache directory**\n\n| File | Description |\n|:-----:|:----------------------:|\n| *.sav | Cartridge battery save |\n\n### Geometry and timing\n\n- The melonDS core's core provided FPS is 59.8983059319\n- The melonDS core's core provided sample rate is 32768 Hz\n- The melonDS core's base width is 256\n- The melonDS core's base height is 384\n- The melonDS core's max width is 256\n- The melonDS core's max height is 384\n- The melonDS core's core provided aspect ratio is 2/3\n\n## Controllers\n\nThe melonDS core supports the following device type(s) in the controls menu, bolded device types are the default for the specified user(s):\n\n### User 1 device types\n\n- None - Doesn't disable input. There's no reason to switch to this.\n- **Nintendo DS** - Joypad - Stay on this.\n\n### Device tables\n\n#### Joypad\n\n\n\n| User 1 input descriptors | RetroPad Inputs |\n|--------------------------|---------------------------------------------|\n| B |  |\n| Y |  |\n| Select |  |\n| Start |  |\n| Up |  |\n| Down |  |\n| Left |  |\n| Right |  |\n| A |  |\n| X |  |\n| L |  |\n| R |  |\n| Swap Screens |  |\n| Close Lid |  |\n\n## Compatibility\n\n- [Upstream melonDS Forums Compatibility section](http://melonds.kuribo64.net/board/forum.php?id=3)\n\n## External Links\n\n- [Official melonDS Website](http://melonds.kuribo64.net/)\n- [Official melonDS Github Repository](https://github.com/melonDS-emu/melonDS)\n- [Libretro melonDS Core info file](https://github.com/libretro/libretro-super/blob/master/dist/info/melonds_libretro.info)\n- [Libretro melonDS Github Repository](https://github.com/libretro/melonds)\n- [Report Libretro melonDS Core Issues Here](https://github.com/libretro/melonds/issues)\n- [Gameplay Videos](https://www.youtube.com/playlist?list=PLRbgg4gk_0IfJciIgm46lbEVafdpVyyNA)\n\n### See also\n\n#### Nintendo - Nintendo DS + Decrypted + (Download Play)\n\n- [Nintendo - DS (DeSmuME 2015)](desmume_2015.md)\n- [Nintendo - DS (DeSmuME)](desmume.md)\n- [Nintendo - DS (melonDS DS)](melonds_ds.md)\n"
},
{
"path": "docs/library/melonds_ds.md",
"content": "# Nintendo - DS (melonDS DS)\n\n## Background\n\nA Nintendo DS emulator (with DSi support) by Arisotura and friends,\nported to libretro by Jesse Talavera.\n\n!!! info \"This is the newer version!\"\n This version of the melonDS core is based on a newer version of the original emulator,\n and has more features than the older [melonDS core](melonds.md).\n Use this one unless you're not ready to migrate.\n\n\n### Author/License\n\nThe melonDS DS core has been authored by\n\n- Jesse Talavera\n\nThe melonDS DS core is licensed under\n\n- [GPLv3](https://github.com/JesseTG/melonds-ds/blob/main/LICENSE)\n\nA summary of the licenses behind RetroArch and its cores can be found [here](../development/licenses.md).\n\n## Extensions\n\nContent that can be loaded by the melonDS core has one of the following file extensions:\n\n- .nds\n- .dsi\n- .ids\n\n## Databases\n\nRetroArch database(s) that are associated with the melonDS DS core:\n\n- [Nintendo - Nintendo DS](https://github.com/libretro/libretro-database/blob/master/rdb/Nintendo%20-%20Nintendo%20DS.rdb)\n- [Nintendo - Nintendo DSi](https://github.com/libretro/libretro-database/blob/master/rdb/Nintendo%20-%20Nintendo%20DSi.rdb)\n\n## BIOS\n\nRequired or optional firmware files go in the frontend's `system` directory.\n\n| Filename | Description | md5sum |\n|:----------------:|:------------------------------------:|:--------------------------------:|\n| bios7.bin | NDS ARM7 BIOS - Optional | df692a80a5b1bc90728bc3dfc76cd948 |\n| bios9.bin | NDS ARM9 BIOS - Optional | a392174eb3e572fed6447e956bde4b25 |\n| firmware.bin | NDS Firmware - Optional | Varies |\n| dsi_bios7.bin | DSi ARM7 BIOS - Required in DSi mode | |\n| dsi_bios9.bin | DSi ARM9 BIOS - Required in DSi mode | |\n| dsi_firmware.bin | DSi Firmware - Required in DSi mode | Varies |\n| dsi_nand.bin | DSi NAND - Required in DSi mode | Varies |\n\n## Features\n\nFrontend-level settings or features that melonDS DS respects.\n\n| Feature | Supported |\n|-------------------|:---------:|\n| Restart | ✔ |\n| Screenshots | ✔ |\n| Saves | ✔ |\n| States | ✔[^1] |\n| Rewind | ✔[^1] |\n| Netplay | ✔[^2] |\n| Core Options | ✔ |\n| [Memory Monitoring (achievements)](../guides/memorymonitoring.md) | ✔ |\n| RetroArch Cheats | ✔ |\n| Native Cheats | ✔ |\n| Controls | ✔ |\n| Remapping | ✔ |\n| Multi-Mouse | ✕ |\n| Rumble | ✔ |\n| Sensors | ✔ |\n| Camera | ✕ |\n| Location | ✕ |\n| Subsystem | ✔ |\n| [Softpatching](../guides/softpatching.md) | ✔ |\n| Disk Control | ✕ |\n| Username | ✔ |\n| Language | ✔ |\n| Crop Overscan | ✕ |\n| LEDs | ✕ |\n\n### Directories\n\nThe melonDS DS core's library name is 'melonDS DS'\n\nThe melonDS DS core saves/loads to/from these directories.\n\n#### Frontend's Save directory\n\n| File | Description |\n|:--------------------:|:---------------------------:|\n| *.srm | Cartridge battery save |\n| dldi_sd_card.bin | Homebrew SD card image |\n| dldi_sd_card.bin.idx | Homebrew SD card file index |\n| dsi_sd_card.bin | DSi SD card image |\n| dsi_sd_card.bin.idx | DSi SD card file index |\n| *.public.sav | DSiWare public save data |\n| *.private.sav | DSiWare private save data |\n| *.banner.sav | DSiWare icon save data |\n\n#### Frontend's System directory\n\n| File | Description |\n|:--------------------:|:--------------------------------------:|\n| melonDS DS/tmd/*.tmd | DSiWare title ID file |\n| wfcsettings.bin | DS Wi-Fi settings (built-in BIOS only) |\n\n#### Frontend's State directory\n\n| File | Description |\n|:--------:|:-----------:|\n| *.state# | State |\n\n### Geometry and timing\n\n- The melonDS DS core's core provided FPS is 59.898307800293 FPS.\n- The melonDS DS core's core provided sample rate is 32768 Hz.\n- The melonDS DS core's base width depends on the screen layout and configured renderer.\n- The melonDS DS core's base height depends on the screen layout and configured renderer.\n- The melonDS DS core's max width depends on the screen layout and configured renderer.\n- The melonDS DS core's max height depends on the screen layout and configured renderer.\n- The melonDS DS core's core-provided aspect ratio depends on the screen layout and configured renderer.\n\n## Subsystems\n\nmelonDS DS uses subsystems to enable inserting GBA ROMs into the emulated Slot-2.\nGBA save data (if any) must be loaded explicitly.\nSubsystems are not used for DSi mode.\n\n| Subsystem | Description |\n|:---------:|--------------------------------------------------------------|\n| gba | NDS ROM in Slot-1, GBA ROM in Slot-2 with optional save data |\n| gbanosav | NDS ROM in Slot-1, GBA ROM in Slot-2 with no GBA save data |\n\n!!! info \"Not for playing GBA games.\"\n melonDS can load Game Boy Advance ROMs and save data for the purpose of Slot-2 connectivity,\n but it cannot actually play GBA games.\n Use a GBA core instead.\n\nAdditional BIOS images are not required.\n\n## Wi-Fi\n\nmelonDS DS fully supports emulating Nintendo WFC services on all platforms.\nYou can choose from one of several preconfigured servers in the core options menu,\nwith [Kaeru WFC](https://kaeru.world/projects/wfc) being the default.\n\nIf there's another server you'd like to use, you can set its DNS address from within the emulated console's Wi-Fi settings menu.\n\n!!! info \"Not related to netplay!\"\n Wi-fi emulation is not related to LAN-based netplay.\n\n## LAN Netplay\n\nmelonDS DS supports emulating LAN multiplayer via netplay. See below for instructions and details.\n\n### What is LAN Multiplayer?\nThe Nintendo DS has several forms of multiplayer,\nincluding local Wi-Fi (also called LAN), Nintendo Wi-Fi Connection (WFC) and infrared.\nYou'll know when games use local Wi-Fi if the game mentions \"Wi-Fi\" and \"players nearby\",\nwhile games using WFC mention \"players around the world\" and use friend codes.\nThe Nintendo DS local Wi-Fi does not use friend codes.\nThis page only explains local Wi-Fi multiplayer.\n\nNow, the Nintendo DS local Wi-Fi isn't the normal Wi-Fi in your house,\nit is a [mesh network that uses specialized hardware](https://melonds.kuribo64.net/comments.php?id=25).\nThis means that games expect extremely low latency,\nwhich is achievable between two consoles directly connected with special hardware,\nbut harder to achieve with two computers with a router in-between,\nand simply **impossible** to achieve through the Internet.\n**LAN multiplayer does not work through the Internet and neither with VPNs or tunnels such as Hamachi**.\nThis is not something that can be fixed easily.\n**The only way to use emulated LAN Multiplayer is on an actual, low latency, wired LAN connection**.\n\nThe latency requirements are so extreme that even in LAN, you might still have issues.\nThat is why using Wi-Fi in your LAN connection is not recommended,\nWi-Fi simply adds too much latency,\nand the connection will drop frequently.\nThe recommended way to use the emulated Wi-Fi LAN connection is with a wired LAN connection between the computers.\n\n### What is a MAC address?\nEvery Nintendo DS (and every device capable of Wi-Fi) comes with an identifier built-in in its firmware called a \"MAC address\".\nFor three or more Nintendo DS consoles to connect in a local Wi-Fi multiplayer network,\nall three need to have different MAC addresses.\nYou can see the emulated console's MAC address in a game with Nintendo WFC\nby going to \"Nintendo WFC Settings\", \"Options\", \"System Information\".\n\nSome games will refuse to load save files\nthat were created on a console with a different MAC address\nthan the console loading the file.\nThat is why it is important to pay attention to your MAC address when sharing save files across devices.\n\nSo how does the emulated console obtain a MAC address?\nIt depends on the core option \"MAC address mode\", in the \"Network\" category:\n\n* Set from firmware:\nThe default setting.\nThe emulator will use the firmware file's MAC address for the emulated console.\nIf there is no firmware file, then a default MAC address of \"00-09-BF-11-22-33\" will be used.\nThis setting will cause issues on LAN multiplayer with more than 2 players\nif the same firmware (or the default firmware) is used on more than one device.\n\n* Derive from libretro username:\nThe emulator will use your username as set on the libretro frontend to automatically generate a MAC address.\nSuch generated MAC addresses will start with \"00-08-BF\".\nDevices with the same username set will always generate the same MAC address.\nUseful when syncing save files across devices\nto guarantee the emulated console's MAC address is the same on all devices.\nThis setting will cause issues on LAN multiplayer\nif more than one player has the same username.\nThe username can be set on RetroArch by going to \"Settings\", \"User\", \"Username\".\n\n### Starting a multiplayer session (RetroArch)\nBefore starting a multiplayer session,\nit is recommended that all set a proper username in \"Settings\", \"User\", \"Username\", in RetroArch,\nand set the MAC address mode to \"Derive from libretro username\".\n\nIn RetroArch, such a multiplayer session can be started through the \"Netplay\" menu either before starting a game or during a game.\nOne player should host and the others should use the \"Refresh Netplay LAN List\" option to join.\nIn game, you'd look for something mentioning local multiplayer and \"players nearby\".\nIn Pokémon games, this can be accessed on the top floor of Pokémon centers,\nin Mario Kart DS, it is the \"Multiplayer\" option in the menu etc.\nThere are a ton of pages online saying that \"Netplay is not network emulation\".\nFor various reasons, these pages are wrong when it comes to melonDS DS.\n\nAgain, emulated LAN multiplayer only works if all players are on the same real local network.\nThis means the same house, apartment etc.\nFor better results, a wired connection is recommended.\n\n## DSi\n\nmelonDS DS supports DSi mode, which allows you to play DSi-enhanced games and DSiWare.\n**There is no need to prepare a NAND image externally;**\nwhen selecting a DSiWare game from RetroArch,\nit (and its previously-exported save data) will be\ntemporarily installed on the configured NAND image.\nAt the end of the session,\nthe save data will be exported to the frontend's save directory\nand the DSiWare will be uninstalled.\n\n## Screen Layouts\n\nmelonDS DS supports a variety of screen layouts, including sideways rotation;\nyou can configure a particular sequence of available layouts in the core options,\nand cycle through them with the `Next Screen Layout` button.\nBest used with per-game core option overrides.\n\n## Controllers\n\nThe melonDS DS core supports the following device type(s) in the controls menu, bolded device types are the default for the specified user(s):\n\n### User 1 device types\n\n- None - Doesn't disable input. There's no reason to switch to this.\n- **Nintendo DS** - Joypad - Stay on this.\n\nFuture device types may be added\nto include peripherals that provided additional inputs.\n\n### Device tables\n\n#### Joypad\n\n\n\n| User 1 input descriptors | RetroPad Inputs |\n|--------------------------|---------------------------------------------|\n| B |  |\n| Y |  |\n| Select |  |\n| Start |  |\n| Up |  |\n| Down |  |\n| Left |  |\n| Right |  |\n| A |  |\n| X |  |\n| L |  |\n| R |  |\n| Microphone |  |\n| Next Screen Layout |  |\n| Move Virtual Cursor |  |\n| Close Lid |  |\n| Touch Virtual Cursor |  |\n\n## Migrating from melonDS 2021\n\nmelonDS DS is intended to replace the [legacy melonDS core](melonds.md).\nIf you have existing data you'd like to migrate, follow these steps.\n\n### Save Files\n\nThe save data format is unchanged between the legacy core and melonDS DS.\nHowever, the method used to save game data internally has changed.\n\nYou'll need to do two things:\n\n1. Go to the RetroArch save directory and rename the \"melonDS\" folder to \"melonDS DS\" (if it exists)\n2. Rename the save files from `.sav` to `.srm`.\n\n### Savestates\n\n**Savestates taken in the legacy core cannot be migrated to melonDS DS.**\nIn the time since the last release of the legacy core,\nthe savestate format has changed upstream.\n_Save your game normally before migrating your data to melonDS DS._\n\n### Config Files\n\nRename the following directories to `melonDS DS`:\n\n- `$RETROARCH_ROOT/config/melonDS` to `melonDS DS`.\n- `$RETROARCH_ROOT/config/remaps/melonDS` to `melonDS DS`.\n- Rename any files inside these directories named `melonDS.opt` to `melonDS DS.opt`.\n\n### Cheats\n\nRename `$RETROARCH_ROOT/cheats/melonDS` to `melonDS DS`.\nCheat support is unchanged.\n\n### System Files\n\nmelonDS DS will detect system files (BIOS, firmware, NAND) in the system directory,\nso no action is required from you.\nHowever, melonDS DS will prefer system files in the \"melonDS DS\" subdirectory.\n\n## Compatibility\n\n- [Upstream melonDS Forums Compatibility section](http://melonds.kuribo64.net/board/forum.php?id=3)\n\n## External Links\n\n- [Official melonDS Website](http://melonds.kuribo64.net/)\n- [Official melonDS GitHub Repository](https://github.com/melonDS-emu/melonDS)\n- [Libretro melonDS DS Core info file](https://github.com/libretro/libretro-super/blob/master/dist/info/melondsds_libretro.info)\n- [Libretro melonDS DS Github Repository](https://github.com/JesseTG/melonds-ds)\n- [Report Libretro melonDS DS Core Issues Here](https://github.com/JesseTG/melonds-ds/issues)\n\n### See also\n\n#### Nintendo - Nintendo DS + Decrypted + (Download Play)\n\n- [Nintendo - DS (DeSmuME 2015)](desmume_2015.md)\n- [Nintendo - DS (DeSmuME)](desmume.md)\n- [Nintendo - DS (melonDS 2021)](melonds.md)\n\n[^1]: Not available in DSi mode.\n[^2]: LAN only. (No, VPNs won't work.)\n"
},
{
"path": "docs/library/mesen-s.md",
"content": "# Nintendo - SNES / SFC / Game Boy / Color (Mesen-S)\n\n## Background\n\nMesen-S is a cross-platform SNES emulator for Windows & Linux built in C++ and C#.\n\nFeatures\n\n- High Accuracy: A lot of effort has gone into making Mesen-S as accurate as possible.\n- High Compatibility\n- SNES, Super Famicom, Game Boy, and Game Boy Color emulation is supported. Super Game Boy has complete support.\n\n### Author/License\n\nThe Mesen-S core has been authored by\n\n- M. Bibaud (aka Sour)\n\nThe Mesen-S core is licensed under\n\n- [GPLv3](https://github.com/SourMesen/Mesen-S/blob/master/README.md)\n\nA summary of the licenses behind RetroArch and its cores can be found [here](../development/licenses.md).\n\n## BIOS\n\nRequired or optional firmware files go in the frontend's system directory.\n\n| Filename | Description | md5sum |\n|:-----------------:|:--------------------------------------:|:--------------------------------:|\n| dsp1.data.rom | DSP1 co-processor firmware - Optional | 3d81b45fa0c2aa8b852dfb1ece7c0971 |\n| dsp1.program.rom | DSP1 co-processor firmware - Optional | ae209fbe789fbf11a48aea5ab1197321 |\n| dsp1b.data.rom | DSP1B co-processor firmware - Optional | 1e3f568634a7d8284020dddc0ae905bc |\n| dsp1b.program.rom | DSP1B co-processor firmware - Optional | d10f446888e097cbf500f3f663cf4f6d |\n| dsp2.data.rom | DSP2 co-processor firmware - Optional | e9417e29223b139c3c4b635a2a3b8744 |\n| dsp2.program.rom | DSP2 co-processor firmware - Optional | aa6e5922a3ed5ded54f24247c11143c5 |\n| dsp3.data.rom | DSP3 co-processor firmware - Optional | 0a81210c0a940b997dd9843281008ee6 |\n| dsp3.program.rom | DSP3 co-processor firmware - Optional | d99ca4562818d49cee1f242705bba6f8 |\n| dsp4.data.rom | DSP4 co-processor firmware - Optional | ee4990879eb68e3cbca239c5bc20303d |\n| dsp4.program.rom | DSP4 co-processor firmware - Optional | a151023b948b90ffc23a5b594bb6fef2 |\n| st010.data.rom | ST010 co-processor firmware - Optional | 254d70762b6f59f99c27c395aba7d07d |\n| st010.program.rom | ST010 co-processor firmware - Optional | 1d70019179a59a566a0bb5d3f2845544 |\n| st011.data.rom | ST011 co-processor firmware - Optional | 10bd3f4aa949737ab9836512c35bcc29 |\n| st011.program.rom | ST011 co-processor firmware - Optional | 95222ebf1c0c2990bcf25db43743f032 |\n| dmg_boot.bin | GB Boot Image - Optional | 32fbbd84168d3482956eb3c5051637f5 |\n| cgb_boot.bin | GBC Boot Image - Optional | dbfce9db9deaa2567f6a84fde55f9680 |\n| sgb_boot.bin | SGB Boot Image - Optional | d574d4f9c12f305074798f54c091a8b4 |\n| sgb2_boot.bin | SGB2 Boot Image - Optional | e0430bca9925fb9882148fd2dc2418c1 |\n| SGB1.sfc | SGB ROM - Optional | b15ddb15721c657d82c5bab6db982ee9 |\n| SGB2.sfc | SGB2 ROM - Optional | 8ecd73eb4edf7ed7e81aef1be80031d5 |\n| BS-X.bin | Satellaview Boot ROM - Optional | fed4d8242cfbed61343d53d48432aced |\n\n## Extensions\n\nContent that can be loaded by the Mesen-S core have the following file extensions:\n\n- .sfc\n- .smc\n- .fig\n- .swc\n- .bs\n- .gb\n- .gbc\n\n## Databases\n\nRetroArch database(s) that are associated with the Mesen-S core:\n\n- [Nintendo - Game Boy](https://github.com/libretro/libretro-database/blob/master/rdb/Nintendo%20-%20Game%20Boy.rdb)\n- [Nintendo - Game Boy Color](https://github.com/libretro/libretro-database/blob/master/rdb/Nintendo%20-%20Game%20Boy%20Color.rdb)\n- [Nintendo - Super Nintendo Entertainment System](https://github.com/libretro/libretro-database/blob/master/rdb/Nintendo%20-%20Super%20Nintendo%20Entertainment%20System.rdb)\n- [Nintendo - Satellaview](https://github.com/libretro/libretro-database/blob/master/rdb/Nintendo%20-%20Satellaview.rdb)\n\n## Features\n\nFrontend-level settings or features that the Mesen-S core respects.\n\n| Feature | Supported |\n|-------------------|:---------:|\n| Restart | ✔ |\n| Saves | ✔ |\n| States | ✔ |\n| Rewind | ✔ |\n| Netplay | ✔ |\n| Core Options | ✔ |\n| [Memory Monitoring (achievements)](../guides/memorymonitoring.md) | ✔ |\n| RetroArch Cheats | ✔ |\n| Native Cheats | ✔ |\n| Controls | ✔ |\n| Remapping | ✔ |\n| Multi-Mouse | ✔ |\n| Rumble | ✕ |\n| Sensors | ✕ |\n| Camera | ✕ |\n| Location | ✕ |\n| Subsystem | ✕ |\n| [Softpatching](../guides/softpatching.md) | ✔ |\n| Disk Control | ✕ |\n| Username | ✕ |\n| Language | ✕ |\n| Crop Overscan | ✔ |\n| LEDs | ✕ |\n\n## Directories\n\nThe Mesen-S core's library name is 'Mesen-S'\n\nThe Mesen-S core saves/loads to/from these directories.\n\n**Frontend's Save directory**\n\n| File | Description |\n|:-----:|:----------------------:|\n| *.srm | Cartridge battery save |\n\n**Frontend's State directory**\n\n| File | Description |\n|:--------:|:-----------:|\n| *.state# | State |\n\n## Geometry and timing\n\n- The Mesen-S core's core provided FPS is 60 for NTSC games and 50 for PAL games.\n- The Mesen-S core's core provided sample rate is 32040 Hz\n- The Mesen-S core's base width is 256\n- The Mesen-S core's base height is 239\n- The Mesen-S core's max width is 512\n- The Mesen-S core's max height is 478\n- The Mesen-S core's core provided aspect ratio is dependent on the ['Aspect Ratio' core option](#core-options)\n\n## Core options\n\nThe Mesen-S core has the following option(s) that can be tweaked from the core options menu. The default setting is bolded.\n\nSettings with (Restart) means that core has to be closed for the new setting to be applied on next launch.\n\n!!! attention\n\tThese core option descriptions have been sourced from the [official Mesen-S documentation](https://www.mesen.ca/snes/docs/). Please go there for more information.\n\n- **NTSC filter** [mesen-s_ntsc_filter] (**Disabled**/Composite (Blargg)/S-Video (Blargg)/RGB (Blargg)/Monochrome (Blargg))\n\n\tSelects a filter to apply to the picture. The NTSC filter available in Mesen-S is blargg’s NTSC filter - this filter is very fast, and available in various other emulators.\n\n- **Region** [mesen-s_region] (**Auto**/NTSC/PAL)\n\n\tWhen set to Auto, the emulator will try to detect the game’s region (NTSC or PAL) - however, this is not always possible. When there is nothing to suggest a game is for the PAL region (Australia & Europe), the NTSC region (North America & Japan) will be used by default.\n\n- **Game Boy Model** [mesen-s_gbmodel] (**Auto**/Game Boy/Game Boy Color/Super Game Boy)\n\n\tDetermines which Game Boy model to emulate when loading a Game Boy or Game Boy Color game. When Auto is selected, Super Game Boy emulation is used for Game Boy games, and Game Boy Color emulation is used for Game Boy Color games.\n\n- **Use SGB2** [mesen-s_sgb2] (Off/**On**)\n\n\tWhen enabled, Super Game Boy 2 is used when emulating the SGB. Super Game Boy 2 has corrected CPU timing and some slight differences in behavior.\n\n- **Vertical Overscan** [mesen-s_overscan_vertical] (**None**/8px/16px)\n\n\tThis overscan setting allow you to cut out pixels vertically on the edge of the screen. On a CRT TV, a few pixels on each side of the screen are usually hidden. Most SNES games output 224 scanlines, while others use the SNES’ 239 scanlines mode. To avoid the window or picture size changing when the game changes between either mode, Mesen-S always outputs 239 scanlines. In the vast majority of games, this results in 7 blank lines on the top and 8 on the bottom. To hide these blank scanlines, set the overscan value to 8.\n\n- **Horizontal Overscan** [mesen-s_overscan_horizontal] (**None**/8px/16px)\n\n\tThis overscan setting allow you to cut out pixels horizontally on the edge of the screen.\n\n- **Aspect Ratio** [mesen-s_aspect_ratio] (**Auto**/No Stretching/NTSC/PAL/4:3/16:9)\n\n\tThe SNES’ resolution in most games is 256x224, but it used to be displayed on CRT TVs that had a rectangular picture. To simulate a CRT TV, you can use the Auto option - it will switch between NTSC and PAL aspect ratios depending on the game you are playing. Using anything other than the Default (No Stretching) option may cause pixels to have irregular sizes. You can reduce this effect by using video filters.\n\n- **Blend Hi-Res Modes** [mesen-s_blend_high_res] (**Off**/On)\n\n\tSome games use the SNES’ “high resolution” mode which produces a 512x224 picture. However, this mode causes horizontal blending, which is sometimes used for pseudo-transparency effects. Enabling this option will allow these pseudo-transparency effects to look as they were intended (but causes the entire picture to look softer/blurrier).\n\n- **Cubic Interpolation (Audio)** [mesen-s_cubic_interpolation] (**Off**/On)\n\n\tThis option replaces the SNES’ default gaussian interpolation filter with a cubic interpolation filter which can produce better audio.\n\n- **Overclock** [mesen-s_overclock] (**None**/Low/Medium/High/Very High)\n\n\tUse this to overclock the CPU.\n\n!!! warning\n\tOverclocking can cause issues in some games.\n\n- **Overclock Type** [mesen-s_overclock_type] (**Before NMI**/After NMI)\n\n\tBefore NMI: Increases the number of scanlines in the PPU, *before* the NMI signal is triggered at the end of the visible frame. This effectively gives more time for games to perform calculations, which can reduce slowdowns in games. **This is the preferred option for overclocking.**\n\n\tAfter NMI: Increases the number of scanlines in the PPU, *after* the NMI signal is triggered at the end of the visible frame. This effectively gives more time for games to perform calculations, which can reduce slowdowns in games. **This option is less compatible and should only be used if the *Before NMI* variation does not work as expected.**\n\n- **Super FX Clock Speed** [mesen-s_superfx_overclock] (**100%**/200%/300%/400%/500%/1000%)\n\n\tIncreases the clock speed used for the Super FX chip, which can reduce lag in Super FX games. This method of overclocking is more efficient for Super FX titles.\n\n- **Default power-on state for RAM** [mesen-s_ramstate] (**Random Values (Default)**/All 0s/All 1s)\n\n\tOn a console, the RAM’s state at power on is undetermined and relatively random. This option lets you select Mesen-S’ behavior when initializing RAM - set all bits to 0, set all bits to 1, or randomize the value of each bit.\n\n## Controllers\n\nThe Mesen-S core supports the following device type(s) in the controls menu, bolded device types are the default for the specified user(s):\n\n### User 1 device types\n\n- None - Input disabled.\n- **RetroPad** - Joypad\n- [SNES Controller](https://nintendo.fandom.com/wiki/Super_Nintendo_Entertainment_System_controller) - Joypad\n- [SNES Mouse](https://nintendo.fandom.com/wiki/SNES_Mouse) - Mouse\n\n### User 2 device types\n\n- None - Input disabled.\n- **RetroPad** - Joypad - SNES Controller\n- [SNES Controller](https://nintendo.fandom.com/wiki/Super_Nintendo_Entertainment_System_controller) - Joypad\n- [SNES Mouse](https://nintendo.fandom.com/wiki/SNES_Mouse) - Mouse\n- [Super Scope](https://nintendo.fandom.com/wiki/Super_Scope) - Lightgun\n- [Multitap](https://nintendo.fandom.com/wiki/Super_Multitap) - Joypad - Allows for up to five players to play together in mulitap games.\n\n### User 3 - 5 device types\n\n- None - Input disabled.\n- **RetroPad** - Joypad\n- [SNES Controller](https://nintendo.fandom.com/wiki/Super_Nintendo_Entertainment_System_controller) - Joypad\n\n### Multitap\n\nMultitap support can be activated in the Mesen-S core by switching User 2's device type to Multitap.\n\n### Controller tables\n\n#### Joypad\n\n| User Remap descriptors for 'SNES Controller' device type | RetroPad Inputs |\n|----------------------------------------------------------|---------------------------------------------|\n| B |  |\n| Y |  |\n| Select |  |\n| Start |  |\n| D-Pad Up |  |\n| D-Pad Down |  |\n| D-Pad Left |  |\n| D-Pad Right |  |\n| A |  |\n| X |  |\n| L |  |\n| R |  |\n\n#### Mouse\n\n| RetroMouse Inputs | SNES Mouse |\n|-------------------------------------------------------|-------------------------|\n|  Mouse Cursor | SNES Mouse Cursor |\n|  Mouse 1 | SNES Mouse Left Button |\n|  Mouse 2 | SNES Mouse Right Button |\n\n#### Pointer\n\n| RetroPointer Inputs | Super Scope |\n|--------------------------------------------------------------------------------------------------------------------------|---------------|\n|  or  Pointer Position | Crosshair |\n|  Mouse 1 | Fire |\n|  Mouse 2 | Cursor Button |\n|  Mouse 3 | Turbo Toggle |\n\n!!! attention\n\tCurrently there is no crosshair. Pressing the mouse grab binding twice in RetroArch (default F11) should make your system cursor visible.\n\n## Compatibility\n\nThe Mesen-S core fully emulates all SNES, GB, and GBC games that have ever been officially released.\n\n## External Links\n\n- [Official Mesen-S Website](https://www.mesen.ca/)\n- [Official Mesen-S Documentation](https://www.mesen.ca/snes/docs/)\n- [Libretro Mesen-S Core info file](https://github.com/libretro/libretro-super/blob/master/dist/info/mesen-s_libretro.info)\n- [Official Mesen-S Github Repository](https://github.com/SourMesen/Mesen-S)\n- [Report Libretro Mesen-S Core Issues Here](https://github.com/SourMesen/Mesen-S/issues)\n\n### See also\n\n#### Nintendo - Game Boy (+ Color)\n\n- [Nintendo - Game Boy / Color (Emux GB)](emux_gb.md)\n- [Nintendo - Game Boy / Color (Gambatte)](gambatte.md)\n- [Nintendo - Game Boy / Color (Gearboy)](gearboy.md)\n- [Nintendo - Game Boy / Color (SameBoy)](sameboy.md)\n- [Nintendo - Game Boy / Color (TGB Dual)](tgb_dual.md)\n- [Nintendo - Game Boy Advance (mGBA)](mgba.md)\n- [Nintendo - Game Boy Advance (VBA-M)](vba_m.md)\n- [Nintendo - SNES / Famicom (bsnes-jg)](bsnes-jg.md)\n- [Nintendo - SNES / Famicom (higan Accuracy)](higan_accuracy.md)\n- [Nintendo - SNES / Famicom (nSide Balanced)](nside_balanced.md)\n\n#### SNES\n\n- [Nintendo - SNES / Famicom (Beetle bsnes)](beetle_bsnes.md)\n- [Nintendo - SNES / Famicom (bsnes-jg)](bsnes-jg.md)\n- [Nintendo - SNES / Famicom (bsnes-mercury Accuracy)](bsnes_mercury_accuracy.md)\n- [Nintendo - SNES / Famicom (bsnes-mercury Balanced)](bsnes_mercury_balanced.md)\n- [Nintendo - SNES / Famicom (bsnes-mercury Performance)](bsnes_mercury_performance.md)\n- [Nintendo - SNES / Famicom (bsnes Accuracy)](bsnes_accuracy.md)\n- [Nintendo - SNES / Famicom (bsnes Balanced)](bsnes_balanced.md)\n- [Nintendo - SNES / Famicom (bsnes C++98 (v085))](bsnes_cplusplus98.md)\n- [Nintendo - SNES / Famicom (bsnes Performance)](bsnes_performance.md)\n- [Nintendo - SNES / Famicom (higan Accuracy)](higan_accuracy.md)\n- [Nintendo - SNES / Famicom (nSide Balanced)](nside_balanced.md)\n- [Nintendo - SNES / Famicom (Snes9x)](snes9x.md)\n- [Nintendo - SNES / Famicom (Snes9x 2002)](snes9x_2002.md)\n- [Nintendo - SNES / Famicom (Snes9x 2005 Plus)](snes9x_2005_plus.md)\n- [Nintendo - SNES / Famicom (Snes9x 2005)](snes9x_2005.md)\n- [Nintendo - SNES / Famicom (Snes9x 2010)](snes9x_2010.md)\n"
},
{
"path": "docs/library/mesen.md",
"content": "# Nintendo - NES / Famicom (Mesen)\n\n## Background\n\nMesen is a high-accuracy NES and Famicom emulator and NSF player for Windows and Linux.\n\nFeatures\n\n- High Accuracy: A lot of effort has gone into making Mesen as accurate as possible.\n- High Compatibility: Over 220 mappers supported (all licensed games supported)\n- NES, Famicom, Famicom Disk System, Dendy, VS System, NSF and NSFe emulation is supported.\n- General: Save States, Rewinding, Movie/Audio Recording, Overclocking, Cheat Codes.\n- Video: Numerous video filters, customizable palettes/overscan, support for HDNes' HD packs.\n- Audio: Stereo effects, per-channel volume and panning, equalizer, etc.\n- Misc: Netplay, 7z/zip support, IPS/BPS patch support, automatic updates, and more!\n\n### Author/License\n\nThe Mesen core has been authored by\n\n- M. Bibaud (aka Sour)\n\nThe Mesen core is licensed under\n\n- [GPLv3](https://github.com/SourMesen/Mesen/blob/master/README.md)\n\nA summary of the licenses behind RetroArch and its cores can be found [here](../development/licenses.md).\n\n## Extensions\n\nContent that can be loaded by the Mesen core have the following file extensions:\n\n- .nes\n- .fds\n- .unf\n- .unif\n\n## Databases\n\nRetroArch database(s) that are associated with the Mesen core:\n\n- [Nintendo - Nintendo Entertainment System](https://github.com/libretro/libretro-database/blob/master/rdb/Nintendo%20-%20Nintendo%20Entertainment%20System.rdb)\n- [Nintendo - Family Computer Disk System](https://github.com/libretro/libretro-database/blob/master/rdb/Nintendo%20-%20Family%20Computer%20Disk%20System.rdb)\n\n## BIOS\n\nRequired or optional firmware files go in the frontend's system directory.\n\n| Filename | Description | md5sum |\n|:-----------:|:-------------------------------------------------------------------------------------:|:--------------------------------:|\n| disksys.rom | Family Computer Disk System BIOS - Required for Family Computer Disk System emulation | ca30b50f880eb660a320674ed365ef7a |\n\n## Features\n\nFrontend-level settings or features that the Mesen core respects.\n\n| Feature | Supported |\n|-------------------|:---------:|\n| Restart | ✔ |\n| Screenshots | ✔ |\n| Saves | ✔ |\n| States | ✔ |\n| Rewind | ✔ |\n| Netplay | ✔ |\n| Core Options | ✔ |\n| [Memory Monitoring (achievements)](../guides/memorymonitoring.md) | ✔ |\n| RetroArch Cheats | ✔ |\n| Native Cheats | ✕ |\n| Controls | ✔ |\n| Remapping | ✔ |\n| Multi-Mouse | ✕ |\n| Rumble | ✕ |\n| Sensors | ✕ |\n| Camera | ✕ |\n| Location | ✕ |\n| Subsystem | ✕ |\n| [Softpatching](../guides/softpatching.md) | ✔ |\n| Disk Control | ✕ |\n| Username | ✕ |\n| Language | ✕ |\n| Crop Overscan | ✕ |\n| LEDs | ✕ |\n\n### Directories\n\nThe Mesen core's library name is 'Mesen'\n\nThe Mesen core saves/loads to/from these directories.\n\n**Frontend's Save directory**\n\n| File | Description |\n|:-----:|:----------------------:|\n| *.srm | Cartridge battery save |\n\n**Frontend's State directory**\n\n| File | Description |\n|:--------:|:-----------:|\n| *.state# | State |\n\n**Frontend's System directory**\n\n| File | Description |\n|:-----------------:|:-----------------:|\n| MesenPalette.pal | Custom palette |\n| HdPacks/* | HD Pack directory |\n\n### Geometry and timing\n\n- The Mesen core's core provided FPS is NTSC 60, PAL/Dendy 50\n- The Mesen core's core provided sample rate is 48000 Hz\n- The Mesen core's base width is 256\n- The Mesen core's base height is 240\n- The Mesen core's max width is 256 (higher when using HD Packs)\n- The Mesen core's max height is 240 (higher when using HD Packs)\n- The Mesen core's core provided aspect ratio is dependent on the ['Aspect Ratio' core option](#core-options).\n\n### Custom Palettes\n\nTo use custom color palettes in the Mesen core, the ['Palette' core option](#core-options) must be set to Custom and the custom color palette file you want to use must be in RetroArch's system directory.\n\nMake sure the custom palette file is named 'MesenPalette.pal'\n\nCustom color palettes for the NES can be generated with either of these tools.\n\n- [Bisqwit's NTSC NES palette generator](http://bisqwit.iki.fi/utils/nespalette.php)\n- [Drag's NTSC NES palette generator](http://drag.wootest.net/misc/palgen.html)\n\n## HD packs\n\n!!! attention\n\tThere is more HD pack documentation at the [official Mesen documentation](https://www.mesen.ca/docs/hdpacks/#using-hd-packs).\n\nTo use HD packs, first make sure to turn on the [Enable HD Packs core option](#core-options.)\n\nFirst, create a folder named 'HdPacks' in RetroArch's System directory.\n\nNext, create a folder inside the HdPacks directory that has the same name as the content you're going to load.\n\nSo, if the content you're loading is Mega Man (USA).nes, the folder should be named 'Mega Man (USA)'.\n\nFinally, extract the HD pack content files to the Mega Man (USA) folder.\n\nHere's an example of a working HD pack setup done with [Mega Man 1 (NES) - 30th Anniversary 16-bit Graphic Pack](https://www.romhacking.net/forum/index.php?topic=25426.0).\n\nPay attention to the file path.\n\n\n\n## Core options\n\nThe Mesen core has the following option(s) that can be tweaked from the core options menu. The default setting is bolded.\n\nSettings with (Restart) means that core has to be closed for the new setting to be applied on next launch.\n\n!!! attention\n\tThese core option descriptions have been sourced from the [official Mesen documentation](https://www.mesen.ca/docs/). Please go there for more information.\n\n- **NTSC filter** [mesen_ntsc_filter] (**Disabled**/Composite (Blargg)/S-Video (Blargg)/RGB (Blargg)/Monochrome (Blargg)/Bisqwit 2x/Bisqwit 4x/Bisqwit 8x)\n\n\tSelects a filter to apply to the picture.\n\n\tBlargg filters are fast.\n\n\tBisqwit filters are slower.\n\n- **Palette** [mesen_palette] (**Default**/Composite Direct (by FirebrandX)/Nes Classic/Nestopia (RGB)/Original Hardware (by FirebrandX)/PVM Style (by FirebrandX)/Sony CXA2025AS/Unsaturated v6 (by FirebrandX)/YUV v3 (by FirebrandX)/Custom)\n\n\tMesen comes with a number of built-in palette options - you can select them from here.\n\n- **Overclock** [mesen_overclock] (**None**/Low/Medium/High/Very High)\n\n\tUse this to overclock or underclock the CPU.\n\n!!! warning\n\tOverclocking can cause issues in some games.\n\n- **Overclock Type** [mesen_overclock_type] (**Before NMI (Recommended)**/After NMI)\n\n\tBefore NMI: Increases the number of scanlines in the PPU, before the NMI signal is triggered at the end of the visible frame. This effectively gives more time for games to perform calculations, which can reduce slowdowns in games. **This is the preferred option for overclocking.**\n\n\tAfter NMI: Increases the number of scanlines in the PPU, after the NMI signal is triggered at the end of the visible frame. This effectively gives more time for games to perform calculations, which can reduce slowdowns in games. **This option is less compatible and should only be used if the before NMI variation does not work as expected.**\n\n- **Region** [mesen_region] (**Auto**/NTSC/PAL/Dendy)\n\n\tWhen set to Auto, the emulator will try to detect the game’s region (NTSC or PAL) - however, this is not always possible. When there is nothing to suggest a game is for the PAL region (Australia & Europe), the NTSC region (North America & Japan) will be used by default. Dendy is used to mimic a number of different NES clones, in particular, the Dendy, which was a popular clone in Russia.\n\n- **Vertical Overscan** [mesen_overscan_vertical] (**None**/8px/16px)\n\n\tThis overscan setting allow you to cut out pixels vertically on any edge of the screen. On a CRT TV, a few pixels on each side of the screen was usually invisible to the player. Because of this, games often have glitches or incorrect palette colors on the edges of the screen – this is normal and caused by the game itself. Setting a value of 8 or so on each side of the overscan configuration will usually hide most glitches.\n\n- **Horizontal Overscan** [mesen_overscan_horizontal] (**None**/8px/16px)\n\n\tThis overscan setting allow you to cut out pixels horizontally on any edge of the screen. On a CRT TV, a few pixels on each side of the screen was usually invisible to the player. Because of this, games often have glitches or incorrect palette colors on the edges of the screen – this is normal and caused by the game itself. Setting a value of 8 or so on each side of the overscan configuration will usually hide most glitches.\n\n- **Aspect Ratio** [mesen_aspect_ratio] (**Auto**/No Stretching/NTSC/PAL/4:3/16:9)\n\n\tThe NES’ internal aspect ratio is almost square (Default (No Stretching)), but it used to be displayed on CRT TVs that had a rectangular picture. To simulate a CRT TV, you can use the Auto option - it will switch between NTSC and PAL aspect ratios depending on the game you are playing. Using anything other than the Default (No Stretching) option may cause pixels to have irregular sizes. You can reduce this effect by using a combination of video filters and the bilinear filtering option.\n\n- **Controller Turbo Speed** [mesen_controllerturbospeed] (**Fast**/Very Fast/Disabled/Slow/Normal)\n\n\tConfigure the controller's turbo buttons' speed.\n\n- **Enable HD Packs** [mesen_hdpacks] (Off/**On**)\n\n\tEnables the use of [HD packs](https://www.mesen.ca/docs/hdpacks/). [Look at the HD packs section for more information](#hd-packs).\n\n- **Remove sprite limit** [mesen_nospritelimit] (Off/**On**)\n\n\tThe NES can normally only draw up to 8 sprites per line – this limitation is indirectly responsible for some of the flickering seen in games at times. When this option is enabled, the limit is disabled, allowing up to 64 sprites to be drawn on the same line.\n\n- **Enable fake stereo effect** [mesen_fake_stereo] (**Off**/On)\n\n\tSelf-explanatory.\n\n- **Reduce popping on Triangle channel** [mesen_mute_triangle_ultrasonic] (Off/**On**)\n\n\tThis option mutes the triangle channel under certain conditions, which prevents it from causing popping sounds.\n\n- **Reduce popping on DMC channel** [mesen_reduce_dmc_popping] (Off/**On**)\n\n\tSimilar to the previous option, but for the DMC channel – this option prevents games from changing the output of the DMC channel too abruptly, which often causes popping sounds.\n\n- **Swap Square channel duty cycles** [mesen_swap_duty_cycle] (**Off**/On)\n\n\tThis option is to mimic some older NES clones that had incorrect sound output for both of the square channels. It greatly alters the sound in some games, and shouldn’t be enabled unless you want this behavior.\n\n- **Disable Noise channel mode flag** [mesen_disable_noise_mode_flag] (**Off**/On)\n\n\tVery early Famicom models did not implement this feature, so this option is available to mimic early Famicom consoles. It changes the sound output of the noise channel in some games, and shouldn’t be enabled unless you want this behavior.\n\n- **Screen Rotation** [mesen_screenrotation] (**None**/90 degrees/180 degrees/270 degrees)\n\n\tRotates the display by the specified angle. This is useful to play games (generally homebrew games) designed for a vertical display.\n\n- **Default power-on state for RAM** [mesen_ramstate] (**All 0s (Default)**/All 1s/Random Values)\n\n\tOn a console, the RAM’s state at power on is undetermined and relatively random. This option lets you select Mesen’s behavior when initializing RAM - set all bits to 0, set all bits to 1, or randomize the value of each bit.\n\n- **FDS: Automatically insert disks** [mesen_fdsautoinsertdisk] (**Off**/On)\n\n\tBy default, the FDS boots with no disk inserted in the drive. This option makes it so the player does not need to manually insert disk 1, side A manually.\n\n- **FDS: Fast forward while loading** [mesen_fdsfastforwardload] (**Off**/On)\n\n\tFDS games contain a large number of load screens due to their data being stored on floppy drives. Mesen needs to emulate this floppy drive’s speed to ensure accurate emulation. This option makes it so Mesen runs the emulation as fast as it can when a game is loading data from the disk, which greatly reduces the time spent on loading screens.\n\n## Controllers\n\nThe Mesen core supports the following device type(s) in the controls menu, bolded device types are the default for the specified user(s):\n\n### User 1 - 2 device types\n\n- None - Input disabled.\n- **Auto** - Joypad - Automatically selects an input device according to the data in the game database.\n- [Standard Controller](https://wiki.nesdev.com/w/index.php/Standard_controller) - Joypad - Manually selects a standard game controller.\n- [Zapper](https://wiki.nesdev.com/w/index.php/Zapper) - Pointer - Manually selects a Zapper light gun.\n- [Power Pad](https://wiki.nesdev.com/w/index.php/Power_Pad) - Joypad - Manually selects a Power Pad peripheral.\n- [Arkanoid](https://wiki.nesdev.com/w/index.php/Arkanoid_controller) - Mouse - Manually selects an Arkanoid controller.\n- [SNES Controller](http://nintendo.wikia.com/wiki/Super_Nintendo_Entertainment_System_controller) - Joypad - Manually selects a SNES Controller.\n- [SNES Mouse](https://wiki.nesdev.com/w/index.php/Mouse) - Mouse - Manually selects a SNES Mouse.\n\n### User 3 device types\n\n- None - Input disabled.\n- **Auto** - Joypad - Automatically selects an input device according to the data in the game database.\n- [Standard Controller](https://wiki.nesdev.com/w/index.php/Standard_controller) - Joypad - Manually selects a standard game controller.\n\n### User 4 device types\n\n- None - Input disabled.\n- **Auto** - Joypad - Automatically selects an input device according to the data in the game database.\n- [Standard Controller](https://wiki.nesdev.com/w/index.php/Standard_controller) - Joypad - Manually selects a standard game controller.\n\n### User 5 device types\n\n- None - Input disabled.\n- **Auto** - Joypad - Automatically selects an input device according to the data in the game database.\n- [Arkanoid](https://wiki.nesdev.com/w/index.php/Arkanoid_controller) - Mouse - Manually selects an Arkanoid controller.\n- [Ascii Turbo Fire](https://en.wikipedia.org/wiki/Turbo_File_(ASCII)) - None - Manually selects an Ascii Turbo Fire device.\n- Bandai Hypershot - Pointer - Manually selects a Bandai Hypershot light gun.\n- Battle Box - None - Manually selects a Battle Box device.\n- [Exciting Boxing](https://wiki.nesdev.com/w/index.php/Exciting_Boxing_Punching_Bag) - Joypad - Manually selects an Exciting Boxing punching bag.\n- [Family Trainer](https://wiki.nesdev.com/w/index.php/Power_Pad) - Joypad - Manually selects a Family Trainer peripheral.\n- [Four Player Adapter](https://wiki.nesdev.com/w/index.php/Four_Score) - None - Manually selects a Four Player Adapter device.\n- [Hori Track](https://wiki.nesdev.com/w/index.php/Mouse#Hori_Track) - Mouse - Manually selects a Hori Track trackball.\n- [Konami Hypershot](https://wiki.nesdev.com/w/index.php/Konami_Hyper_Shot) - Joypad - Manually selects a Konami Hypershot controller.\n- [Pachinko](https://wiki.nesdev.com/w/index.php/Coconuts_Pachinko) - Joypad - Manually selects a Pachinko controller.\n- [Partytap](https://wiki.nesdev.com/w/index.php/Partytap) - Joypad - Manually selects Partytap controllers.\n\n### Other controllers\n\n- [Oeka Kids Tablet](https://wiki.nesdev.com/w/index.php/Oeka_Kids_tablet) - Pointer - The Mesen core will automatically select the Oeka Kids Tablet input device according to the data in the game database. It cannot be manually selected as a device type in RetroArch's controls menu.\n\n### Multitap support\n\nMultitap support can be activated in the Mesen core by switching User 5's device type to Four Player Adapter.\n\n### Controller tables\n\n#### Joypad\n\n!!! attention\n\tThe (FDS) Insert Next Disk and (FDS) Switch Disk Side inputs will NOT do anything while the ['FDS: Automatically insert disks' core option](#core-options) is enabled.\n\n\n\n| User Remap descriptors for 'Standard Controller' device type | RetroPad Inputs |\n|--------------------------------------------------------------|---------------------------------------------|\n| A |  |\n| B |  |\n| Select |  |\n| Start |  |\n| D-Pad Up |  |\n| D-Pad Down |  |\n| D-Pad Left |  |\n| D-Pad Right |  |\n| Turbo A |  |\n| Turbo B |  |\n| (FDS) Insert Next Disk |  |\n| (FDS) Switch Disk Side |  |\n| (VS) Insert Coin 1 |  |\n| (VS) Insert Coin 2 |  |\n| (Famicom) Microphone |  |\n\n| User Remap descriptors for 'SNES Controller' device type | RetroPad Inputs |\n|----------------------------------------------------------|---------------------------------------------|\n| B |  |\n| Y |  |\n| Select |  |\n| Start |  |\n| D-Pad Up |  |\n| D-Pad Down |  |\n| D-Pad Left |  |\n| D-Pad Right |  |\n| A |  |\n| X |  |\n| L |  |\n| R |  |\n\n| User Remap descriptors for 'Power Pad' and 'Family Trainer' device types | RetroPad Inputs |\n|--------------------------------------------------------------------------|---------------------------------------------|\n| Powerpad B1 |  |\n| Powerpad B3 |  |\n| Powerpad B11 |  |\n| Powerpad B12 |  |\n| Powerpad B9 |  |\n| Powerpad B10 |  |\n| Powerpad B7 |  |\n| Powerpad B8 |  |\n| Powerpad B2 |  |\n| Powerpad B4 |  |\n| Powerpad B5 |  |\n| Powerpad B6 |  |\n\n| User Remap descriptors for 'Exciting Boxing' device type | RetroPad Inputs |\n|----------------------------------------------------------|---------------------------------------------|\n| Left Hook |  |\n| Left Jab |  |\n| Move Left |  |\n| Move Right |  |\n| Right Hook |  |\n| Right Jab |  |\n| Body |  |\n| Straight |  |\n\n| User Remap descriptors for 'Pachinko' device type | RetroPad Inputs |\n|---------------------------------------------------|-------------------------------------|\n| Release Trigger |  |\n| Press Trigger |  |\n\n| User Remap descriptors for 'Partytap' device type | RetroPad Inputs |\n|---------------------------------------------------|-------------------------------------|\n| Partytap P1 |  |\n| Partytap P3 |  |\n| Partytap P2 |  |\n| Partytap P4 |  |\n| Partytap P5 |  |\n| Partytap P6 |  |\n\n| RetroPad Inputs | Konami Hypershot |\n|------------------------------------------------|------------------|\n|  | Jump |\n|  | Run |\n|  | Turbo Jump |\n|  | Turbo Run |\n\n#### Mouse\n\n| RetroMouse Inputs | Arkanoid | SNES Mouse | Hori Track |\n|-------------------------------------------------------|-------------------|-------------------------|-------------------------|\n|  Mouse Cursor | Arkanoid Movement | SNES Mouse Cursor | Hori Track Cursor |\n|  Mouse 1 | Arkanoid Fire | SNES Mouse Left Button | Hori Track Left Button |\n|  Mouse 2 | | SNES Mouse Right Button | Hori Track Right Button |\n\n#### Pointer\n\n| RetroPointer Inputs | Zapper | Bandai Hypershot | Oeka Kids Tablet |\n|--------------------------------------------------------------------------------------------------------------------------|------------------|----------------------------|------------------------------|\n|  or  Pointer Position | Zapper Crosshair | Bandai Hypershot Crosshair | Oeka Kids Tablet Stylus |\n|  Mouse 1 | Zapper Fire | Bandai Hypershot Fire | Oeka Kids Tablet Click/Touch |\n|  Mouse 2 | Zapper Offscreen | Bandai Hypershot Offscreen | |\n\n## Compatibility\n\n- [Mesen Mapper Support List](https://github.com/SourMesen/Mesen/blob/master/Core/MapperFactory.cpp#L275)\n\n## External Links\n\n- [Official Mesen Website](https://www.mesen.ca/)\n- [Official Mesen Documentation](https://www.mesen.ca/docs/)\n- [Official Mesen Downloads](https://www.mesen.ca/#Downloads)\n- [Official Mesen Changelog](https://www.mesen.ca/#Changelog)\n- [Libretro Mesen Core info file](https://github.com/libretro/libretro-super/blob/master/dist/info/mesen_libretro.info)\n- [Official Mesen Github Repository](https://github.com/SourMesen/Mesen)\n- [Report Libretro Mesen Core Issues Here](https://github.com/SourMesen/Mesen/issues)\n- [Gameplay Videos](https://www.youtube.com/playlist?list=PLRbgg4gk_0IdbTgE4bID9L5s5f323IewO)\n\n### See also\n\n#### Nintendo - Family Computer Disk System\n\n- [Nintendo - NES / Famicom (FCEUmm)](fceumm.md)\n- [Nintendo - NES / Famicom (Nestopia)](nestopia.md)\n\n#### Nintendo - Nintendo Entertainment System\n\n- [Nintendo - NES / Famicom (bnes)](bnes.md)\n- [Nintendo - NES / Famicom (Emux NES)](emux_nes.md)\n- [Nintendo - NES / Famicom (FCEUmm)](fceumm.md)\n- [Nintendo - NES / Famicom (Nestopia)](nestopia.md)\n- [Nintendo - NES / Famicom (QuickNES)](quicknes.md)\n"
},
{
"path": "docs/library/meteor.md",
"content": "# Nintendo - Game Boy Advance (Meteor)\n\n## Background\n\nMeteor is a Gameboy Advance emulator.\n\nThe Meteor core has been authored by\n\n- Philippe Daouadi\n\nThe Meteor core is licensed under\n\n- [GPLv3](https://github.com/libretro/meteor-libretro/blob/master/COPYING)\n\nA summary of the licenses behind RetroArch and its cores can be found [here](../development/licenses.md).\n\n## Extensions\n\nContent that can be loaded by the Meteor core have the following file extensions:\n\n- .gba\n\n## Databases\n\nRetroArch database(s) that are associated with the Meteor core:\n\n- [Nintendo - Game Boy Advance](https://github.com/libretro/libretro-database/blob/master/rdb/Nintendo%20-%20Game%20Boy%20Advance.rdb)\n\n## Features\n\nFrontend-level settings or features that the Meteor core respects.\n\n| Feature | Supported |\n|-------------------|:---------:|\n| Restart | ✔ |\n| Screenshots | ✔ |\n| Saves | ✔ |\n| States | ✔ |\n| Rewind | ✔ |\n| Netplay | ✕ |\n| Core Options | ✔ |\n| [Memory Monitoring (achievements)](../guides/memorymonitoring.md) | ✕ |\n| RetroArch Cheats | ✕ |\n| Native Cheats | ✕ |\n| Controls | ✔ |\n| Remapping | ✔ |\n| Multi-Mouse | ✕ |\n| Rumble | ✕ |\n| Sensors | ✕ |\n| Camera | ✕ |\n| Location | ✕ |\n| Subsystem | ✕ |\n| [Softpatching](../guides/softpatching.md) | ✔ |\n| Disk Control | ✕ |\n| Username | ✕ |\n| Language | ✕ |\n| Crop Overscan | ✕ |\n| LEDs | ✕ |\n\n### Directories\n\nThe Meteor core's internal core name is 'Meteor GBA'\n\nThe Meteor core saves/loads to/from these directories.\n\n**Frontend's Save directory**\n\n- 'content-name'.srm (Cartridge battery save)\n\n**Frontend's State directory**\n\n- 'content-name'.state# (State)\n\n### Geometry and timing\n\n- The Meteor core's core provided FPS is 59.7275005696\n- The Meteor core's core provided sample rate is 44100 Hz\n- The Meteor core's core provided aspect ratio is 3/2\n\n## Controllers\n\nThe Meteor core supports the following device type(s) in the controls menu, bolded device types are the default for the specified user(s):\n\n### User 1 device types\n\n- None - Doesn't disable input. There's no reason to switch to this.\n- **RetroPad** - Joypad - Stay on this.\n- RetroPad w/Analog - Joypad - Same as RetroPad. There's no reason to switch to this.\n\n### Controller tables\n\n#### Joypad\n\n\n\n| User 1 Remap descriptors | RetroPad Inputs |\n|--------------------------|-------------------------------------------|\n| B |  |\n| Select |  |\n| Start |  |\n| D-Pad Up |  |\n| D-Pad Down |  |\n| D-Pad Left |  |\n| D-Pad Right |  |\n| A |  |\n| L |  |\n| R |  |\n\n## Compatibility\n\nAwaiting description.\n\n## External Links\n\n- [Official Meteor Github Repository](https://github.com/blastrock/meteor)\n- [Libretro Meteor Core info file](https://github.com/libretro/libretro-super/blob/master/dist/info/meteor_libretro.info)\n- [Libretro Meteor Github Repository](https://github.com/libretro/meteor-libretro)\n- [Report Libretro Meteor Core Issues Here](https://github.com/libretro/meteor-libretro/issues)\n\n### See also\n\n#### Nintendo - Game Boy Advance\n\n- [Nintendo - Game Boy Advance (Beetle GBA)](beetle_gba.md)\n- [Nintendo - Game Boy Advance (gpSP)](gpsp.md)\n- [Nintendo - Game Boy Advance (mGBA)](mgba.md)\n- [Nintendo - Game Boy Advance (TempGBA)](tempgba.md)\n- [Nintendo - Game Boy Advance (VBA-M)](vba_m.md)\n- [Nintendo - Game Boy Advance (VBA Next)](vba_next.md)"
},
{
"path": "docs/library/mgba.md",
"content": "# Nintendo - Game Boy Advance (mGBA)\n\n## Background\n\nmGBA is an emulator for running Game Boy Advance games. It aims to be faster and more accurate than many existing Game Boy Advance emulators, as well as adding features that other emulators lack. It also supports Game Boy and Game Boy Color games.\n\nThe mGBA core has been authored by\n\n- endrift\n\nThe mGBA core is licensed under\n\n- [MPLv2.0](https://github.com/libretro/mgba/blob/master/LICENSE)\n\nA summary of the licenses behind RetroArch and its cores can be found [here](../development/licenses.md).\n\n## BIOS\n\nRequired or optional firmware files go in the frontend's system directory.\n\n!!! warning\n\tIn order for the BIOS to be used, the 'Use BIOS file if found' core option must be set to On.\n\n| Filename | Description | md5sum |\n|:------------:|:--------------------------------:|:--------------------------------:|\n| gba_bios.bin | Game Boy Advance BIOS - Optional | a860e8c0b6d573d191e4ec7db1b1e4f6 |\n| gb_bios.bin | Game Boy BIOS - Optional | 32fbbd84168d3482956eb3c5051637f5 |\n| gbc_bios.bin | Game Boy Color BIOS - Optional | dbfce9db9deaa2567f6a84fde55f9680 |\n| sgb_bios.bin | Super Game Boy BIOS - Optional | d574d4f9c12f305074798f54c091a8b4 |\n\n## Extensions\n\nContent that can be loaded by the mGBA core have the following file extensions:\n\n- .gb\n- .gbc\n- .gba\n\nRetroArch database(s) that are associated with the [Core name] core:\n\n- [Nintendo - Game Boy](https://github.com/libretro/libretro-database/blob/master/rdb/Nintendo%20-%20Game%20Boy.rdb)\n- [Nintendo - Game Boy Color](https://github.com/libretro/libretro-database/blob/master/rdb/Nintendo%20-%20Game%20Boy%20Color.rdb)\n- [Nintendo - Game Boy Advance](https://github.com/libretro/libretro-database/blob/master/rdb/Nintendo%20-%20Game%20Boy%20Advance.rdb)\n\n## Features\n\nFrontend-level settings or features that the mGBA core respects.\n\n| Feature | Supported |\n|-------------------|:---------:|\n| Restart | ✔ |\n| Saves | ✔ |\n| States | ✔ |\n| Rewind | ✔ |\n| Netplay | ✕ |\n| Core Options | ✔ |\n| [Memory Monitoring (achievements)](../guides/memorymonitoring.md) | ✔ |\n| RetroArch Cheats | ✔ |\n| [RetroArch SaveRAM Autosave Interval support](https://github.com/libretro/RetroArch/issues/16323#issuecomment-1977792161) | ✔ |\n| Native Cheats | ✕ |\n| Controls | ✔ |\n| Remapping | ✔ |\n| Multi-Mouse | ✕ |\n| Rumble | ✔ |\n| Sensors | ✕ |\n| Camera | ✕ |\n| Location | ✕ |\n| Subsystem | ✕ |\n| [Softpatching](../guides/softpatching.md) | ✔ |\n| Disk Control | ✕ |\n| Username | ✕ |\n| Language | ✕ |\n| Crop Overscan | ✕ |\n| LEDs | ✕ |\n\n## Directories\n\nThe mGBA core's library name is 'mGBA'\n\nThe mGBA core saves/loads to/from these directories.\n\n**Frontend's Save directory**\n\n| File | Description |\n|:-----:|:----------------------:|\n| *.srm | Cartridge battery save |\n\n**Frontend's State directory**\n\n| File | Description |\n|:--------:|:-----------:|\n| *.state# | State |\n\n## Geometry and timing\n\n- The mGBA core's core provided FPS is [FPS]\n- The mGBA core's core provided sample rate is 32768 Hz\n- The mGBA core's base width is [Base width]\n- The mGBA core's base height is [Base height]\n- The mGBA core's max width is [Max width]\n- The mGBA core's max height is [Max height]\n- The mGBA core's core provided aspect ratio is [Aspect ratio]\n\n## Core options\n\nThe mGBA core has the following option(s) that can be tweaked from the core options menu. The default setting is bolded.\n\nSettings with (Restart) means that core has to be closed for the new setting to be applied on next launch.\n\n- **Solar sensor level** [mgba_solar_sensor_level] (**0**|1|2|3|4|5|6|7|8|9|10)\n\n\tCan be used by games that employed the use of a solar sensor on their cartridges. E.g.: Boktai games.\n\n- **Allow opposing directional input** [mgba_allow_opposing_directions] (**OFF**|ON)\n\n\tAllows opposing directional inputs. Up with Down. Right with Left.\n\n- **Game Boy model (requires restart)** [mgba_gb_model] (**Autodetect**|Game Boy|Super Game Boy|Game Boy Color|Game Boy Advance)\n\n\tRuns loaded content with a specific Game Boy model.\n\n\tAutodetect will select the most appropriate model for the current game.\n\n- **Use BIOS file if found** [mgba_use_bios] (**ON**|OFF)\n\n\tUses BIOS present in RetroArch's system directory. Look at the [BIOS section](#bios) for more information.\n\n- **Skip BIOS intro** [mgba_skip_bios] (**OFF**|ON)\n\n\t**The 'Use BIOS file if found' core option must be set to On for proper operation.**\n\n\tSkips the BIOS intro when a BIOS is present in RetroArch's system directory is used.\n\n??? note \"Skip BIOS intro - Off\"\n \n\n- **Use Super Game Boy borders (requires restart)** [mgba_sgb_borders] (**ON**|OFF)\n\n\tDisplay Super Game Boy borders for Super Game Boy enhanced games.\n\n- **Idle loop removal** [mgba_idle_optimization] (**Remove Known**|Detect and Remove|Don't Remove)\n\n\tOptimizes game performance by driving the GBA's CPU less hard.\n\n\tUse this on low-powered hardware if its struggling with game performance.\n\n- **Frameskip** [mgba_frameskip] (**0**|1|2|3|4|5|6|7|8|9|10)\n\n\tChoose how much frames should be skipped to improve performance at the expense of visual smoothness.\n\n## Rumble\n\nRumble only works in the mGBA core when\n\n- The content being ran has rumble support. (e.g. Cartridges with a Rumble Pak)\n- The frontend being used has rumble support.\n- The joypad device being used has rumble support.\n\n## Joypad\n\n\n\n| User 1 input descriptors | RetroPad Inputs |\n|--------------------------|---------------------------------------------|\n| B |  |\n| Turbo B |  |\n| Select |  |\n| Start |  |\n| Up |  |\n| Down |  |\n| Left |  |\n| Right |  |\n| A |  |\n| Turbo A |  |\n| L |  |\n| R |  |\n| Turbo L |  |\n| Turbo R |  |\n| Darken Solar Sensor |  |\n| Brighten Solar Sensor |  |\n\n## Compatibility\n\nPlease file game bugs on the issue tracker [here](https://github.com/mgba-emu/mgba/issues)\n\n## External Links\n\n- [Official mGBA Website](https://mgba.io/)\n- [Official mGBA Github Repository](https://github.com/mgba-emu/mgba)\n- [Libretro mGBA Core info file](https://github.com/libretro/libretro-super/blob/master/dist/info/mgba_libretro.info)\n- [Libretro mGBA Github Repository](https://github.com/libretro/mgba)\n- [Report Libretro mGBA Core Issues Here](https://github.com/mgba-emu/mgba/issues)\n- [Gameplay Videos](https://www.youtube.com/playlist?list=PLRbgg4gk_0Id2gXuMPiXpnjQmDuvg7Wli)\n\n### See also\n\n#### Nintendo - Game Boy Advance\n\n- [Nintendo - Game Boy Advance (Beetle GBA)](beetle_gba.md)\n- [Nintendo - Game Boy Advance (gpSP)](gpsp.md)\n- [Nintendo - Game Boy Advance (Meteor)](meteor.md)\n- [Nintendo - Game Boy Advance (VBA Next)](vba_next.md)\n- [Nintendo - Game Boy Advance (VBA-M)](vba_m.md)\n\n#### Nintendo - Game Boy (+ Color)\n\n- [Nintendo - Game Boy / Color (Emux GB)](emux_gb.md)\n- [Nintendo - Game Boy / Color (Gambatte)](gambatte.md)\n- [Nintendo - Game Boy / Color (Gearboy)](gearboy.md)\n- [Nintendo - Game Boy / Color (SameBoy)](sameboy.md)\n- [Nintendo - Game Boy / Color (TGB Dual)](tgb_dual.md)\n- [Nintendo - SNES / Famicom (higan Accuracy)](higan_accuracy.md)\n- [Nintendo - SNES / Famicom (nSide Balanced)](nside_balanced.md)\n- [Nintendo - SNES / Famicom (Mesen-S)](mesen-s.md)\n"
},
{
"path": "docs/library/microw8.md",
"content": "# MicroW8\n\n## Background\n\n- MicroW8 is a WebAssembly based fantasy console usable for size-coding or larger games.\n\nThe MicroW8 core has been authored by\n\n- [Dennis Ranke](https://github.com/exoticorn)\n- [Kivutar](https://github.com/kivutar)\n\n\nThe MicroW8 core is licensed under\n\n- [Unlicense](https://github.com/libretro/uw8-libretro/blob/main/UNLICENSE)\n\nA summary of the licenses behind RetroArch and its cores can be found [here](../development/licenses.md).\n\n## Extensions\n\nContent that can be loaded by the MicroW8 core have the following file extensions:\n\n- .uw8\n- .wasm\n\nRetroArch database(s) that are associated with the MicroW8 core:\n\n- [MicroW8](https://github.com/libretro/libretro-database/blob/master/rdb/MicroW8.rdb)\n\n## Features\n\nFrontend-level settings or features that the MicroW8 core respects.\n\n| Feature | Supported |\n|-------------------|:---------:|\n| Restart | ✔ |\n| Saves | ✕ |\n| States | ✔ |\n| Rewind | ✔ |\n| Netplay | ✔ |\n| Core Options | ✕ |\n| [Memory Monitoring (achievements)](../guides/memorymonitoring.md) | ✕ |\n| RetroArch Cheats | ✕ |\n| Native Cheats | ✕ |\n| Controls | ✔ |\n| Remapping | ✔ |\n| Multi-Mouse | ✕ |\n| Rumble | ✕ |\n| Sensors | ✕ |\n| Camera | ✕ |\n| Location | ✕ |\n| Subsystem | ✕ |\n| [Softpatching](../guides/softpatching.md) | ✕ |\n| Disk Control | ✕ |\n| Username | ✕ |\n| Language | ✕ |\n| Crop Overscan | ✕ |\n| LEDs | ✕ |\n\n## Geometry and timing\n\n- The MicroW8 core's core provided FPS is 60.\n- The MicroW8 core's core provided sample rate is 44100.\n- The MicroW8 core's base width is 320.\n- The MicroW8 core's base height is 240.\n- The MicroW8 core's max width is 320.\n- The MicroW8 core's max height is 240.\n- The MicroW8 core's core provided aspect ratio is 4/3.\n\n## User 1 device types\n\nThe MicroW8 core supports the following device type(s) in the controls menu, bolded device types are the default for the specified user(s):\n\n- None - Doesn't disable input.\n- **RetroPad**\n\n\n## Joypad\n\n| RetroPad Inputs | MicroW8 inputs |\n|------------------------------------------------|--------------------------|\n|  | D-Pad Up |\n|  | D-Pad Down |\n|  | D-Pad Left |\n|  | D-Pad Right |\n|  | Button X |\n|  | Button Y |\n|  | Button A |\n|  | Button B |\n\n## External Links\n\n- [Official Website](https://exoticorn.github.io/microw8)\n- [Libretro MicroW8 core info file](https://github.com/libretro/libretro-super/blob/master/dist/info/uw8_libretro.info)\n- [Libretro MicroW8 repository](https://github.com/libretro/uw8-libretro)\n- [Report Libretro MicroW8 core issues here](https://github.com/libretro/uw8-libretro/issues)\n- [MicroW8 games](https://itch.io/games/tag-microw8)"
},
{
"path": "docs/library/minivmac.md",
"content": "# Macintosh (minivmac)\n\n\n\n## Background\n\nMinivmac is the build system for Mini vMac, a miniature Macintosh emulator.\n\nFurther information may be found at\n\"https://www.gryphel.com/c/minivmac/\".\n\n### Author/License\n\nThe minivmac core has been authored by\n\n- phcoder\n- rtype\n\nThe minivmac core is licensed under\n\n- [](https://github.com/libretro/libretro-minivmac)\n\nA summary of the licenses behind RetroArch and its cores can be found [here](../development/licenses.md).\n\n## Extensions\n\nContent that can be loaded by the minivmac core have the following file extensions:\n\n- .dsk\n- .img\n- .zip\n- .hvf\n- .cmd\n\n## Databases *WIP*\n\nRetroArch database(s) that are associated with the minivmac core:\n\n## BIOS\n\nRequired or optional firmware files go in the frontend's system directory.\n\n| Filename | Description | md5sum |\n|:---------------:|:----------------------:|:--------------------------------:|\n| MacII.rom | | 66223BE1497460F1E60885EEB35E03CC |\n\n## Features\n\nFrontend-level settings or features that the minivmac core respects.\n\n| Feature | Supported |\n|-------------------|:---------:|\n| Restart | ✕ |\n| Screenshots | ✔ |\n| Saves | ✕ |\n| States | ✕ |\n| Rewind | ✕ |\n| Netplay | ✕ |\n| Core Options | ✔ |\n| [Memory Monitoring (achievements)](../guides/memorymonitoring.md) | ✕ |\n| RetroArch Cheats | ✕ |\n| Native Cheats | ✕ |\n| Controls | ✔ |\n| Remapping | ✔ |\n| Multi-Mouse | ✕ |\n| Rumble | ✕ |\n| Sensors | ✕ |\n| Camera | ✕ |\n| Location | ✕ |\n| Subsystem | ✕ |\n| [Softpatching](../guides/softpatching.md) | ✕ |\n| Disk Control | ✕ |\n| Username | ✕ |\n| Language | ✕ |\n| Crop Overscan | ✕ |\n| LEDs | ✕ |\n\n### Directories\n\nThe minivmac core's library name is 'minivmac'\n\nThe minivmac core saves/loads to/from these directories.\n\n### Geometry and timing\n\n- The minivmac core's core provided FPS is 13.63.\n- The minivmac core's core provided sample rate is 22255 Hz.\n- The minivmac core's base width is 1440.\n- The minivmac core's base height is 1080.\n- The minivmac core's core provided aspect ratio is 4/3.\n\n## Core options\n\nThe minivmac core has the following option(s) that can be tweaked from the core options menu. The default setting is bolded.\n\nSettings with (Restart) means that core has to be closed for the new setting to be applied on next launch.\n\n- **Status Bar** [minivmac_Statusbar] (**ON**|OFF)\n\n- **Keyboard Type** [minivmac_kbdtype] (**Callback**|Poll)\n\n## Controllers\n\nThe minivmac core supports the following device type(s) in the controls menu, bolded device types are the default for the specified user(s):\n\n### User 1 device types\n\n- None - Doesn't disable input. There's no reason to switch to this.\n- **RetroPad** - Joypad\n- Minivmac Joystick - Joypad - Awaiting description.\n- Minivmac Keyboard - Keyboard inputs are always active. Has keymapper support.\n\n### Controller tables\n\n#### Keyboard\n\n| RetroKeyboard Inputs | RetroKeyboard |\n|------------------------------|-----------------------|\n| Keyboard Backspace | BACKSPACE |\n| Keyboard Tab | TAB |\n| Keyboard Return | RETURN |\n| Keyboard Pause | PAUSE |\n| Keyboard Escape | ESCAPE |\n| Keyboard Space | SPACE |\n| Keyboard Quote ' | COLON |\n| Keyboard Comma , | COMMA |\n| Keyboard Minus - | NEGATIVE |\n| Keyboard Period . | PERIOD |\n| Keyboard Slash / | DIVIDE |\n| Keyboard 0 | 0 |\n| Keyboard 1 | 1, Player 1 Coleco #0 |\n| Keyboard 2 | 2, Player 1 Coleco #9 |\n| Keyboard 3 | 3, Player 2 Coleco #0 |\n| Keyboard 4 | 4, Player 2 Coleco #9 |\n| Keyboard 5 | 5 |\n| Keyboard 6 | 6 |\n| Keyboard 7 | 7 |\n| Keyboard 8 | 8 |\n| Keyboard 9 | 9 |\n| Keyboard Semicolon ; | SEMICOLON |\n| Keyboard Equals = | CIRCUMFLEX |\n| Keyboard Left Bracket [ | LEFT BRACKET |\n| Keyboard Backslash \\ | BACKSLASH (YEN) |\n| Keyboard Right Bracket ] | RIGHT BRACKET |\n| Keyboard Backquote ` | AT |\n| Keyboard a | A |\n| Keyboard b | B |\n| Keyboard c | C |\n| Keyboard d | D |\n| Keyboard e | E |\n| Keyboard f | F |\n| Keyboard g | G |\n| Keyboard h | H |\n| Keyboard i | I |\n| Keyboard j | J |\n| Keyboard k | K |\n| Keyboard l | L |\n| Keyboard m | M |\n| Keyboard n | N |\n| Keyboard o | O |\n| Keyboard p | P |\n| Keyboard q | Q |\n| Keyboard r | R |\n| Keyboard s | S |\n| Keyboard t | T |\n| Keyboard u | U |\n| Keyboard v | V |\n| Keyboard w | W |\n| Keyboard x | X |\n| Keyboard y | Y |\n| Keyboard z | Z |\n| Keyboard Delete | DELETE |\n| Keyboard Keypad 0 | NUMPAD 0 |\n| Keyboard Keypad 1 | NUMPAD 1 |\n| Keyboard Keypad 2 | NUMPAD 2 |\n| Keyboard Keypad 3 | NUMPAD 3 |\n| Keyboard Keypad 4 | NUMPAD 4 |\n| Keyboard Keypad 5 | NUMPAD 5 |\n| Keyboard Keypad 6 | NUMPAD 6 |\n| Keyboard Keypad 7 | NUMPAD 7 |\n| Keyboard Keypad 8 | NUMPAD 8 |\n| Keyboard Keypad 9 | NUMPAD 9 |\n| Keyboard Keypad Period . | NUMPAD COMMA |\n| Keyboard Keypad Divide / | NUMPAD DIVIDE |\n| Keyboard Keypad Multiply * | NUMPAD MULTIPLY |\n| Keyboard Keypad Minus - | NUMPAD SUBTRACTION |\n| Keyboard Keypad Plus + | NUMPAD ADD |\n| Keyboard Keypad Enter | NUMPAD PERIOD |\n| Keyboard Up | UP |\n| Keyboard Down | DOWN |\n| Keyboard Right | RIGHT |\n| Keyboard Left | LEFT |\n| Keyboard Insert | INSERT |\n| Keyboard Home | CLS |\n| Keyboard End | STOP |\n| Keyboard Page Up | SELECT |\n| Keyboard F1 | F1 |\n| Keyboard F2 | F2 |\n| Keyboard F3 | F3 |\n| Keyboard F4 | F4 |\n| Keyboard F5 | F5 |\n| Keyboard Caps Lock | CAPS |\n| Keyboard Right Shift | RIGHT SHIFT |\n| Keyboard Left Shift | LEFT SHIFT |\n| Keyboard Left Control | CONTROL |\n| Keyboard Left Alt | GRAPH |\n| Keyboard Print | PRINT |\n\nSupported combinations\n\n## External Links\n\n- [Official minivmac Website](https://www.gryphel.com/c/minivmac/)\n- [minivmac Repository](https://github.com/rickyzhang82/minivmac)\n- [Libretro minivmac Core info file](https://github.com/libretro/libretro-super/blob/master/dist/info/minivmac_libretro.info)\n- [Libretro minivmac Github Repository](https://github.com/libretro/libretro-minivmac)\n- [Report Libretro minivmac Core Issues Here](https://github.com/libretro/libretro-minivmac/issues)"
},
{
"path": "docs/library/mkxp-z.md",
"content": "# RPG Maker XP/VX/VX Ace (mkxp-z)\n\n## Background\n\nOpen-source cross-platform player for (some) RPG Maker XP / VX / VX Ace games. A very heavily modified fork of mkxp. RGSS on steroids with a stupid name.\n\n### Author/License\n\nThe mkxp-z core has been authored by:\n\n- [Aeodyn](https://github.com/Aeodyn) <Aeodyn0@gmail.com>\n- [Alex Folland](https://github.com/AlexFolland) <lexlexlex@gmail.com>\n- [Amaryllis Kulla](https://github.com/Ancurio) <ancurio@mapleshrine.eu>\n- [Thomas Schneider](https://github.com/BlackLotus)\n- [Carsten Teibes](https://github.com/carstene1ns) <dev@f4ke.de>\n- [cremno](https://github.com/cremno) <cremno@mail.ru>\n- [David Salvisberg](https://github.com/Daverball) <dave@daverball.com>\n- [Eblo](https://github.com/Eblo)\n- [Eliza Velasquez](https://github.com/elizagamedev)\n- [Jáchym Toušek](https://github.com/enumag) <enumag@gmail.com>\n- [ijuintekka](https://github.com/ijuintekka) <ijuintekka@hotmail.com>\n- [Joni Savolainen](https://github.com/jonisavo) <joni@savolainen.io>\n- [Luis Cáceres](https://github.com/lacc97) <lacc97@protonmail.ch>\n- [mook](https://github.com/mook)\n- [Nathan de Medeiros Vieira](https://github.com/Nathan-MV) <nathanmvieira@outlook.com>\n- [Riley Pierce](https://github.com/rainefall) <rileyraine01@gmail.com>\n- [Rodrigo Locatti](https://github.com/ReinUsesLisp) <rodrigo.locatti@gmail.com>\n- [Splendide Imaginarius](https://github.com/Splendide-Imaginarius)\n- Struma <strumajen@icloud.com>\n- [Edward Rudd](https://github.com/urkle) <urkle@outoforder.cc>\n- [Wayward Heart](https://github.com/WaywardHeart)\n- [Hao Liu (刘皓)](https://github.com/white-axe) <whiteaxe@tuta.io>\n\nThe mkxp-z core is licensed under:\n\n- [GPLv2](https://github.com/mkxp-z/mkxp-z/blob/dev/COPYING)\n\nA summary of the licenses behind RetroArch and its cores can be found [here](../development/licenses.md).\n\n## Requirements\n\nCurrently, the mkxp-z core requires hardware that supports OpenGL 2.0 or later or OpenGL ES 2.0 or later.\n\n## BIOS\n\nSome RPG Maker games require RTPs (Run Time Packages), which are stock assets intended to be shared between games.\n\nThere is one standard RTP for each RPG Maker version supported by the mkxp-z core (XP, VX, VX Ace), which can be downloaded from [https://www.rpgmakerweb.com/run-time-package](https://www.rpgmakerweb.com/run-time-package).\n\nThe RTPs are distributed as Windows installers and need to be extracted before they can be used by the mkxp-z core. They can be extracted on many different operating systems using [innoextract](https://constexpr.org/innoextract/). The installers are also runnable in Wine, although innoextract is more convenient.\n\nOnce extracted, the RTP files should consist of a directory which contains two subdirectories named \"Audio\" and \"Graphics\" and possibly other files and subdirectories. The directory that contains the \"Audio\" and \"Graphics\" subdirectories should be renamed to \"Standard\" (for RPG Maker XP), \"RPGVX\" (for RPG Maker VX) or \"RPGVXAce\" (for RPG Maker VX Ace) and placed into the \"mkxp-z/RTP\" subdirectory of the frontend's system directory. If done correctly, the directory structure should look like this:\n\n```\n[system directory]\n└── mkxp-z\n └── RTP\n ├── RPGVX\n │ ├── Audio\n │ ├── Fonts\n │ ├── Game.ico\n │ ├── Graphics\n │ ├── RGSS200J.dll\n │ ├── RGSS202E.dll\n │ └── RGSS202J.dll\n ├── RPGVXAce\n │ ├── Audio\n │ ├── Fonts\n │ ├── Game.ico\n │ └── Graphics\n └── Standard\n ├── Audio\n ├── Game.ico\n └── Graphics\n```\n\nThe three files named Game.ico and the .dll files listed in the above directory tree are not required by the mkxp-z core. Feel free to delete them if you want.\n\n## Extensions\n\nContent that can be loaded by the mkxp-z core have the following file extensions (see the [Usage](#usage) section for instructions on how to load games):\n\n- .ini\n- .json\n- .rxproj\n- .rvproj\n- .rvproj2\n- .mkxpz\n- .zip\n- .7z\n\nRetroArch database(s) that are associated with the mkxp-z core:\n\n- [RPG Maker](https://github.com/libretro/libretro-database/blob/master/rdb/RPG%20Maker.rdb)\n- [RPG Maker thumbnails](https://github.com/libretro-thumbnails/RPG_Maker)\n\n## Features\n\nFrontend-level settings or features that the mkxp-z core respects:\n\n| Feature | Supported |\n|-------------------|:---------:|\n| Restart | ✔ |\n| Saves | ✔ |\n| States | ✔ |\n| Rewind | ✔ [^1] |\n| Netplay | ✔ [^1] |\n| Core Options | ✔ |\n| [Memory Monitoring (achievements)](../guides/memorymonitoring.md) | ✔ [^2] |\n| RetroArch Cheats | ✔ [^2] |\n| Native Cheats | ✔ |\n| Controls | ✔ |\n| Remapping | ✔ |\n| Multi-Mouse | ✕ |\n| Rumble | ✕ |\n| Sensors | ✕ |\n| Camera | ✕ |\n| Location | ✕ |\n| Subsystem | ✕ |\n| [Softpatching](../guides/softpatching.md) | ✕ |\n| Disk Control | ✕ |\n| Username | ✔ |\n| Language | ✔ |\n| Crop Overscan | ✕ |\n| LEDs | ✕ |\n\n## Directories\n\nThe mkxp-z core's library name is 'mkxp-z'\n\nThe mkxp-z core saves/loads to/from these directories.\n\n**Frontend's Save directory**\n\n| Directory | Description |\n|:------------:|:-----------:|\n| mkxp-z/Saves/[game title] | This is the directory where the game's save files are saved to. The exact contents of the directory vary depending on the specific game being played. |\n\n**Frontend's System directory**\n\n| Directory | Description |\n|:------------:|:-----------:|\n| mkxp-z/Fonts | Any fonts that the game uses that are not found in the game files will be loaded from here as a fallback. Supported file extensions for fonts are .otf and .ttf. The names of the font files do not matter since the mkxp-z core matches fonts based on the font family name stored in the file. |\n| mkxp-z/RTP | This is where RTPs are loaded from. See the [BIOS](#bios) section for more details. |\n| mkxp-z/Scripts/Preload | Any preload scripts added to this directory can be toggled in the \"Preload Scripts\" section of the core options. Enabled preload scripts will be loaded in lexicographic order of the bytes in their file names prior to loading the game's scripts. |\n| mkxp-z/Scripts/Postload | Any postload scripts added to this directory can be toggled in the \"Postload Scripts\" section of the core options. In RPG Maker VX Ace games, enabled postload scripts will be loaded in lexicographic order of the bytes in their file names after the game's scripts are loaded but before the game starts running. Enabled postload scripts have no effect in RPG Maker XP and RPG Maker VX games. |\n\n## Geometry and timing\n\n- The mkxp-z core's core provided FPS is 40 (RPG Maker XP) or 60 (RPG Maker VX, RPG Maker VX Ace).\n- The mkxp-z core's core provided sample rate is 44100 hertz.\n- The mkxp-z core's base width is 640 (RPG Maker XP) or 544 (RPG Maker VX, RPG Maker VX Ace).\n- The mkxp-z core's base height is 480 (RPG Maker XP) or 416 (RPG Maker VX, RPG Maker VX Ace).\n- The mkxp-z core's max width is 640 (RPG Maker XP) or 544 (RPG Maker VX, RPG Maker VX Ace).\n- The mkxp-z core's max height is 480 (RPG Maker XP) or 416 (RPG Maker VX, RPG Maker VX Ace).\n- The mkxp-z core's core provided aspect ratio is 4:3 (RPG Maker XP) or 17:13 (RPG Maker VX, RPG Maker VX Ace).\n\n## Usage\n\nThere are three ways to load games using the mkxp-z core:\n\n- Load the Game.ini or mkxp.json.\n- Create an empty file with the file extension .rxproj, .rvproj or .rvproj2 in the same directory as Game.ini and/or mkxp.json, and load that. This is intended to make it easier to deal with save states in RetroArch, since RetroArch's save states are named after the file you load as the game, so if you load Game.ini or mkxp.json, all the save states for every game will be named \"Game\" or \"mkxp\", which is really inconvenient.\n- Put the game into a zip or 7z archive with file extension .mkxpz, .zip or .7z and load that. Please note that the files inside the zip or 7z archive should be uncompressed if possible, especially .rgssad/.rgss2a/.rgss3a and .otf/.ttf files inside the archive, or the game will lag quite a bit from trying to seek compressed files. The game will still run, though, just very slowly.\n\nPreload scripts and postload scripts may be added to the mkxp-z/Scripts/Preload and mkxp-z/Scripts/Postload subdirectories of the libretro system directory. Each preload script and postload script added to these directories has its own core option for toggling it. If more than one preload script or postload script is enabled via the core options at the same time, they will be loaded in lexicographic order of the bytes in the file names, which is the same as the order in which they appear in the core options menu.\n\nThe default set of preload scripts provided with mkxp-z is embedded in the core and available by default to remove the need to manually copy them into the preload script directory.\n\nNative cheats are run as Ruby scripts. They can be used, for example, to change the contents of `$game_switches`.\n\n## Core options\n\nThe mkxp-z core has the following option(s) that can be tweaked from the core options menu. The default setting is bolded.\n\nSettings with (Restart) means that core has to be closed for the new setting to be applied on next launch.\n\nIn addition to the core options shown below, there are also core options for changing the key bindings and the currently enabled preload scripts and postload scripts.\n\n- **Runtime: RGSS Version** (Restart) [mkxp-z_rgssVersion] (**inherit**|default|1|2|3)\n\n Specify the RGSS version to run under.\n By default, mkxp will try to guess the required version\n based on the game files.\n If this fails, the version defaults to 1.\n Changes will take effect after the core is reset.\n\n- **Runtime: Save State Size** (Restart) [mkxp-z_saveStateSize] (64|66|68|70|72|74|76|78|80|82|84|86|88|90|92|94|96|98|**100**|102|104|106|108|110|112|114|116|118|120|122|124|126|128|132|136|140|144|148|152|156|160|164|168|172|176|180|184|188|192|196|200|204|208|212|216|220|224|228|232|236|240|244|248|252|256|264|272|280|288|296|304|312|320|328|336|344|352|360|368|376|384|392|400|408|416|424|432|440|448|456|464|472|480|488|496|504|512|544|576|608|640|672|704|736|768|800|832|864|896|928|960|992|1024|1152|1280|1408|1536|1664|1792|1920|2048|2560|3072|3584|4096)\n\n Maximum size of each save state, in mebibytes.\n If the game uses more than this much memory, save state creation will fail.\n Changes to this setting will not take effect until the core is unloaded.\n\n- **Runtime: Debug** (Restart) [mkxp-z_debug] (enabled|**disabled**)\n\n Launch the game in debug mode.\n Changes will take effect after the core is reset.\n\n- **Runtime: Battle Test** (Restart) [mkxp-z_battleTest] (enabled|**disabled**)\n\n Launch the game in battle test mode.\n Changes will take effect after the core is reset.\n\n- **Video: Frame Skip** [mkxp-z_frameSkip] (inherit|enabled|**disabled**)\n\n Skip (don't draw) frames when behind.\n\n- **Video: Subimage Fix** [mkxp-z_subImageFix] (inherit|**default**|enabled|disabled)\n\n Work around buggy graphics drivers which don't\n properly synchronize texture access, most\n apparent when text doesn't show up or the map\n tileset doesn't render at all.\n (default: enabled for systems using OpenGL ES, disabled on other systems)\n\n- **Video: Framebuffer Blitting** [mkxp-z_enableBlitting] (inherit|**default**|enabled|disabled)\n\n Enable framebuffer blitting if the driver is\n capable of it. Some drivers carry buggy\n implementations of this functionality, so\n disabling it can be used as a workaround.\n (default: disabled on Windows, enabled on other systems)\n\n- **Video: Texture Synchronization** [mkxp-z_textureSync] (**default**|eager|lazy)\n\n Controls how often GPU textures are copied to CPU memory.\n Eager synchronization is less likely to cause graphical issues but may cause performance problems in some games.\n Lazy synchronization is faster but may or may not,\n depending on which libretro frontend you're using and what version of it you're using,\n cause graphical artifacts when performing certain operations,\n such as toggling fullscreen or, on Android, opening the app switcher.\n (default: lazy)\n\n- **Audio: Threaded Audio** (Restart) [mkxp-z_threadedAudio] (**enabled**|disabled)\n\n Use a worker thread for rendering the audio instead of\n rendering in the main thread, if possible. Reduces audio\n crackling, especially on systems with slow file system\n access speed. Changes to this setting will not take effect\n until the game is closed.\n\n- **Audio: MIDI Chorus** [mkxp-z_midiChorus] (**inherit**|enabled|disabled)\n\n\tActivate \"chorus\" effect for midi playback.\n\n- **Audio: MIDI Reverb** [mkxp-z_midiReverb] (**inherit**|enabled|disabled)\n\n\tActivate \"reverb\" effect for midi playback.\n\n- **Audio: SE Source Count** (Restart) [mkxp-z_SESourceCount] (**6**|7|8|9|10|11|12|13|14|15|16|17|18|19|20|21|22|23|24|25|26|27|28|29|30|31|32|33|34|35|36|37|38|39|40|41|42|43|44|45|46|47|48|49|50|51|52|53|54|55|56|57|58|59|60|61|62|63|64)\n\n Number of OpenAL sources to allocate for SE playback.\n If there are a lot of sounds playing at the same time\n and audibly cutting each other off, try increasing\n this number.\n Changes will take effect after the core is reset.\n (if this value is also set in the game's mkxp.json,\n the maximum of the value set here and the value in\n mkxp.json will be used)\n\n- **Text: Font Scale** [mkxp-z_fontScale] (0.2|0.25|0.3|0.35|0.4|0.45|0.5|0.55|0.6|0.65|0.7|0.75|0.8|0.85|0.9|0.95|**1.0**|1.05|1.1|1.15|1.2|1.25|1.3|1.35|1.4|1.45|1.5|1.55|1.6|1.65|1.7|1.75|1.8|1.85|1.9|1.95|2.0|2.05|2.1|2.15|2.2|2.25|2.3|2.35|2.4|2.45|2.5|2.55|2.6|2.65|2.7|2.75|2.8|2.85|2.9|2.95|3.0|3.05|3.1|3.15|3.2|3.25|3.3|3.35|3.4|3.45|3.5|3.55|3.6|3.65|3.7|3.75|3.8|3.85|3.9|3.95|4.0|4.05|4.1|4.15|4.2|4.25|4.3|4.35|4.4|4.45|4.5|4.55|4.6|4.65|4.7|4.75|4.8|4.85|4.9|4.95|5.0)\n\n Scales the sizes of all fonts.\n If you think text tends to be too large or too small,\n try fiddling with this.\n (if this value is also set in the game's mkxp.json,\n the product of the value set here and the value in\n mkxp.json will be used)\n\n- **Text: Kerning** [mkxp-z_fontKerning] (**inherit**|default|enabled|disabled)\n\n Kerning adjusts the spacing between individual letters or characters.\n Enabling it generally looks nicer, but RGSS doesn't use it,\n so disabling it should make text appearance more accurate.\n (default: enabled)\n\n- **Text: Font Hinting** [mkxp-z_fontHinting] (**inherit**|default|0|1|2|3)\n\n Hinting adjusts the rendering of individual letters or characters.\n Enabling it may look nicer (especially on low-resolution displays), but\n RGSS doesn't use it, so disabling it should make text appearance more\n accurate. Documentation can be found at:\n https://pysdl2.readthedocs.io/en/latest/modules/sdl2_sdlttf.html#sdl2.sdlttf.TTF_HINTING_NORMAL\n (default: 3)\n\n- **Text: Font Height Reporting** [mkxp-z_fontHeightReporting] (**inherit**|default|0|1)\n\n Controls the algorithm for reporting the height of rendered text.\n 0: Nominal (TTF_FontHeight); matches RGSS behavior; may cut off bottoms of some characters.\n 1: Rendered (TTF_SizeUTF8); deviates from RGSS; may look better.\n (default: 0)\n\n- **Text: Outline Crop** [mkxp-z_fontOutlineCrop] (**inherit**|default|enabled|disabled)\n\n Crops top row and left column of text that has an outline.\n Disabling it generally looks nicer, but RGSS enables it, so enabling it\n should make text appearance more accurate.\n (default: enabled)\n\n- **Text: Load Fonts Into Memory** [mkxp-z_loadFontsIntoMemory] (**default**|enabled|disabled)\n\n When loading a font, load the entire font file into memory instead of using a file handle.\n This improves text rendering performance on systems with extremely slow file system access speed\n at the cost of higher memory usage.\n (default: enabled on Emscripten, disabled on other platforms)\n\n## Joypad\n\nThese are the default bindings. They can be changed in the \"Button Bindings\" section of the core options if needed.\n\n| RetroPad Inputs | RGSS Inputs |\n|------------------------------------------------|--------------------------|\n|  | Input::C |\n|  | Input::B |\n|  | Input::A |\n|  | Input::X |\n|  | Input::UP |\n|  | Input::DOWN |\n|  | Input::LEFT |\n|  | Input::RIGHT |\n|  | Input::L |\n|  | Input::R |\n|  | Input::CTRL |\n|  | Input::SHIFT |\n|  | Input::Y |\n|  | Input::Z |\n|  | Input::ALT |\n|  X | Input::LEFT and Input::RIGHT |\n|  Y | Input::UP and Input::DOWN |\n\n## Mouse\n\nThese are the default bindings. They can be changed in the \"Button Bindings\" section of the core options if needed.\n\n| RetroMouse Inputs | RGSS Inputs |\n|-------------------------------------------------------|---------------------------|\n|  Mouse Cursor | Input.mouse_x and Input.mouse_y |\n|  Mouse 1 | Input::MOUSELEFT |\n|  Mouse 2 | Input::MOUSERIGHT |\n|  Mouse 3 | Input::MOUSEMIDDLE |\n| Mouse 4 | Input::MOUSEX1 |\n| Mouse 5 | Input::MOUSEX2 |\n| Wheel Up | Input.scroll_v |\n| Wheel Down | Input.scroll_v |\n\n## External Links\n\n- [mkxp-z GitHub Repository](https://github.com/mkxp-z/mkxp-z)\n- [Libretro mkxp-z Core info file](https://github.com/libretro/libretro-super/blob/master/dist/info/mkxp-z_libretro.info)\n- [Report Libretro mkxp-z Core Issues Here](https://github.com/mkxp-z/mkxp-z/issues)\n\n## (Related cores)\n\n- [RPG Maker 2000/2003 (EasyRPG)](easyrpg.md)\n\n[^1]: Because RetroArch does not currently support rewind or netplay with cores that use threaded audio, rewind and netplay currently require disabling the [\"Threaded Audio\" core option](#core-options). This core option is enabled by default for better performance and for closer similarity to the original RPG Maker runtimes, which also use threaded audio.\n\n[^2]: Only supported on little-endian devices.\n"
},
{
"path": "docs/library/mr_boom.md",
"content": "# Mr.Boom (Bomberman)\n\n## Background\n\nMr.Boom is an up to 8 player Bomberman clone ported to the libretro API.\n\nThe goal of the game is to bomb away your enemies and other players.\n\nThe Mr.Boom core has been authored by\n\n- Remdy Software\n\nThe Mr.Boom core is licensed under\n\n- [MIT](https://github.com/libretro/mrboom-libretro/blob/master/LICENSE)\n\nA summary of the licenses behind RetroArch and its cores can be found [here](../development/licenses.md).\n\n## Extensions\n\nThe Mr.Boom core does not feature extension use. Just load and start the core.\n\n## Features\n\n| Feature | Supported |\n|-------------------|:---------:|\n| Saves | ✕ |\n| States | ✔ |\n| Rewind | ✔ |\n| Netplay | ✔ |\n| [Memory Monitoring (achievements)](../guides/memorymonitoring.md) | ✕ |\n| RetroArch Cheats | ✕ |\n| Native Cheats | ✕ |\n| Controllers | ✔ |\n| Remapping | ✕ |\n| Multi-Mouse | ✕ |\n| Rumble | ✕ |\n| Sensors | ✕ |\n| Camera | ✕ |\n| Location | ✕ |\n| Subsystem | ✕ |\n\nThe Mr.Boom core's directory name is 'Mr.Boom'\n\nSave states are saved/loaded to and from where state files are stored.\n\n### Geometry and timing\n\n- The Mr. Boom core's core provided FPS is 60\n- The Mr. Boom core's core provided sample rate is 48000 Hz\n- The Mr. Boom core's core provided base width is 320\n- The Mr. Boom core's core provided base height is 200\n- The Mr. Boom core's core provided aspect ratio is 8/5 (native), 4/3 or 16/9\n\n## Core options\n\n*The Mr.Boom core has the following option(s) that can be tweaked from the core options menu. The default setting is bolded.*\n\n- **Team mode** (**Selfie**/Color/Sex): Team mode color.\n\n- **Monsters** (Off/**On**): Awaiting description. Enable or disable monsters.\n\n??? note \"Monsters - On\"\n\t\n\n??? note \"Monsters - Off\"\n\t\n\n- **Drop bomb autofire** (**Off**/On): Enables Drop bomb autofire mode. Holding down the Drop bomb button will repeatedly use the Drop bomb action. (Potentially useful when used in conjunction with certain powerups)\n\n## Controllers\n\n*The Mr.Boom core supports the following controller setting(s), bolded controller settings are the default for the specified user(s):*\n\n### User 1 - 16 Device Type(s)\n\n* **RetroPad** - Joypad with analog\n\n* RetroPad w/Analog - **There is no reason to switch to this.**\n\n### Controllers graph\n\n| RetroPad Inputs | Mr.Boom core inputs |\n|------------------------------------------------|---------------------|\n|  | Drop Bomb/Join game |\n|  | Add a bomberman bot (while in the join game screen) |\n|  | Start game |\n|  | Up/Push bomb |\n|  | Down/Push bomb |\n|  | Left/Push bomb |\n|  | Right/Push bomb |\n|  | Detonate bomb (when you have the Remote control power)/Join game |\n|  | Jump (while riding a Kangaroo)/Join game) |\n\n## External Links\n\n* [Libretro Mr.Boom Core info file](https://github.com/libretro/libretro-super/blob/master/dist/info/mrboom_libretro.info)\n* [Libretro Mr.Boom Repository](https://github.com/libretro/mrboom-libretro)\n* [Report Core Issues Here](https://github.com/libretro/libretro-meta)\n* [Official Website](http://mrboom.mumblecore.org/)\n* [Upstream Repository](https://github.com/Javanaise/mrboom-libretro)\n"
},
{
"path": "docs/library/mu.md",
"content": "# Palm OS (Mu)\n\n## Background\n\nMu is the first Palm OS emulator capable of actually playing Palm games. It is currently capable of playing most 160×160 Palm OS 4 software perfectly. There are a few hardware abstraction glitches and sound FIFO inaccuracies but other than that the device works and the audio plays normally, with no hacks done to the OS.\n\nThe Mu core has been authored by:\n\n- guicrith / meepingsnesroms; Stephanie Gawroriski (Xer Shadow Tail)\n\nThe Mu core is licensed under:\n\n- [CC BY-NC 3.0 US (Non-commercial)](http://creativecommons.org/licenses/by-nc/3.0/us/)\n\nA summary of the licenses behind RetroArch and its cores can be found [here](../development/licenses.md).\n\n## BIOS\n\n[Required or optional firmware files](https://docs.libretro.com/library/bios/) go in the frontend's system directory:\n\n| Filename | Description | md5sum |\n|:-----------------:|:-------------------------------:|:--------------------------------:|\n| `palmos40-en-m500.rom` | Palm OS 4.0 for m500 | `f50e4d5e4d98dc831f2c34a9107651eb` |\n| `palmos41-en-m515.rom` | Palm OS 4.1 for m515 | `83cb1d1c76e568b916dc2e7c0bf669f6` |\n| `palmos52-en-t3.rom` | Palm OS 5.2 for Tungsten T3 | `de46ec84d9aabf655eabdf9b00a3845d` |\n| `bootloader-dbvz.rom` | | `9da101cd2317830649a31f8fa46debec` |\n\nThe BIOS file corresponding to the selected model is required, default is the m515.\n\n## Extensions\n\nContent that can be loaded by the Mu core have the following file extensions:\n\n- `.prc`, `.pqa`, `.pdb`\n- `.zip`\n- `.img` - image file for the MMC card\n\nRetroArch database(s) that are associated with the Mu core: none yet.\n\n## Features\n\nFrontend-level settings or features that the Mu core respects:\n\n| Feature | Supported |\n|-------------------|:---------:|\n| Restart | ✔ |\n| Saves | ✕ |\n| States | ✔ |\n| Rewind | - |\n| Netplay | - |\n| Core Options | ✔ |\n| [Memory Monitoring (achievements)](../guides/memorymonitoring.md) | ✕ |\n| RetroArch Cheats | ✕ |\n| Native Cheats | ✕ |\n| Controls | - |\n| Remapping | ✔ |\n| Multi-Mouse | ✕ |\n| Rumble | ✕ |\n| Sensors | ✕ |\n| Camera | ✕ |\n| Location | ✕ |\n| Subsystem | ✕ |\n| [Softpatching](../guides/softpatching.md) | ✕ |\n| Disk Control | ✕ |\n| Username | ✕ |\n| Language | ✕ |\n| Crop Overscan | ✕ |\n| LEDs | ✔ |\n\n## Geometry and timing\n\n- The Mu core's core provided FPS is 60\n- The Mu core's core provided sample rate is 48000\n- The Mu core's base width is 160\n- The Mu core's base height is 220\n- The Mu core's max width is 320\n- The Mu core's max height is 480\n- The Mu core's core provided aspect ratio is 8:11\n\n## Core options\n\nThe Mu core has the following option(s) that can be tweaked from the core options menu. The default setting is bolded.\n\nCore has to be closed for all settings to be applied on next launch.\n\n- CPU Speed (**1.0**|1.5|2.0|2.5|3.0|0.5)\n- Force Match System Clock (**disabled**|enabled)\n- Ignore Invalid Behavior (**disabled**|enabled)\n- Use Left Joystick As Mouse (**disabled**|enabled)\n- Disable Graffiti Area (**disabled**|enabled)\n- OS Version (**Palm m515/Palm OS 4.1**|Tungsten T3/Palm OS 5.2.1|Tungsten T3/Palm OS 6.0|Palm m500/Palm OS 4.0)\n\n## Joypad\n\n| RetroPad Inputs | Palm OS Inputs |\n|------------------------------------------------|----------------|\n|  | To Do List |\n|  | Date Book |\n|  | D-Pad Center |\n|  | Power |\n|  | D-Pad Up |\n|  | D-Pad Down |\n|  | D-Pad Left (OS5 only) |\n|  | D-Pad Right (OS5 only) |\n|  | Note Pad |\n|  | Address Book |\n|  | Touchscreen click/tap |\n|  | Touchscreen movement |\n\n## Pointer\n\n| RetroPointer Inputs | Palm OS Inputs |\n|--------------------------------------------------------------------------------------------------------------------------|---------------------------|\n|  or  Pointer Position | Touchscreen movement |\n|  or  Pointer Pressed | Touchscreen click/tap |\n\n## External Links\n\n- [Original Mu Website](https://meepingsnesroms.github.io/)\n- [Original Mu Repository](https://github.com/meepingsnesroms/Mu)\n- [Libretro Mu Core info file](https://github.com/libretro/Mu/blob/master/libretroBuildSystem/mu_libretro.info)\n- [Libretro Mu Repository](https://github.com/libretro/Mu)\n- [Report Libretro Mu Core Issues Here](https://github.com/libretro/Mu/issues)\n"
},
{
"path": "docs/library/mupen64plus.md",
"content": "# Nintendo 64 (Mupen64Plus-Next)\n\n## Background\n\nMupen64Plus-Next for libretro is an up-to-date port of Mupen64Plus, a Nintendo 64 emulator. Mupen64Plus-Next for libretro uses GLideN64 as its default graphic plugin, though Angrylion and ParaLLEl-RDP plugs are also available.\n\nFor Android there are two versions of Mupen64Plus-Next. One is designed to work with GLES 2.0 and another one with GLES 3.0, and the GLES 2.0 version will have graphical issues on a GLES 3.0-compatible system.\n\nHow is this different from Parallel-N64?\n\nParallel-N64 was forked off from the standalone Mupen64Plus codebase a number of years ago, and it has diverged fairly significantly since then. Also, the graphic plugin GLideN64 is not available in Parallel-N64.\n\nThis core has the latest upstream accuracy improvements, along with the latest and greatest HLE improvements in GLideN64 and the latest LLE developments in ParaLLEl-RDP/RSP. Outstanding support of Hires Textures.\n\nThe Mupen64Plus-Next core has been authored by\n\n- m4xw\n- gillou\n- gonetz\n- Hacktarux\n- Mupen64Plus Team\n\nThe Mupen64Plus-Next core is licensed under\n\n- [GPLv3](https://github.com/libretro/mupen64plus-libretro/blob/master/LICENSE)\n\n\nA summary of the licenses behind RetroArch and its cores can be found [here](../development/licenses.md).\n\n## Extensions\n\nContent that can be loaded by the Mupen64plus-Next core have the following file extensions (*.gb via Transfer Pak emulation):\n\n- .n64\n- .v64\n- .z64\n- .bin\n- .u1\n- .ndd\n- .gb\n\n## Databases\n\nRetroArch database(s) that are associated with the Mupen64plus-Next core:\n\n- [Nintendo - Nintendo 64](https://github.com/libretro/libretro-database/blob/master/rdb/Nintendo%20-%20Nintendo%2064.rdb)\n- [Nintendo - Nintendo 64DD](https://github.com/libretro/libretro-database/blob/master/rdb/Nintendo%20-%20Nintendo%2064DD.rdb)\n\n## Features\n\nRetroArch-level settings or features that the Mupen64plus-Next core respects.\n\n| Feature | Supported |\n|-------------------|:---------:|\n| Restart | ✔ |\n| Screenshots | ✔ |\n| Saves | ✔ |\n| States | ✔ |\n| Rewind | ✔ |\n| Netplay | ✕ |\n| Core Options | ✔ |\n| [Memory Monitoring (achievements)](../guides/memorymonitoring.md) | ✔ |\n| RetroArch Cheats | ✔ |\n| Native Cheats | ✕ |\n| Controls | ✔ |\n| Remapping | ✔ |\n| Multi-Mouse | ✕ |\n| Rumble | ✔ |\n| Sensors | ✕ |\n| Camera | ✕ |\n| Location | ✕ |\n| Subsystem | ✔ |\n| [Softpatching](../guides/softpatching.md) | ✔ |\n| Disk Control | ✕ |\n| Username | ✕ |\n| Language | ✕ |\n| Crop Overscan | ✕ |\n\n### Directories\n\nThe Mupen64plus-Next core's directory name is 'Mupen64Plus-Next'\n\nThe Mupen64plus-Next core saves/loads to/from these directories.\n\n**RetroArch's Save directory**\n\n- 'content-name'.srm (Cartridge backup save)\n\n**RetroArch's State directory**\n\n- 'content-name'.state# (State)\n\n**RetroArch's System directory**\n\n```\n- Mupen64plus/\n\t\t\t- mupen64plus.ini\n\t\t\t- shaders/\n```\n\n### Geometry and timing\n\n- The Mupen64plus-Next core's internal FPS is (FPS)\n- The Mupen64plus-Next core's internal sample rate is 44100 Hz\n- The Mupen64plus-Next core's core provided aspect ratio is (Ratio)\n\n### High-Resolution Textures\n\nThere are two primary ways to utilize high-resolution textures:\n\n1. By using pre-compiled high-resolution texture packs (in the `.htc` format) that are available for download.\n2. By compiling your own high-resolution texture packs from uncompressed Rice sources.\n\n#### Use Pre-Compiled High-Resolution Textures\n\n- Place the `.htc` formatted textures into the `Mupen64plus/cache` directory.\n- Ensure the `.htc` file name corresponds to the system name of the game as shown in the mupen64plus console.\n- Pre-compiled high-resolution packs will work only if Retroarch core settings related to textures match those used during the pack's compilation. To avoid potential mismatches, you might prefer to compile your own texture packs.\n\n**Recommended core options** for widely used `.htc` texture packs (for example, those used by Djipi or Mollymutt):\n\n- `mupen64plus-EnableTextureCache = \"True\"`\n- `mupen64plus-txHiresEnable = \"True\"`\n- `mupen64plus-txCacheCompression = \"True\"`\n- `mupen64plus-txHiresFullAlphaChannel = \"False\"`\n- `mupen64plus-EnableEnhancedTextureStorage = \"False\"`\n- `mupen64plus-EnableEnhancedHighResStorage = \"False\"`\n\n#### Compile Your Own High-Resolution Texture Packs\n\n1. Obtain the high-resolution textures in uncompressed Rice format.\n2. Name the folder to match the system name of the game in the mupen64plus console and place it in the `Mupen64plus/hires_texture` directory.\n3. When you first launch the game, the `.htc` texture pack will be created. This process can take some time.\n4. After the `.htc` file is successfully generated in the cache subdirectory, you can remove the uncompressed texture directory, as it becomes redundant.\n\nFor custom compilations, enabling the additional options for Alpha Channel and Enhanced Storage will yield a high-resolution texture pack with an `*.hts` extension.\n\nIf you're planning to use your custom texture pack on a different system, ensure that you activate the same core options for textures on the new system as those you set during the compilation.\n\n**Note**: Compilation on Windows can be more intricate than on Linux or iOS. Ensure Rice texture packs are converted to 32-bit PNG.\n\n## Using the Transfer Pak\n\nFirst you have to virtually plug the Transfer Pak, so start a N64 game, then **Quick Menu > Options > Player 1 Pak > transfer** and close content, then there are 2 ways of loading:\n\n### Renaming the GB save and the GB rom to match the N64 rom filename and having the 3 files in the same folder\n\nSo for example if you have Pokemon Stadium (USA).z64, in the same folder you'll have:\n\n - Pokemon Stadium (USA).z64 (the N64 rom).\n\n - Pokemon Stadium (USA).z64.sav (the GB save, change the .srm extension to .sav if needed, it won't work with .srm).\n\n - Pokemon Stadium (USA).z64.gb (the GB rom, if it's a GBC rom you'll need to rename .gbc to .gb).\n\n - So it should look [like this](https://i.imgur.com/U4fBma3.png). If you're on Windows, [make sure you don't have the extensions hidden](https://www.howtogeek.com/205086/beginner-how-to-make-windows-show-file-extensions/)\n\n - And then just load the .z64 file with Mupen64 core :)\n\n### Using subsystems\n\n - Go to **retroarch/saves/**, make a copy of your GB *.srm save file and rename it to *.sav (e.g. Pokemon Red.srm -> Pokemon Red.sav).\n\n - Now go to **Main Menu > Load Core** and load Mupen64Plus-Next. It will load the core without content.\n\n - Go to **Main Menu > Subsystems > Load N64 Transferpak** and load the .sav file.\n\n - Now, go back to **Subsystems** menu and load the *.gb file this time.\n\n - Go back to **Subsystems** menu again and this time load the N64 rom.\n\n - Go to **Subsystems** AGAIN (last time!) and click **Start N64 Transferpak**. If done properly [you should see the .sav, the .gb and the .z64 listed](https://i.imgur.com/v1vTGQT.png).\n\n## Core options\n\nThe Mupen64plus-Next core has the following option(s) that can be tweaked from the core options menu. The default setting is bolded.\n\nSettings with (Restart) means that core has to be closed for the new setting to be applied on next launch.\n\n - **CPU Core** (**dynamic_recompiler**/cached_interpreter/pure_interpreter)\n\n\tChoose which kind of CPU emulation is going to be used. Dynamic recompiler is the fastest mode.\n\n\t**Dynamic recompilier is not available on all platforms.**\n\n- **RSP Mode** (**HLE**/LLE)\n\n\tHow the RSP is emulated, High Level Emulation or Low Level Emulation.\n\tLow level emulation should be more precise but it requires more computational power.\n\n\t**LLE mode is not available on all platforms**\n\n- **4:3 Resolution** (**320x240**/ 640x480/ 960x720/ 1280x960/ 1600x1200/ 1920x1440/ 2240x1680/ 2560x1920/ 2880x2160/ 3200x2400/ 3520x2640/ 3840x2880)\n\n\tSelect the internal rendering resolution for 4:3 Aspect Ratio mode. The 'Aspect Ratio' core option must be set to 4:3 for this to have an effect.\n\tHigher values require more computational power.\n\n- **16:9 Resolution** (**640x360**/ 960x540/ 1280x720/ 1920x1080/ 2560x1440/ 3840x2160/ 7680x4320)\n\n\tSelect the internal rendering resolution for 16:9 Aspect Ratio mode. The 'Aspect Ratio' core option must be set to 16:9 or 16:9 adjusted for this to have an effect.\n\tHigher values require more computational power.\n\n- **Aspect Ratio** (**4:3**/16:9/16:9 adjusted)\n\n\tThis setting adjusts the aspect ratio of the video output. All N64 games support 4:3. Some games support 16:9 within game settings.\n\n- **Bilinear filtering mode** (**standard**/3point)\n\n\tBilinear filtering: Textures will use standard PC-style bilinear filtering.\n\t3 point: Textures will be filtered more like the N64. The result is less smooth but more accurate.\n\n- **MSAA level** (0/2/4/8/16)\n\n\tEnable/Disable MultiSampling Anti-aliasing (0=off, 2,4,8,16=quality).\n\n\t**This core option is not available on all platforms.**\n\n- **Framebuffer Emulation** (**True**/False)\n\n\tEnable the framebuffer emulation.\n\tFrame buffer emulation is a set of techniques used to emulate manipulations with color and depth buffer areas on the real console.\n\tUnchecking this option disables many effects including cropping, aspect ratio, N64 resolution factor and more. Do not uncheck this option unless you have performance issues.\n\n- **Color buffer to RDRAM** (**Async**/Sync/Off)\n\n\tUsed with the framebuffer emulation.\n\tFrame buffer copy is used for some effects (e.g. TV monitor effect where TV shows part of the displayed picture).\n\tIn some games GLideN64 cannot detect when the game uses the frame buffer.\n\tWith these options, you can have GLideN64 copy each frame of your video cards frame buffer to N64 memory.\n\tOff: Disable copying buffers from video card.\n\tSynchronous: Effects are detected for all games, but it can be slow. Use for games where Asynchronous does not work.\n\tAsynchronous: Effects are detected for most games (best choice).\n\n\tThe default setting is dependent on your platform.\n\n- **Depth buffer to RDRAM** (**Software**/FromMem/Off)\n\n\tUsed with the framebuffer emulation.\n\tThe depth buffer is used to emulate some effects (e.g. coronas).\n\tOff: Depth buffer is disabled.\n\tFromMem: Your video card’s depth buffer is copied to N64 memory each frame, which can be slow on some games.\n\tSoftware: Generally faster than copying from VRAM, but the result can be imperfect.\n\n- **Hardware per-pixel lighting** (**False**/True)\n\n\tIn N64 games lighting is calculated per vertex.\n\tThis option enables hardware per-pixel lighting calculation known as Phong shading, which provides smoother and more realistic lighting.\n\tPer-vertex lighting is instead calculated via software. HLE only.\n\n- **Continuous texrect coords** (**Off**/Auto/Force)\n\n\tIn some games the coordinates for parts of 2D elements are not aligned: there is a half-pixel split between adjacent elements.\n\tWhen rendering at the N64’s original resolution it is not visible, but when the image is scaled up it results in black lines.\n\tThis option attempts to connect these 2D elements.\n\n- **Native res. 2D texrects** (**False**/True)\n\tWhen checked, 2D elements are rendered at the N64s resolution before copying them to output.\n\tThis usually eliminates display issues with 2D elements, but it can be slow.\n\tThis option uses heuristics to detect adjacent 2D elements that does not work for every game.\n\n- **Less accurate blending mode** (**True**/False)\n\n\tDo not use shaders to emulate N64 blending modes. Works faster on slow GPU. It can cause glitches.\n\tThe default setting is dependent on your platform.\n\n- **GPU shader depth write** (**False**/True)\n\n\tEnable writing of fragment depth. Some mobile GPUs do not support it, thus it made optional.\n\tThe default setting is dependent on your platform.\n\n- **Cache GPU Shaders** (**True**/False)\n\n\tWhen the option is enabled, plugin saves all new created shaders in a file.\n\tWhen user starts that game again, plugin loads all previously compiled shaders from that file and further gameplay goes smooth.\n\n- **Crop Mode** (**Auto**/Off)\n\n\tIts purpose is to remove black borders, which many N64 games add around image. In auto mode plugins tries to detect empty space and remove it.\n\tIt works only if frame buffer emulation is enabled, as all other post-processing filters.\n\n- **Texture filter** (**None**/Smooth filtering 1/Smooth filtering 2/Smooth filtering 3/Smooth filtering 4/Sharp filtering 1/Sharp filtering 2)\n\n\tThis filter smooths or sharpens textures. There are four smoothing filters and two sharpening filters. The higher the number, the stronger the effect.\n\tPerformance may be affected depending on the game and/or your device.\n\n- **Texture Enhancement** (**None**/As Is/X2/X2SAI/HQ2X/HQ2XS/LQ2X/LQ2XS/HQ4X/2xBRZ/3xBRZ/4xBRZ/5xBRZ/6xBRZ)\n\n\tFilter applied to textures. Depending on which filter, they may cause performance problems.\n\tWhen AS IS is selected, textures are saved to the cache as-is; this improves performance in games that load many textures;\n\tunset Filer background textures for the best performance.\n\n- **Filter background textures** (**True**/False)\n\n\tThis option skips texture enhancements for long, narrow textures that are usually used for backgrounds. This may save texture memory and improve performance.\n\tSet true unless Enhancement mode is set to AS IS.\n\n- **Use High-Res textures** (**False**/True)\n\n\tEnable the high resolution textures. Usage of hires textures is explained above.\n\n- **Use High-Res Full Alpha Channel** (**False**/True)\n\n\tWhen this option is selected, GlideN64 will check how the texture’s alpha channel was designed and will select the most appropriate format.\n\tThis gives texture pack designers freedom to use semi-transparent textures.\n\tClear this option for older or poorly designed texture packs.\n\tRecommended for newer texture packs.\n\n- **Analog Deadzone (percent)** (**15**/20/25/30/0/5/10)\n\n\tThe minimum absolute value of SDL analog Joystick axis to move the N64 controller axis value\n\n- **Analog Sensitivity (percent)** (**100**/95/90/85/80/105/110)\n\n\tThe sensitivity of the analog Joystick.\n\n- **Right C Button** (**C1**/C2/C3/C4)\n\n\tAwaiting description.\n\n- **Left C Button** (**C2**/C3/C4/C1)\n\n\tAwaiting description.\n\n- **Down C Button** (**C3**/C4/C1/C2)\n\n\tAwaiting description.\n\n- **Up C Button** (**C4**/C1/C2/C3)\n\n\tAwaiting description,\n\n- **Player 1 Pak** (**memory**/rumble/none)\n\n\tChoose what Pak has been inserted in the player 1 controller.\n\n- **Player 2 Pak** (**none**/memory/rumble)\n\n\tChoose what Pak has been inserted in the player 2 controller.\n\n- **Player 3 Pak** (**none**/memory/rumble)\n\n\tChoose what Pak has been inserted in the player 3 controller.\n\n- **Player 4 Pak** (**none**/memory/rumble)\n\n\tChoose what Pak has been inserted in the player 4 controller.\n\n- **Count Per Op** (0/1/2/3)\n\n\tForce the number of cycle per emulated instructions.\n\n## Controllers\n\n### Device types\n\nThe Mupen64plus-Next core supports the following device type(s) in the controls menu, bolded device types are the default for the specified user(s):\n\n#### User 1 - 4 device types\n\n- None - Input disabled.\n- **Controller** - Joypad\n\n### Rumble support\n\nRumble only works in the Mupen64plus-Next core when\n\n- The content being ran has rumble support.\n- The joypad input driver being used has rumble support. (e.g. Xinput)\n- The joypad device being used has rumble support.\n- The 'Player # Pak' core options are set to rumble for the respective players.\n\n[List of Nintendo 64 games with Rumble Pak support](http://nintendo.wikia.com/wiki/List_of_Nintendo_64_games_with_Rumble_Pak_support)\n\n### Controller tables\n\n#### Joypad and analog device type table\n\n| User 1 - 4 Remap descriptors | RetroPad Inputs |\n|-------------------------------|----------------------------------------------|\n| A Button (C3) |  |\n| B Button (C2) |  |\n| START Button |  |\n| Up (digital) |  |\n| Down (digital) |  |\n| Left (digital) |  |\n| Right (digital) |  |\n| (C1) |  |\n| (C4) |  |\n| L-Trigger |  |\n| R-Trigger |  |\n| Z-Trigger |  |\n| C Buttons Mode |  |\n| Control Stick X |  X |\n| Control Stick Y |  Y |\n| C Buttons X |  X |\n| C Buttons Y |  Y |\n\n## Compatibility\n\nAwaiting description.\n\n## External Links\n\n- [Libretro Mupen64plus-Next Core info file](https://github.com/libretro/libretro-super/blob/master/dist/info/mupen64plus_next_libretro.info)\n- [Libretro Mupen64plus-Next Github Repository](https://github.com/libretro/mupen64plus-libretro-nx)\n- [Report Libretro Mupen64plus-Next Core Issues Here](https://github.com/libretro/mupen64plus-libretro-nx/issues)\n- [Official Mupen64Plus Website](http://www.mupen64plus.org/)\n- [Official Mupen64Plus Github Organization](https://github.com/mupen64plus)\n- [Gameplay Videos](https://www.youtube.com/playlist?list=PLRbgg4gk_0IeBgJ8wFAH6Oh9aDNC-MBuU)\n\n## See also\n"
},
{
"path": "docs/library/neko_project_ii_kai.md",
"content": "# NEC - PC-98 (Neko Project II Kai)\n\n## Background\n\nNP2kai is a PC-9801 series core. The NEC PC-9800, also known as the PC-98, were a family of computers made by NEC throughout 1982 to 2000. Despite using Intel x86 chips, MS-DOS and Windows OS, and many other superficial similarities, the series is not IBM compatible. Some PC-98 software may work on an IBM or vice versa, but this is very YMMV. In fact, the introduction of a native Japanese version of standard MS-DOS in the early 90s and subsequent entry of cheaper foreign IBM clones in the Japanese market was the nail in the coffin for the PC-98. They were not released or marketed outside of Japan (besides few attempts such as APC-III and PC-9801FC), but still useful for playing early visual novels and Touhou games.\n\n### Author/License\n\nThe Neko Project II Kai core has been authored by\n\n- Neko Project II Team\n- Tomohiro Yoshidomi\n\nThe Neko Project II Kai core is licensed under\n\n- [MIT](https://github.com/AZO234/NP2kai/blob/master/LICENSE)\n\nA summary of the licenses behind RetroArch and its cores can be found [here](../development/licenses.md).\n\n## Extensions\n\nContent that can be loaded by the Neko Project II Kai core have the following file extensions:\n\n- .d98\n- .zip\n- .98d\n- .fdi\n- .fdd\n- .2hd\n- .tfd\n- .d88\n- .88d\n- .hdm\n- .xdf\n- .dup\n- .cmd\n- .hdi\n- .thd\n- .nhd\n- .hdd\n- .hdn\n\n## BIOS\n\nRequired or optional firmware files go in the frontend's system directory.\n\n!!! attention\n\tThese firmware files need to be in a directory named 'np2kai' in the frontend's system directory.\n\n| Filename | Description | md5sum |\n|:-------------------:|:---------------------------------:|:--------------------------------:|\n| np2kai/font.bmp | Needed to display text - Required | 7da1e5b7c482d4108d22a5b09631d967 |\n| np2kai/FONT.ROM | Alt font file - Required | 2af6179d7de4893ea0b705c00e9a98d6 |\n| np2kai/bios.rom | - Required | e246140dec5124c5e404869a84caefce |\n| np2kai/itf.rom | - Required | e9fc3890963b12cf15d0a2eea5815b72 |\n| np2kai/sound.rom | - Required | caf90f22197aed6f14c471c21e64658d |\n| np2kai/bios9821.rom | - Optional | |\n| np2kai/d8000.rom | - Optional | |\n| np2kai/2608_BD.WAV | YM2608 RYTHM sample - Optional | |\n| np2kai/2608_SD.WAV | YM2608 RYTHM sample - Optional | |\n| np2kai/2608_TOP.WAV | YM2608 RYTHM sample - Optional | |\n| np2kai/2608_HH.WAV | YM2608 RYTHM sample - Optional | |\n| np2kai/2608_TOM.WAV | YM2608 RYTHM sample - Optional | |\n| np2kai/2608_RIM.WAV | YM2608 RYTHM sample - Optional | |\n\n## Features\n\nFrontend-level settings or features that the Neko Project II Kai core respects.\n\n| Feature | Supported |\n|-------------------|:---------:|\n| Restart | ✔ |\n| Screenshots | ✔ |\n| Saves | ✕ |\n| States | ✔ |\n| Rewind | ✔ |\n| Netplay | ✔ |\n| Core Options | ✔ |\n| [Memory Monitoring (achievements)](../guides/memorymonitoring.md) | ✕ |\n| RetroArch Cheats | ✕ |\n| Native Cheats | ✕ |\n| Controls | ✔ |\n| Remapping | ✕ |\n| Multi-Mouse | ✕ |\n| Rumble | ✕ |\n| Sensors | ✕ |\n| Camera | ✕ |\n| Location | ✕ |\n| Subsystem | ✕ |\n| [Softpatching](../guides/softpatching.md) | ✕ |\n| Disk Control | ✔ |\n| Username | ✕ |\n| Language | ✕ |\n| Crop Overscan | ✕ |\n| LEDs | ✕ |\n\n### Directories\n\nThe Neko Project II Kai core's directory name is 'Neko Project II kai'\n\nThe Neko Project II Kai core saves/loads to/from these directories.\n\n**Frontend's Home directory**\n\n- .bmp (???)\n\n**Frontend's State directory**\n\n- 'content-name'.state# (State)\n\n**Frontend's System directory**\n\n- np2/np2.cfg (Neko Project II Config file)\n\n### Geometry and timing\n\n- The Neko Project II Kai core's core provided FPS is `56.4`.\n- The Neko Project II Kai core's core provided sample rate is `44100Hz`.\n- The Neko Project II Kai core's core provided aspect ratio is `8/5`.\n\n## Usage\n\nNP2 menu can FDD/HDD swap.\n\nMouse is cuptured (hidden/show toggle) by F11 key.\n\nNP2 menu is opened when F12 key\n\nKeep 'end' key down when booting for machine options.\n\nHow to set GDC 2.5MHz/5MHz?\n\n1. Press End key(assigned Help key) + reset\n2. Select 'ディップスイッチ2'(DIP switch 2)\n\nHow to use CD drive with MS-DOS 6.2?\n\nWrite follow to CONFIG.SYS.\n\n```\n LASTDRIVE=Z\n DEVICE=A:¥DOS¥NECCDD.SYS /D:CD_101\n```\n\nAnd write follow to AUTOEXEC.BAT.\n\n```\n A:¥DOS¥MSCDEX.EXE /D:CD_101 /L:Q\n```\n\nThen, you'll can use CD drive as Q drive.\n\n## Core options\n\nThe Neko Project II Kai core has the following option(s) that can be tweaked from the core options menu. The default setting is bolded.\n\nSettings with (Restart) means that core has to be closed for the new setting to be applied on next launch.\n\n- **PC Model (Restart)** [np2kai_model] (**PC-9801VX**/PC-286/PC-9801VM)\n\n\tAwaiting description.\n\n- **CPU Base Clock (Restart)** [np2kai_clk_base] (**2.4576 MHz**/1.9968 MHz)\n\n\tAwaiting description.\n\n- **CPU Clock Multiplier (Restart)** [np2kai_clk_mult] (**4**/5/6/8/10/12/16/20/24/30/36/40/42/1/2)\n\n\tAwaiting description.\n\n- **RAM Size (Restart)* [np2kai_ExMemory] (**3**/7/11/13/16/32/64/120/230/1)\n\n\tAwaiting description.\n\n- **GDC** [np2kai_gdc] (**uPD7220**/uPD72020)\n\n\tAwaiting description.\n\n- **Skipline Revisions** [np2kai_skipline] (**Full 255 lines**/ON/OFF)\n\n\tAwaiting description.\n\n- **Real Palettes** [np2kai_realpal] (**OFF**/ON)\n\n\tAwaiting description.\n\n- **LCD** [np2kai_lcd ] (**OFF**/ON)\n\n\tAwaiting description.\n\n- **Sound Board (Restart)** [np2kai_SNDboard] (**PC9801-86**/PC9801-26K + 86/PC9801-86 + Chibi-oto/PC9801-118/PC9801-86 + Mate-X PCM(B460)/Mate-X PCM(B460)/Chibi-oto/Speak Board/Spark Board/Sound Orchestra/Sound Orchestra-V/Sound Blaster 16/AMD-98/Otomi-chanx2/Otomi-chanx2 + 86/None/PC9801-14/PC9801-26K)\n\n\t26K: for old games. 86: for newer games.\n\n- **JastSound** [np2kai_jast_snd] (**OFF**/ON)\n\n\tAwaiting description.\n\n- **Sound Generator** [np2kai_usefmgen] (**fmgen**/Default)\n\n\tAwaiting description.\n\n- **Volume FM** [np2kai_volume_F] (0 to 128 in increments of 4. **64 is default**.)\n\n\tAwaiting description.\n\n- **Volume SSG** [np2kai_volume_S] (0 to 128 in increments of 4. **64 is default**.)\n\n\tAwaiting description.\n\n- **Volume ADPCM** [np2kai_volume_A] (0 to 128 in increments of 4. **64 is default**.)\n\n\tAwaiting description.\n\n- **Volume PCM** [np2kai_volume_P] (0 to 128 in increments of 4. **64 is default**.)\n\n\tAwaiting description.\n\n- **Volume RHYTHM** [np2kai_volume_R] (0 to 128 in increments of 4. **64 is default**.)\n\n\tAwaiting description.\n\n- **Volume CD-DA** [np2kai_volume_C] (0 to 255 in increments of 8. **128 is default**.)\n\n\tAwaiting description.\n\n- **Floppy Seek Sound** [np2kai_Seek_Snd] (**OFF**/ON)\n\n\tAwaiting description.\n\n- **Volume Floppy Seek** [np2kai_Seek_Vol] (0 to 128 in increments of 4. **80 is default**.)\n\n\tAwaiting description.\n\n- **Volume Beep** [np2kai_BEEP_vol] (**3**/0/1/2)\n\n\tAwaiting description.\n\n- **Joypad to Mouse Mapping** [np2kai_joy2mouse] (**OFF**/ON)\n\n\tAwaiting description.\n\n- **Joypad to Keyboard Mapping** [np2kai_joy2key] (**OFF**/Arrows/Keypad)\n\n\tAwaiting description.\n\n## Controllers\n\nThe Neko Project II Kai core supports the following device type(s) in the controls menu, bolded device types are the default for the specified user(s):\n\n### User 1 device types\n\n- None - Doesn't disable input.\n- **RetroPad** - Joypad\n- RetroPad w/Analog - Joypad - There's no reason to switch to this.\n\n### Controller tables\n\n#### Joypad\n\n!!! attention\n\tThe Joy2Key and Joy2Mouse modes can be activated with the 'Joypad to Mouse Mapping' and 'Joypad to Keyboard Mapping' core options.\n\n| RetroPad Inputs | Joy2Key (Arrows) | Joy2Key (Keypad) | Joy2Mouse |\n|----------------------------------------------|------------------|----------------------------|----------------------|\n|  | Z key | Z key | Mouse left button |\n|  | Left control key | Left control key | |\n|  | Escape key | Escape key | |\n|  | Return key | Return key | |\n|  | Up arrow key | Keypad Up arrow key (8) | Move mouse up |\n|  | Down arrow key | Keypad down arrow key (2) | Move mouse down |\n|  | Left arrow key | Keypad left arrow key (4) | Move mouse left |\n|  | Right arrow key | Keypad right arrow key (6) | Move mouse right |\n|  | X key | X key | Mouse right button |\n|  | Space key | Space key | |\n|  | Backspace key | Backspace key | Increase mouse speed |\n|  | Right shift key | Right shift key | |\n|  | NP2 menu key | NP2 menu key | NP2 menu key |\n\n#### Keyboard\n\n| RetroKeyboard Inputs | NP2 Keyboard Inputs |\n|------------------------------|------------------------------------|\n| Keyboard Backspace | NKEY_BACKSPACE |\n| Keyboard Tab | NKEY_TAB |\n| Keyboard Return | NKEY_RETURN |\n| Keyboard Pause | NKEY_STOP |\n| Keyboard Escape | NKEY_ESC |\n| Keyboard Space | NKEY_SPACE |\n| Keyboard Quote ' | NKEY_COLON |\n| Keyboard Comma , | NKEY_COMMA |\n| Keyboard Minus - | NKEY_MINUS |\n| Keyboard Period . | NKEY_DOT |\n| Keyboard Slash / | NKEY_SLASH |\n| Keyboard 0 | NKEY_0 |\n| Keyboard 1 | NKEY_1 |\n| Keyboard 2 | NKEY_2 |\n| Keyboard 3 | NKEY_3 |\n| Keyboard 4 | NKEY_4 |\n| Keyboard 5 | NKEY_5 |\n| Keyboard 6 | NKEY_6 |\n| Keyboard 7 | NKEY_7 |\n| Keyboard 8 | NKEY_8 |\n| Keyboard 9 | NKEY_9 |\n| Keyboard Colon : | NKEY_COLON |\n| Keyboard Semicolon ; | NKEY_SEMICOLON |\n| Keyboard Equals = | NKEY_CIRCUMFLEX |\n| Keyboard At @ | NKEY_ATMARK |\n| Keyboard Left Bracket [ | NKEY_LEFTSBRACKET |\n| Keyboard Backslash \\ | NKEY_YEN |\n| Keyboard Right Bracket ] | NKEY_RIGHTSBRACKET |\n| Keyboard Caret ^ | NKEY_CIRCUMFLEX\t |\n| Keyboard Underscore _ | NKEY_UNDERSCORE |\n| Keyboard Backquote ` | NKEY_ATMARK |\n| Keyboard a | NKEY_A |\n| Keyboard b | NKEY_B |\n| Keyboard c | NKEY_C |\n| Keyboard d | NKEY_D |\n| Keyboard e | NKEY_E |\n| Keyboard f | NKEY_F |\n| Keyboard g | NKEY_G |\n| Keyboard h | NKEY_H |\n| Keyboard i | NKEY_I |\n| Keyboard j | NKEY_J |\n| Keyboard k | NKEY_K |\n| Keyboard l | NKEY_L |\n| Keyboard m | NKEY_M |\n| Keyboard n | NKEY_N |\n| Keyboard o | NKEY_O |\n| Keyboard p | NKEY_P |\n| Keyboard q | NKEY_Q |\n| Keyboard r | NKEY_R |\n| Keyboard s | NKEY_S |\n| Keyboard t | NKEY_T |\n| Keyboard u | NKEY_U |\n| Keyboard v | NKEY_V |\n| Keyboard w | NKEY_W |\n| Keyboard x | NKEY_X |\n| Keyboard y | NKEY_Q |\n| Keyboard z | NKEY_Z |\n| Keyboard Delete | NKEY_DEL |\n| Keyboard Keypad 0 | NKEY_KP_0 |\n| Keyboard Keypad 1 | NKEY_KP_1 |\n| Keyboard Keypad 2 | NKEY_KP_2 |\n| Keyboard Keypad 3 | NKEY_KP_2 |\n| Keyboard Keypad 4 | NKEY_KP_4 |\n| Keyboard Keypad 5 | NKEY_KP_5 |\n| Keyboard Keypad 6 | NKEY_KP_6 |\n| Keyboard Keypad 7 | NKEY_KP_7 |\n| Keyboard Keypad 8 | NKEY_KP_8 |\n| Keyboard Keypad 9 | NKEY_KP_9 |\n| Keyboard Keypad Period . | NKEY_KP_DOT |\n| Keyboard Keypad Divide / | NKEY_KP_SLASH |\n| Keyboard Keypad Multiply * | NKEY_KP_ASTERISK |\n| Keyboard Keypad Minus - | NKEY_KP_MINUS |\n| Keyboard Keypad Plus + | NKEY_KP_PLUS |\n| Keyboard Keypad Enter | NKEY_RETURN |\n| Keyboard Keypad Equals = | NKEY_KP_EQUAL |\n| Keyboard Up | NKEY_UP |\n| Keyboard Down | NKEY_DOWN |\n| Keyboard Right | NKEY_RIGHT |\n| Keyboard Left | NKEY_LEFT |\n| Keyboard Insert | NKEY_INS |\n| Keyboard Home | NKEY_HOMECLR |\n| Keyboard End | NKEY_HELP |\n| Keyboard Page Up | NKEY_ROLLUP |\n| Keyboard Page Down | NKEY_ROLLDOWN |\n| Keyboard F1 | NKEY_F1 |\n| Keyboard F2 | NKEY_F2 |\n| Keyboard F3 | NKEY_F3 |\n| Keyboard F4 | NKEY_F4 |\n| Keyboard F5 | NKEY_F5 |\n| Keyboard F6 | NKEY_F6 |\n| Keyboard F7 | NKEY_F7 |\n| Keyboard F8 | NKEY_F8 |\n| Keyboard F9 | NKEY_F9 |\n| Keyboard F10 | NKEY_F10 |\n| Keyboard F11 | Mouse capture (hidden/show toggle) |\n| Keyboard F12 | NP2 menu key |\n| Keyboard Caps Lock | NKEY_CAPS |\n| Keyboard Right Shift | NKEY_SHIFT |\n| Keyboard Left Shift | NKEY_SHIFT |\n| Keyboard Right Control | NKEY_CTRL |\n| Keyboard Left Control | NKEY_CTRL |\n| Keyboard Right Alt | NKEY_KANA |\n| Keyboard Left Alt | NKEY_KANA |\n| Keyboard Print | NKEY_COPY |\n\nSupported combinations\n\n- If you use 104 western keyboard, to input underscore(_), press Shift+right Ctrl.\n\n#### Mouse\n\n| RetroMouse Inputs | NP2 Mouse Inputs |\n|-----------------------------------------------------|--------------------|\n|  Mouse Cursor | Mouse Cursor |\n|  Mouse 1 | Mouse Left Button |\n|  Mouse 2 | Mouse Right Button |\n|  Mouse 3 | NP2 menu key |\n\n## Compatibility\n\nAwaiting description.\n\n## External Links\n\n- [Official Neko Project II Kai Website](http://domisan.sakura.ne.jp/article/np2kai/np2kai.html)\n- [Original Neko Project II Website](http://www.yui.ne.jp/np2/)\n- [Libretro Neko Project II Kai Core info file](https://github.com/libretro/libretro-super/blob/master/dist/info/np2kai_libretro.info)\n- [Libretro Neko Project II Kai Repository](https://github.com/AZO234/NP2kai)\n- [Report Libretro Neko Project II Kai Core Issues Here](https://github.com/AZO234/NP2kai/issues)\n"
},
{
"path": "docs/library/nestopia.md",
"content": "# Nintendo - NES / Famicom (Nestopia)\n\n## Background\n\nNestopia is a cycle accurate emulator for the NES/Famicom.\nThis is the libretro port of the Nestopia emulator, based on the de facto\nupstream Nestopia JG fork. The libretro port contains an additional overclocking feature.\n\n### Author/License\n\nThe Nestopia core has been authored by\n\n- Martin Freij\n- R. Danbrook\n- [Rupert Carmichael (carmiker)](https://github.com/carmiker)\n\nThe Nestopia core is licensed under\n\n- [GPLv2](https://github.com/libretro/nestopia/blob/master/COPYING)\n\nA summary of the licenses behind RetroArch and its cores can be found [here](../development/licenses.md).\n\n## Extensions\n\nContent that can be loaded by the Nestopia core have the following file extensions:\n\n- .nes\n- .fds\n- .unf\n- .unif\n\n## Databases\n\nRetroArch database(s) that are associated with the Nestopia core:\n\n- [Nintendo - Nintendo Entertainment System](https://github.com/libretro/libretro-database/blob/master/rdb/Nintendo%20-%20Nintendo%20Entertainment%20System.rdb)\n- [Nintendo - Family Computer Disk System](https://github.com/libretro/libretro-database/blob/master/rdb/Nintendo%20-%20Family%20Computer%20Disk%20System.rdb)\n\n## BIOS\n\nRequired or optional firmware files go in the frontend's system directory.\n\n!!! warning\n\tPrior to version 1.50, it required the [NstDatabase.xml](#nstdatabasexml) file for general proper emulation. In version 1.50 or higher, it's baked into the core.\n\n| Filename | Description | md5sum |\n|:---------------:|:-----------------------------------------------------------------------------:|:--------------------------------:|\n| disksys.rom | Family Computer Disk System BIOS - Required for Famicom Disk System emulation | ca30b50f880eb660a320674ed365ef7a |\n\n## Features\n\nFrontend-level settings or features that the Nestopia core respects.\n\n| Feature | Supported |\n|-------------------|:---------:|\n| Restart | ✔ |\n| Screenshots | ✔ |\n| Saves | ✔ |\n| States | ✔ |\n| Rewind | ✔ |\n| Netplay | ✔ |\n| Core Options | ✔ |\n| [Memory Monitoring (achievements)](../guides/memorymonitoring.md) | ✕ |\n| RetroArch Cheats | ✔ |\n| Native Cheats | ✕ |\n| Controls | ✔ |\n| Remapping | ✔ |\n| Multi-Mouse | ✕ |\n| Rumble | ✕ |\n| Sensors | ✕ |\n| Camera | ✕ |\n| Location | ✕ |\n| Subsystem | ✕ |\n| [Softpatching](../guides/softpatching.md) | ✔ |\n| Disk Control | ✕ |\n| Username | ✕ |\n| Language | ✕ |\n| Crop Overscan | ✕ |\n| LEDs | ✕ |\n\n### Directories\n\nThe Nestopia core's internal core name is 'Nestopia'\n\nThe Nestopia core saves/loads to/from these directories.\n\n**Frontend's Save directory**\n\n- 'content-name'.srm (Cartridge battery save)\n\n**Frontend's State directory**\n\n- 'content-name'.state# (State)\n\n**Frontend's System directory**\n\n- custom.pal (Custom palette file)\n\n### Geometry and timing\n\n- The Nestopia core's core provided FPS is (FPS)\n- The Nestopia core's core provided sample rate is 44100 Hz\n- The Nestopia core's core provided aspect ratio is dependent on the ['Preferred aspect ratio' core option](#core-options).\n\n### NstDatabase.xml\n\nThe Nestopia core relies on the internal database (built from the NstDatabase.xml file) for\n\n- Games that support a custom mapper\n- Games that support multitap accessories\n- Games that support the Zapper\n- ROM Hacks\n- Famicom Disk System games\n- General proper emulation of games\n\n### Custom color palettes\n\nTo use custom color palettes in the Nestopia core, the custom color palette file you want to use must be in RetroArch's system directory.\n\nMake sure the custom palette file is named 'custom.pal'\n\nAlso, the 'Palette' core option must be set to custom.\n\nCustom color palettes for the NES can be generated with either of these tools.\n\n- [Bisqwit's NTSC NES palette generator](http://bisqwit.iki.fi/utils/nespalette.php)\n- [Drag's NTSC NES palette generator](http://drag.wootest.net/misc/palgen.html)\n\n## Core options\n\nThe Nestopia core has the following option(s) that can be tweaked from the core options menu. The default setting is bolded.\n\nSettings with (Restart) means that core has to be closed for the new setting to be applied on next launch.\n\n- **Blargg NTSC filter** [nestopia_blargg_ntsc_filter] (**disabled**|composite|svideo|rgb|monochrome)\n\n\tEnable Blargg NTSC filters.\n\n!!! attention \"Disclaimer\"\n\tThese 'Blargg NTSC filter' core option screenshots have been taken with the 'Palette' core option set to cxa2025as.\n\n??? note \"Blargg NTSC filter - Off\"\n\t\n\n??? note \"Blargg NTSC filter - composite\"\n\t\n\n??? note \"Blargg NTSC filter - svideo\"\n\t\n\n??? note \"Blargg NTSC filter - rgb\"\n\t\n\n??? note \"Blargg NTSC filter - monochrome\"\n\t\n\n- **Palette** [nestopia_palette] (**cxa2025as**|consumer|canonical|alternative|rgb|pal|composite-direct-fbx|pvm-style-d93-fbx|ntsc-hardware-fbx|nes-classic-fbx-fs|raw|custom)\n\n\tChoose which color palette is going to be used.\n\n!!! attention \"Disclaimer\"\n\tThese 'Palette' core option screenshots have been taken with the 'Blargg NTSC filter' core option set to Off.\n\n??? note \"Palette - cxa2025as\"\n\t\n\n??? note \"Palette - consumer\"\n\t\n\n??? note \"Palette - canonical\"\n\t\n\n??? note \"Palette - alternative\"\n\t\n\n??? note \"Palette - rgb\"\n\t\n\n??? note \"Palette - pal\"\n\t\n\n??? note \"Palette - composite-direct-fbx\"\n\t\n\n??? note \"Palette - pvm-style-d93-fbx\"\n\t\n\n??? note \"Palette - ntsc-hardware-fbx\"\n\t\n\n??? note \"Palette - nes-classic-fbx-fs\"\n\t\n\n??? note \"Palette - raw\"\n\t\n\n- **Remove Sprite Limit** [nestopia_nospritelimit] (**disabled**|enabled)\n\n\tRemove 8-sprites-per-scanline hardware limit.\n\n- **CPU Speed (Overclock)** [nestopia_overclock] (**1x**|2x)\n\n\tOverclock the emulated CPU.\n\n- **4 Player Adapter** [nestopia_select_adapter] (**auto**|ntsc|famicom)\n\n\tManually select a 4 Player Adapter if needed. Some games will not recognize the adapter correctly through the internal database, this option should help fix that.\n\n- **FDS Auto Insntert** [nestopia_fds_auto_insert] (**enabled**|disabled)\n\n\tAutomatically insert first FDS disk on reset.\n\n- **Mask Overscan (Vertical)** [nestopia_overscan_v] (**enabled**|disabled)\n\n\tMask out (vertically) the potentially random glitchy video output that would have been hidden by the bezel around the edge of a standard-definition television screen.\n\n??? note \"Mask Overscan (Vertical) - On\"\n\t\n\n??? note \"Mask Overscan (Vertical) - Off\"\n\t\n\n- **Mask Overscan (Horizontal)** [nestopia_overscan_h] (**disabled**|enabled)\n\n\tMask out (horizontally) the potentially random glitchy video output that would have been hidden by the bezel around the edge of a standard-definition television screen.\n\n??? note \"Mask Overscan (Horizontal) - Off\"\n\t\n\n??? note \"Mask Overscan (Horizontal) - On\"\n\t\n\n- **Preferred aspect ratio** [nestopia_aspect] (**auto**|ntsc|pal|4:3)\n\n\tChoose the preferred aspect ratio. RetroArch's aspect ratio must be set to Core provided in the Video settings. 'auto' will use the [internal database](#nstdatabasexml) for aspect ratio autodetection.\n\n??? note \"Preferred aspect ratio - ntsc\"\n\t\n\n??? note \"Preferred aspect ratio - pal\"\n\t\n\n??? note \"Preferred aspect ratio - 4:3\"\n\t\n\n- **Game Genie Sound Distortion** [nestopia_genie_distortion] (**disabled**|enabled)\n\n\tThe Game Genie cheat device could inadvertently introduce sound distortion in games. By enabling this, you can simulate the distortion it would add to a game's sound.\n\n- **System Region** [nestopia_favored_system] (**auto**|ntsc|pal|famicom|dendy)\n\n\tChoose which region the system is from. 'auto' will use the internal database for region autodetection.\n\n- **RAM Power-on State** [nestopia_ram_power_state] (**0x00**|0xFF|random)\n\n\tAwaiting description.\n\n- **Turbo Pulse Speed** [nestopia_turbo_pulse] (**2**|3|4|5|6|7|8|9)\n\n\tSet the turbo pulse speed for the Turbo B and Turbo A buttons.\n\n## Controllers\n\nThe Nestopia core supports the following device type(s) in the controls menu, bolded device types are the default for the specified user(s):\n\n### User 1 - 4 device types\n\n- None - Disables input.\n- **Auto** - Automatically detects the device to use based on the internal database.\n- Gamepad - Joypad\n- Arkanoid - Arkanoid paddle - This should be automatic from the internal database, but this can be changed to Gamepad if you'd prefer using a joypad rather than a paddle. (Port 2 only)\n- Zapper - Lightgun - The Nestopia core can emulate Zapper inputs. This is generally done automatically based off of the internal database, but can be manually selected as a device type. (Port 2 only)\n\n### Multitap support\n\nThe Nestopia core uses the internal database to detect which games have multitap support.\n\n### Controller tables\n\n#### Joypad\n\n\n\n| User 1 Remap descriptors | RetroPad Inputs |\n|--------------------------|---------------------------------------------|\n| B |  |\n| Turbo B |  |\n| Select |  |\n| Start |  |\n| D-Pad Up |  |\n| D-Pad Down |  |\n| D-Pad Left |  |\n| D-Pad Right |  |\n| A |  |\n| Turbo A |  |\n| (FDS) Disk Side Change |  |\n| (FDS) Eject Disk |  |\n| (VSSystem) Coin 1 |  |\n| (VSSystem) Coin 2 |  |\n| (Famicom) Microphone |  |\n\n| User 2 - 4 Remap descriptors | RetroPad Inputs |\n|------------------------------|---------------------------------------------|\n| B |  |\n| Turbo B |  |\n| Select |  |\n| Start |  |\n| D-Pad Up |  |\n| D-Pad Down |  |\n| D-Pad Left |  |\n| D-Pad Right |  |\n| A |  |\n| Turbo A |  |\n| (FDS) Disk Side Change |  |\n| (FDS) Eject Disk |  |\n\n#### Lightgun\n\n| RetroLightgun Inputs | Zapper |\n|--------------------------------------------------------|------------------|\n|  Gun Crosshair | Zapper Crosshair |\n| Gun Trigger | Zapper Trigger |\n| Gun Aux B | Zapper Light On |\n\n## Compatibility\n\nThe Nestopia core is compatible with 100% of officially released titles, and the vast majority of homebrew and hacks.\n\n## External Links\n\n- [Upstream Nestopia JG Repository](https://gitlab.com/jgemu/nestopia)\n- [Libretro Nestopia Core info file](https://github.com/libretro/libretro-super/blob/master/dist/info/nestopia_libretro.info)\n- [Libretro Nestopia Github Repository](https://github.com/libretro/nestopia)\n- [Report Libretro Nestopia Core Issues Here](https://github.com/libretro/nestopia/issues)\n\n### See also\n\n#### Nintendo - Family Computer Disk System\n\n- [Nintendo - NES / Famicom (FCEUmm)](fceumm.md)\n- [Nintendo - NES / Famicom (Mesen)](mesen.md)\n\n#### Nintendo - Nintendo Entertainment System\n\n- [Nintendo - NES / Famicom (bnes)](bnes.md)\n- [Nintendo - NES / Famicom (Emux NES)](emux_nes.md)\n- [Nintendo - NES / Famicom (FCEUmm)](fceumm.md)\n- [Nintendo - NES / Famicom (Mesen)](mesen.md)\n- [Nintendo - NES / Famicom (QuickNES)](quicknes.md)\n"
},
{
"path": "docs/library/nestopia_ue.md",
"content": "# Nintendo - NES / Famicom (Nestopia)\n\nClick on this link here to get redirected to the Nestopia page.\n"
},
{
"path": "docs/library/nside_balanced.md",
"content": "# Nintendo - SNES / Famicom (nSide Balanced)\n\n## Background\n\nA fork of higan v106 that reimplements the Balanced profile.\n\n### Author/License\n\nThe nSide Balanced core has been authored by\n\n- hex-usr\n\nThe nSide Balanced core is licensed under\n\n- [GPLv3](https://github.com/hex-usr/nSide/blob/master/gpl-3.0.txt)\n\nA summary of the licenses behind RetroArch and its cores can be found [here](../development/licenses.md).\n\n## Extensions\n\nContent that can be loaded by the nSide Balanced core have the following file extensions:\n\n- .sfc\n- .smc\n- .gb\n- .gbc\n- .bml\n- .rom\n\n## Databases\n\nRetroArch database(s) that are associated with the nSide Balanced core:\n\n- [Nintendo - Super Nintendo Entertainment System](https://github.com/libretro/libretro-database/blob/master/rdb/Nintendo%20-%20Super%20Nintendo%20Entertainment%20System%20Hacks.rdb)\n- [Nintendo - Super Nintendo Entertainment System Hacks](https://github.com/libretro/libretro-database/blob/master/rdb/Nintendo%20-%20Super%20Nintendo%20Entertainment%20System%20Hacks.rdb)\n- [Nintendo - Game Boy](https://github.com/libretro/libretro-database/blob/master/rdb/Nintendo%20-%20Game%20Boy.rdb)\n- [Nintendo - Game Boy Color](https://github.com/libretro/libretro-database/blob/master/rdb/Nintendo%20-%20Game%20Boy%20Color.rdb)\n\n## BIOS\n\nRequired or optional firmware files go in the frontend's system directory.\n\n!!! attention\n\tnSide Balanced uses split ROMS for special chip games.\n\n!!! attention\n\tFirmware files for SGB emulation need to be in directories called SGB1.sfc and SGB2.sfc in RetroArch's system directory. Look at the [Super GameBoy support section](#super-gameboy-support) for more information.\n\nNotable DSP1.mdDSP1B Games:\n\n- Super Mario Kart\n- Pilotwings\n\nNotable DSP2 Games:\n\n- Dungeon Master\n\nNotable DSP3 Games:\n\n- SD Gundam GX\n\nNotable DSP4 Games:\n\n- Top Gear 3000\n\nNotable Cx4 Games:\n\n- Mega Man X2\n- Mega Man X3\n\n| Filename | Description | md5sum |\n|:----------------------:|:--------------------------------------:|:--------------------------------:|\n| dsp1.data.rom | DSP1 co-processor firmware - Optional | 3d81b45fa0c2aa8b852dfb1ece7c0971 |\n| dsp1.program.rom | DSP1 co-processor firmware - Optional | ae209fbe789fbf11a48aea5ab1197321 |\n| dsp1b.data.rom | DSP1B co-processor firmware - Optional | 1e3f568634a7d8284020dddc0ae905bc |\n| dsp1b.program.rom | DSP1B co-processor firmware - Optional | d10f446888e097cbf500f3f663cf4f6d |\n| dsp2.data.rom | DSP2 co-processor firmware - Optional | e9417e29223b139c3c4b635a2a3b8744 |\n| dsp2.program.rom | DSP2 co-processor firmware - Optional | aa6e5922a3ed5ded54f24247c11143c5 |\n| dsp3.data.rom | DSP3 co-processor firmware - Optional | 0a81210c0a940b997dd9843281008ee6 |\n| dsp3.program.rom | DSP3 co-processor firmware - Optional | d99ca4562818d49cee1f242705bba6f8 |\n| dsp4.data.rom | DSP4 co-processor firmware - Optional | ee4990879eb68e3cbca239c5bc20303d |\n| dsp4.program.rom | DSP4 co-processor firmware - Optional | a151023b948b90ffc23a5b594bb6fef2 |\n| cx4.data.rom | CX4 co-processor firmware - Optional | 037ac4296b6b6a5c47c440188d3c72e3 |\n| st010.data.rom | ST010 co-processor firmware - Optional | 254d70762b6f59f99c27c395aba7d07d |\n| st010.program.rom | ST010 co-processor firmware - Optional | 1d70019179a59a566a0bb5d3f2845544 |\n| st011.data.rom | ST011 co-processor firmware - Optional | 10bd3f4aa949737ab9836512c35bcc29 |\n| st011.program.rom | ST011 co-processor firmware - Optional | 95222ebf1c0c2990bcf25db43743f032 |\n| st018.data.rom | ST018 co-processor firmware - Optional | 49c898b60d0f15e90d0ba780dd12f366 |\n| st018.program.rom | ST018 co-processor firmware - Optional | dda40ccd57390c96e49d30a041f9a9e7 |\n| SGB1.sfc/sgb1.boot.rom | Super Game Boy BIOS - Optional | |\n| SGB1.sfc/program.rom | Super Game Boy ROM - Optional | |\n| SGB2.sfc/sgb2.boot.rom | Super Game Boy 2 BIOS - Optional | |\n| SGB2.sfc/program.rom | Super Game Boy 2 ROM - Optional | |\n\n## Features\n\nFrontend-level settings or features that the nSide Balanced core respects.\n\n| Feature | Supported |\n|-------------------|:---------:|\n| Restart | ✔ |\n| Screenshots | ✔ |\n| Saves | ✔ |\n| States | ✔ |\n| Rewind | ✔ |\n| Netplay | ✔ |\n| Core Options | ✔ |\n| [Memory Monitoring (achievements)](../guides/memorymonitoring.md) | ✕ |\n| RetroArch Cheats | ✕ |\n| Native Cheats | ✕ |\n| Controls | ✔ |\n| Remapping | ✔ |\n| Multi-Mouse | - |\n| Rumble | ✕ |\n| Sensors | ✕ |\n| Camera | ✕ |\n| Location | ✕ |\n| Subsystem | ✕ |\n| [Softpatching](../guides/softpatching.md) | ✔ |\n| Disk Control | ✕ |\n| Username | ✕ |\n| Language | ✕ |\n| Crop Overscan | ✕ |\n| LEDs | ✕ |\n\n### Directories\n\nThe nSide Balanced core's internal core name is 'higan (Super Famicom Balanced)'\n\nThe nSide Balanced core saves/loads to/from these directories.\n\n**Frontend's Save directory**\n\n- 'content-name'.srm (Cartridge battery save)\n\n**Frontend's State directory**\n\n- 'content-name'.state# (State)\n\n### Geometry and timing\n\n- The nSide Balanced core's core provided FPS is (FPS)\n- The nSide Balanced core's core provided sample rate is (Rate)\n- The nSide Balanced core's core provided aspect ratio is (Ratio)\n\n## Super Gameboy Support\n\nThe nSide Balanced core uses a simplified Super Game Boy routine that makes it much easier to access this feature than with the old v094-based cores.\n\nInstead of using the complex, CLI-based 'subsystem' launch commands, it looks for the necessary files in the system/BIOS directory whenever you feed the core a *.gb/c file.\n\nTo get it working, you'll need one or more Super Game Boy ROMs and the sgb.boot.rom BIOS.\n\n**Step 1**\n\nMake 2 subdirectories in RetroArch's system directory, one named SGB1.sfc and the other named SGB2.sfc.\n\n**Step 2**\n\nCopy your original Super Game Boy ROM into the SGB1.sfc directory and then rename it to program.rom. Copy your Super Game Boy 2 ROM into the SGB2.sfc directory and then rename it program.rom, as well.\n\n**Step 3**\n\nCopy your sgb.boot.rom BIOS into each of your SGB1.sfc and SGB2.sfc directories, and rename them to sgb1.boot.rom and sgb2.boot.rom, respectively.\n\nThe ['Preferred Super GameBoy BIOS' core option](#core-options) lets you choose which of the two SGB BIOSes to use.\n\n**Step 4**\n\nLoad a SGB-supported GB.mdGBC rom.\n\n**Done**\n\n\n\n!!! warning\n\tThere may be graphical glitches when Rewind is set to On in RetroArch's settings.\n\n## MSU-1\n\n!!! attention\n\tMSU-1 support in this core is complex. **Use the [Snes9x core](../library/snes9x#msu-1-support) for simplified and easily accessible MSU-1 support.**\n\nMSU-1 support can be used by loading a correct .bml file.\n\nThere's documentation for loading MSU-1 games in standalone higan [here](https://higan.readthedocs.io/en/stable/guides/import/#msu-1-games).\n\n## Core options\n\nThe nSide Balanced core has the following option(s) that can be tweaked from the core options menu. The default setting is bolded.\n\nSettings with (Restart) means that core has to be closed for the new setting to be applied on next launch.\n\n- **Internal resolution** [higan_sfc_internal_resolution] (**512x480**|512x448|512x240|512x224|256x240|256x224)\n\n\tSelf-explanatory.\n\n??? note \"512x480\"\n \n\n??? note \"512x448\"\n \n\n??? note \"512x240\"\n \n\n??? note \"512x224\"\n \n\n??? note \"256x240\"\n \n\n??? note \"256x224\"\n \n\n- **Color emulation** [higan_sfc_color_emulation] (**OFF**|ON)\n\n\tSimulates the way a console’s display device differs from modern computer monitor’s colour reproduction. In particular, it simulates the slightly-different gamma correction used by the Super Famicom.\n\n??? note \"Color emulation - Disabled\"\n \n\n??? note \"Color emulation - Enabled\"\n \n\n- **Blur emulation** [higan_sfc_blur_emulation] (**OFF**|ON)\n\n\tSimulates the limited horizontal resolution of standard-definition TVs by blurring together horizontally-adjacent pixels. Games like Jurassic Park for the Super Famicom depend on this to emulate a transparency effect.\n\n??? note \"Blur emulation - Disabled\"\n \n\n??? note \"Blur emulation - Enabled\"\n \n\n- **Scanline emulation** [higan_sfc_scanline_emulation] (**OFF**|ON)\n\n\tCurrently does not function properly.\n\n- **Preferred Super GameBoy BIOS (restart)** [higan_sfc_sgb_bios] (**SGB1.sfc/**|SGB2.sfc/)\n\n\tChoose what Super GameBoy BIOS you want to use. Look at the [Super GameBoy Support section](#super-gameboy-support) for more information.\n\n## Controllers\n\nThe nSide Balanced core supports the following device type(s) in the controls menu, bolded device types are the default for the specified user(s):\n\n### User 1 device types\n\n- None - Input disabled.\n- [**SNES Joypad**](http://nintendo.wikia.com/wiki/Super_Nintendo_Entertainment_System_controller) - Joypad\n- [SNES Mouse](https://en.wikipedia.org/wiki/Super_NES_Mouse) - Mouse\n\n### User 2 device types\n\n- None - Input disabled.\n- [**SNES Joypad**](http://nintendo.wikia.com/wiki/Super_Nintendo_Entertainment_System_controller) - Joypad\n- [SNES Mouse](https://en.wikipedia.org/wiki/Super_NES_Mouse) - Mouse\n- [Multitap](http://nintendo.wikia.com/wiki/Super_Multitap) - Joypad - Allows for up to five players to play together in multitap games.\n- [SuperScope](https://en.wikipedia.org/wiki/Super_Scope) - Lightgun - Inputs are not hooked up in this core.\n- [Justifier](https://en.wikipedia.org/wiki/Konami_Justifier) - Lightgun - Inputs are not hooked up in this core.\n- [Justifiers](https://en.wikipedia.org/wiki/Konami_Justifier) - Lightgun - Two Justifiers are plugged in, for two-player Justifier games. Inputs are not hooked up in this core.\n\n### Multitap support\n\nActivating multitap support in compatible games can be configured by switching to the [Multitap device type](#controllers) for User 2.\n\n### Controller tables\n\n#### Joypad\n\n\n\n| User 1 - 5 Remap descriptors | RetroPad Inputs |\n|------------------------------|---------------------------------------------|\n| B |  |\n| Y |  |\n| Select |  |\n| Start |  |\n| D-Pad Up |  |\n| D-Pad Down |  |\n| D-Pad Left |  |\n| D-Pad Right |  |\n| A |  |\n| X |  |\n| L |  |\n| R |  |\n\n#### Mouse\n\n| RetroMouse Inputs | SNES Mouse |\n|-------------------------------------------------------|---------------------------|\n|  Mouse Cursor | SNES Mouse Cursor |\n|  Mouse 1 | SNES Mouse Left Button |\n|  Mouse 2 | SNES Mouse Right Button |\n\n## Compatibility\n\n| Game | Issue |\n|--------------------------|--------------------------------------------------------------------------------|\n| A.S.P. Air Strike Patrol | Black lines show up during gameplay. The shadow below the aircraft is missing. |\n\nIncompatible with ROM hacks made to take advantage of emulator quirks, much like real hardware.\n\n## External Links\n\n- [Official higan Website](https://byuu.org/)\n- [Official higan Upstream Downloads](https://byuu.org/emulation/higan/)\n- [Libretro nSide Balanced Core info file](https://github.com/libretro/libretro-super/blob/master/dist/info/higan_sfc_balanced_libretro.info)\n- [Libretro nSide Balanced Github Repository](https://github.com/hex-usr/nSide)\n- [Report Libretro nSide Balanced Core Issues Here](https://github.com/hex-usr/nSide/issues)\n\n### See also\n\n#### Nintendo - Game Boy (+ Color)\n\n- [Nintendo - Game Boy / Color (Emux GB)](emux_gb.md)\n- [Nintendo - Game Boy / Color (Gambatte)](gambatte.md)\n- [Nintendo - Game Boy / Color (Gearboy)](gearboy.md)\n- [Nintendo - Game Boy / Color (SameBoy)](sameboy.md)\n- [Nintendo - Game Boy / Color (TGB Dual)](tgb_dual.md)\n- [Nintendo - Game Boy Advance (mGBA)](mgba.md)\n- [Nintendo - Game Boy Advance (VBA-M)](vba_m.md)\n- [Nintendo - SNES / Famicom (higan Accuracy)](higan_accuracy.md)\n- [Nintendo - SNES / Famicom (Mesen-S)](mesen-s.md)\n\n#### Nintendo - Super Nintendo Entertainment System (+ Hacks)\n\n- [Nintendo - SNES / Famicom (Beetle bsnes)](beetle_bsnes.md)\n- [Nintendo - SNES / Famicom (bsnes-mercury Accuracy)](bsnes_mercury_accuracy.md)\n- [Nintendo - SNES / Famicom (bsnes-mercury Balanced)](bsnes_mercury_balanced.md)\n- [Nintendo - SNES / Famicom (bsnes-mercury Performance)](bsnes_mercury_performance.md)\n- [Nintendo - SNES / Famicom (bsnes Accuracy)](bsnes_accuracy.md)\n- [Nintendo - SNES / Famicom (bsnes Balanced)](bsnes_balanced.md)\n- [Nintendo - SNES / Famicom (bsnes C++98 (v085))](bsnes_cplusplus98.md)\n- [Nintendo - SNES / Famicom (bsnes Performance)](bsnes_performance.md)\n- [Nintendo - SNES / Famicom (higan Accuracy)](higan_accuracy.md)\n- [Nintendo - SNES / Famicom (Mesen-S)](mesen-s.md)\n- [Nintendo - SNES / Famicom (Snes9x)](snes9x.md)\n- [Nintendo - SNES / Famicom (Snes9x 2002)](snes9x_2002.md)\n- [Nintendo - SNES / Famicom (Snes9x 2005 Plus)](snes9x_2005_plus.md)\n- [Nintendo - SNES / Famicom (Snes9x 2005)](snes9x_2005.md)\n- [Nintendo - SNES / Famicom (Snes9x 2010)](snes9x_2010.md)\n"
},
{
"path": "docs/library/numero.md",
"content": "# Texas Instruments TI-83 (Numero)\n\n\n\n## Background\n\nNumero is a libretro core for emulating the TI-83 family of graphing calculators. It is based on the awesome Wabbitemu emulator. It allows you to play your TI-83 games like never before in fullscreen and using a gamepad! You can also control it with a mouse or keyboard, or you can just use the virtual mouse for pressing the calculator buttons.\n\nThe Numero core has been authored by\n\n- Neil Barkhina\n\nThe Numero core is licensed under\n\n- [GPLv2](https://github.com/nbarkhina/numero/blob/master/LICENSE)\n\nA summary of the licenses behind RetroArch and its cores can be found [here](../development/licenses.md).\n\n## BIOS\n\nIt is required to have one of the bios files below in the frontend's system directory. ti83se.rom is the recommended BIOS as that will give you the largest memory capacity.\n\n| Filename | Description | md5sum |\n|:-----------------:|:-------------------------------:|:--------------------------------:|\n| ti83se.rom | TI-83 Silver Edition | c6ff8204c5c81b7be34614dbbd690c8b |\n| ti83plus.rom | TI-83 Plus | 8011181f810b5ec4e9d6a03f0e14257a |\n| ti83.rom | TI-83 | d4448d09bbfde687c04f9e3310e023ab |\n\n## Extensions\n\nContent that can be loaded by the Numero core have the following file extensions:\n\n- .8xp\n- .8xk\n- .8xg\n\n## Features\n\nFrontend-level settings or features that the Numero core respects.\n\n\n| Feature | Supported |\n|-------------------|:---------:|\n| Restart | ✔ |\n| Saves | ✔ |\n| States | ✔ |\n| Rewind | ✕ |\n| Netplay | ✕ |\n| Core Options | ✔ |\n| [Memory Monitoring (achievements)](../guides/memorymonitoring.md) | ✕ |\n| RetroArch Cheats | ✕ |\n| Native Cheats | ✕ |\n| Controls | ✔ |\n| Remapping | ✔ |\n| Multi-Mouse | ✕ |\n| Rumble | ✕ |\n| Sensors | ✕ |\n| Camera | ✕ |\n| Location | ✕ |\n| Subsystem | ✕ |\n| [Softpatching](../guides/softpatching.md) | ✕ |\n| Disk Control | ✕ |\n| Username | ✕ |\n| Language | ✕ |\n| Crop Overscan | ✕ |\n| LEDs | ✕ |\n\n## Directories\n\nThe Numero core saves/loads to/from the default frontend's save directory.\n\n**Frontend's Save directory**\n\n| File | Description |\n|:------------:|:-----------:|\n| tisavestateprogressti83se.sav | SE Progress Save |\n| tisavestateprogressti83plus.sav | Plus Progress Save |\n| tisavestateprogressti83.sav | TI-83 Progress Save |\n| tisavestatetemp.sav | Temp file used during manual save states |\n\n## Geometry and timing\n\n- The Numero core's core provided FPS is 60\n- The Numero core's core provided sample rate is 0 (currently no sound)\n- The Numero core's base width is 640\n- The Numero core's base height is 480\n- The Numero core's max width is 640\n- The Numero core's max height is 480\n- The Numero core's core provided aspect ratio is 3/4\n\n## Usage\n\n- The Emulator will save your progress every 10 seconds\n - this is done in the background since the calculator doesn't really have any \"long term storage\"\n - everything was always just saved in RAM\n - or if you just select \"Close Content\" in RetroArch that will also immediately save your progress\n- You can run the core without any content by just selecting \"Start Core\"\n- There are two control schemes\n - Joypad which is the default\n - And \"Gaming Buttons\" which is more suited towards gaming\n - You can move the virtual mouse with the left stick\n - and by Pressing R2 to click\n - You can also use the D-Pad and A Button if using the Joypad scheme\n - Change the virtual mouse speed in the core Options\n- You can toggle between the calculator view and \"Big Mode\" with L2\n- Hitting \"Restart\" in the RetroArch menu will clear the entire memory\n - So be careful when doing this because you will lose all your data\n - This is useful however sometimes when the emulator hangs for one reason or another \n- Installing Apps\n - You will probably need to install some \"loaders\" for most of the demanding apps\n - Such as \"Ion\" or \"Mirage\"\n - You can install \"Ion.8xg\" by going to Retroarch => Load Content\n - After starting you will see a message in the bottom left corner if it imported successfully\n - Then go to \"Close Content\"\n - Then go again to \"Load Content\" and install the game you want to run inside of Ion such as \"Ztetris.8xp\"\n - Then keep repeating the process to load all the apps you want (careful not to fill up the entire space)\n - Essentially you have to load each piece one on top of another since there is a single common \"hard drive\" for the calculator\n- Every time you load the emulator you will start from the last place you left off\n - For the same reason mentioned above where it saves in the background\n - Also keep this in mind for save states\n- Save States\n - You can create as many save states as you want using the different slots\n - However they will be named internally based on how you started the emulator\n - From a rom or just the core itself\n - There will will be a common \"In Progress\" storage mechanism when loading different states\n - Save States will restore whatever the state was of the entire calculator\n - Including all installed apps at the time of saving\n - Take lots of save states since you may run into problems where you will need to wipe the memory and try again\n- If you have trouble installing one game or another\n - Try moving things around between Memory and Archive\n - Sometimes different launchers require things not be in Archive\n - You can watch this awesome video by LGR where he talks about the phenomenon\n - https://www.youtube.com/watch?v=nduMTX86Zl0\n\n## Core options\n\nThe Numero core has the following option(s) that can be tweaked from the core options menu. The default setting is bolded.\n\n- **Speed of virtual mouse** [mouse_speed] (**1x**|2x|3x|4x|5x)\n\n## device types\n\nThe Numero core supports the following device type(s) in the controls menu, bolded device types are the default for the specified user(s):\n\n- None - Doesn't disable input.\n- **RetroPad** - Joypad\n- **Gaming Buttons** - Same as joypad but optimized mappings for playing games.\n\nRegardless of what you pick the core also supports using the Mouse/Touch to click the calculator buttons.\n\n## Joypad\n\n\n| RetroPad Inputs | User 1 input descriptors |\n|------------------------------------------------|--------------------------|\n|  | Button 2ND |\n|  | Button DOWN |\n|  | Button ALPHA |\n|  | Button ENTER |\n|  | Mouse Up |\n|  | Mouse Down |\n|  | Mouse Left |\n|  | Mouse Right |\n|  | Mouse Press |\n|  | Button UP |\n|  | Button LEFT |\n|  | Button RIGHT |\n|  | Toggle Big Mode |\n|  | Mouse Press |\n\n## External Links\n\n- [Official Numero Github Repository](https://github.com/nbarkhina/numero)\n- [Libretro Numero Core info file](https://github.com/libretro/libretro-super/blob/master/dist/info/numero_libretro.info)\n- [Report Numero Core Issues Here](https://github.com/nbarkhina/numero/issues)\n"
},
{
"path": "docs/library/nxengine.md",
"content": "# Cave Story (NXEngine)\n\n\n\n## Background\n\nNXEngine is a open source reproduction of the [Cave Story game engine](https://en.wikipedia.org/wiki/Cave_Story). The NXEngine core has been authored by\n\n- Caitlin Shaw\n\nThe NXEngine core is licensed under\n\n- [GPLv3](https://github.com/gameblabla/nxengine-nspire/blob/master/LICENSE)\n\nA summary of the licenses behind RetroArch and its cores can be found [here](../development/licenses.md).\n\n## How to start the NXEngine core:\n\n- To start the NXEngine core, you need to obtain NXEngine's data files. You can do this by going to RetroArch's main menu screen and selecting 'Online Updater'. From there, select 'Content Downloader'.\n\n

\n\n- Select 'NXEngine'', then select 'Cave Story (En).zip'. This should download and extract this file to RetroArch's Downloads directory.\n\n

\n\n- Go back to RetroArch's main menu screen. Select 'Load Content', then 'Downloads'.\n\n

\n\n

\n\n- Select the 'Cave Story (en)' directory, then select 'Doukutsu.exe'.\n\n- If you are asked which core to select, choose 'Cave Story (NXEngine)'.\n\nThe content should now start running!\n\n## Extensions\n\nContent that can be loaded by the NXEngine core have the following file extensions:\n\n- .exe\n\n## Databases\n\nRetroArch database(s) that are associated with the NXEngine core:\n\n- [Cave Story](https://github.com/libretro/libretro-database/blob/master/rdb/Cave%20Story.rdb)\n\n## Features\n\nFrontend-level settings or features that the NXEngine core respects.\n\n| Feature | Supported |\n|-------------------|:---------:|\n| Restart | ✔ |\n| Screenshots | ✔ |\n| Saves | ✔ |\n| States | ✕ |\n| Rewind | ✕ |\n| Netplay | ✕ |\n| Core Options | ✕ |\n| [Memory Monitoring (achievements)](../guides/memorymonitoring.md) | ✕ |\n| RetroArch Cheats | ✕ |\n| Native Cheats | ✕ |\n| Controls | ✔ |\n| Remapping | ✔ |\n| Multi-Mouse | ✕ |\n| Rumble | ✕ |\n| Sensors | ✕ |\n| Camera | ✕ |\n| Location | ✕ |\n| Subsystem | ✕ |\n| [Softpatching](../guides/softpatching.md) | ✕ |\n| Disk Control | ✕ |\n| Username | ✕ |\n| Language | ✕ |\n| Crop Overscan | ✕ |\n| LEDs | ✕ |\n\n### Directories\n\nThe NXEngine core's directory name is 'NXEngine'\n\nThe NXEngine core saves/loads to/from these directories.\n\n**Frontend's Save directory**\n\n- profile#.dat (Save data profile)\n\n### Geometry and timing\n\n- The NXEngine core's core provided FPS is 60\n- The NXEngine core's core provided FPS is 22050 Hz\n- The NXEngine core's core provided aspect ratio is 4/3\n\n## Controllers\n\nThe NXEngine core supports the following device type(s) in the controls menu, bolded device types are the default for the specified user(s):\n\n### User 1 device types\n\n- None - Doesn't disable input\n- **RetroPad** - Joypad\n- RetroPad w/Analog - Joypad - There is no reason to switch to this.\n\n### Controller tables\n\n#### Joypad\n\n| User 1 Remap descriptors | RetroPad Inputs |\n|--------------------------|---------------------------------------------|\n| Jump |  |\n| Settings |  |\n| Inventory |  |\n| D-Pad Up |  |\n| D-Pad Down |  |\n| D-Pad Left |  |\n| D-Pad Right |  |\n| Fire |  |\n| Show/Hide Map |  |\n| Previous Weapon |  |\n| Next Weapon |  |\n\n## External Links\n\n- [Official NXEngine Website](http://nxengine.sourceforge.net/)\n- [Official NXEngine Github Repository](https://github.com/EXL/NXEngine)\n- [Libretro NXEngine Core info file](https://github.com/libretro/libretro-super/blob/master/dist/info/nxengine_libretro.info)\n- [Libretro NXEngine Github Repository](https://github.com/libretro/nxengine-libretro)\n- [Report Libretro NXEngine Core Issues Here](https://github.com/libretro/nxengine-libretro/issues)\n\n## (Related cores)\n\n- [doukutsu-rs](doukutsu-rs.md)"
},
{
"path": "docs/library/o2em.md",
"content": "# Magnavox - Odyssey2 / Philips Videopac+ (O2EM)\n\n\n\n## Background\n\nO2EM is an open source multi-platform Odyssey2 / Videopac+ emulator. The Odyssey2 (Videopac/Jopac in Europe) was a video game console created in the late 70s.\n\nThe O2EM core has been authored by\n\n- Daniel Boris\n- Andre de la Rocha\n- Arlindo M. de Oliveira\n\nThe O2EM core is licensed under\n\n- [Artistic License](https://sourceforge.net/projects/o2em/)\n\nA summary of the licenses behind RetroArch and its cores can be found [here](../development/licenses.md).\n\n## BIOS\n\nRequired or optional firmware files go in the frontend's system directory.\n\n| Filename | Description | md5sum |\n|:----------:|:------------------------------------------------:|:--------------------------------:|\n| o2rom.bin | Odyssey2 BIOS - G7000 model - Required | 562d5ebf9e030a40d6fabfc2f33139fd |\n| c52.bin | Videopac+ French BIOS - G7000 model - Required | f1071cdb0b6b10dde94d3bc8a6146387 |\n| g7400.bin | Videopac+ European BIOS - G7400 model - Required | c500ff71236068e0dc0d0603d265ae76 |\n| jopac.bin | Videopac+ French BIOS - G7400 model - Required | 279008e4a0db2dc5f1c048853b033828 |\n\nCurrently the libretro core only works with the o2rom.bin. As a workaround for playing Videopac+ games, you can rename the g7400.bin firmware file into o2rom.bin, and the core plays it correctly as a Videopac+ game.\n\n## Extensions\n\nContent that can be loaded by the O2EM core have the following file extensions:\n\n- .bin\n\nRetroArch database(s) that are associated with the O2EM core:\n\n- [Magnavox - Odyssey2](https://github.com/libretro/libretro-database/blob/master/rdb/Magnavox%20-%20Odyssey2.rdb)\n- [Philips - Videopac+](https://github.com/libretro/libretro-database/blob/master/rdb/Philips%20-%20Videopac%2B.rdb)\n\n## Features\n\nFrontend-level settings or features that the O2EM core respects.\n\n| Feature | Supported |\n|-------------------|:---------:|\n| Restart | ✔ |\n| Saves | ✕ |\n| States | ✔ |\n| Rewind | ✔ |\n| Netplay | ✕ |\n| Core Options | ✔ |\n| [Memory Monitoring (achievements)](../guides/memorymonitoring.md) | ✔ |\n| RetroArch Cheats | ✕ |\n| Native Cheats | ✕ |\n| Controls | ✔ |\n| Remapping | ✔ |\n| Multi-Mouse | ✕ |\n| Rumble | ✕ |\n| Sensors | ✕ |\n| Camera | ✕ |\n| Location | ✕ |\n| Subsystem | ✕ |\n| [Softpatching](../guides/softpatching.md) | ✕ |\n| Disk Control | ✕ |\n| Username | ✕ |\n| Language | ✕ |\n| Crop Overscan | ✕ |\n| LEDs | ✕ |\n\n## Directories\n\nThe O2EM core's library name is 'O2EM'\n\nThe O2EM core saves/loads to/from these directories.\n\n**Frontend's State directory**\n\n| File | Description |\n|:--------:|:-----------:|\n| *.state# | State |\n\n## Geometry and timing\n\n- The O2EM core's core provided FPS is 60 for NTSC games and 50 for PAL games\n- The O2EM core's core provided sample rate is 44100 Hz\n- The O2EM core's base width is 340\n- The O2EM core's base height is 250\n- The O2EM core's max width is 340\n- The O2EM core's max height is 250\n- The O2EM core's core provided aspect ratio is 4/3\n\n## Core options\n\nThe O2EM core has the following option(s) that can be tweaked from the core options menu. The default setting is bolded.\n\n- **Emulated Hardware (Restart)** [o2em_bios] (**o2rom.bin**|Videopac G7000 (European)|Videopac+ G7400 (European)|Videopac+ G7400 (French))\n\t\n\tSpecify which console hardware to emulate. Requires the corresponding bios file to be present in the frontend 'system' directory (o2rom.bin, c52.bin, g7400.bin, jopac.bin)\n\n- **Console Region (Restart)** [o2em_region] (**Auto**|NTSC|PAL)\n\t\n\tSpecify which region the system is from. 'Auto' chooses the correct region based on emulated hardware. 'NTSC' is 60hz, 'PAL' is 50hz. Games may run abnormally if the wrong region is selected, and the setting my be overridden if the current content is incompatible.\n\n- **Swap Gamepads** [o2em_swap_gamepads] (**disabled**|enabled)\n\t\n\tSwap inputs from the two connected controllers of the emulated console. Required for games such as UFO and P.T. Barnum's Acrobats, which accept player 1 input from the second controller.\n\n- **Virtual keyboard transparency** [o2em_vkb_transparency] (**0%**|25%|50%|75%)\n\n\tSet transparency level of the virtual on-screen keyboard.\n\n??? note \"Virtual keyboard transparency - 0%\"\n\t\n\n??? note \"Virtual keyboard transparency - 25%\"\n\t\n\n??? note \"Virtual keyboard transparency - 50%\"\n\t\n\n??? note \"Virtual keyboard transparency - 75%\"\n\t\n\n- **Crop Overscan** [o2em_crop_overscan] (**disabled**|enabled)\n\t\n\tRemove the border around the edges of the screen, typically unused by games and hidden by the bezel of a standard-definition television.\n\n- **Interframe Blending** [o2em_mix_frames] (**Simple**|Ghosting (65%)|Ghosting (75%)|Ghosting (85%)|Ghosting (95%))\n\t\n\tSimulate CRT phosphor ghosting effects. 'Simple' performs a 50:50 mix of the current and previous frames. 'Ghosting' accumulates pixels from multiple successive frames. May be used to alleviate screen flicker.\n\n- **Audio Volume** [o2em_audio_volume] (**50%**|0%)|5%)|10%)|15%|20%|25%|30%|35%|40%|45%|50%|55%|60%|65%|70%|75%|80%|85%|90%|95%|100%)\n\t\n\tSet output audio volume level.\n\n- **Voice Volume** [o2em_voice_volume] (**70%**|0%)|5%)|10%)|15%|20%|25%|30%|35%|40%|45%|50%|55%|60%|65%|70%|75%|80%|85%|90%|95%|100%)\n\t\n\tSet output volume level of 'The Voice' speech samples. The voice sampleset WAV files must be placed in the frontend 'system/voice' directory.\n\n- **Audio Filter** [o2em_low_pass_filter] (**disabled**|enabled)\n\t\n\tApply a low pass audio filter to soften the 'harsh' sound effects produced by most Odyssey2/Videopac+ games.\n\n- **Audio Filter Level** [o2em_low_pass_range] (**60%**|0%)|5%)|10%)|15%|20%|25%|30%|35%|40%|45%|50%|55%|60%|65%|70%|75%|80%|85%|90%|95%|100%)\n\t\n\tSpecify the cut-off frequency of the low pass audio filter. A higher value increases the perceived 'strength' of the filter, since a wider range of the high frequency spectrum is attenuated.\n\n## Joypad\n\n| RetroPad Inputs | User 1 input descriptors |\n|----------------------------------------------|--------------------------|\n|  | Up |\n|  | Down |\n|  | Left |\n|  | Right |\n|  | Action / Press Key (Virtual Keyboard) |\n|  | Move Virtual Keyboard Up/Down |\n|  | Show/Hide Virtual Keyboard |\n\n| RetroPad Inputs | User 2 input descriptors |\n|----------------------------------------------|--------------------------|\n|  | Up |\n|  | Down |\n|  | Left |\n|  | Right |\n|  | Action |\n\nIn some games, for example UFO/Satellite Attack, the original had the joypads swapped so that Player 1 was on Joypad 2. If you only use one Joypad, a workaround is to provide identical assignments of both Retropads to one joystick and save it as Game Remap or Core Remap.\n\n## Keyboard\n\n| RetroKeyboard Inputs | O2EM Inputs |\n|------------------------------|-------------|\n| Keyboard Return | Enter |\n| Keyboard Space | Space |\n| Keyboard Minus - | - |\n| Keyboard Period . | . |\n| Keyboard Slash / | / |\n| Keyboard 0 | 0 |\n| Keyboard 1 | 1 |\n| Keyboard 2 | 2 |\n| Keyboard 3 | 3 |\n| Keyboard 4 | 4 |\n| Keyboard 5 | 5 |\n| Keyboard 6 | 6 |\n| Keyboard 7 | 7 |\n| Keyboard 8 | 8 |\n| Keyboard 9 | 9 |\n| Keyboard Equals = | = |\n| Keyboard Question ? | ? |\n| Keyboard a | a |\n| Keyboard b | b |\n| Keyboard c | c |\n| Keyboard d | d |\n| Keyboard e | e |\n| Keyboard f | f |\n| Keyboard g | g |\n| Keyboard h | h |\n| Keyboard i | i |\n| Keyboard j | j |\n| Keyboard k | k |\n| Keyboard l | l |\n| Keyboard m | m |\n| Keyboard n | n |\n| Keyboard o | o |\n| Keyboard p | p |\n| Keyboard q | q |\n| Keyboard r | r |\n| Keyboard s | s |\n| Keyboard t | t |\n| Keyboard u | u |\n| Keyboard v | v |\n| Keyboard w | w |\n| Keyboard x | x |\n| Keyboard y | y |\n| Keyboard z | z |\n| Keyboard End | Clear |\n\n## External Links\n\n- [Official O2EM Website](http://o2em.sourceforge.net/)\n- [Official O2EM SourceForge Repository](https://sourceforge.net/projects/o2em/)\n- [Libretro O2EM Core info file](https://github.com/libretro/libretro-super/blob/master/dist/info/o2em_libretro.info)\n- [Libretro O2EM Github Repository](https://github.com/libretro/libretro-o2em)\n- [Report Libretro O2EM Core Issues Here](https://github.com/libretro/libretro-o2em/issues)\n- [Gameplay Videos](https://youtube.com/playlist?list=PLRbgg4gk_0IdZx5HP3o3h8iNkzOx8l4Dn)\n"
},
{
"path": "docs/library/openlara.md",
"content": "# Tomb Raider (OpenLara)\n\n==First, make sure these steps are permissible in your locale. RetroArch and LibRetro do not share any copyrighted content.==\n\n\n\n## Background\n\nA new work-in-progress Tomb Raider game engine ported to libretro.\n\nThis game engine recreation seeks to allow you to play the original Tomb Raider engine games, from 1 all the way up to 5.\n\nOpenLara V1 Tomb Raider 1 is fully playable.\n\nThe nice thing about OpenLara is that, while staying true to the original look and feel of the original, it also adds some enhancements to it that manages to make the boxy old-school Tomb Raider games look a bit less archaic. Some examples include :\n\n- The framerate is no longer fixed to 30fps, and you can now run it at a smooth 60fps framerate. There are even more framerate options, allowing you to play at 90fps, 120fps or even 144fps.\n- You can set the internal resolution of the game.\n- New water effects which replaces the simple vertex manipulation of the water surface on the PSX. The Saturn version actually was the only version that tried to do something a bit more sophisticated with the water.\n- Self-shadowing on all the player models (although this still has some visual anomalies at places).\n- Improved lighting effects, including colored lighting (you can see the save crystals emanating a blue light for instance, something which definitely was not in any of the prior Tomb Raider versions).\n- Shading effects – after Lara gets out of the water, her skin has a slightly wet shading effect.\n- There is also a brand new local multiplayer mode. You toggle the game into splitscreen mode by pressing Start at any one time. From there, you can see a second Lara character, which is only distinguished from the main character by a slightly jerky animation update routine. Player 2 can now take control of this Lara and you can engage in ‘jolly co-operation’. At all times, Player 1 can beckon Player 2 back to his position by pressing the Start button, which resets player 2’s position back to Player 1’s so that Player 2 can always be brought back in case he/she is running too far astray.\n- There is also a first person view that you can toggle into by pressing the Look button (L button) and then pressing the Action button (B button). This gives you a Mirror’s Edge-esque first person view.\n- The ability to target two enemies at the same time individually.\n- The graphical enhancements can all be toggled on/off inside the game’s inventory settings screen (toggleable by pressing the Select button).\n\nThe OpenLara core has been authored by\n\n- XProger\n\nThe OpenLara core is licensed under\n\n- [2-clause BSD](https://github.com/XProger/OpenLara/blob/master/LICENSE)\n\nA summary of the licenses behind RetroArch and its cores can be found [here](../development/licenses.md).\n\n## Requirements\n\nThis core requires that you use OpenGL as the video driver. Go to Settings -> Driver. If ‘video driver’ is set to ‘vulkan’, switch it back to ‘gl’, and then restart.\n\n\n\n!!! attention\n\tThere is currently no ‘working’ macOS version available due to the OpenGL requirement.\n\n## Extensions\n\nContent that can be loaded by the OpenLara core have the following file extensions:\n\n- .phd\n- .psx\n- .tr2\n\nRetroArch dat that is associated with the OpenLara core:\n\n- [Tomb Raider](https://raw.githubusercontent.com/libretro/libretro-database/master/dat/Tomb%20Raider.dat)\n\n## Setup\n\nTR1 is officially supported while 2 or 3 is not. You can still load the levels of 2 or 3 and play them with the proper file scheme. You can download the demo from Online Updater > Content Downloader > Tomb Raider and test Level 2. You can also experience the OpenLara's features in the demo. Apart from that, you can buy it [here on GOG](https://www.gog.com/game/tomb_raider_123) or [here on Steam](https://store.steampowered.com/app/224960/Tomb_Raider_I/). Tomb Raider has differences between ports. The Steam and GOG version do not install the DATA and FMV folders directly into the directory. In Console versions, these files are in the image file.\n\n### Files\n\n- DATA, with .phd and .pcx files inside. These are the level files and title screen textures.\n- FMV, which contains a couple of .rpl files. These are the movies.\n\nNot all audio files are available in the Steam/GOG distribution. In this case, you cannot hear some audio streams. For example, in the GYM level, you cannot hear Lara's instructions, but you can hear the sounds of walking, jumping and taking damage.\n\n## Getting Tomb Raider files\n\nFirst, make sure these steps are permissible in your locale RetroArch or LibRetro do not share copyrighted content. \n\n### Rip Tomb Raider 1 Image from Steam/GOG\n\nWhen you get Tomb Raider on digital platforms, you will see *GAME.GOG*(game file), *GAME.DAT*, dosbox.exe and configuration file of dosbox inside the folder.\n\n??? note \"Files inside Tomb Raider 1 from Steam\"\n\t\n\nGOG files store audio samples in Drumagog format. This format was developed by WaveMachine Labs for a software plugin that offers access to acoustic drums samples. GOG files are associated with VST technology and are compatible with any software that supports it. GOG format was originally developed in 1999 and is regularly updated. \n\nOpen the **dosbox.conf** file with a text editing file. Scroll down to until **[autoexec]**, lines in this section will be run at startup.\n\n```\nmount C .\n imgmount d \".\\game.dat\" -t iso -fs iso\n xcopy D:\\DATA\\ C:\\DATA\\\n xcopy D:\\FMV\\ C:\\FMV\\\n```\n\nWhen you paste the code above, **dosbox.exe** will boot the image and copy the **DATA** and **FMV** files in it to the local machine each time it is opened. The computer version does not contain most audio files. For example, when you export existing audio files, you cannot hear Lara's instructions at the GYM level.\n\n??? note \"Folders from Tomb Raider 1 image\"\n\t\n\nYou must convert the audio files in the main folder of TR1 to .ogg format. You can do this with the small [FFmpeg](https://github.com/FFmpeg/FFmpeg) script below. Apart from that, you can use console audio files with PC port.\n\n??? note \"Converting to OGG\"\n\t```\n\tfor f in ./*.mp3; do ffmpeg -i \"$f\" -c:a libvorbis -q:a 4 \"${f/%mp3/ogg}\"; done\n\t```\n\tThis will convert files from mp3 to ogg\n\nThe PC Port also missing title and loading images, you can get them from the console version. Place the **DELDATA** folder from the Console port into the main TR1 directory.\n\n??? note \"Missing Title Screen / Title Screen from Console\"\n\t\n\t\n\n\n### Rip Tomb Raider 1 Image from Console\n\n[jPSXdec](https://github.com/m35/jpsxdec) is a modern, cross-platform PlayStation 1 audio/video converter. Check their documentation to understand how to use it.\n\n## Folder Setup\n\nTo achieve a continuous game that loads from one level to the next you can load directly from CD\nor preferably setup the content folder like this:\n\n| Folder | File Type(s) | Description |\n|:--------:|:----------------------------------------:|:---------------------------------------:|\n| audio/1/ | track_XX.ogg or XXX.ogg | X represents a number |\n| audio/2/ | track_XX.ogg and MAIN.SFX | Both tracks and MAIN.SFX are required |\n| audio/3/ | track_XX.ogg and MAIN.SFX | Both tracks and MAIN.SFX are required |\n| level/1/ | *.PNG and *.PHD or *.PSX or *.SAT | Load-screens and levels |\n| level/2/ | *.PNG and *.TR2 or *.PSX | Load-screens and levels |\n| level/3/ | *.PNG and *.TR2 or *.PSX | Load-screens and levels |\n| video/1/ | *.RPL or *.FMV | Video cut-scenes |\n| video/2/ | *.RPL or *.FMV | Video cut-scenes |\n| video/3/ | *.RPL or *.FMV | Video cut-scenes |\n\n!!! note\n if you load from CD you won't have soundtrack in TR1\n\n\n## Features\n\nFrontend-level settings or features that the OpenLara core respects.\n\n| Feature | Supported |\n|-------------------|:---------:|\n| Restart | ✕ |\n| Saves | ✔ |\n| States | ✕ |\n| Rewind | ✕ |\n| Netplay | ✕ |\n| Core Options | ✔ |\n| [Memory Monitoring (achievements)](../guides/memorymonitoring.md) | ✕ |\n| RetroArch Cheats | ✕ |\n| Native Cheats | ✕ |\n| Controls | ✔ |\n| Remapping | ✔ |\n| Multi-Mouse | ✕ |\n| Rumble | ✕ |\n| Sensors | ✕ |\n| Camera | ✕ |\n| Location | ✕ |\n| Subsystem | ✕ |\n| [Softpatching](../guides/softpatching.md) | ✕ |\n| Disk Control | ✕ |\n| Username | ✕ |\n| Language | ✕ |\n| Crop Overscan | ✕ |\n| LEDs | ✕ |\n\n\n### FPS mode\n\nWith OpenLara, you can experience Tomb Raider like you've never played before. You can try it through the eyes of Lara Croft with the primary person camera, for this you can switch to this mode by pressing L1 + A and exit this mode with the same combination. FPS also available in 2-Player Mode.\n\n??? note \"FPS mode\"\n\t\n\n### 2-Player Mode\n\nYou can include your friend with whom you want to pass TR levels together. Press Start from Second Controller in order to go 2-Payer Mode.\n\n??? note \"2-Player Mode\"\n\t\n\n## Directories\n\nThe OpenLara core's library name is 'OpenLara'\n\nThe OpenLara core saves/loads to/from these directories.\n\n| File | Description |\n|:---------------------------:|:------------:|\n| system/openlara/*.xsh | Shader files |\n| saves/openlara/savegame.dat | Savegame |\n| saves/openlara/settings | Settings |\n\n## Geometry and timing\n\n- The OpenLara core's core provided FPS is dependent on the ['Framerate' core option](#core-options).\n- The OpenLara core's core provided sample rate is 44100 Hz\n- The OpenLara core's base width is 320\n- The OpenLara core's base height is 240\n- The OpenLara core's max width is dependent on the ['Internal resolution' core option](#core-options)\n- The OpenLara core's max height is dependent on the ['Internal resolution' core option](#core-options)\n- The OpenLara core's core provided aspect ratio is 4/3\n\n## Core options\n\nThe OpenLara core has the following option(s) that can be tweaked from the core options menu. The default setting is bolded.\n\nSettings with (Restart) means that core has to be closed for the new setting to be applied on next launch.\n\n- **Framerate (restart)** [openlara_framerate] (**60fps**|70fps|72fps|75fps|90fps|100fps|119fps|120fps|\n144fps|240fps|244fps|15fps|30fps)\n\n\tModify framerate. Requires a restart.\n\n- **Internal resolution (restart)** [openlara_resolution] (**320x240**|360x480|480x272|512x384|512x512|640x240|\n640x448|640x480|720x576|800x600|960x720|1024x768|\n1024x1024|1280x720|1280x960|1600x1200|1920x1080|\n1920x1440|1920x1600|2048x2048|2560x1440|\n3840x2160|7680x4320|15360x8640|16000x9000)\n\n\tModify the internal resolution. Requires a restart.\n\n??? note \"Internal resolution - 320x240\"\n\t\n\n??? note \"Internal resolution - 1920x1080\"\n\t\n\n## Joypad\n\n| RetroPad Inputs | User 1 input descriptors |\n|------------------------------------------------|--------------------------|\n|  | Action (Shoot/grab) |\n|  | Jump |\n|  | Inventory |\n|  | Start |\n|  | Up |\n|  | Down |\n|  | Left |\n|  | Right |\n|  | Roll |\n|  | Draw weapon |\n|  | Walk (when holding) |\n|  | Duck/Crouch (TR3 and up) |\n|  | Dash (TR3 and up) |\n\n## External Links\n\n- [Official OpenLara Github Repository](https://github.com/XProger/OpenLara)\n- [Official OpenLara Website](http://xproger.info/projects/OpenLara/)\n- [Libretro OpenLara Core info file](https://github.com/libretro/libretro-super/blob/master/dist/info/openlara_libretro.info)\n- [Libretro OpenLara Github Repository](https://github.com/libretro/OpenLara)\n- [Report Libretro OpenLara Core Issues Here](https://github.com/libretro/libretro-meta/issues)\n"
},
{
"path": "docs/library/opera.md",
"content": "# The 3DO Company - 3DO (Opera)\n\n## Background\n\nOpera is an open-source, low-level emulator for the 3DO Game Console. Opera is a fork of 4DO, originally a port of 4DO, itself a fork of FreeDO, to libretro. The fork/rename occurred due to the original 4DO project being dormant and to differentiate the project due to new development and focus.\n\nThe Opera core has been authored by\n\n- trapexit\n- JohnnyDude\n- FreeDO team\n\nThe Opera core is licensed under\n\n- [Modified GNU LGPL / Non-commercial](https://github.com/libretro/opera-libretro/blob/master/libopera/opera_3do.c)\n\nA summary of the licenses behind RetroArch and its cores can be found [here](../development/licenses.md).\n\n## BIOS\n\nOne of the following system BIOSes is required to run software. Place in the frontend's system directory.\n\n| Filename | Description | md5sum |\n|:---------------------------:|:-----------------------------------:|:--------------------------------:|\n| panafz1.bin | Panasonic FZ-1 | f47264dd47fe30f73ab3c010015c155b |\n| panafz10.bin | Panasonic FZ-10 | 51f2f43ae2f3508a14d9f56597e2d3ce |\n| panafz10-norsa.bin | Panasonic FZ-10 [RSA Patch] | 1477bda80dc33731a65468c1f5bcbee9 |\n| panafz10e-anvil.bin | Panasonic FZ-10-E [Anvil] | a48e6746bd7edec0f40cff078f0bb19f |\n| panafz10e-anvil-norsa.bin | Panasonic FZ-10-E [Anvil RSA Patch] | cf11bbb5a16d7af9875cca9de9a15e09 |\n| panafz1j.bin | Panasonic FZ-1J | a496cfdded3da562759be3561317b605 |\n| panafz1j-norsa.bin | Panasonic FZ-1J [RSA Patch] | f6c71de7470d16abe4f71b1444883dc8 |\n| goldstar.bin | Goldstar GDO-101M | 8639fd5e549bd6238cfee79e3e749114 |\n| sanyotry.bin | Sanyo IMP-21J TRY | 35fa1a1ebaaeea286dc5cd15487c13ea |\n| 3do_arcade_saot.bin | Shootout At Old Tucson | 8970fc987ab89a7f64da9f8a8c4333ff |\n\n## FONT ROM\n\nRequired for some Japanese games. Optional otherwise.\n\n| Filename | Description | md5sum |\n|:--------------------------:|:---------------------------:|:--------------------------------:|\n| panafz1-kanji.bin | Panasonic FZ-1 Kanji ROM | b8dc97f778a6245c58e064b0312e8281 |\n| panafz10ja-anvil-kanji.bin | Panasonic FZ-10JA Kanji ROM | 428577250f43edc902ea239c50d2240d |\n| panafz1j-kanji.bin | Panasonic FZ-1J Kanji ROM | c23fb5d5e6bb1c240d02cf968972be37 |\n\n\n\n## Extensions\n\nContent that can be loaded by the Opera core have the following file extensions:\n\n- .iso\n- .bin\n- .chd\n- .cue\n\nRetroArch database(s) that are associated with the Opera core:\n\n- [The 3DO Company - 3DO](https://github.com/libretro/libretro-database/blob/master/rdb/The%203DO%20Company%20-%203DO.rdb)\n\n## Features\n\nFrontend-level settings or features that the Opera core respects.\n\n| Feature | Supported |\n|-------------------|:---------:|\n| Restart | ✔ |\n| Screenshots | ✔ |\n| Saves | ✔ |\n| States | ✔ |\n| Rewind | ✔ |\n| Netplay | ✔ |\n| Core Options | ✔ |\n| [Memory Monitoring (achievements)](../guides/memorymonitoring.md) | ✔ |\n| RetroArch Cheats | ✕ |\n| Native Cheats | ✕ |\n| Controls | ✔ |\n| Remapping | ✔ |\n| Multi-Mouse | ✕ |\n| Rumble | ✕ |\n| Sensors | ✕ |\n| Camera | ✕ |\n| Location | ✕ |\n| Subsystem | ✕ |\n| [Softpatching](../guides/softpatching.md) | ✕ |\n| Disk Control | ✕ |\n| Username | ✕ |\n| Language | ✕ |\n| Crop Overscan | ✕ |\n| LEDs | ✕ |\n\n### Directories\n\nThe Opera core's library name is 'Opera'\n\nThe Opera core saves/loads to/from these directories.\n\n**Frontend's Save directory**\n\n| File | Description |\n|:-------------:|:--------------------------:|\n| *.srm | Per game NVRAM |\n| 3DO.nvram | Shared NVRAM |\n| 3DO.nvram.tmp | Only used for atomic saves |\n\n**Frontend's State directory**\n\n| File | Description |\n|:--------:|:-----------:|\n| *.state# | State |\n\n### Geometry and timing\n\n- The Opera core's core provided FPS is 60\n- The Opera core's core provided sample rate is 44100 Hz\n- The Opera core's base width is 320 when the 'High Resolution' core option is set to disabled.\n- The Opera core's base height is 240 when the 'High Resolution' core option is set to disabled.\n- The Opera core's max width is 320 when the 'High Resolution' core option is set to disabled.\n- The Opera core's max height is 240 when the 'High Resolution' core option is set to disabled.\n- The Opera core's base width is 640 when the 'High Resolution' core option is set to enabled.\n- The Opera core's base height is 480 when the 'High Resolution' core option is set to enabled.\n- The Opera core's max width is 640 when the 'High Resolution' core option is set to enabled.\n- The Opera core's max height is 480 when the 'High Resolution' core option is set to enabled.\n- The Opera core's core provided aspect ratio is 4/3\n\n## Core options\n\nThe Opera core has the following option(s) that can be tweaked from the core options menu. The default setting is bolded.\n\nSettings with (Restart) means that core has to be closed for the new setting to be applied on next launch.\n\n- **CPU overclock** [opera_cpu_overclock] (**1.0x (12.50Mhz)**|1.1x (13.75Mhz)|1.2x (15.00Mhz)|1.5x (18.75Mhz)|1.6x (20.00Mhz)|1.8x (22.50Mhz)|2.0x (25.00Mhz))\n\n The 3DO used a 12.5MHz ARM60 CPU as its central processor. We have implemented a CPU overclocking feature in the Opera core so that you can increase performance upto 2x.\n\n **May not have an impact on all games.**\n\n [https://www.youtube.com/watch?v=7bT2ecwKdHQ](https://www.youtube.com/watch?v=7bT2ecwKdHQ)\n\n- **High Resolution** [opera_high_resolution] (**disabled**|enabled)\n\n\tThe default internal resolution is 320x240, but the output resolution is 640x480. This feature makes the system behave as if it has a 640x480 framebuffer.\n\n??? note \"High Resolution - disabled\"\n\t\n\n??? note \"High Resolution - enabled\"\n\t\n\n- **NVRAM Storage** [opera_nvram_storage] (**per game**|shared)\n\n\tChoose whether NVRAM saves are per game or NVRAM saves are shared between all games.\n\n\tLook at the [Directories section](#directories) for more information.\n\n- **Active Devices** [opera_active_devices] (**1**|2|3|4|5|6|7|8|0)\n\n\tThere is a bug (maybe in Opera but possibly in certain games) in which having more than 1 controller emulated causes the game not to respond to input. This allows working around the issue.\n\n- **Timing Hack 1 (Crash 'n Burn)** [opera_hack_timing_1] (**disabled**|enabled)\n\n\tEnable this to fix Crash 'n Burn.\n\n- **Timing Hack 3 (Dinopark Tycoon)** [opera_hack_timing_3] (**disabled**|enabled)\n\n\tEnable this to fix Dinopark Tycoon.\n\n- **Timing Hack 5 (Microcosm)** [opera_hack_timing_5] (**disabled**|enabled)\n\n\tEnable this to fix Microcosm.\n\n- **Timing Hack 6 (Alone in the Dark)** [opera_hack_timing_6] (**disabled**|enabled)\n\n Enable this to fix Alone in the Dark.\n\n- **Graphics Step Y Hack (Samurai Shodown)** [opera_hack_graphics_step_y] (**disabled**|enabled)\n\n\tEnable this to fix Samurai Shodown's background rendering.\n\n## Joypad\n\n\n\n| User 1 - 2 Remap descriptors | RetroPad Inputs |\n|------------------------------|------------------------------------------------|\n| B |  |\n| A |  |\n| X (Stop) |  |\n| P (Play/Pause) |  |\n| D-Pad Up |  |\n| D-Pad Down |  |\n| D-Pad Left |  |\n| D-Pad Right |  |\n| C |  |\n| L |  |\n| R |  |\n\n## Compatibility\n\n- [Opera Core Compatibility List](http://wiki.fourdo.com/Compatibility_List)\n\n## External Links\n\n- [Official 4DO Website](http://www.fourdo.com/)\n- [Official 4DO Wiki](http://wiki.fourdo.com/Main_Page)\n- [Official 4DO SourceForge Repository](https://sourceforge.net/projects/fourdo/)\n- [Libretro Opera Core info file](https://github.com/libretro/libretro-super/blob/master/dist/info/opera_libretro.info)\n- [Libretro Opera Github Repository](https://github.com/libretro/opera-libretro)\n- [Report Libretro Opera Core Issues Here](https://github.com/libretro/opera-libretro/issues)\n- [Gameplay Videos](https://www.youtube.com/playlist?list=PLRbgg4gk_0IeD-Mj2GG13qsYasGgRNQg4)"
},
{
"path": "docs/library/pcsx2.md",
"content": "# Sony - PlayStation (LRPS2)\n\nClick on this link here to get redirected to the LRPS2 page.\n"
},
{
"path": "docs/library/pcsx_rearmed.md",
"content": "# Sony - PlayStation (PCSX ReARMed)\n\n\n\n## Background\n\nPCSX ReARMed is a fork of PCSX Reloaded. It differs from the latter in that it has special optimizations for systems that have an ARM architecture-based CPU.\n\nThe PCSX ReARMed core has been authored by\n\n- PCSX Team\n- notaz\n- Exophase\n\nThe PCSX ReARMed core is licensed under\n\n- [GPLv2](https://github.com/libretro/pcsx_rearmed/blob/master/COPYING)\n\nA summary of the licenses behind RetroArch and its cores can be found [here](../development/licenses.md).\n\n## BIOS\n\nRequired or optional firmware files go in the frontend's `system` directory.\n\nIf more than one BIOS file exists, the PCSX ReARMed core uses the BIOS above the table below.\n\n!!! attention\n\tIn case the PCSX ReARMed core can find no BIOS files named like this in RetroArch's system directory, it will default to a High-Level Emulation BIOS. This decreases the level of compatibility of the emulator, so it is recommended that you always supply valid BIOS images inside the system directory.\n\n| Filename | Description | md5sum |\n|:---------------:|:----------------------:|:--------------------------------:|\n| PSXONPSP660.bin | Extracted from a PSP | c53ca5908936d412331790f4426c6c33 |\n| scph101.bin | Version 4.4 03/24/00 A | 6E3735FF4C7DC899EE98981385F6F3D0 |\n| scph7001.bin | Version 4.1 12/16/97 A | 1e68c231d0896b7eadcad1d7d8e76129 |\n| scph5501.bin | Version 3.0 11/18/96 A | 490f666e1afb15b7362b406ed1cea246 |\n| scph1001.bin | Version 2.0 05/07/95 A | 924e392ed05558ffdb115408c263dccf |\n\n\n\nIf none of the above is found, PCSX_ReARMed will search for filenames starting with \"scph\" and use that instead.\nIt doesn't seem to matter whatever BIOS version is used and from what region, as long as it's from a retail PSX/PS one.\nIf no compatible BIOS is found, PCSX_ReARMed will revert to use the HLE BIOS, which can have compatibility issues (e.g. memory card issues in Suikoden games, some games just going into black screens, ...).\n\n## Extensions\n\nContent that can be loaded by the PCSX ReARMed core have the following file extensions:\n\n- .bin\n- .cue\n- .img\n- .mdf\n- .pbp\n- .toc\n- .cbn\n- .m3u\n- .ccd\n- .chd\n- .iso\n- .exe\n\nRetroArch database(s) that are associated with the PCSX ReARMed core:\n\n- [Sony - PlayStation](https://github.com/libretro/libretro-database/blob/master/rdb/Sony%20-%20PlayStation.rdb)\n\n## Features\n\nFrontend-level settings or features that the PCSX ReARMed core respects.\n\n| Feature | Supported |\n|-------------------|:---------:|\n| Restart | ✔ |\n| Saves | ✔ |\n| States | ✔ |\n| Rewind | ✔ |\n| Netplay | ✕ |\n| Core Options | ✔ |\n| [Memory Monitoring (achievements)](../guides/memorymonitoring.md) | ✔ |\n| RetroArch Cheats | ✔ |\n| Native Cheats | ✕ |\n| Controls | ✔ |\n| Remapping | ✔ |\n| Multi-Mouse | ✔ |\n| Rumble | ✔ |\n| Sensors | ✕ |\n| Camera | ✕ |\n| Location | ✕ |\n| Subsystem | ✕ |\n| [Softpatching](../guides/softpatching.md) | ✕ |\n| Disk Control | ✔ |\n| Username | ✕ |\n| Language | ✕ |\n| Crop Overscan | ✕ |\n| LEDs | ✕ |\n\n### Directories\n\nThe PCSX ReARMed core's library name is 'PCSX-ReARMed'\n\nThe PCSX ReARMed core saves/loads to/from these directories.\n\n**Frontend's Save directory**\n\n| File | Description |\n|:--------------:|:----------------------------------------------------:|\n| *.srm | Memory card slot 0 |\n| pcsx-card2.mcd | Memory card slot 1 (if enabled, default to disabled) |\n\n**Frontend's State directory**\n\n| File | Description |\n|:--------:|:-----------:|\n| *.state# | State |\n\n### Geometry and timing\n\n- The PCSX ReARMed core's core provided FPS is 60 for NTSC games. 50 for PAL games.\n- The PCSX ReARMed core's core provided sample rate is 44100 Hz\n- The PCSX ReARMed core's base width is 320\n- The PCSX ReARMed core's base height is 240\n- The PCSX ReARMed core's max width is 1024\n- The PCSX ReARMed core's max height is 512\n- The PCSX ReARMed core's core provided aspect ratio is 4/3\n\n### Loading content\n\nPCSX ReARMed needs a cue-sheet that points to an image file. A cue sheet, or cue file, is a metadata file which describes how the tracks of a CD or DVD are laid out.\n\nIf you have e.g. `foo.bin`, you should create a text file and save it as `foo.cue`. Most PS1 games are single-track, so the cue file contents should look like this:\n\n`foobin.cue`\n```\n FILE \"foo.bin\" BINARY\n TRACK 01 MODE1/2352\n INDEX 01 00:00:00\n```\n\nAfter that, you can load the `foo.cue` file in RetroArch with the PCSX ReARMed core.\n\n!!! attention\n Certain PS1 games are multi-track, so their .cue files might be more complicated.\n\n#### Playing PAL copy protected games\n\nPAL copy protected games need a SBI Subchannel file next to the bin/cue files in order to get past the copy protection.\n\n- Ape Escape (Europe).bin\n- Ape Escape (Europe).cue\n- **Ape Escape (Europe).sbi**\n\n#### Multiple-disk games\n\nIf foo is a multiple-disk game, you should have .cue files for each one, e.g. `foo (Disc 1).cue`, `foo (Disc 2).cue`, `foo (Disc 3).cue`.\n\nTo take advantage of PCSX ReARMed's Disk Control feature for disk swapping, an index file (a m3u file) should be made.\n\nCreate a text file and save it as `foo.m3u`. Then enter your game's .cue files on it. The m3u file contents should look something like this:\n\n`foo.m3u`\n```\nfoo (Disc 1).cue\nfoo (Disc 2).cue\nfoo (Disc 3).cue\n```\n\nAfter that, you can load the `foo.m3u` file in RetroArch with the PCSX ReARMed core.\n\nHere's a m3u example done with Valkryie Profile\n\n`Valkyrie Profile (USA).m3u`\n```\nValkyrie Profile (USA) (Disc 1).cue\nValkyrie Profile (USA) (Disc 2).cue\n```\n\n\n\n!!! attention\n\tAdding multi-track games to a RetroArch playlist is recommended. (Manually add an entry a playlist that points to `foo.m3u`)\n\n### Swapping disks\n\nSwapping disks follows this procedure\n\n1. Open tray (Disk Cycle Tray Status)\n\n2. Change the Disk Index to the disk you want to swap to.\n\n3. Close tray (Disk Cycle Tray Status)\n\n4. Return to the game and wait a few seconds to let it take effect\n\n### PBP\n\nAlternatively to using cue sheets with .bin/.iso files, you can convert your games to .pbp (Playstation Portable update file).\n\nA recommended .pbp convert tool is PSX2PSP.\n\nIf converting a multiple-disk game, all disks should be added to the same .pbp file, rather than making a .m3u file for them.\n\nMost conversion tools will want a single .bin file for each disk. If your game uses multiple .bin files (tracks) per disk, you will have to mount the cue sheet to a virtual drive and re-burn the images onto a single track before conversion.\n\n!!! attention\n RetroArch does not currently have .pbp database due to variability in users' conversion methods. All .pbp games will have to be added to playlists manually.\n\n## Saves\n\nFor game savedata storage, the PSX console used memory cards. The PSX console had two slots for memory cards.\n\nThe PCSX ReARMed core defaults to only support the first memory card slot.\nSecond memory card slot can be enabled via the `pcsx_rearmed_memcard2` option.\n\nIn this doc, the first memory card slot will be referred to as 'Memcard slot 0'.\nThe second memory card slot will be referred to as 'Memcard slot 1'.\n\nFor memory card functionality and usage, the PCSX ReARMed core will the Libretro savedata format.\n\n
\n\n| Libretro savedata format |\n|--------------------------|\n| gamename.srm |\n| pcsx-card2.mcd |\n\n
\n\n**By default**, the filename of the Memcard slot 0 savedata will match the loaded cue or m3u or pbp filename, like this:\n\n**By default**, the filename of the Memcard slot 1 savedata (if enabled) will be\n`pcsx-card2.mcd`. This basically means that all games in the same folder share\nthe same nemory card in slot 1.\n\n- Loaded content: Breath of Fire III (USA).cue\n\n- **Memcard slot 0: Breath of Fire III (USA).srm**\n\nor\n\n- Loaded content: Final Fantasy VII (USA).m3u\n\n- **Memcard slot 0: Final Fantasy VII (USA).srm**\n\nor\n\n- Loaded content: Wild Arms 2 (USA).pbp\n\n- **Memcard slot 0: `Wild Arms 2 (USA).srm**\n\n!!! attention\n\tTo import your old memory cards from other emulators, you need to rename them to the Libretro savedata format.\n\n!!! warning\n\tKeep in mind that save states also include the state of the memory card; carelessly loading an old save state will **OVEWRITE** the memory card, potentially resulting in lost saved games. **You can set the 'Don't overwrite SaveRAM on loading savestate' option in RetroArch's Saving settings to On to prevent this.**\n\n## Core options\n\nThe PCSX ReARMed core has the following option(s) that can be tweaked from the core options menu. The default setting is bolded.\n\nSettings with (Restart) means that core has to be closed for the new setting to be applied on next launch.\n\n- **Frameskip** [pcsx_rearmed_frameskip] (**0**|1|2|3)\n\n\tChoose how much frames should be skipped to improve performance at the expense of visual smoothness.\n\n- **Use BIOS** [pcsx_rearmed_bios] (**auto**|HLE)\n\n\tAllows you to use real bios file (if available) or emulated bios (HLE).\n\n\t**HLE** - Forces core to use built-in bios emulation\n\n\t**auto** - Tries to search for compatible bios file, falls back to use HLE if none is found.\n\n- **Region** [pcsx_rearmed_region] (**auto**|NTSC|PAL)\n\n\tChoose what region the system is from.\n\n- **Enable second memory card** [pcsx_rearmed_memcard2] (**disabled**|enabled)\n\n\tEnables or disabled second memory card (Memcard 2 slot). When enabled,\n\tMemcard 2 slot's save data will be loaded and saved as\n\t`pcsx-card2.mcd` file in the saves directory.\n\tAll games will share the same second memory card.\n\n- **Emulated Mouse Sensitivity** [pcsx_rearmed_input_sensitivity] (**1.00**|0.05 - 2.00)\n\n\tAdjust movement responsiveness for the emulated mouse device.\n\n- **Multitap Mode (Restart)** [pcsx_rearmed_multitap] (**disabled**|port 1 only|port 2 only|both)\n\n\tSets the multitap device in either port 1 or port 2 allowing support of upto 5 players, or on both for 8 players.\n\n!!! attention\n\tMultitap option works depending on the game. Setting any mode on a game that does not use multitap will make inputs not working. Leave mode at **disabled** unless supported by game and you really to play in multiplayer modes.\n\n- **NegCon Twist Deadzone (percent)** [pcsx_rearmed_negcon_deadzone] (**0**|5|10|15|20|25|30)\n\n\tSets the deadzone of the RetroPad left analog stick when simulating the 'twist' action of emulated [neGcon Controllers](https://en.wikipedia.org/wiki/NeGcon). Used to eliminate drift/unwanted input.\n\n!!! attention\n\tMost (all?) negCon compatible titles provide in-game options for setting a 'twist' deadzone value. To avoid loss of precision, the in-game deadzone should *always* be set to zero. Any analog stick drift should instead be accounted for by configuring the 'NegCon Twist Deadzone' core option. This is particularly important when 'NegCon Twist Response' is set to 'quadratic' or 'cubic'.\n\n\tXbox gamepads typically require a deadzone of 15-20%. Many Android-compatible bluetooth gamepads have an internal 'hardware' deadzone, allowing the deadzone value here to be set to 0%.\n\n\tFor convenience, it is recommended to make use of the 'Options → Analog Setting 1P' menu of [Gran Turismo](https://en.wikipedia.org/wiki/Gran_Turismo_(video_game)) when calibrating the 'NegCon Twist Deadzone'. This provides a clear and precise representation of 'real' controller input values.\n\n- **NegCon Twist Response** [pcsx_rearmed_negcon_response] (**linear**|quadratic|cubic)\n\n\tSpecifies the analog response when using a RetroPad left analog stick to simulate the 'twist' action of emulated [neGcon Controllers](https://en.wikipedia.org/wiki/NeGcon).\n\n\t'linear': Analog stick displacement is mapped linearly to negCon rotation angle.\n\tRecommended when using racing wheel peripherals.\n\n\t'quadratic': Analog stick displacement is mapped quadratically to negCon rotation angle. This allows for greater precision when making small movements with the analog stick.\n\tOptimal setting for gamepads.\n\n\t'cubic': Analog stick displacement is mapped cubically to negCon rotation angle. This allows for even greater precision when making small movements with the analog stick, but 'exaggerates' larger movements.\n\tEnables precise control but difficult to use.\n\n!!! attention\n\tA linear response is not recommended when using standard gamepad devices. The negCon 'twist' mechanism is substantially different from conventional analog sticks; linear mapping over-amplifies small displacements of the stick, impairing fine control. A linear response is only appropriate when using racing wheel peripherals.\n\n\tIn most cases, the 'quadratic' option should be selected. This provides effective compensation for the physical differences between real/emulated hardware, enabling smooth/precise analog input.\n\n- **Analog axis bounds** [pcsx_rearmed_analog_axis_modifier] (**circle**|square)\n\n\tRange bounds for analog axis. Square bounds help controllers with highly circular ranges that are unable to fully saturate the x and y axis at 45degree deflections.\n\n- **Guncon Adjust X** [pcsx_rearmed_gunconadjustx] (**0**|-25 - 25)\n- **Guncon Adjust Y** [pcsx_rearmed_gunconadjustx] (**0**|-25 - 25)\n\n\tWhen using Guncon mode, you can override aim in emulator if shots misaligned, this applies an increment on the x or y axis.\n\n- **Guncon Adjust Ratio X** [pcsx_rearmed_gunconadjustratiox] (**1**|0.75 - 1.25)\n- **Guncon Adjust Ratio Y** [pcsx_rearmed_gunconadjustratioy] (**1**|0.75 - 1.25)\n\n\tWhen using Guncon mode, you can override aim in emulator if shots misaligned, this applies a ratio on the x or y axis.\n\n- **Enable Vibration** [pcsx_rearmed_vibration] (**enabled**|disabled)\n\n\tEnables Rumble. Look at the [Rumble section](#rumble-support) for more information.\n\n- **Enable Dithering** [pcsx_rearmed_dithering] (**enabled**|disabled)\n\n\tIf Off, disables the dithering pattern the PSX applies to combat color banding.\n\n??? note \"Enable Dithering - On\"\n\t\n\n??? note \"Enable Dithering - Off\"\n\t\n\n- **Frame duping** [pcsx_rearmed_duping_enable] (**enabled**|disabled)\n\n\tA speedup, redraws/reuses the last frame if there was no new data.\n\n- **Display Internal FPS** [pcsx_rearmed_display_internal_fps] (**disabled**|enabled)\n\n\tShows an on-screen frames per second counter.\n\n- **Threaded Rendering** [pcsx_rearmed_gpu_thread_rendering] (**disabled**|sync|async)\n\n\tWhen enabled, runs GPU commands in a thread.\n\n\t'Sync' waits for drawing to finish before vsync.\n\n\t'Async' will not wait unless there's another frame behind it.\n\n- **Show Bios Bootlogo(Breaks some games)** [pcsx_rearmed_show_bios_bootlogo] (**disabled**|enabled)\n\n\tShow the BIOS bootlogo.\n\n??? note \"Skip BIOS - Off\"\n\t\n\n- **Sound: Reverb** [pcsx_rearmed_spu_reverb] (**enabled**|disabled)\n\n\tEnable sound reverb.\n\n- **Sound: Interpolation** [pcsx_rearmed_spu_interpolation] (**simple**|gaussian|cubic|off)\n\n\tModify sound interpolation.\n\n- **CD Access Method (Restart)** [pcsx_rearmed_async_cd] (**sync**|sync|async|precache)\n\n\tSelect method used to read data from content disk images.\n\n\t'Synchronous': Mimics original hardware.\n\t\n\t'Asynchronous': Reduce stuttering on devices with slow storage.\n\t\n\t'Precache': Loads disk image into memory for faster access (**Note: CHD only**).\n\n- **Advanced System Options**\n\n- **XA Decoding** [pcsx_rearmed_noxadecoding] (**enabled**|disabled)\n\n\tDisables XA sound, which can sometimes improve performance.\n\n- **CD Audio** [pcsx_rearmed_nocdaudio] (**enabled**|disabled)\n\n\tDisables XA sound, which can sometimes improve performance.\n\n- **SPU IRQ Always Enabled** [pcsx_rearmed_spuirq] (**disabled**|enabled)\n\n\tCompatibility tweak, should be left to off in most cases. This can be momentarily turned on at any point to try and fix some bugs.\n\t\n\tFew examples includes:\n\n\t'Alien Resurrection': bug where doors can remain closed until the option is turned on.\n\n\t'Legend of Mana': audio out-of-sync bug during FMV sequences can also be fixed by momentarily switching the option on, then off when sound is normal.\n \n- **Additional game fixes options**\n\n- **Diablo Music Fix** [pcsx_rearmed_idiablofix] (**disabled**|enabled)\n\n\tFix for music randomly cuts out when pressing start or interact with somebody.\n\n- **Parasite Eve 2/Vandal Hearts 1/2 Fix** [pcsx_rearmed_pe2_fix] (**disabled**|enabled)\n\n\tEnable this to fit Parasite Eve 2 and Vandal Hearts 1/2\n\n- **InuYasha Sengoku Battle Fix** [pcsx_rearmed_inuyasha_fix] (**disabled**|enabled)\n\n\tEnable this to fix InuYasha.\n\n- **Additional core options for DynaRec (ari64) builds:**\n\n- **Dynamic recompiler** [pcsx_rearmed_drc] (**enabled**|disabled)\n\n\tEnables core to use dynamic recompiler or interpreter (slower) cpu instructions.\n\n\tWhen enabled, dynarec can use either one below:\n\n\tDynarec can either be **ari64** for arm 32-bit devices while **lightrec** i used for 64-bit capable devices or platforms.\n\n- **PSX cpu clock** [pcsx_rearmed_psxclock] (30 - 100, **default 57**)\n\n\tOverclock or underclock the PSX, default is 57.\n\n\tLower value = less work for the emu, may be faster in some cases.\n\n\tCauses compatibility issues, so modify only for games that needs it, leave at default for most games.\n\n- **Additional core options for devices using NEON-compatible CPU:**\n\n- **Enable interlacing mode(s)** [pcsx_rearmed_neon_interlace_enable] (**disabled**|enabled)\n\n\tEnables fake scanlines effect.\n\n- **Enhanced resolution (slow)** [pcsx_rearmed_neon_enhancement_enable] (**disabled**|enabled)\n\n\tRenders in double resolution at the cost of lower performance\n\n\tNot available for high resolution games.\n\n- **Enhanced resolution speed hack** [pcsx_rearmed_neon_enhancement_no_main] (**disabled**|enabled)\n\n\tSpeed hack for above option.\n\n\tCauses game glitches.\n\n- **Additional core options for devices using PEOPS GPU plugin** (some options may or may not have effect or need core restart)\n\n- **(GPU) Odd/Even Bit Hack** [pcsx_rearmed_gpu_peops_odd_even_bit] (**disabled**|enabled)\n\n\tNeeded for Chrono Chross.\n\n- **(GPU) Expand Screen Width** [pcsx_rearmed_gpu_peops_expand_screen_width] (**disabled**|enabled)\n\n\tCapcom fighting games.\n\n- **(GPU) Ignore Brightness Color** [pcsx_rearmed_gpu_peops_ignore_brightness] (**disabled**|enabled)\n\n\tBlack screens in Lunar.\n\n- **(GPU) Disable Coordinate Check** [pcsx_rearmed_gpu_peops_disable_coord_check] (**disabled**|enabled)\n\n\tEnables compatibility mode.\n\n- **(GPU) Lazy Screen Update** [pcsx_rearmed_gpu_peops_lazy_screen_update] (**disabled**|enabled)\n\n\tPandemonium 2\n\n- **(GPU) Old Frame Skipping** [pcsx_rearmed_gpu_peops_old_frame_skip] (**enabled**|disabled)\n\n\tSkips every second frame.\n\n- **(GPU) Repeated Flat Tex Triangles** [pcsx_rearmed_gpu_peops_repeated_triangles] (**disabled**|enabled)\n\n\tNeeded by Dark Forces.\n\n- **(GPU) Draw Quads with Triangles** [pcsx_rearmed_gpu_peops_quads_with_triangles] (**disabled**|enabled)\n\n\tBetter G-colors, worse textures.\n\n- **(GPU) Fake 'Gpu Busy' States** [pcsx_rearmed_gpu_peops_fake_busy_state] (**disabled**|enabled)\n\n\tToggle busy flag after drawing.\n\n- **Additional core options for devices using UNAI GPU plugin** (some options may or may not have effect or need core restart)\n\n- **(GPU) Enable Blending** [pcsx_rearmed_gpu_unai_blending] (**enabled**|disabled)\n\n- **(GPU) Enable Lighting** [pcsx_rearmed_gpu_unai_lighting] (**enabled**|enabled)\n\n- **(GPU) Enable Fast Lighting** [pcsx_rearmed_gpu_unai_fast_lighting] (**disabled**|enabled)\n\n- **(GPU) Enable Forced Interlace** [pcsx_rearmed_gpu_unai_ilace_force] (**disabled**|enabled)\n\n- **(GPU) Enable Pixel Skip** [pcsx_rearmed_gpu_unai_pixel_skip] (**disabled**|enabled)\n\n- **(GPU) Enable Hi-Res Downscaling** [pcsx_rearmed_gpu_unai_scale_hires] (**disabled**|enabled)\n\n\tWhen enabled, will scale hi-res modes to 320x240, skipping unrendered pixels.\n\n## Rumble\n\nRumble only works in the PCSX ReARMed core when\n\n- The content being ran has rumble support.\n- The frontend being used has rumble support.\n- The joypad device being used has rumble support.\n- The ['Enable Vibration' core option](#core-options) is set to On\n- The corresponding user's Pad Type is set to **analog**\n\n## Multitap\n\nActivating multitap support in compatible games can be configured by the ['Multitap 1' and 'Multitap 2' core options](#core-options).\n\n- When multitap1 and multitap2 are off, only User 1 and 2 input works and are assigned as player 1 and player 2 respectively.\n\n## Joypad\n\n\n\n| RetroPad Inputs | User 1 - 8 input descriptors | standard | analog | negcon |\n|------------------------------------------------|------------------------------|-------------|----------------|---------------------------------|\n|  | Cross | Cross | Cross | Analog Button I |\n|  | Square | Square | Square | Analog Button II |\n|  | Select | Select | Select | |\n|  | Start | Start | Start | Start |\n|  | D-Pad Up | D-Pad Up | D-Pad Up | D-Pad Up |\n|  | D-Pad Down | D-Pad Down | D-Pad Down | D-Pad Down |\n|  | D-Pad Left | D-Pad Left | D-Pad Left | D-Pad Left |\n|  | D-Pad Right | D-Pad Right | D-Pad Right | D-Pad Right |\n|  | Circle | Circle | Circle | A |\n|  | Triangle | Triangle | Triangle | B |\n|  | L1 | L1 | L1 | Left Shoulder Button (analog) |\n|  | R1 | R1 | R1 | Right Shoulder Button (digital) |\n|  | L2 | L2 | L2 | Analog Button II |\n|  | R2 | R2 | R2 | Analog Button I |\n|  | L3 | | L3 | |\n|  | R3 | | R3 | |\n|  X | Left Analog X | | Left Analog X | Twist |\n|  Y | Left Analog Y | | Left Analog Y | |\n|  X | Right Analog X | | Right Analog X | |\n|  Y | Right Analog Y | | Right Analog Y | Up: Analog Button I / Down: Analog Button II |\n\n## Compatibility\n\n| Game | Issue |\n|-----------------|--------------------------------------------------------|\n| Jumping Flash 2 | Graphics glitches. Geometry issues. |\n| Tobal 2 | Graphics glitch. Garbled Dream Factory intro sequence. |\n| Kitty the Kool! | No issues. |\n\n## External Links\n\n- [Official PCSX ReARMed Website](http://notaz.gp2x.de/pcsx_rearmed.php)\n- [Official PCSX ReARMed Github Repository](https://github.com/notaz/pcsx_rearmed)\n- [Libretro PCSX ReARMed Core info file](https://github.com/libretro/libretro-super/blob/master/dist/info/pcsx_rearmed_libretro.info)\n- [Libretro PCSX ReARMed Github Repository](https://github.com/libretro/pcsx_rearmed)\n- [Report Libretro PCSX ReARMed Core Issues Here](https://github.com/libretro/pcsx_rearmed/issues)\n- [Gameplay Videos](https://www.youtube.com/playlist?list=PLRbgg4gk_0Ie5y2yx-sl5xn6KRbo5VUMf)\n\n## PSX\n\n- [Sony - PlayStation (Beetle PSX)](beetle_psx.md)\n- [Sony - PlayStation (Beetle PSX HW)](beetle_psx_hw.md)\n"
},
{
"path": "docs/library/pd777.md",
"content": "# Epoch - Cassette Vision (PD777)\n\n## Background\n\nμPD777 is an emulator for the Epoch Cassette Vision, from Japan in 1981.\nIt was one of the first Japanese consoles with interchangeable cartridges, but\nincluded a full CPU in each cartridge --- the console base was mostly buttons\nand wires.\n\nThe Cassette Vision Jr (1983) used the same software, but dropped the paddle controls.\n\nPD777 is a Libretro port, to run in RetroArch.\n\n\nThe PD777 core has been authored by:\n\n- W88DodPECuThLOl (Standalone PD777)\n- Ken Mitton\n\nThe PD777 core is licensed under:\n\n- [MIT](https://github.com/mittonk/PD777/blob/main/LICENSE)\n\nA summary of the licenses behind RetroArch and its cores can be found [here](../development/licenses.md).\n\n## Requirements\n\nMinimal.\n\n## How to start the PD777 core:\n\nROM file handling is slightly awkward because of the two-file ROM format.\n\n1. Zip-files (bundling one `.bin777` and one `.ptn777`) are supported.\n1. Supply a `.bin777` file to load; the core looks for a similarly-named `.ptn777` file in the same directory.\n\nThere is not yet a suitable single-file format for the Cassette Vision.\nIf ROM loading fails, the core will run a built-in balloon demo, as in standalone emulator.\n\n## BIOS\n\nNone.\n\n## Extensions\n\nContent that can be loaded by the PD777 core have the following file extensions:\n\n- .zip\n- .bin777\n\nRetroArch database(s) that are associated with the PD777 core:\n\n- None yet\n\n## Features\n\nFrontend-level settings or features that the PD777 core respects:\n\n| Feature | Supported |\n|-------------------|:---------:|\n| Restart | ✔ |\n| Saves | ✕ |\n| States | ✕ |\n| Rewind | ✕ |\n| Netplay | ✕ |\n| Core Options | ✕ |\n| [Memory Monitoring (achievements)](../guides/memorymonitoring.md) | ✕ |\n| RetroArch Cheats | ✕ |\n| Native Cheats | ✕ |\n| Controls | ✔ |\n| Remapping | ✔ |\n| Multi-Mouse | ✕ |\n| Rumble | ✕ |\n| Sensors | ✕ |\n| Camera | ✕ |\n| Location | ✕ |\n| Subsystem | ✕ |\n| [Softpatching](../guides/softpatching.md) | ✕ |\n| Disk Control | ✕ |\n| Username | ✕ |\n| Language | ✕ |\n| Crop Overscan | ✕ |\n| LEDs | ✕ |\n\n## Directories\n\nNone.\n\n## Geometry and timing\n\n- The PD777 core's core provided FPS is 60.\n- The PD777 core's core provided sample rate is 48000/00 Hz.\n- The PD777 core's base width is 375.\n- The PD777 core's base height is 240.\n- The PD777 core's core provided aspect ratio is 4:3.\n375x240, 60 FPS.\n\n## Usage\n\nStandard.\n\n## Core options\n\nInput > Announce Course Switch: Show the new setting of the Course Select Switch when changing it with up/down buttons.\n\n## User 1 device types\n\nThe PD777 core supports the following device type(s) in the controls menu, bolded device types are the default for the specified user(s):\n\n- **RetroPad**\n- RetroPad w/Analog\n- Mouse\n\n## Joypad\n\nThe controls were built into the base unit, and some 2-player games assign buttons asymmetrically; for example, New Baseball gives most of the buttons to the fielding player, with just Lever Switch 1 for the batting player.\n\n| RetroPad Inputs | User # input descriptors | (Device name) Inputs |\n|------------------------------------------------|--------------------------|---------------------------|\n|  | Push2 | - |\n|  | Push3 | - |\n|  | Select | - |\n|  | Start | - |\n|  | Course Select increment | - |\n|  | Course Select decrement | - |\n|  | Lever Switch 1 Left | - |\n|  | Lever Switch 1 Right | - |\n|  | Push4 | - |\n|  | Push1 | - |\n|  | | - |\n|  | AUX | - |\n|  | | - |\n|  | | - |\n|  | | - |\n|  | | - |\n|  X | Paddle 2 | - |\n|  Y | Paddle 1 | - |\n|  X | | - |\n|  Y | | - |\n\nRetroPad 2 gets Lever Switch 2 and Paddles 3 and 4.\n\n## External Links\n\n- [Standalone PD777 Repository](https://github.com/W88DodPECuThLOl/PD777)\n- [Libretro PD777 Core info file](https://github.com/libretro/libretro-super/blob/master/dist/info/pd777_libretro.info)\n- [Libretro PD777 Github Repository](https://github.com/mittonk/PD777)\n- [Report Libretro PD777 Core Issues Here](https://github.com/mittonk/PD777/issues)\n\n## (Related cores)\n\nNone.\n"
},
{
"path": "docs/library/picodrive.md",
"content": "# Sega - MS/MD/CD/32X (PicoDrive)\n\n## Background\n\nPicoDrive is an open-source Sega 8/16 bit and 32X emulator which was written having ARM-based handheld devices in mind.\n\n## Features\n\n- Supports 32x emulation.\n- Designed to run on weak devices.\n\nThe PicoDrive core has been authored by\n\n- notaz\n- fdave\n\nThe PicoDrive core is licensed under\n\n- [Non-commercial](https://github.com/libretro/picodrive/blob/master/COPYING)\n\nA summary of the licenses behind RetroArch and its cores can be found [here](../development/licenses.md).\n\n## BIOS\n\nRequired or optional firmware files go in the frontend's system directory.\n\n| Filename | Description | md5sum |\n|:-------------:|:-------------------------:|:--------------------------------:|\n| bios_CD_E.bin | MegaCD EU BIOS - Required | e66fa1dc5820d254611fdcdba0662372 |\n| bios_CD_U.bin | SegaCD US BIOS - Required | 2efd74e3232ff260e371b99f84024f7f |\n| bios_CD_J.bin | MegaCD JP BIOS - Required | 278a9397d192149e84e820ac621a8edd |\n\n## Extensions\n\nContent that can be loaded by the PicoDrive core have the following file extensions:\n\n- .bin\n- .gen\n- .smd\n- .md\n- .32x\n- .cue\n- .iso\n- .sms\n- .68k\n- .chd\n\nRetroArch database(s) that are associated with the PicoDrive core:\n\n- [Sega - Master System - Mark III](https://github.com/libretro/libretro-database/blob/master/rdb/Sega%20-%20Master%20System%20-%20Mark%20III.rdb)\n- [Sega - Mega-CD - Sega CD](https://github.com/libretro/libretro-database/blob/master/rdb/Sega%20-%20Mega-CD%20-%20Sega%20CD.rdb)\n- [Sega - Mega Drive - Genesis](https://github.com/libretro/libretro-database/blob/master/rdb/Sega%20-%20Mega%20Drive%20-%20Genesis.rdb)\n- [Sega - PICO](https://github.com/libretro/libretro-database/blob/master/rdb/Sega%20-%20PICO.rdb)\n- [Sega - 32X](https://github.com/libretro/libretro-database/blob/master/rdb/Sega%20-%2032X.rdb)\n\n## Features\n\nFrontend-level settings or features that the PicoDrive core respects.\n\n| Feature | Supported |\n|-------------------|:---------:|\n| Restart | ✔ |\n| Saves | ✔ |\n| States | ✔ |\n| Rewind | ✔ |\n| Netplay | ✔ |\n| Core Options | ✔ |\n| [Memory Monitoring (achievements)](../guides/memorymonitoring.md) | ✔ |\n| RetroArch Cheats | ✔ |\n| Native Cheats | ✕ |\n| Controls | ✔ |\n| Remapping | ✔ |\n| Multi-Mouse | ✕ |\n| Rumble | ✕ |\n| Sensors | ✕ |\n| Camera | ✕ |\n| Location | ✕ |\n| Subsystem | ✕ |\n| [Softpatching](../guides/softpatching.md) | ✕ |\n| Disk Control | ✔ |\n| Username | ✕ |\n| Language | ✕ |\n| Crop Overscan | ✕ |\n| LEDs | ✕ |\n\n## Directories\n\nThe PicoDrive core's library name is 'PicoDrive'\n\nThe PicoDrive core saves/loads to/from these directories.\n\n**Frontend's Save directory**\n\n| File | Description |\n|:-----:|:---------------------:|\n| *.srm | Cartridge backup save |\n\n**Frontend's State directory**\n\n| File | Description |\n|:--------:|:-----------:|\n| *.state# | State |\n\n## Geometry and timing\n\n- The PicoDrive core's core provided FPS is 60 for NTSC games and 50 for PAL games.\n- The PicoDrive core's core provided sample rate is 44100 Hz\n- The PicoDrive core's base width is 320\n- The PicoDrive core's base height is 224\n- The PicoDrive core's max width is 320\n- The PicoDrive core's max height is 240\n- The PicoDrive core's core provided aspect ratio is 10/7 when the ['Core-provided aspect ratio' core option](#core-options) is set to PAR\n- The PicoDrive core's core provided aspect ratio is 4/3 when the ['Core-provided aspect ratio' core option](#core-options) is set to 4/3\n- The PicoDrive core's core provided aspect ratio is 5/4 when the ['Core-provided aspect ratio' core option](#core-options) is set to CRT\n\n## Loading Sega CD games\n\nWhen loading Sega CD games, PicoDrive needs a cue-sheet that points to an image file. A cue sheet, or cue file, is a metadata file which describes how the tracks of a CD or DVD are laid out.\n\nIf you have e.g. `foo.bin`, you should create a text file and save it as `foo.cue`. If the Sega CD game is single-track, the cue file contents should look like this:\n\n```\n FILE \"foo.bin\" BINARY\n TRACK 01 MODE1/2352\n INDEX 01 00:00:00\n```\n\nAfter that, you can load the `foo.cue` file in RetroArch with the PicoDrive core.\n\n!!! warning \"\"\n Certain Sega CD games are multi-track, so their .cue files might be more complicated.\n\nHere's a cue file example done with Lunar - Eternal Blue (USA)\n\n\n\n## Core options\n\nThe PicoDrive core has the following option(s) that can be tweaked from the core options menu. The default setting is bolded.\n\nSettings with (Restart) means that core has to be closed for the new setting to be applied on next launch.\n\n- **Input device 1** [picodrive_input1] (**3 button pad**/6 button pad/None)\n\n\tChoose which kind of controller is plugged in slot 1.\n\n- **\"Input device 2** [picodrive_input2] (**3 button pad**/6 button pad/None)\n\n\tChoose which kind of controller is plugged in slot 2.\n\n- **No sprite limit** [picodrive_sprlim] (**disabled**/enabled)\n\n\tEnable this to remove the sprite limit.\n\n- **MegaCD RAM cart** [picodrive_ramcart] (**disabled**/enabled)\n\n\tEmulate a [MegaCD RAM cart](https://segaretro.org/CD_BackUp_RAM_Cart).\n\n- **Region** [picodrive_region] (**Auto**/Japan NTSC/Japan PAL/US/Europe)\n\n\tForce a specific region.\n\n- **Core-provided aspect ratio** [picodrive_aspect] (**PAR**/4/3/CRT)\n\n\tChoose the core-provided aspect ratio. RetroArch's aspect ratio must be set to Core provided in the Video settings.\n\n??? note \"Core-provided aspect ratio - PAR\"\n\t\n\n??? note \"Core-provided aspect ratio - 4/3\"\n\t\n\n??? note \"Core-provided aspect ratio - CRT\"\n\t\n\n- **Show Overscan** [picodrive_overscan] (**disabled**/enabled)\n\n\tCrop out the potentially random glitchy video output that would have been hidden by the bezel around the edge of a standard-definition television screen.\n\n??? note \"Show Overscan - Off\"\n\t\n\n??? note \"Show Overscan - On\"\n\t\n\n- **68k overclock** [picodrive_overclk68k] (**disabled**/+25%/+50%/+75%/+100%/+200%/+400%)\n\n\tOverclock the emulated [68k chip](http://segaretro.org/M68000)\n\n- **Dynamic recompilers** [picodrive_drc] (**enabled**/disabled)\n\n\tEnable dynamic recompilers which help to improve performance. **This core option is not available on all hardware.**\n\n- **Audio filter** [picodrive_audio_filter] (**disabled**|low-pass)\n\n\tEnable a low pass audio filter to better simulate the characteristic sound of a Model 1 Genesis.\n\n!!! attention\n\tThis option is ignored when running Master System and PICO titles. Only the Genesis and its add-on hardware (Sega CD, 32X) employed a physical low pass filter.\n\n- **Low-pass filter %** [picodrive_lowpass_range] (**60**|65|70|75|80|85|90|95|5|10|15|20|25|30|35|40|45|50|55)\n\n\tSpecify the cut-off frequency of the audio low pass filter. A higher value increases the perceived 'strength' of the filter, since a wider range of the high frequency spectrum is attenuated.\n\n## User 1 - 2 device types\n\nThe PicoDrive core supports the following device type(s).\n\n- None - Input is disabled - Can be switched to using the Input device core options.\n- **3 button pad** - Joypad - Can be switched to using the Input device core options.\n- 6 button pad - Joypad - Can be switched to using the Input device core options.\n- SMS pad - Joypad - Is automatically switched to when a Sega Master System game is loaded.\n\n## Joypad\n\n| RetroPad Inputs | User 1 - 2 input descriptors | 3 button pad | 6 button pad |\n|------------------------------------------------|------------------------------|--------------|--------------|\n|  | B | B | B |\n|  | A | A | A |\n|  | Mode | | Mode |\n|  | Start | Start | Start |\n|  | D-Pad Up | D-Pad Up | D-Pad Up |\n|  | D-Pad Down | D-Pad Down | D-Pad Down |\n|  | D-Pad Left | D-Pad Left | D-Pad Left |\n|  | D-Pad Right | D-Pad Right | D-Pad Right |\n|  | C | C | C |\n|  | Y | | Y |\n|  | X | | X |\n|  | Z | | Z |\n\n| RetroPad Inputs | User 1 - 2 input descriptors | SMS pad |\n|------------------------------------------------|------------------------------|---------------------------|\n|  | Button 1 Start | Button 1 Start |\n|  | Button Pause | Button Pause |\n|  | D-Pad Up | D-Pad Up |\n|  | D-Pad Down | D-Pad Down |\n|  | D-Pad Left | D-Pad Left |\n|  | D-Pad Right | D-Pad Right |\n|  | Button 2 | Button 2 |\n\n## Compatibility\n\n| 32x games | Issue |\n|----------------------------------------------|---------------------------------------------------------------|\n| Brutal Unleashed – Above the Claw | Softlocks after the first fight. |\n| FIFA Soccer ’96 | Glitched main menu text. |\n| Knuckles’ Chaotix | Glitched graphics on the Player Select screen. |\n| NBA Jam Tournament Edition | Framerate issues. |\n| NFL Quarterback Club | Some menu graphics are missing. |\n| Virtua Racing Deluxe | Blinking line during the SEGA logo screen. |\n| World Series Baseball Starring Deion Sanders | Crashes when starting a match. |\n| WWF Raw | Various graphics are missing. |\n\n## External Links\n\n- [Official PicoDrive Website](http://notaz.gp2x.de/pico.php)\n- [Official PicoDrive Github Repository](https://github.com/notaz/picodrive)\n- [Libretro PicoDrive Core info file](https://github.com/libretro/libretro-super/blob/master/dist/info/picodrive_libretro.info)\n- [Libretro PicoDrive Github Repository](https://github.com/libretro/picodrive)\n- [Report Libretro PicoDrive Core Issues Here](https://github.com/libretro/picodrive/issues)\n- [Gameplay Videos](https://www.youtube.com/playlist?list=PLRbgg4gk_0IcA87w16rzmzbYJrnxgJJgP)\n\n## Sega 16-bit\n\n- [Sega - Master System (Emux SMS)](emux_sms.md)\n- [Sega - MS/GG/MD/CD (Genesis Plus GX)](genesis_plus_gx.md)\n- [Sega - MS/GG/SG-1000 (Gearsystem)](gearsystem.md)\n- [MSX/SVI/ColecoVision/SG-1000 (blueMSX)](bluemsx.md)\n"
},
{
"path": "docs/library/play.md",
"content": "# Sony - PlayStation 2 (Play!)\n\n\n\n## Background\n\nA PS2 emulator for Android, iOS, Windows, MacOS and Linux, written in C++.\n\nThe Play! core supports OpenGL rendering.\n\nThe Play! core has been authored by\n\n- Zer0xFF\n- jpd002\n\nThe Play! core is licensed under\n\n- [MIT](https://github.com/jpd002/Play-/blob/master/License.txt)\n\nA summary of the licenses behind RetroArch and its cores can be found [here](../development/licenses.md).\n\n## Requirements\n\n- OpenGL 3.0 or Open GL ES 3.2 or higher for the OpenGL renderer.\n\n\n## Extensions\n\nContent that can be loaded by the Play! core have the following file extensions:\n\n- .chd\n- .cso\n- .cue\n- .elf\n- .iso\n- .isz\n\n\nRetroArch database(s) that are associated with the Play! core:\n\n- [Sony - PlayStation 2](https://github.com/libretro/libretro-database/blob/master/rdb/Sony%20-%20PlayStation%202.rdb)\n\n## Features\n\nFrontend-level settings or features that the Play! core respects.\n\n| Feature | Supported |\n|-------------------|:---------:|\n| Restart | ✔ |\n| Screenshots | ✔ |\n| Saves | ✔ |\n| States | ✔ |\n| Rewind | ✕ |\n| Netplay | ✕ |\n| Core Options | ✔ |\n| [Memory Monitoring (achievements)](../guides/memorymonitoring.md) | ✕ |\n| RetroArch Cheats | ✕ |\n| Native Cheats | ✕ |\n| Controls | ✔ |\n| Remapping | ✔ |\n| Multi-Mouse | ✕ |\n| Rumble | ✕ |\n| Sensors | ✕ |\n| Camera | ✕ |\n| Location | ✕ |\n| Subsystem | ✕ |\n| Disk Control | ✕ |\n| Username | ✕ |\n| Language | ✕ |\n| Crop Overscan | ✕ |\n| LEDs | ✕ |\n\n\n## Core options\n\nThe Play! core has the following option(s) that can be tweaked from the core options menu. The default setting is bolded.\n\nSettings with (Restart) means that core has to be closed for the new setting to be applied on next launch.\n\n\n- **Resolution Multiplier** [play_res_multi] (**1x**|2x|4x|8x)\n\n\tControls the internal resolution of the graphics, significant performance impact if your GPU is not powerful enough for certain resolutions.\n\n- **Presentation Mode** [play_presentation_mode] (**Fit Screen**|Fill Screen|Original Size)\n\n\tChange layout to Fit Screen, Fill Screen or Original Size.\n\n- **Force Bilinear Filtering** [play_bilinear_filtering] (enabled|**disabled**)\n\n\tEnable bilinear filtering.\n\n## Joypad\n\n\n\n| User 1 - 8 input descriptors | RetroPad Inputs | PlayStation Controller Inputs | DualShock Inputs | Analog Controller Inputs | Analog Joystick Inputs | neGcon Inputs |\n|-------------------------------|----------------------------------------------|------------------------------------------------|-------------------------------------------------|-------------------------------------------------|------------------------------------------------|---------------------------------|\n| Cross |  |  |  |  |  | Analog button I |\n| Square |  |  |  |  |  | Analog button II |\n| Select |  |  |  |  |  | |\n| Start |  |  |  |  |  | Start |\n| D-Pad Up |  |  |  |  |  | D-Pad Up |\n| D-Pad Down |  |  |  |  |  | D-Pad Down |\n| D-Pad Left |  |  |  |  |  | D-Pad Left |\n| D-Pad Right |  |  |  |  |  | D-Pad Right |\n| Circle |  |  |  |  |  | A |\n| Triangle |  |  |  |  |  | B |\n| L1 |  |  |  |  |  | Left shoulder button (analog) |\n| R1 |  |  |  |  |  | Right shoulder button (digital) |\n| L2 |  |  |  |  |  | Analog button II |\n| R2 |  |  |  |  |  | Analog button I |\n| L3 |  | |  | | | |\n| R3 |  | |  | | | |\n| Left Analog X |  X | |  |  | Left Joystick X | Twist |\n| Left Analog Y |  Y | |  |  | Left Joystick Y | |\n| Right Analog X |  X | |  |  | Right Joystick X | |\n| Right Analog Y |  Y | |  |  | Right Joystick Y | |\n\n\n## Compatibility\n\nPlay! core is still experimental but promising. Some games are already [playable](https://github.com/jpd002/Play-Compatibility/issues?q=is%3Aopen+is%3Aissue+label%3Astate-playable+sort%3Aupdated-desc).\n\n## External Links\n\n- [Official Play! Website](https://purei.org)\n- [Official Play! Github Repository](https://github.com/jpd002/Play-)\n- [Libretro Play! Core info file](https://github.com/libretro/libretro-super/blob/master/dist/info/play_libretro.info)\n- [Gameplay Videos](https://www.youtube.com/playlist?list=PLRbgg4gk_0If5ArC48Kw2vSC0NmTOdivu)\n\n## Libretro PS2 cores\n\n- [PlayStation 2 (LRPS2)](lrps2.md)\n\n"
},
{
"path": "docs/library/pocketcdg.md",
"content": "# PocketCDG\n\n==You have to provide both .cdg and .mp3 file. RetroArch and LibRetro do not share any copyrighted content.==\n\n\n\n## Background\n\nA MP3 karaoke music player.\n\n### Author/License\n\nThe PocketCDG core has been authored by\n\n- RedBug\n\nThe PocketCDG core is licensed under\n\n- [MIT](https://github.com/libretro/libretro-pocketcdg/blob/master/LICENSE)\n\nA summary of the licenses behind RetroArch and its cores can be found [here](../development/licenses.md).\n\n## Extensions\n\nContent that can be loaded by the PocketCDG core have the following file extensions:\n\n- .cdg\n\n## Features\n\nFrontend-level settings or features that the PocketCDG core respects.\n\n| Feature | Supported |\n|-------------------|:---------:|\n| Restart | ✕ |\n| Screenshots | ✔ |\n| Saves | ✕ |\n| States | ✕ |\n| Rewind | ✕ |\n| Netplay | ✕ |\n| Core Options | ✕ |\n| [Memory Monitoring (achievements)](../guides/memorymonitoring.md) | ✕ |\n| RetroArch Cheats | ✕ |\n| Native Cheats | ✕ |\n| Controls | ✔ |\n| Remapping | ✔ |\n| Multi-Mouse | ✕ |\n| Rumble | ✕ |\n| Sensors | ✕ |\n| Camera | ✕ |\n| Location | ✕ |\n| Subsystem | ✕ |\n| [Softpatching](../guides/softpatching.md) | ✕ |\n| Disk Control | ✕ |\n| Username | ✕ |\n| Language | ✕ |\n| Crop Overscan | ✕ |\n| LEDs | ✕ |\n\n### Directories\n\nThe PocketCDG core's internal core name is 'pocketcdg'\n\n### Geometry and timing\n\n- The PocketCDG core's core provided FPS is 50\n- The PocketCDG core's core provided sample rate is 44100 Hz\n- The PocketCDG core's core provided aspect ratio is 1\n\n## Setup\n\nCreate a folder or put files with both .mp3 and .cdg extensions in the existing folder. The PocketCDG core can load any MP3+CDG file combination. It will then show the lyrics onscreen and on-cue like a true karaoke player, and it will also highlight the text which should be currently sung.\n\n## Controllers\n\nThe PocketCDG core supports the following device type(s) in the controls menu, bolded device types are the default for the specified user(s):\n\n### User 1 device types\n\n- None - Doesn't disable input. There's no reason to switch to this.\n- **RetroPad** - Joypad - Stay on this.\n- RetroKeyboard - Keyboard - Has keymapper support but isn't hooked up to any core inputs. There's no reason to switch to this.\n\n### Controller tables\n\n#### Joypad\n\n| User 1 Remap descriptors | RetroPad Inputs |\n|--------------------------|---------------------------------------------|\n| Pause |  |\n| Start |  |\n| Up |  |\n| Down |  |\n| Left |  |\n| Right |  |\n| Shutdown |  |\n\n## External Links\n\n- [Libretro PocketCDG Core info file](https://github.com/libretro/libretro-super/blob/master/dist/info/pocketcdg_libretro.info)\n- [Libretro PocketCDG Github Repository](https://github.com/libretro/libretro-pocketcdg)\n- [Report Libretro PocketCDG Core Issues Here](https://github.com/libretro/libretro-pocketcdg/issues)\n\n### See also\n\n#### Media\n\n- [FFmpeg](ffmpeg.md)\n- [Game Music Emu](game_music_emu.md)\n- [Imageviewer](imageviewer.md)"
},
{
"path": "docs/library/pokemini.md",
"content": "# Nintendo - Pokémon Mini (PokeMini)\n\n## Background\n\nPokeMini is an emulator for the [Pokémon Mini](https://en.wikipedia.org/wiki/Pok%C3%A9mon_Mini) handheld console.\n\nThe PokeMini core has been authored by\n\n- JustBurn\n\nThe PokeMini core is licensed under\n\n- [GPLv3](https://github.com/libretro/PokeMini/blob/master/LICENSE)\n\nA summary of the licenses behind RetroArch and its cores can be found [here](../development/licenses.md).\n\n## BIOS\n\nRequired or optional firmware files go in the frontend's system directory.\n\n| Filename | Description | md5sum |\n|:-------------:|:-----------------------------:|:--------------------------------:|\n| bios.min | Pokémon Mini BIOS - Optional | 1e4fb124a3a886865acb574f388c803d |\n\n## Extensions\n\nContent that can be loaded by the PokeMini core have the following file extensions:\n\n- .min\n\nRetroArch database(s) that are associated with the PokeMini core:\n\n- [Nintendo - Pokemon Mini](https://github.com/libretro/libretro-database/blob/master/rdb/Nintendo%20-%20Pokemon%20Mini.rdb)\n\n## Features\n\nFrontend-level settings or features that the PokeMini core respects.\n\n| Feature | Supported |\n|-------------------|:---------:|\n| Restart | ✔ |\n| Saves | ✔ |\n| States | ✔ |\n| Rewind | ✔ |\n| Netplay | ✕ |\n| Core Options | ✔ |\n| [Memory Monitoring (achievements)](../guides/memorymonitoring.md) | ✔ |\n| RetroArch Cheats | ✕ |\n| Native Cheats | ✕ |\n| Controls | ✔ |\n| Remapping | ✔ |\n| Multi-Mouse | ✕ |\n| Rumble | ✔ |\n| Sensors | ✕ |\n| Camera | ✕ |\n| Location | ✕ |\n| Subsystem | ✕ |\n| [Softpatching](../guides/softpatching.md) | ✕ |\n| Disk Control | ✕ |\n| Username | ✕ |\n| Language | ✕ |\n| Crop Overscan | ✕ |\n| LEDs | ✕ |\n\n## Directories\n\nThe PokeMini core's library name is 'PokeMini'\n\nThe PokeMini core saves/loads to/from these directories.\n\n**Frontend's Save directory**\n\n| File | Description |\n|:-----:|:-----------:|\n| *.eep | EEPROM save |\n\n**Frontend's State directory**\n\n| File | Description |\n|:--------:|:-----------:|\n| *.state# | State |\n\n## Geometry and timing\n\n- The PokeMini core's core provided FPS is 72\n- The PokeMini core's core provided sample rate is 44100 Hz\n- The PokeMini core's base width is 96\n- The PokeMini core's base height is 64\n- The PokeMini core's max width is 576\n- The PokeMini core's max height is 384\n- The PokeMini core's core provided aspect ratio is 3/2\n\n## Core options\n\nThe PokeMini core has the following option(s) that can be tweaked from the core options menu. The default setting is bolded.\n\nSettings with (Restart) means that core has to be closed for the new setting to be applied on next launch.\n\n- **Video Scale (Restart)** [pokemini_video_scale] (**4x**|5x|6x|1x|2x|3x)\n\n\tSets internal video scale factor. Increasing the scale factor improves the appearance of the internal 'dotmatrix' LCD filter. Scale should normally be set to '1x' for correct operation when using an external GPU shader.\n\n??? note \"*'dotmatrix' LCD filter - Video Scale - 2x*\"\n \n\n??? note \"*'dotmatrix' LCD filter - Video Scale - 4x*\"\n \n\n??? note \"*'dotmatrix' LCD filter - Video Scale - 6x*\"\n \n\n- **LCD Filter** [pokemini_lcdfilter] (**dotmatrix**|scanline|none)\n\n\tSpecifies which internal screen filter should be applied to the display. 'dotmatrix' produces a clean LCD effect, and is the recommended option. LCD filters are disabled when 'Video Scale' is set to '1x'.\n\n??? note \"*LCD Filter - dotmatrix*\"\n \n\n??? note \"*LCD Filter - scanline*\"\n \n\n??? note \"*LCD Filter - none*\"\n \n\n- **LCD Mode** [pokemini_lcdmode] (**analog**|3shades|2shades)\n\n\tSpecifies the greyscale 'colour' reproduction characteristics of the emulated liquid crystal display.\n\n\t'analog' attempts to simulate the Pokémon Mini hardware by allowing smooth time-dependent transitions between 'colour' values. This option is recommended since most games exploited the analog nature of the Pokémon Mini screen to show different shades of 'colour' on a nominally monochrome display.\n\n\t'3shades' reduces the analog greyscale levels to three specific shades and removes all ghosting effects. It is adequate for most games.\n\n\t'2shades' causes the screen to behave as a purely digital monochrome display, either full light or full dark. WARNING: This will cause severe flickering in most games.\n\n- **LCD Contrast** [pokemini_lcdcontrast] (**64**|0|16|32|48|80|96)\n\n\tSets contrast level of emulated liquid crystal display.\n\n- **LCD Brightness** [pokemini_lcdbright] (**0**|-80|-60|-40|-20|20|40|60|80)\n\n\tSets brightness offset of emulated liquid crystal display.\n\n- **Palette** [pokemini_palette] (**Default**|Old|Monochrome|Green|Green Vector|Red|Red Vector|Blue LCD|LEDBacklight|Girl Power|Blue|Blue Vector|Sepia|Monochrome Vector)\n\n\tSpecifies palette used to 'colourise' the emulated liquid crystal display. 'Default' provides a close approximation of the natural screen tint of the original Pokémon Mini hardware. Palettes with a 'Vector' suffix correspond to inverted colours.\n\n??? note \"*Palette - Default*\"\n \n\n??? note \"*Palette - Old*\"\n \n\n??? note \"*Palette - Monochrome*\"\n \n\n??? note \"*Palette - Green*\"\n \n\n??? note \"*Palette - Green Vector*\"\n \n\n??? note \"*Palette - Red*\"\n \n\n??? note \"*Palette - Red Vector*\"\n \n\n??? note \"*Palette - Blue LCD*\"\n \n\n??? note \"*Palette - LEDBacklight*\"\n \n\n??? note \"*Palette - Girl Power*\"\n \n\n??? note \"*Palette - Blue*\"\n \n\n??? note \"*Palette - Blue Vector*\"\n \n\n??? note \"*Palette - Sepia*\"\n \n\n??? note \"*Palette - Monochrome Vector*\"\n \n\n- **Piezo Filter** [pokemini_piezofilter] (**ON**|OFF)\n\n\tEnables an audio filter to more accurately simulate the characteristics of the Pokémon Mini's piezoelectric speaker.\n\n- **Rumble Level (Screen + Controller)** [pokemini_rumblelvl] (**3**|2|1|0)\n\n\tSpecifies the magnitude of the force feedback effect, both virtual ('screen shake') and physical ('controller rumble').\n\n- **Controller Rumble** [pokemini_controller_rumble] (**ON**|OFF)\n\n\tEnables physical force feedback effect via controller rumble.\n\n- **Screen Shake** [pokemini_screen_shake] (**ON**|OFF)\n\n\tEnables virtual force feedback effect by 'shaking' the screen. This is helpful when using a controller without physical rumble support, since a number of games rely on force feedback to prompt user action.\n\n## Rumble\n\nRumble only works in the PokeMini core when\n\n- The content being ran has rumble support.\n- The frontend being used has rumble support.\n- The joypad device being used has rumble support.\n- The core option 'Rumble Level' is set to any value other than '0'.\n- The core option 'Controller Rumble' is set to 'ON'.\n\n!!! attention\n\tIf physical rumble is not supported, it is recommended to set the core option 'Screen Shake' to 'ON'.\n\n## Joypad\n\n| RetroPad Inputs | User 1 input descriptors |\n|---------------------------------------------|--------------------------|\n|  | B |\n|  | Power |\n|  | D-Pad Up |\n|  | D-Pad Down |\n|  | D-Pad Left |\n|  | D-Pad Right |\n|  | A |\n|  | Shake |\n|  | C |\n\n## Compatibility\n\n| Game | Issue |\n|----------------------|------------------------------------------------------------------|\n| Pokemon Pinball Mini | EEPROM saves do not function correctly - use save states instead |\n| Pokemon Race Mini | EEPROM saves do not function correctly - use save states instead |\n\n## External Links\n\n- [Official PokeMini SourceForge Repository](https://sourceforge.net/projects/pokemini/)\n- [Libretro PokeMini Core info file](https://github.com/libretro/libretro-super/blob/master/dist/info/pokemini_libretro.info)\n- [Libretro PokeMini Github Repository](https://github.com/libretro/PokeMini)\n- [Report Libretro PokeMini Core Issues Here](https://github.com/libretro/PokeMini/issues)\n- [Gameplay Videos](https://www.youtube.com/playlist?list=PLRbgg4gk_0IcaGNn2eEveCloqDgw0G31P)"
},
{
"path": "docs/library/ppsspp.md",
"content": "# Sony - PlayStation Portable (PPSSPP)\n\n\n\n## Background\n\nA fast and portable PSP emulator written in C++. No BIOS file required to play, PPSSPP is an \"HLE\" emulator. Default settings balance good compatibility and speed.\n\nThe PPSSPP core has been authored by\n\n- Henrik Hrydgard\n\nThe PPSSPP core is licensed under\n\n- [GPLv2](https://github.com/hrydgard/ppsspp/blob/master/LICENSE.TXT)\n\nA summary of the licenses behind RetroArch and its cores can be found [here](../development/licenses.md).\n\n## Setup (Required!!)\n\nThe PPSSPP core requires some helper files to be fully functional, including assets such as fonts and backgrounds that are required for memory card screens, and per-game settings that are loaded automatically for compatibility/bugfixing.\n\nIn order to acquire PPSSPP's assets files and install them succcessfully, follow these steps:\n\n!!! info\n\tLakka users do not need to follow these steps. Lakka image ships with the assets already included. Those assets are compatible with the version of the core provided in the Lakka image. Using not compatible assets may lead to unexpected results.\n\n### Installing from the 'Core System Files Downloader'\n\nIf your frontend version has `Main Menu > Online Updater > Core System Files Downloader` then that's the easiest solution. Just download 'PPSSPP.zip' from that menu and you're all done!\n\n### Installing from the GitHub repo\n\n1 . Create a directory named PPSSPP in RetroArch's System directory.\n\n```\nRetroArch/\n └── system/\n\t\t └── PPSSPP/\n```\n\nHere's an example of what it should look like.\n\n\n\n2 . Visit [https://github.com/hrydgard/ppsspp](https://github.com/hrydgard/ppsspp) and download the repository.\n\n\n\n3 . Extract ppsspp-master.zip\n\n4 . Copy the contents of `ppsspp-master/assets` into 'system/PPSSPP'\n\nThe end result should look like this.\n\n\n\n!!! attention\n\tDon't like PPSSPP's replacement fonts? You can place the original PSP fonts in 'system/PPSSPP/flash0/font'\n\n## Extensions\n\nContent that can be loaded by the PPSSPP core have the following file extensions:\n\n- .elf\n- .iso\n- .cso\n- .prx\n- .pbp\n- .chd\n\nRetroArch database(s) that are associated with the PPSSPP core:\n\n- [Sony - PlayStation Portable](https://github.com/libretro/libretro-database/blob/master/rdb/Sony%20-%20PlayStation%20Portable.rdb)\n\n## Features\n\nFrontend-level settings or features that the PPSSPP core respects.\n\n| Feature | Supported |\n|-------------------|:---------:|\n| Restart | ✔ |\n| Saves | ✔ |\n| States | ✔ |\n| Rewind | ✕ |\n| Netplay | ✕ |\n| Core Options | ✔ |\n| [Memory Monitoring (achievements)](../guides/memorymonitoring.md) | ✔ |\n| RetroArch Cheats | ✕ |\n| Native Cheats | ✔ |\n| Controls | ✔ |\n| Remapping | ✔ |\n| Multi-Mouse | ✕ |\n| Rumble | ✕ |\n| Sensors | ✕ |\n| Camera | ✕ |\n| Location | ✕ |\n| Subsystem | ✕ |\n| [Softpatching](../guides/softpatching.md) | ✕ |\n| Disk Control | ✕ |\n| Username | ✔ |\n| Language | ✔ |\n| Crop Overscan | ✕ |\n| LEDs | ✕ |\n\n**Texture Replacement Packs**\n\nHigh-resolution texture packs can be used by extracting any archives and placing the contents into the frontend's 'saves' directory, in a directory under PSP/TEXTURES, named for the [game's ID code](https://www.scribd.com/document/515954071/PSP-Game-IDs).\n\n**Netplay**\n\nPPSSPP-libretro can utilize the same netplay services provided by the standalone PPSSPP application by entering the desired network address in the core options, under the 'network' category. See [the upstream documentation](https://github.com/hrydgard/ppsspp/wiki/How-to-play-multiplayer-games-with-PPSSPP) for further details on setup.\n\n## Directories\n\nThe PPSSPP core's library name is 'PPSSPP'\n\nThe PPSSPP core saves/loads to/from these directories.\n\n**Frontend's Save directory**\n\n```\n.\n└── PSP/\n ├── PPSSPP_STATE/ (Used to be the state directory, no longer used)\n ├── SAVEDATA/ (In-game saves)\n ├── flash0/ (Font override for real fonts dumped from PSP system)\n ├── Cheats/ (Internal Cheats directory, disabled by default)\n ├── GAME/ (DLC directory)\n ├── SYSTEM/\n └── CACHE/ (Shader cache)\n └── TEXTURES/\n └── [GAME_ID] (Extracted textures; enabled via core option)\n```\n\n**Frontend's State directory**\n\n| File | Description |\n|:--------:|:-----------:|\n| *.state# | State |\n\n## Geometry and timing\n\n- The PPSSPP core's core provided FPS is 60\n- The PPSSPP core's core provided sample rate is 44100 Hz\n- The PPSSPP core's base width is dependent on the 'Internal Resolution' core option\n- The PPSSPP core's base height is dependent on the 'Internal Resolution' core option\n- The PPSSPP core's max width is dependent on the 'Internal Resolution' core option\n- The PPSSPP core's max height is dependent on the 'Internal Resolution' core option\n- The PPSSPP core's core provided aspect ratio is 16/9\n\n## Language\n\nWhen the 'Language' core option is set to automatic, the default PPSSPP language setting will be pulled from RetroArch's Language setting.\n\n## Nickname\n\nPPSSPP's default nickname setting is pulled from RetroArch's nickname setting.\n\n## Internal Cheats\n\nDisabled by default.\n\n**To enable and allow the use of ini cheat files in save\\PSP\\Cheats, set the 'Internal Cheats Support' core option to enabled.**\n\nCheats can be used to unlock 60fps in several 30fps games.\n\nEach code can be activated or disabled in the ini directly with _C1 in place of _C0 on the title line.\n\n[PPSSPP forums thread](http://forums.ppsspp.org/showthread.php?tid=3590)\n\n## DLC\n\nDLCs need to be installed in the GAME directory. Create the GAME directory in the PSP directory and it should look like this.\n\nRetroArch\\saves\\PPSSPP\\PSP\\GAME\\\n\n## Hardware Rendering\n\n- **OpenGL**\n\n PPSSPP's OpenGL renderer can be used by setting RetroArch's video driver to gl or glcore (where available).\n\n This renderer requires hardware that supports OpenGL/Open GL ES 2.0 or higher. It is an older, pre-Vulkan API, which is slower but with better compatibility. If you encounter problems with other APIs, try this one.\n\n- **Vulkan**\n\n PPSSPP's Vulkan renderer can be used by setting RetroArch's video driver to vulkan. This is the latest and fastest API currently. It is most recommended for demanding less of your CPU, thus being the fastest.\n\n- **D3D11**\n\n PPSSPP's Direct3D 11 renderer can be used by setting RetroArch's video driver to d3d11. In some cases Direct3D 11 may offer better performance than OpenGL, especially on integrated Intel graphics.\n\n## Core options\n\nThe PPSSPP core has the following option(s) that can be tweaked from the core options menu. The default setting is bolded.\n\nSettings with (Restart) means that core has to be closed for the new setting to be applied on next launch.\n\n### System\n\n- **CPU Core** [ppsspp_cpu_core] (**jit**|IR jit|interpreter)\n\n The jit setting enables the Dynamic Recomplier (Dynarec) for CPU emulation. The Dynarec is much faster than the interpreter setting and is the default, recommended mode for supported architectures.\n\n The interpreter setting enables the Interpreter for CPU emulation. The Interpreter is a very slow type of emulation and mostly useful for debug, but should work anywhere.\n\n\tThe IR jit setting might be worth trying against games which are broken in the other two settings.\n\n- **Fast Memory** [ppsspp_fast_memory] (**enabled**|disabled)\n\n\tThis option avoids some memory accesses by caching information, however a few games may have problems when this option is enabled, most run with no problem.\n\n- **Ignore Bad Memory Accesses**\n \n- **I/O Timing Method**\n\n- **Force Real Clock Sync**\n\n- **Locked CPU Speed** [ppsspp_locked_cpu_speed] (**off**|222MHz|266MHz|333MHz)\n\n\tAllows you to lock the internal CPU clock of the emulator (of the emulated CPU).\n\n\tLarger clocks can ensure a more stable performance in certain games that present problems even on a real PSP, but it requires more powerful hardware.\n\n\tLower clocks can help weak hardware have more comfortable gameplay, limiting FPS to a lower rate.\n\n\tChanging this option opens the door to several bugs that may compromise some games.\n\n\tIn case of doubt, keep this on off.\n\n- **Memory Stick Inserted**\n\n- **Cache Full ISO in RAM**\n\n- **Internal Cheats Support** [ppsspp_cheats] (**disabled**|enabled)\n\n\tEnables internal cheats. Look at the [Internal Cheats section](#internal-cheats) for more information.\n\n- **Game Language** [ppsspp_language] (**automatic**|english|japanese|french|spanish|german|italian|dutch|portuguese|russian|korean|chinese_traditional|chinese_simplified)\n\n Configure the PPSSPP's system language.\n\n\tWhen set to automatic, the default PPSSPP language setting will be pulled from RetroArch's Language setting.\n\n- **PSP Mode**\n\n### Video\n\n- **Backend** [ppsspp_rendering_mode] (**Automatic**|OpenGL|Vulkan|D3D11|None)\n\n\tSets the hardware rendering API. 'Automatic' uses whichever backend matches the frontend's current video driver.\n\n- **Software Rendering**\n\n- **Rendering Resolution** [ppsspp_internal_resolution] (**480x272**|960x544|1440x816|1920x1088|2400x1360|2880x1632|3360x1904|3840x2176|4320x2448|4800x2720)\n\n\t**The 'Software Rendering' core option must be set to OFF for this to have any effect.**\n\n\tControls the internal resolution of the graphics, significant performance impact if your GPU is not powerful enough for certain resolutions.\n\n- **MSAA Antialiasing**\n\n- **Crop to 16x9**\n\n- **Frameskip** [ppsspp_frameskip] (**0**|1|2|3|4|5|6|7|8|9)\n\n\tThis option skips image frames to increase the emulation speed. They can be skipped between 1 and 8 frames every second. Using this option can give the impression of the game running faster but with stuttering, and this increases the amount of frames to be skipped you select. This option is only effective when your processor is powerful enough.\n\n- **Auto Frameskip** [ppsspp_auto_frameskip] (**disabled**|enabled)\n\n\tThis option only selects the optimal number of frames to skip to not to compromise both gameplay. The max frames to be skipped can be limited in the Frameskip option.\n\n- **Render Duplicate Frames to 60 Hz**\n\n- **Detect Frame Rate Changes**\n\n- **Buffer Graphics Commands**\n\n- **Software Skinning**\n\n- **Hardware Tesselation**\n\n- **Texture Upscale Type** [ppsspp_texture_scaling_type] (**xbrz**|hybrid|bicubic|hybrid_bicubic)\n\n\tChoose the Texture Upscale Type.\n\n\txBRZ is overall the best option while Hybrid is a slower version of xBRZ and doesn't offers much difference, Hybrid + Bicubic is the slowest one using two effects.\n\n- **Texture Upscaling Level** [ppsspp_texture_scaling_level] (**1**|2|3|4|5|0)\n\n\tWith this option, you can make modifications to the texture scale level, which improves the visual at high resolutions.\n\n\tAll the scaling is made by CPU and results in a great performance impact. Use carefully.\n\n- **Texture Deposterize** [ppsspp_texture_deposterize] (**disabled**|enabled)\n\n\tDeposterize fixes small in-texture glitches that may happen when the texture is upscaled.\n\n- **Texture Shader**\n\n- **Anisotropic Filtering** [ppsspp_texture_anisotropic_filtering] (**off**|1x|2x|4x|8x|16x)\n\n\tModify the Anisotropic Filtering, which fixes the textures on the horizon that are drawn at angles resulting in a better look.\n\n- **Texture Filtering** [ppsspp_texture_filtering] (**auto**|nearest|linear|linear(FMV))\n\n\tApply texture filtering.\n\n\tStick to auto in case of doubt.\n\n- **Smart 2D Texture Filtering**\n\n- **Texture Replacement**\n\n### Input\n\n- **Confirmation Button** [ppsspp_button_preference] (**cross**|circle)\n\n\tSelect whether the cross input or the circle input is the confirmation button.\n\n- **Analog Circle vs Square Gate Compensation**\n\n- **Analog Deadzone**\n \n Additional deadzone to apply after frontend input.\n\n- **Analog Axis Scale**\n \n Additional sensitivity to apply after frontend input.\n\n### Hacks\n\n- **Skip Buffer Effects**\n \n Faster, but nothing may draw in some games.\n\n- **Disable Culling**\n\n- **Skip GPU Readbacks**\n \n Some games require GPU readbacks, so be careful.\n\n- **Lazy Texture Caching (Speedup)**\n \n Faster, but can cause text problems in a few games.\n\n- **Spline/Bezier Curves Quality**\n \n Only used by some games, controls smoothness of curves.\n\n- **Lower Resolution for Effects**\n \n Reduces artifacts\n\n### Network\n\n- **Enable Networking/WLAN (Beta, may break games)**\n\n- **MAC Address Pt 1: x-:--:--:--:--:--**\n\n- **MAC Address Pt 2: -x:--:--:--:--:--**\n\n- **MAC Address Pt 3: --:x-:--:--:--:--**\n\n- **MAC Address Pt 4: --:-x:--:--:--:--**\n\n- **MAC Address Pt 5: --:--:x-:--:--:--**\n\n- **MAC Address Pt 6: --:--:-x:--:--:--**\n\n- **MAC Address Pt 7: --:--:--:x-:--:--**\n\n- **MAC Address Pt 8: --:--:--:-x:--:--**\n\n- **MAC Address Pt 9: --:--:--:--:x-:--**\n\n- **MAC Address Pt 10: --:--:--:--:-x:--**\n\n- **MAC Address Pt 11: --:--:--:--:--:x-**\n\n- **MAC Address Pt 12: --:--:--:--:--:-x**\n\n- **WLAN Channel**\n\n- **Enable Built-in PRO Ad Hoc Server**\n\n- **Change PRO Ad Hoc Server IP Address ('localhost' = multiple instances)**\n\n- **Enable UPnP (Need a few seconds to detect)**\n\n- **Port Offset ('0' = PSP Compatibility)**\n\n- **Minimum Timeout (Override in ms, '0' = default)**\n\n- **Forced First Connect (Faster connect)**\n\n## Joypad\n\n\n\n| RetroPad Inputs | User 1 input descriptors |\n|------------------------------------------------|--------------------------|\n|  | Cross |\n|  | Square |\n|  | Select |\n|  | Start |\n|  | D-Pad Up |\n|  | D-Pad Down |\n|  | D-Pad Left |\n|  | D-Pad Right |\n|  | Circle |\n|  | Triangle |\n|  | L |\n|  | R |\n|  X | Analog X |\n|  Y | Analog Y |\n\n## Compatibility\n\n- [PPSSPP Compatibility List](http://report.ppsspp.org/games)\n\n## External Links\n\n- [Official PPSSPP Website](http://www.ppsspp.org/)\n- [Official PPSSPP Github Repository](https://github.com/hrydgard/ppsspp)\n- [Libretro PPSSPP Core info file](https://github.com/libretro/libretro-super/blob/master/dist/info/ppsspp_libretro.info)\n- [Report Libretro PPSSPP Core Issues Here](https://github.com/libretro/ppsspp/issues)\n- [Gameplay Videos](https://www.youtube.com/playlist?list=PLRbgg4gk_0IcjmP26m8-3JWNzYUXRjqWT)\n"
},
{
"path": "docs/library/prboom.md",
"content": "# Doom (PrBoom)\n\n\n## Background\n\nPort of prboom to libretro - plays Doom, Doom II, Final Doom and other Doom IWAD mods.\n\nThe PrBoom core has been authored by\n\n- Florian Schulze\n\nThe PrBoom core is licensed under\n\n- [GPLv2](https://github.com/libretro/libretro-prboom/blob/master/COPYING)\n\nA summary of the licenses behind RetroArch and its cores can be found [here](../development/licenses.md).\n\n## BIOS\n\nRequired or optional firmware files go in the frontend's system directory.\n\n| Filename | Description |\n|:--------------------------------------------------------------------------------:|:---------------------:|\n| [prboom.wad](https://github.com/libretro/libretro-prboom/blob/master/prboom.wad) | PrBoom requires data ROM 'prboom.wad' inside the SYSTEM directory. |\n\n## Extensions\n\nContent that can be loaded by the PrBoom core have the following file extensions:\n\n- .wad\n- .iwad\n- .pwad\n\nRetroArch database(s) that are associated with the PrBoom core:\n\n- [DOOM](https://github.com/libretro/libretro-database/blob/master/rdb/DOOM.rdb)\n\n## Features\n\nFrontend-level settings or features that the PrBoom core respects.\n\n| Feature | Supported |\n|-------------------|:---------:|\n| Restart | ✔ |\n| Screenshots | ✔ |\n| Saves | ✔ |\n| States | ✕ |\n| Rewind | ✕ |\n| Netplay | ✕ |\n| Core Options | ✔ |\n| [Memory Monitoring (achievements)](../guides/memorymonitoring.md) | ✕ |\n| RetroArch Cheats | ✔ |\n| Native Cheats | ✔ |\n| Controls | ✔ |\n| Remapping | ✔ |\n| Multi-Mouse | ✕ |\n| Rumble | ✕ |\n| Sensors | ✕ |\n| Camera | ✕ |\n| Location | ✕ |\n| Subsystem | ✕ |\n| [Softpatching](../guides/softpatching.md) | ✕ |\n| Disk Control | ✕ |\n| Username | ✕ |\n| Language | ✕ |\n| Crop Overscan | ✕ |\n| LEDs | ✕ |\n\n### Directories\n\nThe PrBoom core's library name is 'PrBoom'\n\nThe PrBoom core saves/loads to/from these directories.\n\n**Frontend's Save directory**\n\n| File | Description |\n|:-------------------------:|:-----------:|\n| (content name)/*.dsg | Save |\n| (content name)/prboom.cfg | DOOM Config |\n\n### Geometry and timing\n\n- The PrBoom core's core provided FPS (by default) is 60\n- The PrBoom core's core provided sample rate is 44100 Hz\n- The PrBoom core's base width is dependent on the Internal resolution core option.\n- The PrBoom core's base height is dependent on the Internal resolution core option.\n- The PrBoom core's max width is dependent on the Internal resolution core option.\n- The PrBoom core's max height is dependent on the Internal resolution core option.\n- The PrBoom core's core provided aspect ratio is 4/3\n\n## Loading DOOM\n\nPrBoom can load wad, iwad, and pwad files. The PrBoom core requires data ROM ['prboom.wad'](https://github.com/libretro/libretro-prboom/blob/master/prboom.wad) inside the loaded content's or system directory.\n\n!!! TIP\n\tIf you start the games by loading prboom.wad they will all share the same content name (\"prboom\" in this case), so the core will put the saves for every game in a single retroarch/saves/prboom/ folder and when playing Doom 2 for example you'll see Doom 1 saves, etc. which will cause confusion for the user. The games will also share the same game overrides/options files/remaps/etc. History tab will also lists each game as \"prboom\".\t\n\nAn example folder structure would be like so:\n\n```\n└── contents/\n └── dooms/\n ├── doom/\n │ ├── doom.wad\n │ └── [music_files].mp3\n └── doom2/\n ├── doom2.wad\n └── [music_files].mp3\n```\n\n```\n└── retroarch/\n └── system\n\t └── prboom.wad\n```\n\n\nGame saves and internal configuration files will be created in the frontend-defined save directory, organised in folders matching the filenames of loaded content - for example:\n\n```\n└── saves/\n └── PrBoom/\n ├── doom/\n │ ├── prbmsav0.dsg\n │ ├── prbmsav1.dsg\n │ └── prboom.cfg\n └── doom2/\n ├── prbmsav0.dsg\n ├── prbmsav1.dsg\n └── prboom.cfg\n```\n\nGame saves are numbered from 'prbmsav0.dsg' to 'prbmsav7.dsg'.\n\n## SIGIL\n\nSigil (stylized as SIGIL) is the unofficial fifth episode of the 1993 video game Doom. Published by Romero Games on May 31, 2019, the Megawad was created by an original co-creator of Doom, John Romero, independently of the main game's then-current owner, Bethesda Softworks. It has nine missions, each with a deathmatch version, and a new soundtrack created by James Paddock and Buckethead.\n\nYou can get SIGIL [here](https://romero.com/)\n\nTurn off 'Look on parent folders for IWADs' inside Quick Menu - Options. This is usually enabled by default, so disable it.\n\nMake sure that you place the SIGIL wad files inside the same directory as your Doom/Ultimate Doom WAD file. You can name this either doomu.wad or doom.wad. Make sure there are NO doom2.wad files inside this same directory, or Sigil might not work properly.\n\nAn example folder structure would be like so:\n\n```\n└── contents/\n └── dooms/\n └── doom/\n ├── doom.wad\n ├── SIGIL.WAD\n └── [music_files].mp3\n```\n\n```\n└── retroarch/\n └── system/\n\t └── prboom.wad\n```\n\n## Music\n\nIf mp3 files are detected in the game folder, PrBoom will play these tracks instead of the internal MIDI musics, see below for the required filenames for each game.\n\n### Doom\n\n!!! Note\n\tEpisode 4 doesn't have exclusive musics, it uses tracks from the previous episodes.\n\n| Filename | Description |\n|------------|--------------------|\n| bunny.mp3 | Endgame Music |\n| e1m1.mp3 | E1M1 |\n| e1m2.mp3 | E1M2 |\n| e1m3.mp3 | E1M3 |\n| e1m4.mp3 | E1M4 |\n| e1m5.mp3 | E1M5 |\n| e1m6.mp3 | E1M6 |\n| e1m7.mp3 | E1M7 |\n| e1m8.mp3 | E1M8 |\n| e1m9.mp3 | E1M9 |\n| e2m1.mp3 | E2M1 |\n| e2m2.mp3 | E2M2 |\n| e2m3.mp3 | E2M3 |\n| e2m4.mp3 | E2M4 |\n| e2m5.mp3 | E2M5 |\n| e2m6.mp3 | E2M6 |\n| e2m7.mp3 | E2M7 |\n| e2m8.mp3 | E2M8 |\n| e2m9.mp3 | E2M9 |\n| e3m1.mp3 | E3M1 |\n| e3m2.mp3 | E3M2 |\n| e3m3.mp3 | E3M3 |\n| e3m4.mp3 | E3M4 |\n| e3m5.mp3 | E3M5 |\n| e3m6.mp3 | E3M6 |\n| e3m7.mp3 | E3M7 |\n| e3m8.mp3 | E3M8 |\n| e3m9.mp3 | E3M9 |\n| inter.mp3 | Intermission Music |\n| intro.mp3 | Title Music |\n| victor.mp3 | Victory Music |\n\n### Doom II, Plutonia, TNT\n\n!!! Note\n\tThese 3 games share the same music filenames but the musics are actually different, for this reason it is recommended to have the games in separated folders.\n\n| Filename | Description |\n|------------|--------------------|\n| adrian.mp3 | MAP25 |\n| ampie.mp3 | MAP23 |\n| betwee.mp3 | MAP04 |\n| count2.mp3 | MAP21 |\n| countd.mp3 | MAP03 |\n| ddtbl2.mp3 | MAP14 |\n| ddtbl3.mp3 | MAP22 |\n| ddtblu.mp3 | MAP08 |\n| dead.mp3 | MAP10 |\n| dead2.mp3 | MAP16 |\n| dm2int.mp3 | Intermission Music |\n| dm2ttl.mp3 | Title Music |\n| doom.mp3 | MAP05 |\n| doom2.mp3 | MAP13 |\n| evil.mp3 | MAP31 |\n| in_cit.mp3 | MAP09 |\n| messag.mp3 | MAP20 |\n| messg2.mp3 | MAP26 |\n| openin.mp3 | MAP30 |\n| read_m.mp3 | Endgame Music |\n| romer2.mp3 | MAP27 |\n| romero.mp3 | MAP18 |\n| runni2.mp3 | MAP15 |\n| runnin.mp3 | MAP01 |\n| shawn.mp3 | MAP07 |\n| shawn2.mp3 | MAP19 |\n| shawn3.mp3 | MAP29 |\n| stalks.mp3 | MAP02 |\n| stlks2.mp3 | MAP11 |\n| stlks3.mp3 | MAP17 |\n| tense.mp3 | MAP28 |\n| theda2.mp3 | MAP12 |\n| theda3.mp3 | MAP24 |\n| the_da.mp3 | MAP06 |\n| ultima.mp3 | MAP32 |\n\n### SIGIL\n\n| Filename | Description |\n|------------|--------------------|\n| e5m1.mp3 | E5M1 |\n| e5m2.mp3 | E5M2 |\n| e5m3.mp3 | E5M3 |\n| e5m4.mp3 | E5M4 |\n| e5m5.mp3 | E5M5 |\n| e5m6.mp3 | E5M6 |\n| e5m7.mp3 | E5M7 |\n| e5m8.mp3 | E5M8 |\n| e5m9.mp3 | E5M9 |\n| inter.mp3 | Intermission Music |\n| intro.mp3 | Title Music |\n\n## Config\n\nPrBoom's internal game settings can be found in the 'prboom.cfg' file inside each game's save directory.\n\nMany of these settings may be changed from the in-game menu. A few notable options are as follows:\n\n- Options → General (page 1) → Framerate (35fps|40fps|50fps|**60fps**|70fps|72fps|75fps|90fps|100fps|\n119fps|120fps|140fps|144fps|240fps|244fps)\n\n\tVanilla Doom has a native framerate of 35fps. This should be considered the 'correct' value, but it can lead to an irregular 'stuttering' effect on 60Hz LCD displays.\n\n\tAll framerates should maintain the proper game speed.\n\n- Options → General (page 1) → Gamma Correction (**Off**|Lv. 1|Lv. 2|Lv. 3|Lv. 4)\n\n\tSets display brightness.\n\n- Options → Screen Size (**Low**|High)\n\n\tWhen set to 'Low', the HUD is shown at the bottom of the screen.\n\n\tWhen set to 'High', the gameplay area fills the screen and no HUD is shown.\n\n- Options → Mouse Sensitivity\n\n\tThe 'horizontal' slider sets the movement speed when looking left/right with either the mouse or the gamepad right analog stick.\n\n## Core options\n\nThe PrBoom core has the following option(s) that can be tweaked from the core options menu. The default setting is bolded.\n\nSettings with (Restart) means that core has to be closed for the new setting to be applied on next launch.\n\n- **Internal resolution (restart)** [prboom-resolution] (**320x200**|640x400|960x600|1280x800|1600x1000|1920x1200)\n\n\tConfigure the resolution. Requires a restart.\n\n??? note \"Internal resolution - 320x200\"\n\t\n\n??? note \"Internal resolution - 1920x1200\"\n\t\n\n- **Mouse active when using Gamepad** [prboom-mouse_on] (**disabled**|enabled)\n\n\tAllows you to use mouse inputs even when User 1's device type isn't set to 'RetroKeyboard/Mouse'.\n\n- **Look on parent folders for IWADs** [prboom-find_recursive_on] (**enabled**|disabled)\n\n\tScans parent folders for IWADs. NOTE: You need to disable this if you want to run SIGIL.\n\n- **Analog Deadzone (percent)** [prboom-analog_deadzone] (**15**|20|25|30|0|5|10)\n\n\tSets the deadzone of the Gamepad analog sticks when the input device type is set to 'Gamepad Modern'.\n\n## User 1 device types\n\nThe PrBoom core supports the following device type(s) in the controls menu, bolded device types are the default for the specified user(s):\n\n- None - Input disabled.\n- **Gamepad Classic** - Joypad\n- **Gamepad Modern** - Joypad\n- **RetroKeyboard/Mouse** - Keyboard and Mouse - Switch to this for keyboard and mouse input. Has keymapper support.\n\n## Joypad\n\n| User 1 input descriptors for 'Gamepad Classic' device type | RetroPad Inputs | PrBoom inputs |\n|------------------------------------------------------------|---------------------------------------------|-----------------|\n| Use |  | Use |\n| Run |  | Run |\n| Show/Hide Map |  | Show/Hide Map |\n| Show/Hide Menu |  | Show/Hide Menu |\n| D-Pad Up |  | D-Pad Up |\n| D-Pad Down |  | D-Pad Down |\n| D-Pad Left |  | D-Pad Left |\n| D-Pad Right |  | D-Pad Right |\n| Fire |  | Fire |\n| Strafe |  | Strafe |\n| Strafe Left |  | Strafe Left |\n| Strafe Right |  | Strafe Right |\n| Previous Weapon |  | Previous Weapon |\n| Next Weapon |  | Next Weapon |\n\n| User 1 input descriptors for 'Gamepad Modern' device type | RetroPad Inputs | PrBoom inputs |\n|-----------------------------------------------------------|------------------------------------------------|-------------------------|\n| Menu Cancel |  | Menu Cancel |\n| Quick Save |  | Quick Save |\n| Show/Hide Map |  | Show/Hide Map |\n| Show/Hide Menu |  | Show/Hide Menu |\n| D-Pad Up |  | D-Pad Up |\n| D-Pad Down |  | D-Pad Down |\n| D-Pad Left |  | D-Pad Left |\n| D-Pad Right |  | D-Pad Right |\n| Menu Select |  | Menu Select |\n| Quick Load |  | Quick Load |\n| Previous Weapon |  | Previous Weapon |\n| Next Weapon |  | Next Weapon |\n| Use |  | Use |\n| Fire |  | Fire |\n| Toggle Run |  | Toggle Run |\n| 180 Turn |  | 180 Turn |\n| |  X | Strafe Left/Right |\n| |  Y | Move Forwards/Backwards |\n| |  X | Look Left/Right |\n\n## Keyboard and Mouse\n\n| RetroKeyboard/Mouse inputs | Weapons |\n|-------------------------------------------------|-----------------|\n| Keyboard 1 | Fist |\n| Keyboard 2 | Pistol |\n| Keyboard 3 | Shotgun |\n| Keyboard 4 | Chaingun |\n| Keyboard 5 | Rocket |\n| Keyboard 8 | Chainsaw |\n| Keyboard 0 | Best |\n| Keyboard Left Control | Fire |\n| Keyboard Right Control | Fire |\n| Wheel Up | Next Weapon |\n| Wheel Down | Previous Weapon |\n|  Mouse 1 | Fire |\n\n| RetroKeyboard/Mouse inputs | Movement |\n|-------------------------------------------------------|-----------------|\n| Keyboard Up | Forward |\n| Keyboard Down | Backward |\n| Keyboard Left | Turn Left |\n| Keyboard Right | Turn Right |\n| Keyboard Left Shift | Run |\n| Keyboard Right Shift | Run |\n| Keyboard Less than < | Strafe Left |\n| Keyboard Greater than > | Strafe Right |\n| Keyboard Left Alt | Strafe |\n| Keyboard Right Alt | Strafe |\n| Keyboard Caps Lock | Autorun |\n| Keyboard Slash / | 180 Turn |\n| Keyboard Space | Use |\n|  Mouse Cursor | Turn Left/Right |\n|  Mouse 2 | Strafe |\n|  Mouse 3 | Use |\n|  Mouse 3 | Forward |\n\n| RetroKeyboard/Mouse inputs | Game |\n|----------------------------|-----------|\n| Keyboard F2 | Save |\n| Keyboard F3 | Load |\n| Keyboard F6 | Quicksave |\n| Keyboard F7 | Endgame |\n| Keyboard F9 | Quickload |\n| Keyboard F10 | Quit |\n\n| RetroKeyboard/Mouse inputs | Screen |\n|------------------------------|--------------|\n| Keyboard F1 | Help |\n| Keyboard Escape | Menu |\n| Keyboard Home | Setup |\n| Keyboard Pause | Pause |\n| Keyboard Tab | Automap |\n| Keyboard F4 | Sound Volume |\n| Keyboard F5 | HUD |\n| Keyboard F8 | Messages |\n| Keyboard F11 | Gamma Fix |\n| Keyboard F12 | Spy |\n| Keyboard Minus - | Smaller View |\n| Keyboard Plus + | Larger View |\n\n| RetroKeyboard/Mouse inputs | Automap |\n|----------------------------|-------------|\n| Keyboard f | Follow Mode |\n| Keyboard Minus - | Zoom in |\n| Keyboard Plus + | Zoom out |\n| Keyboard m | Mark Place |\n| Keyboard c | Clear Marks |\n| Keyboard o | Full/Zoom |\n| Keyboard g | Grid |\n\n## External Links\n\n- [Official PrBoom Website](http://prboom.sourceforge.net/)\n- [Official PrBoom SourceForge Repository](http://sourceforge.net/projects/prboom/)\n- [Libretro PrBoom Core info file](https://github.com/libretro/libretro-super/blob/master/dist/info/prboom_libretro.info)\n- [Libretro PrBoom Github Repository](https://github.com/libretro/libretro-prboom)\n- [Report Libretro PrBoom Core Issues Here](https://github.com/libretro/libretro-prboom/issues)\n\n## id Software\n\n- [Quake 1 (TyrQuake)](tyrquake.md)\n"
},
{
"path": "docs/library/prosystem.md",
"content": "# Atari - 7800 (ProSystem)\n\n## Background\n\nProSystem is an Atari 7800 emulator.\n\n### Author/License\n\nThe ProSystem core has been authored by\n\n- Greg Stanton\n- Brian Berlin\n- Leonis\n- Greg DeMent\n\nThe ProSystem core is licensed under\n\n- [GPLv2](https://github.com/libretro/prosystem-libretro/blob/master/License.txt)\n\nA summary of the licenses behind RetroArch and its cores can be found [here](../development/licenses.md).\n\n## Extensions\n\nContent that can be loaded by the ProSystem core have the following file extensions:\n\n- .a78\n- .bin\n\n## Databases\n\nRetroArch database(s) that are associated with the ProSystem core:\n\n- [Atari - 7800](https://github.com/libretro/libretro-database/blob/master/rdb/Atari%20-%207800.rdb)\n\n## BIOS\n\nRequired or optional firmware files go in the frontend's system directory.\n\n| Filename | Description | md5sum |\n|:-----------------:|:--------------------:|:--------------------------------:|\n| 7800 BIOS (U).rom | 7800 BIOS - Optional | 0763f1ffb006ddbe32e52d497ee848ae |\n\n## Features\n\nFrontend-level settings or features that the ProSystem core respects.\n\n| Feature | Supported |\n|-------------------|:---------:|\n| Restart | ✔ |\n| Screenshots | ✔ |\n| Saves | ✕ |\n| States | ✔ |\n| Rewind | ✔ |\n| Netplay | ✕ |\n| Core Options | ✕ |\n| [Memory Monitoring (achievements)](../guides/memorymonitoring.md) | ✔ |\n| RetroArch Cheats | ✕ |\n| Native Cheats | ✕ |\n| Controls | ✔ |\n| Remapping | ✔ |\n| Multi-Mouse | ✕ |\n| Rumble | ✕ |\n| Sensors | ✕ |\n| Camera | ✕ |\n| Location | ✕ |\n| Subsystem | ✕ |\n| [Softpatching](../guides/softpatching.md) | ✕ |\n| Disk Control | ✕ |\n| Username | ✕ |\n| Language | ✕ |\n| Crop Overscan | ✕ |\n| LEDs | ✕ |\n\n### Directories\n\nThe ProSystem core's internal core name is 'ProSystem'\n\nThe ProSystem core saves/loads to/from these directories.\n\n**Frontend's State directory**\n\n- 'content-name'.state# (State)\n\n### Geometry and timing\n\n- The ProSystem core's core provided FPS is 60 for NTSC games and 50 for PAL games.\n- The ProSystem core's core provided sample rate is 32640 Hz for NTSC games and 31200 Hz for PAL games\n- The ProSystem core's core provided base width is 320\n- The ProSystem core's core provided base height is 223 for NTSC games and 272 for PAL games\n- The ProSystem core's core provided max width is 320\n- The ProSystem core's core provided max height is 292\n- The ProSystem core's core provided aspect ratio is 4/3\n\n## Controllers\n\nThe ProSystem core supports the following device type(s) in the controls menu, bolded device types are the default for the specified user(s):\n\n### User 1 - 2 device types\n\n- None - Doesn't disable input. There's no reason to switch to this.\n- **RetroPad** - Joypad - Stay on this.\n- RetroPad w/Analog - Joypad - Same as RetroPad. There's no reaosn to switch to this.\n\n### Controller tables\n\n#### Joypad\n\n\n\n| User 1 Remap descriptors | RetroPad Inputs |\n|--------------------------|---------------------------------------------|\n| B |  |\n| Console Select |  |\n| Console Pause |  |\n| Up |  |\n| Down |  |\n| Left |  |\n| Right |  |\n| 2 |  |\n| Console Reset |  |\n| Left Difficulty |  |\n| Right Difficulty |  |\n\n| User 2 Remap descriptors | RetroPad Inputs |\n|--------------------------|---------------------------------------------|\n| 1 |  |\n| Up |  |\n| Down |  |\n| Left |  |\n| Right |  |\n| 2 |  |\n\n## External Links\n\n- [Official ProSystem Website](https://gstanton.github.io/ProSystem1_3/)\n- [Official ProSystem Github Repository](https://github.com/gstanton/ProSystem1_3)\n- [Libretro ProSystem Core info file](https://github.com/libretro/libretro-super/blob/master/dist/info/prosystem_libretro.info)\n- [Libretro ProSystem Github Repository](https://github.com/libretro/prosystem-libretro)\n- [Report Libretro ProSystem Core Issues Here](https://github.com/libretro/prosystem-libretro/issues)\n"
},
{
"path": "docs/library/puae.md",
"content": "# PUAE\n\n## Background\n\nPUAE tries to continue where E-UAE left off. PUAE versioning is based on the merged WinUAE version.\n\nThe PUAE core have been authored by\n\n- UAE Team\n\nThe PUAE core is licensed under\n\n- [GPLv2](https://github.com/libretro/libretro-uae/blob/master/COPYING)\n\nA summary of the licenses behind RetroArch and its cores can be found [here](../development/licenses.md).\n\n## Extensions\n\nContent that can be loaded by the PUAE core have the following file extensions:\n\n### Floppies\n\n- .adf\n- .adz\n- .dms\n- .fdi\n- .ipf\n- .raw\n\n### Hard drives\n\n- .hdf\n- .hdz\n- directory\n\n### WHDLoad\n\n- .lha\n- .slave\n- .info\n\n### Compact discs\n\n- .cue\n- .ccd\n- .chd\n- .nrg\n- .mds\n- .iso\n\n### Other\n\n- .uae\n- .m3u\n- .zip\n- .7z\n\n## Databases\n\nRetroArch database(s) that are associated with the PUAE core:\n\n- [Commodore - Amiga](https://github.com/libretro/libretro-database/blob/master/rdb/Commodore%20-%20Amiga.rdb)\n\n## BIOS\n\nRequired or optional firmware files go in the frontend's system directory.\n\nThe core has a somewhat compatible built-in AROS Kickstart, which is used as a fallback when the proper Kickstart is not found.\n\nAmiga Forever and TOSEC filenames are also accepted.\n\n| Filename | Amiga Forever | Description | md5sum |\n|--------------------|---------------------------|------------------------------------|----------------------------------|\n| kick31034.A1000 | amiga-os-110-ntsc.rom | Kickstart v1.1 rev 31.034 NTSC | 0b8442c311caa54fb12ec88eaaa9facf |\n| kick32034.A1000 | amiga-os-110-pal.rom | Kickstart v1.1 rev 32.034 PAL | 1fa1f93d3d7b51271dd1356b8b2b45a9 |\n| kick33180.A500 | amiga-os-120.rom | Kickstart v1.2 rev 33.180 | 85ad74194e87c08904327de1a9443b7a |\n| kick34005.A500 | amiga-os-130.rom | Kickstart v1.3 rev 34.005 | 82a21c1890cae844b3df741f2762d48d |\n| kick37175.A500 | amiga-os-204.rom | Kickstart v2.04 rev 37.175 | dc10d7bdd1b6f450773dfb558477c230 |\n| kick37350.A600 | amiga-os-205-a600.rom | Kickstart v2.05 rev 37.350 | 465646c9b6729f77eea5314d1f057951 |\n| kick40063.A600 | amiga-os-310-a600.rom | Kickstart v3.1 rev 40.063 | e40a5dfb3d017ba8779faba30cbd1c8e |\n| kick39106.A1200 | amiga-os-300-a1200.rom | Kickstart v3.0 rev 39.106 | b7cc148386aa631136f510cd29e42fc3 |\n| kick40068.A1200 | amiga-os-310-a1200.rom | Kickstart v3.1 rev 40.068 | 646773759326fbac3b2311fd8c8793ee |\n| kick39106.A4000 | amiga-os-300-a4000.rom | Kickstart v3.0 rev 39.106 | 9b8bdd5a3fd32c2a5a6f5b1aefc799a5 |\n| kick40068.A4000 | amiga-os-310-a4000.rom | Kickstart v3.1 rev 40.068 | 9bdedde6a4f33555b4a270c8ca53297d |\n| kick34005.CDTV | amiga-os-130-cdtv-ext.rom | CDTV extended ROM v1.00 | 89da1838a24460e4b93f4f0c5d92d48d |\n| kick40060.CD32 | amiga-os-310-cd32.rom | CD32 Kickstart v3.1 rev 40.060 | 5f8924d013dd57a89cf349f4cdedc6b1 |\n| kick40060.CD32.ext | amiga-os-310-cd32-ext.rom | CD32 extended ROM rev 40.060 | bb72565701b1b6faece07d68ea5da639 |\n| kick40060.CD32 | | CD32 KS + extended v3.1 rev 40.060 | f2f241bf094168cfb9e7805dc2856433 |\n\n## Features\n\nFrontend-level settings or features that the PUAE core respect.\n\n| Feature | Supported |\n|-------------------|:---------:|\n| Restart | ✔ |\n| Screenshots | ✔ |\n| Saves | ✔ |\n| States | ✔ |\n| Rewind | ✔ |\n| Netplay | ✕ |\n| Core Options | ✔ |\n| [Memory Monitoring (achievements)](../guides/memorymonitoring.md) | ✔ |\n| RetroArch Cheats | ✔ |\n| Native Cheats | ✕ |\n| Controls | ✔ |\n| Remapping | ✔ |\n| Multi-Mouse | ✔ |\n| Rumble | ✕ |\n| Sensors | ✕ |\n| Camera | ✕ |\n| Location | ✕ |\n| Subsystem | ✕ |\n| [Softpatching](../guides/softpatching.md) | ✕ |\n| Disk Control | ✔ |\n| Username | ✕ |\n| Language | ✕ |\n| Crop Overscan | ✕ |\n| LEDs | ✔ |\n\n### Directories\n\nThe PUAE core's internal core name is 'puae'.\n\nThe PUAE core saves/loads to/from these directories.\n\n**Frontend's Save directory**\n\n- 'content-name'.nvr (CD32/CDTV NVRAM)\n- `BootHD`/`puae_libretro.hdf` (Optional global boot hard drive image directory/file)\n- `WHDLoad`/`WHDLoad.hdf` (WHDLoad helper image directory/file)\n- `WHDSaves`/`WHDSaves.hdf` (WHDLoad save image directory/file)\n\n**Frontend's State directory**\n\n- 'content-name'.state# (State)\n\n### Geometry and timing\n\n- The PUAE core's core provided FPS is dynamic, but initially by default 50 for PAL and 59.94 for NTSC\n- The PUAE core's core provided sample rate is 44100 Hz\n- The PUAE core's base width is 360 in LoRes, 720 in HiRes 1440 in SuperHires\n- The PUAE core's base height is 288 for PAL single line, 576 for PAL double line, 240 for NTSC single line, 480 for NTSC double line\n- The PUAE core's max width is 1440\n- The PUAE core's max height is 576\n- The PUAE core's core provided aspect ratio is automatically set based on core options\n\n### M3U and Disk control\n\nWhen you have a multi disk game, you can use a M3U playlist file to be able to change disks via RetroArch Disc Control interface.\n\nA M3U file is a simple text file with one disk per line ([Wikipedia](https://en.wikipedia.org/wiki/M3U)).\n\nExample:\n\n`Simpsons, The - Bart vs. The Space Mutants.m3u`\n```\nSimpsons, The - Bart vs. The Space Mutants_Disk1.adf\nSimpsons, The - Bart vs. The Space Mutants_Disk2.adf\n```\nPath can be absolute or relative to the location of the M3U file.\n\nWhen the game asks for it, you can change the current disk in the RetroArch \"Disc Control\" menu:\n\n- Eject the current disk with \"Eject Disc\"\n- Select the right disk index with \"Current Disc Index\"\n- Insert the new disk with \"Insert Disc\"\n\nFor games that support multiple disk drives, append \"**(MD)**\" as in \"MultiDrive\" to the M3U filename to insert each disk in different drives. Only possible with maximum 4 disks!\n\n***MultiDrive option is enabled by default, so the tag is not necessary, but some games require disabling it, because they can't handle multiple disk drives.***\n\nFor games that require a dedicated save disk, one may be generated automatically by entering the following line in an M3U file: `#SAVEDISK:VolumeName`. `VolumeName` is optional and may be omitted. For example, this will create a blank, unlabelled disk image at disk index 5:\n\n`Secret of Monkey Island.m3u`\n```\nSecret of Monkey Island_Disk 1.adf\nSecret of Monkey Island_Disk 2.adf\nSecret of Monkey Island_Disk 3.adf\nSecret of Monkey Island_Disk 4.adf\n#SAVEDISK:\n```\n\nSome games require save disks to have a specific label - for example, `It Came from the Desert` will only save to a disk named `DSAVE`:\n\n`It Came from the Desert.m3u`\n```\nIt Came from the Desert_Disk 1.adf\nIt Came from the Desert_Disk 2.adf\nIt Came from the Desert_Disk 3.adf\n#SAVEDISK:DSAVE\n```\n\nAlthough one save disk is normally sufficient, an arbitrary number of `#SAVEDISK:VolumeName` lines may be included. Save disks are located in the frontend's save directory, with the following name: `[M3U_FILE_NAME].save[DISK_INDEX].adf`.\n\nBy default, RetroArch will display the filename (without extension) of each M3U entry when selecting a disk via the `Current Disc Index` drop-down menu. Custom display labels may be set for each disk using the syntax: `DISK_FILE|DISK_LABEL`. For example, the following M3U file:\n\n`Valhalla & the Fortress of Eve.m3u`\n```\nValhalla & the Fortress of Eve_Disk1.adf|Game Disk\nValhalla & the Fortress of Eve_Disk2.adf|Data Disk\nValhalla & the Fortress of Eve_Disk3.adf|Level 1 Disk\nValhalla & the Fortress of Eve_Disk4.adf|Level 2 Disk\nValhalla & the Fortress of Eve_Disk5.adf|Level 3 Disk\nValhalla & the Fortress of Eve_Disk6.adf|Level 4 Disk\n```\n\n...will be shown in RetroArch's disk selection menu as:\n\n```\n1: Game Disk\n2: Data Disk\n3: Level 1 Disk\n4: Level 2 Disk\n5: Level 3 Disk\n6: Level 4 Disk\n```\n\nIf `DISK_LABEL` is intentionally left blank (i.e. `DISK_FILE|`) then only the disk index will be displayed.\n\nSave disks generated by the `#SAVEDISK:` keyword are automatically assigned the label: `Save Disk [SAVE_DISK_INDEX]`.\n\n#### Extra M3U features\n\n- `#SAVEDISK: