 * **GDPR**
The General Data Protection Regulation (GDPR) is a regulation in EU law on data protection and privacy in the European Union (EU) and the European Economic Area (EEA).
Hence, data such as **first name**, **last name**, **mail** will be anonymized after one year of inactivity in LinShare.
You can [activate this feature in the backend configuration.](documentation/EN/administration/how-to-activate-gdpr.md)
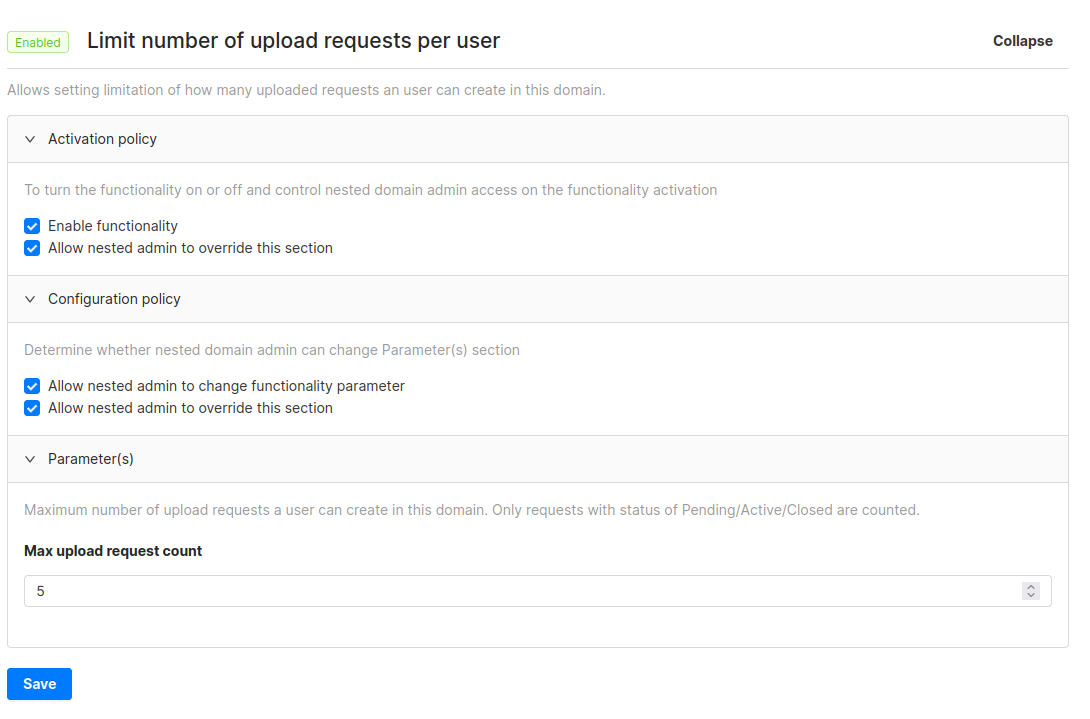
* **SAAS Limitations**
Using LinShare as a SAAS service for free users may cost a lot to a company.
We introduced some configuration in order to limit:
* number of workspaces that can be created by domain
* number of workgroup that can be created in a workspace
* number of opened/closed upload requests per users
This can be configured on the admin side at functionalities level.
* **GDPR**
The General Data Protection Regulation (GDPR) is a regulation in EU law on data protection and privacy in the European Union (EU) and the European Economic Area (EEA).
Hence, data such as **first name**, **last name**, **mail** will be anonymized after one year of inactivity in LinShare.
You can [activate this feature in the backend configuration.](documentation/EN/administration/how-to-activate-gdpr.md)
* **SAAS Limitations**
Using LinShare as a SAAS service for free users may cost a lot to a company.
We introduced some configuration in order to limit:
* number of workspaces that can be created by domain
* number of workgroup that can be created in a workspace
* number of opened/closed upload requests per users
This can be configured on the admin side at functionalities level.
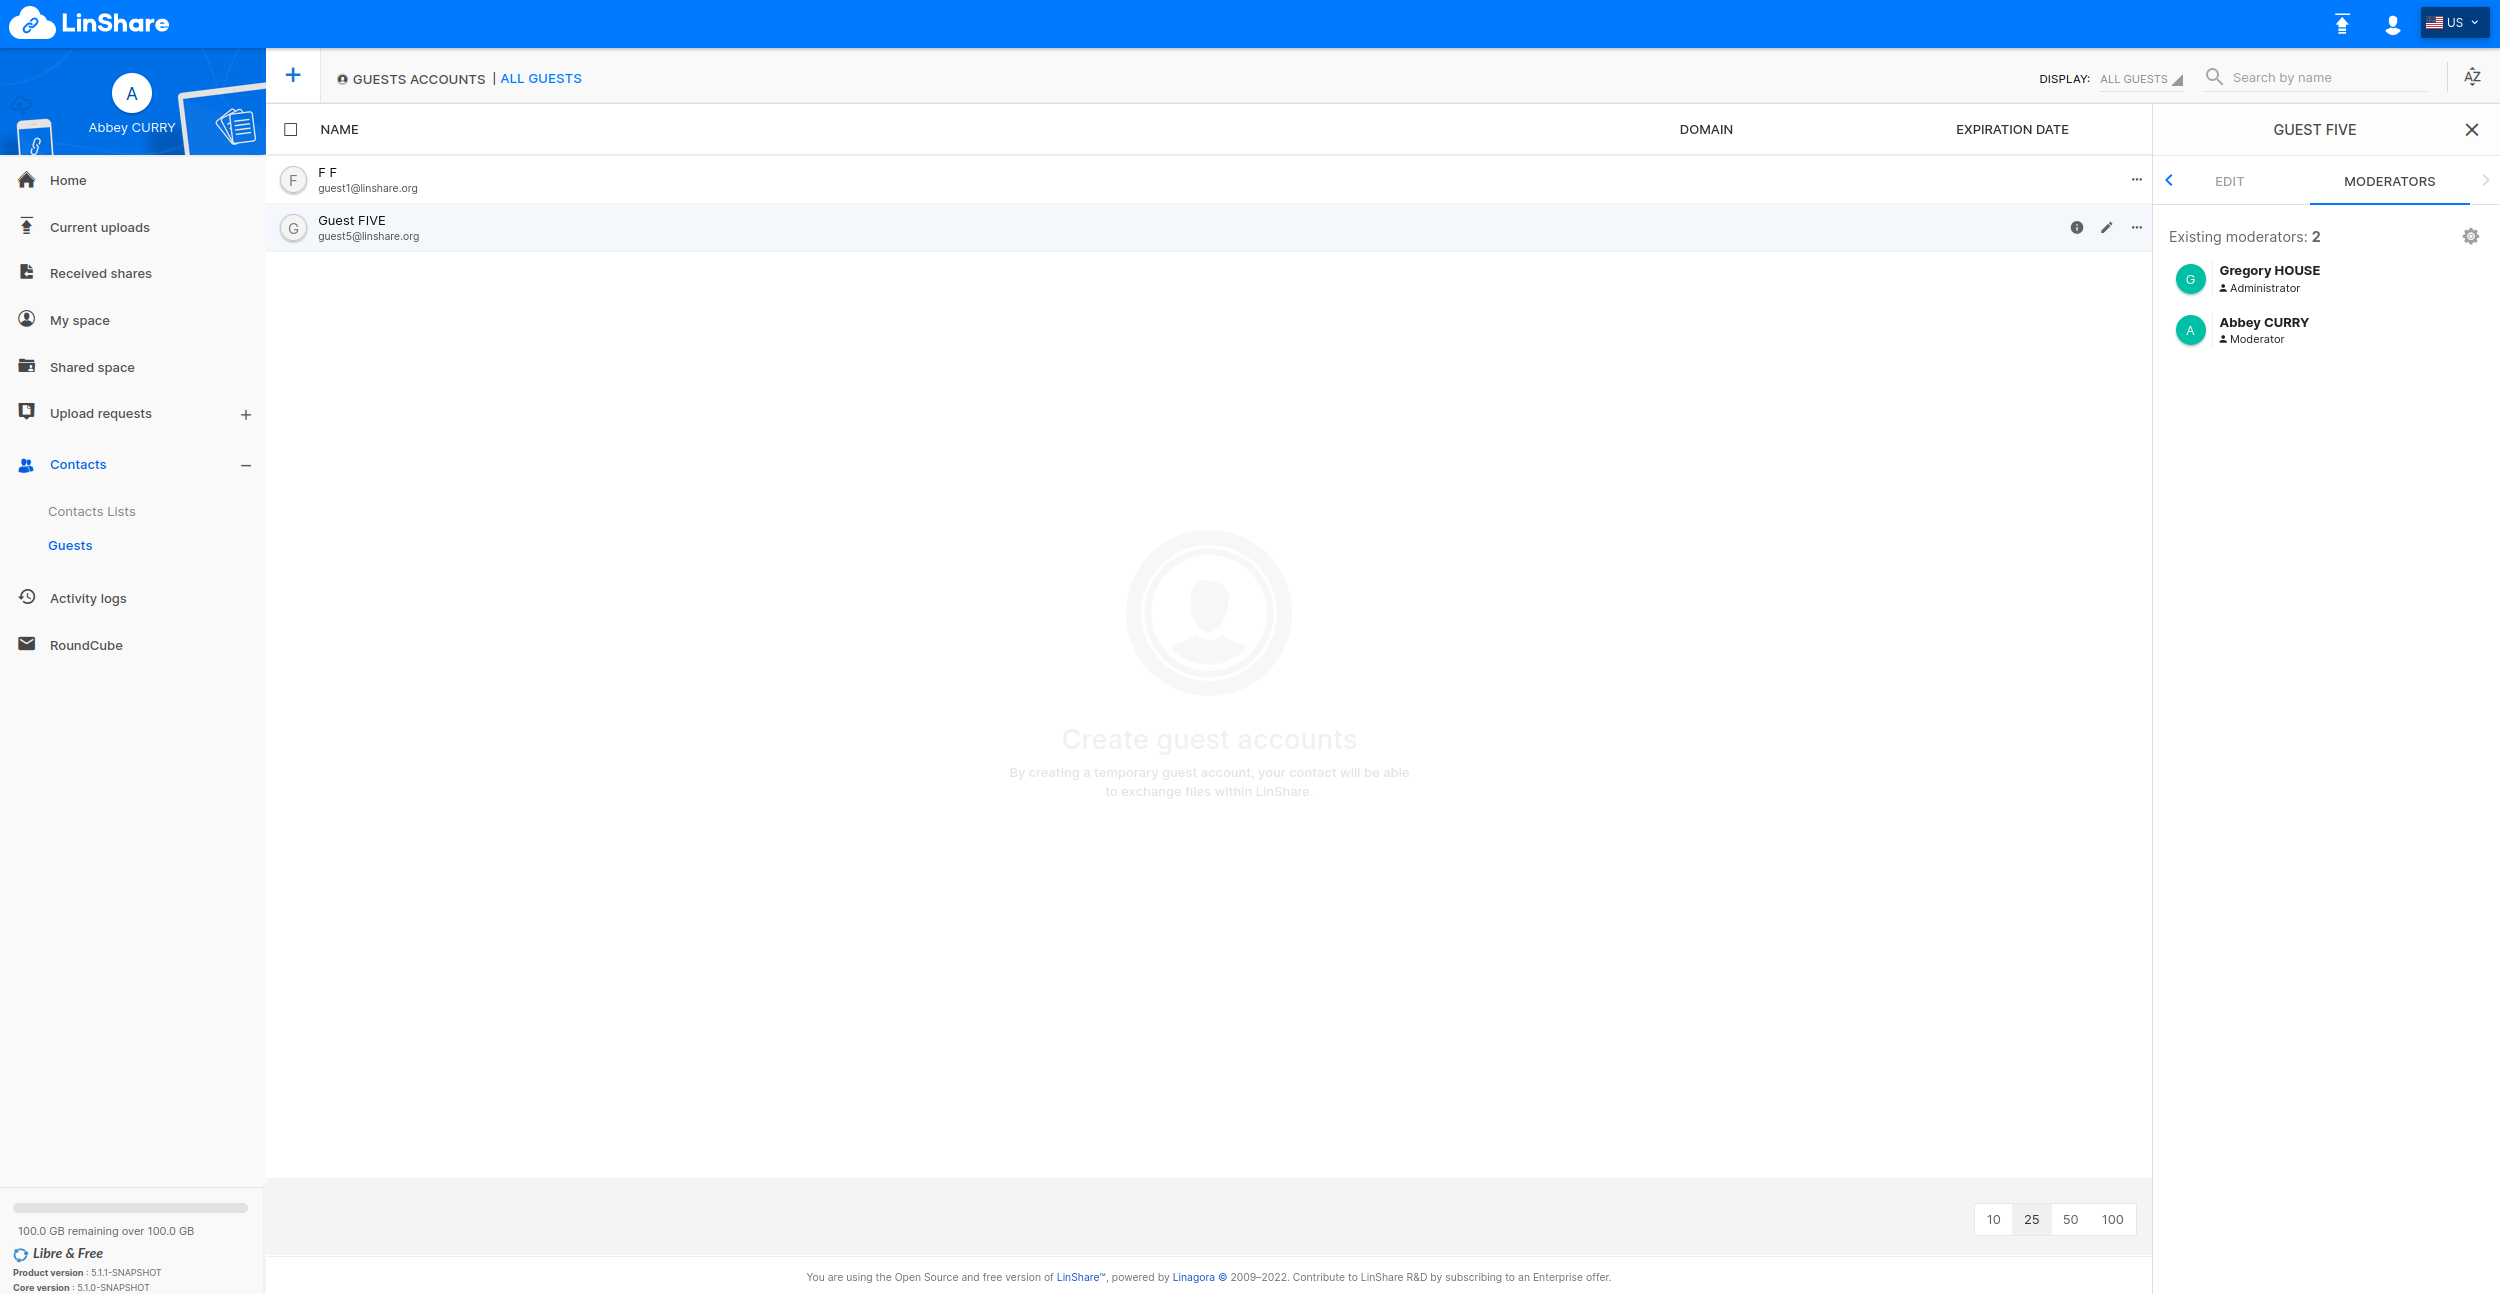
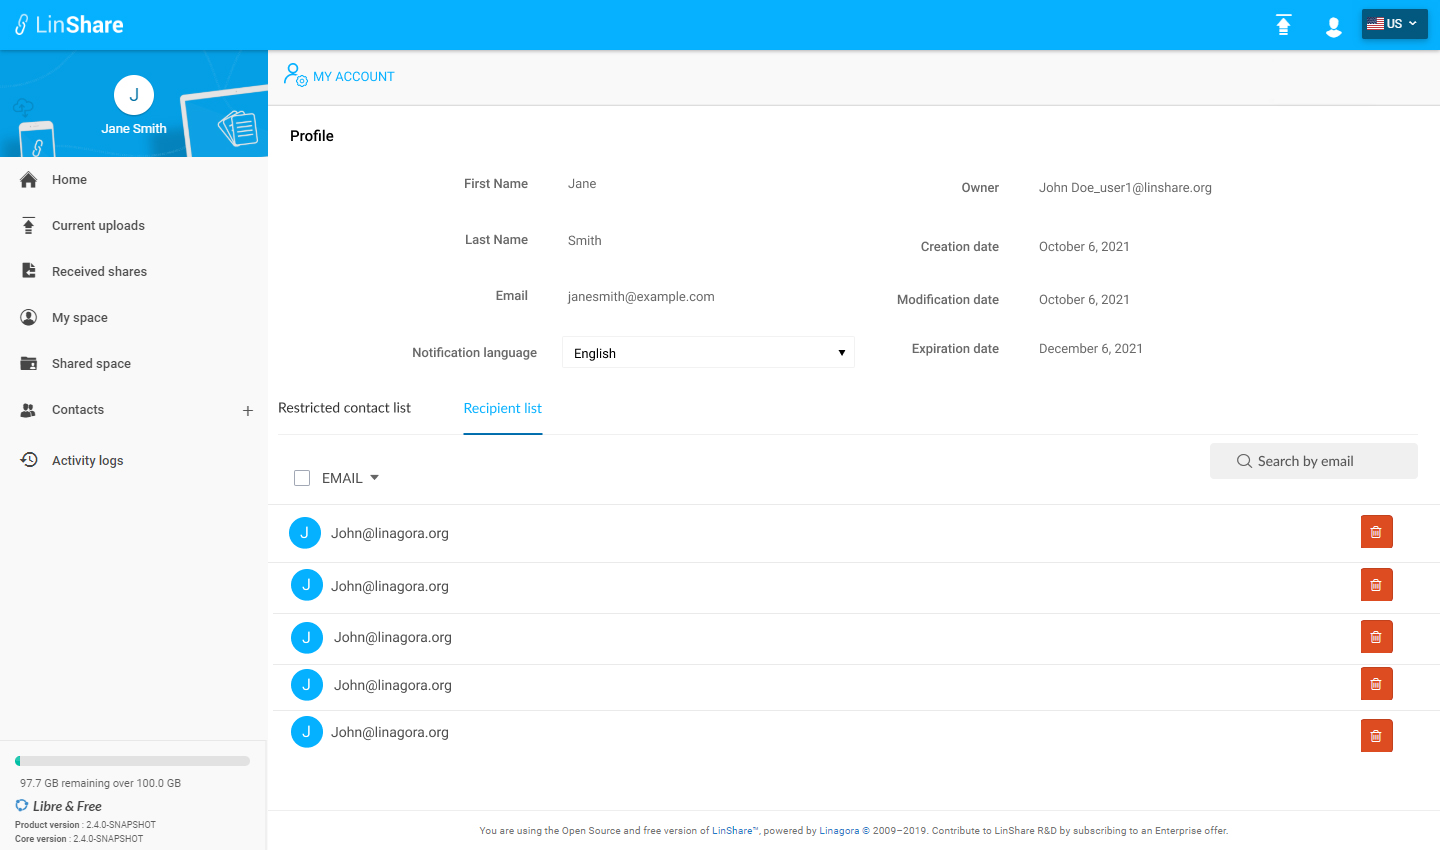
 * **Profile page**
The profile page for users and guests has been enhanced:
* adding favorite recipients list for users
* adding favorite recipients list and restricted contacts list for guests
* **Profile page**
The profile page for users and guests has been enhanced:
* adding favorite recipients list for users
* adding favorite recipients list and restricted contacts list for guests
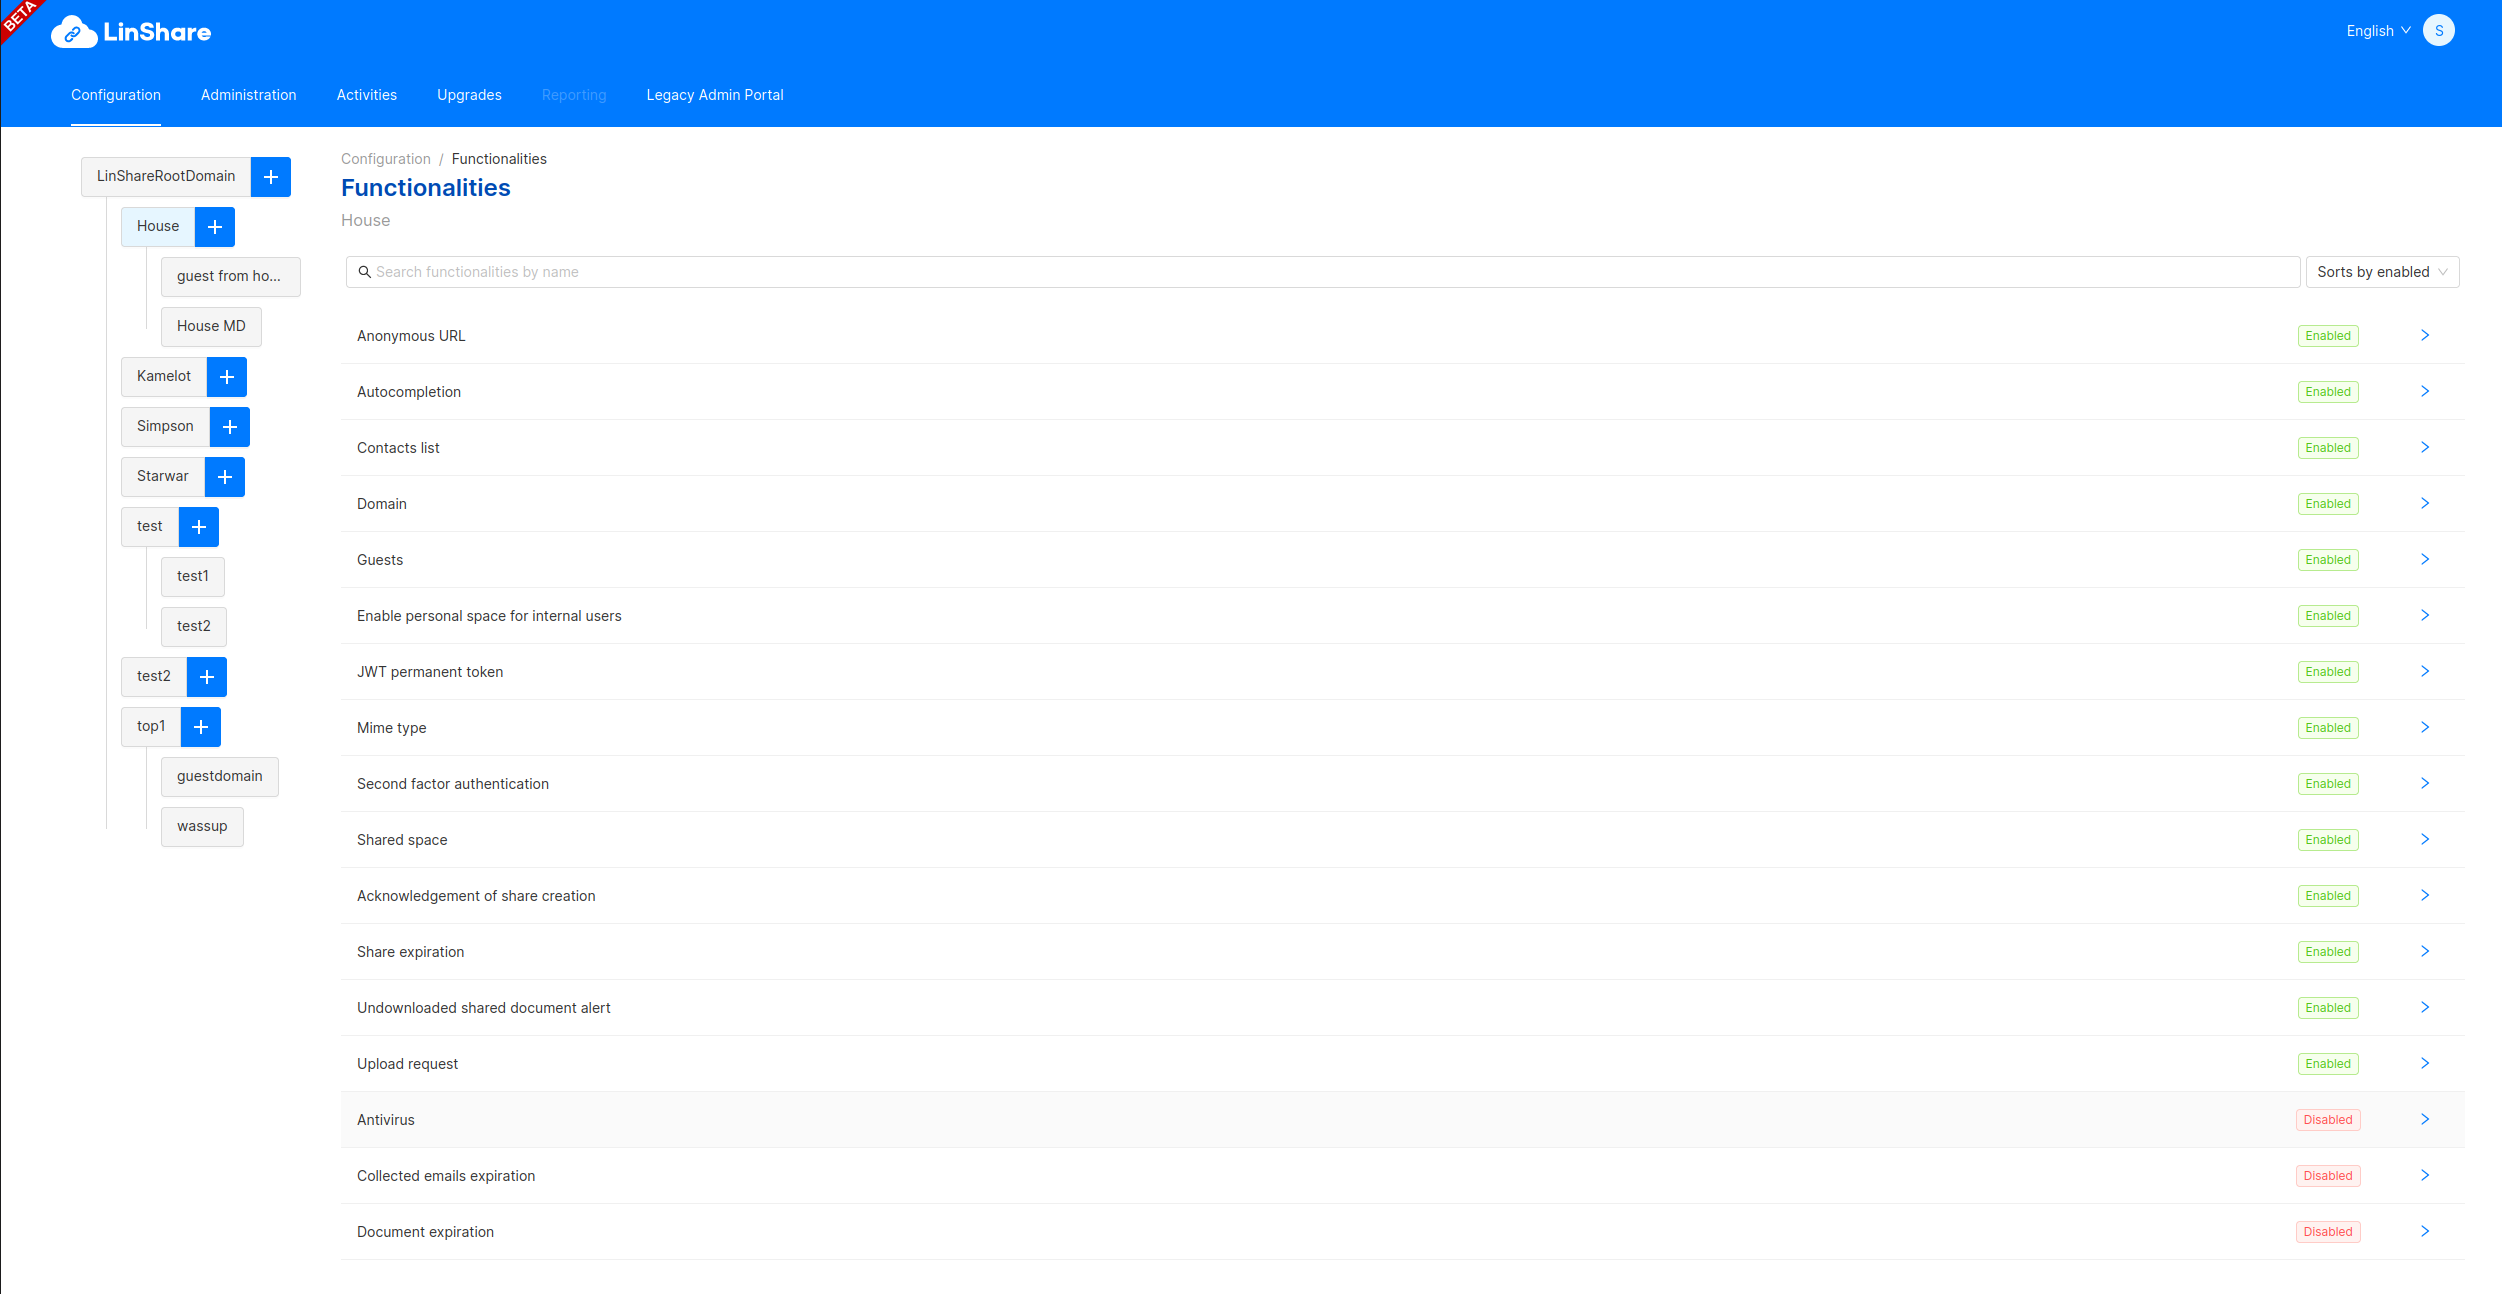
 * **New Admin portal**
We are continuing the migration of LinShare admin portal to the new design.
* Functionalities
In this version, the functionalities management has been rewritten.
* **New Admin portal**
We are continuing the migration of LinShare admin portal to the new design.
* Functionalities
In this version, the functionalities management has been rewritten.
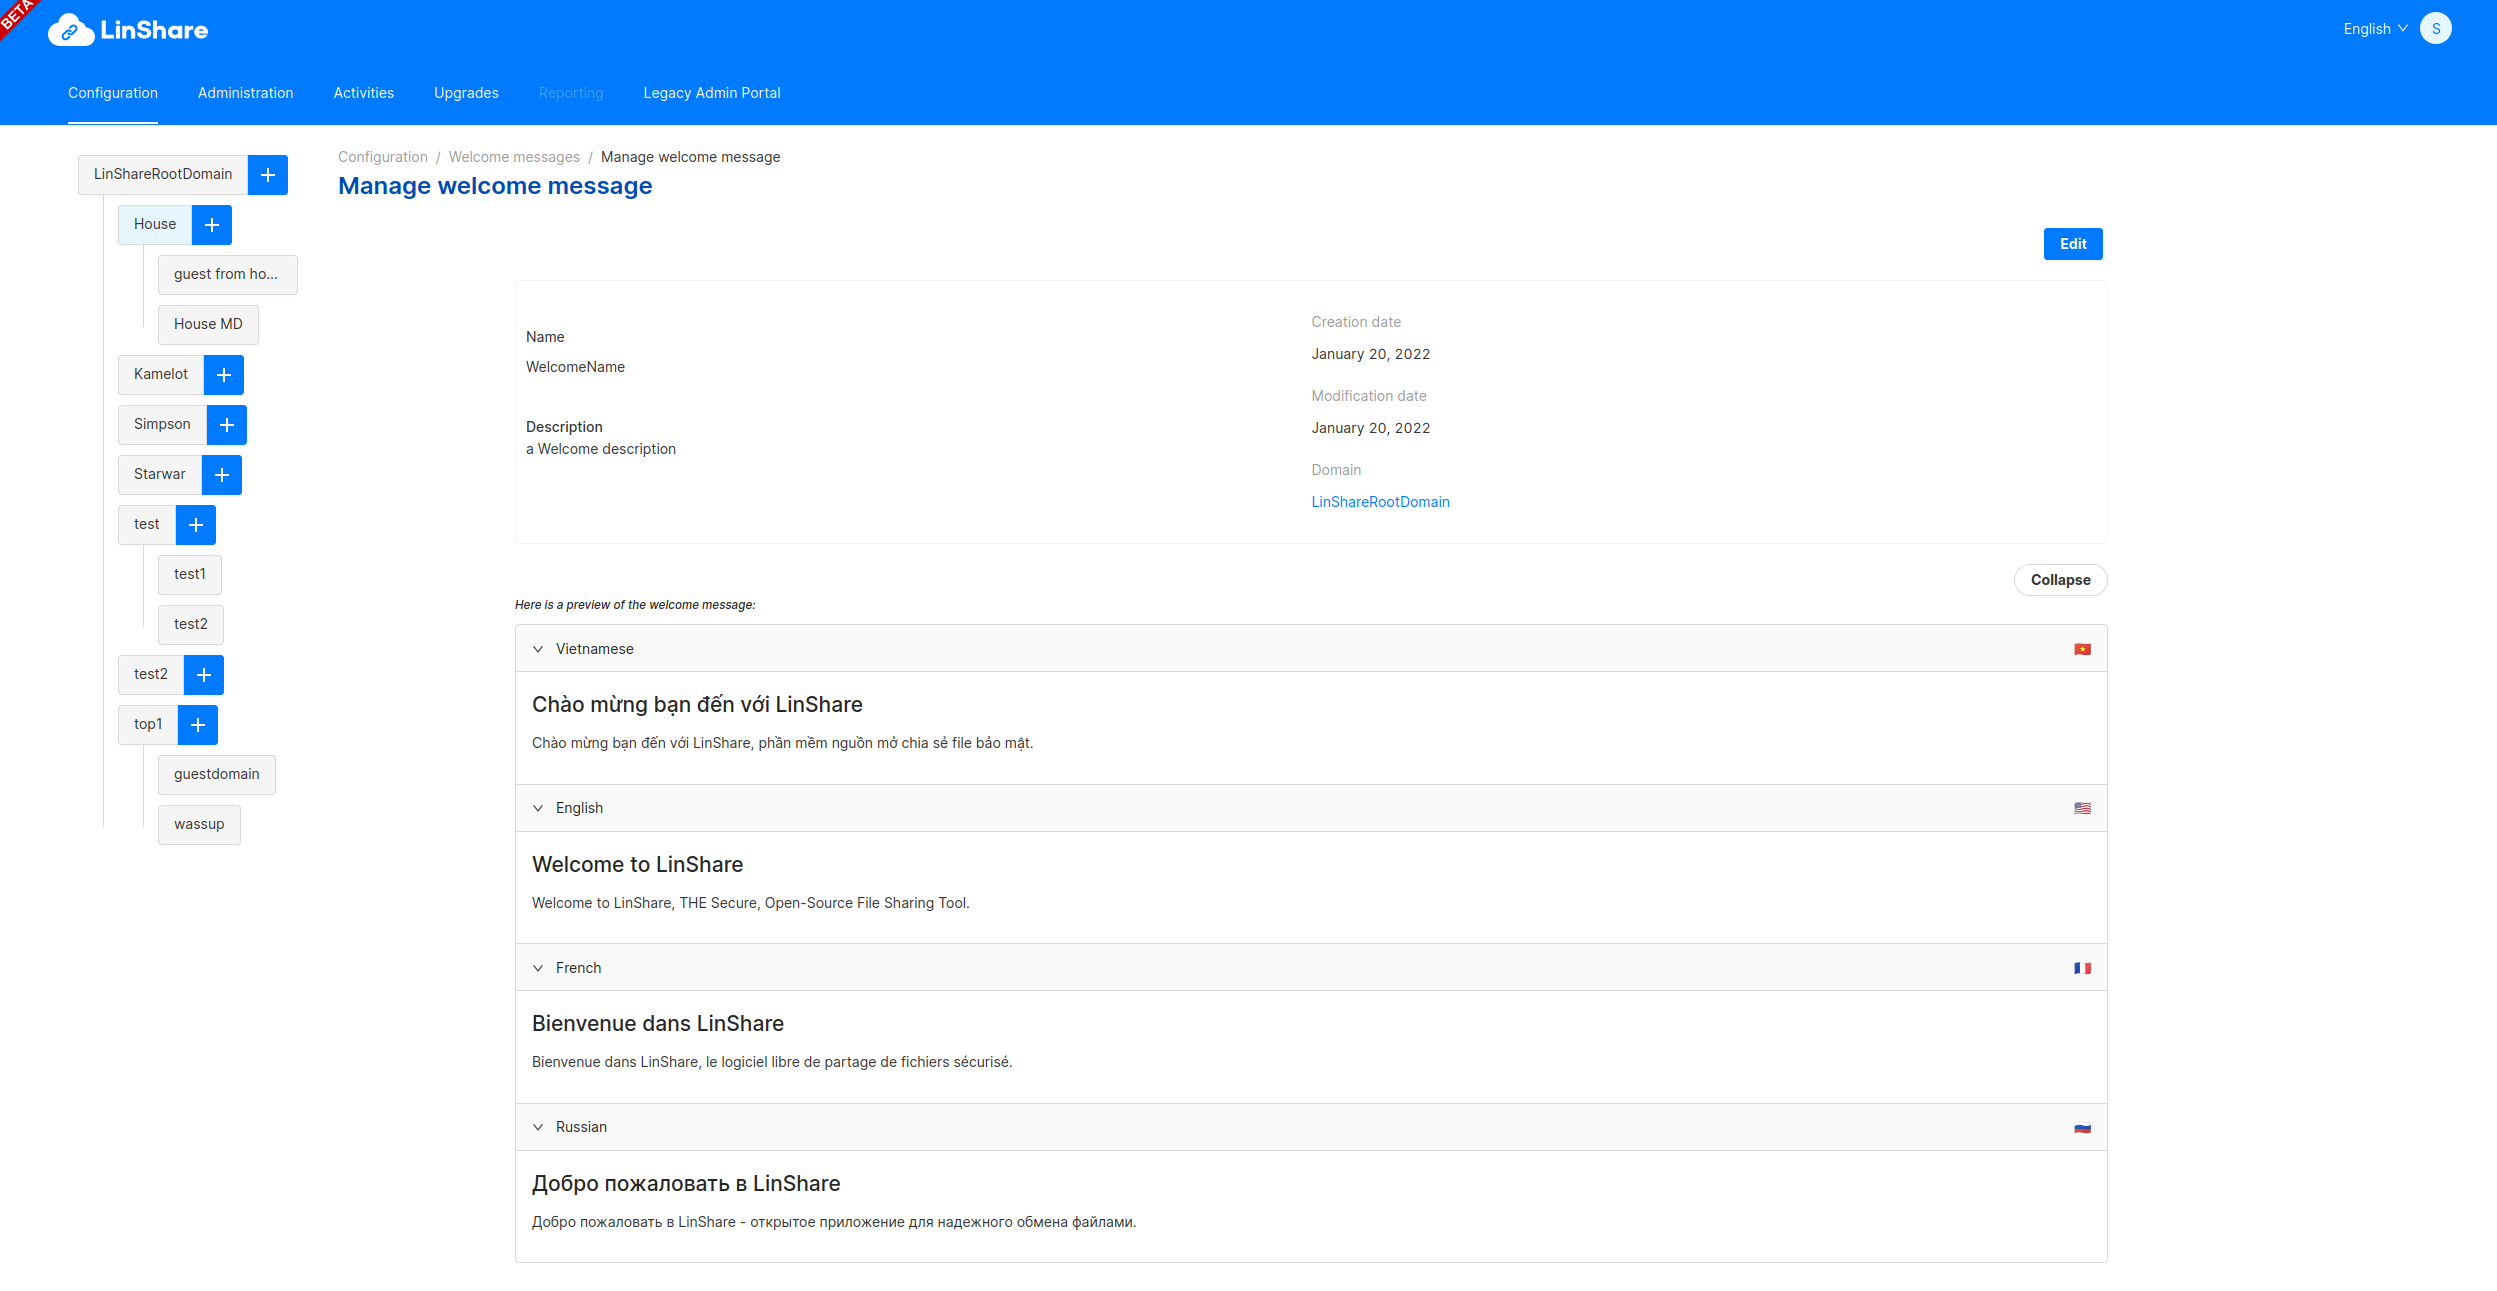
 * Welcome Messages
Also, the welcome messages has been rewritten.
* Welcome Messages
Also, the welcome messages has been rewritten.
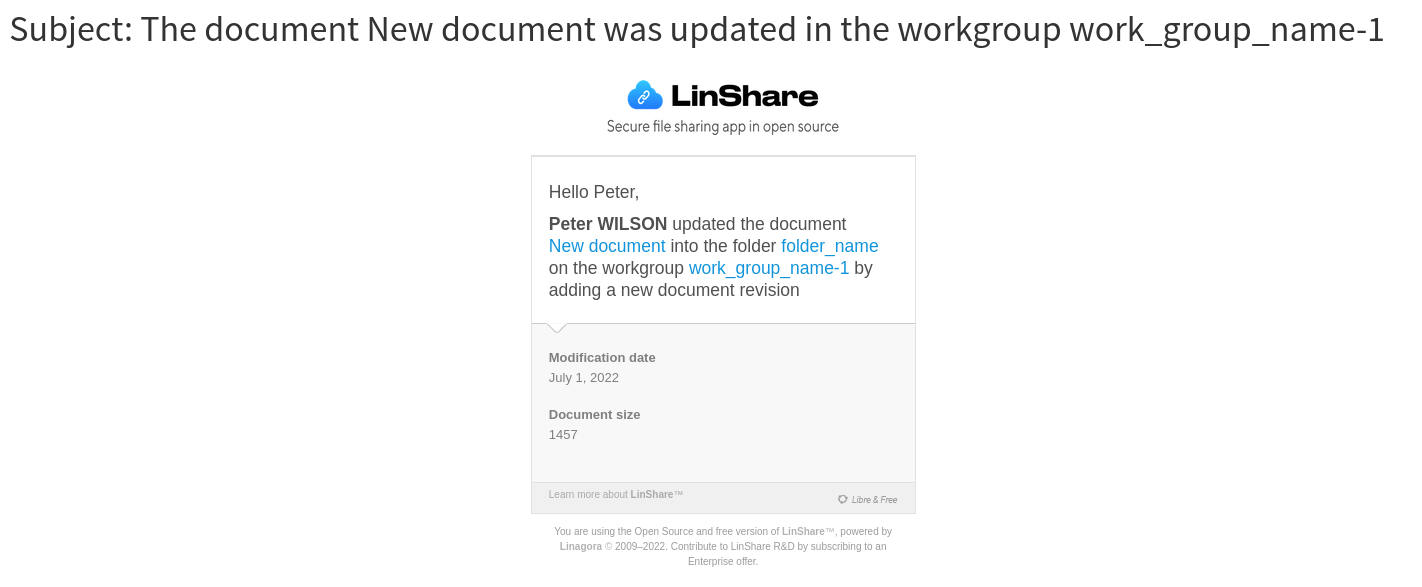
 * **New emails**
We have defined new kinds of emails when a user is uploading a file or a new revision in a work group.
* **New emails**
We have defined new kinds of emails when a user is uploading a file or a new revision in a work group.
 * **New upgrade task**
A new kind of upgrade task has been introduced: OPTIONAL.
Such task might be processed by the admin of LinShare if he needs to.
They are non-blocking, and the upgrade icon will not blink.
Tasks regarding special behaviour / process will use this kind of upgrade task.
## [5.0.4](https://github.com/linagora/linshare/compare/5.0.3...5.0.4) (2022-05-30) [Download link](http://download.linshare.org/versions/5.0.4/)
**The 5.0.4 release of LinShare is out**
- **core** : 5.0.4 - [changelog](https://github.com/linagora/linshare-core/compare/5.0.3...5.0.4)
- **ui-user** : 5.0.4 - [changelog](https://github.com/linagora/linshare-ui-user/compare/v5.0.3...v5.0.4)
- **ui-admin** : 5.0.4 [changelog](https://github.com/linagora/linshare-ui-admin/compare/v5.0.3...v5.0.4)
- **ui-upload-request** : 5.0.4 [changelog](https://github.com/linagora/linshare-ui-upload-request/compare/v5.0.3...v5.0.4)
#### Bug fixes and improvements
* Core:
* Downloading should not fail when mail notification to document owners fail.
* Add support of unlimited expiry date for user api.
* Fix update of unlimited parameter of integer functionalities
* Fix wrong number of remaining days of UR
* Raising exception when user belong to multiple domains (domain discriminator)
* Fix usage of given_name for OIDC claim.
* Fix OIDC provider creation and update
* Add debug traces for OIDC provider.
* Add specific error code when OIDC user provider is not found by its discriminant.
* Add default available languages for functionalities.
* UI-User:
* Issue #1136: French translation issue for upload request
* Issue #1132: Add more OIDC errors handling
* Issue #1131: Do not authRedirect for oidc authentication route
* UI-Admin:
* Issue #258: Fix unable to create workspace filter
* Issue #249: Add error translation for OIDC error
* Issue #238: Handle properly 403 http code
* Issue #247: Fix oidc redirect uri, it should be adapt to webserver origin and path
* Issue #243: Rename oidc callback url
* Issue #243: Move config.js to a config folder
* UI-Upload-Request:
* nothing to report
## [5.0.3](https://github.com/linagora/linshare/compare/5.0.2...5.0.3) (2022-04-06) [Download link](http://download.linshare.org/versions/5.0.3/)
**The 5.0.3 release of LinShare is out**
- **core** : 5.0.3 - [changelog](https://github.com/linagora/linshare-core/compare/5.0.2...5.0.3)
- **ui-user** : 5.0.3 - [changelog](https://github.com/linagora/linshare-ui-user/compare/v5.0.2...v5.0.3)
- **ui-admin** : 5.0.3 [changelog](https://github.com/linagora/linshare-ui-admin/compare/v5.0.2...v5.0.3)
- **ui-upload-request** : 5.0.3 [changelog](https://github.com/linagora/linshare-ui-upload-request/compare/v5.0.2...v5.0.3)
#### Bug fixes and improvements
* Core:
* Fix Spring security issue: CVE-2022-22965
* Fix retrieving sharedSpace audits
* Fix UserProvider findAll (prevent from NPE)
* UI-User:
* Add missing file version.properties
* UI-Admin:
* Issue #239: Make home route configurable, change it to Administration page
* Issue #232: Add editable fields and date fields to OIDC provider form
* Fix inconsistent type of error code between api errors and auth error
* UI-Upload-Request:
* nothing to report
## [4.2.6](https://github.com/linagora/linshare/compare/4.2.5...4.2.6) (2022-04-05) [Download link](http://download.linshare.org/versions/4.2.6/)
**The 4.2.6 release of LinShare is out**
- **core** : 4.2.6 - [changelog](https://github.com/linagora/linshare-core/compare/4.2.5...4.2.6)
- **ui-user** : 4.2.6 - [changelog](https://github.com/linagora/linshare-ui-user/compare/v4.2.5...v4.2.6)
- **ui-admin** : 4.2.6 [changelog](https://github.com/linagora/linshare-ui-admin/compare/v4.2.5...v4.2.6)
- **ui-upload-request** : 4.2.6 [changelog](https://github.com/linagora/linshare-ui-upload-request/compare/v4.2.5...v4.2.6)
#### Bug fixes and improvements
* Core:
* Fix Spring security issue: CVE-2022-22965
* UI-User:
* nothing to report
* UI-Admin:
* Issue #231: Add translation for weak password error
* UI-Upload-Request:
* nothing to report
## [4.1.5](https://github.com/linagora/linshare/compare/4.1.4...4.1.5) (2022-04-05) [Download link](http://download.linshare.org/versions/4.1.5/)
**The 4.1.5 release of LinShare is out**
- **core** : 4.1.5 - [changelog](https://github.com/linagora/linshare-core/compare/4.1.4...4.1.5)
- **ui-user** : 4.1.5 - [changelog](https://github.com/linagora/linshare-ui-user/compare/v4.1.4...v4.1.5)
- **ui-admin** : 4.1.5 [changelog](https://github.com/linagora/linshare-ui-admin/compare/v4.1.4...v4.1.5)
- **ui-upload-request** : 4.1.5 [changelog](https://github.com/linagora/linshare-ui-upload-request/compare/v4.1.4...v4.1.5)
#### Bug fixes and improvements
* Core:
* New endpoint added: SupportedApiVersionImpl
* Fix Spring security issue: CVE-2022-22965
* UI-User:
* Issue #1092: Correct locale keys in extLink default config
* UI-Upload-Request:
* nothing to report
* UI-Admin:
* Issue #171: Show max value input for guest expiration functionality
## [4.2.5](https://github.com/linagora/linshare/compare/4.2.4...4.2.5) (2022-03-29) [Download link](http://download.linshare.org/versions/4.2.5/)
**The 4.2.5 release of LinShare is out**
- **core** : 4.2.5 - [changelog](https://github.com/linagora/linshare-core/compare/4.2.4...4.2.5)
- **ui-user** : 4.2.5 - [changelog](https://github.com/linagora/linshare-ui-user/compare/v4.2.4...v4.2.5)
- **ui-admin** : 4.2.5 [changelog](https://github.com/linagora/linshare-ui-admin/compare/v4.2.4...v4.2.5)
- **ui-upload-request** : 4.2.5 [changelog](https://github.com/linagora/linshare-ui-upload-request/compare/v4.2.4...v4.2.5)
#### Bug fixes and improvements
* Core:
* New endpoint added: SupportedApiVersionImpl
* Fix delete user method of admin v5 API
* Update modification date when creating or deleting folder
* Recalculate account quota on migration script
* Add patch to recalculate user quota after ure deletion
* UI-User:
* Issue #1093: Use completion functionality value for typeahead min length
* Issue #1093: Use functionality value for max char autocompletion
* Issue #1111: Show an error when url is invalid
* UI-Admin:
* Issue #225: Show medium date as tooltip for audit logs
* Issue #229: Hide domain provider management only, instead of hiding entire domain management
## [5.0.2](https://github.com/linagora/linshare/compare/5.0.1...5.0.2) (2022-03-15) [Download link](http://download.linshare.org/versions/5.0.2/)
**The 5.0.2 release of LinShare is out**
- **core** : 5.0.2 - [changelog](https://github.com/linagora/linshare-core/compare/5.0.1...5.0.2)
- **ui-user** : 5.0.2 - [changelog](https://github.com/linagora/linshare-ui-user/compare/v5.0.1...v5.0.2)
- **ui-admin** : 5.0.2 [changelog](https://github.com/linagora/linshare-ui-admin/compare/v5.0.1...v5.0.2)
- **ui-upload-request** : 5.0.2 [changelog](https://github.com/linagora/linshare-ui-upload-request/compare/v5.0.1...v5.0.2)
#### Bug fixes and improvements
* Core:
* Fix init permissions and roles.
* UI-User:
* UI-Admin:
* UI-Upload-Request:
## [5.0.1](https://github.com/linagora/linshare/compare/5.0.0...5.0.1) (2022-03-02) [Download link](http://download.linshare.org/versions/5.0.1/)
**The 5.0.1 release of LinShare is out**
- **core** : 5.0.1 - [changelog](https://github.com/linagora/linshare-core/compare/5.0.0...5.0.1)
- **ui-user** : 5.0.1 - [changelog](https://github.com/linagora/linshare-ui-user/compare/v5.0.0...v5.0.1)
- **ui-admin** : 5.0.1 [changelog](https://github.com/linagora/linshare-ui-admin/compare/v5.0.0...v5.0.1)
- **ui-upload-request** : 5.0.1 [changelog](https://github.com/linagora/linshare-ui-upload-request/compare/v5.0.0...v5.0.1)
#### Bug fixes and improvements
* Core:
* Fix upgrade task of renaming workgroup deletion audit traces.
* Fix init permissions and roles.
* Add new endpoint to get supported API version, we will see a sample below.
* Fix user provider mapping (using lazy loading)
* Fix delete user admin v5
* Fix updating modification date when creating or deleting sharedSpace node
* Recalculate account quota
* UI-User:
* Update LinShare logo and theme color
* Fix autocomplete search
* Show button for support link(Crisp Integration)
* Show an error when anonymous URL is invalid
* Fix an error of not being able to change logo images
* **Breaking change** Update the path of default logo images. Now all images are stored inside `images` folder after bundled. If you are using default logo images, update the image configurations as following:
``` javascript
applicationLogo : {
small: 'images/linshare-logo-white.svg',
large : 'images/ls-logo-big.svg'
},
loginBackground : 'images/bg-linshare-desktop.png',
```
* UI-Admin:
* Fix bug domain creation with empty description
* Fix undefined functionality on logout
* Fix redirect to users list after user deletion
* Support loading certain domain on configuration routes
* Support managing role of workspace members
* Fix checking invalid guest max expiration date
* UI-Upload-Request:
* Update logo and theme color
**Add new endpoint to get supported API version**
* To retrieve all supported API versions, the returned list is ordered by the most recent created API, we can see:
`curl "http://{your_server}/linshare/webservice/rest/api-versions" -H "accept: application/json" -s |jq`
```
{
"USER": {
"name": "USER",
"versions": [
{
"version": 5
},
{
"version": 4
},
{
"version": 2
},
{
"version": 1
}
]
},
"ADMIN": {
"name": "ADMIN",
"versions": [
{
"version": 5
},
{
"version": 4
},
{
"version": 1
}
]
},
"DELEGATION": {
"name": "DELEGATION",
"versions": [
{
"version": 2
}
]
},
"UPLOADREQUEST": {
"name": "UPLOADREQUEST",
"versions": [
{
"version": 4
}
]
}
}
```
* To retrieve just one API we can see:
`curl "http://{your_server}/linshare/webservice/rest/api-versions?type=USER" -H "accept: application/json" -s |jq`
```
{
"USER": {
"name": "USER",
"versions": [
{
"version": 5
},
{
"version": 4
},
{
"version": 2
},
{
"version": 1
}
]
}
}
```
## [5.0.0](https://github.com/linagora/linshare/compare/4.2.4...5.0.0) (2022-02-01) [Download link](http://download.linshare.org/versions/5.0.0/)
**The 5.0.0 release of LinShare is out**
> **NB :**
> You can find the upgrade documentation [here](documentation/EN/upgrade).
- **core** : 5.0.0 - [changelog](https://github.com/linagora/linshare-core/compare/4.2.4...5.0.0)
- **ui-user** : 5.0.0 - [changelog](https://github.com/linagora/linshare-ui-user/compare/v4.2.4...v5.0.0)
- **ui-admin** : 5.0.0 [changelog](https://github.com/linagora/linshare-ui-admin/compare/v4.2.4...v5.0.0)
>**NB:**
>Before launching the upgrade process it is recommended to do a backup on the existing data in your Database.
#### Breaking changes:
* **OIDC Authentication**
* Drop supports for some **ui-user** oidc settings in **config.js**. Now only following settings are required: `authority`, `client_id`, `client_secret`, `scope`.
* Update redirection address for **ui-user**, the relative path of redirection address is now `#!/oidc/callback`. You are required to update settings of your OIDC Provider. See [LemonLDAP OIDC configurations](documentation/EN/installation/sso-lemonldap-using-OIDC.md#step-1-lemonldapng-configuration) for more details.
#### Main features:
* **Appearance**
The logo of LinShare was updated along of the general theme:
* **New upgrade task**
A new kind of upgrade task has been introduced: OPTIONAL.
Such task might be processed by the admin of LinShare if he needs to.
They are non-blocking, and the upgrade icon will not blink.
Tasks regarding special behaviour / process will use this kind of upgrade task.
## [5.0.4](https://github.com/linagora/linshare/compare/5.0.3...5.0.4) (2022-05-30) [Download link](http://download.linshare.org/versions/5.0.4/)
**The 5.0.4 release of LinShare is out**
- **core** : 5.0.4 - [changelog](https://github.com/linagora/linshare-core/compare/5.0.3...5.0.4)
- **ui-user** : 5.0.4 - [changelog](https://github.com/linagora/linshare-ui-user/compare/v5.0.3...v5.0.4)
- **ui-admin** : 5.0.4 [changelog](https://github.com/linagora/linshare-ui-admin/compare/v5.0.3...v5.0.4)
- **ui-upload-request** : 5.0.4 [changelog](https://github.com/linagora/linshare-ui-upload-request/compare/v5.0.3...v5.0.4)
#### Bug fixes and improvements
* Core:
* Downloading should not fail when mail notification to document owners fail.
* Add support of unlimited expiry date for user api.
* Fix update of unlimited parameter of integer functionalities
* Fix wrong number of remaining days of UR
* Raising exception when user belong to multiple domains (domain discriminator)
* Fix usage of given_name for OIDC claim.
* Fix OIDC provider creation and update
* Add debug traces for OIDC provider.
* Add specific error code when OIDC user provider is not found by its discriminant.
* Add default available languages for functionalities.
* UI-User:
* Issue #1136: French translation issue for upload request
* Issue #1132: Add more OIDC errors handling
* Issue #1131: Do not authRedirect for oidc authentication route
* UI-Admin:
* Issue #258: Fix unable to create workspace filter
* Issue #249: Add error translation for OIDC error
* Issue #238: Handle properly 403 http code
* Issue #247: Fix oidc redirect uri, it should be adapt to webserver origin and path
* Issue #243: Rename oidc callback url
* Issue #243: Move config.js to a config folder
* UI-Upload-Request:
* nothing to report
## [5.0.3](https://github.com/linagora/linshare/compare/5.0.2...5.0.3) (2022-04-06) [Download link](http://download.linshare.org/versions/5.0.3/)
**The 5.0.3 release of LinShare is out**
- **core** : 5.0.3 - [changelog](https://github.com/linagora/linshare-core/compare/5.0.2...5.0.3)
- **ui-user** : 5.0.3 - [changelog](https://github.com/linagora/linshare-ui-user/compare/v5.0.2...v5.0.3)
- **ui-admin** : 5.0.3 [changelog](https://github.com/linagora/linshare-ui-admin/compare/v5.0.2...v5.0.3)
- **ui-upload-request** : 5.0.3 [changelog](https://github.com/linagora/linshare-ui-upload-request/compare/v5.0.2...v5.0.3)
#### Bug fixes and improvements
* Core:
* Fix Spring security issue: CVE-2022-22965
* Fix retrieving sharedSpace audits
* Fix UserProvider findAll (prevent from NPE)
* UI-User:
* Add missing file version.properties
* UI-Admin:
* Issue #239: Make home route configurable, change it to Administration page
* Issue #232: Add editable fields and date fields to OIDC provider form
* Fix inconsistent type of error code between api errors and auth error
* UI-Upload-Request:
* nothing to report
## [4.2.6](https://github.com/linagora/linshare/compare/4.2.5...4.2.6) (2022-04-05) [Download link](http://download.linshare.org/versions/4.2.6/)
**The 4.2.6 release of LinShare is out**
- **core** : 4.2.6 - [changelog](https://github.com/linagora/linshare-core/compare/4.2.5...4.2.6)
- **ui-user** : 4.2.6 - [changelog](https://github.com/linagora/linshare-ui-user/compare/v4.2.5...v4.2.6)
- **ui-admin** : 4.2.6 [changelog](https://github.com/linagora/linshare-ui-admin/compare/v4.2.5...v4.2.6)
- **ui-upload-request** : 4.2.6 [changelog](https://github.com/linagora/linshare-ui-upload-request/compare/v4.2.5...v4.2.6)
#### Bug fixes and improvements
* Core:
* Fix Spring security issue: CVE-2022-22965
* UI-User:
* nothing to report
* UI-Admin:
* Issue #231: Add translation for weak password error
* UI-Upload-Request:
* nothing to report
## [4.1.5](https://github.com/linagora/linshare/compare/4.1.4...4.1.5) (2022-04-05) [Download link](http://download.linshare.org/versions/4.1.5/)
**The 4.1.5 release of LinShare is out**
- **core** : 4.1.5 - [changelog](https://github.com/linagora/linshare-core/compare/4.1.4...4.1.5)
- **ui-user** : 4.1.5 - [changelog](https://github.com/linagora/linshare-ui-user/compare/v4.1.4...v4.1.5)
- **ui-admin** : 4.1.5 [changelog](https://github.com/linagora/linshare-ui-admin/compare/v4.1.4...v4.1.5)
- **ui-upload-request** : 4.1.5 [changelog](https://github.com/linagora/linshare-ui-upload-request/compare/v4.1.4...v4.1.5)
#### Bug fixes and improvements
* Core:
* New endpoint added: SupportedApiVersionImpl
* Fix Spring security issue: CVE-2022-22965
* UI-User:
* Issue #1092: Correct locale keys in extLink default config
* UI-Upload-Request:
* nothing to report
* UI-Admin:
* Issue #171: Show max value input for guest expiration functionality
## [4.2.5](https://github.com/linagora/linshare/compare/4.2.4...4.2.5) (2022-03-29) [Download link](http://download.linshare.org/versions/4.2.5/)
**The 4.2.5 release of LinShare is out**
- **core** : 4.2.5 - [changelog](https://github.com/linagora/linshare-core/compare/4.2.4...4.2.5)
- **ui-user** : 4.2.5 - [changelog](https://github.com/linagora/linshare-ui-user/compare/v4.2.4...v4.2.5)
- **ui-admin** : 4.2.5 [changelog](https://github.com/linagora/linshare-ui-admin/compare/v4.2.4...v4.2.5)
- **ui-upload-request** : 4.2.5 [changelog](https://github.com/linagora/linshare-ui-upload-request/compare/v4.2.4...v4.2.5)
#### Bug fixes and improvements
* Core:
* New endpoint added: SupportedApiVersionImpl
* Fix delete user method of admin v5 API
* Update modification date when creating or deleting folder
* Recalculate account quota on migration script
* Add patch to recalculate user quota after ure deletion
* UI-User:
* Issue #1093: Use completion functionality value for typeahead min length
* Issue #1093: Use functionality value for max char autocompletion
* Issue #1111: Show an error when url is invalid
* UI-Admin:
* Issue #225: Show medium date as tooltip for audit logs
* Issue #229: Hide domain provider management only, instead of hiding entire domain management
## [5.0.2](https://github.com/linagora/linshare/compare/5.0.1...5.0.2) (2022-03-15) [Download link](http://download.linshare.org/versions/5.0.2/)
**The 5.0.2 release of LinShare is out**
- **core** : 5.0.2 - [changelog](https://github.com/linagora/linshare-core/compare/5.0.1...5.0.2)
- **ui-user** : 5.0.2 - [changelog](https://github.com/linagora/linshare-ui-user/compare/v5.0.1...v5.0.2)
- **ui-admin** : 5.0.2 [changelog](https://github.com/linagora/linshare-ui-admin/compare/v5.0.1...v5.0.2)
- **ui-upload-request** : 5.0.2 [changelog](https://github.com/linagora/linshare-ui-upload-request/compare/v5.0.1...v5.0.2)
#### Bug fixes and improvements
* Core:
* Fix init permissions and roles.
* UI-User:
* UI-Admin:
* UI-Upload-Request:
## [5.0.1](https://github.com/linagora/linshare/compare/5.0.0...5.0.1) (2022-03-02) [Download link](http://download.linshare.org/versions/5.0.1/)
**The 5.0.1 release of LinShare is out**
- **core** : 5.0.1 - [changelog](https://github.com/linagora/linshare-core/compare/5.0.0...5.0.1)
- **ui-user** : 5.0.1 - [changelog](https://github.com/linagora/linshare-ui-user/compare/v5.0.0...v5.0.1)
- **ui-admin** : 5.0.1 [changelog](https://github.com/linagora/linshare-ui-admin/compare/v5.0.0...v5.0.1)
- **ui-upload-request** : 5.0.1 [changelog](https://github.com/linagora/linshare-ui-upload-request/compare/v5.0.0...v5.0.1)
#### Bug fixes and improvements
* Core:
* Fix upgrade task of renaming workgroup deletion audit traces.
* Fix init permissions and roles.
* Add new endpoint to get supported API version, we will see a sample below.
* Fix user provider mapping (using lazy loading)
* Fix delete user admin v5
* Fix updating modification date when creating or deleting sharedSpace node
* Recalculate account quota
* UI-User:
* Update LinShare logo and theme color
* Fix autocomplete search
* Show button for support link(Crisp Integration)
* Show an error when anonymous URL is invalid
* Fix an error of not being able to change logo images
* **Breaking change** Update the path of default logo images. Now all images are stored inside `images` folder after bundled. If you are using default logo images, update the image configurations as following:
``` javascript
applicationLogo : {
small: 'images/linshare-logo-white.svg',
large : 'images/ls-logo-big.svg'
},
loginBackground : 'images/bg-linshare-desktop.png',
```
* UI-Admin:
* Fix bug domain creation with empty description
* Fix undefined functionality on logout
* Fix redirect to users list after user deletion
* Support loading certain domain on configuration routes
* Support managing role of workspace members
* Fix checking invalid guest max expiration date
* UI-Upload-Request:
* Update logo and theme color
**Add new endpoint to get supported API version**
* To retrieve all supported API versions, the returned list is ordered by the most recent created API, we can see:
`curl "http://{your_server}/linshare/webservice/rest/api-versions" -H "accept: application/json" -s |jq`
```
{
"USER": {
"name": "USER",
"versions": [
{
"version": 5
},
{
"version": 4
},
{
"version": 2
},
{
"version": 1
}
]
},
"ADMIN": {
"name": "ADMIN",
"versions": [
{
"version": 5
},
{
"version": 4
},
{
"version": 1
}
]
},
"DELEGATION": {
"name": "DELEGATION",
"versions": [
{
"version": 2
}
]
},
"UPLOADREQUEST": {
"name": "UPLOADREQUEST",
"versions": [
{
"version": 4
}
]
}
}
```
* To retrieve just one API we can see:
`curl "http://{your_server}/linshare/webservice/rest/api-versions?type=USER" -H "accept: application/json" -s |jq`
```
{
"USER": {
"name": "USER",
"versions": [
{
"version": 5
},
{
"version": 4
},
{
"version": 2
},
{
"version": 1
}
]
}
}
```
## [5.0.0](https://github.com/linagora/linshare/compare/4.2.4...5.0.0) (2022-02-01) [Download link](http://download.linshare.org/versions/5.0.0/)
**The 5.0.0 release of LinShare is out**
> **NB :**
> You can find the upgrade documentation [here](documentation/EN/upgrade).
- **core** : 5.0.0 - [changelog](https://github.com/linagora/linshare-core/compare/4.2.4...5.0.0)
- **ui-user** : 5.0.0 - [changelog](https://github.com/linagora/linshare-ui-user/compare/v4.2.4...v5.0.0)
- **ui-admin** : 5.0.0 [changelog](https://github.com/linagora/linshare-ui-admin/compare/v4.2.4...v5.0.0)
>**NB:**
>Before launching the upgrade process it is recommended to do a backup on the existing data in your Database.
#### Breaking changes:
* **OIDC Authentication**
* Drop supports for some **ui-user** oidc settings in **config.js**. Now only following settings are required: `authority`, `client_id`, `client_secret`, `scope`.
* Update redirection address for **ui-user**, the relative path of redirection address is now `#!/oidc/callback`. You are required to update settings of your OIDC Provider. See [LemonLDAP OIDC configurations](documentation/EN/installation/sso-lemonldap-using-OIDC.md#step-1-lemonldapng-configuration) for more details.
#### Main features:
* **Appearance**
The logo of LinShare was updated along of the general theme:
 * **New administration interface (Beta)**
With this new version, we had to introduce a new API (admin/v5) and its new
interface. Our main goal is to backport every old features of the old interface
but using up to date technologies (Vue.js 3). Of course, this will allow us to
redesign the whole interface, the whole user experience and to also bring new features.
* **Workspaces**
It was introduced in version 4.2 as **Drive**, it was finally renamed as
**Workspace** to make more sense.
*Tiny remember of the feature:*
In LinShare we have workgroups in shared spaces. These groups are designed to make a team works together on one topic. If you have multiple topics in a team, you have to create one workgroup per team. This allows you to add different external people for each workgroup.
The main goals of `Workspace` are :
* Regroup all worgkoups of a team in one item
* Define default team members in the Workspace to avoid workgroup members redefinition
* Manage globally team members rigths (right should be applied from workspace to its workgroups)
* A workgroup can belong to a workspace or be standalone
* **User providers**
At first, LinShare was designed to retrieve users from a LDAP directory. These
users were called *Internal users*, they were able to create some temporary
accounts, called *guest users*.
In this version of LinShare, we added more user providers:
* OIDC user provider
This provider allows LinShare to create users "on-the-fly" at the first log in (using OIDC).
* Twake Console user provider
This provider allows LinShare to retrieve users from the Twake Console app, which is the portal of our new SAAS offer.
## [4.2.4](https://github.com/linagora/linshare/compare/4.2.3...4.2.4) (2022-02-01) [Download link](http://download.linshare.org/versions/4.2.4/)
**The 4.2.4 release of LinShare is out**
- **core** : 4.2.4 - [changelog](https://github.com/linagora/linshare-core/compare/4.2.3...4.2.4)
- **ui-user** : 4.2.4 - [changelog](https://github.com/linagora/linshare-ui-user/compare/v4.2.3...v4.2.4)
- **ui-admin** : 4.2.4 [changelog](https://github.com/linagora/linshare-ui-admin/compare/v4.2.3...v4.2.4)
- **ui-upload-request** : 4.2.4 [changelog](https://github.com/linagora/linshare-ui-upload-request/compare/v4.2.3...v4.2.4)
#### Bug fixes and improvements
* Core:
* Max integer values does not exist on functionality endpoint v1.
* Fix issue with UPGRADE_4_2_ADD_MISSING_PROPERTIES_TO_WORK_GROUP_NODE
(missing wokgroup)
* UI-User:
* Issue #1108: Fix webpack configuration for common images
* **Breaking change** Update the path of default logo images. Now all images are stored inside `images` folder after bundled. If you are using default logo images, update the image configurations as following:
``` javascript
applicationLogo : {
small: 'images/linshare-logo-white.png',
large : 'images/ls-logo-big.png'
},
loginBackground : 'images/bg-linshare-desktop.png',
```
* UI-Admin:
* Translate upgrade tasks keys
* Issue #208: Fix audit log translation key
* Issue #208: Add translation for WORKSPACE
* Issue #205: Hide following features on legacy mode ( LDAP connections Domain patterns Manage domains Workgroups Workgroup patterns)
* Translate missing upgrade tasks keys
* Fix missing key translation
* Issue #201: Update JWT functionality
* Issue #196: Add shared space functionality translation
* Issue #194: Add collected emails expiration functionality
* Refactor internal can upload functionality
* Issue #171: Show max value input for guest expiration functionality
* UI-Upload-Request:
* Issue #101: Fix Fr translation
## [4.2.3](https://github.com/linagora/linshare/compare/4.2.2...4.2.3) (2021-10-28) [Download link](http://download.linshare.org/versions/4.2.3/)
**The 4.2.3 release of LinShare is out**
- **core** : 4.2.3 - [changelog](https://github.com/linagora/linshare-core/compare/4.2.2...4.2.3)
- **ui-user** : 4.2.3 - [changelog](https://github.com/linagora/linshare-ui-user/compare/v4.2.2...v4.2.3)
- **ui-admin** : 4.2.3 [changelog](https://github.com/linagora/linshare-ui-admin/compare/v4.2.2...v4.2.3)
- **ui-upload-request** : 4.2.3 [changelog](https://github.com/linagora/linshare-ui-upload-request/compare/v4.2.2...v4.2.3)
#### Bug fixes and improvements
* Core:
* Fix issue of checking entry size and max deposit size
* Fix checking max count number of upload request entries
* Change TLS default version + document
* Add SSL protocols configuration in mail notification
* Fix undownloaded share mail notification
* Adding more traces to flow api to debug stuck upload.
* Using spring-framework-bom 5.2.16.RELEASE
* Upgrading tika-parsers to 1.27
* Removing useless pdfbox dependencies
* Upgrading xstream to 1.4.17
* UI-User:
* Fix the validation range of share expiration date and USDA notification date
* Allow editing contacts list description
* Fix shared space fetching error
* Fix error of unable to override file when clicking the option in preview dialog
* Fix error of workgroup member can not see current list in browse dialog
* Show secured sharing option for guests
* Fix incorrect refetch shared space permission behavior
* UI-Admin:
* Fix delete contact
* UI-Upload-Request:
* Rework selected items toolbar
* Fix warning on vue-i18n
## [4.1.4](https://github.com/linagora/linshare/compare/4.1.3...4.1.4) (2021-10-22) [Download link](http://download.linshare.org/versions/4.1.4/)
**The 4.1.4 release of LinShare is out**
- **core** : 4.1.4 - [changelog](https://github.com/linagora/linshare-core/compare/4.1.3...4.1.4)
- **ui-user** : 4.1.4 - [changelog](https://github.com/linagora/linshare-ui-user/compare/v4.1.3...v4.1.4)
- **ui-admin** : 4.1.4 [changelog](https://github.com/linagora/linshare-ui-admin/compare/v4.1.3...v4.1.4)
- **ui-upload-request** : 4.1.4 [changelog](https://github.com/linagora/linshare-ui-upload-request/compare/v4.1.3...v4.1.4)
#### Bug fixes and improvements
* Core:
* Change TLS default version + document
* Add SSL protocols configuration in mail notification
* Adding more traces to flow api to debug stuck upload.
* Improving TimingOutInterceptor (error code, decrease verbosity)
* Using spring-framework-bom 5.2.16.RELEASE
* Upgrading tika-parsers to 1.27
* Removing useless pdfbox dependencies
* Upgrading xstream to 1.4.17
* UI-User:
* Issue #1091: Fix the validation range of share expiration date and USDA notification date
* UI-Upload-Request:
* nothing to report
* UI-Admin:
* nothing to report
## [4.2.2](https://github.com/linagora/linshare/compare/4.2.1...4.2.2) (2021-08-16) [Download link](http://download.linshare.org/versions/4.2.2/)
**The 4.2.2 release of LinShare is out**
This release is fixing the upgrade process from LinShare 4.1 to 4.2 (SQL and
upgrade tasks).
* **core** : 4.2.2 - [changelog](https://github.com/linagora/linshare-core/compare/4.2.1...4.2.2)
* **ui-user** : 4.2.2 - [changelog](https://github.com/linagora/linshare-ui-user/compare/v4.2.1...v4.2.2)
* **ui-admin** : 4.2.2 [changelog](https://github.com/linagora/linshare-ui-admin/compare/v4.2.1...v4.2.2)
* **ui-upload-request** : 4.2.2 [changelog](https://github.com/linagora/linshare-ui-upload-request/compare/v4.2.1...v4.2.2)
### Bug fixes and improvements
* Core:
* Fix upgrade script: handling missing revision for workgroup documents.
* Fix upgrade script: Delete if exist mailing_list indexes.
* Fix upgrade script: handling NOT NULL constraint on column create_operation_sum
* Using John DOE when author of a workgroup is missing.
## [4.1.3](https://github.com/linagora/linshare/compare/4.1.2...4.1.3) (2021-08-11) [Download link](http://download.linshare.org/versions/4.1.3/)
**The 4.1.3 release of LinShare is out**
- **core** : 4.1.3 - [changelog](https://github.com/linagora/linshare-core/compare/4.1.2...4.1.3)
- **ui-user** : 4.1.3 - [changelog](https://github.com/linagora/linshare-ui-user/compare/v4.1.2...v4.1.3)
- **ui-admin** : 4.1.3 [changelog](https://github.com/linagora/linshare-ui-admin/compare/v4.1.2...v4.1.3)
- **ui-upload-request** : 4.1.3 [changelog](https://github.com/linagora/linshare-ui-upload-request/compare/v4.1.2...v4.1.3)
#### Bug fixes and improvements
* Core:
* Clean favorite contact list according to allowed contacts for restricted guests.
* Fix adding guest to restricted contact
* Fix negative remaining days in warn before expiry for upload request
* Forbid email update for guest
* Fix glitch between activation and closure date for warn before expiry of an upload request
* Fix exceeding max file number on an upload request
* UI-User:
* Update field creation date in data table of token management page
* Fix editing restricted contacts even when delegation policy is off
* Prevent user from updating email for guest account
* Add error message if there is no restricted contacts
* Fix unable to create guest when contact restriction delgationp policy if off
* Hide copy to my space of an upload request entry when upload permission is disabled
* Hide download button in preview dialog when archive download is disabled
* Fix initial value in rename shared space
* Hide preview option for folders
* Fix versioning parameter toggle not working
* Fix unable to preview duplicated node in workgroup
* Fix token form validation
* UI-Admin:
* Hide max value field for guest expiration functionality
# [4.0.4](https://github.com/linagora/linshare/compare/4.0.3...4.0.4) (2020-08-11) [Download link](http://download.linshare.org/versions/4.0.4/)
**The 4.0.4 release of LinShare is out**
> **NB :**
You can find the upgrade documentation [here](documentation/EN/upgrade).
* **core** : 4.0.4 - [changelog](https://github.com/linagora/linshare-core/compare/4.0.3...4.0.4)
* **ui-user** : 4.0.4 - [changelog](https://github.com/linagora/linshare-ui-user/compare/v4.0.3...v4.0.4)
* **ui-admin** : 4.0.4 [changelog](https://github.com/linagora/linshare-ui-admin/compare/v4.0.3...v4.0.4)
#### Bug fixes and improvements
* Core:
* Clean favorite contact list according to allowed contacts for restricted guests.
* Fix adding guest to restricted contact.
* Forbid email update for guest.
* Fix quota issue when deleting files in workgroups
* Fix preview duplicated sharedSpace document
* Fix moving file between shared spaces
* UI-User:
* Fix action button height in form guest
* Fix editing restricted contacts even when delegation policy is off
* Prevent user from updating email for guest account
* Fix showing current user as restricted contact even when contact restriction delagation policy if off
* Fix displaying copy to myspace when user upload permission is disabled
* Hide download button in preview dialog when archive download is disabled
* Hide copy function in the folder preview
* Hide options menu after clicking on details option of a shared space node
* Fix versioning parameter toggle not working
* Fix unable to preview duplicated node in workgroup
* Fix initial value in rename shared space
* Update move file API instead of copy and delete
* UI-Admin:
* Fix undefined user error in audit log traces
* Fix delete resources
## [4.2.1](https://github.com/linagora/linshare/compare/4.2.0...4.2.1) (2021-08-10) [Download link](http://download.linshare.org/versions/4.2.1/)
**The 4.2.1 release of LinShare is out**
* **core** : 4.2.1 - [changelog](https://github.com/linagora/linshare-core/compare/4.2.0...4.2.1)
* **ui-user** : 4.2.1 - [changelog](https://github.com/linagora/linshare-ui-user/compare/v4.2.0...v4.2.1)
* **ui-admin** : 4.2.1 [changelog](https://github.com/linagora/linshare-ui-admin/compare/v4.2.0...v4.2.1)
* **ui-upload-request** : 4.2.1 [changelog](https://github.com/linagora/linshare-ui-upload-request/compare/v4.2.0...v4.2.1)
### Bug fixes and improvements
* Core:
* Clean favorite contact list according to allowed contacts for restricted guests.
* Fix adding guest to restricted contact
* Fix negative remaining days in warn before expiry
* Updating SharedSpace modification date when updating SharedSpace members
* Updating parent SharedSpace modification date when updating SharedSpace members
* Fix exceeting uploaded entries max total deposit size
* Forbid email update for guest
* UI-User:
* Issue #1074: Update field creation date in data table of token management page
* Issue # 1078: fix being able to move file to original folder when file is direct sibling of a workgroup
* Issue #1077 Make restricted contacts editable even when delegation policy is off
* Fix bottom scroll bar is displayed on some sidebar
* Issue #1033: Add loading spinner in browse dialog
* Issue #1055: Update conditions of filtering by file types of search files in workgroups
* Issue #1005: Handle long shared space name in sidebar header and add tooltip
* Issue #1072: Fix focus input cause broken ui in shared space member tab
* Issue #1055: Update conditions to disable file types
* UI-Upload-Request:
* Issue #98: Support multiple entries download
* Fix data table offset when UR is closed
* Issue #97: Preview upload request entries on clicking file name
* Issue #92: Add translated error message for error 30005
* Fix max width of warning dialog not working
* UI-Admin:
* Packaging old ui twice, standard and legacy archives.
## [4.2.0](https://github.com/linagora/linshare/compare/4.1.2...4.2.0) (2021-07-19) [Download link](http://download.linshare.org/versions/4.2.0/)
**The 4.2.0 release of LinShare is out**
> **NB :**
> You can find the upgrade documentation [here](documentation/EN/upgrade).
- **core** : 4.2.0 - [changelog](https://github.com/linagora/linshare-core/compare/4.1.2...4.2.0)
- **ui-user** : 4.2.0 - [changelog](https://github.com/linagora/linshare-ui-user/compare/v4.1.2...v4.2.0)
- **ui-admin** : 4.2.0 [changelog](https://github.com/linagora/linshare-ui-admin/compare/v4.1.2...v4.2.0)
>**NB:**
>Before launching the upgrade process it is recommended to do a backup on the existing data in your Database.
#### Main features
* **Drive**
In LinShare we have workgroups in shared spaces. These groups are designed to make a team works together on one topic. If you have multiple topics in a team, you have to create one workgroup per team. This allows you to add different external people for each workgroup.
The main goals of `Drive` are :
* Regroup all worgkoups of a team in one item
* Define default team members in the Drive to avoid workgroup members redefinition
* Manage globally team members rigths (right should be applied from drive to its workgroups
* A workgroup can be in a drive or be standalone
The Drive feature was introduced as an alpha verion (API only) on 4.0 version as we can see [here](https://github.com/linagora/linshare/blob/master/CHANGELOG.md#400-2020-07-16-download-link). In this 4.2 version of LinShare the Drive feature is ready, all related interfaces are created.
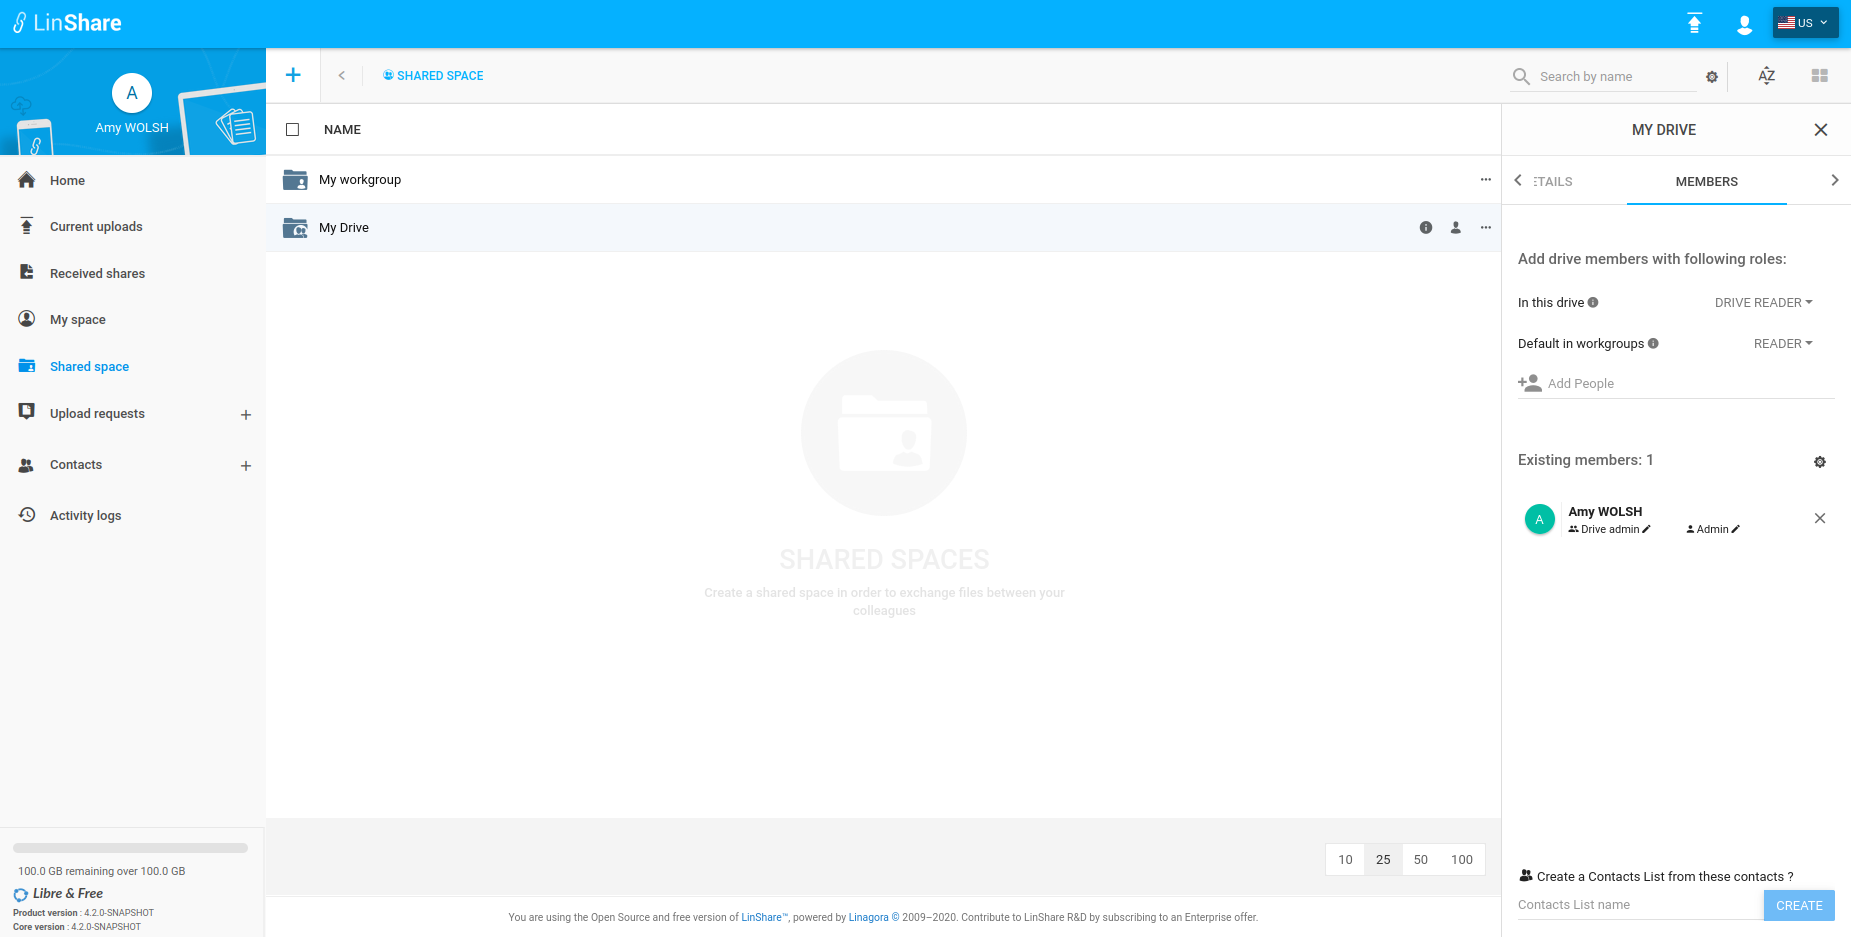
Now in the **SharedSpace** section the user is able to create a **Workgroup** or a **Drive**

In this screenshot we see when a Drive admin will add a sharedSpaceMember to his **Drive**, he needs to specify the new member's role on the Drive and on its nested Workroups.
By default the new member's roles are:
* DRIVE READER on the Drive
* READER on the nested workgroups
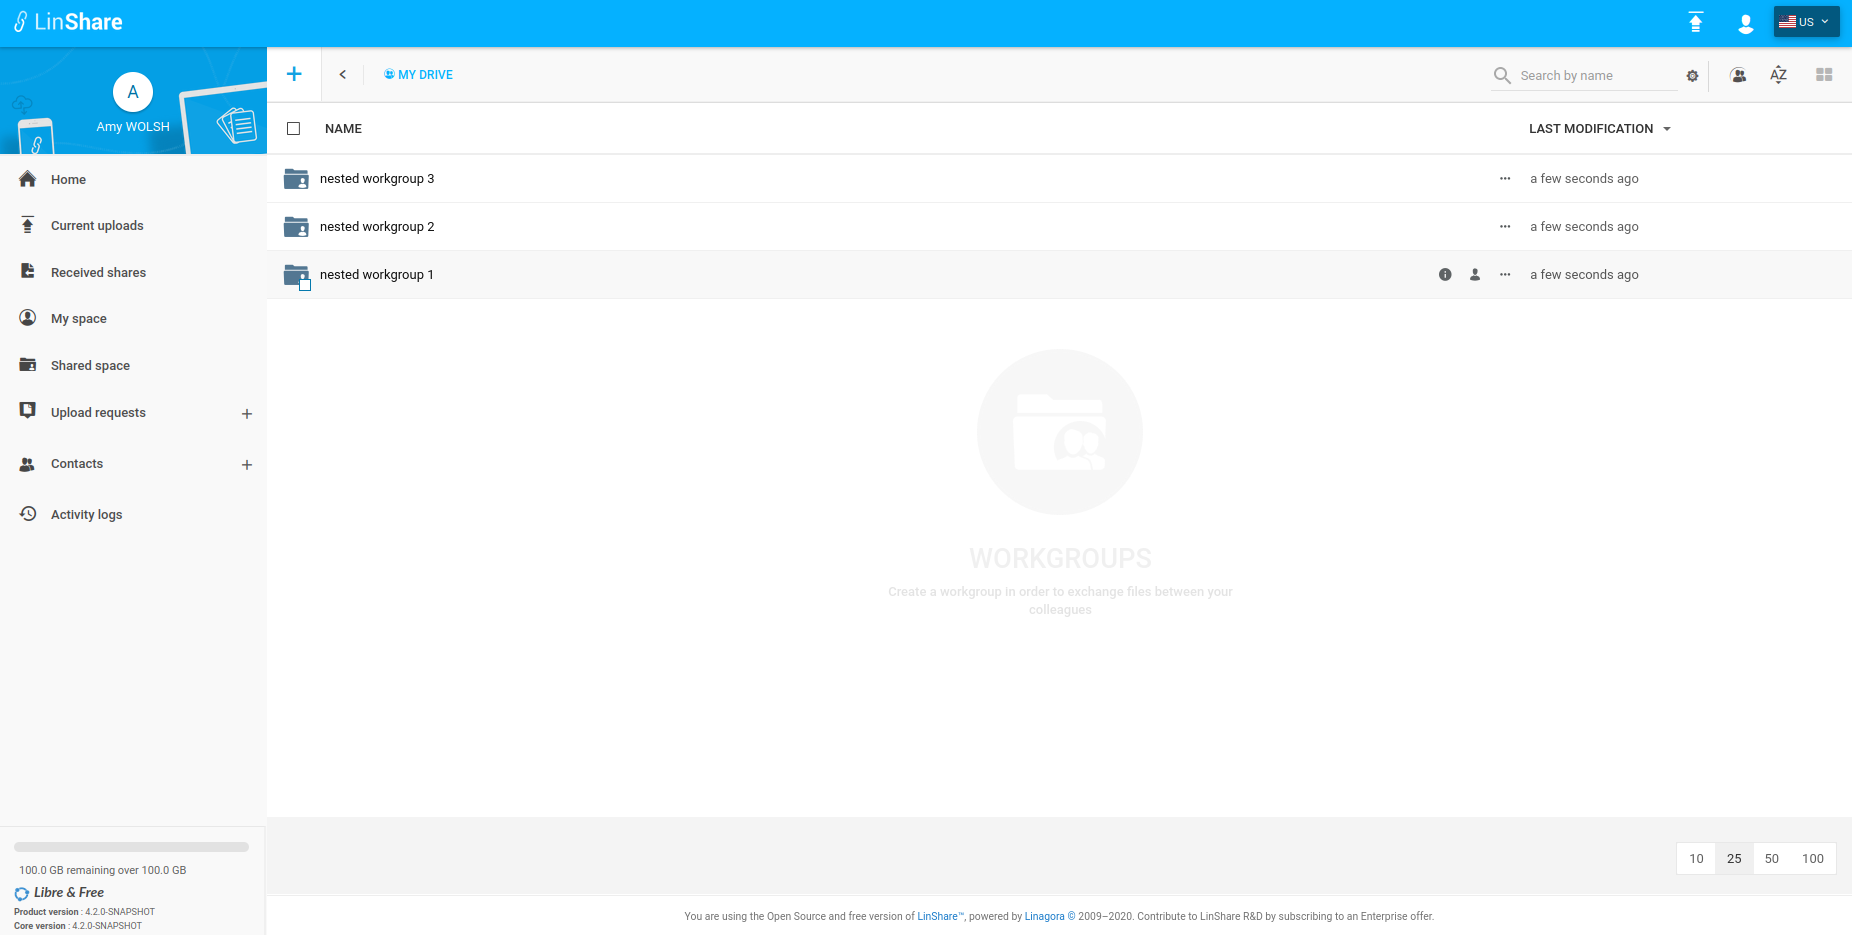
In this screeshot we see the list of nested workgroups on a **Drive**
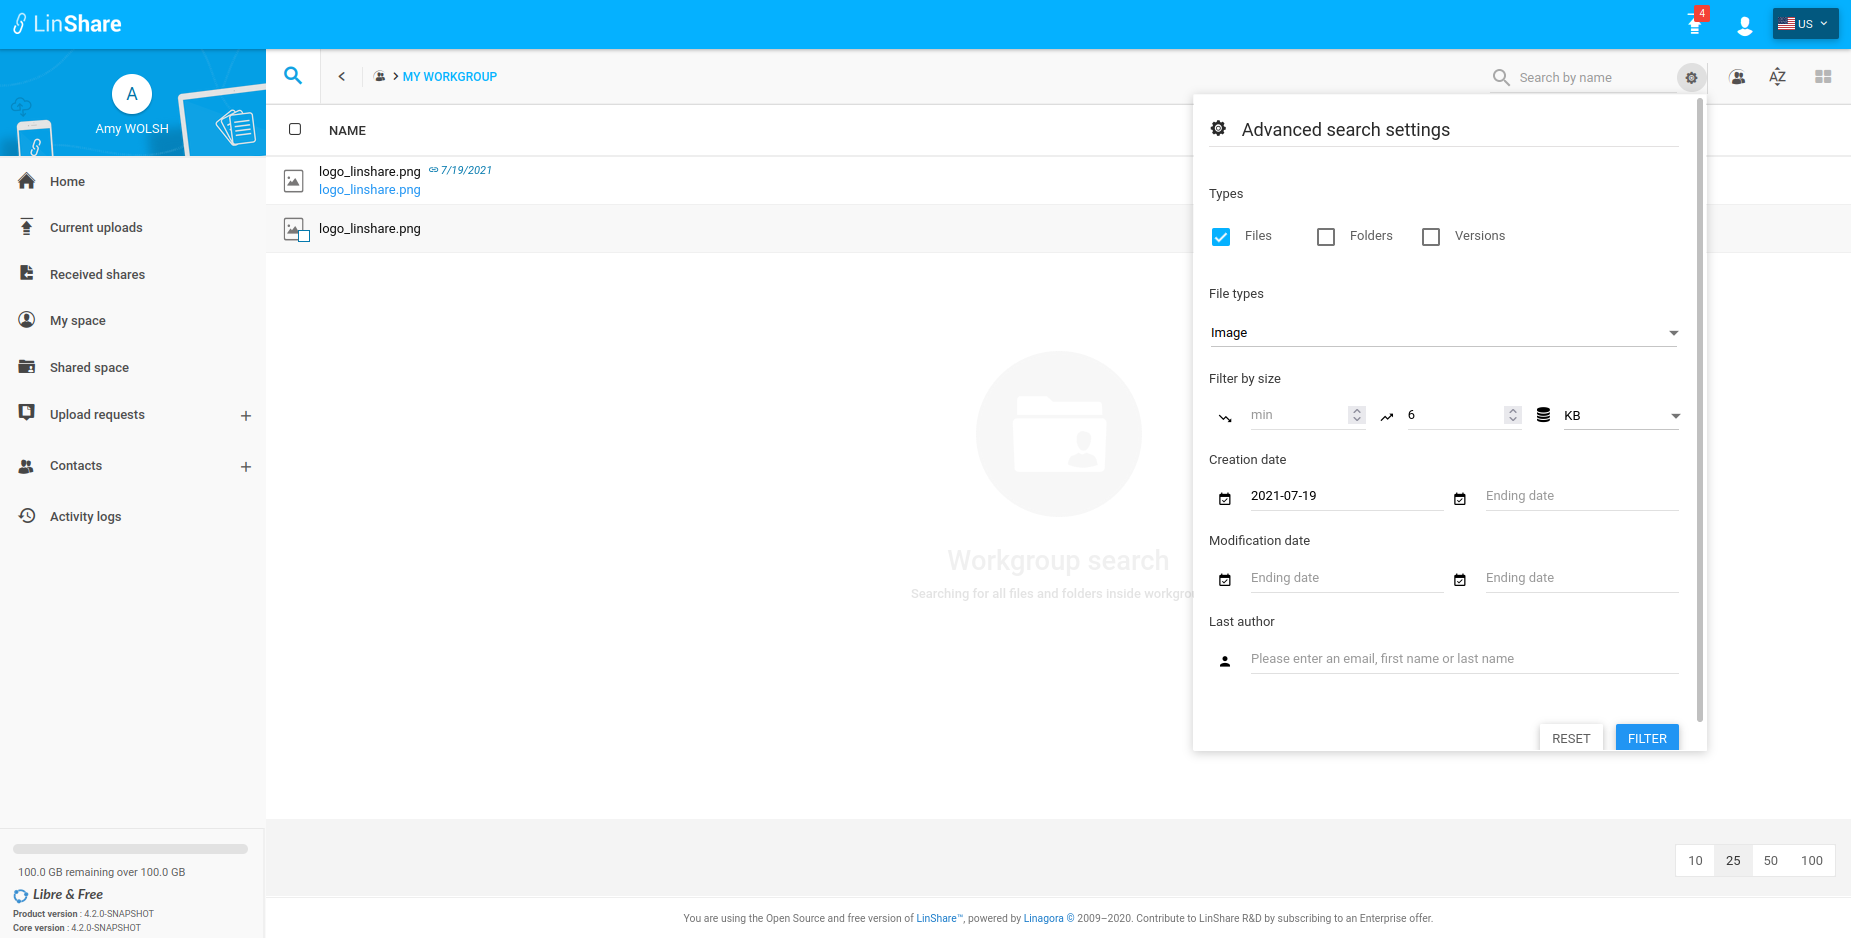
**Search on workgroup**
In this 4.2 version of LinShare an advanced search feature in order to allow a user to filter the created resources into the workgroup by:
* Name
* Types (Folder, Workgroup document or revision)
* Resource kind (image, pdf, audio, archive ...)
* Size
* Creation and modification date
* Last author on the workgroup

In this screeshot we will see the filter by type and creation date.
#### Improvements
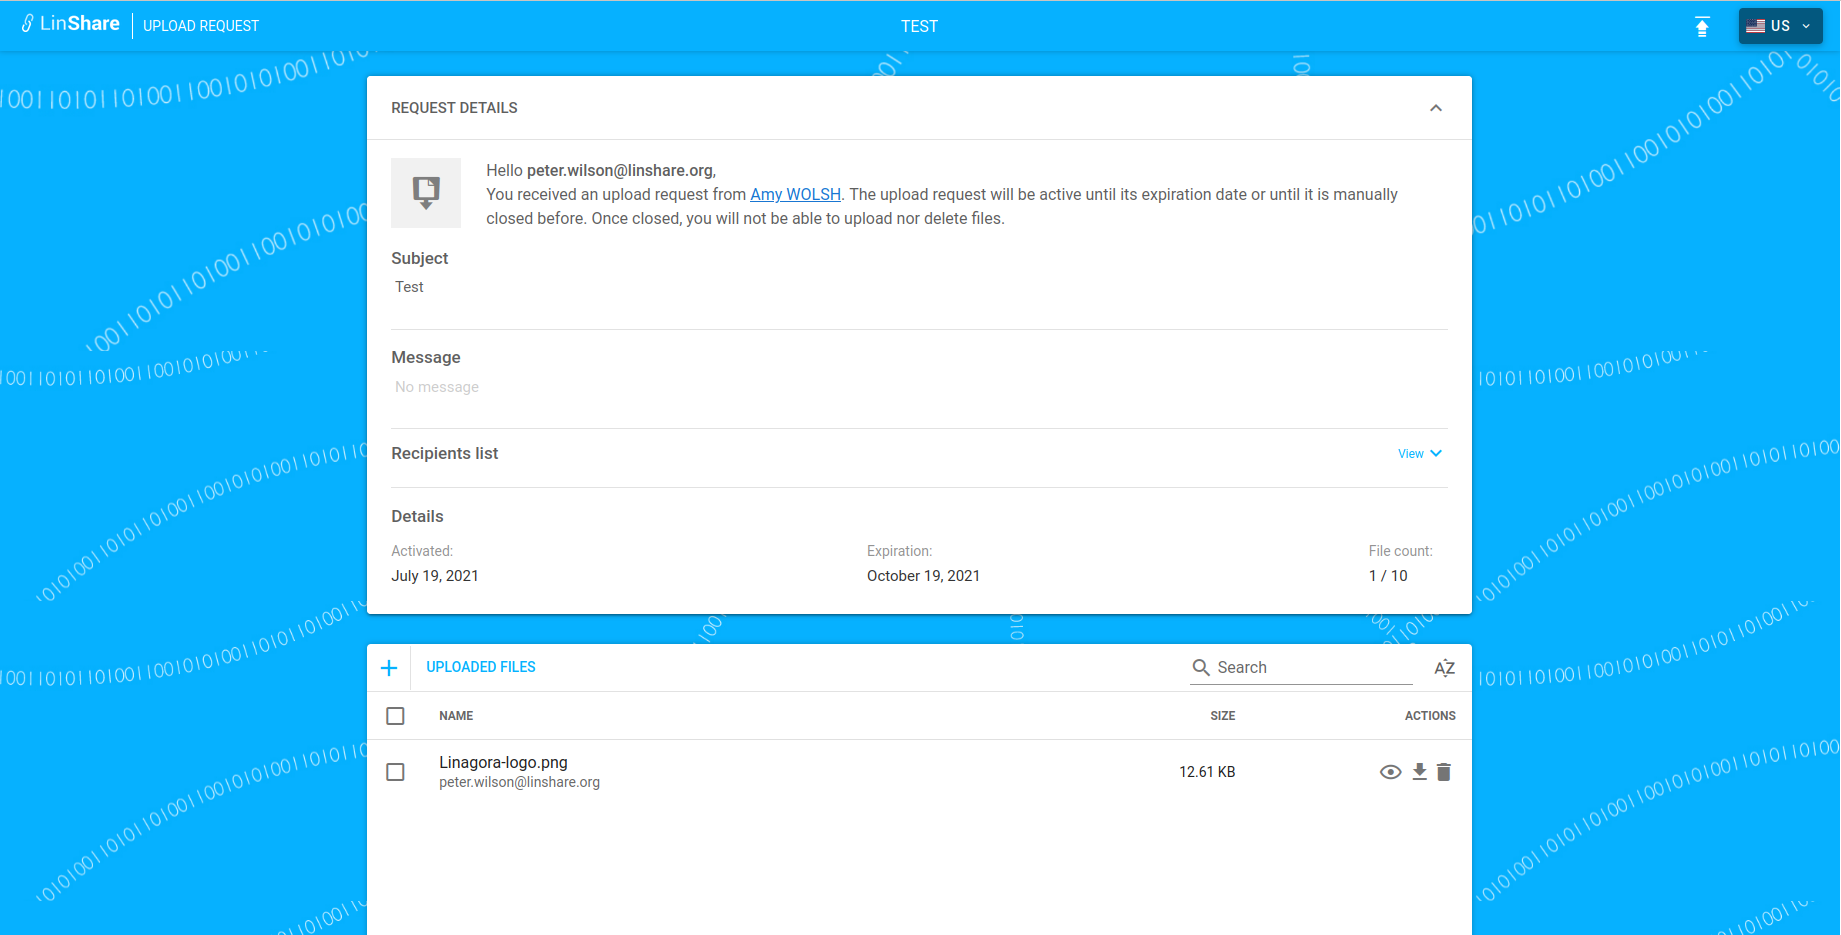
The [upload request feature](https://github.com/linagora/linshare/blob/master/CHANGELOG.md#410-2021-02-25-download-link) was updated on the 4.1 version of linshare.
On this new 4.2 version of LinShare a several improvments were done on it.
Now the recipient of the upload request is able to **preview** and **download** the uploaded documents.
#### Technical information
The [Authentication using OpenID Connect](https://github.com/linagora/linshare/blob/master/CHANGELOG.md#410-2021-02-25-download-link) was introduced on the 4.1 version of LinShare.
On this new 4.2 version of LinShare a several improvments were done on it. The main updates was done on:
* DEPRECATED: oidc.introspectionUri=http://auth.linshare.local/oauth2/introspect
* NEW: oidc.issuerUri=http://auth.linshare.local
For more details you can follow this [installation guide](https://ci.linagora.com/linagora/lgs/linshare/products/linshare-github/blob/master/documentation/EN/installation/sso-lemonldap-using-OIDC.md).
**NB:**
This provider will be reached on LinShare startup, if no provider launched, Linshare startup will fail.
## [4.1.2](https://github.com/linagora/linshare/compare/4.1.1...4.1.2) (2021-04-29) [Download link](http://download.linshare.org/versions/4.1.2/)
**The 4.1.2 release of LinShare is out**
- **core** : 4.1.2 - [changelog](https://github.com/linagora/linshare-core/compare/4.1.1...4.1.2)
- **ui-user** : 4.1.2 - [changelog](https://github.com/linagora/linshare-ui-user/compare/v4.1.1...v4.1.2)
- **ui-admin** : 4.1.2 [changelog](https://github.com/linagora/linshare-ui-admin/compare/v4.1.1...v4.1.2)
- **ui-upload-request** : 4.1.2 [changelog](https://github.com/linagora/linshare-ui-upload-request/compare/v4.1.1...v4.1.2)
Exceptionally, this version contains an optional [patch](https://github.com/linagora/linshare-core/blob/4.1.2/src/main/resources/sql/postgresql/Patch_4.1.2.sql) that will update the email activations of upload requests.
#### Bug fixes and improvements
* Core:
* Fix creating shares from a list created from workgroup members.
* Fix updating nested uploadRequests after their uploadRequestsGroups have been canceled
* Fix the preview of a duplicated sharedSpaceDocument
* Fix managing token by a guest
* Fix moving file between shared spaces
* Delete upload request entries when archiving the upload request
* Fix user's quota after upload request entries deletion by the recipient
* UI-User:
* Improve audit message for copying file to workgroup
* Add tooltip for restricted contacts
* Change date format in placeholder and update error message for guest expiration date
* Add missing VNese translation
* Fix Reset state after new workgroup creation
* Fix date picker going overboard on sidebar
* Adjust space between label and creation date in token management screen
* Fix Reorder role list in shared space members panel
* Update Vnese translation for audit log
* Translate date text in JWT detail
* Translate date field accross app
* Fix do not submit token create when form invalid
* Fix displaying flex on the restricted contacts of guest only
* Fix unable to delete fields when edit contact
* Fix click on share text when file name is long
* Fix token management issues
* Fix unable to move folder inside a workgroup
* support archiving multiple selected upload requests
* Fix archive downloads
* Deselect closed upload requests after close
* Fix tooltip of restricted contacts in guest details sidebar
* Fix wrong default value of expiration date when reopen the guest creation form
* Fix error of select all checkbox not updated while toggle selection of a single guest
* Add clicking on LinShare logo redirection to user customized home page
* Fix UI issue of token sidebar on iPad
* UI-Upload-Request:
* Fix error redirecting to the uploadRequest when it is protected by password
* Use configuration key to change app title
* Add dynamic configs for file size chunks
* Change subject position
* Fix catching backend errors for closing upload request and deleting entries
* Fix hiding close button if functionality is disabled
* UI-Admin:
* Translate mail activation missing keys
## [4.1.1](https://github.com/linagora/linshare/compare/4.1.0...4.1.1) (2021-02-25) [Download link](http://download.linshare.org/versions/4.1.1/)
**The 4.1.1 release of LinShare is out**
- **core** : 4.1.1 - [changelog](https://github.com/linagora/linshare-core/compare/4.1.0...4.1.1)
- **ui-user** : 4.1.1 - [changelog](https://github.com/linagora/linshare-ui-user/compare/v4.1.0...v4.1.1)
- **ui-admin** : 4.1.1 [changelog](https://github.com/linagora/linshare-ui-admin/compare/v4.1.0...v4.1.1)
- **ui-upload-request** : 4.1.1 [changelog](https://github.com/linagora/linshare-ui-upload-request/compare/v4.1.0...v4.1.1)
- **thunderbird-plugin** : 2.0.0 [changelog](https://github.com/linagora/linshare-plugin-thunderbird/blob/master/README.md)
Exceptionally, this version contains an optional [patch](https://github.com/linagora/linshare-core/blob/4.1.1/src/main/resources/sql/postgresql/Patch_4.1.1.sql)
that will fix a delete/reset Issue with functionalities.
#### Bug fixes and improvements
* Thunderbird Plugin:
* New version that supports newer versions of LinShare and Thunderbird.
* Core:
* Fix default values of UR notifaction and expiration functionalites
* Fix quota bug when deleting files in workgroups
* Add patch script for removing duplicate units in functionality_unit (sql patch 4.1.1)
* Add sql function to fix LinShare DB version (sql patch 4.1.1)
* Fix reset and delete functionality bug
* Fix wrong count of uploaded documents in Upload Request mail CLOSED_BY_RECIPIENT template
* Fix recipients list don't dispayed on emails
* Forbid token creation by admin for users
* Fix Share expiration functionality didn't support max value
* Sanitize upload request group inputs
* Add content type annotation in documents/audit endpoint
* Adding not null constraints on max and default value of functionalities
* Fixing supporting unlimited values for max value and revamping migration
* Fix api v1 parameters default value used and max value used
* Add mising condition to the finder: findAllRequestsToBeNotified
* Remove reminder mail sent with expiry alert for UR.
* Fix logger for NotifyBeforeExpirationUploadRequestBatchI
* Update of various libraries for security purpose.
* UI-User:
* Fix delete action is missing in activity tab
* Disable validation on usda if functionality is not enabled
* Support sharing multiple UREs
* Fix quick share form not fully displayed when showing more options
* Add pluralization for translations of upload request FILE_UPLOADED
* Add badge on each upload request group detail
* Resize two upload request icons
* Fix default value of expiration date in sharing
* fix audit log value of notification locale update
* Fix theme entry point not being ignored
* Fix text not localized in Vietnamese
* Fix ui issue of popup confirm on ipad
* rename webpack entry point
* Hide update button when upload request is closed
* Tighten check for beginDate and endDate when searching activity logs
* Show full description on clicking view full button
* Add translations for forwarding files
* Adding forward action in receivedShares
* Update sidebar-share, add new sidebar sidebar-content-forward and remove sidebar-content-more-options
* Refactor shareController and share method in shareObjectService
* Implement quickShare component
* Refactor receivedShareController using tableParamsService
* Add a check to prevent double fetching upload request details
* Fix dialog confirmation in members panel
* Do not allow to go to token management page if JWT_PERMANENT_TOKEN is enabled
* Fix validation of expiration date in upload request
* Fix validation of notification alert date on undownloaded share file
* Catch the error of used password
* Do not tab into the eye icon in password input
* ES6ify change password module
* Fix renaming workgroup node
* Add created work groups to the list, then refresh permissions table
* do not stop progpagation event for option copyToMySpace in dropdown
* Reset selected all icon after delete / close upload requests
* Update translation for vietnamese unknown user text
* Fix console error of hour picker controller
* Update details of audit log for upload request
* Fix cancel deleting jwt dialog not working
* Rename functionality UPLOAD_REQUEST_SECURED_URL to PROTECTED_BY_PASSWORD
* Implement feature to let user select their default home page
* Add a check for already visible sidebar with UR details
* use document copy endpoint for sharing upload request entry
* Fix filter checkbox not initialized correctly
* Fix bug with filtering sender in filter box
* Fix removing date in Upload Request form
* Implement updating a token feature
* Bring JWT feature to production
* Support vieweing JWT details
* Fix upload request form:
* Some field names are in correct
* Error message is wrong
* Message should always colored red
* Fix search by date in audit log
* Automatically update hour when date change in upload request form
* Fix validation of activation date on edit upload request
* Update translation for delete upload request entry in audit log
* Fix notification language options are not translated
* UI-Upload-Request:
* Fix close button disappeared when closed the upload request
* Hide upload menu bar once close upload request
* Check the visibility of close button based on canClose permission
* Display server processing instead of 0s
* Add missing error code for quota limit reached
* UI-Admin:
* Fix user is undefined error in audt logs
* Translate missing mail keys
## [4.1.0](https://github.com/linagora/linshare/compare/4.0.3...4.1.0) (2021-02-25) [Download link](http://download.linshare.org/versions/4.1.0/)
**The 4.1.0 release of LinShare is out**
- **core** : 4.1.0 - [changelog](https://github.com/linagora/linshare-core/compare/4.0.3...4.1.0-1)
- **ui-user** : 4.1.0 - [changelog](https://github.com/linagora/linshare-ui-user/compare/v4.0.3...v4.1.0)
- **ui-admin** : 4.1.0 [changelog](https://github.com/linagora/linshare-ui-admin/compare/v4.0.3...v4.1.0)
- **ui-upload-request** : 4.1.0 [changelog](https://github.com/linagora/linshare-ui-upload-request/releases/tag/v4.1.0)
#### Main features:
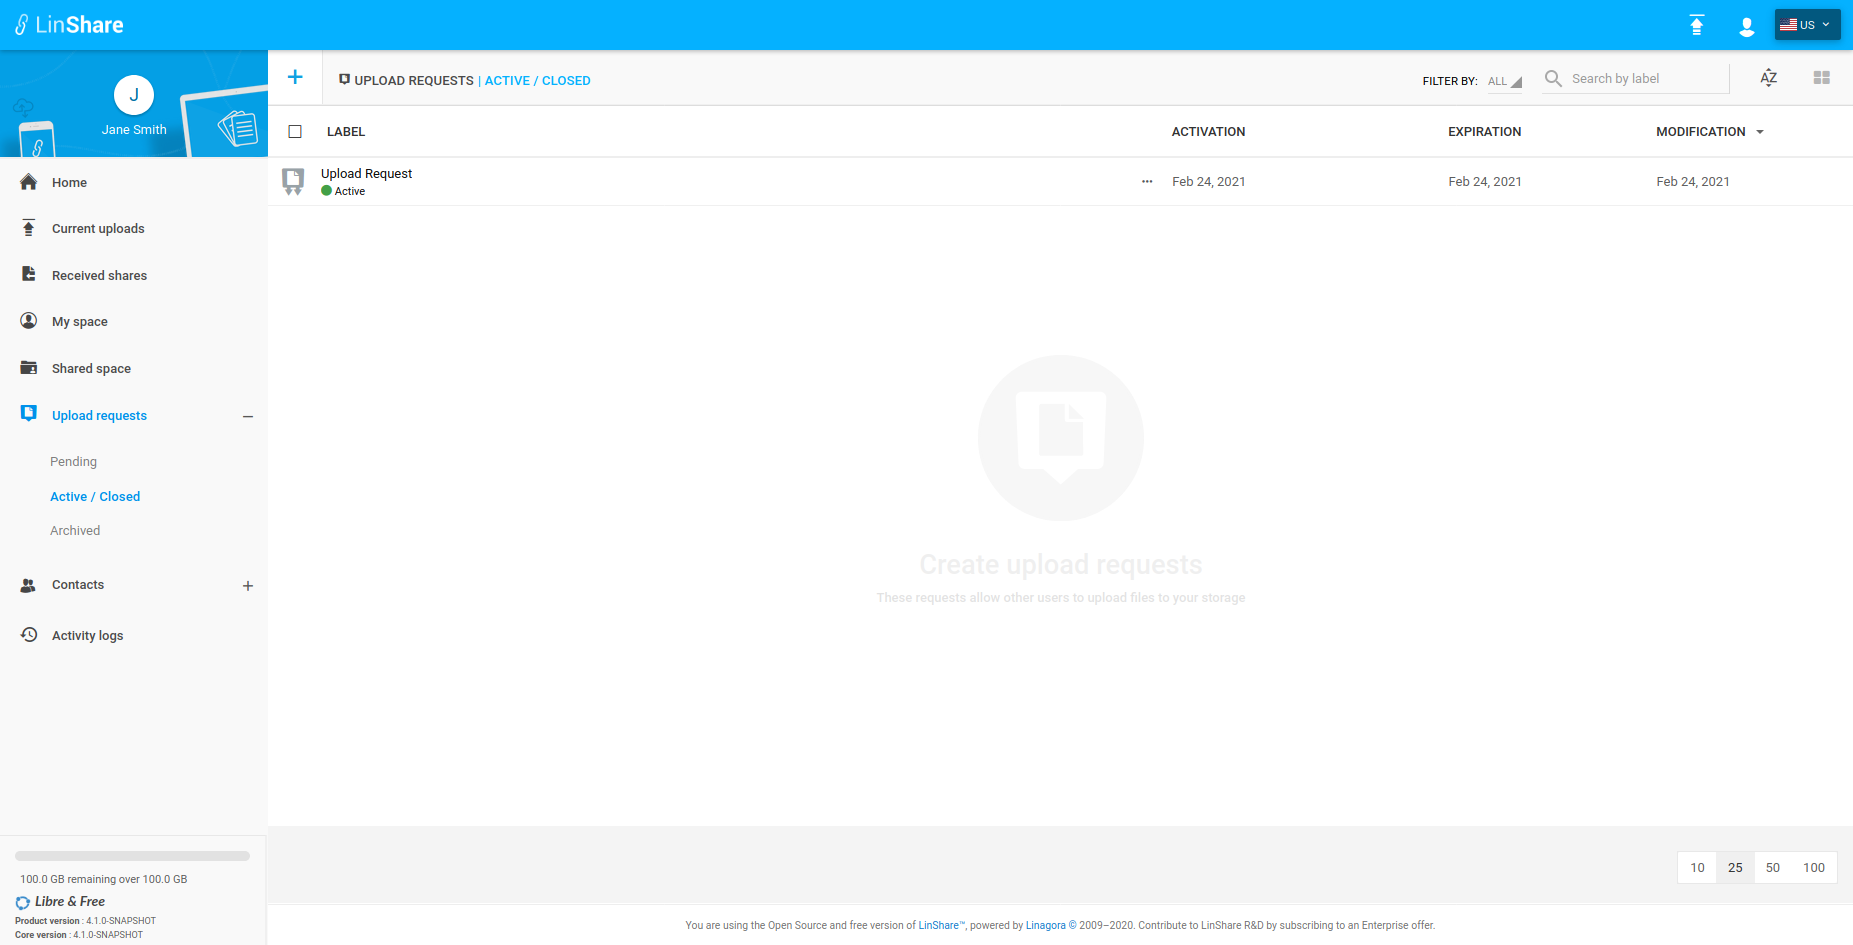
* Upload request:
The 4.1.0 version of LinShare updated the *Upload Request* feature which was introduced before, on the version 1.7.x.
This feature consists of giving the ability to an Internal and guest users to send a request to an External user(just an email) to upload files.
The recipient will receive an email saying that the issuer created an upload request for him and he can follow the link to an external portal where he will be able to upload his files, as we will see in the screenshots below.
>**NB:**
>The external user can access to the external portal and upload his files without having a LinShare account.
In this screenshot we can see the user interface for the upload request:
In the second screeshot we can see the received email where the recipient can access to the external portal:

In the last screenshot we can see the external portal for the upload request on which the recipient is able to access, through the received mail, and upload his files:

* Authentication using OpenID Connect:
The new authentication process consists of delegating users' authentication to an external service called OIDC Provider, for that we have chosen to support the OpenID Connect (aka OIDC) as a technical solution, for more details you can follow the [official documentation](https://openid.net/connect/).
The LinShare roadmap, is to fully use the authentication using OIDC without the need of using LDAP, but curently it is still required to work.
Because users must be present in the LDAP during the OIDC authentication.
- *Technical information*:
We support the following flow : authorization code flow with pkce. For now, only access token with opaque format is handled.
Here is a documentation of [Opaque access token](https://auth0.com/docs/tokens/access-tokens#opaque-access-tokens).
To enable/use the OIDC you can [see](https://github.com/linagora/linshare/tree/master/documentation/EN/administration/how-to-use-OIDC.md)
#### Upgrade:
To upgrade LinShare to 4.1.0 version you can see this [upgrade guide](https://github.com/linagora/linshare/blob/master/documentation/EN/upgrade/linshare-upgrade-from-v4.0-to-v4.1.md#linshare-upgrade-guide)
>**NB**: If LinShare is not yet installed you can [follow](https://github.com/linagora/linshare/blob/master/documentation/EN/installation/linshare-install-debian.md#linshare-installation-on-debian) to have an instance of.
# [4.0.3](https://github.com/linagora/linshare/compare/4.0.2...4.0.3) (2020-12-15) [Download link](http://download.linshare.org/versions/4.0.3/)
**The 4.0.3 release of LinShare is out**
> **NB :**
You can find the upgrade documentation [here](documentation/EN/upgrade).
* **core** : 4.0.3 - [changelog](https://github.com/linagora/linshare-core/compare/4.0.2...4.0.3)
* **ui-user** : 4.0.3 - [changelog](https://github.com/linagora/linshare-ui-user/compare/v4.0.2...v4.0.3)
* **ui-admin** : 4.0.3 [changelog](https://github.com/linagora/linshare-ui-admin/compare/v4.0.2...v4.0.3)
#### Bug fixes and improvements
* Core:
* Fix issue when downloading a folder archive in a workgroup.
* Fix duplicate method for an existing and already duplicated contact list.
* UI-User:
* Improvement: Internal users are now able to change their passwords using a external server. The link to it can be provided in the config.js of user interface.
* UI-Admin:
* Fix delete ldap connections, domains and domain's patterns
# [4.0.2](https://github.com/linagora/linshare/compare/4.0.1...4.0.2) (2020-10-12) [Download link](http://download.linshare.org/versions/4.0.2/)
**The 4.0.2 release of LinShare is out**
> **NB :**
You can find the upgrade documentation [here](documentation/EN/upgrade).
* **core** : 4.0.2 - [changelog](https://github.com/linagora/linshare-core/compare/4.0.1...4.0.2)
* **ui-user** : 4.0.2 - [changelog](https://github.com/linagora/linshare-ui-user/compare/v4.0.1...v4.0.2)
* **ui-admin** : 4.0.2 [changelog](https://github.com/linagora/linshare-ui-admin/compare/v4.0.1...v4.0.2)
#### Bug fixes and improvements
> This version include a lot of bugfixes and enhancements mainly related to mobile compatibility especially for Iphone/Ipad devices.
* Core:
* Add null Content-Type interceptor for LinShare API for all Http Methods
* Add an endpoint with GET http method to get all enums on LinShare
* Exclude unused enums returned from LinShare API
* UI-User:
* *Change renaming behaviour*:
* Open an input dialog for renaming item
* Save on different name (eg: on shared space creation)
* Bugfixes:
* Fix CSS to display expiration field on ipad
* Fix two buttons display in ipad responsive
* Fix UI in home page iPad
* Fix search bar not working on mobile screen
* Fix the display of toolbar function name
* Fix preview image on sidebar when clicked on another document
* Fix conflict with creating normal contact list
* Fix rename function for duplicated contact list
* Fix search members by name
* Fix several issues with expiration date
* Fix the display of translation in Guest page
* Fix restrain contact list option
* Fix background content goes over the table
* Fix button copy in my space
* Fix disable copy in a work group
* Update CSS for responsive platforms
* Implement new otp input
* UI-Admin:
* Fix translate Upload request sub-functionalities description
* Fix delete domain patterns
# [4.0.1](https://github.com/linagora/linshare/compare/4.0.0...4.0.1) (2020-09-07) [Download link](http://download.linshare.org/versions/4.0.1/)
**The 4.0.1 release of LinShare is out**
> **NB :**
You can find the upgrade documentation [here](documentation/EN/upgrade).
* **core** : 4.0.1 - [changelog](https://github.com/linagora/linshare-core/compare/4.0.0...4.0.1)
* **ui-user** : 4.0.1 - [changelog](https://github.com/linagora/linshare-ui-user/compare/v4.0.0...v4.0.1)
* **ui-admin** : 4.0.1 [changelog](https://github.com/linagora/linshare-ui-admin/compare/v4.0.0...v4.0.1)
#### Bug fixes and improvments
* Core:
* Fix the issue of `SSO` authentication of a user who has never logged in before.
* The administrator is able to unlock the locked users after consecutive unsuccessful attempts for login.
* Add the missing traces of JWT authentication provider.
* UI-User:
* Fix displaying the expiration date on received shares
* Fix the automatic redirection to personal space after copying files from received shares.
* Disable adding SharedSpace member when user does not have creation permission
* Fix displaying audit traces
* Fix issue of previewing file in full screen
* UI-Admin:
* Add the admin interface to unlock the locked users.
Here we can see the new interface where the administrator will be able to unlock the blocked user.
* **New administration interface (Beta)**
With this new version, we had to introduce a new API (admin/v5) and its new
interface. Our main goal is to backport every old features of the old interface
but using up to date technologies (Vue.js 3). Of course, this will allow us to
redesign the whole interface, the whole user experience and to also bring new features.
* **Workspaces**
It was introduced in version 4.2 as **Drive**, it was finally renamed as
**Workspace** to make more sense.
*Tiny remember of the feature:*
In LinShare we have workgroups in shared spaces. These groups are designed to make a team works together on one topic. If you have multiple topics in a team, you have to create one workgroup per team. This allows you to add different external people for each workgroup.
The main goals of `Workspace` are :
* Regroup all worgkoups of a team in one item
* Define default team members in the Workspace to avoid workgroup members redefinition
* Manage globally team members rigths (right should be applied from workspace to its workgroups)
* A workgroup can belong to a workspace or be standalone
* **User providers**
At first, LinShare was designed to retrieve users from a LDAP directory. These
users were called *Internal users*, they were able to create some temporary
accounts, called *guest users*.
In this version of LinShare, we added more user providers:
* OIDC user provider
This provider allows LinShare to create users "on-the-fly" at the first log in (using OIDC).
* Twake Console user provider
This provider allows LinShare to retrieve users from the Twake Console app, which is the portal of our new SAAS offer.
## [4.2.4](https://github.com/linagora/linshare/compare/4.2.3...4.2.4) (2022-02-01) [Download link](http://download.linshare.org/versions/4.2.4/)
**The 4.2.4 release of LinShare is out**
- **core** : 4.2.4 - [changelog](https://github.com/linagora/linshare-core/compare/4.2.3...4.2.4)
- **ui-user** : 4.2.4 - [changelog](https://github.com/linagora/linshare-ui-user/compare/v4.2.3...v4.2.4)
- **ui-admin** : 4.2.4 [changelog](https://github.com/linagora/linshare-ui-admin/compare/v4.2.3...v4.2.4)
- **ui-upload-request** : 4.2.4 [changelog](https://github.com/linagora/linshare-ui-upload-request/compare/v4.2.3...v4.2.4)
#### Bug fixes and improvements
* Core:
* Max integer values does not exist on functionality endpoint v1.
* Fix issue with UPGRADE_4_2_ADD_MISSING_PROPERTIES_TO_WORK_GROUP_NODE
(missing wokgroup)
* UI-User:
* Issue #1108: Fix webpack configuration for common images
* **Breaking change** Update the path of default logo images. Now all images are stored inside `images` folder after bundled. If you are using default logo images, update the image configurations as following:
``` javascript
applicationLogo : {
small: 'images/linshare-logo-white.png',
large : 'images/ls-logo-big.png'
},
loginBackground : 'images/bg-linshare-desktop.png',
```
* UI-Admin:
* Translate upgrade tasks keys
* Issue #208: Fix audit log translation key
* Issue #208: Add translation for WORKSPACE
* Issue #205: Hide following features on legacy mode ( LDAP connections Domain patterns Manage domains Workgroups Workgroup patterns)
* Translate missing upgrade tasks keys
* Fix missing key translation
* Issue #201: Update JWT functionality
* Issue #196: Add shared space functionality translation
* Issue #194: Add collected emails expiration functionality
* Refactor internal can upload functionality
* Issue #171: Show max value input for guest expiration functionality
* UI-Upload-Request:
* Issue #101: Fix Fr translation
## [4.2.3](https://github.com/linagora/linshare/compare/4.2.2...4.2.3) (2021-10-28) [Download link](http://download.linshare.org/versions/4.2.3/)
**The 4.2.3 release of LinShare is out**
- **core** : 4.2.3 - [changelog](https://github.com/linagora/linshare-core/compare/4.2.2...4.2.3)
- **ui-user** : 4.2.3 - [changelog](https://github.com/linagora/linshare-ui-user/compare/v4.2.2...v4.2.3)
- **ui-admin** : 4.2.3 [changelog](https://github.com/linagora/linshare-ui-admin/compare/v4.2.2...v4.2.3)
- **ui-upload-request** : 4.2.3 [changelog](https://github.com/linagora/linshare-ui-upload-request/compare/v4.2.2...v4.2.3)
#### Bug fixes and improvements
* Core:
* Fix issue of checking entry size and max deposit size
* Fix checking max count number of upload request entries
* Change TLS default version + document
* Add SSL protocols configuration in mail notification
* Fix undownloaded share mail notification
* Adding more traces to flow api to debug stuck upload.
* Using spring-framework-bom 5.2.16.RELEASE
* Upgrading tika-parsers to 1.27
* Removing useless pdfbox dependencies
* Upgrading xstream to 1.4.17
* UI-User:
* Fix the validation range of share expiration date and USDA notification date
* Allow editing contacts list description
* Fix shared space fetching error
* Fix error of unable to override file when clicking the option in preview dialog
* Fix error of workgroup member can not see current list in browse dialog
* Show secured sharing option for guests
* Fix incorrect refetch shared space permission behavior
* UI-Admin:
* Fix delete contact
* UI-Upload-Request:
* Rework selected items toolbar
* Fix warning on vue-i18n
## [4.1.4](https://github.com/linagora/linshare/compare/4.1.3...4.1.4) (2021-10-22) [Download link](http://download.linshare.org/versions/4.1.4/)
**The 4.1.4 release of LinShare is out**
- **core** : 4.1.4 - [changelog](https://github.com/linagora/linshare-core/compare/4.1.3...4.1.4)
- **ui-user** : 4.1.4 - [changelog](https://github.com/linagora/linshare-ui-user/compare/v4.1.3...v4.1.4)
- **ui-admin** : 4.1.4 [changelog](https://github.com/linagora/linshare-ui-admin/compare/v4.1.3...v4.1.4)
- **ui-upload-request** : 4.1.4 [changelog](https://github.com/linagora/linshare-ui-upload-request/compare/v4.1.3...v4.1.4)
#### Bug fixes and improvements
* Core:
* Change TLS default version + document
* Add SSL protocols configuration in mail notification
* Adding more traces to flow api to debug stuck upload.
* Improving TimingOutInterceptor (error code, decrease verbosity)
* Using spring-framework-bom 5.2.16.RELEASE
* Upgrading tika-parsers to 1.27
* Removing useless pdfbox dependencies
* Upgrading xstream to 1.4.17
* UI-User:
* Issue #1091: Fix the validation range of share expiration date and USDA notification date
* UI-Upload-Request:
* nothing to report
* UI-Admin:
* nothing to report
## [4.2.2](https://github.com/linagora/linshare/compare/4.2.1...4.2.2) (2021-08-16) [Download link](http://download.linshare.org/versions/4.2.2/)
**The 4.2.2 release of LinShare is out**
This release is fixing the upgrade process from LinShare 4.1 to 4.2 (SQL and
upgrade tasks).
* **core** : 4.2.2 - [changelog](https://github.com/linagora/linshare-core/compare/4.2.1...4.2.2)
* **ui-user** : 4.2.2 - [changelog](https://github.com/linagora/linshare-ui-user/compare/v4.2.1...v4.2.2)
* **ui-admin** : 4.2.2 [changelog](https://github.com/linagora/linshare-ui-admin/compare/v4.2.1...v4.2.2)
* **ui-upload-request** : 4.2.2 [changelog](https://github.com/linagora/linshare-ui-upload-request/compare/v4.2.1...v4.2.2)
### Bug fixes and improvements
* Core:
* Fix upgrade script: handling missing revision for workgroup documents.
* Fix upgrade script: Delete if exist mailing_list indexes.
* Fix upgrade script: handling NOT NULL constraint on column create_operation_sum
* Using John DOE when author of a workgroup is missing.
## [4.1.3](https://github.com/linagora/linshare/compare/4.1.2...4.1.3) (2021-08-11) [Download link](http://download.linshare.org/versions/4.1.3/)
**The 4.1.3 release of LinShare is out**
- **core** : 4.1.3 - [changelog](https://github.com/linagora/linshare-core/compare/4.1.2...4.1.3)
- **ui-user** : 4.1.3 - [changelog](https://github.com/linagora/linshare-ui-user/compare/v4.1.2...v4.1.3)
- **ui-admin** : 4.1.3 [changelog](https://github.com/linagora/linshare-ui-admin/compare/v4.1.2...v4.1.3)
- **ui-upload-request** : 4.1.3 [changelog](https://github.com/linagora/linshare-ui-upload-request/compare/v4.1.2...v4.1.3)
#### Bug fixes and improvements
* Core:
* Clean favorite contact list according to allowed contacts for restricted guests.
* Fix adding guest to restricted contact
* Fix negative remaining days in warn before expiry for upload request
* Forbid email update for guest
* Fix glitch between activation and closure date for warn before expiry of an upload request
* Fix exceeding max file number on an upload request
* UI-User:
* Update field creation date in data table of token management page
* Fix editing restricted contacts even when delegation policy is off
* Prevent user from updating email for guest account
* Add error message if there is no restricted contacts
* Fix unable to create guest when contact restriction delgationp policy if off
* Hide copy to my space of an upload request entry when upload permission is disabled
* Hide download button in preview dialog when archive download is disabled
* Fix initial value in rename shared space
* Hide preview option for folders
* Fix versioning parameter toggle not working
* Fix unable to preview duplicated node in workgroup
* Fix token form validation
* UI-Admin:
* Hide max value field for guest expiration functionality
# [4.0.4](https://github.com/linagora/linshare/compare/4.0.3...4.0.4) (2020-08-11) [Download link](http://download.linshare.org/versions/4.0.4/)
**The 4.0.4 release of LinShare is out**
> **NB :**
You can find the upgrade documentation [here](documentation/EN/upgrade).
* **core** : 4.0.4 - [changelog](https://github.com/linagora/linshare-core/compare/4.0.3...4.0.4)
* **ui-user** : 4.0.4 - [changelog](https://github.com/linagora/linshare-ui-user/compare/v4.0.3...v4.0.4)
* **ui-admin** : 4.0.4 [changelog](https://github.com/linagora/linshare-ui-admin/compare/v4.0.3...v4.0.4)
#### Bug fixes and improvements
* Core:
* Clean favorite contact list according to allowed contacts for restricted guests.
* Fix adding guest to restricted contact.
* Forbid email update for guest.
* Fix quota issue when deleting files in workgroups
* Fix preview duplicated sharedSpace document
* Fix moving file between shared spaces
* UI-User:
* Fix action button height in form guest
* Fix editing restricted contacts even when delegation policy is off
* Prevent user from updating email for guest account
* Fix showing current user as restricted contact even when contact restriction delagation policy if off
* Fix displaying copy to myspace when user upload permission is disabled
* Hide download button in preview dialog when archive download is disabled
* Hide copy function in the folder preview
* Hide options menu after clicking on details option of a shared space node
* Fix versioning parameter toggle not working
* Fix unable to preview duplicated node in workgroup
* Fix initial value in rename shared space
* Update move file API instead of copy and delete
* UI-Admin:
* Fix undefined user error in audit log traces
* Fix delete resources
## [4.2.1](https://github.com/linagora/linshare/compare/4.2.0...4.2.1) (2021-08-10) [Download link](http://download.linshare.org/versions/4.2.1/)
**The 4.2.1 release of LinShare is out**
* **core** : 4.2.1 - [changelog](https://github.com/linagora/linshare-core/compare/4.2.0...4.2.1)
* **ui-user** : 4.2.1 - [changelog](https://github.com/linagora/linshare-ui-user/compare/v4.2.0...v4.2.1)
* **ui-admin** : 4.2.1 [changelog](https://github.com/linagora/linshare-ui-admin/compare/v4.2.0...v4.2.1)
* **ui-upload-request** : 4.2.1 [changelog](https://github.com/linagora/linshare-ui-upload-request/compare/v4.2.0...v4.2.1)
### Bug fixes and improvements
* Core:
* Clean favorite contact list according to allowed contacts for restricted guests.
* Fix adding guest to restricted contact
* Fix negative remaining days in warn before expiry
* Updating SharedSpace modification date when updating SharedSpace members
* Updating parent SharedSpace modification date when updating SharedSpace members
* Fix exceeting uploaded entries max total deposit size
* Forbid email update for guest
* UI-User:
* Issue #1074: Update field creation date in data table of token management page
* Issue # 1078: fix being able to move file to original folder when file is direct sibling of a workgroup
* Issue #1077 Make restricted contacts editable even when delegation policy is off
* Fix bottom scroll bar is displayed on some sidebar
* Issue #1033: Add loading spinner in browse dialog
* Issue #1055: Update conditions of filtering by file types of search files in workgroups
* Issue #1005: Handle long shared space name in sidebar header and add tooltip
* Issue #1072: Fix focus input cause broken ui in shared space member tab
* Issue #1055: Update conditions to disable file types
* UI-Upload-Request:
* Issue #98: Support multiple entries download
* Fix data table offset when UR is closed
* Issue #97: Preview upload request entries on clicking file name
* Issue #92: Add translated error message for error 30005
* Fix max width of warning dialog not working
* UI-Admin:
* Packaging old ui twice, standard and legacy archives.
## [4.2.0](https://github.com/linagora/linshare/compare/4.1.2...4.2.0) (2021-07-19) [Download link](http://download.linshare.org/versions/4.2.0/)
**The 4.2.0 release of LinShare is out**
> **NB :**
> You can find the upgrade documentation [here](documentation/EN/upgrade).
- **core** : 4.2.0 - [changelog](https://github.com/linagora/linshare-core/compare/4.1.2...4.2.0)
- **ui-user** : 4.2.0 - [changelog](https://github.com/linagora/linshare-ui-user/compare/v4.1.2...v4.2.0)
- **ui-admin** : 4.2.0 [changelog](https://github.com/linagora/linshare-ui-admin/compare/v4.1.2...v4.2.0)
>**NB:**
>Before launching the upgrade process it is recommended to do a backup on the existing data in your Database.
#### Main features
* **Drive**
In LinShare we have workgroups in shared spaces. These groups are designed to make a team works together on one topic. If you have multiple topics in a team, you have to create one workgroup per team. This allows you to add different external people for each workgroup.
The main goals of `Drive` are :
* Regroup all worgkoups of a team in one item
* Define default team members in the Drive to avoid workgroup members redefinition
* Manage globally team members rigths (right should be applied from drive to its workgroups
* A workgroup can be in a drive or be standalone
The Drive feature was introduced as an alpha verion (API only) on 4.0 version as we can see [here](https://github.com/linagora/linshare/blob/master/CHANGELOG.md#400-2020-07-16-download-link). In this 4.2 version of LinShare the Drive feature is ready, all related interfaces are created.
Now in the **SharedSpace** section the user is able to create a **Workgroup** or a **Drive**


In this screenshot we see when a Drive admin will add a sharedSpaceMember to his **Drive**, he needs to specify the new member's role on the Drive and on its nested Workroups.
By default the new member's roles are:
* DRIVE READER on the Drive
* READER on the nested workgroups

In this screeshot we see the list of nested workgroups on a **Drive**

**Search on workgroup**
In this 4.2 version of LinShare an advanced search feature in order to allow a user to filter the created resources into the workgroup by:
* Name
* Types (Folder, Workgroup document or revision)
* Resource kind (image, pdf, audio, archive ...)
* Size
* Creation and modification date
* Last author on the workgroup

In this screeshot we will see the filter by type and creation date.

#### Improvements
The [upload request feature](https://github.com/linagora/linshare/blob/master/CHANGELOG.md#410-2021-02-25-download-link) was updated on the 4.1 version of linshare.
On this new 4.2 version of LinShare a several improvments were done on it.
Now the recipient of the upload request is able to **preview** and **download** the uploaded documents.

#### Technical information
The [Authentication using OpenID Connect](https://github.com/linagora/linshare/blob/master/CHANGELOG.md#410-2021-02-25-download-link) was introduced on the 4.1 version of LinShare.
On this new 4.2 version of LinShare a several improvments were done on it. The main updates was done on:
* DEPRECATED: oidc.introspectionUri=http://auth.linshare.local/oauth2/introspect
* NEW: oidc.issuerUri=http://auth.linshare.local
For more details you can follow this [installation guide](https://ci.linagora.com/linagora/lgs/linshare/products/linshare-github/blob/master/documentation/EN/installation/sso-lemonldap-using-OIDC.md).
**NB:**
This provider will be reached on LinShare startup, if no provider launched, Linshare startup will fail.
## [4.1.2](https://github.com/linagora/linshare/compare/4.1.1...4.1.2) (2021-04-29) [Download link](http://download.linshare.org/versions/4.1.2/)
**The 4.1.2 release of LinShare is out**
- **core** : 4.1.2 - [changelog](https://github.com/linagora/linshare-core/compare/4.1.1...4.1.2)
- **ui-user** : 4.1.2 - [changelog](https://github.com/linagora/linshare-ui-user/compare/v4.1.1...v4.1.2)
- **ui-admin** : 4.1.2 [changelog](https://github.com/linagora/linshare-ui-admin/compare/v4.1.1...v4.1.2)
- **ui-upload-request** : 4.1.2 [changelog](https://github.com/linagora/linshare-ui-upload-request/compare/v4.1.1...v4.1.2)
Exceptionally, this version contains an optional [patch](https://github.com/linagora/linshare-core/blob/4.1.2/src/main/resources/sql/postgresql/Patch_4.1.2.sql) that will update the email activations of upload requests.
#### Bug fixes and improvements
* Core:
* Fix creating shares from a list created from workgroup members.
* Fix updating nested uploadRequests after their uploadRequestsGroups have been canceled
* Fix the preview of a duplicated sharedSpaceDocument
* Fix managing token by a guest
* Fix moving file between shared spaces
* Delete upload request entries when archiving the upload request
* Fix user's quota after upload request entries deletion by the recipient
* UI-User:
* Improve audit message for copying file to workgroup
* Add tooltip for restricted contacts
* Change date format in placeholder and update error message for guest expiration date
* Add missing VNese translation
* Fix Reset state after new workgroup creation
* Fix date picker going overboard on sidebar
* Adjust space between label and creation date in token management screen
* Fix Reorder role list in shared space members panel
* Update Vnese translation for audit log
* Translate date text in JWT detail
* Translate date field accross app
* Fix do not submit token create when form invalid
* Fix displaying flex on the restricted contacts of guest only
* Fix unable to delete fields when edit contact
* Fix click on share text when file name is long
* Fix token management issues
* Fix unable to move folder inside a workgroup
* support archiving multiple selected upload requests
* Fix archive downloads
* Deselect closed upload requests after close
* Fix tooltip of restricted contacts in guest details sidebar
* Fix wrong default value of expiration date when reopen the guest creation form
* Fix error of select all checkbox not updated while toggle selection of a single guest
* Add clicking on LinShare logo redirection to user customized home page
* Fix UI issue of token sidebar on iPad
* UI-Upload-Request:
* Fix error redirecting to the uploadRequest when it is protected by password
* Use configuration key to change app title
* Add dynamic configs for file size chunks
* Change subject position
* Fix catching backend errors for closing upload request and deleting entries
* Fix hiding close button if functionality is disabled
* UI-Admin:
* Translate mail activation missing keys
## [4.1.1](https://github.com/linagora/linshare/compare/4.1.0...4.1.1) (2021-02-25) [Download link](http://download.linshare.org/versions/4.1.1/)
**The 4.1.1 release of LinShare is out**
- **core** : 4.1.1 - [changelog](https://github.com/linagora/linshare-core/compare/4.1.0...4.1.1)
- **ui-user** : 4.1.1 - [changelog](https://github.com/linagora/linshare-ui-user/compare/v4.1.0...v4.1.1)
- **ui-admin** : 4.1.1 [changelog](https://github.com/linagora/linshare-ui-admin/compare/v4.1.0...v4.1.1)
- **ui-upload-request** : 4.1.1 [changelog](https://github.com/linagora/linshare-ui-upload-request/compare/v4.1.0...v4.1.1)
- **thunderbird-plugin** : 2.0.0 [changelog](https://github.com/linagora/linshare-plugin-thunderbird/blob/master/README.md)
Exceptionally, this version contains an optional [patch](https://github.com/linagora/linshare-core/blob/4.1.1/src/main/resources/sql/postgresql/Patch_4.1.1.sql)
that will fix a delete/reset Issue with functionalities.
#### Bug fixes and improvements
* Thunderbird Plugin:
* New version that supports newer versions of LinShare and Thunderbird.
* Core:
* Fix default values of UR notifaction and expiration functionalites
* Fix quota bug when deleting files in workgroups
* Add patch script for removing duplicate units in functionality_unit (sql patch 4.1.1)
* Add sql function to fix LinShare DB version (sql patch 4.1.1)
* Fix reset and delete functionality bug
* Fix wrong count of uploaded documents in Upload Request mail CLOSED_BY_RECIPIENT template
* Fix recipients list don't dispayed on emails
* Forbid token creation by admin for users
* Fix Share expiration functionality didn't support max value
* Sanitize upload request group inputs
* Add content type annotation in documents/audit endpoint
* Adding not null constraints on max and default value of functionalities
* Fixing supporting unlimited values for max value and revamping migration
* Fix api v1 parameters default value used and max value used
* Add mising condition to the finder: findAllRequestsToBeNotified
* Remove reminder mail sent with expiry alert for UR.
* Fix logger for NotifyBeforeExpirationUploadRequestBatchI
* Update of various libraries for security purpose.
* UI-User:
* Fix delete action is missing in activity tab
* Disable validation on usda if functionality is not enabled
* Support sharing multiple UREs
* Fix quick share form not fully displayed when showing more options
* Add pluralization for translations of upload request FILE_UPLOADED
* Add badge on each upload request group detail
* Resize two upload request icons
* Fix default value of expiration date in sharing
* fix audit log value of notification locale update
* Fix theme entry point not being ignored
* Fix text not localized in Vietnamese
* Fix ui issue of popup confirm on ipad
* rename webpack entry point
* Hide update button when upload request is closed
* Tighten check for beginDate and endDate when searching activity logs
* Show full description on clicking view full button
* Add translations for forwarding files
* Adding forward action in receivedShares
* Update sidebar-share, add new sidebar sidebar-content-forward and remove sidebar-content-more-options
* Refactor shareController and share method in shareObjectService
* Implement quickShare component
* Refactor receivedShareController using tableParamsService
* Add a check to prevent double fetching upload request details
* Fix dialog confirmation in members panel
* Do not allow to go to token management page if JWT_PERMANENT_TOKEN is enabled
* Fix validation of expiration date in upload request
* Fix validation of notification alert date on undownloaded share file
* Catch the error of used password
* Do not tab into the eye icon in password input
* ES6ify change password module
* Fix renaming workgroup node
* Add created work groups to the list, then refresh permissions table
* do not stop progpagation event for option copyToMySpace in dropdown
* Reset selected all icon after delete / close upload requests
* Update translation for vietnamese unknown user text
* Fix console error of hour picker controller
* Update details of audit log for upload request
* Fix cancel deleting jwt dialog not working
* Rename functionality UPLOAD_REQUEST_SECURED_URL to PROTECTED_BY_PASSWORD
* Implement feature to let user select their default home page
* Add a check for already visible sidebar with UR details
* use document copy endpoint for sharing upload request entry
* Fix filter checkbox not initialized correctly
* Fix bug with filtering sender in filter box
* Fix removing date in Upload Request form
* Implement updating a token feature
* Bring JWT feature to production
* Support vieweing JWT details
* Fix upload request form:
* Some field names are in correct
* Error message is wrong
* Message should always colored red
* Fix search by date in audit log
* Automatically update hour when date change in upload request form
* Fix validation of activation date on edit upload request
* Update translation for delete upload request entry in audit log
* Fix notification language options are not translated
* UI-Upload-Request:
* Fix close button disappeared when closed the upload request
* Hide upload menu bar once close upload request
* Check the visibility of close button based on canClose permission
* Display server processing instead of 0s
* Add missing error code for quota limit reached
* UI-Admin:
* Fix user is undefined error in audt logs
* Translate missing mail keys
## [4.1.0](https://github.com/linagora/linshare/compare/4.0.3...4.1.0) (2021-02-25) [Download link](http://download.linshare.org/versions/4.1.0/)
**The 4.1.0 release of LinShare is out**
- **core** : 4.1.0 - [changelog](https://github.com/linagora/linshare-core/compare/4.0.3...4.1.0-1)
- **ui-user** : 4.1.0 - [changelog](https://github.com/linagora/linshare-ui-user/compare/v4.0.3...v4.1.0)
- **ui-admin** : 4.1.0 [changelog](https://github.com/linagora/linshare-ui-admin/compare/v4.0.3...v4.1.0)
- **ui-upload-request** : 4.1.0 [changelog](https://github.com/linagora/linshare-ui-upload-request/releases/tag/v4.1.0)
#### Main features:
* Upload request:
The 4.1.0 version of LinShare updated the *Upload Request* feature which was introduced before, on the version 1.7.x.
This feature consists of giving the ability to an Internal and guest users to send a request to an External user(just an email) to upload files.
The recipient will receive an email saying that the issuer created an upload request for him and he can follow the link to an external portal where he will be able to upload his files, as we will see in the screenshots below.
>**NB:**
>The external user can access to the external portal and upload his files without having a LinShare account.
In this screenshot we can see the user interface for the upload request:

In the second screeshot we can see the received email where the recipient can access to the external portal:

In the last screenshot we can see the external portal for the upload request on which the recipient is able to access, through the received mail, and upload his files:

* Authentication using OpenID Connect:
The new authentication process consists of delegating users' authentication to an external service called OIDC Provider, for that we have chosen to support the OpenID Connect (aka OIDC) as a technical solution, for more details you can follow the [official documentation](https://openid.net/connect/).
The LinShare roadmap, is to fully use the authentication using OIDC without the need of using LDAP, but curently it is still required to work.
Because users must be present in the LDAP during the OIDC authentication.
- *Technical information*:
We support the following flow : authorization code flow with pkce. For now, only access token with opaque format is handled.
Here is a documentation of [Opaque access token](https://auth0.com/docs/tokens/access-tokens#opaque-access-tokens).
To enable/use the OIDC you can [see](https://github.com/linagora/linshare/tree/master/documentation/EN/administration/how-to-use-OIDC.md)
#### Upgrade:
To upgrade LinShare to 4.1.0 version you can see this [upgrade guide](https://github.com/linagora/linshare/blob/master/documentation/EN/upgrade/linshare-upgrade-from-v4.0-to-v4.1.md#linshare-upgrade-guide)
>**NB**: If LinShare is not yet installed you can [follow](https://github.com/linagora/linshare/blob/master/documentation/EN/installation/linshare-install-debian.md#linshare-installation-on-debian) to have an instance of.
# [4.0.3](https://github.com/linagora/linshare/compare/4.0.2...4.0.3) (2020-12-15) [Download link](http://download.linshare.org/versions/4.0.3/)
**The 4.0.3 release of LinShare is out**
> **NB :**
You can find the upgrade documentation [here](documentation/EN/upgrade).
* **core** : 4.0.3 - [changelog](https://github.com/linagora/linshare-core/compare/4.0.2...4.0.3)
* **ui-user** : 4.0.3 - [changelog](https://github.com/linagora/linshare-ui-user/compare/v4.0.2...v4.0.3)
* **ui-admin** : 4.0.3 [changelog](https://github.com/linagora/linshare-ui-admin/compare/v4.0.2...v4.0.3)
#### Bug fixes and improvements
* Core:
* Fix issue when downloading a folder archive in a workgroup.
* Fix duplicate method for an existing and already duplicated contact list.
* UI-User:
* Improvement: Internal users are now able to change their passwords using a external server. The link to it can be provided in the config.js of user interface.
* UI-Admin:
* Fix delete ldap connections, domains and domain's patterns
# [4.0.2](https://github.com/linagora/linshare/compare/4.0.1...4.0.2) (2020-10-12) [Download link](http://download.linshare.org/versions/4.0.2/)
**The 4.0.2 release of LinShare is out**
> **NB :**
You can find the upgrade documentation [here](documentation/EN/upgrade).
* **core** : 4.0.2 - [changelog](https://github.com/linagora/linshare-core/compare/4.0.1...4.0.2)
* **ui-user** : 4.0.2 - [changelog](https://github.com/linagora/linshare-ui-user/compare/v4.0.1...v4.0.2)
* **ui-admin** : 4.0.2 [changelog](https://github.com/linagora/linshare-ui-admin/compare/v4.0.1...v4.0.2)
#### Bug fixes and improvements
> This version include a lot of bugfixes and enhancements mainly related to mobile compatibility especially for Iphone/Ipad devices.
* Core:
* Add null Content-Type interceptor for LinShare API for all Http Methods
* Add an endpoint with GET http method to get all enums on LinShare
* Exclude unused enums returned from LinShare API
* UI-User:
* *Change renaming behaviour*:
* Open an input dialog for renaming item
* Save on different name (eg: on shared space creation)
* Bugfixes:
* Fix CSS to display expiration field on ipad
* Fix two buttons display in ipad responsive
* Fix UI in home page iPad
* Fix search bar not working on mobile screen
* Fix the display of toolbar function name
* Fix preview image on sidebar when clicked on another document
* Fix conflict with creating normal contact list
* Fix rename function for duplicated contact list
* Fix search members by name
* Fix several issues with expiration date
* Fix the display of translation in Guest page
* Fix restrain contact list option
* Fix background content goes over the table
* Fix button copy in my space
* Fix disable copy in a work group
* Update CSS for responsive platforms
* Implement new otp input
* UI-Admin:
* Fix translate Upload request sub-functionalities description
* Fix delete domain patterns
# [4.0.1](https://github.com/linagora/linshare/compare/4.0.0...4.0.1) (2020-09-07) [Download link](http://download.linshare.org/versions/4.0.1/)
**The 4.0.1 release of LinShare is out**
> **NB :**
You can find the upgrade documentation [here](documentation/EN/upgrade).
* **core** : 4.0.1 - [changelog](https://github.com/linagora/linshare-core/compare/4.0.0...4.0.1)
* **ui-user** : 4.0.1 - [changelog](https://github.com/linagora/linshare-ui-user/compare/v4.0.0...v4.0.1)
* **ui-admin** : 4.0.1 [changelog](https://github.com/linagora/linshare-ui-admin/compare/v4.0.0...v4.0.1)
#### Bug fixes and improvments
* Core:
* Fix the issue of `SSO` authentication of a user who has never logged in before.
* The administrator is able to unlock the locked users after consecutive unsuccessful attempts for login.
* Add the missing traces of JWT authentication provider.
* UI-User:
* Fix displaying the expiration date on received shares
* Fix the automatic redirection to personal space after copying files from received shares.
* Disable adding SharedSpace member when user does not have creation permission
* Fix displaying audit traces
* Fix issue of previewing file in full screen
* UI-Admin:
* Add the admin interface to unlock the locked users.
Here we can see the new interface where the administrator will be able to unlock the blocked user.
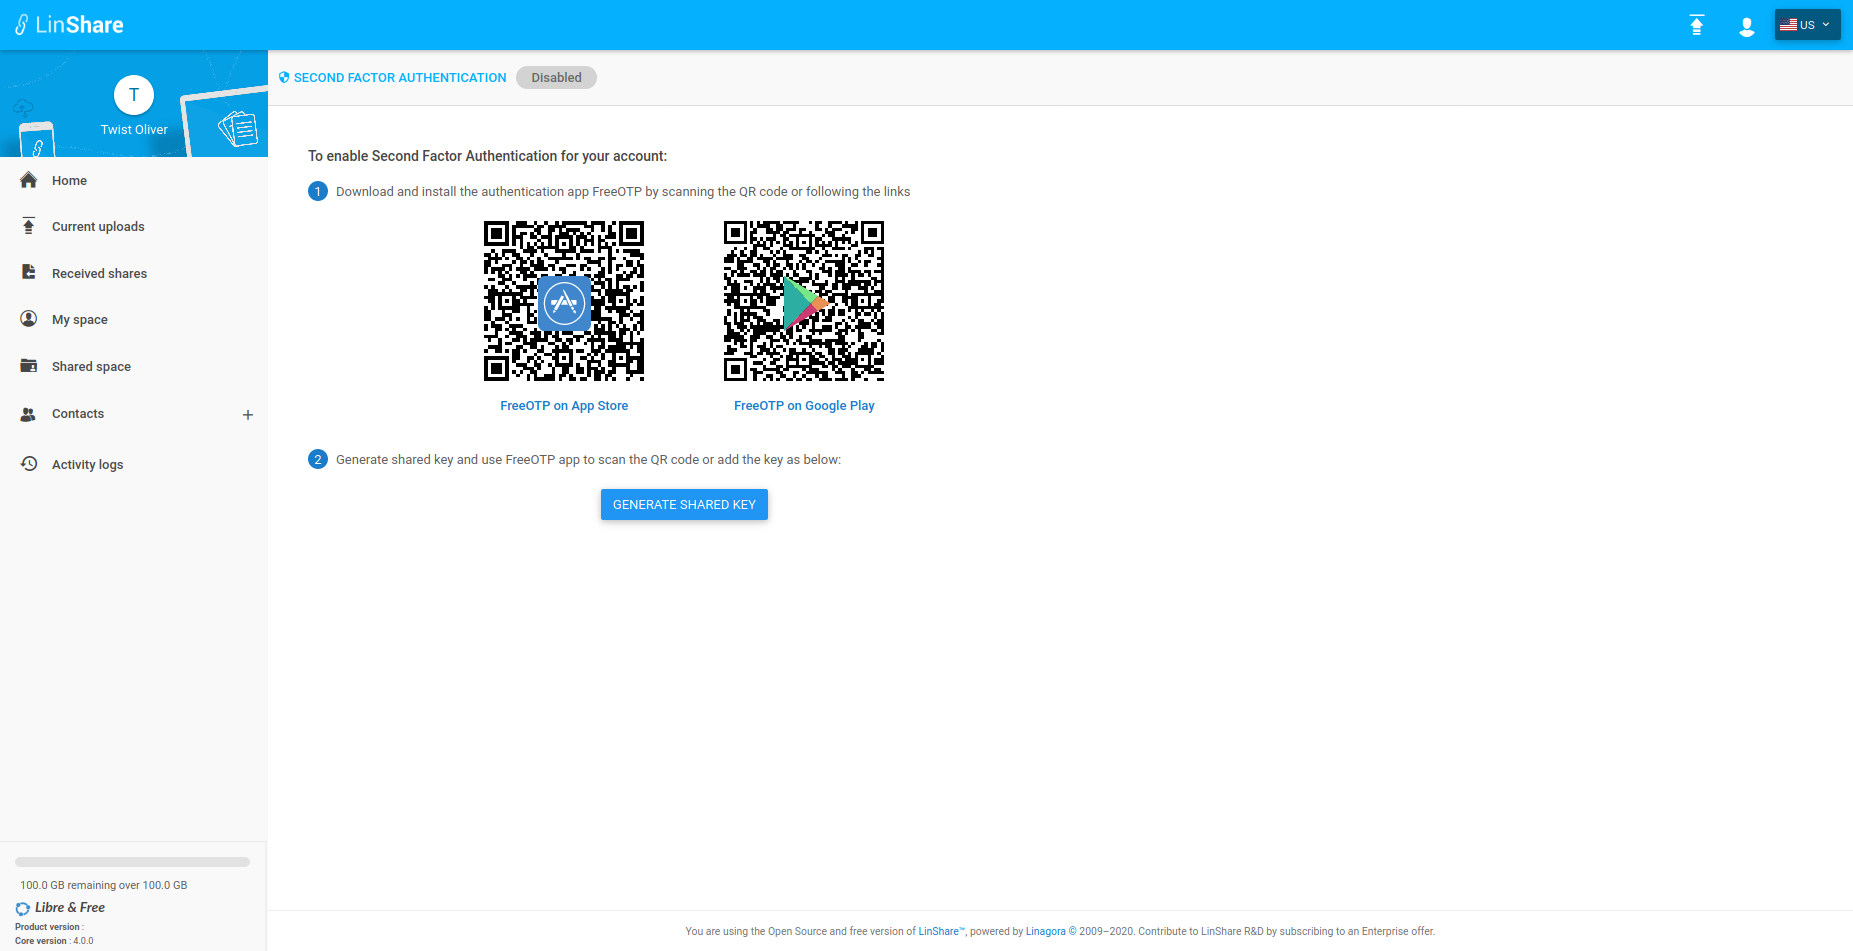 In the second screenshot we can see the interface where the user will enter the received six digit code.
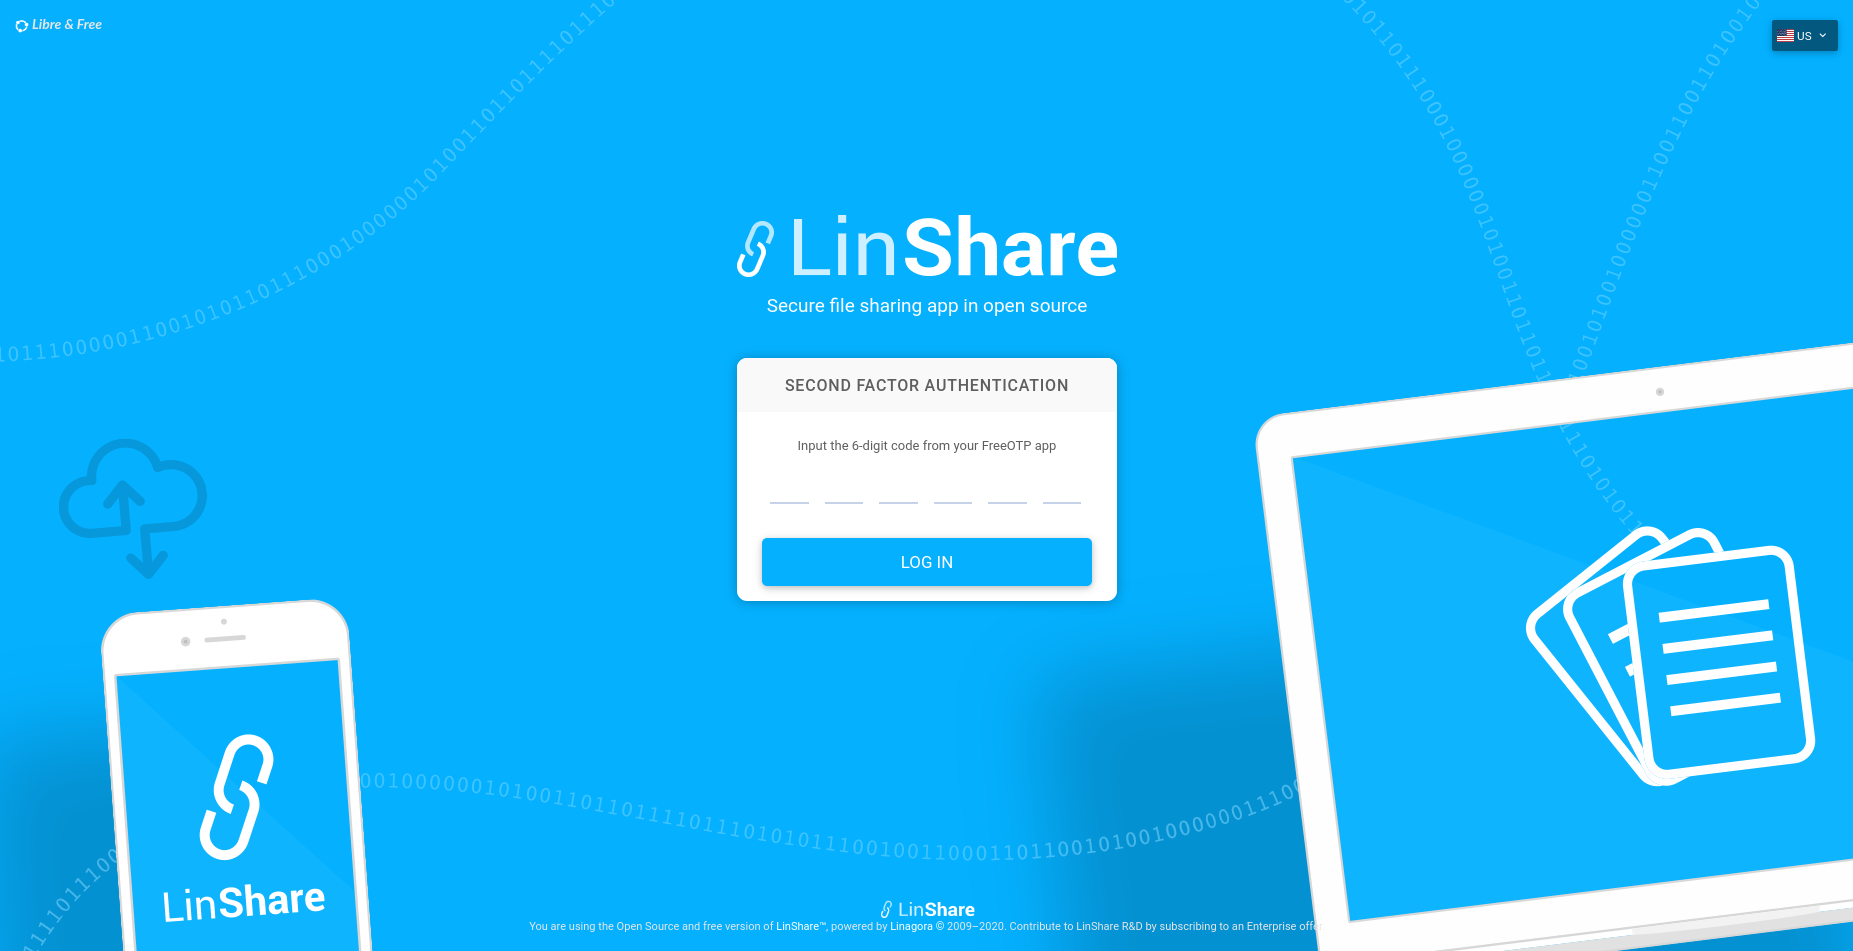 * **Lockout account:**
To avoid giving the attacker the time to guess the valid account credentials, a process of locking out an account is added to LinShare after unsuccessful consecutive attempts for a user login.
* **Change password:**
In LinShare 4.0.0 guests are able to change their passwords without using the reset/lost password feature.
In this screenshot we can see the interface where the guest will be able to change and enter the new password.
* **Lockout account:**
To avoid giving the attacker the time to guess the valid account credentials, a process of locking out an account is added to LinShare after unsuccessful consecutive attempts for a user login.
* **Change password:**
In LinShare 4.0.0 guests are able to change their passwords without using the reset/lost password feature.
In this screenshot we can see the interface where the guest will be able to change and enter the new password.
 * **Passay** framework is added in order to enhance the complexity of the entered password, Here we can see the list of the different rules which should be respected in the entered password(Minimum/Maximum length, Minimum number of upper/lower case, Minimum number of digits, Minimum number of special characters).
* The new entered password must be different from the last 10 saved passwords.
* **Drive(alpha, API only):**
In LinShare we have workgroups in shared spaces. These groups are designed to make a team works together on one topic. If you have multiple topics in a team, you have to create one workgroup per team. This allows you to add different external people for each workgroup.
The main goals of `Drive` are :
* Regroup all worgkoups of a team in one item
* Define default team members in the Drive to avoid workgroup members redefinition
* Manage globally team members rigths (right should be applied from drive to its workgroups
* A workgroup can be in a drive or be standalone
*NB:* This feature is just implemented on **LinShare-core**, which means there is no user interface, there are just the different APIs of the feature.
#### Upgraded dependencies:
- `JAVA` version is upgraded from 8 to 11
- `Tomcat` is upgraded from 8 to 9
- `PostgreSQL` is upgraded from 9 to 11
- `MongoDB` is upgraded from 3.6 to 4.2
* Upgraded libraries: Jcloud, Hibernate, Spring, Spring data
To upgrade LinShare to 4.0.0 version you can [see](https://github.com/linagora/linshare/blob/master/documentation/EN/upgrade/linshare-upgrade-from-v2.3-to-v4.0.md)
>**NB**: If LinShare is not yet installed you can follow this [documentation](https://github.com/linagora/linshare/blob/master/documentation/EN/installation/linshare-install-debian.md) to have an instance of.
### Breaking changes:
In order to enhance security level, the password encryption strategy has been updated, and LinShare's administrator password was reset to the default value.
After upgrading process, you can change your password
- As the password encoding strategy is updated, upgrade tasks are created to notify anonymous users and guests in order to reset their passwords.
## [2.3.6](https://github.com/linagora/linshare/compare/2.3.5...2.3.6) (2021-08-10) [Download link](http://download.linshare.org/versions/2.3.6/)
**The 2.3.6 release of LinShare is out**
> **NB :**
> You can find the upgrade documentation [here](documentation/EN/upgrade).
- **core** : 2.3.6 - [changelog](https://github.com/linagora/linshare-core/compare/2.3.5...2.3.6)
- **ui-user** : 2.3.6 - [changelog](https://github.com/linagora/linshare-ui-user/compare/v2.3.5...v2.3.6)
- **ui-admin** : 3.3.4 - [changelog](https://github.com/linagora/linshare-ui-admin/compare/v3.3.3...v3.3.4)
#### Bug fixes and improvments
* Core:
* Clean favorite contact list according to allowed contacts for restricted guests.
* Fix adding guest to restricted contact
* Forbid email update for guest
* Security issues: Upgrading rhino
* Security issues: Upgrading xerces
* Fix quota bug when deleting files in workgroups
* Fix preview duplicated sharedSpace document
* Fix moving file from shared space to another one
* Delete change password for delegation api
* Fix find all audit traces
* UI-User:
* Fix error of unability to create guest
* Fix error message displaying incorrecly for restricted contacts list, no default contact.
* Issue #1075: Show restricted contacts list when delegacy policy is off
* Issue #1057: Prevent user from updating email for guest account
* Issue #1058: add error message if there is no restricted contacts
* Issue #1068: Fix no restricted contact on update the restricted field
* Issue #1041 Do not show copy to myspace when user upload permission is disabled
* Issue #1009: Disable clicking eyes icon in folder detail sidebar
* Issue #1008: hide options menu after clicking on details option of a shared space node
* Issue #1009: Hide preview option for folders
* Issue #997: Fix initial value when renaming a shared space
* Issue #992: Reset state after create new workgroup
* Issue #970: Fix move files between workgroups
* Issue #626: Fix view details file in preview mode
* Issue #545: Fix preview image on sidebar when clicked on another document
* Issue #545: Fix navigation for preview files
* Using shared spaces params for retrieving audit data
* #478: Allow to click all the sidebar section
* UI-Admin:
* #84: Add conditional for remove can-create-guest checkbox for guest
## [2.3.5](https://github.com/linagora/linshare/compare/2.3.4...2.3.5) (2020-04-20) [Download link](http://download.linshare.org/versions/2.3.5/)
**The 2.3.5 release of LinShare is out**
> **NB :**
> You can find the upgrade documentation [here](documentation/EN/upgrade).
- **core** : 2.3.5 - [changelog](https://github.com/linagora/linshare-core/compare/2.3.4...2.3.5)
- **ui-user** : 2.3.5 - [changelog](https://github.com/linagora/linshare-ui-user/compare/v2.3.4...v2.3.5)
#### Features
- Support of MongoDB 3.6:
LinShare 2.3.5 supports MongoDB 3.6, so we recommend to use 3.6 version because 3.2 and 3.4 are not [officially](https://www.mongodb.com/support-policy) supported anymore.
> To upgrade your MongoDB version you can follow: [ mongodb-upgrade-from-3.2-to-3.6-debian](https://ci.linagora.com/linagora/lgs/linshare/products/linshare-github/blob/master/documentation/EN/upgrade/mongodb-upgrade-from-3.2-to-3.6-debian.md) or [mongodb-upgrade-from-3.2-to-3.6-centos](https://ci.linagora.com/linagora/lgs/linshare/products/linshare-github/blob/master/documentation/EN/upgrade/mongodb-upgrade-from-3.2-to-3.6-centos.md).
**NB:**
Before launching the upgrade process it is recommended to do a backup on the existing data in your Database.
#### Bug fixes and improvments
* Core:
- Fix guest default language
- In order to enhance the level of security in LinShare a sanitizer is added for all inputs.
- Compute expiry date when last sharing is deleted manually.
- Fix Document expiration date is set even functionality disabled.
* UI-User:
- Fix download icon shown even if downlod archive functionnality disabled
- Fix Dislay of document expiry date.
- Fix tooltip text and translation related to Documents sharing
# [2.3.4](https://github.com/linagora/linshare/compare/2.3.3...2.3.4) (2020-03-20) [Download link](http://download.linshare.org/versions/2.3.4/)
**The 2.3.4 release of LinShare is out**
> **NB :**
You can find the upgrade documentation [here](documentation/EN/upgrade).
* **core** : 2.3.4 - [changelog](https://github.com/linagora/linshare-core/compare/2.3.3...2.3.4)
* **ui-user** : 2.3.4 - [changelog](https://github.com/linagora/linshare-ui-user/compare/v2.3.3...v2.3.4)
* **ui-admin** : 3.3.3 - [changelog](https://github.com/linagora/linshare-ui-admin/compare/v3.3.2...v3.3.3)
* **linshare-plugin-thunderbird** : 1.9.1 - [changelog](https://github.com/linagora/linshare-plugin-thunderbird/compare/v1.8.0...v1.9.1)
#### Bug fixes and improvments
* Core:
* Fix and improve the statistic daily batch of Users
* The Keystone v3 support is added for Jcloud. Now LinShare supports V2 and V3 versions. [Documentation](https://github.com/linagora/linshare-backend-dockerfile/blob/2.3.4/README.md#configuration)
* Fix document name after copying it to personalSpace from a sharedSpace
* Fix management of domain patterns
* Fix and improve the edition of a technical accounts
* Fix bug of binding first and last name on email generation
* Improve mail attachment audit traces
* UI-User:
* Hide download button when archive download functionality is disabled
* UI-Admin:
* Improve the build of email template, by giving the choice to the admin to switch between the existant email configurations
* Linshare-plugin-thunderbird
* The pluging is upgraded to be supported by TB68
# [2.3.3](https://github.com/linagora/linshare/compare/2.3.2...2.3.3) (2020-01-22) [Download link](http://download.linshare.org/versions/2.3.3/)
**The 2.3.3 release of LinShare is out**
> **NB :**
You can find the upgrade documentation [here](documentation/EN/upgrade).
* **core** : 2.3.3 - [changelog](https://github.com/linagora/linshare-core/compare/2.3.2...2.3.3)
* **ui-user** : 2.3.3 - [changelog](https://github.com/linagora/linshare-ui-user/compare/v2.3.2...v2.3.3)
* **ui-admin** : 3.3.2 - [changelog](https://github.com/linagora/linshare-ui-admin/compare/v3.3.1...v3.3.2)
#### Bug fixes and improvments
* Core:
* Improve the size control of an archive to download
* Improve the field reply-to of an email in case of the root user is the actor of the action
* Fix find metadata endpoint of a workGroup node
* Add new endpoint in admin api to expose guest details
* Fix find the shared space member to update with memberUuid instead of accountUuid
* Fix and improve the deleted sharedSpaces
* UI-Admin:
* Fix unasignable domain, prohibit the assign of a user to Root or guest domain
* Fix! admin interface was loading the configuration from the guest's domain instead of the owner's domain
# [2.3.2](https://github.com/linagora/linshare/compare/2.3.1...2.3.2) (2019-11-13) [Download link](http://download.linshare.org/versions/2.3.2/)
**The 2.3.2 release of LinShare is out**
> **NB :**
You can find the upgrade documentation [here](documentation/EN/upgrade).
* **core** : 2.3.2 - [changelog](https://github.com/linagora/linshare-core/compare/2.3.1...2.3.2)
* **ui-user** : 2.3.2 - [changelog](https://github.com/linagora/linshare-ui-user/compare/v2.3.1...v2.3.2)
#### Bug fixes and improvments
* Core:
* Fix domain purge batch
* Fix user deletion after domain purge
* Improve guest complexity password
* Fix conctats menu not diplayed for guest user
* Fix the rejection of the '@' on upload document
* Fix delete publicKey
* Add pem support for public keys
* Fix LS sql script upgrade 2.2 to 2.3
* Fix download workgroup document
* Fix download archive for revisions
* Add missing endpoints for delegation v2 api
* Fix delete and update for workgroup pattern
* UI-User:
* Upgrade bower to the latest and safe release
* Fix anonymous download when download attribute is not available
# [2.3.1](https://github.com/linagora/linshare/compare/2.3.0...2.3.1) (2019-09-03) [Download link](http://download.linshare.org/versions/2.3.1/)
**The 2.3.1 release of LinShare is out**
> **NB :**
You can find the upgrade documentation [here](documentation/EN/upgrade).
* **core** : 2.3.1 - [changelog](https://github.com/linagora/linshare-core/compare/2.3.0...2.3.1)
* **ui-admin** : 3.3.1 - [changelog](https://github.com/linagora/linshare-ui-admin/compare/v3.3.0...v3.3.1)
* **ui-user** : 2.3.1 - [changelog](https://github.com/linagora/linshare-ui-user/compare/v2.3.0...v2.3.1)
#### Bug fixes and improvments
* Core:
* Fixing the Upgrade task __UPDATE_DOCUMENT_STRUCTURE_FOR_VERSIONING__
* Improve documentation about document batches
* Fix outdated LinShare license link.
* UI-User:
* Fix outdated LinShare license link.
* UI-Admin:
* Fix outdated LinShare license link.
# [2.3.0](https://github.com/linagora/linshare/compare/2.2.0...2.3.0) (2019-06-19) [Download link](http://download.linshare.org/versions/2.3.0/)
**The 2.3.0 release of LinShare is out**
> **NB :**
You can find the upgrade documentation [here](documentation/EN/upgrade).
### Main features
* [Versioning](documentation/EN/configuration/how-to-use-file-versioning.md) [DOC] : The new versioning feature will give a better collaborative
experience for LinShare users, it will save all updates on documents (workroups)
* **Passay** framework is added in order to enhance the complexity of the entered password, Here we can see the list of the different rules which should be respected in the entered password(Minimum/Maximum length, Minimum number of upper/lower case, Minimum number of digits, Minimum number of special characters).
* The new entered password must be different from the last 10 saved passwords.
* **Drive(alpha, API only):**
In LinShare we have workgroups in shared spaces. These groups are designed to make a team works together on one topic. If you have multiple topics in a team, you have to create one workgroup per team. This allows you to add different external people for each workgroup.
The main goals of `Drive` are :
* Regroup all worgkoups of a team in one item
* Define default team members in the Drive to avoid workgroup members redefinition
* Manage globally team members rigths (right should be applied from drive to its workgroups
* A workgroup can be in a drive or be standalone
*NB:* This feature is just implemented on **LinShare-core**, which means there is no user interface, there are just the different APIs of the feature.
#### Upgraded dependencies:
- `JAVA` version is upgraded from 8 to 11
- `Tomcat` is upgraded from 8 to 9
- `PostgreSQL` is upgraded from 9 to 11
- `MongoDB` is upgraded from 3.6 to 4.2
* Upgraded libraries: Jcloud, Hibernate, Spring, Spring data
To upgrade LinShare to 4.0.0 version you can [see](https://github.com/linagora/linshare/blob/master/documentation/EN/upgrade/linshare-upgrade-from-v2.3-to-v4.0.md)
>**NB**: If LinShare is not yet installed you can follow this [documentation](https://github.com/linagora/linshare/blob/master/documentation/EN/installation/linshare-install-debian.md) to have an instance of.
### Breaking changes:
In order to enhance security level, the password encryption strategy has been updated, and LinShare's administrator password was reset to the default value.
After upgrading process, you can change your password
- As the password encoding strategy is updated, upgrade tasks are created to notify anonymous users and guests in order to reset their passwords.
## [2.3.6](https://github.com/linagora/linshare/compare/2.3.5...2.3.6) (2021-08-10) [Download link](http://download.linshare.org/versions/2.3.6/)
**The 2.3.6 release of LinShare is out**
> **NB :**
> You can find the upgrade documentation [here](documentation/EN/upgrade).
- **core** : 2.3.6 - [changelog](https://github.com/linagora/linshare-core/compare/2.3.5...2.3.6)
- **ui-user** : 2.3.6 - [changelog](https://github.com/linagora/linshare-ui-user/compare/v2.3.5...v2.3.6)
- **ui-admin** : 3.3.4 - [changelog](https://github.com/linagora/linshare-ui-admin/compare/v3.3.3...v3.3.4)
#### Bug fixes and improvments
* Core:
* Clean favorite contact list according to allowed contacts for restricted guests.
* Fix adding guest to restricted contact
* Forbid email update for guest
* Security issues: Upgrading rhino
* Security issues: Upgrading xerces
* Fix quota bug when deleting files in workgroups
* Fix preview duplicated sharedSpace document
* Fix moving file from shared space to another one
* Delete change password for delegation api
* Fix find all audit traces
* UI-User:
* Fix error of unability to create guest
* Fix error message displaying incorrecly for restricted contacts list, no default contact.
* Issue #1075: Show restricted contacts list when delegacy policy is off
* Issue #1057: Prevent user from updating email for guest account
* Issue #1058: add error message if there is no restricted contacts
* Issue #1068: Fix no restricted contact on update the restricted field
* Issue #1041 Do not show copy to myspace when user upload permission is disabled
* Issue #1009: Disable clicking eyes icon in folder detail sidebar
* Issue #1008: hide options menu after clicking on details option of a shared space node
* Issue #1009: Hide preview option for folders
* Issue #997: Fix initial value when renaming a shared space
* Issue #992: Reset state after create new workgroup
* Issue #970: Fix move files between workgroups
* Issue #626: Fix view details file in preview mode
* Issue #545: Fix preview image on sidebar when clicked on another document
* Issue #545: Fix navigation for preview files
* Using shared spaces params for retrieving audit data
* #478: Allow to click all the sidebar section
* UI-Admin:
* #84: Add conditional for remove can-create-guest checkbox for guest
## [2.3.5](https://github.com/linagora/linshare/compare/2.3.4...2.3.5) (2020-04-20) [Download link](http://download.linshare.org/versions/2.3.5/)
**The 2.3.5 release of LinShare is out**
> **NB :**
> You can find the upgrade documentation [here](documentation/EN/upgrade).
- **core** : 2.3.5 - [changelog](https://github.com/linagora/linshare-core/compare/2.3.4...2.3.5)
- **ui-user** : 2.3.5 - [changelog](https://github.com/linagora/linshare-ui-user/compare/v2.3.4...v2.3.5)
#### Features
- Support of MongoDB 3.6:
LinShare 2.3.5 supports MongoDB 3.6, so we recommend to use 3.6 version because 3.2 and 3.4 are not [officially](https://www.mongodb.com/support-policy) supported anymore.
> To upgrade your MongoDB version you can follow: [ mongodb-upgrade-from-3.2-to-3.6-debian](https://ci.linagora.com/linagora/lgs/linshare/products/linshare-github/blob/master/documentation/EN/upgrade/mongodb-upgrade-from-3.2-to-3.6-debian.md) or [mongodb-upgrade-from-3.2-to-3.6-centos](https://ci.linagora.com/linagora/lgs/linshare/products/linshare-github/blob/master/documentation/EN/upgrade/mongodb-upgrade-from-3.2-to-3.6-centos.md).
**NB:**
Before launching the upgrade process it is recommended to do a backup on the existing data in your Database.
#### Bug fixes and improvments
* Core:
- Fix guest default language
- In order to enhance the level of security in LinShare a sanitizer is added for all inputs.
- Compute expiry date when last sharing is deleted manually.
- Fix Document expiration date is set even functionality disabled.
* UI-User:
- Fix download icon shown even if downlod archive functionnality disabled
- Fix Dislay of document expiry date.
- Fix tooltip text and translation related to Documents sharing
# [2.3.4](https://github.com/linagora/linshare/compare/2.3.3...2.3.4) (2020-03-20) [Download link](http://download.linshare.org/versions/2.3.4/)
**The 2.3.4 release of LinShare is out**
> **NB :**
You can find the upgrade documentation [here](documentation/EN/upgrade).
* **core** : 2.3.4 - [changelog](https://github.com/linagora/linshare-core/compare/2.3.3...2.3.4)
* **ui-user** : 2.3.4 - [changelog](https://github.com/linagora/linshare-ui-user/compare/v2.3.3...v2.3.4)
* **ui-admin** : 3.3.3 - [changelog](https://github.com/linagora/linshare-ui-admin/compare/v3.3.2...v3.3.3)
* **linshare-plugin-thunderbird** : 1.9.1 - [changelog](https://github.com/linagora/linshare-plugin-thunderbird/compare/v1.8.0...v1.9.1)
#### Bug fixes and improvments
* Core:
* Fix and improve the statistic daily batch of Users
* The Keystone v3 support is added for Jcloud. Now LinShare supports V2 and V3 versions. [Documentation](https://github.com/linagora/linshare-backend-dockerfile/blob/2.3.4/README.md#configuration)
* Fix document name after copying it to personalSpace from a sharedSpace
* Fix management of domain patterns
* Fix and improve the edition of a technical accounts
* Fix bug of binding first and last name on email generation
* Improve mail attachment audit traces
* UI-User:
* Hide download button when archive download functionality is disabled
* UI-Admin:
* Improve the build of email template, by giving the choice to the admin to switch between the existant email configurations
* Linshare-plugin-thunderbird
* The pluging is upgraded to be supported by TB68
# [2.3.3](https://github.com/linagora/linshare/compare/2.3.2...2.3.3) (2020-01-22) [Download link](http://download.linshare.org/versions/2.3.3/)
**The 2.3.3 release of LinShare is out**
> **NB :**
You can find the upgrade documentation [here](documentation/EN/upgrade).
* **core** : 2.3.3 - [changelog](https://github.com/linagora/linshare-core/compare/2.3.2...2.3.3)
* **ui-user** : 2.3.3 - [changelog](https://github.com/linagora/linshare-ui-user/compare/v2.3.2...v2.3.3)
* **ui-admin** : 3.3.2 - [changelog](https://github.com/linagora/linshare-ui-admin/compare/v3.3.1...v3.3.2)
#### Bug fixes and improvments
* Core:
* Improve the size control of an archive to download
* Improve the field reply-to of an email in case of the root user is the actor of the action
* Fix find metadata endpoint of a workGroup node
* Add new endpoint in admin api to expose guest details
* Fix find the shared space member to update with memberUuid instead of accountUuid
* Fix and improve the deleted sharedSpaces
* UI-Admin:
* Fix unasignable domain, prohibit the assign of a user to Root or guest domain
* Fix! admin interface was loading the configuration from the guest's domain instead of the owner's domain
# [2.3.2](https://github.com/linagora/linshare/compare/2.3.1...2.3.2) (2019-11-13) [Download link](http://download.linshare.org/versions/2.3.2/)
**The 2.3.2 release of LinShare is out**
> **NB :**
You can find the upgrade documentation [here](documentation/EN/upgrade).
* **core** : 2.3.2 - [changelog](https://github.com/linagora/linshare-core/compare/2.3.1...2.3.2)
* **ui-user** : 2.3.2 - [changelog](https://github.com/linagora/linshare-ui-user/compare/v2.3.1...v2.3.2)
#### Bug fixes and improvments
* Core:
* Fix domain purge batch
* Fix user deletion after domain purge
* Improve guest complexity password
* Fix conctats menu not diplayed for guest user
* Fix the rejection of the '@' on upload document
* Fix delete publicKey
* Add pem support for public keys
* Fix LS sql script upgrade 2.2 to 2.3
* Fix download workgroup document
* Fix download archive for revisions
* Add missing endpoints for delegation v2 api
* Fix delete and update for workgroup pattern
* UI-User:
* Upgrade bower to the latest and safe release
* Fix anonymous download when download attribute is not available
# [2.3.1](https://github.com/linagora/linshare/compare/2.3.0...2.3.1) (2019-09-03) [Download link](http://download.linshare.org/versions/2.3.1/)
**The 2.3.1 release of LinShare is out**
> **NB :**
You can find the upgrade documentation [here](documentation/EN/upgrade).
* **core** : 2.3.1 - [changelog](https://github.com/linagora/linshare-core/compare/2.3.0...2.3.1)
* **ui-admin** : 3.3.1 - [changelog](https://github.com/linagora/linshare-ui-admin/compare/v3.3.0...v3.3.1)
* **ui-user** : 2.3.1 - [changelog](https://github.com/linagora/linshare-ui-user/compare/v2.3.0...v2.3.1)
#### Bug fixes and improvments
* Core:
* Fixing the Upgrade task __UPDATE_DOCUMENT_STRUCTURE_FOR_VERSIONING__
* Improve documentation about document batches
* Fix outdated LinShare license link.
* UI-User:
* Fix outdated LinShare license link.
* UI-Admin:
* Fix outdated LinShare license link.
# [2.3.0](https://github.com/linagora/linshare/compare/2.2.0...2.3.0) (2019-06-19) [Download link](http://download.linshare.org/versions/2.3.0/)
**The 2.3.0 release of LinShare is out**
> **NB :**
You can find the upgrade documentation [here](documentation/EN/upgrade).
### Main features
* [Versioning](documentation/EN/configuration/how-to-use-file-versioning.md) [DOC] : The new versioning feature will give a better collaborative
experience for LinShare users, it will save all updates on documents (workroups)
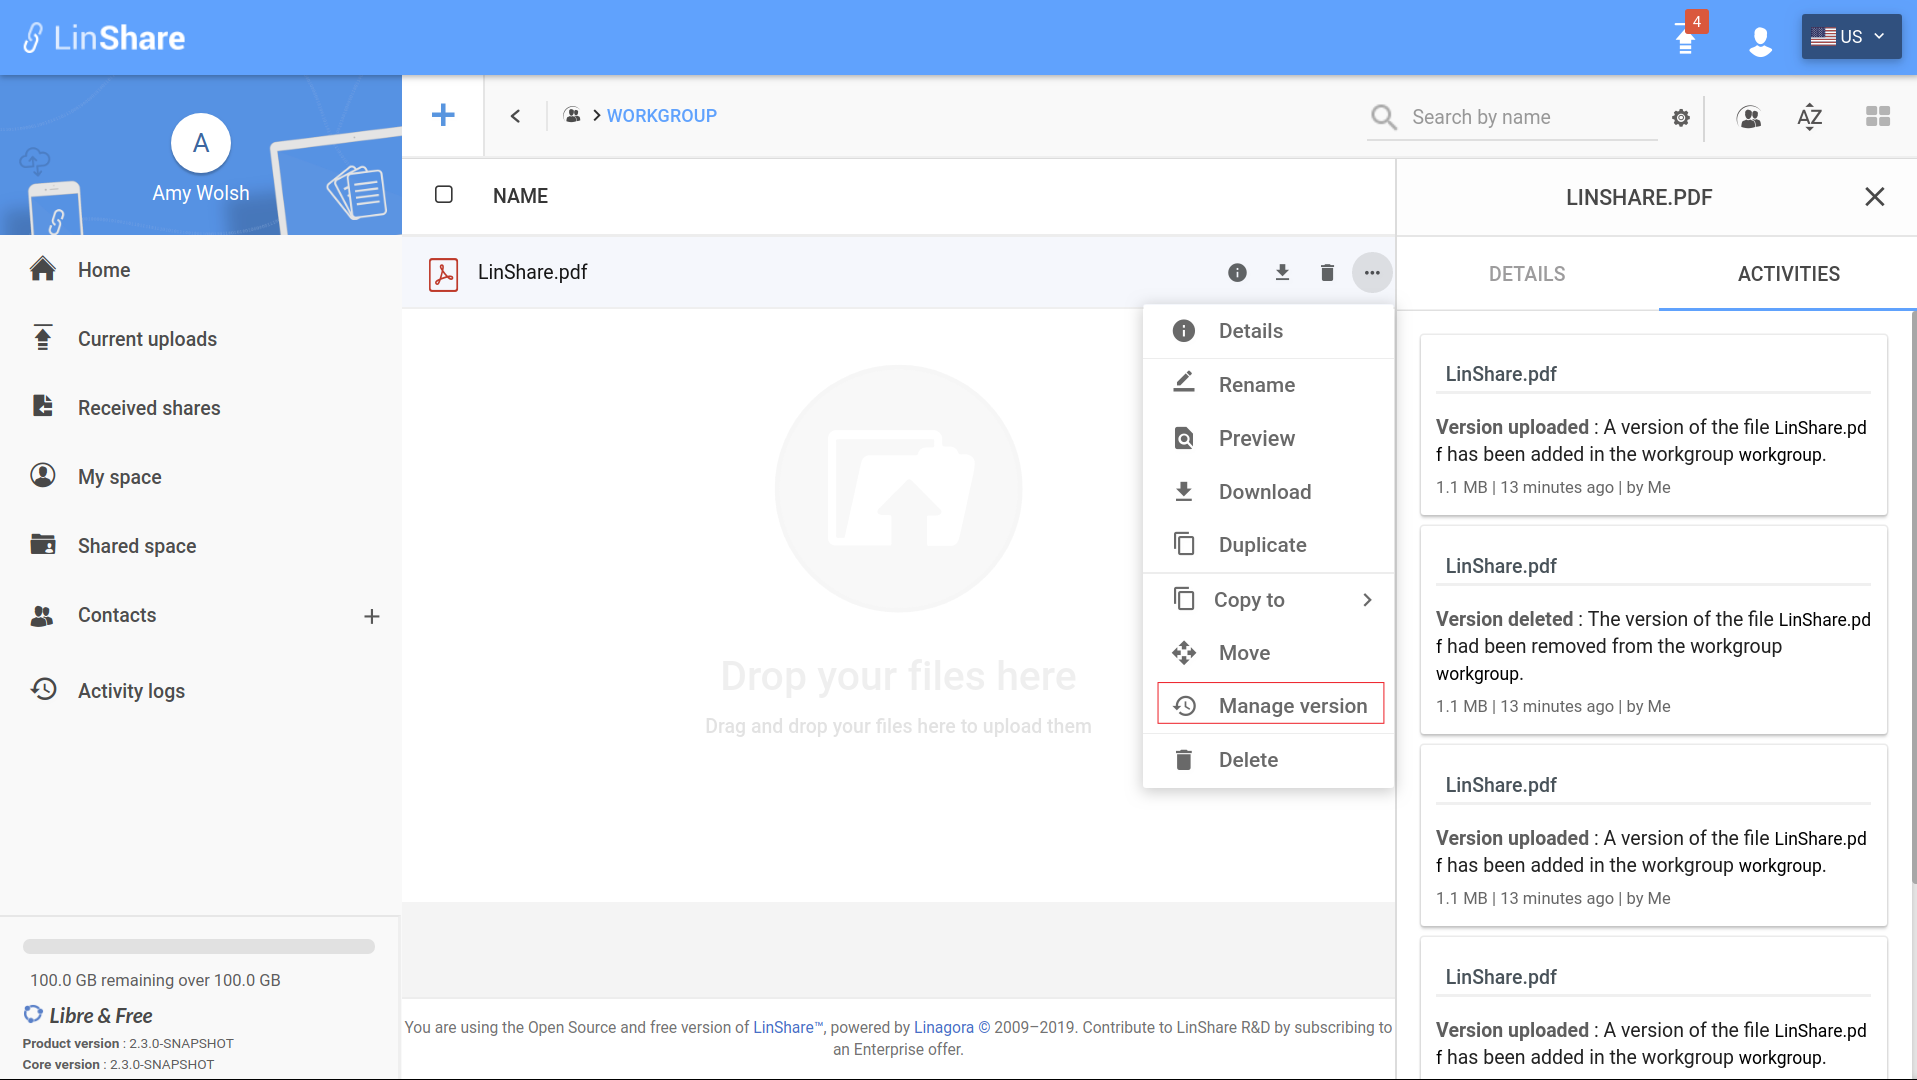
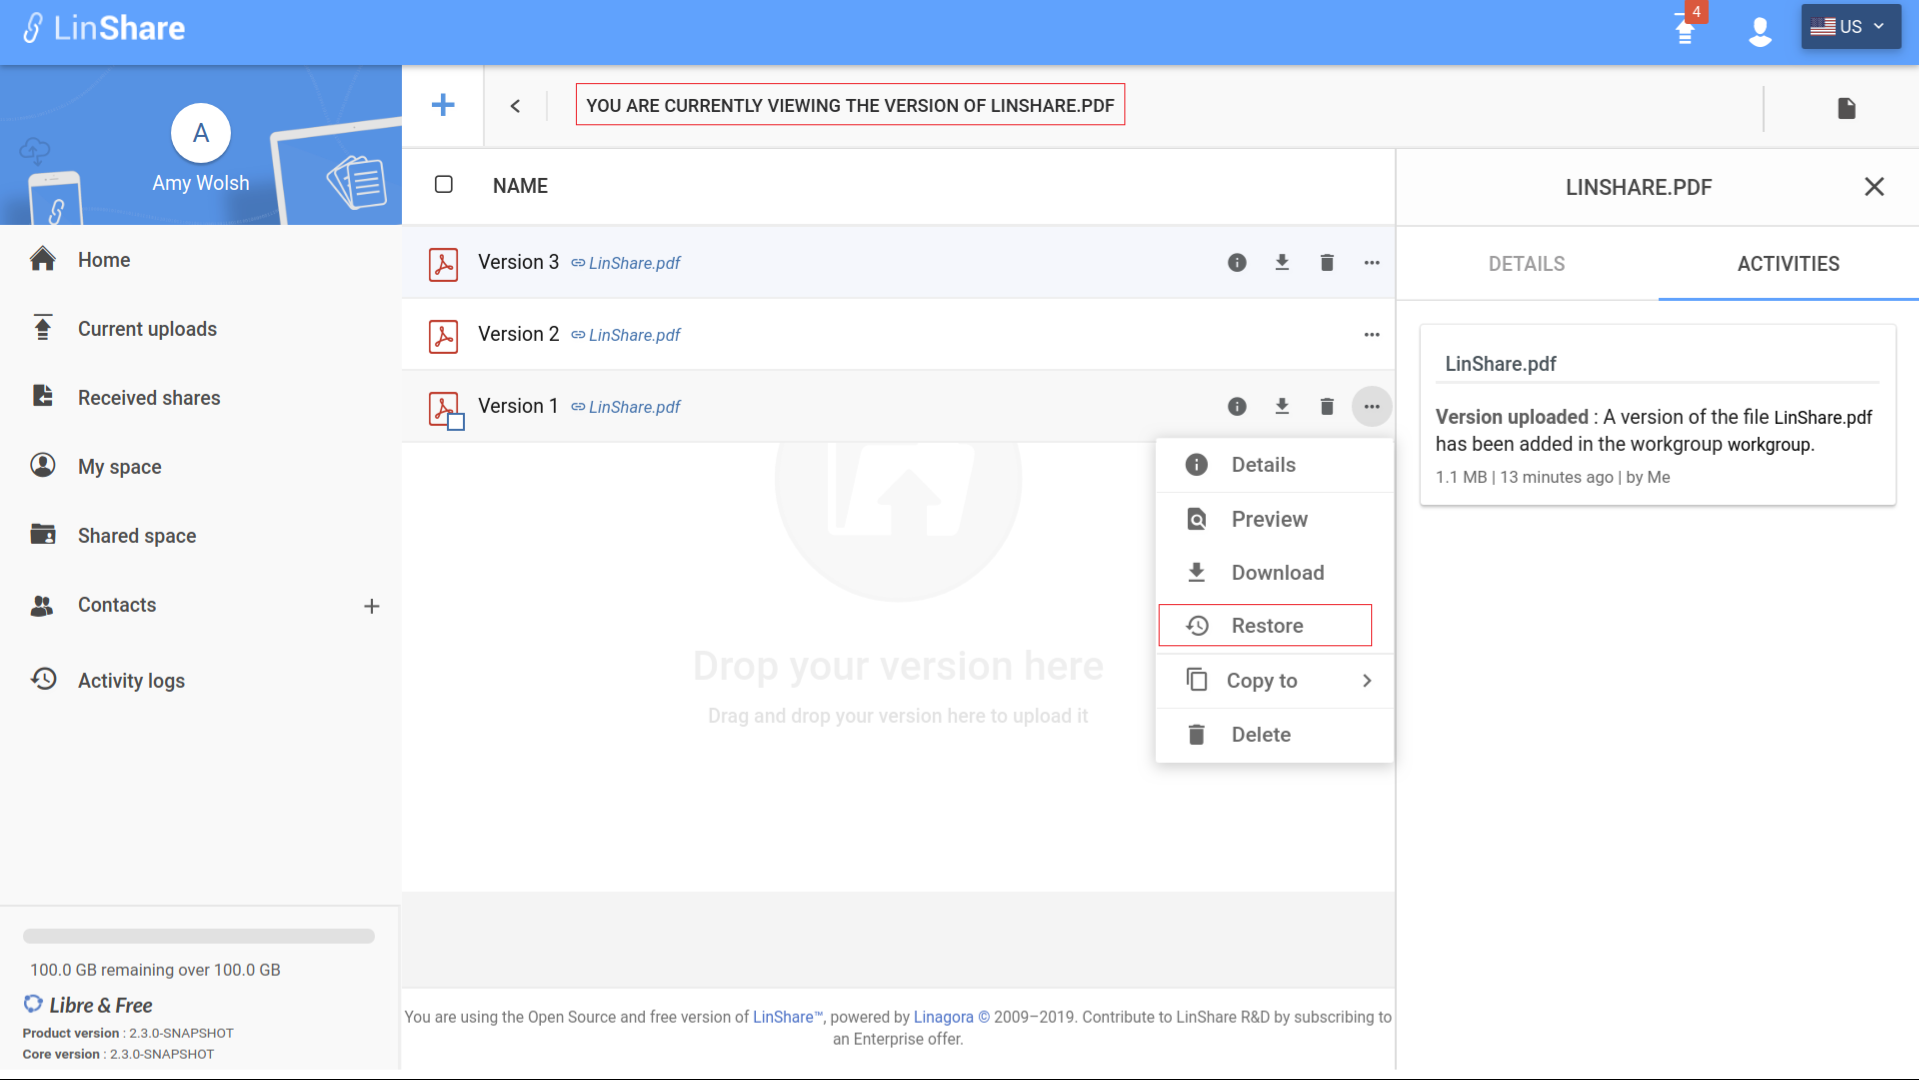 * [Mail attachement] : This feature will allow the LinShare administrators to upload and use their personal logo into all mail notifications.
* [Full Russian support] : This LinShare release will contain the Russian language for:
* Emails notifications
* User and Admin interfaces
* Welcome message
* [Mail attachement] : This feature will allow the LinShare administrators to upload and use their personal logo into all mail notifications.
* [Full Russian support] : This LinShare release will contain the Russian language for:
* Emails notifications
* User and Admin interfaces
* Welcome message
 All screenshots are available [here](http://download.linshare.org/screenshots/2.3.0/)
### Others features
* [Download folders] : This LinShare release will allow users to download folders in zip format.
You can find all the API documentation: [linshare-core-documentation-ws-api-userv2.tar.bz2](http://download.linshare.org/components/linshare-core/2.3.0/)
All screenshots are available [here](http://download.linshare.org/screenshots/2.3.0/)
### Fixes
* core:
* Fix delete sharedSpace member
* Fix retrieve audit related resources on workgroupNode
* Fix bug of expired shares deletion
### Extra informations:
#### LinShare components
* **core** : 2.3.0 - [changelog](https://github.com/linagora/linshare-core/compare/2.2.0...2.3.0)
* **ui-admin** : 3.3.0 - [changelog](https://github.com/linagora/linshare-ui-admin/compare/v3.2.0...v3.3.0)
* **ui-user** : 2.3.0 - [changelog](https://github.com/linagora/linshare-ui-user/compare/v2.2.0...v2.3.0)
* **thumbnail-server** : 2.0.3
* **linshare-plugin-thunderbird** : 1.8.0
#### Bug fixes and little improvments
* UI-User:
* SharedSpace:
* Member - Set default selected role by configuration
* Update shared space endpoint: From `shared_space_nodes` to `shared_spaces`
* Browser: Change of behavior
* From a regular file: Open in current location if rights to CREATE else in workgroup root
* From a version: Open in workgroup root
* Update API to use withRole query param to avoid another request to get the role of user for single or list of workgroups
* General:
* Update main secondary background theme color from Main & external to be coherent
* Fixes:
* Sidebar details:
* Fix title display when its length exceeds the width for mobile
* Fix the button previous in the details sidebar in mobile mode
* SharedSpace:
* Fix Create contact list from member
* Fix! SharedSpace sidebar member - UI dropdown
* General:
* Fix the bubble position of uploaded files on mobile
* Build:
* Fix! Custom theme generation: When passing from Ruby-Sass to Node-Sass, the config did not take into account the theme files
* Fix! build step ngAnnotate
* UI-Admin:
* Reordering Menu and dashboard menu - Enhance use experience.
* Fix! quota progress bar for one user in manage users
* Fix! display default and max value of the quota in a sub domain
* Fix! Workgroup details - UI - Role selector
* Fix! Menu - Css link
* Fix! creation/modification date format
#### Upgrade libraries
* core:
* Upgrad apache tika to 1.20v
* Upgrade jetty to 9.4.8
* Upgrade spring and spring security to 5.1.2.RELEASE
* Upgrade to Hibernate 5.3.7
* Upgrade spring data to Kay-SR11
* Upgrade guava to 27.0-jre
* Upgrade from jackson 1.9 to 2.9
* Upgrade Junit from 4.12 to 5.4.2
* Upgrade pypika library to 0.18.4 version
#### Removed dependencies:
* core:
* Replace deprecated antisamy library by new library to sanitize html injections
* Remove jackrabbit dependencies from LinShare
* Remove thumbnail dependency
* Remove apache chemistry dependencies
* Remove SOAP webservices
#### New API endpoints
* New endpoint is added to recover additional informations of the requested node like (number of sub-nodes, node's type, nodes'size)
```
/linshare/webservice/rest/user/v2/shared_spaces/{sharedSpaceUuid}/nodes/{sharedSpaceNodeUuid}/metadata
```
* Breaking change (fix): we replaced the accountUuid pathParam by a memberUuid in this endpoint.
```
/linshare/webservice/rest/user/v2/shared_spaces/{uuid}/members/{memberUuid}
```
All screenshots are available [here](http://download.linshare.org/screenshots/2.3.0/)
### Others features
* [Download folders] : This LinShare release will allow users to download folders in zip format.
You can find all the API documentation: [linshare-core-documentation-ws-api-userv2.tar.bz2](http://download.linshare.org/components/linshare-core/2.3.0/)
All screenshots are available [here](http://download.linshare.org/screenshots/2.3.0/)
### Fixes
* core:
* Fix delete sharedSpace member
* Fix retrieve audit related resources on workgroupNode
* Fix bug of expired shares deletion
### Extra informations:
#### LinShare components
* **core** : 2.3.0 - [changelog](https://github.com/linagora/linshare-core/compare/2.2.0...2.3.0)
* **ui-admin** : 3.3.0 - [changelog](https://github.com/linagora/linshare-ui-admin/compare/v3.2.0...v3.3.0)
* **ui-user** : 2.3.0 - [changelog](https://github.com/linagora/linshare-ui-user/compare/v2.2.0...v2.3.0)
* **thumbnail-server** : 2.0.3
* **linshare-plugin-thunderbird** : 1.8.0
#### Bug fixes and little improvments
* UI-User:
* SharedSpace:
* Member - Set default selected role by configuration
* Update shared space endpoint: From `shared_space_nodes` to `shared_spaces`
* Browser: Change of behavior
* From a regular file: Open in current location if rights to CREATE else in workgroup root
* From a version: Open in workgroup root
* Update API to use withRole query param to avoid another request to get the role of user for single or list of workgroups
* General:
* Update main secondary background theme color from Main & external to be coherent
* Fixes:
* Sidebar details:
* Fix title display when its length exceeds the width for mobile
* Fix the button previous in the details sidebar in mobile mode
* SharedSpace:
* Fix Create contact list from member
* Fix! SharedSpace sidebar member - UI dropdown
* General:
* Fix the bubble position of uploaded files on mobile
* Build:
* Fix! Custom theme generation: When passing from Ruby-Sass to Node-Sass, the config did not take into account the theme files
* Fix! build step ngAnnotate
* UI-Admin:
* Reordering Menu and dashboard menu - Enhance use experience.
* Fix! quota progress bar for one user in manage users
* Fix! display default and max value of the quota in a sub domain
* Fix! Workgroup details - UI - Role selector
* Fix! Menu - Css link
* Fix! creation/modification date format
#### Upgrade libraries
* core:
* Upgrad apache tika to 1.20v
* Upgrade jetty to 9.4.8
* Upgrade spring and spring security to 5.1.2.RELEASE
* Upgrade to Hibernate 5.3.7
* Upgrade spring data to Kay-SR11
* Upgrade guava to 27.0-jre
* Upgrade from jackson 1.9 to 2.9
* Upgrade Junit from 4.12 to 5.4.2
* Upgrade pypika library to 0.18.4 version
#### Removed dependencies:
* core:
* Replace deprecated antisamy library by new library to sanitize html injections
* Remove jackrabbit dependencies from LinShare
* Remove thumbnail dependency
* Remove apache chemistry dependencies
* Remove SOAP webservices
#### New API endpoints
* New endpoint is added to recover additional informations of the requested node like (number of sub-nodes, node's type, nodes'size)
```
/linshare/webservice/rest/user/v2/shared_spaces/{sharedSpaceUuid}/nodes/{sharedSpaceNodeUuid}/metadata
```
* Breaking change (fix): we replaced the accountUuid pathParam by a memberUuid in this endpoint.
```
/linshare/webservice/rest/user/v2/shared_spaces/{uuid}/members/{memberUuid}
```
An __intLevel__ of 0 means __returning all the parents of the specified DN, which is also included. ## __ldap.fsup__ function This function works like "ldap.sup(DN, 0)", to which an LDAP filter is applied, to get back only the DN that matches the pattern. ``` ldap.fsup (DN, ldapFilter) ``` ================================================ FILE: documentation/EN/administration/README.md ================================================ # Administration, configuration and exploitation * [Administration](linshare-admin.md) * [Configuration and administration](configuration-administration.md). * [Exploitation and administration](exploitation-administration.md). * [LDAP configuration](ldap.md). * [LQL Functions](LQL-functions.md). * How to [use custom email logo in LinShare](how-to-use-mail-attachment.md). * How to [use JWT on LinShare](how-to-use-jwt.md). * How to [use file versioning on LinShare](how-to-use-file-versioning.md). * [Lockout accounts](account-lockout-policy.md) * How to [configure password policy](configuration-password-policy.md) * How to [login into LinShare without email](how-to-login-without-email.md). * How to [migrate your Log4j 1.x configuration to Log4j 2.x](how-to-migrate-log4j-configuration.md). * How to [put log configuration in debug](how-to-put-log-configuration-in-debug.md). * How to [activate GDPR on LinShare](how-to-activate-gdpr.md) * How to [Use OIDC and LDAP providers for same domain](Use-OIDC-and-LDAP-same-domain.md) ================================================ FILE: documentation/EN/administration/Use-OIDC-and-LDAP-same-domain.md ================================================ # Using LDAP server as search provider in case of OIDC user provider ## Description Searching internal users (autocomplete) not already authenticated in case of OIDC user provider can be done if users are stored in LDAP server. ## Key Limitations - **No Auto-Provisioning**: LDAP search only - users won't be auto-created - **Anonymous Shares**: Unprovisioned users can get anonymous shares - **Search Scope**: Limited to LDAP branch defined in `baseDn` ## Configuration Workflow When configuring OIDC with LDAP autocomplete, internal users **not existing in LinShare's database** will receive anonymous shares. This guide explains how to enable LDAP user search while maintaining expected sharing behavior. You can avoid this problem by : 1- Creating a new LDAP connection (UI-Admin -> Configuration -> Remote servers) and set LDAP information. 2- Creating new User filter (UI-Admin -> Configuration -> User filters) and set LDAP information. 3- When creating/editing your OIDC provider: - Specify the baseDn parameter to target the LDAP branch containing internal users (e.g., ou=People,dc=linshare,dc=org). - This ensures user searches during file sharing are constrained to the correct LDAP subtree. After that you should add those lines in linshare.properties : ### Update `linshare.properties` guide Two properties have been introduced: ``` # LDAP Connection UUID (From: Remote Servers UI) oidc.ldap.connectionUuid=76ef5ee0-6513-4a64-b711-90a1bbdbfc55 # LDAP Pattern UUID (From: User Filters UI - Filter labeled 'pattern-ldap-local') oidc.ldap.provider.patternUuid=cd02e600-f324-4cea-9724-21d8647e9533 ``` ### Database Configuration To persist the LDAP branch configuration: 1. Table: user_provider 2. Column: base_dn 3. Target Row: `UPDATE user_provider SET base_dn = 'ou=People,dc=linshare,dc=org' WHERE uuid = 'your-user_provider-uuid' AND provider_type = 'OIDC_PROVIDER';` They allow to link every oidc connection to a ldap connection and pattern to be used as backup user provider (to retrieve client informations if absent from the DB) ================================================ FILE: documentation/EN/administration/account-lockout-policy.md ================================================ To enhance security into LinShare, lockout accounts feature is integrated in LinShare 4.0.0. # Lockout Rules: Account lockout rules are used by LinShare to lock out an account when user tries to log on unsuccessfully several times in a row. Here are the rules : - After 3 attempts : account locked for 10 minutes - After 6 attempts : account locked for 20 minutes - After 9 attempts : account locked for 60 minutes (1 heure) - After 12 attempts : account locked for 1440 minutes (1 journée) - After 15 attempts : account locked indefinitely (It is essential to request the administrator to unlock the account) # Unlock accounts The administrator has the ability to unlock a locked account. - In the left Menu side, select Users - Then choose the section manage users - Set in the search field the user's name then select him - If the user's account is locked you'll see a button that allows you to unlock him
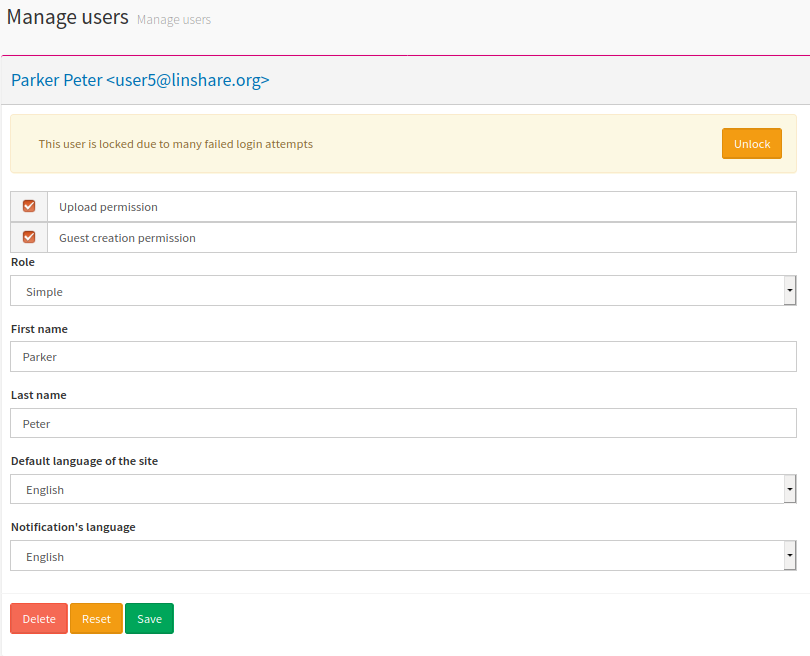 ================================================
FILE: documentation/EN/administration/configuration-administration.md
================================================
# System Settings
* [Path and Files](#num1)
* [Databases](#num2)
* [PostgreSQL](#num21)
* [MongoDB](#num22)
* [SMTP Settings](#num3)
* [SSO](#num4)
* [ClamAV antivirus ](#num5)
* [Job scheduler](#num6)
* [JWT (JSON Web Token)](#num7)
* [Application startup modes](#num8)
* [Document storage](#num9)
* [Thumbnail engine](#num10)
* [Additional settings](#num11)
System settings can be done in the file `/etc/linshare/linshare.properties`.
>Note:
================================================
FILE: documentation/EN/administration/configuration-administration.md
================================================
# System Settings
* [Path and Files](#num1)
* [Databases](#num2)
* [PostgreSQL](#num21)
* [MongoDB](#num22)
* [SMTP Settings](#num3)
* [SSO](#num4)
* [ClamAV antivirus ](#num5)
* [Job scheduler](#num6)
* [JWT (JSON Web Token)](#num7)
* [Application startup modes](#num8)
* [Document storage](#num9)
* [Thumbnail engine](#num10)
* [Additional settings](#num11)
System settings can be done in the file `/etc/linshare/linshare.properties`.
>Note:Restarting tomcat is required so that linshare-core can take the settings from `/etc/linshare/linshare.properties` into account. Here are all parameters from the __properties__ file: ## Path and Files - java.io.tmpdir (`/tmp/` by default). - log4j2.configuration (`file:/etc/linshare/log4j2.properties` by default). - linshare.config.path (`file:/etc/linshare/` by default). ## Databases ### PostgreSQL - linshare.db.driver.class : database driver. - `org.postgresql.Driver` PostgreSQL database driver (by default); - `org.h2.Driver` H2 database driver. - linshare.db.username : database username: (`linshare` by default). - linshare.db.password : database password: (`linshare` by default). - linshare.db.url : database host. Format : `connector:base://ip|hostname:port/database_name`: (`jdbc:postgresql://localhost:5432/linshare` by default). - linshare.db.pool.maxactive : maximum number of active connections (`100` by default). - linshare.db.pool.maxidle : maximum number of standby connections (`30` by default). - linshare.db.pool.maxwait : maximum number of waiting connections (`10000` by default). - linshare.db.pool.timebetweenevictionrunsmillis : delay between two recoveries (`180000` by default). ### MongoDB - linshare.mongo.client.uri : standard URI connection scheme to connect to (`mongodb://linshare:linshare@127.0.0.1:27017/linshare` by default) - linshare.mongo.gridfs.smallfiles.client.uri : standard URI connection scheme to connect to store tiny files such as thumbnails, mail attachments... (`mongodb://linshare:linshare@127.0.0.1:27017/linshare-files` by default). - linshare.mongo.gridfs.bigfiles.client.uri: store all files in MongoDB GridFS (`mongodb://linshare:linshare@127.0.0.1:27017/linshare-bigfiles` by default). Not recommended for production mode, it is advised to use instead **Jcloud** as a file data store (Amazon S3, Swift, Ceph, filesystem). - linshare.mongo.connect.timeout (`30000` by default) - linshare.mongo.socket.timeout (`30000` by default) - linshare.mongo.write.concern: - `MAJORITY`: waits on a majority of servers for the write operation (by default). - `JOURNALED`: Writes operations wait for the server to group commit to the journal file on disk. - `ACKNOWLEDGED`: Writes operations that use this write concern will wait for acknowledgement, using the default write concern configured on the server. ## SMTP Settings - mail.smtp.host : IP address or domain to connect to SMTP service (`smtp.yourdomain.com` by default). - mail.smtp.port : port to connect to SMTP service (`25` by default). - mail.smtp.auth.needed : - `true` : enable authentication by username/password in order to connect to SMTP service using `mail.smtp.user` and `mail.smtp.password`. - `false` : no authentication is required (by default). - mail.smtp.user : username to connect to SMTP service (`user` by default). - mail.smtp.password : password to connect to SMTP service (`password` by default). - mail.smtp.charset : Charset used for the SMTP service (`UTF-8` by default). - mail.smtp.ssl.enable: (`false` by default) - mail.smtp.starttls.enable: (`false` by default) ## SSO - sso.header.allowfrom.enable: - `true`: enable IP address filtering of SSO proxies (by default). - `false`: disable IP address filtering of SSO proxies. - sso.header.allowfrom : IP address list of SSO proxies that are allowed to inject HTTP headers. Separator is comma (`127.0.0.1` by default). - sso.header.user : HTTP header that contains the user id that is authenticated by the SSO service. > Note:
Concret example would be the creation of several domains invited in LinShare with several URLs. It would be then possible to force each vhost to search for an authenticated user in a specific domain. ## ClamAV antivirus - virusscanner.clamav.host : IP address of the antivirus host (`localhost` by default). - virusscanner.clamav.port : Available port to connect to the host machine (`3310` by default). - virusscanner.limit.filesize : Any file larger than the defined size (in bytes) will not be scanned by the antivirus (`50000000` ( 50 Mégabytes by default). by default) >Note:
Activation of this feature can be done in the administration menu of LinShare. See [linshare-admin](linshare-admin.md) for more details. ## Job scheduler - job.document.cleaner.activation - `true` enable job that removes old files ; - `false` disable this job (by default). - job.document.cleaner.cron.expression: frequency of the job that clears old files (`00011?`, each year by default). - job.ldapgroups.cron.expression (`000/4**?`, every 4 hours by default). - job.mimetype.cron.expression: frequency of the job that checks and updates file MIME types (`0300**?`, every day at 0:30 by default). - job.shares.cron.expression: frequency of the job that clears expired shares (`0300**?`, every day at 0:30 by default). - job.shares.undownloaded.notification.cron.expression (`006**?`, every day at 6:00 by default). - job.users.cron.expression (`000**?`, every day at midnight by default). - job.users.delay.before.purge (`7` by default). > Warning :
Even if a job that clears expired data and/or expired shares is configured to run, nothing will be remove unless the setting `job.document.cleaner.activation` is not set to `true`. ## JWT (JSON Web Token) - jwt.global.key.private.path: private key location (by default `/etc/linshare/id_rsa`) - jwt.global.key.public.path: public location (by default `/etc/linshare/id_rsa.pub`) - jwt.issuer: token issuer of LinShare (by default `LinShare`) - jwt.expiration: LinShare token expiration time (by default `300`) - jwt.token.max.lifetime: maximum accepted token expiration time coming from any external application (by default `300`) See [linshare-admin](../../EN/administration/how-to-use-jwt.md) for more details. ## Application startup mode - linshare.mode.production : - `true` : in production (by default); - `false` : otherwise: display server errors details on the clients. ## Document storage (JCloud) > Remember to set your profile to `jcloud` to use those storages. `gridfs` is deprecated. ### Storage mode selection - **linshare.documents.storage.mode** - `filesystem`: stores documents on file system for local storage (by default) - `swift-keystone`: stores documents into swift without region support (generic). - `openstack-swift`: stores documents into openstack swift with region support(regionId will be mandatory). - `aws-s3`: stores documents into Amazon S3. - `s3` : stores document through s3 protocols - **linshare.documents.storage.providers**: is a list of supported providers, for which we tested and/or provided a specific connector. But you can try to add jcloud compatible storage modes to be used by our default implementation. Storage mode selected in `linshare.documents.storage.mode` must be available in this property. ### Storage parameters * For local storage (by default) - **linshare.documents.storage.filesystem**: path to the local storage (`directory=/var/lib/linshare/filesystemstorage` by default) * For online storage: - **linshare.documents.storage.endpoint**: online storage IP address (`http://127.0.0.1:5000/v2.0` by default) - **linshare.documents.storage.identity**: online storage username (`identity` by default) - **linshare.documents.storage.credential**: online storage password (`password` by default) - **linshare.documents.storage.bucket**: online storage bucket (`e0531829-8a75-49f8-bb30-4539574d66c7` by default) - **linshare.documents.storage.multipartupload**: do you want multipart upload (`false` by default) - If using `openstack-swift` : - **linshare.documents.storage.regionId**: region id to use - **linshare.documents.storage.keystone.version**: keystone version to use - **linshare.documents.storage.project.name**: project name to use - **linshare.documents.storage.multipartupload**: should be set to `true` - If using`s3` or `aws-s3` : - **linshare.documents.storage.forceS3SignatureVersion**: integer forcing a specific signature version. Accepted values are 2 or 4; others will be ignored and version will be chosen automatically by jcloud (default is 0) - **linshare.documents.storage.endpoint**: becomes optional. If absent, `identity` and `credential` will be used to connect. > Note: `linshare.documents.storage.identity` can be replaced by `linshare.documents.storage.user.domain` & `linshare.documents.storage.user.name` (both must be present) ### Additional jcloud parameters There are additional jcloud properties that can be added though a configuration file inside `linshare.war` that you can edit `/WEB-INF/classes/OPTIONAL-springContext-storage-jcloud.xml` : Here are default added properties : ```
The version suffix `+` means that the application is compatible with any higher version. Otherwise, the application is only compatible with the specified version. | Description | Value | | ---------- | ------- | | Arch. | x64/x86 | | CPU | ? | | RAM | ? | | Disk Space | 1 GB for the application + as much space as necessary for the files | | OS | Linux CentOS 7+ or Debian 8+ | | Kernel | 3.10+ (CentOS) | #### Dependencies : | Dependency | Version | | ---------- | ------- | | Java (openjdk) | 8 (linshare 2.0 to 2.3) or 11 (from linshare 2.4) | | PostgreSQL | 9.2.24+ | | MongoDB | 3.2.22+ | | apache | 2.4.6+ | | tomcat | 7 (CentOS) / tomcat 8 (Debian) | | libreoffice | 6.2 | ### Global Architecture  ### Services, Components and Logs The LinShare application consists in several components; each component is matching a service. Being able to manage those services and analysing the logs helps to quickly troubleshoot issues. This table gives an overview of all the services that are used by the LinShare application. | Component | Service | Configuration file | Log file | | --------------- |:-------------|------------|:---------------:| | Servlets Container | tomcat8 (Debian) | /var/lib/tomcat8/conf/catalina.properties | /var/log/tomcat8/catalina.out | | | tomcat (CentOS) | /etc/httpd/conf.d/ | /var/log/tomcat/catalina.out | | Web Server | apache2 (Debian) | /etc/apache2/sites-available/ | /var/log/apache2/linshare* | | | httpd (CentOS) | /usr/share/tomcat/conf/catalina.properties | /var/log/httpd/linshare* | | PostgreSQL | postgresql | /var/lib/pgsql/data/pg_hba.conf | /var/lib/pgsql/data/pg_log/ | | MongoDB | mongod | /etc/mongod.conf | /var/log/mongodb/mongod.log | | Thumbnail engine | linshare-thumbnail-server | /etc/linshare/linshare-thumbnail-server.yml | /var/log/thumbnail-server.log | >Note :
See the appropriate section [Services & Components](#sac) for the way to start, stop, see the status of any service. ### Network Architecture | Port | Transport | Service/Component | Protocol | Description | | ---- | --------- | ----------------- | --------- | ----------- | | 25 | tcp | postfix | SMTP | Outgoing mail server | | 636 | tcp | slapd | LDAPS | Directory services | | 443 | tcp | httpd or apache2 / nginx | HTTPS | Client interface (web browser or email client extension) with LinShare font-end | | 8080 | tcp | tomcat8 or tomcat | HTTP | Interface between LinShare front-end and back-end | | 8005 | tcp | tomcat8 or tomcat | AJP | Tomcat `Shutdown` port | | 8009 | tcp | tomcat8 or tomcat | AJP | Internal Tomcat management interface to manage application servlets | | 443 / 6800->7300 / 500 | tcp | jCloud Storage | HTTPS | Optional Storage : Amazon S3 / ceph / swift | | 5432 | tcp | postgresql | PostgreSQL Wire Protocol | PostgreSQL connection socket | | 27017 | tcp | mongod | MongoDB Wire Protocol | MongoDB connection socket | | 8090 | udp | linshare-thumbnail-server | ? | libreoffice thumbnail socket (optional) |  ## System Configuration ### System Settings #### Java See the installation process dedicated to this configuration : [CentOS](../installation/linshare-install-centos.md#openjdk-java-jre-installation) or [Debian](../installation/linshare-install-debian.md#openjdk-java-jre-installation). #### PostgreSQL See the installation process dedicated to this configuration : [CentOS](../installation/linshare-install-centos.md#postgresql-installation) or [Debian](../installation/linshare-install-debian.md#postgresql-installation). #### MongoDB See the installation process dedicated to this configuration : [CentOS](../installation/linshare-install-centos.md#mongodb-installation) or [Debian](../installation/linshare-install-debian.md#mongodb-installation). #### Tomcat See the installation process dedicated to this configuration : [CentOS](../installation/linshare-install-centos.md#tomcat-installation) or [Debian](../installation/linshare-install-debian.md#tomcat-installation). #### Web Server See the installation process dedicated to the Apache configuration : [CentOS](../installation/linshare-install-centos.md#web-server-installation) or [Debian](../installation/linshare-install-debian.md#web-server-installation). >Note:
Nginx configuration is not part of this documentation. #### Firewall See the installation process dedicated to the `firewalld` configuration : [CentOS](../installation/linshare-install-centos.md#firewall-configuration). ### Application Settings #### Session Live Time This configuration can be changed in the following file: - Debian : `/usr/local/tomcat/conf/web.xml` - CentOS : `/etc/tomcat/web.xml` Replace by the desired value (time is in minutes!) ```xml
It is possible to create your own theme. Please see [creating_a_theme_for_linshare](../development/linshare-ui-user/creating_a_theme_for_linshare.md) for more details. To switch between themes, it is necessary to define a redirection rule for the css theme file : it has to be done at the web server level (Apache or nginx), but only for the front-office. The Apache configuration file to edit is in: * `/etc/httpd/conf.d/linshare-ui-user.conf` on CentOS * `/etc/apache2/sites-available/linshare-ui-user.conf` on Debian. The following example shows an Apache redirection. The Apache configuration was taken from a standard configuration (see the appropriate installation page : [CentOS](../installation/linshare-install-centos.md#ui-user) or [Debian](../installation/linshare-install-debian.md#ui-user)). Here is a full Apache configuration example for the LinShare front-office, in order to get the `red` theme: ```xml
Never manually edit the `stylesheet` reference in the file `linshare-ui-user/index.html`. Indeed, the file suffix name will change at each new LinShare version. > Note:
For Docker images, there is an environment variable to set for overriding the theme: `LINSHARE_THEME`. This variable can take one of those values: `default`, `darkgreen`, `red`, or any other installed theme name. ##### Advanced theming In the config/config.js file, you also have the possibility to override some images: ```js // To override the application logo set the url of the image corresponding to the sizes (small 155x29 and big 500x192) applicationLogo : { small : 'images/common/linshare-logo-white.png', large : 'images/ls-logo-big.png' }, // To override the background image of the login screen set the url of the image loginBackground : 'images/bg-linshare-desktop.png', ``` #### Java properties file Please refer to the [dedicated page](./configuration-administration.md). #### log4j properties file (only CentOS) > Warning:
This section only applies to CentOS, since Debian is using `logrotate`. LinShare is using the Java-based logging utility `log4j 2` **for CentOS**. Its configuration is located in the file `/etc/linshare/log4j.properties`. ##### Log levels The utility `log4j 2` defines the built-in log levels and messages, in decreasing order of severity : | Level | Description | | ------ | ----------- | | OFF | No logging. | | FATAL | Severe errors that cause premature termination. | | ERROR | Other runtime errors or unexpected conditions. | | WARN | Use of deprecated APIs, poor use of API, other runtime situations that are undesirable or unexpected, but not necessarily wrong. | | INFO | Interesting runtime events (startup/shutdown). | | DEBUG | Detailed information on the flow through the system. Everything that is logged in LinShare is visible at this verbosity level. | | TRACE | Most detailed information (not used, equivalent to `DEBUG` for LinShare). | >Note:
By default, the application is provided with `INFO` as log level. It can be necessary to switch to the `DEBUG` lebel in order to get more details about the debugging for example. This setting is available under `log4j.rootCategory` in the configuration file `/etc/linshare/log4j.properties` : ```java log4j.rootCategory=INFO, LINSHARE ``` >Note:
The second element of the setting `log4j.rootCategory` stands for a `Logger`, which means a log message destination. Each `Logger` is independently configurable as to what level of logging it currently logs. Usually, one `Logger` is used for each Java application : which is the case for LinShare : its name is therefore `LINSHARE`. It is recognized by the Java application and shall therefore not be edited. ##### Destinations `Appenders` are responsible for delivering LogEvents to their destination. There are several types, each type having its own specific settings. Here is the list of the most popular `Appenders` : | Type | Description | | ---- | ----------- | | ConsoleAppender | Writes logs into the Java console : `System.out` (standard output: by default if not specified) or `System.err` (standard error). | | RollingFileAppender | Writes logs into the specified file. It rolls the file over according to a defined file size as well as a number of files to split the logs. | | DailyRollingFileAppender | Writes logs into the specified file. It rolls the file over according to a defined timeslot. This is what is used by default in LinShare. | | JDBCAppender | Writes logs into a buffer which will then send them into a SQL database. | `Appender` type is defined throw the setting `log4j.appender.LINSHARE` in the LinShare configuration file `/etc/linshare/log4j.properties` : ```java log4j.appender.LINSHARE=org.apache.log4j.DailyRollingFileAppender ``` >Note:
To get to know more about the available `Appenders`, please refer to the [official log4j documentation](https://logging.apache.org/log4j/2.x/manual/appenders.html). The `Appender` `DailyRollingFileAppender` is used by default in LinShare, and provides settings to configure : * Absolute path to the log file * Append (by default) / Overwrite logs (rarely usefull) * Encoding * Rotating log period * Customize logging format. All these settings can be respectively found in the LinShare configuration file `/etc/linshare/log4j.properties` : ```java log4j.appender.LINSHARE.File=/var/log/tomcat/linshare.log log4j.appender.LINSHARE.Append=true log4j.appender.LINSHARE.Encoding=UTF-8 log4j.appender.LINSHARE.DatePattern='.'yyyy-MM-dd'.log' log4j.appender.LINSHARE.layout = org.apache.log4j.PatternLayout log4j.appender.LINSHARE.layout.ConversionPattern=[%p]:%t:%d{yyyyMMdd.HHmmss}:%c:%M:%m%n log4j.appender.CONSOLE=org.apache.log4j.ConsoleAppender log4j.appender.CONSOLE.layout=org.apache.log4j.PatternLayout log4j.appender.CONSOLE.layout.ConversionPattern=[%p]:%t:%d{yyyyMMdd.HHmmss}:%c:%M:%m%n ``` ##### Log Rotation The setting `log4j.appender.LINSHARE.DatePattern` can be used to define the log rotation period. By default, it is defined at midnight every day. Is is possible to define other periods. Here are some examples of possible configurations : | DatePattern | Description | | ----------- | ----------- | | `'.'yyyy-MM` | Log rotation at the beginning of each mounth. | | `'.'yyyy-ww` | Log rotation the first day of the week (depends on localization parameters). | | `'.'yyyy-MM-dd` | Log rotation every day at midnight. | | `'.'yyyy-MM-dd-a` | Log rotation twice a day : midnight and midday. | | `'.'yyyy-MM-dd-HH` | Log rotation every hour. | | `'.'yyyy-MM-dd-HH-mm` | Log rotation every minute. | ##### Other settings There are other framework development specific settings in `/etc/linshare/log4j.properties` : see the file for more details. ## Management & Exploitation ### Maintenance Mode Maintenance Mode allows the LinShare administrator to block any further LinShare file uploads. >Note:
Interface user access is not affected. Maintenance mode's target is at domain level. For more details, [see the dedicated page](../../FR/administration/linshare-admin.md#configuration-du-quota-des-domaines) [`FR`]. ### Services & Components For the services & components list (name, description, path to the configuration files, logs, etc.), see [above](#csal). >Note:
This section only describes the exploitation tasks in general. Commands are listed with the `
This section has been tested with version 2.3.0 of LinShare. It is possible that some SQL queries have to be adapted pour higher versions of LinShare. From a Linux shell, under the `root` user, type in the different commands, in order to access the SQL interpreter : ```bash [root@linshare-linagora /]# su - postgres Last login: Wed Sep 18 16:11:27 CEST 2019 on pts/0 -bash-4.2$ psql -d linshare psql (9.2.24) Type "help" for help. linshare=# ``` At the end of the operation, the following commands can be used in order to go back to the initial Linux shell : ```bash linshare=# \q -bash-4.2$ exit logout [root@linshare-linagora /]# ``` #### Plateform Statistics ##### Number of documents ```sql select count(*) from document; ``` ##### Size sum of all documents ```sql select sum(ls_size) from document; ``` >Warning:
This sum represents the virtual size used by those documents. Indeed, the component in charge of the document storage is making a data deduplication of those files. ##### The top 10 biggest files ```sql select * from document order by ls_size desc limit 10; ``` ##### Number of users having at least shared a document ```sql select count(distinct mail) from users as u join log_entry as l on u.mail = l.actor_mail where log_action = 'FILE_SHARE_WITH_ALERT_FOR_USD' or log_action = 'FILE_SHARE' ; ``` #### User statistics The string
This sum represents the virtual size used by those documents. Indeed, the component in charge of the document storage is making a data deduplication of those files. ##### Number of shared documents ```sql select count(*) from entry as e join document_entry as d on e.id = d.entry_id join account as a on a.id = e.owner_id where shared >= 1 and mail = '
* You need to specify correctly the path to private key `id_rsa` and public key `id_rsa.pub`.
* LinShare supports two public keys formats : `SSH` and `PEM`.
Now You can request LinShare services to generate your JWT : curl -H 'Accept: application/json' -H 'Content-Type: application/json' .../linshare/webservice/rest/user/v2/authentication/jwt -u "`email`:`password`" Server respond with the new token. To authenticate to LinShare using your token, you can use this CURL : curl -H 'Accept: application/json' -H 'Content-Type: application/json' .../linshare/webservice/rest/user/v2/authentication/authorized -H "Authorization: Bearer $token" #### 3) Store your public key Admin of Linshare can store new public key with unique __ISSUER__. This is allows an other application to be authenticated to LinShare by using its own JWT. You can use this cURL to store your public_key on LinShare : ``` curl -H 'Accept: application/json' -H 'Content-Type: application/json' http://*****/linshare/webservice/rest/admin/public_keys -u "admin email: admin password" -d '{ "domainUuid" : "LinShareRootDomain", "issuer" : "issuer", "publicKey" : "-----BEGIN PUBLIC KEY-----\nMIIBIjANBgkqhkiG9w0BAQEFAAOCAQ8AMIIBCgKCAQEA5NqIm6/34kSSifBgRdKG\nYGZCYa3yA+/WYcuKoSJEeR33dT/T8W+uNxLa5WC1V2HUJpGpI7k3vXZEv8Ge2luo\nSKzGjpbP9tJsiSMmpe8EkE0ckH17uBltIU8E6rmdJv1BEZwjYitKahXDNc2Hvz52\nlIcFB/Bs4egy0hw/Zr1dXLca5/jY2MQTExnjTI4iuKmQaNRIYo2sQ/41JuyGD/So\ncxZ7kjIQPwgtju4N0h9NovnpzbUkcoKiFFVVv7HVn3tVSgOPBlMfrTFexvT90W/r\nAtqZlVfMm1DLehpJ3+jkhqscppMEl9R4+d24O6v+xlDUid54HXYss78uWi4wElVu\njwIDAQAB\n-----END PUBLIC KEY-----", "format" : "PEM" }' ``` > important :
The PEM key format, contain some line breaks, so you need to add `\n` on the end of each line, to make this key authentic. #### 4) Generate a permanent token LinShare proposes also to create a token without expiration date. From the admin interface, the new `JWT permanent token` functionality allows a LinShare administrator to : * Enable or disable this functionality. * Allow admin of his subDomain to create a new tokens. * Allow the user to view and delete his tokens. * Allow the user to create his own authentication token. You can refer to LinShare Web service API documentation to use it. See `linshare-core-2.2.0-documentation-ws-api-userv2.tar.bz2` document here http://download.linshare.org/components/linshare-core/2.2.0-1/ You can use the following cURL to generate and show a permanent token with user role : * Create a new permanent token : ``` curl -H 'Accept: application/json' -H 'Content-Type: application/json' http://****/linshare/webservice/rest/user/v2/jwt -u "`email`:`password`" -d '{"label" : "LinShare permanent token" }' ``` * Show my own permanent token : ``` curl -H 'Accept: application/json' -H 'Content-Type: application/json' http://****/linshare/webservice/rest/user/v2/jwt/ -u "`email`:`password`" ``` And this is cURL for administrator to generate a token for another user : * Create a permanent token for a user : ``` curl -H 'Accept: application/json' -H 'Content-Type: application/json' http://****/linshare/webservice/rest/admin/jwt?actorUuid=`actorUuid` -u "`admins email`:`admin password`" -d '{ "domainUuid": "`domainUuid`", "actorUuid": "`actorUuid`", "issuer": "`issuer`", "label": "LinShare permanent token", "description": "description", "subject": "actor email" }' ``` * Show all permanent token on my domain : ``` curl -H 'Accept: application/json' -H 'Content-Type: application/json' http://*****/linshare/webservice/rest/admin/jwt?domainUuid=`domainuuid`-u "`admins email`:`admin password`". ``` ================================================ FILE: documentation/EN/administration/how-to-use-mail-attachment.md ================================================ # How to use mail attachment on LinShare ## Overview * [Definition](#1-definition) * [How to use mail attachment](#2-howTo) ### 1. Definition In previous versions of LinShare, the template of the email notification is predefined and uneditable. Since the version 2.3, LinShare allows the administrator to personalize the logo in the email notification by overriding the default one without the need to duplicate the current mail configuration. It is the only part of the mail configuration which is editable. All the rest remains in read only mode. For more advanced customisation, you must create your own mail configuration, with your own mail layout and mail contents. ### 2. How to use mail attachment Only API are available for the mail attachment feature for now. It means there is no screens in the administration interface, you must use the command line interface, aka `linshareadmcli`, to use this feature. The CLI is available through PyPi (Python Package index) [here](https://pypi.org/project/linsharecli/). By default `LinShare` provides a MailConfiguration object containing a layout and a set of mail contents. In this layout, you will find the default linShare logo referenced by the CID (Content ID) `logo.linshare@linshare.org`. **Use case 1: Override the default logo:** You can override the default logo by creating a mail attachment object into the default mail configuration as we will see in the example below. `linshareadmcli mail_configs list` ``` +---------------------+--------------------------------------+--------------------+----------+---------+---------------------+---------------------+ | name | uuid | domain | readonly | visible | creationDate | modificationDate | +---------------------+--------------------------------------+--------------------+----------+---------+---------------------+---------------------+ | Default mail config | 946b190d-4c95-485f-bfe6-d288a2de1edd | LinShareRootDomain | False | True | 2020-07-24 12:40:13 | 2020-07-24 12:40:13 | +---------------------+--------------------------------------+--------------------+----------+---------+---------------------+---------------------+ ``` * We can see here, by default we have an empty list of mail attachments related the default mail configuration: `linshareadmcli mail_attachments 946b190d-4c95-485f-bfe6-d288a2de1edd list` ``` +------+------+-----+--------+--------------+----------+-------------+ | uuid | name | cid | enable | enableForAll | language | description | +------+------+-----+--------+--------------+----------+-------------+ +------+------+-----+--------+--------------+----------+-------------+ ``` * You can find below the list of information which you need to know before starting the mail attachment's upload process ` linshareadmcli mail_attachments 946b190d-4c95-485f-bfe6-d288a2de1edd create -h ` Output: ``` usage: linshare-admin-cli mail_attachments mail_config create [-h] [--cid CID] [--name NAME] [--description DESCRIPTION] [--language {ENGLISH,FRENCH,RUSSIAN}] [--alt ALT] [--disable] [--cli-mode] logo positional arguments: logo Path to the file (logo) to upload optional arguments: -h, --help show this help message and exit --cid CID Content id for the mail attachment. Use the 'logo.linshare@linshare.org' CID to override the default LinShare logo. If you are using your own CID, you must create your own mail layout and reference it. --name NAME --description DESCRIPTION --language {ENGLISH,FRENCH,RUSSIAN} By default, the new logo will be used with all languages. If set, you will override only one language. --alt ALT --disable When enabled, mail attachment will be used during server side mail rendering. By default, mail attachments are enabled. --cli-mode It will only display the created resource uuid. ``` * Create a new mail attachment related to the default mail configuration: ` linshareadmcli mail_attachments 946b190d-4c95-485f-bfe6-d288a2de1edd create --cid logo.linshare@linshare.org --name mailAttachment --description `test upload custom mail attachment` --language ENGLISH
 `linshareadmcli mail_configs list`
```
+-----------------------+--------------------------------------+--------------------+----------+---------+---------------------+---------------------+
| name | uuid | domain | readonly | visible | creationDate | modificationDate |
+-----------------------+--------------------------------------+--------------------+----------+---------+---------------------+---------------------+
| Default mail config | 946b190d-4c95-485f-bfe6-d288a2de1edd | LinShareRootDomain | False | True | 2020-07-24 12:40:13 | 2020-07-24 12:40:13 |
| MyCustomConfiguration | f0661920-074e-43bc-a234-3ac461c2f928 | LinShareRootDomain | False | True | 2020-08-26 11:02:06 | 2020-08-26 11:02:06 |
+-----------------------+--------------------------------------+--------------------+----------+---------+---------------------+---------------------+
```
The new mail configuration is created.
* An empty list of mail attachments related the new mail configuration:
`linshareadmcli mail_attachments f0661920-074e-43bc-a234-3ac461c2f928 list`
```
+------+------+-----+--------+--------------+----------+-------------+
| uuid | name | cid | enable | enableForAll | language | description |
+------+------+-----+--------+--------------+----------+-------------+
+------+------+-----+--------+--------------+----------+-------------+
```
* Then you can upload the new mail attachment related to your new mail configuration.
`linshareadmcli mail_attachments f0661920-074e-43bc-a234-3ac461c2f928 create --cid logo.linshare@linshare.org --name mailAttachment --description 'upload my custom attachment'
`linshareadmcli mail_configs list`
```
+-----------------------+--------------------------------------+--------------------+----------+---------+---------------------+---------------------+
| name | uuid | domain | readonly | visible | creationDate | modificationDate |
+-----------------------+--------------------------------------+--------------------+----------+---------+---------------------+---------------------+
| Default mail config | 946b190d-4c95-485f-bfe6-d288a2de1edd | LinShareRootDomain | False | True | 2020-07-24 12:40:13 | 2020-07-24 12:40:13 |
| MyCustomConfiguration | f0661920-074e-43bc-a234-3ac461c2f928 | LinShareRootDomain | False | True | 2020-08-26 11:02:06 | 2020-08-26 11:02:06 |
+-----------------------+--------------------------------------+--------------------+----------+---------+---------------------+---------------------+
```
The new mail configuration is created.
* An empty list of mail attachments related the new mail configuration:
`linshareadmcli mail_attachments f0661920-074e-43bc-a234-3ac461c2f928 list`
```
+------+------+-----+--------+--------------+----------+-------------+
| uuid | name | cid | enable | enableForAll | language | description |
+------+------+-----+--------+--------------+----------+-------------+
+------+------+-----+--------+--------------+----------+-------------+
```
* Then you can upload the new mail attachment related to your new mail configuration.
`linshareadmcli mail_attachments f0661920-074e-43bc-a234-3ac461c2f928 create --cid logo.linshare@linshare.org --name mailAttachment --description 'upload my custom attachment' Every tasks have to be executed in order to complete the update. While some 'Mandatory' tasks are not done, it will be impossible for the users to use the system. While some 'Required' tasks are not done, the system will work in a downgraded mode. Some functionalities or data might not be accessible. Those tasks might be executed while the system is being used. Now you can execute your SQL script. In most cases, you may want to add your SQL queries to a migration script so that, the upgrade tasks are avalaible and ready to be lauched after the upgrade of your LinShare application. #### 4 Add your upgradeTask bean in the adminUpgradeTaskRestService bean into scriptContext-upgrade.xml : Example :
From the Product Owner, Engineering Team should be aware of the prioritized topics for the development process | - From the list of user stories with the label `STORY::READY`, a series of technical issues are established. all developers must subscribe to this label to get updates.
- Technical issues must be linked with corresponding Story issues (using "Linked issues" module), `Development:xxx` labels must be added to the story to identify the needs. (Refer to [Development labels](##development-labels))
- `BACKEND:xxx` and/org`FRONTEND:xxx` labels must also be added to materialize the progress of this achievement. (Refer to [Development state labels](##development-state-labels)). Frontend developers should subscribe to `BACKEND:READY` label to get updates.
- Once we start working on a tech issue, STORY must be updated with label to `STORY::IMPLEMENTING`.
- After a user story is implemented, update the story issue label to `STORY::IMPLEMENTED`
- Notify the QA department to start testing process | Engineering Team (specifically current Scrum Master or Lead Developer) | | **A series of test criteria**
These activities are commenced right when user stories are finished | - For each user stories, QA personnel in charge at the moment will create a series of test critera | QA Department | | **Stable feature, ready for release**
These activities start after a feature is implemented from Engineering Team | - In case of any issue regarding the implemented user story, QA personnel will create an issue in linshare-qa repository.
- Issues must be well defined, using provided template, labelled accordingly. (Refer to [Severity labels](##severity-labels))
- Dev team will analyze the issue in QA board and add one state label (Refer to [State labels](##state-labels)), and then, if needed, create technical issues in the related repository
- Dev team will update the QA issue according to the related component, f.i backend issue with `DEVELOPMENT::core`, frontend web app with `DEVELOPMENT::ui`,
- Then the PO must define the priority and the target of the issue, ie in which versions this issue must be fixed,
- Once the technical issues are handled, developers must update the QA issue status to `To Do`
- When the issue is fixed or implemented, satisfying the definition of done. QA personnel will then close the issue | Engineering Team, QA Department | > At the first daily of the week, each week, two members of the Dev team, one front, one back, will be chosen to review the QA board and analyse issues. ## Development rules * Once the technical issue is created, severity, priority and target labels must be set according to the QA issue (if they are defined) * For each merge request, we must set the milestone field according to the release, ex "LinShare release 4.1.3" or "LinShare release 4.0.4". * Once the QA issues have been reviewed and technical issues created, dev team must assign the QA issue to the PO, then he will be able to set TARGET and PRIORITY labels. ## Releases ### Milestones and labels Before planning a new release for a component, a new "LinShare release x.y.z" milesone must be created as long as its related TARGET label. For the version 4.1.3, we must create the label TARGET:4.1.3 and the milestone "LinShare release 4.1.3". Once a component is released, all closed issues marked with the label TARGET:4.1.3 must be updated with the milestone "LinShare release 4.1.3". Once the sprint is completed, the PO updates the milestone field with "LinShare release" milestone according to the higher target label. ie: if an issue has the target 4.0.4 and 4.1.3, the milestone value will be "LinShare release 4.1.3". ## Annexes #### Severity labels | Severity label | Description | |----------------|-------------| | Severity::Critical | This defect indicates complete shut-down of the application, nothing can proceed further | | Severity::Major | It is a highly severe defect and collapses the system. However, certain parts of the system remain functional | | Severity::Medium | It causes some undesirable behavior, but the application is still functional | | Severity::Minor | It won't cause any major break-down of the application | > Labels handle by the QA team #### State labels | State label | Description | |----------------|-------------| | STATE::CONFIRMED | This issue is confirmed and need to be fixed.| | STATE::PENDING | This issue is not yet confirmed, it may be a false positive, a missing feature, a corner case, same data are needed to pursuit the investigation. | | STATE::REJECTED | This isn't a bug, it could be a false positive, a feature or a corner case that we won't handle. | > Labels handle by the Dev team #### Priority labels | Priority label | Description | |----------------|-------------| | Priority::Urgent | This issue must be handled right now.| | Priority::High | This issue must be handled by the end of the current sprint or at the begining of next one. | | Priority::Medium | This issue should be handled when we have spare time, when the sprint finishes earlier than planned.| | Priority::Low | This issue can be handled by for say newcommers, as a way to discover LinShare without pressure. | > Labels handle by the PO #### Development labels | Development label | Description | |----------------|-------------| | Development::Core | This issue has an impact on backend components.| | Development::UI | This issue has an impact on the frontend components. | > Labels handle by the Dev team, they must be added once tech issues are created. #### Development state labels | Development state label | Description | |----------------|-------------| | BACKEND::TODO | Tech issues were created, waiting to be implemented. | | BACKEND::READY | Tech issues were created and implemented. | | FRONTEND::TODO | Tech issues were created, waiting to be implemented. | | FRONTEND::READY | Tech issues were created and implemented. | > Labels handle by the Dev team, they must be added once tech issues are created/implemented. ================================================ FILE: documentation/EN/development/workflow/story-definition.md ================================================ ## Story definition For any new feature or update on an existing feature, Project Owner and Business Analyst should work together to validate the details of the change of the product. #### Participants - Product Owner, Business Analyst, UI Designer - To be informed: QA department, Engineering Teams #### Activities | Outcomes | Activities | Participants | |----------|------------|--------------| | **Well defined EPIC**
For any EPIC, there should be one created issue and and another document store in this repository. The content stored in this repository is the single source of truth for any changes to the EPIC | - Create an issue with a label `EPIC::Draft` using the [Epic Template](../../../../.gitlab/issue_templates/epic.md).
- Update the label to `EPIC::Writing` once the EPIC content is finished | Product Owner | | **A complete list of user stories**
Similarly with EPIC, for any user stories, there are one User Story issue and a document stored in this repository. | These following activities are applied two scenarios:
1. When defining the user stories of an epic
2. When a user story requires an update
- For each user stories, create an issue for it using the [Story template](../../../../.gitlab/issue_templates/story.md), use the label `STORY::Draft`
- Create a merge request to commit all the user stories to this repository
- Participants will then review and make changes on the content of the merge request, any updates must be mirrored in the story issue, use the label `STORY::Writing`
- During this process, UI designer might be involved for any graphic examples
- Once the user stories are ready, screenshots of final design are exported and added to the final docomentation. Finally, the merge request is then merged.
- Update the user story label to `STORY::READY`
- QA department and Engineering team are informed to move on with [development process](./development.md) | Product Owner, Business Analyst, UI Designer | #### Document storage structure For every epic, create a folder named similarly with the epic title, words are separated by dashes (f.i: `upload-requests`). Inside the folder, a README.md contains all the basic information of the epic (following [epic template](../../epics/template-epic.md)). For each story of the epic, create a markdown file to describe the story (following [story template](../../epics/template-story.md)). The mardown must be named using following format: > story-[issue number]-[actor]-[an action toward an entity].md There is also a `resources` folder to store files (images, documents) that are attached in the epic or stories. Folder structure example: ``` epics └── upload-requests ├── resources ├── story-1-user-create-upload-request.md ├── story-2-admin-manage-user-upload-requests.md └── README.md ``` ================================================ FILE: documentation/EN/epics/Desktop-synchronization-client/README.md ================================================ # Summary * [Context](#context) * [Definition](#definition) * [Stories](#stories) * [Misc](#misc) ## Context [Back to Summary](#summary) ## Definition This client will be an agent in charge of a bidirectional synchronization of a Workgroup in LinShare and a folder on the filesystem. This client won't include any interface to have close experience of the current web interface [Back to Summary](#summary) ## Stories TODO > A list of all the story documentation in the epic, must format as a list of links to corresponding user story files inside epic folder 1. [As a user, i can do something](./link-to-the-file.md) [Back to Summary](#summary) ## Misc > Link references, UI mockup, link to gitlab issye or any extra documents related to the EPIC * [Gitlab issue]() * [UI Mockup]() [Back to Summary](#summary) ================================================ FILE: documentation/EN/epics/Desktop-synchronization-client/story-528-user-can-sign-up-or-log-in-LinShare-desktop-app.md ================================================ # Summary * [Related EPIC](#related-epic) * [Definition](#definition) * [UI Design](#ui-design) * [Misc](#misc) ## Related EPIC * [Desktop synchronization client](./README.md) ## Definition #### Preconditions - Given that I have installed LinShare desktop app in my computer #### Description **UC1. Sign up to LinShare SAAS** - After I finished the installation, the screen Sign up/log-in LinShare desktop app will be opened automatically, or I can search LinShare app on the computer and open it - On the screen, I can see options Create an account/Login/Use your own server - I select option :"Create account", then a new screen will be shown - I input email and click button to continue: - If the email is invalid, there will be an error message - If the email is valid, a new screen will be displayed - I input fields "Name" and "Surname" (mandatory), then click button Send me a password: - If there is any error, there will be a notification with option "Sign-up again" or Contact technical. - If there is no error, an email with password will be sent to the inputted email and the confirmation screen will be shown with text message "A password has been sent to your email [inputted email], check your email and continue login" and a button "Continue" - I click on button :"Continue" the screen Log-in LinShare SAAS will be opened. - When I open email, I can see a password and a verification link. I click on the link then the account is activated and I can start using LinShare SAAS with the provided password **UC2: Log-in to LinShare SAAS** - Given that I had an LinShare SAAS account - On the screen, I can see options Create an account/Login/Use your own server, I select option :"Log in" - The browser will be opened with OIDC log-in screen: - I input my SSO account credentials, then the OIDC provider will validate. - If the information is valid, I will log-in successfully to the LinShare app **UC3. Log-in to self-hosted server** - On the screen, I can see options Create an account/Login/Use your own server, I select option :"User your own server" - A new screen will be displayed that asking me to input server link and a checkbox:" My server is using a SSO" - I input my server URL - If I do not select the checkbox and click button Log-in - If the server URL is valid, a new screen will be displayed - I input username and password to login: The log-in process is as normal - I can select a button "Forgotten password". If I click on this button, I am re-direct to a web-link to reset password. - If 2FA is enabled: - If log-in credentials are correct, 2FA popup is displayed. I have to fill the 6-digits code on my FreeOTP app and click button Log-in to validate - If the code is valid, I log-in system successfully - If the code is invalid, the system will display error message. - If I select checkbox "My server is using a SSO" then click button Log-in: - If the server URL is valid, the browser will be opened with OIDC log-in screen - I input my SSO account credentials, then the OIDC provider will validate. - If the information is valid, I will log-in successfully to the LinShare app #### Postconditions [Back to Summary](#summary) ## UI Design #### Mockups #### Final design [Back to Summary](#summary) ## Misc [Back to Summary](#summary) ================================================ FILE: documentation/EN/epics/Desktop-synchronization-client/story-529-user-can-browse-and-select-workgroups-to-synchronized.md ================================================ # Summary * [Related EPIC](#related-epic) * [Definition](#definition) * [UI Design](#ui-design) * [Misc](#misc) ## Related EPIC * [Desktop synchronization client](./README.md) ## Definition #### Preconditions - Given that I have installed LinShare desktop app in my computer - Given that I had LinShare account #### Description - After login successfully to LinShare desktop app: - If I have not added any synchronized workgroup, I am redirected automatically to screen: "Browse Workgroups to sync with this computer " - If I have any synchronized workgroup, I am redirected automatically to screen: "Synchronized Workgoups" - Or When I click on LinShare icon LinShare at the bottom right or top right, I can see a menu and I select option: "Browse Workgroups", then the screen "Select Workgroups to sync with this computer" will be opened. - On this screen, I can see the list of workgroups that: - I have writer or admin roles on it - The versioning is enabled on that workgroup - If the workgroup is synchronized before, it still appears in the list but with checkbox selected and non-editable. - I can select 1 or multiple workgroups by select checkbox next to each workgroup in the list - I can see the text below: "Select a location for your synchronized workgroups. Each workgroup will be synchronized to a folder with the same name." and a field below - I Can see the default location of the synchronized folder is shown: C:/Users/MyUser/LinShare: This will create a new folder:"LinShare" - I can click chevron icon on the field, then the system file browser will be opened and I can select another location. This field cannot be blank. - I click button Next, then each selected workgroups will be synchronized: - If in selected workgroups, there are any 2 workgroups with the same name, there will be an error message : 2 workgroups with the same name cannot be in a same folder - If there is already a folder with same name of any selected workgroups , there will be an error message: "A folder with the name [] already exists." - In syncing process, I can see a spinner icon in each workgroup - When the syncing is completed, the icon complete will be shown with the last sync date with the status (success or failure) - Now, I can see the location field is in read mode - I can click button Open folder, then the system will open synchronized folder. - Each workgroup will be synchronized to a folder with the same name with that workgroup - When I open one synchronized folder, I can see all the files/folders inside as same as web version #### Postconditions [Back to Summary](#summary) ## UI Design #### Mockups    #### Final design [Back to Summary](#summary) ## Misc [Back to Summary](#summary) ================================================ FILE: documentation/EN/epics/Desktop-synchronization-client/story-532-user-can-view-synchronized-workgroups.md ================================================ # Summary * [Related EPIC](#related-epic) * [Definition](#definition) * [UI Design](#ui-design) * [Misc](#misc) ## Related EPIC * [Desktop synchronization client](./README.md) ## Definition #### Preconditions - Given that I have installed LinShare desktop app in my computer - I have a LinShare account and log-in successfully to LinShare desktop app #### Description - When I click on LinShare icon LinShare at the bottom right or top right, I can see a menu and I select option: Open sychronized workgroups - The screen listing synchronized workgroups will be opened - on this screen, I can see all the workgroups which are currently synchronized in this computer with the last sync date - When I right-click on one workgroup, I can see a menu with options: - Open with file browser: When I select this option, the synchronized workgroup will be opened with the file browser - Synchronize Workgroup: When I select this option, the synchronization of this Workgroup will be trigger immediately except if there is already a synchronization task running in background (auto or manual) . I can see the status symbol when syncing is in process and completed - Stop syncing: When I select this option, there will be a confirmation message:" The synchronization link of this workgroup will be removed in this computer. It will still be available on the web and other devices." - If I choose Yes, the synchronization link of this workgroup will be stopped. Now when I open screen Browse workgroup, I can see this workgroup is available to synchronize #### Postconditions [Back to Summary](#summary) ## UI Design #### Mockups   #### Final design [Back to Summary](#summary) ## Misc [Back to Summary](#summary) ================================================ FILE: documentation/EN/epics/Desktop-synchronization-client/story-533-user-can-add-file-or-folder-to-synchronized-workgroups.md ================================================ # Summary * [Related EPIC](#related-epic) * [Definition](#definition) * [UI Design](#ui-design) * [Misc](#misc) ## Related EPIC * [Desktop synchronization client](./README.md) ## Definition #### Preconditions - Given that I have installed LinShare desktop app in my computer - Given that I had LinShare account and have synchronized workgroups on my computer #### Description - After login successfully to LinShare desktop app, I am redirected automatically to screen: "Synchronized Workgoups" - Or I can click on LinShare icon at the top or bottom right of screen (depending on OS) and select option "Open synchronized workgroups" - I right-click on a workgroup and select option: "Open with file explorer", then the synchronized workgroup will be opened. **UC1. Adding file to the synchronized workgroup** - I can add files to synchronized workgroup as normally in file system of my computer: Create a file directly in the folder, Copy/move files from another place, Drag/Drop files... - After file(s) is added, It will be synchronized to the server in 3 ways: - 1. Automatically: There will be a synchronization task running in background every hour. This task will update all the changes of the client in that 1 hour app to the server. - 2. Manually: I can right-click on the synchronized workgroup and select option :" Synchronize Workgroup": The synchronization of this Workgroup will be trigger immediately except if there is already a synchronization task running in background (auto or manual) . I can see the status symbol when syncing is in process and completed - 3. When I start the app on my computer, the synchronization of all workgroups will be trigger. - When a file has more than one version on the web, the client app only get the latest version. - When a new file is added on local and it has same name with a file on web, there will be a notification for user that it will become the latest version of that file **UC2. Edit a file in synchronized workgroup** - I can open a file on my synchronized workgroup on my computer and edit then save that file with the same name as original - When the workgroup is synchronized (automatically or mannually), the system will validate: - If the updated file in local is not updated on server, it will be synchronized to the server as the latest version. - If there is a conflict between local and server: - A conflict occurs when both client and server try to modify the same file at the same time. When client uploads file to the server, it will recognize that the server version has also changed. - In this case, there will be a notification message, user can select 1 of these options and click button Next - Ignore the conflict and upload local file to server: After synchronizing, the local version will become the latest version. The server version will become older version. You can also go to web LinShare and see all versions of this file. - Resync the workgroup on local: If you select this option, the latest version of this file in server will be downloaded to this workgroup and the local file will have a number added to its name - If I click button Cancel, the synchronization of this workgroup will be canceled. **UC3. Adding folder to the synchronized workgroup** - I can add folder to synchronized workgroup as normally in file system of my computer: Create a new folder directly in the synchronized workgroup , Copy/move folder from another place, Drag/Drop folder - After folder is added, It will be synchronized to the server in 3 ways: - 1. Automatically: There will be a synchronization task running in background every hour. This task will update all the changes of the client in that 1 hour app to the server. - 2. Manually: I can right-click on the synchronized workgroup and select option :" Synchronize Workgroup": The synchronization of this Workgroup will be trigger immediately except if there is already a synchronization task running in background (auto or manual) . I can see the status symbol when syncing is in process and completed - 3. When I start the app on my computer, the synchronization of all workgroups will be trigger. #### Postconditions - After the synchronization has been completed, I can see the new file/folder is added to the corresponding workgroup on the web - On the other side, If there is a new file/Folder is added to the workgroup on web, it will be updated in my synchronized workgroup in my computer. [Back to Summary](#summary) ## UI Design #### Mockups   #### Final design [Back to Summary](#summary) ## Misc [Back to Summary](#summary) ================================================ FILE: documentation/EN/epics/Desktop-synchronization-client/story-534-user-can-remove-file-or-folder-in-synchronized-workgroup.md ================================================ # Summary * [Related EPIC](#related-epic) * [Definition](#definition) * [UI Design](#ui-design) * [Misc](#misc) ## Related EPIC * [Desktop synchronization client](./README.md) ## Definition #### Preconditions - Given that I have installed LinShare desktop app in my computer - Given that I had LinShare account and have synchronized workgroups on my computer #### Description - After login successfully to LinShare desktop app, I am redirected automatically to screen: "Synchronized Workgroups" - Or I can click on LinShare icon at the top or bottom right of screen (depending on OS) and select option "Open synchronized workgroups" - I right-click on a workgroup and select option: "Open with file explorer", then the synchronized workgroup will be opened. **UC1. Remove file in a synchronized workgroup** - I can remove files in a synchronized workgroup as normally in file system of my computer: Right-click on a file and select option Delete/ Move to trash , Move files to another place, Drag file and drop to another place - After file(s) is removed locally, the file system will notify the desktop app about this change, and it will be synchronized to the server immediately **UC2. Remove folder(s) in a synchronized workgroup** - I can remove folder in a synchronized workgroup as normally in file system of my computer: Right-click on a folder and select option Delete/ Move to trash , Move folder to another place, Drag folder and drop to another place - After folder is removed locally, the file system will notify the desktop app about this change, and it will be synchronized to the server immediately #### Postconditions - After the synchronization has been completed, I can see the new file/folder is removed in the corresponding workgroup on the web - On the other side, If there is a new file/Folder is removed in the workgroup on web, it will be updated in my synchronized workgroup in my computer in 3 ways: - 1. Automatically: There will be a synchronization task running in background every hour. This task will update all the changes of the client in that 1 hour app to the server and vice versa. - 2. Manually: I can right-click on the synchronized workgroup and select option :" Synchronize Workgroup": The synchronization of this Workgroup will be trigger immediately except if there is already a synchronization task running in background (auto or manual) . I can see the status symbol when syncing is in process and completed - 3. When I start the app on my computer, the synchronization of all workgroups will be trigger. [Back to Summary](#summary) ## UI Design #### Mockups  #### Final design [Back to Summary](#summary) ## Misc [Back to Summary](#summary) ================================================ FILE: documentation/EN/epics/Desktop-synchronization-client/story-535-user-can-rename-file-or-folder-in-my-synchronized-workgroup.md ================================================ # Summary * [Related EPIC](#related-epic) * [Definition](#definition) * [UI Design](#ui-design) * [Misc](#misc) ## Related EPIC * [Desktop synchronization client](./README.md) ## Definition #### Preconditions - Given that I have installed LinShare desktop app in my computer - Given that I had LinShare account and have synchronized workgroups on my computer #### Description - After login successfully to LinShare desktop app, I am redirected automatically to screen: "Synchronized Workgoups" - Or I can click on LinShare icon at the top or bottom right of screen (depending on OS) and select option "Open synchronized workgroups" - I right-click on a workgroup and select option: "Open with file explorer", then the synchronized workgroup will be opened. **UC1. Rename a file in a synchronized workgroup** - I can rename files in a synchronized workgroup as normally in file system of my computer: Right-click on a file and select option Rename - There will be a dialog that displaying current file name and I can edit this name then click button Save - If the new name is valid, it will be changed successfully. If the name is invalid (contains special character, already existed name...), there will be corresponding error message. - After file(s) is renamed locally, the file system will notify the desktop app about this change, and it will be synchronized to the server immediately - When a new file is renamed on local and it has same name with a file on web, there will be a notification for user that it will become the latest version of that file **UC2. Rename a folder in a synchronized workgroup** - I can rename folder in a synchronized workgroup as normally in file system of my computer: Right-click on a file and select option Rename - - There will be a dialog that displaying current file name and I can edit this name then click button Save - If the new name is valid, it will be changed successfully. If the name is invalid (contains special character, already existed name...), there will be corresponding error message. - After folder is renamed locally, the file system will notify the desktop app about this change, and it will be synchronized to the server immediately - When a folder is renamed on local and it has same name with a folder on web, there will be a notification for user that it will have a number added to its name. #### Postconditions - After the synchronization has been completed, I can see the new file/folder is renamed in the corresponding workgroup on the web - On the other side, If a file/Folder is renamed in the workgroup on web, it will be updated in my synchronized workgroup in my computer in 3 ways: - 1. Automatically: There will be a synchronization task running in background every hour. This task will update all the changes of the client in that 1 hour app to the server. - 2. Manually: I can right-click on the synchronized workgroup and select option :" Synchronize Workgroup": The synchronization of this Workgroup will be trigger immediately except if there is already a synchronization task running in background (auto or manual) . I can see the status symbol when syncing is in process and completed - 3. When I start the app on my computer, the synchronization of all workgroups will be trigger. [Back to Summary](#summary) ## UI Design #### Mockups #### Final design [Back to Summary](#summary) ## Misc [Back to Summary](#summary) ================================================ FILE: documentation/EN/epics/Guests/README.md ================================================ # Summary * [Context](#context) * [Definition](#definition) * [Stories](#stories) * [Misc](#misc) ## Context [Back to Summary](#summary) ## Definition A guest is like a regular user except he has an expiration date, we can optionally give him a personal space, and we can optionally restrict the list of contacts he can see and share with. A guest is only managed by it's author, we called it the owner. In this epic we want to change the way it is working by introducing a new concept, a moderator of guest. We will keep the term owner to keep track of the person who created the guest but beeing the owner will not mean you have the right to manage the guest. when a guest is created, the current authenticated user will be automatically added as the moderator of a guest. Of course he can also add other users (internals) as moderator at creation and update time. A moderator will be able to administrate the guest, changing his first name, last name, enabling the contact restriction, etc ... As an administrator, I should be able to add or remove moderators from a guest account. [Back to Summary](#summary) ## Stories TODO > A list of all the story documentation in the epic, must format as a list of links to corresponding user story files inside epic folder 1. [As a user, i can do something](./link-to-the-file.md) [Back to Summary](#summary) ## Misc > Link references, UI mockup, link to gitlab issye or any extra documents related to the EPIC * [Gitlab issue]() * [UI Mockup]() [Back to Summary](#summary) ================================================ FILE: documentation/EN/epics/Guests/srory-313-user-can-see notification-email-when-my-account-is-locked.md ================================================ # Summary * [Related EPIC](#related-epic) * [Definition](#definition) * [Screenshots](#screenshots) * [Misc](#misc) ## Related EPIC * EPIC: https://ci.linagora.com/linagora/lgs/linshare/products/linshare-github/issues/266 ## Definition ### Pre-condition * Given that I am a LinShare user (internal or guest) ### Description **UC1. As a user, I should receive an email to inform that my account has been locked** * Given that I am a LinShare user * I go to log-in LinShare page and enter my user name but wrong password for 3 attempts * At third time, after entering wrong password, I can see the toast message: “Your account has been locked due to failed attempts. Please check your email for more details”. - When I open my email (which is linked with LinShare account), I can see a notification from LinShare that told me the reason why my account has been locked and how long my Linshare account will be locked” **UC 2. As a user, I should receive an email to inform me that my account has been unlocked** * Given that I am a LinShare user and my account has been locked due to failed attempts to log-in * My account can be locked for different times: * After 3 attempts : account locked for 10 minutes * After 6 attempts : account locked for 20 minutes * After 9 attempts : account locked for 60 minutes (1 hour) * After 12 attempts : account locked for 1440 minutes (1 day) * After 15 attempts : account locked indefinitely * There are 2 ways that my account can be unlocked: 1. After the locked time defined by the rule above, my account will be unlocked automatically 2. Admin can unlock a user account manually in admin portal * In both case when my account is unlocked, I will receive an email informing that my LinShare account has been unlocked, and a link to LinShare login page. * Now in log-in LinShare page, if I enter correct user name and password, I can log-in successfully. If wrong, the system will follow locking rules. [Back to Summary](#summary) ### Postconditions ## Screenshots None [Back to Summary](#summary) ## Misc [Back to Summary](#summary) ================================================ FILE: documentation/EN/epics/Guests/story-1-user-create-guest-account-when-sharing-file.md ================================================ # Summary * [Related EPIC](#related-epic) * [Definition](#definition) * [Screenshots](#screenshots) * [Misc](#misc) ## Related EPIC * [Sharing file](./README.md) ## Definition #### Preconditions - Given that i am an Linshare user and i log-in Linshare successfully #### Description - From menu, i go to MySpace and see the list of files - I click on three-dot button of a file and select option Share - The Quick share panel will be shown - On Add recipients filed, i type email address, for example [Email address 1] - If the email is an valid email but is an external account, the system will display a suggestion with the same email and a button "Create guest account?" - If i click on Create guest account, there will be a confirmation popup "You will invite "[Email address 1]" as your guest?" - If i choose Yes, the selected email will be used to create a guest. - If i choose No, the popup will disappear. - If i do not click on Create guest account, i can select the email as recipient as currently. #### Postconditions - After guest account is created from the email, i can see a toast message " Guest account created". The guest is automatically added to the list of recipients. The toast message should also contain a "see" action . - When i access my guest list, i can see the [Email address 1] on the list, i can edit that guest to add first name and last name. [Back to Summary](#summary) ## UI Design #### Mockups   #### Final design [Back to Summary](#summary) ## Misc [Back to Summary](#summary) ================================================ FILE: documentation/EN/epics/Guests/story-349-User-view-My-account-page.md ================================================ # Summary * [Related EPIC](#related-epic) * [Definition](#definition) * [UI Design](#ui-design) * [Misc](#misc) ## Related EPIC * [Name of the epic](./README.md) ## Definition #### Preconditions - Given that I am a LinShare user - After log-in successfully, I click on human icon and see a list of option - I select the first option "My account", a new screen will be displayed. #### Description **UC1. Internal user can see My account screen** - On My account screen, I can see section Profile with following information: - First name: Plain-text - Last name : Plain-text - Email: Plain-text - Allowed to create guests: readonly toggle (on/off) - Personal space enabled: readonly toggle (on/off) - Creation date: Plain-text - Modification date: Plain-text - Notification language: A drop-down list with options: English/French/Russian - When I select another language, there will be a toast message: "You have been selected [language] as notification language" **UC2. Guest can see My account screen** - On My account screen, I can see 2 sections: - Profile with following information: - First name: Plain-text - Last name : Plain-text - Email: Plain-text - Owner: Plain-text. Displays Full name - email address of my guest account's creator. - Personal space enabled: readonly toggle (on/off) - Creation date: Plain-text - Modification date: Plain-text - Expiration date: Plain-text . This date is set by the owner can be changed by the owner. - Notification language: A drop-down list with options: English/French/Russian - When I select another language, there will be a toast message: "You have been selected [language] as notification language" - Restricted contact list: - When the owner enables Restricted contact for my guest account, The rule is defined in story 2. Guest account can view restricted contact list - When restricted contact is disabled, this section is hidden. #### Post-conditions [Back to Summary](#summary) ## UI Design #### Mockups     #### Final design [Back to Summary](#summary) ## Misc [Back to Summary](#summary) ================================================ FILE: documentation/EN/epics/Guests/story-422-guest-account-can-view-restricted-contact-list.md ================================================ # Summary * [Related EPIC](#related-epic) * [Definition](#definition) * [Screenshots](#screenshots) * [Misc](#misc) ## Related EPIC * [Name of the epic](./README.md) ## Definition #### Preconditions - Given that i am a guest from LinShare - Given that the author of the guest has enabled the Restricted Contact List for guest account. #### Description - when i log-in to LinShare, I click on Human icon on the top right of screen and see the option Restricted Contact List - I click on this option and screen Restricted Contact List will be shown - In new view, i can see the list of contacts that the guest creator has assigned for me - Each contact contain Fist name - Last name an email. - I can sort the list by First name, Last name or Email - Default sort is First name #### Postconditions - I can not edit or delete any contact in Restricted contact list - The resticted contacts will be shown when i execute an action that contains Auto-complete popup (share...). - If the guest creator edit the restricted contact list for my guest account, my Restricted contact list will be updated too. - If the guest creator disable the function "Restricted contact" for my guest account, the option Restricted Contact List is also hidden from the option list when i click Human icon on top right. [Back to Summary](#summary) ## UI Design #### Mockups   #### Final design [Back to Summary](#summary) ## Misc [Back to Summary](#summary) ================================================ FILE: documentation/EN/epics/Guests/story-472-user-can-see-his-recipient-list-in-profile-page.md ================================================ # Summary * [Related EPIC](#related-epic) * [Definition](#definition) * [UI Design](#ui-design) * [Misc](#misc) ## Related EPIC * [Name of the epic](./README.md) ## Definition #### Preconditions - Given that I am a LinShare user (internal or guest) - After log-in successfully, I click on human icon and see a list of option - I select the first option "My account", a new screen will be displayed. #### Description - On My account screen: - As an internal user, I can only see "Favorite Recipient list" - As a guest, I can see "Favorite Recipient list" and "Restricted contact list" - On this list, I can see a list of recipients who I have shared documents with. - I can click on arrow in column title "Email" to sort ascending or descending - I can click on Delete button of an email, there will be a confirmation message. If I choose Yes, the email will be removed - I can delete multiple items by selecting checkbox beside each email or click checkbox on the collum title "Email" and click button Delete - I can input in field " Search by email " then click Enter to see the result. #### Post-conditions - On sharing form, when I start to input some character in the field Recipient, I can see suggestion of recipient from this list if it matched - When I shared document with a new email successfully, it will be added to this list with expiration date = current date + expiration period (managed by admin) - When an email in this list expires, it is removed from the list and user cannot see it in auto-completion fields. [Back to Summary](#summary) ## UI Design #### Mockups   #### Final design [Back to Summary](#summary) ## Misc [Back to Summary](#summary) ================================================ FILE: documentation/EN/epics/Guests/story-480-admin-can-manage-moderator-list-of a-guest.md ================================================ # Summary * [Related EPIC](#related-epic) * [Definition](#definition) * [UI Design](#ui-design) * [Misc](#misc) ## Related EPIC * [Guests](./README.md) ## Definition #### Preconditions - Given that I am a LinShare root admin or nested admin - I logged-in LinShare Admin portal successfully and select menu tab :"Administration" then select user list - In the user list, I click in a guest user, the Manage user page will be opened. #### Description - On Guest details screen, there are 4 tabs: - User profile - Personal space quota - Restricted contact list - Moderator list - In Moderators list tab, I can see the current Moderators list of that guest - On moderator list, I can see a filter "Role" with the default option is "All" - When I click on this filter, there wil be a drop-down list with options: All/Simple/Admin - If I select one role and click enter, the system will display the moderators with selected role - I can type in search bar to search moderators by email/first name/ Last name. **UC1. Add a Moderator** - To add a moderator for this guest, I need to: - Select moderator's role from the drop-down list with options: Simple or Admin. - Add people: After select a role, I need to input a user in this field (I can select from suggestion list). It can only be an internal LinShare user (not guest account). - Then The selected user will be added to the moderator list below with selected role. **UC2. Delete an moderator** -To delete a moderator, I click on "x" icon of the moderator then the moderator will be removed from the list **UC3. Edit a moderator** - I can change the moderator's role by clicking on Edit icon of the moderator, then the roles drop-down list will be opened. - I can select new role for the moderator: Admin or Simple - Then the drop-down list is closed and the moderator is updated with new role #### Postconditions - Only when I click button Save, all updates above are saved to that guest. - When a user is added as a moderator with admin role , he can edit a guest's information, add or remove moderator or Delete that guest. - When a user is added as a moderator with simple role, he can edit guest's information and cannot add/remove moderator or Delete that guest - When a moderator is removed, he only has Read right to that guest. [Back to Summary](#summary) ## UI Design #### Mockups  #### Final design [Back to Summary](#summary) ## Misc [Back to Summary](#summary) ================================================ FILE: documentation/EN/epics/Guests/story-481-user-can-create-guest-with-moderators.md ================================================ # Summary * [Related EPIC](#related-epic) * [Definition](#definition) * [UI Design](#ui-design) * [Misc](#misc) ## Related EPIC * [Guests](./README.md) ## Definition #### Preconditions - Given that I am a LinShare user and I logged-in LinShare successfully #### Description - From menu, I go to Contacts => Guests - I click on Create guest button, the guest creating form will be shown - I can see a new field:"Moderators", including a drop-down list and "Add people" field - I can select roles from the drop-down list: Admin or simple - Then in Add people field, I type some characters then there will be a suggestion list. This list only contains internal users - If there is no match, the message "Unknown user" will be shown - I select a user from suggestion, it is added to the moderator list below - I am automatically added as guest's admin moderator. - If I enable option: "Restricted contact" list, the field "Add people" to restricted contact list is displayed. - The guest's author (me) is automatically added as restricted contact. - I can see a button "cross" on field "Add people" - When I hover this button, I can see an explanation: "Add moderator list as restricted contacts" - If I click this button, all moderators above will be added to restricted contact list - I can continue input other fields as normal and click Create button #### Postconditions - There are 3 roles to a guest: Guest' admin moderator, guest's simple moderator and guest's reader. Every LinShare user has one of these roles to a guest. If a user is not added as a moderator to a guest, he is automatically has "Guest's Reader" role. - I can remove users from controller list by clicking icon "x" in each contact - I can change the role of each user in moderator list by click on edit icon then select role admin/simple from the drop-down list - I can add someone to the restricted contact list which is not a moderator - After adding all moderators as restricted contact, I can remove some of them from the restricted contact list. - The information of Guest owner is still kept in Guest detail - When an user is added as moderator of a guest (except the guest author), the moderator will receive an email notification with information: - Guest's email and full name - Date of guest creation - Moderator Right to that new guest (simple or admin) - Full name and email of the person who added you as moderator - And a button link to that guest detail panel. [Back to Summary](#summary) ## UI Design #### Mockups    #### Final design [Back to Summary](#summary) ## Misc [Back to Summary](#summary) ================================================ FILE: documentation/EN/epics/Guests/story-482-user-can-edit-a-guest.md ================================================ # Summary * [Related EPIC](#related-epic) * [Definition](#definition) * [UI Design](#ui-design) * [Misc](#misc) ## Related EPIC * [Guests](./README.md) ## Definition #### Preconditions - Given that I am a LinShare user and I logged-in LinShare successfully #### Description - From menu, I go to Contacts => Guests - I can see all guests in my domain **UC1. Edit a guest as simple moderator** - If I am simple moderator of the guest, When I click on three-dot button, I can see options: Detail, Edit - I select option Edit, then the Edit guest form will be opened. [Screen1](#screen-1) - I can edit fields: - First name: A text field, mandatory. If the field is blank, there will be error message below:"This field cannot be blank". - Last name: A text field, mandatory. If the field is blank, there will be error message below:"This field cannot be blank". - Expiration date: I can change the expiration date as current rules. - Advanced options: Activate user space and restrict contact list: I can edit these field ad current rules - I can read but cannot edit guest'Email field. - I cannot edit or delete moderator list - I click button update, if there is no error (permission, validation...), the guest is updated with a successful toast notification. **UC2. Edit a guest as admin moderator** - If I am admin moderator of the guest, When I click on three-dot button, I can see options: Detail, Edit, Delete - I select option Edit, then the Edit guest form will be opened.[Screen 2](#screen-2) [screen 3](#screen-3) - I can edit fields as UC1 and Moderators list : - Add guest's moderator : I select role Simple/Admin then input user in "Add people" field. Default role is "Simple" - Remove guest's moderator: On the moderator list, I can click icon "x", then the moderator will be removed from the list - Edit moderator's role: On the moderator list, I can click icon Edit, a drop-down list will be shown with 2 options: Simple or Admin. I can select the new role. - I click button update, if there is no error (permission, validation...), the guest is updated with a successful toast notification. #### Postconditions - After I click button Update, if there is any new guest's moderator or any current moderator is removed, the moderator list in Guest detail panel is updated too - If I click button Cancel, every update will not be saved. - When a moderator of a guest is updated right or removed from moderator list, he will receive an email notification with information: - Guest's email and full name - Updated information: Change role or be removed - Full name and email of the person who change your role or remove your moderator right - And a button link to that guest detail panel. [Back to Summary](#summary) ## UI Design ### Mockups #### Screen 1  #### Screen 2  #### Screen 3  ####Final design [Back to Summary](#summary) ## Misc [Back to Summary](#summary) ================================================ FILE: documentation/EN/epics/Guests/story-483-user-can-see-moderator-list-of-a-guest.md ================================================ # Summary * [Related EPIC](#related-epic) * [Definition](#definition) * [UI Design](#ui-design) * [Misc](#misc) ## Related EPIC * [Guests](./README.md) ## Definition #### Preconditions - Given that I am a LinShare user and I logged-in LinShare successfully #### Description - From menu, I go to Contacts => Guests - I can see all guests in my domain - If I am moderator with admin role for a guest, when I click on three-dot button, I can see options: Detail, Edit, Delete - If am moderator with simple role for a guest, when I click on three-dot button, I can see options: Detail, Edit - If I am reader of the guest, When I click on three-dot button, I can see option: Detail - When I select option "Detail" of a guest, the detail panel will be opened. - On detail panel, I can see new field Moderators list if I am guest's moderators with admin or simple role o. Guest's reader cannot see this field. - I can see a field: "My role". The role can be Admin moderator/Simple moderator/Reader. #### Postconditions - This moderators list includes avatar icon, full name of user and his role to the guest - When a moderator is added or removed, this is list is updated accordingly - I can see the author of the guest - who created the guest but may or may not be moderator of that guest [Back to Summary](#summary) ## UI Design #### Mockups   #### Final design [Back to Summary](#summary) ## Misc [Back to Summary](#summary) ================================================ FILE: documentation/EN/epics/Guests/story-484-admin-moderator-can-delete-guest-account.md ================================================ # Summary * [Related EPIC](#related-epic) * [Definition](#definition) * [UI Design](#ui-design) * [Misc](#misc) ## Related EPIC * [Guests](./README.md) ## Definition #### Preconditions - Given that I am a LinShare user and I logged-in LinShare successfully #### Description - From menu, I go to Contacts => Guests - I can see all guests in my domain - If I am admin moderator of the guest, When I hover that guest or click on three-dot button, I can see options: Detail, Edit, Delete - I select option :"Delete", a confirmation popup will be displayed - I click button "Yes, Delete" #### Postconditions - The deleted guest is removed from my guest list - Only admin moderators can remove that guest - Every other user cannot see that deleted guest on his guest list after deletion [Back to Summary](#summary) ## UI Design #### Mockups  #### Final design [Back to Summary](#summary) ## Misc [Back to Summary](#summary) ================================================ FILE: documentation/EN/epics/Guests/story-486-guest-reader-can-request-to-become-simple-moderator.md ================================================ # Summary * [Related EPIC](#related-epic) * [Definition](#definition) * [UI Design](#ui-design) * [Misc](#misc) ## Related EPIC * [Guests](./README.md) ## Definition #### Preconditions - Given that I am a LinShare user and I logged-in LinShare successfully #### Description - From menu, I go to Contacts => Guests - I can see all guests in my domain - When I click on three-dot button of a guest that I have read right, I can see option "Ask for simple moderator right" - When I click on this option, then "Edit" tab will be opened. - On Edit tab, I can see a text :"You don't have permission to update this guest". - I can see a text message: "You can send a request to become simple moderator of this guest. A simple moderator can edit guest’s information and settings" and a button "Send request" - I click on this button, there will be a popup:"You are about to send a request to become a simple moderator of this guest. Once sent, you can see the request's status in Detail panel of guest" with 2 buttons Cancel and Send - I select "Proceed", then the request will be sent. - There will be a toast message when the request was sent successfully - After sending the request, If I am click option "Ask for simple moderator right" of that guest again, I am navigated to Edit tab of that guest - Now in the Edit tab, I can see a text message:" You have sent a request to become simple moderator of this guest. Please wait for approval." #### Postconditions - When a request is sent, the admin moderator can see this request in the pending request list of this guest - When I open Detail panel of the guest, I can see the text: You have sent a request to become a simple moderator of this guest" with creation date and current status of request: - If the request is sent successfully, it has status "Pending" - If the domain admin or admin moderator add me manually as moderator, this request will have status "Aborted" - If the request is rejected, It will have status:"Rejected" - If the request is approved, it will have status:"Approved" - When I click on Status link, it opened Activities tab of the guest. [Back to Summary](#summary) ## UI Design #### Mockups      #### Final design [Back to Summary](#summary) ## Misc [Back to Summary](#summary) ================================================ FILE: documentation/EN/epics/Guests/story-488-admin-moderator-can-manage-moderator-request-list.md ================================================ # Summary * [Related EPIC](#related-epic) * [Definition](#definition) * [UI Design](#ui-design) * [Misc](#misc) ## Related EPIC * [Guests](./README.md) ## Definition #### Preconditions - Given that I am a LinShare user and I logged-in LinShare successfully #### Description - From menu, I go to Contacts => Guests - I can see all guests in my domain - When I click on three-dot button of a guest that I have admin moderator right, I can see option "Pending request" - When I click on this option, then "Moderator request" tab will be opened. - I can see the list of all pending requests to become moderators of this guest - Each request include: Full name of the requester, the role he wants to request ( simple or admin) and 2 options: Approve or Reject icons - When I hover the icon, I can see the tooltip to show the button meaning: Approve or Deny - When I click on option "Approve", that requester will become the moderator of the guest with the requested right. - When I click on option "Reject", there will be a confirmation popup:" You are about to reject this request ! Beware, this action cannot be undone." and 2 button Close and Proceed - If I choose Proceed, the requested will be denied. #### Postconditions - When there is a new moderator request, every admin moderator of that guest will receive and email notification about that request with information: - Requester's full name and email - Requested right - Date/time of creation - Status :Pending - And a button links to navigate to Pending request list of that guest - When an admin moderator approves or rejects a pending request, other admin moderators of that guest receive an email notification with information: - Requester's full name and email - Date of creation - Requested right - Status :Approved or rejected - Date/time of approval of rejection - Full name and email of the person who approve or reject the request - When an admin moderator approves or rejects a pending request, the requester also receives an email notification with information: - Date of creation - Requested right - Status :Approved or rejected - Date/time of approval of rejection - Full name and email of the person who approves or rejects the request - When a request is approved or denied, it will be removed from the pending list. - When a requester is approved to become a guest's moderators, he will be appeared in moderator list in Edit tab of that guest. - After the request is approved or denied, when the requester open Detail panel of the guest, he can see the status of request is updated from "pending" to "Approved" or "Denied" and If the request is approved, his right is also updated too. [Back to Summary](#summary) ## UI Design #### Mockups     #### Final design [Back to Summary](#summary) ## Misc [Back to Summary](#summary) ================================================ FILE: documentation/EN/epics/Guests/story-490-user-can-see-activities-log-of-a-guest.md ================================================ # Summary * [Related EPIC](#related-epic) * [Definition](#definition) * [UI Design](#ui-design) * [Misc](#misc) ## Related EPIC * [Guests](./README.md) ## Definition #### Preconditions - Given that I am a LinShare user and I logged-in LinShare successfully #### Description - From menu, I go to Contacts => Guests - I can see all guests in my domain - If I am moderator with admin role for a guest, when I click on three-dot button, I can see options: Detail, Edit, Delete - If am moderator with simple role for a guest, when I click on three-dot button, I can see options: Detail, Edit - If I am reader of the guest, When I click on three-dot button, I can see option: Detail - When I select option "Detail" of a guest, the detail panel will be opened. - I select tab "Activities" and see the activities of the guest will be displayed depending on my role: - If I am guest's reader, I can only see the audit traces related to my own moderator requests in Activities Tab - If I am guest's admin moderator , I can see activities tab of the guest with all audit traces: - Create guest - Edit guest's name or email - Edit guest's restricted contact list: Enable or disable checkbox, Add or remove restricted contact - Edit "Expiration date" - Edit checkbox "Activate user space" - Edit moderator list: Enable or disable checkbox, Add or remove moderator - Moderator request: New request, Approve or deny request of all moderator requests. - If I am guest's simple moderator, I can see activities tab of the guest with all audit traces except the ones related to moderator requests. I can only see audit traces related to my own moderator requests. - Technical user can perform some actions on behalf of a user, so the actor who performed the action may not be the same as the authenticated user. In this case, in the audit trace, I can see an asterisque near the actor name, which on hovering, I can see a message: "This action was performed by the [authUser name] on behalf of [Actor]" #### Postconditions [Back to Summary](#summary) ## UI Design #### Mockups  #### Final design [Back to Summary](#summary) ## Misc [Back to Summary](#summary) ================================================ FILE: documentation/EN/epics/Guests/story-493-admin-can-see-activities-log-of-a-guest-account.md ================================================ # Summary * [Related EPIC](#related-epic) * [Definition](#definition) * [UI Design](#ui-design) * [Misc](#misc) ## Related EPIC * [Guests](./README.md) ## Definition #### Preconditions - Given that I am a LinShare root admin or nested admin - I logged in LinShare Admin portal successfully and select menu tab :"Administration" then select user list - In the user list, I click in a guest user, the Manage user page will be opened. #### Description - On Guest details screen, there are 5 tabs: - User profile - Personal space quota - Restricted contact list - Moderators - Activities - In Activities tab, I can see all activities of the guest in a table, including columns: - Actor: The full name of person who performed the action - Time: default sorted by lasted time. I can click icon on column's name to sort activities by latest or earliest time - Details: the Detail of action - Technical user can perform some actions on behalf of a user, so the actor who performed the action may not be the same as the authenticated user. In this case, in the audit trace, I can see an asterisque near the actor name, which on hovering, I can see a message: "This action was performed by the [authUser name] on behalf of [Actor]" #### Postconditions [Back to Summary](#summary) ## UI Design #### Mockups  #### Final design [Back to Summary](#summary) ## Misc [Back to Summary](#summary) ================================================ FILE: documentation/EN/epics/Guests/story-540-user-can-select-language-of-email-notification-when-sharing-file.md ================================================ # Summary * [Related EPIC](#related-epic) * [Definition](#definition) * [UI Design](#ui-design) * [Misc](#misc) ## Related EPIC * [New admin portal](./README.md) ## Definition #### Preconditions #### Description **UC1. Notification Language setting in Profile page** - Given that I am LinShare user (internal user or guest) - After log-in successfully, I click on human icon and see a list of option - I select the first option "My account", a new screen will be displayed. - On My account page, I can see a new field: "Notification language for external users" - This is language of email notification when the user shares a file to users without an LinShare account. - I can select another option from the drop-down list: English, French, Russia - When I select another language, there will be a toast message: "You have been selected [language] as notification language for external users" **UC2. Setting notification language on UI User** - When a user shares files, on share form, he clicks button "more options" and see a new field: "Notification language for external users" - I can see a tooltip when hovering icon "i": When sharing document to a LinShar user, the email language will be recipient's notification language. This setting is email notification language for users without an LinShare account" - Default language is value of field "Notification language for external users" in My account page - User can select another option from the drop-down list: English, French, Russia - When user shares document to external users, the recipient will receive emails about share in above selected language. - When user shares document to internal users, the recipient will receive email about share in his notification language (which is value of field "My notification language" in recipient's Profile page) - There are some kinds of emails about share that a recipient can receive: - When the share is created - When the share is deleted - When the password of anonymous share was reset - The share has expired and was deleted by the system - The file share of the sender is about to expire #### Post-conditions [Back to Summary](#summary) ## UI Design #### Mockups   #### Final design [Back to Summary](#summary) ## Misc [Back to Summary](#summary) ================================================ FILE: documentation/EN/epics/Guests/story-556-user-can-filter-guests-by-roles.md ================================================ # Summary * [Related EPIC](#related-epic) * [Definition](#definition) * [UI Design](#ui-design) * [Misc](#misc) ## Related EPIC * [Guests](./README.md) ## Definition #### Preconditions - Given that I am a LinShare user and I logged-in LinShare successfully #### Description - From menu, I go to Contacts => Guests and see the list of guests - On the top right of screen, I can see a filter with default selection is My guest. - When I click on this filter, I can see a drop-down list with options: - Other guests: If I select this option, the system will display list of guests that I do not have moderator right. - My guest: When I click on this option, I can see a second drop-down list: - All: I select this option, system will display all guests that I am moderator of - My role: SIMPLE: If I select this option, system will display guests that I have SIMPLE moderator right - My role: ADMIN. If I select this option, system will display guests that I have Admin moderator right #### Postconditions [Back to Summary](#summary) ## UI Design #### Mockups  #### Final design [Back to Summary](#summary) ## Misc [Back to Summary](#summary) ================================================ FILE: documentation/EN/epics/Guests/story-557-admin-can-view-all-guests-of-a-user.md ================================================ # Summary * [Related EPIC](#related-epic) * [Definition](#definition) * [UI Design](#ui-design) * [Misc](#misc) ## Related EPIC * [New admin portal](./README.md) ## Definition #### Preconditions * Given that am an admin (super admin/ nested admin) #### Description * After log-in Admin portal successfully, I select the Administration tab => User lists * In the user list, I click on one user, the Manage user page will be opened #### Postconditions - I can see a new tab: Guest list - I select this new tab, I can see the list of guests of this user, which means the user is moderator of - Each guest will include information: avatar, Full name, Email, and his domain - I can see the user's moderator role for each guest. It can be SIMPLE or ADMIN - When I click on search bar, I can see a drop-down option: User's role - When I select this search criteria, I can see options: Simple/Admin. - If I select Simple and click Enter, the system will display guest list that user has Simple moderator role of - If I select Admin and click Enter, the system will display guest list that user has Admin moderator role of - If I do not select search criteria and input some character to search bar, the system will search guest by email/first name/last name. - When I click on a guest in the list, I am navigated to the detail page of that guest. [Back to Summary](#summary) ## UI Design #### Mockups  #### Final design [Back to Summary](#summary) ## Misc [Back to Summary](#summary) ================================================ FILE: documentation/EN/epics/Guests/story-558-user-can-view-audit-logs-related-to-a-guest.md ================================================ # Summary * [Related EPIC](#related-epic) * [Definition](#definition) * [UI Design](#ui-design) * [Misc](#misc) ## Related EPIC * [Guests](./README.md) ## Definition #### Preconditions - Given that I am a LinShare user and I logged-in LinShare successfully #### Description - From menu, I go to Activities logs - I can see activities logs of a guest depending on following audit rules: - Create guest : Guest/Guest's author/Guests' moderators (at creation time) can see this log - Edit guest's name : All Guest's moderators and the guest can see this log - Edit guest's restricted contact list: Enable or disable checkbox, Add or remove restricted contact": All Guest's moderators and the guest can see this log - Edit "Expiration date": All Guest's moderators and the guest can see this log - Edit checkbox "Activate user space": All Guest's moderators and the guest can see this log - Edit moderator list: Enable or disable checkbox, Add or remove moderator: All admin moderators can see this log - Create Moderator request: - A user requests to become Simple moderator: The requestor and all admin moderators can see this log - A simple moderator requests to become admin moderator: The requestor and all admin moderators can see this log - Approve or deny moderator requests: All admin moderators and the requestors can see this log - Delete guest account: All guest moderators can see this log. - Technical user can perform some actions on behalf of a user, so the actor who performed the action may not be the same as the authenticated user. In this case, in the audit trace, I can see an asterisque near the actor name, which on hovering, I can see a message: "This action was performed by the [authUser name] on behalf of [Actor]" #### Postconditions [Back to Summary](#summary) ## UI Design #### Mockups #### Final design [Back to Summary](#summary) ## Misc [Back to Summary](#summary) ================================================ FILE: documentation/EN/epics/Guests/story-564-user-can-filter-activities-on-UI-User.md ================================================ # Summary * [Related EPIC](#related-epic) * [Definition](#definition) * [UI Design](#ui-design) * [Misc](#misc) ## Related EPIC * [Guests-User](./README.md) ## Definition #### Preconditions - Given that I am a LinShare user - After log-in successfully to LinShare, I select Activities #### Description **1. Filter audit log** - In new view I can see the filter: Date range - When I click on this field, I can select pre-defined period : Today, Yesterday, Last seven days, Last 2 weeks, Last 30 days, Last month, This month, Last 6 months - Or I can customize the start date and end date - When I click on button Add filters, I can select additional filters: Resource type, Resource name, Action, Actor - Resource groups: - when I select this filter, there will be a drop-down list listing all resource groups of audit logs - There are 8 groups and each groups can contain multiple resource types: - Shared Space: Workspace, Workgroup, Workspace member, Workgroup member, Workgroup document, Workgroup folder, Workgroup revision - Myspace: Document - Upload request: Upload request, Upload request Group, Upload request URL, Upload request document - Share: Share entry, Anonymous share - Guest: Guest - Contact: Contact, Contact list - User: Account, Authentication, JWT token. - I can select one or multiple resource types from the list, then it will be displayed as a filter criteria in the row below as: "Resource type: [ selected option1 ] or [selected option2 ] or ..." and a delete icon next to it. - If I click enter, the system will search all the audit logs that belong to selected resource type. - Resource name: - When I select this filter, there will be a dialog that allow me to input text amd click button Apply - Then it will be displayed as a filter criteria in the row below: "Resource name: inputted text" and a delete icon next to it. - If I click Enter, the system will search all the audit logs that has resource name contains inputted text. - Action: - when I select this filter, there will be a drop-down list listing all actions of audit logs - I can select one action from the list, then it will be displayed as a filter criteria in the row below as: "Action: [ selected option1 ] or [ selected option2 ] or ..." and a delete icon next to it. - If I click enter, the system will search all the audit logs that belong to selected action - Auth user: - When I select this filter, there will be a dialog with a search field - when I input some characters in the search field, the system will display suggestion list and I can select one auth user from the list. - I can search auth user by email or uuid - Then it will be displayed as a filter criteria in the row below: "Auth user: selected user" and a delete icon next to it. - If I click Enter, the system will search all the audit logs which have auth user as selected. - I can filter audit logs by one of above criteria or combine them - Each search criteria in the search bar is seperated by a delete icon. I can click this icon to delete the criteria - I can also click button Clear filter to delete all current selected filter **2. Display the result** - After selecting filter, I click button Enter, the system will execute searching audit logs with selected filter conditions and display the result below, including columns: - Actor - Action - Resource type - Resource name - Date: When I hover the date, there will be a popover that displays detail date - time - Details #### Postconditions - With filters Resources type and Action, user can select multiple options and the search operator for these 2 filters is "Or" - With filter Resource name, user can only search by one option - The audit logs list will be paginated with default row is 25, I can change the number at the bottom of page. - In the audit log table, I can sort ascending and descending in each column (except column Detail) - Default sort is latest date time - When an action is performed by a technical account, the actor displayed in the trace list is the name of the user. There will be an information icon next to actor name. If I hover/click on this icon, there will be a popover:" This action is performed by [technical account's name] on behalf of [user name] - When I click on a specific resource or hover the resource, there will be a popover with option: "View all related traces". When I select this option, the system will search and display all related traces of that specific resource [Back to Summary](#summary) ## UI Design #### Mockups  #### Final design [Back to Summary](#summary) ## Misc [Back to Summary](#summary) ================================================ FILE: documentation/EN/epics/Guests/stroy-487-simple-moderator-can-request-to-become-admin-moderator.md ================================================ # Summary * [Related EPIC](#related-epic) * [Definition](#definition) * [UI Design](#ui-design) * [Misc](#misc) ## Related EPIC * [Guests](./README.md) ## Definition #### Preconditions - Given that I am a LinShare user and I logged-in LinShare successfully #### Description - From menu, I go to Contacts => Guests - I can see all guests in my domain - When I click on three-dot button of a guest that I have simple moderator right, I can see option "Ask for admin moderator right" - When I click on this option, then "My request" tab will be opened. - I can see a text message: "You can send a request to become admin moderator of this guest. An admin moderator can delete guest account and manage moderator request list of that guest." and a button "Send request" - I click on this button, there will be a popup:"You are about to send a request to become an admin moderator of this guest. Once sent, you can see the request's status in Detail panel of guest" with 2 buttons Cancel and Send - I select "Send", then the request will be sent. - There will be a toast message when the request was sent successfully - After sending the request, If I am click option "Ask for admin moderator right" of that guest again, I am navigated to Details tab of that guest - Now in Details tab, I can see a text message:" You have sent a request to become admin moderator of this guest. Please wait for approval." and a close icon #### Postconditions - When a request is sent, the admin moderator can see this request in the pending request list of this guest - When I open Detail panel of the guest, I can see the text: You have sent a request to become a admin moderator of this guest" with creation date and current status of request: - If the request is sent successfully, it has status "Pending" - If the domain admin or admin moderator add me manually as moderator, this request will have status "Aborted" - If the request is rejected, It will have status:"Rejected" - If the request is approved, it will have status:"Approved" - When I click on Status link, it opened Activities tab of the guest. [Back to Summary](#summary) ## UI Design #### Mockups      #### Final design [Back to Summary](#summary) ## Misc [Back to Summary](#summary) ================================================ FILE: documentation/EN/epics/New Sharing Process on top of Shared Spaces/README.md ================================================ # Summary * [Context](#context) * [Definition](#definition) * [Stories](#stories) * [Misc](#misc) ## Context [Back to Summary](#summary) ## Definition TODO [Back to Summary](#summary) ## Stories TODO > A list of all the story documentation in the epic, must format as a list of links to corresponding user story files inside epic folder 1. [As a user, i can do something](./link-to-the-file.md) [Back to Summary](#summary) ## Misc > Link references, UI mockup, link to gitlab issue or any extra documents related to the EPIC * [Gitlab issue]() * [UI Mockup]() [Back to Summary](#summary) ================================================ FILE: documentation/EN/epics/New Sharing Process on top of Shared Spaces/story-578-user-can-share-a-workgroup-or-a-workspace.md ================================================ # Summary * [Related EPIC](#related-epic) * [Definition](#definition) * [UI Design](#ui-design) * [Misc](#misc) ## Related EPIC * [New admin portal](./README.md) ## Definition #### Preconditions * Given that I am a LinShare user * After logged-in successfully, I go to Shared space. #### Description **UC1. Add a member who is not yet an user to a workgroup** - Given that I am a workgroup admin - I click button Add member, then the Member tab of that workgroup will be opened. - I select a role and input an email to the field "Add people" - If I can not found the user I am looking for (because it does not exist), the system should propose to me a specific entry in the auto-complete result list to create an guest account : "Create guest account?" - I select this button, then there will be a popup:"You will invite [inputted email] to be a guest" and Yes/No button - If I choose Yes, the inputted email will be added as a guest account automatically, and there will be a toast message :"The guest account was created successfully" - The external email now become a guest and added as a member to the workgroup. **UC2. Add a member who is not yet an user to a workspace** - Given that I am a workspacd's admin - I click button Add member, then the Member tab of that workspace will be opened. - I select workspace's role, workgroup's role and input an email to the field "Add people" - If I can not found the user I am looking for (because it does not exist), the system should propose to me a specific entry in the auto-complete result list to create an guest account : "Create guest account?" - I select this button, then there will be a popup:"You will invite [inputted email] to be a guest" and Yes/No button - If I choose Yes, the inputted email will be added as a guest account automatically, and there will be a toast message :"The guest account was created successfully" - The external email now become a guest and added as a member to the workspace with selected roles. **UC3 Receiver can access to a shared workgroup/workspace** - Given that I am an external user who have not had LinShare account and a LinShare user granted me access to a LinShare workgroup/workspace - I received an email notification via email about the share. - If I am an external user with no LinShare account: I receive 2 emails: - The first email to inform that I am invited to a LinShare with a guest account. I need to activate guest account by clicking on the link and change password. - The second email is to inform that I am invited to a workgroup/workspace. There will be a link to the shared workgroup/workspace. When I click to this link: - If I am logging in LinShare with activated guest account, I am redirected to the shared workgroup/workspace in Shared space - If I have not logged in LinShare, the log-in screen will be opened. #### Postconditions [Back to Summary](#summary) ## UI Design #### Mockups #### Final design [Back to Summary](#summary) ## Misc [Back to Summary](#summary) ================================================ FILE: documentation/EN/epics/New Sharing Process on top of Shared Spaces/story-580-user-can-manage- sharing-link-of-a-workgroup-or-a-workspace.md ================================================ # Summary * [Related EPIC](#related-epic) * [Definition](#definition) * [UI Design](#ui-design) * [Misc](#misc) ## Related EPIC * [New admin portal](./README.md) ## Definition #### Preconditions - Given that I am a LinShare user - Admin enabled the functionality about sharing link for workgroup #### Description **UC1. Get Sharing link** * When I click three-dots button of a workgroup/workspace that I am admin of, I can see option "Get sharing link" * I select this option, a new screen will be opened: * In this new screen, I can see: - A link: this link is generated automatically when sharing first time by the system. I can click button Copy next to this link. Another button should let me renew this link. - Checkbox "Expiration": Default value of the checkbox is set by admin. - When I select this checkbox, a date picker will be shown and I can select an expiry date for this share. - The expiry date must > today. - On the expiry date, the sharing link will be removed. - Checkbox: Allow people with this link to request access. Default value of the checkbox is set by admin - When I select this checkbox, people with this link can send a request to access the workgroup/workspace - When the checkbox is un-ticked, when an user who is not shared yet accesses the workgroup/workspace link, he will not be able to create access request to the workgroup/workspace. - Checkbox: Enable/disable the link: Default value is enabled. When the link is disabled, button "Copy link" is disabled too. User cannot access a disabled link. **UC2. Edit a sharing link of a workroup/workspace** - When I click on three-dot button of a workgroup/workspace, I can see option :"Get sharing link" - I select this option, then the sharing link popup will be opened. - I can edit fields on the popup: - Checkbox "Expiration": If the checkbox is ticked, I can untick this checkbox . If the checkbox is not selected, I can select and choose an expiration date > current date - Checkbox: Allow people with this link to request access. I can tick/untick this checkbox to allow/not allow people with the sharing link create access request to this workgroup/workspace - Checkbox: Enable/disable the link - When I click button Renew the link, all the checkboxes will be set to default values. - After edit, I can click button Save, then the popup will be closed. **UC3. Remove sharing link of a workgroup/workspace** - As workgroup/workspace admin, When I click three-dot button of a workgroup, I select option:"Get sharing link", then the sharing link popup will be opened - On this popup I can see button "Remove" - When I click this button, there will be a confirmation message - If I choose Yes, then the sharing link of the workgroup/workspace will be deleted - Now when workgroup/workspace admin select option "Get sharing link" of that workgroup/workspace, a new link will be generated. #### Postconditions - A receiver can get the sharing link of workgroup/workspace through email or get directly from the sender. - Only workgroup/workspace admin can create and edit/remove a sharing link - Worgkoup's reader /contributor/writer can only copy the sharing link of that workgroup. If the link is disabled/not created yet, reader /contributor/writer cannot see the sharing link. - After a sharing link is removed or disabled, when a user access the link, there will be a message that the link is invalid [Back to Summary](#summary) ## UI Design #### Mockups #### Final design [Back to Summary](#summary) ## Misc [Back to Summary](#summary) ================================================ FILE: documentation/EN/epics/New Sharing Process on top of Shared Spaces/story-581-user-can-request-access-to-a-workgroup-or-a-workspace.md ================================================ # Summary * [Related EPIC](#related-epic) * [Definition](#definition) * [UI Design](#ui-design) * [Misc](#misc) ## Related EPIC * [New admin portal](./README.md) ## Definition #### Preconditions - Given that I received a sharing link of a LinShare workgroup/workspace but I am not one of the recipients in the list. #### Description - When I click on that link, it will be opened in the browser and system will check: - If I have logged-in LinShare: (1) - There will be a new screen saying that my current account is not granted permission. - If in the setting of that shared workgroup/workspace, the checkbox " Allow people with this link to request access" is selected, I can see a button:"Request access". and a field :"Add a message" - If in the setting of the shared workgroup/workspace, the checkbox :" Allow people with this link to request access" is not selected, I cannot see button:"Request access" - I can input message to that field (optional) then click button Request access, then the workgroup/workspace's admins can see a new request to access the workgroup/workspace with status "Pending". - If I have not logged-in, I can see options: - Log-in: When I select this option, the Log-in screen will be opened. After I logged in successfully, the system will validate: - If the logged-in account is granted access permission, then I can see the shared workgroup/workspace in my shared space - If the logged-in account is not granted access permission, the process is as case (1) above - Request access: When I select this option, a new screen will be opened: - If in the setting of that shared workgroup/workspace, the checkbox " Allow people with this link to request access" is not selected, I can see a message that I cannot access to the workgroup/workspace. - If in the setting of that shared workgroup/workspace, the checkbox " Allow people with this link to request access" is selected, I can see a field to input my email, and a text field to input my message (optional) - After inputting my email and personal message , I can click button Request access. I can also see an explanation that if my access request is approved, my inputted email will be used to create a guest account. - The system will validate: - If the inputted email already exists in the current pending access requests of the workgroup/workspace, a message will be shown:" You already created an access request with this email on [creation date or pending request]. Plesae wait for approval." - If the inputted email does not exist in current pending access requests, a new access request will be sent. - The workgroup/workspace's admins will receive a new request to access the workgroup/workspace with status "Pending". #### Postconditions - After I click button Send access request to a workgroup/workspace, I can see a message:"You request has been sent. You will receive an email notification if your request is approved or not" - When there is a new access request to the workgroup/workspace, the workgroup/workspace admins will receive an email notification. [Back to Summary](#summary) ## UI Design #### Mockups #### Final design [Back to Summary](#summary) ## Misc [Back to Summary](#summary) ================================================ FILE: documentation/EN/epics/New Sharing Process on top of Shared Spaces/story-582-workgroup-admin-can-manage-access-request-of-a-workgroup-or-a-workspace.md ================================================ # Summary * [Related EPIC](#related-epic) * [Definition](#definition) * [UI Design](#ui-design) * [Misc](#misc) ## Related EPIC * [Guests](./README.md) ## Definition #### Preconditions - Given that I am a LinShare user and I logged-in LinShare successfully #### Description - I go to shared space - When I click on three-dot button of a workgroup/workspace that I am admin of, I can see option "Access request" - When I click on this option, then "Access request" tab will be opened. - I can see the list of all pending requests to access this workgroup/workspace - Each request include: Name/Email of the requester, the role and 2 buttons: Approve or Reject - For workgroup, the default role is reader, I can click on this field, a drop-down list will be shown to select other roles: Contributor/Writer/Admin. - For workspace, there are 2 roles: Default workgroup role and workspace role. The default selected role is Reader, and the list of roles for workspace are: Admin, Writer, Reader - When I click on button "Approve": - If the requester is already a LinShare user, that requester will become member of the workgroup/workspace with selected role - If the requester is not an user yet, there will be a notification message:" By approving this request, you will invite [external email] as a guest user". If I choose Yes, a guest account will be created automatically for this email then he will be added to the workgroup/workspace with selected role. - When I click on button "Reject", there will be a confirmation popup:" You are about to reject this request ! Beware, this action cannot be undone." and 2 button Close and Proceed." If I choose Proceed, the request will be denied. #### Postconditions - When there is a new request, every admin of the workgroup/workspace will receive and email notification about that request with information: - Requester full name (if any - in case the requester is already a LinShare user) and email - Date/time of creation - Status : Pending - And a button links to navigate to Pending request list of that workgroup/workspace - When an admin approves or rejects a pending request, other admins of that workgroup/workspace receive an email notification with information: - Requester full name (if any - in case the requester is already a LinShare user) and email - Date of creation - Status :Approved or rejected - Date/time of approval of rejection - Full name and email of the admin who approve or reject the request - When an admin approves or rejects a pending request, the requester also receives an email notification with information: - Date of creation - Status :Approved or rejected - Date/time of approval of rejection - Full name and email of the admin who approves or rejects the request - In case that a requester is not yet a LinShare user and the request is approved, he received 2 email: - The first email to inform that I am invited to a LinShare with a guest account. I need to activate guest account by clicking on the link and change password. - The second email is to inform that I am approved to become workgroup/workspace member. - When a request is approved or denied, it will be removed from the pending list. [Back to Summary](#summary) ## UI Design #### Mockups #### Final design [Back to Summary](#summary) ## Misc [Back to Summary](#summary) ================================================ FILE: documentation/EN/epics/New Sharing Process on top of Shared Spaces/story-583-admin-can-manage-functionality-Sharing-link-of-workgroup.md ================================================ # Summary * [Related EPIC](#related-epic) * [Definition](#definition) * [UI Design](#ui-design) * [Misc](#misc) ## Related EPIC * [New admin portal](./README.md) ## Definition #### Preconditions - Given that am super admin or nested admin of LinShare admin - After log-in successfully, I go to Configuration Tab - I click on Parameters, then select Shared Space - Sharing link for workgroups, the screen setting for this feature will be opened. #### Description - Below the functionality title, I can see an explanation text field " This functionality determine whether users can create Sharing link of a workgroup." - I can see 3 policies: - Activation policy includes 2 toggles - Enable functionality: - If this toggle is switched on, user of this domain accesses his shared space and click on three-dot button of a Workgroup, he can see option "Get sharing link". - If the toggle is disabled, when user accesses his shared Space and click on three-dot button of a Workgroup, he cannot see option "Get sharing link". - Allow nested admin to override this section: When I click on the icon "i", I can see a collapsible legend: " Once activated, nested admin can override the setting "Enable functionality" for his own domain. When disabled, the value of setting "Enable functionality" is applied for all nested domains and nested admin cannot update" - The rule is as same as toggle (1.2) in story 43. Admin manage function anonymous URL - Configuration policy includes 2 toggles: - Configure functionality: Allow nested admin to change the default parameter. When I click on the icon "i", I can see a collapsible legend: "By enabling, you allow your nested domain admin to change default parameter field in his domain". - The rule is as same as toggle (2.1) in story 43. Admin manage function anonymous URL - Allow nested to override this section: When I click on the icon "i", I can see a collapsible legend:"By enabling, nested admin can re-enable the Configure functionality toggle and then change the default parameter" - The rule is as same as toggle (2.2) in story 43. Admin manage function anonymous URL - Delegation policy includes 2 toggles: - Allow user to change default parameter: - If the toggle is on, when user opens screen sharing link of a workgroup, he can select/un-select the checkbox "Expiration". - If the toggle is off, user cannot change value of this checkbox. - Allow nested admin to override this section: When I click on the icon "i", I can see a collapsible legend: " Once activated, nested admin can override the setting "Allow user to change default parameter" for his own domain. When disabled, the value of setting "Enable functionality" is applied for all nested domains and nested admin cannot update" - The rule is as same as toggle (3.2) in story 43. Admin manage function anonymous URL - Parameter: A checkbox: - If the checkbox is selected, the text displays: " The checkbox Expiration will be selected by default." On UI user, when user create a new sharing link of workgroup , The checkbox "Expiration" will be selected by default. - If the checkbox is un-selected, the text displays: " The checkbox Expiration will be unselected by default." On UI user, when user create a new sharing link of workgroup , The checkbox "Expiration" will be un-selected by default. - There are 2 nested-functionalities under this functionality: Sharing link expiration policy and Access request to workgroup **Nested functionality: Sharing link expiration policy** - Below the functionality title, I can see an explanation text field "This functionality determines the expiration date range of Sharing link of a workgroup." - There are 2 policies and 2 parameters: - Configuration policy includes 2 toggles: - Configure functionality: Allow nested admin to change the default parameter. When I click on the icon "i", I can see a collapsible legend: "By enabling, you allow your nested domain admin to change default parameter field in his domain". - The rule is as same as toggle (2.1) in story 43. Admin manage function anonymous URL - Allow nested to override this section : When I click on the icon "i", I can see a collapsible legend:"By enabling, nested admin can re-enable the Configure functionality toggle and then change the default parameter" - The rule is as same as toggle (2.2) in story 43. Admin manage function anonymous URL - Delegation policy includes 2 toggles: - Allow user to change default parameter: - If the toggle is on, when user opens screen sharing link of a workgroup and select the checkbox "Expiration", he can change default value of expiration date - If the toggle is off, user cannot change value of Expiration date of a workgroup sharing link. The field value depends on the default parameter below. - Allow nested admin to override this section: When I click on the icon "i", I can see a collapsible legend: " Once activated, nested admin can override the setting "Allow user to change default parameter" for his own domain. When disabled, the value of setting "Allow user to change default parameter" is applied for all nested domains and nested admin cannot update" - The rule is as same as toggle (3.2) in story 43. Admin manage function anonymous URL - Parameters: - When user select checkbox "Expiration" of a workgroup sharing link, the date picker field will appear. The default expiration date is calculated as creation date + default value. The date range is defined between [Creation date] and [ creation date + max value] " - The parameter include 2 fields: - Default value: A text field that only accepts number with a drop-down list contains options: Month, week, day. - Max value: A text field that only accepts number with a drop-down list contains options: Month, week, day or I can select the checkbox "Unlimited" for the max value. **Nested functionality: Allow Workgroup access requests** - There is an explanation text field "This functionality determine whether people (any user with or without an LinShare account) with sharing link can request access to the workgroup or not" - I can see 3 policies: - Activation policy includes 2 toggles - Enable functionality: When I click on the icon "i", I can see a collapsible legend: - If this toggle is switched on, when user open screen sharing link of a workgroup, he can see a checkbox: "Allow people with this link to request access". - If the toggle is disabled, this checkbox will not appear on screen sharing link of workgroup. - Allow nested admin to override this section: When I click on the icon "i", I can see a collapsible legend: " Once activated, nested admin can override the setting "Enable functionality" for his own domain. When disabled, the value of setting "Enable functionality" is applied for all nested domains and nested admin cannot update" - The rule is as same as toggle (1.2) in story 43. Admin manage function anonymous URL - Configuration policy includes 2 toggles: - Configure functionality: Allow nested admin to change the default parameter. When I click on the icon "i", I can see a collapsible legend: "By enabling, you allow your nested domain admin to change default parameter field in his domain". - The rule is as same as toggle (2.1) in story 43. Admin manage function anonymous URL - Allow nested to override this section: When I click on the icon "i", I can see a collapsible legend:"By enabling, nested admin can re-enable the Configure functionality toggle and then change the default parameter" - The rule is as same as toggle (2.2) in story 43. Admin manage function anonymous URL - Delegation policy includes 2 toggles: - Allow user to change default parameter: When I click on the icon "i", I can see a collapsible legend: - If the toggle is on, when user edit a workgroup sharing link, he can select/un-select the checkbox "Allow people with this link to request access". - If the toggle is off, user cannot change value of this checkbox. - Allow nested admin to override this section: When I click on the icon "i", I can see a collapsible legend: " Once activated, nested admin can override the setting "Allow user to change default parameter" for his own domain. When disabled, the value of setting "Enable functionality" is applied for all nested domains and nested admin cannot update" - The rule is as same as toggle (3.2) in story 43. Admin manage function anonymous URL - Parameter: A checkbox - If the checkbox is selected, the text displays: "Allow people with sharing link to request access". On UI user, when user create a new sharing link of workgroup , The checkbox "Allow people with this link to request access" will be selected by default. - If the checkbox is un-selected, the text displays: " Do not allow people with sharing link to request access". On UI user, when user create new a sharing link of workgroup, The checkbox "Allow people with this link to request access" will be unselected by default. #### Post-conditions The rule is as same as Post-condition of Story 43. Admin manage function anonymous URL. [Back to Summary](#summary) ## UI Design #### Mockups #### Final design [Back to Summary](#summary) ## Misc [Back to Summary](#summary) ================================================ FILE: documentation/EN/epics/New Sharing Process on top of Shared Spaces/story-584-user-can-see-activities-and-audit-logs-related-to-sharing-shared-space.md ================================================ # Summary * [Related EPIC](#related-epic) * [Definition](#definition) * [UI Design](#ui-design) * [Misc](#misc) ## Related EPIC * [Guests](./README.md) ## Definition #### Preconditions - Given that I am a LinShare user and I logged-in LinShare successfully #### Description **UC1. User can see activities related to sharing workgroup/workspace** - From menu, I go to Shared space and open Detail page of a workgroup/workspace. - I select Activities tab, then I can see activities: - Share with external user: Only admin can see this log - Create/Edit/Renew/Delete a sharing link for workgroup/workspace: All members can see this log - Enable/Disable a sharing link for workgroup/workspace: All members can see this log - Access request to workgroup/workspace: - A new request is created: Workgroup/workspace admin can see this log - Approve or deny access requests: All admins and can see this log - Technical user can perform some actions on behalf of a user, so the actor who performed the action may not be the same as the authenticated user. In this case, in the audit trace, I can see an asterisque near the actor name, which on hovering, I can see a message: "This action was performed by the [authUser name] on behalf of [Actor]" **UC2. User can see audit logs related to sharing workgroup/workspace** - From menu, I go to Activities logs - I can see activities logs related to sharing a workgroup/workspace: - Share with external user: Ony admin can see this logs - Create/Edit/Renew/Delete a sharing link for workgroup/workspace: All members can see this log - Enable/Disable a sharing link for workgroup/workspace: All members can see this log - Access request to workgroup/workspace: - A new request is created: Workgroup/workspace admin can see this log - Approve or deny access requests: All admins and can see this log - Technical user can perform some actions on behalf of a user, so the actor who performed the action may not be the same as the authenticated user. In this case, in the audit trace, I can see an asterisque near the actor name, which on hovering, I can see a message: "This action was performed by the [authUser name] on behalf of [Actor]" **UC3. Admin can see audit logs related to sharing workgroup/workspace** - After log-in successfully to Admin portal, admin can go to Activities logs and search for a workgroup/workspace - He can see all the activities related to a sharing a workspace/workgroup as listed above. #### Postconditions [Back to Summary](#summary) ## UI Design #### Mockups #### Final design [Back to Summary](#summary) ## Misc [Back to Summary](#summary) ================================================ FILE: documentation/EN/epics/New Sharing Process on top of Shared Spaces/story-586-Functionality-sharing-link-of-workspace.md ================================================ # Summary * [Related EPIC](#related-epic) * [Definition](#definition) * [UI Design](#ui-design) * [Misc](#misc) ## Related EPIC * [New admin portal](./README.md) ## Definition #### Preconditions - Given that am super admin or nested admin of LinShare admin - After log-in successfully, I go to Configuration Tab - I click on Parameters, then select Shared Space - Sharing link for workspace, the screen setting for this feature will be opened. #### Description - Below the functionality title, I can see an explanation text field " This functionality determine whether users can create Sharing link of a Workspace." - I can see 3 policies: - Activation policy includes 2 toggles - Enable functionality: - If this toggle is switched on, user of this domain accesses his shared space and click on three-dot button of a Workspace, he can see option "Get sharing link". - If the toggle is disabled, when user accesses his shared Space and click on three-dot button of a Workspace, he cannot see option "Get sharing link". - Allow nested admin to override this section: When I click on the icon "i", I can see a collapsible legend: " Once activated, nested admin can override the setting "Enable functionality" for his own domain. When disabled, the value of setting "Enable functionality" is applied for all nested domains and nested admin cannot update" - The rule is as same as toggle (1.2) in story 43. Admin manage function anonymous URL - Configuration policy includes 2 toggles: - Configure functionality: Allow nested admin to change the default parameter. When I click on the icon "i", I can see a collapsible legend: "By enabling, you allow your nested domain admin to change default parameter field in his domain". - The rule is as same as toggle (2.1) in story 43. Admin manage function anonymous URL - Allow nested to override this section: When I click on the icon "i", I can see a collapsible legend:"By enabling, nested admin can re-enable the Configure functionality toggle and then change the default parameter" - The rule is as same as toggle (2.2) in story 43. Admin manage function anonymous URL - Delegation policy includes 2 toggles: - Allow user to change default parameter: - If the toggle is on, when user opens screen sharing link of a workspace, he can select/un-select the checkbox "Expiration". - If the toggle is off, user cannot change value of this checkbox. - Allow nested admin to override this section: When I click on the icon "i", I can see a collapsible legend: " Once activated, nested admin can override the setting "Allow user to change default parameter" for his own domain. When disabled, the value of setting "Enable functionality" is applied for all nested domains and nested admin cannot update" - The rule is as same as toggle (3.2) in story 43. Admin manage function anonymous URL - Parameter: A checkbox: - If the checkbox is selected, the text displays: " The checkbox Expiration will be selected by default." On UI user, when user create a new sharing link of workspace, The checkbox "Expiration" will be selected by default. - If the checkbox is un-selected, the text displays: " The checkbox Expiration will be unselected by default." On UI user, when user create a new sharing link of workspace , The checkbox "Expiration" will be un-selected by default. - There are 2 nested-functionalities under this functionality: Sharing link expiration policy and Access request to Workspace **Nested functionality: Sharing link expiration policy** - Below the functionality title, I can see an explanation text field " This functionality determines the expiration date range of Sharing link of a workspace." - There are 2 policies and 2 parameters: - Configuration policy includes 2 toggles: - Configure functionality: Allow nested admin to change the default parameter. When I click on the icon "i", I can see a collapsible legend: "By enabling, you allow your nested domain admin to change default parameter field in his domain". - The rule is as same as toggle (2.1) in story 43. Admin manage function anonymous URL - Allow nested to override this section : When I click on the icon "i", I can see a collapsible legend:"By enabling, nested admin can re-enable the Configure functionality toggle and then change the default parameter" - The rule is as same as toggle (2.2) in story 43. Admin manage function anonymous URL - Delegation policy includes 2 toggles: - Allow user to change default parameter: - If the toggle is on, when user opens screen sharing link of a Workspace and select the checkbox "Expiration", he can change default value of expiration date - If the toggle is off, user cannot change value of Expiration date of a Workspace sharing link. The field value depends on the default parameter below. - Allow nested admin to override this section: When I click on the icon "i", I can see a collapsible legend: " Once activated, nested admin can override the setting "Allow user to change default parameter" for his own domain. When disabled, the value of setting "Allow user to change default parameter" is applied for all nested domains and nested admin cannot update" - The rule is as same as toggle (3.2) in story 43. Admin manage function anonymous URL - Parameters: - When user select checkbox "Expiration" of a Workspace sharing link, the date picker field will appear. The default expiration date is calculated as creation date + default value. The date range is defined between [Creation date] and [ creation date + max value] " - The parameter include 2 fields: - Default value: A text field that only accepts number with a drop-down list contains options: Month, week, day. - Max value: A text field that only accepts number with a drop-down list contains options: Month, week, day or I can select the checkbox "Unlimited" for the max value. **Nested functionality: Allow Workspace access requests** - There is an explanation text field "This functionality determine whether people (any user with or without an LinShare account) with sharing link can request access to the workspace or not"" - I can see 3 policies: - Activation policy includes 2 toggles - Enable functionality: When I click on the icon "i", I can see a collapsible legend: - If this toggle is switched on, when user open screen sharing link of a Workspace, he can see a checkbox: "Allow people with this link to request access". - If the toggle is disabled, this checkbox will not appear on screen sharing link of Workspace. - Allow nested admin to override this section: When I click on the icon "i", I can see a collapsible legend: " Once activated, nested admin can override the setting "Enable functionality" for his own domain. When disabled, the value of setting "Enable functionality" is applied for all nested domains and nested admin cannot update" - The rule is as same as toggle (1.2) in story 43. Admin manage function anonymous URL - Configuration policy includes 2 toggles: - Configure functionality: Allow nested admin to change the default parameter. When I click on the icon "i", I can see a collapsible legend: "By enabling, you allow your nested domain admin to change default parameter field in his domain". - The rule is as same as toggle (2.1) in story 43. Admin manage function anonymous URL - Allow nested to override this section: When I click on the icon "i", I can see a collapsible legend:"By enabling, nested admin can re-enable the Configure functionality toggle and then change the default parameter" - The rule is as same as toggle (2.2) in story 43. Admin manage function anonymous URL - Delegation policy includes 2 toggles: - Allow user to change default parameter: When I click on the icon "i", I can see a collapsible legend: - If the toggle is on, when user edit a Workspace sharing link, he can select/un-select the checkbox "Allow people with this link to request access". - If the toggle is off, user cannot change value of this checkbox. - Allow nested admin to override this section: When I click on the icon "i", I can see a collapsible legend: " Once activated, nested admin can override the setting "Allow user to change default parameter" for his own domain. When disabled, the value of setting "Enable functionality" is applied for all nested domains and nested admin cannot update" - The rule is as same as toggle (3.2) in story 43. Admin manage function anonymous URL - Parameter: A checkbox - If the checkbox is selected, the text displays: "Allow people with sharing link to request access". On UI user, when user create a new sharing link of Workspace , The checkbox "Allow people with this link to request access" will be selected by default. - If the checkbox is un-selected, the text displays: " Do not allow people with sharing link to request access". On UI user, when user create new a sharing link of Workspace, The checkbox "Allow people with this link to request access" will be unselected by default. #### Post-conditions The rule is as same as Post-condition of Story 43. Admin manage function anonymous URL. [Back to Summary](#summary) ## UI Design #### Mockups #### Final design [Back to Summary](#summary) ## Misc [Back to Summary](#summary) ================================================ FILE: documentation/EN/epics/New Sharing Process on top of Shared Spaces/story-587-user-can-share-a-folder.md ================================================ # Summary * [Related EPIC](#related-epic) * [Definition](#definition) * [UI Design](#ui-design) * [Misc](#misc) ## Related EPIC * [New admin portal](./README.md) ## Definition #### Preconditions * Given that I am a LinShare user * After logged-in successfully, I go to Shared space and open a workgroup #### Description - Given that I have admin/writer role to that workgroup - When I click on three-dot button of the folder, I can see a new option : Share by link - I select this option, the sharing folder screen will be opened. - On the sharing screen, I can see: - Button Add Recipient - Who has access: Listing all the users who have access to this folder via sharing - I click button Add Recipient, then a new screen will be opened. - I can input an email to the field "Add people" and select a permission - Permission list includes: - Read-only: The receiver can only view and download the files of shared folder - Read and write: The receiver can view, download and upload files to the shared folder - Full access: The receiver can view, upload, download and delete the files of shared folder - When I start to type in the field "Add recipient", the system will display a suggestion list: - I can select one user from the list: - If I select one user who is already a member of parent workgroup of the folder, there will be toast message:" This user is already had access permission to this folder because a member of Parent workgroup :[workgroup name]." I can continue adding this user as a recipient of the shared folder by link. After sharing, this user can access to the folder in 2 ways: In Shared Space as a workgroup member and in Shared by links as a recipient of shared folder. - If the user is not a member of parent workgroup of the folder, I can select this user from suggestion list. - If I can not find the user I am looking for (because it does not exist), the system should propose to me a specific entry in the auto-complete result list to create an guest account : "Create guest account?" - I select this button, then there will be a popup:"You will invite [inputted email] to be a guest" and Yes/No button - If I choose Yes, the inputted email will be added as a guest account automatically, and there will be a toast message :"The guest account was created successfully" - The external email now become a guest and can access the shared folder. #### Postconditions [Back to Summary](#summary) ## UI Design #### Mockups     #### Final design [Back to Summary](#summary) ## Misc [Back to Summary](#summary) ================================================ FILE: documentation/EN/epics/New Sharing Process on top of Shared Spaces/story-588-user-can-see-the-list-of-received-shares-of-shared-space.md ================================================ # Summary * [Related EPIC](#related-epic) * [Definition](#definition) * [UI Design](#ui-design) * [Misc](#misc) ## Related EPIC * [New admin portal](./README.md) ## Definition #### Preconditions * Given that I am a LinShare user * After logged-in successfully, I go to Shared space #### Description - Given that a LinShare user granted me access to a LinShare folder - If I am already a LinShare user, I received an email notification via email about the share.There will be a link to the shared folder. - If I am an external user with no LinShare account: I receive 2 emails: - The first email to inform that I am invited to a LinShare with a guest account. I need to activate guest account by clicking on the link and change password. - The second email is to inform that I am invited to a folder. There will be a link to the shared folder. - When I click on the link of shared folder in email: - If I have not logged in LinShare, the log-in screen will be opened. - If I am logging in LinShare, I am redirected to the shared folder. - In Shared Space, I can see a toggle with 2 tabs: Shared Space and Shared by links. Shared space contains all of my workspaces and workgroup as currently. - In Shared by links, I can see the list of all folders/files which are shared with me through sharing link - There is a filter that allows me to select to view only files or folders or both - The table of list contains columns: - Name - Type: folder or file - Link creation date - Expiration date - I can sort by name/link created date/expiration date - I can search folder/file by name #### Postconditions [Back to Summary](#summary) ## UI Design #### Mockups  #### Final design [Back to Summary](#summary) ## Misc [Back to Summary](#summary) ================================================ FILE: documentation/EN/epics/New Sharing Process on top of Shared Spaces/story-589-user-can-manage-a-shared-folder.md ================================================ # Summary * [Related EPIC](#related-epic) * [Definition](#definition) * [UI Design](#ui-design) * [Misc](#misc) ## Related EPIC * [New admin portal](./README.md) ## Definition #### Preconditions - Given that I am a LinShare user and I have shared a folder before #### Description **UC1. Get Sharing link** * On the sharing screen of a folder, I can see a button "Get Sharing link" or: - When I click on three-dots button of a folder, I can see option :"Get Sharing link" - Only Admin or writer of parent workgroup of the folder can create a sharing link. Reader, Contributor of the parent workgroup cannot create sharing link. * I select this option, new screen will be opened: * In this new screen, I can see: - A link: this link is generated automatically when sharing first time by the system. I can click button Copy next to this link. Another button should let me renew this link. - Checkbox "Expiration": Default value of the checkbox is set by domain admin. - When I select this checkbox, a date picker will be shown and I can select an expiry date for this share. - The expiry date must > today. - On the expiry date, the sharing link will be removed. - Checkbox: Allow people with this link to request access. Default value of the checkbox is set by domain admin - When I select this checkbox, people with this link can send a request to access the folder - When the checkbox is un-ticked, when a user who is not shared yet accesses the folder link, he will not be able to create access request to this folder - Checkbox: Enable/disable the link: Default value is enabled. When the link is disabled, button "Copy link" is disabled too. User cannot access a disabled link. - When the folder is shared, there will be a shared icon on the folder (same as shared file in Myspace) **UC2. Edit a sharing link of a folder** - Admin/Writer of parent workgroup of the folder can edit a sharing link. Reader, Contributor of the parent workgroup cannot edit sharing link. - Given that the sharing link of the folder has been created before. - When I click on three-dot button of the folder, I can see option :"Get sharing link" - I select this option, then the sharing link popup will be opened. - I can edit fields on the popup: - Checkbox "Expiration": If the checkbox is ticked, I can untick this checkbox . If the checkbox is not selected, I can select and choose an expiration date > current date - Checkbox: Allow people with this link to request access. I can tick/untick this checkbox to allow/not allow people with the sharing link create access request to this folder - Checkbox: Enable/disable the link - After edit, I can click button Save, then the popup will be closed. - When I click button Renew the link, a confirmation popup will be displayed. If I select Yes, the sharing link will be replaced by a new link all the checkboxes will be set to default values. - When a link is renewed, an notification email will be sent to the current receivers about this changed with the new link. **UC3. Remove share/sharing link of folder** - Given that I am admin/writer of parent workgroup of the shared folder. - When I click three-dot button of the shared folder, I select option:"Get sharing link", then the sharing link popup will be opened - On this popup I can see button "Remove" - When I click this button, there will be a confirmation message - If I choose Yes, then the sharing link of the folder will be deleted - All the recipients in the list will be removed access from this folder. - Now when the admin/writer of parent workgroup of the folder selects option "Get sharing link" of that workgroup/workspace, a new link will be generated. **UC4. Edit role/ Remove access of a user** - Given that I am admin/writer of parent workgroup of the shared folder. - When I click three-dot button of the folder and select option:"Get sharing link", then the sharing screen will be opened - On this screen, I can see the list of recipients with its access permission to the shared folder - When I click on the permission field of eah recipient, I can see a drop-down list with option: Read, Read and write, and Remove access - I can select another permission for the recipient or Remove access - When I Click button Save, the updates is saved, there will be a notification message that the updates are saved. - When a recipient is removed access from the shared folder, he cannot see the shared folder on his Received shares category. #### Postconditions - A receiver can get the sharing link of workgroup/workspace through email or get directly from the sender. - Admin or writer of parent workgroup of the folder can create and edit/remove a sharing link and the share - Parent Worgkoup's reader /contributor can only copy the sharing link of that workgroup. If the link is disabled/not created yet, reader /contributor cannot see the sharing link: The option "Get sharing link" will be disabled when he clicks on three-dot button of the folder. - After a sharing link is removed or disabled, when a user access the link, there will be a message that the link is invalid [Back to Summary](#summary) ## UI Design #### Mockups   #### Final design [Back to Summary](#summary) ## Misc [Back to Summary](#summary) ================================================ FILE: documentation/EN/epics/New Sharing Process on top of Shared Spaces/story-590-admin-can-manage-functionality-sharing-folder-and-file-by-link.md ================================================ # Summary * [Related EPIC](#related-epic) * [Definition](#definition) * [UI Design](#ui-design) * [Misc](#misc) ## Related EPIC * [New admin portal](./README.md) ## Definition #### Preconditions - Given that am super admin or nested admin of LinShare admin - After log-in successfully, I go to Configuration Tab - I click on Parameters, then select Shared Space, then select Sharing link for folder/file, the screen setting for this feature will be opened. #### Description - Below the functionality title, I can see an explanation text field " This functionality determine whether users can create Sharing link of a folder/file." - I can see 3 policies: - Activation policy includes 2 toggles - Enable functionality: - If this toggle is switched on, user of this domain accesses his shared space and click on three-dot button of a folder/File, he can see option "Get sharing link". - If the toggle is disabled, when user accesses his shared Space and click on three-dot button of a folder/file, he cannot see option "Get sharing link". - Allow nested admin to override this section: When I click on the icon "i", I can see a collapsible legend: " Once activated, nested admin can override the setting "Enable functionality" for his own domain. When disabled, the value of setting "Enable functionality" is applied for all nested domains and nested admin cannot update" - The rule is as same as toggle (1.2) in story 43. Admin manage function anonymous URL - Configuration policy includes 2 toggles: - Configure functionality: Allow nested admin to change the default parameter. When I click on the icon "i", I can see a collapsible legend: "By enabling, you allow your nested domain admin to change default parameter field in his domain". - The rule is as same as toggle (2.1) in story 43. Admin manage function anonymous URL - Allow nested to override this section: When I click on the icon "i", I can see a collapsible legend:"By enabling, nested admin can re-enable the Configure functionality toggle and then change the default parameter" - The rule is as same as toggle (2.2) in story 43. Admin manage function anonymous URL - Delegation policy includes 2 toggles: - Allow user to change default parameter: - If the toggle is on, when user opens screen sharing link of a folder/file, he can select/un-select the checkbox "Expiration". - If the toggle is off, user cannot change value of this checkbox. - Allow nested admin to override this section: When I click on the icon "i", I can see a collapsible legend: " Once activated, nested admin can override the setting "Allow user to change default parameter" for his own domain. When disabled, the value of setting "Enable functionality" is applied for all nested domains and nested admin cannot update" - The rule is as same as toggle (3.2) in story 43. Admin manage function anonymous URL - Parameter: A checkbox: - If the checkbox is selected, the text displays: " The checkbox Expiration will be selected by default." On UI user, when user create a new sharing link of folder/file , The checkbox "Expiration" will be selected by default. - If the checkbox is un-selected, the text displays: " The checkbox Expiration will be unselected by default." On UI user, when user create a new sharing link of folder/file , The checkbox "Expiration" will be un-selected by default. - There are 2 nested-functionalities under this functionality: Sharing link expiration policy and Access request to folder/file **Nested functionality: Sharing link expiration policy** - Below the functionality title, I can see an explanation text field " This functionality determines the expiration date range of Sharing link of a folder/file ." - There are 2 policies and 2 parameters: - Configuration policy includes 2 toggles: - Configure functionality: Allow nested admin to change the default parameter. When I click on the icon "i", I can see a collapsible legend: "By enabling, you allow your nested domain admin to change default parameter field in his domain". - The rule is as same as toggle (2.1) in story 43. Admin manage function anonymous URL - Allow nested to override this section : When I click on the icon "i", I can see a collapsible legend:"By enabling, nested admin can re-enable the Configure functionality toggle and then change the default parameter" - The rule is as same as toggle (2.2) in story 43. Admin manage function anonymous URL - Delegation policy includes 2 toggles: - Allow user to change default parameter: - If the toggle is on, when user opens screen sharing link of a folder/file and select the checkbox "Expiration", he can change default value of expiration date - If the toggle is off, user cannot change value of Expiration date of a folder/file sharing link. The field value depends on the default parameter below. - Allow nested admin to override this section: When I click on the icon "i", I can see a collapsible legend: " Once activated, nested admin can override the setting "Allow user to change default parameter" for his own domain. When disabled, the value of setting "Allow user to change default parameter" is applied for all nested domains and nested admin cannot update" - The rule is as same as toggle (3.2) in story 43. Admin manage function anonymous URL - Parameters: - When user select checkbox "Expiration" of a folder/file sharing link, the date picker field will appear. The default expiration date is calculated as creation date + default value. The date range is defined between [Creation date] and [ creation date + max value] " - The parameter include 2 fields: - Default value: A text field that only accepts number with a drop-down list contains options: Month, week, day. - Max value: A text field that only accepts number with a drop-down list contains options: Month, week, day or I can select the checkbox "Unlimited" for the max value. **Nested functionality: Allow folder/file access requests** - There is an explanation text field "This functionality determine whether people (any user with or without an LinShare account) with sharing link can request access to the folder/file or not" - I can see 3 policies: - Activation policy includes 2 toggles - Enable functionality: When I click on the icon "i", I can see a collapsible legend: - If this toggle is switched on, when user open screen sharing link of a folder/file, he can see a checkbox: "Allow people with this link to request access". - If the toggle is disabled, this checkbox will not appear on screen sharing link of folder/file. - Allow nested admin to override this section: When I click on the icon "i", I can see a collapsible legend: " Once activated, nested admin can override the setting "Enable functionality" for his own domain. When disabled, the value of setting "Enable functionality" is applied for all nested domains and nested admin cannot update" - The rule is as same as toggle (1.2) in story 43. Admin manage function anonymous URL - Configuration policy includes 2 toggles: - Configure functionality: Allow nested admin to change the default parameter. When I click on the icon "i", I can see a collapsible legend: "By enabling, you allow your nested domain admin to change default parameter field in his domain". - The rule is as same as toggle (2.1) in story 43. Admin manage function anonymous URL - Allow nested to override this section: When I click on the icon "i", I can see a collapsible legend:"By enabling, nested admin can re-enable the Configure functionality toggle and then change the default parameter" - The rule is as same as toggle (2.2) in story 43. Admin manage function anonymous URL - Delegation policy includes 2 toggles: - Allow user to change default parameter: When I click on the icon "i", I can see a collapsible legend: - If the toggle is on, when user edit a folder/file sharing link, he can select/un-select the checkbox "Allow people with this link to request access". - If the toggle is off, user cannot change value of this checkbox. - Allow nested admin to override this section: When I click on the icon "i", I can see a collapsible legend: " Once activated, nested admin can override the setting "Allow user to change default parameter" for his own domain. When disabled, the value of setting "Enable functionality" is applied for all nested domains and nested admin cannot update" - The rule is as same as toggle (3.2) in story 43. Admin manage function anonymous URL - Parameter: A checkbox - If the checkbox is selected, the text displays: "Allow people with sharing link to request access". On UI user, when user create a new sharing link of folder/file , The checkbox "Allow people with this link to request access" will be selected by default. - If the checkbox is un-selected, the text displays: " Do not allow people with sharing link to request access". On UI user, when user create new a sharing link of folder/file, The checkbox "Allow people with this link to request access" will be unselected by default. #### Post-conditions The rule is as same as Post-condition of Story 43. Admin manage function anonymous URL. [Back to Summary](#summary) ## UI Design #### Mockups #### Final design [Back to Summary](#summary) ## Misc [Back to Summary](#summary) ================================================ FILE: documentation/EN/epics/New Sharing Process on top of Shared Spaces/story-592-user-can-manage-shared-folder-in-received-shares-of-shared-space.md ================================================ # Summary * [Related EPIC](#related-epic) * [Definition](#definition) * [UI Design](#ui-design) * [Misc](#misc) ## Related EPIC * [New admin portal](./README.md) ## Definition #### Preconditions * Given that I am a LinShare user * After logged-in successfully, I go to Shared space. * I select the tab: Shared by links. In this list I can see all the folders/files which have been shared to me. #### Description - If I have "Read" permission to the folder, I can : - Open folder and see all child folders/files inside - When I click on three-dot button of the folder, I can see the options: Details, Download, Leave share - When I click on thee-dot button of the file inside that folder, I can see options: Details, Preview, Download, Copy to Myspace/Shared Space - If I have "Read and Write" permission to the folder, I can: - Open folder and see all child folders/files inside - Create a folder, Upload file/folder - When I click on three-dot button of the folder, I can see the options: Details, Rename, Download, Leave share - When I click on thee-dot button of the file inside that folder, I can see options: Details, Rename, Preview, Download, Duplicate, Copy to Myspace/Shared Space - If I have "Full access" to the folder, I have all permissions as above "Read and Write" right, and can Delete files/folder inside the Shared folder. - If I am in Shared by links view of a shared folder/file and also a member of the parent workgroup of that shared folder/file, I can see an option: View in Shared Space. When I select this option, I am redirected to this folder/file in Shared Space tab. - If I am in the Shared Space view of a folder/file and I am also added as a recipient of Shared folder, I can see option :" View in Shared by links". When I select this option, I am redirected to this folder/file in Shared by link tab. - My permissions to a folder/file between "Shared space" and "Shared by links" do not depend on each other. - When I select one "Shared by link" folder, there will be an actions bar displayed: - There will be options: Download as zip, Leave Share - If I select Download, the selected folder will be downloaded as zip - If I select Leave Share, there will be a confirmation message. If I choose Yes, the selected folders will be removed. - When I select multiple "Shared by link" folders, there will be an actions bar displayed: - There will be options: Leave Share - If I select Leave Share, there will be a confirmation message. If I choose Yes, all the selected shared by link folders will be removed. - When I select multiple "Shared by link" files, there will be an actions bar displayed: - There will be options: Download them all, Download as zip, Leave Share - If I select Download, all the selected files will be downloaded - If I select Download as zip, all the selected file will be downloaded as a zipped folder. - If I select Leave Share, there will be a confirmation message. If I choose Yes, all the selected shared by link files will be removed. #### Postconditions [Back to Summary](#summary) ## UI Design #### Mockups #### Final design [Back to Summary](#summary) ## Misc [Back to Summary](#summary) ================================================ FILE: documentation/EN/epics/New Sharing Process on top of Shared Spaces/story-593-user-can-create-access-request-to-a-folder.md ================================================ # Summary * [Related EPIC](#related-epic) * [Definition](#definition) * [UI Design](#ui-design) * [Misc](#misc) ## Related EPIC * [New admin portal](./README.md) ## Definition #### Preconditions - Given that I received a sharing link of a LinShare folder but I am not one of the recipients of shared by link folder. #### Description - When I click on that link, it will be opened in the browser and system will check: - If I have logged-in LinShare: (1) - There will be a message "Access denied" and a link back to Homepage. - If in the setting of that shared folder, the checkbox " Allow people with this link to request access" is selected, I can see a button:"Request access". and a field :"Add a message" - If in the setting of the shared folder, the checkbox :" Allow people with this link to request access" is not selected, I cannot see button:"Request access". - I can input message to that field (optional) then click button Request access, then the parent workgroup 's admins/writer of the folder can see a new request to access the folder with status "Pending". - If I have not logged-in, I can see options: - Log-in: When I select this option, the Log-in screen will be opened. After I logged in successfully, the system will validate: - If the logged-in account is granted access permission, then I can see the shared by link folder in my shared space/ Shared by link tab - If the logged-in account is not granted access permission, the process is as case (1) above - Request access: When I select this option, a new screen will be opened: - If in the setting of that shared folder, the checkbox " Allow people with this link to request access" is not selected, I can see a message that I cannot access to the folder - If in the setting of that shared folder, the checkbox " Allow people with this link to request access" is selected, I can see a field to input my email, and a text field to input my message (optional) - After inputting my email and personal message , I can click button Request access. I can also see an explanation that if my access request is approved, my inputted email will be used to create a guest account. - The system will validate: - If the inputted email already exists in the current pending access requests of the folder, a message will be shown:" You already created an access request with this email on [creation date or pending request]. Please wait for approval." - If the inputted email does not exist in current pending access requests, a new access request will be sent. - The parent workgroup's admins/writers will receive a new request to access the folder with status "Pending". #### Postconditions - After I click button Send access request to a folder, I can see a message:"You request has been sent. You will receive an email notification if your request is approved or not" - When there is a new access request to the folder, the workgroup/workspace admins will receive an email notification. [Back to Summary](#summary) ## UI Design #### Mockups #### Final design [Back to Summary](#summary) ## Misc [Back to Summary](#summary) ================================================ FILE: documentation/EN/epics/New Sharing Process on top of Shared Spaces/story-596-workgroup-admin-or-writer-can-manage-access-request-to-a-folder-in-my-workgroup.md ================================================ # Summary * [Related EPIC](#related-epic) * [Definition](#definition) * [UI Design](#ui-design) * [Misc](#misc) ## Related EPIC * [Guests](./README.md) ## Definition #### Preconditions - Given that I am a LinShare user and I logged-in LinShare successfully #### Description - I go to shared space - When I click on three-dot button of a shared folder that I am admin/writer of the parent workgroup, I can see option "Access request" - When I click on this option, then "Access request" tab will be opened. - I can see the list of all pending requests to access this shared folder - Each request include: Name/Email of the requester, the role and 2 buttons: Approve or Reject - The default role is reader, I can click on this field, a drop-down list will be shown to select other roles: Read/Read and Write/Full access - When I click on button "Approve": - If the requester is already a LinShare user, that requester will have access to the shared folder with selected role. This folder will appear in the recipient's Shared by links tab - If the requester is not a user yet, there will be a notification message:" By approving this request, you will invite [external email] as a guest user". If I choose Yes, a guest account will be created automatically for this email then he will have access to the shared folder with selected role - When I click on button "Reject", there will be a confirmation popup:" You are about to reject this request ! Beware, this action cannot be undone." and 2 button Close and Proceed." If I choose Proceed, the request will be denied. #### Postconditions - When there is a new request to a folder, every admin/writer of the parent workgroup will receive and email notification about that request with information: - Requester full name (if any - in case the requester is already a LinShare user) and email - Date/time of creation - Status : Pending - And a button links to navigate to Pending request list of that shared folder - When an admin/writer approves or rejects a pending request to a shared folder, other admins/writers of that workgroup will receive an email notification with information: - Requester full name (if any - in case the requester is already a LinShare user) and email - Date of creation - Status :Approved or rejected - Date/time of approval of rejection - Full name and email of the admin/writer who approve or reject the request - When an admin/writer approves or rejects a pending request, the requester also receives an email notification with information: - Date of creation - Status :Approved or rejected - Date/time of approval of rejection - Full name and email of the admin/writer who approves or rejects the request - In case that a requester is not yet a LinShare user and the request is approved, he received 2 email: - The first email to inform that I am invited to a LinShare with a guest account. I need to activate guest account by clicking on the link and change password. - The second email is to inform that I am granted access to the shared by link folder. - When a request is approved or denied, it will be removed from the pending list. [Back to Summary](#summary) ## UI Design #### Mockups  #### Final design [Back to Summary](#summary) ## Misc [Back to Summary](#summary) ================================================ FILE: documentation/EN/epics/SAAS/README.md ================================================ # Summary * [Context](#context) * [Definition](#definition) * [Stories](#stories) * [Misc](#misc) ## Context [Back to Summary](#summary) ## Definition TODO [Back to Summary](#summary) ## Stories TODO > A list of all the story documentation in the epic, must format as a list of links to corresponding user story files inside epic folder 1. [As a user, i can do something](./link-to-the-file.md) [Back to Summary](#summary) ## Misc > Link references, UI mockup, link to gitlab issye or any extra documents related to the EPIC * [Gitlab issue]() * [UI Mockup]() [Back to Summary](#summary) ================================================ FILE: documentation/EN/epics/SAAS/story-514-as-a user-I-want-to-be-able-to-join-the-support.md ================================================ # Summary * [Related EPIC](#related-epic) * [Definition](#definition) * [UI Design](#ui-design) * [Misc](#misc) ## Related EPIC * [SAAS](./README.md) ## Definition #### Preconditions - Given that I am LinShare SaaS user - Given this function is enabled. #### Description **UC1. UI-User** - After logged in successfully, I click on Hunman icon on top right of screen - I can see a drop-down list - I select option "Support', then I am redirected to the support page in a new Tab **UC2. Enable/disable this function** - To enable, disable this function, I need to configure in ui-user/config/config.js file: - The boolean parameter: - If the function is enabled, when user of this domain already logged in then click on Human button on top right of screen, he can see option "Support" from drop-down list - If the function is disabled, when user of this domain already logged in then click on Human button on top right of screen, the option "Support' will be hidden on drop-down list - Provider - Url toward the chat website - If provider is crisp, extra parameters like user email, language will be added to the link. #### Postconditions - In support page, I can see the welcome message chat:"How can we help with LinShare" and I can start to chat with the supporter. [Back to Summary](#summary) ## UI Design #### Mockups  #### Final design [Back to Summary](#summary) ## Misc [Back to Summary](#summary) ================================================ FILE: documentation/EN/epics/SAAS/story-541-SAAS-user-can-see-proper-error-message-of-limitations.md ================================================ # Summary * [Related EPIC](#related-epic) * [Definition](#definition) * [UI Design](#ui-design) * [Misc](#misc) ## Related EPIC * [SAAS](./README.md) ## Definition #### Preconditions - Given that I am LinShare SaaS user #### Description - A new key is added in ui-user/config/config.js file: saasMode - If saasMode=false, user is not in SAAS offer, the error messages when user reaches limitations are described as in below stories: - Number of workspaces: [story 536](https://ci.linagora.com/linagora/lgs/linshare/products/linshare-github/-/blob/master/documentation/EN/epics/new-admin-portal/story-536-admin-can-manage-number-of-workspaces-that-can-be%20created-in-a-domain.md) - Number of workgroups inside a workspace: [story 538](https://ci.linagora.com/linagora/lgs/linshare/products/linshare-github/-/blob/master/documentation/EN/epics/new-admin-portal/story-538-admin-can-manage-number-of-workgroups-that-can-be-created-inside-a-workspace.md) - Number of recipients in an Upload request: [story 539](https://ci.linagora.com/linagora/lgs/linshare/products/linshare-github/-/blob/master/documentation/EN/epics/new-admin-portal/story-539-admin-can-manage-number-of-recipients-of-an-upload-request.md) - Number of uploaded file per day: [story 560](./story-560-limit-the-number-of-uploaded-files-per-day.md) - Number of upload requests (Pending/Active/Closed): [story561](./story-561-admin-can-manage-number-of-upload-request-per-user.md) - If saasMode=true, user is using SAAS offer, the error messages when user reaches limitations are changed as following: - With number of workspaces: - The message is "You have reached maximum number of workspaces. Please contact your company owner to upgrade the company plan at [Console]()." - With number of workgroups inside a workspace: - The message is: " You have reached maximum number of workgroups inside this workspace. Please contact your company owner to upgrade the company plan at [Console]()." - With number of recipients of an upload request: - The message is: "You have reached maximum number of recipients for this upload request. Please contact your company owner to upgrade the company plan at [Console]()." - With number of uploaded files per day: - The message is: "You have reached maximum number of uploaded files per day. Please contact your company owner to upgrade the company plan at [Console]()." - With number of upload requests: - The message is: "You have reached maximum number of uploaded requests. Please contact your company owner to upgrade the company plan at [Console]()." - When user clicks on the link [Console](), user is redirected to Console page. #### Postconditions [Back to Summary](#summary) ## UI Design #### Mockups #### Final design [Back to Summary](#summary) ## Misc [Back to Summary](#summary) ================================================ FILE: documentation/EN/epics/SAAS/story-560-limit-the-number-of-uploaded-files-per-day.md ================================================ # Summary * [Related EPIC](#related-epic) * [Definition](#definition) * [UI Design](#ui-design) * [Misc](#misc) ## Related EPIC * [SAAS](./README.md) ## Definition #### Preconditions #### Description **UC1. As an admin, I want to manage the functionality Limit number of uploaded files per day per user** - Given that am super admin or nested admin of LinShare admin - After log-in successfully, I go to Configuration Tab - I click on Parameters, then select Number of uploaded files per day , the screen setting for this feature will be opened. - On the screen title, I can see a collapsible legend:" This functionality allows admin to set limitation for number of uploaded files per day per user in this domain." - There are 2 policies and 1 parameter: - Activation policy includes 2 toggles: - Enable functionality: When I click on the icon "i", I can see a collapsible legend: - If this toggle is switched on, the number of uploaded files per day per user in this domain will be limited. The uploaded files will be counted in only Myspace. The limitation number will be set in the below parameter. - If the toggle is disabled, the number of uploaded files per day per user in this domain will not be limited. - Allow nested admin to override "Enable functionality": Toggle. When I click on the icon "i", I can see a collapsible legend: " Once activated, nested admin can override the setting "Enable functionality" for his own domain. When disabled, the value of setting "Enable functionality" is applied for all nested domains and nested admin cannot update" - The rule is as same as toggle (1.2) in story 43. Admin manage function anonymous URL - Configuration policy includes 2 toggles: - Configure functionality: Allow nested admin to change the default parameter. When I click on the icon "i", I can see a collapsible legend: "By enabling, you allow your nested domain admin to change default parameter field in his domain". - The rule is as same as toggle (2.1) in story 43. Admin manage function anonymous URL - Allow nested to override "Configure functionality": When I click on the icon "i", I can see a collapsible legend:"By enabling, nested admin can re-enable the Configure functionality toggle and then change the default parameter" - The rule is as same as toggle (2.2) in story 43. Admin manage function anonymous URL - Parameter: a text field, named "Max uploaded files count" - When I click on icon "i", I can see a collapsible legend: "Max number of files that a user in this domain can upload to Myspace in a day". - I can only input number in this field. Default value : 20 **UC2. As a user, I cannot upload more than my max number of files per day** - Given that I am a LinShare user - Given that the functionality Limit number of uploaded files per day is enabled - When I upload a file to Myspace in LinShare, the system will validate: - If my total uploaded files in Myspace today are smaller than value of "Max uploaded file count" (set by domain admin), the uploading is processed as normally - If my total uploaded files in Myspace today has reached the value of "Max uploaded file count" (set by domain admin), there will be an error message: "You have reached maximum number of uploaded files per day." **UC3. As a user, I want to upload multiple files to Myspace with the limitation of number of files** - If I upload multiple files in once or I upload a folder which contains multiple files, and the number of uploading files makes my total uploaded files a day greater than the limitation, for example: - My limitation is 20 files per day and I have not uploaded any file today - On Myspace , I click button Upload and select 25 files from my computer to upload - The files list will be appeared in the Current upload section. The system will validate: - If any file in the list is greater than file size limitation, there will be an error message as currently - If there is no available space, there will be an error message for remaining files as currently - After the twentieth file is uploaded successfully, there will be an error message for remaining files in the list: "You have reached maximum number of uploaded file per day" #### Postconditions - The file count will be reset every day for each user in the domain - The time is calculated by user' time zone. - When user copy/move files in LinShare, it will not be counted as new uploads [Back to Summary](#summary) ## UI Design #### Mockups #### Final design [Back to Summary](#summary) ## Misc [Back to Summary](#summary) ================================================ FILE: documentation/EN/epics/SAAS/story-561-admin-can-manage-number-of-upload-request-per-user.md ================================================ # Summary * [Related EPIC](#related-epic) * [Definition](#definition) * [UI Design](#ui-design) * [Misc](#misc) ## Related EPIC * [SAAS](./README.md) ## Definition #### Preconditions #### Description **UC1. As an admin, I want to manage the functionality Limit number of uploaded requests per user** - Given that am super admin or nested admin of LinShare admin - After log-in successfully, I go to Configuration Tab - I click on Parameters, then select Upload request, then the screen setting for this feature will be opened. - There is a new sub-function: Limit number of upload requests per user - On the sub-function title, I can see a collapsible legend:" This functionality allows admin to set limitation for number of uploaded requests (pending/active/closed) per user in this domain." - There are 2 policies and 1 parameter: - Activation policy includes 2 toggles: - Enable functionality: When I click on the icon "i", I can see a collapsible legend: - If this toggle is switched on, the number of uploaded requests per user in this domain will be limited. The limitation will be applied for upload requests with statuses: Pending/Active/Closed. The limitation number will be set in the below parameter. - If the toggle is disabled, the number of uploaded request in this domain will not be limited. - Allow nested admin to override "Enable functionality": Toggle. When I click on the icon "i", I can see a collapsible legend: " Once activated, nested admin can override the setting "Enable functionality" for his own domain. When disabled, the value of setting "Enable functionality" is applied for all nested domains and nested admin cannot update" - The rule is as same as toggle (1.2) in story 43. Admin manage function anonymous URL - Configuration policy includes 2 toggles: - Configure functionality: Allow nested admin to change the default parameter. When I click on the icon "i", I can see a collapsible legend: "By enabling, you allow your nested domain admin to change default parameter field in his domain". - The rule is as same as toggle (2.1) in story 43. Admin manage function anonymous URL - Allow nested to override "Configure functionality": When I click on the icon "i", I can see a collapsible legend:"By enabling, nested admin can re-enable the Configure functionality toggle and then change the default parameter" - The rule is as same as toggle (2.2) in story 43. Admin manage function anonymous URL - Parameter: a text field, named "Max uploaded request count" - When I click on icon "i", I can see a collapsible legend: "Max number of upload requests of a user in this domain. The number is counted on upload requests with status: Pending/Active/Closed". - I can only input number in this field. - By default, this functionality is disabled. It is only enabled when user is using LinShare SAAS. - Default value for the parameter is depending on the user's subscription in SAAS offer. **UC2. As a user, I cannot create upload request if the number of my upload requests have reached the limitation** - Given that I am a LinShare user - Given that the functionality Limit number of uploaded request is enabled - When I click button create a new Upload request in LinShare, the system will validate: - If my total uploaded requests with status: Pending/Active/Close is smaller than value of "Max uploaded request count" (set by domain admin), I can continue creating upload request as normally. - If my total uploaded requests with status: Pending/Active/Close has reached the value of "Max uploaded request count" (set by domain admin), there will be an error message: "You have reached maximum number of uploaded requests." #### Postconditions [Back to Summary](#summary) ## UI Design #### Mockups #### Final design [Back to Summary](#summary) ## Misc [Back to Summary](#summary) ================================================ FILE: documentation/EN/epics/drive/README.md ================================================ # Summary * [Context](#context) * [Definition](#definition) * [Stories](#stories) * [Misc](#misc) ## Context In LinShare we have workgroups in shared spaces. These workgroups are designed to let a team works together on one topic. If you have multiple topics in a team, you have to create one workgroup per topic, each time you will also need to add team members as part of this workgroups. So the membership of a workgroup can differ for each workgroups. The main goals of Drive are : * to group some workgroups together, like workgroups were belonging to the same team or project. * to avoid workgroup membership redefintion each time you are creating a new workgroup. Of course, we also want to have the possiblity to create standalone workgroups, with the requirement of being part of a Drive. [Back to Summary](#summary) ## Definition ### Rules * This feature must be available on sharedSpace. * The Drive will be managed as a new functionality. * A Drive can only contain workgroups. A Drive can't contain a Drive, a Document or a Folder. * Among a Drive, a member has two roles, one role dedicated to the Drive by itself. A second one which will be his role by default in workgroups created inside that Drive. - Drive roles (DRIVE_ADMIN, for example) is applied to the current Drive.
- Default workgroups roles : Defined on the Drive and applied on the workgroups inside it as a default value.
* The workgroup members inside a Drive inherit from the defaut workgroup roles and properties but they can be overridden locally. * When an external user (from the drive) is added to a nested workgroup, he can't see the Drive name, only the workgroup name. (To be confirmed) ### Actions * Create a Drive : - Anyone can create Drives if the functionality is enabled. - The Drive creator is Admin by default, and has default admin role on workgroups inside the Drive. * Add member to a Drive : - To add new members to the Drive, member must have the role of __DRIVE_ADMIN__. - The new member is added with a Drive role and a default Workgroups role. - The new member is also added to all nested workgroups inside the Drive with the default role defined on the Drive. If he already exists in a nested workgroup, the higher role is kept in order to resolve the conflict. * Create new Workgroups inside a Drive : - Members must have at least the __DRIVE WRITER__ role. - The __WORKGROUP ADMIN__ role is automatically assigned to the creator of the workgroup - All drive members are also added to the workgroup with their own default workgroup roles * Add an external user of the Drive to workgroup : - Just edit the workgroup to add the user with his role. - You must be admin of the drive or the workgroup. * Update the Drive informations and member of Drive : - All member with DRIVE_WRITER role can update a Drive. - We need to propagate all modifications on Drive members into the workGroups. we have two mode : - Soft : the changes are only applied to workgroup members if they were not upgraded locally, with a higher rrole for example. - Force : overrides member's role in all nested workgroups by the drive's one. * Delete a workgroup : - All member with the right permissions on the workgroup - All member with ADMIN or WRITER role on the workgroup. ### Drive Permissions Drive are managed using 3 different roles. Workgroup roles are just here as reminder. | Permissions / Role | DRIVE READER | DRIVE WRITER | DRIVE ADMIN | WORKGROUP READER | WORKGROUP CONTRIBUTOR | WORKGROUP WRITER | WORKGROUP ADMIN | | :-------: | :-------: | :-------: | :-------: | :-------: | :-------: | :-------: | :-------: | | See member of the Drive |X|X|X| | | | | | Add member to the Drive | | |X| | | | | | Update member on the Drive | | |X| | | | | | Delete Member on the Drive | | |X| | | | | | Update The Drive | | |X| | | | | | Delete the Drive | | |X| | | | | | - | | Add a workgroup | |X|X| | | | | | Update a Workgroup | |X|X| | | |X| | Delete a Workgroup | |X|X| | | |X| | Add member to the Workgroup | | |?| | | |X| | Delete Member on the Workgroup | | |?| | | |X| | Update member on the Workgroup | | |?| | | |X| | - | | See the documents | | | |X|X|X|X| | Download a document | | | |X|X|X|X| | Upload Document | | | | |X|X|X| | Delete a document | | | | | |X|X| [Back to Summary](#summary) ## Stories 1. [As an user, I want to view list of Drives and Workgroups in Shared Space](./story-1-user-view-list-of-drives-or-workgroups.md) 2. [As an user, I want to create a Drive](./story-2-user-create-a-drive.md) 3. [As an user, I want to view all members of a Drive](./story-3-user-see-all-members-of-a-drive.md) 4. [As an user, I want to view all Workgroups inside a drive](./story-4-user-see-all-workgroups-inside-my-drive.md) 5. [As an user, I want to delete my Drive](./story-5-user-delete-my-drive.md) 6. [As an user, I want to view Drive detail](./story-6-user-view-drive-detail.md) 7. [As an administrator, I want to enable/disable Drive functionality](./story-7-administrator-enable-or-disable-functionality.md) 8. [As an user, I want to delete Drive member](./story-8-user-delete-drive-member.md) 9. [As an user, I want to add Drive member](./story-9-user-add-member-to-drive.md) 10. [As an user, I want to delete Workgroup inside my Drive](./story-10-user-delete-workgroup-inside-Drive.md) 11. [As an user, I want to create Workgroup inside my Drive](./story-11-user-create-workgroup-inside-Drive.md) 12. [As an user, I want to delete member of a Workgroup inside Drive](./story-12-user-delete-member-of-a-workgroup.md) 13. [As an user, I want to add external member to a Workgroup inside Drive](./story-13-user-add-external-member-to-workgroup-inside-Drive.md) 14. [As an user, I want to rename Drive](./story-14-user-rename-Drive.md) 15. [As an user, I want to view Drive's activity](./story-15-user-view-Drive's-activity.md) 16. [As an user, I want to update member's role on Drive](./story-16-user-update-member-role-on-Drive.md) 17. [As an user, I want to update default Workgroup's role of Drive member](./story-17-user-update-default-workgroup-role-of-Drive-member.md) 18. [As an user, I want to be noticed when I am added to a Drive](./story-18-user-noticed-when-I-am-added-to-a-Drive.md) [Back to Summary](#summary) ## Misc > Link references, UI mockup, link to gitlab issye or any extra documents related to the EPIC * [Gitlab issue]() * [UI Mockup]() [Back to Summary](#summary) ================================================ FILE: documentation/EN/epics/drive/mockups/story-2-create-a-drive.md ================================================ ================================================ FILE: documentation/EN/epics/drive/story-01-user-view-list-of-drives-or-workgroups.md ================================================ # Summary * [Related EPIC](#related-epic) * [Definition](#definition) * [Screenshots](#screenshots) * [Misc](#misc) ## Related EPIC * [drive](./README.md) ## Definition #### Preconditions * Given that i am a Linshare user * Given that the functionality of Drives is enabled in Admin setting #### Description * After logged-in successfully, i go to Shared Space * I can see the list of my drives and workgroups that are not inside any drives * When i click button "++ on top left of screen, there will be 2 options: Create a drive / Create a workgroup * If the functionality of Drives is disabled in Admin setting, when i click button +, the option Create a drive is not shown #### Postconditions * I can see the list of drives that i am a member. [Back to Summary](#summary) ## UI Design #### Mockups  #### Final design  [Back to Summary](#summary) ## Misc [Back to Summary](#summary) ================================================ FILE: documentation/EN/epics/drive/story-02-user-create-a-drive.md ================================================ # Summary * [Related EPIC](#related-epic) * [Definition](#definition) * [Screenshots](#screenshots) * [Misc](#misc) ## Related EPIC * [drive](./README.md) ## Definition #### Preconditions * Given that i am a Linshare user * Given that the functionality of Drives is enabled in Admin setting #### Description * After logged-in successfully, i go to Shared Space * I can see the list of my drives and workgroups that are not inside any drives * When i click button "+" on top left of screen, there will be 2 options: Create a drive / Create a workgroup * When i hover the option Create Workgroup, there will be a helper message:"A workgroup is a collaborating space that that can be managed by internal users or guests. A workgroup can be inside a drive (as nested) or standalone. Only Workgroups contains files or folders." * When i hover the option Create Drive, there will be a helper message:" A Drive contains only Workgroups, a Drive will allow you to define a list of default members for all nested Workgroups." * I choose create a Drive * A popup will be displayed with a default drive name * I can edit the name or not then click button Create #### Postconditions * If The Drive is created successfully, the system will display a successful notification message. If there is any error (invalid name, permission, network...), system will display an error message. * My role to the new created drive is Admin and my default role on the workgroups inside the drive is admin * I can see this action on the Drive audit. [Back to Summary](#summary) ## UI Design #### Mockups   #### Final design   [Back to Summary](#summary) ## Misc [Back to Summary](#summary) ================================================ FILE: documentation/EN/epics/drive/story-03-user-see-all-members-of-a-drive.md ================================================ # Summary * [Related EPIC](#related-epic) * [Definition](#definition) * [Screenshots](#screenshots) * [Misc](#misc) ## Related EPIC * [drive](./README.md) ## Definition #### Preconditions * Given that i am a Linshare user * Given that the functionality of Drives is enabled in Admin setting #### Description **UC1.View existing member list** * After logged-in successfully, i go to Shared Space * I can see the list of my drives and workgroups that are not inside any drive. * When i hover any drive, i can see the icon Member and i click on this icon, the member tab (second tab) will be opened. * In member tab, i can see the list of drive's member with each member's role to the drive and his default role to workgroups inside the Drive * If the i am Drive's admin, be side the Existing member list, i can see the section Add a member and icon Delete/Edit next to each member. **UC2. Search/sort/filter member list** * Given that i am on Member tab of a Drive * When i click on icon Setting, the search box will be opened * I can input text in search box to find member by member's name, role (drive role), email * I can click icon sort, a drop-down list will be opened that including 2 part: * Sort by: List the sort criteria that i can choose: First name, last name, user rights. I can double click on any criteria to change between descending or ascending sort * Filter by: List the filter criteria that i can choose: Reader right, admin right, contributor right #### Postconditions [Back to Summary](#summary) ## UI Design #### Mockups   #### Final design   [Back to Summary](#summary) ## Misc [Back to Summary](#summary) ================================================ FILE: documentation/EN/epics/drive/story-04-user-see-all-workgroups-inside-my-drive.md ================================================ # Summary * [Related EPIC](#related-epic) * [Definition](#definition) * [Screenshots](#screenshots) * [Misc](#misc) ## Related EPIC * [drive](./README.md) ## Definition #### Preconditions * Given that i am a Linshare user * Given that the functionality of Drives is enabled in Admin setting #### Description **UC1.View list of workgroups** * After logged-in successfully, i go to Shared Space * I can see the list of my drives and workgroups that are not inside any drives * I click on a drive. * I see the list of all workgroups inside my drive. (drives that i am a member of) * On top right of screen, I can see a human icon beside sorting icon * when i hover this human icon, i can see a tooltip "View drive detail" * When i click on this icon, the Drive detail panel will be opened. * On i can see both workgoups list and detail information of the drive. **UC2. Sorting list of workgoups** * On top right of screen, I can see a sorting icon * when i click on this icon, i can see dropdown list of sorting criteria: - Modification date - Creation date - Name * I can choose one of these sorting criteria and double click to change the sorting order * The workgroup list will change accordingly **UC3. Search workgoups** * On top right of screen, i can see a search bar "Search by name" * I can type in this field and the system will display matching result instantly * I can click on icon setting beside Search bar, the Advanced Search setting popup will be opened * I select checkbox, other fields in popup will be enabled. * I can choose type of date: Modification date or Creation date * I select begining date and ending date then click button Filter or Reset to cancel. [Back to Summary](#summary) ## UI Design #### Mockups     #### Final design   [Back to Summary](#summary) ## Misc [Back to Summary](#summary) ================================================ FILE: documentation/EN/epics/drive/story-05-user-delete-my-drive.md ================================================ # Summary * [Related EPIC](#related-epic) * [Definition](#definition) * [Screenshots](#screenshots) * [Misc](#misc) ## Related EPIC * [Drives](./README.md) ## Definition #### Preconditions * Given that i am a Linshare user * Given that the functionality of Drives is enabled in Admin setting * After logged-in successfully, i go to Shared Space * I can see the list of my drives and workgroups that are not inside any drive. #### Description **UC1. Delete one drive** * when i click on three-dot button of a drive, if i am the admin of drive, the option Delete will be enabled. * Or when i click checkbox to select a drive that i am admin, i can see the action bar displayed on top of screen. * I click button Delete, a confirmation popup will prompt * I confirm deletion, the selected Drive will be removed from the list. All the workgroups inside the drive are also deleted **UC2. Delete multiple Drives and workroups** * When i click checkbox to select multiple drives/workgroups that i have admin role, on the action bar, i can see the option Delete is enabled * I click on this option, the confirmation popup will be displayed * I confirm the deletion, all the selected drives/workgroups will be removed . #### Postconditions * The selected Drive(s) will be removed from the list. All the workgroups inside the drive are also deleted * I can see this action on my Activity Logs. [Back to Summary](#summary) ## UI Design #### Mockups    #### Final design **Delete one drive**    **Delete multiple drives**    [Back to Summary](#summary) ## Misc [Back to Summary](#summary) ================================================ FILE: documentation/EN/epics/drive/story-06-user-view-drive-detail.md ================================================ # Summary * [Related EPIC](#related-epic) * [Definition](#definition) * [Screenshots](#screenshots) * [Misc](#misc) ## Related EPIC * [Drive](./README.md) ## Definition #### Preconditions * Given that i am a Linshare user * Given that the functionality of Drives is enabled in Admin setting * After logged-in successfully, i go to Shared Space * I can see the list of my drives and workgroups that are not inside any drive. #### Description **UC1. View detailed information of a drive.** * After logged-in successfully, i go to Shared Space * I can see the list of my drives and workgroups that are not inside any drive. * When i hover the drive name, i can see the icon information, i click on this icon, the Detail panel will be opened on the right * Or when i click on thee-dots button of a drive, i can see a drop-down list of actions, and i choose option "Details", then the Detail panel will be opened on the right. User with any role to the drive (admin/writer/reader) can view detail tab. * On detail tab, i can see the following information: * Drive name * Description (if any) * Creation time * Update time * Update person * My rights to the drive * Members: When i click on this link, it will open Member tab * Versioning enable: Default setting for inside workgroups versioning. When this checkbox is ticked , all the workgroups inside will be default versioned . When this checkbox is not ticked, the all the workgroups inside will be not versioned by default (when workgroup is created). **UC2. Edit description ** * On Detail tab of a Drive, i can see the field " Description" below the Drive's name * If i am the Drive reader or writer, i can only see the field as non editable text * If i am the admin of the drive, i can see the icon Edit next to the field * When i click on icon Edit, i can change the description then save. **UC3. View detailed information of a drive when I'm inside a drive** * After logged-in successfully, i go to Shared Space * I can see the list of my drives and workgroups that are not inside any drive. * I go inside in a Drive to browser workgroups * I click on the "View Drive details" button (like workgroups), near to the "AZ" button. * Then the Detail panel will be opened on the righ. [Back to Summary](#summary) ## UI Design #### Mockups    #### Final design   [Back to Summary](#summary) ## Misc [Back to Summary](#summary) ================================================ FILE: documentation/EN/epics/drive/story-07-administrator-enable-or-disable-functionality.md ================================================ # Summary * [Related EPIC](#related-epic) * [Definition](#definition) * [Screenshots](#screenshots) * [Misc](#misc) ## Related EPIC * [Drives](./README.md) ## Definition #### Preconditions * Given that i am LinShare administrator. I logged in the admin interface #### Description * I go to parameters on the side menu. * I click on functionalities. * I click on the Drive functionality. * I can now enable or disable Drive functionality and enable/disable Creation right: * When the functionality is enabled, the Drives are displayed on User interface. * When the functionality is disabled, the Drives are hidden on User interface * When the functionality is enabled and Creation right is enabled, the button Create Drive (button "+" at top left of Listing drives screen) is enabled on User interface. * When the functionality is enabled and Creation right is disabled, the button Create Drive is disabled on User interface. [Back to Summary](#summary) ## UI Design #### Mockups #### Final design  [Back to Summary](#summary) ## Misc [Back to Summary](#summary) ================================================ FILE: documentation/EN/epics/drive/story-08-user-delete-drive-member.md ================================================ # Summary * [Related EPIC](#related-epic) * [Definition](#definition) * [Screenshots](#screenshots) * [Misc](#misc) ## Related EPIC * [Drive](./README.md) ## Definition #### Preconditions * Given that I am a LinShare user * Given that the functionality of Drives is enabled in Admin setting #### Description * After logged-in successfully, I go to Shared Space * I can see the list of my drives and workgroups that are not inside any drive. * When I hover any drive name on the list, I can see the icon Member and I click on this icon, the member tab (second tab) will be opened. * Or when I click on three-dot button of a drive, if I am the admin of drive, the option Add member will be enabled. If I am not the admin of Drive, this option will be disabled. I choose Add a member, the Member tab will be opened on the right. * In Existing member section, if I am the admin of Drive, I can see icon Delete next to each member's name * I click on Delete icon, there will be a confirmation popup * I confirm deletion, the member will be removed. #### Postconditions * Selected member is removed from the Drive member list and all the workgroups inside the drive. * I can see a toast notification message of successful deletion. * I can see this action on the Drive audit [Back to Summary](#summary) ## UI Design #### Mockups  #### Final design    [Back to Summary](#summary) ## Misc [Back to Summary](#summary) ================================================ FILE: documentation/EN/epics/drive/story-09-user-add-member-to-drive.md ================================================ # Summary * [Related EPIC](#related-epic) * [Definition](#definition) * [Screenshots](#screenshots) * [Misc](#misc) ## Related EPIC * [drive](./README.md) ## Definition #### Preconditions * Given that i am a LinShare user * Given that the functionality of Drives is enabled in Admin setting #### Description * After logged-in successfully, I go to Shared Space * I can see the list of my Drives and workgroups that are not inside any Drive. * When i hover any Drive, i can see the icon Member and i click on this icon, the member tab (second tab) will be opened. * Or when i click on three-dot button of a Drive, if i am the admin of Drive, the option Add member will be enabled. If i am not the admin of Drive, this option will be disabled. I choose Add a member, the Member tab will be opened on the right. * I can see the the Add a member section that includes fields: * Drive role: A drop-down list including options: Admin, Writer, Reader. The default selection is Reader * Default Workgroup role: A drop-down list including options: Admin, Writer, Contributor, Reader. The default selection is Reader * Add people: I can input text in this field to search Linshare user (internal users and guests) by name or email. The system will display result instantly and i can choose one user from the list. * If the selected user is already a member of Drive, there will be an error toast message. * If not, That user will be added to the Drive. Now he will be listed in section Existing member of the Drive. #### Postconditions * The new member is added to the Drive with selected role * He is added to all workgroups inside the Drive with the default workgroup role * I can see this action on the Drive audit [Back to Summary](#summary) ## UI Design #### Mockups    #### Final design      [Back to Summary](#summary) ## Misc [Back to Summary](#summary) ================================================ FILE: documentation/EN/epics/drive/story-10-user-delete-workgroup-inside-Drive.md ================================================ # Summary * [Related EPIC](#related-epic) * [Definition](#definition) * [Screenshots](#screenshots) * [Misc](#misc) ## Related EPIC > Links to the epic document in the epic folder, normally README. * [Drive](./README.md) ## Definition #### Preconditions * Given that i am a LinShare user #### Description * After logged-in successfully, i go to Shared Space section. * I can see the list of Drives/Workgroups. * I click on a Drive, i can see the list of workgroups inside that Drive * When i click on three-dots button of a Workgroup that i have admin role, a drop-down list of actions will be shown. * If i am workgroup admin, the option Delete will be enabled. If i am not workgroup admin, the option Delete will be disabled. * Or when i select checkbox of one or multiple workgroups that i have admin role, i can see the action bar with Delete option enabled * I click on button Delete, there will be a confirmation popup * I click button to confirm deletion #### Postconditions * If the selected workgroup is deleted successfully, there will be an notification message. * If the workgroup is not deleted successfully, there will be an error message. * I can delete one or multiple workgroups in once. * I can see this action on the current Drive audit. [Back to Summary](#summary) ## UI Design #### Mockups    #### Final design    [Back to Summary](#summary) ## Misc [Back to Summary](#summary) ================================================ FILE: documentation/EN/epics/drive/story-11-user-create-workgroup-inside-Drive.md ================================================ # Summary * [Related EPIC](#related-epic) * [Definition](#definition) * [Screenshots](#screenshots) * [Misc](#misc) ## Related EPIC * [Drive](./README.md) ## Definition #### Preconditions * Given that I am a LinShare user * Given that the functionality of Drives is enabled in Admin setting #### Description * After logged-in successfully, I go to Shared Space * I can see the list of my drives and workgroups that are not inside any drive. * I click on a Drive and the the list of workgroups inside * If I have role Admin/writer to the Drive, I can see the icon "+" is enabled on top left of screen. If not, the icon is disabled * I click on this icon, the popup Create a workgroup is opened with a default name * I can edit workgroup name or not then click button Save #### Postconditions * The new workgroup is created , there will be a successful notification message * If there is any error, there will be an error message. (Invalid Workgroup's name, network error...) * All the Drive'members are added automatically to the new created workgroup with his default role to Workgroup * The creator of the workgroup is workgroup's admin by default. * I can see this action on the Drive audit and Workgroup audit. * When i access an Drive, i can see the breadcrumb on top of screen : Share Space > Drive's name * When i access one Workgroup inside the Drive, i can see the breadcrumb on top of screen: Shared Space > Drive's name > Workgroup's name. [Back to Summary](#summary) ## UI Design #### Mockups   #### Final design    [Back to Summary](#summary) ## Misc [Back to Summary](#summary) ================================================ FILE: documentation/EN/epics/drive/story-12-user-delete-member-of-a-workgroup.md ================================================ # Summary * [Related EPIC](#related-epic) * [Definition](#definition) * [Screenshots](#screenshots) * [Misc](#misc) ## Related EPIC * [Drive](./README.md) ## Definition #### Preconditions * Given that I am a LinShare user * Given that the functionality of Drives is enabled in Admin setting #### Description * After logged-in successfully, I go to Shared Space * I can see the list of my drives and workgroups that are not inside any drive. * I click on a Drive and the the list of workgroups inside * when I hover a workgroup that I have Admin role, I can see an icon human or click three dot button of that workgroup, I can see the option Add a member is enabled, I click on this option and Member tab of workgroup will be opened. * On Member tab, I can see the list of current workgroup members * When I am admin of Drive, I can see beside external members, there will be 2 icon Delete and Edit * I click on button Delete * There will be a confirmation popup * I click button Delete to confirm #### Postconditions * The external member will be deleted and removed from the Workgroup's Existing member section * There will be a successful notification message * If the deletion is not executed, there will be an error message * I can see this action Drive and workgroup audit [Back to Summary](#summary) ## UI Design #### Mockups  #### Final design    [Back to Summary](#summary) ## Misc [Back to Summary](#summary) ================================================ FILE: documentation/EN/epics/drive/story-13-user-add-external-member-to-workgroup-inside-Drive.md ================================================ # Summary * [Related EPIC](#related-epic) * [Definition](#definition) * [Screenshots](#screenshots) * [Misc](#misc) ## Related EPIC * [Drive](./README.md) ## Definition #### Preconditions * Given that I am a LinShare user * Given that the functionality of Drives is enabled in Admin setting #### Description * After logged-in successfully, I go to Shared Space * I can see the list of my drives and workgroups that are not inside any drive. * I click on a Drive and the the list of workgroups inside * when I hover a workgroup that I have Admin role, I can see an icon human or click three dot button of that workgroup, I can see the option Add a member is enabled, I click on this option and Member tab of workgroup will be opened. * On Member tab, I can see the list of current workgroup members and there is two types of members: * Internal members are users who also are members of the parent Drive * External member is an user not a member of parent Drive * When I am admin of Drive, I can see the difference of this 2 kinds of members: beside internal member, there will be only one icon Edit, while with external members, there will be 2 icon Delete and Edit * I select the role and search member on "Add team member" field, the list of suggestion will be displayed. * I choose one user from the list. #### Postconditions * The new member will be added to the workgroup * On Existing members section, I can filter user by new criteria : external user or Drive member * I can see this action in Workgroup audit. [Back to Summary](#summary) ## UI Design #### Mockups  #### Final design     [Back to Summary](#summary) ## Misc [Back to Summary](#summary) ================================================ FILE: documentation/EN/epics/drive/story-14-user-rename-Drive.md ================================================ # Summary * [Related EPIC](#related-epic) * [Definition](#definition) * [Screenshots](#screenshots) * [Misc](#misc) ## Related EPIC * [Drive](./README.md) ## Definition #### Preconditions * Given that I am a LinShare user * Given that the functionality of Drives is enabled in Admin setting #### Description * After logged-in successfully, I go to Shared Space * I can see the list of my drives and workgroups that are not inside any drives * when I click on three-dot button of a drive, if I am the admin of drive, the option Rename will be enabled. * Or when I click checkbox to select a drive that I am admin, I can see the action bar displayed on top of screen, I click on button More option and see the option Rename * I click button Rename, a popup will be displayed * I can edit the name and click button to save #### Postconditions * If the new name is valid, the Drive's name will be updated * If there is any error ( name with Special character, network error, permission error...), there will be a toast message to inform me [Back to Summary](#summary) ## UI Design #### Mockups  #### Final design    [Back to Summary](#summary) ## Misc [Back to Summary](#summary) ================================================ FILE: documentation/EN/epics/drive/story-15-user-view-Drive's-activity.md ================================================ # Summary * [Related EPIC](#related-epic) * [Definition](#definition) * [Screenshots](#screenshots) * [Misc](#misc) ## Related EPIC * [Drive](./README.md) ## Definition #### Preconditions * Given that I am a LinShare user * Given that the functionality of Drives is enabled in Admin setting #### Description * After logged-in successfully, I go to Shared Space * I can see the list of my drives and workgroups that are not inside any drive. * When I hover the drive name, I can see the icon information, I click on this icon, the Detail panel will be opened on the right * Or when I click on thee-dots button of a drive, I can see a drop-down list of actions, and I choose option "Details", then the right panel will be opened. * I click on the tab "Activity", I can see all audit related to current Drive * Each activity will include information: `Objective, Description, Time, Person who executed the action.` * Action that will be recorded in Drive's activities: Create/Rename Drive, Create/Delete/Rename workgroup, Add/Remove/Edit member to Drive, Add member/remove/Edit member to workgroup #### Postconditions [Back to Summary](#summary) ## UI Design #### Mockups #### Final design  [Back to Summary](#summary) ## Misc [Back to Summary](#summary) ================================================ FILE: documentation/EN/epics/drive/story-16-user-update-member-role-on-Drive.md ================================================ # Summary * [Related EPIC](#related-epic) * [Definition](#definition) * [Screenshots](#screenshots) * [Misc](#misc) ## Related EPIC * [Drive](./README.md) ## Definition #### Preconditions * Given that I am a Linshare user * Given that the functionality of Drives is enabled in Admin setting #### Description * After logged-in successfully, I go to Shared Space * I can see the list of my drives and workgroups that are not inside any drive. * When I hover any drive name on the list, I can see the icon Member and I click on this icon, the member tab (second tab) will be opened. * Or when I click on three-dot button of a drive, if I am the admin of drive, the option Add member will be enabled. If I am not the admin of Drive, this option will be disabled. I choose Add a member, the Member tab will be opened on the right. * In Existing member section, if I am the admin of Drive, I can see icon Edit next to each member's name * I click on Edit icon, a popup will prompt * I can see list of Drive roles including Admin, Writer, Reader and member's current role is selected * I can choose another Drive role for this member then click button Update #### Postconditions * The new role of member is updated on the Drive. * I can see this action on the Drive audit. [Back to Summary](#summary) ## UI Design #### Mockups   #### Final design   [Back to Summary](#summary) ## Misc [Back to Summary](#summary) ================================================ FILE: documentation/EN/epics/drive/story-17-user-update-default-workgroup-role-of-Drive-member.md ================================================ # Summary * [Related EPIC](#related-epic) * [Definition](#definition) * [Screenshots](#screenshots) * [Misc](#misc) ## Related EPIC * [Drive](./README.md) ## Definition #### Preconditions * Given that i am a LinShare user * Given that the functionality of Drive is enabled in Admin setting #### Description * After logged-in successfully, I go to Shared Space * I can see the list of my drives and workgroups that are not inside any drive. * When I hover any drive name on the list, I can see the icon Member and I click on this icon, the member tab (second tab) will be opened. * Or when I click on three-dot button of a drive, if I am the admin of drive, the option Add member will be enabled. If I am not the admin of Drive, this option will be disabled. I choose Add a member, the Member tab will be opened on the right. * In Existing member section, if i am the admin of Drive, I can see icon Edit default workgroup role next to each member's name * I click on Edit default workgoup role icon, a popup will prompt . * I can see a drop dow list of Default workgroup roles including Admin, Writer, Contributor, Reader and member's current default role to workgoupsis selected. * I can choose another Workgroup role for this member. * I can tick the check box "Override this role for all existing workgroups then click button Update. #### Postconditions * If I select checkbox Override current setting, the member's role of all workgoups inside this drive will be updated with the new role. * If I do not select checkbox Override current setting, new role of the member will be applied to the workgroups inside the Drive, except the workgroups in which this members' role were updated before. * I can see this action on the Drive audit and on the audit of workgroup inside this Drive. [Back to Summary](#summary) ## UI Design #### Mockups  #### Final design   [Back to Summary](#summary) ## Misc [Back to Summary](#summary) ================================================ FILE: documentation/EN/epics/drive/story-18-user-noticed-when-i-am-added-to-a-Drive.md ================================================ # Summary * [Related EPIC](#related-epic) * [Definition](#definition) * [Screenshots](#screenshots) * [Misc](#misc) ## Related EPIC * [Drive](./README.md) ## Definition #### Preconditions * Notifications related to Drives for user are enabled by admin #### Description **UC1. Send notification when an user is added to a Drive** * When a Linshare user is added to a drive, he will receive an email notification with the following content:  **UC2: Send notifiction when an user is removed from a Drive** * When a member is removed from the Drive, he will receive an email notification with the following content:  **UC3: Send notification when an Drive member is updated** * When a drive member's role or default workgroup' role is updated, he will receive an email notification with the following content:  #### Note * When the list of workgroups in UC1/UC3 are more than 5, in email content, the system will only list 5 latest updated workgroups' name and the icon "..." for the rest. [Back to Summary](#summary) ## UI Design #### Mockups #### Final design [Back to Summary](#summary) ## Misc [Back to Summary](#summary) ================================================ FILE: documentation/EN/epics/drive/story-19-user-view-drives-list-in-pick-destination-screen.md ================================================ # Summary * [Related EPIC](#related-epic) * [Definition](#definition) * [Screenshots](#screenshots) * [Misc](#misc) ## Related EPIC * [Drive](./README.md) ## Definition #### Preconditions - Given that I am a LinShare user - Given that the functionality of Drives is enabled in Admin setting - Given that i have permission to copy/move files/folder in workgroup #### Description - After logged-in successfully, I go to Shared Space. - I can see the list of my drives and workgroups that are not inside any drive. - I click on a Drive and the the list of workgroups inside that Drive - I click on one workgroup and see the list of files/folders inside the workgroup - When i select a file/folder and move to Shared Space or copy file to Shared Space, i can see the Pick destination screen. - I can see the list of Drives and workgroups which are not inside any Drive. - The workgroups that i dont have permission to copy/move are disabled. #### Postconditions - When i click on one Drive, i can see the list of workgroups inside that drive: Only workgroups that i have permission to copy/moved are enabled and i can continue choosing these workgroups as destination. - If functionality of Drives is disabled in Admin setting, i cannot see drives list in Pick destination screen [Back to Summary](#summary) ## UI Design #### Mockups  #### Final design [Back to Summary](#summary) ## Misc ================================================ FILE: documentation/EN/epics/new-admin-portal/README.md ================================================ # Summary * [Context](#context) * [Definition](#definition) * [Stories](#stories) * [Misc](#misc) ## Context We want to build a new webapp for administrators to replace the current linshare-ui-admin app. The goal of this task is get rid of the old application because it is using outdated frameworks. All the current screens managing LinShare functionnalities must be developed in this new app but the whole design and the user experience. [Back to Summary](#summary) ## Definition ### Audience This new SPA is designed to admininistrate LinShare. For now it is mainly about the configuration of the product itself but this application provides also some pages to view the activity of all users in the platform. Later we will also provide some other pages display some reporting figures and charts. Currently, we have only two profiles which are allowed to access to admin portal: * Profile SUPERADMIN: The only user with this profile is root@localhost.localdomain, provided by default by the app. This user is allowed to read, modify and delete resources except files stored in personal spaces or shared spaces (workgroups). The main purpose of this user is to configure the link between LinShare and your LDAP directory. Then you should use user with ADMIN profiles to administrate the platform * Profile ADMIN: Every user in LinShare can be promoted to ADMIN, they are still able to use the current user portal but they are also allowed to log in into the admin portal. In the future, we will introduce some new profiles like REPORTING, or AUDIT, to be able to access to the admin portal but with less permissions. ### Roles and permissions At first we need to define which categories will be available per each profile: |Pages / Profiles | SUPERADMIN | ADMIN | |------------------------------------|------|-------| | Home page | X | X | | | | | | Configuration > Domains* | X | X | | Configuration > Parameters | X | X | | Configuration > Email Templates | X | X | | Configuration > Welcome Messages | X | X | | Configuration > Type Mime Policies | X | X | | Configuration > Domain Policies | X | | | Configuration > Providers | X | | | Configuration > Quota Management | X | ? | | Configuration > Public keys | X | X | | | | | | Administration > Users | X | X | | Administration > Drives/Workgroups | X | X | | Administration > Contact Lists | X | X | | Administration > Inconsistent Users| X | | | Administration > Loggers ? | X | X | | | | | | Reporting > Basic statistics | X | X | | Reporting > Advanced statistics | X | X | | Reporting > Error statistics | X | ? | | Reporting > Activities | X | X | | Reporting > Upgrades | X | ? | In order to grant access to these pages (display the menu links) into the new admin interface, we need to implement a basic permission management in the frontend app itself. Of course, the backend won't rely on this because it already have fine access control checks. These permissions will be used to dynamically build the admin interface at the authentication step according to the user's profile. For "Configuration > Domains", not all properties will be editable by administrators * Name : ROOT=ReadUpdate, ADMIN=Read * Descritption : ROOT=ReadUpdate, ADMIN=None * Default Email Language : ROOT=ReadUpdate, ADMIN=ReadUpdate * Default User Role : ROOT=ReadUpdate, ADMIN=ReadUpdate * Type : ROOT=Read, ADMIN=Read * creationDate : ROOT=Read, ADMIN=Read * modificationDate : ROOT=Read, ADMIN=Read [Back to Summary](#summary) ## Stories > A list of all the story documentation in the epic, must format as a list of links to corresponding user story files inside epic folder 1. [As a user, i can do something](./link-to-the-file.md) [Back to Summary](#summary) ## Misc > Link references, UI mockup, link to gitlab issye or any extra documents related to the EPIC * [Gitlab issue]() * [UI Mockup]() [Back to Summary](#summary) ================================================ FILE: documentation/EN/epics/new-admin-portal/Story-633-system-can-generate-and-deliver-3-CSV-files-to-a-mailing-list.md ================================================ # Summary * [Related EPIC](#related-epic) * [Definition](#definition) * [UI Design](#ui-design) * [Misc](#misc) ## Related EPIC * [New admin portal](./README.md) ## Definition ### Preconditions ### Description - As a system administrator, I want the application to automatically generate and deliver 3 CSV files to a list of users. - This will be done through a cronjob. ### Postcondition - The application should provide a configuration option to specify the list of mailing list who will receive 3 CSV files. - The application should support scheduling the delivery of the CSV files via the cron job. - The cron job should be configurable to execute at a specific time and frequency. - The 3 CSV files should be sent as attachments to the designated users via email - The email should include a clear and informative subject line and body text. - The application should log the successful execution of the cron job, including details such as the delivery status and any errors encountered. - In case of any errors during delivery, appropriate error messages should be logged to facilitate troubleshooting. Additional Considerations: The generated CSV files should contain columns accordingly: - File1: Top receivers by shared file size - Receiver's mail - Aggregated sizes of shared files - File2: Top receivers by number of files share - Receiver's mail - Number of shared files - File3: The file should include all share operations during the day (one line per share operation with one sender and one receiver). The content of the file : - Sender's mail - Sender name - Sender uid - Sender domain - Receiver's mail - Receiver type - Receiver name - Receiver uid - Receiver domain - File name - File uid - Size of shared file - Date and time of share See the csv example:  [Back to Summary](#summary) ## UI Design ### Mockups ### Final design [Back to Summary](#summary) ## Misc [Back to Summary](#summary) ================================================ FILE: documentation/EN/epics/new-admin-portal/mockups/Model CSV.csv ================================================ Sender mail,Sender name,Sender uid,Sender Domain,Receiver mail,Receiver type ,Receiver name,Receiver uid,Receiver Domain ,File name,File uid,Size of shared file (Kb),Date and time of share abbey.curry@linshare.org,Abbey CURRY,3932b3b4-7d94-4a8e-bfd5-10788b0f388t,Domaine1,amy.wolsh@linshare.org,internal,Amy WOLSH,fa3fe32a-ea1f-42e6-9224-b6b5056337f9,Domaine2,file1.pdf,8dacf652-5dfe-4521-b313-c1ca307eb2f,100,2023-08-28T14:50:44 abbey.curry@linshare.org,Abbey CURRY,3932b3b4-7d94-4a8e-bfd5-10788b0f388t,Domaine1,amy.wolsh@linshare.org,internal,Amy WOLSH,fa3fe32a-ea1f-42e6-9224-b6b5056337f9,Domaine2,file2.pdf,5bcdf652-5dfe-4521-b313-c1ca307zmn,300,2023-08-28T14:50:44 dawson.waterfield@linshare.org,Dawson WATERFIELD,sl3fe32a-ea1f-42e6-9224-b6b505633888,Domaine2,peter.wilson@linshare.org,external,Peter WILSON,2932b3b4-7d94-4a8e-bfd5-10788b0f388t,,file3.odt,7ghdf652-5dfe-4521-b313-c1ca307pkt,200,2023-06-14T16:45:33 ================================================ FILE: documentation/EN/epics/new-admin-portal/story-01-admin-administrator-see-the-list-of-workgroups.md ================================================ # Summary * [Related EPIC](#related-epic) * [Definition](#definition) * [Screenshots](#screenshots) * [Misc](#misc) ## Related EPIC * [New admin portal](./README.md) ## Definition #### Preconditions - Given that i am supper admin of New Admin Portal #### Description - After log-in Admin Portal successfully, i go to Administration tab - On Administration tab, i can see the list of links to screens: My users, My Drives/workgroups, My contact lists, Inconsistent users, loggers - I click on My Drives/ Workgroups, the screen My Drives and Workgroups will be opened. - In new view I can and see the following information: - A Search bar - A Sort field - A list of all workgroups/drives #### Postconditions - Each Workgroup/Drive is is displayed as an item with name - If workgroup is inside an Drive, the parent Drive name is shown under the workgroup name - Default sort criteria is Modification date - When i click on Sort field, there will be drop-down list containing sort criteria: Modification date, Creation date, Workgroup/Drive name. - I can select sort criteria from the list and use the arrow up and down to change order of sorting. - The default number of displayed items is 25, i can change the number of iems at the bottom of page. - When i click on a Workgroup item, the Manage Workgroup detail screen will be opened. - When i click on a Drive item, the Mange Drive detail will be opened. [Back to Summary](#summary) ## UI Design #### Mockups    #### Final design [Back to Summary](#summary) ## Misc [Back to Summary](#summary) ================================================ FILE: documentation/EN/epics/new-admin-portal/story-02-admin-search-workgroup-and-drive-in-admin-portal.md ================================================ # Summary * [Related EPIC](#related-epic) * [Definition](#definition) * [Screenshots](#screenshots) * [Misc](#misc) ## Related EPIC * [New admin portal](./README.md) ## Definition #### Preconditions - Given that i am Super admin of new Admmin Portal #### Description - After log-in succesfully to Admin Portal, i go to Administration screen - On Administration tab, I click on My Drives/ Workgroups, the screen My Drives and Workgroups will be opened. - In new view I can see the list of all workgroups and Drives - I click on the search bar, there will be a drop-down list of search criteria including: - Member: When i select this search citeria, the search bar will display: Member = "text input". When i start typing, i can see the suggestion list of Linshare user (internal and guest account) which have first name, last name or email contains text inputted. I can select member from the list. When i click Enter, the system will search workgroups that contain that selected user as a members - Type: When i select this search criteria, the seach bar will display Type = "Dropdown list". The options are: Workgroups (all Workgroups), Drives, Nested workgroups (workgroups which are inside a drive), Independent Workgroups (workgroups which are not inside any drive) - Number of administrators: When i select this search criteria, the search bar will display Number of Administrators = "Dropdown list". Options are: None/More than 0 - Number of members: When i select this search criteria, the search bar will display Number of Members = "Dropdown list". Options are: None/More than 0 - When i start typing on search bar without select any search criteria from the dropdown list, the system will show default search criteria is Workgroup/Drive's name. #### Postconditions - I can search drives/workgrousp by one of above criteria or combine them - Each search criteria in the search bar is seperated by a delete icon. I can click this icon to delete the criteria - After select one criteria in search bar, that option is hidden in the dropdown list of search criteria. - For example: - I chose Member as a search criteria - I type some character and see the list of suggestion - I select one user (John Doe-user1@linshare.org) from the list - Now the search bar is: Member=John Doe - When i click on search bar, i can see the list of criteria is: Type; Administrator number; Member number. [Back to Summary](#summary) ## UI Design #### Mockups   #### Final design [Back to Summary](#summary) ## Misc [Back to Summary](#summary) ================================================ FILE: documentation/EN/epics/new-admin-portal/story-03-admin-manage-workgroup.md ================================================ # Summary * [Related EPIC](#related-epic) * [Definition](#definition) * [Screenshots](#screenshots) * [Misc](#misc) ## Related EPIC * [New admin portal](./README.md) ## Definition ### Preconditions - Given that i am super-admin in Linshare - I logged-in to Amin portal successfully ### Description **UC1.View/Edit/Delete workgroup** - After log-in Admin Portal successfully, i go to Administration tab - On Administration tab, i can see the list of links to screens: My users, My Drives/workgroups, My contact lists, Inconsistent users, loggers - I click on My Drives/ Workgroups, the screen My Drives and Workgroups list will be opened - I click on a workgroup in the list, the screen Manage workgroup is displayed. - The Manage workgroup page will include: - Workgroup's name - "Delete workgroup" button: - When i click on this button, there will be a confirmation message. - When i choose Yes to confirm, the workgroup will be removed. Now the workgroup members cannot find that workgroup in User app. - I will see a toast notification and back to the Workgroups/Drive list screen. - On the right part i can see uneditable fields including: - Drive: The link to parent Drive that contain current workgroup. I can click on this link to go to Manage drive . If this workgroup is standalone, the text "None" is displayed. - Creation date - Modification date - Author: Creator of workgroup - Domain: The link displays domain name of the current workgroup. When I click on this link, the domain detail page will be opened. - On the left part i can see the editable fields including: - Worgkroup name: Text field. This field cannot be blank or contains special characters. When click icon Edit, i can change the name and click Save icon, if the workgroup name is invalid, i can see an error message. - Description: Display workgroup's desctiption. When i click on icon Edit, i can update the field and click save icon. **UC2.Manage member list of a standalone workgroup** - In Manage workgroup screen, i can see the list of user: - A search bar: I can choose search criteria from the list: Member or Role. - If I choose member, the search bar will display: " Member = "text input" When i start typing, i can see the suggestion list of Linshare user (internal and guest account) which have first name, last name or email contains text inputed. I can select member from the list. - If I choose Role, the search bar will display: Role = "Dropdown list". Options include: Administrator, Writer, Contributor, Reader - I can only choose one search criteria, if i want to change, i have to delete the other. - If i do not choose search criteria and type in the search bar, the default search will be email. - Each member is displayed in one role. Each role include: - Firstname + Last name of member - Email - Role: display current role of member. I can re-choose role from drop-down list: Administrator, Writer, Contributor, Reader. The new role will be updated instantly. - A Delete button: When i click on this button, there will be a confirmation message. If i choose Yes, the member will be removed from workgroup. - Add member: - I can select role from the dropdown list (Administrator, Writer, Contributor, Reader) - Then i type in the field, system will display a suggestion list (internal user and guest user) which have first name, last name or email contains text inputed. - I select one user from this list then he will become the workgroup members with the selected role. **UC3. Manage member list of a nested workgroup (a workgroup inside a drive)** - With a nested workgroup, i can also see the list of members and search member - Each member on the member list has a label : Drive member or External member to distinguish if a workgroup member is also a member of parent Drive. - If member is a drive member, i can only update the role and cannot delete the member, so there is no Delete icon - If member is external member, i can both update member role and Delete that member - When i add a member to the workgroup, this member is an external member - The member list is paginated and the default number of displayed items is 25, I can change this number at the bottom of page [Back to Summary](#summary) ## UI Design ### Mockups    ### Final design [Back to Summary](#summary) ## Misc [Back to Summary](#summary) ================================================ FILE: documentation/EN/epics/new-admin-portal/story-04-admin-manage-a-Drive-in-admin-portal.md ================================================ # Summary * [Related EPIC](#related-epic) * [Definition](#definition) * [Screenshots](#screenshots) * [Misc](#misc) ## Related EPIC * [New admin portal](./README.md) ## Definition #### Preconditions - Given that i am super-admin in Linshare - I logged-in to Amin portal successfully #### Description **UC1.View and Edit Drive information** - After log-in Admin Portal successfully, i go to Administration tab - On Administration tab, i can see the list of links to screens: My users, My Drives/workgroups, My contact lists, Inconsistent users, loggers - I click on My Drives/ Workgroups, the screen My Drives and Workgroups list will be opened. - I click on a Drive in the list, the screen Manage Drive will be opened. - On the right part i can see uneditable fields including: - Creation date - Modification date - Author: Creator of the Drive - Domain: The link displays domain name of the current workgroup. When I click on this link, the domain detail page will be opened - On the left part i can see the editable fields including: - Drive's name: Text field. This field cannot be blank or contains special characters. When click icon Edit, i can change the name and click Enter to Save, if the name is invalid, i can see an error message. If the name is valid, the field will be updated. - Description: a text field displaying current Drive's desctiption. When i click on icon Edit, i can change the name and click Enter to Save. This field can be blank. **UC2. Delete Drive** - On the top right of screen, i can see a button "Delete Drive" - When i click on this button, there will be a confirmation message. - When i choose Yes to confirm, the Drive will be removed. Now the Drive's members cannot find that Drive in User app. - I will see a toast notification and back to the Workgroups/Drive list screen. #### Postconditions [Back to Summary](#summary) ## UI Design #### Mockups  #### Final design [Back to Summary](#summary) ## Misc [Back to Summary](#summary) ================================================ FILE: documentation/EN/epics/new-admin-portal/story-05-admin-view-workgroup-list-inside-a-drive.md ================================================ # Summary * [Related EPIC](#related-epic) * [Definition](#definition) * [Screenshots](#screenshots) * [Misc](#misc) ## Related EPIC * [New Admin portal](./README.md) ## Definition #### Preconditions - Given that i am super-admin in Linshare - I logged-in to Amin portal successfully #### Description - After log-in Admin Portal successfully, i go to Administration tab - On Administration tab, i can see the list of links to screens: My users, My Drives/workgroups, My contact lists, Inconsistent users, loggers - When I click on My Drives/ Workgroups, I can see My Drives and Workgroups list. - I click on a Drive in the list, the screen Manage Drives is opened. - Under Drive information part, i can see 2 tabs, and the First one is Workgroups list, including all workgoups created inside this Drive - Each role represents a workgroup with Workgroup icon, Workgroup name and modification date. - The workgroup list is paginated and the default number of displayed items is 25, I can change this number at the bottom of page - The default order of worksgroup is last modification time. - I can change the sort criteria by selecting from drop-down list: Modification date, Creation date, Name - Search bar: - When i click on the search bar, a drop-down list of search criteria will be displayed including options: Member, Number of administrators, Number of members. I can select one criteria: - If i select Member: When i select this search citeria, the search bar will display: Member = "text input". When i start typing, i can see the suggestion list of Linshare user (internal and guest account) which have first name, last name or email contains text inputted. I can select member from the list. When i click Enter, the system will search and display workgroups that contain that selected user as a members. - Number of administrators: When i select this search criteria, the search bar will display Number of Administrators = "Dropdown list". Options are: None/More than 0. - Number of members: When i select this search criteria, the search bar will display Number of Members = "Dropdown list". Options are: None/More than 0. - When i start typing on search bar without select any search criteria from the dropdown list, the system will show default search criteria is Workgroup's name. - When i click in one workgroup, the Screen Manage that workgoup will be opened. #### Postconditions [Back to Summary](#summary) ## UI Design #### Mockups   #### Final design [Back to Summary](#summary) ## Misc [Back to Summary](#summary) ================================================ FILE: documentation/EN/epics/new-admin-portal/story-06-admin-manage-member-list-of-a-drive.md ================================================ # Summary * [Related EPIC](#related-epic) * [Definition](#definition) * [Screenshots](#screenshots) * [Misc](#misc) ## Related EPIC * [New admin portal](./README.md) ## Definition #### Preconditions - Given that i am super-admin in Linshare - I logged-in to Amin portal successfully #### Description - After log-in Admin Portal successfully, i go to Administration tab - On Administration tab, i can see the list of links to screens: My users, My Drives/workgroups, My contact lists, Inconsistent users, loggers - When I click on My Drives/ Workgroups, I can see My Drives and Workgroups list. - I click on a Drive in the list, the screen Manage Drives is opened. - Under Drive information part, i can see 2 tabs, and the First one is Workgroups list, i click on the second tab: Member list **UC1. Add member to the Drive** - To add a member to the Drive, i need to fill in 3 fields: - Drive role: A drop-down list with options: Admin, Writer, Reader. The default value is Reader. when i hover the tooltip, i can see a message:"The member’s role of this drive" - Default workgroup role: A drop-down list with options: Admin, Writer, Contributor, Reader. The default valuw is Reader. When i hover the tooltip, i can see a message:" The member’s default role of all workgroups inside this drive" - Add member: when i type characters, the suggestion list of Linshare users (internal and guest user) will be displayed. I can select one user and he will be come the Drive member with above selected roles. - This new user will be listed on the member list. He is also noticed by an email notification. **UC2. Search members** - When i click on Search bar, i can see a drop-down list that allows me to choose Search criteria: - Name: When i select Name, the search bar will display: "Name = "text input" When i start typing, i can see the suggestion list of Linshare user (internal and guest account) which have first name, last name or email contains text inputed. - If i select a member, the result list below will display only that selected member. - If i click Enter, the result list below will displayed all matched members of the Drive - Drive role: If I choose Role, the search bar will display: Drive Role = "Dropdown list". Options include: Admin, Writer, Reader - Default workgroup role: If i select this criteria, the search bar will display Default Workgroup Role="Dropdown list". Options includes Admin, Writer, Contributor, Reader. - If i do not choose search criteria and type in the search bar, the default search will be email. **UC3. Update/Delete member** - Each member is displayed in one row in the list and includes information: - User icon - First name and last name - Email - Drive role: Display current Drive role of the member. I can assign another role for member by click on Edit icon and select new role from the Drop down list. - Default workgroup role: Display current default workgroup role. When i click icon Edit, there will be a popup, in which i can choose another role from drop-down list and a check box to override the new role for all existing workgroups inside of Drive - I click on icon Delete, there will be a confirmation popup - If i choose Yes, that member will be removed out of Drive and all workgroups inside. - The member list is paginated and the default number of displayed items is 25, I can change this number at the bottom of page #### Postconditions [Back to Summary](#summary) ## UI Design #### Mockups    #### Final design [Back to Summary](#summary) ## Misc [Back to Summary](#summary) ================================================ FILE: documentation/EN/epics/new-admin-portal/story-07-admin-log-in-Admin-portal.md ================================================ # Summary * [Related EPIC](#related-epic) * [Definition](#definition) * [Screenshots](#screenshots) * [Misc](#misc) ## Related EPIC * [New admin portal](./README.md) ## Definition #### Preconditions #### Description **UC1. As a Super admin (root domain admin), i want to log-in Admin portal** * Given that i am a root domain admin * I access the Admin portal URL * I can see the Log-in screen, including fields: * Email: text field * Password: text field - hidden by dots * After inputting log-in credentials and click button Sign-in, the system will validate: * If the log-in credentials are valid, i am redirected to the admin portal home page for Super admin * If email and/or password is invalid, system will prompt error toast message. * In Super admin homepage, i can see the below information: * Language flag: When i click on, i can see the language options: Enlish, Français, Русский. When i choose a language, the whole page will be displayed on the selected one * Human icon: When I click on, i can see my email and 2 options: Change password and Logout * I can see top-menu includes tabs: Configuration, Administration, Reporting, Activities, Upgrades * A domain tree menu on the Left: I can see full domain tree with Root domain and other lower level domains. **UC2. As a nested admin, i want to log-in Admin portal** * Given that i am nested domain admin * I access the Admin portal URL * I can see the Log-in screen, including fields: * Email: text field * Password: text field - hiden by dots * After inputting log-in credentials and click button Sign-in, the system will validate: * If the log-in credentials are valid, i am redirected to the admin portal home page for nested admin * If email and/or password is invalid, system will prompt error toast message. * In nested admin homepage, i can see the below information: * Language flag: When i click on, i can see the language options: Enlish, Français, Русский. When i choose a language, the whole page will be displayed on the selected one * Human icon: When I click on, i can see my email and button Logout * I can see top-menu includes tabs: Configuration, Administration, Reporting, Activities. * A domain tree menu on the Left: I can only see my domain and other lower level domains, and cannot see the higher-level domain. #### Postconditions [Back to Summary](#summary) ## UI Design #### Mockups #### Final design      [Back to Summary](#summary) ## Misc [Back to Summary](#summary) ================================================ FILE: documentation/EN/epics/new-admin-portal/story-08-admin-enable-2FA.md ================================================ # Summary * [Related EPIC](#related-epic) * [Definition](#definition) * [Screenshots](#screenshots) * [Misc](#misc) ## Related EPIC * [New admin portal](./README.md) ## Definition #### Preconditions Given that am an admin and also a normal Linshare user * Given that Admin functionalities enabled 2FA and my 2FA has not been setup (Setting 2FA can be done in both User UI or Admin UI) #### Description * After log-in to Admin UI, i click on human icon the right corner * I click on Second factor authentication, 2FA set-up page will be opened. * If the Admin functionalities make 2FA usage required for my domain, after log-in Admin UI, i am redirected to 2FA set-up page and i cannot go to other page without setting 2FA. * I can see the the 2FA status is disabled. * In this view, I can see 2 steps to enable 2FA * Step 1: Download and install the authentication app Free OTP. I can click the links or scan QR code to download app from Apple store and Google play. * Step 2 : In the next step, I click button Add Shared key, a QR code will be generated by LinShare server and displayed. * I open FreeOTP app on my device and scan this QR code. I can see my account in the list account screen of the app, including information: issuer + account. Issuer is "Linshare" and account is user'email. #### Postconditions * The FreeOTP app will start to generate random token – a 6digits-code. * This code will be changed and invalid after each 30 seconds. * Now if i refresh page, i can not see the QR code. Depend on setting: * If admin functionalities allow me to remove shared key, screen 4 will be displayed. If not, screen 5 will be displayed. **Note: If i enabled 2FA on Admin UI, it is also enabled on User UI. When i try to access UI user now, i am required to input 6-digits code to authenticate** [Back to Summary](#summary) ## UI Design #### Mockups #### Final design Screen 1  Screen 2  Screen 3  Screen 4  Screen 5  [Back to Summary](#summary) ## Misc [Back to Summary](#summary) ================================================ FILE: documentation/EN/epics/new-admin-portal/story-09-admin-domain-administrators-authenticate-using-2FA.md ================================================ # Summary * [Related EPIC](#related-epic) * [Definition](#definition) * [Screenshots](#screenshots) * [Misc](#misc) ## Related EPIC * [New admin portal](./README.md) ## Definition #### Preconditions * Given that I am an domain admin and my 2FA is already enabled. #### Description * When I open log-in screen, I can see the login form. * I input username and password and click button Login * If log-in credentials are not correct, system will display error notification as normal. * If log-in credentials are correct, 2FA popup is displayed. I have to fill the 6-digits code on my FreeOTP app and click button Log-in to validate. #### Postconditions * If the code is valid, I log-in system successfully * If the code is invalid, the system will display error message. [Back to Summary](#summary) ## UI Design #### Mockups #### Final design    [Back to Summary](#summary) ## Misc [Back to Summary](#summary) ================================================ FILE: documentation/EN/epics/new-admin-portal/story-10-admin-remove-shared-key-2FA.md ================================================ # Summary * [Related EPIC](#related-epic) * [Definition](#definition) * [Screenshots](#screenshots) * [Misc](#misc) ## Related EPIC * [New admin portal](./README.md) ## Definition #### Preconditions * Given that I am an LinShare admin and my 2FA is enabled * I logged in the admin UI successfully #### Description * I click on the human head icon in the top right corner * I click 2 factor authentication, I am redirected to [2FA page] * I click button “Remove shared key”, the system will display confirmation popup. #### Postconditions * If i choose Yes, the system will delete the shared key in LinShare server, the 2 FA is also disabled. * When i log out Admin UI and open log-in screen, i just need to fill my username and password to log-in. It is the same on User UI. [Back to Summary](#summary) ## UI Design #### Mockups #### Final design   [Back to Summary](#summary) ## Misc [Back to Summary](#summary) ================================================ FILE: documentation/EN/epics/new-admin-portal/story-11-admin-log-out-admin-portal.md ================================================ # Summary * [Related EPIC](#related-epic) * [Definition](#definition) * [Screenshots](#screenshots) * [Misc](#misc) ## Related EPIC * [New admin portal](./README.md) ## Definition #### Preconditions * Given that i am a Linshare admin and already log-in to admin portal #### Description * When click on the top right corner of the portal, i can see the option " Log-out" * I click on Log-out button. #### Postconditions * I am log-out of the system and redirected to the Log-in page. [Back to Summary](#summary) ## UI Design #### Mockups #### Final design   [Back to Summary](#summary) ## Misc [Back to Summary](#summary) ================================================ FILE: documentation/EN/epics/new-admin-portal/story-12-admin-view-and-search-user-list.md ================================================ # Summary * [Related EPIC](#related-epic) * [Definition](#definition) * [Screenshots](#screenshots) * [Misc](#misc) ## Related EPIC * [New admin portal](./README.md) ## Definition #### Preconditions * Given that I am an admin of Linshare * After log-in successfully to Admin portal from the left menu, i click on the option "User" #### Description * The screen User list will be opened, i can see: * Information tooltip: When i click on the icon information, a page description will be shown, then i click on the icon again, the description will be collapsed. * User list including: * User icon * First name * Last name * Email * User's role * A search bar * A sort field #### Postconditions * When I click on the search bar, there will be a drop-down list of search criteria including: * First name: When i select this search citeria, the search bar will display: First name contains = "text input". I click Enter, the search tag is completed and an icon Detele. Then I click enter the system will search users which have first name contains text inputted. * First name: When i select this search citeria, the search bar will display: First name contains = "text input". I click Enter,the search tag is completed and an icon Detele. Then I click enter the system will search users which have last name contains text inputted. * Domain: When select this search citeria, the search bar will display: First name contains = "dropdown list" List of options contain all domains. I select one domain, the search tag is completed with a delete icon.Then I click enter the system will search users which have selected domain. * Role: When i select this search criteria, the search bar will display Role = "Dropdown list". The options are: Admin/Simple. I select one role, the search tag is completed with a delete icon.Then I click enter the system will search users which have selected role * Type: When i select this search criteria, the search bar will display Type = "Dropdown list". The options are: Internal/Guest. I select one role, the search tag is completed with a delete icon.Then I click enter the system will search users which have selected type. * Restriected/ Guest creation right/Enable personal space: When i select one of these search criteria, the search bar will display Criteria name = "Boolean". I select Yes or No, the search tag is completed with a delete icon.Then I click enter the system will search users which have selected criteria value. * When i start typing on search bar without select any search criteria from the dropdown list, the system will show default search criteria is email - I can search users by one of above criteria or combine them - Each search criteria in the search bar is seperated by a delete icon. I can click this icon to delete the criteria - After select one criteria in search bar, that option is hidden in the dropdown list of search criteria. - For example: - I chose First name as a search criteria - I type some character ex: Joe and click enter - Now the search bar is: First name contain John - When i click Space on search bar, i can see the list of criteria excluding First name. * When i click on Sort field, there will be drop-down list containing sort criteria: None, Domain, First name, Last name, Email, Creation date, Modification date. * I can select sort criteria from the list and use the arrow up and down to change order of sorting. * The default number of displayed items is 25, i can change the number of iems at the bottom of page. * If i am nested admin, i can only search domains in which that i am admin. * If i am super admin, the result contain all users in all domain. [Back to Summary](#summary) ## UI Design #### Mockups #### Final design         [Back to Summary](#summary) ## Misc [Back to Summary](#summary) ================================================ FILE: documentation/EN/epics/new-admin-portal/story-13-admin-mange-user-profile.md ================================================ # Summary * [Related EPIC](#related-epic) * [Definition](#definition) * [Screenshots](#screenshots) * [Misc](#misc) ## Related EPIC * [New admin portal](./README.md) ## Definition #### Preconditions * Given that am an admin (super admin/ nested admin) #### Description * After log-in Admin portal successfully, i go to User search page * I input search criteria and the system will display the result list * In the user list, i click on one user, the Manage user page will be opened #### Postconditions * The Manage user page will include: * User name + email and button Delete this user. When i click on this button, there will be a confirmation message. If i choose Yes, then the user will be deleted. * If this user is locked due to failed login attempts, he will be locked and there will be a session that said This user is locked due to failed login attempts, and a button Unlock. If i click on this button, there will be a confirmation message. If i choose Yes, the system will unlock this user and the session is disappeared from the current view. * Second factor authentication: If the status is enabled, there will be a button Delete shared key. When i click on this button, there will be a confirmation message. IF i choose Yes, the shared key will be removed and the 2FA is also disabled on the user UI and the status label changes to disabled. Now the Remove shared key button is disappeared. * Three tabs: User profile, Personal space quota, Upload request. * In Personal profile page, i can see: * In the right part, these fields are not editable: User type, Creation date, modification date, domain. * The editable fields on the left including: * First name: text, this field cannot be blank. * Last name: text, this field cannot be blank * Role: Drop-down. Options list: Simple, Administrator * Notification language: Drop-down. Option list: English, French, Russian * Enable personal space: Check box. If i untick this box, the user cannot see Myspace section and cannot upload file to Myspace * Guest creation: If i untick this box, the user cannot see the Guest section in Contact * When i click button Save, all the updates in the tab will be saved. * When i click button Cancel, the system will not save any updates. [Back to Summary](#summary) ## UI Design #### Mockups #### Final design          [Back to Summary](#summary) ## Misc [Back to Summary](#summary) ================================================ FILE: documentation/EN/epics/new-admin-portal/story-14-admin-manage-user-personal-quota.md ================================================ # Summary * [Related EPIC](#related-epic) * [Definition](#definition) * [Screenshots](#screenshots) * [Misc](#misc) ## Related EPIC * [New admin portal](./README.md) ## Definition #### Preconditions * Given that am an admin (super admin/ nested admin) #### Description * After log-in Admin portal successfully, i go to User search page * I input search criteria and the system will display the result list * In the user list, i click on one user, the Manage user page will be opened * I click on Personal space quota page tab #### Postconditions * On this tab i can see : * Used Space/Remaining quota chart: When i change the personal quota, this chart is also changed. * User's personal space allocated quota: I can see 2 fields Default value is 100 GB and non-editable. and Current value that can be overrided. When i click button Override default value, the field is editable now (number only) and i can choose the unit in the dropdown list (B, KB,MB,GB,TB,PB,EB,ZB,YB). Total files size in user's myspace cannot exceed this values. * User's max upload file size in Personal Space: I can see 2 fields Default value is 10 GB and non-editable. and Current value that can be overrided. When i click button Override default value, the field is editable now (number only) and i can choose the unit in the dropdown list (B, KB,MB,GB,TB,PB,EB,ZB,YB). User cannot upload file with the size exceed this value. * The user's max upload file size in Personal space need to be smaller than User'personal space allocated quota. If not, there will be an error message and the field is highlight. * When i click on button Use default, the User's personal space allocated quota and User's personal space allocated quota will be set to default value * When i click button Save, all the changes will be updated * When i click button Reset, all the changed will not be saved. [Back to Summary](#summary) ## UI Design #### Mockups #### Final design    [Back to Summary](#summary) ## Misc [Back to Summary](#summary) ================================================ FILE: documentation/EN/epics/new-admin-portal/story-15-admin-manage-guest-account.md ================================================ # Summary * [Related EPIC](#related-epic) * [Definition](#definition) * [Screenshots](#screenshots) * [Misc](#misc) ## Related EPIC > Links to the epic document in the epic folder, normally README. * [Name of the epic](./README.md) ## Definition #### Preconditions * Given that am an admin (super admin/ nested admin) #### Description * After log-in Admin portal successfully, i go to User search page * I input search criteria and the system will display the result list * In the user list, i click on one guest account, the Manage user page will be opened #### Postconditions * The Manage user page will include: * User name + email and button Delete this user * If this user is locked due to failed login attempts, he will be locked and there will be a session that said This user is locked due to failed login attempts, and a button Unlock. If i click on this button, there will be a confirmation message. If i choose Yes, the system will unlock this user and the session is disappeared from the current view. Now user can log-in User portal as normal. * Second factor authentication: If the status is enabled, there will be a button Delete shared key. When i click on this button, there will be a confirmation message. IF i choose Yes, the shared key will be removed and the 2FA is also disabled on the user portal and the status label changes to disabled. Now the Remove shared key button is disappeared. * Three tabs: User profile, Personal space quote, Restricted contact * In Personal profile page, i can see: * In the right part, these fields are not editable: User type, Creation date, modification date, Owner, Domain. * The editable fields on the left including: * First name: text that shows current'user first name, this field cannot be blank * Last name: text that shows current's user last name, this field cannot be blank * Notification language: Drop-down. Option list: English, French, Russian * Expiration date: Display current expiration date. * When i click on date picker, i can chooose another expiration date. I cannot choose the expiration date <= today. When i click Save button, the new expiration date will be updated. * On date picker, the maximum expiration date is displayed with a tooltip. The value is computed with the Guest functionality of the author's domain. * When i hover the tooltip, i can see the message :" The author of this guest is limited by the maximum expiration date. As an admin, you can override this date." * Email: text that show current's user email. * Enable personal space: Check box. If i untick this box, the user cannot see Myspace section and cannot upload file to Myspace * When i click button Save, all the updates in the tab will be saved. * When i click button Cancel, the system will not save any updates. * In the Personal space quota, the same as normal user. * On expiry date, the guest account will be deleted and admin cannot search that guest, the guest cannot log-in to user Portal. [Back to Summary](#summary) ## UI Design #### Mockups #### Final design    [Back to Summary](#summary) ## Misc [Back to Summary](#summary) ================================================ FILE: documentation/EN/epics/new-admin-portal/story-16-admin-manage-restricted-contact-list.md ================================================ # Summary * [Related EPIC](#related-epic) * [Definition](#definition) * [Screenshots](#screenshots) * [Misc](#misc) ## Related EPIC > Links to the epic document in the epic folder, normally README. * [Name of the epic](./README.md) ## Definition #### Preconditions * Given that am an admin (super admin/ nested admin) #### Description * Given that am an admin (super admin/ nested admin) * After log-in Admin portal successfully, i go to User search page * I input search criteria and the system will display the result list * In the user list, i click on one guest, the Manage user page will be opened * Guest account will have 3 tabs: I click on third tab Restricted contact list #### Postconditions * On this tab i can see: * Add contact field * Restricted contact list: Show the current restricted contact of the guest * Comment: Text input * When i input in the "Add contact" field, the system will search in DB and display result list below, i can choose one of them and the selected person will be added to the Restricted contact list. * I can click on button X to remove restricted contact out of the list. * I click button Save, system will validate: * If the field Restricted contact is ticked but there is no contact in field Restricted contact list, there will be an error message: "You can not update a restricted guest without a list of contacts" * If there is >= 1 contact in the Restricted contact list, system will display message: " Update successfully" * The owner of the guest ( an internal Linshare user) is also can manage that guest's restricted contact list. When admin updates a guest'restricted contact list in Admin site, it will affect the guest'owner site (User portal), and vice versa. For example, if user A create guest B, and he set up that guest B has restricted contact that contains only user A. Domain addmin go to Admin portal and add user C to guest B's restricted contact list, now user A go to see detail of guest B, he can see guest B's restricted contact list contains user B and User C. * When a guest has a restricted contact list, he can only see/interact/share with persons in this list. When the restricted contact list is disabled, he can see/interact/share as a normal user. [Back to Summary](#summary) ## UI Design #### Mockups #### Final design     [Back to Summary](#summary) ## Misc [Back to Summary](#summary) ================================================ FILE: documentation/EN/epics/new-admin-portal/story-17-admin-create-domain.md ================================================ # Summary * [Related EPIC](#related-epic) * [Definition](#definition) * [Screenshots](#screenshots) * [Misc](#misc) ## Related EPIC * [New admin portal](./README.md) ## Definition #### Preconditions * Given that i am super-admin in Linshare * I logged-in to Amin portal successfully #### Description * After log-in Admin Portal successfully, i go to Administration tab * On the left of screen, i can see a domain tree. * There are 4 types of domain: root domain, Top domain, Guest domain and Sub domain * There are 3 levels in domain tree: * Root domain is highest level: From root domain, i can add top domains. There are no limitation about number of top domains i can create. * Top domain is second level: From each top domain, i can create as many sub domain as I want sub domain and only 1 guest domain * Sub domain and guest domain is third level: I cannot create any lower level domain. * When i click on Cross icon of Root domain in domain tree, the button :"Add top domain" will be displayed. * When i click on button "Add top domain", a screen will be opened. * On this new screen, i can see: * Screen name: Create a new [domain type] in [Parent domain name] * Domain name: A text field that allow me to input domain name. This field is mandatory. I can click on Information icon to see the explaination: "This domain name will be used officially in whole platform, both Admin site and End user site" * Description: A text field that allow me to input description. This field is optional * A toggle : Create domain policy automatically. Default value is false. I can click on con Information to see the explaination:" If enabled, a rule will be created automatically by authorizing the newly created domain to communicate with itself only. All other communications are forbidden by default. If disabled, the default domain policy will be applied. It will allow all other domains to see this domain." * I can see a text message:" The domain will be created with default values, for example default role or locale, etc...After creating domain, please edit the domain and its parameters for more advanced settings." #### Postconditions * After input information, i click button Save, the system will validate: * If there is any error in field Domain name (ex: blank fileld, domain name is over max length) , it will be highlighted with red border and an error message * If there is no error, the new top domain is created, the popup is closed and system will display an toast message to confirm creation with a link towards domain Detail page. * If i click on the link, i will land to the detail page. * The new created domain will be displayed in the domain tree under its parent domain. * If i click on Cross button of a Top domain: * If top domain does not have any lower level domain or only has sub domains, i can see 2 options: Add sub domain/Add guest domain * If top domain already has a guest domain, i can only see 1 option: Add sub domain. * Only super admin can create domains. [Back to Summary](#summary) ## UI Design #### Mockups     #### Final design [Back to Summary](#summary) ## Misc [Back to Summary](#summary) ================================================ FILE: documentation/EN/epics/new-admin-portal/story-18-admin-edit-domain-details.md ================================================ # Summary * [Related EPIC](#related-epic) * [Definition](#definition) * [Screenshots](#screenshots) * [Misc](#misc) ## Related EPIC * [New admin portal](./README.md) ## Definition #### Preconditions * Given that i am admin/super-admin in Linshare * I logged-in to Amin portal successfully * On Domain tree, i select a domain. * I go to Configuartion tab on top navigation bar and select Details, the screen Domain Detail of current selected domain on domain tree will be disppayed. #### Description **UC1. As a super-admin, i can view and edit root domain details** * With the Root domain Detail page, I can see the information: * Name: A text field when i click on, i can edit current name * Description: A text field when i click on, i can edit current description * Creation date: Non-editable field * Modification date: Non-editable field * When i click Save button, the system will validate: * If the field: "Name" is invalid (blank, over max length..), the field will be marked with red border and an error message * If valid, the updates will be saved and system will display a successful notification * When i click Cancel button, the updates will not be saved. **UC2. As a super-admin, i can view and edit Top domain/Sub domain details** * With a lower-level domain (Top domain/Sub domain), i can see the information: * Name: A text field when i click on, i can edit current name * Description: A text field when i click on, i can edit current description * Default user role: The default value of this field is Simple. I can choose from the dropdown list options: Simple or Administrator. I can see a description text under this field "This role will be assigned to all newly created users on this domain. Administrator can still change user's role later in Administration page". * Email language: The default value of this field is English. I can choose from the drop-down list options: English, French, Russian. I can see a description text under this field: "Notification emails will be sent in this language for all newly created users on this domain. Administrator can still change user's email language later in Administration page". * Creation date: Non-editable field * Modification date: Non-editable field * Welcome message: Display name of welcome message this domain is using, when i click on this link i am navigated to the Detail page of this Welcome message in View mode. * Mime policy: Display name of mime policy this domain is using, when i click on this link i am navigated to the Detail page of this Mime policy in View mode * Domain policy: Display name of domain policy this domain is using, when i click on this link i am navigated to the Detail page of this Domain policy in Read mode * Mail configuration: Display name of Mail configuration this domain is using, when i click on this link i am navigated to the Detail page of this Mail configuration in View mode * User provider/Group provider/Drive provider: If the provider has been set up yet, there will be a link "View detail" , when i click on this link, i am navigated to detail page of that provider. If the provider has not been set up, there will be a link "Create", when i click on this link, i am navigated to the Create page of that provider. * When i cancel the view, i am navigated back to this Domain detail page. * When i click Save button, the system will validate: * If the field: "Name" is invalid (blank, over max length..), the field will be marked with red border and an error message * If valid, the updates will be saved and system will display a successful notification * When i click Cancel button, the updates will not be saved. **UC3. As a super-admin, i can view and edit a Guest domain** - With a guest domain, i can see the information: * Name: A text field when i click on, i can edit current name * Description: A text field when i click on, i can edit current description * Default user role: The default value of this field is Simple. I can choose from the dop-down list options: Simple or Administrator. I can see a description text under this field "This role will be assigned to all newly created users on this domain. Administrator can still change user's role later in Administration page". * Email language: The default value of this field is English. I can choose from the drop-down list options: English, French, Russian. I can see a description text under this field: "Notification emails will be sent in this language for all newly created users on this domain. Administrator can still change user's email language later in Administration page". * Creation date: Non-editable field * Modification date: Non-editable field * Welcome message: Display name of welcome message this domain is using, when i click on this link i am navigated to the Detail page of this Welcome message in Read mode. * Mime policy: Display name of mime policy this domain is using, when i click on this link i am navigated to the Detail page of this Mime policy in Read mode * Domain policy: Display name of domain policy this domain is using, when i click on this link i am navigated to the Detail page of this Domain policy in Read mode * Mail configurations: Display name of Mail configurations this domain is using, when i click on this link i am navigated to the Detail page of this Mail congigurations in Read mode * When i cancel the view, i am navigated back to this Domain detail page. * When i click Save button, the system will validate: * If the field: "Name" is invalid (blank, over max length..), the field will be marked with red border and an error message * If valid, the updates will be saved and system will display a successful notification * When i click Cancel button, the updates will not be saved. **UC4. As an nested admin, i can view and edit Details page of my domains which i am admin on** * If i am the nested admin, i can see the information: * Name: Non-editable field displays current domain name. I cannot edit this field * Default user role: The default value of this field is Simple. I can choose from the dop-down list options: Simple or Administrator. I can see a description text under this field "This role will be assigned to all newly created users on this domain. Administrator can still change user's role later in Administration page". * Email language: The default value of this field is English. I can choose from the drop-down list options: English, French, Russian. I can see a description text under this field: "Notification emails will be sent in this language for all newly created users on this domain. Administrator can still change user's email language later in Administration page". * Creation date: Non-editable field * Modification date: Non-editable field * Welcome message: Display name of welcome message this domain is using, when i click on this link i am navigated to the Detail page of this Welcome message in Read mode. * Mime policy: Display name of mime policy this domain is using, when i click on this link i am navigated to the Detail page of this Mime policy in Read mode * Mail configurations: Display name of Mail configurations this domain is using, when i click on this link i am navigated to the Detail page of this Mail congigurations in Read mode * When i cancel the view, i am navigated back to this Domain detail page. * When i click Save button, the system will save the updates and displayed successful notification * When i click Cancel button, the updates will not be saved. #### Postconditions [Back to Summary](#summary) ## UI Design #### Mockups      #### Final design [Back to Summary](#summary) ## Misc [Back to Summary](#summary) ================================================ FILE: documentation/EN/epics/new-admin-portal/story-19-admin-delete-domain.md ================================================ # Summary * [Related EPIC](#related-epic) * [Definition](#definition) * [Screenshots](#screenshots) * [Misc](#misc) ## Related EPIC * [New admin portal](./README.md) ## Definition #### Preconditions * Given that i am super-admin in Linshare * I logged-in to Amin portal successfully * On Domain tree, i select a domain. * I go to Configuartion tab on top navigation bar and select Details, the screen Domain Detail of current selected domain on domain tree will be disppayed. #### Description * On Details page of top domain/guest domain/sup domain, i can see a Delete button * I click Delete, there will be a confirmation message: "You are about to delete this domain, this procedure is irreversible and destroy all associated users. Do you want to proceed?" and Yes/No button * If i choose Yes, the system will validate: * If the domain is top domain and has no Sub domain or guest domain, the deletion is executed * If the domain is top domain and there is any sub domain/guest domain, the system will display message: "Please remove all sub-domains and guest-domain of this Top domain then you can delete this Top domain" * If the domain is sub-domain or guest domain, the deletion is executed. #### Postconditions * When a domain is deleted succesfully, there will be a toast message to notice the deletion. * The deleted domain is removed from the domain tree. * I will be navigated to the Details page of root domain Details page * Note: Only root domain see the Delete button. [Back to Summary](#summary) ## UI Design #### Mockups  #### Final design [Back to Summary](#summary) ## Misc [Back to Summary](#summary) ================================================ FILE: documentation/EN/epics/new-admin-portal/story-20-admin-view-remote-servers-list.md ================================================ # Summary * [Related EPIC](#related-epic) * [Definition](#definition) * [Screenshots](#screenshots) * [Misc](#misc) ## Related EPIC * [New admin portal](./README.md) ## Definition #### Preconditions * Given that i am super-admin in LinShare * I logged-in to ADmin portal successfully #### Description - I go to Configuration tab on top navigation bar, if i am selecting root domain in domain tree, i can see the Configuration screen including: Details, Parameters, Mail templates, Welcome messages, Mine Type policies, Domain policies, Remote servers, Remote filters, Quota, Plublic keys. - If i am selecting a nested domain in domain tree, i can see the Configuration screen including: Details, Parameters, Mail templates, Welcome messages, Mine Type policies, Domain policies, Remote servers, Remote filters, Providers, Quota, Plublic keys - If i am selecting a guest domain in domain tree, i can see the Configuration screen including: Details, Parameters, Mail templates, Welcome messages, Mine Type policies, Domain policies, Quota, Plublic keys - I click on Root domain or a nested domain in domain tree and click on Remote servers, the screen Remote servers list will be opened. #### Postconditions - I can see a help message on screen name: "Remote servers can be used for any domain. - All current servers will be listed in a table, including columns: - Name - Server type - Creation date - Modification date - Action - I can sort by each column: Name, Server type, Creation date, Modification date - Default sort is last modification date - In Action column, when i click on thee-dots button, i can see the drop-down list: Duplicate, Edit, Delete - I can see a search bar and typing in, the system will search by server name and display corresponding result in the table below - When i click button "Create", i can see the drop-down list: LDAP connection, Twake connection - The remote server list is paginated and the default number of displayed items is 25, I can change this number at the bottom of page [Back to Summary](#summary) ## UI Design #### Mockups     #### Final design [Back to Summary](#summary) ## Misc [Back to Summary](#summary) ================================================ FILE: documentation/EN/epics/new-admin-portal/story-21-admin-can-create-duplicate-edit-delete-LDAP-connection.md ================================================ # Summary * [Related EPIC](#related-epic) * [Definition](#definition) * [Screenshots](#screenshots) * [Misc](#misc) ## Related EPIC * [New admin portal](./README.md) ## Definition #### Preconditions * Given that i am super-admin in Linshare * I logged-in to Admin portal successfully #### Description **UC1. Create LDAP connection** - I go to Configuartion tab on top navigation bar, and select Remote servers - The screen listing Remote server will be displayed - I click on button Create, there will be 2 options: LDAP connection and twake connection - I select LDAP connection, screen Create LDAP connection will be displayed. - In this screen i can see a helper message on screen name when i click information icon - To create an LDAP connection, i need to input fields: - Name: a text field and mandatory - Provider URL: Text field and madatory - LDAP user dn: a texfield and optional - LDAP password: a text field and optional. When i start typing in this field, the inputed characters will be hidden by star icons automatically and the closed Eye icon will be shown. I click to this icon, the field value will be shown. - When i click button Save, the system will validate if any mandatory field is blank, it will be highlighted in red and a message:"[field name] cannot be blank" - If there is no error, the new LDAP connection is created and there will be a successful notification - I am redirected to the Screen remote server listing, and the new create LDAP connection appears on the list. - If i click button Cancel, i am navigated to the Listing server screen. **UC2. Edit LDAP connection** - There are 2 ways to access Edit LDAP connection screen: - In the Remote server listing screen, i click on three dot-button of an LDAP server and select option Edit from the drop-down list - Or i can click an the LDAP server row on the Remote server listing table - On the LDAP servers screen, i can edit all fields: Name, Provider URL, LDAP user dn, LDAP password then click button Save. - If any mandatory field is blank, it will be highlighted in red and a message:"[field name] cannot be blank" - If non of the madatory fields is not blank, the updates will be saved and there will be a successful toast message. - If i click button Reset, all the updates will be reset to the before value - I can click Remote servers on the breadcrumb to navigate back to the server listing screen. **UC3. Duplicate an LDAP connection** - On the Remote server listing screen, i click on thee-dot button of an LDAP server and select option Duplicate from the drop-down list - The screen Create LDAP server will be opened - Except the field Name is blank, other fields will have the same value as the LDAP server that i slected to duplicate - I input the field Name, and can edit other fields - When i click button Save, the system will validate if any mandatory field is blank, it will be highlighted in red and a message:"[field name] cannot be blank" - If there is no error, the new LDAP connection is created and there will be a successful notification - If i click button Cancel, i am navigated to the Listing server screen. **UC4. Delete an LDAP connection** - There are 2 ways to delete an LDAP server: - In the Remote server listing screen, i click on three dot-button of an LDAP server and select option Delete from the drop-down list - Or i can click an the LDAP server row on the Remote server listing table to go to LDAP server detail screen. On this screen i can see the button Delete - When i click on button Delete, the system will validate: - If the LDAP connection is not associated with any providers (user provider, group provider, drive provider) there will be a confirmation popup: "You are about to delete this remote sever connection, this procedure is irreversible. Do you want to proceed?" and YEs/No button - I choose Yes to confirm, the selected server connections will be deleted. - System will prompt a deletion confirmation toast. - If the LDAP connection is associated with any provider, the system will display a message: " This LDAP connection is associated with at least one of the providers. You cannot delete." **UC5. Delete multiple LDAP connections** - On Remote servers listing screen, i can select multiple servers on the list by tick the checkbox of each item - There will be a top bar that indicates number of selected servers, an isolation icon, an Undo icon and a Delete icon. - When i click on Isolation icon, the screen only shows selected items - When i click on Undo icon, all the selected items are unselected -When i click on button Delete: - If every of selected LDAP connections is not associated with any of current providers, there will be an confirmation popup: "You are about to delete [number of selected items] remote server connections, this procedure is irreversible. Do you want to proceed?" and Yes/No button - I choose Yes to confirm, the selected connections will be deleted. - System will prompt a deletion confirmation toast. - If every of selected connections is associated with any of current providers, the system will display message: " One of selected connections is associated with at least one of providers. You cannot delete." **UC6. View Associated domains** - On Remote servers listing screen, i click on three-dot button on Action column. - I select option "View associated domains" - A new screen will be opened - I can see the list of domain's name which are using the LDAP connection with its's user provider/group provider/drive provider. - There will be a lablel next to each domain's name that indicating domain type of that domain - Only Top domain or sub domain can use LDAP connection, Root domain and guest domain can't. - When i click one domain on the list, i am navigated to one of provider pages of that domain. The order will be user provider=>group provider=>Drive provider, - If the LDAP connection is not Associated with any domain, there will be a text message: " There is no domain using this LDAP connection. " #### Postconditions [Back to Summary](#summary) ## UI Design #### Mockups          #### Final design [Back to Summary](#summary) ## Misc [Back to Summary](#summary) ================================================ FILE: documentation/EN/epics/new-admin-portal/story-22-admin-view-user-filter-list.md ================================================ # Summary * [Related EPIC](#related-epic) * [Definition](#definition) * [Screenshots](#screenshots) * [Misc](#misc) ## Related EPIC * [New admin portal](./README.md) ## Definition #### Preconditions - Given that i am super-admin in LinShare - I logged-in to Admin portal successfully #### Description - I go to Configuration tab on top navigation bar, if i am selecting root domain in domain tree, i can see the Configuration screen including: Details, Parameters, Mail templates, Welcome messages, Mine Type policies, Domain policies, Remote servers, Remote filters, Quota, Plublic keys. - If i am selecting a nested domain in domain tree, i can see the Configuration screen including: Details, Parameters, Mail templates, Welcome messages, Mine Type policies, Domain policies, Remote servers, Remote filters, Providers, Quota, Plublic keys - If i am selecting a guest domain in domain tree, i can see the Configuration screen including: Details, Parameters, Mail templates, Welcome messages, Mine Type policies, Domain policies, Quota, Plublic keys - I click on Root domain or a nested domain in domain tree and click on Remote filters, the screen Remote filters list will be opened. #### Postconditions - On Remote filters screen, i can see three kinds of filters: User filters, Group filters, Drive filters. - I can see a help message on screen name: "Remote filters can be used for any domain". - I click on User filters, the screen User filters list will be opened. - I can see a help message on screen name: "User filters can be used for any domain". - All current filters will be listed in a table, including columns: - Name - Description - Type - Creation date - Modification date - Action - I can sort by each column: Name, Type, Creation date, Modification date - Default sort is last modification date - In Action column, when i click on thee-dots button, i can see the drop-down list: Duplicate, Edit, Delete - I can see a search bar and typing in, the system will search by fiter name and display corresponding result in the table below - When i click button "Create", i can see the drop-down list: LDAP filters, Twake filters - The user filter list is paginated and the default number of displayed items is 25, I can change this number at the bottom of page [Back to Summary](#summary) ## UI Design ### Mockups     ### Final design [Back to Summary](#summary) ## Misc [Back to Summary](#summary) ================================================ FILE: documentation/EN/epics/new-admin-portal/story-23-admin-create-edit-duplicate-delete-user-filters.md ================================================ # Summary * [Related EPIC](#related-epic) * [Definition](#definition) * [Screenshots](#screenshots) * [Misc](#misc) ## Related EPIC * [New admin portal](./README.md) ## Definition #### Preconditions * Given that i am super-admin in LinShare * I logged-in to Admin portal successfully #### Description **UC1. Create LDAP user filter** - I go to Configuartion tab on top navigation bar, and select Remote filters - The screen listing Remote filters will be displayed, i select User filters, the screen listing user filters is opened. - I click on button Create, there will be 2 options: LDAP filters and Twake filters - I select LDAP filters, screen Create LDAP User filter will be displayed. - In this screen i can see a helper message on screen name when i click information icon - To create an LDAP User filter, i need to input fields: - Model selector: optional field, a drop-down list includes 4 options: default-pattern-AD; default-pattern-demo; default-pattern-obm; default-pattern-openldap - When i select one model, other fields on screen excepting "Name" will be filled out automatically. - Name: a text field and mandatory - Description: a text field and optional - Search all workgroup query: a text field and mandatory - Search workgroup query: a text field and mandatory - Attributes fields on the right of screen are: - Mail: a text field and mandatory - First name: a text field and mandatory - Last name: a text field and mandatory - User unique identifier: a text field and mandatory - Search page size: a text field and mandatory - Search limit: Completion page size: a text field and mandatory - Completion limit: a text field and mandatory - When i click button Save, the system will validate if any mandatory field is blank, it will be highlighted in red and a message:"[field name] cannot be blank" - If there is no error, the new LDAP User filter is created and there will be a successful notification - I am redirected to the Screen User filters listing, and the new create LDAP user filter appears on the list. - If i click button Cancel, i am navigated to the Listing user filters screen. **UC2. Edit LDAP User filter** - There are 2 ways to access Edit LDAP user filter screen: - In the User filters listing screen, i click on three dot-button of an LDAP user filter and select option Edit from the drop-down list - Or i can click an the LDAP user filter row on the User filter listing table. - On the LDAP user filter screen, i can edit all fields excepting "Model selector" (this field will not be shown in Edit mode) then click button Save. - If any mandatory field is blank, it will be highlighted in red and a message:"[field name] cannot be blank" - If non of the mandatory fields is blank, the updates will be saved and there will be a successful toast message. - If i click button Reset, all the updates will be reset to the before values. - I can click User filters on the breadcrumb to navigate back to the User filter listing screen. **UC3. Duplicate an LDAP User filter** - On the User filter listing screen, i click on thee-dot button of an LDAP User filter and select option Duplicate from the drop-down list - The screen Create LDAP USer filter will be opened - Except the field Name is blank, other fields will have the same value as the LDAP User filter that i slected to duplicate - I input the field Name, and can edit other fields - When i click button Save, the system will validate if any mandatory field is blank, it will be highlighted in red and a message:"[field name] cannot be blank" - If there is no error, the new LDAP user filter is created and there will be a successful notification - If i click button Cancel, i am navigated to the User filter listing screen. **UC4. Delete an LDAP User filter** - There are 2 ways to delete an LDAP user filter: - In the User filter listing screen, i click on three dot-button of an LDAP user filter and select option Delete from the drop-down list - Or i can click an the LDAP user filter row on the User filter listing table to go to LDAP user filter detail screen. On this screen i can see the button Delete - When i click on button Delete: - If the user filter is not accociated with any domain, there will be an confirmation popup: "You are about to delete this User filter, this procedure is irreversible. Do you want to proceed?" and Yes/No button - I choose Yes to confirm, the User filter will be deleted. - System will prompt a deletion confirmation toast. - If the user filter is accociated with any domain, the system will display message: "This user filter is accociated with at least one domain. You cannot delete." **UC5. Delete multiple user filters** - On User filter listing screen, i can select multiple User filters on the list by tick the checkbox of each item - There will be a top bar that indicates number of selected user filters, an isolation icon, an Undo icon and a Delete icon. - When i click on Isolation icon, the screen only shows selected items - When i click on Undo icon, all the selected items are unselected - When i click on button Delete: - If any of selected user filters is not accociated with any domain, there will be an confirmation popup: "You are about to delete [number of seleted items] user filters, this procedure is irreversible. Do you want to proceed?" and YEs/No button - I choose Yes to confirm, the selected User filters will be deleted. - System will prompt a deletion confirmation toast. - If any of selected user filters is accociated with any domain, the system will display message: " One of selected user filters is accociated with at least one domain. You cannot delete." **UC6. View Associated domains** - On User filter listing screen, i click on three-dot button on Action column - I select option "View associated domains" - A new screen will be opened - I can see the list of domain's name which are using the user filter. - There will be a lable next to each domain's name that indicating domain type of that domain - Only Top domain or sub domain can use an user filter, Root domain and guest domain can't. - When i click one domain on the list, i am navigated to User provider page of that domain. - If the user filter is not associated with any domain, there will be a text message: " There is no domain using this user filter. " #### Postconditions [Back to Summary](#summary) ## UI Design #### Mockups         #### Final design [Back to Summary](#summary) ## Misc [Back to Summary](#summary) ================================================ FILE: documentation/EN/epics/new-admin-portal/story-24-admin-manage-LDAP-user-provider.md ================================================ # Summary * [Related EPIC](#related-epic) * [Definition](#definition) * [Screenshots](#screenshots) * [Misc](#misc) ## Related EPIC * [New admin portal](./README.md) ## Definition #### Preconditions - Given that i am super-admin in LinShare - I logged-in to Admin portal successfully - I choose a nested domain in domain tree and click on Configuration screen, i click on item Providers. (If i select root domain or guest domain in domain tree, i cannot see item Providers) - On screen Providers, i can see 3 types: User providers, Groups Provider, Drive Providers. #### Description **UC1. Create LDAP User Provider** - I select User Providers, if the current selected domain doesn't have an user provider, screen 2 will be displayed. - When i click button "Add user provider", there will be a drop-down list with 3 options: LDAP provider, OIDC provider, Twake provider - I select LDAP provider, screen 3 will be displayed, the button Add user provider will be disabled - To add an LDAP user provider, i need to fill the followings: - LDAP connection: mandatory field, a drop-downlist which contain current LDAP connections list. There is a button next to this field that when i click on, i am navigated to Create LDAP connection screen - After I created a LDAP connection successfully, i am navigated back to this screen - User filter: mandatory field, a drop-down list which contain current LDAP user filter list. There is a button next to this field that when i click on, i am navigated to Create LDAP user filter Screen - After I created an User filter successfully, i am navigated back to this screen. - Base dn: a text field and mandatory. When i hover the tooltip, there will be a legend: "LinShare will start looking for users from this position in your LDAP." - When i click button Save, the system will validate if any mandatory field is blank, it will be highlighted in red and a message:"[field name] cannot be blank" - If there is no error, the User provider is saved and there will be a successful notification, I am redirected to Screen 4. - If i click button Cancel, i am navigated to the screen 2 **UC2. Edit LDAP User Provider** - I select User Providers, if current selected domain already had an user provider, screen 4 will be displayed. - On this screen, i can edit all fields: LDAP connection, User filter, Basedn - I click button Save, the system will validate if any mandatory field is blank, it will be highlighted in red and a message:"[field name] cannot be blank" - If there is no error, the User provider is updated and there will be a successful notification. - If i click button Reset, all the fields will be reset to the before-updated values. **UC3.Delete LDAP User Provider** - On screen 4, i can see a Delete button - When i click on this button, there will be a confimation popup:""You are about to delete this user provider, this procedure is irreversible. Do you want to proceed?" and Yes/No button - I choose Yes to confirm, the LDAP user provider will be deleted. - System will prompt a deletion confirmation toast. - I am navigated to screen 1. #### Postconditions - The user provider is associated with the selected nested domain in the left domain tree. - Root domain is not associated with any User provider - Guest domain is not associated with any USer provider [Back to Summary](#summary) ## UI Design #### Mockups     #### Final design [Back to Summary](#summary) ## Misc [Back to Summary](#summary) ================================================ FILE: documentation/EN/epics/new-admin-portal/story-25-admin-view-group-filter-list.md ================================================ # Summary * [Related EPIC](#related-epic) * [Definition](#definition) * [Screenshots](#screenshots) * [Misc](#misc) ## Related EPIC * [New admin portal](./README.md) ## Definition #### Preconditions - Given that i am super-admin in LinShare - I logged-in to Admin portal successfully #### Description - I go to Configuration tab on top navigation bar, if i am selecting root domain in domain tree, i can see the Configuration screen including: Details, Parameters, Mail templates, Welcome messages, Mine Type policies, Domain policies, Remote servers, Remote filters, Quota, Plublic keys. - If i am selecting a nested domain in domain tree, i can see the Configuration screen including: Details, Parameters, Mail templates, Welcome messages, Mine Type policies, Domain policies, Remote servers, Remote filters, Providers, Quota, Plublic keys - If i am selecting a guest domain in domain tree, i can see the Configuration screen including: Details, Parameters, Mail templates, Welcome messages, Mine Type policies, Domain policies, Quota, Plublic keys - I click on Root domain or a nested domain in domain tree and click on Remote filters, the screen Remote filters list will be opened. #### Postconditions - On Remote filters screen, i can see three kinds of filters: User filters, Group filters, Drive filters. - I can see a help message on screen name: "Remote filters can be used for any domain". - I click on Group filters, the screen Group filters list will be opened. - I can see a help message on screen name: "Group filters can be used for any domain". - All current filters will be listed in a table, including columns: - Name - Description - Type - Creation date - Modification date - Action - I can sort by each column: Name, Type, Creation date, Modification date - Default sort is last modification date - The group filter list is paginated and the default number of displayed items is 25, I can change this number at the bottom of page - In Action column, when i click on thee-dots button, i can see the drop-down list: Duplicate, Edit, Delete, See asscociated domains - I can see a search bar and typing in, the system will search by filter name and display corresponding result in the table below - When i click button "Create", I am navigated to LDAP filter creation screen. [Back to Summary](#summary) ## UI Design ### Mockups    ### Final design [Back to Summary](#summary) ## Misc [Back to Summary](#summary) ================================================ FILE: documentation/EN/epics/new-admin-portal/story-26-admin-create-Duplicate-Edit-Delete-group-filter.md ================================================ # Summary * [Related EPIC](#related-epic) * [Definition](#definition) * [Screenshots](#screenshots) * [Misc](#misc) ## Related EPIC * [New admin portal](./README.md) ## Definition #### Preconditions * Given that i am super-admin in LinShare * I logged-in to Admin portal successfully #### Description **UC1. Create LDAP group filter** - I go to Configuration tab on top navigation bar, and select Remote filters - The screen listing Remote filters will be displayed, i select Group filters, the screen listing group filters is opened. - I click on button Create, screen Create LDAP Group filter will be displayed. - In this screen i can see a helper message on screen name when i click information icon - To create an LDAP Group filter, i need to input fields: - Model selector: optional field, a drop-down list includes 1 options: Ldap groups - When i select the model, other fields on screen excepting "Name" will be filled out automatically. - Name: a text field and mandatory - Description: a text field and optional - Search all workgroups query: a text field and mandatory - Search workgroup query: a text field and mandatory - Workgroup prefix: a text field and optional - Search page size: a text field and mandatory - Attributes fields on the right of screen are: - Member email: a text field and mandatory - Member first name: a text field and mandatory - Member last name: a text field and mandatory - Workgroup name: a text field and mandatory - Workgroup member: a text field and mandatory - Below each of field, there will be a grey text to explain what is this field used for (check the screen 2) - When i click button Save, the system will validate if any mandatory field is blank, it will be highlighted in red and a message:"[field name] cannot be blank" - If there is no error, the new LDAP group filter is created and there will be a successful notification - I am redirected to the Screen Group filters listing, and the new create LDAP group filter appears on the list. - If i click button Cancel, i am navigated to the Listing group filters screen. **UC2. Edit LDAP Group filter** - There are 2 ways to access Edit LDAP group filter screen: - In the Group filters listing screen, i click on three dot-button of an LDAP group filter and select option Edit from the drop-down list - Or i can click an the LDAP group filter row on the group filter listing table. - On the LDAP group filter screen, i can edit all fields excepting "Model selector" (this field will not be shown in Edit mode) then click button Save. - If any mandatory field is blank, it will be highlighted in red and a message:"[field name] cannot be blank" - If none of the mandatory fields is blank, the updates will be saved and there will be a successful toast message. - If i click button Reset, all the updates will be reset to the before values. - I can click Group filters on the breadcrumb to navigate back to the Group filter listing screen. **UC3. Duplicate an LDAP Group filter** - On the Group filter listing screen, i click on thee-dot button of an LDAP Group filter and select option Duplicate from the drop-down list - The screen Create LDAP Group filter will be opened - Except the field Name is blank, other fields will have the same value as the LDAP Group filter that i slected to duplicate - I input the field Name, and can edit other fields - When i click button Save, the system will validate if any mandatory field is blank, it will be highlighted in red and a message:"[field name] cannot be blank" - If there is no error, the new LDAP Group filter is created and there will be a successful notification - If i click button Cancel, i am navigated to the Group filter listing screen. **UC4. Delete an LDAP Group filter** - There are 2 ways to delete an LDAP group filter: - In the group filter listing screen, i click on three dot-button of an LDAP group filter and select option Delete from the drop-down list - Or i can click an LDAP Group filter row on the Group filter listing table to go to LDAP group filter detail screen. On this screen i can see the button Delete. - When i click on button Delete: - If the group filter is not associated with any domain, there will be an confirmation popup: "You are about to delete this Group filter, this procedure is irreversible. Do you want to proceed?" and Yes/No button - I choose Yes to confirm, the Group filter will be deleted. - System will prompt a deletion confirmation toast. - If the Group filter is associated with any domain, the system will display message: "This group filter is associated with at least one domain. You cannot delete." **UC5. Delete multiple group filters** - On Group filter listing screen, i can select multiple Group filters on the list by tick the checkbox of each item - There will be a top bar that indicates number of selected group filters, an isolation icon, an Undo icon and a Delete icon. - When i click on Isolation icon, the screen only shows selected items - When i click on Undo icon, all the selected items are unselected - When i click on button Delete: - If any of selected group filters is not associated with any domain, there will be an confirmation popup: "You are about to delete [number of selected items] group filters, this procedure is irreversible. Do you want to proceed?" and Yes/No button - I choose Yes to confirm, the selected Group filters will be deleted. - System will prompt a deletion confirmation toast. - If any of selected group filters is associated with any domain, the system will display message: " One of selected group filters is associated with at least one domain. You cannot delete." **UC6. View associated domains** - On Group filter listing screen, i click on three-dot button on Action column. - I select option "View associated domains" - A new screen will be opened - I can see the list of domain's name which are using the group filter. - There will be a lable next to each domain's name that indicating domain type of that domain - Only Top domain or sub domain can use an group filter, Root domain and guest domain can't. - When i click one domain on the list, i am navigated to Group provider page of that domain. - If the group filter is not associated with any domain, there will be a text message: " There is no domain using this group filter. " #### Postconditions [Back to Summary](#summary) ## UI Design #### Mockups         #### Final design [Back to Summary](#summary) ## Misc [Back to Summary](#summary) ================================================ FILE: documentation/EN/epics/new-admin-portal/story-27-admin-manage-group-provider.md ================================================ # Summary * [Related EPIC](#related-epic) * [Definition](#definition) * [Screenshots](#screenshots) * [Misc](#misc) ## Related EPIC * [New admin portal](./README.md) ## Definition #### Preconditions - Given that i am super-admin in Linshare - I logged-in to Admin portal successfully - I choose a nested domain in domain tree and click on Configuration screen, i click on item Providers. (If i select root domain or guest domain in domain tree, i cannot see item Providers) - On screen Providers, i can see 3 types: User providers, Groups Provider, Drive Providers. #### Description **UC1. Create LDAP group Provider** - I select Group Providers, if the current selected domain doesn't have a group provider, screen 2 will be displayed. - When i click button "Add Group provider", screen 3 will be displayed, the button Add group provider will be disabled. - To add an LDAP group provider, i need to fill the followings: - LDAP connection: mandatory field, a drop-downlist which contain current LDAP connections list. There is a button next to this field that when i click on, i am navigated to Create LDAP connection screen - After i create a LDAP connection successfully, i am navigated back to this screen - Group filter: mandatory field, a drop-down list which contain current LDAP group filter list. There is a button next to this field that when i click on, i am navigated to Create LDAP group filter Screen - After i create a group filter successfully, i am navigated back to this screen - Base dn: a text field and mandatory. When i hover the tooltip, there will be a legend: "LinShare will start looking for group members from this position in your LDAP." - Search in other domains: A checkbox, if i select, i will search users who are members of the remote LDAP groups in others domains than my own domain, according to the domain policies. - When i click button Save, the system will validate if any mandatory field is blank, it will be highlighted in red and a message:"[field name] cannot be blank" - If there is no error, the Group provider is saved and there will be a successful notification, I am redirected to Screen 4. - If i click button Cancel, i am navigated to the Screen 2. **UC2. Edit LDAP Group Provider** - I select Group Providers, if current selected domain already had an group provider, screen 4 will be displayed. - On this screen, i can edit all fields: LDAP connection, group filter, Basedn, checkbox Search user in other domains. - I click button Save, the system will validate if any mandatory field is blank, it will be highlighted in red and a message:"[field name] cannot be blank" - If there is no error, the Group provider is updated and there will be a successful notification. - If i click button Reset, all the fields will be reset to the before-updated values. **UC3.Delete LDAP Group Provider** - On screen 4, i can see a Delete button - When i click on this button, there will be a confimation popup:""You are about to delete this group provider, this procedure is irreversible. Do you want to proceed?" and Yes/No button - I choose Yes to confirm, the LDAP group provider will be deleted. - System will prompt a deletion confirmation toast. - I am navigated to screen 1. #### Postconditions - The group provider is associated with the selected nested domain in the left domain tree. - Root domain is not associated with any group provider - Guest domain is not associated with any group provider [Back to Summary](#summary) ## UI Design #### Mockups     #### Final design [Back to Summary](#summary) ## Misc [Back to Summary](#summary) ================================================ FILE: documentation/EN/epics/new-admin-portal/story-28-admin-manage-OIDC-user-provider.md ================================================ # Summary * [Related EPIC](#related-epic) * [Definition](#definition) * [UI Design](#ui-design) * [Misc](#misc) ## Related EPIC * [New admin portal](./README.md) ## Definition #### Preconditions - Given that i am super-admin in LinShare - I logged-in to Admin portal successfully - I choose a nested domain in domain tree and click on Configuration screen, i click on item Providers. (If i select root domain or guest domain in domain tree, i cannot see item Providers) - On screen Providers, i can see 3 types: User providers, Groups Provider, Drive Providers. #### Description **UC1. Create OIDC User Provider** - I select User Providers, if the current selected domain doesn't have an user provider, screen 2 will be displayed. - When i click button "Add user provider", there will be a drop-down list with 3 options: LDAP provider, OIDC provider, Twake provider - I select OIDC provider, screen 3 will be displayed, the button Add user provider will be disabled - To add an OIDC user provider, I need to fill: - "Associated domain indentifier". This is a string field and mandatory. - Check external user ID: A checkbox. : If enabled, LinShare will search for a claim named 'external_uid', store it in the database at the first connection. Then the store value will be compared with the value provided by OIDC at each authentication attempt. if it does not match, user will be rejected. - Use Access Claim: A checkbox: If enabled, LinShare will search for a claim named 'linshare_access' and compare it to the value store in key 'oidc.access.claim.value="linshare"' in the property file. If it does not match, user will be rejected. - Use Role Claim: A checkbox: If enabled, LinShare will search for a claim named 'linshare_role' to define the default role value when creating the profile at first connection only (Possible values: ADMIN, SIMPLE) - Use email locale Claim: A checkbox: If enabled, LinShare will search for a claim named 'linshare_locale' to define the default role value when creating the profile at first connection only (Possible values: ENGLISH, FRENCH, RUSSIAN) - I can also see a text message :"By creating OIDC user provider for [associated domain name], you allow LinShare to create users for this domain when a user authenticates with OIDC. The user will be created in this domain if the value of the claim 'domain_discriminator' matches the value above."," - When i click button Save, the system will validate: - If associated domain identifier is already in use by an other domain/oidc provider in LinShare, the field will be highlighted in red and a message:"Associated domain identifier already exists" - If Associated domain identifier field is blank, it will be highlighted in red and a message:"Associated domain identifier cannot be blank" - If there is no error, the User provider is saved and there will be a successful notification, I am redirected to Screen 4. - If i click button Cancel, i am navigated to the screen 2 - Now when there is a person log-in Linshare with OIDC and his OIDC identifier is founded in associated domain, he will be created user account in this domain. **UC2. Edit OIDC USer Provider** - I select User Providers, if current selected domain already had a user provider, screen 4 will be displayed. - On this screen, I can edit the field "Associated Domain identifier". and other checkboxes. - When i click button Save, the system will validate: - If associated domain identifier is already existing in LinShare, the field will be highlighted in red and a message:"Associated domain identifier already exists" - If associated domain identifier field is blank, it will be highlighted in red and a message:"Associated domain identifier cannot be blank" - If there is no error, the User provider is updated and there will be a successful notification. - I can see the non-editatble fields: - Creation date - Modification date: This field will be the latest modification date. - If i click button Reset, the field will be reset to the before-updated values. **UC3.Delete OIDC User Provider** - On screen 4, i can see a Delete button - When i click on this button, there will be a confimation popup:""You are about to delete this user provider, this procedure is irreversible. Do you want to proceed?" and Yes/No button - I choose Yes to confirm, the OIDC user provider will be deleted. - System will prompt a deletion confirmation toast. - I am navigated to screen 1. #### Postconditions - The user provider is associated with the selected nested domain in the left domain tree. - Root domain is not associated with any User provider - Guest domain is not associated with any USer provider [Back to Summary](#summary) ## UI Design #### Mockups     #### Final design [Back to Summary](#summary) ## Misc [Back to Summary](#summary) ================================================ FILE: documentation/EN/epics/new-admin-portal/story-29-admin-view-drive-filter-list.md ================================================ # Summary * [Related EPIC](#related-epic) * [Definition](#definition) * [Screenshots](#screenshots) * [Misc](#misc) ## Related EPIC * [New admin portal](./README.md) ## Definition #### Preconditions - Given that i am super-admin in LinShare - I logged-in to Admin portal successfully #### Description - I go to Configuration tab on top navigation bar, if i am selecting root domain in domain tree, i can see the Configuration screen including: Details, Parameters, Mail templates, Welcome messages, Mine Type policies, Domain policies, Remote servers, Remote filters, Quota, Plublic keys. - If i am selecting a nested domain in domain tree, i can see the Configuration screen including: Details, Parameters, Mail templates, Welcome messages, Mine Type policies, Domain policies, Remote servers, Remote filters, Providers, Quota, Plublic keys - If i am selecting a guest domain in domain tree, i can see the Configuration screen including: Details, Parameters, Mail templates, Welcome messages, Mine Type policies, Domain policies, Quota, Plublic keys - I click on Root domain or a nested domain in domain tree and click on Remote filters, the screen Remote filters list will be opened. #### Postconditions - On Remote filters screen, i can see three kinds of filters: User filters, Group filters, Drive filters. - I can see a help message on screen name: "Remote filters can be used for any domain". - I click on Drive filters, the screen Drive filters list will be opened. - I can see a help message on screen name: "Drive filters can be used for any domain". - All current filters will be listed in a table, including columns: - Name - Description - Type - Creation date - Modification date - Action - I can sort by each column: Name, Type, Creation date, Modification date - Default sort is last modification date - The drive filter list is paginated and the default number of displayed items is 25, I can change this number at the bottom of page - In Action column, when i click on thee-dots button, i can see the drop-down list: Duplicate, Edit, Delete, See associated domains. - I can see a search bar and typing in, the system will search by filter name and display corresponding result in the table below - When i click button "Create", i am navigated to screen Drive filter creation. [Back to Summary](#summary) ## UI Design ### Mockups    ### Final design [Back to Summary](#summary) ## Misc [Back to Summary](#summary) ================================================ FILE: documentation/EN/epics/new-admin-portal/story-30-admin-create-duplicate-edit-delete-drive-filter.md ================================================ # Summary * [Related EPIC](#related-epic) * [Definition](#definition) * [Screenshots](#screenshots) * [Misc](#misc) ## Related EPIC * [New admin portal](./README.md) ## Definition #### Preconditions * Given that i am super-admin in LinShare * I logged-in to Admin portal successfully #### Description **UC1. Create LDAP drive filter** - I go to Configuration tab on top navigation bar, and select Remote filters - The screen listing Remote filters will be displayed, i select Drive filters, the screen listing drive filters is opened. - I click on button Create, screen Create LDAP Drive filter will be displayed. - In this screen i can see a helper message on screen name when i click information icon - To create an LDAP Drive filter, i need to input fields: - Model selector: optional field, i can choose option from a drop-down list - When i select the model, other fields on screen excepting "Name" will be filled out automatically. - Name: a text field and mandatory - Description: a text field and optional - Search all drives query: a text field and mandatory - Search drive query: a text field and mandatory - Drive prefix: a text field and optional - Search page size: a text field and mandatory - Attributes fields on the right of screen are: - Member email: a text field and mandatory - Member first name: a text field and mandatory - Member last name: a text field and mandatory - Drive name: a text field and mandatory - Drive member: a text field and mandatory - Below each of filed, there will be a grey text to explain what is this field used for (check the screen 2) - When i click button Save, the system will validate if any mandatory field is blank, it will be highlighted in red and a message:"[field name] cannot be blank" - If there is no error, the new LDAP drive filter is created and there will be a successful notification - I am redirected to the Screen Drive filters listing, and the new create LDAP drive filter appears on the list. - If i click button Cancel, i am navigated to the Listing drive filters screen. **UC2. Edit LDAP Drive filter** - There are 2 ways to access Edit LDAP drive filter screen: - In the Drive filters listing screen, i click on three dot-button of an LDAP drive filter and select option Edit from the drop-down list - Or i can click an the LDAP drive filter row on the drive filter listing table. - On the LDAP drive filter screen, i can edit all fields excepting "Model selector" (this field will not be shown in Edit mode) then click button Save. - If any mandatory field is blank, it will be highlighted in red and a message:"[field name] cannot be blank" - If none of the mandatory fields is blank, the updates will be saved and there will be a successful toast message. - If i click button Reset, all the updates will be reset to the before values. - I can click Drive filters on the breadcrumb to navigate back to the Drive filter listing screen. **UC3. Duplicate an LDAP Drive filter** - On the Drive filter listing screen, i click on thee-dot button of an LDAP drive filter and select option Duplicate from the drop-down list - The screen Create LDAP drive filter will be opened - Except the field Name is blank, other fields will have the same value as the LDAP drive filter that i selected to duplicate - I input the field Name, and can edit other fields - When i click button Save, the system will validate if any mandatory field is blank, it will be highlighted in red and a message:"[field name] cannot be blank" - If there is no error, the new LDAP drive filter is created and there will be a successful notification - If i click button Cancel, i am navigated to the Drive filter listing screen. **UC4. Delete an LDAP Drive filter** - There are 2 ways to delete an LDAP drive filter: - In the Drive filter listing screen, i click on three dot-button of an LDAP Drive filter and select option Delete from the drop-down list - Or i can click an LDAP Drive filter row on the Drive filter listing table to go to LDAP Drive filter detail screen. On this screen i can see the button Delete. - When i click on button Delete: - If the Drive filter is not accociated with any domain, there will be an confirmation popup: "You are about to delete this Drive filter, this procedure is irreversible. Do you want to proceed?" and Yes/No button - I choose Yes to confirm, the Drive filter will be deleted. - System will prompt a deletion confirmation toast. - If the Drive filter is accociated with any domain, the system will display message: "This Drive filter is accociated with at least one domain. You cannot delete." **UC5. Delete multiple Drive filters** - On Drive filter listing screen, i can select multiple Drive filters on the list by tick the checkbox of each item - There will be a top bar that indicates number of selected Drive filters, an isolation icon, an Undo icon and a Delete icon. - When i click on Isolation icon, the screen only shows selected items - When i click on Undo icon, all the selected items are unselected - When i click on button Delete: - If any of selected Drive filters is not associated with any domain, there will be an confirmation popup: "You are about to delete [number of selected items] drive filters, this procedure is irreversible. Do you want to proceed?" and Yes/No button - I choose Yes to confirm, the selected Drive filters will be deleted. - System will prompt a deletion confirmation toast. - If any of selected Drive filters is associated with any domain, the system will display message: " One of selected Drive filters is associated with at least one domain. You cannot delete." **UC6. View associated domains** - On Drive filter listing screen, i click on three-dot button on Action column. - I select option "View associated domains" - A new screen will be opened - I can see the list of domain's name which are using the Drive filter. - There will be a lable next to each domain's name that indicating domain type of that domain - Only Top domain or sub domain can use an Drive filter, Root domain and guest domain can't. - When i click one domain on the list, i am navigated to Drive provider page of that domain. - If the Drive filter is not associated with any domain, there will be a text message: " There is no domain using this drive filter. " #### Postconditions [Back to Summary](#summary) ## UI Design #### Mockups         #### Final design [Back to Summary](#summary) ## Misc [Back to Summary](#summary) ================================================ FILE: documentation/EN/epics/new-admin-portal/story-31-admin-manage-drive-provider.md ================================================ # Summary * [Related EPIC](#related-epic) * [Definition](#definition) * [Screenshots](#screenshots) * [Misc](#misc) ## Related EPIC * [New admin portal](./README.md) ## Definition #### Preconditions - Given that i am super-admin in Linshare - I logged-in to Admin portal successfully - I choose a nested domain in domain tree and click on Configuration screen, i click on item Providers. (If i select root domain or guest domain in domain tree, i cannot see item Providers) - On screen Providers, i can see 3 types: User providers, Groups Provider, Drive Providers. #### Description **UC1. Create LDAP Drive Provider** - I select Drive Providers, if the current selected domain doesn't have a drive provider, screen 2 will be displayed. - When i click button "Add Drive provider", screen 3 will be displayed, the button Add drive provider will be disabled. - To add an LDAP drive provider, i need to fill the followings: - LDAP connection: mandatory field, a drop-downlist which contain current LDAP connections list. There is a button next to this field that when i click on, i am navigated to Create LDAP connection screen - After i create a LDAP connection successfully, i am navigated back to this screen - Drive filter: mandatory field, a drop-down list which contain current LDAP drive filter list. There is a button next to this field that when i click on, i am navigated to Create LDAP drive filter Screen - After i create a drive filter successfully, i am navigated back to this screen - Base dn: a text field and mandatory. When i hover the tooltip, there will be a legend: "LinShare will start looking for Drives from this position in your LDAP server." - Search in other domains: A checkbox, if i select, i will search users who are members of the remote LDAP drives in others domains than my own domain, according to the domain policies. - When i click button Save, the system will validate if any mandatory field is blank, it will be highlighted in red and a message:"[field name] cannot be blank" - If there is no error, the drive provider is saved and there will be a successful notification, I am redirected to Screen 4. - If i click button Cancel, i am navigated to the Screen 2. **UC2. Edit LDAP drive Provider** - I select drive Providers, if current selected domain already had an drive provider, screen 4 will be displayed. - On this screen, i can edit all fields: LDAP connection, drive filter, Basedn, checkbox Search user in other domains. - I click button Save, the system will validate if any mandatory field is blank, it will be highlighted in red and a message:"[field name] cannot be blank" - If there is no error, the drive provider is updated and there will be a successful notification. - If i click button Reset, all the fields will be reset to the before-updated values. **UC3.Delete LDAP drive Provider** - On screen 4, i can see a Delete button - When i click on this button, there will be a confimation popup:""You are about to delete this drive provider, this procedure is irreversible. Do you want to proceed?" and Yes/No button - I choose Yes to confirm, the LDAP drive provider will be deleted. - System will prompt a deletion confirmation toast. - I am navigated to screen 1. #### Postconditions - The drive is associated with the selected nested domain in the left domain tree. - Root domain is not associated with any drive provider - Guest domain is not associated with any drive provider [Back to Summary](#summary) ## UI Design #### Mockups     #### Final design [Back to Summary](#summary) ## Misc [Back to Summary](#summary) ================================================ FILE: documentation/EN/epics/new-admin-portal/story-32-admin-view-list-of-contact-lists.md ================================================ # Summary * [Related EPIC](#related-epic) * [Definition](#definition) * [Screenshots](#screenshots) * [Misc](#misc) ## Related EPIC * [New admin portal](./README.md) ## Definition #### Preconditions - Given that i am supper admin or an nested admin #### Description - After log-in Admin Portal successfully, i go to Administration tab - On Administration tab, i can see the list of links to screens: Users, Drives/workgroups, Contact lists, Inconsistent users, loggers - I click on Contact lists, the screen My contact lists will be opened. - In new view I can and see the following information: - A Search bar - A Sort field - A list of all contact list #### Postconditions - If i am super admin, i can see contact lists of all domains. - If i am nested admin, i can only see contact lists of my domains. - When i click on icon tooltip next to screen name, i can see an colapsible text :"This view allows you to manage the contact list (a mailing list permit to send a mail to registered users on it ). By clicking in a list, you can manage the users and edit their information.(description, make the list visible or hidden , delete or add a user ...)". - Each contact list is is displayed as an item with name, it's owner and a lable : Private of Public - The default number of displayed items is 25, i can change the number of iems at the bottom of page. - When i click on a contact list item, the Manage Contact list screen will be opened. [Back to Summary](#summary) ## UI Design #### Mockups   #### Final design [Back to Summary](#summary) ## Misc [Back to Summary](#summary) ================================================ FILE: documentation/EN/epics/new-admin-portal/story-33-admin-search-and-sort-contact-lists.md ================================================ # Summary * [Related EPIC](#related-epic) * [Definition](#definition) * [Screenshots](#screenshots) * [Misc](#misc) ## Related EPIC * [New Admin portal](./README.md) ## Definition #### Preconditions - Given that i am Super admin or nested admin of new Admmin Portal #### Description - After log-in succesfully to Admin Portal, i go to Administration screen - On Administration tab, I click on Contact lits, the screen Contact lists will be opened. - In new view I can see the list of all contact lists **UC1.Search contact lists** - I click on the search bar, there will be a drop-down list of search criteria including: - Owner (of the contact list): When i select this search citeria, the search bar will display: Owner = "text input". When i start typing, i can see the suggestion list of Linshare user (internal and guest account) which have first name, last name or email contains text inputted. I can select user from the list. When i click Enter, the system will search contact lists that belong to selected user. - Visibility: When i select this search criteria, the search bar will display Visibility = "Dropdown list". Options are: Public/Private. - Member: When i select this search citeria, the search bar will display: Member = "text input". When i start typing, i can see the suggestion list of Linshare user (internal and guest account) which have first name, last name or email contains text inputted. I can select member from the list. When i click Enter, the system will search contact lists that contain that selected user as a member - Number of members: When i select this search criteria, the search bar will display Number of Members = "Dropdown list". Options are: None/More than 0 - Domain: When i select this search criteria, the search bar will display Domain = "Dropdown list". If i am super admin, the list of options will contain all domains. If i am nested admin, the list of options contains only my domains. - When i start typing on search bar without select any search criteria from the dropdown list, the system will show default search criteria is contact list's name. **UC2.Sort contact lists** - On the Sort field, i can see Default sort criteria is Modification date - When i click on Sort field, there will be drop-down list containing sort criteria: Modification date, Creation date, Contact list's name - I can select sort criteria from the list and use the arrow up and down to change order of sorting. #### Postconditions - I can search contact lists by one of above criteria or combine them - Each search criteria in the search bar is seperated by a delete icon. I can click this icon to delete the criteria - After select one criteria in search bar, that option is hidden in the dropdown list of search criteria. - For example: - I chose Member as a search criteria - I type some character and see the list of suggestion - I select one user (John Doe-user1@linshare.org) from the list - Now the search bar is: Member=John Doe - When i click on search bar, i can see the list of criteria is: Owner, Visibility, Number of members, Domain. [Back to Summary](#summary) ## UI Design #### Mockups      #### Final design [Back to Summary](#summary) ## Misc [Back to Summary](#summary) ================================================ FILE: documentation/EN/epics/new-admin-portal/story-34-admin-manage-a-contact-list.md ================================================ # Summary * [Related EPIC](#related-epic) * [Definition](#definition) * [Screenshots](#screenshots) * [Misc](#misc) ## Related EPIC * [New admin portal](./README.md) ## Definition ### Preconditions - Given that i am super-admin/nested admin in Linshare - I logged-in to Amin portal successfully ### Description **UC1.View/Edit/Delete Contact list** - After log-in Admin Portal successfully, i go to Administration tab - On Administration tab, i can see the list that links to corresponding screens: Users, Drives/workgroups, Contact lists, Inconsistent users, loggers - I click on My Contact lists, the screen My Contact litsts will be opened. - I click on a Contact list, the screen Manage Contact list is displayed. - On the screen, i can see below editabe informations: - Contact list's name: A requred field - Description: An optional field - Visibility: A checkbox, i can switch between Private and Public. If the contact list is private, other users cannot search/use this contact list. If it is public, other users can search/use the contact list. - When i click button Save, the system will validate if any mandatory field is blank, it will be highlight and an error message:"[field name] cannot be blank". Otherwise the updates are saved and there will be a successful notification. - When i click button Reset, all the updated field wil be reset to the before values. - On the right of screen i can see uneditable fields including: - Owner : Name -email of the contact list's owner. - Creation date - Modification date - Domain - "Delete" button: - When i click on this button, there will be a confirmation message. - When i choose Yes to confirm, the Contact list will be removed. - I will see a toast notification and back to the My contact lists screen. - The action Delete and Update will be recorded in history log in both Admin portal and Contact list Owner's LinShare account **UC2.Manage member list of a contact list** - Add member: - I can see three fields: Email(mandatory), Firstname(optional), Last name (optional) - When i typing in Email, the suggestion list of users will be displayed. I can choose one user from the list, and First name and Last name will be autofilled. - I can also add external user in contact list - Then i click button Add, if the email is not blank, the new contact will be added to the list below. If the Email is blank, it will be highted and there will be an error message. - View/Delete member list : - Each contact will be displayed innone row with informations: Email - First naem -Last name and a Delete icon. - When i click on icon Delete, there will be an confirmation message - If i choose Yes, the deletion is executed and that contact will be removed from the list. - The actions Delete contact and Add contact will be recoreded in history log in both Admin portal and Contact list Owner's LinShare account - Search members: - When click on Search bar, i can see a drop-down list of search criteria: First name, Last name - If i select First name as Search criteria, the search bar will display: First name = "text input". When i type some text and click Enter, the system will search members with first name contains text inputted, in this contact list - If i select Last name as Search citeria, the search bar will display: Last name = "text input". I click Enter, When i type some text and click enter, the system will search members which have last name contains text inputted, in this contact list - If i do not select Search criteria and typing text in Search bar, the system will show default search criteria is member's Email. - I can search contact lists by one of above criteria or combine them. - Each search criteria in the search bar is seperated by a delete icon. I can click this icon to delete the criteria - After select one criteria in search bar, that option is hidden in the dropdown list of search criteria. - Sort member: - On the Sort field, i can see Default sort criteria is First name - When i click on Sort field, there will be drop-down list containing sort criteria: Email. First name, Last name. - I can select sort criteria from the list and use the arrow up and down to change order of sorting. [Back to Summary](#summary) ## UI Design ### Mockups     ### Final design [Back to Summary](#summary) ## Misc [Back to Summary](#summary) ================================================ FILE: documentation/EN/epics/new-admin-portal/story-35-admin-view-mime-policies-list.md ================================================ # Summary * [Related EPIC](#related-epic) * [Definition](#definition) * [Screenshots](#screenshots) * [Misc](#misc) ## Related EPIC * [New admin portal](./README.md) ## Definition #### Preconditions * Given that i am super-admin or nested admin in LinShare * I logged-in to Admin portal successfully #### Description - I select a domain in Domain tree and go to Configuration tab on top navigation bar - I click on Mime policies, the screen Mine policies listing list will be opened. **UC1.Super-admin view the list of mime policies** - If i am selecting root domain in domain tree, i can see the list of mime policies that i created. They can be used for any lower-level domains. - If i am selecting a nested domain in the domain tree, i can see the list of mime policies that created by that domain and the mime policies from higher level domain. - I can see a tooltip icon on screen name, which i can click on and see the explaination text. - The mime policies list includes columns: - Name - Read-only: True/False. If false, this mime policy is created by the selected domain on tree memu. If true, this mime policy is created by the higher-level domain. - Domain: The name of domain that created the mime policy - Creation date - Modification date - Assigned: Yes/No. This column indicates which mime policy is used for the current selected domain in the domain tree. Each domain can use only 1 mime policy a time - Action: When i click on three-dot button, i can see actions: - If the selected domain is root domain, the actions are: Duplicate, Edit, Delete. - If the selected domain is a nested domain (top domain/Sub domain/Guest domain), the actions are: Assign, Duplicate, Edit, Delete - If the mime policy is currently used, the option "Assign" is disabled. **UC1.Super-admin view the list of mime policies** - I can see the list of mime policies that created for selected domain, which can be used for lower-level domain, and mime policies from higher-level domain. - The mime policies list includes columns: - Name - Read-only: True/False. If false, this mime policy is created by the selected domain on tree memu. If true, this mime policy is created by the higher-level domain. - Domain: The name of domain that created the mime policy - Creation date - Modification date - Assigned: Yes/No. This column indicates which mime policy is used for the current selected domain in the domain tree. Each domain can use only 1 mime policy a time - Action: When i click on three-dot button, i can see actions: - If the mime policies is from my higher-level domain (eg: i am admin of Top domain and the mime policy is from Root domain), i can see the action: Assign, Duplicate, View - If the mime pilicy is from my domain or lower-level domain, i can see the action: Assign, Duplicate, Edit, Delete #### Postconditions - I can sort by columns: Name, Read only, Domain, Creation date, Modification date - Default sort is last modification date - The mime policies list is paginated and the default number of displayed items is 25, I can change this number at the bottom of page - I can see a search bar and typing in, the system will search by Mime policy's name and display corresponding result in the table below - When i click button "Create", the screen Create new mime policy screen will be opened. - If i log-in as nested admin, i can only see the domain tree that contains only my nested domain and see the mime policies list of my nested domain [Back to Summary](#summary) ## UI Design #### Mockups       #### Final design [Back to Summary](#summary) ## Misc [Back to Summary](#summary) ================================================ FILE: documentation/EN/epics/new-admin-portal/story-36-admin-manage-mime-policy.md ================================================ # Summary * [Related EPIC](#related-epic) * [Definition](#definition) * [Screenshots](#screenshots) * [Misc](#misc) ## Related EPIC * [New admin portal](./README.md) ## Definition #### Preconditions - Given that i am super-admin/nested admin in LinShare - I logged-in to Admin portal successfully - I select a domain in Domain tree and go to Configuration tab on top navigation bar - I click on Mime policies, the screen Mine policies listing list will be opened. - If i am selecting root domain in domain tree, i can see the list of mime policies that i created. They can be used for any lower-level domains. - If i am selecting a nested domain in the domain tree, i can see the list of mime policies that i created and the mime policies from higher level domain. #### Description **UC1. Create an mime policy** - On Mime policies listing screen, i can click on create button - The screen Create mime policy will be displayed. - I can see 2 tabs: Detail and Mime types - On Detail tab i need to input fields: - Name: a text field and mandatory - Description: a text field and optional - The non-editable fields incude: - Domain - Creation date - Modification date - On the Second tab, I can see the list of all mime types in the table below - On the table i can see the columns: - Mime types: Name of the mime type - Extention: the extention of the mime type - Status: a toggle button to epresent the state of the current row. - By default, all the mime types on the table will be selected. - I can click on the button Enable all or disable all. When i hover the buttons, there will be a message: "This action will update the whole list of mime types on the server". - Or i can go to enable/disable every mime type with the checkbox on each row - I can click on Search bar to search by mime type' name or extentions, or status (enable or disable) ,the result will be displayed in the table below. - The default Search is extention. - I can sort by each column: Mime type, Extention, Status - The default Sort is Mime type - When i click button Save, the system will validate if field "Name" is blank, it will be highlighted in red and a message:"[field name] cannot be blank" - If there is no error, the new mime policy is created and there will be a successful notification, - Ii am redirected to the Screen mime policy listing and the new created mime policy is displayed in the table - If i click button Cancel, i am navigated to Screen mime policy listing **UC2. Edit mime ploicy**. - If i am super-admin, i can edit all mime policies - If i am nested admin, i can only edit the mime policies created by me and my lower-level domain - There are 2 ways to access Edit mime policy screen: - In the Mime policy listing screen, i click on three dot-button of a Mime policy and select option Detail from the drop-down list - Or i can click an the mime policy row on the mime policy listing table. - By default, the Mime policy detail screen will be in View mode - If i have permission to Edit, there will be button Edit, i click on this button, the Edit mode will be enabled - On the mime policy screen, i can edit all fields and select/unselect mime types then click button Save. - The system will validate if field "Name" is blank, it will be highlighted in red and a message:"[field name] cannot be blank" - If there is no error, the updates will be saved and there will be a successful toast message. - If i click button Reset, all the updates will be reset to the before values. **UC3. View mime policy** - If i am nested admin, On Listing mime policies screen, when i click on three-dot button of a mime policy from higher level domain, I can see the option "Detail" - When i click on this button, the screen mime policy detail will be displayed in mode "view". - I can not update any field, and there is no button Delete, Save, Reset, Edit - I can click on Mime policies in Breadcrumb to navigate back to Mime policies listing screen. **UC4. Duplicate a Mime policy** - On the Mime policy listing screen, i click on thee-dot button of a Mime policy and select option Duplicate from the drop-down list - The screen Create Mime policy will be opened. - Except the field Name is blank, other fields will have the same value as the Mime policy that i selected to duplicate - I input the field Name, and can edit other fields - When i click button Save, the system will validate as UC 1, create a new mime policy. **UC5. Delete an Mime policy** - If i am nested admin I can only delete mime policies in my domain and my nested domain. I cannot delete mime policies from higher-domain - If i am super-admin, i can delete every mime policies. - There is no Delete button for Default Mime pilicy - There are 2 ways to delete a Mime policy: - In the Mime policies listing screen, i click on three dot-button of an Mime policy and select option Delete from the drop-down list - Or i can click an Mime policy row on the listing table to go to Mime policy detail screen. On this screen i can see the button Delete. - When i click on button Delete: - If the Mime policy is not associated with any domain, there will be an confirmation popup: "You are about to delete this Mime policy , this procedure is irreversible. Do you want to proceed?" and Yes/No button - I choose Yes to confirm, the Mime policy will be deleted. - System will prompt a deletion confirmation toast. - If the Mime policy is associated with any domain, the system will display message: "This Mime policy is associated with at least one domain. You cannot delete." **UC5. Delete multiple Mime policies** - On Mime policies listing screen, i can select multiple Mime policies on the list by tick the checkbox of each item - There will be a top bar that indicates number of selected Mime policies, an isolation icon, an Undo icon and a Delete icon. - When i click on Isolation icon, the screen only shows selected items - When i click on Undo icon, all the selected items are unselected - If i do not have permission to delete any of selected mime policies, the button Delete will be disabled. - When i click on button Delete: - If any of selected Mime policy is not associated with any domain, there will be an confirmation popup: "You are about to delete [number of selected items] Mime policies, this procedure is irreversible. Do you want to proceed?" and Yes/No button - I choose Yes to confirm, the selected Mime policy will be deleted. - System will prompt a deletion confirmation toast. - If any of selected Mime policies is associated with any domain, the system will display message: " One of selected Mime policies is associated with at least one domain. You cannot delete." **UC7. Assign a mime policy** - On Mime policies listing screen, i click on three-dot button on Action column. - I select option "Assign" - If the selected mime policy is already assigned for the selected domain in left domain tree, there will be a message:" This mime policy is already assigned for [selected domain name] - If not, the system will display message:" You are about to assign this mime policy for [selected domain name]. Do you want to proceed?" and Yes/No button - If i choose Yes, the mime policies is assigned for selected domain on domain tree. - Each domain can only be assigned with one mime policy a time - The value in column "Assigned" of the old mime policy will be changed from Yes => No and the new assigned mime policy will be changed to Yes. - When i hover the tooltip on column title "Assigned", there will be an explaination text: "If the mime policy is used for the current selected domain in domain tree, the value will be Yes". **UC8. View associated domains** - On mime policies listing screen, i click on three-dot button on Action column. - I select option "View associated domains" - A new screen will be opened - I can see the list of domain's name which are using this mime policy. - There will be a label next to each domain's name that indicating domain type of that domain - When i click one domain on the list, i am navigated to Mime policies listing screen of that domain. - If the mime policy is not associated with any domain, there will be a text message: " There is no domain using this mime policy. " - If i am the nested admin, i can only view associates domains which are under my administration permission. #### Postconditions [Back to Summary](#summary) ## UI Design #### Mockups           #### Final design [Back to Summary](#summary) ## Misc [Back to Summary](#summary) ================================================ FILE: documentation/EN/epics/new-admin-portal/story-37-admin-view-welcome-message-list.md ================================================ # Summary * [Related EPIC](#related-epic) * [Definition](#definition) * [Screenshots](#screenshots) * [Misc](#misc) ## Related EPIC * [New admin portal](./README.md) ## Definition #### Preconditions * Given that i am super-admin or nested admin in LinShare * I logged-in to Admin portal successfully #### Description - I go to Configuration tab on top navigation bar - I click on Welcome messages, the screen welcome messages listing list will be opened. **UC1.Super-admin view the list of welcome messages** - If i am selecting root domain in domain tree, i can see the list of welcome messages that i created. They can be used for any lower-level domains. - If i am selecting a nested domain in the domain tree, i can see the list of welcome messages that created by that domain and the welcome messages from higher level domain. - I can see a tooltip icon on screen name, which i can click on and see the explaination text. - The welcome messages list includes columns: - Name - Read-only: True/False. If false, this welcome message is created by the selected domain on tree memu. If true, this welcome message is created by the higher-level domain. - Domain: The name of domain that created the welcome message - Creation date - Modification date - Assigned: Yes/No. This column indicates which welcome message is used for the current selected domain in the domain tree. Each domain can use only 1 welcome message a time - Action: When i click on three-dot button, i can see actions: - If the selected domain is root domain, the actions are: Duplicate, Edit, Delete. - If the selected domain is a nested domain (top domain/Sub domain/Guest domain), the actions are: Assign, Duplicate, Edit, Delete - If the welcome message is currently used, the option "Assign" is disabled. **UC2. Nested admin view the list of welcome messages** - I can see the list of welcome messages that created for selected domain, which can be used for lower-level domain, and welcome messages from higher-level domain. - The welcome messages list includes columns: - Name - Read-only: True/False. If false, this welcome message is created by the selected domain on tree memu. If true, this welcome message is created by the higher-level domain. - Domain: The name of domain that created the welcome message - Creation date - Modification date - Assigned: Yes/No. This column indicates which welcome message is used for the current selected domain in the domain tree. Each domain can use only 1 welcome message a time - Action: When i click on three-dot button, i can see actions: - If the welcome message is from my higher-level domain (eg: i am admin of Top domain and the welcome message is from Root domain), i can see the action: Assign, Duplicate, View - If the welcome message is from my domain or lower-level domain, i can see the action: Assign, Duplicate, Edit, Delete #### Postconditions - I can sort by columns: Name, Read only, Domain, Creation date, Modification date - Default sort is last modification date - The welcome messages list is paginated and the default number of displayed items is 25, I can change this number at the bottom of page - I can see a search bar and typing in, the system will search by welcome message's name and display corresponding result in the table below - When i click button "Create", the screen Create new welcome message screen will be opened. - If i log-in as nested admin, i can only see the domain tree that contains only my nested domain and see the welcome message list of my nested domain [Back to Summary](#summary) ## UI Design #### Mockups      #### Final design [Back to Summary](#summary) ## Misc [Back to Summary](#summary) ================================================ FILE: documentation/EN/epics/new-admin-portal/story-38-admin-manage-welcome-message.md ================================================ # Summary * [Related EPIC](#related-epic) * [Definition](#definition) * [Screenshots](#screenshots) * [Misc](#misc) ## Related EPIC * [New admin portal](./README.md) ## Definition #### Preconditions - Given that i am super-admin/nested admin in LinShare - I logged-in to Admin portal successfully - I select a domain in Domain tree and go to Configuration tab on top navigation bar - I click on Welcome messages, the screen Welcome message list will be opened. - If i am selecting root domain in domain tree, i can see the list of Welcome messages that i created. They can be used for any lower-level domains. - If i am selecting a nested domain in the domain tree, i can see the list of Welcome messages that i created and the Welcome messages from higher level domain. #### Description **UC1. Create a welcome message** - On Welcome messages listing screen, i can click on create button - The screen Create Welcome message will be displayed. - To create an Welcome message, i need to input fields: - Name: a text field and mandatory - Description: a text field and optional - The non-editable fields incude: - Domain - Creation date -Modification date - I can see 4 wecome message fields corresponding to 4 languages: English, French, Russia, Vietnamese - I can fill in these field and click button Save. - The system will validate if field "Name" is blank, it will be highlighted in red and a message:"[field name] cannot be blank" - If there is no error, the new welcome message is created and there will be a successful notification, - I am redirected to the Screen welcome messages listing and the new created welcome message is displayed in the table - If i click button Cancel, i am navigated to Screen welcome message listing **UC2. Edit welcome message**. - If i am super-admin, i can edit all welcome message - If i am nested admin, i can only edit the welcome messages created by me and my lower-level domain. - There are 2 ways to access welcome message policy screen: - In the welcome message listing screen, i click on three dot-button of a welcome message and select option Edit from the drop-down list - Or i can click on the welcome message row in the welcome message listing table. - By default, the Welcome message detail screen will be in View mode - If i have permission to Edit, there will be button Edit, i click on this button, the Edit mode will be enabled - I can edit all fields Name, Description and Message content then click button Save. - The system will validate if field "Name" is blank, it will be highlighted in red and a message:"[field name] cannot be blank" - If there is no error, the updates will be saved and there will be a successful toast message. - If i click button Reset, all the updates will be reset to the before values. **UC3. View welcome message** - If i am nested admin, On Listing welcome messages screen, when i click on three-dot button of a welcome message from higher level domain, I can see the option "View" - When i click on this button, the screen welcome message detail will be displayed in mode "view" - I can not update any field, and there is no button Delete, Save, Reset as Edit screen - I can click on Welcome messages in Breadcrumb to navigate back to Welcome messages listing screen. **UC4. Duplicate a Welcome message** - On the Welcome messages listing screen, i click on thee-dot button of a Welcome messages and select option Duplicate from the drop-down list - The screen Create Welcome message will be opened. - Except the field Name is blank, other fields will have the same value as the Welcome message that i selected to duplicate - I input the field Name, and can edit other fields - When i click button Save, the system will validate as UC 1, create a new Welcome message. **UC5. Delete an Welcome message** - If i am nested admin I can only delete Welcome messages in my domain and my nested domain. I cannot delete welcome messages from higher-domain - If i am super-admin, i can delete every Welcome message. - There is no Delete button for Default welcome message. - There are 2 ways to delete a Welcome message: - In the Welcome messages listing screen, i click on three dot-button of an Welcome message and select option Delete from the drop-down list - Or i can click an Welcome message row on the listing table to go to Welcome message detail screen. On this screen i can see the button Delete. - When i click on button Delete: - If the Welcome message is not associated with any domain, there will be an confirmation popup: "You are about to delete this Welcome message , this procedure is irreversible. Do you want to proceed?" and Yes/No button - I choose Yes to confirm, the Welcome message will be deleted. - System will prompt a deletion confirmation toast. - If the Welcome message is associated with any domain, the system will display message: "This Welcome message is associated with at least one domain. You cannot delete." **UC6. Delete multiple Welcome message** - On Welcome message listing screen, i can select multiple Welcome messages on the list by tick the checkbox of each item - There will be a top bar that indicates number of selected Welcome message, an isolation icon, an Undo icon and a Delete icon. - When i click on Isolation icon, the screen only shows selected items - When i click on Undo icon, all the selected items are unselected - If i do not have permission to delete any of selected Welcome message, the button Delete will be disabled. - When i click on button Delete: - If any of selected Welcome message is not associated with any domain, there will be an confirmation popup: "You are about to delete [number of selected items] Welcome messages, this procedure is irreversible. Do you want to proceed?" and Yes/No button - I choose Yes to confirm, the selected Welcome messages will be deleted. - System will prompt a deletion confirmation toast. - If any of selected Welcome messages is associated with any domain, the system will display message: " One of selected Welcome messages is associated with at least one domain. You cannot delete." **UC7. Assign a Welcome message** - On Welcome messages listing screen, i click on three-dot button on Action column. - I select option "Assign" - If the selected Welcome message is already assigned for the selected domain in left domain tree, there will be a message:" This Welcome message is already assigned for [selected domain name] - If not, the system will display message:" You are about to assign this Welcome message for [selected domain name]. Do you want to proceed?" and Yes/No button - If i choose Yes, the Welcome message is assigned for selected domain on domain tree. - Each domain can only be assigned with one Welcome message a time - The value in column "Assigned" of the old Welcome message will be changed from Yes => No and the new assigned Welcome message will be changed to Yes. - When i hover the tooltip on column title "Assigned", there will be an explaination text: "If the Welcome message is used for the current selected domain in domain tree, the value will be Yes". **UC8. View associated domains** - On welcome message listing screen, i click on three-dot button on Action column. - I select option "View associated domains" - A new screen will be opened - I can see the list of domain's name which are using this welcome message. - There will be a label next to each domain's name that indicating domain type of that domain - When i click one domain on the list, i am navigated to Welcome messages listing screen of that domain. - If the welcome message is not associated with any domain, there will be a text message: " There is no domain using this welcome message. " - If i am the nested admin, i can only view associates domains which are under my administration permission. #### Postconditions [Back to Summary](#summary) ## UI Design #### Mockups       #### Final design [Back to Summary](#summary) ## Misc [Back to Summary](#summary) ================================================ FILE: documentation/EN/epics/new-admin-portal/story-39-admin-view-domain-policies-list.md ================================================ # Summary * [Related EPIC](#related-epic) * [Definition](#definition) * [Screenshots](#screenshots) * [Misc](#misc) ## Related EPIC * [New admin portal](./README.md) ## Definition #### Preconditions * Given that i am super-admin in LinShare * I logged-in to Admin portal successfully #### Description - I select a domain in Domain tree and go to Configuration tab on top navigation bar - I click on Domain policies, the screen Domain policies listing screen will be opened. **UC1.Super-admin view the list of domain policies** - I can see the list of domain policies that i created in the table - I can see a tooltip icon on screen name, which i can click on and see the explaination text. - The domain policies list includes columns: - Name - Description - Creation date - Modification date - Assigned: Yes/No. This column indicates which domain policy is used for the current selected domain in the domain tree. Each domain can use only 1 domain policy a time - Action: When i click on three-dot button, i can see actions: - If the selected domain is root domain, the actions are: Duplicate, Edit, Delete, See associated domain - If the selected domain is a nested domain (top domain/Sub domain/Guest domain), the actions are: Assign, Duplicate, Edit, Delete, See associated domain. - If the domain policy is currently used for selected domain in domain tree, the option "Assign" is disabled. #### Postconditions - I can sort by columns: Name, Creation date, Modification date - Default sort is last modification date - The domain policies list is paginated and the default number of displayed items is 25, I can change this number at the bottom of page - I can see a search bar and typing in, the system will search by Domain policy's name and display corresponding result in the table below - When i click on column name "Assign",there will be a help text message. - When i click button "Create", the screen Create new domain policy screen will be opened. - If i log-in as nested admin, i can not see the Domain policies menu in Configuration screen. [Back to Summary](#summary) ## UI Design #### Mockups    #### Final design [Back to Summary](#summary) ## Misc [Back to Summary](#summary) ================================================ FILE: documentation/EN/epics/new-admin-portal/story-40-admin-manage-a-domain-policy.md ================================================ # Summary * [Related EPIC](#related-epic) * [Definition](#definition) * [Screenshots](#screenshots) * [Misc](#misc) ## Related EPIC * [New admin portal](./README.md) ## Definition #### Preconditions - Given that i am super-admin in LinShare - I logged-in to Admin portal successfully - I click on Domain policies, the screen Domain policy list will be opened. #### Description **UC1. Create a domain policy** - On Domain policies listing screen, i can click on create button - The screen Create Domain ploicy will be displayed. - I can see 2 tabs: Detail and Rules - In Detail tab, i need to input fields: - Name: a text field and mandatory - Description: a text field and optional - Then i can Add rules in second tab: - I can select type and domain from the drop-down list and click button Add - Type: Allow/Deny - Domain: List of current domains and an option "All" - The new rule will be added to the Rule table below - Rule table includes: - Position: there are 2 arrows up and down. I can click on these arrows to change the position of the rule to the higher (or lower) than the row above (or below) - Domain: The domain i selected when adding this rule - Type: The type i selected when adding rule. - Action: Delete: When i click on this button, there will be an confirmation message. If i choose Yes, the rule will be removed from the table. - After adding rules, i click button Save - The system will validate if field "Name" is blank, it will be highlighted in red and a message:"[field name] cannot be blank" - If there is no error, the new domain policy is created and there will be a successful notification, - I am redirected to the Screen Domain policies listing - If i click button Cancel, i am navigated to Screen Domain policies listing **UC2. Edit domain policy**. - As super-admin, i can edit all domain policies, except for the Default Domain policy. - There are 2 ways to access domain policy screen: - In the domain policy listing screen, i click on three dot-button of a domain policy and select option Detail from the drop-down list - Or i can click on the domain policy row in the domain policies listing table. - By default, the Domain policy detail screen will be in View mode - If the Domain policy is Default Domain policy, there is only button Cancel to navigate back to listing domain policies screen - If i have permission to Edit the domain policy, there will be button Edit, i click on this button, the Edit mode will be enabled - I can edit all fields Name, Description and Add/remove rules then click button Save. - The system will validate if field "Name" is blank, it will be highlighted in red and a message:"[field name] cannot be blank" - If there is no error, the updates will be saved and there will be a successful toast message. - If i click button Reset, all the updates will be reset to the before values. **UC3. Duplicate a domain policy** - On the domain policies listing screen, i click on thee-dot button of a Domain policy and select option Duplicate from the drop-down list - The screen Create Domain policy will be opened. - Except the field Name is blank, other fields will have the same value as the Domain policy that i selected to duplicate - I input the field Name, and can edit other fields - When i click button Save, the system will validate as UC 1, create a new Domain policy. **UC4. Delete a Domain policy** - As super-admin, I have delete permission to delete every Domain policy except for the Default domain policy by system. There is no Delete button for this Domain policy. - There are 2 ways to delete a Domain policy : - In the Domain policy listing screen, i click on three dot-button of an Domain policy and select option Delete from the drop-down list - Or i can click an Domain policy row on the listing table to go to Domain policy detail screen. On this screen i can see the button Delete. - When i click on button Delete: - If the Domain is not associated with any domain, there will be an confirmation popup: "You are about to delete this Domain policy , this procedure is irreversible. Do you want to proceed?" and Yes/No button - I choose Yes to confirm, the domain policy will be removed.. - System will prompt a deletion confirmation toast. - If the Domain policy is associated with any domain, the system will display message: "This Domain policy is associated with at least one domain. You cannot delete." and a link "See associated domain". If i click on this link. i am navigated to the Screen Associated domain of this domain policy. **UC5. Delete multiple domain policies** - On Domain policies listing screen, i can select multiple domain policies on the list by tick the checkbox of each item - There will be a top bar that indicates number of selected Domain policies, an isolation icon, an Undo icon and a Delete icon. - When i click on Isolation icon, the screen only shows selected items - When i click on Undo icon, all the selected items are unselected - If i do not have permission to delete any of selected domain policies, the button Delete will be disabled. - When i click on button Delete: - If any of selected Domain policy is not associated with any domain, there will be an confirmation popup: "You are about to delete [number of selected items] Domain policies, this procedure is irreversible. Do you want to proceed?" and Yes/No button - I choose Yes to confirm, the selected domain policies will be deleted. - System will prompt a deletion confirmation toast. - If any of selected Domain policy is associated with one domain, the system will display message: " One of selected domain policies is associated with at least one domain. You cannot delete." **UC6. Assign a Domain policy** - On domain policy listing screen, i click on three-dot button on Action column. - I select option "Assign" - If the selected domain policy is already assigned for the selected domain in left domain tree, there will be a message:" This Domain policy is already assigned for [selected domain name] - If not, the system will display message:" You are about to assign this Domain policy for [selected domain name]. Do you want to proceed?" and Yes/No button - If i choose Yes, the Domain policy is assigned for selected domain on domain tree. - Each domain policy can only be assigned for one Domain a time. - The value in column "Assigned" of the old Domain policy will be changed from Yes => No and the new assigned Domain policy will be changed to Yes. - When i hover the tooltip on column title "Assigned", there will be an explaination text: "If the Domain policy is used for the current selected domain in domain tree, the value will be Yes". - I cannot assign a domain policy for Root domain: If i am selecting Root domain on Domain tree and click thee-dot button of a domain policy, the option assign will be hidden. **UC7. View associated domain** - On Domain policies listing screen, i click on three-dot button on Action column. - I select option "View associated domains" - A new screen will be opened - I can see the list of domain's name which are using the Domain policies. - There will be a label next to each domain's name that indicating domain type of that domain - When i click one domain on the list, i am navigated to Domain detail page of that domain. - If the Domain policy is not associated with any domain, there will be a text message: " There is no domain using this Domain policy. " #### Postconditions [Back to Summary](#summary) ## UI Design #### Mockups          #### Final design [Back to Summary](#summary) ## Misc [Back to Summary](#summary) ================================================ FILE: documentation/EN/epics/new-admin-portal/story-41-admin-navigate-between-old-admin-ui-and-new-admin-ui.md ================================================ # Summary * [Related EPIC](#related-epic) * [Definition](#definition) * [Screenshots](#screenshots) * [Misc](#misc) ## Related EPIC > Links to the epic document in the epic folder, normally README. * [New admin portal](./README.md) ## Definition #### Preconditions - Given that i am admin of Linshare #### Description **UC1. Log-in and log-out** - If i access the new admin URL, i can see the log-in screen - I input Email, Password and click button to log-in - If the credentials are correct, i log-in successfully - If i access to the old admin portal and I'm not authenticated, i am redirected to login-screen of the New UI admin - Then i can continue log-in process as above - When i log-in to the new admin portal successfylly, i am also automatically authenticated to the old admin app. - When i click button to log-out in old admin app, i am also log-out of new admin portal and navigated to log-in page of new admin-portal. **UC2. Navigate between new admin interface and old admin interface** - After log-in sucessfully to the new admin app, i can see a link to the old admin app on the menu "Legacy admin app" - When i hover this link, i can see the an explanation text :"The development of this new interface is in progress, you can use the old version for all configuration menus." - when i click on that link, i am navigated to the hompage of the old admin interface and can use every functions. - On the old admin interface, i can see a link to the new admin interface above the Search bar "New admin app" - When i hover this link, i can see an explaination text :"Try our new admin app." - When i click on that link, i am navigated to the Home page of new admin portal. **UC3. Navigate between functions of old admin and new admin app** - When i click on a menu link in new admin UI that has not been implemented, there will be a popup displaying:" This function has not been available on this version. Do you want to access the old version to continue ?" - If i choose Yes, i am navigated to the Home page of the old admin UI - when i click on a menu link of a function which is not implemented in old Admin and not ready in new admin, there will be a toast message :"This function is not available now and will coming soon." ##### Matching menu links between old new app and old admin app |New admin UI | Old admin UI | |------------------------------------|------| | Configuration > Details | Domains > Manage domains | | Configuration > Parameters | Domains > Functionalities | | Configuration > Email Templates | Mails > Mail Configuration | | Configuration > Welcome Messages | Domains > Welcome messages | | Configuration > Type Mime Policies | Domains > Mime policies | | Configuration > Domain Policies | Domains > Inter-domains communication rules | | Configuration > Remote servers | Domains > LDAP connections | | Configuration > Remote filters > User filters | Domains > Domain patterns | | Configuration > Remote filters > Group filters | Domains > Workgroup patterns | | Configuration > Remote filters > Drive filters | X | | Configuration > Providers > User Providers | Domains > Manage domains | | Configuration > Providers > Group Providers | Domains > Manage domains | | Configuration > Providers > Drive Providers | Domains > Manage domains | | Configuration > Quota Management | Domains > Manage domains quota | | Configuration > Public keys | X | | | | | | Administration > Users | Users > Manage users | | Administration > Drives/Workgroups | Workgroups | | Administration > Contact Lists | Contact lists | | Administration > Inconsistent Users| Users > Inconsistent user | | Administration > Loggers | x | | | | | | Reporting | X | | | | | | Activities | History | | | | | | Upgrades | Upgrade tasks | #### Postconditions [Back to Summary](#summary) ## UI Design #### Mockups    #### Final design [Back to Summary](#summary) ## Misc [Back to Summary](#summary) ================================================ FILE: documentation/EN/epics/new-admin-portal/story-42-admin-view-functionalities-list.md ================================================ # Summary * [Related EPIC](#related-epic) * [Definition](#definition) * [UI Design](#ui-design) * [Misc](#misc) ## Related EPIC * [New admin portal](./README.md) ## Definition #### Preconditions - Given that i am superadmin/nested admin of LinShare - After log-in successfully, i go to Configuration tab and select Parameters #### Description - I select a domain in domain tree, the screen list of functionalities of that domain will be displayed. - Root domain can see all functionalities and nested domain can only see the functionalities if its parent domain allow: - If a parent domain disable 2 toggles of a functionalities: "Enable functionality" and "Allow nested admin to change "Enable functionalities", this functionality will disappear on the functionalities list of the nested domain. - Each functionality will be displayed in a row with its status icon enable or disable. - I can click on each row to go to detail setting screen of that functionality - I can search functionality by name by inputting in the search bar, the matches will be shown instantly below. - I can sort the functionalities by the state #### Postconditions - If i am super-admin, i can see the functionalities list of all domains - If i am nested admin, i can see functionalities list of my domain and my nested domain [Back to Summary](#summary) ## UI Design #### Mockups   #### Final design [Back to Summary](#summary) ## Misc [Back to Summary](#summary) ================================================ FILE: documentation/EN/epics/new-admin-portal/story-43-admin-manage-function-anonymous-URL.md ================================================ # Summary * [Related EPIC](#related-epic) * [Definition](#definition) * [UI Design](#ui-design) * [Misc](#misc) ## Related EPIC * [New admin portal](./README.md) ## Definition #### Preconditions - Given that am super admin or nested admin of LinShare admin - After log-in successfully, I go to Configuration Tab - I click on Parameters, then select Anonymous URL, the screen setting for this feature will be opened. #### Description - I can see there are 4 settings in this screen: - Anonymous URL is the original function: I can click on the icon "i" to see a collapsible legend :"The functionality allow users to share documents with anonymous users (/external) through email. When this functionality is not activated, the below sub-functions will not work" - And when I click icon "i": next to "Anonymous URL", all below legends will be expanded too. - 4 Sub-functions include: - Force anonymous sharing process - Hide Received Shares menu - Anonymous download notification - Email notification URL - In anonymous URL setting, there are 3 policies and 1 default parameter : - Activation policy includes 2 toggles: - (1.1) Enable functionality: When I click on the icon "i", I can see a collapsible legend: " Once activated, the user can share a file with an anonymous user." - If this toggle is switched on, user of this domain can share file with external users in LinShare UI User - If the toggle is disabled, end user of this domain cannot share file with an external users in LinShare UI User - (1.2) Allow nested admin to override "Enable functionality": When I click on the icon "i", I can see a collapsible legend: " Once activated, nested admin can override the activation for his own domain. When disabled, the value of setting "Enable functionality" is applied for all nested domains and nested admin cannot update" - If the toggle is switched on, the nested admin can enable/disable the setting "Enable functionality" for his domain. - If the toggle is off, the nested admin can see but cannot change the setting of "enable functionality" for his domain. When I update "enable functionality" toggle on or off for my domain, it is also applied for my nested domains. In lower-level domain, this setting is inherited from parent domain and displayed in read only mode (the toggle is in grey) - When the 2 toggles (1.1) , (1.2) are both disabled, the other settings of this functionality are hidden. This functionality disappear on every lower domains. - When toggle (1.1) is on and (1.2) is off, in nested domain I can only see the toggle (1.1) in read only mode and toggle (1.2) disappears. - When toggle (1.1) and (1.2) are both on, or when toggle (1.1) is off and (1.2) is on, in nested domain I can see and update these toggles. - Configuration policy includes 2 toggles: - (2.1) Configure functionality: Allow nested admin to change the default parameter : When I click on the icon "i", I can see a collapsible legend: "By enabling, you allow your nested domain admin to change default parameter in his domain". - If the toggle is on in a parent domain, the nested admin can change the value of default parameter field for his domain. - If the toggle is off, the nested admin can see but cannot change the value of default parameter field. The default parameter of nested domain is inherited from it's parent domain and displayed in read only mode. - (2.2) Allow nested to override "Configure functionality": When I click on the icon "i", I can see a collapsible legend:"By enabling, nested admin can re-enable the Configure functionality toggle and then change the default parameter" - If the toggle is on in parent domain, then nested admin can see and update both toggles for his domain. - If default value of toggle "2.1" in nested domain is disabled, the default parameter field is non-editable. Nested Admin can re-enable toggle 2.1 and the field default parameter is editable now. - If this toggle is off in parent domain, and toggle (2.1) is on, then in nested domain, admin see the toggle (2.1) in read only mode and toggle (2.2) disappear. I can edit default parameter field. - When 2 toggles (2.1) and (2.2) are both disabled, they also disappear on nested domains, the default parameter is in read only mode and inherited from parent domain. - Delegation policy includes 2 toggles: - (3.1) Allow user to change default parameter: When I click on the icon "i", I can see a collapsible legend: - If the toggle is on, when a user share a file with an anonymous user, he can see a checkbox "Secure sharing". He can enable or disable this option. - If the toggle is off, user cannot change value of checkbox "Secure sharing" - (3.2) Allow nested admin to override delegation : When I click on the icon "i", I can see a collapsible legend: " Once activated, nested admin can override the setting "Allow user to change default parameter" for his own domain. When disabled, the value of setting "Allow user to change default parameter" is applied for all nested domains and nested admin cannot update" - If the toggle is on, the nested admin can change the setting "Allow user to change default parameter" for his domain. - If the toggle is off:the nested admin can see but cannot change the setting "Allow user to change default parameter" for his domain. When I update "enable functionality" toggle on or off for my domain, it is also applied for my lower-level domains. In lower-level domain, this setting is inherited from parent domain and displayed in read only mode. The toggle "Allow nested admin to override delegation" is hidden in nested domain. - When 2 toggles (3.1) and (3.2) are both disabled, they also disappear on nested domains. - Default parameter: A checkbox. When I click on the icon "i", I can see a collapsible legend:" User will see a checkbox "Secure sharing" on sharing form. This setting decides how to show this checkbox by default" - If the checkbox is selected, the text displays "The anonymous shares will be secured by a password when created." Which means there will be a password generated when user creates anonymous shares. - If the checkbox is not selected, the texts displays "The anonymous shares will not be secured by a password when created." Which means The anonymous shares will be sent without a protected password #### Postconditions - Root admin can configure this functionality for every domain - Nested admin can configure the functionality for his domain and his nested domain if the parent domain admin allows it - There will be no toggle : "Allow nested admin to override ..." in sub-domain and guest domain setting - I can click on Parameters on Breadcrumb to go back to functionality listing screen - I can click on arrow back or forth at the bottom and top of screen to navigate to next/previous parameter setting - When I hover these arrows, I can see an explanation tooltip "Next functionality"/"Previous functionality" - In nested domain there is a button Reset to parent domain. When settings in nested domain is same as it's parent domain, this button is disabled. - When setting in nested domain is different from it's parent domain's value, this button will be enabled. - When I click on this button, the all the settings in this nested domain will be updated from it's parent domain. - When I open this screen, by default all the legends will be expanded. [Back to Summary](#summary) ## UI Design #### Mockups    #### Final design [Back to Summary](#summary) ## Misc [Back to Summary](#summary) ================================================ FILE: documentation/EN/epics/new-admin-portal/story-439-admin-can-see-statistics-about-creation-or-deletion-of-files-per-domain.md ================================================ # Summary * [Related EPIC](#related-epic) * [Definition](#definition) * [UI Design](#ui-design) * [Misc](#misc) ## Related EPIC * [New admin portal](./README.md) ## Definition #### Preconditions - Given that am super admin or nested admin of LinShare - After log-in successfully, I go to Tab Reporting - A new page will be opened. #### Description - On this new screen I can see 2 charts: Storage consumption and Quantity of files - Filters include: - Domain - Category - Time: - If I select Last 7 days: The charts will display 7 columns - Last 30 days: 4-5 columns, each column = a week - Last 6 months: 6 columns, each column = a month - Last year: 4 columns, each column = a quarter - Custom range: the number of columns will be calculated and display so that the number of columns is not more than 7, and prefer nearest smaller unit of time. - After I select filters Domain/Category/time then click Enter, these 2 charts will be displayed accordingly: - Storage consumption: This is a mixed graph between 2 bars chart and a line chart - The horizontal axis is display time period with the unit is selected from the filters above - The vertical axis displays size (MB) - 2 bars represent for total size of creation (upload files) and total size of deleted files on the domain - A line chart reflects the balance between creation and deletion and is defined as [total creation size] - [total deletion size] - When I hover the chart, I can see a popup that shows detail number at every time point. For ex: - Aug 20: - Upload: 23MB - Delete: 20MB - Balance: 3MB - Number of files: This is a mixed graph between 2 bars and a line chart - The horizontal axis is display time period with the unit is selected from the filters above - The vertical axis displays number - 2 bars represent for total number of creation (upload files) and total number of deleted files on the domain - A line chart reflects the balance between creation and deletion number and is defined as [total creation number] - [total deletion number] - When I hover the chart, I can see a popup that shows detail number at every time point. For ex: - Aug 20: - Upload: 23 files - Delete: 20 files - Balance: 3 files #### Post-conditions - A Top Domain's quota contains 3 parts: Personal spaces quota and Sharedspace quota and sub-domains quota - A subdomain's quota contains Personal spaces quota and Sharedspace quota - If in the filter "Category", I select "whole domain", the statistics is calculated on all Personal spaces and Sharedspace of the domain and sub-domain quota (if any) is not included - If in the filter "Category", I select ""Shared Space", the statistics is calculated on all Sharespace (all workgroups) of the domain - If in the filter "Category", I select "Myspace", the statistics is calculated on Personal Spaces of all user of the domain. - When I change the filter condition, the charts and detail report are also changed accordingly. - If I am root admin, I can see statistics about storage consumption and quantity of files in all platform or any domain - If I am nested admin, I can see statistics about storage consumption and quantity of files in my own domain and my nested domains (if any). [Back to Summary](#summary) ## UI Design #### Mockups       #### Final design [Back to Summary](#summary) ## Misc [Back to Summary](#summary) ================================================ FILE: documentation/EN/epics/new-admin-portal/story-44-admin-manage-sub-featues-of-anonymous-URL.md ================================================ # Summary * [Related EPIC](#related-epic) * [Definition](#definition) * [UI Design](#ui-design) * [Misc](#misc) ## Related EPIC * [New admin portal](./README.md) ## Definition #### Preconditions - Given that am super admin or nested admin of LinShare admin - After log-in successfully, I go to Configuration Tab - I click on Parameters, then select Anonymous URL, the screen setting for this feature will be opened. #### Description - Anonymous URL is the original function: When this functionality is not activated, the below 4 sub-functions will not work" **Sub-function 1. Force anonymous sharing process** - I can click on the title of this function to collapse/expand the settings - I click on the icon "i" to see the collapsible legend: "By Enabling this functionality, the user can choose to share documents only with Anonymous Url. In this case, the users will not see the shared document in the Received Share Menu" - There are 3 policies and 1 default parameter : - Activation policy includes 2 toggles: - Enable functionality: Toggle. When I click on the icon "i", I can see a collapsible legend: - If this toggle is switched on, when a user of this domain shares a document, he can see a checkbox "Force anonymous share for all recipients". If this checkbox is ticked, the document will be shared with anonymous URL for both internal/external recipients. - If the toggle is disabled, end user of this domain will not see the checkbox "Force anonymous share for all recipients" when sharing a file. - Allow nested admin to override "Enable functionality": Toggle. When I click on the icon "i", I can see a collapsible legend: " Once activated, nested admin can override the setting "Enable functionality" for his own domain. When disabled, the value of setting "Enable functionality" is applied for all nested domains and nested admin cannot update" - The rule is as same as toggle (1.2) in story 43. Admin manage function anonymous URL - Configuration policy includes 2 toggles: - Configure functionality: Allow nested admin to change the default parameter. When I click on the icon "i", I can see a collapsible legend: "By enabling, you allow your nested domain admin to change default parameter field in his domain". - The rule is as same as toggle (2.1) in story 43. Admin manage function anonymous URL - Allow nested to override "Configure functionality": When I click on the icon "i", I can see a collapsible legend:"By enabling, nested admin can re-enable the Configure functionality toggle and then change the default parameter" - The rule is as same as toggle (2.2) in story 43. Admin manage function anonymous URL - Delegation policy includes 2 toggles: - Allow user to change default parameter: When I click on the icon "i", I can see a collapsible legend: - If the toggle is on, when a user share a file, he can see a checkbox "Force anonymous share for all recipients". He can enable or disable this option. - If the toggle is off, end user cannot change the value of checkbox "Force anonymous share for all recipients" when sharing a file. The value of checkbox depends on it's admin setting - Allow nested admin to override Delegation: When I click on the icon "i", I can see a collapsible legend: " Once activated, nested admin can override the setting "Allow user to change default parameter" for his own domain. When disabled, the value of setting "Enable functionality" is applied for all nested domains and nested admin cannot update" - The rule is as same as toggle (3.2) in story 43. Admin manage function anonymous URL - Default activation checkbox value in share form: A checkbox. When I click on the icon "i", I can see a collapsible legend:" User will see a checkbox "Force anonymous share for all recipients" on sharing form. This setting decides how to show the default value of this checkbox." - If the checkbox is selected, the text displays "Anonymous Sharing with all users(internal and guests)." Which means every recipient will received this file with an anonymous URL in email, either internal/guest or external users. - If the checkbox is not selected, the texts displays "Anonymous Sharing with only anonymous users." Which means The anonymous sharing is only applied for external users. Internal user and guests are still received file in his Received Shares menu **Sub-function 2. Hide Received Shares menu** - I can click on the title of this function to collapse/expand the settings - I click on the icon "i" to see the collapsible legend: "By Enabling this functionality, users will not have the access to the Received Share menu." - There is only Activation policy that includes 2 toggles for this functionality: - Enable functionality: When I click on the icon "i", I can see a collapsible legend: - If this toggle is switched on, users of this domain cannot see and access the Received Share menu - If this toggle is switched off, users of this domain can access the Received Share menu as normal - Allow nested admin override "Enable functionality" - If the toggle is on, the nested admin can enable/disable the setting "Enable functionality" for his domain. - If the toggle is off, the nested admin see but cannot change the setting of "enable functionality" for his domain. When i update "enable functionality" toggle on or off for my domain, it is also applied for my nested domains. In lower-level domain, this setting is inherited from parent domain and displayed in read only mode (the toggle is in grey) - When the 2 toggles are both disabled, the functionality disappear on every lower domains. **Sub-function 3. Anonymous download notification** - I click on the icon "i" to see the collapsible legend:"Anonymous download notification will be sent for every download or only for the first." - There is only Configuration policy that includes 2 toggles for this functionality: - Configure functionality: Allow nested admin to change the default parameter. When i click on the icon "i", I can see a collapsible legend: "By enabling, you allow your nested domain admin to change default parameter in his domain". - The rule is as same as toggle (2.1) in story 43. Admin manage function anonymous URL - Allow nested admin to override "Configure functionality": When i click on the icon "i", I can see a collapsible legend:"By enabling, nested admin can re-enable the Configure functionality toggle and then change the default parameter" - The rule is as same as toggle (2.2) in story 43. Admin manage function anonymous URL - Default parameter: A checkbox - When the checkbox is ticked, the text displays: "Notification will be sent for every download." Every time a recipient download a file from anonymous sharing, the sender will receive an email notification. - When the checkbox is un-ticked, the text displays: "Notification will be sent for the first download only." The download notification of an anonymous share will be sent to the sharer on the fist time. **Sub-function 4. Email notification URL** - I click on the icon "i" to see the collapsible legend:"This setting is for receiver's file URL when anonymous sharing." - There is only Configuration policy that includes 2 toggles for this functionality: - (1.1) Configure functionality: Allow nested admin to change the field: "LinShare UI user URL". When I click on the icon "i", I can see a collapsible legend: "By enabling, you allow your nested domain admin to change the field: "LinShare ui user URL" in his domain". - If the toggle is on in a parent domain, the nested admin can change the value of "LinShare UI user URL" his domain. - If the toggle is off, the nested admin can see but cannot change the value of "LinShare UI user URL". This field value of nested domain is inherited from it's parent domain and displayed in read only mode. - (1.2) Allow nested admin to override "Configure functionality": When I click on the icon "i", I can see a collapsible legend:"By enabling, nested admin can re-enable the Configure functionality toggle and then change the field: "LinShare ui user URL"" - If the toggle is on in parent domain, then nested admin can see and update both toggles for his domain. - If default value of toggle "1.1" in nested domain is disabled, the field ""LinShare ui user URL" is non-editable. Nested Admin can re-enable toggle 1.1 and the field "LinShare ui user URL"is editable now. - If this toggle is off in parent domain, and toggle (1.1) is on, then in nested domain, admin see the toggle (1.1) in read only mode and toggle (1.2) disappear. I can edit the field: "LinShare ui user URL" - When 2 toggles are both disabled, they also disappear on nested domains, the field: "LinShare ui user URL" is in read only mode and inherited from parent domain. - Default parameter: - Field name: LinShare UI User URL - This is a text field - When I click on icon "i", I can see a collapsible legend: "You can input your email notification URL in this field. This URL will be appeared in receiver 's notification when user in this domain shares file with anonymous URL' #### Postconditions [Back to Summary](#summary) ## UI Design #### Mockups #### Final design [Back to Summary](#summary) ## Misc [Back to Summary](#summary) ================================================ FILE: documentation/EN/epics/new-admin-portal/story-45-admin-manage-antivirus-functionality.md ================================================ # Summary * [Related EPIC](#related-epic) * [Definition](#definition) * [UI design](#ui-design) * [Misc](#misc) ## Related EPIC * [New admin portal](./README.md) ## Definition #### Preconditions - Given that am super admin or nested admin of LinShare admin - After log-in successfully, I go to Configuration Tab - I click on Parameters, then select Antivirus, the screen setting for this feature will be opened. #### Description - On the screen Antivirus, I can see a collapsible legend:"By enabling this functionality, When user uploads a file in LinShare, it will be scanned for the virus before uploading to server. In order to use this functionality, you need first to configure the IP and the port of the antivirus in the linshare.properties configuration file. Tomcat restart is required. We only support ClamAV" - There is only Activation policy for this function, which includes 2 toggles: - Enable functionality: When I click on the icon "i", I can see a collapsible legend: " Once activated, when user upload a file, it will be scanned for virus. If de-activated, the uploaded file will not be scanned." - Allow nested admin to override "Enable functionality": When I click on the icon "i", I can see a collapsible legend: " Once activated, nested admin can override the activation for his own domain. When disabled, the value of setting "Enable functionality" is applied for all nested domains and nested admin cannot update" - The other rules for this function is as same as Activation policy in story 43. Admin manage function Anonymous URL - Documentation: In order to use this functionality, you need first to configure the IP and the port of the antivirus in the linshare.properties configuration file. Tomcat restart is required. We only support ClamAV. [Back to Summary](#summary) ## UI Design #### Mockups #### Final design [Back to Summary](#summary) ## Misc [Back to Summary](#summary) ================================================ FILE: documentation/EN/epics/new-admin-portal/story-459-admin-can-check-user-diagnostic.md ================================================ # Summary * [Related EPIC](#related-epic) * [Definition](#definition) * [Screenshots](#screenshots) * [Misc](#misc) ## Related EPIC * [New admin portal](./README.md) ## Definition #### Preconditions * Given that am an admin (super admin/ nested admin) #### Description * After log-in Admin portal successfully, I select Administration tab * Then I select Inconsistent users * On this screen, there will be 2 tabs: USer diagnostic and Inconsistent user list **UC1. User diagnostic** - On this tab, I can see an help text: "For a given email address, this view shows a full report of the matching user on his presence in the LDAP with the associated domain and also in the database. So this view is useful when testing if a user is in the right domain or if he belongs to multiple domains in the same time, etc ... Furthermore, in this view you can show all related information to a user and edit them such as changing the user's domain to another." - I can see a text field below :"Find a person's accounts by giving his email address" - When I input text to this field, the auto-complete list will be displayed and I can select one email address from the list - Then the system will search for that email in the whole platform then show the result in the below. - Each row is a domain that user is currently belongs to: - The table includes columns: - Domain name: Name of the domains that user is currently associated to - LDAP: If this column is tick, it means that the user exists in the LDAP of the domain on the first column. If it is marked red, it means that the user is currently not belongs to LDAP of the domain on the first column - Database: If this column is tick, it means that the user exists in the DB of the domain on the first column. If it is marked red, it means that the user is currently not belongs to DB of the domain on the first column - GUEST: If this column is tick, it means that the user exists in the GUEST DB of the domain on the first column. If it is marked red, it means that the user is currently not belongs to GUEST DB of the domain on the first column - In the result report of an email , when I click on 1 row: - If the email exists in DB/GUEST, the user profile page in the domain of selected row will be displayed. - If the email exists in LDAP server but not exist in DB/GUEST, there will be a message: "This user does not have a LinShare profile. Would you like to create it in the database ?". If I choose Yes, user'profile will be created in DB and the Profile page of user will be displayed. If I choose No, the popup closes and I will not see the User profile in that domain. **UC2 Migrate a user to another domain** - In the result report of an email, when I click on one row and the profile page of user in the domain of selected row is shown, I can manage that user as normally and a new button "Migrate" - When I click on button Migrate, a popup "Migration of Users' domain" will be displayed - There will be a field "New domain" with a drop-down list of all available top domains and sub-domains. - I select one domain in the list and click button Apply - If the selected domain is current domain, or the user already exists in the targeted domain, there will be a notification message: "user already exists in the targeted domain" - If the user has not existed in the targeted domain, the user will be migrated to the new domain and no longer exists in the old domain. There will be a successful notification message. - In the user's profile page, the domain name will be updated to new domain. - When I click on Reload button in the domain report of the user, the new domain will be updated in the result table. [Back to Summary](#summary) ## UI Design #### Screenshots  #### Final design [Back to Summary](#summary) ## Misc [Back to Summary](#summary) ================================================ FILE: documentation/EN/epics/new-admin-portal/story-46-admin-manage-function-completion.md ================================================ # Summary * [Related EPIC](#related-epic) * [Definition](#definition) * [UI Design](#ui-design) * [Misc](#misc) ## Related EPIC * [New admin portal](./README.md) ## Definition #### Preconditions - Given that am super admin or nested admin of LinShare admin - After log-in successfully, I go to Configuration Tab - I click on Parameters, then select Completion, the screen setting for this feature will be opened. #### Description - On the screen Completion, i can see a collapsible legend:"When user types in fields to add people, a suggestion list will appear base on inputted characters. The number of characters is defined in the Default parameter field below." - This function is enabled by default and admin cannot disable it. - There is only Configuration policy for this function, which includes 2 toggles: - Configure functionality: Allow nested admin to change the default parameter. When I click on the icon "i", I can see a collapsible legend: "By enabling, you allow your nested domain admin to change default parameter field in his domain". - The rule is as same as toggle (2.1) in story 43. Admin manage function anonymous URL - Allow nested to override "Configure functionality": When I click on the icon "i", I can see a collapsible legend:"By enabling, nested admin can re-enable the Configure functionality toggle and then change the default parameter" - The rule is as same as toggle (2.2) in story 43. Admin manage function anonymous URL - Default parameter: a text field. - When I click on icon "i", I can see a collapsible legend: "Number of input characters. Base on these characters, system will search for the matched users and display in suggestion list" - I can only input number in this field. #### Post-conditions The rule is as same as Post-condition of Story 43. Admin manage function anonymous URL. [Back to Summary](#summary) ## UI Design #### Mockups #### Final design [Back to Summary](#summary) ## Misc [Back to Summary](#summary) ================================================ FILE: documentation/EN/epics/new-admin-portal/story-47-admin-manage-function-Contacts-list.md ================================================ # Summary * [Related EPIC](#related-epic) * [Definition](#definition) * [UI Design](#ui-design) * [Misc](#misc) ## Related EPIC * [New admin portal](./README.md) ## Definition #### Preconditions - Given that am super admin or nested admin of LinShare admin - After log-in successfully, I go to Configuration Tab - I click on Parameters, then select Contacts list, the screen setting for this feature will be opened. #### Description - On the screen Contacts list, I can see 2 functions: Contacts list and Creation right **UC1. Contacts list** - Contact list is the original function. I can click on the icon "i" to see a collapsible legend :"The functionality allows user of this domain to create his contact lists. A Contact list may include internal/guest users, or external users and can be public or private. When a contact list is public, other LinShare users can use this contact list when sharing document, creating upload request... If the contact list is private, only the owner can use it. When this functionality is not activated, the below sub-function will not work" - In Contacts list setting, there is only Activation policy, including 2 toggles: - Enable functionality: When I click on the icon "i", I can see a collapsible legend: - If this toggle is switched on, user of this domain can access the menu Contact > Contacts list and manage available Contacts list. - If the toggle is disabled, user of this domain cannot see the menu Contacts list in his LinShare account. - Allow nested admin to override "Enable functionality": Toggle. When I click on the icon "i", I can see a collapsible legend: " Once activated, nested admin can override the setting "Enable functionality" for his own domain. When disabled, the value of setting "Enable functionality" is applied for all nested domains and nested admin cannot update" - The rule is as same as toggle (1.2) in story 43. Admin manage function anonymous URL **UC2. Creation right** - In Creation right setting, there is only Activation policy, including 2 toggles: - Enable functionality: When I click on the icon "i", I can see a collapsible legend: - If this toggle is switched on, user of this domain can see the button Create new Contacts list on screen Listing Contacts. - If the toggle is disabled, the button Create new Contacts list is disabled. - Allow nested admin to override "Enable functionality": . When I click on the icon "i", I can see a collapsible legend: " Once activated, nested admin can override the setting "Enable functionality" for his own domain. When disabled, the value of setting "Enable functionality" is applied for all nested domains and nested admin cannot update" - The rule is as same as toggle (1.2) in story 43. Admin manage function anonymous URL #### Post-conditions The rule is as same as Post-condition of Story 43. Admin manage function anonymous URL. [Back to Summary](#summary) ## UI Design #### Mockups #### Final design [Back to Summary](#summary) ## Misc [Back to Summary](#summary) ================================================ FILE: documentation/EN/epics/new-admin-portal/story-470-admin-can-manage-Drives-and-Standalone-workgroups-in-Shared-Space-Functionality.md ================================================ # Summary * [Related EPIC](#related-epic) * [Definition](#definition) * [UI Design](#ui-design) * [Misc](#misc) ## Related EPIC * [New admin portal](./README.md) ## Definition #### Preconditions - Given that am super admin or nested admin of LinShare admin - After log-in successfully, I go to Configuration Tab - I click on Parameters, then select Shared Space, the screen setting for this feature will be opened. #### Description - There are 4 settings in this screen: "Shared Space" is the original function and 4 sub-functions. **Original function: Shared Space** - When I can click on the icon "i" next to "Shared Space", I see a collapsible legend: "This functionality allows users to access Shared Space. Shared Space contains Drives and Standalone Workgroups. A drive contains members with their roles and nested Workgroups. A Workgroup contains members with their roles and some content (folders/files/versions). When this functionality is not activated, the below sub-function will not work" - There is only Activation policy, including 2 toggles: - Enable functionality: When I click on the icon "i", I can see a collapsible legend: - If this toggle is switched on, when user of this domain access his LinShare account, he can see the menu Shared Space - If the toggle is disabled, user cannot see the menu Shared Space. - Allow nested admin to override "Enable functionality": Toggle. When I click on the icon "i", I can see a collapsible legend: " Once activated, nested admin can override the setting "Enable functionality" for his own domain. When disabled, the value of setting "Enable functionality" is applied for all nested domains and nested admin cannot update" - The rule is as same as toggle (1.2) in story 43. Admin manage function anonymous URL **Sub-function 1. Creation right-Drive** - When I click on the icon "i" next to "Creation right", I see a collapsible legend: " This functionality allows users to create Drives. The main goal of Drives is to gather Workgroups together and to define default membership and roles for a bunch of users. You may see Workgroups as projects and Drive as team, a team who handle these projects. " - I can see 2 policies: - Activation policy includes 2 toggles - Enable functionality: When I click on the icon "i", I can see a collapsible legend: - If this toggle is switched on, When user of this domain accesses his Shared Space and click Create button, he can see option: "Create drive" - If the toggle is disabled, when user accesses his shared Space and click Create button, he cannot see option "Create drive" - Allow nested admin to override "Enable functionality": When I click on the icon "i", I can see a collapsible legend: " Once activated, nested admin can override the setting "Enable functionality" for his own domain. When disabled, the value of setting "Enable functionality" is applied for all nested domains and nested admin cannot update" - The rule is as same as toggle (1.2) in story 43. Admin manage function anonymous URL - Configuration policy includes 2 toggles: - Configure functionality: Allow nested admin to change the default parameter. When I click on the icon "i", I can see a collapsible legend: "By enabling, you allow your nested domain admin to change default parameter field in his domain". - The rule is as same as toggle (2.1) in story 43. Admin manage function anonymous URL - Allow nested to override "Configure functionality": When I click on the icon "i", I can see a collapsible legend:"By enabling, nested admin can re-enable the Configure functionality toggle and then change the default parameter" - The rule is as same as toggle (2.2) in story 43. Admin manage function anonymous URL **Sub-function 2. Creation right-standalone workgroup** - When I can click on the icon "i" next to "Creation right", I see a collapsible legend: "In LinShare, there are 2 kinds of workgroups: Standalone workgroup and nested workgroup. Standalone workgroup is not under any Drive and nested workgroup is created inside a Drive. This setting is ony applied for Standalone workgroup. Creation right of nested workgroup depends on Drive user's role " - There are 2 policies: - Activation policy which includes 2 toggles: - Enable functionality: When I click on the icon "i", I can see a collapsible legend: - If this toggle is switched on, when user of this domain access menu Shared space, he can click the button "+" on the top left of screen to create a new standalone workgroup. - If the toggle is disabled, the button "+" to create standalone workgroup will be disabled. - Allow nested admin to override "Enable functionality": Toggle. When I click on the icon "i", I can see a collapsible legend: " Once activated, nested admin can override the setting "Enable functionality" for his own domain. When disabled, the value of setting "Enable functionality" is applied for all nested domains and nested admin cannot update" - The rule is as same as toggle (1.2) in story 43. Admin manage function anonymous URL - Configuration policy includes 2 toggles: - Configure functionality: Allow nested admin to change the default parameter. When I click on the icon "i", I can see a collapsible legend: "By enabling, you allow your nested domain admin to change default parameter field in his domain". - The rule is as same as toggle (2.1) in story 43. Admin manage function anonymous URL - Allow nested to override "Configure functionality": When I click on the icon "i", I can see a collapsible legend:"By enabling, nested admin can re-enable the Configure functionality toggle and then change the default parameter" - The rule is as same as toggle (2.2) in story 43. Admin manage function anonymous URL **Sub-function 3. Archive download right** - When I can click on the icon "i" next to "Archive download right", I see a collapsible legend: "By enabling this functionality, users will be allowed to download the content of a folder as an archive." " - There are 2 policies and 1 parameter: - Activation policy: Includes 2 toggles: - Enable functionality: When I click on the icon "i", I can see a collapsible legend: - If this toggle is switched on, user can see the option "Download" of a folder in workgroup. - If the toggle is disabled, the option "Download" of folder in workgroup will be hidden. User need to download each file in that folder. - Allow nested admin to override "Enable functionality": Toggle. When I click on the icon "i", I can see a collapsible legend: " Once activated, nested admin can override the setting "Enable functionality" for his own domain. When disabled, the value of setting "Enable functionality" is applied for all nested domains and nested admin cannot update" - The rule is as same as toggle (1.2) in story 43. Admin manage function anonymous URL - Configuration policy: Includes 2 toggles: - Configure functionality: Allow nested admin to change the default parameter. When I click on the icon "i", I can see a collapsible legend: "By enabling, you allow your nested domain admin to change default parameter field in his domain". - The rule is as same as toggle (2.1) in story 43. Admin manage function anonymous URL - Allow nested to override "Configure functionality": When I click on the icon "i", I can see a collapsible legend:"By enabling, nested admin can re-enable the Configure functionality toggle and then change the default parameter" - The rule is as same as toggle (2.2) in story 43. Admin manage function anonymous URL - Parameter: Max size - When I click on icon "i", I can see a collapsible legend:"This parameter contains the maximal size of the archive to download, it can be edited relating to your need, (manage with precaution)." - A text field that only accepts number with a drop-down list contains options: Kilobyte, Megabyte, Gigabyte **Sub-function 4. File versioning right** - When I can click on the icon "i" next to "File versioning right", I see a collapsible legend:"By enabling this functionality, it will enable file versioning feature in workgroups.". - There are 3 policies and 1 parameter: - Activation policy includes 2 toggles: - Enable functionality: When I click on the icon "i", I can see a collapsible legend: - If this toggle is switched on, the checkbox "Versioning enable" will be shown in workgroup detail - If the toggle is disabled, the checkbox versioning will not be shown in workgroups which are created after the toggle is disabled. For the workgroups which are created before, If the versioning was enabled and used, the checkbox status is kept in read mode with a badge legend: "Only for uploaded files when versioning was enabled". - Allow nested admin to override "Enable functionality": Toggle. When I click on the icon "i", I can see a collapsible legend: " Once activated, nested admin can override the setting "Enable functionality" for his own domain. When disabled, the value of setting "Enable functionality" is applied for all nested domains and nested admin cannot update" - The rule is as same as toggle (1.2) in story 43. Admin manage function anonymous URL - Configuration policy includes 2 toggles: - Configure functionality: Allow nested admin to change the default parameter. When I click on the icon "i", I can see a collapsible legend: "By enabling, you allow your nested domain admin to change default parameter field in his domain". - The rule is as same as toggle (2.1) in story 43. Admin manage function anonymous URL - Allow nested to override "Configure functionality": When I click on the icon "i", I can see a collapsible legend:"By enabling, nested admin can re-enable the Configure functionality toggle and then change the default parameter" - The rule is as same as toggle (2.2) in story 43. Admin manage function anonymous URL - Delegation policy includes 2 toggles: - Allow user to change default parameter: When I click on the icon "i", I can see a collapsible legend: - If the toggle is on, when user edit a workgroup, he can select/un-select the checkbox "File versioning". - If the toggle is off, user cannot change value of this checkbox. - Allow nested admin to override Delegation: When I click on the icon "i", I can see a collapsible legend: " Once activated, nested admin can override the setting "Allow user to change default parameter" for his own domain. When disabled, the value of setting "Enable functionality" is applied for all nested domains and nested admin cannot update" - The rule is as same as toggle (3.2) in story 43. Admin manage function anonymous URL - Parameter: A checkbox - When I click on the icon "i", I can see a collapsible legend:" This parameter will decide the default value of the checkbox "File versioning" of a new created workgroup - If the checkbox is selected, the text displays: " Versioning will be enabled by default when creating a new workgroup." When a new workgroup is created, the checkbox "File versioning" will be enabled by default. User can see the option "Manage version" of file inside that workgroup. - If the checkbox is un-selected, the text displays: "Versioning will be disabled by default when creating a new workgroup.". When a new workgroup is created, the checkbox "File versioning" will be disabled by default. Option "Mange version" is hidden in drop-down list of actions of file inside that workgroup. #### Post-conditions The rule is as same as Post-condition of Story 43. Admin manage function anonymous URL. **UI User** - If versioning is enabled and: - Workgroup is newly created: Every file inside will have option Manage version. Each version will have options: Detail, Preview, Download, Restore, Copy, Delete - Workgroup is created and disabled versioning before: Every old or new file of that workgroup will have option Manage version with options: Detail, Preview, Download, Restore, Copy, Delete - If versioning is disabled and: - Workgroup is newly created: The checkbox versioning is not shown and every file inside the workgroup will not have option Manage version - Workgroup is created and disabled versioning before: The checkbox versioning is not shown and every file inside the workgroup will not have option Manage version - Workgroup is created and enabled versioning before: The checkbox versioning is shown in read mode and: - If current file inside has a revisions, it still has option Manage version with options: download, copy, delete, preview and detail. - If current file do not have any revision, the option Manage version will not be shown. - For new uploaded files: Do not have option Manage version [Back to Summary](#summary) ## UI Design #### Mockups   #### Final design [Back to Summary](#summary) ## Misc [Back to Summary](#summary) ================================================ FILE: documentation/EN/epics/new-admin-portal/story-471-admin-can-manage-functionality-User-favorite-recipient-expiration.md ================================================ # Summary * [Related EPIC](#related-epic) * [Definition](#definition) * [UI Design](#ui-design) * [Misc](#misc) ## Related EPIC * [New admin portal](./README.md) ## Definition #### Preconditions - Given that am super admin or nested admin of LinShare admin - After log-in successfully, I go to Configuration Tab - I click on Parameters, then select User favorite recipient expiration, the screen setting for this feature will be opened. #### Description - On the screen title, I can see a collapsible legend:"When a LinShare user shares filed with a new recipient (internal/external or guest), his email will be saved in a recipient list so that user can easily find them next time. This functionality allows admin to set retention period for emails in that list. " - I can see 2 policies and 1 default parameter field - Activation policy includes 2 toggles - Enable functionality: When I click on the icon "i", I can see a collapsible legend: - If this toggle is switched on, when user of this domain shares a file with a new email, the email will be stored in LinShare DB with expiration date = current date + value in Default parameter field. When it expires, the email is automatically removed. On active period, if the user shares file with this recipient again, the expiration date of this email is re-calculated = sharing date + value in default parameters". - If the toggle is disabled, the emails in recipient list will not expire. - Allow nested admin to override "Enable functionality": Toggle. When I click on the icon "i", I can see a collapsible legend: " Once activated, nested admin can override the setting "Enable functionality" for his own domain. When disabled, the value of setting "Enable functionality" is applied for all nested domains and nested admin cannot update" - The rule is as same as toggle (1.2) in story 43. Admin manage function anonymous URL - Configuration policy includes 2 toggles: - Configure functionality: Allow nested admin to change the default parameter. When I click on the icon "i", I can see a collapsible legend: "By enabling, you allow your nested domain admin to change default parameter field in his domain". - The rule is as same as toggle (2.1) in story 43. Admin manage function anonymous URL - Allow nested to override "Configure functionality": When I click on the icon "i", I can see a collapsible legend:"By enabling, nested admin can re-enable the Configure functionality toggle and then change the default parameter" - The rule is as same as toggle (2.2) in story 43. Admin manage function anonymous URL - Default parameter: - When I click on icon "i", I can see a collapsible legend: "The period setting used to calculate expiration date of new recipient's email. Expiration date = Created date + expiration period" - The parameter include 2 fields: - A tex field that only accepts number - A drop-down list contains options: Month, week, day. #### Post-conditions The rule is as same as Post-condition of Story 43. Admin manage function anonymous URL. [Back to Summary](#summary) ## UI Design #### Mockups #### Final design [Back to Summary](#summary) ## Misc [Back to Summary](#summary) ================================================ FILE: documentation/EN/epics/new-admin-portal/story-476-root-admin-can-manage-root-domain-quota.md ================================================ # Summary * [Related EPIC](#related-epic) * [Definition](#definition) * [UI Design](#ui-design) * [Misc](#misc) ## Related EPIC * [New admin portal](./README.md) ## Definition #### Preconditions - Given that I am Root admin of LinShare - I logged in to LinShare new admin portal - I select Root domain in Domain tree and go to Configuration tab on top navigation bar. - I click on Quota, the screen setting domain quota for root domain will be opened. #### Description - On Screen Manage domain quota for root domain, I can see 2 sections: 1.Used Space for LinShareRootDomain - When I click on icon "i", there will be a collapsible legend: "This section allows you to manage the current domain quota size and setup it as on your need. The quota of sub-domain cannot be greater than root domain quota. The used space of root domain is sum of all sub-domains used space". - Domain quota [DQ-ROOT]: I can input only number that >0 and select size unit from the drop-down list: B/KB/MB/GB/TB/PB/EB/ZB/YB - When I change the size unit, the number is also updated accordingly. For e.g the field is currently 1 TB. I change the unit to "GB", then the number is automatically changed to "1000". We have 1TB = 1000 GB. - Value of this field is used as the max value of max domain quota in Subdomains default allocation settings section below. 2.Subdomains default allocation settings - When I click on icon "i", there will be a collapsible legend:"This section allows you to manage the default values for nested domains of your current domain" - I can see a toggle: "Activate domain Shared quota": When I click on icon "i", I can see an explanation tooltip: "Activation of this mode exempt from setting each container's quota of this domain (Personal Space and Shared Space). The user will see global consumption of all users of the domain." 2.1 When the toggle "Activate domain Shared quota" is disabled, I can see a chart and three setting parts: - Sub-domain quota: - Default quota value for all sub-domain [DQ-SUB] : I can input only number that >0 and select size unit from the drop-down list: B/KB/MB/GB/TB/PB/EB/ZB/YB - Max domain quota = [DQ-ROOT]: None-editable field. When[DQ-ROOT] is updated, this field is also updated accordingly. - When I input [DQ-SUB] > max domain quota, there will be an error message. - Personal space quota: - Allocated quota for all Personal spaces [PSQ-SUB]: This is the total quota of all users's personal space (My space) in this sub-domain - I can input only number that >0 and select size unit from the drop-down list: B/KB/MB/GB/TB/PB/EB/ZB/YB - When I input a value > [DQ-SUB], there will be an error message: "The value should be below or equal to: [DQ-SUB]" - Default Personal Space allocated quota (per user): [PSQ] - I can input only number that >0 and select size unit from the drop-down list: B/KB/MB/GB/TB/PB/EB/ZB/YB - There is an instruction text below: Value can not exceed the personal spaces quota - When I input a value > [PSQ-SUB], there will be an error message: "The value should be below or equal to: [PSQ-SUB]" - Default Personal Spaces max file size: - I can input only number that >0 and select size unit from the drop-down list: B/KB/MB/GB/TB/PB/EB/ZB/YB - There is an instruction text below: Value can not exceed Default Personal Space allocated quota (per user) - When I input a value > [PSQ], there will be an error message: "The value should be below or equal to: [PSQ]" - Sharedspace quota: - Default total Sharedspaces allocated quota [SSQ-SUB]: This is the total quota of all users's sharedspaces in this sub-domain - I can input only number that >0 and select size unit from the drop-down list: B/KB/MB/GB/TB/PB/EB/ZB/YB - When I input a value > [DQ-SUB], there will be an error message: "The value should be below or equal to: [DQ-SUB]" - Default Sharedspace max file size : - I can input only number that >0 and select size unit from the drop-down list: B/KB/MB/GB/TB/PB/EB/ZB/YB - There is an instruction text below: Value can not exceed [SSQ-SUB] - When I input a value > [SSQ-SUB], there will be an error message: "The value should be below or equal to: [SSQ-SUB]" - Chart: This chart represents Personal Space allocated quota, Sharedspace allocated quota and Unassigned quota on a same bar - Sub-domain quota = Personal Space allocated quota + Sharedspace allocated quota + Unassigned quota - When Personal Space allocated quota + Sharedspace allocated quota > Sub-domain quota, I can see the over limit amount on the chart - When I update any of the quota, the charts is updated accordingly 2.2 When the toggle "Activate domain Shared quota" is enabled: - I can see a text displayed:" When domain shared quota is enabled, every user in this domain shares the same quota of the domain. Every upload from user will be calculated to Domain Share Quota, no matter My Space or Shared Space". - "Default Personal Spaces max file size" field: - I can input only number that >0 and select size unit from the drop-down list: B/KB/MB/GB/TB/PB/EB/ZB/YB - There is an instruction text below: Value can not exceed allocated domain quota - When I input a value > [DQ-SUB], there will be an error message: "The value should be below or equal to: [DQ-SUB] " - Default Sharedspace max file size : - I can input only number that >0 and select size unit from the drop-down list: B/KB/MB/GB/TB/PB/EB/ZB/YB - There is an instruction text below: Value can not exceed allocated domain quota - When I input a value > [DQ-SUB], there will be an error message: "The value should be below or equal to: [DQ-SUB]]" #### Postconditions - When I click button Save, If there is no error, there will be a successful notification - The updated information will be saved and applied for nested domains. - If after updating, the settings in root domain conflicts with current setting of nested domain, the error symbol will be shown in domain tree and in every detail setting. - I can click on the link :"Allocate quota for specific user", then I am navigated to User list screen - I can find a user then set up quota for that user. Otherwise, the quota of each user will be inherited from its domain setting. [Back to Summary](#summary) ## UI Design #### Mockups     #### Final design [Back to Summary](#summary) ## Misc [Back to Summary](#summary) ================================================ FILE: documentation/EN/epics/new-admin-portal/story-478-admin manage-top-domain-quota.md ================================================ # Summary * [Related EPIC](#related-epic) * [Definition](#definition) * [UI Design](#ui-design) * [Misc](#misc) ## Related EPIC * [New admin portal](./README.md) ## Definition #### Preconditions - Given that I am Root admin of LinShare - I logged in to LinShare new admin portal - I select Top domain in Domain tree and go to Configuration tab on top navigation bar. - I click on Quota, the screen setting domain quota for top domain will be opened. #### Description - On Screen Manage domain quota for top domain, I can see 3 links to 3 seperate pages : 1. Domain quota and used space - When I click on icon "i", there will be a collapsible legend: "This section allows you to manage the current domain quota size and setup it as on your need. The quota of top-domain cannot be greater than root domain quota. The used space of top domain is sum of all sub-domains used space.". - Domain quota [DQ-TOP]: The default value will be inherited from default allocation setting of root domain. I can click on icon break to edit the default setting. - I can input only number that >0 and select size unit from the drop-down list: B/KB/MB/GB/TB/PB/EB/ZB/YB - When I change the size unit, the number is also updated accordingly. For e.g the field is currently 1 TB. I change the unit to "GB", then the number is automatically changed to "1000". We have 1TB = 1000 GB. - Value of this field is used as the max value of max domain quota in Subdomains default allocation settings section below. - I can see the text that displays max domain quota and default subdomain quota - Chart: This chart presents 3 components of Domain quota: Current domain used space, Sub-domains used space, Remaining space and unallocated space - Maintenance mode: When this is activated, user cannot upload file to this Domain, both in Myspace and Shared Space. 2. Allocation within the current domain (Containers) - When I click on icon "i", there will be a collapsible legend: "Quota in a domain is managed by containers. Currently we have 2 containers: - Personal spaces: Manage the allocated space for all users'space - Shared spaces: Manage the allocated space for all sharedspace (workgroups and workspaces)" - I can see a toggle: "Activate domain Shared quota": When I click on icon "i", I can see an explanation tooltip: "Activation of this mode exempt from setting each container's quota of this domain (Personal Space and Shared Space). The user will see global consumption of all users and workgroups of the domain." - All settings in this section are inherited from the Sub-domain default allocation setting of root domain. I can click on icon break to edit default settings. 2.1 When the toggle "Activate domain Shared quota" is disabled, I can see a chart and three setting parts: - Personal space quota: - Total Personal spaces allocated quota [PSQ-TOP]: This is the total quota of all users's personal space (My space) in this top domain - I can input only number that >0 and select size unit from the drop-down list: B/KB/MB/GB/TB/PB/EB/ZB/YB - When I input a value > [DQ-TOP], there will be an error message: "The value should be below or equal to: [DQ-TOP]" - Personal Space allocated quota (per user): [PSQ-USER] - I can input only number that >0 and select size unit from the drop-down list: B/KB/MB/GB/TB/PB/EB/ZB/YB - When I input a value > [PSQ-TOP], there will be an error message: "The value should be below or equal to: [PSQ-TOP]" - Personal Spaces max file size: - I can input only number that >0 and select size unit from the drop-down list: B/KB/MB/GB/TB/PB/EB/ZB/YB - When I input a value > [PSQ-USER], there will be an error message: "The value should be below or equal to: [PSQ-USER]" - A chart: Presents the utilization of domain's personal spaces quota, including 3 values: Used Space , Remaining quota (= [PSQ-TOP]-used space), Unallocated space (= [DQ-TOP]- [PSQ-TOP]) - Toggle "Maintenance mode": When this toggle is enabled, there will be a text:"Maintenance mode is activated, thereby preventing any uploads to be made within the Personal Spaces." - SharedSpace quota: - Total ShareSpaces allocated quota [SSQ-TOP]: This is the total quota of all users's sharedSpaces in this top domain - I can input only number that >0 and select size unit from the drop-down list: B/KB/MB/GB/TB/PB/EB/ZB/YB - When I input a value > [DQ-TP], there will be an error message: "The value should be below or equal to: [DQ-TOP]" - SharedSpaces max file size : - I can input only number that >0 and select size unit from the drop-down list: B/KB/MB/GB/TB/PB/EB/ZB/YB - There is an instruction text below: Value can not exceed [SSQ-TOP] - When I input a value > [SSQ-TOP], there will be an error message: "The value should be below or equal to: [SSQ-TOP]" - A Chart present utilization of this top domain's sharedSpace quota, including 3 values: Used Space, Remaining quota (=[PSQ-TOP]-used space), Unallocated space (= [DQ-TOP]- [SSQ-TOP]) - Toggle "Maintenance mode": When this toggle is enabled, there will be a text:" Maintenance mode is activated, thereby preventing any uploads to be made within the SharedSpace". - Container virtual allocation: - Chart: This chart represents Personal Space allocated quota, SharedSpace allocated quota and unallocated quota on a same bar - Top domain quota = Personal Space allocated quota + SharedSpace allocated quota + Unallocated space - When Personal Space allocated quota + SharedSpace allocated quota > Top-domain quota, I can see the over limit amount on the chart - When I update any of the quota, the charts is updated accordingly 2.2 When the toggle "Activate domain Shared quota" is enabled: - I can see a text displayed:" When domain shared quota is enabled, every user in this domain shares the same quota of the domain. Every upload from user will be calculated to Domain Share Quota, no matter My Space or Shared Space". - Personal Spaces max file size" field: - I can input only number that >0 and select size unit from the drop-down list: B/KB/MB/GB/TB/PB/EB/ZB/YB - There is an instruction text below: Value can not exceed allocated domain quota - When I input a value > [DQ-TOP], there will be an error message: "The value should be below or equal to: [DQ-TOP] " - SharedSpace max file size : - I can input only number that >0 and select size unit from the drop-down list: B/KB/MB/GB/TB/PB/EB/ZB/YB - There is an instruction text below: Value can not exceed allocated domain quota - When I input a value > [DQ-TOP], there will be an error message: "The value should be below or equal to: [DQ-TOP]]" 3. Subdomains default allocation settings - Subdomains default allocation settings in top domain is inherited from Subdomains default allocation settings of Root domain - The same rules are also applied - In each setting, I can click icon break to edit the default setting #### Postconditions - When I click button Save, If there is no error, there will be a successful notification - The updated information will be saved and applied for nested domains. - If after updating, the settings in root domain conflicts with current setting of nested domain, the error symbol will be shown in domain tree and in every detail setting. - After I override default setting, I can click icon break next to that setting to reset it to default setting. - When I click button Reset, all default settings from parent domain will be applied for current domain. - I can click on the link :"Allocate quota for specific user", then I am navigated to User list screen - I can find a user then set up quota for that user. Otherwise, the quota of each user will be inherited from its domain setting. [Back to Summary](#summary) ## UI Design #### Mockups        #### Final design [Back to Summary](#summary) ## Misc [Back to Summary](#summary) ================================================ FILE: documentation/EN/epics/new-admin-portal/story-48-admin-manage-function-Document-Expiration.md ================================================ # Summary * [Related EPIC](#related-epic) * [Definition](#definition) * [UI Design](#ui-design) * [Misc](#misc) ## Related EPIC * [New admin portal](./README.md) ## Definition #### Preconditions - Given that am super admin or nested admin of LinShare admin - After log-in successfully, I go to Configuration Tab - I click on Parameters, then select Document expiration, the screen setting for this feature will be opened. #### Description - On the screen title Document expiration, I can see a collapsible legend:" This functionality allow admin to set expiration period for any new uploaded/duplicated document by users in Myspace. When it expires, this document is automatically removed. If user share a document, its expiration date will be changed to undefined. On share-expiration date, the expiration date of this document is re-calculated base on below default parameters". - I can see 2 policies and 1 default parameter field - Activation policy includes 2 toggles - Enable functionality: When I click on the icon "i", I can see a collapsible legend: - If this toggle is switched on, when user of this domain upload or duplicate a file in Myspace, he can see expiration date with the value = creation date + value in Default parameter field. - If the toggle is disabled, the uploaded document in Myspace will not have an expiration date. - Allow nested admin to override "Enable functionality": Toggle. When I click on the icon "i", I can see a collapsible legend: " Once activated, nested admin can override the setting "Enable functionality" for his own domain. When disabled, the value of setting "Enable functionality" is applied for all nested domains and nested admin cannot update" - The rule is as same as toggle (1.2) in story 43. Admin manage function anonymous URL - Configuration policy includes 2 toggles: - Configure functionality: Allow nested admin to change the default parameter. When I click on the icon "i", I can see a collapsible legend: "By enabling, you allow your nested domain admin to change default parameter field in his domain". - The rule is as same as toggle (2.1) in story 43. Admin manage function anonymous URL - Allow nested to override "Configure functionality": When I click on the icon "i", I can see a collapsible legend:"By enabling, nested admin can re-enable the Configure functionality toggle and then change the default parameter" - The rule is as same as toggle (2.2) in story 43. Admin manage function anonymous URL - Default parameter: - When I click on icon "i", I can see a collapsible legend: "The period setting used to calculate expiration date of document. Expiration date = Created date + expiration period" - The parameter include 2 fields: - A tex field that only accepts number - A drop-down list contains options: Month, week, day. #### Post-conditions The rule is as same as Post-condition of Story 43. Admin manage function anonymous URL. [Back to Summary](#summary) ## UI Design #### Mockups #### Final design [Back to Summary](#summary) ## Misc [Back to Summary](#summary) ================================================ FILE: documentation/EN/epics/new-admin-portal/story-49-admin-manage-function-Domain.md ================================================ # Summary * [Related EPIC](#related-epic) * [Definition](#definition) * [UI Design](#ui-design) * [Misc](#misc) ## Related EPIC * [New admin portal](./README.md) ## Definition #### Preconditions - Given that am super admin or nested admin of LinShare admin - After log-in successfully, I go to Configuration Tab - I click on Parameters, then select Domain, the screen setting for this feature will be opened. #### Description - On the function Domain screen , I can see 2 sub-functions: Domain email and Notification URL **Sub-function 1. Domain email** - I can click on the icon "i" to see a collapsible legend :"By enabling, this functionality allows admin to configure his domain email. This email will be the sender's email address of any notification sent from this domain." - There is only Configuration policy, including 2 toggles: - Configure functionality: Allow nested admin to change the default parameter. When I click on the icon "i", I can see a collapsible legend: "By enabling, you allow your nested domain admin to change default parameter field in his domain". - The rule is as same as toggle (2.1) in story 43. Admin manage function anonymous URL - Allow nested to override "Configure functionality": When I click on the icon "i", I can see a collapsible legend:"By enabling, nested admin can re-enable the Configure functionality toggle and then change the default parameter" - The rule is as same as toggle (2.2) in story 43. Admin manage function anonymous URL - Default parameter: a text field. - When I click on icon "i", I can see a collapsible legend: " You can input your domain email in this field. This email address will appear as sender's email address of any notification from your domain" **Sub-function 2. Notification URL** - I can click on the icon "i" to see a collapsible legend :"By enabling, this functionality allows admin to configure his domain's notification URL. This URL will appear in any notification from this domain except for anonymous sharing notification." - There is only Configuration policy, including 2 toggles: - Configure functionality: Allow nested admin to change the default parameter. When I click on the icon "i", I can see a collapsible legend: "By enabling, you allow your nested domain admin to change default parameter field in his domain". - The rule is as same as toggle (2.1) in story 43. Admin manage function anonymous URL - Allow nested to override "Configure functionality": When I click on the icon "i", I can see a collapsible legend:"By enabling, nested admin can re-enable the Configure functionality toggle and then change the default parameter" - The rule is as same as toggle (2.2) in story 43. Admin manage function anonymous URL - Default parameter: a text field. - When I click on icon "i", I can see a collapsible legend: " You can input your domain's notification URL in this field. This URL will appear in receiver's notification content, e.g when user in this domain create an upload request, share a file with internal user..." #### Post-conditions The rule is as same as Post-condition of Story 43. Admin manage function anonymous URL. [Back to Summary](#summary) ## UI Design #### Mockups #### Final design [Back to Summary](#summary) ## Misc [Back to Summary](#summary) ================================================ FILE: documentation/EN/epics/new-admin-portal/story-495-admin-can-filter-audit-and-export-result.md ================================================ # Summary * [Related EPIC](#related-epic) * [Definition](#definition) * [UI Design](#ui-design) * [Misc](#misc) ## Related EPIC * [New admin portal](./README.md) ## Definition #### Preconditions - Given that I am Nested admin or Root admin of LinShare - After log-in successfully to Admin Portal, I select Activities Tab #### Description **1. Filter audit log** In this view, I can see default filters: Action, Ressource type, Domain, Actor, Resource name, Time Range: 1. Filters audit log include: - Domain: A drop-down list - Time range: A drop-down list and a date rage - Resource type: A drop-down list listing all resource groups of audit logs - Resource name: An auto-complete listing all resource name of audit logs - Actor: An auto-complete listing all auth user by email or uuid - Action: An auto-complete listing all logs actions - I can filter audit logs by one of above criteria or combine them - Each search criteria in the search bar is seperated by a delete icon. I can click this icon to delete the criteria - I can also click button Clear filter to delete all current selected filter **2. Display the result** - After selecting filter, I click button Enter, the system will execute searching audit logs with selected filter conditions and display the result below, including columns: - Order - Domain - Actor: When I hover actor name, his email is showned - Action - Resource type - Resource name - Date time: When I hover the date, there will be a popover that displays detail date - time - Details: When I click on 3-dot button, a detail popup of audit log is shown - The filters are handled by back-end. - In the result table, if the resource type are: File, Share, Workgroup file, Workgroup file (version), then there will be a column "Size" in the result table to display file size - If the resource type: "Share" is included in the filters, in result screen I can see recipient's email column: Recipient #### Postconditions - With filters Resources type and Action, user can select multiple options and the search operator for these 2 filters is "Or" - With filter Actor and Resource name, user can only search by one option - The audit logs list will be paginated with default row is 25, I can change the number at the bottom of page. - In the audit log table, I can sort ascending and descending in each column - Default sort is latest date time column - If I select option All domains, the result will show logs of my domain and my all nested domains [Back to Summary](#summary) ## UI Design #### Mockups  #### Final design [Back to Summary](#summary) ## Misc [Back to Summary](#summary) ================================================ FILE: documentation/EN/epics/new-admin-portal/story-498-admin-can-manage-sub-function-moderator-request-of-functionality-Guest.md ================================================ # Summary * [Related EPIC](#related-epic) * [Definition](#definition) * [UI Design](#ui-design) * [Misc](#misc) ## Related EPIC * [New admin portal](./README.md) ## Definition #### Preconditions - Given that am super admin or nested admin of LinShare admin - After log-in successfully, I go to Configuration Tab - I click on Parameters, then select Guests, the screen setting for this feature will be opened. #### Description - There are 6 settings in this screen: - "Guests" is the original setting - 5 Sub-functions include: - Enable Myspace - Expiration - Postpone guest expiry date - Contacts restriction - Moderators Refer to [story51](story-51-admin-manage-function-guest.md) **Sub-function 5. Moderators request** - When I can click on the icon "i" next to "Moderators request", I see a collapsible legend: "This functionality allows users to delegate administration rights of his guest to other users. A user will be able to promote another user as: - Simple moderator of guest: edition of guest's properties - Admin moderator: edition of guest's properties and managing other moderators. - The author of a guest, is by default added as his admin moderator. - When a user is not a moderator of a guest, he can only view guest's detail information (guest reader)" - There are 2 policies and 1 parameter: - Activation policy includes 2 toggles: - Enable functionality: When I click on the icon "i", I can see a collapsible legend: - If this toggle is switched on: - When user create or edit a guest, he can see a field :" Moderators list". He can add other people to this list with role Admin or Simple. The guest's author is automatically added as admin moderator. - If this toggle is switched off: - When user create a guest, he cannot see the field:"Moderators list". The guest's author automatically has admin moderator role. - When user edit a guest: he cannot see the field:"Moderators list". The moderator list before switch off will be hidden. Now only guest's author has admin moderator role to that guest. If the toggle is switched on again, the moderator list before will be added too. - Allow nested admin to override "Enable functionality": Toggle. When I click on the icon "i", I can see a collapsible legend: " Once activated, nested admin can override the setting "Enable functionality" for his own domain. When disabled, the value of setting "Enable functionality" is applied for all nested domains and nested admin cannot update" - The rule is as same as toggle (1.2) in story 43. Admin manage function anonymous URL - Configuration policy includes 2 toggles: - Configure functionality: Allow nested admin to change the default parameter. When I click on the icon "i", I can see a collapsible legend: "By enabling, you allow your nested domain admin to change default parameter field in his domain". - The rule is as same as toggle (2.1) in story 43. Admin manage function anonymous URL - Allow nested to override "Configure functionality": When I click on the icon "i", I can see a collapsible legend:"By enabling, nested admin can re-enable the Configure functionality toggle and then change the default parameter" - The rule is as same as toggle (2.2) in story 43. Admin manage function anonymous URL - Parameter: A checkbox: - If the checkbox is selected, the text displays: "Users are allowed to ask current admin moderators to be promoted moderators." - A user with read-right can create request to become simple moderator of that guest. A Guest's simple moderator can send request to become admin moderator of that guest. Then requester can track the status of his request in Activities task and detail panel of the guest. Guest's admin moderator can manage (approve or deny) all the pending requests in tab "Pending request" of that guest - If the checkbox is selected, the text displays: " Users are not allowed to ask current admin moderators to be promoted moderators. (Moderator requests are disabled.)" - The option "Ask for moderator right" on guest list screen and the tab "Pending request" in Guest detail panel will be hidden. User cannot create moderator request and guest admin cannot see the pending request list. #### Post-conditions The rule is as same as Post-condition of Story 43. Admin manage function anonymous URL. [Back to Summary](#summary) ## UI Design #### Mockups #### Final design [Back to Summary](#summary) ## Misc [Back to Summary](#summary) ================================================ FILE: documentation/EN/epics/new-admin-portal/story-51-admin-manage-function-guest.md ================================================ # Summary * [Related EPIC](#related-epic) * [Definition](#definition) * [UI Design](#ui-design) * [Misc](#misc) ## Related EPIC * [New admin portal](./README.md) ## Definition #### Preconditions - Given that am super admin or nested admin of LinShare admin - After log-in successfully, I go to Configuration Tab - I click on Parameters, then select Guests, the screen setting for this feature will be opened. #### Description - There are 5 settings in this screen: - "Guests" is the original setting: I can click on the icon "i" to see a collapsible legend :"This functionality allows user to manage Guests. When a guest with an external email is invited by LinShare user, he can use every function of LinShare as an internal user, except that he has an expiration date. When this functionality is not activated, the below sub-functions will not work" - And when I click icon "i": next to "Guests", all below legends will be expanded too. - 4 Sub-functions include: - Enable Myspace - Expiration - Postpone guest expiry date - Contacts restriction **Original function: Guests** - There is only Activation policy, including 2 toggles: - Enable functionality: When I click on the icon "i", I can see a collapsible legend: - If this toggle is switched on, user of this domain can access to menu Contact => Guests then create guest accounts and manage them. - If the toggle is disabled, user cannot see the menu Contact => Guests in his LinShare account. - Allow nested admin to override "Enable functionality": Toggle. When I click on the icon "i", I can see a collapsible legend: " Once activated, nested admin can override the setting "Enable functionality" for his own domain. When disabled, the value of setting "Enable functionality" is applied for all nested domains and nested admin cannot update" - The rule is as same as toggle (1.2) in story 43. Admin manage function anonymous URL **Sub-function 1. Enable Myspace** - When the original function - Guests is enabled, this sub-function is also enabled by default and cannot be changed. - When I can click on the icon "i" next to "Enable Myspace", I see a collapsible legend: "This function allows user to choose if his guests can use Myspace or not" - There are 2 policies and 1 parameter: - Configuration policy: Includes 2 toggles: - Configure functionality: Allow nested admin to change the default parameter. When I click on the icon "i", I can see a collapsible legend: "By enabling, you allow your nested domain admin to change default parameter field in his domain". - The rule is as same as toggle (2.1) in story 43. Admin manage function anonymous URL - Allow nested to override "Configure functionality": When I click on the icon "i", I can see a collapsible legend:"By enabling, nested admin can re-enable the Configure functionality toggle and then change the default parameter" - The rule is as same as toggle (2.2) in story 43. Admin manage function anonymous URL - Delegation policy: Includes 2 toggles: - Allow user to change default parameter: When I click on the icon "i", I can see a collapsible legend: - If the toggle is on, when user creates guest account, he can tick/un-tick the checkbox :"Activate user space". - If the toggle is off, end user cannot change the value of checkbox "Activate user space". The value of checkbox depends on default parameter. - Allow nested admin to override Delegation: When I click on the icon "i", I can see a collapsible legend: " Once activated, nested admin can override the setting "Allow user to change default parameter" for his own domain. When disabled, the value of setting "Enable functionality" is applied for all nested domains and nested admin cannot update" - The rule is as same as toggle (3.2) in story 43. Admin manage function anonymous URL - Default parameter: a checkbox - When I click on icon "i", I can see a collapsible legend: "User will see a checkbox "Activate user " on Guest creation form. This setting decides how to show the default value of this checkbox" - If the checkbox is selected, the text displays "The guest can use Myspace." Which means guest account can see and upload file in Myspace in LinShare - If the checkbox is not selected, the texts displays "The guest cannot use Myspace." Which means My space will be hidden on that guest account. **Sub-function 2. Expiration** - When the original function - Guests is enabled, this sub-function is also enabled by default and cannot be changed. - When I can click on the icon "i" next to "Expiration", I see a collapsible legend: "This function allows user to set the expiration date for his guest account" - There are 2 policies and 1 parameter: - Configuration policy: Includes 2 toggles: - Configure functionality: Allow nested admin to change the default parameter. When I click on the icon "i", I can see a collapsible legend: "By enabling, you allow your nested domain admin to change default parameter field in his domain". - The rule is as same as toggle (2.1) in story 43. Admin manage function anonymous URL - Allow nested to override "Configure functionality": When I click on the icon "i", I can see a collapsible legend:"By enabling, nested admin can re-enable the Configure functionality toggle and then change the default parameter" - The rule is as same as toggle (2.2) in story 43. Admin manage function anonymous URL - Delegation policy: Includes 2 toggles: - Allow user to change default parameter: When I click on the icon "i", I can see a collapsible legend: - If the toggle is on, when user creates guest account, he can change the value of field Expiration date. - If the toggle is off, user cannot change the value of field Expiration date. The expiration date depends on default parameter. - Allow nested admin to override Delegation: When I click on the icon "i", I can see a collapsible legend: " Once activated, nested admin can override the setting "Allow user to change default parameter" for his own domain. When disabled, the value of setting "Enable functionality" is applied for all nested domains and nested admin cannot update" - The rule is as same as toggle (3.2) in story 43. Admin manage function anonymous URL - Default parameter: - When I click on icon "i", I can see a collapsible legend:"User will see the field "Expiration date" on Guest creation form. The default expiration date is calculated as current date + default value. The date range is defined as: - At creation time: between [Current date] and [ current date + max value] . - At update time: The date range is between [Current date] and [ creation date + max value]" - The parameter include 2 fields: - Default value: A text field that only accepts number with a drop-down list contains options: Month, week, day. - Max value: A text field that only accepts number with a drop-down list contains options: Month, week, day. **Sub-function 3. Postpone guest expiry date** - When I can click on the icon "i" next to "Postpone guest expiry date", I see a collapsible legend:" This functionality allows internal users to edit and postpone the expiry date of a guest" - There is only Activation policy, including 2 toggles: - Enable functionality: When I click on the icon "i", I can see a collapsible legend: - If this toggle is switched on, When user edit a guest's information, he can see the date range of expiration date is between [current date] and [current date + max value of expiration parameter]. Therefore, the user can extend guest's expiry date since the max expiry date is now calculated by current date, not creation date. - If the toggle is disabled, When user edit a guest's information, he can see the date range of expiration date as defined in sub-function Expiration above - Allow nested admin to override "Enable functionality": Toggle. When I click on the icon "i", I can see a collapsible legend: " Once activated, nested admin can override the setting "Enable functionality" for his own domain. When disabled, the value of setting "Enable functionality" is applied for all nested domains and nested admin cannot update" - The rule is as same as toggle (1.2) in story 43. Admin manage function anonymous URL **Sub-function 4. Contacts restriction** - When I can click on the icon "i" next to "Contacts restriction", I see a collapsible legend:"You can restrict guests to share only with a restricted and personal list of emails. By default, the guest will be restricted to his owner." - There are 3 policies and 1 parameter: - Activation policy includes 2 toggles: - Enable functionality: When I click on the icon "i", I can see a collapsible legend: - If this toggle is switched on, When user creates a new guest, he can see a checkbox "Restrict contact list" in Advanced options. - If the toggle is disabled, When user creates a new guest, he cannot see the checkbox. - Allow nested admin to override "Enable functionality": Toggle. When I click on the icon "i", I can see a collapsible legend: " Once activated, nested admin can override the setting "Enable functionality" for his own domain. When disabled, the value of setting "Enable functionality" is applied for all nested domains and nested admin cannot update" - The rule is as same as toggle (1.2) in story 43. Admin manage function anonymous URL - Configuration policy includes 2 toggles: - Configure functionality: Allow nested admin to change the default parameter. When I click on the icon "i", I can see a collapsible legend: "By enabling, you allow your nested domain admin to change default parameter field in his domain". - The rule is as same as toggle (2.1) in story 43. Admin manage function anonymous URL - Allow nested to override "Configure functionality": When I click on the icon "i", I can see a collapsible legend:"By enabling, nested admin can re-enable the Configure functionality toggle and then change the default parameter" - The rule is as same as toggle (2.2) in story 43. Admin manage function anonymous URL - Delegation policy includes 2 toggles: - Allow user to change default parameter: When I click on the icon "i", I can see a collapsible legend: - If the toggle is on, when user creates guest account, he can select/un-select the checkbox "Restrict contact list". - If the toggle is off, user cannot change value of this checkbox. The checkbox value depends on the default parameter below. - Allow nested admin to override Delegation: When I click on the icon "i", I can see a collapsible legend: " Once activated, nested admin can override the setting "Allow user to change default parameter" for his own domain. When disabled, the value of setting "Enable functionality" is applied for all nested domains and nested admin cannot update" - The rule is as same as toggle (3.2) in story 43. Admin manage function anonymous URL - Parameter: A checkbox - When I click on the icon "i", I can see a collapsible legend:" This parameter will decide the default value of the checkbox "Restrict contact list" on Advanced option of guest creation form" - If the checkbox is selected, the text displays: "The guest will be restricted to a list of emails." In Guest creation form, the checkbox "Restrict contact list" will be selected and the guest owner will be added to this list by default. User can add/remove people to this list. - If the checkbox is selected, the text displays: "The guest will not be restricted.". The checkbox "Restricted contact list" in guest creation form is un-selected by default. #### Post-conditions The rule is as same as Post-condition of Story 43. Admin manage function anonymous URL. [Back to Summary](#summary) ## UI Design #### Mockups #### Final design [Back to Summary](#summary) ## Misc [Back to Summary](#summary) ================================================ FILE: documentation/EN/epics/new-admin-portal/story-511-admin-can-manage-domain-quota-for-subdomain-or-guest-domain.md ================================================ # Summary * [Related EPIC](#related-epic) * [Definition](#definition) * [UI Design](#ui-design) * [Misc](#misc) ## Related EPIC * [New admin portal](./README.md) ## Definition #### Preconditions - Given that I am Root admin of LinShare - I logged in to LinShare new admin portal - I select Sub domain or Guest domain in Domain tree and go to Configuration tab on top navigation bar. - I click on Quota, the screen setting domain quota for sub-domain/Guest domain will be opened. #### Description - On Screen Manage domain quota for sub-domain, I can see 2 links to 2 seperate screens: 1.Domain quota and used space - When I click on icon "i", there will be a collapsible legend: "This section allows you to manage the current domain quota size and setup it as on your need. The quota of sub-domain cannot be greater than top domain quota.". - Domain quota [DQ-SUB]: The default value will be inherited from default allocation setting of root domain. I can click on icon break to edit the default setting. - I can see the text that displays max domain quota [DQ-TOP] - Chart: This chart presents 3 values: Current domain used space Remaining space and unallocated space - Maintenance mode: When this is activated, user cannot upload file to this Domain, both in Myspace and Shared Space. 2. Allocation within the current domain (Containers) - The setting rules are as same as Top domain settings #### Postconditions - When I click button Save, If there is no error, there will be a successful notification - The updated information will be saved - After I override default setting, I can click icon break next to that setting to reset it to default setting. - When I click button Reset, all default settings from parent domain will be applied for current domain. - The setting for Guest domain is as same as setting for Sub-domain - I can click on the link :"Allocate quota for specific user", then I am navigated to User list screen - I can find a user then set up quota for that user. Otherwise, the quota of each user will be inherited from its domain setting. [Back to Summary](#summary) ## UI Design #### Mockups     #### Final design [Back to Summary](#summary) ## Misc [Back to Summary](#summary) ================================================ FILE: documentation/EN/epics/new-admin-portal/story-513-domain-admin-can-manage-quota-for-my-domain-and-nested-domains.md ================================================ # Summary * [Related EPIC](#related-epic) * [Definition](#definition) * [UI Design](#ui-design) * [Misc](#misc) ## Related EPIC * [New admin portal](./README.md) ## Definition #### Preconditions - Given that I am Nested admin of LinShare - I logged in to LinShare new admin portal - I can see domain tree including my domain and sub-domains. - I go to Configuration tab on top navigation bar. - I click on Quota, the screen setting domain quota for my domain will be opened. - #### Description - I can see 2 sections links to 2 separate screens: 1. Allocation within the current domain (Containers) - When I click on icon "i", there will be a collapsible legend: "Quota in a domain is managed by containers. Currently we have 2 containers: - Personal spaces: Manage the allocated space for all users'space - Shared spaces: Manage the allocated space for all sharedspace (workgroups and workspaces)" - I can see my Domain quota: This value is set by root admin and I can not update it - I can see a toggle: "Activate domain Shared quota": - When I click on icon "i", I can see an explanation tooltip: "Activation of this mode exempt from setting each container's quota of this domain (Personal Space and Shared Space). The user will see global consumption of all users and workgroups of the domain." - Only root admin can set this toggle, I cannot enable/disable this toggle as a domain admin. - All below settings in this section are inherited from the Sub-domain default allocation setting of root domain. I can click on icon break to edit default settings. 1.1 When the toggle "Activate domain Shared quota" is disabled, I can see a chart and three setting parts: - Personal space quota: - Total Personal spaces allocated quota [PSQ-TOP]: This is the total quota of all users's personal space (My space) in this top domain - I can input only number that >0 and select size unit from the drop-down list: B/KB/MB/GB/TB/PB/EB/ZB/YB - When I input a value > [DQ-TOP], there will be an error message: "The value should be below or equal to: [DQ-TOP]" - Personal Space allocated quota (per user): [PSQ-USER] - I can input only number that >0 and select size unit from the drop-down list: B/KB/MB/GB/TB/PB/EB/ZB/YB - When I input a value > [PSQ-TOP], there will be an error message: "The value should be below or equal to: [PSQ-TOP]" - Personal Spaces max file size: - I can input only number that >0 and select size unit from the drop-down list: B/KB/MB/GB/TB/PB/EB/ZB/YB - When I input a value > [PSQ-USER], there will be an error message: "The value should be below or equal to: [PSQ-USER]" - A chart: Presents the utilization of domain's personal spaces quota, including 3 values: Used Space , Remaining quota (= [PSQ-TOP]-used space), Unallocated space (= [DQ-TOP]- [PSQ-TOP]) - Toggle "Maintenance mode": When this toggle is enabled, there will be a text:"Maintenance mode is activated, thereby preventing any uploads to be made within the Personal Spaces." - SharedSpace quota: - Total ShareSpaces allocated quota [SSQ-TOP]: This is the total quota of all users's sharedSpaces in this top domain - I can input only number that >0 and select size unit from the drop-down list: B/KB/MB/GB/TB/PB/EB/ZB/YB - When I input a value > [DQ-TP], there will be an error message: "The value should be below or equal to: [DQ-TOP]" - SharedSpaces max file size : - I can input only number that >0 and select size unit from the drop-down list: B/KB/MB/GB/TB/PB/EB/ZB/YB - There is an instruction text below: Value can not exceed [SSQ-TOP] - When I input a value > [SSQ-TOP], there will be an error message: "The value should be below or equal to: [SSQ-TOP]" - A Chart present utilization of this top domain's sharedSpace quota, including 3 values: Used Space, Remaining quota (=[PSQ-TOP]-used space), Unallocated space (= [DQ-TOP]- [SSQ-TOP]) - Toggle "Maintenance mode": When this toggle is enabled, there will be a text:" Maintenance mode is activated, thereby preventing any uploads to be made within the SharedSpace". - Container virtual allocation: - Chart: This chart represents Personal Space allocated quota, SharedSpace allocated quota and unallocated quota on a same bar - Top domain quota = Personal Space allocated quota + SharedSpace allocated quota + Unallocated space - When Personal Space allocated quota + SharedSpace allocated quota > Top-domain quota, I can see the over limit amount on the chart - When I update any of the quota, the charts is updated accordingly 2.2 When the toggle "Activate domain Shared quota" is enabled: - I can see a text displayed:" When domain shared quota is enabled, every user in this domain shares the same quota of the domain. Every upload from user will be calculated to Domain Share Quota, no matter My Space or Shared Space". - Personal Spaces max file size" field: - I can input only number that >0 and select size unit from the drop-down list: B/KB/MB/GB/TB/PB/EB/ZB/YB - There is an instruction text below: Value can not exceed allocated domain quota - When I input a value > [DQ-TOP], there will be an error message: "The value should be below or equal to: [DQ-TOP] " - SharedSpace max file size : - I can input only number that >0 and select size unit from the drop-down list: B/KB/MB/GB/TB/PB/EB/ZB/YB - There is an instruction text below: Value can not exceed allocated domain quota - When I input a value > [DQ-TOP], there will be an error message: "The value should be below or equal to: [DQ-TOP]]" 3. Subdomains default allocation settings - Subdomains default allocation settings in top domain is inherited from Subdomains default allocation settings of Root domain - The same rules are also applied - In each setting, I can click icon break to edit the default setting #### Postconditions - When I click button Save, If there is no error, there will be a successful notification - The updated information will be saved and applied for nested domains. - If after updating, the settings in root domain conflicts with current setting of nested domain, the error symbol will be shown in domain tree and in every detail setting. - After I override default setting, I can click icon break next to that setting to reset it to default setting. - When I click button Reset, all default settings from parent domain will be applied for current domain. - I can click on the link :"Allocate quota for specific user", then I am navigated to User list screen - I can find a user then set up quota for that user. Otherwise, the quota of each user will be inherited from its domain setting. - I can set up domain quota for my sub-domain or guest domain as [story 511.admin manage subdomain quota] [Back to Summary](#summary) ## UI Design #### Mockups      #### Final design [Back to Summary](#summary) ## Misc [Back to Summary](#summary) ================================================ FILE: documentation/EN/epics/new-admin-portal/story-52-apply-max-value-and-default-value-for-functionality-parameters.md ================================================ # Summary * [Related EPIC](#related-epic) * [Definition](#definition) * [UI Design](#ui-design) * [Misc](#misc) ## Related EPIC * [New admin portal](./README.md) ## Definition #### Description #### 1. Share expiration **UC1. Admin UI** - Given that I am an Admin LinShare - In Admin portal, I go to Domain => Functionalities => Share expiration - I can see there are 2 parameters in Share expiration setting : - Default value: include a text box that only contain number and a dropdown-list with option: day/week/month - Max value: include a text box that only contain number and a dropdown-list with option: day/week/month - or I can select a checkbox unlimited for max value. **UC2. User UI** * Given that I am a LinShare user and the Functionalities "Share expiration" is enabled in Admin UI * when i try to share a file in LinShare, on Quick Share screen, I can see the field :" Expiration date" * If the Delegation policy of Share expiration in Admin is disabled, the value of this field is defined = current date + default value of Share expiration. And user cannot change this value * If the Delegation policy of Share expiration in Admin is enabled, the value of this field is defined as : * The default Share expiry date = current date + Default value of Share Expiration set by Domain Admin * The date range is between [Current date] and [current date + max max value] of Share Expiration set by Domain Admin. #### 2. Guest Expiration **UC1. Admin UI** - Given that I am an Admin LinShare - In Admin portal, I go to Domain => Functionalities => Guest => Guest expiration - I can see there are 2 parameters in Share expiration setting : - Default value: include a text box that only contain number and a dropdown-list with option: day/week/month - Max value: include a text box that only contain number and a dropdown-list with option: day/week/month **UC2. User UI** * Given that I am a LinShare user and the Functionalities "Guest" is enabled in Admin UI * When i create a guest on LinShare, I can see the field Expiration date * If the Delegation policy of Guest Expiration in Admin is disabled, the value of this field is defined = current date + default value of Guest Expiration. And user cannot change this value * If the Delegation policy of Guest Expiration in Admin is enabled, when creating a guest, the value of this field is defined as : * Default value = current date + default period of Guest Expiration * The date range is between [Current date] and [ current date + max value] of Guest Expiration set by domain admin. * If the function Postpone guest expiry date is disabled, when I edit a guest's expiration date, the date range is defined as : [ Current date ] and [Creation date + max value] * If the function Postpone guest expiry date is enabled, when I edit a guest's expiration date, the date range is defined as : [Current date] and [ current date + max value] [Back to Summary](#summary) ## UI Design #### Mockups #### Final design [Back to Summary](#summary) ## Misc [Back to Summary](#summary) ================================================ FILE: documentation/EN/epics/new-admin-portal/story-53-admin-manage-function-Enable-Myspace.md ================================================ # Summary * [Related EPIC](#related-epic) * [Definition](#definition) * [UI Design](#ui-design) * [Misc](#misc) ## Related EPIC * [New admin portal](./README.md) ## Definition #### Preconditions - Given that am super admin or nested admin of LinShare admin - After log-in successfully, I go to Configuration Tab - I click on Parameters, then select Enable Myspace, the screen setting for this feature will be opened. #### Description - When I click on the When I click on the icon "i" next to screen tittle, I can see a collapsible legend: "This functionality allows users in your domain can access menu Myspace. My space is a personal space where user can upload his documents and share with other users/work space " - There is only Configuration policy, including 2 toggles: - Configure functionality: Allow nested admin to change the default parameter. When I click on the icon "i", I can see a collapsible legend: "By enabling, you allow your nested domain admin to change default parameter field in his domain". - The rule is as same as toggle (2.1) in story 43. Admin manage function anonymous URL - Allow nested to override "Configure functionality": When I click on the icon "i", I can see a collapsible legend:"By enabling, nested admin can re-enable the Configure functionality toggle and then change the default parameter" - The rule is as same as toggle (2.2) in story 43. Admin manage function anonymous URL - Default parameter: a checkbox - When I click on icon "i", I can see a collapsible legend: " This setting decides when a new user is created, he can use Myspace by default or not." - If the checkbox is selected, the text displays "User can use Myspace." Which means when user is created, he can see and upload file in Myspace in LinShare - If the checkbox is not selected, the texts displays "User cannot use Myspace." Which means My space will be hidden on new user's account #### Post-conditions The rule is as same as Post-condition of Story 43. Admin manage function anonymous URL. [Back to Summary](#summary) ## UI Design #### Mockups #### Final design [Back to Summary](#summary) ## Misc [Back to Summary](#summary) ================================================ FILE: documentation/EN/epics/new-admin-portal/story-536-admin-can-manage-number-of-workspaces-that-can-be created-in-a-domain.md ================================================ # Summary * [Related EPIC](#related-epic) * [Definition](#definition) * [UI Design](#ui-design) * [Misc](#misc) ## Related EPIC * [New admin portal](./README.md) ## Definition #### Preconditions - Given that am super admin or nested admin of LinShare admin - After log-in successfully, I go to Configuration Tab - I click on Parameters, then select Shared Space, the screen setting for this feature will be opened. #### Description - In Share Space, there are 6 sub-functions. 4 current sub-functions are described in story [story 470](story-470-admin-can-manage-Drives-and-Standalone-workgroups-in-Shared-Space-Functionality.md) - There is a new sub-function: Workspace limitation **Sub-function: Workspace limitation** - On the screen title, I can see a collapsible legend:" This functionality allows admin to set limitation for number of Workspaces that can be created in this domain" - There are 2 policies and 1 parameter: - Activation policy includes 2 toggles: - Enable functionality: When I click on the icon "i", I can see a collapsible legend: - If this toggle is switched on, the number of Workspaces that can be created in this domain will be limited. - If the toggle is disabled, the number of Workspaces that can be created in this domain will not be limited. Default behavior. - Allow nested admin to override "Enable functionality": Toggle. When I click on the icon "i", I can see a collapsible legend: " Once activated, nested admin can override the setting "Enable functionality" for his own domain. When disabled, the value of setting "Enable functionality" is applied for all nested domains and nested admin cannot update" - The rule is as same as toggle (1.2) in story 43. Admin manage function anonymous URL - Configuration policy includes 2 toggles: - Configure functionality: Allow nested admin to change the default parameter. When I click on the icon "i", I can see a collapsible legend: "By enabling, you allow your nested domain admin to change default parameter field in his domain". - The rule is as same as toggle (2.1) in story 43. Admin manage function anonymous URL - Allow nested to override "Configure functionality": When I click on the icon "i", I can see a collapsible legend:"By enabling, nested admin can re-enable the Configure functionality toggle and then change the default parameter" - The rule is as same as toggle (2.2) in story 43. Admin manage function anonymous URL - Parameter: a text field, named "Max Workspace count" - When I click on icon "i", I can see a collapsible legend: "Max number of Workspaces that can be created in this domain". - I can only input number in this field. Default value : 5 #### Post-conditions - The rule is as same as Post-condition of Story 43. Admin manage function anonymous URL. - On UI for user, When the number of workspaces in this domain reaches the limitation, and a user clicks button Create new workspace, there will be a message:"You have reached maximum number of workspaces. " - At the time admin set the limitation of workspace, if a current number of workspaces exceeded the limitation, user of this domain cannot create new workspace. [Back to Summary](#summary) ## UI Design #### Mockups  #### Final design [Back to Summary](#summary) ## Misc [Back to Summary](#summary) ================================================ FILE: documentation/EN/epics/new-admin-portal/story-538-admin-can-manage-number-of-workgroups-that-can-be-created-inside-a-workspace.md ================================================ # Summary * [Related EPIC](#related-epic) * [Definition](#definition) * [UI Design](#ui-design) * [Misc](#misc) ## Related EPIC * [New admin portal](./README.md) ## Definition #### Preconditions - Given that am super admin or nested admin of LinShare admin - After log-in successfully, I go to Configuration Tab - I click on Parameters, then select Shared Space, the screen setting for this feature will be opened. #### Description - In Share Space, there are 6 sub-functions. 4 current sub-functions are described in story [story 470](story-470-admin-can-manage-Drives-and-Standalone-workgroups-in-Shared-Space-Functionality.md) - There is a new sub-function: Nested Workgroup limitation **Sub-function: Nested Workgroup limitation** - On the screen title, I can see a collapsible legend:" This functionality allows admin to set limitation for number of nested Workgroups that can be created inside a workspace in this domain" - There are 2 policies and 1 parameter: - Activation policy includes 2 toggles: - Enable functionality: When I click on the icon "i", I can see a collapsible legend: - If this toggle is switched on, the number of nested workgroups that can be created inside a workspace in this domain will be limited. This limitation is counted by total number of nested workgroups inside a workspace in this domain. The limitation number will be set in the below parameter. - If the toggle is disabled, the number of nested workgroups that can be created inside a workspace in this domain will not be limited. Default behavior. - Allow nested admin to override "Enable functionality": Toggle. When I click on the icon "i", I can see a collapsible legend: " Once activated, nested admin can override the setting "Enable functionality" for his own domain. When disabled, the value of setting "Enable functionality" is applied for all nested domains and nested admin cannot update" - The rule is as same as toggle (1.2) in story 43. Admin manage function anonymous URL - Configuration policy includes 2 toggles: - Configure functionality: Allow nested admin to change the default parameter. When I click on the icon "i", I can see a collapsible legend: "By enabling, you allow your nested domain admin to change default parameter field in his domain". - The rule is as same as toggle (2.1) in story 43. Admin manage function anonymous URL - Allow nested to override "Configure functionality": When I click on the icon "i", I can see a collapsible legend:"By enabling, nested admin can re-enable the Configure functionality toggle and then change the default parameter" - The rule is as same as toggle (2.2) in story 43. Admin manage function anonymous URL - Parameter: a text field, named "Max workgroups count" - When I click on icon "i", I can see a collapsible legend: "Max number of nested workgroups that can be created inside a workspace in this domain". - I can only input number in this field. Default value : 5 #### Post-conditions - The rule is as same as Post-condition of Story 43. Admin manage function anonymous URL. - On UI for user, When the number of nested workgroups inside a workspace in this domain reaches the limitation, and a user clicks button Create new workgroup, there will be a message: "You have reached maximum number of workgroups inside this workspace. " - At the time admin set the limitation of nested workgroups, if current number of workgroups inside a workspace exceeded the limitation, user cannot create new workgroup. [Back to Summary](#summary) ## UI Design #### Mockups  #### Final design [Back to Summary](#summary) ## Misc [Back to Summary](#summary) ================================================ FILE: documentation/EN/epics/new-admin-portal/story-539-admin-can-manage-number-of-recipients-of-an-upload-request.md ================================================ # Summary * [Related EPIC](#related-epic) * [Definition](#definition) * [UI Design](#ui-design) * [Misc](#misc) ## Related EPIC * [New admin portal](./README.md) ## Definition #### Preconditions - Given that am super admin or nested admin of LinShare admin - After log-in successfully, I go to Configuration Tab - I click on Parameters, then select Upload request, the screen setting for this feature will be opened. #### Description - Current sub-functions are described in story [story 60](story-60-admin-manage-function-upload-request.md) - There is a new sub-function: Maximum number of recipients **Sub-function: Maximum number of recipients** - On the screen title, I can see a collapsible legend:" This functionality allows admin to set maximum number of recipients that a user can send an upload request to" - There are 2 policies and 1 parameter: - Activation policy includes 2 toggles: - Enable functionality: When I click on the icon "i", I can see a collapsible legend: - If this toggle is switched on, When user create an upload request, the number of recipients for every upload request will be limited. The limitation number will be set in the below parameter. - If the toggle is disabled, the number of recipients for every upload request created by user in this domain will not be limited. Default behavior. - Allow nested admin to override "Enable functionality": Toggle. When I click on the icon "i", I can see a collapsible legend: " Once activated, nested admin can override the setting "Enable functionality" for his own domain. When disabled, the value of setting "Enable functionality" is applied for all nested domains and nested admin cannot update" - The rule is as same as toggle (1.2) in story 43. Admin manage function anonymous URL - Configuration policy includes 2 toggles: - Configure functionality: Allow nested admin to change the default parameter. When I click on the icon "i", I can see a collapsible legend: "By enabling, you allow your nested domain admin to change default parameter field in his domain". - The rule is as same as toggle (2.1) in story 43. Admin manage function anonymous URL - Allow nested to override "Configure functionality": When I click on the icon "i", I can see a collapsible legend:"By enabling, nested admin can re-enable the Configure functionality toggle and then change the default parameter" - The rule is as same as toggle (2.2) in story 43. Admin manage function anonymous URL - Parameter: a text field, named "Max recipient count" - When I click on icon "i", I can see a collapsible legend: "Max number of recipients for every upload request ". - I can only input number in this field.Default value : 5 #### Post-conditions - The rule is as same as Post-condition of Story 43. Admin manage function anonymous URL. - On UI for user, When user create a new upload request and inputting the field "Add recipient", if the number of inputted recipients have reached the maximum limitation, there will be a message: "You have reached maximum number of recipients for this upload request." - The recipient limitation is also applied when user edit an upload request - The recipient limitation is applied for both collective and individual upload request [Back to Summary](#summary) ## UI Design #### Mockups #### Final design [Back to Summary](#summary) ## Misc [Back to Summary](#summary) ================================================ FILE: documentation/EN/epics/new-admin-portal/story-54-admin-manage-function-JWT-permanent token.md ================================================ # Summary * [Related EPIC](#related-epic) * [Definition](#definition) * [UI Design](#ui-design) * [Misc](#misc) ## Related EPIC * [New admin portal](./README.md) ## Definition #### Preconditions - Given that am super admin or nested admin of LinShare domain - After log-in successfully, I go to Configuration Tab - I click on Parameters, then select JWT permanent token, the screen setting for this feature will be opened. #### Description. - I can click on the icon "i" to see a collapsible legend :"This functionality allows user to manage his JWT permanent token and authenticate by using a permanent token. " - There are 2 policies and 1 parameter: - Activation policy includes 2 toggles: - Enable functionality: When I click on the icon "i", I can see a collapsible legend: - If this toggle is switched on, When user clicks on human icon on his account, he can select the option "JWT token management" and navigate to Token management page. - If the toggle is disabled, When user clicks on human icon on his account, he will not see the option Token management and cannot authenticate by using permanent token - Allow nested admin to override "Enable functionality": When I click on the icon "i", I can see a collapsible legend: " Once activated, nested admin can override the setting "Enable functionality" for his own domain. When disabled, the value of setting "Enable functionality" is applied for all nested domains and nested admin cannot update" - The rule is as same as toggle (1.2) in story 43. Admin manage function anonymous URL - Configuration policy: Includes 2 toggles: - Configure functionality: Allow nested admin to change the default parameter. When I click on the icon "i", I can see a collapsible legend: "By enabling, you allow your nested domain admin to change default parameter field in his domain". - The rule is as same as toggle (2.1) in story 43. Admin manage function anonymous URL - Allow nested to override "Configure functionality": When I click on the icon "i", I can see a collapsible legend:"By enabling, nested admin can re-enable the Configure functionality toggle and then change the default parameter" - The rule is as same as toggle (2.2) in story 43. Admin manage function anonymous URL - Default parameter: A checkbox - When I click on icon "i", I can see a collapsible legend: "This parameter decides if the admin can create permanent token for his domain's users or not" - When the checkbox is ticked, the text displays:" Admin can create JWT token for his domain's users ". When admin go to Manage user page, on the JWT management tab, he can see the button Create token - When the checkbox is un-ticked, the text displays:" Admin cannot create JWT token for his domain's users". When admin go to Manage user page, on the JWT management tab, he cannot see the button Create token #### Post-conditions The rule is as same as Post-condition of Story 43. Admin manage function anonymous URL. [Back to Summary](#summary) ## UI Design #### Mockups #### Final design [Back to Summary](#summary) ## Misc [Back to Summary](#summary) ================================================ FILE: documentation/EN/epics/new-admin-portal/story-545-admin-can-filter-and-view-audit-logs.md ================================================ # Summary * [Related EPIC](#related-epic) * [Definition](#definition) * [UI Design](#ui-design) * [Misc](#misc) ## Related EPIC * [New admin portal](./README.md) ## Definition #### Preconditions - Given that I am Nested admin or Root admin of LinShare - After log-in successfully to Admin Portal, I select Activities Tab #### Description **1. Filter audit log** - In new view I can see 2 default filters: Domain and Date range: - Domain: A drop-down list - Default selection is All domains - When I click on the field, a drop-down list is displayed: - If I am a nested admin, the drop-down list contains my domain and my nested domain - If I am root admin, the drop-down list contains all domains. - I can see all of my nested domains and select any of them - Date range: - When I click on this field, I can select pre-defined period : Today, Yesterday, Last seven days, Last 2 weeks, Last 30 days, Last month, This month, Last 6 months - Or I can customize the start date and end date - When I click on button Add filters, I can select additional filters: Resource type, Resource name, Action, Actor - Resource groups: - when I select this filter, there will be a drop-down list listing all resource groups of audit logs - There are 8 groups and each groups can contain multiple resource types: - Shared Space: Workspace, Workgroup, Workspace member, Workgroup member, Workgroup document, Workgroup folder, Workgroup revision - Myspace: Document - Upload request: Upload request, Upload request Group, Upload request URL, Upload request document - Share: Share entry, Anonymous share - Guest: Guest, Reset password - Contact: Contact, Contact list - User: Account, Authentication, JWT token. - Administration: Domain, User filter, Workgroup filter, Workspace filter, Functionality - I can select one or multiple resource types from the list, then it will be displayed as a filter criteria in the row below as: "Resource type: [ selected option1 ] or [selected option2 ] or ..." and a delete icon next to it. - If I click enter, the system will search all the audit logs that belong to selected resource type. - Resource name: - When I select this filter, there will be a dialog that allow me to input text amd click button Apply - Then it will be displayed as a filter criteria in the row below: "Resource name: inputted text" and a delete icon next to it. - If I click Enter, the system will search all the audit logs that has resource name contains inputted text. - Action: - when I select this filter, there will be a drop-down list listing all actions of audit logs - I can select one action from the list, then it will be displayed as a filter criteria in the row below as: "Action: [ selected option1 ] or [ selected option2 ] or ..." and a delete icon next to it. - If I click enter, the system will search all the audit logs that belong to selected action - Actor: - When I select this filter, there will be a dialog with a search field - when I input some characters in the search field, the system will display suggestion list and I can select one actor from the list. The actor list will include normal user, administrator, system - I can search actor by email or uuid - Then it will be displayed as a filter criteria in the row below: "Actor: selected user" and a delete icon next to it. - If I click Enter, the system will search all the audit logs that were executed by the selected actor - Auth user: - When I select this filter, there will be a dialog with a search field - when I input some characters in the search field, the system will display suggestion list and I can select one auth user from the list. - I can search auth user by email or uuid - Then it will be displayed as a filter criteria in the row below: "Auth user: selected user" and a delete icon next to it. - If I click Enter, the system will search all the audit logs which have auth user as selected. - I can filter audit logs by one of above criteria or combine them - Each search criteria in the search bar is seperated by a delete icon. I can click this icon to delete the criteria - I can also click button Clear filter to delete all current selected filter **2. Display the result** - After selecting filter, I click button Enter, the system will execute searching audit logs with selected filter conditions and display the result below, including columns: - Domain - Actor - Action - Resource type - Resource name - Date: When I hover the date, there will be a popover that displays detail date - time - Details #### Postconditions - With filters Resources type and Action, user can select multiple options and the search operator for these 2 filters is "Or" - With filter Actor and Resource name, user can only search by one option - The audit logs list will be paginated with default row is 25, I can change the number at the bottom of page. - In the audit log table, I can sort ascending and descending in each column - Default sort is latest date time column - If I select option All domains, the result will show logs of my domain and my all nested domains [Back to Summary](#summary) ## UI Design #### Mockups            #### Final design [Back to Summary](#summary) ## Misc [Back to Summary](#summary) ================================================ FILE: documentation/EN/epics/new-admin-portal/story-546-admin-can-see-if-an-action-is-perfomed-by-technical-account.md ================================================ # Summary * [Related EPIC](#related-epic) * [Definition](#definition) * [UI Design](#ui-design) * [Misc](#misc) ## Related EPIC * [New admin portal](./README.md) ## Definition #### Preconditions - Given that I am Nested admin or Root admin of LinShare #### Description - After log-in successfully to Admin Portal, I selec History tab - I input some filter criteria and click enter - The result will be displayed in the list below - In column "Actor", I can see the name of the actor - In LinShare, one action can be performed by: - A user who logs-in his account in User UI and perform the action on his own. The actor field will display user's name - An Administrator who logs in his Admin UI anf perform an action. In this case, the actor field will display "Administrator" - A Technical account who performs the action on behalf of a user that he has been delegated. In this case, auth user will be different with actor. - When an action is performed by a technical account, the actor displayed in the trace list is the name of the user. There will be an information icon next to actor name, If I hover/click on this icon, there will be a popover:" This action is performed by [technical account's name] on behalf of [user name] #### Postconditions [Back to Summary](#summary) ## UI Design #### Mockups  #### Final design [Back to Summary](#summary) ## Misc [Back to Summary](#summary) ================================================ FILE: documentation/EN/epics/new-admin-portal/story-55-admin-manage-function-mine-type.md ================================================ # Summary * [Related EPIC](#related-epic) * [Definition](#definition) * [UI Design](#ui-design) * [Misc](#misc) ## Related EPIC * [New admin portal](./README.md) ## Definition #### Preconditions - Given that am super admin or nested admin of LinShare admin - After log-in successfully, I go to Configuration Tab - I click on Parameters, then select Mime type, the screen setting for this feature will be opened. #### Description - On the screen title, I can see a collapsible legend:" By enabling this functionality, the Mime policy which is configured in Domain detail page will be applied for this domain ". - There is only Activation policy which includes 2 toggles: - Enable functionality: When I click on the icon "i", I can see a collapsible legend: - If this toggle is switched on, when user of this domain upload a file, it must comply with the Mime policy of the domain - If the toggle is disabled, the uploaded document is not validated by Mime policy. - Allow nested admin to override "Enable functionality": Toggle. When I click on the icon "i", I can see a collapsible legend: " Once activated, nested admin can override the setting "Enable functionality" for his own domain. When disabled, the value of setting "Enable functionality" is applied for all nested domains and nested admin cannot update" - The rule is as same as toggle (1.2) in story 43. Admin manage function anonymous URL #### Post-conditions The rule is as same as Post-condition of Story 43. Admin manage function anonymous URL. [Back to Summary](#summary) ## UI Design #### Mockups https://www.figma.com/proto/cxt7NfZNneW8yJB4SMlM1B/%5BAdmin%5D-System-%26-Configuration?node-id=1824%3A57205&scaling=min-zoom&page-id=1823%3A49247 #### Final design [Back to Summary](#summary) ## Misc [Back to Summary](#summary) ================================================ FILE: documentation/EN/epics/new-admin-portal/story-555-admin-can-view-all-traces-related-to-a-specific-resource.md ================================================ # Summary * [Related EPIC](#related-epic) * [Definition](#definition) * [UI Design](#ui-design) * [Misc](#misc) ## Related EPIC * [New admin portal](./README.md) ## Definition #### Preconditions - Given that I am Nested admin or Root admin of LinShare #### Description - After log-in successfully to Admin Portal, I select Activities tab - I input some filter criteria and click enter - The result will be displayed in the list below - On Detail description column, the actor and resource name are hyper-link, when I click on the link, it will open resource detail (if any). - When I click on a specific resource or hover the resource, there will be a popover with option: "View all related traces " - When I select this option, the system will search and display all related traces of that specific resource: - The condition for the trace to appear on this list is because some other resources consider this resource as related (see 'relatedResources' backend field) - For example: When a guest account is updated the name from "A" to "B" - Currently, in the Activities list, If user search for resource name "A", he only sees the traces that have resource name "A" and he cannot see all events of that guest after the guest's name is changed - Now, when user click "View all related activities" of guest "A', he can see any activity related to that resource ID, no matter that the guest's name has changed. #### Postconditions - When I select option :"View all related traces", all current filters will be cleared - On result screen View all related traces of the resource, I can click the button Close to back to the default screen. [Back to Summary](#summary) ## UI Design #### Mockups  #### Final design [Back to Summary](#summary) ## Misc [Back to Summary](#summary) ================================================ FILE: documentation/EN/epics/new-admin-portal/story-559-admin-can-filter-guest-with-no-moderator.md ================================================ # Summary * [Related EPIC](#related-epic) * [Definition](#definition) * [UI Design](#ui-design) * [Misc](#misc) ## Related EPIC * [New admin portal](./README.md) ## Definition #### Preconditions * Given that I am an admin of LinShare * After log-in successfully to Admin portal from the left menu, I click on the option "User" #### Description * The screen User list will be opened, and I can see the search bar * When I click on the search bar, there will be a drop-down list of search criteria [story12](story-12-admin-view-and-search-user-list.md) * When I select Account type = Guest, there will be a new criteria appearing in the list: "Number of Moderator" * When I select this search criteria, the search bar will display Number of Moderators = "inputted number". I can only input number as 0,1,2 ... and click Enter, the search tag is completed with a delete icon. * I click enter the system will search for guests with number of moderators defined. #### Postconditions * If I want to filter Guests with no moderator, I input "Number of moderators" = 0 * In Search bar, If I do not select "Account type" = "Guest", the criteria "Moderator" will not be available. [Back to Summary](#summary) ## UI Design #### Mockups #### Final design [Back to Summary](#summary) ## Misc [Back to Summary](#summary) ================================================ FILE: documentation/EN/epics/new-admin-portal/story-56-admin-manage-function-second-factor-authentication.md ================================================ # Summary * [Related EPIC](#related-epic) * [Definition](#definition) * [UI Design](#ui-design) * [Misc](#misc) ## Related EPIC * [New admin portal](./README.md) ## Definition #### Preconditions - Given that am super admin or nested admin of LinShare admin - After log-in successfully, I go to Configuration Tab - I click on Parameters, then select Second factor authentication, the screen setting for this feature will be opened. #### Description - I click on the icon "i" next to the screen title to see the collapsible legend: "The functionality manages second factor authentication feature. Any changes of this page will have impact on all users of LinShare" - There are 3 policies and 1 default parameter : - Activation policy includes 2 toggles: - Enable functionality: Toggle. When I click on the icon "i", I can see a collapsible legend:"By enabling, users in this domain can use the second factor authentication for their account." - If this toggle is switched on, When user logged-in his LinShare account and click human icon on top right, he can select the option "Second factor authentication", then the setting 2FA page will be opened. - If the toggle is disabled, user will not see the option Second factor authentication when clicking on human icon. - Allow nested admin to override "Enable functionality": Toggle. When I click on the icon "i", I can see a collapsible legend: " Once activated, nested admin can override the setting "Enable functionality" for his own domain. When disabled, the value of setting "Enable functionality" is applied for all nested domains and nested admin cannot update" - The rule is as same as toggle (1.2) in story 43. Admin manage function anonymous URL - Configuration policy includes 2 toggles: - Configure functionality: Allow nested admin to change the default parameter. When I click on the icon "i", I can see a collapsible legend: "By enabling, you allow your nested domain admin to change default parameter field in his domain". - The rule is as same as toggle (2.1) in story 43. Admin manage function anonymous URL - Allow nested to override "Configure functionality": When I click on the icon "i", I can see a collapsible legend:"By enabling, nested admin can re-enable the Configure functionality toggle and then change the default parameter" - The rule is as same as toggle (2.2) in story 43. Admin manage function anonymous URL - Delegation policy includes 2 toggles: - Allow user to remove shared key: When I click on the icon "i", I can see a collapsible legend: - If the toggle is on, When user is already set up 2FA for his LinShare account, he can access 2FA setting page and remove Shared key then create a new one - If the toggle is off, user cannot remove the shared key - Allow nested admin to override Delegation: When I click on the icon "i", I can see a collapsible legend: " Once activated, nested admin can override the setting "Allow user to remove shared key" for his own domain. When disabled, the value of setting "Allow user to remove shared key" is applied for all nested domains and nested admin cannot update" - The rule is as same as toggle (3.2) in story 43. Admin manage function anonymous URL - Default parameter: A checkbox. When I click on the icon "i", I can see a collapsible legend:"This setting decides if second factor authentication is required or optional for this domain users" - If the checkbox is selected, the text displays "The second factor authentication will be required for all users". If user has not set up 2FA, after logging-in with username and password, he is automatically navigated to 2FA setting page and cannot access other screens until he finishes the setting. - If the checkbox is not selected, the texts displays "The second factor authentication can be enabled by users (optional)." The user can decide to use second factor authentication or not. #### Post-conditions The rule is as same as Post-condition of Story 43. Admin manage function anonymous URL. [Back to Summary](#summary) ## UI Design #### Mockups #### Final design [Back to Summary](#summary) ## Misc [Back to Summary](#summary) ================================================ FILE: documentation/EN/epics/new-admin-portal/story-565-admin-can-manage-technical-account.md ================================================ # Summary * [Related EPIC](#related-epic) * [Definition](#definition) * [UI Design](#ui-design) * [Misc](#misc) ## Related EPIC * [New admin portal](./README.md) ## Definition #### Preconditions * Given that I am root admin of LinShare * After log-in successfully to Admin portal, I select menu Administration => Technical account * The screen listing technical accounts will be displayed #### Description **UC1. View and filter technical account list** * In The screen Technical account list, I can see: * Information tooltip: When I click on the icon information, a page description will be shown, then I click on the icon again, the description will be collapsed. * Technical account list including: * User icon * Name * Email * Status: Enabled or disabled * Role: Currently there is only 1 role : Delegation * Locked account: If the account has been locked, there will be a label. * A search bar * A sort field * When I click on the search bar, there will be a drop-down list of search criteria including: * Status: When select this search criteria, the search bar will display: Status = "dropdown list" The options are: Enabled/Disabled. I select one status, the search tag is completed with a delete icon.Then I click enter the system will search technical account which have selected status. * Name: When I select this search criteria, the search bar will display: Name contains = "text input". I click Enter, the search tag is completed and an icon Delete. Then I click enter the system will search technocal accounts which have field Name contains text inputted. * Identifier: When I select this search criteria, the search bar will display: Id = "text input". I click Enter, the search tag is completed and an icon Delete. Then I click enter the system will search technical accounts which have id contains inputted text. * Locked account : When I select this search criteria, the search bar will display: Locked account = "dropdown list". with options Yes/No. I select one option, the search tag is completed with a delete icon.Then I click enter the system will search technical account which have been locked or unlocked. * When I start typing on search bar, the system will show default search criteria is email - I can search technical account by one of above criteria or combine them - Each search criteria in the search bar is seperated by a delete icon. I can click this icon to delete the criteria - After select one criterion in search bar, that option is hidden in the dropdown list of search criteria. * When I click on Sort field, there will be drop-down list containing sort criteria: Name, Email, Creation date, Modification date. * I can select sort criteria from the list and use the arrow up and down to change order of sorting. * The default number of displayed items is 25, I can change the number of items at the bottom of page. **UC2. Create a technical account** - On listing technical account screen, I click on button "Create", the screen Create new technical account will be displayed. - On this screen, I can input fields: - Name: Mandatory, text field - Email: Mandatory, text field - Role: A drop-down list. Currently, there is only 1 role: Delegation and it is selected by default - Checkbox: Enable/Disable account - Password field: A text field. When I finish inputting this field, the system will check if the password is in compliance with the rules and display error messages if any. - Confirm password: This field must be as same as Value of field Password above - After I input all field and click button Create, system will validate, if there is no error, the account is created successfully with a toast message - If there is any blank field, it will be highlighted in red with an error message - If the email is already existing in the system, there will be an error message - If the password is not correct, the help message will be highlighted in red - If the value of "Confirm password" is not matched with "Password", there will be an error message **UC3 Edit a technical account** - On the technical account list, I select one account then the screen Account detail will be opened - On this screen I can see 2 tabs: Account detail and Change password - On the first tab Account detail, I can see: - None-editable information includes: - Identifier: This field is generated by the system and is used to log-in - Role - Creation date - Modification date - Editable fields includes: - Name - Email - Checkbox: I can tick/un-tick the checkbox to enable/disable account - Permissions: This includes a list of all available permissions for this user's role. I can select/unselect checkbox of each permission on the list - When I click button Save, the system will validate if there is no error, the updates are saved - On the second tab Change password, I can see 3 fields: - Current password - New password - Retype new password - After I input 3 fields and click button Save, the system will validate: - If the current password is correct - If the New password is complied with the rule above - IF the Re-type new password is matched with New password - If there is no error, the new password is saved and there will be a notification message **UC4. Delete a technical account** - Delete 1 account: - On Account detail screen, I can see a button Delete - When I click on this button, there will be a confirmation popup: You are about to delete this technical account, this procedure is irreversible. Do you want to proceed??" - If I choose Yes, the account is removed and I am back to the listing technical account screen. - Delete multiple account: - On Listing account screen, I can select multiple account and see option Delete - When I select Delete, there will be a confirmation popup. - If I choose Yes, all selected account will be removed from the list **UC5. Lock/unlock a technical account** - When a technical account log-in unsuccessfully several times, the account will be locked by the rule: - After 3 attempts : account is locked for 10 minutes. - After 6 attempts : account is locked for 20 minutes. - After 9 attempts : account is locked for 60 minutes (1 hour) - After 12 attempts : account is locked for 1440 minutes (1 day) - After 15 attempts : account is locked indefinitely. - After locking period, the account will be unlocked automatically, except fot the case locking indefinitely. - Unlock a single account: - When a technical account is locked, when I open detail screen of that account on admin portal, I can see a message "This user is locked due to many failed login attempts" and a button Unlock - When I click on this button, the account is unlocked. - Unlock multiple accounts: - On listing account screen, If I select multiple locked accounts, the option Unlock will be enabled. - I select Unlock, all selected account will be unlocked. #### Postconditions - When a technical account is created successfully, an identifier is generated for that account and user can use this information with password to log-in. - This technical account can perform action on behalf of any user in the platform. The permissions can be edited after account creation. - After account deletion, user cannot use information of that account to log-in to LinShare on behalf of other user - When an account is disabled, he cannot log-in to LinShare [Back to Summary](#summary) ## UI Design #### Mockups     #### Final design [Back to Summary](#summary) ## Misc [Back to Summary](#summary) ================================================ FILE: documentation/EN/epics/new-admin-portal/story-57-admin-manage-function-acknowledgement-of-share-creation.md ================================================ # Summary * [Related EPIC](#related-epic) * [Definition](#definition) * [UI Design](#ui-design) * [Misc](#misc) ## Related EPIC * [New admin portal](./README.md) ## Definition #### Preconditions - Given that am super admin or nested admin of LinShare admin - After log-in successfully, I go to Configuration Tab - I click on Parameters, then select Acknowledgement of share creation, the screen setting for this feature will be opened. #### Description - On the screen title, I can see a collapsible legend:" This functionality allows user to receive email notification when he shares a document in LinShare." - There are 3 policies and 1 parameter: - Activation policy includes 2 toggles: - Enable functionality: When I click on the icon "i", I can see a collapsible legend: - If this toggle is switched on, When user shares a document, he can see a checkbox "Sharing acknowledgement" in Advanced options. - If the toggle is disabled, When user creates a new guest, he cannot see that checkbox. - Allow nested admin to override "Enable functionality": Toggle. When I click on the icon "i", I can see a collapsible legend: " Once activated, nested admin can override the setting "Enable functionality" for his own domain. When disabled, the value of setting "Enable functionality" is applied for all nested domains and nested admin cannot update" - The rule is as same as toggle (1.2) in story 43. Admin manage function anonymous URL - Configuration policy includes 2 toggles: - Configure functionality: Allow nested admin to change the default parameter. When I click on the icon "i", I can see a collapsible legend: "By enabling, you allow your nested domain admin to change default parameter field in his domain". - The rule is as same as toggle (2.1) in story 43. Admin manage function anonymous URL - Allow nested to override "Configure functionality": When I click on the icon "i", I can see a collapsible legend:"By enabling, nested admin can re-enable the Configure functionality toggle and then change the default parameter" - The rule is as same as toggle (2.2) in story 43. Admin manage function anonymous URL - Delegation policy includes 2 toggles: - Allow user to change default parameter: When I click on the icon "i", I can see a collapsible legend: - If the toggle is on, when user shares a document, he can select/un-select the checkbox "Sharing acknowledgement". - If the toggle is off, user cannot change value of this checkbox. The checkbox value depends on the default parameter below. - Allow nested admin to override Delegation: When I click on the icon "i", I can see a collapsible legend: " Once activated, nested admin can override the setting "Allow user to change default parameter" for his own domain. When disabled, the value of setting "Allow user to change default parameter" is applied for all nested domains and nested admin cannot update" - The rule is as same as toggle (3.2) in story 43. Admin manage function anonymous URL - Parameter: A checkbox - When I click on the icon "i", I can see a collapsible legend:" This parameter will decide the default value of the checkbox "Sharing acknowledgement" on Advanced option of guest creation form" - If the checkbox is selected, the text displays: "An acknowledgement will be sent to the issuer of the share." In sharing form, the checkbox "Sharing acknowledgement" will be selected and the issuer will receive an email when the document is shared successfully. - If the checkbox is selected, the text displays: "No acknowledgement will be sent to the issuer of the share". The checkbox "Sharing acknowledgement" in sharing form is un-selected by default. #### Post-conditions The rule is as same as Post-condition of Story 43. Admin manage function anonymous URL. [Back to Summary](#summary) ## UI Design #### Mockups #### Final design [Back to Summary](#summary) ## Misc [Back to Summary](#summary) ================================================ FILE: documentation/EN/epics/new-admin-portal/story-570-admin-can-view-statistics-about-users-and-storage.md ================================================ # Summary * [Related EPIC](#related-epic) * [Definition](#definition) * [UI Design](#ui-design) * [Misc](#misc) ## Related EPIC * [New admin portal](./README.md) ## Definition #### Preconditions - Given that am super admin or nested admin of LinShare - After log-in successfully, I go to Tab Reporting - A new page will be opened. #### Description - On this screen, I can see: **UC1** - Total numbers of users: - If I am root admin, and filter Domain I select "All domain", I can see total number of users of whole platform - If I am nested admin,and filter Domain I select "All domain", I can see total number of users of my domain and my nested domain (if any) - When I select a domain in the filter, the screen will display number of users in selected Domain - Number of guests: - If I am root admin,and filter Domain I select "All domain" I can see total number of guests of all domains - If I am nested admin, and filter Domain I select "All domain", I can see total number of guests of my domain and my nested domains - Currently, all guests under a top domain are stored in a dedicated domain, no matter what sub-domain created the guest account. In this screen: - When I select a TOP domain in the filter, the guest number = created guests from this TOP domain - When I select a SUB domain in the filter, the guest number = created guests from this SUB domain - When I select a guest domain in the filter, the number of guests = Total guest in this domain = total of guest of all SUB domains under that top domain, adn the top domain itself; For e.g: TOP domain A has 1 guest domain and 2 sub domains A1 and A2. - If I select Top domain A in filter, the guest number = Guest created from Top domain A domain A1 + Guest created from A2 = Guest number in guest domain - If I select sub-domain A1 in filter, the guest number = Guest created from domain A1 - If I select sub- domain A2 in filter the guest number = guest created from domain A2 - If I select Guest domain under Top domain A, the guest number = Total guests = Guest created from Top domain A+ Guests created from sub-domain A1 + Guest created from sub-domain A2 **UC2** - I can see a list of top 100 of users by their used quota - In this list, I can see information: - The order: Base on user'used storage - User's name - Email - Domain - Storage used of the user/current quota - If in filter Domain I select "All domain": - If I am root domain, this top 100 users list by their used quota will be calculated on whole platform - If I am nested domain, this top 100 users list by their used quota will be calculated on my domain and my nested domains - If in filter Domain I select a domain, this top 100 users list by their used quota will be calculated on selected domain #### Post-conditions [Back to Summary](#summary) ## UI Design #### Mockups #### Final design [Back to Summary](#summary) ## Misc [Back to Summary](#summary) ================================================ FILE: documentation/EN/epics/new-admin-portal/story-571-admin-can-filter-user-by-lock-status.md ================================================ # Summary * [Related EPIC](#related-epic) * [Definition](#definition) * [UI Design](#ui-design) * [Misc](#misc) ## Related EPIC * [New admin portal](./README.md) ## Definition #### Preconditions * Given that I am an admin of LinShare * After log-in successfully to Admin portal from the left menu, I click on the option "User" #### Description * The screen User list will be opened, and I can see the search bar * * When I click on the search bar, there will be a drop-down list of search criteria [story12](story-12-admin-view-and-search-user-list.md) * There is a new criteria: "Locked account" * If I select this search criteria, the search bar will display: Locked account = "dropdown list". with options Yes/No. I select one option, the search tag is completed with a delete icon.Then I click enter the system will search technical account which have been locked or unlocked. * If the user is locked, in the user list page, there will e a lock label in that account #### Postconditions * Root admin can view and filter all users in the platform * Nested admin can view and filter users in his domain and nested domain (if any) [Back to Summary](#summary) ## UI Design #### Mockups #### Final design [Back to Summary](#summary) ## Misc [Back to Summary](#summary) ================================================ FILE: documentation/EN/epics/new-admin-portal/story-572-admin-can-perform-bulk-operations-on-users-listing-page.md ================================================ # Summary * [Related EPIC](#related-epic) * [Definition](#definition) * [UI Design](#ui-design) * [Misc](#misc) ## Related EPIC * [New admin portal](./README.md) ## Definition #### Preconditions * Given that I am root admin or nested admin of LinShare * After log-in successfully to Admin portal, I select menu Administration => Users * The listing user page will be displayed. #### Description **UC1. Delete multiple user accounts** - On Listing account screen, I can select multiple account and see option Delete - When I select Delete, there will be a confirmation popup. - If I choose Yes, all selected accounts will be removed from the list **UC2. Unlock multiple accounts** - On listing account screen, If I select multiple locked accounts, the option Unlock will be enabled. - I select Unlock, all selected account will be unlocked. #### Postconditions - Root admin can perform bulk operations in user lists of whole platform - Nested admin can perform bulk operations in user list of his domain and nested domain (if any) - Admin can perform bulk operations in search result screen: For e.g, admin can search for locked account then unlock them . [Back to Summary](#summary) ## UI Design #### Mockups #### Final design [Back to Summary](#summary) ## Misc [Back to Summary](#summary) ================================================ FILE: documentation/EN/epics/new-admin-portal/story-574-super-admin-can-manage-Remote-server-and-Remote-filters-in-System-page.md ================================================ # Summary * [Related EPIC](#related-epic) * [Definition](#definition) * [UI Design](#ui-design) * [Misc](#misc) ## Related EPIC * [New admin portal](./README.md) ## Definition #### Preconditions * Given that I am root admin of LinShare * I log-in successfully to Admin portal #### Description - I can see a new menu tab: System - When I click on this tab, I can see 3 items: Remote servers and Remote filters, Providers - When I select Remote servers, the screen listing remote servers will be opened and I can create, edit ,delete... remote servers as currently. - When I select Remote filters, I can see 3 options User filters, Group filters and Workspace filters. I can select one of them then go to that remote filter listing screen and I can create, edit ,delete... remote filters as currently. - When I select Providers, I can see the list of Top domains: - I can click on chevron icon to see the nested domains - On each domain in the lít, I can see an option "See Providers" - and when I click on this option, The screen Provider listing of that domain will be opened and I can create, edit ,delete... user providers/workgroup provider/workspaces providers as currently. #### Postconditions - The domain tree will not be available - Only root admin can see the tab: " System ", nested admin can not see/access to this tab - [Back to Summary](#summary) ## UI Design #### Mockups   #### Final design [Back to Summary](#summary) ## Misc [Back to Summary](#summary) ================================================ FILE: documentation/EN/epics/new-admin-portal/story-575-admin-can-see-list-of-child-domains-that-he-manages.md ================================================ # Summary * [Related EPIC](#related-epic) * [Definition](#definition) * [UI Design](#ui-design) * [Misc](#misc) ## Related EPIC * [New admin portal](./README.md) ## Definition #### Preconditions * Given that I am root admin or nested admin of LinShare * I log-in successfully to Admin portal #### Description **UC1. See the list of child domains** - I click on Configuration tab: - On this page, I can see the list of domains: - If I am root admin, I can see every domain in the whole platform - If I am nested admin, I can see my own domain and nested domain (if any) - I can open/expand the domain list to see nested domains - In each domain, I can see a three-dot button that when I click on, there are options: - View domain detail - Create a child domain: Only root admin can see this option - Settings **UC2. Delete multiple domains** - Only root admin can delete domains - On the listing domain screen, I can select multiple domains - There will be a button "Delete" - When I click on this button, there will be a confirmation popup. - If I choose Yes, all selected domains will be removed from the list - When I select a domain to delete, its nested domains must be selected too. **UC3. Search domain by name** - In domain listing screen, I can see a search bar "Search by name" - I input text in Search bar then click Enter, the system will search for domains which have name matching with inputted text - The result will include all child domain levels #### Postconditions - paginated and the default number of displayed items is 25, I can change this number at the bottom of page. [Back to Summary](#summary) ## UI Design #### Mockups  #### Final design [Back to Summary](#summary) ## Misc [Back to Summary](#summary) ================================================ FILE: documentation/EN/epics/new-admin-portal/story-576-root-admin-can-create-a-child-domain-in-domain-listing-screen.md ================================================ # Summary * [Related EPIC](#related-epic) * [Definition](#definition) * [UI Design](#ui-design) * [Misc](#misc) ## Related EPIC * [New admin portal](./README.md) ## Definition #### Preconditions * Given that I am root admin of LinShare * I log-in successfully to Admin portal #### Description - I click on Configuration tab: - On this page, I can see the list of domains: - As a root admin, I can see every domain in the whole platform - I can open/expand the domain list to see nested domains - In each domain, I can see a three-dot button that when I click on, there are options: - View domain detail - Create a child domain: Only root admin can see this option. - Settings - When I select option:"Create a child domain" from Root domain, the screen Create Top domain will be opened. - When I select option:"Create a child domain" form Top domain, I can choose to create a Sub-domain or Guest domain if guest domain of that TOP domain - I can continue inputting information to create a domain as currently. #### Postconditions - After a child domain is created successfully, it will be appeared on the domain listings under it parent domain. [Back to Summary](#summary) ## UI Design #### Mockups  #### Final design [Back to Summary](#summary) ## Misc [Back to Summary](#summary) ================================================ FILE: documentation/EN/epics/new-admin-portal/story-577-admin-can-see-settings-of-a-domain.md ================================================ # Summary * [Related EPIC](#related-epic) * [Definition](#definition) * [UI Design](#ui-design) * [Misc](#misc) ## Related EPIC * [New admin portal](./README.md) ## Definition #### Preconditions * Given that I am root admin or nested admin of LinShare * I log-in successfully to Admin portal #### Description - I click on Configuration tab: - On this page, I can see the list of domains: - If I am root admin, I can see every domain in the whole platform - If I am nested admin, I can see my own domain and nested domain (if any) - I can open/expand the domain list to see nested domains - In each domain, I can see a three-dot button that when I click on, there are options: - View domain detail - Create a child domain: Only root admin can see this option. - Settings - When I select option "View domain detail", the Detail screen of that selected domain is opened. I can edit as currently - When I select option "Settings", I can see a list of setting items including: - Domain detail - Parameters (Aka Functionalities) - Mine type policies - Welcome messages - Quota - Public key (JWT) - I can select one item on the list and continue setting as currently. - On each setting screen, I can see a button Next and Previous and when I click on this button, I am navigated to this setting of next/previous sibling domain (domain at same level). - On the breadcrumb, I can see the full path of current domain. I can select a parent/child domain in the breadcrumb. - Eg: If I am in currently on a setting screen, e.g Parameters of a sub-domain A1 , then I click button :"Next", then I am navigated to the Parameters setting screen of sub-domain A2. Or in breadcrumb, I can select it's top domain A or root domain (if I am root admin). #### Postconditions [Back to Summary](#summary) ## UI Design #### Mockups #### Final design [Back to Summary](#summary) ## Misc [Back to Summary](#summary) ================================================ FILE: documentation/EN/epics/new-admin-portal/story-58-admin-manage-function-share-expiration.md ================================================ # Summary * [Related EPIC](#related-epic) * [Definition](#definition) * [UI Design](#ui-design) * [Misc](#misc) ## Related EPIC * [New admin portal](./README.md) ## Definition #### Preconditions - Given that am super admin or nested admin of LinShare admin - After log-in successfully, I go to Configuration Tab - I click on Parameters, then select Share expiration, the screen setting for this feature will be opened. #### Description - There are 2 settings in this screen: Share expiration is original function and Deleting files on expiration shares is sub-function **Original function: Share expiration** - On the screen title, I can see a collapsible legend:" By enabling, this functionality allows user to set expiration date for shared document in LinShare.When this functionality is not activated, the below sub-function will not work" - There are 3 policies and 2 parameters: - Activation policy includes 2 toggles: - Enable functionality: When I click on the icon "i", I can see a collapsible legend: - If this toggle is switched on, When user shares a document, he can see the field Expiration date - If the toggle is disabled, user cannot see the field Expiration date in Sharing form - Allow nested admin to override "Enable functionality": Toggle. When I click on the icon "i", I can see a collapsible legend: " Once activated, nested admin can override the setting "Enable functionality" for his own domain. When disabled, the value of setting "Enable functionality" is applied for all nested domains and nested admin cannot update" - The rule is as same as toggle (1.2) in story 43. Admin manage function anonymous URL - Configuration policy includes 2 toggles: - Configure functionality: Allow nested admin to change the default parameter. When I click on the icon "i", I can see a collapsible legend: "By enabling, you allow your nested domain admin to change default parameter field in his domain". - The rule is as same as toggle (2.1) in story 43. Admin manage function anonymous URL - Allow nested to override "Configure functionality": When I click on the icon "i", I can see a collapsible legend:"By enabling, nested admin can re-enable the Configure functionality toggle and then change the default parameter" - The rule is as same as toggle (2.2) in story 43. Admin manage function anonymous URL - Delegation policy includes 2 toggles: - Allow user to change default parameter: When I click on the icon "i", I can see a collapsible legend: - If the toggle is on, when user shares a document, he can change default value of expiration date - If the toggle is off, user cannot change value of Expiration date. The field value depends on the default parameter below. - Allow nested admin to override Delegation: When I click on the icon "i", I can see a collapsible legend: " Once activated, nested admin can override the setting "Allow user to change default parameter" for his own domain. When disabled, the value of setting "Allow user to change default parameter" is applied for all nested domains and nested admin cannot update" - The rule is as same as toggle (3.2) in story 43. Admin manage function anonymous URL - Parameters: - When I click on icon "i", I can see a collapsible legend: "User will see the field "Expiration date" on Sharing form. The default expiration date is calculated as creation date + default value. The date range is defined between [Creation date] and [ creation date + max value] " - The parameter include 2 fields: - Default value: A text field that only accepts number with a drop-down list contains options: Month, week, day. - Max value: A text field that only accepts number with a drop-down list contains options: Month, week, day or I can select the checkbox "Unlimited" for the max value. **Sub-function: Deleting files on expiration shares** - When I click on the screen title, I can see a collapsible legend:" This functionality allows admin to set if the shared document is removed on the last share's expiration or not" - There is only Configuration policy and one Parameter - Configuration policy includes 2 toggles: - Configure functionality: Allow nested admin to change the default parameter. When I click on the icon "i", I can see a collapsible legend: "By enabling, you allow your nested domain admin to change default parameter field in his domain". - The rule is as same as toggle (2.1) in story 43. Admin manage function anonymous URL - Allow nested to override "Configure functionality": When I click on the icon "i", I can see a collapsible legend:"By enabling, nested admin can re-enable the Configure functionality toggle and then change the default parameter" - The rule is as same as toggle (2.2) in story 43. Admin manage function anonymous URL - Parameter: A checkbox - If the checkbox is selected, the text displays: The document will be removed at the expiration of the last share. The document will be removed on sharer's Myspace on expiration date of the last share. - If the checkbox is not selected, the text displays: The document will not be removed at the expiration of the last share. #### Post-conditions The rule is as same as Post-condition of Story 43. Admin manage function anonymous URL. [Back to Summary](#summary) ## UI Design #### Mockups #### Final design [Back to Summary](#summary) ## Misc [Back to Summary](#summary) ================================================ FILE: documentation/EN/epics/new-admin-portal/story-59-admin-manage-function-undownloaded-shared-document-alert.md ================================================ # Summary * [Related EPIC](#related-epic) * [Definition](#definition) * [UI Design](#ui-design) * [Misc](#misc) ## Related EPIC * [New admin portal](./README.md) ## Definition #### Preconditions - Given that am super admin or nested admin of LinShare admin - After log-in successfully, I go to Configuration Tab - I click on Parameters, then select Undownloaded shared document alert, the screen setting for this feature will be opened. #### Description - There are 2 settings in this screen: Undownloaded shared document alert is original function and Undownloaded shared document alert - Days before the alert is sub-function **Original function: Undownloaded shared document alert** - On the screen title, I can see a collapsible legend:" By enabling this functionality, users will have the opportunity to get notified when a document has not been downloaded following a share. That notification is sent if at least one document of the share has not been downloaded at all.When this functionality is not activated, the below sub-function will not work" - There are 3 policies and 1 parameter: - Activation policy includes 2 toggles: - Enable functionality: When I click on the icon "i", I can see a collapsible legend: - If this toggle is switched on, When user shares a document, he can see the checkbox "Undownloaded document alert" in advanced options. - If the toggle is disabled, user cannot see the checkbox - Allow nested admin to override "Enable functionality": Toggle. When I click on the icon "i", I can see a collapsible legend: " Once activated, nested admin can override the setting "Enable functionality" for his own domain. When disabled, the value of setting "Enable functionality" is applied for all nested domains and nested admin cannot update" - The rule is as same as toggle (1.2) in story 43. Admin manage function anonymous URL - Configuration policy includes 2 toggles: - Configure functionality: Allow nested admin to change the default parameter. When I click on the icon "i", I can see a collapsible legend: "By enabling, you allow your nested domain admin to change default parameter field in his domain". - The rule is as same as toggle (2.1) in story 43. Admin manage function anonymous URL - Allow nested to override "Configure functionality": When I click on the icon "i", I can see a collapsible legend:"By enabling, nested admin can re-enable the Configure functionality toggle and then change the default parameter" - The rule is as same as toggle (2.2) in story 43. Admin manage function anonymous URL - Delegation policy includes 2 toggles: - Allow user to change default parameter: When I click on the icon "i", I can see a collapsible legend: - If the toggle is on, when user shares a document, he can change default value of checkbox "Undownloaded document alert" - If the toggle is off, user cannot change default value of this checkbox - Allow nested admin to override Delegation: When I click on the icon "i", I can see a collapsible legend: " Once activated, nested admin can override the setting "Allow user to change default parameter" for his own domain. When disabled, the value of setting "Allow user to change default parameter" is applied for all nested domains and nested admin cannot update" - The rule is as same as toggle (3.2) in story 43. Admin manage function anonymous URL - Default parameter: A checkbox - When I click on icon "i", I can see a collapsible legend: "User will see the checkbox "Undownloaded document alert" on Sharing form. This setting will decide the default value of the checkbox" - If the checkbox is ticked, the text displays: The undownloaded shared document alert is activated - If the checkbox is un-ticked, the text displays: The undownloaded shared document alert is deactivated **Sub-function: Number of work days before undownloaded alert"** - On the screen title, I can see a collapsible legend: "When the checkbox "Undownloaded document alert" is ticked on user's Sharing form, the field "Notification date for undownloaded file" is appeared. This setting is for the number of work days (weekends and holidays are excluded) between sharing date and the alert notification date" - There are 2 policies and 2 parameters: - Configuration policy includes 2 toggles: - Configure functionality: Allow nested admin to change the default parameter. When I click on the icon "i", I can see a collapsible legend: "By enabling, you allow your nested domain admin to change default parameter field in his domain". - The rule is as same as toggle (2.1) in story 43. Admin manage function anonymous URL - Allow nested to override "Configure functionality": When I click on the icon "i", I can see a collapsible legend:"By enabling, nested admin can re-enable the Configure functionality toggle and then change the default parameter" - The rule is as same as toggle (2.2) in story 43. Admin manage function anonymous URL - Delegation policy includes 2 toggles: - Allow user to change default parameter: When I click on the icon "i", I can see a collapsible legend: - If the toggle is on, when user shares a document and the checkbox "Undownloaded document alert" is ticked, he can change default value of field "Notification date for undownloaded file" - If the toggle is off, user cannot change the default value of undownloaded notification date. The field value depends on the default parameter below. - Allow nested admin to override Delegation: When I click on the icon "i", I can see a collapsible legend: " Once activated, nested admin can override the setting "Allow user to change default parameter" for his own domain. When disabled, the value of setting "Allow user to change default parameter" is applied for all nested domains and nested admin cannot update" - The rule is as same as toggle (3.2) in story 43. Admin manage function anonymous URL - Parameters: - When I click on icon "i", I can see a collapsible legend: " When the checkbox "Undownloaded document alert is ticked on sharing form, User will see the field "Notification date for undownloaded file". The default date is calculated as creation date + default value. The date range is defined between [Creation date] and [Expiration date] " - The parameter: - Field name: Number of worked days between creation date and the alert notification. - Default value: A text field that only accepts number. #### Post-conditions The rule is as same as Post-condition of Story 43. Admin manage function anonymous URL. [Back to Summary](#summary) ## UI Design #### Mockups #### Final design [Back to Summary](#summary) ## Misc [Back to Summary](#summary) ================================================ FILE: documentation/EN/epics/new-admin-portal/story-599-admin-can-manage-inconsistent-user.md ================================================ # Summary * [Related EPIC](#related-epic) * [Definition](#definition) * [Screenshots](#screenshots) * [Misc](#misc) ## Related EPIC * [New admin portal](./README.md) ## Definition #### Preconditions * Given that am root admin #### Description * After log-in Admin portal successfully, I select Administration tab * Then I select Inconsistent users * On this screen, there will be 2 tabs: USer diagnostic and Inconsistent user list, I select "Inconsistent users list" **UC1. View the list of inconsistent users** - On this tab, I can see a help text: " An inconsistent user is a user who is no longer in any LDAP associated to different domains. This view enables the domain of an inconsistent user so that he become a regular user. Through a user's result, you can edit the information related to him. By selection of a group of users, you can delete them all at one or change their domain." - A consistent user is a user that exists in DB of a domain but not exist in LDAP server of that domain - All inconsistent users of the whole platform will be displayed in the below list: - The list includes: - First name - Last name - Email - Domain name and ID: Name of the domain in DB that user is currently associated to - Role of the user in his domain: Admin or Simple - I can sort by every column, ascending descending **UC2. Search inconsistent user** - In the list of inconsistent users, I can see a Search field - I can search by different criteria: First name, Last name, Email, Domain's name, domain ID - After I select and input search criteria then click Enter, the result will be displayed in the list. **UC3 Migrate user to another domain** - In the list of inconsistent user, I can select one or multiple user, then the actions bar will be enabled - Action bar includes button Migrate, Delete, I select action Migrate - There will be a field "New domain" with a drop-down list of all available top domains and sub-domains (without guest domains). - I select one domain in the list and click button Apply - If the selected domain is current domain, or the user already exists in the targeted domain, there will be a notification message: "user already exists in the targeted domain" - If the user has not existed in the targeted domain, the user will be migrated to the new domain and no longer exists in the old domain. There will be a successful notification message. - In the user's profile page, the domain name will be updated to new domain. - When a user is migrated to a new domain, if that email also exists in LDAP server of that new domain, he will no longer a consistent user and will be disappeared from the inconsistent user list **UC4. Delete consistent user** - In the list of inconsistent user, I can select one or multiple user, then the actions bar will be enabled - Action bar includes button Migrate, Delete, I select action Delete - There will be a confirmation popup - If I choose Yes, the selected users will be deleted from the DB and will disappear from the inconsistent user list. [Back to Summary](#summary) ## UI Design #### Screenshots  #### Final design [Back to Summary](#summary) ## Misc [Back to Summary](#summary) ================================================ FILE: documentation/EN/epics/new-admin-portal/story-60-admin-manage-function-upload-request.md ================================================ # Summary * [Related EPIC](#related-epic) * [Definition](#definition) * [UI Design](#ui-design) * [Misc](#misc) ## Related EPIC * [New admin portal](./README.md) ## Definition #### Preconditions - Given that am super admin or nested admin of LinShare admin - After log-in successfully, I go to Configuration Tab - I click on Parameters, then select Upload request, the screen setting for this feature will be opened. #### Description - There are 11 settings in this screen: Upload request is original function and 10 sub-functions. **Original function: Upload request** - On the screen title, I can see a collapsible legend:" An upload request is a feature through which a person (email) can upload files for a LinShare user, in a temporary and regulated manner. The uploaded documents will impact the issuer’s personal space quota. When this functionality is not activated, the below sub-functions will not work" - There is only 1 policy and 1 parameter in this setting - Activation policy includes 2 toggles: - Enable functionality: When I click on the icon "i", I can see a collapsible legend: - If this toggle is switched on, the feature is enabled, user can see the menu Upload request in his LinShare account. - If the toggle is disabled, the menu Upload request will be hidden in user's LinShare account. - Allow nested admin to override "Enable functionality": Toggle. When I click on the icon "i", I can see a collapsible legend: " Once activated, nested admin can override the setting "Enable functionality" for his own domain. When disabled, the value of setting "Enable functionality" is applied for all nested domains and nested admin cannot update" - The rule is as same as toggle (1.2) in story 43. Admin manage function anonymous URL - Parameters: A text field - When I click on icon "i", I can see a collapsible legend: "This URL will be used as the website base URL for every email notifications that will be sent by the server. ex https://upload-request.linshare.local" **Sub-function 1: Upload request-closure right** - When I click on the screen title, I can see a collapsible legend: - "Close an Upload Request (issuer/recipient): - The issuer and, possibly, the recipient can close an upload request. - The recipient can no longer modify or add documents to the upload request. - The upload request then appears as closed in the current view. - Once an upload request expires, it is automatically closed." - There are 3 policies and 1 parameter: - Activation policy includes 2 toggles: - Enable functionality: When I click on the icon "i", I can see a collapsible legend: - If this toggle is switched on, When user creates upload request, there will be a checkbox "Allow closure" in Advanced options. - If the toggle is disabled, user cannot see the checkbox - Allow nested admin to override "Enable functionality": Toggle. When I click on the icon "i", I can see a collapsible legend: " Once activated, nested admin can override the setting "Enable functionality" for his own domain. When disabled, the value of setting "Enable functionality" is applied for all nested domains and nested admin cannot update" - The rule is as same as toggle (1.2) in story 43. Admin manage function anonymous URL - Configuration policy includes 2 toggles: - Configure functionality: Allow nested admin to change the default parameter. When I click on the icon "i", I can see a collapsible legend: "By enabling, you allow your nested domain admin to change default parameter field in his domain". - The rule is as same as toggle (2.1) in story 43. Admin manage function anonymous URL - Allow nested to override "Configure functionality": When I click on the icon "i", I can see a collapsible legend:"By enabling, nested admin can re-enable the Configure functionality toggle and then change the default parameter" - The rule is as same as toggle (2.2) in story 43. Admin manage function anonymous URL - Delegation policy includes 2 toggles: - Allow user to change default parameter: When I click on the icon "i", I can see a collapsible legend: - If the toggle is on, when user creates an upload request, he can change default value of checkbox "Allow closure" - If the toggle is off, user cannot change default value of this checkbox. - Allow nested admin to override Delegation: When I click on the icon "i", I can see a collapsible legend: " Once activated, nested admin can override the setting "Allow user to change default parameter" for his own domain. When disabled, the value of setting "Allow user to change default parameter" is applied for all nested domains and nested admin cannot update" - The rule is as same as toggle (3.2) in story 43. Admin manage function anonymous URL - Default parameter: A checkbox - When I click on icon "i", I can see a collapsible legend: "User will see the checkbox "Allow closure" on Upload request creation form. This setting will decide the default value of the checkbox" - If the checkbox is ticked, the text displays: The recipient can close the upload request. When the upload request is created with this option, the recipient can see button "Close" in the upload request portal. - If the checkbox is un-ticked, the text displays: The recipient can not close the upload request. **Sub-function 2: Upload request - Recipient delete right** - When I click on the screen title, I can see a collapsible legend:" By enabling, this functionality allows recipients of an upload request to delete the uploaded documents" - There are 3 policies and 1 parameter: - Activation policy includes 2 toggles: - Enable functionality: When I click on the icon "i", I can see a collapsible legend: - If this toggle is switched on, When user creates an Upload request, he can see the checkbox "Allow deletion" in Advanced options. - If the toggle is disabled, user cannot see the checkbox - Allow nested admin to override "Enable functionality": Toggle. When I click on the icon "i", I can see a collapsible legend: " Once activated, nested admin can override the setting "Enable functionality" for his own domain. When disabled, the value of setting "Enable functionality" is applied for all nested domains and nested admin cannot update" - The rule is as same as toggle (1.2) in story 43. Admin manage function anonymous URL - Configuration policy includes 2 toggles: - Configure functionality: Allow nested admin to change the default parameter. When I click on the icon "i", I can see a collapsible legend: "By enabling, you allow your nested domain admin to change default parameter field in his domain". - The rule is as same as toggle (2.1) in story 43. Admin manage function anonymous URL - Allow nested to override "Configure functionality": When I click on the icon "i", I can see a collapsible legend:"By enabling, nested admin can re-enable the Configure functionality toggle and then change the default parameter" - The rule is as same as toggle (2.2) in story 43. Admin manage function anonymous URL - Delegation policy includes 2 toggles: - Allow user to change default parameter: When I click on the icon "i", I can see a collapsible legend: - If the toggle is on, when user creates an upload request, he can change default value of checkbox "Allow deletion" - If the toggle is off, user cannot change default value of this checkbox. - Allow nested admin to override Delegation: When I click on the icon "i", I can see a collapsible legend: " Once activated, nested admin can override the setting "Allow user to change default parameter" for his own domain. When disabled, the value of setting "Allow user to change default parameter" is applied for all nested domains and nested admin cannot update" - The rule is as same as toggle (3.2) in story 43. Admin manage function anonymous URL - Default parameter: A checkbox - When I click on icon "i", I can see a collapsible legend: "User will see the checkbox "Allow deletion" on Upload request creation form. This setting will decide the default value of the checkbox" - If the checkbox is ticked, the text displays: The recipient can delete files. When the upload request is created with this option, the recipient can see button "Delete" in uploaded documents from the upload request portal. - If the checkbox is un-ticked, the text displays: The recipient can not delete files. **Sub-function 3: Upload request - Delay before activation** - When I click on the screen title, I can see a collapsible legend:"This functionality allows to manage the delay between the upload request's creation date and the activation date (upload request is available and users can upload documents)" - There are 3 policies and 2 parameter: - Activation policy includes 2 toggles: - Enable functionality: When I click on the icon "i", I can see a collapsible legend: - If this toggle is switched on, When user creates an Upload request, he can see the field "Activation date" - If the toggle is disabled, user cannot see this field and the activation date is creation date. - Allow nested admin to override "Enable functionality": Toggle. When I click on the icon "i", I can see a collapsible legend: " Once activated, nested admin can override the setting "Enable functionality" for his own domain. When disabled, the value of setting "Enable functionality" is applied for all nested domains and nested admin cannot update" - The rule is as same as toggle (1.2) in story 43. Admin manage function anonymous URL - Configuration policy includes 2 toggles: - Configure functionality: Allow nested admin to change the default parameter. When I click on the icon "i", I can see a collapsible legend: "By enabling, you allow your nested domain admin to change default parameter field in his domain". - The rule is as same as toggle (2.1) in story 43. Admin manage function anonymous URL - Allow nested to override "Configure functionality": When I click on the icon "i", I can see a collapsible legend:"By enabling, nested admin can re-enable the Configure functionality toggle and then change the default parameter" - The rule is as same as toggle (2.2) in story 43. Admin manage function anonymous URL - Delegation policy includes 2 toggles: - Allow user to change default parameter: When I click on the icon "i", I can see a collapsible legend: - If the toggle is on, when user creates an upload request, he can change default value of "Activation date" - If the toggle is off, user cannot change default value Activation date. The field value depends on the default parameter below. - Allow nested admin to override Delegation: When I click on the icon "i", I can see a collapsible legend: " Once activated, nested admin can override the setting "Allow user to change default parameter" for his own domain. When disabled, the value of setting "Allow user to change default parameter" is applied for all nested domains and nested admin cannot update" - The rule is as same as toggle (3.2) in story 43. Admin manage function anonymous URL - Parameters: - When I click on icon "i", I can see a collapsible legend:"The default Activation date is calculated as current date + default value. The date range is defined as: - At creation time: between [Current date] and [ current date + max value] . - At update time: The date range is between [Current date] and [ creation date + max value]" - The parameter include 2 fields: - Default value: A text field that only accepts number with a drop-down list contains options: Month, week, day. - Max value: A text field that only accepts number with a drop-down list contains options: Month, week, day or I can select the checkbox "Unlimited" for the max value. **Sub-function 4: Upload request - Delay before expiration** - When I click on the screen title, I can see a collapsible legend:"This functionality allows to manage the delay between the activation date and the expiry date. Ex: if an Upload request is activated on 3 January and the delay before expiration is 2 days, the expiry date will be 6 January at 00h00." - There are 3 policies and 2 parameter: - Activation policy includes 2 toggles: - Enable functionality: When I click on the icon "i", I can see a collapsible legend: - If this toggle is switched on, When user creates an Upload request, he can see the field "Expiration date" - If the toggle is disabled, user cannot see this field and there will be no expiration date for Upload request - Allow nested admin to override "Enable functionality": Toggle. When I click on the icon "i", I can see a collapsible legend: " Once activated, nested admin can override the setting "Enable functionality" for his own domain. When disabled, the value of setting "Enable functionality" is applied for all nested domains and nested admin cannot update" - The rule is as same as toggle (1.2) in story 43. Admin manage function anonymous URL - Configuration policy includes 2 toggles: - Configure functionality: Allow nested admin to change the default parameter. When I click on the icon "i", I can see a collapsible legend: "By enabling, you allow your nested domain admin to change default parameter field in his domain". - The rule is as same as toggle (2.1) in story 43. Admin manage function anonymous URL - Allow nested to override "Configure functionality": When I click on the icon "i", I can see a collapsible legend:"By enabling, nested admin can re-enable the Configure functionality toggle and then change the default parameter" - The rule is as same as toggle (2.2) in story 43. Admin manage function anonymous URL - Delegation policy includes 2 toggles: - Allow user to change default parameter: When I click on the icon "i", I can see a collapsible legend: - If the toggle is on, when user creates an upload request, he can change default value of "Expiration date" - If the toggle is off, user cannot change default value Expiration date. The field value depends on the default parameter below. - Allow nested admin to override Delegation: When I click on the icon "i", I can see a collapsible legend: " Once activated, nested admin can override the setting "Allow user to change default parameter" for his own domain. When disabled, the value of setting "Allow user to change default parameter" is applied for all nested domains and nested admin cannot update" - The rule is as same as toggle (3.2) in story 43. Admin manage function anonymous URL - Parameters: - When I click on icon "i", I can see a collapsible legend:"The default expiration date is calculated as Activation date + default value. The date range is defined as: - At creation time: between [Activation date] and [ Activation date + max value] . - At update time: If Activation date is < current date The date range is between [Current date] and [ Activation date + max value]". If Activation date is > current date, the date range will be between [Activation date] and [ Activation date + max value] . - The parameter include 2 fields: - Default value: A text field that only accepts number with a drop-down list contains options: Month, week, day. - Max value: A text field that only accepts number with a drop-down list contains options: Month, week, day or I can select the checkbox "Unlimited" for the max value. **Sub-function 5: Upload request - Delay before notification** - When I click on the screen title, I can see a collapsible legend:"This functionality allows to manage the delay before sending a notification (to issuer and recipient) about upload request expiration. It will be an email notifications reminding the recipient that the issuer is expecting something from him." - There are 3 policies and 2 parameter: - Activation policy includes 2 toggles: - Enable functionality: When I click on the icon "i", I can see a collapsible legend: - If this toggle is switched on, When user creates an Upload request, he can see the field "Reminder date" - If the toggle is disabled, user cannot see this field and the reminder notification about the upload request's expiration will not be sent - Allow nested admin to override "Enable functionality": Toggle. When I click on the icon "i", I can see a collapsible legend: " Once activated, nested admin can override the setting "Enable functionality" for his own domain. When disabled, the value of setting "Enable functionality" is applied for all nested domains and nested admin cannot update" - The rule is as same as toggle (1.2) in story 43. Admin manage function anonymous URL - Configuration policy includes 2 toggles: - Configure functionality: Allow nested admin to change the default parameter. When I click on the icon "i", I can see a collapsible legend: "By enabling, you allow your nested domain admin to change default parameter field in his domain". - The rule is as same as toggle (2.1) in story 43. Admin manage function anonymous URL - Allow nested to override "Configure functionality": When I click on the icon "i", I can see a collapsible legend:"By enabling, nested admin can re-enable the Configure functionality toggle and then change the default parameter" - The rule is as same as toggle (2.2) in story 43. Admin manage function anonymous URL - Delegation policy includes 2 toggles: - Allow user to change default parameter: When I click on the icon "i", I can see a collapsible legend: - If the toggle is on, when user creates an upload request, he can change default value of "Reminder date" - If the toggle is off, user cannot change default value Reminder date. The field value depends on the default parameter below. - Allow nested admin to override Delegation: When I click on the icon "i", I can see a collapsible legend: " Once activated, nested admin can override the setting "Allow user to change default parameter" for his own domain. When disabled, the value of setting "Allow user to change default parameter" is applied for all nested domains and nested admin cannot update" - The rule is as same as toggle (3.2) in story 43. Admin manage function anonymous URL - Parameters: - When I click on icon "i", I can see a collapsible legend:"The default Reminder date is calculated as Expiration date - default value. The date range is defined as: - At creation time: the date range is between [ creation date] and [expiration date] - At update time: the date range is between [current date] and [expiration date] - The parameter: - Default value: A text field that only accepts number with a drop-down list contains options: Month, week, day. **Sub-function 6: Upload request - Maximum deposit size** - When I click on the screen title, I can see a collapsible legend:"This functionality allows to define a maximum size for total upload request's files" - There are 3 policies and 2 parameter: - Activation policy includes 2 toggles: - Enable functionality: When I click on the icon "i", I can see a collapsible legend: - If this toggle is switched on, When user creates an Upload request, he can see the field "Total size of files" - If the toggle is disabled, user cannot see this field and the Total size of files is not limited. - Allow nested admin to override "Enable functionality": Toggle. When I click on the icon "i", I can see a collapsible legend: " Once activated, nested admin can override the setting "Enable functionality" for his own domain. When disabled, the value of setting "Enable functionality" is applied for all nested domains and nested admin cannot update" - The rule is as same as toggle (1.2) in story 43. Admin manage function anonymous URL - Configuration policy includes 2 toggles: - Configure functionality: Allow nested admin to change the default parameter. When I click on the icon "i", I can see a collapsible legend: "By enabling, you allow your nested domain admin to change default parameter field in his domain". - The rule is as same as toggle (2.1) in story 43. Admin manage function anonymous URL - Allow nested to override "Configure functionality": When I click on the icon "i", I can see a collapsible legend:"By enabling, nested admin can re-enable the Configure functionality toggle and then change the default parameter" - The rule is as same as toggle (2.2) in story 43. Admin manage function anonymous URL - Delegation policy includes 2 toggles: - Allow user to change default parameter: When I click on the icon "i", I can see a collapsible legend: - If the toggle is on, when user creates an upload request, he can change default value of field "Total size of files" - If the toggle is off, user cannot change default value.The field value depends on the default parameter below. - Allow nested admin to override Delegation: When I click on the icon "i", I can see a collapsible legend: " Once activated, nested admin can override the setting "Allow user to change default parameter" for his own domain. When disabled, the value of setting "Allow user to change default parameter" is applied for all nested domains and nested admin cannot update" - The rule is as same as toggle (3.2) in story 43. Admin manage function anonymous URL - Parameters: - When I click on icon "i", I can see a collapsible legend:" The default value of field "Total size of files" will be displayed when user open upload request creation form. If user is allowed to edit, the range is between 0 and max value." - The parameter include 2 fields: - Default value: A text field that only accepts number with a drop-down list contains options: Kilobyte, Megabyte, Gigabyte - Max value: A text field that only accepts number with a drop-down list contains options:Kilobyte, Megabyte, Gigabyte or I can select the checkbox "Unlimited" for the max value. **Sub-function 7: Upload request - Maximum file count** - When I click on the screen title, I can see a collapsible legend:"This functionality allows to set a limit for the number of documents that can be uploaded to the upload request." - There are 3 policies and 2 parameter: - Activation policy includes 2 toggles: - Enable functionality: When I click on the icon "i", I can see a collapsible legend: - If this toggle is switched on, When user creates an Upload request, he can see the field "Max number of files" - If the toggle is disabled, user cannot see this field and the number of files is not limited. - Allow nested admin to override "Enable functionality": Toggle. When I click on the icon "i", I can see a collapsible legend: " Once activated, nested admin can override the setting "Enable functionality" for his own domain. When disabled, the value of setting "Enable functionality" is applied for all nested domains and nested admin cannot update" - The rule is as same as toggle (1.2) in story 43. Admin manage function anonymous URL - Configuration policy includes 2 toggles: - Configure functionality: Allow nested admin to change the default parameter. When I click on the icon "i", I can see a collapsible legend: "By enabling, you allow your nested domain admin to change default parameter field in his domain". - The rule is as same as toggle (2.1) in story 43. Admin manage function anonymous URL - Allow nested to override "Configure functionality": When I click on the icon "i", I can see a collapsible legend:"By enabling, nested admin can re-enable the Configure functionality toggle and then change the default parameter" - The rule is as same as toggle (2.2) in story 43. Admin manage function anonymous URL - Delegation policy includes 2 toggles: - Allow user to change default parameter: When I click on the icon "i", I can see a collapsible legend: - If the toggle is on, when user creates an upload request, he can change default value of field "Max number of files" - If the toggle is off, user cannot change default value.The field value depends on the default parameter below. - Allow nested admin to override Delegation: When I click on the icon "i", I can see a collapsible legend: " Once activated, nested admin can override the setting "Allow user to change default parameter" for his own domain. When disabled, the value of setting "Allow user to change default parameter" is applied for all nested domains and nested admin cannot update" - The rule is as same as toggle (3.2) in story 43. Admin manage function anonymous URL - Parameters: - When I click on icon "i", I can see a collapsible legend:" The default value of field "Max number of files" will be displayed when user open upload request creation form. If user is allowed to edit, the range is between 0 and max value." - The parameter include 2 fields: - Default value: A text field that only accepts integer - Max value: A text field that only accepts integer **Sub-function 8: Upload request - Maximum file size** - When I click on the screen title, I can see a collapsible legend:"This functionality allows to set a limit for each file size that can be uploaded. " - There are 3 policies and 2 parameter: - Activation policy includes 2 toggles: - Enable functionality: When I click on the icon "i", I can see a collapsible legend: - If this toggle is switched on, When user creates an Upload request, he can see the field "Max size of a file" - If the toggle is disabled, user cannot see this field and the size of a file. - Allow nested admin to override "Enable functionality": Toggle. When I click on the icon "i", I can see a collapsible legend: " Once activated, nested admin can override the setting "Enable functionality" for his own domain. When disabled, the value of setting "Enable functionality" is applied for all nested domains and nested admin cannot update" - The rule is as same as toggle (1.2) in story 43. Admin manage function anonymous URL - Configuration policy includes 2 toggles: - Configure functionality: Allow nested admin to change the default parameter. When I click on the icon "i", I can see a collapsible legend: "By enabling, you allow your nested domain admin to change default parameter field in his domain". - The rule is as same as toggle (2.1) in story 43. Admin manage function anonymous URL - Allow nested to override "Configure functionality": When I click on the icon "i", I can see a collapsible legend:"By enabling, nested admin can re-enable the Configure functionality toggle and then change the default parameter" - The rule is as same as toggle (2.2) in story 43. Admin manage function anonymous URL - Delegation policy includes 2 toggles: - Allow user to change default parameter: When I click on the icon "i", I can see a collapsible legend: - If the toggle is on, when user creates an upload request, he can change default value of field "Max size of a file" - If the toggle is off, user cannot change default value.The field value depends on the default parameter below. - Allow nested admin to override Delegation: When I click on the icon "i", I can see a collapsible legend: " Once activated, nested admin can override the setting "Allow user to change default parameter" for his own domain. When disabled, the value of setting "Allow user to change default parameter" is applied for all nested domains and nested admin cannot update" - The rule is as same as toggle (3.2) in story 43. Admin manage function anonymous URL - Parameters: - When I click on icon "i", I can see a collapsible legend:" The default value of field "Max size of a file" will be displayed when user open upload request creation form. If user is allowed to edit, the range is between 0 and max value." - The parameter include 2 fields: - Default value: A text field that only accepts number with a drop-down list contains options: Kilobyte, Megabyte, Gigabyte - Max value: A text field that only accepts number with a drop-down list contains options:Kilobyte, Megabyte, Gigabyte or I can select the checkbox "Unlimited" for the max value. **Sub-function 9: Upload request - email notification language** - When the original function - Upload request is enabled, this sub-function is also enabled by default and cannot be changed. - When I can click on the icon "i" next to the title, I see a collapsible legend: "This function allows user to choose if his guests can use Myspace or not" - There are 2 policies and 1 parameter: - Configuration policy: Includes 2 toggles: - Configure functionality: Allow nested admin to change the default parameter. When I click on the icon "i", I can see a collapsible legend: "By enabling, you allow your nested domain admin to change default parameter field in his domain". - The rule is as same as toggle (2.1) in story 43. Admin manage function anonymous URL - Allow nested to override "Configure functionality": When I click on the icon "i", I can see a collapsible legend:"By enabling, nested admin can re-enable the Configure functionality toggle and then change the default parameter" - The rule is as same as toggle (2.2) in story 43. Admin manage function anonymous URL - Delegation policy: Includes 2 toggles: - Allow user to change default parameter: When I click on the icon "i", I can see a collapsible legend: - If the toggle is on, when user creates an upload request, he can change the value of field "Notification language" - If the toggle is off, end user cannot edit this field. The field value depends on default parameter. - Allow nested admin to override Delegation: When I click on the icon "i", I can see a collapsible legend: " Once activated, nested admin can override the setting "Allow user to change default parameter" for his own domain. When disabled, the value of setting "Enable functionality" is applied for all nested domains and nested admin cannot update" - The rule is as same as toggle (3.2) in story 43. Admin manage function anonymous URL - Default parameter: a drop-down list - When I click on icon "i", I can see a collapsible legend: "This is setting for default value of field "Notification language" in upload request creation form." - The options are: English, French **Sub-function 10: Upload request - Protected by password URL** - When I click on the screen title, I can see a collapsible legend:"This functionality allows to secure the shared access URL's by a generated password (which is sent by mail for each recipient). " - There are 3 policies and 2 parameter: - Activation policy includes 2 toggles: - Enable functionality: When I click on the icon "i", I can see a collapsible legend: - If this toggle is switched on, When user creates an Upload request, he can see the checkbox "Password protected" - If the toggle is disabled, user cannot see this checkbox and recipient can access the upload request URL without a password. - Allow nested admin to override "Enable functionality": Toggle. When I click on the icon "i", I can see a collapsible legend: " Once activated, nested admin can override the setting "Enable functionality" for his own domain. When disabled, the value of setting "Enable functionality" is applied for all nested domains and nested admin cannot update" - The rule is as same as toggle (1.2) in story 43. Admin manage function anonymous URL - Configuration policy includes 2 toggles: - Configure functionality: Allow nested admin to change the default parameter. When I click on the icon "i", I can see a collapsible legend: "By enabling, you allow your nested domain admin to change default parameter field in his domain". - The rule is as same as toggle (2.1) in story 43. Admin manage function anonymous URL - Allow nested to override "Configure functionality": When I click on the icon "i", I can see a collapsible legend:"By enabling, nested admin can re-enable the Configure functionality toggle and then change the default parameter" - The rule is as same as toggle (2.2) in story 43. Admin manage function anonymous URL - Delegation policy includes 2 toggles: - Allow user to change default parameter: When I click on the icon "i", I can see a collapsible legend: - If the toggle is on, when user creates an upload request, he can change default value of checkbox "Password protected" - If the toggle is off, user cannot change default value.The field value depends on the default parameter below. - Allow nested admin to override Delegation: When I click on the icon "i", I can see a collapsible legend: " Once activated, nested admin can override the setting "Allow user to change default parameter" for his own domain. When disabled, the value of setting "Allow user to change default parameter" is applied for all nested domains and nested admin cannot update" - The rule is as same as toggle (3.2) in story 43. Admin manage function anonymous URL - Parameters: - When I click on icon "i", I can see a collapsible legend:" The default value of checkbox "Password protected" will be displayed when user open upload request creation form." - If the checkbox is ticked, the text displays: The access to the invitation will be protected by a password. - If the checkbox is un-ticked, the text displays: The access to the invitation will not be protected by a password. #### Post-conditions The rule is as same as Post-condition of Story 43. Admin manage function anonymous URL. [Back to Summary](#summary) ## UI Design #### Mockups #### Final design [Back to Summary](#summary) ## Misc [Back to Summary](#summary) ================================================ FILE: documentation/EN/epics/new-admin-portal/story-601-root-admin-can-see-upgrade-tasks.md ================================================ # Summary * [Related EPIC](#related-epic) * [Definition](#definition) * [UI Design](#ui-design) * [Misc](#misc) ## Related EPIC * [New admin portal](./README.md) ## Definition #### Preconditions * Given that I am root admin of LinShare * I log-in successfully to Admin portal #### Description **UC1. View the list of upgrade tasks** - I click on Upgrade task - There will be an explanation text about the upgrade task: - Utility: For upgrading from a minor version like 2.1.x to 2.2.x or a major version like 1.x to 2.0, it might be necessary to execute some additional tasks on the data in order to complete the software update. Remember: The update process always start by a SQL migration (exception of bugfix version, e.g.: 2.3.6). - Process : Those tasks shall be executed in order and finished in a success state.NB: A task can finish in a success state but some error might have appeared during the task execution. If so, it is required to check the execution logs displayed in the console view. If an error has appeared, it will be essential to view the Tomcat server logs for more details, resolve the issues and restart the task to continue. - Criticality: Every task have to be executed in order to complete the update. While some 'Mandatory' tasks are not done, it will be impossible for the users to use the system. While some 'Required' tasks are not done, the system will work in a downgraded mode. Some functionalities or data might not be accessible. Those tasks might be executed while the system is being used. - A reload button on top of screen: When I click this button, the list will be reloaded. - I can see the list of upgrade tasks in a table below with columns: - Identifier: The name of the task - Description - Criticality: - Status - Modification date - Actions: There are 3 actions: Retry upgrade task, Show previous execution, Show console - When I click on Retry upgrade task, there will be a confirmation popup. If I choose Yes, the task will be run again in backend system. - When the running task is finished, the log of that task will be displayed. **UC2. View the logs of an upgrade task** - On the upgrade tasks list, I can click on Show console, it will display the latest console history of the task - When click action Show previous execution or click on one row/upgrade task on the table list, the screen that lists all executions of that task will be opened - I can see an explanation helper text: - Migration task execution log: The logs of a migration task execution is logged here. With the console view, you can check the logs of it. Warning: It is simplified logs. To get the advanced details in case of errors, you will need to check the Tomcat server logs. A good practice is to set the LinShare software in debug mode before updating. - I can also see buttons: Back to previous screen, Reload the list - Each execution log will include information: Status, Creation date, Modification date, Duration, Action - On Action column, I click on button Show console - Then the console log of that execution log will be displayed: - I can see an explanation helper text: - Migration task execution log. The logs of a migration task execution is logged here. With the console view, you can check the logs of it. Warning: It is simplified logs. To get the advanced details in case of errors, you will need to check the Tomcat server logs. A good practice is to set the LinShare software in debug mode before updating. - I can also see buttons: Back to previous screen, Reload the screen - The execution log will be displayed below with console view - I can filter by log level: WARNING, INFO, ERROR, DEBUG #### Postconditions [Back to Summary](#summary) ## UI Design #### Screenshots   #### Final design [Back to Summary](#summary) ## Misc [Back to Summary](#summary) ================================================ FILE: documentation/EN/epics/new-admin-portal/story-602-admin-can-see-the-list-of-email-configuration.md ================================================ # Summary * [Related EPIC](#related-epic) * [Definition](#definition) * [UI Design](#ui-design) * [Misc](#misc) ## Related EPIC * [New admin portal](./README.md) ## Definition #### Preconditions * Given that I am root admin or nested admin of LinShare * I logged-in to the admin portal successfully #### Description - I select a domain and go to Configuration tab on top navigation bar - I click on Email templates, a new screen will be opened with 5 categories: - Mail configuration - Mail layout - Mail footer - Mail content - Mail activation - I select Mail configuration, the screen mail configuration listing will be opened. - I can click on tooltip and see explanation text: - "This view allows you to create a mail template to your domains, from the entered information - 'Mail layout' allows to create a custom mail layout. - 'Mail footer' to edit the mail footer template. - 'Mail content' to manage mail notification content, sent to LinShare users. After your different mail templates you can in 'Domains configuration' (on creation/edition of your domain), choose a mail configuration." **UC1.Super-admin view the list of Mail configurations** - If I am selecting root domain , I can see the list of Mail configurations that I created. They can be used for any lower-level domains. - If I am selecting a nested domain, I can see the list of Mail configurations created by that domain and the Mail configurations from higher level domain. - I can see a tooltip icon on screen name, which I can click on and see the explanation text. - The Mail configurations list includes columns: - Name - Read-only: True/False. If false, this Mail configuration is created by the selected domain. If true, this Mail configurations is created by the higher-level domain. - Domain: The name of domain that created the Mail configurations - Creation date - Modification date - Assigned: Yes/No. This column indicates which Mail configurations is used for the current selected domain. Each domain can use only 1 Mail configurations a time - Visibility: Public/Private. If the email configuration is public, lower level domain can use this. If private, lover-level domain cannot use this email configuration - Action: When i click on three-dot button, i can see actions: - If the selected domain is root domain, the actions are: Duplicate, Edit, Delete. - If the selected domain is a nested domain (top domain/Sub domain/Guest domain), the actions are: Assign, Duplicate, Edit, Delete - If the Mail configurations is currently used, the option "Assign" is disabled. **UC2.Nested-admin view the list of Mail configurations** - I can see the list of Mail configurations that created for selected domain, which can be used for lower-level domain, and Mail configurations from higher-level domain. - The Mail configurations list includes columns: - Name - Read-only: True/False. If false, this Mail configurations is created by the selected domain. If true, this Mail configurations is created by the higher-level domain. - Domain: The name of domain that created the Mail configurations - Creation date - Modification date - Assigned: Yes/No. This column indicates which Mail configuration is used for the current selected domain. Each domain can use only 1 Mail configuration a time - Visibility: Public/Private. If the email configuration is public, lower level domain can use this. If private, lover-level domain cannot use this email configuration - Action: When I click on three-dot button, i can see actions: - If the Mail configuration is from my higher-level domain (eg: i am admin of Top domain and the Mail configuration is from Root domain), I can see the action: Assign, Duplicate, View - If the Mail configurations is from my domain or lower-level domain, I can see the action: Assign, Duplicate, Edit, Delete #### Postconditions - I can sort by columns: Name, Read only, Domain, Creation date, Modification date - Default sort is last modification date - The Mail configurations list is paginated and the default number of displayed items is 25, I can change this number at the bottom of page - I can see a search bar and typing in, the system will search by Mail configurations's name and display corresponding result in the table below - If I log-in as nested admin, I Mail configurations list of my domain and my nested domains. [Back to Summary](#summary) ## UI Design #### Mockups    #### Final design [Back to Summary](#summary) ## Misc [Back to Summary](#summary) ================================================ FILE: documentation/EN/epics/new-admin-portal/story-603-admin-can-manage-an-email-configuration.md ================================================ # Summary * [Related EPIC](#related-epic) * [Definition](#definition) * [UI Design](#ui-design) * [Misc](#misc) ## Related EPIC * [New admin portal](./README.md) ## Definition #### Preconditions - Given that I am super-admin/nested admin in LinShare - I logged-in to Admin portal successfully - I select a domain and go to Configuration tab on top navigation bar - I click on Mails => Mail configurations, the screen Mail configuration list will be opened. - If I am seeing settings of root domain, I can see the list of Mail configurations that root admin created. They can be used for any lower-level domains. - If I am seeing settings a nested domain in the domain tree, I can see the list of Mail configurations that Nested admin created and the Mail configurations from higher level domain. #### Description **UC1. Create a mail configuration** - On Mail configuration listing screen, I click on create button - The screen Create Email configuration will be displayed. - To create an Email configuration, I need to input fields: - Name: a text field and mandatory - Target domain: is the domain this mail configuration will belongs to. Default value is the current selected domain. I can click and select another target domain from the drop-downn list. - Duplicate from: A drop-down list of mail configurations that target domain has access right. This model will be used to duplicate for new configuration - Visible: This checkbox is to allow subdomains to use this configuration or not. - After input above fields, I click button Create, if there is no blank field, the new mail configuration is created successfully with a toast message - I am redirected to the Screen Mail configuration listing and the new created mail configuration is displayed in the table. **UC2. Edit mail configuration**. - If I am super-admin, I can edit all mail configuration - If I am nested admin, I can only edit the mail configuration created by me and my lower-level domain. - There are 2 ways to access a mail configuration screen: - In the mail configuration listing screen, I click on three dot-button of a mail configuration and select option Edit from the drop-down list - Or I can click on the mail configuration row in the mail configuration listing table. - By default, the mail configuration detail screen will be in View mode - If I have permission to Edit, there will be button Edit, I click on this button, the Edit mode will be enabled - I can edit all fields including: - Name - Visible: checkbox - Mail layout: a drop-down list of mail layouts that can be used for this domain : they are mail layouts created by this domain or mail layouts of higher-level domains. - Mail footer: a drop-down list of mail footers that can be used for this domain : they are mail footers created by this domain or mail layouts of higher-level domains. There are 3 tabs for 3 languages: English, Русский, Français - Mail content: There are 3 tabs for 3 languages: English, Русский, Français. Each tab displays mail content type list in one language - In mail content list, there are 3 columns: - Mail content type: the list of content type is fixed. I can search for mail content type - Selected mail content: Display the currently selected mail content. This selection is duplicated from mail configuration model by default. I can click on drop down list and select another mail content for this content type. The list of mail contents for this content type are the ones created by this domain or higher-level domains. - The non-editable fields include: - Domain - Creation date -Modification date - After editting I click button Save, The system will validate if field "Name" is blank, it will be highlighted in red and a message:"[field name] cannot be blank" - If there is no error, the updates will be saved and there will be a successful toast message. - If I click button Reset, all the updates will be reset to the before values. **UC3. View email configuration** - If I am nested admin, On email configuration screen, when I click on three-dot button of a email configuration from higher level domain, I can see the option "View" - When I click on this button, the screen email configuration detail will be displayed in mode "view" - I can not update any field, and there is no button Delete, Save, Reset as Edit screen **UC4. Duplicate an email configuration** - On the Email configuration listing screen, I click on thee-dot button of an email configuration and select option Duplicate from the drop-down list - The screen Create email configuration will be opened. (UC1) - Except the field Name is blank, other fields will have the same value as the email configuration that I selected to duplicate - I input the field Name, and can edit other fields - When I click button Save, the system will validate as UC 1. **UC5. Delete an Email configuration** - If I am nested admin I can only delete Email configuration in my domain and my nested domain. I cannot delete Email configuration from higher-domain - If i am super-admin, i can delete every Email configuration - There is no Delete button for Default Email configuration. - There are 2 ways to delete a Email configuration: - In the Email configuration listing screen, I click on three dot-button of an Email configuration and select option Delete from the drop-down list - Or I can click an Email configuration row on the listing table to go to Email configuration detail screen. On this screen I can see the button Delete. - When I click on button Delete: - If the Email configuration is not associated with any domain, there will be an confirmation popup: "You are about to delete this Email configuration, this procedure is irreversible. Do you want to proceed?" and Yes/No button - I choose Yes to confirm, the Email configuration will be deleted. - System will prompt a deletion confirmation toast. - If the Email configuration is associated with any domain, the system will display message: "This Email configuration is associated with at least one domain. You cannot delete." **UC6. Delete multiple Email configurations** - On Email configuration listing screen, I can select multiple Email configurations on the list by tick the checkbox of each item - There will be a top bar that indicates number of selected Email configuration, an isolation icon, an Undo icon and a Delete icon. - When I click on Isolation icon, the screen only shows selected items - When I click on Undo icon, all the selected items are unselected - If I do not have permission to delete any of selected Email configuration, the button Delete will be disabled. - When I click on button Delete: - If any of selected Email configuration is not associated with any domain, there will be a confirmation popup: "You are about to delete [number of selected items] Email configuration, this procedure is irreversible. Do you want to proceed?" and Yes/No button - I choose Yes to confirm, the selected Email configuration will be deleted. - System will prompt a deletion confirmation toast. - If any of selected Email configuration is associated with any domain, the system will display message: " One of selected Email configurations is associated with at least one domain. You cannot delete." **UC7. Assign an Email configuration** - On Email configuration listing screen, I click on three-dot button on Action column. - I select option "Assign" - If the selected Email configuration is already assigned for the current selected domain, there will be a message:" This Email configuration is already assigned for [selected domain name] - If not, the system will display message:" You are about to assign this Email configuration for [selected domain name]. Do you want to proceed?" and Yes/No button - If i choose Yes, the Email configuration is assigned for currently selected domain. - Each domain can only be assigned with one Email configuration a time - The value in column "Assigned" of the old Email configuration will be changed from Yes => No and the new assigned Email configuration will be changed to Yes. - When I hover the tooltip on column title "Assigned", there will be an explanation text: "If the Email configuration is used for the current selected domain, the value will be Yes". **UC8. View associated domains** - On Email configuration listing screen, I click on three-dot button on Action column. - I select option "View associated domains" - A new screen will be opened - I can see the list of domain's name which are using this Email configuration. - There will be a label next to each domain's name that indicating domain type of that domain - When I click one domain on the list, I am navigated to Email configuration listing screen of that domain. - If the Email configuration is not associated with any domain, there will be a text message: " There is no domain using this Email configuration. " - If I am the nested admin, I can only view associates domains which are under my administration permission. #### Postconditions [Back to Summary](#summary) ## UI Design #### Mockups    #### Final design [Back to Summary](#summary) ## Misc [Back to Summary](#summary) ================================================ FILE: documentation/EN/epics/new-admin-portal/story-604-admin-can-see-the-list-of-mail-layouts.md ================================================ # Summary * [Related EPIC](#related-epic) * [Definition](#definition) * [UI Design](#ui-design) * [Misc](#misc) ## Related EPIC * [New admin portal](./README.md) ## Definition #### Preconditions * Given that I am root admin or nested admin of LinShare * I logged-in to the admin portal successfully #### Description - I select a domain and go to Configuration tab on top navigation bar - I click on Email templates, a new screen will be opened with 5 categories: - Mail configuration - Mail layout - Mail footer - Mail content - Mail activation - I select Mail layouts, then screen listing email layouts will be opened - I click on tooltip icon and see an explanation text: - "This view allows you to create a models for your mails layout. You need to create a HTML & text models. A mail layout allows you to adjust the different parts (salutation, message, logo, footer) into a mail. - ${mailSubject} Title / Mail subject - ${image} LinShare log, that can be set in the configuration(If you have the required authorities) - ${personalMessage} A custom message added to the default message ${body} - ${greetings} Greeting message - ${body} Content that you put in 'Mail content' - ${footer} Content that you put in 'Mail footer' **UC1.Super-admin view the list of Mail layouts** - If I am viewing setting of root domain, I can see the list of Mail layouts that I created. They can be used for any lower-level domains. - If I am viewing settings of a nested domain, I can see the list of Mail layouts created by that domain and the Mail layouts from higher level domain. - I can see a tooltip icon on screen name, which I can click on and see the explanation text. - The Mail layouts list includes columns: - Name - Read-only: - Default mail layout is read-only for both root admin and nested admin - Root admin can edit every mail layout (except Default mail layout ) - Nested admin can edit only mail layout of his domain and nested domains. For mail layout of root admin, he can read-only - Domain: The name of domain that created the Mail layouts - Creation date - Modification date - Visibility: Public/Private: If mail layout is public, lower-level domain will appear in the layout list of lower-level domain. And lower-level domain can use this mail layout. If mail layout is private, lower-level domain will not appear in the layout list of lower-level domain. - Action: When I click on three-dot button, I can see actions: Duplicate, Edit, Delete(except for default mail layout where we will have Duplicate and view). **UC2.Nested-admin view the list of Mail layouts** - As a nested admin, I can select one of my nested domains and view the list of Mail layouts that created for that domain and Mail layouts from higher-level domain. - The Mail layouts list includes columns: - Name - Read-only: - Default mail layout is read-only for both root admin and nested admin - Root admin can edit every mail layout (except Default mail layout ) - Nested admin can edit only mail layout of his domain and nested domains. For mail layout of root admin, he can read-only - Domain: The name of domain that created the Mail layout - Creation date - Modification date - Visibility: Public/Private: If mail layout is public, lower-level domain will appear in the layout list of lower-level domain. And lower-level domain can use this mail layout. If mail layout is private, lower-level domain will not appear in the layout list of lower-level domain. - Action: When I click on three-dot button, I can see actions: - If the Mail layout is from my higher-level domain (eg: i am admin of Top domain and the Mail layout is from Root domain), I can see the action: Duplicate, View - If the Mail layout is from my domain or lower-level domain, I can see the action: Duplicate, Edit, Delete (except for default mail layout where we will have Duplicate and view). #### Postconditions - I can sort by columns: Name, Read only, Domain, Creation date, Modification date - Default sort is last modification date - The Mail layouts list is paginated and the default number of displayed items is 25, I can change this number at the bottom of page - I can see a search bar and typing in, the system will search by Mail layout's name and display corresponding result in the table below [Back to Summary](#summary) ## UI Design #### Mockups  #### Final design [Back to Summary](#summary) ## Misc [Back to Summary](#summary) ================================================ FILE: documentation/EN/epics/new-admin-portal/story-605-admin-can-manage-a-mail-layout.md ================================================ # Summary * [Related EPIC](#related-epic) * [Definition](#definition) * [UI Design](#ui-design) * [Misc](#misc) ## Related EPIC * [New admin portal](./README.md) ## Definition #### Preconditions - Given that I am super-admin/nested admin in LinShare - I logged-in to Admin portal successfully - I select a domain and go to Configuration tab on top navigation bar - I click on Mails => Mail layouts, the screen Mail layouts list will be opened. - If I am seeing settings of root domain, I can see the list of Mail layouts that root admin created. They can be used for any lower-level domains if it is public - If I am seeing settings a nested domain in the domain tree, I can see the list of Mail layouts that Nested admin created and the Mail layouts from higher level domain. #### Description **UC1. Create a mail layout** - On Mail layouts listing screen, I click on create button - The screen Create Email layout will be displayed. - To create an Email layouts, I need to input fields: - Name: a text field and mandatory - Target domain: is the domain this mail layout will belongs to. Default value is the current selected domain. I can click and select another target domain from the drop-downn list. - Model: A drop-down list of mail layouts that target domain has access right. This model will be used to duplicate for new layout - Visible: This checkbox is to allow subdomains to use this layout or not. - After input above fields, I click button Create, if there is no blank field, the new mail layout is created successfully with a toast message - I am redirected to the Screen Mail layouts listing and the new created mail layout is displayed in the table. **UC2. Edit mail layout**. - If I am super-admin, I can edit all mail layouts - If I am nested admin, I can only edit the mail layout created for my domain and my lower-level domain. - The Default mail layout detail will be in View mode and cannot be edited by any user. (there is no button Edit for this Default mail layout) - There are 2 ways to access a mail layouts screen: - In the mail layouts listing screen, I click on three dot-button of a mail layout and select option Edit from the drop-down list - Or I can click on the mail layout row in the mail layout listing table. - If I have permission to Edit, there will be button Edit, I click on this button, the Edit mode will be enabled - I can edit all fields including: - Name - Visible: checkbox - Mail layout: a string value that automatically filled by the same field in the model that I selected in Create layout screen. - Message translation: There are 3 tabs for 3 languages: English, Русский, Français. Each tab displays message translation list in one language. This is a string value that automatically filled by the same field in the model that I selected in Create layout screen. - The non-editable fields include: - Domain - Creation date - Modification date - After editing mail layout I click button Save, The system will validate: - If field "Name" is blank, it will be highlighted in red and a message:"[field name] cannot be blank" - If I removed the copyright footer section in Mail layout, there will be an error message "You do not have the right to remove copyright footer." - If there is no error, the updates will be saved and there will be a successful toast message. - If I click button Reset, all the updates will be reset to the before values. **UC3. View email layout** - If I am nested admin, On email layout listing screen, when I click on three-dot button of a email layout from higher level domain, I can see the option "View" - When I click on this button, the screen email layout detail will be displayed in mode "view" - I can not update any field, and there is no button Delete, Save, Reset as Edit screen **UC4. Delete an Email layout** - If I am nested admin I can only delete Email layout in my domain and my nested domain. I cannot delete Email layout from higher-domain - If I am super-admin, I can delete every Email layout - There is no Delete button for Default Email layout - There are 2 ways to delete a Email layout: - In the Email layout listing screen, I click on three dot-button of an Email layout and select option Delete from the drop-down list - Or I can click an Email layout row on the listing table to go to Email configuration detail screen. On this screen I can see the button Delete. - When I click on button Delete: - If the Email layout is not used in any mail configuration, there will be an confirmation popup: "You are about to delete this Email layout, this procedure is irreversible. Do you want to proceed?" and Yes/No button - I choose Yes to confirm, the Email layout will be deleted. - System will prompt a deletion confirmation toast. - If the Email layout is used in any mail configuration, the system will display message: "This Email layout is used with at least one mail configuration. You cannot delete." **UC5. Delete multiple Email layouts** - On Email configuration listing screen, I can select multiple Email layouts on the list by tick the checkbox of each item - There will be a top bar that indicates number of selected Email layouts, an isolation icon, an Undo icon and a Delete icon. - When I click on Isolation icon, the screen only shows selected items - When I click on Undo icon, all the selected items are unselected - If I do not have permission to delete any of selected Email layout, the button Delete will be disabled. - When I click on button Delete: - If any of selected Email layouts is not used in any mail configuration, there will be a confirmation popup: "You are about to delete [number of selected items] Email layouts, this procedure is irreversible. Do you want to proceed?" and Yes/No button - I choose Yes to confirm, the selected Email layouts will be deleted. - System will prompt a deletion confirmation toast. - If any of selected Email layouts is used in any mail configuration, the system will display message: " One of selected Email layout is used in at least one mail configuration. You cannot delete." **UC6 Duplicate an email layout** - On the Welcome email layout listing screen, i click on thee-dot button of a Welcome messages and select option Duplicate from the drop-down list - The screen Create layout will be opened (UC1) - Except the field Name is blank, other fields will have the same value as the email layout that I selected to duplicate - I input the field Name, and can edit other fields - When I click button Save, the system will validate as UC 1, create a new Email layout. **UC7. View associated email configurations** - On Email configuration listing screen, I click on three-dot button on Action column. - I select option "View associated configurations" - A new screen will be opened - I can see the list of email configurations which are using this Email layout. - There will be a label next to each email configuration's name that indicating domain 's name of email configuration - When I click one email configuration on the list, I am navigated to detail screen of that email configuration. - If the Email layout is not used with any email configuration, there will be a text message: " There is no email configuration using this Email layout. " - If I am the nested admin, I can only view associates email configuration which are under my administration permission. #### Postconditions [Back to Summary](#summary) ## UI Design #### Mockups     #### Final design [Back to Summary](#summary) ## Misc [Back to Summary](#summary) ================================================ FILE: documentation/EN/epics/new-admin-portal/story-606-admin-can-see-the-list-of-mail-footers.md ================================================ # Summary * [Related EPIC](#related-epic) * [Definition](#definition) * [UI Design](#ui-design) * [Misc](#misc) ## Related EPIC * [New admin portal](./README.md) ## Definition #### Preconditions * Given that I am root admin or nested admin of LinShare * I logged-in to the admin portal successfully #### Description - I select a domain and go to Configuration tab on top navigation bar - I click on Email templates, a new screen will be opened with 5 categories: - Mail configuration - Mail layout - Mail footer - Mail content - Mail activation - I select Mail footers, and the listing mail footer screen will be opened - I can click on a tooltip and see helper text: - "Mail footer: This view allows you to create templates for your mails footer. You should create a HTML & text model. In the view 'Mail configuration' you can create a mail template and associate it to a mail layout and mail footer. (NB: Mail layout should contain ${footer} variable in order to set in the mail footer." **UC1.Super-admin view the list of Mail footers** - If I am viewing setting of root domain, I can see the list of Mail footers that I created. They can be used for any lower-level domains. - If I am viewing settings of a nested domain, I can see the list of Mail footers created by that domain and the Mail footers from higher level domain. - The Mail footers list includes columns: - Name - Read-only: True/False. If false, this Mail footer is created by the current selected domain. If true, this Mail footer is created by the higher-level domain. - Domain: The name of domain that created the Mail footer - Creation date - Modification date - Visibility: Public/Private: If mail footer is public, lower-level domain will appear in the footer list of lower-level domain. And lower-level domain can use this mail footer. If mail footer is private, lower-level domain will not appear in the footer list of lower-level domain. - Action: When I click on three-dot button, I can see actions: Duplicate, Edit, Delete. **UC2.Nested-admin view the list of Mail footer** - As a nested admin, I can select one of my nested domains and view the list of Mail footers that created for that domain and Mail footers from higher-level domain. - The Mail footers list includes columns: - Name - Read-only: True/False. If false, this Mail footer is created by the selected domain. If true, this Mail footer is created by the higher-level domain. - Domain: The name of domain that created the Mail footer - Creation date - Modification date - Visibility: Public/Private: If mail footer is public, lower-level domain will appear in the footer list of lower-level domain. And lower-level domain can use this mail footer. If mail footer is private, lower-level domain will not appear in the footers list of lower-level domain. - Action: When I click on three-dot button, I can see actions: - If the Mail footer is from my higher-level domain (eg: i am admin of Top domain and the Mail footer is from Root domain), I can see the action: Duplicate, View - If the Mail footer is from my domain or lower-level domain, I can see the action: Duplicate, Edit, Delete #### Postconditions - I can sort by columns: Name, Read only, Domain, Creation date, Modification date, visibility - Default sort is last modification date - The Mail footer list is paginated and the default number of displayed items is 25, I can change this number at the bottom of page - I can see a search bar and typing in, the system will search by Mail footer's name and display corresponding result in the table below [Back to Summary](#summary) ## UI Design #### Mockups  #### Final design [Back to Summary](#summary) ## Misc [Back to Summary](#summary) ================================================ FILE: documentation/EN/epics/new-admin-portal/story-607-admin-can-manage-a-mail-footer.md ================================================ # Summary * [Related EPIC](#related-epic) * [Definition](#definition) * [UI Design](#ui-design) * [Misc](#misc) ## Related EPIC * [New admin portal](./README.md) ## Definition #### Preconditions - Given that I am super-admin/nested admin in LinShare - I logged-in to Admin portal successfully - I select a domain and go to Configuration tab on top navigation bar - I click on Mails => Mail footers, the screen Mail footer list will be opened. - If I am seeing settings of root domain, I can see the list of Mail footers that root admin created. They can be used for any lower-level domains if it is public - If I am seeing settings a nested domain in the domain tree, I can see the list of Mail footers that Nested admin created and the Mail footers from higher level domain. #### Description **UC1. Create a mail footer** - On Mail footers listing screen, I click on create button - The screen Create Email footer will be displayed. - To create an Email footer, I need to input fields: - Name: a text field and mandatory - Target domain: is the domain this mail footer will belongs to. Default value is the current selected domain. I can click and select another target domain from the drop-downn list. - Model: A drop-down list of mail footers that target domain has access right. This model will be used to duplicate for new footer - Visible: This checkbox is to allow subdomains to use this footer or not. - After input above fields, I click button Create, if there is no blank field, the new mail footer is created successfully with a toast message - I am redirected to the Screen Mail footers listing and the new created mail footer is displayed in the table. - Now when I open mail configuration for this domain, the mail footer will be shown as one of the options in drop-down list of the field "Footer" **UC2. Edit mail footer**. - If I am super-admin, I can edit all mail footers - If I am nested admin, I can only edit the mail footer created by me and my lower-level domain. - There are 2 ways to access a mail footer detail screen: - In the mail footers listing screen, I click on three dot-button of a mail footer and select option Edit from the drop-down list - Or I can click on the mail footer row in the mail footer listing table. - By default, the mail footer detail screen will be in View mode - If I have permission to Edit, there will be button Edit, I click on this button, the Edit mode will be enabled - I can edit all fields including: - Name - Visible: checkbox - Mail footer: a string value that automatically filled by the same field in the model that I selected in Create footer screen. - Message translation: There are 3 tabs for 3 languages: English, Русский, Français. Each tab displays message translation list in one language. This is a string value that automatically filled by the same field in the model that I selected in Create footer screen. - The non-editable fields include: - Domain - Creation date -Modification date - After editing I click button Save, The system will validate if field "Name" is blank, it will be highlighted in red and a message:"[field name] cannot be blank" - If there is no error, the updates will be saved and there will be a successful toast message. - If I click button Reset, all the updates will be reset to the before values. **UC3. View email footer** - If I am nested admin, On email footers listing screen, when I click on three-dot button of an email footer from higher level domain, I can see the option "View" - When I click on this button, the screen email footer detail will be displayed in mode "view" - I can not update any field, and there is no button Delete, Save, Reset as Edit screen **UC4. Delete an Email footer** - If I am nested admin I can only delete Email footer in my domain and my nested domain. I cannot delete Email footer from higher-domain - If I am super-admin, I can delete every Email footer - There is no Delete button for Default Email footer - There are 2 ways to delete a Email footer: - In the Email footers listing screen, I click on three dot-button of an Email footer and select option Delete from the drop-down list - Or I can click an Email footer row on the listing table to go to Email footer detail screen. On this screen I can see the button Delete. - When I click on button Delete: - If the Email footer is not used in any mail configuration, there will be a confirmation popup: "You are about to delete this Email footer, this procedure is irreversible. Do you want to proceed?" and Yes/No button - I choose Yes to confirm, the Email footer will be deleted. - System will prompt a deletion confirmation toast. - If the Email footer is used in any mail configuration, the system will display message: "This Email footer is used with at least one mail configuration. You cannot delete." **UC5. Delete multiple Email footers** - On Email footer listing screen, I can select multiple Email footers on the list by tick the checkbox of each item - There will be a top bar that indicates number of selected Email footers, an isolation icon, an Undo icon and a Delete icon. - When I click on Isolation icon, the screen only shows selected items - When I click on Undo icon, all the selected items are unselected - If I do not have permission to delete any of selected Email footer, the button Delete will be disabled. - When I click on button Delete: - If any of selected Email footers is not used in any mail configuration, there will be a confirmation popup: "You are about to delete [number of selected items] Email footers, this procedure is irreversible. Do you want to proceed?" and Yes/No button - I choose Yes to confirm, the selected Email footers will be deleted. - System will prompt a deletion confirmation toast. - If any of selected Email footers is used in any mail configuration, the system will display message: " One of selected Email footer is used in at least one mail configuration. You cannot delete." **UC6 Duplicate an email footer** - On the Welcome email footer listing screen, i click on thee-dot button of a Welcome messages and select option Duplicate from the drop-down list - The screen Create footer will be opened (UC1) - Except the field Name is blank, other fields will have the same value as the email footer that I selected to duplicate - I input the field Name, and can edit other fields - When I click button Save, the system will validate as UC 1, create a new Email footer. **UC7. View associated email configurations** - On Email configuration listing screen, I click on three-dot button on Action column. - I select option "View associated configurations" - A new screen will be opened - I can see the list of email configurations which are using this Email footer. - There will be a label next to each email configuration's name that indicating domain 's name of email configuration - When I click one email configuration on the list, I am navigated to detail screen of that email configuration. - If the Email footer is not used with any email configuration, there will be a text message: " There is no email configuration using this Email footer. " - If I am the nested admin, I can only view associates email configuration which are under my administration permission. #### Postconditions [Back to Summary](#summary) ## UI Design #### Mockups     #### Final design [Back to Summary](#summary) ## Misc [Back to Summary](#summary) ================================================ FILE: documentation/EN/epics/new-admin-portal/story-608-admin-can-see-the-list-of-mail-contents.md ================================================ # Summary * [Related EPIC](#related-epic) * [Definition](#definition) * [UI Design](#ui-design) * [Misc](#misc) ## Related EPIC * [New admin portal](./README.md) ## Definition #### Preconditions * Given that I am root admin or nested admin of LinShare * I logged-in to the admin portal successfully #### Description - I select a domain and go to Configuration tab on top navigation bar - I click on Email templates, a new screen will be opened with 5 categories: - Mail configuration - Mail layout - Mail footer - Mail content - Mail activation - I select Mail content, and the listing mail contents screen will be opened - I can click on a tooltip and see helper text: - "This view allows you to set the mail notification content sent automatically to the application's users. You can write a messages in english, french, vietnamese or russian. You can also create a several versions of this messages. you can then in the tab 'Mail configuration', choose the right content of the configuration. - The fields 'Subject', 'Greetings' et 'Body',replace ${subject}, ${greetings} and ${body} that you have added to a 'Mail layout" **UC1.Super-admin view the list of Mail contents** - If I am viewing setting of root domain, I can see the list of Mail contents that I created. They can be used for any lower-level domains. - If I am viewing settings of a nested domain, I can see the list of Mail contents created by that domain and the Mail contents from higher level domain. - The Mail contents list includes columns: - Content type - Read-only: - Root admin can edit every mail content (except Default mail content) - Nested admin can edit only mail content of his domain and nested domains. For mail content of root admin, he can read-only - Domain: The name of domain that created the Mail content - Modification date - Action: When I click on three-dot button, I can see actions: Duplicate, Edit, Delete. - Each content type has a default content. The default contents are non-editable and cannot delete. **UC2.Nested-admin view the list of Mail contents** - As a nested admin, I can select one of my nested domains and view the list of Mail contents that created for that domain and Mail contents from higher-level domain. - The Mail contents list includes columns: - Content type - Read-only: Nested admin can edit only mail content of his domain and nested domains. For mail content of root admin, he can read-only - Domain: The name of domain that created the Mail content - Modification date - Action: When I click on three-dot button, I can see actions: - If the Mail content is from my higher-level domain (eg: i am admin of Top domain and the Mail content is from Root domain), I can see the action: Duplicate, View - If the Mail footer is from my domain or lower-level domain, I can see the action: Duplicate, Edit, Delete - Each content type has a default content. The default contents are non-editable and cannot delete. **UC3. Search mail content** - I can see a search bar on top of the content list - When I click on Search field, there will be a drop-down list that contains all content types. I can select one from the list and system will display all contents that belong to selected content type in the contents list below. - Or I can input text to the search field and click Enter, system will search and displayed the matched ones. #### Postconditions - I can sort by columns: Content type, Read only, Domain,Modification date - Default sort is latest modification date - The Mail contents list is paginated and the default number of displayed items is 25, I can change this number at the bottom of page [Back to Summary](#summary) ## UI Design #### Mockups     #### Final design [Back to Summary](#summary) ## Misc [Back to Summary](#summary) ================================================ FILE: documentation/EN/epics/new-admin-portal/story-609-admin-can-manage-a-mail-content.md ================================================ # Summary * [Related EPIC](#related-epic) * [Definition](#definition) * [UI Design](#ui-design) * [Misc](#misc) ## Related EPIC * [New admin portal](./README.md) ## Definition #### Preconditions - Given that I am super-admin/nested admin in LinShare - I logged-in to Admin portal successfully - I select a domain and go to Configuration tab on top navigation bar - I click on Mails => Mail contents, the screen Mail contents list will be opened. - If I am seeing settings of root domain, I can see the list of Mail contents that root admin created. They can be used for any lower-level domains if it is public - If I am seeing settings a nested domain in the domain tree, I can see the list of Mail contents that Nested admin created and the Mail contents from higher level domain. #### Description **UC1. Create a mail content** - On Mail contents listing screen, I click on create button - The screen Create Email contents will be displayed. - To create an Email contents, I need to input fields: - Name: a text field and mandatory - Target domain: is the domain this mail content will belongs to. Default value is the currently selected domain. I can click and select another target domain from the drop-downn list. - Content types: is the list of all contents in the system. I can select one content from the drop-down list. - Duplicate from : A drop-down list of mail contents that target domain has access right. This mail content will be used to duplicate for new created mail content. - Visible: This checkbox is to allow subdomains to use this content or not. - After input above fields, I click button Create, if there is no blank field, the new mail content is created successfully with a toast message - I am redirected to the Screen Mail contents listing and the new created mail content is displayed in the table. - Now when I open mail configuration for this domain, the mail content will be shown as one of the options of its content type. **UC2. Edit mail content**. - If I am super-admin, I can edit all mail contents - If I am nested admin, I can only edit the mail content created by me and my lower-level domain. - There are 2 ways to access a mail content screen: - In the mail contents listing screen, I click on three dot-button of a mail content and select option Edit from the drop-down list - Or I can click on the mail content row in the mail contents listing table. - By default, the mail content detail screen will be in View mode - If I have permission to Edit, there will be button Edit, I click on this button, the Edit mode will be enabled - I can edit all fields including: - Name - Visible: checkbox - Subject: a string value that automatically filled by the same field in the model that I selected in Create content screen. - Body: a string value that automatically filled by the same field in the model that I selected in Create content screen - Context Variables: A drop-down list of scenarios of this email. With each scenario, the context variables below can be different. The list of scenarios and context variables for each scenario are fixed by backend and I cannot edit this list. - Mail configuration list: The list of existing mail configurations created by current domain. By default, the mail content will be the same for every mail configuration. When a mail configuration of current domain is created or deleted, it is also updated to this list - Message translation: There are 3 tabs for 3 languages: English, Русский, Français. Each tab displays message translation list in one language. This is a string value that automatically filled by the same field in the model that I selected in Create content screen. - Preview/Preview live button: When I click on this button, the email content will be displayed below in user's view - The non-editable fields include: - Content type: The content type of the email. - Domain - Creation date -Modification date - After editting I click button Save, The system will validate if field "Name" is blank, it will be highlighted in red and a message:"[field name] cannot be blank" - If there is no error, the updates will be saved and there will be a successful toast message. - If I click button Reset, all the updates will be reset to the before values. **UC3. View email content** - If I am nested admin, On email contents listing screen, when I click on three-dot button of a email content from higher level domain, I can see the option "View" - When I click on this button, the screen email content detail will be displayed in mode "view" - I can not update any field, and there is no button Delete, Save, Reset as Edit screen **UC4. Delete an Email content** - If I am nested admin I can only delete Email content in my domain and my nested domain. I cannot delete Email content from higher-domain - If I am super-admin, I can delete every Email content - There is no Delete button for Default Email content - There are 2 ways to delete an Email content: - In the Email content listing screen, I click on three dot-button of an Email content and select option Delete from the drop-down list - Or I can click an Email content row on the listing table to go to Email content detail screen. On this screen I can see the button Delete. - When I click on button Delete: - If the Email content is not used in any mail configuration, there will be an confirmation popup: "You are about to delete this Email content, this procedure is irreversible. Do you want to proceed?" and Yes/No button - I choose Yes to confirm, the Email content will be deleted. - System will prompt a deletion confirmation toast. - If the Email content is used in any mail configuration, the system will display message: "This Email content is used with at least one mail configuration. You cannot delete." **UC5. Delete multiple Email contents** - On Email content listing screen, I can select multiple Email contents on the list by tick the checkbox of each item - There will be a top bar that indicates number of selected Email contents, an isolation icon, an Undo icon and a Delete icon. - When I click on Isolation icon, the screen only shows selected items - When I click on Undo icon, all the selected items are unselected - If I do not have permission to delete any of selected Email content, the button Delete will be disabled. - When I click on button Delete: - If any of selected Email contents is not used in any mail configuration, there will be a confirmation popup: "You are about to delete [number of selected items] Email contents, this procedure is irreversible. Do you want to proceed?" and Yes/No button - I choose Yes to confirm, the selected Email contents will be deleted. - System will prompt a deletion confirmation toast. - If any of selected Email contents is used in any mail configuration, the system will display message: " One of selected Email content is used in at least one mail configuration. You cannot delete." **UC6 Duplicate an email contents** - On the Welcome email content listing screen, i click on thee-dot button of a Welcome messages and select option Duplicate from the drop-down list - The screen Create content will be opened (UC1) - Except the field Name is blank, other fields will have the same value as the email content that I selected to duplicate - I input the field Name, and can edit other fields - When I click button Save, the system will validate as UC 1, create a new Email content. **UC7. View associated email configurations** - On Email contents listing screen, I click on three-dot button on Action column. - I select option "View associated configurations" - A new screen will be opened - I can see the list of email configurations which are using this Email content. - There will be a label next to each email configuration's name that indicating domain 's name of email configuration - When I click one email configuration on the list, I am navigated to detail screen of that email configuration. - If the Email content is not used with any email configuration, there will be a text message: " There is no email configuration using this Email content. " - If I am the nested admin, I can only view associates email configuration which are under my administration permission. #### Postconditions [Back to Summary](#summary) ## UI Design #### Mockups     #### Final design [Back to Summary](#summary) ## Misc [Back to Summary](#summary) ================================================ FILE: documentation/EN/epics/new-admin-portal/story-610-admin-can-see-the-list-of-mail-activations.md ================================================ # Summary * [Related EPIC](#related-epic) * [Definition](#definition) * [UI Design](#ui-design) * [Misc](#misc) ## Related EPIC * [New admin portal](./README.md) ## Definition #### Preconditions - Given that I am Root admin/nested admin of LinShare - After log-in successfully, I go to Configuration => Select a domain => View details=> Email => Mail activation #### Description - The screen list of mail activations of selected domain will be displayed - The list includes all mail content types and its activation status. - Each content type will be displayed in a row with its status icon: enabled or disabled. - I can click on each row to go to detail setting screen of that mail content activation - I can search mail content type by name by inputting in the search bar, the matches will be shown instantly below. - I can sort the mail activations by the state: Enabled or disabled. #### Postconditions - If i am super-admin, I can see the mail activation list of all domains - If i am nested admin, I can see mail activation list of my domain and my nested domains if any - The list is paginated and the default number of displayed items is 25, I can change this number at the bottom of page [Back to Summary](#summary) ## UI Design #### Mockups  #### Final design [Back to Summary](#summary) ## Misc [Back to Summary](#summary) ================================================ FILE: documentation/EN/epics/new-admin-portal/story-611-root-admin-can-manage-a-mail-activation-for-any-domain.md ================================================ # Summary * [Related EPIC](#related-epic) * [Definition](#definition) * [UI design](#ui-design) * [Misc](#misc) ## Related EPIC * [New admin portal](./README.md) ## Definition #### Preconditions - Given that am root admin/nested admin of LinShare. - After log-in successfully, I go to Configuration Tab => Select any domain => View details - I click on Tab Mail template, then select Mail Activation, the screen listing all mail content type activation is displayed. #### Description #### UC1. I am root admin - On this screen, When I click on collapse icon on the mail content title, I can see the activation setting for this content type: - An explanation text about this mail content type - Toggle: Enable notification: When the toggle is enabled, this email content type will be sent for users in this domain. If it is disabled, this type of email will not be sent for users in this domain - Toggle: Allow nested admin to override "Enable notification": When I click on the icon "i", I can see a collapsible legend: " Once activated, nested admin can override the activation of this email notification for his own domain. When disabled, the value of setting "Enable notification" is applied for all nested domains and nested admin cannot update" - Root admin can configure email activation for every domain - There will be no toggle : "Allow nested admin to override "Email notification" in sub-domain and guest domain setting - In nested domain there is a button Reset to parent domain. When settings in nested domain is same as it's parent domain, this button is disabled. - When setting in nested domain is different from it's parent domain's value, this button will be enabled. - When I click on this button, the all the settings in this nested domain will be updated from it's parent domain. #### UC2. I am nested admin - On this screen, When I click on collapse icon on the mail content title, I can see the activation setting for this content type: - An explanation text about this mail content type - Toggle: Enable notification: When the toggle is enabled, this email content type will be sent for users in this domain. If it is disabled, this type of email will not be sent for users in this domain - If the root admin allow nested domain to change this setting, I can enable/disable above toggle for my own domain and my nested domains if any. - If the root admin does not allow nested admin to change this setting, the value of setting "Enable notification" is applied for all nested domains and nested admin cannot update this toggle - If I can change toggle "Enable notification", there will be a button "Reset to parent value". - When settings in nested domain is same as it's parent domain, this button is disabled. - When setting in nested domain is different from it's parent domain's value, this button will be enabled. - When I click on this button, the all the settings in this nested domain will be updated from it's parent domain. #### Postconditions [Back to Summary](#summary) ## UI Design #### Mockups   #### Final design [Back to Summary](#summary) ## Misc [Back to Summary](#summary) ================================================ FILE: documentation/EN/epics/new-admin-portal/story-62-admin-manage-login-on-UI-User.md ================================================ # Summary * [Related EPIC](#related-epic) * [Definition](#definition) * [UI Design](#ui-design) * [Misc](#misc) ## Related EPIC * [New admin portal](./README.md) ## Definition #### Preconditions #### Description - To enable, disable this function, I need to configure the boolean parameter in ui-user/config/config.js file. - If the function is enabled, when user of this domain open Log-in page, he can see 2 Log-in option: password authentication or SSO. With password authentication, user need to input email/password and can also see options "Keep me signed in" and "Forgotten password" - If the function is disabled, when user of this domain open Log-in page, he only sees the option Login with SSO. The options "Keep me signed in" and "Forgotten password" are also hidden. #### Post-conditions [Back to Summary](#summary) ## UI Design #### Mockups #### Final design [Back to Summary](#summary) ## Misc [Back to Summary](#summary) ================================================ FILE: documentation/EN/epics/new-admin-portal/story-63-admin-can-see-statistics-about-actions-of-any-resource.md ================================================ # Summary * [Related EPIC](#related-epic) * [Definition](#definition) * [UI Design](#ui-design) * [Misc](#misc) ## Related EPIC * [New admin portal](./README.md) ## Definition #### Preconditions - Given that am super admin or nested admin of LinShare - After log-in successfully, I go to Tab Reporting - A new page will be opened. #### Description #### UC1. Filter and summary of uploaded files - On this new screen, I can select filters: - Filters include: - Domain: A combo-box. - If I am root domain, I can see the list of all domains . - If I am nested admin, I can see list of domains in which I have administration right. - Default option is "All". - Category: - Whole domain - Shared Space - My Space - Time: A combo-box with option list: - All time - Last 7 days - Last 30 days - Last 6 months - Last year - Custom range: Whe I select this option, there will be a date picker that allows me to select From date and To date - Default option is last 7 days - When I select a domain, category and time and click Enter, the charts below will reflect data of the selected domain in selected time - Charts include: - Summary: This summary wil be calculated based on selected domain and selected period. This part will includes : - Total domain: - Total workgroups - Total users - Total guests - Total storage statics : This is the current statistics of domain storage of selected domain/Myspace/Shared Space. It will not depend on Time filter. They are grouped into 3 categories: - Media files: Include images and videos. - Documents: Includes files in document format. - Others: The remaining files which do not belong to 2 above groups. - Each category will display number of uploaded files and total file size - There is a summary statistics for 3 categories with total storage in use and available space - The button "Upgrade plan" is only available on SAAS version, when I click on this button, I am navigated to console homepage. ##### UC2. Resource detail statistics - On the Domain statistics table, I can see the detail number of each resource - Resources: - If I am super admin, I can select all available resources: Anonymous Share, Share, Upload request, Upload request document, Workgroup, Drive, Drive member, Contact, Contact list, Guest, JWT token, Document, Authentication, User, Mail attachment, Workgroup member, Workgroup folder, Workgroup document, Workgroup document revisions, Domain User filter, Group filter, Drive filter - If I am nested admin , I can select all other resources except for: Domain User filter, Group filter, Drive filter, Domains, Remote server, Providers, - After select domain and time frame, I click Enter and the Report will be generated with detail statistics about activities of every resource that I am allow to access - I can select columns to display on the table, each column is one action: Create, Delete, Download, Get, Update, Success, Fail, Purge #### Post-conditions - If I am root admin, I can see statistics of all domains in all platform or any domain - If I am nested admin, I can only see statistics of my own domain and my nested domains (if any). [Back to Summary](#summary) ## UI Design #### Mockups    #### Final design [Back to Summary](#summary) ## Misc [Back to Summary](#summary) ================================================ FILE: documentation/EN/epics/new-admin-portal/story-631-admin-can-see-top-receivers-by-shared-file-number.md ================================================ # Summary * [Related EPIC](#related-epic) * [Definition](#definition) * [UI design](#ui-design) * [Misc](#misc) ## Related EPIC * [New admin portal](./README.md) ## Definition #### Preconditions - Given that I am supper admin or nested admin of New Admin Portal #### Description After log-in successfully, I go to Tab Reporting On this screen I can see the widget Top 50 receivers by shared files count The global filter of the page will not be applied to widget - The widget will display a new a table "Top 50 Receivers by shared file count" with two columns accordingly : - Receiver email - Number of shared files #### Postconditions - Rows should be sorted by shared file size in descending order by default - Rows should be displayed with pagination [Back to Summary](#summary) ## UI Design #### Mockups #### Final design [Back to Summary](#summary) ## Misc [Back to Summary](#summary) ================================================ FILE: documentation/EN/epics/new-admin-portal/story-632-admin-can-see-top-50-receivers-by-aggregated-shared-files-size.md ================================================ # Summary * [Related EPIC](#related-epic) * [Definition](#definition) * [UI Design](#ui-design) * [Misc](#misc) ## Related EPIC * [New admin portal](./README.md) ## Definition #### Preconditions - Given that I am supper admin or domain admin of New Admin Portal #### Description After log-in successfully, I go to Tab Reporting On this screen I can see the widget Top 50 receivers by agregated shared files size By default, the filters include: - Domain: All domains - Time: All time - If the user is the root admin by default he can see top 50 receivers of all domains - If the user is the domain admin by default he can see top 50 receivers of all nested domains When I click on Filter button, I can see a filter screen - Domain: - If I am root admin, I can select any domain in platform - If I am nested admin, I can select any of my nested domains - Then the result will be calculated in selected domain. Time: I can select one time range then the result will be calculated based on selected time. - After I select filters Domain/Time then click Enter, there will be a new a table "Top 50 Receivers by aggregated shared file size" with four columns will be displayed accordingly: - Order - Share receiver: Name and email of receiver - Domain name: Domain of the receiver, if the receiver is external users, the name of domain will be blank. - Size of aggregated shared files #### Postconditions - Rows should by shared file size in descending order - Rows should be displayed with pagination [Back to Summary](#summary) ## UI Design #### Mockups #### Final design [Back to Summary](#summary) ## Misc [Back to Summary](#summary) ================================================ FILE: documentation/EN/epics/new-admin-portal/story-639-admin-can-manage-blacklist-or-whitelist-of mime policy.md ================================================ # Summary * [Related EPIC](#related-epic) * [Definition](#definition) * [Screenshots](#screenshots) * [Misc](#misc) ## Related EPIC * [New admin portal](./README.md) ## Definition #### Preconditions - Given that i am super-admin/nested admin in LinShare - I logged-in to Admin portal successfully - I select a domain in Domain tree and go to Configuration tab on top navigation bar - I click on Mime policies, the screen Mine policies listing list will be opened. - If i am selecting root domain in domain tree, i can see the list of mime policies that i created. They can be used for any lower-level domains. - If i am selecting a nested domain in the domain tree, i can see the list of mime policies that i created and the mime policies from higher level domain. #### Description **UC1. Create an mime policy** - On Mime policies listing screen, i can click on create button - The screen Create mime policy will be displayed. - Name: a text field and mandatory - The non-editable fields incude: - Domain - Creation date - I input name and click button Create => the mime policy is created - After a mime policy is created successfully, by default blacklist option is selected and there is no mime types in blacklist table - which means that all mime types are authorized. **UC2. Add white-list/Black list for mime policy**. - If i am super-admin, i can edit all mime policies - If i am nested admin, i can only edit the mime policies created by me and my lower-level domain - There are 2 ways to access Edit mime policy screen: - In the Mime policy listing screen, i click on three dot-button of a Mime policy and select option Detail from the drop-down list - Or i can click an the mime policy row on the mime policy listing table. - By default, the Mime policy detail screen will be in View mode - If i have permission to Edit, there will be button Edit, i click on this button, the Edit mode will be enable. - On the mime policy screen, below "Name" and "System information", I can see a text: "You can select to create black list or white list then add mime types to the list" , and radio buttons for Blacklist or White list. - On the left table i can see list of all mime types - Mime types: Name of the mime type - Extention: the extention of the mime type - If I select radio button "Black list" , the table on the right will be blacklist table: All mime types on blacklist table will be blocked, and the remaining mime types are authorized. - If I select radio button "White list", he table on the right will be whitelist table: All mime types on whitelist table will be authorized, and the remaining mime types are blocked. - I can add/remove mime types from left table to the blacklist/whitelist table on the right by 2 ways: 1. I can select checkbox of mime types on left table, then click button "Add" , then they will be moved to the right table. If I want to remove mime type from blacklist/white list, I can select checkbox of mime types on right table then click button "Remove", then they will be moved to left table. 2. I can drag and drop mime type between 2 tables - When I click Save, the mime policy is saved with blacklist/white list. **UC3. Edit blacklist/whitelist** - When I open mime policy detail screen, I can see the whitelist/blacklist that I created before - If the current list is blacklist, the radio button of blacklist is selected and the table name is blacklist - If the current list is whitelist, the the radio button of whitelist is selected and the table name is whitelist - I can change the list from blacklist to white list and vice versa by selecting the radio button, then the name of table below is also changed accorrdingly - I can add or remove some mimes types from left table list to the blacklist/white list on the right by 2 ways: 1. I can select checkbox of mime types on left table, then click button "Add" , then they will be moved to the right table. If I want to remove mime type from blacklist/white list, I can select checkbox of mime types on right table then click button "Remove", then they will be moved to left table. 2. I can drag and drop mime type between 2 tables - When I click Save, the mime policy is saved with updated information. #### Postconditions [Back to Summary](#summary) ## UI Design #### Mockups  #### Final design [Back to Summary](#summary) ## Misc [Back to Summary](#summary) ================================================ FILE: documentation/EN/epics/new-admin-portal/story-64-admin-manage-Twake-server-connection.md ================================================ # Summary * [Related EPIC](#related-epic) * [Definition](#definition) * [UI Design](#ui-design) * [Misc](#misc) ## Related EPIC * [New admin portal](./README.md) ## Definition #### Preconditions * Given that i am super-admin in Linshare * I logged-in to Admin portal successfully #### Description **UC1. Create Twake connection** - I go to Configuration tab on top navigation bar, and select Remote servers - The screen listing Remote server will be displayed - I click on button Create, there will be 2 options: LDAP connection and Twake connection - I select Twake connection, screen Create Twake connection will be displayed. - In this screen I can see a helper message on screen name when I click information icon - To create a Twake connection, I need to input fields: - Name: a text field and mandatory - Twake URL: Text field and madatory - User name: a texfield and madatory - Password: a text field and madatory. When I start typing in this field, the inputted characters will be hidden by star icons automatically and the closed Eye icon will be shown. I click to this icon, the field value will be displayed. - When i click button Save, the system will validate if any mandatory field is blank, it will be highlighted in red and a message:"[field name] cannot be blank" - If there is no error, the new Twake connection is created and there will be a successful notification - I am redirected to the Screen remote server listing, and the new created Twake connection appears on the list. - If i click button Cancel, i am navigated to the Listing server screen. **UC2. Edit Twake connection** - There are 2 ways to access Edit Twake connection screen: - In the Remote server listing screen, i click on three dot-button of an Twake server and select option Edit from the drop-down list - Or i can click an the Twake server name on the Remote server listing table - On the Twake connection Edit screen, i can update all fields: Name, Twake URL, User name, Password then click button Save. - If any mandatory field is blank, it will be highlighted in red and a message:"[field name] cannot be blank" - If all mandatory fields are filled, the updates will be saved and there will be a successful toast message. - If i click button Reset, all the updates will be reset to the before values - I can click Remote servers on the breadcrumb to navigate back to the server listing screen. **UC3. Duplicate a Twake connection** - On the Remote server listing screen, i click on thee-dot button of an twake connection and select option Duplicate from the drop-down list - The screen Create twake connection will be opened. - Except the field Name is blank, other fields will have the same value as the Twake connection that I selected to duplicate - I input the field Name, and can edit other fields - When I click button Save, the system will validate if any mandatory field is blank, it will be highlighted in red and a message:"[field name] cannot be blank" - If there is no error, the new Twake connection is created and there will be a successful notification - If I click button Cancel, I am navigated to the Listing server screen. **UC4. Delete a Twake connection** - There are 2 ways to delete an Twake connection: - In the Remote server listing screen, I click on three dot-button of a Twake server and select option Delete from the drop-down list - Or i can click a Twake connection row on the Remote server listing table to go to Twake server connection detail screen. On this screen I can see the button Delete - When i click on button Delete, the system will validate: - If the Twake connection is not associated with any user providers, there will be a confirmation popup: "You are about to delete this remote sever connection, this procedure is irreversible. Do you want to proceed?" and YEs/No button - I choose Yes to confirm, the selected server connections will be deleted. - System will prompt a deletion confirmation toast. - If the Twake connection is associated with any provider, the system will display a message: " This server connection is associated with at least one of the providers. You cannot delete." **UC5. View Associated domains** - On Remote servers listing screen, i click on three-dot button on Action column. - I select option "View associated domains" - A new screen will be opened - I can see the list of domain's name which are using the Twake connection with its user providers - There will be a label next to each domain's name that indicating domain type of that domain - Only Top domain or sub-domain can use Twake connection, Root domain and guest domain can't. - When I click one domain on the list, I am navigated to user provider detail screen of that domain - If the Twake connection is not Associated with any domain, there will be a text message: " There is no domain using this Twake connection. " #### Postconditions [Back to Summary](#summary) ## UI Design #### Mockups      #### Final design [Back to Summary](#summary) ## Misc [Back to Summary](#summary) ================================================ FILE: documentation/EN/epics/new-admin-portal/story-65-admin-manage-Twake-user-provider.md ================================================ # Summary * [Related EPIC](#related-epic) * [Definition](#definition) * [UI Design](#ui-design) * [Misc](#misc) ## Related EPIC * [New admin portal](./README.md) ## Definition ### Preconditions - Given that i am super-admin in LinShare - I logged-in to Admin portal successfully - I choose a nested domain in domain tree and click on Configuration screen, I click on Providers. (If I select root domain, I cannot see menu Providers) - If I am selecting a Top domain or Sub-domain of domain tree, On screen Providers, I can see 3 types: User providers, Groups Provider, Drive Providers. - If I am selecting a guest domain of domain tree, When I select Providers in Configuration screen, I can see the only option: "Create Twake Guest Provider" ### Description #### UC1. Create Twake User Provider for Top domain or Sub domain - I select User Providers, if the current selected domain doesn't have an user provider, [screen 2](#screen-2) will be displayed. - When I click button "Add user provider", there will be a drop-down list with 3 options: LDAP provider, OIDC provider, Twake provider - I select Twake provider, [screen 3](#screen-3) will be displayed, the button "Add user provider" will be disabled - To add an Twake user provider, I need to fill the followings: - Twake connection: mandatory field, a drop-down list which contain current Twake connections list. There is a button next to this field that when I click on, I am navigated to Create Twake connection screen - After I created and saved a Twake connection successfully, I am navigated back to this screen instead of Remote server listing screen - Company id: a text field and mandatory. When I hover the tooltip, there will be a legend: "LinShare will start retrieving users from this company in Twake." - When I click button Save, the system will validate: - If any mandatory field is blank, it will be highlighted in red and a message:"[field name] cannot be blank" - If there is no error, the User provider is saved and there will be a successful notification, I am redirected to [screen 4](#screen-4) - If I click button Cancel, I am navigated to the [screen 2](#screen-2) #### UC2. Create Twake Guest provider for Guest Domain - A guest domain can only get guest provider from Twake. - When I select guest domain in Domain tree and select Providers on Configuration tab, [screen 5](#screen-5) will be opened and I can only see an option: Add Twake guest provider - I can see a warning message:"Creating a Twake GuestProvider is optional. After Twake guest provider is added, guests from Twake will be created in LinShare database and managed by LinShare." - I click on the button "Add Twake guest provider" and [screen 6](#screen-6) will be shown. - I need to select Twake connection adn Company id then click button Save - The system will validate as UC1 #### UC3. Edit Twake User Provider - I select User Providers, if current selected domain already had an user provider, [screen 4](#screen-4) will be displayed. - On this screen, I can edit all fields: Twake connection, Company id - When I click button Save, the system will validate: - If any mandatory field is blank, it will be highlighted in red and a message:"[field name] cannot be blank" - If there is no error, the User provider is updated and there will be a successful notification. - If I click button Reset, all the fields will be reset to the before-updated values. #### UC4. Delete Twake User Provider - On [screen 4](#screen-4), i can see a Delete button - When I click on this button, there will be a confirmation popup:"You are about to delete this user provider, this procedure is irreversible. Do you want to proceed?" and Yes/No button - I choose Yes to confirm, the Twake user provider will be deleted. - System will prompt a deletion confirmation toast. - I am navigated to screen 1. ### Postconditions - The user provider is associated with the selected domain in the left domain tree. - Root domain is not associated with any User provider - Guest domain is only associated with guest provider from Twake - Top domain or sub domain can retrieve user from 3 sources: Twake, OIDC, LDAP - When Twake user provider is created for top domain/sub-domain, the system will retrieve only all users excepting guests from Twake server - When Twake guest provider is created for guest domain, the system will retrieve only guest users from Twake server. [Back to Summary](#summary) ## UI Design #### Mockups ##### Screen 1  ##### Screen 2  ##### Screen 3  ##### Screen 4  ##### Screen 5  ##### Screen 6  ##### Screen 7  #### Final design [Back to Summary](#summary) ## Misc [Back to Summary](#summary) ================================================ FILE: documentation/EN/epics/new-admin-portal/story-66-admin-can-see-statistics-about-kind-of-uploaded-files.md ================================================ # Summary * [Related EPIC](#related-epic) * [Definition](#definition) * [UI Design](#ui-design) * [Misc](#misc) ## Related EPIC * [New admin portal](./README.md) ## Definition #### Preconditions - Given that am super admin or nested admin of LinShare - After log-in successfully, I go to Tab Reporting - A new page will be opened. #### Description - On this new screen, I can see a chart: Most uploaded file types: - Base on filter, the chart will display data of most uploaded file in selected Domain , Category and Time frame. - The column chart below display the number of 5 file types which are most uploaded - With each file type, there will be the total file size and the percentage of that file type. #### Post-conditions - If I am root admin, I can see statistics of most uploaded files in all platform or any domain - If I am nested admin, I can only see statistics of most uploaded files in my own domain and my nested domains (if any). [Back to Summary](#summary) ## UI Design #### Mockups   #### Final design [Back to Summary](#summary) ## Misc [Back to Summary](#summary) ================================================ FILE: documentation/EN/epics/new-admin-portal/story-67-admin-can-filter-drives-workgroups-by-domain.md ================================================ # Summary * [Related EPIC](#related-epic) * [Definition](#definition) * [UI Design](#ui-design) * [Misc](#misc) ## Related EPIC * [New admin portal](./README.md) ## Definition #### Preconditions - Given that I am Nested admin or Root admin of LinShare #### Description - After log-in successfully to Admin Portal, I select Administration Tab - On Administration tab, I click on My Drives/ Workgroups, the screen My Drives and Workgroups will be opened. - In new view I can see the list of all workgroups and Drives - I click on the search bar, there will be a drop-down list of search criteria including: Member, Type, Number of administrators, Number of members and a new option: Domain - When I select this search criteria, the search bar will display Domain = "Dropdown list". - If I am root admin, the option list contains all domains of platform - If I am nested admin, the option list contains domains that I have administration right. - When I click Enter, the system will filter all drives/workgroup belonging to that selected domain and displays the result below. - When I click one Drive/workgroup in the result list, the detail screen of that drive/workgroup will be displayed and I can see the Domain name information in a link. - When I click on domain link, I am navigated to that domain detail page. #### Postconditions - I can search drives/workgrousp by one of above criteria or combine them - Each search criteria in the search bar is seperated by a delete icon. I can click this icon to delete the criteria - After select one criteria in search bar, that option is hidden in the drop-down list of search criteria. - For example: - I chose Domain as a search criteria - I select one domain (e.g. Top1) from the option list - Now the search bar displays: Domain=Top1 - When I click on search bar, I can see the list of criteria is: Member; Type; Administrator number; Member number. [Back to Summary](#summary) ## UI Design #### Mockups    #### Final design [Back to Summary](#summary) ## Misc [Back to Summary](#summary) ================================================ FILE: documentation/EN/epics/new-ui-user/.gitkeep ================================================ ================================================ FILE: documentation/EN/epics/new-ui-user/Sharing/Story-649-user-can-share-by-link.md ================================================ # Summary * [Related EPIC](#related-epic) * [Definition](#definition) * [UI Design](#ui-design) * [Misc](#misc) ## Related EPIC * [New UI user](./README.md) ## Definition ### Preconditions - Given that I am logged into my account ### Description **UC1. As a LinShare user, I can share the file by link** - I open MySpace and see the list of files - I click on 3-dots button of a file and hover option Share - Then I can see 2 types of share: Share by email or Share link - If I select Share by email, then the share screen is opened as currently - If I select Share link, a popup will be opened and I can see: - File information : File name, file size and file format - A link of file: There is a button Copy next to the link. When I select this button, the file link is copied to my clipboard. I can send this link to the person tht I want to share the file - Expiration date: This field's value is set default by admin and I can changed the date - Password: When I select the checkbox, a password will be automatically generated by system I can change it (?) - When I closed the popup, there will be a "Shared" icon on this file. - I can see a button "Remove link" at the bottom of the popup. If I select this button, the share link will be deleted and the shared icon disappeared on this file. - The share link is removed automatically on its expiry date. **UC2. Receiver can view adn download file from a share link** - Given that I received a share link by LinShare user - I open that link on my browser - If the share link is expied, I can see a notification message - If the share link is secured by a password, I can see a screen that asked me to input password - After I input correct password, I am redirected to the shared file. - I can see the preview of file (if any) and a download button - When I click download button, the file is downloaded to my device ### Postcondition [Back to Summary](#summary) ## UI Design ### Mockups  ### Final design [Back to Summary](#summary) ## Misc [Back to Summary](#summary) ================================================ FILE: documentation/EN/epics/new-ui-user/Story-640-user-can-authenticate-using-SSO.md ================================================ # Summary * [Related EPIC](#related-epic) * [Definition](#definition) * [UI Design](#ui-design) * [Misc](#misc) ## Related EPIC * [New UI user](./README.md) ## Definition ### Preconditions - Given that I (the user) already have log-in credentials from the user provider - Given that the user provider that contains my account is an external user providers such as openID Connect provider and SSO is configed to login LinShare. ### Description - When I open LinShare UI-User URL of my company, I am redirected to the OIDC provider log-in screen I need to inout my log-in credentials including: - Login (Email, UPN, ...) depending on the IDP - Password then click Sign-in - The OIDC provider will validate if my email and password are correct or not : - If the inputted credendials are incorrect, there will be error message - If the inputted credentials are correct, I logged-in successfully in the OIDC provider. - Then the system will redirect me back to the LinShare application. ### Postcondition - From my UI-user URL, the system can automatically detect if it is using SSO and redirect me to the SSO log-in page. - Once I have successfully authenticated with the user provider, the system should redirect me back to the application. - The system should create a LinShare user account for me if I do not already have one. [Back to Summary](#summary) ## UI Design ### Mockups ### Final design [Back to Summary](#summary) ## Misc [Back to Summary](#summary) ================================================ FILE: documentation/EN/epics/new-ui-user/Story-641-user-can navigate-between-pages.md ================================================ # Summary * [Related EPIC](#related-epic) * [Definition](#definition) * [UI Design](#ui-design) * [Misc](#misc) ## Related EPIC * [New UI user](./README.md) ## Definition ### Preconditions - The user should be authenticated ### Description As a user, I want to have a clear and concise home page that provides me with an overview of the website and allows me to easily find the information I need. ### Postcondition - The menu should be located at the left of the page and serve as the gateway to different sections. The menu will be structured into the following categories: - Home: Directs users to the main landing page. - Quick share: A new feature that allows to share file quickly and can be turn on/off. - Current Uploads: Provides a quick link to recently uploaded files. - Received Shares: Displays shared content received from other users. There are only files in Received shares - My Space: Offers a personalized section for user-specific content. There are only files in My space - Shared space: Presents a collaborative area for files shared among users. Sub-categories are Workspaces and workgroups. A Workspace contains workgroups. A workgoup can contain folders/files. User should be able to navigate easily to child-level of file/folder, e.g using breadcrumbs. - Upload Requests: Lists upload requests. Sub-categories include Pending, Active/Close, Expired - Contacts: Sub-categories include Contact lists and Guests - Activity Logs: Displays a record of recent user activities. - Each category should have a drop-down menu that lists all of the available subcategories. - The menu should be responsive and easy to use on all devices. [Back to Summary](#summary) ## UI Design ### Mockups ### Final design [Back to Summary](#summary) ## Misc [Back to Summary](#summary) ================================================ FILE: documentation/EN/epics/new-ui-user/Story-642-user-can-authenticate-second-factor.md ================================================ # Summary * [Related EPIC](#related-epic) * [Definition](#definition) * [Screenshots](#screenshots) * [Misc](#misc) ## Related EPIC ## Definition - Given that I am an LinShare user and my 2FA is already enabled. - When I open log-in screen, I can see the login form. - I input username and password and click button Login - If log-in credentials are not correct, system will display error notification as normal. - If log-in credentials are correct, 2FA popup is displayed. I have to fill the 6-digits code on my FreeOTP app and click button Log-in to validate - If the code is valid, I log-in system successfully - If the code is invalid, the system will display error message. - If the authentication is failed for multiple times (code is invalid), the account will be locked by following rules : * After 3 attempts : account locked for 10 minutes * After 6 attempts : account locked for 20 minutes * After 9 attempts : account locked for 60 minutes (1 hour) * After 12 attempts : account locked for 1440 minutes (1 day) * After 15 attempts : account locked indefinitely - When account is locked, I can see a message: "Your account has been locked for [locked time] due to failed login attempts" [Back to Summary](#summary) ## Screenshots   [Back to Summary](#summary) ## Misc None [Back to Summary](#summary) UI Design: https://www.figma.com/file/YaAuajPYpMGHsKyGBePaJ9/Admin-LinShare?node-id=304%3A13106 ================================================ FILE: documentation/EN/epics/new-ui-user/Story-642-user-can-authenticate-using-username-and-password.md ================================================ # Summary * [Related EPIC](#related-epic) * [Definition](#definition) * [UI Design](#ui-design) * [Misc](#misc) ## Related EPIC * [New UI user](./README.md) ## Definition ### Preconditions - Given that I (the user) already have LinShare log-in credentials from the user provider (LDAP) ### Description - When I open LinShare UI-User URL of my company, I can see a log-in screen: - The log-in screen includes fields: - Email: A text field and mandatory - Password: A text field and mandatory - Keep me Signed-in: A checkbox - Forgot password: A link - After input fields, I click Log-in button, the system will validate: - If field email or password is blank, there will be an error message: This field cannot be blank (error1) - If email format is invalid, there will be an error message: Invalid email format (error 2) - If there is no error, I am logged-in successfully to LinShare - IF the email or password is incorrect, there will be an error message: Authentication failed, either the email or the password is invalid. - If the authentication is failed for multiple times, the account will be locked by following rules : * After 3 attempts : account locked for 10 minutes * After 6 attempts : account locked for 20 minutes * After 9 attempts : account locked for 60 minutes (1 hour) * After 12 attempts : account locked for 1440 minutes (1 day) * After 15 attempts : account locked indefinitely - Error (1) and error (2) are not counted as failed authentication - When account is locked, I can see a message: "Your account has been locked for [locked time] due to failed login attempts" ### Postcondition - If I input correct log-in credentials, I am logged in and redirected to LinShare homepage. - The system should create a LinShare user account for me if I do not already have one. **NB: Possibility for the user to change logo, background images and colors : We will have a dedicated story for this [Back to Summary](#summary) ## UI Design ### Mockups  ### Final design [Back to Summary](#summary) ## Misc [Back to Summary](#summary) ================================================ FILE: documentation/EN/epics/new-ui-user/Story-643-user-can-authenticate-oidc-provider.md ================================================ ================================================ FILE: documentation/EN/epics/new-ui-user/Story-644-user-can-choose-keep-me-signed.md ================================================ # Summary * [Related EPIC](#related-epic) * [Definition](#definition) * [Screenshots](#screenshots) * [Misc](#misc) ## Related EPIC ## Definition - On the web login page, there is a checkbox "Keep me signed in" - I select the checkbox "Keep me signed in" option and successfully logs in, the application should securely store the session information. - When I opens the website next time, either by reopening the browser or returning after closing the session, should result in automatic sign-in without the need to re-enter login credentials. - If I manually logs out, the "Keep me signed in" preference is reset, requiring manual login on the next visit. [Back to Summary](#summary) ## Screenshots [Back to Summary](#summary) ## Misc None [Back to Summary](#summary) ================================================ FILE: documentation/EN/epics/new-ui-user/Story-645-user-can-manage-profile.md ================================================ ================================================ FILE: documentation/EN/epics/new-ui-user/Story-646-user-can-manage-tokens.md ================================================ # Summary * [Related EPIC](#related-epic) * [Definition](#definition) * [UI Design](#ui-design) * [Misc](#misc) ## Related EPIC * [New UI user](./README.md) ## Definition ### Preconditions - Given that I haved loged-in successfully to my account ### Description - I click on my avatar on the left corner then select Manage account => Select "Token management" on the left menu **UC1. Listing tokens** - I can see the list of my current tokens - Each row includes token's name and creation date - I can sort the token list by name and creation date - The list is paginated and I can select number of items /page. **UC2. View the detail of a token** - When I hover each row of the token list, I can see 3 icons: Details, Edit, Delete - OR When I click on 3-dots buttons of the token, I can see a list of 3 options: Details, Edit, Delete - I select "Detais", then the details screen of token is opened - I can see information: - token's creator - token name - Creation date - Modification date **UC3. Edit the token** - When I select Edit option of the token, the Edit screen is opened - I can edit token name and description. (Name cannot be empty) - Then I click Save button, the token is updated and there will be a notification message. **UC4. Delete the token** - When I select Delete option of the token, there will be a confirmation popup - If I choose Proceed, the token is deleted, there will be a confimation message - The authentication using that token will be terminated immediately. **UC5. Create a new token** - When I click Create button, the Create token screen will be opened - I need to input token name field (mandatory) and Add a description (optional) - Then I click Create button, there a popup display with a text : "You have created a new token Beware, the token is only shown once and cannot be restored. Please save the token before closing:" - And the token that I created is displayed with a Copy button next to it. - When I click Copy, the token is copied to clipboard and I can saved it in another place - When I click button Close, the popup disappear and I can see the new token name in the list. ### Postcondition [Back to Summary](#summary) ## UI Design ### Mockups      ### Final design [Back to Summary](#summary) ## Misc [Back to Summary](#summary) ================================================ FILE: documentation/EN/epics/new-ui-user/Story-647-user-can-logout.md ================================================ # Summary * [Related EPIC](#related-epic) * [Definition](#definition) * [UI Design](#ui-design) * [Misc](#misc) ## Related EPIC * [New UI user](./README.md) ## Definition ### Preconditions - Given that I am logged into my account ### Description **UC1. Logging out mannually** - When I cick on the avatar at top right of screen, a drop-down list of options will be shown. - I click on the "Log-out" button - Then I should be redirected to the log-in page, and my session should be terminated. - In case that I logged-in with SSO before, When I click Log-out button, I am logged out by the SSO provider before redirected to Log-in page. **UC2. Automatic session timeout** Given that I am logged into my account, When my session is inactive for a specified time, Then I should be automatically logged out to ensure security. ### Postcondition [Back to Summary](#summary) ## UI Design ### Mockups  ### Final design [Back to Summary](#summary) ## Misc [Back to Summary](#summary) ================================================ FILE: documentation/EN/epics/new-ui-user/Story-651-user-can-upload-and-share-files-quickly.md ================================================ # Summary * [Related EPIC](#related-epic) * [Definition](#definition) * [UI Design](#ui-design) * [Misc](#misc) ## Related EPIC * [New UI user](./README.md) ## Definition ### Preconditions - Given that I am LinShare user I have logged into my account ### Description - When I select "Quick share" on left menu, a new screen will be opened. - On this quick share widget, I can see a button "Upload files and share" - When I click this button, the file browser is opened and I can select file to upload: - If I upload one file, I can select share by link or share by email - If I upload multiple files, the option "share by link" is disabled. User can only share multiple files via emails. (At the first step we only support share by link for single file. User can archive multiple files locally and upload it as one file." **UC1. Share file by link** - I select one file to upload. When the upload is finished, I can see file information: - File name - File size - File type - And the close button next to each file to remove - I can select one of 2 options: Share by link or Share by email - If I select option Share by link, then the button "Get a link" is displayed below. - I can input fields (non-mandatory): - Title: A text field - Message: A text fiels - Expiry date: Default date is set by admin and user can change this date if the admin setting allows - Password: When I select the checkbox, then the a password will be automatically generated by system I can change it (?) - I click button "Get a link", then the system will genertate a link and display it below the file name with a Copy button - I can copy the link and share to other people - I can see a button "Remove link" at the bottom of the popup. If I select this button, the share link will be deleted. - There is button "View" next to the shared file. When I click this button, I am redirected to Myspace and the shared file is highlited (selected). There will be a "Shared" icon on this file. **UC2. Share file (s) by email** - After select file and upload, I can see file information including: - File name - File size - File type - And the close button next to each file to remove - I can click "Add more files" to upload additional files - I select option "Share by email". (If I uploaded multiple file, the default option is "Share by email" and I can not select "Share by link") - I can input fields: - Recipients: Mandatory field. When I input some characters, the system will display auto-complete suggestions. I can input multiple email addresses to this field. - Expiration date: The default date will be set by admin. I can change the expiration date If admin allows to change - Email subject: A text field - Enter your email message: A text field - Add a share descrption: A text field - Set password: A checkbox. If I select this checkbox, the receiver will receive a password in the sharing email and he needs to input this password to access the dhared files - Sharing acknowledgement: A checkbox. If I select this checkbox, I will receive an mail about this share - Undownloaded document alert: A checkbox. IF I select this checkbox, the field Notification for undownloaded file is displayed below. I can select a date. On that date, if the shared file has not been downloaded, I will receive a notification email. - After input field, I click button Share. There will be a successful toast message:"Your files were successfully sent." and button "View" - When I click "view", , I am redirected to Myspace and the shared file is highlited (selected). There will be a "Shared" icon on this file. ### Postcondition [Back to Summary](#summary) ## UI Design ### Mockups    ### Final design [Back to Summary](#summary) ## Misc [Back to Summary](#summary) ================================================ FILE: documentation/EN/epics/template-epic.md ================================================ # Summary * [Context](#context) * [Definition](#definition) * [Stories](#stories) * [Misc](#misc) ## Context [Back to Summary](#summary) ## Definition TODO [Back to Summary](#summary) ## Stories TODO > A list of all the story documentation in the epic, must format as a list of links to corresponding user story files inside epic folder 1. [As a user, i can do something](./link-to-the-file.md) [Back to Summary](#summary) ## Misc > Link references, UI mockup, link to gitlab issye or any extra documents related to the EPIC * [Gitlab issue]() * [UI Mockup]() [Back to Summary](#summary) ================================================ FILE: documentation/EN/epics/template-story.md ================================================ # Summary * [Related EPIC](#related-epic) * [Definition](#definition) * [UI Design](#ui-design) * [Misc](#misc) ## Related EPIC > Links to the epic document in the epic folder, normally README. * [Name of the epic](./README.md) ## Definition #### Preconditions #### Description #### Postconditions [Back to Summary](#summary) ## UI Design #### Mockups #### Final design [Back to Summary](#summary) ## Misc [Back to Summary](#summary) ================================================ FILE: documentation/EN/epics/upload-request/README.md ================================================ # Summary * [Context](#context) * [Definition](#definition) * [Stories](#stories) * [Misc](#misc) ## Context An upload request is a feature through which a person (email) can upload files for a LinShare user, in a temporary and regulated manner. The uploaded documents will impact the issuer’s personal space quota. Currently, the feature is fully implemented with the basic workflow but still remains some limitations.  ## Definition Stories * Continue improving timezone issue of date/time fields in Upload Request form * Add a function that allow the UR sender can remind the recipients to upload files to the UR * Add a function that allow sender remove recipients from UR * Add a fucntion that allow Linshare user to preview files in Upload request TODO: Add stories that were writen and implemented in 4.1 [Back to Summary](#summary) ## Stories > A list of all the story documentation in the epic, must format as a list of links to corresponding user story files inside epic folder 1. [As a user, i can do something](./link-to-the-file.md) [Back to Summary](#summary) ## Misc > Link references, UI mockup, link to gitlab issye or any extra documents related to the EPIC * [Gitlab issue]() * [UI Mockup]() [Back to Summary](#summary) ================================================ FILE: documentation/EN/epics/upload-request/story-1-issuer-send-reminder-notification-to-recipient.md ================================================ # Summary * [Related EPIC](#related-epic) * [Definition](#definition) * [Screenshots](#screenshots) * [Misc](#misc) ## Related EPIC * [Upload Request](./README.md) ## Definition #### Preconditions * Given that i am an Linshare user * Given that domain admin enabled reminder email activation policy. #### Description ### UC1 Remind recipients of collective Upload request * From menu, i go to screen List active/closed UR * On an active collective Upload request, when i click on three-dot button, i can see option "Remind recipients" * When i click on button Remind recipient, a popup will be appeared: * In the popup, i can see the sentence "The reminder email will be sent to all recipients." and a checkbox "Add a new message". When i tick this box, a text field will be displayed and i can input the new message. This message (if any) will be sent in the reminder email. * When i click button Proceed on popup, the system will send a reminder email to all recipients of the collective UR. * Reminder Mail content is configured in Admin UI: When the recipient open the mail, he can see mail content and a button Access. When he click on Access button, his Upload Request Portal will be opened. ### UC2 Remind recipients of individual Upload request * From menu, i go to screen List active/closed UR * On an active individual Upload request, when i click on three-dot button, i can see option "Remind recipients" * When i click on button Remind recipient, a popup will be appeared: * In the popup, i can see the sentence "The reminder email will be sent to following recipients." the list pf recipients will be dislplayed. I can tick/untick the checkbox next to each recipients. There is also a checkbox "Add a new message". When i tick this box, a text field will be displayed and i can input the new message. This message (if any) will be sent in the reminder email. * When i click button Proceed on popup, the system will send a reminder email to all selected recipients * Reminder Mail content is configured in Admin UI: When the recipient open the mail, he can see mail content and a button Access. When he click on Access button, his Upload Request Portal will be opened. ### UC3 Remind a recipient of a nested upload request * From menu, i go to screen List active/closed UR * When i click on an active individual upload request, the list of nested upload request screen is opened. * I click on three-dot button of an nested UR, i can see the option "Remind recipient" * When i choose option Remind recipient, a popup will be displayed. * In the popup, i can see the sentence "The reminder email will be sent to [recipient email]." and a checkbox "Add a new message". When i tick this box, a text field will be displayed and i can input the new message. This message (if any) will be sent in the reminder email. * If i choose Proceed to confirm, the system will send a reminder email to selected recipient. * Reminder Mail content is configured in Admin UI: When the recipient open the mail, he can see mail content and a button Access. When he click on Access button, his Upload Request Portal will be opened. [Back to Summary](#summary) ## UI Design #### Mockups **1.1 Remind recipients - UR list**  **1.2 Popup - Collective UR**  **1.3 Remind one recipient- nested UR**  **1.4 Popup - Individual UR**  **1.5 Popup - Nested UR**  #### Final design [Back to Summary](#summary) ## Misc [Back to Summary](#summary) ================================================ FILE: documentation/EN/epics/upload-request/story-2-issuer-remove-recipient-of-collective-Upload-Request.md ================================================ # Summary * [Related EPIC](#related-epic) * [Definition](#definition) * [Screenshots](#screenshots) * [Misc](#misc) ## Related EPIC * [Upload-Request](./README.md) ## Definition #### Preconditions * Given that functionality "Upload request" is enabled in Admin * Given that i am an issuer of Upload request * Given that email notification for Remove recipient is enabled in Admin #### Description * I log-in the system successfully and from the left menu, I choose Upload request, I can see the second-level menu including: - Created: Listing URs that have status “Created” - Active+Closed: Listing Urs that have status Active or Closed - Archived: Listing Urs that have status Archived * In UR list screen, I click on three-dot button of a pending/active UR, the drop-down list will be displayed. * If the UR is collective, i can see the option Remove recipient that when i click on, the right panel "Details" will appear. * In "Details" Panel, i can see the recpipient list. * Beside every recipient, i can see the delete icon that when i click on, a confirmation popup will be displayed: "You are about to remove a recipient from this upload request! All files uploaded by this recipient will be also removed. Beware, this action cannot be undone." * I choose Yes to confirm, the recipient will be removed and system will display message :" [Selected recipicent's email] has been removed successfully from the Upload request" #### Postconditions * If the UR is collective and status is Pending, after removing recipient, he will be removed from the Recipient list * If the UR is collective and status is Active, after removing recipient, his uploaded files will be removed also. * The removed recipient will receive email notification. * Now when recipient tries to access UR, he will see an error page 404. [Back to Summary](#summary) ## UI Design #### Mockups    #### Final design [Back to Summary](#summary) ## Misc [Back to Summary](#summary) ================================================ FILE: documentation/EN/epics/upload-request/story-3-hour-picker-improvement.md ================================================ # Summary * [Related EPIC](#related-epic) * [Definition](#definition) * [Screenshots](#screenshots) * [Misc](#misc) ## Related EPIC * [Upload-request](./README.md) ## Definition #### Current behavior * When creating upload request, we have 3 date/time fields: * Activation date * Expiration date * Reminder date * With each date/time fields, there will be an default hour = current hour +1 * Under default hour, there will be an button "Set" that when i click on, there will be an hour picker that allow me to choose hour from 1=> 24. Now the button "Set" change to "Remove" * If i click button Remove, the hour will be reset to "current hour"+1 * Currently, when i do not change default value of activation date, and click button Create, if other fields are valid, the UR will be activated immediately. * If i choose an activation hour <= current hour, there will be an error message from server #### Improvement **Activation date** * If default value of activation date is creation date, when i open Create UR form, on Activation date field, i can see a checkbox : Activate on submission ticked by default. * If Delegation policy is enabled, i can untick the checkbox, the button Set is enabled and then i can click button Set to choose activation Date/hour. * If delegation policy is disabled, i cannot unctick the checkbox * If default value of activation date is > creation date, when i open Create UR form, on Activation date field, i can see the default value date with default hour = current hour +1 * If Delegation policy is enabled, i can tick the checkbox to activate UR on creation. The date/hour picker will be disabled now. * If delegation policy is disabled, i cannot tick the checkbox. * When the Delegation is disabled, hour picker will be disabled also. * When i click button Create, if other fields are valid, and the activation date is today but hour is < current hour, system will display error message: "Please choose the hour between [next hour] and 23" **Expiry date** * Expiry date will be > activation date at least 1 day. When expiry date is creation date +1, i can choose expiry date = today but i choose hour <= current hour, system will display error message: "Please choose the hour between [next hour] and 23" **Reminder date** * When the Delegation is disabled, hour picker will be disabled also. * Default hour in Expiry date field is current hour +1 and when delegation policy is enabled, i can click button Set to choose expiry date/hour. * When Reminder date = today, and i choose hour <= current hour, system will display error message: "Please choose the hour between [next hour] and 23" [Back to Summary](#summary) ## UI Design #### Mockups   #### Final design [Back to Summary](#summary) ## Misc [Back to Summary](#summary) ================================================ FILE: documentation/EN/epics/upload-request/story-4-user-preview-file-in-upload-request.md ================================================ # Summary * [Related EPIC](#related-epic) * [Definition](#definition) * [Screenshots](#screenshots) * [Misc](#misc) ## Related EPIC * [Upload request](./README.md) ## Definition #### Preconditions - Given that I am a Linshare user - Given that Upload request functionality is enabled in Admin #### Description - After log-in successfully to Linshare, i go to Upload requests => Active/Closed. - I can see the list of Upload requests which have status Active or Closed. - I click on one Upload request and see the list of uploaded files. - I can see preview of a file in 2 ways: 1. I click on three-dot button of a file and select the option Preview, the preview page will be displayed. 2. I click on three-dot button of a file and select the option "Details" - The File Details tab will be opened, and i can see thumbnail on the Details section - I click on the thumbnail, the preview page will be displayed. #### Postconditions - If the file type is not supported to preview, i can see a page with text: No Preview Available - If the file type is supported, i can read the file's content. - On top right of peview page, i can see the options: - Details: When i click on, the Details tab will be displayed - Download: When i click on, the downloading will be executed as current process - Copy to Myspace: When i click on, the file will be copied to Myspace as current process [Back to Summary](#summary) ## UI Design #### Mockups Details screen  Preview available  No preview available  #### Final design [Back to Summary](#summary) ## Misc [Back to Summary](#summary) ================================================ FILE: documentation/EN/epics/upload-request/story-5-external-user-preview-file-in-upload-request-portal.md ================================================ # Summary * [Related EPIC](#related-epic) * [Definition](#definition) * [Screenshots](#screenshots) * [Misc](#misc) ## Related EPIC * [Upload request](./README.md) ## Definition #### Preconditions - Given that Upload request functionality is enabled in Admin - Given that I am recipient of an Upload request and the upload request is active or closed (readonly). #### Description - When i access the active upload request portal, i can see the list of files of that upload request. - I can preview file by 2 ways: 1. I click on icon Preview in Actions column, the preview page will be displayed. 2. I click directly on the file name area, the preview page will be displayed. #### Postconditions - If the file type is not supported to preview, i can see a page with text: No Preview Available - If the file type is supported, i can read the file's content. - On top right of peview page, i can see the options: - Download: When i click on, the downloading will be executed as current process [Back to Summary](#summary) ## UI Design #### Mockups  #### Final design [Back to Summary](#summary) ## Misc [Back to Summary](#summary) ================================================ FILE: documentation/EN/epics/upload-request/story-6-recipient-can-download-a-file-in-UR-portal.md ================================================ # Summary * [Related EPIC](#related-epic) * [Definition](#definition) * [Screenshots](#screenshots) * [Misc](#misc) ## Related EPIC * [Upload request](./README.md) ## Definition #### Preconditions - Given that i am recipient of an Upload request. - I open the upload interface from the link #### Description **UC1. As a recipient, I can upload file in my upload request** - I can only upload file if UR is active - In the Upload area, I can upload a file by two ways: - I click Upload button, the dialog box will be opened and I can choose files from local device to uploaded. - I can drop files to the Upload area - When a file is about to be uploaded, the system will validate according to issuer’s request configure as following: - If the uploaded file is exceed the max file size, system will display an error message - If the max number of files is reached, system will display an error message - If the max total file size is reached, system will display an error message - If the issuer’s disc space is insufficient, system will display an error message - If an selected file passed all above validation, it is uploaded successfully and listed in the area File already uploaded with the information: File name, Size - If the upload request is collective, all recipients see the same upload request interface, which mean they can see others’s uploaded files, and delete them if the issuer allowed. **UC2. As a recipient, I can delete file in my upload request** - I can only delete file if my Upload request is active - If the issuer granted me permission to delete uploaded files, I can click the item “Delete” beside the file to delete. - When a file is uploaded or deleted, the issuer will receive a notification email. This email template is configured in Admin setting. - I can select mukltiple files and click button Delete, there will be a confimation message. - If i choose Yes, all selected files will be removed. **UC3. As a recipient, i can download files in my upload request** - I can download files if my Upload request is active or closed. - In Upload request, i can see the list of uploaded files. - On Action column i can see icon "Download" which when i click on, the selected file will be downloaded to my device. - I can select multiple files then click button "Download", all the selected file will be downloaded to my device. #### Postconditions [Back to Summary](#summary) ## UI Design #### Mockups  #### Final design [Back to Summary](#summary) ## Misc [Back to Summary](#summary) ================================================ FILE: documentation/EN/epics/workgroups/README.md ================================================ # Summary * [Context](#context) * [Definition](#definition) * [Stories](#stories) * [Misc](#misc) ## Context [Back to Summary](#summary) ## Definition A workgroup is a collaborative space where you can upload files and folders. The workgroup belongs to the company not to a person, all the data will be kept even if the members leave this group. Members must be users either guest or internal users and they have at least the READER role. TODO: Define all roles. [Back to Summary](#summary) ## Stories > A list of all the story documentation in the epic, must format as a list of links to corresponding user story files inside epic folder 1. [As an user, I would like to be able to filter workgroups by name when I try to copy/move a file/folder to another workgroup](./story-1-user-filter-workgroup-in-pick-destination-screen.md) [Back to Summary](#summary) ## Misc > Link references, UI mockup, link to gitlab issye or any extra documents related to the EPIC * [Gitlab issue]() * [UI Mockup]() [Back to Summary](#summary) ================================================ FILE: documentation/EN/epics/workgroups/story-1-user-filter-workgroup-in-pick-destination-screen.md ================================================ # Summary * [Related EPIC](#related-epic) * [Definition](#definition) * [Screenshots](#screenshots) * [Misc](#misc) ## Related EPIC > Links to the epic document in the epic folder, normally README. * [Workgroups](./README.md) ## Definition #### Preconditions - Given that i am LinShare user. - Given that Workgroups functionality is enabled in Admin site. #### Description - After logged-in successfully to LinShare, i go to Shared Space and see the list of workgroups - I go to a workgroup that i have Copy/move file/folder roles - I select one or multiple files/folders to copy/move to Shared Space - Or from Myspace screen, i select one or multiple files then copy/move to SharedSpace. - A Pick destination screen will be shown and list all the worgkoups that i can copy/move files/folder to - When i click on icon Search, a text field will promt below with Place holder "Search by name" and a close button. #### Postconditions - If i input text in Search field and the system will display corresponding workgroups which have name matching searched text. - If i click on Close button, the Search field will be disappeared. [Back to Summary](#summary) ## UI Design #### Mockups   #### Final design [Back to Summary](#summary) ## Misc [Back to Summary](#summary) ================================================ FILE: documentation/EN/epics/workgroups/story-2-view-default-current-folder-in-pick-destination-screen.md ================================================ # Summary * [Related EPIC](#related-epic) * [Definition](#definition) * [Screenshots](#screenshots) * [Misc](#misc) ## Related EPIC * [Workgroups](./README.md) ## Definition #### Preconditions - Given that i am LinShare user. - Given that Workgroups functionality is enabled in Admin site. #### Description - After logged-in successfully to LinShare, i go to Shared Space and see the list of workgroups. - I go to a workgroup that i have Copy/move file/folder roles. - I select one file/folder to copy/move to Shared Space and click button Copy to Shared space/Move. - A Pick destination screen will be shown - In this screen i can see the current folder/workgroup that contains moved file/folder and a breadcumb that show the file/folder's path - I can click each level in breadcumb to re-select the destination folder/workgroup. - Then i can continue copyig/moving file/folder process and normal #### Postconditions - I can see the default Destination screen is showing current directory of the file/folder. [Back to Summary](#summary) ## UI Design #### Mockups  #### Final design [Back to Summary](#summary) ## Misc [Back to Summary](#summary) ================================================ FILE: documentation/EN/epics/workgroups/story-3-user-search-files-folders-by-name-inside-a-workgroup.md ================================================ # Summary * [Related EPIC](#related-epic) * [Definition](#definition) * [Screenshots](#screenshots) * [Misc](#misc) ## Related EPIC * [Workgroups](./README.md) ## Definition #### Preconditions - Given that i am a LinShare user. - Given that "Workgroup" functionality is enabled in Admin. #### Description **UC1. Search files or folders inside a workgroup** - After logged-in successfully to LinShare, i go to Shared Space and see the list of workgroups. - I click on a workgroup and see the list of files/folders inside. - I can see field "Search by name" on top right of screen and click on icon setting next to this field - The popup Advanced Search settings will be displayed (Screen1) and i can see the list of search criteria including: - Type: includes three checkboxes Files/Folders/Versions and Files and Folders are ticked by default. - File types: a drop-down list with the options: Any types/ Images/Documents/PDFs/Spreadsheets/Presentations/Audio/Archive /Other. - If Type Files or Versions is not selected, then the field File type is disabled. - Size: i can custom the range of size with a tooltip : only applied for file and version - Creation date: I can custom creation date. - Modification date: I can custom modification date range - File/folder's Author: When i input some character of name or email, system will display a suggestion list that allow me to pick. I can input multiple owners in this field. - After choosing search critetia, i input characters on the field " Search by name" - The system will search files and folders name inside that workgroup and display search result instantly in the list below (Screen 2) - The result will include not only files/folders at first level of the workgroup but also files/folder at child levels of folders inside the workgroup. **UC2. Search files or folders inside a folder** - After logg-in successfully to LinShare, i go to Shared Space - I click on a workgroup and go to a folder inside that workgroup - On the top right of screen i see the field "Search by name" and click on icon setting next to this field. - A popup Advanced Search Settings will be displayed (Screen 3) and i can see the list of search criteria including: - Type: includes three checkboxes Files/Folders/Versions and Files and Folders are ticked by default. - File types: a drop-down list with the options: Any types/ Images/Documents/PDFs/Spreadsheets/Presentations/Audio/Archive /Other. - If Type Files or Versions is not selected, then the field File type is disabled. - Size: i can custom the range of size with a tooltip : only applied for file and version - Creation date: I can custom creation date range - Modification date: I can custom modification date range - File/folder's Author: When i input some character of name or email, system will display a suggestion list that allow me to pick. I can input multiple owners in this field. - After choosing search critetia, i input characters on the field " Search by name" and click Enter - The system will search file/folders inside current folder, including child folders of current folder and display result list. #### Postconditions - The result will include not only files/folders at first level of the workgroup but also files/folder at child levels of folders inside the workgroup. - In result list, with each item, i can see a full path below each item with an file type/folder icon. - When i click on three-dots button of a file in the list, i can see the options: Details, Go to destination, Preview, Download. If the workgoup's versioning is enabled and the file is not a version file, i can see the option Manage version, If the file is a version file i cannot see the option Manage version. - When i click on go to destination, i am navigated to file location - With Version in the result list: i can see the original file name and the version ID = Creation date. - When i hover the Version ID, i can see the detailed hour, minute and second of creation date. - When i click on one item, it will go directly to the location of that item. - The Search criteria will be kept until user change the setting. - When i click button Reset, the Search criteria is cleared, the Search result disappears and the screen content disppays current folder. [Back to Summary](#summary) ## UI Design #### Mockups ##### Screen 1  ##### Screen 2  ##### Screen 3  #### Final design [Back to Summary](#summary) ## Misc [Back to Summary](#summary) ================================================ FILE: documentation/EN/epics/workgroups/story-364-user-can-copy-or-move-a-folder-from-a-workgroup-to-another-workgroup.md ================================================ # Summary * [Related EPIC](#related-epic) * [Definition](#definition) * [UI Design](#ui-design) * [Misc](#misc) ## Related EPIC > Links to the epic document in the epic folder, normally README. * [Name of the epic](./README.md) ## Definition #### Preconditions - Given that I am a LinShare user. - Given that "Workgroup" functionality is enabled in Admin. #### Description - After logged-in successfully to LinShare, I go to Shared Space and see the list of workgroups - I go to a workgroup and see the list of files and folders - I click three-dot button of a folder then select option Copy or Move from dop-down list - Or I can tick the checkbox in each folder to select multiple folders, then select option Copy or Move from the action bar - A Pick destination screen will be shown and list all the workgroups - I select a workgroup or select a folder inside a workgroup as destination then click button Copy/Move, the selected folders will be copied/moved to the destination workgroup/folder #### Postconditions - In Pick destination screen, only workgroups that I have can copy/move folder permission are enabled. - Only When I already selected one workgroup or folder as destination, button Copy here/Move here is enabled. - In Pick destination screen, I can create a folder quickly inside a workgroup then select this new created folder as destination - After click button Copy/Move here, there will be a toast message:"The file(s) or folder(s) has been moved into : [destination workgroup/folder] and button View - When I click on this View button, I am redirected to the destination workgroup/folder and I can see the moved/copied folder(s) is selected. - I can copy/move one folder, multiple folders or both files and folders at once. [Back to Summary](#summary) ## UI Design #### Mockups    #### Final design [Back to Summary](#summary) ## Misc [Back to Summary](#summary) ================================================ FILE: documentation/EN/epics/workgroups/story-376-user-can-add-member-to-drive-or-workgroup-from-a-contact-list.md ================================================ # Summary * [Related EPIC](#related-epic) * [Definition](#definition) * [UI Design](#ui-design) * [Misc](#misc) ## Related EPIC * [New admin portal](./README.md) ## Definition #### Preconditions - Given that I am a LinShare user #### Description - After log-in LinShare successfully, I go to Shared space and see the list of Drives and Workgroups. - I click on three-dot button and select option "Add a member", the left panel will be open with tab "Members" displaying - On member tab, When I start to type in fields "Add recipients", there wil be a list of suggestion that matched - This list can include internal users, guests, and contact lists - Contact list can be my own contact lists public contact lists by other users - I select a contact list from the suggestion list, then system will validate and add contact one by one in that list: - If the contact on the list are internal users/guests, it will be added to the Workgroup/Drive with the selected roles - If the contact is an external email, the system will display a toast message to inform that " [external email] cannot be added to the workgroup/drive #### Postconditions - When my contact lists are displayed in suggestion list, I can see the name of contact list and a label "By me" below - When another user' contact lists are displayed in suggestion list, it will show the contact list's name and name of that contact lists' owner. - When a user in contact list is added to a drive, it is also added to all workgroups inside that Drive. - When a user in contact list is already a member of workgroup or drive, there will be a toast message :" [user name]is already a member of this Workgroup/Drive". - When a user in contact list is already a member in a nested workgroup but not a member to the parent Drive, he is added to other nested workgroups with default workgroup role, except the nested workgroup that he is already a member. His role in this workgroup will remain the same as before. [Back to Summary](#summary) ## UI Design #### Mockups  #### Final design [Back to Summary](#summary) ## Misc [Back to Summary](#summary) ================================================ FILE: documentation/EN/epics/workgroups/story-377-user-can-see-number-of-shared-space-nodes-from-detail-panel.md ================================================ # Summary * [Related EPIC](#related-epic) * [Definition](#definition) * [UI Design](#ui-design) * [Misc](#misc) ## Related EPIC * [New admin portal](./README.md) ## Definition #### Preconditions - Given that I am a LinShare user - Given that Shared Space is enabled in my domain #### Description - After log-in LinShare successfully, I go to Shared space and see the list of Drives and Standalone Workgroups. - For standalone workgroup, When I select option Details, The details panel will be opened - I can click on one Drive and see the list of nested workgroups of that drive. I select option Details of a nested workgroup, the detail panel is opened. - On the details panel, I can see some new information: - Folders number: none-editable number field - Total number of Files and Versions: none-editable number field and be calculated as total of number of files and number of version below. - Files: none-editable number field - Versions: none-editable number field #### Postconditions - The number of folders is the sum of all folders inside that selected workgroup in every folder level. - The number of files is the sum of all files in every folder level. - The number of versions is the sum of all versions of all files in every folder level. [Back to Summary](#summary) ## UI Design #### Mockups  #### Final design [Back to Summary](#summary) ## Misc [Back to Summary](#summary) ================================================ FILE: documentation/EN/installation/README.md ================================================ # Installation guides This is the documentation for a new LinShare installation : * [How to install LinShare on Debian destribution](linshare-install-debian.md). * [How to install LinShare on CentOs 7 distribution](linshare-install-centos.md). * [Integration with LemonLDAP::NG using headers](sso-lemonldap-using-headers.md). * [Integration with LemonLDAP::NG using OpenID Connect (OIDC)](sso-lemonldap-using-OIDC-opaque-tokens.md). . * [Integration with Microsoft Azure using OpenID Connect (OIDC)](sso-microsoft-azure-using-OIDC-JWT-tokens.md). * [Required versions of LinShare's dependencies](requirements.md). ================================================ FILE: documentation/EN/installation/linshare-6.x-install-debian-12.md ================================================ # LinShare Installation on Debian * [LinShare Download](#dlLinshare) * [Archive and files configuration Deployment](#installFile) * [JVM Installation](#installOpenJDK) * [Databases Installation](#bdd) * [PostgreSQL Installation](#postgre) * [MongoDB Installation](#mongo) * [Thumbnail Engine (optional)](#thumbnail) * [Tomcat Installation](#tomcat) * [Web Server Installation](#apache) * [ui-user vhost Configuration](#ui-user) * [ui-admin vhost Configuration](#ui-admin) * [ui-upload-request vhost Configuration](#ui-upload-request) * [LinShare Configuration and Launching](#linconf) * [First Access](#firstAccess) * [Upload Request](#uploadRequest) Welcome to LinShare installation Guide, This page provides a __LinShare__ version 6.x installation on *Debian Bookworm 12* > Note :
> Installation of previous supported versions of __LinShare__ are available at github branches: > - [LinShare 6.0](https://github.com/linagora/linshare/blob/maintenance-6.0.x/documentation/EN/installation/linshare-install-debian.md) > - [LinShare 5.1](https://github.com/linagora/linshare/blob/maintenance-5.1.x/documentation/EN/installation/linshare-install-debian.md) > - [LinShare 5.0](https://github.com/linagora/linshare/blob/maintenance-5.0.x/documentation/EN/installation/linshare-install-debian.md) > - [LinShare 4.2](https://github.com/linagora/linshare/blob/maintenance-4.2.x/documentation/EN/installation/linshare-install-debian.md) > - [LinShare 4.1](https://github.com/linagora/linshare/blob/maintenance-4.1.x/documentation/EN/installation/linshare-install-debian.md) > - [LinShare 4.0](https://github.com/linagora/linshare/blob/maintenance-4.0.x/documentation/EN/installation/linshare-install-debian.md) > - [LinShare 2.3](https://github.com/linagora/linshare/blob/maintenance-2.3.x/documentation/EN/installation/linshare-install-debian.md) > - [LinShare 2.2](https://github.com/linagora/linshare/blob/maintenance-2.2.x/documentation/EN/installation/linshare-install.md) > - [LinShare 2.1](https://github.com/linagora/linshare/blob/maintenance-2.1.x/documentation/EN/installation/linshare-install.md) > - [LinShare 2.0](https://github.com/linagora/linshare/blob/maintenance-2.0.x/documentation/EN/installation/linshare-install.md) ## LinShare Download __LinShare__ can be downloaded here : [http://download.linshare.org/versions/](http://download.linshare.org/versions/) There are several versions of __LinShare__. Choose the version of __LinShare__ that is in agreement with the installation guide. Do not install and use a component version which is different from the ones you'll find within the folder itself. Otherwise you will meet dependencies problems. In this new version of LinShare a new admin interface is introduced, so we will need two ui-admin components (old component and new one), as it will be explained later. Our goal for the future is to implement all features in the old interface into the new one. > Note :
In this process, it is considered that the files are downloaded in the `/tmp/linshare_data` temporary directory. Of course, it is possible to use another temporary directory. For this installation, download the following files in `/tmp/linshare_data`: * linshare-core-{VERSION}.war * linshare-core-{VERSION}-sql.tar.bz2 * linshare-ui-admin-{VERSION}.tar.bz2 * linshare-ui-user-{VERSION}.tar.bz2 * linshare-ui-upload-request-{VERSION}.tar.bz2 For this installation process, be sure that your system has it's default locale set to `en_US.UTF-8`. You can use this command to configure it: ```bash dpkg-reconfigure locales ``` To manipulate the archives, it is necessary to install `unzip` and `bzip2`: ```bash apt install unzip bzip2 ``` ## Archive and files configuration Deployment **LinShare war conversion** > Note :
To make LinShare 6.x compatible with Tomcat 10 we need to convert LinShare war with the Apache Tomcat® Migration tool for Jakarta EE software. ```bash wget https://dlcdn.apache.org/tomcat/jakartaee-migration/v1.0.9/binaries/jakartaee-migration-1.0.9-bin.tar.gz tar xzf jakartaee-migration-1.0.9.tar.gz java -jar jakartaee-migration-1.0.9/lib/jakartaee-migration-1.0.9.jar /tmp/linshare_data/linshare-core-{VERSION}.war /tmp/linshare_data/liinshare.war mkdir -p /etc/linshare unzip -j -d /etc/linshare/ /tmp/linshare_data/linshare-core-{VERSION}.war WEB-INF/classes/{linshare,log4j2}.* Archive: linshare.war inflating: /etc/linshare/linshare.properties.sample inflating: /etc/linshare/log4j2.properties mv /etc/linshare/linshare.properties.sample /etc/linshare/linshare.properties chown root:tomcat /etc/linshare/* chmod 640 /etc/linshare/* ``` ## JVM Installation **LinShare** requires a Java Virtual Machine. > You can find the required and recommended JVM distribution in LinShare's system requirements [here](./requirements.md) For example, you can install the JVM provided by Debian community based on OpenJDK 17 from Debian official packages: ```bash apt update apt install openjdk-17-jre ``` ## Databases Installation **LinShare** uses two DBMS, MongoDB & PostgreSQL > Note :
At the beginning, LinShare was developped with PostgreSQL. New functionalities have been developped with MongoDB. Roadmap is to move everything to MongoDB. Task is huge, so LinShare is actually using both databases. #### PostgreSQL Installation __Linshare__ requires the use of PostgreSQL for its files and configuration. This section gives details about the PostgreSQL installation. - Installed version for is PostgreSQL 15, you can install it with: ```bash apt update apt install postgresql ``` > You can find the required versions of LinShare's dependencies [here](./requirements.md) Configurer and start the PostgreSQL service : ```bash systemctl start postgresql ``` Adapt the PostgreSQL access file in `/etc/postgresql/11/main/pg_hba.conf`: ```bash # TYPE DATABASE USER CIDR-ADDRESS METHOD local linshare linshare md5 host linshare linshare 127.0.0.1/32 md5 host linshare linshare ::1/128 md5 ``` > Note :
These lines are usually at the end of the file. For security reasons, the postgreSQL service only listens in local. Restart PostgreSQL service: ```bash systemctl restart postgresql ``` You should also add those rules among the first. Indeed, PostgreSQL uses the first valid rule which match the authentication request. Create linshare user and database: > sample password is **linshare** used for convenience, it should be changed ```bash su - postgres [postgres@localhost ~]$ psql CREATE ROLE linshare ENCRYPTED PASSWORD 'linshare' NOSUPERUSER NOCREATEDB NOCREATEROLE INHERIT LOGIN; CREATE DATABASE linshare WITH OWNER = linshare ENCODING = 'UTF8' TABLESPACE = pg_default LC_COLLATE = 'en_US.UTF-8' LC_CTYPE = 'en_US.UTF-8' CONNECTION LIMIT = -1; GRANT ALL ON DATABASE linshare TO linshare; \q ``` Import the SQL files `createSchema.sql` and `import-postgresql.sql`: ```bash cd /tmp/linshare_data tar xjvf linshare-core-*-sql.tar.bz2 psql -h localhost -U linshare -W -d linshare -f linshare-core-sql/postgresql/createSchema.sql psql -h localhost -U linshare -W -d linshare -f linshare-core-sql/postgresql/import-postgresql.sql ``` Password for user linshare: linshare Edit the __LinShare__ configuration file in `/etc/linshare/linshare.properties` according to your need: ```java #******************** DATABASE ### PostgreSQL linshare.db.username=linshare linshare.db.password=linshare linshare.db.driver.class=org.postgresql.Driver linshare.db.url=jdbc:postgresql://localhost:5432/linshare linshare.db.dialect=org.hibernate.dialect.PostgreSQLDialect ``` ### MongoDB Installation For the __LinShare__ installation, it is required to install a MongoDB database. **LinShare** requires MongoDB 5.0 > You can find the required versions of LinShare's dependencies [here](./requirements.md) - Import MongoDB GPG Key ```bash sudo apt -y install gnupg2 wget -qO - https://www.mongodb.org/static/pgp/server-5.0.asc | sudo apt-key add - ``` - Add repository URL to your Debian: ```bash echo "deb http://repo.mongodb.org/apt/debian buster/mongodb-org/5.0 main" | sudo tee /etc/apt/sources.list.d/mongodb-org.list ``` - Install mongodb package ```bash sudo apt update sudo apt -y install mongodb-org ``` See the [official guide](https://docs.mongodb.com/v5.0/tutorial/install-mongodb-on-debian/) if needed. - start MongoDB server ```bash sudo systemctl start mongod ``` Now MongoDB server is available and ready to be used. - Configure MongoDB Authentication: Execute following commands to enable authentication ```bash mongo ``` ```bash > use admin; ``` ```bash > db.createUser( { user: "linshare", pwd: "linshare", roles: [ { role: "readWrite", db: "linshare" }, { role: "readWrite", db: "linshare-files" } ] } ) ``` > sample password is **linshare** used for convenience, it should be changed - LinShare MongoDB related configuration By default, MongoDB is configured with the following __LinShare__ configuration in the file `/etc/linshare/linshare.properties`, just change it as following : ```java #### Mongo storage options #### linshare.mongo.connect.timeout=30000 linshare.mongo.socket.timeout=30000 #### Write concern # MAJORITY: waits on a majority of servers for the write operation. # JOURNALED: Write operations wait for the server to group commit to the journal file on disk. # ACKNOWLEDGED: Write operations that use this write concern will wait for acknowledgement, # using the default write concern configured on the server. linshare.mongo.write.concern=MAJORITY #### connection for data # replicaset: host1[:port1][,host2[:port2],...[,hostN[:portN]]][/[database][?options]] linshare.mongo.data.replicaset=127.0.0.1:27017 linshare.mongo.data.database=linshare # linshare.mongo.data.credentials=[user:password[@database]] linshare.mongo.data.credentials=linshare:linshare@admin #### connection for small files # Using MongoDb to store very small files (thumbnails, mail attachments, ...) linshare.mongo.smallfiles.replicaset=127.0.0.1:27017 linshare.mongo.smallfiles.database=linshare-files linshare.mongo.smallfiles.credentials=linshare:linshare@admin #### The connection for bigfiles is used just if the `gridfs` spring profile is enabled. # Store all files in MongoDB GridFS. Not recommended. linshare.mongo.bigfiles.replicaset=127.0.0.1:27017 linshare.mongo.bigfiles.database=linshare-bigfiles linshare.mongo.bigfiles.credentials=linshare:linshare@admin ######## Storage options - end ######## ``` For more information about the mongo dataBases used in LinShare you can read this: [documentation](https://github.com/linagora/linshare/blob/master/documentation/EN/administration/configuration-administration.md#mongodb) ## Thumbnail Engine (optional) > Note :
There is a bug in the library that is used by __LinShare__ in order to communicate with LibreOffice (specific to CentOS). LinShare developpment team is actually working on this issue (08/2019). __LinShare__ has a preview generation engine for a wide range of files : - OpenDocument format (ODT, ODP, ODS, ODG) - Microsoft documents format (DOCX, DOC, PPTX, PPT, XLSX, XLS) - PDF documents - Images files (PNG, JPEG, JPG, GIF) - Text files (TXT, XML, LOG, HTML ...) > Note :
Before using this engine you should have LibreOffice installed on your machine, the minimum version of libreOffice is : 4.2.8. To install libreOffice: ```bash apt update apt install libreoffice ``` By default thumbnail generation engine is set to `FALSE`. To enable it, edit __LinShare__ configuration file in `/etc/linshare/linshare.properties`: ```java #******** LinThumbnail configuration # key to enable or disable thumbnail generation linshare.documents.thumbnail.enable=true linshare.linthumbnail.dropwizard.server=http://0.0.0.0:8090/linthumbnail?mimeType=%1$s linshare.documents.thumbnail.pdf.enable=true ``` This will allow to generate previews after each file upload. To use it, download the following files from [http://download.linshare.org/versions/](http://download.linshare.org/versions/) : * thumbnail-server-{VERSION}.jar * thumbnail-server-{VERSION}.yml > Note :
In this process, it is considered that the files are downloaded in the `/tmp/linshare_data` temporary directory. Of course, it is possible to use another temporary directory. > Note
By default the server is configured to listens on port 80, it is possible to change it. Install the file `thumbnail-server-{VERSION}.yml` into `/etc/linshare/linshare-thumbnail-server.yml` and install the java archive `thumbnail-server-{VERSION}.jar` into the repository `/usr/local/sbin/linshare-thumbnail-server.jar` : ```java mv /tmp/linshare_data/thumbnail-server-*.yml /etc/linshare/linshare-thumbnail-server.yml mv /tmp/linshare_data/thumbnail-server-*.jar /usr/local/sbin/linshare-thumbnail-server.jar ``` Creating a systemd service can be useful to automcatically start the thumbnail engine in background at system boot. Create the file `/lib/systemd/system/linshare-thumbnail-server.service`, and add the following content : ```bash [Unit] Description=LinShare thumbnail server After=network.target [Service] Type=idle KillMode=process ExecStart=/usr/bin/java -jar /usr/local/sbin/linshare-thumbnail-server.jar server /etc/linshare/linshare-thumbnail-server.yml [Install] WantedBy=multi-user.target Alias=linshare-thumbnail-server.service ``` Configure and start the new service : ```bash systemctl daemon-reload systemctl enable linshare-thumbnail-server.service systemctl start linshare-thumbnail-server.service ``` ## Tomcat Installation __LinShare__ is a Java application compiled and embedded under the WAR (**W** eb **A** pplication a **R** chive) format, so it needs a servlet container Java (Tomcat or Jetty) to run. This section describes its installation and configuration. > You can find the required versions of LinShare's dependencies [here](./requirements.md) Install Tomcat from the repositories: ```bash sudo apt install -y tomcat10 ``` To specify the location of the __LinShare__ configuration (_linshare.properties_ file) and also the default start options, get the commented lines in the header of the `linshare.properties` file and copy-paste them in the tomcat file (`/etc/default/tomcat10`): All starting needful options by default to LinShare are indicated in the header of the following configuration files : * `/etc/linshare/linshare.properties` * `/etc/linshare/log4j2.properties` N.B.: if you are using __LinShare__ version >= 5.1.0, then the `log4j.properties` should be replaced by `log4j2.properties` It is required to add the following lines in: `/etc/default/tomcat10`: ```conf JAVA_OPTS="${JAVA_OPTS} -Xms512m -Xmx2048m" JAVA_OPTS="${JAVA_OPTS} -Dlinshare.config.path=file:/etc/linshare/" JAVA_OPTS="${JAVA_OPTS} -Dlog4j2.configurationFile=file:/etc/linshare/log4j2.properties" ``` If you want to change the location of tmp directory you need to override the default directory used by tomcat10 which is `/tmp`, by editing `/etc/default/tomcat10` and add: ```conf CATALINA_TMPDIR=/your/path/tmp ``` > Note :
If you encounter an error in overriding your new `tmp` directory path, it could be due to the lack of write permission of Tomcat on your new directory. You can check [this section](https://github.com/linagora/linshare/blob/master/documentation/EN/installation/linshare-install-debian.md#linshare-configuration-and-launching). #### profiles LinShare provides different profiles that can allow you to conditionally setup the application (different way of storage, authentication ...). ##### Available profiles: Available authentication profiles : * **default** : default authentication process. * **sso** : Enable headers injection for SSO. > **NB** You must enable at least one authentication profile among authentication profiles Available file data store profiles : * **jcloud** : Using jcloud as file data store : Amazon S3, Swift, Ceph, filesystem. * **gridfs** : Using gridfs (mongodb) as file data store. The recommended profile for production is jcloud. > LinShare uses `jcould` profile as a default filesystem data storage. Additional profiles : * **batches** : if this profile is enabled, it will enable all Quartz jobs (cron tasks). ##### Additional configuration: In the tomcat file `/var/lib/tomcat10/conf/catalina.properties` There is a key named `tomcat.util.scan.DefaultJarScanner.jarsToSkip`. Add `jclouds-bouncycastle-1.9.2.jar,bcprov-*.jar,\` somewhere in the section of this key. Deploy the __LinShare__ application archive into the Tomcat server: ```bash mv /tmp/linshare_data/linshare-core-{VERSION}.war /var/lib/tomcat10/webapps/linshare.war ``` ## Web Server Installation __LinShare__ administration interface is exploiting web languages such as HTML/CSS and JavaScript. It requires a simple web server such as Apache or Nginx. This section presents the Apache HTTP server installation. > You can find the required versions of LinShare's dependencies [here](./requirements.md) Install Apache 2 from the repositories : ```bash apt install -y apache2 ``` ### ui-user vhost Configuration To deploy the __LinShare__ application, it is necessary to activate the __mod_proxy__ module on apache 2. Create the subdirectories in the directory `/var/www/`, note that the repository name will be the application domain name. Assign to the user the access permissions to the subdirectories. ```bash cd /var/www/ tar xjf /tmp/linshare_data/linshare-ui-user-
The upload request component is optional on LinShare(it is not required to make LinShare work), by default its functionality is enabled, so for a proper functioning of this feature you need to follow the guide below to deploy its insterface.If it is not the case you can disable the functionality on the administration interface. First, go [here](#uploadRequest) to download the upload request module. To deploy the Upload-Request interface of __LinShare__, you need to open your linshare-ui-upload-request.conf virtualhost file : ``` cp /etc/apache2/sites-available/000-default.conf /etc/apache2/sites-available/linshare-ui-upload-request.conf sudo a2dissite 000-default sudo a2enmod ssl sudo a2enmod headers sudo a2ensite linshare-ui-upload-request sudo a2enmod proxy proxy_http ``` And then you can change the virtualhost configuration file as follows: ```xml
You have some vhost's examples in the following repository : [utils/apache2/vhosts-sample/](../../../utils/apache2/vhosts-sample/linshare-admin.conf) Restart the apache 2 service: ```bash systemctl restart apache2 ``` ## LinShare Configuration and Launching Configure the storage location of the files in the __LinShare__ configuration file `/etc/linshare/linshare.properties` : ```java linshare.documents.storage.filesystem.directory=/var/lib/linshare/filesystemstorage linshare.encipherment.tmp.dir=/var/lib/linshare/tmp ``` In this configuration, it is necessary to create the folder with the correct permissions: ```bash mkdir -p /var/lib/linshare chown -R tomcat:tomcat /var/lib/linshare ``` Configure the SMTP service access so that __LinShare__ can send message notifications in the __LinShare__ configuration `/etc/linshare/linshare.properties` file: ```java mail.smtp.host=
Recommended profile for production is jcloud with Swift. tomcat10 is sandboxed to write just in its own directories, if you try to use a local Filesystem storage you need to override the default configuration of Tomcat by creating in `/etc/systemd/system/tomcat10.service.d/` a file named `override.conf` containing: ``` [Service] ReadWritePaths=/var/lib/linshare ``` Then you need to: ``` systemctl daemon-reload systemctl restart tomcat10 ``` Start the tomcat service, in order to start the __LinShare__ application: ```bash systemctl start tomcat10 ``` To check that __LinShare__ is working, check the logs: ```bash tail -f /var/log/tomcat10/catalina.out ``` Once the service has successfully started, the following message may appear: ``` org.apache.coyote.http11.Http11Protocol start INFO: Démarrage de Coyote HTTP/1.1 sur http-8080 org.apache.catalina.startup.Catalina start INFO: Server startup in 23151 ms ``` Then restart the Apache service : `[root@localhost ~]$ sudo systemctl restart apache2` ### First Access > Note: Before the first access to __LinShare__ you need to add all `linshare-*.local` ServerNames to the `/etc/hosts` file. ```Bash 127.0.0.1 linshare-user.local 127.0.0.1 linshare-admin.local 127.0.0.1 linshare-upload-request.local ``` __LinShare__ service is now reachable at the following adresses: For the user interface: * http://linshare-user.local/  For the administration interface: * http://linshare-admin.local/ Here are the default credentials for the system administrator: * Username : root@localhost.localdomain * Password : adminlinshare Please change the password in the administration interface. > Note :
It is not possible to add other LinShare standard users locally without LDAP. Please see the dedicated page for the LDAP configuration in the [application parameters](../administration/linshare-admin.md). To access to the admin interface : * http://linshare-admin.local/  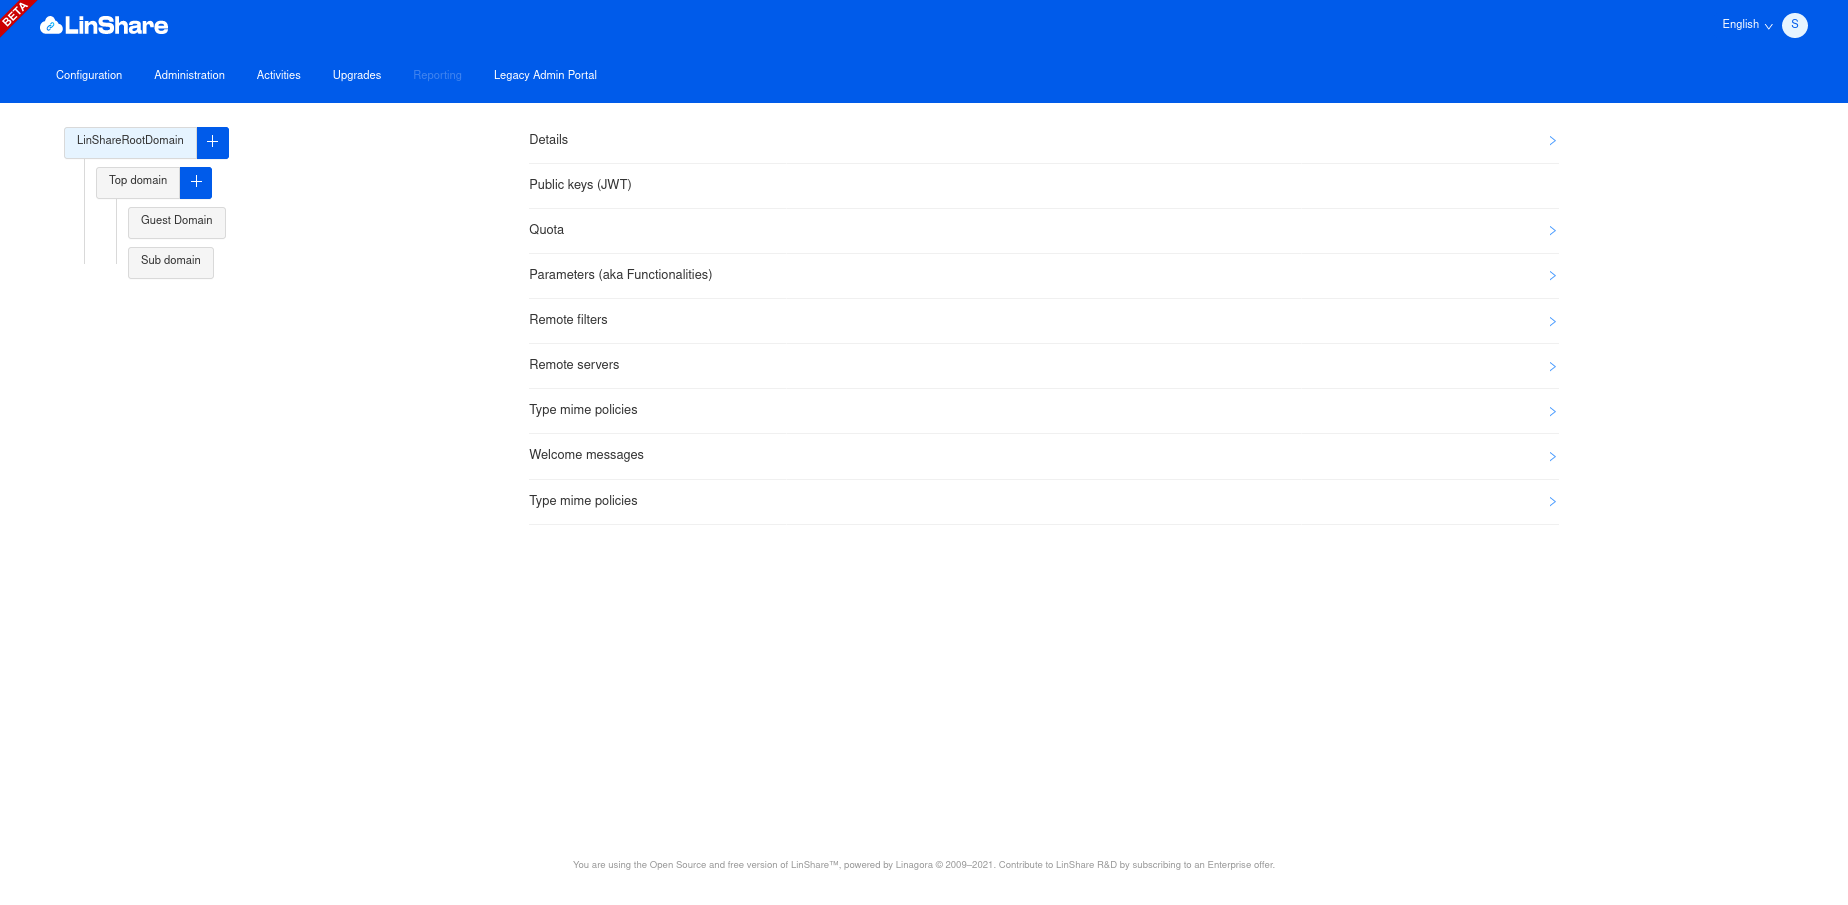 ### Upload Request component installation #### Download of the module This module in on free download at the following address : * [http://download.linshare.org/versions/](http://download.linshare.org/versions/) For this Installation, download the following file according to the version you want : * linshare-ui-upload-request-{VERSION}.tar.bz2 >Note :
The upload request feature is only available from LinShare 1.7 to LinShare 1.12, and since LinShare 4.1. #### deployment of the archive Deploy the __LinShare__ UI UploadRequest archive in the Apache server repository : ``` [root@localhost ~]$ cd /var/www/ [root@localhost ~]$ tar xjf linshare-ui-upload-request-{VERSION}.tar.bz2 [root@localhost ~]$ chown -R www-data: linshare-ui-upload-request ``` Next, you may follow the vhost configuration of upload request module [here](#ui-upload-request). To access at __LinShare Upload Request__, first start the Core, then restart the Apache2 service : `[root@localhost ~]$ service apache2 restart` ### First access The __Upload Request service__ is now reachable at the address below by default : __http:///linshare-upload-request.local/__ > Note :
You need to inquire the url into your upload request url parameter in your administration interface. To do so, go to your administration interface, choose the __Upload Request__ functionnality, and inquire the url in the "parameters" fields. ================================================ FILE: documentation/EN/installation/linshare-install-centos.md ================================================ # WARNING: deprecated # LinShare Installation on CentOS * [LinShare Download](#dlLinshare) * [Archive and files configuration Deployment](#installFile) * [JVM Installation](#installOpenJDK) * [Databases Installation](#bdd) * [PostgreSQL Installation](#postgre) * [MongoDB Installation](#mongo) * [Thumbnail Engine (optional)](#thumbnail) * [Tomcat Installation](#tomcat) * [Web Server Installation](#apache) * [ui-user vhost Configuration](#ui-user) * [ui-admin vhost Configuration](#ui-admin) * [ui-upload-request vhost Configuration](#ui-upload-request) * [Firewall Configuration](#firewalld) * [LinShare Configuration and Launching](#linconf) * [First Access](#firstAccess) Welcome to LinShare installation Guide, This page provides a LinShare version 5 installation on *CentOs 7* (older CentOS versions are not supported). > Note :
> Installation of previous supported versions of __LinShare__ are available at github branches: > - [LinShare 4.2](https://github.com/linagora/linshare/blob/maintenance-4.2.x/documentation/EN/installation/linshare-install-centos.md) > - [LinShare 4.1](https://github.com/linagora/linshare/blob/maintenance-4.1.x/documentation/EN/installation/linshare-install-centos.md) > - [LinShare 4.0](https://github.com/linagora/linshare/blob/maintenance-4.0.x/documentation/EN/installation/linshare-install-centos.md) > - [LinShare 2.3](https://github.com/linagora/linshare/blob/maintenance-2.3.x/documentation/EN/installation/linshare-install-centos.md) > - [LinShare 2.2](https://github.com/linagora/linshare/blob/maintenance-2.2.x/documentation/EN/installation/linshare-install-centos-7.md) > - [LinShare 2.1](https://github.com/linagora/linshare/blob/maintenance-2.2.x/documentation/EN/installation/linshare-install-centos-7.md) > - [LinShare 2.0](https://github.com/linagora/linshare/blob/maintenance-2.1.x/documentation/EN/installation/linshare-install-centos-7.md) ## LinShare Download __LinShare__ can be downloaded here: [http://download.linshare.org/versions/](http://download.linshare.org/versions/) > Note:
There are several versions of __LinShare__. Choose the version of __LinShare__ that is in agreement with the installation guide. Do not install and use a component version which is different from the ones you'll find within the folder itself. Otherwise you will meet dependencies problems. In this new version of LinShare a new admin interface is introduced, so we will need two ui-admin components (old component and new one), as it will be explained later. Our goal for the future is to implement all features in the old interface into the new one. For this installation, download the following files : * linshare-core-{VERSION}.war * linshare-core-{VERSION}-sql.tar.bz2 * linshare-ui-admin-{VERSION}.tar.bz2 * linshare-ui-admin-{VERSION}-legacy.tar.bz2 * linshare-ui-user-{VERSION}.tar.bz2 * linshare-ui-upload-request-{VERSION}.tar.bz2 > Note :
In this process, it is considered that the files are downloaded in the `/tmp/linshare_data` temporary directory. Of course, it is possible to use another temporary directory. To manipulate the archives, it is necessary to install `unzip` and `bzip2`: ```bash yum install -y unzip bzip2 ``` ## Archive and files configuration Deployment Create the configuration repository of __LinShare__, past the configuration files, and rename the sample file as follow : ```bash mkdir -p /etc/linshare mv /tmp/linshare_data/linshare-core-{VERSION}.war /etc/linshare/linshare.war unzip -j -d /etc/linshare/ linshare.war WEB-INF/classes/{linshare,log4j}.* Archive: linshare.war inflating: /etc/linshare/linshare.properties.sample inflating: /etc/linshare/log4j.properties mv /etc/linshare/linshare.properties.sample /etc/linshare/linshare.properties ``` Edit the file `/etc/linshare/log4j.properties` in order to replace the following line : ```java log4j.rootCategory=INFO, CONSOLE ``` by the following one : ```java log4j.rootCategory=INFO, LINSHARE ``` Check the following log file location ```java log4j.appender.LINSHARE.File=/var/log/tomcat/linshare.log ``` ## JVM Installation **LinShare** requires a Java Virtual Machine. > You can find the required and recommended JVM distribution in LinShare's system requirements [here](./requirements.md) ```bash yum install java-17-openjdk-devel ``` To update Java version you can set: ``` update-alternatives --config java ``` > Note :
You can ignore the possible errors from the Java plugin. ## Databases Installation > Note :
At the beginning, LinShare was developped with PostgreSQL. New functionalities have been developped with MongoDB. Roadmap is to move everything to MongoDB. Task is huge, so LinShare is actually using both databases. ### PostgreSQL Installation __Linshare__ requires the use of PostgreSQL 9.x and newer versions for its files and configurations. This section gives details about the PostgreSQL installation. > You can find the required versions of LinShare's dependencies [here](./requirements.md) > Note :
MySQL database is not compatible anymore since LinShare v2. ```bash yum install -y postgresql postgresql-server ``` Configure and start the PostgreSQL service : ```bash postgresql-setup initdb systemctl enable postgresql systemctl start postgresql ``` Adapt the PostgreSQL access file in `/var/lib/pgsql/data/pg_hba.conf`: ```bash # TYPE DATABASE USER CIDR-ADDRESS METHOD local all postgres peer local linshare linshare md5 host linshare linshare 127.0.0.1/32 md5 host linshare linshare ::1/128 md5 ``` > Note :
These lines are usually at the end of the file. For security reasons, the postgreSQL service only listens in local. Restart PostgreSQL service: ```bash systemctl restart postgresql ``` You should also add those rules among the first. Indeed, PostgreSQL uses the first valid rule which match the authentication request. Create the user linshare (password is PASSWORD") : ```bash su - postgres [postgres@localhost ~]$ psql CREATE ROLE linshare ENCRYPTED PASSWORD 'PASSWORD' NOSUPERUSER NOCREATEDB NOCREATEROLE INHERIT LOGIN; \q ``` Commands: to quit, type `\q`, to get help, type `\?`. Create and import the database schemas : ```bash su - postgres [postgres@localhost ~]$ psql CREATE DATABASE linshare WITH OWNER = linshare ENCODING = 'UTF8' TABLESPACE = pg_default LC_COLLATE = 'en_US.UTF-8' LC_CTYPE = 'en_US.UTF-8' CONNECTION LIMIT = -1; GRANT ALL ON DATABASE linshare TO linshare; \q ``` > Note :
Eventually use the script named `createDatabase.sh` from `src/main/resources/sql/postgresql/` which provides the commands to create the database. Import the SQL files `createSchema.sql` and `import-postgresql.sql`: ```bash cd /tmp/linshare_data tar xjvf linshare-core-*-sql.tar.bz2 psql -U linshare -W -d linshare -f linshare-core-sql/postgresql/createSchema.sql Password for user linshare: PASSWORD psql -U linshare -W -d linshare -f linshare-core-sql/postgresql/import-postgresql.sql Password for user linshare: PASSWORD ``` Edit the __LinShare__ configuration file in `/etc/linshare/linshare.properties`: ```java #******************** DATABASE ### PostgreSQL linshare.db.username=linshare linshare.db.password=PASSWORD linshare.db.driver.class=org.postgresql.Driver linshare.db.url=jdbc:postgresql://localhost:5432/linshare linshare.db.dialect=org.hibernate.dialect.PostgreSQLDialect ``` ### MongoDB Installation For the __LinShare__ installation, it is required to install MongoDB 4.2. For more details about the different mongoDB databases of __LinShare__ you can refer to this [Documentation](https://github.com/linagora/linshare/blob/master/documentation/EN/installation/linshare-install-centos.md#mongodb-installation) > You can find the required versions of LinShare's dependencies [here](./requirements.md) Create a file `/etc/yum.repos.d/mongodb-org.repo`, and add the repository informations in the latest stable release to the file: ```bash [mongodb-org-4.2] name=MongoDB Repository baseurl=https://repo.mongodb.org/yum/redhat/$releasever/mongodb-org/4.2/x86_64/ gpgcheck=1 enabled=1 gpgkey=https://www.mongodb.org/static/pgp/server-4.2.asc ``` Install the mongodb-org package from the new repository, by using the yum utility: ```bash yum install -y mongodb-org ``` See the [official guide](https://docs.mongodb.com/v4.2/tutorial/install-mongodb-on-red-hat/) if needed. - start MongoDB server ```bash sudo systemctl start mongod ``` - Configure MongoDB Authentication: Execute following commands to enable authentication ```bash mongo ``` ```bash > use admin; ``` ```bash > db.createUser( { user: "linshare", pwd: "linshare", roles: [ { role: "readWrite", db: "linshare" }, { role: "readWrite", db: "linshare-files" } ] } ) ``` > sample password is **linshare** used for convenience, it should be changed - LinShare MongoDB related configuration By default, MongoDB is configured with the following __LinShare__ configuration in the file `/etc/linshare/linshare.properties` : ```java #### Mongo storage options #### linshare.mongo.connect.timeout=30000 linshare.mongo.socket.timeout=30000 #### Write concern # MAJORITY: waits on a majority of servers for the write operation. # JOURNALED: Write operations wait for the server to group commit to the journal file on disk. # ACKNOWLEDGED: Write operations that use this write concern will wait for acknowledgement, # using the default write concern configured on the server. linshare.mongo.write.concern=MAJORITY #### connection for data # replicaset: host1[:port1][,host2[:port2],...[,hostN[:portN]]][/[database][?options]] linshare.mongo.data.replicaset=127.0.0.1:27017 linshare.mongo.data.database=linshare # linshare.mongo.data.credentials=[user:password[@database]] linshare.mongo.data.credentials=linshare:linshare@admin #### connection for small files # Using MongoDb to store very small files (thumbnails, mail attachments, ...) linshare.mongo.smallfiles.replicaset=127.0.0.1:27017 linshare.mongo.smallfiles.database=linshare-files linshare.mongo.smallfiles.credentials=linshare:linshare@admin ``` Before starting the MongoDB service, check that the file `/etc/mongod.conf` has the bind ip address: 127.0.0.1. Then, configure and start the MongoDB service: ```bash systemctl enable mongod systemctl start mongod ``` For more information about the mongo dataBases used in LinShare you can read this: [documentation](https://github.com/linagora/linshare/blob/master/documentation/EN/administration/configuration-administration.md#mongodb) ## Thumbnail Engine (optional) > Note :
There is a bug in the library that is used by __LinShare__ in order to communicate with LibreOffice (specific to CentOS). LinShare developpment team is actually working on this issue (08/2019). __LinShare__ has a preview generation engine for a wide range of files : - OpenDocument format (ODT, ODP, ODS, ODG) - Microsoft documents format (DOCX, DOC, PPTX, PPT, XLSX, XLS) - PDF documents - Images files (PNG, JPEG, JPG, GIF) - Text files (TXT, XML, LOG, HTML ...) > Note :
Before using this engine you should have LibreOffice installed on your machine, the minimum version of libreOffice is : 4.2.8. To install libreOffice: ```bash yum -y install libreOffice ``` By default thumbnail generation engine is set to `FALSE`. To enable it, edit __LinShare__ configuration file in `/etc/linshare/linshare.properties`: ```java #******** LinThumbnail configuration # key to enable or disable thumbnail generation linshare.documents.thumbnail.enable=true linshare.linthumbnail.dropwizard.server=http://0.0.0.0:8090/linthumbnail?mimeType=%1$s linshare.documents.thumbnail.pdf.enable=true ``` This will allow to generate previews after each file upload. To use it, download the following files from [http://download.linshare.org/versions/](http://download.linshare.org/versions/) : * linshare-thumbnail-server-{VERSION}.jar * linshare-thumbnail-server-{VERSION}.yml > Note :
In this process, it is considered that the files are downloaded in the `/tmp/linshare_data` temporary directory. Of course, it is possible to use another temporary directory. > Note
By default the server is configured to listens on port 80, it is possible to change it. Install the file `linshare-thumbnail-server-{VERSION}.yml` into `/etc/linshare/linshare-thumbnail-server.yml` and install the java archive `linshare-thumbnail-server-{VERSION}.jar` into the repository `/usr/local/sbin/linshare-thumbnail-server.jar` : ```java mv /tmp/linshare_data/linshare-thumbnail-server-*.yml /etc/linshare/linshare-thumbnail-server.yml mv /tmp/linshare_data/linshare-thumbnail-server-*.jar /usr/local/sbin/linshare-thumbnail-server.jar ``` Creating a systemd service can be useful to automcatically start the thumbnail engine in background at system boot. Create the file `/etc/systemd/system/linshare-thumbnail-server.service`, and add the following content : ```bash [Unit] Description=LinShare thumbnail server After=network.target [Service] Type=idle KillMode=process ExecStart=/usr/bin/java -jar /usr/local/sbin/linshare-thumbnail-server.jar server /etc/linshare/linshare-thumbnail-server.yml [Install] WantedBy=multi-user.target Alias=linshare-thumbnail-server.service ``` Configure and start the new service : ```bash systemctl daemon-reload systemctl enable linshare-thumbnail-server.service systemctl start linshare-thumbnail-server.service ``` ## Tomcat Installation __LinShare__ is a Java application compiled and embedded under the WAR (**W** eb **A** pplication a **R** chive) format, so it needs a servlet container Java (Tomcat or Jetty) to run. This section describes its installation and configuration. > You can find the required versions of LinShare's dependencies [here](./requirements.md) This LinShare version is using Java 11 so it requires at least the version 8.5 of __Tomcat__. On CentOs __Tomcat__ does not exist any more on the OS default packages. So you can search on internet how to install it manually. And then add the server configurations bellow. To specify the location of the __LinShare__ configuration (_linshare.properties_ file) and also the default start options, get the commented lines in the header of the `linshare.properties` file and copy-paste them in the tomcat configuration file (Example: /etc/sysconfig/tomcat). All starting needful options by default to Linshare are indicated in the header of the following configuration files : * `/etc/linshare/linshare.properties` * `/etc/linshare/log4j.properties` It is required to add the following lines in the tomcat configuration file (Example: /etc/sysconfig/tomcat): ```conf JAVA_OPTS="-Djava.awt.headless=true -Xms512m -Xmx2048m -Dlinshare.config.path=file:/etc/linshare/ -Dlog4j.configuration=file:/etc/linshare/log4j.properties" ``` If you want to change the location of tmp directory concatenate line below to `JAVA_OPTS`: ```conf JAVA_OPTS="... -Djava.io.tmpdir=/tmp/" ``` ####profiles LinShare provides different profiles that can allow you to conditionally constrcut the application (different way of storage, authentication ...), availables profiles are listed above. To configure which profile you want to use. You can edit used profiles by adding the following key to the JAVA_OPTS parameter. Example with the default value: ```config JAVA_OPTS=" ... -Dspring.profiles.active=default,jcloud,batches" ``` > **NB** You must enable at least one authentication profile among authentication profiles Available authentication profiles : * default : default authentication process. * sso : Enable headers injection for SSO. Available file data store profiles : * jcloud : Using jcloud as file data store : Amazon S3, Swift, Ceph, filesystem. * gridfs : Using gridfs (mongodb) as file data store. Recommended profile for production is jcloud with Swift. Additional profiles : * batches : if this profile is enabled (by default it should be), it will enable all Quartz jobs (cron tasks). Ex: If you want to use `gridfs`: "-Dspring.profiles.active=default,gridfs,batches" In the tomcat file `/usr/share/tomcat/conf/catalina.properties`, return carriage are marked with the `\` character, in order to reduce the lines width of the values for each configuration key. There is a key named `tomcat.util.scan.DefaultJarScanner.jarsToSkip`. Add `jclouds-bouncycastle-1.9.2.jar,bcprov-*.jar,\` somewhere in the section of this key. Here is an extract of the file `/usr/share/tomcat/conf/catalina.properties` with the added line in the middle: ```java jetty-*.jar,oro-*.jar,servlet-api-*.jar,tagsoup-*.jar,xmlParserAPIs-*.jar,\ jclouds-bouncycastle-1.9.2.jar,bcprov-*.jar,\ xom-*.jar ``` Deploy the __LinShare__ application archive into the Tomcat server: ```bash mv /etc/linshare/linshare.war /usr/share/tomcat/webapps/linshare.war ``` ## Web Server Installation __LinShare__ administration interface is exploiting web languages such as HTML/CSS and JavaScript. It requires a simple web server such as Apache or Nginx. This section presents the Apache HTTP server installation. > You can find the required versions of LinShare's dependencies [here](./requirements.md) Install httpd from the repositories : ```bash yum install -y httpd ``` ### ui-user vhost Configuration To deploy the __LinShare__ application, it is necessary to activate the __mod_proxy__ module on httpd. Create the subdirectories in the directory `/var/www/`, note that the repository name will be the application domain name. Assign to the user the access permissions to the subdirectories. ```bash mv /tmp/linshare_data/linshare-ui-user-
* After any modification of a vhost, you must reload the Apache server :
`[root@localhost ~]$ sudo systemctl restart httpd.service`
### ui-admin vhost Configuration As mentioned before for application __LinShare__ UI Admin we will need two components, you can follow the steps bellow to deploy them in the apache2 repository : ```bash cd /var/www/ tar xjf /tmp/linshare_data/linshare-ui-admin-{VERSION}-legacy.tar.bz2 chown -R www-data: linshare-ui-admin cd linshare-ui-admin tar xjf /tmp/linshare_data/linshare-ui-admin-{VERSION}.tar.bz2 mv linshare-ui-admin new ``` To deploy the __LinShare__ administration interface, it is necessary to create the virtualhost configuration file. Add the file `/etc/httpd/conf.d/linshare-ui-admin.conf` with the following content: ```xml
* After any modification of a vhost, you must reload the Apache server :
`[root@localhost ~]$ sudo systemctl restart httpd.service`
### ui-upload-request vhost Configuration > Note :
The upload request component is optional on LinShare(it is not required to make LinShare work), by default its functionality is enabled, so for a proper functioning of this feature you need to follow the guide below to deploy its insterface.If it is not the case you can disable the functionality on the administration interface. Deploy the archive of the application __LinShare__ UI upload request in the httpd repository : ```bash mv /tmp/linshare_data/linshare-ui-upload-request-{VERSION}.tar.bz2 /var/www cd /var/www/ tar xjf linshare-linshare-ui-upload-request-{VERSION}.tar.bz2 chown -R apache: linshare-ui-upload-request rm -fr /var/www/linshare-ui-upload-request-
* After any modification of a vhost, you must reload the Apache server :
`[root@localhost ~]$ sudo systemctl restart httpd.service`
> Note :
You have some vhost's examples in the following repository : [utils/apache2/vhosts-sample/](../../../utils/apache2/vhosts-sample/) Configure and start the httpd service: ```bash systemctl enable httpd systemctl start httpd ``` ## Firewall Configuration When needed, add the 80 port and eventually all necessary ports into the `/etc/firewalld/zones/public.xml` file: ```xml
Recommended profile for production is jcloud with Swift. Configure and start the tomcat service, in order to start the __LinShare__ application: ```bash systemctl enable tomcat systemctl start tomcat ``` To check that __LinShare__ is working, check the logs: ```bash tail -f /var/log/tomcat/catalina.out ``` Once the service has successfully started, the following message may appear: ``` org.apache.coyote.http11.Http11Protocol start INFO: Démarrage de Coyote HTTP/1.1 sur http-8080 org.apache.catalina.startup.Catalina start INFO: Server startup in 23151 ms ``` Then restart the Apache service : `[root@localhost ~]$ sudo systemctl restart httpd.service` ### First Access > Note: Before the first access to __LinShare__ you need to add all `linshare-*.local` ServerNames to the `/etc/hosts` file. ```Bash 127.0.0.1 linshare-user.local 127.0.0.1 linshare-admin.local 127.0.0.1 linshare-upload-request.local ``` __LinShare__ service is now reachable at the following adresses: For the user interface: * http://linshare-user.local/linshare  For the administration interface: * http://linshare-admin.local/ Here are the default credentials for the system administrator: * Username : root@localhost.localdomain * Password : adminlinshare Please change the password in the administration interface. > Note :
It is not possible to add other LinShare standard users locally without LDAP. Please see the dedicated page for the LDAP configuration in the [application parameters](../administration/linshare-admin.md).  For the __Upload Request service__ is now reachable at the address below by default : * Repository installation version : __http://linshare-upload-request.local/#/{uuid}__ > Note :
You need to inquire the url into your upload request url parameter in your administration interface. To do so, go to your administration interface, choose the __Upload Request__ functionnality, and inquire the url in the "parameters" fields. * http://linshare-upload-request.local  ================================================ FILE: documentation/EN/installation/linshare-install-debian.md ================================================ # LinShare Installation on Debian * [LinShare Download](#dlLinshare) * [Archive and files configuration Deployment](#installFile) * [JVM Installation](#installOpenJDK) * [Databases Installation](#bdd) * [PostgreSQL Installation](#postgre) * [MongoDB Installation](#mongo) * [Thumbnail Engine (optional)](#thumbnail) * [Tomcat Installation](#tomcat) * [Web Server Installation](#apache) * [ui-user vhost Configuration](#ui-user) * [ui-admin vhost Configuration](#ui-admin) * [ui-upload-request vhost Configuration](#ui-upload-request) * [LinShare Configuration and Launching](#linconf) * [First Access](#firstAccess) * [Upload Request](#uploadRequest) Welcome to LinShare installation Guide, This page provides a __LinShare__ version 6.0 installation on *Debian bullseye 11* > Note :
> Installation of previous supported versions of __LinShare__ are available at github branches: > - [LinShare 5.1](https://github.com/linagora/linshare/blob/maintenance-5.1.x/documentation/EN/installation/linshare-install-debian.md) > - [LinShare 5.0](https://github.com/linagora/linshare/blob/maintenance-5.0.x/documentation/EN/installation/linshare-install-debian.md) > - [LinShare 4.2](https://github.com/linagora/linshare/blob/maintenance-4.2.x/documentation/EN/installation/linshare-install-debian.md) > - [LinShare 4.1](https://github.com/linagora/linshare/blob/maintenance-4.1.x/documentation/EN/installation/linshare-install-debian.md) > - [LinShare 4.0](https://github.com/linagora/linshare/blob/maintenance-4.0.x/documentation/EN/installation/linshare-install-debian.md) > - [LinShare 2.3](https://github.com/linagora/linshare/blob/maintenance-2.3.x/documentation/EN/installation/linshare-install-debian.md) > - [LinShare 2.2](https://github.com/linagora/linshare/blob/maintenance-2.2.x/documentation/EN/installation/linshare-install.md) > - [LinShare 2.1](https://github.com/linagora/linshare/blob/maintenance-2.1.x/documentation/EN/installation/linshare-install.md) > - [LinShare 2.0](https://github.com/linagora/linshare/blob/maintenance-2.0.x/documentation/EN/installation/linshare-install.md) ## LinShare Download __LinShare__ can be downloaded here : [http://download.linshare.org/versions/](http://download.linshare.org/versions/) There are several versions of __LinShare__. Choose the version of __LinShare__ that is in agreement with the installation guide. Do not install and use a component version which is different from the ones you'll find within the folder itself. Otherwise you will meet dependencies problems. > Note :
In this process, it is considered that the files are downloaded in the `/tmp/linshare_data` temporary directory. Of course, it is possible to use another temporary directory. For this installation, download the following files in `/tmp/linshare_data`: * linshare-core-{VERSION}.war * linshare-core-{VERSION}-sql.tar.bz2 * linshare-ui-admin-{VERSION}.tar.bz2 * linshare-ui-user-{VERSION}.tar.bz2 * linshare-ui-upload-request-{VERSION}.tar.bz2 For this installation process, be sure that your system has it's default locale set to `en_US.UTF-8`. You can use this command to configure it: ```bash dpkg-reconfigure locales ``` To manipulate the archives, it is necessary to install `unzip` and `bzip2`: ```bash apt install unzip bzip2 ``` ## Archive and files configuration Deployment ```bash mkdir -p /etc/linshare unzip -j -d /etc/linshare/ /tmp/linshare_data/linshare-core-{VERSION}.war WEB-INF/classes/{linshare,log4j2}.* Archive: linshare.war inflating: /etc/linshare/linshare.properties.sample inflating: /etc/linshare/log4j2.properties mv /etc/linshare/linshare.properties.sample /etc/linshare/linshare.properties chown root:tomcat /etc/linshare/* chmod 640 /etc/linshare/* ``` ## JVM Installation **LinShare** requires a Java Virtual Machine. > You can find the required and recommended JVM distribution in LinShare's system requirements [here](./requirements.md) For example, you can install the JVM provided by Debian community based on OpenJDK 17 from Debian official packages: ```bash apt update apt install openjdk-17-jre ``` ## Databases Installation **LinShare** uses two DBMS, MongoDB & PostgreSQL > Note :
At the beginning, LinShare was developped with PostgreSQL. New functionalities have been developped with MongoDB. Roadmap is to move everything to MongoDB. Task is huge, so LinShare is actually using both databases. #### PostgreSQL Installation __Linshare__ requires the use of PostgreSQL for its files and configuration. This section gives details about the PostgreSQL installation. - Installed version for is PostgreSQL 15, you can install it with: ```bash apt update apt install postgresql ``` > You can find the required versions of LinShare's dependencies [here](./requirements.md) Configurer and start the PostgreSQL service : ```bash systemctl start postgresql ``` Adapt the PostgreSQL access file in `/etc/postgresql/11/main/pg_hba.conf`: ```bash # TYPE DATABASE USER CIDR-ADDRESS METHOD local linshare linshare md5 host linshare linshare 127.0.0.1/32 md5 host linshare linshare ::1/128 md5 ``` > Note :
These lines are usually at the end of the file. For security reasons, the postgreSQL service only listens in local. Restart PostgreSQL service: ```bash systemctl restart postgresql ``` You should also add those rules among the first. Indeed, PostgreSQL uses the first valid rule which match the authentication request. Create linshare user and database: > sample password is **linshare** used for convenience, it should be changed ```bash su - postgres [postgres@localhost ~]$ psql CREATE ROLE linshare ENCRYPTED PASSWORD 'linshare' NOSUPERUSER NOCREATEDB NOCREATEROLE INHERIT LOGIN; CREATE DATABASE linshare WITH OWNER = linshare ENCODING = 'UTF8' TABLESPACE = pg_default LC_COLLATE = 'en_US.UTF-8' LC_CTYPE = 'en_US.UTF-8' CONNECTION LIMIT = -1; GRANT ALL ON DATABASE linshare TO linshare; \q ``` Import the SQL files `createSchema.sql` and `import-postgresql.sql`: ```bash cd /tmp/linshare_data tar xjvf linshare-core-*-sql.tar.bz2 psql -h localhost -U linshare -W -d linshare -f linshare-core-sql/postgresql/createSchema.sql psql -h localhost -U linshare -W -d linshare -f linshare-core-sql/postgresql/import-postgresql.sql ``` Password for user linshare: linshare Edit the __LinShare__ configuration file in `/etc/linshare/linshare.properties` according to your need: ```java #******************** DATABASE ### PostgreSQL linshare.db.username=linshare linshare.db.password=linshare linshare.db.driver.class=org.postgresql.Driver linshare.db.url=jdbc:postgresql://localhost:5432/linshare linshare.db.dialect=org.hibernate.dialect.PostgreSQLDialect ``` ### MongoDB Installation For the __LinShare__ installation, it is required to install a MongoDB database. **LinShare** requires MongoDB 5.0 > You can find the required versions of LinShare's dependencies [here](./requirements.md) - Import MongoDB GPG Key ```bash sudo apt -y install gnupg2 wget -qO - https://www.mongodb.org/static/pgp/server-5.0.asc | sudo apt-key add - ``` - Add repository URL to your Debian: ```bash echo "deb http://repo.mongodb.org/apt/debian buster/mongodb-org/5.0 main" | sudo tee /etc/apt/sources.list.d/mongodb-org.list ``` - Install mongodb package ```bash sudo apt update sudo apt -y install mongodb-org ``` See the [official guide](https://docs.mongodb.com/v5.0/tutorial/install-mongodb-on-debian/) if needed. - start MongoDB server ```bash sudo systemctl start mongod ``` Now MongoDB server is available and ready to be used. - Configure MongoDB Authentication: Execute following commands to enable authentication ```bash mongo ``` ```bash > use admin; ``` ```bash > db.createUser( { user: "linshare", pwd: "linshare", roles: [ { role: "readWrite", db: "linshare" }, { role: "readWrite", db: "linshare-files" } ] } ) ``` > sample password is **linshare** used for convenience, it should be changed - LinShare MongoDB related configuration By default, MongoDB is configured with the following __LinShare__ configuration in the file `/etc/linshare/linshare.properties`, just change it as following : ```java #### Mongo storage options #### linshare.mongo.connect.timeout=30000 linshare.mongo.socket.timeout=30000 #### Write concern # MAJORITY: waits on a majority of servers for the write operation. # JOURNALED: Write operations wait for the server to group commit to the journal file on disk. # ACKNOWLEDGED: Write operations that use this write concern will wait for acknowledgement, # using the default write concern configured on the server. linshare.mongo.write.concern=MAJORITY #### connection for data # replicaset: host1[:port1][,host2[:port2],...[,hostN[:portN]]][/[database][?options]] linshare.mongo.data.replicaset=127.0.0.1:27017 linshare.mongo.data.database=linshare # linshare.mongo.data.credentials=[user:password[@database]] linshare.mongo.data.credentials=linshare:linshare@admin #### connection for small files # Using MongoDb to store very small files (thumbnails, mail attachments, ...) linshare.mongo.smallfiles.replicaset=127.0.0.1:27017 linshare.mongo.smallfiles.database=linshare-files linshare.mongo.smallfiles.credentials=linshare:linshare@admin #### The connection for bigfiles is used just if the `gridfs` spring profile is enabled. # Store all files in MongoDB GridFS. Not recommended. linshare.mongo.bigfiles.replicaset=127.0.0.1:27017 linshare.mongo.bigfiles.database=linshare-bigfiles linshare.mongo.bigfiles.credentials=linshare:linshare@admin ######## Storage options - end ######## ``` For more information about the mongo dataBases used in LinShare you can read this: [documentation](https://github.com/linagora/linshare/blob/master/documentation/EN/administration/configuration-administration.md#mongodb) ## Thumbnail Engine (optional) > Note :
There is a bug in the library that is used by __LinShare__ in order to communicate with LibreOffice (specific to CentOS). LinShare developpment team is actually working on this issue (08/2019). __LinShare__ has a preview generation engine for a wide range of files : - OpenDocument format (ODT, ODP, ODS, ODG) - Microsoft documents format (DOCX, DOC, PPTX, PPT, XLSX, XLS) - PDF documents - Images files (PNG, JPEG, JPG, GIF) - Text files (TXT, XML, LOG, HTML ...) > Note :
Before using this engine you should have LibreOffice installed on your machine, the minimum version of libreOffice is : 4.2.8. To install libreOffice: ```bash apt update apt install libreoffice ``` By default thumbnail generation engine is set to `FALSE`. To enable it, edit __LinShare__ configuration file in `/etc/linshare/linshare.properties`: ```java #******** LinThumbnail configuration # key to enable or disable thumbnail generation linshare.documents.thumbnail.enable=true linshare.linthumbnail.dropwizard.server=http://0.0.0.0:8090/linthumbnail?mimeType=%1$s linshare.documents.thumbnail.pdf.enable=true ``` This will allow to generate previews after each file upload. To use it, download the following files from [http://download.linshare.org/versions/](http://download.linshare.org/versions/) : * thumbnail-server-{VERSION}.jar * thumbnail-server-{VERSION}.yml > Note :
In this process, it is considered that the files are downloaded in the `/tmp/linshare_data` temporary directory. Of course, it is possible to use another temporary directory. > Note
By default the server is configured to listens on port 80, it is possible to change it. Install the file `thumbnail-server-{VERSION}.yml` into `/etc/linshare/linshare-thumbnail-server.yml` and install the java archive `thumbnail-server-{VERSION}.jar` into the repository `/usr/local/sbin/linshare-thumbnail-server.jar` : ```java mv /tmp/linshare_data/thumbnail-server-*.yml /etc/linshare/linshare-thumbnail-server.yml mv /tmp/linshare_data/thumbnail-server-*.jar /usr/local/sbin/linshare-thumbnail-server.jar ``` Creating a systemd service can be useful to automcatically start the thumbnail engine in background at system boot. Create the file `/lib/systemd/system/linshare-thumbnail-server.service`, and add the following content : ```bash [Unit] Description=LinShare thumbnail server After=network.target [Service] Type=idle KillMode=process ExecStart=/usr/bin/java -jar /usr/local/sbin/linshare-thumbnail-server.jar server /etc/linshare/linshare-thumbnail-server.yml [Install] WantedBy=multi-user.target Alias=linshare-thumbnail-server.service ``` Configure and start the new service : ```bash systemctl daemon-reload systemctl enable linshare-thumbnail-server.service systemctl start linshare-thumbnail-server.service ``` ## Tomcat Installation __LinShare__ is a Java application compiled and embedded under the WAR (**W** eb **A** pplication a **R** chive) format, so it needs a servlet container Java (Tomcat or Jetty) to run. This section describes its installation and configuration. > You can find the required versions of LinShare's dependencies [here](./requirements.md) Install Tomcat from the repositories: ```bash sudo apt install -y tomcat10 ``` To specify the location of the __LinShare__ configuration (_linshare.properties_ file) and also the default start options, get the commented lines in the header of the `linshare.properties` file and copy-paste them in the tomcat file (`/etc/default/tomcat10`): All starting needful options by default to LinShare are indicated in the header of the following configuration files : * `/etc/linshare/linshare.properties` * `/etc/linshare/log4j2.properties` N.B.: if you are using __LinShare__ version >= 5.1.0, then the `log4j.properties` should be replaced by `log4j2.properties` It is required to add the following lines in: `/etc/default/tomcat10`: ```conf JAVA_OPTS="${JAVA_OPTS} -Xms512m -Xmx2048m" JAVA_OPTS="${JAVA_OPTS} -Dlinshare.config.path=file:/etc/linshare/" JAVA_OPTS="${JAVA_OPTS} -Dlog4j2.configurationFile=file:/etc/linshare/log4j2.properties" ``` If you want to change the location of tmp directory you need to override the default directory used by tomcat10 which is `/tmp`, by editing `/etc/default/tomcat10` and add: ```conf CATALINA_TMPDIR=/your/path/tmp ``` > Note :
If you encounter an error in overriding your new `tmp` directory path, it could be due to the lack of write permission of Tomcat on your new directory. You can check [this section](https://github.com/linagora/linshare/blob/master/documentation/EN/installation/linshare-install-debian.md#linshare-configuration-and-launching). #### profiles LinShare provides different profiles that can allow you to conditionally setup the application (different way of storage, authentication ...). ##### Available profiles: Available authentication profiles : * **default** : default authentication process. * **sso** : Enable headers injection for SSO. > **NB** You must enable at least one authentication profile among authentication profiles Available file data store profiles : * **jcloud** : Using jcloud as file data store : Amazon S3, Swift, Ceph, filesystem. * **gridfs** : Using gridfs (mongodb) as file data store. The recommended profile for production is jcloud. > LinShare uses `jcould` profile as a default filesystem data storage. Additional profiles : * **batches** : if this profile is enabled, it will enable all Quartz jobs (cron tasks). ##### Additional configuration: In the tomcat file `/var/lib/tomcat10/conf/catalina.properties` There is a key named `tomcat.util.scan.DefaultJarScanner.jarsToSkip`. Add `jclouds-bouncycastle-1.9.2.jar,bcprov-*.jar,\` somewhere in the section of this key. #### Migrator: On convertit l'archive war de LinShare pour qu'il soit compatible avec Tomcat 10: • Télécharger l’outil de conversion : wget https://dlcdn.apache.org/tomcat/jakartaee-migration/v1.0.9/binaries/jakartaee-migration-1.0.9-bin.tar.gz • Convertir linshare.war tar xzf jakartaee-migration-1.0.9.tar.gz java -jar jakartaee-migration-1.0.9/lib/jakartaee-migration-1.0.9.jar /tmp/linshare-core-6.5.0.war /tmp/linshare.war • Déployer le war converti: rm -fr /var/lib/tomcat9/webapps/linshare cp /tmp/linshare.war /var/lib/tomcat9/webapps/linshare.war Deploy the __LinShare__ application archive into the Tomcat server: ```bash mv /tmp/linshare_data/linshare-core-{VERSION}.war /var/lib/tomcat10/webapps/linshare.war ``` ## Web Server Installation __LinShare__ administration interface is exploiting web languages such as HTML/CSS and JavaScript. It requires a simple web server such as Apache or Nginx. This section presents the Apache HTTP server installation. > You can find the required versions of LinShare's dependencies [here](./requirements.md) Install Apache 2 from the repositories : ```bash apt install -y apache2 ``` ### ui-user vhost Configuration To deploy the __LinShare__ application, it is necessary to activate the __mod_proxy__ module on apache 2. Create the subdirectories in the directory `/var/www/`, note that the repository name will be the application domain name. Assign to the user the access permissions to the subdirectories. ```bash cd /var/www/ tar xjf /tmp/linshare_data/linshare-ui-user-
The upload request component is optional on LinShare(it is not required to make LinShare work), by default its functionality is enabled, so for a proper functioning of this feature you need to follow the guide below to deploy its insterface.If it is not the case you can disable the functionality on the administration interface. First, go [here](#uploadRequest) to download the upload request module. To deploy the Upload-Request interface of __LinShare__, you need to open your linshare-ui-upload-request.conf virtualhost file : ``` cp /etc/apache2/sites-available/000-default.conf /etc/apache2/sites-available/linshare-ui-upload-request.conf sudo a2dissite 000-default sudo a2enmod ssl sudo a2enmod headers sudo a2ensite linshare-ui-upload-request sudo a2enmod proxy proxy_http ``` And then you can change the virtualhost configuration file as follows: ```xml
You have some vhost's examples in the following repository : [utils/apache2/vhosts-sample/](../../../utils/apache2/vhosts-sample/linshare-admin.conf) Restart the apache 2 service: ```bash systemctl restart apache2 ``` ## LinShare Configuration and Launching Configure the storage location of the files in the __LinShare__ configuration file `/etc/linshare/linshare.properties` : ```java linshare.documents.storage.filesystem.directory=/var/lib/linshare/filesystemstorage linshare.encipherment.tmp.dir=/var/lib/linshare/tmp ``` In this configuration, it is necessary to create the folder with the correct permissions: ```bash mkdir -p /var/lib/linshare chown -R tomcat:tomcat /var/lib/linshare ``` Configure the SMTP service access so that __LinShare__ can send message notifications in the __LinShare__ configuration `/etc/linshare/linshare.properties` file: ```java mail.smtp.host=
Recommended profile for production is jcloud with Swift. tomcat10 is sandboxed to write just in its own directories, if you try to use a local Filesystem storage you need to override the default configuration of Tomcat by creating in `/etc/systemd/system/tomcat10.service.d/` a file named `override.conf` containing: ``` [Service] ReadWritePaths=/var/lib/linshare ``` Then you need to: ``` systemctl daemon-reload systemctl restart tomcat10 ``` Start the tomcat service, in order to start the __LinShare__ application: ```bash systemctl start tomcat10 ``` To check that __LinShare__ is working, check the logs: ```bash tail -f /var/log/tomcat10/catalina.out ``` Once the service has successfully started, the following message may appear: ``` org.apache.coyote.http11.Http11Protocol start INFO: Démarrage de Coyote HTTP/1.1 sur http-8080 org.apache.catalina.startup.Catalina start INFO: Server startup in 23151 ms ``` Then restart the Apache service : `[root@localhost ~]$ sudo systemctl restart apache2` ### First Access > Note: Before the first access to __LinShare__ you need to add all `linshare-*.local` ServerNames to the `/etc/hosts` file. ```Bash 127.0.0.1 linshare-user.local 127.0.0.1 linshare-admin.local 127.0.0.1 linshare-upload-request.local ``` __LinShare__ service is now reachable at the following adresses: For the user interface: * http://linshare-user.local/  For the administration interface: * http://linshare-admin.local/ Here are the default credentials for the system administrator: * Username : root@localhost.localdomain * Password : adminlinshare Please change the password in the administration interface. > Note :
It is not possible to add other LinShare standard users locally without LDAP. Please see the dedicated page for the LDAP configuration in the [application parameters](../administration/linshare-admin.md).  ### Upload Request component installation #### Download of the module This module in on free download at the following address : * [http://download.linshare.org/versions/](http://download.linshare.org/versions/) For this Installation, download the following file according to the version you want : * linshare-ui-upload-request-{VERSION}.tar.bz2 >Note :
The upload request feature is only available from LinShare 1.7 to LinShare 1.12, and since LinShare 4.1. #### deployment of the archive Deploy the __LinShare__ UI UploadRequest archive in the Apache server repository : ``` [root@localhost ~]$ cd /var/www/ [root@localhost ~]$ tar xjf linshare-ui-upload-request-{VERSION}.tar.bz2 [root@localhost ~]$ chown -R www-data: linshare-ui-upload-request ``` Next, you may follow the vhost configuration of upload request module [here](#ui-upload-request). To access at __LinShare Upload Request__, first start the Core, then restart the Apache2 service : `[root@localhost ~]$ service apache2 restart` ### First access The __Upload Request service__ is now reachable at the address below by default : __http:///linshare-upload-request.local/__ > Note :
You need to inquire the url into your upload request url parameter in your administration interface. To do so, go to your administration interface, choose the __Upload Request__ functionnality, and inquire the url in the "parameters" fields. ================================================ FILE: documentation/EN/installation/requirements.md ================================================ This file provides a list of dependencies's versions required by **LinShare** # System requirements | LinShare Version | OS | JVM core version1 | Recommended JVM distribution2 | PostgreSQL | MongoDB | Tomcat | Apache HTTPD | |------------------|-----------------------|------------------------------|------------------------------------------|---------------|--------------------|----------|---------------| | 7.0 | Debian 11 | OpenJDK 17.0.9+8 | Azul Zulu 17.46.19 (JRE Edition) | PostgreSql 13 | MongoDB 5.0 | Tomcat 9 | Apache 2.4 | | 6.2 | Debian 11 | - | Debian OpenJDK 11 (JRE Edition) | PostgreSql 13 | MongoDB 5.0 | Tomcat 9 | Apache 2.4 | | 6.1 | Debian 11 | - | Debian OpenJDK 11 (JRE Edition) | PostgreSql 13 | MongoDB 5.0 | Tomcat 9 | Apache 2.4 | | 6.0 | Debian 11 | - | Debian OpenJDK 11 (JRE Edition) | PostgreSql 13 | MongoDB 5.0 | Tomcat 9 | Apache 2.4 | | 5.1 | Debian 10 | - | Debian OpenJDK 11 (JRE Edition) | PostgreSql 11 | MongoDB 4.2 | Tomcat 9 | Apache 2.4 | | 5.0 | Debian 10 | - | Debian OpenJDK 11 (JRE Edition) | PostgreSql 11 | MongoDB 4.2 | Tomcat 9 | Apache 2.4 | | 4.2 | Debian 10 | - | Debian OpenJDK 11 (JRE Edition) | PostgreSql 11 | MongoDB 4.2 | Tomcat 9 | Apache 2.4 | | 4.1 | Debian 10 | - | Debian OpenJDK 11 (JRE Edition) | PostgreSql 11 | MongoDB 4.2 | Tomcat 9 | Apache 2.4 | | 4.0 | Debian 10 | - | Debian OpenJDK 11 (JRE Edition) | PostgreSql 11 | MongoDB 4.2 | Tomcat 9 | Apache 2.4 | | 2.3 | Debian 8, 9, Centos 7 | - | Debian OpenJDK 8 (JRE Edition) | PostgreSql 9 | MongoDB 3.2 to 3.6 | Tomcat 8 | Apache 2.4 | | 2.2 | Debian 8, Centos 7 | - | Debian OpenJDK 8 (JRE Edition) | PostgreSql 9 | MongoDB 3.2 | Tomcat 8 | Apache 2.4 | | 2.1 | Debian 8, Centos 7 | - | Debian OpenJDK 8 (JRE Edition) | PostgreSql 9 | MongoDB 3.2 | Tomcat 8 | Apache 2.4 | | 2.0 | Debian 8, Centos 7 | - | Debian OpenJDK 8 (JRE Edition) | PostgreSql 9 | MongoDB 3.2 | Tomcat 8 | Apache 2.4 | | 1.12 | Debian 8, Centos 7 | - | Debian OpenJDK 7 (JRE Edition) | PostgreSql 9 | - | Tomcat 7 | Apache 2.2 | Notes: 1. Each available JVM distribution are based on a common JVM core, mainly OpenJDK. Linshare could work with all distributions based on this given JVM core or upper. For JVM distributions based on a **minor update** of the JVM core, all should works fine. For JVM distributions based on a **major update** of the JVM core, all should works fine **if no breaking change was introduced**. 1. Even if Linshare could work1 with other JVM distributions based on the given JVM core, as we can't support LinShare on all compliant JVM distributions, we recommend to use this given JVM distribution in a production environment. # Supported browsers This is the list of supported browsers' versions required by **LinShare**: | Browsers | version | |-------------|---------| | Chrome | 90+ | | Firefox | 88+ | | Firefox ESR | 78+ | ================================================ FILE: documentation/EN/installation/sso-lemonldap-using-OIDC-opaque-tokens.md ================================================ # Integration with LemonLDAP::NG LemonLDAP::NG is an open source Web Single Sign On (WebSSO) supporting multiple protocoles, like CAS, SAML, header injections, OIDC, ... In this case, we are going to use OIDC which is the recommended protocol with opaque access tokens. ## Resume Deployment of LemonLDAP::NG is out of scope of this document, you can find a lot of documentation about LemonLDAP::NG installation here: https://lemonldap-ng.org/documentation/quickstart. We assume you already have a running instance of LemonLDAP::NG and LinShare. For the whole guide, I will assume you are using my favorite Linux distribution, aka Debian. According to our installation guide, LinShare is deployed on http://linshare-user.local. /!\ there is two ways to use OIDC: * You can only delegate the authentication to OIDC but for the provisioning you will still rely on user providers (LDAP or TWAKE) to create/provision users. * You can also decide to delegate the provisioning to OIDC (full delegation). To do that, you need to use the OIDC user provider. Users will be created at first connection or when they are added to a sharing or a worgroups. User's profile will be created using OIDC claims as source of information. See Step 4. ## Step 1: LemonLDAP::NG configuration. You need to add a new relying party named LinShare. So you need to go to the menu named "OpenID Connect Relying Parties" and then do: * Add OpenID Relying Party: LinShare * exported attributes: * email => mail * family_name => sn * given_name => givenName * for LinShare >= 6.3 : * email => mail * last_name => sn * first_name => givenName * Options/Basic * ClientID: linshare * Client secret: linshare * Public client: Off * for LinShare < 5 : Allowed redirection addresses for login: http://linshare-user.local/#!/oidc * for LinShare >= 5 : Allowed redirection addresses for login: http://linshare-user.local/#!/oidc/callback, http://linshare-admin.local/new/#/oidc/callback * Options/Security * Require PKCE: On NB: Prior LinShare 5.0, it was: * name => givenName Now you need to save to apply the configuration. Hint you will need the Issuer identifier URL for the next step, so grab it before leaving the manager. (See: OpenID Connect Service / Issuer identifier) In our example we will use "http://auth.linshare.local". * Add OpenID Relying Party: LinShareMobile * exported attributes: * email => mail * family_name => sn * given_name => givenName * Options/Basic * ClientID: linshare-mobile * Client secret: linshare * Public client: Off * PostLogoutRedirectUris : "linshare.mobile://oauthredirect" // must be, unless you can change that in mobile * RedirectUris: "linshare.mobile://oauthredirect" // must be, unless you can change that in mobile * Options/Security * Require PKCE: On ## Step 2: LinShare backend configuration ### Enable OIDC support in LinShare. NB: OIDC will not be enabled if you are still using the 'sso' spring profile, please use 'default' instead. You need to edit `/etc/linshare/linshare.properties` and add/uncomment the following keys: Since LinShare 4.1: ``` ## OIDC Parameters oidc.on=true oidc.introspectionUri=http://auth.linshare.local/oauth2/introspect oidc.client.id=linshare oidc.client.secret=linshare ``` Since LinShare 4.2: ``` ## OIDC Parameters oidc.on=true oidc.issuerUri=http://auth.linshare.local oidc.client.id=linshare oidc.client.secret=linshare ``` ### Token setting after 6.0.2 To use OIDC opaque token : - property `oidc.on=true` - property `oidc.opaqueToken.lengh` must be strictly greater than your token length If neither of these sets of conditions are met, authentication will try to default to legacy JWT. > Note: > Be wary that until now property `oidc.opaqueToken.lengh` has a spelling mistake, but you must use `lengh` instead of `length`. This will be corrected in a future release. ### Restart Finally just restart Tomcat : `systemctl restart tomcat`. ## Step 3: LinShare frontend configuration ## Step 3.1: LinShare frontend configuration : Ui-User You need to edit the configuration file linshare-ui-user/config/config.js and add the following keys: ``` ... homePage: 'home', ... oidcSetting: { authority: 'http://auth.linshare.local', client_id: 'linshare', client_secret: 'linshare', scope: 'openid email profile' }, oidcEnabled: true, ``` Since LinShare 6.3: ``` ... homePage: 'home', ... oidcSetting: { authority: 'http://auth.linshare.local', oidcToken: 'Oidc-Opaque', client_id: 'linshare', client_secret: 'linshare', scope: 'openid email profile' }, oidcEnabled: true, ``` ## Step 3.2: LinShare frontend configuration : Ui-Admin You need to edit the configuration file linshare-ui-admin/new/config/config.js and add the following keys: ``` ... oidcSetting: { authority: 'http://auth.linshare.local', client_id: 'linshare', client_secret: 'linshare', scope: 'openid email profile' }, oidcEnabled: true, ``` Since LinShare 6.3: ``` ... homePage: 'home', ... oidcSetting: { authority: 'http://auth.linshare.local', oidcToken: 'Oidc-Opaque', client_id: 'linshare', client_secret: 'linshare', scope: 'openid email profile' }, oidcEnabled: true, ``` ## Step 3.3: LinShare mobile app configuration: You can add this if you want to enable OIDC for the mobile app: ``` ... mobileOidcEnabled: true, mobileOidcSetting: { authority: 'https://auth.linshare.local', client_id: 'linshare-mobile', redirect_url: 'linshare.mobile://oauthredirect', post_logout_redirect_uri: 'linshare.mobile://oauthredirect', response_type: 'code', scope: 'openid email profile' }, ... ``` Since LinShare 6.3: ``` ... homePage: 'home', ... oidcSetting: { authority: 'http://auth.linshare.local', oidcToken: 'Oidc-Opaque', client_id: 'linshare', client_secret: 'linshare', scope: 'openid email profile' }, oidcEnabled: true, ``` ## Step 4: OIDC User Provider (Optional) As explained above, you can also configure LinShare to create user's profile from OIDC claims. In the admin interface, you need to go to [configuration](https://admin.linshare-5-0-on-commit.integration-linshare.org/new/#/configuration) page then go to a Top or Sub Domain, click on Providers/UserProviders and create an 'OIDC Provider'. You will be able to provide a discriminant value aka associated domain identifier, using the claim `domain_discriminator`, in order to create new users in this domain. In order to be flexible, this claim is a list (ex ['DOMAIN_8']). For now LinShare supports only one domain at the time but we expect to be able to support multiple domains in the futur. This field can also contains application roles, and only some of them are useful for LinShare, ex: `['APP_1_ROLE_1','APP_2_ROLE_8','LINSHARE_ROLE_VIP','APP_2_ROLE_ADMIN', ...]` In this example, only `LINSHARE_ROLE_VIP` will be useful to match a domain 'VIP'. Maybe for other users, it could be `LINSHARE_ROLE_REGULAR`. These other roles can be provided but will be silently ignored if they do not match any domains. So you may need to create a new scope, named `linshare` with this new claim. Then you need to edit ui-user and ui-admin config.js file to change the scope value as : `scope: 'openid email profile linshare'` Look at documentation above each field for more details. Go step 1 to see how to add other claims. ================================================ FILE: documentation/EN/installation/sso-lemonldap-using-headers.md ================================================ # Integration with LemonLDAP::NG LemonLDAP::NG is an open source Web Single Sign On (WebSSO) supporting multiple protocoles, like CAS, SAML, header injections, OIDC, ... In this case, we are going to use header injections. NB: This method is deprecated, and does not work very well with SPA. The recommended protocole is OIDC (see other guide) ## Resume Deployment of LemonLDAP::NG is out of scope of this document, you can find a lot of documentation about LemonLDAP::NG installation here: https://lemonldap-ng.org/documentation/quickstart. We assume you already have a running instance of LemonLDAP::NG and LinShare. For the whole guide, I will assume you are using my favorite Linux distribution, aka Debian. In standard deployment, LinShare service is published on one URL. We will reused the same URL declared in the installation guide, linshare-user.local. In SSO mode, LinShare require an external URL for Guests and Anonymous URL functionalities. We will keep the original URL for public access and use linshare-user-sso.local for internal usage. For LemonLDAP::NG integration, you will have four important steps : * Web server configuration: Configuration of Apache's vhosts that expose the linshare-ui-user application. * Tomcat configuration * Configuration LemonLDAP::NG Declaration of a new application in the lemonldap-ng portal with access rules. * LinShare configuration Once LemonLDAP::NG integration is done, we have to update LinShare configuration to use good URL for mail notifications. ## Step 1: Web server (Apache) There is two to integrate an application with LemonLDAP::NG, decentralized (old way) and centralized (new way). ### Using Apache in decentralized mode You have to install and deploy the LemonLDAP::NG Handers on the LinShare server apt-get install lemonldap-ng-handler This will deploy the default handler vhost : /etc/apache2/sites-available/handler-apache2.conf Then you can edit it and retrieve the following instructions that you need to add to your vhost: ``` PerlOptions +GlobalRequest PerlModule Lemonldap::NG::Handler ``` So you have to deploy 2 vhosts, one protected by LemonLDAP::NG for your internal users. The second vhost will be used for external access like anonymous URLs or Guests. #### Public vhost ```
* Before using this engine you should have LibreOffice or OpenOffice installed on your machine, the minimum version of libreOffice is : 4.2.8. By default thumbnail generation engine is set to FALSE. To enable it, you must edit LinShare's configuration file : ```java #******** LinThumbnail configuration # key to enable or disable thumbnail generation linshare.documents.thumbnail.enable=true # key to enable remote thumbnail generation linshare.linthumbnail.remote.mode=false linshare.linthumbnail.dropwizard.server=http://0.0.0.0:8090/linthumbnail?mimeType=%1$s linshare.documents.thumbnail.pdf.enable=true ``` This will allow to generate previews after each file upload. You also have the option to use this engine remotely. For that you must first activate the remote mode : ```java #******** LinThumbnail configuration # key to enable or disable thumbnail generation linshare.documents.thumbnail.enable=true # key to enable remote thumbnail generation linshare.linthumbnail.remote.mode=true linshare.linthumbnail.dropwizard.server=http://0.0.0.0:8090/linthumbnail?mimeType=%1$s linshare.documents.thumbnail.pdf.enable=true ``` Now go to `http://download.linshare.org/versions/` and download the following files: * linshare-thumbnail-server-{VERSION}.jar * linshare-thumbnail-server-{VERSION}.yml > Note
By defaults the server is configured to listen on port 80, you can change it, if necessary. Copy the configuration file `linshare-thumbnail-server-{VERSION}.yml` into `/etc/linshare/linshare-thumbnail-server.yml` and copy the java archive `linshare-thumbnail-server-{VERSION}.jar` into this directory `/usr/local/sbin/linshare-thumbnail-server.jar`, you can use the following command for that : $ cp linshare-thumbnail-server-*.yml /etc/linshare/linshare-thumbnail-server.yml $ cp linshare-thumbnail-server-*.jar /usr/local/sbin/linshare-thumbnail-server.jar * You can automate starting of thumbnail server, by creating a `systemd` service in the `/etc/systemd/system` directory, with the following name `linshare-thumbnail-server.service`. Edit the `linshare-thumbnail-server.service` file and copy the code below : ```java [Unit] Description=LinShare thumbnail server After=network.target [Service] Type=idle KillMode=process ExecStart=/usr/bin/java -jar /usr/local/sbin/linshare-thumbnail-server.jar server /etc/linshare/linshare-thumbnail-server.yml [Install] WantedBy=multi-user.target Alias=linshare-thumbnail-server.service ``` Now you should enable the service, it will be automatically started after a reboot : ```bash $ systemctl enable linshare-thumbnail-server.service ``` To __start Thumbnail__, you need first to restart the Tomcat service : `[root@localhost ~]$ systemctl restart Tomcat` Use this command to start the service: ```bash $ systemctl start linshare-thumbnail-server.service ``` ================================================ FILE: documentation/EN/upgrade/linshare-upgrade-from-v2.1-to-v2.2.md ================================================ # LinShare upgrade guide > Note : - We explain in this file how to upgrade your LinShare's version. - Please note that all the components found in each LinShare's version (http://download.linshare.org/version/{VERSION}) must be upgraded together. Each LinShare version folder, contains the dependencies required to install the version properly. ## Overview * [Note about LinShare versions](#lversions) * [Necessary artifacts](#artifacts) * [Backups](#backup) * [Upgrade LinShare core](#core) * [Upgrade LinShare ui-admin](#ui-admin) * [Upgrade LinShare ui-user](#ui-user) * [Upgrade tasks](#tasks) ## LinShare Versions LinShare version number are named according to the [following pattern](https://semver.org/) X.Y.Z. * X : Major release A major version can bring disruptive changes, among which addition/replacement/removal of technologies used in the product. They could break compatibility between two versions of LinShare. * Y : Minor release A minor version brings new functionalities and possibly database schema modification. * Z : Maintenance release Only bug fixes. No database schema modification. ## Necessary artifacts For this migration, download the following files from this address: http://download.linshare.org/versions/2.2.0 : * __linshare-core-2.2.0.war__ * __linshare-core-2.2.0-sql.tar.bz2__ * __linshare-ui-admin-3.2.0.tar.bz2__ * __linshare-ui-user-2.2.0.tar.bz2__ > Note : - Download all components on `/root/downloads` directory ## Backups : To avoid any side effect of these critical operations, it is better to store a backup of your databases PostgreSQL and MongoDB. To do that please execute these commands : * Postgres Linshare dump : pg_dump -h host -p port -U linshare -W -f dump-linshare.sql * MongoDb Linshare dump mongodump --host `host` --port `port` ## Upgrade LinShare-core First you need to stop Apache service and Tomcat service: ``` $ systemctl apache2 stop ``` ```bash $ systemctl stop tomcat8 ``` Once your service Tomcat is stopped, you should extract the content of `linshare-core-2.2.0-sql.tar.bz2` by using this command: ```bash $ tar xjvf /root/downloads/linshare-core-2.2.0-sql.tar.bz2 ``` Then you will find the necessary file for the migration, named `linshare-core-2.2.0-sql/postgresql/Migration_2.1.0_to_2.2.0.sql` Migration scripts are specific for each database management system. You have one directory by supported database management system. All scripts are named according to the following pattern "Migration_X.A.0_to_X.B.0.sql". In order to upgrade LinShare from 2.1 to 2.2 you ALWAYS need to run the script : ```bash $ psql -h localhost -d linshare -U linshare -f Migration_2.1.0_to_2.2.0.sql ``` You can view the database version through the following query `select * from version`. Once the migration file is done, you should replace the linShare.war with LinShare-core-2.2.0.war ```bash $ rm /var/lib/tomcat8/webapps/linShare.war $ rm -fr /var/lib/tomcat8/webapps/linshare $ cp /root/downloads/linshare-core-2.2.0.war /var/lib/tomcat8/webapps/linshare.war ``` Now you can start your Tomcat again ```bash $ systemctl start tomcat8 ``` ## Upgrade LinShare-ui-admin Deploy the archive of the application __LinShare UI Admin__ in the Apache 2 repository : ``` $ cd /var/www/ $ rm linshare-ui-admin $ tar xjvf /root/downloads/linshare-ui-admin-3.2.0.tar.bz2 $ chown -R apache: /var/www/linshare-ui-admin ``` ## Upgrade LinShare-ui-user Deploy the archive of the application __LinShare UI User__ in the Apache 2 repository : ``` $ cd /var/www/ $ rm linshare-ui-user $ tar xjvf /root/downloads/linshare-ui-user-2.2.0.tar.bz2 $ chown -R apache: /var/www/linshare-ui-user ``` Now you can start your Apache service again. ``` $ systemctl apache2 start ``` ## Upgrade task execution in the administration interface For this new version, you need to run further migration tasks in the admin interface : http://linshare-admin.local/#/upgradetasks/list. All the tasks must be executed by order and succeed in order to complete the upgrade. NB: A task can finish with a successful status but errors can be noticed during the progress. It is necessary to check the execution reports found in the console. In case of errors, you must read the logs of Tomcat server for more details, resolve the problems and launch the task before carrying on. * As long as the tasks with status 'Mandatory' are not completed, the users can not use the system. * As long as the tasks with status 'Required' are not completed, the system will work partially (Some functionality might be deactivated). These tasks can be executed simultaneously without disrupting the user's activity. Once the mandatory tasks have been executed, you can switch to the next step if you want to re-establish quickly the LinShare service. The required tasks can take some time depending on amout of data. Once all these tasks are done, your LinShare app will be operational. ================================================ FILE: documentation/EN/upgrade/linshare-upgrade-from-v2.2-to-v2.3.md ================================================ # LinShare upgrade guide > Note : - We explain in this file how to upgrade your LinShare's version. - Please note that all the components found in each LinShare's version (http://download.linshare.org/versions/{VERSION}) must be upgraded together. Each LinShare version folder, contains the dependencies required to install the version properly. ## Overview * [Note about LinShare versions](#lversions) * [Necessary artifacts](#artifacts) * [Backups](#backup) * [Upgrade LinShare core](#core) * [Upgrade LinShare ui-admin](#ui-admin) * [Upgrade LinShare ui-user](#ui-user) * [Upgrade tasks](#tasks) ## LinShare Versions LinShare versions number are named according to the [following pattern](https://semver.org/) X.Y.Z. * X : Major release A major version can bring disruptive changes, among which addition/replacement/removal of technologies used in the product. They could break compatibility between two versions of LinShare. * Y : Minor release A minor version brings new functionalities and possibly database schema modification. * Z : Maintenance release Only bug fixes. No database schema modification. ## Necessary artifacts For this migration, download the following files from this address: http://download.linshare.org/versions/2.3.0 : * __linshare-core-2.3.0.war__ * __linshare-core-2.3.0-sql.tar.bz2__ * __linshare-ui-admin-3.3.0.tar.bz2__ * __linshare-ui-user-2.3.0.tar.bz2__ > Note : - Download all components on `/root/downloads` directory ## Backups : To avoid any side effect of these critical operations, it is better to store a backup of your databases PostgreSQL and MongoDB. To do that please execute these commands : * Postgres Linshare dump : pg_dump -h host -p port -U linshare -W -f dump-linshare.sql * MongoDb Linshare dump mongodump --host `host` --port `port` ## Upgrade LinShare-core First you need to stop Apache and Tomcat services: ``` $ systemctl apache2 stop ``` ```bash $ systemctl stop tomcat8 ``` Once your Tomcat service is stopped, you should extract the content of `linshare-core-2.3.0-sql.tar.bz2` by using this command: ```bash $ tar xjvf /root/downloads/linshare-core-2.3.0-sql.tar.bz2 ``` Then you will find the necessary file for the migration, named `linshare-core-2.3.0-sql/postgresql/Migration_2.2.0_to_2.3.0.sql` Migration scripts are specific for each database management system. You have one directory by supported database management system. All scripts are named according to the following pattern "Migration_X.A.0_to_X.B.0.sql". In order to upgrade LinShare from 2.2 to 2.3 you ALWAYS need to run the script : ```bash $ psql -h localhost -d linshare -U linshare -f Migration_2.2.0_to_2.3.0.sql ``` You can view the database version through the following query `select * from version`. Once the migration file is done, you should replace the linShare.war with LinShare-core-2.3.0.war ```bash $ rm /var/lib/tomcat8/webapps/linShare.war $ rm -fr /var/lib/tomcat8/webapps/linshare $ cp /root/downloads/linshare-core-2.3.0.war /var/lib/tomcat8/webapps/linshare.war ``` #### Update linshare.properties - Update related to upgrade Spring DATA The update of Spring DATA on LinShare 2.3 allows us to support mongo drivers (3.4) and (3.6). Since the connection parameters are different, it is necessary to update the content of the block `#### Mongo Storage Options` on your `/etc/linshare/linshare.properties` file. Open `/etc/linshare/linshare.properties` and search the `#### Mongo Storage Options` section, replace it by: ```shell # linshare.mongo.connect.timeout=30000 # linshare.mongo.socket.timeout=30000 #### Write concern # MAJORITY: waits on a majority of servers for the write operation. # JOURNALED: Write operations wait for the server to group commit to the journal file on disk. # ACKNOWLEDGED: Write operations that use this write concern will wait for acknowledgement, # using the default write concern configured on the server. linshare.mongo.write.concern=MAJORITY # Standard URI connection scheme # mongodb://[username:password@]host1[:port1][,host2[:port2],...[,hostN[:portN]]][/[database][?options]] # linshare.mongo.client.uri=mongodb://linshare:linshare@127.0.0.1:27017/linshare linshare.mongo.client.uri=mongodb://127.0.0.1:27017/linshare #### GridFS storage options #### #### Using MongoDb to store very small files (thumbnails, mail attachments, ...) # linshare.mongo.gridfs.smallfiles.client.uri=mongodb://linshare:linshare@127.0.0.1:27017/linshare-files linshare.mongo.gridfs.smallfiles.client.uri=mongodb://127.0.0.1:27017/linshare-files #### Extended GridFS storage options #### # Store all files in MongoDB GridFS. Not recommended. # linshare.mongo.gridfs.bigfiles.client.uri=mongodb://linshare:linshare@127.0.0.1:27017/linshare-bigfiles linshare.mongo.gridfs.bigfiles.client.uri=mongodb://127.0.0.1:27017/linshare-bigfiles ``` Update the differents URIs with your valid host port and database credentials. See the [official documentation](https://docs.mongodb.com/manual/reference/connection-string/) for more information on using the URI for MongoDB connection and replica set. > NB: The mongodb profiles (__mongo__ and __mongo-auth__) are removed from LinShare. You must delete them from __- Dspring.profiles.active__ or from __SPRING_PROFILES_ACTIVE__ environment variable. - Update related to LinShare thumbnails The thumbnails generator local mode was removed, only remote mode is kept. please check [this documentation](../installation/linshare-install.md#thumbnail) to see how to configure it. Now you can start your Tomcat again ```bash $ systemctl start tomcat8 ``` ## Upgrade LinShare-ui-admin Deploy the archive of the application __LinShare UI Admin__ in the Apache 2 repository : ``` $ cd /var/www/ $ rm linshare-ui-admin $ tar xjvf /root/downloads/linshare-ui-admin-3.3.0.tar.bz2 $ chown -R apache: /var/www/linshare-ui-admin ``` ## Upgrade LinShare-ui-user Deploy the archive of the application __LinShare UI User__ in the Apache 2 repository : ``` $ cd /var/www/ $ rm linshare-ui-user $ tar xjvf /root/downloads/linshare-ui-user-2.3.0.tar.bz2 $ chown -R apache: /var/www/linshare-ui-user ``` Now you can start your Apache service again. ``` $ systemctl apache2 start ``` ## Upgrade task execution in the administration interface For this new version, you need to run further migration tasks in the admin interface : http://`YourServerName`/#/upgradetasks/list. All the tasks must be executed by order and succeed in order to complete the upgrade. NB: A task can finish with a successful status but errors can be noticed during the progress. It is necessary to check the execution reports found in the console. In case of errors, you must read the logs of Tomcat server for more details, resolve the problems and launch the task before carrying on. * As long as the tasks with status 'Mandatory' are not completed, the users can not use the system. * As long as the tasks with status 'Required' are not completed, the system will work partially (Some functionality might be deactivated). These tasks can be executed simultaneously without disrupting the user's activity. Once the mandatory tasks have been executed, you can switch to the next step if you want to re-establish quickly the LinShare service. The required tasks can take some time depending on amout of data. Once all these tasks are done, your LinShare app will be operational. ================================================ FILE: documentation/EN/upgrade/linshare-upgrade-from-v2.3-to-v4.0.md ================================================ # LINSHARE UPGRADE > **Note** : > - We explain in this file how to upgrade your LinShare instance from 2.3 to 4.0. The application of this process consists of installing LinShare on a new machine and you will be able to restore databases and the storage space on the new machine, to achieve the migration as we are going to explain in the next steps. > - Please note that all the components found in 4.0 version folder [here](http://download.linshare.org/versions) must be upgraded together. ## Overview * [Install the new version of LinShare](#lsinstall) * [Maintenance of LinShare v2.3 server](#maintenance) * [Data backup](#backup) * [Data restore on the new machine](#restore) * [Database upgrade](#dbupgrade) * [Server startup after data migration mode](#startup) * [Upgrade tasks](#ugtasks) * [Back to nominal mode](#nominal) # Procedure ## Requirements This procedure presumes that you are using in **Debian 10 (Buster)** machine : - OpenJDK 11 - Tomcat 9 - PostgreSQL 11 - MongoDB 4.2 - apache2 All requirements are listed [here](./requirements.md). ## Install the new version of LinShare On your new machine, install LinShare by following the official [documentation](https://github.com/linagora/linshare/blob/master/documentation/EN/installation/linshare-install-debian.md#linshare-installation-on-debian) Once LinShare is properly installed and working you can move to the next step. ## Maintenance mode configuration In the archive linshare-ui-user.tar.bz2 you will find an html page named 'error-pages/maintenance.html'. This page is designed to warn users about the maintenance status of the current server. You have to apply these operations on both LinShare machines v2.3 and v4.0. * Create the directory /var/www/linshare-maintenance * Copy the content of the folder named error-pages into the folder /var/www/linshare-maintenance/ * Then add your new maintenance vhost following the server: *LinShare v2.3* ``` [root@localhost ~]$ vim /etc/apache2/sites-available/linshare-maintenance.conf
The user guide is only for 2.x LinShare versions. * This is LinShare user manual [documentation](linshare-user.md). ================================================ FILE: documentation/EN/user/linshare-user.md ================================================ # LinShare User Manual > Note :
This user guide is only for 2.x LinShare versions. ## Summary * [1. Home](#1-home) * [2. My space](#2-my-space) * [My files](#my-files) * [Received shares](#received-shares) * [Activity logs](#activity-logs) * [3. Current uploads](#3-current-uploads) * [4. Shared space](#4-shared-space) * [5. Contact lists](#5-contact-lists) * [6. Guests](#6-guests) * [7. Activity logs](#7-activity-logs) ### Language You can choose your language on the login page of LinShare. The language list is available at the upper right corner. Note that it won't be possible to do it once you are logged in. ### 1. Home This home page is a welcome page, filled with three links according to enabled functionalities and your own rights : - *HOST YOUR FILES* : which redirects you to your [own space](#2-my-space). - *UPLOAD & SHARE* : which redirects you to your [current uploads](#3-current-uploads). - *UPLOAD TO A GROUP* : which redirects you to your [shared space](#4-shared-spaces). ### 2. My space **My space** consists in 2 sides: your own files and the ones shared with you. * **_My files_** **My files** gather all the files you uploaded on _your space_. Each shared file (which is not past the expiration date) is labeled "_shared_". To upload a new file, you have 2 choices: - Click on the **+** button on the upper left side. - Drag and drop your file from your file browser to your own space (you can then see the center circle become blue). When a uploaded file is hoovered, 3 icons appear on the right side. From left, those icons mean: - Display file's infos. - Share the file with other users (internal or external, refer to Share). - Download the file. * **_Received shares_** In this section, you can see all the files shared to you. Most of the section **My files** functionalities are the same in here. * **_Activity logs_** Within all sections containing files, the activity logs is available in the right sidebar (by clicking on the  icon). This activity logs gather all actions done on the files. ### 3. Current uploads All current uploads are listed in this section. It gathers the current uploads from [My space](#2-my-space) and [Shared space](#4-shared-spaces). To exclusively visualize the uploads on My space, or Shared space, you need to click on the corresponding tab on the upper right side. Some actions are available in the upper right corner, near the _My space_ and _Shared space_ tabs. Those actions are the following: - Pause the selected upload. - Resume the upload. - Cancel the upload. - Clean up the upload history. ### 4. Shared spaces > The **Shared spaces** gather the workgroups. Those are sharing areas in which other internal users or guests (refer to [Guests](#guests)) can see or even upload files. Each group member can see all files within this sharing area. - _**Roles**_ The 2.2 LinShare release version introduced a new role access management in workgroups. Refer to the tables below to see the link between permissions and roles. - **Before 2.2.x...** | Role | View/Download workgroup files/folders | Upload, Rename files/folders| Delete files/folders | View members and roles | Update member role | Remove workgroup member| Update/Delete workgroup | | :-------: |:--------------------------------------| :--------------------------|:-----------------------------| :--------------------------|:------------------| :---------------------| :---------------------| | READER |
- - [x]
- - [x]
- - [x]
- - [x]
- - [x]
- - [x]
- - [x]
- - [x]
- - [x]
- - [x]
- - [x]
- - [x]
- - [x]
- - [x]
- - [x]
- - [x]
- - [x]
- - [x]
- - [x]
- - [x] **NEW**
- - [x]
- - [x]
- - [x]
- - [x]
- - [x]
- - [x]
- - [x]
- - [x]