Repository: stefanprodan/istio-gke
Branch: master
Commit: 2ec4720cbd35
Files: 19
Total size: 45.8 KB
Directory structure:
gitextract_qi1h0t8e/

├── .gitignore
├── LICENSE
├── README.md
└── docs/
    ├── apps/
    │   ├── 00-index.md
    │   ├── 01-canary-flagger.md
    │   └── 02-ab-testing-helm.md
    ├── istio/
    │   ├── 00-index.md
    │   ├── 01-prerequisites.md
    │   ├── 02-gke-setup.md
    │   ├── 03-clouddns-setup.md
    │   ├── 04-istio-setup.md
    │   ├── 05-letsencrypt-setup.md
    │   └── 06-grafana-config.md
    └── openfaas/
        ├── 00-index.md
        ├── 01-mtls-config.md
        ├── 02-mixer-rules.md
        ├── 03-openfaas-setup.md
        ├── 04-gateway-config.md
        └── 05-canary.md
================================================
FILE CONTENTS
================================================
================================================
FILE: .gitignore
================================================
# Binaries for programs and plugins
*.exe
*.exe~
*.dll
*.so
*.dylib
# Test binary, build with `go test -c`
*.test
# Output of the go coverage tool, specifically when used with LiteIDE
*.out
================================================
FILE: LICENSE
================================================
MIT License
Copyright (c) 2018 Stefan Prodan
Permission is hereby granted, free of charge, to any person obtaining a copy
of this software and associated documentation files (the "Software"), to deal
in the Software without restriction, including without limitation the rights
to use, copy, modify, merge, publish, distribute, sublicense, and/or sell
copies of the Software, and to permit persons to whom the Software is
furnished to do so, subject to the following conditions:
The above copyright notice and this permission notice shall be included in all
copies or substantial portions of the Software.
THE SOFTWARE IS PROVIDED "AS IS", WITHOUT WARRANTY OF ANY KIND, EXPRESS OR
IMPLIED, INCLUDING BUT NOT LIMITED TO THE WARRANTIES OF MERCHANTABILITY,
FITNESS FOR A PARTICULAR PURPOSE AND NONINFRINGEMENT. IN NO EVENT SHALL THE
AUTHORS OR COPYRIGHT HOLDERS BE LIABLE FOR ANY CLAIM, DAMAGES OR OTHER
LIABILITY, WHETHER IN AN ACTION OF CONTRACT, TORT OR OTHERWISE, ARISING FROM,
OUT OF OR IN CONNECTION WITH THE SOFTWARE OR THE USE OR OTHER DEALINGS IN THE
SOFTWARE.
================================================
FILE: README.md
================================================
# Istio service mesh guides

[Istio GKE setup](/docs/istio/00-index.md)
* [Prerequisites - client tools](/docs/istio/01-prerequisites.md)
* [GKE cluster setup](/docs/istio/02-gke-setup.md)
* [Cloud DNS setup](/docs/istio/03-clouddns-setup.md)
* [Install Istio with Helm](/docs/istio/04-istio-setup.md)
* [Configure Istio Gateway with Let's Encrypt wildcard certificate](/docs/istio/05-letsencrypt-setup.md)
* [Expose services outside the service mesh](/docs/istio/06-grafana-config.md)
[Progressive delivery walkthrough](docs/apps/00-index.md)
* [Automated canary deployments with Flagger](/docs/apps/01-canary-flagger.md)
* [A/B testing for a micro-service stack with Helm](/docs/apps/02-ab-testing-helm.md)
[OpenFaaS service mesh walkthrough](docs/openfaas/00-index.md)
* [Configure OpenFaaS mutual TLS](/docs/openfaas/01-mtls-config.md)
* [Configure OpenFaaS access policies](/docs/openfaas/02-mixer-rules.md)
* [Install OpenFaaS with Helm](/docs/openfaas/03-openfaas-setup.md)
* [Configure OpenFaaS Gateway to receive external traffic](/docs/openfaas/04-gateway-config.md)
* [Canary deployments for OpenFaaS functions](/docs/openfaas/05-canary.md)
================================================
FILE: docs/apps/00-index.md
================================================
# Progressive delivery walkthrough
This guide shows you how to route traffic between different versions of a service and how to automate canary deployments.
At the end of this guide you will be deploying a series of micro-services with the following characteristics:
* A/B testing for frontend services
* Source/Destination based routing for backend services
* Progressive deployments gated by Prometheus
### Labs
* [Automated canary deployments with Flagger](01-canary-flagger.md)
* [A/B testing for a micro-service stack with Helm](02-ab-testing-helm.md)
================================================
FILE: docs/apps/01-canary-flagger.md
================================================
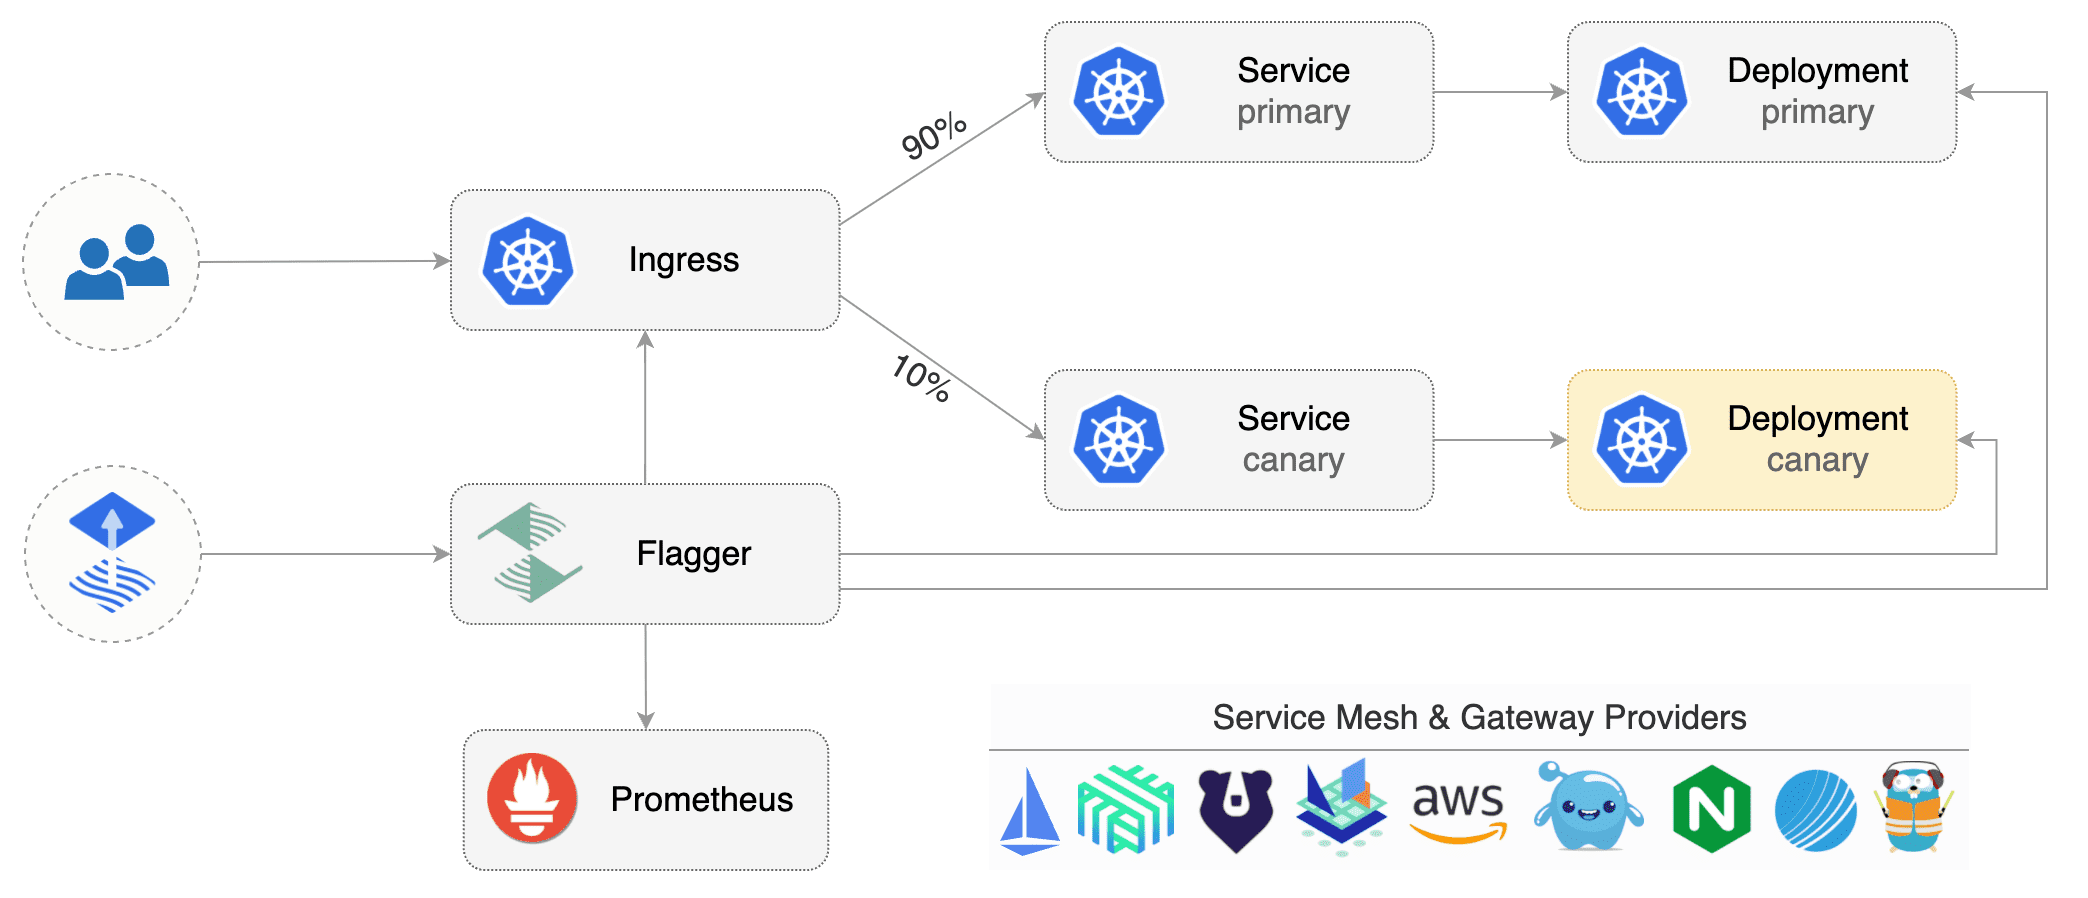
# Automated canary deployments with Flagger
[Flagger](https://github.com/stefanprodan/flagger) is a Kubernetes operator that automates the promotion of
canary deployments using Istio routing for traffic shifting and Prometheus metrics for canary analysis.
### Install Flagger
Deploy Flagger in the `istio-system` namespace using Helm:
```bash
# add the Helm repository
helm repo add flagger https://flagger.app
# install or upgrade
helm upgrade -i flagger flagger/flagger \
--namespace=istio-system \
--set metricsServer=http://prometheus.istio-system:9090
```
Flagger is compatible with Kubernetes >1.11.0 and Istio >1.0.0.
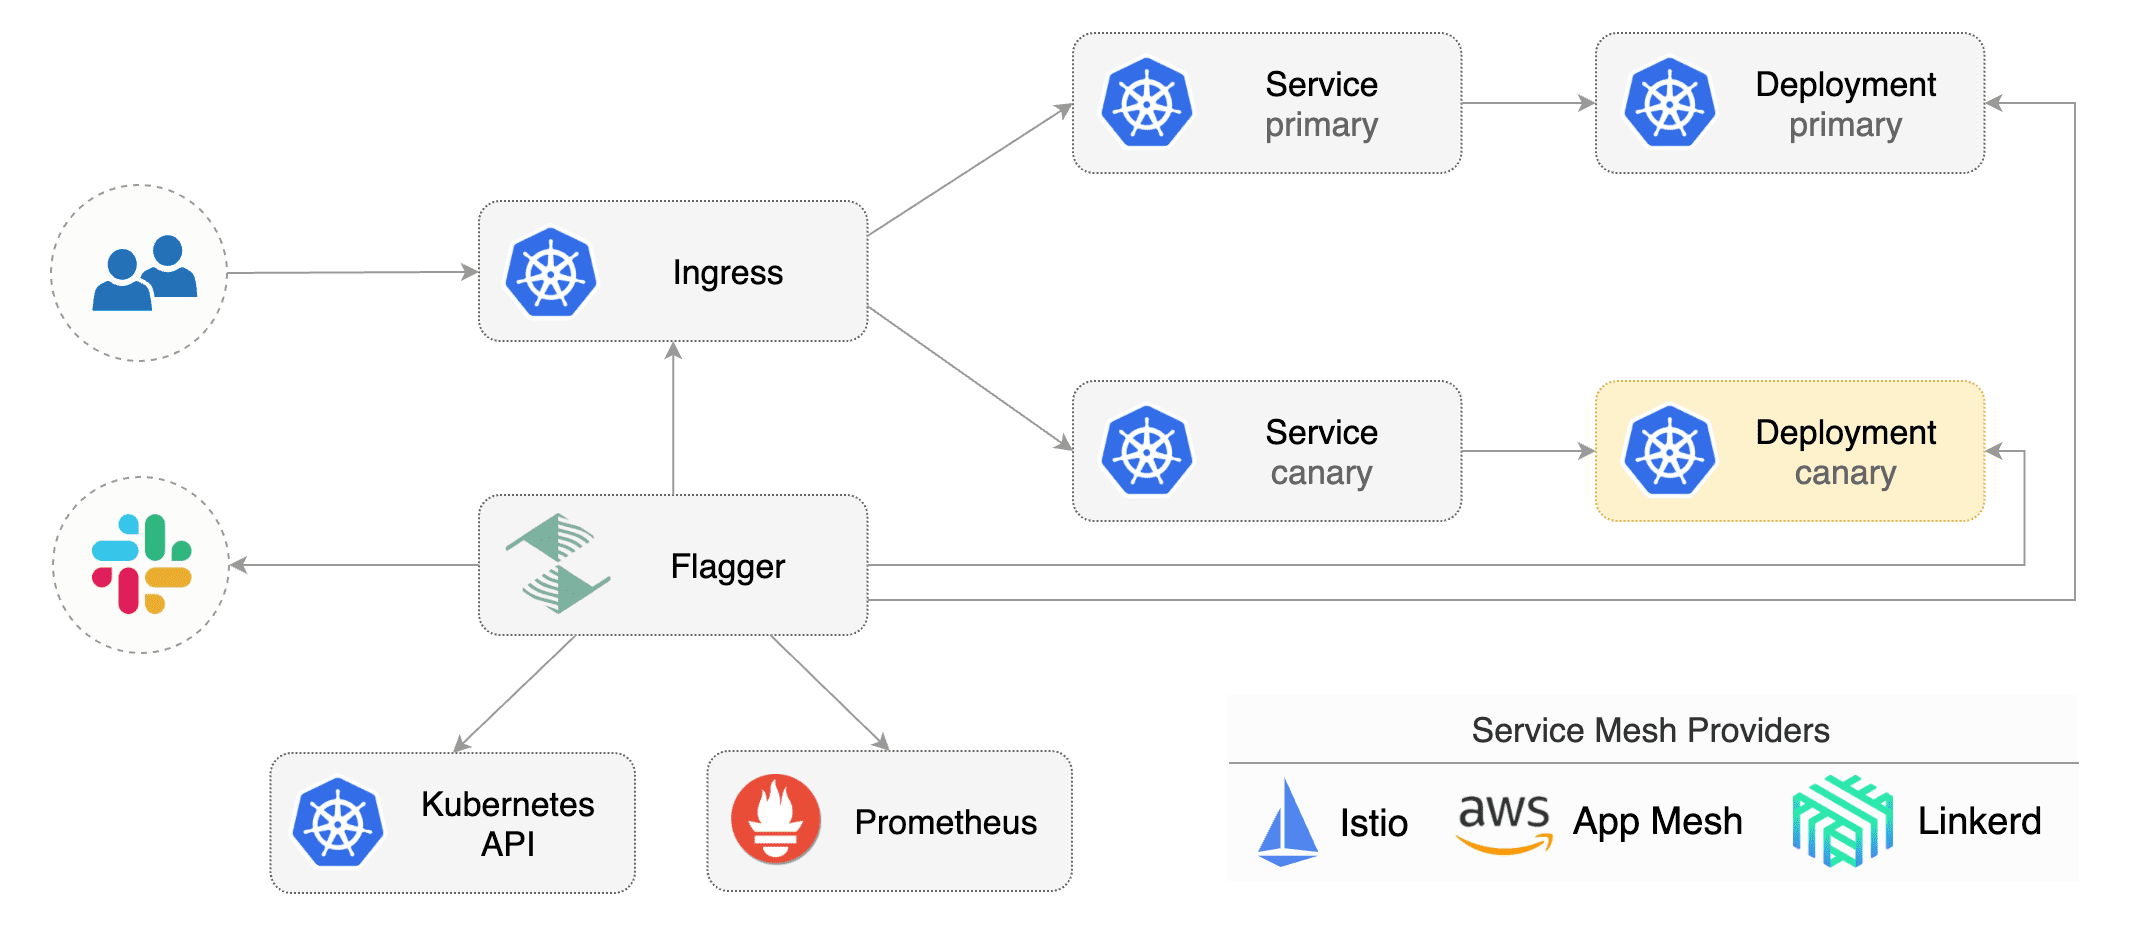
Flagger takes a Kubernetes deployment and optionally a horizontal pod autoscaler (HPA) and creates a series of objects
(Kubernetes deployments, ClusterIP services and Istio virtual services) to drive the canary analysis and promotion.
A canary deployment is triggered by changes in any of the following objects:
* Deployment PodSpec (container image, command, ports, env, resources, etc)
* ConfigMaps mounted as volumes or mapped to environment variables
* Secrets mounted as volumes or mapped to environment variables
Gated canary promotion stages:
* scan for canary deployments
* check Istio virtual service routes are mapped to primary and canary ClusterIP services
* check primary and canary deployments status
* halt advancement if a rolling update is underway
* halt advancement if pods are unhealthy
* increase canary traffic weight percentage from 0% to 5% (step weight)
* call webhooks and check results
* check canary HTTP request success rate and latency
* halt advancement if any metric is under the specified threshold
* increment the failed checks counter
* check if the number of failed checks reached the threshold
* route all traffic to primary
* scale to zero the canary deployment and mark it as failed
* wait for the canary deployment to be updated and start over
* increase canary traffic weight by 5% (step weight) till it reaches 50% (max weight)
* halt advancement while canary request success rate is under the threshold
* halt advancement while canary request duration P99 is over the threshold
* halt advancement if the primary or canary deployment becomes unhealthy
* halt advancement while canary deployment is being scaled up/down by HPA
* promote canary to primary
* copy ConfigMaps and Secrets from canary to primary
* copy canary deployment spec template over primary
* wait for primary rolling update to finish
* halt advancement if pods are unhealthy
* route all traffic to primary
* scale to zero the canary deployment
* mark rollout as finished
* wait for the canary deployment to be updated and start over
You can change the canary analysis _max weight_ and the _step weight_ percentage in the Flagger's custom resource.
### Automated canary analysis and promotion
Create a test namespace with Istio sidecar injection enabled:
```bash
export REPO=https://raw.githubusercontent.com/weaveworks/flagger/master
kubectl apply -f ${REPO}/artifacts/namespaces/test.yaml
```
Create a deployment and a horizontal pod autoscaler:
```bash
kubectl apply -f ${REPO}/artifacts/canaries/deployment.yaml
kubectl apply -f ${REPO}/artifacts/canaries/hpa.yaml
```
Deploy the load testing service to generate traffic during the canary analysis:
```bash
kubectl -n test apply -f ${REPO}/artifacts/loadtester/deployment.yaml
kubectl -n test apply -f ${REPO}/artifacts/loadtester/service.yaml
```
Create a canary custom resource (replace example.com with your own domain):
```yaml
apiVersion: flagger.app/v1alpha3
kind: Canary
metadata:
name: podinfo
namespace: test
spec:
# deployment reference
targetRef:
apiVersion: apps/v1
kind: Deployment
name: podinfo
# the maximum time in seconds for the canary deployment
# to make progress before it is rollback (default 600s)
progressDeadlineSeconds: 60
# HPA reference (optional)
autoscalerRef:
apiVersion: autoscaling/v2beta1
kind: HorizontalPodAutoscaler
name: podinfo
service:
# container port
port: 9898
trafficPolicy:
tls:
# use ISTIO_MUTUAL when mTLS is enabled
mode: DISABLE
# Istio gateways (optional)
gateways:
- public-gateway.istio-system.svc.cluster.local
- mesh
# Istio virtual service host names (optional)
hosts:
- app.example.com
canaryAnalysis:
# schedule interval (default 60s)
interval: 1m
# max number of failed metric checks before rollback
threshold: 5
# max traffic percentage routed to canary
# percentage (0-100)
maxWeight: 50
# canary increment step
# percentage (0-100)
stepWeight: 10
metrics:
- name: request-success-rate
# minimum req success rate (non 5xx responses)
# percentage (0-100)
threshold: 99
interval: 1m
- name: request-duration
# maximum req duration P99
# milliseconds
threshold: 500
interval: 30s
# generate traffic during analysis
webhooks:
- name: load-test
url: http://flagger-loadtester.test/
timeout: 5s
metadata:
cmd: "hey -z 1m -q 10 -c 2 http://podinfo-canary.test:9898/"
```
Save the above resource as podinfo-canary.yaml and then apply it:
```bash
kubectl apply -f ./podinfo-canary.yaml
```
After a couple of seconds Flagger will create the canary objects:
```bash
# applied
deployment.apps/podinfo
horizontalpodautoscaler.autoscaling/podinfo
canary.flagger.app/podinfo
# generated
deployment.apps/podinfo-primary
horizontalpodautoscaler.autoscaling/podinfo-primary
service/podinfo
service/podinfo-canary
service/podinfo-primary
virtualservice.networking.istio.io/podinfo
```

Trigger a canary deployment by updating the container image:
```bash
kubectl -n test set image deployment/podinfo \
podinfod=quay.io/stefanprodan/podinfo:1.4.1
```
Flagger detects that the deployment revision changed and starts a new rollout:
```
kubectl -n test describe canary/podinfo
Status:
Canary Revision: 19871136
Failed Checks: 0
State: finished
Events:
Type Reason Age From Message
---- ------ ---- ---- -------
Normal Synced 3m flagger New revision detected podinfo.test
Normal Synced 3m flagger Scaling up podinfo.test
Warning Synced 3m flagger Waiting for podinfo.test rollout to finish: 0 of 1 updated replicas are available
Normal Synced 3m flagger Advance podinfo.test canary weight 5
Normal Synced 3m flagger Advance podinfo.test canary weight 10
Normal Synced 3m flagger Advance podinfo.test canary weight 15
Normal Synced 2m flagger Advance podinfo.test canary weight 20
Normal Synced 2m flagger Advance podinfo.test canary weight 25
Normal Synced 1m flagger Advance podinfo.test canary weight 30
Normal Synced 1m flagger Advance podinfo.test canary weight 35
Normal Synced 55s flagger Advance podinfo.test canary weight 40
Normal Synced 45s flagger Advance podinfo.test canary weight 45
Normal Synced 35s flagger Advance podinfo.test canary weight 50
Normal Synced 25s flagger Copying podinfo.test template spec to podinfo-primary.test
Warning Synced 15s flagger Waiting for podinfo-primary.test rollout to finish: 1 of 2 updated replicas are available
Normal Synced 5s flagger Promotion completed! Scaling down podinfo.test
```
**Note** that if you apply new changes to the deployment during the canary analysis, Flagger will restart the analysis.
You can monitor all canaries with:
```bash
watch kubectl get canaries --all-namespaces
NAMESPACE NAME STATUS WEIGHT LASTTRANSITIONTIME
test podinfo Progressing 15 2019-01-16T14:05:07Z
prod frontend Succeeded 0 2019-01-15T16:15:07Z
prod backend Failed 0 2019-01-14T17:05:07Z
```
### Automated rollback
During the canary analysis you can generate HTTP 500 errors and high latency to test if Flagger pauses the rollout.
Create a tester pod and exec into it:
```bash
kubectl -n test run tester --image=quay.io/stefanprodan/podinfo:1.2.1 -- ./podinfo --port=9898
kubectl -n test exec -it tester-xx-xx sh
```
Generate HTTP 500 errors:
```bash
watch curl http://podinfo-canary:9898/status/500
```
Generate latency:
```bash
watch curl http://podinfo-canary:9898/delay/1
```
When the number of failed checks reaches the canary analysis threshold, the traffic is routed back to the primary,
the canary is scaled to zero and the rollout is marked as failed.
```
kubectl -n test describe canary/podinfo
Status:
Canary Revision: 16695041
Failed Checks: 10
State: failed
Events:
Type Reason Age From Message
---- ------ ---- ---- -------
Normal Synced 3m flagger Starting canary deployment for podinfo.test
Normal Synced 3m flagger Advance podinfo.test canary weight 5
Normal Synced 3m flagger Advance podinfo.test canary weight 10
Normal Synced 3m flagger Advance podinfo.test canary weight 15
Normal Synced 3m flagger Halt podinfo.test advancement success rate 69.17% < 99%
Normal Synced 2m flagger Halt podinfo.test advancement success rate 61.39% < 99%
Normal Synced 2m flagger Halt podinfo.test advancement success rate 55.06% < 99%
Normal Synced 2m flagger Halt podinfo.test advancement success rate 47.00% < 99%
Normal Synced 2m flagger (combined from similar events): Halt podinfo.test advancement success rate 38.08% < 99%
Warning Synced 1m flagger Rolling back podinfo.test failed checks threshold reached 10
Warning Synced 1m flagger Canary failed! Scaling down podinfo.test
```
### Monitoring
Flagger comes with a Grafana dashboard made for canary analysis.
Install Grafana with Helm:
```bash
helm upgrade -i flagger-grafana flagger/grafana \
--namespace=istio-system \
--set url=http://prometheus.istio-system:9090
```
The dashboard shows the RED and USE metrics for the primary and canary workloads:
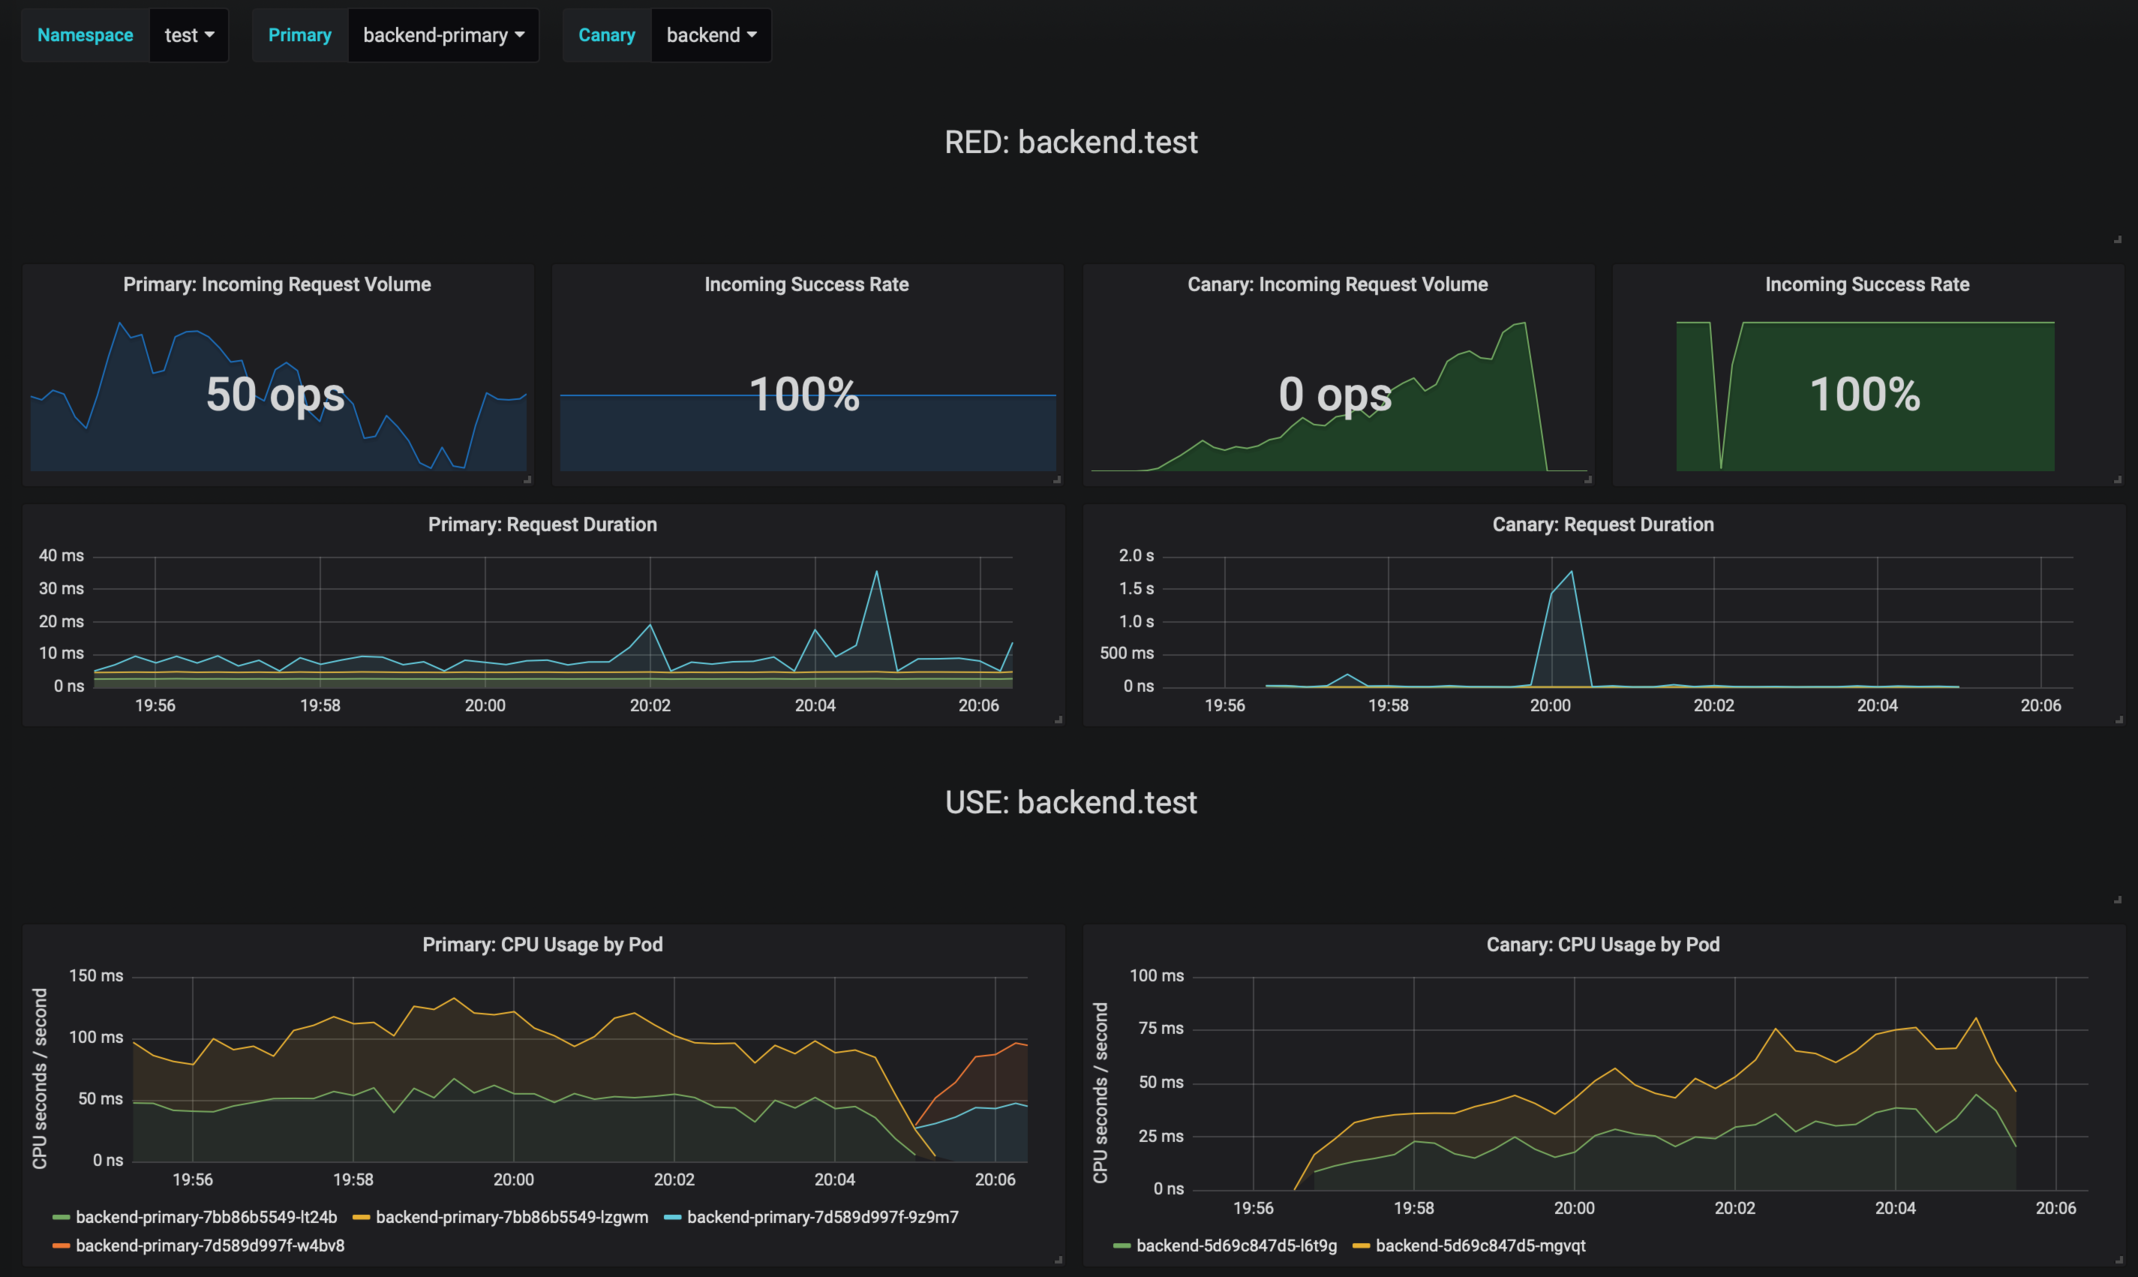
The canary errors and latency spikes have been recorded as Kubernetes events and logged by Flagger in json format:
```
kubectl -n istio-system logs deployment/flagger --tail=100 | jq .msg
Starting canary deployment for podinfo.test
Advance podinfo.test canary weight 5
Advance podinfo.test canary weight 10
Advance podinfo.test canary weight 15
Advance podinfo.test canary weight 20
Advance podinfo.test canary weight 25
Advance podinfo.test canary weight 30
Advance podinfo.test canary weight 35
Halt podinfo.test advancement success rate 98.69% < 99%
Advance podinfo.test canary weight 40
Halt podinfo.test advancement request duration 1.515s > 500ms
Advance podinfo.test canary weight 45
Advance podinfo.test canary weight 50
Copying podinfo.test template spec to podinfo-primary.test
Halt podinfo-primary.test advancement waiting for rollout to finish: 1 old replicas are pending termination
Scaling down podinfo.test
Promotion completed! podinfo.test
```
### Alerting
Flagger can be configured to send Slack notifications:
```bash
helm upgrade -i flagger flagger/flagger \
--namespace=istio-system \
--set slack.url=https://hooks.slack.com/services/YOUR/SLACK/WEBHOOK \
--set slack.channel=general \
--set slack.user=flagger
```
Once configured with a Slack incoming webhook, Flagger will post messages when a canary deployment has been initialized,
when a new revision has been detected and if the canary analysis failed or succeeded.
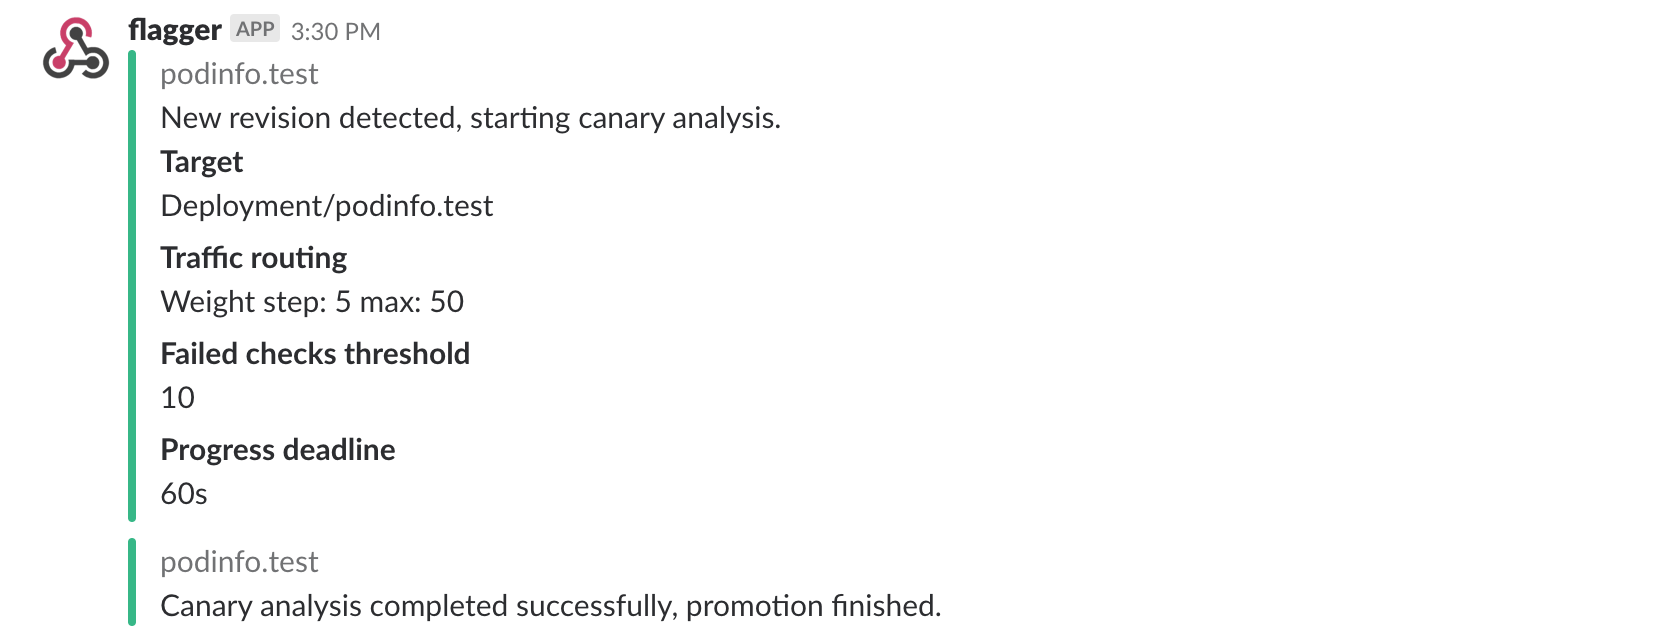
A canary deployment will be rolled back if the progress deadline exceeded or if the analysis
reached the maximum number of failed checks:

Besides Slack, you can use Alertmanager to trigger alerts when a canary deployment failed:
```yaml
- alert: canary_rollback
expr: flagger_canary_status > 1
for: 1m
labels:
severity: warning
annotations:
summary: "Canary failed"
description: "Workload {{ $labels.name }} namespace {{ $labels.namespace }}"
```
Next: [A/B Testing with Helm](02-ab-testing-helm.md)
================================================
FILE: docs/apps/02-ab-testing-helm.md
================================================
# A/B testing with Istio and Helm
To experiment with different traffic routing techniques
I've created a Helm chart for [podinfo](https://github.com/stefanprodan/k8s-podinfo) that lets you chain multiple
services and wraps all the Istio objects needs for A/B testing and canary deployments.
Using the podinfo chart you will be installing three microservices: frontend, backend and data store.
Each of these services can have two versions running in parallel, the versions are called blue and green.
The assumption is that for the frontend you'll be running A/B testing based on the user agent HTTP header.
The green frontend is not backwards compatible with the blue backend so you'll route all requests from the green
frontend to the green backend. For the data store you'll be running performance testing. Both backend versions are
compatible with the blue and green data store so you'll be splitting the traffic between blue and green data stores
and compare the requests latency and error rate to determine if the green store performs
better than the blue one.
### Deploy the blue version
Add the podinfo Helm repository:
```bash
helm repo add sp https://stefanprodan.github.io/k8s-podinfo
```
Create a namespace with Istio sidecar injection enabled:
```yaml
apiVersion: v1
kind: Namespace
metadata:
labels:
istio-injection: enabled
name: demo
```
Save the above resource as demo.yaml and then apply it:
```bash
kubectl apply -f ./demo.yaml
```

Create a frontend release exposed outside the service mesh on the podinfo sub-domain (replace `example.com` with your domain):
```yaml
host: podinfo.example.com
exposeHost: true
blue:
replicas: 2
tag: "1.2.0"
message: "Greetings from the blue frontend"
backend: http://backend:9898/api/echo
green:
# disabled (all traffic goes to blue)
replicas: 0
```
Save the above resource as frontend.yaml and then install it:
```bash
helm install --name frontend sp/podinfo-istio \
--namespace demo \
-f ./frontend.yaml
```
Create a backend release:
```yaml
host: backend
blue:
replicas: 2
tag: "1.2.0"
backend: http://store:9898/api/echo
green:
# disabled (all traffic goes to blue)
replicas: 0
```
Save the above resource as backend.yaml and then install it:
```bash
helm install --name backend sp/podinfo-istio \
--namespace demo \
-f ./backend.yaml
```
Create a store release:
```yaml
host: store
blue:
replicas: 2
tag: "1.2.0"
weight: 100
green:
# disabled (all traffic goes to blue)
replicas: 0
```
Save the above resource as store.yaml and then install it:
```bash
helm install --name store sp/podinfo-istio \
--namespace demo \
-f ./store.yaml
```
Open `https://podinfo.exmaple.com` in your browser, you should see a greetings message from the blue version.
Clicking on the ping button will make a call that spans across all microservices.
Access Jaeger dashboard using port forwarding:
```bash
kubectl -n istio-system port-forward deployment/istio-tracing 16686:16686
```
Navigate to `http://localhost:16686` and select `store` from the service dropdown. You should see a trace for each ping.

Istio tracing is able to capture the ping call spanning across all microservices because podinfo forwards the Zipkin HTTP
headers. When a HTTP request reaches the Istio Gateway, Envoy will inject a series of headers used for tracing. When podinfo
calls a backend service, will copy the headers from the incoming HTTP request:
```go
func copyTracingHeaders(from *http.Request, to *http.Request) {
headers := []string{
"x-request-id",
"x-b3-traceid",
"x-b3-spanid",
"x-b3-parentspanid",
"x-b3-sampled",
"x-b3-flags",
"x-ot-span-context",
}
for i := range headers {
headerValue := from.Header.Get(headers[i])
if len(headerValue) > 0 {
to.Header.Set(headers[i], headerValue)
}
}
}
```
### Deploy the green version

Change the frontend definition to route traffic coming from Safari users to the green deployment:
```yaml
host: podinfo.example.com
exposeHost: true
blue:
replicas: 2
tag: "1.2.0"
message: "Greetings from the blue frontend"
backend: http://backend:9898/api/echo
green:
replicas: 2
tag: "1.2.1"
routing:
# target Safari
- match:
- headers:
user-agent:
regex: "^(?!.*Chrome).*Safari.*"
# target API clients by version
- match:
- headers:
x-api-version:
regex: "^(v{0,1})1\\.2\\.([1-9]).*"
message: "Greetings from the green frontend"
backend: http://backend:9898/api/echo
```
Save the above resource and apply it:
```bash
helm upgrade --install frontend sp/podinfo-istio \
--namespace demo \
-f ./frontend.yaml
```
Change the backend definition to receive traffic based on source labels. The blue frontend will be routed to the blue
backend and the green frontend to the green backend:
```yaml
host: backend
blue:
replicas: 2
tag: "1.2.0"
backend: http://store:9898/api/echo
green:
replicas: 2
tag: "1.2.1"
routing:
# target green callers
- match:
- sourceLabels:
color: green
backend: http://store:9898/api/echo
```
Save the above resource and apply it:
```bash
helm upgrade --install backend sp/podinfo-istio \
--namespace demo \
-f ./backend.yaml
```
Change the store definition to route 80% of the traffic to the blue deployment and 20% to the green one:
```yaml
host: store
# load balance 80/20 between blue and green
blue:
replicas: 2
tag: "1.2.0"
weight: 80
green:
replicas: 1
tag: "1.2.1"
```
Save the above resource and apply it:
```bash
helm upgrade --install store sp/podinfo-istio \
--namespace demo \
-f ./store.yaml
```
### Restrict access with Mixer rules
Let's assume the frontend service has a vulnerability and a bad actor can execute arbitrary commands in the frontend container.
If someone gains access to the frontend service, from there he/she can issue API calls to the backend and data store service.
In order to simulate this you can exec into the frontend container and curl the data store API:
```bash
kubectl -n demo exec -it frontend-blue-675b4dff4b-xhg9d -c podinfod sh
~ $ curl -v http://store:9898
* Connected to store (10.31.250.154) port 9898 (#0)
```
There is no reason why the frontend service should have access to the data store, only the backend service should be
able to issue API calls to the store service. With Istio you can define access rules and restrict access based on source and
destination.
Let's create an Istio config that denies access to the data store unless the caller is the backend service:
```yaml
apiVersion: config.istio.io/v1alpha2
kind: denier
metadata:
name: denyhandler
namespace: demo
spec:
status:
code: 7
message: Not allowed
---
apiVersion: config.istio.io/v1alpha2
kind: checknothing
metadata:
name: denyrequest
namespace: demo
spec:
---
apiVersion: config.istio.io/v1alpha2
kind: rule
metadata:
name: denystore
namespace: demo
spec:
match: destination.labels["app"] == "store" && source.labels["app"] != "backend"
actions:
- handler: denyhandler.denier
instances: [ denyrequest.checknothing ]
```
Save the above resource as demo-rules.yaml and then apply it:
```bash
kubectl apply -f ./demo-rules.yaml
```
Now if you try to call the data store from the frontend container Istio Mixer will deny access:
```bash
kubectl -n demo exec -it frontend-blue-675b4dff4b-xhg9d -c podinfod sh
~ $ watch curl -s http://store:9898
PERMISSION_DENIED:denyhandler.denier.demo:Not allowed
```
The permission denied error can be observed in Grafana. Open the Istio Workload dashboard, select the demo namespace and
podinfo-blue workload from the dropdown, scroll to outbound services and you'll see the HTTP 403 errors:

Once you have the Mixer rules in place you could create an alert for HTTP 403 errors with Prometheus and Alertmanager
to be notified about suspicious activities inside the service mesh.
================================================
FILE: docs/istio/00-index.md
================================================
# Istio GKE setup
This guide walks you through setting up Istio on Google Kubernetes Engine.

At the end of this guide you will be running Istio with the following characteristics:
* secure Istio ingress gateway with Let’s Encrypt TLS
* encrypted communication between Kubernetes workloads with Istio mutual TLS
* Jaeger tracing
* Prometheus and Grafana monitoring
* canary deployments, A/B testing and traffic mirroring capabilities
### Labs
* [Prerequisites - client tools](01-prerequisites.md)
* [GKE cluster setup](02-gke-setup.md)
* [Cloud DNS setup](03-clouddns-setup.md)
* [Install Istio with Helm](04-istio-setup.md)
* [Configure Istio Gateway with Let's Encrypt wildcard certificate](05-letsencrypt-setup.md)
* [Expose services outside the service mesh](06-grafana-config.md)
================================================
FILE: docs/istio/01-prerequisites.md
================================================
# Prerequisites
You will be creating a cluster on Google’s Kubernetes Engine (GKE),
if you don’t have an account you can sign up [here](https://cloud.google.com/free/) for free credits.
Login into GCP, create a project and enable billing for it.
Install the [gcloud](https://cloud.google.com/sdk/) command line utility and configure your project with `gcloud init`.
Set the default project (replace `PROJECT_ID` with your own project):
```bash
gcloud config set project PROJECT_ID
```
Set the default compute region and zone:
```bash
gcloud config set compute/region europe-west3
gcloud config set compute/zone europe-west3-a
```
Enable the Kubernetes and Cloud DNS services for your project:
```bash
gcloud services enable container.googleapis.com
gcloud services enable dns.googleapis.com
```
Install the `kubectl` command-line tool:
```bash
gcloud components install kubectl
```
Install the `helm` command-line tool:
```bash
brew install kubernetes-helm
```
Create Tiller service account:
```bash
kubectl --namespace kube-system create sa tiller
kubectl create clusterrolebinding tiller-cluster-rule --clusterrole=cluster-admin --serviceaccount=kube-system:tiller
```
Install Tiller:
```bash
helm init --service-account tiller --upgrade --wait
```
Next: [GKE cluster setup](02-gke-setup.md)
================================================
FILE: docs/istio/02-gke-setup.md
================================================
# GKE cluster setup
Create a cluster with three nodes using the latest Kubernetes version:
```bash
k8s_version=$(gcloud container get-server-config --format=json \
| jq -r '.validMasterVersions[0]')
gcloud container clusters create istio \
--cluster-version=${k8s_version} \
--zone=europe-west3-a \
--num-nodes=3 \
--machine-type=n1-highcpu-4 \
--preemptible \
--no-enable-cloud-logging \
--disk-size=50 \
--enable-autorepair \
--scopes=gke-default
```
The above command will create a default node pool consisting of `n1-highcpu-4` (vCPU: 4, RAM 3.60GB, DISK: 30GB) preemptible VMs.
Preemptible VMs are up to 80% cheaper than regular instances and are terminated and replaced after a maximum of 24 hours.
Set up credentials for `kubectl`:
```bash
gcloud container clusters get-credentials istio -z=europe-west3-a
```
Create a cluster admin role binding:
```bash
kubectl create clusterrolebinding "cluster-admin-$(whoami)" \
--clusterrole=cluster-admin \
--user="$(gcloud config get-value core/account)"
```
Validate your setup with:
```bash
kubectl get nodes -o wide
```
Next: [Cloud DNS setup](03-clouddns-setup.md)
================================================
FILE: docs/istio/03-clouddns-setup.md
================================================
# Cloud DNS setup
You will need an internet domain and access to the registrar to change the name servers to Google Cloud DNS.
Create a managed zone named `istio` in Cloud DNS (replace `example.com` with your domain):
```bash
gcloud dns managed-zones create \
--dns-name="example.com." \
--description="Istio zone" "istio"
```
Look up your zone's name servers:
```bash
gcloud dns managed-zones describe istio
```
Update your registrar's name server records with the records returned by the above command.
Wait for the name servers to change (replace `example.com` with your domain):
```bash
watch dig +short NS example.com
```
Create a static IP address named `istio-gateway-ip` in the same region as your GKE cluster:
```bash
gcloud compute addresses create istio-gateway-ip --region europe-west3
```
Find the static IP address:
```bash
gcloud compute addresses describe istio-gateway-ip --region europe-west3
```
Create the following DNS records (replace `example.com` with your domain and set your Istio Gateway IP):
```bash
DOMAIN="example.com"
GATEWAYIP="35.198.98.90"
gcloud dns record-sets transaction start --zone=istio
gcloud dns record-sets transaction add --zone=istio \
--name="${DOMAIN}" --ttl=300 --type=A ${GATEWAYIP}
gcloud dns record-sets transaction add --zone=istio \
--name="www.${DOMAIN}" --ttl=300 --type=A ${GATEWAYIP}
gcloud dns record-sets transaction add --zone=istio \
--name="*.${DOMAIN}" --ttl=300 --type=A ${GATEWAYIP}
gcloud dns record-sets transaction execute --zone istio
```
Verify that the wildcard DNS is working (replace `example.com` with your domain):
```bash
watch host test.example.com
```
Next: [Install Istio with Helm](04-istio-setup.md)
================================================
FILE: docs/istio/04-istio-setup.md
================================================
# Install Istio with Helm
Add Istio Helm repository:
```bash
export ISTIO_VER="1.2.3"
helm repo add istio.io https://storage.googleapis.com/istio-release/releases/${ISTIO_VER}/charts
```
Installing the Istio custom resource definitions:
```bash
helm upgrade -i istio-init istio.io/istio-init --wait --namespace istio-system
```
Wait for Istio CRDs to be deployed:
```bash
kubectl -n istio-system wait --for=condition=complete job/istio-init-crd-10
kubectl -n istio-system wait --for=condition=complete job/istio-init-crd-11
kubectl -n istio-system wait --for=condition=complete job/istio-init-crd-12
```
Create a secret for Grafana credentials:
```bash
# generate a random password
PASSWORD=$(head -c 12 /dev/urandom | shasum| cut -d' ' -f1)
kubectl -n istio-system create secret generic grafana \
--from-literal=username=admin \
--from-literal=passphrase="$PASSWORD"
```
Configure Istio with Prometheus, Jaeger, and cert-manager and set your load balancer IP:
```yaml
# ingress configuration
gateways:
enabled: true
istio-ingressgateway:
type: LoadBalancer
loadBalancerIP: "35.198.98.90"
autoscaleEnabled: true
autoscaleMax: 2
# common settings
global:
# sidecar settings
proxy:
resources:
requests:
cpu: 10m
memory: 64Mi
limits:
cpu: 2000m
memory: 256Mi
controlPlaneSecurityEnabled: false
mtls:
enabled: false
useMCP: true
# pilot configuration
pilot:
enabled: true
autoscaleEnabled: true
sidecar: true
resources:
requests:
cpu: 10m
memory: 128Mi
# sidecar-injector webhook configuration
sidecarInjectorWebhook:
enabled: true
# security configuration
security:
enabled: true
# galley configuration
galley:
enabled: true
# mixer configuration
mixer:
policy:
enabled: false
replicaCount: 1
autoscaleEnabled: true
telemetry:
enabled: true
replicaCount: 1
autoscaleEnabled: true
resources:
requests:
cpu: 10m
memory: 128Mi
# addon prometheus configuration
prometheus:
enabled: true
scrapeInterval: 5s
# addon jaeger tracing configuration
tracing:
enabled: true
# addon grafana configuration
grafana:
enabled: true
security:
enabled: true
```
Save the above file as `my-istio.yaml` and install Istio with Helm:
```bash
helm upgrade --install istio istio.io/istio \
--namespace=istio-system \
-f ./my-istio.yaml
```
Verify that Istio workloads are running:
```bash
watch kubectl -n istio-system get pods
```
Next: [Configure Istio Gateway with Let's Encrypt wildcard certificate](05-letsencrypt-setup.md)
================================================
FILE: docs/istio/05-letsencrypt-setup.md
================================================
# Configure Istio Gateway with Let's Encrypt wildcard certificate

Create a Istio Gateway in istio-system namespace with HTTPS redirect:
```yaml
apiVersion: networking.istio.io/v1alpha3
kind: Gateway
metadata:
name: public-gateway
namespace: istio-system
spec:
selector:
istio: ingressgateway
servers:
- port:
number: 80
name: http
protocol: HTTP
hosts:
- "*"
tls:
httpsRedirect: true
- port:
number: 443
name: https
protocol: HTTPS
hosts:
- "*"
tls:
mode: SIMPLE
privateKey: /etc/istio/ingressgateway-certs/tls.key
serverCertificate: /etc/istio/ingressgateway-certs/tls.crt
```
Save the above resource as istio-gateway.yaml and then apply it:
```bash
kubectl apply -f ./istio-gateway.yaml
```
Create a service account with Cloud DNS admin role (replace `my-gcp-project` with your project ID):
```bash
GCP_PROJECT=my-gcp-project
gcloud iam service-accounts create dns-admin \
--display-name=dns-admin \
--project=${GCP_PROJECT}
gcloud iam service-accounts keys create ./gcp-dns-admin.json \
--iam-account=dns-admin@${GCP_PROJECT}.iam.gserviceaccount.com \
--project=${GCP_PROJECT}
gcloud projects add-iam-policy-binding ${GCP_PROJECT} \
--member=serviceAccount:dns-admin@${GCP_PROJECT}.iam.gserviceaccount.com \
--role=roles/dns.admin
```
Create a Kubernetes secret with the GCP Cloud DNS admin key:
```bash
kubectl create secret generic cert-manager-credentials \
--from-file=./gcp-dns-admin.json \
--namespace=istio-system
```
Install cert-manager's CRDs:
```bash
CERT_REPO=https://raw.githubusercontent.com/jetstack/cert-manager
kubectl apply -f ${CERT_REPO}/release-0.7/deploy/manifests/00-crds.yaml
```
Create the cert-manager namespace and disable resource validation:
```bash
kubectl create namespace cert-manager
kubectl label namespace cert-manager certmanager.k8s.io/disable-validation=true
```
Install cert-manager with Helm:
```bash
helm repo add jetstack https://charts.jetstack.io && \
helm repo update && \
helm upgrade -i cert-manager \
--namespace cert-manager \
--version v0.7.0 \
jetstack/cert-manager
```
Create a letsencrypt issuer for CloudDNS (replace `email@example.com` with a valid email address and `my-gcp-project` with your project ID):
```yaml
apiVersion: certmanager.k8s.io/v1alpha1
kind: Issuer
metadata:
name: letsencrypt-prod
namespace: istio-system
spec:
acme:
server: https://acme-v02.api.letsencrypt.org/directory
email: email@example.com
privateKeySecretRef:
name: letsencrypt-prod
dns01:
providers:
- name: cloud-dns
clouddns:
serviceAccountSecretRef:
name: cert-manager-credentials
key: gcp-dns-admin.json
project: my-gcp-project
```
Save the above resource as letsencrypt-issuer.yaml and then apply it:
```bash
kubectl apply -f ./letsencrypt-issuer.yaml
```
Create a wildcard certificate (replace `example.com` with your domain):
```yaml
apiVersion: certmanager.k8s.io/v1alpha1
kind: Certificate
metadata:
name: istio-gateway
namespace: istio-system
spec:
secretName: istio-ingressgateway-certs
issuerRef:
name: letsencrypt-prod
commonName: "*.example.com"
acme:
config:
- dns01:
provider: cloud-dns
domains:
- "*.example.com"
- "example.com"
```
Save the above resource as of-cert.yaml and then apply it:
```bash
kubectl apply -f ./of-cert.yaml
```
In a couple of minutes cert-manager should fetch a wildcard certificate from letsencrypt.org:
```text
kubectl -n istio-system describe certificate istio-gateway
Events:
Type Reason Age From Message
---- ------ ---- ---- -------
Normal CertIssued 1m52s cert-manager Certificate issued successfully
```
Recreate Istio ingress gateway pods:
```bash
kubectl -n istio-system delete pods -l istio=ingressgateway
```
Note that Istio gateway doesn't reload the certificates from the TLS secret on cert-manager renewal.
Since the GKE cluster is made out of preemptible VMs the gateway pods will be replaced once every 24h, if your not using
preemptible nodes then you need to manually kill the gateway pods every two months before the certificate expires.
Next: [Expose services outside the service mesh](06-grafana-config.md)
================================================
FILE: docs/istio/06-grafana-config.md
================================================
# Expose Grafana outside the service mesh
In order to expose services via the Istio Gateway you have to create a Virtual Service attached to Istio Gateway.
Create a virtual service in `istio-system` namespace for Grafana (replace `example.com` with your domain):
```yaml
apiVersion: networking.istio.io/v1alpha3
kind: VirtualService
metadata:
name: grafana
namespace: istio-system
spec:
hosts:
- "grafana.example.com"
gateways:
- public-gateway.istio-system.svc.cluster.local
http:
- route:
- destination:
host: grafana
timeout: 30s
```
Save the above resource as grafana-virtual-service.yaml and then apply it:
```bash
kubectl apply -f ./grafana-virtual-service.yaml
```
Navigate to `http://grafana.example.com` in your browser and you should be redirected to the HTTPS version.
Check that HTTP2 is enabled:
```bash
curl -I --http2 https://grafana.example.com
HTTP/2 200
content-type: text/html; charset=UTF-8
x-envoy-upstream-service-time: 3
server: envoy
```
Next: [A/B testing and canary deployments demo](/docs/apps/00-index.md)
================================================
FILE: docs/openfaas/00-index.md
================================================
# OpenFaaS service mesh walkthrough
This guide walks you through setting up OpenFaaS with Istio on Google Kubernetes Engine.

At the end of this guide you will be running OpenFaaS with the following characteristics:
* secure OpenFaaS ingress with Let’s Encrypt TLS and authentication
* encrypted communication between OpenFaaS core services and functions with Istio mutual TLS
* isolated functions with Istio Mixer rules
* Jaeger tracing and Prometheus monitoring for function calls
* canary deployments for OpenFaaS functions
### Labs
* [Configure OpenFaaS mutual TLS](01-mtls-config.md)
* [Configure OpenFaaS access policies](02-mixer-rules.md)
* [Install OpenFaaS with Helm](03-openfaas-setup.md)
* [Configure OpenFaaS Gateway to receive external traffic](04-gateway-config.md)
* [Canary deployments for OpenFaaS functions](05-canary.md)
================================================
FILE: docs/openfaas/01-mtls-config.md
================================================
# Configure OpenFaaS mutual TLS
An OpenFaaS instance is composed out of two namespaces: one for the core services and one for functions.
In order to secure the communication between core services and functions we need to enable mutual TLS on both namespaces.
Create the OpenFaaS namespaces with Istio sidecar injection enabled:
```bash
kubectl apply -f https://raw.githubusercontent.com/openfaas/faas-netes/master/namespaces.yml
```
Enable mTLS on `openfaas` namespace:
```yaml
apiVersion: authentication.istio.io/v1alpha1
kind: Policy
metadata:
name: default
namespace: openfaas
spec:
peers:
- mtls: {}
---
apiVersion: networking.istio.io/v1alpha3
kind: DestinationRule
metadata:
name: default
namespace: openfaas
spec:
host: "*.openfaas.svc.cluster.local"
trafficPolicy:
tls:
mode: ISTIO_MUTUAL
```
Save the above resource as of-mtls.yaml and then apply it:
```bash
kubectl apply -f ./of-mtls.yaml
```
Allow plaintext traffic to NATS:
```yaml
apiVersion: networking.istio.io/v1alpha3
kind: DestinationRule
metadata:
name: "nats-no-mtls"
namespace: openfaas
spec:
host: "nats.openfaas.svc.cluster.local"
trafficPolicy:
tls:
mode: DISABLE
```
Save the above resource as of-nats-no-mtls.yaml and then apply it:
```bash
kubectl apply -f ./of-nats-no-mtls.yaml
```
Enable mTLS on `openfaas-fn` namespace:
```yaml
apiVersion: authentication.istio.io/v1alpha1
kind: Policy
metadata:
name: default
namespace: openfaas-fn
spec:
peers:
- mtls: {}
---
apiVersion: networking.istio.io/v1alpha3
kind: DestinationRule
metadata:
name: default
namespace: openfaas-fn
spec:
host: "*.openfaas-fn.svc.cluster.local"
trafficPolicy:
tls:
mode: ISTIO_MUTUAL
```
Save the above resource as of-functions-mtls.yaml and then apply it:
```bash
kubectl apply -f ./of-functions-mtls.yaml
```
Next: [Configure OpenFaaS access policies](02-mixer-rules.md)
================================================
FILE: docs/openfaas/02-mixer-rules.md
================================================
# Configure OpenFaaS access policies
Kubernetes namespaces alone offer only a logical separation between workloads.
To prohibit functions from calling each other or from reaching
the OpenFaaS core services we need to create Istio Mixer rules.
Deny access to OpenFaaS core services from the `openfaas-fn` namespace except for system functions:
```yaml
apiVersion: config.istio.io/v1alpha2
kind: denier
metadata:
name: denyhandler
namespace: openfaas
spec:
status:
code: 7
message: Not allowed
---
apiVersion: config.istio.io/v1alpha2
kind: checknothing
metadata:
name: denyrequest
namespace: openfaas
spec:
---
apiVersion: config.istio.io/v1alpha2
kind: rule
metadata:
name: denyopenfaasfn
namespace: openfaas
spec:
match: destination.namespace == "openfaas" && source.namespace == "openfaas-fn" && source.labels["role"] != "openfaas-system"
actions:
- handler: denyhandler.denier
instances: [ denyrequest.checknothing ]
```
Save the above resources as of-rules.yaml and then apply it:
```bash
kubectl apply -f ./of-rules.yaml
```
Deny access to functions except for OpenFaaS core services:
```yaml
apiVersion: config.istio.io/v1alpha2
kind: denier
metadata:
name: denyhandler
namespace: openfaas-fn
spec:
status:
code: 7
message: Not allowed
---
apiVersion: config.istio.io/v1alpha2
kind: checknothing
metadata:
name: denyrequest
namespace: openfaas-fn
spec:
---
apiVersion: config.istio.io/v1alpha2
kind: rule
metadata:
name: denyopenfaasfn
namespace: openfaas-fn
spec:
match: destination.namespace == "openfaas-fn" && source.namespace != "openfaas" && source.labels["role"] != "openfaas-system"
actions:
- handler: denyhandler.denier
instances: [ denyrequest.checknothing ]
```
Save the above resources as of-functions-rules.yaml and then apply it:
```bash
kubectl apply -f ./of-functions-rules.yaml
```
Next: [Install OpenFaaS with Helm](03-openfaas-setup.md)
================================================
FILE: docs/openfaas/03-openfaas-setup.md
================================================
# Install OpenFaaS with Helm
Before installing OpenFaaS you need to provide the basic authentication credential for the OpenFaaS gateway.
Create a secret named `basic-auth` in the `openfaas` namespace:
```bash
# generate a random password
password=$(head -c 12 /dev/urandom | shasum| cut -d' ' -f1)
kubectl -n openfaas create secret generic basic-auth \
--from-literal=basic-auth-user=admin \
--from-literal=basic-auth-password=$password
```
Add the OpenFaaS `helm` repository:
```bash
helm repo add openfaas https://openfaas.github.io/faas-netes/
```
Install OpenFaaS with Helm:
```bash
helm upgrade --install openfaas openfaas/openfaas \
--namespace openfaas \
--set functionNamespace=openfaas-fn \
--set operator.create=true \
--set securityContext=true \
--set basic_auth=true \
--set exposeServices=false \
--set operator.createCRD=true
```
Verify that OpenFaaS workloads are running:
```bash
kubectl -n openfaas get pods
```
Next: [Configure OpenFaaS Gateway to receive external traffic](04-gateway-config.md)
================================================
FILE: docs/openfaas/04-gateway-config.md
================================================
# Configure OpenFaaS Gateway to receive external traffic
Create an Istio virtual service for OpenFaaS Gateway (replace `example.com` with your domain):
```yaml
apiVersion: networking.istio.io/v1alpha3
kind: VirtualService
metadata:
name: gateway
namespace: openfaas
spec:
hosts:
- "openfaas.example.com"
gateways:
- public-gateway.istio-system.svc.cluster.local
http:
- route:
- destination:
host: gateway
timeout: 30s
```
Save the above resource as of-virtual-service.yaml and then apply it:
```bash
kubectl apply -f ./of-virtual-service.yaml
```
Wait for OpenFaaS Gateway to come online:
```bash
watch curl -v https://openfaas.example.com/healthz
```
Save your credentials in faas-cli store:
```bash
echo $password | faas-cli login -g https://openfaas.example.com -u admin --password-stdin
```
Next: [Canary deployments for OpenFaaS functions](05-canary.md)
================================================
FILE: docs/openfaas/05-canary.md
================================================
# Canary deployments for OpenFaaS functions

Create a general available release for the `env` function version 1.0.0:
```yaml
apiVersion: openfaas.com/v1alpha2
kind: Function
metadata:
name: env
namespace: openfaas-fn
spec:
name: env
image: stefanprodan/of-env:1.0.0
resources:
requests:
memory: "32Mi"
cpu: "10m"
limits:
memory: "64Mi"
cpu: "100m"
```
Save the above resources as env-ga.yaml and then apply it:
```bash
kubectl apply -f ./env-ga.yaml
```
Create a canary release for version 1.1.0:
```yaml
apiVersion: openfaas.com/v1alpha2
kind: Function
metadata:
name: env-canary
namespace: openfaas-fn
spec:
name: env-canary
image: stefanprodan/of-env:1.1.0
resources:
requests:
memory: "32Mi"
cpu: "10m"
limits:
memory: "64Mi"
cpu: "100m"
```
Save the above resources as env-canary.yaml and then apply it:
```bash
kubectl apply -f ./env-canary.yaml
```
Create an Istio virtual service with 10% traffic going to canary:
```yaml
apiVersion: networking.istio.io/v1alpha3
kind: VirtualService
metadata:
name: env
namespace: openfaas-fn
spec:
hosts:
- env
http:
- route:
- destination:
host: env
weight: 90
- destination:
host: env-canary
weight: 10
timeout: 30s
```
Save the above resources as env-virtual-service.yaml and then apply it:
```bash
kubectl apply -f ./env-virtual-service.yaml
```
Test traffic routing (one in ten calls should hit the canary release):
```bash
while true; do sleep 1; curl -sS https://openfaas.example.com/function/env | grep HOSTNAME; done
HOSTNAME=env-59bf48fb9d-cjsjw
HOSTNAME=env-59bf48fb9d-cjsjw
HOSTNAME=env-59bf48fb9d-cjsjw
HOSTNAME=env-59bf48fb9d-cjsjw
HOSTNAME=env-59bf48fb9d-cjsjw
HOSTNAME=env-59bf48fb9d-cjsjw
HOSTNAME=env-59bf48fb9d-cjsjw
HOSTNAME=env-59bf48fb9d-cjsjw
HOSTNAME=env-59bf48fb9d-cjsjw
HOSTNAME=env-canary-5dffdf4458-4vnn2
```
Access Jaeger dashboard using port forwarding:
```bash
kubectl -n istio-system port-forward deployment/istio-tracing 16686:16686
```
Tracing the general available release:

Tracing the canary release:

Monitor ga vs canary success rate and latency with Grafana:

gitextract_qi1h0t8e/
├── .gitignore
├── LICENSE
├── README.md
└── docs/
├── apps/
│ ├── 00-index.md
│ ├── 01-canary-flagger.md
│ └── 02-ab-testing-helm.md
├── istio/
│ ├── 00-index.md
│ ├── 01-prerequisites.md
│ ├── 02-gke-setup.md
│ ├── 03-clouddns-setup.md
│ ├── 04-istio-setup.md
│ ├── 05-letsencrypt-setup.md
│ └── 06-grafana-config.md
└── openfaas/
├── 00-index.md
├── 01-mtls-config.md
├── 02-mixer-rules.md
├── 03-openfaas-setup.md
├── 04-gateway-config.md
└── 05-canary.md
Condensed preview — 19 files, each showing path, character count, and a content snippet. Download the .json file or copy for the full structured content (50K chars).
[
{
"path": ".gitignore",
"chars": 192,
"preview": "# Binaries for programs and plugins\n*.exe\n*.exe~\n*.dll\n*.so\n*.dylib\n\n# Test binary, build with `go test -c`\n*.test\n\n# Ou"
},
{
"path": "LICENSE",
"chars": 1070,
"preview": "MIT License\n\nCopyright (c) 2018 Stefan Prodan\n\nPermission is hereby granted, free of charge, to any person obtaining a c"
},
{
"path": "README.md",
"chars": 1259,
"preview": "# Istio service mesh guides \n\n is a Kubernetes operator"
},
{
"path": "docs/apps/02-ab-testing-helm.md",
"chars": 8364,
"preview": "# A/B testing with Istio and Helm\n\nTo experiment with different traffic routing techniques \nI've created a Helm chart fo"
},
{
"path": "docs/istio/00-index.md",
"chars": 891,
"preview": "# Istio GKE setup\n\nThis guide walks you through setting up Istio on Google Kubernetes Engine.\n\n, \nif you don’t have an account you c"
},
{
"path": "docs/istio/02-gke-setup.md",
"chars": 1128,
"preview": "# GKE cluster setup\n\nCreate a cluster with three nodes using the latest Kubernetes version:\n\n```bash\nk8s_version=$(gclou"
},
{
"path": "docs/istio/03-clouddns-setup.md",
"chars": 1704,
"preview": "# Cloud DNS setup\n\nYou will need an internet domain and access to the registrar to change the name servers to Google Clo"
},
{
"path": "docs/istio/04-istio-setup.md",
"chars": 2603,
"preview": "# Install Istio with Helm\n\nAdd Istio Helm repository:\n\n```bash\nexport ISTIO_VER=\"1.2.3\"\n\nhelm repo add istio.io https://"
},
{
"path": "docs/istio/05-letsencrypt-setup.md",
"chars": 4459,
"preview": "# Configure Istio Gateway with Let's Encrypt wildcard certificate\n\n. The extraction includes 19 files (45.8 KB), approximately 13.0k tokens. Use this with OpenClaw, Claude, ChatGPT, Cursor, Windsurf, or any other AI tool that accepts text input. You can copy the full output to your clipboard or download it as a .txt file.
Extracted by GitExtract — free GitHub repo to text converter for AI. Built by Nikandr Surkov.