Showing preview only (987K chars total). Download the full file or copy to clipboard to get everything.
Repository: trekhleb/links-detector
Branch: master
Commit: 746d387743f7
Files: 87
Total size: 919.4 KB
Directory structure:
gitextract_y0_euu71/

├── .eslintrc.js
├── .gitignore
├── LICENCE
├── README.DEV.md
├── README.md
├── articles/
│   └── printed_links_detection/
│       ├── printed_links_detection.md
│       └── printed_links_detection.ru.md
├── package.json
├── public/
│   ├── index.css
│   ├── index.html
│   ├── manifest.json
│   ├── models/
│   │   └── links_detector/
│   │       └── v1/
│   │           └── model.json
│   ├── robots.txt
│   ├── videos/
│   │   └── demo-black-720p.webm
│   └── wasm/
│       ├── tfjs-backend-wasm-simd.wasm
│       ├── tfjs-backend-wasm-threaded-simd.wasm
│       └── tfjs-backend-wasm.wasm
├── serve.json
├── src/
│   ├── components/
│   │   ├── App.tsx
│   │   ├── Routes.tsx
│   │   ├── elements/
│   │   │   ├── BoxesCanvas.tsx
│   │   │   ├── DebugInfo.tsx
│   │   │   ├── DetectedLinks.tsx
│   │   │   ├── DetectedLinksPrefixes.tsx
│   │   │   ├── LinksDetector.tsx
│   │   │   ├── PerformanceMonitor.tsx
│   │   │   └── PixelsCanvas.tsx
│   │   ├── screens/
│   │   │   ├── DebugScreen.tsx
│   │   │   ├── DemoScreen.tsx
│   │   │   ├── DetectorScreen.tsx
│   │   │   ├── HomeScreen.tsx
│   │   │   └── NotFoundScreen.tsx
│   │   └── shared/
│   │       ├── CameraStream.tsx
│   │       ├── Demo.tsx
│   │       ├── EnhancedRow.tsx
│   │       ├── ErrorBoundary.tsx
│   │       ├── Footer.tsx
│   │       ├── Grid.tsx
│   │       ├── Header.tsx
│   │       ├── HyperLink.tsx
│   │       ├── Icon.tsx
│   │       ├── LaunchButton.tsx
│   │       ├── Logo.tsx
│   │       ├── MainNavigation.tsx
│   │       ├── Modal.tsx
│   │       ├── ModalCloseButton.tsx
│   │       ├── Notification.tsx
│   │       ├── PageTitle.tsx
│   │       ├── ProgressBar.tsx
│   │       ├── Promo.tsx
│   │       ├── Spinner.css
│   │       ├── Spinner.tsx
│   │       └── Template.tsx
│   ├── configs/
│   │   ├── analytics.ts
│   │   ├── detectionConfig.ts
│   │   └── pwa.ts
│   ├── constants/
│   │   ├── debug.ts
│   │   ├── links.ts
│   │   ├── page.ts
│   │   ├── routes.ts
│   │   └── style.ts
│   ├── hooks/
│   │   ├── useGraphModel.ts
│   │   ├── useLinksDetector.ts
│   │   ├── useLogger.ts
│   │   ├── usePageTitle.ts
│   │   ├── useTesseract.ts
│   │   └── useWindowSize.ts
│   ├── icons/
│   │   ├── README.md
│   │   └── index.ts
│   ├── index.tsx
│   ├── react-app-env.d.ts
│   ├── service-worker.ts
│   ├── serviceWorkerRegistration.ts
│   ├── setupTests.ts
│   ├── styles/
│   │   └── index.css
│   └── utils/
│       ├── analytics.ts
│       ├── debug.ts
│       ├── graphModel.ts
│       ├── image.ts
│       ├── logger.ts
│       ├── numbers.ts
│       ├── profiler.ts
│       ├── routes.ts
│       ├── tesseract.ts
│       └── types.ts
├── tailwind.config.js
└── tsconfig.json
================================================
FILE CONTENTS
================================================
================================================
FILE: .eslintrc.js
================================================
module.exports = {
env: {
browser: true,
es6: true,
node: true,
jest: true,
},
extends: [
'eslint:recommended',
'airbnb',
'airbnb/hooks',
'plugin:import/typescript',
],
parser: '@typescript-eslint/parser',
plugins: [
'@typescript-eslint',
],
parserOptions: {
ecmaVersion: 2017,
sourceType: 'module',
},
rules: {
indent: ['error', 2],
'linebreak-style': ['error', 'unix'],
quotes: ['error', 'single'],
'no-console': 'warn',
'no-unused-vars': 'off',
'@typescript-eslint/no-unused-vars': [
'error',
{ vars: 'all', args: 'after-used', ignoreRestSiblings: false },
],
// Consider using explicit annotations for object literals and function return types even when they can be inferred.
'@typescript-eslint/explicit-function-return-type': 'warn',
'no-empty': 'warn',
'react/jsx-filename-extension': [1, { extensions: ['.js', '.jsx', '.tsx'] }],
'import/extensions': [1, { extensions: ['.js', '.jsx', '.tsx'] }],
'no-use-before-define': 'off',
'@typescript-eslint/no-use-before-define': 'error',
'no-shadow': 'off',
'@typescript-eslint/no-shadow': 'error',
'react/require-default-props': 'off',
'no-useless-return': 'off',
'import/prefer-default-export': 'off',
'arrow-body-style': 'off',
'react/jsx-one-expression-per-line': 'off',
},
};
================================================
FILE: .gitignore
================================================
# See https://help.github.com/articles/ignoring-files/ for more about ignoring files.
# dependencies
/node_modules
/.pnp
.pnp.js
# testing
/coverage
# production
/build
# misc
.DS_Store
.env.local
.env.development.local
.env.test.local
.env.production.local
.idea
.vscode
npm-debug.log*
yarn-debug.log*
yarn-error.log*
# Tailwind generated styles
src/styles/tailwind.css
================================================
FILE: LICENCE
================================================
MIT License
Copyright (c) 2020 Oleksii Trekhleb
Permission is hereby granted, free of charge, to any person obtaining a copy
of this software and associated documentation files (the "Software"), to deal
in the Software without restriction, including without limitation the rights
to use, copy, modify, merge, publish, distribute, sublicense, and/or sell
copies of the Software, and to permit persons to whom the Software is
furnished to do so, subject to the following conditions:
The above copyright notice and this permission notice shall be included in all
copies or substantial portions of the Software.
THE SOFTWARE IS PROVIDED "AS IS", WITHOUT WARRANTY OF ANY KIND, EXPRESS OR
IMPLIED, INCLUDING BUT NOT LIMITED TO THE WARRANTIES OF MERCHANTABILITY,
FITNESS FOR A PARTICULAR PURPOSE AND NONINFRINGEMENT. IN NO EVENT SHALL THE
AUTHORS OR COPYRIGHT HOLDERS BE LIABLE FOR ANY CLAIM, DAMAGES OR OTHER
LIABILITY, WHETHER IN AN ACTION OF CONTRACT, TORT OR OTHERWISE, ARISING FROM,
OUT OF OR IN CONNECTION WITH THE SOFTWARE OR THE USE OR OTHER DEALINGS IN THE
SOFTWARE.
================================================
FILE: README.DEV.md
================================================
# Links Detector: Engineering Notes
## Working with the repository
#### Installation
`yarn install`
#### Running locally over `http`
`yarn start`
The app will be available at [http://localhost:3000/links-detector/](http://localhost:3000/links-detector/)
#### Running locally over `https`
It might be needed to get a camera access while testing the app on mobile devices through a local network.
`yarn start-https`
The app will be available at [https://localhost:3000/links-detector/](http://localhost:3000/links-detector/). You may also access it through the mobile device at `https://<your.local.ip.here>/links/detector` if it is on the same network.
#### Running the production build
Service workers and [PWA](https://web.dev/progressive-web-apps/) (Progressive Web App) features might be tested against production builds only. To build production version of the app and serve it, run:
`yarn start-prod`
The app will be available at [http://localhost:4000/links-detector/](http://localhost:4000/links-detector/)
## Version locks
`react-router-dom v5.X.X` isn't compatible with `history v5.X.X`.
Therefore `package.json` locked `history` package version to `v4.X.X`. See [StackOverflow question](https://stackoverflow.com/questions/62449663/react-router-with-custom-history-not-working) for more details.
================================================
FILE: README.md
================================================
# 📖 👆🏻 Links Detector
> Links Detector makes printed links clickable _via your smartphone camera_. No need to type a link in, just scan and click on it.
🚀 [**Launch Links Detector**](https://trekhleb.github.io/links-detector/) _(preferably from your smartphone)_
[](https://trekhleb.github.io/links-detector)
[📖 Long-read about how the detector works](https://trekhleb.dev/blog/2020/printed-links-detection/)
## 🤷🏻 The Problem
So you read a book or a magazine and see the link like `https://some-url.com/which/may/be/long?and_with_params=true`, but you can't click on it since it is printed. To visit this link you need to start typing it character by character in the browser's address bar, which may be pretty annoying and error-prone.
## 💡 The Solution
Similarly to QR-code detection, we may try to "teach" the smartphone to _detect_ and _recognize_ printed links for us and to make them _clickable_. This way you'll do just _one_ click instead of _multiple_ keystrokes. Your operational complexity goes from `O(N)` to `O(1)`.
This is exactly what _Links Detector_ tries to achieve. It makes you do just one click on the link instead of typing the whole link manually character by character.

## ⚠️ Limitations
Currently, the application is in _experimental_ _Alpha_ stage and has [many issues and limitations](https://github.com/trekhleb/links-detector/issues?q=is%3Aopen+is%3Aissue+label%3Aenhancement). So don't raise your expectations level too high until these issues are resolved 🤷🏻.
## 🏋🏻 Model Training
The detection model was trained using [TensorFlow 2 Object Detection API](https://github.com/tensorflow/models/tree/master/research/object_detection).
You may found the details of the training in [**📖 👆🏻 Making the Printed Links Clickable Using TensorFlow 2 Object Detection API**](https://trekhleb.dev/blog/2020/printed-links-detection/) long read article.
## ⚙️ Technologies
_Links Detector_ is a pure frontend [React](https://create-react-app.dev/) application written on [TypeScript](https://www.typescriptlang.org/). Links detection is happening right in your browser without the need of sending images to the server.
_Links Detector_ is [PWA](https://web.dev/progressive-web-apps/) (Progressive Web App) friendly application made on top of a [Workbox](https://developers.google.com/web/tools/workbox) library. While you navigate through the app it tries to cache all resources to make them available offline and to make consequent visits much faster for you. You may also [install](https://developer.mozilla.org/en-US/docs/Web/Progressive_web_apps/Developer_guide/Installing) Links Detector as a standalone app on your smartphone.
Links detection and recognition happens by means of [TensorFlow](https://www.tensorflow.org) and [Tesseract.js](https://github.com/naptha/tesseract.js) libraries which in turn rely on [WebGL](https://developer.mozilla.org/en-US/docs/Web/API/WebGL_API) and [WebAssembly](https://developer.mozilla.org/en-US/docs/WebAssembly) browser support.
## Author
- [@trekhleb](https://trekhleb.dev)
================================================
FILE: articles/printed_links_detection/printed_links_detection.md
================================================
# 📖 👆🏻 Making the Printed Links Clickable Using TensorFlow 2 Object Detection API

## 📃 TL;DR
_In this article we will start solving the issue of making the printed links (i.e. in a book or in a magazine) clickable via your smartphone camera._
We will use [TensorFlow 2 Object Detection API](https://github.com/tensorflow/models/tree/master/research/object_detection) to train a custom object detector model to find positions and bounding boxes of the sub-strings like `https://` in the text image (i.e. in smartphone camera stream).
The text of each link (right continuation of `https://` bounding box) will be recognized by using [Tesseract](https://tesseract.projectnaptha.com/) library. The recognition part will not be covered in this article, but you may find the complete code example of the application in [links-detector repository](https://github.com/trekhleb/links-detector).
> 🚀 [**Launch Links Detector demo**](https://trekhleb.github.io/links-detector/) from your smartphone to see the final result.
> 📝 [**Open links-detector repository**](https://github.com/trekhleb/links-detector) on GitHub to see the complete source code of the application.
Here is how the final solution will look like:
> ⚠️ Currently the application is in _experimental_ _Alpha_ stage and has [many issues and limitations](https://github.com/trekhleb/links-detector/issues?q=is%3Aopen+is%3Aissue+label%3Aenhancement). So don't raise your expectations level too high until these issues are resolved 🤷🏻. Also, the purpose of this article is more about learning how to work with TensorFlow 2 Object Detection API rather than coming up with a production-ready model.
> In case if Python code blocks in this article will lack proper formatting on this platform feel free to [to read the article on GitHub](https://github.com/trekhleb/links-detector/blob/master/articles/printed_links_detection/printed_links_detection.md)
## 🤷🏻️ The Problem
I work as a software engineer and in my own time, I learn Machine Learning as a hobby. But this is not the problem yet.
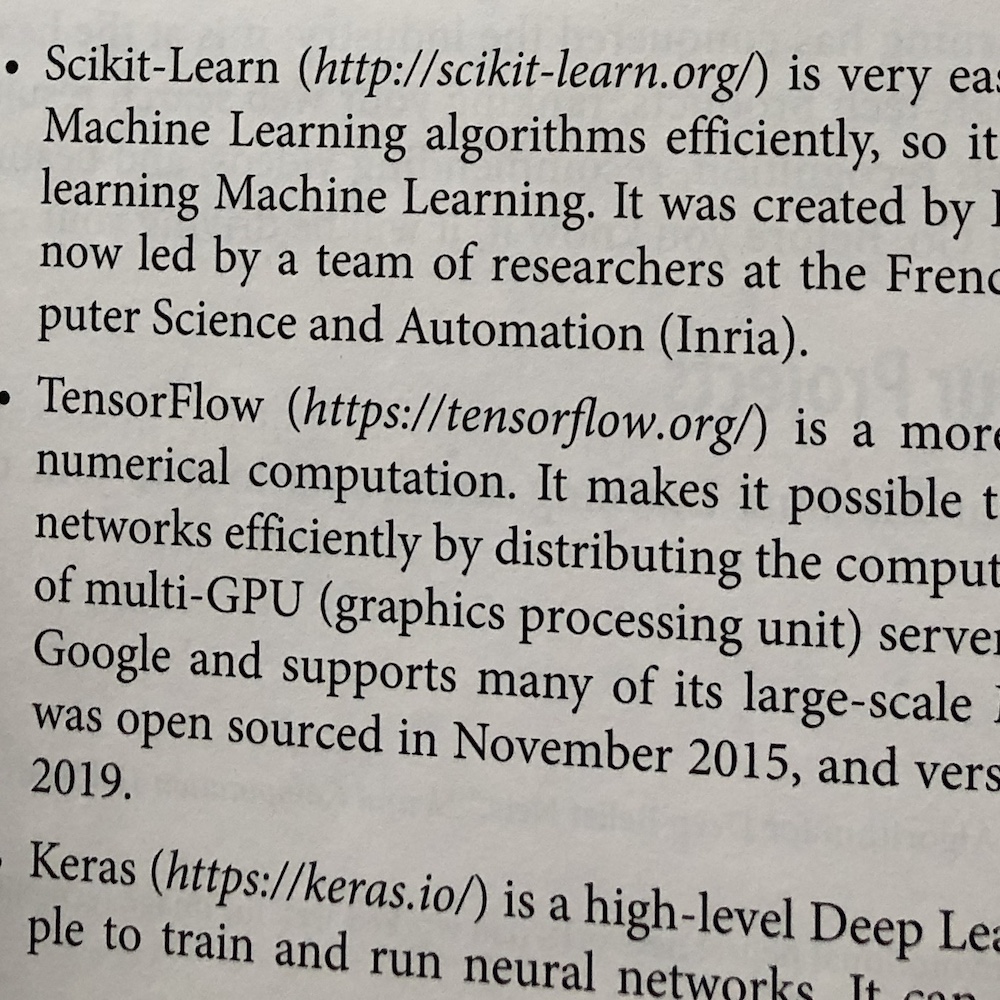
I bought a printed book about Machine Learning recently and while I was reading through the first several chapters I've encountered many printed links in the text that looked like `https://tensorflow.org/` or `https://some-url.com/which/may/be/even/longer?and_with_params=true`.

I saw all these links, but I couldn't click on them since they were printed (thanks, cap!). To visit these links I needed to start typing them character by character in the browser's address bar, which was pretty annoying and error-prone.
## 💡 Possible Solution
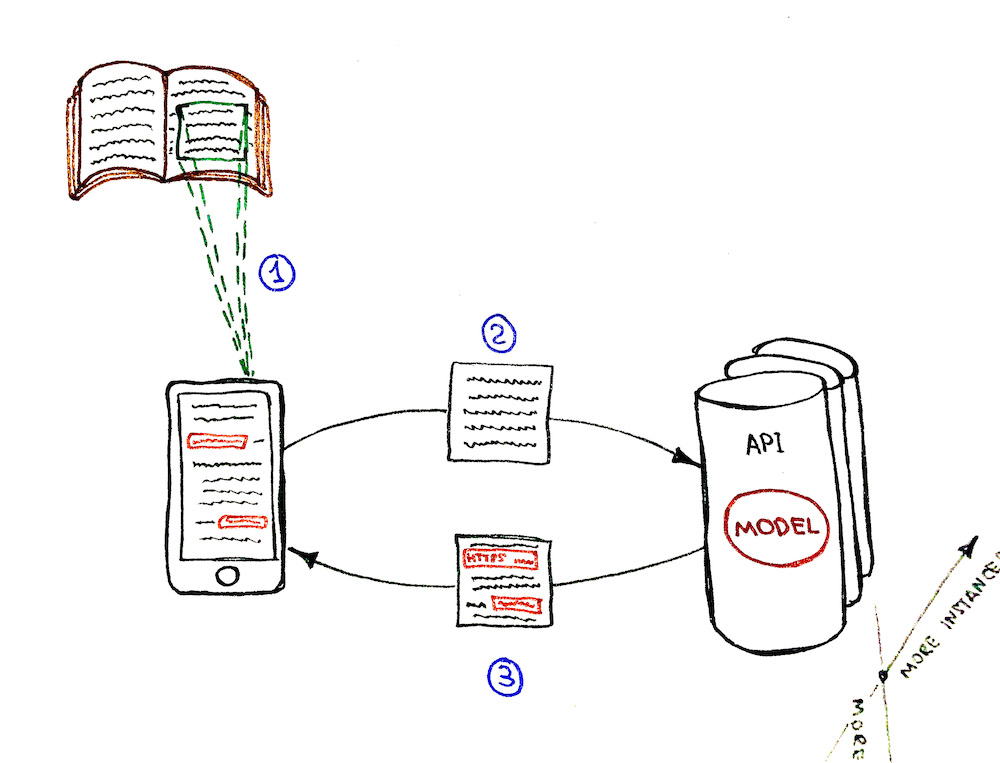
So, I was thinking, what if, similarly to QR-code detection, we will try to "teach" the smartphone to _(1)_ _detect_ and _(2)_ _recognize_ printed links for us and to make them _clickable_? This way you would do just one click instead of multiple keystrokes. The operational complexity of "clicking" the printed links goes from `O(N)` to `O(1)`.
This is how the final workflow will look like:

## 📝 Solution Requirements
As I've mentioned earlier I'm just studying Machine Learning as a hobby. Thus, the purpose of this article is more about _learning_ how to work with TensorFlow 2 Object Detection API rather than coming up with a production-ready application.
With that being said, I simplified the solution requirements to the following:
1. The detection and recognition processes should have a **close-to-real-time** performance (i.e. `0.5-1` frames per second) on a device like iPhone X. It means that the whole _detection + recognition_ process should take up to `2` seconds (pretty bearable as for the amateur project).
2. Only **English** links should be supported.
3. Only **dark text** (i.e. black or dark-grey) on **light background** (i.e. white or light-grey) should be supported.
4. Only `https://` links should be supported for now (it is ok if our model will not recognize the `http://`, `ftp://`, `tcp://` or other types of links).
## 🧩 Solution Breakdown
### High-level breakdown
Let's see how we could approach the problem on a high level.
#### Option 1: Detection model on the back-end
**The flow:**
1. Get camera stream (frame by frame) on the client-side.
2. Send each frame one by one over the network to the back-end.
3. Do link detection and recognition on the back-end and send the response back to the client.
4. Client draws the detection boxes with the clickable links.
**Pros:**
- 💚 The detection performance is not limited by the client's device. We may speed the detection up by scaling the service horizontally (adding more instances) and vertically (adding more cores/GPUs).
- 💚 The model might be bigger since there is no need to upload it to the client-side. Downloading the `~10Mb` model on the client-side may be ok, but loading the `~100Mb` model might be a big issue for the client's network and application UX (user experience) otherwise.
- 💚 It is possible to control who is using the model. Model is guarded behind the API, so we would have complete control over its callers/clients.
**Cons:**
- 💔 System complexity growth. The application tech stack grew from just `JavaScript` to, let's say, `JavaScript + Python`. We need to take care of the autoscaling.
- 💔 Offline mode for the app is not possible since it needs an internet connection to work.
- 💔 Too many HTTP requests between the client and the server may become a bottleneck at some point. Imagine if we would want to improve the performance of the detection, let's say, from `1` to `10+` frames per second. This means that each client will send `10+` requests per second. For `10` simultaneous clients it is already `100+` requests per second. The `HTTP/2` bidirectional streaming and `gRPC` might be useful in this case, but we're going back to the increased system complexity here.
- 💔 System becomes more expensive. Almost all points from the Pros section need to be paid for.
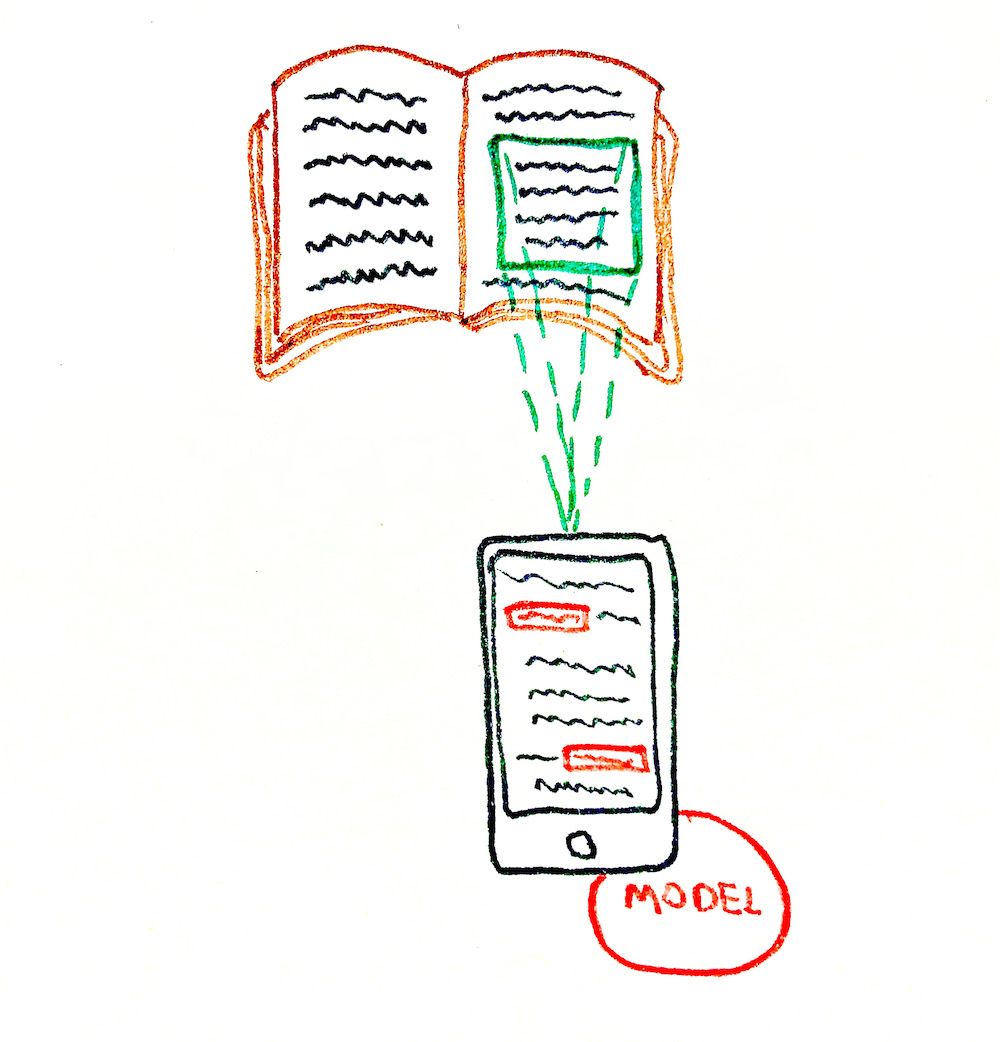
#### Option 2: Detection model on the front-end
**The flow:**
1. Get camera stream (frame by frame) on the client-side.
2. Do link detection and recognition on the client-side (without sending anything to the back-end).
3. Client draws the detection boxes with the clickable links.
**Pros:**
- 💚 System is less complex. We don't need to set up the servers, build the API, and introduce an additional Python stack to the system.
- 💚 Offline mode is possible. The app doesn't need an internet connection to work since the model is fully loaded to the device. So the Progressive Web Application ([PWA](https://web.dev/progressive-web-apps/)) might be built to support that.
- 💚 System is "kind of" scaling automatically. The more clients you have, the more cores and GPUs they bring. This is not a proper scaling solution though (more about that in a Cons section below).
- 💚 System is cheaper. We only need a server for static assets (`HTML`, `JS`, `CSS`, model files, etc.). This may be done for free, let's say, on GitHub.
- 💚 No issue with the growing number of HTTP requests per second to the server-side.
**Cons:**
- 💔 Only horizontal scaling is possible (each client will have its own CPU/GPU). Vertical scaling is not possible since we can't influence the client's device performance. As a result, we can't guarantee fast detection for low performant devices.
- 💔 It is not possible to guard the model usage and control the callers/clients of the model. Everyone could download the model and re-use it.
- 💔 Battery consumption of the client's device might become an issue. For the model to work it needs computational resources. So clients might not be happy with their iPhone getting warmer and warmer while the app is working.
#### High-level conclusion
Since the purpose of the project was more about learning and not coming up with a production-ready solution _I decided to go with the second option of serving the model from the client side_. This made the whole project much cheaper (actually with GitHub it was free to host it), and I could focus more on Machine Learning than on the autoscaling back-end infrastructure.
### Lower level breakdown
Ok, so we've decided to go with the serverless solution. Now we have an image from the camera stream as an input that looks something like this:
We need to solve two sub-tasks for this image:
1. Links **detection** (finding the position and bounding boxes of the links)
2. Links **recognition** (recognizing the text of the links)
#### Option 1: Tesseract based solution
The first and the most obvious approach would be to solve the _Optical Character Recognition_ ([OCR](https://en.wikipedia.org/wiki/Optical_character_recognition)) task by recognizing the whole text of the image by using, let's say, [Tesseract.js](https://github.com/naptha/tesseract.js) library. It returns the bounding boxes of the paragraphs, text lines, and text blocks along with the recognized text.
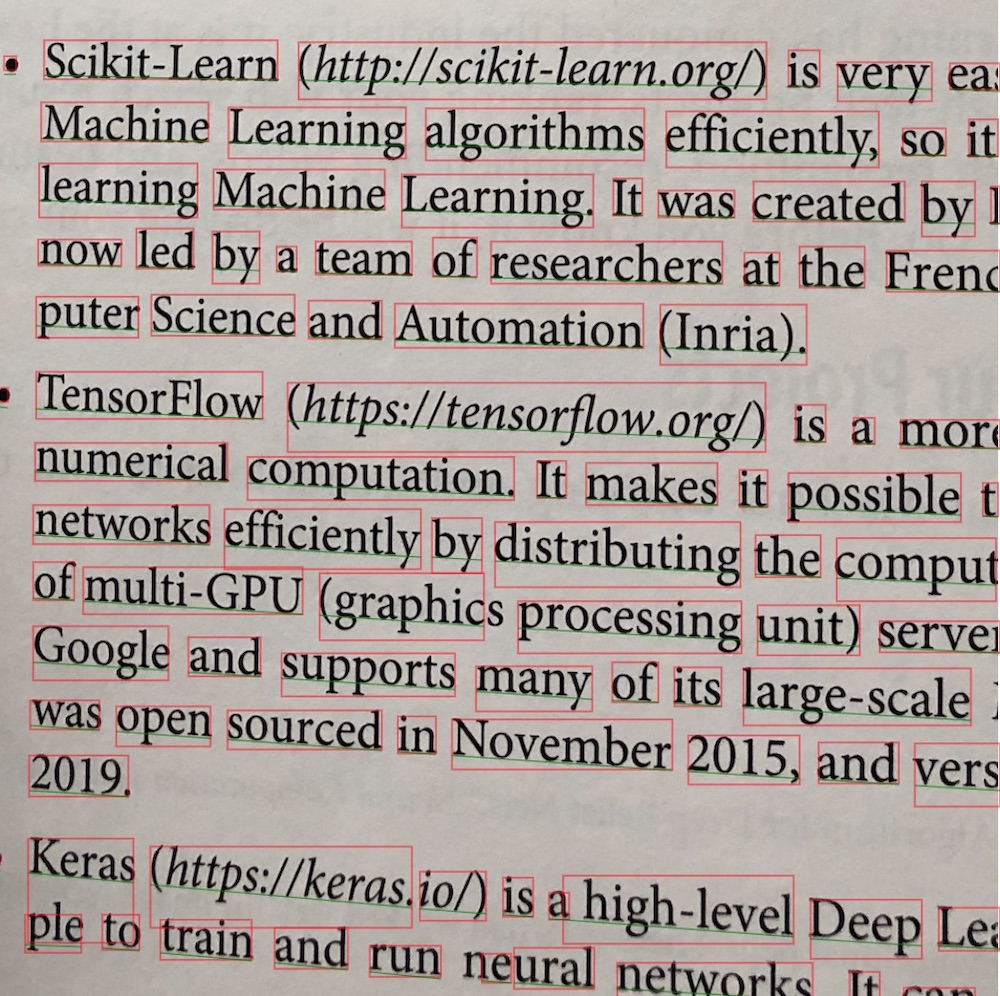
We may try then to extract the links from the recognized text lines or text blocks with a regular expression like [this one](https://stackoverflow.com/questions/3809401/what-is-a-good-regular-expression-to-match-a-url) (example is on TypeScript):
```typescript
const URL_REG_EXP = /https?:\/\/(www\.)?[-a-zA-Z0-9@:%._+~#=]{2,256}\.[a-z]{2,4}\b([-a-zA-Z0-9@:%_+.~#?&/=]*)/gi;
const extractLinkFromText = (text: string): string | null => {
const urls: string[] | null = text.match(URL_REG_EXP);
if (!urls || !urls.length) {
return null;
}
return urls[0];
};
```
💚 Seems like the issue is solved in a pretty straightforward and simple way:
- We know the bounding boxes of the links
- We also know the text of the links to make them clickable
💔 The thing is that the _recognition + detection_ time may vary from `2` to `20+` seconds depending on the size of the text, on the amount of "something that looks like a text" on the image, on the image quality and on other factors. So it will be really hard to achieve those `0.5-1` frames per second to make the user experience at least _close_ to real-time.
💔 Also if we would think about it, we're asking the library to recognize the **whole** text from the image for us even though it might contain only one or two links in it (i.e. only ~10% of the text might be useful for us), or it may even not contain the links at all. In this case, it sounds like a waste of computational resources.
#### Option 2: Tesseract + TensorFlow based solution
We could make Tesseract work faster if we used some _additional "adviser" algorithm_ prior to the links text recognition. This "adviser" algorithm should detect, but not recognize, _the leftmost position_ of each link on the image if there are any. This will allow us to speed up the recognition part by following these rules:
1. If the image does not contain any link we should not call Tesseract detection/recognition at all.
2. If the image does have the links then we need to ask Tesseract to recognize only those parts of the image that contains the links. We're not interested in spending the time for recognition of the irrelevant text that does not contain the links.
The "adviser" algorithm that will take place before the Tesseract should work with a constant time regardless of the image quality, or the presence/absence of the text on the image. It also should be pretty fast and detect the leftmost positions of the links for less than `1s` so that we could satisfy the "close-to-real-time" requirement (i.e. on iPhone X).
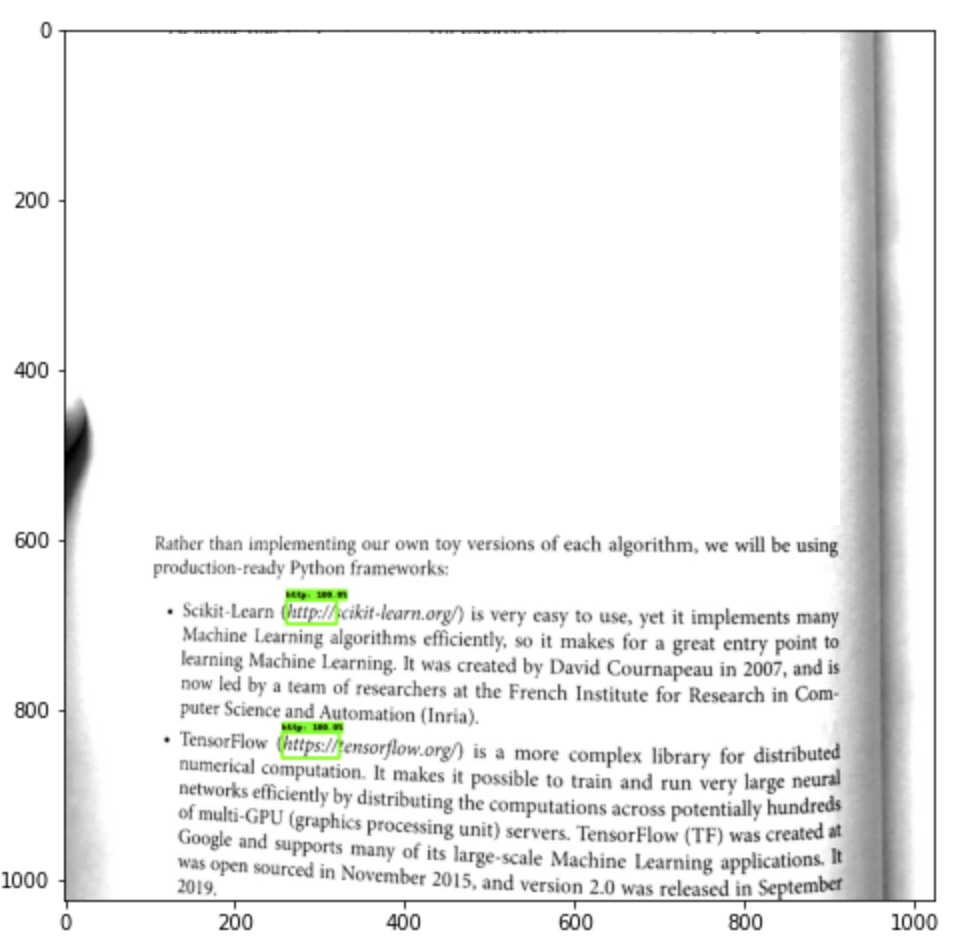
> 💡 So what if we will use another object detection model to help us find all occurrences of the `https://` substrings (every secure link has this prefix, doesn't it) in the image? Then, having these `https://` bounding boxes in the text we may extract the right-side continuation of them and send them to the Tesseract for text recognition.
Take a look at the picture below:
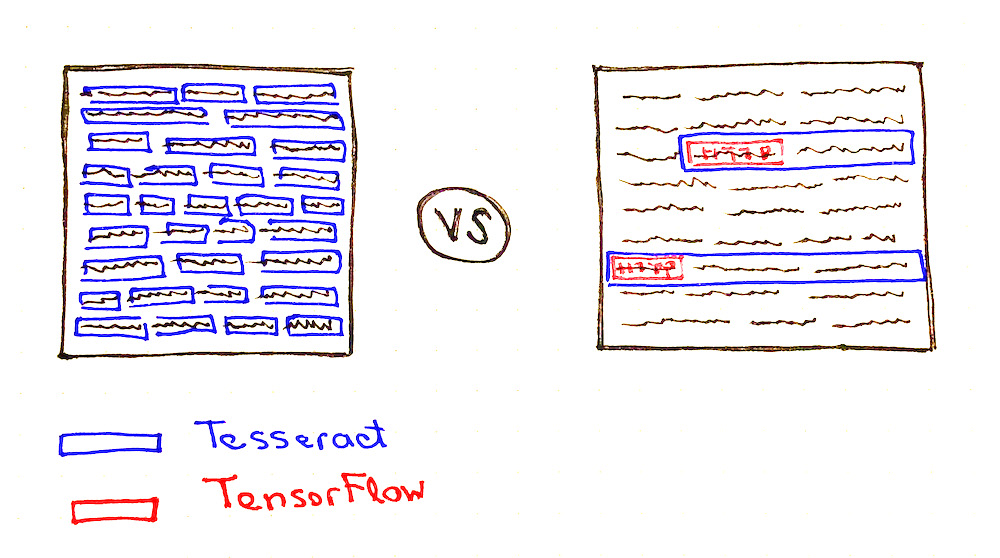
You may notice that Tesseract needs to do **much less** work in case if it would have some hints about where are the links might be located (see the number of blue boxes on both pictures).
So the question now is which object detection model we should choose and how to re-train it to support the detection of the custom `https://` objects.
> Finally! We've got closer to the TensorFlow part of the article 😀
## 🤖 Selecting the Object Detection Model
Training a new object detection model is not a reasonable option in our context because of the following reasons:
- 💔 The training process might take days/weeks and bucks.
- 💔 We most probably won't be able to collect hundreds of thousands of _labeled_ images of the books that have links in them (we might try to generate them though, but more about that later).
So instead of creating a new model, we should better teach an existing object detection model to do the custom object detection for us (to do the [transfer learning](https://en.wikipedia.org/wiki/Transfer_learning)). In our case, the "custom objects" would be the images with `https://` text drawn in them. This approach has the following benefits:
- 💚 The dataset might be much smaller. We don't need to collect hundreds of thousands of the labeled images. Instead, we may do `~100` pictures and label them manually. This is because the model is already pre-trained on the general dataset like [COCO dataset](https://cocodataset.org/#home) and already learned how to extract general image features.
- 💚 The training process will be much faster (minutes/hours on GPU instead of days/weeks). Again, this is because of a smaller dataset (smaller batches) and because of fewer trainable parameters.
We may choose the existing model from [TensorFlow 2 Detection Model Zoo](https://github.com/tensorflow/models/blob/master/research/object_detection/g3doc/tf2_detection_zoo.md) which provides a collection of detection models pre-trained on the [COCO 2017 dataset](https://cocodataset.org/#home). Now it contains `~40` model variations to choose from.
To re-train and fine-tune the model on the custom dataset we will use a [TensorFlow 2 Object Detection API](https://github.com/tensorflow/models/tree/master/research/object_detection). The TensorFlow Object Detection API is an open-source framework built on top of [TensorFlow](https://www.tensorflow.org/) that makes it easy to construct, train, and deploy object detection models.
If you follow the [Model Zoo](https://github.com/tensorflow/models/blob/master/research/object_detection/g3doc/tf2_detection_zoo.md) link you will find the _detection speed_ and _accuracy_ for each model.
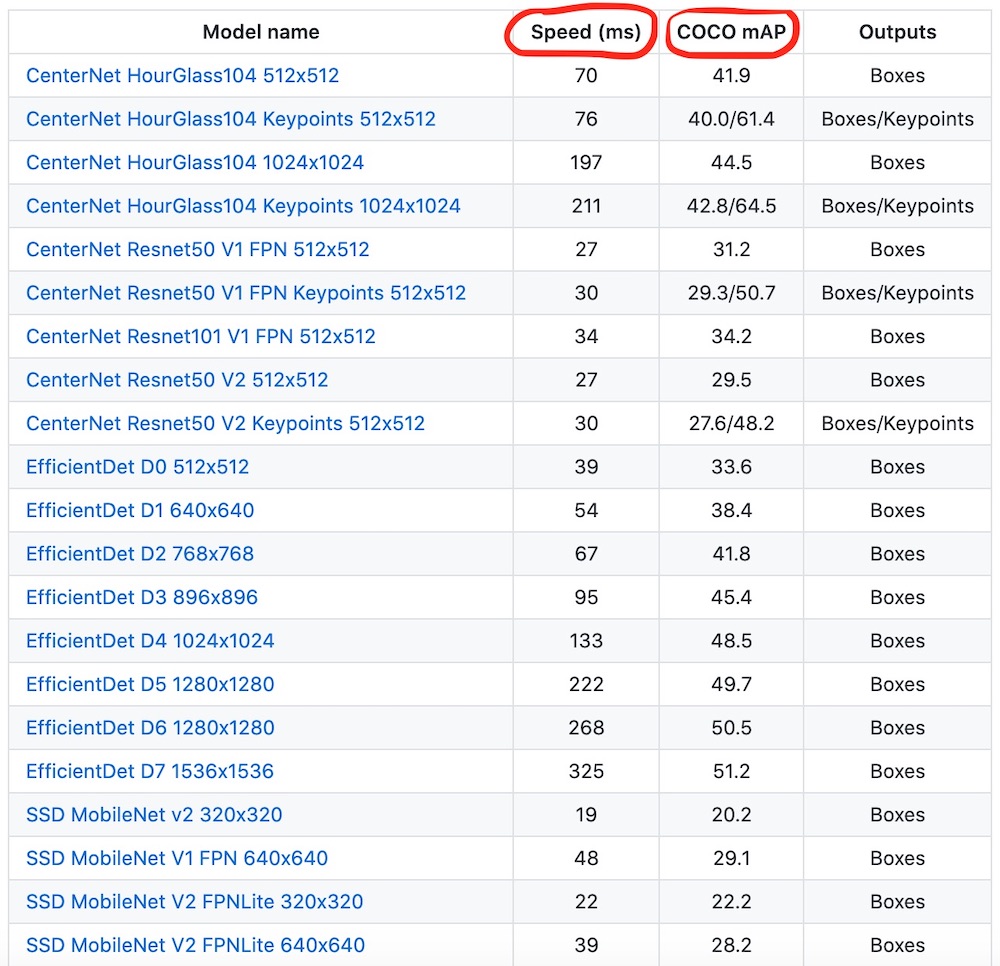
_Image source: [TensorFlow Model Zoo](https://github.com/tensorflow/models/blob/master/research/object_detection/g3doc/tf2_detection_zoo.md) repository_
Of course, we would want to find the right balance between the detection **speed** and **accuracy** while picking the model. But what might be even more important in our case is the **size** of the model since it will be loaded to the client-side.
The size of the archived model might vary drastically from `~20Mb` to `~1Gb`. Here are several examples:
- `1386 (Mb)` `centernet_hg104_1024x1024_kpts_coco17_tpu-32`
- ` 330 (Mb)` `centernet_resnet101_v1_fpn_512x512_coco17_tpu-8`
- ` 195 (Mb)` `centernet_resnet50_v1_fpn_512x512_coco17_tpu-8`
- ` 198 (Mb)` `centernet_resnet50_v1_fpn_512x512_kpts_coco17_tpu-8`
- ` 227 (Mb)` `centernet_resnet50_v2_512x512_coco17_tpu-8`
- ` 230 (Mb)` `centernet_resnet50_v2_512x512_kpts_coco17_tpu-8`
- ` 29 (Mb)` `efficientdet_d0_coco17_tpu-32`
- ` 49 (Mb)` `efficientdet_d1_coco17_tpu-32`
- ` 60 (Mb)` `efficientdet_d2_coco17_tpu-32`
- ` 89 (Mb)` `efficientdet_d3_coco17_tpu-32`
- ` 151 (Mb)` `efficientdet_d4_coco17_tpu-32`
- ` 244 (Mb)` `efficientdet_d5_coco17_tpu-32`
- ` 376 (Mb)` `efficientdet_d6_coco17_tpu-32`
- ` 376 (Mb)` `efficientdet_d7_coco17_tpu-32`
- ` 665 (Mb)` `extremenet`
- ` 427 (Mb)` `faster_rcnn_inception_resnet_v2_1024x1024_coco17_tpu-8`
- ` 424 (Mb)` `faster_rcnn_inception_resnet_v2_640x640_coco17_tpu-8`
- ` 337 (Mb)` `faster_rcnn_resnet101_v1_1024x1024_coco17_tpu-8`
- ` 337 (Mb)` `faster_rcnn_resnet101_v1_640x640_coco17_tpu-8`
- ` 343 (Mb)` `faster_rcnn_resnet101_v1_800x1333_coco17_gpu-8`
- ` 449 (Mb)` `faster_rcnn_resnet152_v1_1024x1024_coco17_tpu-8`
- ` 449 (Mb)` `faster_rcnn_resnet152_v1_640x640_coco17_tpu-8`
- ` 454 (Mb)` `faster_rcnn_resnet152_v1_800x1333_coco17_gpu-8`
- ` 202 (Mb)` `faster_rcnn_resnet50_v1_1024x1024_coco17_tpu-8`
- ` 202 (Mb)` `faster_rcnn_resnet50_v1_640x640_coco17_tpu-8`
- ` 207 (Mb)` `faster_rcnn_resnet50_v1_800x1333_coco17_gpu-8`
- ` 462 (Mb)` `mask_rcnn_inception_resnet_v2_1024x1024_coco17_gpu-8`
- ` 86 (Mb)` `ssd_mobilenet_v1_fpn_640x640_coco17_tpu-8`
- ` 44 (Mb)` `ssd_mobilenet_v2_320x320_coco17_tpu-8`
- ` 20 (Mb)` `ssd_mobilenet_v2_fpnlite_320x320_coco17_tpu-8`
- ` 20 (Mb)` `ssd_mobilenet_v2_fpnlite_640x640_coco17_tpu-8`
- ` 369 (Mb)` `ssd_resnet101_v1_fpn_1024x1024_coco17_tpu-8`
- ` 369 (Mb)` `ssd_resnet101_v1_fpn_640x640_coco17_tpu-8`
- ` 481 (Mb)` `ssd_resnet152_v1_fpn_1024x1024_coco17_tpu-8`
- ` 480 (Mb)` `ssd_resnet152_v1_fpn_640x640_coco17_tpu-8`
- ` 233 (Mb)` `ssd_resnet50_v1_fpn_1024x1024_coco17_tpu-8`
- ` 233 (Mb)` `ssd_resnet50_v1_fpn_640x640_coco17_tpu-8`
The **`ssd_mobilenet_v2_fpnlite_640x640_coco17_tpu-8`** model might be a good fit in our case:
- 💚 It is relatively lightweight: `20Mb` archived.
- 💚 It is pretty fast: `39ms` for the detection.
- 💚 It uses the MobileNet v2 network as a feature extractor which is optimized for usage on mobile devices to reduce energy consumption.
- 💚 It does the object detection for the whole image and for all objects in it **in one go** regardless of the image content (no [regions proposal](https://en.wikipedia.org/wiki/Region_Based_Convolutional_Neural_Networks) step is involved which makes the detection faster).
- 💔 It is not the most accurate model though (everything is a tradeoff ⚖️).
The model name encodes some several important characteristics that you may read more about if you want:
- The expected image input size is `640x640px`.
- The model implements [Single Shot MultiBox Detector](https://arxiv.org/abs/1512.02325) (SSD) and [Feature Pyramid Network](https://arxiv.org/abs/1612.03144) (FPN).
- [MobileNet v2](https://ai.googleblog.com/2018/04/mobilenetv2-next-generation-of-on.html) convolutional neural network ([CNN](https://en.wikipedia.org/wiki/Convolutional_neural_network)) is used as a feature extractor.
- The model was trained on [COCO dataset](https://cocodataset.org/#home)
## 🛠 Installing Object Detection API
In this article, we're going to install the Tensorflow 2 Object Detection API _as a Python package_. It is convenient in case if you're experimenting in [Google Colab](https://colab.research.google.com/) (recommended) or in [Jupyter](https://jupyter.org/try). For both cases no local installation is needed, you may experiment right in your browser.
You may also follow the [official documentation](https://github.com/tensorflow/models/blob/master/research/object_detection/g3doc/tf2.md) if you would prefer to install Object Detection API via Docker.
> If you stuck with something during the API installation or during the dataset preparation try to read through the [TensorFlow 2 Object Detection API tutorial](https://tensorflow-object-detection-api-tutorial.readthedocs.io/en/latest/index.html) which adds a lot of useful details to this process.
First, let's clone the [API repository](https://github.com/tensorflow/models):
```bash
git clone --depth 1 https://github.com/tensorflow/models
```
_output →_
```
Cloning into 'models'...
remote: Enumerating objects: 2301, done.
remote: Counting objects: 100% (2301/2301), done.
remote: Compressing objects: 100% (2000/2000), done.
remote: Total 2301 (delta 561), reused 922 (delta 278), pack-reused 0
Receiving objects: 100% (2301/2301), 30.60 MiB | 13.90 MiB/s, done.
Resolving deltas: 100% (561/561), done.
```
Now, let's compile the [API proto files](https://github.com/tensorflow/models/tree/master/research/object_detection/protos) into Python files by using [protoc](https://grpc.io/docs/protoc-installation/) tool:
```bash
cd ./models/research
protoc object_detection/protos/*.proto --python_out=.
```
Finally, let's install the TF2 version of [setup.py](https://github.com/tensorflow/models/blob/master/research/object_detection/packages/tf2/setup.py) via `pip`:
```bash
cp ./object_detection/packages/tf2/setup.py .
pip install . --quiet
```
> It is possible that the last step will fail because of some dependency errors. In this case, you might want to run `pip install . --quiet` one more time.
We may test that installation went successfully by running the following tests:
```bash
python object_detection/builders/model_builder_tf2_test.py
```
You should see the logs that end with something similar to this:
```
[ OK ] ModelBuilderTF2Test.test_unknown_ssd_feature_extractor
----------------------------------------------------------------------
Ran 20 tests in 45.072s
OK (skipped=1)
```
The TensorFlow Object Detection API is installed! You may now use the scripts that API provides for doing the model [inference](https://github.com/tensorflow/models/blob/master/research/object_detection/colab_tutorials/inference_tf2_colab.ipynb), [training](https://github.com/tensorflow/models/blob/master/research/object_detection/g3doc/tf2_training_and_evaluation.md) or [fine-tuning](https://github.com/tensorflow/models/blob/master/research/object_detection/colab_tutorials/eager_few_shot_od_training_tf2_colab.ipynb).
## ⬇️ Downloading the Pre-Trained Model
Let's download our selected `ssd_mobilenet_v2_fpnlite_640x640_coco17_tpu-8` model from the TensorFlow Model Zoo and check how it does the general object detection (detection of the objects of classes from COCO dataset like "cat", "dog", "car", etc.).
We will use the [get_file()](https://www.tensorflow.org/api_docs/python/tf/keras/utils/get_file) TensorFlow helper to download the archived model from the URL and unpack it.
```python
import tensorflow as tf
import pathlib
MODEL_NAME = 'ssd_mobilenet_v2_fpnlite_640x640_coco17_tpu-8'
TF_MODELS_BASE_PATH = 'http://download.tensorflow.org/models/object_detection/tf2/20200711/'
CACHE_FOLDER = './cache'
def download_tf_model(model_name, cache_folder):
model_url = TF_MODELS_BASE_PATH + model_name + '.tar.gz'
model_dir = tf.keras.utils.get_file(
fname=model_name,
origin=model_url,
untar=True,
cache_dir=pathlib.Path(cache_folder).absolute()
)
return model_dir
# Start the model download.
model_dir = download_tf_model(MODEL_NAME, CACHE_FOLDER)
print(model_dir)
```
_output →_
```
/content/cache/datasets/ssd_mobilenet_v2_fpnlite_640x640_coco17_tpu-8
```
Here is how the folder structure looks so far:

The `checkpoint` folder contains the snapshot of the pre-trained model.
The `pipeline.config` file contains the detection settings of the model. We'll come back to this file later when we will need to fine-tune the model.
## 🏄🏻️ Trying the Model (Doing the Inference)
For now, the model can detect the object of [90 COCO dataset classes](https://cocodataset.org/#explore) like a `car`, `bird`, `hot dog` etc.
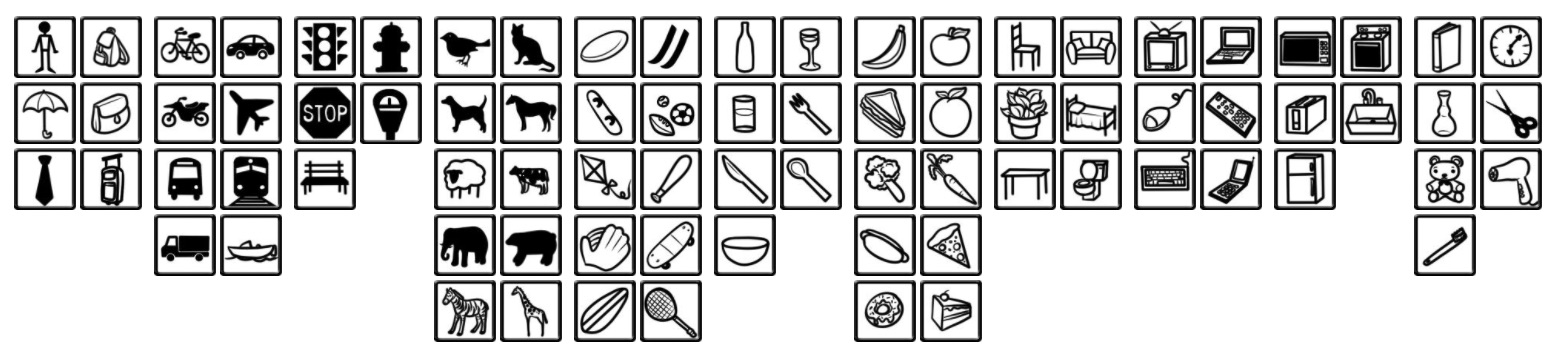
_Image source: [COCO dataset](https://cocodataset.org/#explore) website_
Let's see how the model performs on some general images that contain the objects of these classes.
### Loading COCO labels
Object Detection API already has a complete set of COCO labels (classes) defined for us.
```python
import os
# Import Object Detection API helpers.
from object_detection.utils import label_map_util
# Loads the COCO labels data (class names and indices relations).
def load_coco_labels():
# Object Detection API already has a complete set of COCO classes defined for us.
label_map_path = os.path.join(
'models/research/object_detection/data',
'mscoco_complete_label_map.pbtxt'
)
label_map = label_map_util.load_labelmap(label_map_path)
# Class ID to Class Name mapping.
categories = label_map_util.convert_label_map_to_categories(
label_map,
max_num_classes=label_map_util.get_max_label_map_index(label_map),
use_display_name=True
)
category_index = label_map_util.create_category_index(categories)
# Class Name to Class ID mapping.
label_map_dict = label_map_util.get_label_map_dict(label_map, use_display_name=True)
return category_index, label_map_dict
# Load COCO labels.
coco_category_index, coco_label_map_dict = load_coco_labels()
print('coco_category_index:', coco_category_index)
print('coco_label_map_dict:', coco_label_map_dict)
```
_output →_
```
coco_category_index:
{
1: {'id': 1, 'name': 'person'},
2: {'id': 2, 'name': 'bicycle'},
...
90: {'id': 90, 'name': 'toothbrush'},
}
coco_label_map_dict:
{
'background': 0,
'person': 1,
'bicycle': 2,
'car': 3,
...
'toothbrush': 90,
}
```
### Build a detection function
We need to create a detection function that will use the pre-trained model we've downloaded to do the object detection.
```python
import tensorflow as tf
# Import Object Detection API helpers.
from object_detection.utils import config_util
from object_detection.builders import model_builder
# Generates the detection function for specific model and specific model's checkpoint
def detection_fn_from_checkpoint(config_path, checkpoint_path):
# Build the model.
pipeline_config = config_util.get_configs_from_pipeline_file(config_path)
model_config = pipeline_config['model']
model = model_builder.build(
model_config=model_config,
is_training=False,
)
# Restore checkpoints.
ckpt = tf.compat.v2.train.Checkpoint(model=model)
ckpt.restore(checkpoint_path).expect_partial()
# This is a function that will do the detection.
@tf.function
def detect_fn(image):
image, shapes = model.preprocess(image)
prediction_dict = model.predict(image, shapes)
detections = model.postprocess(prediction_dict, shapes)
return detections, prediction_dict, tf.reshape(shapes, [-1])
return detect_fn
inference_detect_fn = detection_fn_from_checkpoint(
config_path=os.path.join('cache', 'datasets', MODEL_NAME, 'pipeline.config'),
checkpoint_path=os.path.join('cache', 'datasets', MODEL_NAME, 'checkpoint', 'ckpt-0'),
)
```
This `inference_detect_fn` function will accept an image and will return the detected objects' info.
### Loading the images for inference
Let's try to detect the object on this image:
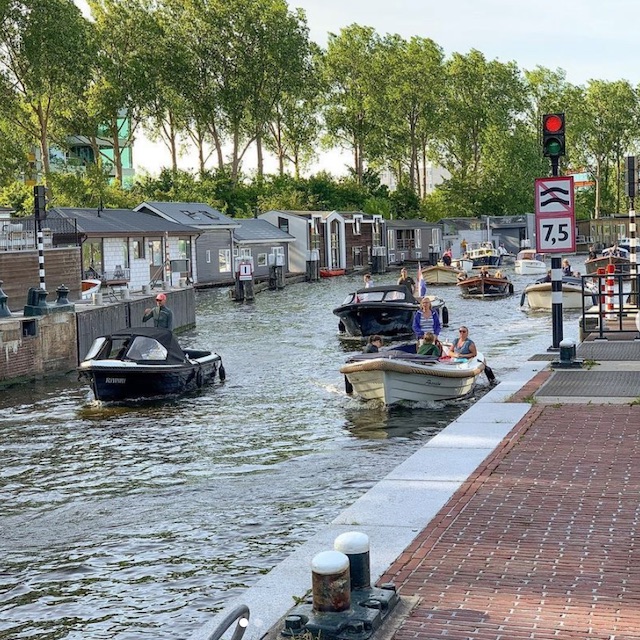
_Image source: [oleksii_trekhleb](https://www.instagram.com/oleksii_trekhleb/?hl=en) Instagram_
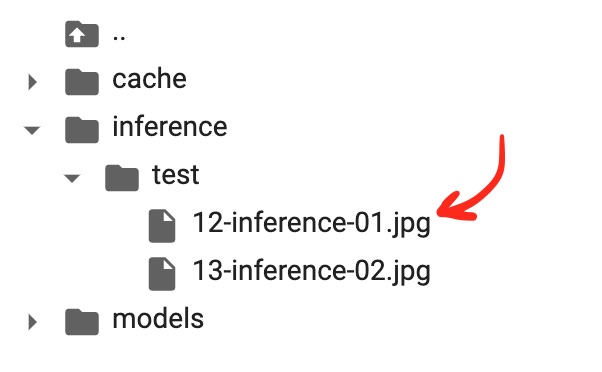
To do that let's save the image to the `inference/test/` folder of our project. If you're using Google Colab you may create this folder and upload the image manually.
Here is how the folder structure looks so far:
```python
import matplotlib.pyplot as plt
%matplotlib inline
# Creating a TensorFlow dataset of just one image.
inference_ds = tf.keras.preprocessing.image_dataset_from_directory(
directory='inference',
image_size=(640, 640),
batch_size=1,
shuffle=False,
label_mode=None
)
# Numpy version of the dataset.
inference_ds_numpy = list(inference_ds.as_numpy_iterator())
# You may preview the images in dataset like this.
plt.figure(figsize=(14, 14))
for i, image in enumerate(inference_ds_numpy):
plt.subplot(2, 2, i + 1)
plt.imshow(image[0].astype("uint8"))
plt.axis("off")
plt.show()
```
### Running the detection on test data
Now we're ready to run the detection. The `inference_ds_numpy[0]` array stores the pixel data for the first image in `Numpy` format.
```python
detections, predictions_dict, shapes = inference_detect_fn(
inference_ds_numpy[0]
)
```
Let's see the shapes of the output:
```python
boxes = detections['detection_boxes'].numpy()
scores = detections['detection_scores'].numpy()
classes = detections['detection_classes'].numpy()
num_detections = detections['num_detections'].numpy()[0]
print('boxes.shape: ', boxes.shape)
print('scores.shape: ', scores.shape)
print('classes.shape: ', classes.shape)
print('num_detections:', num_detections)
```
_output →_
```
boxes.shape: (1, 100, 4)
scores.shape: (1, 100)
classes.shape: (1, 100)
num_detections: 100.0
```
The model has made a `100` detections for us. It doesn't mean that it found `100` objects on the image though. It means that the model has `100` slots, and it can detect `100` objects at max on a single image. Each detection has a score that represents the confidence of the model about it. The bounding boxes for each detection are stored in the `boxes` array. The scores or confidences of the model about each detection are stored in the `scores` array. Finally, the `classes` array stores the labels (classes) for each detection.
Let's check the first 5 detections:
```python
print('First 5 boxes:')
print(boxes[0,:5])
print('First 5 scores:')
print(scores[0,:5])
print('First 5 classes:')
print(classes[0,:5])
class_names = [coco_category_index[idx + 1]['name'] for idx in classes[0]]
print('First 5 class names:')
print(class_names[:5])
```
_output →_
```
First 5 boxes:
[[0.17576033 0.84654826 0.25642633 0.88327974]
[0.5187813 0.12410264 0.6344235 0.34545377]
[0.5220358 0.5181462 0.6329132 0.7669856 ]
[0.50933677 0.7045719 0.5619138 0.7446198 ]
[0.44761637 0.51942706 0.61237675 0.75963426]]
First 5 scores:
[0.6950246 0.6343004 0.591157 0.5827219 0.5415643]
First 5 classes:
[9. 8. 8. 0. 8.]
First 5 class names:
['traffic light', 'boat', 'boat', 'person', 'boat']
```
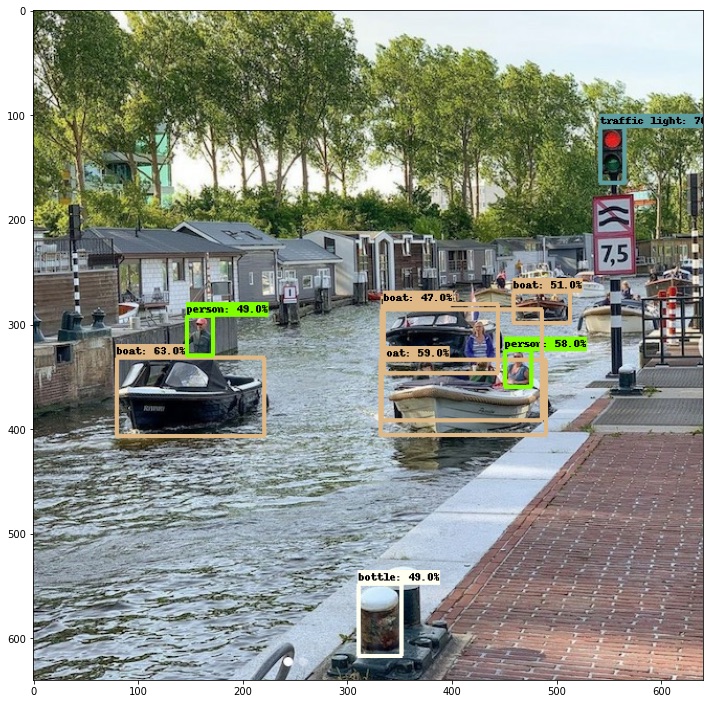
The model sees the `traffic light`, three `boats`, and a `person` on the image. We may confirm that indeed these objects are seen on the image.
From the `scores` array may see that the model is most confident (close to 70% of probability) in the `traffic light` object.
Each entry of `boxes` array is `[y1, x1, y2, x2]`, where `(x1, y1)` and `(x2, y2)` are the top-left and bottom-right corners of the bounding box.
Let's visualize the detection boxes:
```python
# Importing Object Detection API helpers.
from object_detection.utils import visualization_utils
# Visualizes the bounding boxes on top of the image.
def visualize_detections(image_np, detections, category_index):
label_id_offset = 1
image_np_with_detections = image_np.copy()
visualization_utils.visualize_boxes_and_labels_on_image_array(
image_np_with_detections,
detections['detection_boxes'][0].numpy(),
(detections['detection_classes'][0].numpy() + label_id_offset).astype(int),
detections['detection_scores'][0].numpy(),
category_index,
use_normalized_coordinates=True,
max_boxes_to_draw=200,
min_score_thresh=.4,
agnostic_mode=False,
)
plt.figure(figsize=(12, 16))
plt.imshow(image_np_with_detections)
plt.show()
# Visualizing the detections.
visualize_detections(
image_np=tf.cast(inference_ds_numpy[0][0], dtype=tf.uint32).numpy(),
detections=detections,
category_index=coco_category_index,
)
```
Here is the output:
If we will do the detection for the text image here is what we will see:
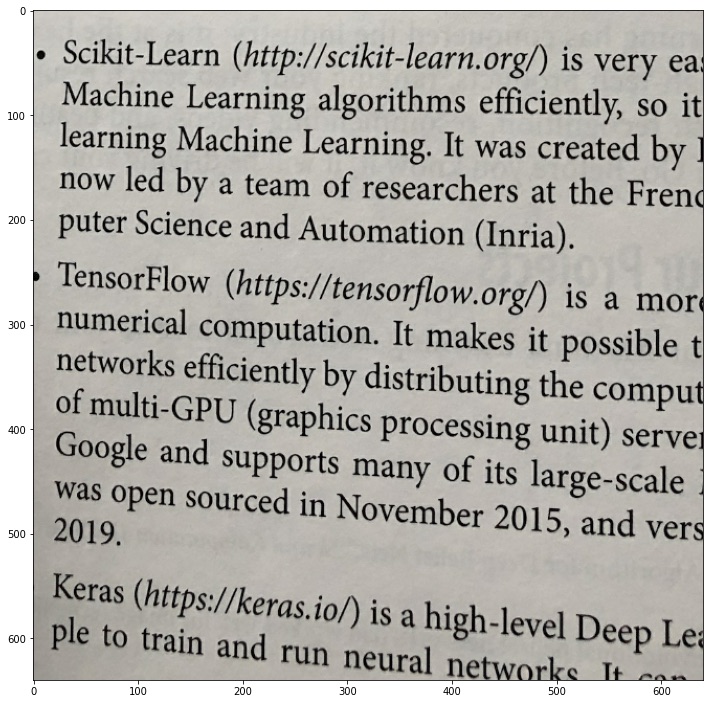
The model couldn't detect anything on this image. This is what we're going to change, we want to teach the model to "see" the `https://` prefixes on this image.
## 📝 Preparing the Custom Dataset
To "teach" the `ssd_mobilenet_v2_fpnlite_640x640_coco17_tpu-8` model to detect the custom objects which are _not_ a part of a COCO dataset we need to do the fine-tune training on a new custom dataset.
The datasets for object detection consist of two parts:
1. The image itself (i.e. the image of the book page)
2. The boundary boxes that show where exactly on the image the custom objects are located.
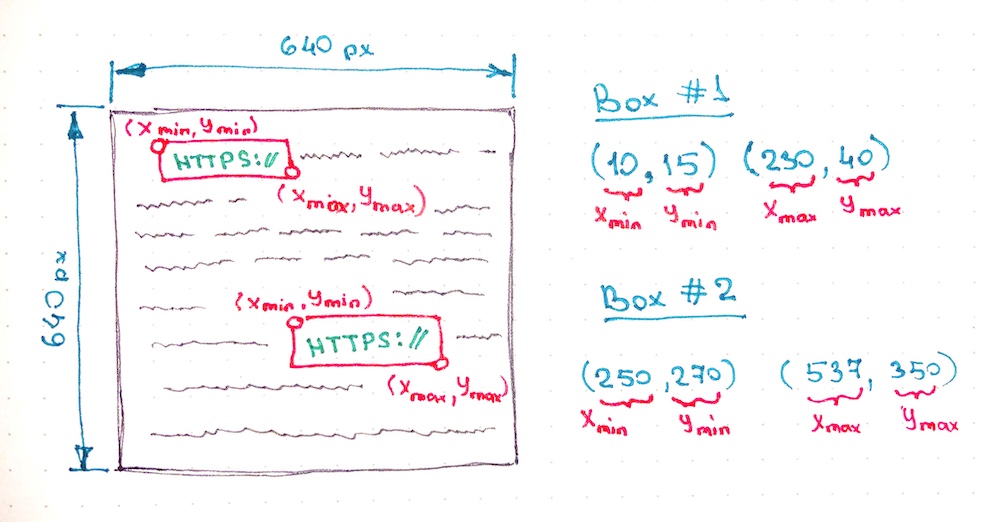
In the example above each box has `left-top` and `right-bottom` coordinates in _absolute_ values (in pixels). However, there are also different formats of writing the location of the bounding boxes exists. For example, we may locate the bounding box by setting the coordinate of its `center point` and its `width` and `height`. We might also use _relative_ values (percentage of the width and height of the image) for setting up the coordinates. But you've got the idea, the network needs to know what the image is and where on the image the objects are located.
Now, how can we get the custom dataset for training? We have three options here:
1. _Re-use_ the existing dataset.
2. _Generate_ a new dataset of fake book images.
3. _Create_ the dataset manually by taking or downloading the pictures of real book pages which contain `https://` links and labeling all bounding boxes.
### Option 1: Re-using the existing dataset
There are plenty of the datasets that are shared to be re-used by researches. We could start from the following resources to find a proper dataset:
- [Google Dataset Search](https://datasetsearch.research.google.com/)
- [Kaggle Datasets](https://www.kaggle.com/datasets)
- [awesome-public-datasets](https://github.com/awesomedata/awesome-public-datasets) repository
- etc.
💚 If you could find the needed dataset and its license allows you to re-use it, it is probably the fastest way to get straight to the model training.
💔 I couldn't find the dataset with labeled `https://` prefixes though.
So we need to skip this option.
### Option 2: Generating the synthetic dataset
There are tools that exist (i.e. [keras_ocr](https://keras-ocr.readthedocs.io/en/latest/examples/end_to_end_training.html#generating-synthetic-data)) that might help us to generate random text, include the link in it, and draw it on images with some background and distortions.
💚 The cool part about this approach is that we have the freedom to generate training examples for different _fonts_, _ligatures_, _text colors_, _background colors_. This is very useful if we want to avoid the [model overfitting](https://en.wikipedia.org/wiki/Overfitting) during the training (so that the model could generalize well to unseen real-world examples instead of failing once the background shade is changed for a bit).
💚 It is also possible to generate a variety of link types like `http://`, `http://`, `ftp://`, `tcp://` etc. Otherwise, it might be hard to find enough real-world examples of this kind of links for training.
💚 Another benefit of this approach is that we could generate as many training examples as we want. We're not limited to the number of pages of the printed book we've found for the dataset. Increasing the number of training examples may also increase the accuracy of the model.
💔 It is possible though to misuse the generator and to generate the training images that will be quite different from real-world examples. Let's say we may use the wrong and unrealistic distortions for the page (i.e. using waves bend instead of the arc one). In this case, the model will not generalize well to real-world examples.
> I see this approach as a really promising one. It may help to overcome many model issues (more on that below). I didn't try it yet though. But it might be a good candidate for another article.
### Option 3: Creating the dataset manually
The most straightforward way though is to get the book (or books) and to make the pictures of the pages with the links and to label all of them manually.
The good news is that the dataset might be pretty small (hundreds of images might be enough) because we're not going to train the model _from scratch_ but instead, we're going to do a [transfer learning](https://en.wikipedia.org/wiki/Transfer_learning) (also see the [few-shot learning](https://paperswithcode.com/task/few-shot-learning).)
💚 In this case, the training dataset will be really close to real-world data. You will literally take the printed book, take a picture of it with realistic fonts, bends, shades, perspectives, and colors.
💔 Even though it doesn't require a lot of images it may still be time-consuming.
💔 It is hard to come up with a diverse database where training examples would have different fonts, background colors, and different types of links (we need to find many diverse books and magazines to accomplish that).
Since the article has a learning purpose and since we're not trying to win an object detection competition let's go with this option for now and try to create a dataset by ourselves.
### Preprocessing the data
So, I've ended up shooting `125` images of the book pages that contain one or more `https://` links on them.
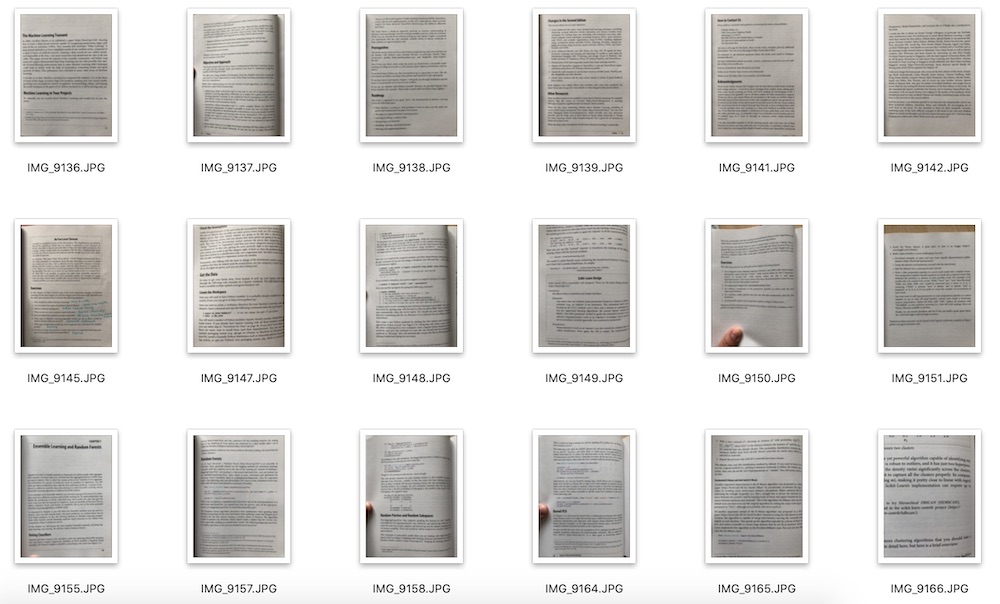
I put all these images in the `dataset/printed_links/raw` folder.
Next, I'm going to preprocess the images by doing the following:
- **Resize** each image to the width of `1024px` (they are too big originally and have a width of `3024px`)
- **Crop** each image to make them squared (this is optional, and we could just resize the image by simply squeezing it, but I want the model to be trained on realistic proportions of `https:` boxes).
- **Rotate** image if needed by applying the [exif](https://en.wikipedia.org/wiki/Exif) metadata.
- **Greyscale** the image (we don't need the model to take the colors into consideration).
- **Increase brightness**
- **Increase contrast**
- **Increase sharpness**
Remember, that once we've decided to apply these transformations and adjustments to the dataset we need to do the same in the future for each image that we will send to the model for detection.
Here is how we could apply these adjustments to the image using Python:
```python
import os
import math
import shutil
from pathlib import Path
from PIL import Image, ImageOps, ImageEnhance
# Resize an image.
def preprocess_resize(target_width):
def preprocess(image: Image.Image, log) -> Image.Image:
(width, height) = image.size
ratio = width / height
if width > target_width:
target_height = math.floor(target_width / ratio)
log(f'Resizing: To size {target_width}x{target_height}')
image = image.resize((target_width, target_height))
else:
log('Resizing: Image already resized, skipping...')
return image
return preprocess
# Crop an image.
def preprocess_crop_square():
def preprocess(image: Image.Image, log) -> Image.Image:
(width, height) = image.size
left = 0
top = 0
right = width
bottom = height
crop_size = min(width, height)
if width >= height:
# Horizontal image.
log(f'Squre cropping: Horizontal {crop_size}x{crop_size}')
left = width // 2 - crop_size // 2
right = left + crop_size
else:
# Vetyical image.
log(f'Squre cropping: Vertical {crop_size}x{crop_size}')
top = height // 2 - crop_size // 2
bottom = top + crop_size
image = image.crop((left, top, right, bottom))
return image
return preprocess
# Apply exif transpose to an image.
def preprocess_exif_transpose():
# @see: https://pillow.readthedocs.io/en/stable/reference/ImageOps.html
def preprocess(image: Image.Image, log) -> Image.Image:
log('EXif transpose')
image = ImageOps.exif_transpose(image)
return image
return preprocess
# Apply color transformations to the image.
def preprocess_color(brightness, contrast, color, sharpness):
# @see: https://pillow.readthedocs.io/en/3.0.x/reference/ImageEnhance.html
def preprocess(image: Image.Image, log) -> Image.Image:
log('Coloring')
enhancer = ImageEnhance.Color(image)
image = enhancer.enhance(color)
enhancer = ImageEnhance.Brightness(image)
image = enhancer.enhance(brightness)
enhancer = ImageEnhance.Contrast(image)
image = enhancer.enhance(contrast)
enhancer = ImageEnhance.Sharpness(image)
image = enhancer.enhance(sharpness)
return image
return preprocess
# Image pre-processing pipeline.
def preprocess_pipeline(src_dir, dest_dir, preprocessors=[], files_num_limit=0, override=False):
# Create destination folder if not exists.
Path(dest_dir).mkdir(parents=False, exist_ok=True)
# Get the list of files to be copied.
src_file_names = os.listdir(src_dir)
files_total = files_num_limit if files_num_limit > 0 else len(src_file_names)
files_processed = 0
# Logger function.
def preprocessor_log(message):
print(' ' + message)
# Iterate through files.
for src_file_index, src_file_name in enumerate(src_file_names):
if files_num_limit > 0 and src_file_index >= files_num_limit:
break
# Copy file.
src_file_path = os.path.join(src_dir, src_file_name)
dest_file_path = os.path.join(dest_dir, src_file_name)
progress = math.floor(100 * (src_file_index + 1) / files_total)
print(f'Image {src_file_index + 1}/{files_total} | {progress}% | {src_file_path}')
if not os.path.isfile(src_file_path):
preprocessor_log('Source is not a file, skipping...\n')
continue
if not override and os.path.exists(dest_file_path):
preprocessor_log('File already exists, skipping...\n')
continue
shutil.copy(src_file_path, dest_file_path)
files_processed += 1
# Preprocess file.
image = Image.open(dest_file_path)
for preprocessor in preprocessors:
image = preprocessor(image, preprocessor_log)
image.save(dest_file_path, quality=95)
print('')
print(f'{files_processed} out of {files_total} files have been processed')
# Launching the image preprocessing pipeline.
preprocess_pipeline(
src_dir='dataset/printed_links/raw',
dest_dir='dataset/printed_links/processed',
override=True,
# files_num_limit=1,
preprocessors=[
preprocess_exif_transpose(),
preprocess_resize(target_width=1024),
preprocess_crop_square(),
preprocess_color(brightness=2, contrast=1.3, color=0, sharpness=1),
]
)
```
As a result, all processed images were saved to the `dataset/printed_links/processed` folder.
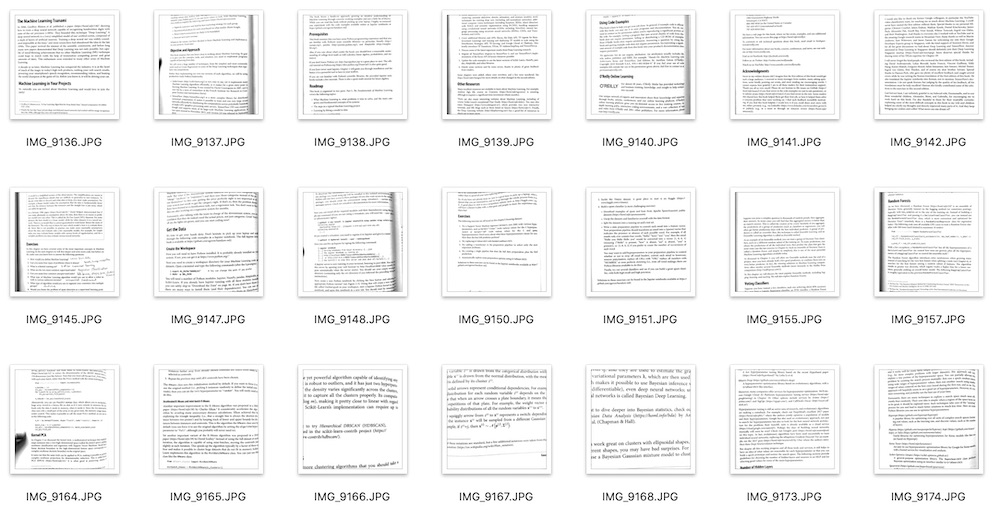
You may preview the images like this:
```python
import matplotlib.pyplot as plt
import numpy as np
def preview_images(images_dir, images_num=1, figsize=(15, 15)):
image_names = os.listdir(images_dir)
image_names = image_names[:images_num]
num_cells = math.ceil(math.sqrt(images_num))
figure = plt.figure(figsize=figsize)
for image_index, image_name in enumerate(image_names):
image_path = os.path.join(images_dir, image_name)
image = Image.open(image_path)
figure.add_subplot(num_cells, num_cells, image_index + 1)
plt.imshow(np.asarray(image))
plt.show()
preview_images('dataset/printed_links/processed', images_num=4, figsize=(16, 16))
```
### Labeling the dataset
To do the labeling (to mark the locations of the objects that we're interested in, namely the `https://` prefixes) we may use the [LabelImg](https://github.com/tzutalin/labelImg) graphical image annotation tool.
> For this step you might want to install the LabelImg tool on your local machine (not in Colab). You may find the detailed installation instructions in [LabelImg README](https://github.com/tzutalin/labelImg).
Once you have LabelImg tool installed you may launch it for the `dataset/printed_links/processed` folder from the root of your project like this:
```bash
labelImg dataset/printed_links/processed
```
Then you'll need to label all the images from the `dataset/printed_links/processed` folder and save annotations as XML files to `dataset/printed_links/labels/xml/` folder.
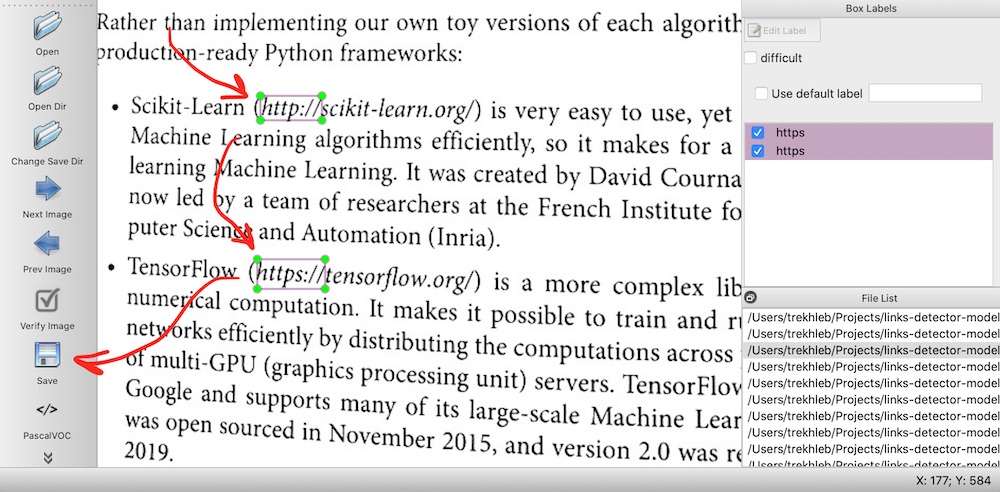
After the labeling we should have an XML file with bounding boxes data for each image:
### Splitting the dataset into train, test, and validation subsets
To identify the model's [overfitting or underfitting](https://en.wikipedia.org/wiki/Overfitting) issue we need to split the dataset into `train` and `test` dataset. Let's say `80%` of our images will be used to train the model and `20%` of the images will be used to check how well the model generalizes to the images that it didn't see before.
> In this section we'll do the files splitting by copying them into different folders (`test` and `train` folders). However, this might not be the most optimal way. Instead, the splitting of the dataset may be done on [tf.data.Dataset](https://www.tensorflow.org/api_docs/python/tf/data/Dataset) level.
```python
import re
import random
def partition_dataset(
images_dir,
xml_labels_dir,
train_dir,
test_dir,
val_dir,
train_ratio,
test_ratio,
val_ratio,
copy_xml
):
if not os.path.exists(train_dir):
os.makedirs(train_dir)
if not os.path.exists(test_dir):
os.makedirs(test_dir)
if not os.path.exists(val_dir):
os.makedirs(val_dir)
images = [f for f in os.listdir(images_dir)
if re.search(r'([a-zA-Z0-9\s_\\.\-\(\):])+(.jpg|.jpeg|.png)$', f, re.IGNORECASE)]
num_images = len(images)
num_train_images = math.ceil(train_ratio * num_images)
num_test_images = math.ceil(test_ratio * num_images)
num_val_images = math.ceil(val_ratio * num_images)
print('Intended split')
print(f' train: {num_train_images}/{num_images} images')
print(f' test: {num_test_images}/{num_images} images')
print(f' val: {num_val_images}/{num_images} images')
actual_num_train_images = 0
actual_num_test_images = 0
actual_num_val_images = 0
def copy_random_images(num_images, dest_dir):
copied_num = 0
if not num_images:
return copied_num
for i in range(num_images):
if not len(images):
break
idx = random.randint(0, len(images)-1)
filename = images[idx]
shutil.copyfile(os.path.join(images_dir, filename), os.path.join(dest_dir, filename))
if copy_xml:
xml_filename = os.path.splitext(filename)[0]+'.xml'
shutil.copyfile(os.path.join(xml_labels_dir, xml_filename), os.path.join(dest_dir, xml_filename))
images.remove(images[idx])
copied_num += 1
return copied_num
actual_num_train_images = copy_random_images(num_train_images, train_dir)
actual_num_test_images = copy_random_images(num_test_images, test_dir)
actual_num_val_images = copy_random_images(num_val_images, val_dir)
print('\n', 'Actual split')
print(f' train: {actual_num_train_images}/{num_images} images')
print(f' test: {actual_num_test_images}/{num_images} images')
print(f' val: {actual_num_val_images}/{num_images} images')
partition_dataset(
images_dir='dataset/printed_links/processed',
train_dir='dataset/printed_links/partitioned/train',
test_dir='dataset/printed_links/partitioned/test',
val_dir='dataset/printed_links/partitioned/val',
xml_labels_dir='dataset/printed_links/labels/xml',
train_ratio=0.8,
test_ratio=0.2,
val_ratio=0,
copy_xml=True
)
```
After splitting your dataset folder structure should look similar to this:
```
dataset/
└── printed_links
├── labels
│ └── xml
├── partitioned
│ ├── test
│ └── train
│ ├── IMG_9140.JPG
│ ├── IMG_9140.xml
│ ├── IMG_9141.JPG
│ ├── IMG_9141.xml
│ ...
├── processed
└── raw
```
### Exporting the dataset
The last manipulation we should do with the data is to convert our datasets into [TFRecord](https://www.tensorflow.org/tutorials/load_data/tfrecord) format. The `TFRecord` format is a format that TensorFlow is using for storing a sequence of binary records.
First, let's create two folders: one is for the labels in `CSV` format, and the other one is for the final dataset in `TFRecord` format.
```bash
mkdir -p dataset/printed_links/labels/csv
mkdir -p dataset/printed_links/tfrecords
```
Now we need to create a `dataset/printed_links/labels/label_map.pbtxt` proto file that will describe the classes of the objects in our dataset. In our case, we only have _one class_ which we may call `http`. Here is the content of this file:
```
item {
id: 1
name: 'http'
}
```
Now we're ready to generate the TFRecord datasets out of images in `jpg` format and labels in `xml` format:
```python
import os
import io
import math
import glob
import tensorflow as tf
import pandas as pd
import xml.etree.ElementTree as ET
from PIL import Image
from collections import namedtuple
from object_detection.utils import dataset_util, label_map_util
tf1 = tf.compat.v1
# Convers labels from XML format to CSV.
def xml_to_csv(path):
xml_list = []
for xml_file in glob.glob(path + '/*.xml'):
tree = ET.parse(xml_file)
root = tree.getroot()
for member in root.findall('object'):
value = (root.find('filename').text,
int(root.find('size')[0].text),
int(root.find('size')[1].text),
member[0].text,
int(member[4][0].text),
int(member[4][1].text),
int(member[4][2].text),
int(member[4][3].text)
)
xml_list.append(value)
column_name = ['filename', 'width', 'height', 'class', 'xmin', 'ymin', 'xmax', 'ymax']
xml_df = pd.DataFrame(xml_list, columns=column_name)
return xml_df
def class_text_to_int(row_label, label_map_dict):
return label_map_dict[row_label]
def split(df, group):
data = namedtuple('data', ['filename', 'object'])
gb = df.groupby(group)
return [data(filename, gb.get_group(x)) for filename, x in zip(gb.groups.keys(), gb.groups)]
# Creates a TFRecord.
def create_tf_example(group, path, label_map_dict):
with tf1.gfile.GFile(os.path.join(path, '{}'.format(group.filename)), 'rb') as fid:
encoded_jpg = fid.read()
encoded_jpg_io = io.BytesIO(encoded_jpg)
image = Image.open(encoded_jpg_io)
width, height = image.size
filename = group.filename.encode('utf8')
image_format = b'jpg'
xmins = []
xmaxs = []
ymins = []
ymaxs = []
classes_text = []
classes = []
for index, row in group.object.iterrows():
xmins.append(row['xmin'] / width)
xmaxs.append(row['xmax'] / width)
ymins.append(row['ymin'] / height)
ymaxs.append(row['ymax'] / height)
classes_text.append(row['class'].encode('utf8'))
classes.append(class_text_to_int(row['class'], label_map_dict))
tf_example = tf1.train.Example(features=tf1.train.Features(feature={
'image/height': dataset_util.int64_feature(height),
'image/width': dataset_util.int64_feature(width),
'image/filename': dataset_util.bytes_feature(filename),
'image/source_id': dataset_util.bytes_feature(filename),
'image/encoded': dataset_util.bytes_feature(encoded_jpg),
'image/format': dataset_util.bytes_feature(image_format),
'image/object/bbox/xmin': dataset_util.float_list_feature(xmins),
'image/object/bbox/xmax': dataset_util.float_list_feature(xmaxs),
'image/object/bbox/ymin': dataset_util.float_list_feature(ymins),
'image/object/bbox/ymax': dataset_util.float_list_feature(ymaxs),
'image/object/class/text': dataset_util.bytes_list_feature(classes_text),
'image/object/class/label': dataset_util.int64_list_feature(classes),
}))
return tf_example
def dataset_to_tfrecord(
images_dir,
xmls_dir,
label_map_path,
output_path,
csv_path=None
):
label_map = label_map_util.load_labelmap(label_map_path)
label_map_dict = label_map_util.get_label_map_dict(label_map)
tfrecord_writer = tf1.python_io.TFRecordWriter(output_path)
images_path = os.path.join(images_dir)
csv_examples = xml_to_csv(xmls_dir)
grouped_examples = split(csv_examples, 'filename')
for group in grouped_examples:
tf_example = create_tf_example(group, images_path, label_map_dict)
tfrecord_writer.write(tf_example.SerializeToString())
tfrecord_writer.close()
print('Successfully created the TFRecord file: {}'.format(output_path))
if csv_path is not None:
csv_examples.to_csv(csv_path, index=None)
print('Successfully created the CSV file: {}'.format(csv_path))
# Generate a TFRecord for train dataset.
dataset_to_tfrecord(
images_dir='dataset/printed_links/partitioned/train',
xmls_dir='dataset/printed_links/partitioned/train',
label_map_path='dataset/printed_links/labels/label_map.pbtxt',
output_path='dataset/printed_links/tfrecords/train.record',
csv_path='dataset/printed_links/labels/csv/train.csv'
)
# Generate a TFRecord for test dataset.
dataset_to_tfrecord(
images_dir='dataset/printed_links/partitioned/test',
xmls_dir='dataset/printed_links/partitioned/test',
label_map_path='dataset/printed_links/labels/label_map.pbtxt',
output_path='dataset/printed_links/tfrecords/test.record',
csv_path='dataset/printed_links/labels/csv/test.csv'
)
```
As a result we should now have two files: `test.record` and `train.record` in `dataset/printed_links/tfrecords/` folder:
```
dataset/
└── printed_links
├── labels
│ ├── csv
│ ├── label_map.pbtxt
│ └── xml
├── partitioned
│ ├── test
│ ├── train
│ └── val
├── processed
├── raw
└── tfrecords
├── test.record
└── train.record
```
These two files `test.record` and `train.record` are our final datasets that we will use to fine-tune the `ssd_mobilenet_v2_fpnlite_640x640_coco17_tpu-8` model.
## 📖 Exploring the TFRecord Datasets
In this section, we will see how we may use the TensorFlow 2 Object Detection API to explore the datasets in `TFRecord` format.
**Checking the number of items in a dataset**
To count the number of items in the dataset we may do the following:
```python
import tensorflow as tf
# Count the number of examples in the dataset.
def count_tfrecords(tfrecords_filename):
raw_dataset = tf.data.TFRecordDataset(tfrecords_filename)
# Keep in mind that the list() operation might be
# a performance bottleneck for large datasets.
return len(list(raw_dataset))
TRAIN_RECORDS_NUM = count_tfrecords('dataset/printed_links/tfrecords/train.record')
TEST_RECORDS_NUM = count_tfrecords('dataset/printed_links/tfrecords/test.record')
print('TRAIN_RECORDS_NUM: ', TRAIN_RECORDS_NUM)
print('TEST_RECORDS_NUM: ', TEST_RECORDS_NUM)
```
_output →_
```
TRAIN_RECORDS_NUM: 100
TEST_RECORDS_NUM: 25
```
So we will train the model on `100` examples, and we will check the model accuracy on `25` test images.
**Previewing the dataset images with bounding boxes**
To preview images with detection boxes we may do the following:
```python
import tensorflow as tf
import numpy as np
from google.protobuf import text_format
import matplotlib.pyplot as plt
# Import Object Detection API.
from object_detection.utils import visualization_utils
from object_detection.protos import string_int_label_map_pb2
from object_detection.data_decoders.tf_example_decoder import TfExampleDecoder
%matplotlib inline
# Visualize the TFRecord dataset.
def visualize_tfrecords(tfrecords_filename, label_map=None, print_num=1):
decoder = TfExampleDecoder(
label_map_proto_file=label_map,
use_display_name=False
)
if label_map is not None:
label_map_proto = string_int_label_map_pb2.StringIntLabelMap()
with tf.io.gfile.GFile(label_map,'r') as f:
text_format.Merge(f.read(), label_map_proto)
class_dict = {}
for entry in label_map_proto.item:
class_dict[entry.id] = {'name': entry.name}
raw_dataset = tf.data.TFRecordDataset(tfrecords_filename)
for raw_record in raw_dataset.take(print_num):
example = decoder.decode(raw_record)
image = example['image'].numpy()
boxes = example['groundtruth_boxes'].numpy()
confidences = example['groundtruth_image_confidences']
filename = example['filename']
area = example['groundtruth_area']
classes = example['groundtruth_classes'].numpy()
image_classes = example['groundtruth_image_classes']
weights = example['groundtruth_weights']
scores = np.ones(boxes.shape[0])
visualization_utils.visualize_boxes_and_labels_on_image_array(
image,
boxes,
classes,
scores,
class_dict,
max_boxes_to_draw=None,
use_normalized_coordinates=True
)
plt.figure(figsize=(8, 8))
plt.imshow(image)
plt.show()
# Visualizing the training TFRecord dataset.
visualize_tfrecords(
tfrecords_filename='dataset/printed_links/tfrecords/train.record',
label_map='dataset/printed_links/labels/label_map.pbtxt',
print_num=3
)
```
As a result, we should see several images with bounding boxes drawn on top of each image.
## 📈 Setting Up TensorBoard
Before starting the training process we need to launch a [TensorBoard](https://www.tensorflow.org/tensorboard).
TensorBoard will allow us to monitor the training process and see if the model is actually learning something or should we better stop the training and adjust training parameters. It will also help us to analyze what objects and at what location the model is detecting.
_Image source: [TensorBoard homepage](https://www.tensorflow.org/tensorboard)_
The cool part about TensorBoard is that we may run it directly in Google Colab. However, if you're running the notebook in your local installation of Jupyter you may also [install it as Python package](https://github.com/tensorflow/tensorboard/blob/master/README.md) and launch it from the terminal.
First, let's create a `./logs` folder where all training logs will be written:
```bash
mkdir -p logs
```
Next, we may load the TensorBoard extension on Google Colab:
```
%load_ext tensorboard
```
And finally we may launch a TensorBoard to monitor the `./logs` folder:
```
%tensorboard --logdir ./logs
```
As a result, you should see the empty TensorBoard panel:

After the model training is be started you may get back to this panel and see the training process progress.
## 🏋🏻️ Model Training
### Configuring the Detection Pipeline
Now it's time to get back to the `cache/datasets/ssd_mobilenet_v2_fpnlite_640x640_coco17_tpu-8/pipeline.config` file that we've mentioned earlier. This file defines the parameters of `ssd_mobilenet_v2_fpnlite_640x640_coco17_tpu-8` model training.
We need to copy the `pipeline.config` file to the root of the project and adjust a couple of things in it:
1. We should change the **number of classes** from `90` (the COCO classes) to just `1` (the `http` class).
2. We should reduce the **batch size** to `8` to avoid the errors that are connected to the insufficient memory.
3. We need to point the model to its **checkpoints** since we don't want to train the model from scratch.
4. We need to change the `fine_tune_checkpoint_type` to `detection`.
5. We need to point the model to a proper **labels map**.
6. Lastly, we need to pint the model to the **train and test datasets**.
All these changes may be done manually directly in `pipeline.config` file. But we may also do them through code:
```python
import tensorflow as tf
from shutil import copyfile
from google.protobuf import text_format
from object_detection.protos import pipeline_pb2
# Adjust pipeline config modification here if needed.
def modify_config(pipeline):
# Model config.
pipeline.model.ssd.num_classes = 1
# Train config.
pipeline.train_config.batch_size = 8
pipeline.train_config.fine_tune_checkpoint = 'cache/datasets/ssd_mobilenet_v2_fpnlite_640x640_coco17_tpu-8/checkpoint/ckpt-0'
pipeline.train_config.fine_tune_checkpoint_type = 'detection'
# Train input reader config.
pipeline.train_input_reader.label_map_path = 'dataset/printed_links/labels/label_map.pbtxt'
pipeline.train_input_reader.tf_record_input_reader.input_path[0] = 'dataset/printed_links/tfrecords/train.record'
# Eval input reader config.
pipeline.eval_input_reader[0].label_map_path = 'dataset/printed_links/labels/label_map.pbtxt'
pipeline.eval_input_reader[0].tf_record_input_reader.input_path[0] = 'dataset/printed_links/tfrecords/test.record'
return pipeline
def clone_pipeline_config():
copyfile(
'cache/datasets/ssd_mobilenet_v2_fpnlite_640x640_coco17_tpu-8/pipeline.config',
'pipeline.config'
)
def setup_pipeline(pipeline_config_path):
clone_pipeline_config()
pipeline = read_pipeline_config(pipeline_config_path)
pipeline = modify_config(pipeline)
write_pipeline_config(pipeline_config_path, pipeline)
return pipeline
def read_pipeline_config(pipeline_config_path):
pipeline = pipeline_pb2.TrainEvalPipelineConfig()
with tf.io.gfile.GFile(pipeline_config_path, "r") as f:
proto_str = f.read()
text_format.Merge(proto_str, pipeline)
return pipeline
def write_pipeline_config(pipeline_config_path, pipeline):
config_text = text_format.MessageToString(pipeline)
with tf.io.gfile.GFile(pipeline_config_path, "wb") as f:
f.write(config_text)
# Adjusting the pipeline configuration.
pipeline = setup_pipeline('pipeline.config')
print(pipeline)
```
Here is the content of the `pipeline.config` file:
```
model {
ssd {
num_classes: 1
image_resizer {
fixed_shape_resizer {
height: 640
width: 640
}
}
feature_extractor {
type: "ssd_mobilenet_v2_fpn_keras"
depth_multiplier: 1.0
min_depth: 16
conv_hyperparams {
regularizer {
l2_regularizer {
weight: 3.9999998989515007e-05
}
}
initializer {
random_normal_initializer {
mean: 0.0
stddev: 0.009999999776482582
}
}
activation: RELU_6
batch_norm {
decay: 0.996999979019165
scale: true
epsilon: 0.0010000000474974513
}
}
use_depthwise: true
override_base_feature_extractor_hyperparams: true
fpn {
min_level: 3
max_level: 7
additional_layer_depth: 128
}
}
box_coder {
faster_rcnn_box_coder {
y_scale: 10.0
x_scale: 10.0
height_scale: 5.0
width_scale: 5.0
}
}
matcher {
argmax_matcher {
matched_threshold: 0.5
unmatched_threshold: 0.5
ignore_thresholds: false
negatives_lower_than_unmatched: true
force_match_for_each_row: true
use_matmul_gather: true
}
}
similarity_calculator {
iou_similarity {
}
}
box_predictor {
weight_shared_convolutional_box_predictor {
conv_hyperparams {
regularizer {
l2_regularizer {
weight: 3.9999998989515007e-05
}
}
initializer {
random_normal_initializer {
mean: 0.0
stddev: 0.009999999776482582
}
}
activation: RELU_6
batch_norm {
decay: 0.996999979019165
scale: true
epsilon: 0.0010000000474974513
}
}
depth: 128
num_layers_before_predictor: 4
kernel_size: 3
class_prediction_bias_init: -4.599999904632568
share_prediction_tower: true
use_depthwise: true
}
}
anchor_generator {
multiscale_anchor_generator {
min_level: 3
max_level: 7
anchor_scale: 4.0
aspect_ratios: 1.0
aspect_ratios: 2.0
aspect_ratios: 0.5
scales_per_octave: 2
}
}
post_processing {
batch_non_max_suppression {
score_threshold: 9.99999993922529e-09
iou_threshold: 0.6000000238418579
max_detections_per_class: 100
max_total_detections: 100
use_static_shapes: false
}
score_converter: SIGMOID
}
normalize_loss_by_num_matches: true
loss {
localization_loss {
weighted_smooth_l1 {
}
}
classification_loss {
weighted_sigmoid_focal {
gamma: 2.0
alpha: 0.25
}
}
classification_weight: 1.0
localization_weight: 1.0
}
encode_background_as_zeros: true
normalize_loc_loss_by_codesize: true
inplace_batchnorm_update: true
freeze_batchnorm: false
}
}
train_config {
batch_size: 8
data_augmentation_options {
random_horizontal_flip {
}
}
data_augmentation_options {
random_crop_image {
min_object_covered: 0.0
min_aspect_ratio: 0.75
max_aspect_ratio: 3.0
min_area: 0.75
max_area: 1.0
overlap_thresh: 0.0
}
}
sync_replicas: true
optimizer {
momentum_optimizer {
learning_rate {
cosine_decay_learning_rate {
learning_rate_base: 0.07999999821186066
total_steps: 50000
warmup_learning_rate: 0.026666000485420227
warmup_steps: 1000
}
}
momentum_optimizer_value: 0.8999999761581421
}
use_moving_average: false
}
fine_tune_checkpoint: "cache/datasets/ssd_mobilenet_v2_fpnlite_640x640_coco17_tpu-8/checkpoint/ckpt-0"
num_steps: 50000
startup_delay_steps: 0.0
replicas_to_aggregate: 8
max_number_of_boxes: 100
unpad_groundtruth_tensors: false
fine_tune_checkpoint_type: "detection"
fine_tune_checkpoint_version: V2
}
train_input_reader {
label_map_path: "dataset/printed_links/labels/label_map.pbtxt"
tf_record_input_reader {
input_path: "dataset/printed_links/tfrecords/train.record"
}
}
eval_config {
metrics_set: "coco_detection_metrics"
use_moving_averages: false
}
eval_input_reader {
label_map_path: "dataset/printed_links/labels/label_map.pbtxt"
shuffle: false
num_epochs: 1
tf_record_input_reader {
input_path: "dataset/printed_links/tfrecords/test.record"
}
}
```
### Launching the training process
We're ready now to launch a training process using the TensorFlow 2 Object Detection API. The API contains a [model_main_tf2.py](https://github.com/tensorflow/models/blob/master/research/object_detection/model_main_tf2.py) script that will run training for us. Feel free to explore the flags that this Python script supports in the source-code (i.e. `num_train_steps`, `model_dir` and others) to see their meanings.
We will be training the model for `1000` iterations (epochs). Feel free to train it for a smaller or larger number of iterations depending on the learning progress (see the TensorBoard charts).
```bash
%%bash
NUM_TRAIN_STEPS=1000
CHECKPOINT_EVERY_N=1000
PIPELINE_CONFIG_PATH=pipeline.config
MODEL_DIR=./logs
SAMPLE_1_OF_N_EVAL_EXAMPLES=1
python ./models/research/object_detection/model_main_tf2.py \
--model_dir=$MODEL_DIR \
--num_train_steps=$NUM_TRAIN_STEPS \
--sample_1_of_n_eval_examples=$SAMPLE_1_OF_N_EVAL_EXAMPLES \
--pipeline_config_path=$PIPELINE_CONFIG_PATH \
--checkpoint_every_n=$CHECKPOINT_EVERY_N \
--alsologtostderr
```
While the model is training (it may take around`~10 minutes` for `1000` iterations in [GoogleColab GPU](https://colab.research.google.com/notebooks/gpu.ipynb) runtime) you should be able to observe the training progress in TensorBoard. The `localization` and `classification` losses should decrease which means that the model is doing a good job in localizing and classifying new custom objects.
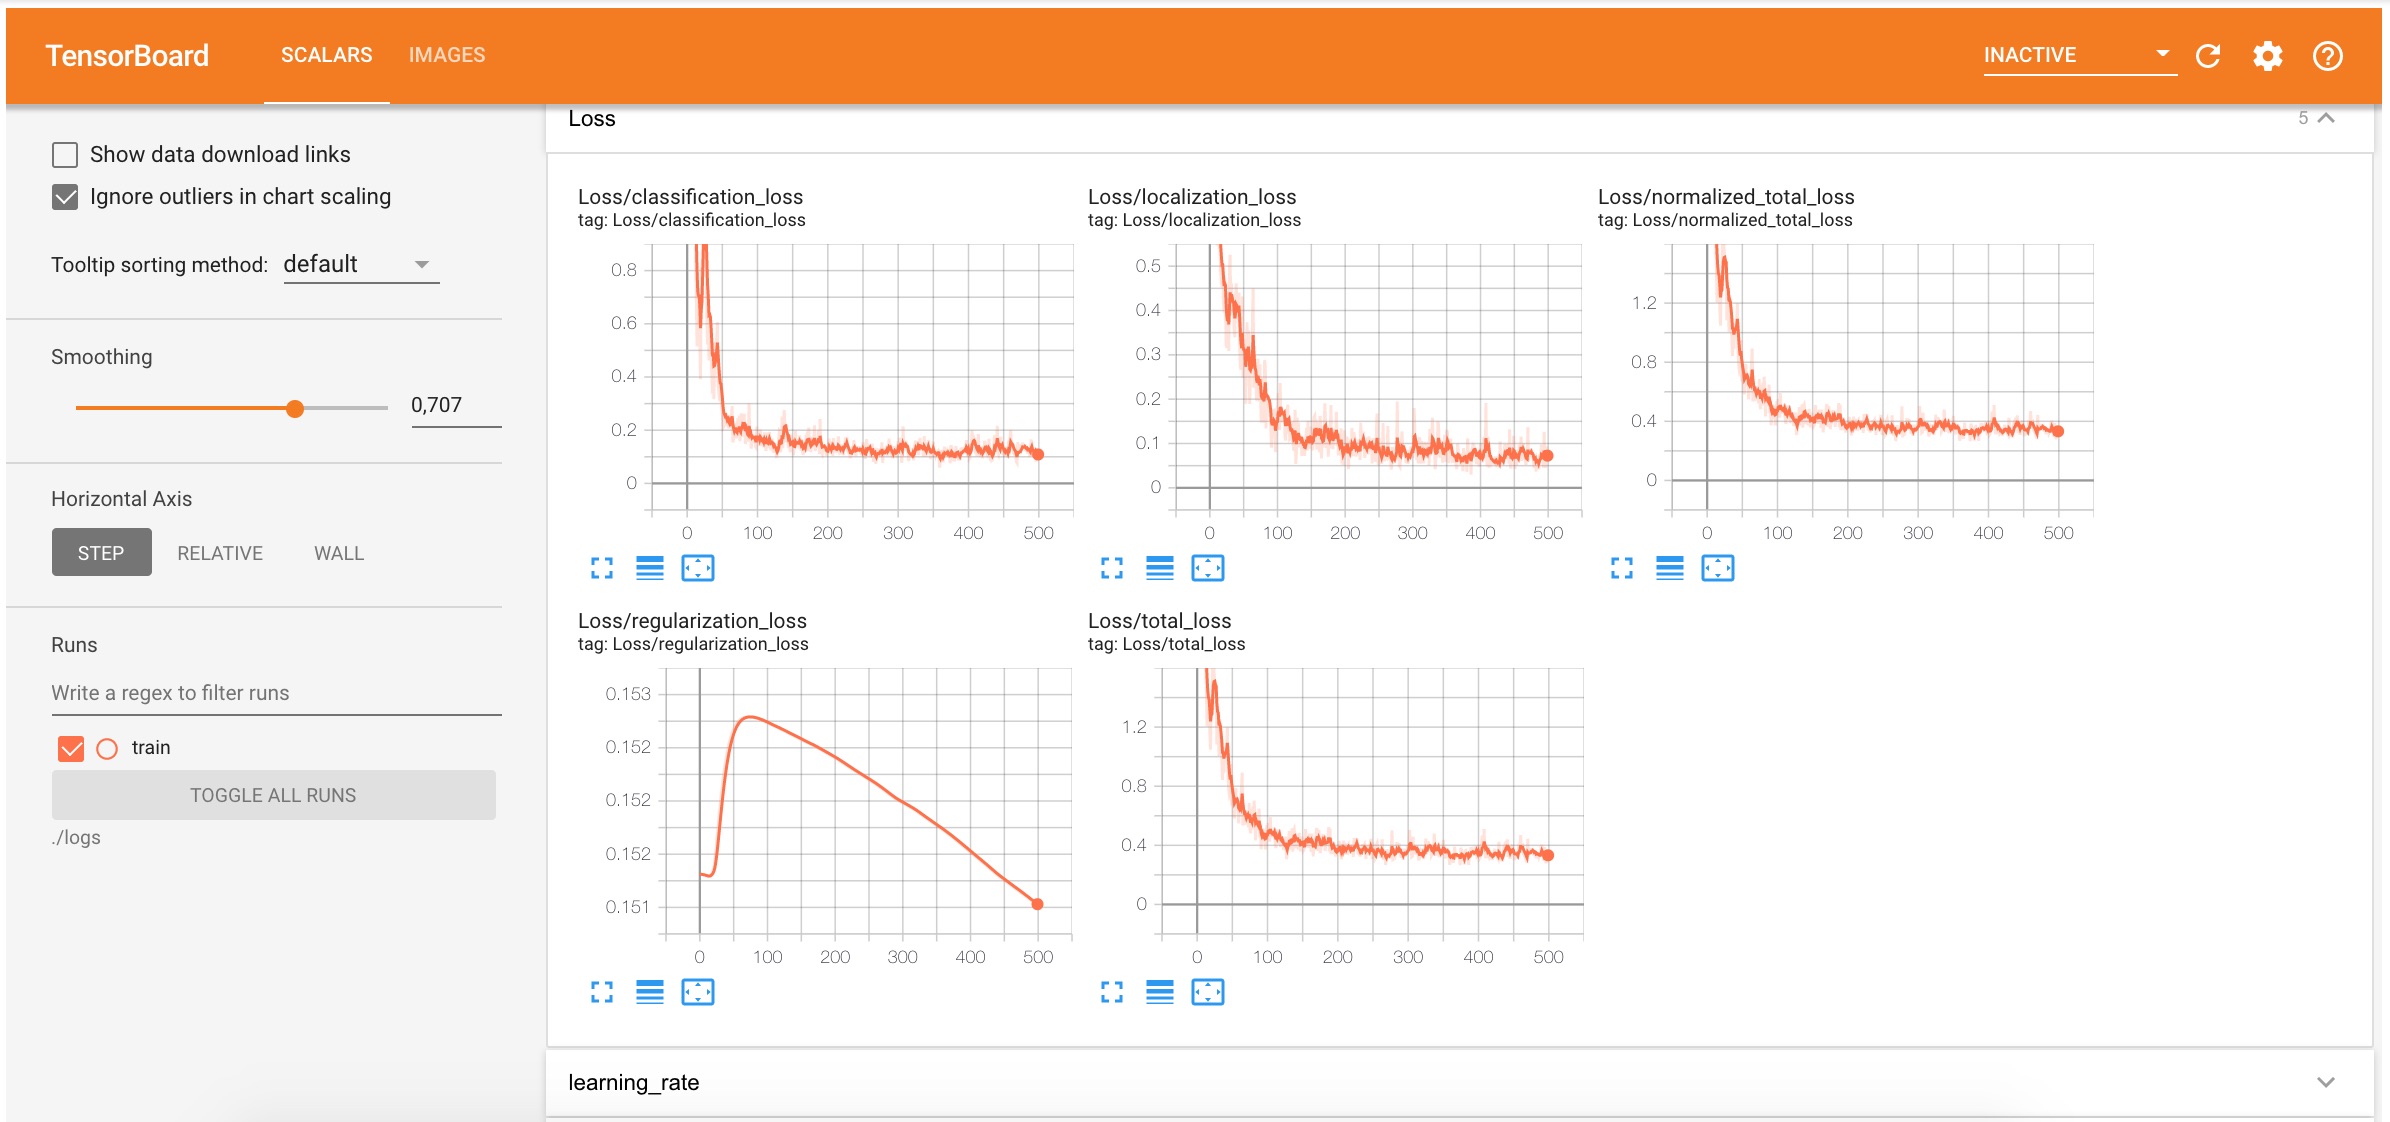
Also during the training, the new model checkpoints (parameters that the model has learned during the training) will be saved to the `logs` folder.
The `logs` folder structure now looks like this:
```
logs
├── checkpoint
├── ckpt-1.data-00000-of-00001
├── ckpt-1.index
└── train
└── events.out.tfevents.1606560330.b314c371fa10.1747.1628.v2
```
### Evaluating the Model (Optional)
The evaluation process uses the trained model checkpoints and evaluates how well the model performs in detecting objects in the test dataset. The results of this evaluation are summarised in the form of some [metrics](https://github.com/tensorflow/models/blob/master/research/object_detection/g3doc/evaluation_protocols.md), which can be examined over time. You may read more about how to evaluate these metrics [here](https://tensorflow-object-detection-api-tutorial.readthedocs.io/en/latest/training.html#evaluating-the-model-optional).
We will skip the metrics evaluation step in this article. But we may still use the evaluation step to see the model's detections in TensorBoard:
```bash
%%bash
PIPELINE_CONFIG_PATH=pipeline.config
MODEL_DIR=logs
python ./models/research/object_detection/model_main_tf2.py \
--model_dir=$MODEL_DIR \
--pipeline_config_path=$PIPELINE_CONFIG_PATH \
--checkpoint_dir=$MODEL_DIR \
```
After launching the script you should be able to see several side-by-side images with detections boxes:
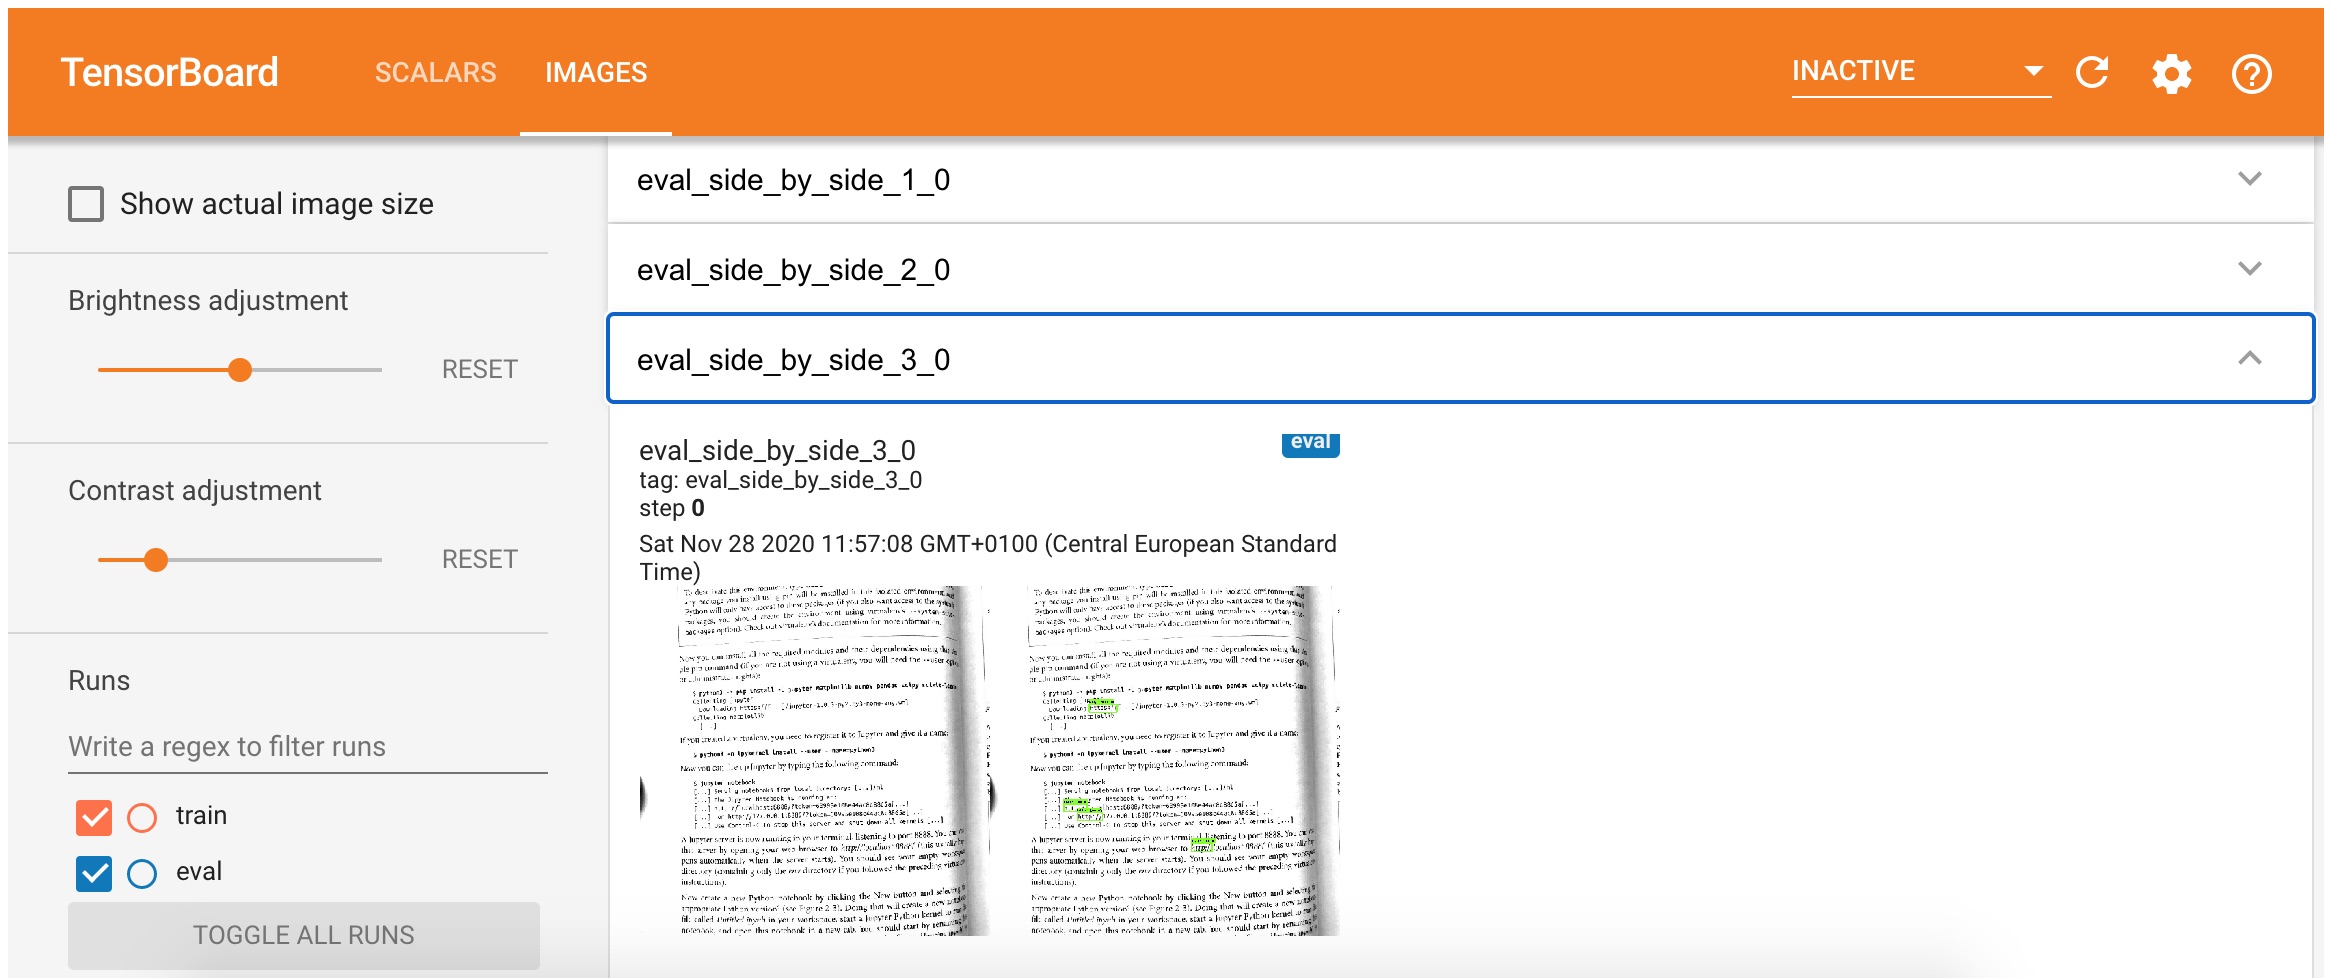
## 🗜 Exporting the Model
Once the training process is complete we should save the trained model for further usage. To export the model we will use the [exporter_main_v2.py](https://github.com/tensorflow/models/blob/master/research/object_detection/exporter_main_v2.py) script from Object Detection API. It prepares an object detection TensorFlow graph for inference using model configuration and a trained checkpoint. The script outputs associated checkpoint files, a SavedModel, and a copy of the model config:
```bash
%%bash
python ./models/research/object_detection/exporter_main_v2.py \
--input_type=image_tensor \
--pipeline_config_path=pipeline.config \
--trained_checkpoint_dir=logs \
--output_directory=exported/ssd_mobilenet_v2_fpnlite_640x640_coco17_tpu-8
```
Here is what the `exported` folder contains after the export:
```
exported
└── ssd_mobilenet_v2_fpnlite_640x640_coco17_tpu-8
├── checkpoint
│ ├── checkpoint
│ ├── ckpt-0.data-00000-of-00001
│ └── ckpt-0.index
├── pipeline.config
└── saved_model
├── assets
├── saved_model.pb
└── variables
├── variables.data-00000-of-00001
└── variables.index
```
At this moment we have a `saved_model` that may be used for inference.
## 🚀 Using the Exported Model
Let's see how can we use the saved model from the previous step for object detections.
First, we need to create a detection function that will use the saved model. It will accept the image and will output the detected objects:
```python
import time
import math
PATH_TO_SAVED_MODEL = 'exported/ssd_mobilenet_v2_fpnlite_640x640_coco17_tpu-8/saved_model'
def detection_function_from_saved_model(saved_model_path):
print('Loading saved model...', end='')
start_time = time.time()
# Load saved model and build the detection function
detect_fn = tf.saved_model.load(saved_model_path)
end_time = time.time()
elapsed_time = end_time - start_time
print('Done! Took {} seconds'.format(math.ceil(elapsed_time)))
return detect_fn
exported_detect_fn = detection_function_from_saved_model(
PATH_TO_SAVED_MODEL
)
```
_output →_
```
Loading saved model...Done! Took 9 seconds
```
To map the IDs of the detected classes back to the class names we need to load the label map as well:
```python
from object_detection.utils import label_map_util
category_index = label_map_util.create_category_index_from_labelmap(
'dataset/printed_links/labels/label_map.pbtxt',
use_display_name=True
)
print(category_index)
```
_output →_
```
{1: {'id': 1, 'name': 'http'}}
```
Testing the model on a test dataset.
```python
import matplotlib.pyplot as plt
import tensorflow as tf
import numpy as np
from object_detection.utils import visualization_utils
from object_detection.data_decoders.tf_example_decoder import TfExampleDecoder
%matplotlib inline
def tensors_from_tfrecord(
tfrecords_filename,
tfrecords_num,
dtype=tf.float32
):
decoder = TfExampleDecoder()
raw_dataset = tf.data.TFRecordDataset(tfrecords_filename)
images = []
for raw_record in raw_dataset.take(tfrecords_num):
example = decoder.decode(raw_record)
image = example['image']
image = tf.cast(image, dtype=dtype)
images.append(image)
return images
def test_detection(tfrecords_filename, tfrecords_num, detect_fn):
image_tensors = tensors_from_tfrecord(
tfrecords_filename,
tfrecords_num,
dtype=tf.uint8
)
for image_tensor in image_tensors:
image_np = image_tensor.numpy()
# The model expects a batch of images, so add an axis with `tf.newaxis`.
input_tensor = tf.expand_dims(image_tensor, 0)
detections = detect_fn(input_tensor)
# All outputs are batches tensors.
# Convert to numpy arrays, and take index [0] to remove the batch dimension.
# We're only interested in the first num_detections.
num_detections = int(detections.pop('num_detections'))
detections = {key: value[0, :num_detections].numpy() for key, value in detections.items()}
detections['num_detections'] = num_detections
# detection_classes should be ints.
detections['detection_classes'] = detections['detection_classes'].astype(np.int64)
image_np_with_detections = image_np.astype(int).copy()
visualization_utils.visualize_boxes_and_labels_on_image_array(
image_np_with_detections,
detections['detection_boxes'],
detections['detection_classes'],
detections['detection_scores'],
category_index,
use_normalized_coordinates=True,
max_boxes_to_draw=100,
min_score_thresh=.3,
agnostic_mode=False
)
plt.figure(figsize=(8, 8))
plt.imshow(image_np_with_detections)
plt.show()
test_detection(
tfrecords_filename='dataset/printed_links/tfrecords/test.record',
tfrecords_num=10,
detect_fn=exported_detect_fn
)
```
As a result, you should see `10` images from the test dataset and highlighted `https:` prefixes that were detected by the model:
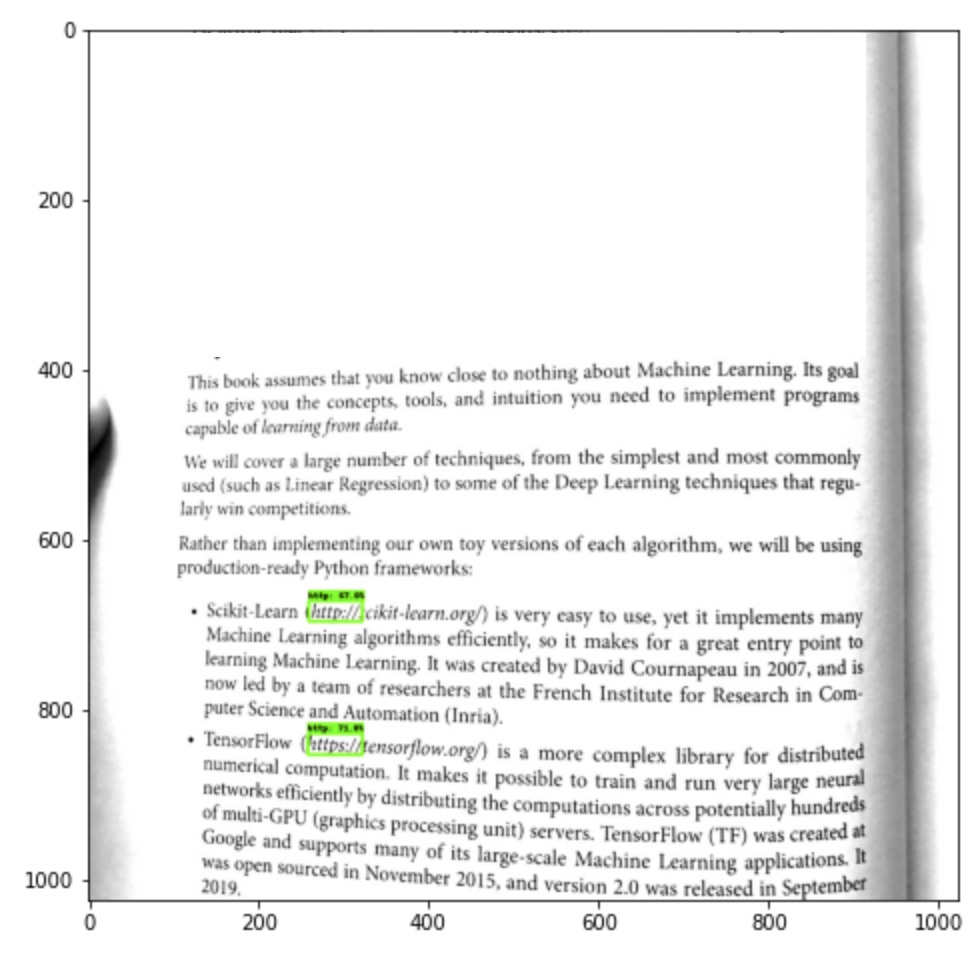
The fact that the model is able to detect custom objects (in our case the `https://` prefixes) on the images it hasn't seen before is a good sign and something that we wanted to achieve.
## 🗜 Converting the Model for Web
As you remember from the beginning of this article, our goal was to use the custom object detection model in the browser. Luckily, there is a [TensorFlow.js](https://www.tensorflow.org/js) JavaScript version of the TensorFlow library exists. In JavaScript, we can't work with our saved model directly. Instead, we need to convert it to [tfjs_graph_model](https://www.tensorflow.org/js/tutorials/conversion/import_saved_model) format.
To do this we need to install the tensorflowjs Python package:
```bash
pip install tensorflowjs --quiet
```
The model may be exported like this:
```bash
%%bash
tensorflowjs_converter \
--input_format=tf_saved_model \
--output_format=tfjs_graph_model \
exported/ssd_mobilenet_v2_fpnlite_640x640_coco17_tpu-8/saved_model \
exported_web/ssd_mobilenet_v2_fpnlite_640x640_coco17_tpu-8
```
The `exported_web` folder contains the `.json` file with the model metadata and a bunch of `.bin` files with trained model parameters:
```
exported_web
└── ssd_mobilenet_v2_fpnlite_640x640_coco17_tpu-8
├── group1-shard1of4.bin
├── group1-shard2of4.bin
├── group1-shard3of4.bin
├── group1-shard4of4.bin
└── model.json
```
Finally, we have the model that is able to detect `https://` prefixes for us, and it is saved in JavaScript-understandable format.
Let's check the model size to see if it is light enough to be loaded completely to the client-side:
```python
import pathlib
def get_folder_size(folder_path):
mB = 1000000
root_dir = pathlib.Path(folder_path)
sizeBytes = sum(f.stat().st_size for f in root_dir.glob('**/*') if f.is_file())
return f'{sizeBytes//mB} MB'
print(f'Original model size: {get_folder_size("cache/datasets/ssd_mobilenet_v2_fpnlite_640x640_coco17_tpu-8")}')
print(f'Exported model size: {get_folder_size("exported/ssd_mobilenet_v2_fpnlite_640x640_coco17_tpu-8")}')
print(f'Exported WEB model size: {get_folder_size("exported_web/ssd_mobilenet_v2_fpnlite_640x640_coco17_tpu-8")}')
```
_output →_
```
Original model size: 31 MB
Exported model size: 28 MB
Exported WEB model size: 13 MB
```
As you may see the model that we're going to use for the Web has `13MB` which is quite acceptable in our case.
Later in JavaScript we may start using the model like this:
```javascript
import * as tf from '@tensorflow/tfjs';
const model = await tf.loadGraphModel(modelURL);
```
> 🧭 The next step is to implement the Links Detector UI which will use this model, but this is another story for another article. The final source code of the application may be found in [links-detector repository](https://github.com/trekhleb/links-detector) on GitHub.
## 🤔 Conclusions
In this article, we started to solve the issue with printed links detection. We ended up creating the custom object detector to recognize the `https://` prefixes on text images (i.e. on smartphone camera stream images). We have also converted the model to a `tfjs_graph_model` to be able to re-use it on the client-side.
You may 🚀 [**launch Links Detector demo**](https://trekhleb.github.io/links-detector/) from your smartphone to see the final result and to try how the model performs on your books or magazines.
Here is how the final solution looks like:

You may also 📝 [**browse the links-detector repository**](https://github.com/trekhleb/links-detector) on GitHub to see the complete source code of the UI part of the application.
> ⚠️ Currently the application is in _experimental_ _Alpha_ stage and has [many issues and limitations](https://github.com/trekhleb/links-detector/issues?q=is%3Aopen+is%3Aissue+label%3Aenhancement). So don't raise your expectations level too high until these issues are resolved 🤷🏻.
As the next steps which might improve the model performance we might do the following:
- Extend the dataset with more link types (`http://`, `tcp://`, `ftp://` etc)
- Extended the dataset with images that have dark backgrounds
- Extend the dataset with underlined links
- Extend the dataset with examples of different fonts and ligatures
- etc.
Even though the model has a lot to be improved to make it closer to the production-ready state, I still hope that this article was useful for you and gave you some guidelines and inspiration to play around with your custom object detectors.
Happy training, folks!
================================================
FILE: articles/printed_links_detection/printed_links_detection.ru.md
================================================
# 📖 👆🏻 Делаем печатные ссылки кликабельными с помощью TensorFlow 2 Object Detection API

## 📃 TL;DR
_В этой статье мы начнем решать проблему того, как сделать печатные ссылки в книгах или журналах кликабельными используя камеру смартфона._
С помощью [TensorFlow 2 Object Detection API](https://github.com/tensorflow/models/tree/master/research/object_detection) мы научим TensorFlow модель находить позиции и габариты строк `https://` в изображениях (например в каждом кадре видео из камеры смартфона).
Текст каждой ссылки, расположенный по правую сторону от `https://`, будет распознан с помощью библиотеки [Tesseract](https://tesseract.projectnaptha.com/). Работа с библиотекой Tesseract не является предметом этой статьи, но вы можете найти полный исходный код приложения в репозитории [links-detector repository](https://github.com/trekhleb/links-detector) на GitHub.
> 🚀 [**Запустить Links Detector**](https://trekhleb.github.io/links-detector/) со смартфона, чтобы увидеть конечный результат.
> 📝 [**Открыть репозиторий links-detector**](https://github.com/trekhleb/links-detector) на GitHub с полным исходным кодом приложения.
Вот так в итоге будет выглядеть процесс распознавания печатных ссылок:

> ⚠️ На данный момент приложение находится в _экспериментальной_ стадии и имеет [множество недоработок и ограничений](https://github.com/trekhleb/links-detector/issues?q=is%3Aopen+is%3Aissue+label%3Aenhancement). Поэтому, до тех пор, пока вышеуказанные недоработки не будут ликвидированы, не ожидайте от приложения слишком многого 🤷🏻. Также стоит отметить, что целью данной статьи является экспериментирование с TensorFlow 2 Object Detection API, а не создание production-ready приложения.
> В случае, если блоки с исходным кодом в этой статье будут отображаться без подсветки кода вы можете [перейти на GitHub версию этой статьи](https://github.com/trekhleb/links-detector/blob/master/articles/printed_links_detection/printed_links_detection.ru.md)
## 🤷🏻️ Проблема
Я работаю программистом, и в свободное от работы время учу Machine Learning в качестве хобби. Но проблема не в этом.
Я купил книгу по машинному обучению и, читая первые главы, столкнулся с множеством печатных ссылок на подобии `https://tensorflow.org/` или `https://some-url.com/which/may/be/even/longer?and_with_params=true`.

К сожалению, кликать по печатным ссылкам не представлялось возможным (спасибо, Кэп!). Чтобы открыть ссылки в браузере мне приходилось набирать их посимвольно в адресной строке, что было довольно медленно. К тому же опечатки никто не отменял.
## 💡 Возможное решение
Я подумал, а что если, по аналогии с распознавателем QR кодов, мы "научим" смартфон _(1)_ _определять местоположение_ и _(2)_ _распознавать_ печатные гипер-ссылки и делать их кликабельными? В таком случае читатель делал бы всего один клик вместо посимвольного ввода с множеством нажатий на клавиши. Операционная сложность всей этой операции уменьшилась бы с `O(N)` до `O(1)`.
Вот так бы этот процесс выглядел:

## 📝 Требования к решению
Как я уже упомянул выше, я не эксперт в машинном обучении. Для меня это больше как хобби. Поэтому и цель этой статьи заключается больше в _экспериментировании_ и _обучении_ работе с TensorFlow 2 Object Detection API, чем в попытке создания production-ready приложения.
С учетом вышесказанного, я упростил требования к финальному решению и свел их к следующим пунктам:
1. Производительность процесса обнаружения и распознавания должна быть **близка** к реальному времени (например, `0.5-1` кадров в секунду на устройстве схожем по производительности с iPhone X). Это будет означать, что весь процесс _обнаружения + распознавания_ должен происходить не более чем за `2` секунды.
2. Должны поддерживаться только ссылки на **английском** языке.
3. Должны поддерживаться только ссылки **черного (темно-серого) цвета на белом (светло-сером) фоне**.
4. Должны поддерживаться только `https://` ссылки (допускается, что `http://`, `ftp://`, `tcp://` и прочие ссылки не будут распознаны).
## 🧩 Находим решение
### Общий подход
#### Вариант №1: Модель на стороне сервера
**Алгоритм действий:**
1. Получаем видео-поток (кадр за кадром) на стороне клиента.
2. Отправляем каждый кадр на сервер.
3. Осуществляем обнаружение и распознавание ссылок на сервере и отправляем результат клиенту.
4. Отображаем распознанные ссылки ни стороне клиента и делаем их кликабельными.

**Преимущества:**
- 💚 Скорость обнаружения и распознавания ссылок не ограничена производительностью клиентского устройства. При желании мы можем ускорить скорость обнаружения ссылок масштабируя наши сервера горизонтально (больше серверов) или вертикально (больше ядер и GPUs).
- 💚 Модель может иметь больший размер (и, возможно, большую точность), поскольку отсутствует необходимость ее загрузки на сторону клиента. Загрузить модель размером `~10Mb` на сторону клиента выглядит реалистичным, но все-же загрузить модель размером `~100Mb` может быть довольно проблематичным с точки зрения пользовательского UX (user experience).
- 💚 У нас появляется возможность контролировать доступ к модели. Поскольку модель "спрятана" за публичным API, мы можем контролировать каким клиентам она будет доступна.
**Недостатки:**
- 💔 Сложность системы растет. Вместо использования одного лишь `JavaScript` на стороне клиента нам необходимо будет так же создать, например, `Python` инфраструктуру на стороне сервера. Нам так же будет необходимо позаботиться об автоматическом масштабировании сервиса.
- 💔 Работа приложения в режиме оффлайн невозможна поскольку для работы приложения требуется доступ к интернету.
- 💔 Множество HTTP запросов к сервису со стороны клиента может стать слабым местом системы с точки зрения производительности. Предположим, мы хотим улучшить производительность обнаружения и распознавания ссылок с `1` до `10+` кадров в секунду. В таком случае каждый клиент будет слать `10+` запросов в секунду на сервер. Для `10` клиентов, работающих одновременно, это уже будет означать `100+` запросов в секунду. На помощь могут прийти двусторонний стриминг `HTTP/2` и `gRPC`, но мы снова возвращаемся к первому пункту, связанному с растущей сложностью системы.
- 💔 Стоимость системы растет. В основном это связано с оплатой за аренду серверов.
#### Вариант №2: Модель на стороне клиента
**Алгоритм действий:**
1. Получаем видео-поток (кадр за кадром) на стороне клиента.
2. Осуществляем обнаружение и распознавание ссылок на стороне клиента (без отправки на сервер).
3. Отображаем распознанные ссылки ни стороне клиента и делаем их кликабельными.

**Преимущества:**
- 💚 Менее сложная система. Нет необходимости в разработке серверной части приложения и создания API.
- 💚 Приложение может работать в режиме оффлайн. Модель загружена на сторону клиента и нет необходимости в доступе к интернету (см. [Progressive Web Application](https://web.dev/progressive-web-apps/))
- 💚 Система "почти" автоматически масштабируема. Каждый новый клиент приложения "приходит" со своим процессором и видеокартой. Это конечно же неполноценное масштабирование (мы затронем причины ниже).
- 💚 Система гораздо дешевле. Нам необходимо заплатить только за сервер со статическими данными (`HTML`, `JS`, `CSS`, файлы модели и пр.). В случае с GitHub, такой сервер может быть предоставлен бесплатно.
- 💚 Отсутствует (так же как и серверы) проблема большого количества HTTP запросов в секунду к серверам.
**Недостатки:**
- 💔 Возможно только горизонтальное масштабирование, когда каждый клиент автоматически имеет свои собственные процессоры и графическую карту. Вертикальное масштабирование невозможно поскольку мы не можем повлиять на производительность клиентского устройства. В результате мы не можем гарантировать быстрого обнаружения и распознавания ссылок для медленных устройств.
- 💔 Невозможно контролировать использование модели клиентами. Каждый может загрузить к себе модель и использовать ее где и как угодно.
- 💔 Скорость расхода батареи клиентского устройства может стать проблемой. Модель при работе потребляет вычислительные ресурсы. Пользователи приложения могут быть недовольны тем, что их iPhone становится все теплее и теплее во время работы.
#### Выбираем общий подход
Поскольку целю этой статьи и проекта в целом является обучение, а не создание приложения коммерческого уровня _мы можем выбрать второй вариант и хранить модель на стороне клиента_. Это сделает весь проект менее затратным и у нас будет возможность больше сфокусироваться на машинном обучении, а не на создании автоматически масштабируемой серверной инфраструктуры.
### Углубляемся в детали
Итак, мы выбрали вариант приложения без серверной части. Предположим теперь, что у нас на входе есть изображение (кадр) из видео-потока камеры, который выглядит так:

Нам необходимо решить две подзадачи:
1. **Обнаружение** ссылок (найти позицию и габариты ссылок на странице)
2. **Распознавание** ссылок (распознать текст ссылок)
#### Вариант №1: Решение на основе библиотеки Tesseract
Первым и наиболее очевидным вариантом решением задачи _оптического распознавания символов_ ([OCR](https://en.wikipedia.org/wiki/Optical_character_recognition)) может быть распознавания текста всего изображения с помощью, например, библиотеки [Tesseract.js](https://github.com/naptha/tesseract.js). Она принимает изображение на вход и выдает распознанные параграфы, текстовые строки, блоки текста и слова и вместе с габаритами и координатами.

Далее мы можем попытаться найти ссылки в распознанном тексте с помощью регулярного выражения [похожего на это](https://stackoverflow.com/questions/3809401/what-is-a-good-regular-expression-to-match-a-url) (пример на TypeScript):
```typescript
const URL_REG_EXP = /https?:\/\/(www\.)?[-a-zA-Z0-9@:%._+~#=]{2,256}\.[a-z]{2,4}\b([-a-zA-Z0-9@:%_+.~#?&/=]*)/gi;
const extractLinkFromText = (text: string): string | null => {
const urls: string[] | null = text.match(URL_REG_EXP);
if (!urls || !urls.length) {
return null;
}
return urls[0];
};
```
💚 Похоже, что задача решена довольно прямолинейным и простым способом:
- Мы знаем габариты и координаты ссылок.
- Мы так же знаем текст ссылок и можем сделать их кликабельными.
💔 Проблема в том, что время _обнаружения + распознавания_ может варьироваться от `2` до `20+` секунд в зависимости от размера изображения, его качества и "похожих на текст" объектов в изображении. В итоге будет очень сложно достичь той _близкой_ к реальному времени производительности в `0.5-1` кадров в секунду.
💔 Также, если подумать, то мы просим библиотеку распознать **весь** текст на картинке, даже если в тексте совсем нет ссылок или если в тексте есть одна-две ссылки, которые составляют, пускай, ~10% от всего объема текста. Это звучит как неэффективная трата вычислительных ресурсов.
#### Вариант №2: Решение на основе библиотек Tesseract и TensorFlow (+1 модель)
Мы могли бы заставить Tesseract работать быстрее используя еще один _дополнительный "алгоритм-советчик"_ перед тем, как приступить к распознаванию ссылок. Этот "алгоритм-советчик" должен обнаруживать (но не распознавать) _начало ссылок (координаты самой левой границы ссылки)_ для каждой ссылки в изображении. Это позволит нам ускорить задачу распознавания текста ссылок, если мы будем следовать следующим правилам:
1. Если изображение не содержит ни одной ссылки мы должны полностью избежать распознавания текста библиотекой Tesseract.
2. Если изображение содержит ссылки, то мы должны "попросить" Tesseract распознать только те части изображения, которые содержат текст ссылок. Мы хотим тратить время на распознавание "полезного" для нашей задачи текста.
Этот "алгоритм-советчик", который будет срабатывать перед вызовом Tesseract должен выполняться каждый раз за одно и то же время, независимо от качества и содержимого изображения. Он также должен быть достаточно быстрым и должен определять наличие и позиции ссылок быстрее чем за `1` секунду (например, на iPhone X). В таком случае мы сможем попытаться заставить наше приложение работать в режиме близком к реальному времени (определения "близости" мы дали выше).
> 💡 Итак, что если мы воспользуемся еще одним алгоритмом (еще одной моделью) обнаружения объектов, который поможет нам найти строки `https://` в изображении (каждая защищенная ссылка начинается с `https://`, не так ли?). Тогда, зная расположение и габариты префиксов `https://` в изображении, мы сможем отправить на распознавание текста с помощью библиотеки Tesseract только те части изображения, которые находятся по правую сторону от префиксов `https://` и являются их продолжением.
Обратите внимание на изображение ниже:

На этом изображении можно заметить, что Tesseract будет выполнять **гораздо меньше** работы по распознаванию текста, если мы подскажем ему, где в тексте могут находиться ссылки (обратите внимание на количество голубых прямоугольников, чем не доказательство 🤓).
Итак, вопрос, на который нам необходимо ответить теперь, какую же модель обнаружения объектов нам выбрать и как "научить" ее находить на изображении префиксы `https://`.
> Наконец-то мы подобрались ближе к TensorFlow 😀
## 🤖 Выбираем подходящую модель обнаружения объектов
Тренировка новой модели обнаружения объектов с нуля не является хорошим вариантом в нашем случае по следующим причинам:
- 💔 Тренировка может занять дни/недели и стоить много денег (за аренду тех-же серверов с GPU).
- 💔 У нас скорее всего не получится собрать набор данных, состоящий из сотен тысяч фотографий книг и журналов со ссылками. Тем-более, что нам нужны не только изображения, но еще и координаты префиксов `https://` для каждого из них. С другой стороны мы можем попытаться сгенерировать такой набор данных, но об этом ниже.
Итак, вместо создания новой модели обнаружения объектов, мы будем обучать уже существующую и натренированную модель обнаруживать новый для нее класс объектов (см. [transfer learning](https://en.wikipedia.org/wiki/Transfer_learning)). В нашем случае под "новым классом" объектов мы имеем в виду изображения префикса `https://`. Такой подход имеет следующие преимущества:
- 💚 Набор данных может быть гораздо меньшим. Нет необходимости собирать сотни тысяч изображений с локализациями (координатами объектов в изображении). Вместо этого мы можем обойтись сотней изображений и сделать локализацию объектов вручную. Это возможно по той причине, что модель уже натренированна на общем наборе данных типа [COCO](https://cocodataset.org/#home) и уже умеет извлекать основные характеристики изображения (научить "первокурсника" линейной алгебре, _как правило_, легче, чем "первоклассника").
- 💚 Время тренировки так же будет гораздо меньшим (на GPU получим минуты/часы вместо дней/недель). Время сокращается за счет меньшего объема данных (меньших партий данных во время тренировки) и меньшего количества тренируемых параметров модели.
Мы можем выбрать существующую модель из ["зоопарка" моделей TensorFlow 2](https://github.com/tensorflow/models/blob/master/research/object_detection/g3doc/tf2_detection_zoo.md), который представляет собой коллекцию моделей натренированных на наборе данных [COCO 2017](https://cocodataset.org/#home). На данный момент эта коллекция включает в себя `~40` разных вариаций моделей.
Для того, чтобы "научить" модель обнаруживать новые, ранее неизвестные ей объекты, мы можем воспользоваться [TensorFlow 2 Object Detection API](https://github.com/tensorflow/models/tree/master/research/object_detection). TensorFlow Object Detection API - это фреймворк на основе [TensorFlow](https://www.tensorflow.org/), который позволяет конструировать и тренировать модели обнаружения объектов.
Если вы перейдете по ссылке на ["зоопарк" моделей](https://github.com/tensorflow/models/blob/master/research/object_detection/g3doc/tf2_detection_zoo.md) вы увидите, что для каждой модели там указана _скорость_ и _точность_ обнаружения объектов.

_Изображение взято с репозитория [TensorFlow Model Zoo](https://github.com/tensorflow/models/blob/master/research/object_detection/g3doc/tf2_detection_zoo.md)_
Конечно же, для того, чтобы выбрать подходящую модель, нам важно найти правильный баланс между **скоростью** и **точностью** обнаружения. Но что еще важнее в нашем случае, это **размер** модели, поскольку мы планируем загружать ее на сторону клиента.
Размер архива с моделью может варьироваться от `~20Mb` до `~1Gb`. Вот несколько примеров:
- `1386 (Mb)` `centernet_hg104_1024x1024_kpts_coco17_tpu-32`
- ` 330 (Mb)` `centernet_resnet101_v1_fpn_512x512_coco17_tpu-8`
- ` 195 (Mb)` `centernet_resnet50_v1_fpn_512x512_coco17_tpu-8`
- ` 198 (Mb)` `centernet_resnet50_v1_fpn_512x512_kpts_coco17_tpu-8`
- ` 227 (Mb)` `centernet_resnet50_v2_512x512_coco17_tpu-8`
- ` 230 (Mb)` `centernet_resnet50_v2_512x512_kpts_coco17_tpu-8`
- ` 29 (Mb)` `efficientdet_d0_coco17_tpu-32`
- ` 49 (Mb)` `efficientdet_d1_coco17_tpu-32`
- ` 60 (Mb)` `efficientdet_d2_coco17_tpu-32`
- ` 89 (Mb)` `efficientdet_d3_coco17_tpu-32`
- ` 151 (Mb)` `efficientdet_d4_coco17_tpu-32`
- ` 244 (Mb)` `efficientdet_d5_coco17_tpu-32`
- ` 376 (Mb)` `efficientdet_d6_coco17_tpu-32`
- ` 376 (Mb)` `efficientdet_d7_coco17_tpu-32`
- ` 665 (Mb)` `extremenet`
- ` 427 (Mb)` `faster_rcnn_inception_resnet_v2_1024x1024_coco17_tpu-8`
- ` 424 (Mb)` `faster_rcnn_inception_resnet_v2_640x640_coco17_tpu-8`
- ` 337 (Mb)` `faster_rcnn_resnet101_v1_1024x1024_coco17_tpu-8`
- ` 337 (Mb)` `faster_rcnn_resnet101_v1_640x640_coco17_tpu-8`
- ` 343 (Mb)` `faster_rcnn_resnet101_v1_800x1333_coco17_gpu-8`
- ` 449 (Mb)` `faster_rcnn_resnet152_v1_1024x1024_coco17_tpu-8`
- ` 449 (Mb)` `faster_rcnn_resnet152_v1_640x640_coco17_tpu-8`
- ` 454 (Mb)` `faster_rcnn_resnet152_v1_800x1333_coco17_gpu-8`
- ` 202 (Mb)` `faster_rcnn_resnet50_v1_1024x1024_coco17_tpu-8`
- ` 202 (Mb)` `faster_rcnn_resnet50_v1_640x640_coco17_tpu-8`
- ` 207 (Mb)` `faster_rcnn_resnet50_v1_800x1333_coco17_gpu-8`
- ` 462 (Mb)` `mask_rcnn_inception_resnet_v2_1024x1024_coco17_gpu-8`
- ` 86 (Mb)` `ssd_mobilenet_v1_fpn_640x640_coco17_tpu-8`
- ` 44 (Mb)` `ssd_mobilenet_v2_320x320_coco17_tpu-8`
- ` 20 (Mb)` `ssd_mobilenet_v2_fpnlite_320x320_coco17_tpu-8`
- ` 20 (Mb)` `ssd_mobilenet_v2_fpnlite_640x640_coco17_tpu-8`
- ` 369 (Mb)` `ssd_resnet101_v1_fpn_1024x1024_coco17_tpu-8`
- ` 369 (Mb)` `ssd_resnet101_v1_fpn_640x640_coco17_tpu-8`
- ` 481 (Mb)` `ssd_resnet152_v1_fpn_1024x1024_coco17_tpu-8`
- ` 480 (Mb)` `ssd_resnet152_v1_fpn_640x640_coco17_tpu-8`
- ` 233 (Mb)` `ssd_resnet50_v1_fpn_1024x1024_coco17_tpu-8`
- ` 233 (Mb)` `ssd_resnet50_v1_fpn_640x640_coco17_tpu-8`
Модель **`ssd_mobilenet_v2_fpnlite_640x640_coco17_tpu-8`** выглядит наиболее подходящей в нашем случае:
- 💚 Она относительно небольшая - `20Mb` в архиве.
- 💚 Она достаточно быстрая - `39ms` на одно обнаружение.
- 💚 Она использует сеть MobileNet v2 в качестве экстрактора свойств изображения (feature extractor), которая в свою очередь оптимизирована под работу на мобильных устройствах и обеспечивает меньший расход батареи.
- 💚 Она производит обнаружение всех известных ей объектов в изображении **за один проход** независимо от содержимого изображения (отсутствует шаг [regions proposal](https://en.wikipedia.org/wiki/Region_Based_Convolutional_Neural_Networks), что делает работу сети быстрее).
- 💔 В то же время это не самая точная модель (все является компромиссом ⚖️)
Название модели включает в себя ее несколько важных характеристик, с которыми вы при желании можете ознакомиться детальнее:
- Ожидаемый размер изображения на входе - `640x640px`.
- Модель построена на основе [Single Shot MultiBox Detector](https://arxiv.org/abs/1512.02325) (SSD) и [Feature Pyramid Network](https://arxiv.org/abs/1612.03144) (FPN).
- Сверточная нейронная сеть ([CNN](https://en.wikipedia.org/wiki/Convolutional_neural_network)) [MobileNet v2](https://ai.googleblog.com/2018/04/mobilenetv2-next-generation-of-on.html) используется в качестве экстрактора свойств изображения (feature extractor).
- Модель была обучена на наборе данных [COCO](https://cocodataset.org/#home)
## 🛠 Устанавливаем Object Detection API
В этой статье мы будем устанавливать Tensorflow 2 Object Detection API _в виде пакета Python_. Это достаточно удобно, в случае если вы экспериментируете в [Google Colab](https://colab.research.google.com/) (предпочтительно) или в [Jupyter](https://jupyter.org/try). В обоих случаях вы можете избежать локальной инсталляции пакетов и проводить эксперименты непосредственно в браузере.
Также есть возможность установки Object Detection API используя Docker, о котором вы можете прочитать в [документации](https://github.com/tensorflow/models/blob/master/research/object_detection/g3doc/tf2.md).
> Если у вас возникнут трудности во время установки API или во время создания набора данных (следующие разделы), вы можете обратиться к статье [TensorFlow 2 Object Detection API tutorial](https://tensorflow-object-detection-api-tutorial.readthedocs.io/en/latest/index.html), в которой есть много полезных деталей и советов.
Для начала давайте клонируем [репозиторий с API](https://github.com/tensorflow/models):
```bash
git clone --depth 1 https://github.com/tensorflow/models
```
_output →_
```
Cloning into 'models'...
remote: Enumerating objects: 2301, done.
remote: Counting objects: 100% (2301/2301), done.
remote: Compressing objects: 100% (2000/2000), done.
remote: Total 2301 (delta 561), reused 922 (delta 278), pack-reused 0
Receiving objects: 100% (2301/2301), 30.60 MiB | 13.90 MiB/s, done.
Resolving deltas: 100% (561/561), done.
```
Теперь можем скомпилировать [файлы-прототипы API](https://github.com/tensorflow/models/tree/master/research/object_detection/protos) в Python формат, используя [protoc](https://grpc.io/docs/protoc-installation/):
```bash
cd ./models/research
protoc object_detection/protos/*.proto --python_out=.
```
Следующим шагом будет установка API для версии TensorFlow 2 используя `pip` и файл [setup.py](https://github.com/tensorflow/models/blob/master/research/object_detection/packages/tf2/setup.py)`:
```bash
cp ./object_detection/packages/tf2/setup.py .
pip install . --quiet
```
> Если на этом шаге вы обнаружите ошибки, связанные установкой зависимых пакетов, попробуйте запустить `pip install . --quiet` во второй раз.
Проверить успешность установки вы можете запустив тест:
```bash
python object_detection/builders/model_builder_tf2_test.py
```
В итоге вы должны будете увидеть в консоли, что-то вроде этого:
```
[ OK ] ModelBuilderTF2Test.test_unknown_ssd_feature_extractor
----------------------------------------------------------------------
Ran 20 tests in 45.072s
OK (skipped=1)
```
TensorFlow Object Detection API установлена! Теперь мы можем использовать скрипты, предоставляемы этой API, для [обнаружения объектов в изображениях](https://github.com/tensorflow/models/blob/master/research/object_detection/colab_tutorials/inference_tf2_colab.ipynb), [тренировки](https://github.com/tensorflow/models/blob/master/research/object_detection/g3doc/tf2_training_and_evaluation.md) или [доработки](https://github.com/tensorflow/models/blob/master/research/object_detection/colab_tutorials/eager_few_shot_od_training_tf2_colab.ipynb) моделей.
## ⬇️ Загружаем заранее обученную модель
Давайте загрузим ранее выбранную нами модель `ssd_mobilenet_v2_fpnlite_640x640_coco17_tpu-8` из коллекции моделей TensorFlow и посмотрим, как мы можем использовать ее для обнаружения общих объектов, таких как "кот", "собака", "машина" и пр. (объектов с классами, поддерживаемыми набором данных COCO).
Мы воспользуемся утилитой TensorFlow [get_file()](https://www.tensorflow.org/api_docs/python/tf/keras/utils/get_file) для загрузки архивированной модели по URL и для дальнейшей ее распаковки.
```python
import tensorflow as tf
import pathlib
MODEL_NAME = 'ssd_mobilenet_v2_fpnlite_640x640_coco17_tpu-8'
TF_MODELS_BASE_PATH = 'http://download.tensorflow.org/models/object_detection/tf2/20200711/'
CACHE_FOLDER = './cache'
def download_tf_model(model_name, cache_folder):
model_url = TF_MODELS_BASE_PATH + model_name + '.tar.gz'
model_dir = tf.keras.utils.get_file(
fname=model_name,
origin=model_url,
untar=True,
cache_dir=pathlib.Path(cache_folder).absolute()
)
return model_dir
# Start the model download.
model_dir = download_tf_model(MODEL_NAME, CACHE_FOLDER)
print(model_dir)
```
_output →_
```
/content/cache/datasets/ssd_mobilenet_v2_fpnlite_640x640_coco17_tpu-8
```
Вот как на данный момент выглядит структура папок:

Папка `checkpoint` содержит "слепок" параметров обученной модели.
Файл `pipeline.config` содержит настройки обнаружения. Мы еще вернемся к этому файлу ниже, когда будем обучать нашу модель.
## 🏄🏻️ Обнаружение объектов с помощью загруженной модели
На данный момент модель способна обнаруживать объекты классов, поддерживаемых набором данных COCO ([их всего 90](https://cocodataset.org/#explore)), таких, как `car`, `bird`, `hot dog` и пр. Эти классы еще могут называть ярлыками (labels).

_Источник изображения: [сайт COCO](https://cocodataset.org/#explore)_
Попробуем, обнаружит ли модель объекты этих классов.
### Загружаем ярлыки COCO
Object Detection API уже содержит файл с полным набор классов (ярлыков) COCO для нашего удобства.
```python
import os
# Import Object Detection API helpers.
from object_detection.utils import label_map_util
# Loads the COCO labels data (class names and indices relations).
def load_coco_labels():
# Object Detection API already has a complete set of COCO classes defined for us.
label_map_path = os.path.join(
'models/research/object_detection/data',
'mscoco_complete_label_map.pbtxt'
)
label_map = label_map_util.load_labelmap(label_map_path)
# Class ID to Class Name mapping.
categories = label_map_util.convert_label_map_to_categories(
label_map,
max_num_classes=label_map_util.get_max_label_map_index(label_map),
use_display_name=True
)
category_index = label_map_util.create_category_index(categories)
# Class Name to Class ID mapping.
label_map_dict = label_map_util.get_label_map_dict(label_map, use_display_name=True)
return category_index, label_map_dict
# Load COCO labels.
coco_category_index, coco_label_map_dict = load_coco_labels()
print('coco_category_index:', coco_category_index)
print('coco_label_map_dict:', coco_label_map_dict)
```
_output →_
```
coco_category_index:
{
1: {'id': 1, 'name': 'person'},
2: {'id': 2, 'name': 'bicycle'},
...
90: {'id': 90, 'name': 'toothbrush'},
}
coco_label_map_dict:
{
'background': 0,
'person': 1,
'bicycle': 2,
'car': 3,
...
'toothbrush': 90,
}
```
### Создаем функцию обнаружения
В этом разделе мы создадим так называемую функцию обнаружения, которая будет использовать загруженную нами ранее модель, собственно, для обнаружения объектов в изображении.
```python
import tensorflow as tf
# Import Object Detection API helpers.
from object_detection.utils import config_util
from object_detection.builders import model_builder
# Generates the detection function for specific model and specific model's checkpoint
def detection_fn_from_checkpoint(config_path, checkpoint_path):
# Build the model.
pipeline_config = config_util.get_configs_from_pipeline_file(config_path)
model_config = pipeline_config['model']
model = model_builder.build(
model_config=model_config,
is_training=False,
)
# Restore checkpoints.
ckpt = tf.compat.v2.train.Checkpoint(model=model)
ckpt.restore(checkpoint_path).expect_partial()
# This is a function that will do the detection.
@tf.function
def detect_fn(image):
image, shapes = model.preprocess(image)
prediction_dict = model.predict(image, shapes)
detections = model.postprocess(prediction_dict, shapes)
return detections, prediction_dict, tf.reshape(shapes, [-1])
return detect_fn
inference_detect_fn = detection_fn_from_checkpoint(
config_path=os.path.join('cache', 'datasets', MODEL_NAME, 'pipeline.config'),
checkpoint_path=os.path.join('cache', 'datasets', MODEL_NAME, 'checkpoint', 'ckpt-0'),
)
```
Функция `inference_detect_fn` принимает на входе изображение и возвращает информацию об обнаруженных в нем объектах.
### Загружаем тестовые изображения
Давайте попробуем найти объекты на следующем изображении:

Для этого сохраним это изображение в папку `inference/test/` нашего проекта. Если вы используете Google Colab, вы можете создать эту папку и произвести загрузку файла вручную.
Вот как структура папок должна выглядеть на данный момент:

```python
import matplotlib.pyplot as plt
%matplotlib inline
# Creating a TensorFlow dataset of just one image.
inference_ds = tf.keras.preprocessing.image_dataset_from_directory(
directory='inference',
image_size=(640, 640),
batch_size=1,
shuffle=False,
label_mode=None
)
# Numpy version of the dataset.
inference_ds_numpy = list(inference_ds.as_numpy_iterator())
# You may preview the images in dataset like this.
plt.figure(figsize=(14, 14))
for i, image in enumerate(inference_ds_numpy):
plt.subplot(2, 2, i + 1)
plt.imshow(image[0].astype("uint8"))
plt.axis("off")
plt.show()
```
### Запускаем обнаружение для тестового изображения
На данном этапе мы готовы запустить обнаружение. Первый элемент массива `inference_ds_numpy[0]` содержит наше первое тестовое изображение в формате массива `Numpy`.
```python
detections, predictions_dict, shapes = inference_detect_fn(
inference_ds_numpy[0]
)
```
Проверим размерность массивов, которые нам вернула функция:
```python
boxes = detections['detection_boxes'].numpy()
scores = detections['detection_scores'].numpy()
classes = detections['detection_classes'].numpy()
num_detections = detections['num_detections'].numpy()[0]
print('boxes.shape: ', boxes.shape)
print('scores.shape: ', scores.shape)
print('classes.shape: ', classes.shape)
print('num_detections:', num_detections)
```
_output →_
```
boxes.shape: (1, 100, 4)
scores.shape: (1, 100)
classes.shape: (1, 100)
num_detections: 100.0
```
Модель вернула нам массив со `100` "обнаружениями". Это не означает, что модель нашла `100` объектов в изображении. Это скорее говорит нам, что модель имеет `100` ячеек и поддерживает обнаружение максимум `100` объектов одновременно в одном изображении. Каждое "обнаружение" имеет соответствующий рейтинг (вероятность, score), который говорит об уверенности модели в том, что обнаружен именно этот объект. Габариты каждого найденного объекта хранятся в массиве `boxes`. Рейтинг каждого обнаружения хранится в массиве `scores`. Массив `classes` хранит ярлыки для каждого "обнаружения".
Давайте проверим первые 5 таких "обнаружений":
```python
print('First 5 boxes:')
print(boxes[0,:5])
print('First 5 scores:')
print(scores[0,:5])
print('First 5 classes:')
print(classes[0,:5])
class_names = [coco_category_index[idx + 1]['name'] for idx in classes[0]]
print('First 5 class names:')
print(class_names[:5])
```
_output →_
```
First 5 boxes:
[[0.17576033 0.84654826 0.25642633 0.88327974]
[0.5187813 0.12410264 0.6344235 0.34545377]
[0.5220358 0.5181462 0.6329132 0.7669856 ]
[0.50933677 0.7045719 0.5619138 0.7446198 ]
[0.44761637 0.51942706 0.61237675 0.75963426]]
First 5 scores:
[0.6950246 0.6343004 0.591157 0.5827219 0.5415643]
First 5 classes:
[9. 8. 8. 0. 8.]
First 5 class names:
['traffic light', 'boat', 'boat', 'person', 'boat']
```
Модель видит светофор (`traffic light`), три лодки (`boats`) и человека (`person`). И мы можем подтвердить, что эти объекты действительно существуют в изображении.
В массиве `scores` мы видим, что модель наиболее уверенна (с 70% вероятностью) в найденном объекте класса `traffic light`.
Каждый элемент массива `boxes` представляет собой координаты `[y1, x1, y2, x2]`, где `(x1, y1)` и `(x2, y2)` соответственно координаты левого верхнего и правого нижнего углов габаритного прямоугольника.
Попробуем визуализировать габаритные прямоугольники:
```python
# Importing Object Detection API helpers.
from object_detection.utils import visualization_utils
# Visualizes the bounding boxes on top of the image.
def visualize_detections(image_np, detections, category_index):
label_id_offset = 1
image_np_with_detections = image_np.copy()
visualization_utils.visualize_boxes_and_labels_on_image_array(
image_np_with_detections,
detections['detection_boxes'][0].numpy(),
(detections['detection_classes'][0].numpy() + label_id_offset).astype(int),
detections['detection_scores'][0].numpy(),
category_index,
use_normalized_coordinates=True,
max_boxes_to_draw=200,
min_score_thresh=.4,
agnostic_mode=False,
)
plt.figure(figsize=(12, 16))
plt.imshow(image_np_with_detections)
plt.show()
# Visualizing the detections.
visualize_detections(
image_np=tf.cast(inference_ds_numpy[0][0], dtype=tf.uint32).numpy(),
detections=detections,
category_index=coco_category_index,
)
```
В итоге мы увидим:

В то же время, если мы попробуем обнаружить объекты на текстовом изображении мы увидим следующее:

Модель не смогла найти ничего в этом изображении. Это как-раз то, что мы собираемся исправить и чему хотим научить нашу модель - видеть приставки `https://` в текстовых изображениях.
## 📝 Подготавливаем набор данных для тренировки
Для того, чтобы научить модель `ssd_mobilenet_v2_fpnlite_640x640_coco17_tpu-8` обнаруживать объекты, которые _не были_ описаны в наборе данных COCO нам необходимо подготовить свой набор данных и "доучить" модель на нем.
Наборы данных для задачи обнаружения объектов состоят из двух компонентов:
1. Собственно само изображение (например, изображение печатной странички книги или журнала)
2. Габаритные прямоугольники, которые показывают где именно в изображении расположены объекты.

В примере выше координаты `левого верхнего` и `правого нижнего` углов имеют _абсолютные_ значения (в пикселях). Также существуют альтернативные способы записи параметров таких габаритных прямоугольников. Например, мы можем описать прямоугольник с помощью его `координат центра`, а так же `ширины` и `высоты`. Мы также можем использовать _относительные_ значения координат (процент от ширины или высоты изображения). Но в целом, думаю идея понятна: модель должна знать где именно в изображении находится тот или иной объект.
Вопрос в том, где же нам взять такие данные для тренировки. У нас есть три варианта:
1. _Воспользоваться имеющимся_ набором данных.
2. _Сгенерировать новый_ искусственный набор данных.
3. _Создать_ набор данных вручную путем фотографирования или загрузки реальных изображений с текстом и `https://` ссылками и дальнейшей аннотацией (указанием позиций объектов) каждого изображения вручную.
### Вариант №1: Использование существующих наборов данных
Есть множество общедоступных наборов данных. Мы можем воспользоваться следующими ресурсами для поиска подходящего набора:
- [Google Dataset Search](https://datasetsearch.research.google.com/)
- [Kaggle Datasets](https://www.kaggle.com/datasets)
- репозиторий [awesome-public-datasets](https://github.com/awesomedata/awesome-public-datasets)
- и пр.
💚 Если у вас получится найти подходящий набор данных с лицензией, позволяющей его использовать, то это, пожалуй, наиболее быстрый способ начать тренировку модели.
💔 Но проблема в том, что мне не удалось найти набор данных, содержащий изображения книг со ссылками и их координатами.
Этот вариант нам прийдется пропустить.
### Вариант №2: Генерирование искусственного набора данных
Существуют библиотеки (например [keras_ocr](https://keras-ocr.readthedocs.io/en/latest/examples/end_to_end_training.html#generating-synthetic-data)), которые могли бы нам помочь сгенерировать случайный текст, поместить в него ссылку и отрисовать текст на различных фонах и с различными искажениями.
💚 Преимущество данного подхода заключается в том, что он дает нам возможность сгенерировать экземпляры данных с разными _шрифтами_, _лигатурами_, _цветами текста_ и _фона_. Это помогло бы нам избежать проблемы [переученности модели](https://en.wikipedia.org/wiki/Overfitting). Модель могла-бы легко обобщать свои "знания" в случае с изображениями, которые она не видела ранее.
💚 Этот подход дает нам возможность сгенерировать разные типы ссылок, таких как: `http://`, `http://`, `ftp://`, `tcp://` и пр. Ведь найти множество реальных изображений с разными типами ссылок могло бы стать проблемой.
💚 Еще одним преимуществом этого подхода является то, что мы можем сгенерировать столько изображений сколько хотим. Мы не ограничены количеством страниц со ссылками в книге, которую нам удалось найти. Увеличение набора данных может в итоге улучшить точность модели.
💔 С другой стороны, существует возможность неправильного использования такого генератора, что в итоге может привести к набору
данных, который будет существенно отличаться от реальных изображений. Например, мы можем ошибочно применить неправдоподобные изгибы страниц (волна вместо дуги) или неправдоподобные фоны. Модель в таком может не обобщить свои "знания" на изображения из реального мира.
> Этот подход мне кажется очень многообещающим. Он может помочь нам преодолеть множество недостатков модели (о них мы упомянем ниже в статье). Я пока еще не пробовал применить этот подход, но, возможно, это будет предметом отдельной статьи.
### Вариант №3: Создание набора данных вручную
Наиболее прямолинейный способ - это взять книгу (или книги), сфотографировать странички, содержащие ссылки и обозначить локации префиксов `https://` для каждой странички вручную.
Хорошая новость в том, что набор данных, который нам нужен, может быть достаточно небольшим (сотни изображений будет достаточно). Это обусловлено тем, что мы не собираемся тренировать модель _с нуля_. Вместо этого мы будем "доучивать" уже обученную модель (см. [transfer learning](https://en.wikipedia.org/wiki/Transfer_learning) и [few-shot learning](https://paperswithcode.com/task/few-shot-learning)).
💚 В данном случае набор данных будет максимально приближен к реальному миру. Мы в буквальном смысле возьмем книгу, сфотографируем странички с реальными шрифтами, изгибами, тенями и цветами.
💔 С другой стороны, даже с учетом того, что нам нужны всего сотни страничек, работа по сбору таких страничек и их дальнейшей аннотации может занять достаточно много времени.
💔 Тяжело найти разные книги и журналы с разными шрифтами, типами ссылок, с разными фонами и лигатурами. В итоге набора данных будет достаточно узконаправленным (у пользователей должны будут быть книги со шрифтами и фонами похожими на ваши).
Поскольку целью этой статьи, как было упомянуто выше, не является создание модели, которая должна выиграть соревнование по обнаружению объектов, мы можем пойти по пути создания модели вручную.
### Обрабатываем фото для набора данных
Я сфотографировал `125` страничек одной книги, в которых нашел `https://` ссылки.

Все изображения были помещены в папку `dataset/printed_links/raw`.
Следующим шаг - обработка изображений. Давайте применим следующие преобразования:
- **Изменим размер** каждого изображения так, чтобы их ширина составила `1024px` (изначально изображения были чересчур большими с шириной в `3024px`)
- **Обрежем** каждое изображение так, чтобы оно стало квадратным (это делать не обязательно, можно просто сжать изображение до квадратных пропорций, не обрезая его, но я хотел сохранить естественные пропорции префиксов `https:` перед обучением).
- **Развернем** каждое изображения до правильной ориентации, применив метаданные из тега [exif](https://en.wikipedia.org/wiki/Exif).
- **Сделаем каждое изображение черно-белым**, поскольку мы не хотим, чтобы модель брала во внимание цвет.
- **Увеличим яркость**
- **Увеличим контраст**
- **Увеличим резкость**
Стоить отметить, что в будущем, мы должны будем применять эти же манипуляции над изображениями перед тем, как отправлять их на вход нашей модели (если тренировочные изображения были черно-белыми и квадратными, то и реальные изображения, которые мы будем отправлять в нашу модель должны быть такими же квадратными и черно-белыми).
Мы можем применить все вышеописанные трансформации используя Python:
```python
import os
import math
import shutil
from pathlib import Path
from PIL import Image, ImageOps, ImageEnhance
# Resize an image.
def preprocess_resize(target_width):
def preprocess(image: Image.Image, log) -> Image.Image:
(width, height) = image.size
ratio = width / height
if width > target_width:
target_height = math.floor(target_width / ratio)
log(f'Resizing: To size {target_width}x{target_height}')
image = image.resize((target_width, target_height))
else:
log('Resizing: Image already resized, skipping...')
return image
return preprocess
# Crop an image.
def preprocess_crop_square():
def preprocess(image: Image.Image, log) -> Image.Image:
(width, height) = image.size
left = 0
top = 0
right = width
bottom = height
crop_size = min(width, height)
if width >= height:
# Horizontal image.
log(f'Squre cropping: Horizontal {crop_size}x{crop_size}')
left = width // 2 - crop_size // 2
right = left + crop_size
else:
# Vetyical image.
log(f'Squre cropping: Vertical {crop_size}x{crop_size}')
top = height // 2 - crop_size // 2
bottom = top + crop_size
image = image.crop((left, top, right, bottom))
return image
return preprocess
# Apply exif transpose to an image.
def preprocess_exif_transpose():
# @see: https://pillow.readthedocs.io/en/stable/reference/ImageOps.html
def preprocess(image: Image.Image, log) -> Image.Image:
log('EXif transpose')
image = ImageOps.exif_transpose(image)
return image
return preprocess
# Apply color transformations to the image.
def preprocess_color(brightness, contrast, color, sharpness):
# @see: https://pillow.readthedocs.io/en/3.0.x/reference/ImageEnhance.html
def preprocess(image: Image.Image, log) -> Image.Image:
log('Coloring')
enhancer = ImageEnhance.Color(image)
image = enhancer.enhance(color)
enhancer = ImageEnhance.Brightness(image)
image = enhancer.enhance(brightness)
enhancer = ImageEnhance.Contrast(image)
image = enhancer.enhance(contrast)
enhancer = ImageEnhance.Sharpness(image)
image = enhancer.enhance(sharpness)
return image
return preprocess
# Image pre-processing pipeline.
def preprocess_pipeline(src_dir, dest_dir, preprocessors=[], files_num_limit=0, override=False):
# Create destination folder if not exists.
Path(dest_dir).mkdir(parents=False, exist_ok=True)
# Get the list of files to be copied.
src_file_names = os.listdir(src_dir)
files_total = files_num_limit if files_num_limit > 0 else len(src_file_names)
files_processed = 0
# Logger function.
def preprocessor_log(message):
print(' ' + message)
# Iterate through files.
for src_file_index, src_file_name in enumerate(src_file_names):
if files_num_limit > 0 and src_file_index >= files_num_limit:
break
# Copy file.
src_file_path = os.path.join(src_dir, src_file_name)
dest_file_path = os.path.join(dest_dir, src_file_name)
progress = math.floor(100 * (src_file_index + 1) / files_total)
print(f'Image {src_file_index + 1}/{files_total} | {progress}% | {src_file_path}')
if not os.path.isfile(src_file_path):
preprocessor_log('Source is not a file, skipping...\n')
continue
if not override and os.path.exists(dest_file_path):
preprocessor_log('File already exists, skipping...\n')
continue
shutil.copy(src_file_path, dest_file_path)
files_processed += 1
# Preprocess file.
image = Image.open(dest_file_path)
for preprocessor in preprocessors:
image = preprocessor(image, preprocessor_log)
image.save(dest_file_path, quality=95)
print('')
print(f'{files_processed} out of {files_total} files have been processed')
# Launching the image preprocessing pipeline.
preprocess_pipeline(
src_dir='dataset/printed_links/raw',
dest_dir='dataset/printed_links/processed',
override=True,
# files_num_limit=1,
preprocessors=[
preprocess_exif_transpose(),
preprocess_resize(target_width=1024),
preprocess_crop_square(),
preprocess_color(brightness=2, contrast=1.3, color=0, sharpness=1),
]
)
```
В результате все обработанные изображения будут сохранены в папке `dataset/printed_links/processed`.

Мы можем просмотреть полученные изображения следующим образом:
```python
import matplotlib.pyplot as plt
import numpy as np
def preview_images(images_dir, images_num=1, figsize=(15, 15)):
image_names = os.listdir(images_dir)
image_names = image_names[:images_num]
num_cells = math.ceil(math.sqrt(images_num))
figure = plt.figure(figsize=figsize)
for image_index, image_name in enumerate(image_names):
image_path = os.path.join(images_dir, image_name)
image = Image.open(image_path)
figure.add_subplot(num_cells, num_cells, image_index + 1)
plt.imshow(np.asarray(image))
plt.show()
preview_images('dataset/printed_links/processed', images_num=4, figsize=(16, 16))
```
### Указываем позиции и габариты объектов для нашего набора данных
Для того, чтобы указать позиции и габариты объектов (префиксов `https://`) в нашем наборе данных мы можем воспользоваться программой аннотации изображений [LabelImg](https://github.com/tzutalin/labelImg).
> Вам понадобится установить LabelImg локально на ваш компьютер. Детальную инструкцию по установке вы сможете найти в [документации LabelImg](https://github.com/tzutalin/labelImg)
После установки LabelImg, вы можете запустить программу из консоли, указав папку с изображениями (в нашем случае `dataset/printed_links/processed`), которую вы хотите аннотировать:
```bash
labelImg dataset/printed_links/processed
```
В открывшемся окне вам необходимо аннотировать все изображения из папки `dataset/printed_links/processed` и сохранить все изображения в формате XML в папку `dataset/printed_links/labels/xml/`.


После завершения процесса аннотирования для каждого изображения мы должны получить XML файл с позицией и габаритами каждого объекта:

### Разбиваем общий набор данных на тренировочный и тестовый наборы
Для того, чтобы идентифицировать проблему [переучивания или недоучивания](https://en.wikipedia.org/wiki/Overfitting) модели, нам необходимо разбить наш общий набор данных на тренировочный и тестовый наборы. Мы можем использовать `80%` всех изображений для тренировки и `20%` изображений для тестирования модели. Задача тестового набора - понять насколько наша модель может обобщить свои "знания" на данных, которые она не "видела" раньше.
> В этой статье мы будем разбивать файлы путем их перемешивания и копирования в разные папки (в папки `test` и `train`). Стоит отметить, что такой подход, возможно, не является оптимальным. Вместо физического размещения файлов в разных папках мы так же можем разбивать набор данных на подгруппы на лету с помощью [tf.data.Dataset](https://www.tensorflow.org/api_docs/python/tf/data/Dataset).
```python
import re
import random
def partition_dataset(
images_dir,
xml_labels_dir,
train_dir,
test_dir,
val_dir,
train_ratio,
test_ratio,
val_ratio,
copy_xml
):
if not os.path.exists(train_dir):
os.makedirs(train_dir)
if not os.path.exists(test_dir):
os.makedirs(test_dir)
if not os.path.exists(val_dir):
os.makedirs(val_dir)
images = [f for f in os.listdir(images_dir)
if re.search(r'([a-zA-Z0-9\s_\\.\-\(\):])+(.jpg|.jpeg|.png)$', f, re.IGNORECASE)]
num_images = len(images)
num_train_images = math.ceil(train_ratio * num_images)
num_test_images = math.ceil(test_ratio * num_images)
num_val_images = math.ceil(val_ratio * num_images)
print('Intended split')
print(f' train: {num_train_images}/{num_images} images')
print(f' test: {num_test_images}/{num_images} images')
print(f' val: {num_val_images}/{num_images} images')
actual_num_train_images = 0
actual_num_test_images = 0
actual_num_val_images = 0
def copy_random_images(num_images, dest_dir):
copied_num = 0
if not num_images:
return copied_num
for i in range(num_images):
if not len(images):
break
idx = random.randint(0, len(images)-1)
filename = images[idx]
shutil.copyfile(os.path.join(images_dir, filename), os.path.join(dest_dir, filename))
if copy_xml:
xml_filename = os.path.splitext(filename)[0]+'.xml'
shutil.copyfile(os.path.join(xml_labels_dir, xml_filename), os.path.join(dest_dir, xml_filename))
images.remove(images[idx])
copied_num += 1
return copied_num
actual_num_train_images = copy_random_images(num_train_images, train_dir)
actual_num_test_images = copy_random_images(num_test_images, test_dir)
actual_num_val_images = copy_random_images(num_val_images, val_dir)
print('\n', 'Actual split')
print(f' train: {actual_num_train_images}/{num_images} images')
print(f' test: {actual_num_test_images}/{num_images} images')
print(f' val: {actual_num_val_images}/{num_images} images')
partition_dataset(
images_dir='dataset/printed_links/processed',
train_dir='dataset/printed_links/partitioned/train',
test_dir='dataset/printed_links/partitioned/test',
val_dir='dataset/printed_links/partitioned/val',
xml_labels_dir='dataset/printed_links/labels/xml',
train_ratio=0.8,
test_ratio=0.2,
val_ratio=0,
copy_xml=True
)
```
После разбития нашего набора данных структура папок должна выглядеть так:
```
dataset/
└── printed_links
├── labels
│ └── xml
├── partitioned
│ ├── test
│ └── train
│ ├── IMG_9140.JPG
│ ├── IMG_9140.xml
│ ├── IMG_9141.JPG
│ ├── IMG_9141.xml
│ ...
├── processed
└── raw
```
### Экспортируем набор данных
Последней манипуляцией над данными, которую нам необходимо произвести, будет конвертация данных в формат [TFRecord](https://www.tensorflow.org/tutorials/load_data/tfrecord). Формат `TFRecord` используется TensorFlow для хранения последовательности записей (в нашем случае для хранения последовательности изображений).
Сначала создадим две папки: одну для хранения аннотаций в формате `CSV`, другую для хранения нашей финальной версии набора данных в формате `TFRecord`.
```bash
mkdir -p dataset/printed_links/labels/csv
mkdir -p dataset/printed_links/tfrecords
```
Теперь нам необходимо создать файл-прототип `dataset/printed_links/labels/label_map.pbtxt` с классами объектов, которые наша модель должна научиться распознавать. В нашем случае у нас будет всего _один класс_, который мы назовем `http`. Содержимое файла должно быть следующим:
```
item {
id: 1
name: 'http'
}
```
Теперь мы готовы конвертировать набор данных в формат TFRecord из набора `jpg` изображений и аннотаций в `xml` формате:
```python
import os
import io
import math
import glob
import tensorflow as tf
import pandas as pd
import xml.etree.ElementTree as ET
from PIL import Image
from collections import namedtuple
from object_detection.utils import dataset_util, label_map_util
tf1 = tf.compat.v1
# Convers labels from XML format to CSV.
def xml_to_csv(path):
xml_list = []
for xml_file in glob.glob(path + '/*.xml'):
tree = ET.parse(xml_file)
root = tree.getroot()
for member in root.findall('object'):
value = (root.find('filename').text,
int(root.find('size')[0].text),
int(root.find('size')[1].text),
member[0].text,
int(member[4][0].text),
int(member[4][1].text),
int(member[4][2].text),
int(member[4][3].text)
)
xml_list.append(value)
column_name = ['filename', 'width', 'height', 'class', 'xmin', 'ymin', 'xmax', 'ymax']
xml_df = pd.DataFrame(xml_list, columns=column_name)
return xml_df
def class_text_to_int(row_label, label_map_dict):
return label_map_dict[row_label]
def split(df, group):
data = namedtuple('data', ['filename', 'object'])
gb = df.groupby(group)
return [data(filename, gb.get_group(x)) for filename, x in zip(gb.groups.keys(), gb.groups)]
# Creates a TFRecord.
def create_tf_example(group, path, label_map_dict):
with tf1.gfile.GFile(os.path.join(path, '{}'.format(group.filename)), 'rb') as fid:
encoded_jpg = fid.read()
encoded_jpg_io = io.BytesIO(encoded_jpg)
image = Image.open(encoded_jpg_io)
width, height = image.size
filename = group.filename.encode('utf8')
image_format = b'jpg'
xmins = []
xmaxs = []
ymins = []
ymaxs = []
classes_text = []
classes = []
for index, row in group.object.iterrows():
xmins.append(row['xmin'] / width)
xmaxs.append(row['xmax'] / width)
ymins.append(row['ymin'] / height)
ymaxs.append(row['ymax'] / height)
classes_text.append(row['class'].encode('utf8'))
classes.append(class_text_to_int(row['class'], label_map_dict))
tf_example = tf1.train.Example(features=tf1.train.Features(feature={
'image/height': dataset_util.int64_feature(height),
'image/width': dataset_util.int64_feature(width),
'image/filename': dataset_util.bytes_feature(filename),
'image/source_id': dataset_util.bytes_feature(filename),
'image/encoded': dataset_util.bytes_feature(encoded_jpg),
'image/format': dataset_util.bytes_feature(image_format),
'image/object/bbox/xmin': dataset_util.float_list_feature(xmins),
'image/object/bbox/xmax': dataset_util.float_list_feature(xmaxs),
'image/object/bbox/ymin': dataset_util.float_list_feature(ymins),
'image/object/bbox/ymax': dataset_util.float_list_feature(ymaxs),
'image/object/class/text': dataset_util.bytes_list_feature(classes_text),
'image/object/class/label': dataset_util.int64_list_feature(classes),
}))
return tf_example
def dataset_to_tfrecord(
images_dir,
xmls_dir,
label_map_path,
output_path,
csv_path=None
):
label_map = label_map_util.load_labelmap(label_map_path)
label_map_dict = label_map_util.get_label_map_dict(label_map)
tfrecord_writer = tf1.python_io.TFRecordWriter(output_path)
images_path = os.path.join(images_dir)
csv_examples = xml_to_csv(xmls_dir)
grouped_examples = split(csv_examples, 'filename')
for group in grouped_examples:
tf_example = create_tf_example(group, images_path, label_map_dict)
tfrecord_writer.write(tf_example.SerializeToString())
tfrecord_writer.close()
print('Successfully created the TFRecord file: {}'.format(output_path))
if csv_path is not None:
csv_examples.to_csv(csv_path, index=None)
print('Successfully created the CSV file: {}'.format(csv_path))
# Generate a TFRecord for train dataset.
dataset_to_tfrecord(
images_dir='dataset/printed_links/partitioned/train',
xmls_dir='dataset/printed_links/partitioned/train',
label_map_path='dataset/printed_links/labels/label_map.pbtxt',
output_path='dataset/printed_links/tfrecords/train.record',
csv_path='dataset/printed_links/labels/csv/train.csv'
)
# Generate a TFRecord for test dataset.
dataset_to_tfrecord(
images_dir='dataset/printed_links/partitioned/test',
xmls_dir='dataset/printed_links/partitioned/test',
label_map_path='dataset/printed_links/labels/label_map.pbtxt',
output_path='dataset/printed_links/tfrecords/test.record',
csv_path='dataset/printed_links/labels/csv/test.csv'
)
```
В результате мы должны получить файлы `test.record` и `train.record` в папке `dataset/printed_links/tfrecords/`:
```
dataset/
└── printed_links
├── labels
│ ├── csv
│ ├── label_map.pbtxt
│ └── xml
├── partitioned
│ ├── test
│ ├── train
│ └── val
├── processed
├── raw
└── tfrecords
├── test.record
└── train.record
```
Эти два файла `test.record` и `train.record` являются конечной версией нашего набора данных, который мы будем использовать для обучения модели `ssd_mobilenet_v2_fpnlite_640x640_coco17_tpu-8`.
## 📖 Работаем с набором данных в формате TFRecord
В этом разделе мы посмотрим, какие инструменты для исследования наборов данных в формате `TFRecord` имеются в TensorFlow 2 Object Detection API.
**Проверяем количество экземпляров в наборе данных**
Посчитать количество экземпляров мы можем следующим образом:
```python
import tensorflow as tf
# Count the number of examples in the dataset.
def count_tfrecords(tfrecords_filename):
raw_dataset = tf.data.TFRecordDataset(tfrecords_filename)
# Keep in mind that the list() operation might be
# a performance bottleneck for large datasets.
return len(list(raw_dataset))
TRAIN_RECORDS_NUM = count_tfrecords('dataset/printed_links/tfrecords/train.record')
TEST_RECORDS_NUM = count_tfrecords('dataset/printed_links/tfrecords/test.record')
print('TRAIN_RECORDS_NUM: ', TRAIN_RECORDS_NUM)
print('TEST_RECORDS_NUM: ', TEST_RECORDS_NUM)
```
_output →_
```
TRAIN_RECORDS_NUM: 100
TEST_RECORDS_NUM: 25
```
Итак, мы будем тренировать нашу модель на `100` экземплярах и проверять ее способность к обобщению на `25` изображениях.
**Отображаем габариты и локализацию объектов в изображениях**
Отобразить габариты и позицию объектов в изображении мы можем следующим образом:
```python
import tensorflow as tf
import numpy as np
from google.protobuf import text_format
import matplotlib.pyplot as plt
# Import Object Detection API.
from object_detection.utils import visualization_utils
from object_detection.protos import string_int_label_map_pb2
from object_detection.data_decoders.tf_example_decoder import TfExampleDecoder
%matplotlib inline
# Visualize the TFRecord dataset.
def visualize_tfrecords(tfrecords_filename, label_map=None, print_num=1):
decoder = TfExampleDecoder(
label_map_proto_file=label_map,
use_display_name=False
)
if label_map is not None:
label_map_proto = string_int_label_map_pb2.StringIntLabelMap()
with tf.io.gfile.GFile(label_map,'r') as f:
text_format.Merge(f.read(), label_map_proto)
class_dict = {}
for entry in label_map_proto.item:
class_dict[entry.id] = {'name': entry.name}
raw_dataset = tf.data.TFRecordDataset(tfrecords_filename)
for raw_record in raw_dataset.take(print_num):
example = decoder.decode(raw_record)
image = example['image'].numpy()
boxes = example['groundtruth_boxes'].numpy()
confidences = example['groundtruth_image_confidences']
filename = example['filename']
area = example['groundtruth_area']
classes = example['groundtruth_classes'].numpy()
image_classes = example['groundtruth_image_classes']
weights = example['groundtruth_weights']
scores = np.ones(boxes.shape[0])
visualization_utils.visualize_boxes_and_labels_on_image_array(
image,
boxes,
classes,
scores,
class_dict,
max_boxes_to_draw=None,
use_normalized_coordinates=True
)
plt.figure(figsize=(8, 8))
plt.imshow(image)
plt.show()
# Visualizing the training TFRecord dataset.
visualize_tfrecords(
tfrecords_filename='dataset/printed_links/tfrecords/train.record',
label_map='dataset/printed_links/labels/label_map.pbtxt',
print_num=3
)
```
В результате мы должны увидеть несколько изображений с прямоугольными габаритами для каждого из объектов,

## 📈 Устанавливаем TensorBoard
Перед тем, как начать тренировку мы можем запустить [TensorBoard](https://www.tensorflow.org/tensorboard).
TensorBoard поможет нам в мониторинге тренировочного процесса. Он поможет нам увидеть, действительно ли модель обучается или же нам лучше остановить тренировку и подправить параметры тренировки. TensorBoard также поможет нам какие объекты и где именно на изображении наша модель обнаруживает.

_Источник изображения: [домашняя страница TensorBoard](https://www.tensorflow.org/tensorboard)_
Отличной особенностью TensorBoard является то, что мы можем запустить его прямо в Google Colab. Если же вы экспериментируете с моделью локально в Jupyter ноутбуке, то вы можете [установить TensorBoard как Python пакет](https://github.com/tensorflow/tensorboard/blob/master/README.md) и запустить его локально из консоли.
Для начала создадим папку `./logs`, в которой во время тренировки будут храниться параметры модели.
```bash
mkdir -p logs
```
Далее, мы загружаем расширение TensorBoard в Google Colab:
```
%load_ext tensorboard
```
И теперь мы можем запустить TensorBoard и указать папку `./logs` в качестве папки с логами тренировки,
```
%tensorboard --logdir ./logs
```
В результате вы должны увидеть пустую панель TensorBoard:

После того, как мы начнем тренировку, мы сможем вернуться к этой панели и проверить насколько хорошо она обучается.
## 🏋🏻️ Тренировка модели
### Настраиваем параметры тренировки
Теперь мы можем вернуться к ранее упомянутому файлу `cache/datasets/ssd_mobilenet_v2_fpnlite_640x640_coco17_tpu-8/pipeline.config`. В этом файле собраны параметры для тренировки модели `ssd_mobilenet_v2_fpnlite_640x640_coco17_tpu-8`.
Нам необходимо скопировать файл `pipeline.config` в корень нашего проекта и изменить следующие параметры:
1. Необходимо **количество классов** с `90` (количество классов набора данных COCO) на `1` (наш единственный класс `http`)
2. Необходимо уменьшить **размер тренировочного пакета** (batch size) до `8` изображений на один пакет, чтобы избежать проблем с недостатком памяти.
3. Необходимо указать нашей модели, где хранятся сохраненные **слепки** ранее натренированных параметров модели, поскольку мы не хотим тренировать ее с нуля.
4. Необходимо установить параметр `fine_tune_checkpoint_type` в `detection`.
5. Необходимо указать модели, где находится **карта новых классов** объектов.
6. Необходимо указать модели, где находятся **тренировочный и тестовый наборы данных**.
Все эти изменения можно сделать вручную в файле `pipeline.config`, но это так же можно сделать программно:
```python
import tensorflow as tf
from shutil import copyfile
from google.protobuf import text_format
from object_detection.protos import pipeline_pb2
# Adjust pipeline config modification here if needed.
def modify_config(pipeline):
# Model config.
pipeline.model.ssd.num_classes = 1
# Train config.
pipeline.train_config.batch_size = 8
pipeline.train_config.fine_tune_checkpoint = 'cache/datasets/ssd_mobilenet_v2_fpnlite_640x640_coco17_tpu-8/checkpoint/ckpt-0'
pipeline.train_config.fine_tune_checkpoint_type = 'detection'
# Train input reader config.
pipeline.train_input_reader.label_map_path = 'dataset/printed_links/labels/label_map.pbtxt'
pipeline.train_input_reader.tf_record_input_reader.input_path[0] = 'dataset/printed_links/tfrecords/train.record'
# Eval input reader config.
pipeline.eval_input_reader[0].label_map_path = 'dataset/printed_links/labels/label_map.pbtxt'
pipeline.eval_input_reader[0].tf_record_input_reader.input_path[0] = 'dataset/printed_links/tfrecords/test.record'
return pipeline
def clone_pipeline_config():
copyfile(
'cache/datasets/ssd_mobilenet_v2_fpnlite_640x640_coco17_tpu-8/pipeline.config',
'pipeline.config'
)
def setup_pipeline(pipeline_config_path):
clone_pipeline_config()
pipeline = read_pipeline_config(pipeline_config_path)
pipeline = modify_config(pipeline)
write_pipeline_config(pipeline_config_path, pipeline)
return pipeline
def read_pipeline_config(pipeline_config_path):
pipeline = pipeline_pb2.TrainEvalPipelineConfig()
with tf.io.gfile.GFile(pipeline_config_path, "r") as f:
proto_str = f.read()
text_format.Merge(proto_str, pipeline)
return pipeline
def write_pipeline_config(pipeline_config_path, pipeline):
config_text = text_format.MessageToString(pipeline)
with tf.io.gfile.GFile(pipeline_config_path, "wb") as f:
f.write(config_text)
# Adjusting the pipeline configuration.
pipeline = setup_pipeline('pipeline.config')
print(pipeline)
```
Вот окончательная версия файла `pipeline.config` после редактирования:
```
model {
ssd {
num_classes: 1
image_resizer {
fixed_shape_resizer {
height: 640
width: 640
}
}
feature_extractor {
type: "ssd_mobilenet_v2_fpn_keras"
depth_multiplier: 1.0
min_depth: 16
conv_hyperparams {
regularizer {
l2_regularizer {
weight: 3.9999998989515007e-05
}
}
initializer {
random_normal_initializer {
mean: 0.0
stddev: 0.009999999776482582
}
}
activation: RELU_6
batch_norm {
decay: 0.996999979019165
scale: true
epsilon: 0.0010000000474974513
}
}
use_depthwise: true
override_base_feature_extractor_hyperparams: true
fpn {
min_level: 3
max_level: 7
additional_layer_depth: 128
}
}
box_coder {
faster_rcnn_box_coder {
y_scale: 10.0
x_scale: 10.0
height_scale: 5.0
width_scale: 5.0
}
}
matcher {
argmax_matcher {
matched_threshold: 0.5
unmatched_threshold: 0.5
ignore_thresholds: false
negatives_lower_than_unmatched: true
force_match_for_each_row: true
use_matmul_gather: true
}
}
similarity_calculator {
iou_similarity {
}
}
box_predictor {
weight_shared_convolutional_box_predictor {
conv_hyperparams {
regularizer {
l2_regularizer {
weight: 3.9999998989515007e-05
}
}
initializer {
random_normal_initializer {
mean: 0.0
stddev: 0.009999999776482582
}
}
activation: RELU_6
batch_norm {
decay: 0.996999979019165
scale: true
epsilon: 0.0010000000474974513
}
}
depth: 128
num_layers_before_predictor: 4
kernel_size: 3
class_prediction_bias_init: -4.599999904632568
share_prediction_tower: true
use_depthwise: true
}
}
anchor_generator {
multiscale_anchor_generator {
min_level: 3
max_level: 7
anchor_scale: 4.0
aspect_ratios: 1.0
aspect_ratios: 2.0
aspect_ratios: 0.5
scales_per_octave: 2
}
}
post_processing {
batch_non_max_suppression {
score_threshold: 9.99999993922529e-09
iou_threshold: 0.6000000238418579
max_detections_per_class: 100
max_total_detections: 100
use_static_shapes: false
}
score_converter: SIGMOID
}
normalize_loss_by_num_matches: true
loss {
localization_loss {
weighted_smooth_l1 {
}
}
classification_loss {
weighted_sigmoid_focal {
gamma: 2.0
alpha: 0.25
}
}
classification_weight: 1.0
localization_weight: 1.0
}
encode_background_as_zeros: true
normalize_loc_loss_by_codesize: true
inplace_batchnorm_update: true
freeze_batchnorm: false
}
}
train_config {
batch_size: 8
data_augmentation_options {
random_horizontal_flip {
}
}
data_augmentation_options {
random_crop_image {
min_object_covered: 0.0
min_aspect_ratio: 0.75
max_aspect_ratio: 3.0
min_area: 0.75
max_area: 1.0
overlap_thresh: 0.0
}
}
sync_replicas: true
optimizer {
momentum_optimizer {
learning_rate {
cosine_decay_learning_rate {
learning_rate_base: 0.07999999821186066
total_steps: 50000
warmup_learning_rate: 0.026666000485420227
warmup_steps: 1000
}
}
momentum_optimizer_value: 0.8999999761581421
}
use_moving_average: false
}
fine_tune_checkpoint: "cache/datasets/ssd_mobilenet_v2_fpnlite_640x640_coco17_tpu-8/checkpoint/ckpt-0"
num_steps: 50000
startup_delay_steps: 0.0
replicas_to_aggregate: 8
max_number_of_boxes: 100
unpad_groundtruth_tensors: false
fine_tune_checkpoint_type: "detection"
fine_tune_checkpoint_version: V2
}
train_input_reader {
label_map_path: "dataset/printed_links/labels/label_map.pbtxt"
tf_record_input_reader {
input_path: "dataset/printed_links/tfrecords/train.record"
}
}
eval_config {
metrics_set: "coco_detection_metrics"
use_moving_averages: false
}
eval_input_reader {
label_map_path: "dataset/printed_links/labels/label_map.pbtxt"
shuffle: false
num_epochs: 1
tf_record_input_reader {
input_path: "dataset/printed_links/tfrecords/test.record"
}
}
```
### Запускаем процесс тренировки
Мы готовы запустить процесс тренировки модели используя TensorFlow 2 Object Detection API. API содержит файл [model_main_tf2.py](https://github.com/tensorflow/models/blob/master/research/object_detection/model_main_tf2.py), который содержит всю логику тренировки. Вы можете детальнее ознакомиться с исходным Python кодом файла, в котором описаны входные параметры скрипта (например, `num_train_steps`, `model_dir` и пр.).
Мы будем тренировать модель в течение `1000` итераций (эпох).
```bash
%%bash
NUM_TRAIN_STEPS=1000
CHECKPOINT_EVERY_N=1000
PIPELINE_CONFIG_PATH=pipeline.config
MODEL_DIR=./logs
SAMPLE_1_OF_N_EVAL_EXAMPLES=1
python ./models/research/object_detection/model_main_tf2.py \
--model_dir=$MODEL_DIR \
--num_train_steps=$NUM_TRAIN_STEPS \
--sample_1_of_n_eval_examples=$SAMPLE_1_OF_N_EVAL_EXAMPLES \
--pipeline_config_path=$PIPELINE_CONFIG_PATH \
--checkpoint_every_n=$CHECKPOINT_EVERY_N \
--alsologtostderr
```
Во время тренировки модели (это может занять `~10` минут для `1000` итераций с использованием [GPU runtime](https://colab.research.google.com/notebooks/gpu.ipynb) в GoogleColab) вы можете увидеть как процесс тренировки в TensorBoard. Ошибки `localization` и `classification` должны уменьшаться, что означает, что модель все лучше и лучше локализует объекты и определяет их класс.

Также по мере обучения модели в папке `logs` будут создаваться новые чекпоинты (слепки) параметров модели.
Папка `logs` может выглядеть следующим образом:
```
logs
├── checkpoint
├── ckpt-1.data-00000-of-00001
├── ckpt-1.index
└── train
└── events.out.tfevents.1606560330.b314c371fa10.1747.1628.v2
```
### Оцениваем модель (опционально)
Чтобы оценить точность работы модели мы пробуем обнаружить объекты на изображения из тестового набора данных. Результат такой оценки обобщается в виде [метрик](https://github.com/tensorflow/models/blob/master/research/object_detection/g3doc/evaluation_protocols.md), изменение которых мы можем наблюдать с течением времени. Вы можете более детально ознакомиться с тем, какие именно метрики используются [здесь](https://tensorflow-object-detection-api-tutorial.readthedocs.io/en/latest/training.html#evaluating-the-model-optional).
В этой статье мы пропустим этот шаг с метриками, но мы все-же можем воспользоваться панелью TensorBoard, чтобы увидеть, какие объекты модель обнаруживает на тестовом наборе данных:
```bash
%%bash
PIPELINE_CONFIG_PATH=pipeline.config
MODEL_DIR=logs
python ./models/research/object_detection/model_main_tf2.py \
--model_dir=$MODEL_DIR \
--pipeline_config_path=$PIPELINE_CONFIG_PATH \
--checkpoint_dir=$MODEL_DIR \
```
После запуска скрипта вы сможете увидеть несколько изображений с обнаруженными в них предметами:

## 🗜 Экспортируем модель
После окончания тренировки необходимо сохранить модель для дальнейшего использования. Для экспортирования модели мы воспользуемся скриптом [exporter_main_v2.py](https://github.com/tensorflow/models/blob/master/research/object_detection/exporter_main_v2.py) из Object Detection API. Этот скрипт подготавливает TensorFlow граф на основании чекпоинтов модели и ее тренировочной конфигурации. После выполнения скрипта мы получим папку с чекпоинтами, моделью в формате SavedModel и копией конфигурационного файла модели.
```bash
%%bash
python ./models/research/object_detection/exporter_main_v2.py \
--input_type=image_tensor \
--pipeline_config_path=pipeline.config \
--trained_checkpoint_dir=logs \
--output_directory=exported/ssd_mobilenet_v2_fpnlite_640x640_coco17_tpu-8
```
Вот так выглядит содержимое папки `exported`:
```
exported
└── ssd_mobilenet_v2_fpnlite_640x640_coco17_tpu-8
├── checkpoint
│ ├── checkpoint
│ ├── ckpt-0.data-00000-of-00001
│ └── ckpt-0.index
├── pipeline.config
└── saved_model
├── assets
├── saved_model.pb
└── variables
├── variables.data-00000-of-00001
└── variables.index
```
На этом этапе у нас есть модель в папке `saved_model`, которую мы уже можем использовать для обнаружения объектов.
## 🚀 Использование экспортированной модели
Давайте посмотрим, как мы можем использовать модель, экспортированную на предыдущем этапе.
В начале нам необходимо создать функцию-обнаружитель, которая будет использовать сохраненную модель. Эта функция будет принимать изображение на вход и выдавать информацию об обнаруженных объектах:
```python
import time
import math
PATH_TO_SAVED_MODEL = 'exported/ssd_mobilenet_v2_fpnlite_640x640_coco17_tpu-8/saved_model'
def detection_function_from_saved_model(saved_model_path):
print('Loading saved model...', end='')
start_time = time.time()
# Load saved model and build the detection function
detect_fn = tf.saved_model.load(saved_model_path)
end_time = time.time()
elapsed_time = end_time - start_time
print('Done! Took {} seconds'.format(math.ceil(elapsed_time)))
return detect_fn
exported_detect_fn = detection_function_from_saved_model(
PATH_TO_SAVED_MODEL
)
```
_output →_
```
Loading saved model...Done! Took 9 seconds
```
Для сопоставления идентификаторов обнаруженных классов с именами классов нам также необходимо загрузить карту классов:
```python
from object_detection.utils import label_map_util
category_index = label_map_util.create_category_index_from_labelmap(
'dataset/printed_links/labels/label_map.pbtxt',
use_display_name=True
)
print(category_index)
```
_output →_
```
{1: {'id': 1, 'name': 'http'}}
```
Тестируем нашу модель на тестовом наборе данных.
```python
import matplotlib.pyplot as plt
import tensorflow as tf
import numpy as np
from object_detection.utils import visualization_utils
from object_detection.data_decoders.tf_example_decoder import TfExampleDecoder
%matplotlib inline
def tensors_from_tfrecord(
tfrecords_filename,
tfrecords_num,
dtype=tf.float32
):
decoder = TfExampleDecoder()
raw_dataset = tf.data.TFRecordDataset(tfrecords_filename)
images = []
for raw_record in raw_dataset.take(tfrecords_num):
example = decoder.decode(raw_record)
image = example['image']
image = tf.cast(image, dtype=dtype)
images.append(image)
return images
def test_detection(tfrecords_filename, tfrecords_num, detect_fn):
image_tensors = tensors_from_tfrecord(
tfrecords_filename,
tfrecords_num,
dtype=tf.uint8
)
for image_tensor in image_tensors:
image_np = image_tensor.numpy()
# The model expects a batch of images, so add an axis with `tf.newaxis`.
input_tensor = tf.expand_dims(image_tensor, 0)
detections = detect_fn(input_tensor)
# All outputs are batches tensors.
# Convert to numpy arrays, and take index [0] to remove the batch dimension.
# We're only interested in the first num_detections.
num_detections = int(detections.pop('num_detections'))
detections = {key: value[0, :num_detections].numpy() for key, value in detections.items()}
detections['num_detections'] = num_detections
# detection_classes should be ints.
detections['detection_classes'] = detections['detection_classes'].astype(np.int64)
image_np_with_detections = image_np.astype(int).copy()
visualization_utils.visualize_boxes_and_labels_on_image_array(
image_np_with_detections,
detections['detection_boxes'],
detections['detection_classes'],
detections['detection_scores'],
category_index,
use_normalized_coordinates=True,
max_boxes_to_draw=100,
min_score_thresh=.3,
agnostic_mode=False
)
plt.figure(figsize=(8, 8))
plt.imshow(image_np_with_detections)
plt.show()
test_detection(
tfrecords_filename='dataset/printed_links/tfrecords/test.record',
tfrecords_num=10,
detect_fn=exported_detect_fn
)
```
В результате вы должны увидеть `10` изображений из тестового набора данных с обнаруженными и подсвеченными `https:` префиксами:

Тот факт, что модель смогла обнаружить объекты (в нашем случае префиксы `https://`) в изображениях, которые она раньше не "видела" является хорошим знаком и, собственно, тем, что мы хотели достигнуть этой тренировкой.
## 🗜 Конвертируем модель в веб-совместимый формат
Как вы помните из начала данной статьи нашей целью была тренировка модели обнаружения объектов, которую мы могли бы использовать в браузере. К счастью, существует JavaScript версия TensorFlow - [TensorFlow.js](https://www.tensorflow.org/js). В JavaScript мы не можем работать с сохраненной ранее моделью напрямую. Нам нужна еще одна последняя конвертация модели в формат [tfjs_graph_model](https://www.tensorflow.org/js/tutorials/conversion/import_saved_model).
Для того, чтобы осуществить эту конвертацию, нам понадобится Python пакет tensorflowjs:
```bash
pip install tensorflowjs --quiet
```
Теперь мы можем конвертировать модель в нужный нам формат:
```bash
%%bash
tensorflowjs_converter \
--input_format=tf_saved_model \
--output_format=tfjs_graph_model \
exported/ssd_mobilenet_v2_fpnlite_640x640_coco17_tpu-8/saved_model \
exported_web/ssd_mobilenet_v2_fpnlite_640x640_coco17_tpu-8
```
Папка `exported_web` содержит `.json` файл с информацией об архитектуре модели, а несколько файлов в формате `.bin` содержат ее параметры.
```
exported_web
└── ssd_mobilenet_v2_fpnlite_640x640_coco17_tpu-8
├── group1-shard1of4.bin
├── group1-shard2of4.bin
├── group1-shard3of4.bin
├── group1-shard4of4.bin
└── model.json
```
Наконец-то мы получили модель, которая способна обнаруживать `https://` префиксы в изображениях и которая сохранена в формате, понятном JavaScript приложениям.
Давайте проверим размеры моделей, которые мы создали:
```python
import pathlib
def get_folder_size(folder_path):
mB = 1000000
root_dir = pathlib.Path(folder_path)
sizeBytes = sum(f.stat().st_size for f in root_dir.glob('**/*') if f.is_file())
return f'{sizeBytes//mB} MB'
print(f'Original model size: {get_folder_size("cache/datasets/ssd_mobilenet_v2_fpnlite_640x640_coco17_tpu-8")}')
print(f'Exported model size: {get_folder_size("exported/ssd_mobilenet_v2_fpnlite_640x640_coco17_tpu-8")}')
print(f'Exported WEB model size: {get_folder_size("exported_web/ssd_mobilenet_v2_fpnlite_640x640_coco17_tpu-8")}')
```
_output →_
```
Original model size: 31 MB
Exported model size: 28 MB
Exported WEB model size: 13 MB
```
Как вы можете заметить, модель, которую мы собираемся использовать на стороне клиента весит `13MB`, что вполне допустимо и соответствует требованиям, которые мы определили в начале статьи.
Позже на стороне клиента мы сможем импортировать эту модель следующим образом:
```javascript
import * as tf from '@tensorflow/tfjs';
const model = await tf.loadGraphModel(modelURL);
```
> 🧭 Следующим шагом будет реализация пользовательского интерфейса для модели, что является темой для другой статьи. Но уже сейчас, при желании, вы можете ознакомиться с финальным примером кода приложения на TypeScript в [репозитории links-detector](https://github.com/trekhleb/links-detector) на GitHub.
## 🤔 Заключение
В этой статье мы начали решать проблему распознавания печатных ссылок. В итоге мы обучили модель, способную распознавать префиксы `https://` в текстовых изображениях (например, в кадрах видео-потока с камеры смартфона). Мы также конвертировали обученную модель в формат `tfjs_graph_model` для дальнейшего использования ее на стороне клиента в JavaScript/TypeScript приложении.
Вы можете 🚀 [**запустить Links Detector**](https://trekhleb.github.io/links-detector/) со своего смартфона и попробовать, как он обнаруживает ссылки в вашей книге или журнале.
Финальное решение выглядит следующим образом:

Вы также можете 📝 [**ознакомиться с репозиторием links-detector**](https://github.com/trekhleb/links-detector) на GitHub, в котором сможете найти исходный код клиентской части приложения.
> ⚠️ На данный момент приложение находится в _экспериментальной_ стадии и имеет [множество недоработок и ограничений](https://github.com/trekhleb/links-detector/issues?q=is%3Aopen+is%3Aissue+label%3Aenhancement). Поэтому, до тех пор, пока вышеуказанные недоработки не будут ликвидированы, не ожидайте от приложения слишком многого 🤷🏻.
В качестве следующих шагов по улучшению точности модели мы можем сделать следующее:
- Дополнить тренировочный и тестовый наборы данных ссылками разных форматов (`http://`, `tcp://`, `ftp://` и пр.)
- Дополнить набор данных примерами изображений с темным фоном и светлым текстом.
- Дополнить набор данных подчеркнутыми ссылками.
- Дополнить набор данных текстами и ссылками с другими шрифтами
- и пр.
Несмотря на то, что точность модели недостаточна для релиза полноценного приложения, я все-же надеюсь, что эта статья была для вас полезной и вдохновила вас на дальнейшие эксперименты с моделями обнаружения объектов.
Успешной тренировки!
================================================
FILE: package.json
================================================
{
"name": "links-detector",
"version": "0.1.0",
"private": true,
"author": {
"name": "Oleksii Trekhleb",
"url": "https://www.linkedin.com/in/trekhleb/"
},
"homepage": "https://trekhleb.github.io/links-detector/",
"scripts": {
"format:index": "prettier \"public/index.html\" --write",
"cp-wasm": "cp node_modules/@tensorflow/tfjs-backend-wasm/dist/tfjs-backend-wasm.wasm ./public/wasm",
"cp-wasm-simd": "cp node_modules/@tensorflow/tfjs-backend-wasm/dist/tfjs-backend-wasm-simd.wasm ./public/wasm",
"cp-wasm-simd-thread": "cp node_modules/@tensorflow/tfjs-backend-wasm/dist/tfjs-backend-wasm-threaded-simd.wasm ./public/wasm",
"build:wasm": "yarn cp-wasm && yarn cp-wasm-simd && yarn cp-wasm-simd-thread",
"build:style": "tailwind build src/styles/index.css -o src/styles/tailwind.css",
"build:pwa": "pwa-asset-generator src/icons/pwa/links-detector-logo-white.svg public/icons --manifest public/manifest.json --index public/index.html --background black --path \"%PUBLIC_URL%\" --scrape false --icon-only",
"postbuild:pwa": "yarn run format:index",
"build:assets": "yarn build:wasm && yarn build:style && yarn build:pwa",
"prebuild": "yarn build:assets",
"build": "react-scripts build",
"prestart": "yarn build:assets",
"start": "react-scripts start",
"start-https": "HTTPS=true yarn start",
"prestart-prod": "yarn build",
"start-prod": "serve -c serve.json -l 4000",
"test": "react-scripts test",
"eject": "react-scripts eject",
"lint": "eslint 'src/**/*.{js,ts,tsx}'",
"predeploy": "yarn build",
"deploy": "gh-pages -d ./build"
},
"dependencies": {
"@tensorflow/tfjs": "^2.4.0",
"@tensorflow/tfjs-backend-wasm": "^2.7.0",
"@tensorflow/tfjs-core": "^2.4.0",
"@testing-library/jest-dom": "^5.11.5",
"@testing-library/react": "^11.1.0",
"@testing-library/user-event": "^12.1.10",
"@types/gtag.js": "^0.0.3",
"@types/jest": "^26.0.15",
"@types/lodash": "^4.14.161",
"@types/node": "^14.14.5",
"@types/react": "^16.9.0",
"@types/react-dom": "^16.9.0",
"@types/react-helmet": "^6.1.0",
"@types/react-router-dom": "^5.1.5",
"@types/tesseract.js": "^0.0.2",
"history": "^4.10.1",
"lodash": "^4.17.20",
"react": "^17.0.1 ",
"react-dom": "^17.0.1",
"react-helmet": "^6.1.0",
"react-router-dom": "^5.2.0",
"react-scripts": "4.0.0",
"tailwindcss": "^1.8.10",
"tesseract.js": "^2.1.3",
"typescript": "~4.0.5",
"workbox-core": "^5.1.3",
"workbox-expiration": "^5.1.3",
"workbox-precaching": "^5.1.3",
"workbox-routing": "^5.1.3",
"workbox-strategies": "^5.1.3",
"workbox-cacheable-response": "^5.1.3",
"workbox-google-analytics": "^5.1.3"
},
"devDependencies": {
"@typescript-eslint/eslint-plugin": "^4.1.1",
"@typescript-eslint/parser": "^4.1.1",
"eslint-config-airbnb": "^18.2.0",
"eslint-plugin-import": "^2.22.0",
"eslint-plugin-jsx-a11y": "^6.3.1",
"eslint-plugin-react": "^7.20.6",
"eslint-plugin-react-hooks": "^4.1.2",
"gh-pages": "^3.1.0",
"prettier": "^2.1.2",
"pwa-asset-generator": "^3.2.3",
"serve": "^11.3.2"
},
"eslintConfig": {
"extends": "react-app"
},
"browserslist": {
"production": [
">0.2%",
"not dead",
"not op_mini all"
],
"development": [
"last 1 chrome version",
"last 1 firefox version",
"last 1 safari version"
]
}
}
================================================
FILE: public/index.css
================================================
html, body {
background-color: black;
color: white;
height: 100%;
font-family: Roboto, system-ui, -apple-system, BlinkMacSystemFont, "Segoe UI", "Helvetica Neue", Arial, "Noto Sans", sans-serif, "Apple Color Emoji", "Segoe UI Emoji", "Segoe UI Symbol", "Noto Color Emoji";
}
.full-height {
height: 100%;
box-sizing: border-box;
}
.fade-in-1 {
animation: fadeIn ease-in-out .1s;
}
.fade-in-2 {
animation: fadeIn ease-in-out .2s;
}
.fade-in-5 {
animation: fadeIn ease-in-out .5s;
}
.fade-in-10 {
animation: fadeIn ease-in-out 1s;
}
.pulsate-1 {
animation: pulsate-1 2s cubic-bezier(0, 0, 0.2, 1) infinite;
}
.pulsate-2 {
animation: pulsate-2 2s cubic-bezier(0, 0, 0.2, 1) infinite;
}
@keyframes fadeIn {
0% {
opacity: 0;
}
100% {
opacity: 1;
}
}
@keyframes pulsate-1 {
0% {
transform: scale(1);
opacity: 1;
}
75%, 100% {
transform: scale(1.5);
opacity: 0;
}
}
@keyframes pulsate-2 {
0%, 10% {
transform: scale(1);
opacity: 1;
}
100% {
transform: scale(1.5);
opacity: 0;
}
}
================================================
FILE: public/index.html
================================================
<!DOCTYPE html>
<html lang="en">
<head>
<!-- Global site tag (gtag.js) - Google Analytics -->
<script
async
src="https://www.googletagmanager.com/gtag/js?id=G-YJ73BX984Z"
></script>
<script>
window.dataLayer = window.dataLayer || [];
function gtag(){dataLayer.push(arguments);}
gtag('js', new Date());
gtag('config', 'G-YJ73BX984Z');
</script>
<title>Links Detector</title>
<meta
name="description"
content="Links Detector makes printed links clickable via your smartphone camera. No need to type a link in, just scan and click on it."
/>
<meta charset="utf-8" />
<meta name="viewport" content="width=device-width, initial-scale=1" />
<meta name="theme-color" content="#000000" />
<meta property="og:type" content="website" />
<meta property="og:title" content="Links Detector" />
<meta
property="og:description"
content="Links Detector makes printed links clickable via your smartphone camera. No need to type a link in, just scan and click on it."
/>
<meta
property="og:url"
content="https://trekhleb.github.io/links-detector"
/>
<meta
property="og:image"
content="https://trekhleb.github.io/links-detector/images/links-detector-banner-bg-black-2.png"
/>
<link rel="manifest" href="%PUBLIC_URL%/manifest.json" />
<link
href="https://fonts.googleapis.com/css2?family=Roboto:wght@100;300;400;500;700;900&display=swap"
rel="stylesheet"
/>
<link rel="stylesheet" href="%PUBLIC_URL%/index.css" />
<link rel="icon" href="%PUBLIC_URL%/favicon.ico" />
<link
rel="icon"
type="image/png"
sizes="32x32"
href="%PUBLIC_URL%/icons/favicon-32x32.png"
/>
<link
rel="icon"
type="image/png"
sizes="16x16"
href="%PUBLIC_URL%/icons/favicon-16x16.png"
/>
<link
rel="apple-touch-icon"
sizes="180x180"
href="%PUBLIC_URL%/icons/apple-icon-180.jpg"
/>
<link
rel="apple-touch-icon"
sizes="167x167"
href="%PUBLIC_URL%/icons/apple-icon-167.jpg"
/>
<link
rel="apple-touch-icon"
sizes="152x152"
href="%PUBLIC_URL%/icons/apple-icon-152.jpg"
/>
<link
rel="apple-touch-icon"
sizes="120x120"
href="%PUBLIC_URL%/icons/apple-icon-120.jpg"
/>
<meta name="apple-mobile-web-app-capable" content="yes" />
</head>
<body>
<noscript>You need to enable JavaScript to run Links Detector.</noscript>
<div id="root" class="full-height">
<small>Loading links detector app...</small>
</div>
</body>
</html>
================================================
FILE: public/manifest.json
================================================
{
"name": "Links Detector",
"short_name": "Links Detector",
"description": "Links Detector makes printed links clickable via your smartphone camera. No need to type a link in, just scan and click on it.",
"start_url": "/links-detector/?src=pwa",
"scope": "/links-detector/",
"display": "standalone",
"orientation": "portrait",
"theme_color": "#000000",
"background_color": "#000000",
"icons": [
{
"src": "icons/manifest-icon-192.png",
"sizes": "192x192",
"type": "image/png",
"purpose": "maskable any"
},
{
"src": "icons/manifest-icon-512.png",
"sizes": "512x512",
"type": "image/png",
"purpose": "maskable any"
},
{
"src": "favicon.ico",
"sizes": "48x48",
"type": "image/x-icon"
}
]
}
================================================
FILE: public/models/links_detector/v1/model.json
================================================
{
"format": "graph-model",
"generatedBy": "2.3.0",
"convertedBy": "TensorFlow.js Converter v2.4.0",
"userDefinedMetadata": {
"signature": {
"inputs": {
"input_tensor:0": {
"name": "input_tensor:0",
"dtype": "DT_UINT8",
"tensorShape": {
"dim": [
{
"size": "1"
},
{
"size": "-1"
},
{
"size": "-1"
},
{
"size": "3"
}
]
}
}
},
"outputs": {
"Identity_1:0": {
"name": "Identity_1:0",
"dtype": "DT_FLOAT",
"tensorShape": {
"dim": [
{
"size": "1"
},
{
"size": "100"
},
{
"size": "4"
}
]
}
},
"Identity_3:0": {
"name": "Identity_3:0",
"dtype": "DT_FLOAT",
"tensorShape": {
"dim": [
{
"size": "1"
},
{
"size": "100"
},
{
"size": "2"
}
]
}
},
"Identity_5:0": {
"name": "Identity_5:0",
"dtype": "DT_FLOAT",
"tensorShape": {
"dim": [
{
"size": "1"
}
]
}
},
"Identity:0": {
"name": "Identity:0",
"dtype": "DT_FLOAT",
"tensorShape": {
"dim": [
{
"size": "1"
},
{
"size": "100"
}
]
}
},
"Identity_7:0": {
"name": "Identity_7:0",
"dtype": "DT_FLOAT",
"tensorShape": {
"dim": [
{
"size": "1"
},
{
"size": "51150"
},
{
"size": "2"
}
]
}
},
"Identity_2:0": {
"name": "Identity_2:0",
"dtype": "DT_FLOAT",
"tensorShape": {
"dim": [
{
"size": "1"
},
{
"size": "100"
}
]
}
},
"Identity_4:0": {
"name": "Identity_4:0",
"dtype": "DT_FLOAT",
"tensorShape": {
"dim": [
{
"size": "1"
},
{
"size": "100"
}
]
}
},
"Identity_6:0": {
"name": "Identity_6:0",
"dtype": "DT_FLOAT",
"tensorShape": {
"dim": [
{
"size": "1"
},
{
"size": "51150"
},
{
"size": "4"
}
]
}
}
}
}
},
"modelTopology": {
"node": [
{
"name": "StatefulPartitionedCall/Postprocessor/BatchMultiClassNonMaxSuppression/PadOrClipBoxList/zeros_7",
"op": "Const",
"attr": {
"value": {
"tensor": {
"dtype": "DT_INT32",
"tensorShape": {
"dim": [
{
"size": "1"
}
]
}
}
},
"dtype": {
"type": "DT_INT32"
}
}
},
{
"name": "StatefulPartitionedCall/Postprocessor/BatchMultiClassNonMaxSuppression/PadOrClipBoxList/sub_13/x",
"op": "Const",
"attr": {
"value": {
"tensor": {
"dtype": "DT_INT32",
"tensorShape": {}
}
},
"dtype": {
"type": "DT_INT32"
}
}
},
{
"name": "StatefulPartitionedCall/Postprocessor/BatchMultiClassNonMaxSuppression/PadOrClipBoxList/zeros_6",
"op": "Const",
"attr": {
"value": {
"tensor": {
"dtype": "DT_INT32",
"tensorShape": {
"dim": [
{
"size": "1"
}
]
}
}
},
"dtype": {
"type": "DT_INT32"
}
}
},
{
"name": "StatefulPartitionedCall/Postprocessor/BatchMultiClassNonMaxSuppression/Reshape_3",
"op": "Const",
"attr": {
"value": {
"tensor": {
"dtype": "DT_FLOAT",
"tensorShape": {
"dim": [
{
"size": "51150"
}
]
}
}
},
"dtype": {
"type": "DT_FLOAT"
}
}
},
{
"name": "StatefulPartitionedCall/Postprocessor/BatchMultiClassNonMaxSuppression/MultiClassNonMaxSuppression/Gather/GatherV2_3/axis",
"op": "Const",
"attr": {
"value": {
"tensor": {
"dtype": "DT_INT32",
"tensorShape": {}
}
},
"dtype": {
"type": "DT_INT32"
}
}
},
{
"name": "StatefulPartitionedCall/Postprocessor/BatchMultiClassNonMaxSuppression/MultiClassNonMaxSuppression/SortByField/Gather/GatherV2_3/axis",
"op": "Const",
"attr": {
"value": {
"tensor": {
"dtype": "DT_INT32",
"tensorShape": {}
}
},
"dtype": {
"type": "DT_INT32"
}
}
},
{
"name": "StatefulPartitionedCall/Postprocessor/BatchMultiClassNonMaxSuppression/MultiClassNonMaxSuppression/ClipToWindow/Gather/GatherV2_3/axis",
"op": "Const",
"attr": {
"dtype": {
"type": "DT_INT32"
},
"value": {
"tensor": {
"dtype": "DT_INT32",
"tensorShape": {}
}
}
}
},
{
"name": "StatefulPartitionedCall/Postprocessor/BatchMultiClassNonMaxSuppression/MultiClassNonMaxSuppression/SortByField_1/Gather/GatherV2_3/axis",
"op": "Const",
"attr": {
"value": {
"tensor": {
"dtype": "DT_INT32",
"tensorShape": {}
}
},
"dtype": {
"type": "DT_INT32"
}
}
},
{
"name": "StatefulPartitionedCall/Postprocessor/BatchMultiClassNonMaxSuppression/MultiClassNonMaxSuppression/Gather_1/GatherV2_3/axis",
"op": "Const",
"attr": {
"value": {
"tensor": {
"dtype": "DT_INT32",
"tensorShape": {}
}
},
"dtype": {
"type": "DT_INT32"
}
}
},
{
"name": "StatefulPartitionedCall/Postprocessor/BatchMultiClassNonMaxSuppression/MultiClassNonMaxSuppression/Gather_2/GatherV2_3/axis",
"op": "Const",
"attr": {
"value": {
"tensor": {
"dtype": "DT_INT32",
"tensorShape": {}
}
},
"dtype": {
"type": "DT_INT32"
}
}
},
{
"name": "StatefulPartitionedCall/Postprocessor/BatchMultiClassNonMaxSuppression/PadOrClipBoxList/strided_slice_12/stack",
"op": "Const",
"attr": {
"value": {
"tensor": {
"dtype": "DT_INT32",
"tensorShape": {
"dim": [
{
"size": "1"
}
]
}
}
},
"dtype": {
"type": "DT_INT32"
}
}
},
{
"name": "StatefulPartitionedCall/Postprocessor/BatchMultiClassNonMaxSuppression/PadOrClipBoxList/strided_slice_12/stack_1",
"op": "Const",
"attr": {
"value": {
"tensor": {
"dtype": "DT_INT32",
"tensorShape": {
"dim": [
{
"size": "1"
}
]
}
}
},
"dtype": {
"type": "DT_INT32"
}
}
},
{
"name": "StatefulPartitionedCall/Postprocessor/BatchMultiClassNonMaxSuppression/PadOrClipBoxList/strided_slice_12/stack_2",
"op": "Const",
"attr": {
"value": {
"tensor": {
"dtype": "DT_INT32",
"tensorShape": {
"dim": [
{
"size": "1"
}
]
}
}
},
"dtype": {
"type": "DT_INT32"
}
}
},
{
"name": "StatefulPartitionedCall/Postprocessor/BatchMultiClassNonMaxSuppression/PadOrClipBoxList/sub_12/y",
"op": "Const",
"attr": {
"value": {
"tensor": {
"dtype": "DT_INT32",
"tensorShape": {}
}
},
"dtype": {
"type": "DT_INT32"
}
}
},
{
"name": "StatefulPartitionedCall/Postprocessor/BatchMultiClassNonMaxSuppression/PadOrClipBoxList/Greater_6/y",
"op": "Con
gitextract_y0_euu71/ ├── .eslintrc.js ├── .gitignore ├── LICENCE ├── README.DEV.md ├── README.md ├── articles/ │ └── printed_links_detection/ │ ├── printed_links_detection.md │ └── printed_links_detection.ru.md ├── package.json ├── public/ │ ├── index.css │ ├── index.html │ ├── manifest.json │ ├── models/ │ │ └── links_detector/ │ │ └── v1/ │ │ └── model.json │ ├── robots.txt │ ├── videos/ │ │ └── demo-black-720p.webm │ └── wasm/ │ ├── tfjs-backend-wasm-simd.wasm │ ├── tfjs-backend-wasm-threaded-simd.wasm │ └── tfjs-backend-wasm.wasm ├── serve.json ├── src/ │ ├── components/ │ │ ├── App.tsx │ │ ├── Routes.tsx │ │ ├── elements/ │ │ │ ├── BoxesCanvas.tsx │ │ │ ├── DebugInfo.tsx │ │ │ ├── DetectedLinks.tsx │ │ │ ├── DetectedLinksPrefixes.tsx │ │ │ ├── LinksDetector.tsx │ │ │ ├── PerformanceMonitor.tsx │ │ │ └── PixelsCanvas.tsx │ │ ├── screens/ │ │ │ ├── DebugScreen.tsx │ │ │ ├── DemoScreen.tsx │ │ │ ├── DetectorScreen.tsx │ │ │ ├── HomeScreen.tsx │ │ │ └── NotFoundScreen.tsx │ │ └── shared/ │ │ ├── CameraStream.tsx │ │ ├── Demo.tsx │ │ ├── EnhancedRow.tsx │ │ ├── ErrorBoundary.tsx │ │ ├── Footer.tsx │ │ ├── Grid.tsx │ │ ├── Header.tsx │ │ ├── HyperLink.tsx │ │ ├── Icon.tsx │ │ ├── LaunchButton.tsx │ │ ├── Logo.tsx │ │ ├── MainNavigation.tsx │ │ ├── Modal.tsx │ │ ├── ModalCloseButton.tsx │ │ ├── Notification.tsx │ │ ├── PageTitle.tsx │ │ ├── ProgressBar.tsx │ │ ├── Promo.tsx │ │ ├── Spinner.css │ │ ├── Spinner.tsx │ │ └── Template.tsx │ ├── configs/ │ │ ├── analytics.ts │ │ ├── detectionConfig.ts │ │ └── pwa.ts │ ├── constants/ │ │ ├── debug.ts │ │ ├── links.ts │ │ ├── page.ts │ │ ├── routes.ts │ │ └── style.ts │ ├── hooks/ │ │ ├── useGraphModel.ts │ │ ├── useLinksDetector.ts │ │ ├── useLogger.ts │ │ ├── usePageTitle.ts │ │ ├── useTesseract.ts │ │ └── useWindowSize.ts │ ├── icons/ │ │ ├── README.md │ │ └── index.ts │ ├── index.tsx │ ├── react-app-env.d.ts │ ├── service-worker.ts │ ├── serviceWorkerRegistration.ts │ ├── setupTests.ts │ ├── styles/ │ │ └── index.css │ └── utils/ │ ├── analytics.ts │ ├── debug.ts │ ├── graphModel.ts │ ├── image.ts │ ├── logger.ts │ ├── numbers.ts │ ├── profiler.ts │ ├── routes.ts │ ├── tesseract.ts │ └── types.ts ├── tailwind.config.js └── tsconfig.json
SYMBOL INDEX (142 symbols across 56 files)

FILE: src/components/App.tsx
  function App (line 16) | function App(): React.ReactElement {

FILE: src/components/Routes.tsx
  function Routes (line 11) | function Routes(): React.ReactElement {

FILE: src/components/elements/BoxesCanvas.tsx
  type BoxesCanvasProps (line 5) | type BoxesCanvasProps = {

FILE: src/components/elements/DebugInfo.tsx
  function DebugInfo (line 12) | function DebugInfo(): React.ReactElement {

FILE: src/components/elements/DetectedLinks.tsx
  type DetectedLinksProps (line 10) | type DetectedLinksProps = {
  function DetectedLinks (line 15) | function DetectedLinks(props: DetectedLinksProps): React.ReactElement | ...

FILE: src/components/elements/DetectedLinksPrefixes.tsx
  type DetectedLinksPrefixesProps (line 7) | type DetectedLinksPrefixesProps = {
  function DetectedLinksPrefixes (line 12) | function DetectedLinksPrefixes(props: DetectedLinksPrefixesProps): React...

FILE: src/components/elements/LinksDetector.tsx
  type LinksDetectorProps (line 39) | type LinksDetectorProps = {
  function LinksDetector (line 44) | function LinksDetector(props: LinksDetectorProps): React.ReactElement | ...

FILE: src/components/elements/PerformanceMonitor.tsx
  type DetectionPerformanceProps (line 4) | type DetectionPerformanceProps = {
  function PerformanceMonitor (line 8) | function PerformanceMonitor(props: DetectionPerformanceProps): React.Rea...

FILE: src/components/elements/PixelsCanvas.tsx
  type PixelsCanvasProps (line 5) | type PixelsCanvasProps = {
  function PixelsCanvas (line 11) | function PixelsCanvas(props: PixelsCanvasProps): React.ReactElement {

FILE: src/components/screens/DebugScreen.tsx
  function DebugScreen (line 6) | function DebugScreen(): React.ReactElement {

FILE: src/components/screens/DemoScreen.tsx
  function DemoScreen (line 6) | function DemoScreen(): React.ReactElement {

FILE: src/components/screens/DetectorScreen.tsx
  function DetectorScreen (line 11) | function DetectorScreen(): React.ReactElement {

FILE: src/components/screens/HomeScreen.tsx
  function HomeScreen (line 10) | function HomeScreen(): React.ReactElement {

FILE: src/components/screens/NotFoundScreen.tsx
  function NoteFoundScreen (line 10) | function NoteFoundScreen(): React.ReactElement {

FILE: src/components/shared/CameraStream.tsx
  type FacingMode (line 12) | type FacingMode = 'user' | 'environment';
  type CameraStreamProps (line 14) | type CameraStreamProps = {
  function CameraStream (line 30) | function CameraStream(props: CameraStreamProps): React.ReactElement {

FILE: src/components/shared/Demo.tsx
  function Demo (line 13) | function Demo(): React.ReactElement {

FILE: src/components/shared/EnhancedRow.tsx
  type EnhancedRowProps (line 3) | type EnhancedRowProps = {
  function EnhancedRow (line 10) | function EnhancedRow(props: EnhancedRowProps): React.ReactElement {

FILE: src/components/shared/ErrorBoundary.tsx
  type ErrorBoundaryProps (line 5) | type ErrorBoundaryProps = {
  type ErrorBoundaryState (line 9) | type ErrorBoundaryState = {
  class ErrorBoundary (line 13) | class ErrorBoundary extends React.Component<ErrorBoundaryProps, ErrorBou...
    method constructor (line 16) | constructor(props: any) {
    method getDerivedStateFromError (line 24) | static getDerivedStateFromError(): ErrorBoundaryState {
    method componentDidCatch (line 28) | componentDidCatch(error: Error, errorInfo: ErrorInfo): void {
    method render (line 35) | render(): React.ReactNode {

FILE: src/components/shared/Footer.tsx
  function Footer (line 8) | function Footer(): React.ReactElement {

FILE: src/components/shared/Grid.tsx
  type GridProps (line 3) | type GridProps = {
  function Grid (line 10) | function Grid(props: GridProps): React.ReactElement {

FILE: src/components/shared/Header.tsx
  function Header (line 5) | function Header(): React.ReactElement {

FILE: src/components/shared/HyperLink.tsx
  type HyperLinkProps (line 8) | type HyperLinkProps = {
  function HyperLink (line 16) | function HyperLink(props: HyperLinkProps): React.ReactElement {

FILE: src/components/shared/Icon.tsx
  type IconProps (line 4) | type IconProps = {
  function Icon (line 9) | function Icon(props: IconProps): React.ReactElement | null {

FILE: src/components/shared/LaunchButton.tsx
  type LaunchButtonProps (line 6) | type LaunchButtonProps = {
  function LaunchButton (line 11) | function LaunchButton(props: LaunchButtonProps): React.ReactElement {

FILE: src/components/shared/Logo.tsx
  function Logo (line 11) | function Logo(): React.ReactElement {

FILE: src/components/shared/MainNavigation.tsx
  function MainNavigation (line 5) | function MainNavigation(): React.ReactElement {

FILE: src/components/shared/Modal.tsx
  type ModalProps (line 5) | type ModalProps = {
  function Modal (line 11) | function Modal(props: ModalProps): React.ReactElement {

FILE: src/components/shared/ModalCloseButton.tsx
  type ModalCloseButtonProps (line 6) | type ModalCloseButtonProps = {
  function ModalCloseButton (line 10) | function ModalCloseButton(props: ModalCloseButtonProps): React.ReactElem...

FILE: src/components/shared/Notification.tsx
  type NotificationLevel (line 5) | enum NotificationLevel {
  type NotificationProps (line 11) | type NotificationProps = {
  function Notification (line 16) | function Notification(props: NotificationProps): React.ReactElement {

FILE: src/components/shared/PageTitle.tsx
  function PageTitle (line 7) | function PageTitle(): React.ReactElement | null {

FILE: src/components/shared/ProgressBar.tsx
  type ProgressBarProps (line 4) | type ProgressBarProps = {
  function ProgressBar (line 11) | function ProgressBar(props: ProgressBarProps): React.ReactElement {

FILE: src/components/shared/Promo.tsx
  function Promo (line 3) | function Promo(): React.ReactElement {

FILE: src/components/shared/Spinner.tsx
  function Spinner (line 5) | function Spinner(): React.ReactElement {

FILE: src/components/shared/Template.tsx
  type TemplateProps (line 7) | type TemplateProps = {
  function Template (line 11) | function Template(props: TemplateProps): React.ReactElement {

FILE: src/configs/analytics.ts
  constant GOOGLE_ANALYTICS_ID (line 1) | const GOOGLE_ANALYTICS_ID = 'G-NEPEGVZ6TM';

FILE: src/configs/detectionConfig.ts
  constant MODELS_BASE_URL (line 4) | const MODELS_BASE_URL = `${BASE_APP_PATH}`;
  type DetectionConfig (line 6) | type DetectionConfig = {
  constant DETECTION_CONFIG (line 39) | const DETECTION_CONFIG: DetectionConfig = {

FILE: src/configs/pwa.ts
  constant PWA_ENABLED (line 1) | const PWA_ENABLED: boolean = true;
  constant CACHE_PREFIX (line 2) | const CACHE_PREFIX: string = 'links-detector';
  constant CACHE_VERSION (line 3) | const CACHE_VERSION: string = 'v1';

FILE: src/constants/links.ts
  constant GITHUB_BASE_URL (line 1) | const GITHUB_BASE_URL: string = 'https://github.com/trekhleb/links-detec...
  constant GITHUB_ISSUES_LINK (line 2) | const GITHUB_ISSUES_LINK: string = `${GITHUB_BASE_URL}/issues`;

FILE: src/constants/page.ts
  constant APP_TITLE (line 1) | const APP_TITLE: string = 'Links Detector';
  constant APP_TITLE_SEPARATOR (line 2) | const APP_TITLE_SEPARATOR: string = ' | ';

FILE: src/constants/routes.ts
  constant BASE_APP_PATH (line 3) | const BASE_APP_PATH: string = '/links-detector';
  constant BASE_VIDEO_PATH (line 4) | const BASE_VIDEO_PATH: string = `${BASE_APP_PATH}/videos`;
  constant BASE_ROUTE_PATH (line 8) | const BASE_ROUTE_PATH: string = '/';
  constant DEBUG_GET_PARAM (line 10) | const DEBUG_GET_PARAM = 'debug';
  type RouteNames (line 12) | enum RouteNames {
  type RouteType (line 19) | type RouteType = {
  type RoutesType (line 24) | type RoutesType = {
  constant ROUTES (line 42) | const ROUTES: RoutesType = {
  constant HOME_ROUTE (line 61) | const HOME_ROUTE: RouteType = ROUTES.home;

FILE: src/constants/style.ts
  constant THEME_COLOR (line 2) | const THEME_COLOR: string = 'yellow';
  constant THEME_COLOR_INTENSITY (line 3) | const THEME_COLOR_INTENSITY: number = 400;
  constant DETECTION_TEXT_COLOR_CLASS (line 5) | const DETECTION_TEXT_COLOR_CLASS: string = 'text-black';
  constant DETECTION_BACKGROUND_COLOR_CLASS (line 6) | const DETECTION_BACKGROUND_COLOR_CLASS: string = `bg-${THEME_COLOR}-${TH...
  constant LINKS_TEXT_HOVER_COLOR_CLASS (line 7) | const LINKS_TEXT_HOVER_COLOR_CLASS: string = `text-${THEME_COLOR}-${THEM...
  constant THEME_BG_COLOR_CLASS (line 8) | const THEME_BG_COLOR_CLASS: string = `bg-${THEME_COLOR}-${THEME_COLOR_IN...
  constant LAUNCH_BUTTON_BACKGROUND_HOVER_CLASS (line 9) | const LAUNCH_BUTTON_BACKGROUND_HOVER_CLASS: string = `bg-${THEME_COLOR}-...
  constant FRAME_PADDING_CLASS (line 12) | const FRAME_PADDING_CLASS: string = 'p-5';

FILE: src/hooks/useGraphModel.ts
  type UseGraphModelProps (line 9) | type UseGraphModelProps = {
  type UseGraphModelOutput (line 14) | type UseGraphModelOutput = {

FILE: src/hooks/useLinksDetector.ts
  type DetectionPerformance (line 37) | type DetectionPerformance = {
  type DetectedLink (line 49) | type DetectedLink = {
  type UseLinkDetectorProps (line 57) | type UseLinkDetectorProps = {
  type DetectProps (line 66) | type DetectProps = {
  type UseLinkDetectorOutput (line 76) | type UseLinkDetectorOutput = {
  type TesseractDetection (line 87) | type TesseractDetection = ConfigResult | RecognizeResult | DetectResult;
  constant URL_REG_EXP (line 90) | const URL_REG_EXP = /https?:\/\/(www\.)?[-a-zA-Z0-9@:%._+~#=]{2,256}\.[a...

FILE: src/hooks/useLogger.ts
  type UseLoggerParams (line 4) | type UseLoggerParams = {
  function useLogger (line 8) | function useLogger(params: UseLoggerParams = {}): Loggers {

FILE: src/hooks/usePageTitle.ts
  type UsePageTitleOutput (line 6) | type UsePageTitleOutput = {
  function usePageTitle (line 10) | function usePageTitle(): UsePageTitleOutput {

FILE: src/hooks/useTesseract.ts
  type UseSchedulerProps (line 13) | type UseSchedulerProps = InitSchedulerProps;
  type UseSchedulerOutput (line 15) | type UseSchedulerOutput = {

FILE: src/hooks/useWindowSize.ts
  type WindowSize (line 6) | type WindowSize = {
  function useWindowSize (line 13) | function useWindowSize(): WindowSize {

FILE: src/icons/index.ts
  type ICON_KEYS (line 17) | enum ICON_KEYS {
  type IconType (line 33) | type IconType = {
  type IconsType (line 38) | type IconsType = {
  constant ICONS (line 42) | const ICONS: IconsType = {

FILE: src/serviceWorkerRegistration.ts
  type Config (line 21) | type Config = {
  function registerValidSW (line 26) | function registerValidSW(swUrl: string, config?: Config): void {
  function register (line 83) | function register(config?: Config): void {
  function unregister (line 121) | function unregister(): void {

FILE: src/utils/debug.ts
  type TFInfoProps (line 4) | type TFInfoProps = {
  type TFInfo (line 8) | type TFInfo = {

FILE: src/utils/graphModel.ts
  type TFBackends (line 9) | enum TFBackends {
  type ModelPredictions (line 87) | type ModelPredictions = {
  type DetectionBox (line 94) | type DetectionBox = {
  type GraphModelExecuteProps (line 103) | type GraphModelExecuteProps = {

FILE: src/utils/image.ts
  type Pixels (line 5) | type Pixels = HTMLImageElement | HTMLCanvasElement| HTMLVideoElement;
  type FilterFunc (line 7) | type FilterFunc = (colors: Uint8ClampedArray, shift: number) => void;
  type PreprocessPixelsProps (line 79) | type PreprocessPixelsProps = {

FILE: src/utils/logger.ts
  type LoggerContext (line 4) | type LoggerContext = string | null;
  type LoggerMessage (line 5) | type LoggerMessage = string;
  type LoggerMeta (line 6) | type LoggerMeta = Error | Object | null;
  type LinksDetectorConsole (line 8) | interface LinksDetectorConsole {
  function getSystemLogger (line 17) | function getSystemLogger(): LinksDetectorConsole {
  type TableLogger (line 39) | type TableLogger = (
  type Logger (line 45) | type Logger = (
  type Loggers (line 50) | type Loggers = {
  type OnCallLoggerCallback (line 60) | type OnCallLoggerCallback =
  type BuildLoggerProps (line 63) | type BuildLoggerProps = {
  type BuildTableLoggerProps (line 110) | type BuildTableLoggerProps = {
  type BuildLoggersParams (line 133) | type BuildLoggersParams = {

FILE: src/utils/profiler.ts
  type Profiler (line 3) | type Profiler = {

FILE: src/utils/tesseract.ts
  type InitSchedulerProps (line 14) | type InitSchedulerProps = {
  type JobTypes (line 21) | enum JobTypes {
  type WorkerLoadingStatuses (line 26) | enum WorkerLoadingStatuses {
  constant CORE_WORKER_ID (line 38) | const CORE_WORKER_ID = 'core';
  type WorkerLoadingProgress (line 40) | type WorkerLoadingProgress = {
  type WorkersLoadingProgress (line 44) | type WorkersLoadingProgress = {
  type WorkerLogEvent (line 48) | type WorkerLogEvent = {

FILE: src/utils/types.ts
  type ZeroOneRange (line 2) | type ZeroOneRange = number;
  type SignedZeroOneRange (line 5) | type SignedZeroOneRange = number;
Condensed preview — 87 files, each showing path, character count, and a content snippet. Download the .json file or copy for the full structured content (1,044K chars).
[
{
"path": ".eslintrc.js",
"chars": 1393,
"preview": "module.exports = {\n env: {\n browser: true,\n es6: true,\n node: true,\n jest: true,\n },\n extends: [\n 'esl"
},
{
"path": ".gitignore",
"chars": 377,
"preview": "# See https://help.github.com/articles/ignoring-files/ for more about ignoring files.\n\n# dependencies\n/node_modules\n/.pn"
},
{
"path": "LICENCE",
"chars": 1073,
"preview": "MIT License\n\nCopyright (c) 2020 Oleksii Trekhleb\n\nPermission is hereby granted, free of charge, to any person obtaining "
},
{
"path": "README.DEV.md",
"chars": 1322,
"preview": "# Links Detector: Engineering Notes\n\n## Working with the repository\n\n#### Installation\n\n`yarn install`\n\n#### Running loc"
},
{
"path": "README.md",
"chars": 3188,
"preview": "# 📖 👆🏻 Links Detector\n\n> Links Detector makes printed links clickable _via your smartphone camera_. No need to type a li"
},
{
"path": "articles/printed_links_detection/printed_links_detection.md",
"chars": 84677,
"preview": "# 📖 👆🏻 Making the Printed Links Clickable Using TensorFlow 2 Object Detection API\n\n - Google Analytics -->\n <script\n as"
},
{
"path": "public/manifest.json",
"chars": 797,
"preview": "{\n \"name\": \"Links Detector\",\n \"short_name\": \"Links Detector\",\n \"description\": \"Links Detector makes printed links cli"
},
{
"path": "public/models/links_detector/v1/model.json",
"chars": 642336,
"preview": "{\n \"format\": \"graph-model\",\n \"generatedBy\": \"2.3.0\",\n \"convertedBy\": \"TensorFlow.js Converter v2.4.0\",\n \"userDefined"
},
{
"path": "public/robots.txt",
"chars": 67,
"preview": "# https://www.robotstxt.org/robotstxt.html\nUser-agent: *\nDisallow:\n"
},
{
"path": "serve.json",
"chars": 451,
"preview": "{\n \"public\": \"./build\",\n \"rewrites\": [\n {\n \"source\": \"/links-detector\",\n \"destination\": \"index.html\"\n "
},
{
"path": "src/components/App.tsx",
"chars": 641,
"preview": "import React from 'react';\nimport { Router } from 'react-router-dom';\nimport { createHashHistory, Location } from 'histo"
},
{
"path": "src/components/Routes.tsx",
"chars": 883,
"preview": "import React from 'react';\nimport { Switch, Route } from 'react-router-dom';\n\nimport { ROUTES } from '../constants/route"
},
{
"path": "src/components/elements/BoxesCanvas.tsx",
"chars": 3341,
"preview": "import React, { useRef, useEffect, useCallback } from 'react';\nimport { DetectionBox } from '../../utils/graphModel';\nim"
},
{
"path": "src/components/elements/DebugInfo.tsx",
"chars": 1255,
"preview": "import React, { useEffect, useState } from 'react';\n\nimport {\n getTFInfo,\n isCanvasFilterSupported,\n isWebGLSupported"
},
{
"path": "src/components/elements/DetectedLinks.tsx",
"chars": 1786,
"preview": "import React, { CSSProperties } from 'react';\nimport { DetectedLink } from '../../hooks/useLinksDetector';\nimport Icon f"
},
{
"path": "src/components/elements/DetectedLinksPrefixes.tsx",
"chars": 1872,
"preview": "import React, { CSSProperties } from 'react';\nimport { DetectionBox } from '../../utils/graphModel';\nimport { relativeTo"
},
{
"path": "src/components/elements/LinksDetector.tsx",
"chars": 7575,
"preview": "import React, {\n CSSProperties,\n useCallback,\n useEffect,\n useState,\n} from 'react';\nimport { Rectangle } from 'tess"
},
{
"path": "src/components/elements/PerformanceMonitor.tsx",
"chars": 1126,
"preview": "import React, { CSSProperties } from 'react';\nimport { DetectionPerformance } from '../../hooks/useLinksDetector';\n\ntype"
},
{
"path": "src/components/elements/PixelsCanvas.tsx",
"chars": 960,
"preview": "import React, { useEffect, useRef } from 'react';\nimport useLogger from '../../hooks/useLogger';\nimport { Pixels } from "
},
{
"path": "src/components/screens/DebugScreen.tsx",
"chars": 268,
"preview": "import React from 'react';\n\nimport DebugInfo from '../elements/DebugInfo';\nimport PageTitle from '../shared/PageTitle';\n"
},
{
"path": "src/components/screens/DemoScreen.tsx",
"chars": 363,
"preview": "import React from 'react';\n\nimport PageTitle from '../shared/PageTitle';\nimport Demo from '../shared/Demo';\n\nfunction De"
},
{
"path": "src/components/screens/DetectorScreen.tsx",
"chars": 1427,
"preview": "import React, { useState } from 'react';\nimport { useHistory, useLocation } from 'react-router-dom';\nimport { History, L"
},
{
"path": "src/components/screens/HomeScreen.tsx",
"chars": 1141,
"preview": "import React from 'react';\nimport { useHistory, useLocation } from 'react-router-dom';\nimport { History, LocationDescrip"
},
{
"path": "src/components/screens/NotFoundScreen.tsx",
"chars": 1146,
"preview": "import React, { useEffect } from 'react';\nimport { Link, useLocation } from 'react-router-dom';\nimport { Location } from"
},
{
"path": "src/components/shared/CameraStream.tsx",
"chars": 5406,
"preview": "import React, {\n CSSProperties,\n useCallback, useEffect, useRef, useState,\n} from 'react';\nimport throttle from 'lodas"
},
{
"path": "src/components/shared/Demo.tsx",
"chars": 1327,
"preview": "import React, {\n SyntheticEvent,\n useState,\n} from 'react';\n\nimport { BASE_VIDEO_PATH } from '../../constants/routes';"
},
{
"path": "src/components/shared/EnhancedRow.tsx",
"chars": 751,
"preview": "import React from 'react';\n\ntype EnhancedRowProps = {\n content: React.ReactNode,\n contentClassName?: string,\n classNa"
},
{
"path": "src/components/shared/ErrorBoundary.tsx",
"chars": 1134,
"preview": "import React, { ErrorInfo } from 'react';\nimport Notification, { NotificationLevel } from './Notification';\nimport { bui"
},
{
"path": "src/components/shared/Footer.tsx",
"chars": 769,
"preview": "import React from 'react';\n\nimport HyperLink from './HyperLink';\nimport { GITHUB_BASE_URL, GITHUB_ISSUES_LINK } from '.."
},
{
"path": "src/components/shared/Grid.tsx",
"chars": 1676,
"preview": "import React, { CSSProperties } from 'react';\n\ntype GridProps = {\n vCells: number,\n hCells: number,\n width: number,\n "
},
{
"path": "src/components/shared/Header.tsx",
"chars": 202,
"preview": "import React from 'react';\n\nimport Logo from './Logo';\n\nfunction Header(): React.ReactElement {\n return (\n <header c"
},
{
"path": "src/components/shared/HyperLink.tsx",
"chars": 1221,
"preview": "import React from 'react';\nimport { Link } from 'react-router-dom';\n\nimport { ICON_KEYS } from '../../icons';\nimport Ico"
},
{
"path": "src/components/shared/Icon.tsx",
"chars": 708,
"preview": "import React from 'react';\nimport { ICON_KEYS, ICONS } from '../../icons';\n\ntype IconProps = {\n iconKey: ICON_KEYS,\n c"
},
{
"path": "src/components/shared/LaunchButton.tsx",
"chars": 2017,
"preview": "import React, { CSSProperties } from 'react';\nimport { LAUNCH_BUTTON_BACKGROUND_HOVER_CLASS } from '../../constants/styl"
},
{
"path": "src/components/shared/Logo.tsx",
"chars": 1061,
"preview": "import React from 'react';\nimport { Link } from 'react-router-dom';\n\nimport Icon from './Icon';\nimport { ICON_KEYS } fro"
},
{
"path": "src/components/shared/MainNavigation.tsx",
"chars": 415,
"preview": "import React from 'react';\nimport { NavLink } from 'react-router-dom';\nimport { ROUTES } from '../../constants/routes';\n"
},
{
"path": "src/components/shared/Modal.tsx",
"chars": 1062,
"preview": "import React from 'react';\n\nimport ModalCloseButton from './ModalCloseButton';\n\ntype ModalProps = {\n children: React.Re"
},
{
"path": "src/components/shared/ModalCloseButton.tsx",
"chars": 797,
"preview": "import React from 'react';\n\nimport Icon from './Icon';\nimport { ICON_KEYS } from '../../icons';\n\ntype ModalCloseButtonPr"
},
{
"path": "src/components/shared/Notification.tsx",
"chars": 1338,
"preview": "import React from 'react';\nimport { ICON_KEYS } from '../../icons';\nimport Icon from './Icon';\n\nexport enum Notification"
},
{
"path": "src/components/shared/PageTitle.tsx",
"chars": 380,
"preview": "import React from 'react';\nimport { Helmet } from 'react-helmet';\n\nimport usePageTitle from '../../hooks/usePageTitle';\n"
},
{
"path": "src/components/shared/ProgressBar.tsx",
"chars": 1120,
"preview": "import React from 'react';\nimport { ZeroOneRange } from '../../utils/types';\n\ntype ProgressBarProps = {\n progress?: Zer"
},
{
"path": "src/components/shared/Promo.tsx",
"chars": 401,
"preview": "import React from 'react';\n\nfunction Promo(): React.ReactElement {\n return (\n <div className=\"flex flex-col\">\n "
},
{
"path": "src/components/shared/Spinner.css",
"chars": 191,
"preview": "@keyframes sk-scaleout {\n 0% {\n -webkit-transform: scaleX(0);\n transform: scaleX(0);\n }\n 100% {\n -webkit-tra"
},
{
"path": "src/components/shared/Spinner.tsx",
"chars": 522,
"preview": "import React, { CSSProperties } from 'react';\nimport './Spinner.css';\nimport { DETECTION_BACKGROUND_COLOR_CLASS } from '"
},
{
"path": "src/components/shared/Template.tsx",
"chars": 852,
"preview": "import React, { CSSProperties } from 'react';\n\nimport Header from './Header';\nimport Footer from './Footer';\nimport { FR"
},
{
"path": "src/configs/analytics.ts",
"chars": 51,
"preview": "export const GOOGLE_ANALYTICS_ID = 'G-NEPEGVZ6TM';\n"
},
{
"path": "src/configs/detectionConfig.ts",
"chars": 1634,
"preview": "import { ZeroOneRange } from '../utils/types';\nimport { BASE_APP_PATH } from '../constants/routes';\n\nexport const MODELS"
},
{
"path": "src/configs/pwa.ts",
"chars": 139,
"preview": "export const PWA_ENABLED: boolean = true;\nexport const CACHE_PREFIX: string = 'links-detector';\nexport const CACHE_VERSI"
},
{
"path": "src/constants/debug.ts",
"chars": 187,
"preview": "import { DEBUG_GET_PARAM } from './routes';\n\nexport const isDebugMode = (): boolean => {\n const url = new URL(window.lo"
},
{
"path": "src/constants/links.ts",
"chars": 156,
"preview": "export const GITHUB_BASE_URL: string = 'https://github.com/trekhleb/links-detector';\nexport const GITHUB_ISSUES_LINK: st"
},
{
"path": "src/constants/page.ts",
"chars": 101,
"preview": "export const APP_TITLE: string = 'Links Detector';\nexport const APP_TITLE_SEPARATOR: string = ' | ';\n"
},
{
"path": "src/constants/routes.ts",
"chars": 1500,
"preview": "import { APP_TITLE, APP_TITLE_SEPARATOR } from './page';\n\nexport const BASE_APP_PATH: string = '/links-detector';\nexport"
},
{
"path": "src/constants/style.ts",
"chars": 716,
"preview": "// @see: https://tailwindcss.com/docs/background-color#class-reference\nconst THEME_COLOR: string = 'yellow';\nconst THEME"
},
{
"path": "src/hooks/useGraphModel.ts",
"chars": 3407,
"preview": "import { useState, useEffect, useCallback } from 'react';\nimport * as tf from '@tensorflow/tfjs';\n\nimport useLogger from"
},
{
"path": "src/hooks/useLinksDetector.ts",
"chars": 11982,
"preview": "import { GraphModel } from '@tensorflow/tfjs';\nimport {\n ConfigResult,\n DetectResult,\n Line,\n RecognizeOptions,\n Re"
},
{
"path": "src/hooks/useLogger.ts",
"chars": 368,
"preview": "import { useRef } from 'react';\nimport { buildLoggers, LoggerContext, Loggers } from '../utils/logger';\n\ntype UseLoggerP"
},
{
"path": "src/hooks/usePageTitle.ts",
"chars": 591,
"preview": "import { useEffect, useState } from 'react';\nimport { useRouteMatch } from 'react-router-dom';\n\nimport { routeTitleFromP"
},
{
"path": "src/hooks/useTesseract.ts",
"chars": 2873,
"preview": "import { Scheduler } from 'tesseract.js';\nimport {\n useCallback,\n useEffect,\n useRef,\n useState,\n} from 'react';\n\nim"
},
{
"path": "src/hooks/useWindowSize.ts",
"chars": 1132,
"preview": "import { useEffect, useState } from 'react';\nimport throttle from 'lodash/throttle';\n\nimport useLogger from './useLogger"
},
{
"path": "src/icons/README.md",
"chars": 533,
"preview": "# Icons\n\n- [Tutorial](https://tailwindcss.com/course/working-with-svg-icons/#app) of how to style icons with Tailwind\n- "
},
{
"path": "src/icons/index.ts",
"chars": 2676,
"preview": "import React, { SVGProps } from 'react';\n\nimport { ReactComponent as XIcon } from './feathericons/x.svg';\nimport { React"
},
{
"path": "src/index.tsx",
"chars": 438,
"preview": "import React from 'react';\nimport ReactDOM from 'react-dom';\n\nimport './styles/tailwind.css';\nimport App from './compone"
},
{
"path": "src/react-app-env.d.ts",
"chars": 223,
"preview": "/// <reference types=\"react-scripts\" />\n\n/*\ndeclare module 'glfx';\n\nor\n\ndeclare namespace bananaJs {\n function getBan"
},
{
"path": "src/service-worker.ts",
"chars": 3904,
"preview": "/// <reference lib=\"webworker\" />\n\n// This service worker can be customized!\n// See https://developers.google.com/web/to"
},
{
"path": "src/serviceWorkerRegistration.ts",
"chars": 5072,
"preview": "// This optional code is used to register a service worker.\n// register() is not called by default.\n\n// This lets the ap"
},
{
"path": "src/setupTests.ts",
"chars": 255,
"preview": "// jest-dom adds custom jest matchers for asserting on DOM nodes.\n// allows you to do things like:\n// expect(element).to"
},
{
"path": "src/styles/index.css",
"chars": 59,
"preview": "@tailwind base;\n@tailwind components;\n@tailwind utilities;\n"
},
{
"path": "src/utils/analytics.ts",
"chars": 1248,
"preview": "import { Location } from 'history';\nimport { GOOGLE_ANALYTICS_ID } from '../configs/analytics';\n\nconst getPathFromLocati"
},
{
"path": "src/utils/debug.ts",
"chars": 1170,
"preview": "import * as tf from '@tensorflow/tfjs';\nimport { setTFBackend } from './graphModel';\n\ntype TFInfoProps = {\n modelURL: s"
},
{
"path": "src/utils/graphModel.ts",
"chars": 5767,
"preview": "import * as tf from '@tensorflow/tfjs';\nimport { setWasmPaths } from '@tensorflow/tfjs-backend-wasm';\nimport { DataType "
},
{
"path": "src/utils/image.ts",
"chars": 3653,
"preview": "/* eslint-disable no-param-reassign */\n\nimport { SignedZeroOneRange, ZeroOneRange } from './types';\n\nexport type Pixels "
},
{
"path": "src/utils/logger.ts",
"chars": 3903,
"preview": "import { isDebugMode } from '../constants/debug';\nimport { gaErrorLog } from './analytics';\n\nexport type LoggerContext ="
},
{
"path": "src/utils/numbers.ts",
"chars": 315,
"preview": "export const toFloatFixed = (num: number, fractionDigits: number): number => {\n const leverage: number = 10 ** fraction"
},
{
"path": "src/utils/profiler.ts",
"chars": 1310,
"preview": "import { toFloatFixed } from './numbers';\n\nexport type Profiler = {\n start: () => void,\n stop: (inSeconds?: boolean) ="
},
{
"path": "src/utils/routes.ts",
"chars": 478,
"preview": "import { ROUTES, RouteType } from '../constants/routes';\n\nexport const routeFromPath = (path: string): RouteType | null "
},
{
"path": "src/utils/tesseract.ts",
"chars": 5651,
"preview": "import {\n createWorker,\n createScheduler,\n Scheduler,\n Worker,\n WorkerOptions,\n WorkerParams,\n PSM,\n} from 'tesse"
},
{
"path": "src/utils/types.ts",
"chars": 98,
"preview": "// [0, 1]\nexport type ZeroOneRange = number;\n\n// [-1, 1]\nexport type SignedZeroOneRange = number;\n"
},
{
"path": "tailwind.config.js",
"chars": 679,
"preview": "// @see: https://tailwindcss.com/docs/configuration/\n// @see: https://github.com/tailwindcss/tailwindcss/blob/master/stu"
},
{
"path": "tsconfig.json",
"chars": 575,
"preview": "{\n \"compilerOptions\": {\n \"target\": \"es5\",\n \"lib\": [\n \"dom\",\n \"dom.iterable\",\n \"esnext\"\n ],\n "
}
]
// ... and 4 more files (download for full content)
About this extraction
This page contains the full source code of the trekhleb/links-detector GitHub repository, extracted and formatted as plain text for AI agents and large language models (LLMs). The extraction includes 87 files (919.4 KB), approximately 231.2k tokens, and a symbol index with 142 extracted functions, classes, methods, constants, and types. Use this with OpenClaw, Claude, ChatGPT, Cursor, Windsurf, or any other AI tool that accepts text input. You can copy the full output to your clipboard or download it as a .txt file.
Extracted by GitExtract — free GitHub repo to text converter for AI. Built by Nikandr Surkov.