Showing preview only (428K chars total). Download the full file or copy to clipboard to get everything.
Repository: yeyupiaoling/LearnPaddle2
Branch: master
Commit: 7c53fa82cd64
Files: 215
Total size: 322.8 KB
Directory structure:
gitextract_qo9m5qrb/

├── .gitignore
├── LICENSE
├── README.md
├── note1/
│   ├── README.md
│   └── test_paddle.py
├── note10/
│   ├── README.md
│   ├── mobilenet_v2.py
│   ├── test_visualdl.py
│   └── train.py
├── note11/
│   ├── README.md
│   ├── create_data_list.py
│   ├── download_image.py
│   ├── infer.py
│   ├── mobilenet_v1.py
│   ├── reader.py
│   └── train.py
├── note12/
│   ├── README.md
│   ├── bilstm_net.py
│   ├── create_data.py
│   ├── download_text_data.py
│   ├── infer.py
│   ├── text_reader.py
│   └── train.py
├── note13/
│   ├── README.md
│   ├── image_reader.py
│   ├── infer.py
│   └── train.py
├── note14/
│   ├── README.md
│   ├── index.html
│   └── paddle_server.py
├── note15/
│   ├── .gitignore
│   ├── README.md
│   ├── app/
│   │   ├── .gitignore
│   │   ├── build.gradle
│   │   ├── proguard-rules.pro
│   │   └── src/
│   │       └── main/
│   │           ├── AndroidManifest.xml
│   │           ├── assets/
│   │           │   └── infer_model/
│   │           │       ├── __model__
│   │           │       ├── batch_norm_0.b_0
│   │           │       ├── batch_norm_0.w_0
│   │           │       ├── batch_norm_0.w_1
│   │           │       ├── batch_norm_0.w_2
│   │           │       ├── batch_norm_1.b_0
│   │           │       ├── batch_norm_1.w_0
│   │           │       ├── batch_norm_1.w_1
│   │           │       ├── batch_norm_1.w_2
│   │           │       ├── batch_norm_10.b_0
│   │           │       ├── batch_norm_10.w_0
│   │           │       ├── batch_norm_10.w_1
│   │           │       ├── batch_norm_10.w_2
│   │           │       ├── batch_norm_11.b_0
│   │           │       ├── batch_norm_11.w_0
│   │           │       ├── batch_norm_11.w_1
│   │           │       ├── batch_norm_11.w_2
│   │           │       ├── batch_norm_12.b_0
│   │           │       ├── batch_norm_12.w_0
│   │           │       ├── batch_norm_12.w_1
│   │           │       ├── batch_norm_12.w_2
│   │           │       ├── batch_norm_13.b_0
│   │           │       ├── batch_norm_13.w_0
│   │           │       ├── batch_norm_13.w_1
│   │           │       ├── batch_norm_13.w_2
│   │           │       ├── batch_norm_14.b_0
│   │           │       ├── batch_norm_14.w_0
│   │           │       ├── batch_norm_14.w_1
│   │           │       ├── batch_norm_14.w_2
│   │           │       ├── batch_norm_15.b_0
│   │           │       ├── batch_norm_15.w_0
│   │           │       ├── batch_norm_15.w_1
│   │           │       ├── batch_norm_15.w_2
│   │           │       ├── batch_norm_16.b_0
│   │           │       ├── batch_norm_16.w_0
│   │           │       ├── batch_norm_16.w_1
│   │           │       ├── batch_norm_16.w_2
│   │           │       ├── batch_norm_17.b_0
│   │           │       ├── batch_norm_17.w_0
│   │           │       ├── batch_norm_17.w_1
│   │           │       ├── batch_norm_17.w_2
│   │           │       ├── batch_norm_18.b_0
│   │           │       ├── batch_norm_18.w_0
│   │           │       ├── batch_norm_18.w_1
│   │           │       ├── batch_norm_18.w_2
│   │           │       ├── batch_norm_19.b_0
│   │           │       ├── batch_norm_19.w_0
│   │           │       ├── batch_norm_19.w_1
│   │           │       ├── batch_norm_19.w_2
│   │           │       ├── batch_norm_2.b_0
│   │           │       ├── batch_norm_2.w_0
│   │           │       ├── batch_norm_2.w_1
│   │           │       ├── batch_norm_2.w_2
│   │           │       ├── batch_norm_20.b_0
│   │           │       ├── batch_norm_20.w_0
│   │           │       ├── batch_norm_20.w_1
│   │           │       ├── batch_norm_20.w_2
│   │           │       ├── batch_norm_21.b_0
│   │           │       ├── batch_norm_21.w_0
│   │           │       ├── batch_norm_21.w_1
│   │           │       ├── batch_norm_21.w_2
│   │           │       ├── batch_norm_22.b_0
│   │           │       ├── batch_norm_22.w_0
│   │           │       ├── batch_norm_22.w_1
│   │           │       ├── batch_norm_22.w_2
│   │           │       ├── batch_norm_23.b_0
│   │           │       ├── batch_norm_23.w_0
│   │           │       ├── batch_norm_23.w_1
│   │           │       ├── batch_norm_23.w_2
│   │           │       ├── batch_norm_24.b_0
│   │           │       ├── batch_norm_24.w_0
│   │           │       ├── batch_norm_24.w_1
│   │           │       ├── batch_norm_24.w_2
│   │           │       ├── batch_norm_25.b_0
│   │           │       ├── batch_norm_25.w_0
│   │           │       ├── batch_norm_25.w_1
│   │           │       ├── batch_norm_25.w_2
│   │           │       ├── batch_norm_26.b_0
│   │           │       ├── batch_norm_26.w_0
│   │           │       ├── batch_norm_26.w_1
│   │           │       ├── batch_norm_26.w_2
│   │           │       ├── batch_norm_3.b_0
│   │           │       ├── batch_norm_3.w_0
│   │           │       ├── batch_norm_3.w_1
│   │           │       ├── batch_norm_3.w_2
│   │           │       ├── batch_norm_4.b_0
│   │           │       ├── batch_norm_4.w_0
│   │           │       ├── batch_norm_4.w_1
│   │           │       ├── batch_norm_4.w_2
│   │           │       ├── batch_norm_5.b_0
│   │           │       ├── batch_norm_5.w_0
│   │           │       ├── batch_norm_5.w_1
│   │           │       ├── batch_norm_5.w_2
│   │           │       ├── batch_norm_6.b_0
│   │           │       ├── batch_norm_6.w_0
│   │           │       ├── batch_norm_6.w_1
│   │           │       ├── batch_norm_6.w_2
│   │           │       ├── batch_norm_7.b_0
│   │           │       ├── batch_norm_7.w_0
│   │           │       ├── batch_norm_7.w_1
│   │           │       ├── batch_norm_7.w_2
│   │           │       ├── batch_norm_8.b_0
│   │           │       ├── batch_norm_8.w_0
│   │           │       ├── batch_norm_8.w_1
│   │           │       ├── batch_norm_8.w_2
│   │           │       ├── batch_norm_9.b_0
│   │           │       ├── batch_norm_9.w_0
│   │           │       ├── batch_norm_9.w_1
│   │           │       ├── batch_norm_9.w_2
│   │           │       ├── conv2d_0.w_0
│   │           │       ├── conv2d_1.w_0
│   │           │       ├── conv2d_10.w_0
│   │           │       ├── conv2d_11.w_0
│   │           │       ├── conv2d_12.w_0
│   │           │       ├── conv2d_13.w_0
│   │           │       ├── conv2d_2.w_0
│   │           │       ├── conv2d_3.w_0
│   │           │       ├── conv2d_4.w_0
│   │           │       ├── conv2d_5.w_0
│   │           │       ├── conv2d_6.w_0
│   │           │       ├── conv2d_7.w_0
│   │           │       ├── conv2d_8.w_0
│   │           │       ├── conv2d_9.w_0
│   │           │       ├── depthwise_conv2d_0.w_0
│   │           │       ├── depthwise_conv2d_1.w_0
│   │           │       ├── depthwise_conv2d_10.w_0
│   │           │       ├── depthwise_conv2d_11.w_0
│   │           │       ├── depthwise_conv2d_12.w_0
│   │           │       ├── depthwise_conv2d_2.w_0
│   │           │       ├── depthwise_conv2d_3.w_0
│   │           │       ├── depthwise_conv2d_4.w_0
│   │           │       ├── depthwise_conv2d_5.w_0
│   │           │       ├── depthwise_conv2d_6.w_0
│   │           │       ├── depthwise_conv2d_7.w_0
│   │           │       ├── depthwise_conv2d_8.w_0
│   │           │       ├── depthwise_conv2d_9.w_0
│   │           │       ├── fc_0.b_0
│   │           │       └── fc_0.w_0
│   │           ├── java/
│   │           │   └── com/
│   │           │       ├── baidu/
│   │           │       │   └── paddle/
│   │           │       │       └── PML.java
│   │           │       └── yeyupiaoling/
│   │           │           └── note15/
│   │           │               ├── MainActivity.java
│   │           │               └── Utils.java
│   │           └── res/
│   │               ├── drawable/
│   │               │   └── ic_launcher_background.xml
│   │               ├── drawable-v24/
│   │               │   └── ic_launcher_foreground.xml
│   │               ├── layout/
│   │               │   └── activity_main.xml
│   │               ├── mipmap-anydpi-v26/
│   │               │   ├── ic_launcher.xml
│   │               │   └── ic_launcher_round.xml
│   │               └── values/
│   │                   ├── colors.xml
│   │                   ├── strings.xml
│   │                   └── styles.xml
│   ├── build.gradle
│   ├── gradle/
│   │   └── wrapper/
│   │       ├── gradle-wrapper.jar
│   │       └── gradle-wrapper.properties
│   ├── gradle.properties
│   ├── gradlew
│   ├── gradlew.bat
│   └── settings.gradle
├── note2/
│   ├── README.md
│   ├── constant_sum.py
│   └── variable_sum.py
├── note3/
│   ├── README.md
│   ├── linear_regression.py
│   └── uci_housing_linear.py
├── note4/
│   ├── README.md
│   └── mnist_classification.py
├── note5/
│   ├── README.md
│   └── text_classification.py
├── note6/
│   ├── GAN.py
│   └── README.md
├── note7/
│   ├── DQN.py
│   └── README.md
├── note8/
│   ├── README.md
│   ├── save_infer_model.py
│   ├── save_use_params_model.py
│   ├── save_use_persistables_model.py
│   └── use_infer_model.py
├── note9/
│   ├── README.md
│   ├── pretrain_model.py
│   └── train.py
└── requirements.txt
================================================
FILE CONTENTS
================================================
================================================
FILE: .gitignore
================================================
.idea/
note1/fit_a_line.inference.model
note3/image/
note8/models/
note9/models/
note10/log/
note11/images/
note11/infer_model/
note12/datasets/
note12/infer_model/
note13/train_image/
note13/infer_image/
note13/infer_model/
note13/datasets/
note14/infer_model/
note14/images/
================================================
FILE: LICENSE
================================================
Apache License
Version 2.0, January 2004
http://www.apache.org/licenses/
TERMS AND CONDITIONS FOR USE, REPRODUCTION, AND DISTRIBUTION
1. Definitions.
"License" shall mean the terms and conditions for use, reproduction,
and distribution as defined by Sections 1 through 9 of this document.
"Licensor" shall mean the copyright owner or entity authorized by
the copyright owner that is granting the License.
"Legal Entity" shall mean the union of the acting entity and all
other entities that control, are controlled by, or are under common
control with that entity. For the purposes of this definition,
"control" means (i) the power, direct or indirect, to cause the
direction or management of such entity, whether by contract or
otherwise, or (ii) ownership of fifty percent (50%) or more of the
outstanding shares, or (iii) beneficial ownership of such entity.
"You" (or "Your") shall mean an individual or Legal Entity
exercising permissions granted by this License.
"Source" form shall mean the preferred form for making modifications,
including but not limited to software source code, documentation
source, and configuration files.
"Object" form shall mean any form resulting from mechanical
transformation or translation of a Source form, including but
not limited to compiled object code, generated documentation,
and conversions to other media types.
"Work" shall mean the work of authorship, whether in Source or
Object form, made available under the License, as indicated by a
copyright notice that is included in or attached to the work
(an example is provided in the Appendix below).
"Derivative Works" shall mean any work, whether in Source or Object
form, that is based on (or derived from) the Work and for which the
editorial revisions, annotations, elaborations, or other modifications
represent, as a whole, an original work of authorship. For the purposes
of this License, Derivative Works shall not include works that remain
separable from, or merely link (or bind by name) to the interfaces of,
the Work and Derivative Works thereof.
"Contribution" shall mean any work of authorship, including
the original version of the Work and any modifications or additions
to that Work or Derivative Works thereof, that is intentionally
submitted to Licensor for inclusion in the Work by the copyright owner
or by an individual or Legal Entity authorized to submit on behalf of
the copyright owner. For the purposes of this definition, "submitted"
means any form of electronic, verbal, or written communication sent
to the Licensor or its representatives, including but not limited to
communication on electronic mailing lists, source code control systems,
and issue tracking systems that are managed by, or on behalf of, the
Licensor for the purpose of discussing and improving the Work, but
excluding communication that is conspicuously marked or otherwise
designated in writing by the copyright owner as "Not a Contribution."
"Contributor" shall mean Licensor and any individual or Legal Entity
on behalf of whom a Contribution has been received by Licensor and
subsequently incorporated within the Work.
2. Grant of Copyright License. Subject to the terms and conditions of
this License, each Contributor hereby grants to You a perpetual,
worldwide, non-exclusive, no-charge, royalty-free, irrevocable
copyright license to reproduce, prepare Derivative Works of,
publicly display, publicly perform, sublicense, and distribute the
Work and such Derivative Works in Source or Object form.
3. Grant of Patent License. Subject to the terms and conditions of
this License, each Contributor hereby grants to You a perpetual,
worldwide, non-exclusive, no-charge, royalty-free, irrevocable
(except as stated in this section) patent license to make, have made,
use, offer to sell, sell, import, and otherwise transfer the Work,
where such license applies only to those patent claims licensable
by such Contributor that are necessarily infringed by their
Contribution(s) alone or by combination of their Contribution(s)
with the Work to which such Contribution(s) was submitted. If You
institute patent litigation against any entity (including a
cross-claim or counterclaim in a lawsuit) alleging that the Work
or a Contribution incorporated within the Work constitutes direct
or contributory patent infringement, then any patent licenses
granted to You under this License for that Work shall terminate
as of the date such litigation is filed.
4. Redistribution. You may reproduce and distribute copies of the
Work or Derivative Works thereof in any medium, with or without
modifications, and in Source or Object form, provided that You
meet the following conditions:
(a) You must give any other recipients of the Work or
Derivative Works a copy of this License; and
(b) You must cause any modified files to carry prominent notices
stating that You changed the files; and
(c) You must retain, in the Source form of any Derivative Works
that You distribute, all copyright, patent, trademark, and
attribution notices from the Source form of the Work,
excluding those notices that do not pertain to any part of
the Derivative Works; and
(d) If the Work includes a "NOTICE" text file as part of its
distribution, then any Derivative Works that You distribute must
include a readable copy of the attribution notices contained
within such NOTICE file, excluding those notices that do not
pertain to any part of the Derivative Works, in at least one
of the following places: within a NOTICE text file distributed
as part of the Derivative Works; within the Source form or
documentation, if provided along with the Derivative Works; or,
within a display generated by the Derivative Works, if and
wherever such third-party notices normally appear. The contents
of the NOTICE file are for informational purposes only and
do not modify the License. You may add Your own attribution
notices within Derivative Works that You distribute, alongside
or as an addendum to the NOTICE text from the Work, provided
that such additional attribution notices cannot be construed
as modifying the License.
You may add Your own copyright statement to Your modifications and
may provide additional or different license terms and conditions
for use, reproduction, or distribution of Your modifications, or
for any such Derivative Works as a whole, provided Your use,
reproduction, and distribution of the Work otherwise complies with
the conditions stated in this License.
5. Submission of Contributions. Unless You explicitly state otherwise,
any Contribution intentionally submitted for inclusion in the Work
by You to the Licensor shall be under the terms and conditions of
this License, without any additional terms or conditions.
Notwithstanding the above, nothing herein shall supersede or modify
the terms of any separate license agreement you may have executed
with Licensor regarding such Contributions.
6. Trademarks. This License does not grant permission to use the trade
names, trademarks, service marks, or product names of the Licensor,
except as required for reasonable and customary use in describing the
origin of the Work and reproducing the content of the NOTICE file.
7. Disclaimer of Warranty. Unless required by applicable law or
agreed to in writing, Licensor provides the Work (and each
Contributor provides its Contributions) on an "AS IS" BASIS,
WITHOUT WARRANTIES OR CONDITIONS OF ANY KIND, either express or
implied, including, without limitation, any warranties or conditions
of TITLE, NON-INFRINGEMENT, MERCHANTABILITY, or FITNESS FOR A
PARTICULAR PURPOSE. You are solely responsible for determining the
appropriateness of using or redistributing the Work and assume any
risks associated with Your exercise of permissions under this License.
8. Limitation of Liability. In no event and under no legal theory,
whether in tort (including negligence), contract, or otherwise,
unless required by applicable law (such as deliberate and grossly
negligent acts) or agreed to in writing, shall any Contributor be
liable to You for damages, including any direct, indirect, special,
incidental, or consequential damages of any character arising as a
result of this License or out of the use or inability to use the
Work (including but not limited to damages for loss of goodwill,
work stoppage, computer failure or malfunction, or any and all
other commercial damages or losses), even if such Contributor
has been advised of the possibility of such damages.
9. Accepting Warranty or Additional Liability. While redistributing
the Work or Derivative Works thereof, You may choose to offer,
and charge a fee for, acceptance of support, warranty, indemnity,
or other liability obligations and/or rights consistent with this
License. However, in accepting such obligations, You may act only
on Your own behalf and on Your sole responsibility, not on behalf
of any other Contributor, and only if You agree to indemnify,
defend, and hold each Contributor harmless for any liability
incurred by, or claims asserted against, such Contributor by reason
of your accepting any such warranty or additional liability.
END OF TERMS AND CONDITIONS
APPENDIX: How to apply the Apache License to your work.
To apply the Apache License to your work, attach the following
boilerplate notice, with the fields enclosed by brackets "[]"
replaced with your own identifying information. (Don't include
the brackets!) The text should be enclosed in the appropriate
comment syntax for the file format. We also recommend that a
file or class name and description of purpose be included on the
same "printed page" as the copyright notice for easier
identification within third-party archives.
Copyright [yyyy] [name of copyright owner]
Licensed under the Apache License, Version 2.0 (the "License");
you may not use this file except in compliance with the License.
You may obtain a copy of the License at
http://www.apache.org/licenses/LICENSE-2.0
Unless required by applicable law or agreed to in writing, software
distributed under the License is distributed on an "AS IS" BASIS,
WITHOUT WARRANTIES OR CONDITIONS OF ANY KIND, either express or implied.
See the License for the specific language governing permissions and
limitations under the License.
================================================
FILE: README.md
================================================
# LearnPaddle2
PaddlePaddle新版本Fluid教程,使用的PaddlePaddle版本为1.2.0,Python版本为3.5。
# 文章博客地址
* [第一章 新版本PaddlePaddle的安装](https://blog.doiduoyi.com/articles/1584974303857.html)
* [第二章 计算1+1](https://blog.doiduoyi.com/articles/1584974387872.html)
* [第三章 线性回归](https://blog.doiduoyi.com/articles/1584974471592.html)
* [第四章 卷积神经网络](https://blog.doiduoyi.com/articles/1584974540988.html)
* [第五章 循环神经网络](https://blog.doiduoyi.com/articles/1584974601202.html)
* [第六章 生成对抗网络](https://blog.doiduoyi.com/articles/1584974661687.html)
* [第七章 强化学习](https://blog.doiduoyi.com/articles/1584974728689.html)
* [第八章 模型的保存与使用](https://blog.doiduoyi.com/articles/1584974792165.html)
* [第九章 迁移学习](https://blog.doiduoyi.com/articles/1584974849177.html)
* [第十章 VisualDL 训练可视化](https://blog.doiduoyi.com/articles/1584974915236.html)
* [第十一章 自定义图像数据集识别](https://blog.doiduoyi.com/articles/1584974968544.html)
* [第十二章 自定义文本数据集分类](https://blog.doiduoyi.com/articles/1584975038292.html)
* [第十三章 自定义图像数生成](https://blog.doiduoyi.com/articles/1584975142214.html)
* [第十四章 把预测模型部署在服务器](https://blog.doiduoyi.com/articles/1584975208040.html)
* [第十五章 把预测模型部署到Android手机上](https://blog.doiduoyi.com/articles/1584975263604.html)
# 补充
来都来了,觉得不错的话,给个star吧。
================================================
FILE: note1/README.md
================================================
@[TOC]
# 前言
这一章我们介绍如何安装新版本的PaddlePaddle,这里说的新版本主要是说Fluid版本。Fluid 是设计用来让用户像Pytorch和Tensorflow Eager Execution一样执行程序。在这些系统中,不再有模型这个概念,应用也不再包含一个用于描述Operator图或者一系列层的符号描述,而是像通用程序那样描述训练或者预测的过程。也就是说PaddlePaddle从Fluid版本开始使用动态图机制,所以我们这个系列也是使用Fluid版本编写的教程。
# 环境
- 系统:64位Windows 10专业版,64位Ubuntu 16.04
- Python环境:Python 3.5
- 内存:8G
# Windows下安装
PaddlePaddle在1.2版本之后开始支持Windows,也就是说使用Windows的用户不需要再安装Docker容器,或者使用Windows的Liunx子系统,直接可以在Windows系统本身安装PaddlePaddle。下面我们就介绍如何在Windows安装PaddlePaddle,分为两个部分介绍,首先安装Python 3.5环境,然后再使用命令安装PaddlePaddle。
## 安装Python
1、本系列使用的是Python 3.5,官方在Windows上支持Python2.7.15,Python3.5.x,Python3.6.x,Python3.7.x。读者根据自己的实际情况安装自己喜欢的版本。官网下载页面:https://www.python.org/downloads/windows/ ,官网下载地址:https://www.python.org/ftp/python/3.5.4/python-3.5.4-amd64.exe

2、双击运行Python 3.5安装包开始安装,记住要选上添加环境变量,这很重要,之后使用命令都要依赖这个环境变量,要不每次都要进入到`pip`的目录比较麻烦。然后点击`Install Now`开始安装。

3、安装完成之后,测试安装是否成功,打开`Windows PowerShell`或者`cmd`,笔者的系统是Windows 10,可以使用`Windows PowerShell`,如果读者是其他系统,可以使用`cmd`。用命令`python -V`查看是否安装成功。正常安装之后可以显示安装Python的版本。

## 安装PaddlePaddle
PaddlePaddle支持Windows之后,安装起来非常简单,只需要一条命令就可以完成安装。
- 安装CPU版本,打开`Windows PowerShell`,输入以下命令。可以使用`==`指定安装PaddlePaddle的版本,如没有指定版本,默认安装是最新版本。`-i`后面是镜像源地址,使用国内镜像源可以大大提高下载速度:
```
pip3 install paddlepaddle==1.2.0 -i https://mirrors.aliyun.com/pypi/simple/
```
- 安装GPU版本,目前不支持Windows的GPU版本,支持后会更新。
- 测试安装是否成功,在`Windows PowerShell`中输入命令`python`,进入到Python 编辑环境,并输入以下代码,导没有保存证明安装成功:
```
import paddle.fluid
```

# Ubuntu下安装
下面介绍在Ubuntu系统下安装PaddlePaddle,PaddlePaddle支持64位的Ubuntu 14.04 /16.04 /18.04系统,Python支持Python2.7.15,Python3.5.x,Python3.6.x,Python3.7.x。
- 安装Python 3.5(通常不需要执行)。通常情况下Ubuntu 16.04自带的就是Python 3.5,其他Ubuntu的版本自带的可能是其他版本,不过没有关系,PaddlePaddle基本都支持,所以不必专门安装Python3.5。
```
sudo apt install python3.5
sudo apt install python3.5-dev
```
- 安装CPU版本,打开Ubuntu的终端,快捷键是`Ctrl+Alt+T`,输入以下命令。可以使用`==`指定安装PaddlePaddle的版本,如没有指定版本,默认安装是最新版本。`-i`后面是镜像源地址,使用国内镜像源可以大大提高下载速度:
```
pip3 install paddlepaddle==1.2.0 -i https://mirrors.aliyun.com/pypi/simple/
```
- 安装GPU版本,安装GPU版本之前,要先安装CUDA,可以查看笔者之前的文章[《Ubuntu安装和卸载CUDA和CUDNN》](https://blog.csdn.net/qq_33200967/article/details/80689543),安装完成 CUDA 9 和 CUDNN 7 之后,再安装PaddlePaddle的GPU版本,安装命令如下。可以使用`==`指定安装PaddlePaddle的版本和CUDA、CUDNN的版本,这必须要跟读者系统本身安装的CUDA版本对应,比如以下命令就是安装支持CUDA 9.0和CUDNN 7的PaddlePaddle版本。`-i`后面是镜像源地址,使用国内镜像源可以大大提高下载速度:
```
pip3 install paddlepaddle-gpu==1.2.0.post97 -i https://mirrors.aliyun.com/pypi/simple/
```
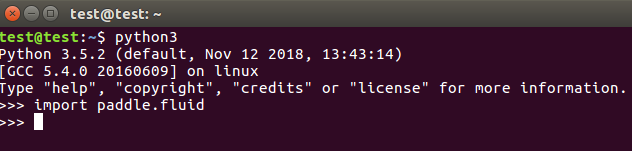
- 测试安装是否成功,在终端中输入命令`python3`,进入到Python 编辑环境,并输入以下代码,正确情况下如图所示:
```
import paddle.fluid
```
# 源码编译
这部分我们将介绍使用源码编译PaddlePaddle,可以通过这种方式安装符合读者需求的PaddlePaddle,比如笔者的电脑安装的是CUDA 10 和 CUDNN 7,而目前官方提供的没有支持CUDA 10 和 CUDNN 7的PaddlePaddle版本,所以笔者就可以通过源码编译的方式编译PaddlePaddle安装包,当然也要PaddlePaddle支持才行。
## Windows下源码编译
下面我们将介绍在Windows系统下进行源码编译PaddlePaddle。目前支持使用的系统是64位的Windows 10 家庭版/专业版/企业版。
1. 安装`Visual Studio 2015 Update3`。下载地址:https://visualstudio.microsoft.com/zh-hans/vs/older-downloads/ ,因为是旧版本,还有`加入免费的 Dev Essentials 计划`才能正常下载。


2. 安装`cmake 3.13`,下载cmake的安装包,下载地址:https://cmake.org/download/ ,一路默认,只需要在添加环境变量的时候注意添加环境变量就可以了。如何存在环境变量问题,可以重启系统。

3. 安装Python的依赖库,只要执行以下命令。关于Windows安装Python,在“Windows下安装”部分已经介绍过,这里就不介绍了。
```
pip3 install numpy
pip3 install protobuf
pip3 install wheel
```
4. 安装 git 工具。git的下载地址:https://git-scm.com/downloads ,下载git的安装包,安装的时候一路默认就可以了。

5. 右键打开`Git Bash Here`,执行以下两条命令。将PaddlePaddle的源码clone在当下目录下的Paddle的文件夹中,并进入Padde目录下,操作如下图所示,之后的命令也是在这个终端操作:
```
git clone https://github.com/PaddlePaddle/Paddle.git
cd Paddle
```


6. 切换到较稳定release分支下进行编译,入笔者选择1.2版本的代码:
```
git checkout release/1.2
```
7. 创建名为build的目录并进入:
```
mkdir build
cd build
```
8. 执行编译
- 编译**CPU版本**命令如下:
```
cmake .. -G "Visual Studio 14 2015 Win64" -DPY_VERSION=3.5 -DPYTHON_INCLUDE_DIR=${PYTHON_INCLUDE_DIRS} -DPYTHON_LIBRARY=${PYTHON_LIBRARY} -DPYTHON_EXECUTABLE=${PYTHON_EXECUTABLE} -DWITH_FLUID_ONLY=ON -DWITH_GPU=OFF -DWITH_TESTING=OFF -DCMAKE_BUILD_TYPE=Release
```
- 编译**GPU版本**,目前Windows还不支持GPU,支持后会更新。

9. 下载第三方依赖包(openblas,snappystream),下载地址:https://github.com/wopeizl/Paddle_deps ,将整个`third_party`文件夹放到上面第7步创建的`build`目录下。
10. 使用`Blend for Visual Studio 2015` 打开`paddle.sln`文件,选择平台为`x64`,配置为`Release`,开始编译
11. 编译成功后进入`\paddle\build\python\dist`目录下找到生成的`.whl`包
12. 执行以下命令安装编译好的PaddlePaddle包:
```
pip3 install (whl包的名字)
```
## Ubuntu本地下源码编译
下面介绍的是使用Ubuntu编译PaddlePaddle源码,笔者的系统是64位的Ubuntu 16.04,Python环境是Python 3.5。
### 安装openCV
1. 更新apt的源,命令如下:
```
sudo apt update
```
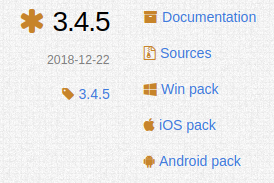
2. 下载openCV源码,官方地址:https://opencv.org/releases.html , 笔者下载的是3.4.5版本,选择的是`Sources`点击下载。
3. 解压openCV源码,命令如下:
```
unzip opencv-3.4.5.zip
```
4. 安装可能需要的依赖库,命令如下:
```
sudo apt-get install cmake
sudo apt-get install build-essential libgtk2.0-dev libavcodec-dev libavformat-dev libjpeg.dev libtiff4.dev libswscale-dev libjasper-dev
```
5. 开始执行cmake。
```
cd opencv-3.4.5/
mkdir my_build_dir
cd my_build_dir
cmake -D CMAKE_BUILD_TYPE=Release -D CMAKE_INSTALL_PREFIX=/usr/local ..
```
6. 开始执行编译
```
make -j$(nproc)
```
7. 执行安装命令
```
sudo make install
```
### 安装依赖环境
编译PaddlePaddle源码之前,还需要安装以下的一些依赖环境。
```
sudo apt install python3.5-dev
sudo apt-get udpate
sudo apt-get install -y software-properties-common
sudo add-apt-repository ppa:deadsnakes/ppa
sudo apt install curl
sudo curl https://bootstrap.pypa.io/get-pip.py -o - | python3.5
sudo easy_install pip
sudo apt install swig
sudo apt install wget
sudo pip install numpy==1.14.0
sudo pip install protobuf==3.1.0
sudo pip install wheel
sudo apt install patchelf
```
### 编译PaddlePaddle
1. 将PaddlePaddle的源码clone在当下目录下的Paddle的文件夹中,并进入Padde目录下,命令如下:
```
git clone https://github.com/PaddlePaddle/Paddle.git
cd Paddle
```
2. 切换到较稳定release分支下进行编译,比如笔者使用的是1.2版本,读者可以根据自己的情况选择其他版本:
```
git checkout release/1.2
```
3. 创建并进入一个叫build的目录下:
```
mkdir build && cd build
```
4. 执行cmake,这里分为CPU版本和GPU版本。
- 编译**CPU版本**,命令如下。使用参数`-DPY_VERSION`指定编译的PaddlePaddle支持的Python版本,笔者这里选择的是Python 3.5。并且使用参数`-DWITH_FLUID_ONLY`指定不编译V2版本的PaddlePaddle代码。使用参数`-DWITH_GPU`指定不使用GPU,也就是只编译CPU版本:
```
cmake .. -DPY_VERSION=3.5 -DWITH_FLUID_ONLY=ON -DWITH_GPU=OFF -DWITH_TESTING=OFF -DCMAKE_BUILD_TYPE=Release
```
- 编译**GPU版本**,还要安装一下依赖环境,如下:
1. 安装 CUDA 和 CUDNN,可以查看笔者之前的文章[《Ubuntu安装和卸载CUDA和CUDNN》](https://blog.csdn.net/qq_33200967/article/details/80689543)
2. 安装nccl2,命令如下
```
wget http://developer.download.nvidia.com/compute/machine-learning/repos/ubuntu1604/x86_64/nvidia-machine-learning-repo-ubuntu1604_1.0.0-1_amd64.deb
dpkg -i nvidia-machine-learning-repo-ubuntu1604_1.0.0-1_amd64.deb
sudo apt-get install -y libnccl2=2.2.13-1+cuda9.0 libnccl-dev=2.2.13-1+cuda9.0
```
3. 执行cmake。使用参数`-DPY_VERSION`指定编译的PaddlePaddle支持的Python版本,笔者这里选择的是Python 3.5。并且使用参数`-DWITH_FLUID_ONLY`指定不编译V2版本的PaddlePaddle代码。使用参数`-DWITH_GPU`指定使用GPU,同时编译支持CPU和GPU版本的PaddlePaddle。
```
cmake .. -DPY_VERSION=3.5 -DWITH_FLUID_ONLY=ON -DWITH_GPU=ON -DWITH_TESTING=OFF -DCMAKE_BUILD_TYPE=Release
```
5. 使用以下命令正式编译,编译时间比较长:
```
make -j$(nproc)
```
6. 编译成功后进入`/paddle/build/python/dist`目录下找到生成的PaddlePaddle`.whl`包,可以使用这个命令进入到指定目录。
```
cd /paddle/build/python/dist
```
7. 在当前机器或目标机器安装编译好的`.whl`包:
```
pip3 install (whl包的名字)
```
## Ubuntu使用Docker源码编译
使用docker编译的安装包只能支持Ubuntu的PaddlePaddle,因为下载docker镜像也是Ubuntu系统的。通过使用docker编译PaddlePaddle得到的安装包,可以在docker本身使用,之后可以使用docker执行PaddlePaddle。也可以本地的Ubuntu上安装使用,不过要注意的是docker中的系统是Ubuntu 16.04。
### 安装Docker
1. 安装前准备
```python
# 卸载系统原有docker
sudo apt-get remove docker docker-engine docker.io
# 更新apt-get源
sudo apt-get update
# 安装docker的依赖
sudo apt-get install apt-transport-https ca-certificates curl software-properties-common
curl -fsSL https://download.docker.com/linux/ubuntu/gpg | sudo apt-key add -
sudo apt-key fingerprint 0EBFCD88
sudo add-apt-repository "deb [arch=amd64] https://download.docker.com/linux/ubuntu && $(lsb_release -cs) && stable"
```
2. 安装Docker,编译**CPU版本**使用。
```python
# 再次更新apt-get源
sudo apt-get update
# 开始安装docker
sudo apt-get install docker-ce
# 加载docker
sudo apt-cache madison docker-ce
# 验证docker是否安装成功
sudo docker run hello-world
```
正常情况下输出如下图所示。

3. 安装nvidia-docker,编译**GPU版本**使用(根据情况安装)。安装之前要确认本地有独立显卡并安装的显卡驱动。
```
wget -P /tmp https://github.com/NVIDIA/nvidia-docker/releases/download/v1.0.1/nvidia-docker_1.0.1-1_amd64.deb
sudo dpkg -i /tmp/nvidia-docker*.deb && rm /tmp/nvidia-docker*.deb
```
### 编译PaddlePaddle
1. 克隆PaddlePaddle源码:
```
git clone https://github.com/PaddlePaddle/Paddle.git
```
2. 进入Paddle目录下:
```
cd Paddle
```
3. 启动docker镜像
- 编译**CPU版本**,使用命令
```
sudo docker run --name paddle-test -v $PWD:/paddle --network=host -it hub.baidubce.com/paddlepaddle/paddle:latest-dev /bin/bash
```
- 编译**GPU版本**,使用命令
```
sudo nvidia-docker run --name paddle-test -v $PWD:/paddle --network=host -it hub.baidubce.com/paddlepaddle/paddle:latest-dev /bin/bash
```
4. 进入Docker后进入paddle目录下:
```
cd paddle
```
5. 切换到较稳定release分支下进行编译,读者可以根据自己的情况选择其他版本:
```
git checkout release/1.2
```
6. 创建并进入`/paddle/build`路径下:
```
mkdir -p /paddle/build && cd /paddle/build
```
7. 使用以下命令安装相关依赖:
```
pip3 install protobuf==3.1.0
apt install patchelf
```
8. 执行cmake:
- 编译**CPU版本**PaddlePaddle的命令。使用参数`-DPY_VERSION`指定编译的PaddlePaddle支持的Python版本,笔者这里选择的是Python 3.5。并且使用参数`-DWITH_FLUID_ONLY`指定不编译V2版本的PaddlePaddle代码。使用参数`-DWITH_GPU`指定不使用GPU,只编译支持CPU的PaddlePaddle:
```
cmake .. -DPY_VERSION=3.5 -DWITH_FLUID_ONLY=ON -DWITH_GPU=OFF -DWITH_TESTING=OFF -DCMAKE_BUILD_TYPE=Release
```
- 编译**GPU版本**PaddlePaddle的命令。使用参数`-DPY_VERSION`指定编译的PaddlePaddle支持的Python版本,笔者这里选择的是Python 3.5。并且使用参数`-DWITH_FLUID_ONLY`指定不编译V2版本的PaddlePaddle代码。使用参数`-DWITH_GPU`指定使用GPU,同时编译支持CPU和GPU版本的PaddlePaddle。这里要注意一下,我们拉取的这个镜像是CUDA 8.0的,不一定跟读者本地的CUDA版本对应,这可能导致编译的安装包在本地不可用:
```
cmake .. -DPY_VERSION=3.5 -DWITH_FLUID_ONLY=ON -DWITH_GPU=ON -DWITH_TESTING=OFF -DCMAKE_BUILD_TYPE=Release
```
9. 执行编译:
```
make -j$(nproc)
```
10. 编译成功后,生成的安装包存放在`/paddle/build/python/dist`目录下,如果是想在docker中安装PaddlePaddle,可以直接在docker中打开这个目录。如果要在本地安装的话,还有先退出docker,并进入到这个目录:
```python
# 在docker镜像中安装
cd /paddle/build/python/dist
# 在Ubuntu本地安装】
exit
cd build/python/dist
```
11. 安装PaddlePaddle,执行以下命令:
```
pip3.5 install (whl包的名字)
```
# 测试环境
下面介绍在Windows测试PaddlePaddle的安装情况,Ubuntu环境类似。
1. 开发工具笔者喜欢使用PyCharm,下载地址:https://www.jetbrains.com/pycharm/download/#section=windows , 笔者使用的是社区版本的PyCharm,因为这个是免费的[坏笑]。

2. 创建一个新项目,并选择系统的Python环境,第一个是创建一个Python的虚拟环境,这里选择第二个外部的Python环境,点击`...`选择外部Python环境。

3. 这里选择系统的Python环境,选择的路径是之前安装Python的路径。

3. 创建一个Python程序文件,并命名为`test_paddle.py`,编写并执行以下测试代码,现在看不懂没有关系,跟着这个系列教程来学,我们会熟悉使用PaddlePaddle的:
```python
# Include libraries.
import paddle
import paddle.fluid as fluid
import numpy
import six
# Configure the neural network.
def net(x, y):
y_predict = fluid.layers.fc(input=x, size=1, act=None)
cost = fluid.layers.square_error_cost(input=y_predict, label=y)
avg_cost = fluid.layers.mean(cost)
return y_predict, avg_cost
# Define train function.
def train(save_dirname):
x = fluid.layers.data(name='x', shape=[13], dtype='float32')
y = fluid.layers.data(name='y', shape=[1], dtype='float32')
y_predict, avg_cost = net(x, y)
sgd_optimizer = fluid.optimizer.SGD(learning_rate=0.001)
sgd_optimizer.minimize(avg_cost)
train_reader = paddle.batch(
paddle.reader.shuffle(paddle.dataset.uci_housing.train(), buf_size=500),
batch_size=20)
place = fluid.CPUPlace()
exe = fluid.Executor(place)
def train_loop(main_program):
feeder = fluid.DataFeeder(place=place, feed_list=[x, y])
exe.run(fluid.default_startup_program())
PASS_NUM = 1000
for pass_id in range(PASS_NUM):
total_loss_pass = 0
for data in train_reader():
avg_loss_value, = exe.run(
main_program, feed=feeder.feed(data), fetch_list=[avg_cost])
total_loss_pass += avg_loss_value
if avg_loss_value < 5.0:
if save_dirname is not None:
fluid.io.save_inference_model(
save_dirname, ['x'], [y_predict], exe)
return
print("Pass %d, total avg cost = %f" % (pass_id, total_loss_pass))
train_loop(fluid.default_main_program())
# Infer by using provided test data.
def infer(save_dirname=None):
place = fluid.CPUPlace()
exe = fluid.Executor(place)
inference_scope = fluid.core.Scope()
with fluid.scope_guard(inference_scope):
[inference_program, feed_target_names, fetch_targets] = (
fluid.io.load_inference_model(save_dirname, exe))
test_reader = paddle.batch(paddle.dataset.uci_housing.test(), batch_size=20)
test_data = six.next(test_reader())
test_feat = numpy.array(list(map(lambda x: x[0], test_data))).astype("float32")
test_label = numpy.array(list(map(lambda x: x[1], test_data))).astype("float32")
results = exe.run(inference_program,
feed={feed_target_names[0]: numpy.array(test_feat)},
fetch_list=fetch_targets)
print("infer results: ", results[0])
print("ground truth: ", test_label)
# Run train and infer.
if __name__ == "__main__":
save_dirname = "fit_a_line.inference.model"
train(save_dirname)
infer(save_dirname)
```
正常情况下会输出:
```
Pass 0, total avg cost = 13527.760742
Pass 1, total avg cost = 12497.969727
Pass 2, total avg cost = 11737.727539
Pass 3, total avg cost = 11017.893555
Pass 4, total avg cost = 9801.554688
Pass 5, total avg cost = 9150.510742
Pass 6, total avg cost = 8611.593750
Pass 7, total avg cost = 7924.654297
......
```
PaddlePaddle的安装已经介绍完成,那我们开始进入深度学习的大门吧。本系列教程将会一步步介绍如何使用PaddlePaddle,并使用PaddlePaddle应用到实际项目中。
项目代码GitHub地址:https://github.com/yeyupiaoling/LearnPaddle2/tree/master/note1
**注意:** 最新代码以GitHub上的为准
# 参考资料
1. http://www.paddlepaddle.org/documentation/docs/zh/1.2/beginners_guide/install/install_Ubuntu.html
2. http://www.paddlepaddle.org/documentation/docs/zh/1.2/beginners_guide/install/install_Windows.html
3. https://blog.csdn.net/cocoaqin/article/details/78163171
================================================
FILE: note1/test_paddle.py
================================================
# Include libraries.
import paddle
import paddle.fluid as fluid
import numpy
import six
# Configure the neural network.
def net(x, y):
y_predict = fluid.layers.fc(input=x, size=1, act=None)
cost = fluid.layers.square_error_cost(input=y_predict, label=y)
avg_cost = fluid.layers.mean(cost)
return y_predict, avg_cost
# Define train function.
def train(save_dirname):
x = fluid.layers.data(name='x', shape=[13], dtype='float32')
y = fluid.layers.data(name='y', shape=[1], dtype='float32')
y_predict, avg_cost = net(x, y)
sgd_optimizer = fluid.optimizer.SGD(learning_rate=0.001)
sgd_optimizer.minimize(avg_cost)
train_reader = paddle.batch(
paddle.reader.shuffle(paddle.dataset.uci_housing.train(), buf_size=500),
batch_size=20)
place = fluid.CPUPlace()
exe = fluid.Executor(place)
def train_loop(main_program):
feeder = fluid.DataFeeder(place=place, feed_list=[x, y])
exe.run(fluid.default_startup_program())
PASS_NUM = 1000
for pass_id in range(PASS_NUM):
total_loss_pass = 0
for data in train_reader():
avg_loss_value, = exe.run(
main_program, feed=feeder.feed(data), fetch_list=[avg_cost])
total_loss_pass += avg_loss_value
if avg_loss_value < 5.0:
if save_dirname is not None:
fluid.io.save_inference_model(
save_dirname, ['x'], [y_predict], exe)
return
print("Pass %d, total avg cost = %f" % (pass_id, total_loss_pass))
train_loop(fluid.default_main_program())
# Infer by using provided test data.
def infer(save_dirname=None):
place = fluid.CPUPlace()
exe = fluid.Executor(place)
inference_scope = fluid.core.Scope()
with fluid.scope_guard(inference_scope):
[inference_program, feed_target_names, fetch_targets] = (
fluid.io.load_inference_model(save_dirname, exe))
test_reader = paddle.batch(paddle.dataset.uci_housing.test(), batch_size=20)
test_data = six.next(test_reader())
test_feat = numpy.array(list(map(lambda x: x[0], test_data))).astype("float32")
test_label = numpy.array(list(map(lambda x: x[1], test_data))).astype("float32")
results = exe.run(inference_program,
feed={feed_target_names[0]: numpy.array(test_feat)},
fetch_list=fetch_targets)
print("infer results: ", results[0])
print("ground truth: ", test_label)
# Run train and infer.
if __name__ == "__main__":
save_dirname = "fit_a_line.inference.model"
train(save_dirname)
infer(save_dirname)
================================================
FILE: note10/README.md
================================================
@[TOC]
# 前言
VisualDL是一个面向深度学习任务设计的可视化工具,包含了scalar、参数分布、模型结构、图像可视化等功能。可以这样说:“所见即所得”。我们可以借助VisualDL来观察我们训练的情况,方便我们对训练的模型进行分析,改善模型的收敛情况。
1. `scalar`,趋势图,可用于训练测试误差的展示

2. `image`, 图片的可视化,可用于卷积层或者其他参数的图形化展示

3. `histogram`, 用于参数分布及变化趋势的展示

4. `graph`,用于训练模型结构的可视化

以上的图像来自[VisualDL的Github](https://github.com/PaddlePaddle/VisualDL)
既然那么方便,那么我们就来尝试一下吧。VisualDL底层采用C++编写,但是它在提供C++ SDK的同时,也支持Python SDK,我们主要是使用Python的SDK。顺便说一下,VisualDL除了支持PaddlePaddle,之外,还支持pytorch, mxnet在内的大部分主流DNN平台。
# VisualDL的安装
本章只讲述在Ubuntu系统上的安装和使用,Mac的操作应该也差不多。
## 使用pip安装
使用pip安装非常简单,只要一条命令就够了,如下:
```shell
pip3 install --upgrade visualdl
```
测试一下是否安装成功了,运行一个例子下载日志文件:
```shell
# 在当前位置下载一个日志
vdl_create_scratch_log
```
然后再输入,启动VisualDL并加载这个日志信息:
```shell
visualdl --logdir=scratch_log/ --port=8080
```
这里说明一下,visualDL的参数:
- `host` 设定IP
- `port` 设定端口
- `model_pb` 指定 ONNX 格式的模型文件,这木方我们还没要用到
**注意:** 如果是报以下的错误,那是因为protobuf版本过低的原因。
```
root@test:/home/test/VisualDL# visualdl --logdir ./scratch_log --port 8080
Traceback (most recent call last):
File "/usr/local/bin/visualdl", line 29, in <module>
import visualdl.server.graph as vdl_graph
File "/usr/local/lib/python2.7/dist-packages/visualdl/server/graph.py", line 23, in <module>
from . import onnx
File "/usr/local/lib/python2.7/dist-packages/visualdl/server/onnx/__init__.py", line 8, in <module>
from .onnx_pb2 import ModelProto
File "/usr/local/lib/python2.7/dist-packages/visualdl/server/onnx/onnx_pb2.py", line 213, in <module>
options=None, file=DESCRIPTOR),
TypeError: __init__() got an unexpected keyword argument 'file'
```
protobuf的版本要不小于3.5.0,如何小于这个版本可以使用以下命令升级:
```
pip3 install protobuf -U
```
然后在浏览器上输入:
```
http://127.0.0.1:8080
```
即可看到一个可视化的界面,如下:

## 使用源码安装
如果读者出于各种情况,使用pip安装不能满足需求,那可以考虑使用源码安装VisualDL,操作如下:
首先要安装依赖库:
```shell
# 安装npm
apt install npm
# 安装node
apt install nodejs-legacy
# 安装cmake
apt install cmake
# 安装unzip
apt install unzip
```
然后在GitHub上clone最新的源码并打开:
```shell
git clone https://github.com/PaddlePaddle/VisualDL.git
cd VisualDL
```
之后是编译生成`whl`安装包:
```shell
python3 setup.py bdist_wheel
```
生成`whl`安装包之后,就可以使用pip命令安装这个安装包了,`*`号对应的是visualdl版本号,读者要根据实际情况来安装:
```shell
pip3 install --upgrade dist/visualdl-*.whl
```
安装完成之后,同样可以使用在上一部分的[使用pip安装](http://mp.csdn.net/mdeditor/79127175#%E4%BD%BF%E7%94%A8pip%E5%AE%89%E8%A3%85)的测试方法测试安装是否成功。
# 简单使用VisualDL
我们编写下面这一小段的代码来学习VisualDL的使用,`test_visualdl.py`的代码如下:
```python
# 导入VisualDL的包
from visualdl import LogWriter
# 创建一个LogWriter,第一个参数是指定存放数据的路径,
# 第二个参数是指定多少次写操作执行一次内存到磁盘的数据持久化
logw = LogWriter("./random_log", sync_cycle=10000)
# 创建训练和测试的scalar图,
# mode是标注线条的名称,
# scalar标注的是指定这个组件的tag
with logw.mode('train') as logger:
scalar0 = logger.scalar("scratch/scalar")
with logw.mode('test') as logger:
scalar1 = logger.scalar("scratch/scalar")
# 读取数据
for step in range(1000):
scalar0.add_record(step, step * 1. / 1000)
scalar1.add_record(step, 1. - step * 1. / 1000)
```
运行Python代码之后,在终端上输入,从上面的代码可以看到我们定义的路径是`./random_log`:
```shell
visualdl --logdir=random_log/ --port=8080
```
然后在浏览器上输入:
```
http://127.0.0.1:8080
```
然后就可以看到刚才编写Python代码生成的图像了:

经过这个例子,读者对VisualDL有了进一步的了解了,那么在接下来的我们就在实际的PaddlePaddle例子中使用我们的VisualDL。
# 在PaddlePaddle使用VisualDL
下面就介绍在PaddlePaddle训练中使用VisualDL,通过在训练的时候使用VisualDL不断收集训练的数据集,最终通过可视化展示出来。
## 定义MobileNet V2神经网络
创建一个`mobilenet_v2.py`来定义一个MobileNet V2神经网络。MobileNet V2是MobileNet V1的升级版,从名字可以看出这个网络是为例移动设备而诞生的,它最大的特点就是模型小,预测速度快,适合部署在移动设备上。MobileNet V2是将MobileNet V1和残差网络ResNet的残差单元结合起来,用Depthwise Convolutions代替残差单元的bottleneck,最重要的是与residuals block相反,通常的residuals block是先经过1×1的卷积,降低feature map通道数,然后再通过3×3卷积,最后重新经过1×1卷积将feature map通道数扩张回去;而且为了避免ReLU对特征的破坏,用线性层替换channel数较少层后的ReLU非线性激活。
```python
import paddle.fluid as fluid
def conv_bn_layer(input, filter_size, num_filters, stride, padding, num_groups=1, if_act=True, use_cudnn=True):
conv = fluid.layers.conv2d(input=input,
num_filters=num_filters,
filter_size=filter_size,
stride=stride,
padding=padding,
groups=num_groups,
use_cudnn=use_cudnn,
bias_attr=False)
bn = fluid.layers.batch_norm(input=conv)
if if_act:
return fluid.layers.relu6(bn)
else:
return bn
def shortcut(input, data_residual):
return fluid.layers.elementwise_add(input, data_residual)
def inverted_residual_unit(input,
num_in_filter,
num_filters,
ifshortcut,
stride,
filter_size,
padding,
expansion_factor):
num_expfilter = int(round(num_in_filter * expansion_factor))
channel_expand = conv_bn_layer(input=input,
num_filters=num_expfilter,
filter_size=1,
stride=1,
padding=0,
num_groups=1,
if_act=True)
bottleneck_conv = conv_bn_layer(input=channel_expand,
num_filters=num_expfilter,
filter_size=filter_size,
stride=stride,
padding=padding,
num_groups=num_expfilter,
if_act=True,
use_cudnn=False)
linear_out = conv_bn_layer(input=bottleneck_conv,
num_filters=num_filters,
filter_size=1,
stride=1,
padding=0,
num_groups=1,
if_act=False)
if ifshortcut:
out = shortcut(input=input, data_residual=linear_out)
return out
else:
return linear_out
def invresi_blocks(input, in_c, t, c, n, s, name=None):
first_block = inverted_residual_unit(input=input,
num_in_filter=in_c,
num_filters=c,
ifshortcut=False,
stride=s,
filter_size=3,
padding=1,
expansion_factor=t)
last_residual_block = first_block
last_c = c
for i in range(1, n):
last_residual_block = inverted_residual_unit(input=last_residual_block,
num_in_filter=last_c,
num_filters=c,
ifshortcut=True,
stride=1,
filter_size=3,
padding=1,
expansion_factor=t)
return last_residual_block
def net(input, class_dim, scale=1.0):
bottleneck_params_list = [
(1, 16, 1, 1),
(6, 24, 2, 2),
(6, 32, 3, 2),
(6, 64, 4, 2),
(6, 96, 3, 1),
(6, 160, 3, 2),
(6, 320, 1, 1),
]
# conv1
input = conv_bn_layer(input,
num_filters=int(32 * scale),
filter_size=3,
stride=2,
padding=1,
if_act=True)
# bottleneck sequences
i = 1
in_c = int(32 * scale)
for layer_setting in bottleneck_params_list:
t, c, n, s = layer_setting
i += 1
input = invresi_blocks(input=input,
in_c=in_c,
t=t,
c=int(c * scale),
n=n,
s=s,
name='conv' + str(i))
in_c = int(c * scale)
# last_conv
input = conv_bn_layer(input=input,
num_filters=int(1280 * scale) if scale > 1.0 else 1280,
filter_size=1,
stride=1,
padding=0,
if_act=True)
feature = fluid.layers.pool2d(input=input,
pool_size=7,
pool_stride=1,
pool_type='avg',
global_pooling=True)
net = fluid.layers.fc(input=feature,
size=class_dim,
act='softmax')
return net
```
创建一个`train.py`开始训练。首先导入相关的依赖包。
```python
import paddle as paddle
import paddle.dataset.cifar as cifar
import paddle.fluid as fluid
import mobilenet_v2
from visualdl import LogWriter
```
创建VisualDL的记录器,通过这个记录器可以记录每次训练的数据,并存储在`log/`目录下。
```python
# 创建记录器
log_writer = LogWriter(dir='log/', sync_cycle=10)
# 创建训练和测试记录数据工具
with log_writer.mode('train') as writer:
train_cost_writer = writer.scalar('cost')
train_acc_writer = writer.scalar('accuracy')
histogram = writer.histogram('histogram', num_buckets=50)
with log_writer.mode('test') as writer:
test_cost_writer = writer.scalar('cost')
test_acc_writer = writer.scalar('accuracy')
```
这里是定义一系列的操作,如定义输入层,获取MobileNet V2的分类器,克隆预测程序,定义优化方法。
```python
# 定义输入层
image = fluid.layers.data(name='image', shape=[3, 32, 32], dtype='float32')
label = fluid.layers.data(name='label', shape=[1], dtype='int64')
# 获取分类器
model = mobilenet_v2.net(image, 10)
# 获取损失函数和准确率函数
cost = fluid.layers.cross_entropy(input=model, label=label)
avg_cost = fluid.layers.mean(cost)
acc = fluid.layers.accuracy(input=model, label=label)
# 获取训练和测试程序
test_program = fluid.default_main_program().clone(for_test=True)
# 定义优化方法
optimizer = fluid.optimizer.AdamOptimizer(learning_rate=1e-3)
opts = optimizer.minimize(avg_cost)
```
获取CIFAR的训练数据和测试数据,并创建一个执行器,MobileNet V2这个模型虽然使用在手机上的,但是在训练起来却不是那么快,最好使用GPU进行训练,要不是相当的慢。
```python
# 获取CIFAR数据
train_reader = paddle.batch(cifar.train10(), batch_size=32)
test_reader = paddle.batch(cifar.test10(), batch_size=32)
# 定义一个使用CPU的执行器
place = fluid.CUDAPlace(0)
# place = fluid.CPUPlace()
exe = fluid.Executor(place)
# 进行参数初始化
exe.run(fluid.default_startup_program())
# 定义输入数据维度
feeder = fluid.DataFeeder(place=place, feed_list=[image, label])
```
这里从初始化程序中获取全部参数的名称,用于之后训练过程中输出参数的值,并记录到VisualDL中。
```python
# 定义日志的开始位置和获取参数名称
train_step = 0
test_step = 0
params_name = fluid.default_startup_program().global_block().all_parameters()[0].name
```
开始训练模型,在训练过程中,把训练时的损失值保存到`train_cost_writer`中,把训练时的准确率保存到`train_acc_writer`中,把训练过程中的参数变化保存到`histogram`中。把测试时的损失值保存到`test_cost_writer`中,把测试时的准确率保存到`test_acc_writer`中。
```python
# 训练10次
for pass_id in range(10):
# 进行训练
for batch_id, data in enumerate(train_reader()):
train_cost, train_acc, params = exe.run(program=fluid.default_main_program(),
feed=feeder.feed(data),
fetch_list=[avg_cost, acc, params_name])
# 保存训练的日志数据
train_step += 1
train_cost_writer.add_record(train_step, train_cost[0])
train_acc_writer.add_record(train_step, train_acc[0])
histogram.add_record(train_step, params.flatten())
# 每100个batch打印一次信息
if batch_id % 100 == 0:
print('Pass:%d, Batch:%d, Cost:%0.5f, Accuracy:%0.5f' %
(pass_id, batch_id, train_cost[0], train_acc[0]))
# 进行测试
test_accs = []
test_costs = []
for batch_id, data in enumerate(test_reader()):
test_cost, test_acc = exe.run(program=test_program,
feed=feeder.feed(data),
fetch_list=[avg_cost, acc])
# 保存测试的日志数据
test_step += 1
test_cost_writer.add_record(test_step, test_cost[0])
test_acc_writer.add_record(test_step, test_acc[0])
test_accs.append(test_acc[0])
test_costs.append(test_cost[0])
# 求测试结果的平均值
test_cost = (sum(test_costs) / len(test_costs))
test_acc = (sum(test_accs) / len(test_accs))
print('Test:%d, Cost:%0.5f, Accuracy:%0.5f' % (pass_id, test_cost, test_acc))
```
训练时输出的信息:
```
Pass:0, Batch:0, Cost:2.79566, Accuracy:0.03125
Pass:0, Batch:100, Cost:2.48199, Accuracy:0.15625
Pass:0, Batch:200, Cost:2.49757, Accuracy:0.18750
Pass:0, Batch:300, Cost:2.10605, Accuracy:0.28125
Pass:0, Batch:400, Cost:2.24151, Accuracy:0.15625
Pass:0, Batch:500, Cost:1.99807, Accuracy:0.21875
Pass:0, Batch:600, Cost:1.92178, Accuracy:0.34375
Pass:0, Batch:700, Cost:1.81583, Accuracy:0.28125
Pass:0, Batch:800, Cost:2.22559, Accuracy:0.25000
Pass:0, Batch:900, Cost:1.79611, Accuracy:0.34375
Pass:0, Batch:1000, Cost:2.00520, Accuracy:0.25000
```
训练结束之后,启动VisualDL工具,指定日志文件的目录和端口号。
```
visualdl --logdir=log/ --port=8080
```
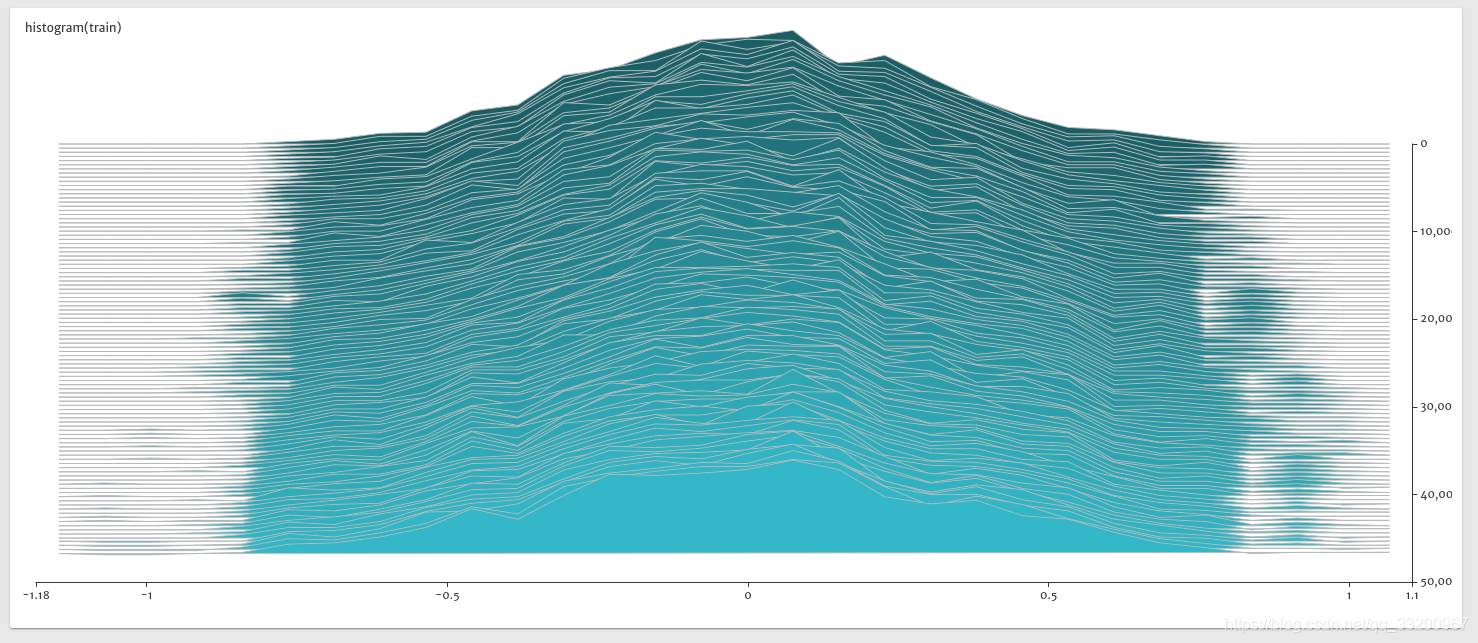
访问网页地址:`http://localhost:8080/`,我们会得到以下的图片。
- 训练时的准确率和损失值的变化,从这些图片可以看到模型正在收敛,准确率在不断提升。

- 下图是使用测试集的准确率和损失值,从图中可以看出后期的测试情况准确率在下降,损失值在增大,也对比上图训练的准确率还在上升,证明模型出现过拟合的情况。

- 下图是训练是参数的histogram图,从图中可以看出参数正在趋于稳定,同时的没有出现异常值,如极大值或者极小值。
本章关于VisualDL的使用就介绍到这里,读者在实际开发中可以使用VisualDL,通过利用VisualDL给予的训练可视化,不断优化模型。
同步到百度AI Studio平台:http://aistudio.baidu.com/#/projectdetail/38856
同步到科赛网K-Lab平台:https://www.kesci.com/home/project/5c3f495589f4aa002b845d6b
项目代码GitHub地址:https://github.com/yeyupiaoling/LearnPaddle2/tree/master/note10
**注意:** 最新代码以GitHub上的为准
# 参考资料
1. https://blog.csdn.net/qq_33200967/article/details/79127175
2. https://github.com/PaddlePaddle/VisualDL
3. https://www.jianshu.com/p/4c9404d4998c
================================================
FILE: note10/mobilenet_v2.py
================================================
import paddle.fluid as fluid
def conv_bn_layer(input, filter_size, num_filters, stride, padding, num_groups=1, if_act=True, use_cudnn=True):
conv = fluid.layers.conv2d(input=input,
num_filters=num_filters,
filter_size=filter_size,
stride=stride,
padding=padding,
groups=num_groups,
use_cudnn=use_cudnn,
bias_attr=False)
bn = fluid.layers.batch_norm(input=conv)
if if_act:
return fluid.layers.relu6(bn)
else:
return bn
def shortcut(input, data_residual):
return fluid.layers.elementwise_add(input, data_residual)
def inverted_residual_unit(input,
num_in_filter,
num_filters,
ifshortcut,
stride,
filter_size,
padding,
expansion_factor):
num_expfilter = int(round(num_in_filter * expansion_factor))
channel_expand = conv_bn_layer(input=input,
num_filters=num_expfilter,
filter_size=1,
stride=1,
padding=0,
num_groups=1,
if_act=True)
bottleneck_conv = conv_bn_layer(input=channel_expand,
num_filters=num_expfilter,
filter_size=filter_size,
stride=stride,
padding=padding,
num_groups=num_expfilter,
if_act=True,
use_cudnn=False)
linear_out = conv_bn_layer(input=bottleneck_conv,
num_filters=num_filters,
filter_size=1,
stride=1,
padding=0,
num_groups=1,
if_act=False)
if ifshortcut:
out = shortcut(input=input, data_residual=linear_out)
return out
else:
return linear_out
def invresi_blocks(input, in_c, t, c, n, s, name=None):
first_block = inverted_residual_unit(input=input,
num_in_filter=in_c,
num_filters=c,
ifshortcut=False,
stride=s,
filter_size=3,
padding=1,
expansion_factor=t)
last_residual_block = first_block
last_c = c
for i in range(1, n):
last_residual_block = inverted_residual_unit(input=last_residual_block,
num_in_filter=last_c,
num_filters=c,
ifshortcut=True,
stride=1,
filter_size=3,
padding=1,
expansion_factor=t)
return last_residual_block
def net(input, class_dim, scale=1.0):
bottleneck_params_list = [
(1, 16, 1, 1),
(6, 24, 2, 2),
(6, 32, 3, 2),
(6, 64, 4, 2),
(6, 96, 3, 1),
(6, 160, 3, 2),
(6, 320, 1, 1),
]
# conv1
input = conv_bn_layer(input,
num_filters=int(32 * scale),
filter_size=3,
stride=2,
padding=1,
if_act=True)
# bottleneck sequences
i = 1
in_c = int(32 * scale)
for layer_setting in bottleneck_params_list:
t, c, n, s = layer_setting
i += 1
input = invresi_blocks(input=input,
in_c=in_c,
t=t,
c=int(c * scale),
n=n,
s=s,
name='conv' + str(i))
in_c = int(c * scale)
# last_conv
input = conv_bn_layer(input=input,
num_filters=int(1280 * scale) if scale > 1.0 else 1280,
filter_size=1,
stride=1,
padding=0,
if_act=True)
feature = fluid.layers.pool2d(input=input,
pool_size=7,
pool_stride=1,
pool_type='avg',
global_pooling=True)
net = fluid.layers.fc(input=feature,
size=class_dim,
act='softmax')
return net
================================================
FILE: note10/test_visualdl.py
================================================
# 导入VisualDL的包
from visualdl import LogWriter
# 创建一个LogWriter,第一个参数是指定存放数据的路径,
# 第二个参数是指定多少次写操作执行一次内存到磁盘的数据持久化
logw = LogWriter("./random_log", sync_cycle=10000)
# 创建训练和测试的scalar图,
# mode是标注线条的名称,
# scalar标注的是指定这个组件的tag
with logw.mode('train') as logger:
scalar0 = logger.scalar("scratch/scalar")
with logw.mode('test') as logger:
scalar1 = logger.scalar("scratch/scalar")
# 读取数据
for step in range(1000):
scalar0.add_record(step, step * 1. / 1000)
scalar1.add_record(step, 1. - step * 1. / 1000)
================================================
FILE: note10/train.py
================================================
import mobilenet_v2
import paddle as paddle
import paddle.dataset.cifar as cifar
import paddle.fluid as fluid
from visualdl import LogWriter
# 创建记录器
log_writer = LogWriter(dir='log/', sync_cycle=10)
# 创建训练和测试记录数据工具
with log_writer.mode('train') as writer:
train_cost_writer = writer.scalar('cost')
train_acc_writer = writer.scalar('accuracy')
histogram = writer.histogram('histogram', num_buckets=50)
with log_writer.mode('test') as writer:
test_cost_writer = writer.scalar('cost')
test_acc_writer = writer.scalar('accuracy')
# 定义输入层
image = fluid.layers.data(name='image', shape=[3, 32, 32], dtype='float32')
label = fluid.layers.data(name='label', shape=[1], dtype='int64')
# 获取分类器
model = mobilenet_v2.net(image, 10)
# 获取损失函数和准确率函数
cost = fluid.layers.cross_entropy(input=model, label=label)
avg_cost = fluid.layers.mean(cost)
acc = fluid.layers.accuracy(input=model, label=label)
# 获取训练和测试程序
test_program = fluid.default_main_program().clone(for_test=True)
# 定义优化方法
optimizer = fluid.optimizer.AdamOptimizer(learning_rate=1e-3)
opts = optimizer.minimize(avg_cost)
# 获取CIFAR数据
train_reader = paddle.batch(cifar.train10(), batch_size=32)
test_reader = paddle.batch(cifar.test10(), batch_size=32)
# 定义一个使用CPU的执行器
place = fluid.CUDAPlace(0)
# place = fluid.CPUPlace()
exe = fluid.Executor(place)
# 进行参数初始化
exe.run(fluid.default_startup_program())
# 定义输入数据维度
feeder = fluid.DataFeeder(place=place, feed_list=[image, label])
# 定义日志的开始位置和获取参数名称
train_step = 0
test_step = 0
params_name = fluid.default_startup_program().global_block().all_parameters()[0].name
# 训练10次
for pass_id in range(10):
# 进行训练
for batch_id, data in enumerate(train_reader()):
train_cost, train_acc, params = exe.run(program=fluid.default_main_program(),
feed=feeder.feed(data),
fetch_list=[avg_cost, acc, params_name])
# 保存训练的日志数据
train_step += 1
train_cost_writer.add_record(train_step, train_cost[0])
train_acc_writer.add_record(train_step, train_acc[0])
histogram.add_record(train_step, params.flatten())
# 每100个batch打印一次信息
if batch_id % 100 == 0:
print('Pass:%d, Batch:%d, Cost:%0.5f, Accuracy:%0.5f' %
(pass_id, batch_id, train_cost[0], train_acc[0]))
# 进行测试
test_accs = []
test_costs = []
for batch_id, data in enumerate(test_reader()):
test_cost, test_acc = exe.run(program=test_program,
feed=feeder.feed(data),
fetch_list=[avg_cost, acc])
# 保存测试的日志数据
test_step += 1
test_cost_writer.add_record(test_step, test_cost[0])
test_acc_writer.add_record(test_step, test_acc[0])
test_accs.append(test_acc[0])
test_costs.append(test_cost[0])
# 求测试结果的平均值
test_cost = (sum(test_costs) / len(test_costs))
test_acc = (sum(test_accs) / len(test_accs))
print('Test:%d, Cost:%0.5f, Accuracy:%0.5f' % (pass_id, test_cost, test_acc))
================================================
FILE: note11/README.md
================================================
@[TOC]
GitHub地址:https://github.com/yeyupiaoling/LearnPaddle2/tree/master/note11
# 前言
本章将介绍如何使用PaddlePaddle训练自己的图片数据集,在之前的图像数据集中,我们都是使用PaddlePaddle自带的数据集,本章我们就来学习如何让PaddlePaddle训练我们自己的图片数据集。
# 爬取图像
在本章中,我们使用的是自己的图片数据集,所以我们需要弄一堆图像来制作训练的数据集。下面我们就编写一个爬虫程序,让其帮我们从百度图片中爬取相应类别的图片。
创建一个`download_image.py`文件用于编写爬取图片程序。首先导入所需的依赖包。
```python
import re
import uuid
import requests
import os
import numpy
import imghdr
from PIL import Image
```
然后编写一个下载图片的函数,这个是程序核心代码。参数是下载图片的关键、保存的名字、下载图片的数量。关键字是百度搜索图片的关键。
```python
# 获取百度图片下载图片
def download_image(key_word, save_name, download_max):
download_sum = 0
str_gsm = '80'
# 把每个类别的图片存放在单独一个文件夹中
save_path = 'images' + '/' + save_name
if not os.path.exists(save_path):
os.makedirs(save_path)
while download_sum < download_max:
# 下载次数超过指定值就停止下载
if download_sum >= download_max:
break
str_pn = str(download_sum)
# 定义百度图片的路径
url = 'http://image.baidu.com/search/flip?tn=baiduimage&ie=utf-8&' \
'word=' + key_word + '&pn=' + str_pn + '&gsm=' + str_gsm + '&ct=&ic=0&lm=-1&width=0&height=0'
print('正在下载 %s 的第 %d 张图片.....' % (key_word, download_sum))
try:
# 获取当前页面的源码
result = requests.get(url, timeout=30).text
# 获取当前页面的图片URL
img_urls = re.findall('"objURL":"(.*?)",', result, re.S)
if len(img_urls) < 1:
break
# 把这些图片URL一个个下载
for img_url in img_urls:
# 获取图片内容
img = requests.get(img_url, timeout=30)
img_name = save_path + '/' + str(uuid.uuid1()) + '.jpg'
# 保存图片
with open(img_name, 'wb') as f:
f.write(img.content)
download_sum += 1
if download_sum >= download_max:
break
except Exception as e:
print('【错误】当前图片无法下载,%s' % e)
download_sum += 1
continue
print('下载完成')
```
图片下载完成之后,需要删除一家损坏的图片,因为在下载的过程中,由于图片本身的问题或者下载过程造成的图片损坏,需要把这些已经损坏的图片上传。下面的函数就是删除所有损坏的图片,根据图像数据集的目录读取获取所有图片文件的路径,然后使用`imghdr`工具获取图片的类型是否为`png`或者`jpg`来判断图片文件是否完整,最后再删除根据图片的通道数据来删除灰度图片。
```python
# 删除不是JPEG或者PNG格式的图片
def delete_error_image(father_path):
# 获取父级目录的所有文件以及文件夹
try:
image_dirs = os.listdir(father_path)
for image_dir in image_dirs:
image_dir = os.path.join(father_path, image_dir)
# 如果是文件夹就继续获取文件夹中的图片
if os.path.isdir(image_dir):
images = os.listdir(image_dir)
for image in images:
image = os.path.join(image_dir, image)
try:
# 获取图片的类型
image_type = imghdr.what(image)
# 如果图片格式不是JPEG同时也不是PNG就删除图片
if image_type is not 'jpeg' and image_type is not 'png':
os.remove(image)
print('已删除:%s' % image)
continue
# 删除灰度图
img = numpy.array(Image.open(image))
if len(img.shape) is 2:
os.remove(image)
print('已删除:%s' % image)
except:
os.remove(image)
print('已删除:%s' % image)
except:
pass
```
最后在main入口中通过调用两个函数来完成下载图像数据集,使用中文进行百度搜索图片,使用英文是为了出现中文路径导致图片读取错误。
```python
if __name__ == '__main__':
# 定义要下载的图片中文名称和英文名称,ps:英文名称主要是为了设置文件夹名
key_words = {'西瓜': 'watermelon', '哈密瓜': 'cantaloupe',
'樱桃': 'cherry', '苹果': 'apple', '黄瓜': 'cucumber', '胡萝卜': 'carrot'}
# 每个类别下载一千个
max_sum = 500
for key_word in key_words:
save_name = key_words[key_word]
download_image(key_word, save_name, max_sum)
# 删除错误图片
delete_error_image('images/')
```
输出信息:
```
正在下载 哈密瓜 的第 0 张图片.....
【错误】当前图片无法下载,HTTPConnectionPool(host='www.boyingsj.com', port=80): Read timed out.
正在下载 哈密瓜 的第 10 张图片.....
```
**注意:** 下载处理完成之后,还可能存在其他杂乱的图片,所以还需要我们手动删除这些不属于这个类别的图片,这才算完成图像数据集的制作。
# 创建图像列表
创建一个`create_data_list.py`文件,在这个程序中,我们只要把爬取保存图片的路径的文件夹路径传进去就可以了,生成固定格式的列表,格式为`图片的路径 <Tab> 图片类别的标签`:
```python
import json
import os
def create_data_list(data_root_path):
with open(data_root_path + "test.list", 'w') as f:
pass
with open(data_root_path + "train.list", 'w') as f:
pass
# 所有类别的信息
class_detail = []
# 获取所有类别
class_dirs = os.listdir(data_root_path)
# 类别标签
class_label = 0
# 获取总类别的名称
father_paths = data_root_path.split('/')
while True:
if father_paths[len(father_paths) - 1] == '':
del father_paths[len(father_paths) - 1]
else:
break
father_path = father_paths[len(father_paths) - 1]
all_class_images = 0
other_file = 0
# 读取每个类别
for class_dir in class_dirs:
if class_dir == 'test.list' or class_dir == "train.list" or class_dir == 'readme.json':
other_file += 1
continue
print('正在读取类别:%s' % class_dir)
# 每个类别的信息
class_detail_list = {}
test_sum = 0
trainer_sum = 0
# 统计每个类别有多少张图片
class_sum = 0
# 获取类别路径
path = data_root_path + "/" + class_dir
# 获取所有图片
img_paths = os.listdir(path)
for img_path in img_paths:
# 每张图片的路径
name_path = class_dir + '/' + img_path
# 如果不存在这个文件夹,就创建
if not os.path.exists(data_root_path):
os.makedirs(data_root_path)
# 每10张图片取一个做测试数据
if class_sum % 10 == 0:
test_sum += 1
with open(data_root_path + "test.list", 'a') as f:
f.write(name_path + "\t%d" % class_label + "\n")
else:
trainer_sum += 1
with open(data_root_path + "train.list", 'a') as f:
f.write(name_path + "\t%d" % class_label + "\n")
class_sum += 1
all_class_images += 1
# 说明的json文件的class_detail数据
class_detail_list['class_name'] = class_dir
class_detail_list['class_label'] = class_label
class_detail_list['class_test_images'] = test_sum
class_detail_list['class_trainer_images'] = trainer_sum
class_detail.append(class_detail_list)
class_label += 1
# 获取类别数量
all_class_sum = len(class_dirs) - other_file
# 说明的json文件信息
readjson = {}
readjson['all_class_name'] = father_path
readjson['all_class_sum'] = all_class_sum
readjson['all_class_images'] = all_class_images
readjson['class_detail'] = class_detail
jsons = json.dumps(readjson, sort_keys=True, indent=4, separators=(',', ': '))
with open(data_root_path + "readme.json", 'w') as f:
f.write(jsons)
print('图像列表已生成')
```
最后执行就可以生成图像的列表。
```python
if __name__ == '__main__':
# 把生产的数据列表都放在自己的总类别文件夹中
data_root_path = "images/"
create_data_list(data_root_path)
```
输出信息:
```
正在读取类别:apple
正在读取类别:cantaloupe
正在读取类别:carrot
正在读取类别:cherry
正在读取类别:cucumber
正在读取类别:watermelon
图像列表已生成
```
运行这个程序之后,会生成在data文件夹中生成一个单独的大类文件夹,比如我们这次是使用到蔬菜类,所以我生成一个`vegetables`文件夹,在这个文件夹下有3个文件:
|文件名|作用|
|:---:|:---:|
|trainer.list|用于训练的图像列表|
|test.list|用于测试的图像列表|
|readme.json|该数据集的json格式的说明,方便以后使用|
`readme.json`文件的格式如下,可以很清楚看到整个数据的图像数量,总类别名称和类别数量,还有每个类对应的标签,类别的名字,该类别的测试数据和训练数据的数量:
```json
{
"all_class_images": 2200,
"all_class_name": "images",
"all_class_sum": 2,
"class_detail": [
{
"class_label": 1,
"class_name": "watermelon",
"class_test_images": 110,
"class_trainer_images": 990
},
{
"class_label": 2,
"class_name": "cantaloupe",
"class_test_images": 110,
"class_trainer_images": 990
}
]
}
```
# 定义模型
创建一个`mobilenet_v1.py`文件,在本章我们使用的是MobileNet神经网络,MobileNet是Google针对手机等嵌入式设备提出的一种轻量级的深层神经网络,它的核心思想就是卷积核的巧妙分解,可以有效减少网络参数,从而达到减小训练时网络的模型。因为太大的模型模型文件是不利于移植到移动设备上的,比如我们把模型文件迁移到Android手机应用上,那么模型文件的大小就直接影响应用安装包的大小。以下就是使用PaddlePaddle定义的MobileNet神经网络:
```python
import paddle.fluid as fluid
def conv_bn_layer(input, filter_size, num_filters, stride,
padding, channels=None, num_groups=1, act='relu', use_cudnn=True):
conv = fluid.layers.conv2d(input=input,
num_filters=num_filters,
filter_size=filter_size,
stride=stride,
padding=padding,
groups=num_groups,
act=None,
use_cudnn=use_cudnn,
bias_attr=False)
return fluid.layers.batch_norm(input=conv, act=act)
```
```python
def depthwise_separable(input, num_filters1, num_filters2, num_groups, stride, scale):
depthwise_conv = conv_bn_layer(input=input,
filter_size=3,
num_filters=int(num_filters1 * scale),
stride=stride,
padding=1,
num_groups=int(num_groups * scale),
use_cudnn=False)
pointwise_conv = conv_bn_layer(input=depthwise_conv,
filter_size=1,
num_filters=int(num_filters2 * scale),
stride=1,
padding=0)
return pointwise_conv
```
```python
def net(input, class_dim, scale=1.0):
# conv1: 112x112
input = conv_bn_layer(input=input,
filter_size=3,
channels=3,
num_filters=int(32 * scale),
stride=2,
padding=1)
# 56x56
input = depthwise_separable(input=input,
num_filters1=32,
num_filters2=64,
num_groups=32,
stride=1,
scale=scale)
input = depthwise_separable(input=input,
num_filters1=64,
num_filters2=128,
num_groups=64,
stride=2,
scale=scale)
# 28x28
input = depthwise_separable(input=input,
num_filters1=128,
num_filters2=128,
num_groups=128,
stride=1,
scale=scale)
input = depthwise_separable(input=input,
num_filters1=128,
num_filters2=256,
num_groups=128,
stride=2,
scale=scale)
# 14x14
input = depthwise_separable(input=input,
num_filters1=256,
num_filters2=256,
num_groups=256,
stride=1,
scale=scale)
input = depthwise_separable(input=input,
num_filters1=256,
num_filters2=512,
num_groups=256,
stride=2,
scale=scale)
# 14x14
for i in range(5):
input = depthwise_separable(input=input,
num_filters1=512,
num_filters2=512,
num_groups=512,
stride=1,
scale=scale)
# 7x7
input = depthwise_separable(input=input,
num_filters1=512,
num_filters2=1024,
num_groups=512,
stride=2,
scale=scale)
input = depthwise_separable(input=input,
num_filters1=1024,
num_filters2=1024,
num_groups=1024,
stride=1,
scale=scale)
feature = fluid.layers.pool2d(input=input,
pool_size=0,
pool_stride=1,
pool_type='avg',
global_pooling=True)
net = fluid.layers.fc(input=feature,
size=class_dim,
act='softmax')
return net
```
# 定义数据读取
创建一个`reader.py`文件,这个程序就是用户训练和测试的使用读取数据的。训练的时候,通过这个程序从本地读取图片,然后通过一系列的预处理操作,最后转换成训练所需的Numpy数组。
首先导入所需的包,其中`cpu_count`是获取当前计算机有多少个CPU,然后使用多线程读取数据。
```python
import os
import random
from multiprocessing import cpu_count
import numpy as np
import paddle
from PIL import Image
```
首先定义一个`train_mapper()`函数,这个函数是根据传入进来的图片路径来对图片进行预处理,比如训练的时候需要统一图片的大小,同时也使用多种的数据增强的方式,如水平翻转、垂直翻转、角度翻转、随机裁剪,这些方式都可以让有限的图片数据集在训练的时候成倍的增加。最后因为PIL打开图片存储顺序为H(高度),W(宽度),C(通道),PaddlePaddle要求数据顺序为CHW,所以需要转换顺序。最后返回的是处理后的图片数据和其对应的标签。
```python
# 训练图片的预处理
def train_mapper(sample):
img_path, label, crop_size, resize_size = sample
try:
img = Image.open(img_path)
# 统一图片大小
img = img.resize((resize_size, resize_size), Image.ANTIALIAS)
# 随机水平翻转
r1 = random.random()
if r1 > 0.5:
img = img.transpose(Image.FLIP_LEFT_RIGHT)
# 随机垂直翻转
r2 = random.random()
if r2 > 0.5:
img = img.transpose(Image.FLIP_TOP_BOTTOM)
# 随机角度翻转
r3 = random.randint(-3, 3)
img = img.rotate(r3, expand=False)
# 随机裁剪
r4 = random.randint(0, int(resize_size - crop_size))
r5 = random.randint(0, int(resize_size - crop_size))
box = (r4, r5, r4 + crop_size, r5 + crop_size)
img = img.crop(box)
# 把图片转换成numpy值
img = np.array(img).astype(np.float32)
# 转换成CHW
img = img.transpose((2, 0, 1))
# 转换成BGR
img = img[(2, 1, 0), :, :] / 255.0
return img, int(label)
except:
print("%s 该图片错误,请删除该图片并重新创建图像数据列表" % img_path)
```
这个`train_reader()`函数是根据已经创建的图像列表解析得到每张图片的路径和其他对应的标签,然后使用`paddle.reader.xmap_readers()`把数据传递给上面定义的`train_mapper()`函数进行处理,最后得到一个训练所需的reader。
```python
# 获取训练的reader
def train_reader(train_list_path, crop_size, resize_size):
father_path = os.path.dirname(train_list_path)
def reader():
with open(train_list_path, 'r') as f:
lines = f.readlines()
# 打乱图像列表
np.random.shuffle(lines)
# 开始获取每张图像和标签
for line in lines:
img, label = line.split('\t')
img = os.path.join(father_path, img)
yield img, label, crop_size, resize_size
return paddle.reader.xmap_readers(train_mapper, reader, cpu_count(), 102400)
```
这是一个测试数据的预处理函数`test_mapper()`,这个没有做太多处理,因为测试的数据不需要数据增强操作,只需统一图片大小和设置好图片的通过顺序和数据类型即可。
```python
# 测试图片的预处理
def test_mapper(sample):
img, label, crop_size = sample
img = Image.open(img)
# 统一图像大小
img = img.resize((crop_size, crop_size), Image.ANTIALIAS)
# 转换成numpy值
img = np.array(img).astype(np.float32)
# 转换成CHW
img = img.transpose((2, 0, 1))
# 转换成BGR
img = img[(2, 1, 0), :, :] / 255.0
return img, int(label)
```
这个是测试的reader函数`test_reader()`,这个跟训练的reader函数定义一样。
```python
# 测试的图片reader
def test_reader(test_list_path, crop_size):
father_path = os.path.dirname(test_list_path)
def reader():
with open(test_list_path, 'r') as f:
lines = f.readlines()
for line in lines:
img, label = line.split('\t')
img = os.path.join(father_path, img)
yield img, label, crop_size
return paddle.reader.xmap_readers(test_mapper, reader, cpu_count(), 1024)
```
# 训练模型
万事俱备,只等训练了。关于PaddlePaddle训练流程,我们已经非常熟悉了,那么我们就简单地过一遍。
创建`train.py`文件,首先导入所需的包,其中包括我们定义的MobileNet模型和数据读取程序:
```python
import os
import shutil
import mobilenet_v1
import paddle as paddle
import reader
import paddle.fluid as fluid
```
然后定义数据输入层,这次我们使用的是图片大小是224,这比之前使用的CIFAR数据集的32大小要大很多,所以训练其他会慢不少。至于`resize_size`是用于统一缩放到这个大小,然后再随机裁剪成`crop_size`大小,`crop_size`才是最终训练图片的大小。
```python
crop_size = 224
resize_size = 250
# 定义输入层
image = fluid.layers.data(name='image', shape=[3, crop_size, crop_size], dtype='float32')
label = fluid.layers.data(name='label', shape=[1], dtype='int64')
```
接着获取MobileNet网络的分类器,传入的第一个参数就是上面定义的输入层,第二个是分类的类别大小,比如我们这次爬取的图像类别数量是6个。
```python
# 获取分类器,因为这次只爬取了6个类别的图片,所以分类器的类别大小为6
model = mobilenet_v1.net(image, 6)
```
再接着是获取损失函数和平均准确率函数,还有测试程序和优化方法,这个优化方法我加了正则,因为爬取的图片数量太少,在训练容易过拟合,所以加上正则一定程度上可以抑制过拟合。
```python
# 获取损失函数和准确率函数
cost = fluid.layers.cross_entropy(input=model, label=label)
avg_cost = fluid.layers.mean(cost)
acc = fluid.layers.accuracy(input=model, label=label)
# 获取训练和测试程序
test_program = fluid.default_main_program().clone(for_test=True)
# 定义优化方法
optimizer = fluid.optimizer.AdamOptimizer(learning_rate=1e-3,
regularization=fluid.regularizer.L2DecayRegularizer(1e-4))
opts = optimizer.minimize(avg_cost)
```
这里就是获取训练测试是所以想的数据读取reader,通过使用`paddle.batch()`函数可以把多条数据打包成一个批次,训练的时候是按照一个个批次训练的。
```python
# 获取自定义数据
train_reader = paddle.batch(reader=reader.train_reader('images/train.list', crop_size, resize_size), batch_size=32)
test_reader = paddle.batch(reader=reader.test_reader('images/test.list', crop_size), batch_size=32)
```
执行训练之前,还需要创建一个执行器,建议使用GPU进行训练,因为我们训练的图片比较大,所以使用CPU训练速度会相当的慢。
```python
# 定义一个使用GPU的执行器
place = fluid.CUDAPlace(0)
# place = fluid.CPUPlace()
exe = fluid.Executor(place)
# 进行参数初始化
exe.run(fluid.default_startup_program())
# 定义输入数据维度
feeder = fluid.DataFeeder(place=place, feed_list=[image, label])
```
最后终于可以执行训练了,这里跟在前些章节都几乎一样,就不重复介绍了。
```python
# 训练100次
for pass_id in range(100):
# 进行训练
for batch_id, data in enumerate(train_reader()):
train_cost, train_acc = exe.run(program=fluid.default_main_program(),
feed=feeder.feed(data),
fetch_list=[avg_cost, acc])
# 每100个batch打印一次信息
if batch_id % 100 == 0:
print('Pass:%d, Batch:%d, Cost:%0.5f, Accuracy:%0.5f' %
(pass_id, batch_id, train_cost[0], train_acc[0]))
# 进行测试
test_accs = []
test_costs = []
for batch_id, data in enumerate(test_reader()):
test_cost, test_acc = exe.run(program=test_program,
feed=feeder.feed(data),
fetch_list=[avg_cost, acc])
test_accs.append(test_acc[0])
test_costs.append(test_cost[0])
# 求测试结果的平均值
test_cost = (sum(test_costs) / len(test_costs))
test_acc = (sum(test_accs) / len(test_accs))
print('Test:%d, Cost:%0.5f, Accuracy:%0.5f' % (pass_id, test_cost, test_acc))
```
训练的过程中可以保存预测模型,用于之后的预测。笔者一般是每一个pass保存一次模型。
```python
# 保存预测模型
save_path = 'infer_model/'
# 删除旧的模型文件
shutil.rmtree(save_path, ignore_errors=True)
# 创建保持模型文件目录
os.makedirs(save_path)
# 保存预测模型
fluid.io.save_inference_model(save_path, feeded_var_names=[image.name], target_vars=[model], executor=exe)
```
训练输出的信息:
```
Pass:0, Batch:0, Cost:1.84754, Accuracy:0.15625
Test:0, Cost:4.66276, Accuracy:0.17857
Pass:1, Batch:0, Cost:1.04008, Accuracy:0.59375
Test:1, Cost:1.23828, Accuracy:0.54464
Pass:2, Batch:0, Cost:1.04778, Accuracy:0.65625
Test:2, Cost:0.99189, Accuracy:0.64286
Pass:3, Batch:0, Cost:1.21555, Accuracy:0.65625
Test:3, Cost:1.01552, Accuracy:0.57589
Pass:4, Batch:0, Cost:0.64620, Accuracy:0.81250
Test:4, Cost:1.19264, Accuracy:0.63393
```
# 预测图片
经过上面训练后,得到了一个预测模型,下面我们就使用一个预测模型来预测一些图片。
创建一个`infer.py`文件作为预测程序。首先导入所需的依赖包。
```python
import paddle.fluid as fluid
from PIL import Image
import numpy as np
```
创建一个执行器,这些不需要训练,所以可以使用CPU进行预测,速度不会太慢,当然,使用GPU的预测速度会更快一些。
```python
# 创建执行器
place = fluid.CPUPlace()
exe = fluid.Executor(place)
exe.run(fluid.default_startup_program())
```
然后加载预测模型,获取预测程序和输入层的名字,还有网络的分类器。
```python
# 保存预测模型路径
save_path = 'infer_model/'
# 从模型中获取预测程序、输入数据名称列表、分类器
[infer_program, feeded_var_names, target_var] = fluid.io.load_inference_model(dirname=save_path, executor=exe)
```
预测图片之前,还需要对图片进行预处理,处理的方式跟测试的时候处理的方式一样。
```python
# 预处理图片
def load_image(file):
img = Image.open(file)
# 统一图像大小
img = img.resize((224, 224), Image.ANTIALIAS)
# 转换成numpy值
img = np.array(img).astype(np.float32)
# 转换成CHW
img = img.transpose((2, 0, 1))
# 转换成BGR
img = img[(2, 1, 0), :, :] / 255.0
img = np.expand_dims(img, axis=0)
return img
```
最后获取经过预处理的图片数据,再使用这些图像数据进行预测,得到分类结果。
```python
# 获取图片数据
img = load_image('images/apple/0fdd5422-31e0-11e9-9cfd-3c970e769528.jpg')
# 执行预测
result = exe.run(program=infer_program,
feed={feeded_var_names[0]: img},
fetch_list=target_var)
```
我们可以通过解析分类的结果,获取概率最大类别标签。关于预测输出的`result`是数据,它是3维的,第一层是输出本身就是一个数组,第二层图片的数量,因为PaddlePaddle支持多张图片同时预测,最后一层就是每个类别的概率,这个概率的总和为1,概率最大的标签就是预测结果。
```python
# 显示图片并输出结果最大的label
lab = np.argsort(result)[0][0][-1]
names = ['苹果', '哈密瓜', '胡萝卜', '樱桃', '黄瓜', '西瓜']
print('预测结果标签为:%d, 名称为:%s, 概率为:%f' % (lab, names[lab], result[0][0][lab]))
```
预测输出的结果:
```
预测结果标签为:0, 名称为:苹果, 概率为:0.948698
```
# 参考资料
1. https://yeyupiaoling.blog.csdn.net/article/details/79095265
================================================
FILE: note11/create_data_list.py
================================================
import json
import os
def create_data_list(data_root_path):
with open(data_root_path + "test.list", 'w') as f:
pass
with open(data_root_path + "train.list", 'w') as f:
pass
# 所有类别的信息
class_detail = []
# 获取所有类别
class_dirs = os.listdir(data_root_path)
# 类别标签
class_label = 0
# 获取总类别的名称
father_paths = data_root_path.split('/')
while True:
if father_paths[len(father_paths) - 1] == '':
del father_paths[len(father_paths) - 1]
else:
break
father_path = father_paths[len(father_paths) - 1]
all_class_images = 0
other_file = 0
# 读取每个类别
for class_dir in class_dirs:
if class_dir == 'test.list' or class_dir == "train.list" or class_dir == 'readme.json':
other_file += 1
continue
print('正在读取类别:%s' % class_dir)
# 每个类别的信息
class_detail_list = {}
test_sum = 0
trainer_sum = 0
# 统计每个类别有多少张图片
class_sum = 0
# 获取类别路径
path = data_root_path + "/" + class_dir
# 获取所有图片
img_paths = os.listdir(path)
for img_path in img_paths:
# 每张图片的路径
name_path = class_dir + '/' + img_path
# 如果不存在这个文件夹,就创建
if not os.path.exists(data_root_path):
os.makedirs(data_root_path)
# 每10张图片取一个做测试数据
if class_sum % 10 == 0:
test_sum += 1
with open(data_root_path + "test.list", 'a') as f:
f.write(name_path + "\t%d" % class_label + "\n")
else:
trainer_sum += 1
with open(data_root_path + "train.list", 'a') as f:
f.write(name_path + "\t%d" % class_label + "\n")
class_sum += 1
all_class_images += 1
# 说明的json文件的class_detail数据
class_detail_list['class_name'] = class_dir
class_detail_list['class_label'] = class_label
class_detail_list['class_test_images'] = test_sum
class_detail_list['class_trainer_images'] = trainer_sum
class_detail.append(class_detail_list)
class_label += 1
# 获取类别数量
all_class_sum = len(class_dirs) - other_file
# 说明的json文件信息
readjson = {}
readjson['all_class_name'] = father_path
readjson['all_class_sum'] = all_class_sum
readjson['all_class_images'] = all_class_images
readjson['class_detail'] = class_detail
jsons = json.dumps(readjson, sort_keys=True, indent=4, separators=(',', ': '))
with open(data_root_path + "readme.json", 'w') as f:
f.write(jsons)
print('图像列表已生成')
if __name__ == '__main__':
# 把生产的数据列表都放在自己的总类别文件夹中
data_root_path = "images/"
create_data_list(data_root_path)
================================================
FILE: note11/download_image.py
================================================
import re
import uuid
import requests
import os
import numpy
import imghdr
from PIL import Image
# 获取百度图片下载图片
def download_image(key_word, save_name, download_max):
download_sum = 0
str_gsm = '80'
# 把每个类别的图片存放在单独一个文件夹中
save_path = 'images' + '/' + save_name
if not os.path.exists(save_path):
os.makedirs(save_path)
while download_sum < download_max:
# 下载次数超过指定值就停止下载
if download_sum >= download_max:
break
str_pn = str(download_sum)
# 定义百度图片的路径
url = 'http://image.baidu.com/search/flip?tn=baiduimage&ie=utf-8&' \
'word=' + key_word + '&pn=' + str_pn + '&gsm=' + str_gsm + '&ct=&ic=0&lm=-1&width=0&height=0'
print('正在下载 %s 的第 %d 张图片.....' % (key_word, download_sum))
try:
# 获取当前页面的源码
result = requests.get(url, timeout=30).text
# 获取当前页面的图片URL
img_urls = re.findall('"objURL":"(.*?)",', result, re.S)
if len(img_urls) < 1:
break
# 把这些图片URL一个个下载
for img_url in img_urls:
# 获取图片内容
img = requests.get(img_url, timeout=30)
img_name = save_path + '/' + str(uuid.uuid1()) + '.jpg'
# 保存图片
with open(img_name, 'wb') as f:
f.write(img.content)
download_sum += 1
if download_sum >= download_max:
break
except Exception as e:
print('【错误】当前图片无法下载,%s' % e)
download_sum += 1
continue
print('下载完成')
# 删除不是JPEG或者PNG格式的图片
def delete_error_image(father_path):
# 获取父级目录的所有文件以及文件夹
try:
image_dirs = os.listdir(father_path)
for image_dir in image_dirs:
image_dir = os.path.join(father_path, image_dir)
# 如果是文件夹就继续获取文件夹中的图片
if os.path.isdir(image_dir):
images = os.listdir(image_dir)
for image in images:
image = os.path.join(image_dir, image)
try:
# 获取图片的类型
image_type = imghdr.what(image)
# 如果图片格式不是JPEG同时也不是PNG就删除图片
if image_type is not 'jpeg' and image_type is not 'png':
os.remove(image)
print('已删除:%s' % image)
continue
# 删除灰度图
img = numpy.array(Image.open(image))
if len(img.shape) is 2:
os.remove(image)
print('已删除:%s' % image)
except:
os.remove(image)
print('已删除:%s' % image)
except:
pass
if __name__ == '__main__':
# 定义要下载的图片中文名称和英文名称,ps:英文名称主要是为了设置文件夹名
key_words = {'西瓜': 'watermelon', '哈密瓜': 'cantaloupe',
'樱桃': 'cherry', '苹果': 'apple', '黄瓜': 'cucumber', '胡萝卜': 'carrot'}
# 每个类别下载一千个
max_sum = 500
for key_word in key_words:
save_name = key_words[key_word]
download_image(key_word, save_name, max_sum)
# 删除错误图片
delete_error_image('images/')
================================================
FILE: note11/infer.py
================================================
import paddle.fluid as fluid
from PIL import Image
import numpy as np
# 创建执行器
place = fluid.CPUPlace()
exe = fluid.Executor(place)
exe.run(fluid.default_startup_program())
# 保存预测模型路径
save_path = 'infer_model/'
# 从模型中获取预测程序、输入数据名称列表、分类器
[infer_program, feeded_var_names, target_var] = fluid.io.load_inference_model(dirname=save_path, executor=exe)
# 预处理图片
def load_image(file):
img = Image.open(file)
# 统一图像大小
img = img.resize((224, 224), Image.ANTIALIAS)
# 转换成numpy值
img = np.array(img).astype(np.float32)
# 转换成CHW
img = img.transpose((2, 0, 1))
# 转换成BGR
img = img[(2, 1, 0), :, :] / 255.0
img = np.expand_dims(img, axis=0)
return img
# 获取图片数据
img = load_image('images/apple/0fdd5422-31e0-11e9-9cfd-3c970e769528.jpg')
# 执行预测
result = exe.run(program=infer_program,
feed={feeded_var_names[0]: img},
fetch_list=target_var)
# 显示图片并输出结果最大的label
lab = np.argsort(result)[0][0][-1]
names = ['苹果', '哈密瓜', '胡萝卜', '樱桃', '黄瓜', '西瓜']
print('预测结果标签为:%d, 名称为:%s, 概率为:%f' % (lab, names[lab], result[0][0][lab]))
================================================
FILE: note11/mobilenet_v1.py
================================================
import paddle.fluid as fluid
def net(input, class_dim, scale=1.0):
# conv1: 112x112
input = conv_bn_layer(input=input,
filter_size=3,
channels=3,
num_filters=int(32 * scale),
stride=2,
padding=1)
# 56x56
input = depthwise_separable(input=input,
num_filters1=32,
num_filters2=64,
num_groups=32,
stride=1,
scale=scale)
input = depthwise_separable(input=input,
num_filters1=64,
num_filters2=128,
num_groups=64,
stride=2,
scale=scale)
# 28x28
input = depthwise_separable(input=input,
num_filters1=128,
num_filters2=128,
num_groups=128,
stride=1,
scale=scale)
input = depthwise_separable(input=input,
num_filters1=128,
num_filters2=256,
num_groups=128,
stride=2,
scale=scale)
# 14x14
input = depthwise_separable(input=input,
num_filters1=256,
num_filters2=256,
num_groups=256,
stride=1,
scale=scale)
input = depthwise_separable(input=input,
num_filters1=256,
num_filters2=512,
num_groups=256,
stride=2,
scale=scale)
# 14x14
for i in range(5):
input = depthwise_separable(input=input,
num_filters1=512,
num_filters2=512,
num_groups=512,
stride=1,
scale=scale)
# 7x7
input = depthwise_separable(input=input,
num_filters1=512,
num_filters2=1024,
num_groups=512,
stride=2,
scale=scale)
input = depthwise_separable(input=input,
num_filters1=1024,
num_filters2=1024,
num_groups=1024,
stride=1,
scale=scale)
feature = fluid.layers.pool2d(input=input,
pool_size=0,
pool_stride=1,
pool_type='avg',
global_pooling=True)
net = fluid.layers.fc(input=feature,
size=class_dim,
act='softmax')
return net
def conv_bn_layer(input, filter_size, num_filters, stride,
padding, channels=None, num_groups=1, act='relu', use_cudnn=True):
conv = fluid.layers.conv2d(input=input,
num_filters=num_filters,
filter_size=filter_size,
stride=stride,
padding=padding,
groups=num_groups,
act=None,
use_cudnn=use_cudnn,
bias_attr=False)
return fluid.layers.batch_norm(input=conv, act=act)
def depthwise_separable(input, num_filters1, num_filters2, num_groups, stride, scale):
depthwise_conv = conv_bn_layer(input=input,
filter_size=3,
num_filters=int(num_filters1 * scale),
stride=stride,
padding=1,
num_groups=int(num_groups * scale),
use_cudnn=False)
pointwise_conv = conv_bn_layer(input=depthwise_conv,
filter_size=1,
num_filters=int(num_filters2 * scale),
stride=1,
padding=0)
return pointwise_conv
================================================
FILE: note11/reader.py
================================================
import os
import random
from multiprocessing import cpu_count
import numpy as np
import paddle
from PIL import Image
# 训练图片的预处理
def train_mapper(sample):
img_path, label, crop_size, resize_size = sample
try:
img = Image.open(img_path)
# 统一图片大小
img = img.resize((resize_size, resize_size), Image.ANTIALIAS)
# 随机水平翻转
r1 = random.random()
if r1 > 0.5:
img = img.transpose(Image.FLIP_LEFT_RIGHT)
# 随机垂直翻转
r2 = random.random()
if r2 > 0.5:
img = img.transpose(Image.FLIP_TOP_BOTTOM)
# 随机角度翻转
r3 = random.randint(-3, 3)
img = img.rotate(r3, expand=False)
# 随机裁剪
r4 = random.randint(0, int(resize_size - crop_size))
r5 = random.randint(0, int(resize_size - crop_size))
box = (r4, r5, r4 + crop_size, r5 + crop_size)
img = img.crop(box)
# 把图片转换成numpy值
img = np.array(img).astype(np.float32)
# 转换成CHW
img = img.transpose((2, 0, 1))
# 转换成BGR
img = img[(2, 1, 0), :, :] / 255.0
return img, int(label)
except:
print("%s 该图片错误,请删除该图片并重新创建图像数据列表" % img_path)
# 获取训练的reader
def train_reader(train_list_path, crop_size, resize_size):
father_path = os.path.dirname(train_list_path)
def reader():
with open(train_list_path, 'r') as f:
lines = f.readlines()
# 打乱图像列表
np.random.shuffle(lines)
# 开始获取每张图像和标签
for line in lines:
img, label = line.split('\t')
img = os.path.join(father_path, img)
yield img, label, crop_size, resize_size
return paddle.reader.xmap_readers(train_mapper, reader, cpu_count(), 102400)
# 测试图片的预处理
def test_mapper(sample):
img, label, crop_size = sample
img = Image.open(img)
# 统一图像大小
img = img.resize((crop_size, crop_size), Image.ANTIALIAS)
# 转换成numpy值
img = np.array(img).astype(np.float32)
# 转换成CHW
img = img.transpose((2, 0, 1))
# 转换成BGR
img = img[(2, 1, 0), :, :] / 255.0
return img, int(label)
# 测试的图片reader
def test_reader(test_list_path, crop_size):
father_path = os.path.dirname(test_list_path)
def reader():
with open(test_list_path, 'r') as f:
lines = f.readlines()
for line in lines:
img, label = line.split('\t')
img = os.path.join(father_path, img)
yield img, label, crop_size
return paddle.reader.xmap_readers(test_mapper, reader, cpu_count(), 1024)
================================================
FILE: note11/train.py
================================================
import os
import shutil
import mobilenet_v1
import paddle as paddle
import reader
import paddle.fluid as fluid
crop_size = 224
resize_size = 250
# 定义输入层
image = fluid.layers.data(name='image', shape=[3, crop_size, crop_size], dtype='float32')
label = fluid.layers.data(name='label', shape=[1], dtype='int64')
# 获取分类器,因为这次只爬取了6个类别的图片,所以分类器的类别大小为6
model = mobilenet_v1.net(image, 6)
# 获取损失函数和准确率函数
cost = fluid.layers.cross_entropy(input=model, label=label)
avg_cost = fluid.layers.mean(cost)
acc = fluid.layers.accuracy(input=model, label=label)
# 获取训练和测试程序
test_program = fluid.default_main_program().clone(for_test=True)
# 定义优化方法
optimizer = fluid.optimizer.AdamOptimizer(learning_rate=1e-3,
regularization=fluid.regularizer.L2DecayRegularizer(1e-4))
opts = optimizer.minimize(avg_cost)
# 获取自定义数据
train_reader = paddle.batch(reader=reader.train_reader('images/train.list', crop_size, resize_size), batch_size=32)
test_reader = paddle.batch(reader=reader.test_reader('images/test.list', crop_size), batch_size=32)
# 定义一个使用GPU的执行器
place = fluid.CUDAPlace(0)
# place = fluid.CPUPlace()
exe = fluid.Executor(place)
# 进行参数初始化
exe.run(fluid.default_startup_program())
# 定义输入数据维度
feeder = fluid.DataFeeder(place=place, feed_list=[image, label])
# 训练10次
for pass_id in range(100):
# 进行训练
for batch_id, data in enumerate(train_reader()):
train_cost, train_acc = exe.run(program=fluid.default_main_program(),
feed=feeder.feed(data),
fetch_list=[avg_cost, acc])
# 每100个batch打印一次信息
if batch_id % 100 == 0:
print('Pass:%d, Batch:%d, Cost:%0.5f, Accuracy:%0.5f' %
(pass_id, batch_id, train_cost[0], train_acc[0]))
# 进行测试
test_accs = []
test_costs = []
for batch_id, data in enumerate(test_reader()):
test_cost, test_acc = exe.run(program=test_program,
feed=feeder.feed(data),
fetch_list=[avg_cost, acc])
test_accs.append(test_acc[0])
test_costs.append(test_cost[0])
# 求测试结果的平均值
test_cost = (sum(test_costs) / len(test_costs))
test_acc = (sum(test_accs) / len(test_accs))
print('Test:%d, Cost:%0.5f, Accuracy:%0.5f' % (pass_id, test_cost, test_acc))
# 保存预测模型
save_path = 'infer_model/'
# 删除旧的模型文件
shutil.rmtree(save_path, ignore_errors=True)
# 创建保持模型文件目录
os.makedirs(save_path)
# 保存预测模型
fluid.io.save_inference_model(save_path, feeded_var_names=[image.name], target_vars=[model], executor=exe)
================================================
FILE: note12/README.md
================================================
@[TOC]
# 前言
我们在第五章学习了循环神经网络,在第五章中我们使用循环神经网络实现了一个文本分类的模型,不过使用的数据集是PaddlePaddle自带的一个数据集,我们并没有了解到PaddlePaddle是如何使用读取文本数据集的,那么本章我们就来学习一下如何使用PaddlePaddle训练自己的文本数据集。我们将会从中文文本数据集的制作开始介绍,一步步讲解如何使用训练一个中文文本分类神经网络模型。
GitHub地址:https://github.com/yeyupiaoling/LearnPaddle2/tree/master/note12
# 爬取文本数据集
网络上一些高质量的中文文本分类数据集相当少,经过充分考虑之后,绝对自己从网络中爬取自己的中文文本数据集。在GitHub中有一个开源的爬取今日头条中文新闻标题的代码,链接地址请查看最后的参考资料。我们在这个开源代码上做一些简单修改后,就使用他来爬取数据。
创建一个`download_text_data.py`文件,这个就是爬取数据集的程序。首先导入相应的依赖包。
```python
import os
import random
import requests
import json
import time
```
然后设置新闻的分类列表,这些是我们将要爬取的新闻类别。第一个值是分类的标签,第二个值是分类的中文名称,第三个是网络访问的请求头,通过值获取相应类别的新闻。
```python
# 分类新闻参数
news_classify = [
[0, '民生', 'news_story'],
[1, '文化', 'news_culture'],
[2, '娱乐', 'news_entertainment'],
[3, '体育', 'news_sports'],
[4, '财经', 'news_finance'],
[5, '房产', 'news_house'],
[6, '汽车', 'news_car'],
[7, '教育', 'news_edu'],
[8, '科技', 'news_tech'],
[9, '军事', 'news_military'],
[10, '旅游', 'news_travel'],
[11, '国际', 'news_world'],
[12, '证券', 'stock'],
[13, '农业', 'news_agriculture'],
[14, '游戏', 'news_game']
]
```
以下代码片段是爬取数据的核心代码。`get_data`函数的`tup`参数是上面定义的新闻类别,`data_path`参数是保存爬取的文本数据。为了让爬取的程序更像正常的网络访问,这里还设置了一个访问请求头参数`querystring`和请求头`headers`,然后通过`requests.request`进行网络访问,爬取新闻数据,并对其进行解析,最后把需要的数据保存到本地文件中。
```python
# 已经下载的新闻标题的ID
downloaded_data_id = []
# 已经下载新闻标题的数量
downloaded_sum = 0
def get_data(tup, data_path):
global downloaded_data_id
global downloaded_sum
print('============%s============' % tup[1])
url = "http://it.snssdk.com/api/news/feed/v63/"
# 分类新闻的访问参数,模仿正常网络访问
t = int(time.time() / 10000)
t = random.randint(6 * t, 10 * t)
querystring = {"category": tup[2], "max_behot_time": t, "last_refresh_sub_entrance_interval": "1524907088",
"loc_mode": "5",
"tt_from": "pre_load_more", "cp": "51a5ee4f38c50q1", "plugin_enable": "0", "iid": "31047425023",
"device_id": "51425358841", "ac": "wifi", "channel": "tengxun", "aid": "13",
"app_name": "news_article", "version_code": "631", "version_name": "6.3.1",
"device_platform": "android",
"ab_version": "333116,297979,317498,336556,295827,325046,239097,324283,170988,335432,332098,325198,336443,330632,297058,276203,286212,313219,328615,332041,329358,322321,327537,335710,333883,335102,334828,328670,324007,317077,334305,280773,335671,319960,333985,331719,336452,214069,31643,332881,333968,318434,207253,266310,321519,247847,281298,328218,335998,325618,333327,336199,323429,287591,288418,260650,326188,324614,335477,271178,326588,326524,326532",
"ab_client": "a1,c4,e1,f2,g2,f7", "ab_feature": "94563,102749", "abflag": "3", "ssmix": "a",
"device_type": "MuMu", "device_brand": "Android", "language": "zh", "os_api": "19",
"os_version": "4.4.4", "uuid": "008796762094657", "openudid": "b7215ea70ca32066",
"manifest_version_code": "631", "resolution": "1280*720", "dpi": "240",
"update_version_code": "6310", "_rticket": "1524907088018", "plugin": "256"}
headers = {
'cache-control': "no-cache",
'postman-token': "26530547-e697-1e8b-fd82-7c6014b3ee86",
'User-Agent': 'Dalvik/1.6.0 (Linux; U; Android 4.4.4; MuMu Build/V417IR) NewsArticle/6.3.1 okhttp/3.7.0.2'
}
# 进行网络请求
response = requests.request("GET", url, headers=headers, params=querystring)
# 获取返回的数据
new_data = json.loads(response.text)
with open(data_path, 'a', encoding='utf-8') as fp:
for item in new_data['data']:
item = item['content']
item = item.replace('\"', '"')
item = json.loads(item)
# 判断数据中是否包含id和新闻标题
if 'item_id' in item.keys() and 'title' in item.keys():
item_id = item['item_id']
print(downloaded_sum, tup[0], tup[1], item['item_id'], item['title'])
# 通过新闻id判断是否已经下载过
if item_id not in downloaded_data_id:
downloaded_data_id.append(item_id)
# 安装固定格式追加写入文件中
line = u"{}_!_{}_!_{}_!_{}".format(item['item_id'], tup[0], tup[1], item['title'])
line = line.replace('\n', '').replace('\r', '')
line = line + '\n'
fp.write(line)
downloaded_sum += 1
```
有时候爬取时间比较长,可能中途需要中断。所以就需要以下的代码进行处理,读取已经保存的文本数据的文件中的数据ID,通过使用这个数据集,在爬取数据的时候就不再重复保存数据了。
```python
def get_routine(data_path):
global downloaded_sum
# 从文件中读取已经有的数据,避免数据重复
if os.path.exists(data_path):
with open(data_path, 'r', encoding='utf-8') as fp:
lines = fp.readlines()
downloaded_sum = len(lines)
for line in lines:
item_id = int(line.split('_!_')[0])
downloaded_data_id.append(item_id)
print('在文件中已经读起了%d条数据' % downloaded_sum)
else:
os.makedirs(os.path.dirname(data_path))
while 1:
# 开始下载数据
time.sleep(10)
for classify in news_classify:
get_data(classify, data_path)
# 当下载量超过300000就停止下载
if downloaded_sum >= 300000:
break
```
最后在main入口中启动爬取文本数据的函数。
```python
if __name__ == '__main__':
data_path = 'datasets/news_classify_data.txt'
dict_path = "datasets/dict_txt.txt"
# 下载数据集
get_routine(data_path)
```
在爬取过程中,输出信息:
```
============文化============
17 1 文化 6646565189942510093 世界第一豪宅,坐落于北京,一根柱子27个亿,世界首富都买不起!
18 1 文化 6658382232383652104 俗语讲:“男怕初一,女怕十五”,这话什么意思?有道理吗?
19 1 文化 6636596124998173192 浙江一员工请假条火了,内容令人狂笑不止,字迹却让人念念不忘
20 1 文化 6658848073562718734 难怪悟空被赶下山后菩提神秘消失,你看看方寸山门口对联写了啥?
21 1 文化 6658952207871771140 他把183件国宝无偿捐给美国,捐回中国却收了450万美元
```
# 制作训练数据
上面爬取的文本数据并不能直接拿来训练,因为PaddlePaddle训练的数据不能是字符串的,所以需要对这些文本数据转换成整型类型的数据。就是把一个字对应上唯一的数字,最后把全部的文字转换成数字。
创建`create_data.py`文件。创建`create_dict()`函数,这个函数用来创建一个数据字典。数字字典就是把每个字都对应一个一个数字,包括标点符号。
```python
import os
# 把下载得数据生成一个字典
def create_dict(data_path, dict_path):
dict_set = set()
# 读取已经下载得数据
with open(data_path, 'r', encoding='utf-8') as f:
lines = f.readlines()
# 把数据生成一个元组
for line in lines:
title = line.split('_!_')[-1].replace('\n', '')
for s in title:
dict_set.add(s)
# 把元组转换成字典,一个字对应一个数字
dict_list = []
i = 0
for s in dict_set:
dict_list.append([s, i])
i += 1
# 添加未知字符
dict_txt = dict(dict_list)
end_dict = {"<unk>": i}
dict_txt.update(end_dict)
# 把这些字典保存到本地中
with open(dict_path, 'w', encoding='utf-8') as f:
f.write(str(dict_txt))
print("数据字典生成完成!")
```
生成的数据字典类型如下:
```
{'港': 712, '选': 367, '所': 0, '斯': 1,
```
创建一个数据自己之后,就使用这个数据字典把下载数据转换成数字,还有标签。
```python
def create_data_list(data_root_path):
with open(data_root_path + 'test_list.txt', 'w') as f:
pass
with open(data_root_path + 'train_list.txt', 'w') as f:
pass
with open(os.path.join(data_root_path, 'dict_txt.txt'), 'r', encoding='utf-8') as f_data:
dict_txt = eval(f_data.readlines()[0])
with open(os.path.join(data_root_path, 'news_classify_data.txt'), 'r', encoding='utf-8') as f_data:
lines = f_data.readlines()
i = 0
for line in lines:
title = line.split('_!_')[-1].replace('\n', '')
l = line.split('_!_')[1]
labs = ""
if i % 10 == 0:
with open(os.path.join(data_root_path, 'test_list.txt'), 'a', encoding='utf-8') as f_test:
for s in title:
lab = str(dict_txt[s])
labs = labs + lab + ','
labs = labs[:-1]
labs = labs + '\t' + l + '\n'
f_test.write(labs)
else:
with open(os.path.join(data_root_path, 'train_list.txt'), 'a', encoding='utf-8') as f_train:
for s in title:
lab = str(dict_txt[s])
labs = labs + lab + ','
labs = labs[:-1]
labs = labs + '\t' + l + '\n'
f_train.write(labs)
i += 1
print("数据列表生成完成!")
```
转换后的数据如下:
```
321,364,535,897,322,263,354,337,441,815,943 12
540,299,884,1092,671,938 13
```
这里顺便增加获取字典长度的函数,因为在训练的时候获取神经网络分类器的时候需要用到。
```python
# 获取字典的长度
def get_dict_len(dict_path):
with open(dict_path, 'r', encoding='utf-8') as f:
line = eval(f.readlines()[0])
return len(line.keys())
```
最后执行创建数据字典和生成数据列表的函数就可以生成待训练的数据了。
```python
if __name__ == '__main__':
# 把生产的数据列表都放在自己的总类别文件夹中
data_root_path = "datasets/"
data_path = os.path.join(data_root_path, 'news_classify_data.txt')
dict_path = os.path.join(data_root_path, "dict_txt.txt")
# 创建数据字典
create_dict(data_path, dict_path)
# 创建数据列表
create_data_list(data_root_path)
```
在执行的过程中会输出信息:
```
数据字典生成完成!
数据列表生成完成!
```
# 定义模型
然后我们定义一个文本分类模型,这里使用的是双向单层LSTM模型,据说百度的情感分析也是使用这个模型的。我们创建一个`bilstm_net.py`文件,用于定义双向单层LSTM模型。
```python
import paddle.fluid as fluid
def bilstm_net(data, dict_dim, class_dim, emb_dim=128, hid_dim=128, hid_dim2=96, emb_lr=30.0):
# embedding layer
emb = fluid.layers.embedding(input=data,
size=[dict_dim, emb_dim],
param_attr=fluid.ParamAttr(learning_rate=emb_lr))
# bi-lstm layer
fc0 = fluid.layers.fc(input=emb, size=hid_dim * 4)
rfc0 = fluid.layers.fc(input=emb, size=hid_dim * 4)
lstm_h, c = fluid.layers.dynamic_lstm(input=fc0, size=hid_dim * 4, is_reverse=False)
rlstm_h, c = fluid.layers.dynamic_lstm(input=rfc0, size=hid_dim * 4, is_reverse=True)
# extract last layer
lstm_last = fluid.layers.sequence_last_step(input=lstm_h)
rlstm_last = fluid.layers.sequence_last_step(input=rlstm_h)
# concat layer
lstm_concat = fluid.layers.concat(input=[lstm_last, rlstm_last], axis=1)
# full connect layer
fc1 = fluid.layers.fc(input=lstm_concat, size=hid_dim2, act='tanh')
# softmax layer
prediction = fluid.layers.fc(input=fc1, size=class_dim, act='softmax')
return prediction
```
# 定义数据读取
接下来我们定义`text_reader.py`文件,用于读取文本数据集。这相对图片读取来说,这比较简单。
首先导入相应的依赖包。
```python
from multiprocessing import cpu_count
import numpy as np
import paddle
```
因为在上一个程序已经把文本转换成PaddlePaddle可读数据,所以直接就可以在文件中读取数据成了。
```python
# 训练数据的预处理
def train_mapper(sample):
data, label = sample
data = [int(data) for data in data.split(',')]
return data, int(label)
# 训练数据的reader
def train_reader(train_list_path):
def reader():
with open(train_list_path, 'r') as f:
lines = f.readlines()
# 打乱数据
np.random.shuffle(lines)
# 开始获取每张图像和标签
for line in lines:
data, label = line.split('\t')
yield data, label
return paddle.reader.xmap_readers(train_mapper, reader, cpu_count(), 1024)
```
这里跟训练的读取方式一样,只是没有一个打乱数据的操作。
```python
# 测试数据的预处理
def test_mapper(sample):
data, label = sample
data = [int(data) for data in data.split(',')]
return data, int(label)
# 测试数据的reader
def test_reader(test_list_path):
def reader():
with open(test_list_path, 'r') as f:
lines = f.readlines()
for line in lines:
data, label = line.split('\t')
yield data, label
```
# 训练模型
然后编写`train.py`文件,开始训练文本分类模型。首先到如相应的依赖包。
```python
import os
import shutil
import paddle
import paddle.fluid as fluid
import create_data
import text_reader
import bilstm_net
```
定义网络输入层,数据是一条文本数据,所以只有一个维度。
```python
# 定义输入数据, lod_level不为0指定输入数据为序列数据
words = fluid.layers.data(name='words', shape=[1], dtype='int64', lod_level=1)
label = fluid.layers.data(name='label', shape=[1], dtype='int64')
```
接着是获取双向单层LSTM模型的分类器,这里需要用到文本数据集的字典大小,然后还需要分类器的大小,因为我们的文本数据有15个类别,所以这里分类器的大小是15。
```python
# 获取数据字典长度
dict_dim = create_data.get_dict_len('datasets/dict_txt.txt')
# 获取长短期记忆网络
model = bilstm_net.bilstm_net(words, dict_dim, 15)
```
然后是定义一系列的损失函数,准确率函数,克隆预测程序和优化方法。这里使用的优化方法是Adagrad优化方法,Adagrad优化方法多用于处理稀疏数据。
```python
# 获取损失函数和准确率
cost = fluid.layers.cross_entropy(input=model, label=label)
avg_cost = fluid.layers.mean(cost)
acc = fluid.layers.accuracy(input=model, label=label)
# 获取预测程序
test_program = fluid.default_main_program().clone(for_test=True)
# 定义优化方法
optimizer = fluid.optimizer.AdagradOptimizer(learning_rate=0.002)
opt = optimizer.minimize(avg_cost)
# 创建一个执行器,CPU训练速度比较慢
# place = fluid.CPUPlace()
place = fluid.CUDAPlace(0)
exe = fluid.Executor(place)
# 进行参数初始化
exe.run(fluid.default_startup_program())
```
这里就是获取我们在上一个文件中定义读取数据的reader,根据不同的文本文件加载训练和预测的数据,准备进行训练。
```python
# 获取训练和预测数据
train_reader = paddle.batch(reader=text_reader.train_reader('datasets/train_list.txt'), batch_size=128)
test_reader = paddle.batch(reader=text_reader.test_reader('datasets/test_list.txt'), batch_size=128)
```
最后在这里进行训练和测试,我们然执行器在训练的过程中输出训练时的是损失值和准确率。然后每40个batch打印一次信息和执行一次测试操作,查看网络模型在测试集中的准确率。
```python
# 定义输入数据的维度
feeder = fluid.DataFeeder(place=place, feed_list=[words, label])
# 开始训练
for pass_id in range(10):
# 进行训练
for batch_id, data in enumerate(train_reader()):
train_cost, train_acc = exe.run(program=fluid.default_main_program(),
feed=feeder.feed(data),
fetch_list=[avg_cost, acc])
if batch_id % 40 == 0:
print('Pass:%d, Batch:%d, Cost:%0.5f, Acc:%0.5f' % (pass_id, batch_id, train_cost[0], train_acc[0]))
# 进行测试
test_costs = []
test_accs = []
for batch_id, data in enumerate(test_reader()):
test_cost, test_acc = exe.run(program=test_program,
feed=feeder.feed(data),
fetch_list=[avg_cost, acc])
test_costs.append(test_cost[0])
test_accs.append(test_acc[0])
# 计算平均预测损失在和准确率
test_cost = (sum(test_costs) / len(test_costs))
test_acc = (sum(test_accs) / len(test_accs))
print('Test:%d, Cost:%0.5f, ACC:%0.5f' % (pass_id, test_cost, test_acc))
```
我可以在每pass训练结束之后保存一次预测模型,可以用于之后的预测。
```python
# 保存预测模型
save_path = 'infer_model/'
# 删除旧的模型文件
shutil.rmtree(save_path, ignore_errors=True)
# 创建保持模型文件目录
os.makedirs(save_path)
# 保存预测模型
fluid.io.save_inference_model(save_path, feeded_var_names=[words.name], target_vars=[model], executor=exe)
```
训练输出的信息:
```
Pass:0, Batch:0, Cost:2.70816, Acc:0.07812
Test:0, Cost:2.68423, ACC:0.14427
Pass:0, Batch:40, Cost:2.01647, Acc:0.34375
Test:0, Cost:1.99191, ACC:0.34301
Pass:0, Batch:80, Cost:1.61981, Acc:0.47656
Test:0, Cost:1.69227, ACC:0.46456
Pass:0, Batch:120, Cost:1.40459, Acc:0.57812
Test:0, Cost:1.47188, ACC:0.53961
Pass:0, Batch:160, Cost:1.15466, Acc:0.65625
Test:0, Cost:1.32585, ACC:0.59393
Pass:0, Batch:200, Cost:1.08597, Acc:0.67188
Test:0, Cost:1.20917, ACC:0.63793
Pass:0, Batch:240, Cost:1.08081, Acc:0.66406
Test:0, Cost:1.14794, ACC:0.66145
```
# 预测文本
在上面的训练中,我们已经训练到了一个文本分类预测模型。接下来我们就使用这个模型来预测我们想要预测文本。
创建`infer.py`文件开始进行预测,首先导入依赖包。
```python
import numpy as np
import paddle.fluid as fluid
```
然后创建执行器,并加载预测模型文件,获取到预测程序和输入数据的名称和网络分类器。
```python
# 创建执行器
place = fluid.CPUPlace()
exe = fluid.Executor(place)
exe.run(fluid.default_startup_program())
# 保存预测模型路径
save_path = 'infer_model/'
# 从模型中获取预测程序、输入数据名称列表、分类器
[infer_program, feeded_var_names, target_var] = fluid.io.load_inference_model(dirname=save_path, executor=exe)
```
因为我们输入的是文本数据,但是PaddlePaddle读取的数据是整型数据,所以我们需要一个函数帮助我们把文本字符根据数据集的字典转换成整型数据。
```python
# 获取数据
def get_data(sentence):
# 读取数据字典
with open('datasets/dict_txt.txt', 'r', encoding='utf-8') as f_data:
dict_txt = eval(f_data.readlines()[0])
dict_txt = dict(dict_txt)
# 把字符串数据转换成列表数据
keys = dict_txt.keys()
data = []
for s in sentence:
# 判断是否存在未知字符
if not s in keys:
s = '<unk>'
data.append(int(dict_txt[s]))
return data
```
然后在这里获取数据。
```python
data = []
# 获取图片数据
data1 = get_data('京城最值得你来场文化之旅的博物馆')
data2 = get_data('谢娜为李浩菲澄清网络谣言,之后她的两个行为给自己加分')
data.append(data1)
data.append(data2)
```
因为输入的不定长度的文本数据,所以我们需要根据不同的输入数据的长度创建张量数据。
```python
# 获取每句话的单词数量
base_shape = [[len(c) for c in data]]
# 生成预测数据
tensor_words = fluid.create_lod_tensor(data, base_shape, place)
```
最后执行预测程序,获取预测结果。
```python
# 执行预测
result = exe.run(program=infer_program,
feed={feeded_var_names[0]: tensor_words},
fetch_list=target_var)
```
获取预测结果之后,获取预测结果的最大概率的标签,然后根据这个标签获取类别的名字。
```python
# 分类名称
names = ['民生', '文化', '娱乐', '体育', '财经',
'房产', '汽车', '教育', '科技', '军事',
'旅游', '国际', '证券', '农业', '游戏']
# 获取结果概率最大的label
for i in range(len(data)):
lab = np.argsort(result)[0][i][-1]
print('预测结果标签为:%d, 名称为:%s, 概率为:%f' % (lab, names[lab], result[0][i][lab]))
```
预测输出的信息:
```
预测结果标签为:10, 名称为:旅游, 概率为:0.848075
预测结果标签为:2, 名称为:娱乐, 概率为:0.894570
```
# 参考资料
1. https://github.com/fate233/toutiao-text-classfication-dataset
2. https://github.com/baidu/Senta
================================================
FILE: note12/bilstm_net.py
================================================
import paddle.fluid as fluid
def bilstm_net(data, dict_dim, class_dim, emb_dim=128, hid_dim=128, hid_dim2=96, emb_lr=30.0):
# embedding layer
emb = fluid.layers.embedding(input=data,
size=[dict_dim, emb_dim],
param_attr=fluid.ParamAttr(learning_rate=emb_lr))
# bi-lstm layer
fc0 = fluid.layers.fc(input=emb, size=hid_dim * 4)
rfc0 = fluid.layers.fc(input=emb, size=hid_dim * 4)
lstm_h, c = fluid.layers.dynamic_lstm(input=fc0, size=hid_dim * 4, is_reverse=False)
rlstm_h, c = fluid.layers.dynamic_lstm(input=rfc0, size=hid_dim * 4, is_reverse=True)
# extract last layer
lstm_last = fluid.layers.sequence_last_step(input=lstm_h)
rlstm_last = fluid.layers.sequence_last_step(input=rlstm_h)
# concat layer
lstm_concat = fluid.layers.concat(input=[lstm_last, rlstm_last], axis=1)
# full connect layer
fc1 = fluid.layers.fc(input=lstm_concat, size=hid_dim2, act='tanh')
# softmax layer
prediction = fluid.layers.fc(input=fc1, size=class_dim, act='softmax')
return prediction
================================================
FILE: note12/create_data.py
================================================
import os
def create_data_list(data_root_path):
with open(data_root_path + 'test_list.txt', 'w') as f:
pass
with open(data_root_path + 'train_list.txt', 'w') as f:
pass
with open(os.path.join(data_root_path, 'dict_txt.txt'), 'r', encoding='utf-8') as f_data:
dict_txt = eval(f_data.readlines()[0])
with open(os.path.join(data_root_path, 'news_classify_data.txt'), 'r', encoding='utf-8') as f_data:
lines = f_data.readlines()
i = 0
for line in lines:
title = line.split('_!_')[-1].replace('\n', '')
l = line.split('_!_')[1]
labs = ""
if i % 10 == 0:
with open(os.path.join(data_root_path, 'test_list.txt'), 'a', encoding='utf-8') as f_test:
for s in title:
lab = str(dict_txt[s])
labs = labs + lab + ','
labs = labs[:-1]
labs = labs + '\t' + l + '\n'
f_test.write(labs)
else:
with open(os.path.join(data_root_path, 'train_list.txt'), 'a', encoding='utf-8') as f_train:
for s in title:
lab = str(dict_txt[s])
labs = labs + lab + ','
labs = labs[:-1]
labs = labs + '\t' + l + '\n'
f_train.write(labs)
i += 1
print("数据列表生成完成!")
# 把下载得数据生成一个字典
def create_dict(data_path, dict_path):
dict_set = set()
# 读取已经下载得数据
with open(data_path, 'r', encoding='utf-8') as f:
lines = f.readlines()
# 把数据生成一个元组
for line in lines:
title = line.split('_!_')[-1].replace('\n', '')
for s in title:
dict_set.add(s)
# 把元组转换成字典,一个字对应一个数字
dict_list = []
i = 0
for s in dict_set:
dict_list.append([s, i])
i += 1
# 添加未知字符
dict_txt = dict(dict_list)
end_dict = {"<unk>": i}
dict_txt.update(end_dict)
# 把这些字典保存到本地中
with open(dict_path, 'w', encoding='utf-8') as f:
f.write(str(dict_txt))
print("数据字典生成完成!")
# 获取字典的长度
def get_dict_len(dict_path):
with open(dict_path, 'r', encoding='utf-8') as f:
line = eval(f.readlines()[0])
return len(line.keys())
if __name__ == '__main__':
# 把生产的数据列表都放在自己的总类别文件夹中
data_root_path = "datasets/"
data_path = os.path.join(data_root_path, 'news_classify_data.txt')
dict_path = os.path.join(data_root_path, "dict_txt.txt")
# 创建数据字典
create_dict(data_path, dict_path)
# 创建数据列表
create_data_list(data_root_path)
================================================
FILE: note12/download_text_data.py
================================================
import os
import random
import requests
import json
import time
# 分类新闻参数
news_classify = [
[0, '民生', 'news_story'],
[1, '文化', 'news_culture'],
[2, '娱乐', 'news_entertainment'],
[3, '体育', 'news_sports'],
[4, '财经', 'news_finance'],
[5, '房产', 'news_house'],
[6, '汽车', 'news_car'],
[7, '教育', 'news_edu'],
[8, '科技', 'news_tech'],
[9, '军事', 'news_military'],
[10, '旅游', 'news_travel'],
[11, '国际', 'news_world'],
[12, '证券', 'stock'],
[13, '农业', 'news_agriculture'],
[14, '游戏', 'news_game']
]
# 已经下载的新闻标题的ID
downloaded_data_id = []
# 已经下载新闻标题的数量
downloaded_sum = 0
def get_data(tup, data_path):
global downloaded_data_id
global downloaded_sum
print('============%s============' % tup[1])
url = "http://it.snssdk.com/api/news/feed/v63/"
# 分类新闻的访问参数,模仿正常网络访问
t = int(time.time() / 10000)
t = random.randint(6 * t, 10 * t)
querystring = {"category": tup[2], "max_behot_time": t, "last_refresh_sub_entrance_interval": "1524907088",
"loc_mode": "5",
"tt_from": "pre_load_more", "cp": "51a5ee4f38c50q1", "plugin_enable": "0", "iid": "31047425023",
"device_id": "51425358841", "ac": "wifi", "channel": "tengxun", "aid": "13",
"app_name": "news_article", "version_code": "631", "version_name": "6.3.1",
"device_platform": "android",
"ab_version": "333116,297979,317498,336556,295827,325046,239097,324283,170988,335432,332098,325198,336443,330632,297058,276203,286212,313219,328615,332041,329358,322321,327537,335710,333883,335102,334828,328670,324007,317077,334305,280773,335671,319960,333985,331719,336452,214069,31643,332881,333968,318434,207253,266310,321519,247847,281298,328218,335998,325618,333327,336199,323429,287591,288418,260650,326188,324614,335477,271178,326588,326524,326532",
"ab_client": "a1,c4,e1,f2,g2,f7", "ab_feature": "94563,102749", "abflag": "3", "ssmix": "a",
"device_type": "MuMu", "device_brand": "Android", "language": "zh", "os_api": "19",
"os_version": "4.4.4", "uuid": "008796762094657", "openudid": "b7215ea70ca32066",
"manifest_version_code": "631", "resolution": "1280*720", "dpi": "240",
"update_version_code": "6310", "_rticket": "1524907088018", "plugin": "256"}
headers = {
'cache-control': "no-cache",
'postman-token': "26530547-e697-1e8b-fd82-7c6014b3ee86",
'User-Agent': 'Dalvik/1.6.0 (Linux; U; Android 4.4.4; MuMu Build/V417IR) NewsArticle/6.3.1 okhttp/3.7.0.2'
}
# 进行网络请求
response = requests.request("GET", url, headers=headers, params=querystring)
# 获取返回的数据
new_data = json.loads(response.text)
with open(data_path, 'a', encoding='utf-8') as fp:
for item in new_data['data']:
item = item['content']
item = item.replace('\"', '"')
item = json.loads(item)
# 判断数据中是否包含id和新闻标题
if 'item_id' in item.keys() and 'title' in item.keys():
item_id = item['item_id']
print(downloaded_sum, tup[0], tup[1], item['item_id'], item['title'])
# 通过新闻id判断是否已经下载过
if item_id not in downloaded_data_id:
downloaded_data_id.append(item_id)
# 安装固定格式追加写入文件中
line = u"{}_!_{}_!_{}_!_{}".format(item['item_id'], tup[0], tup[1], item['title'])
line = line.replace('\n', '').replace('\r', '')
line = line + '\n'
fp.write(line)
downloaded_sum += 1
def get_routine(data_path):
global downloaded_sum
# 从文件中读取已经有的数据,避免数据重复
if os.path.exists(data_path):
with open(data_path, 'r', encoding='utf-8') as fp:
lines = fp.readlines()
downloaded_sum = len(lines)
for line in lines:
item_id = int(line.split('_!_')[0])
downloaded_data_id.append(item_id)
print('在文件中已经读起了%d条数据' % downloaded_sum)
else:
os.makedirs(os.path.dirname(data_path))
while 1:
# 开始下载数据
time.sleep(10)
for classify in news_classify:
get_data(classify, data_path)
# 当下载量超过300000就停止下载
if downloaded_sum >= 300000:
break
if __name__ == '__main__':
data_path = 'datasets/news_classify_data.txt'
dict_path = "datasets/dict_txt.txt"
# 下载数据集
get_routine(data_path)
================================================
FILE: note12/infer.py
================================================
import numpy as np
import paddle.fluid as fluid
# 创建执行器
place = fluid.CPUPlace()
exe = fluid.Executor(place)
exe.run(fluid.default_startup_program())
# 保存预测模型路径
save_path = 'infer_model/'
# 从模型中获取预测程序、输入数据名称列表、分类器
[infer_program, feeded_var_names, target_var] = fluid.io.load_inference_model(dirname=save_path, executor=exe)
# 获取数据
def get_data(sentence):
# 读取数据字典
with open('datasets/dict_txt.txt', 'r', encoding='utf-8') as f_data:
dict_txt = eval(f_data.readlines()[0])
dict_txt = dict(dict_txt)
# 把字符串数据转换成列表数据
keys = dict_txt.keys()
data = []
for s in sentence:
# 判断是否存在未知字符
if not s in keys:
s = '<unk>'
data.append(np.int64(dict_txt[s]))
return data
data = []
# 获取图片数据
data1 = get_data('京城最值得你来场文化之旅的博物馆')
data2 = get_data('谢娜为李浩菲澄清网络谣言,之后她的两个行为给自己加分')
data.append(data1)
data.append(data2)
# 获取每句话的单词数量
base_shape = [[len(c) for c in data]]
# 生成预测数据
tensor_words = fluid.create_lod_tensor(data, base_shape, place)
# 执行预测
result = exe.run(program=infer_program,
feed={feeded_var_names[0]: tensor_words},
fetch_list=target_var)
# 分类名称
names = ['民生', '文化', '娱乐', '体育', '财经',
'房产', '汽车', '教育', '科技', '军事',
'旅游', '国际', '证券', '农业', '游戏']
# 获取结果概率最大的label
for i in range(len(data)):
lab = np.argsort(result)[0][i][-1]
print('预测结果标签为:%d, 名称为:%s, 概率为:%f' % (lab, names[lab], result[0][i][lab]))
================================================
FILE: note12/text_reader.py
================================================
from multiprocessing import cpu_count
import numpy as np
import paddle
# 训练数据的预处理
def train_mapper(sample):
data, label = sample
data = [int(data) for data in data.split(',')]
return data, int(label)
# 训练数据的reader
def train_reader(train_list_path):
def reader():
with open(train_list_path, 'r') as f:
lines = f.readlines()
# 打乱数据
np.random.shuffle(lines)
# 开始获取每张图像和标签
for line in lines:
data, label = line.split('\t')
yield data, label
return paddle.reader.xmap_readers(train_mapper, reader, cpu_count(), 1024)
# 测试数据的预处理
def test_mapper(sample):
data, label = sample
data = [int(data) for data in data.split(',')]
return data, int(label)
# 测试数据的reader
def test_reader(test_list_path):
def reader():
with open(test_list_path, 'r') as f:
lines = f.readlines()
for line in lines:
data, label = line.split('\t')
yield data, label
return paddle.reader.xmap_readers(test_mapper, reader, cpu_count(), 1024)
================================================
FILE: note12/train.py
================================================
import os
import shutil
import paddle
import paddle.fluid as fluid
import create_data
import text_reader
import bilstm_net
# 定义输入数据, lod_level不为0指定输入数据为序列数据
words = fluid.layers.data(name='words', shape=[1], dtype='int64', lod_level=1)
label = fluid.layers.data(name='label', shape=[1], dtype='int64')
# 获取数据字典长度
dict_dim = create_data.get_dict_len('datasets/dict_txt.txt')
# 获取长短期记忆网络
model = bilstm_net.bilstm_net(words, dict_dim, 15)
# 获取损失函数和准确率
cost = fluid.layers.cross_entropy(input=model, label=label)
avg_cost = fluid.layers.mean(cost)
acc = fluid.layers.accuracy(input=model, label=label)
# 获取预测程序
test_program = fluid.default_main_program().clone(for_test=True)
# 定义优化方法
optimizer = fluid.optimizer.AdagradOptimizer(learning_rate=0.002)
opt = optimizer.minimize(avg_cost)
# 创建一个执行器,CPU训练速度比较慢
# place = fluid.CPUPlace()
place = fluid.CUDAPlace(0)
exe = fluid.Executor(place)
# 进行参数初始化
exe.run(fluid.default_startup_program())
# 获取训练和预测数据
train_reader = paddle.batch(reader=text_reader.train_reader('datasets/train_list.txt'), batch_size=128)
test_reader = paddle.batch(reader=text_reader.test_reader('datasets/test_list.txt'), batch_size=128)
# 定义输入数据的维度
feeder = fluid.DataFeeder(place=place, feed_list=[words, label])
# 开始训练
for pass_id in range(10):
# 进行训练
for batch_id, data in enumerate(train_reader()):
train_cost, train_acc = exe.run(program=fluid.default_main_program(),
feed=feeder.feed(data),
fetch_list=[avg_cost, acc])
if batch_id % 40 == 0:
print('Pass:%d, Batch:%d, Cost:%0.5f, Acc:%0.5f' % (pass_id, batch_id, train_cost[0], train_acc[0]))
# 进行测试
test_costs = []
test_accs = []
for batch_id, data in enumerate(test_reader()):
test_cost, test_acc = exe.run(program=test_program,
feed=feeder.feed(data),
fetch_list=[avg_cost, acc])
test_costs.append(test_cost[0])
test_accs.append(test_acc[0])
# 计算平均预测损失在和准确率
test_cost = (sum(test_costs) / len(test_costs))
test_acc = (sum(test_accs) / len(test_accs))
print('Test:%d, Cost:%0.5f, ACC:%0.5f' % (pass_id, test_cost, test_acc))
# 保存预测模型
save_path = 'infer_model/'
# 删除旧的模型文件
shutil.rmtree(save_path, ignore_errors=True)
# 创建保持模型文件目录
os.makedirs(save_path)
# 保存预测模型
fluid.io.save_inference_model(save_path, feeded_var_names=[words.name], target_vars=[model], executor=exe)
================================================
FILE: note13/README.md
================================================
@[TOC]
# 前言
我们在第六章介绍了生成对抗网络,并使用生成对抗网络训练mnist数据集,生成手写数字图片。那么本章我们将使用对抗生成网络训练我们自己的图片数据集,并生成图片。在第六章中我们使用的黑白的单通道图片,在这一章中,我们使用的是3通道的彩色图。
GitHub地址:https://github.com/yeyupiaoling/LearnPaddle2/tree/master/note13
# 定义数据读取
我们首先创建一个`image_reader.py`文件,用于读取我们自己定义的图片数据集。首先导入所需的依赖包。
```python
import os
import random
from multiprocessing import cpu_count
import numpy as np
import paddle
from PIL import Image
```
这里的图片预处理主要是对图片进行等比例压缩和中心裁剪,这里为了避免图片在图片在resize时出现变形的情况,导致训练生成的图片不是我们真实图片的样子。这里为了增强数据集,做了随机水平翻转。最后在处理图片的时候,为了避免数据集中有单通道图片导致训练中断,所以还把单通道图转成3通道图片。
```python
# 测试图片的预处理
def train_mapper(sample):
img, crop_size = sample
img = Image.open(img)
# 随机水平翻转
r1 = random.random()
if r1 > 0.5:
img = img.transpose(Image.FLIP_LEFT_RIGHT)
# 等比例缩放和中心裁剪
width = img.size[0]
height = img.size[1]
if width < height:
ratio = width / crop_size
width = width / ratio
height = height / ratio
img = img.resize((int(width), int(height)), Image.ANTIALIAS)
height = height / 2
crop_size2 = crop_size / 2
box = (0, int(height - crop_size2), int(width), int(height + crop_size2))
else:
ratio = height / crop_size
height = height / ratio
width = width / ratio
img = img.resize((int(width), int(height)), Image.ANTIALIAS)
width = width / 2
crop_size2 = crop_size / 2
box = (int(width - crop_size2), 0, int(width + crop_size2), int(height))
img = img.crop(box)
img = img.resize((crop_size, crop_size), Image.ANTIALIAS)
# 把单通道图变成3通道
if len(img.getbands()) == 1:
img1 = img2 = img3 = img
img = Image.merge('RGB', (img1, img2, img3))
# 转换成numpy值
img = np.array(img).astype(np.float32)
# 转换成CHW
img = img.transpose((2, 0, 1))
# 转换成BGR
img = img[(2, 1, 0), :, :] / 255.0
return img
```
在这篇文章中,我们读取数据集不需要使用到数据列表,因为我们并没有进行分类,只是把所有的图片用于训练并生成图片。所有这里只需要把文件中的所有图片都读取进行训练就 可以了。
```python
# 测试的图片reader
def train_reader(train_image_path, crop_size):
pathss = []
for root, dirs, files in os.walk(train_image_path):
path = [os.path.join(root, name) for name in files]
pathss.extend(path)
def reader():
for line in pathss:
yield line, crop_size
return paddle.reader.xmap_readers(train_mapper, reader, cpu_count(), 1024)
```
# 训练生成模型
下面创建`train.py`文件,用于训练对抗生成模型,并在训练过程中生成图片和保存预测模型。首先导入所需的依赖包。
```python
import os
import shutil
import numpy as np
import paddle
import paddle.fluid as fluid
import matplotlib.pyplot as plt
import image_reader
```
下面时定义生成器的,我们在第六章也介绍过。生成器的作用是尽可能生成满足判别器条件的图像。随着以上训练的进行,判别器不断增强自身的判别能力,而生成器也不断生成越来越逼真的图片,以欺骗判别器。生成器主要由两组全连接和BN层、两组转置卷积运算组成。唯一不同的时在生成器最后输出的大小是3,因为我们生成的图片是3通道的彩色图片,而且使用的激活函数是sigmoid,保证了输出的结果都是在0到1范围之内,这是彩色图片的颜色范围。
```python
# 训练的图片大小
image_size = 112
# 定义生成器
def Generator(y, name="G"):
def deconv(x, num_filters, filter_size=5, stride=2, dilation=1, padding=2, output_size=None, act=None):
return fluid.layers.conv2d_transpose(input=x,
num_filters=num_filters,
output_size=output_size,
filter_size=filter_size,
stride=stride,
dilation=dilation,
padding=padding,
act=act)
with fluid.unique_name.guard(name + "/"):
# 第一组全连接和BN层
y = fluid.layers.fc(y, size=2048)
y = fluid.layers.batch_norm(y)
# 第二组全连接和BN层
y = fluid.layers.fc(y, size=int(128 * (image_size / 4) * (image_size / 4)))
y = fluid.layers.batch_norm(y)
# 进行形状变换
y = fluid.layers.reshape(y, shape=[-1, 128, int((image_size / 4)), int((image_size / 4))])
# 第一组转置卷积运算
y = deconv(x=y, num_filters=128, act='relu', output_size=[int((image_size / 2)), int((image_size / 2))])
# 第二组转置卷积运算
y = deconv(x=y, num_filters=3, act='sigmoid', output_size=[image_size, image_size])
return y
```
判别器的作用是训练真实的数据集,然后使用训练真实数据集模型去判别生成器生成的假图片。这一过程可以理解判别器为一个二分类问题,判别器在训练真实数据集时,尽量让其输出概率为1,而训练生成器生成的假图片输出概率为0。这样不断给生成器压力,让其生成的图片尽量逼近真实图片,以至于真实到连判别器也无法判断这是真实图像还是假图片。以下判别器由三组卷积池化层和一个最后全连接层组成,全连接层的大小为1,输入一个二分类的结果。
```python
# 判别器 Discriminator
def Discriminator(images, name="D"):
# 定义一个卷积池化组
def conv_pool(input, num_filters, act=None):
return fluid.nets.simple_img_conv_pool(input=input,
filter_size=3,
num_filters=num_filters,
pool_size=2,
pool_stride=2,
act=act)
with fluid.unique_name.guard(name + "/"):
y = fluid.layers.reshape(x=images, shape=[-1, 3, image_size, image_size])
# 第一个卷积池化组
y = conv_pool(input=y, num_filters=64, act='leaky_relu')
# 第一个卷积池化加回归层
y = conv_pool(input=y, num_filters=128)
y = fluid.layers.batch_norm(input=y, act='leaky_relu')
# 第二个卷积池化加回归层
y = fluid.layers.fc(input=y, size=1024)
y = fluid.layers.batch_norm(input=y, act='leaky_relu')
# 最后一个分类器输出
y = fluid.layers.fc(input=y, size=1, act='sigmoid')
return y
```
然后在这里获取所需的程序,如判别器D识别生成器G生成的假图片程序,判别器D识别真实图片程序,生成器G生成符合判别器D的程序和初始化的程序。最后定义一个`get_params()`函数用于获取参数名称。
```python
# 创建判别器D识别生成器G生成的假图片程序
train_d_fake = fluid.Program()
# 创建判别器D识别真实图片程序
train_d_real = fluid.Program()
# 创建生成器G生成符合判别器D的程序
train_g = fluid.Program()
# 创建共同的一个初始化的程序
startup = fluid.Program()
# 噪声维度
z_dim = 100
# 从Program获取prefix开头的参数名字
def get_params(program, prefix):
all_params = program.global_block().all_parameters()
return [t.name for t in all_params if t.name.startswith(prefix)]
```
定义一个判别器识别真实图片的程序,这里判别器传入的数据是真实的图片数据,这里的输出图片是3通道的。这里使用的损失函数是fluid.layers.sigmoid_cross_entropy_with_logits(),这个损失函数是求它们在任务上的错误率,他们的类别是互不排斥的。所以无论真实图片的标签是什么,都不会影响模型识别为真实图片。这里更新的也只有判别器模型的参数,使用的优化方法是Adam。
```python
# 训练判别器D识别真实图片
with fluid.program_guard(train_d_real, startup):
# 创建读取真实数据集图片的data,并且label为1
real_image = fluid.layers.data('image', shape=[3, image_size, image_size])
ones = fluid.layers.fill_constant_batch_size_like(real_image, shape=[-1, 1], dtype='float32', value=1)
# 判别器D判断真实图片的概率
p_real = Discriminator(real_image)
# 获取损失函数
real_cost = fluid.layers.sigmoid_cross_entropy_with_logits(p_real, ones)
real_avg_cost = fluid.layers.mean(real_cost)
# 获取判别器D的参数
d_params = get_params(train_d_real, "D")
# 创建优化方法
optimizer = fluid.optimizer.Adam(learning_rate=2e-4)
optimizer.minimize(real_avg_cost, parameter_list=d_params)
```
这里定义一个判别器识别生成器生成的图片的程序,这里是使用噪声的维度进行输入。这里判别器识别的是生成器生成的图片,这里使用的损失函数同样是fluid.layers.sigmoid_cross_entropy_with_logits()。这里更新的参数还是判别器模型的参数,也是使用Adam优化方法。
```python
# 训练判别器D识别生成器G生成的图片为假图片
with fluid.program_guard(train_d_fake, startup):
# 利用创建假的图片data,并且label为0
z = fluid.layers.data(name='z', shape=[z_dim])
zeros = fluid.layers.fill_constant_batch_size_like(z, shape=[-1, 1], dtype='float32', value=0)
# 判别器D判断假图片的概率
p_fake = Discriminator(Generator(z))
# 获取损失函数
fake_cost = fluid.layers.sigmoid_cross_entropy_with_logits(p_fake, zeros)
fake_avg_cost = fluid.layers.mean(fake_cost)
# 获取判别器D的参数
d_params = get_params(train_d_fake, "D")
# 创建优化方法
optimizer = fluid.optimizer.Adam(learning_rate=2e-4)
optimizer.minimize(fake_avg_cost, parameter_list=d_params)
```
最后定义一个训练生成器生成图片的模型,这里也克隆一个预测程序,用于之后在训练的时候输出预测的图片。损失函数和优化方法都一样,但是要更新的参数是生成器的模型参。
```python
# 训练生成器G生成符合判别器D标准的假图片
fake = None
with fluid.program_guard(train_g, startup):
# 噪声生成图片为真实图片的概率,Label为1
z = fluid.layers.data(name='z', shape=[z_dim])
ones = fluid.layers.fill_constant_batch_size_like(z, shape=[-1, 1], dtype='float32', value=1)
# 生成图片
fake = Generator(z)
# 克隆预测程序
infer_program = train_g.clone(for_test=True)
# 生成符合判别器的假图片
p = Discriminator(fake)
# 获取损失函数
g_cost = fluid.layers.sigmoid_cross_entropy_with_logits(p, ones)
g_avg_cost = fluid.layers.mean(g_cost)
# 获取G的参数
g_params = get_params(train_g, "G")
# 只训练G
optimizer = fluid.optimizer.Adam(learning_rate=2e-4)
optimizer.minimize(g_avg_cost, parameter_list=g_params)
```
这里创建一个可以生成训练噪声数据的reader函数。
```python
# 噪声生成
def z_reader():
while True:
yield np.random.uniform(-1.0, 1.0, (z_dim)).astype('float32')
```
这里定义一个保存在训练过程生成的图片,通过观察生成图片的情况,可以了解到训练的效果。
```python
# 保存图片
def show_image_grid(images):
for i, image in enumerate(images):
image = image.transpose((2, 1, 0))
save_image_path = 'train_image'
if not os.path.exists(save_image_path):
os.makedirs(save_image_path)
plt.imsave(os.path.join(save_image_path, "test_%d.png" % i), image)
```
这里就开始获取自定义的图片数据集,这里只需要把存放图片数据集的文件夹传进去就可以了。
```python
# 生成真实图片reader
mydata_generator = paddle.batch(reader=image_reader.train_reader('datasets', image_size), batch_size=32)
# 生成假图片的reader
z_generator = paddle.batch(z_reader, batch_size=32)()
test_z = np.array(next(z_generator))
```
接着获取执行器,准备进行训练,这里笔者建议最好使用GPU,因为CPU贼慢。
```python
# 创建执行器,最好使用GPU,CPU速度太慢了
# place = fluid.CPUPlace()
place = fluid.CUDAPlace(0)
exe = fluid.Executor(place)
# 初始化参数
exe.run(startup)
```
最好就可以开始训练啦,我们可以在训练的时候输出训练的损失值。在训练每一个Pass之后又可以使用预测程序生成图片并进行保存到本地。
```python
# 开始训练
for pass_id in range(100):
for i, real_image in enumerate(mydata_generator()):
# 训练判别器D识别真实图片
r_fake = exe.run(program=train_d_fake,
fetch_list=[fake_avg_cost],
feed={'z': test_z})
# 训练判别器D识别生成器G生成的假图片
r_real = exe.run(program=train_d_real,
fetch_list=[real_avg_cost],
feed={'image': np.array(real_image)})
# 训练生成器G生成符合判别器D标准的假图片
r_g = exe.run(program=train_g,
fetch_list=[g_avg_cost],
feed={'z': test_z})
if i % 100 == 0:
print("Pass:%d, Batch:%d, 训练判别器D识别真实图片Cost:%0.5f, "
"训练判别器D识别生成器G生成的假图片Cost:%0.5f, "
"训练生成器G生成符合判别器D标准的假图片Cost:%0.5f" % (pass_id, i, r_fake[0], r_real[0], r_g[0]))
# 测试生成的图片
r_i = exe.run(program=infer_program,
fetch_list=[fake],
feed={'z': test_z})
r_i = np.array(r_i).astype(np.float32)
# 显示生成的图片
show_image_grid(r_i[0])
```
同时在每个Pass之后又可以保存预测函数,用于之后预测生成图片使用。
```python
# 保存预测模型
save_path = 'infer_model/'
# 删除旧的模型文件
shutil.rmtree(save_path, ignore_errors=True)
# 创建保持模型文件目录
os.makedirs(save_path)
# 保存预测模型
fluid.io.save_inference_model(save_path, feeded_var_names=[z.name], target_vars=[fake], executor=exe, main_program=train_g)
```
在训练的过程可以输出每一个训练程序输出的损失值:
```
Pass:0, Batch:0, 训练判别器D识别真实图片Cost:1.03734, 训练判别器D识别生成器G生成的假图片Cost:0.46931, 训练生成器G生成符合判别器D标准的假图片Cost:0.54236
Pass:1, Batch:0, 训练判别器D识别真实图片Cost:1.09766, 训练判别器D识别生成器G生成的假图片Cost:0.32896, 训练生成器G生成符合判别器D标准的假图片Cost:0.44473
Pass:2, Batch:0, 训练判别器D识别真实图片Cost:1.17703, 训练判别器D识别生成器G生成的假图片Cost:0.38643, 训练生成器G生成符合判别器D标准的假图片Cost:0.39445
```
# 使用模型生成图片
在上一个文件中,我们已经训练得到一个预测模型,下面我们将使用这个预测模型直接生成图片。创建`infer.py`文件用于预测生成图片。首先导入相应的依赖包。
```python
import os
import paddle
import matplotlib.pyplot as plt
import numpy as np
import paddle.fluid as fluid
```
然后创建执行器,这里可以使用CPU进行预测可以,因为预测并不需要太大的计算。然后加载上一步训练保存的预测模型,获取预测程序,输入层的名称,和生成器。
```python
# 创建执行器
place = fluid.CPUPlace()
exe = fluid.Executor(place)
exe.run(fluid.default_startup_program())
# 保存预测模型路径
save_path = 'infer_model/'
# 从模型中获取预测程序、输入数据名称列表、分类器
[infer_program, feeded_var_names, target_var] = fluid.io.load_inference_model(dirname=save_path, executor=exe)
```
跟训练的时候一样,需要生成噪声数据作为输入数据。这里说明一下,输入数据`z_generator `的batch大小就是生成图片的数量。
```python
# 噪声维度
z_dim = 100
# 噪声生成
def z_reader():
while True:
yield np.random.uniform(-1.0, 1.0, (z_dim)).astype('float32')
z_generator = paddle.batch(z_reader, batch_size=32)()
test_z = np.array(next(z_generator))
```
这里创建一个保存生成图片的函数,用于保存预测生成的图片。
```python
# 保存图片
def save_image(images):
for i, image in enumerate(images):
image = image.transpose((2, 1, 0))
save_image_path = 'infer_image'
if not os.path.exists(save_image_path):
os.makedirs(save_image_path)
plt.imsave(os.path.join(save_image_path, "test_%d.png" % i), image)
```
最后执行预测程序,开始生成图片。预测输出的结果就是图片的数据,通过保存这些数据就是保存图片了。
```python
# 测试生成的图片
r_i = exe.run(program=infer_program,
feed={feeded_var_names[0]: test_z},
fetch_list=target_var)
r_i = np.array(r_i).astype(np.float32)
# 显示生成的图片
save_image(r_i[0])
print('生成图片完成')
```
目前这个网络在训练比较复杂的图片时,模型的拟合效果并不太好,也就是说生成的图片没有我们想象那么好。所以这个网络还需要不断调整,如果读者有更好的建议,欢迎交流一下。
# 参考资料
1. https://github.com/oraoto/learn_ml/blob/master/paddle/gan-mnist-split.ipynb
2. https://www.cnblogs.com/max-hu/p/7129188.html
3. https://blog.csdn.net/somtian/article/details/72126328
================================================
FILE: note13/image_reader.py
================================================
import os
import random
from multiprocessing import cpu_count
import numpy as np
import paddle
from PIL import Image
# 测试图片的预处理
def train_mapper(sample):
img, crop_size = sample
img = Image.open(img)
# 随机水平翻转
r1 = random.random()
if r1 > 0.5:
img = img.transpose(Image.FLIP_LEFT_RIGHT)
# 等比例缩放和中心裁剪
width = img.size[0]
height = img.size[1]
if width < height:
ratio = width / crop_size
width = width / ratio
height = height / ratio
img = img.resize((int(width), int(height)), Image.ANTIALIAS)
height = height / 2
crop_size2 = crop_size / 2
box = (0, int(height - crop_size2), int(width), int(height + crop_size2))
else:
ratio = height / crop_size
height = height / ratio
width = width / ratio
img = img.resize((int(width), int(height)), Image.ANTIALIAS)
width = width / 2
crop_size2 = crop_size / 2
box = (int(width - crop_size2), 0, int(width + crop_size2), int(height))
img = img.crop(box)
img = img.resize((crop_size, crop_size), Image.ANTIALIAS)
# 把单通道图变成3通道
if len(img.getbands()) == 1:
img1 = img2 = img3 = img
img = Image.merge('RGB', (img1, img2, img3))
# 转换成numpy值
img = np.array(img).astype(np.float32)
# 转换成CHW
img = img.transpose((2, 0, 1))
# 转换成BGR
img = img[(2, 1, 0), :, :] / 255.0
return img
# 测试的图片reader
def train_reader(train_image_path, crop_size):
pathss = []
for root, dirs, files in os.walk(train_image_path):
path = [os.path.join(root, name) for name in files]
pathss.extend(path)
def reader():
for line in pathss:
yield line, crop_size
return paddle.reader.xmap_readers(train_mapper, reader, cpu_count(), 1024)
================================================
FILE: note13/infer.py
================================================
import os
import paddle
import matplotlib.pyplot as plt
import numpy as np
import paddle.fluid as fluid
# 创建执行器
place = fluid.CPUPlace()
exe = fluid.Executor(place)
exe.run(fluid.default_startup_program())
# 保存预测模型路径
save_path = 'infer_model/'
# 从模型中获取预测程序、输入数据名称列表、分类器
[infer_program, feeded_var_names, target_var] = fluid.io.load_inference_model(dirname=save_path, executor=exe)
# 噪声维度
z_dim = 100
# 噪声生成
def z_reader():
while True:
yield np.random.uniform(-1.0, 1.0, (z_dim)).astype('float32')
z_generator = paddle.batch(z_reader, batch_size=32)()
test_z = np.array(next(z_generator))
# 保存图片
def save_image(images):
for i, image in enumerate(images):
image = image.transpose((2, 1, 0))
save_image_path = 'infer_image'
if not os.path.exists(save_image_path):
os.makedirs(save_image_path)
plt.imsave(os.path.join(save_image_path, "test_%d.png" % i), image)
# 测试生成的图片
r_i = exe.run(program=infer_program,
feed={feeded_var_names[0]: test_z},
fetch_list=target_var)
r_i = np.array(r_i).astype(np.float32)
# 显示生成的图片
save_image(r_i[0])
print('生成图片完成')
================================================
FILE: note13/train.py
================================================
import os
import shutil
import numpy as np
import paddle
import paddle.fluid as fluid
import matplotlib.pyplot as plt
import image_reader
# 训练的图片大小
image_size = 112
# 定义生成器
def Generator(y, name="G"):
def deconv(x, num_filters, filter_size=5, stride=2, dilation=1, padding=2, output_size=None, act=None):
return fluid.layers.conv2d_transpose(input=x,
num_filters=num_filters,
output_size=output_size,
filter_size=filter_size,
stride=stride,
dilation=dilation,
padding=padding,
act=act)
with fluid.unique_name.guard(name + "/"):
# 第一组全连接和BN层
y = fluid.layers.fc(y, size=2048)
y = fluid.layers.batch_norm(y)
# 第二组全连接和BN层
y = fluid.layers.fc(y, size=int(128 * (image_size / 4) * (image_size / 4)))
y = fluid.layers.batch_norm(y)
# 进行形状变换
y = fluid.layers.reshape(y, shape=[-1, 128, int((image_size / 4)), int((image_size / 4))])
# 第一组转置卷积运算
y = deconv(x=y, num_filters=128, act='relu', output_size=[int((image_size / 2)), int((image_size / 2))])
# 第二组转置卷积运算
y = deconv(x=y, num_filters=3, act='sigmoid', output_size=[image_size, image_size])
return y
# 判别器 Discriminator
def Discriminator(images, name="D"):
# 定义一个卷积池化组
def conv_pool(input, num_filters, act=None):
return fluid.nets.simple_img_conv_pool(input=input,
filter_size=3,
num_filters=num_filters,
pool_size=2,
pool_stride=2,
act=act)
with fluid.unique_name.guard(name + "/"):
y = fluid.layers.reshape(x=images, shape=[-1, 3, image_size, image_size])
# 第一个卷积池化组
y = conv_pool(input=y, num_filters=64, act='leaky_relu')
# 第一个卷积池化加回归层
y = conv_pool(input=y, num_filters=128)
y = fluid.layers.batch_norm(input=y, act='leaky_relu')
# 第二个卷积池化加回归层
y = fluid.layers.fc(input=y, size=1024)
y = fluid.layers.batch_norm(input=y, act='leaky_relu')
# 最后一个分类器输出
y = fluid.layers.fc(input=y, size=1, act='sigmoid')
return y
# 创建判别器D识别生成器G生成的假图片程序
train_d_fake = fluid.Program()
# 创建判别器D识别真实图片程序
train_d_real = fluid.Program()
# 创建生成器G生成符合判别器D的程序
train_g = fluid.Program()
# 创建共同的一个初始化的程序
startup = fluid.Program()
# 噪声维度
z_dim = 100
# 从Program获取prefix开头的参数名字
def get_params(program, prefix):
all_params = program.global_block().all_parameters()
return [t.name for t in all_params if t.name.startswith(prefix)]
# 训练判别器D识别真实图片
with fluid.program_guard(train_d_real, startup):
# 创建读取真实数据集图片的data,并且label为1
real_image = fluid.layers.data('image', shape=[3, image_size, image_size])
ones = fluid.layers.fill_constant_batch_size_like(real_image, shape=[-1, 1], dtype='float32', value=1)
# 判别器D判断真实图片的概率
p_real = Discriminator(real_image)
# 获取损失函数
real_cost = fluid.layers.sigmoid_cross_entropy_with_logits(p_real, ones)
real_avg_cost = fluid.layers.mean(real_cost)
# 获取判别器D的参数
d_params = get_params(train_d_real, "D")
# 创建优化方法
optimizer = fluid.optimizer.Adam(learning_rate=2e-4)
optimizer.minimize(real_avg_cost, parameter_list=d_params)
# 训练判别器D识别生成器G生成的图片为假图片
with fluid.program_guard(train_d_fake, startup):
# 利用创建假的图片data,并且label为0
z = fluid.layers.data(name='z', shape=[z_dim])
zeros = fluid.layers.fill_constant_batch_size_like(z, shape=[-1, 1], dtype='float32', value=0)
# 判别器D判断假图片的概率
p_fake = Discriminator(Generator(z))
# 获取损失函数
fake_cost = fluid.layers.sigmoid_cross_entropy_with_logits(p_fake, zeros)
fake_avg_cost = fluid.layers.mean(fake_cost)
# 获取判别器D的参数
d_params = get_params(train_d_fake, "D")
# 创建优化方法
optimizer = fluid.optimizer.Adam(learning_rate=2e-4)
optimizer.minimize(fake_avg_cost, parameter_list=d_params)
# 训练生成器G生成符合判别器D标准的假图片
fake = None
with fluid.program_guard(train_g, startup):
# 噪声生成图片为真实图片的概率,Label为1
z = fluid.layers.data(name='z', shape=[z_dim])
ones = fluid.layers.fill_constant_batch_size_like(z, shape=[-1, 1], dtype='float32', value=1)
# 生成图片
fake = Generator(z)
# 克隆预测程序
infer_program = train_g.clone(for_test=True)
# 生成符合判别器的假图片
p = Discriminator(fake)
# 获取损失函数
g_cost = fluid.layers.sigmoid_cross_entropy_with_logits(p, ones)
g_avg_cost = fluid.layers.mean(g_cost)
# 获取G的参数
g_params = get_params(train_g, "G")
# 只训练G
optimizer = fluid.optimizer.Adam(learning_rate=2e-4)
optimizer.minimize(g_avg_cost, parameter_list=g_params)
# 噪声生成
def z_reader():
while True:
yield np.random.uniform(-1.0, 1.0, (z_dim)).astype('float32')
# 读取cifar数据集,不使用label
def cifar_reader(reader):
def r():
for img, label in reader():
yield img.reshape(3, 32, 32)
return r
# 保存图片
def show_image_grid(images):
for i, image in enumerate(images):
image = image.transpose((2, 1, 0))
save_image_path = 'train_image'
if not os.path.exists(save_image_path):
os.makedirs(save_image_path)
plt.imsave(os.path.join(save_image_path, "test_%d.png" % i), image)
# 生成真实图片reader
mydata_generator = paddle.batch(reader=image_reader.train_reader('datasets', image_size), batch_size=32)
# 使用CIFAR数据集
# mydata_generator = paddle.batch(reader=cifar_reader(paddle.dataset.cifar.train10()), batch_size=128)
# 生成假图片的reader
z_generator = paddle.batch(z_reader, batch_size=32)()
# 测试噪声
test_z = np.array(next(z_generator))
# 创建执行器,最好使用GPU,CPU速度太慢了
# place = fluid.CPUPlace()
place = fluid.CUDAPlace(0)
exe = fluid.Executor(place)
# 初始化参数
exe.run(startup)
# 开始训练
for pass_id in range(100):
for i, real_image in enumerate(mydata_generator()):
# 训练判别器D识别真实图片
r_fake = exe.run(program=train_d_fake,
fetch_list=[fake_avg_cost],
feed={'z': test_z})
# 训练判别器D识别生成器G生成的假图片
r_real = exe.run(program=train_d_real,
fetch_list=[real_avg_cost],
feed={'image': np.array(real_image)})
# 训练生成器G生成符合判别器D标准的假图片
r_g = exe.run(program=train_g,
fetch_list=[g_avg_cost],
feed={'z': test_z})
if i % 100 == 0:
print("Pass:%d, Batch:%d, 训练判别器D识别真实图片Cost:%0.5f, "
"训练判别器D识别生成器G生成的假图片Cost:%0.5f, "
"训练生成器G生成符合判别器D标准的假图片Cost:%0.5f" % (pass_id, i, r_fake[0], r_real[0], r_g[0]))
# 测试生成的图片
r_i = exe.run(program=infer_program,
fetch_list=[fake],
feed={'z': test_z})
r_i = np.array(r_i).astype(np.float32)
# 显示生成的图片
show_image_grid(r_i[0])
# 保存预测模型
save_path = 'infer_model/'
# 删除旧的模型文件
shutil.rmtree(save_path, ignore_errors=True)
# 创建保持模型文件目录
os.makedirs(save_path)
# 保存预测模型
fluid.io.save_inference_model(save_path, feeded_var_names=[z.name], target_vars=[fake], executor=exe, main_program=train_g)
================================================
FILE: note14/README.md
================================================
暂时这样凑合着看,之后有时间再补充文字说明。[微笑]
@[TOC]
# 前言
如果读者使用过百度等的一些图像识别的接口,比如百度的细粒度图像识别接口,应该了解这个过程,省略其他的安全方面的考虑。这个接口大体的流程是,我们把图像上传到百度的网站上,然后服务器把这些图像转换成功矢量数据,最后就是拿这些数据传给深度学习的预测接口,比如是PaddlePaddle的预测接口,获取到预测结果,返回给客户端。这个只是简单的流程,真实的复杂性远远不止这些,但是我们只需要了解这些,然后去搭建属于我们的图像识别接口。
# 了解Flask
安装flask很简单,只要一条命令就可以了:
```
pip install flask
```
同时我们也使用到flask_cors,所以我们也要安装这个库
```
pip install flask_cors
```
创建一个`paddle_server.py`文件,然后编写一个简单的程序,了解一些如何使用这个Flask框架,首先导入所需的依赖库:
```python
import os
import uuid
import numpy as np
import paddle.fluid as fluid
from PIL import Image
from flask import Flask, request
from flask_cors import CORS
from werkzeug.utils import secure_filename
```
编写一个`hello_world()`函数,使用`@app.route('/')`是指定访问的路径,该函数的返回值是一个字符串`Welcome to PaddlePaddle`:
```python
# 根路径,返回一个字符串
@app.route('/')
def hello_world():
return 'Welcome to PaddlePaddle'
```
然后启动这个服务,如果是在Ubuntu的话,可能是需要在root下执行这个程序。
```python
if __name__ == '__main__':
# 启动服务,并指定端口号
app.run(port=80)
```
然后浏览器访问`http://127.0.0.1`,返回之前写好的字符串:
```
Welcome to PaddlePaddle
```
要预测图片,上传图片是首要的,所以我们来学习如何使用Flask来上传图片。
- `secure_filename`是为了能够正常获取到上传文件的文件名
- `/upload`指定该函数的访问地址
- `methods=['POST']`指定该路径只能使用POST方法访问
- `f = request.files['img']`读取表单名称为img的文件
- `f.save(img_path)`在指定路径保存该文件
```python
# 上传文件
@app.route('/upload', methods=['POST'])
def upload_file():
f = request.files['img']
# 设置保存路径
save_father_path = 'images'
img_path = os.path.join(save_father_path, str(uuid.uuid1()) + secure_filename(f.filename).split('.')[-1])
if not os.path.exists(save_father_path):
os.makedirs(save_father_path)
f.save(img_path)
return 'success, save path: ' + img_path
```
然后再次启动服务
```python
if __name__ == '__main__':
# 启动服务,并指定端口号
app.run(port=80)
```
然后再创建`index.html`文件,编写一个表单,指定表单提交的路径`http://127.0.0.1/upload`,并设置表单提交数据的格式`multipart/form-data`,而且支持表单提交方式是POST。
```xml
<!DOCTYPE html>
<html lang="en">
<head>
<meta charset="UTF-8">
<title>预测图像</title>
</head>
<body>
<!--上传图片的表单-->
<form action="http://127.0.0.1/upload" enctype="multipart/form-data" method="post">
选择上传的图像:<input type="file" name="img"><br>
<input type="submit" value="上传">
</form>
</body>
</html>
```
# 预测服务
在`paddle_server.py`中添加:
```python
# 预处理图片
def load_image(file):
img = Image.open(file)
# 统一图像大小
img = img.resize((224, 224), Image.ANTIALIAS)
# 转换成numpy值
img = np.array(img).astype(np.float32)
# 转换成CHW
img = img.transpose((2, 0, 1))
# 转换成BGR
img = img[(2, 1, 0), :, :] / 255.0
img = np.expand_dims(img, axis=0)
return img
```
```python
# 创建执行器
place = fluid.CPUPlace()
exe = fluid.Executor(place)
exe.run(fluid.default_startup_program())
# 保存预测模型路径
save_path = 'infer_model/'
# 从模型中获取预测程序、输入数据名称列表、分类器
[infer_program, feeded_var_names, target_var] = fluid.io.load_inference_model(dirname=save_path, executor=exe)
```
```python
@app.route('/infer', methods=['POST'])
def infer():
f = request.files['img']
# 保存图片
save_father_path = 'images'
img_path = os.path.join(save_father_path, str(uuid.uuid1()) + '.' + secure_filename(f.filename).split('.')[-1])
if not os.path.exists(save_father_path):
os.makedirs(save_father_path)
f.save(img_path)
# 开始预测图片
img = load_image(img_path)
result = exe.run(program=infer_program,
feed={feeded_var_names[0]: img},
fetch_list=target_var)
# 显示图片并输出结果最大的label
lab = np.argsort(result)[0][0][-1]
names = ['苹果', '哈密瓜', '胡萝卜', '樱桃', '黄瓜', '西瓜']
# 打印和返回预测结果
r = '{"label":%d, "name":"%s", "possibility":%f}' % (lab, names[lab], result[0][0][lab])
print(r)
return r
```
```python
if __name__ == '__main__':
# 启动服务,并指定端口号
app.run(port=80)
```
在`index.html`文件增加一个表单:
```xml
<!DOCTYPE html>
<html lang="en">
<head>
<meta charset="UTF-8">
<title>预测图像</title>
</head>
<body>
<!--调用服务器预测接口的表单-->
<form action="http://127.0.0.1/infer" enctype="multipart/form-data" method="post">
选择预测的图像:<input type="file" name="img"><br>
<input type="submit" value="预测">
</form>
</body>
</html>
```
================================================
FILE: note14/index.html
================================================
<!DOCTYPE html>
<html lang="en">
<head>
<meta charset="UTF-8">
<title>预测图像</title>
</head>
<body>
<!--上传图片的表单-->
<form action="http://127.0.0.1/upload" enctype="multipart/form-data" method="post">
选择上传的图像:<input type="file" name="img"><br>
<input type="submit" value="上传">
</form>
<br><br>
<!--调用服务器预测接口的表单-->
<form action="http://127.0.0.1/infer" enctype="multipart/form-data" method="post">
选择预测的图像:<input type="file" name="img"><br>
<input type="submit" value="预测">
</form>
</body>
</html>
================================================
FILE: note14/paddle_server.py
================================================
import os
import uuid
import numpy as np
import paddle.fluid as fluid
from PIL import Image
from flask import Flask, request
from flask_cors import CORS
from werkzeug.utils import secure_filename
app = Flask(__name__)
# 允许跨越访问
CORS(app)
# 根路径,返回一个字符串
@app.route('/')
def hello_world():
return 'Welcome to PaddlePaddle'
# 上传文件
@app.route('/upload', methods=['POST'])
def upload_file():
f = request.files['img']
# 设置保存路径
save_father_path = 'images'
img_path = os.path.join(save_father_path, str(uuid.uuid1()) + secure_filename(f.filename).split('.')[-1])
if not os.path.exists(save_father_path):
os.makedirs(save_father_path)
f.save(img_path)
return 'success, save path: ' + img_path
# 预处理图片
def load_image(file):
img = Image.open(file)
# 统一图像大小
img = img.resize((224, 224), Image.ANTIALIAS)
# 转换成numpy值
img = np.array(img).astype(np.float32)
# 转换成CHW
img = img.transpose((2, 0, 1))
# 转换成BGR
img = img[(2, 1, 0), :, :] / 255.0
img = np.expand_dims(img, axis=0)
return img
# 创建执行器
place = fluid.CPUPlace()
exe = fluid.Executor(place)
exe.run(fluid.default_startup_program())
# 保存预测模型路径
save_path = 'infer_model/'
# 从模型中获取预测程序、输入数据名称列表、分类器
[infer_program, feeded_var_names, target_var] = fluid.io.load_inference_model(dirname=save_path, executor=exe)
@app.route('/infer', methods=['POST'])
def infer():
f = request.files['img']
# 保存图片
save_father_path = 'images'
img_path = os.path.join(save_father_path, str(uuid.uuid1()) + '.' + secure_filename(f.filename).split('.')[-1])
if not os.path.exists(save_father_path):
os.makedirs(save_father_path)
f.save(img_path)
# 开始预测图片
img = load_image(img_path)
result = exe.run(program=infer_program,
feed={feeded_var_names[0]: img},
fetch_list=target_var)
# 显示图片并输出结果最大的label
lab = np.argsort(result)[0][0][-1]
names = ['苹果', '哈密瓜', '胡萝卜', '樱桃', '黄瓜', '西瓜']
# 打印和返回预测结果
r = '{"label":%d, "name":"%s", "possibility":%f}' % (lab, names[lab], result[0][0][lab])
print(r)
return r
if __name__ == '__main__':
# 启动服务,并指定端口号
app.run(port=80)
================================================
FILE: note15/.gitignore
================================================
*.iml
.gradle
/local.properties
/.idea/libraries
/.idea/modules.xml
/.idea/workspace.xml
.DS_Store
/build
/captures
.externalNativeBuild
/app/src/androidTest
/app/src/test
================================================
FILE: note15/README.md
================================================
# 目录
@[toc]
# 前言
现在越来越多的手机要使用到深度学习了,比如一些图像分类,目标检测,风格迁移等等,之前都是把数据提交给服务器完成的。但是提交给服务器有几点不好,首先是速度问题,图片上传到服务器需要时间,客户端接收结果也需要时间,这一来回就占用了一大半的时间,会使得整体的预测速度都变慢了,再且现在手机的性能不断提高,足以做深度学习的预测。其二是隐私问题,如果只是在本地预测,那么用户根本就不用上传图片,安全性也大大提高了。所以本章我们就来学如何包我们训练的PaddlePaddle预测模型部署到Android手机上。
# 编译paddle-mobile库
想要把PaddlePaddle训练好的预测库部署到Android手机上,还需要借助paddle-mobile框架。paddle-mobile框架主要是为了方便PaddlePaddle训练好的模型部署到移动设备上,比如Android手机,苹果手机,树莓派等等这些移动设备,有了paddle-mobile框架大大方便了把PaddlePaddle的预测库部署到移动设备上,而且paddle-mobile框架针对移动设备做了大量的优化,使用这些预测库在移动设备上有了更好的预测性能。
想要在Android手机上使用paddle-mobile,就要编译Android能够使用的CPP库,在这一部分中,我们介绍两种编译Android的paddle-mobile库,分别是使用Docker编译paddle-mobile库、使用Ubuntu交叉编译paddle-mobile库。
## 使用Docker编译
为了方便操作,以下的操作都是在root用户的执行的:
1、安装Docker,以下是在Ubuntu下安装的的方式,只要一条命令就可以了:
```
apt-get install docker.io
```
2、克隆paddle-mobile源码:
```
git clone https://github.com/PaddlePaddle/paddle-mobile.git
```
3、进入到paddle-mobile根目录下编译docker镜像:
```
cd paddle-mobile
# 编译生成进行,编译时间可能要很长
docker build -t paddle-mobile:dev - < Dockerfile
```
编译完成可以使用`docker images`命令查看是否已经生成进行:
```
root@test:/home/test# docker images
REPOSITORY TAG IMAGE ID CREATED SIZE
paddle-mobile dev fffbd8779c68 20 hours ago 3.76 GB
```
4、运行镜像并进入到容器里面,当前目录还是在paddle-mobile根目录下:
```
docker run -it -v $PWD:/paddle-mobile paddle-mobile:dev
```
5、在容器里面执行以下两条命令:
```
root@fc6f7e9ebdf1:/# cd paddle-mobile/
root@fc6f7e9ebdf1:/paddle-mobile# cmake -DCMAKE_TOOLCHAIN_FILE=tools/toolchains/arm-android-neon.cmake
```
6、(可选)可以使用命令`ccmake .`配置一些信息,比如可以设置`NET`仅支持`googlenet`,这样便于得到的paddle-mobile库会更小一些,修改完成之后,使用`c`命令保存,使用`g`退出。笔者一般跳过这个步骤。
```
Page 1 of 1
CMAKE_ASM_FLAGS
CMAKE_ASM_FLAGS_DEBUG
CMAKE_ASM_FLAGS_RELEASE
CMAKE_BUILD_TYPE
CMAKE_INSTALL_PREFIX /usr/local
CMAKE_TOOLCHAIN_FILE /paddle-mobile/tools/toolchains/arm-android-neon.cmake
CPU ON
DEBUGING ON
FPGA OFF
LOG_PROFILE ON
MALI_GPU OFF
NET defult
USE_EXCEPTION ON
USE_OPENMP ON
```
7、最后执行一下`make`就可以了,到这一步就完成了paddle-mobile的编译。
```
root@fc6f7e9ebdf1:/paddle-mobile# make
```
8、使用`exit`命令退出容器,回到Ubuntu本地上。
```
root@fc6f7e9ebdf1:/paddle-mobile# exit
```
9、在paddle-mobile根目录下,有一个build目录,我们编译好的paddle-mobile库就在这里。
```
root@test:/home/test/paddle-mobile/build# ls
libpaddle-mobile.so
```
`libpaddle-mobile.so`就是我们在开发Android项目的时候使用到的paddle-mobile库。
## 使用Ubuntu编译
1、首先要下载和解压NDK。
```
wget https://dl.google.com/android/repository/android-ndk-r17b-linux-x86_64.zip
unzip android-ndk-r17b-linux-x86_64.zip
```
2、设置NDK环境变量,目录是NDK的解压目录。
```
export NDK_ROOT="/home/test/paddlepaddle/android-ndk-r17b"
```
设置好之后,可以使用以下的命令查看配置情况。
```
root@test:/home/test/paddlepaddle# echo $NDK_ROOT
/home/test/paddlepaddle/android-ndk-r17b
```
3、安装cmake,需要安装较高版本的,笔者的cmake版本是3.11.2。
- 下载cmake源码
```
wget https://cmake.org/files/v3.11/cmake-3.11.2.tar.gz
```
- 解压cmake源码
```
tar -zxvf cmake-3.11.2.tar.gz
```
- 进入到cmake源码根目录,并执行`bootstrap`。
```
cd cmake-3.11.2
./bootstrap
```
- 最后执行以下两条命令开始安装cmake。
```
make
make install
```
- 安装完成之后,可以使用`cmake --version`是否安装成功.
```
root@test:/home/test/paddlepaddle# cmake --version
cmake version 3.11.2
CMake suite maintained and supported by Kitware (kitware.com/cmake).
```
4、克隆paddle-mobile源码。
```
git clone https://github.com/PaddlePaddle/paddle-mobile.git
```
5、进入到paddle-mobile的tools目录下,执行编译。
```
cd paddle-mobile/tools/
sh build.sh android
```
(可选)如果想编译针对某一个网络编译更小的库时,可以在命令后面加上相应的参数,如下:
```
sh build.sh android mobilenet
```
6、最后会在`paddle-mobile/build/release/arm-v7a/build`目录下生产paddle-mobile库。
```
root@test:/home/test/paddlepaddle/paddle-mobile/build/release/arm-v7a/build# ls
libpaddle-mobile.so
```
`libpaddle-mobile.so`就是我们在开发Android项目的时候使用到的paddle-mobile库。
# 创建Android项目
首先使用Android Studio创建一个普通的Android项目,我们可以不用选择CPP的支持,因为我们已经编译好了CPP。之后按照以下的步骤开始执行:
1、在`main`目录下创建两个`assets/infer_model`文件夹,这个文件夹我们将会使用它来存放PaddlePaddle训练好的预测模型,本章我们使用的预测模型是[《PaddlePaddle从入门到炼丹》十一——自定义图像数据集识别](https://blog.csdn.net/qq_33200967/article/details/87895105)训练得到的预测模型,我们训练好的模型复制到这个文件夹下。
2、在`main`目录下创建一个`jniLibs`文件夹,这个文件夹是存放CPP编译库的,就是**编译paddle-mobile库**部分编译的`libpaddle-mobile.so`
3、在Android项目的配置文件夹中加上权限声明,因为我们要使用到读取相册和使用相机,所以加上以下的权限声明:
```xml
<uses-permission android:name="android.permission.WRITE_EXTERNAL_STORAGE" />
<uses-permission android:name="android.permission.READ_EXTERNAL_STORAGE" />
```
4、修改`activity_main.xml`界面,修改成如下:
```xml
<?xml version="1.0" encoding="utf-8"?>
<RelativeLayout xmlns:android="http://schemas.android.com/apk/res/android"
xmlns:app="http://schemas.android.com/apk/res-auto"
xmlns:tools="http://schemas.android.com/tools"
android:layout_width="match_parent"
android:layout_height="match_parent"
tools:context=".MainActivity">
<LinearLayout
android:id="@+id/ll"
android:orientation="horizontal"
android:layout_alignParentBottom="true"
android:layout_width="match_parent"
android:layout_height="50dp">
<Button
android:layout_weight="1"
android:id="@+id/load"
android:text="加载模型"
android:layout_width="0dp"
android:layout_height="match_parent" />
<Button
android:id="@+id/clear"
android:layout_weight="1"
android:text="清空模型"
android:layout_width="0dp"
android:layout_height="match_parent" />
<Button
android:id="@+id/infer"
android:layout_weight="1"
android:text="预测图片"
android:layout_width="0dp"
android:layout_height="match_parent" />
</LinearLayout>
<TextView
android:layout_above="@id/ll"
android:id="@+id/show"
android:hint="这里显示预测结果"
android:layout_width="match_parent"
android:layout_height="100dp" />
<ImageView
android:id="@+id/image_view"
android:layout_above="@id/show"
android:layout_width="match_parent"
android:layout_height="match_parent" />
</RelativeLayout>
```
5、创建一个`com.baidu.paddle`包,在这个包下创建的Java程序,这个Java程序就是用于调用paddle-mobile的CPP动态库的。它提供了多种方法给我们使用,我们主要使用到加载模型的方法`load(String modelDir)`,清空已加载的方法`clear()`,还有最最重要的预测方法`predictImage(float[] buf, int[]ddims)`。
```java
package com.baidu.paddle;
public class PML {
// set thread num
public static native void setThread(int threadCount);
//Load seperated parameters
public static native boolean load(String modelDir);
// load qualified model
public static native boolean loadQualified(String modelDir);
// Load combined parameters
public static native boolean loadCombined(String modelPath, String paramPath);
// load qualified model
public static native boolean loadCombinedQualified(String modelPath, String paramPath);
// object detection
public static native float[] predictImage(float[] buf, int[]ddims);
// predict yuv image
public static native float[] predictYuv(byte[] buf, int imgWidth, int imgHeight, int[] ddims, float[]meanValues);
// clear model
public static native void clear();
}
```
6、然后在项目的主要包下创建一个`Utils.java`的工具类。这个工具类主要编写一些图像的处理方法,和一些模型复制方法等,我们下面将一一介绍这些方法。
该方法是用于获取预测结果中概率最大的标签,参数是执行预测的结果,这个结果是对应没有类别的概率,这个方法就判断哪个类别的概率最大,然后就返回概率最大的标签。
```java
// 获取预测值中最大概率的标签
public static int getMaxResult(float[] result) {
float probability = result[0];
int r = 0;
for (int i = 0; i < result.length; i++) {
if (probability < result[i]) {
probability = result[i];
r = i;
}
}
return r;
}
```
该方法是把图片转换成预测需要用的数据格式浮点数组。在转换的过程中也对图像做了预处理,这个预处理需要跟训练的预处理的方式一样,否则无法正确预测。还有指定了处理后图片的大小,根据参数输入的宽度和高度,把图片压缩到这些自定的大小。还有把图片的通道顺序改为RGB,同时每个像素除以255,这个操作跟训练的时候一样。
```java
// 对将要预测的图片进行预处理
public static float[] getScaledMatrix(Bitmap bitmap, int desWidth, int desHeight) {
float[] dataBuf = new float[3 * desWidth * desHeight];
int rIndex;
int gIndex;
int bIndex;
int[] pixels = new int[desWidth * desHeight];
Bitmap bm = Bitmap.createScaledBitmap(bitmap, desWidth, desHeight, false);
bm.getPixels(pixels, 0, desWidth, 0, 0, desWidth, desHeight);
int j = 0;
int k = 0;
for (int i = 0; i < pixels.length; i++) {
int clr = pixels[i];
j = i / desHeight;
k = i % desWidth;
rIndex = j * desWidth + k;
gIndex = rIndex + desHeight * desWidth;
bIndex = gIndex + desHeight * desWidth;
// 转成RGB通道顺序,并除以255,跟训练的预处理一样
dataBuf[rIndex] = (float) (((clr & 0x00ff0000) >> 16) / 255.0);
dataBuf[gIndex] = (float) (((clr & 0x0000ff00) >> 8) / 255.0);
dataBuf[bIndex] = (float) (((clr & 0x000000ff)) / 255.0);
}
if (bm.isRecycled()) {
bm.recycle();
}
return dataBuf;
}
```
该方法是对图片进行压缩,避免图片过大,超过内存支出。把图片的最大长度压缩到500以内。
```java
// 压缩图片,避免图片过大
public static Bitmap getScaleBitmap(String filePath) {
BitmapFactory.Options opt = new BitmapFactory.Options();
opt.inJustDecodeBounds = true;
BitmapFactory.decodeFile(filePath, opt);
int bmpWidth = opt.outWidth;
int bmpHeight = opt.outHeight;
int maxSize = 500;
// compress picture with inSampleSize
opt.inSampleSize = 1;
while (true) {
if (bmpWidth / opt.inSampleSize < maxSize || bmpHeight / opt.inSampleSize < maxSize) {
break;
}
opt.inSampleSize *= 2;
}
opt.inJustDecodeBounds = false;
return BitmapFactory.decodeFile(filePath, opt);
}
```
该方法是根据相册返回的URI转换为图片的绝对路径,用于之后使用这个路径获取图片内容。
```java
// 根据相册返回的URI返回图片的绝对路径
public static String getPathFromURI(Context context, Uri uri) {
String result;
Cursor cursor = context.getContentResolver().query(uri, null, null, null, null);
if (cursor == null) {
result = uri.getPath();
} else {
cursor.moveToFirst();
int idx = cursor.getColumnIndex(MediaStore.Images.ImageColumns.DATA);
result = cursor.getString(idx);
cursor.close();
}
return result;
}
```
该方法是把`assets`资源文件下的预测文件复制到缓存目录,用于之后加载模型文件。
```java
// 复制莫模型文件到缓存目录
public static void copyFileFromAsset(Context context, String oldPath, String newPath) {
try {
// 预测模型文件在assets中的位置
String[] fileNames = context.getAssets().list(oldPath);
if (fileNames.length > 0) {
// directory
File file = new File(newPath);
if (!file.exists()) {
file.mkdirs();
}
// copy recursivelyC
for (String fileName : fileNames) {
copyFileFromAsset(context, oldPath + "/" + fileName, newPath + "/" + fileName);
}
} else {
// file
File file = new File(newPath);
// if file exists will never copy
if (file.exists()) {
return;
}
// copy file to new path
InputStream is = context.getAssets().open(oldPath);
FileOutputStream fos = new FileOutputStream(file);
byte[] buffer = new byte[1024];
int byteCount;
while ((byteCount = is.read(buffer)) != -1) {
fos.write(buffer, 0, byteCount);
}
fos.flush();
is.close();
fos.close();
}
} catch (Exception e) {
e.printStackTrace();
}
}
```
7、最后修改`MainActivity.java`,修改如下:
这里做一些初始化操作,如加载PaddleMobile的动态库,指定图片的形状。
```java
private String model_path;
// 模型文件夹
private String assets_path = "infer_model";
private boolean load_result = false;
// 输入图片的形状,分别是:batch size、通道数、宽度、高度
private int[] ddims = {1, 3, 224, 224};
private ImageView imageView;
private TextView showTv;
// 加载PaddleMobile的动态库
static {
try {
System.loadLibrary("paddle-mobile");
} catch (Exception e) {
e.printStackTrace();
}
}
```
该方法是初始化控件,和定义按钮的点击事件,如加载模型点击事件,清空模型点击事件,打开相册预测图片点击事件。
```java
// 初始化控件
private void initView(){
Button loadBtn = findViewById(R.id.load);
Button clearBtn = findViewById(R.id.clear);
Button inferBtn = findViewById(R.id.infer);
showTv = findViewById(R.id.show);
imageView = findViewById(R.id.image_view);
// 加载模型点击事件
loadBtn.setOnClickListener(new View.OnClickListener() {
@Override
public void onClick(View v) {
load_result = PML.load(model_path);
if (load_result) {
Toast.makeText(MainActivity.this, "模型加载成功", Toast.LENGTH_SHORT).show();
} else {
Toast.makeText(MainActivity.this, "模型加载失败", Toast.LENGTH_SHORT).show();
}
}
});
// 清空模型点击事件
clearBtn.setOnClickListener(new View.OnClickListener() {
@Override
public void onClick(View v) {
PML.clear();
load_result = false;
Toast.makeText(MainActivity.this, "模型已清空", Toast.LENGTH_SHORT).show();
}
});
// 打开相册选择图片预测点击事件
inferBtn.setOnClickListener(new View.OnClickListener() {
@Override
public void onClick(View v) {
if (load_result){
Intent intent = new Intent(Intent.ACTION_PICK);
intent.setType("image/*");
startActivityForResult(intent, 1);
} else {
Toast.makeText(MainActivity.this, "模型未加载", Toast.LENGTH_SHORT).show();
}
}
});
}
```
该方法是一个回调方法,主要是打开相册后的回调预测操作。使用返回的URI转换为绝对路径,然后使用这个图片路径转换成Bitmap用于显示,同时也使用这个路径执行预测操作。
```java
// 回调事件
@Override
protected void onActivityResult(int requestCode, int resultCode, @Nullable Intent data) {
String image_path;
if (resultCode == Activity.RESULT_OK) {
switch (requestCode) {
case 1:
if (data == null) {
return;
}
// 获取相册返回的URI
Uri image_uri = data.getData();
// 根据图片的URI获取绝对路径
image_path = Utils.getPathFromURI(MainActivity.this, image_uri);
// 压缩图片用于显示
Bitmap bitmap = Utils.getScaleBitmap(image_path);
imageView.setImageBitmap(bitmap);
// 开始预测图片
predictImage(image_path);
break;
}
}
}
```
该方法是预测操作的方法,参数是图片的绝对路径,首先根据图片获取已经压缩过的Bitmap,然后使用这个Bitmap转换成预处理后的浮点数组,最后执行预测操作。再根据预测结果提取最大概率的标签,并获取该标签的类别名称。
```java
// 根据图片的路径预测图片
private void predictImage(String image_path) {
// 把图片进行压缩
Bitmap bmp = Utils.getScaleBitmap(image_path);
// 把图片转换成浮点数组,用于预测
float[] inputData = Utils.getScaledMatrix(bmp, ddims[2], ddims[3]);
try {
long start = System.currentTimeMillis();
// 执行预测,获取预测结果
float[] result = PML.predictImage(inputData, ddims);
long end = System.currentTimeMillis();
// 获取概率最大的标签
int r = Utils.getMaxResult(result);
// 获取标签对应的类别名称
String[] names = {"苹果", "哈密瓜", "胡萝卜", "樱桃", "黄瓜", "西瓜"};
String show_text = "标签:" + r + "\n名称:" + names[r] + "\n概率:" + result[r] + "\n时间:" + (end - start) + "ms";
// 显示预测结果
showTv.setText(show_text);
} catch (Exception e) {
e.printStackTrace();
}
}
```
这主要是用于动态获取权限,因为读取外部文件需要读取外部文件的权限,又因为读取外部文件权限是属于危险权限,需要动态获取。
```java
// 多权限动态申请
private void requestPermissions() {
List<String> permissionList = new ArrayList<>();
if (ContextCompat.checkSelfPermission(this, Manifest.permission.WRITE_EXTERNAL_STORAGE) != PackageManager.PERMISSION_GRANTED) {
permissionList.add(Manifest.permission.WRITE_EXTERNAL_STORAGE);
}
if (ContextCompat.checkSelfPermission(this, Manifest.permission.READ_EXTERNAL_STORAGE) != PackageManager.PERMISSION_GRANTED) {
permissionList.add(Manifest.permission.READ_EXTERNAL_STORAGE);
}
// if list is not empty will request permissions
if (!permissionList.isEmpty()) {
ActivityCompat.requestPermissions(this, permissionList.toArray(new String[permissionList.size()]), 1);
}
}
@Override
public void onRequestPermissionsResult(int requestCode, @NonNull String[] permissions, @NonNull int[] grantResults) {
super.onRequestPermissionsResult(requestCode, permissions, grantResults);
switch (requestCode) {
case 1:
if (grantResults.length > 0) {
for (int i = 0; i < grantResults.length; i++) {
int grantResult = grantResults[i];
if (grantResult == PackageManager.PERMISSION_DENIED) {
String s = permissions[i];
Toast.makeText(this, s + " permission was denied", Toast.LENGTH_SHORT).show();
}
}
}
break;
}
}
```
然后修改`onCreate`,首先获取缓存文件路径,然后初始化视图控件和动态获取权限,最后把预测模型文件复制到缓存路径下。
```java
@Override
protected void onCreate(Bundle savedInstanceState) {
super.onCreate(savedInstanceState);
setContentView(R.layout.activity_main);
model_path = getCacheDir().getAbsolutePath() + File.separator + "infer_model";
// 初始化控件
initView();
// 动态请求权限
requestPermissions();
// 从assets中复制模型文件到缓存目录下
Utils.copyFileFromAsset(this, assets_path, model_path);
}
```
8、最后运行项目,选择图片预测会得到以下的效果:

# 参考资料
1. https://github.com/PaddlePaddle/paddle-mobile
2. https://blog.csdn.net/qq_33200967/article/details/81066970
================================================
FILE: note15/app/.gitignore
================================================
/build
================================================
FILE: note15/app/build.gradle
================================================
apply plugin: 'com.android.application'
android {
compileSdkVersion 28
defaultConfig {
applicationId "com.yeyupiaoling.note15"
minSdkVersion 19
targetSdkVersion 28
versionCode 1
versionName "1.0"
testInstrumentationRunner "android.support.test.runner.AndroidJUnitRunner"
}
buildTypes {
release {
minifyEnabled false
proguardFiles getDefaultProguardFile('proguard-android.txt'), 'proguard-rules.pro'
}
}
}
dependencies {
implementation fileTree(dir: 'libs', include: ['*.jar'])
implementation 'com.android.support:appcompat-v7:28.0.0'
implementation 'com.android.support.constraint:constraint-layout:1.1.3'
testImplementation 'junit:junit:4.12'
androidTestImplementation 'com.android.support.test:runner:1.0.2'
androidTestImplementation 'com.android.support.test.espresso:espresso-core:3.0.2'
}
================================================
FILE: note15/app/proguard-rules.pro
================================================
# Add project specific ProGuard rules here.
# You can control the set of applied configuration files using the
# proguardFiles setting in build.gradle.
#
# For more details, see
# http://developer.android.com/guide/developing/tools/proguard.html
# If your project uses WebView with JS, uncomment the following
# and specify the fully qualified class name to the JavaScript interface
# class:
#-keepclassmembers class fqcn.of.javascript.interface.for.webview {
# public *;
#}
# Uncomment this to preserve the line number information for
# debugging stack traces.
#-keepattributes SourceFile,LineNumberTable
# If you keep the line number information, uncomment this to
# hide the original source file name.
#-renamesourcefileattribute SourceFile
================================================
FILE: note15/app/src/main/AndroidManifest.xml
================================================
<?xml version="1.0" encoding="utf-8"?>
<manifest xmlns:android="http://schemas.android.com/apk/res/android"
package="com.yeyupiaoling.note15">
<uses-permission android:name="android.permission.WRITE_EXTERNAL_STORAGE" />
<uses-permission android:name="android.permission.READ_EXTERNAL_STORAGE" />
<application
android:allowBackup="true"
android:icon="@mipmap/ic_launcher"
android:label="@string/app_name"
android:roundIcon="@mipmap/ic_launcher_round"
android:supportsRtl="true"
android:theme="@style/AppTheme">
<activity android:name=".MainActivity">
<intent-filter>
<action android:name="android.intent.action.MAIN" />
<category android:name="android.intent.category.LAUNCHER" />
</intent-filter>
</activity>
</application>
</manifest>
================================================
FILE: note15/app/src/main/java/com/baidu/paddle/PML.java
================================================
package com.baidu.paddle;
public class PML {
// set thread num
public static native void setThread(int threadCount);
//Load seperated parameters
public static native boolean load(String modelDir);
// load qualified model
public static native boolean loadQualified(String modelDir);
// Load combined parameters
public static native boolean loadCombined(String modelPath, String paramPath);
// load qualified model
public static native boolean loadCombinedQualified(String modelPath, String paramPath);
// object detection
public static native float[] predictImage(float[] buf, int[]ddims);
// predict yuv image
public static native float[] predictYuv(byte[] buf, int imgWidth, int imgHeight, int[] ddims, float[]meanValues);
// clear model
public static native void clear();
}
================================================
FILE: note15/app/src/main/java/com/yeyupiaoling/note15/MainActivity.java
================================================
package com.yeyupiaoling.note15;
import android.Manifest;
import android.app.Activity;
import android.content.Intent;
import android.content.pm.PackageManager;
import android.graphics.Bitmap;
import android.net.Uri;
import android.os.Bundle;
import android.support.annotation.NonNull;
import android.support.annotation.Nullable;
import android.support.v4.app.ActivityCompat;
import android.support.v4.content.ContextCompat;
import android.support.v7.app.AppCompatActivity;
import android.view.View;
import android.widget.Button;
import android.widget.ImageView;
import android.widget.TextView;
import android.widget.Toast;
import com.baidu.paddle.PML;
import java.io.File;
import java.util.ArrayList;
import java.util.List;
public class MainActivity extends AppCompatActivity {
private String model_path;
// 模型文件夹
private String assets_path = "infer_model";
private boolean load_result = false;
// 输入图片的形状,分别是:batch size、通道数、宽度、高度
private int[] ddims = {1, 3, 224, 224};
private ImageView imageView;
private TextView showTv;
// 加载PaddlePaddle的动态库
static {
try {
System.loadLibrary("paddle-mobile");
} catch (Exception e) {
e.printStackTrace();
}
}
@Override
protected void onCreate(Bundle savedInstanceState) {
super.onCreate(savedInstanceState);
setContentView(R.layout.activity_main);
model_path = getCacheDir().getAbsolutePath() + File.separator + "infer_model";
// 初始化控件
initView();
// 动态请求权限
requestPermissions();
// 从assets中复制模型文件到缓存目录下
Utils.copyFileFromAsset(this, assets_path, model_path);
}
// 初始化控件
private void initView(){
Button loadBtn = findViewById(R.id.load);
Button clearBtn = findViewById(R.id.clear);
Button inferBtn = findViewById(R.id.infer);
showTv = findViewById(R.id.show);
imageView = findViewById(R.id.image_view);
// 加载模型点击事件
loadBtn.setOnClickListener(new View.OnClickListener() {
@Override
public void onClick(View v) {
load_result = PML.load(model_path);
if (load_result) {
Toast.makeText(MainActivity.this, "模型加载成功", Toast.LENGTH_SHORT).show();
} else {
Toast.makeText(MainActivity.this, "模型加载失败", Toast.LENGTH_SHORT).show();
}
}
});
// 清空模型点击事件
clearBtn.setOnClickListener(new View.OnClickListener() {
@Override
public void onClick(View v) {
PML.clear();
load_result = false;
Toast.makeText(MainActivity.this, "模型已清空", Toast.LENGTH_SHORT).show();
}
});
// 打开相册选择图片预测点击事件
inferBtn.setOnClickListener(new View.OnClickListener() {
@Override
public void onClick(View v) {
if (load_result){
Intent intent = new Intent(Intent.ACTION_PICK);
intent.setType("image/*");
startActivityForResult(intent, 1);
} else {
Toast.makeText(MainActivity.this, "模型未加载", Toast.LENGTH_SHORT).show();
}
}
});
}
// 回调事件
@Override
protected void onActivityResult(int requestCode, int resultCode, @Nullable Intent data) {
String image_path;
if (resultCode == Activity.RESULT_OK) {
switch (requestCode) {
case 1:
if (data == null) {
return;
}
// 获取相册返回的URI
Uri image_uri = data.getData();
// 根据图片的URI获取绝对路径
image_path = Utils.getPathFromURI(MainActivity.this, image_uri);
// 压缩图片用于显示
Bitmap bitmap = Utils.getScaleBitmap(image_path);
imageView.setImageBitmap(bitmap);
// 开始预测图片
predictImage(image_path);
break;
}
}
}
// 根据图片的路径预测图片
private void predictImage(String image_path) {
// 把图片进行压缩
Bitmap bmp = Utils.getScaleBitmap(image_path);
// 把图片转换成浮点数组,用于预测
float[] inputData = Utils.getScaledMatrix(bmp, ddims[2], ddims[3]);
try {
long start = System.currentTimeMillis();
// 执行预测,获取预测结果
float[] result = PML.predictImage(inputData, ddims);
long end = System.currentTimeMillis();
// 获取概率最大的标签
int r = Utils.getMaxResult(result);
// 获取标签对应的类别名称
String[] names = {"苹果", "哈密瓜", "胡萝卜", "樱桃", "黄瓜", "西瓜"};
String show_text = "标签:" + r + "\n名称:" + names[r] + "\n概率:" + result[r] + "\n时间:" + (end - start) + "ms";
// 显示预测结果
showTv.setText(show_text);
} catch (Exception e) {
e.printStackTrace();
}
}
// 多权限动态申请
private void requestPermissions() {
List<String> permissionList = new ArrayList<>();
if (ContextCompat.checkSelfPermission(this, Manifest.permission.WRITE_EXTERNAL_STORAGE) != PackageManager.PERMISSION_GRANTED) {
permissionList.add(Manifest.permission.WRITE_EXTERNAL_STORAGE);
}
if (ContextCompat.checkSelfPermission(this, Manifest.permission.READ_EXTERNAL_STORAGE) != PackageManager.PERMISSION_GRANTED) {
permissionList.add(Manifest.permission.READ_EXTERNAL_STORAGE);
}
// if list is not empty will request permissions
if (!permissionList.isEmpty()) {
ActivityCompat.requestPermissions(this, permissionList.toArray(new String[permissionList.size()]), 1);
}
}
@Override
public void onRequestPermissionsResult(int requestCode, @NonNull String[] permissions, @NonNull int[] grantResults) {
super.onRequestPermissionsResult(requestCode, permissions, grantResults);
switch (requestCode) {
case 1:
if (grantResults.length > 0) {
for (int i = 0; i < grantResults.length; i++) {
int grantResult = grantResults[i];
if (grantResult == PackageManager.PERMISSION_DENIED) {
String s = permissions[i];
Toast.makeText(this, s + " permission was denied", Toast.LENGTH_SHORT).show();
}
}
}
break;
}
}
}
================================================
FILE: note15/app/src/main/java/com/yeyupiaoling/note15/Utils.java
================================================
package com.yeyupiaoling.note15;
import android.content.Context;
import android.database.Cursor;
import android.graphics.Bitmap;
import android.graphics.BitmapFactory;
import android.net.Uri;
import android.provider.MediaStore;
import java.io.File;
import java.io.FileOutputStream;
import java.io.InputStream;
public class Utils {
// 获取预测值中最大概率的标签
public static int getMaxResult(float[] result) {
float probability = result[0];
int r = 0;
for (int i = 0; i < result.length; i++) {
if (probability < result[i]) {
probability = result[i];
r = i;
}
}
return r;
}
// 对将要预测的图片进行预处理
public static float[] getScaledMatrix(Bitmap bitmap, int desWidth, int desHeight) {
float[] dataBuf = new float[3 * desWidth * desHeight];
int rIndex;
int gIndex;
int bIndex;
int[] pixels = new int[desWidth * desHeight];
Bitmap bm = Bitmap.createScaledBitmap(bitmap, desWidth, desHeight, false);
bm.getPixels(pixels, 0, desWidth, 0, 0, desWidth, desHeight);
int j = 0;
int k = 0;
for (int i = 0; i < pixels.length; i++) {
int clr = pixels[i];
j = i / desHeight;
k = i % desWidth;
rIndex = j * desWidth + k;
gIndex = rIndex + desHeight * desWidth;
bIndex = gIndex + desHeight * desWidth;
// 转成RGB通道顺序,并除以255,跟训练的预处理一样
dataBuf[rIndex] = (float) (((clr & 0x00ff0000) >> 16) / 255.0);
dataBuf[gIndex] = (float) (((clr & 0x0000ff00) >> 8) / 255.0);
dataBuf[bIndex] = (float) (((clr & 0x000000ff)) / 255.0);
}
if (bm.isRecycled()) {
bm.recycle();
}
return dataBuf;
}
// 压缩图片,避免图片过大
public static Bitmap getScaleBitmap(String filePath) {
BitmapFactory.Options opt = new BitmapFactory.Options();
opt.inJustDecodeBounds = true;
BitmapFactory.decodeFile(filePath, opt);
int bmpWidth = opt.outWidth;
int bmpHeight = opt.outHeight;
int maxSize = 500;
// compress picture with inSampleSize
opt.inSampleSize = 1;
while (true) {
if (bmpWidth / opt.inSampleSize < maxSize || bmpHeight / opt.inSampleSize < maxSize) {
break;
}
opt.inSampleSize *= 2;
}
opt.inJustDecodeBounds = false;
return BitmapFactory.decodeFile(filePath, opt);
}
// 根据相册返回的URI返回图片的绝对路径
public static String getPathFromURI(Context context, Uri uri) {
String result;
Cursor cursor = context.getContentResolver().query(uri, null, null, null, null);
if (cursor == null) {
result = uri.getPath();
} else {
cursor.moveToFirst();
int idx = cursor.getColumnIndex(MediaStore.Images.ImageColumns.DATA);
result = cursor.getString(idx);
cursor.close();
}
return result;
}
// 复制莫模型文件到缓存目录
public static void copyFileFromAsset(Context context, String oldPath, String newPath) {
try {
// 预测模型文件在assets中的位置
String[] fileNames = context.getAssets().list(oldPath);
if (fileNames.length > 0) {
// directory
File file = new File(newPath);
if (!file.exists()) {
file.mkdirs();
}
// copy recursivelyC
for (String fileName : fileNames) {
copyFileFromAsset(context, oldPath + "/" + fileName, newPath + "/" + fileName);
}
} else {
// file
File file = new File(newPath);
// if file exists will never copy
if (file.exists()) {
return;
}
// copy file to new path
InputStream is = context.getAssets().open(oldPath);
FileOutputStream fos = new FileOutputStream(file);
byte[] buffer = new byte[1024];
int byteCount;
while ((byteCount = is.read(buffer)) != -1) {
fos.write(buffer, 0, byteCount);
}
fos.flush();
is.close();
fos.close();
}
} catch (Exception e) {
e.printStackTrace();
}
}
}
================================================
FILE: note15/app/src/main/res/drawable/ic_launcher_background.xml
================================================
<?xml version="1.0" encoding="utf-8"?>
<vector xmlns:android="http://schemas.android.com/apk/res/android"
android:width="108dp"
android:height="108dp"
android:viewportHeight="108"
android:viewportWidth="108">
<path
android:fillColor="#26A69A"
android:pathData="M0,0h108v108h-108z" />
<path
android:fillColor="#00000000"
android:pathData="M9,0L9,108"
android:strokeColor="#33FFFFFF"
android:strokeWidth="0.8" />
<path
android:fillColor="#00000000"
android:pathData="M19,0L19,108"
android:strokeColor="#33FFFFFF"
android:strokeWidth="0.8" />
<path
android:fillColor="#00000000"
android:pathData="M29,0L29,108"
android:strokeColor="#33FFFFFF"
android:strokeWidth="0.8" />
<path
android:fillColor="#00000000"
android:pathData="M39,0L39,108"
android:strokeColor="#33FFFFFF"
android:strokeWidth="0.8" />
<path
android:fillColor="#00000000"
android:pathData="M49,0L49,108"
android:strokeColor="#33FFFFFF"
android:strokeWidth="0.8" />
<path
android:fillColor="#00000000"
android:pathData="M59,0L59,108"
android:strokeColor="#33FFFFFF"
android:strokeWidth="0.8" />
<path
android:fillColor="#00000000"
android:pathData="M69,0L69,108"
android:strokeColor="#33FFFFFF"
android:strokeWidth="0.8" />
<path
android:fillColor="#00000000"
android:pathData="M79,0L79,108"
android:strokeColor="#33FFFFFF"
android:strokeWidth="0.8" />
<path
android:fillColor="#00000000"
android:pathData="M89,0L89,108"
android:strokeColor="#33FFFFFF"
android:strokeWidth="0.8" />
<path
android:fillColor="#00000000"
android:pathData="M99,0L99,108"
android:strokeColor="#33FFFFFF"
android:strokeWidth="0.8" />
<path
android:fillColor="#00000000"
android:pathData="M0,9L108,9"
android:strokeColor="#33FFFFFF"
android:strokeWidth="0.8" />
<path
android:fillColor="#00000000"
android:pathData="M0,19L108,19"
android:strokeColor="#33FFFFFF"
android:strokeWidth="0.8" />
<path
android:fillColor="#00000000"
android:pathData="M0,29L108,29"
android:strokeColor="#33FFFFFF"
android:strokeWidth="0.8" />
<path
android:fillColor="#00000000"
android:pathData="M0,39L108,39"
android:strokeColor="#33FFFFFF"
android:strokeWidth="0.8" />
<path
android:fillColor="#00000000"
android:pathData="M0,49L108,49"
android:strokeColor="#33FFFFFF"
android:strokeWidth="0.8" />
<path
android:fillColor="#00000000"
android:pathData="M0,59L108,59"
android:strokeColor="#33FFFFFF"
android:strokeWidth="0.8" />
<path
android:fillColor="#00000000"
android:pathData="M0,69L108,69"
android:strokeColor="#33FFFFFF"
android:strokeWidth="0.8" />
<path
android:fillColor="#00000000"
android:pathData="M0,79L108,79"
android:strokeColor="#33FFFFFF"
android:strokeWidth="0.8" />
<path
android:fillColor="#00000000"
android:pathData="M0,89L108,8
gitextract_qo9m5qrb/ ├── .gitignore ├── LICENSE ├── README.md ├── note1/ │ ├── README.md │ └── test_paddle.py ├── note10/ │ ├── README.md │ ├── mobilenet_v2.py │ ├── test_visualdl.py │ └── train.py ├── note11/ │ ├── README.md │ ├── create_data_list.py │ ├── download_image.py │ ├── infer.py │ ├── mobilenet_v1.py │ ├── reader.py │ └── train.py ├── note12/ │ ├── README.md │ ├── bilstm_net.py │ ├── create_data.py │ ├── download_text_data.py │ ├── infer.py │ ├── text_reader.py │ └── train.py ├── note13/ │ ├── README.md │ ├── image_reader.py │ ├── infer.py │ └── train.py ├── note14/ │ ├── README.md │ ├── index.html │ └── paddle_server.py ├── note15/ │ ├── .gitignore │ ├── README.md │ ├── app/ │ │ ├── .gitignore │ │ ├── build.gradle │ │ ├── proguard-rules.pro │ │ └── src/ │ │ └── main/ │ │ ├── AndroidManifest.xml │ │ ├── assets/ │ │ │ └── infer_model/ │ │ │ ├── __model__ │ │ │ ├── batch_norm_0.b_0 │ │ │ ├── batch_norm_0.w_0 │ │ │ ├── batch_norm_0.w_1 │ │ │ ├── batch_norm_0.w_2 │ │ │ ├── batch_norm_1.b_0 │ │ │ ├── batch_norm_1.w_0 │ │ │ ├── batch_norm_1.w_1 │ │ │ ├── batch_norm_1.w_2 │ │ │ ├── batch_norm_10.b_0 │ │ │ ├── batch_norm_10.w_0 │ │ │ ├── batch_norm_10.w_1 │ │ │ ├── batch_norm_10.w_2 │ │ │ ├── batch_norm_11.b_0 │ │ │ ├── batch_norm_11.w_0 │ │ │ ├── batch_norm_11.w_1 │ │ │ ├── batch_norm_11.w_2 │ │ │ ├── batch_norm_12.b_0 │ │ │ ├── batch_norm_12.w_0 │ │ │ ├── batch_norm_12.w_1 │ │ │ ├── batch_norm_12.w_2 │ │ │ ├── batch_norm_13.b_0 │ │ │ ├── batch_norm_13.w_0 │ │ │ ├── batch_norm_13.w_1 │ │ │ ├── batch_norm_13.w_2 │ │ │ ├── batch_norm_14.b_0 │ │ │ ├── batch_norm_14.w_0 │ │ │ ├── batch_norm_14.w_1 │ │ │ ├── batch_norm_14.w_2 │ │ │ ├── batch_norm_15.b_0 │ │ │ ├── batch_norm_15.w_0 │ │ │ ├── batch_norm_15.w_1 │ │ │ ├── batch_norm_15.w_2 │ │ │ ├── batch_norm_16.b_0 │ │ │ ├── batch_norm_16.w_0 │ │ │ ├── batch_norm_16.w_1 │ │ │ ├── batch_norm_16.w_2 │ │ │ ├── batch_norm_17.b_0 │ │ │ ├── batch_norm_17.w_0 │ │ │ ├── batch_norm_17.w_1 │ │ │ ├── batch_norm_17.w_2 │ │ │ ├── batch_norm_18.b_0 │ │ │ ├── batch_norm_18.w_0 │ │ │ ├── batch_norm_18.w_1 │ │ │ ├── batch_norm_18.w_2 │ │ │ ├── batch_norm_19.b_0 │ │ │ ├── batch_norm_19.w_0 │ │ │ ├── batch_norm_19.w_1 │ │ │ ├── batch_norm_19.w_2 │ │ │ ├── batch_norm_2.b_0 │ │ │ ├── batch_norm_2.w_0 │ │ │ ├── batch_norm_2.w_1 │ │ │ ├── batch_norm_2.w_2 │ │ │ ├── batch_norm_20.b_0 │ │ │ ├── batch_norm_20.w_0 │ │ │ ├── batch_norm_20.w_1 │ │ │ ├── batch_norm_20.w_2 │ │ │ ├── batch_norm_21.b_0 │ │ │ ├── batch_norm_21.w_0 │ │ │ ├── batch_norm_21.w_1 │ │ │ ├── batch_norm_21.w_2 │ │ │ ├── batch_norm_22.b_0 │ │ │ ├── batch_norm_22.w_0 │ │ │ ├── batch_norm_22.w_1 │ │ │ ├── batch_norm_22.w_2 │ │ │ ├── batch_norm_23.b_0 │ │ │ ├── batch_norm_23.w_0 │ │ │ ├── batch_norm_23.w_1 │ │ │ ├── batch_norm_23.w_2 │ │ │ ├── batch_norm_24.b_0 │ │ │ ├── batch_norm_24.w_0 │ │ │ ├── batch_norm_24.w_1 │ │ │ ├── batch_norm_24.w_2 │ │ │ ├── batch_norm_25.b_0 │ │ │ ├── batch_norm_25.w_0 │ │ │ ├── batch_norm_25.w_1 │ │ │ ├── batch_norm_25.w_2 │ │ │ ├── batch_norm_26.b_0 │ │ │ ├── batch_norm_26.w_0 │ │ │ ├── batch_norm_26.w_1 │ │ │ ├── batch_norm_26.w_2 │ │ │ ├── batch_norm_3.b_0 │ │ │ ├── batch_norm_3.w_0 │ │ │ ├── batch_norm_3.w_1 │ │ │ ├── batch_norm_3.w_2 │ │ │ ├── batch_norm_4.b_0 │ │ │ ├── batch_norm_4.w_0 │ │ │ ├── batch_norm_4.w_1 │ │ │ ├── batch_norm_4.w_2 │ │ │ ├── batch_norm_5.b_0 │ │ │ ├── batch_norm_5.w_0 │ │ │ ├── batch_norm_5.w_1 │ │ │ ├── batch_norm_5.w_2 │ │ │ ├── batch_norm_6.b_0 │ │ │ ├── batch_norm_6.w_0 │ │ │ ├── batch_norm_6.w_1 │ │ │ ├── batch_norm_6.w_2 │ │ │ ├── batch_norm_7.b_0 │ │ │ ├── batch_norm_7.w_0 │ │ │ ├── batch_norm_7.w_1 │ │ │ ├── batch_norm_7.w_2 │ │ │ ├── batch_norm_8.b_0 │ │ │ ├── batch_norm_8.w_0 │ │ │ ├── batch_norm_8.w_1 │ │ │ ├── batch_norm_8.w_2 │ │ │ ├── batch_norm_9.b_0 │ │ │ ├── batch_norm_9.w_0 │ │ │ ├── batch_norm_9.w_1 │ │ │ ├── batch_norm_9.w_2 │ │ │ ├── conv2d_0.w_0 │ │ │ ├── conv2d_1.w_0 │ │ │ ├── conv2d_10.w_0 │ │ │ ├── conv2d_11.w_0 │ │ │ ├── conv2d_12.w_0 │ │ │ ├── conv2d_13.w_0 │ │ │ ├── conv2d_2.w_0 │ │ │ ├── conv2d_3.w_0 │ │ │ ├── conv2d_4.w_0 │ │ │ ├── conv2d_5.w_0 │ │ │ ├── conv2d_6.w_0 │ │ │ ├── conv2d_7.w_0 │ │ │ ├── conv2d_8.w_0 │ │ │ ├── conv2d_9.w_0 │ │ │ ├── depthwise_conv2d_0.w_0 │ │ │ ├── depthwise_conv2d_1.w_0 │ │ │ ├── depthwise_conv2d_10.w_0 │ │ │ ├── depthwise_conv2d_11.w_0 │ │ │ ├── depthwise_conv2d_12.w_0 │ │ │ ├── depthwise_conv2d_2.w_0 │ │ │ ├── depthwise_conv2d_3.w_0 │ │ │ ├── depthwise_conv2d_4.w_0 │ │ │ ├── depthwise_conv2d_5.w_0 │ │ │ ├── depthwise_conv2d_6.w_0 │ │ │ ├── depthwise_conv2d_7.w_0 │ │ │ ├── depthwise_conv2d_8.w_0 │ │ │ ├── depthwise_conv2d_9.w_0 │ │ │ ├── fc_0.b_0 │ │ │ └── fc_0.w_0 │ │ ├── java/ │ │ │ └── com/ │ │ │ ├── baidu/ │ │ │ │ └── paddle/ │ │ │ │ └── PML.java │ │ │ └── yeyupiaoling/ │ │ │ └── note15/ │ │ │ ├── MainActivity.java │ │ │ └── Utils.java │ │ └── res/ │ │ ├── drawable/ │ │ │ └── ic_launcher_background.xml │ │ ├── drawable-v24/ │ │ │ └── ic_launcher_foreground.xml │ │ ├── layout/ │ │ │ └── activity_main.xml │ │ ├── mipmap-anydpi-v26/ │ │ │ ├── ic_launcher.xml │ │ │ └── ic_launcher_round.xml │ │ └── values/ │ │ ├── colors.xml │ │ ├── strings.xml │ │ └── styles.xml │ ├── build.gradle │ ├── gradle/ │ │ └── wrapper/ │ │ ├── gradle-wrapper.jar │ │ └── gradle-wrapper.properties │ ├── gradle.properties │ ├── gradlew │ ├── gradlew.bat │ └── settings.gradle ├── note2/ │ ├── README.md │ ├── constant_sum.py │ └── variable_sum.py ├── note3/ │ ├── README.md │ ├── linear_regression.py │ └── uci_housing_linear.py ├── note4/ │ ├── README.md │ └── mnist_classification.py ├── note5/ │ ├── README.md │ └── text_classification.py ├── note6/ │ ├── GAN.py │ └── README.md ├── note7/ │ ├── DQN.py │ └── README.md ├── note8/ │ ├── README.md │ ├── save_infer_model.py │ ├── save_use_params_model.py │ ├── save_use_persistables_model.py │ └── use_infer_model.py ├── note9/ │ ├── README.md │ ├── pretrain_model.py │ └── train.py └── requirements.txt
SYMBOL INDEX (86 symbols across 29 files)

FILE: note1/test_paddle.py
  function net (line 9) | def net(x, y):
  function train (line 17) | def train(save_dirname):
  function infer (line 51) | def infer(save_dirname=None):

FILE: note10/mobilenet_v2.py
  function conv_bn_layer (line 4) | def conv_bn_layer(input, filter_size, num_filters, stride, padding, num_...
  function shortcut (line 20) | def shortcut(input, data_residual):
  function inverted_residual_unit (line 24) | def inverted_residual_unit(input,
  function invresi_blocks (line 65) | def invresi_blocks(input, in_c, t, c, n, s, name=None):
  function net (line 90) | def net(input, class_dim, scale=1.0):

FILE: note11/create_data_list.py
  function create_data_list (line 5) | def create_data_list(data_root_path):

FILE: note11/download_image.py
  function download_image (line 11) | def download_image(key_word, save_name, download_max):
  function delete_error_image (line 53) | def delete_error_image(father_path):

FILE: note11/infer.py
  function load_image (line 17) | def load_image(file):

FILE: note11/mobilenet_v1.py
  function net (line 4) | def net(input, class_dim, scale=1.0):
  function conv_bn_layer (line 93) | def conv_bn_layer(input, filter_size, num_filters, stride,
  function depthwise_separable (line 108) | def depthwise_separable(input, num_filters1, num_filters2, num_groups, s...

FILE: note11/reader.py
  function train_mapper (line 10) | def train_mapper(sample):
  function train_reader (line 44) | def train_reader(train_list_path, crop_size, resize_size):
  function test_mapper (line 62) | def test_mapper(sample):
  function test_reader (line 77) | def test_reader(test_list_path, crop_size):

FILE: note12/bilstm_net.py
  function bilstm_net (line 4) | def bilstm_net(data, dict_dim, class_dim, emb_dim=128, hid_dim=128, hid_...

FILE: note12/create_data.py
  function create_data_list (line 4) | def create_data_list(data_root_path):
  function create_dict (line 41) | def create_dict(data_path, dict_path):
  function get_dict_len (line 69) | def get_dict_len(dict_path):

FILE: note12/download_text_data.py
  function get_data (line 32) | def get_data(tup, data_path):
  function get_routine (line 83) | def get_routine(data_path):

FILE: note12/infer.py
  function get_data (line 16) | def get_data(sentence):

FILE: note12/text_reader.py
  function train_mapper (line 7) | def train_mapper(sample):
  function train_reader (line 14) | def train_reader(train_list_path):
  function test_mapper (line 30) | def test_mapper(sample):
  function test_reader (line 37) | def test_reader(test_list_path):

FILE: note13/image_reader.py
  function train_mapper (line 10) | def train_mapper(sample):
  function train_reader (line 54) | def train_reader(train_image_path, crop_size):

FILE: note13/infer.py
  function z_reader (line 22) | def z_reader():
  function save_image (line 32) | def save_image(images):

FILE: note13/train.py
  function Generator (line 13) | def Generator(y, name="G"):
  function Discriminator (line 41) | def Discriminator(images, name="D"):
  function get_params (line 81) | def get_params(program, prefix):
  function z_reader (line 153) | def z_reader():
  function cifar_reader (line 159) | def cifar_reader(reader):
  function show_image_grid (line 168) | def show_image_grid(images):

FILE: note14/paddle_server.py
  function hello_world (line 17) | def hello_world():
  function upload_file (line 23) | def upload_file():
  function load_image (line 35) | def load_image(file):
  function infer (line 61) | def infer():

FILE: note15/app/src/main/java/com/baidu/paddle/PML.java
  class PML (line 3) | public class PML {
    method setThread (line 5) | public static native void setThread(int threadCount);
    method load (line 8) | public static native boolean load(String modelDir);
    method loadQualified (line 11) | public static native boolean loadQualified(String modelDir);
    method loadCombined (line 14) | public static native boolean loadCombined(String modelPath, String par...
    method loadCombinedQualified (line 17) | public static native boolean loadCombinedQualified(String modelPath, S...
    method predictImage (line 20) | public static native float[] predictImage(float[] buf, int[]ddims);
    method predictYuv (line 23) | public static native float[] predictYuv(byte[] buf, int imgWidth, int ...
    method clear (line 26) | public static native void clear();

FILE: note15/app/src/main/java/com/yeyupiaoling/note15/MainActivity.java
  class MainActivity (line 27) | public class MainActivity extends AppCompatActivity {
    method onCreate (line 49) | @Override
    method initView (line 64) | private void initView(){
    method onActivityResult (line 112) | @Override
    method predictImage (line 137) | private void predictImage(String image_path) {
    method requestPermissions (line 160) | private void requestPermissions() {
    method onRequestPermissionsResult (line 176) | @Override

FILE: note15/app/src/main/java/com/yeyupiaoling/note15/Utils.java
  class Utils (line 14) | public class Utils {
    method getMaxResult (line 17) | public static int getMaxResult(float[] result) {
    method getScaledMatrix (line 30) | public static float[] getScaledMatrix(Bitmap bitmap, int desWidth, int...
    method getScaleBitmap (line 60) | public static Bitmap getScaleBitmap(String filePath) {
    method getPathFromURI (line 84) | public static String getPathFromURI(Context context, Uri uri) {
    method copyFileFromAsset (line 100) | public static void copyFileFromAsset(Context context, String oldPath, ...

FILE: note4/mnist_classification.py
  function multilayer_perceptron (line 9) | def multilayer_perceptron(input):
  function convolutional_neural_network (line 20) | def convolutional_neural_network(input):
  function load_image (line 115) | def load_image(file):

FILE: note5/text_classification.py
  function rnn_net (line 7) | def rnn_net(ipt, input_dim):
  function lstm_net (line 25) | def lstm_net(ipt, input_dim):

FILE: note6/GAN.py
  function Generator (line 8) | def Generator(y, name="G"):
  function Discriminator (line 36) | def Discriminator(images, name="D"):
  function get_params (line 76) | def get_params(program, prefix):
  function z_reader (line 147) | def z_reader():
  function mnist_reader (line 153) | def mnist_reader(reader):
  function show_image_grid (line 162) | def show_image_grid(images):

FILE: note7/DQN.py
  function DQNetWork (line 10) | def DQNetWork(ipt, variable_field):
  function _build_sync_target_network (line 29) | def _build_sync_target_network():

FILE: note8/save_infer_model.py
  function vgg16 (line 10) | def vgg16(input, class_dim=1000):

FILE: note8/save_use_params_model.py
  function vgg16 (line 10) | def vgg16(input, class_dim=1000):

FILE: note8/save_use_persistables_model.py
  function vgg16 (line 10) | def vgg16(input, class_dim=1000):

FILE: note8/use_infer_model.py
  function load_image (line 17) | def load_image(file):

FILE: note9/pretrain_model.py
  function resnet50 (line 10) | def resnet50(input):
  function if_exist (line 119) | def if_exist(var):

FILE: note9/train.py
  function resnet50 (line 10) | def resnet50(input, class_dim):
Condensed preview — 215 files, each showing path, character count, and a content snippet. Download the .json file or copy for the full structured content (422K chars).
[
  {
    "path": ".gitignore",
    "chars": 277,
    "preview": ".idea/\nnote1/fit_a_line.inference.model\nnote3/image/\nnote8/models/\nnote9/models/\nnote10/log/\nnote11/images/\nnote11/infer"
  },
  {
    "path": "LICENSE",
    "chars": 11357,
    "preview": "                                 Apache License\n                           Version 2.0, January 2004\n                   "
  },
  {
    "path": "README.md",
    "chars": 1214,
    "preview": "# LearnPaddle2\nPaddlePaddle新版本Fluid教程,使用的PaddlePaddle版本为1.2.0,Python版本为3.5。\n\n# 文章博客地址\n\n\n* [第一章 新版本PaddlePaddle的安装](https"
  },
  {
    "path": "note1/README.md",
    "chars": 16773,
    "preview": "@[TOC]\n\n# 前言\n这一章我们介绍如何安装新版本的PaddlePaddle,这里说的新版本主要是说Fluid版本。Fluid 是设计用来让用户像Pytorch和Tensorflow Eager Execution一样执行程序。在这些"
  },
  {
    "path": "note1/test_paddle.py",
    "chars": 2735,
    "preview": "# Include libraries.\nimport paddle\nimport paddle.fluid as fluid\nimport numpy\nimport six\n\n\n# Configure the neural network"
  },
  {
    "path": "note10/README.md",
    "chars": 15493,
    "preview": "@[TOC]\n\n# 前言\nVisualDL是一个面向深度学习任务设计的可视化工具,包含了scalar、参数分布、模型结构、图像可视化等功能。可以这样说:“所见即所得”。我们可以借助VisualDL来观察我们训练的情况,方便我们对训练的模型"
  },
  {
    "path": "note10/mobilenet_v2.py",
    "chars": 5258,
    "preview": "import paddle.fluid as fluid\n\n\ndef conv_bn_layer(input, filter_size, num_filters, stride, padding, num_groups=1, if_act="
  },
  {
    "path": "note10/test_visualdl.py",
    "chars": 515,
    "preview": "# 导入VisualDL的包\nfrom visualdl import LogWriter\n\n# 创建一个LogWriter,第一个参数是指定存放数据的路径,\n# 第二个参数是指定多少次写操作执行一次内存到磁盘的数据持久化\nlogw = L"
  },
  {
    "path": "note10/train.py",
    "chars": 3092,
    "preview": "import mobilenet_v2\nimport paddle as paddle\nimport paddle.dataset.cifar as cifar\nimport paddle.fluid as fluid\nfrom visua"
  },
  {
    "path": "note11/README.md",
    "chars": 21795,
    "preview": "@[TOC]\n\nGitHub地址:https://github.com/yeyupiaoling/LearnPaddle2/tree/master/note11\n\n# 前言\n本章将介绍如何使用PaddlePaddle训练自己的图片数据集,"
  },
  {
    "path": "note11/create_data_list.py",
    "chars": 2765,
    "preview": "import json\nimport os\n\n\ndef create_data_list(data_root_path):\n    with open(data_root_path + \"test.list\", 'w') as f:\n   "
  },
  {
    "path": "note11/download_image.py",
    "chars": 3233,
    "preview": "import re\nimport uuid\nimport requests\nimport os\nimport numpy\nimport imghdr\nfrom PIL import Image\n\n\n# 获取百度图片下载图片\ndef down"
  },
  {
    "path": "note11/infer.py",
    "chars": 1086,
    "preview": "import paddle.fluid as fluid\nfrom PIL import Image\nimport numpy as np\n\n# 创建执行器\nplace = fluid.CPUPlace()\nexe = fluid.Exec"
  },
  {
    "path": "note11/mobilenet_v1.py",
    "chars": 4781,
    "preview": "import paddle.fluid as fluid\n\n\ndef net(input, class_dim, scale=1.0):\n    # conv1: 112x112\n    input = conv_bn_layer(inpu"
  },
  {
    "path": "note11/reader.py",
    "chars": 2581,
    "preview": "import os\nimport random\nfrom multiprocessing import cpu_count\nimport numpy as np\nimport paddle\nfrom PIL import Image\n\n\n#"
  },
  {
    "path": "note11/train.py",
    "chars": 2641,
    "preview": "import os\nimport shutil\nimport mobilenet_v1\nimport paddle as paddle\nimport reader\nimport paddle.fluid as fluid\n\ncrop_siz"
  },
  {
    "path": "note12/README.md",
    "chars": 17087,
    "preview": "@[TOC]\n\n# 前言\n我们在第五章学习了循环神经网络,在第五章中我们使用循环神经网络实现了一个文本分类的模型,不过使用的数据集是PaddlePaddle自带的一个数据集,我们并没有了解到PaddlePaddle是如何使用读取文本数据集"
  },
  {
    "path": "note12/bilstm_net.py",
    "chars": 1113,
    "preview": "import paddle.fluid as fluid\n\n\ndef bilstm_net(data, dict_dim, class_dim, emb_dim=128, hid_dim=128, hid_dim2=96, emb_lr=3"
  },
  {
    "path": "note12/create_data.py",
    "chars": 2531,
    "preview": "import os\n\n\ndef create_data_list(data_root_path):\n    with open(data_root_path + 'test_list.txt', 'w') as f:\n        pas"
  },
  {
    "path": "note12/download_text_data.py",
    "chars": 4545,
    "preview": "import os\nimport random\nimport requests\nimport json\nimport time\n\n# 分类新闻参数\nnews_classify = [\n    [0, '民生', 'news_story'],"
  },
  {
    "path": "note12/infer.py",
    "chars": 1441,
    "preview": "import numpy as np\nimport paddle.fluid as fluid\n\n# 创建执行器\nplace = fluid.CPUPlace()\nexe = fluid.Executor(place)\nexe.run(fl"
  },
  {
    "path": "note12/text_reader.py",
    "chars": 1117,
    "preview": "from multiprocessing import cpu_count\nimport numpy as np\nimport paddle\n\n\n# 训练数据的预处理\ndef train_mapper(sample):\n    data, "
  },
  {
    "path": "note12/train.py",
    "chars": 2619,
    "preview": "import os\nimport shutil\n\nimport paddle\nimport paddle.fluid as fluid\n\nimport create_data\nimport text_reader\nimport bilstm"
  },
  {
    "path": "note13/README.md",
    "chars": 13108,
    "preview": "@[TOC]\n\n# 前言\n我们在第六章介绍了生成对抗网络,并使用生成对抗网络训练mnist数据集,生成手写数字图片。那么本章我们将使用对抗生成网络训练我们自己的图片数据集,并生成图片。在第六章中我们使用的黑白的单通道图片,在这一章中,我们"
  },
  {
    "path": "note13/image_reader.py",
    "chars": 1815,
    "preview": "import os\nimport random\nfrom multiprocessing import cpu_count\nimport numpy as np\nimport paddle\nfrom PIL import Image\n\n\n#"
  },
  {
    "path": "note13/infer.py",
    "chars": 1150,
    "preview": "import os\nimport paddle\nimport matplotlib.pyplot as plt\nimport numpy as np\nimport paddle.fluid as fluid\n\n# 创建执行器\nplace ="
  },
  {
    "path": "note13/train.py",
    "chars": 7428,
    "preview": "import os\nimport shutil\nimport numpy as np\nimport paddle\nimport paddle.fluid as fluid\nimport matplotlib.pyplot as plt\nim"
  },
  {
    "path": "note14/README.md",
    "chars": 4106,
    "preview": "暂时这样凑合着看,之后有时间再补充文字说明。[微笑]\n\n@[TOC]\n\n# 前言\n如果读者使用过百度等的一些图像识别的接口,比如百度的细粒度图像识别接口,应该了解这个过程,省略其他的安全方面的考虑。这个接口大体的流程是,我们把图像上传到百"
  },
  {
    "path": "note14/index.html",
    "chars": 518,
    "preview": "<!DOCTYPE html>\n<html lang=\"en\">\n<head>\n    <meta charset=\"UTF-8\">\n    <title>预测图像</title>\n</head>\n<body>\n<!--上传图片的表单-->"
  },
  {
    "path": "note14/paddle_server.py",
    "chars": 2195,
    "preview": "import os\nimport uuid\nimport numpy as np\nimport paddle.fluid as fluid\nfrom PIL import Image\nfrom flask import Flask, req"
  },
  {
    "path": "note15/.gitignore",
    "chars": 172,
    "preview": "*.iml\n.gradle\n/local.properties\n/.idea/libraries\n/.idea/modules.xml\n/.idea/workspace.xml\n.DS_Store\n/build\n/captures\n.ext"
  },
  {
    "path": "note15/README.md",
    "chars": 20363,
    "preview": "\n# 目录\n@[toc]\n# 前言\n现在越来越多的手机要使用到深度学习了,比如一些图像分类,目标检测,风格迁移等等,之前都是把数据提交给服务器完成的。但是提交给服务器有几点不好,首先是速度问题,图片上传到服务器需要时间,客户端接收结果也需"
  },
  {
    "path": "note15/app/.gitignore",
    "chars": 7,
    "preview": "/build\n"
  },
  {
    "path": "note15/app/build.gradle",
    "chars": 928,
    "preview": "apply plugin: 'com.android.application'\n\nandroid {\n    compileSdkVersion 28\n    defaultConfig {\n        applicationId \"c"
  },
  {
    "path": "note15/app/proguard-rules.pro",
    "chars": 751,
    "preview": "# Add project specific ProGuard rules here.\n# You can control the set of applied configuration files using the\n# proguar"
  },
  {
    "path": "note15/app/src/main/AndroidManifest.xml",
    "chars": 879,
    "preview": "<?xml version=\"1.0\" encoding=\"utf-8\"?>\n<manifest xmlns:android=\"http://schemas.android.com/apk/res/android\"\n    package="
  },
  {
    "path": "note15/app/src/main/java/com/baidu/paddle/PML.java",
    "chars": 848,
    "preview": "package com.baidu.paddle;\n\npublic class PML {\n    // set thread num\n    public static native void setThread(int threadCo"
  },
  {
    "path": "note15/app/src/main/java/com/yeyupiaoling/note15/MainActivity.java",
    "chars": 6637,
    "preview": "package com.yeyupiaoling.note15;\n\nimport android.Manifest;\nimport android.app.Activity;\nimport android.content.Intent;\ni"
  },
  {
    "path": "note15/app/src/main/java/com/yeyupiaoling/note15/Utils.java",
    "chars": 4487,
    "preview": "package com.yeyupiaoling.note15;\n\nimport android.content.Context;\nimport android.database.Cursor;\nimport android.graphic"
  },
  {
    "path": "note15/app/src/main/res/drawable/ic_launcher_background.xml",
    "chars": 5606,
    "preview": "<?xml version=\"1.0\" encoding=\"utf-8\"?>\n<vector xmlns:android=\"http://schemas.android.com/apk/res/android\"\n    android:wi"
  },
  {
    "path": "note15/app/src/main/res/drawable-v24/ic_launcher_foreground.xml",
    "chars": 1880,
    "preview": "<vector xmlns:android=\"http://schemas.android.com/apk/res/android\"\n    xmlns:aapt=\"http://schemas.android.com/aapt\"\n    "
  },
  {
    "path": "note15/app/src/main/res/layout/activity_main.xml",
    "chars": 1620,
    "preview": "<?xml version=\"1.0\" encoding=\"utf-8\"?>\n<RelativeLayout xmlns:android=\"http://schemas.android.com/apk/res/android\"\n    xm"
  },
  {
    "path": "note15/app/src/main/res/mipmap-anydpi-v26/ic_launcher.xml",
    "chars": 272,
    "preview": "<?xml version=\"1.0\" encoding=\"utf-8\"?>\n<adaptive-icon xmlns:android=\"http://schemas.android.com/apk/res/android\">\n    <b"
  },
  {
    "path": "note15/app/src/main/res/mipmap-anydpi-v26/ic_launcher_round.xml",
    "chars": 272,
    "preview": "<?xml version=\"1.0\" encoding=\"utf-8\"?>\n<adaptive-icon xmlns:android=\"http://schemas.android.com/apk/res/android\">\n    <b"
  },
  {
    "path": "note15/app/src/main/res/values/colors.xml",
    "chars": 208,
    "preview": "<?xml version=\"1.0\" encoding=\"utf-8\"?>\n<resources>\n    <color name=\"colorPrimary\">#3F51B5</color>\n    <color name=\"color"
  },
  {
    "path": "note15/app/src/main/res/values/strings.xml",
    "chars": 69,
    "preview": "<resources>\n    <string name=\"app_name\">note15</string>\n</resources>\n"
  },
  {
    "path": "note15/app/src/main/res/values/styles.xml",
    "chars": 388,
    "preview": "<resources>\n\n    <!-- Base application theme. -->\n    <style name=\"AppTheme\" parent=\"Base.Theme.AppCompat.Light.DarkActi"
  },
  {
    "path": "note15/build.gradle",
    "chars": 546,
    "preview": "// Top-level build file where you can add configuration options common to all sub-projects/modules.\n\nbuildscript {\n    \n"
  },
  {
    "path": "note15/gradle/wrapper/gradle-wrapper.properties",
    "chars": 230,
    "preview": "#Fri Feb 22 11:28:20 CST 2019\ndistributionBase=GRADLE_USER_HOME\ndistributionPath=wrapper/dists\nzipStoreBase=GRADLE_USER_"
  },
  {
    "path": "note15/gradle.properties",
    "chars": 726,
    "preview": "# Project-wide Gradle settings.\n# IDE (e.g. Android Studio) users:\n# Gradle settings configured through the IDE *will ov"
  },
  {
    "path": "note15/gradlew",
    "chars": 5296,
    "preview": "#!/usr/bin/env sh\n\n##############################################################################\n##\n##  Gradle start up"
  },
  {
    "path": "note15/gradlew.bat",
    "chars": 2176,
    "preview": "@if \"%DEBUG%\" == \"\" @echo off\n@rem ##########################################################################\n@rem\n@rem "
  },
  {
    "path": "note15/settings.gradle",
    "chars": 15,
    "preview": "include ':app'\n"
  },
  {
    "path": "note2/README.md",
    "chars": 3305,
    "preview": "@[TOC]\n\n# 前言\n在第一章介绍了PaddlePaddle的安装,接下来我们将介绍如何使用PaddlePaddle。PaddlePaddle是百度在2016年9月27日开源的一个深度学习框架,也是目前国内唯一一个开源的深度学习框架。"
  },
  {
    "path": "note2/constant_sum.py",
    "chars": 474,
    "preview": "import paddle.fluid as fluid\n\n# 定义两个张量\nx1 = fluid.layers.fill_constant(shape=[2, 2], value=1, dtype='int64')\nx2 = fluid."
  },
  {
    "path": "note2/variable_sum.py",
    "chars": 667,
    "preview": "import paddle.fluid as fluid\nimport numpy as np\n\n# 定义两个张量\na = fluid.layers.create_tensor(dtype='int64', name='a')\nb = fl"
  },
  {
    "path": "note3/README.md",
    "chars": 7117,
    "preview": "@[TOC]\n\n# 前言\n在第二章,我们已经学习了如何使用PaddlePaddle来进行加法计算,从这个小小的例子中,我们掌握了PaddlePaddle的使用方式。在本章中,我们将介绍使用PaddlePaddle完成一个深度学习非常常见的"
  },
  {
    "path": "note3/linear_regression.py",
    "chars": 1431,
    "preview": "import paddle.fluid as fluid\nimport numpy as np\n\n# 定义一个简单的线性网络\nx = fluid.layers.data(name='x', shape=[1], dtype='float32"
  },
  {
    "path": "note3/uci_housing_linear.py",
    "chars": 1699,
    "preview": "import paddle.fluid as fluid\nimport paddle\nimport paddle.dataset.uci_housing as uci_housing\n\n# 定义一个简单的线性网络\nx = fluid.lay"
  },
  {
    "path": "note4/README.md",
    "chars": 8960,
    "preview": "@[TOC]\n\n# 前言\n上一章我们通过学习线性回归例子入门了深度学习,同时也熟悉了PaddlePaddle的使用方式,那么我们在本章学习更有趣的知识点卷积神经网络。深度学习之所以那么流行,很大程度上是得益于它在计算机视觉上得到非常好的效"
  },
  {
    "path": "note4/mnist_classification.py",
    "chars": 4098,
    "preview": "import numpy as np\nimport paddle as paddle\nimport paddle.dataset.mnist as mnist\nimport paddle.fluid as fluid\nfrom PIL im"
  },
  {
    "path": "note5/README.md",
    "chars": 7704,
    "preview": "@[TOC]\n\n# 前言\n除了卷积神经网络,深度学习中还有循环神经网络也是很常用的,循环神经网络更常用于自然语言处理任务上。我们在这一章中,我们就来学习如何使用PaddlePaddle来实现一个循环神经网络,并使用该网络完成情感分析的模型"
  },
  {
    "path": "note5/text_classification.py",
    "chars": 4340,
    "preview": "import paddle\nimport paddle.dataset.imdb as imdb\nimport paddle.fluid as fluid\nimport numpy as np\n\n\ndef rnn_net(ipt, inpu"
  },
  {
    "path": "note6/GAN.py",
    "chars": 6598,
    "preview": "import numpy as np\nimport paddle\nimport paddle.fluid as fluid\nimport matplotlib.pyplot as plt\n\n\n# 定义生成器\ndef Generator(y,"
  },
  {
    "path": "note6/README.md",
    "chars": 10251,
    "preview": "@[TOC]\n\n# 前言\n我们上一章使用MNIST数据集进行训练,获得一个可以分类手写字体的模型。如果我们数据集的数量不够,不足于让模型收敛,最直接的是增加数据集。但是我们收集数据并进行标注是非常消耗时间了,而最近非常火的生成对抗网络就非"
  },
  {
    "path": "note7/DQN.py",
    "chars": 5797,
    "preview": "import numpy as np\r\nimport paddle.fluid as fluid\r\nimport random\r\nimport gym\r\nfrom collections import deque\r\nfrom paddle."
  },
  {
    "path": "note7/README.md",
    "chars": 8194,
    "preview": "@[TOC]\n\n# 前言\n本章介绍使用PaddlePaddle实现强化学习,通过自我学习,完成一个经典控制类的游戏,相关游戏介绍可以在[Gym官网](https://gym.openai.com/envs/#classic_control"
  },
  {
    "path": "note8/README.md",
    "chars": 10300,
    "preview": "@[TOC]\n\n# 前言\n本系列教程中,前面介绍的都没有保存模型,训练之后也就结束了。那么本章就介绍如果在训练过程中保存模型,用于之后预测或者恢复训练,又或者由于其他数据集的预训练模型。本章会介绍三种保存模型和使用模型的方式。\n\n# 训练"
  },
  {
    "path": "note8/save_infer_model.py",
    "chars": 3446,
    "preview": "import os\nimport shutil\n\nimport paddle as paddle\nimport paddle.dataset.cifar as cifar\nimport paddle.fluid as fluid\n\n\n# 定"
  },
  {
    "path": "note8/save_use_params_model.py",
    "chars": 3560,
    "preview": "import os\nimport shutil\n\nimport paddle as paddle\nimport paddle.dataset.cifar as cifar\nimport paddle.fluid as fluid\n\n\n# 定"
  },
  {
    "path": "note8/save_use_persistables_model.py",
    "chars": 3596,
    "preview": "import os\nimport shutil\n\nimport paddle as paddle\nimport paddle.dataset.cifar as cifar\nimport paddle.fluid as fluid\n\n\n# 定"
  },
  {
    "path": "note8/use_infer_model.py",
    "chars": 1166,
    "preview": "import paddle.fluid as fluid\nfrom PIL import Image\nimport numpy as np\n\n# 创建执行器\nplace = fluid.CPUPlace()\nexe = fluid.Exec"
  },
  {
    "path": "note9/README.md",
    "chars": 15374,
    "preview": "@[TOC]\n\n# 前言\n在深度学习训练中,例如图像识别训练,每次从零开始训练都要消耗大量的时间和资源。而且当数据集比较少时,模型也难以拟合的情况。基于这种情况下,就出现了迁移学习,通过使用已经训练好的模型来初始化即将训练的网络,可以加快"
  },
  {
    "path": "note9/pretrain_model.py",
    "chars": 5759,
    "preview": "import os\nimport shutil\nimport paddle as paddle\nimport paddle.dataset.flowers as flowers\nimport paddle.fluid as fluid\nfr"
  },
  {
    "path": "note9/train.py",
    "chars": 5987,
    "preview": "import os\nimport shutil\nimport paddle as paddle\nimport paddle.dataset.flowers as flowers\nimport paddle.fluid as fluid\nfr"
  },
  {
    "path": "requirements.txt",
    "chars": 12,
    "preview": "paddlepaddle"
  }
]

// ... and 139 more files (download for full content)
About this extraction
This page contains the full source code of the yeyupiaoling/LearnPaddle2 GitHub repository, extracted and formatted as plain text for AI agents and large language models (LLMs). The extraction includes 215 files (322.8 KB), approximately 106.7k tokens, and a symbol index with 86 extracted functions, classes, methods, constants, and types. Use this with OpenClaw, Claude, ChatGPT, Cursor, Windsurf, or any other AI tool that accepts text input. You can copy the full output to your clipboard or download it as a .txt file.
Extracted by GitExtract — free GitHub repo to text converter for AI. Built by Nikandr Surkov.