Showing preview only (2,771K chars total). Download the full file or copy to clipboard to get everything.
Repository: espocrm/documentation
Branch: master
Commit: b283673466cc
Files: 329
Total size: 2.6 MB
Directory structure:
gitextract_xalhlxge/

├── .gitignore
├── README.md
├── docs/
│   ├── _static/
│   │   ├── csv/
│   │   │   └── bpm-examples.csv
│   │   └── scripts/
│   │       ├── backup-docker-container.sh
│   │       └── backup.sh
│   ├── administration/
│   │   ├── 2fa.md
│   │   ├── addresses.md
│   │   ├── apache-server-configuration.md
│   │   ├── api-before-save-script.md
│   │   ├── app-secrets.md
│   │   ├── b2c.md
│   │   ├── backup-and-restore.md
│   │   ├── bpm-activities.md
│   │   ├── bpm-compensation.md
│   │   ├── bpm-configuration.md
│   │   ├── bpm-drip-email-campaign.md
│   │   ├── bpm-events.md
│   │   ├── bpm-examples.md
│   │   ├── bpm-formula.md
│   │   ├── bpm-gateways.md
│   │   ├── bpm-signals.md
│   │   ├── bpm-tips.md
│   │   ├── bpm-tracking-urls.md
│   │   ├── bpm.md
│   │   ├── collaborators.md
│   │   ├── commands.md
│   │   ├── config-params.md
│   │   ├── cron-on-windows.md
│   │   ├── currency.md
│   │   ├── dashboards.md
│   │   ├── date-formatting.md
│   │   ├── docker/
│   │   │   ├── caddy.md
│   │   │   ├── installation.md
│   │   │   └── traefik.md
│   │   ├── dynamic-logic.md
│   │   ├── email-fetching.md
│   │   ├── emails.md
│   │   ├── entity-manager.md
│   │   ├── extensions.md
│   │   ├── fields.md
│   │   ├── file-storage.md
│   │   ├── formula/
│   │   │   ├── array.md
│   │   │   ├── datetime.md
│   │   │   ├── entity.md
│   │   │   ├── env.md
│   │   │   ├── exception.md
│   │   │   ├── ext.md
│   │   │   ├── general.md
│   │   │   ├── json.md
│   │   │   ├── language.md
│   │   │   ├── log.md
│   │   │   ├── number.md
│   │   │   ├── object.md
│   │   │   ├── password.md
│   │   │   ├── record.md
│   │   │   ├── string.md
│   │   │   └── util.md
│   │   ├── formula-functions.md
│   │   ├── formula-scripts-examples.md
│   │   ├── formula.md
│   │   ├── iis-server-configuration.md
│   │   ├── import.md
│   │   ├── installation-by-script.md
│   │   ├── installation.md
│   │   ├── jobs.md
│   │   ├── layout-manager.md
│   │   ├── ldap-authorization-for-ad.md
│   │   ├── ldap-authorization-for-openldap.md
│   │   ├── ldap-authorization.md
│   │   ├── log.md
│   │   ├── maps.md
│   │   ├── moving-to-another-server.md
│   │   ├── multiple-assigned-users.md
│   │   ├── nginx-server-configuration.md
│   │   ├── nginx-virtual-host.md
│   │   ├── oidc.md
│   │   ├── passwords.md
│   │   ├── performance-tweaking.md
│   │   ├── phone-numbers.md
│   │   ├── portal/
│   │   │   ├── apache-configuration.md
│   │   │   └── nginx-configuration.md
│   │   ├── portal.md
│   │   ├── roles-management.md
│   │   ├── security.md
│   │   ├── server-configuration.md
│   │   ├── sms-sending.md
│   │   ├── terms-and-naming.md
│   │   ├── troubleshooting.md
│   │   ├── upgrading-manually.md
│   │   ├── upgrading.md
│   │   ├── users-management.md
│   │   ├── web-to-lead.md
│   │   ├── webhooks.md
│   │   ├── websocket.md
│   │   ├── workflows-telegram-message.md
│   │   └── workflows.md
│   ├── api/
│   │   ├── index.html
│   │   └── spec.json
│   ├── css/
│   │   └── extra.css
│   ├── development/
│   │   ├── acl.md
│   │   ├── api/
│   │   │   ├── account.md
│   │   │   ├── attachment.md
│   │   │   ├── crud.md
│   │   │   ├── currency-rate.md
│   │   │   ├── i18n.md
│   │   │   ├── metadata.md
│   │   │   ├── relationships.md
│   │   │   └── stream.md
│   │   ├── api-action.md
│   │   ├── api-client-go.md
│   │   ├── api-client-java.md
│   │   ├── api-client-js.md
│   │   ├── api-client-php.md
│   │   ├── api-client-python.md
│   │   ├── api-client-rust.md
│   │   ├── api-client-zig.md
│   │   ├── api-search-params.md
│   │   ├── api-tutorial.md
│   │   ├── api.md
│   │   ├── app-params.md
│   │   ├── attachments.md
│   │   ├── autoload.md
│   │   ├── calculated-fields.md
│   │   ├── campaign-unsubscribe-template.md
│   │   ├── coding-practices.md
│   │   ├── coding-rules.md
│   │   ├── collection.md
│   │   ├── confirm-dialog.md
│   │   ├── container-services.md
│   │   ├── custom-buttons.md
│   │   ├── custom-config-parameters.md
│   │   ├── custom-css.md
│   │   ├── custom-entity-type.md
│   │   ├── custom-field-type.md
│   │   ├── custom-views.md
│   │   ├── customize-standard-fields.md
│   │   ├── db-indexes.md
│   │   ├── di.md
│   │   ├── duplicate-check.md
│   │   ├── dynamic-handler.md
│   │   ├── email-sending.md
│   │   ├── entry-points.md
│   │   ├── examples/
│   │   │   └── dynamic-logic-multi-enum.md
│   │   ├── extension-packages.md
│   │   ├── frontend/
│   │   │   ├── ajax.md
│   │   │   ├── controller.md
│   │   │   ├── dependency-injection.md
│   │   │   ├── html-css.md
│   │   │   ├── monkey-patching.md
│   │   │   ├── record-panels.md
│   │   │   ├── save-error-handlers.md
│   │   │   ├── templates.md
│   │   │   └── view-setup-handlers.md
│   │   ├── hooks.md
│   │   ├── how-to-create-a-dashlet.md
│   │   ├── how-to-start.md
│   │   ├── index.md
│   │   ├── jobs.md
│   │   ├── link-multiple-with-primary.md
│   │   ├── metadata/
│   │   │   ├── acl-defs.md
│   │   │   ├── app-acl-portal.md
│   │   │   ├── app-acl.md
│   │   │   ├── app-actions.md
│   │   │   ├── app-address-formats.md
│   │   │   ├── app-admin-panel.md
│   │   │   ├── app-api.md
│   │   │   ├── app-app-params.md
│   │   │   ├── app-authentication-2fa-methods.md
│   │   │   ├── app-authentication.md
│   │   │   ├── app-cleanup.md
│   │   │   ├── app-client-icons.md
│   │   │   ├── app-client-navbar.md
│   │   │   ├── app-client-record.md
│   │   │   ├── app-client-routes.md
│   │   │   ├── app-client.md
│   │   │   ├── app-complex-expression.md
│   │   │   ├── app-config.md
│   │   │   ├── app-console-commands.md
│   │   │   ├── app-container-services.md
│   │   │   ├── app-currency-conversion.md
│   │   │   ├── app-currency.md
│   │   │   ├── app-database-platforms.md
│   │   │   ├── app-date-time.md
│   │   │   ├── app-default-dashboard-layouts.md
│   │   │   ├── app-default-dashboard-options.md
│   │   │   ├── app-email-template.md
│   │   │   ├── app-entity-manager-params.md
│   │   │   ├── app-entity-manager.md
│   │   │   ├── app-entity-template-list.md
│   │   │   ├── app-entity-templates.md
│   │   │   ├── app-export.md
│   │   │   ├── app-field-processing.md
│   │   │   ├── app-file-storage.md
│   │   │   ├── app-file.md
│   │   │   ├── app-formula.md
│   │   │   ├── app-hook.md
│   │   │   ├── app-image.md
│   │   │   ├── app-js-libs.md
│   │   │   ├── app-language.md
│   │   │   ├── app-layouts.md
│   │   │   ├── app-link-manager.md
│   │   │   ├── app-map-providers.md
│   │   │   ├── app-mass-actions.md
│   │   │   ├── app-metadata.md
│   │   │   ├── app-orm.md
│   │   │   ├── app-pdf-engines.md
│   │   │   ├── app-popup-notifications.md
│   │   │   ├── app-portal-container-services.md
│   │   │   ├── app-reactions.md
│   │   │   ├── app-rebuild.md
│   │   │   ├── app-record-id.md
│   │   │   ├── app-record.md
│   │   │   ├── app-reg-exp-patterns.md
│   │   │   ├── app-relationships.md
│   │   │   ├── app-scheduled-jobs.md
│   │   │   ├── app-select.md
│   │   │   ├── app-sms-providers.md
│   │   │   ├── app-template-helpers.md
│   │   │   ├── app-templates.md
│   │   │   ├── app-web-socket.md
│   │   │   ├── authentication-methods.md
│   │   │   ├── client-defs.md
│   │   │   ├── dashlets.md
│   │   │   ├── entity-acl.md
│   │   │   ├── entity-defs.md
│   │   │   ├── fields.md
│   │   │   ├── integrations.md
│   │   │   ├── logic-defs.md
│   │   │   ├── notification-defs.md
│   │   │   ├── pdf-defs.md
│   │   │   ├── record-defs.md
│   │   │   ├── scopes.md
│   │   │   ├── select-defs.md
│   │   │   └── stream-defs.md
│   │   ├── metadata.md
│   │   ├── modal.md
│   │   ├── model.md
│   │   ├── modules.md
│   │   ├── new-function-in-formula.md
│   │   ├── orm-value-objects.md
│   │   ├── orm.md
│   │   ├── quote-custom-calculations.md
│   │   ├── resources.md
│   │   ├── scheduled-job.md
│   │   ├── select-builder.md
│   │   ├── select-manager.md
│   │   ├── services.md
│   │   ├── template-custom-helper.md
│   │   ├── tests.md
│   │   ├── translation.md
│   │   ├── view.md
│   │   └── workflow-service-actions.md
│   ├── extensions/
│   │   ├── advanced-pack/
│   │   │   └── overview.md
│   │   ├── export-import/
│   │   │   ├── compare.md
│   │   │   ├── customization.md
│   │   │   ├── export.md
│   │   │   ├── import.md
│   │   │   ├── overview.md
│   │   │   └── run-by-code.md
│   │   ├── google-integration/
│   │   │   ├── calendar.md
│   │   │   ├── contacts.md
│   │   │   ├── gmail.md
│   │   │   └── setting-up.md
│   │   ├── meeting-scheduler/
│   │   │   └── index.md
│   │   ├── outlook-integration/
│   │   │   ├── calendar.md
│   │   │   ├── contacts.md
│   │   │   ├── email.md
│   │   │   └── setting-up.md
│   │   ├── project-management/
│   │   │   └── projects.md
│   │   ├── sales-pack/
│   │   │   ├── bill-credits.md
│   │   │   ├── bills.md
│   │   │   ├── credit-notes.md
│   │   │   ├── delivery-orders.md
│   │   │   ├── inventory-management.md
│   │   │   ├── issuance-locking.md
│   │   │   ├── multi-currency.md
│   │   │   ├── overview.md
│   │   │   ├── payments.md
│   │   │   ├── prices.md
│   │   │   ├── purchase-orders.md
│   │   │   ├── receipt-orders.md
│   │   │   ├── reports.md
│   │   │   ├── return-orders.md
│   │   │   ├── subscriptions.md
│   │   │   ├── suppliers.md
│   │   │   ├── tax-codes.md
│   │   │   ├── taxes.md
│   │   │   └── write-offs.md
│   │   ├── stripe-integration/
│   │   │   └── index.md
│   │   ├── voip-integration/
│   │   │   ├── 3cx-integration-setup.md
│   │   │   ├── asterisk-integration-setup.md
│   │   │   ├── binotel-integration-setup.md
│   │   │   ├── customization.md
│   │   │   ├── docker-container.md
│   │   │   ├── iexpbx-integration-setup.md
│   │   │   ├── overview.md
│   │   │   ├── starface-integration-setup.md
│   │   │   ├── troubleshooting.md
│   │   │   └── twilio-integration-setup.md
│   │   └── zoom-integration/
│   │       └── index.md
│   ├── index.md
│   ├── js/
│   │   └── extra.js
│   └── user-guide/
│       ├── activities-and-calendar.md
│       ├── browser-support.md
│       ├── campaigns.md
│       ├── case-management.md
│       ├── complex-expressions.md
│       ├── data-privacy.md
│       ├── documents.md
│       ├── emails.md
│       ├── export.md
│       ├── imap-smtp-configuration.md
│       ├── invoices.md
│       ├── knowledge-base.md
│       ├── mail-merge.md
│       ├── markdown.md
│       ├── mass-email.md
│       ├── optimistic-concurrency-control.md
│       ├── printing-to-pdf.md
│       ├── products.md
│       ├── quotes.md
│       ├── reports.md
│       ├── sales-management.md
│       ├── sales-orders.md
│       ├── shortcuts.md
│       ├── stream.md
│       ├── text-search.md
│       └── working-time-calendar.md
└── mkdocs.yml
================================================
FILE CONTENTS
================================================
================================================
FILE: .gitignore
================================================
site/
.venv
.idea
================================================
FILE: README.md
================================================
# EspoCRM Documentation
### View documentation
* [On the website](https://docs.espocrm.com)
* [On this repository](docs/index.md)
### How to build
Assuming you have *python* and *pip* installed.
Install the packages:
1. `pip install mkdocs`
2. `pip install mdx_truly_sane_lists`
3. `pip install mkdocs-material`
Command to build:
```
mkdocs build
```
Command to build if using venv:
```
.venv/bin/mkdocs build
```
Command to build on Windows:
```
python -m mkdocs build
```
================================================
FILE: docs/_static/csv/bpm-examples.csv
================================================
name,targetType,isActive,data,description
"Example: Email reply catching",Account,,"{""list"":[{""type"":""eventStart"",""center"":{""x"":100,""y"":160},""id"":""9y6izy64v1""},{""type"":""taskSendMessage"",""center"":{""x"":200,""y"":160},""doNotStore"":false,""from"":""system"",""to"":""targetEntity"",""replyTo"":"""",""messageType"":""Email"",""optOutLink"":false,""id"":""a1r9e3g1ee"",""text"":""Send email to account"",""emailTemplateName"":null,""emailTemplateId"":null,""description"":""Select email template.""},{""startId"":""9y6izy64v1"",""endId"":""a1r9e3g1ee"",""startDirection"":""r"",""id"":""63d18vn5hw"",""type"":""flow""},{""type"":""gatewayEventBased"",""center"":{""x"":300,""y"":160},""id"":""ximev2a5su"",""text"":null,""description"":""Stops the flow until the first subsequent event is triggered.""},{""startId"":""a1r9e3g1ee"",""endId"":""ximev2a5su"",""startDirection"":""r"",""id"":""eigxf6kf3b"",""type"":""flow""},{""type"":""eventIntermediateMessageCatch"",""center"":{""x"":380,""y"":160},""repliedTo"":""a1r9e3g1ee"",""relatedTo"":null,""messageType"":""Email"",""id"":""076bji878y"",""text"":""Replied with 'yes'"",""description"":""Event will be triggered if the received email is a reply to the email sent by the process before and body contains word 'yes'"",""conditionsFormula"":""string\\contains(body, string\\lowerCase('yes'))""},{""type"":""eventIntermediateTimerCatch"",""center"":{""x"":380,""y"":260},""timerBase"":null,""timerShift"":24,""timerShiftUnits"":""hours"",""timerShiftOperator"":""plus"",""timerFormula"":null,""id"":""5g9qccto4j"",""text"":""Wait 24h"",""description"":null},{""startId"":""ximev2a5su"",""endId"":""5g9qccto4j"",""startDirection"":""d"",""id"":""vzobuguik8"",""type"":""flow""},{""startId"":""ximev2a5su"",""endId"":""076bji878y"",""startDirection"":""r"",""id"":""ddeuegbdmn"",""type"":""flow""},{""type"":""eventEnd"",""center"":{""x"":480,""y"":260},""id"":""smpn4950he""},{""startId"":""5g9qccto4j"",""endId"":""smpn4950he"",""startDirection"":""r"",""id"":""w8cy6l5tja"",""type"":""flow""},{""type"":""task"",""center"":{""x"":480,""y"":160},""id"":""0st6bue5bz"",""text"":""Create task"",""description"":""You need also to assign the task to some user."",""actionList"":[{""link"":""Task"",""fieldList"":[""name""],""fields"":{""name"":{""subjectType"":""value"",""attributes"":{""name"":""Discuss about a possible deal""}}},""cid"":0,""id"":""27dhn9mrxs"",""linkList"":[""parent""],""formula"":"""",""entityType"":""Task"",""type"":""createEntity""}]},{""startId"":""076bji878y"",""endId"":""0st6bue5bz"",""startDirection"":""r"",""id"":""wwft7n4nzu"",""type"":""flow""},{""type"":""eventEnd"",""center"":{""x"":580,""y"":160},""id"":""znvksdm1ff""},{""startId"":""0st6bue5bz"",""endId"":""znvksdm1ff"",""startDirection"":""r"",""id"":""yqcx692xco"",""type"":""flow""}],""createdEntitiesData"":{""a1r9e3g1ee"":{""elementId"":""a1r9e3g1ee"",""actionId"":null,""entityType"":""Email"",""numberId"":0,""text"":""Send email to account""},""0st6bue5bz_27dhn9mrxs"":{""elementId"":""0st6bue5bz"",""actionId"":""27dhn9mrxs"",""link"":null,""entityType"":""Task"",""numberId"":0}}}","This example shows how it's possible to catch a reply to the email sent by the process.
* This flowchart is not active. You need to set *Is Active* to make it runnable.
Click on flow items bellow to see more info.
This process supposed to be started manually (from the account detail view > dropdown in top-right corner).
You can replace start event with the event of other type."
"Example: Sub-process",Account,,"{""list"":[{""type"":""eventStart"",""center"":{""x"":40,""y"":100},""id"":""dnce1dwk9c"",""text"":""Start manually"",""description"":null},{""type"":""task"",""center"":{""x"":140,""y"":100},""id"":""d0bwlpsqjb"",""text"":""Create opportunity"",""description"":null,""actionList"":[{""link"":""Opportunity"",""fieldList"":[""name"",""stage"",""closeDate"",""amount""],""fields"":{""name"":{""subjectType"":""value"",""attributes"":{""name"":""New subscription""}},""stage"":{""subjectType"":""value"",""attributes"":{""stage"":""Proposal""}},""closeDate"":{""subjectType"":""today"",""shiftDays"":""1"",""attributes"":{},""shiftUnit"":""months""},""amount"":{""subjectType"":""value"",""attributes"":{""amount"":500,""amountCurrency"":""USD""}}},""cid"":0,""id"":""mo1mt5e7q1"",""linkList"":[""account""],""formula"":"""",""entityType"":""Opportunity"",""type"":""createEntity""}]},{""startId"":""dnce1dwk9c"",""endId"":""d0bwlpsqjb"",""startDirection"":""r"",""id"":""tscf17xz0c"",""type"":""flow""},{""type"":""subProcess"",""center"":{""x"":240,""y"":260},""isExpanded"":true,""triggeredByEvent"":false,""dataList"":[{""type"":""eventStart"",""center"":{""x"":40,""y"":80},""id"":""rfa7a1ten5"",""text"":null,""description"":""The flow starts from Start Event once Sub-Process element is reached by the flow.""},{""type"":""task"",""center"":{""x"":140,""y"":80},""id"":""fwdhod2w40"",""text"":""Assign opportunity"",""actionList"":[],""description"":""Here you can add 'Apply Assignment Rule' or 'Update Target Record' action.""},{""startId"":""rfa7a1ten5"",""endId"":""fwdhod2w40"",""startDirection"":""r"",""id"":""nk0635f6o5"",""type"":""flow""},{""type"":""eventIntermediateConditionalCatch"",""center"":{""x"":260,""y"":80},""id"":""ya9l302iso"",""text"":""Opportunity is won"",""conditionsAll"":[{""comparison"":""equals"",""subjectType"":""value"",""cid"":0,""fieldToCompare"":""stage"",""type"":""all"",""value"":""Closed Won""}],""conditionsAny"":[],""conditionsFormula"":"""",""description"":null},{""type"":""eventEnd"",""center"":{""x"":340,""y"":80},""id"":""nj9rtq4sxs""},{""startId"":""ya9l302iso"",""endId"":""nj9rtq4sxs"",""startDirection"":""r"",""id"":""71idx7lyd3"",""type"":""flow""},{""startId"":""fwdhod2w40"",""endId"":""ya9l302iso"",""startDirection"":""r"",""id"":""o695oc3hqy"",""type"":""flow""}],""target"":""created:d0bwlpsqjb_mo1mt5e7q1"",""returnVariableList"":[],""targetType"":""Opportunity"",""id"":""d5fxlnoewa"",""width"":395,""height"":184,""text"":""Target is switched to opportunity within sub-process"",""description"":null},{""startId"":""d0bwlpsqjb"",""endId"":""d5fxlnoewa"",""startDirection"":""r"",""id"":""eozfn81pez"",""type"":""flow""},{""type"":""eventIntermediateTimerBoundary"",""attachedToId"":""d5fxlnoewa"",""cancelActivity"":false,""timerBase"":null,""timerShift"":10,""timerShiftUnits"":""days"",""timerShiftOperator"":""plus"",""timerFormula"":null,""attachPosition"":""bl4"",""center"":{""x"":100,""y"":352},""id"":""bwf5gnjmh2"",""text"":""10 days passed"",""description"":""If 10 days passed and sub-process is still active then this event will be triggered. Since it is not interrupting, it won't stop the sub-process.""},{""type"":""task"",""center"":{""x"":100,""y"":460},""id"":""qd6ismf2r1"",""text"":""Notify user assigned to account"",""actionList"":[{""recipient"":""link:assignedUser"",""userIdList"":[],""userNames"":{},""cid"":0,""id"":""cccgw7wd87"",""messageTemplate"":""Opportunity for account {entity} has been in process for 10 days."",""specifiedTeamsIds"":[],""specifiedTeamsNames"":{},""type"":""createNotification""}],""description"":null},{""type"":""eventEnd"",""center"":{""x"":100,""y"":540},""id"":""bzuaili08f"",""text"":null,""description"":""This will NOT stop the process, because there will still active flow items. It's a best practice to end any flow with End Event.""},{""startId"":""qd6ismf2r1"",""endId"":""bzuaili08f"",""startDirection"":""d"",""id"":""yx8275wtrt"",""type"":""flow""},{""startId"":""bwf5gnjmh2"",""endId"":""qd6ismf2r1"",""startDirection"":""d"",""id"":""4j2hubewis"",""type"":""flow""},{""type"":""eventIntermediateConditionalBoundary"",""attachedToId"":""d5fxlnoewa"",""cancelActivity"":true,""attachPosition"":""bl1"",""center"":{""x"":220,""y"":352},""id"":""i7rer4ire8"",""text"":""Opportunity is lost"",""conditionsAll"":[{""comparison"":""equals"",""subjectType"":""value"",""cid"":0,""fieldToCompare"":""created:d0bwlpsqjb_mo1mt5e7q1.stage"",""type"":""all"",""value"":""Closed Lost""}],""conditionsAny"":[],""conditionsFormula"":"""",""description"":""It's an interrupting event. It will stop the sub-process it's attached to.""},{""type"":""task"",""center"":{""x"":220,""y"":460},""id"":""t30fe2rbnm"",""text"":""Notify user assigned to account"",""actionList"":[{""recipient"":""link:assignedUser"",""userIdList"":[],""userNames"":{},""cid"":0,""id"":""qstbhs9m8a"",""messageTemplate"":""Opportunity for account {entity} is lost."",""specifiedTeamsIds"":[],""specifiedTeamsNames"":{},""type"":""createNotification""}],""description"":null},{""startId"":""i7rer4ire8"",""endId"":""t30fe2rbnm"",""startDirection"":""d"",""id"":""l0wsiyzsbo"",""type"":""flow""},{""type"":""eventEnd"",""center"":{""x"":220,""y"":540},""id"":""m6krciw1ab"",""text"":null,""description"":""The process will be stopped with this event, since there won't be any active flow items at that moment. It's a best practice to end any flow with End Event.""},{""startId"":""t30fe2rbnm"",""endId"":""m6krciw1ab"",""startDirection"":""d"",""id"":""lgt4082clq"",""type"":""flow""},{""type"":""task"",""center"":{""x"":520,""y"":260},""id"":""r3co6n6vyx"",""text"":""Create task to arrange shipment"",""actionList"":[{""link"":""Task"",""fieldList"":[""name""],""fields"":{""name"":{""subjectType"":""value"",""attributes"":{""name"":""Arrange shipment""}}},""cid"":0,""id"":""eatnd0zhrz"",""linkList"":[""account""],""formula"":"""",""entityType"":""Task"",""type"":""createEntity""}],""description"":""You can make this task assigned to some used. Edit the action and add Assigned User field.""},{""startId"":""d5fxlnoewa"",""endId"":""r3co6n6vyx"",""startDirection"":""r"",""id"":""3ktu0s122l"",""type"":""flow""},{""type"":""eventEnd"",""center"":{""x"":620,""y"":260},""id"":""oxcrq8pqoh""},{""startId"":""r3co6n6vyx"",""endId"":""oxcrq8pqoh"",""startDirection"":""r"",""id"":""f7nkp9lajf"",""type"":""flow""}],""createdEntitiesData"":{""d0bwlpsqjb_mo1mt5e7q1"":{""elementId"":""d0bwlpsqjb"",""actionId"":""mo1mt5e7q1"",""link"":null,""entityType"":""Opportunity"",""numberId"":0},""r3co6n6vyx_eatnd0zhrz"":{""elementId"":""r3co6n6vyx"",""actionId"":""eatnd0zhrz"",""link"":null,""entityType"":""Task"",""numberId"":0}}}","This example shows how it's regular sub-processes work in BPM.
* This flowchart is not active. You need to set *Is Active* to make it runnable.
Click on flow items bellow to see more info.
This process supposed to be started manually (from the account detail view > dropdown in top-right corner).
You can replace start event with the event of other type."
"Example: User task",Lead,,"{""list"":[{""type"":""taskUser"",""center"":{""x"":160,""y"":120},""actionType"":""Approve"",""assignmentType"":"""",""instructions"":null,""name"":""Approve lead: '{$name}'"",""targetTeamId"":null,""target"":"""",""id"":""450yvismmk"",""text"":""User needs to approve lead"",""targetTeamName"":null,""description"":""You need to specify *Assignment* field. E.g. you can make the task to be assigned to a specific user, who is a sales manager or apply round-robin among users of a specific team.\n\nThe execution of the flow will be stopped until the user task is resolved.\n\n""},{""type"":""eventStartConditional"",""center"":{""x"":60,""y"":120},""triggerType"":""afterRecordCreated"",""isInterrupting"":false,""id"":""hmchah0hs2"",""text"":""Lead created & status is 'New'"",""description"":null,""conditionsAll"":[{""comparison"":""equals"",""subjectType"":""value"",""cid"":0,""fieldToCompare"":""status"",""value"":""New"",""type"":""all""}],""conditionsAny"":[],""conditionsFormula"":""""},{""startId"":""hmchah0hs2"",""endId"":""450yvismmk"",""startDirection"":""r"",""id"":""4xiy8mazdh"",""type"":""flow""},{""type"":""gatewayExclusive"",""center"":{""x"":260,""y"":120},""id"":""kw4z4p00jg"",""text"":null,""defaultFlowId"":""p0md4yzc4c"",""flowList"":[{""id"":""m4hu3o0ykw"",""conditionsAll"":[{""comparison"":""equals"",""subjectType"":""value"",""cid"":0,""fieldToCompare"":""created:450yvismmk.resolution"",""value"":""Approved"",""type"":""all""}],""conditionsAny"":[],""conditionsFormula"":""""}],""description"":null},{""startId"":""450yvismmk"",""endId"":""kw4z4p00jg"",""startDirection"":""r"",""id"":""zvzlrejg7j"",""type"":""flow""},{""type"":""task"",""center"":{""x"":380,""y"":180},""id"":""ftj2vk8jyg"",""text"":""Change status to 'Dead'"",""actionList"":[{""fieldList"":[""status""],""fields"":{""status"":{""subjectType"":""value"",""attributes"":{""status"":""Dead""}}},""cid"":0,""id"":""uapdcjlwh3"",""formula"":"""",""type"":""updateEntity""}],""description"":null},{""startId"":""kw4z4p00jg"",""endId"":""ftj2vk8jyg"",""startDirection"":""d"",""id"":""p0md4yzc4c"",""type"":""flow"",""isDefault"":true,""text"":""not"",""description"":null},{""type"":""eventEnd"",""center"":{""x"":480,""y"":180},""id"":""sbye7srr81"",""text"":null,""description"":null},{""startId"":""ftj2vk8jyg"",""endId"":""sbye7srr81"",""startDirection"":""r"",""id"":""0rzdao21lz"",""type"":""flow""},{""type"":""task"",""center"":{""x"":380,""y"":60},""id"":""dro3qss4io"",""text"":""Assign lead, change status to 'Assigned'"",""actionList"":[{""fieldList"":[""status""],""fields"":{""status"":{""subjectType"":""value"",""attributes"":{""status"":""Assigned""}}},""cid"":0,""id"":""re6s604de8"",""formula"":"""",""type"":""updateEntity""}],""description"":""Add *Apply Assigned Rule* action or use *Update Target Record* to set the specific Assigned User.""},{""startId"":""kw4z4p00jg"",""endId"":""dro3qss4io"",""startDirection"":""u"",""id"":""m4hu3o0ykw"",""type"":""flow"",""isDefault"":false,""text"":""approved"",""description"":null},{""type"":""eventEnd"",""center"":{""x"":480,""y"":60},""id"":""7gp8swt3c2"",""text"":null,""description"":null},{""startId"":""dro3qss4io"",""endId"":""7gp8swt3c2"",""startDirection"":""r"",""id"":""l0kizq3kbg"",""type"":""flow""}],""createdEntitiesData"":{""450yvismmk"":{""elementId"":""450yvismmk"",""actionId"":null,""entityType"":""BpmnUserTask"",""numberId"":0,""text"":""User needs to approve lead""}}}","This example shows how it's possible to make BPM process to interact with a user.
* This flowchart is not active. You need to set *Is Active* to make it runnable.
Click on flow items bellow to see more info.
This example is for Contact entity type. You can create a similar flowchart for any other entity type.
"
"Example: Tracking URLs",Contact,,"{""list"":[{""type"":""eventStart"",""center"":{""x"":60,""y"":120},""id"":""kabctmad37"",""text"":""Start event"",""description"":""You can start a process manually, from the contact detail view > menu in the top-right corner.\n\nYou can use *Conditional Start Event* instead of this one. To start the process automatically once a contact meets a specific criteria.""},{""type"":""taskSendMessage"",""center"":{""x"":160,""y"":120},""doNotStore"":false,""from"":""system"",""to"":""targetEntity"",""replyTo"":"""",""messageType"":""Email"",""optOutLink"":false,""id"":""zlq87fmo83"",""text"":""Send tracking link to customer"",""emailTemplateName"":null,""emailTemplateId"":null,""description"":""Create and select an email template. Use a placeholder of your tracking URL in the template body as URL of a link.""},{""startId"":""kabctmad37"",""endId"":""zlq87fmo83"",""startDirection"":""r"",""id"":""s82mkwpspe"",""type"":""flow""},{""type"":""gatewayEventBased"",""center"":{""x"":280,""y"":120},""id"":""vcon04sppd"",""text"":null,""description"":""This will stop execution of the flow until any subsequent event is triggered.""},{""startId"":""zlq87fmo83"",""endId"":""vcon04sppd"",""startDirection"":""r"",""id"":""6weyw6rep4"",""type"":""flow""},{""type"":""eventIntermediateTimerCatch"",""center"":{""x"":360,""y"":120},""timerBase"":null,""timerShift"":7,""timerShiftUnits"":""days"",""timerShiftOperator"":""plus"",""timerFormula"":null,""id"":""hy7u5o7agx"",""text"":""Time expired"",""description"":""We 7 days expire, the event will be triggered. It will cancel the concurrent pending event 'Link clicked'.""},{""type"":""eventIntermediateSignalCatch"",""center"":{""x"":360,""y"":220},""signal"":""clickUrl.Contact.{$id}.5d8206aa9d76df4c8"",""id"":""isu1v13nfx"",""text"":""Link clicked"",""description"":""This event is triggered once a customer clicked the link.\n\nReplace `5d8206aa9d76df4c8` with the real ID of your tracking URL. ID can be obtained from the address bar or from the placeholder of the tracking URL.""},{""startId"":""vcon04sppd"",""endId"":""hy7u5o7agx"",""startDirection"":""r"",""id"":""fxvfwqph8o"",""type"":""flow""},{""startId"":""vcon04sppd"",""endId"":""isu1v13nfx"",""startDirection"":""d"",""id"":""7fjh4skior"",""type"":""flow""},{""type"":""eventEnd"",""center"":{""x"":440,""y"":120},""id"":""oii6la4bfz"",""text"":null,""description"":null},{""type"":""task"",""center"":{""x"":460,""y"":220},""id"":""y68y98mltp"",""text"":""Do something"",""description"":""Here you can make some actions with the contact. E.g. update some field with *Update Target Record* action."",""actionList"":[]},{""type"":""eventEnd"",""center"":{""x"":560,""y"":220},""id"":""wqo430vyvs"",""text"":null,""description"":null},{""startId"":""hy7u5o7agx"",""endId"":""oii6la4bfz"",""startDirection"":""r"",""id"":""0yxkcxh31f"",""type"":""flow""},{""startId"":""isu1v13nfx"",""endId"":""y68y98mltp"",""startDirection"":""r"",""id"":""hq9xnk35rt"",""type"":""flow""},{""startId"":""y68y98mltp"",""endId"":""wqo430vyvs"",""startDirection"":""r"",""id"":""xm0tnpk22u"",""type"":""flow""}],""createdEntitiesData"":{""zlq87fmo83"":{""elementId"":""zlq87fmo83"",""actionId"":null,""entityType"":""Email"",""numberId"":0,""text"":""Send tracking link to customer""}}}","This example shows how it's possible to automatically interact with a customer via emails.
* This flowchart is not active. You need to set *Is Active* to make it runnable.
* You need to create Tracking URL at Campaigns > top-right menu > Tracking URLs. Tracking URLs. Create URL and obtain a generated placeholder (example: `{trackingUrl:5d8206aa9d76df4c8}`). Use that placeholder as a URL of the link in your email template. Example: `<a href=""{trackingUrl:5d8206aa9d76df4c8}"">Click me</a>`.
Click on flow items bellow to see more info.
This example is for Contact entity type. You can create a similar flowchart for Account or Lead.
"
"Example: Drip email campaign",Lead,,"{""list"":[{""type"":""eventStartSignal"",""center"":{""x"":40,""y"":100},""signal"":""@leadCapture.LEAD_CAPTURE_ID"",""isInterrupting"":false,""id"":""tj7y8xjxel"",""text"":""Lead subscribed"",""description"":""Replace *LEAD_CAPTURE_ID* with ID for the Lead Capture record. \n\nID can be obtained from the address bar on the detail view of Lead Capture record. Administration > Lead Capture > click on the record.\n\nYou can also start the process manually, from the lead detail view > menu in the top-right corner.\n\nYou can also use *Conditional Start Event* instead of this one. To start the campaign once a lead meets a specific criteria.""},{""type"":""taskSendMessage"",""center"":{""x"":140,""y"":100},""doNotStore"":false,""from"":""system"",""to"":""targetEntity"",""replyTo"":"""",""messageType"":""Email"",""optOutLink"":true,""id"":""vv3g2qreo7"",""text"":""Send welcome email"",""emailTemplateName"":null,""emailTemplateId"":null,""description"":""Select email template. ""},{""startId"":""tj7y8xjxel"",""endId"":""vv3g2qreo7"",""startDirection"":""r"",""id"":""18tm84gton"",""type"":""flow""},{""type"":""eventIntermediateTimerCatch"",""center"":{""x"":240,""y"":100},""timerBase"":null,""timerShift"":7,""timerShiftUnits"":""days"",""timerShiftOperator"":""plus"",""timerFormula"":null,""id"":""nl6fasw5ey"",""text"":""Wait 7 days"",""description"":""This will stop a flow execution for 7 days.""},{""startId"":""vv3g2qreo7"",""endId"":""nl6fasw5ey"",""startDirection"":""r"",""id"":""katp0qxsd7"",""type"":""flow""},{""type"":""taskSendMessage"",""center"":{""x"":280,""y"":200},""doNotStore"":false,""from"":""system"",""to"":""targetEntity"",""replyTo"":"""",""messageType"":""Email"",""optOutLink"":true,""id"":""35pbf4obcs"",""text"":""Send email #1"",""emailTemplateName"":null,""emailTemplateId"":null,""description"":""Select email template.""},{""startId"":""nl6fasw5ey"",""endId"":""35pbf4obcs"",""startDirection"":""r"",""id"":""0v29rrcw0z"",""type"":""flow""},{""type"":""eventIntermediateTimerCatch"",""center"":{""x"":380,""y"":200},""timerBase"":null,""timerShift"":7,""timerShiftUnits"":""days"",""timerShiftOperator"":""plus"",""timerFormula"":null,""id"":""tvzgqpzarn"",""text"":""Wait 7 days"",""description"":""This will stop a flow execution for 7 days.""},{""startId"":""35pbf4obcs"",""endId"":""tvzgqpzarn"",""startDirection"":""r"",""id"":""rs87q5e62u"",""type"":""flow""},{""type"":""gatewayExclusive"",""center"":{""x"":460,""y"":260},""id"":""qul8pya34q"",""text"":""Lead is converted"",""description"":null,""defaultFlowId"":""la5nv59bb1"",""flowList"":[{""id"":""ztv11gwdiu"",""conditionsAll"":[{""comparison"":""equals"",""subjectType"":""value"",""cid"":0,""fieldToCompare"":""status"",""value"":""Converted"",""type"":""all""}],""conditionsAny"":[],""conditionsFormula"":""""}]},{""startId"":""tvzgqpzarn"",""endId"":""qul8pya34q"",""startDirection"":""r"",""id"":""ylwrry53ss"",""type"":""flow""},{""type"":""taskSendMessage"",""center"":{""x"":560,""y"":320},""doNotStore"":false,""from"":""system"",""to"":""targetEntity"",""replyTo"":"""",""messageType"":""Email"",""optOutLink"":true,""id"":""jnkhc4jx17"",""text"":""Send email #2-c"",""emailTemplateName"":null,""emailTemplateId"":null,""description"":""Select email template. ""},{""type"":""taskSendMessage"",""center"":{""x"":360,""y"":320},""doNotStore"":false,""from"":""system"",""to"":""targetEntity"",""replyTo"":"""",""messageType"":""Email"",""optOutLink"":true,""id"":""z614240ac9"",""text"":""Send email #2"",""emailTemplateName"":null,""emailTemplateId"":null,""description"":""Select email template. ""},{""startId"":""qul8pya34q"",""endId"":""jnkhc4jx17"",""startDirection"":""r"",""id"":""ztv11gwdiu"",""type"":""flow"",""isDefault"":false,""text"":""yes"",""description"":null},{""startId"":""qul8pya34q"",""endId"":""z614240ac9"",""startDirection"":""l"",""id"":""la5nv59bb1"",""type"":""flow"",""isDefault"":true,""text"":""no"",""description"":null},{""type"":""gatewayExclusive"",""center"":{""x"":460,""y"":380},""id"":""8td5tjelmv""},{""startId"":""jnkhc4jx17"",""endId"":""8td5tjelmv"",""startDirection"":""d"",""id"":""cv25n3sry1"",""type"":""flow""},{""startId"":""z614240ac9"",""endId"":""8td5tjelmv"",""startDirection"":""d"",""id"":""ylupvbttcf"",""type"":""flow""},{""type"":""eventIntermediateTimerCatch"",""center"":{""x"":460,""y"":460},""timerBase"":null,""timerShift"":30,""timerShiftUnits"":""days"",""timerShiftOperator"":""plus"",""timerFormula"":null,""id"":""1st7mkgevh"",""text"":""Wait 30 days"",""description"":null},{""startId"":""8td5tjelmv"",""endId"":""1st7mkgevh"",""startDirection"":""d"",""id"":""avlmd4qzcy"",""type"":""flow""},{""type"":""taskSendMessage"",""center"":{""x"":560,""y"":460},""doNotStore"":false,""from"":""system"",""to"":""targetEntity"",""replyTo"":"""",""messageType"":""Email"",""optOutLink"":true,""id"":""wxpeoqmqto"",""text"":""Send email #3"",""emailTemplateName"":null,""emailTemplateId"":null,""description"":""Select email template. ""},{""startId"":""1st7mkgevh"",""endId"":""wxpeoqmqto"",""startDirection"":""r"",""id"":""m0jfvpcul9"",""type"":""flow""},{""type"":""task"",""center"":{""x"":560,""y"":560},""id"":""g5j1ksct0e"",""text"":""Update lead"",""description"":""Here you can update the lead record. For example: set some field to indicate that the lead has finished the campaign.\n\nEdit *Update Target Record* action to specify what to update."",""actionList"":[{""fieldList"":[],""fields"":{},""cid"":0,""id"":""y7s7rqp9rx"",""formula"":"""",""type"":""updateEntity""}]},{""startId"":""wxpeoqmqto"",""endId"":""g5j1ksct0e"",""startDirection"":""d"",""id"":""x9hwxkda4m"",""type"":""flow""},{""type"":""eventEnd"",""center"":{""x"":660,""y"":560},""id"":""8irjncf90g"",""text"":""End campaign"",""description"":null},{""startId"":""g5j1ksct0e"",""endId"":""8irjncf90g"",""startDirection"":""r"",""id"":""rb39zoq635"",""type"":""flow""},{""type"":""eventSubProcess"",""center"":{""x"":100,""y"":360},""isExpanded"":true,""triggeredByEvent"":true,""dataList"":[{""type"":""eventStartSignal"",""center"":{""x"":40,""y"":40},""signal"":""optOut.Lead.{$id}"",""isInterrupting"":true,""id"":""g2r3zm7c5m"",""text"":""Lead opted-out"",""description"":""Do NOT change the signal name above.\n\nThis event is interrupting, meaning it will stop the parent process once triggered, so the campaign will be stopped.""},{""type"":""eventEnd"",""center"":{""x"":140,""y"":40},""id"":""9ezcdbezdj""},{""startId"":""g2r3zm7c5m"",""endId"":""9ezcdbezdj"",""startDirection"":""r"",""id"":""4pz5fd6hh5"",""type"":""flow""}],""target"":"""",""targetType"":""Lead"",""id"":""pq3dd59hsq"",""eventStartData"":{""type"":""eventStartSignal"",""center"":{""x"":60,""y"":40},""signal"":""optOut.Lead.{$id}"",""isInterrupting"":true,""id"":""g2r3zm7c5m"",""text"":""Lead opted-out"",""description"":""Do NOT change the signal name above.\n\nThis event is interrupting, meaning it will stop the parent process once triggered, so the campaign will be stopped.""},""width"":189,""height"":121}],""createdEntitiesData"":{""vv3g2qreo7"":{""elementId"":""vv3g2qreo7"",""actionId"":null,""entityType"":""Email"",""numberId"":0,""text"":""Send welcome email""},""35pbf4obcs"":{""elementId"":""35pbf4obcs"",""actionId"":null,""entityType"":""Email"",""numberId"":1,""text"":""Send email #1""},""jnkhc4jx17"":{""elementId"":""jnkhc4jx17"",""actionId"":null,""entityType"":""Email"",""numberId"":2,""text"":""Send email #2-c""},""z614240ac9"":{""elementId"":""z614240ac9"",""actionId"":null,""entityType"":""Email"",""numberId"":3,""text"":""Send email #2""},""wxpeoqmqto"":{""elementId"":""wxpeoqmqto"",""actionId"":null,""entityType"":""Email"",""numberId"":4,""text"":""Send email #3""}}}","This example show how it's possible to run drip campaigns with BPM.
* This flowchart is not active. You need to set *Is Active* to make it runnable.
* You need to edit Start Event to specify ID of a lead capture record.
* You need to specify email templates for each 'Send Message' tasks.
Click on flow items bellow to see more info."
================================================
FILE: docs/_static/scripts/backup-docker-container.sh
================================================
#!/bin/bash
# This script creates a backup of an EspoCRM Docker container, including both the database and files.
#
# EspoCRM - Open Source CRM application.
# Copyright (C) 2014-2026 EspoCRM, Inc.
# Website: https://www.espocrm.com
set -e
function printExitError() {
local message="$1"
local red='\033[0;31m'
local default='\033[0m'
printf "\n${red}ERROR${default}: ${message}\n"
exit 1
}
DEFAULT_ESPOCRM_CONTAINER="espocrm"
DEFAULT_BACKUP_PATH="$(pwd)"
printf "NOTICE\nThis script is designed to work only with the official EspoCRM Docker image:\nhttps://docs.espocrm.com/administration/docker/installation/#install-espocrm-with-docker-compose.\n\n"
sleep 1
if [ -z "$1" ]; then
echo "Enter an EspoCRM container name ($DEFAULT_ESPOCRM_CONTAINER):"
read ESPOCRM_CONTAINER
if [ -z "$ESPOCRM_CONTAINER" ]; then
ESPOCRM_CONTAINER="$DEFAULT_ESPOCRM_CONTAINER"
fi
else
ESPOCRM_CONTAINER="$1"
fi
if [ -z "$2" ]; then
echo "Enter a full path to backup directory ($DEFAULT_BACKUP_PATH):"
read BACKUP_PATH
if [ -z "$BACKUP_PATH" ]; then
BACKUP_PATH="$DEFAULT_BACKUP_PATH"
fi
else
BACKUP_PATH="$2"
fi
# --- Validate ---
if [ ! -d "$BACKUP_PATH" ]; then
mkdir -p "$BACKUP_PATH" || printExitError "Unable to create the directory '$BACKUP_PATH'"
fi
if [ ! -w "$BACKUP_PATH" ]; then
printExitError "Backup directory '$BACKUP_PATH' is not writable"
fi
DB_CONTAINER=$(docker exec "$ESPOCRM_CONTAINER" printenv ESPOCRM_DATABASE_HOST || echo "")
if [ -z "$DB_CONTAINER" ]; then
printExitError "Unable to determine the database container."
fi
DB_NAME=$(docker exec "$ESPOCRM_CONTAINER" printenv ESPOCRM_DATABASE_NAME || echo "espocrm")
DB_USER=$(docker exec "$ESPOCRM_CONTAINER" printenv ESPOCRM_DATABASE_USER || echo "espocrm")
DB_PASS=$(docker exec "$ESPOCRM_CONTAINER" printenv ESPOCRM_DATABASE_PASSWORD || echo "")
if ! docker ps --format '{{.Names}}' | grep -q "^${ESPOCRM_CONTAINER}$"; then
printExitError "Container '$ESPOCRM_CONTAINER' is not running"
fi
if ! docker ps --format '{{.Names}}' | grep -q "^${DB_CONTAINER}$"; then
printExitError "Container '$DB_CONTAINER' is not running"
fi
if [ -z "$DB_PASS" ]; then
printExitError "Unable to determine the database from container environment"
fi
# --- Prepare temp dir and archive name ---
BACKUP_ARCHIVE_NAME="$(date +'%Y-%m-%d_%H%M%S').tar.gz"
TEMP_DIR="$BACKUP_PATH/espocrm_backup_tmp"
mkdir -p "$TEMP_DIR"
# --- Database backup ---
echo ">>> Backing up database '$DB_NAME'..."
DB_VERSION=$(docker exec "$DB_CONTAINER" mariadb --version 2>/dev/null || docker exec "$DB_CONTAINER" mysql --version 2>/dev/null)
if echo "$DB_VERSION" | grep -qi "mariadb"; then
DUMP_CMD="mariadb-dump"
else
DUMP_CMD="mysqldump"
fi
docker exec "$DB_CONTAINER" \
$DUMP_CMD --user="$DB_USER" --password="$DB_PASS" "$DB_NAME" \
> "$TEMP_DIR/db.sql" || printExitError "Unable to create a backup for the database '$DB_NAME'"
tar -czf "$TEMP_DIR/db.tar.gz" -C "$TEMP_DIR" "db.sql"
rm "$TEMP_DIR/db.sql"
echo ">>> Database backup done."
# --- Files backup ---
echo ">>> Backing up EspoCRM files..."
docker run --rm \
--volumes-from "${ESPOCRM_CONTAINER}" \
-v "${TEMP_DIR}:/backup" \
alpine tar czf /backup/files.tar.gz -C /var/www/html . > /dev/null 2>&1
echo ">>> Files backup done."
# --- Bundle into single archive ---
echo ">>> Creating final archive..."
tar czf "$BACKUP_PATH/$BACKUP_ARCHIVE_NAME" -C "$TEMP_DIR" .
# --- Cleanup ---
rm -rf "$TEMP_DIR"
echo ""
echo "Backup created at '$BACKUP_PATH/$BACKUP_ARCHIVE_NAME'."
================================================
FILE: docs/_static/scripts/backup.sh
================================================
#!/bin/bash
# This script creates a backup of an EspoCRM installation, including both the database and files.
#
# EspoCRM - Open Source CRM application.
# Copyright (C) 2014-2026 EspoCRM, Inc.
# Website: https://www.espocrm.com
set -e
function printExitError() {
local message="$1"
local red='\033[0;31m'
local default='\033[0m'
printf "\n${red}ERROR${default}: ${message}\n"
exit 1
}
DEFAULT_PATH_TO_ESPO="/var/www/html"
DEFAULT_BACKUP_PATH=$(pwd)
if [ -z "$1" ]; then
echo "Enter a full path to EspoCRM directory ($DEFAULT_PATH_TO_ESPO):"
read PATH_TO_ESPO
if [ -z "$PATH_TO_ESPO" ]; then
PATH_TO_ESPO="$DEFAULT_PATH_TO_ESPO"
fi
else
PATH_TO_ESPO="$1"
fi
if [ ! -d "$PATH_TO_ESPO" ]; then
printExitError "The directory '$PATH_TO_ESPO' does not exist"
fi
if [ ! -r "$PATH_TO_ESPO" ]; then
printExitError "The directory '$PATH_TO_ESPO' is not readable"
fi
if [ -z "$2" ]; then
echo "Enter a full path to backup directory ($DEFAULT_BACKUP_PATH):"
read BACKUP_PATH
if [ -z "$BACKUP_PATH" ]; then
BACKUP_PATH="$DEFAULT_BACKUP_PATH"
fi
else
BACKUP_PATH="$2"
fi
if [ ! -d "$BACKUP_PATH" ]; then
mkdir -p "$BACKUP_PATH" || printExitError "Unable to create the directory '$BACKUP_PATH'"
fi
if [ ! -w "$BACKUP_PATH" ]; then
printExitError "Backup directory '$BACKUP_PATH' is not writable"
fi
cd "$PATH_TO_ESPO"
if [ ! -f "data/config.php" ]; then
printExitError "The '$PATH_TO_ESPO' is not EspoCRM directory"
fi
DB_NAME=$(php -r "\$config=include('data/config.php'); echo @\$config['database']['dbname'];")
DB_USER=$(php -r "\$config=include('data/config.php'); echo @\$config['database']['user'];")
DB_PASS=$(php -r "\$config=include('data/config.php'); echo @\$config['database']['password'];")
if [ -z "$DB_NAME" ]; then
DB_NAME=$(php -r "\$config=include('data/config-internal.php'); echo @\$config['database']['dbname'];")
fi
if [ -z "$DB_USER" ]; then
DB_USER=$(php -r "\$config=include('data/config-internal.php'); echo @\$config['database']['user'];")
fi
if [ -z "$DB_PASS" ]; then
DB_PASS=$(php -r "\$config=include('data/config-internal.php'); echo @\$config['database']['password'];")
fi
if [ -z "$DB_NAME" ]; then
printExitError "Unable to determine database name"
fi
BACKUP_NAME=$(basename "$PATH_TO_ESPO")
BACKUP_ARCHIVE_NAME="$(date +'%Y-%m-%d_%H%M%S').tar.gz"
echo ">>> Backing up database ..."
# Detect database type and set appropriate dump command
if command -v mariadb-dump &> /dev/null; then
DUMP_CMD="mariadb-dump"
echo ">>> Detected MariaDB"
elif mysqldump --version 2>&1 | grep -qi "mariadb"; then
DUMP_CMD="mariadb-dump"
echo ">>> Detected MariaDB"
elif command -v mysqldump &> /dev/null; then
DUMP_CMD="mysqldump"
echo ">>> Detected MySQL"
else
printExitError "Neither MariaDB nor MySQL database found"
fi
cd "$BACKUP_PATH" || {
printExitError "Permission denied on $BACKUP_PATH"
}
mkdir -p "$BACKUP_NAME"
cd "$BACKUP_NAME"
# --- Database backup ---
"$DUMP_CMD" --user="$DB_USER" --password="$DB_PASS" "$DB_NAME" > "db.sql" || {
echo "Enter database user:"
read DB_USER
echo "Enter database password:"
read DB_PASS
"$DUMP_CMD" --user="$DB_USER" --password="$DB_PASS" "$DB_NAME" > "db.sql" || {
printExitError "Unable to create a backup for the database '$DB_NAME'"
}
}
tar -czf "db.tar.gz" "db.sql"
rm "db.sql"
echo ">>> Database backup done."
# --- Files backup ---
echo ">>> Backing up files..."
tar -czf "files.tar.gz" -C "$PATH_TO_ESPO" .
echo ">>> Files backup done."
# --- Bundle into single archive ---
echo ">>> Creating final archive..."
cd ..
tar czf "$BACKUP_ARCHIVE_NAME" "$BACKUP_NAME"/
# Remove temporary files
rm -rf "$BACKUP_NAME"
echo ""
echo "Backup is created at '$BACKUP_PATH/$BACKUP_ARCHIVE_NAME'."
================================================
FILE: docs/administration/2fa.md
================================================
# 2-Factor Authentication
EspoCRM supports the following 2-factor authentication methods:
* TOTP (as of v5.7)
* Email (as of v7.0)
* SMS (as of v7.0)
An administrator needs to enable 2FA at Administration > Authentication and select allowed methods. Then users can enable 2FA for their accounts.
## TOTP
[Time-based One-time Password](https://en.wikipedia.org/wiki/Time-based_One-time_Password_algorithm) is an algorithm that generates a one-time password which uses the current time as a source of uniqueness.
!!! warning
The server time must be correct. Otherwise, authentication won't work.
### Enabling for user
You need to have an authenticator application installed on your mobile phone (e.g. [Google Authenticator](https://en.wikipedia.org/wiki/Google_Authenticator)).
Go to your user profile (from the menu at the top-right corner) and then click *Security* button. Then, enable 2FA, select the *TOTP* method. After that, scan the QR-code with your mobile application.
Next time when you log in to Espo, you will need to enter your username and password, then enter a code from your mobile application.
### If you lost your TOTP key
If you are not an administrator, you need to contact the administrator to ask them to disable 2FA for your user account.
If you are an administrator, the only option is to disable 2FA globally by setting `'auth2FA' => false` in the config file `data/config.php`.
## Authentication via email
When the Email 2FA is used, after a user entered a valid username and password, a code will be sent to their email address. Then, the user needs to enter that code to log in to Espo.
It's highly recommended for users to use a non-primary email address for 2FA. A user should have at least two email addresses (they can be added only by admin).
### Enabling for user
Go to your user profile (from the menu at the top-right corner) and then click *Security* button. Then, enable 2FA and select the *Email* method. Choose an email address (it's highly recommended to choose non-primary one) and then send a code. Then you will need to confirm the code.
## Authentication via SMS
Requires having an implementation for your SMS provider. An extension with SMS providers can be downloaded [here](https://github.com/espocrm/ext-sms-providers/releases).
### Enabling for user
Go to your user profile (from the menu at the top-right corner) and then click *Security* button. Then, enable 2FA and select the *SMS* method. Choose a phone number and then send a code. Then, you will need to confirm the code.
================================================
FILE: docs/administration/addresses.md
================================================
# Addresses
## Countries
*As of v8.3.*
An administrator can add country names with their ISO 3166-1 alpha-2 codes (at Administration > Address Countries).
Added countries will be available in autocompletion in Address fields.
Countries marked as preferred will be displayed first (on empty input).
Countries can also be [imported](import.md) from a CSV file.
The default predefined country list with English names can be optionally loaded. To do this, follow: Administration > Address Countries > top-right menu > Populate with default country list.
================================================
FILE: docs/administration/apache-server-configuration.md
================================================
# Apache server configuration for EspoCRM
These instructions are supplementary to the [server configuration](server-configuration.md) guidelines. Note that all configuration settings listed here are made on an Ubuntu server.
## PHP requirements
To install all necessary libraries, run these commands in the terminal:
```
sudo apt-get update
sudo apt-get install php-mysql php-json php-gd php-zip php-imap php-mbstring php-curl php-exif php-ldap php-xml
sudo phpenmod imap mbstring
sudo service apache2 restart
```
## Server configuration
On a **production** environment, the following configuration is recommended:
* The document root should be set to `/path_to_espo/public/`.
* An alias `/client/` => `/path_to_espo/client/` should be added.
Apache config example:
```
DocumentRoot /path_to_espo/public/
Alias /client/ /path_to_espo/client/
<Directory /var/www/html/>
AllowOverride None
</Directory>
<Directory /path_to_espo/public/>
AllowOverride All
</Directory>
```
Note that `/path_to_espo` should be changed to the absolute path of the EspoCRM instance on your server. It can be `/var/www/html` if you extracted EspoCRM package to the default Apache root directory.
The location of the Apache config is usually `/etc/apache2/apache2.conf` (on Ubuntu) but can be different.
You need to have **mod_rewrite** enabled. You can do it by running in the terminal:
```
sudo a2enmod rewrite
sudo service apache2 restart
```
For **non-production environment** you can just set `AllowOverride All` for the root directory. Then the `.htaccess` file in the root directory will handle all rewrite rules.
## Enabling rewrite rules
EspoCRM requires *mod_rewrite* being enabled in Apache. W/o it you may encounter *'API Error: EspoCRM API is unavailable'* error during installation or see an information page prompting to configure your webserver.
To fix it, try the following steps **one by one**. After each step check if the issue is solved. If it works, then further steps are not needed.
### 1. Enable *mod_rewrite* support for Apache
To enable *mod_rewrite*, run these commands in a terminal:
```
sudo a2enmod rewrite
sudo service apache2 restart
```
### 2. Enable *.htaccess* support
To enable .htaccess support, add or edit the server configuration file. It can be:
* `/etc/apache2/apache2.conf`
* `/etc/httpd/conf/httpd.conf`
* `/etc/apache2/sites-available/ESPO_VIRTUAL_HOST.conf`
Add the following code:
```
<Directory /PATH_TO_ESPO/>
AllowOverride All
</Directory>
```
You need to change `/PATH_TO_ESPO/` to the full path to your EspoCRM instance. It can be `/var/www/html/`.
Note: On production, it's reasonable to use `/PATH_TO_ESPO/public/` path instead.
Then restart Apache:
```
sudo service apache2 restart
```
### 3. Add RewriteBase path (a last resort, not needed in most cases)
Open the file `/ESPOCRM_DIRECTORY/api/v1/.htaccess` and replace the following line:
```
# RewriteBase /
```
with
```
RewriteBase /REQUEST_URI/api/v1/
```
where *REQUEST_URI* is a part of URL, e.g. for `https://example.com/espocrm/`, REQUEST_URI is *'espocrm'*.
## Enable HTTP AUTHORIZATION support (only for FastCGI)
FastCGI does not support HTTP AUTHORIZATION by default. If you use FastCGI, you have to enable it in your VirtualHost or `/etc/apache2/apache2.conf` (or httpd.conf) by adding the following code:
For Fcgid module:
```
<IfModule mod_fcgid.c>
FcgidPassHeader Authorization
FcgidPassHeader Proxy-Authorization
FcgidPassHeader HTTP_AUTHORIZATION
</IfModule>
```
For FastCgi module:
```
<IfModule mod_fastcgi.c>
FastCgiConfig -pass-header Authorization \
-pass-header Proxy-Authorization \
-pass-header HTTP_AUTHORIZATION
</IfModule>
```
To check which module is currently being used, run this command and find the module:
```
apache2ctl -M
```
================================================
FILE: docs/administration/api-before-save-script.md
================================================
# API Before-Save Script
*As of v7.5.*
A [formula](formula.md) script that is invoked on POST and PUT API requests to an entity endpoint before the record is saved.
It's executed only when the record is created or updated via the API (this also includes actions made through the UI as EspoCRM is a single page application – the frontend communicates with the backend via API). It's not executed when a record is saved from within the system (e.g. in hooks, workflow actions, custom code).
Can be used for custom validation, duplicate checking and access control. Available at Administration > Entity Manager > {Entity type} > Formula.
!!! warning
API Before-Save Script is not executed when doing mass update.
You can use `exception\throwInvalid` [function](formula/exception.md#exceptionthrowinvalid) for additional internal
validation in the Before-save script. This script executes every time an entity is saved.
!!! note
Avoid accessing related records in API Before-Save Script using a dot (e.g. `account.assignedUserId`). When the script is executed, the relation can be not yet established.
## Special functions
!!! warning
These functions are available only in *API Before-Save Script*. Using them in other places will produce an error.
In error throwing functions, the MESSAGE will be rendered in Espo in an error alert, it supports Markdown syntax. The BODY is an HTTP response body, which may be needed for integrations.
### recordService\skipDuplicateCheck
Returns *true* if a *skipDuplicateCheck* HTTP header is passed (when a user is warned about a duplicate but opts to save the record anyway).
!!! example
```
if (!recordService\skipDuplicateCheck()) {
// process duplicate checking
}
```
### recordService\throwDuplicateConflict
`recordService\throwDuplicateConflict(RECORD_ID)`
`recordService\throwDuplicateConflict(RECORD_IDS)` – receives a list of IDs.
Throws a duplicate conflict exception. This will show a modal dialog warning the user that the saved record
might be a duplicate.
!!! example
```
if (!recordService\skipDuplicateCheck()) {
$id = record\findOne('MyEntityType', null, null, 'name=', name);
if ($id) {
recordService\throwDuplicateConflict($id);
}
}
```
### recordService\throwBadRequest
`recordService\throwBadRequest(MESSAGE, [BODY])`
Throws a Bad Request exception.
!!! example
```
recordService\throwBadRequest('Invalid value.');
```
!!! example
```
// HTTP response body.
$obj = object\create();
$obk['key'] = 'value';
recordService\throwBadRequest('Invalid value.', $obj);
```
### recordService\throwForbidden
`recordService\throwForbidden(MESSAGE, [BODY])`
Throws a Forbidden exception.
### recordService\throwConflict
`recordService\throwConflict(MESSAGE, [BODY])`
Throws a Conflict exception.
## Examples
### Duplicate checking
Example 1:
```
if (entity\isNew() && !recordService\skipDuplicateCheck()) {
$id = record\findOne('MyEntityType', null, null, 'name=', name);
if ($id) {
recordService\throwDuplicateConflict($id);
}
}
```
Example 2:
```
if (entity\isNew() && !recordService\skipDuplicateCheck()) {
$ids = list();
$id = record\findOne('MyEntityType', null, null, 'name=', name);
if ($id) {
$ids = array\push($ids, $id);
}
$id = record\findOne('MyEntityType', null, null, 'emailAddress=', emailAddress);
if ($id) {
$ids = array\push($ids, $id);
}
$ids = array\unique($ids);
if (array\length($ids)) {
recordService\throwDuplicateConflict($ids);
}
}
```
### Validation
Example:
```
if (status == 'Completed' && !dateCompleted) {
recordService\throwBadRequest("Missing `dateCompleted` value.");
}
```
### Access control
Example:
```
if (
entity\isAttributeChanged('status') &&
!array\includes(env\userAttribute('teamsIds'), '6133380f577a93492')
) {
recordService\throwForbidden("Not allowed to change status.");
}
```
================================================
FILE: docs/administration/app-secrets.md
================================================
# App Secrets
*As of v9.0.*
Applications secrets allow you to securely store sensitive values in Espo, such as API keys and passwords. To access them, go to: Administration > App Secrets.
Secrets are stored as instances of the *AppSecret* entity type. It's possible to read them from code and a Formula script.
## Reading in Formula
*As of v9.2.3.*
Example:
```
$secretValue = ext\appSecret\get($secretName);
```
## Using in Workflows
In the *Send HTTP Request* action, it's possible to insert secrets into headers using the placeholder *{#secrets.name}*. Where *name* is the secret's name.
================================================
FILE: docs/administration/b2c.md
================================================
# Configuring EspoCRM for B2C (Business-to-Client)
By default, EspoCRM is configured for use in B2B business. It's possible to set it up solely for B2C.
* Check *B2C Mode* at Administration > Settings.
* Remove the *Account* tab from the navigation menu: Administration > User Interface.
* Remove the *Account* fields from your layouts: Administration > Layout Manager.
* Disable access to the *Account* scope in Roles if you allowed it before.
* Remove the *Account* from picklists of all parent fields: Administration > Entity Manager > {Meeting/Call/Task/Email} > Fields > Parent.
================================================
FILE: docs/administration/backup-and-restore.md
================================================
# Backup and Restore
This article outlines backup and restore methods for EspoCRM in various environments:
* [Non-containerized installation](#non-containerized-installation)
* [Docker installation](#docker-installation)
## Non-containerized installation
Refers to a traditional installation that does not use containers.
### Backup with a script
You can use a script to back up all needed data. Login via SSH and run the commands (tested on the Ubuntu server).
#### Step 1. Download a script
```bash
wget https://raw.githubusercontent.com/espocrm/documentation/stable/docs/_static/scripts/backup.sh
```
#### Step 2. Run the script
```bash
bash ./backup.sh PATH_TO_ESPOCRM BACKUP_PATH
```
where
* `PATH_TO_ESPOCRM` is a path to installed EspoCRM directory
* `BACKUP_PATH` is a path to backup directory
For Ubuntu server it is:
```bash
bash ./backup.sh /var/www/html /opt/backups
```
Note: If your MariaDB / MySQL user doesn't have needed rights to dump your database, you will be prompted to enter credentials of another MariaDB / MySQL user.
After successful creation, you will get a path to the created backup.
### Manual backup
To make a full backup of your EspoCRM instance you need to copy EspoCRM files and dump the database. Here are the instructions on how to do it on an Ubuntu server with MySQL or MariaDB.
#### Step 1. Back up files
Create an archive of the entire directory contents of the EspoCRM instance. You can use the following command:
```bash
tar -czf "files.tar.gz" -C /var/www/html .
```
The command above implies that the path to your instance is `/var/www/html`, which is usual default path on Linux servers. Modify it if needed.
#### Step 2. Back up database
To back up all your data, you have to know the database name and credentials for access. You can find the database name in the configuration file `/ESPOCRM_DIRECTORY/data/config-internal.php` under the section *database*. You can use this command to back up your database.
For MariaDB:
```bash
mariadb-dump --user=DATABASE_USER --password=DATABASE_PASSWORD DATABASE_NAME > "db.sql"
```
For MySQL:
```bash
mysqldump --user=DATABASE_USER --password=DATABASE_PASSWORD DATABASE_NAME > "db.sql"
```
#### Step 3. Copy the backup
That's all. Now, you have to copy the created backup to a safe place.
### Manual restore
You can restore the EspoCRM instance from the backup created as described above.
#### Step 1. Unarchive backup files
To unarchive files, you can use *Archive Manager* or run the below command. Files need to be placed in the web-server directory.
```bash
tar -xzf "files.tar.gz" -C /var/www/html
```
where `/var/www/html` is the web-server directory.
#### Step 2. Set required permissions
The files should be owned by the web-server user and have correct permissions. Set required permissions by following this [instruction](server-configuration.md#required-permissions-for-unix-based-systems).
#### Step 3. Import database dump
Database dump should be imported to the same database with the same user credentials, otherwise the correction should be made in the configuration file `ESPOCRM_DIRECTORY/data/config-internal.php`. To import your database from the dump, run the command below in a terminal:
For MariaDB:
```bash
mariadb --user=DATABASE_USER --password=DATABASE_PASSWORD DATABASE_NAME < db.sql
```
For MySQL:
```bash
mysql --user=DATABASE_USER --password=DATABASE_PASSWORD DATABASE_NAME < db.sql
```
#### Step 4. Check/configure crontab
Check if your crontab is configured properly. Run the command below and check if a path to EspoCRM is correct:
```bash
sudo crontab -l -u www-data
```
where `www-data` is your web-server user.
If you have to make any changes, use this command:
```bash
sudo crontab -l -u www-data
```
More details about configuring crontab see [here](server-configuration.md#setting-up-crontab).
## Docker installation
### Backup with a script
!!! important
Script must be run from the host.
#### Step 1. Download a script
```bash
wget https://raw.githubusercontent.com/espocrm/documentation/stable/docs/_static/scripts/backup-docker-container.sh
```
#### Step 2. Run the script
Run one of the following commands at your choice:
```bash
sudo bash backup-docker-container.sh
```
or
```bash
sudo bash backup-docker-container.sh CONTAINER_NAME ./BACKUP_DIR
```
### Automatic backups
Backups can be scheduled on the host by adding the following entry to the crontab:
```
0 1 * * * sudo bash /opt/scripts/backup-docker-container.sh CONTAINER_NAME /backup/espocrm >> /backup/espocrm/backup.log 2>&1
```
### Manual backup
Run the following commands:
```bash
mkdir ./BACKUP_DIR
# Database
sudo docker exec CONTAINER_NAME mariadb-dump \
-u DATABASE_USER --password=DATABASE_PASSWORD DATABASE_NAME \
> ./BACKUP_DIR/db.sql
# Files
sudo docker exec CONTAINER_NAME tar czf - /var/www/html > ./BACKUP_DIR/files.tar.gz
```
### Manual restore
Run the following commands:
```bash
# Database
sudo docker exec -i CONTAINER_NAME mariadb \
-u DATABASE_USER --password=DATABASE_PASSWORD DATABASE_NAME \
< ./BACKUP_DIR/db.sql
# Files
sudo docker exec CONTAINER_NAME sh -c "rm -rf /var/www/html/*"
cat ./BACKUP_DIR/files.tar.gz | sudo docker exec -i CONTAINER_NAME tar xzf - -C /
# Restart
sudo docker restart CONTAINER_NAME
```
================================================
FILE: docs/administration/bpm-activities.md
================================================
# BPM Activities
Activities encompass automated tasks, manual tasks, and sub-processes. On a flowchart, they are depicted as gray rectangles.
* [Task](#task)
* [Send Message Task](#send-message-task)
* [User Task](#user-task)
* [Script Task](#script-task)
* [Sub-Process](#sub-process)
* [Event Sub-Process](#event-sub-process)
* [Call Activity](#call-activity)
----
## Task
A task can execute different actions. Available actions are listed below.
The BPM task utilizes actions from the Workflow tool. The list of available actions is almost the same as in Workflows. See more details about [Workflow actions](workflows.md#actions).
### Actions
#### Create Record
Creates a new record of a specific entity type.
#### Create Related Record
Creates a new record related to the target record.
#### Update Target Record
Updates the target record. You can also utilize Formula script to set fields with calculated values.
It's possible to delete the record with the Formula expression: `deleted = 1`.
#### Update Related Record
Updates a record (or multiple records) related to the target record. You can also utilize Formula script to set fields with calculated values.
#### Update Created Record
Updates a record that was created within the current process.
It's possible to delete the record with the formula expression: `deleted = 1`.
#### Update Process Record
Updates the process record. Can be used to assign the process to a specific user or team.
It's possible to delete the process record with the formula expression: `deleted = 1`.
#### Link to Another Record
Relates the target record with another record.
#### Unlink from Another Record
Unrelates the target record from another specified record.
#### Apply Assignment Rule
Assigns the record to a user based on a specific assignment rule. Can be applied to the target record, the process record, or any record created by the process. See [more](workflows.md#apply-assignment-rule).
#### Create Notification
Creates an in-app notification for specific users. See [more](workflows.md#create-notification).
Process variables can be included in a message with such placeholders: `{$$variable}`, where *$variable* is a variable defined in the process.
#### Make Followed
Makes specific users to follow the target record, the process record, or any record created by the process.
#### Trigger Another Workflow Rule
Runs a workflow rule of the sequential type. The target record of the called rule can be the same or be switched to a related record or a record created by the process.
#### Run Service Action
Runs a specific service action. The list of built-in actions is available [here](workflows.md#run-service-action). Developers can create custom service actions.
#### Send HTTP Request
Calls an external API endpoint. See [more](workflows.md#send-http-request).
#### Execute Formula Script
Executes a specific Formula script.
### Formula usage
When using Formula in a task that creates or updates another record, the current entity (for the script) is switched the the record you are creating. To access attributes of the target record you can utilize the function `targetEntity\attribute(ATTRIBUTE)`.
!!! example
```
// attribute of the target record
$someVariable1 = targetEntity\attribute('name');
// attribute of the record you are creating or updating
$someVariable2 = name;
// attribute of the record you are creating or updating
$someVariable3 = entity\attribute('name');
```
!!! warning
In the context of create and update record actions, it's recommended to use Formula only for setting attributes. Use the *Script Task* or *Execute Formula Script* action for any other logic.
If the parameter *Isolate Variables* is checked, Formula variables defined within the task won't be exposed outside of the task. The *Return Variables* parameter allows you to specify variables that will be exposed.
!!! note
If you didn't check the *Isolate Variables* parameter, be aware that all variables defined in Execute Formula Script actions will remain available throughout the process and even after it finishes. Since some variables may contain sensitive data or consume disk space, checking the Isolate Variables parameter is recommended.
----
## Send Message Task
Sends an email message to a specific recipient.
An email can be sent to:
* User assigned to process
* Target record (if such has email address)
* Related record
* Specific email address
* Specific users
* Specific teams
* Specific contacts
* Followers of target record
You can specify which email address the email will be sent from.
If you specify a *Reply-To* address, a sent email will contain it in the *Reply-To* header. It will facilitate a recipient to reply to that address instead of the address specified in the *From* field.
When you use *Specific email address* option, it's possible to use process variables. E.g. `{$$emailAddress}`, where *$emailAddress* is a variable defined in the process before.
An Email Template is used to generate the email. You can use regular placeholders (both in body and subject) to substitute field values of the target record. You can also insert process variables (defined in a Script Task) in an email template with placeholders like `{$$variable}`.
You can catch a reply to a sent email with Message Intermediate Event further in the process.
Additional attachments can be added to an email using the *Attachments Variable* parameter. Specify a Formula variable name that contains an attachment ID or an array of attachment IDs. You can generate needed attachments in a Formula script in a previous action. As of v3.6.
### Opting-out
It's possible to add opt-out link to an email body. Opting out can be caught within the process with Catching Signal Event with the signal name `optOut.ENTITY_TYPE.{$id}`, where *ENTITY_TYPE* should be replaced with an entity type (e.g. Lead), *{$id}* is a placeholder standing for the target record ID. Signal name usage example: `optOut.Lead.{$id}`.
### Tracking URLs
See a [separate article](bpm-tracking-urls.md).
----
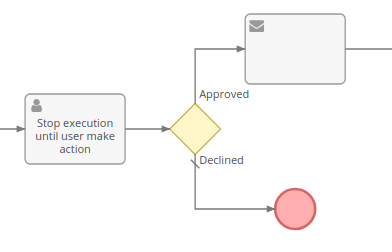
## User Task
It stops the flow until a user (specified explicitly or selected by an assignment rule) resolves the task. A Process User Task record will be created in the system. By default, there are 3 action types: Approve, Review, and Accomplish.
* Approve – requires the user to choose between 'Approved' and 'Declined'.
* Review – gives only one option: 'Reviewed'.
* Accomplish – has two options: 'Completed' and 'Failed'.
The user assigned to the created Process User Task record will receive an in-app notification. An administrator can also enable email notifications for Process User Tasks under Administration > Notifications > Email Notifications.
It's possible to specify text with instructions for the user (markdown is supported).
You can use placeholders in *Name* and *Instructions* fields:
* `{$attribute}` – attribute of target record
* `{$$variable}` – process variable (defined by Script Task)
Users can also add the Process User Tasks dashlet on their dashboard to see their active process user tasks.
An administrator can add custom action types in Entity Manager. The resolution options available for a particular action type is controlled by dynamic logic. The logic can be edited as well.
### Displaying on detail view
It's possible to display Process User Tasks on the detail view of the target entity.
#### Using Report Panels
You can utilize the *Report Panels* feature to display process tasks on the record detail view. Create a Report of the List type that shows all Process User Tasks (no filters). Then, create a Report Panel (Administration > Report Panels) for the needed entity type with this list Report selected.
#### Using created relationship
It's possible to create a Children-to-Parent relationship between some entity type and the Process User Task, then Process User Tasks will be available in the *Bottom* layout of that entity type. Go to Administration > Entity Manager > BpmnUserTask > Relationships > edit Children-to-Parent, check your entity type in *Foreign Fields*.
### Resolution
It's possible to check a resolution of a passed Process User Task with diverging gateways or conditional events. This allows for making ramifications in the process flow depending on a resolution. The User Task resolution is available in conditions of gateways and conditional events.
The resolution (as well as any User Task field) can be also accessed further in the flow with Formula:
```
$resolution = bpm\createdEntity\attribute('USER_TASK_ELEMENT_ID', 'resolution');
$resolutionNote = bpm\createdEntity\attribute('USER_TASK_ELEMENT_ID', 'resolutionNote');
```
The element ID can be obtained from the User Task's detail view.
### Canceling
A created User Task can be canceled by a process. There are two ways:
1. Using 'Update Created Record' action (within a Task activity), setting 'Is Canceled' field to 'true'.
2. Using interrupting boundary event (attached to the User Task activity).
----
## Script Task
Executes a [Formula](formula.md) script.
You can store some variables and use them further in the process. All variables you defined in the script will be automatically stored.
```
$myVar1 = 'test';
$myVar2 = id;
// ...
$myVar2 = null;
```
Variables can be utilized in:
* Condition checking
* Tasks that create or update record
* Email templates
* Signal names
* User Task names
* Email addresses in a Send Message task
You can update the target record with a Script Task, though the more proper way is to use the Update Target Record action of a regular Task.
With the Script Task, you can define actions that are impossible to do with the regular Task. Examples:
* Create a new user and send generated password ([see](formula-scripts-examples.md#creating-new-user))
* Send email with generated PDF in attachment ([see](formula-scripts-examples.md#sending-email-with-generated-pdf-in-attachment))
If the parameter *Isolate Variables* is checked, Formula variables defined within the task won't be exposed outside of the task. The *Return Variables* parameter allows you to specify variables that will be exposed.
!!! note
If you didn't check the *Isolate Variables* parameter, be aware that all defined variables will remain available throughout the process and even after it finishes. Since some variables may contain sensitive data or consume disk space, it might be reasonable to unset them at the end of the script.
```
$tmpVariable = null;
```
Though, checking the Isolate Variables parameter is recommended.
----
## Sub-Process
A sub-process is an isolated process that executes within the parent process. A sub-process has it's own flowchart. It starts once the flow reaches its activity element in the parent process.
A sub-process should have one (and only one) regular Start Event.
A sub-process can be interrupted by an interrupting boundary event. When a sub-process is successfully ended (not interrupted and not ended with an error), the flow of the parent process proceeds to the next element.
It's possible to **pass a different target record** to a sub-process (to switch the target record to another). After you placed the Sub-Process element on a flowchart, click it to edit, then specify the target. It allows you to easily access fields of created records or records related to the target record. For example, to send a notification to the assigned user of the opportunity that was created within the process.
It's possible to define a target record using a Formula expression. You need to select the target *Record: {EntityType}* and specify a formula expression in the *Target ID Expression* field. The expression should evaluate to the ID of the record.
When a sub-process is initiated, all formula **variables are copied** from the parent process to the sub-process. Variables of the sub-process are isolated from its parent process. You can specify which variables will be copied to the parent process upon the completion in the *Return Variables* parameter. Note: Specify variable names without a leading *$* character.
When a sub-process is initiated, it receives an information about all records that have been created by the parent process by that moment. The sub-process can access those records. The parent process can access records created by the sub-process only after the sub-process is completed. Once the sub-process is completed, it passes the information about created records to the parent process.
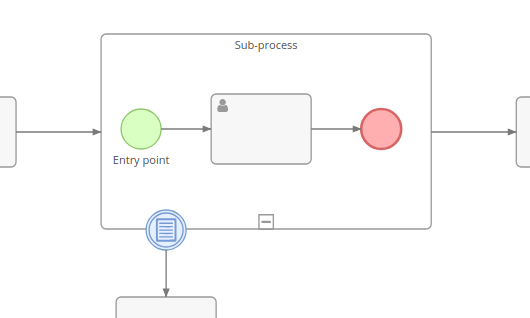
### Multi-instance sub-process
*As of v2.10.*
The *Collection Expression* should evaluate to a list of values. Each value will instantiate a separate sub-process. The value will be available in the variable `$inputItem`.
In case of a **sequential** multi-instance sub-process, sub processes will be executed one by one. Otherwise, they execute in parallel.
It's possible to have multiple sub-processes for different targets. By using the Formula function *record\findRelatedMany*, it's possible to have sub-processes for related records. The result of the function is the list of IDs. You need to set the *Target ID Expression* to `$inputItem`.
The result of a multi-instance sub-process can be returned to a specific variable defined by the *Return Collection Variable* field. It will contain an array of objects. Each object will contain return-variables of each sub-process instance.
When a multi-instance sub-process is interrupted by a boundary event, all other instances are cancelled.
The max number of sub-process instances is defined by the config parameter `bpmnSubProcessInstanceMaxCount`. The default value is `20`.
----
## Event Sub-Process
An Event Sub-Process has neither ingoing nor outgoing flows. It is triggered by its Start Event. The start event can be of any type: Conditional, Timer, Signal, Message, Error, Escalation.
It is possible to **pass a different target record** to an event sub-process. An event sub-process can *interrupt* its parent process. Whether the sub-process is interrupting is determined by the *Is Interrupting* parameter of its start event.
When an event sub-process is initiated, all formula **variables are copied** from the parent process to the sub-process.
When an event sub-process is initiated, it receives an information about all records that have been created by the parent process by that moment. The sub-process can access those records. Records created by the event sub-process won't be accessible by the parent process.
Non-interrupting event sub-process can be executed **multiple times**. For example, when a condition occurred multiple times.
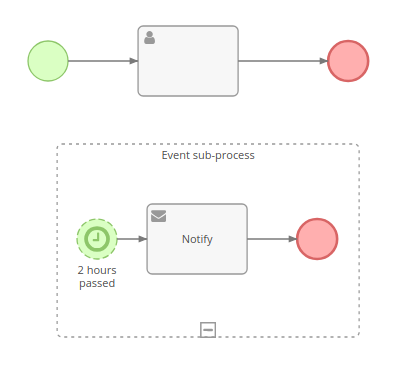
----
## Call Activity
Executes a sub-process defined by a flowchart stored separately. Provides the ability to re-use the same flowchart in different processes. The Call Activity sub-process works the same way as a regular Sub-Process.
It is possible to pass a different target record to a sub-process.
================================================
FILE: docs/administration/bpm-compensation.md
================================================
# Compensation in BPM
*As of Advanced Pack v2.14.*
The Compensation mechanism is supposed to perform undo actions when something went wrong. Only successfully completed activities can be compensated. Both tasks and sub-processes can be compensated.
A compensation is initiated by triggering a Compensation Event (usually from an error handler). The throwing compensation event can specify an activity's ID that needs to be compensated. If the ID is omitted, all *visible* *compensable* activities will be compensated in the order reverse to their instantiation.
By utilizing intermediate throwing compensation events, it is possible to establish a specific order in which compensations will be executed.
!!! note
Compensation can be applied only for activities that were successfully completed. A sub-process that is not yet finished cannot be compensated from outside.
An activity is **compensable** if one of the two following conditions is met:
* Activity has a Boundary Compensation Event attached that is associated with a compensation activity.
* Activity is a sub-process that contains a Compensation Event Sub-Process.
Boundary compensation:
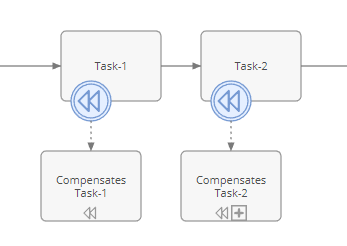
When a sub-process is compensated with the boundary event, the compensation activity does not have access to the sub-process internal state (called Black-Box compensation). To be able to access the internal state, use the Compensation Event Sub-Process inside the sub-process.
When the parent process initiates compensation for the sub-process activity, if there's no boundary compensation event attached to that activity, it will check whether the sub-process contains an event sub-process with a compensation start event (called Compensation Handler). Then, it executes the compensation handler. The compensation handler usually is supposed to explicitly throw compensation events to compensate activities of the sub-process.
Compensation event sub-process:
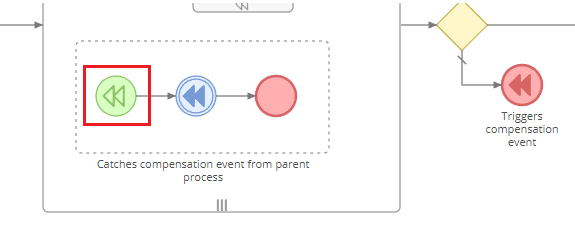
An activity is considered **visible** from the throwing Event when:
* It is contained in a normal flow at the same level of the process/sub-process.
* It is contained in the parent process/sub-process of an event sub-process in which the Event is contained.
In the same level:
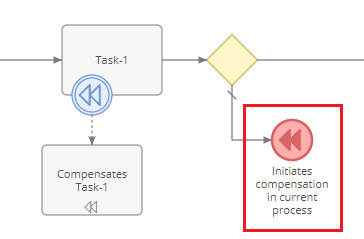
From the event sub-process:
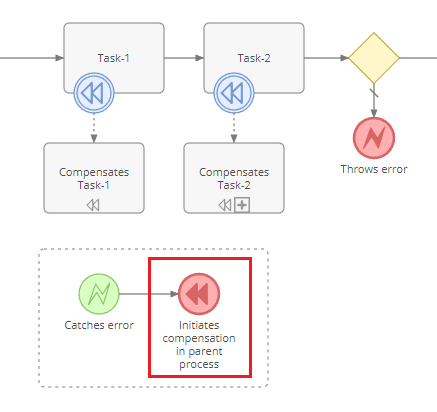
Compensation events:
* [Boundary](bpm-events.md#compensation-intermediate-event-boundary)
* [Start](bpm-events.md#compensation-start-event)
* [Intermediate throwing](bpm-events.md#compensation-intermediate-event-throwing)
* [End](bpm-events.md#compensation-end-event)
================================================
FILE: docs/administration/bpm-configuration.md
================================================
# BPM Configuration
## Deferring conditional event checking
*As of v2.8.7.*
Within a period defined by the config parameter `bpmnPendingDeferPeriod` (`"6 hours"` by default), pending conditional event nodes are being checked as soon as possible.
After that period, they will be checked with an interval defined by the parameter `bpmnPendingDeferIntervalPeriod` (`"10 minutes"` by default).
This is an optimization measure.
If an entity is updated, it will make nodes related to that entity to be checked one time regardless whether the defer period has been passed.
## Pending event checking limit
The config parameter `bpmnProceedPendingMaxSize` (`20000` by default) limits max number of pending flows that can be processed. Consider increasing it if you usually have a large number of active processes.
## Multi-instance sub-process limit
The max number of sub-process instances (within a multi-instance sub-process) is defined by the config parameter `bpmnSubProcessInstanceMaxCount`. The default value is `20`.
## Running in parallel
*As of v3.10.*
Can be enabled by setting the config parameter `bpmnRunInParallel` to `true`. Running jobs [in parallel](jobs.md#running-jobs-in-parallel-processes) must be also enabled.
For scheduled processes, to process them in parallel, use a Timer Intermediate Event right after the Start Timer event. Scheduled processes are started sequentially even if the *bpmnRunInParallel* parameter is set to true.
================================================
FILE: docs/administration/bpm-drip-email-campaign.md
================================================
# Drip Email Campaign with BPM
With the [BPM tool](bpm.md) it's possible to create drip email campaigns.
## Campaign starting
The drip email campaign for an individual target (lead or contact) will be represented as single BPM Process. A process can be started automatically or manually.
You need to create a *Process Flowchart* (under Administration > Flowcharts) and choose the *Lead* (or *Contact*) target type.
### Starting on lead subscription
A process instance will be started once a Lead enters into the CRM through the [Lead Capture](web-to-lead.md) form.
You need to use the *Signal Start Event* with a specific signal name. Put it on the flowchart layout and click it to edit. Specify the signal name with the value `@leadCapture.LEAD_CAPTURE_ID`, where *LEAD_CAPTURE_ID* is an ID of the lead capture record (can be obtained from its URL).
### Starting once lead gets related with target list
Can be useful if you don't utilize the Lead Capture but use some other logic. You need to do the same steps as in the previous section but use the signal name `@relate.targetLists.TARGET_LIST_ID`, where *TARGET_LIST_ID* is an ID of the target list record (can be obtained from its URL).
### Starting manually
Every BPM process can be started manually (a user needs to have a corresponding permission granted with a role). You can use either the *Signal Start Event* or the regular *Start Event* in the flowchart.
## Email sending
Use multiple *[Send Message Tasks](bpm-activities.md#send-message-task)*. Each item will automatically send a specific email. You need to check *Opt-out link* parameter for these tasks to provide recipients with the ability to unsubscribe from the campaign.
You need to put *Timer Intermediate Events* between tasks and specify how much time should pass before every next email sending.
You also can use [Gateways](bpm-gateways.md) to diverge a flow upon certain conditions.
## Handling opting-out
Once a target (recipient of an email) clicked on the unsubscribe link, the system broadcasts a signal `optOut.Lead.some-lead-id`, where *some-lead-id* is an actual ID of the lead record.
We want the whole process to be terminated once a Lead is opted out.
For this, you need to add the *Event Sub-Process*. Put a *Signal Start Event* inside the sub-process rectangle and specify the signal name with the value `optOut.Lead.{$id}`. You also need to check the parameter *Is Interrupting* for this event. By setting this parameter, we indicate that the whole parent process should be interrupted once the event is catched.
Here, inside the sub-process, you can also add a *Task* that will do some manipulations with the target record (Lead).
## Example
You can get a downloadable example [here](bpm-examples.md#downloadable-examples).
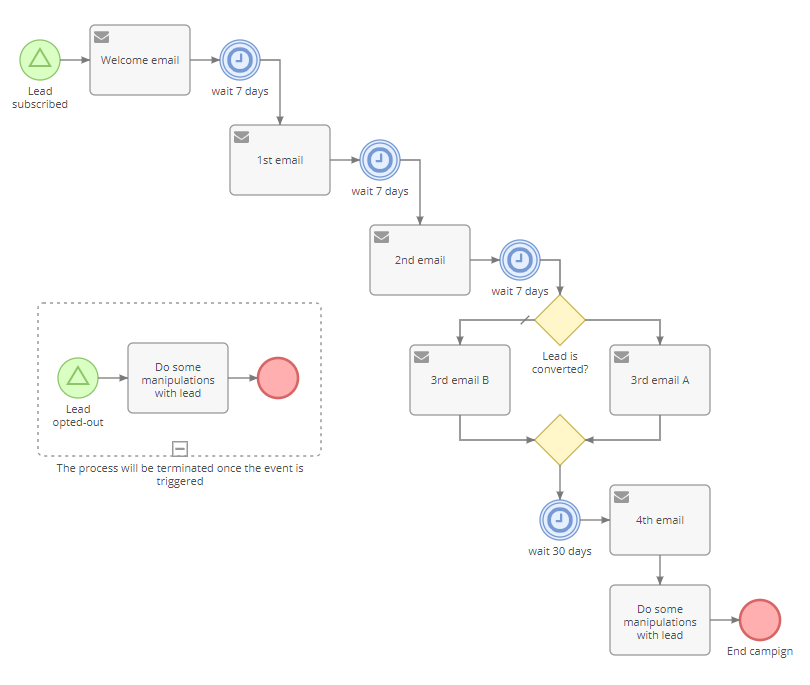
================================================
FILE: docs/administration/bpm-events.md
================================================
# BPM Events
Events represent something that happens during a business process. They also start, end and interrupt a process flow. Depicted as a circle.
Events can be divided into the following groups:
* Start – green circle. They are entry points of processes and sub-processes.
* Intermediate – blue circle. Occur between start and end events in a process. Can throw or catch.
* End – red circle. Define final points of process flows.
* Boundary – blue circle attached to an activity. They allow to interact with running activities. Technically, they are intermediate catching events.
All available events:
* Start Events
* [Start](#start-event)
* [Conditional](#conditional-start-event)
* [Timer](#timer-start-event)
* [Signal](#signal-start-event)
* [Error](#error-start-event)
* [Escalation](#escalation-start-event)
* [Compensation](#compensation-start-event)
* Intermediate Events
* [Conditional (catching)](#conditional-intermediate-event-catching)
* [Timer (catching)](#timer-intermediate-event-catching)
* [Signal (catching)](#signal-intermediate-event-catching)
* [Signal (throwing)](#signal-intermediate-event-throwing)
* [Message (catching)](#message-intermediate-event-catching)
* [Escalation (throwing)](#escalation-intermediate-event-throwing)
* [Compensation (throwing)](#compensation-intermediate-event-throwing)
* End Events
* [End](#end-event)
* [Terminate](#terminate-end-event)
* [Error](#error-end-event)
* [Escalation](#escalation-end-event)
* [Signal](#signal-end-event)
* [Compensation](#compensation-end-event)
* Boundary Events
* [Error](#error-intermediate-event-boundary)
* [Conditional](#conditional-intermediate-event-boundary)
* [Timer](#timer-intermediate-event-boundary)
* [Escalation](#escalation-intermediate-event-boundary)
* [Signal](#signal-intermediate-event-boundary)
* [Message](#message-intermediate-event-boundary)
* [Compensation](#compensation-intermediate-event-boundary)
----
## Start Events
### Start Event
Doesn't have parameters. It's a starting point of the process. A Start Event can be initiated manually by a user who has access to create processes. This can be done either from the processes list view or from the detail view of a target record.
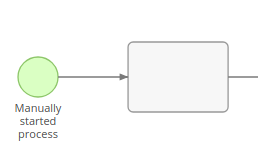
Can be also used as an entry point of a sub-process.
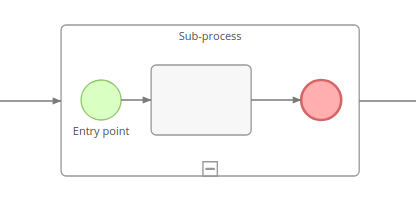
### Conditional Start Event
A starting point of a process. It's supposed to be triggered automatically when specified conditions are met. There are three types of triggers: 'After record created', 'After record updated', and 'After record saved'. Event conditions are defined in the same way as conditions in the Workflows tool. See [here](workflows.md#conditions).
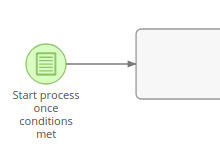
Can be also used to start an event sub-process.
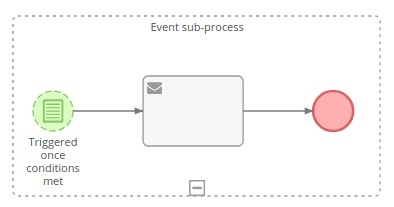
!!! note
When used to start an event sub-process, the Boundary Start Event is not synced with the flow. Condition checking is run in idle which may cause some delay. A flowchart design should not rely on a condition event being checked immediately.
### Timer Start Event
A starting point of a process. It initiates processes by scheduling. You need to select a list report (which returns records, each one will initiate a separate process) and specify execution scheduling (in the crontab notation).
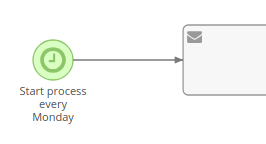
Can be also used to start an event sub-process. In this case, it is scheduled to be triggered at time defined by event parameters.
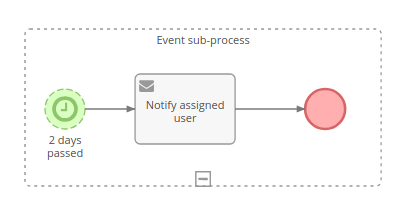
### Signal Start Event
Can be used to start processes and event sub-processes.
When it's used to start a process, only *object signals* can be used.
When it's used to start an event sub-process, it's possible to use placeholders in a signal name. Example: `test.{$id}`, {$id} will be replaced with the ID of the target record.
!!! note
Signals are not limited by a process scope. Signal triggered in one BPM process can be caught in another process.
!!! note
Signal name cannot be empty.
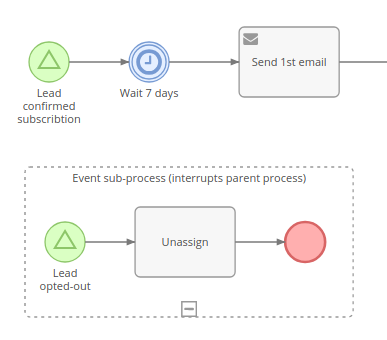
See [more info](bpm-signals.md) about signals.
### Error Start Event
Can only be used to start an event sub-process. It's triggered once an error event is thrown within the same process.
If the *Error Code* is specified, the event will be triggered only when an error with the same code occurs. If the *Error Code* is empty, it will catch any error.
It cannot be non-interrupting, because the process gets terminated once an error event is thrown.
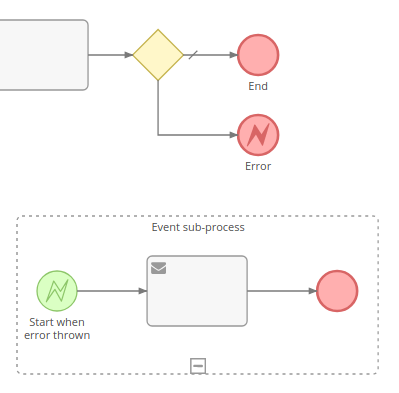
It's possible to view an error code and message in the flow log.
The error code and the exception message can be obtained further in the flow with Formula functions `bpm\caughtErrorCode` and `bpm\caughtErrorMessage`.
!!! note
When an error event sub-process is defined inside a regular sub-process, it can be reasonable to re-throw the error in the end
of the event sub-process with the Error End Event. It will propagate the error to the top level.
### Escalation Start Event
Can be used only to start an event sub-process. It's triggered once an escalation event it thrown within the same process.
If the Escalation Code is specified, it will be triggered only when an escalation with the same code occurs. If the Escalation Code is empty, it will catch any escalation.
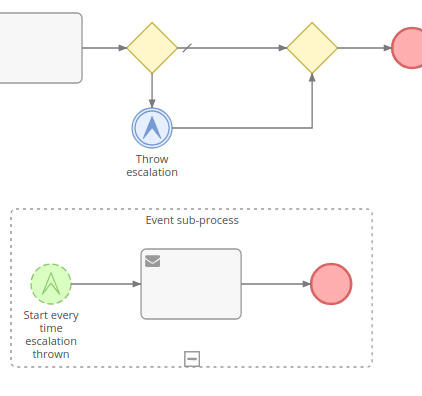
### Compensation Start Event
*As of v2.14.*
Starts a sub-process compensation handler. Can be used only in an event sub-process.
When the parent process initiates compensation for the sub-process activity, if there's no boundary compensation event attached to that activity, it will check whether the sub-process contains an event sub-process with a compensation start event (called Compensation Handler). Then, it executes the compensation handler. The compensation handler usually is supposed to explicitly throw compensation events to compensate activities of the sub-process.

!!! note
Actual only when the event sub-process is inside a regular sub-process.
In case of a multi-instance sub-process, the compensation handler is processed for each completed instance of the sub-process.
----
## Intermediate Events
### Conditional Intermediate Event (Catching)
This event stops the flow until specified criteria is met. Event conditions are defined in the same way as conditions in the Workflow tool. See [here](workflows.md#conditions). Note that BPM tool introduces [additional functions](bpm-formula.md) that can be used in a Formula script.
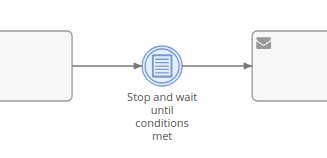
### Timer Intermediate Event (Catching)
This event stops the flow and waits as long as it's determined by event's parameters.
For more complex timer settings you can utilize a [Formula](formula.md) script. Formula scripts should return a Date-Time value (date-time string in the UTC timezone). Once this time arrives, the flow is proceeded to the next element.
By utilizing *datetime\closest* Formula function, it's possible to set the timer to a specific time in the future, e.g. the beginning of the next working day.
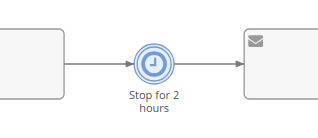
### Signal Intermediate Event (Catching)
Stops the flow until a specific signal is catched. Placeholders can be used in a signal name.
!!! note
Signal name can not be empty.
See [more info](bpm-signals.md) about signals.
### Signal Intermediate Event (Throwing)
Broadcasts a specified signal. Placeholders can be used in a signal name. Example: `test.{$id}`, {$id} will be replaced with the ID of the target record.
If the first character of a signal name is `@`, it will broadcast an object signal along with the current target record. This signal type can be used only to initiate a new process or trigger a workflow rule.
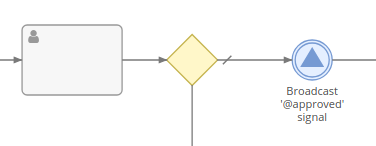
!!! note
Signals are not limited by a process scope. Signal triggered in one BPM process can be caught in another process.
!!! note
Signal name can not be empty.
See [more info](bpm-signals.md) about signals.
### Message Intermediate Event (Catching)
Stops the flow until an email is received.
Only emails sent not by internal users can trigger the event.
It's possible to utilize the event in pair with the *Send Message* task. The event will wait until the sent email is replied. Specify that email in the *Replied To* parameter.
The *Related To* parameter requires that the email was related (via the Parent field) to a specific record.
There is the ability to specify Formula conditions that the email should satisfy to trigger the event. You can utilize it to skip auto-response emails or to catch emails containing a specific ID. Formula example: `string\contains(body, $id)`.
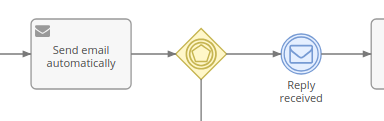
### Escalation Intermediate Event (Throwing)
Throws an escalation. The Escalation Code can be specified. An escalation can be catched by a boundary event (if it's thrown within a sub-process) or by an event sub-process.
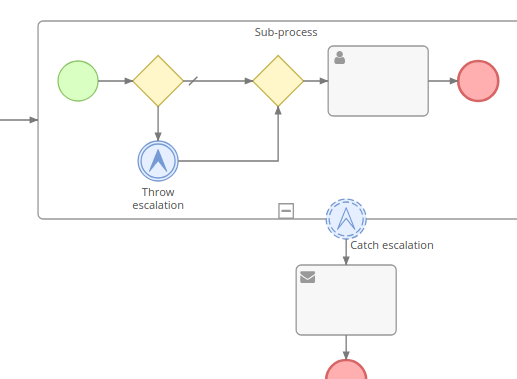
### Compensation Intermediate Event (Throwing)
*As of v2.14.*
Behaves the same as the [compensation end event](#compensation-end-event) with the only difference that it continues flow execution to the next element.
Can be useful to ensure processing of multiple compensations in a specific order.
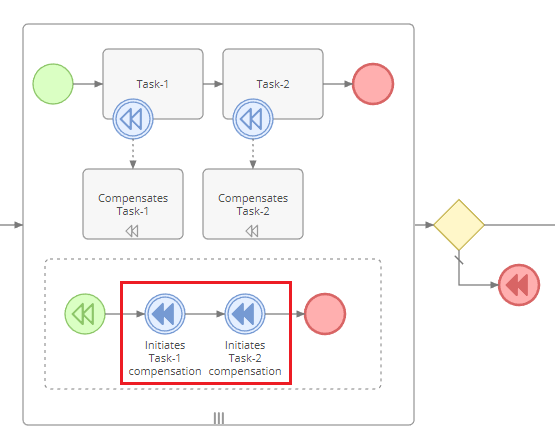
----
## End Events
### End Event
Ends the current flow. It doesn't end flows running in parallel. When the flow reaches an end event and there isn't anything running in parallel, then the process ends.
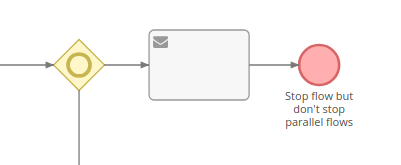
### Terminate End Event
Ends all flows. The process is subsequently ended.

### Error End Event
Terminates the process and triggers an error. The Error Code can be specified. The error can be catched by a boundary event (if it's thrown within a sub-process) or by an event sub-process.
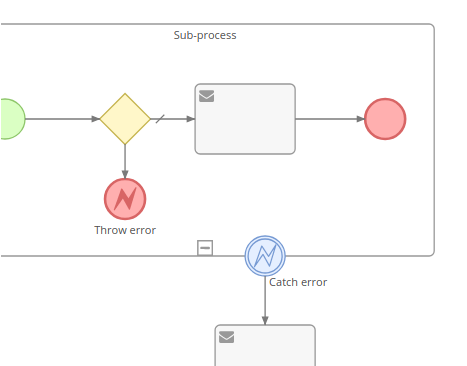
!!! note
Uncaught errors are propagated to the parent process.
### Escalation End Event
Ends the flow and triggers an escalation. The Escalation Code can be specified. The escalation can be catched by a boundary event (if it's thrown within a sub-process) or by an event sub-process.

### Signal End Event
Ends the flow and broadcasts a specified signal.
Placeholders can be used in a signal name. Example: `test.{$id}`, {$id} will be replaced with the ID of the target record.
If the first character of the signal name is `@`, it will broadcast an object signal along with the current target record. This signal type can be used only to initiate a new process or trigger a workflow rule.
!!! note
Signals are not limited by a process scope. A signal triggered in one BPM process can be caught in another process.
!!! note
Signal name can not be empty.
See [more info](bpm-signals.md) about signals.
### Compensation End Event
*As of v2.14.*
Initiates compensation and ends the flow once compensation is completed.
Can compensate a specific activity (by specifying an activity's ID, the activity ID can be obtained on the detail view of the activity) or all activities (that are visible from the event). Only completed activities (not failed or interrupted) are compensated.
An activity is considered visible from the throwing Event when:
* It is contained in normal flow at the same level of the process/sub-process.
* It is contained in the parent process/sub-process of an event sub-process in which the Event is contained.
In the same level:

From the event sub-process:

When the activity ID is omitted, all visible completed activities are compensated in the order reverse to their instantiation.
Compensation is supposed to perform undo actions when something went wrong. Usually, compensation is triggered from error handlers.
----
## Boundary Events
Boundary events can be attached to activities (usually sub-processes). Boundary event can interrupt an activity (if the *Is Interrupting* parameter is checked). Non-interrupting boundary event can be triggered multiple times.
### Error Intermediate Event (Boundary)
It's triggered once an error event is thrown within the activity (sub-process) it's attached to.
It cannot be non-interrupting, because the activity gets terminated once an error event is thrown.
If the Error Code is specified, it will be triggered only when an error with the same code occurs. If the Error Code is empty, it will catch any error.

It's possible to view the error code and the exception message in the flow log.
The error code and the exception message can be obtained further in the flow with Formula functions `bpm\caughtErrorCode` and `bpm\caughtErrorMessage`.
!!! note
If the error event is attached to a task with the *Send HTTP Request* action, it's possible to catch a specific response error code (e.g. 404, 403).
### Conditional Intermediate Event (Boundary)
Triggered when specific conditions are met. Note that same non-interrupting events can be triggered multiple times. First, when conditions get fulfilled, then, when conditions get unfulfilled, and so on.
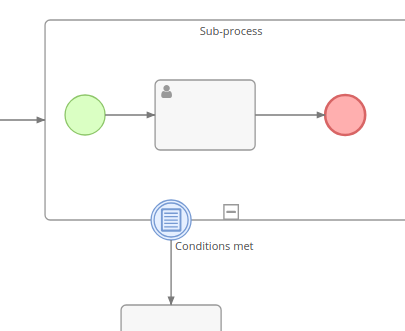
!!! note
The Boundary Conditional Event is not synced with the flow. Condition checking is run in idle which may cause some delay. A flowchart design should not rely on a boundary condition event being checked immediately.
### Timer Intermediate Event (Boundary)
Triggered after a specific period of time. The timer starts once the activity starts.
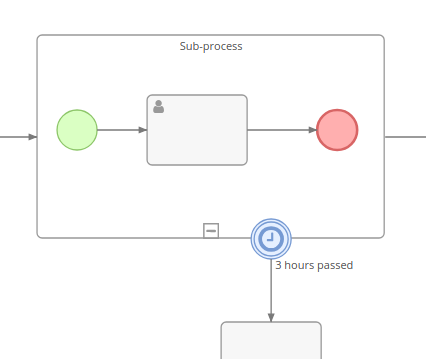
### Escalation Intermediate Event (Boundary)
It's triggered once an escalation event is thrown within the activity (sub-process) it's attached to.
If the Escalation Code is specified, it will be triggered only when an escalation with the same code occurs. If the Escalation Code is empty, it will catch any escalation.

### Signal Intermediate Event (Boundary)
It's triggered once a specific signal is broadcasted. Note that a signal can be triggered from anywhere in the system, not necessarily from the same process.
Placeholders can be used in a signal name. E.g. `test.{$id}`, {$id} will be replaced with the target's ID.
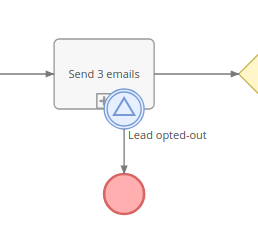
### Message Intermediate Event (Boundary)
Triggered once an email is received. It functions the same as *Message Intermediate Event (Catching)*.
### Compensation Intermediate Event (Boundary)
*As of v2.14.*
Triggered once compensation is initiated for an activity it is attached to. Must be connected with a compensation activity (task or sub-process).

!!! note
Compensation can be applied only for activities that were successfully completed.
When it's a sub-process being compensated, the compensation activity does not have access to the sub-process internal state (called Black-Box compensation). To be able to access the internal state, use the compensation event sub-process inside the sub-process instead.
In case of a multi-instance sub-process, the compensation activity is processed for each completed instance of the sub-process.
================================================
FILE: docs/administration/bpm-examples.md
================================================
# BPM Examples
## Downloadable examples
You can download the CSV file with examples and then import it into your EspoCRM instance.
1. Download the [CSV file](https://raw.githubusercontent.com/espocrm/documentation/master/docs/_static/csv/bpm-examples.csv) with examples.
2. In your EspoCRM, go to Administration > Import, select *Process Flowchart* entity type and upload the CSV file. Go through import steps.
3. You will find imported examples under Administration > Flowcharts.
!!! note
These flowcharts are not active, so they won't run until you set them active.
Included examples:
* User task
* Drip email campaign
* Tracking URLs
* Sub-process
* Email reply catching
## Screenshot-only examples
#### Example 1
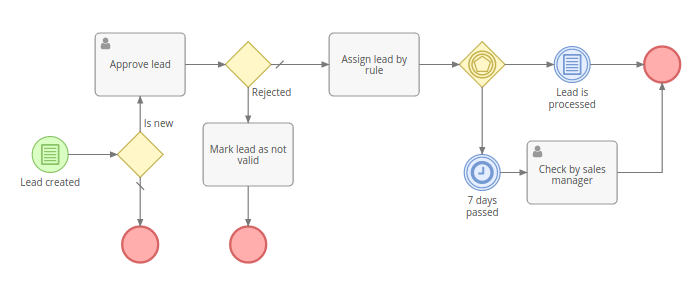
#### Example 2
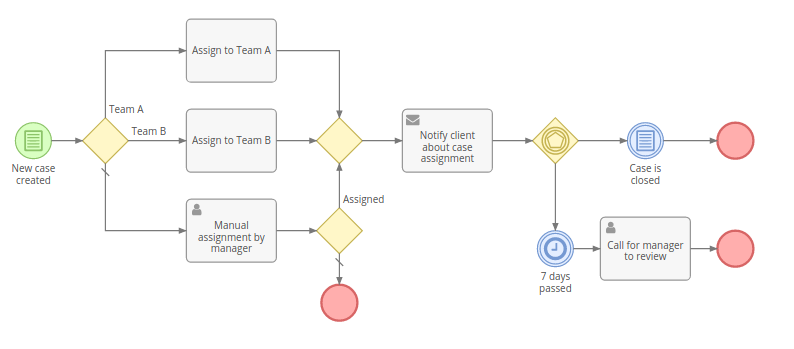
#### Example 3
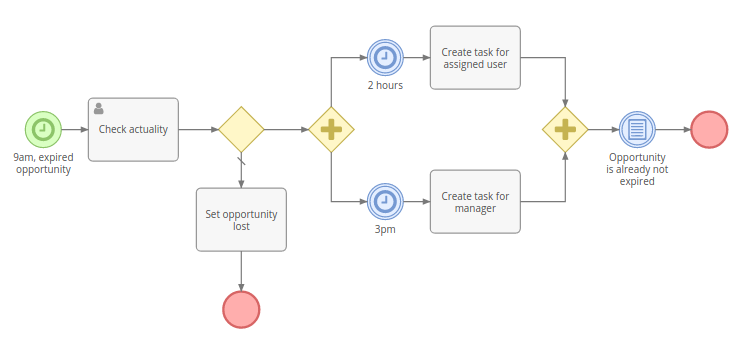
#### Example 4

================================================
FILE: docs/administration/bpm-formula.md
================================================
# BPM Formula Functions
The [BPM tool](bpm.md) provides additional formula functions.
A Formula script can be utilized in conditions, script tasks, and various task actions. Some functions can be used in a workflow (broadcastSignal, startProcess).
* [bpm\targetEntity\attribute](#bpmtargetentityattribute)
* [bpm\createdEntity\attribute](#bpmcreatedentityattribute)
* [bpm\processEntity\attribute](#bpmprocessentityattribute)
* [bpm\startProcess](#bpmstartprocess)
* [bpm\broadcastSignal](#bpmbroadcastsignal)
* [bpm\caughtErrorCode](#bpmcaughterrorcode)
* [bpm\caughtErrorMessage](#bpmcaughterrormessage)
### bpm\targetEntity\attribute
`bpm\targetEntity\attribute(ATTRIBUTE)`
Fetches an attribute value of a target record.
### bpm\createdEntity\attribute
`bpm\createdEntity\attribute(ALIAS_ID, ATTRIBUTE)`
Fetches an attribute value of a record created within a process.
Available records:
* records created within *Task* activities;
* user tasks;
* sent messages.
ALIAS_ID can be obtained:
* from the detail view of a *Task* that has an action that creates a record;
* from the detail view of a *User Task* (ID field);
* from the detail view of a *Send Message Task* (ID field).
!!! example
```
$resolutionNote = bpm\createdEntity\attribute('e6cmwnd894', 'resolutionNote');
```
### bpm\processEntity\attribute
`bpm\processEntity\attribute(ATTRIBUTE)`
Fetches an attribute value of a process record.
### bpm\startProcess
`bpm\startProcess(FLOWCHART_ID, TARGET_TYPE, TARGET_ID, [ELEMENT_ID])`
Starts a process.
!!! example
`bpm\startProcess('flowchart-id', 'Account', 'account-id');`
### bpm\broadcastSignal
* `bpm\broadcastSignal(SIGNAL_NAME)` – broadcast a regular signal
* `bpm\broadcastSignal(SIGNAL_NAME, ENTITY_TYPE, ENTITY_ID)` – broadcast an object signal
It can be useful to broadcast a custom signal from a workflow rule and then catch it inside a running process. A workflow rule will perform some condition checking and only after that will broadcast the signal.
!!! example "Example, regular signal"
```
$signalName = string\concatenate(
'notePostedInCaseBySupportManager.',
entity\attribute('id')
);
bpm\broadcastSignal($signalName);
```
Then it will be possible to catch the signal in a BPM process by listening to the signal `notePostedInCaseBySupportManager.{$id}`.
!!! example "Example, object signal"
Workflow on Quote Item broadcasts a signal when amount is changed.
```
bpm\broadcastSignal('@quoteItemIsChanged', 'Quote', entity\attribute('quoteId'));
```
Then it will be possible to catch the signal by a workflow. It can be useful for situations when you need to recalculate something when a related record is changed.
### bpm\caughtErrorCode
*As of v2.14.*
Returns the code of a caught error. Error codes are of the string type. Can be used after a catching Error Event.
### bpm\caughtErrorMessage
*As of v2.14.*
Returns the message of a caught exception. Can be used after a catching Error Event.
================================================
FILE: docs/administration/bpm-gateways.md
================================================
# BPM Gateways
Gateways diverge and converge flows. Depicted as a yellow diamond. They can be used to determine a path in which the flow will go depending on specific conditions. They can split a flow into multiple parallel flows and join parallel flows into a single one.
* [Exclusive](#exclusive-gateway)
* [Inclusive](#inclusive-gateway)
* [Parallel](#parallel-gateway)
* [Event Based](#event-based-gateway)
----
## Exclusive Gateway
Can diverge or converge flows.
In case of diverging, it defines a single flow (path) that will be chosen according specified criteria. The first met condition determines the flow, next conditions are omitted. There is the ability to specify a default flow. The default flow will be chosen if there are no conditions met. The default flow is marked with a slash sign.
!!! important
There must be at least two outgoing flows to be able to specify diverging criteria.
In case of converging, it just directs the flow to the outgoing element. It does not block the flow, hence parallel flows won't be merged into a single flow.
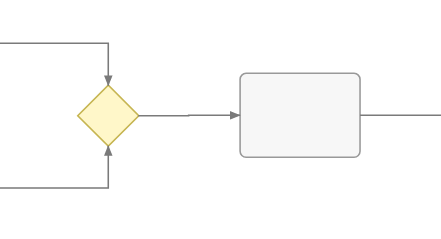
----
## Inclusive Gateway
Can diverge or converge flows.
In case of diverging, it can direct to one or multiple parallel flows (paths), depending on accomplishment of criteria of each flow. The default flow is chosen if there are no met conditions. The default flow is marked with a slash sign.
!!! important
There must be at least two outgoing flows to be able to specify diverging criteria.
If there is a necessity to merge parallel flows produced by a diverging inclusive gateway, you need to use a converging inclusive gateway. It will wait for all incoming flows and only then will continue to the outgoing element.
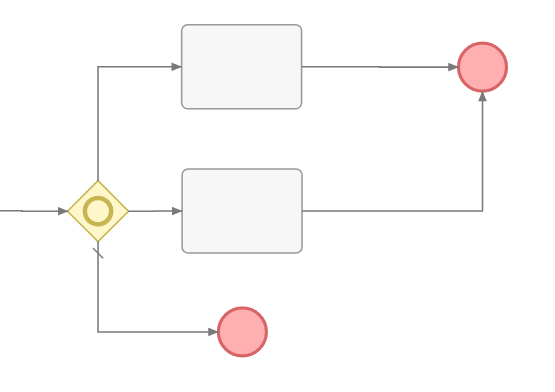
!!! note
Diverging and converging gateways must be balanced. The number of flows outgoing from a diverging gateway should equal the number of flows incoming to a converging gateway. If between these gateways one of flows splits into nested parallel flows, these nested flows must be converged before the outer converging gateway. And so on.
!!! note
If one of parallel flows has been ended for some reason, then the diverging converging will never be processed. The process will be blocked. Avoid the flowchart design that can bring about such a situation.
----
## Parallel Gateway
Can diverge or converge flows.
In case of diverging, it splits the flow into multiple parallel flows. There are no parameters for this gateway type.
In case of converging, it waits until all incoming flows come and only then continues to the next outgoing element.
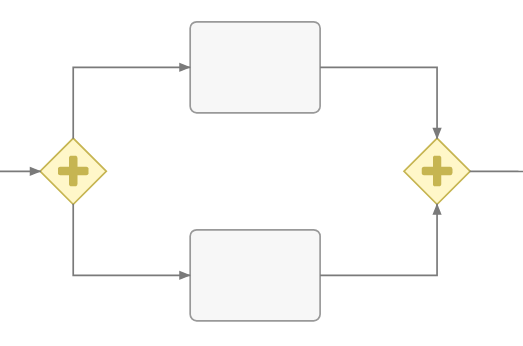
!!! note
Diverging and converging gateways must be balanced. The number of flows outgoing from a diverging gateway should equal the number of flows incoming to a converging gateway. If between these gateways one of flows splits into nested parallel flows, these nested flows must be converged before the outer converging gateway. And so on.
!!! note
If one of parallel flows has been ended for some reason, then diverging gateway will never be processed. The process will be blocked. Avoid the flowchart design that can bring about such a situation.
----
## Event Based Gateway
Can only diverge flows.
It stops the flow until any of outgoing events gets triggered. The triggered event determines the single flow. Other outgoing events get rejected.
Only intermediate events can be on the other end of outgoing sequence flows.
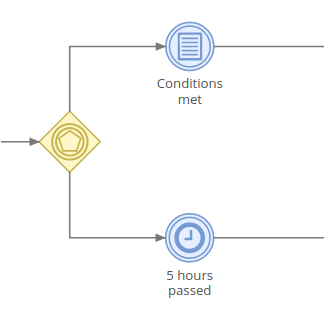
================================================
FILE: docs/administration/bpm-signals.md
================================================
# Signals
Signals are events with a specific name. Signals are broadcasted globally, they are not limited by a process scope. It means that a signal triggered in one BPM process can be caught in another process.
The signals feature is a part of the Advanced Pack extension and can be utilized in the BPM and Workflows tools.
How signals are broadcasted:
* There are set of standard signals which are broadcasted upon specific events in the application. These *built-in signals* are listed below in the article.
* It's possible to broadcast [custom signals](bpm-events.md#signal-intermediate-event-throwing) in a BPM process.
* It's possible to broadcast custom signals using the [Formula function](bpm-formula.md#bpmbroadcastsignal) `bpm\broadcastSignal(SIGNAL_NAME)`.
* It's possible to broadcast custom signals via PHP code.
There are two types of signals:
* Regular signals
* Object signals
In this article:
* [Regular signals](#regular-signals)
* [Object signals](#object-signals)
* [Naming clarification](#naming-clarification)
## Regular signals
* Can be broadcasted and caught within a running process.
* Cannot be used to start a process or a workflow rule.
In BPM processes, the *Signal Intermediate Events* can catch and throw only regular signals.
### Built-in signals
Below is the list of available out-of-the-box signals which are broadcasted in the system upon specific conditions.
!!! note
Signal name parts written in the upper case (e.g. ENTITY_TYPE, ID, LINK_NAME) must be replaced with corresponding values. E.g. when an Account with an ID `abc01` is updated, a signal `update.Account.abc01` is broadcasted. See the naming clarification below.
#### Default
* `create.ENTITY_TYPE` – record of ENTITY_TYPE created, e.g. `create.Lead`;
* `update.ENTITY_TYPE.ID` – record update, e.g. `update.Lead.aabbcc01`;
* `delete.ENTITY_TYPE.ID` – record removed;
* `relate.ENTITY_TYPE.ID.LINK_NAME` – record related with another record (only for *many-to-many*);
* `relate.ENTITY_TYPE.ID.LINK_NAME.FOREIGN_ID` – record related with another record, ID of the related record is specified (only for *many-to-many*);
* `unrelate.ENTITY_TYPE.ID.LINK_NAME` – record unrelated from another record (only for *many-to-many*);
* `unrelate.ENTITY_TYPE.ID.LINK_NAME.FOREIGN_ID` – (only for *many-to-many*);
* `createRelated.ENTITY_TYPE.ID.LINK_NAME` – created a related record, one-to-many relationship, e.g. Opportunity created for Account;
* `createChild.ENTITY_TYPE.ID.CHILD_ENTITY_TYPE` – when created a record related through a parent, e.g. Meeting created for Account;
* `streamPost.ENTITY_TYPE.ID` – when somebody posted in the stream;
#### Contacts/Leads
* `leadCapture.ENTITY_TYPE.ID` – when a Lead (or Contact) is processed through the Lead Capture (confirmed opt-in if the double opt-in is enabled);
* `leadCapture.ENTITY_TYPE.ID.LEAD_CAPTURE_ID` – the same, but the ID of a Lead Capture record is specified;
* `optOut.ENTITY_TYPE.ID` – person opted-out;
* `optOut.ENTITY_TYPE.ID.TARGET_LIST_ID` – person opted-out from a specific target list;
* `cancelOptOut.ENTITY_TYPE.ID` – person opted-in again;
* `cancelOptOut.ENTITY_TYPE.ID.TARGET_LIST_ID`;
* `eventAccepted.ENTITY_TYPE.ID.EVENT_ENTITY_TYPE` – person accepted a meeting/call invitation;
* `eventAccepted.ENTITY_TYPE.ID.EVENT_ENTITY_TYPE.EVENT_ID` – person accepted a meeting/call invitation, event id is specified;
* `eventTentative.ENTITY_TYPE.ID.EVENT_ENTITY_TYPE` – person set Tentative status in a meeting/call invitation;
* `eventTentative.ENTITY_TYPE.ID.EVENT_ENTITY_TYPE.EVENT_ID`;
* `eventAcceptedTentative.ENTITY_TYPE.ID.EVENT_ENTITY_TYPE` – person set Accepted or Tentative status in a meeting/call invitation;
* `eventAcceptedTentative.ENTITY_TYPE.ID.EVENT_ENTITY_TYPE.EVENT_ID`;
* `eventDeclined.ENTITY_TYPE.ID.EVENT_ENTITY_TYPE` – person declined a meeting/call invitation;
* `eventDeclined.ENTITY_TYPE.ID.EVENT_ENTITY_TYPE.EVENT_ID`
#### Contacts/Leads/Accounts/Users
* `clickUrl.ENTITY_TYPE.ID` – recipient opened a tracking URL , see [here](bpm-tracking-urls.md);
* `clickUrl.ENTITY_TYPE.ID.CAMPAIGN_TRACKING_URL_ID` – recipient opened a specific tracking URL;
#### Other
* `clickUniqueUrl.UNIQUE_ID` – recipient opened a tracking URL with a unique ID, see [here](bpm-tracking-urls.md);
### Placeholders
When defining a signal name in Signal Events in a BPM Flowchart, you can use placeholders:
* `{$attribute}` – attribute of target record
* `{$$variable}` – formula variable
E.g. `mySignal.{$status}.{$id}` – *status* and *id* are attributes of the target record. Placeholders will be replaced with attribute values, so the actual signal name will look like `mySignal.New.someIdValue`.
## Object signals
* Broadcasted along with the entity (record).
* Prefixed with `@` character.
* Can be used only to initiate a new process or workflow rule.
* Can't be caught within a running process.
* Can be broadcasted by a running process.
!!! note
Signal Intermediate Event (Catching) can't catch object signals.
Example: A process triggers signal *@approve*. A target record of the *Lead* entity type is attached to the signal. You have another BPM flowchart for the *Lead* entity type that starts with the *@approve* signal. In this case, a new process will be started, and the Lead record from the first process will be passed as a target record of the second process.
### Built-in signals
Below is the list of available out-of-the-box signals that are broadcasted in the system.
!!! note
Signal name parts written in the upper case (e.g LINK_NAME, FOREIGN_ID) must be replaced with corresponding values. See the naming clarification below.
#### Default
* `@create` – record created;
* `@update` – record updated;
* `@delete` – record removed (can't be used in BPM);
* `@relate.LINK_NAME` – record related with another record (only for *many-to-many*); the foreign ID is passed in the `id` parameter;
* `@relate.LINK_NAME.FOREIGN_ID` – record related with another record, an ID of related record is specified (only for *many-to-many*);
* `@unrelate.LINK_NAME` – record unrelated from another record; the foreign ID is passed in the `id` parameter;
* `@unrelate.LINK_NAME.FOREIGN_ID`
#### Contacts/Leads:
* `@leadCapture` – when a Lead (or Contact) is processed through the Lead Capture (confirmed opt-in if it's enabled);
* `@leadCapture.LEAD_CAPTURE_ID`
* `@optOut` – person opted-out;
* `@optOut.TARGET_LIST_ID` – person opted-out from a specific target list;
* `@cancelOptOut` – person opted-in again;
* `@cancelOptOut.TARGET_LIST_ID`
#### Contacts/Leads/Accounts/Users
* `@clickUrl` – recipient opened a tracking URL;
* `@clickUrl.CAMPAIGN_TRACKING_URL_ID` – recipient opened a specific tracking URL;
#### Meetings/Calls/Events
* `@eventAccepted.ENTITY_TYPE` – an attendee accepted the event (ENTITY_TYPE can be *Contact*, *Lead*, *User*; as of v3.0.13); the foreign ID is passed in the `id` parameter;
* `@eventTentative.ENTITY_TYPE` – an attendee set a tentative acceptance status; the foreign ID is passed in the `id` parameter;
* `@eventDeclined.ENTITY_TYPE` – an attendee declined the event; the foreign ID is passed in the `id` parameter;
* `@eventAcceptedTentative.ENTITY_TYPE` – an attendee accepted the event or set as tentative (ENTITY_TYPE can be *Contact*, *Lead*, *User*; as of v3.0.13); the foreign ID is passed in the `id` parameter;
### Signal parameters
*As of v3.2.*
Some object signal are passed with additional parameters. These parameters can be accessed with a formula function `workflow\\signalParam('parameterName')`.
## Naming clarification
* *ID* – an ID of a record that you can obtain from the browser address bar;
* *ENTITY_TYPE* – an entity type of the record (not translated), you can obtain it at Administration > Entity Manager;
* *LINK_NAME* – a relation name, you can obtain it at Administration > Entity Manager;
* *FOREIGN_ID* – an ID of a related record.
================================================
FILE: docs/administration/bpm-tips.md
================================================
# BPM Tips
## Execution in idle
When a process is initiated by a user interaction (e.g. after record is created), it starts to execute in the web server
process until the flow reaches a catching event, *Send Message Task*, or *User Task*, which will switch execution to the idle mode (process will continue
to run by cron/daemon).
If you have script tasks that take some time to run, it's reasonable to force to switch execution to the idle mode.
This will prevent a user from waiting until scripts are finished. In worst cases it can even cause a timeout error. The trick is to add *Timer Intermediate Event* with 0 timer value. You can add it right after a start event.
## Unsetting process variables
Variables defined in a *Script Task* and *Execute Formula Script* action will be stored in the Process (unless *Isolate Variables* is checked). If you don't need a specific variable to be used further in the process, it's reasonable to unset it in the end of the script.
```
$tempVariable = null;
```
Also consider to unset sensitive data immediately after usage.
## Cleaning up ended processes
Ended Processes are *not* cleaned up automatically, as they may hold information important for the business. You may utilize a scheduled Workflow rule that will handle removal of ended Processes.
## Self-removal
You can set up a BPM process to remove itself. Add *Task* > *Update Process Record*. Add in Formula: `deleted = true;`.
## Displaying processes on record detail view
You can utilize the [Report Panels](../user-guide/reports.md#report-panels) feature to display all related processes on the record detail view.
1. Create a List report for the Process entity type with the *Target* runtime filter.
2. Create a report panel (Administration > Report Panels) for your entity type, select the report.
================================================
FILE: docs/administration/bpm-tracking-urls.md
================================================
# Tracking URLs with BPM
## Non-unique URL
It's possible to add links into email body and catch when a recipient clicked on it. It provides the ability to automate interactions with customers.
A Tracking URL can be created at Campaigns > top-right menu > Tracking URLs. Create a URL and obtain the generated placeholder (example: `{trackingUrl:5d8206aa9d76df4c8}`). Use that placeholder as a URL of the link in your email template.
Further in the process flow, you will be able to catch the URL click with the *Signal Intermediate Event (Catching)*.
When the tracking URL is clicked, the system broadcasts the signal `clickUrl.ENTITY_TYPE.ID.TRACKING_URL_ID`. Where *ENTITY_TYPE* is an entity type of the person stored in the CRM, *ID* is a record ID of the person, *TRACKING_URL_ID* is an ID of the tracking URL record. See the example below.
Process flowchart example:
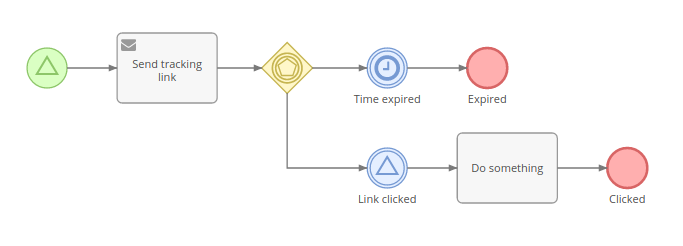
In this example, the target entity type is *Lead*.
The signal name, defined in the catching event: `clickUrl.Lead.{$id}.5d8206aa9d76df4c8`, where `5d8206aa9d76df4c8` is an ID of the *Tracking URL* (can be obtained from the address bar). You need to replace *5d8206aa9d76df4c8* with your ID. `{$id}` is a placeholder that will be automatically replaced with the ID of the Lead.
### Example
You can get a downloadable example [here](bpm-examples.md#downloadable-examples).
## Unique URL
*Available as of Advanced Pack 2.7.0 and EspoCRM 6.1.3.*
Useful when the URL must be unique for a specific process. E.g. send an email for a feedback on provided customer support, the email contains unique links to rate quality of support.
The signal `clickUniqueUrl.UNIQUE_ID` will be broadcasted when the URL is opened by a recipient, where *UNIQUE_ID* is a generated ID.
Use code `{trackingUrl:TRACKING_URL_ID.{$$variableName}}` in an email template instead of a *URL:* , where *variableName* is a name of the variable where the generated ID is stored, *TRACKING_URL_ID* is an ID of the Tracking URL record (can be obtained from the address bar). The code will be automatically substituted with a proper URL when the email is sent.
Steps:
1\. Create Tracking URL at Campaigns > top-right menu > Tracking URLs.
2\. In BPM: Use an *Execute Formula Script* action or *Script Task* to generate a unique and store it in a variable:
```
$uniqueId = util\generateId();
```
3\. In BPM: Add a *Send Message* task. Use an email template with the link `{trackingUrl:TRACKING_URL_ID.{$$uniqueId}}`. Replace `TRACKING_URL_ID` with the ID of the *Tracking URL* record. This link is supposed to be clicked by a recipient.
4\. In BPM: Use a *Signal Catching* event with the signal `clickUniqueUrl.{$$uniqueId}`.
================================================
FILE: docs/administration/bpm.md
================================================
---
search:
boost: 2
tags:
- automation
- bpm
---
# Business Process Management
The Business Process Management (BPM) tool provides the ability to model and automate business processes in EspoCRM in a no-code/low-code way. The engine executes business processes described in the BPMN 2.0 standard.
The BPM tool is available in [Advanced Pack](https://www.espocrm.com/extensions/advanced-pack/) extension.

### Difference from Workflows tool
The Workflows tool is intended for automation of simple business rules, without sequential flow items, when there is no need to display the flow graphically.
The BPM tool is intended for more complex business logic, where there can be diverging and converging flows, execution delays, user interactions. The flowchart view makes the business process more comprehensible for a human, the log allows you to see how the process was held.
The BPM tool has all the capabilities of the Workflows tool. If you've used the Workflows tool before, your knowledge will be useful for getting into BPM, as they share a number of features.
In this article:
* [Process Flowcharts](#process-flowcharts)
* [Processes](#processes)
* [Flowchart Elements](#flowchart-elements)
* [Conditions](#conditions)
## See also
* [Examples](bpm-examples.md)
* [Signals](bpm-signals.md)
* [Compensation](bpm-compensation.md)
* [BPM specific formula functions](bpm-formula.md)
* [Drip email campaign with BPM](bpm-drip-email-campaign.md)
* [Tracking URLs with BPM](bpm-tracking-urls.md)
* [Tips](bpm-tips.md)
* [Configuration](bpm-configuration.md)
* [Quick tour](https://app.supademo.com/demo/cmflay16uf28039ozjxxlw5sn)
## Process Flowcharts
Available under Administration > Flowcharts. An administrator can also add the Process Flowcharts tab to the navigation bar.
Flowcharts are intended for modeling business processes. An administrator can create and edit flowcharts. Regular users can only view flowcharts.
Every Flowchart has its specific entity type (defined by the *Target Type* field). The Flowchart determines execution of future process instances. It comprises flowchart elements and connections between elements.
If a Process Flowchart has the unchecked *Is Active* field, then it won't initiate process instances.
To show details and parameters of a certain flowchart element you need to click on it. In the edit mode you will be able to edit parameters.
## Processes
Available under Administration > Processes. An administrator can also add the Processes tab to the navigation bar.
A Process represents a business process instance. When it's initiated, it gets the status *Started*. When the Process is finished, it gets the status *Ended*.
A Process is executed according to its Flowchart. The Flowchart of a Process can't be changed after the Process is started.
A Process is obligatorily related to a single target record.
Processes can be started:
* Automatically – Upon specific conditions, signal, or scheduling, described in the Flowchart.
* Manually – To start process manually, a user needs to click the *Start Process* button on the Processes list view, or on the record detail view from the dropdown in the top-right corner.
* By a Workflow rule – using the *Start BPM Process* action in a rule. It allows you to pass the workflow's target record or a related record as a target for the new process.
By using a Workflow with the manual trigger, it's possible to have a button on the detail view that will start a particular process.
The execution of a Process is visualized with colors highlighting statuses of flow nodes:
* green – processed;
* yellow – pending;
* violet – in process;
* gray – failed.

**Only one Process** for the same target record and Flowchart can be active at the same time. It means that if you have multiple Start Events, once one of them is triggered (the process is started), other Start Events will be ignored while the Process is active.
Usually Processes start their execution flow from a Start Event (green colored circle). One Process Flowchart can have multiple Start Events.
### Manipulating
A Process can be **stopped manually** by a user who has edit access to that Process. You can do it from the dropdown menu next to the *Edit* button.
It's possible to **manually reject or interrupt** pending and active flow nodes. You can do it from the *Log* panel on the Process detail view in the dropdown menu of a specific Flow Node. Note that in some cases after rejecting a Flow Node the Process becomes suspended and won't ever end by itself. You will need to either manually stop it or start a flow from any node to continue executing.
It's possible to **manually start a flow from any element** of an already started Process. You need to click on a specific flowchart element on the Process detail view and then click the button *Start flow from here*.
Ended, stopped and interrupted Processes can be *reactivated* (from the dropdown next to the *Edit* button). After reactivation, the Process does not have any active Flow Nodes. You need to manually start the flow from a specific Flow Node element. Ended Sub-Processes can be reactivated only if their parent Process is active. Meaning that you might need to reactivate the parent Process first.
### Access control
Only administrators can create or edit Flowcharts. With Roles it's possible to allow regular users to view Flowcharts, and view or edit Processes. Note that a user needs also to have access to the Process Flowchart scope to be able to view Process Flowchart details.
## Flowchart Elements
See more detail in separate articles:
* [Gateways](bpm-gateways.md)
* [Events](bpm-events.md)
* [Activities](bpm-activities.md)
### Gateways
Gateways diverge and converge flows. Depicted as a yellow diamond. They can be used to determine a path in which the flow will go depending on specific conditions. They can split the flow into multiple parallel flows and join parallel flows into a single one.
### Events
Events represent something that happens during a business process. They also start, end and interrupt the process flow. Depicted as a circle.
### Activities
Automated tasks, manual tasks and sub-processes. Represented as a gray rectangle.
### Flows
#### Sequence Flow
Represented as a solid arrow. It indicates the order in which process elements will be executed.
## Conditions
Conditional events, exclusive and inclusive diverging gateways have conditions that determine the flow of the process.
Through the UI, there is the ability to check conditions for the following records:
* Target record;
* Records related to the target through many-to-one and children-to-parent relationships;
* Records created by the Process via tasks;
* User Task records, what allows checking a task resolution.
It's also possible to define conditions with [Formula](formula.md) expressions. Example: `status == 'New' && assignedUserId == null`.
Conditions in the BPM tool are the same as in the Workflow tool. See more details about [workflow's conditions](workflows.md#conditions).
================================================
FILE: docs/administration/collaborators.md
================================================
---
search:
boost: 2
---
# Collaborators
*As of v9.0.*
The Collaborators feature allow multiple users to work on the same record.
Users added as collaborators to a record can view the record, can read the stream and post to the stream.
The Collaborators feature is available for custom entities created via the Entity Manager and
for the following out-of-the-box entity types: Task, Case, Account, Contact, Lead, Opportunity, Document, Knowledge Base Article and Target List.
## Enabling
The Collaborators feature can be enabled for an entity type in the Entity Manager at:
Administration > Entity Manager > {Entity Type} > Edit > Collaborators.
Once the Collaborators feature is enabled for an entity type:
* Link-multiple field *Collaborators* is automatically created.
* Bool filter *Shared* is added.
The administrator needs to add the created *Collaborators* field to the layout. It's recommended to add to the side panel
under the Teams field: Administration > Entity Manager > {Entity Type} > Layouts > Side Panel Fields.
## Behavior
Assignees are automatically added to collaborators. This ensures that when a record is reassigned to another user,
the previous assignee remains a collaborator unless explicitly removed.
A user who creates a record is automatically pre-filled as a collaborator.
This ensures that a user with 'own' read access will still have access to a record after assigning it to another user.
## Access
Users added as collaborators to a record obtain *read* and *stream* access, provided their access level, as defined by Roles, is other than *no*.
Access prerequisites:
* Assignment Permission is required to be able to add a user to collaborators.
* Edit access to a record is required to be able to add collaborators.
Limitations:
* Portal users cannot be added as collaborators.
================================================
FILE: docs/administration/commands.md
================================================
---
search:
boost: 2
---
# Console Commands
!!! note
You can run `php command.php` instead of `bin/command`. May be reasonable if there's no execute permission for *bin/command*. To grant execute permission, run `chmod +x bin/command`.
!!! note
On Unix-based systems, it is reasonable to run commands under the root (or web server) user.
## List of available commands
```
bin/command
```
## Clear cache
```
php clear_cache.php
```
## Rebuild
```
php rebuild.php
```
Clears cache, rebuilds database and other things.
### Hard rebuild
*As of v7.4.*
```
bin/command rebuild --hard
```
Hard database rebuild. It will drop unused columns, decrease exceeding column lengths, fix index names, set proper collations. It won't drop unused tables (consider removing them manually).
If a parameter `-y` is specified, it won't prompt for confirmation before running hard rebuild (as of v9.0).
Recommended to have a database backup before running hard rebuild.
## Changing user password
```
bin/command set-password [username]
```
Where `[username]` is a user name, e.g. `admin`.
## Upgrade
```
bin/command upgrade
```
Upgrades EspoCRM instance to the next available version. The upgrade package is downloaded automatically. It may take a few steps to upgrade to the latest version, so you will need to run the same command multiple times.
See additional parameters [here](upgrading.md#additional-parameters).
## Extension
Installing or upgrading:
```
bin/command extension --file="path/to/extension/package.zip"
```
Uninstalling:
```
bin/command extension -u --name="Extension Name"
```
Uninstalling by ID:
```
bin/command extension -u --id="extension-ID"
```
List all extensions:
```
bin/command extension -l
```
## Running job
```
bin/command run-job JobName
```
Where *JobName* is an internal name of the job you want to run.
!!! example
```
bin/command run-job Cleanup
bin/command run-job ProcessMassEmail
```
## Version
Print the current version:
```
bin/command version
```
## Setting user password
```
bin/command set-password {username}
```
Where `{username}` is a user name, e.g. `admin`.
## Creating admin user
*As of v7.4.*
```
bin/command create-admin-user {username}
```
Where `{username}` is a user name, e.g. `admin`.
Can be useful when you need to run an Espo instance from a repository without the need to go through UI installation.
## Import
See more detail [here](import.md#console-commands).
## App info
```
bin/command app-info
```
With this command you can get some information about the application (container services, binding, jobs).
## Update app timestamp
*As of v8.1.*
```
bin/command update-app-timestamp
```
Updates the app timestamp to the current time. When an Espo instance is updated or an extension is installed or uninstalled, the app timestamp is updated to let the browser know that the old cache is not actual anymore. Sometimes developers may need to update the app timestamp manually, for example, when writing custom JavaScript code.
## Rebuild category paths
```
bin/command rebuild-category-paths {EntityType}
```
Rebuilds category paths. For example, for DocumentFolder, WorkflowCategory. May be needed if for some reason paths data is corrupted resulting in not working expanded mode.
## Config get
*As of v10.0.*
Print a config parameter value:
```
bin/command config:get {param}
```
Print in JSON:
```
bin/command config:get {param} --json
```
Note: In the examples, `{param}` is a placeholder, curly braces should not be used.
## Config set
*As of v10.0.*
Set a value (implies string type):
```
bin/command config:set {param} {value}
```
Set with type:
```
bin/command config:set {param} true --type=bool
```
Supported types: `string`, `bool`, `int`, `float`, `json`. If the type is not specified, the input value is treated as string. Always specify the type if the stored parameter value must be anything other than string.
Set a value passed in JSON:
```
bin/command config:set {param} [\"one\", \"two\"] --type=json
```
Set a nested parameter:
```
bin/command config:set database.host localhost
```
Note: In the examples, `{param}` and `{value}` are placeholders, curly braces should not be used.
================================================
FILE: docs/administration/config-params.md
================================================
---
search:
boost: 2
---
# Config parameters
Config parameters can be changed or added manually in the file `data/config.php`. Parameters can also be added to the file `data/config-internal.php`. Use the **internal config** to store sensitive parameters.
In this article:
* [List of parameters](#list-of-parameters)
* [Config files](#config-files)
## List of parameters
The list of parameters along with their default values. This is not a full list of params. Most of params available in the admin UI are not listed here.
* [General](#general)
* [UI](#ui)
* [Access control](#access-control)
* [Notifications](#notifications)
* [Emails](#emails)
* [Stream](#stream)
* [Clean-up](#clean-up)
* [Passwords](#passwords)
* [Auth](#auth)
* [Security](#security)
* [Jobs & Daemon](#jobs-daemon)
* [Mass Email](#mass-email)
* [Kanban](#kanban)
* [Text search](#text-search)
* [PDF](#pdf)
* [Events](#events)
* [Attachments](#attachments)
* [Misc](#misc)
### General
* siteUrl – URL of EspoCRM instance;
* useCache – `true`;
* isDeveloperMode – `false` – enables developer mode; not to be used on instances installed from a package; only for an instance that is run right from a repository;
* useCacheInDeveloperMode – `false` – to use front-end cache in developer mode; front-end is not cached by default in developer mode;
* maintenanceMode – `false` – only administrators will have access to the system;
* disableCron – `false`;
* useWebSocket – `false`;
* ajaxTimeout – `60000` – timeout for ajax requests (in milliseconds);
* language – system language;
* timeZone – system timezone;
* exportDelimiter – `','` – default export delimiter;
* recordListMaxSizeLimit – `200` – max number of records can be fetched in a single GET API request;
* maxSelectTextAttributeLengthForList – `10000` – text fields are cut when records accessed with a list request;
* displayListViewRecordCount – `true` – to display a number of records on the list view;
* addressCountryList – array of countries available in autocomplete;
* addressCityList – array of cities available in autocomplete;
* addressStateList – array of states available in autocomplete;
* defaultCurrency – currency applied by default;
* baseCurrency – which currency to use as base when defining rates;
* currencyList – array of available currencies;
* thumbImageCacheDisabled – `false` – to disable thumb image files being created in `data/upload/thumbs` directory (as of v7.0);
* globalSearchMaxSize – `10` – how much records is shown in the global search;
* massActionIdleCountThreshold – `100` – record number threshold after which mass-action is processed in idle (as of v7.1);
* exportIdleCountThreshold – `1000` – record number threshold after which export is processed in idle (as of v7.1);
* leadCaptureAllowOrigin – `*` – *Access-Control-Allow-Origin* response header value for the lead capture endpoint;
* ipAddressServerParam – `REMOTE_ADDR` – server parameter to be used for obtaining a request IP address (as of v7.5);
### UI
* applicationDescription – the text in the meta tag; default value: `EspoCRM – Open Source CRM application` (as of v7.0);
* adminPanelIframeDisabled – `false` – disables the right iframe-panel on the administration page (as of v7.0);
* activitiesCreateButtonMaxCount – `3` – a max number of create buttons to display on the Activities page (as of v7.2);
* listViewSettingsDisabled – `false` – disable list view settings (as of v8.1);
* tabQuickSearch – `true` – tab quick search in the navbar (as of v8.5);
### Access control
* aclAllowDeleteCreated – `true` – whether to allow regular users to delete record they created, even they don't have *delete* access to;
* aclAllowDeleteCreatedThresholdPeriod – `24 hours` – time window available for deletion of created records;
### Notifications
* adminNotifications – `true` – notifications in admin panel;
* adminNotificationsNewVersion – `true` – notifications about new versions in admin panel;
* adminNotificationsNewExtensionVersion – `true` – notifications about new extension versions in admin panel;
* emailReminderPortionSize – `10` – how much email reminders can be sent at once (as of v7.0);
* notificationsMaxSize – `5` – how much in-app notifications is shown when the notification panel is shown up;
* notificationsCheckInterval – `10` – an interval between checks for new notifications (actual only if web socket is not enabled);
* popupNotificationsCheckInterval – `15` – an interval between checks for new popup notifications (actual only if web socket is not enabled) (as of v7.3.2);
* reminderMaxCount – `10` – a max number of reminders per event (as of v8.3);
* notificationGrouping – `true` – notification grouping (as of v9.2);
### Emails
* emailKeepParentTeamsEntityList – `['Case']` – when a related email is fetched, teams of the parent record will be copied to the email; by default, it's available only for cases;
* emailForceUseExternalClient – `false` – when composing an email, all users will be forced to use external client;
* emailAutoReplySuppressPeriod – `'2 hours'` – an auto-reply email (for group email account) won't be sent to the same recipient if one was already sent in a period of time defined by the parameter; to prevent looping (as of v6.1.8);
* emailAutoReplyLimit – `5` – a max number of auto-reply emails that can be sent to one recipient within a period defined by the *emailAutoReplySuppressPeriod* parameter (as of v7.0);
* emailFoldersDisabled – `false` – disables email folders;
* emailRecipientAddressMaxCount – `100` – max number of addresses allowed in TO, CC, BCC (as of v7.5);
* emailTemplateHtmlizerDisabled – `false` – disables Handlebars template engine for email templates;
* emailServerAllowedAddressList – the list of allowed internal addresses in the format *host:port*, e.g. `localhost:587` (as of v9.3.2);
### Stream
* noteEditThresholdPeriod – `'7 days'` – how much time is available for editing stream posts;
* noteDeleteThresholdPeriod – `'1 month'` – how much time is available for deleting stream posts;
* streamEmailWithContentEntityTypeList – `['Case']` – to display the content of the email in stream; by default, it's available only for cases;
* recordFollowersLoadLimit – `6` – how much records loaded in the *Followers* field;
* notePinnedMaxCount – `5` – max number of pinned notes per record;
* streamReactionsCheckMaxSize – `50` – when refreshing a user's stream, how many posts will be checked for new reactions; as of 9.0;
### Clean-up
* cleanupJobPeriod – `'10 days'` – cleaning up deleted Job records;
* cleanupActionHistoryPeriod – `'15 days'` – action history records;
* cleanupAuthTokenPeriod – `'1 month'` – auth tokens;
* cleanupAuthLogPeriod – `'2 months'` – auth log;
* cleanupAppLog – `true` – app log cleanup (as of v9.1);
* cleanupAppLogPeriod – `'30 days'` – app log cleanup period (as of v8.3);
* cleanupNotificationsPeriod – `'2 months'` – notifications;
* cleanupAttachmentsPeriod – `'15 days'` – attachments with roles 'Export File', 'Mail Merge', 'Mass Pdf' and attachments relate for deleted records;
* cleanupOrphanAttachments – `false` – cleaning up attachments that were uploaded but not linked with any record; *cleanupAttachmentsPeriod* is used; an experimental parameter;
* cleanupBackupPeriod – `'2 months'` – backup of files created during upgrades;
* cleanupDeletedRecordsPeriod – `'2 months'` – complete deletion of records that were marked as deleted (*deleted = 1*);
* cleanupSubscribers – `true` – cleaning up stream subscribers for not-actual records (as of v7.3);
* cleanupSubscribersPeriod – `'2 months'` – period for cleaning up subscribers for not-actual records (as of v7.3);
* cleanupAudit – `true` – to perform cleanup of the audit log;
* cleanupAuditPeriod – `3 month` – how long audit log records stay before cleanup;
### Passwords
* passwordStrengthLength – min password length;
* passwordStrengthLetterCount – how many letters are required for passwords;
* passwordStrengthNumberCount – how many numbers are required for passwords;
* passwordStrengthBothCases – `false` – password must contain letters of both upper and lower case;
* passwordRecoveryRequestLifetime – `3 hours` – how long a password recovery link is valid;
* passwordChangeRequestNewUserLifetime – `2 days` – how long a password change link for new users is valid (as of v7.1);
* passwordChangeRequestExistingUserLifetime – `2 days` – how long a password change link (initiated by admin) for existing users is valid (as of v7.1);
### Auth
* authAnotherUserDisabled – `false` – disable the ability to log in as another user for admins (as of v7.3);
* authLogDisabled – `false` – disable auth log records (as of v7.4);
* authApiUserLogDisabled – `false` – disable auth log records for successful connections of API users (as of v7.4);
* auth2FAEmailCodeLifetimePeriod – `'10 minutes'` – lifetime of email 2FA codes;
* auth2FASmsCodeLifetimePeriod – `'10 minutes'` – lifetime of SMS 2FA codes;
#### Brute force prevention for IP address
* authMaxFailedAttemptNumber – `10` – if the number of failed login attempts within a specific period exceeds the specified number, then the system won't allow to login;
* authFailedAttemptsPeriod – `'60 seconds'` – period taken into account;
* authFailedCodeAttemptsPeriod – `'5 minutes'` – period for checking a number of failed 2FA code check attempts (as of v8.4);
#### Brute force prevention for user name
*As of v9.3.*
* authUsernameFailedAttemptsLimitEnabled – `false` – enables brute force prevention measure delays;
* authMaxUsernameFailedAttemptNumber – `30` – if the number of failed login attempts within a specific period exceeds the specified number, then the system will do a delay;
* authUsernameFailedAttemptsPeriod – `'60 seconds'` – period taken into account;
* authUsernameFailedAttemptsDelay – `2` – delay in seconds;
### Security
* adminUpgradeDisabled – `false` – disables the ability to upgrade or upload extensions via the UI; (as of v8.1);
* clientSecurityHeadersDisabled – `false` – disable security headers (as of v7.2);
* clientCspDisabled – `false` – disable Content-Security-Policy header for the client page (as of v7.2);
* clientCspScriptSourceList – a script source white-list for the Content-Security-Policy header (as of v7.2);
* clientStrictTransportSecurityHeaderDisabled – `false` – disables `Strict-Transport-Security` header, actual if a webserver adds it (as of v7.3);
* clientCspFormActionDisabled – `false` – disables addition of `form-action 'self'` in the CSP header (as of v9.0.8);
### Jobs & Daemon
* jobMaxPortion – `15` – max number of jobs per one execution; a portion of jobs that is run in a queue is counted as one job;
* jobPeriod – `7800` – max execution time (in seconds) allocated for a single job; if exceeded then set to *Failed*;
* jobPeriodForActiveProcess – `36000` – max execution time (in seconds) allocated for a single job with active process; if exceeded then set to *Failed*;
* jobRerunAttemptNumber – `1` – number of attempts to re-run failed jobs;
* jobRunInParallel – `false` – jobs will be executed in parallel processes (see [here](jobs.md#running-jobs-in-parallel-processes));
* jobPoolConcurrencyNumber – `8` – max number of processes run simultaneously;
* cronMinInterval – `2` – min interval (in seconds) between two cron runs;
* daemonMaxProcessNumber – `5` – max number of processes run simultaneously;
* daemonInterval – `10` – interval between process runs (in seconds);
* daemonProcessTimeout – `36000` – max lifetime of a process run (in seconds);
* jobE0MaxPortion – `100` – max portion of jobs executed in a single process for *e0* queue; this queue is intended for email sending; is run as often as possible;
* jobQ0MaxPortion – `200` – *q0* is a queue for a general usage; is run as often as possible;
* jobQ1MaxPortion – `500` – *q1* is a queue for a general usage; is run every minute;
* jobGroupMaxPortion – `100` – a portion size for grouped jobs;
### Mass Email
* massEmailMaxAttemptCount – `3` – how many attempts to send an email will be made (can be helpful when SMTP server is gone away);
* massEmailSiteUrl – to override the default site URL (can be helpful if there's no access to your CRM from the internet, but you need to handle opting out & tracking URLs; you will need to configure your server to handle requests to the specified URL);
### Kanban
* kanbanMaxOrderNumber – `50` – a number of records that can be ordered within a group; as of v6.1;
* kanbanMinColumnWidth – `220` – a min width of column; the horizontal scrolling will appear to prevent column being shrunk less than the specified value; as of v7.1;
### Text search
* textFilterContainsMinLength – `4` – actual if *Use 'contains' operator when filtering varchar fields* parameter is enabled;
### PDF
* pdfEngine – `Tcpdf` – what PDF engine to use; as of v6.1;
* pdfFontFace – default font face;
* pdfFontSize – default font size;
### Events
* eventAssignedUserIsAttendeeDisabled – `false` – If set *true*, then assigned user won't be automatically added to an attendee list (for meetings and calls);
* eventInvitationForceSystemSmtp – `false` – To send invitation emails from system SMTP (otherwise a user's personal account can be used); as of v7.3;
* busyRangesMaxRange – A max timeline range on which free/busy slots are displayed on the Scheduler panel.
### Attachments
* attachmentUploadMaxSize – `256` – max size of attachments in Mb; as of v7.2;
* attachmentUploadChunkSize – `4` – chunk size in Mb; attachments uploaded by chunk; `0` disables uploading by chunk; as of v7.2;
* inlineAttachmentUploadMaxSize – `20` – max size of inline attachments in Mb (e.g. inline images for emails);
### Misc
* starsLimit – 500 – max number of stars a user can give per entity type;
* phoneNumberMaxCount – 10 – max number of phone numbers per record;
* emailAddressMaxCount – 10 – max number of email addresses per record;
* iframeSandboxExcludeDomainList – array of domains that do not require adding `sandbox="allow-scripts"` in the Iframe dashlet; as of v9.0.7;
* leadCaptureSiteUrl – to override the default site URL (can be helpful if there's no access to your CRM from the internet, but you want to expose the lead capture; you will need to configure your server to handle requests to the specified URL); as of v9.2;
* wysiwygCodeEditorDisabled – `false` – disable the Wysiwyg field code editor; as of v8.2;
* customPrefixDisabled – `false` – disable adding a *c* prefix to custom entity types, fields and links; as of v8.2; setting to true may cause conflicts; highly discouraged, voids official support;
## Config files
* `data/config.php` – the main config; can be written by the application or manually;
* `data/config-internal.php` – for storing sensitive parameters that should never make their way to the front-end; can be written by the application or manually;
* `data/config-override.php` – overrides parameters of the main config, supposed to be written only manually; you can read environment variables in there; as of v8.2;
* `data/config-override-internal.php` – overrides parameters of the main config, supposed to be written only manually; for storing sensitive parameters; as of v8.2.
================================================
FILE: docs/administration/cron-on-windows.md
================================================
# Setting up Cron on Windows
!!! note
All configuration settings listed here are made on **Windows Server 2019**.
To setup crontab on Windows system, take the following steps:
1\. Login as administrator into your EspoCRM instance.
2\. Go to the Scheduled Jobs section in the administrator panel (Menu > Administration > Scheduled Jobs) and copy the string for the crontab, replace `php.exe` instead of `php-cgi.exe` and add `"` symbols to the start and the end of the `php.exe` path. It looks like this one:
```
"C:\Program Files\PHP\v8.2\php.exe" -f C:\inetpub\wwwroot\733\cron.php
```
3\. Create a batch file by using Notepad and save with the *.bat* extension with string from step 2.
4\. From the Windows Start menu, select Administrative Tools and then Task Scheduler.
5\. Create a folder inside Windows directory and Task inside.
6\. Configure the Task with the following settings and click `OK`:


7\. Right-click on the created Task and Click on `Run`.
================================================
FILE: docs/administration/currency.md
================================================
---
search:
boost: 2
---
# Currency
In this article:
* [Settings & rates](#settings-rates)
* [Currency conversion](#currency-conversion)
* [Currency rates API](#currency-rates-api)
* [Adding missing currency](#adding-missing-currency)
* [Conversion via formula](#conversion-via-formula)
* [Decimal data type](#decimal-data-type)
## Settings & rates
An administrator can configure currency-related parameters and rates at Administration > Currency. It's possible to specify which currencies will be available in the system in the *Currency List* parameter.
Parameters:
* Currency List – The currencies available in the system.
* Default Currency – The currency that is pre-set when creating a new record. Currency values are converted to the default currency when filtering records by a currency field, sorting by a currency field, generating a Grid report with currency fields.
* Base Currency – The currency used as a base when specifying currency rates. It is usually the local currency in which the company operates.
### Exchange rates
*As of v9.3.*
Currency exchange rates are available under: Administration > Currency > Currency Rates button in the top-right corner. They can be also reached from the Global Search with the search *Currencies* query. The Currencies tab can be added to the navigation bar.
Currency exchange rates can be viewed or edited by:
- Admin users
- Users with access to the Currency scope
A rate entry has a mandatory *Date* field. The rate with the latest non-future date is used as the current rate.
### Default currency for specific field
It's possible to set an exclusive default currency for a specific field.
For example, for the *Amount* field of the *Opportunity*, set the *Default* value at Administration > Entity Manager > Opportunity > fields > amountCurrency.
## Currency conversion
### Converted field
All fields of *Currency* type are paired with a special read-only field of *Currency Converted* type. When you create a new Currency field, a Converted field is created automatically. This field represents a value converted to *Default Currency* based on current currency rates. This field is used for sorting by currency field, filtering, comparison, reporting. The field is read-only.
!!! note
When currency rates are changed, the value of Currency Converted field is also changed. Technically the value is not stored, but calculated on-fly. This can cause an issue that your reports get changed every time currency rates are changed.
To preserve converted values based on current rates you can:
1. Convert currency manually. With mass action from the list view or action on the detail view.
2. Convert currency automatically with the Workflows tool. Convert Currency service action is available for Opportunities, Quotes, Sales Orders, Invoices. E.g. you can setup a workflow that will update currencies for all closed opportunities each week.
3. Utilize Formula to store a current converted value in a separate read-only field. You can use either a regular Before Save Script or the Workflow tool.
### Storing current converted value
Let's assume that you have a currency field named *amount*, and the default currency is *USD*.
Create a new field of *Currency* type, name it *amountLocal*, make it read-only. Note that for non-custom entities the field will be named *cAmountLocal*.
Add a Formula script to the *Before Save Script* in the Entity Manager. You can also use this formula in a Workflow rule.
```
amountLocal = amountConverted;
amountLocalCurrency = 'USD';
```
You can re-calculate formula for all existing records with a mass action from the list view.
Note that some entity types may have already such a field implemented.
### Convert currency manually
It's possible to manually convert all currency fields of a record.
1. Mass action on the list view. Select which records you want to update (you can select all results). In *Actions* dropdown, click *Convert Currency*.
2. Action on the detail view. Available in the dropdown next to *Edit* button.
### Convert currency with Workflow
*Convert Currency* service action is available for Opportunity, Quote, Sales Order, Invoice. E.g. you can set up a workflow that will update currencies for all closed opportunities each week.
## Currency rates API
The API User needs to have *Currency* scope enabled in Roles.
Request to get all rates: `GET api/v1/CurrencyRate`.
Request to update specific rates: `PUT api/v1/CurrencyRate`, with JSON payload.
Payload example:
```
{
"EUR": 1.11,
"UAH": 0.037
}
```
Rate values are related to *Base Currency* specified in Settings.
## Adding missing currency
If a currency that you need is missing, you can add it manually.
Create a file: `custom/Espo/Custom/Resources/metadata/app/currency.json`
```json
{
"list": [
"__APPEND__",
"COD"
]
}
```
where *COD* is a 3-letter currency code in [ISO 4217](https://en.wikipedia.org/wiki/ISO_4217) standard.
Clear cache at Administration.
## Conversion via formula
Example (conversion from the default currency to EUR, for a field named *amount*):
```
amountEur = amountConverted * record\attribute('Currency', 'EUR', 'rate');
```
The field *amountConverted* contains an automatically calculated value in the default currency. Such fields are automatically created for all currency fields.
You can also use the [ext\currency\convert](formula/ext.md#extcurrencyconvert) function to convert currency amounts.
## Decimal data type
*As of v7.4.*
When precision is necessary for a specific currency field, it's recommended to use a Decimal data type. When creating a new currency field, check a corresponding checkbox.
For existing fields, can be enabled manually in metadata > entityDefs:
```json
{
"fields": {
"myCurrencyField": {
"decimal": true,
"precision": 13,
"scale": 4
}
}
}
```
Rebuild is required after modifying an existing field. Can take long if the table is big. Run from CLI in this case.
If the parameters *precision* and *scale* are not defined, values 13, 4 are used.
In the application, amount values will be represented as strings (rather than floats).
In templates (PDF, email), you need to use the *numberFormat* helper to print currency values.
================================================
FILE: docs/administration/dashboards.md
================================================
# Dashboards
All internal users can manage their dashboards, including adding, removing, and configuring dashlets, as well as adding dashboard tabs. Users can lock their dashboard to prevent accidental changes.
An administrator can edit dashboards of other users. On the user detail view, click the *Preferences* item from the dropdown at the top-right corner. There, you can find *Dashboard Layout*.
Users can reset their dashboard layout to the default. On the Preferences edit view, click *Reset Dashboard to Default* from the dropdown next to the *Edit* button. The administrator can reset dashboards of other users.
On the dashboard:
* Dashlets can be dragged by the header.
* Dashlets can be resized by dragging the lower-right corner.
* Multiple dashboard tabs can be created to group dashlets by their purpose.
## System default dashboard
The default dashboard layout will be applied to all new users. This layout be changed at Administration > User Interface > Dashboard Layout.
## Dashboard templates
Dashboard templates are available for administrators at Administration > Dashboard Templates. They provide the ability to deploy specific dashboard layouts to multiple users. It's also possible to deploy for all users of a specific team.
## Portal dashboard
On the edit view of the Portal record, you can define its default dashboard layout. It will be applied to all portal users unless a user has a specific *Dashboard Template*.
When editing a *Portal User*, you can specify the Dashboard Template for that user. This template will override the default template of the Portal.
## Dashlet
This section covers several out-of-the-box dashlets.
### Recort List
This dashlet allows users to display records of any entity type.
Parameters:
- Primary Filter – for example, a user can select *Open* filter to display only open Tasks.
- Additional Filters (known as Bool filters) – for example, a user can add *Only My* filter to display only records assignmed to them, or *Shared* filter to display records where they added as a collaborator.
- Order By and Order
- Layout
### My Activities
Displays user's upcoming activities, such as Meetings, Calls, Tasks, and entity types of the Event type.
Parameters:
- Next X Days – number of days into the future for which activities are displayed.
- Include Shared – to include tasks where the user is added as s collaborator.
### Iframe
Provides the ability to display external site in an Iframe.
Parameters:
- URL
### Memo
Provides the ability to display a specific text. Markdown is supported. It can be used to display instructions for users.
### Calendar
Displays the user's calendar.
Prameters:
- Mode – the calendar mode.
- What to display – what activity types to display.
- Teams – optionally, to display activities of specific teams.
### Stream
Displays the user's stream.
Parameters:
- Don't show own records
### My Inbox
Displays inbound emails.
### Sales Pipeline
A sales pipeline chart based on Opportunities.
Parameters:
- Date Filter
- Group by last reached stage
- Team (optional)
### Sales by Month
A sales by month chart based on Opportunities.
Parameters:
- Date Filter
### Opportunities by Lead Source
A chart.
Parameters:
- Date Filter
### Opportunities by Stage
A chart.
Parameters:
- Date Filter
## See also
* [Creating custom dashlet](../development/how-to-create-a-dashlet.md)
================================================
FILE: docs/administration/date-formatting.md
================================================
# Date & Time Formatting
* `YYYY` – 4 digit year: `2020`
* `YY` – 2 digit year: `20`
* `M MM` – month number: `1..12`
* `MMM MMMM` – month: `Jan..December`
* `D DD` – day of month: `1..31`
* `Do` – day of month with ordinal: `1st..31st`
* `ddd dddd` – day of week: `Tue Tuesday`
* `H HH` – hours (24 hour time): `0..23`
* `h hh` – hours (12 hour time): `0..12`
* `a A` – post or ante meridiem: `am PM`
* `m mm` – minutes: `0..59`
* `s ss` – seconds: `0..59`
* `Z ZZ zz` – offset from UTC : `+02:00 +0200`
* `zz` – timezone: `Europe/London`
================================================
FILE: docs/administration/docker/caddy.md
================================================
# Caddy and EspoCRM
The Caddy web server is an open-source, HTTP/2-enabled web server written in Go.
To connect Caddy and EspoCRM, you can use the Docker Compose environment. Also, you must have your own domain.
1\. Create a folder that will contain your EspoCRM files and database.
2\. Create here a `docker-compose.yml` file:
#### docker-compose.yml
```
services:
caddy:
image: caddy:latest
container_name: caddy
restart: always
ports:
- "80:80"
- "443:443"
volumes:
- ./certs:/etc/caddy/certs # optional: if you have self-signed certificates
- ./Caddyfile:/etc/caddy/Caddyfile
environment:
- ACME_AGREE=true # to automatically obtain certificates
espocrm-db:
image: mariadb:latest
container_name: espocrm-db
environment:
MARIADB_ROOT_PASSWORD: root_password
MARIADB_DATABASE: espocrm
MARIADB_USER: espocrm
MARIADB_PASSWORD: database_password
volumes:
- espocrm-db:/var/lib/mysql
restart: always
healthcheck:
test: ["CMD", "healthcheck.sh", "--connect", "--innodb_initialized"]
interval: 20s
start_period: 10s
timeout: 10s
retries: 3
espocrm:
image: espocrm/espocrm
container_name: espocrm
environment:
ESPOCRM_DATABASE_PLATFORM: Mysql
ESPOCRM_DATABASE_HOST: espocrm-db
ESPOCRM_DATABASE_USER: espocrm
ESPOCRM_DATABASE_PASSWORD: database_password
ESPOCRM_ADMIN_USERNAME: admin
ESPOCRM_ADMIN_PASSWORD: password
ESPOCRM_SITE_URL: "https://{YOUR_DOMAIN}"
volumes:
- espocrm:/var/www/html
restart: always
depends_on:
espocrm-db:
condition: service_healthy
expose:
- 80
espocrm-daemon:
image: espocrm/espocrm
container_name: espocrm-daemon
volumes:
- espocrm:/var/www/html
restart: always
depends_on:
- espocrm
entrypoint: docker-daemon.sh
espocrm-websocket:
image: espocrm/espocrm
container_name: espocrm-websocket
environment:
ESPOCRM_CONFIG_USE_WEB_SOCKET: "true"
ESPOCRM_CONFIG_WEB_SOCKET_URL: "wss://{YOUR_DOMAIN}/ws"
ESPOCRM_CONFIG_WEB_SOCKET_ZERO_M_Q_SUBSCRIBER_DSN: "tcp://*:7777"
ESPOCRM_CONFIG_WEB_SOCKET_ZERO_M_Q_SUBMISSION_DSN: "tcp://espocrm-websocket:7777"
volumes:
- espocrm:/var/www/html
restart: always
depends_on:
- espocrm
entrypoint: docker-websocket.sh
expose:
- 8080
volumes:
espocrm:
espocrm-db:
```
3\. Create here a `Caddyfile` text file:
#### Caddyfile
```
espocrm-example.com {
reverse_proxy espocrm:80
reverse_proxy /ws espocrm-websocket:8080 {
header_up Host {host}
header_up X-Real-IP {remote}
header_up X-Forwarded-For {remote}
header_up X-Forwarded-Proto {scheme}
}
# Optional for Self-Signed SSL Certificate
# tls /etc/caddy/certs/myserver.crt /etc/caddy/certs/myserver.key
}
```
----
Now, start containers with the CLI command `docker compose up -d`.
================================================
FILE: docs/administration/docker/installation.md
================================================
# EspoCRM with Docker
In this article:
- [Installing with Docker](#install-espocrm-with-docker)
- [Installing with Docker Compose](#install-espocrm-with-docker-compose)
- [Installing with Traefik](#install-espocrm-with-traefik)
- [Installing with Caddy](#install-espocrm-with-caddy)
- [Upgrading](#upgrading)
- [Shutdown and cleanup](#shutdown-and-cleanup-containers)
- [Running a shell](#running-a-shell)
- [Environments](#installation-environments)
- [Config Environments](#config-environments)
- [Image Variants](#image-variants)
- [Troubleshooting](#troubleshooting)
## Install EspoCRM with Docker
One of the ways to install EspoCRM is by using its official Docker Image. The EspoCRM Container Package contains the Docker image, which incorporates all the required files and dependencies to launch EspoCRM in development or production environments. You can use Docker to run EspoCRM in an isolated environment built with Docker containers.
EspoCRM image requires to run MariaDB or MySQL server:
```
$ docker run --name mariadb -e MARIADB_ROOT_PASSWORD=password -d mariadb:latest
```
- `mariadb` — name of MariaDB container,
- `MARIADB_ROOT_PASSWORD=password` — you can change `password` to any password you want,
- `mariadb:latest` — [MariaDB image](https://hub.docker.com/_/mariadb/tags) version.
Run EspoCRM container:
```
$ docker run --name my-espocrm --link mariadb:mariadb -d espocrm/espocrm
```
- `my-espocrm` — name of EspoCRM container,
- `mariadb:mariadb` — name (link) of MariaDB container,
- `espocrm/espocrm` — [EspoCRM image](https://hub.docker.com/r/espocrm/espocrm/tags) version.
#### Run EspoCRM container via a specific port:
```
$ docker run --name my-espocrm -p 8080:80 --link mariadb:mariadb -d espocrm/espocrm
```
Then, access it via `http://localhost:8080` with credentials admin and password.
#### Run EspoCRM via a specific IP or a domain with a port:
```
$ docker run --name my-espocrm -e ESPOCRM_SITE_URL=http://172.20.0.100:8080 -p 8080:80 --link mariadb:mariadb -d espocrm/espocrm
```
Then, access it via `http://172.20.0.100:8080` with credentials **admin** and **password**.
## Install EspoCRM with Docker Compose
You can use Docker Compose to run EspoCRM in an isolated environment built with Docker containers. Before starting, make sure you have [Compose](https://docs.docker.com/compose/install/) installed.
1\. Create an empty directory.
```
$ mkdir espocrm-docker
```
2\. Change into this directory.
```
$ cd espocrm-docker/
```
3\. Create a **`docker-compose.yml`** file:
```
services:
espocrm-db:
image: mariadb:latest
container_name: espocrm-db
environment:
MARIADB_ROOT_PASSWORD: root_password
MARIADB_DATABASE: espocrm
MARIADB_USER: espocrm
MARIADB_PASSWORD: database_password
volumes:
- espocrm-db:/var/lib/mysql
restart: always
healthcheck:
test: ["CMD", "healthcheck.sh", "--connect", "--innodb_initialized"]
interval: 20s
start_period: 10s
timeout: 10s
retries: 3
espocrm:
image: espocrm/espocrm
container_name: espocrm
environment:
ESPOCRM_DATABASE_PLATFORM: Mysql
ESPOCRM_DATABASE_HOST: espocrm-db
ESPOCRM_DATABASE_USER: espocrm
ESPOCRM_DATABASE_PASSWORD: database_password
ESPOCRM_ADMIN_USERNAME: admin
ESPOCRM_ADMIN_PASSWORD: password
ESPOCRM_SITE_URL: "http://localhost:8080"
volumes:
- espocrm:/var/www/html
restart: always
depends_on:
espocrm-db:
condition: service_healthy
ports:
- 8080:80
espocrm-daemon:
image: espocrm/espocrm
container_name: espocrm-daemon
volumes:
- espocrm:/var/www/html
restart: always
entrypoint: docker-daemon.sh
espocrm-websocket:
image: espocrm/espocrm
container_name: espocrm-websocket
environment:
ESPOCRM_CONFIG_USE_WEB_SOCKET: "true"
ESPOCRM_CONFIG_WEB_SOCKET_URL: "ws://localhost:8081"
ESPOCRM_CONFIG_WEB_SOCKET_ZERO_M_Q_SUBSCRIBER_DSN: "tcp://*:7777"
ESPOCRM_CONFIG_WEB_SOCKET_ZERO_M_Q_SUBMISSION_DSN: "tcp://espocrm-websocket:7777"
volumes:
- espocrm:/var/www/html
restart: always
entrypoint: docker-websocket.sh
ports:
- 8081:8080
volumes:
espocrm-db:
espocrm:
```
More about *Installation Environments* you can find [here](#installation-environments).
4\. Build EspoCRM project from directory.
```
$ docker compose up -d
```
5\. Bring up EspoCRM in a web browser. You can use http://localhost as the IP address, and open http://localhost:8080 in a web browser.
### Install EspoCRM with Traefik
You can read the instructions for installing EspoCRM in conjunction with Traefik in the Docker Compose environment [here](https://docs.espocrm.com/administration/docker/traefik/).
### Install EspoCRM with Caddy
You can read the instructions for installing EspoCRM in conjunction with Caddy in the Docker Compose environment [here](https://docs.espocrm.com/administration/docker/caddy/).
### Upgrading
In order to upgrade the container created by the `docker-compose.yml`:
1. Open your EspoCRM container directory.
2. Run the command:
```
$ docker compose pull && docker compose up -d
```
Within a few minutes the container will be upgraded to the latest version.
### Shutdown and cleanup containers
The `docker compose down` command removes the containers and default network, but preserves EspoCRM database.
The `docker compose down --volumes` removes the containers, default network, and the EspoCRM database.
### Running a shell
In order to enter the container and view the files, make a rebuild, etc., use the following command (`espocrm` is your container name):
```
$ docker exec -it espocrm bash
```
## Installation Environments
This is one-time environment variables which are using only for the fresh installation. If you need to define configuration options on the container startup, see the [Config Environments](#config-environments).
#### ESPOCRM_DATABASE_PLATFORM
Database platform. The possible values: `Mysql` or `Postgresql`. The default value is `Mysql`.
#### ESPOCRM_DATABASE_HOST
Database host name for EspoCRM. The default value is `espocrm-db`.
#### ESPOCRM_DATABASE_PORT
Database port for EspoCRM. The default value is empty.
#### ESPOCRM_DATABASE_NAME
Database name for EspoCRM. The default value is `espocrm`.
#### ESPOCRM_DATABASE_USER
Database user for EspoCRM. The default value is `root`.
#### ESPOCRM_DATABASE_PASSWORD
Database password for EspoCRM. The default value is `password`.
#### ESPOCRM_ADMIN_USERNAME
User name for an administrator of EspoCRM. The default value is `admin`.
#### ESPOCRM_ADMIN_PASSWORD
User password for an administrator of EspoCRM. The default value is `password`.
#### ESPOCRM_SITE_URL
The URL of EspoCRM. This option is very important for normal operating of EspoCRM. Examples: `http://172.20.0.100:8080`, `http://my-crm.local`.
### Other optional options
The list of possible values and their default values can be found in EspoCRM Administrator panel > Settings.
- `ESPOCRM_LANGUAGE`
- `ESPOCRM_DATE_FORMAT`
- `ESPOCRM_TIME_FORMAT`
- `ESPOCRM_TIME_ZONE`
- `ESPOCRM_WEEK_START`
- `ESPOCRM_DEFAULT_CURRENCY`
- `ESPOCRM_THOUSAND_SEPARATOR`
- `ESPOCRM_DECIMAL_MARK`
## Config Environments
These environment variables are using to define configuration parameters of the EspoCRM every time on the container startup. The parameters that can be changed are defined in the `data/config.php` or `data/config-internal.php`.
### Naming
Config environment variables should be converted from the camel-case format. For example:
The `exportDisabled` config option should be converted to `ESPOCRM_CONFIG_EXPORT_DISABLED`.
### Logger
There are additional options to change the `logger`:
- `ESPOCRM_CONFIG_LOGGER_LEVEL: "DEBUG"`
- `ESPOCRM_CONFIG_LOGGER_MAX_FILE_NUMBER: 30`
- `ESPOCRM_CONFIG_LOGGER_PATH: "data/logs/espo.log"`
For more details, visit [documentation](../log.md).
### Allowed types:
#### String
```
ESPOCRM_CONFIG_WEB_SOCKET_URL: "wss://my-espocrm.com:8080"
```
#### Integer
```
ESPOCRM_CONFIG_EMAIL_MESSAGE_MAX_SIZE: 10
```
#### Boolean
```
ESPOCRM_CONFIG_USE_WEB_SOCKET: "true"
```
#### Null
```
ESPOCRM_CONFIG_CURRENCY_DECIMAL_PLACES: "null"
```
## Image Variants
The `espocrm` images come in many flavors, each designed for a specific use case.
- `espocrm:apache`
- `espocrm:fpm`
- `espocrm:fpm-alpine`
- `espocrm:<version>`
- `espocrm:<version>-apache`
- `espocrm:<version>-fpm`
- `espocrm:<version>-fpm-alpine`
## Troubleshooting
### Switching to MySQL 8.4
In MySQL 8.4 there were changes in the authentication procedure, so you may encounter authentication related errors while upgrading EspoCRM. In this case, it is recommended to take the following steps:
1\. Change *authentication plugin* to `caching_sha2_password` for your MySQL users:
Notes:
- Replace the `YOUR_ROOT_PASSWORD` with your MySQL root password.
- Replace the `YOUR_ESPOCRM_DB_PASSWORD` with your MySQL espocrm user password.
```
sudo docker exec -i mysql mysql --user=root -p -e "
ALTER USER IF EXISTS 'root'@'localhost' IDENTIFIED WITH caching_sha2_password BY 'YOUR_ROOT_PASSWORD';
ALTER USER IF EXISTS 'root'@'%' IDENTIFIED WITH caching_sha2_password BY 'YOUR_ROOT_PASSWORD';
ALTER USER IF EXISTS 'espocrm'@'localhost' IDENTIFIED WITH caching_sha2_password BY 'YOUR_ESPOCRM_DB_PASSWORD';
ALTER USER IF EXISTS 'espocrm'@'%' IDENTIFIED WITH caching_sha2_password BY 'YOUR_ESPOCRM_DB_PASSWORD';"
```
2\. Remove from *docker-compose.yml* file the following line: `command: --default-authentication-plugin=mysql_native_password`.
3\. Restart and build `mysql` container:
```
sudo docker stop mysql && sudo docker rm mysql
docker compose up -d --build
```
================================================
FILE: docs/administration/docker/traefik.md
================================================
# Traefik and EspoCRM
Traefik is an open-source reverse proxy that makes it easy to work with microservices and/or just containers with your applications.
To connect Traefik and EspoCRM, you can use the Docker Compose environment. Also, you must have your own domain.
1. Create a folder that will contain your EspoCRM files and database.
2. Create here a `docker-compose.yml` file:
#### docker-compose.yml
```
services:
traefik:
image: traefik:latest
container_name: traefik
command:
- --api.insecure=true
- --providers.docker=true
- --providers.docker.exposedbydefault=false
- --entrypoints.websecure.address=:443
- --entrypoints.web.address=:80
- --entrypoints.web.http.redirections.entryPoint.to=websecure
- --entrypoints.web.http.redirections.entryPoint.scheme=https
- --entrypoints.web.http.redirections.entrypoint.permanent=true
- --certificatesresolvers.esporesolver.acme.tlschallenge=true
- --certificatesresolvers.esporesolver.acme.email={EMAIL_ADDRESS}
- --certificatesresolvers.esporesolver.acme.storage=/letsencrypt/acme.json
ports:
- "80:80"
- "8080:8080"
- "443:443"
volumes:
- ./letsencrypt:/letsencrypt
- /var/run/docker.sock:/var/run/docker.sock:ro
espocrm-db:
image: mariadb:latest
container_name: espocrm-db
command: --max-allowed-packet=64MB
restart: always
healthcheck:
test: ["CMD", "healthcheck.sh", "--connect", "--innodb_initialized"]
interval: 20s
start_period: 10s
timeout: 10s
retries: 3
environment:
MARIADB_ROOT_PASSWORD: root_password
MARIADB_DATABASE: espocrm
MARIADB_USER: espocrm
MARIADB_PASSWORD: database_password
volumes:
- ./espocrm-db:/var/lib/mysql
espocrm:
image: espocrm/espocrm:latest
container_name: espocrm
environment:
ESPOCRM_DATABASE_HOST: espocrm-db
ESPOCRM_DATABASE_USER: espocrm
ESPOCRM_DATABASE_PASSWORD: database_password
ESPOCRM_ADMIN_USERNAME: admin
ESPOCRM_ADMIN_PASSWORD: password
ESPOCRM_SITE_URL: "https://{ESPOCRM_DOMAIN}"
restart: always
depends_on:
espocrm-db:
condition: service_healthy
volumes:
- ./espocrm:/var/www/html
labels:
- traefik.enable=true
- traefik.http.routers.espocrm-app.rule=Host(`{ESPOCRM_DOMAIN}`)
- traefik.http.routers.espocrm-app.entrypoints=websecure
- traefik.http.routers.espocrm-app.tls=true
- traefik.http.routers.espocrm-app.tls.certresolver=esporesolver
espocrm-daemon:
image: espocrm/espocrm:latest
container_name: espocrm-daemon
volumes:
- espocrm:/var/www/html
restart: always
entrypoint: docker-daemon.sh
espocrm-websocket:
image: espocrm/espocrm:latest
container_name: espocrm-websocket
environment:
ESPOCRM_CONFIG_USE_WEB_SOCKET: "true"
ESPOCRM_CONFIG_WEB_SOCKET_ZERO_M_Q_SUBSCRIBER_DSN: "tcp://*:7777"
ESPOCRM_CONFIG_WEB_SOCKET_ZERO_M_Q_SUBMISSION_DSN: "tcp://espocrm-websocket:7777"
volumes:
- espocrm:/var/www/html
restart: always
entrypoint: docker-websocket.sh
labels:
- traefik.enable=true
- traefik.http.routers.espocrm-ws.rule=Host(`{ESPOCRM_DOMAIN}`) && PathPrefix(`/ws`)
- traefik.http.routers.espocrm-ws.entrypoints=websecure
- traefik.http.routers.espocrm-ws.tls=true
- traefik.http.routers.espocrm-ws.tls.certresolver=esporesolver
- traefik.http.services.espocrm-ws.loadbalancer.server.port=8080
volumes:
espocrm-db:
espocrm:
```
Traefik container commands explanation:
- **api.insecure=true** – *Enable the API in insecure mode. You can access Traefik Dashboard at `your_server_IP:8080`*
- **providers.docker=true** – *Enable Docker as the provider for Traefik*
- **providers.docker.exposedbydefault=false** – *Don't expose every container to Traefik, only expose enabled ones*
- **entrypoints.websecure.address=:443** – *Define an entrypoint for HTTPS on port :443 named websecure*
- **entrypoints.web.address=:80** – *Define an entrypoint for port :80 named web*
- **entrypoints.web.http.redirections.entryPoint.to=websecure** – *Redirect all incoming requests to entrypoint websecure*
- **entrypoints.web.http.redirections.entryPoint.scheme=https** – *Redirection target scheme*
- **entrypoints.web.http.redirections.entrypoint.permanent=true** – *Apply a permanent redirection*
- **certificatesresolvers.esporesolver.acme.tlschallenge=true** – *Enable TLS-ALPN-01 to generate and renew ACME certificates*
- **certificatesresolvers.esporesolver.acme.email=`{EMAIL_ADDRESS}`** – *Setting email for certificates*
- **certificatesresolvers.esporesolver.acme.storage=/letsencrypt/acme.json** – *Defining acme.json file to store certificates information*
EspoCRM container commands explanation:
- **traefik.enable=true** – *Enable Traefik to proxy main EspoCRM container*
- **traefik.http.routers.espocrm-app.rule=Host(`{ESPOCRM_DOMAIN}`)** – *Your domain name goes here for the HTTP rule*
- **traefik.http.routers.espocrm-app.entrypoints=websecure** – *Define entrypoint for HTTPS*
- **traefik.http.routers.espocrm-app.tls=true** – *Make sure all routers tied to this entrypoint are using HTTPS by default*
- **traefik.http.routers.espocrm-app.tls.certresolver=esporesolver** – *Define certificates resolvers for HTTPS*
> The labels in the EspoCRM container for WebSocket works in exactly the same way, we only add a prefix to the host and open port 8080 for container.
----
Now, start containers with the CLI command `docker compose up -d`.
You can track the work of Traefik on the Dashboard at *your_server_IP:8080*.
EspoCRM will work with both HTTP and HTTPS on your domain.
================================================
FILE: docs/administration/dynamic-logic.md
================================================
---
search:
boost: 2
---
# Dynamic Logic
A dynamic behavior for forms can be achieved by utilizing the Dynamic Logic feature.
## Fields
Dynamic Logic parameters are available for every field (Administration > Entity Manager > {Entity Type} > Fields > {field}.
The Dynamic Logic allows you to define conditions making certain fields visible, required or read-only. Conditions will be
checked automatically when data in the form is changed.
For *Enum*, *Array*, *Multi-Enum*, *Checklist* fields it's, possible to define different sets of options that will be
available for the field depending on which condition is met. Note that the order of option list is taken into account.
Dynamic logic can control:
* Visibility − if the field is visible or not;
* Required − if the field is required or not;
* Read-only − if the field read-only or not;
* Options − conditions that determine options available for enum fields;
* Invalidity − conditions making the field invalid.
Conditions are configured through user interface, no coding required.
!!! note
* When a condition for a field checks the value of the same field, it may cause side effects. E.g. making a field read-only when the same field is not empty.
* When defining enum options that depend on the current value of the field, you need to include the current value to the option set.
* In some cases it may be reasonable to disable the inline-edit functionality for a specific field as it may interfere with the dynamic logic.
* Dynamic Logic operates fields on the form, it has no effect on buttons and menu items in the UI.
* Dynamic Logic is not applied on the list view.
### Field logic
#### Visible
Is applied only in the frontend.
#### Required
Is applied only in the frontend and in the backend (as of v9.1).
#### Read-only
Is applied only in the frontend. Conditions are checked against the current state of the record. If we change a record without saving it, it changes the current state.
#### Read-only saved-state
*As of v9.1.*
Dynamic logic conditions checked against the saved state of the record. The logic is not applied while editing a record without saving.
* Is not applied when a record is created.
* Applied in both the frontend and the backend.
* Applied in mass-update.
Use-case: Make a field Resolution read-only when Status = Completed. It won't be possible to write the Resolution field while the Status is saved as Completed. Even if we change the Status on the form, the Resolution field will still be read-only. But if we change and save the Status, it will be possible to write the Resolution field.
#### Options
A mapping of conditions against option lists. Specific conditions determine what options will be available in an enum field.
For Enum, Array, Multi-Enum and Checklist fields.
### Regular expression
For *Varchar* and *Text* fields, it's possible to define a regular expression to check whether a value matches a specific
pattern.
An expression should start and end with a slash character.
Example: `/^\d{5}-\d{6}-\d{2}$/`
You can also specify regular expression flags after the ending slash.
## Panels
In the Layout Manager, you can specify conditions making a specific panel visible. Edit the panel to configure the dynamic logic.
Available in the following layouts:
* Detail
* Side Panels
* Bottom Panels
It's also possible to define conditions on which a specific color will be applied to the panel.
## Misc
To determine whether a record is being created, check whether the ID is empty. It can be useful to hide some fields when the record not yet created or to show some panel with instructions described in a panel note.
For dynamic logic that is applied only in the frontend, you may consider additionally using an API Before-Save script for a validation purpose.
## See also
* [Dynamic Logic quick tour](https://app.supademo.com/demo/cmke83sqa1io5qm44yrnnenp8)
================================================
FILE: docs/administration/email-fetching.md
================================================
# Emails
The document is moved to [here](emails.md).
================================================
FILE: docs/administration/emails.md
================================================
---
search:
boost: 3
---
# Email Administration
!!! important
[Cron](server-configuration.md#setting-up-crontab) should be configured in your system to make email fetching work.
## Overview
EspoCRM has the ability to monitor IMAP mailboxes. Emails can be fetched by Group Email Accounts and Personal Email Accounts. Group Email Accounts represent group mailboxes: the most common case is a support-team mailbox. Personal Email Accounts represent personal mailboxes of users.
As an email is coming, the system tries to link it with an appropriate record (Accounts, Lead, Opportunity, Case). Users who follow that record will receive a notification about the new email in the system, even if they are not recipients of the email.
!!! warning "Important"
Email records **are not duplicated** in the system, even if they are fetched by different email accounts. If you remove an email record from the CRM, it will be removed for all users. It's recommended to **move to trash** instead. It's also recommended to restrict *delete* access for users in Roles.
An Email record can be assigned to a particular user. By default, the Assigned User field is not available on the layout. The administrator can add it at: Administration > Entity Manager > Side Panel Fields.
## Access control
Access to imported emails is controlled by Roles. It means that if a particular email was imported from a mailbox of some user, other users will be able to see that email if they have access to that email.
If a user has a *read* access level set to *own*, they will be able to see emails that are related to them through at least one of the following links: Users, Assigned Users, Assigned User, Created By. Note than an email is automatically gets related with a user through the Users links if the user's email address is either in the *From*, *To* or *CC*.
There are 4 access levels: No, Own, Team, All.
## Group email accounts
Group Email Accounts can be accessed at Administration > Group Email Accounts.
Only administrator can setup Group Email Accounts. Group Email Accounts can be used for both receiving and sending emails.
The *Teams* field determines which teams incoming emails will be assigned to.
If a Group Email Account has the SMTP enabled and it's checked as **shared**, then users will be able to use this account when sending emails. Access to the account for sending is controlled by Roles through the *Group Email Account* permission. If the permission level is set to *teams*, then users of the teams selected in the *Teams* field of the Group Email Account will be able to use that Group Email Account.
There is the ability to make the system send an **auto-reply** for emails incoming to a Group Email Account.
### System email account
One Group Email Account needs to be picked as the system default account. All notifications and system emails will be sent from that account.
1. Create and configure a Group Email Account (at Administration > Group Email Accounts).
2. Navigate to Administration > Outbound Emails.
3. Specify the email address in the *System Email Address* field. The email address must be exactly the same as in the created Group Email Account (the list of available accounts will be shown in an autocomplete dropdown).
### Email-to-Case
There is an option to make the system create a new Case record from each email incoming to a specific Group Email Account. Cases can be distributed to users of a specific Team. There are three available distribution rules: *Direct Assignment*, *Round-Robin* and *Less-Busy*.
!!! note
Only the first email in the thread creates a new Case. Every subsequent email will be linked to the existing Case record and a Note will be added to the Stream.
When a user wants to send a reply to a customer, they need to make sure that the Case is selected as a **parent** of the email that is being sent. It will add the group email address to the *Reply-To* field of the email. So the customer's reply will be sent to the group address rather than to the user’s one.
## Personal email accounts
Regular users can set up their own email accounts that need to be monitored (at Emails tab > top right dropdown menu > Personal Email Accounts).
The administrator also can manage Personal Email Accounts of users (at Administration > Personal Email Accounts).
!!! warning "Important"
By default, regular users don’t have **access** to Personal Email Accounts. The Administrator needs to allow access to the *Personal Email Accounts* scope in Roles.
!!! warning "Important"
This is required to have the email functionality working properly. User records need to have their email address (or multiple addresses) set in the *Email* field. Only the administrator can change the *Email* field for users. It's supposed that the user's email address is the same as the email address of the user's Personal Email Account.
## Email filters
Email Filters provide the ability to automatically filter incoming emails based to specified criteria. For example, if you don't want notification messages sent by some application to be imported to EspoCRM, you can create a filter to make EspoCRM skip them.
The administrator can create **global** filters applied to all email accounts. Users can create filters for their own Personal Email Account and for their entire Inbox.
Available filter parameters:
- From
- To
- Subject
- Body Contains
- Body Contains All
If any of specified filter parameters does not match for a particular email, then the filter is not applied.
Wildcard (*) can be used in filter parameters.
================================================
FILE: docs/administration/entity-manager.md
================================================
---
search:
boost: 2
---
# Entity Manager
The Entity Manager is an essential part of EspoCRM. It allows using the system as a platform for custom business application development, as well as customizing the default CRM features.
With the Entity Manager, you can:
* Add new entity types.
* Customize existing entity types: change labels, default order and many other parameters.
* Configure fields: add new and customize existing ones.
* Configure relationships: add new, change labels and parameters of existing ones.
The Entity Manager tool is available from the Administration panel.
All customizations made via the Entity Manager are stored in the `custom` directory. You can make customizations on a separate instance, then [copy](#copying-customizations-to-another-instance) them to another instance.
!!! note
When creating a new entity type, a field or relationship in an existing entity type, the system will add a prefix *c* to the name (meaning custom). The purpose of it is to prevent naming conflicts with future versions. This behavior can be disabled with the config parameter `customPrefixDisabled`. Disable it at your own risk.
In this article:
* [Creating new entity type](#creating-new-entity-type)
* [Entity type parameters](#entity-type-parameters)
* [Fields](#fields)
* [Relationships](#relationships)
* [Formula](#formula)
* [Copying customizations to another instance](#copying-customizations-to-another-instance)
See also:
* [Quick tour](https://app.supademo.com/demo/cmc39h2hnlaf0sn1ru3j5yul5)
## Creating new entity type
Click the *Create Entity* button on the Entity Manager main page (Administration > Entity Manager). Specify the name, labels and select the type. If you select the *Person* type, your entity will have Email, Phone, First Name, Last Name and Salutation fields. Check the *Stream* if you want to have the Stream panel (users will be able to follow records).
Types:
* Base – has only basic fields created by default: Name, Assigned User, Teams, Description.
* Base Plus – like the Base type but with the Activities, History, Tasks panels.
* Event – has the Date Start, Date End, Duration, Parent, Status fields; available in the Calendar and in the Activities panel (must be [enabled](../user-guide/activities-and-calendar.md#custom-entities-on-calendar) at Administration > Settings).
* Person – has the Email, Phone, First Name, Last Name, Salutation, Address fields; the Activities, History, Tasks panels.
* Company – has the Email, Phone, Billing Address, Shipping Address fields; the Activities, History, Tasks panels.
## Entity type parameters
If you click *Edit* on the entity view, you will be able to change parameters of that entity type.
* Labels – singular and plural names of the entity type.
* Default order – how records are sorted in list views by default.
* Stream – enables the Stream feature for the entity type.
* Stars – the ability to star records; stars can be used by users to bookmark specific records.
* Disabled – check if you don't need this entity type in the system.
* Text Filter Fields – defines which fields are searched by the main text filter and global search.
* Status Field – specifies which field (of enum type) will be used to represent the record status; required for the Kanban view.
* Kanban view – enables the Kanban view mode; the parameter is available only if the Status Field is specified.
* Full-Text Search – enables full-text search; see more [here](../user-guide/text-search.md#full-text-search).
* Disable record count – the total number won't be displayed on the list view; can decrease loading time when the DB table is big.
* Color – a color for a quick recognition.
* Icon – pick an icon for the entity type.
* Preserve Audit Log – disables cleanup of the audit log; this parameter is applicable only if Stream is disabled, since if Stream is enabled, audit log records are not being deleted.
* Collaborators – the ability to [share](roles-management.md#collaborators) records with specific users.
* Multiple Assigned Users – the ability to assign multiple users to a record.
* Categories – records can be organized into tree-like categories; available for Base and Base Plus types (as of v10.0).
* Lockable – enables record locking (as of v10.0).
* Transactional Save – enables wrapping saves and removals into DB transactions (as of v10.0).
!!! note
Some parameters are not available for certain entity types.
## Fields
By clicking the *Fields* button, you will be moved to a separate page. There, you will be able to create new fields or update existing ones.
See [more detail](fields.md) about fields in the separate article.
!!! important
After you created a new field, you may also need to put this field on [layouts](layout-manager.md) (Administration > Layout Manager).
You also need to add the field to the Search Filters layout to be able to search by the field on the list view.
## Relationships
You can create custom relationships between entity types. Both standard and custom entities can be related to each other.
It's possible to create a relationship between the same entity type. E.g. a Company can have a parent company and child companies.
It's possible to have multiple relationships between the same entity type pairs. E.g. a Person and an Event can be linked by two relationships: attendees and organizers.
Relationship types are listed below.
#### One-to-Many
After you created the relationship, a *Link* field will be automatically created for the right-side entity type. You can add the link field to the Detail layout (at Administration > Entity Manager > {Entity Type} > Layouts > Detail). You can also add the relationship panel to the left entity type (at Administration > Entity Manager > {Entity Type} > Layouts > Bottom Panels).
#### Many-to-One
The same as One-to-Many but vice versa.
#### Many-to-Many
After you created the relationship, relationship panels will be available on both sides (at Administration > Entity Manager > {Entity Type} > Layouts > Bottom Panels).
#### One-to-One Right
The *Link* field will be created in the current entity type (left), the *Link-One* field – in the foreign entity type (right). It does not matter which one-to-one type to choose from the user perspective.
#### One-to-One Left
The same as previous but vice versa. The *Link* field will be created in the foreign entity type.
#### Children-to-Parent
Linking with multiple entity types through the *Link-Parent* field.
*Foreign Links* checkboxes allows you to create Has-Children links in specific parent entity types. For example, if we check *Account* foreign link, it will create a link in the Account entity type. It will allow to add relationship panel in Account.
### Parameters
#### Link Multiple field
The parameter *Link Multiple Field* implies that the field of the *Link-Multiple* type will be created along with the relationship. You can put such a field on the layout. It's convenient for quick picking of related records. It's not a good option if your relationship is intended to have a lot of linked records that can slow down loading of the detail view screen.
Examples of link-multiple fields:
* *Teams* field – most entities have this field;
* *Contacts* field in *Opportunity*;
* *Contacts* field in *Case*.
#### Audited
If the parameter **Audited** is checked, then updates of the relationship will be logged in Stream.
## Formula
### Before-save custom script
This [formula](formula.md) script will be executed every time before a record is saved. This provides the ability to automatically set specific fields with values derived from calculation. In addition, some functions can perform actions, for example, record creation.
To edit the formula script for a specific entity type, follow Administration > Entity Manager > a needed entity type > Formula.
!!! note
It can be reasonable to set fields that are supposed to be calculated by formula as read-only (Administration > Entity Manager > {Entity Type} > Fields).
An administrator can run *Recalculate Formula* action for specific records from the list view: select records (or all search results) > click *Actions* dropdown > click *Recalculate Formula*.
### API before-save script
*As of v7.5.*
This [formula](formula.md) script is called on create and update API requests, before the record is saved. See more [detail](api-before-save-script.md).
## Copying customizations to another instance
All customizations made through Entity Manager are stored in the `custom/Espo/Custom` folder. You need to copy contents of this folder to another instance and then run rebuild (CLI command `php rebuild.php`).
### Exporting to extension
It's also possible to export customization to an installable extension. On the Entity Manager page, from the dropdown next to *Create Entity* button.
================================================
FILE: docs/administration/extensions.md
================================================
# Managing extensions
## Installing
In order to install EspoCRM extension (e.g. Advanced Pack):
1. Login as an administrator.
2. Go to Administration > Extensions.
3. Upload your extension package (zip file).
4. Click Install button.
## Upgrading
In order to upgrade an already installed extension to a newer version:
1. Download the new version of the needed extension.
2. Log in as an administrator.
3. Go to Administration > Extensions.
4. Upload your new extension package (zip file) without uninstalling the already installed version.
5. Click the **Install** button.
!!! note
There's no need to install intermediate versions. Install just the latest one.
## Uninstalling
Steps to uninstall an extension:
1. Login as an administrator.
2. Go to Administration > Extensions.
3. Find the needed extension on the list of available extensions.
4. Click **Uninstall** from the dropdown.
!!! note
Uninstalling an extension does not cause data loss (unless the developer deliberately added such a logic). You can install the extension again and continue using it. Though, if you run a hard rebuild after uninstalling, it will remove all custom database columns added by the extension but it won't remove custom tables.
## Deleting
When an extension is uninstalled, it is still available in the system. It can be completely deleted. Steps to delete an extension:
1. Login as an administrator.
2. Go to Administration > Extensions.
3. Find the needed extension in the list of available extensions.
4. Click **Remove** from the dropdown.
## CLI commands
### Installing & upgrading
```
php command.php extension --file="path/to/extension/package.zip"
```
See more [commands](commands.md#extension).
!!! note
In some cases, installing extensions via CLI is preferable, as usually PHP configuration for CLI is not as limited as for a web server.
For example, if a new version of an extension adds
gitextract_xalhlxge/ ├── .gitignore ├── README.md ├── docs/ │ ├── _static/ │ │ ├── csv/ │ │ │ └── bpm-examples.csv │ │ └── scripts/ │ │ ├── backup-docker-container.sh │ │ └── backup.sh │ ├── administration/ │ │ ├── 2fa.md │ │ ├── addresses.md │ │ ├── apache-server-configuration.md │ │ ├── api-before-save-script.md │ │ ├── app-secrets.md │ │ ├── b2c.md │ │ ├── backup-and-restore.md │ │ ├── bpm-activities.md │ │ ├── bpm-compensation.md │ │ ├── bpm-configuration.md │ │ ├── bpm-drip-email-campaign.md │ │ ├── bpm-events.md │ │ ├── bpm-examples.md │ │ ├── bpm-formula.md │ │ ├── bpm-gateways.md │ │ ├── bpm-signals.md │ │ ├── bpm-tips.md │ │ ├── bpm-tracking-urls.md │ │ ├── bpm.md │ │ ├── collaborators.md │ │ ├── commands.md │ │ ├── config-params.md │ │ ├── cron-on-windows.md │ │ ├── currency.md │ │ ├── dashboards.md │ │ ├── date-formatting.md │ │ ├── docker/ │ │ │ ├── caddy.md │ │ │ ├── installation.md │ │ │ └── traefik.md │ │ ├── dynamic-logic.md │ │ ├── email-fetching.md │ │ ├── emails.md │ │ ├── entity-manager.md │ │ ├── extensions.md │ │ ├── fields.md │ │ ├── file-storage.md │ │ ├── formula/ │ │ │ ├── array.md │ │ │ ├── datetime.md │ │ │ ├── entity.md │ │ │ ├── env.md │ │ │ ├── exception.md │ │ │ ├── ext.md │ │ │ ├── general.md │ │ │ ├── json.md │ │ │ ├── language.md │ │ │ ├── log.md │ │ │ ├── number.md │ │ │ ├── object.md │ │ │ ├── password.md │ │ │ ├── record.md │ │ │ ├── string.md │ │ │ └── util.md │ │ ├── formula-functions.md │ │ ├── formula-scripts-examples.md │ │ ├── formula.md │ │ ├── iis-server-configuration.md │ │ ├── import.md │ │ ├── installation-by-script.md │ │ ├── installation.md │ │ ├── jobs.md │ │ ├── layout-manager.md │ │ ├── ldap-authorization-for-ad.md │ │ ├── ldap-authorization-for-openldap.md │ │ ├── ldap-authorization.md │ │ ├── log.md │ │ ├── maps.md │ │ ├── moving-to-another-server.md │ │ ├── multiple-assigned-users.md │ │ ├── nginx-server-configuration.md │ │ ├── nginx-virtual-host.md │ │ ├── oidc.md │ │ ├── passwords.md │ │ ├── performance-tweaking.md │ │ ├── phone-numbers.md │ │ ├── portal/ │ │ │ ├── apache-configuration.md │ │ │ └── nginx-configuration.md │ │ ├── portal.md │ │ ├── roles-management.md │ │ ├── security.md │ │ ├── server-configuration.md │ │ ├── sms-sending.md │ │ ├── terms-and-naming.md │ │ ├── troubleshooting.md │ │ ├── upgrading-manually.md │ │ ├── upgrading.md │ │ ├── users-management.md │ │ ├── web-to-lead.md │ │ ├── webhooks.md │ │ ├── websocket.md │ │ ├── workflows-telegram-message.md │ │ └── workflows.md │ ├── api/ │ │ ├── index.html │ │ └── spec.json │ ├── css/ │ │ └── extra.css │ ├── development/ │ │ ├── acl.md │ │ ├── api/ │ │ │ ├── account.md │ │ │ ├── attachment.md │ │ │ ├── crud.md │ │ │ ├── currency-rate.md │ │ │ ├── i18n.md │ │ │ ├── metadata.md │ │ │ ├── relationships.md │ │ │ └── stream.md │ │ ├── api-action.md │ │ ├── api-client-go.md │ │ ├── api-client-java.md │ │ ├── api-client-js.md │ │ ├── api-client-php.md │ │ ├── api-client-python.md │ │ ├── api-client-rust.md │ │ ├── api-client-zig.md │ │ ├── api-search-params.md │ │ ├── api-tutorial.md │ │ ├── api.md │ │ ├── app-params.md │ │ ├── attachments.md │ │ ├── autoload.md │ │ ├── calculated-fields.md │ │ ├── campaign-unsubscribe-template.md │ │ ├── coding-practices.md │ │ ├── coding-rules.md │ │ ├── collection.md │ │ ├── confirm-dialog.md │ │ ├── container-services.md │ │ ├── custom-buttons.md │ │ ├── custom-config-parameters.md │ │ ├── custom-css.md │ │ ├── custom-entity-type.md │ │ ├── custom-field-type.md │ │ ├── custom-views.md │ │ ├── customize-standard-fields.md │ │ ├── db-indexes.md │ │ ├── di.md │ │ ├── duplicate-check.md │ │ ├── dynamic-handler.md │ │ ├── email-sending.md │ │ ├── entry-points.md │ │ ├── examples/ │ │ │ └── dynamic-logic-multi-enum.md │ │ ├── extension-packages.md │ │ ├── frontend/ │ │ │ ├── ajax.md │ │ │ ├── controller.md │ │ │ ├── dependency-injection.md │ │ │ ├── html-css.md │ │ │ ├── monkey-patching.md │ │ │ ├── record-panels.md │ │ │ ├── save-error-handlers.md │ │ │ ├── templates.md │ │ │ └── view-setup-handlers.md │ │ ├── hooks.md │ │ ├── how-to-create-a-dashlet.md │ │ ├── how-to-start.md │ │ ├── index.md │ │ ├── jobs.md │ │ ├── link-multiple-with-primary.md │ │ ├── metadata/ │ │ │ ├── acl-defs.md │ │ │ ├── app-acl-portal.md │ │ │ ├── app-acl.md │ │ │ ├── app-actions.md │ │ │ ├── app-address-formats.md │ │ │ ├── app-admin-panel.md │ │ │ ├── app-api.md │ │ │ ├── app-app-params.md │ │ │ ├── app-authentication-2fa-methods.md │ │ │ ├── app-authentication.md │ │ │ ├── app-cleanup.md │ │ │ ├── app-client-icons.md │ │ │ ├── app-client-navbar.md │ │ │ ├── app-client-record.md │ │ │ ├── app-client-routes.md │ │ │ ├── app-client.md │ │ │ ├── app-complex-expression.md │ │ │ ├── app-config.md │ │ │ ├── app-console-commands.md │ │ │ ├── app-container-services.md │ │ │ ├── app-currency-conversion.md │ │ │ ├── app-currency.md │ │ │ ├── app-database-platforms.md │ │ │ ├── app-date-time.md │ │ │ ├── app-default-dashboard-layouts.md │ │ │ ├── app-default-dashboard-options.md │ │ │ ├── app-email-template.md │ │ │ ├── app-entity-manager-params.md │ │ │ ├── app-entity-manager.md │ │ │ ├── app-entity-template-list.md │ │ │ ├── app-entity-templates.md │ │ │ ├── app-export.md │ │ │ ├── app-field-processing.md │ │ │ ├── app-file-storage.md │ │ │ ├── app-file.md │ │ │ ├── app-formula.md │ │ │ ├── app-hook.md │ │ │ ├── app-image.md │ │ │ ├── app-js-libs.md │ │ │ ├── app-language.md │ │ │ ├── app-layouts.md │ │ │ ├── app-link-manager.md │ │ │ ├── app-map-providers.md │ │ │ ├── app-mass-actions.md │ │ │ ├── app-metadata.md │ │ │ ├── app-orm.md │ │ │ ├── app-pdf-engines.md │ │ │ ├── app-popup-notifications.md │ │ │ ├── app-portal-container-services.md │ │ │ ├── app-reactions.md │ │ │ ├── app-rebuild.md │ │ │ ├── app-record-id.md │ │ │ ├── app-record.md │ │ │ ├── app-reg-exp-patterns.md │ │ │ ├── app-relationships.md │ │ │ ├── app-scheduled-jobs.md │ │ │ ├── app-select.md │ │ │ ├── app-sms-providers.md │ │ │ ├── app-template-helpers.md │ │ │ ├── app-templates.md │ │ │ ├── app-web-socket.md │ │ │ ├── authentication-methods.md │ │ │ ├── client-defs.md │ │ │ ├── dashlets.md │ │ │ ├── entity-acl.md │ │ │ ├── entity-defs.md │ │ │ ├── fields.md │ │ │ ├── integrations.md │ │ │ ├── logic-defs.md │ │ │ ├── notification-defs.md │ │ │ ├── pdf-defs.md │ │ │ ├── record-defs.md │ │ │ ├── scopes.md │ │ │ ├── select-defs.md │ │ │ └── stream-defs.md │ │ ├── metadata.md │ │ ├── modal.md │ │ ├── model.md │ │ ├── modules.md │ │ ├── new-function-in-formula.md │ │ ├── orm-value-objects.md │ │ ├── orm.md │ │ ├── quote-custom-calculations.md │ │ ├── resources.md │ │ ├── scheduled-job.md │ │ ├── select-builder.md │ │ ├── select-manager.md │ │ ├── services.md │ │ ├── template-custom-helper.md │ │ ├── tests.md │ │ ├── translation.md │ │ ├── view.md │ │ └── workflow-service-actions.md │ ├── extensions/ │ │ ├── advanced-pack/ │ │ │ └── overview.md │ │ ├── export-import/ │ │ │ ├── compare.md │ │ │ ├── customization.md │ │ │ ├── export.md │ │ │ ├── import.md │ │ │ ├── overview.md │ │ │ └── run-by-code.md │ │ ├── google-integration/ │ │ │ ├── calendar.md │ │ │ ├── contacts.md │ │ │ ├── gmail.md │ │ │ └── setting-up.md │ │ ├── meeting-scheduler/ │ │ │ └── index.md │ │ ├── outlook-integration/ │ │ │ ├── calendar.md │ │ │ ├── contacts.md │ │ │ ├── email.md │ │ │ └── setting-up.md │ │ ├── project-management/ │ │ │ └── projects.md │ │ ├── sales-pack/ │ │ │ ├── bill-credits.md │ │ │ ├── bills.md │ │ │ ├── credit-notes.md │ │ │ ├── delivery-orders.md │ │ │ ├── inventory-management.md │ │ │ ├── issuance-locking.md │ │ │ ├── multi-currency.md │ │ │ ├── overview.md │ │ │ ├── payments.md │ │ │ ├── prices.md │ │ │ ├── purchase-orders.md │ │ │ ├── receipt-orders.md │ │ │ ├── reports.md │ │ │ ├── return-orders.md │ │ │ ├── subscriptions.md │ │ │ ├── suppliers.md │ │ │ ├── tax-codes.md │ │ │ ├── taxes.md │ │ │ └── write-offs.md │ │ ├── stripe-integration/ │ │ │ └── index.md │ │ ├── voip-integration/ │ │ │ ├── 3cx-integration-setup.md │ │ │ ├── asterisk-integration-setup.md │ │ │ ├── binotel-integration-setup.md │ │ │ ├── customization.md │ │ │ ├── docker-container.md │ │ │ ├── iexpbx-integration-setup.md │ │ │ ├── overview.md │ │ │ ├── starface-integration-setup.md │ │ │ ├── troubleshooting.md │ │ │ └── twilio-integration-setup.md │ │ └── zoom-integration/ │ │ └── index.md │ ├── index.md │ ├── js/ │ │ └── extra.js │ └── user-guide/ │ ├── activities-and-calendar.md │ ├── browser-support.md │ ├── campaigns.md │ ├── case-management.md │ ├── complex-expressions.md │ ├── data-privacy.md │ ├── documents.md │ ├── emails.md │ ├── export.md │ ├── imap-smtp-configuration.md │ ├── invoices.md │ ├── knowledge-base.md │ ├── mail-merge.md │ ├── markdown.md │ ├── mass-email.md │ ├── optimistic-concurrency-control.md │ ├── printing-to-pdf.md │ ├── products.md │ ├── quotes.md │ ├── reports.md │ ├── sales-management.md │ ├── sales-orders.md │ ├── shortcuts.md │ ├── stream.md │ ├── text-search.md │ └── working-time-calendar.md └── mkdocs.yml
SYMBOL INDEX (1 symbols across 1 files)

FILE: docs/js/extra.js
  function loadNavpanel (line 5) | function loadNavpanel() {
Condensed preview — 329 files, each showing path, character count, and a content snippet. Download the .json file or copy for the full structured content (2,891K chars).
[
  {
    "path": ".gitignore",
    "chars": 18,
    "preview": "site/\n.venv\n.idea\n"
  },
  {
    "path": "README.md",
    "chars": 484,
    "preview": "# EspoCRM Documentation\n\n### View documentation\n\n* [On the website](https://docs.espocrm.com)\n* [On this repository](doc"
  },
  {
    "path": "docs/_static/csv/bpm-examples.csv",
    "chars": 26560,
    "preview": "name,targetType,isActive,data,description\n\"Example: Email reply catching\",Account,,\"{\"\"list\"\":[{\"\"type\"\":\"\"eventStart\"\","
  },
  {
    "path": "docs/_static/scripts/backup-docker-container.sh",
    "chars": 3606,
    "preview": "#!/bin/bash\n\n# This script creates a backup of an EspoCRM Docker container, including both the database and files.\n#\n# E"
  },
  {
    "path": "docs/_static/scripts/backup.sh",
    "chars": 3855,
    "preview": "#!/bin/bash\n\n# This script creates a backup of an EspoCRM installation, including both the database and files.\n#\n# EspoC"
  },
  {
    "path": "docs/administration/2fa.md",
    "chars": 2558,
    "preview": "# 2-Factor Authentication\n\nEspoCRM supports the following 2-factor authentication methods: \n\n* TOTP (as of v5.7)\n* Email"
  },
  {
    "path": "docs/administration/addresses.md",
    "chars": 557,
    "preview": "# Addresses\n\n## Countries\n\n*As of v8.3.*\n\nAn administrator can add country names with their ISO 3166-1 alpha-2 codes (at"
  },
  {
    "path": "docs/administration/apache-server-configuration.md",
    "chars": 3845,
    "preview": "# Apache server configuration for EspoCRM\n\nThese instructions are supplementary to the [server configuration](server-con"
  },
  {
    "path": "docs/administration/api-before-save-script.md",
    "chars": 4055,
    "preview": "# API Before-Save Script\n\n*As of v7.5.*\n\nA [formula](formula.md) script that is invoked on POST and PUT API requests to "
  },
  {
    "path": "docs/administration/app-secrets.md",
    "chars": 600,
    "preview": "# App Secrets\n\n*As of v9.0.*\n\nApplications secrets allow you to securely store sensitive values in Espo, such as API key"
  },
  {
    "path": "docs/administration/b2c.md",
    "chars": 586,
    "preview": "# Configuring EspoCRM for B2C (Business-to-Client)\n\nBy default, EspoCRM is configured for use in B2B business. It's poss"
  },
  {
    "path": "docs/administration/backup-and-restore.md",
    "chars": 5320,
    "preview": "# Backup and Restore\n\nThis article outlines backup and restore methods for EspoCRM in various environments:\n\n* [Non-cont"
  },
  {
    "path": "docs/administration/bpm-activities.md",
    "chars": 15439,
    "preview": "# BPM Activities\n\nActivities encompass automated tasks, manual tasks, and sub-processes. On a flowchart, they are depict"
  },
  {
    "path": "docs/administration/bpm-compensation.md",
    "chars": 3211,
    "preview": "# Compensation in BPM\n\n*As of Advanced Pack v2.14.*\n\nThe Compensation mechanism is supposed to perform undo actions when"
  },
  {
    "path": "docs/administration/bpm-configuration.md",
    "chars": 1459,
    "preview": "# BPM Configuration\n\n## Deferring conditional event checking\n\n*As of v2.8.7.*\n\nWithin a period defined by the config par"
  },
  {
    "path": "docs/administration/bpm-drip-email-campaign.md",
    "chars": 2925,
    "preview": "# Drip Email Campaign with BPM\n\nWith the [BPM tool](bpm.md) it's possible to create drip email campaigns.\n\n## Campaign s"
  },
  {
    "path": "docs/administration/bpm-events.md",
    "chars": 18982,
    "preview": "# BPM Events\n\nEvents represent something that happens during a business process. They also start, end and interrupt a pr"
  },
  {
    "path": "docs/administration/bpm-examples.md",
    "chars": 1302,
    "preview": "# BPM Examples\n\n## Downloadable examples\n\nYou can download the CSV file with examples and then import it into your EspoC"
  },
  {
    "path": "docs/administration/bpm-formula.md",
    "chars": 3048,
    "preview": "# BPM Formula Functions\n\nThe [BPM tool](bpm.md) provides additional formula functions.\n\nA Formula script can be utilized"
  },
  {
    "path": "docs/administration/bpm-gateways.md",
    "chars": 4191,
    "preview": "# BPM Gateways\n\nGateways diverge and converge flows. Depicted as a yellow diamond. They can be used to determine a path "
  },
  {
    "path": "docs/administration/bpm-signals.md",
    "chars": 7936,
    "preview": "# Signals\n\nSignals are events with a specific name. Signals are broadcasted globally, they are not limited by a process "
  },
  {
    "path": "docs/administration/bpm-tips.md",
    "chars": 1820,
    "preview": "# BPM Tips\n\n## Execution in idle\n\nWhen a process is initiated by a user interaction (e.g. after record is created), it s"
  },
  {
    "path": "docs/administration/bpm-tracking-urls.md",
    "chars": 2820,
    "preview": "# Tracking URLs with BPM\n\n## Non-unique URL\n\nIt's possible to add links into email body and catch when a recipient click"
  },
  {
    "path": "docs/administration/bpm.md",
    "chars": 7214,
    "preview": "---\nsearch:\n  boost: 2\ntags:\n  - automation\n  - bpm\n---\n\n# Business Process Management\n\nThe Business Process Management "
  },
  {
    "path": "docs/administration/collaborators.md",
    "chars": 1834,
    "preview": "---\nsearch:\n  boost: 2\n---\n\n# Collaborators\n\n*As of v9.0.*\n\nThe Collaborators feature allow multiple users to work on th"
  },
  {
    "path": "docs/administration/commands.md",
    "chars": 4247,
    "preview": "---\nsearch:\n  boost: 2\n---\n\n# Console Commands\n\n!!! note\n\n    You can run `php command.php` instead of `bin/command`. Ma"
  },
  {
    "path": "docs/administration/config-params.md",
    "chars": 15198,
    "preview": "---\nsearch:\n  boost: 2\n---\n\n# Config parameters\n\nConfig parameters can be changed or added manually in the file `data/co"
  },
  {
    "path": "docs/administration/cron-on-windows.md",
    "chars": 1311,
    "preview": "# Setting up Cron on Windows\n\n!!! note\n\n    All configuration settings listed here are made on **Windows Server 2019**.\n"
  },
  {
    "path": "docs/administration/currency.md",
    "chars": 6321,
    "preview": "---\nsearch:\n  boost: 2\n---\n\n# Currency\n\nIn this article:\n\n* [Settings & rates](#settings-rates)\n* [Currency conversion]("
  },
  {
    "path": "docs/administration/dashboards.md",
    "chars": 3408,
    "preview": "# Dashboards\n\nAll internal users can manage their dashboards, including adding, removing, and configuring dashlets, as w"
  },
  {
    "path": "docs/administration/date-formatting.md",
    "chars": 541,
    "preview": "# Date & Time Formatting\n\n* `YYYY` – 4 digit year: `2020`\n* `YY` – 2 digit year: `20`\n* `M MM` – month number: `1..12`\n*"
  },
  {
    "path": "docs/administration/docker/caddy.md",
    "chars": 3041,
    "preview": "# Caddy and EspoCRM\n\nThe Caddy web server is an open-source, HTTP/2-enabled web server written in Go.\n\nTo connect Caddy "
  },
  {
    "path": "docs/administration/docker/installation.md",
    "chars": 9771,
    "preview": "# EspoCRM with Docker\n\nIn this article:\n\n- [Installing with Docker](#install-espocrm-with-docker)\n- [Installing with Doc"
  },
  {
    "path": "docs/administration/docker/traefik.md",
    "chars": 5896,
    "preview": "# Traefik and EspoCRM\n\nTraefik is an open-source reverse proxy that makes it easy to work with microservices and/or just"
  },
  {
    "path": "docs/administration/dynamic-logic.md",
    "chars": 4066,
    "preview": "---\nsearch:\n  boost: 2\n---\n\n# Dynamic Logic\n\nA dynamic behavior for forms can be achieved by utilizing the Dynamic Logic"
  },
  {
    "path": "docs/administration/email-fetching.md",
    "chars": 54,
    "preview": "# Emails\n\nThe document is moved to [here](emails.md).\n"
  },
  {
    "path": "docs/administration/emails.md",
    "chars": 5610,
    "preview": "---\nsearch:\n  boost: 3\n---\n\n# Email Administration\n\n!!! important\n\n    [Cron](server-configuration.md#setting-up-crontab"
  },
  {
    "path": "docs/administration/entity-manager.md",
    "chars": 8872,
    "preview": "---\nsearch:\n  boost: 2\n---\n\n# Entity Manager\n\nThe Entity Manager is an essential part of EspoCRM. It allows using the sy"
  },
  {
    "path": "docs/administration/extensions.md",
    "chars": 2008,
    "preview": "# Managing extensions\n\n## Installing\n\nIn order to install EspoCRM extension (e.g. Advanced Pack):\n\n1. Login as an admini"
  },
  {
    "path": "docs/administration/fields.md",
    "chars": 16169,
    "preview": "# Fields\n\n## Field types\n\nThe list of field types available for creating:\n\n* [Varchar](#varchar) – a single-line text;\n*"
  },
  {
    "path": "docs/administration/file-storage.md",
    "chars": 1572,
    "preview": "# File Storage\n\nBy default, all uploaded files (attachments) are stored in `data/upload` directory. EspoCRM is shipped w"
  },
  {
    "path": "docs/administration/formula/array.md",
    "chars": 2167,
    "preview": "# Formula > Functions > Array\n\n* [array\\includes](#arrayincludes)\n* [array\\push](#arraypush)\n* [array\\length](#arrayleng"
  },
  {
    "path": "docs/administration/formula/datetime.md",
    "chars": 4917,
    "preview": "# Formula > Functions > Datetime\n\nDate and date-time values are represented as strings. E.g. `'2021-01-01'`, `'2021-01-0"
  },
  {
    "path": "docs/administration/formula/entity.md",
    "chars": 4399,
    "preview": "# Formula > Functions > Entity\n\nFunctions of the *Entity* group operate with a target record. There can be only one targ"
  },
  {
    "path": "docs/administration/formula/env.md",
    "chars": 208,
    "preview": "# Formula > Functions > Env\n\n## env\\userAttribute\n`env\\userAttribute(ATTRIBUTE)`\n\nReturns ATTRIBUTE of the current user."
  },
  {
    "path": "docs/administration/formula/exception.md",
    "chars": 561,
    "preview": "# Formula > Functions > Exception\n\n* [exception\\throwInvalid](#exceptionthrowinvalid)\n\n## exception\\throwInvalid\n\n`excep"
  },
  {
    "path": "docs/administration/formula/ext.md",
    "chars": 6279,
    "preview": "# Formula > Functions > Ext\n\n* [ext\\account\\findByEmailAddress](#extaccountfindbyemailaddress)\n* [ext\\currency\\convert]("
  },
  {
    "path": "docs/administration/formula/general.md",
    "chars": 1035,
    "preview": "# Formula > Functions > General\n\n* [list](#list)\n* [ifThenElse](#ifthenelse)\n* [ifThen](#ifthen)\n\n## list\n\n`list(VALUE-1"
  },
  {
    "path": "docs/administration/formula/json.md",
    "chars": 673,
    "preview": "# Formula > Functions > JSON\n\n* [json\\retrieve](#jsonretrieve)\n* [json\\encode](#jsonencode)\n\n## json\\retrieve\n\n`json\\ret"
  },
  {
    "path": "docs/administration/formula/language.md",
    "chars": 708,
    "preview": "# Formula > Functions > Language\n\n* [language\\translate](#languagetranslate)\n* [language\\translateOption](#languagetrans"
  },
  {
    "path": "docs/administration/formula/log.md",
    "chars": 682,
    "preview": "# Formula > Functions > Log\n\n*As of v8.3.*\n\n* [log\\info](#loginfo)\n* [log\\notice](#lognotice)\n* [log\\warning](#logwarnin"
  },
  {
    "path": "docs/administration/formula/number.md",
    "chars": 1826,
    "preview": "# Formula > Functions > Number\n\n* [number\\format](#numberformat)\n* [number\\abs](#numberabs)\n* [number\\power](#numberpowe"
  },
  {
    "path": "docs/administration/formula/object.md",
    "chars": 1154,
    "preview": "# Formula > Functions > Object\n\n* [object\\create](#objectcreate)\n* [object\\get](#objectget)\n* [object\\set](#objectset)\n*"
  },
  {
    "path": "docs/administration/formula/password.md",
    "chars": 363,
    "preview": "# Formula > Functions > Password\n\n## password\\generate\n\n`password\\generate()`\n\nGenerates and returns a password.\n\n## pas"
  },
  {
    "path": "docs/administration/formula/record.md",
    "chars": 8651,
    "preview": "# Formula > Functions > Record\n\n* [record\\exists](#recordexists)\n* [record\\count](#recordcount)\n* [record\\findOne](#reco"
  },
  {
    "path": "docs/administration/formula/string.md",
    "chars": 4663,
    "preview": "# Formula > Functions > String\n\n* [string\\concatenate](#stringconcatenate)\n* [string\\substring](#stringsubstring)\n* [str"
  },
  {
    "path": "docs/administration/formula/util.md",
    "chars": 619,
    "preview": "# Formula > Functions > Util\n\n* [util\\generateId](#utilgenerateid)\n* [util\\generateRecordId](#utilgeneraterecordid)\n* [u"
  },
  {
    "path": "docs/administration/formula-functions.md",
    "chars": 7781,
    "preview": "---\nsearch:\n  boost: 2\n---\n\n# Formula Functions\n\nThe format of function usage: `groupName\\functionName(argument1, argume"
  },
  {
    "path": "docs/administration/formula-scripts-examples.md",
    "chars": 1181,
    "preview": "# Formula Scripts Examples\n\n* [Creating new user](#creating-new-user)\n* [Sending email with generated PDF in attachment]"
  },
  {
    "path": "docs/administration/formula.md",
    "chars": 10998,
    "preview": "---\nsearch:\n  boost: 3\n---\n\n# Formula Script\n\nFormula Script is a simple scripting language designed specially for EspoC"
  },
  {
    "path": "docs/administration/iis-server-configuration.md",
    "chars": 3033,
    "preview": "# IIS server configuration for EspoCRM\n\n*As of v7.0.*\n\nThese instructions are supplementary to the [server configuration"
  },
  {
    "path": "docs/administration/import.md",
    "chars": 7073,
    "preview": "# Import\n\nProvides the ability to import records from CSV files.\n\nAn administrator can access the Import tool at Adminis"
  },
  {
    "path": "docs/administration/installation-by-script.md",
    "chars": 17140,
    "preview": "# Installation by Script\n\nThis script automatically installs EspoCRM as a Docker image with Nginx server and MariaDB dat"
  },
  {
    "path": "docs/administration/installation.md",
    "chars": 2800,
    "preview": "---\nsearch:\n  boost: 2\n---\n\n# Installation\n\n### Requirements\n\nEspoCRM can run on most hosting providers that support PHP"
  },
  {
    "path": "docs/administration/jobs.md",
    "chars": 6146,
    "preview": "# Jobs\n\nJobs are tasks executing in the background. They handle operations like sending notifications, mass mailing, syn"
  },
  {
    "path": "docs/administration/layout-manager.md",
    "chars": 5488,
    "preview": "# Layout Management\n\nThe Layout Manager provides the ability to customize the appearance of detail, edit, list views as "
  },
  {
    "path": "docs/administration/ldap-authorization-for-ad.md",
    "chars": 927,
    "preview": "# LDAP authorization for Active Directory\n\nExample of configuration LDAP authorization for the Active Directory server. "
  },
  {
    "path": "docs/administration/ldap-authorization-for-openldap.md",
    "chars": 803,
    "preview": "# LDAP authorization for OpenLDAP\n\nExample of configuration LDAP authorization for OpenLDAP server. The full guide to co"
  },
  {
    "path": "docs/administration/ldap-authorization.md",
    "chars": 4289,
    "preview": "# LDAP Authorization\n\n* [LDAP configuration](#ldap-configuration)\n* [Active Directory configuration](ldap-authorization-"
  },
  {
    "path": "docs/administration/log.md",
    "chars": 3647,
    "preview": "---\nsearch:\n  boost: 3\n---\n\n# Log\n\n## Default log\n\nBy default, the application log files are automatically created in th"
  },
  {
    "path": "docs/administration/maps.md",
    "chars": 1651,
    "preview": "# Maps\n\nEspoCRM supports Google Maps out of the box.\n\n## Google Maps\n\n### API Key\n\nTo use Google Maps, you need to speci"
  },
  {
    "path": "docs/administration/moving-to-another-server.md",
    "chars": 2665,
    "preview": "# Moving EspoCRM to another server\n\nFollow these steps to move EspoCRM to another server.\n\n### Step 1. Backup files\n\nOpe"
  },
  {
    "path": "docs/administration/multiple-assigned-users.md",
    "chars": 823,
    "preview": "# Multiple Assigned Users\n\n*As of v9.0.*\n\nMultiple assigned users can be enabled for custom entity types and for certain"
  },
  {
    "path": "docs/administration/nginx-server-configuration.md",
    "chars": 3197,
    "preview": "# Nginx server configuration for EspoCRM\n\nThese instructions are supplementary to the [server configuration](server-conf"
  },
  {
    "path": "docs/administration/nginx-virtual-host.md",
    "chars": 2927,
    "preview": "# Configuring Virtual Host on Nginx\n\nIn this guide we will show how to configure a virtual host on Nginx for EspoCRM on "
  },
  {
    "path": "docs/administration/oidc.md",
    "chars": 4298,
    "preview": "# OpenID Connect (OIDC) Authentication\n\n*As of v7.3.*\n\nEspoCRM supports authentication over the OIDC protocol. A user ca"
  },
  {
    "path": "docs/administration/passwords.md",
    "chars": 2226,
    "preview": "# Passwords\n\n## New users\n\nWhen an administrator creates a new user, there are two options for password generation:\n\n* L"
  },
  {
    "path": "docs/administration/performance-tweaking.md",
    "chars": 2449,
    "preview": "# Performance Tweaking\n\n## Recommendations\n\n* SSD is preferred over HDD.\n* Dedicated server is preferred over shared.\n* "
  },
  {
    "path": "docs/administration/phone-numbers.md",
    "chars": 1002,
    "preview": "# Phone Numbers\n\n## International phone numbers\n\nThe international phone numbers functionality can be enabled or disable"
  },
  {
    "path": "docs/administration/portal/apache-configuration.md",
    "chars": 1803,
    "preview": "# Configuring Portal in Apache\n\nIt's possible to be able to access to the Portal by a different URL. You need to set the"
  },
  {
    "path": "docs/administration/portal/nginx-configuration.md",
    "chars": 2500,
    "preview": "# Configuring Portal in Nginx\n\nIt's possible to be able to access to the Portal by a different URL. You need to set the "
  },
  {
    "path": "docs/administration/portal.md",
    "chars": 4144,
    "preview": "---\nsearch:\n  boost: 2\n---\n\n# Portal\n\nThe Portal feature provides the ability to access specific CRM data and functions "
  },
  {
    "path": "docs/administration/roles-management.md",
    "chars": 7321,
    "preview": "---\nsearch:\n  boost: 2\ntags:\n  - roles\n---\n\n# Role Management\n\nIn this article:\n\n* [Overview](#overview)\n* [Permissions "
  },
  {
    "path": "docs/administration/security.md",
    "chars": 1405,
    "preview": "# Security recommendations\n\n## Password strength\n\n❗ Important.\n\nConfigure password strength parameters (at Administratio"
  },
  {
    "path": "docs/administration/server-configuration.md",
    "chars": 6272,
    "preview": "---\nsearch:\n  boost: 2\n---\n\n# Server Configuration for EspoCRM\n\nEspoCRM can be installed on:\n\n* Webserver\n  * [Apache](a"
  },
  {
    "path": "docs/administration/sms-sending.md",
    "chars": 4623,
    "preview": "# SMS Sending\n\nEspoCRM has the built-in functionality for sending SMS, but it's not shipped with any provider implementa"
  },
  {
    "path": "docs/administration/terms-and-naming.md",
    "chars": 2833,
    "preview": "# Terms & Naming\n\n## Entity type\n\nAn *entity type* is a type of data, an object. For example, Account, Contact, Opportun"
  },
  {
    "path": "docs/administration/troubleshooting.md",
    "chars": 9081,
    "preview": "# Troubleshooting\n\nIn this article:\n\n* [Check logs](#check-logs)\n  * [Debug mode](#debug-mode)\n* [Check system requireme"
  },
  {
    "path": "docs/administration/upgrading-manually.md",
    "chars": 5211,
    "preview": "# Upgrading Manually\n\n## Option 1. Migration\n\n!!! note\n\n    The minimal version you can upgrade from using this method i"
  },
  {
    "path": "docs/administration/upgrading.md",
    "chars": 4767,
    "preview": "---\nsearch:\n  boost: 3\n---\n\n# How to upgrade EspoCRM\n\n## Upgrade from CLI\n\nThis is the preferable way to upgrade.\n\nComma"
  },
  {
    "path": "docs/administration/users-management.md",
    "chars": 4659,
    "preview": "# Users management\n\nIn this article:\n\n* [User types](#user-types)\n* [Sending access info](#sending-access-info)\n* [Passw"
  },
  {
    "path": "docs/administration/web-to-lead.md",
    "chars": 7852,
    "preview": "---\nsearch:\n  boost: 2\n---\n\n# Web-to-Lead\n\nIn this article:\n\n* [Lead capture](#lead-capture)\n* [Web form](#web-form)\n* ["
  },
  {
    "path": "docs/administration/webhooks.md",
    "chars": 5158,
    "preview": "# Webhooks\n\nWebhooks allow other applications to subscribe to specific events happening in EspoCRM and receive data rela"
  },
  {
    "path": "docs/administration/websocket.md",
    "chars": 4912,
    "preview": "# WebSocket\n\nThe WebSocket enables interaction between a server and a client (browser) without the latter making polling"
  },
  {
    "path": "docs/administration/workflows-telegram-message.md",
    "chars": 1457,
    "preview": "# Sending telegram message with Workflow\n\nSince Advanced Pack version 2.4.0 it’s possible to send HTTP requests with Wor"
  },
  {
    "path": "docs/administration/workflows.md",
    "chars": 19151,
    "preview": "---\nsearch:\n  boost: 2\ntags:\n  - automation\n---\n\n# Workflows\n\nThe Workflows tool is available in [Advanced Pack](https:/"
  },
  {
    "path": "docs/api/index.html",
    "chars": 542,
    "preview": "<!doctype html>\n<html lang=\"en\">\n  <head>\n    <meta charset=\"utf-8\">\n    <meta name=\"viewport\" content=\"width=device-wid"
  },
  {
    "path": "docs/api/spec.json",
    "chars": 1504773,
    "preview": "{\n    \"openapi\": \"3.1.1\",\n    \"info\": {\n        \"title\": \"EspoCRM API\",\n        \"version\": \"1.0.0\"\n    },\n    \"paths\": {"
  },
  {
    "path": "docs/css/extra.css",
    "chars": 2440,
    "preview": ":root {\n    //--md-link-color: #537898;\n    --md-accent-fg-color: #af4d73;\n    --md-accent-fg-color-light: #cc95aa;\n}\n\n*"
  },
  {
    "path": "docs/development/acl.md",
    "chars": 3341,
    "preview": "# ACL · Access control level\n\n## Access checking\n\nThere are two [container services](di.md/#container-services) that pro"
  },
  {
    "path": "docs/development/api/account.md",
    "chars": 3510,
    "preview": "# API · Account\n\n* [List](#list)\n* [Create](#create)\n* [Read](#read)\n* [Update](#read)\n* [Delete](#delete)\n* [Stream](#s"
  },
  {
    "path": "docs/development/api/attachment.md",
    "chars": 2799,
    "preview": "# API · Attachment\n\n* [Uploading](#uploading)\n* [Downloading](#downloading)\n\n### Uploading\n\n!!! note\n\n    There's also t"
  },
  {
    "path": "docs/development/api/crud.md",
    "chars": 2978,
    "preview": "# API · CRUD Operations\n\nCRUD stands for create, read, update, delete.\n\n!!! note\n\n    You can obtain the list of [entity"
  },
  {
    "path": "docs/development/api/currency-rate.md",
    "chars": 374,
    "preview": "# API · CurrencyRate\n\n### Getting rates\n\n`GET CurrencyRate`\n\nReturns currency rates.\n\nRequires *read* access to *Currenc"
  },
  {
    "path": "docs/development/api/i18n.md",
    "chars": 616,
    "preview": "# API · I18n (Internalization)\n\n## Getting all labels\n\n`GET I18n`\n\nReturns all application labels. If authorized as an A"
  },
  {
    "path": "docs/development/api/metadata.md",
    "chars": 304,
    "preview": "# API · Metadata\n\n## Getting metadata\n\n`GET Metadata`\n\nReturns application metadata. Note that not all metadata is avail"
  },
  {
    "path": "docs/development/api/relationships.md",
    "chars": 1893,
    "preview": "# API · Related records\n\n!!! note\n    You can obtain the list of [link](../../administration/terms-and-naming.md#link) n"
  },
  {
    "path": "docs/development/api/stream.md",
    "chars": 885,
    "preview": "# API · Stream\n\n### List stream records for the current user\n\n`GET Stream`\n\nGet parameters:\n\n* `offset` – (int) offset\n*"
  },
  {
    "path": "docs/development/api-action.md",
    "chars": 8323,
    "preview": "# API actions\n\nThis article would be useful for those who needs to create a custom [API](api.md) action.\n\n## Routing\n\nYo"
  },
  {
    "path": "docs/development/api-client-go.md",
    "chars": 2861,
    "preview": "# API Client implementation in Go\r\n\r\n- [API Key authentication](#using-api-key-authentication)\r\n- [Basic authentication]"
  },
  {
    "path": "docs/development/api-client-java.md",
    "chars": 2363,
    "preview": "# API Client implementation in Java\r\n\r\n- [Installing](#installing)\r\n- [Usage](#usage)\r\n\r\n!!! note\r\n\r\n    This is an unof"
  },
  {
    "path": "docs/development/api-client-js.md",
    "chars": 4708,
    "preview": "# API Client Implementation in Javascript (Nodejs)\n\n* [Usage](#usage)\n* [Module](#module)\n\n## Usage\n\n```js\n\nconst Client"
  },
  {
    "path": "docs/development/api-client-php.md",
    "chars": 1193,
    "preview": "# API Client Implementation in PHP\n\nRequire [Espo Api Client](https://github.com/espocrm/php-espo-api-client) with Compo"
  },
  {
    "path": "docs/development/api-client-python.md",
    "chars": 3375,
    "preview": "# API Client Implementation in Python\n\n!!! note\n\n    You need to have *requests* package installed with: `pip install re"
  },
  {
    "path": "docs/development/api-client-rust.md",
    "chars": 3279,
    "preview": "# API Client implementation in Rust\r\n\r\n* [Installation](#installation)\r\n* [HMAC authorization](#hmac-authorization)\r\n* ["
  },
  {
    "path": "docs/development/api-client-zig.md",
    "chars": 3282,
    "preview": "# API Client implementation in Zig\r\n\r\n- [Installation](#installation)\r\n- [API Key authentication](#using-api-key-authent"
  },
  {
    "path": "docs/development/api-search-params.md",
    "chars": 6185,
    "preview": "# API search parameters\n\nFilters and other search parameters can be used with API functions that returns a list of recor"
  },
  {
    "path": "docs/development/api-tutorial.md",
    "chars": 2148,
    "preview": "# API Usage Tutorial\n\n## In EspoCRM\n\n1. Go to Administration > Roles and create a **new role** with permissions you want"
  },
  {
    "path": "docs/development/api.md",
    "chars": 5953,
    "preview": "# API Overview\n\nEspoCRM is a single page application so the frontend uses REST API to connect with the backend.\nAll oper"
  },
  {
    "path": "docs/development/app-params.md",
    "chars": 1184,
    "preview": "# App Params\n\nApp params are returned by the back-end once a user logged in. You can use these params in the front-end. "
  },
  {
    "path": "docs/development/attachments.md",
    "chars": 3001,
    "preview": "# Attachments\n\n## Attachment entity\n\nAttachments are records that represent stored files. These files can be attachments"
  },
  {
    "path": "docs/development/autoload.md",
    "chars": 969,
    "preview": "# Autoload\n\nSometimes when developing a module for Espo, you need to include 3rd party libraries via composer. \nAs Espo "
  },
  {
    "path": "docs/development/calculated-fields.md",
    "chars": 789,
    "preview": "# Calculated Fields\n\nIt's possible to create a custom not-storable read-only field a value of which will be calculated d"
  },
  {
    "path": "docs/development/campaign-unsubscribe-template.md",
    "chars": 1232,
    "preview": "# Custom template for mass email unsubscribe page\n\n1. Create a file `custom/Espo/Custom/Resources/metadata/clientDefs/Ca"
  },
  {
    "path": "docs/development/coding-practices.md",
    "chars": 1385,
    "preview": "# Backend Coding Practices\n\n## Namespace structure\n\nWithin a module namespace:\n\n- `Entities\\` – entities;\n- `Controllers"
  },
  {
    "path": "docs/development/coding-rules.md",
    "chars": 9741,
    "preview": "# Coding Rules\n\n### 1\\. Never pass Container into class constructors. Pass all dependencies separately.\n\n❗ Bad:\n\n```php\n"
  },
  {
    "path": "docs/development/collection.md",
    "chars": 3177,
    "preview": "# Collection\n\nA collection is a list of models. See the [class](https://github.com/espocrm/espocrm/blob/stable/client/sr"
  },
  {
    "path": "docs/development/confirm-dialog.md",
    "chars": 354,
    "preview": "# Confirmation dialog\n\nShowing a confirmation modal dialog to a user before doing some actions.\n\nAvailable in views.\n\n``"
  },
  {
    "path": "docs/development/container-services.md",
    "chars": 2333,
    "preview": "# Container Services\n\nConsole command that prints all available container services with their implementing classes:\n\n```"
  },
  {
    "path": "docs/development/custom-buttons.md",
    "chars": 7165,
    "preview": "# Custom buttons & dropdown actions for detail, list, edit views\n\n## In top-right corner\n\nHow to add buttons (or dropdow"
  },
  {
    "path": "docs/development/custom-config-parameters.md",
    "chars": 3574,
    "preview": "# Custom config parameters\n\nIn this article it will be shown how to add custom config parameters and how to make them av"
  },
  {
    "path": "docs/development/custom-css.md",
    "chars": 364,
    "preview": "# Custom CSS file\n\nCreate a file `custom/Espo/Custom/Resources/metadata/app/client.json`.\n\n```json\n{\n    \"cssList\": [\n  "
  },
  {
    "path": "docs/development/custom-entity-type.md",
    "chars": 6717,
    "preview": "# Custom Entity Type\n\nThis article gives information about how to create custom entity types manually (without using the"
  },
  {
    "path": "docs/development/custom-field-type.md",
    "chars": 1543,
    "preview": "# Creating custom field type\n\nUse the name of your field type instead of `{field-type}`.\n\n### Field definition\n\nCreate a"
  },
  {
    "path": "docs/development/custom-views.md",
    "chars": 4414,
    "preview": "# Custom views\n\n## Record views\n\nEspoCRM framework provides abilities to define custom views for certain entity types. T"
  },
  {
    "path": "docs/development/customize-standard-fields.md",
    "chars": 1905,
    "preview": "# Customizing existing fields\n\n## Customizing field type\n\nAn example for the *Address* field type.\n\nCreate a file `custo"
  },
  {
    "path": "docs/development/db-indexes.md",
    "chars": 1633,
    "preview": "# Database indexes\n\nProper database indexes can drastically improve a performance of list view loading, reports, search "
  },
  {
    "path": "docs/development/di.md",
    "chars": 12275,
    "preview": "# Dependency Injection\n\nThe Dependency Injection framework provides needed dependencies to classes (usually via a constr"
  },
  {
    "path": "docs/development/duplicate-check.md",
    "chars": 2075,
    "preview": "# Custom duplicate check\n\nDuplicate check is performed upon record creation. Optionally, it can be enabled for record up"
  },
  {
    "path": "docs/development/dynamic-handler.md",
    "chars": 3365,
    "preview": "# Dynamic Handler (complex dynamic forms)\n\nDynamic Handler provides the ability to manipulate the form (detail/edit view"
  },
  {
    "path": "docs/development/email-sending.md",
    "chars": 1004,
    "preview": "# Email Sending\n\nExample:\n\n```php\n<?php\nnamespace Espo\\SomeNamespace;\n\nuse Espo\\Core\\Mail\\EmailSender;\nuse Espo\\Core\\Mai"
  },
  {
    "path": "docs/development/entry-points.md",
    "chars": 2065,
    "preview": "# Entry Points\n\nEntry points offer distinct access routes to the application, each serving different functions apart fro"
  },
  {
    "path": "docs/development/examples/dynamic-logic-multi-enum.md",
    "chars": 1768,
    "preview": "# Example: Dynamic handler for multi-enum fields\n\nSee [the dynamic handler documentation](../dynamic-handler.md).\n\nIn th"
  },
  {
    "path": "docs/development/extension-packages.md",
    "chars": 2683,
    "preview": "# Making extension package\n\n!!! note\n\n    It's recommended to use the [ext-template](https://github.com/espocrm/ext-temp"
  },
  {
    "path": "docs/development/frontend/ajax.md",
    "chars": 1022,
    "preview": "# Ajax Requests\n\nThe *Espo.Ajax* object is used to make requests to Espo API endpoints. See the [source file](https://gi"
  },
  {
    "path": "docs/development/frontend/controller.md",
    "chars": 3646,
    "preview": "# Client controller & routing\n\n## Routes\n\nClient routes are defined in metadata > app > clientRoutes.\n\nExample:\n\n```json"
  },
  {
    "path": "docs/development/frontend/dependency-injection.md",
    "chars": 2429,
    "preview": "# Dependency injection in frontend\n\n*As of v9.0.*\n\n!!! note\n\n    Using dependency injection in the frontend requires tra"
  },
  {
    "path": "docs/development/frontend/html-css.md",
    "chars": 4705,
    "preview": "# HTML & CSS\n\n## Button\n\n```html\n<button class=\"btn {style-class}\">Label</button>\n```\n\nStyle classes:\n\n* `btn-default`\n*"
  },
  {
    "path": "docs/development/frontend/monkey-patching.md",
    "chars": 1197,
    "preview": "# Monkey patching\n\n[Monkey patching](https://en.wikipedia.org/wiki/Monkey_patch) allows you to dynamically extend any fr"
  },
  {
    "path": "docs/development/frontend/record-panels.md",
    "chars": 1353,
    "preview": "# Custom panel on record (detail & edit) view\n\nAn example for *Account* entity type.\n\nCreate a file `custom/Espo/Custom/"
  },
  {
    "path": "docs/development/frontend/save-error-handlers.md",
    "chars": 1530,
    "preview": "# Save error handlers\n\nWhen a record is being saved, it's possible to throw an exception in the backend and then handle "
  },
  {
    "path": "docs/development/frontend/templates.md",
    "chars": 2687,
    "preview": "# Templates\n\nA template of a [view](../view.md) is used to render an HTML. Before rendering, the view passes data to the"
  },
  {
    "path": "docs/development/frontend/view-setup-handlers.md",
    "chars": 1839,
    "preview": "# View Setup Handlers\n\n*As of v7.0*\n\nViewSetupHandlers framework provides the ability to customize existing views w/o ex"
  },
  {
    "path": "docs/development/hooks.md",
    "chars": 5784,
    "preview": "# Hooks\n\nThe Hooks framework provides the ability to catch some actions in the system in order to call custom logic.\n\nCo"
  },
  {
    "path": "docs/development/how-to-create-a-dashlet.md",
    "chars": 2078,
    "preview": "# Custom dashlets\n\nCreate a file `custom/Espo/Custom/Resources/metadata/dashlets/{DASHLET_NAME}.json` with your dashlet "
  },
  {
    "path": "docs/development/how-to-start.md",
    "chars": 5149,
    "preview": "# How to get started\n\n*(for developers)*\n\nIn this article:\n\n* [Option A. Extension development](#option-a-extension-deve"
  },
  {
    "path": "docs/development/index.md",
    "chars": 2330,
    "preview": "# Developer Documentation\n\n### General\n\n* [Getting started](how-to-start.md)\n* [Making extension package](extension-pack"
  },
  {
    "path": "docs/development/jobs.md",
    "chars": 1588,
    "preview": "# Jobs\n\nSometimes it's reasonable to execute some actions in background. For example, when sending an email, to prevent "
  },
  {
    "path": "docs/development/link-multiple-with-primary.md",
    "chars": 2710,
    "preview": "# Link Multiple field with Primary\n\nSometimes you have a *hasMany* relationship and need to have the ability to a select"
  },
  {
    "path": "docs/development/metadata/acl-defs.md",
    "chars": 3089,
    "preview": "# aclDefs\n\nPath: metadata > aclDefs > {ScopeName}.\n\nDefines access control parameters for a specific scope (or entity ty"
  },
  {
    "path": "docs/development/metadata/app-acl-portal.md",
    "chars": 151,
    "preview": "# app > aclPortal\n\nPath: metadata > app > aclPortal.\n\nAccess control level parameters for portals. Has the same paramete"
  },
  {
    "path": "docs/development/metadata/app-acl.md",
    "chars": 4498,
    "preview": "# app > acl\n\nPath: metadata > app > acl.\n\nAccess control level parameters for the system (excluding portals).\n\n## mandat"
  },
  {
    "path": "docs/development/metadata/app-actions.md",
    "chars": 773,
    "preview": "# app > actions\n\nPath: metadata > app > actions.\n\nDefinitions for the [Action]() framework. An action-name => Object map"
  },
  {
    "path": "docs/development/metadata/app-address-formats.md",
    "chars": 678,
    "preview": "# app > addressFormats\n\nA mapping format => params. Defines address formats (used in the backend).\n\n## formatterClassNam"
  },
  {
    "path": "docs/development/metadata/app-admin-panel.md",
    "chars": 1602,
    "preview": "# app > adminPanel\n\nPath: metadata > app > adminPanel.\n\nDefines what to display on the Administration page.\n\n```json\n{\n "
  },
  {
    "path": "docs/development/metadata/app-api.md",
    "chars": 2817,
    "preview": "# app > api\n\nPath: metadata > app > api.\n\n*As of v7.4.*\n\nDefinitions for API framework.\n\nProvides the ability to add mid"
  },
  {
    "path": "docs/development/metadata/app-app-params.md",
    "chars": 385,
    "preview": "# app > appParams\n\nPath: metadata > app > appParams.\n\n[AppParams framework](../app-params.md) definitions. A name => Obj"
  },
  {
    "path": "docs/development/metadata/app-authentication-2fa-methods.md",
    "chars": 1175,
    "preview": "# app > authentication2FAMethods\n\nPath: metadata > app > authentication2FAMethods.\n\nDefinitions for 2-factor authenticat"
  },
  {
    "path": "docs/development/metadata/app-authentication.md",
    "chars": 1760,
    "preview": "# app > authentication\n\n## beforeLoginHookClassNameList\n\nArray of hook class names. Fired before logging in before crede"
  },
  {
    "path": "docs/development/metadata/app-cleanup.md",
    "chars": 331,
    "preview": "# app > cleanup\n\nA Key-Value map. Defines cleaning up classes. Fired by the *Cleanup* job.\n\nExample:\n\n```json\n\n{\n    \"so"
  },
  {
    "path": "docs/development/metadata/app-client-icons.md",
    "chars": 231,
    "preview": "# app > clientIcons\n\nPath: metadata > app > clientIcons.\n\n## classList\n\n*string[]*\n\n*As of v9.1.*\n\nAdditional icon class"
  },
  {
    "path": "docs/development/metadata/app-client-navbar.md",
    "chars": 1746,
    "preview": "# app > clientNavbar\n\nNavbar definitions.\n\n## items\n\n*Object.<string, Object\\>*\n\n*As of v8.1.*\n\nNavbar items (in the top"
  },
  {
    "path": "docs/development/metadata/app-client-record.md",
    "chars": 270,
    "preview": "# app > clientRecord\n\nPath: metadata > app > clientRecord.\n\nClient record definitions.\n\n## panels\n\n*Object.<string, Obje"
  },
  {
    "path": "docs/development/metadata/app-client-routes.md",
    "chars": 142,
    "preview": "# app > clientRoutes\n\nPath: metadata > app > clientRoutes.\n\nFront-end client routes. See more [here](../frontend/control"
  },
  {
    "path": "docs/development/metadata/app-client.md",
    "chars": 1400,
    "preview": "# app > client\n\nPath: metadata > app > client.\n\nGeneral definitions for the front-end client.\n\n## scriptList\n\n*string[]*"
  },
  {
    "path": "docs/development/metadata/app-complex-expression.md",
    "chars": 496,
    "preview": "# app > complexExpression\n\nPath: metadata > app > complexExpression.\n\nDefinitions for the [complex expression](../../use"
  },
  {
    "path": "docs/development/metadata/app-config.md",
    "chars": 1387,
    "preview": "# app > config\n\nPath: metadata > app > config.\n\nApplication config definitions.\n\n## params\n\n*Object.<string, Object\\>\\>*"
  },
  {
    "path": "docs/development/metadata/app-console-commands.md",
    "chars": 595,
    "preview": "# app > consoleCommands\n\nPath: metadata > app > consoleCommands.\n\nConsole [commands](../../administration/commands.md). "
  },
  {
    "path": "docs/development/metadata/app-container-services.md",
    "chars": 675,
    "preview": "# app > containerServices\n\nPath: metadata > app > containerServices.\n\nDefinitions of [container services](../di.md#conta"
  },
  {
    "path": "docs/development/metadata/app-currency-conversion.md",
    "chars": 342,
    "preview": "# app > currencyConversion\n\nExample:\n\n```json\n{\n    \"entityConverterClassNameMap\": {\n        \"MyEntityType\": \"Espo\\\\Modu"
  },
  {
    "path": "docs/development/metadata/app-currency.md",
    "chars": 705,
    "preview": "# app > currency\n\nPath: metadata > app > currency.\n\nCurrency definitions.\n\n## symbolMap\n\n*Object<string, string\\>*\n\nA cu"
  },
  {
    "path": "docs/development/metadata/app-database-platforms.md",
    "chars": 835,
    "preview": "# app > databasePlatforms\n\nPath: metadata > app > databasePlatforms.\n\n*Object.<string, Object\\>*\n\n*As of v7.4.*\n\nExample"
  },
  {
    "path": "docs/development/metadata/app-date-time.md",
    "chars": 524,
    "preview": "# app > dateTime\n\nPath: metadata > app > dateTime.\n\nDate-time definitions.\n\nExample:\n\n```json\n{\n    \"dateFormatList\": [\n"
  },
  {
    "path": "docs/development/metadata/app-default-dashboard-layouts.md",
    "chars": 1081,
    "preview": "# app > defaultDashboardLayouts\n\nPath: metadata > app > defaultDashboardLayouts.\n\nDefault dashboard layouts.\n\nExample:\n\n"
  },
  {
    "path": "docs/development/metadata/app-default-dashboard-options.md",
    "chars": 277,
    "preview": "# app > defaultDashboardOptions\n\nPath: metadata > app > defaultDashboardOptions.\n\nOptions for [default dashboard](app-de"
  },
  {
    "path": "docs/development/metadata/app-email-template.md",
    "chars": 1125,
    "preview": "# metadata > app > emailTemplate\n\nEmail template definitions.\n\n## placeholders\n\nPlaceholders.\n\nExample:\n\n```json\n\n{\n    "
  },
  {
    "path": "docs/development/metadata/app-entity-manager-params.md",
    "chars": 1663,
    "preview": "# app > entityManagerParams\n\n*As of v7.5.*\n\nPath: metadata > app > entityManagerParams\n\nAdditional entity parameters. De"
  },
  {
    "path": "docs/development/metadata/app-entity-manager.md",
    "chars": 768,
    "preview": "# app > entityManager\n\nPath: metadata > app > entityManager.\n\n\n## createHookClassNameList\n\n*class-string<Espo\\Tools\\Enti"
  },
  {
    "path": "docs/development/metadata/app-entity-template-list.md",
    "chars": 334,
    "preview": "# app > entityTemplateList\n\nPath: metadata > app > entityTemplateList.\n\n*string[]*\n\nA list of entity templates available"
  },
  {
    "path": "docs/development/metadata/app-entity-templates.md",
    "chars": 536,
    "preview": "# app > entityTemplates\n\nPath: metadata > app > entityTemplates\n\n*As of v8.0.*\n\nDefinitions for entity type templates.\n\n"
  },
  {
    "path": "docs/development/metadata/app-export.md",
    "chars": 1375,
    "preview": "# app > export\n\nPath: metadata > app > export.\n\nDefinitions for the Export framework.\n\n## formatList\n\n*string*\n\nAvailabl"
  },
  {
    "path": "docs/development/metadata/app-field-processing.md",
    "chars": 682,
    "preview": "# app > fieldProcessing\n\nPath: metadata > app > fieldProcessing.\n\nDefinitions for the Field Processing framework.\n\n## re"
  },
  {
    "path": "docs/development/metadata/app-file-storage.md",
    "chars": 420,
    "preview": "# app > fileStorage\n\nPath: metadata > app > fileStorage.\n\nFile storages.\n\n## implementationClassNameMap\n\n*Object.<string"
  },
  {
    "path": "docs/development/metadata/app-file.md",
    "chars": 443,
    "preview": "# app > file\n\nPath: metadata > app > file.\n\n## extensionMimeTypeMap\n\n*Object.<string, string[]\\>*\n\nMime types associated"
  },
  {
    "path": "docs/development/metadata/app-formula.md",
    "chars": 420,
    "preview": "# app > formula\n\nPath: metadata > app > formula.\n\nDefinitions for the formula editor.\n\n## functionList\n\n*Object[]*\n\nFunc"
  },
  {
    "path": "docs/development/metadata/app-hook.md",
    "chars": 250,
    "preview": "# app > hook\n\nPath: metadata > app > hook.\n\nDefinitions for the [Hook framework](../hooks.md).\n\n## suppressClassNameList"
  },
  {
    "path": "docs/development/metadata/app-image.md",
    "chars": 912,
    "preview": "# app > image\n\nPath: metadata > app > image.\n\n## allowedFileTypeList\n\n*string[]*\n\nA list of allowed image mime types. Us"
  },
  {
    "path": "docs/development/metadata/app-js-libs.md",
    "chars": 1902,
    "preview": "# app > jsLibs\n\nPath: metadata > app > jsLibs.\n\nJS libraries definitions for the loader.\n\nExample:\n\n```json\n{\n    \"some-"
  },
  {
    "path": "docs/development/metadata/app-language.md",
    "chars": 1077,
    "preview": "# app > language\n\nPath: metadata > app > language.\n\nApplication languages.\n\n## list\n\n*string[]*\n\nA list of languages ava"
  },
  {
    "path": "docs/development/metadata/app-layouts.md",
    "chars": 318,
    "preview": "# app > layouts\n\nPath: metadata > app > layouts.\n\nExample:\n\n```json\n{\n    \"Opportunity\": {\n        \"list\": {\n           "
  }
]

// ... and 129 more files (download for full content)
About this extraction
This page contains the full source code of the espocrm/documentation GitHub repository, extracted and formatted as plain text for AI agents and large language models (LLMs). The extraction includes 329 files (2.6 MB), approximately 692.3k tokens, and a symbol index with 1 extracted functions, classes, methods, constants, and types. Use this with OpenClaw, Claude, ChatGPT, Cursor, Windsurf, or any other AI tool that accepts text input. You can copy the full output to your clipboard or download it as a .txt file.
Extracted by GitExtract — free GitHub repo to text converter for AI. Built by Nikandr Surkov.